
Technical Support and E-Warranty Certificate www.vevor.com/support
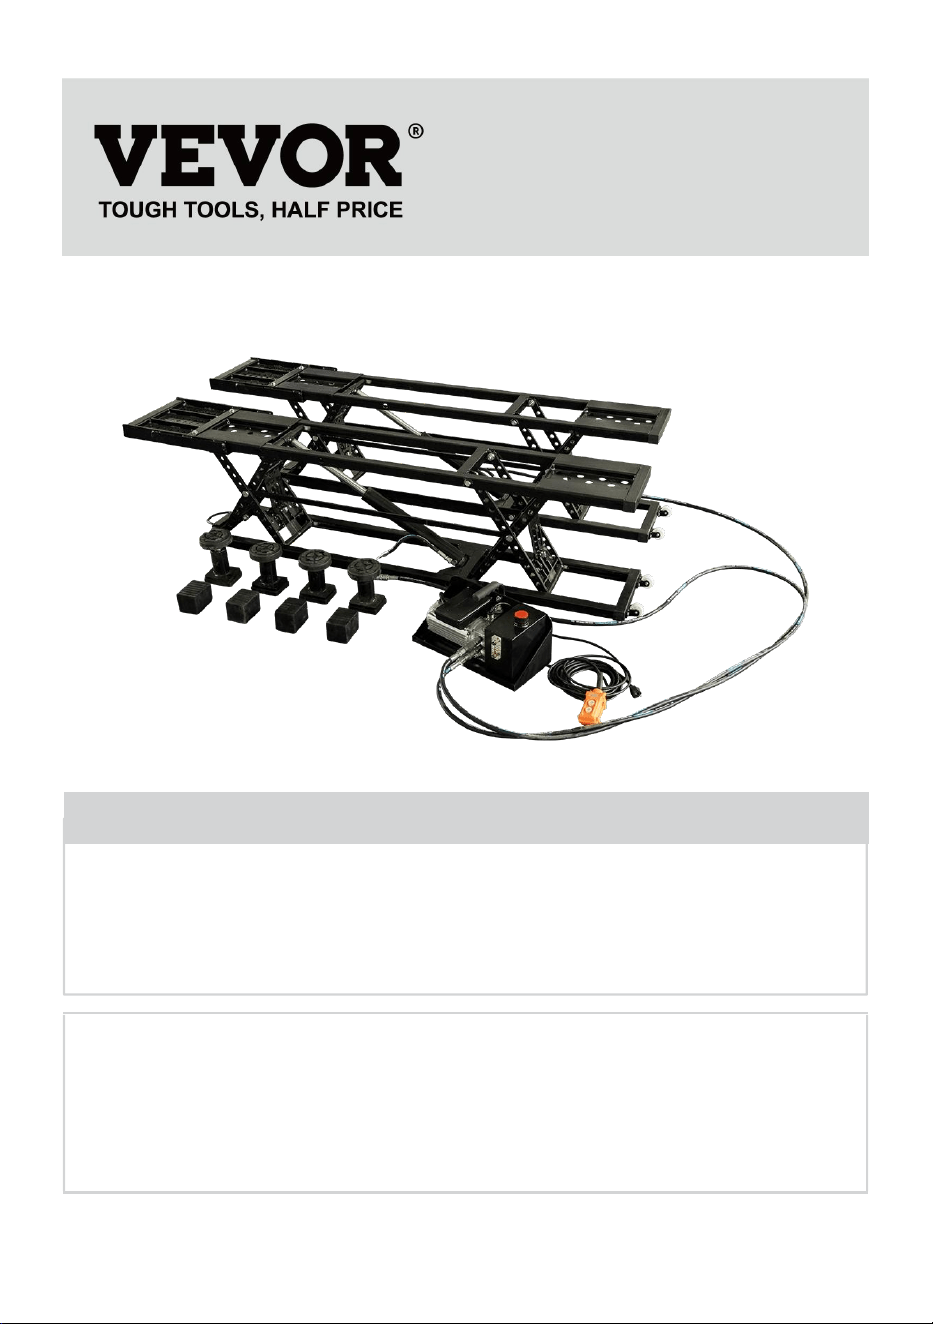
PORTABLE LIFTS
MODEL: JT-5000 / JT-7000
We continue to be committed to provide you tools with competitive price.
"Save Half", "Half Price" or any other similar expressions used by us only represents an
estimate of savings you might benefit from buying certain tools with us compared to the major
top brands and does not necessarily mean to cover all categories of tools offered by us. You
are kindly reminded to verify carefully when you are placing an order with us if you are
actually saving half in comparison with the top major brands.
- 1 -
MODEL:JT-5000 / JT-7000
Have product questions? Need technical support? Please feel free to
contact us:
Technical Support and E-Warranty Certificate
www.vevor.com/support
NEED HELP? CONTACT US!
This is the original instruction, please read all manual instructions
carefully before operating. VEVOR reserves a clear interpretation of our
user manual. The appearance of the product shall be subject to the
product you received. Please forgive us that we won't inform you again if
there are any technology or software updates on our product.
PORTABLE LIFTS

- 2 -
IMPORTANT SAFEGUARDS
WARNING:
READ, STUDY, AND UNDERSTAND ALL WARNINGS AND
OPERATING INSTRUCTIONS PRIOR TO USE. FAILURE TO
HEED THESE INSTRUCTIONS MAY RESULT IN PROPERTY
DAMAGE AND/OR SERIOUS PERSONAL INJURY.
To avoid personal injury or property damage, please read and observe all safety
precautions.
The manufacturer shall not be responsible for injury or damage due to unsafe and
incorrect product use or system operation, or lack of maintenance.
The warning indicates a potential danger to take proper action to avoid personal
injury.
The note indicates that the right action was taken to prevent damage or equipment
failure.
The simple lifting platform shall be operated by qualified operators trained and
familiar with hydraulic products. Operation without professional knowledge may
cause serious safety accidents or personal and property losses.
The operator should read the operation manual before using the product and
place this manual near the product.This product is a portable and simple lifting
platform that can only be used to lift the corresponding type of car.
Visual inspection shall be performed before each use for abnormal conditions
such as welding cracks, leaks, damage, loose or missing parts.
Keep your distance when the product starts to work.
Any changes to the product are prohibited.
Lift the cars only in the position specified by the car manufacturer.
Before use, please specify the weight of the car. This product overload is
prohibited. Overloading may cause serious safety accidents or personal and
property losses.
A simple lifting platform is lifting equipment, not supporting equipment. After the
load rises or falls, it must always be held mechanically. Please do not be in the
hydraulic load under the work.

- 3 -
Do not regulate the relief valve.
Avoid using any extension lines, which may overheat.
If you must use it, ensure that the minimum value is 14 AWG.
The product is thoroughly inspected at least once a year.
Replace any damaged or severely worn cable, hydraulic hose, labeling, or
warning labels.
Do not use this product until damaged or worn items are replaced.
Do not place an unbalanced or off-center load on the jack.
Incorrect load can cause equipment failure and possible personal injury.
Do not work under an elevated vehicle without prior support with mechanical
support or other appropriate methods.
When lifting the load, all precautions shall be taken to avoid vehicle movement.
When using the product on the road, the traffic may cause the already-raised
car to shake.
Turn off the engine and pull the handbrake tightly. It is best to use the brake pad
to prevent sliding. Please ensure that there is no one in the vehicle before using
it.
Do not enter the car or start the engine during the lifting process.
Do not touch the hot part, which may cause burns.
Warnings
Warning: It cannot be used with a 50Hz power supply as it will damage the
machine. It must be used with a 60Hz power supply.
When operating the hydraulic equipment, please wear safety glasses.
The floor surface must be dry and flat with a minimum compressive strength of
500 psi.
Be careful with the cables and hydraulic hoses, and avoid being run over or
pressed by the car.
Remove all the jewelry when using this product.
Suspended jewelry and metal jewelry may get stuck in moving parts.

- 4 -
If the vehicle has a risk of falling from the platform, please clear the area in
advance.
Before approaching an elevated vehicle, make sure all four lock rods are in a
natural falling state.
Do not turn on the refueling plug on the power supply device when the lifting
platform starts working.
Do not pull the remote control cord or power cord to move the AC power supply
device, which will damage the power cord.
Contact an authorized service center for hydraulic technical support or repair
services.
The manufacturer has no warranty obligation for products repaired, modified or
damaged by unauthorized personnel due to misuse, abuse, accident,
negligence or improper handling.
Tips:
Always care to keep the product clean.
When not using the product, please withdraw all the parts to the original state.
Please use hydraulic equipment at room temperature, do not use hydraulic
equipment above 65℃ (150 ℉).
Overheating will soften the seal and weaken the hose material, causing oil
leakage or other equipment failures.
Do not raise the lift platform frame to a full expansion height without increasing
the vehicle load!
If you are using our product for the first time, a simple way to be familiar with
the operation is to control the product repeatedly up and down the platform
several times without load.
But make sure you don't take your products to the top when empty, actually just
lift them to about 200-300mm above the ground.
If you completely raise the platform to its maximum height, your platform may
get stuck.
Do not remove the tires of the vehicle and lower the platform to the ground.
- 5 -
The lifting platform requires space between the ground and the vehicle to generate
sufficient force to lift the vehicle, as it cannot be lifted at full load from a completely
flat starting position.

- 6 -
Specifications
Model
JT-5000
JT-7000
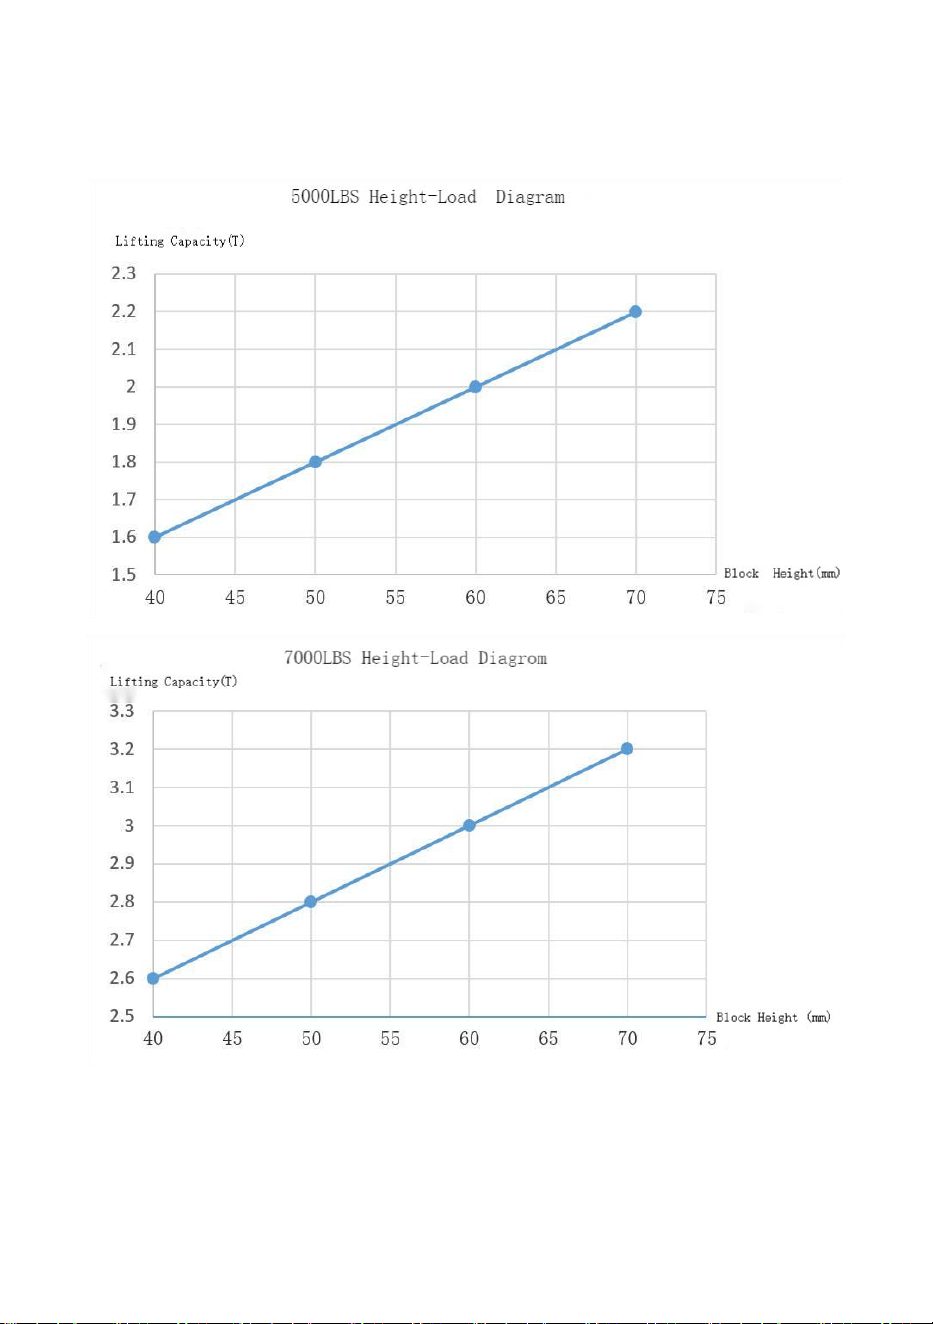
Max. Load (lbs/kg)
5000/2268
7000/3175
Rated Power
750W
750W
Rated Voltage
AC120V/60Hz
AC120V/60Hz
Rated Current
6.25A
6.25A
Lifting Range
(inch/mm)
5.12-18.5 / 130-470
(Mat)
9.06-22.4 / 230-570
(Column)
6.5-20 / 165-510
(Mat)
10.24-22.4 / 230- 570
(Column)
Ambient
Temperature
- 20°C~70°C
-4°F-~158°F
- 20°C~70°C
-4°F-~158°F
Be sure to read this manual carefully before using this product.
Be sure to install, operate, maintain or simply lift the platform according to the
manual, otherwise it may bring safety risks, or even cause property damage,
product damage, injury or death (in rare cases).
Only authorized personnel can operate or repair the product, and any unofficial
modifications can result in warranty failure and increase the risk of injury or
property damage, so be sure to read and follow the warnings and instructions
on the product label.
SAVE THESE INSTRUCTIONS
- 7 -
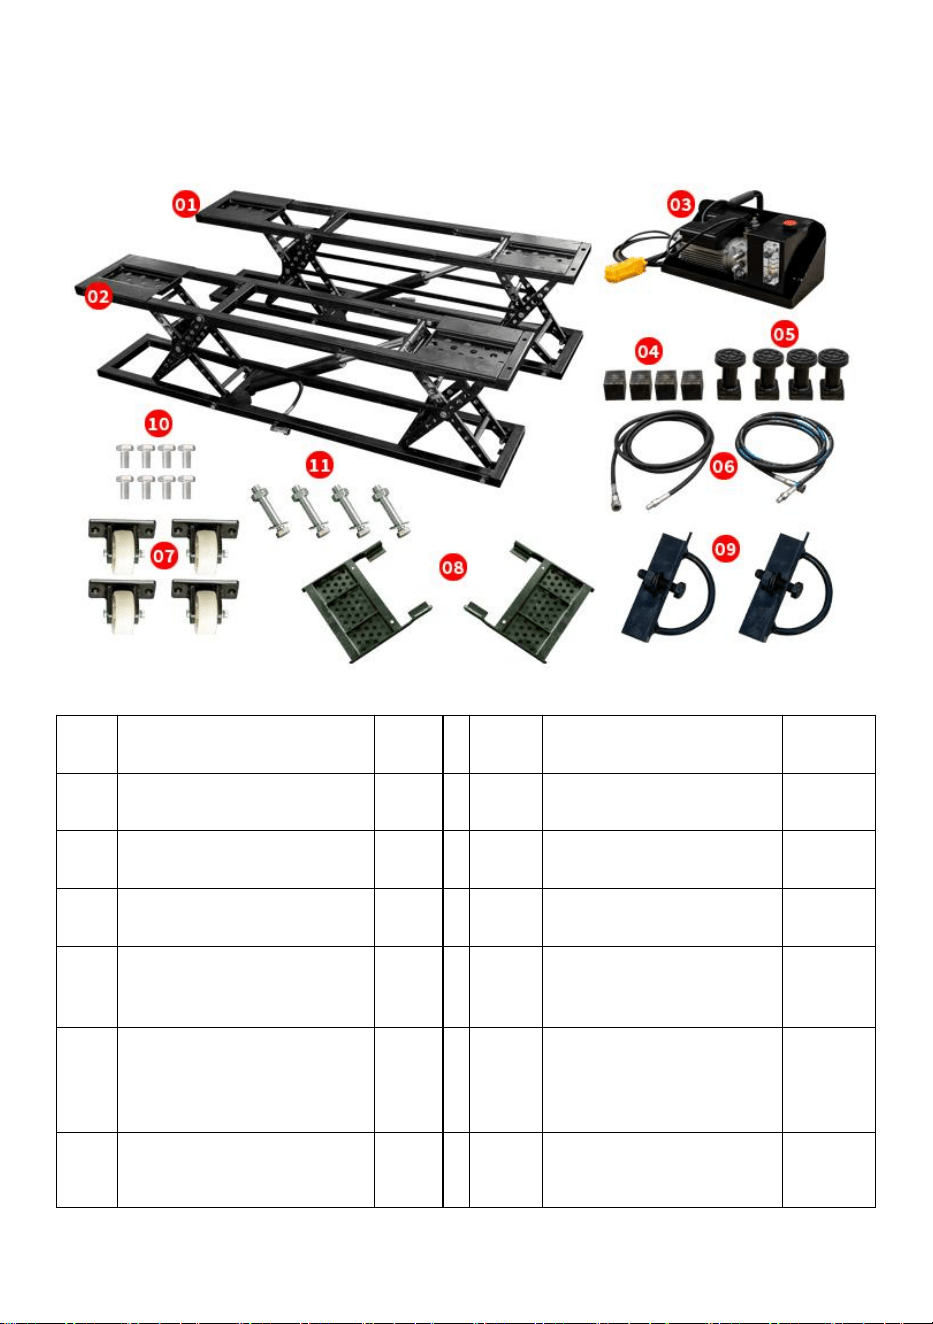
Components
The car lift platform contains the following components:
No.
Description
Qty.
No.
Description
Qty.
①
Lift Bracket A
1
⑦
Wheel
4
②
Lift Bracket B
1
⑧
Extension Support
2
③
Pumping Station
1
⑨
Handles
2
④
Mat
4
⑩
Screw M8*16mm
8
⑤
Column
4
⑪
Screw M10*55mm
Washer 10
Nut M10
4
⑥
Long Hose
2
- 8 -
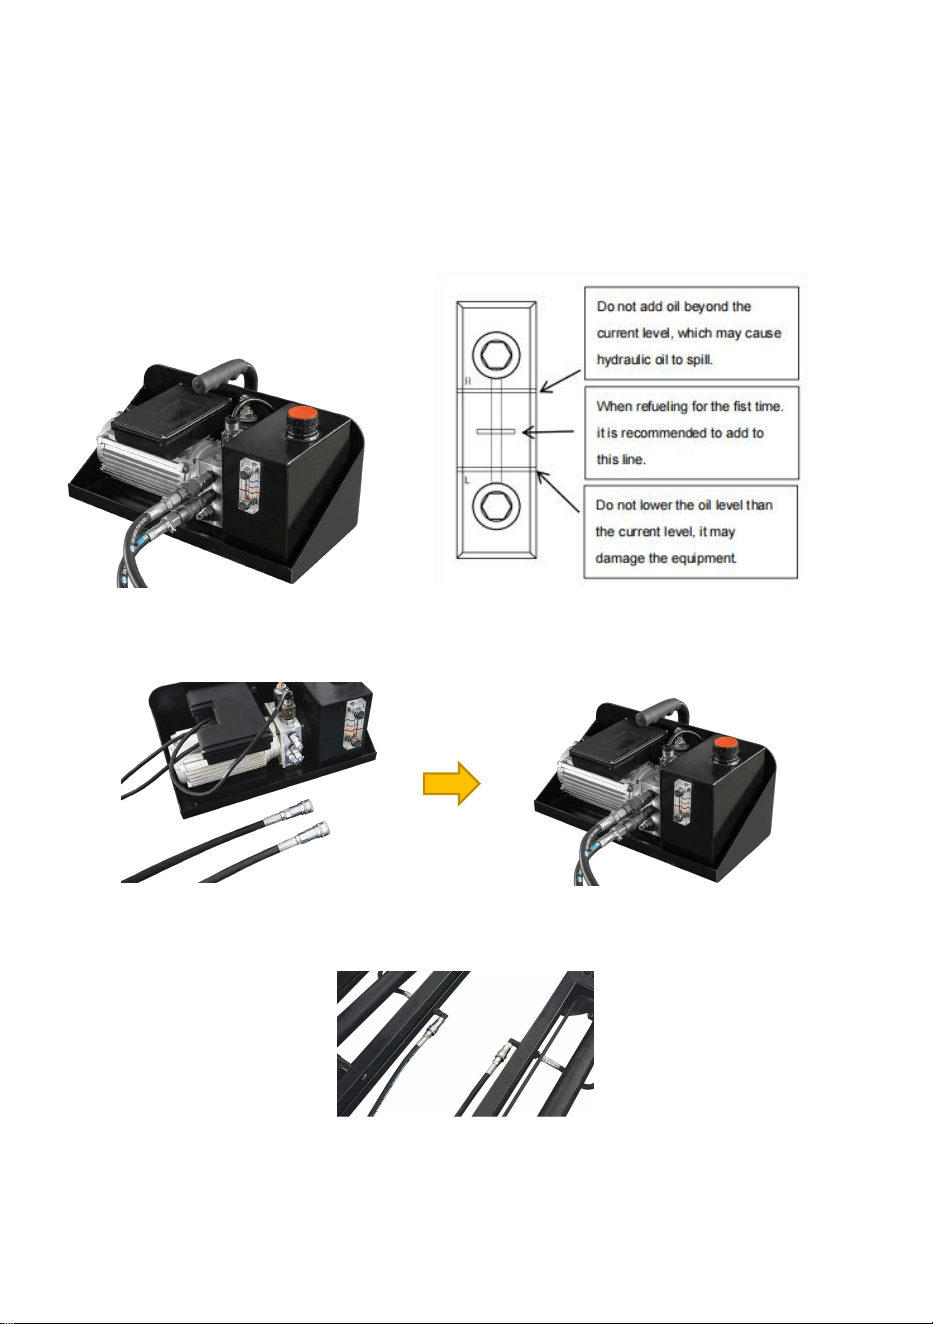
Installation
1. Open the wooden box and take out all the components.
2. The hydraulic tank has no hydraulic oil during transportation.
3. As shown, open the exhaust plug, inject 3.8 liters of ISO 46# hydraulic oil into
the tank, and then close the exhaust plug.
4. Two long hydraulic hoses connect one end of the female connector to the
power unit.
The male connector connects to the tubing connector of the lift platform.
Note: To move the lifting platform to a different position, disconnect the
long hydraulic hose from the connected power train position and move the
power train and the frame/hose, respectively.
- 9 -
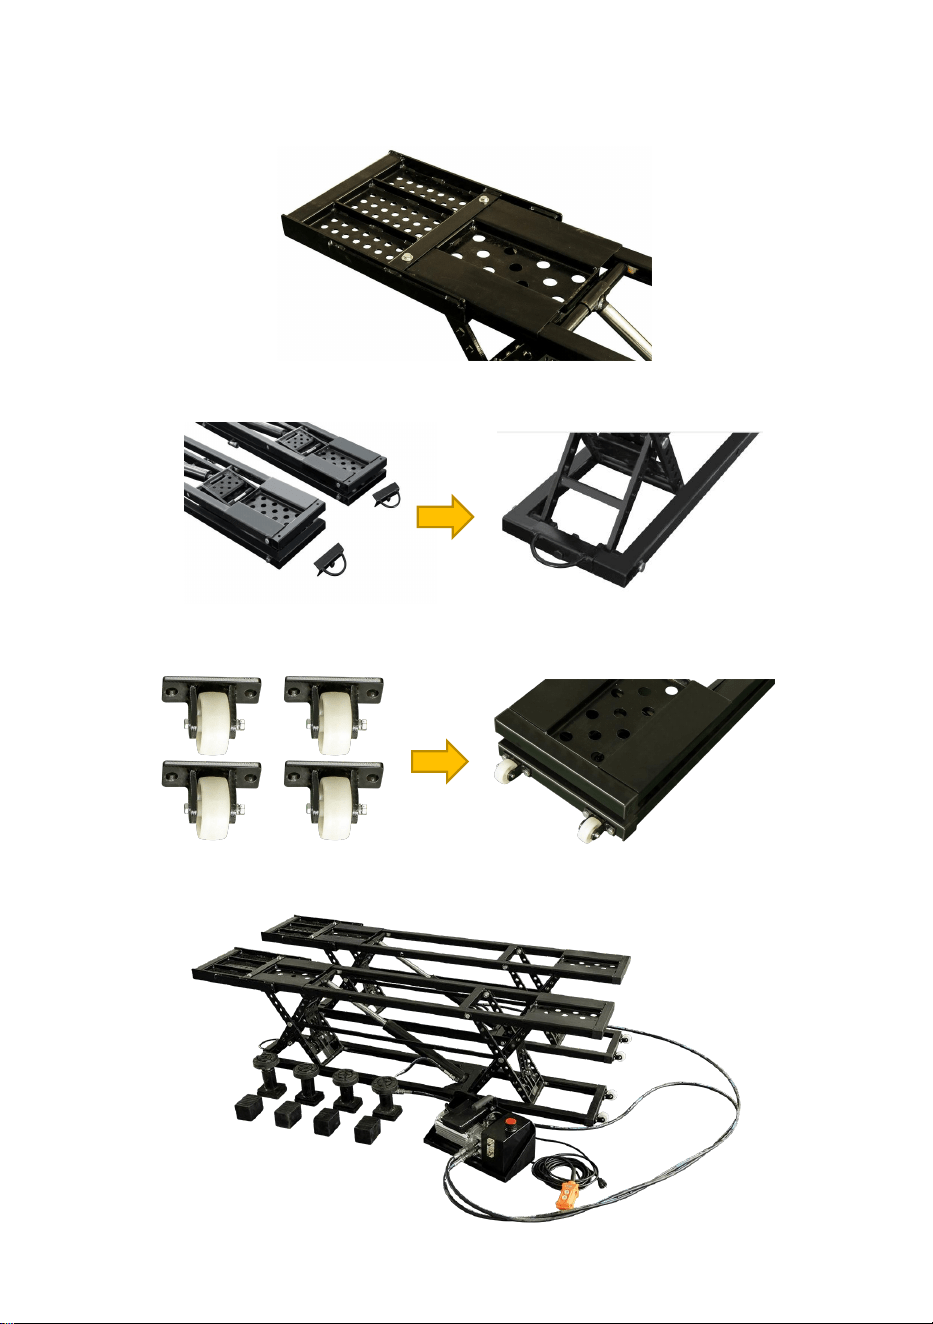
5. According to the actual lifting needs, the extended model needs to be
extended. The extension plate is secured with two screws.
6. Fix the two handles behind the lifting platform.
7. Fix the two wheels to the front of the lifting platform.
8. Product Diagram
- 10 -
Before using the power supply, check for the recommended voltage on the
power supply meter.
When the power unit is powered on, you can start using the lifting platform on
the remote control board.
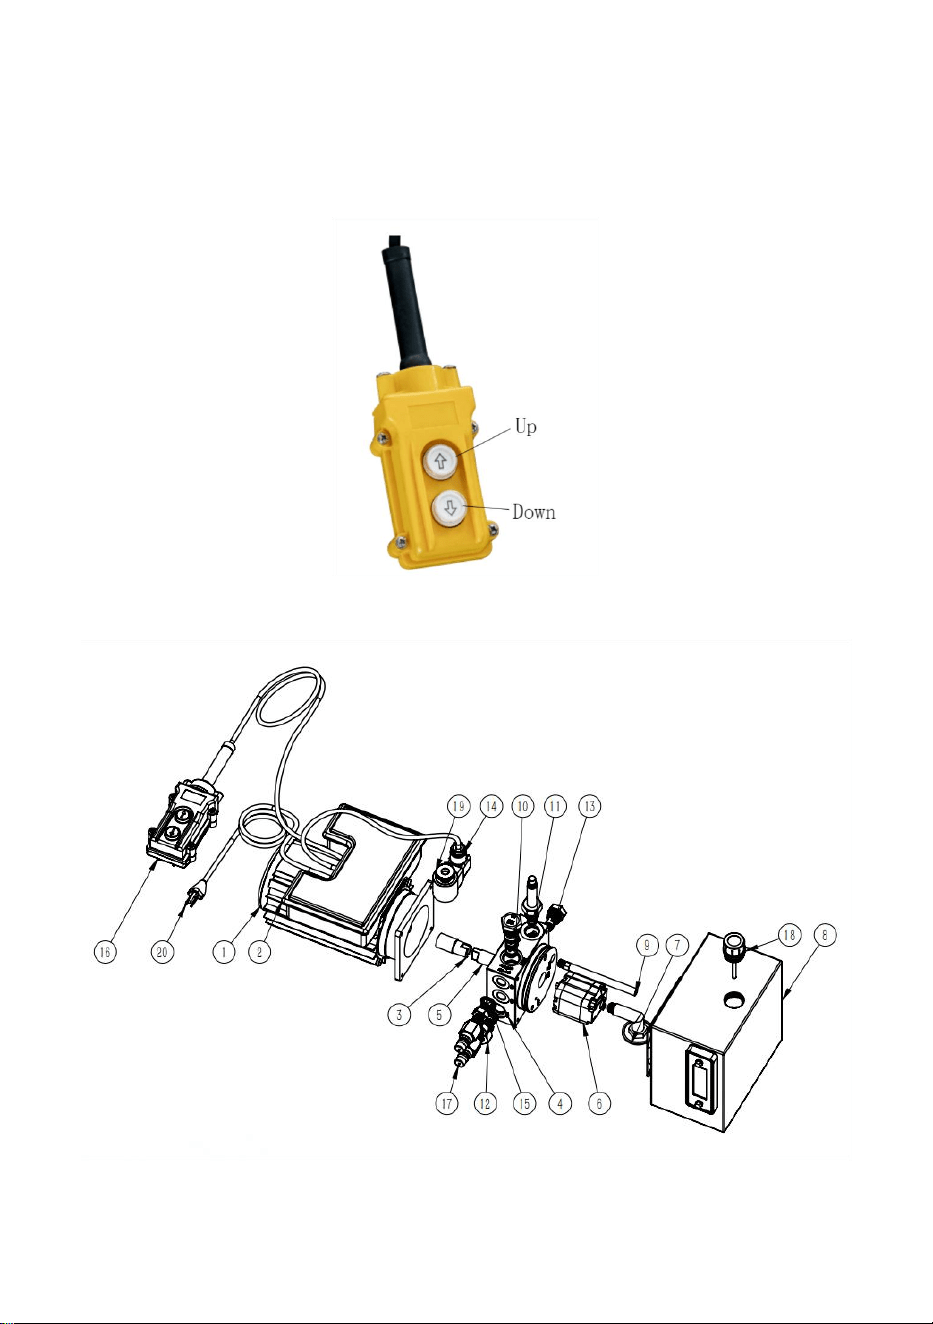
9. Pumping Station

- 11 -
Parts List:
NO.
Spare Part Name
Qty.
NO.
Spare Part Name
Qty.
1
Motor
1
11
Elector-cut off valve
1
2
Control Box
1
12
unloader
1
3
Motor connection column
1
13
One-way throttle valve
1
4
Multi-function elevator valve block
1
14
Electromagnetic valve
1
5
Gear pump connecting shaft
1
15
Sealing ring
2
6
Gear pump
1
16
Cable controller
1
7
Oil suction filter pipe
1
17
Quick connector
2
8
Fuel tank
1
18
Fuel tank cap
1
9
Oil return line
1
19
Twist silk
1
10
Flow control valve
1
20
Plug
1
Note: To avoid hydraulic fluid overflow, the exhaust plug is sealed before
transporting the power unit.
- 12 -
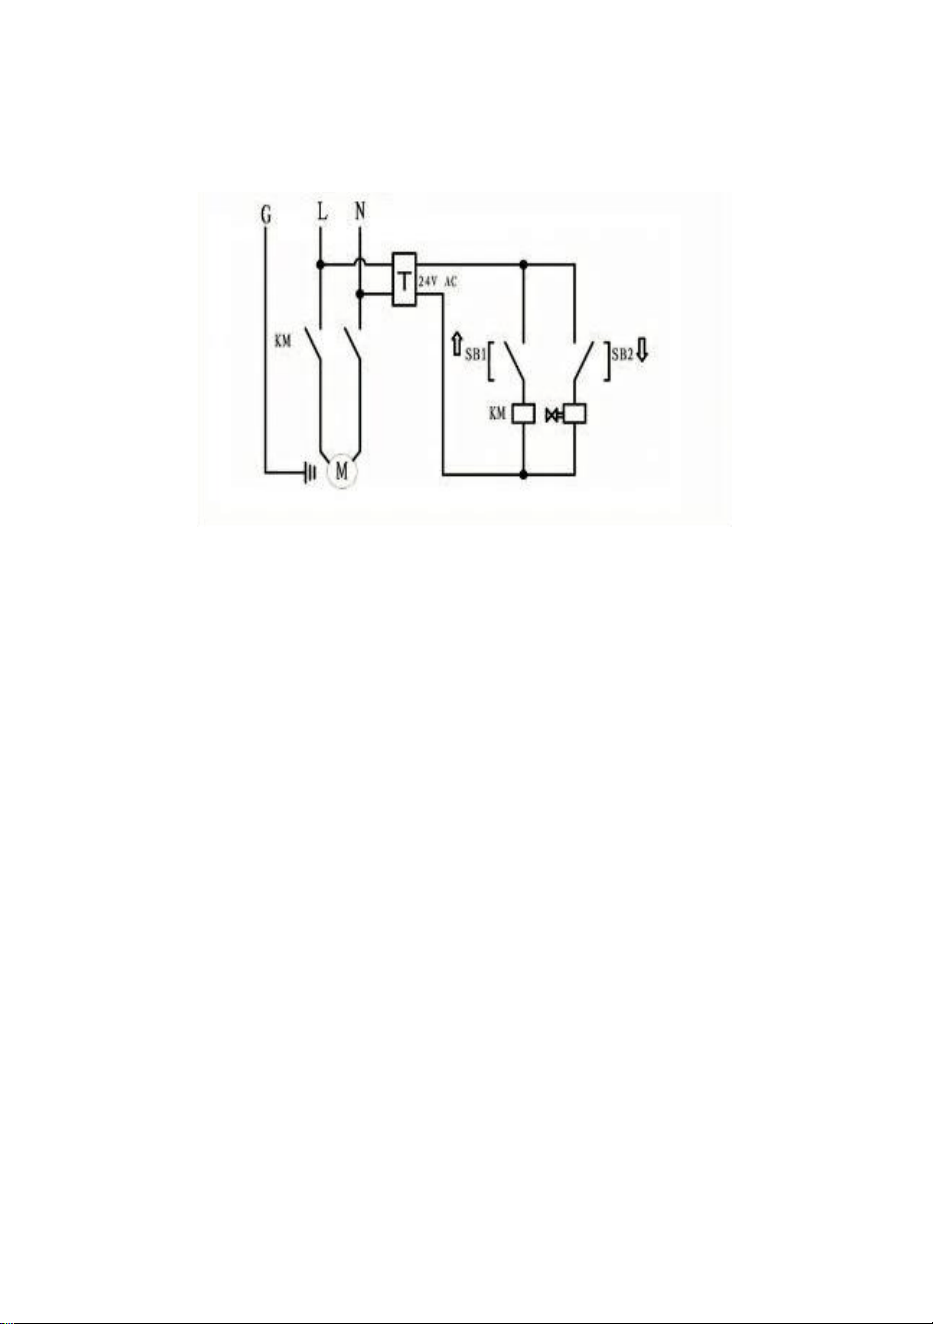
Electric pump wiring diagram
Power Requirement:120V, 60Hz
Operation
1. Air discharge: In the case of no load, raise the lifting frame to 200-300 mm;
repeat up and down several times until both sides are flush. It can start to use.
Note:Incorrect position may cause vehicle instability and may cause a fall from the
lift platform. This may damage the vehicle, damage the simple lifting platform, and
may harm the safety of personnel.
2. Safety: Before using the car lifting platform, please check the following items:
Check the lifting platform:
Check the lifting platform for any lost, severely worn, or damaged parts. Ensure
that the lift block is in the receiving tray. Do not operate the product with any
problems; please get in touch with an authorized repair agency or your dealer
Check the area:
Check for obstacles around the lifting platform or anything that may affect the
lifting of the vehicle. If you find an obstacle, remove it away. In the activity, do not
let people or animals near the lifting platform.
Check the operator:
Ensure that everyone operating the lifting platform is trained to use it, read the
labels on the device, and read the instructions. Only the operator should be close
to the lifting platform during the operation process.
Check for safety:
Ensure that everyone walking near the lifting platform is aware of its presence and
takes appropriate safety measures. When lifting the platform, do not leave it until it

- 13 -
is in the locked position. Put it down, don't let it leave the ground. Do not let
children or anyone affected by drugs or alcohol operate. Do not work under
elevated vehicles unless the rated vehicle jack is installed under the lifting point
recommended by the factory.
Check the vehicle:
Never overload it. Keep people from entering the vehicle that you want to lift up.
You must use the vehicle lifting point recommended by the factory. Do not lift only
one side, corner, or end of the car.
About the mat block:
When you lift the vehicle with the top of the lift platform, the vehicle should not
touch the jack frame.
Instead, they should contact the lifting block in the receiving tray that is easily
lifted.
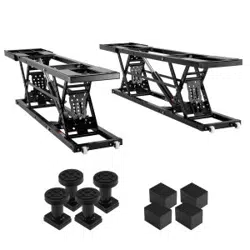
Each lift platform includes four small and four large lift block components.
Only use the same lifting block of the same height at the same time, do not use the
lifting block.
Note: Do not lift the vehicle directly on the frame and use the pad in the receiving
tray.
Raising the vehicle on the frame may damage the vehicle and/or lift platform.
The two frames are always placed as parallel as possible within the limits of the
vehicle's lifting point, and if they are too far from the parallel, the load stability will
be affected.
Do not drive the vehicle on the lifting platform, which will damage the product.
Do not lift the vehicle onto the platform frame, must use the lift.
There are two ways to locate your lift jack frame:
1
External in: Drive the vehicle to the desired position and place the lift platform
on different sides outside the vehicle and between the wheels. If the distance
between the wheels is not long enough, turn the frame to fit the length of the frame,
pushing one end to the right position under the vehicle and then the other end.
Finally, adjust to the specified location.
Make sure not to crush the hydraulic hose.
2
Inside out: Put the left and right frames together, drive the vehicle over the
frame, and pull each frame to the ideal position below the vehicle according to the
factory recommended support point.
- 14 -
Make sure not to crush the hydraulic hose.
Note: Before installing the lift platform frame, make sure they are completely
lowered, and there are no obstacles in the working area.
Make sure your car is balanced in front and back; otherwise, you will lose its
balance.
To locate the easy lifting jack frame:
1. Identify the methods needed to locate your easy lift platform framework.
2. Place the lift block into the receiving tray.
Note: Do not lift any load on the frame alone, always use the pad inside the
receiving tray.
3. Push the platform car in place.
4. If you use internal methods, drive the vehicle over the frame.
5. Place the pad under the jacking position specified by the automobile manufacturer.
6. Adjust the pad position to fit.
Operation Procedures:
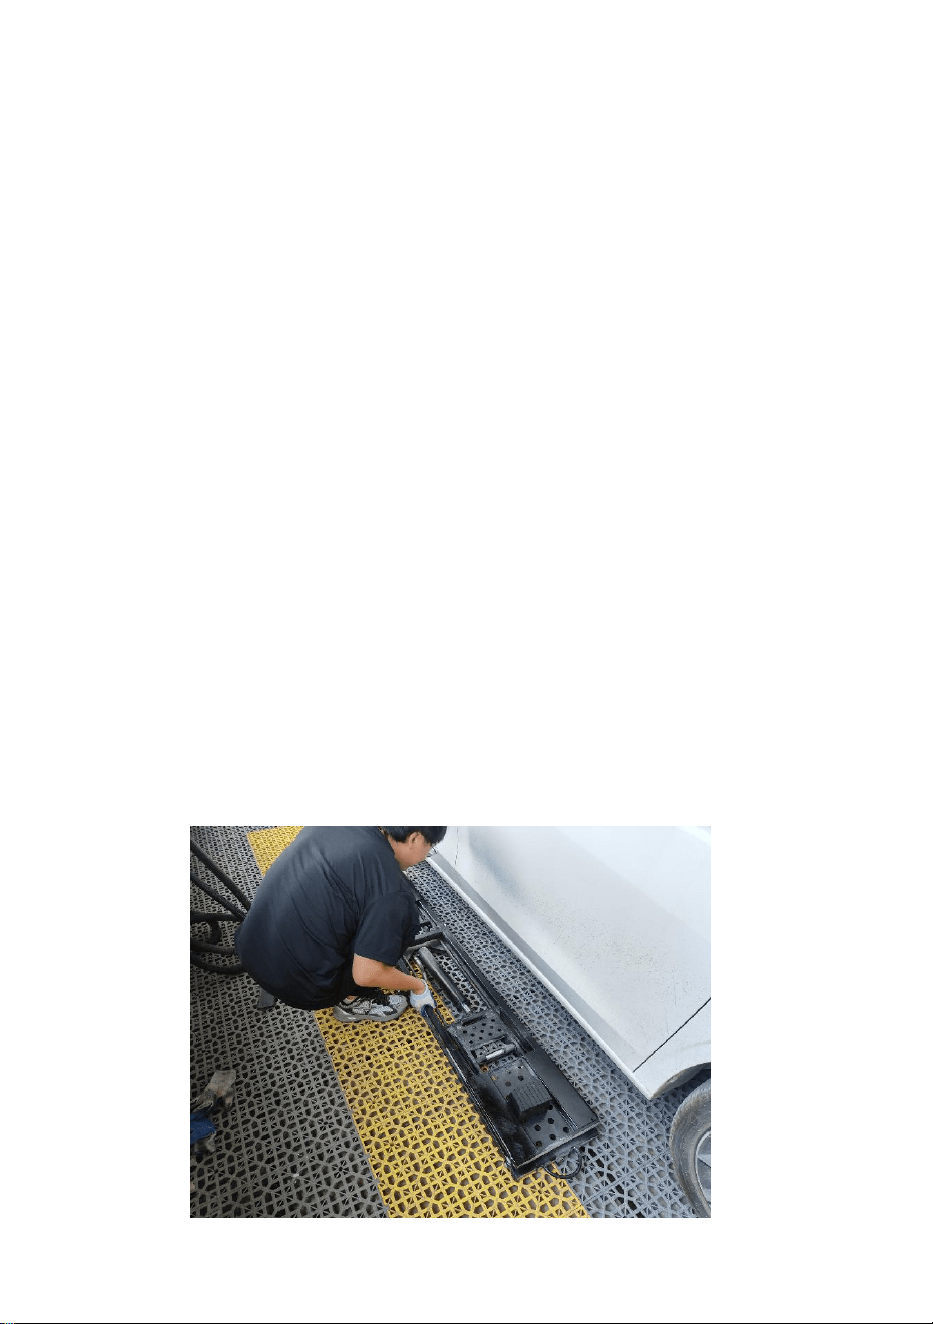
1. Put the lift platform on both sides of the car, put the rubber pad on the platform.
- 15 -
2. Push the lift platform under the car, adjust the position of the lift and rubber
pads.
3. The lift connector is connected to one end of the hydraulic hose, and the other
end of the hose is connected to the power unit.
- 16 -
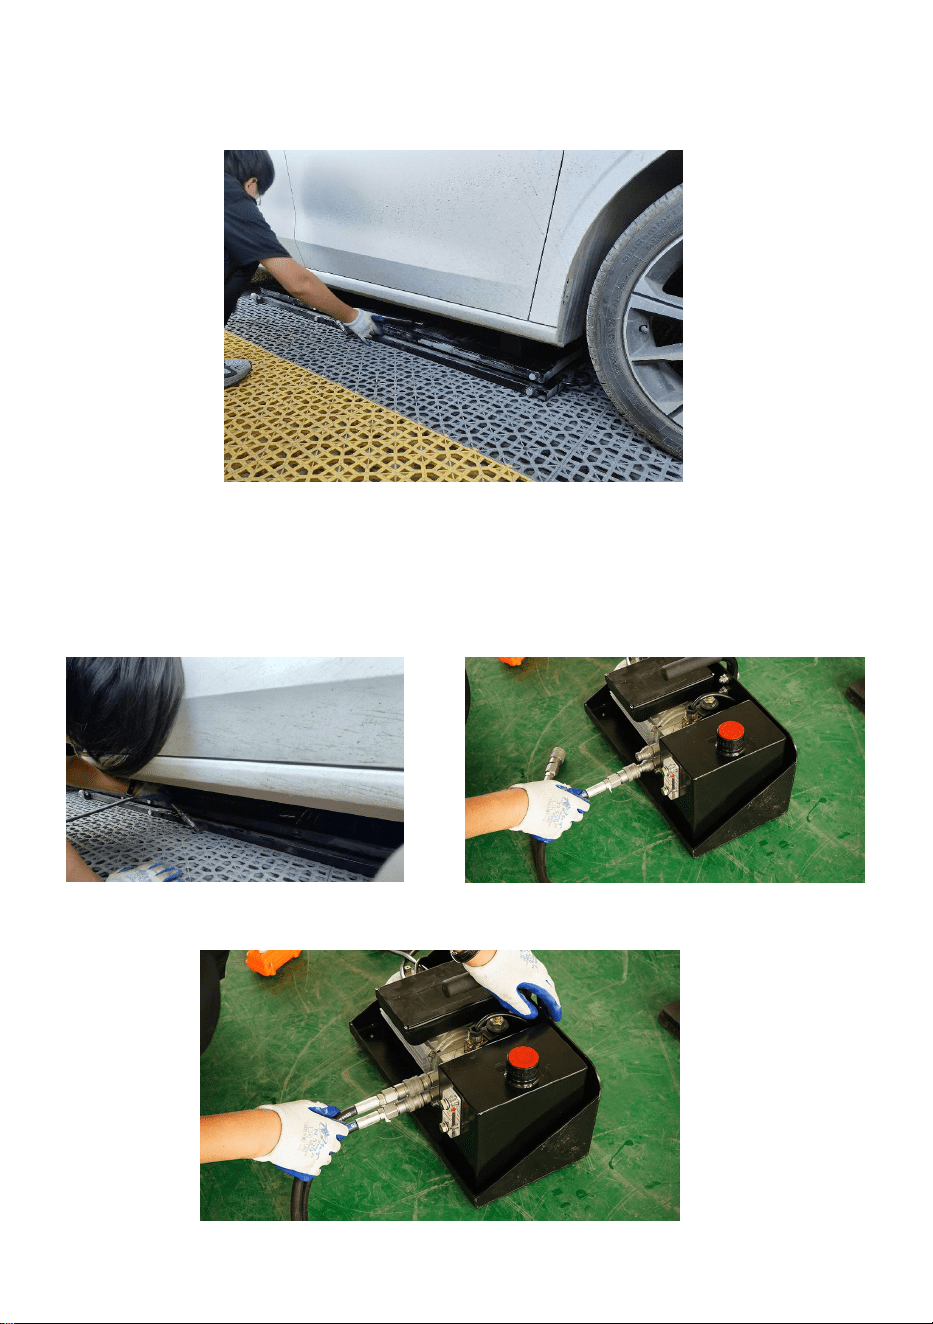
4.Connect the power supply.
5.Press the up button, and the lift will rise to the highest height; after reaching the
highest, you need to press the down button, after the mechanical lock is locked,
stop pressing the button.
6.When the lift is lowered, firstly press the up button, unlock the four lock blocks,
and then press the down button to lower the lift to the lowest height.
- 17 -
- 18 -
7.Take the lift out.
The simple lifting platform can start to work smoothly.
Note: When operating the simple lift jack, pay attention to the
following matters:
Always use the elevator pad, and do not lift the weight directly on the frame.
• Blocks can only be used for receiving trays.
• Check your simple lifting platform before each use.
If any damage or severe wear is found, please do not use it.
• When the vehicle is lifted, do not shake the vehicle or move the weights that may
cause a weight shift.
• Raising the lifting platform to the top lock position and engaging with it is the
safest way to support it.
• Unless your platform is on the ground, don't let the weight rise.
• All hose connectors must be properly fastened together before you can use the
product or apply pressure.
• Do not attempt to connect or disconnect the hose when the equipment is loaded
or when the hydraulic system is under pressure.

- 19 -
• Keep joint fittings clean and free.
• Take all effective preventive measures to prevent dust from entering the system.
• Be careful when using the threaded sealant or threaded sealing tape when
installing the hydraulic fittings.
If using the tape, trim the loose ends to prevent the tape from entering the
hydraulic system.
Ensure that no threaded sealing tape or threaded sealant enters the hydraulic
system.
Threaded sealing tape or threaded sealant in hydraulic oil can affect the flow of
fluid and may cause a system failure.
• Keep your hands from the hydraulic oil and follow the lubricant manufacturer's
safety instructions.
• Use protective equipment (goggles, protective gloves, suitable work clothes,
safety boots, etc.) when operating the hydraulic system.
• If the hydraulic oil touches the eye, enters the blood, or is swallowed, seek
medical attention immediately.
• Do not pull the remote control power cord or power cord to move the power
supply unit, otherwise the power cord will be damaged.
Before using:
Visinspect all moving parts for damage or excessive wear.
The equipment is put into operation before repairing any damaged or worn parts.
Ensure that the safety lock is in good working condition.
If the safety lock is damaged or excessively worn, do not use the lifting platform.
Check the lifting table for damage or excessive wear.
If damaged or worn, please replace it.
Check all bolts and pins for total movement and correct installation.
Warning
Do not attempt to lift the vehicle until confirming that the lift bracket is in the correct
lift position below the vehicle, and there is enough room to operate in all directions.

- 20 -
Rise:
1. Hold down the remote control. The lifting platform begin to rise.
2. Just before the frame contacts the car, release the switch button and the
platform stops moving.
Check whether the rubber pad is located at the factory recommended lifting
position on the vehicle.
If necessary, adjust the lift platform to keep it in place (you may need to lower the
vehicle a little bit to adjust the lift platform).
3. After confirming that the position is correct, press the button on the remote
control, and the simple lifting platform starts to rise.
4. Check whether the vehicle is stable before continuing to upgrade the platform.
If the vehicle is unstable, press the remote control, carefully place the vehicle back
to the ground, and then make the necessary adjustments.
5. When the platform lifting position exceeds the locked position, press the drop
button of the remote control to stop the drop when the platform is lowered to the
locked position.
6. Visual inspection to ensure that both sides are in the same locked position.
Warning: Before doing any other thing (such as starting the vehicle work or
leaving the area), visually verify that the two lifts are jointly locked and that all pads
are in contact with the lifting point recommended by the vehicle factory.
After that, you can operate the vehicle.
Do not work under the elevated vehicle unless the rated vehicle jack is installed on

- 21 -
the lifting point recommended by the factory.
Drop the simple lifting platform:
Warning: When lowering the platform frame, make sure the locks and locks are on
their rails.
For example, if they are knocked to the side, they may get stuck in the rail of the
track, which may cause the easy lifting platform not to descend correctly.
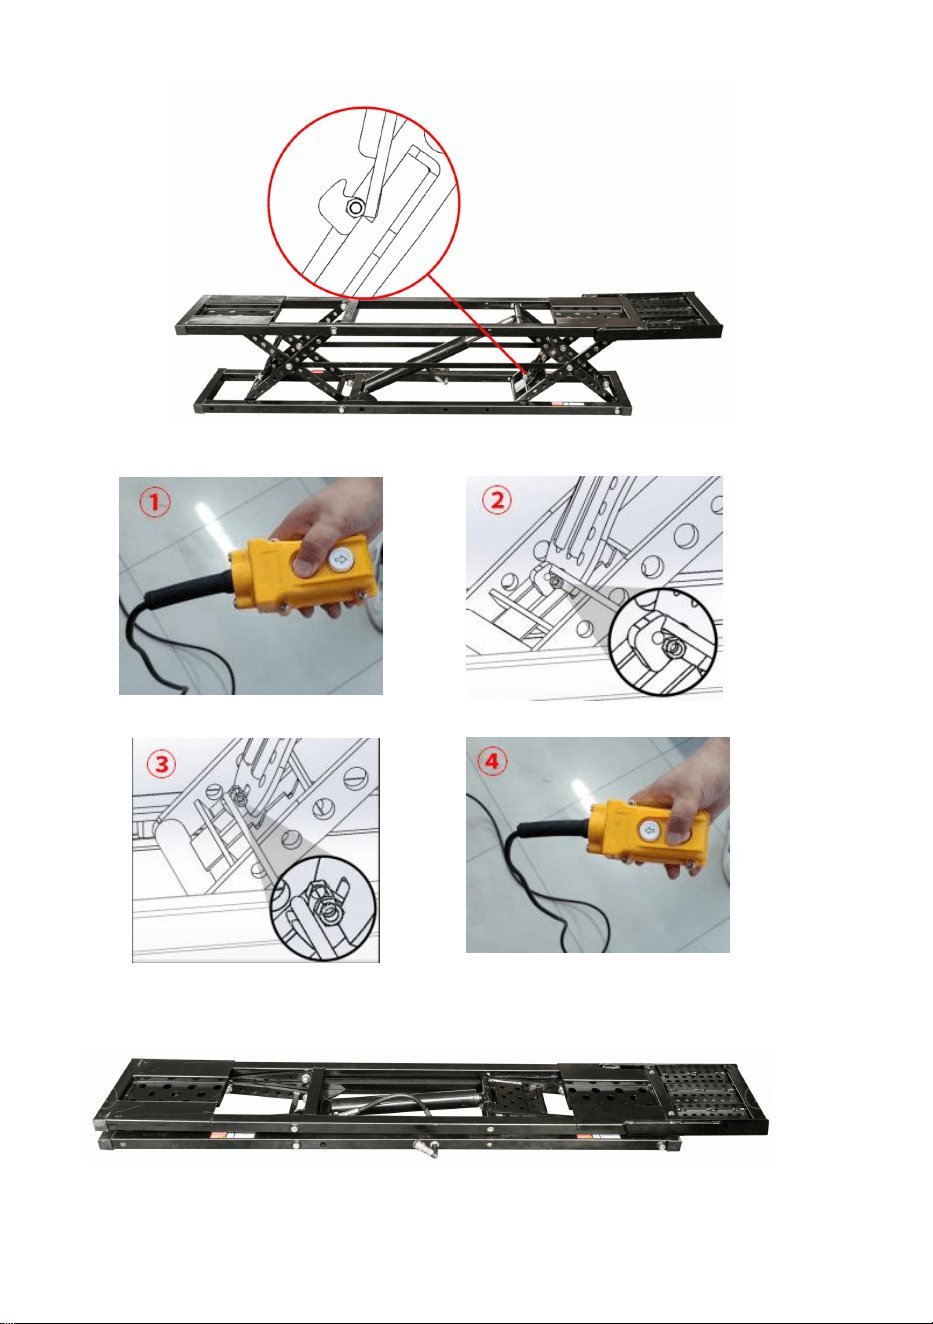
Drop:
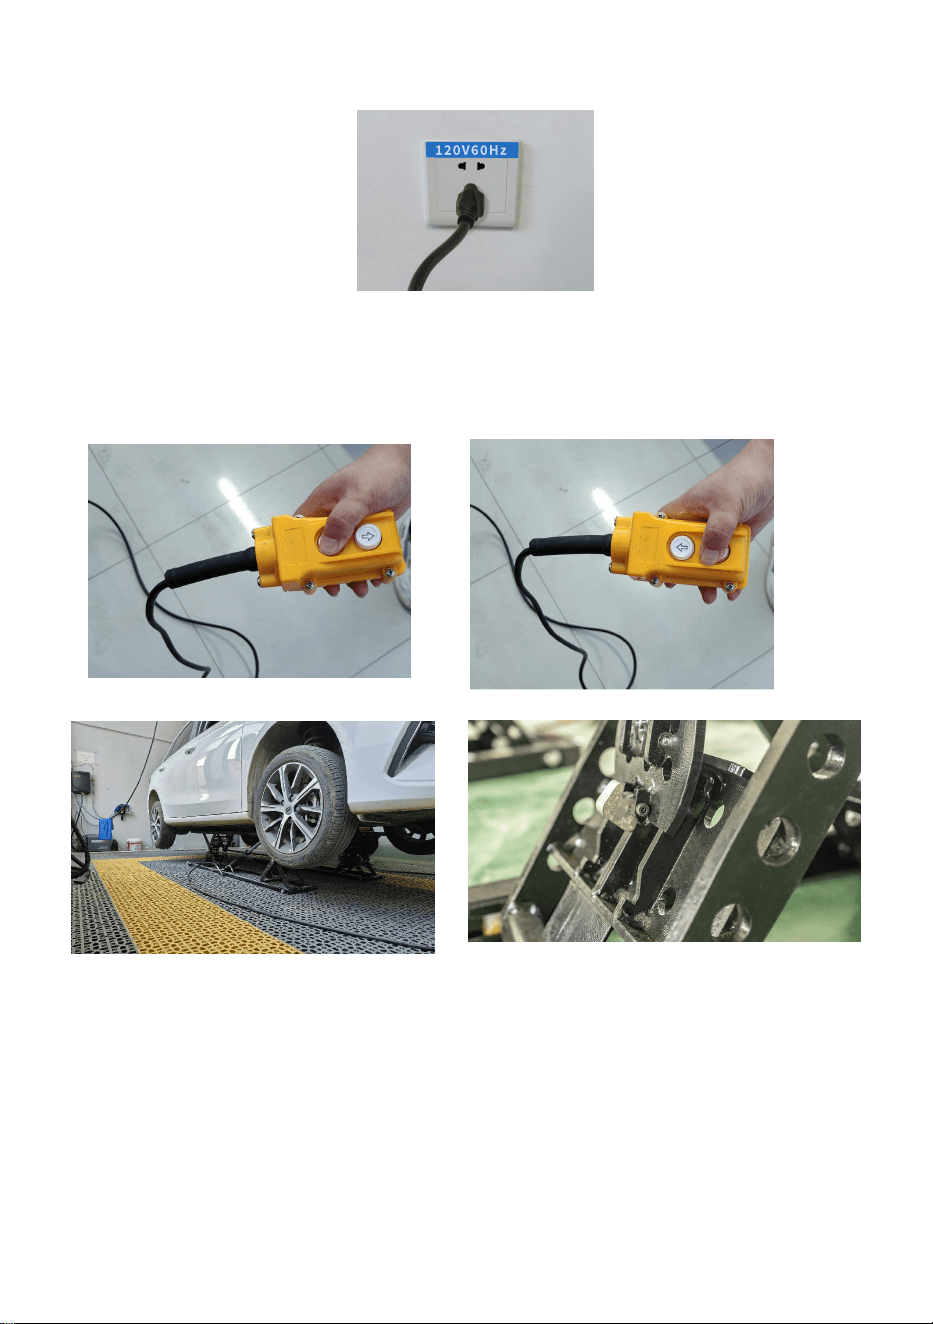
1. Press and hold until the lock plate crosses the lock teeth.
2. As shown in the drawing, lift the lock rod on the frame with a tool, so that the
maximum contact plane of the lock block can fully contact the track on the lock
plate.
3. Pay attention to observation, and ensure that the two ends of the equipment
drop slowly at the same time. If any imbalance is found, please stop the drop
operation immediately.
Note: The simple lift platform recommends a few seconds down after the frame
lands; this ensures that as much hydraulic oil is returned to the tank as possible.
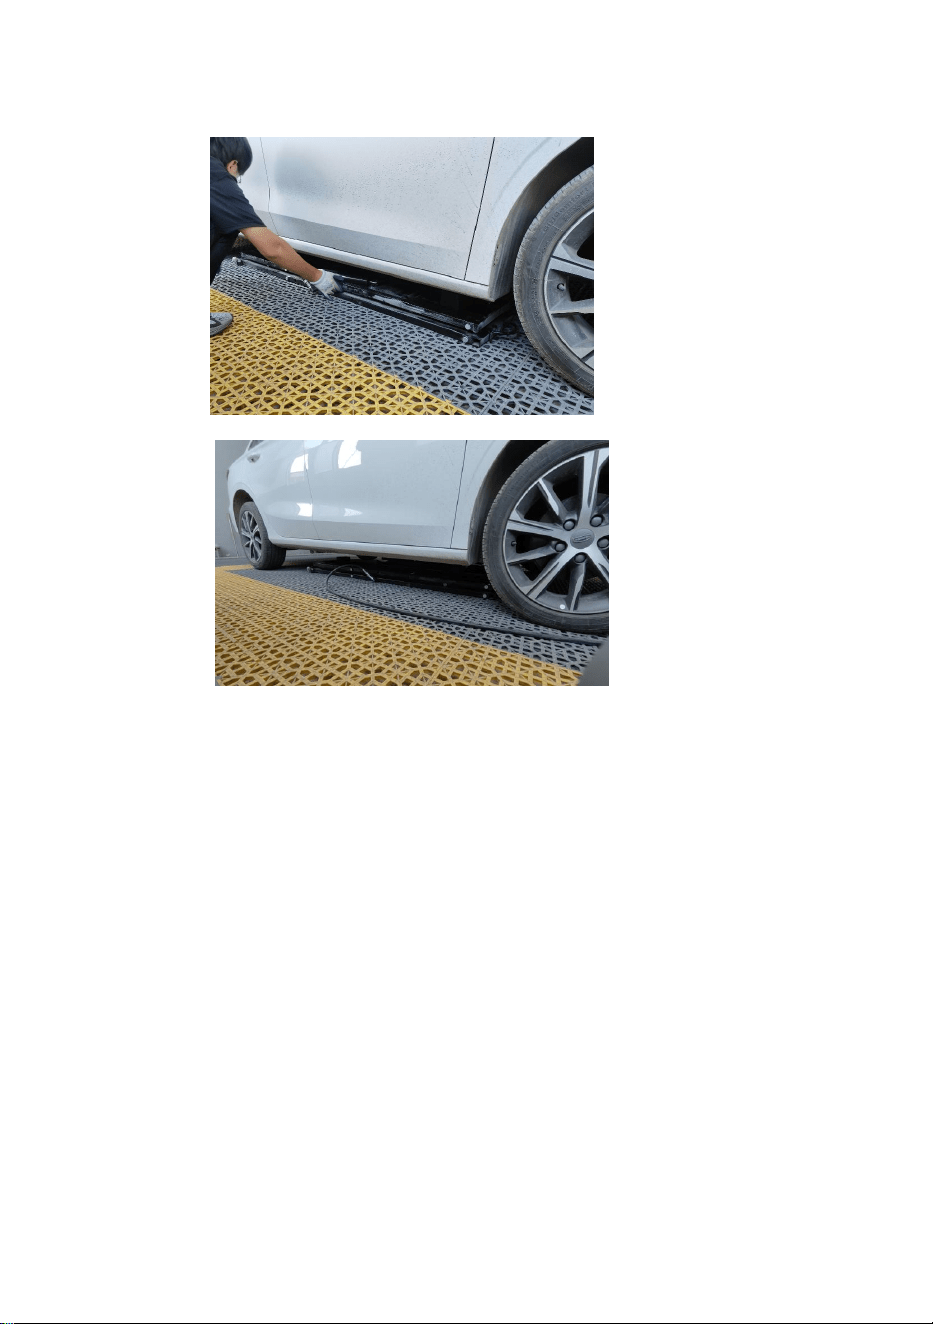
4. After the frame falls completely, remove the simple lifting platform from below
the vehicle.
5. If you do need to move the vehicle.
Make sure not to drive the vehicle over the hydraulic hose.
Monthly maintenance
Lubricate all hinge joints and check for excessive wear.
Check the hydraulic oil level and supply it in time.
Replace all warnings and safety-related labels on the simple lifting platform.
If not unidentified or lost, please contact the manufacturer in time.
Lubrication nodes
The lifting jack recommends yellow lithium-based grease (or similar) lubrication
nodes.
Troubleshooting
This section describes how to troubleshoot prone problems.
Note: If your lift platform does not work properly, you must stop using it until it is fixed.
Important: All maintenance work must be done by qualified personnel.

- 22 -
Problem
Solution
Can't lift.
Ensure that the hydraulic hose is not clamped or
leaking.
Ensure that there is sufficient hydraulic oil in the
tank.
Ensure that the power supply unit has the
appropriate power supply.
Oil pump exhaust.
Can't drop.
Ensure that there is a weight on the frame.
The pump has no pressure.
Maintain the pump.
Stuck at the highest point
with no load.
Requires weight down from a fully raised position.
Reference to no load at the top for help.
Cannot rise from the lowest
point.
The lifting platform cannot rise from the lowest
point, because it needs the space to rise together.
Hydraulic oil pollution.
Replace it with the specified hydraulic oil.
The product is abnormal.
Add the lubricating grease to the designated
lubrication node.
Not using the remote control
also slowly drops down.
Ensure that the easy lift jack is in the locked
position (if not, the hydraulic oil will leak slowly,
lowering the frame).
The gas pump cannot
maintain pressure.
You can check them using standard valve tools.
Do not make the spool too tight.
Fast connections get harder
and harder to connect.
The hydraulic system is under increasing pressure.
To prevent this, after the frame reaches the ground,
hold down the drop button on the remote control for
a few seconds to get as much hydraulic fluid as
possible back to the tank.
If the pressure accumulation is too high to allow for
quick connection, please contact the dealer.
Made In China