
Installation Instructions for
3cm Countertops and Undermount Sinks
(Models: 050, 080 & 090)
BEFORE YOU REMOVE THE TOP FROM THE CARTON
Prior to removing the countertop from the carton inspect the carton for damage and package contents.
If any damage is found, contact your place of purchase.
Products shown in this manual do not reect a specic vanity or sink.
Installation Instructions for 3cm Countertops with Undermount Sink
IMPORTANT STEPS BEFORE YOU BEGIN
• Ensure the vanity cabinet is in place and has been properly installed to meet plumbing codes. For your safety and to
achieve the best possible results, James Martin Vanities recommends you consult with a professional contractor.
• Shut off the water supply. Water supply and drain access must be in place prior to installing the countertop and sink.
• Ensure the vanity cabinet is level.
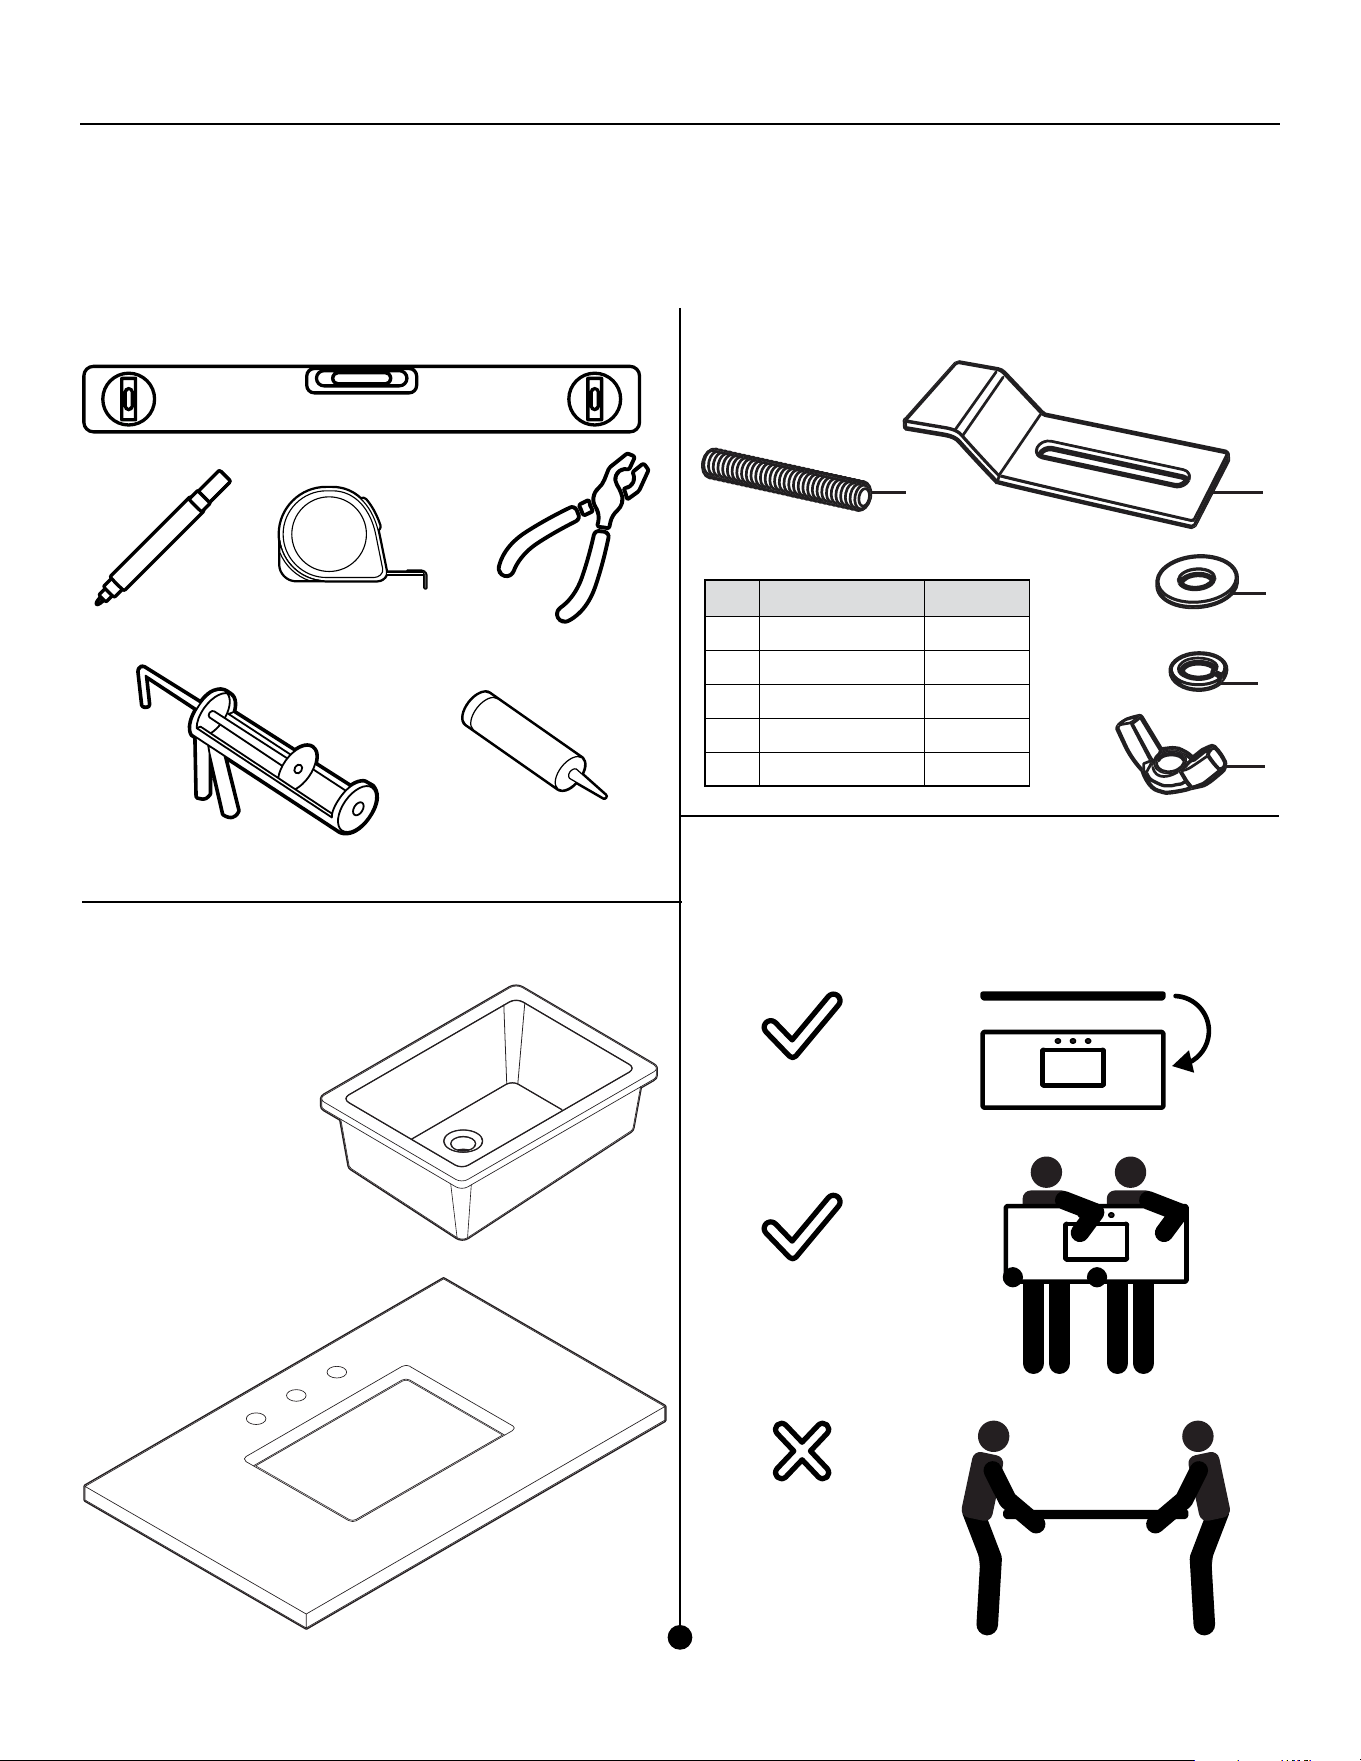
TOOLS AND MATERIALS: (Not included)
Caulk Gun Silicone Sealant
Level
Marker Tape Measure Pliers
COUNTERTOP
CARTON
CONTENTS
• 3cm Countertop
• Assembly
Instructions
• Hardware
SINK MOUNTING HARDWARE (Included)
Part Description Quantity
A Set screw 4
B Sink clamp 4
C Washer 4
D Lock washer 4
E Wing nut 4
The 3cm Countertop
and Sink are
packaged and
shipped separately.
SINK CARTON CONTENTS
• Sink
C
E
B
A
PROPER HANDLING OF 3CM COUNTER TOP
Carefully unpack the countertop and place nished side down
on at, soft and sturdy surface.
Important: The countertop is very fragile. Take caution when
handling, and have someone assist you.
Rotate carton from
at position and lift
top vertically.
Lift top vertically
with two people.
NEVER LIFT OR
CARRY THE VANITY
TOP FLAT.
D
2
JAMES MARTIN VANITIES
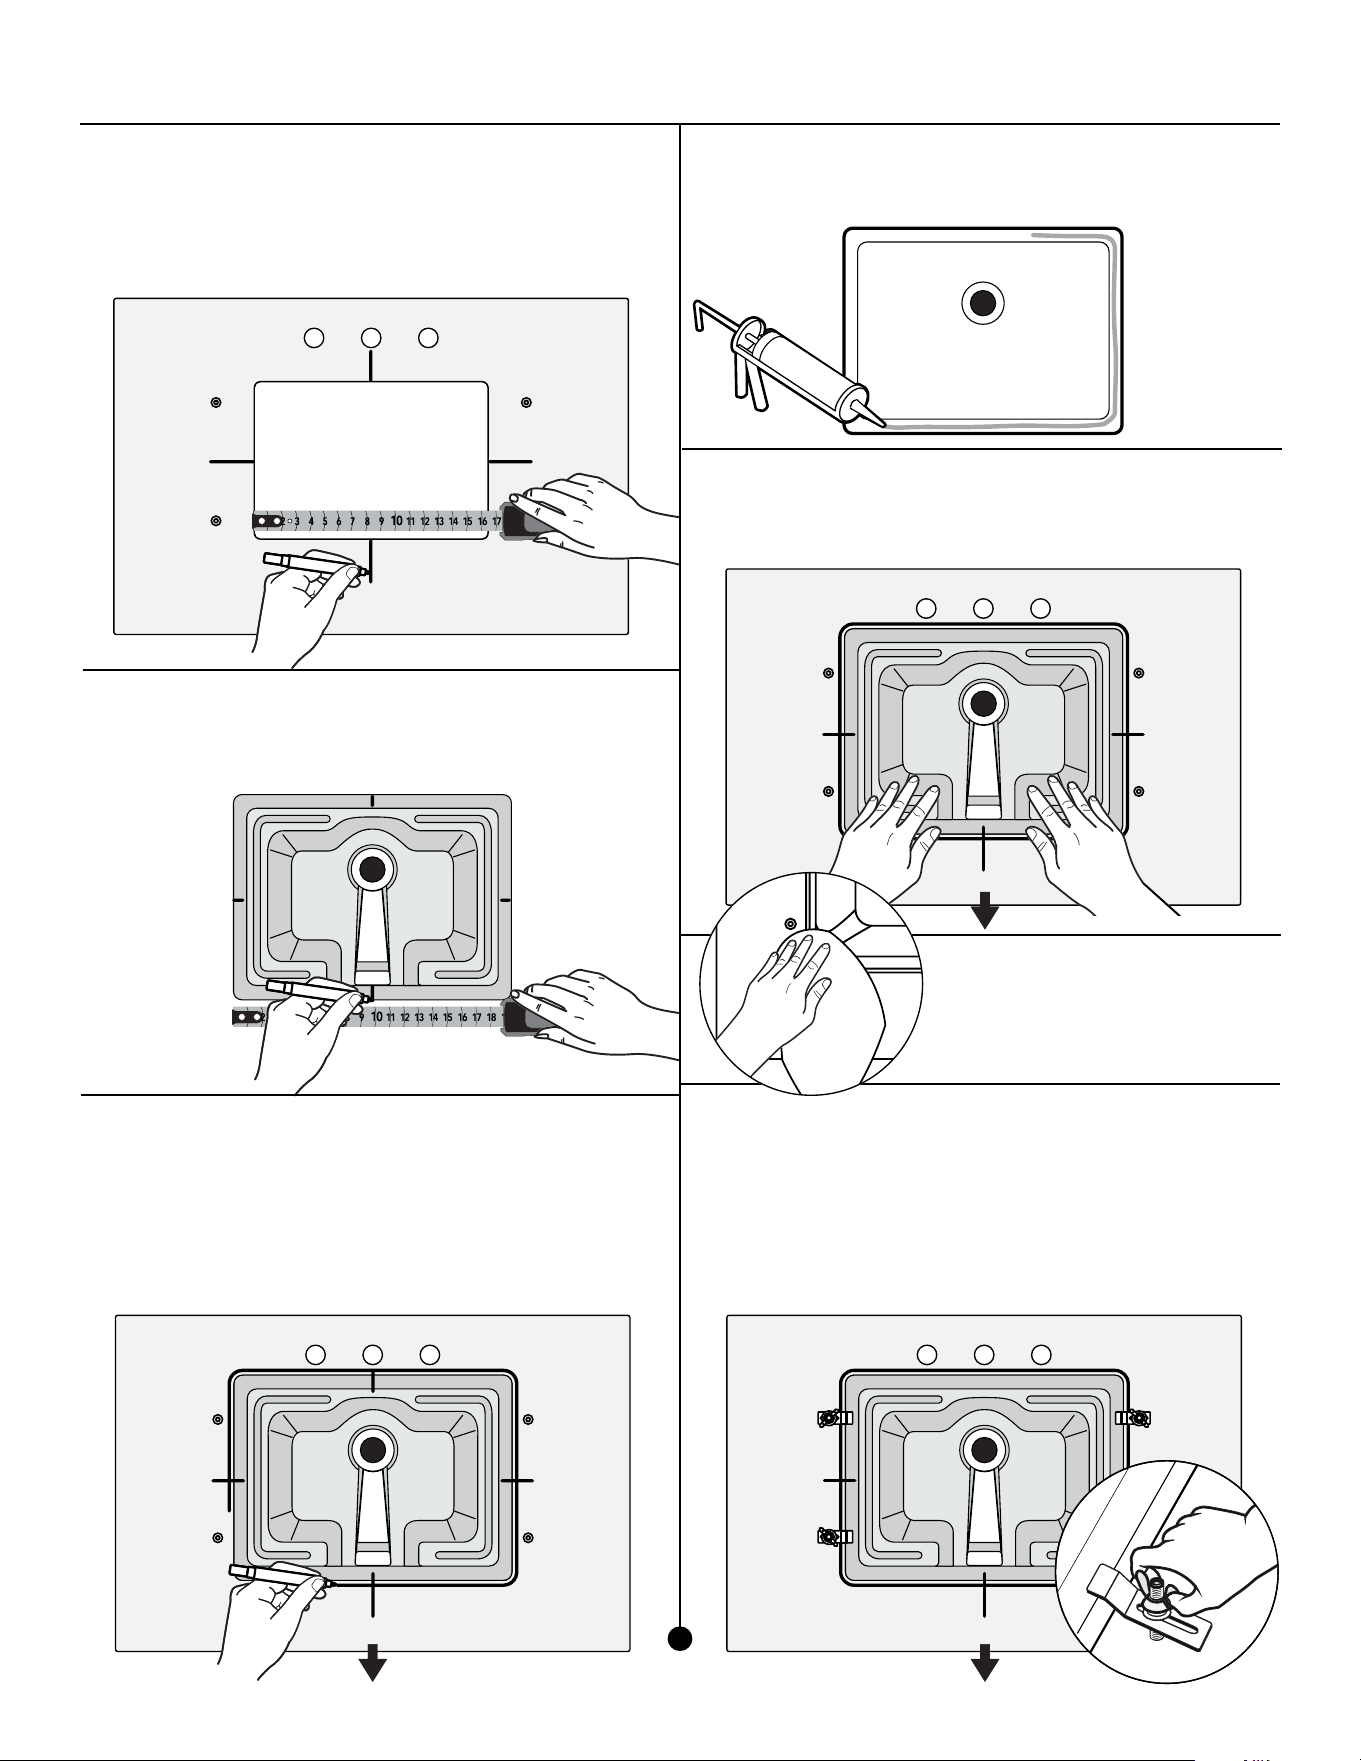
SINK INSTALLATION
IMPORTANT: Make sure all surfaces are clean.
Place top nished side down on a soft surface.
1. Using a tape measure, draw a straight 3” line marking the
center points of all sides of the sink cut out.
2. Carefully unpack the undermount sink and place on a
soft surface, bowl side up. Using a tape measure, identify
and mark center point on all sides of the bottom and
prole of the lip of the sink.
3. Carefully lift the sink and place it centered over the
countertop cutout, bowl side up and with the overow
drain at the opposite end from the faucet holes. Align all
marked center points along each side of the lip of the
sink, with the marked center points along cut out in the
countertop. Ensure the sink is centered over the opening
and carefully trace around the perimeter of the sink
with a marker.
4. Carefully lift the sink from the countertop and place it on
a soft surface, bowl side down. Apply a bead of silicone
sealant around the top edge of the sink rim.
5. Carefully lift and turn the sink over on the countertop,
positioning it within your marked outline, ensuring again
that the overow is opposite from the faucet holes.
Once positioned, press rmly in place.
6. Wipe away any excess sealant.
To ensure proper adhesion,
and for added stability, apply
the sink clips before allowing
the sealant to dry.
OVERFLOW
OVERFLOW
OVERFLOW
7. Attach sink clips by placing the contoured end of the
bracket against the sink lip, aligning the open, notched
area over the threaded inserts. The bracket will be at a
slight angle, and the angle will vary depending on the
thickness of the sink lip. Insert the set screw. Allow sealant
to dry as indicated by manufacturer. Although the sealant
is what secures the sink to the top, we suggest keeping
the clips in place after installation.
3
Installation Instructions for 3cm Countertops with Undermount Sink
JAMES MARTIN VANITIES
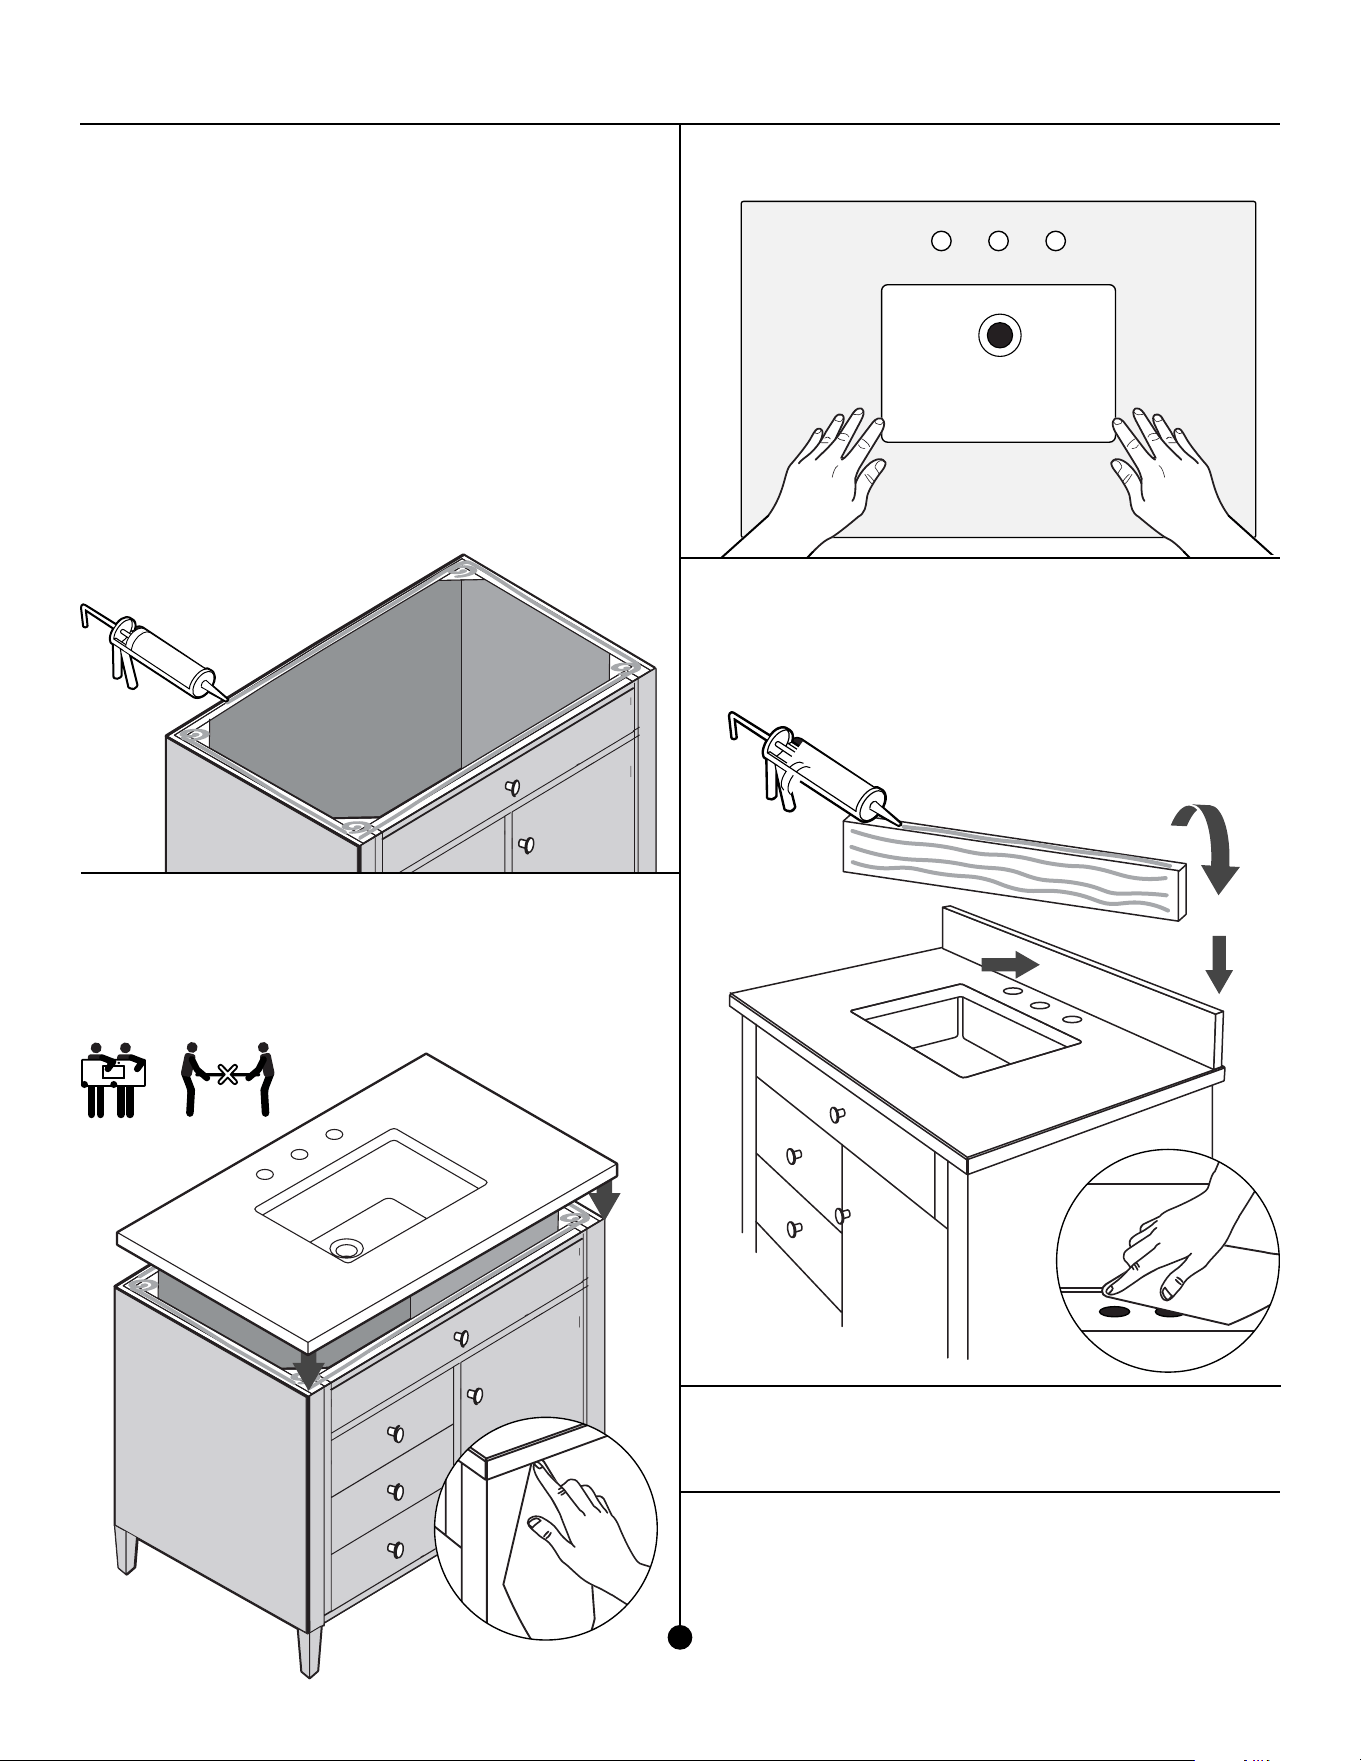
PREPARING THE VANITY CABINET FOR
INSTALLATION OF THE COUNTERTOP
AND SINK
IMPORTANT: Make sure all surfaces are clean.
8. Apply an adhesive around the top edge of the vanity
cabinet. Add an extra dot on all
4 corners of the
vanity top.
10. Once positioned, press rmly into place. Wipe away any
excess sealant using a damp cloth.
12. Once assembled allow the silicone sealant to fully dry
according to the manufacturer’s recommendation. When
dry, proceed to the installation of your faucet and drain.
13. For stone tops, such as marble and granite, it is
recommended that you apply a high quality sealer to
protect from staining and discoloration. Stone sealer
should be reapplied once or twice per year, depending
upon usage, according to sealer’s instructions.
11. If you are installing a wood back-splash (available on
specic models), place a generous amount of silicone
sealant on the back of it and press it into place against
your bathroom wall. Fill any gaps that are left with silicone
sealant. Wipe away any excess sealant with a damp cloth.
IMPORTANT
• Ensure the vanity cabinet is in place and has been properly
installed to meet plumbing codes. For your safety and to
achieve the best possible results, James Martin Vanities
recommends you consult with a professional contractor.
• Shut off the water supply. Water supply and drain access
must be in place prior to installing the countertop and sink.
• Ensure the vanity cabinet is level.
9. With assistance from another person, carefully lift the
countertop with sink to a vertical position and ease onto
the vanity cabinet, front edge rst.
Important: The countertop is very fragile. Take caution when
handling, and have someone assist you.
Installation Instructions for 3cm Countertops with Undermount Sink
4
12/23
JAMES MARTIN VANITIES