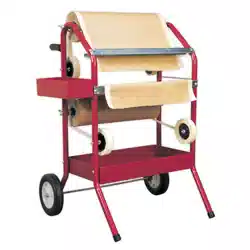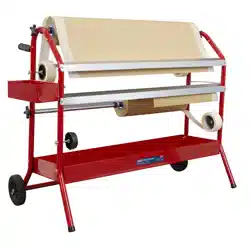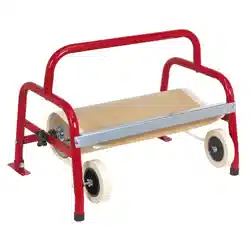
MASKING PAPER DISPENSER 450MM ROLL
MODEL NO: MK65.V3
Thank you for purchasing a Sealey product. Manufactured to a high standard, this product will, if used according to these instructions,
and properly maintained, give you years of trouble free performance.
IMPORTANT: PLEASE READ THESE INSTRUCTIONS CAREFULLY. NOTE THE SAFE OPERATIONAL REQUIREMENTS, WARNINGS & CAUTIONS. USE
THE PRODUCT CORRECTLY AND WITH CARE FOR THE PURPOSE FOR WHICH IT IS INTENDED. FAILURE TO DO SO MAY CAUSE DAMAGE AND/OR
PERSONAL INJURY AND WILL INVALIDATE THE WARRANTY. KEEP THESE INSTRUCTIONS SAFE FOR FUTURE USE.
1. SAFETY
9 Ensure the dispenser is on a reasonably flat, level floor or wall mounted securely before loading.
9 Ensure that all fittings are tight and secure.
9 Be aware that the paper cutting blades are sharp, handle with care.
8 DO NOT use the dispenser for any purpose other than that for which it is designed.
8 DO NOT sit or stand on the dispenser.
2. INTRODUCTION
Singlerolldispenseracceptsrollsupto450mmandcanbeusedoorstandingorwallmounted.Automaticallyappliesadhesivetape
to edges of masking paper.
3. CONTENTS
Seeg.3overleaf.
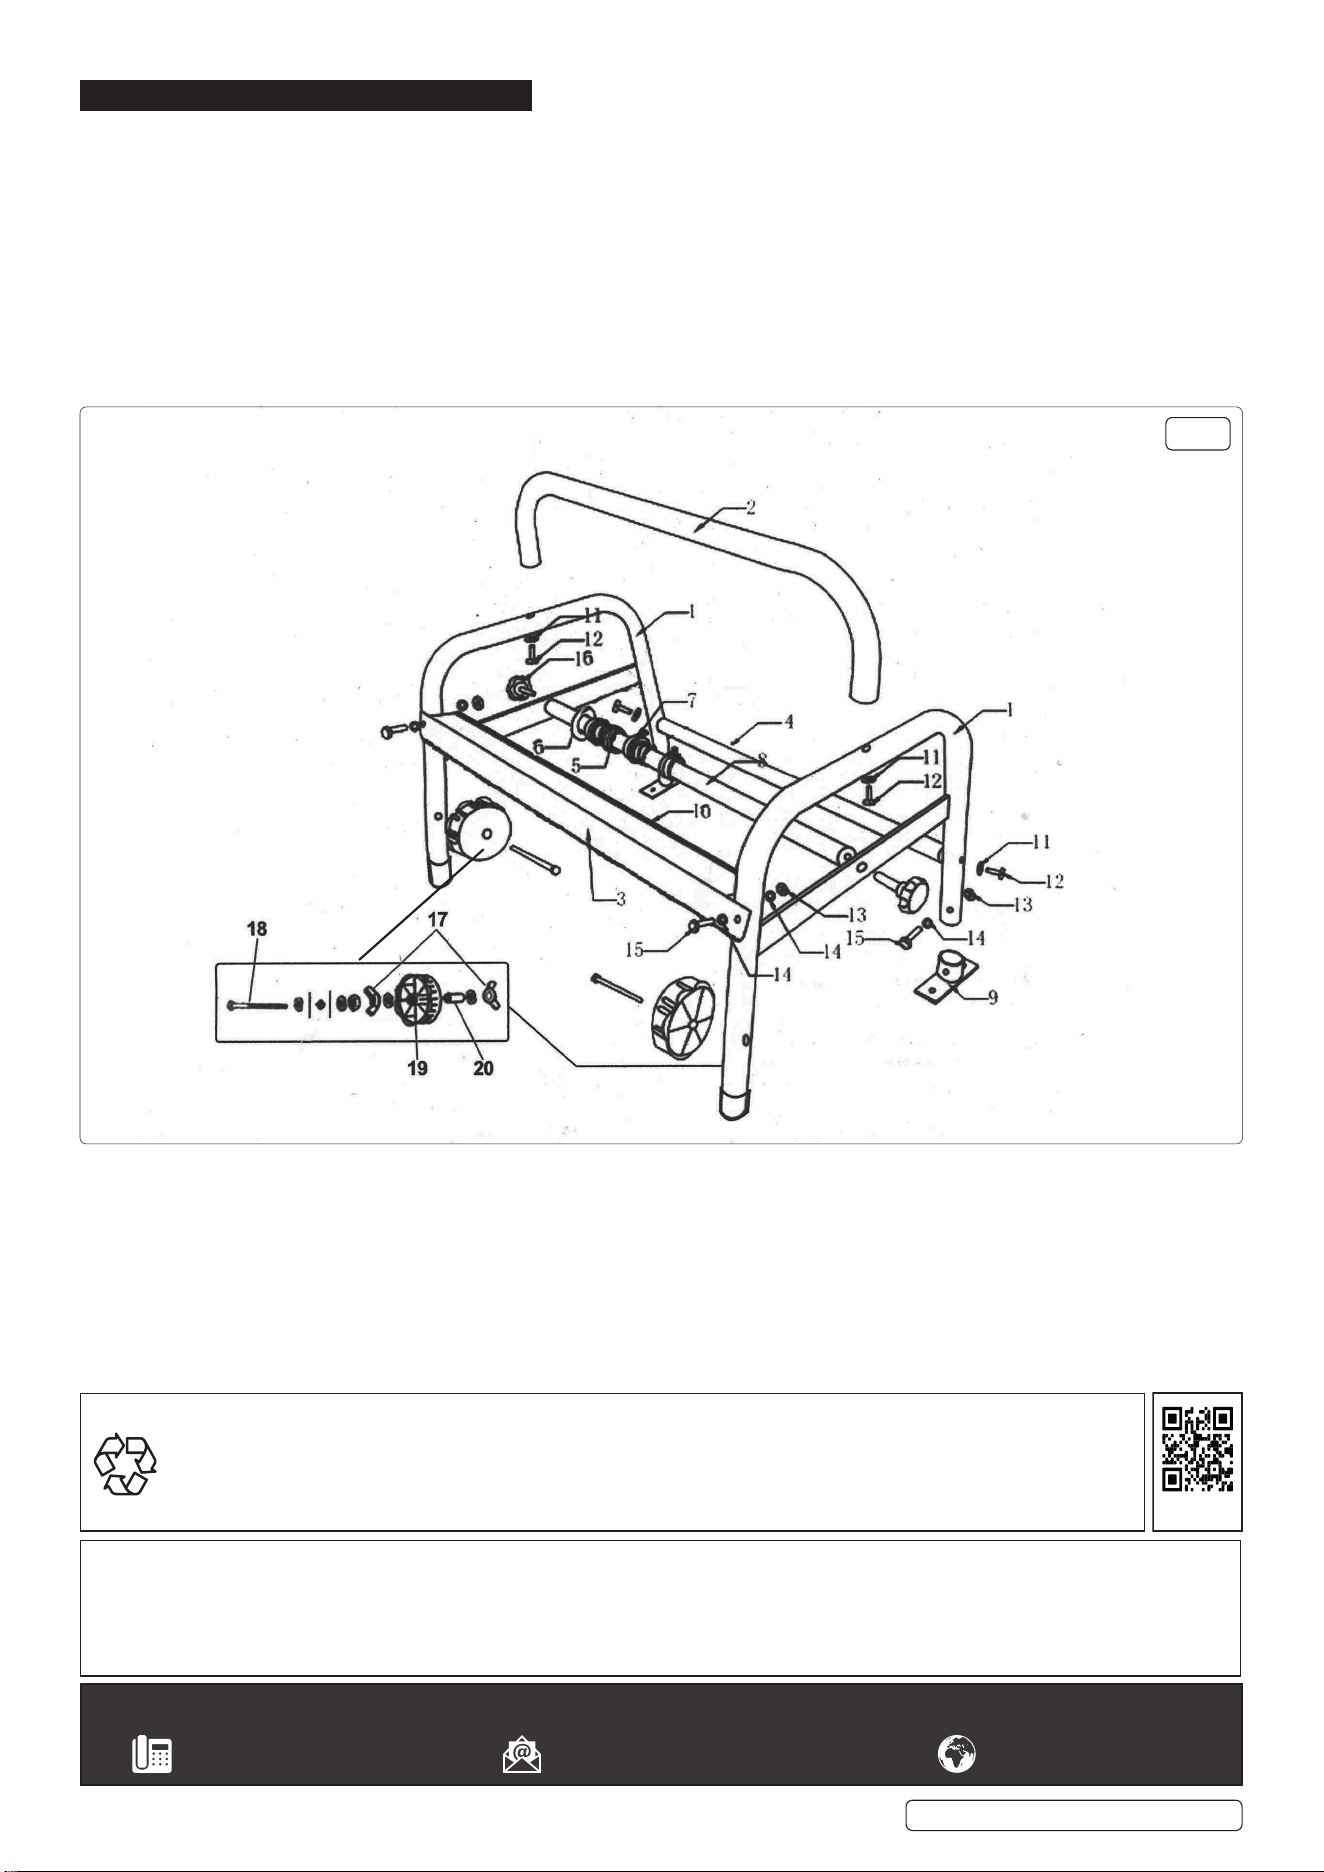
Number Description Quantity
1 Tubular Frame 2
2 Top Handle 1
3 Cutting Blade 1
4 Cross tube 1
5 Paper holding springs 2
6 Paper holding washers 4
7 Paper holding Rings 4
8 Paper Bar 1
9 Mounting bracket 2
10 Cutting blade spring 1
4. ASSEMBLY
NOTE:Numbersinbracketsrefertoitemnumbersinfig.3.
4.1. If dispenser is to be free standing fit the four rubber feet to the tubular frames (1).
4.2. If the dispenser is to be bench or wall mounted fit the two mounting brackets (9) to the rear legs of the tubular
frames(1),usingM16screws(15),M6washers(14)andM6nuts(13).Fittwoofthefeettothefrontlegsofthetubularframes(1).
4.3. Attachthetophandle(2)tothetopofthetubularframes(1)usingM8screws(12)andM8washers(11).
4.4. Attachthetwotubularframes(1)tothecrosstube(4)usingM8screws(12)andM8washers(11).DO NOT fully tighten screws at this
stage.
4.5. Fitcuttingbladespring(10)toeitherendofthecuttingblade(3),asshowninfig.1.
4.6. Fitcuttingblade(3)toupperholesinfrontlegsoftubularframes(1)usingM16screws(15),M6washers(14)andM6nuts(13).
4.7. Tighten all screws/nuts.
4.8. Insert bolts (18) through front legs of tubular frames (1) and tighten in place using M6 washers (14)
andM6nuts(13).
4.9. Thread a wing nut (17) onto each bolt (18) with the wings towards the frame leg.
4.10. Slide washer (14) and hub (20) onto each bolt (18) and then fit tape reels (19) onto hubs (20) with open sides towards tubular
4.11. frame (1) legs.
4.12. Position tape reels (19) with washer (14) and wing nut (17).
4.13. Fit paper washers (6), cutting blade spring (10) and paper holding spring (5) to paper bar (8) as shown in fig.2.
4.14. Locate paper bar (8) between bars of tubular frames (1) and retain with knob (16).
Refer to
instruction
manual
MK65.V3Issue108/11/23
Original Language Version
© Jack Sealey Limited
Number Description Quantity
11 Washers (M8) 4
12 Screws (M8) 4
13 Nuts (M6) 6
14 Washers (M6) 16
15 Screws (M16) 8
16 Knobs 2
17 Wing nuts 4
18 Long bolts 2
19 Tape Reel 2
20 Hub 2
g.1
g.2
5. a OPERATION
5.1. Remove paper bar (8) from frame and remove washers (6), springs (5) and paper holding washers (6).
5.2. Slide paper bar (8) through centre of masking paper roll so that, when reinstalled in frame,
paper will come from top of roll towards front of dispenser.
5.3. Replace washers (6), springs (5) and paper holding rings as shown in fig.2, at each end of roll.
5.4. If two narrow rolls are used fit one spring and washer per roll and use the two extra paper holding rings for the extra roll..
5.5. Refit paper bar, complete with paper roll, to frame assembly. Position roll in centre of bar and fix in place by tightening screws in paper
holding rings (7).
5.6. Threadleadingedgeofpaperbetweencuttingbladespring(10)andguideedgeofcuttingblade(3),seefig.1.
5.7. Press masking tape rolls onto tape reels (19) so that tape leaves bottom of rolls towards the
rear of the dispenser. Rolls may be positioned relative to the masking paper edges by adjusting wing nuts.
5.8.
5.9.
5.10.
.
MK65.V3Issue108/11/23
Original Language Version
© Jack Sealey Limited
Sealey Group, Kempson Way, Suffolk Business Park, Bury St Edmunds, Suffolk. IP32 7AR
01284 757500 sales@sealey.co.uk www.sealey.co.uk
Note: It is our policy to continually improve products and as such we reserve the right to alter data, specifications and component parts without prior
notice. Please note that other versions of this product are available. If you require documentation for alternative versions, please email or call
our technical team on technical@sealey.co.uk or 01284 757505.
Important: No Liability is accepted for incorrect use of this product.
Warranty: Guarantee is 12 months from purchase date, proof of which is required for any claim.
ENVIRONMENT PROTECTION
Recycleunwantedmaterialsinsteadofdisposingofthemaswaste.Alltools,accessoriesandpackagingshouldbesorted,
taken to a recycling centre and disposed of in a manner which is compatible with the environment. When the product
becomes completely unserviceable and requires disposal, drain any fluids (if applicable) into approved containers and
dispose of the product and fluids according to local regulations.
REGISTER YOUR
PURCHASE HERE
g.3