Loading ...
Loading ...
Loading ...

4 Switch on the appliance (Fig. 12).
5 To trim most effectively, move the appliance
against the hair growth direction. Make sure
that the surface of the comb always stays in
contact with the skin (Fig. 15).
Since all hairs do not grow in the same
direction, you may want to try different
trimming positions (i.e. upwards, downwards, or
across). Practice is best for optimum results.
6 If a lot of hair has accumulated in the comb,
remove it from the appliance and blow and/or
shake out the hairs. Regularly remove cut hair
from the comb. The selected hair length setting
does not change when the comb is removed.
7 Switch off and clean the appliance and
attachments after each use.
Trimming without comb
If you trim without the comb, your hair is cut off
close to the skin (0.4mm). You can use the
trimming head without the comb to:
- Define hair line
- Trim nape of neck
- Remove single unwanted hairs
1 Make sure the product is switched off.
2 Pull the comb off the product (Fig. 17).
-
Never pull at the flexible top of the comb.
Always pull at the sides.
3 Turn on the product.
4 Make well-controlled movements. Touch the
hair lightly with the trimmer.
-
For a comfortable trim close to your skin,
place the flat side of the trimming head
against your skin and make strokes in the
desired direction (Fig. 18).
-
For contouring, hold the trimming head
perpendicular to the skin and move the
trimming head upwards or downwards with
gentle pressure (Fig. 19).
5 Turn off and clean the product after each use
(see 'Cleaning').
Precision trimmer
Use the precision trimmer to create fine lines and
contours around your facial style, close to the skin
(to a length of 1/32in./0.5mm).
1 Hold the precision trimming head perpendicular
to the skin and move the trimming head
upwards or downwards with gentle pressure
(Fig. 16).
Cleaning
Never use scouring pads, abrasive cleaning agents
or aggressive liquids such as petrol or acetone to
clean the appliance.
Clean the appliance after each use.
1 Switch off the appliance and disconnect it from
the wall socket.
2 Wipe the housing of the appliance with a dry
cloth.
3 Remove the comb (Fig. 17) and clean it with the
cleaning brush and/or rinse it under the tap
(Fig. 20).
4 Clean the cutting unit with the cleaning brush
and/or rinse it under the tap (Fig. 23Fig. 21).
5 Carefully shake off excess water and let the
appliance air dry completely.
Never dry the trimmer teeth with a towel or
tissue, as this may damage the trimmer teeth.
6 After cleaning, reattach the comb (Fig. 9) to the
appliance.
Every 3 months: cleaning trimming head
connector
1 Turn off the product and disconnect it from the
wall outlet.
2 Remove the comb (Fig. 17).
3 Pull the cutting unit off the appliance (Fig. 22).
4 Clean the trimming head connector and hair
chamber with the cleaning brush and/or rinse
them under the tap (Fig. 24).
5 Clean the inside of the trimming head with the
cleaning brush and/or rinse it under the tap
(Fig. 23).
6 Carefully shake off excess water and let all parts
dry completely.
7 Press the trimming head back on the appliance.
Make sure the projection on the back of the
trimming head fits exactly onto the notch in the
hair chamber (Fig. 25).
Ordering accessories
To buy accessories or spare parts, visit
www.philips.com/parts-and-accessories or go to
your Philips dealer. You can also contact the
Philips Consumer Care Center in your country (see
the international warranty leaflet for contact
details).
Storage
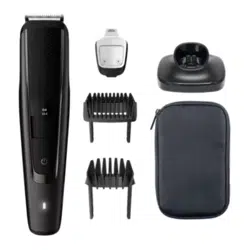
- Store the product in the pouch supplied. Make
sure the product is dry before you store it in the
pouch.
Ordering accessories
To buy accessories or spare parts, visit
www.philips.com/parts-and-accessories or go to
your Philips dealer. You can also contact the
Philips Consumer Care Center in your country (see
the international warranty leaflet for contact
details).
Recycling
- This symbol means that this product shall not
be disposed of with normal household waste
(2012/19/EU) (Fig. 4).
- This symbol means that this product contains a
built-in rechargeable battery which shall not be
disposed of with normal household waste (Fig.
5) (2006/66/EC). Please take your product to
an official collection point or a Philips service
center to have a professional remove the
rechargeable battery.
Loading ...
