
ZD421 and ZD621
Series
Desktop Printers
User Guide
P1123730-05EN Rev A

Copyright
2023/09/12
ZEBRA and the stylized Zebra head are trademarks of Zebra Technologies Corporation, registered in many
jurisdictions worldwide. All other trademarks are the property of their respective owners. ©2023 Zebra
Technologies Corporation and/or its affiliates. All rights reserved.
Information in this document is subject to change without notice. The software described in this document
is furnished under a license agreement or nondisclosure agreement. The software may be used or copied
only in accordance with the terms of those agreements.
For further information regarding legal and proprietary statements, please go to:
SOFTWARE: zebra.com/linkoslegal.
COPYRIGHTS: zebra.com/copyright.
PATENTS: ip.zebra.com.
WARRANTY: zebra.com/warranty.
END USER LICENSE AGREEMENT: zebra.com/eula.
Terms of Use
Proprietary Statement
This manual contains proprietary information of Zebra Technologies Corporation and its subsidiaries
(“Zebra Technologies”). It is intended solely for the information and use of parties operating and
maintaining the equipment described herein. Such proprietary information may not be used, reproduced,
or disclosed to any other parties for any other purpose without the express, written permission of Zebra
Technologies.
Product Improvements
Continuous improvement of products is a policy of Zebra Technologies. All specifications and designs are
subject to change without notice.
Liability Disclaimer
Zebra Technologies takes steps to ensure that its published Engineering specifications and manuals are
correct; however, errors do occur. Zebra Technologies reserves the right to correct any such errors and
disclaims liability resulting therefrom.
Limitation of Liability
In no event shall Zebra Technologies or anyone else involved in the creation, production, or delivery of the
accompanying product (including hardware and software) be liable for any damages whatsoever (including,
without limitation, consequential damages including loss of business profits, business interruption, or loss
of business information) arising out of the use of, the results of use of, or inability to use such product, even
if Zebra Technologies has been advised of the possibility of such damages. Some jurisdictions do not allow
the exclusion or limitation of incidental or consequential damages, so the above limitation or exclusion may
not apply to you.

Contents
About This Guide............................................................................................................................................13
Other Valuable Printer Resources.................................................................................................... 13
Zebra OneCare Printer Service and Support................................................................................ 14
Notational Conventions........................................................................................................................14
Icon Conventions................................................................................................................................... 14
Introduction......................................................................................................................................................16
Link-OS 4 inch Desktop Thermal Printers...................................................................................... 16
Common Desktop Printer Features.................................................................................................. 17
Link-OS 4-inch Desktop Printer Options................................................................................. 18
What’s in the Box?............................................................................................................................... 20
Unpacking and Inspecting the Printer............................................................................................20
What You WillNeed to Print...............................................................................................................21
Modes of Printing................................................................................................................................. 22
Opening Your Printer...........................................................................................................................23
Closing Your Printer.............................................................................................................................24
Printer Features............................................................................................................................................. 25
Exterior Features of Your Printer..................................................................................................... 25
Inside the ZD421 Dual-Capacity Ribbon Roll Printer...................................................................27
Inside the ZD621 Dual-Capacity Ribbon Roll Printer.................................................................. 28
RFID Antenna Location– ZD621RPrinters Only.................................................................. 29
Media Dancer–ZD621 Printers Only......................................................................................30
Dual-Capacity Ribbon Chassis–Ribbon Roll Holders................................................................ 31
Inside the ZD421 Direct Thermal Printer........................................................................................32
3

Contents
Inside the ZD621 Direct Thermal Printer........................................................................................33
Inside the ZD421 Ribbon Cartridge Printer....................................................................................34
Accessing the Printhead of the ZD421 Ribbon Cartridge Printer.................................... 35
Label Dispenser Option (field-installable)–All Models..............................................................37
Cutter Option (field-installable) – All Models................................................................................ 38
Linerless Media Tear-Off Option – Direct Thermal Models Only............................................39
Linerless Cutter Option – Direct Thermal Models Only............................................................ 40
Identifying Platen Drive Roller Types..............................................................................................40
Printer Power Supply Options...........................................................................................................42
Attached Power Supply Base....................................................................................................42
Attached Battery Base and Battery......................................................................................... 43
ZD621 Direct Thermal Locking Printer Feature – Healthcare Models Only......................... 45
Zebra Print Touch for Near-Field Communications (NFC).........................................................45
Controls and Indicators.................................................................................................................................47
User Interface.........................................................................................................................................47
Standard Interface Controls...............................................................................................................48
Meaning of the Indicator Light Patterns.........................................................................................53
Status–Typical Operating Conditions................................................................................... 54
Status–Printhead Operation.................................................................................................... 55
Status–Bluetooth Low Energy Option.................................................................................. 56
Status–Ethernet (LAN) Option................................................................................................. 57
Status–Wi-Fi (WLAN) Option.................................................................................................... 57
Battery Indicators and Controls........................................................................................................58
Install Hardware Options.............................................................................................................................. 61
Field-Installable Printer Accessories and Options........................................................................61
Printer Connectivity Modules............................................................................................................ 62
Accessing the Connectivity Module Slot............................................................................... 62
Installing the Serial Port Module.............................................................................................. 63
Installing the Internal Ethernet (LAN) Module....................................................................... 64
Removing Printer Connectivity Modules................................................................................ 65
Installing the Wireless Connectivity Module................................................................................. 66
4

Contents
Finding Your Printer's Media Access Control (MAC) Address..................................................70
Media Handling Options..................................................................................................................... 73
Removing the Standard Bezel...................................................................................................73
Installing the Label Dispenser................................................................................................... 74
Installing the Standard Media Cutter.......................................................................................74
Media Roll Core Size Adapters.........................................................................................................76
Installing the Media Roll Adapters........................................................................................... 76
Installing the Attached Power Supply Base Options.................................................................. 77
Installing the Attached Battery Base Options.............................................................................. 80
Installing the Battery into the Attached Power Base...................................................................81
Color Touch Display and Controls..............................................................................................................84
Color Touch Display Printer Controls............................................................................................. 85
Home Screen......................................................................................................................................... 86
Printer Status.................................................................................................................................. 86
Printer Info....................................................................................................................................... 87
Printer Wizards...............................................................................................................................88
User Menus.....................................................................................................................................89
System Menu..........................................................................................................................................93
System > Language......................................................................................................................93
System > Program Language > Diagnostic Mode............................................................... 95
System > Program Language > Virtual Device.....................................................................96
System > Program Language > ZBI.........................................................................................96
System > Settings > Display Time Format............................................................................. 98
System > Settings > Password Level...................................................................................... 99
System > Settings > Set Password.........................................................................................100
System > Settings > Power Up Action................................................................................... 101
System > Settings > Head Close Action...............................................................................102
System > Settings > Screen Calibration................................................................................103
System > Settings > Restore Defaults................................................................................... 104
System > Settings > Print: System Settings......................................................................... 105
System > Energy Saving > Energy Star................................................................................ 106
Connection Menu................................................................................................................................ 107
Connection > Networks > Reset Network............................................................................108
5

Contents
Connection > Networks > Primary Network........................................................................ 109
Connection > Networks > IP Port............................................................................................ 110
Connection > Networks > IP Alternate Port...........................................................................111
Connection > Networks > Print: Network Info......................................................................112
Connection > Networks > Visibility Agent.............................................................................113
Connection > Wired > Wired IP Protocol...............................................................................115
Connection > Wired > Wired IP Address............................................................................... 115
Connection > Wired > Wired Gateway................................................................................... 116
Connection > Wired > Wired MAC Address......................................................................... 118
Connection > WLAN > WLAN IP Protocol............................................................................. 118
Connection > WLAN > WLAN IP Address............................................................................. 119
Connection > WLAN > WLAN Subnet................................................................................... 120
Connection > WLAN > WLAN Gateway................................................................................. 121
Connection > WLAN > WLAN MAC Address.......................................................................123
Connection > WLAN > ESSID...................................................................................................124
Connection > WLAN > WLAN Security..................................................................................125
Connection > WLAN > WLAN Band.......................................................................................126
Connection > WLAN > WLAN Country Code.......................................................................127
Connection > Bluetooth > Bluetooth..................................................................................... 128
Connection > Bluetooth > Bluetooth Discovery..................................................................129
Connection > Bluetooth > Friendly Name............................................................................ 129
Connection > Bluetooth > Minimum Security Mode.......................................................... 130
Connection > Bluetooth > Specification Version................................................................132
Connection > Bluetooth > MAC Address..............................................................................133
Connection > Bluetooth > Bluetooth Auth. PIN...................................................................134
Connection > Bluetooth > Bluetooth Bonding.................................................................... 135
Print Menu............................................................................................................................................. 136
Print > Print Quality > Darkness.............................................................................................. 136
Print > Print Quality > Print Speed..........................................................................................138
Print > Print Quality > Print Type.............................................................................................139
Print > Print Quality > Label Type...........................................................................................140
Print > Print Quality > Label Length........................................................................................ 141
Print > Print Quality > Label Width (Dots)............................................................................. 142
Print > Label Position > Collection Method..........................................................................143
6

Contents
Print > Label Position > Tear Line Offset.............................................................................. 144
Print > Label Position > Horizontal Label Offset................................................................. 145
Print > Label Position > Vertical Label Offset......................................................................146
Print > Sensors > Manual Calibration.....................................................................................147
Print > Sensors > Label Sensor............................................................................................... 147
Print > Sensors > Sensor Type................................................................................................149
Print > Sensors > Print: Sensor Profile...................................................................................149
Print > Print Station...................................................................................................................... 151
Print > Applicator > Applicator Port Mode............................................................................152
Print > Applicator > Start Print Mode..................................................................................... 153
Print > Applicator > Error on Pause........................................................................................154
Print > Applicator > Applicator Reprint..................................................................................155
RFID Menu.............................................................................................................................................156
RFID > RFID Status......................................................................................................................156
RFID > RFID Test......................................................................................................................... 157
RFID > RFID Calibrate................................................................................................................ 158
RFID > Read Power.................................................................................................................... 160
RFID > Write Power..................................................................................................................... 161
RFID > RFID Antenna................................................................................................................. 162
RFID > RFID Valid Count........................................................................................................... 163
RFID > RFID Void Count............................................................................................................164
RFID > RFID Program Position.................................................................................................165
RFID > Read RFID Data............................................................................................................. 166
Storage Menu.......................................................................................................................................168
Storage > USB > Copy: Files to USB.....................................................................................169
Storage > USB > Copy: Files to Printer.................................................................................170
Storage > USB > Copy: Configuration to USB......................................................................171
Storage > USB > Print: From USB...........................................................................................172
Storage > Print Asset Lists........................................................................................................173
Storage > USB > Print from E:..................................................................................................174
Setup...............................................................................................................................................................175
Printer Setup Overview......................................................................................................................175
Select a Location for the Printer.....................................................................................................176
7

Contents
Install Printer Options and Connectivity Modules...................................................................... 176
Attaching the Printer to a Power Source......................................................................................177
Media Preparation for Printing.........................................................................................................178
Preparing and Handling Media................................................................................................178
Media Storage Guidelines.........................................................................................................178
Roll MediaTypes and Loading........................................................................................................ 178
Setting Media Sensing by Media type.................................................................................. 179
Loading Media.............................................................................................................................. 179
Movable Sensor Adjustment.................................................................................................... 182
Loading Roll Media for Cutter Models..........................................................................................185
Thermal Transfer Roll Ribbon Loading......................................................................................... 186
Loading Zebra Transfer Roll Ribbon......................................................................................188
Loading Non-Zebra 300-Meter Transfer Ribbon.................................................................191
Loading the Ribbon Cartridge (ZD421Ribbon Cartridge Printers Only)..............................198
Running a SmartCal Media Calibration.........................................................................................199
Test Printing with a Configuration Report...................................................................................200
Detecting and Recovering from a Media-Out Condition..........................................................201
Detecting and Recovering from a Ribbon-Out Condition.......................................................203
Connecting Your Printer to a Computer......................................................................................204
Interface Cable Requirements................................................................................................205
USB Interface...............................................................................................................................205
Serial Interface............................................................................................................................ 205
Ethernet (LAN, RJ-45)................................................................................................................206
Wi-Fi and Bluetooth Classic Wireless Connectivity Option............................................ 208
Update Printer Firmware to Finish Option Installations...........................................................208
What To Do If You Forget to Install the Printer Drivers First................................................. 208
Setup for Windows...................................................................................................................................... 215
Windows-to-Printer Communication Setup (Process Overview).............................................215
Installing the Windows Printer Drivers.......................................................................................... 215
Running the Printer Installation Wizard.........................................................................................219
Setting Up the Wi-Fi Print Server Option.................................................................................... 222
Configuring the Printer Using ZebraNet Bridge’s Connectivity Wizard...............................223
Sending a ZPL Configuration Script to the Printer.............................................................231
8

Contents
Configuring the Printer Using Bluetooth..................................................................................... 232
Connecting the Printer to a Windows 10 OS......................................................................234
After Your Printer is Connected.....................................................................................................239
Test Printing with Zebra Setup Utilities............................................................................... 239
Test-Printing with the Windows Printer and Faxes Menu............................................... 239
Test-Printing with an Ethernet Printer Connected to a Network................................... 239
Test-Printing with a Copied ZPL Command File for Non-Windows Operating
Systems.................................................................................................................................... 240
Print Operations........................................................................................................................................... 241
Thermal Printing...................................................................................................................................241
Determining Your Printer’s Configuration Settings....................................................................241
Select a Print Mode or Collection Method................................................................................. 242
Adjusting the Print Quality...............................................................................................................242
Adjusting the Print Width................................................................................................................. 243
Replacing Supplies while Using the Printer................................................................................243
Printing on Fanfold Media................................................................................................................243
Printing with Externally-Mounted Roll Media..............................................................................246
Using the Label Dispenser Option................................................................................................ 247
Using the Linerless Options............................................................................................................250
Linerless Printing......................................................................................................................... 251
Sending Files to the Printer............................................................................................................. 251
Ribbon Cartridge Programming Commands................................................................................251
Printing with the Attached Battery Base and Battery Option................................................ 252
Uninterrupted Power Supply (UPS) Mode...........................................................................252
Battery Mode............................................................................................................................... 252
Printer Fonts.........................................................................................................................................253
Identifying Fonts in Your Printer............................................................................................ 253
Localizing the Printer with Code Pages...............................................................................254
Asian Fonts and Other Large Font Sets.............................................................................. 254
EPL Line Mode– Direct Thermal Printers only......................................................................... 254
ZD621 Locking Printer Option........................................................................................................ 255
Zebra Keyboard Display Unit (ZKDU) – Printer Accessory.....................................................256
Zebra Basic Interpreter (ZBI)...........................................................................................................256
9

Contents
Setting the Power Failure Recovery Mode Jumper..................................................................257
USB Host Port and Link-OS UsageExamples........................................................................................ 258
USB Host.............................................................................................................................................. 258
Using a USB Host for Firmware Updates................................................................................... 259
Files for Completing the Exercises............................................................................................... 259
Exercise 1: Copy Files to a USB Flash Drive and Perform USB Mirror..................................261
Exercise 2: Print a Label Format from a USB Flash Drive...................................................... 262
Exercise 3: Copy Files to/from a USB Flash Drive....................................................................264
Exercise 4: Enter Data for a Stored File with a USB Keyboard and Print a Label............. 266
Using the USB Host Port and Near Field Communication (NFC) Capabilities................... 268
Exercise 5: Enter Data for a Stored File with a Smart Device and Print a Label........268
Maintenance................................................................................................................................................. 270
Cleaning.................................................................................................................................................270
Cleaning Supplies.......................................................................................................................270
Recommended Cleaning Schedule........................................................................................271
Cleaning the Printhead............................................................................................................. 272
Cleaning the Media Path..........................................................................................................276
Cleaning the Cutter Option..................................................................................................... 279
Cleaning the Label Dispenser Option..................................................................................280
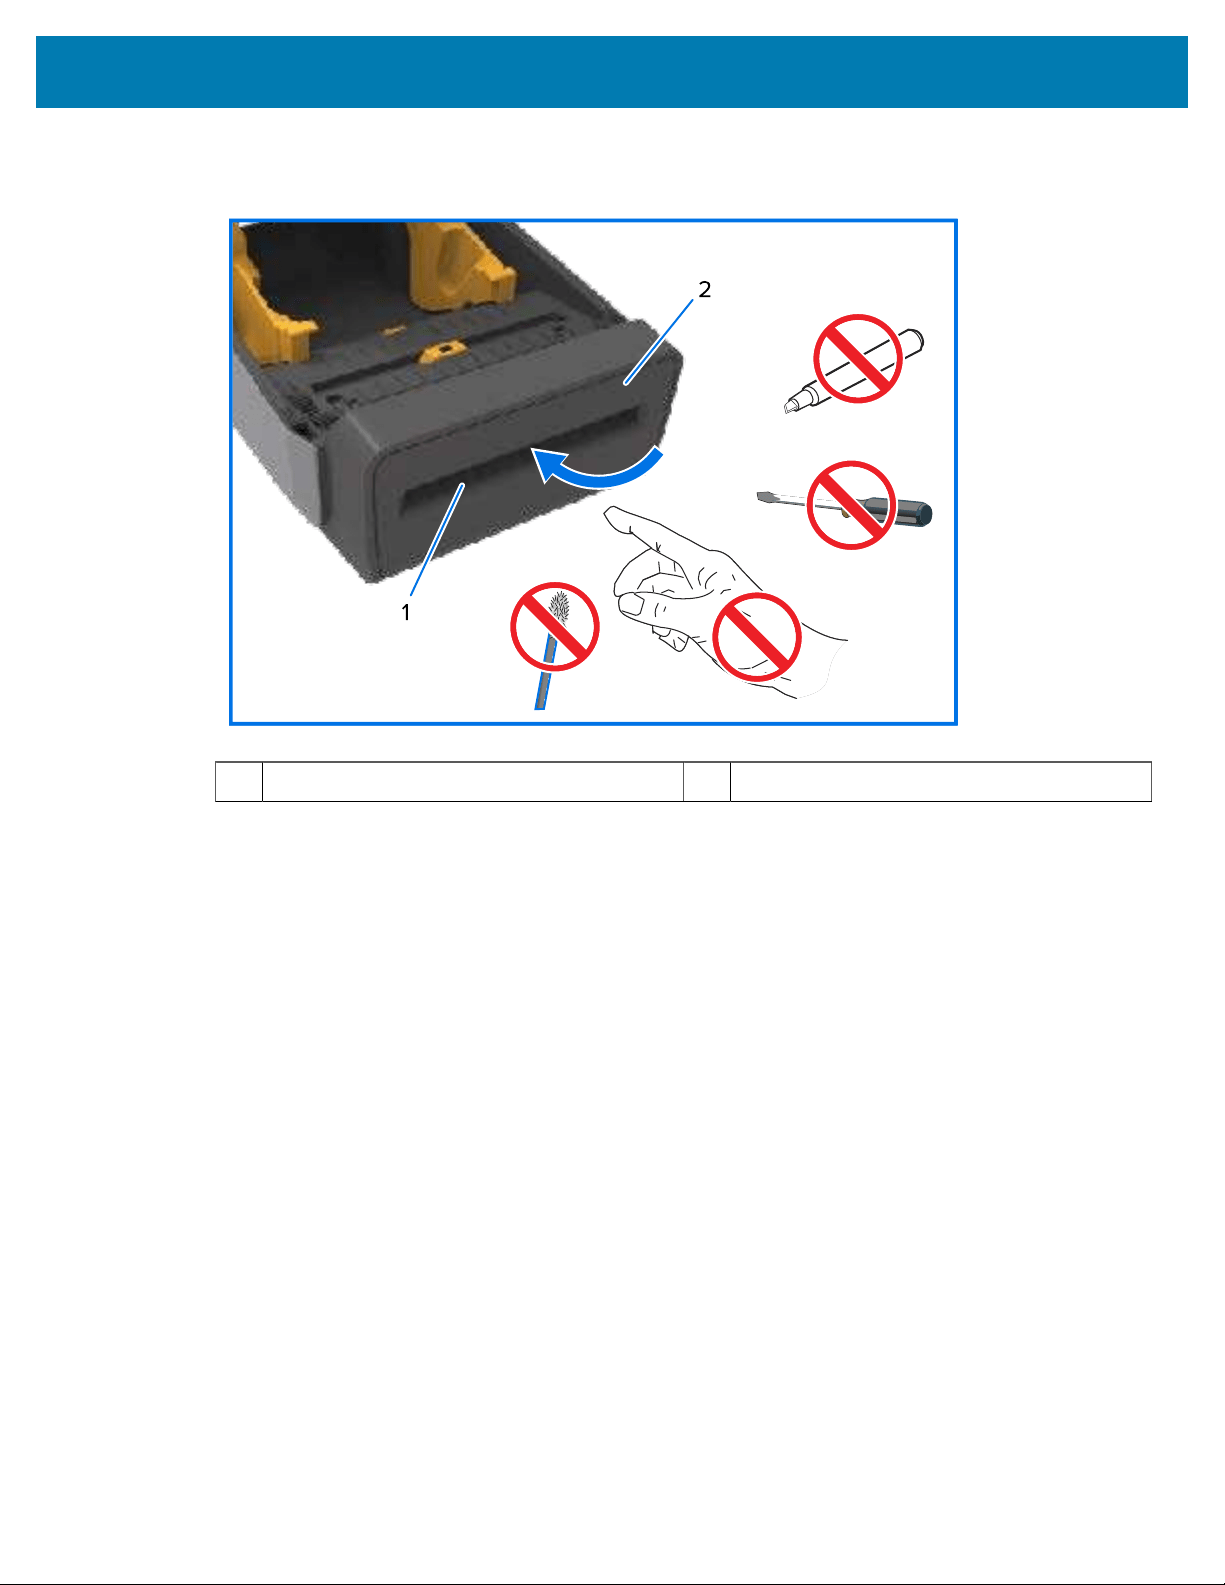
Cleaning the Sensor................................................................................................................... 281
Cleaning and Replacing the Platen.......................................................................................286
Replacing the Printhead........................................................................................................... 290
Updating Printer Firmware................................................................................................................310
Other Printer Maintenance............................................................................................................... 310
Fuses....................................................................................................................................................... 310
Troubleshooting.............................................................................................................................................311
Resolving Alerts and Errors...............................................................................................................311
Alert: Printhead Open..................................................................................................................311
Alert: Media Out...........................................................................................................................312
Alert: Ribbon In – ZD421 Cartridge Printer only................................................................. 313
10

Contents
Alert: Ribbon Out......................................................................................................................... 313
Alert: Ribbon Low – ZD421 Cartridge Printer only.............................................................314
Alert: Cutter Error........................................................................................................................ 315
Alert:Printhead Over Temp......................................................................................................315
Alert: Printhead Shutdown........................................................................................................ 316
Alert: Printhead Under Temp................................................................................................... 316
Alert: Out of Memory..................................................................................................................317
Resolving Print Issues........................................................................................................................ 318
Issue: General Print Quality Issues.........................................................................................318
Issue: No Print on the Label.....................................................................................................319
Issue: Labels Are Distorted in Size or Print Area Start Position Varies.........................319
Communication Issues....................................................................................................................... 319
Issue: Label Job Sent, No Data Transfer..............................................................................319
Issue: Label Job Sent, Skips Labels or Prints Bad Content............................................320
Issue: Label Job Sent, Data Transfers, But No Print........................................................ 320
Miscellaneous Issues.........................................................................................................................320
Issue: Settings are Lost or Ignored.......................................................................................320
Issue: Non-continuous labels act as Continuous labels................................................... 321
Issue: Printer Locks Up.............................................................................................................. 321
Issue: Erroneous Ribbon Cartridge Faults............................................................................321
Issue: Battery has a Red Indicator..........................................................................................321
Tools...............................................................................................................................................................323
Printer Diagnostics............................................................................................................................. 323
Power-On Self Test....................................................................................................................323
Running a SmartCal Media Calibration................................................................................ 324
Printing the Printer and Network Configuration Reports (CANCEL Self Test)............ 324
Network (and Bluetooth) Configuration Report..................................................................326
Printing a Print Quality Report(FEED Self Test)................................................................. 327
Resetting Non-Network Printer Configuration Settings to their Factory Defaults...... 331
Resetting the Printer's Network Settings to Their Factory Defaults............................. 332
RESET Button Functions...........................................................................................................332
Performing a Communication Diagnostics Test.................................................................334
Sensor Profile...............................................................................................................................335
11

Contents
Activating Advanced Mode............................................................................................................. 336
Manually Calibrating Media..................................................................................................... 336
Manual Print Width Adjustment.............................................................................................. 337
Manual Print Darkness Adjustment....................................................................................... 338
Factory Test Modes................................................................................................................... 340
Interface Connector Wiring........................................................................................................................ 341
Universal Serial Bus (USB) Interface.............................................................................................. 341
Serial Port Interface........................................................................................................................... 342
Dimensions................................................................................................................................................... 344
Dimensions– ZD421/ZD621 Thermal Transfer Printer Models..............................................344
Dimensions–ZD421C (Ribbon Cartridge Thermal Transfer) Printer Models..................... 353
Dimensions– ZD421/ZD621 Direct Thermal Printer Models................................................... 361
Media.............................................................................................................................................................. 371
Types of Thermal Media....................................................................................................................371
Determining Thermal Media Types........................................................................................ 371
General Media and Print Specifications.......................................................................................372
ZPL Configuration........................................................................................................................................376
Managing the ZPL Printer Configuration..................................................................................... 376
ZPL Printer Configuration Format and Reusable Files..................................................... 376
Configuration Setting to Command Cross-reference............................................................... 378
Printer Memory Management and Related Status Reports..................................................... 381
ZPL Programming for Memory Management..................................................................... 382
Glossary.........................................................................................................................................................384
12

About This Guide
About This Guide
This guide is for integrators and operators of the Zebra ZD421 and ZD621 Desktop Printers. Use this guide
to install, configure, operate, and support your printer(s).
Zebra has made the following resources available online to assist you:
• How-to videos
• Product page links to printer specifications
• Printer accessory, supplies, parts, and software links
• Setup, configuration, and programming guides
• Printer drivers (Windows, Apple, OPOS, etc.),firmware, and utilities
• Printer fonts
• Knowledge base and support contacts
• Printer warranty and repair links
The specific product pages for your printer model(s) are:
• ZD421 Direct Thermal printer — zebra.com/zd421d-info
• ZD421 Thermal Transfer printer — zebra.com/zd421t-info
• ZD421 Thermal Transfer Ribbon Cartridge printer — zebra.com/zd421c-info
• ZD621 Direct Thermal printer — zebra.com/zd621d-info
• ZD621 Thermal Transfer printer — zebra.com/zd621t-info
• ZD621R Thermal Transfer RFID printer — zebra.com/zd621r-info
Other Valuable Printer Resources
Zebra has a large suite of free and fee based software, Apps (applications), and other technical resources
for your Zebra Link-OS printer.
These are just some of the extensive software and resource areas available online:
• ZebraDesigner label design software:
zebra.com/zebradesigner
• Printer management tools
• Virtual devices for legacy languages normally associated with other printer brands
• Cloud-based enterprise printer management and printing
13

About This Guide
• XML and PDF format file printing
• Oracle and SAP support
• Zebra Savanna Data Intelligence platform - turns raw data from devices (IoT) and sensors into
actionable intelligence for your business
• A suite of Link-OS Mobile Apps (applications for phones, tablets, etc.)
• Link-OS software development kit (SDK)
• Additional Operating Systems (OS) and Service platforms
For more information, see ZebraLink, Zebra Link-OS, and the Zebra Savannacloud data platform at
zebra.com/software.
Zebra OneCare Printer Service and Support
For maximum productivity, we can help your business ensure its Zebra printers are online and ready for
business.
See the descriptions of the Zebra OneCare service and support options available for your printers at
zebra.com/zebraonecare.
Notational Conventions
The following conventions are used in this document:
• Bold text is used to highlight the following:
• Dialog box, window, and screen names
• Dropdown list and list box names
• Checkbox and radio button names
• Icons on a screen
• Key names on a keypad
• Button names on a screen
• Bullets (•) indicate:
• Action items
• List of alternatives
• Lists of required steps that are not necessarily sequential.
• Sequential lists (for example, those that describe step-by-step procedures) appear as numbered lists.
Icon Conventions
The documentation set is designed to give the reader more visual clues. The following visual indicators are
used throughout the documentation set.
NOTE: The text here indicates information that is supplemental for the user to know and that is
not required to complete a task.
14

About This Guide
IMPORTANT: The text here indicates information that is important for the user to know.
CAUTION: If the precaution is not heeded, the user could receive a minor or moderate injury.
WARNING: If danger is not avoided, the user CAN be seriously injured or killed.
DANGER: If danger is not avoided, the user WILL be seriously injured or killed.
15

Introduction
Introduction
This section introduces the Zebra ZD421 andZD621desktop thermal label printers. It details your printer's
features, the options available for your printer, and what ships with your printer.
This document covers the following ZD Series desktop printer models:
• ZD421 Direct Thermal printer — zebra.com/zd421d-info
• ZD421 Thermal Transfer printer — zebra.com/zd421t-info
• ZD421 Thermal Transfer Ribbon Cartridge printer — zebra.com/zd421c-info
• ZD621 Direct Thermal printer — zebra.com/zd621d-info
• ZD621 Thermal Transfer printer — zebra.com/zd621t-info
• ZD621R Thermal Transfer RFID printer — zebra.com/zd621r-info
Link-OS 4 inch Desktop Thermal Printers
The Zebra Link-OS 4 inch Desktop printers are compact label printers with a wide range of features and
options.
• Both Direct Thermal and Thermal Transfer printer models are available.
• This printer series includes healthcare printer models engineered with plastics that can withstand
routinely-used hospital cleaning chemicals. They ship with a medical-grade power supply.
• ZD421 printers support printing speeds* of:
• up to 152 mm per second (6 ips) for 203 dpi printers.
• up to 102 mm per second (4 ips) for 300 dpi printers.
• ZD621 printers support printing speeds* of:
• up to 203 mm/s per second (8 ips or inches per second) for 203 dpi (dots per inch print density)
printers
• up to 152 mm/s (6 ips) for 300 dpi version printers.
• Used with Link-OS virtual devices, these printers support both ZPL and EPL Zebra printer programming
languages and a wide variety of other printer-control languages.
NOTE: * Maximum print speeds vary by model, print resolution, and the type of media being
used.
16
Introduction
Common Desktop Printer Features
Zebra desktop printers share thefeatures listed here.
OpenAccess design To simplify media loading.
Color-coded touch points (for
operator controls and media
guides) plus an enhanced
user interface featuring
three buttons and five status
indicators
For ease of using the printer.
Field-installable media
handling options
So you can use a variety of media with your printer.
Media roll support
Outer Diameter (O.D.): Up to 127 mm (5 in.)
Inner Diameter (I.D.) roll cores: 12.7 mm (0.5 in.), 25.4 mm (1 in.), and
additional core sizes when usingoptional media core adapters
Movable media sensor Compatibility with a wide range of media types:
• Full and partial width black mark media and notched/slotted media.
• Multi-center position transmissivity sensor for use with label gap/web
media
Modular connectivity slot
• On ZD421 models, themodular connectivity slot is available for field-
installable 10/100 Ethernet (802.3 RJ-45) with an internal print server
or serial (RS-232 DB-9) interface options.
• On ZD621 models,the modular connectivity slot has a serial (RS-232
DB-9) port, and an Ethernet (LAN, RJ-45 connector) with an internal
print server that supports 10Base-T, 100Base-TX, and Ethernet 10/100
auto-switching networks factory installed.
Font support
On-the-fly OpenType and TrueType font scaling and import.
Unicode
Resident scalable font (Swiss 721 Latin 1 font)
Selection of resident bitmap fonts
Backwards-compatibility
focused technology
For quick printer replacements:
• Drop-in replacement of legacy Zebra desktop printers.
• Support for EPL and ZPL programming language instructions.
• Support for Link-OS virtual devices to interpret non-Zebra printer
programming language code.
Universal Serial Bus (USB)
2.0 interface
For convenient connectivity and quick file transfers.
Universal Serial Bus (USB)
host port
To speed up print operations such as printer firmware updates.
Table 1Common Desktop Printer Features
17

Introduction
Factory-installed network
models
Supports printer configuration using a setup utility running on mobile
devices.
• Use the printer’s optional Bluetooth Low Energy (LE) feature for
short-range communication to mobile devices. Bluetooth LE works
with Zebra mobile setup utility applications to assist in printer setup,
perform media calibration, and maximize print quality.
• Tap to pair devices with the printer, access printer information,
and use mobile applications usingZebra’s Print Touch (Near Field
Communication or NFC).
Zebra’s Link-OS An open platform that connects operating systems for smart Zebra
devices with powerful software apps, allowing for quick integration,
management, and maintenance from any location.
On-board Real Time Clock
(RTC)
For internal printer timekeeping.
XML-enabled printing For barcode label printing; lowers license fees and print server
hardware requirements, reducing customization and programming
costs.
Zebra global printing solution Supports the following:
• Microsoft Windowskeyboard encoding (and ANSI), Unicode UTF-8
and UTF-16 (Unicode Transformation Formats)
• XML
• ASCII (7-bit and 8-bit used by legacy programs and systems)
• Basic single- and double-byte font encoding
• Hexadecimal encoding
• JIS and Shift-JIS (Japanese Industrial Standards)
• Custom character mapping (DAT table creation, font linking, and
character remapping)
Printhead maintenance
reporting
Reporting can be enabled and customized to suit your needs.
Tool-free replacement For printheads and platen (drive) rollers.
Minimum of 64 MB of internal
(E:\) printer memory
To store forms, fonts, and graphics.
Table 1Common Desktop Printer Features(Continued)
Link-OS 4-inch Desktop Printer Options
Zebra Link-OS 4-inch desktop printers can be ordered with a range of factory-installed options. Other
options are field upgrade kits.
• Color Touch LCD User Interface for easy setup, print configuration, printing, and use of a variety of Link-
OS features.
• ZD621R thermal transfer printer — factory-installed RFID support available with the color touch display.
18

Introduction
• Healthcare printer models:
• Healthcare wipe-able plastics for easy disinfecting and cleaning
• IEC 60601-1 certified power supply.
• Wired and Wireless options — factory-installed and field-installable):
• Wi-Fi (802.11ac – includes a/b/g/n), Bluetooth Classic 4.1, and Bluetooth Low Energy (LE) 5.0 wireless
connectivity.
• Internal Ethernet Print Server (LAN, RJ-45 connector) — supports 10Base-T, 100Base-TX, and fast
Ethernet 10/100 auto-switching networks for wired connectivity. This includes Bluetooth Low Energy
(LE) wireless connectivity.
• ZD621 printers — include Internal Ethernet Print Server (LAN, RJ-45 connector) with support for
10Base-T, 100Base-TX, and Ethernet 10/100 auto-switching networks; and a Serial (RS-232 DB-9)
port.
• ZD421 Field installable connectivity modules
• Internal Ethernet Print Server (LAN, RJ-45 connector) —supports 10Base-T, 100Base-TX, and
Ethernet 10/100 auto-switching networks
• Serial (RS-232 DB-9) Port
• Thermal transfer printing—A choice of models that support thermal transfer ribbon cartridge or dual-
capacity ribbon rolls (74-meter and 300-meter)
• Field installable media handling options
• Label Dispenser (peels liner off the label and dispenses the label)
• General-purpose media cutter(cuts or tears off a label after it is printed)
• Media Core Adapter kit include adapters for media rolls with Outer Diameters (O.D.) up to 127 mm (5 in.):
• 38.1 mm (1.5 in.) I.D. media cores
• 50.8 mm (2.0 in.) I.D. media cores
• 76.2 (3.0 in.) I.D. media cores
• Attached power supply base with internal power supply
• Attached battery base with removable battery
• Attached battery base and battery are sold separately
• The battery provides a regulated 24 VDC until shutdown for recharging, to maintain print quality.
This keeps print from changing as the battery discharges with use.
• Battery shutdown mode for shipping and storage
• Built-in battery charge and status indicators
• Asian Language support with printer configuration options for the large Simplified and Traditional
Chinese, Japanese, or Korean character sets.(Printers sold in China have the Simplified Chinese
SimSun font pre-installed.)
• Zebra ZBI 2.0 (Zebra BASIC Interpreter) programming language. ZBI allows you to create custom printer
operations that can automate processes, use peripherals such as scanners, scales, keyboards or the
Zebra Keyboard Display Units, all without being attached to a PC or a network.
• ZD621 Direct Thermal healthcare models — Locking Media Cabinet forfor additional security, and
Kensington Slot for Kensington locking devices to secure the printer.
19

Introduction
What’s in the Box?
After unpacking and inspecting the printer,make sure you have all the parts listed here.Familiarize
yourself with the printer hardware so you can follow the instructions in this guide.
Printer
USB cable
Printer documentation
Power supply and power cord. (Power cord varies by region.)
The items below are included with thermal transfer printermodels only. Direct thermal printers do not
need ribbon for printing, so they do not ship with these..
Empty starter ribbon cores
Non-Zebra 300-meter ribbon adapters
Unpacking and Inspecting the Printer
When you receive the printer, immediately unpack it and inspect for shipping damage. Also make sure the
package includes all the parts.
See the Zebra support page for your printer (listed in the introductory chapter of this guide) for videos that
show how to pack and unpack your printer.
1. Save all packing materials.
2. Check all exterior surfaces for damage.
3. Open the printer and inspect the media compartment for loose or damaged components.
20

Introduction
4. If you discover shipping damageon inspecting the printer:
a) Immediately notify the shipping company and file a damage report.
NOTE: Zebra Technologies Corporation is not responsible for any damage to the printer
incurred during shipment, and will not cover the repair of this damage under its warranty
policy.
b) Keep all packaging material for shipping-company inspection.
c) Notify your authorized Zebra reseller promptly.
What You WillNeed to Print
Your printer is one of three parts of your printing solution. To print, you will also need print media and
software.
The printer can operate in standalone mode. It does not have to be connected to other devices or systems
to print.
Compatible media
Depending on the printer model (direct thermal or
thermal transfer), you will need appropriate media
to print.
Direct thermal printing uses chemically-treated,
heat-sensitive media that blackens when it
passes under the thermal printhead.Fordirect
thermal printing, you will need direct thermal
media.Ribbon is not required for direct thermal
printing.
Thermal transfer printing uses a heated ribbon to
produce durable, long-lasting images on a wide
variety of materials.For thermal transfer printing,
you will need thermal transfer media and thermal
transfer ribbon rolls (or a ribbon cartridge for
Ribbon Cartridge printer models).
You can use media that is of any supported
format. Depending on your printing needs, you
can use labels, tags, tickets, receipt paper, fanfold
stacks, tamper-proof labels, etc.
Use information from zebra.com/supplies or from
your reseller to identify and procure media for your
printer and for your specific uses.
Table 2Supplies, Drivers and Applications You Will Need to Print
21

Introduction
Software
• Printer drivers
• Printer programming utilities
• Applications (such as for label design)
Zebra provides a complete suite of free Link-OS
software applications and drivers to configure
printer settings, print labels and receipts, get
printer status, import graphics and fonts, send
programming commands, update firmware, and
download files.
Use these drivers and applications to configure
and manage your printer and your print jobs from a
central device such as a PC or laptop.
For information on installing the drivers, see
Installing the Windows Printer Drivers on page
215.
You can use ZebraDesigner—a free application for
Windows PC operating systems—to design simple
labels and forms. ZebraDesigner is available to
download from zebra.com/zebradesigner.
Table 2Supplies, Drivers and Applications You Will Need to Print(Continued)
Modes of Printing
Depending on your printer type, model and options, it may support one or more of these modes and media
configurations.
Mode Description
Direct Thermal printing
Uses heat-sensitive media to print.
When setting this mode, use media that supports Direct Thermal
printing.See Determining Thermal Media Types on page 371.
Thermal Transfer printing
Requires ribbon rolls or a thermal transfer ribbon cartridge to print.
While printing, heat and pressure transfer ink from the ribbon to the
media.
When using Thermal Transfer printing, be sure to use thermal transfer
media. See Determining Thermal Media Types on page 371.
Standard tear-off mode
Allows you to tear off each label or batch-print a strip of labels and tear
them off after the printer has printed the label(s).
Label dispense mode
If your printer has the optionalfactory-installed label dispenser, the
dispenser automatically peels away the backing material from a label as
it is being printed before it prints the next label.
Media cutting mode
Ifyour printer has the optionalfactory-installedmedia cutter,the printer
cuts the label liner between the labels, the receipt paper, or the tag
stock.
Linerless media printing
In linerless printing, the printer accommodates cut or tear-off optionsfor
the easy pick-and-place of labels.
Table 3Print Modes
22
Introduction
Mode Description
Standalone operation (printer
operates on its own without a
live network connection)
The printer can printan auto-running label format or form (programming
based)without being actively connected to a networked device such as
a computer.
• On printers with the color display or color-touch display option, you
can use menus to access and print a label format or form.
• You can use a Link-OS app which enables you to connect to the
printer using the Bluetooth (wireless) option.
• You can print using an auto-running label format or form
(programming based).
• Your printer supportsdata-input devices that can be connected to
the printer’s USB Host port or serial port. Data-input devices include
scanners, weighing scales, or Zebra Keyboard Display Units (ZKDUs).
Shared network printing
mode
Printers configured with factory-installed Ethernet (LAN) and Wi-Fi
(WLAN) interface options ship with an internal print server to enable
wired and wireless networking respectively.
Table 3Print Modes(Continued)
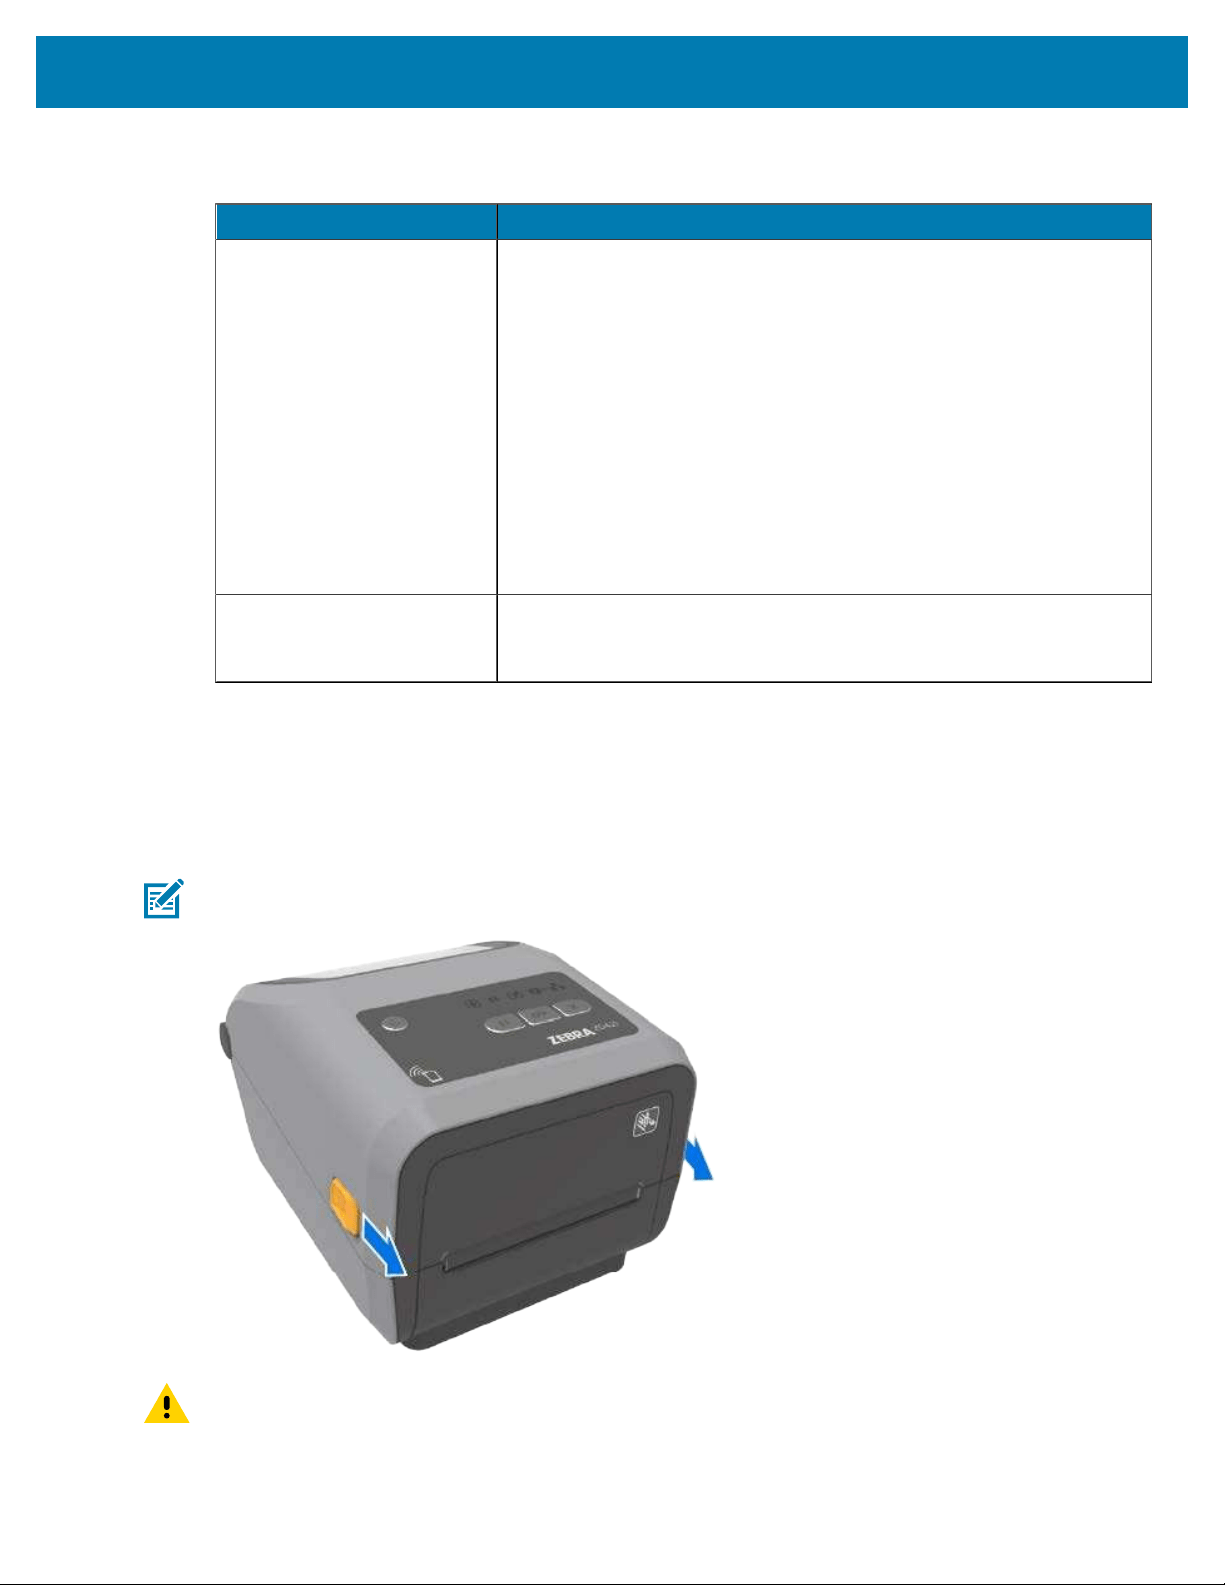
Opening Your Printer
Use this procedure to openthe media compartment, inspect and clean the interior periodically, load
printing supplies, and replace those parts as necessary that are operator-replaceable.
To open the printer, pull the release latches towards you and lift the cover.
NOTE: If this is the first time you are opening the printer after receiving it, check the media
compartment for loose or damaged components.
CAUTION: The discharge of electrostatic energy that accumulates on the surface of the human
body or other surfaces can damage or destroy the printhead and other electronic components
23
Introduction
used in this device. You must observe static-safe procedures when working with the printhead or
the electronic components under the top cover.
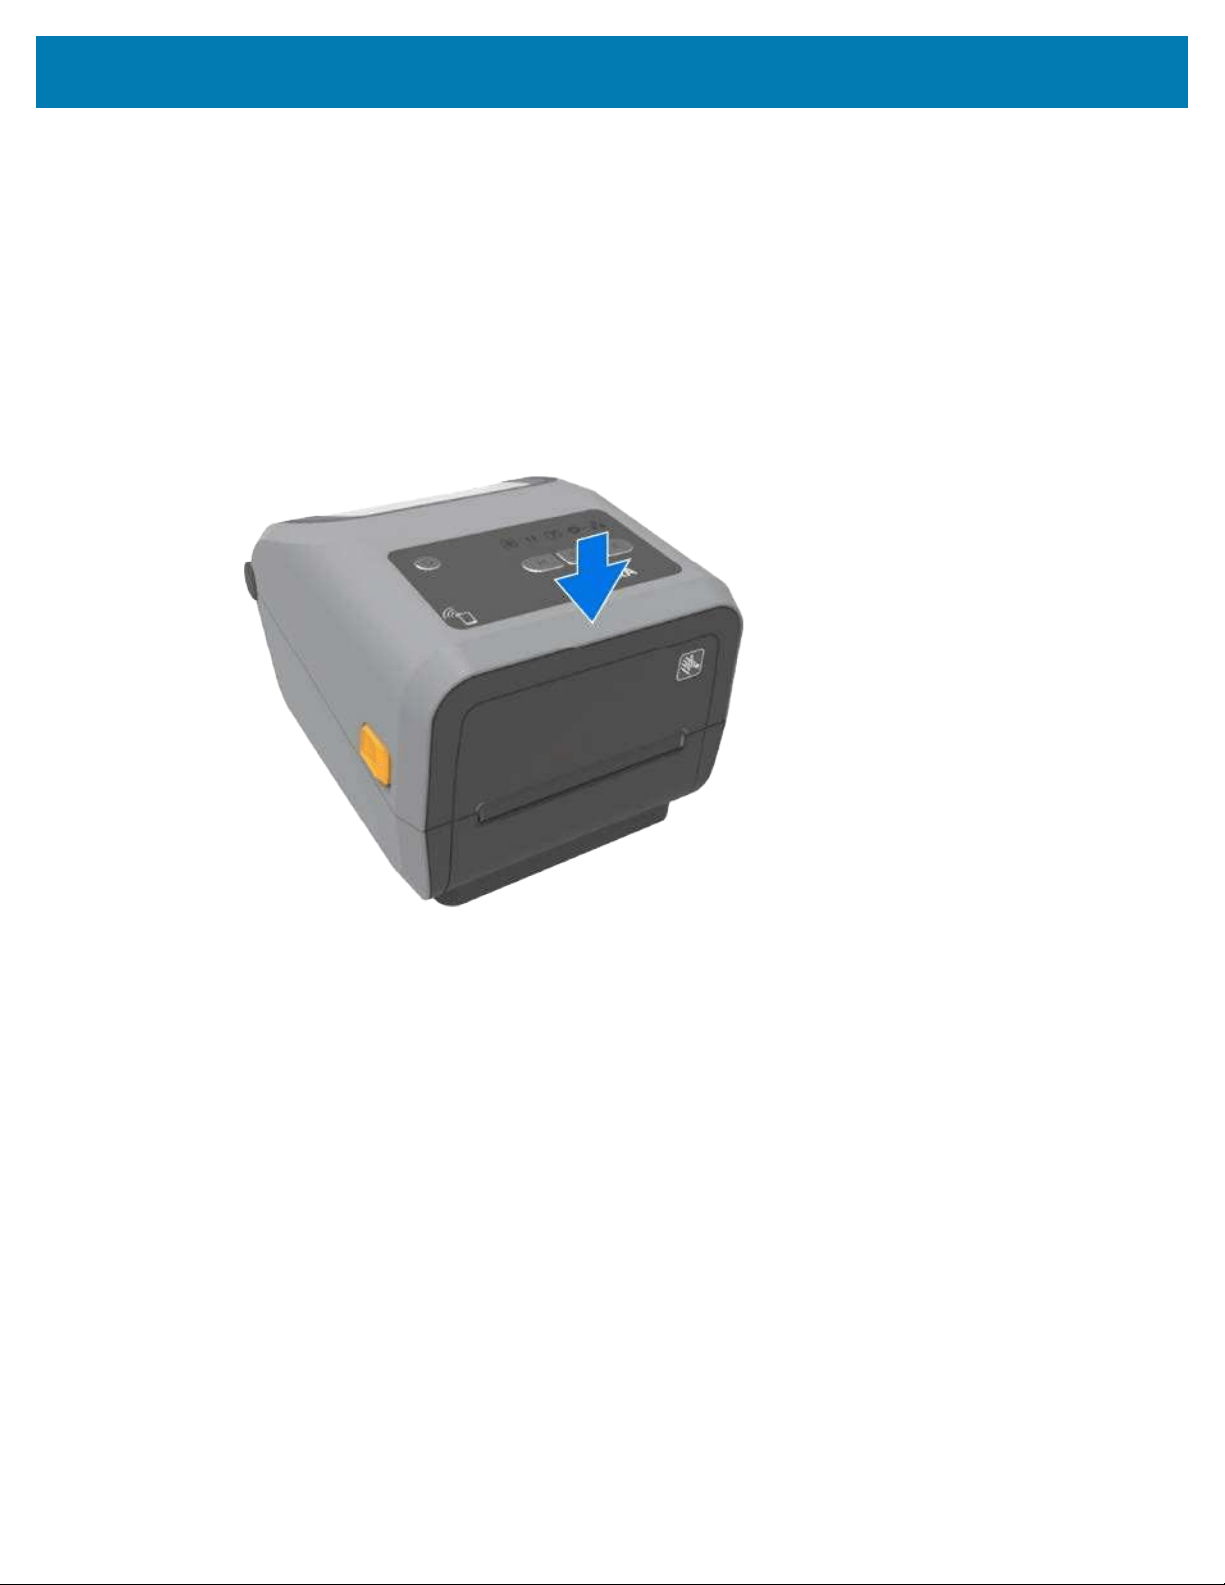
Closing Your Printer
Make sure printer cover is closed properly after you load media or ribbon and after you have cleaned the
inside of the printer.
To close the printer cover:
1. Lower the top cover.
2. Push down firmly, either in the center or in both corners on the front of the printer, until both side
latches lock.
24
Printer Features
Printer Features
Use these support links to familiarize yourself with the internal and external physical features of your
printer.
For printer features videos and other helpful information, go to:
• ZD421 Direct Thermal printer — zebra.com/zd421d-info
• ZD421 Thermal Transfer printer — zebra.com/zd421t-info
• ZD421 Thermal Transfer Ribbon Cartridge printer — zebra.com/zd421c-info
• ZD621 Direct Thermal printer — zebra.com/zd621d-info
• ZD621 Thermal Transfer printer — zebra.com/zd621t-info
• ZD621R Thermal Transfer RFID printer — zebra.com/zd621r-info
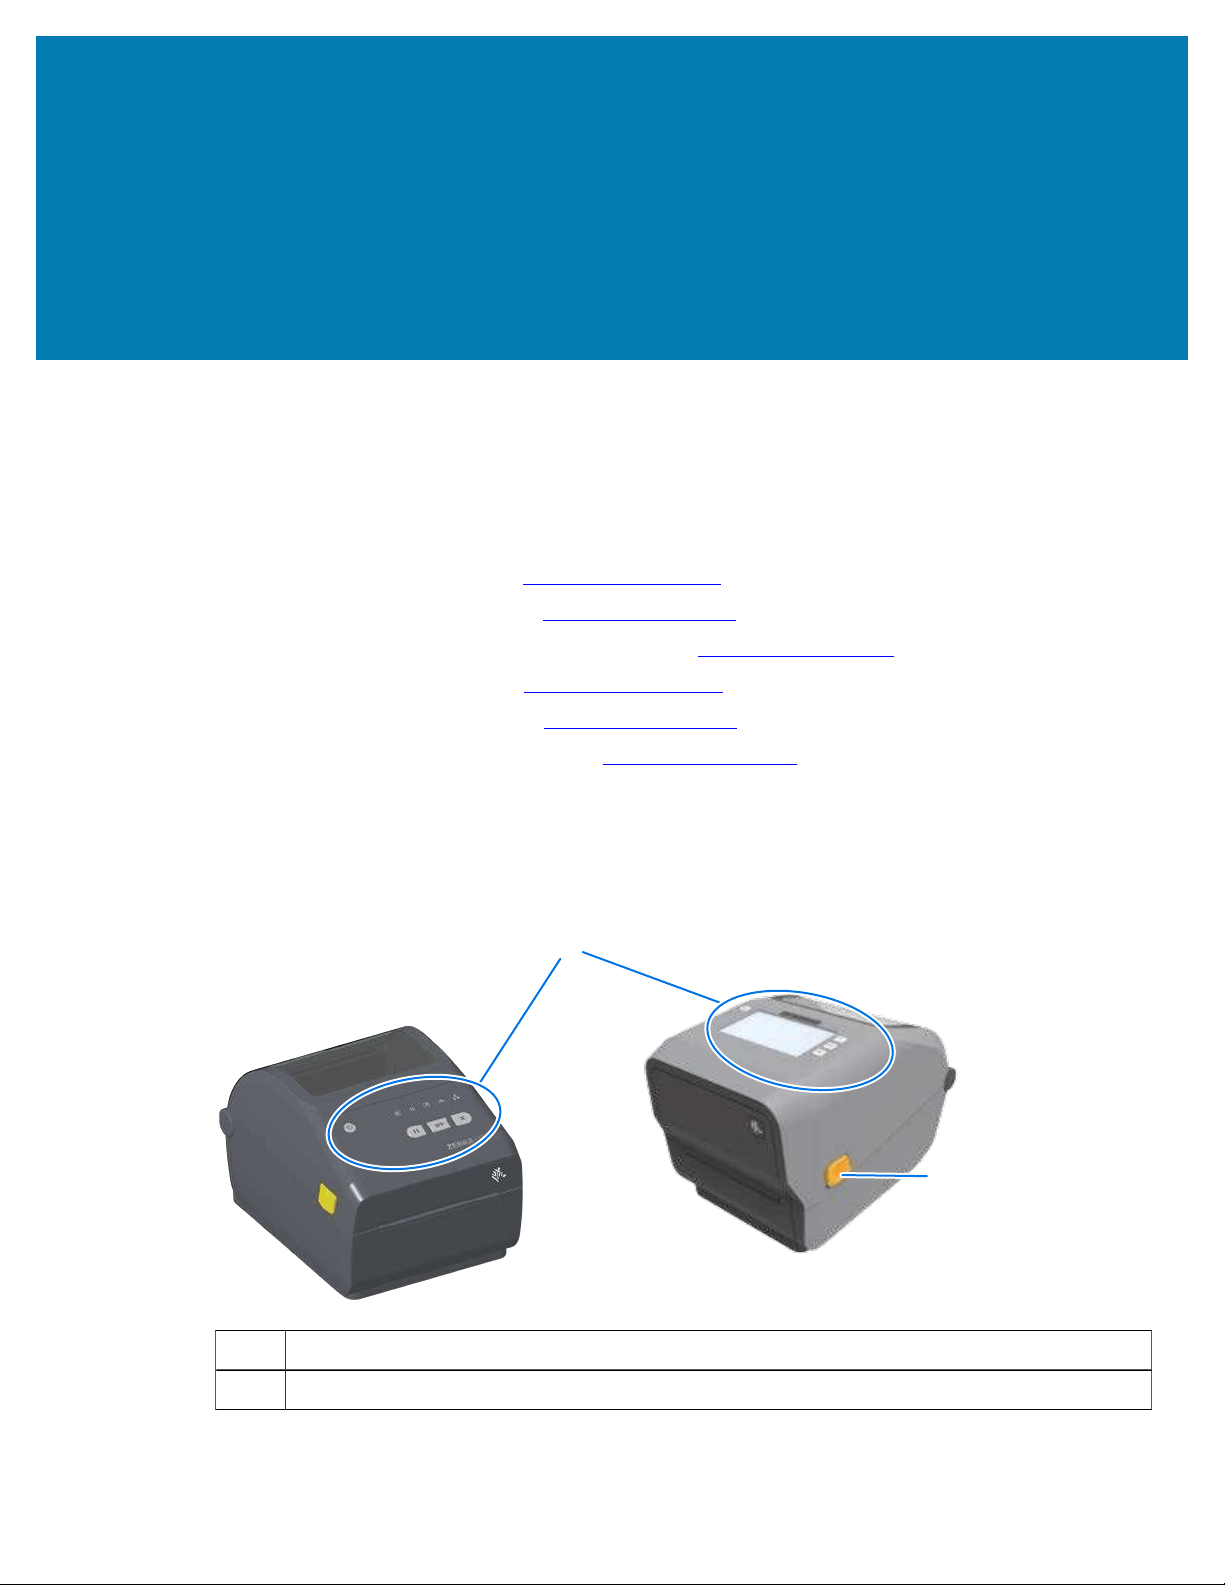
Exterior Features of Your Printer
Theprinter's exterior features are used to power up and power down the printer, open and close the
media compartment, make power and network connections, and configure and operate your printer.
1
2
1 User interface controls and, in some models, color touch display
2 Release latch
25
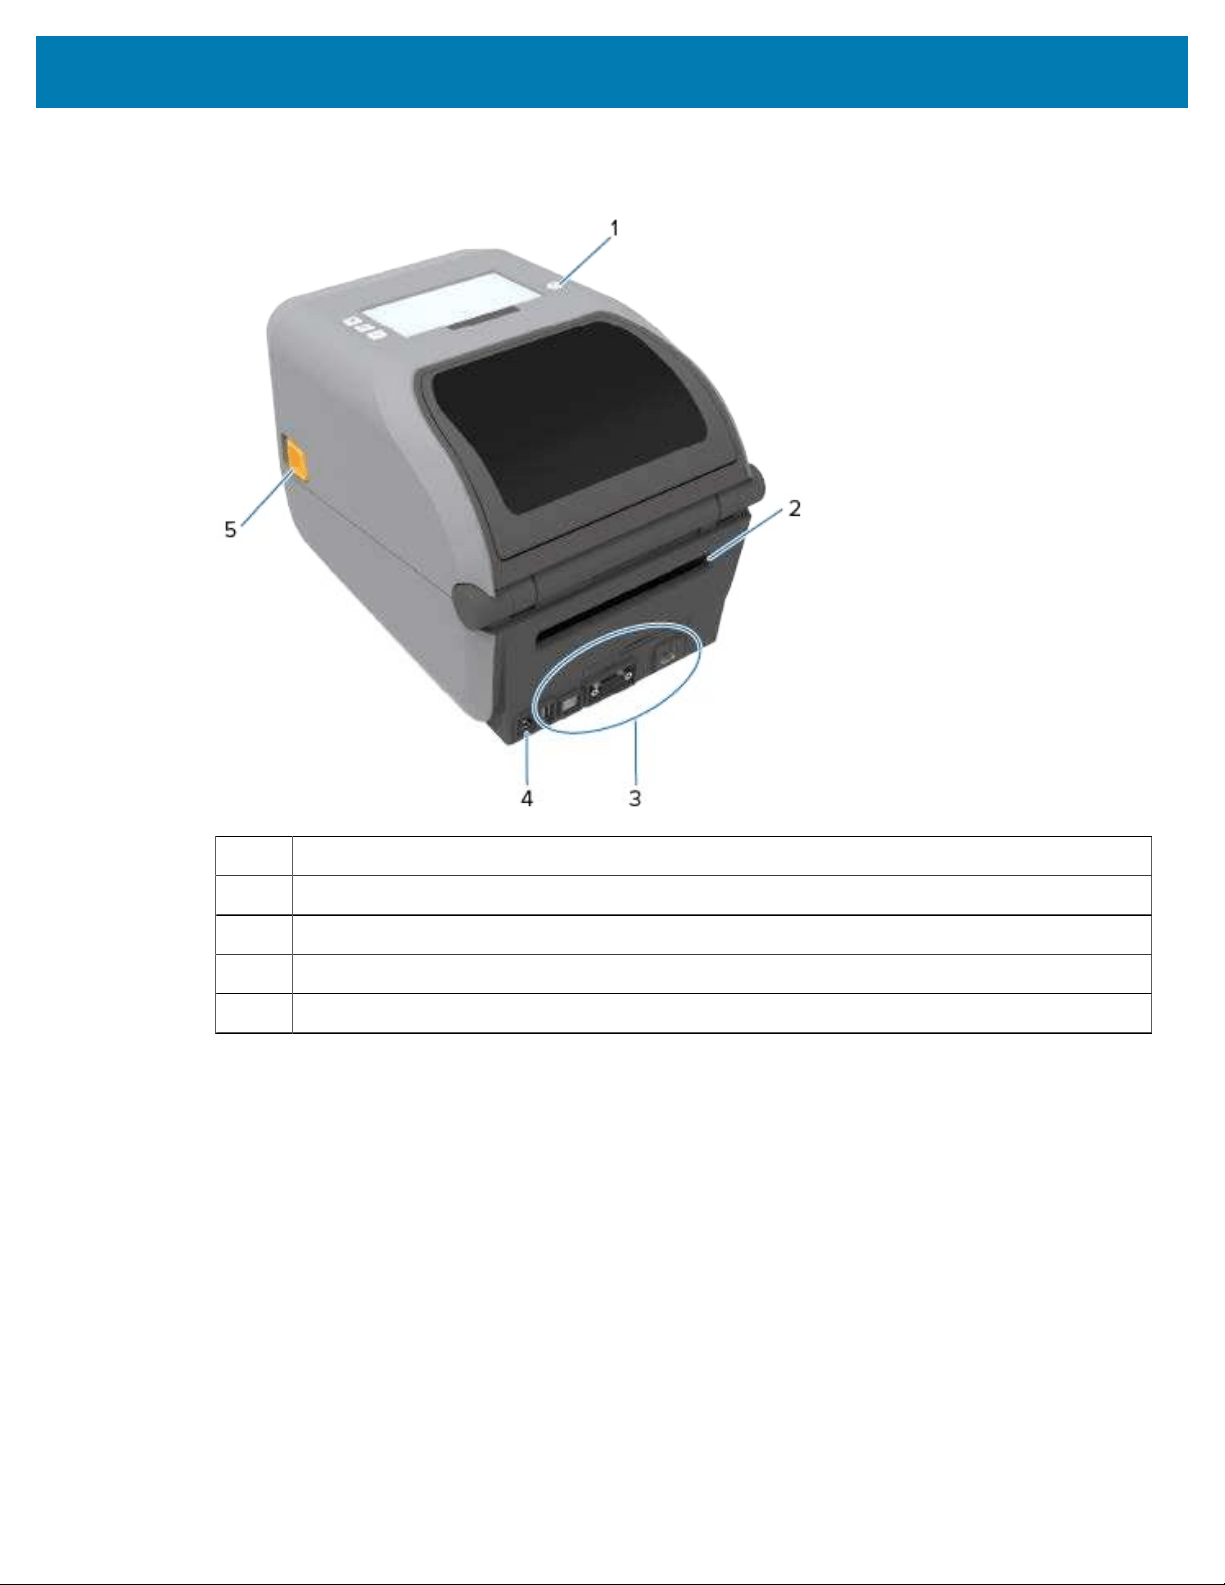
Printer Features
See Controls and Indicators on page 47 for information on how to operate the printer using the interface
buttons and the color touch display if your printer has one.
1 POWER button
2 Fanfold media entry slot
3 Interface and connectivity module slot access
4 DC power receptacle
5 Release latch
26
Printer Features
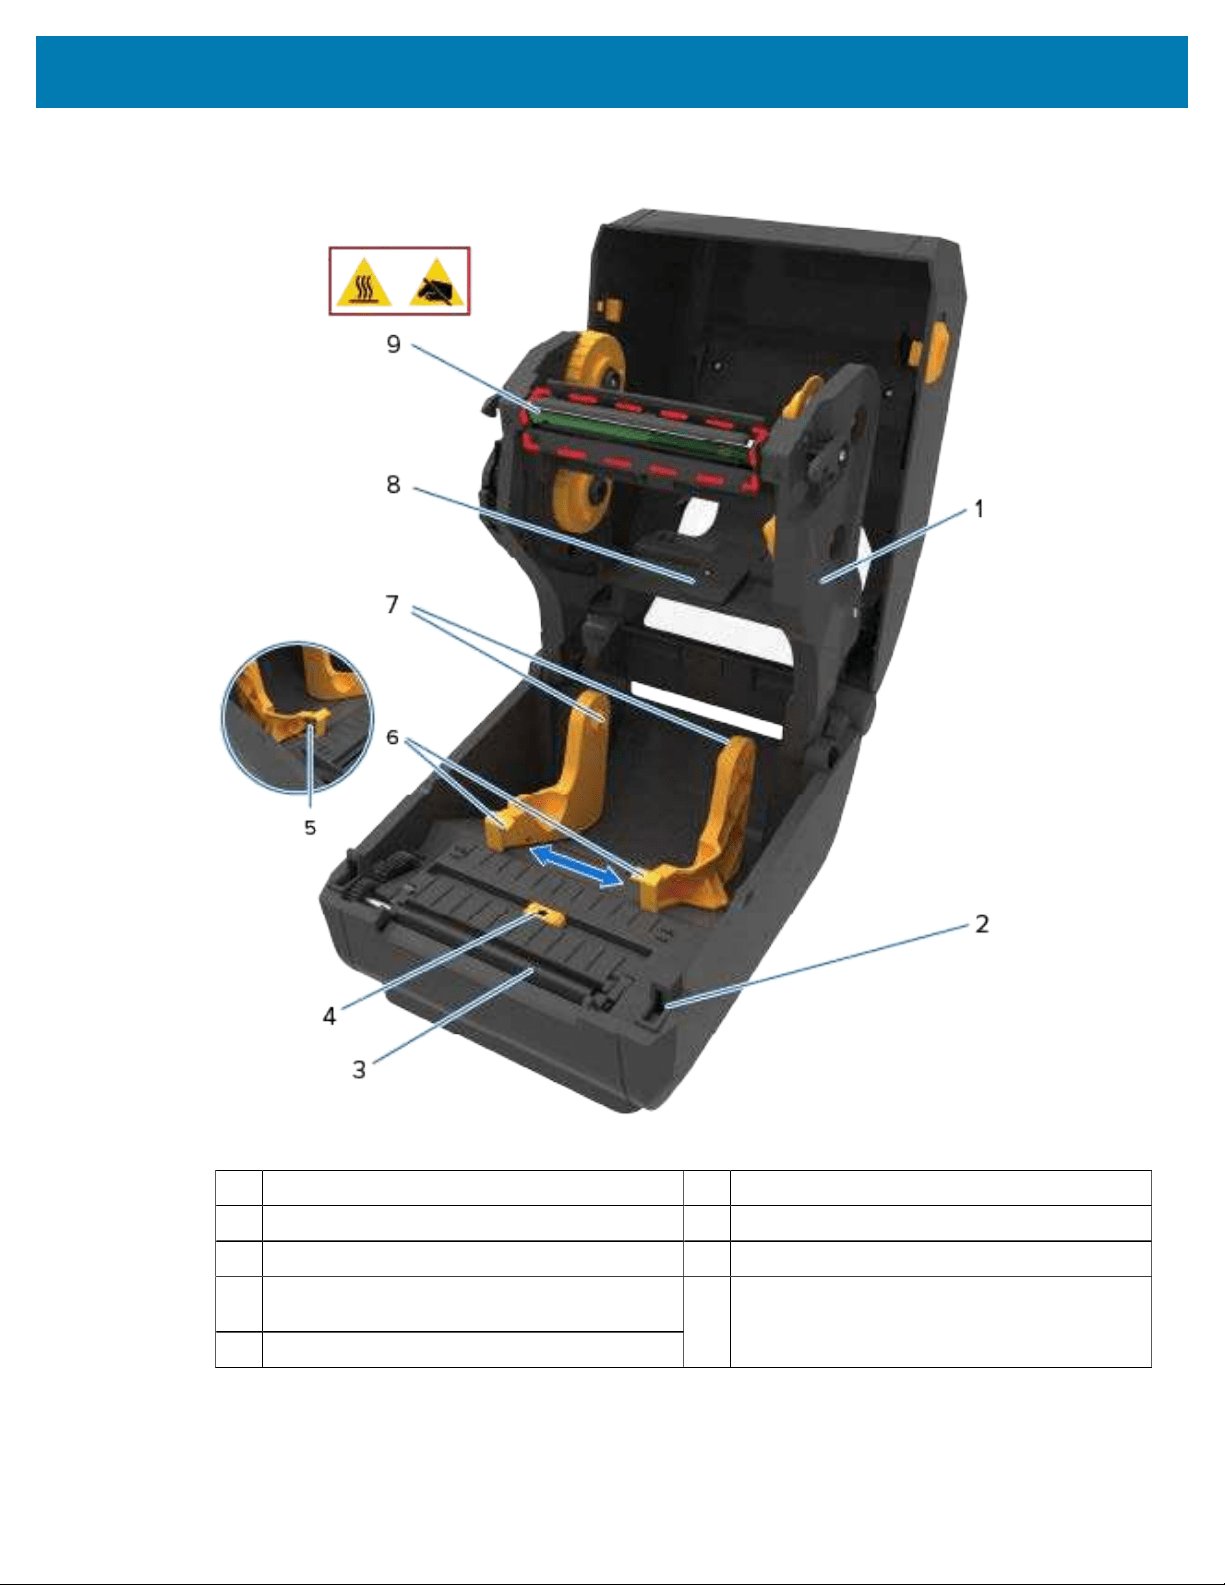
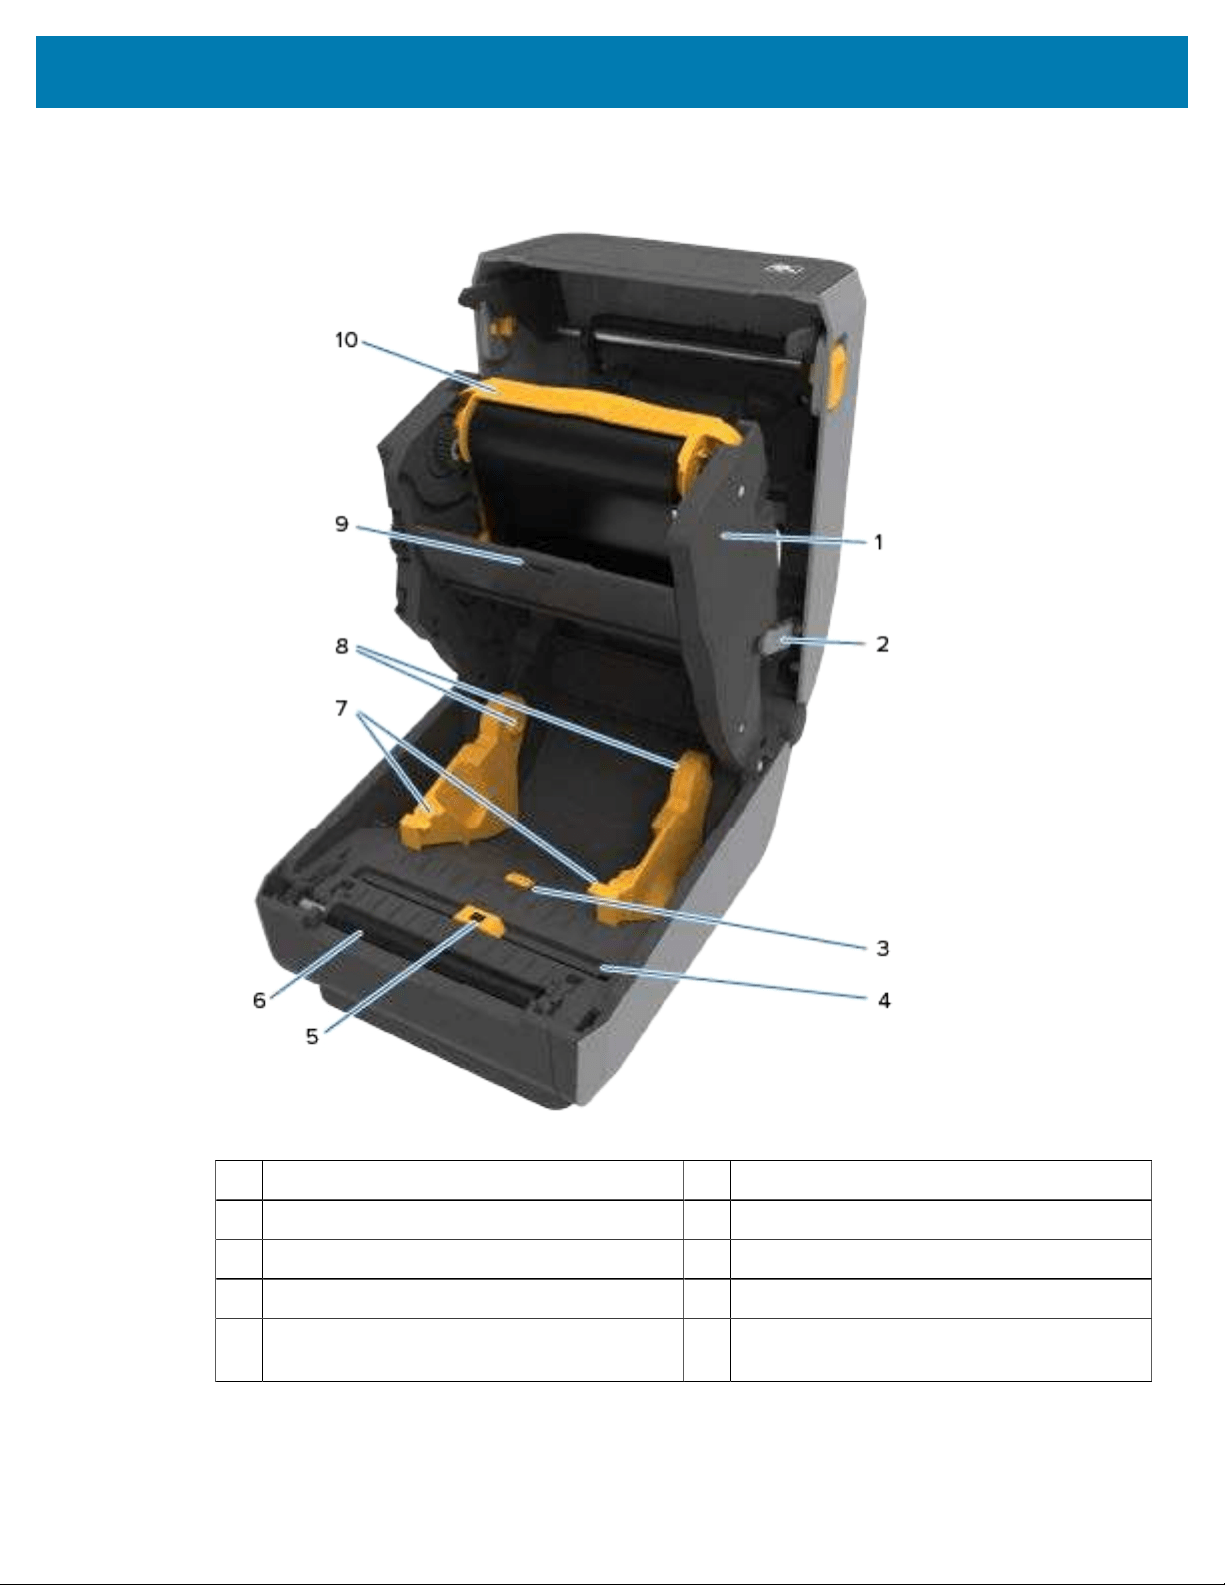
Inside the ZD421 Dual-Capacity Ribbon Roll Printer
1 Ribbon carriage 6 Media guides
2 Head-up sensor (inside) 7 Roll holders
3 Platen (drive) roller 8 Upper web (gap) array sensor (other side)
4 Movable sensor (black mark and lower web/
gap)
5 Media guide stop
9 Printhead(may be hot – do NOT touch!)
27
Printer Features
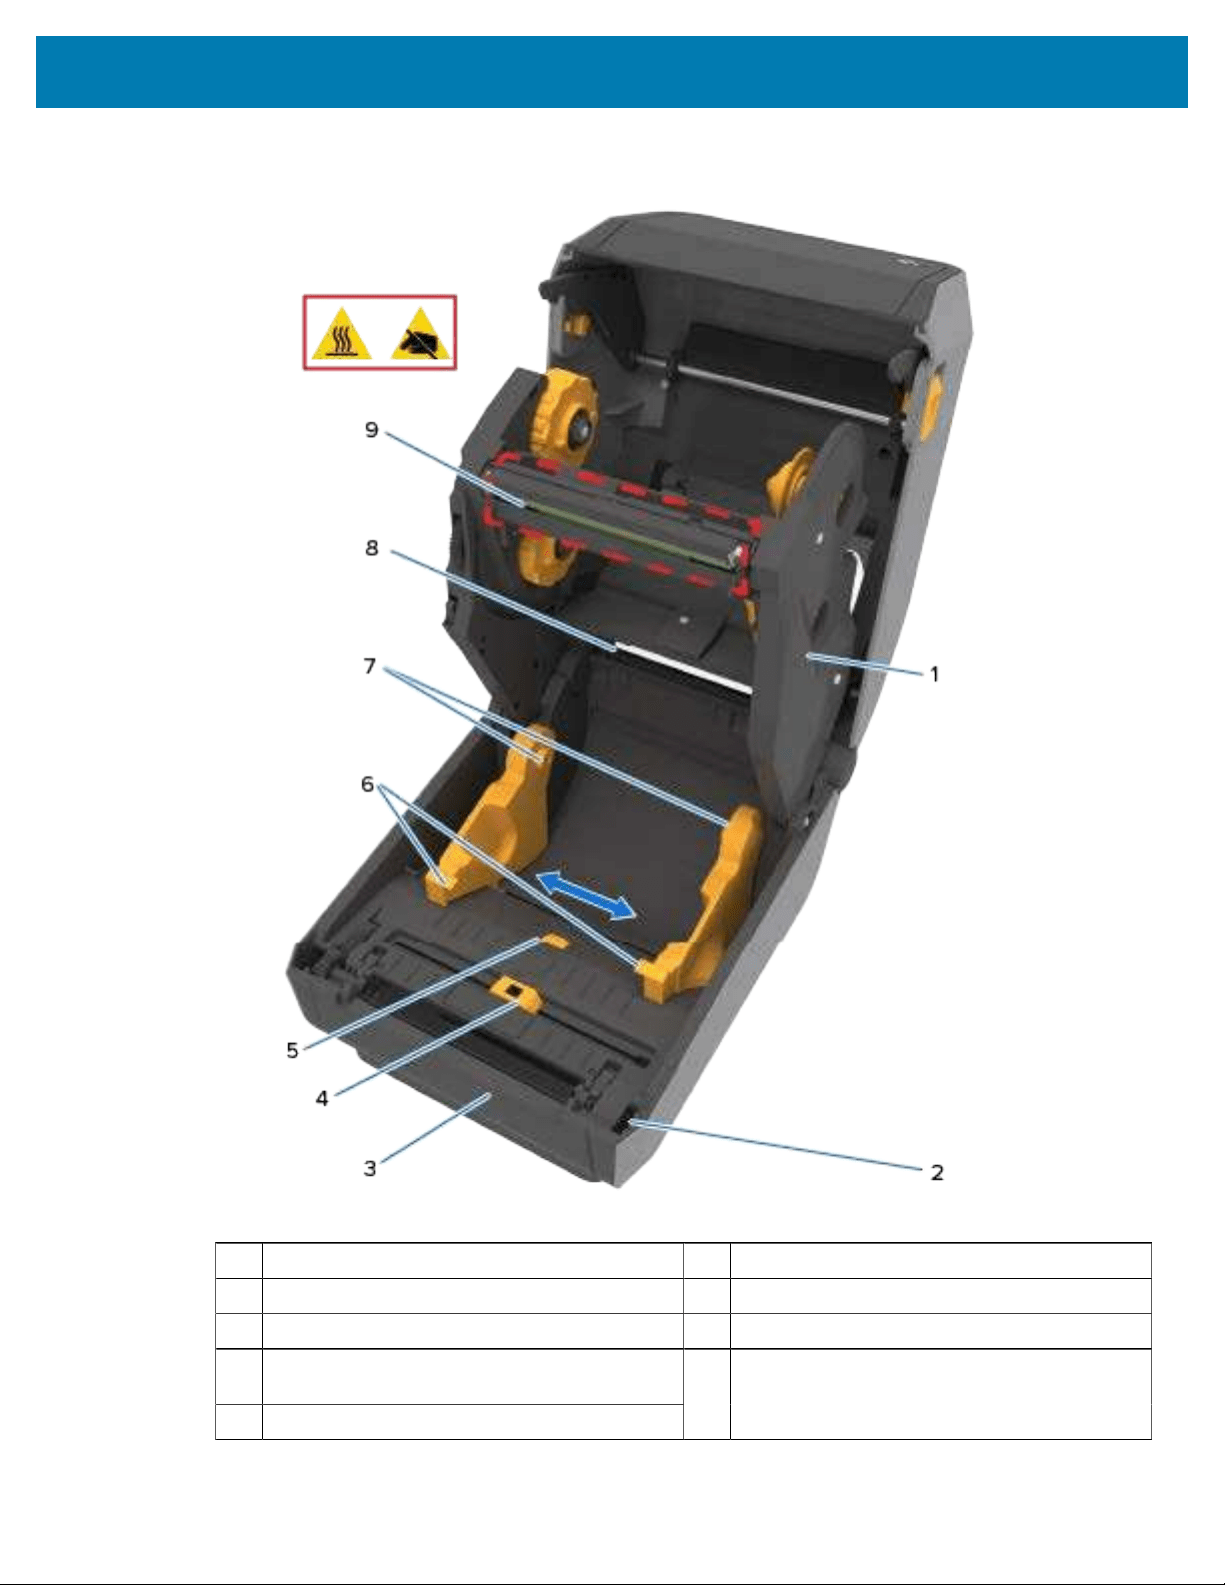
Inside the ZD621 Dual-Capacity Ribbon Roll Printer
1 Ribbon carriage 6 Media guides
2 Head-up sensor (inside) 7 Roll holders
3 Platen (drive) roller 8 Upper web (gap) array sensor (other side)
4 Movable sensor (black mark and lower web/
gap)
5 Media guide stop adjustment
9 Printhead(may be hot – do NOT touch!)
28
Printer Features
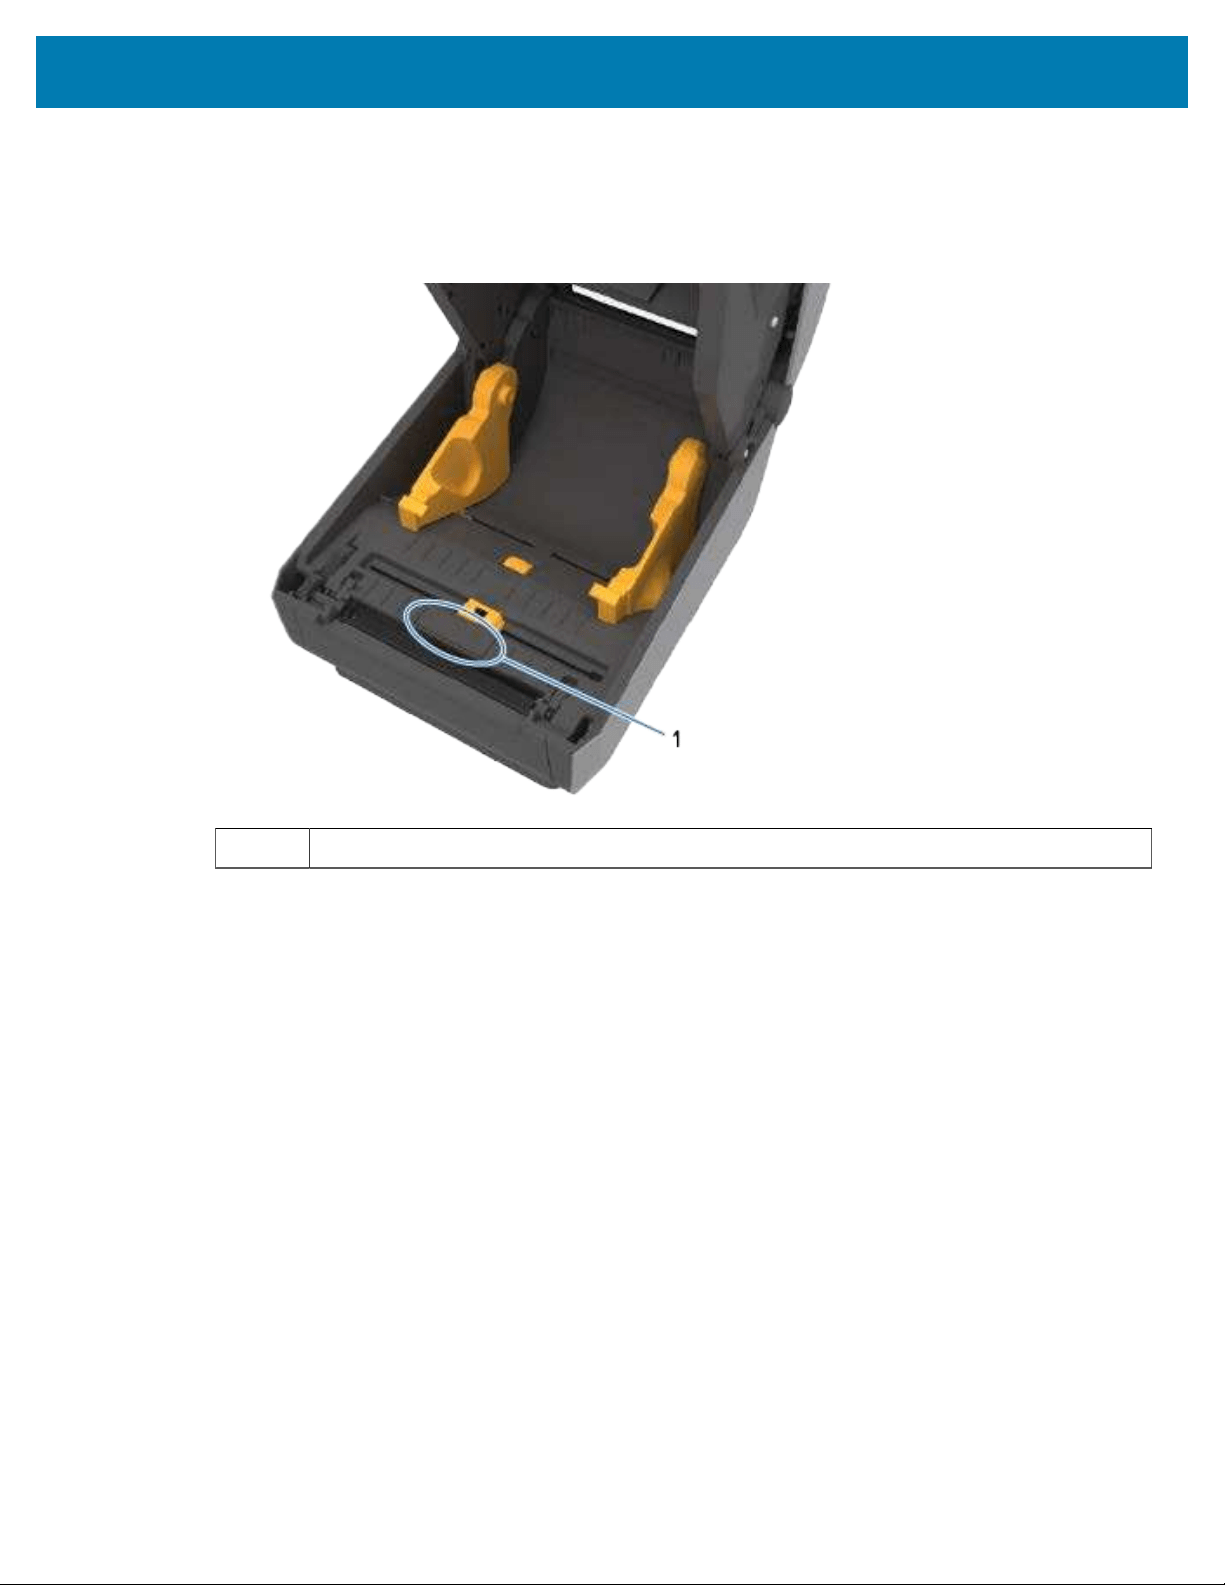
RFID Antenna Location– ZD621RPrinters Only
OnZD621R printers which are RFID-sensing printers, the RFID antenna is located between the platen roller
and the channel of the movable media sensor. Other printer RFID indications on ZD621R printers include
information displayed on the color touch display when it on, as also information on the product label.
1 RFID antenna dome
29
Printer Features
Media Dancer–ZD621 Printers Only
In this image, the printer’s window is removed and the media dancer is colored for easy identification. As
seen within the printer, it is of the same color as the dark gray parts adjacent to it.
1 Media dancer (ZD621 models only)
30
Printer Features
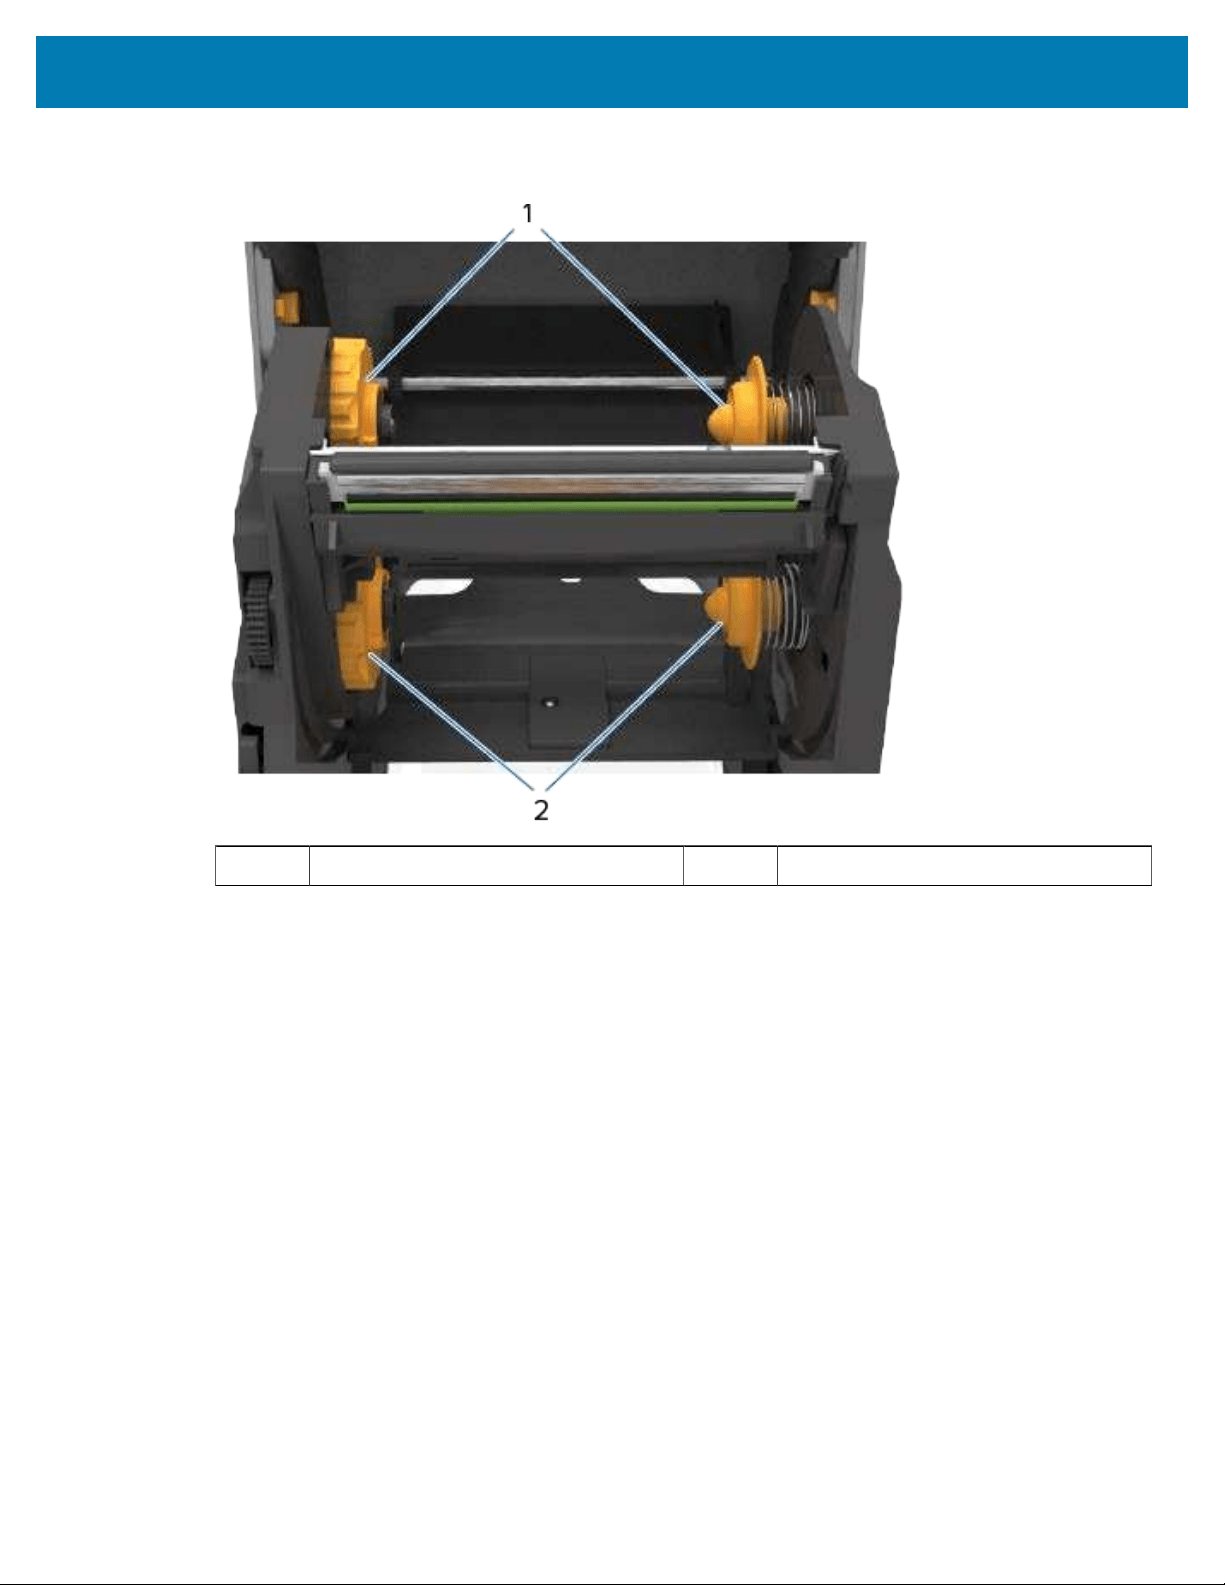
Dual-Capacity Ribbon Chassis–Ribbon Roll Holders
1 Take-up spindles 2 Supply spindles (full ribbon rolls)
31
Printer Features
Inside the ZD421 Direct Thermal Printer
1 Printhead(may be hot – do NOT touch!) 5 Head-up sensor (inside)
2 Upper web (gap) array sensor 6 Movable sensor (black mark and lower web/
gap)
3 Roll holders 7 Platen (drive) roller
4 Media guides 8 Media guide stop
32
Printer Features
Inside the ZD621 Direct Thermal Printer
1 Printhead (may be hot–do NOT touch!) 5 Media guide stop adjustment
2 Head-up sensor (inside) 6 Media guides
3 Platen (drive) roller 7 Roll holders
4 Movable sensor (black mark and lower web /
gap)
8 Upper web (gap) array sensor
33
Printer Features
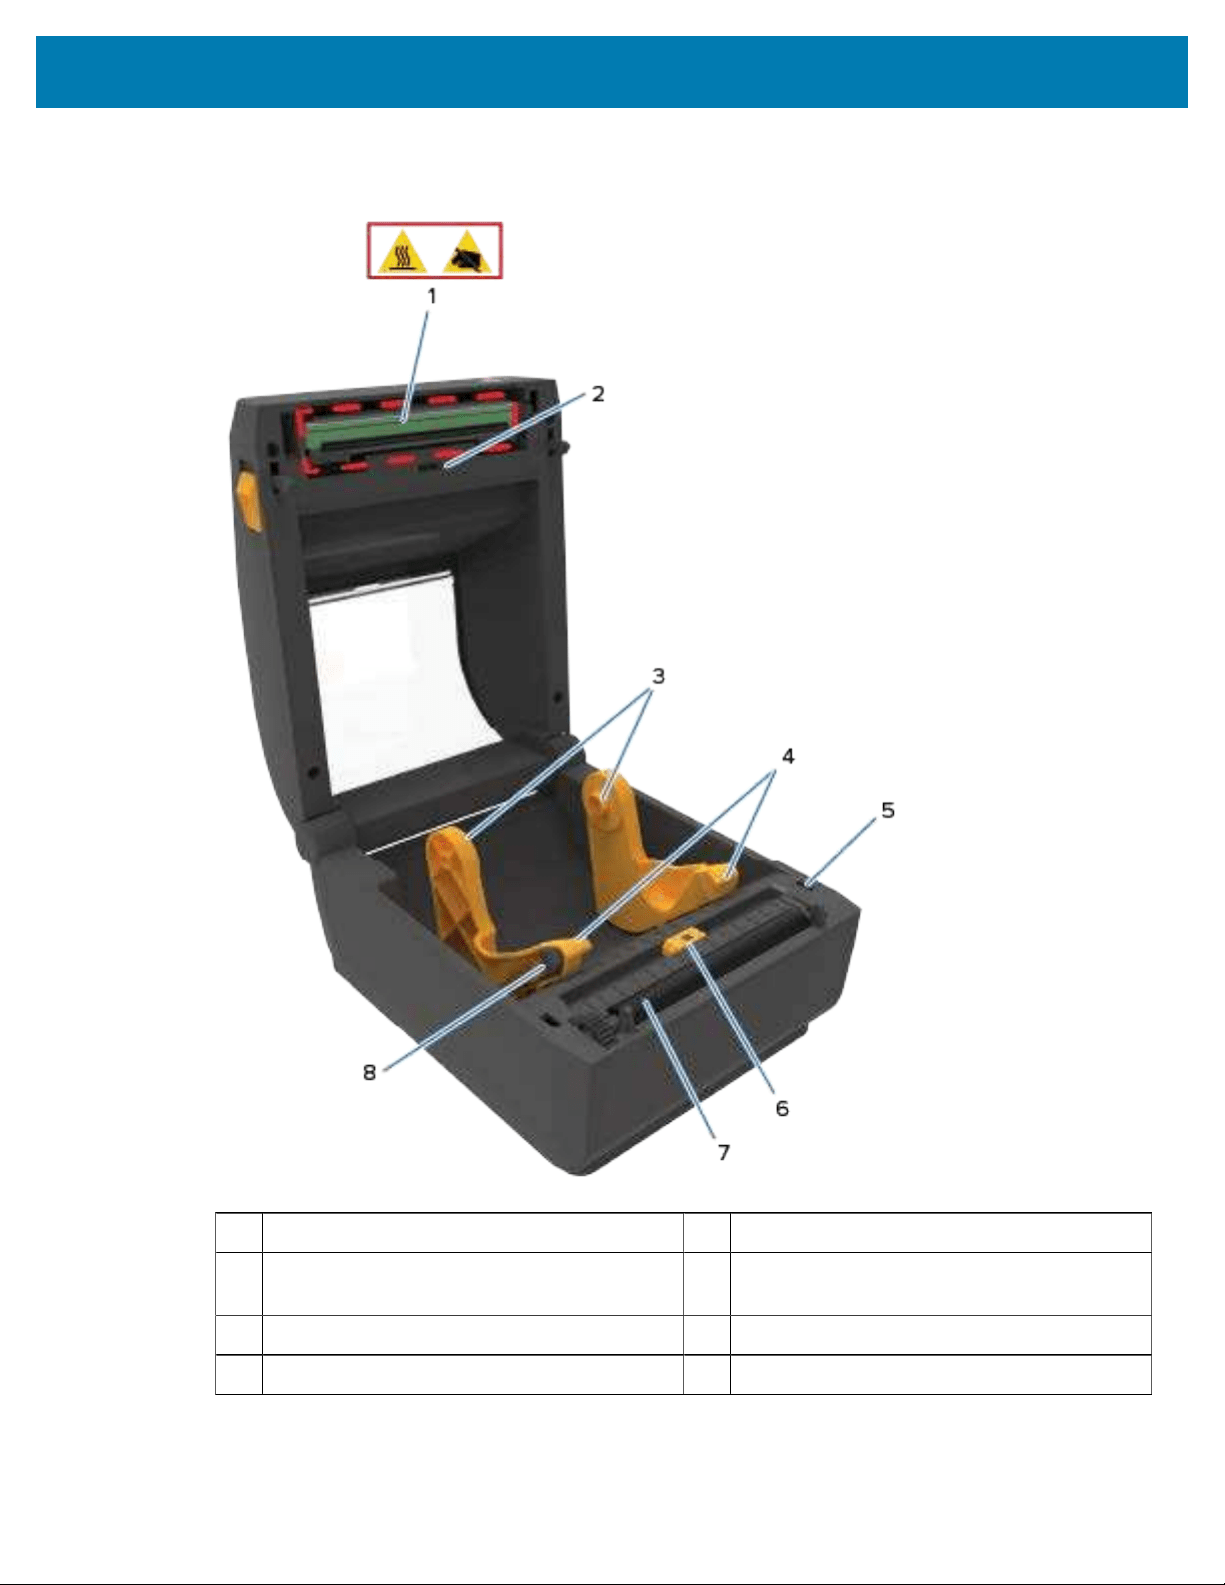
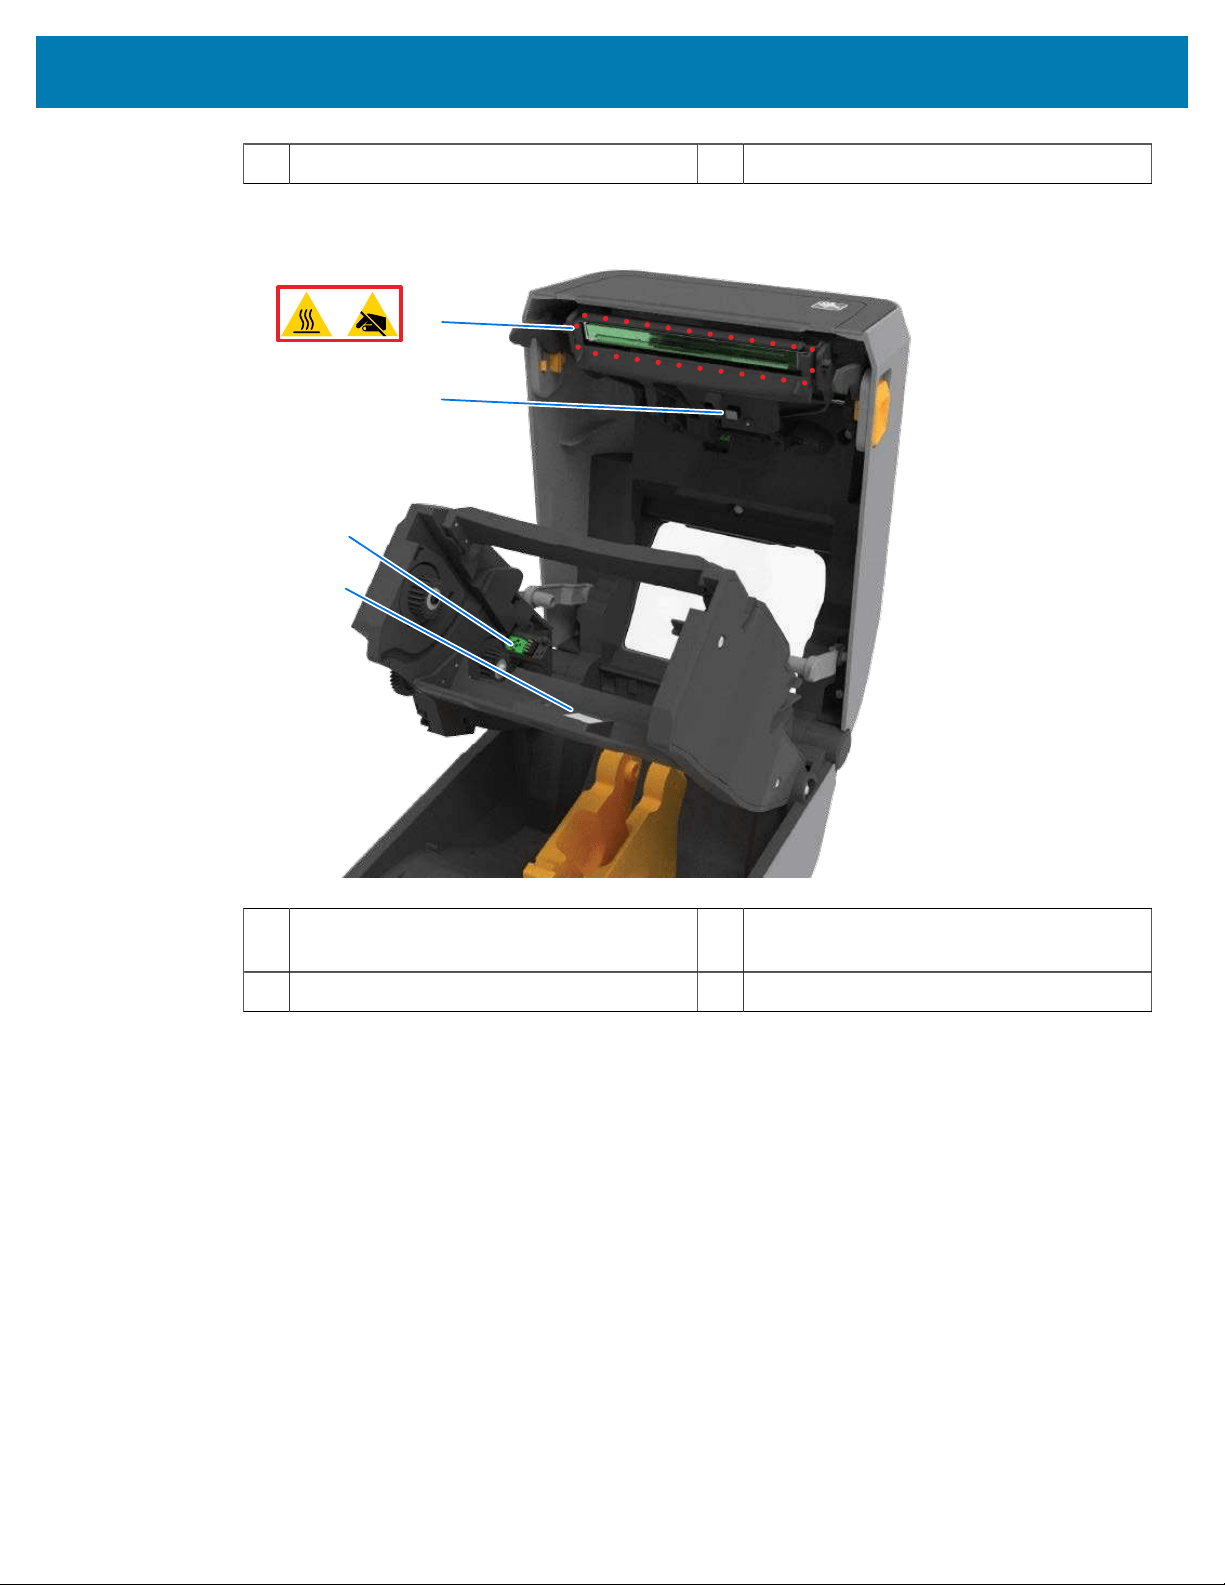
Inside the ZD421 Ribbon Cartridge Printer
1 Ribbon drive transport 6 Platen (drive) roller
2 Release arms (2) 7 Media guides
3 Media guide adjustment stop 8 Roll holders
4 Head-up sensor (inside) 9 Upper web (gap) array sensor
5 Movable sensor (black mark and lower web /
gap)
10 Ribbon cartridge (shown installed – sold
separately)
34
Printer Features
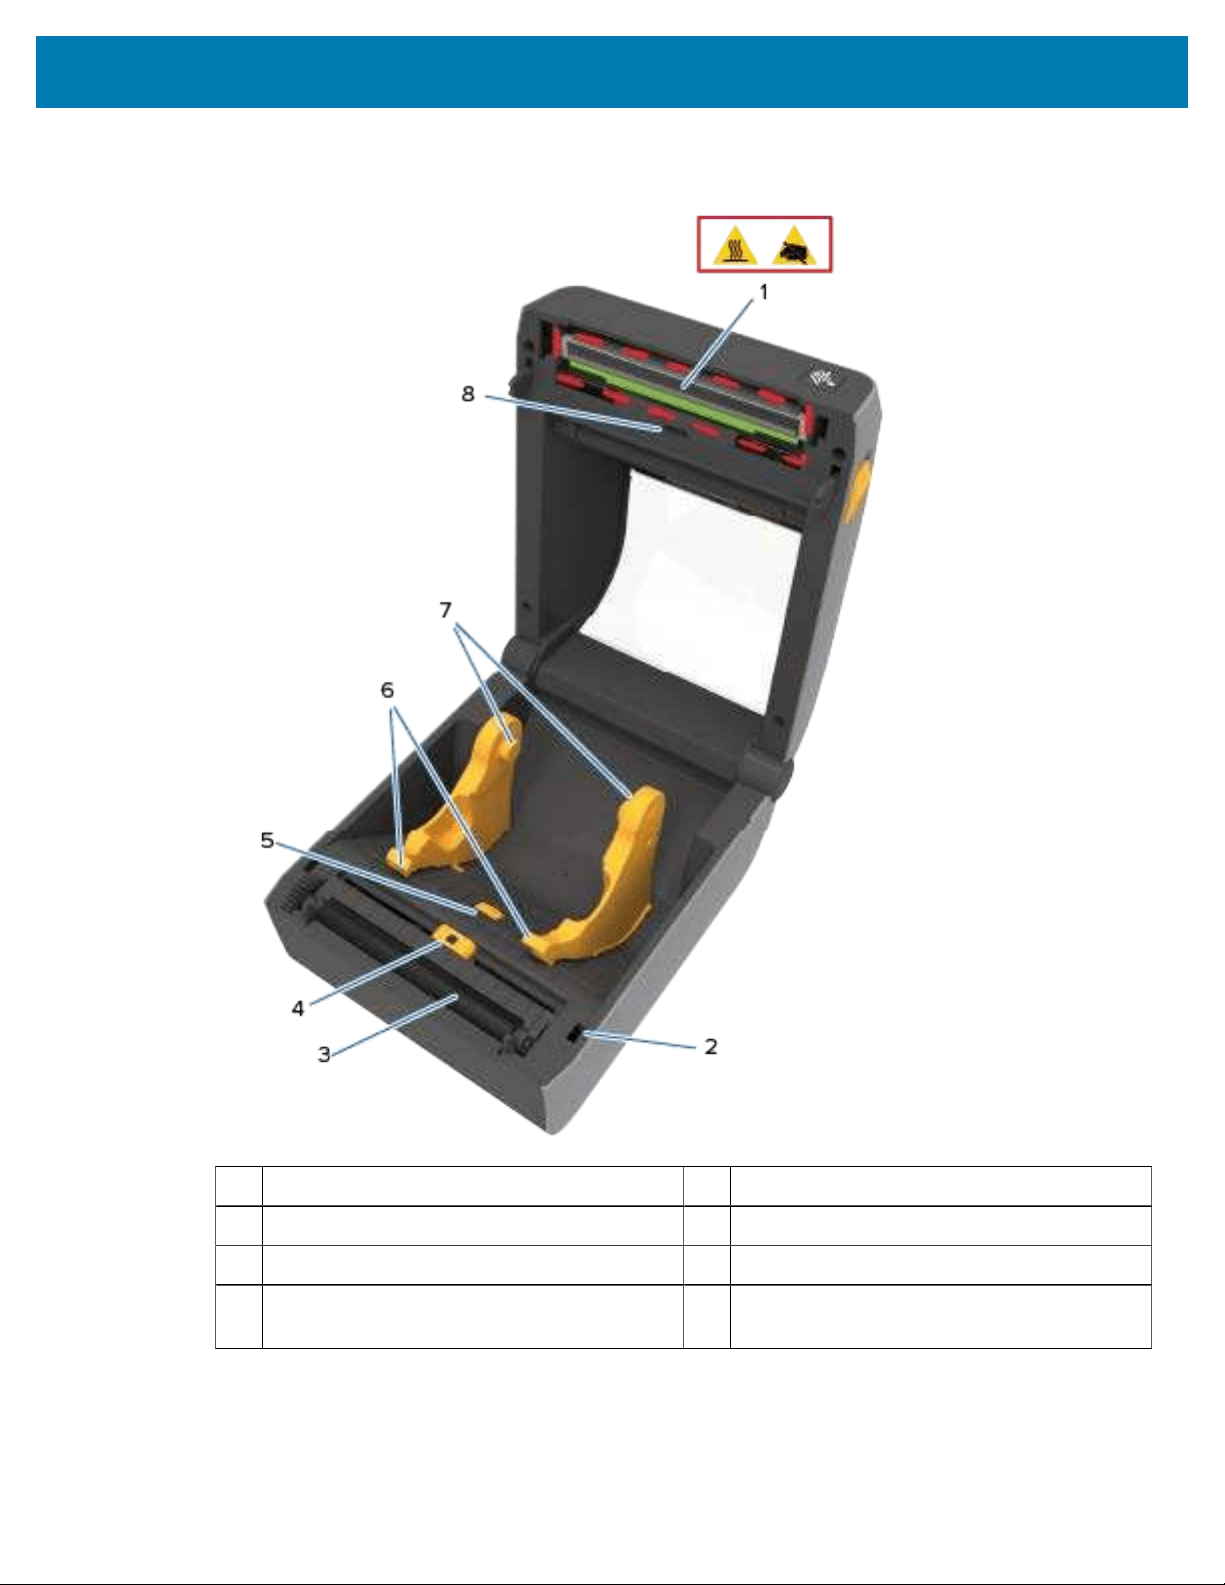
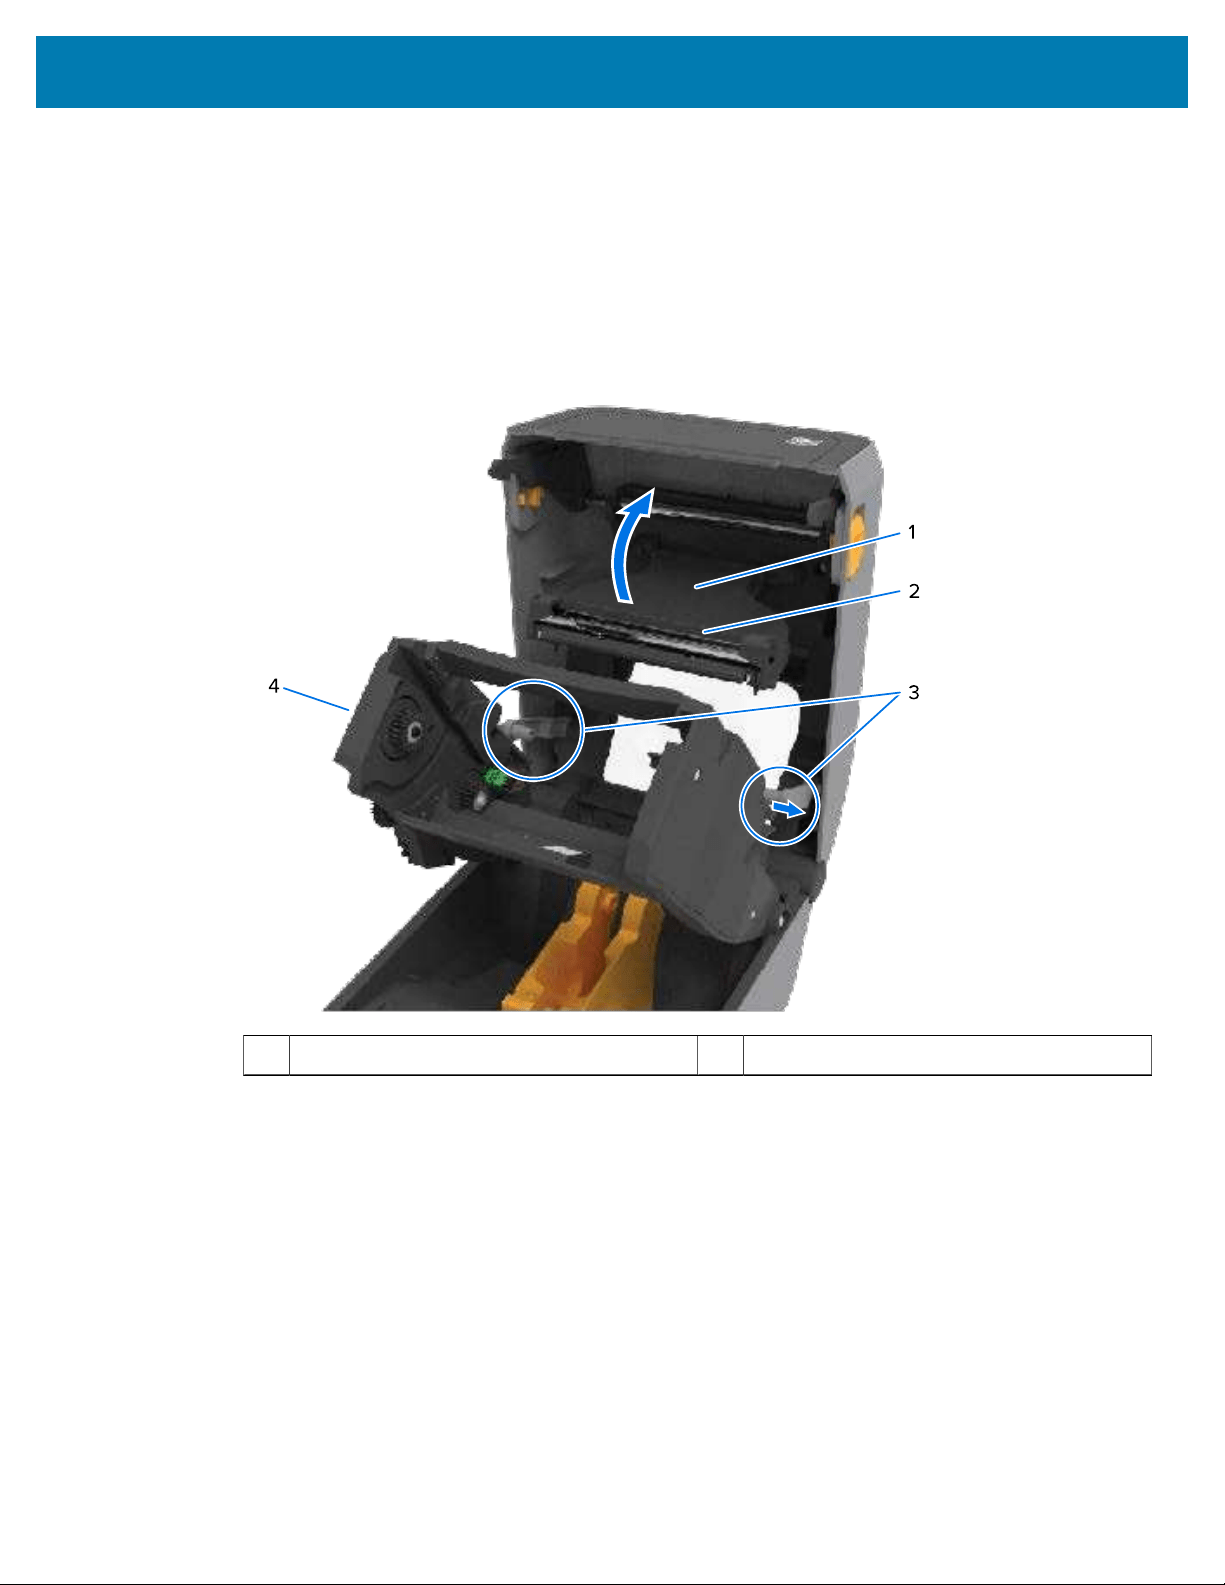
Accessing the Printhead of the ZD421 Ribbon Cartridge Printer
To access the printhead:
1. Pull both release arms out (lighter gray parts).
The ribbon drive transport drops down.
2. Lift printhead actuator arm up to access the printhead.
1 Printhead actuator arm 3 Release arms
35
Printer Features
2 Back of printhead 4 Ribbon transport
1
2
3
4
1 Printhead (may be hot Supply spindles (full
ribbon rolls)–do NOT touch!
3 Ribbon cartridge authentication and status
interface
2 Ribbon sensor 4 Ribbon sensor's reflector
36
Printer Features
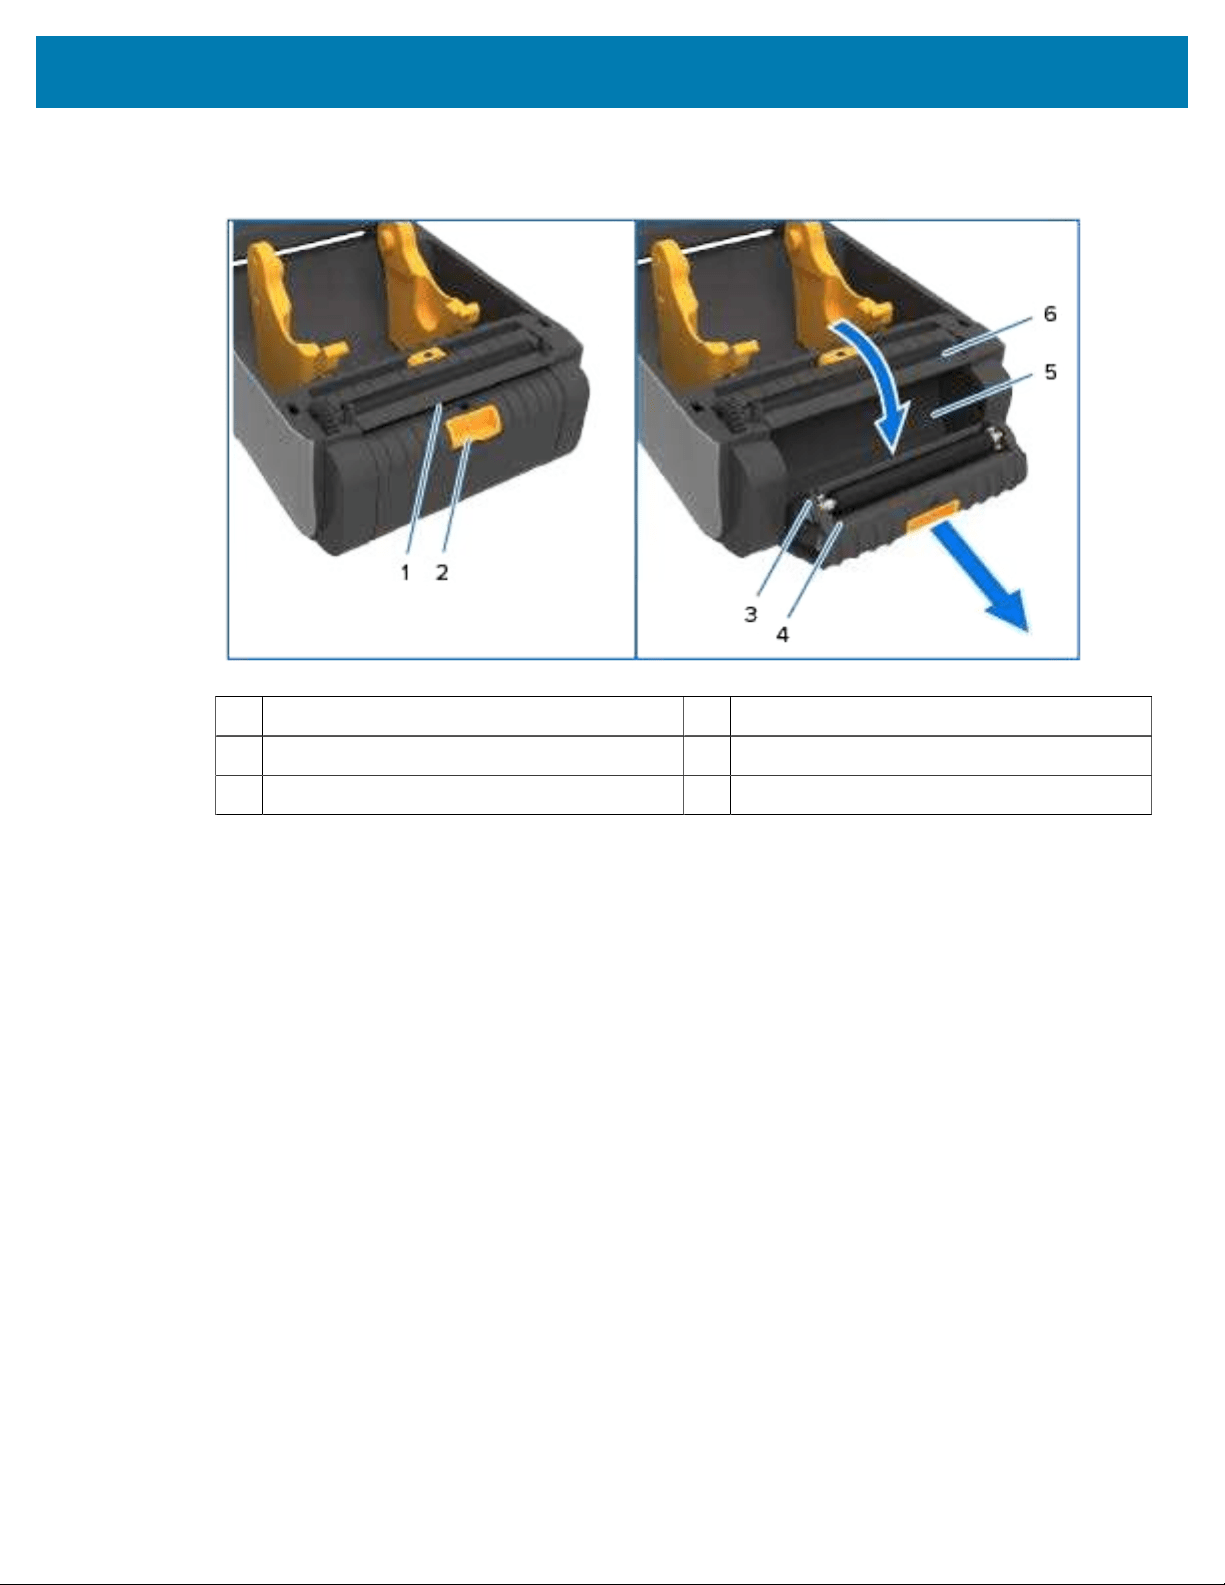
Label Dispenser Option (field-installable)–All Models
1 Label-taken sensor 4 Dispenser door
2 Door latch 5 Label liner exit area
3 Peel roll 6 Label peel bar
37
Printer Features
Cutter Option (field-installable) – All Models
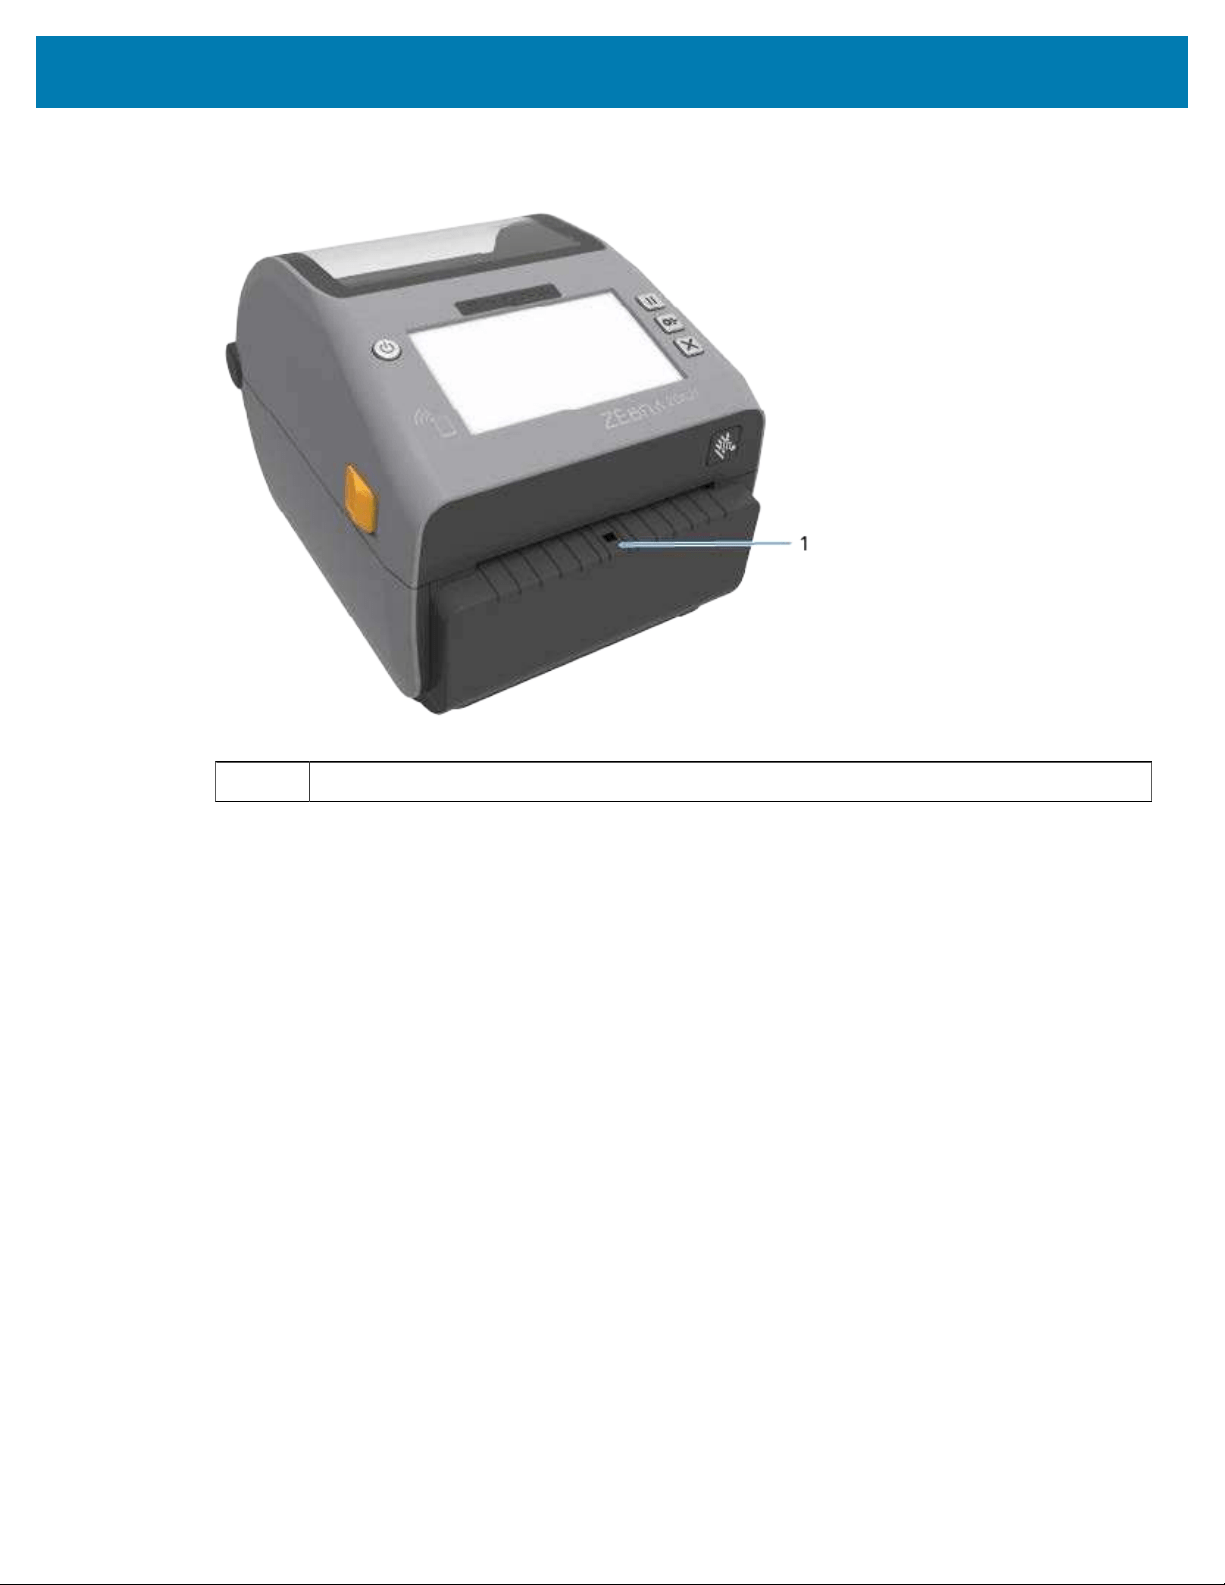
1 Media exit slot 2 Cutter module
38
Printer Features
Linerless Media Tear-Off Option – Direct Thermal Models Only
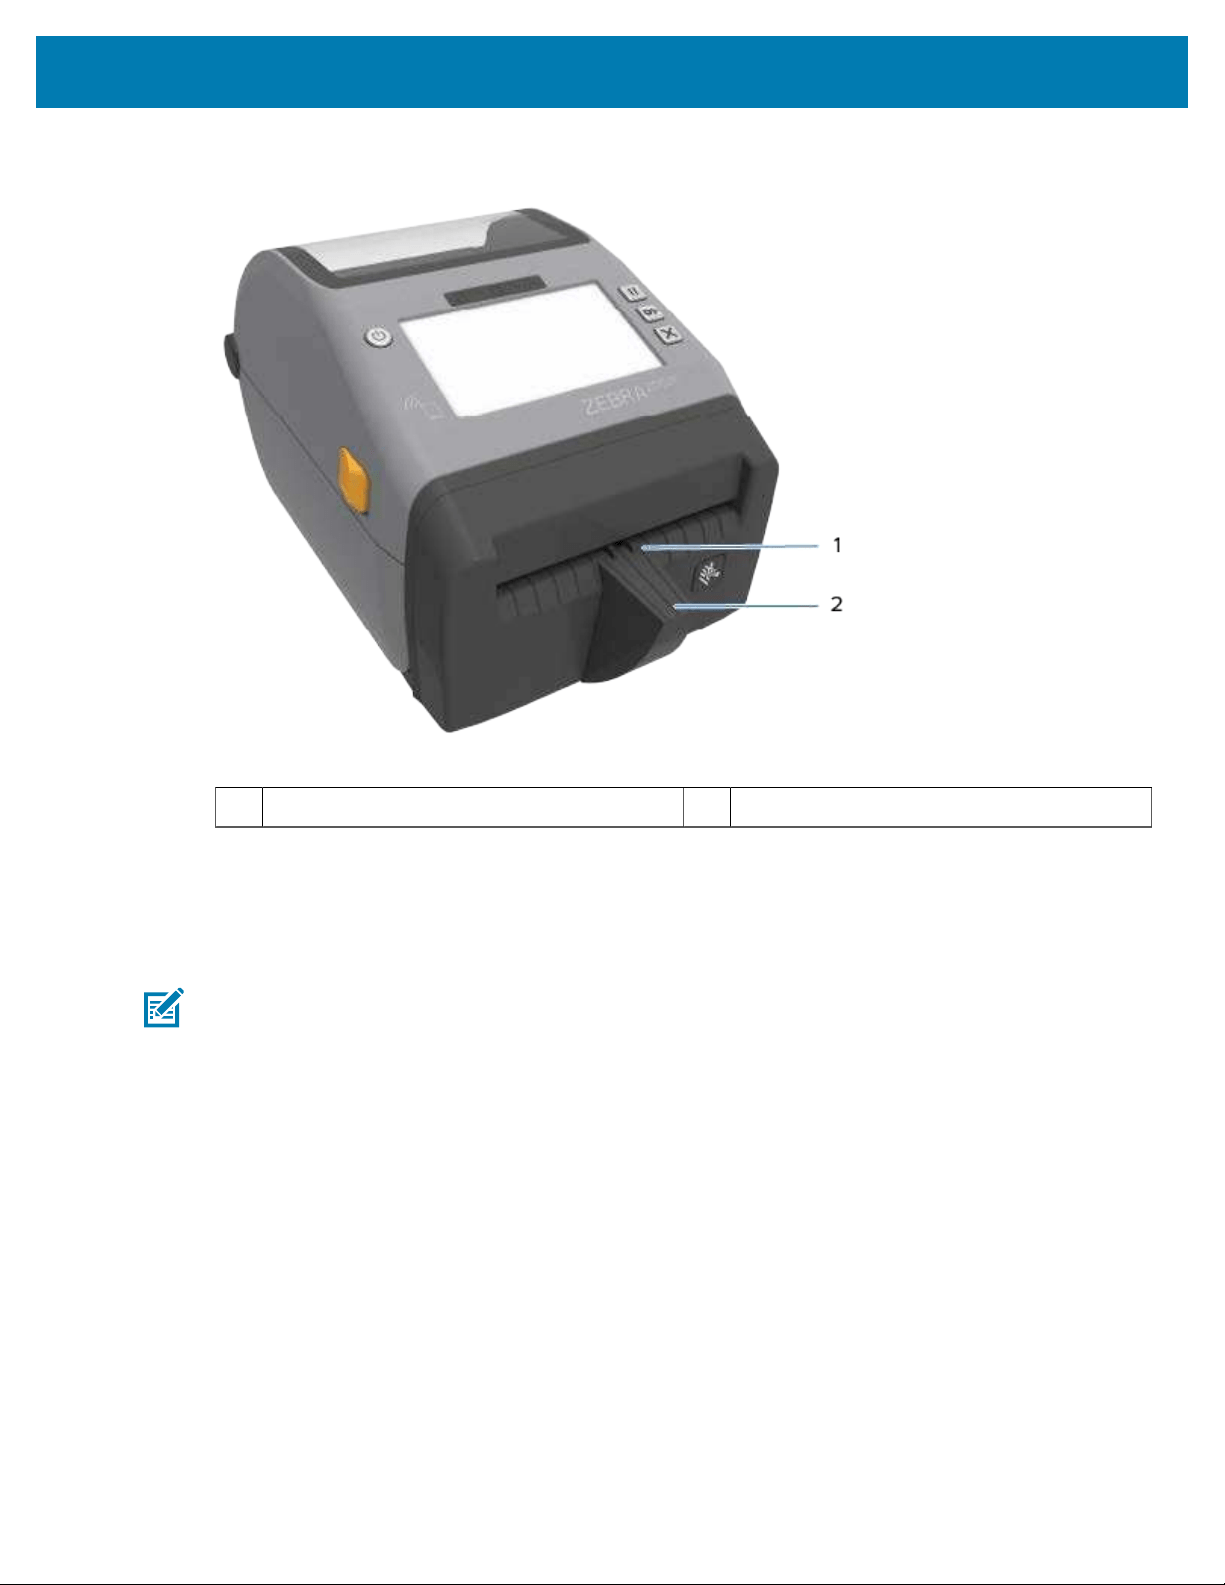
1 Label-taken sensor
39
Printer Features
Linerless Cutter Option – Direct Thermal Models Only
1 Label-taken sensor 2 Cut label landing area
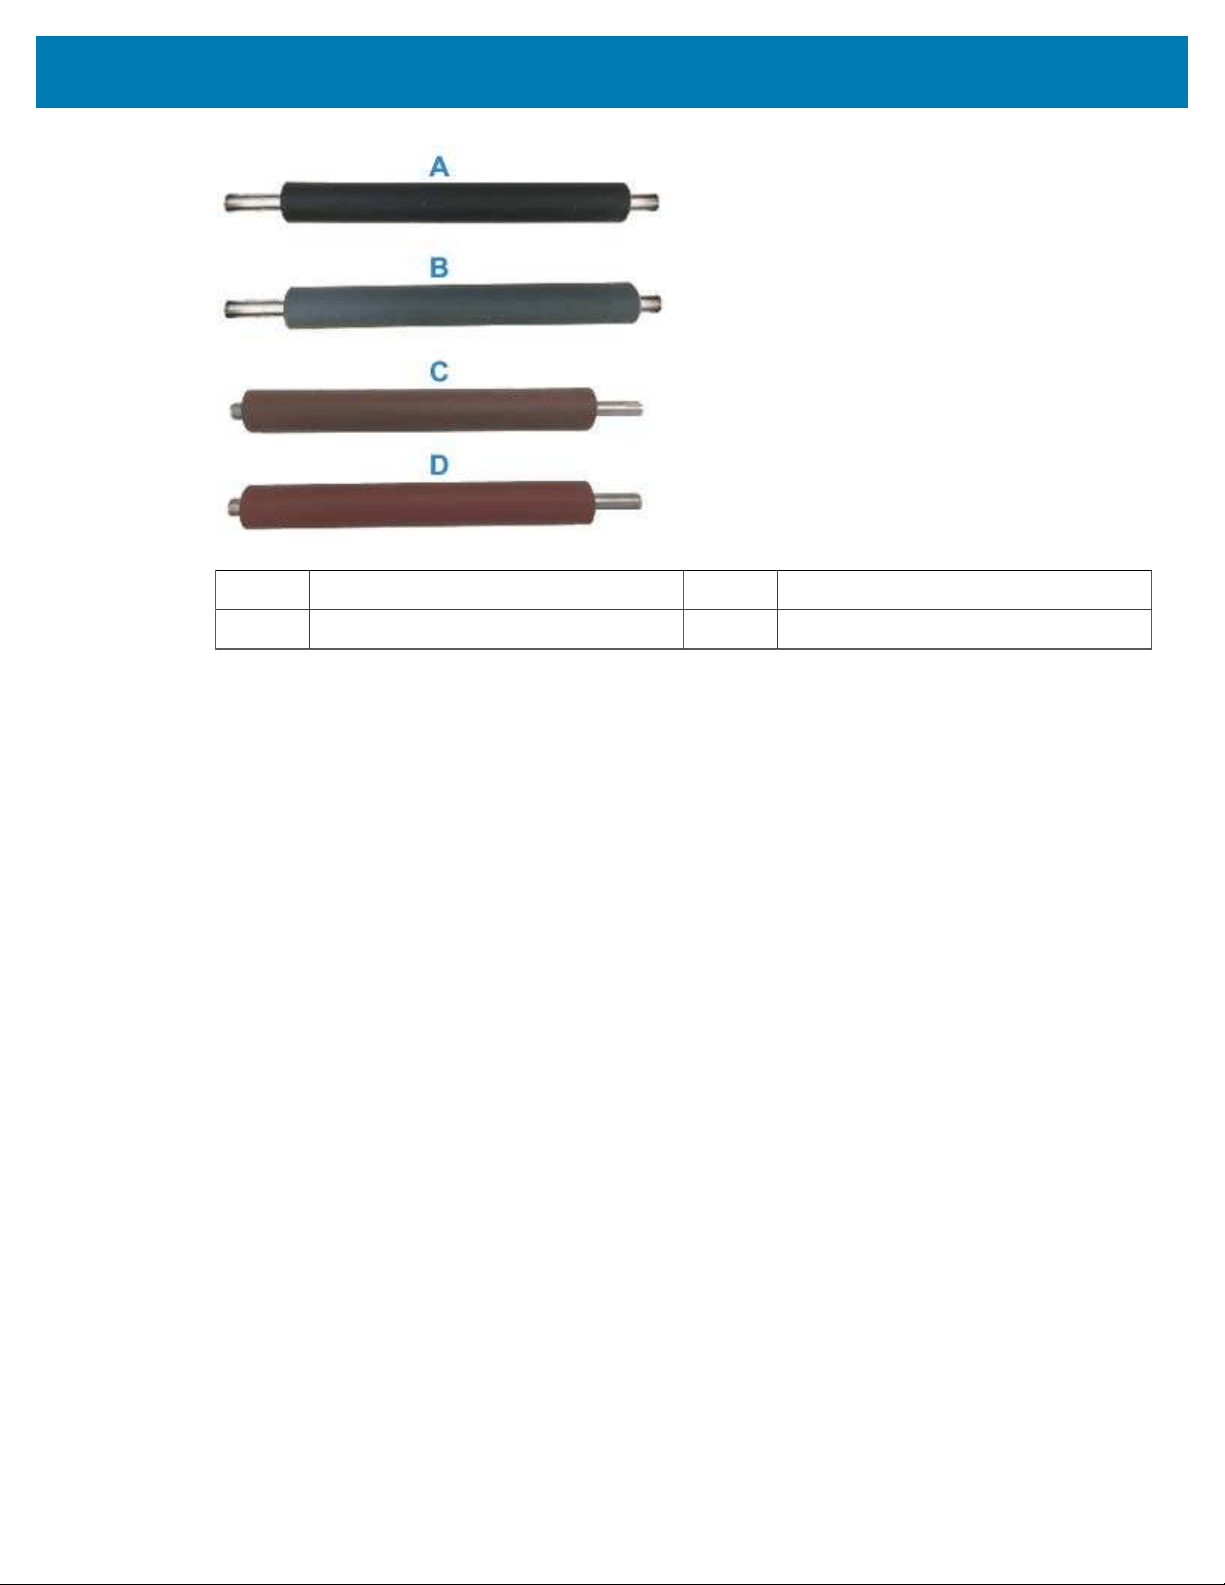
Identifying Platen Drive Roller Types
The platen (drive) rollers are colored differently to identify the platen type and print resolution of your
printer (and the platen).
NOTE: Do NOT exchange platen types unless you are specifically instructed to do so either by an
upgrade procedure or by Zebra Technical Support. If incorrect platens are used, the printer will
stop operating as normal and cause a variety of problems that would require resolution.
40
Printer Features
A 203 dpi standard platen (black) C 203 dpi linerless platen (reddish-brown)
B 300 dpi standard platen (gray) D 300 dpi linerless platen (brown)
41
Printer Features
Printer Power Supply Options
Instead ofthe power supply that shipped with your printer, you can use one of two field-installable
attached power options—an attached power supply base or a battery power base. Both are easily
attachable to your printer with screws.
Attached Power Supply Base
1 Rear view of attached power supply base 2 Front view of attached power supply base
42
Printer Features
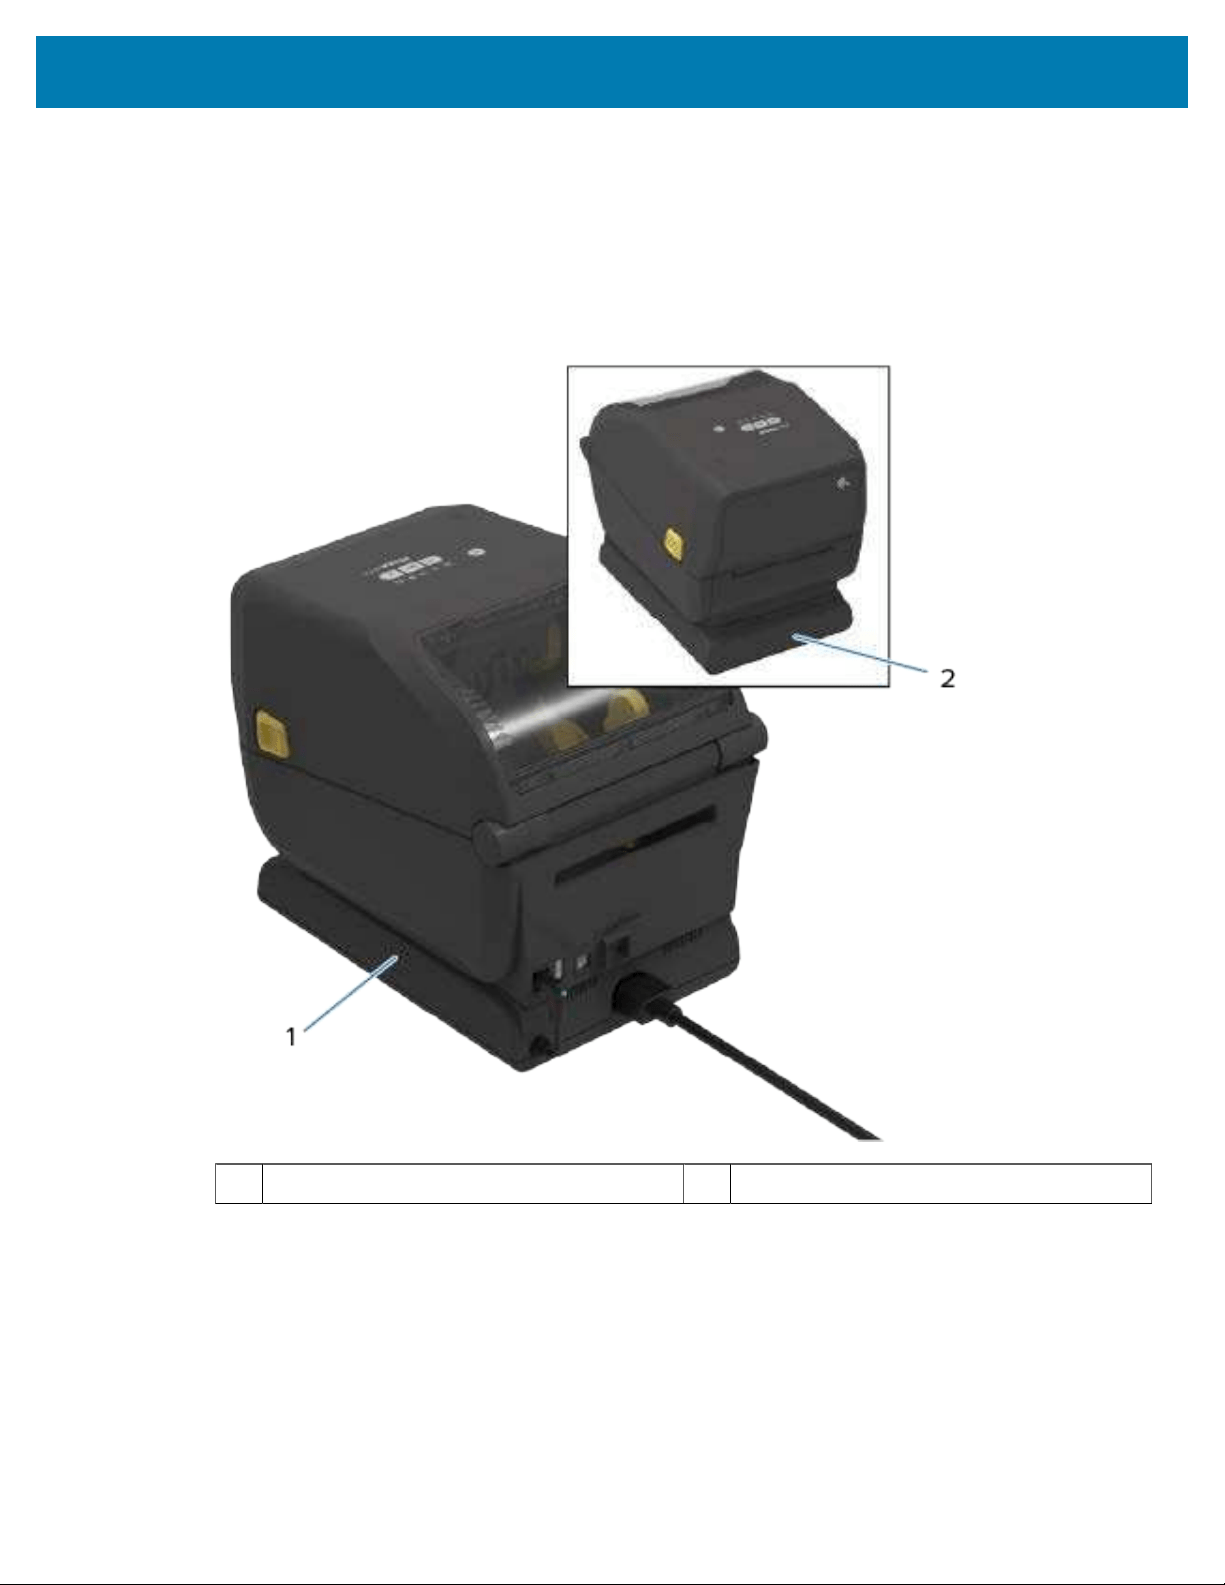
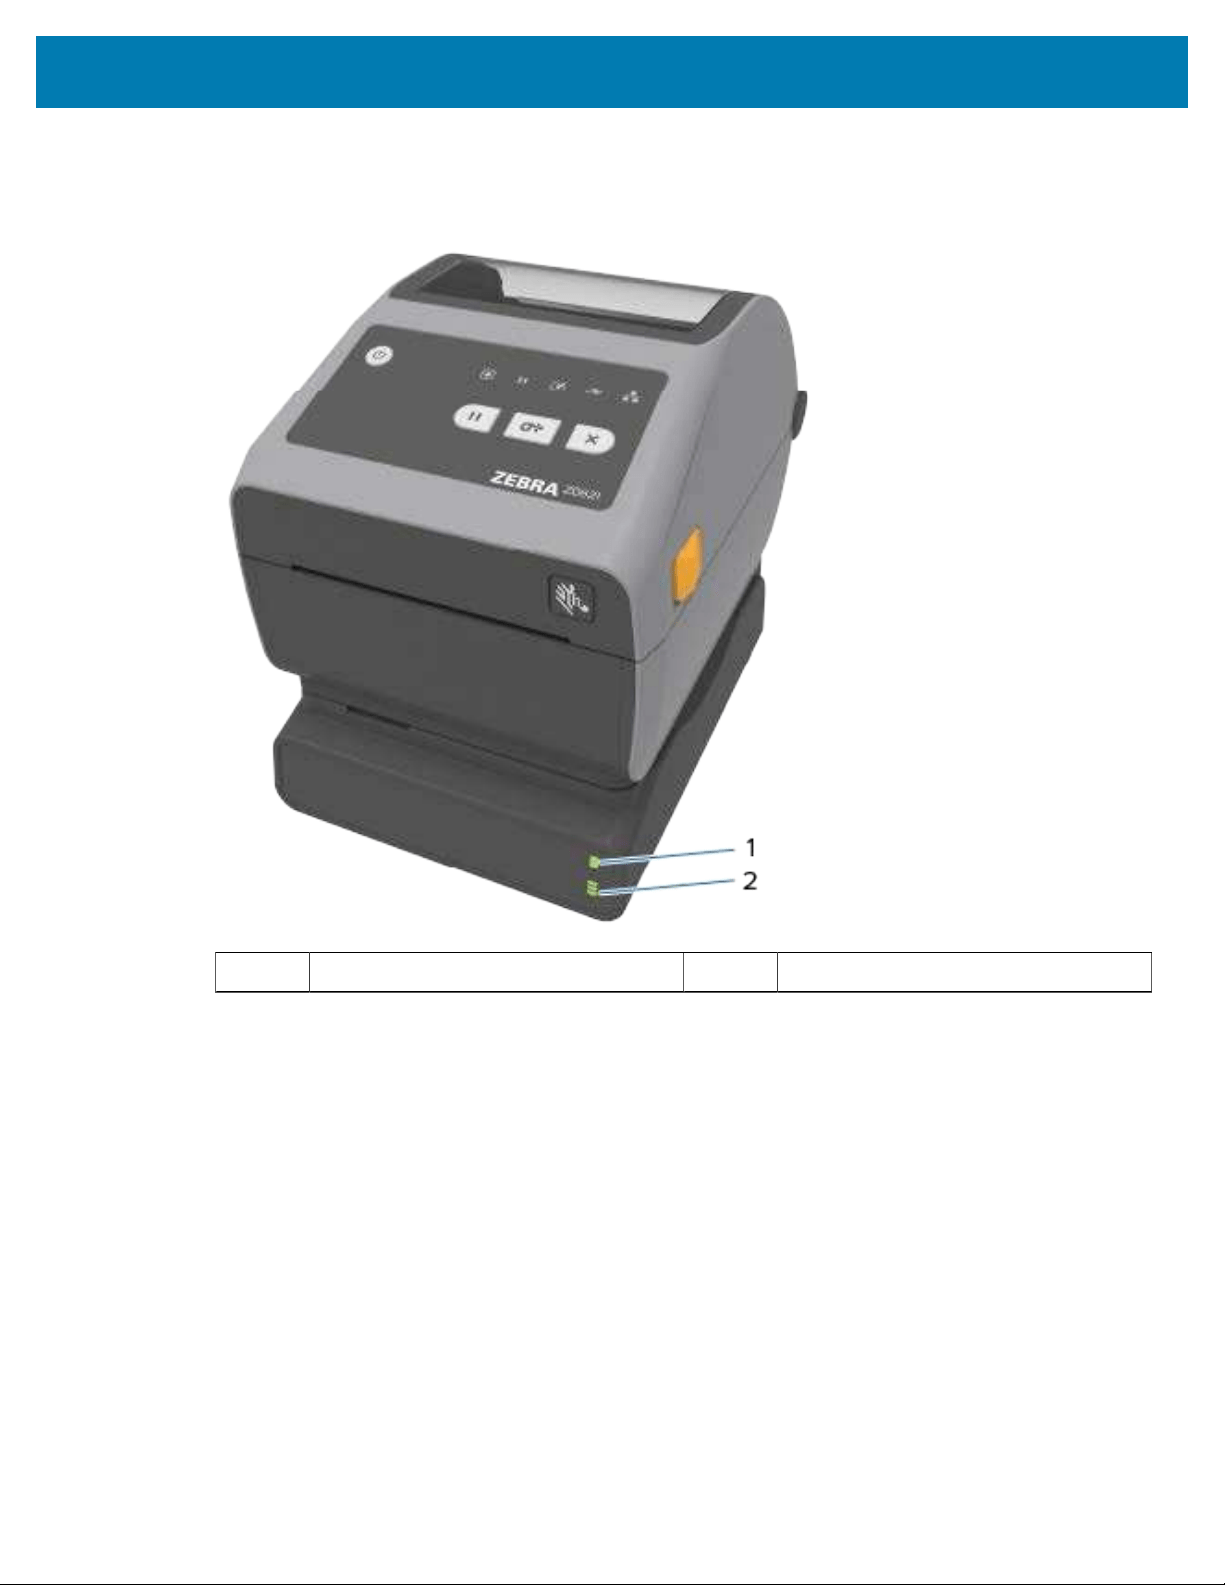
Attached Battery Base and Battery
Figure 1Printer with Battery Base Installed
1 Battery power base 2 Battery status and charge indicators
43
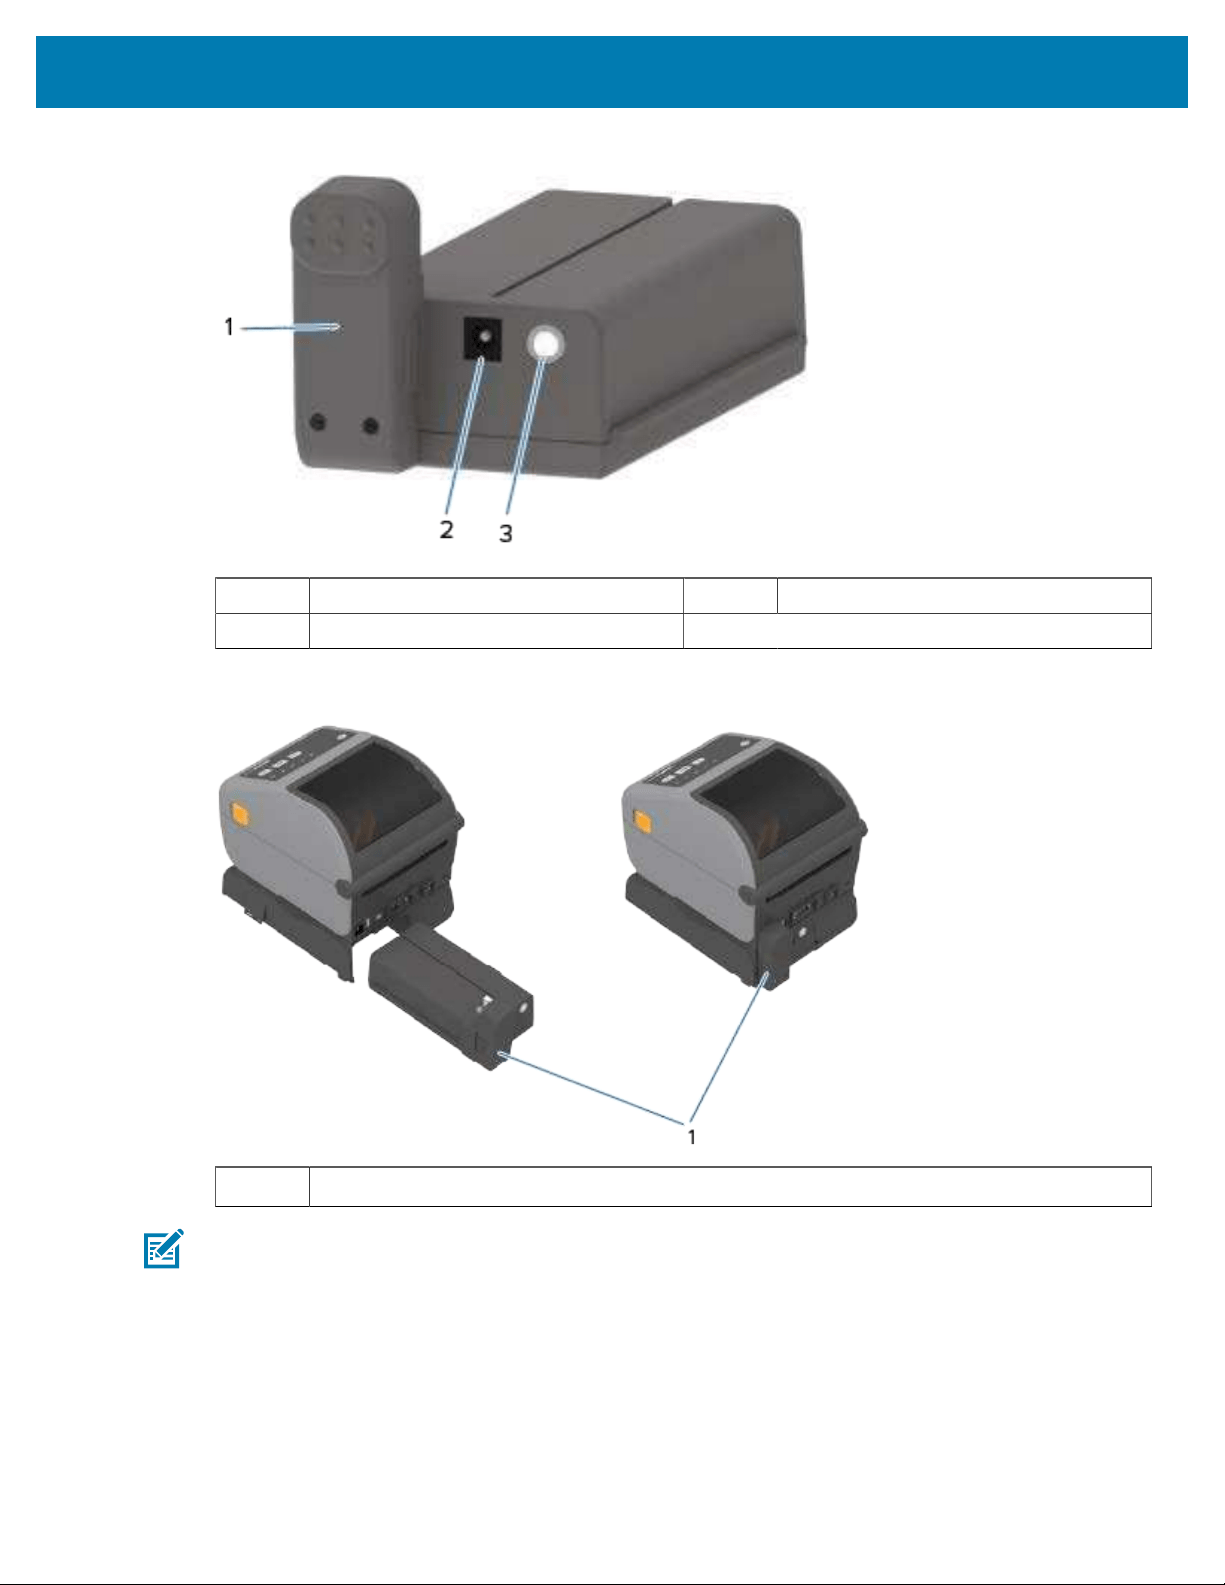
Printer Features
1 Power interface 3 Battery control button
2 Power input
Figure 2Battery Ready to Install (left) andPrinter with Battery installed (right)
1 Battery latch
NOTE: A printer power supply or other approved Zebra power source is needed to charge your
battery.The battery can be charged, checked, and configured for storage without being attached
to the printer.
44
Printer Features
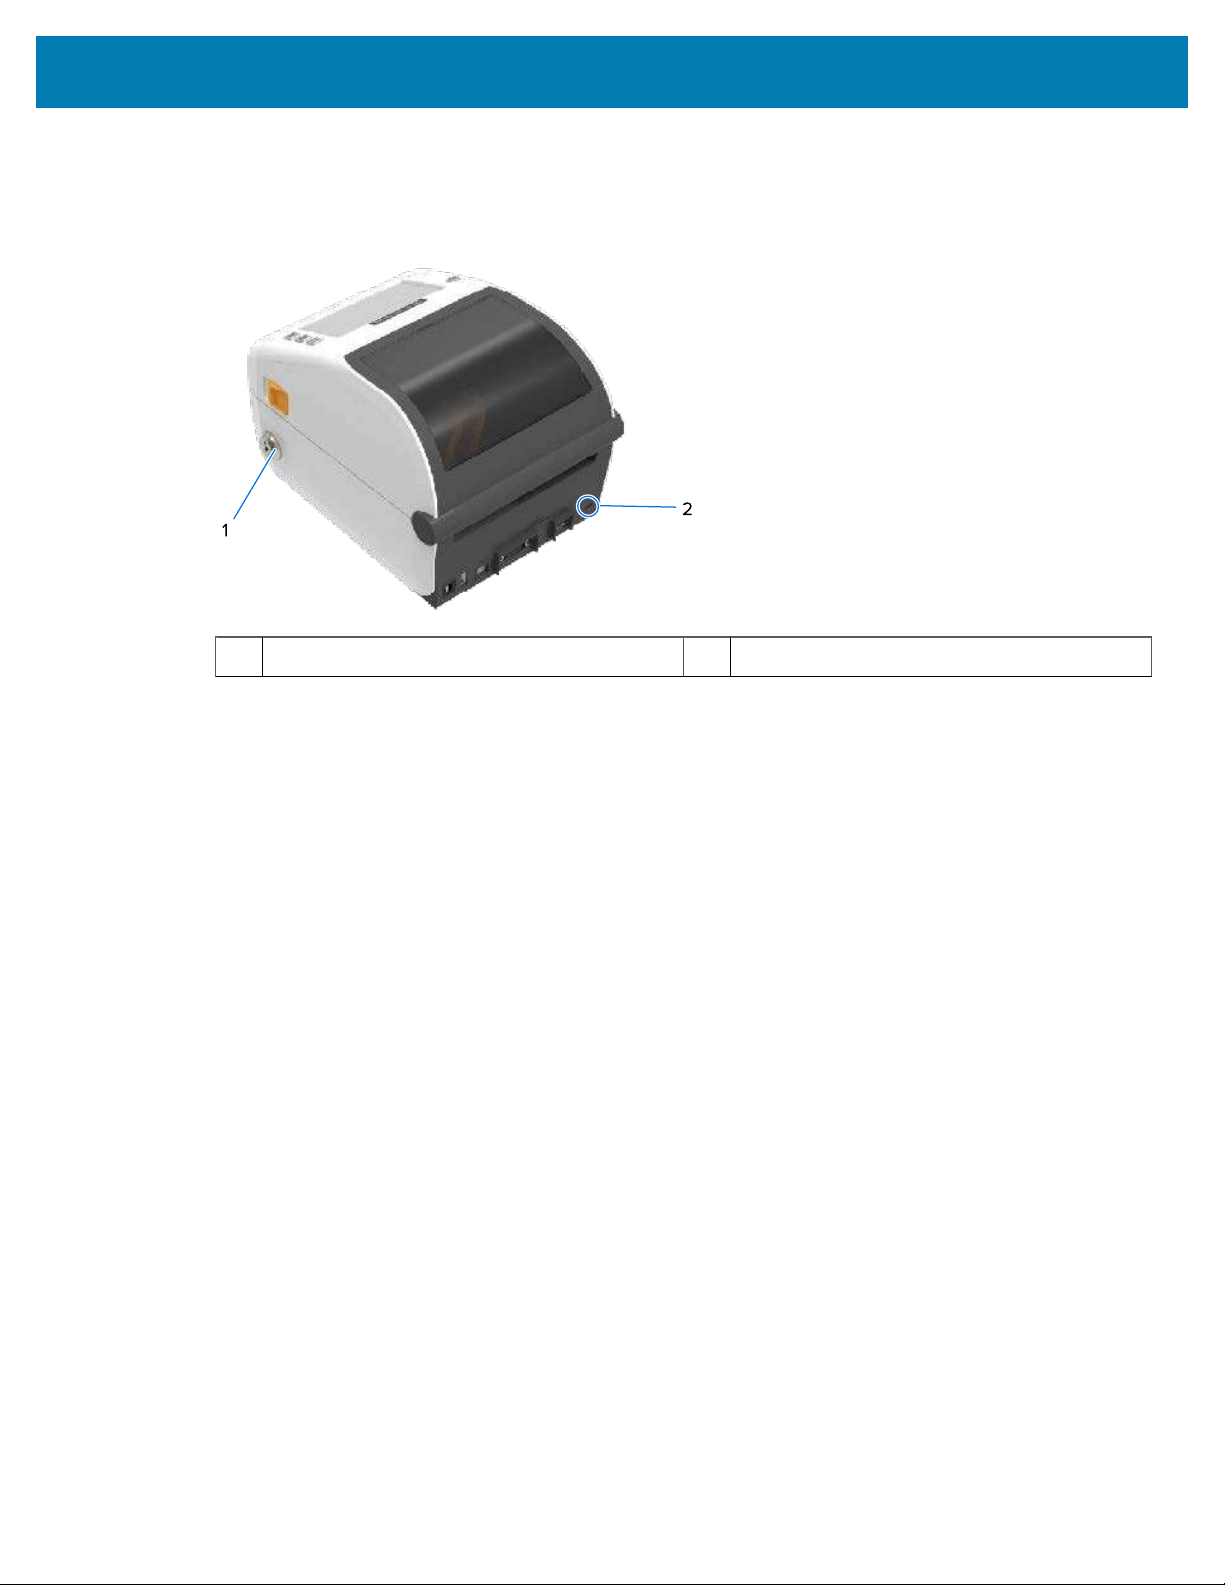
ZD621 Direct Thermal Locking Printer Feature – Healthcare Models Only
Direct Thermal Healthcare printer models come with lock-and-key access to the printer’s media
compartment plus a Kensington Lock Slot on the printer's back panel to secure the printer.
1 Cabinet lock 2 Kensington lock slot
For more information on the Locking Printer option, see
Zebra Basic Interpreter (ZBI) on page 256.
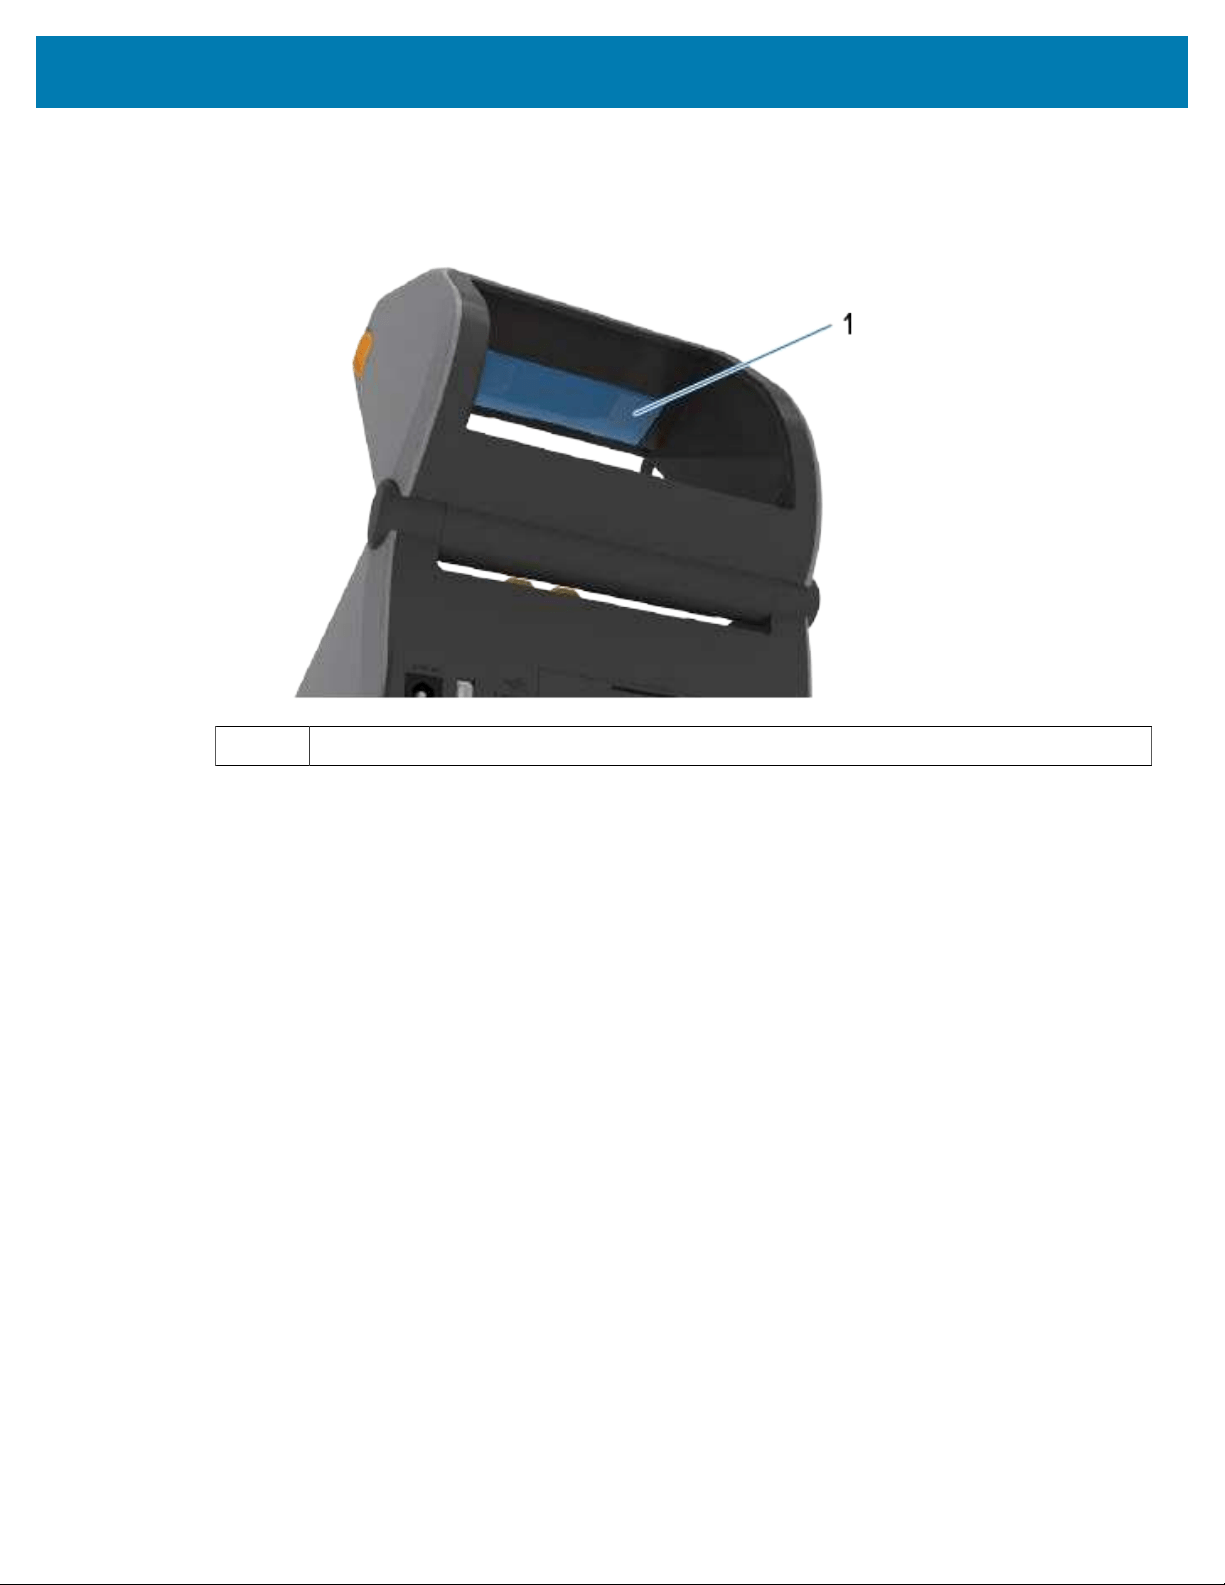
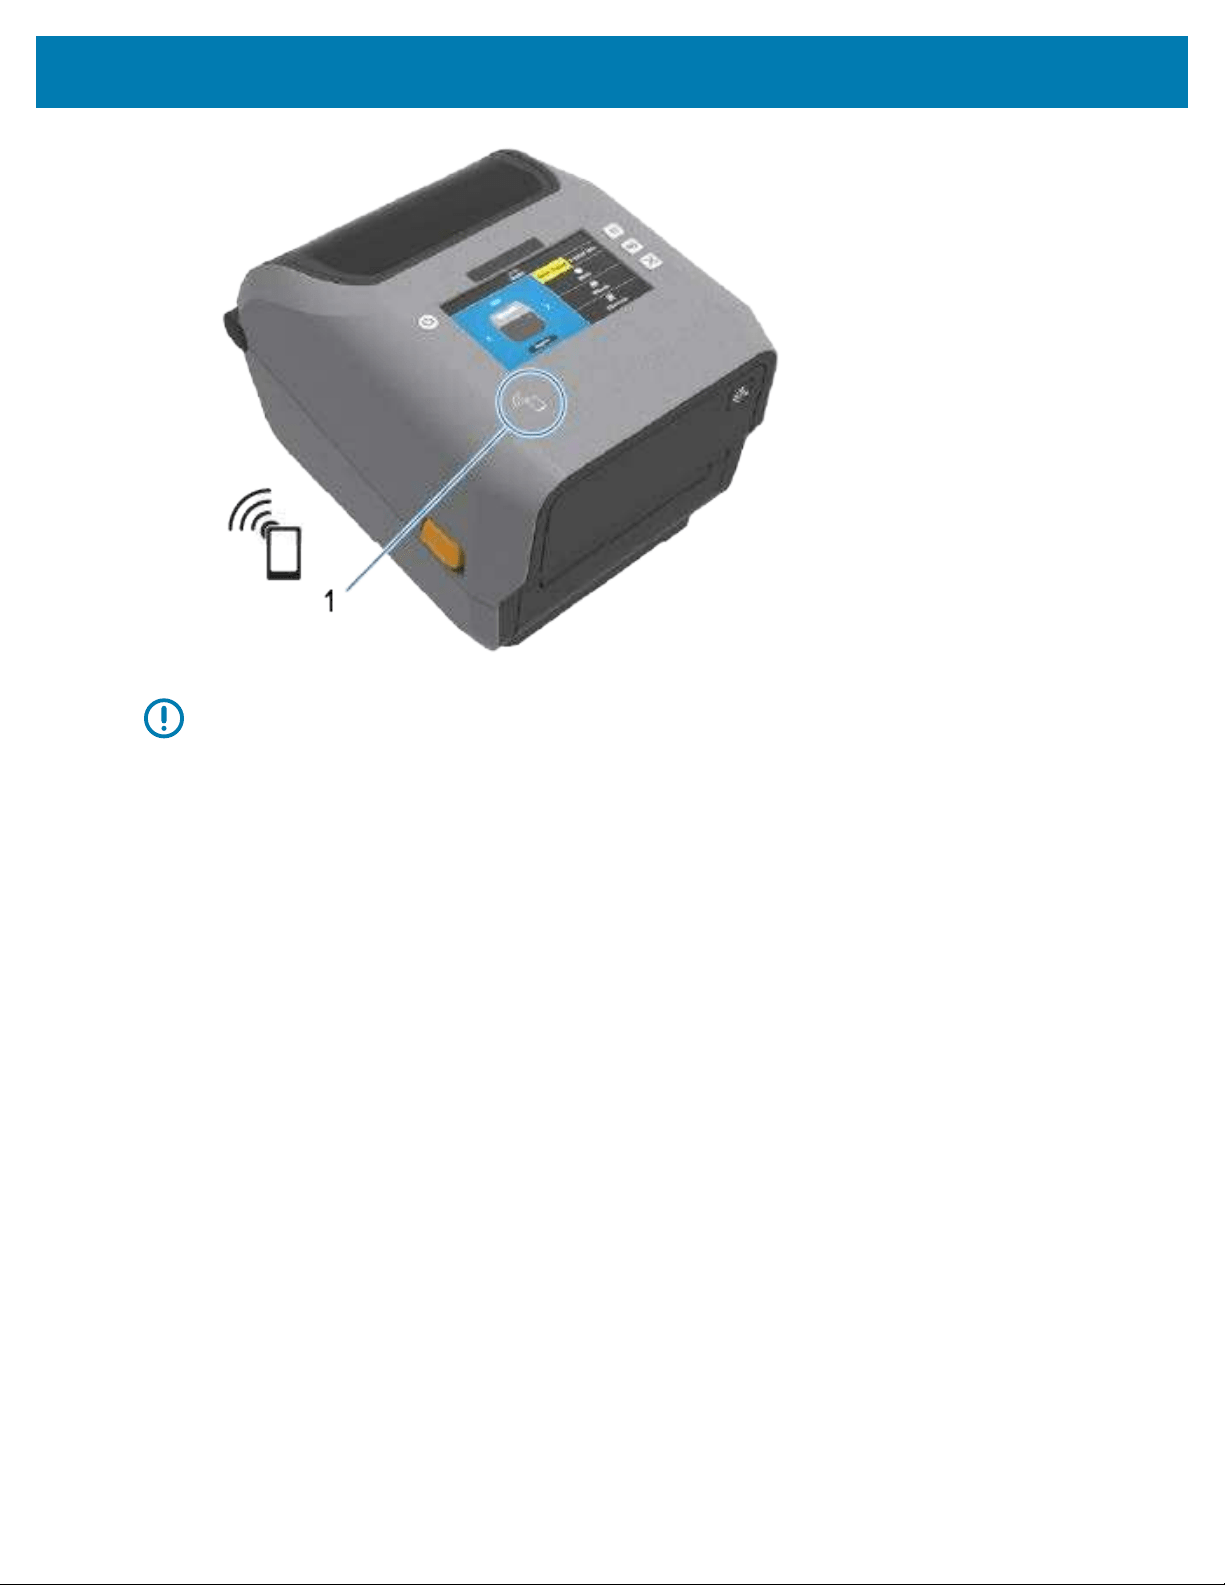
Zebra Print Touch for Near-Field Communications (NFC)
The Zebra Print Touch feature allows you to touch an Android-based, Near Field Communication (NFC)-
enabled device such as a smart phone or tablet to the printer’s Print Touch logo to pair the device to the
printer.
Zebra Print Touch is available on Zebra printer models with factory-installed networking (Wi-Fi, wired
Ethernet, Bluetooth, and Bluetooth Low Power). The Print Touch feature allows you to use your mobile
device to provide information for which you are prompted and then print a label using that information.
This image shows Print Touch (passive NFC) location on your printer.
45
Printer Features
IMPORTANT: Some mobile devices may not support NFC communication with the printer until
you configure the required NFC settings in your device. If you encounter difficulties, consult your
service provider or your smart device manufacturer for more information.
Data encoded into the tag includes:
• a URL for a Zebra quick-help style support web page
• the printer’s unique Bluetooth Low Energy MAC address
• the printer’s Bluetooth Classic MAC address (if present)
• the printer’s Wi-Fi (WLAN) MAC address (if present)
• the printer’s Ethernet (LAN) MAC address (if present)
• the printer SKU (ex.,D6A142-301F00EZ)
• the printer’s unique serial number
The NFC tag can be used to:
• pair with a compatible mobile device using Bluetooth.
• launch an application.
• launch a mobile browser to a web page.
46

Controls and Indicators
Controls and Indicators
This section discusses the two user control panel variations and their functionality.
User Interface
The printer's primary user interface controls are on the front of the device.Two user interface options are
available on these printers.
• Standard User Interface — This interface serves basic printer control and status functions. Operating
status is provided by five icon indicator lights. These lights, together and in combination, provide a wide
range of printer status notifications. They are visible from a farther distance than the proximity needed to
read a printer display screen. See the Meaning of the Indicator Light Patterns on page 53.
• The printer user interface supports various routine tasks such as replacing printing supplies (labels,
receipt paper, transfer ribbon, or others). For example, you are notified of a media-out condition by
the color and state of two indicators.
• Each status indicator icon represent a functional area of printer operation (such as SUPPLIES or
NETWORK).
• Depending on the operational state of the printer, the printer's status indicator lights convey the
printer's status and activities(data downloading, over-temperature cooling cycle, or other) using a
variety of states:
• off (not lit—does NOT require your attention)
• litup red, green, or amber (orange yellow)
• blinking / flashing
• fading (bright to off)
• lighting up steady in a variety of patterns
• The color of these status indicators may be:
• Red — indicates that your attention is needed or that the printer is not ready to print.
• Green — indicates the printer is ready or functioning.
• Amber (orange/yellow) — indicates a busy or active process (data downloading, over-temperature
cooling cycle, etc.).
• Control buttons—You will use thesein various combinations to access internal utilities that calibrate
the printer to your media and change printer settings that are modifiable.
47

Controls and Indicators
• Color Display or Color Touch Display (available on some printer ZD printer models) — Provides
the means to easily set up and configure the printer. The display is customizable by all user types,
The interface includes all standard user interface controls and indicators to provide printer status
information.
• The display option on the printer provides printer status and messages. It supports 19 languages,
selectable on the configuration menus or set through programming.
• The menu system allows you to change print settings (darkness, speed, etc.), run utilities, and set the
wired and wireless communication interfaces (serial, Ethernet, Wi-Fi) installed on your printer.
Standard Interface Controls
The printer's user interface is located on the top of the printer towards the front.
48
Controls and Indicators
49
Icon Button Descriptions
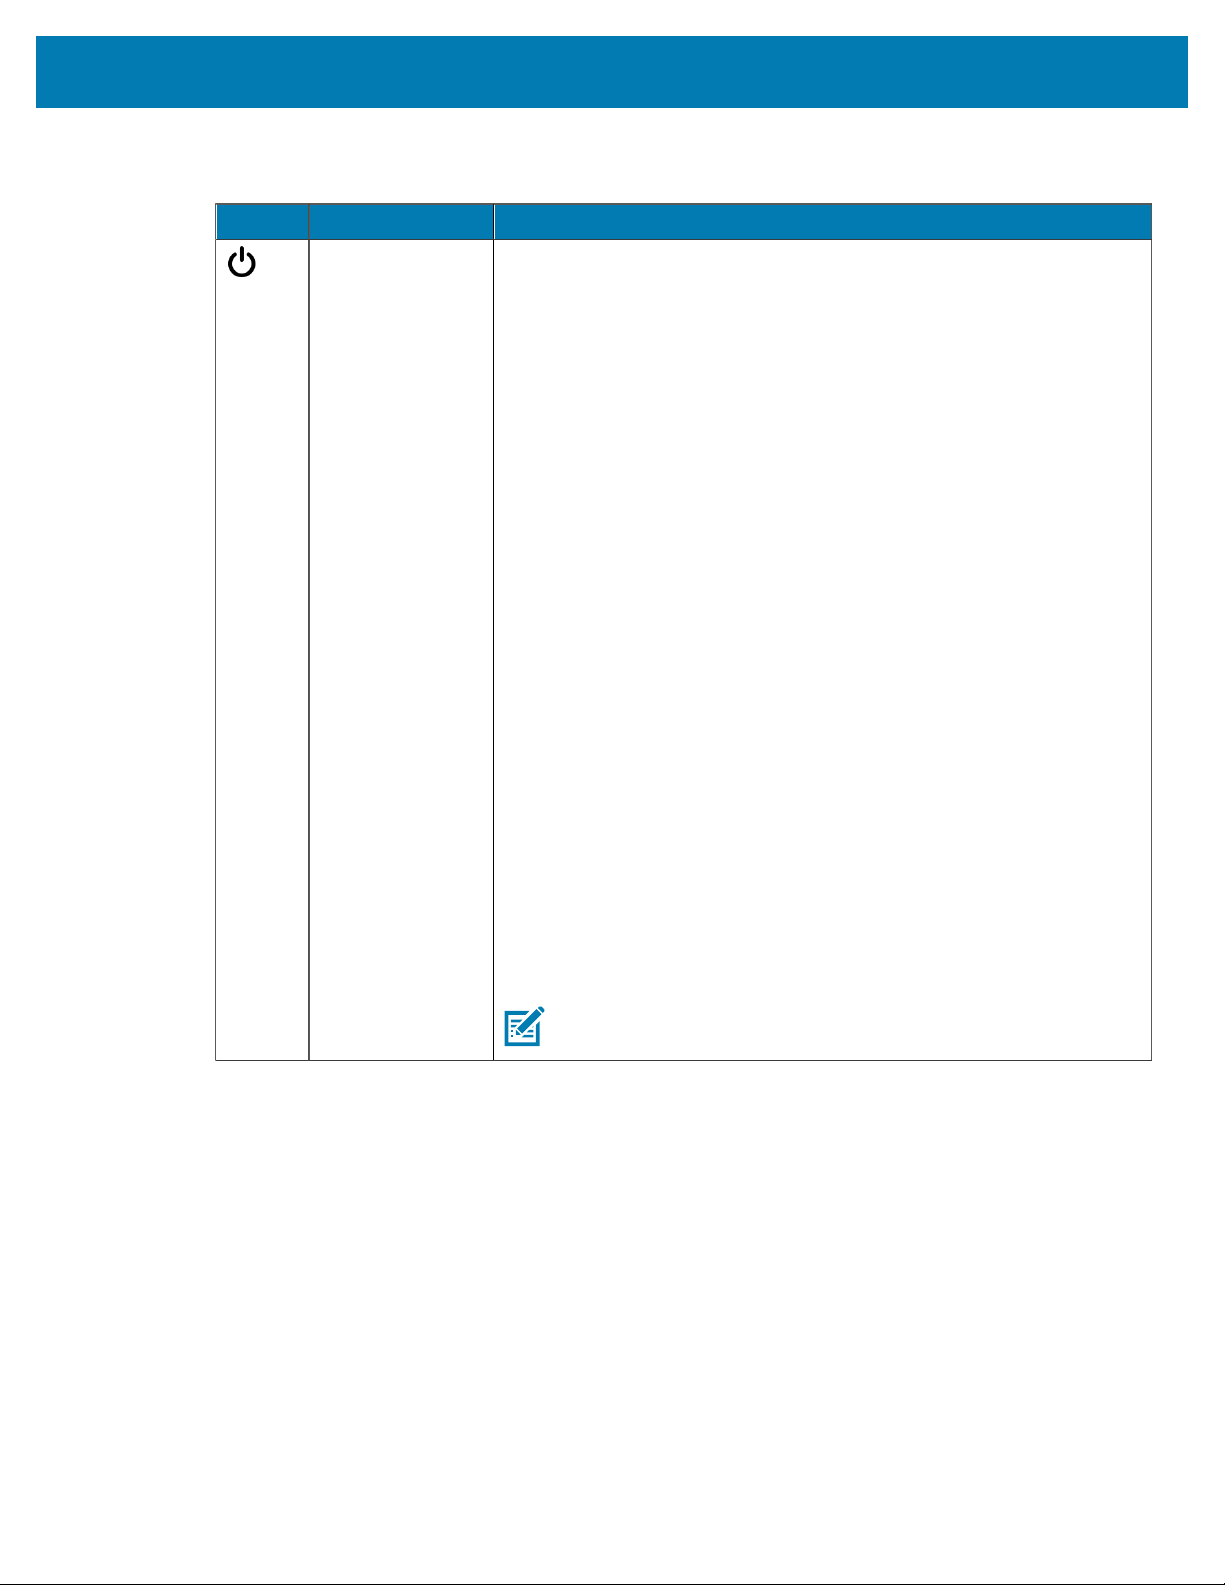
1. POWER button
— Pressing this
button turns
power to the
printerON and
OFF.
Also used to
initiate low-power
sleep and wake
states.
• Initial power ON — Press POWER until the printer’s indicator lights
flash on in various combinations for several seconds. This indicates
the printer is performing self-diagnostics and configuration checks,
and integrating optional components.The Status indicator turns solid
green, indicating the printer is ready for normal print operations.
• Energy Star (low power mode) — To minimize power use, press and
release POWER one time to place the printer in Energy Star low
power mode. All the indicators will turn off except the Status Indicator
which will turn on and off to indicate the printer is in Energy Star
Mode.
• Power OFF with Energy Star Delayed —Press and hold POWER for
4–9 seconds. You can start a batch print job and put the printer into
the low power consumption state of Sleep mode after the job has
finished.
• Power OFF / Shutdown — Press and hold POWER for 4–9 seconds to
turn printer power OFF.
• Power Failure Recovery Mode — This printer feature is activated by a
hardware jumper setting on one of the optional Printer Connectivity
Modules installed in the printer. You can turn this mode on and off by
activating the jumper.
• The printer automatically powers ON when connected to an active
AC power source.
• Supports Sleep Mode and Power OFF with Sleep Mode Delayed
features.
• When Power Failure Recovery Mode is initiated, the printer resets
andand runs the Initial Power ON sequence onthe loss of power
(Power OFF / Shutdown).
NOTE: Power Failure Recovery Mode is available ONLY on
printers with a printer connectivity module installed.
Table 4Standard Interface Controls
Controls and Indicators
Icon Button Descriptions
2. STATUS
Indicator —
Primary status
indicator for
overall printer
health and
operational status.
Also known as the
Power indicator.
• Green — The printer is ready to print and engage in data transfer.
• Green, slowly turning on and off —The printer is in sleep mode.
• Red— Media out, media detection error, head (cover/printhead)
open, cut error, or printhead authentication failure.
• Amber— Printhead over temp (temperature), printhead element
failure, out of memory while storing content (formats, graphics, fonts,
etc.), and interface power fault for USB Host or serial ports.
• Blinking amber— Printhead under temp (temperature)
• Blinking red— Printhead over temp (temperature). This status is
coupled with blinking red Pause indicator. Printer requires cooling
and restart.
Table 4Standard Interface Controls
50
3. PAUSE
Indicator — The
printer is in Pause
mode when the
Pause indicator
light is on. A label
(print form) or
all labels (print
forms) in the print
buffer’s queue can
be canceledusing
the CANCEL
button when the
Pause indicator is
on.
• Amber— Printer is paused. The print, label feed(advance), and other
label routines are suspended until you exit the printer from Pause
state by pressing PAUSE.
• Blinking red— Printhead over temp (temperature). Coupled with
blinking red Status indicator, indicates that the printer must be
allowed to cool and then restarted.
4.. DATA Indicat
— Indicates the
status of data
transfer activity.
• Off— Data transfer is not occurring.
• Green— A data communication operation has not finished, but data
is not actively being transferred.
• Blinking Green— Data communication in process.
• Blinking Amber— OUT OF MEMORY while storing content (formats,
graphics, fonts, etc.).

Controls and Indicators
Icon Button Descriptions
5. SUPPLIES
Indicator —
Indicates status of
media loaded in
the printer (label,
receipt, tags,
transfer ribbon,
ribbon cartridge,
etc.)
• Red—Media Out.
• Blinking red — RIBBON OUT. Applies to printing in Thermal Transfer
mode, (The printer does NOT require ribbon to print in Direct Thermal
mode.)
• Blinking red and amber— Ribbon Cartridge Low (ZD421 Ribbon
Cartridge printers only).
• Blinking amber— RIBBON IN (ZD421 Ribbon Cartridge printers only).
Detected when the printer is set to print in Direct Thermal mode, a
mode in which the printer does NOT require ribbon to print.
6. NETWORK
Indicator —
Indicates network
activity and status.
• Amber — 10 base Ethernet (LAN) connection detected.
• Green— 10/100 Ethernet (LAN) connection detected or when Wi-Fi
(WLAN) has a strong signal and is connected.
• Red— when an Ethernet (LAN) or Wi-Fi (WLAN) fault occurs.
• Blinking red — during Wi-Fi (WLAN) association.
• Blinking amber— during Wi-Fi (WLAN) authentication.
• Blinking green— when a Wi-Fi (WLAN) connection has been
established but the signal is weak.
Table 4Standard Interface Controls(Continued)
51
Controls and Indicators
Icon Button Descriptions
7. CANCEL Button
— Cancels print
jobs.Functional
only when the
printer is in Pause
state.
• Cancel printing— Press CANCEL one time to cancel printing the next
format in the print buffer.
• Cancel all print jobs— Press and hold CANCEL for two seconds. The
printer cancels printing ALL pending formats.
8. FEED (Advance)
Button — Advance
a label (print form/
format).
• Feed one label (one blank form or format length of a label, receipt,
tag, ticket, etc.) — Press and release FEED when the printer is not
printing.
• Advance multiple labels— Press and hold FEED when the printer is
not printing. The printer advances loaded media to the beginning
position of the next label (format/form) and the next until you release
FEED.
• Reprint last label (activated using a SGD command:
ezpl.reprint_mode)—This feature allows the reprinting a failed
media print. If the printer runs out of media (paper, labels, transfer
ribbon, etc.), it can re-print the last label (print form/format).
NOTE: The print buffer which stores the print image for
printing and reprint is automatically cleared when the
printer is turned off or reset.
9. PAUSE Button
— Pauses print
and media
movement.
• Stop print activities and place the printer into Pause state— Press
PAUSE. The printer finishes printing the current label before it
pauses.The PAUSE indicator displays Amber (orange/yellow) to
indicate the printer is in Pause state.
• Exit the printer out of Pause state and return it to normal operation—
Press PAUSE when the printer is in Pause state. If you are printing a
multi-label (form or format) job or if one or more other prints job are in
the print queue, the printer resumes printing the job(s) in queue.
Table 4Standard Interface Controls(Continued)
52
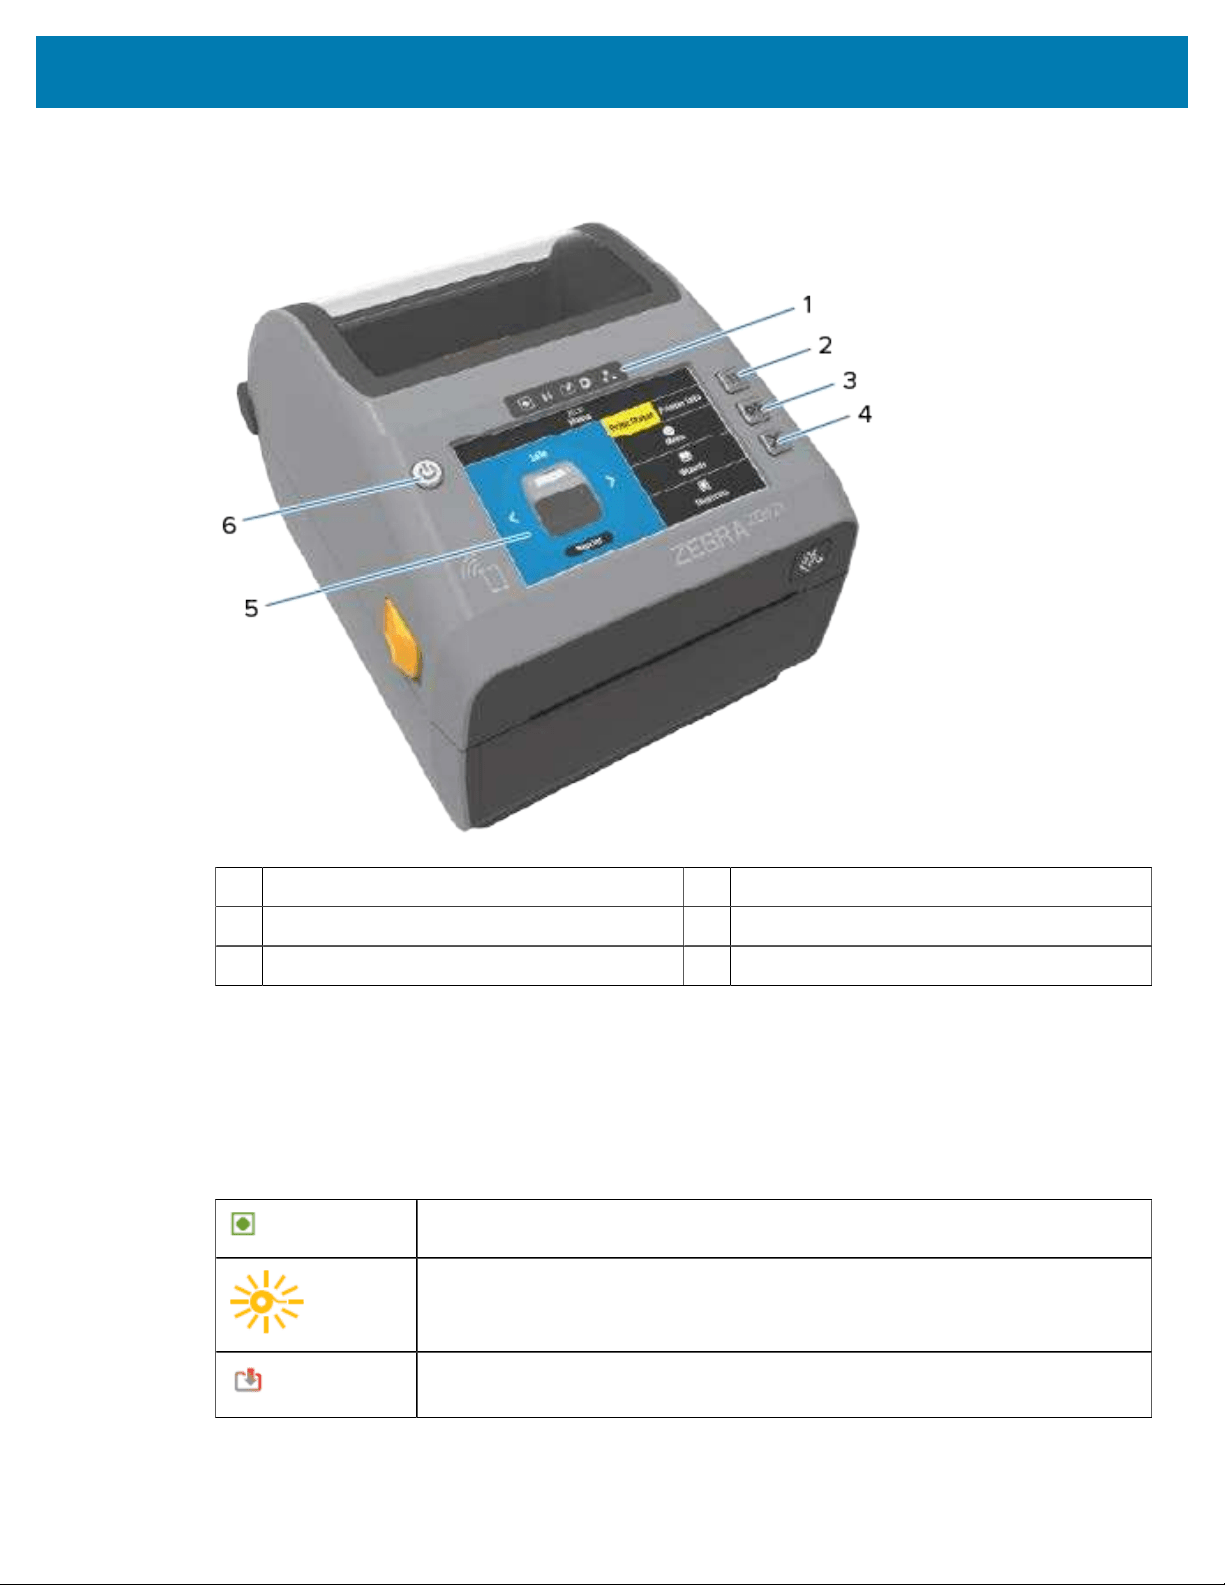
Controls and Indicators
1 Status indicators 4 CANCEL button
2 PAUSE button 5 Color Touch display and interface
3 FEED button 6 POWER button
Meaning of the Indicator Light Patterns
All Link-OS 4 inch printers include status indicators on their user interfaces.
The indicators may be off or on in a variety of lighting patterns of red, green, or amber (orange/yellow).
They may flash (blink), fade (bright to off), alternate between colors, or simply remain lit.as indicated in the
table below.
Steady on
Flashing
Fade
53
On printers with a Color Touch display, the user interface controls are mapped as shown here.
The functionality of the buttons is the same as described earlier.
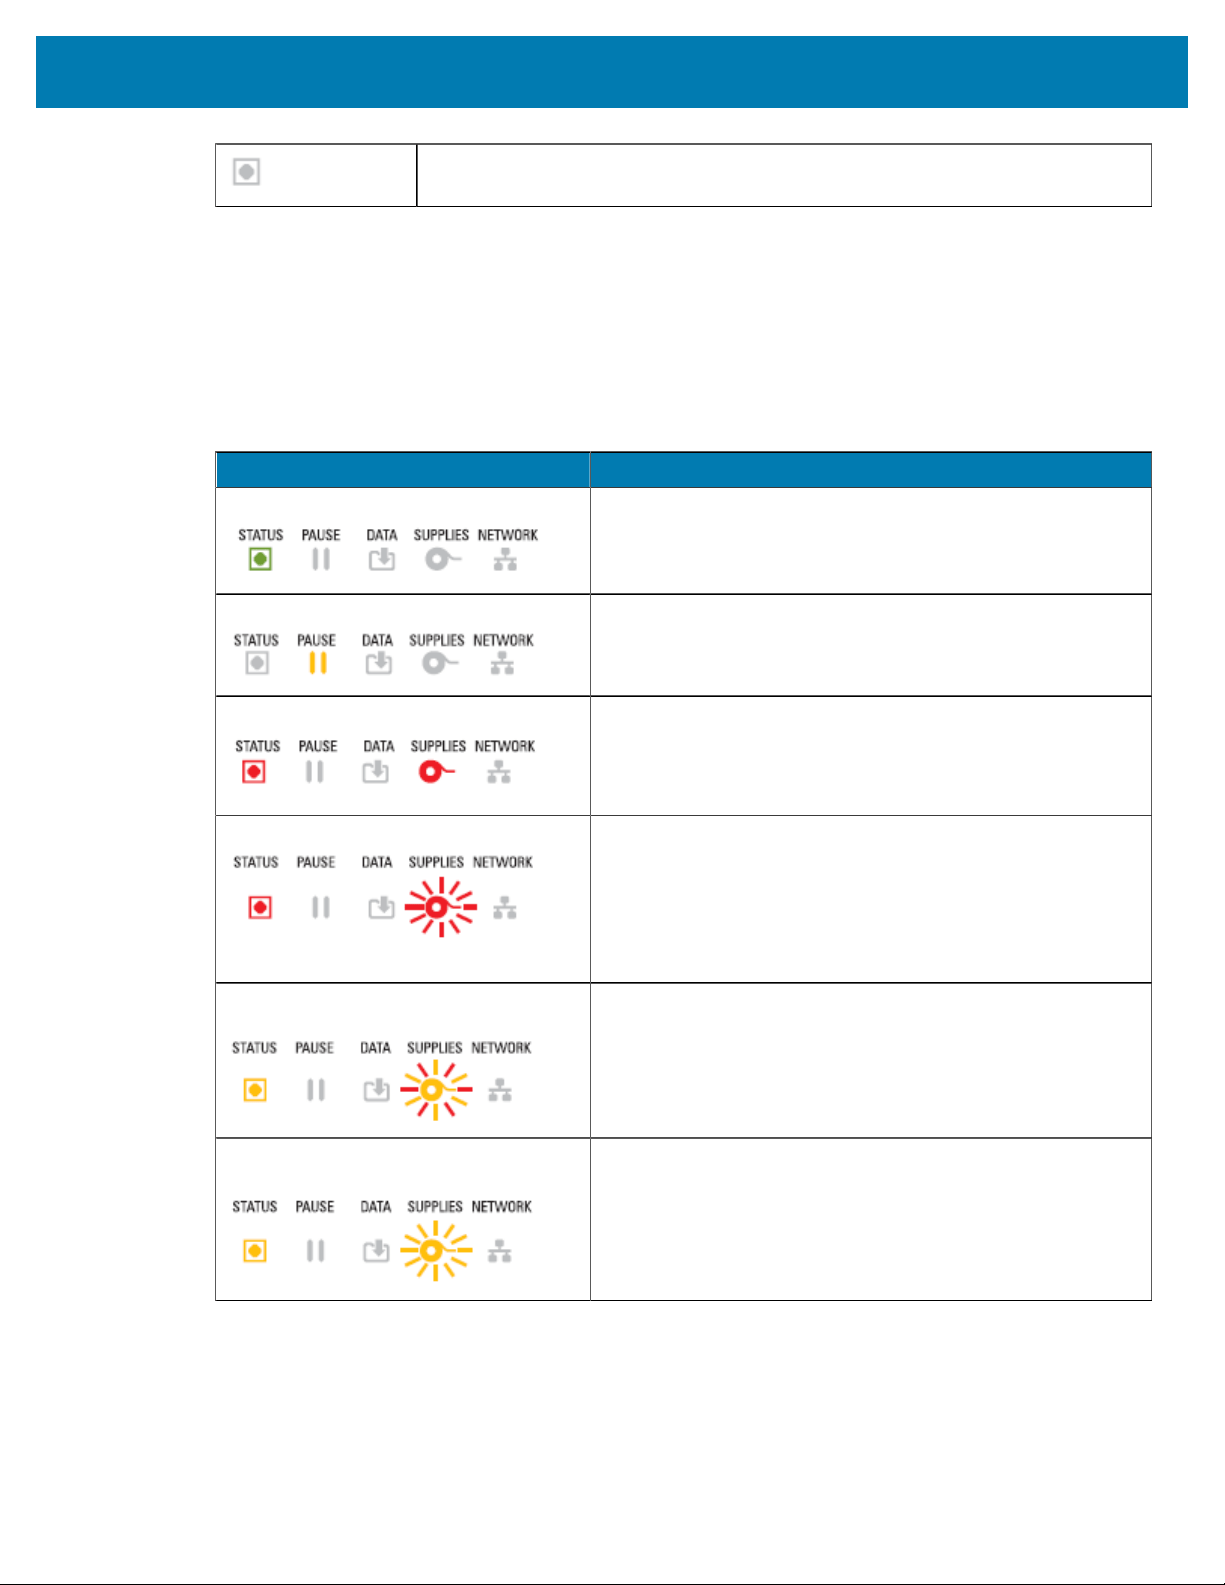
Controls and Indicators
Off
For information on resolving errors identified using the status of the indicator lights, see Troubleshooting
on page 311.
Status–Typical Operating Conditions
This table describes printer status under typical operating conditions.
Status Description
Printer Ready
The printer is powered on and ready to print.
Pause
The printer is paused. Press PAUSE to resume print
operations.
Media Out
The printer has run out of media (labels, receipts, tags,
tickets, etc.).
The printer needs attention and cannot continue without user
intervention.
Ribbon Out
The printer has detected the end of a ribbon roll (reflective
end on ribbon rolls) or, in case of a Ribbon Cartridge printer, a
missing ribbon cartridge.
Alternatively, if a Ribbon Cartridge printer is set to print
in Thermal Transfer mode, the ribbon cartridge must be
replaced for the printer to continue printing.
Ribbon Low (Ribbon Cartridge Printers
only)
The default value for a Ribbon Low condition is 10% of ribbon
remaining.
The Media indicator flashes red and yellow while the Status
indicator is solid yellow.
Ribbon In (Ribbon Cartridge Printers
Only)
A Thermal Transfer printer is set to print in Direct Thermal
Mode while it has a ribbon cartridge installed.
Remove the ribbon cartridge to continue printing in Direct
Thermal mode.
Table 5Typical Operating ConditionsStatus Indications
54
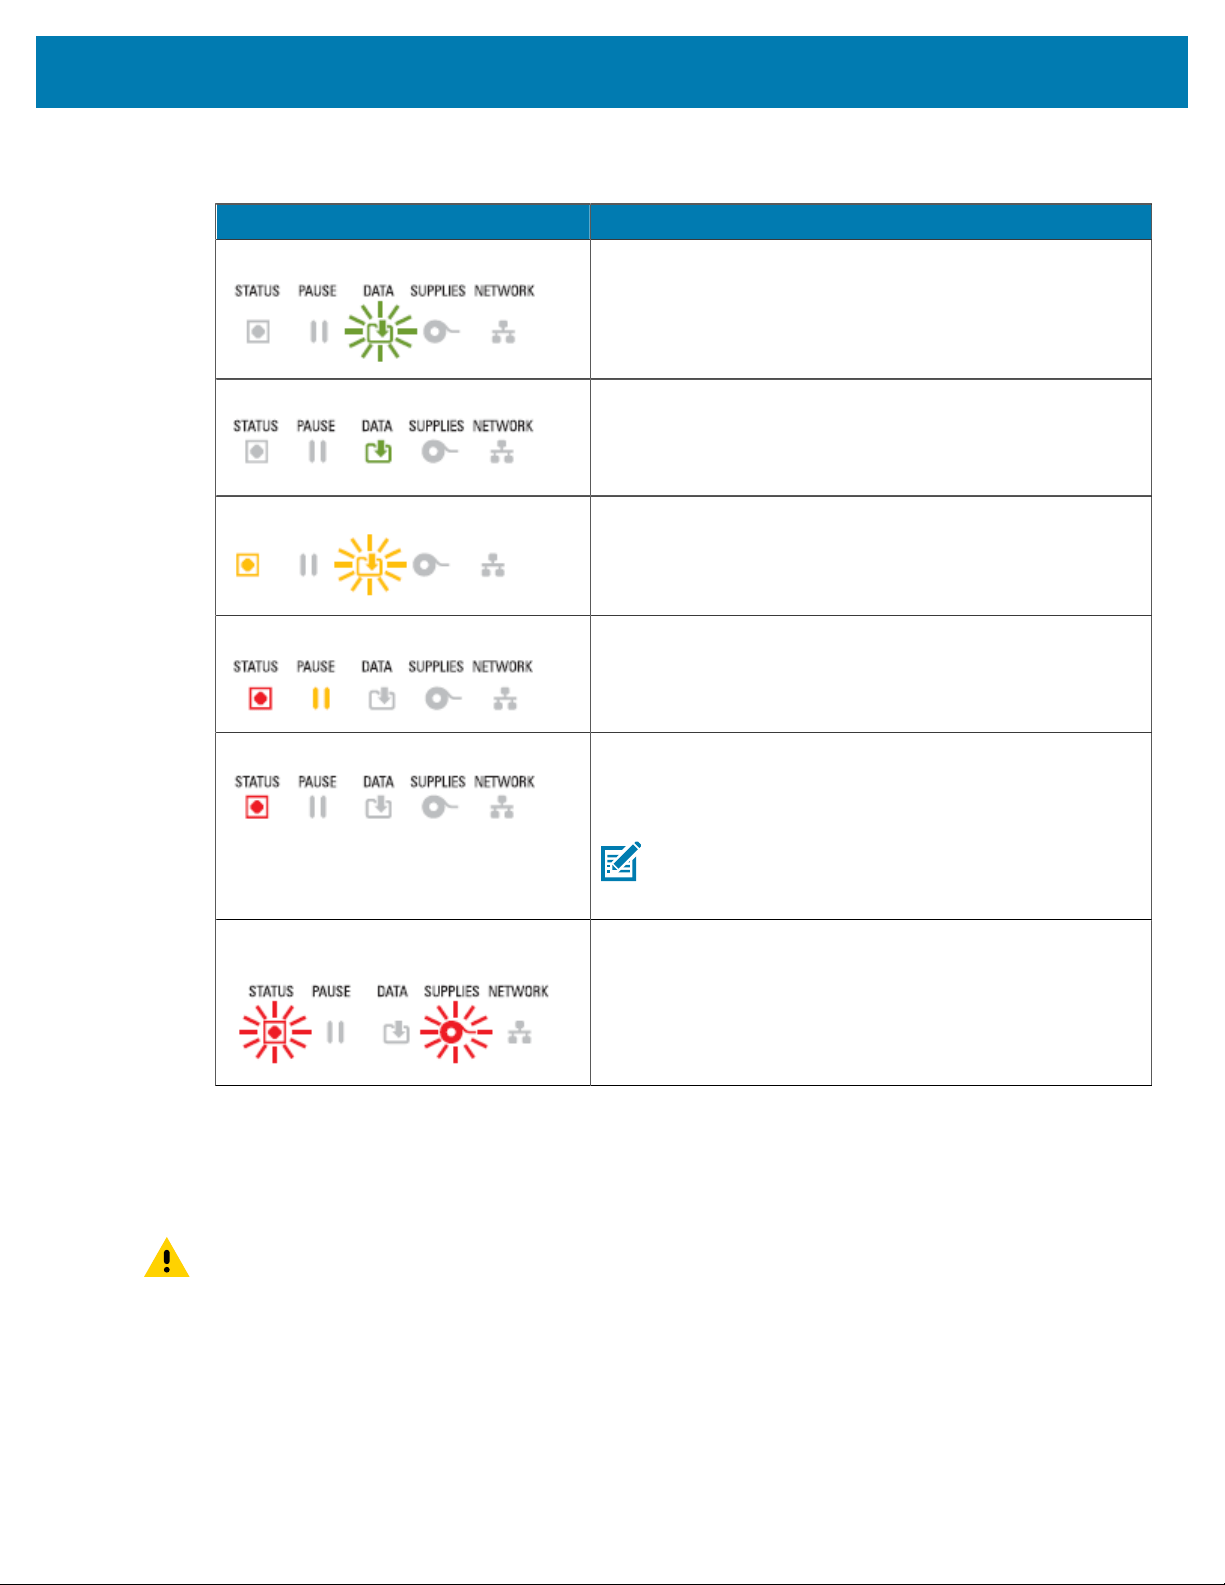
Controls and Indicators
Status Description
Transferring Data
Data communication is in process.
Data Transfers Paused
While a data communication operation has not yet been
complete, data is not actively being transferred at the time.
Out of Memory
Out of memory while attempting to storing content such as
formats, graphics, and fonts.
Make sure the printer has enough storage for the data you
are trying to transfer.
Cover Open/Printhead (PH) Open
The cover (printhead) is open. The printer needs attention
and cannot continue without user intervention.
Cut Error (Binding)
The cutter blade is bound and is not moving properly.
The cutter is not an operator-serviceable component.Call a
service technician for assistance.
NOTE: Do NOT remove the cutter cover (bezel).
Never attempt to insert objects or fingers in to the
cutter mechanism.
Cartridge Authentication Failed (Ribbon
Cartridge printers only)
The ribbon cartridge cannot be authenticated or it has been
altered.
Your printer only supports Genuine Zebra Ribbon Cartridges.
It cannot use refurbished ribbon cartridges or non-Zebra
ribbon cartridges to print.
Table 5Typical Operating ConditionsStatus Indications(Continued)
Status–Printhead Operation
This table describes status indicator conditions you may see during printhead operations and what those
conditions mean.
CAUTION: The printhead may be hot and could cause severe burns. Allow the printhead to cool.
55
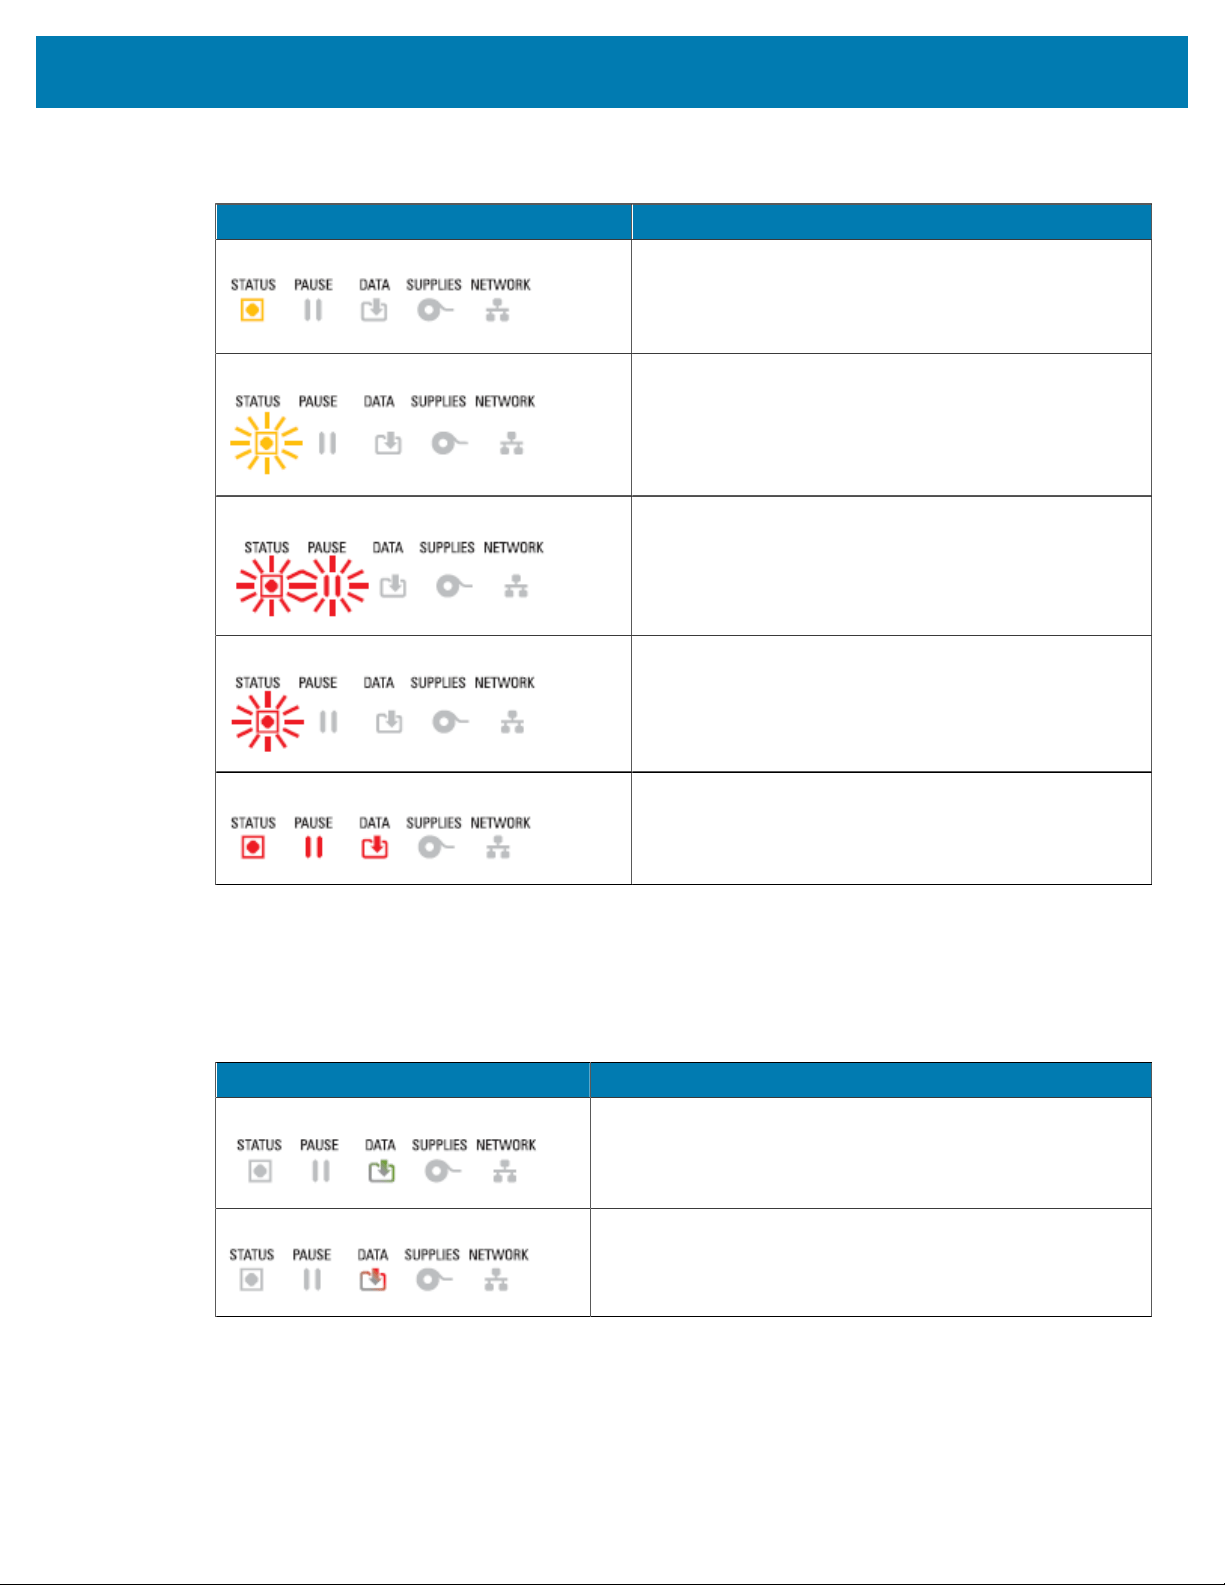
Controls and Indicators
Status Description
Printhead Over Temp
The printhead is over temperature and paused to allow
the printhead to cool. The print operation will resume
after the printhead has cooled.
Printhead Under Temp
The printhead is under temperature. Typically, the
operating environment is below the printer’s minimum
operational temperature.
Printhead Shutdown
The printhead is over temperature. Turn printer power
OFF. Wait several minutes to allow the printer to
completely cool. Then turn printer power ON.
Printhead Resolution Error
The printer is unable to read the printhead resolution
type (dpi). The printhead has been replaced incorrectly
or replaced with a non-Zebra-branded printhead.
Unauthorized Printhead Error
The printhead was replaced with one that is not a
genuine Zebra printhead. Install a genuine Zebra
printhead to continue.
Table 6Printhead Operation Status Indications
Status–Bluetooth Low Energy Option
This table describes Bluetooth status indications and what they mean.
Status Description
Bluetooth LE Paired Bluetooth Low Energy has paired.
Bluetooth LE Failed to Pair Bluetooth Low Energy has failed to pair.
Table 7Bluetooth Low Energy Status Indicators
56
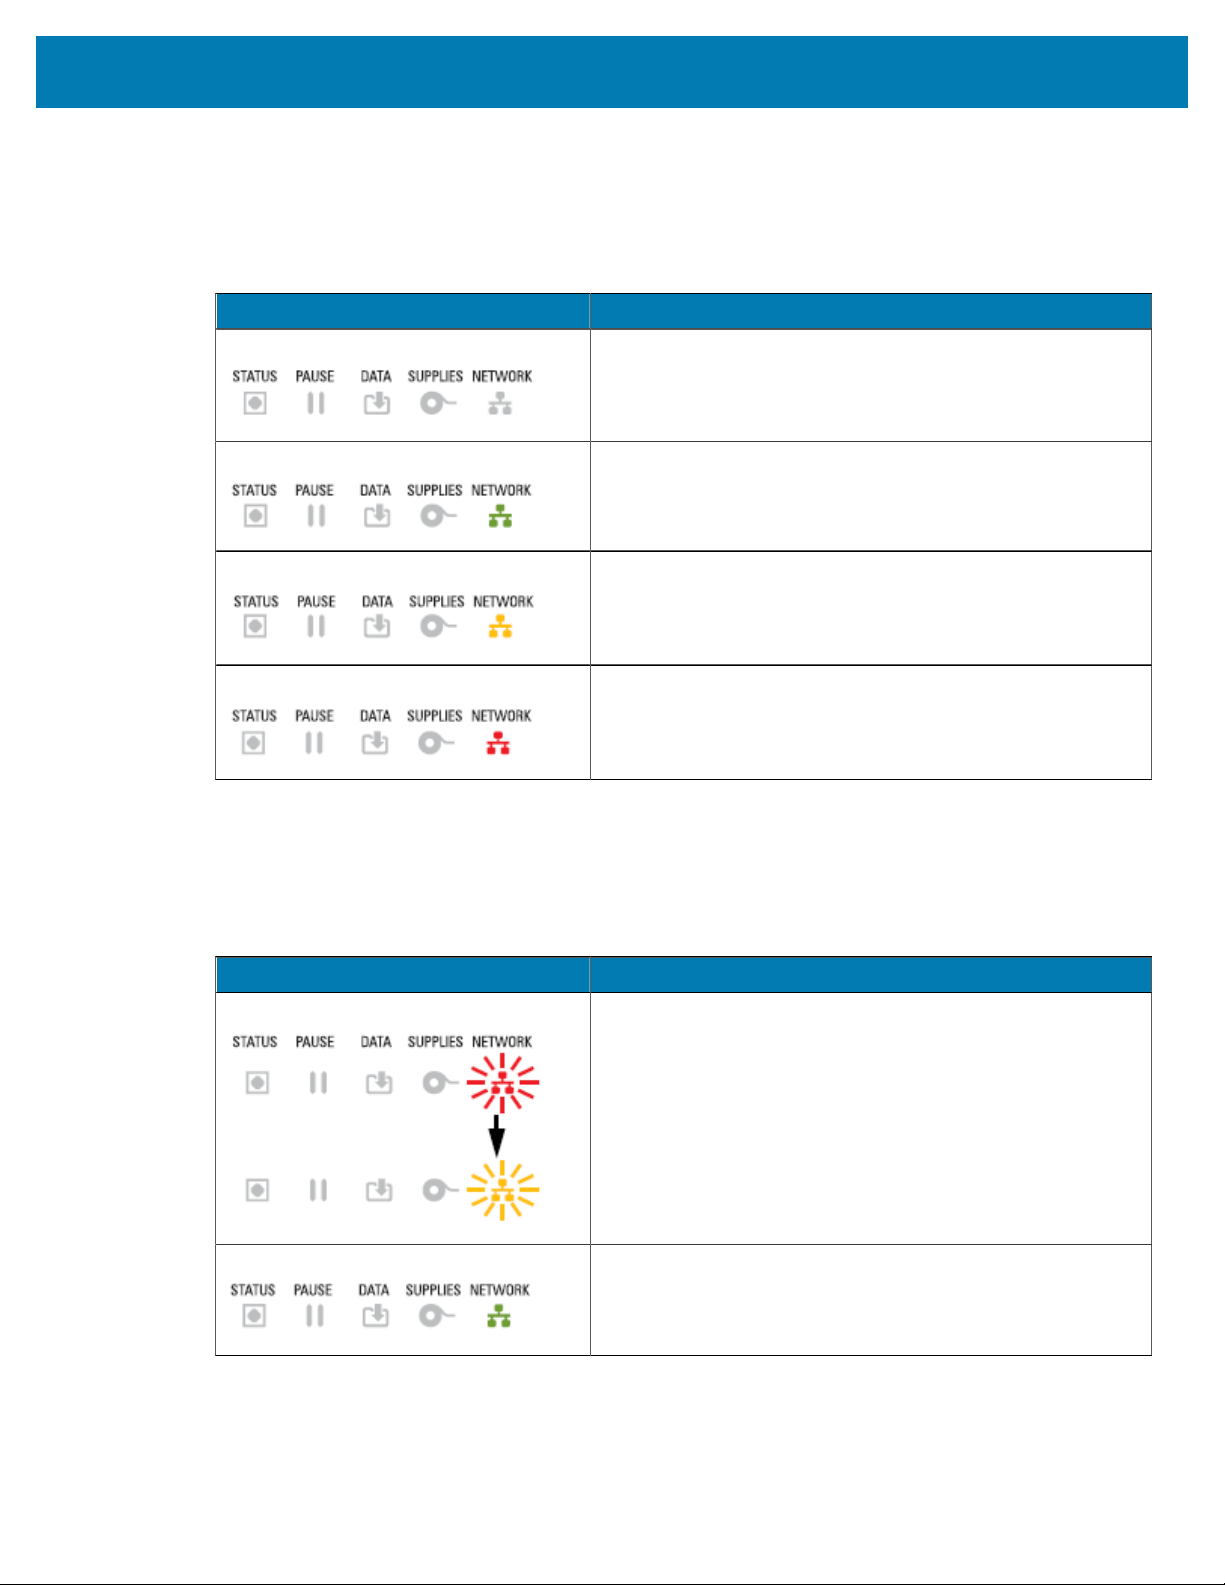
Controls and Indicators
Status–Ethernet (LAN) Option
This table describes Ethernet (LAN) statuses.
Status Description
Ethernet (LAN) No Link
No Ethernet link is available. The NETWORK status light on
the back of the printer is off.
Ethernet (LAN) 100base Link
A 100 Base link was found.
Ethernet (LAN) 10base Link
A 10 Base link was found.
Ethernet (LAN) Link Error
An error condition exists. The printer is not connected to your
network.
Table 8Ethernet (LAN) Status Indications
Status–Wi-Fi (WLAN) Option
This table describes Wi-Fi (WLAN) statuses.
Status Description
Wi-Fi Connecting to WLAN
The light flashes red while the printer associates with the
network.
The light then flashes yellow while the printer is
authenticating with the network.
Wi-Fi (WLAN) 100base Link The printer is connected to your network and the Wi-Fi signal
is strong.
Table 9Wi-Fi (WLAN)Status Indications
57
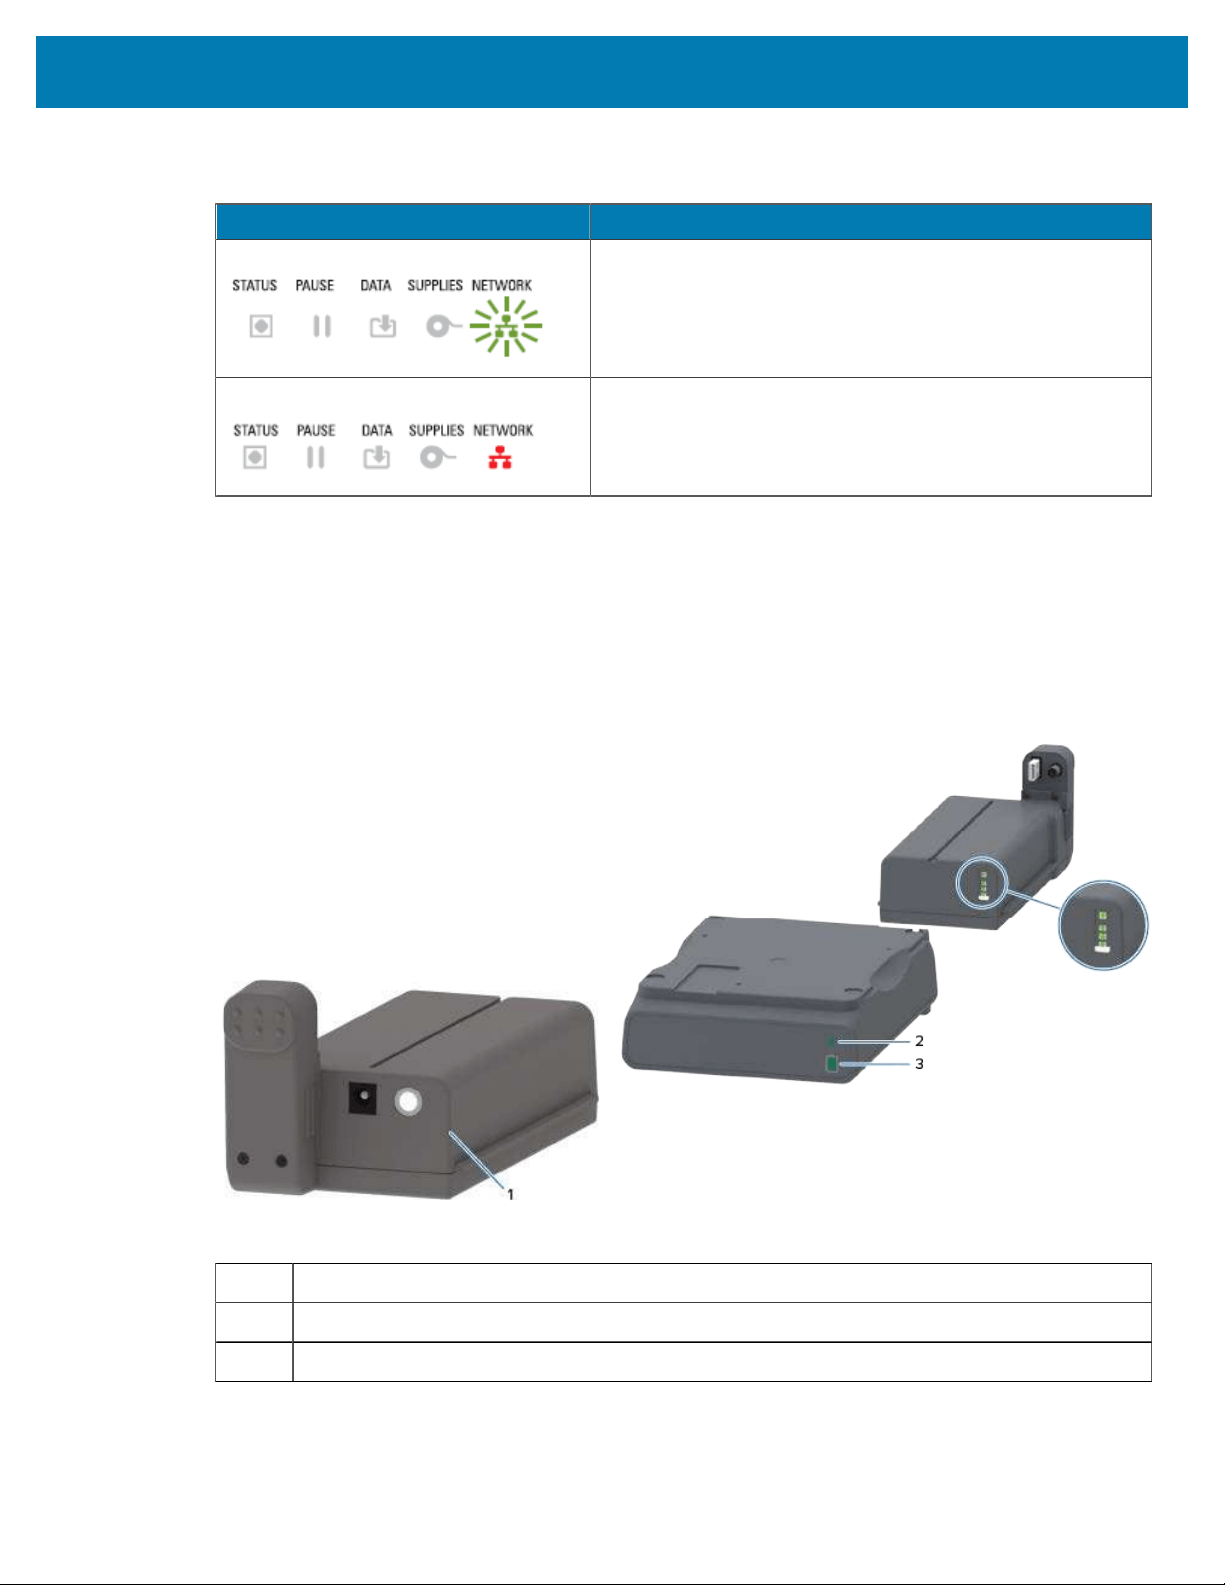
Controls and Indicators
Status Description
Wi-Fi (WLAN) 10base Link
The printer is connected to your network and the Wi-Fi signal
is weak.
Wi-Fi (WLAN) Link Error
An error condition exists. The printer is not connected to your
network.
Table 9Wi-Fi (WLAN)Status Indications(Continued)
Battery Indicators and Controls
The optional printer battery accessory has a simple, one button, four-LED indicator user interface to control
and display battery status and health. The battery acts as an uninterruptible power supply (UPS) for the
printer.
For more information on using the battery with your printer and power saving modes (sleep, shutdown,
etc.), see
Printing with the Attached Battery Base and Battery Option on page 252.
1 Battery Control button
2 Battery health indicator (located on the back of the battery)
3 Battery charge level indicator (located on the back of the battery)
58
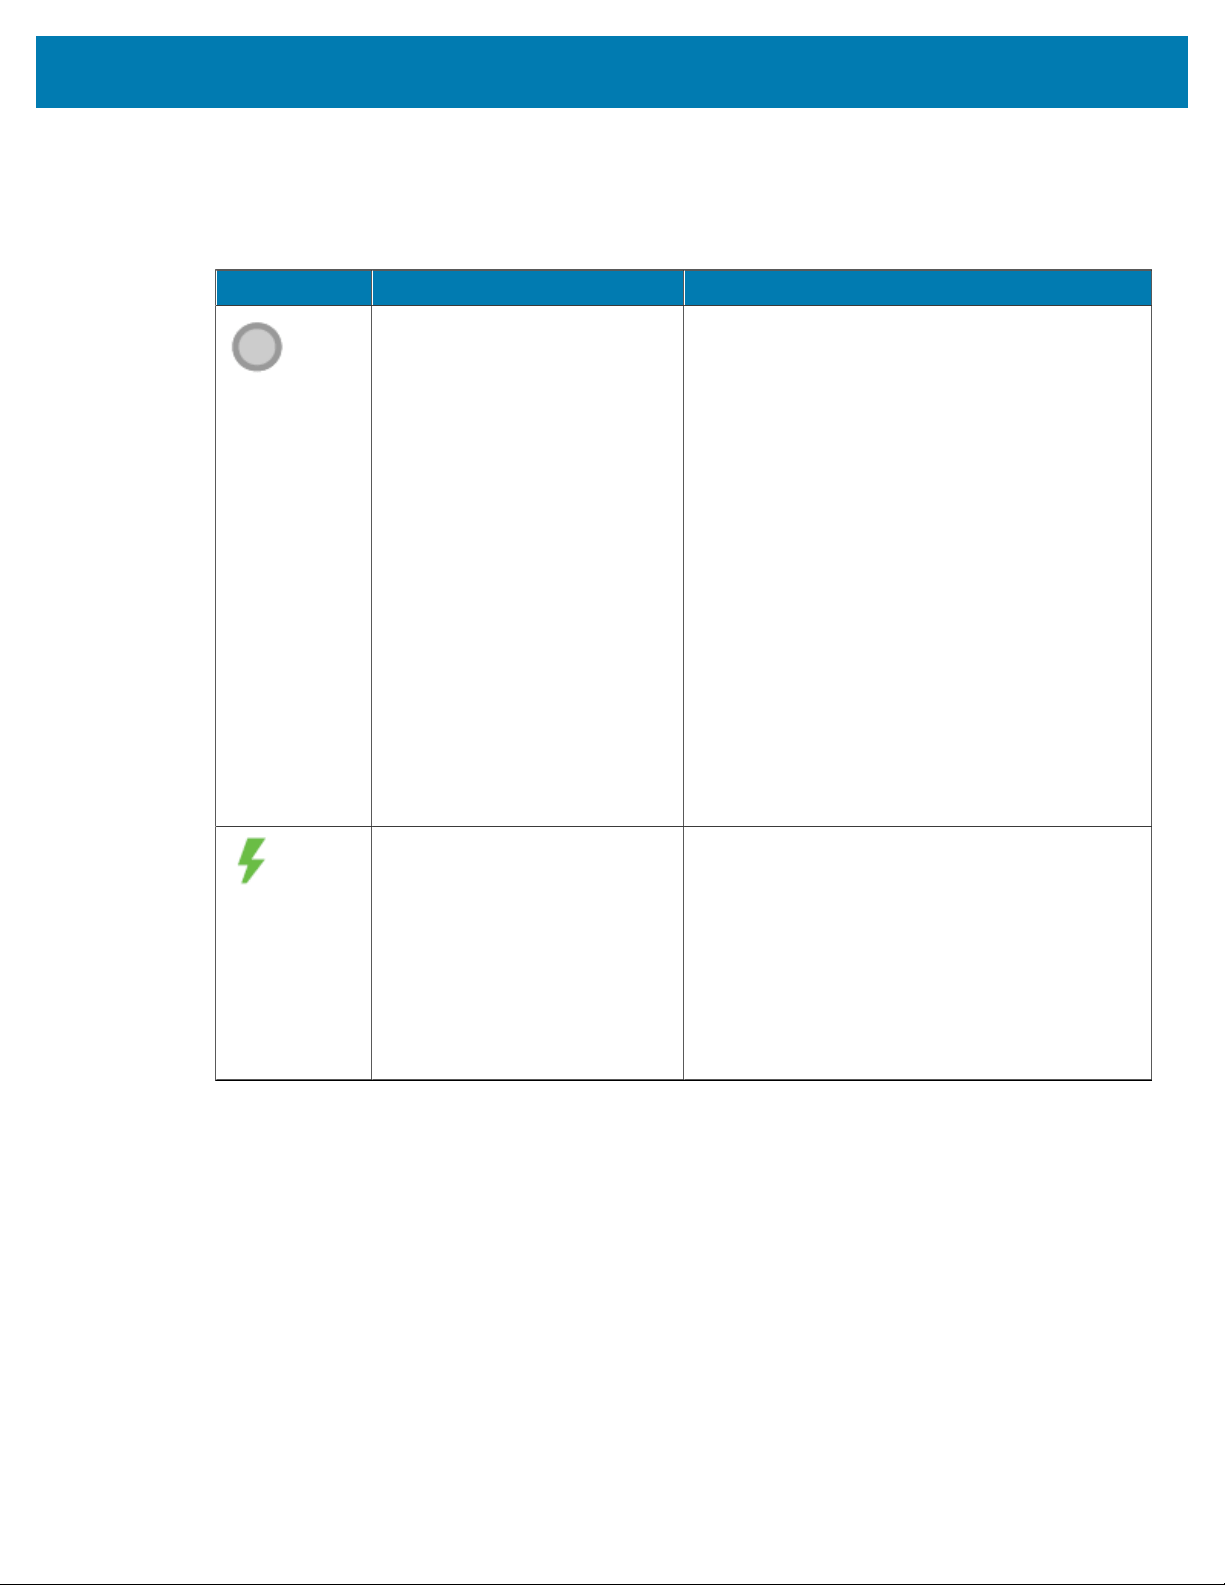
Controls and Indicators
The exploded view (the circles in the image above) show the health indicator on the top and the three
charge-level indicators below it.
Icon Button/Indicator Descriptions
Battery Control button —
Enables you to control the
battery, both inside and outside
of the printer.
• If you press and release this button when the
battery is on , it has this effect:
• Wakes up (activates power) the battery from
Sleep mode or Shutdown mode. The battery
health and charge status are checked.
The battery indicators all flash on and off
together three times. Now, you have one
minute to turn printer power on before the
battery reverts to a prior Sleep or Shutdown
mode.
• Thebattery displays the its charge level in
the first 10 seconds after internal battery
health checks are complete
To place the printer in Shutdown mode, press
and hold Battery Control for 10–11 seconds and
release. The battery starts shutting down.
Approximately three seconds later, all battery LEDs
flash three times to let you know the battery has
shut down.
Battery Health indicator —
Displays the battery’s charging
status and health of the battery.
• Green — Good health, charge complete and
ready to operate.
• Amber — Charging (printer is OFF).
• Red — Battery has an internal error. Remove
the battery and see Troubleshooting on page
311.
• Flashing red — Charging error (over or under
temperature, internal monitoring error, or other)
Table 10Battery Indicators and Controls
59

Controls and Indicators
Icon Button/Indicator Descriptions
Battery Charge Level indicator —
Displays the battery’s charging
status and health of the battery.
• Three green bars on, indicator does not flash —
The battery is fully charged and does not have
to continue charging.
• Two green bars on with the top bar flashing —
The battery is at less than full charge.
• One green bar flash — It is time to charge your
battery!
• No bars on — The battery needs charging,
but the Battery Health indicator flashes
when Battery Control is pressed. The printer
CANNOT be turned on when the battery is in
this state.
• Amber — The battery is charging.
Table 10Battery Indicators and Controls (Continued)
60

Install Hardware Options
Install Hardware Options
This section provides instructions for installing the commonnetwork connectivity modules and media
handling options available for use with your printer.
IMPORTANT: To simplify and speed up the setup process, install all connectivity modules and
media-handling options before you set up and use your printer for the first time.
IMPORTANT: We strongly recommend that you update your printer’s firmware after the printer
hardware options are added.Many of these options have internal firmware that require the latest
firmware to be installed on your printer.For instructions, see Updating Printer Firmware on page
310.
Field-Installable Printer Accessories and Options
This section lists the accessories and options available for the printer models covered in this guide.
Printer Connectivity Modules
The connectivity module’s access door must be removed prior to installing the following options. See
Accessing the Connectivity Module Slot on page 62.
• Wireless Connectivity Module (Wi-Fi 802.11ac, Bluetooth 4.2, BTLE 5, and MFi 3.0) — see Installing the
Wireless Connectivity Module on page 66.
• ZD421 Serial Port —see Installing the Serial Port Module on page 63.
• RS-232 DB-9 connector with DTE/DTC auto-switching — see Serial Port Interface on page 342.
• ZD421 Internal Ethernet (wired LAN) — see Installing the Internal Ethernet (LAN) Module on page 64.
• RJ-45 connector
• Fast Ethernet 10/100 auto-switching, 10Base-T, and 100Base-TX networks
Media Handling Options
The printer’s standard bezel must be removed prior to installing the following options — see Removing the
Standard Bezel on page 73.
• Label Dispenser (automatically peels liner off labels and dispenses the labels)— see Installing the Label
Dispenser on page 74.
• General Purpose Media Cutter —see Installing the Standard Media Cutter on page 74.
• Media Roll Adapters for 38.1 mm (1.5 in.), 50.8 mm (2.0 in.), or 76.2 mm (3.0 in.) I.D. media cores—see
Media Roll Core Size Adapters on page 76.
61
• Fanfold Media Access Cover for thermal transfer printers.

Install Hardware Options
Power Base Options
The ZD421 and ZD621 printers support power base field upgrade kits for each of the Direct Thermal
and Thermal Transfer versions of these printers.
• Attached Power Supply Base (power supply included) —see Installing the Attached Power Supply Base
Options on page 77.
• Battery Power Base (battery pack sold separately) —see Installing the Attached Battery Base Options
on page 80.
• Battery Pack (battery power base sold separately) —see Installing the Battery into the Attached Power
Base on page 81.
Printer Connectivity Modules
The connectivity modules are easily installable without the use of tools.
CAUTION: The discharge of electrostatic energy that accumulates on the surface of the human
body or other surfaces can damage or destroy the printhead or electronic components used in
this device. You must observe static-safe procedures when working with the printhead or the
electronic components.
Power Failure Recovery Mode Jumper (OFF by Default)
All printer connectivity modules have a power failure recovery jumper that is set to the OFF position by
default.
When the jumper is set to ON, the printer automatically powers on when plugged into an active AC power
source.
NOTE: Power Failure Recovery Mode is available ONLY on printers that have a Printer
Connectivity Module installed.
See also POWER Button—Power Failure Recovery Mode in Standard Interface Controls on page 48 for
information on the power ON/OFF behaviors when the jumper is set to ON.
Accessing the Connectivity Module Slot
Follow these instructions to gain access to the connectivity module slot.
1. Disconnect the DC power plug from the rear of the printer.
2. Open the module access door by pushing down on the top of the door with your fingertip.
This releases the latch.
62
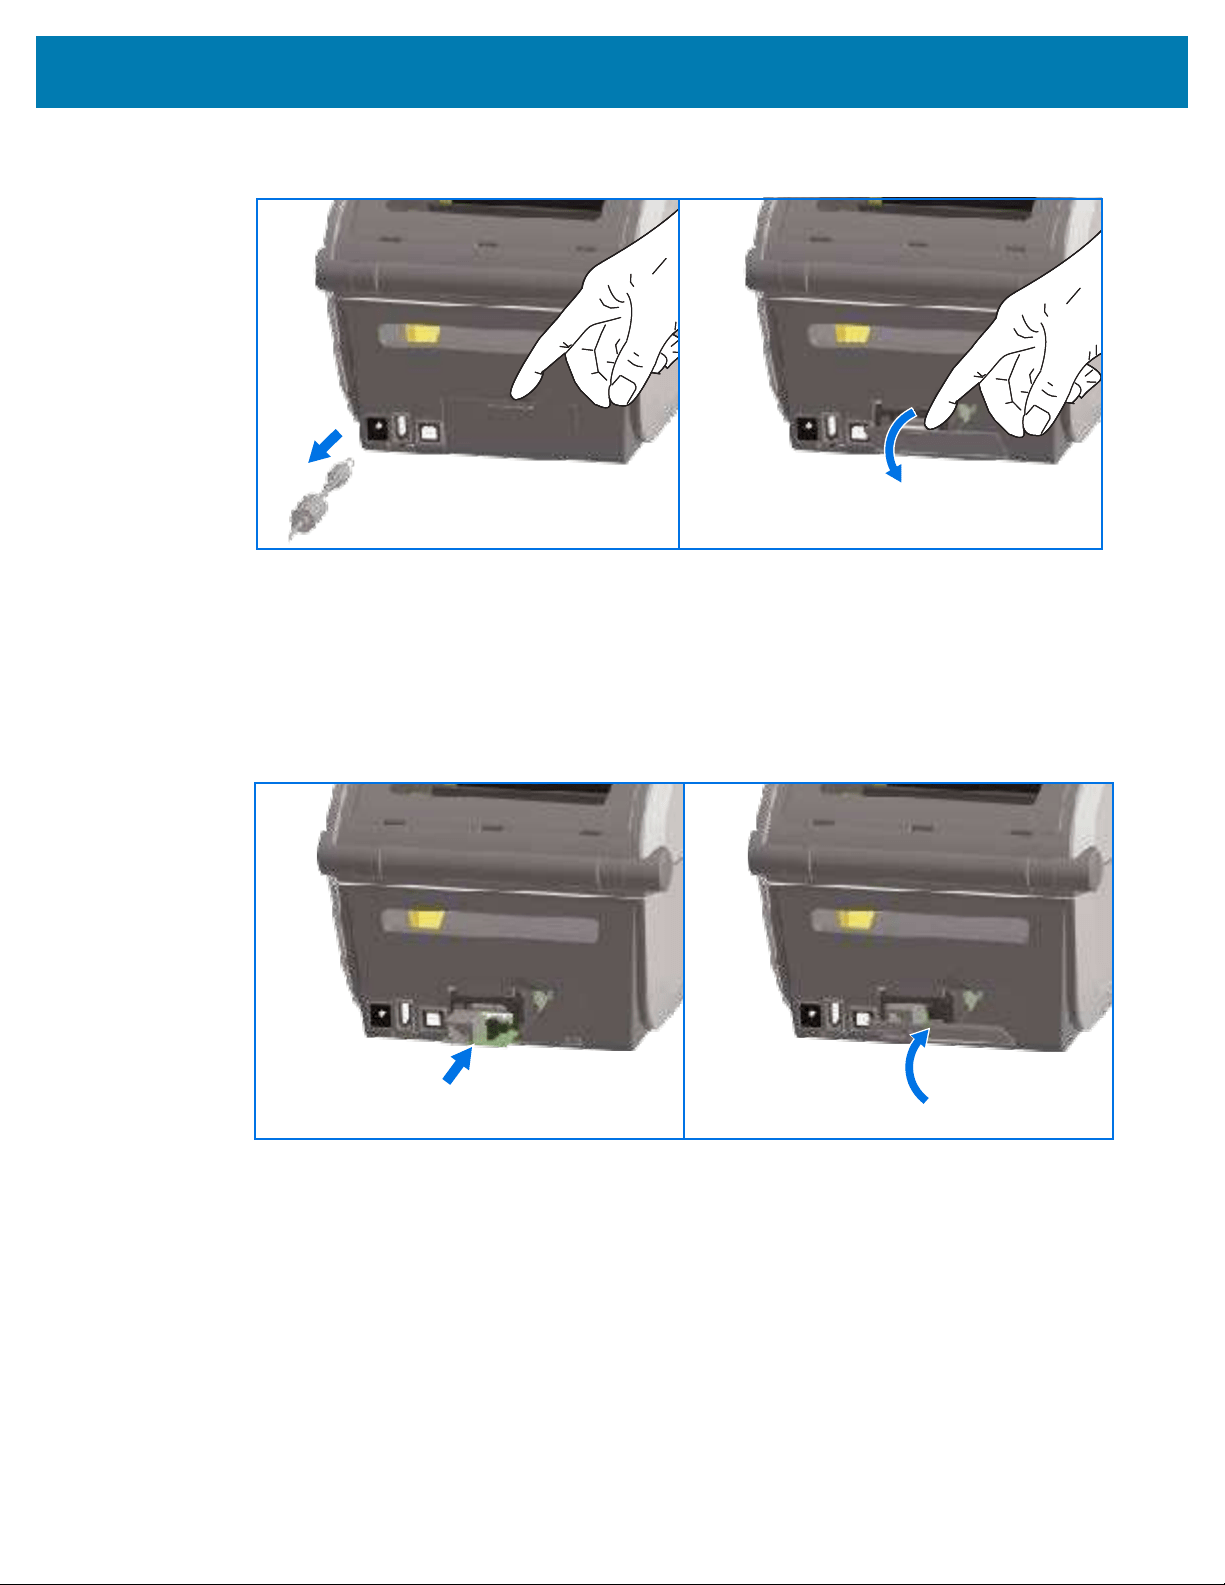
Install Hardware Options
3. Pull the door away from the printer and down to remove.
Installing the Serial Port Module
Follow these instructions toinstall the serial port module.
1. With the DC power plug and module’s access door removed, slide the serial port module into the
printer. Push the circuit card in slowly but firmly until the card is just past the inside lip of the access
door.
63
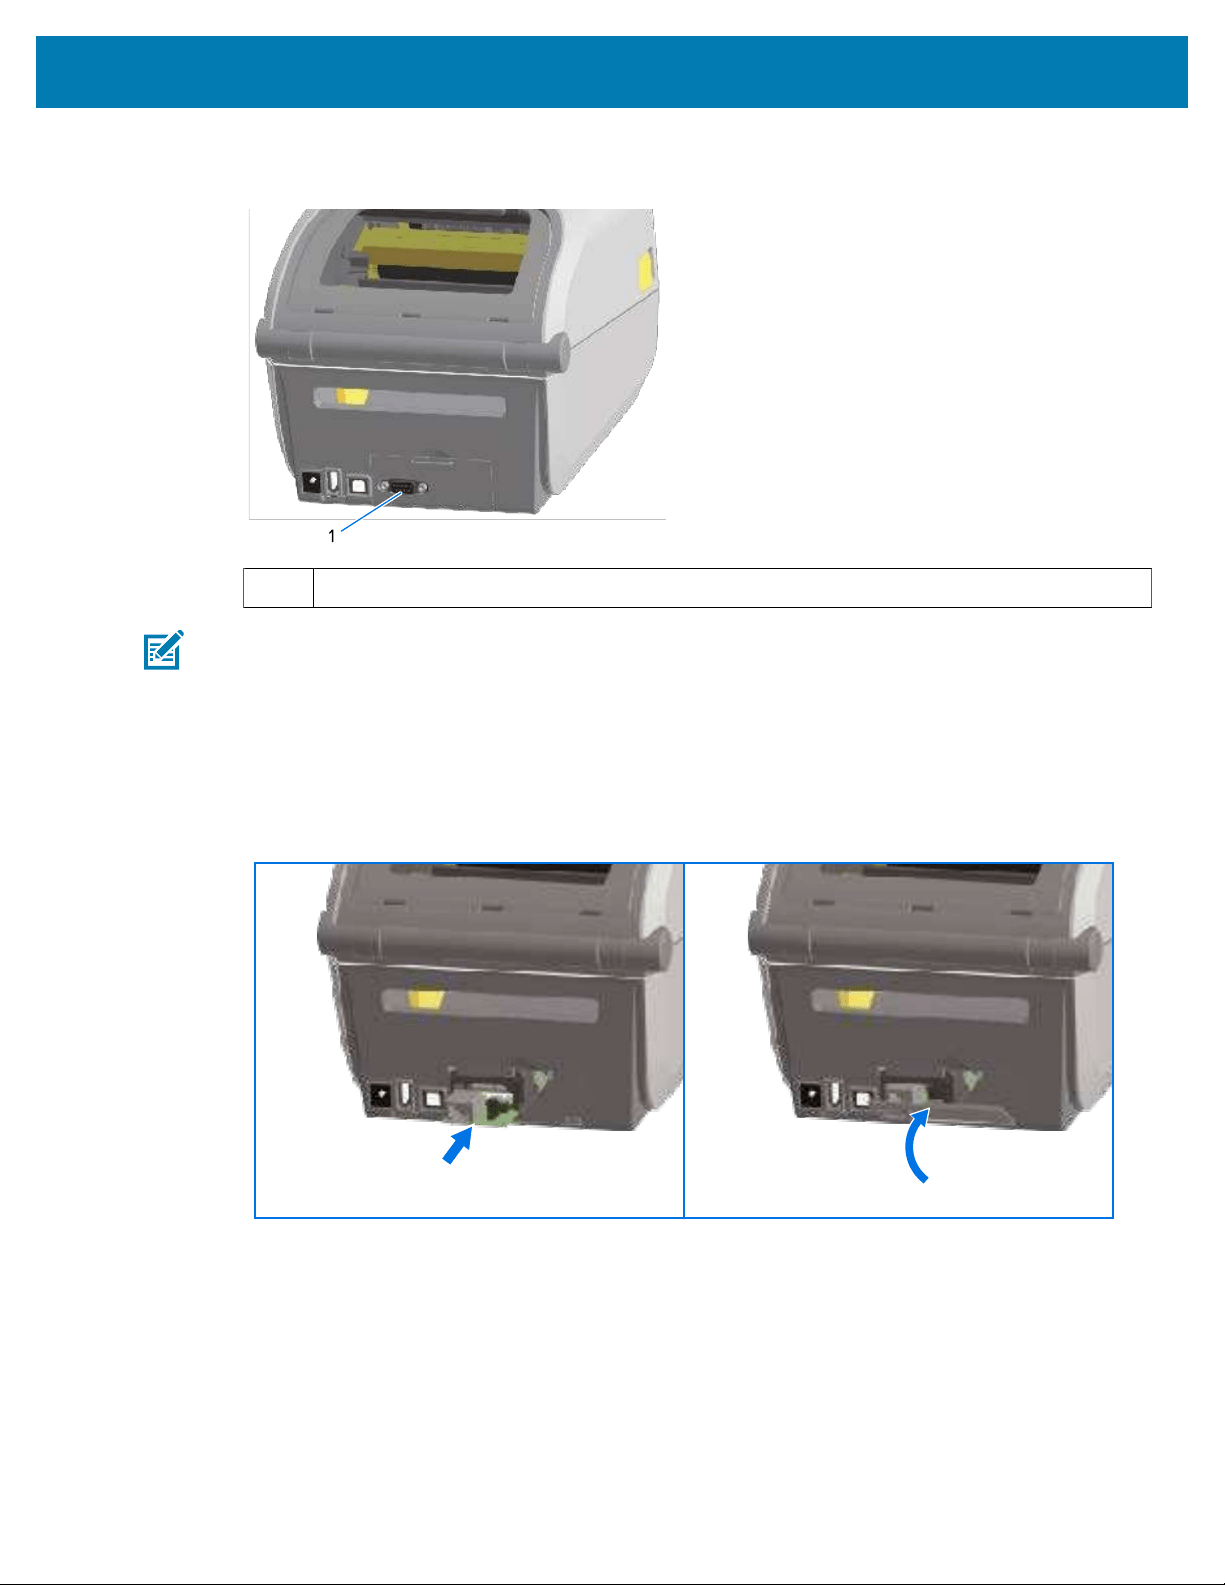
Install Hardware Options
2. Align the bottom of the serial port’s door cover to the bottom lip of the module access opening. Swing
the door up and snap the cover closed.
1 Serial port (RS-232)
NOTE: For best printer performance, update the printer’s firmware after installing options or
immediately after the printer’s initial setup. See Updating Printer Firmware on page 310.
Installing the Internal Ethernet (LAN) Module
Follow these instructions toinstall the Ethernet (LAN) module.
1. With the DC power plug and module’s access door removed, slide the Ethernet module into the printer.
Push the circuit card in slowly but firmly until the card is just past the inside lip of the access door.
64
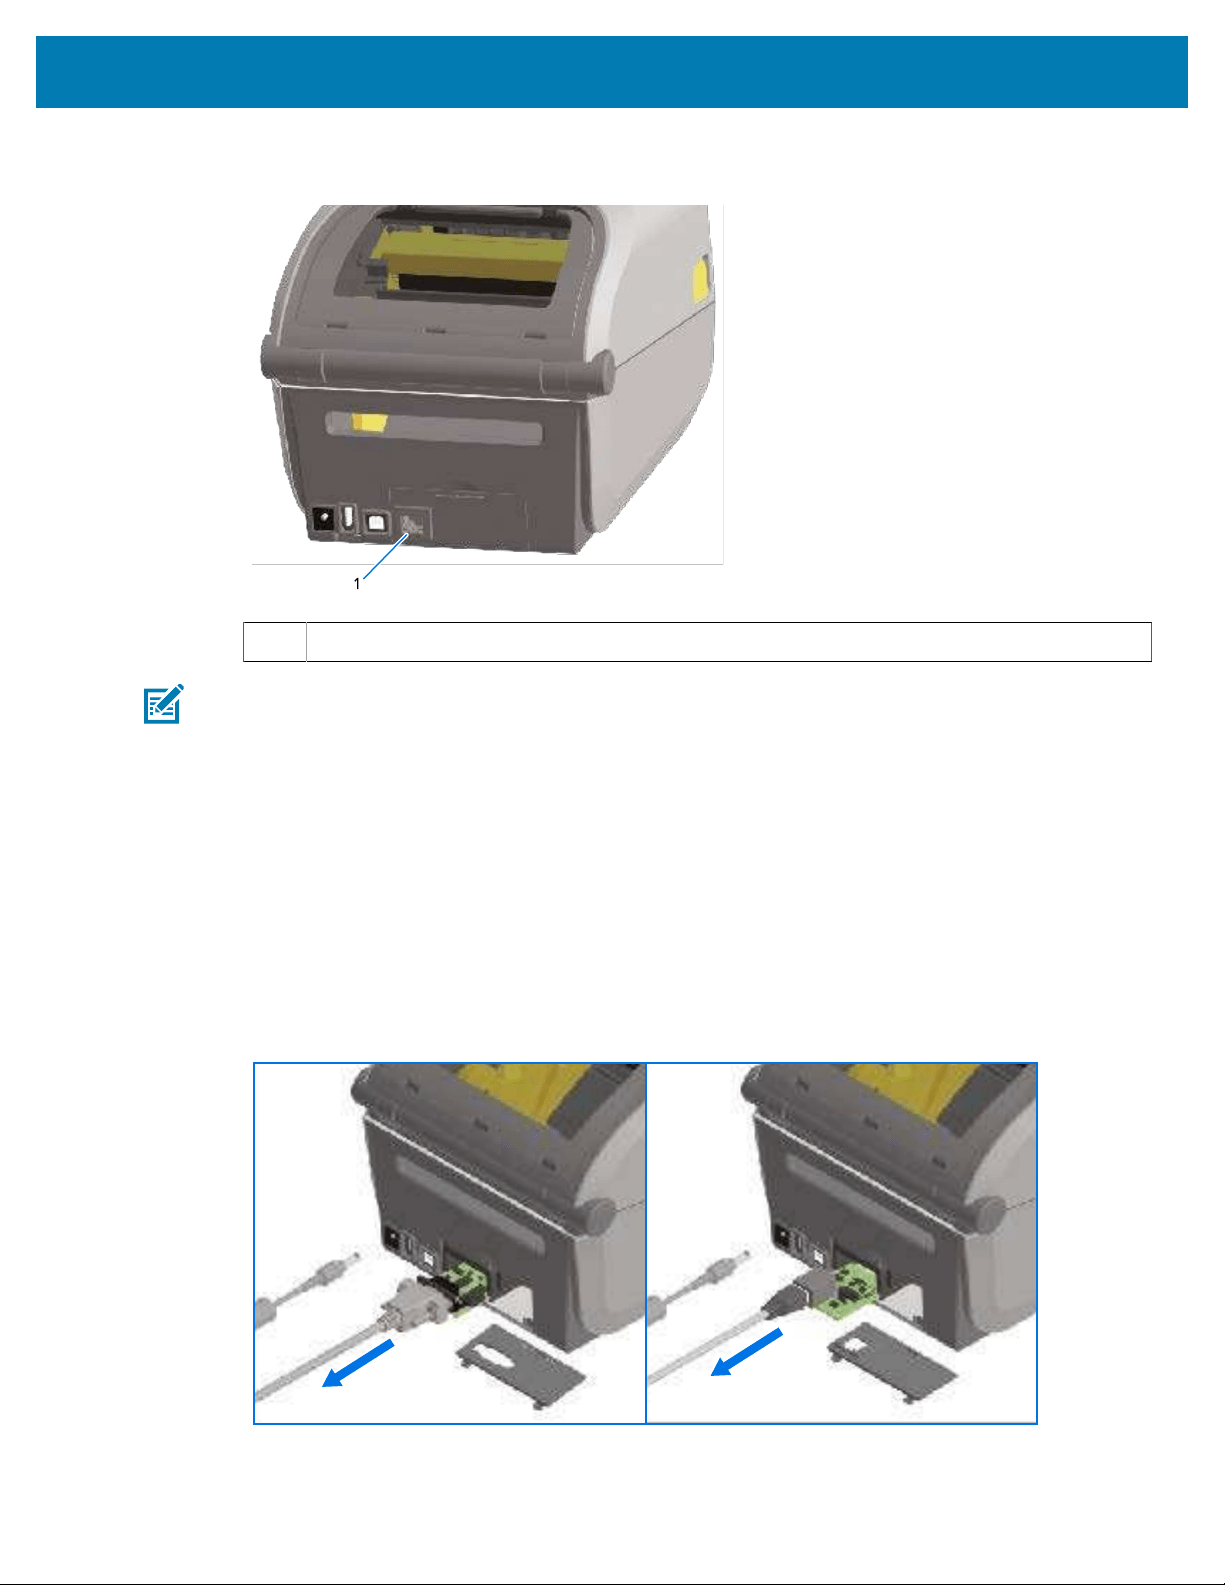
Install Hardware Options
2. Align the bottom of the Ethernet port’s door cover to the bottom lip of the module access opening, then
swing the door up and snap the cover closed.
1 Ethernet port (RJ-45)
NOTE: For best printer performance, update the printer’s firmware after installing options or
immediately after the printer’s initial setup. See Updating Printer Firmware on page 310.
Removing Printer Connectivity Modules
Connectivity modules can easily be removed when you need to install another module or for printer repair.
They should not, as a general practice, be removed and replaced routinely.
Follow these instructions to remove a connectivity module installed in your printer:
1. Remove the interface cable (Ethernet or Serial).
2. Remove the module access door. Push down on the top of the door with your fingertip.
This releases the latch.
65
3. Pull the door away and down to remove.

Install Hardware Options
4. Reattach the interface cable to the connectivity module and secure the cable.
5. Gently pull on the interface cable that is secured to the connectivity module, thenslowly pull the module
out of the printer.
6. Install a different connectivity module or reinstall the connectivity module’s access door as required.
Align it to the bottom lip of the access opening and swing it up to snap and lock in place.
Installing the Wireless Connectivity Module
Use this procedure to install the Wireless Connectivity Module.
CAUTION: The discharge of electrostatic energy that accumulates on the surface of the human
body or other surfaces can damage or destroy the printhead or electronic components used in
this device. You must observe static-safe procedures when working with the printhead or the
electronic components.
No tools are needed to perform this procedure.
To prepare for the installation, remove any loaded media, turn printer power OFF, and disconnect any
power or interface cables from the printer.
1. Access the wireless connectivity area by turning the printer over to access the wireless connectivity
door.
2. Push the latch at the top with your fingertip to open the module access door.The printer base has a
recessed area for your fingertip.
The latch releases.
66
3. Lift and swing the door up to remove it.
4. Align the antenna arm (marked 1 in the next figure) into the well.
5. Lower and align the module (2) to the printer's Wi-Fi connector (3).
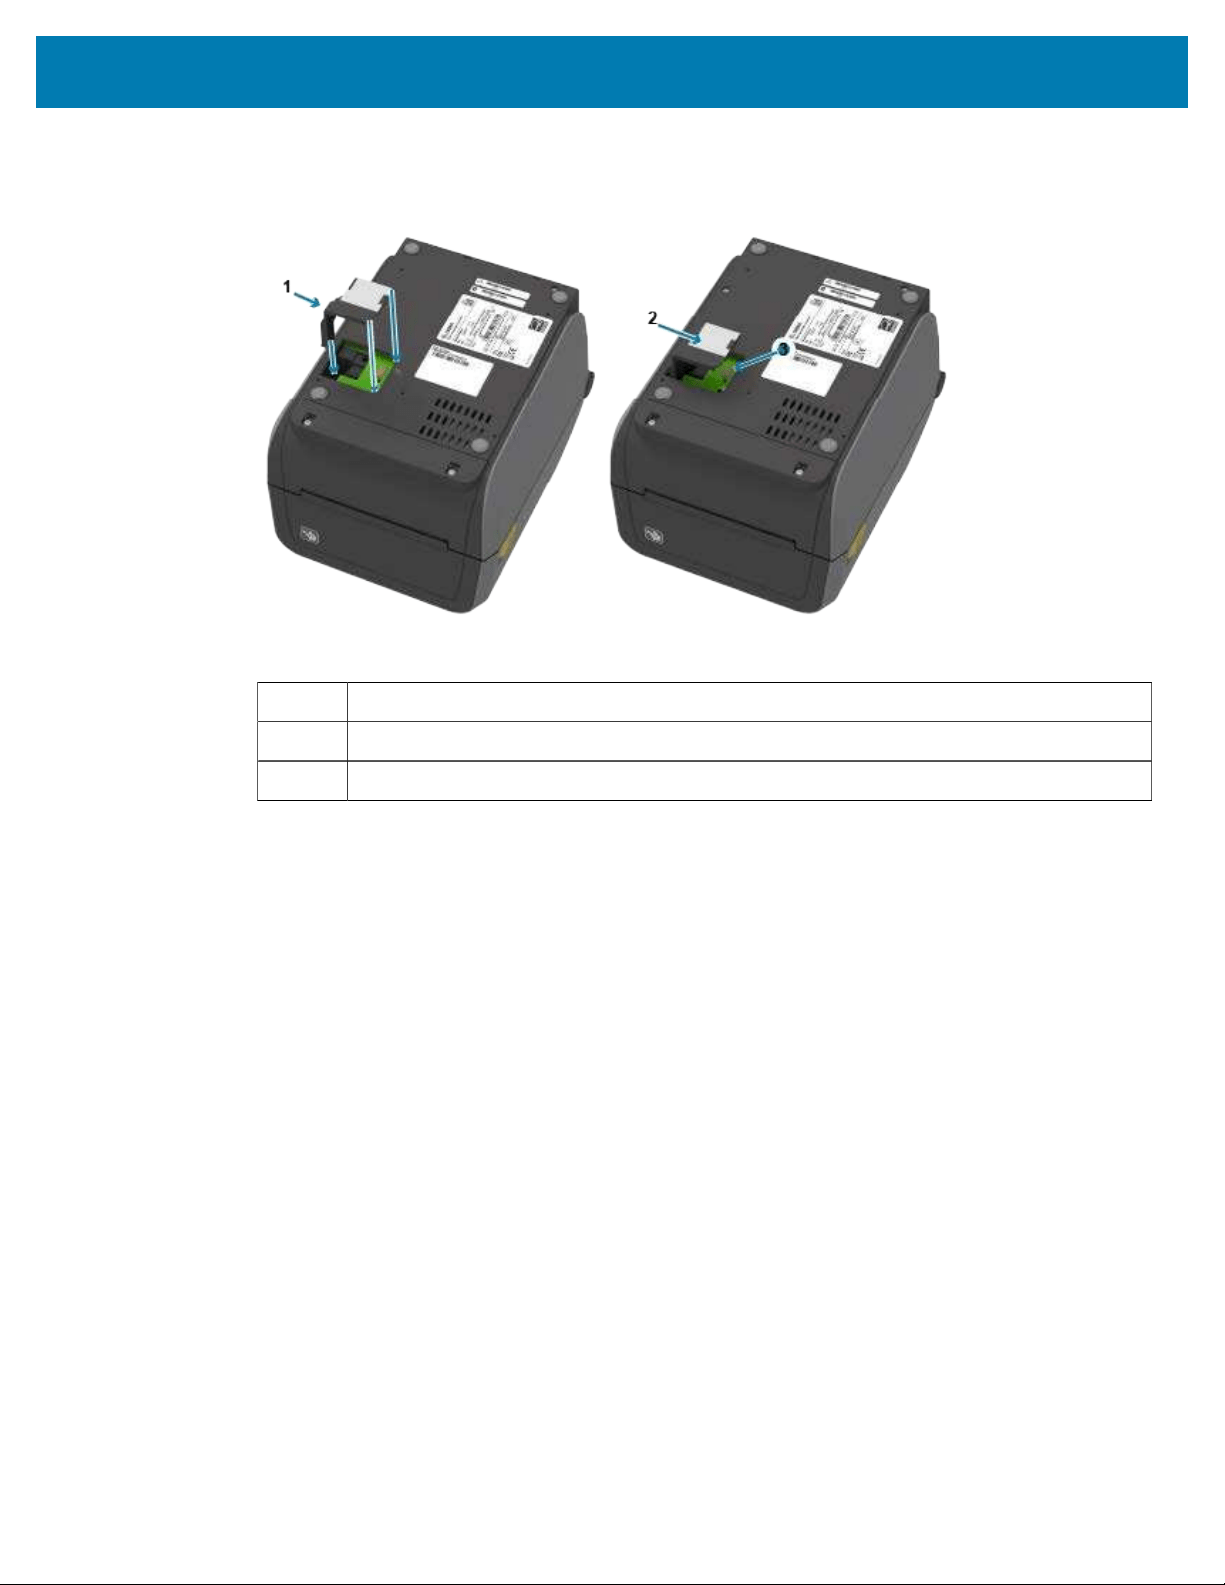
Install Hardware Options
67
6. Push the module (2) in gently but firmly until fully seated.
Figure 3Seating the Module (steps 4–6)
1 Antenna arm
2 Module
3 Wi-Fi connector
7. Align the shortest side of the wireless connectivity door (show as 1 in the next image)to the
shortest side of the opening.
8. Swing the door (1) on the tab in the middle of the door, then swing the door closed.
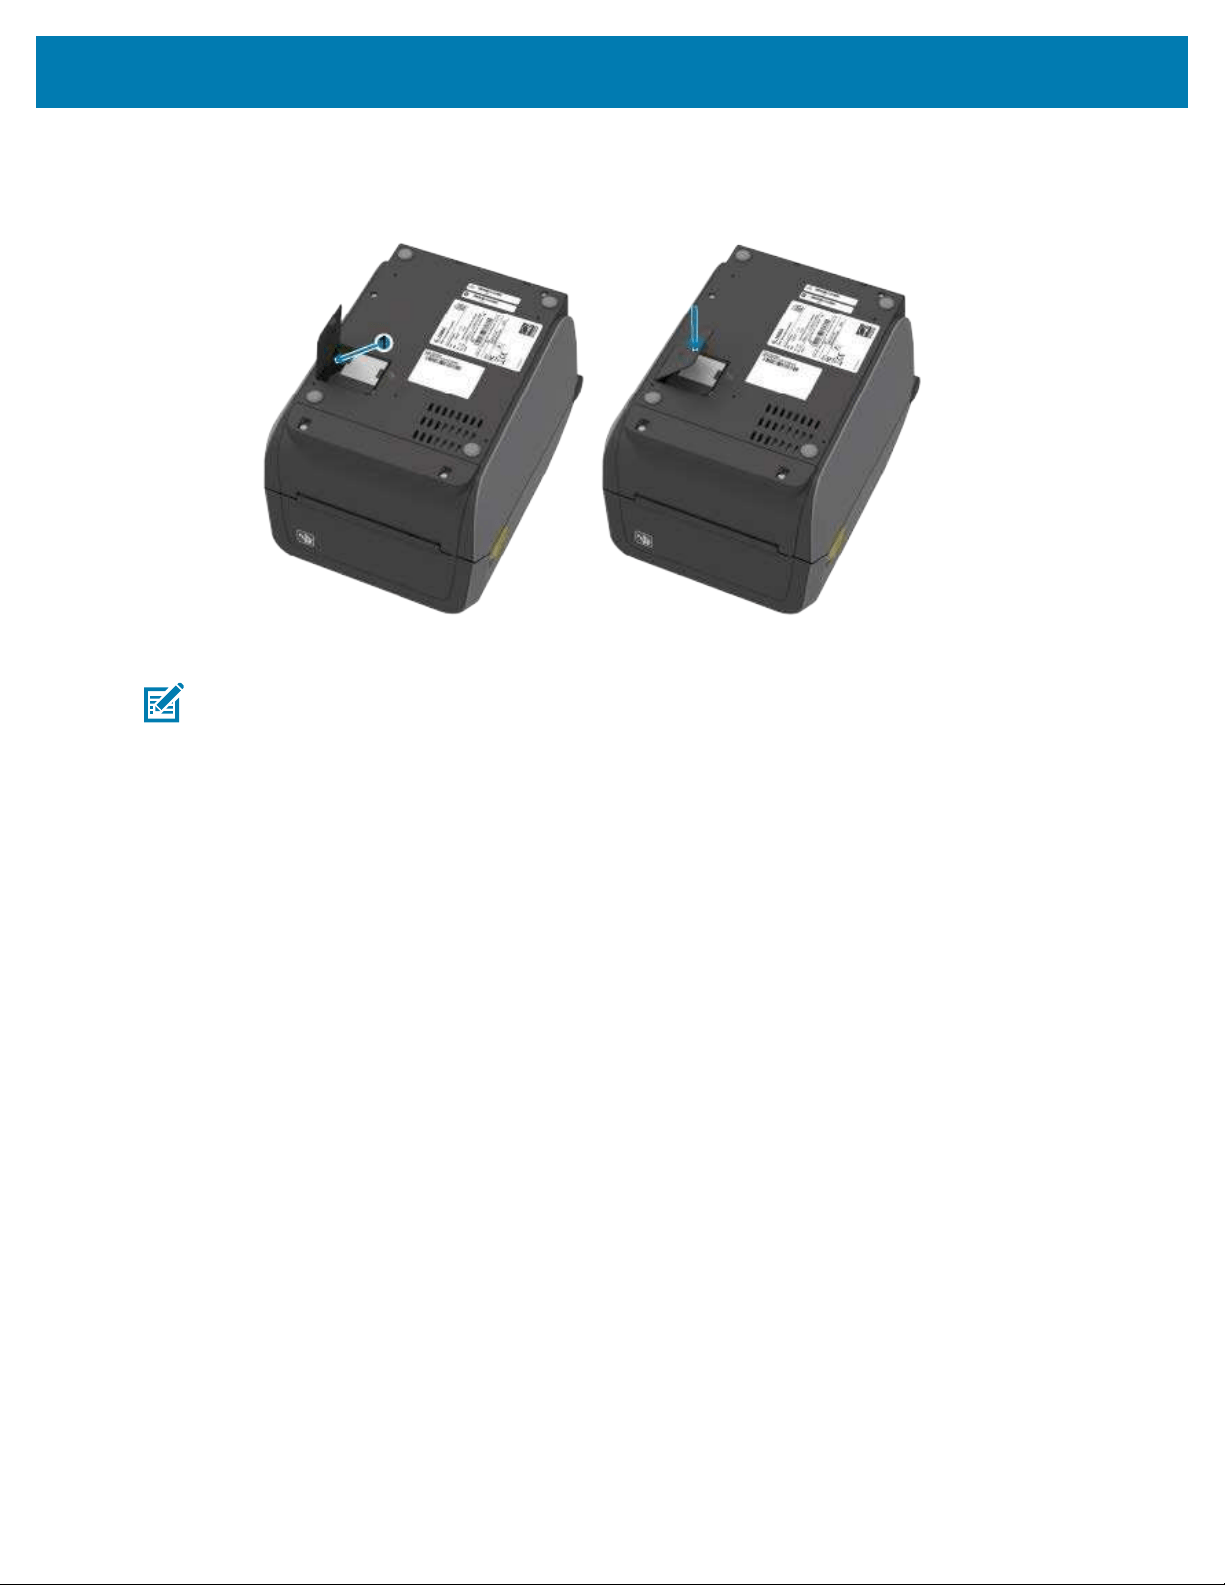
Install Hardware Options
68
9. Push the door (1) to lock the latch.
Figure 4Closing the Wireless Connectivity Door (steps 7–9)
NOTE: The wireless connectivity door (1) will not close correctly if the module has not been
fully seated. Being able to close this door properly is a good indication that the module is
correctly seated.
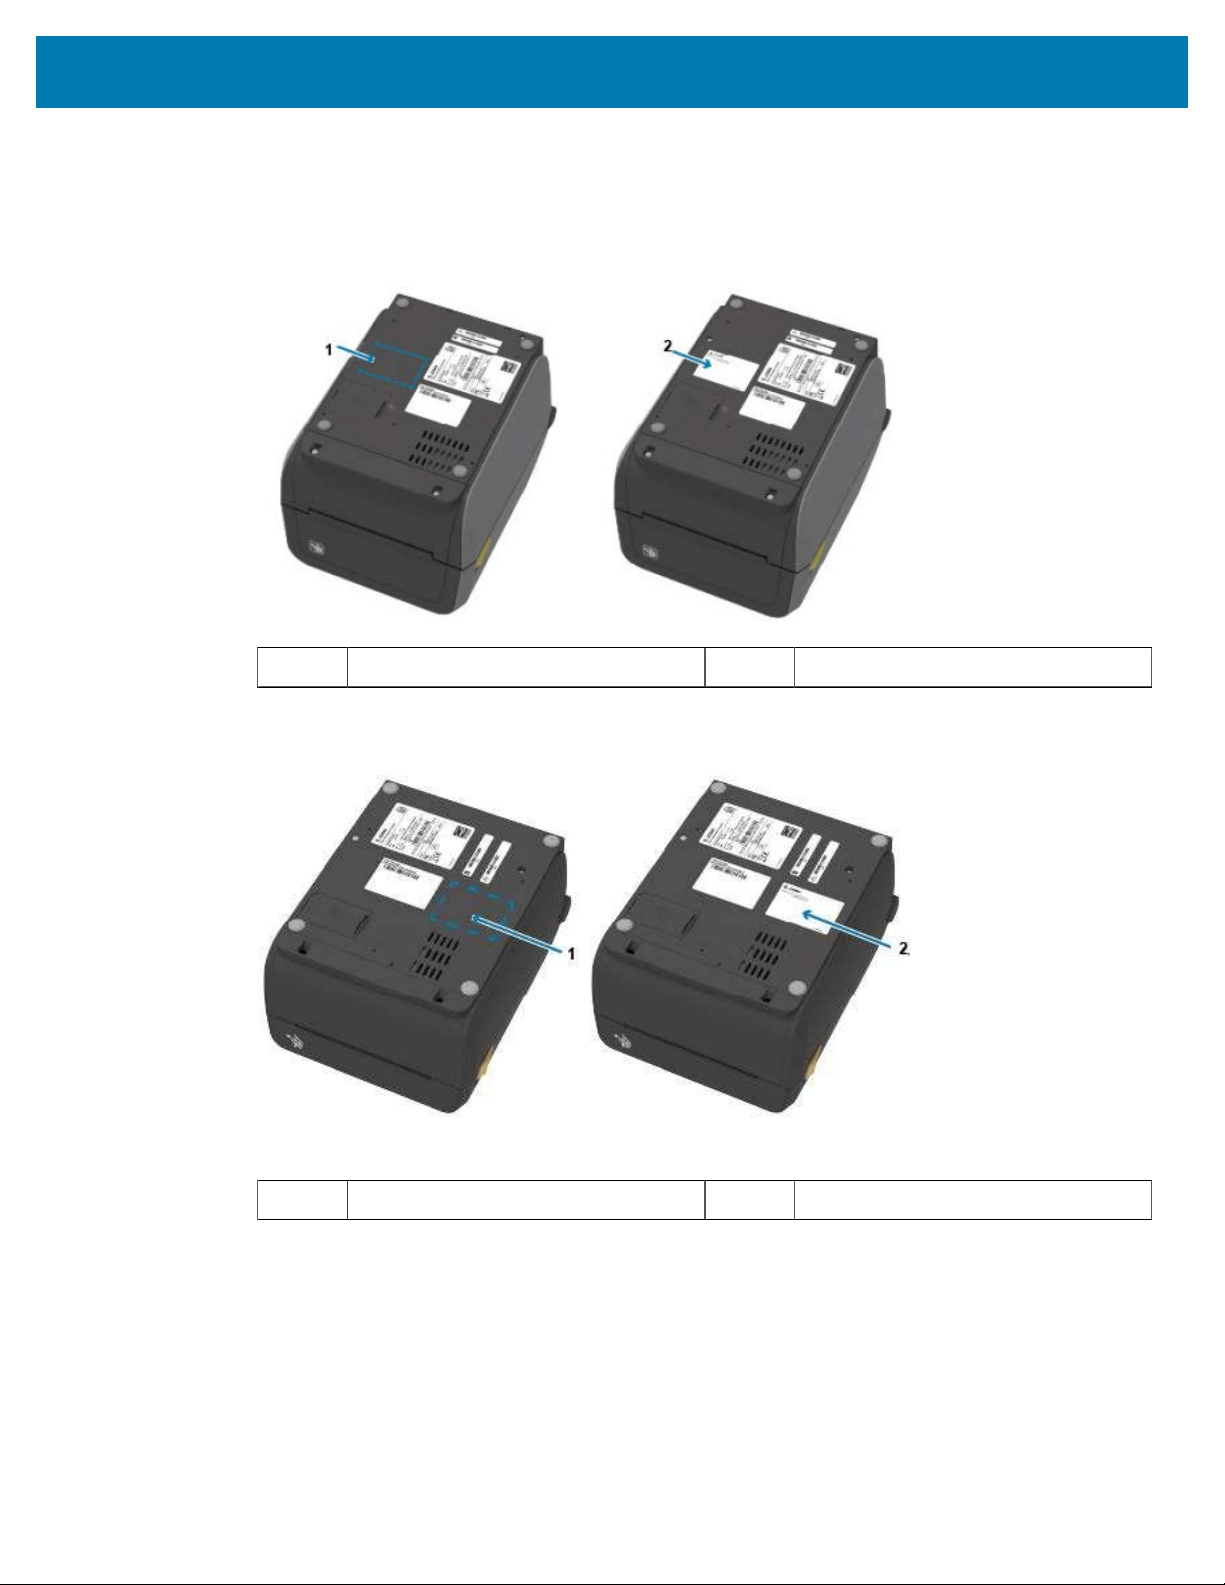
Install Hardware Options
69
10. Place the compliance label that shipped with the module on the bottom of the printer.
The compliance label has the appropriate regulatory marks needed to use the printer in your country.
Figure 5Label Locations for Thermal Transfer Printers
1 Location for the label 2 Label affixed
Figure 6Label Locations for Direct Thermal Printers
1 Location for the label 2 Label affixed
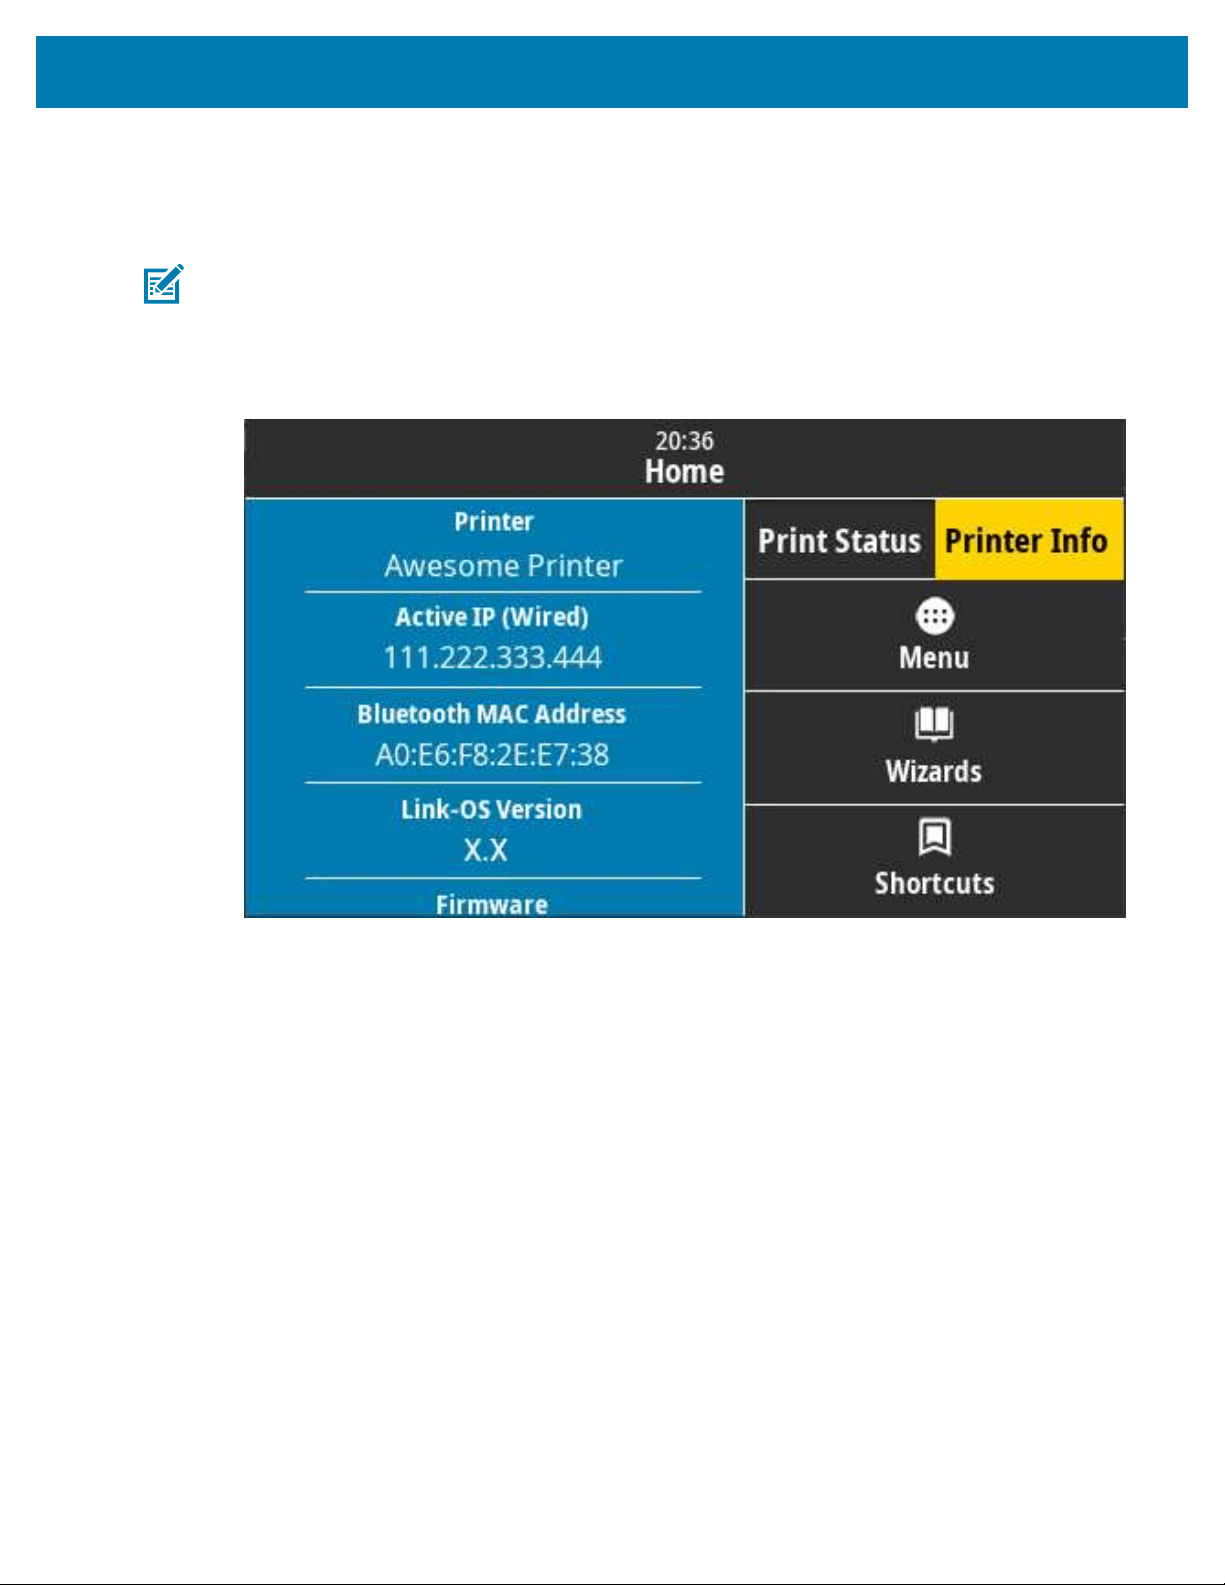
Install Hardware Options
Finding Your Printer's Media Access Control (MAC) Address
Use this procedure to find your printer's MAC address.
NOTE: If your printer came with a Wi-Fi/Bluetooth module installed, the labels with the MAC
address can be found the bottom of the printer.
70
1. If your printer has a color-touch display, use this step. (Otherwise, skip to step 2.)
Tap Printer Info on the display...
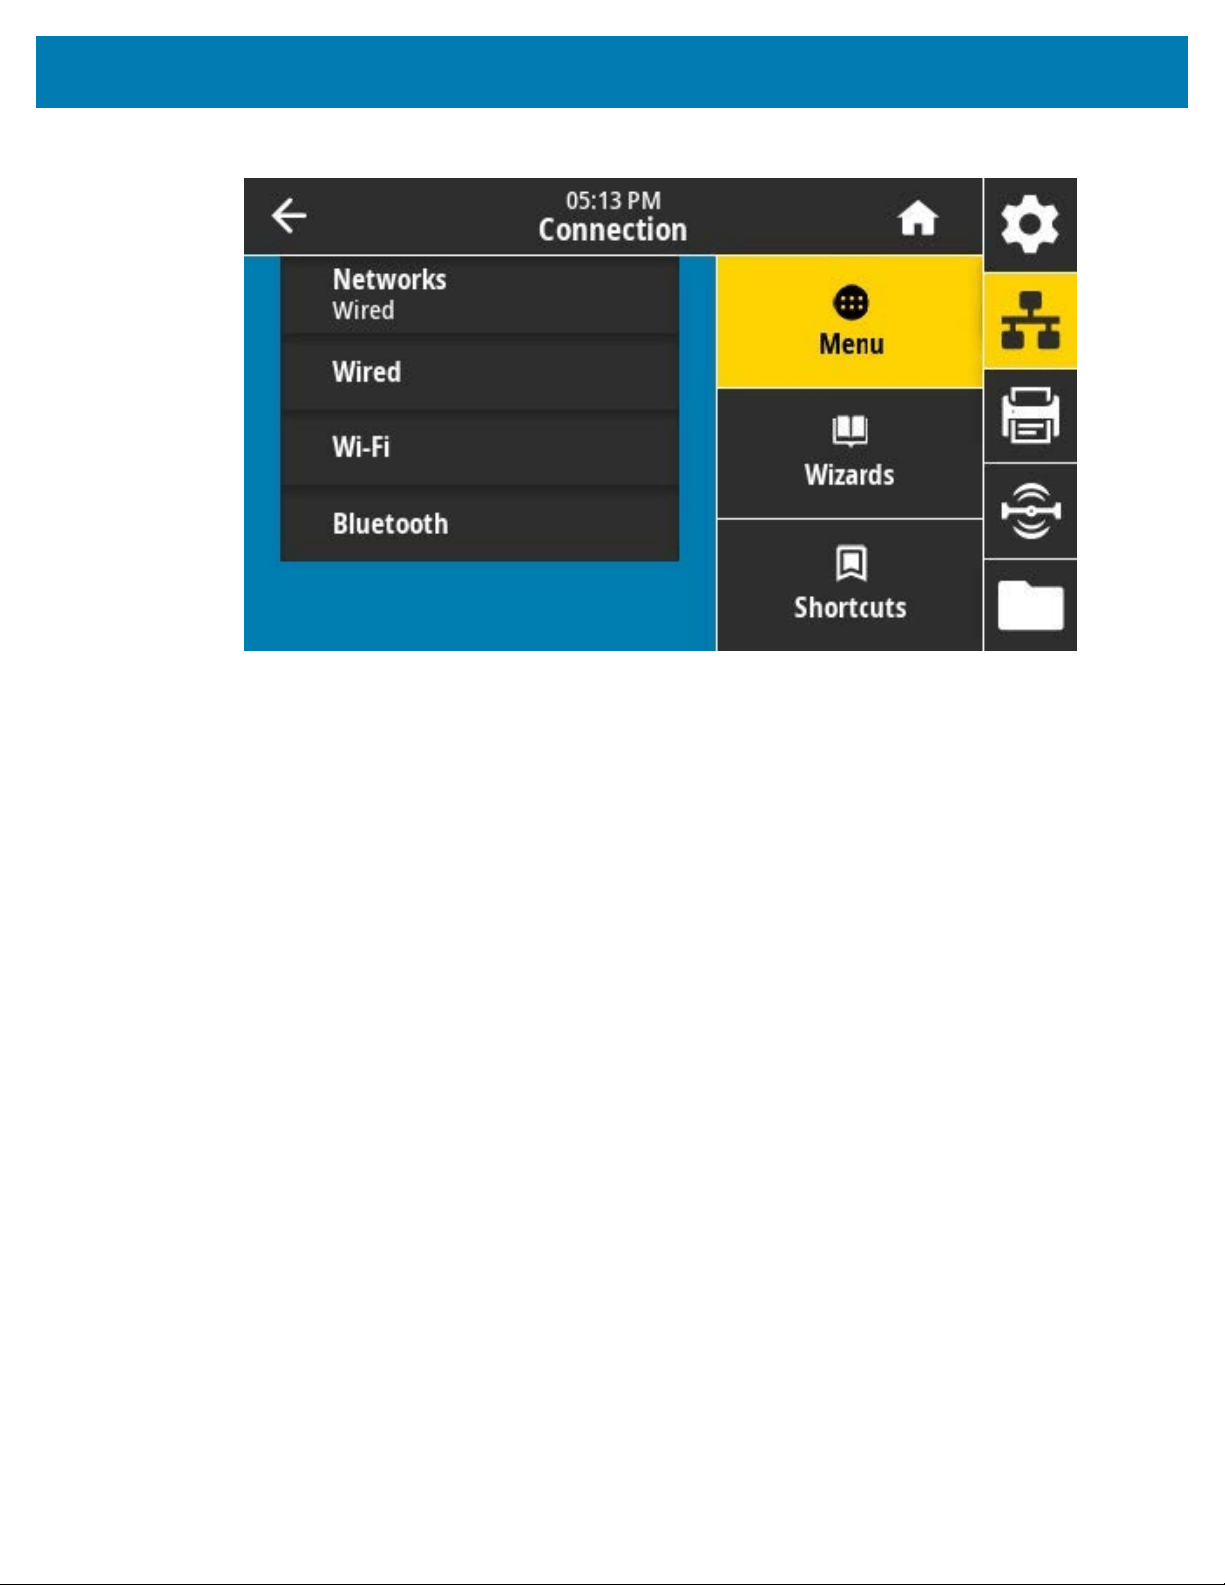
Install Hardware Options
Alternatively, tap Menu > Network > Wi-Fi, and scroll down.
71
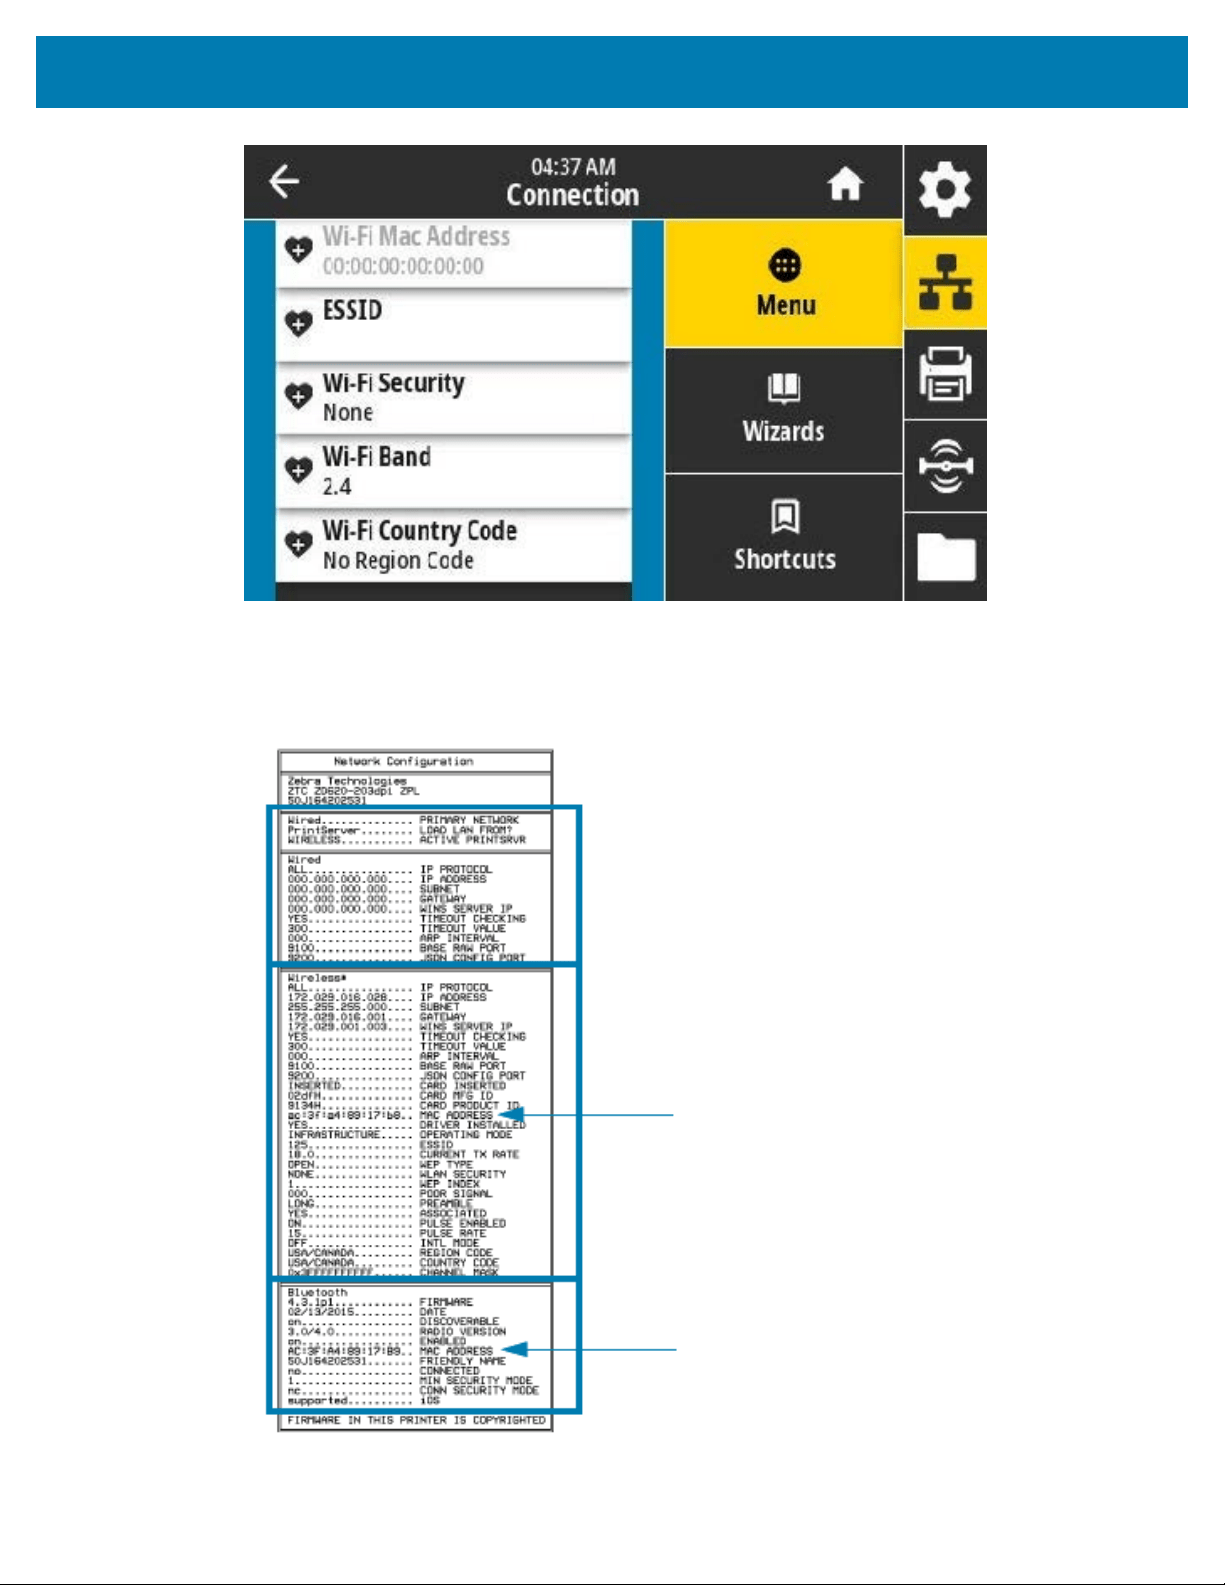
Install Hardware Options
2. If your printer does NOT have acolor touch display and you want to locate the printer's MAC
address,press and hold FEEDand CANCEL simultaneously for a few seconds while the printer is in
Ready state. The printer prints a network configuration report that lists its MAC address.
72
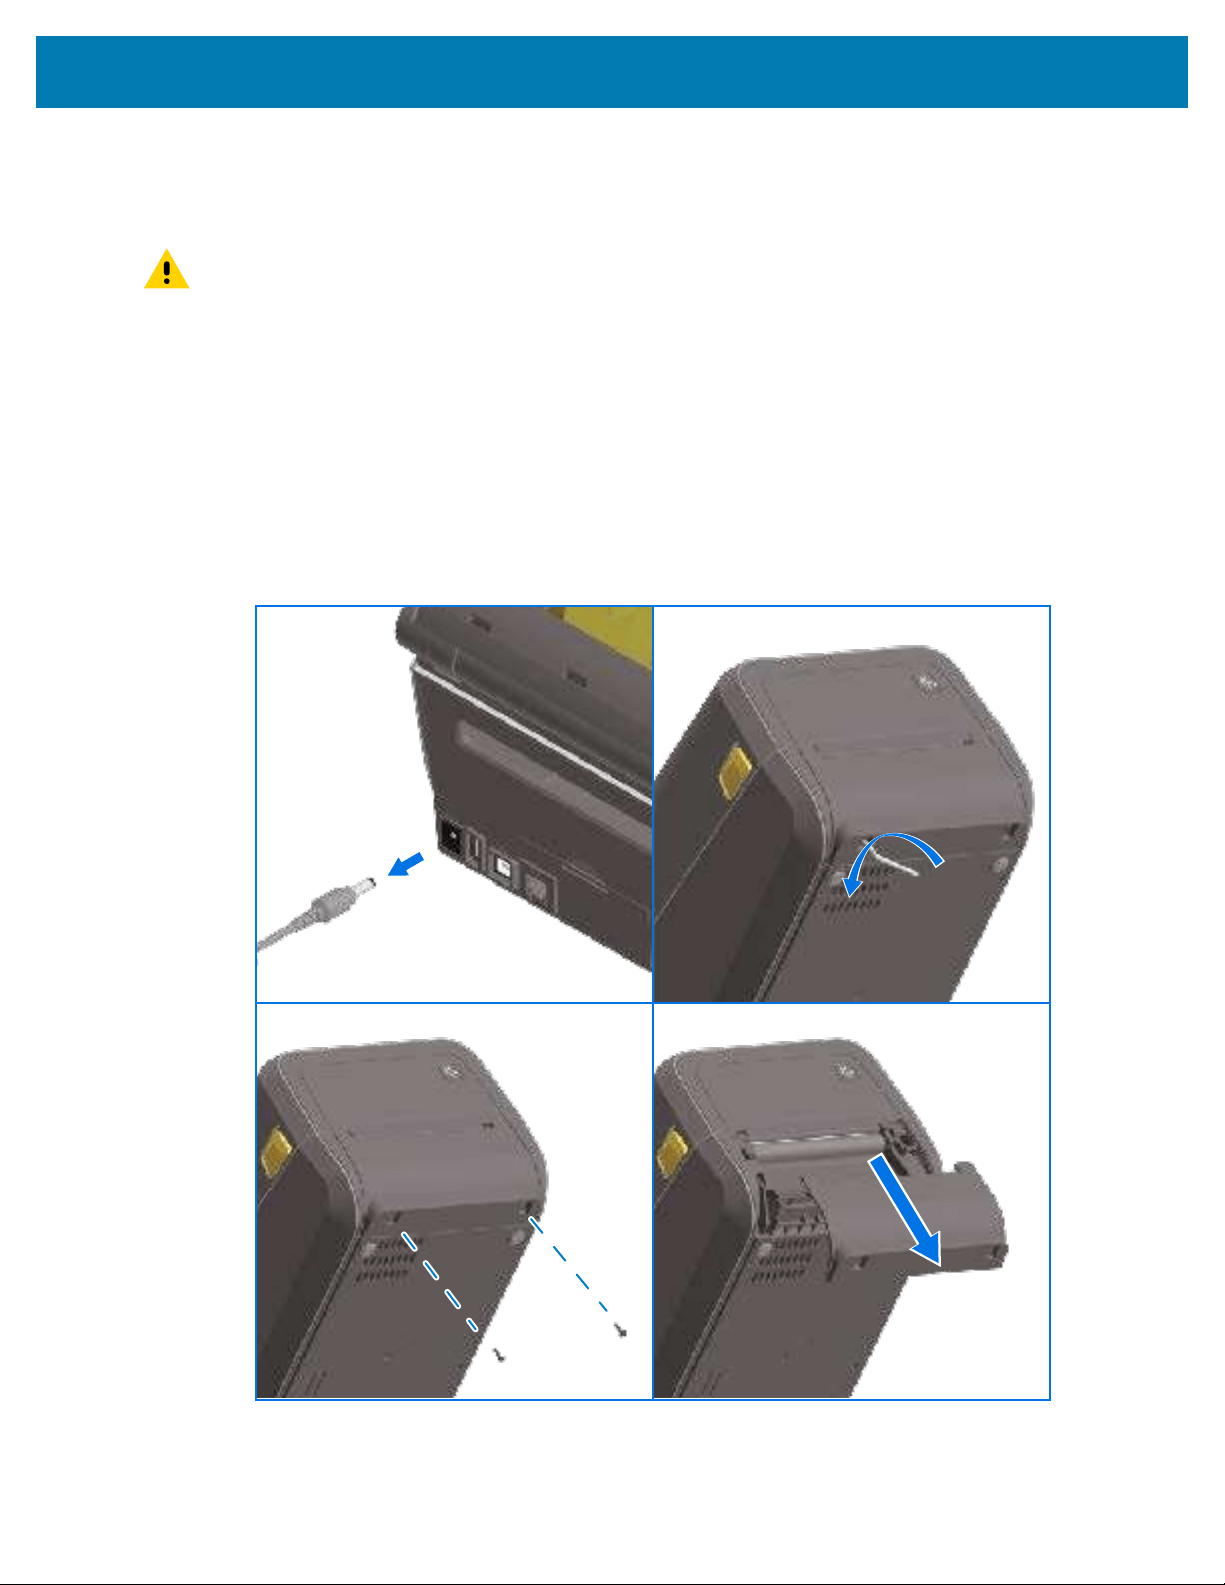
Install Hardware Options
Media Handling Options
This section describes the various media handling options available with your printer.
CAUTION: The discharge of electrostatic energy that accumulates on the surface of the human
body or other surfaces can damage or destroy the printhead or electronic components used in
this device. You must observe static-safe procedures when working with the printhead or the
electronic components.
Removing the Standard Bezel
Use this procedure to remove the standard bezel before mounting your media-handling option.
1. Disconnect the printer’s DC power input plug from the rear of the printer.
2. Turn the printer upside down. Use thethe supplied Torx wrench to remove thetwo mounting screws.
Save the screws to reinstall the bezel later.
3. Slide the bezel down the front about 12.5 mm (0.5 in.) until it comes loose and pull it out.
73
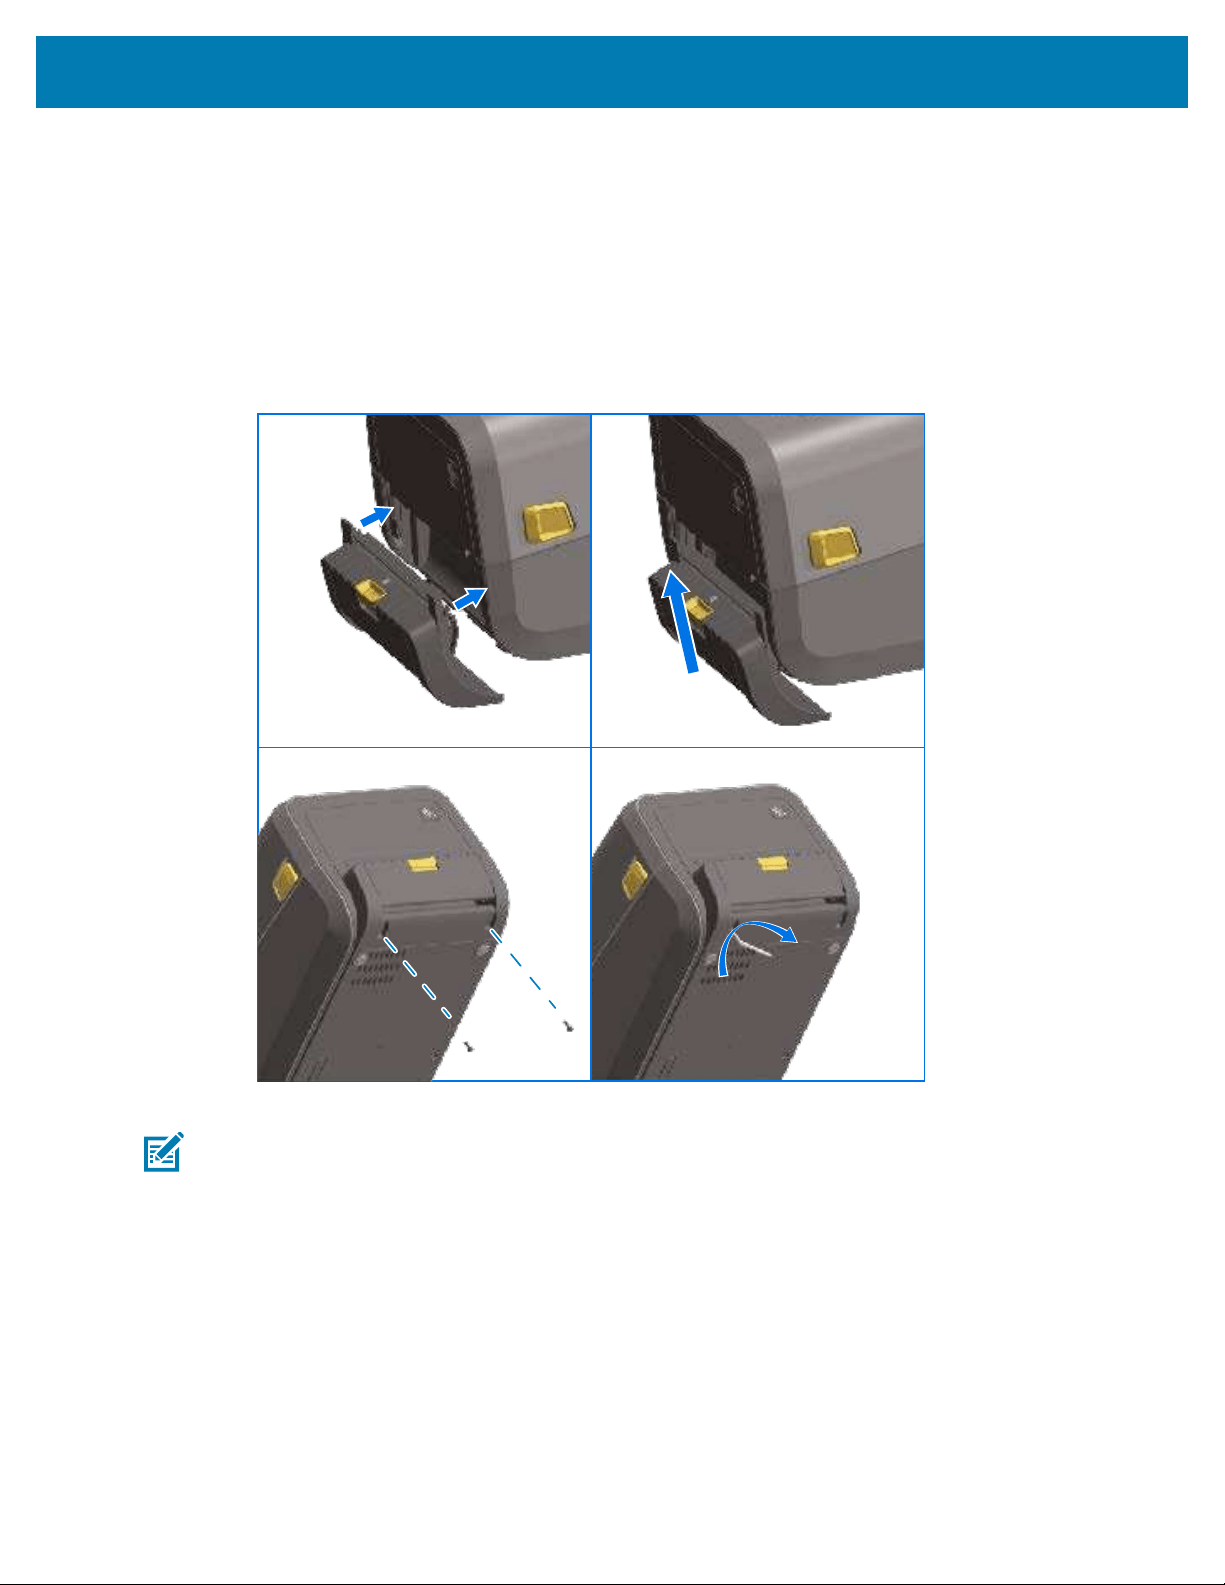
Install Hardware Options
Installing the Label Dispenser
To install the label dispenser, you must remove the standard bezel and disconnect DC input power to the
printer. See
Removing the Standard Bezel on page 73.
1. Place the label dispenser module and printer right side up with the top of the module 12.5 mm (0.5 in.)
below the bottom of the top cover. Center and push the module into the front of the printer and slide it
up until it stops.
2. Turn the printer upside down, then use the Torx wrench to attach the module to the printer with the two
supplied screws.
NOTE: For optimal printer performance, update the printer’s firmware after installing options
or immediately after the printer’s initial setup. See Updating Printer Firmware on page 310.
Installing the Standard Media Cutter
To install the standard media cutter, you must remove the standard bezel and disconnect DC input power
to the printer.See Removing the Standard Bezel on page 73.
74
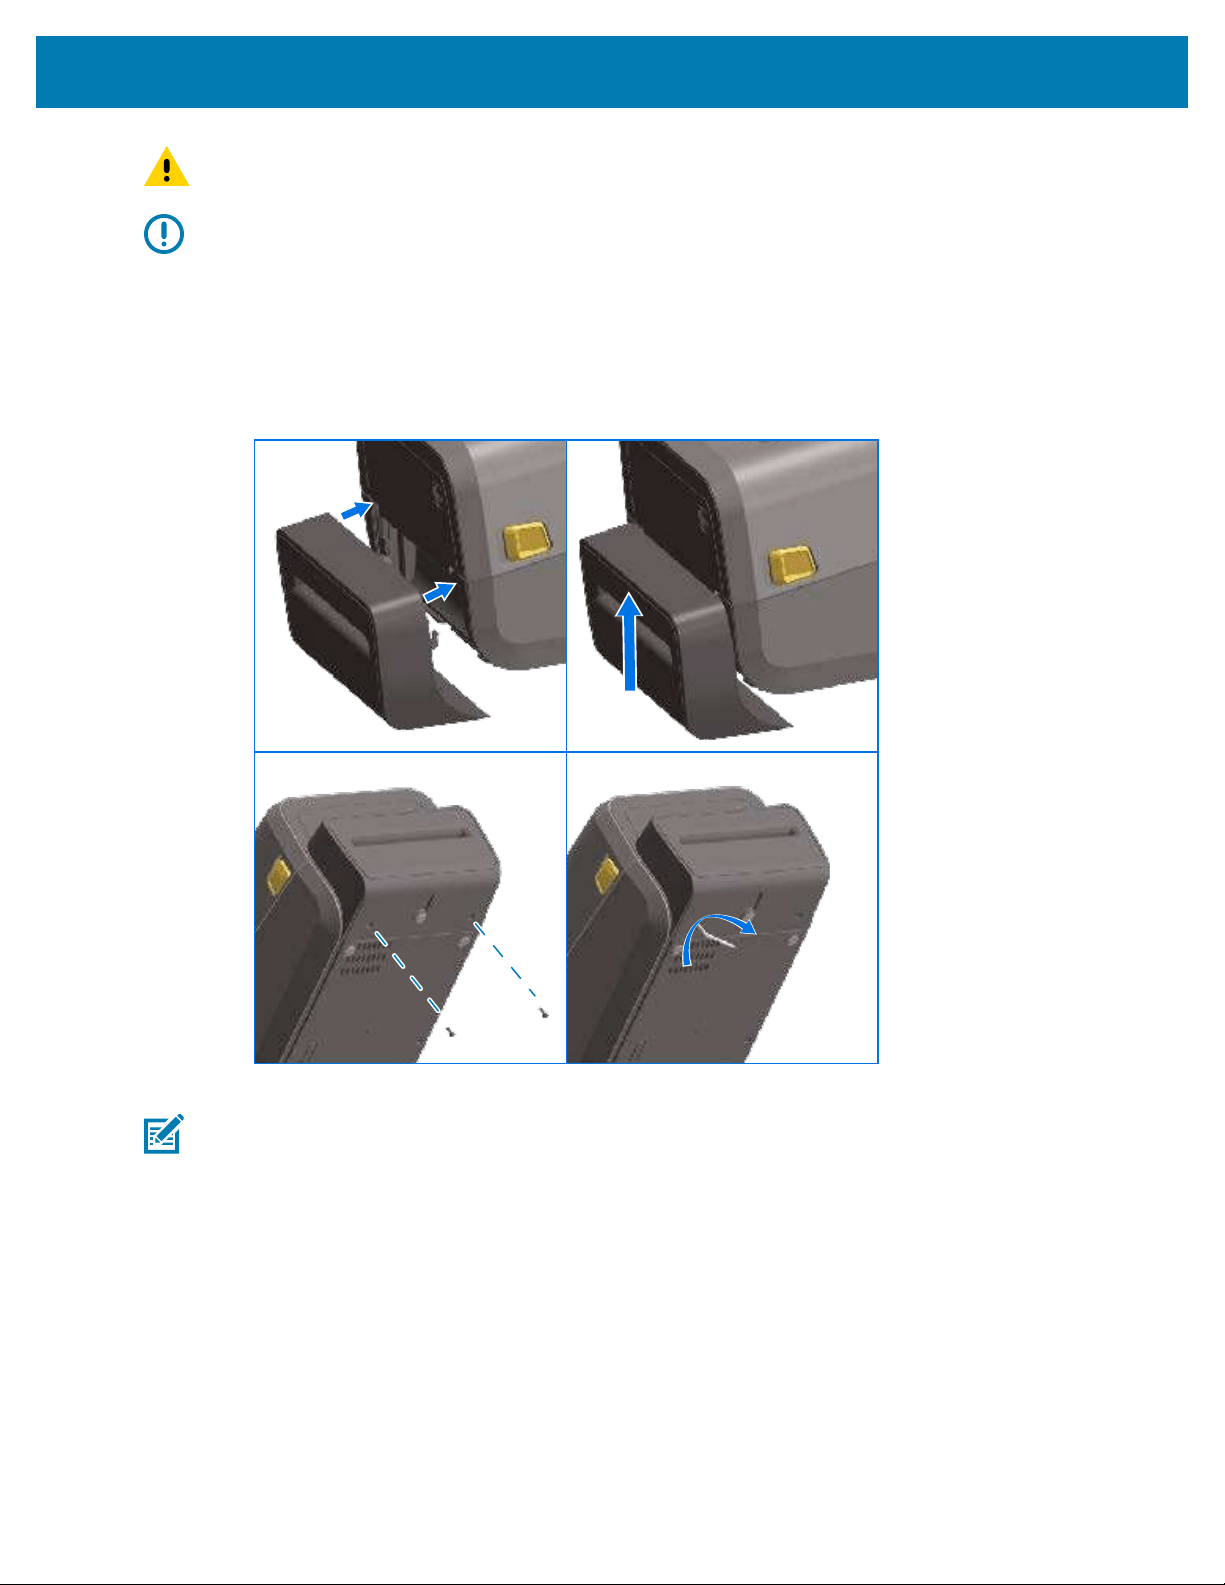
Install Hardware Options
CAUTION: There are no operator serviceable parts in the cutter unit. Never remove the cutter
cover (bezel). Never attempt to insert objects or fingers into the cutter mechanism.
IMPORTANT: Using unapproved tools, cotton swabs, solvents, etc. may damage or shorten the
cutter’s usable life or cause the cutter to bind.
1. Place the cutter module and printer right side up with the top of the module even with the bottom of the
top cover.
2. Center and push the module into the front of the printer and slide it up until it stops.
3. Turn the printer upside down, then use theTorx wrench toattach the module to the printer with the two
supplied screws.
NOTE: For optimal printer performance, update the printer’s firmware after installing options
or immediately after the printer’s initial setup. See Updating Printer Firmware on page 310.
75
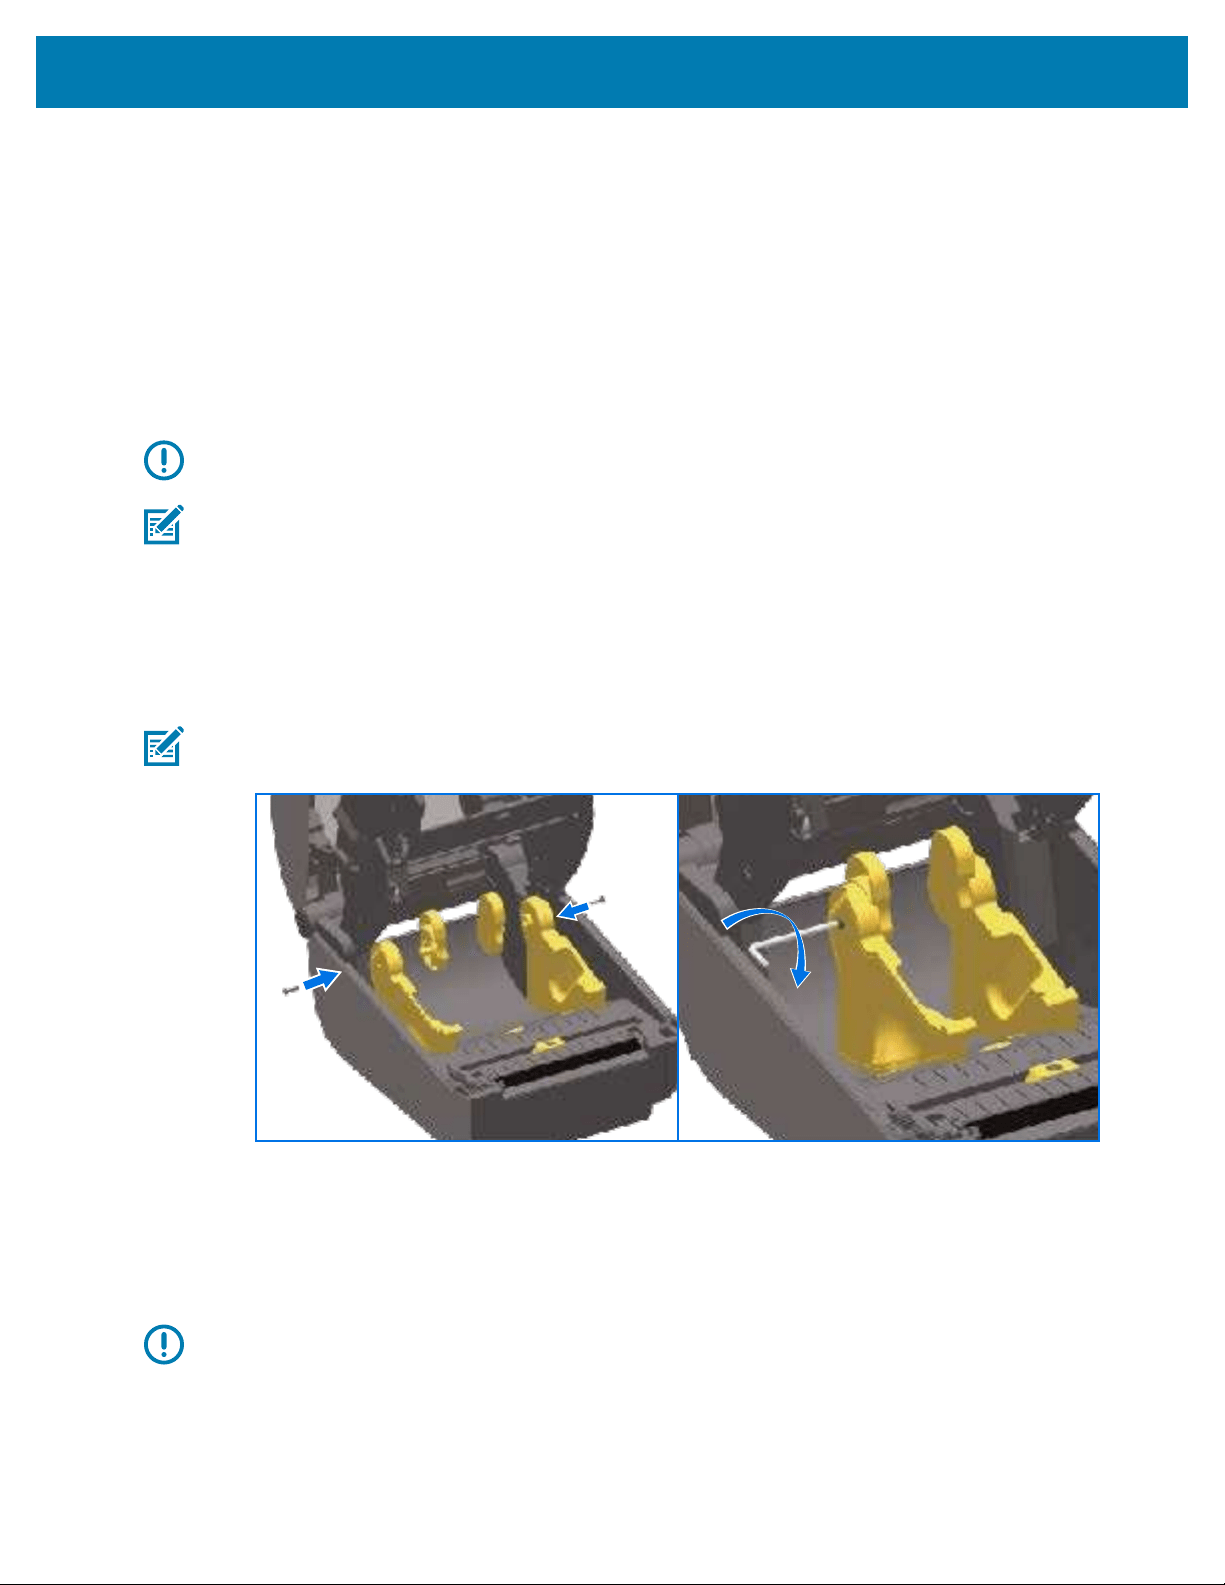
Install Hardware Options
Media Roll Core Size Adapters
The media roll adapters kit includes three pairs of media roll adapters. The kits are for the following inner
diameter (I.D.) media cores:
• 38.1 mm (1.5 in.)
• 50.8 mm (2.0 in.)
• 76.2 mm (3.0 in.)
The adapters are intended to be permanently installed in the printer. You can replace them as needed to
support other media roll sizes that require one of these adapter sizes.
IMPORTANT: The adapters may wear out if they are changed too often.
NOTE: When you removethe media adapters to print on standard roll cores, the plastic pieces
on the sides of the media roll holders may rub against the roll. If this is the case, push the
attached pieces back into the side of the media roll holder.
Installing the Media Roll Adapters
1. Place one screw in the top adapter mounting hole of both of the roll holders. Turn the screws clockwise
using the Torx wrench until the tip of the screw barely protrudes through the inside of the roll holder.
NOTE: The screws are self-tapping.
2. Place the adapter on the inside of the roll holder, making sure the large sideis on top and the smooth
side (no ribs) face the middle of the printer.
3. Align the adapter’s top screw hole to the protruding screw tip and pinch it tightly to the roll holder body.
Tighten the screw until there is no gap between the adapter and roll holder. Do not tighten beyond this
point.
IMPORTANT: Over-tightening will strip the thread.
76
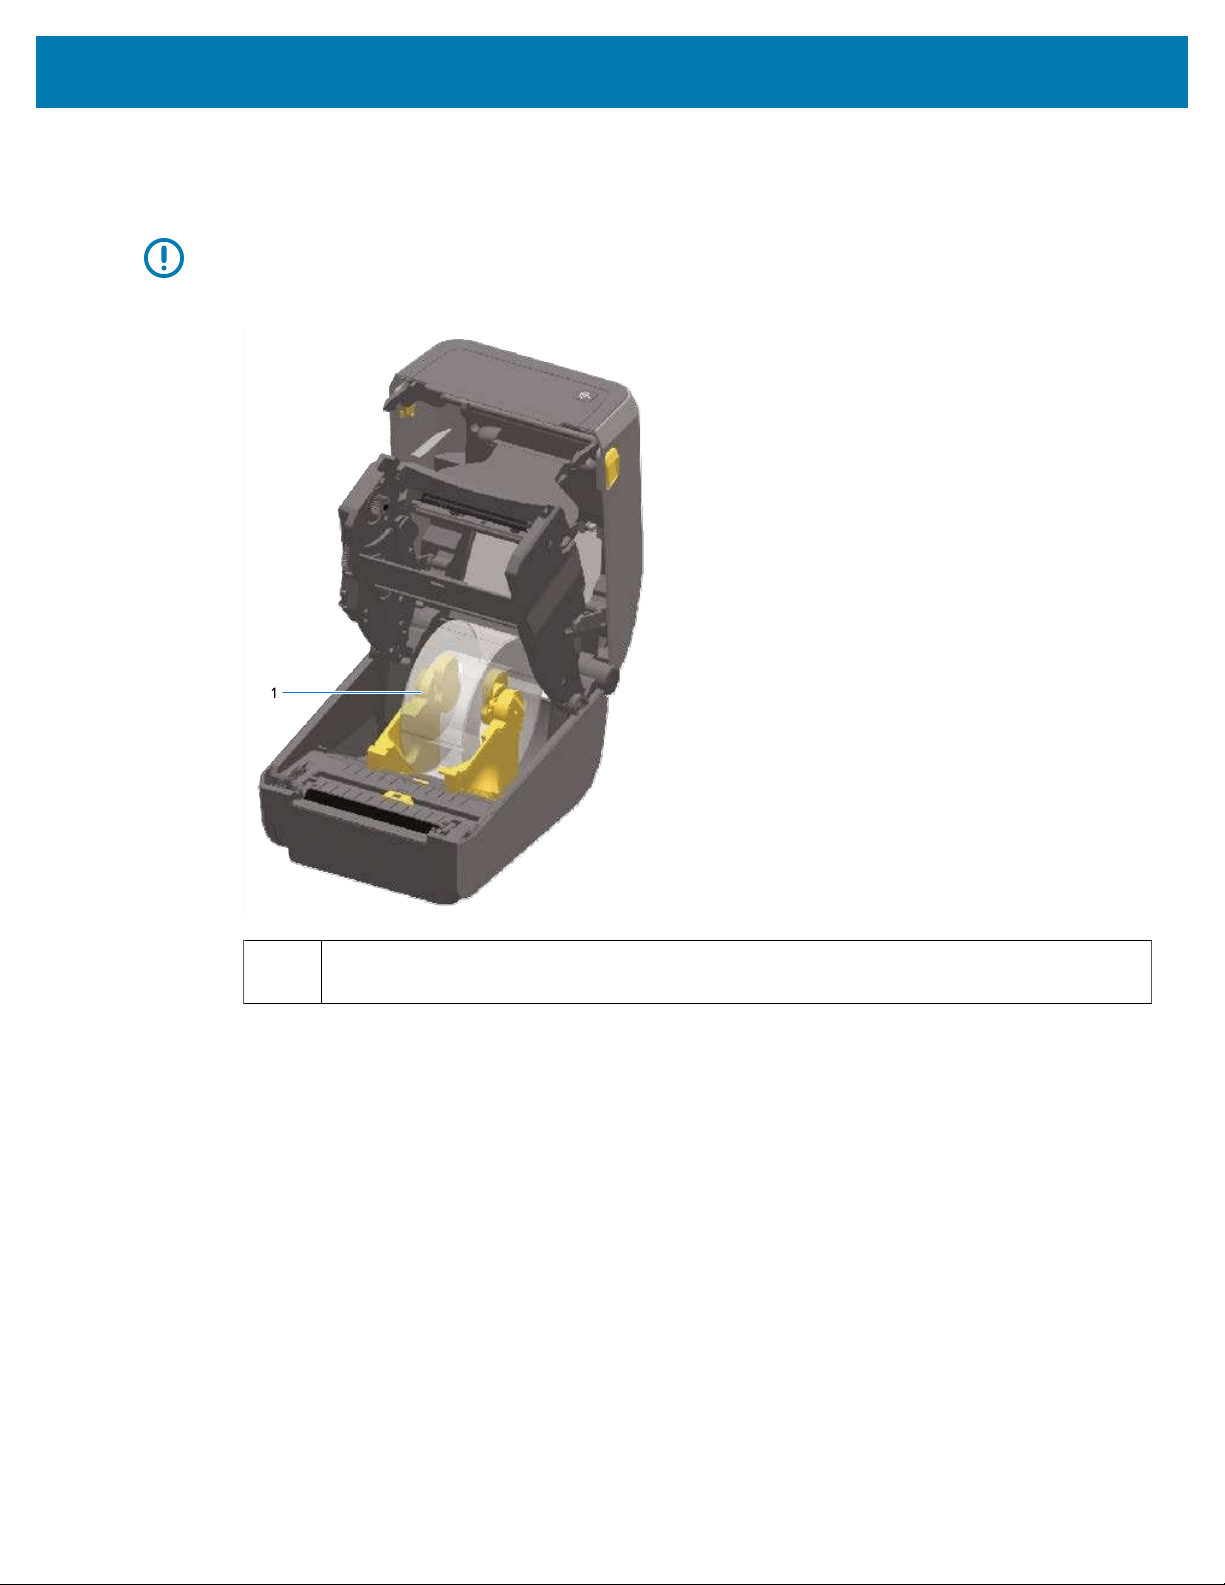
Install Hardware Options
4. Insert a screw in the bottom adapter mounting hole. Pinch the adapter tightly to the roll holder while
tightening the screw. Tighten the screw until there is no gap between the adapter and roll holder. Do
not tighten beyond this point.
IMPORTANT: Over-tightening will strip the thread.
5. Repeat the above steps to install the other adapter and roll holder.
1 Label roll with 76.2 mm (3.0 in.) inner core mounted on media core adapters (shown as an
example)
Installing the Attached Power Supply Base Options
The power base is designed for quick installation usingmounting screws (provided with the upgrade kit)
anda Torx T10 wrench that you supply.
1. Remove media rolls (if any) from the printer.
2. Unplugthe power supply cable from the back of the printer.
3. Turn the printer over and align the power base to the bottom of the printer, making sure the printer
power plug is oriented toward the back of the printer. The printer’s rubber feetshould align with
recesses on the top of the power base.
77
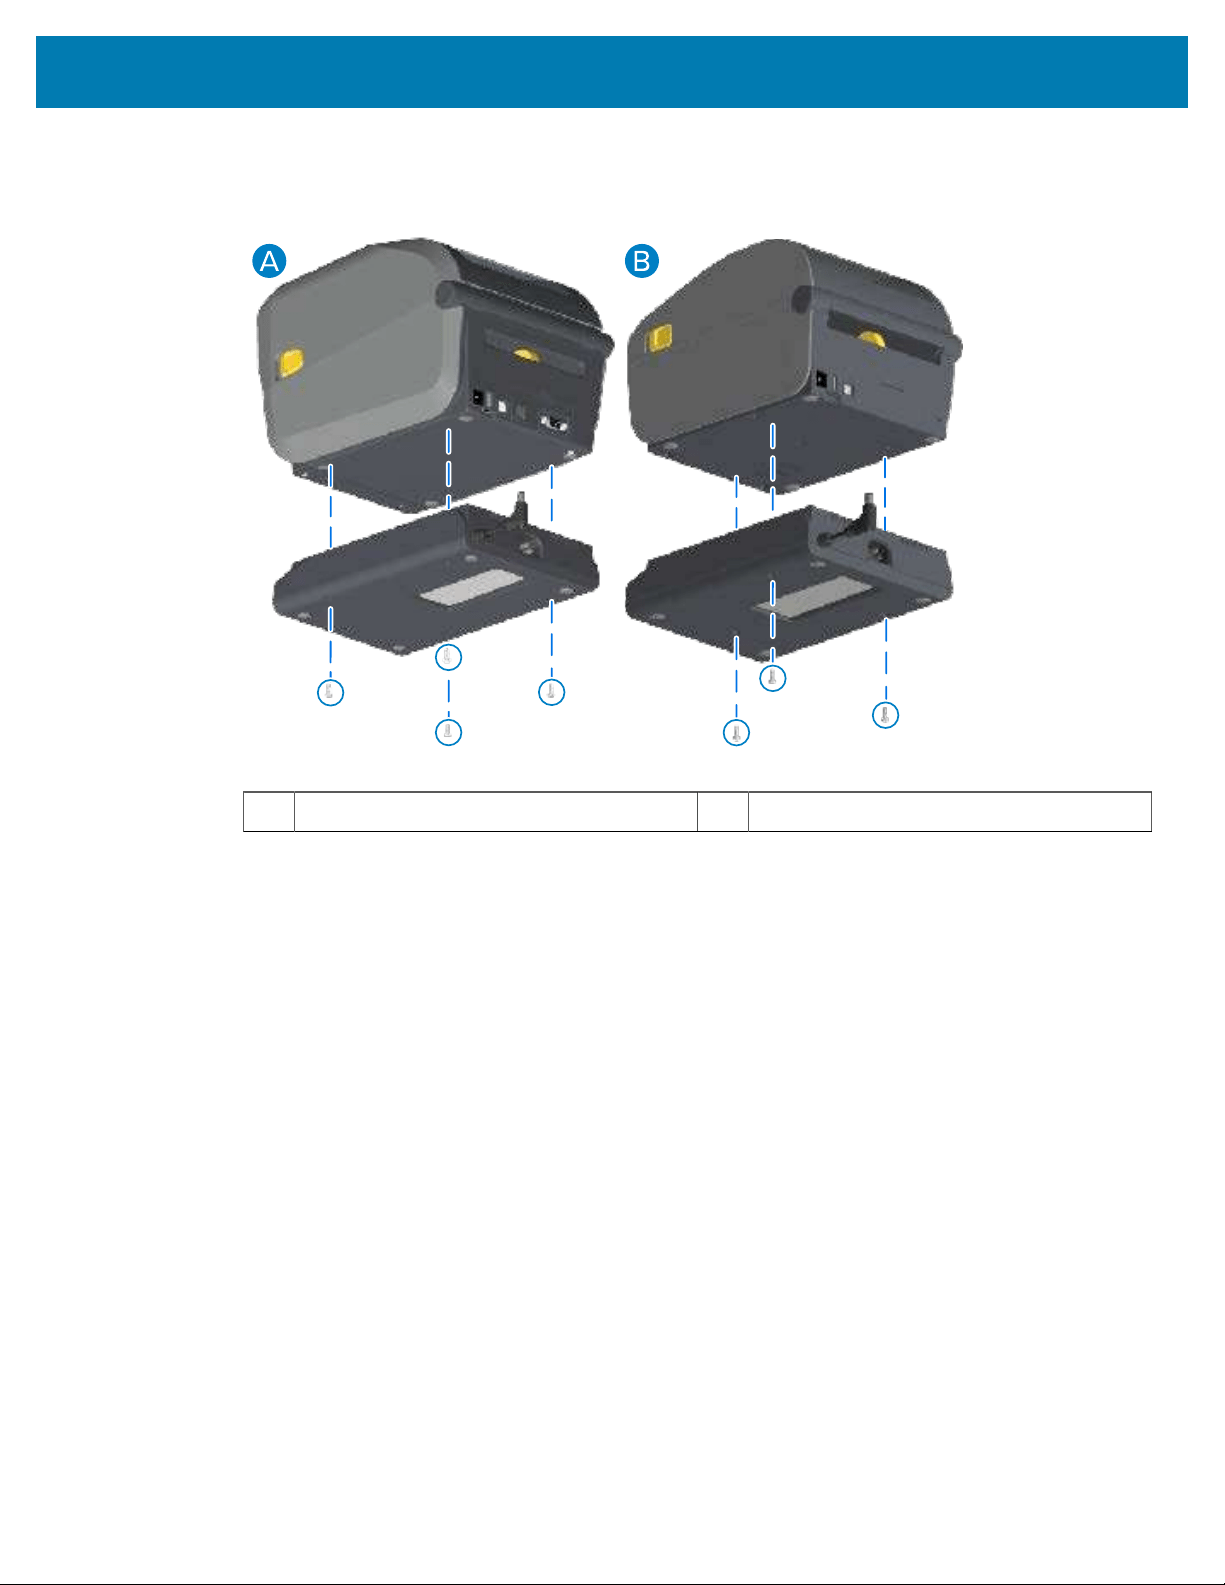
Install Hardware Options
4. Use the screws provided to attach the power base to the printer.Thermal Transfer printer models use
four screws (A), and DirectThermal printer models use three screws (B).Tighten the screws using the
T10 wrench provided in the kit.
A
Thermal Transfer printers
B
Direct Thermal printers
78
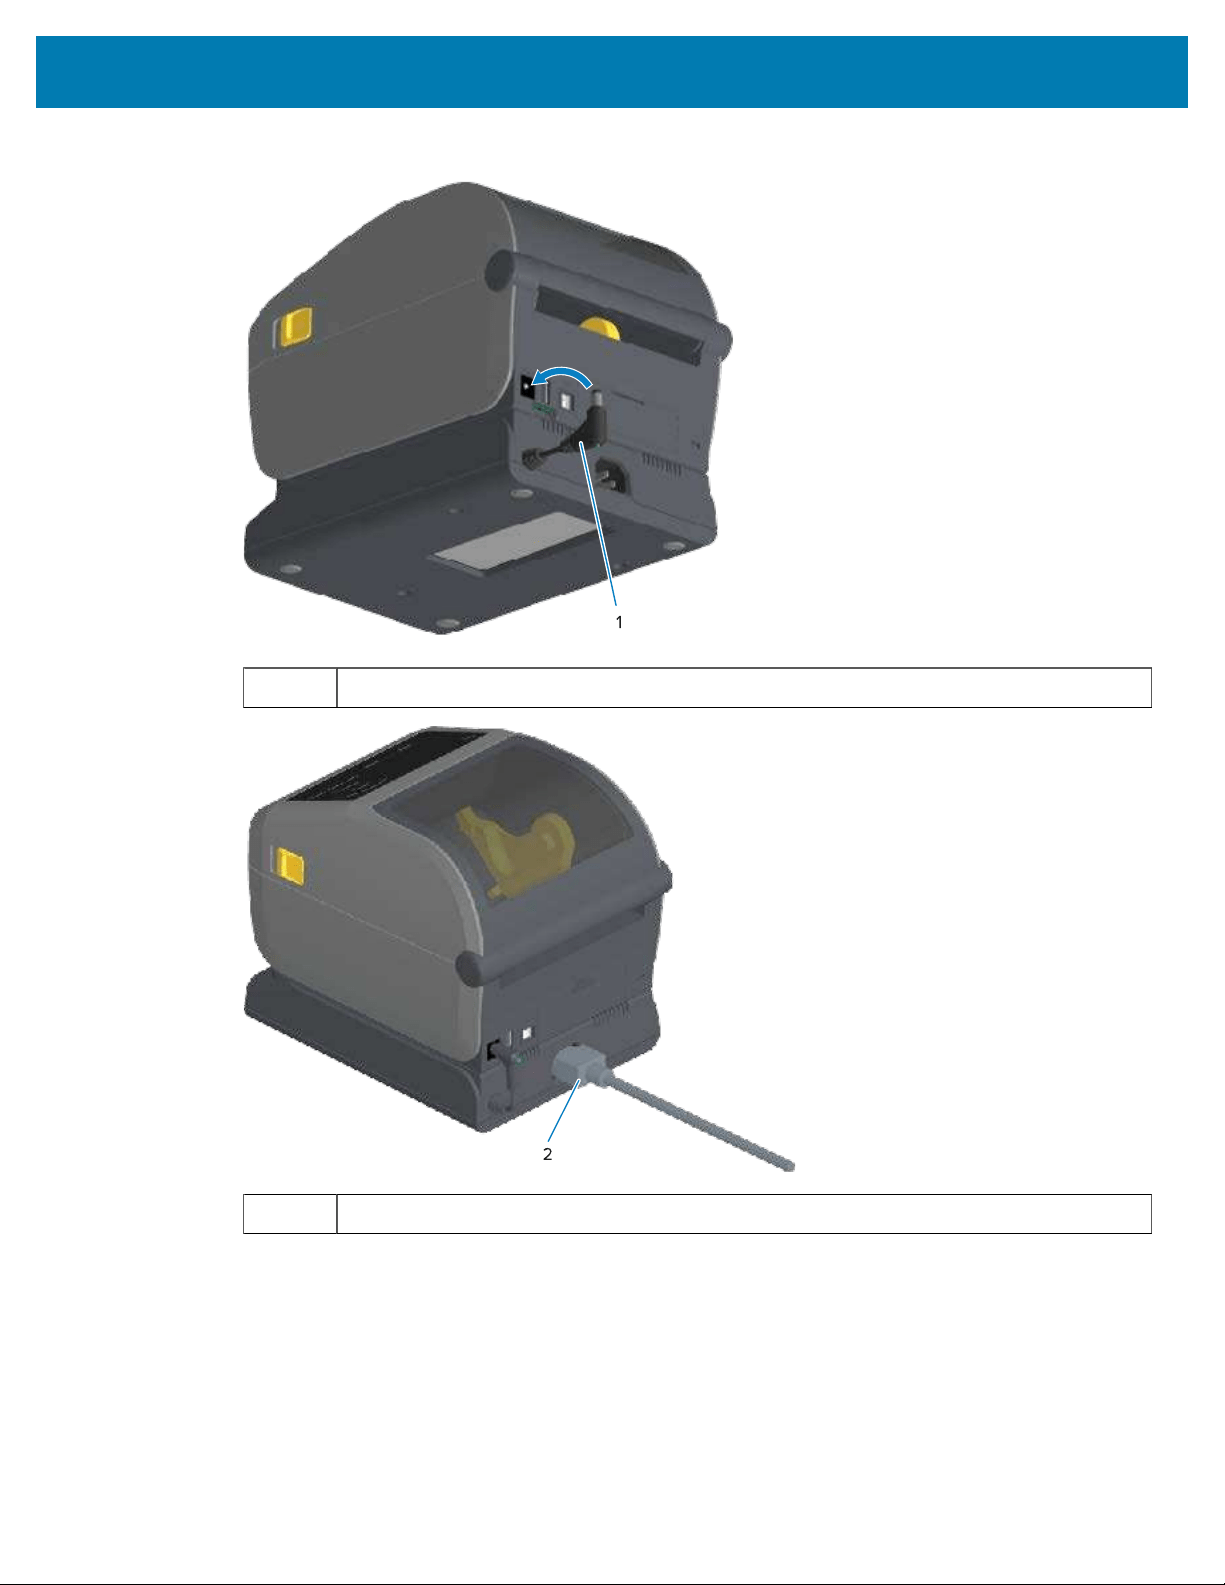
Install Hardware Options
5. Insert the DC input power plug into the printer.
1 DC input power plug
79
2
DC input power plug
6. Re-connect the AC power cord to the printer power base.
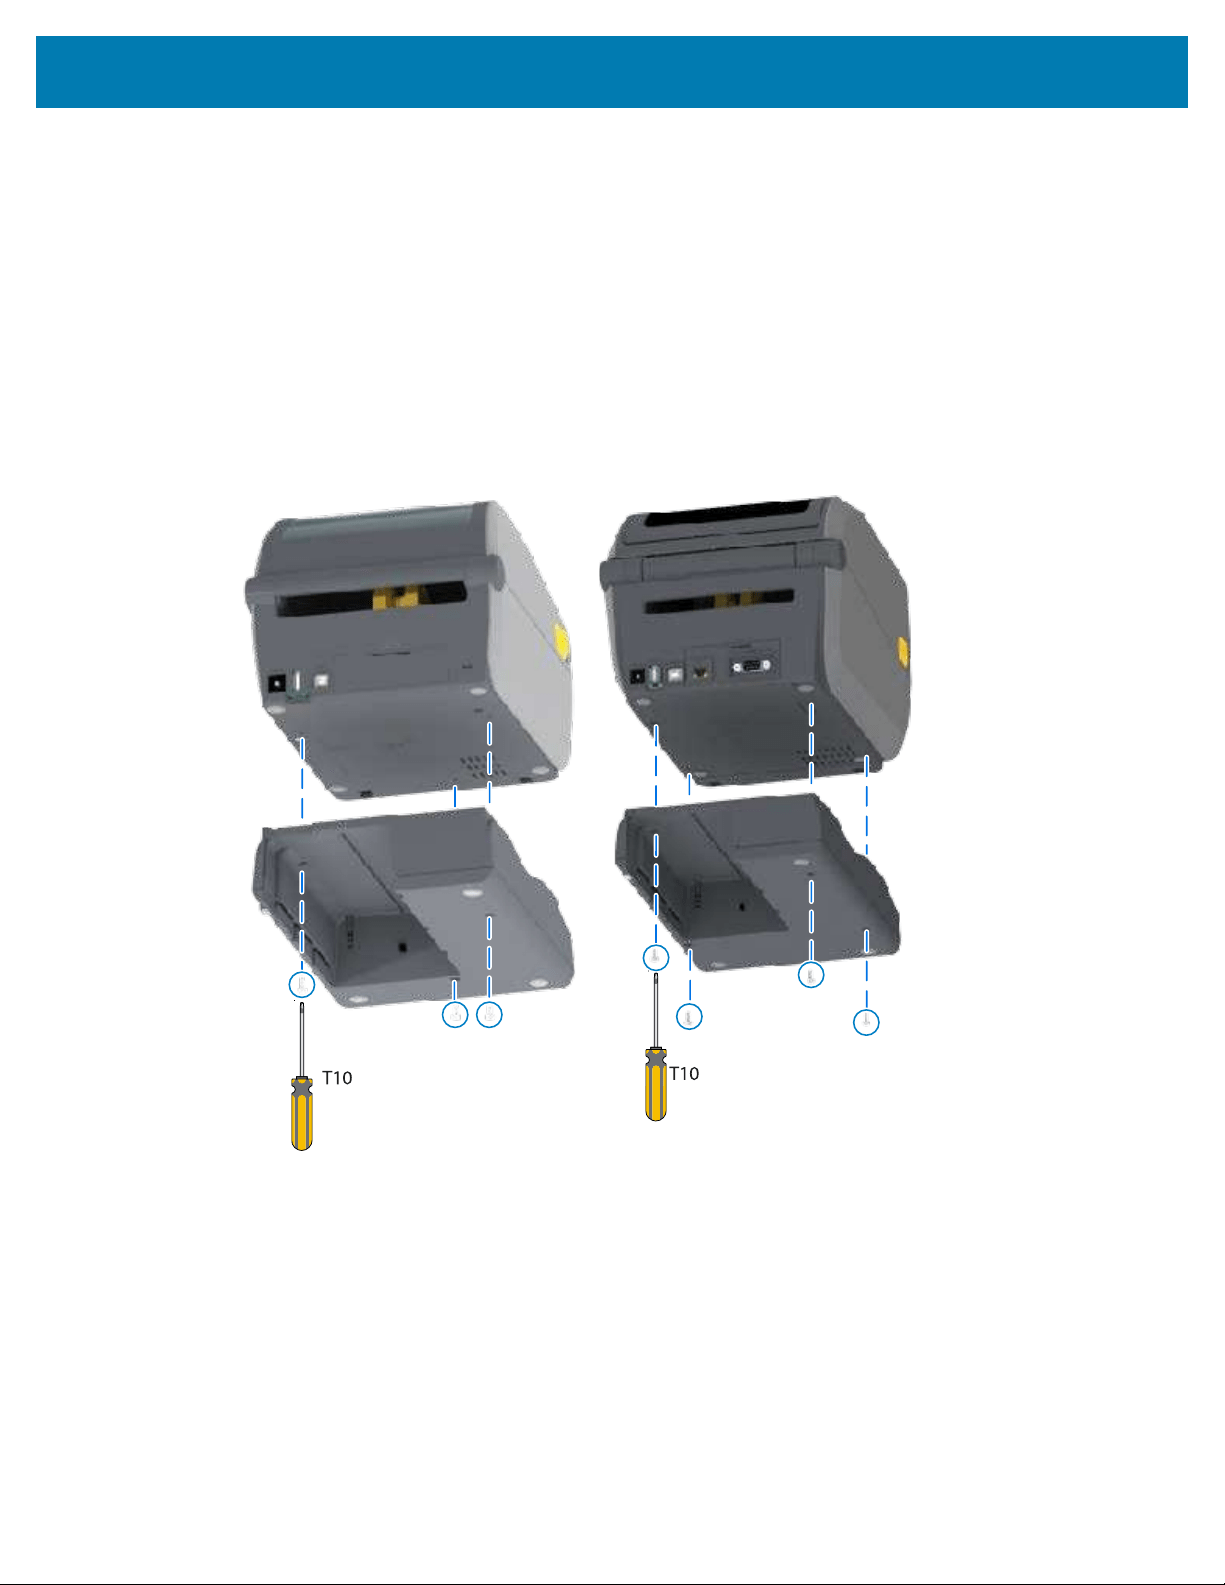
Install Hardware Options
Installing the Attached Battery Base Options
The battery base is ready to attach to the printer. The base is installed using a Torx T10 wrench and the
mounting screws provided with the upgrade kit.
1. Remove media rolls (if any) from the printer. Detach the original power supply cable from the back of
the printer.
2. Turn the printer over and align the power base to the bottom of the printer with the printer power plug
oriented toward the back of the printer. The printer’s rubber feet should align with the recesses in the
top of the power base.
80
3. Use the screws provided to attach the power base to the printer. Thermal Transfer printer models use
four screws (image on the left below) and Direct Thermal printer models use three screws (image on the
right below). Tighten the screws using the Torx wrench supplied in the kit.
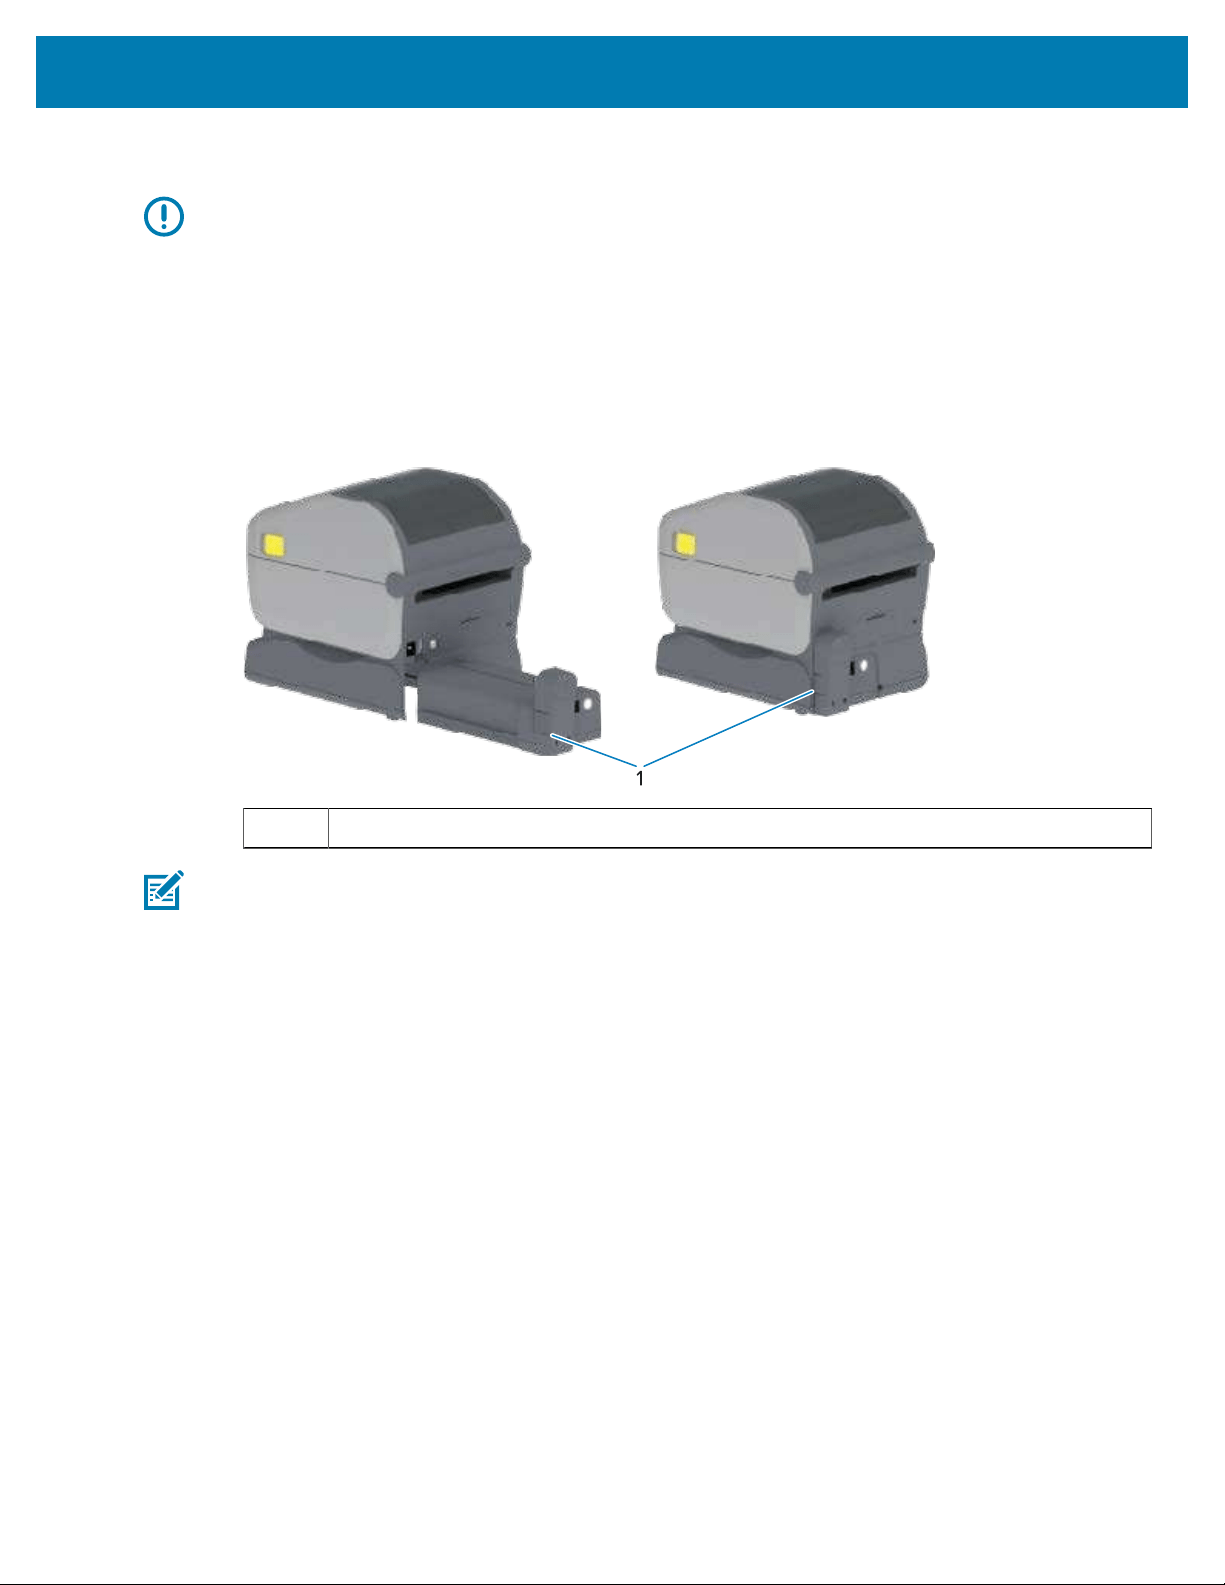
Install Hardware Options
Installing the Battery into the Attached Power Base
IMPORTANT: The attached battery base must be properly installed and securely connected your
printer to keep from damaging the printer or the battery.
1. Disconnect the printer’s external power supply from the DC power input connector located on the rear
of the printer.
81
2. Slide the battery into the battery slot on the battery base. Push the battery into the base until battery
pack is flush to the rear of the battery base, and the connectors on the battery pack are engaged with
the ports on the back of the printer.
This image shows the position of the battery when it is ready to install (left) and the battery installed in
the base (right).
1 Battery latch
NOTE: Batteries are shipped in shutdown mode for safety and to keep the battery from
discharging during storage and shipping. The battery requires charging prior to initial use with
the printer.
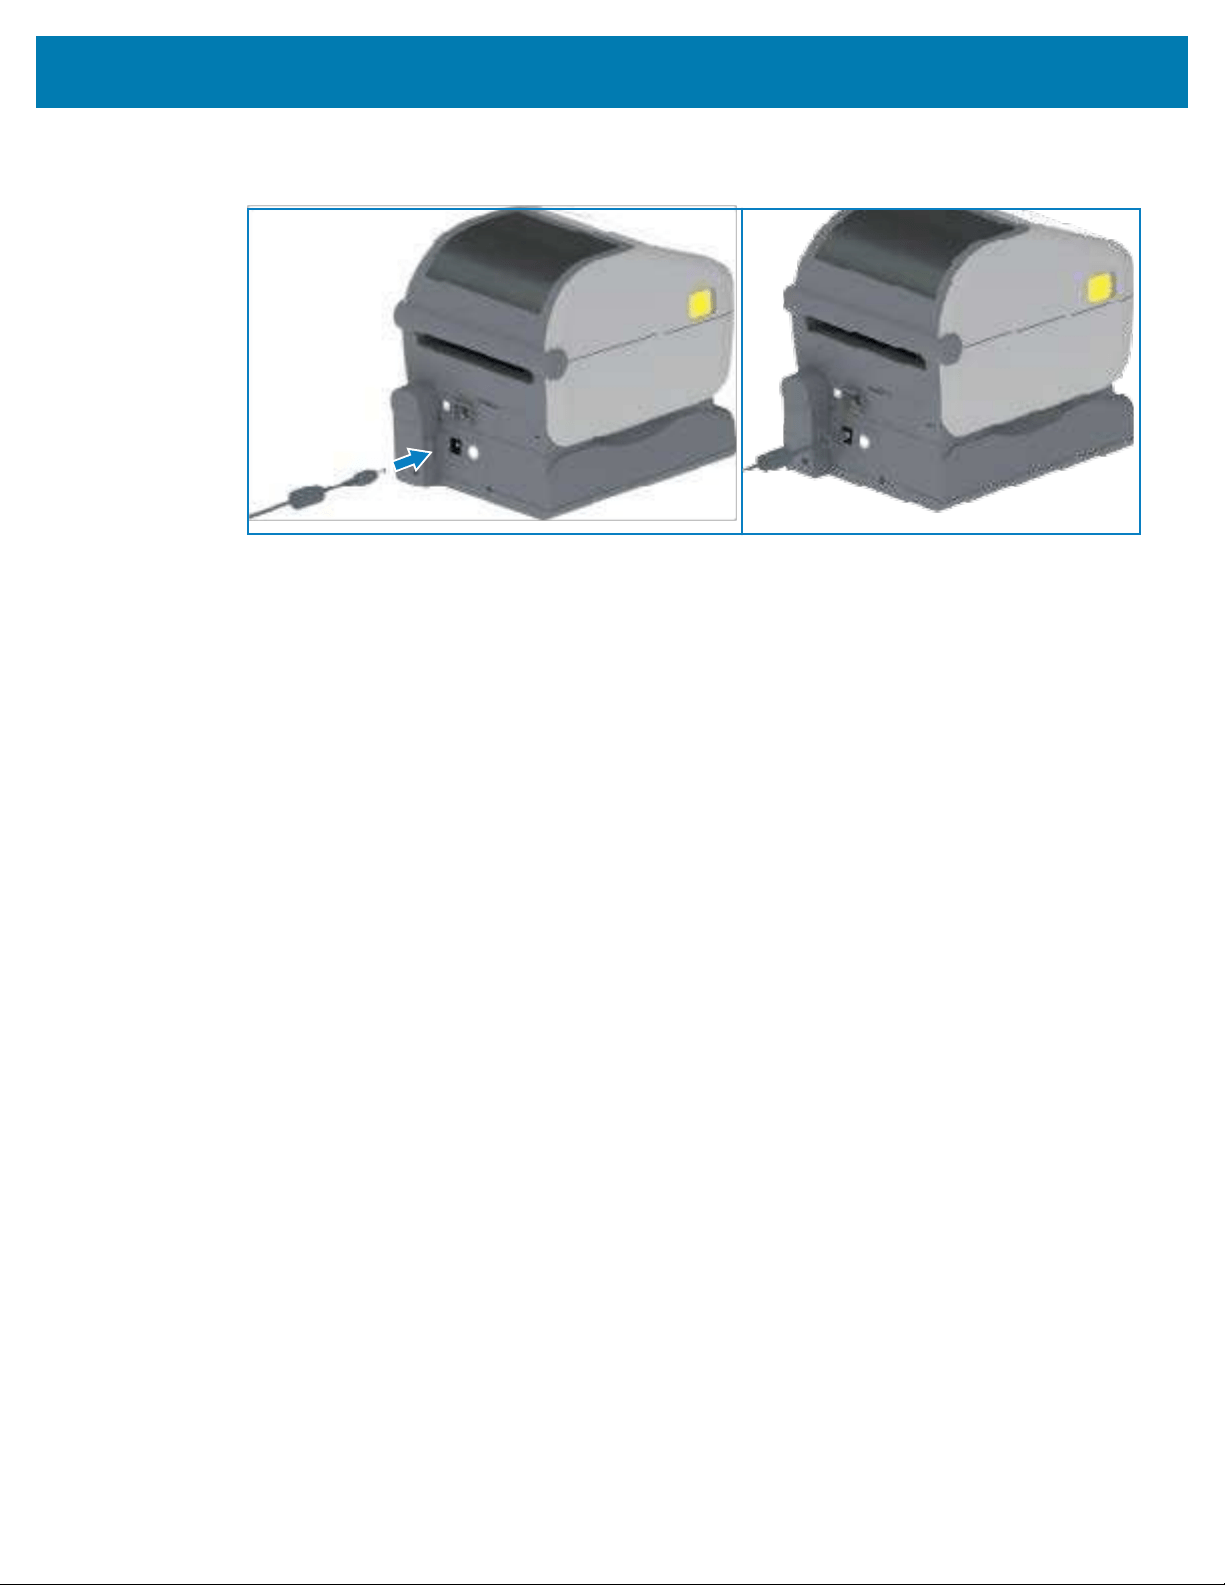
Install Hardware Options
3. Attach the printer’s power supply to the battery to wake up the battery from shutdown mode and begin
its initial charge.
82

Install Hardware Options
4. The battery must be fully charged before first use. See Battery Indicators and Controls on page 58 to
learn how to:
• turn the battery on.
• discover battery-charge-saving features and behaviors.
• check the battery’s charge level and health.
The battery takes approximately two hours to reach full charge. The battery status/ health indicator
(lighting bolt) turns from amber (charging) to green (charged) when the battery reaches full charge.
83

Color Touch Display and
Controls
84
The optional Color Touch Display available with select printers in this printer series lets you access
printer features and run print jobs, use wizards for commonly-performed tasks, and troubleshoot issues if
any with your printer.
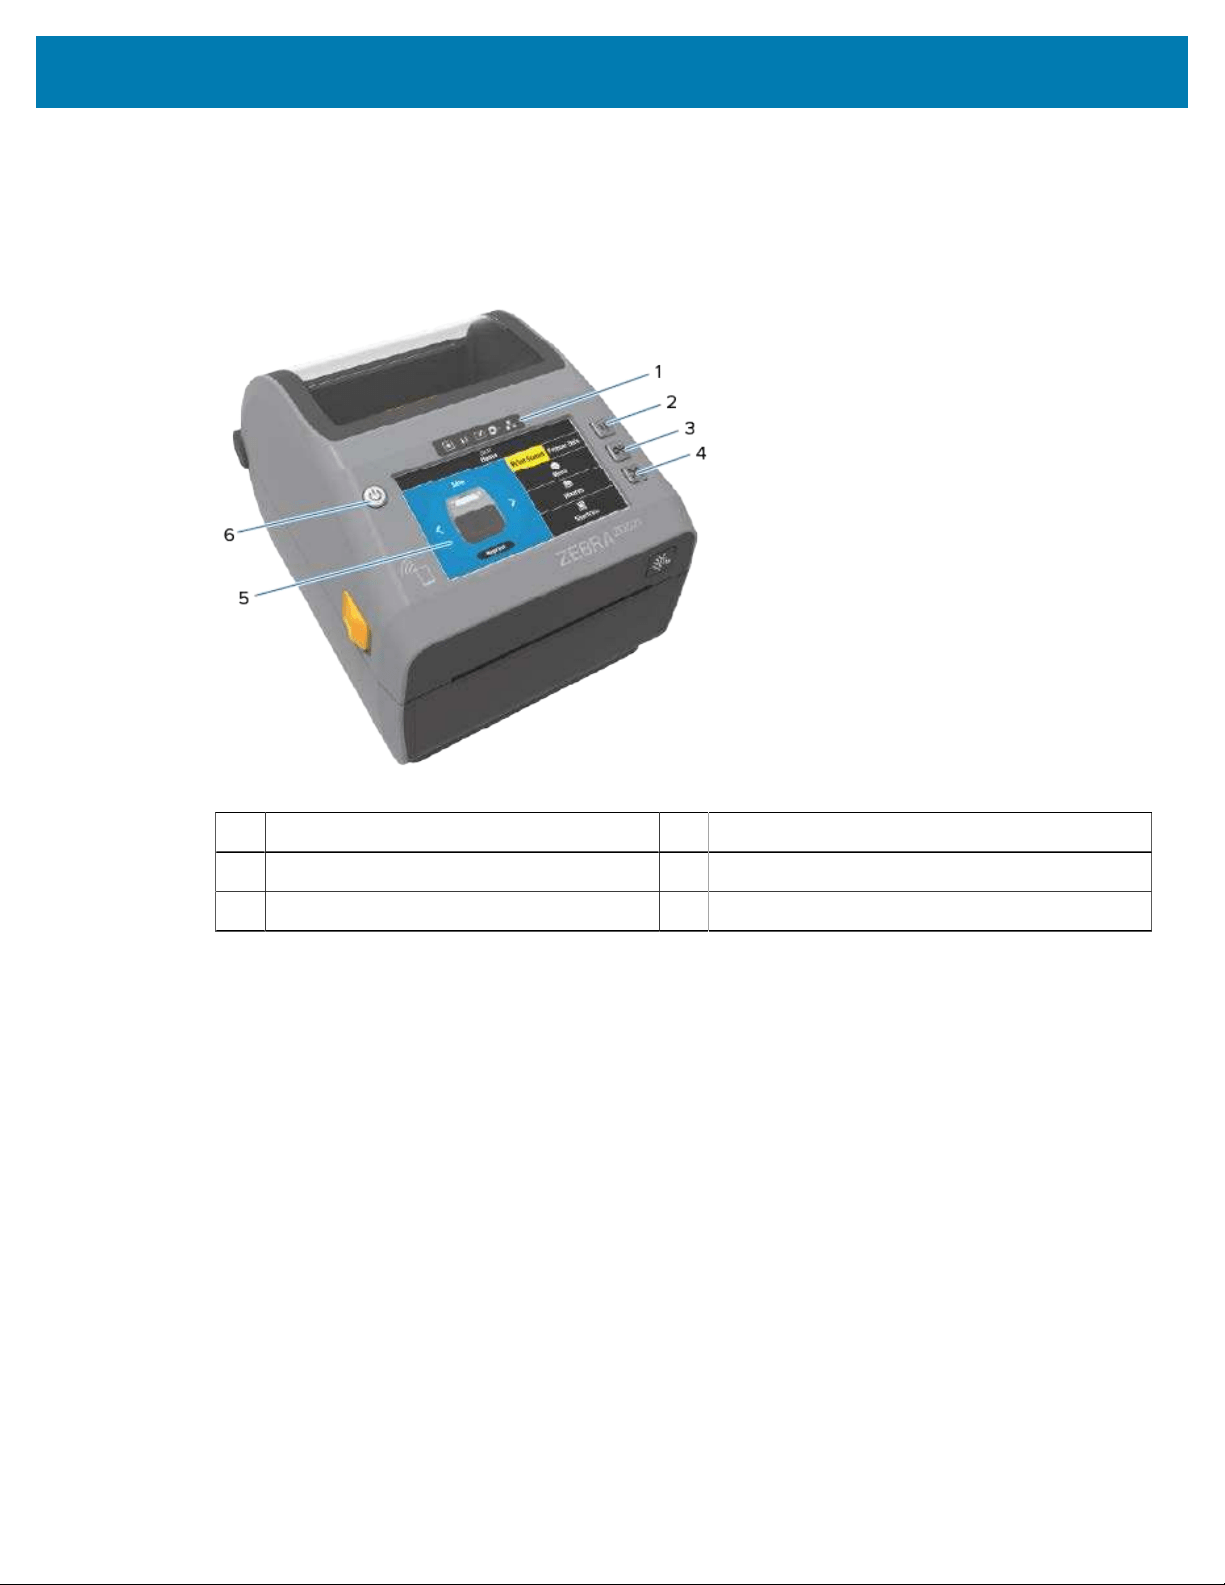
Color Touch Display and Controls
Color Touch Display and Controls
Color Touch Display Printer Controls
The Color-Touch Display interface option (available with some ZD series printer models) makes it easy
for you to operate your printer. It is customizable for all user types and includes standard controls and
indicators.
1 Status indicators 4 CANCEL button
2 PAUSE button 5 Color-touch display and Interface
3 FEED button 6 POWER button
See
Controls and Indicators on page 47 for information on the printer’s Standard Interface controls
(POWER, PAUSE, FEED, and CANCEL buttons) and the five printer status indicators.
85
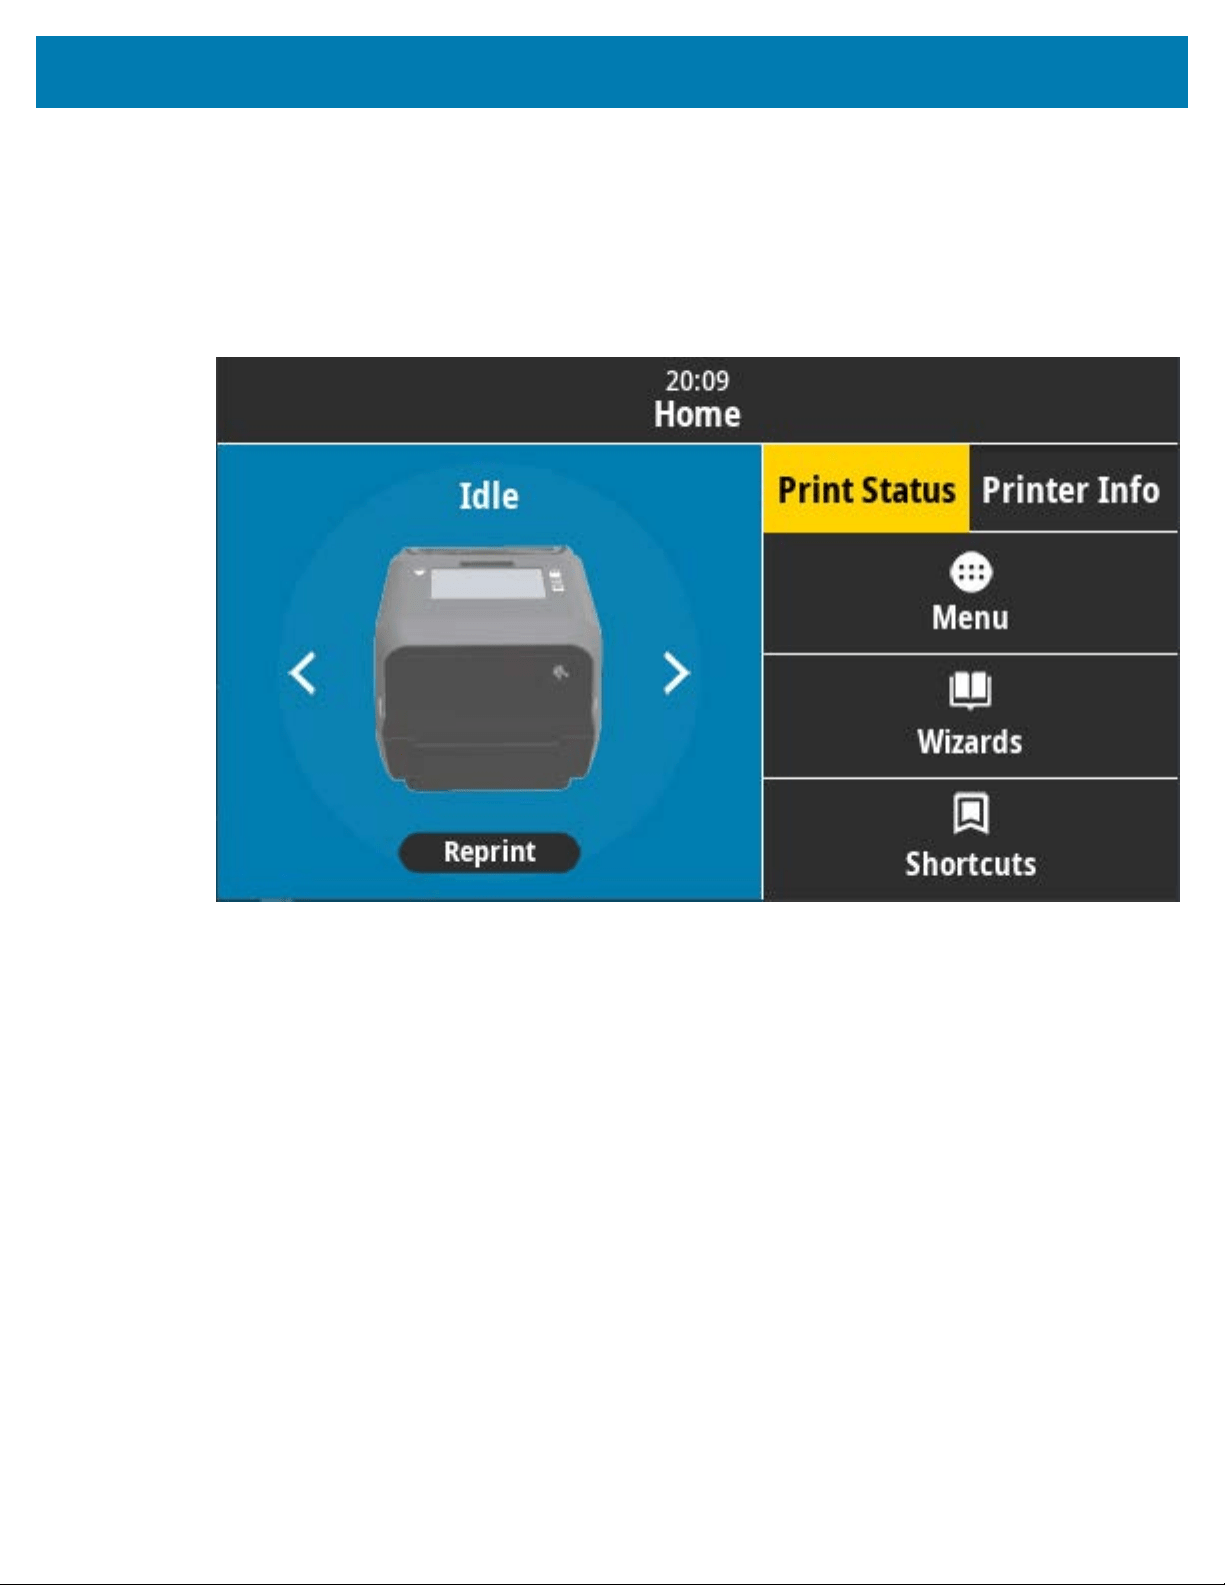
Color Touch Display and Controls
Home Screen
The Home screen on the printer's display shows you the printer’s current status and provides a way for you
to access the printer’s menus. You can rotate the image of the printer 360 degrees to view the information
on it from all angles.
Printer Status
86
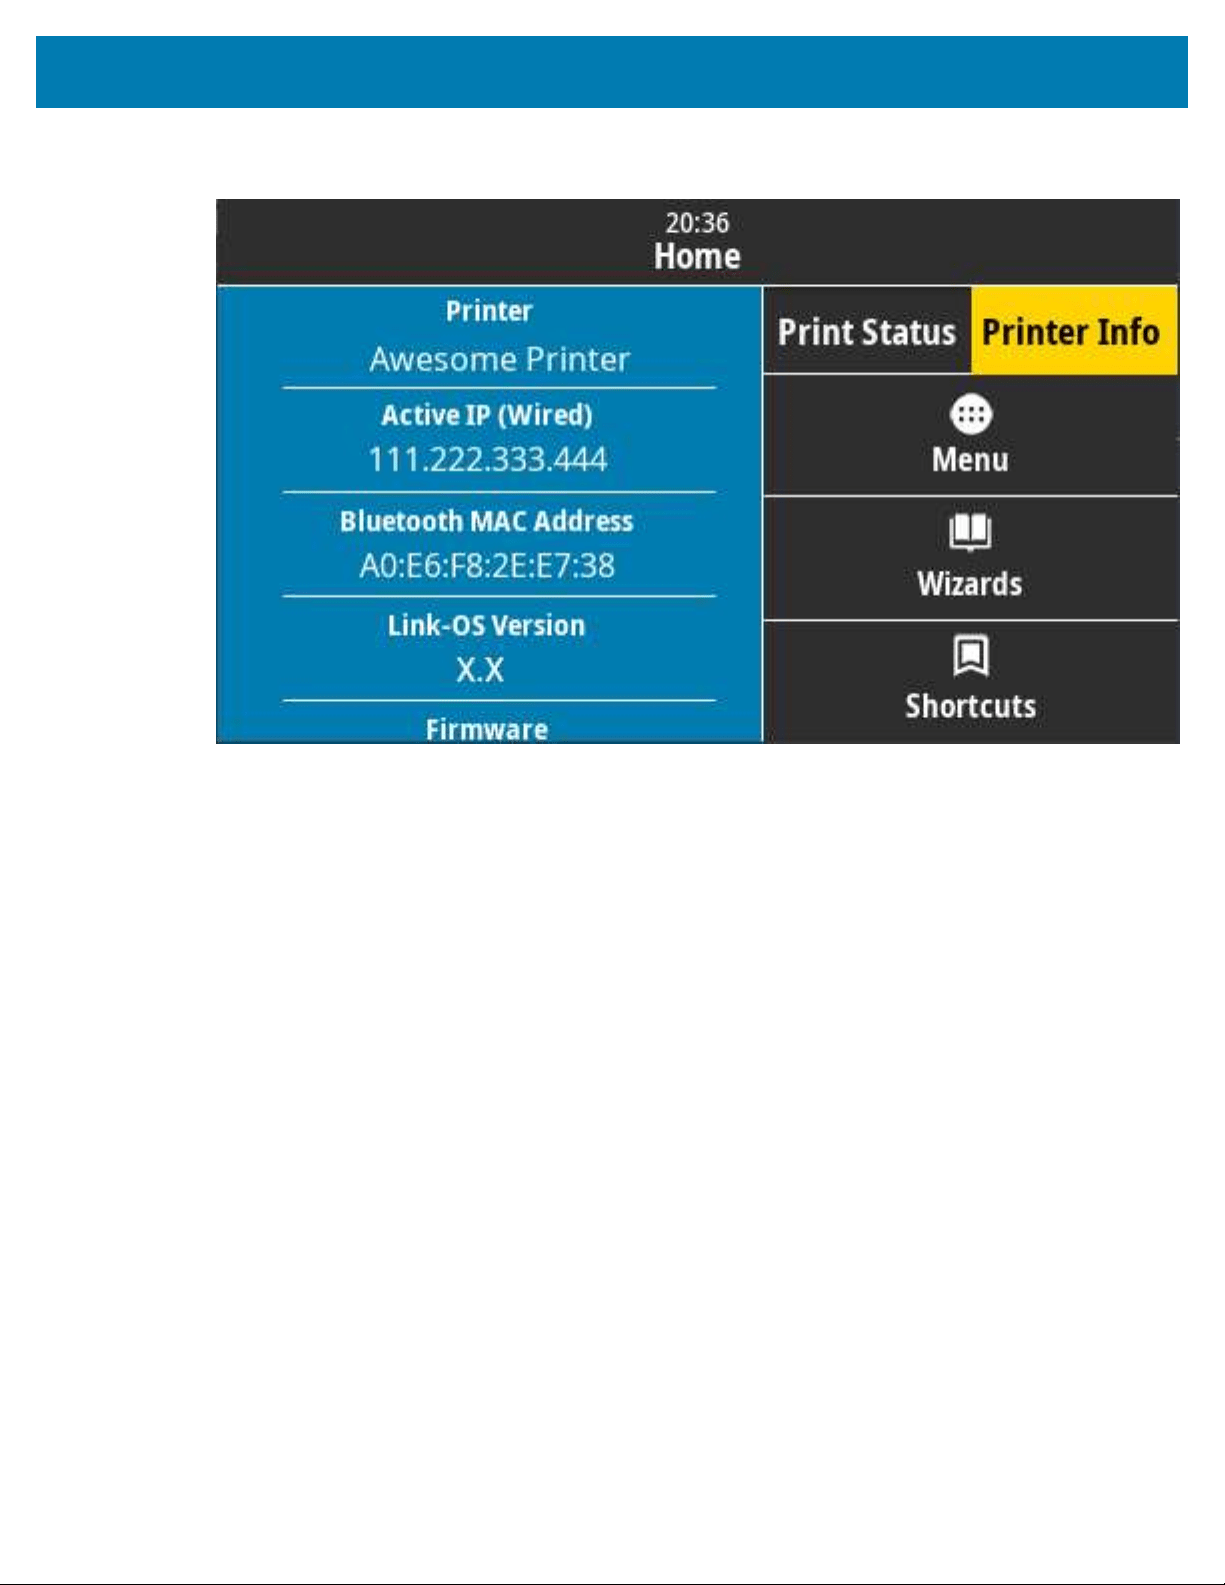
Color Touch Display and Controls
Printer Info
Printers with the optional Color Touch Display interface include the following features:
• The printer's Standard Interface controls and status indicators provide a way for you to place the printer
in various modes, recognize printer status, and operate the printer.
• The interactive Color Touch Display shows the normal operation status of the Home Screen with access
to:
• Print Status and Printer Info— Provide information about the printer.
• Menu — Navigate the menu to establish and change settings, and to control print operations and file
transfers.
• Wizards — Use these to change printer settings by going through prompts. See Printer Wizards on
page 88.
• Shortcuts— Use these to quickly access the most recent menu items and to save your favorites.
Touch the darkened heart icon next to a menu item to save it to your list of favorites. Items in the
favorites are shown in the order in which they were saved.
87
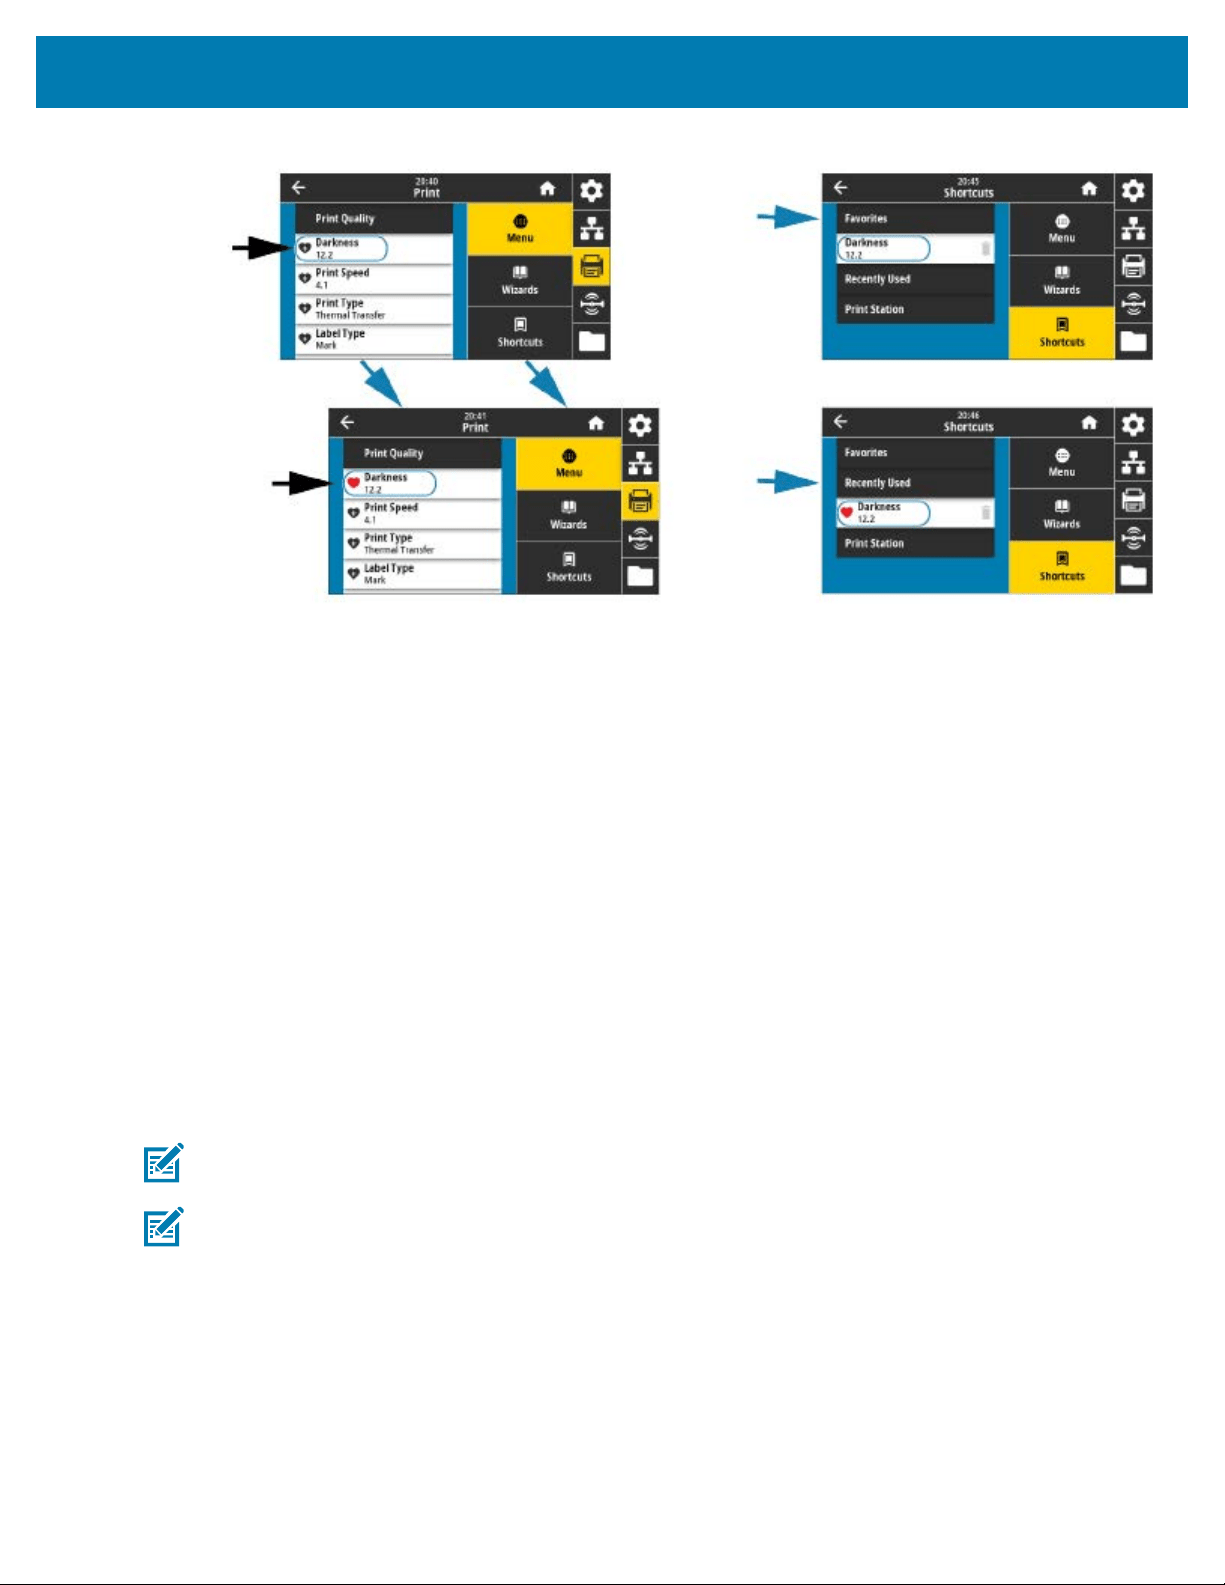
Color Touch Display and Controls
The Color Touch Display displays alerts and error messages.If the background color of the Home Screen
is yellow or red, the printer is in an alert or error state. For more information, see Resolving Alerts and
Errors on page 311.
The Color Touch Displayalso shows a quick link to online instructions and how-to videos that you can
access using mobile devices.And it provides access to onboard help.
Printer Wizards
Printer wizards are designed to assist you by walking you through the setup process for various printer
settings and features.
The following wizards are available:
• Set All Wizard — runs all the Wizards in sequence.
• System Wizard — sets up non-print related operating system settings.
• Connection Wizard — configures the printer’s connectivity options.
• Print Wizard — configures key printing parameters and features.
• RFID Wizard — sets up the RFID subsystem’s operations.
NOTE: When using the Wizards, do not send data to the printer from the host.
NOTE: For optimal results, use full-width media when running the Print or Set All Wizards. If the
media is shorter than an image to be printed, the image may be truncated or it may print across
multiple labels.
On the Home screen, touch Wizards to see the available options. For more information about individual
settings set by any of the wizards,. See User Menus on page 89.
88
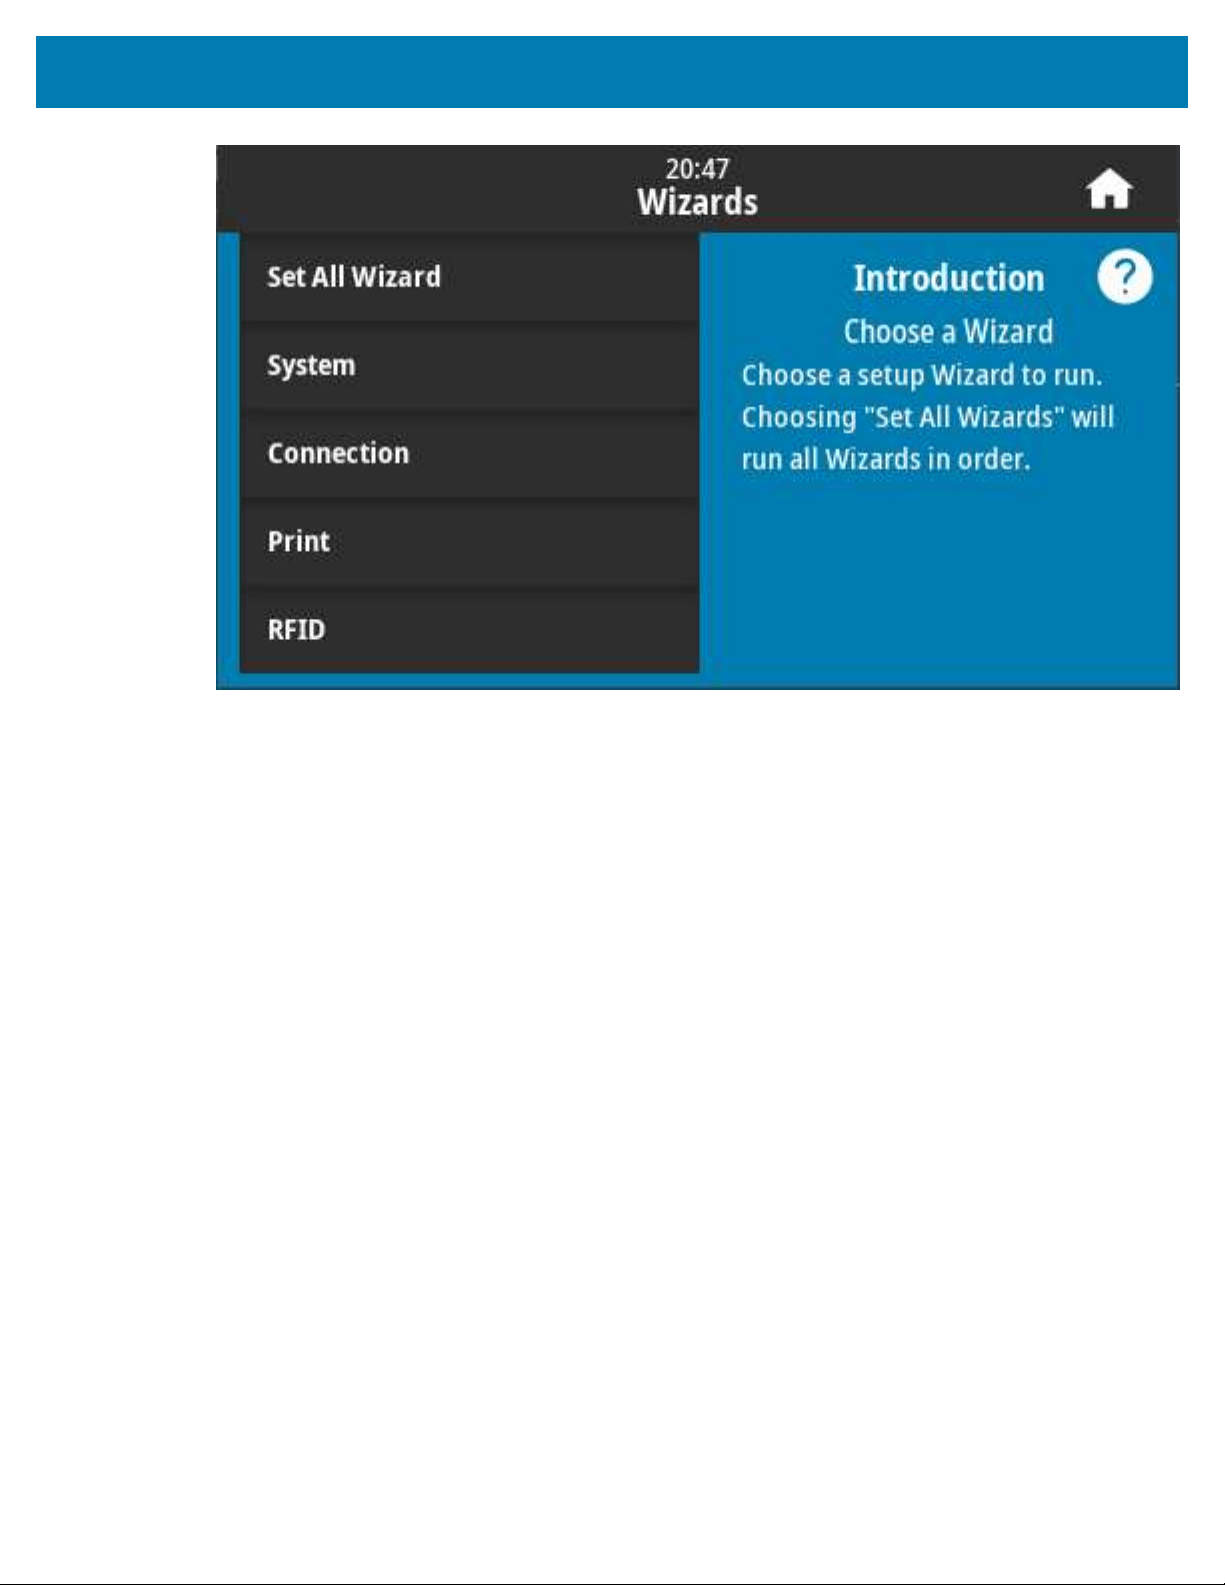
Color Touch Display and Controls
User Menus
The printer's user menus enable you to configure the printer.
The following menus are available:
• System menu
• Connection menu
• Print menu
• RFID menu
• Storage menu
89

Color Touch Display and Controls
90
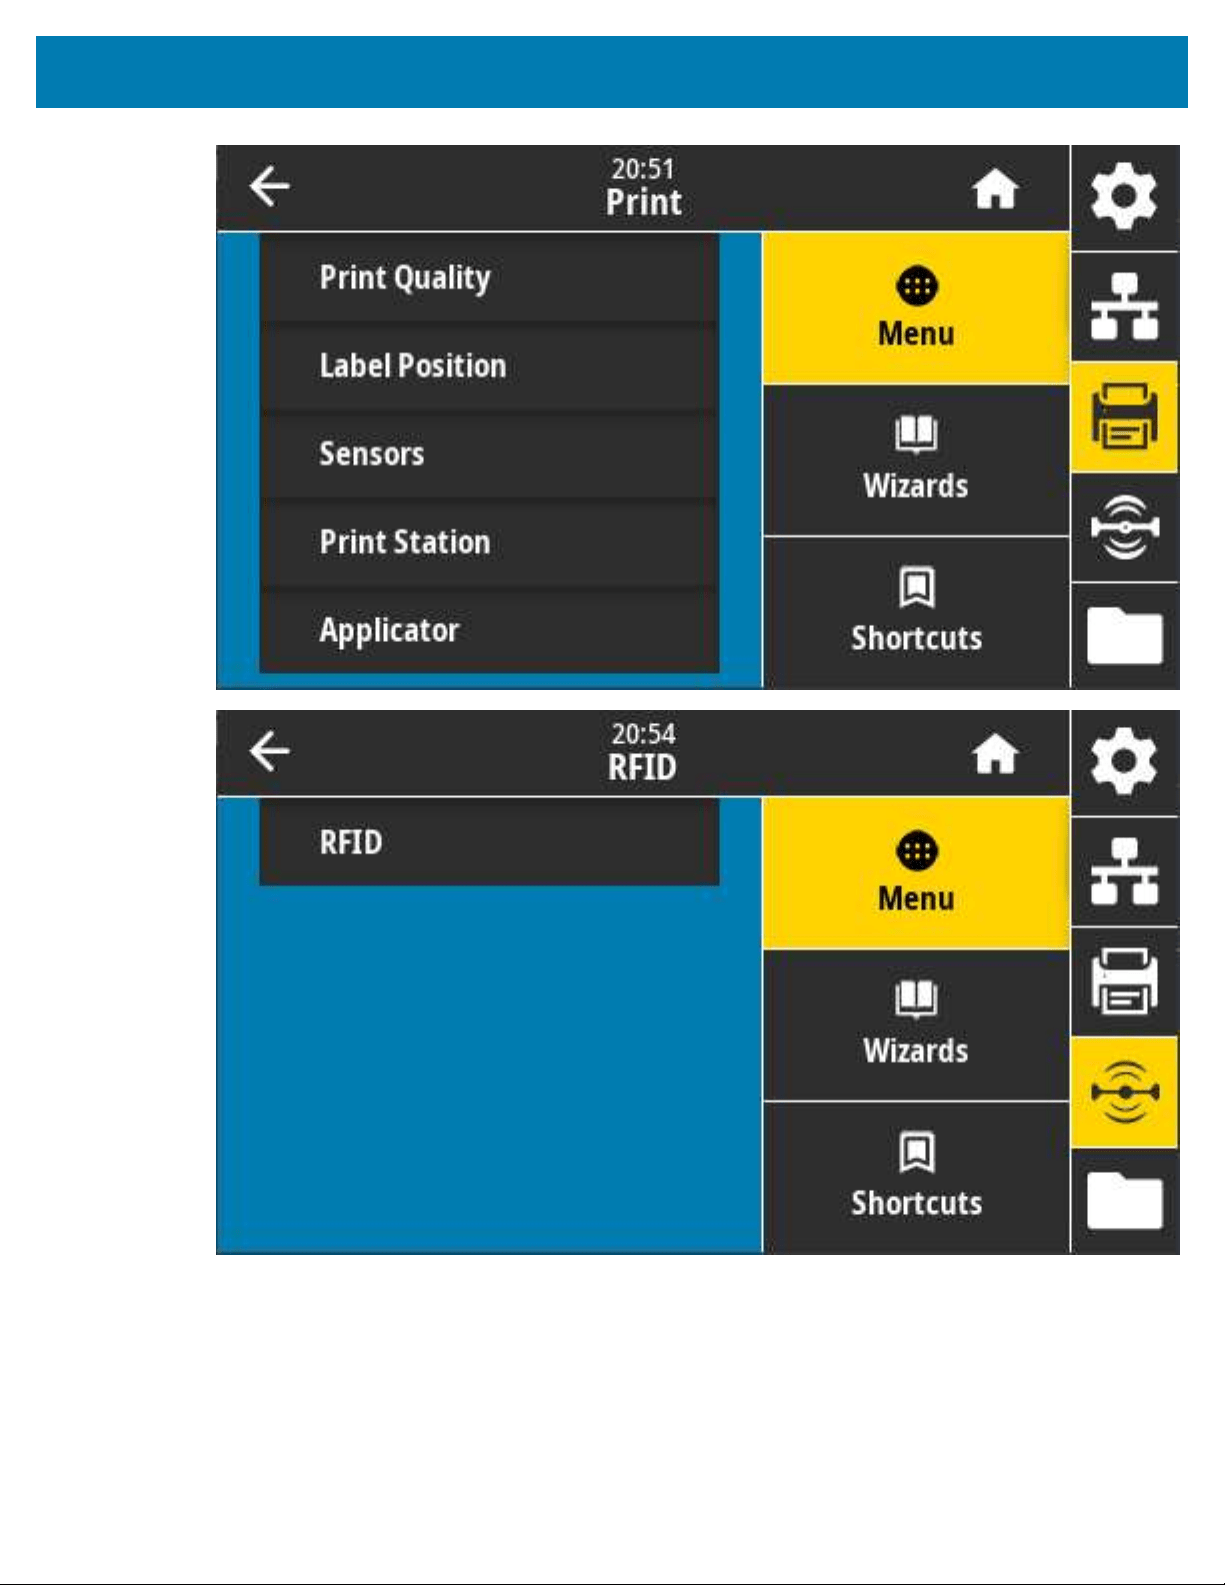
Color Touch Display and Controls
91
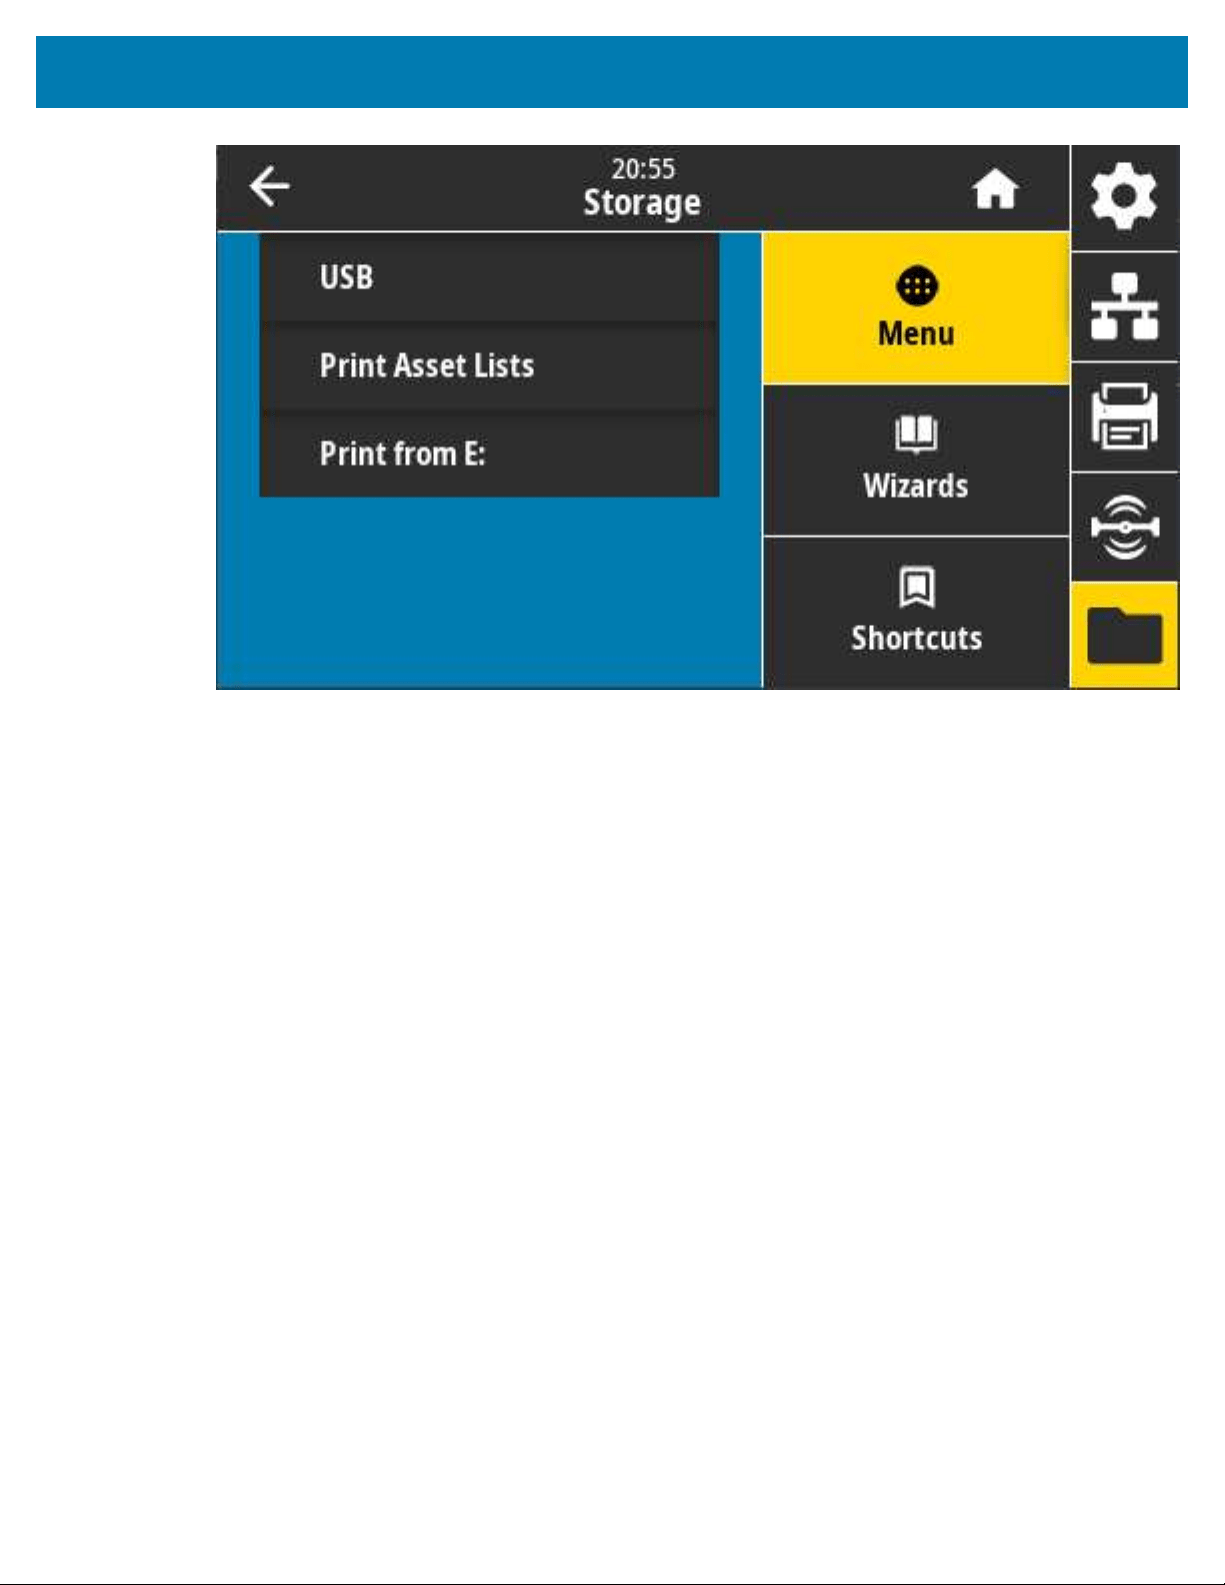
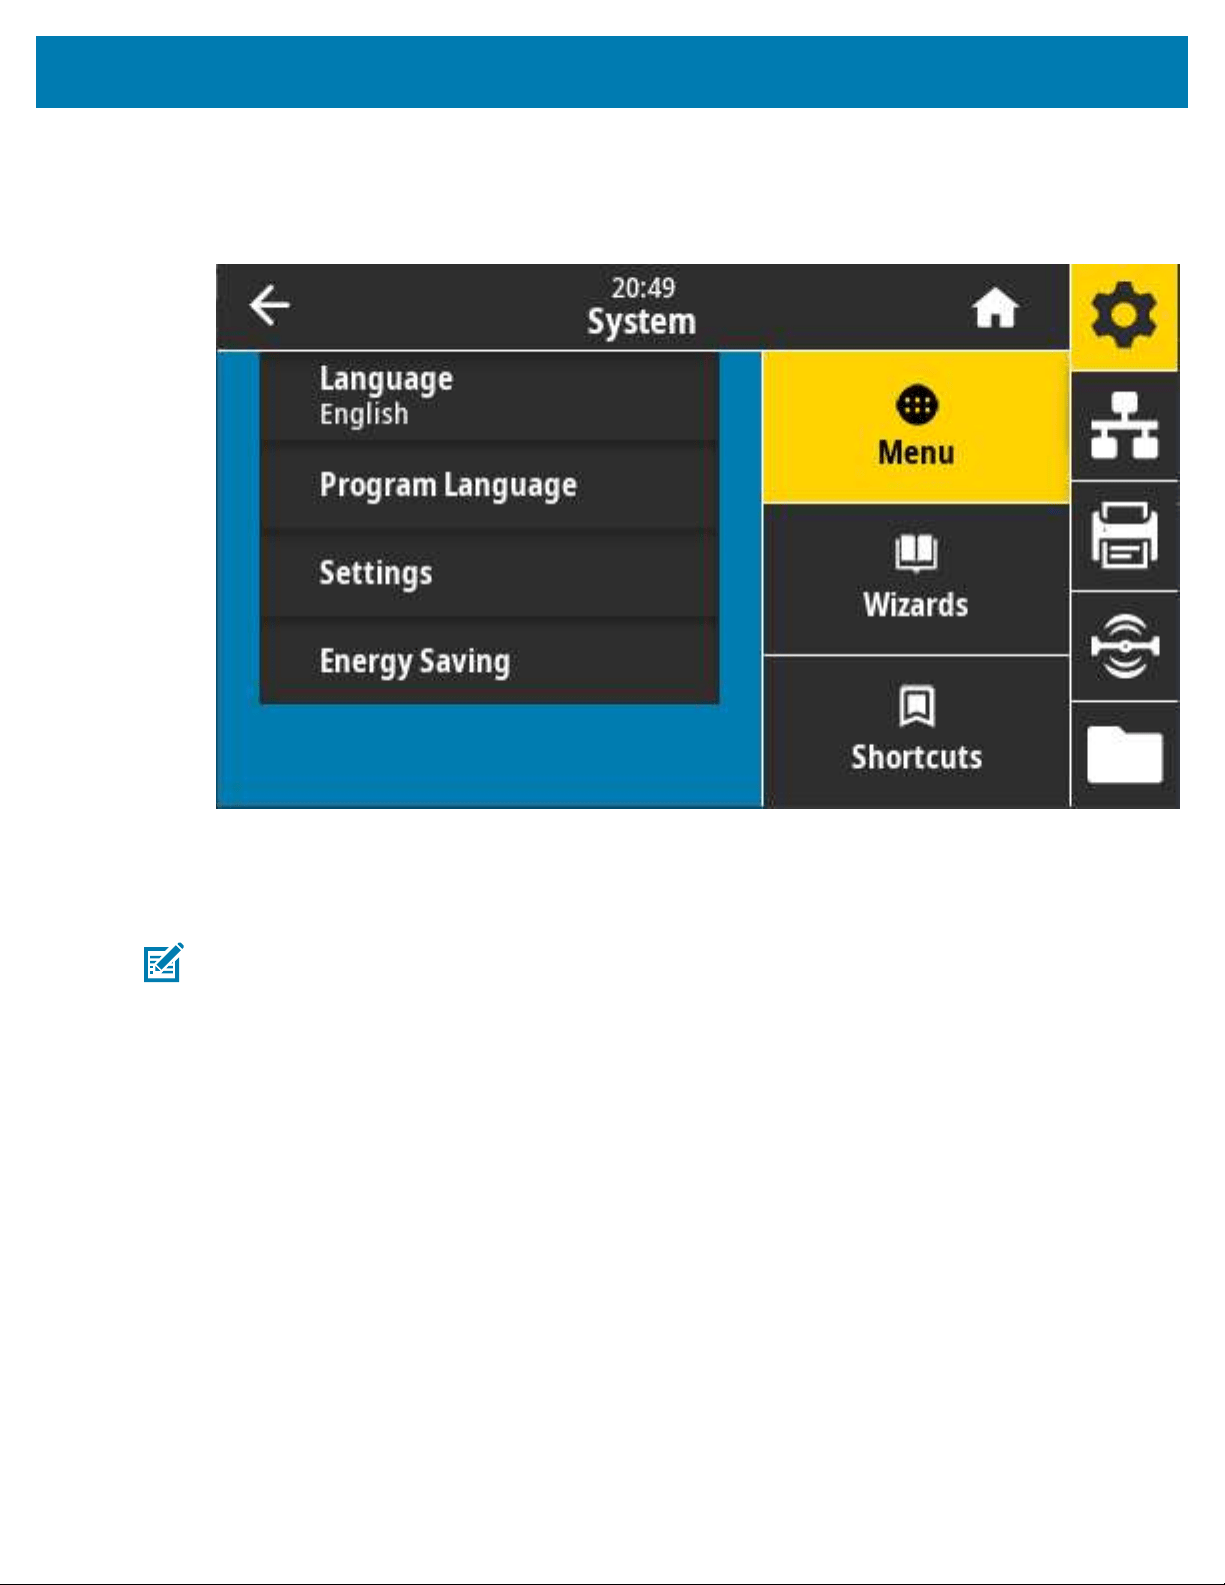
Color Touch Display and Controls
System Menu
Use System menu items to specify settings for printer function and printer options, set the display
language, and restore defaults.
System > Language
Use this setting to select one of 19 language choices for your printer display.
NOTE: The language selections for this parameter are displayed by language name in the
language of the displayed name.
93
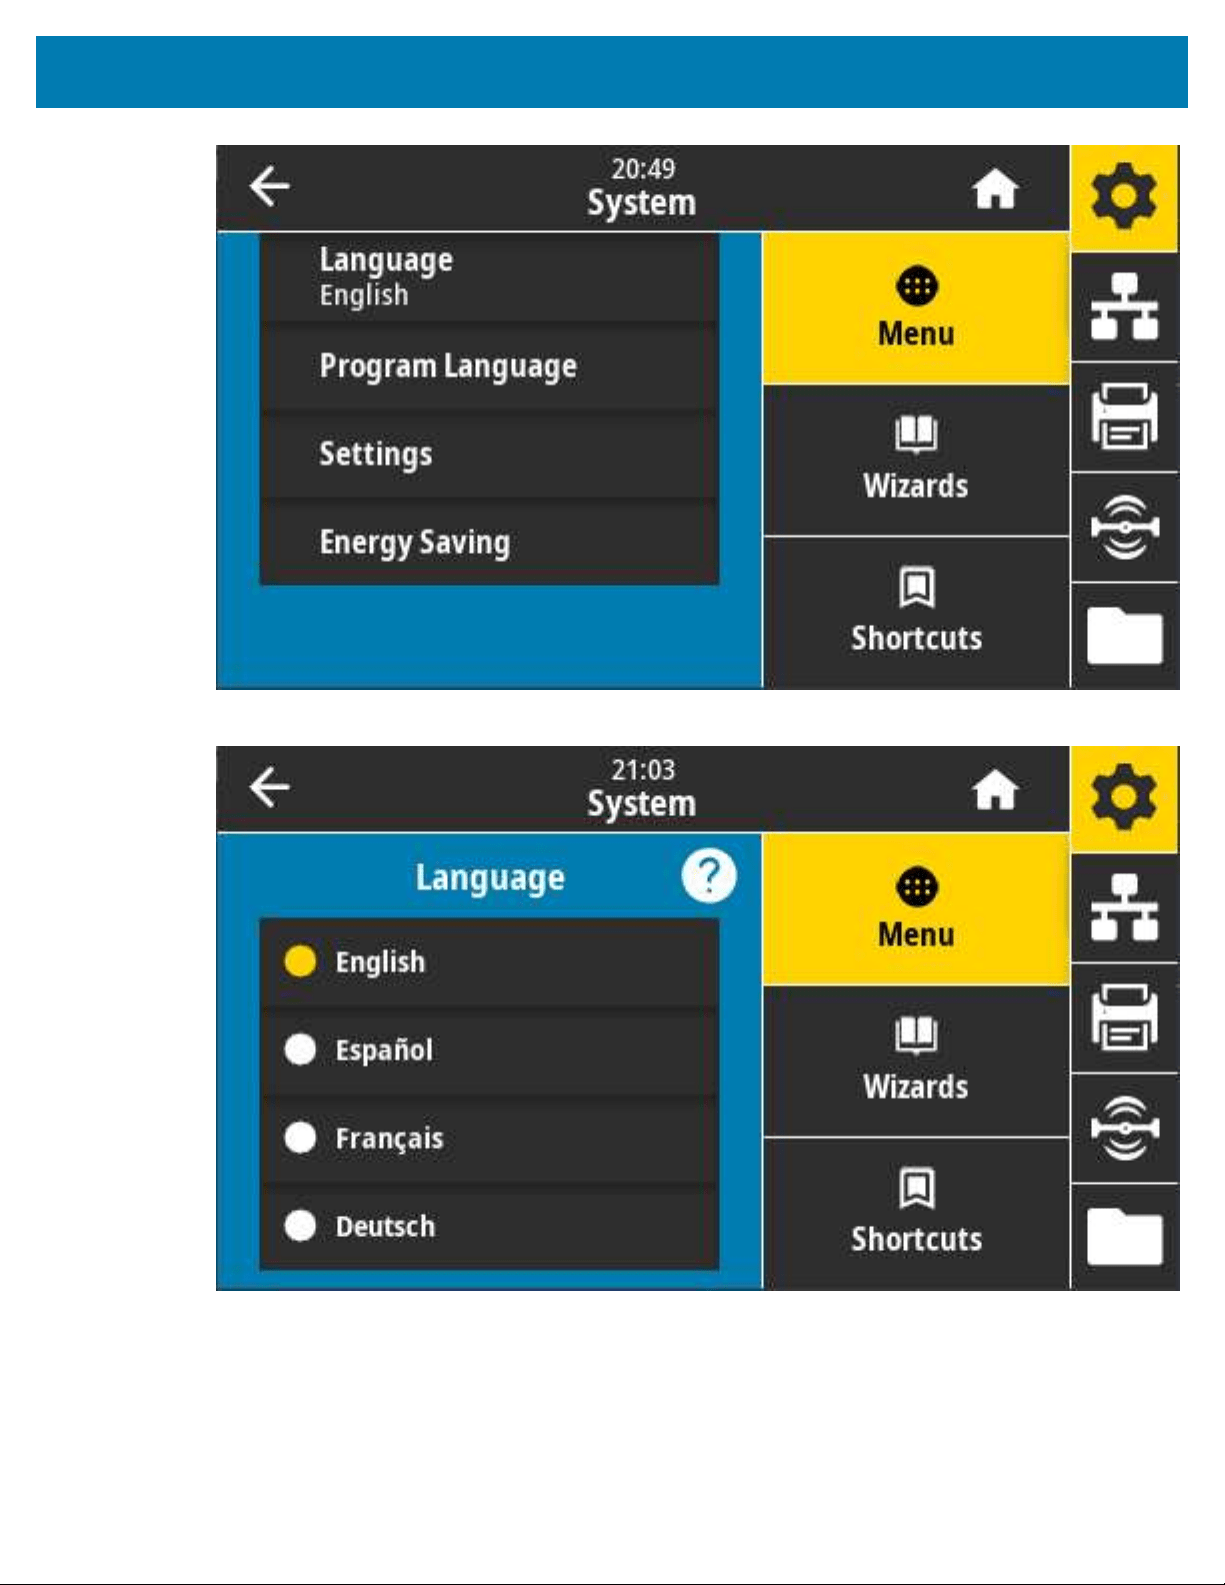
Color Touch Display and Controls
Touch/select Language to see and select from the available choices:
Accepted values: ENGLISH, SPANISH, FRENCH, GERMAN, ITALIAN, NORWEGIAN, PORTUGUESE,
SWEDISH, DANISH, DUTCH, FINNISH, CZECH, JAPANESE, KOREAN, ROMANIAN, RUSSIAN, POLISH,
SIMPLIFIED CHINESE, TRADITIONAL CHINESE
Related ZPL command(s): ^KL
94
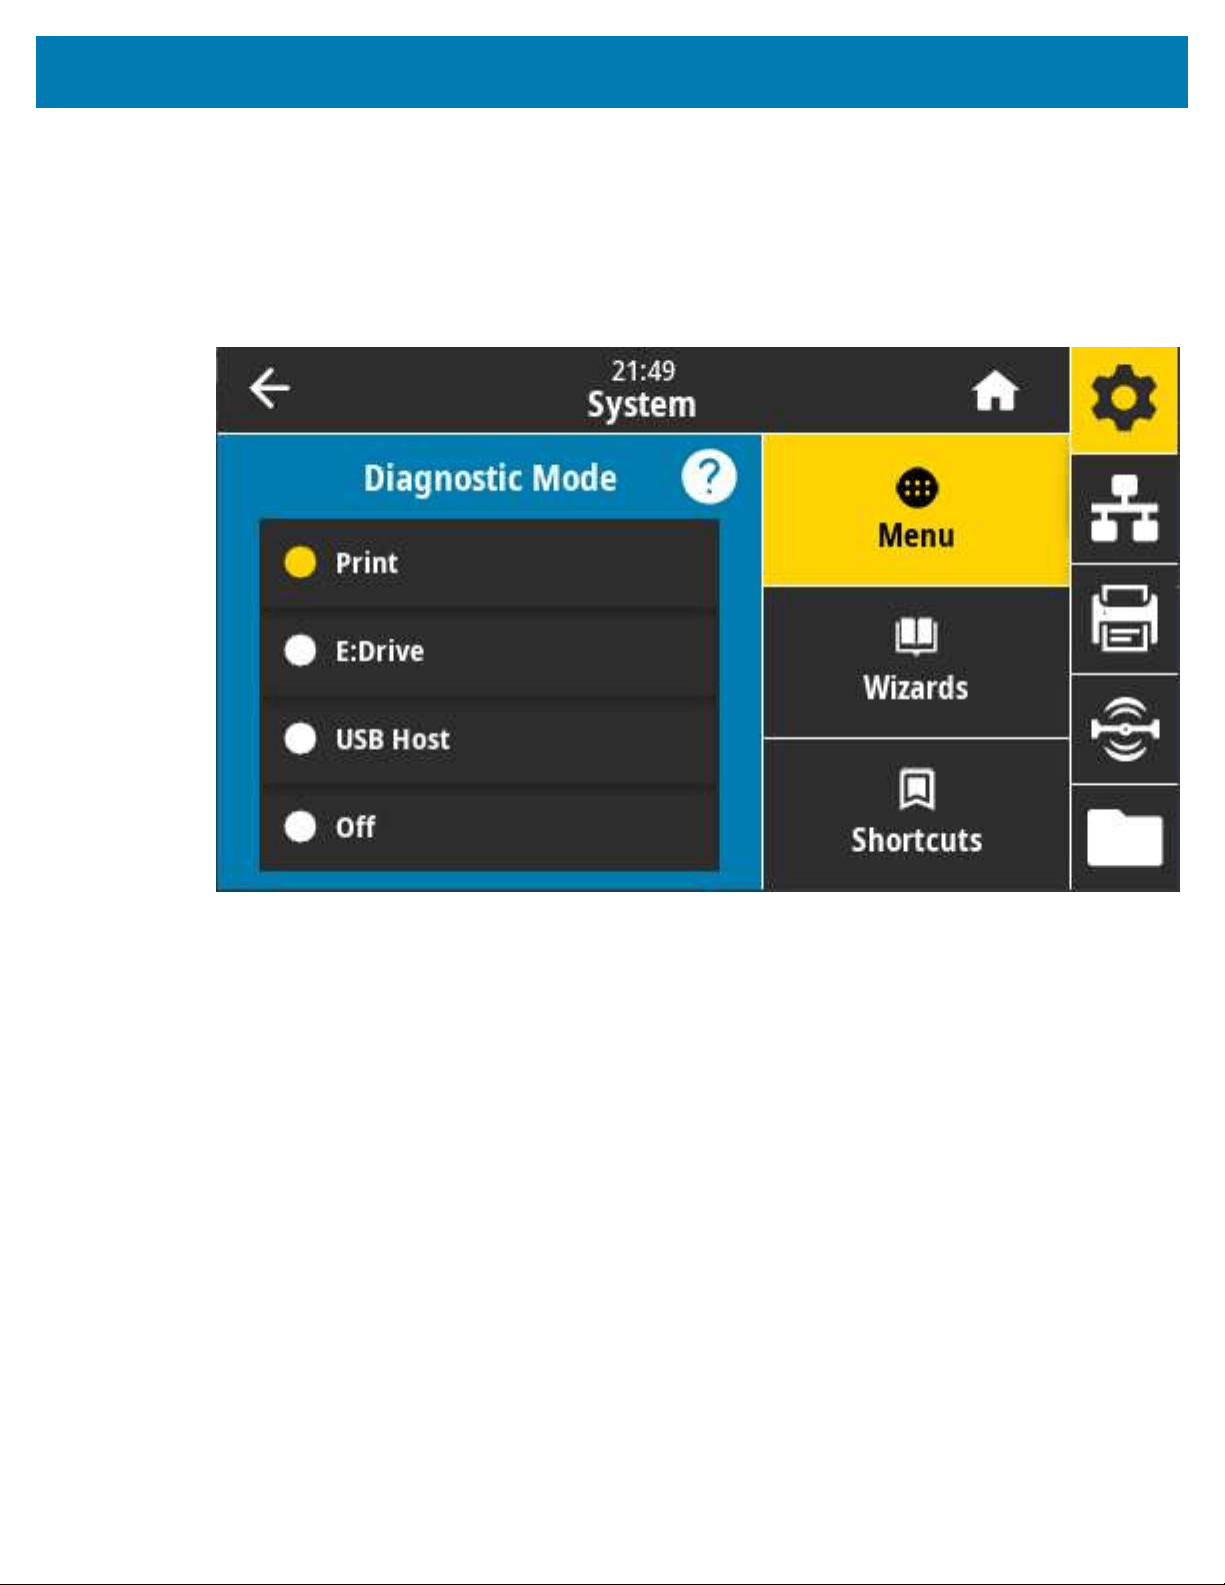
Color Touch Display and Controls
SGD command used: print.tone
View and Modify Printer Settings > General Setup > Language
System > Program Language > Diagnostic Mode
Use Communications Diagnostics Mode to enable the printer to output all communication as printed data
for advanced troubleshooting
Accepted values: Print, E: Drive, USB Host, Off
Related ZPL command(s): For Print Diagnostics only: ~JD to enable, ~JE to disable
Print Server web page: View and Modify Printer Settings > General Setup > Language
Control panel key(s): For print diagnostics only, with the printer in Ready state, press PAUSE + FEED
simultaneously and hold for two seconds.
95
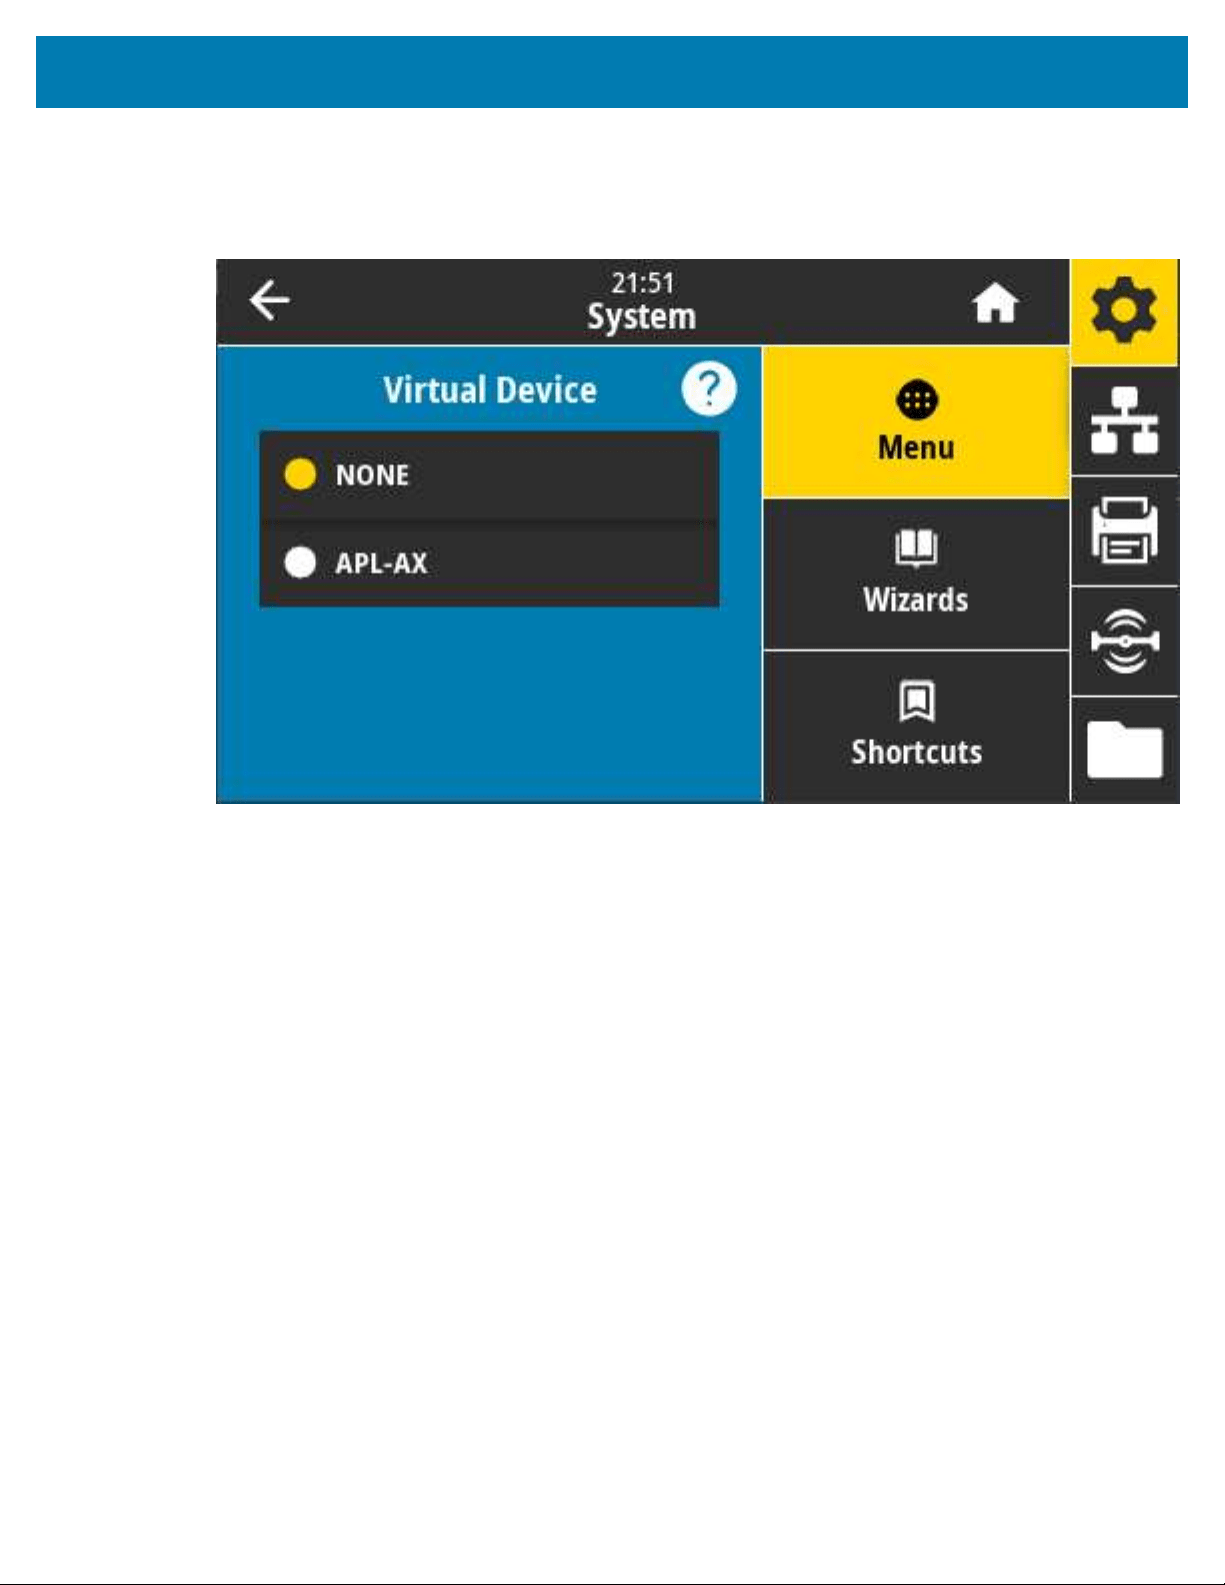
Color Touch Display and Controls
System > Program Language > Virtual Device
If any Virtual Device applications are installed on your printer, you may view or enable/disable them from
this user menu.
Values displayed: NONE, (followed by a list of any connected Link-OS Virtual Devices)
System > Program Language > ZBI
Zebra Basic Interpreter (ZBI 2.0) is a purchasable printer programming option.
If you would like to purchase this option, contact your Zebra reseller.
96
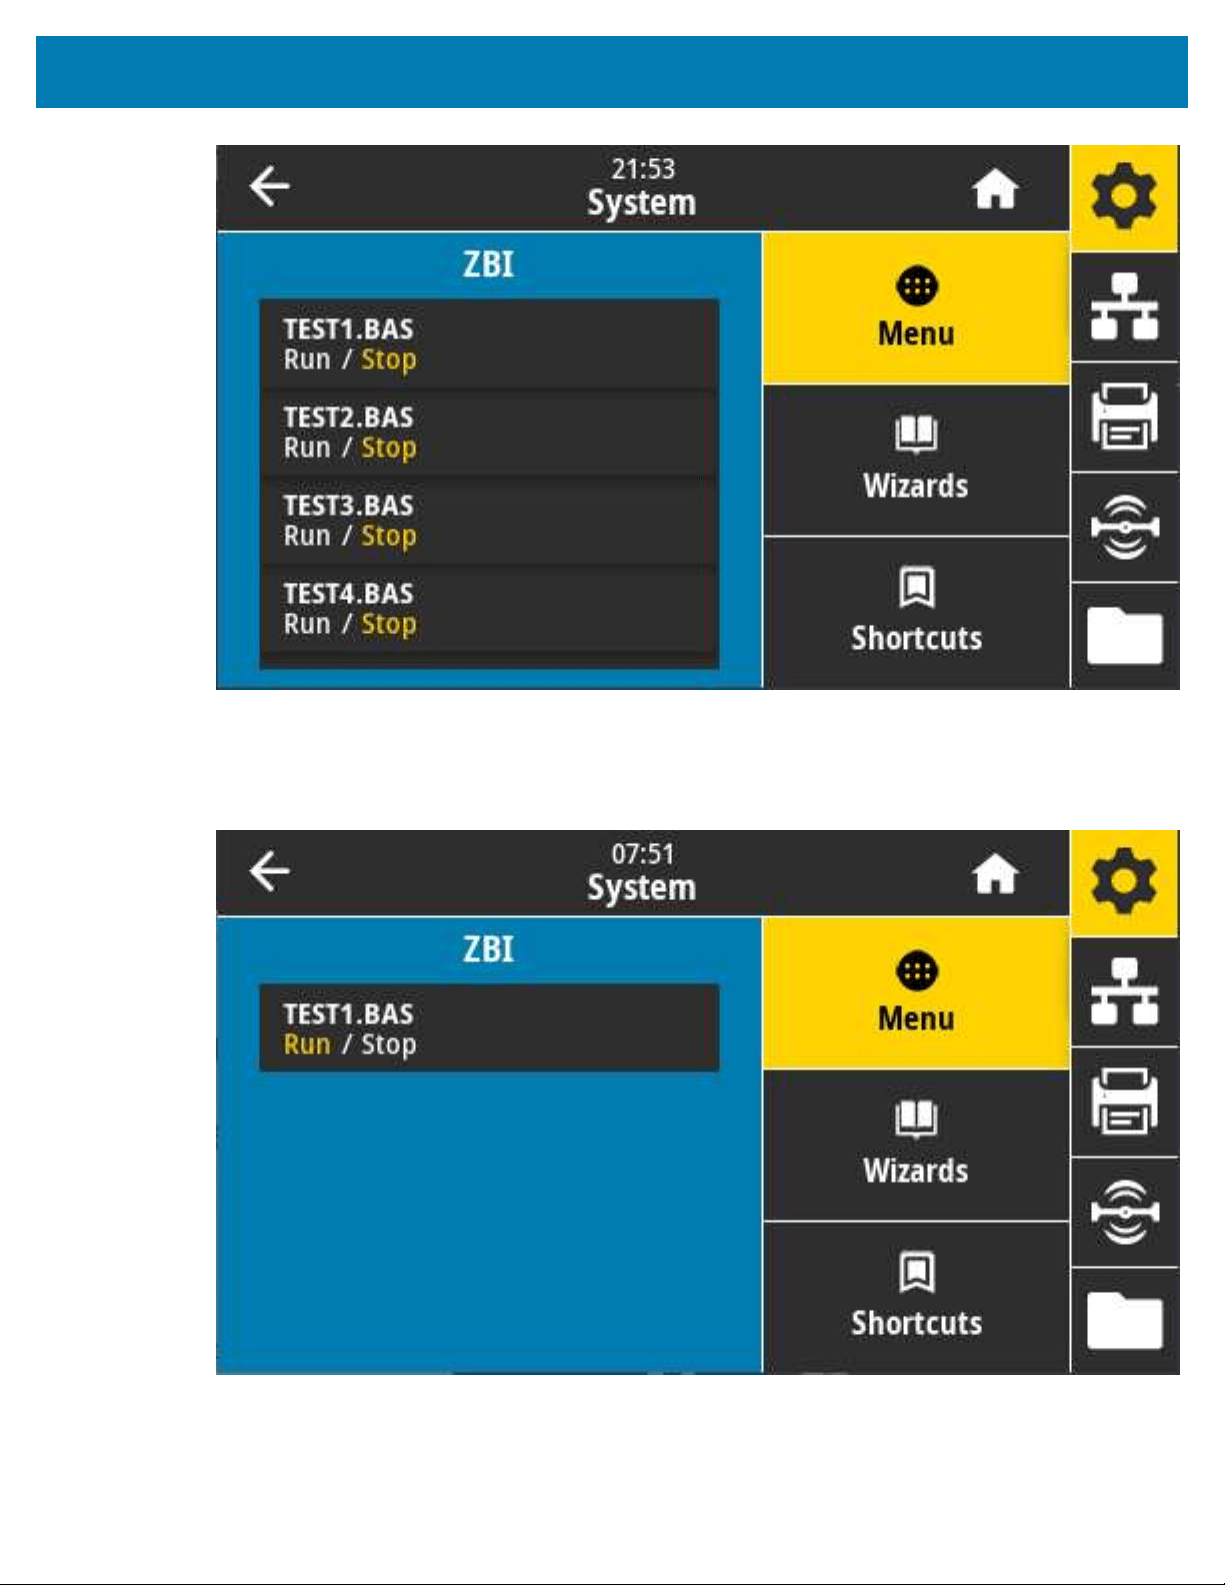
Color Touch Display and Controls
If ZBI programs have been downloaded to your printer, you may select one to run using this menu item. If
no program exists on your printer, the display shows NONE.
When ZBI programs have been downloaded but none are running, the printer lists all available programs.
To run one of them, touch Run under the program name.
97
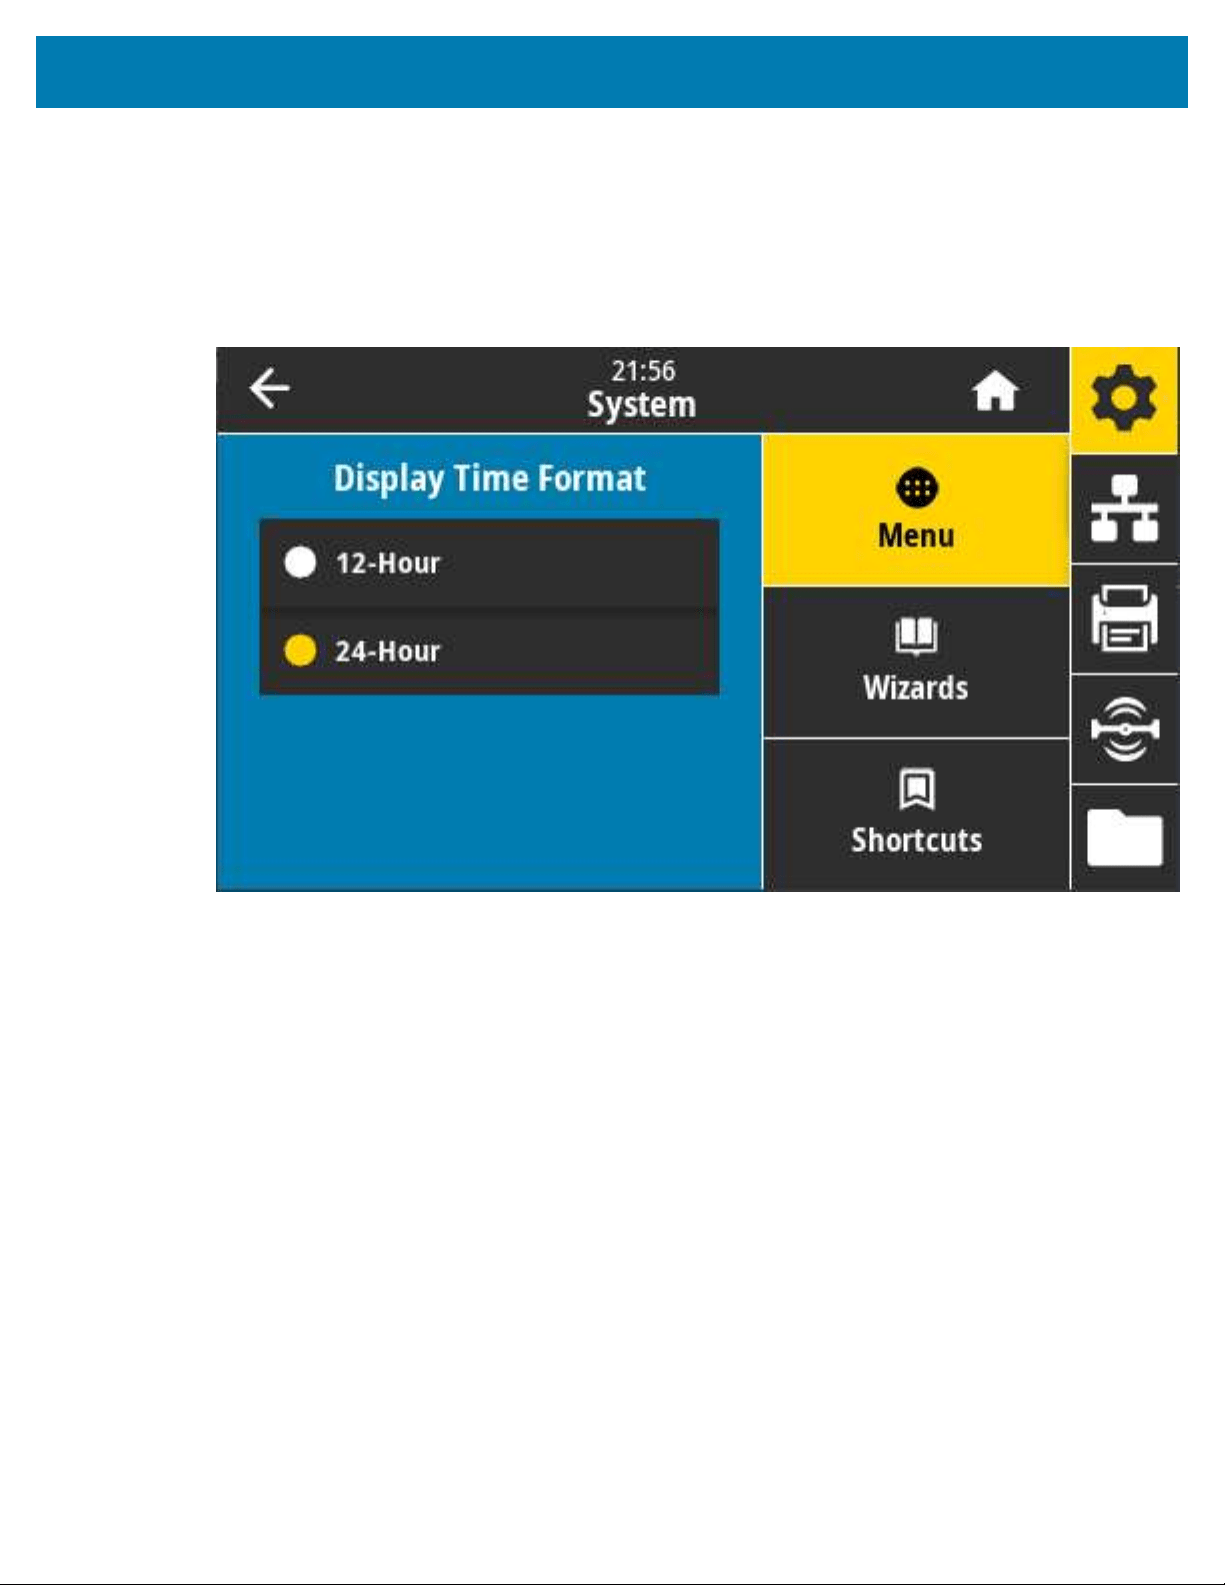
Color Touch Display and Controls
After the selected program is initiated, only that program is listed on the display. Touch Stop to end the
program.
SGD command used: zbi.key (identifies if the ZBI 2.0 option is enabled or disabled on the printer)
System > Settings > Display Time Format
Use this setting to select the time format used by the printer.
Accepted values: 12-Hour, 24-Hour
SGD command used:device.idle_display_value
98

Color Touch Display and Controls
System > Settings > Password Level
Use this setting to select the level of password protection for user menu items.
Accepted values: Selected, All, None
Related ZPL command(s): ^KP (to change the printer password)
99
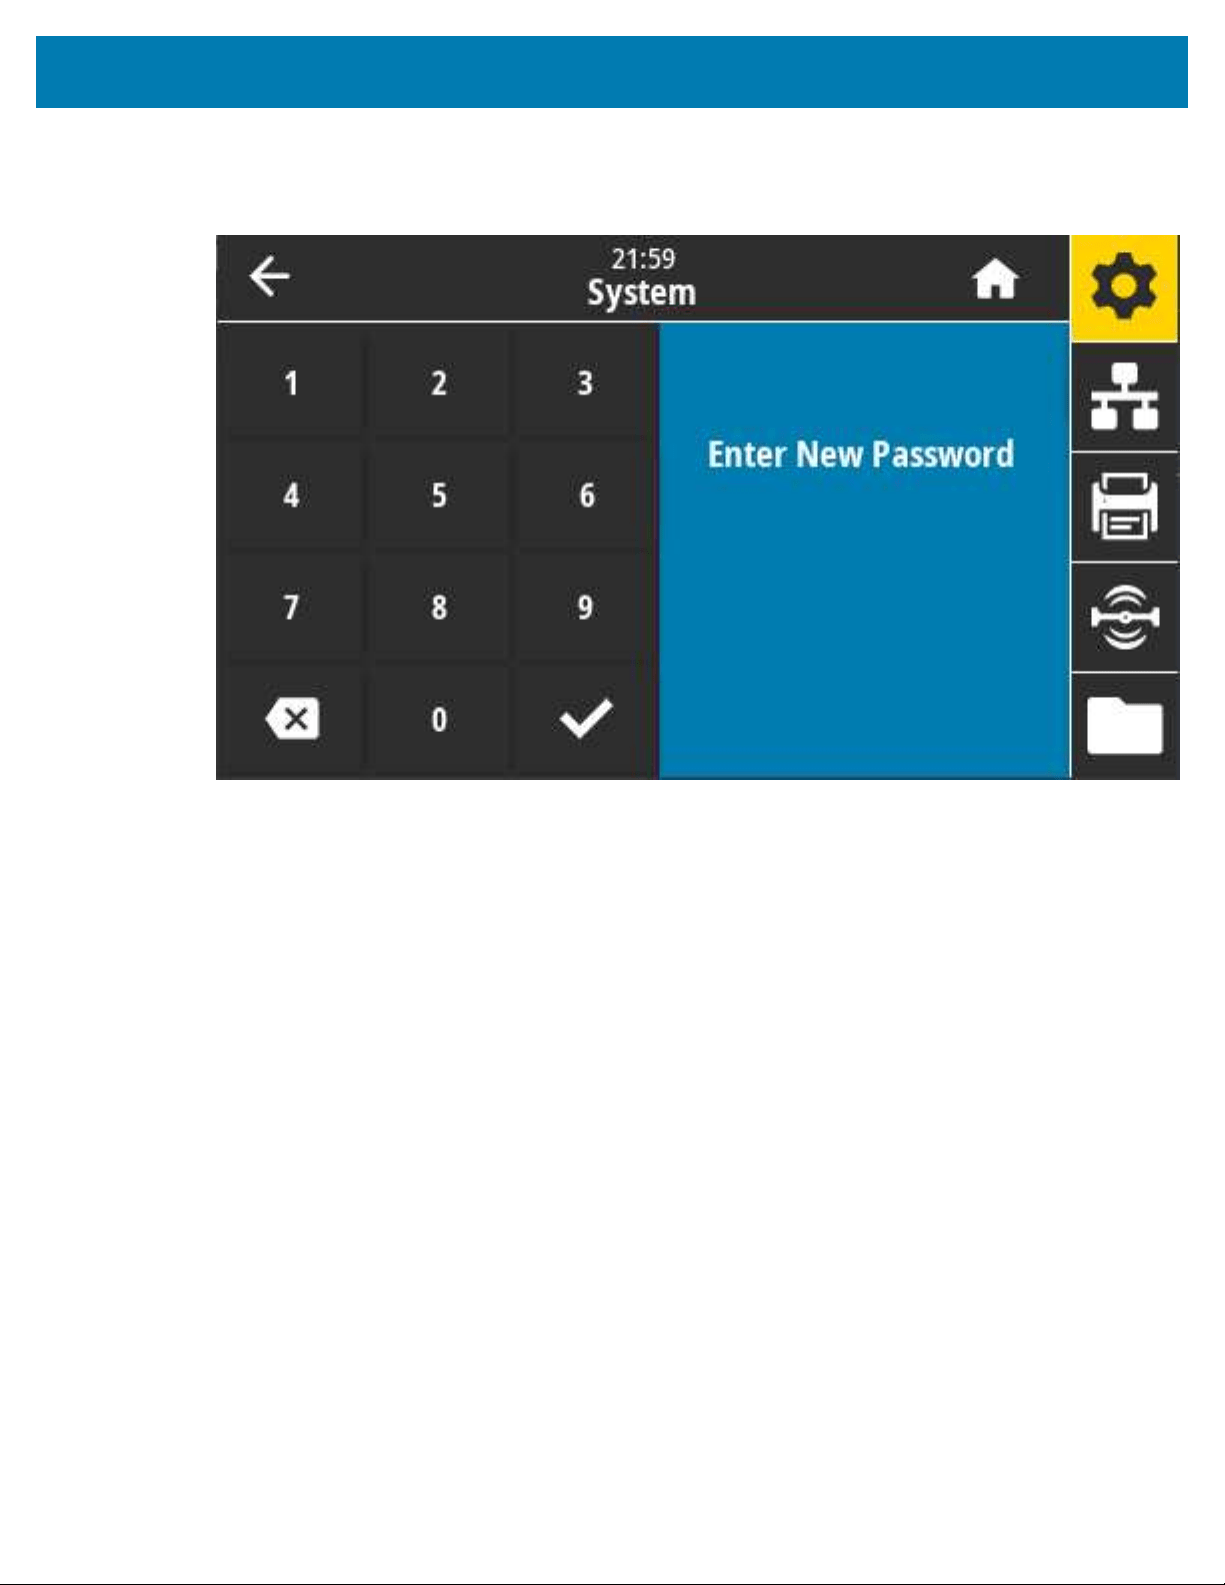
Color Touch Display and Controls
System > Settings > Set Password
Set a new printer password for menu items protected by the previous parameter.
Accepted values: Numerals 0–9 The default printer password is 1234.
Related ZPL command(s): ^KP
100

Color Touch Display and Controls
System > Settings > Power Up Action
Set the action for the printer to take during the power-up sequence.
Accepted values:
• CALIBRATE—Adjusts sensor levels and thresholds, determines the label length, and feeds the media to
the next web.
• FEED—Feeds the labels to the first registration point.
• LENGTH—Determines the label length using current sensor values, and feeds the media to the next
web.
• NO MOTION—Tells the printer not to move the media. You must manually ensure that the web is
positioned correctly, or press FEED to position the next web.
• SHORT CAL—Sets the media and web thresholds without adjusting sensor gain, determines the label
length, and feeds the media to the next web.
Related ZPL command(s): ^MF
SGD command used: ezpl.power_up_action
Printer web page: View and Modify Printer Settings > Calibration
101

Color Touch Display and Controls
System > Settings > Head Close Action
Set the action for the printer to take when you close the printhead.
Accepted values:
• CALIBRATE—Adjusts sensor levels and thresholds, determines the label length, and feeds the media to
the next web.
• FEED—Feeds the labels to the first registration point
• LENGTH—Determines the label length using current sensor values, and feeds the media to the next
web.
• NO MOTION—Tells the printer not to move the media. You must manually ensure that the web is
positioned correctly, or press feed to position the next web.
• SHORT CAL—Sets the media and web thresholds without adjusting sensor gain, determines the label
length, and feeds the media to the next web.
Related ZPL command(s): ^MF
SGD command used: ezpl.head_close_action
Printer web page: View and Modify Printer Settings > Calibration
102

Color Touch Display and Controls
System > Settings > Screen Calibration
Touch each crosshair to calibrate the screen.
103
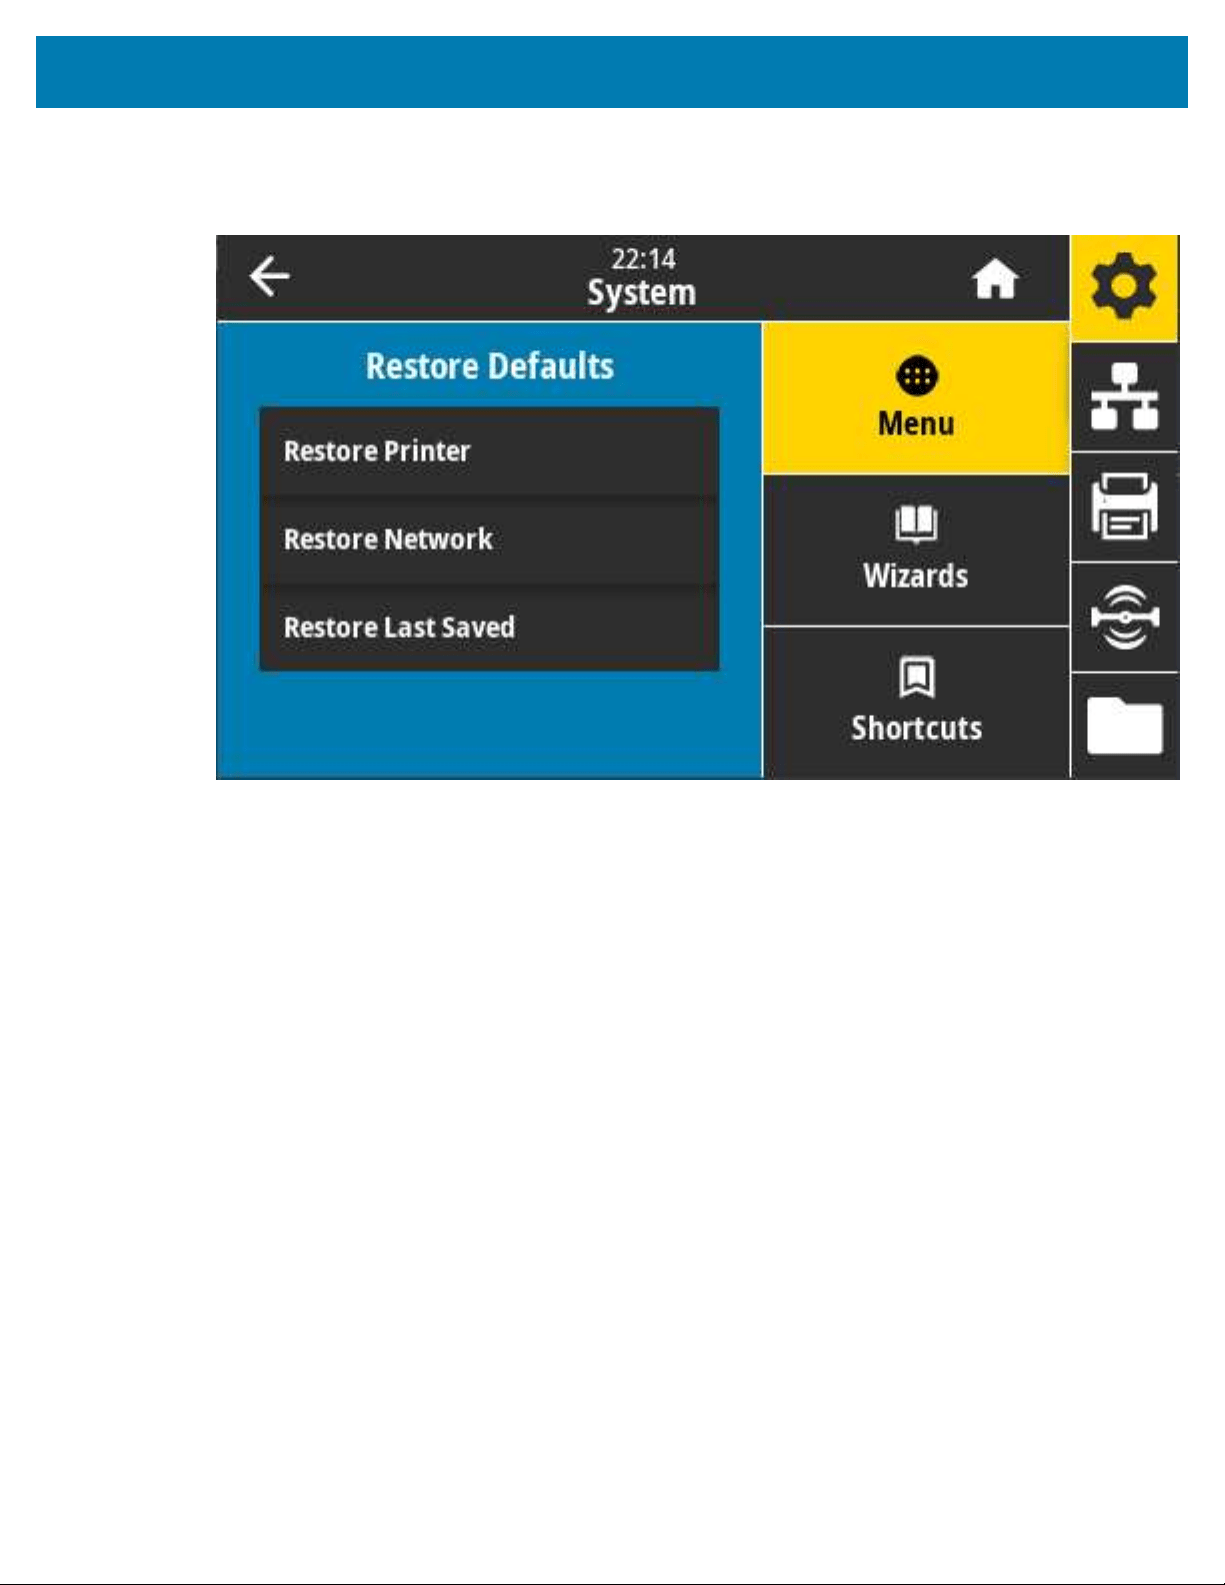
Color Touch Display and Controls
System > Settings > Restore Defaults
Restore specific printer, print server, and network settings back to the factory defaults.
Use care when loading defaults because you will need to reload all settings that you changed manually.
This menu item is available through two user menus with different default values for each.
Accepted values:
• PRINTER—Restores all printer settings other than the network settings back to factory defaults. Use
care when loading defaults because you will need to set all settings that you had changed manually
before the reset.
• NETWORK—Reinitializes the printer’s wired or wireless print server. With a wireless print server, the
printer also re-associates with your wireless network.
• LAST SAVED—Loads settings from the last permanent save.
• NO MOTION—Tells the printer not to move the media. You must manually ensure that the web is
positioned correctly, or press FEED to position the next web.
• SHORT CAL—Sets the media and web thresholds without adjusting sensor gain, determines the label
length, and feeds the media to the next web.
Related ZPL command(s):
• PRINTER—^JUF
• NETWORK—^JUN
• LAST SAVED—^JUR
Control panel key(s): To reset the printer parameters to factory values, hold FEED + PAUSE simultaneously
during printer power-up.
104
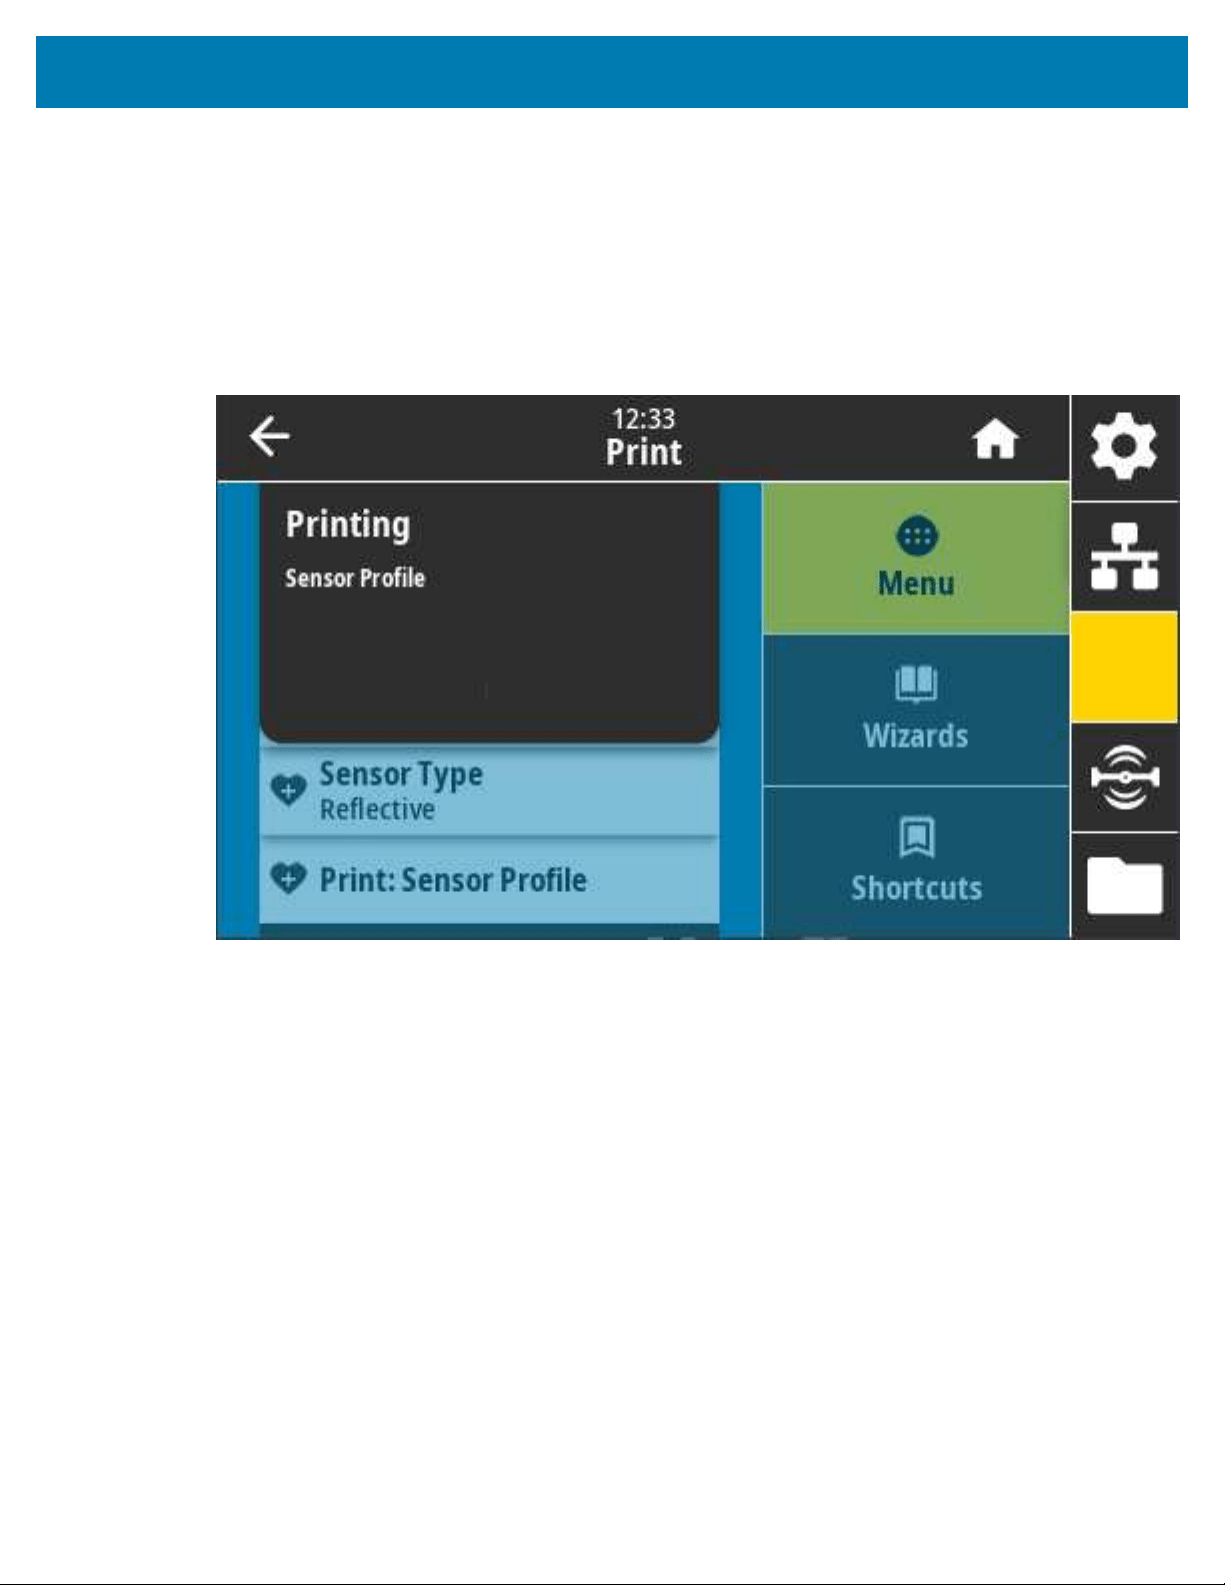
Color Touch Display and Controls
Printer web pages:
• PRINTER—View and Modify Printer Settings > Restore Default Configuration
• NETWORK—Reset Print Server > Print Server Settings
• LAST SAVED—View and Modify Printer Settings > Restore Saved Configuration
System > Settings > Print: System Settings
Prints a printer configuration report.
Related ZPL command(s): ~WC
Control panel key(s):
• Hold CANCEL for two seconds during printer power-up.
• With the printer in Ready state, press and hold FEED + CANCEL simultaneously for two seconds.
Printer web page: View and Modify Printer Settings > Print Listings on Label
105
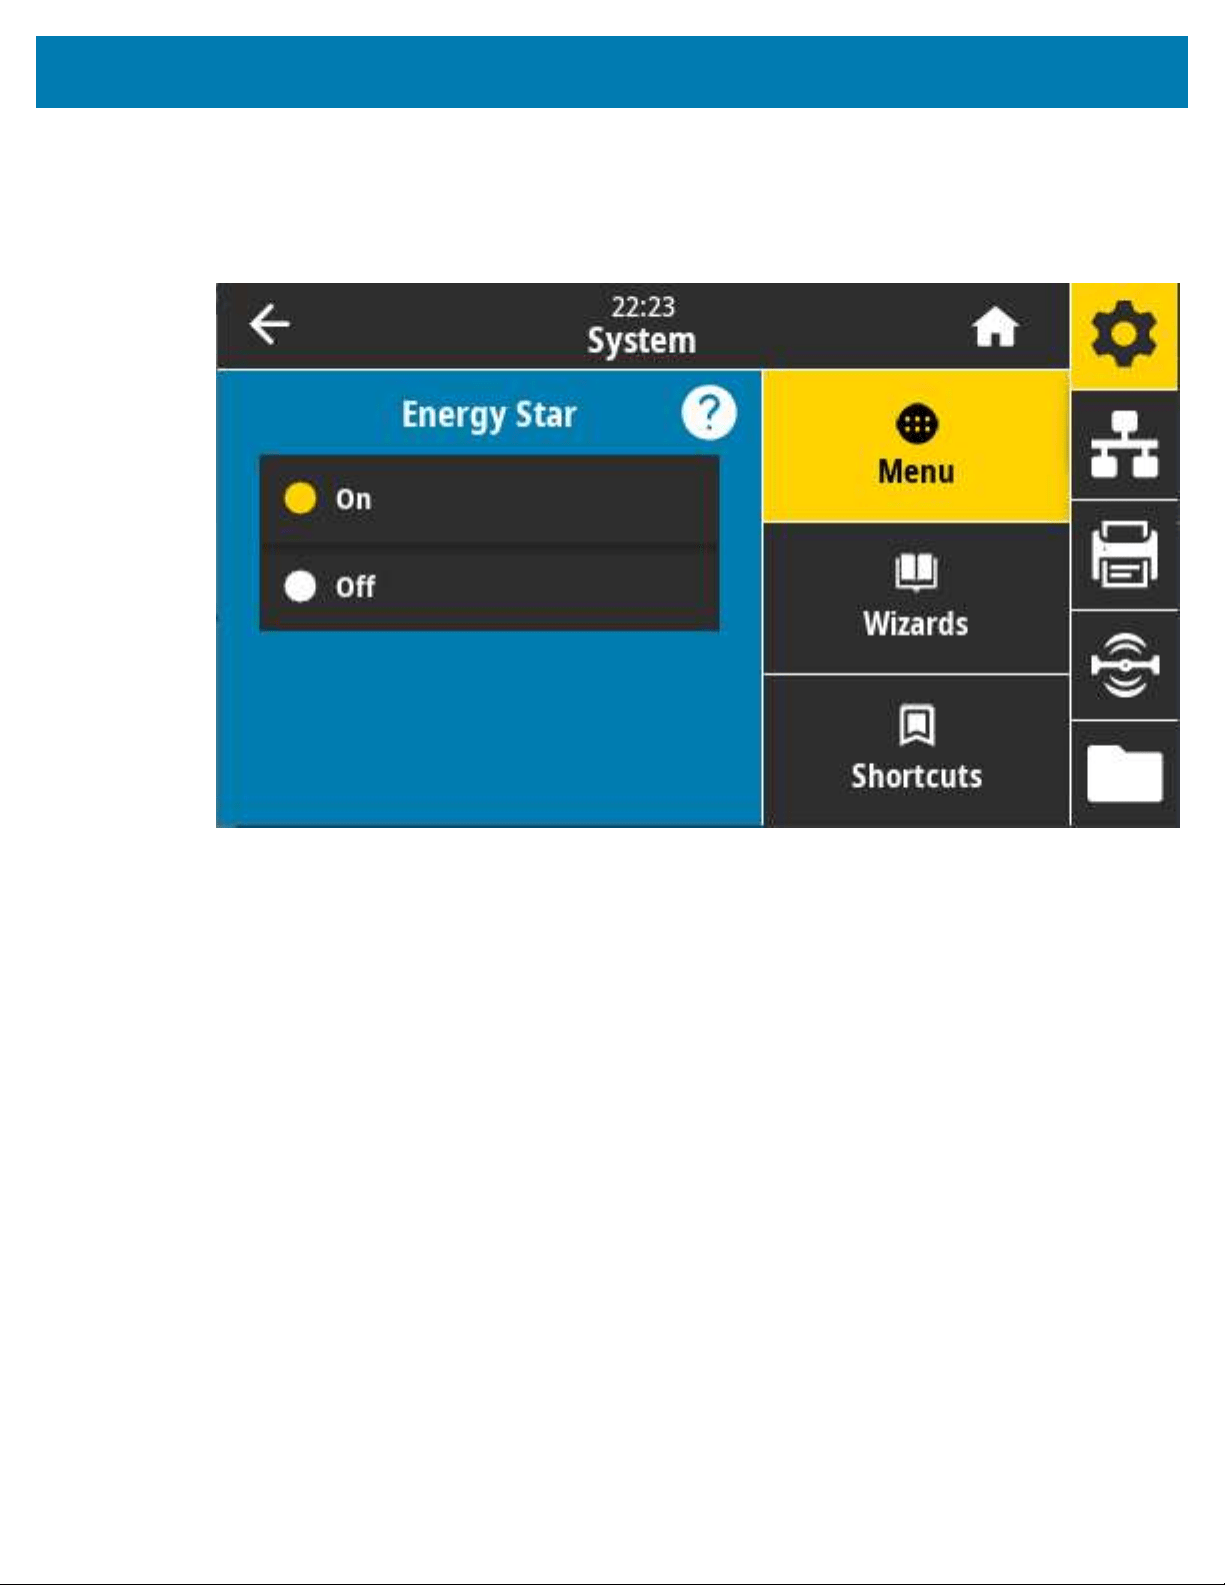
Color Touch Display and Controls
System > Energy Saving > Energy Star
When Energy Star mode is enabled, the printer goes into a “sleep” mode after a timeout period, thereby
lowering power consumption. Press any button on the control panel to bring the printer back to an active
state.
Accepted values: ON, OFF
SGD command(s) used:
• power.energy_star.enable
• power.energy_star_timeout
106
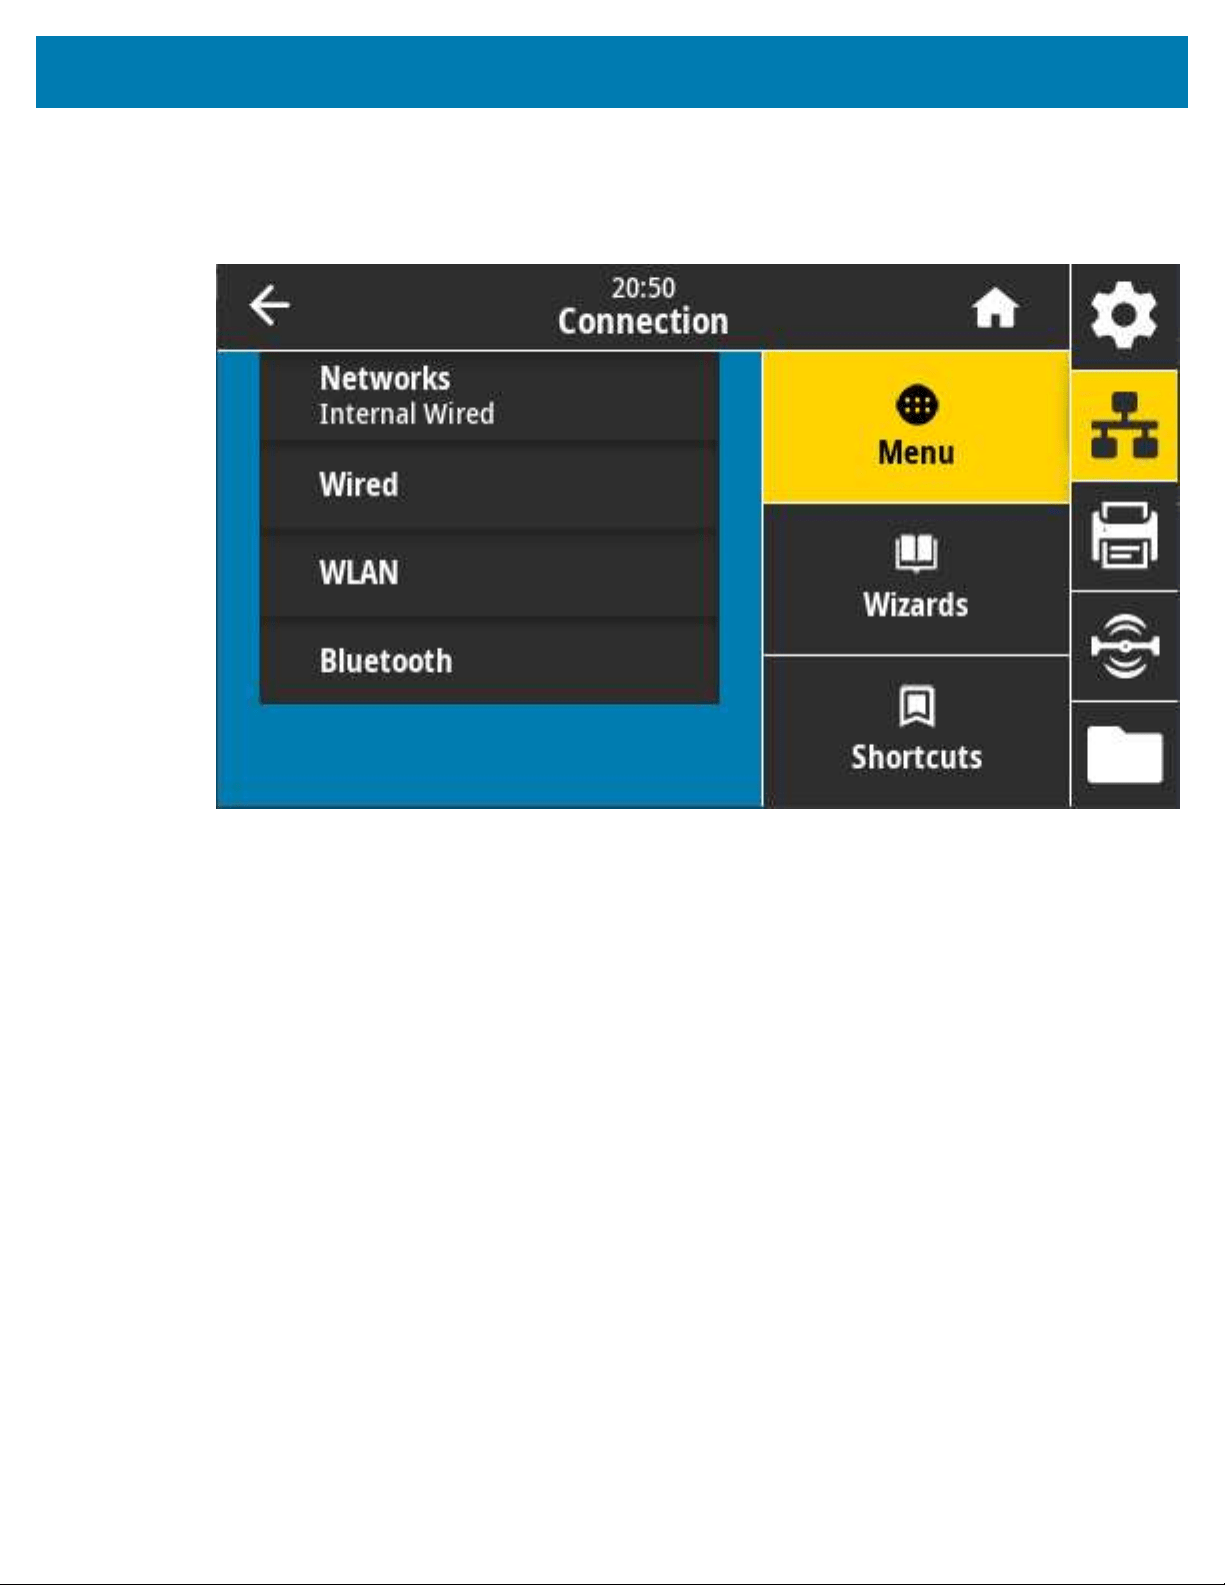
Color Touch Display and Controls
Connection Menu
Use this menu to set connection parameters for wired and wireless (Wi-Fi and Bluetooth) printer
communication.
107
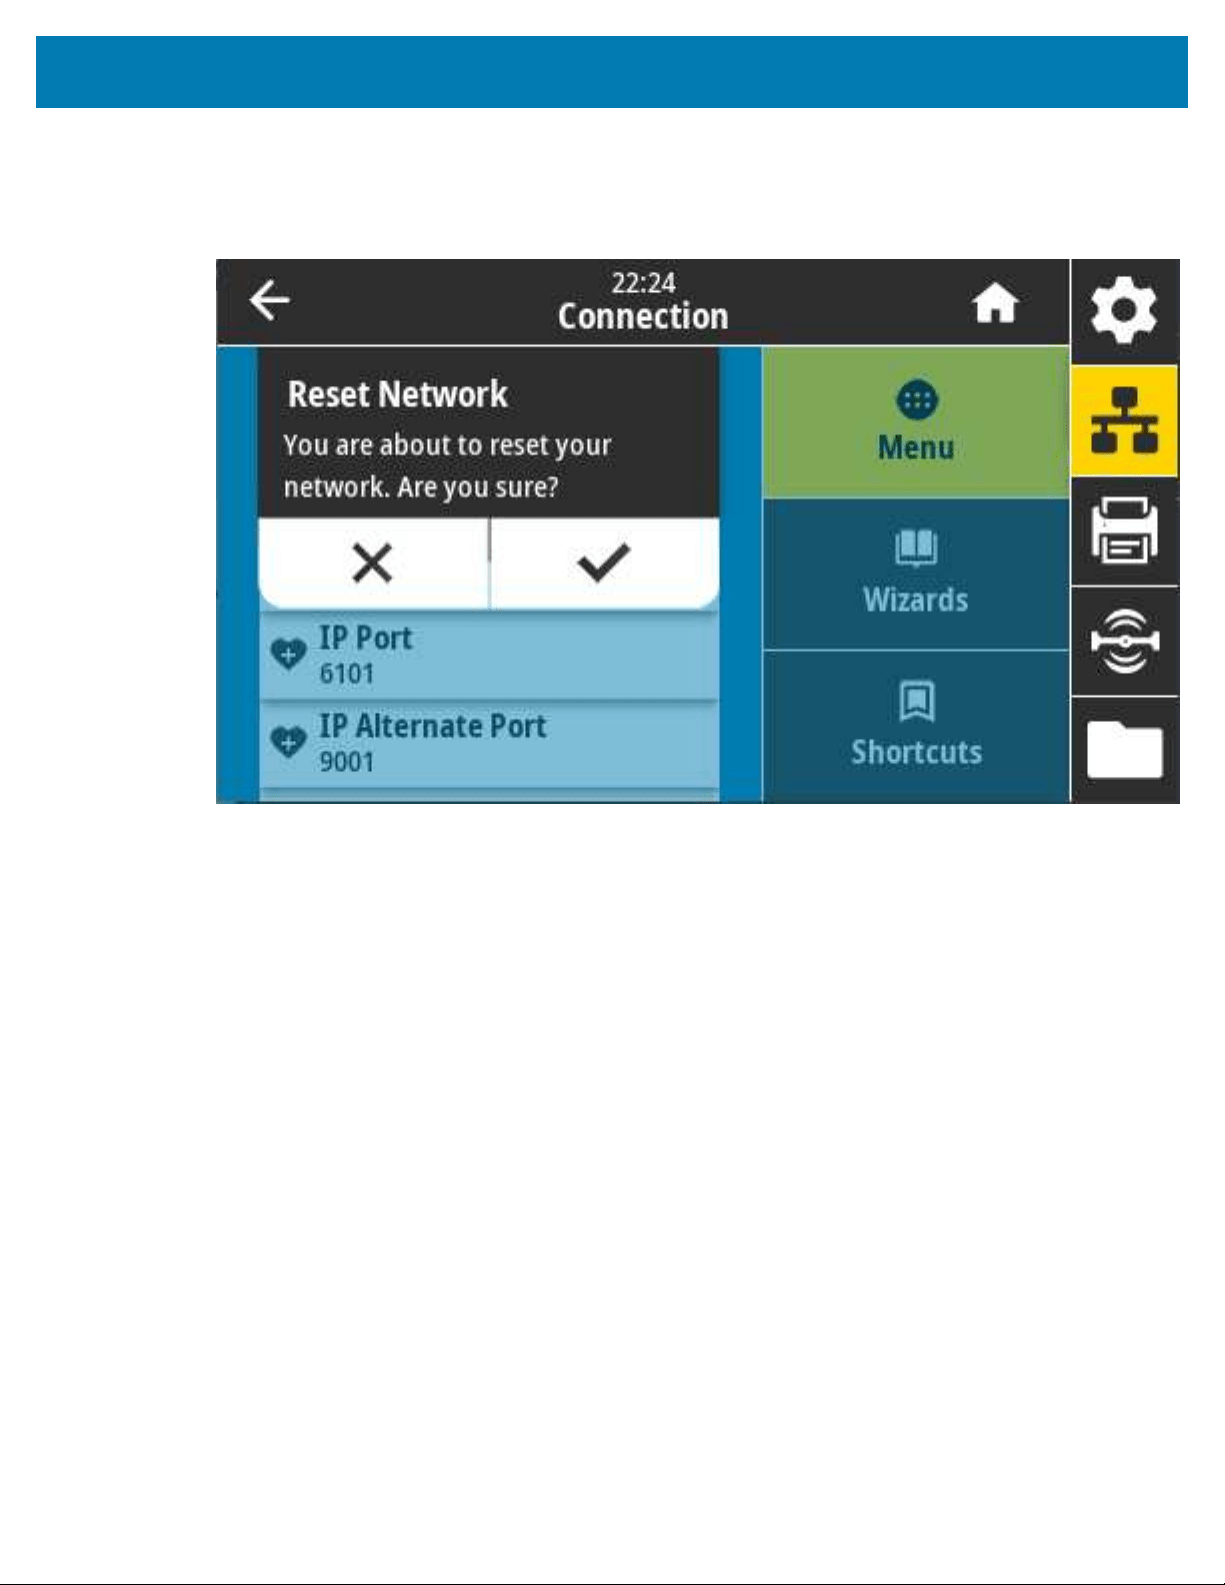
Color Touch Display and Controls
Connection > Networks > Reset Network
This option resets the wired or wireless print server and saves any changes that you made to any network
settings. You must reset the print server to allow changes to the network settings to take effect.
Related ZPL command(s): ~WR
SGD command used: device.reset
Printer web page: Print Server Settings > Reset Print Server
108

Color Touch Display and Controls
Connection > Networks > Primary Network
View or modify whether the wired or wireless print server is considered primary. You have the ability to
select the primary.
Accepted values: Wired, WLAN
Related ZPL command(s): ^NC
SGD command used: ip.primary_network
109
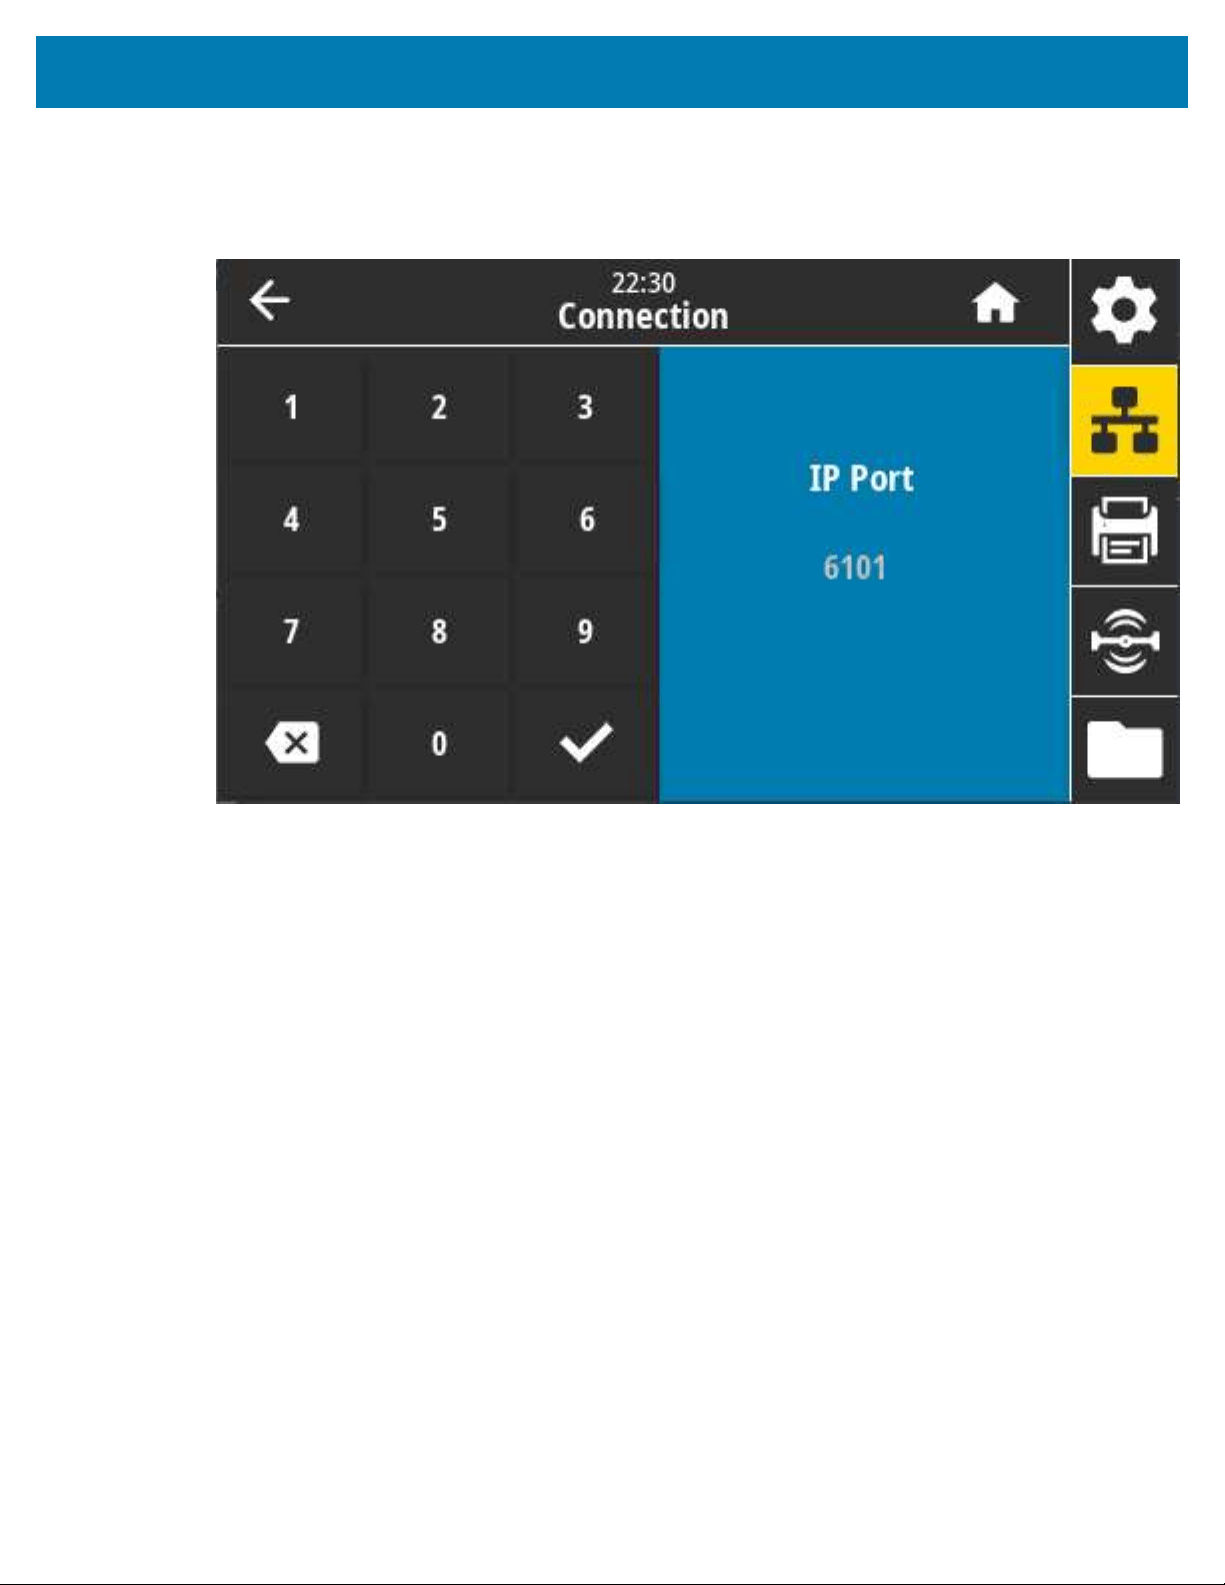
Color Touch Display and Controls
Connection > Networks > IP Port
This printer setting refers to the internal wired print server's port number that the TCP print service is
listening on. Normal TCP communications from the host should be directed to this port.
SGD command used: internal_wired.ip.port
Printer web page: View and Modify Printer Settings > Network Communications Setup > TCP/IP Settings
110

Color Touch Display and Controls
Connection > Networks > IP Alternate Port
This command sets the port number of the alternate TCP port. Print servers supporting this command will
monitor both the primary port and the alternate port for connections at the same time.
SGD command(s) used:
• internal_wired.ip.port_alternate
• wlan.ip.port_alternate
Printer web page: View and Modify Printer Settings > Network Communications Setup > TCP/IP Settings
111
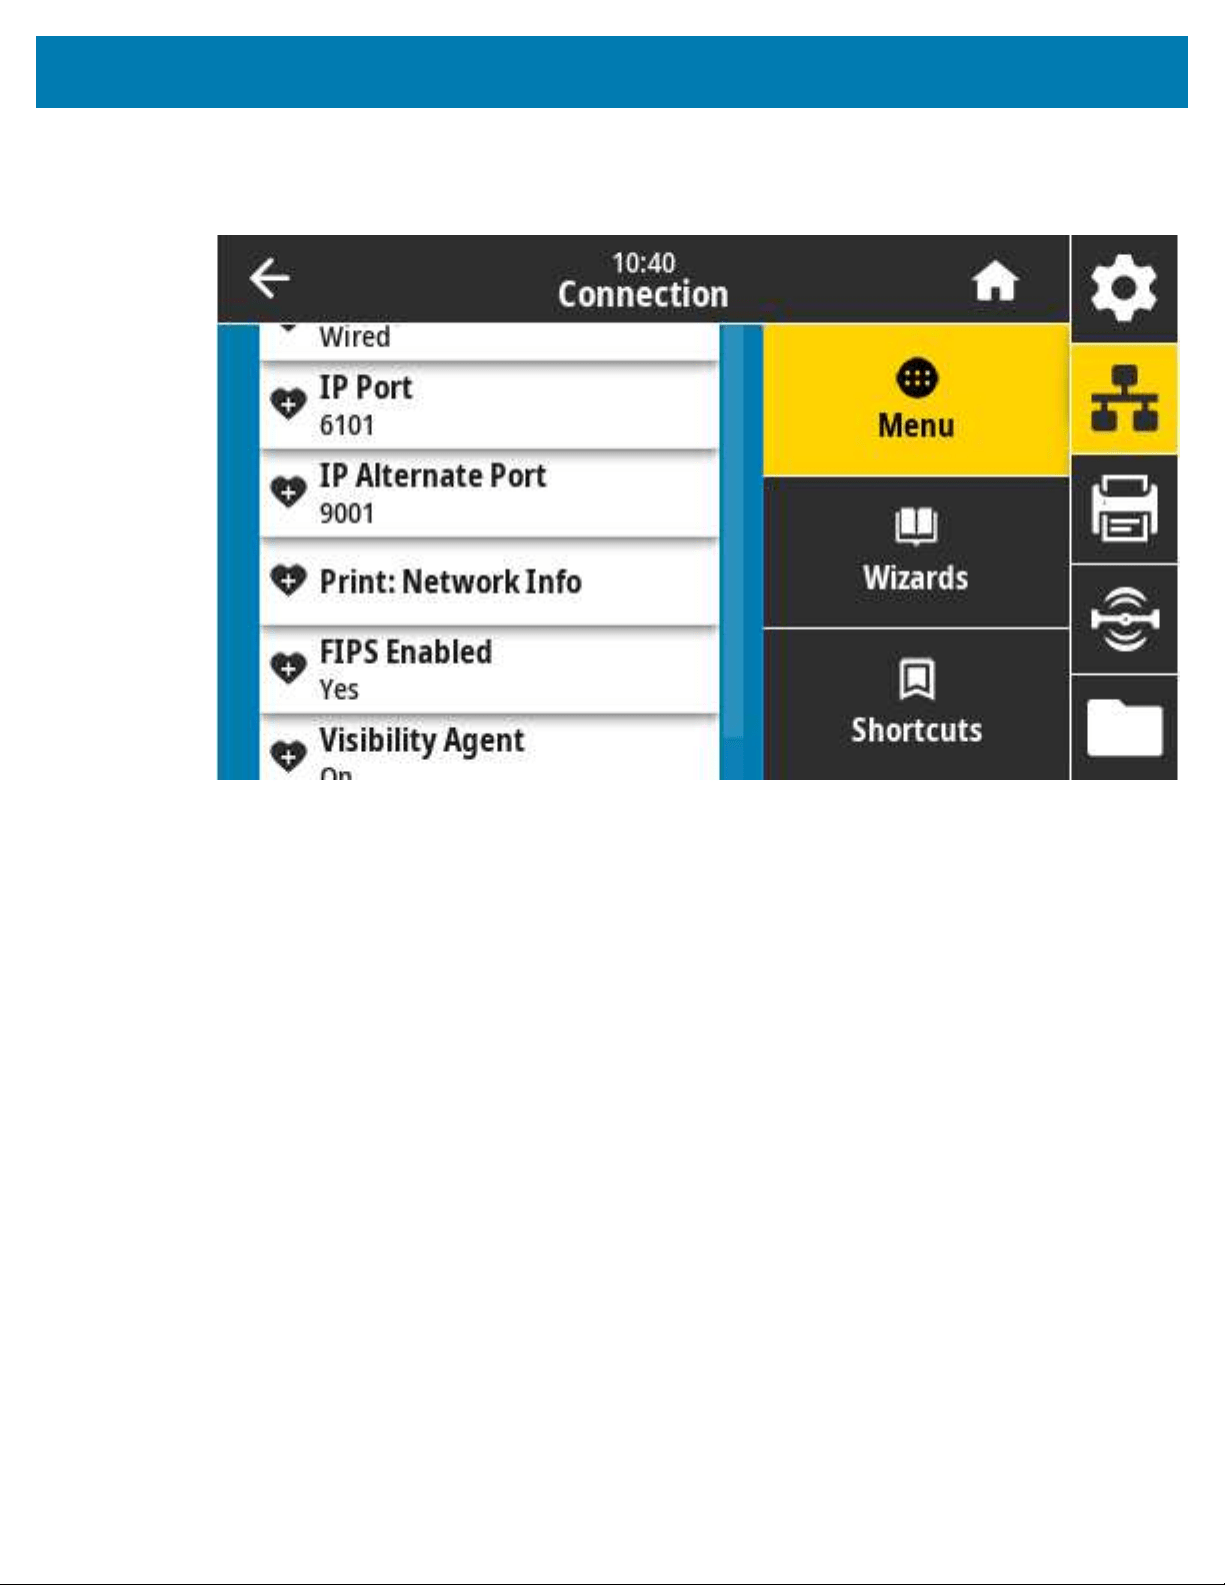
Color Touch Display and Controls
Connection > Networks > Print: Network Info
Prints the settings for any print server or Bluetooth device that is installed.
Related ZPL command(s): ~WL
Control panel key(s):
• During printer power-up, hold CANCEL down for two seconds.
• While the printer is in Ready state, press and hold FEED + CANCEL simultaneously for two seconds.
The printer prints the Network Configuration label.
Printer web page: View and Modify Printer Settings > Print Listings on Label
112

Color Touch Display and Controls
Connection > Networks > Visibility Agent
When connected to a wired or wireless network, the printer will try and connect to Zebra’s Asset Visibility
Service, through the cloud-based Zebra printer connector. To opt out of the feature, disable this setting.
The printer uses an encrypted, certificate-authenticated, web-socket connection to send discovery,
settings, and alerts data. It does NOT transmit data printed using label formats.
113
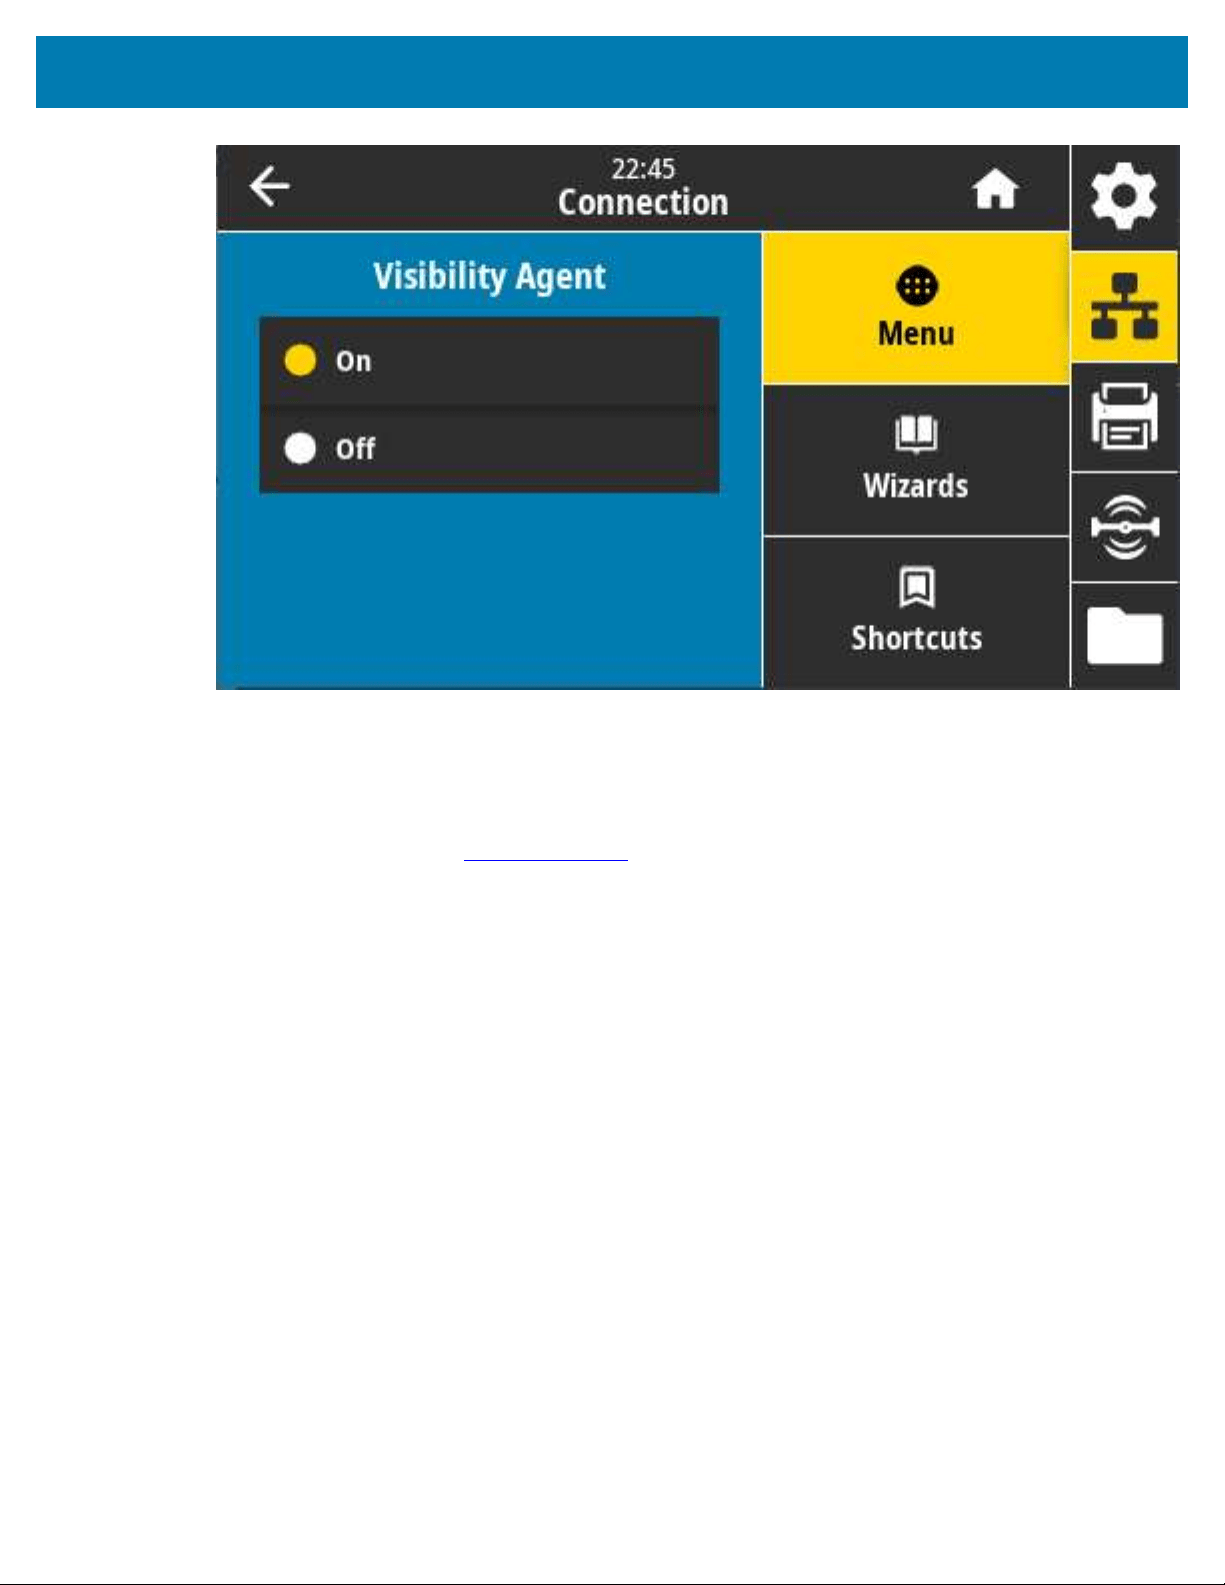
Color Touch Display and Controls
Accepted values: ON, OFF
SGD command used: weblink.zebra_connector.enable
Printer web page: View and Modify Printer Settings > Network Configuration > Cloud Connect Settings
For more information, see the application note titled “Opting Out of the Asset Visibility Agent”. It is
available through search on zebra.com/support.
114
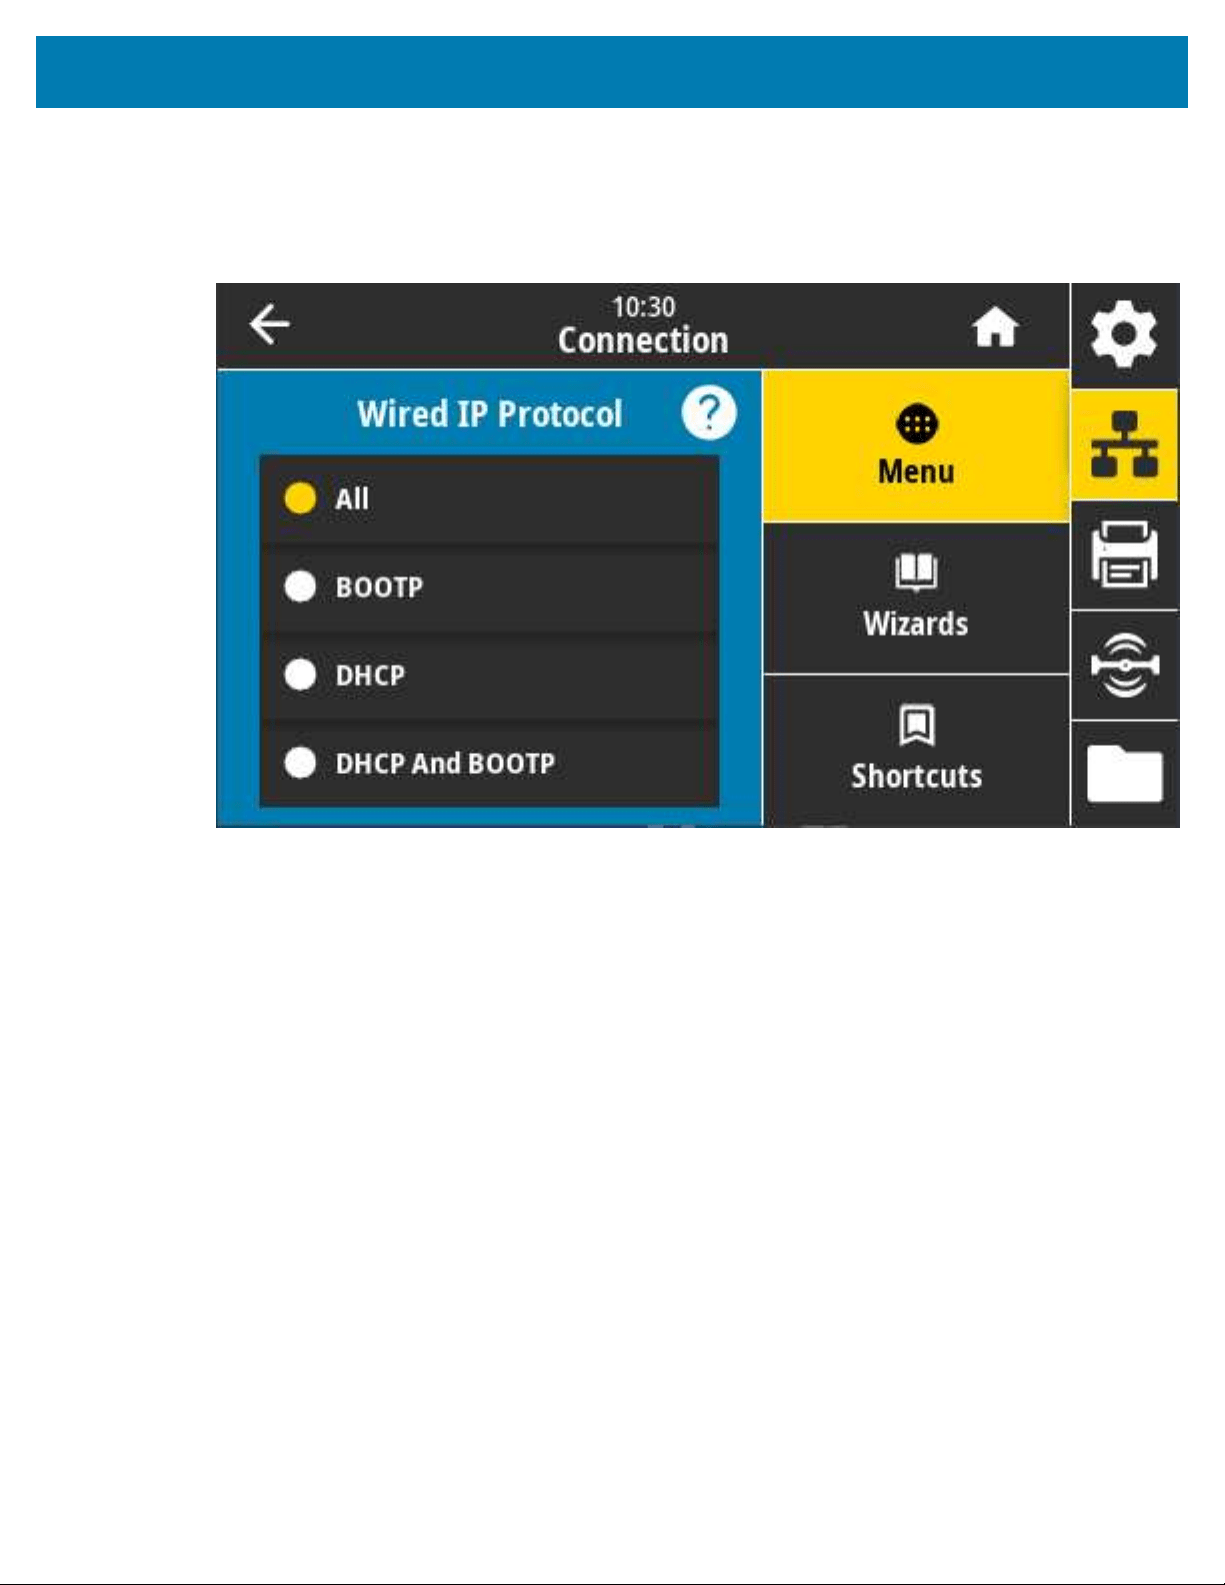
Color Touch Display and Controls
Connection > Wired > Wired IP Protocol
The wired print server’s IP address can be set by you("permanent") or be selected by the server
("dynamic").When a dynamic option is chosen, this parameter specifies the method(s) by which the print
server receives the IP address from the server.
You must reset the print server to allow changes to the network settings to take effect.See Connection >
Networks > Reset Network on page 108.
Accepted values: ALL, GLEANING ONLY, RARP, BOOTP, DHCP, DHCP & BOOTP, PERMANENT
Related ZPL command(s): ^ND
SGD command used: internal_wired.ip.protocol
Printer web page: View and Modify Printer Settings > Network Communications Setup > TCP/IP Settings
Connection > Wired > Wired IP Address
View and, if necessary, change the printer’s wired IP address.
To save any changes you make to this setting, set Connection > Wired > Wired IP Protocol to
PERMANENT. Then reset the print server(see Connection > Networks > Reset Network on page 108).
115
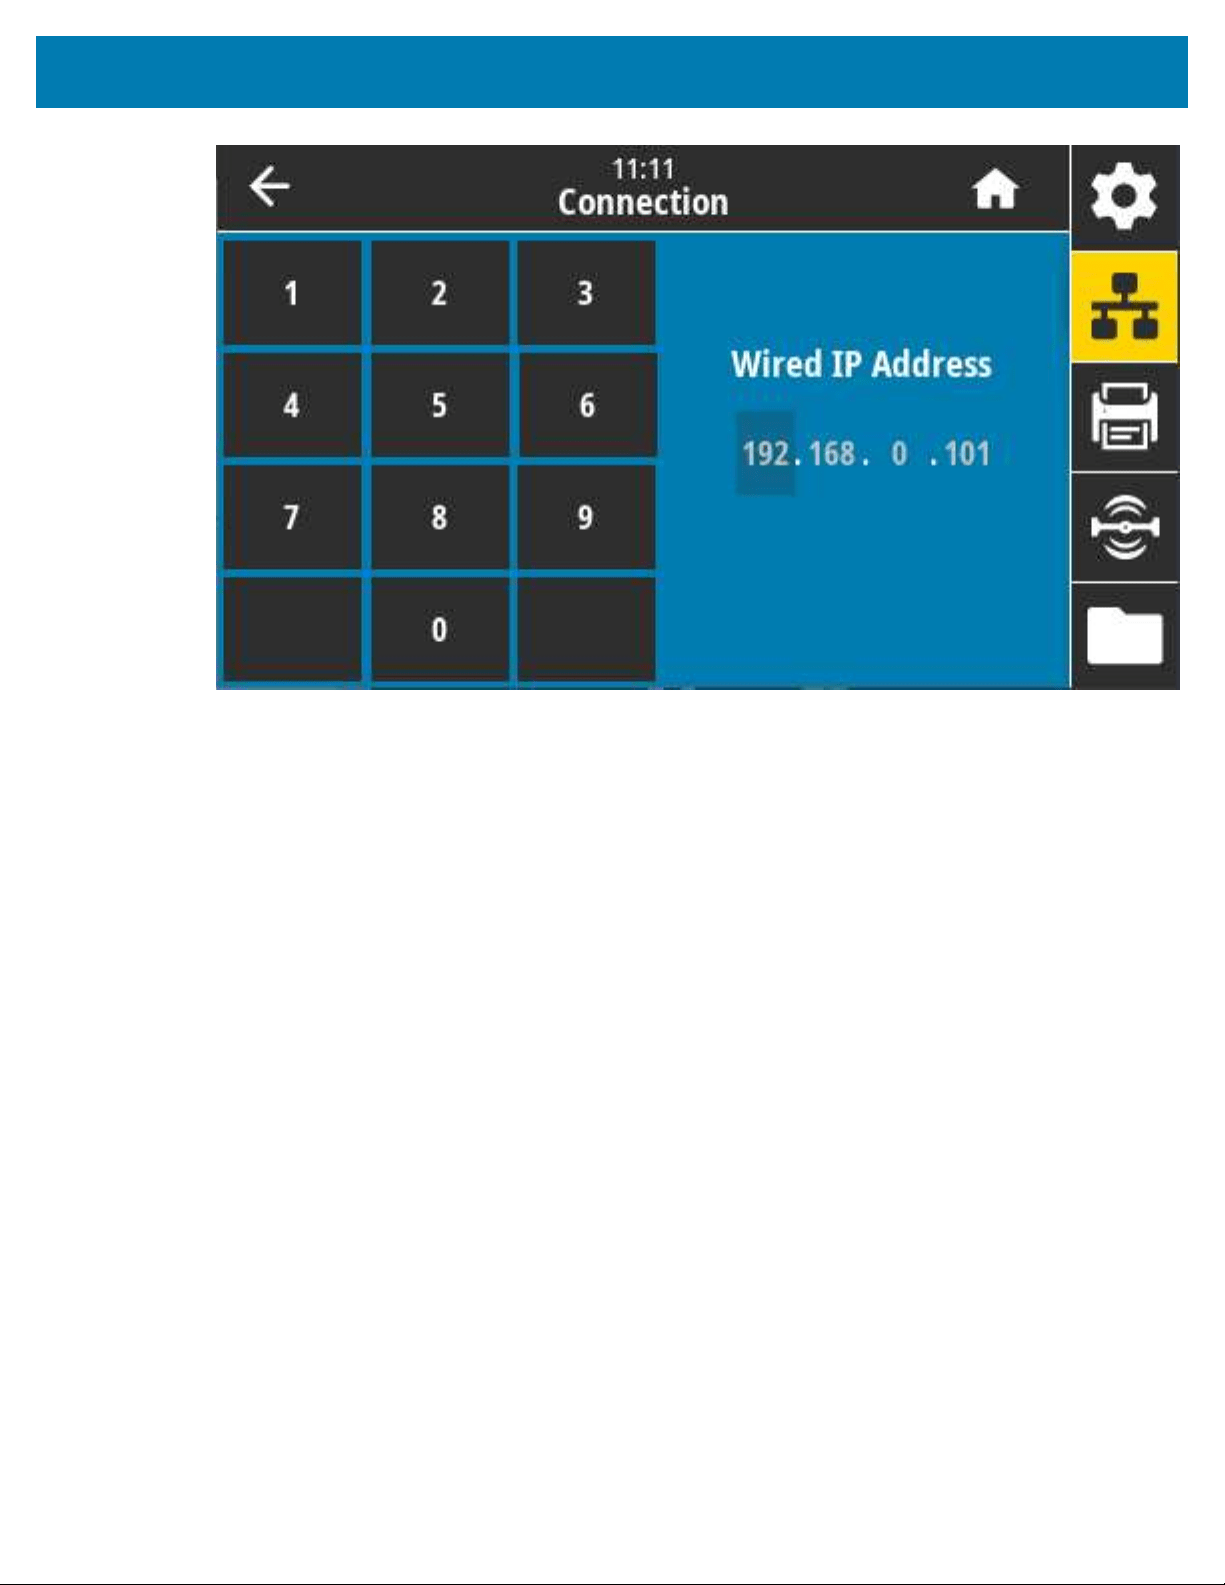
Color Touch Display and Controls
Accepted values: 000 to 255 (for each field)
Related ZPL command(s): ^ND
SGD command used: internal_wired.ip.addr
Printer web page: View and Modify Printer Settings > Network Communications Setup > TCP/IP Settings
Connection > Wired > Wired Gateway
Use this screen to view and if necessary change the default wired gateway.
To save any changes you make to this setting, set Connection > Wired > Wired IP Protocol to
PERMANENT.Then reset the print server (see Connection > Networks > Reset Network on page 108).
116

Color Touch Display and Controls
Accepted values: 000 to 255 (for each field)
Related ZPL command(s): ^ND
SGD command used: internal_wired.ip.gateway
Printer web page: View and Modify Printer Settings > Network Communications Setup > TCP/IP Settings
117

Color Touch Display and Controls
Connection > Wired > Wired MAC Address
View the Media Access Control (MAC) address of the wired print server. This value cannot be modified.
SGD command used: internal_wired.mac_addr
Printer web page: View and Modify Printer Settings > Network Communications Setup > TCP/IP Settings
Connection > WLAN > WLAN IP Protocol
You can setthe wireless print server’s IP address("permanent") or the server can set it ("dynamic") . When
a dynamic option is chosen, this parameter tells the method(s) by which this print server receives the IP
address from the server.
You must reset the print server to allow changes to the network settings to take effect(see Connection >
Networks > Reset Network on page 108).
118
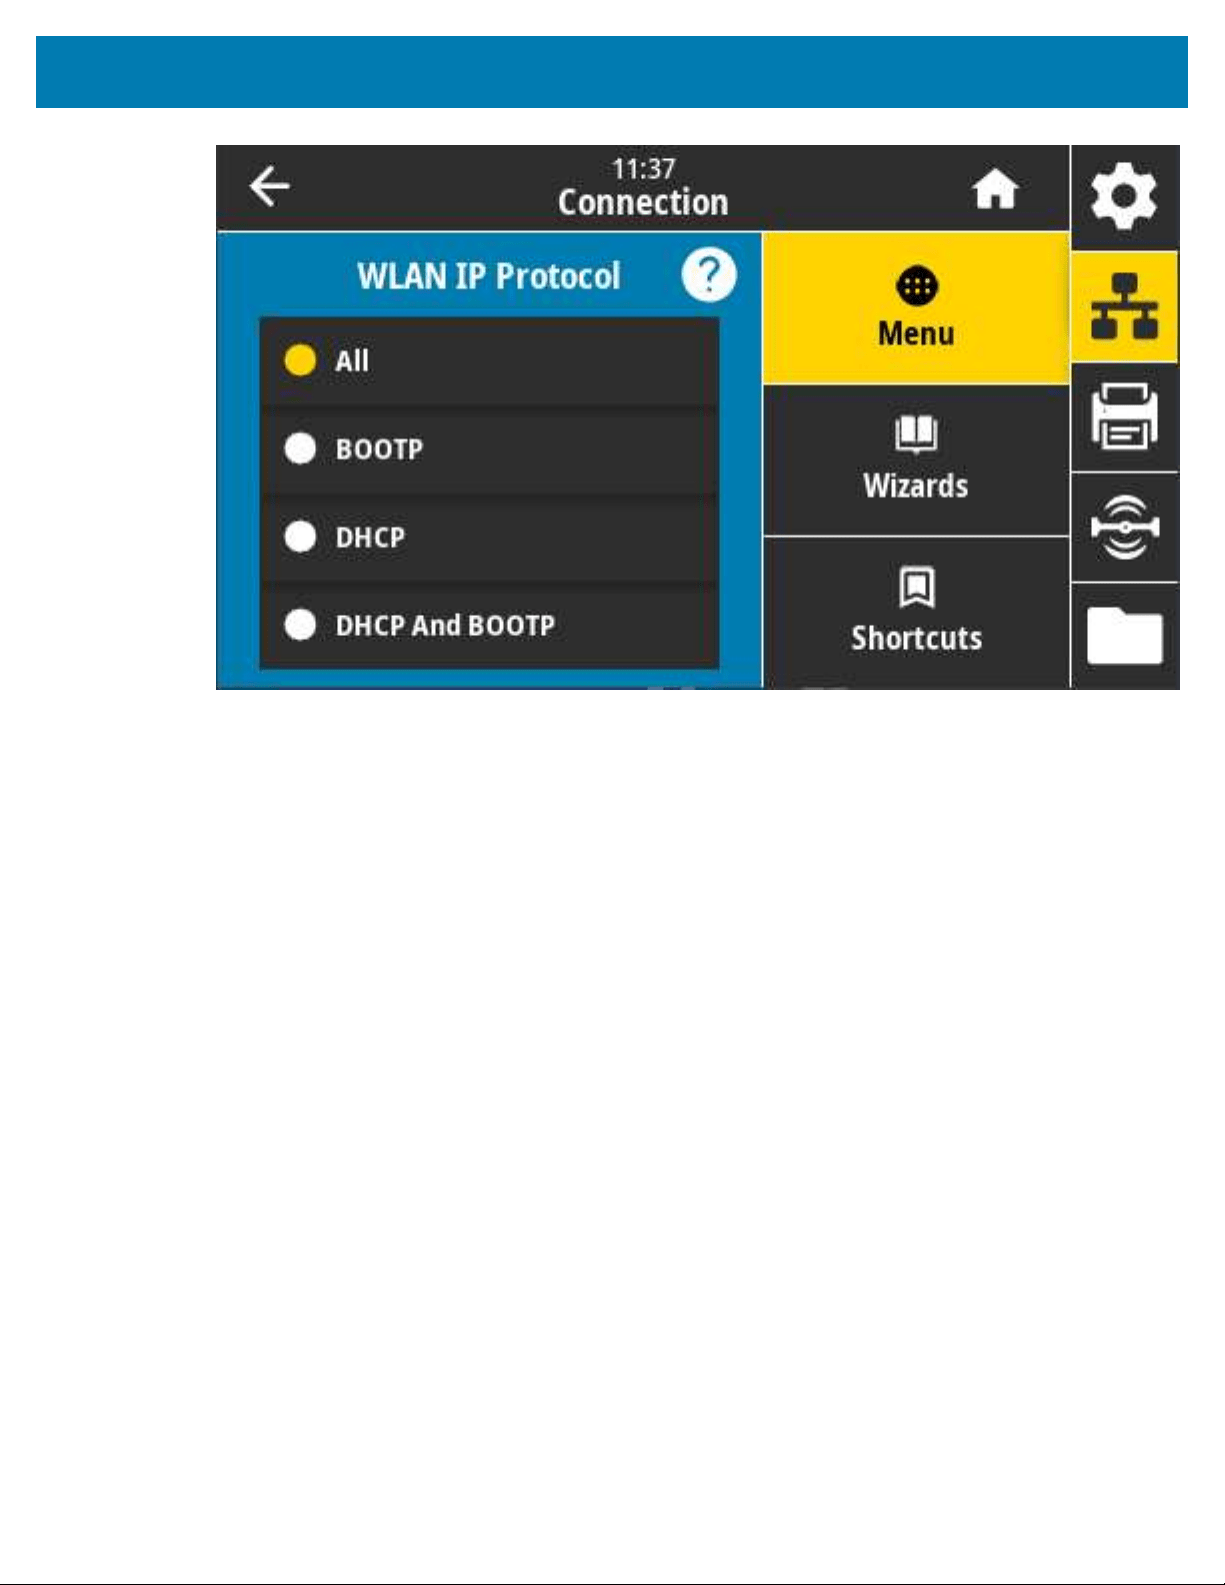
Color Touch Display and Controls
Accepted values: ALL, GLEANING ONLY, RARP, BOOTP, DHCP, DHCP & BOOTP, PERMANENT
Related ZPL command(s): ^ND
SGD command used: wlan.ip.protocol
Printer web page: View and Modify Printer Settings > Network Communications Setup > Wireless Setup
Connection > WLAN > WLAN IP Address
Use this screen to view and if necessary change the printer’s wireless IP address.
To save changes to this setting, set Connection > WLAN > WLAN IP Protocol to PERMANENT. Then reset
the print server. See Connection > Networks > Reset Network on page 108.
119

Color Touch Display and Controls
Accepted values: 000 to 255 (for each field)
Related ZPL command(s): ^ND
SGD command used:
• ip.addr
• wlan.ip.addr
Printer web page:
View and Modify Printer Settings > Network Communications Setup > Wireless Setup
Connection > WLAN > WLAN Subnet
Use this screen to view and if necessary change the wireless subnet mask.
To save changes to this setting, set Connection > WLAN > WLAN IP Protocol.to PERMANENT. Then reset
the print server. See Connection > Networks > Reset Network on page 108.
120

Color Touch Display and Controls
Accepted values: 000 to 255 (for each field)
Related ZPL command(s): ^ND
SGD command used: wlan.ip.netmask
Printer web page: View and Modify Printer Settings > Network Communications Setup > Wireless Setup
Connection > WLAN > WLAN Gateway
View and, if necessary, change the default wireless gateway.
To save changes you make to this setting, set Connection > WLAN > WLAN IP Protocol to PERMANENT.
Then reset the print server. See Connection > Networks > Reset Network on page 108.
121

Color Touch Display and Controls
Accepted values: 000 to 255 (for each field)
Related ZPL command(s): ^ND
SGD command used: wlan.ip.gateway
Printer web page: View and Modify Printer Settings > Network Communications Setup > Wireless Setup
122
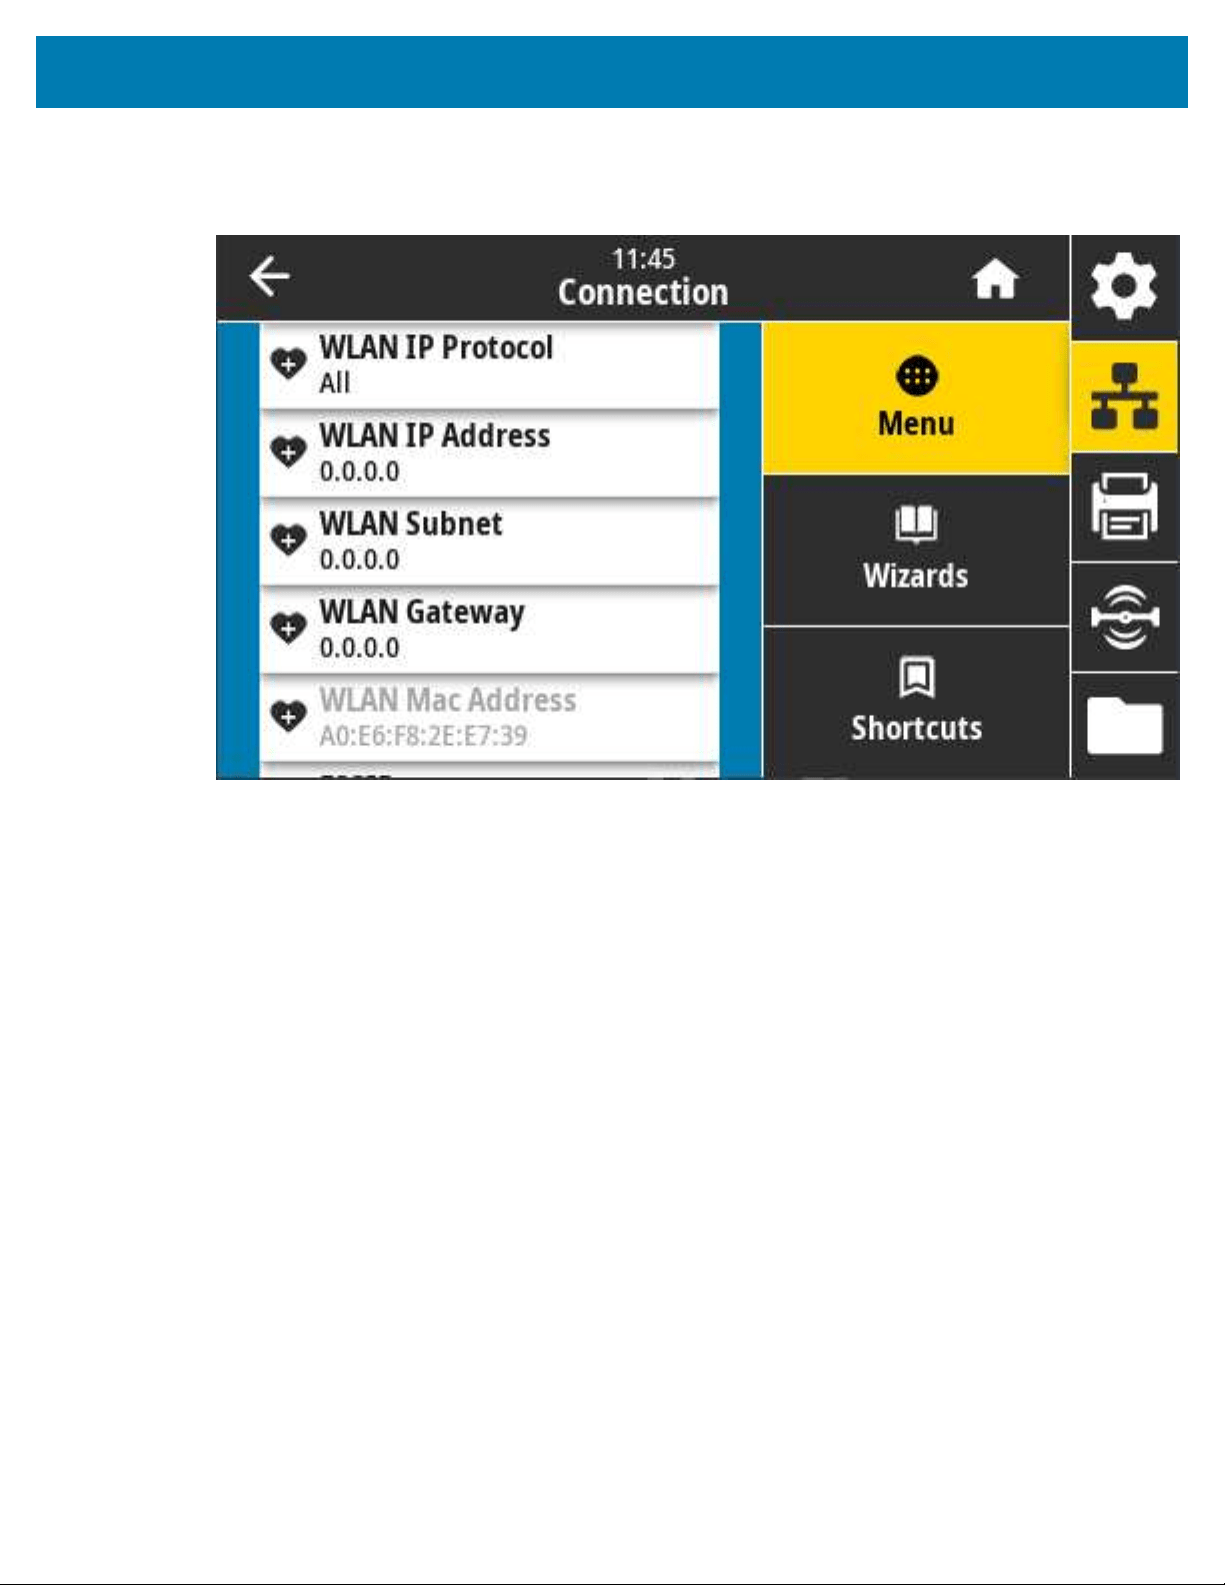
Color Touch Display and Controls
Connection > WLAN > WLAN MAC Address
View the Media Access Control (MAC) address of the wireless print server. This value cannot be modified.
SGD command used: wlan.mac_addr
Printer web page: View and Modify Printer Settings > Network Communications Setup > Wireless Setup
123
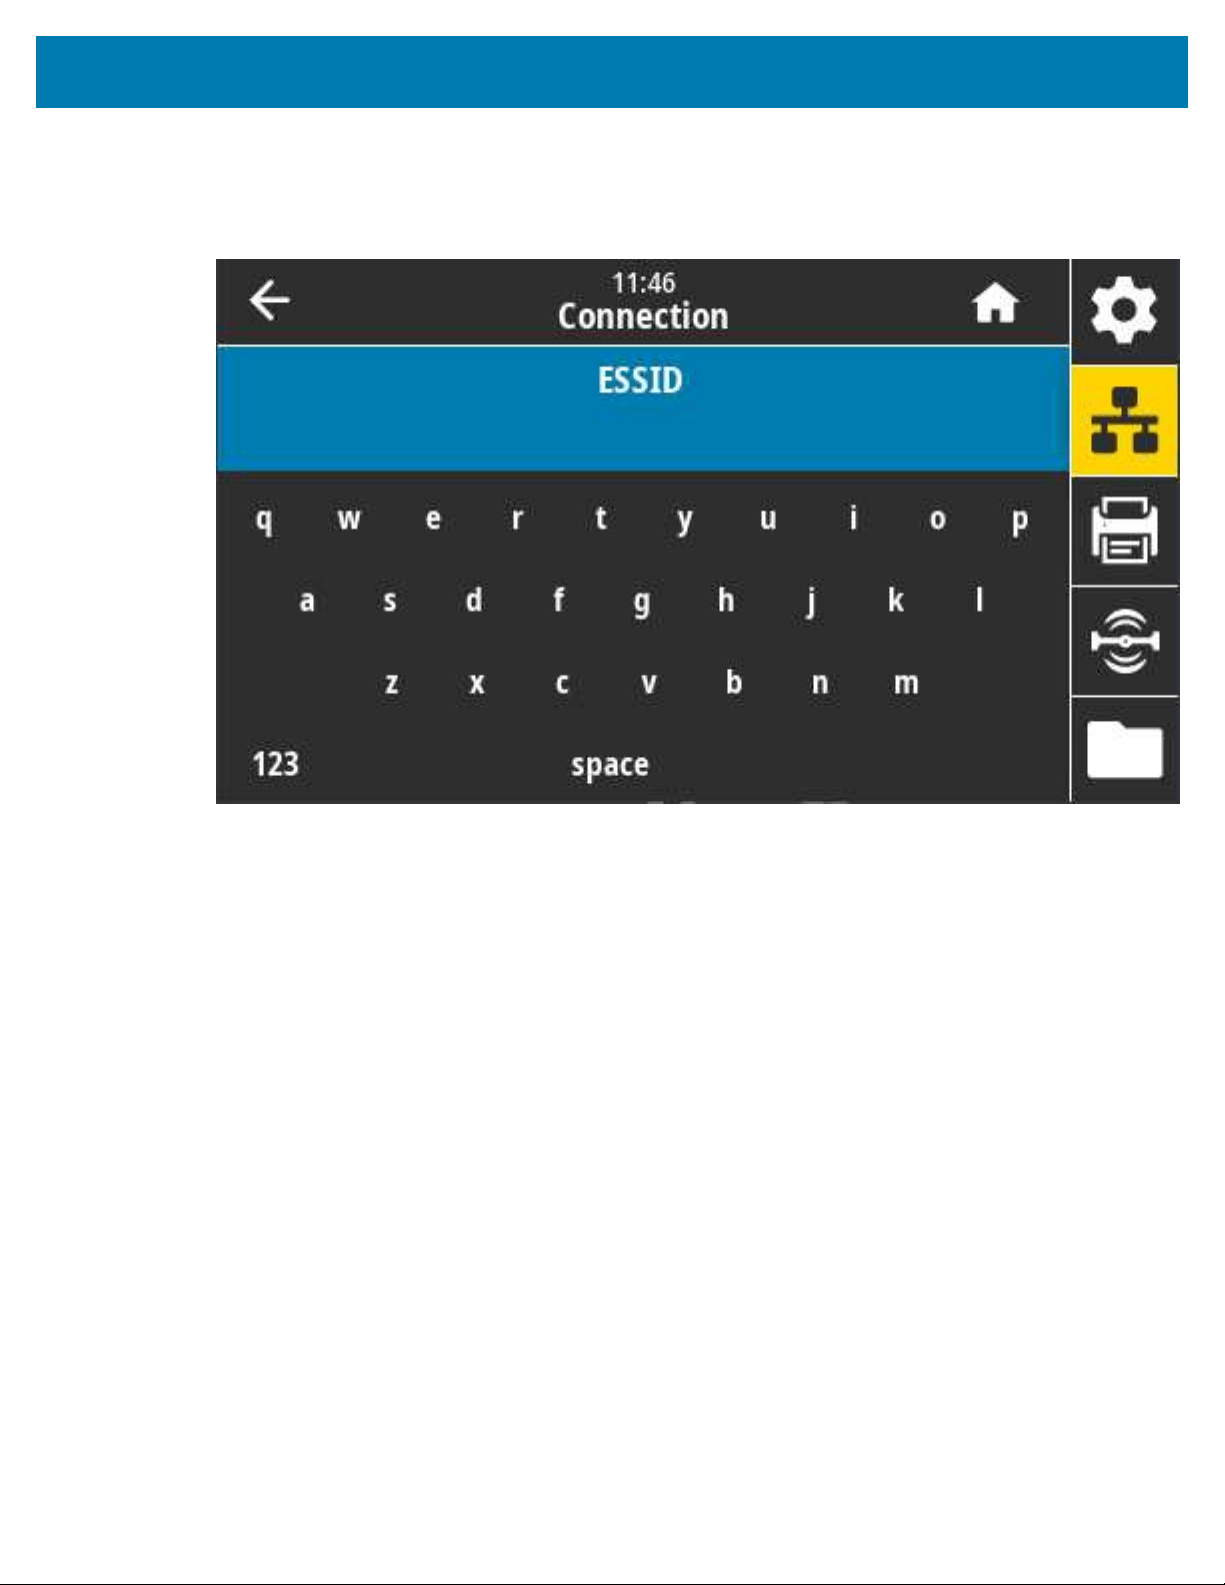
Color Touch Display and Controls
Connection > WLAN > ESSID
The Extended Service Set Identification (ESSID) is an identifier for your wireless network. Specify the ESSID
for the current wireless configuration.
Accepted values: 32-character alphanumeric string (default: 125)
SGD command used: wlan.essid
Printer web page: View and Modify Printer Settings > Network Communications Setup > Wireless Setup
124
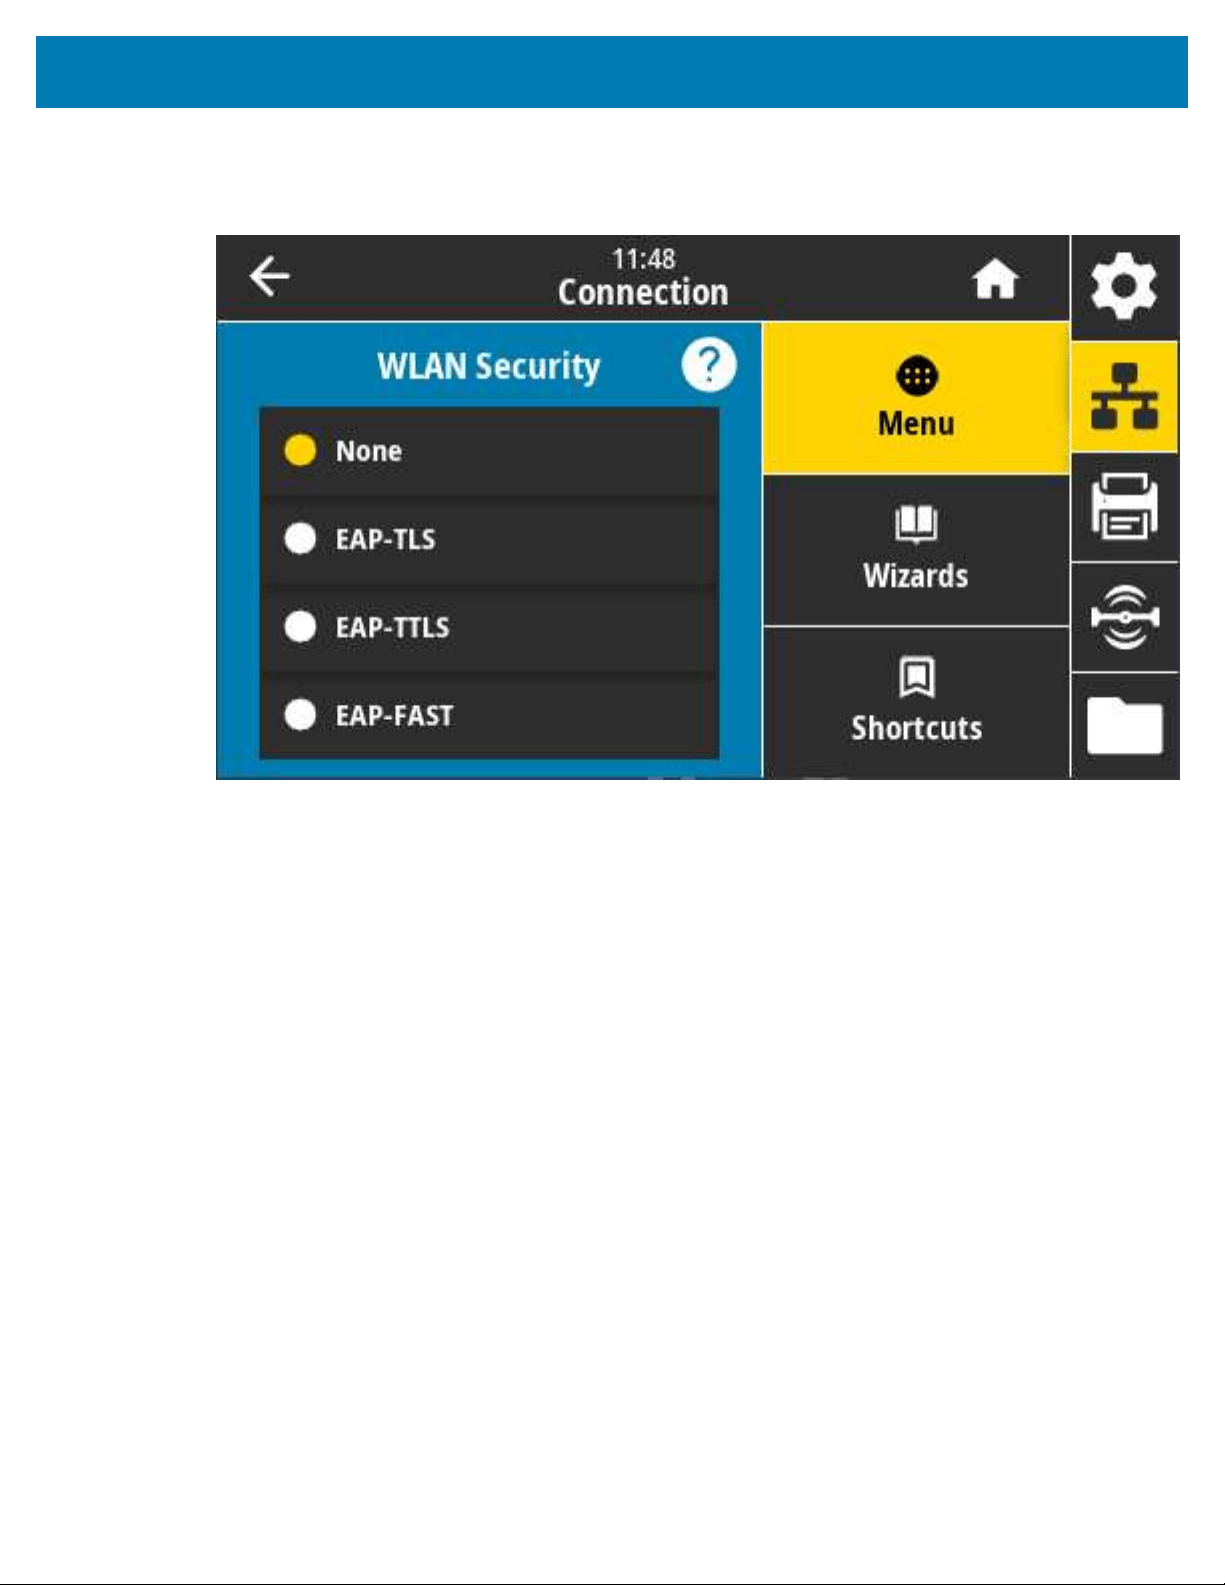
Color Touch Display and Controls
Connection > WLAN > WLAN Security
Select the security type being used on your WLAN.
Related ZPL command(s): ^WX
SGD command used: wlan.security
Printer web page: View and Modify Printer Settings > Network Communications Setup > Wireless
Encryption Setup
125
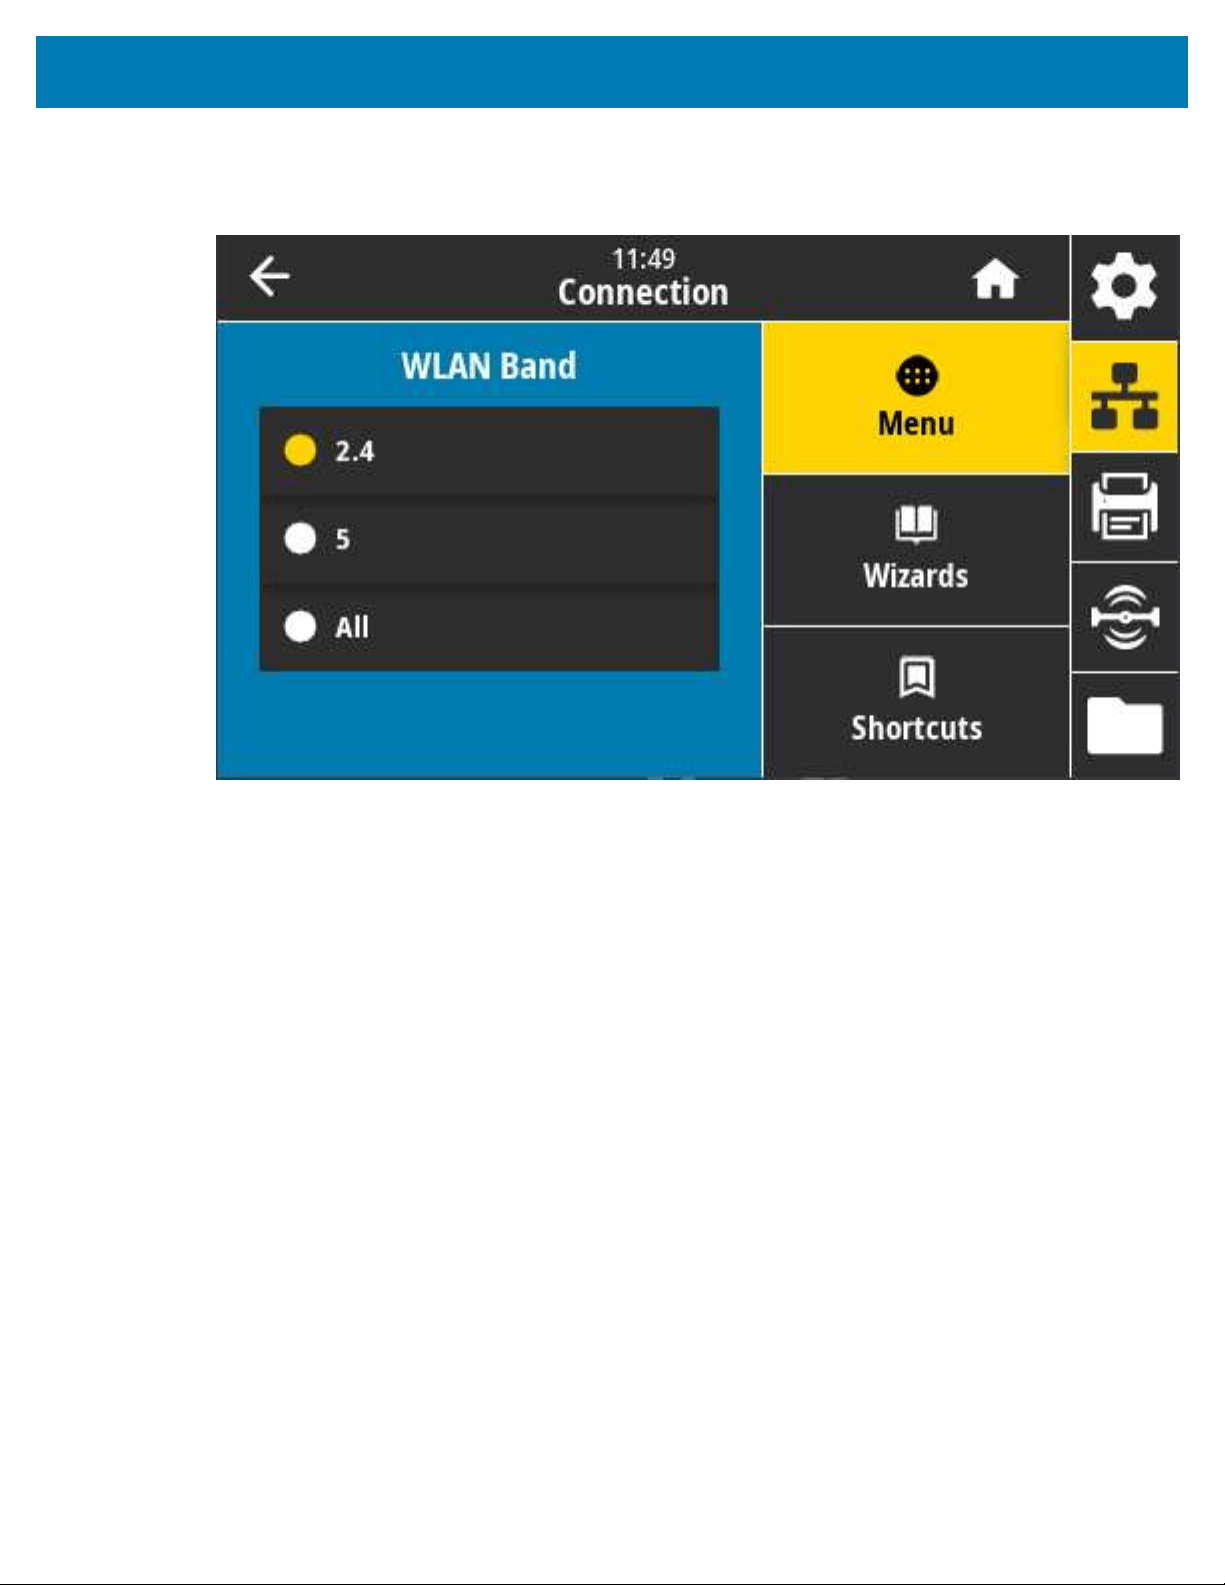
Color Touch Display and Controls
Connection > WLAN > WLAN Band
Set a preferred band to connect with via Wi-Fi.
Accepted values: 2.4, 5, None
SGD command used: wlan.band_preference
Printer web page: View and Modify Printer Settings > Network Communications Setup > Wireless Setup
126

Color Touch Display and Controls
Connection > WLAN > WLAN Country Code
The country code defines the regulatory country for which the wireless radio is currently configured.
NOTE: The list of country codes is specific to each printer. It depends on the printer model and
the wireless radio configuration of the printer. This list is subject to change, addition, or deletion
with any firmware update, at any time, without notice.
To determine the country codes available on your printer, issue the ! U1 getvar "wlan" command to
return all commands related to WLAN settings. Locate the wlan.country.code string in the results and
view the country codes available for your printer.
SGD command used: wlan.country_code
127

Color Touch Display and Controls
Connection > Bluetooth > Bluetooth
Select if the printer is “Discoverable” for Bluetooth device pairing.
Accepted values:
• ON—Enables the Bluetooth radio.
• OFF—Disables the Bluetooth radio.
SGD command used: bluetooth.enable
128

Color Touch Display and Controls
Connection > Bluetooth > Bluetooth Discovery
Use this parameter to specify if the printer is “discoverable” for Bluetooth device pairing.
Accepted values:
• ON—Enables Bluetooth discoverable mode.
• OFF—Disables Bluetooth discoverable mode.
SGD command used: bluetooth.discoverable
Connection > Bluetooth > Friendly Name
This command sets the friendly name, which is used during service discovery.
For changes to take effect, turn printer power OFF and ON. Alternatively, issue the device.reset
command.
Another way to reset the network is to use the Reset Network menu option. See Connection > Networks
> Reset Network on page 108.
If you do not set a friendly name for the printer for easier discovery, the name defaults to the printer serial
number.
129
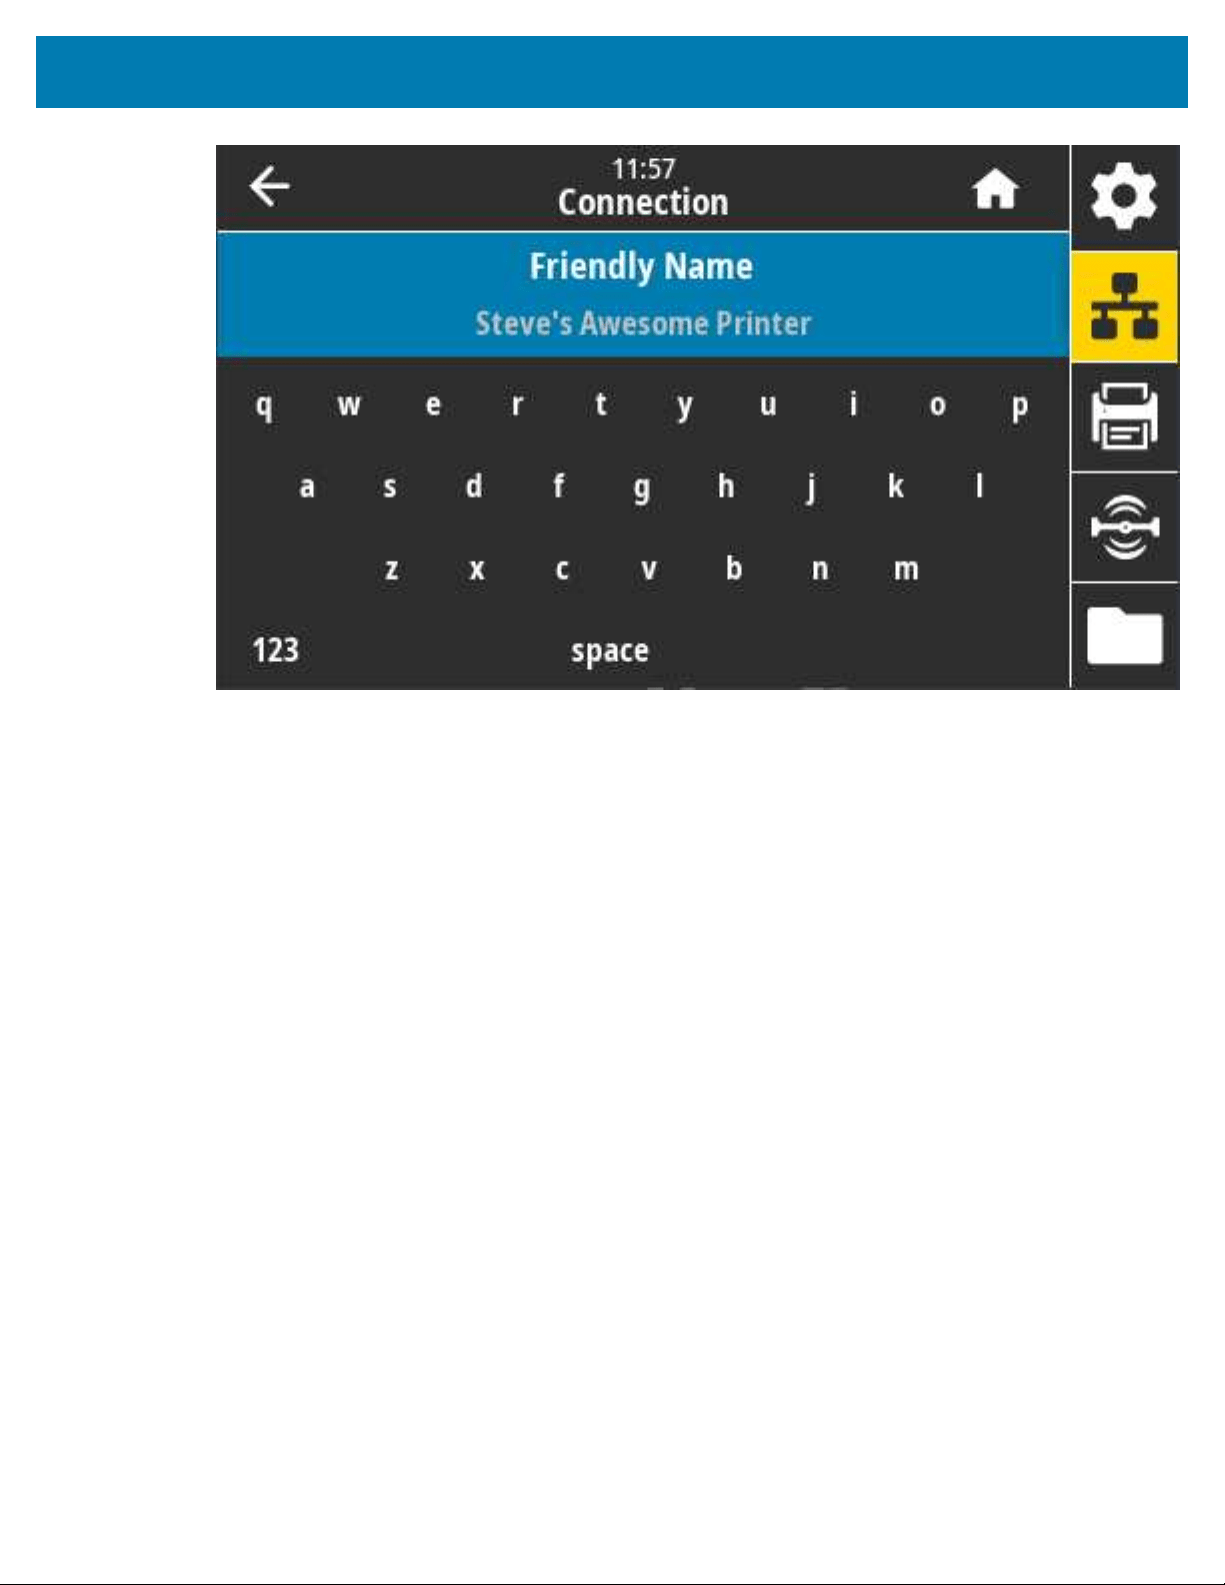
Color Touch Display and Controls
Accepted values:17-character text string
SGD command used: bluetooth.friendly_name
Connection > Bluetooth > Minimum Security Mode
This printer setting establishes the Minimum Security mode for Bluetooth connections.
The Minimum Security Mode provides for various levels of security, depending on the printer radio version
and printer firmware.
130


Color Touch Display and Controls
Connection > Bluetooth > Specification Version
This parameter displays the Bluetooth library version number.
SGD command used: bluetooth.version
132
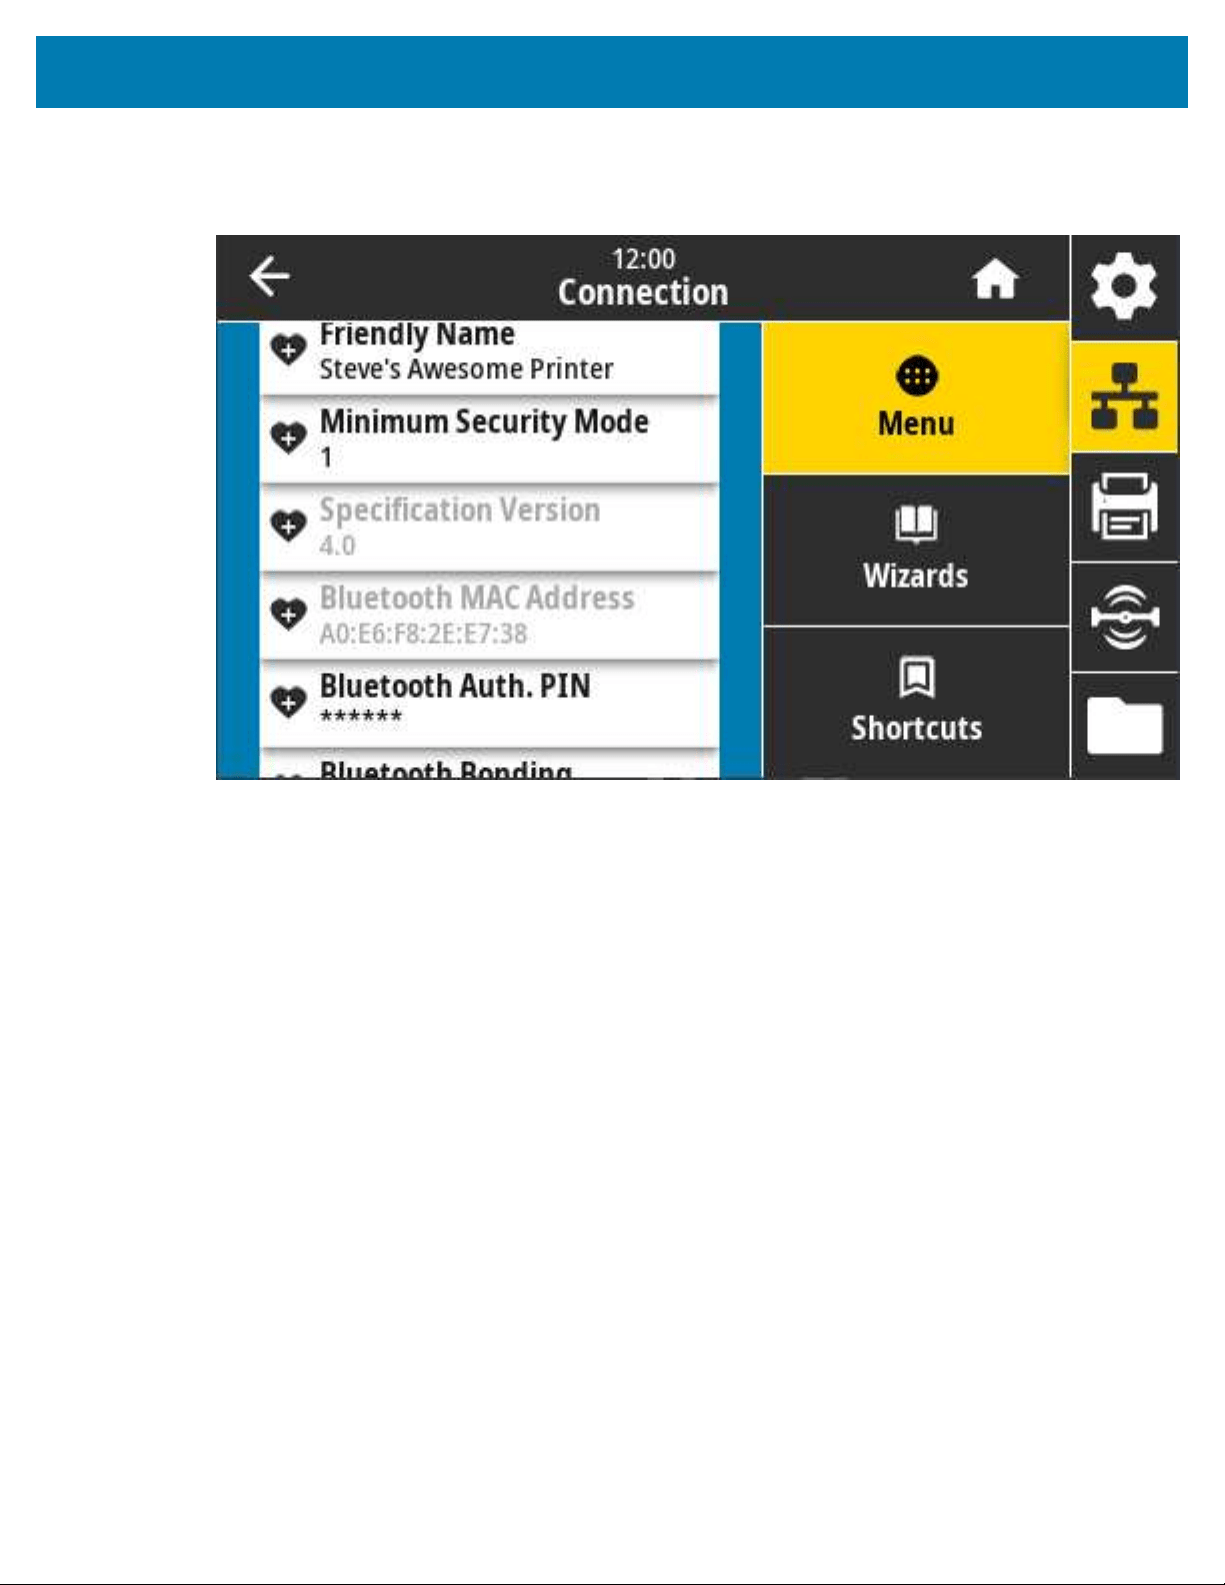
Color Touch Display and Controls
Connection > Bluetooth > MAC Address
This parameter displays the Bluetooth device address.
SGD command used: bluetooth.address
133
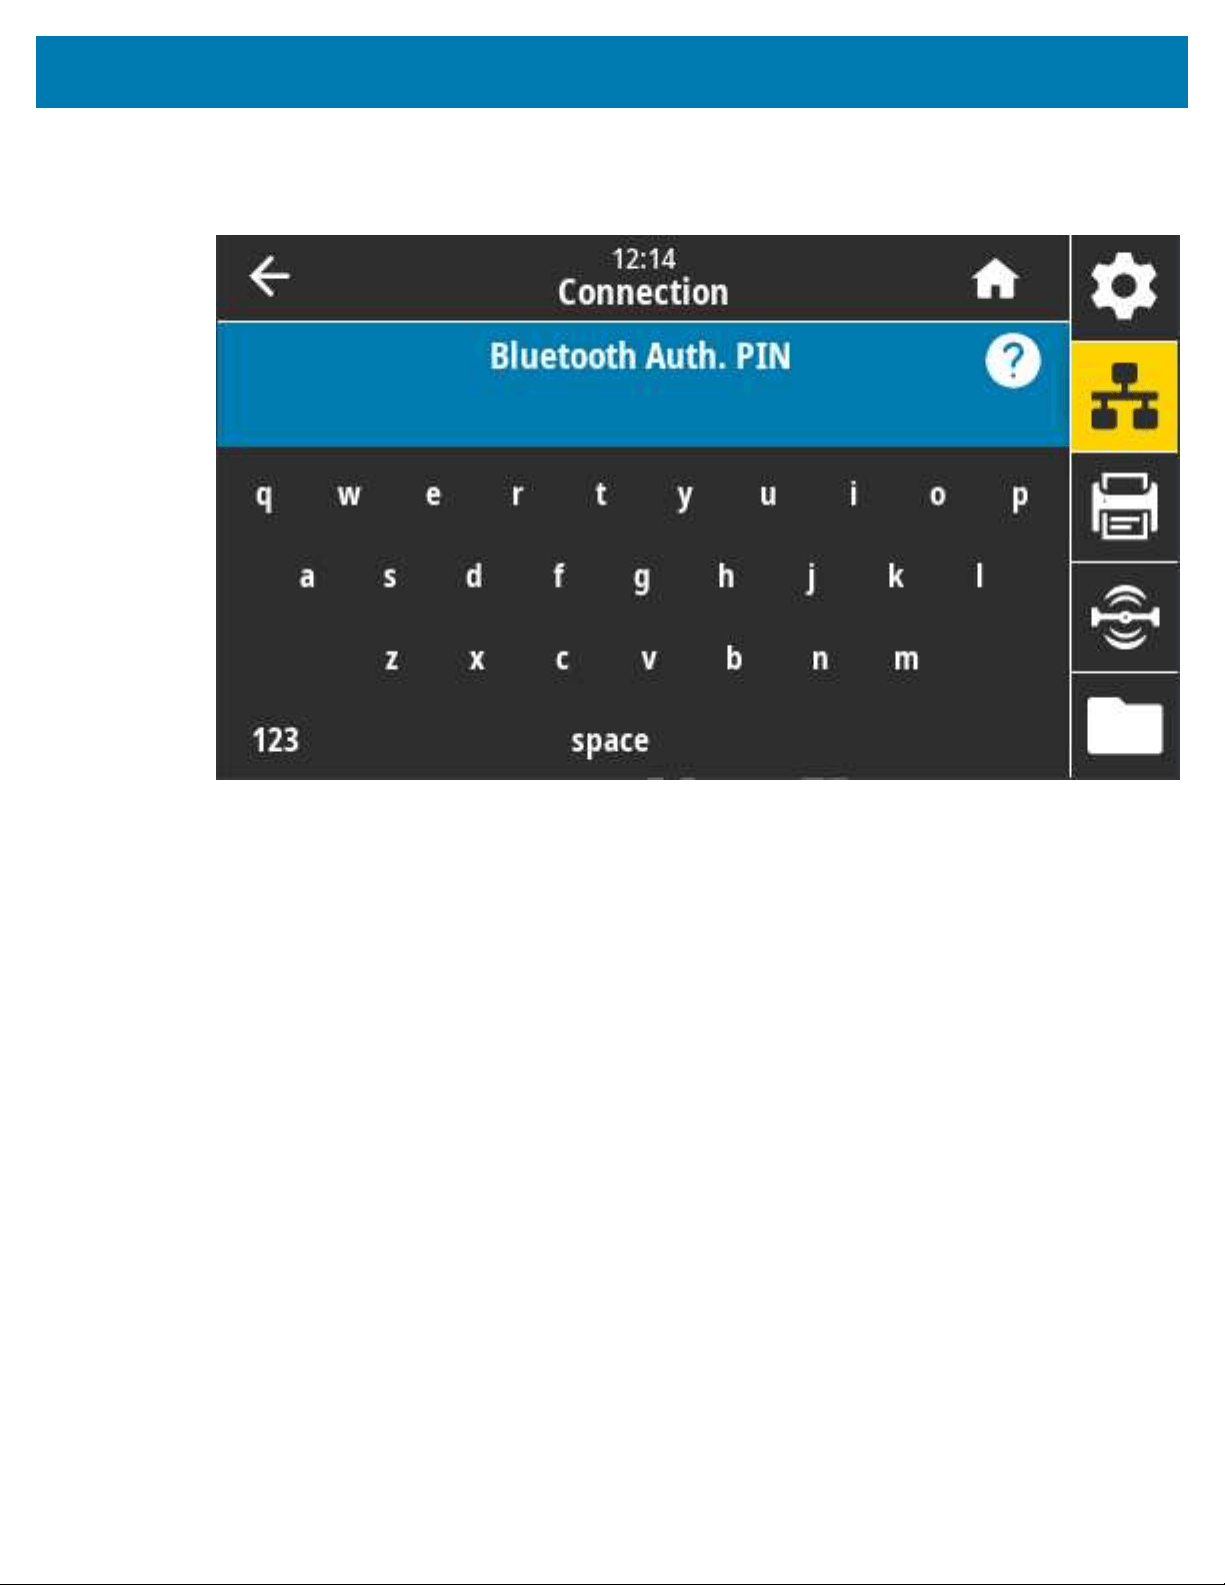
Color Touch Display and Controls
Connection > Bluetooth > Bluetooth Auth. PIN
This parameter displays the Bluetooth device address.
SGD command(s) used:
• To set the PIN: bluetooth.bluetooth_pin
• To enable authentication using the PIN: bluetooth.authentication
134
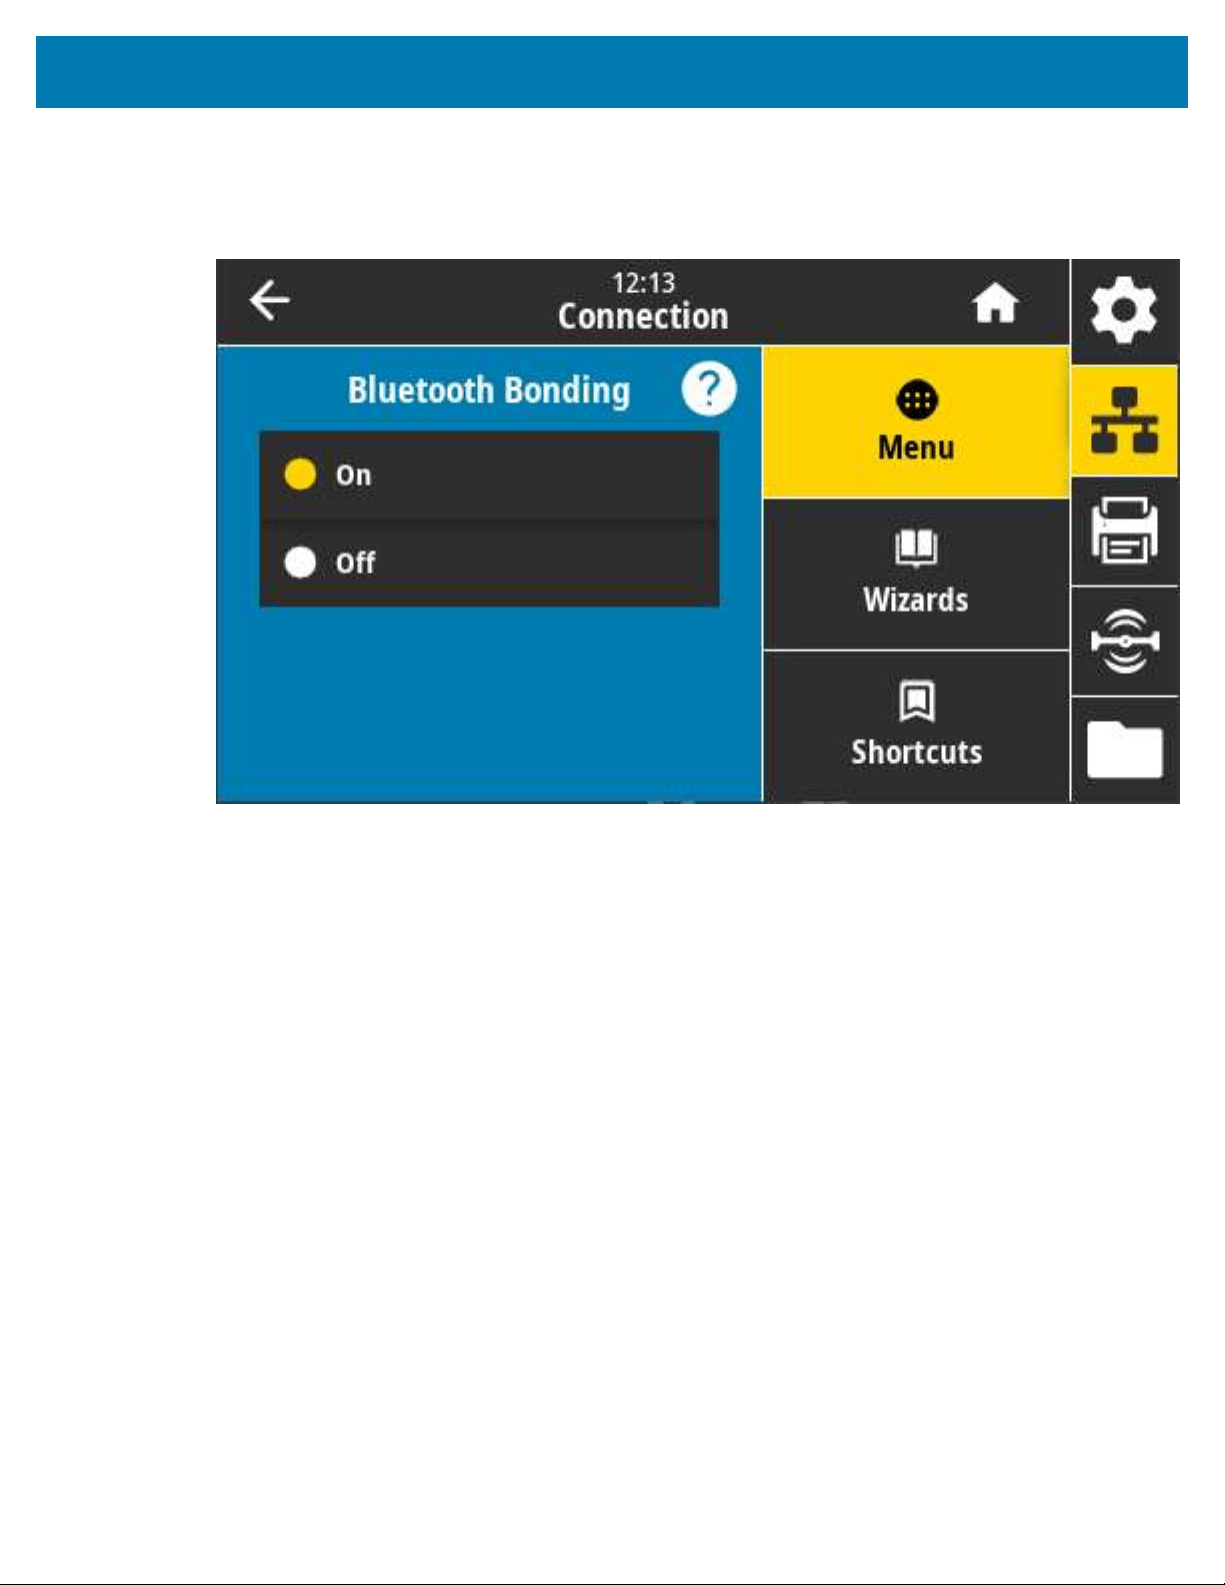
Color Touch Display and Controls
Connection > Bluetooth > Bluetooth Bonding
This setting is used to specify if the Bluetooth stack will “bond” or will save link keys for devices that
successfully connect to the printer.
Accepted values:
• ON—Enables Bluetooth bonding.
• OFF—Disables Bluetooth bonding.
SGD command used: bluetooth.bonding
135

Color Touch Display and Controls
Print Menu
Use this menu to set and change print settings such as print darkness, speed, and size.
Print > Print Quality > Darkness
Set the print darkness to the lowest setting that provides good print quality.
If you set the darkness too high, the label image may print unclearly, barcodes may not scan correctly, the
ribbon may burn through, or the printhead may wear prematurely.
136
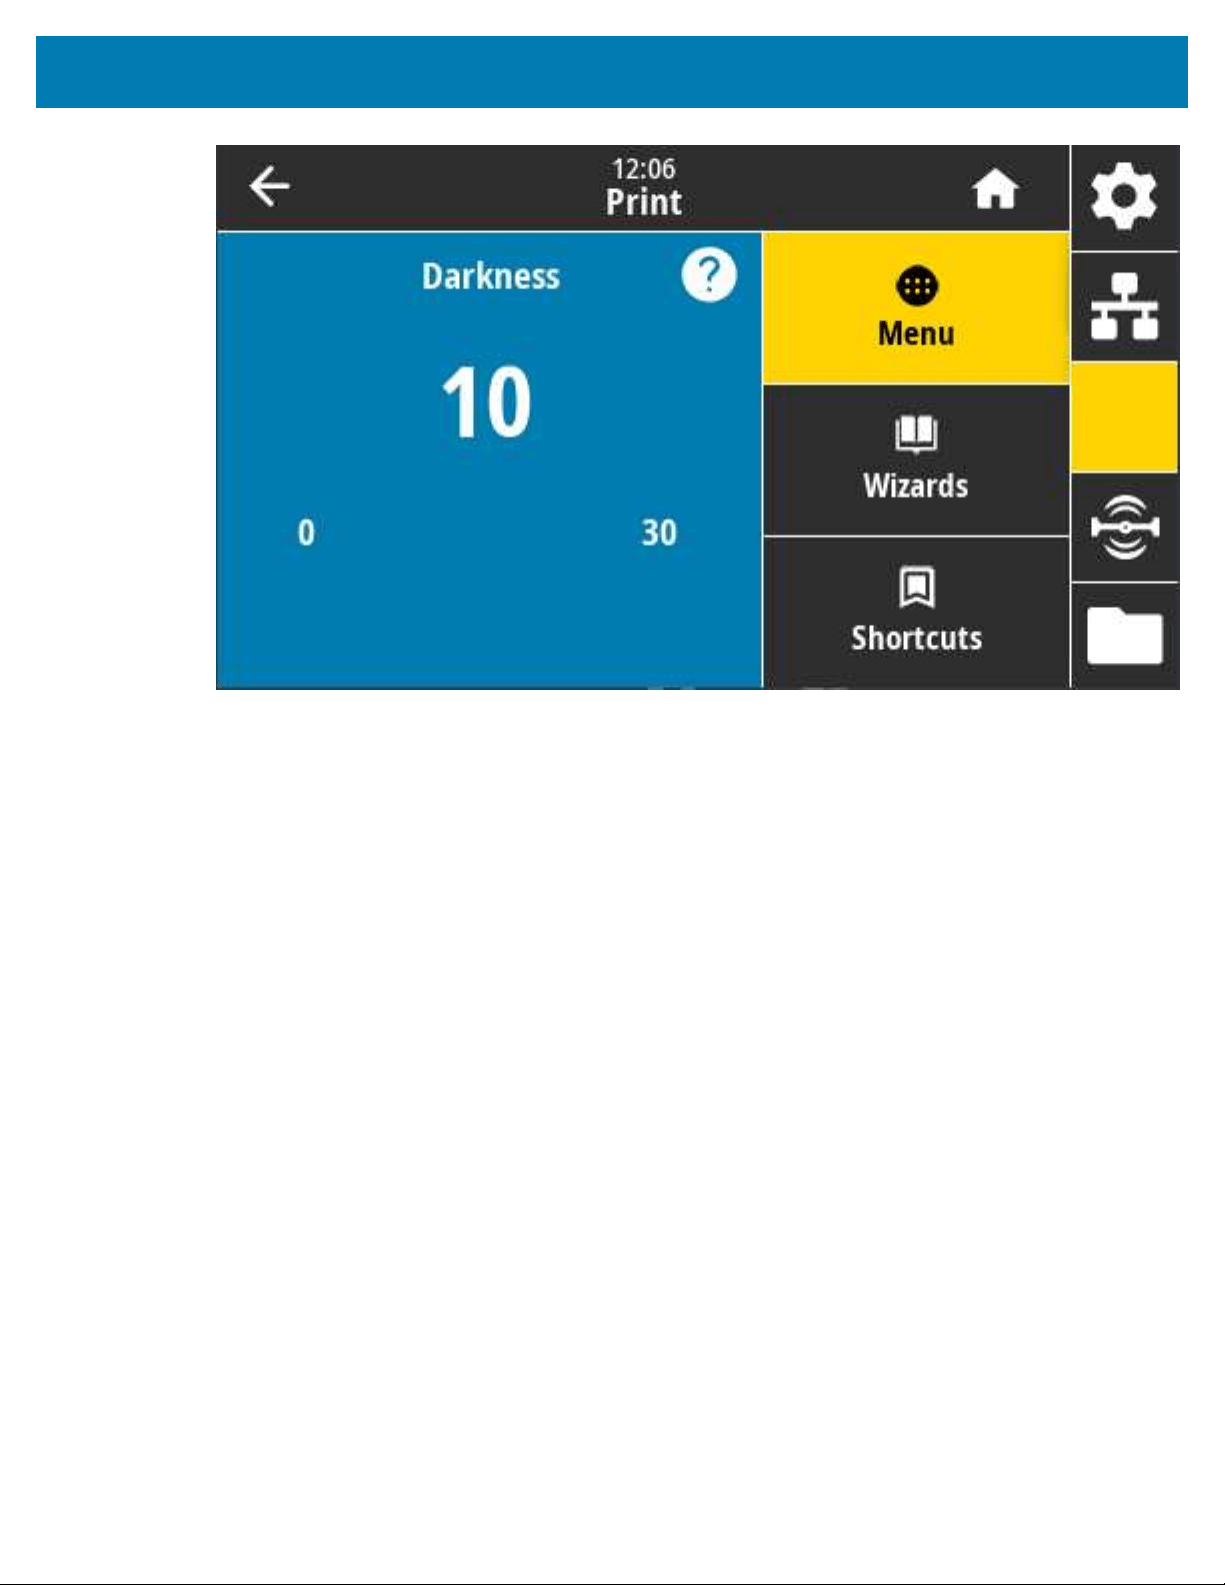
Color Touch Display and Controls
Accepted values: 0.0 to 30.0
Related ZPL command(s):
• ^MD
• ~SD
SGD command used: print.tone
Printer web page: View and Modify Printer Settings > General Setup > Darkness
137
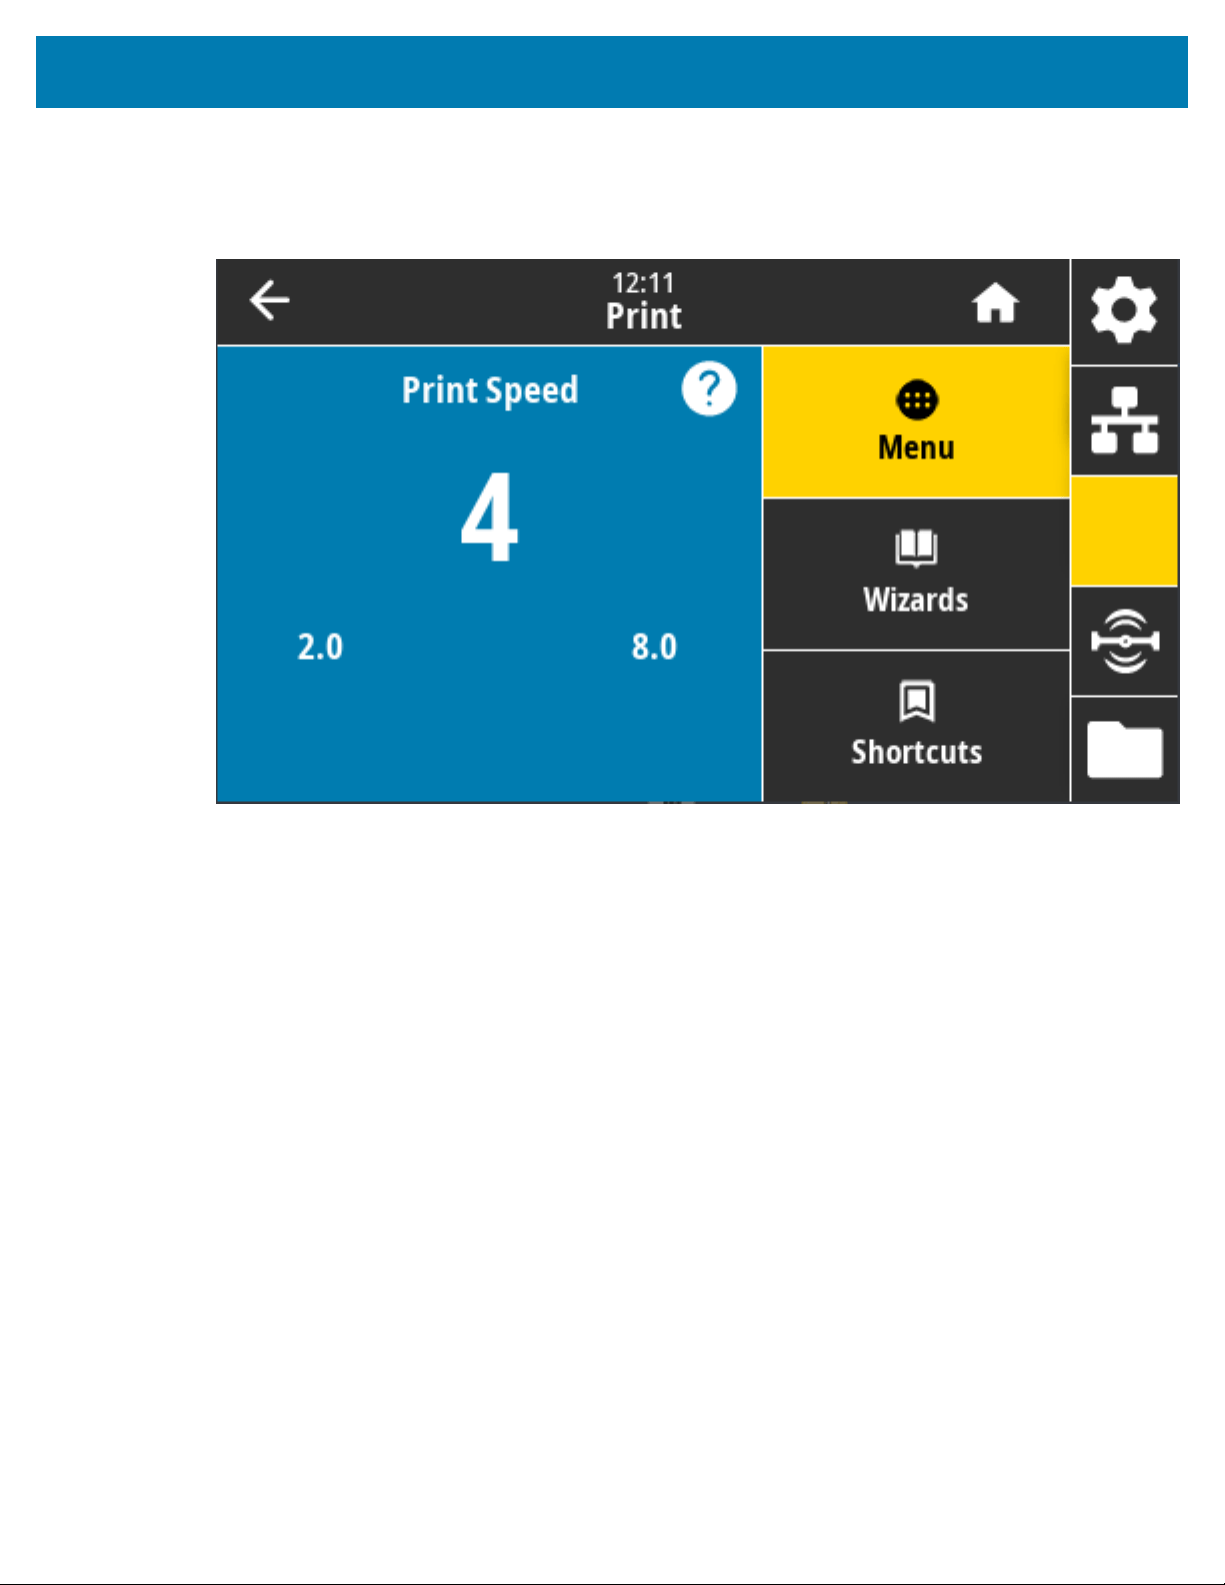
Color Touch Display and Controls
Print > Print Quality > Print Speed
Select the speed in inches per second (ips), for printing a label. Slower print speeds typically yield better
print quality.
Accepted values:
• ZD621 203 dpi = 2 to 8 ips
• ZD621 300 dpi = 2 to 6 ips
Related ZPL command(s): ^PR
SGD command used: media.speed
Printer web page: View and Modify Printer Settings > General Setup > Print Speed
138
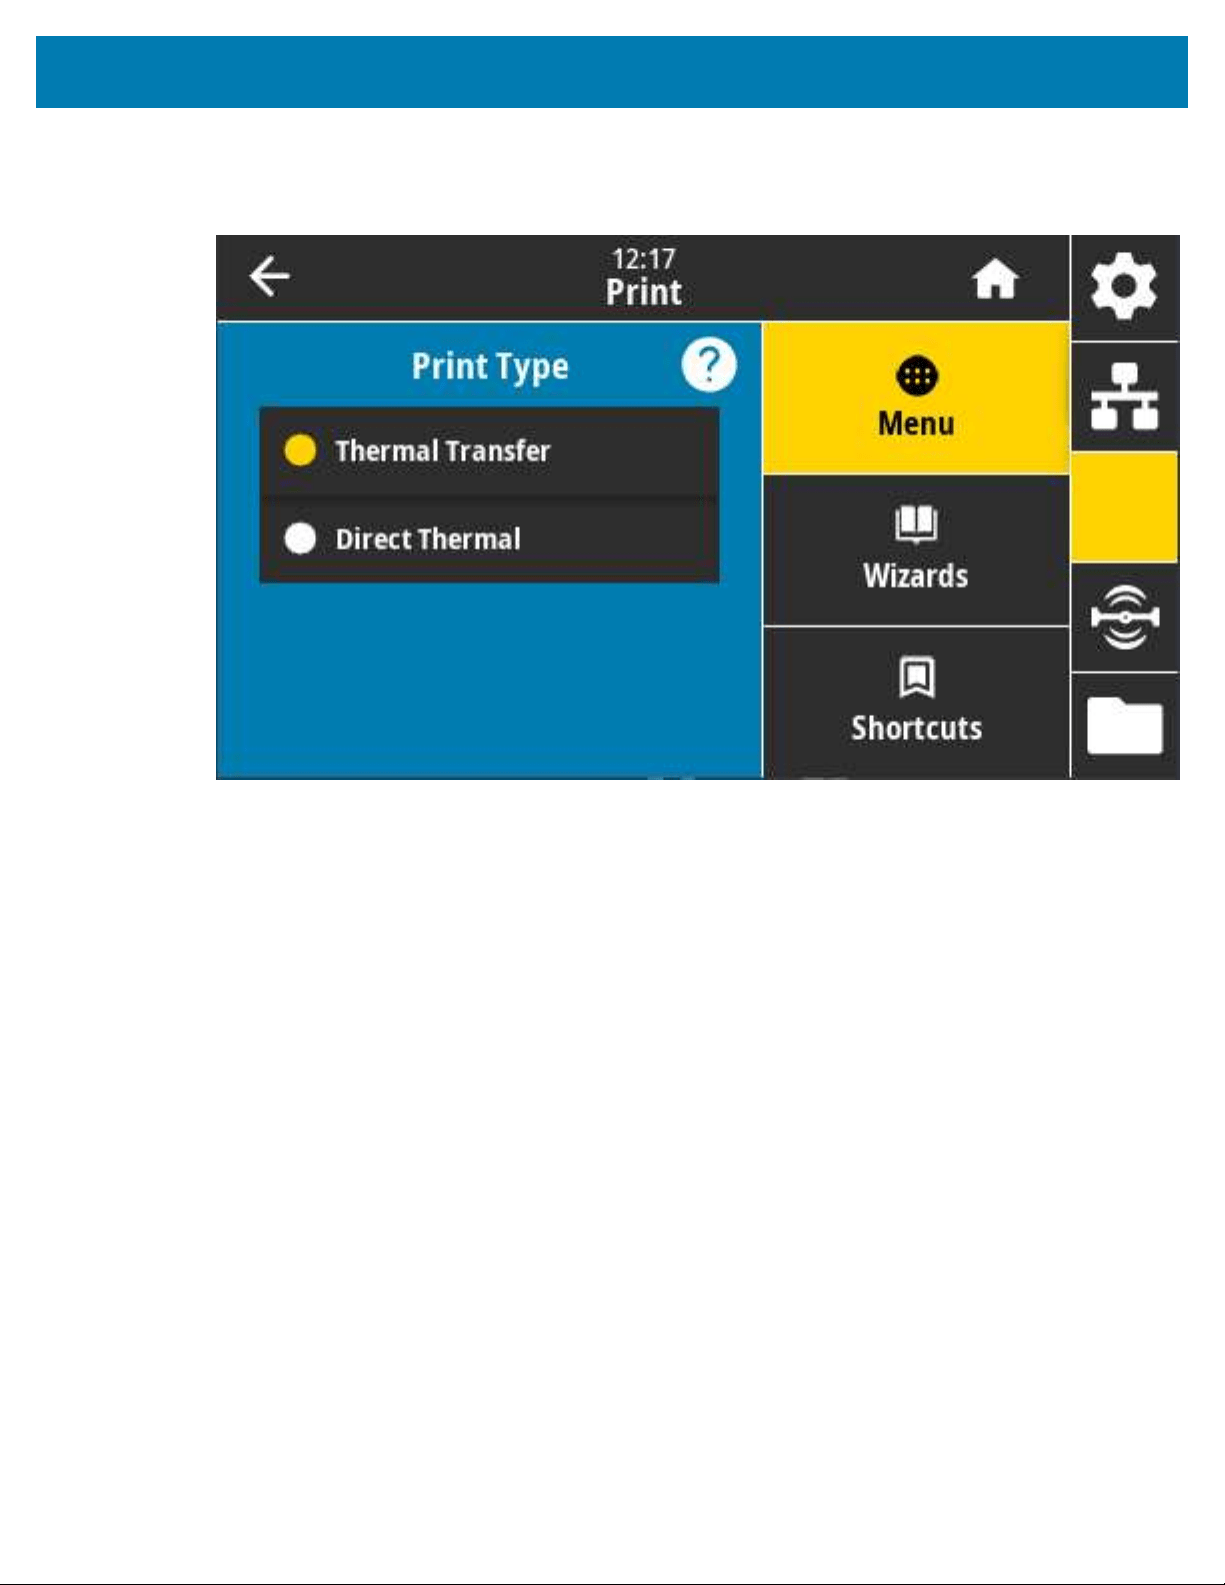
Color Touch Display and Controls
Print > Print Quality > Print Type
Specify if the printer needs to use ribbon for printing.
Accepted values:
• Thermal Transfer—Uses ribbon and thermal transfer media.
• Direct Thermal—Uses direct thermal media and no ribbon.
Related ZPL command(s): ^MT
SGD command used: ezpl.print_method
Printer web page: View and Modify Printer Settings > Media Setup > Print Method
139
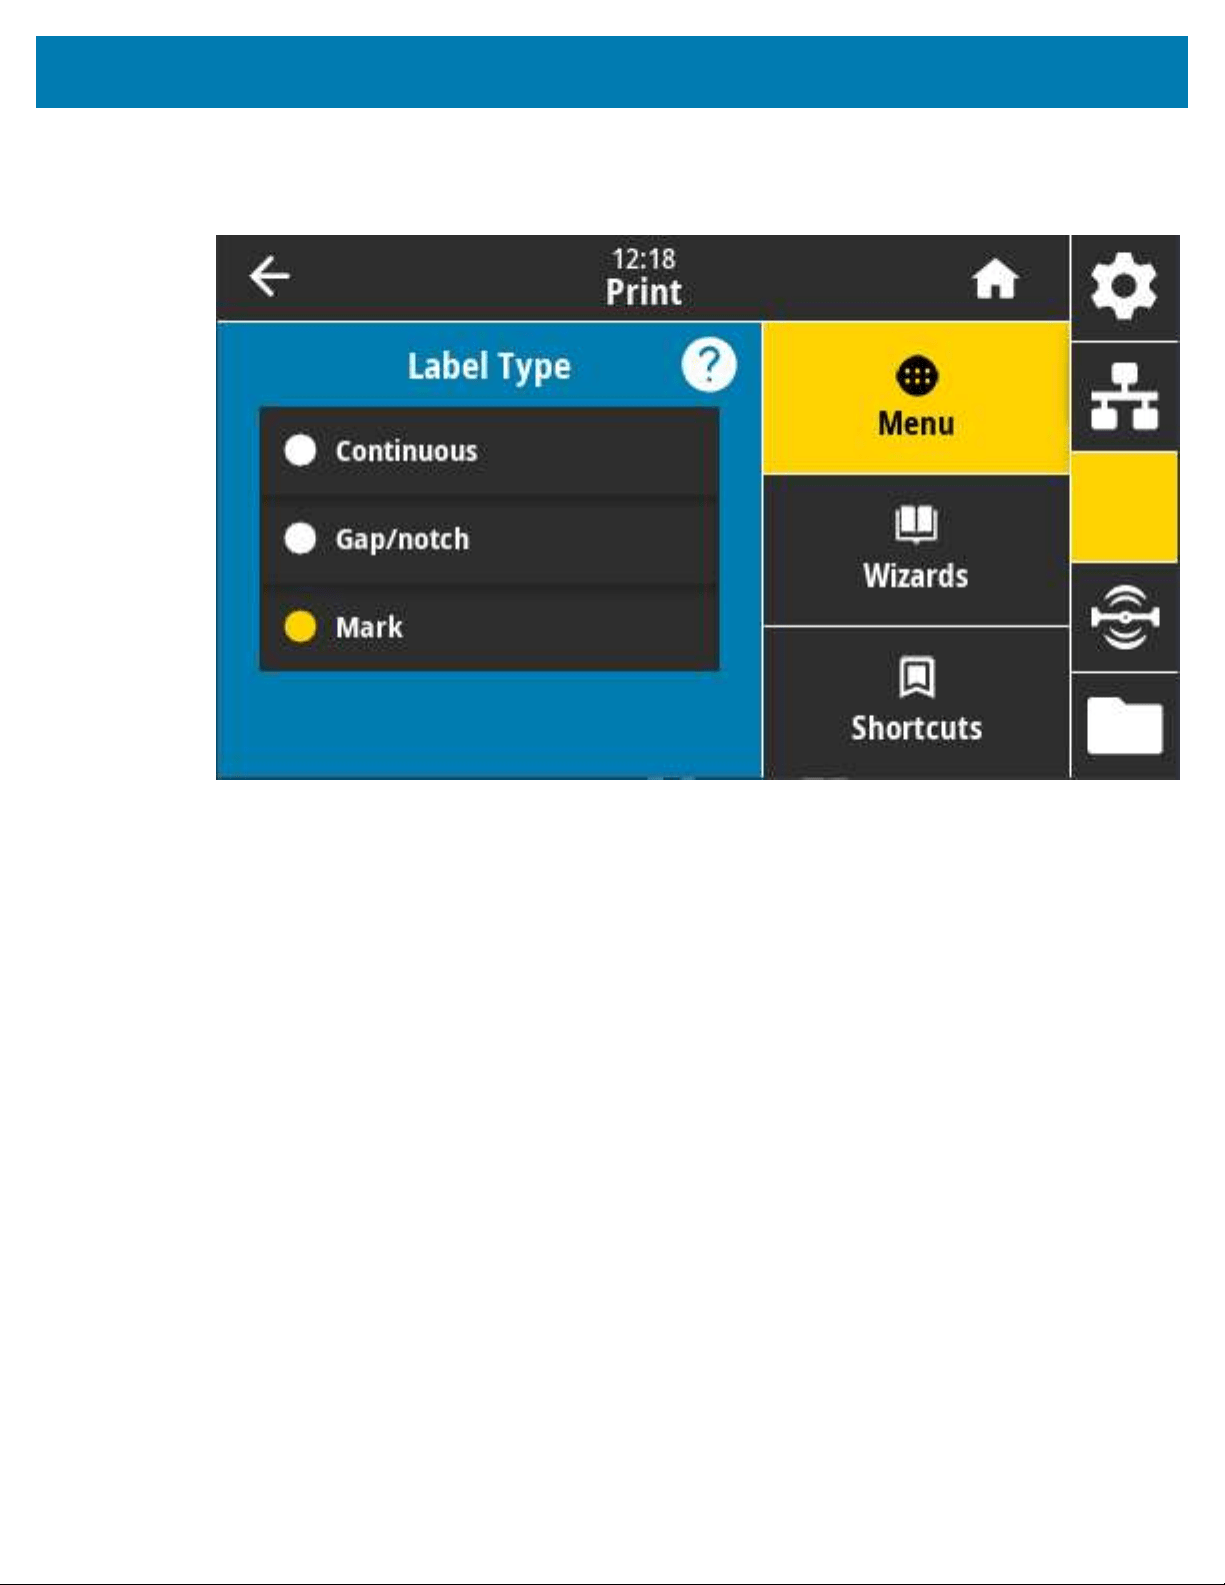
Color Touch Display and Controls
Print > Print Quality > Label Type
Select the type of media that you are using.
If you select Continuous, you must include a label length (see Print > Print Quality > Label Length on page
141) in your label format layout (^LL if you are using ZPL).
If you select Gap/Notch or Mark for various non-continuous media, the printer feeds the media to calculate
the label length.
Accepted values: Continuous, Gap/Notch, Mark
Related ZPL command: ^MN
SGD command used: ezpl.media_type
Printer web page: View and Modify Printer Settings > Media Setup > Media Type
140
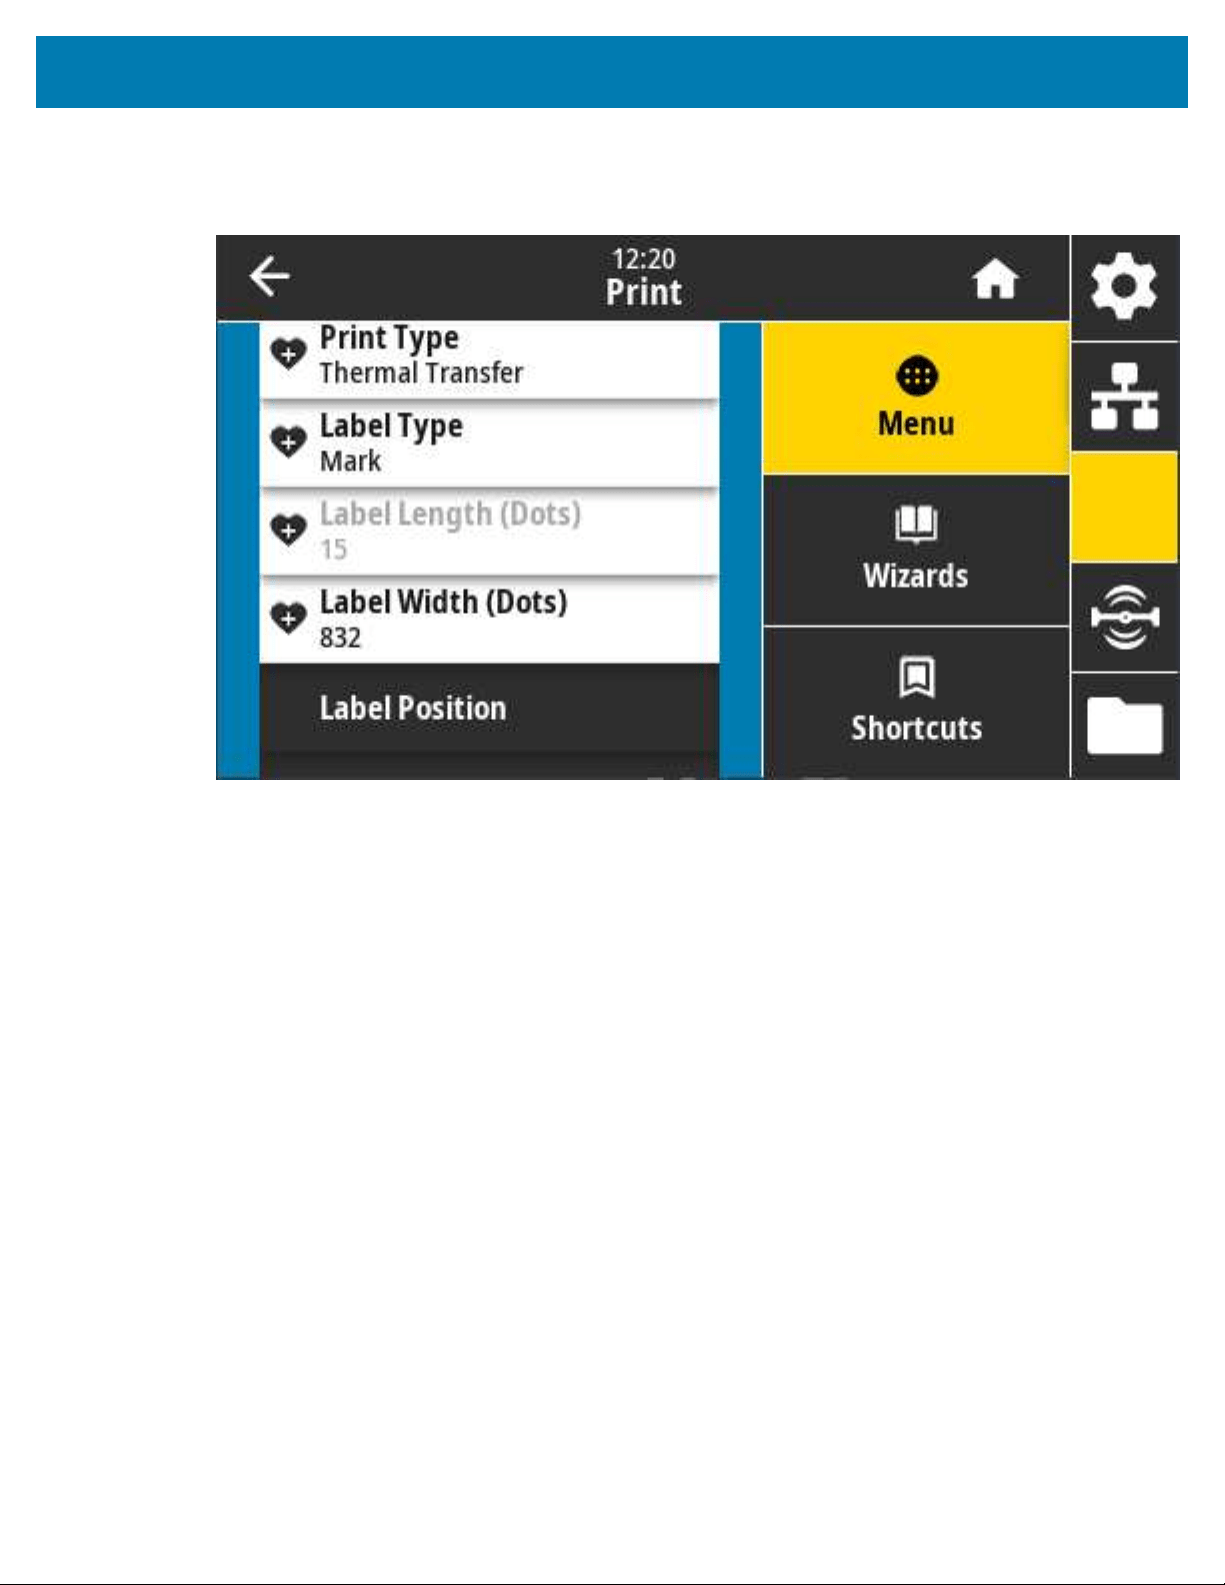
Color Touch Display and Controls
Print > Print Quality > Label Length
View the calibrated label length in dots. This value cannot be modified.
141
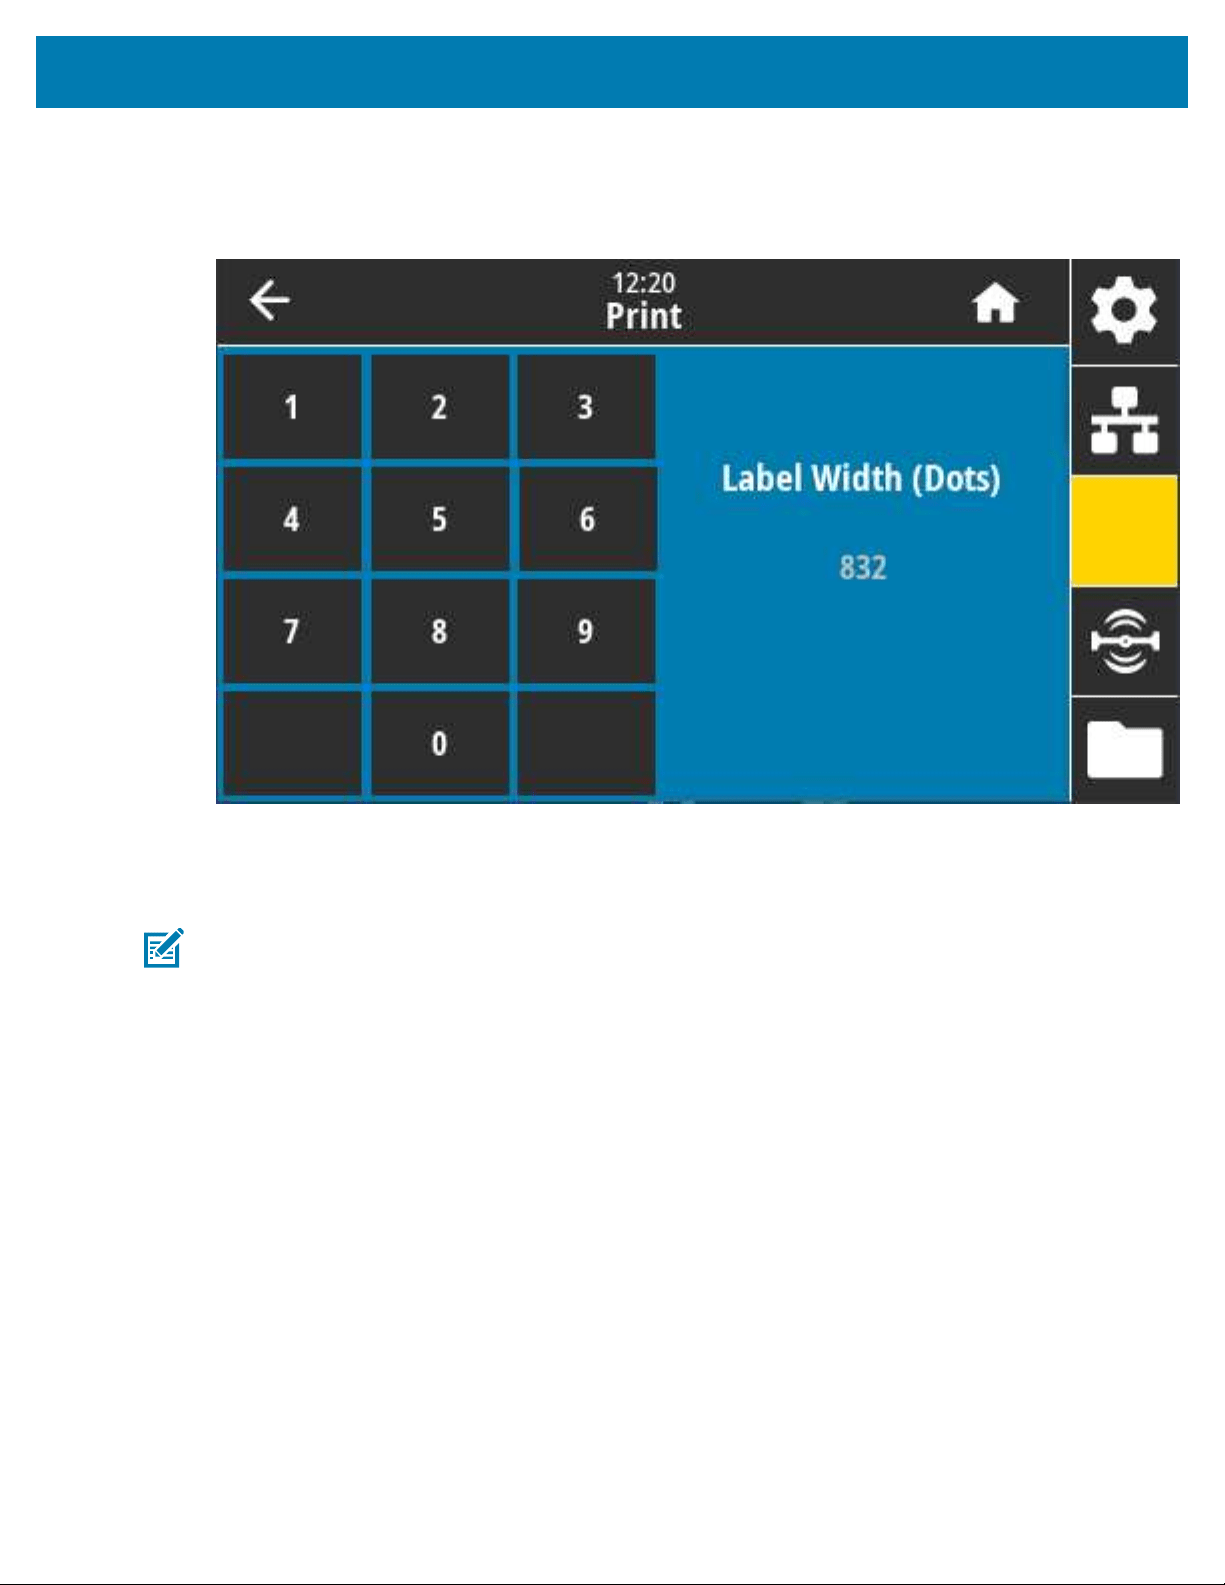
Color Touch Display and Controls
Print > Print Quality > Label Width (Dots)
Specify the width of the labels being used, in dots. The default value is the maximum width for the printer,
based on the printhead’s DPI value.
Setting the width too narrow can result in portions of a label format not being printed on the media.
Setting the width too wide wastes formatting memory and can cause the printer to print outside the label
edges and onto the platen roller.
NOTE: This setting can affect the horizontal position of the label format if the image was inverted
using the ^POI ZPL command.
Accepted values: ZD621 203 dpi = 0002 to 832 dots
ZD621 300 dpi = 0002 to 1280* dots
Related ZPL command(s): ^PW
SGD command used: ezpl.print_width
Printer web page: View and Modify Printer Settings > Media Setup > Print Width
142

Color Touch Display and Controls
Print > Label Position > Collection Method
Select a collection method that is compatible with the options available on your printer.
Accepted values: Tear Off, Peel Off, Rewind, Cutter, Delayed Cut, Linerless Peel, Linerless Rewind,
Linerless Tear, Applicator, Linerless Cut, Linerless Delayed Cut
Related ZPL command(s): ^MM
SGD command used: media.printmode
Printer web page: View and Modify Printer Settings > General Setup > Print Mode
143
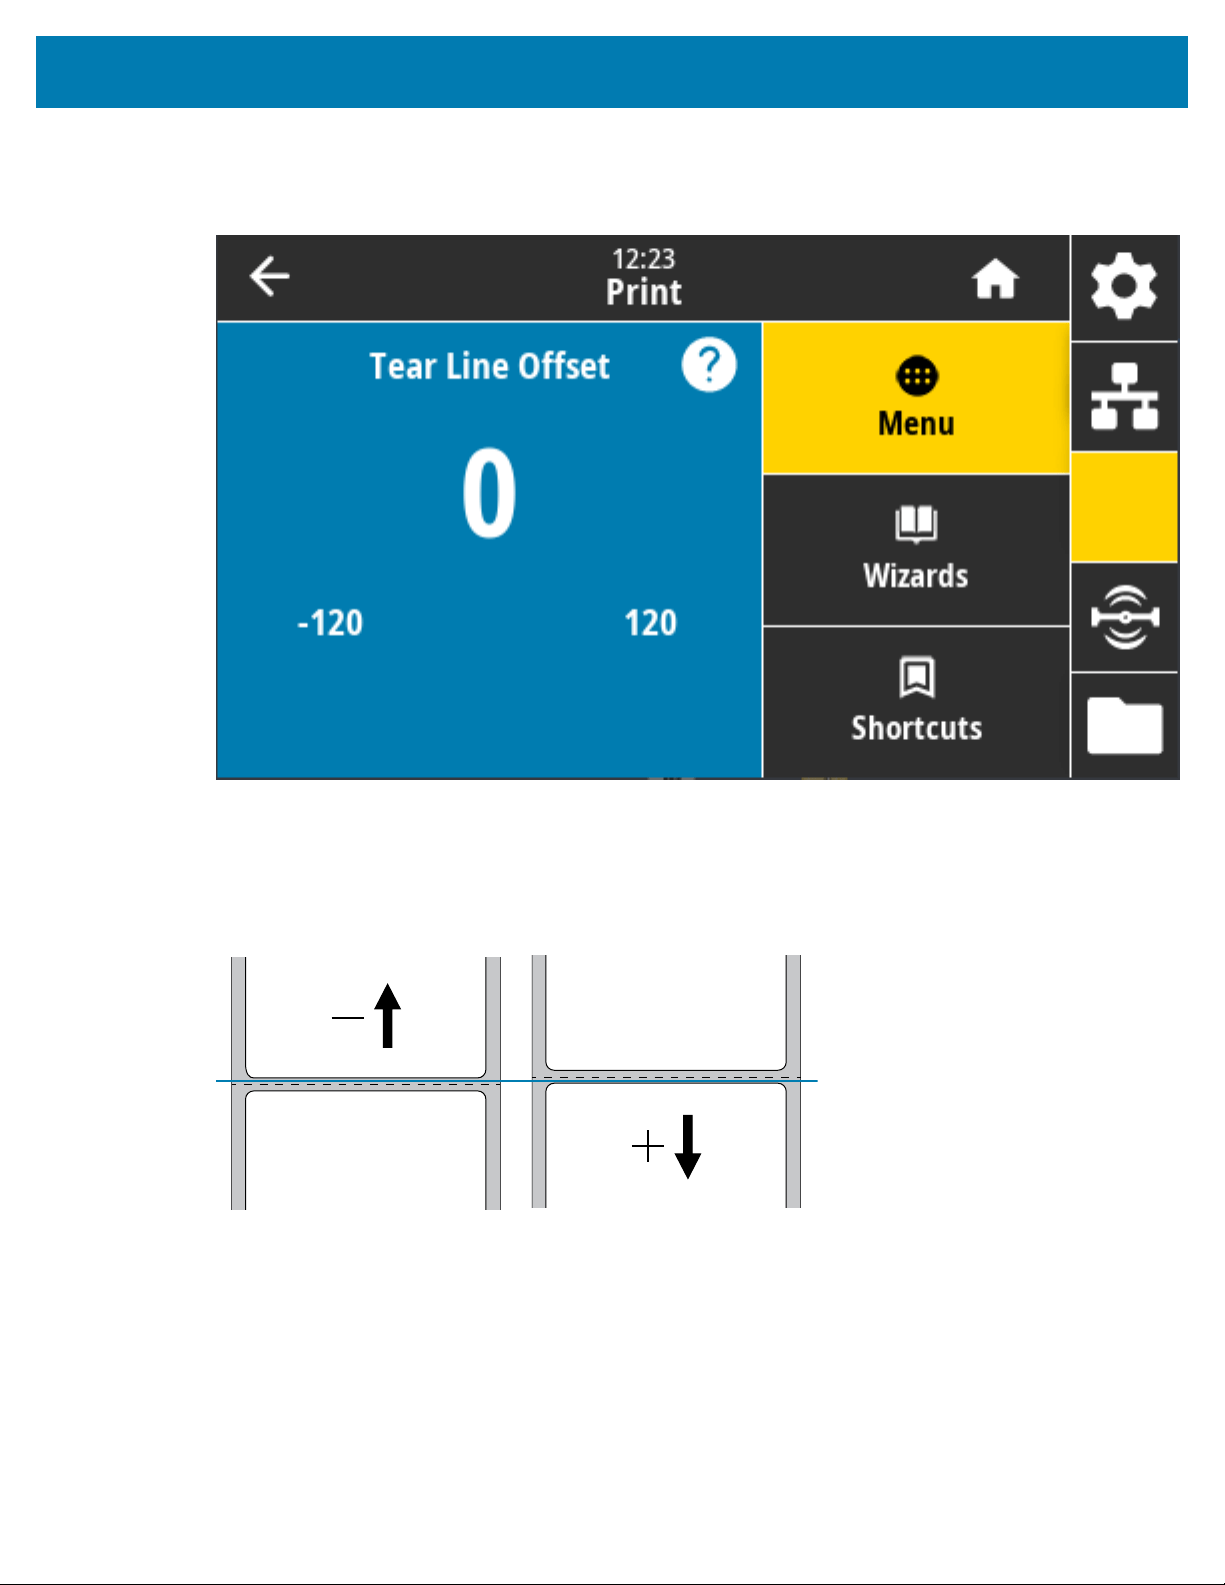
Color Touch Display and Controls
Print > Label Position > Tear Line Offset
Set the position where the printer stops for tear-off label removal.
If necessary, shift the position of the media over the tear-off feature after printing.
• Lower numbers move the media into the printer by the specified number of dots (the tear line moves
closer to the edge of the label just printed)
• Higher numbers move the media out of the printer (the tear line moves closer to the leading edge of the
next label).
Accepted values: –120 to +120
Related ZPL command(s): ~TA
SGD command used: media.printmode
Printer web page: View and Modify Printer Settings > General Setup > Tear Off
144

Color Touch Display and Controls
Print > Label Position > Horizontal Label Offset
If necessary, shift the position of the image horizontally on the label.
If necessary, shift the horizontal position of the print on the media.
• Negative numbers move the left edge of the image toward the left edge of the label by the number of
dots selected.
• Positive numbers move the edge of the image toward the right edge of the label.
Accepted values: –9999 to 9999
Related ZPL command(s): ^LS
SGD command used: zpl.left_position
Printer web page: View and Modify Printer Settings > Advanced Setup > Left Position
145
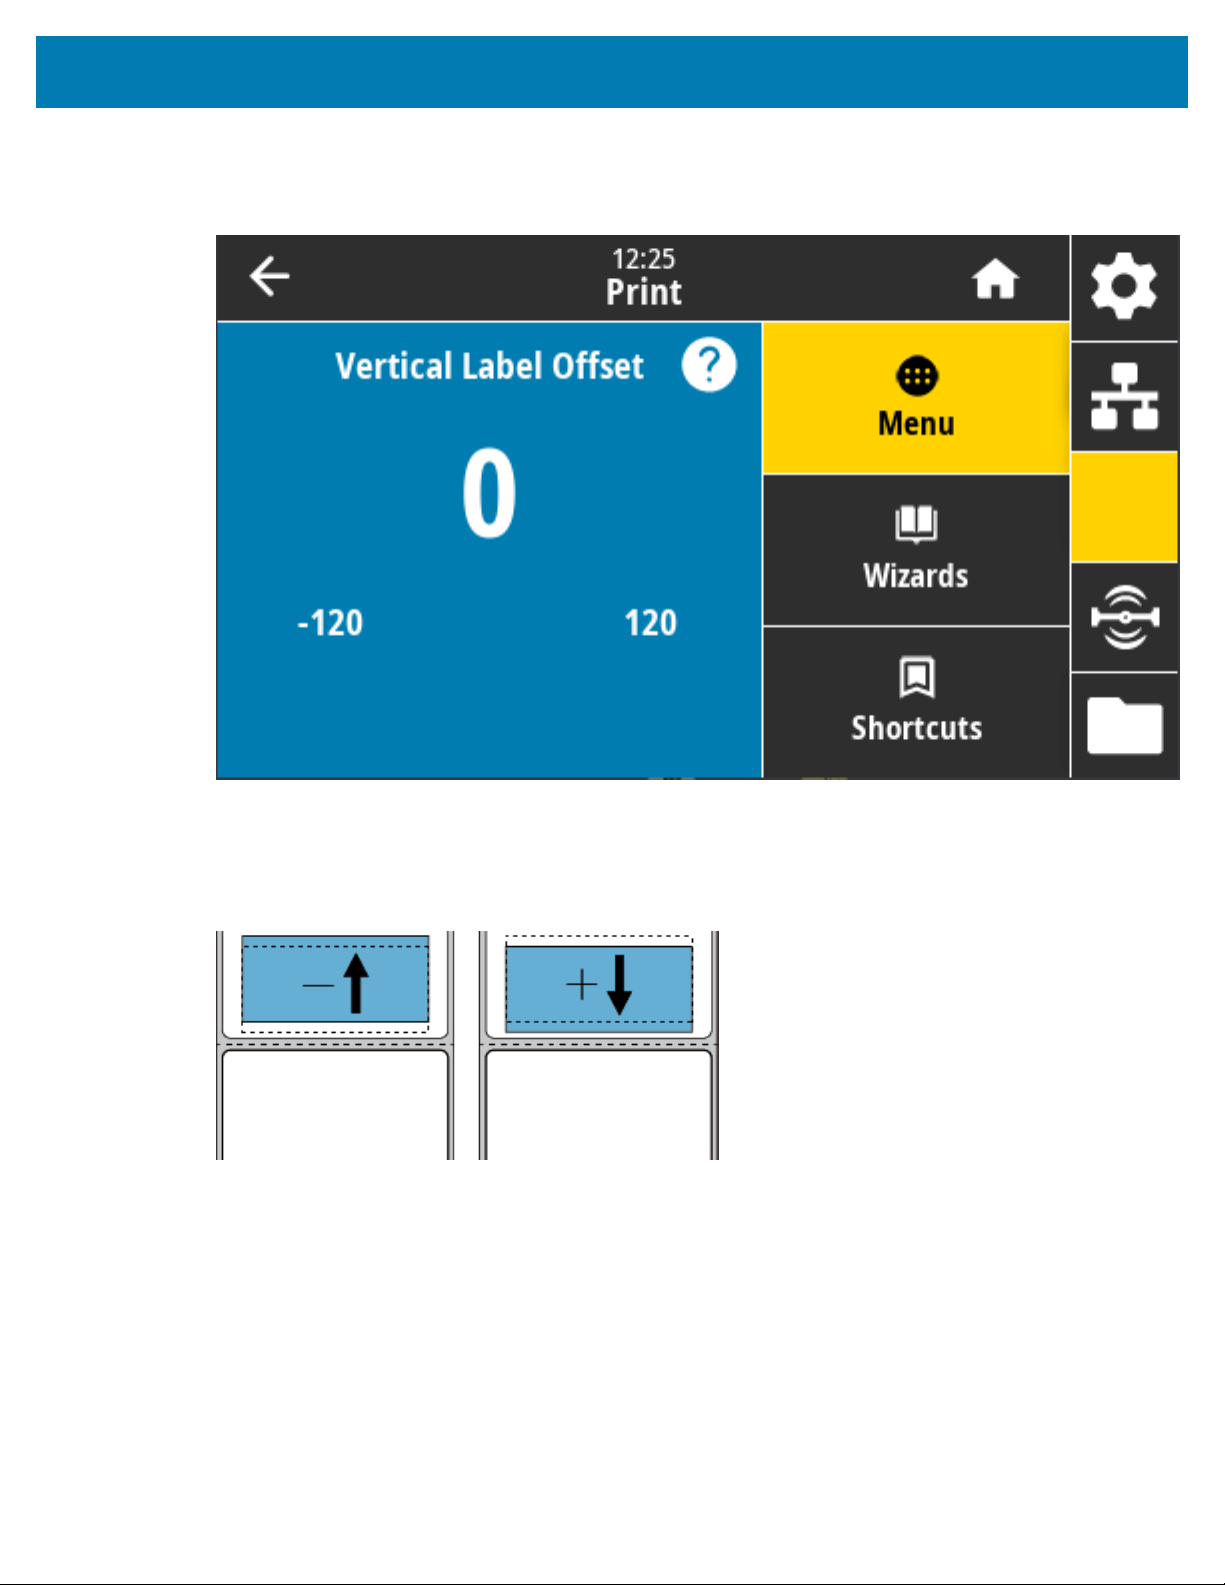
Color Touch Display and Controls
Print > Label Position > Vertical Label Offset
If necessary, use this parameter to shift the position of the image vertically on the label.
If necessary, shift the position horizontal of the print on the media.
• Lower numbers move the image higher on the label (toward the printhead).
• Higher numbers move the image farther down on the label (away from the printhead) by the specified
number of dots.
Accepted values: -120 to 120
Related ZPL command(s): ^LT
SGD command used: zpl.top_position
Printer web page: View and Modify Printer Settings > Advanced Setup > Label Top
146
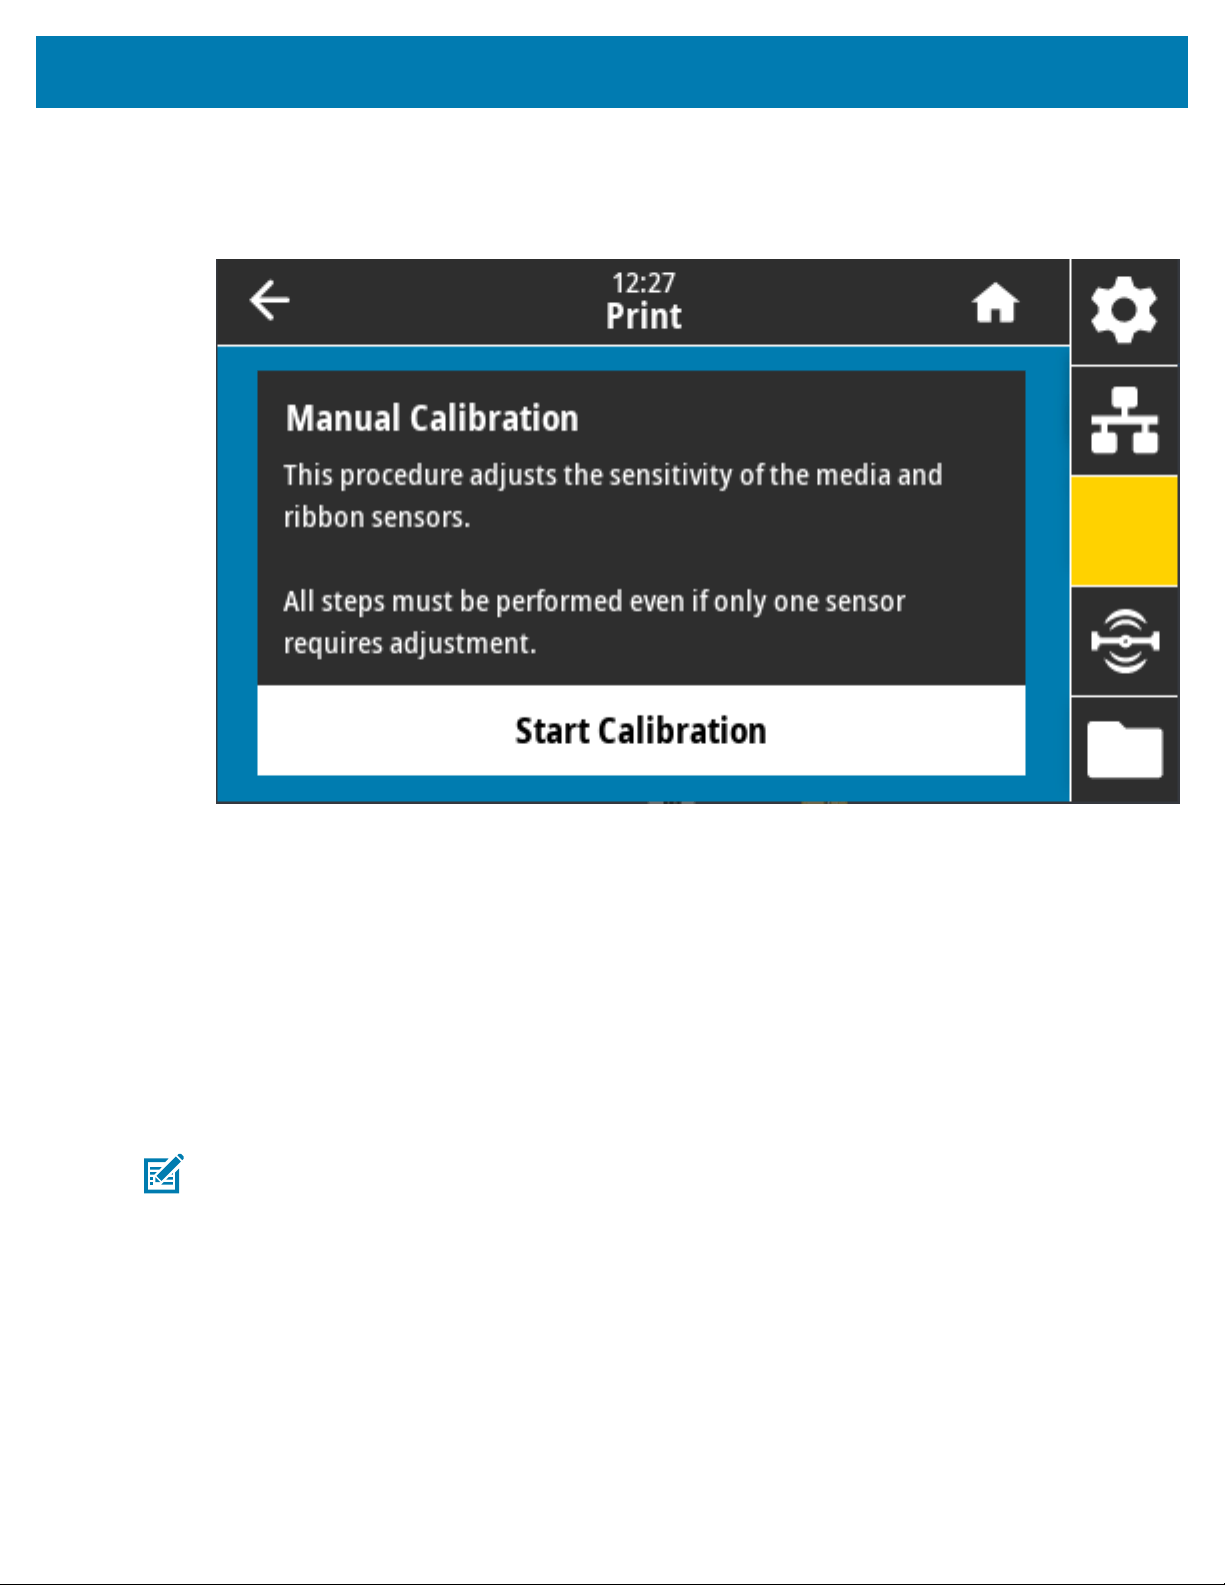
Color Touch Display and Controls
Print > Sensors > Manual Calibration
This wizard that interactively steps you through a manual calibration of media sensor settings. Manually
calibrate the printer as needed to adjust the sensitivity of the media and ribbon sensors.
For complete instructions on how to perform a calibration procedure, see Manually Calibrating Media on
page 336.
Related ZPL command(s): ~JC
SGD command used: ezpl.manual_calibration
Control panel key(s): To initiate the calibration, press and hold PAUSE + FEED + CANCEL
simultaneouslyfor two seconds.
Print > Sensors > Label Sensor
This screen shows the sensitivity level of the label sensor which is typically set by the printer during the
calibration process.
NOTE: Do NOT change these settings unless you are told to do so by Zebra Technical Support
or by an authorized service technician.
147

Color Touch Display and Controls
Range of values: 0 to 255
SGD command used: ezpl.label_sensor
Printer web page: View and Modify Printer Settings > Calibration
148

Color Touch Display and Controls
Print > Sensors > Sensor Type
Select between transmissive and reflective media sensing based on the media type you plan to use for
printing.
Accepted values: REFLECTIVE,TRANSMISSIVE
• Reflective — Used when the printer needs to detect black mark/line and notches/holes on the back of
media. This is because black markings and holes do not reflect like label liner or paper.
• Transmissive (sees through media and liner) — Used when the printer needs to sense gaps/webs for
regular labels and continuous media. These types of media do not have tracking marks or notches.
Related ZPL command(s): ^JS
SGD command used: device.sensor_select
Printer web page:View and Modify Printer Settings > Media Setup
Print > Sensors > Print: Sensor Profile
Shows the sensor settings compared to actual sensor readings.
To interpret the results, see Sensor Profile on page 335.
149
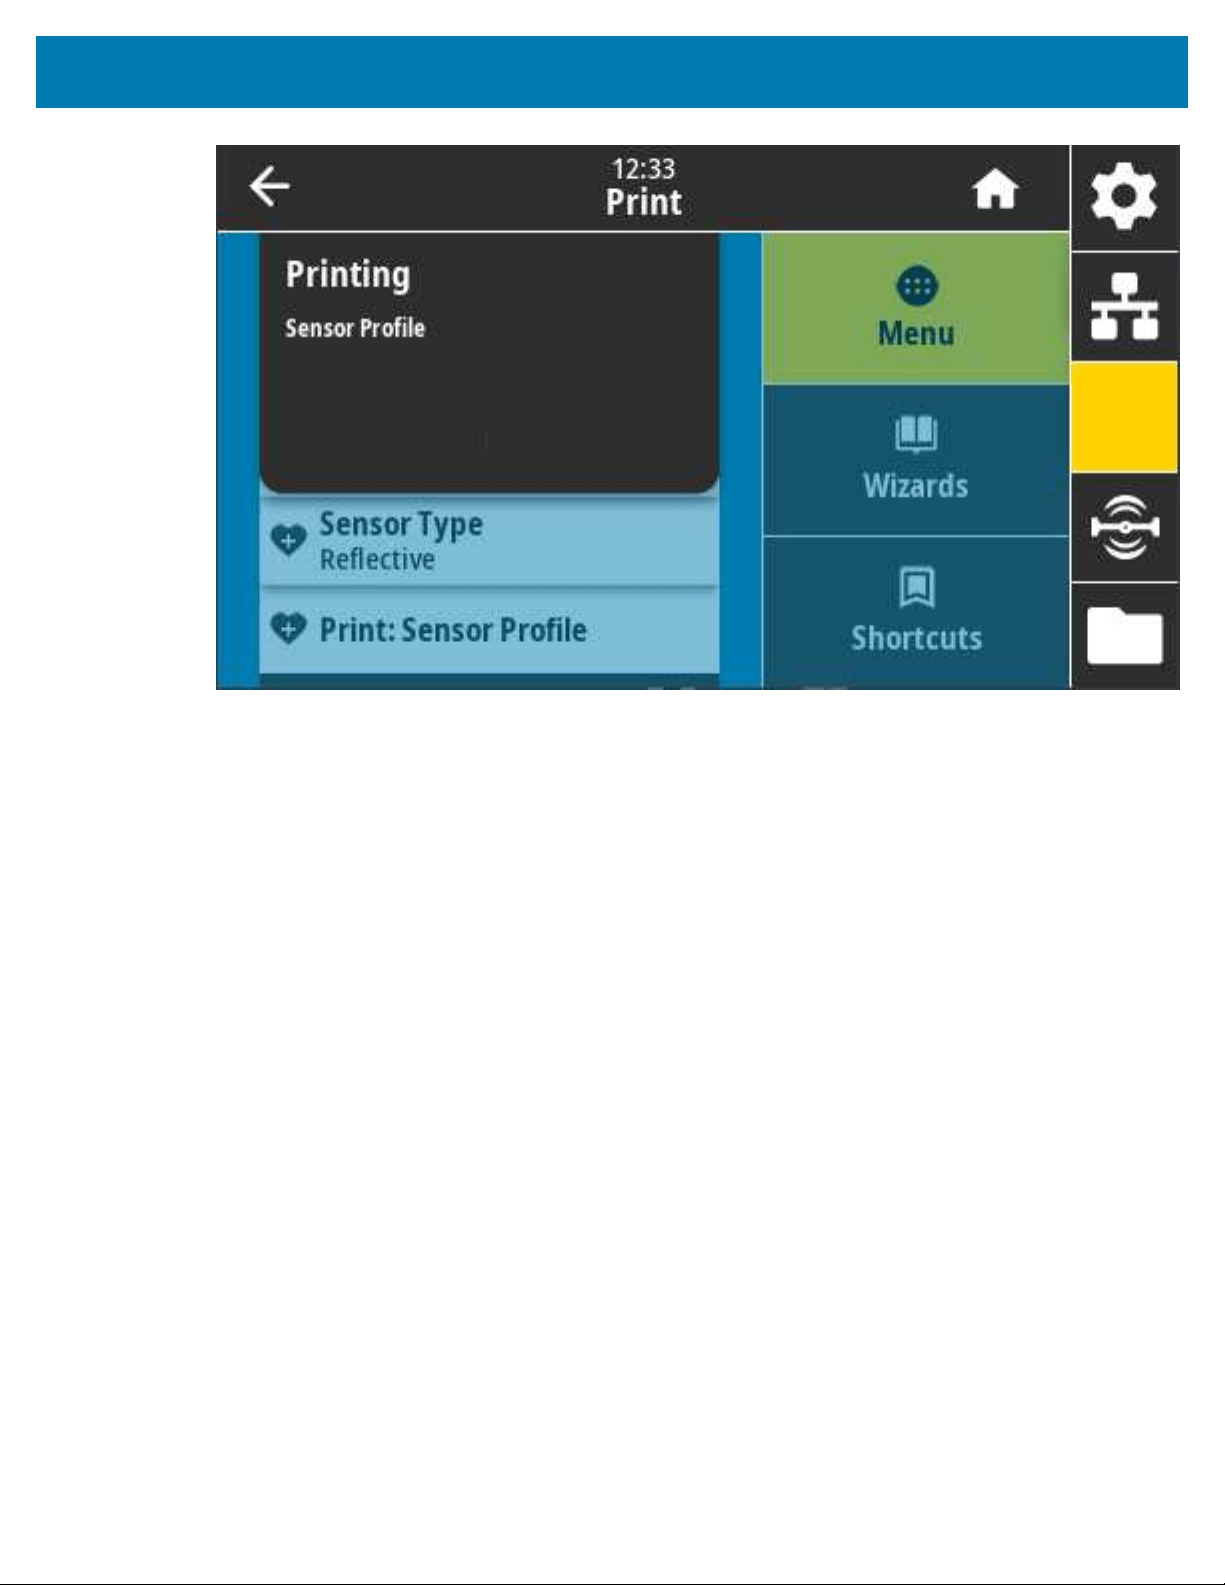
Color Touch Display and Controls
Related ZPL command(s): ~JG
Control panel key(s): During printer power-up, press and hold FEED + CANCEL simultaneously.
Printer web page: View and Modify Printer Settings > Print Listings on Label
150
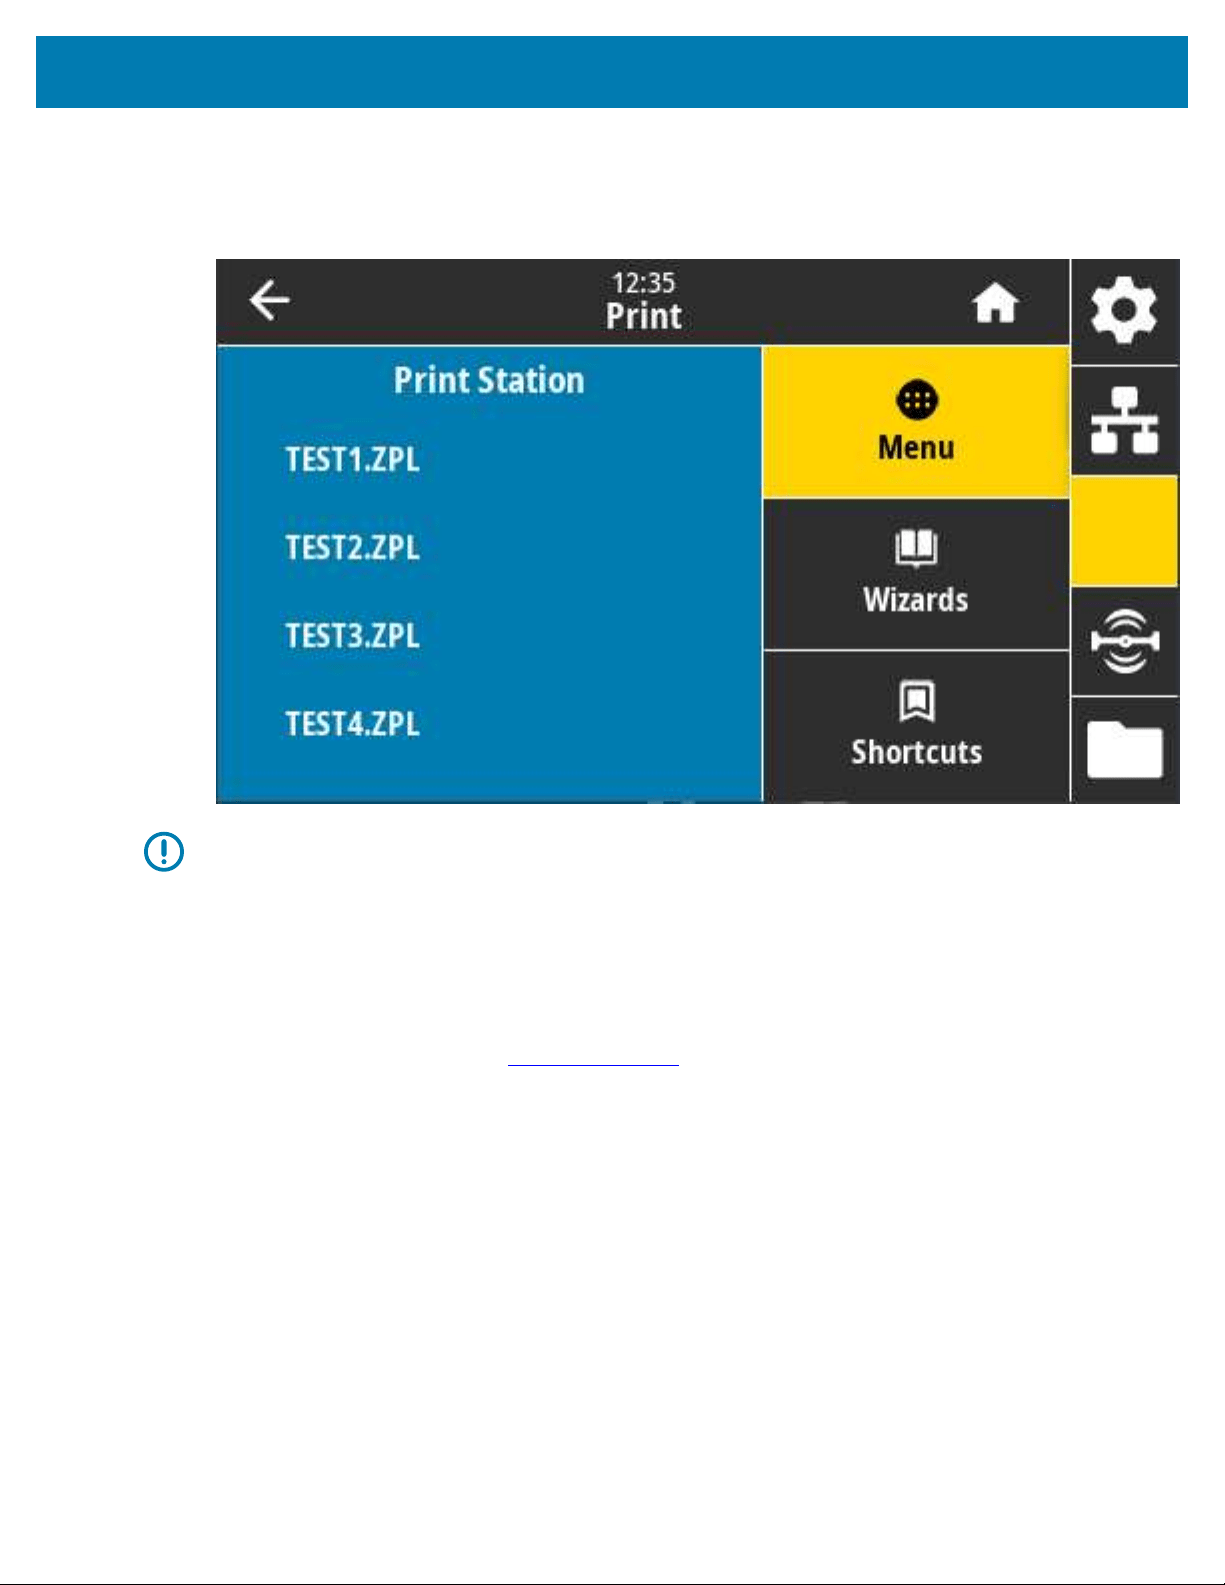
Color Touch Display and Controls
Print > Print Station
Use this menu item to fill in variable fields in a label format and print the label using a Human Input Device
(HID), such as a USB keyboard, scale, or barcode scanner.
IMPORTANT: To use this option, a suitable label format must be stored on the printer's E: drive.
See Using the USB Host Port and Near Field Communication (NFC) Capabilities on page 268
and Exercise 5: Enter Data for a Stored File with a Smart Device and Print a Label on page 268
to learn how to use this feature.
When you plug an HID into one of the printer’s USB host ports, use this menu to select a form on the
printer’s E: drive. When you are prompted to fill in each variable ^FN field on the form, you can specify the
desired quantity of labels to print.
For more information about using the ^FN command or the SGD commands related to this feature, refer to
the Zebra Programming Guide at zebra.com/manuals.
SGD command(s) used:
• usb.host.keyboard_input (must be set to ON)
• usb.host.template_list
• usb.host.fn_field_list
• usb.host.fn_field_data
• usb.host.fn_last_field
• usb.host.template_print_amount
151
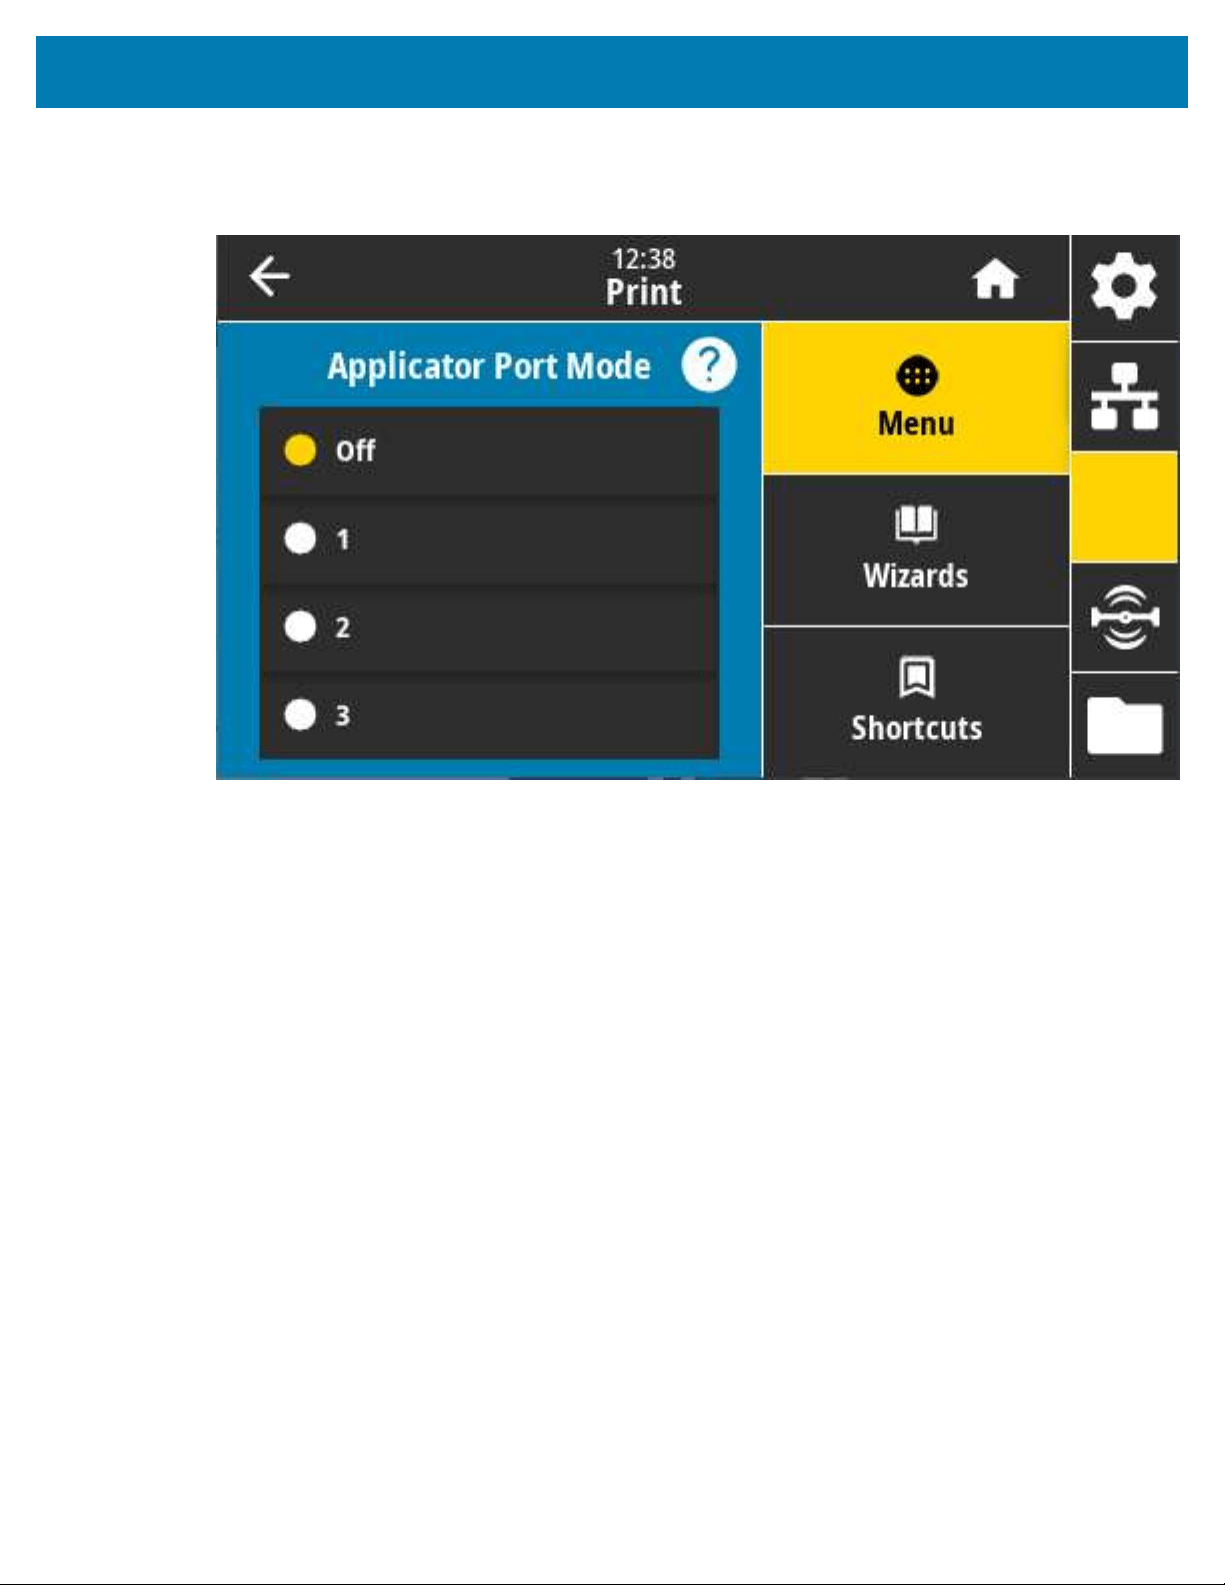
Color Touch Display and Controls
Print > Applicator > Applicator Port Mode
Controls the way in which the applicator port’s “End Print” signal functions.
Accepted values:
• Off 1 = End Print signal normally high, and low only when the printer is moving the label forward.
• 2 = End Print signal normally low, and high only when the printer is moving the label forward.
• 3 = End Print signal normally high, and low for 20 ms when a label has been printed and positioned.
• 4 = End Print signal normally low, and high for 20 ms when a label has been printed and positioned.
Related ZPL command(s): ^JJ
SGD command used: device.applicator.end_print
152

Color Touch Display and Controls
Print > Applicator > Start Print Mode
Determines if the applicator port’s “Start Print” signal is in level mode or pulse mode.
Accepted values:
• Pulse — Start Print signal must be disabled before it can be asserted for the next label.
• Level — Start Print signal does not need to be disabled to print the next label. A label prints as long as
the Start Print signal is low and a label is formatted correctly.
Related ZPL command(s): ^JJ
SGD command used: device.applicator.start_print
153
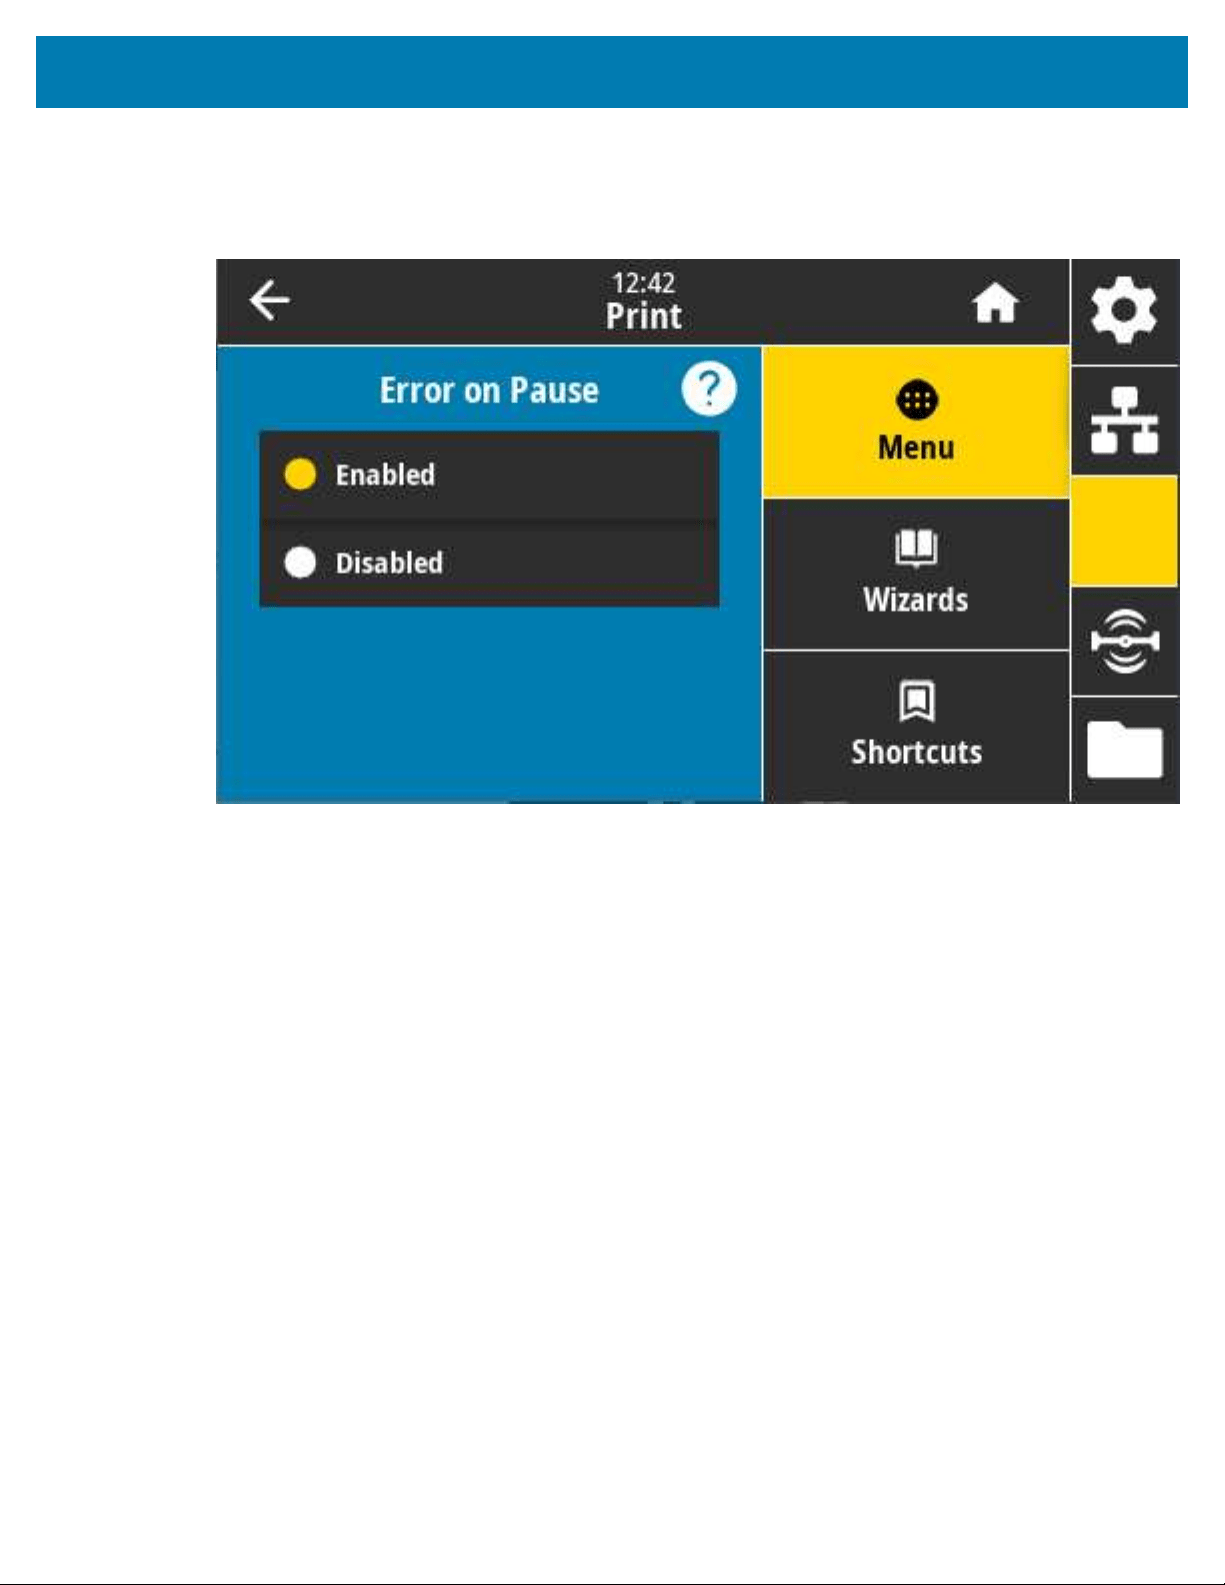
Color Touch Display and Controls
Print > Applicator > Error on Pause
Determines how applicator port errors are treated by the printer. Enabling this feature also causes the
“Service Required” pin to be asserted.
Accepted values: ENABLED, DISABLED
SGD command used: device.applicator.error_on_pause
Printer web page: View and Modify Printer Settings > Advanced Setup > Error on Pause
154

Color Touch Display and Controls
Print > Applicator > Applicator Reprint
This setting specifies if a high or low value is required for an applicator to reprint a label.
It enables or disables the ~PR command which, when enabled, reprints the last printed label. It also
enables the Reprint on the Home screen.
Related ZPL command(s): ^JJ, ~PR
SGD command used: device.applicator.reprint
155
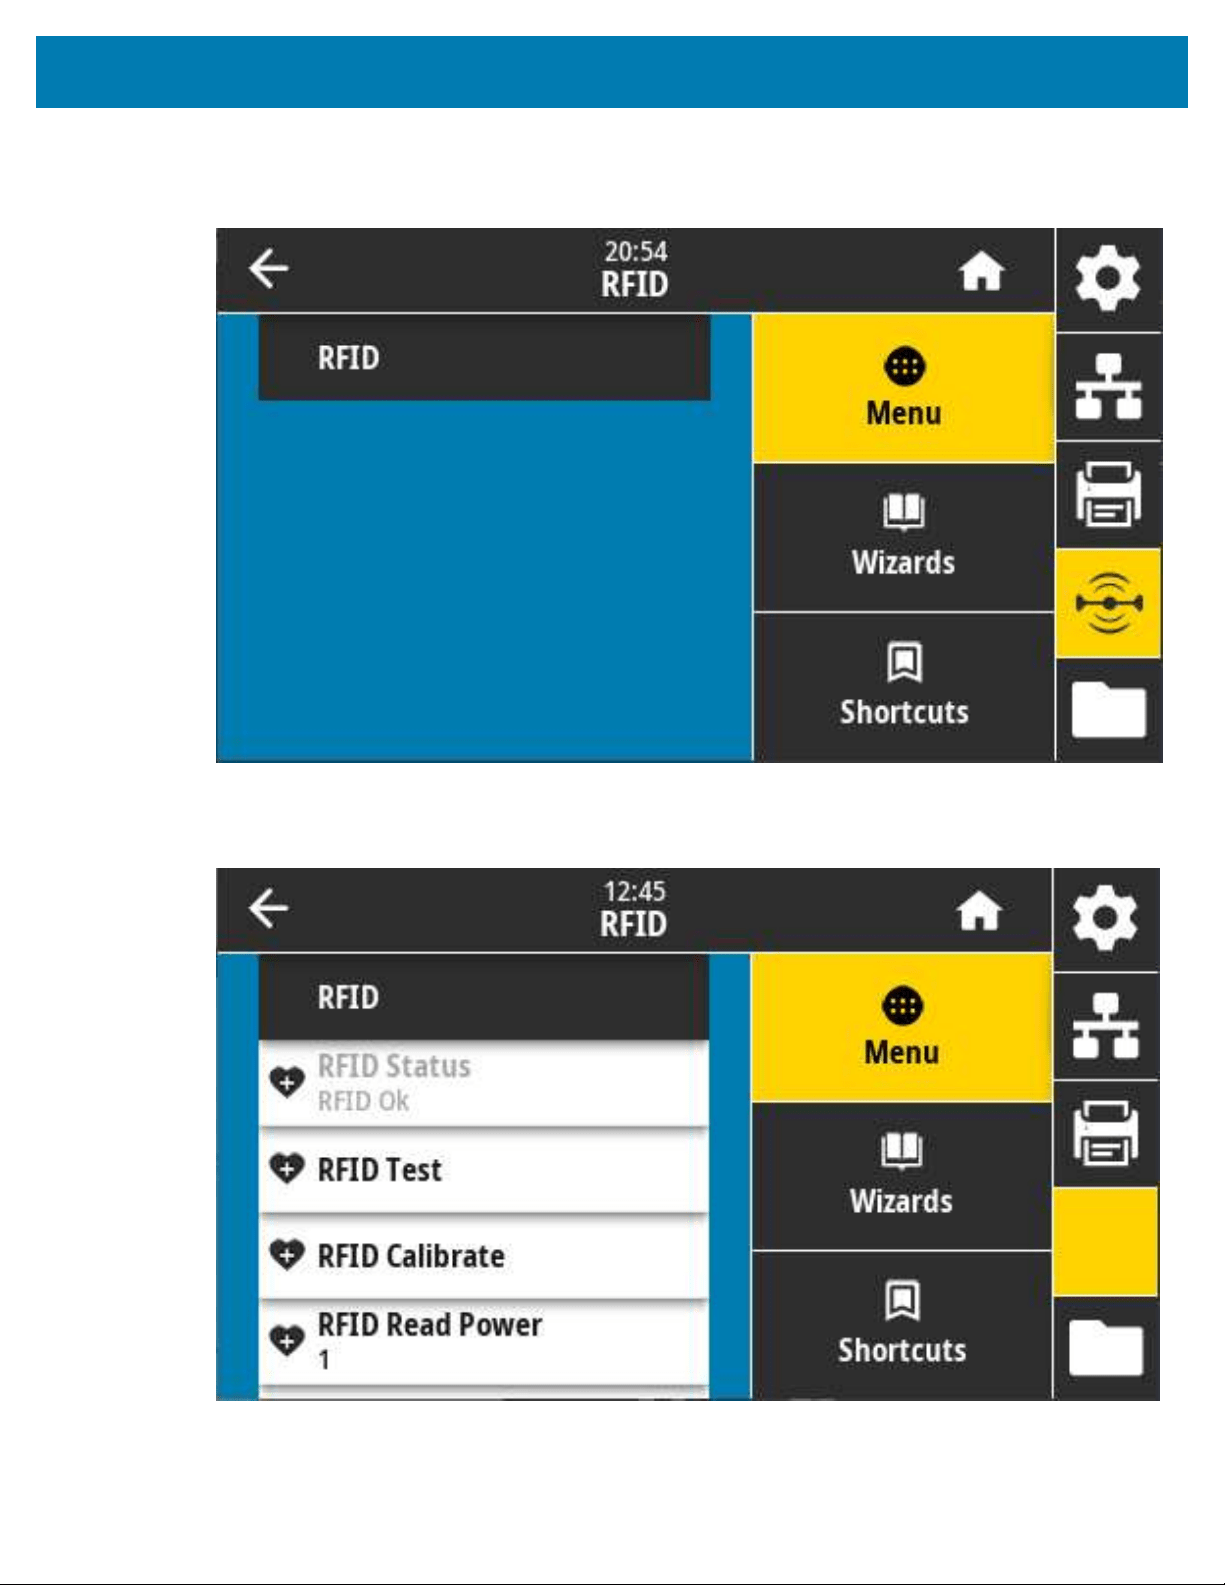
Color Touch Display and Controls
RFID Menu
Use this menu to configure, monitor, and test the RFID subsystem operation.
RFID > RFID Status
Display the status of the RFID subsystem of the printer.
Related ZPL command(s): ^HL, ~HL
SGD command used: rfid.error.response
156
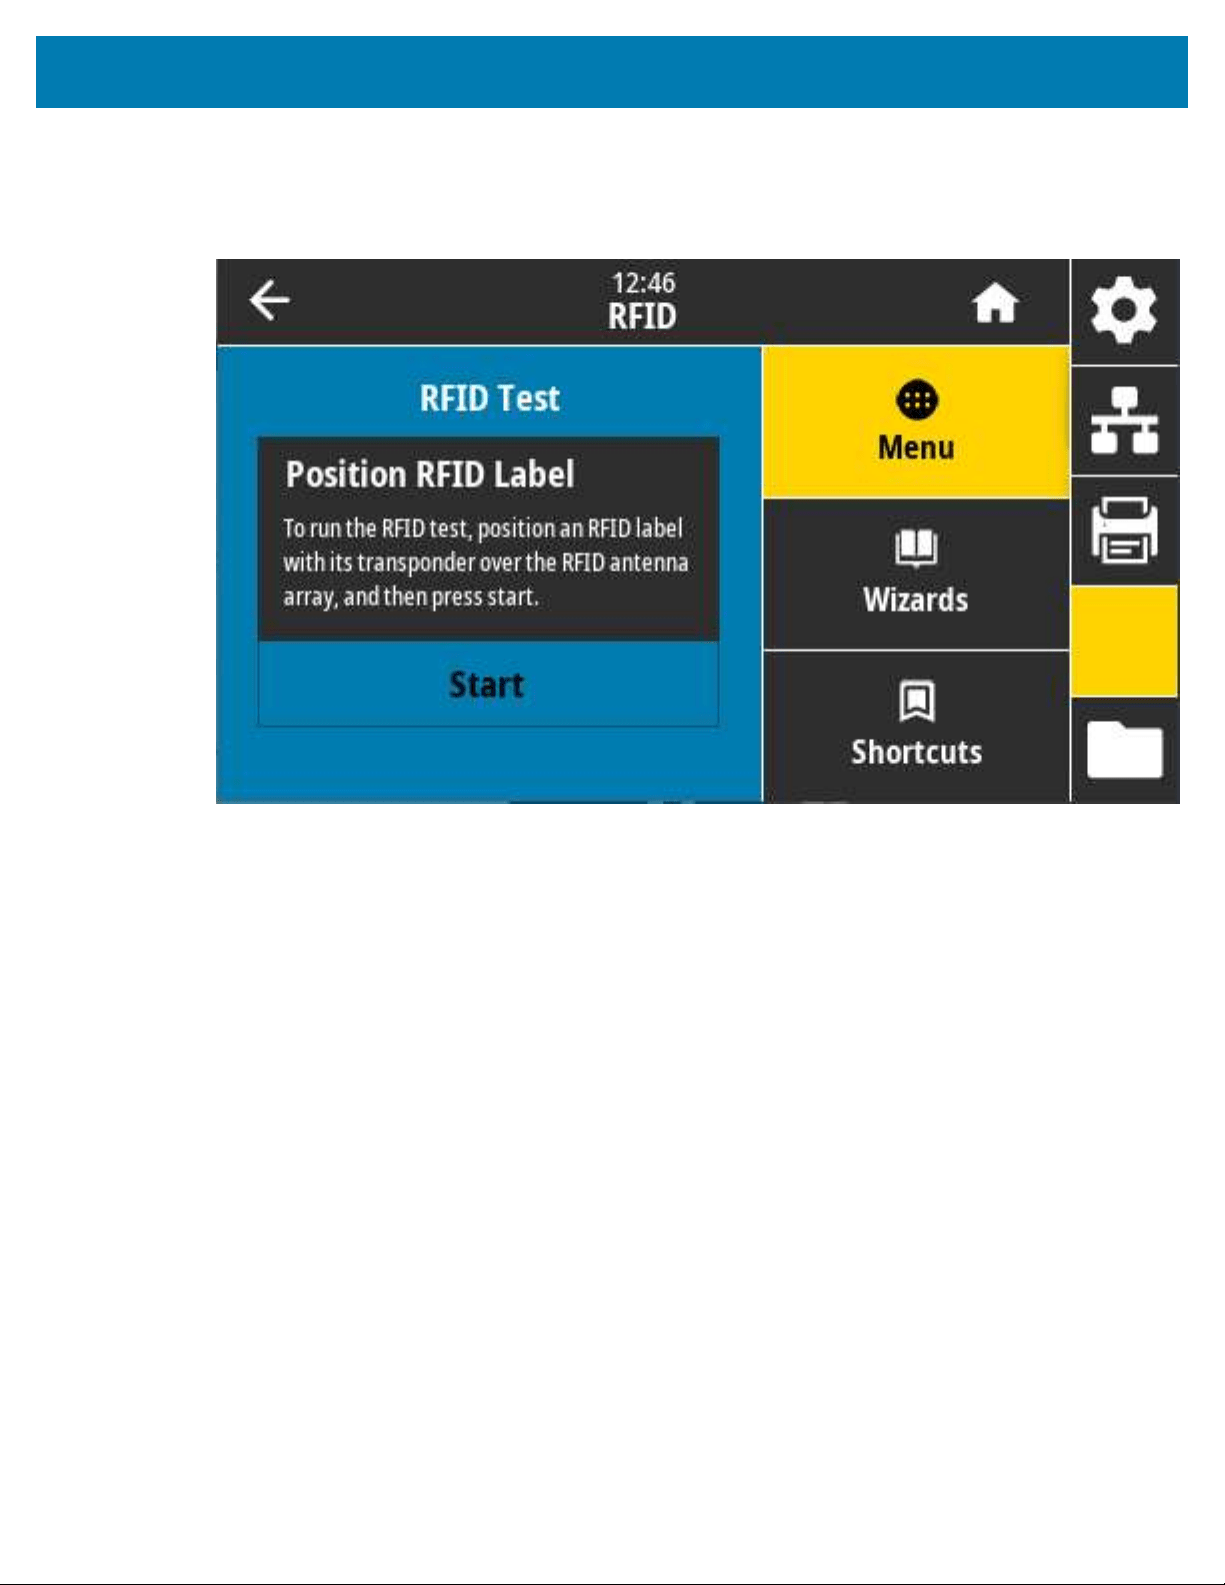
Color Touch Display and Controls
RFID > RFID Test
During the RFID test, the printer attempts to read and write to a transponder. The printer's components do
not move during this test.
To test an RFID label,position an RFID label with its transponder above the RFID antenna array. Then touch
Start.
The results of this test appear on the display when the test is complete.
157

Color Touch Display and Controls
SGD commands used:
• rfid.tag.test.content
• fid.tag.test.execute
RFID > RFID Calibrate
Initiate tag calibration for RFID media. (This is NOT the same as media and ribbon calibration.)
During the process, the printer moves the media, calibrates the RFID tag position, and determines the
optimal settings for the RFID media being used. These settings include:
• the programming position
• the antenna element to use
• the read/write power level to use
For more information, refer to RFID Programming Guide 3 available from zebra.com/manuals.
NOTE: Before you run this command, load the printer with RFID media, calibrate your printer
(see Print > Sensors > Manual Calibration on page 147, close the printhead, and press FEED to
advance at least one label to make sure that tag calibration will begin from the correct position.
Leave all transponders before and after the tag that is being calibrated. This allows the printer to determine
RFID settings which do not encode the adjacent tag. Allow a portion of media to extend out the front of the
printer to make room for back-feed during the tag calibration procedure.
158

Color Touch Display and Controls
Related ZPL command(s): ^HR
SGD command used: rfid.tag.calibrate
159

Color Touch Display and Controls
RFID > Read Power
Specify an appropriate value here if RFID tag calibration does not determine the desired read power for
the tags you plan to use.
Accepted values: 0 to 30
Related ZPL command(s): ^RW
SGD command used: rfid.reader_1.power.read
Printer web page: View and Modify Printer Settings > RFID Setup > RFID READ PWR
160
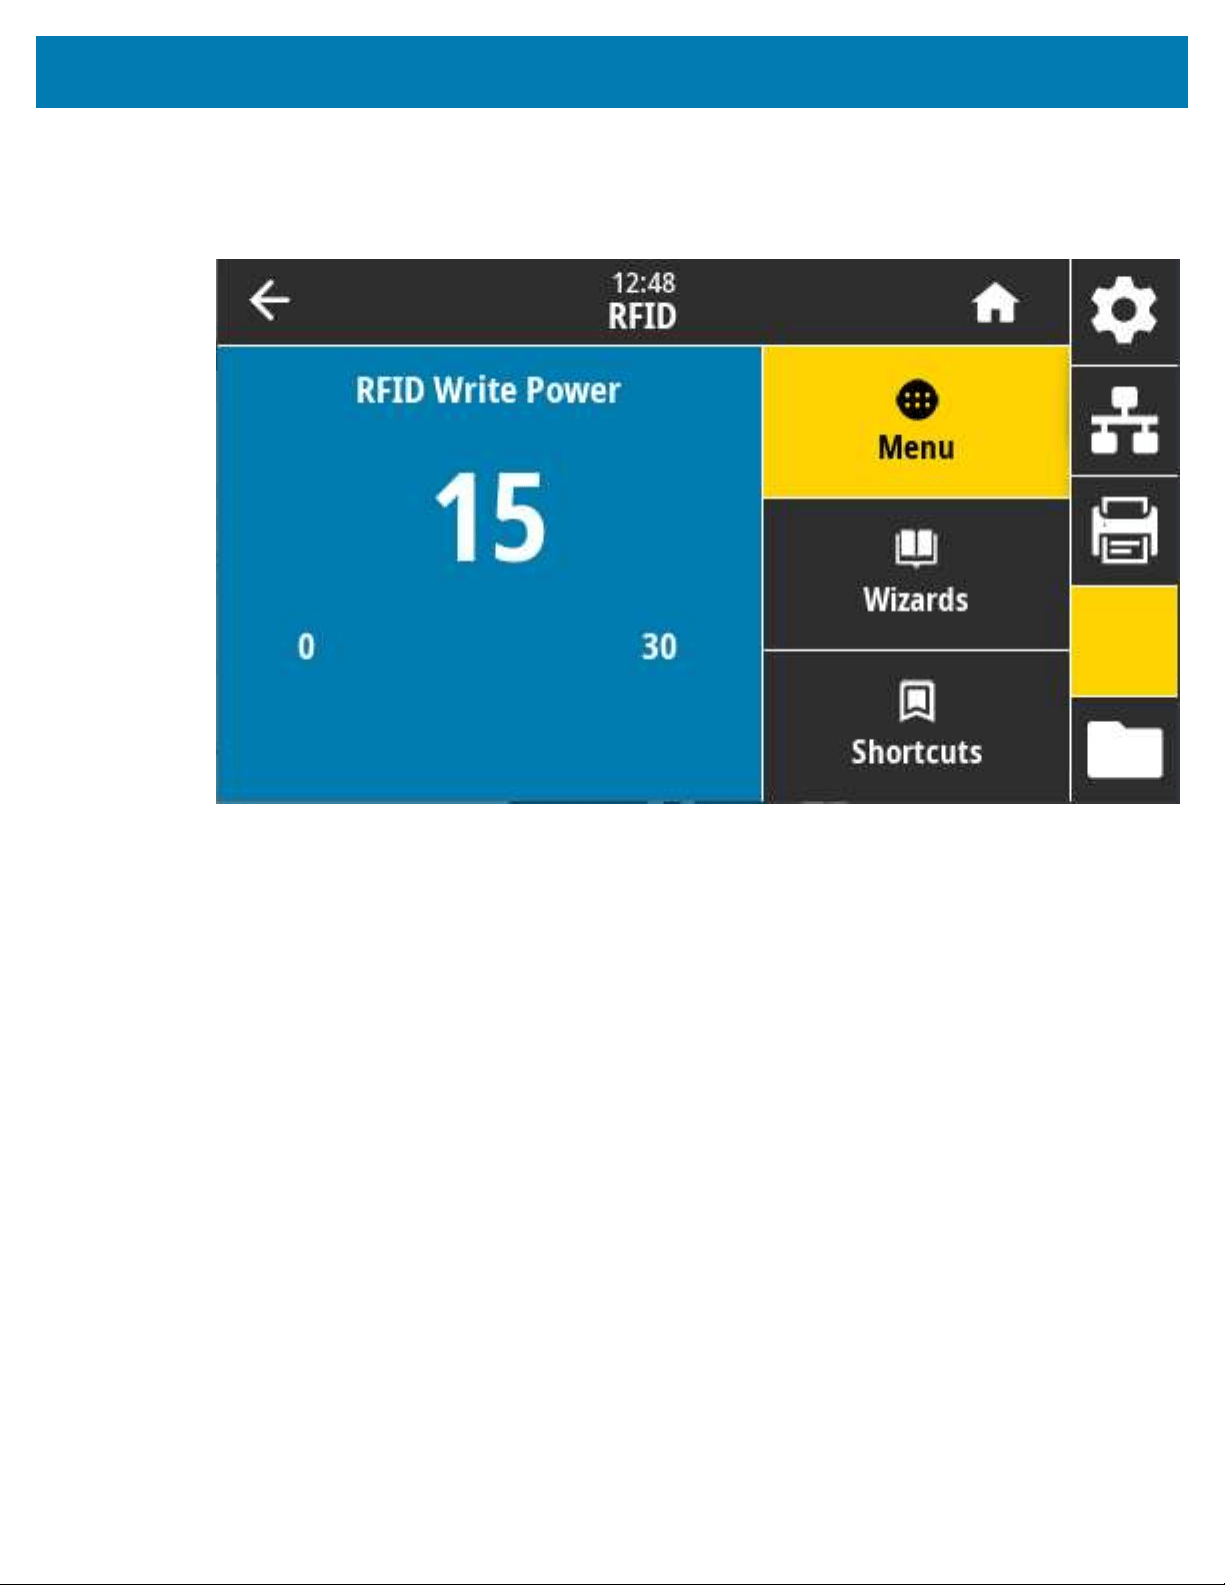
Color Touch Display and Controls
RFID > Write Power
Specify the appropriate value on this screen if RFID tag calibration does not determine the desired write
power for the tags you plan to use.
Accepted values: 0 to 30
Related ZPL command(s): ^RW
SGD command used: rfid.reader_1.power.write
Printer web page: View and Modify Printer Settings > RFID Setup > RFID WRITE PWR
161
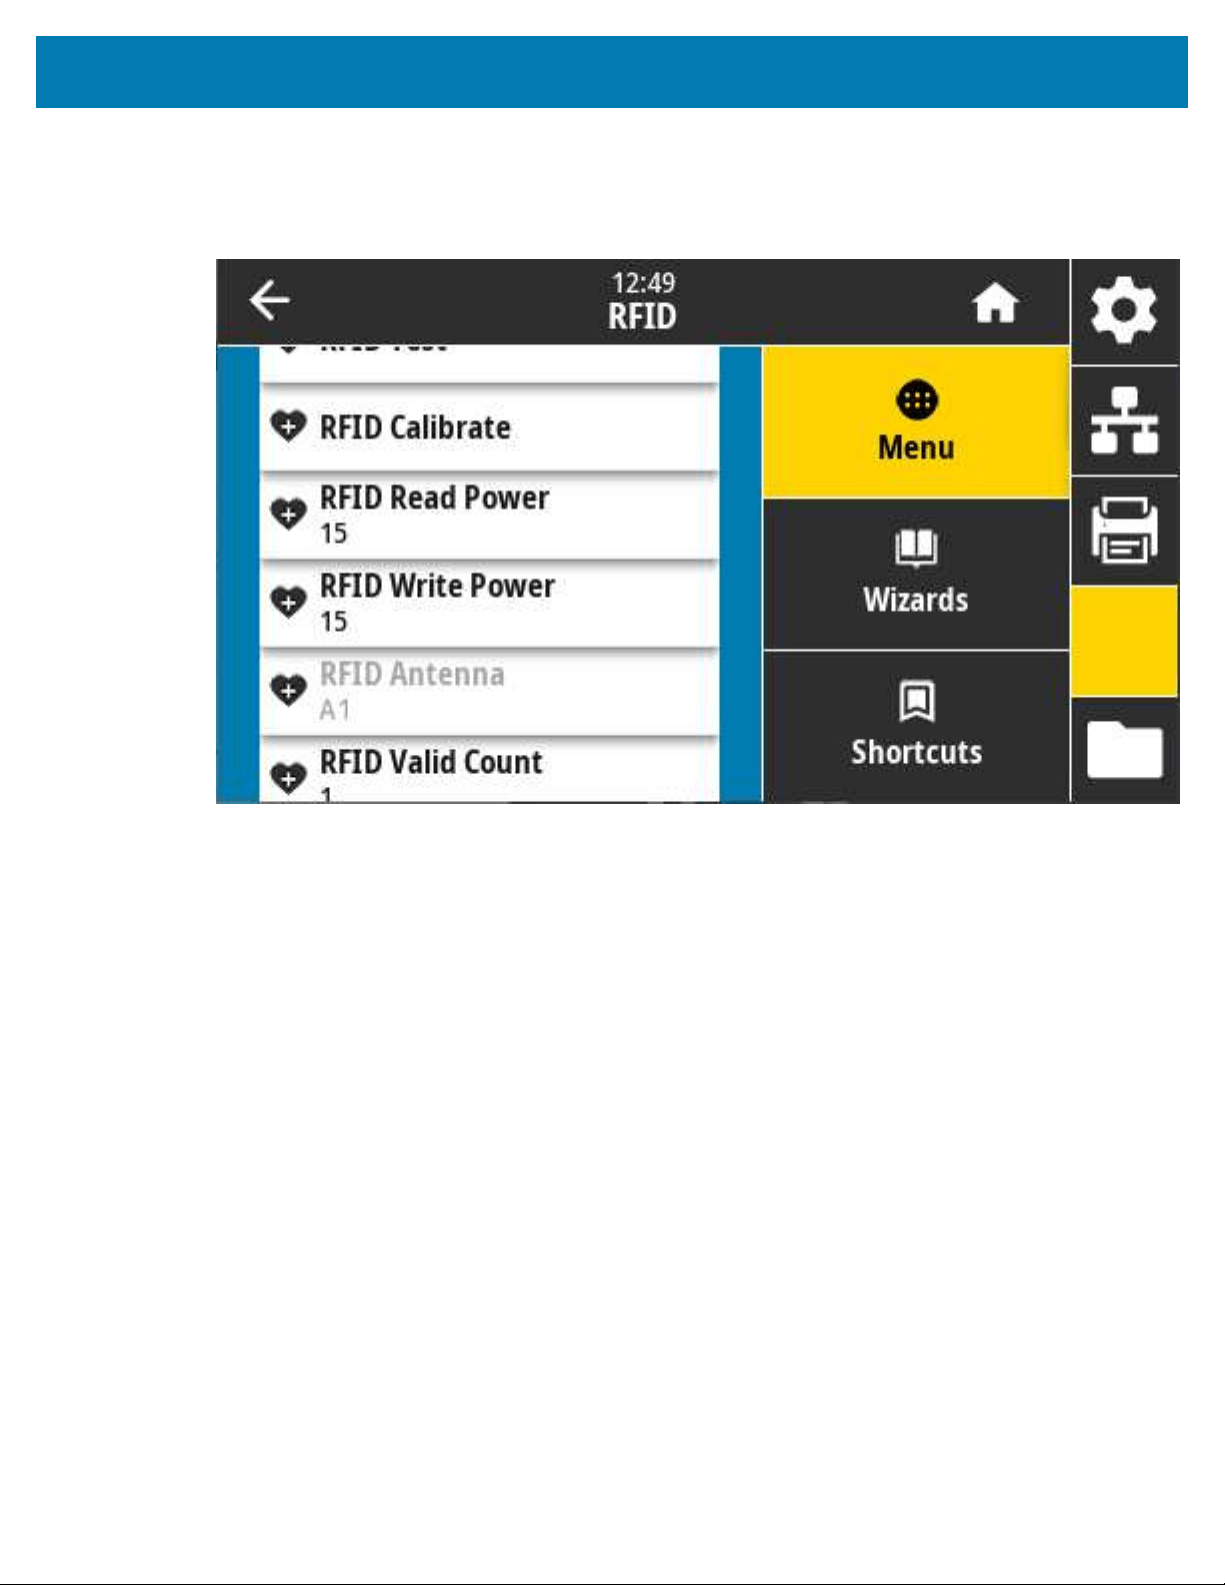
Color Touch Display and Controls
RFID > RFID Antenna
Specify the appropriate value here if RFID tag calibration does notdetermine the desired antenna
selection.
Accepted values:A1 default (only valid setting for center aligned antennas used in this Zebra printer)
Related ZPL command(s): ^RW
SGD command used: rfid.reader_1.antenna_port
Printer web page: View and Modify Printer Settings > RFID Setup > RFIDANTENNA
162

Color Touch Display and Controls
RFID > RFID Valid Count
Used to reset the RFID valid label counter to zero.
Related ZPL command(s): ~RO
SGD command used: odometer.rfid.valid_resettable
163

Color Touch Display and Controls
RFID > RFID Void Count
Used to reset the RFID void label counter to zero.
Related ZPL command(s): ~RO
SGD command used: odometer.rfid.void_resettable
164
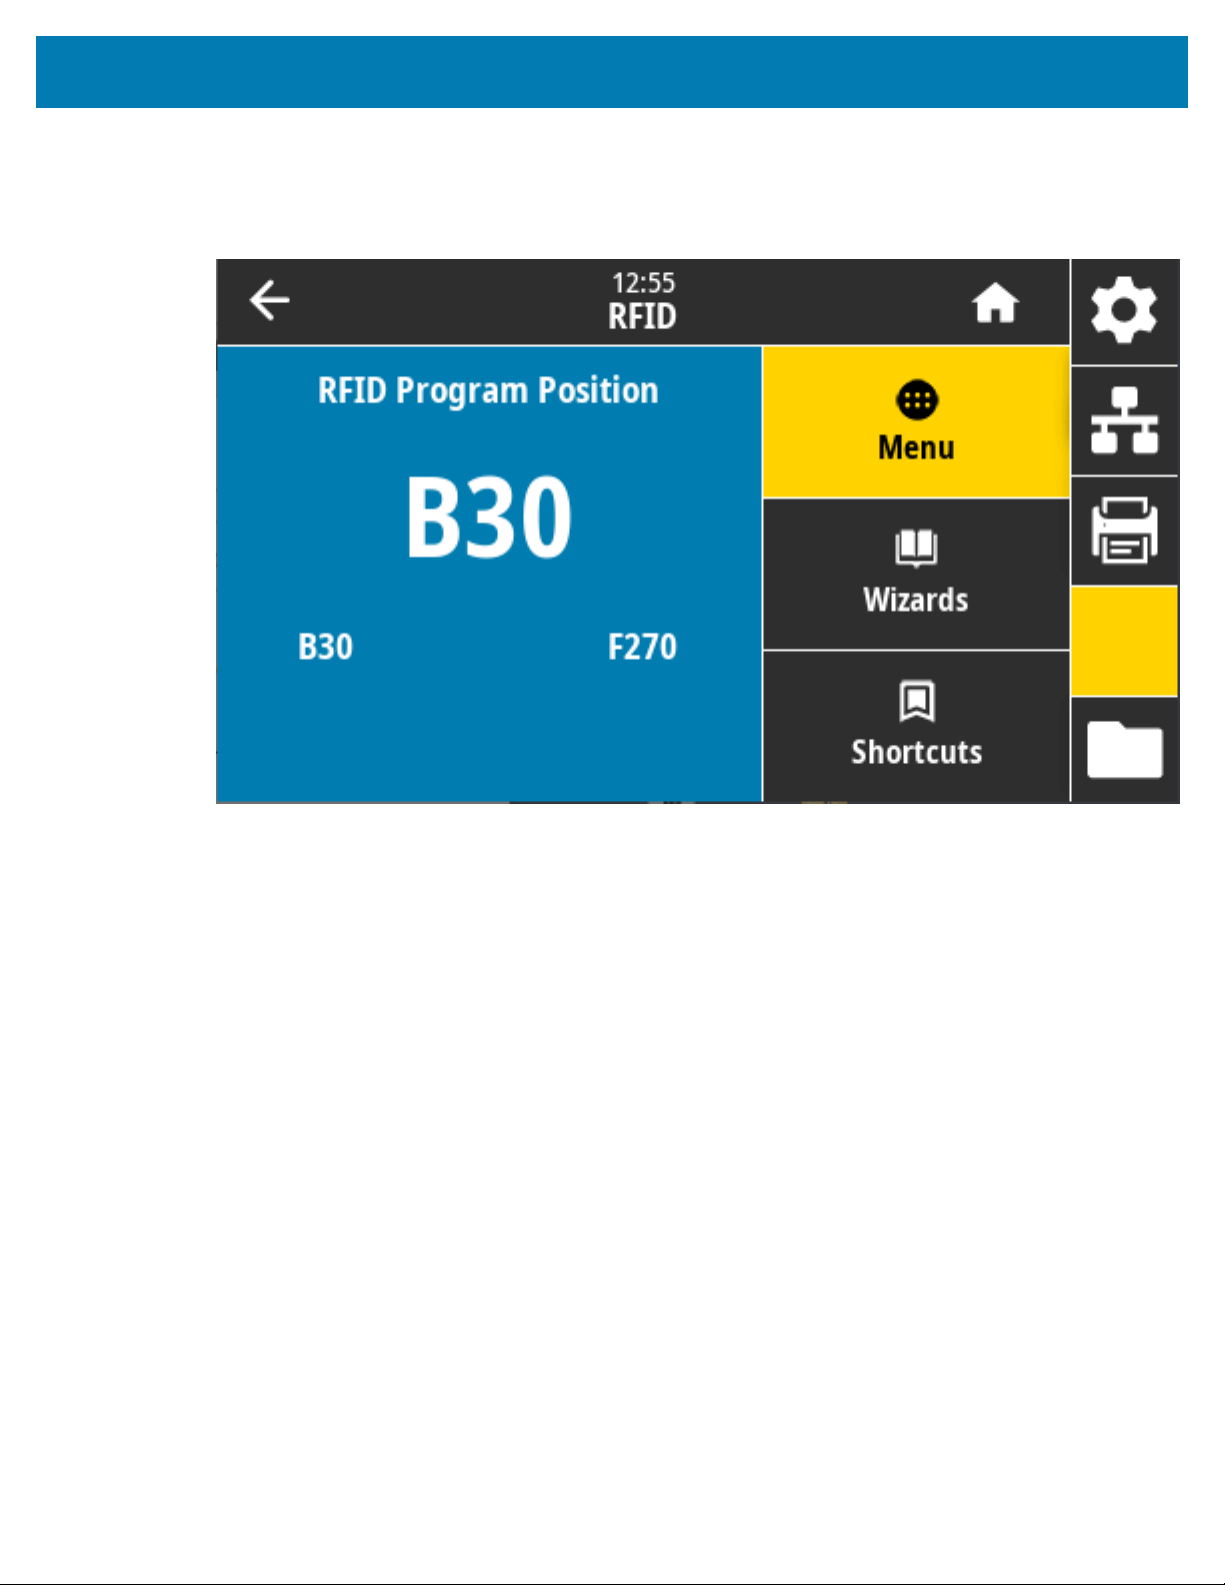
Color Touch Display and Controls
RFID > RFID Program Position
Specify the appropriate value ifthe desired programming position (read/write position) is not achieved
through RFID tag calibration.
Accepted values:
• F0 to Fxxx (where xxx is the label length in millimeters or 999, whichever is less) — The printer feeds
the label forward for the specified distance and then begins programming.
• B0 to B30 — The printer back-feeds the label for the specified distance and then begins programming.
To account for the back-feed, allow the empty media liner to extend out of the front of the printer when
using a backward programming position.
Related ZPL command(s): ^RS
SGD command used:rfid.position.program
Printer web page: View and Modify Printer Settings > RFID Setup > PROGRAM POSITION
165
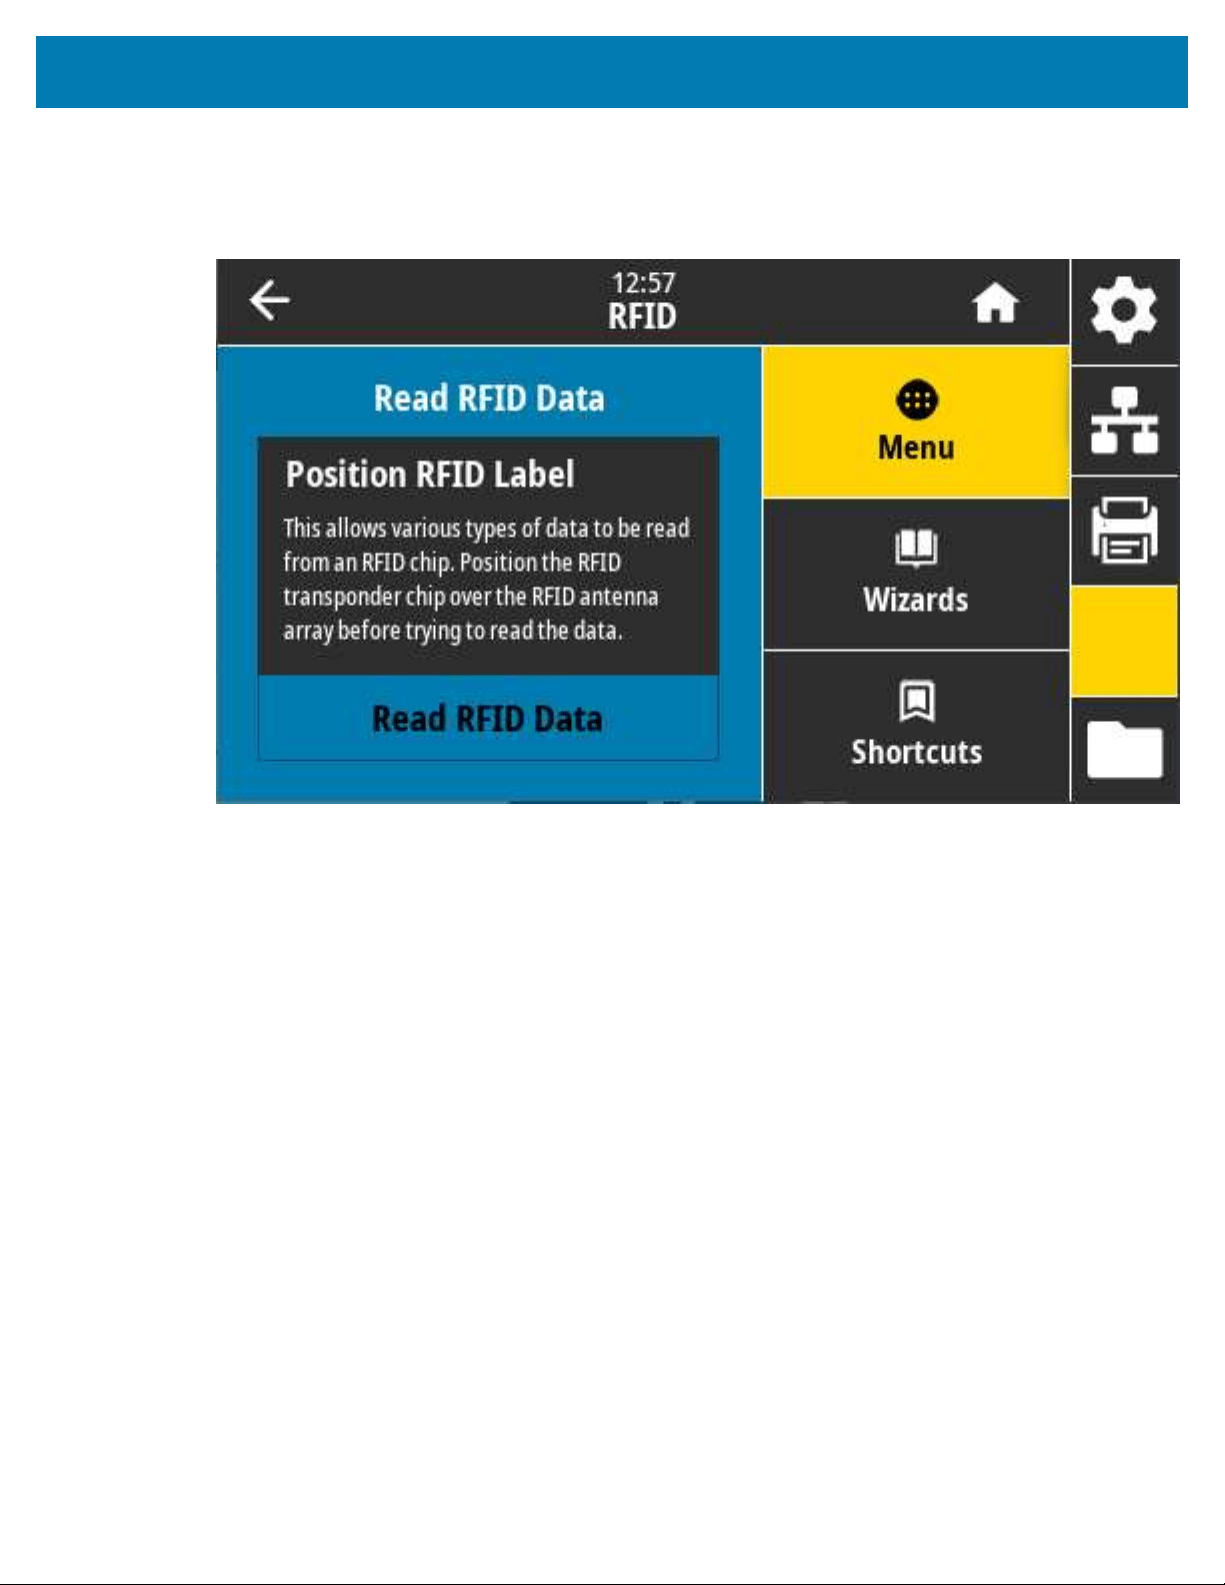
Color Touch Display and Controls
RFID > Read RFID Data
Read and return the specified tag data from the RFID tag located over the RFID antenna. No printer
movement occurs while tag data is being read. The printhead can be open or closed.
To read and display the information stored on an RFID tag,position the RFID label with its transponder over
the RFID antenna, then touch Read RFID Data.
The results of the test are shown on the display.
166
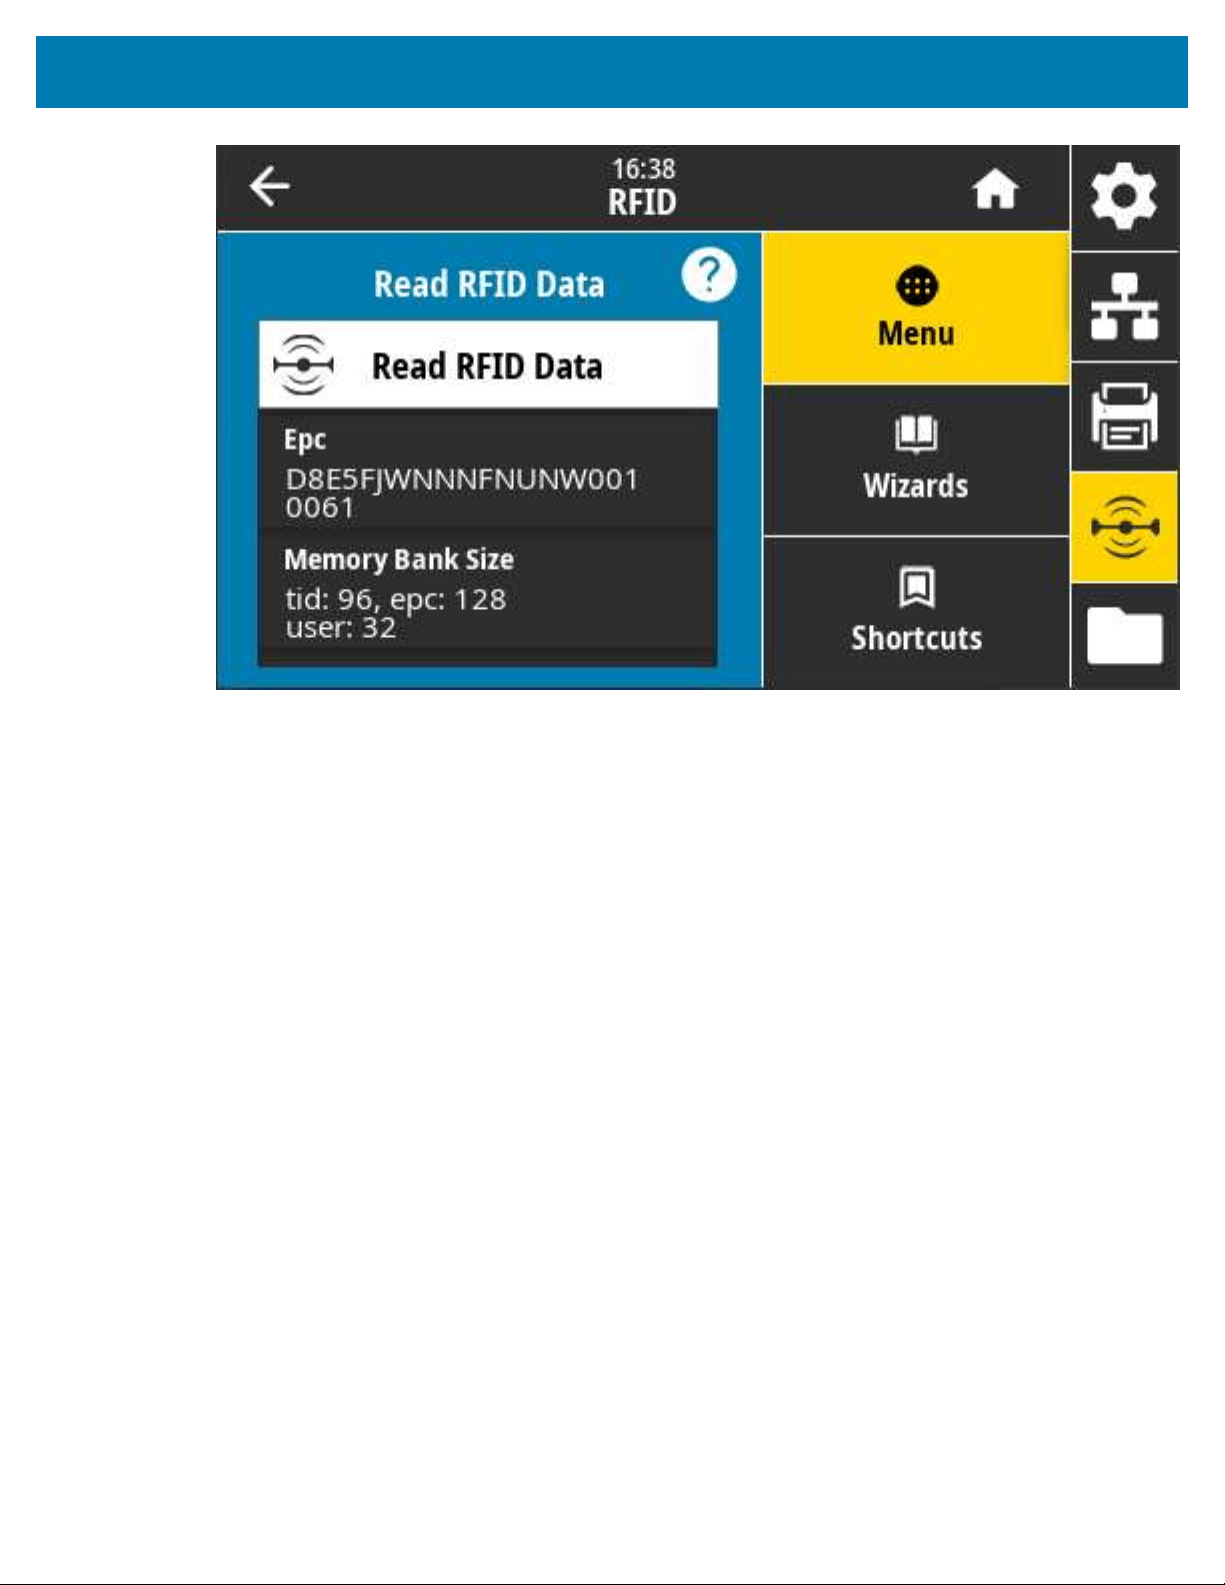
Color Touch Display and Controls
Related ZPL command(s): ^RF
SGD command used:
• rfid.tag.read.content
• rfid.tag.read.execute
167
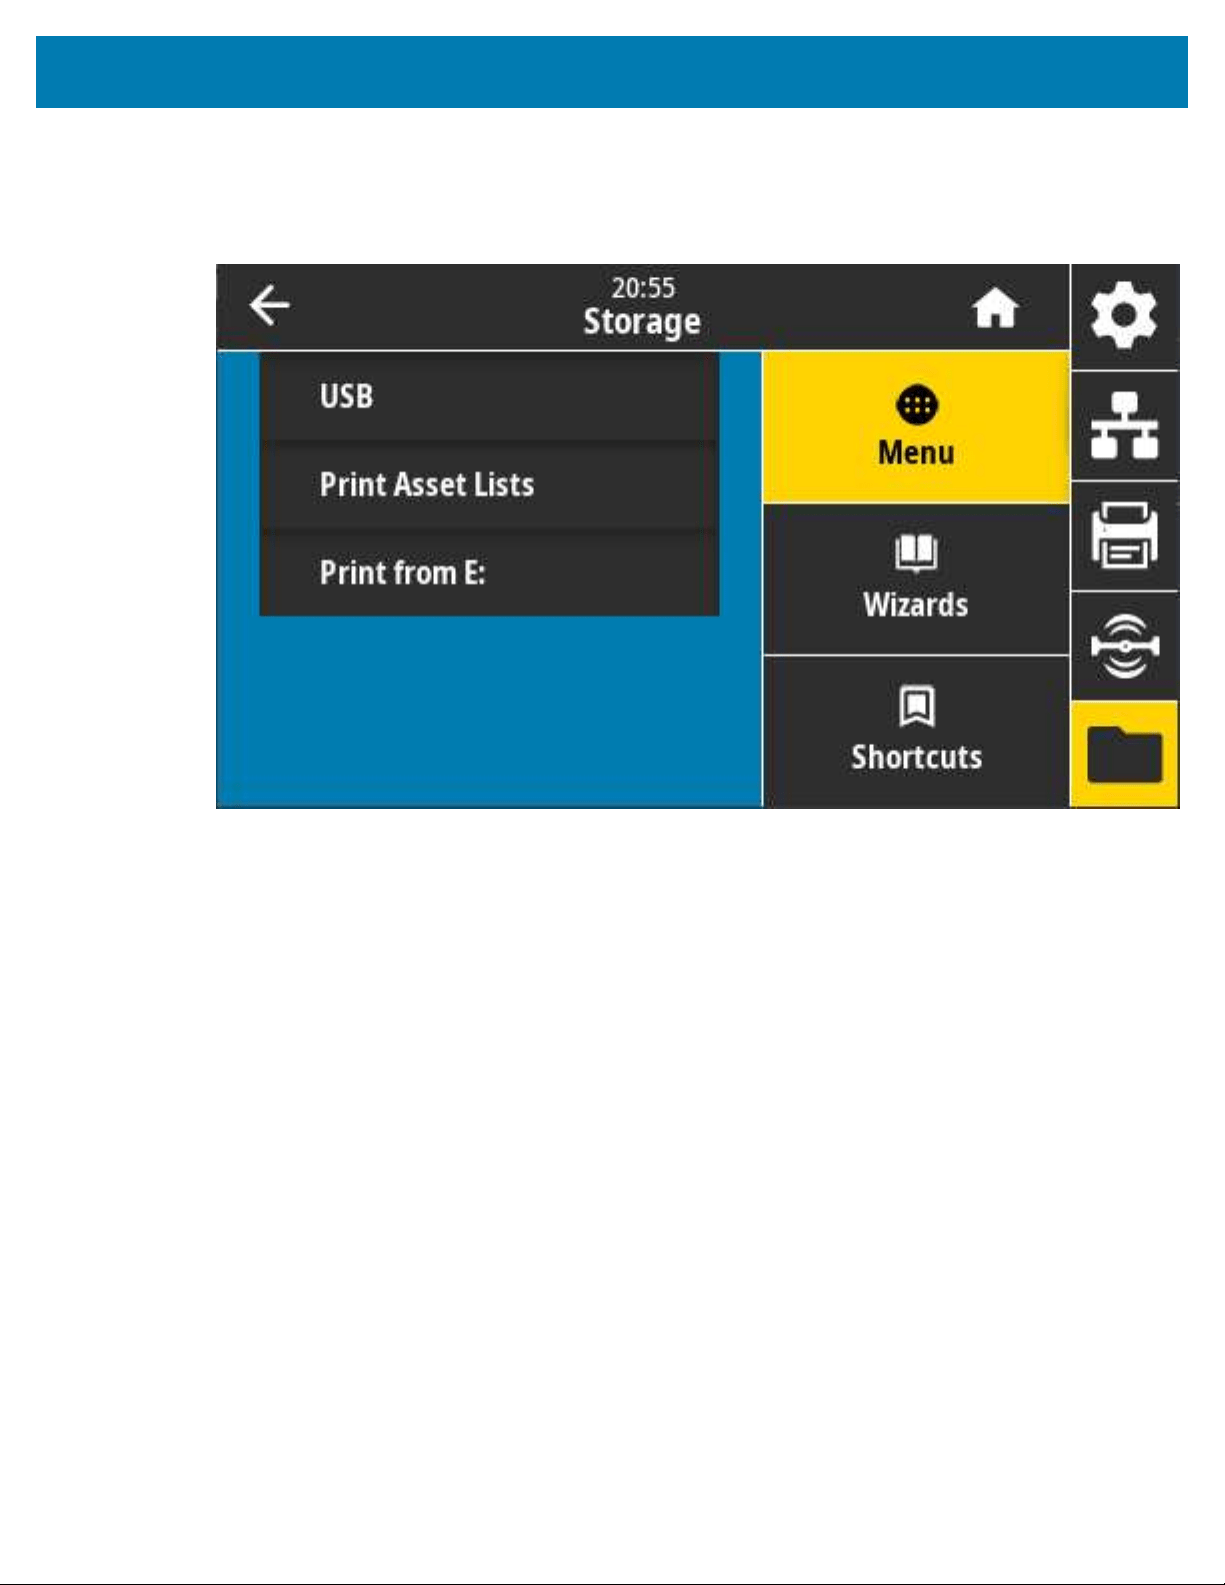
Color Touch Display and Controls
Storage Menu
Use this menu to manage file operations within the printer, accessing external files via the USB Host, and
print label formats.
168

Color Touch Display and Controls
Storage > USB > Copy: Files to USB
Select files from the printer to store on a USB Flash drive.
To copy files from the printer to a USB Flash drive:
1. Insert a USB flash drive into the printer’s USB host port.The printer lists available files
2. Touch the box next to the desired files. You can also Select All.
3. Touch the checkmark to copy the selected files.
SGD command used: usb.host.write_list
169
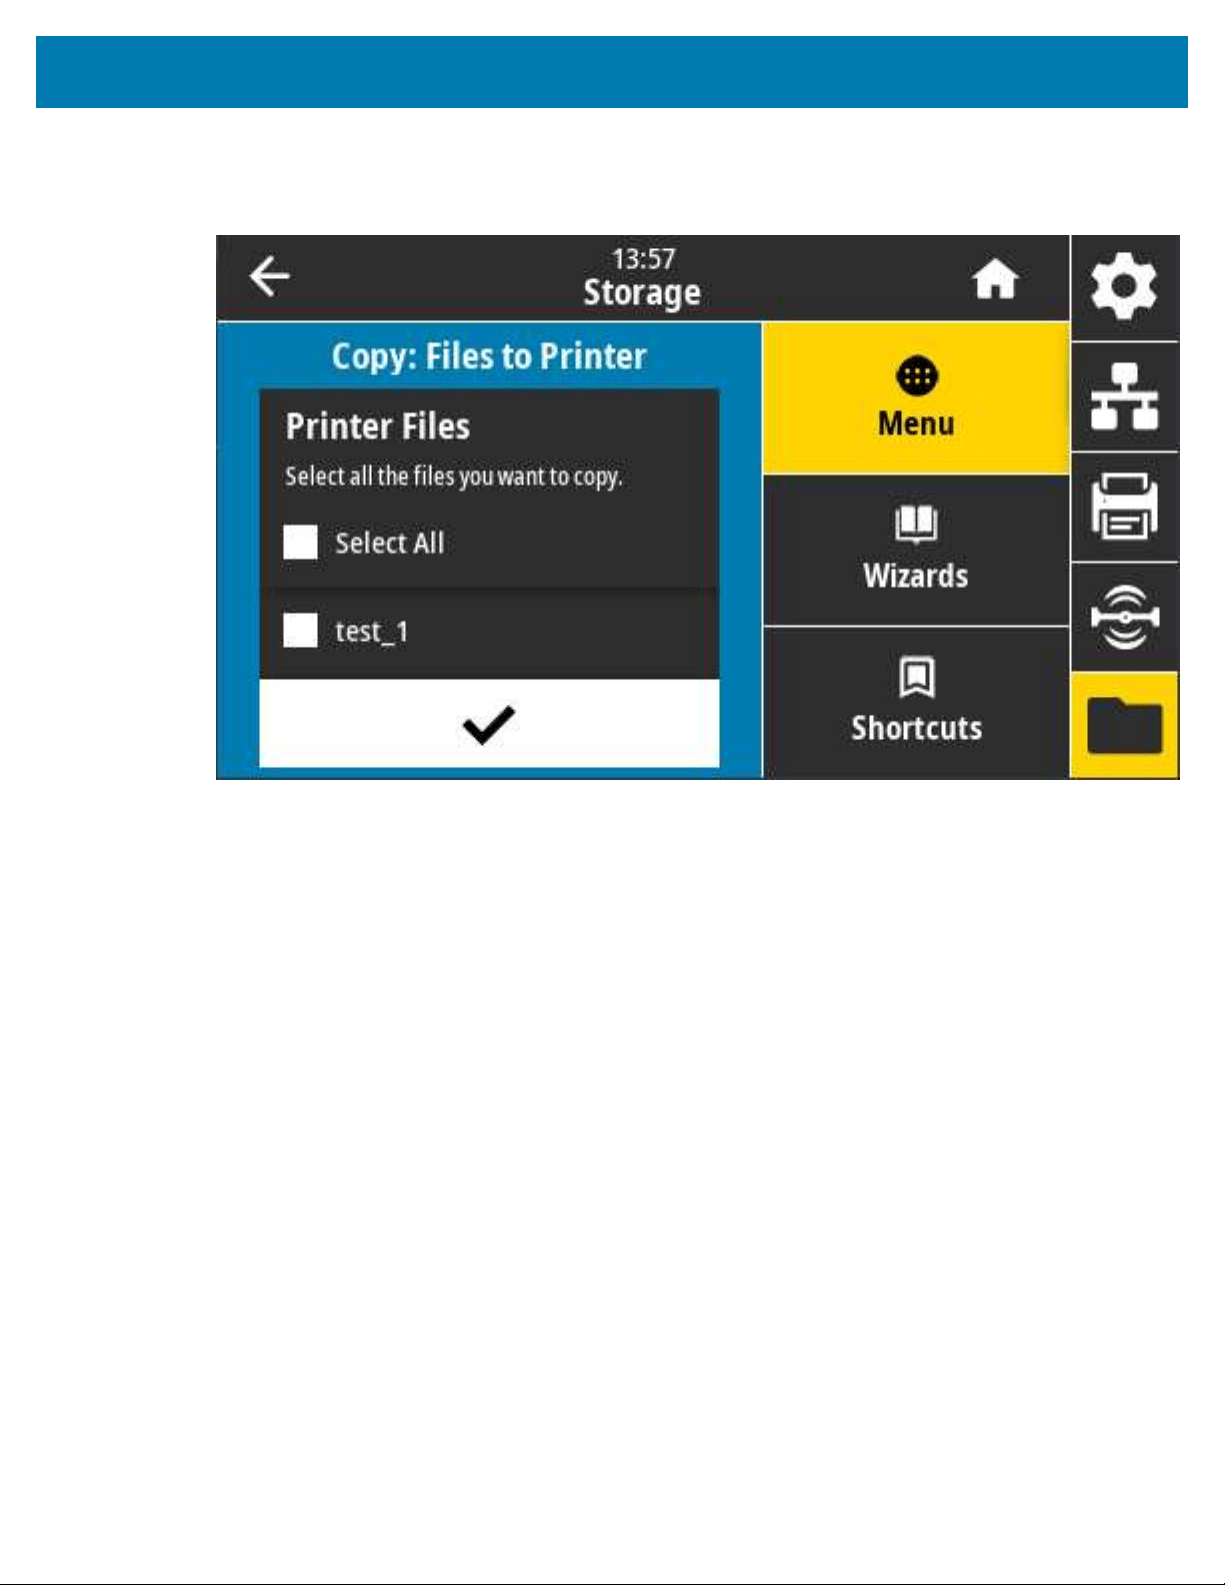
Color Touch Display and Controls
Storage > USB > Copy: Files to Printer
Select files to copy to the printer from a USB Flash drive.
To copy files to the printer from a USB Flash drive:
1. Insert a USB flash drive into the printer’s USB host port.The printer lists available files
2. Touch the box next to the desired files.Select All is also available.
3. Touch the checkmark to copy the selected files.
SGD command used: usb.host.read_list
170
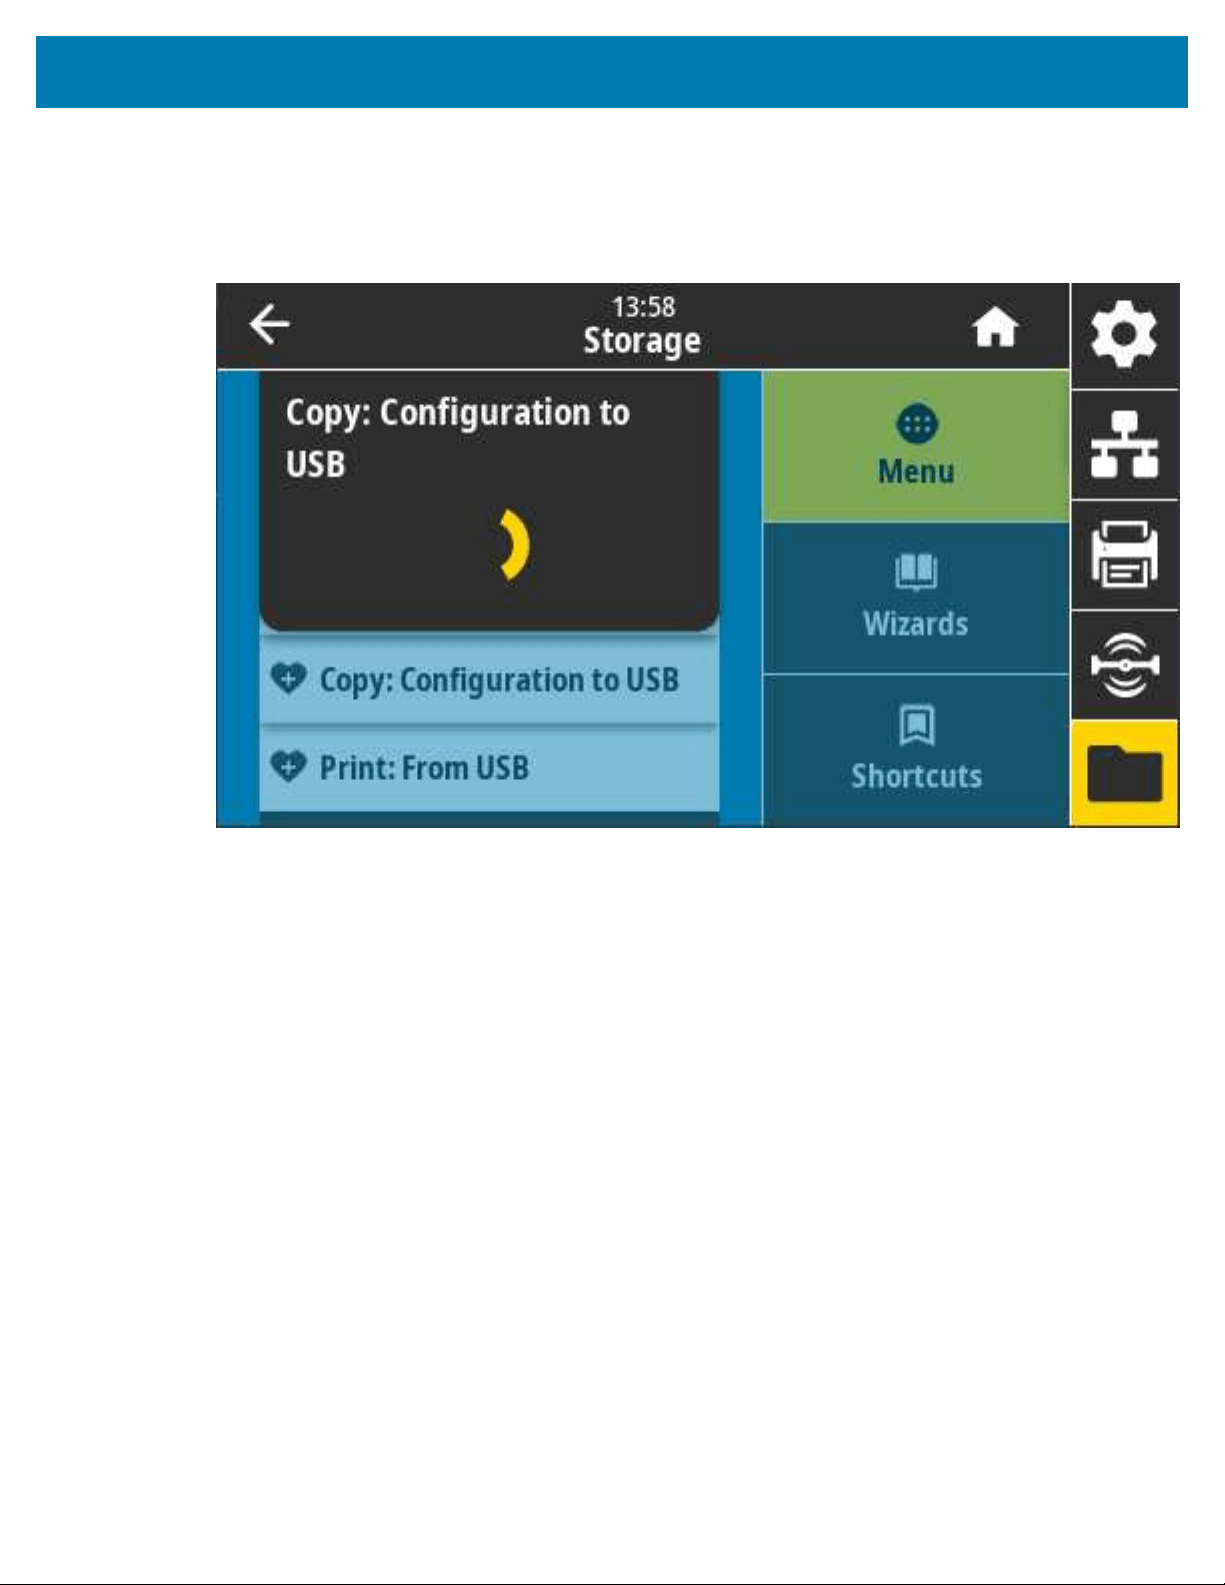
Color Touch Display and Controls
Storage > USB > Copy: Configuration to USB
Use this function to copy the printer’s configuration information to a USB mass storage device, such as
a USB Flash drive, that is plugged into one of the printer’s USB host ports. This makes the information
accessible without having to print physical labels.
Related ZPL command(s): ^HH(returns the printer configuration information returned to the host computer)
Printer web pages:
• To view printer configuration information on your web browser: Printer Home Page > View Printer
Configuration
• To print the configuration information on labels: View and Modify Printer Settings > Print Listings on
Label
171

Color Touch Display and Controls
Storage > USB > Print: From USB
Select files to print from a USB Flash drive.
To print files from a USB Flash drive:
1. Insert a USB flash drive into the printer’s USB host port.The printer lists available files
2. Touch the box next to the desired files. You can also Select All.
3. Touch the checkmark to copy the selected files.
SGD command used: usb.host.read_list
172
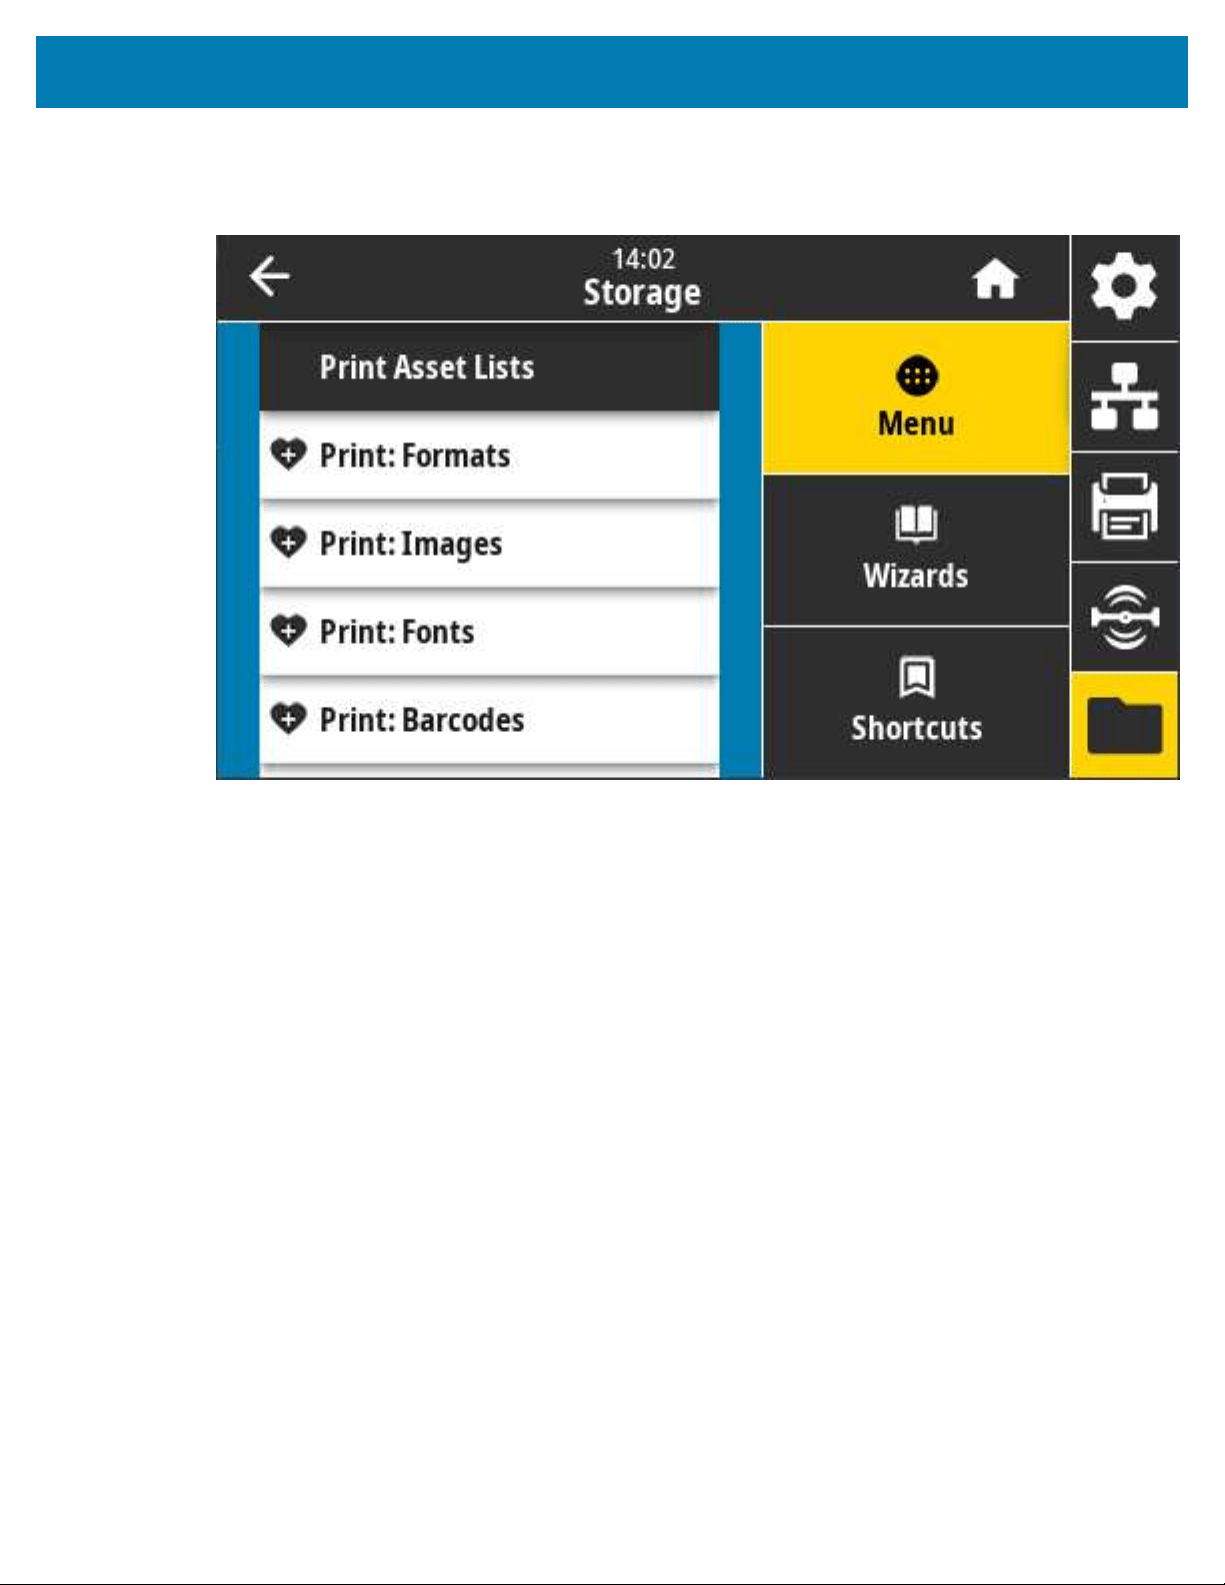
Color Touch Display and Controls
Storage > Print Asset Lists
Print the specified information on one or more labels.
Accepted values:
• Formats — Prints the available formats stored in the printer’s RAM, Flash memory, or optional memory
card.
• Images — Prints the available images stored in the printer’s RAM, Flash memory, or optional memory
card.
• Fonts — Prints the available fonts in the printer, including standard printer fonts plus any optional fonts.
Fonts may be stored in RAM or Flash memory.
• Barcodes — Prints the available barcodes in the printer. Barcodes may be stored in RAM or Flash
memory.
• All—Prints the previous labels plus the printer configuration label and the network configuration label
Related ZPL command(s): ^WD
Printer web page: View and Modify Printer Settings > Print Listings on Label
173

Color Touch Display and Controls
Storage > USB > Print from E:
Select files to print from files in printer E: memory.
To print files from printer E: memory:
1. Touch the box next to the desired files. You cal also use Select All.
2. Touch the checkmark to print the selected files.
SGD command used: usb.host.write_list
174

Setup
Setup
This section assists you in setting up and operating your printer. The setup process can be broken down
into two phases: hardware setup and host system (software/driver) setup. This section covers the physical
hardware setup needed to print your first label.
Printer Setup Overview
Review this overview and prepare for the setup before you begin the physical printer setup.
• Install any printer hardware options first. See Install Hardware Options on page 61.
• Place the printer in a safe location with access to power and where you can connect interface cables or
wirelessly to the system.
• Attach the printer and power supply to a grounded AC power source.See Attaching the Printer to a
Power Source on page 177.
• Select and prepare media for your printer.See Media on page 371.
• Load the media.See Loading Media on page 179.
• Turn printer power ON.
• Calibrate the printer for the media.See Running a SmartCal Media Calibration on page 199.
• Print a Configuration Report to verify basic printer operation.See Test Printing with a Configuration
Report on page 200.
• Turn printer power OFF.
• Choose a method to communicate to and manage your printerusing a wired or wireless connection.
The available wired local connection types are:
• USB port
• Serial port(option available for your printer)
• Ethernet (LAN)(option available for your printer)
• Attach the printer cable to the network or host system, making sure printer power is OFF.
• Begin the second phase of printer setup, typically Setup for Windows on page 215.
175
Setup
Select a Location for the Printer
The printer and media need a clean and safe area with moderate temperatures for optimal print operations
Select a location for the printer that meets these conditions:
Condition Description
Surface Must be solid, level, and of sufficient size and strength to hold the printer
loaded with media (or in the case of fanfold media, stable and sturdy with the
media placed on the surface)..
Space The operating location for the printer must include enough space to open the
printer (for media access and cleaning), and enable access to connectivity
and power cords. Leave open space on all sides of the printer to allow for
proper ventilation and cooling.
IMPORTANT: Do not place any padding or cushioning material
under or around the base of the printer because this will restrict
airflow and could cause the printer to overheat.
Power Situate the printer within easy access of a power outlet.
Data communication
interfaces
Ensure that cabling and Wi-Fi or Bluetooth radios do NOT exceed the
maximum distance specified by the communication protocol standard or
product data sheet for this printer. Radio signal strength can be reduced by
physical barriers (objects, walls, etc.).
Data cables Cables should not be routed with or near power cords or conduits,
fluorescent lighting, transformers, microwave ovens, motors or other
sources of electrical noise and interference. These interference sources may
cause problems with communications, host system operation, and printer
functionality.
Operating conditions Your printer is designed to function in a wide range of environments.
• Operational temperature:40°F to 105°F (5°C to 41°C)
• Operational humidity:10% to 90%non-condensing
• Non-operational temperature:-40°F to 140°F (-40°C to 60°C)
• Non-operational humidity: 5% to 95% non-condensing
Install Printer Options and Connectivity Modules
If your printer will use any of the following printer options, you will need to install them before you proceed
with the printer setup.
• Wireless (802.11ac and Bluetooth 4.2) Module—See
Installing the Wireless Connectivity Module on
page 66
• Serial (RS-232 DB-9) Port Module—See Installing the Serial Port Module on page 63.
• Internal Ethernet (LAN) Module—See Installing the Internal Ethernet (LAN) Module on page 64.
• Label Dispenser (automatically peels the liner off the label and dispenses the label)—See Installing the
Label Dispenser
on page 74.
176
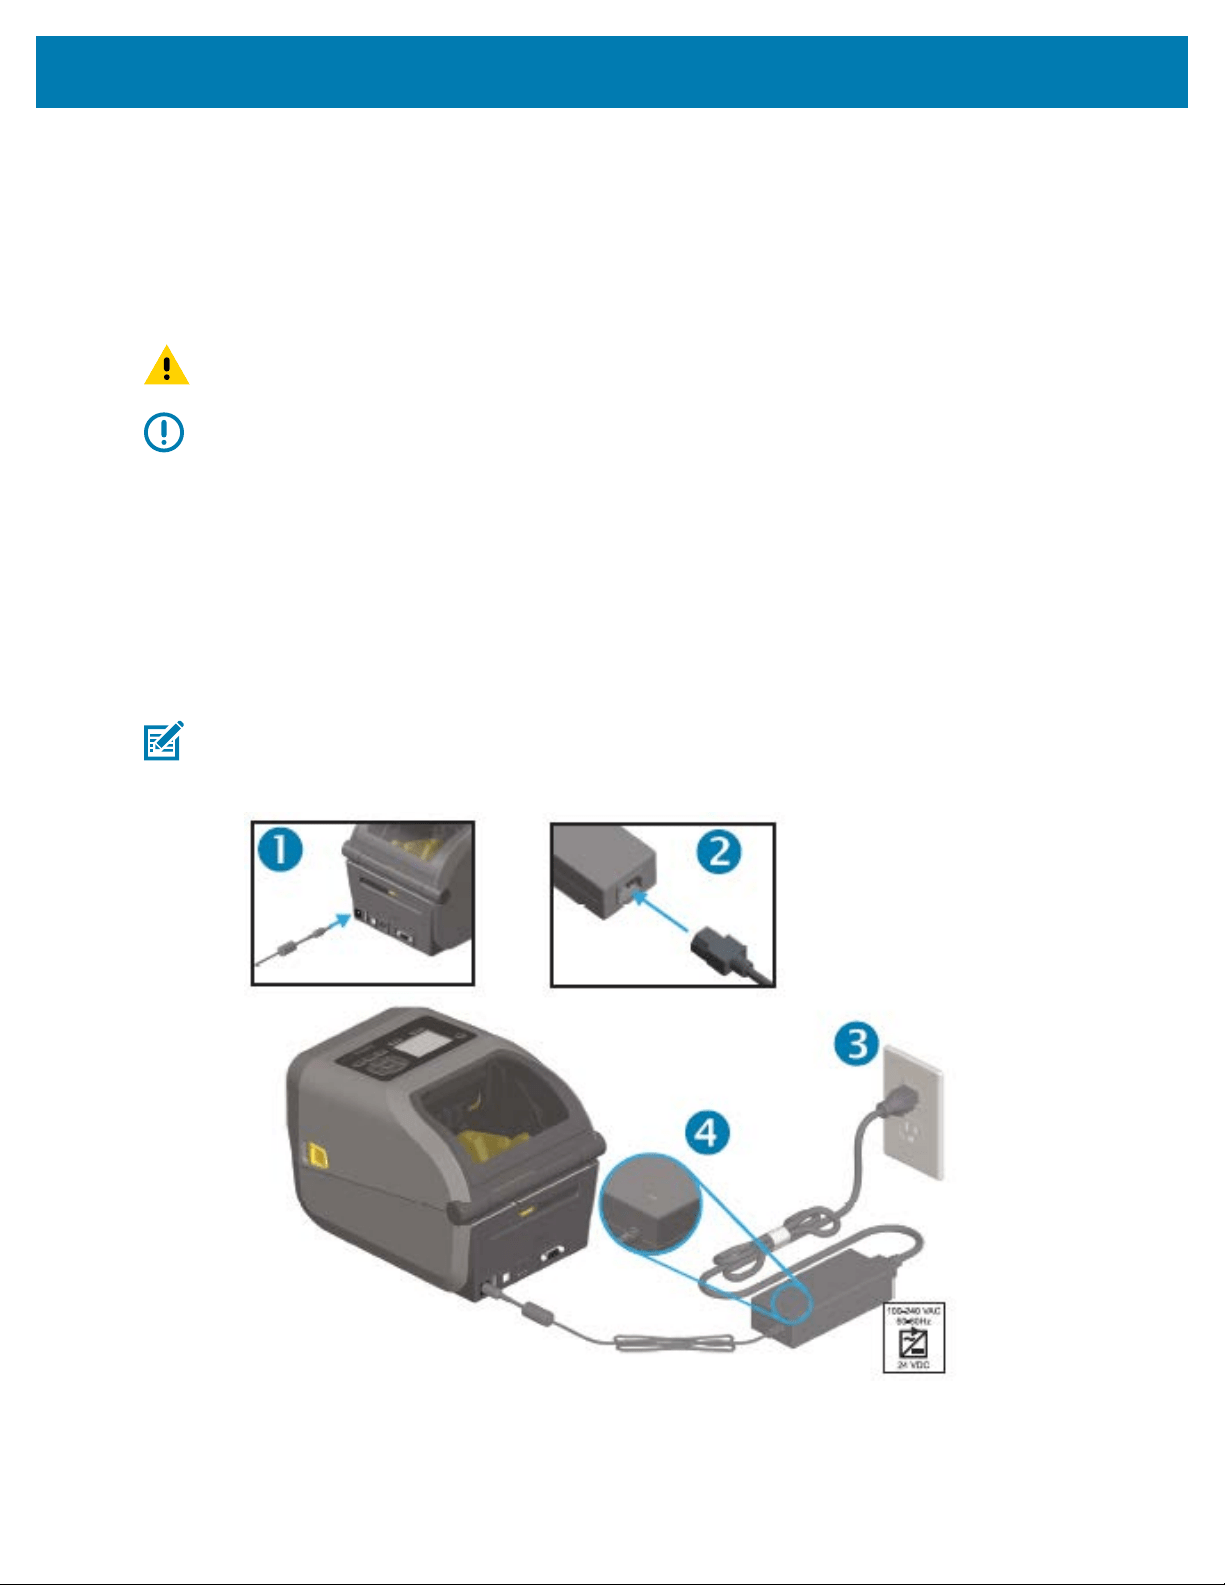
Setup
• Standard (general purpose) media cutter—See Installing the Standard Media Cutter on page 74.
• Media Roll Core Size Adapters for 38.1 mm (1.5 in.), 50.8 mm (2.0 in.), or 76.2 (3.0 in.) I.D. media
cores.—For information on these adapters, see Media Roll Core Size Adapters on page 76. To install
the adapters, see Installing the Media Roll Adapters on page 76.
Attaching the Printer to a Power Source
CAUTION: Never operate the printer and power supply in an area where they can get wet.
Serious personal injury could result!
IMPORTANT: Ensure the appropriate power cord with a three-prong plug and an IEC 60320-C13
connector are used at all times. These power cords must bear the relevant certification mark of
the country in which the product is being used.
Set up your printer so that you can handle the power cord easily if needed. Some setup and
troubleshooting tasks may ask you to turn printer power OFF. When the instructions call for turning printer
power OFF, separate the power cord from the power supply receptacle or AC electrical outlet to ensure
that the printer CANNOT carry electrical current.
1. Plug the power supply into the printer’s DC power receptacle.
2. Insert the AC power cord into the power supply.
3. Plug the other end of the AC power cord into an appropriate AC electrical outlet.
NOTE: TheAC outlet (plug) end of the power cord varies by region.
The active power light turns green if power is on at the AC outlet.
177
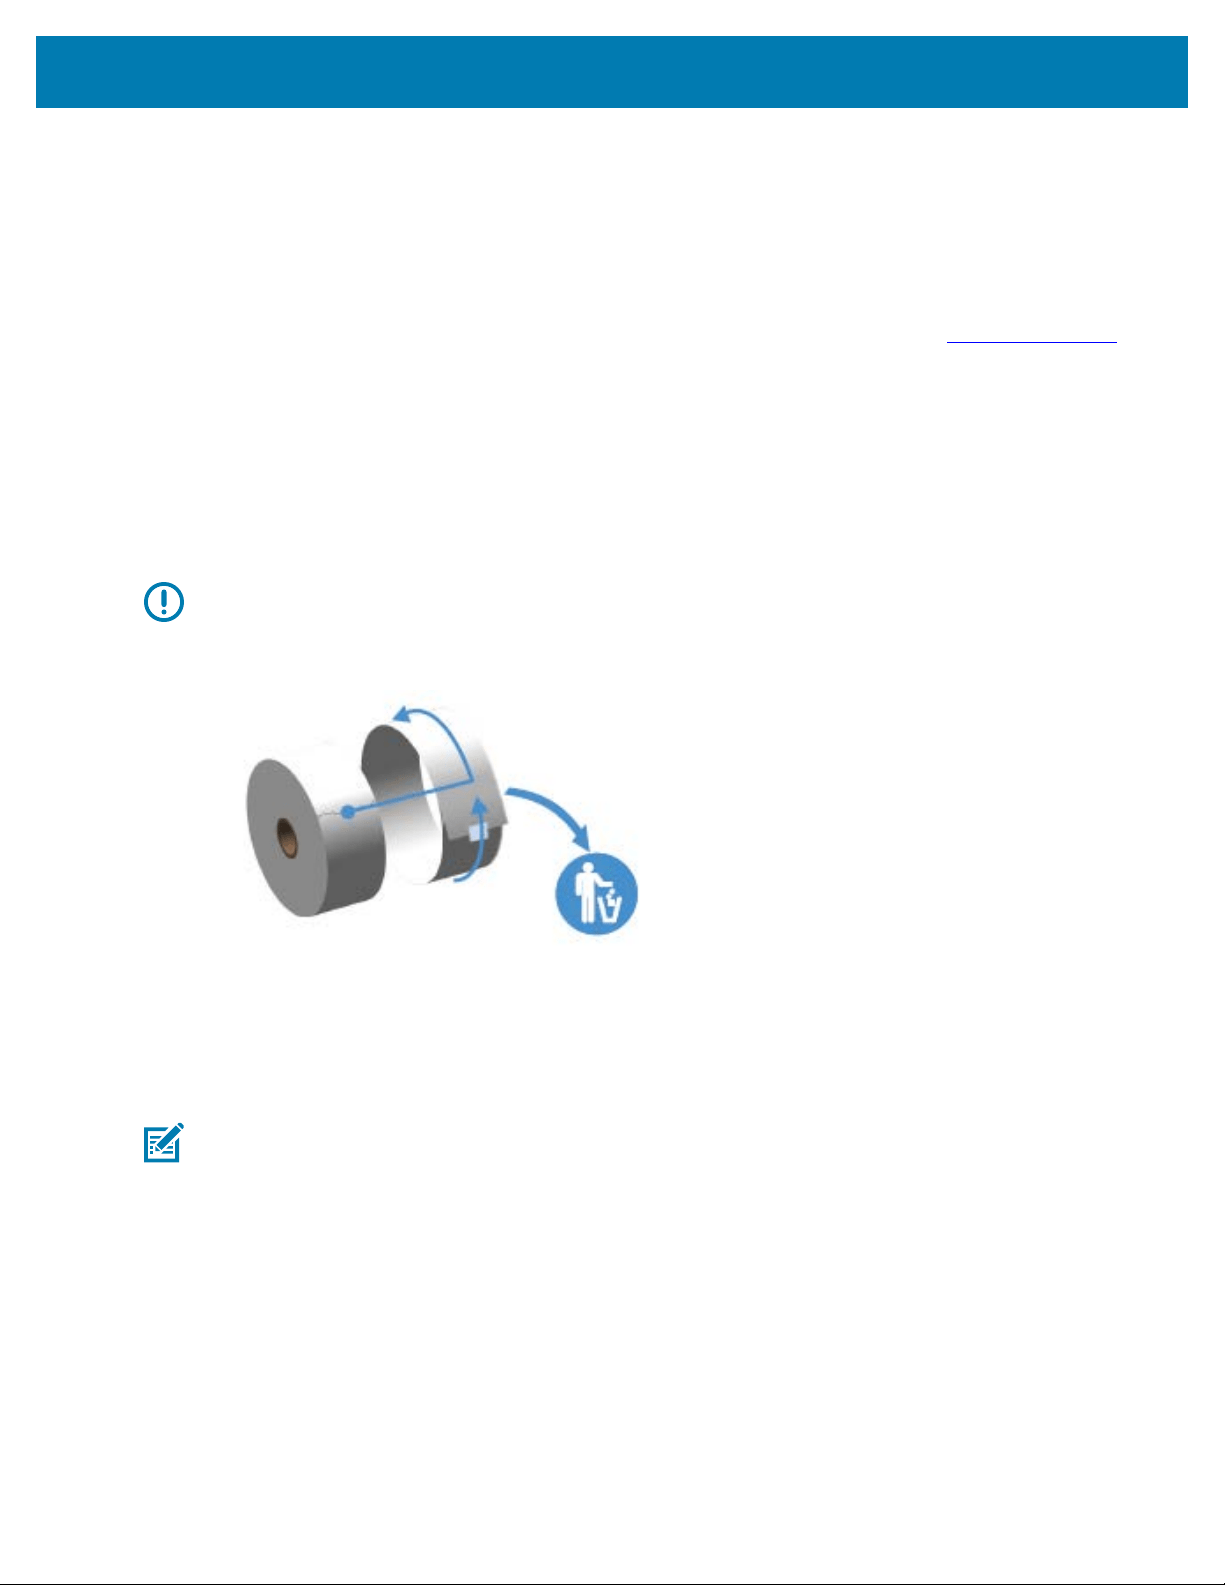
Setup
Media Preparation for Printing
Purchase media that will suit your printing needs.Media does not ship with the printer.
You can use labels, tags, tickets, receipt paper, fanfold stacks, tamper proof labels or other print media
formats.Use the Zebra web site or your reseller may be able to help you select the right media for your
intended printing application.
To procure media that is specifically designed for use with your Zebra printer, go to
zebra.com/supplies.
During setup, use the same media that you would use for normal printer operation. This will help you
identify any setup or real-life application issues so you can address them right at the start.
Preparing and Handling Media
Careful handing and storage of your media is important in order to maximize print quality. If the media
becomes contaminated or dirty, it can damage the printer and cause defects in the printed image such as
voids, streaks, discoloration, and compromising of the adhesive.
IMPORTANT: During manufacturing, packaging, handling and storage, the outside length of
media may become dirty or contaminated. Remove the outside layer of the media roll or stack to
reduce the possibility of contaminants being transferred from the media onto the printhead while
printing.
Media Storage Guidelines
Follow these media storage guidelines for optimal print output.
• Store media in a clean, dry, cool, dark area.
NOTE: Direct thermal media is chemically treated to be heat-sensitive. Direct sunlight or heat
sources may ‘expose’ the media.
• Do NOT store media with chemicals or cleaning products.
• Leave media in its protective packaging and remove the packaging only before use.
• Many media types and label adhesives have a shelf life or expiration date. Always use the oldest, viable
(non-expired) media first.
Roll MediaTypes and Loading
The printers support the three basic types of media: continuous media, marked media, and label media.All
three types are loaded the same way for the printer models described in this guide.
• Continuous has no marks that define print length. These are typically used for receipts.
178
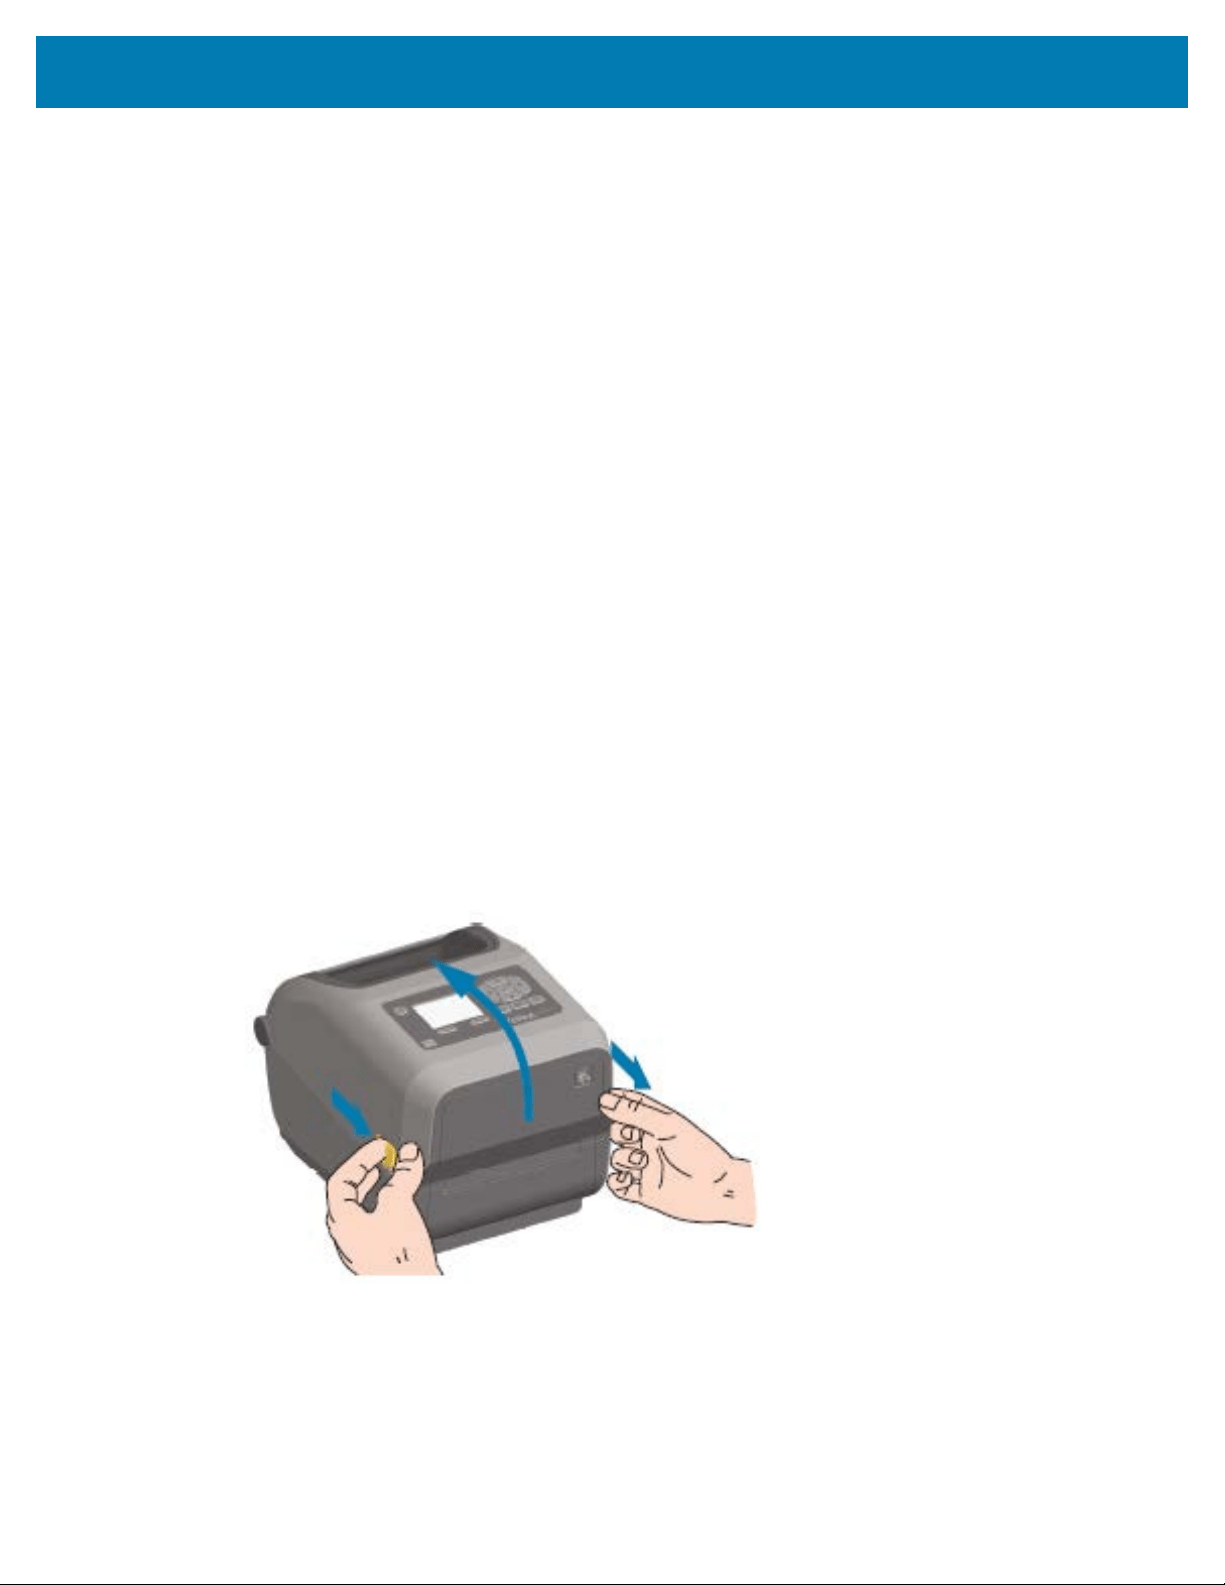
Setup
• Marked media comes with black lines, black marks, notches, or holes that help the printer sense print
length.
• Label media avails of the print sensor's ability to look through the media backing (liner) and sense the
beginning and end of labels on the roll.
The printer uses two sensing methods to accommodate a wide range of media:
• Center-area transmissive sensing for continuous media and gap/web label media.
• Full-width movable (reflective) sensing for print format (length) using black marks, black lines, notches,
or holes.
Setting Media Sensing by Media type
• For web/gap media, the printer senses the differences between the label and the liner to determine the
print format length.
• For continuous roll media, the printer only senses the media’s characteristics. The print format’s length
is set by programming (driver or software) or by using length of the last stored form.
• For black mark media, the printer uses its sensor to measure the print format length, from the first black
mark to the start of the next black mark .
• If using a label dispenser, load the media and proceed with Using the Label Dispenser Option on page
247.
• If using fanfold media, see Printing on Fanfold Media on page 243.
Loading Media
This procedure works for the Tear-Off (standard bezel), Label Dispense, and Media Cutting options that are
available to use with your printer.
1. Open the printer. Pull the release latch levers toward the front of the printer.
2. Open the media roll holders. Orient the media roll so that its printing surface will face up as it passes
over the platen (drive) roller. Pull the media guides open with your free hand and place the media roll on
179
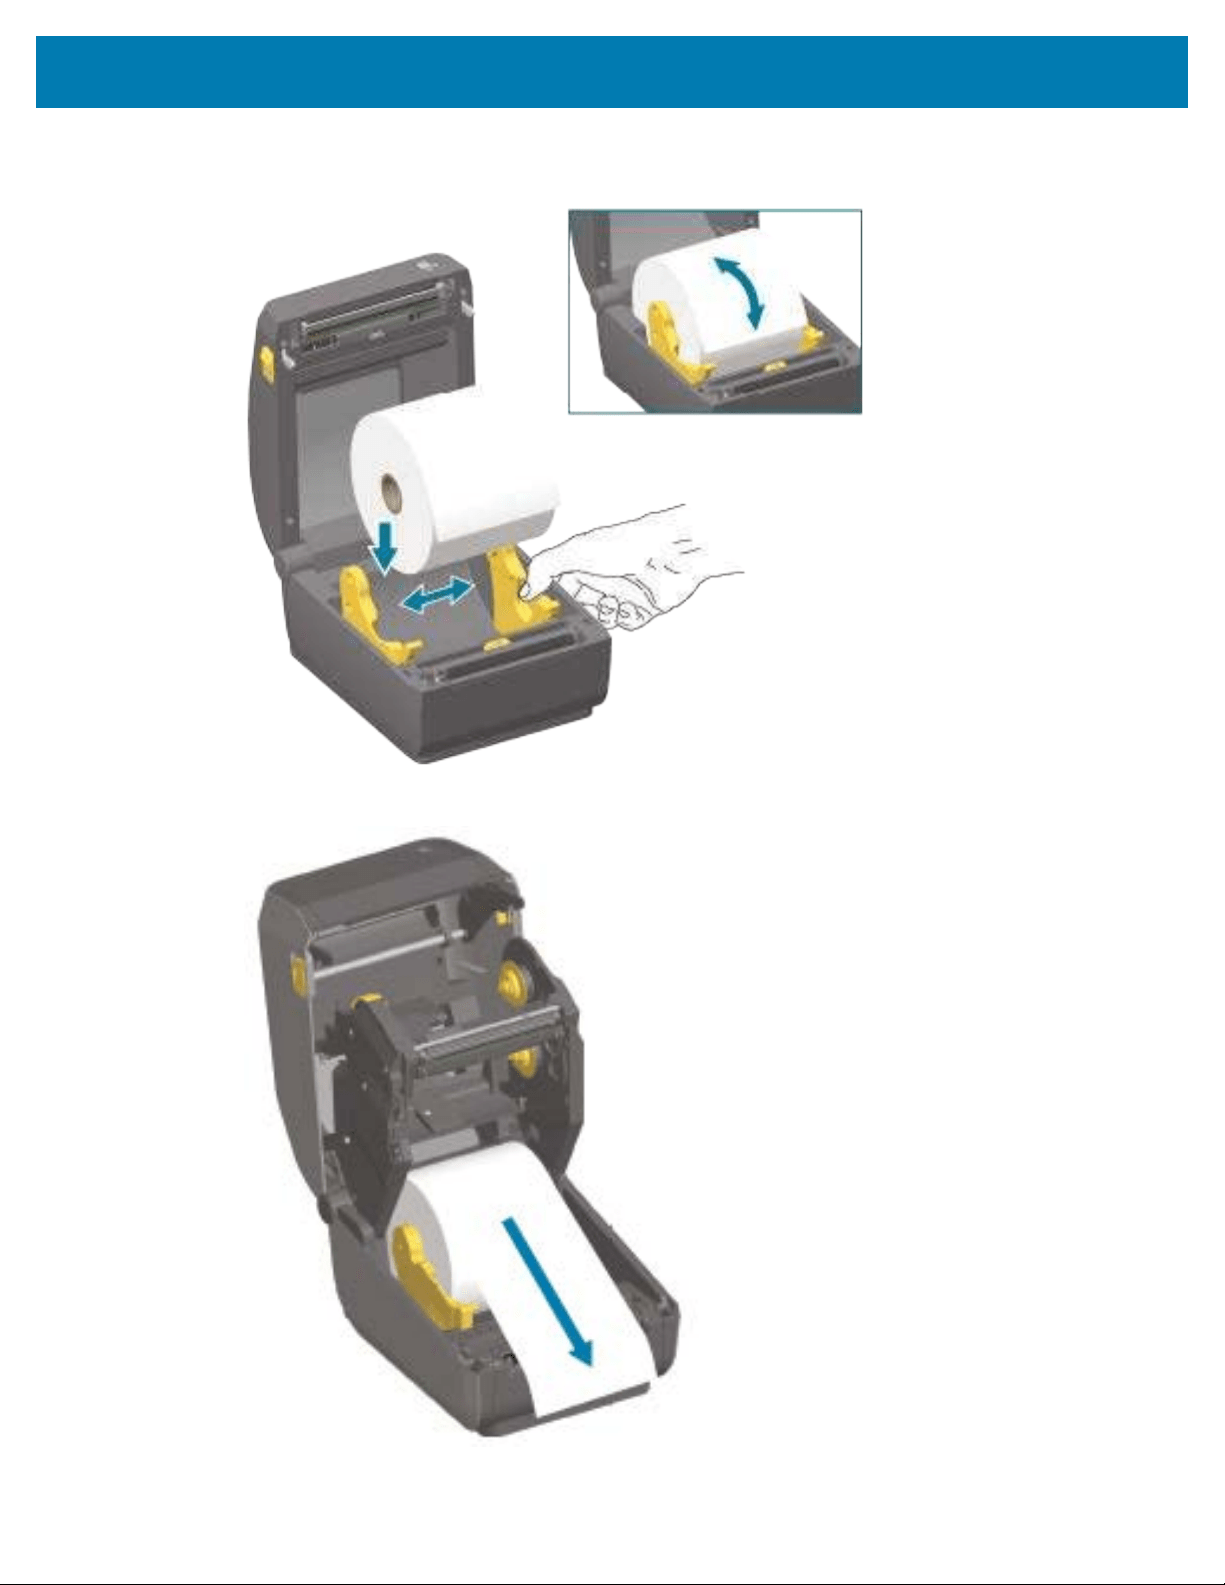
Setup
the roll holders and release the guides. Verify the roll turns freely. The roll must not sit in the bottom of
the media compartment.
3. Pull the media so that it extends out of the front of the printer.
180
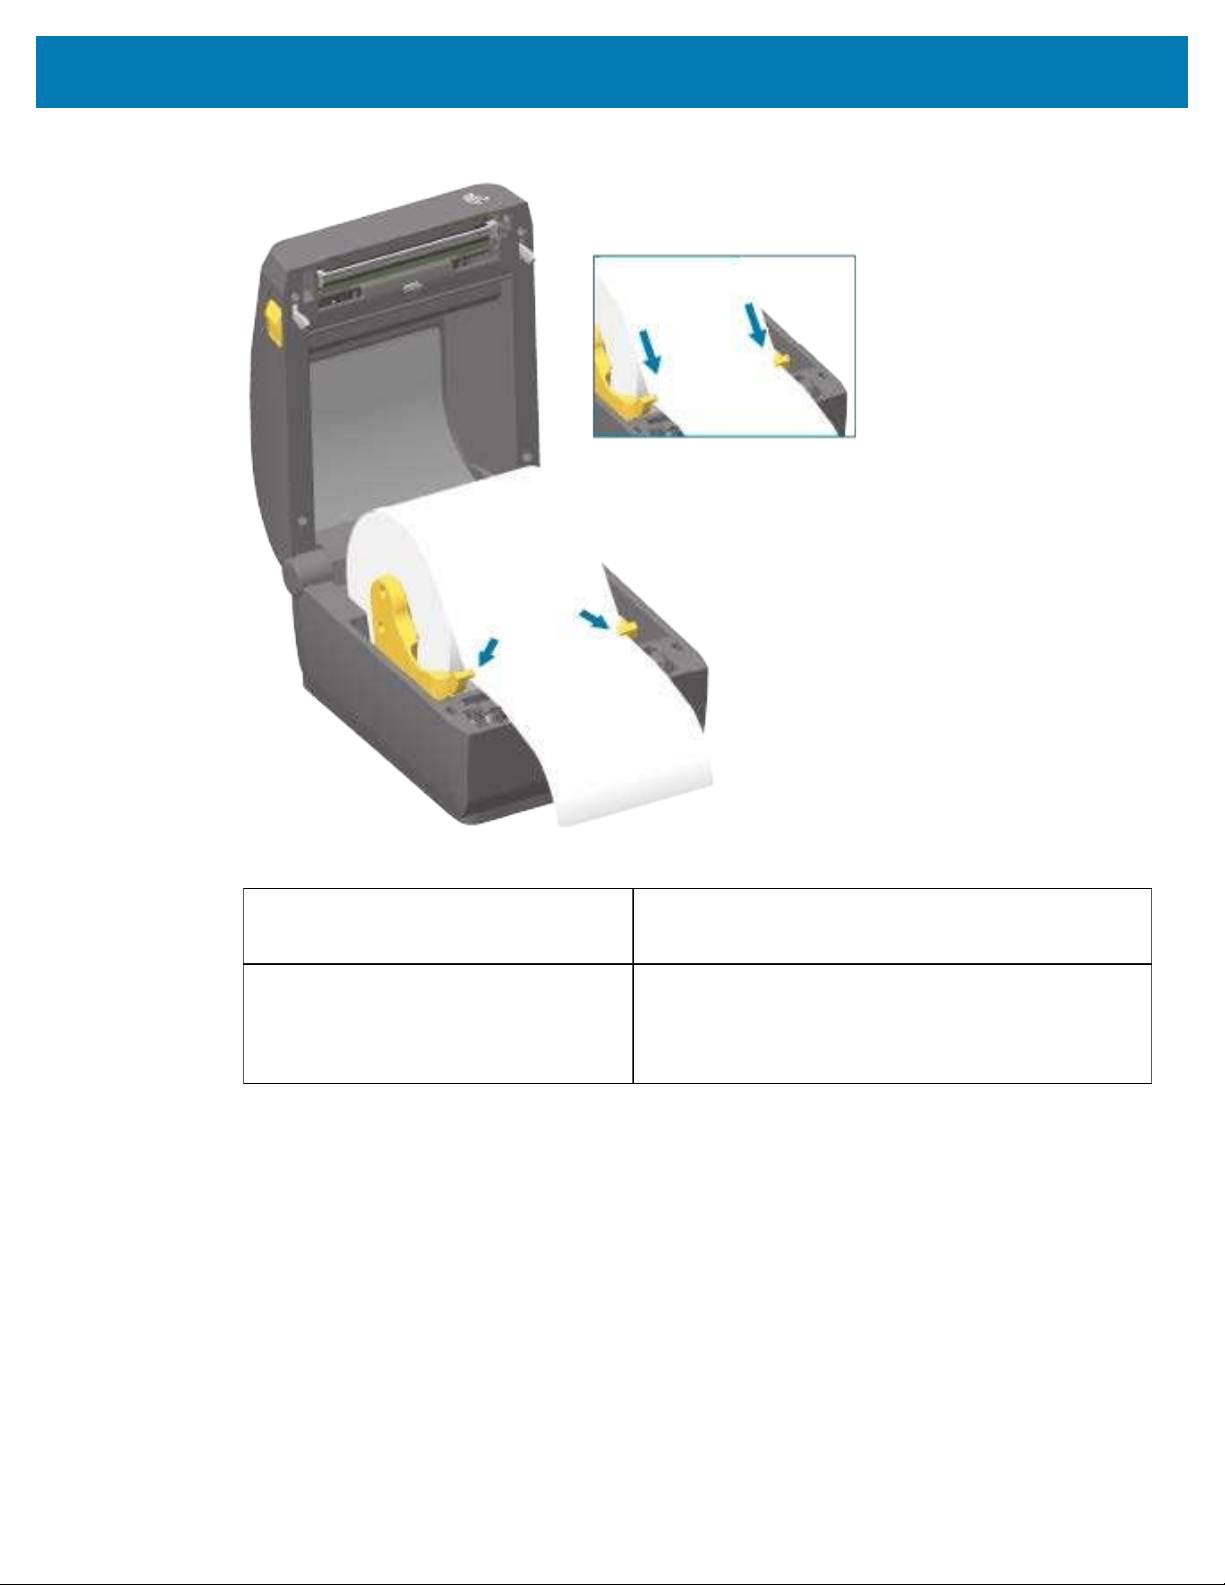
Setup
4. Push the media under both of the media guides.
5. Flip the media up and align the movable media sensor as appropriate for your media type.
For continuous roll receipt-type media
and for label media without black marks
or notches...
Align the media to the default center position.
181
For black mark (black line, notches or
holes), backed media...
Adjust the sensor position in such a way that the sensor
aligns to the center of the black mark.
Avoid the center area of the media so you only use
black-mark sensing for printing on black mark media.
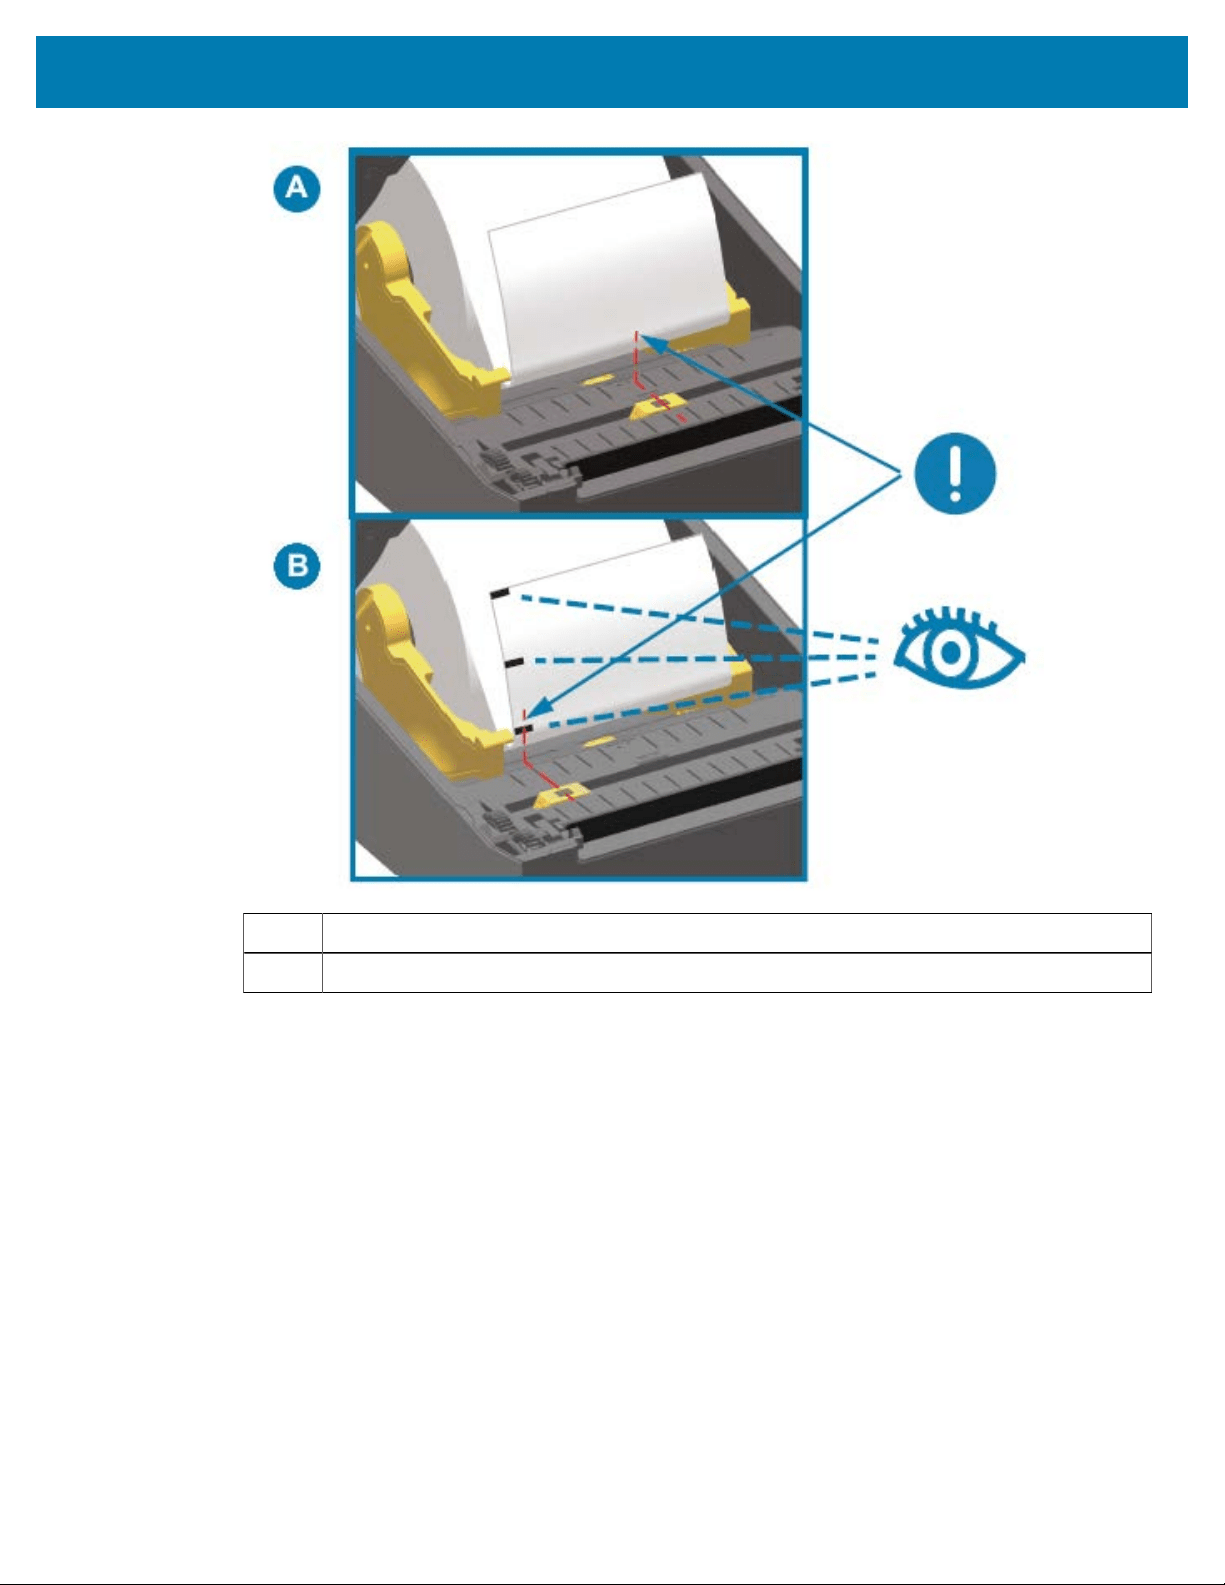
Setup
A Web (gap) sensing standard operating position for the sensor (default)
B Off-center sensor position (use for black mark sensing only
Movable Sensor Adjustment
The movable sensor is a dual-function sensor. It provides transmissive (sees through media) and reflective
media sensing. The printer can use either sensing method, but not both simultaneously.
The movable sensor has a center array of sensors. This provides adjustable transmissive web (gap)
sensing to positions that match legacy Zebra desktop printer sensor locations and positions in between.
This also provides for use of some non-standard media variations or irregularly-shaped media.
The movable sensor allows the printer to use media with black marks or notches (holes through the media)
on the back side of the media (or media liner). The sensor aligns to the middle of black marks or notches
not in the center of the media roll to avoid web/gap sensing array.
182

Setup
Adjusting the Movable Sensor for Black Marks or Notches
Black mark sensing looks for non-reflective surfaces such as black marks, black lines, notches or holes
on the back of the media which do not reflect the sensor’s near infrared light beam back to the sensor’s
detector. The sensor light and its black mark detector are located next to each other, under the sensor
cover.
1. Position the movable sensor’s alignment arrow to the middle of the black mark or notch in the
underside of the media.
2. Verify that you have set the sensor alignment as far as possible from the edge of the media, where
100% of the sensor window is aimed within the region of the black mark.
NOTE: When printing, the media can move from side to side ±1mm (due to media variations
and edge damage due to handling). Notches cut into the side of the media can also become
damaged.
Adjusting the Movable Sensor for Web (Gap) Sensing
The movable sensor for web/gap sensing supports multiple positions.
The movable sensor’s default position is ideal for printing on most label types.
The adjustment range is from center to off-center positions. This adjustment is ideal for printing two labels
side by side on a roll.
The movable sensor adjustment range covers sensor positions use by legacy Zebra printers.
Web (gap) sensing with the movable sensor only functions when the movable sensor’s alignment arrow
points to any position on the alignment key.
183
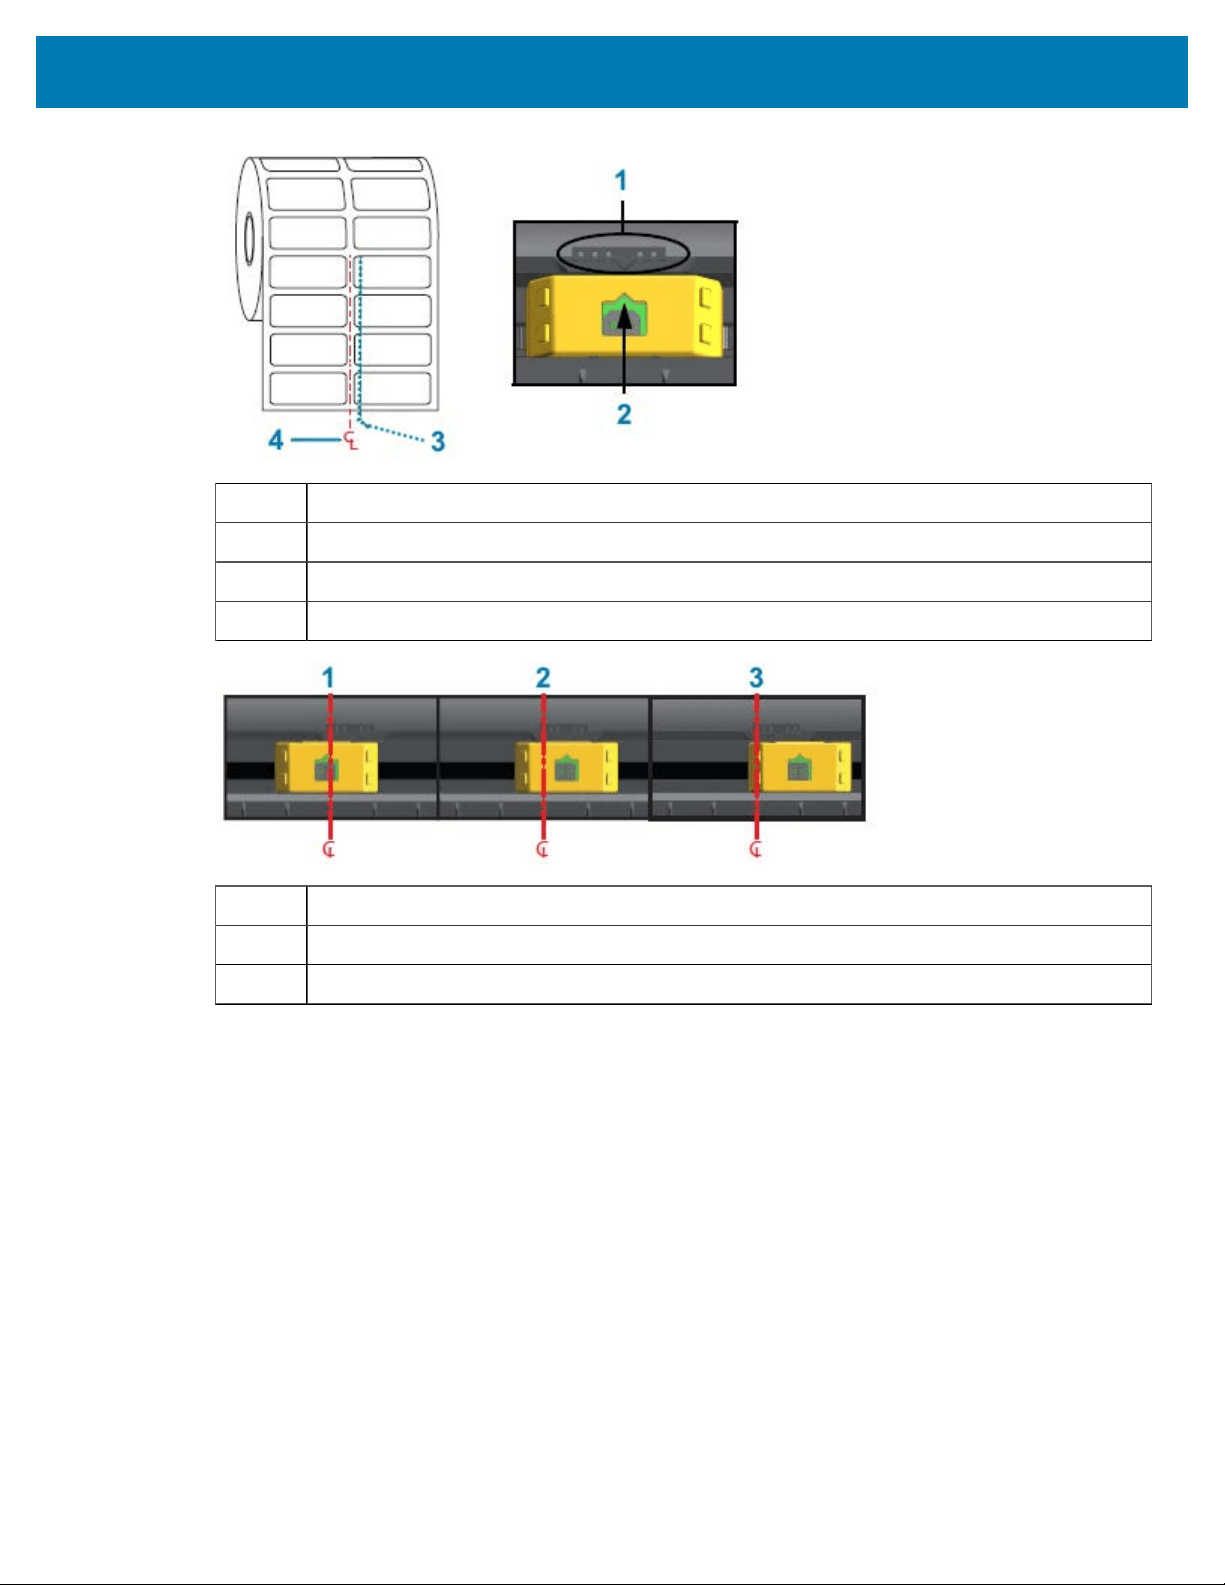
Setup
1 Alignment key
2 Alignment arrow (default position)
3 Default gap sensing position
4 Center line
1 Center-aligned sensing position
2 Default sensing position
3 Maximum right sensing position
The following are Zebra printer fixed sensor position relative to a ZD Series printer:
• Default — Zebra models G-Series fixed-position sensors: LP/TLP 2842, LP/TLP 2844, and LP/TLP 2042
• Center aligned — Zebra model LP/TLP 2742
184
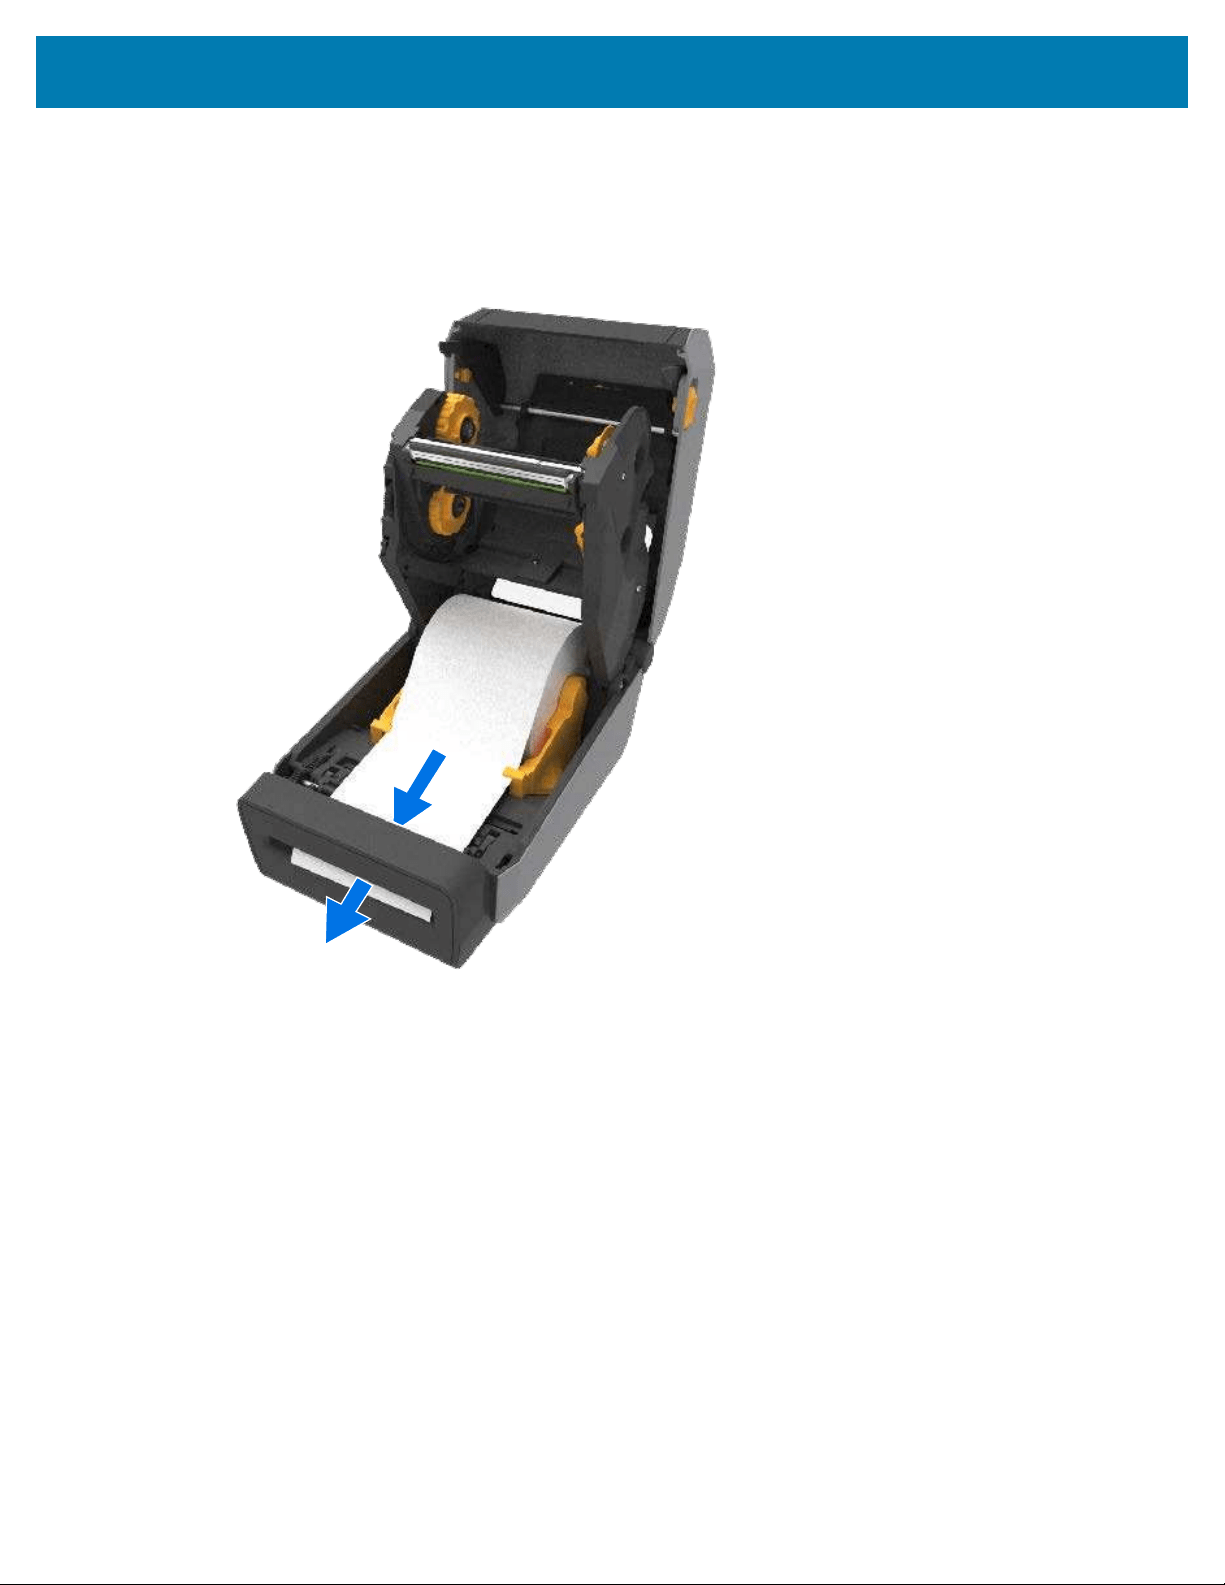
Setup
Loading Roll Media for Cutter Models
If your printer has the optional cutter module installed, use these instructions to continue loading the roll
media.
1. Thread the media through cutter’s media slot and pull it out the front of the printer.
185
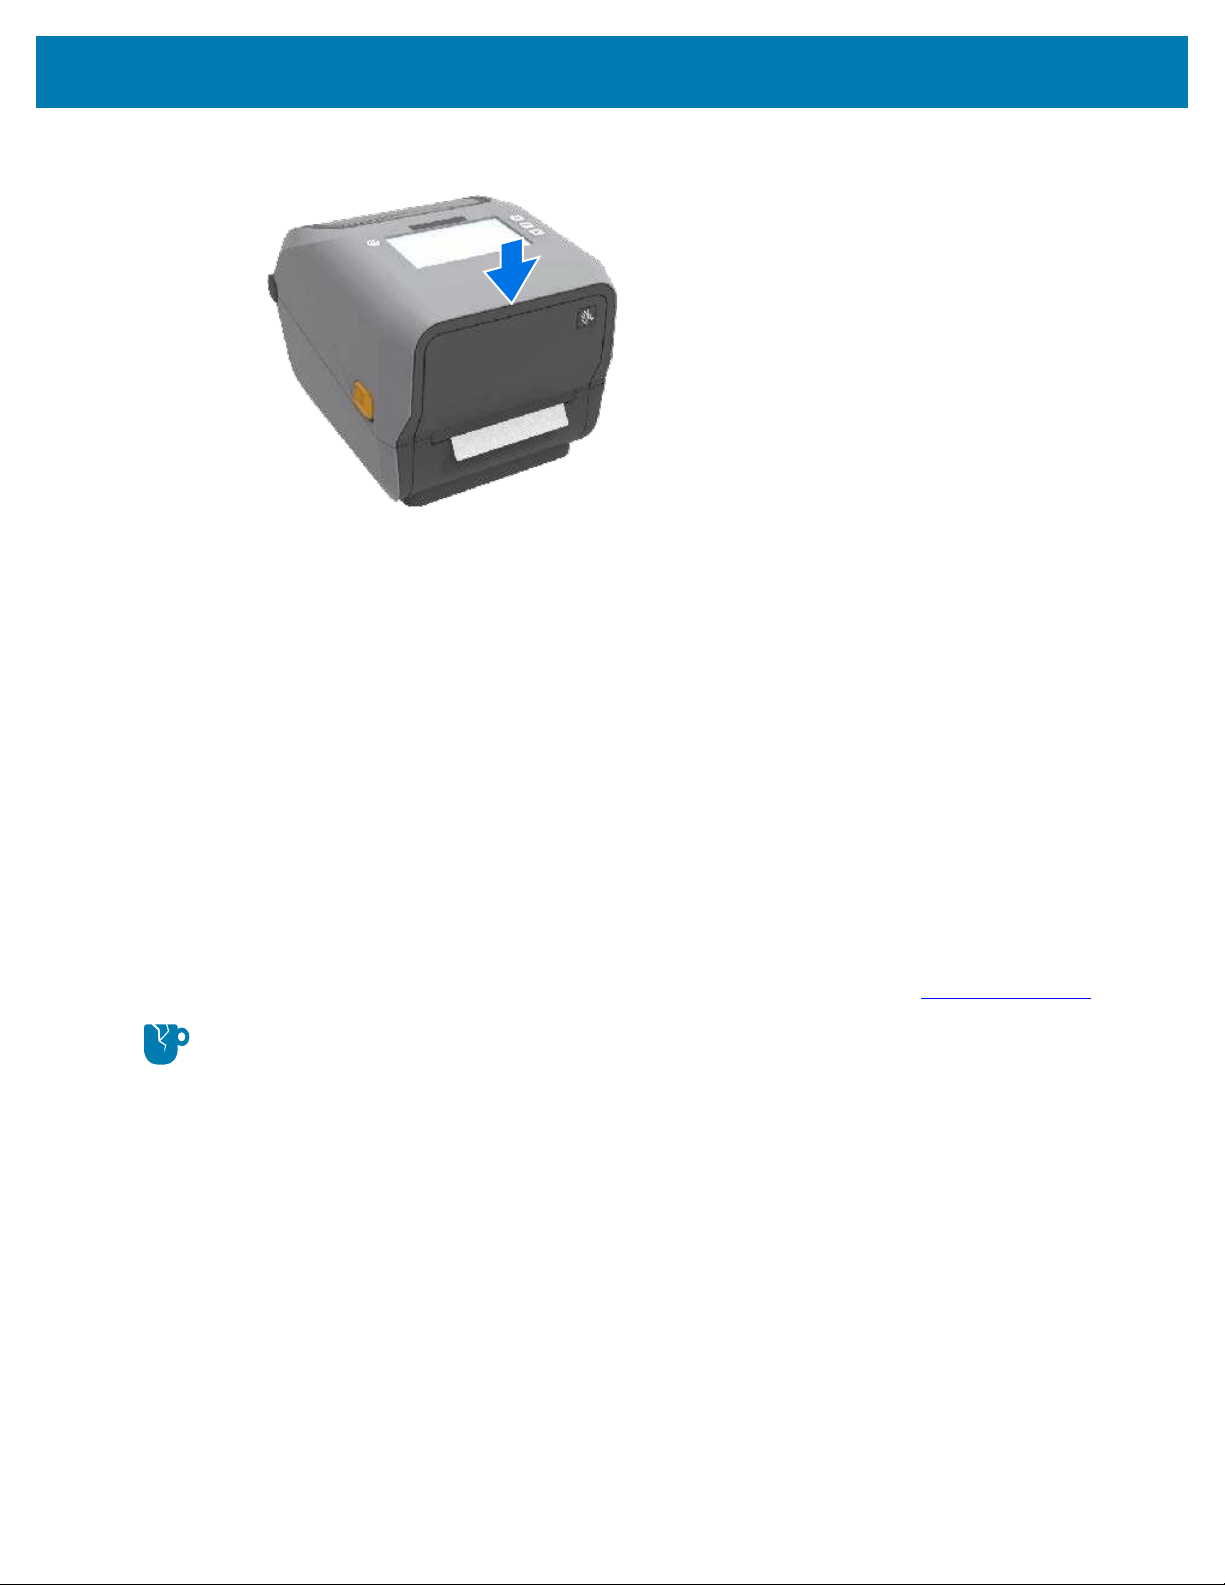
Setup
2. Close the printer. Press down until the cover snaps closed.
You may need a calibrate your printer for the media.See Running a SmartCal Media Calibration on page
199. The printer’s sensors must adjust to sense the label, the liner, and the distance between labels to
operate properly.
However, you do not have to recalibrate the printer's media sensors when you are loading the media with
the same physical specifications (size, label type) and vendor/batch. If this is the case, just press FEED
(Advance) to ready the new media for printing.
Thermal Transfer Roll Ribbon Loading
Thermal transfer printers have a flexible ribbon system that supports 74-meter and 300-meter ribbons
manufactured by Zebra. Your printer ships with 300-meter ribbon adapters to support non-Zebra ribbon
rolls.
The74-meter ribbon used with non-Zebra printers does NOT require non-Zebra ribbon adapters to operate
properly.
Transfer ribbons come in several varieties—and in some cases several colors—to match your application
needs. Transfer ribbons manufactured by Zebra are specifically designed for use with your Zebra printer
and Zebra brand media.For transfer ribbon rolls and other printing supplies, see zebra.com/supplies.
CAUTION—PRODUCT DAMAGE: Using non-Zebra media or ribbons that are NOT approved for
use with your Zebra printer may damage your printer or printhead.
186

Setup
Inner Diameter (I.D.) = 12.2 mm (0.5 in.) I.D. = 25.4 mm (1.0 in.)
• To ensure optimal print results, match the media and ribbon types.
• To protect the printhead from wear, always use ribbon that is wider than the media.
• For printing on Direct Thermal media, do NOT load ribbon in the printer.See Determining Thermal
Media Types on page 371.
• To avoid ribbon wrinkling and other print problems, always use an empty ribbon core that matches your
transfer ribbon roll’s inner diameter (I.D.).
Your printer requires ribbons manufactured by Zebra that have a ribbon-out trailer (reflector). When the
printer senses this trailer, it recognizes that the transfer ribbon roll has been used up and it stops printing.
In addition, ribbons and ribbon cores manufactured by Zebra include notches to help maintain ribbon-roll
engagement and drive (without slipping) while printing.
Zebra-manufactured ribbons for your printer include:
• Performance Wax
• Premium Wax/Resin
• Performance Resin for synthetics (6 inches per second or ips maximum speed) and coated paper (4 ips
maximum speed)
• Premium Resin for synthetics (4 ips maximum speed)
IMPORTANT: If using74-meter ribbons, DO NOT pair them with early-model desktop printer
ribbon cores! These older cores are too large. You can identify the older-style ribbon cores (and
some Non-Zebra ribbons) by notches seen ONLY on one side of the ribbon core.
IMPORTANT: DO NOT use ribbon cores that have damaged notches (rounded, frayed, smashed,
etc.) The core notches must be square to lock the core onto the spindle. Otherwise, the core may
slip and cause ribbon wrinkle, poor end-of-ribbon sensing, or other intermittent failures.
187
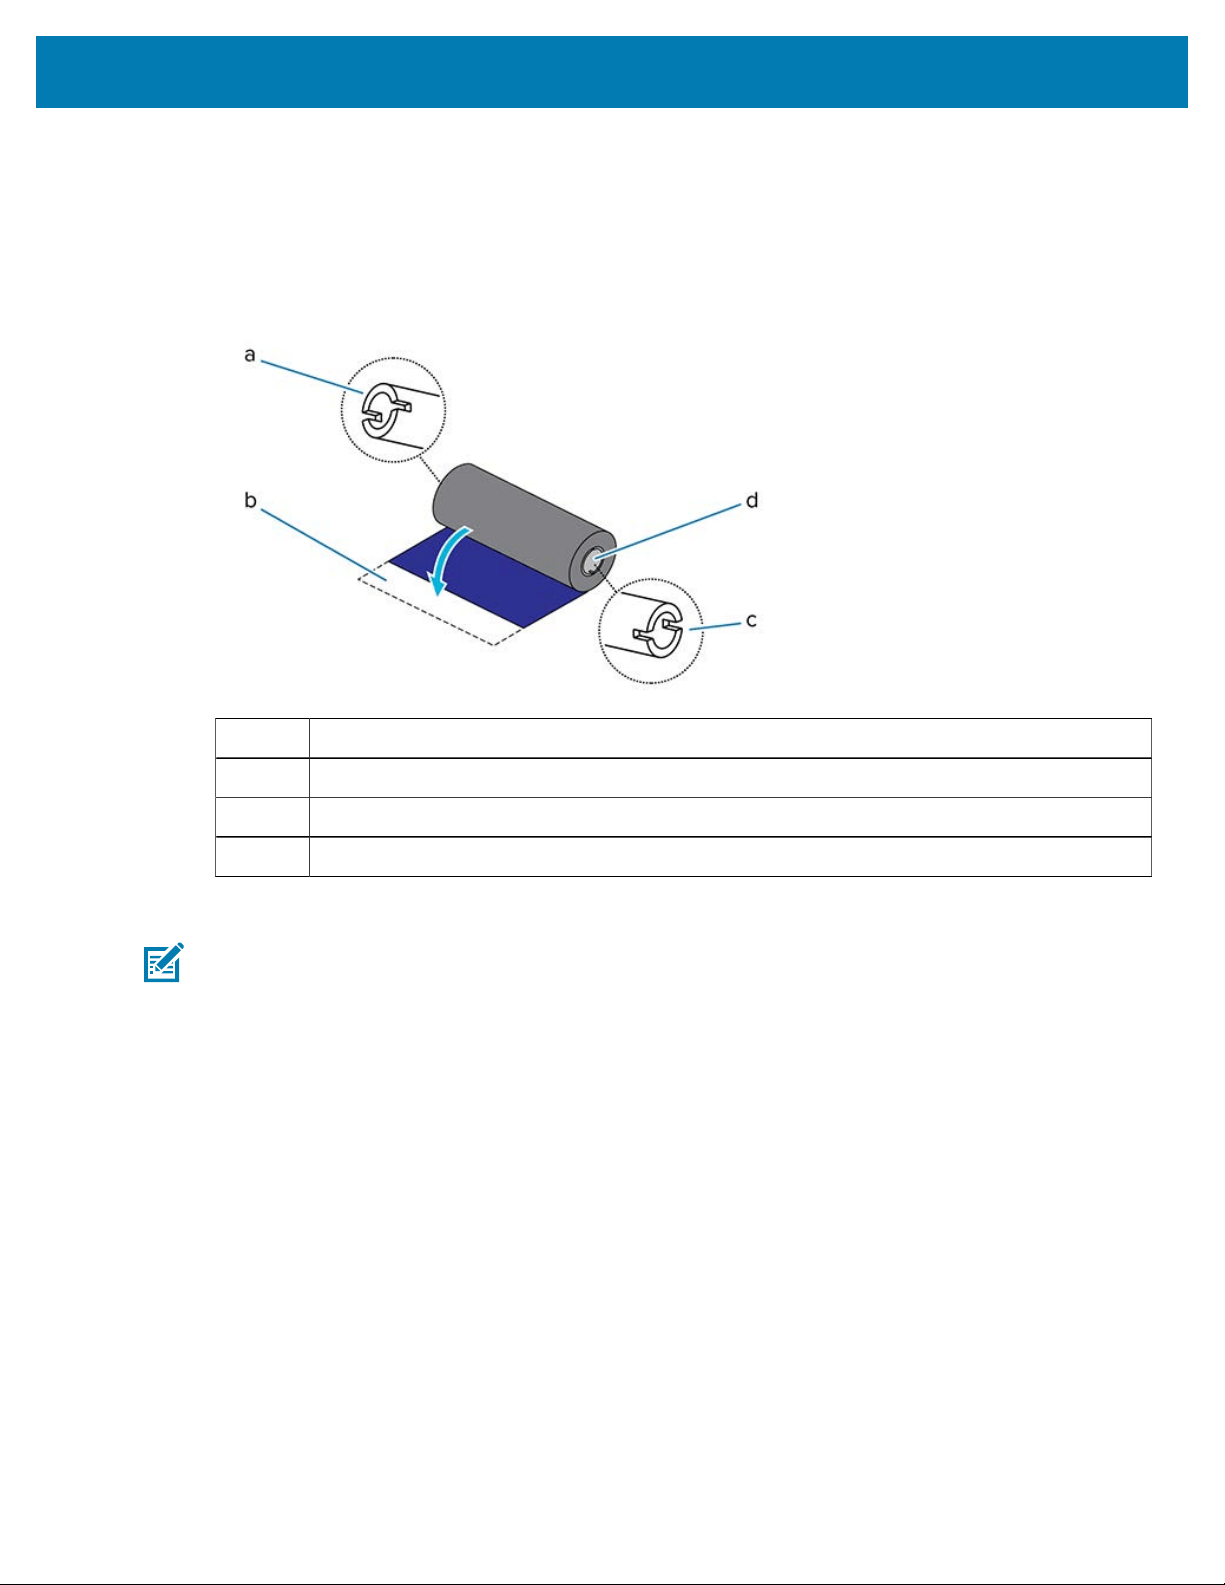
Setup
Loading Zebra Transfer Roll Ribbon
Be sure to complete the preparatory steps described here before you load the ribbon.
Prepare the ribbon by removing its wrapping and pulling its adhesive strip free.
Verify that the ribbon and empty ribbon core have notches on the left side of the ribbon cores as shown
here. (If they do not, see
Loading Non-Zebra 300-Meter Transfer Ribbon on page 191.)
a Notch (required on left side of ribbon)
b Adhesive strip
c Notches are also on the right side of the 74-meter ribbon
d Right side (printer and roll)
1. With the printer open, place an empty ribbon core on printer’s take-up spindles.
NOTE: You can find your first ribbon take-up core in the packing box. Subsequently, use the
empty supply core from the supply spindle for the next roll of ribbon.
2. Push the right side of the empty core onto the spring-loaded spindle (right side), aligning the core with
the center of the left-side spindle’s hub. Then rotate the core until the notches align and lock.
188
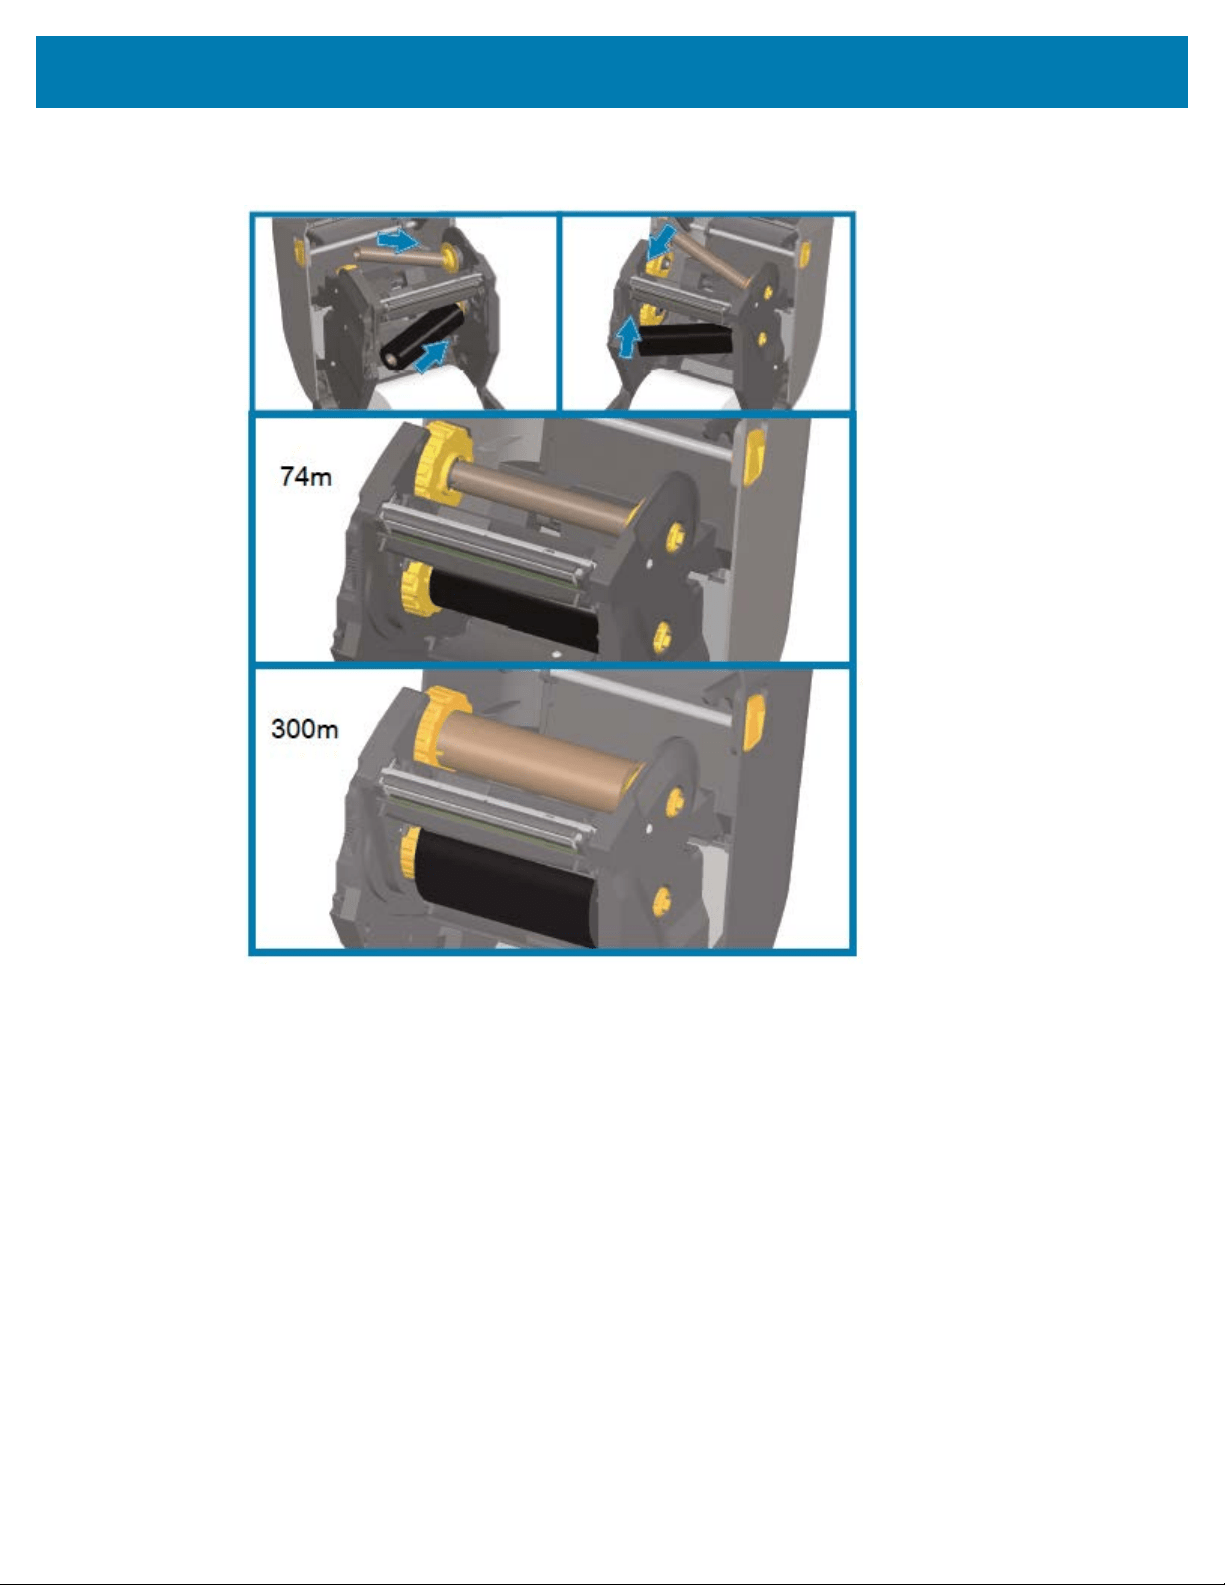
Setup
3. Place a new ribbon roll on printer’s lower ribbon supply spindle.Push it onto the right spindle and lock
the left side on to the left supply spindle.
189
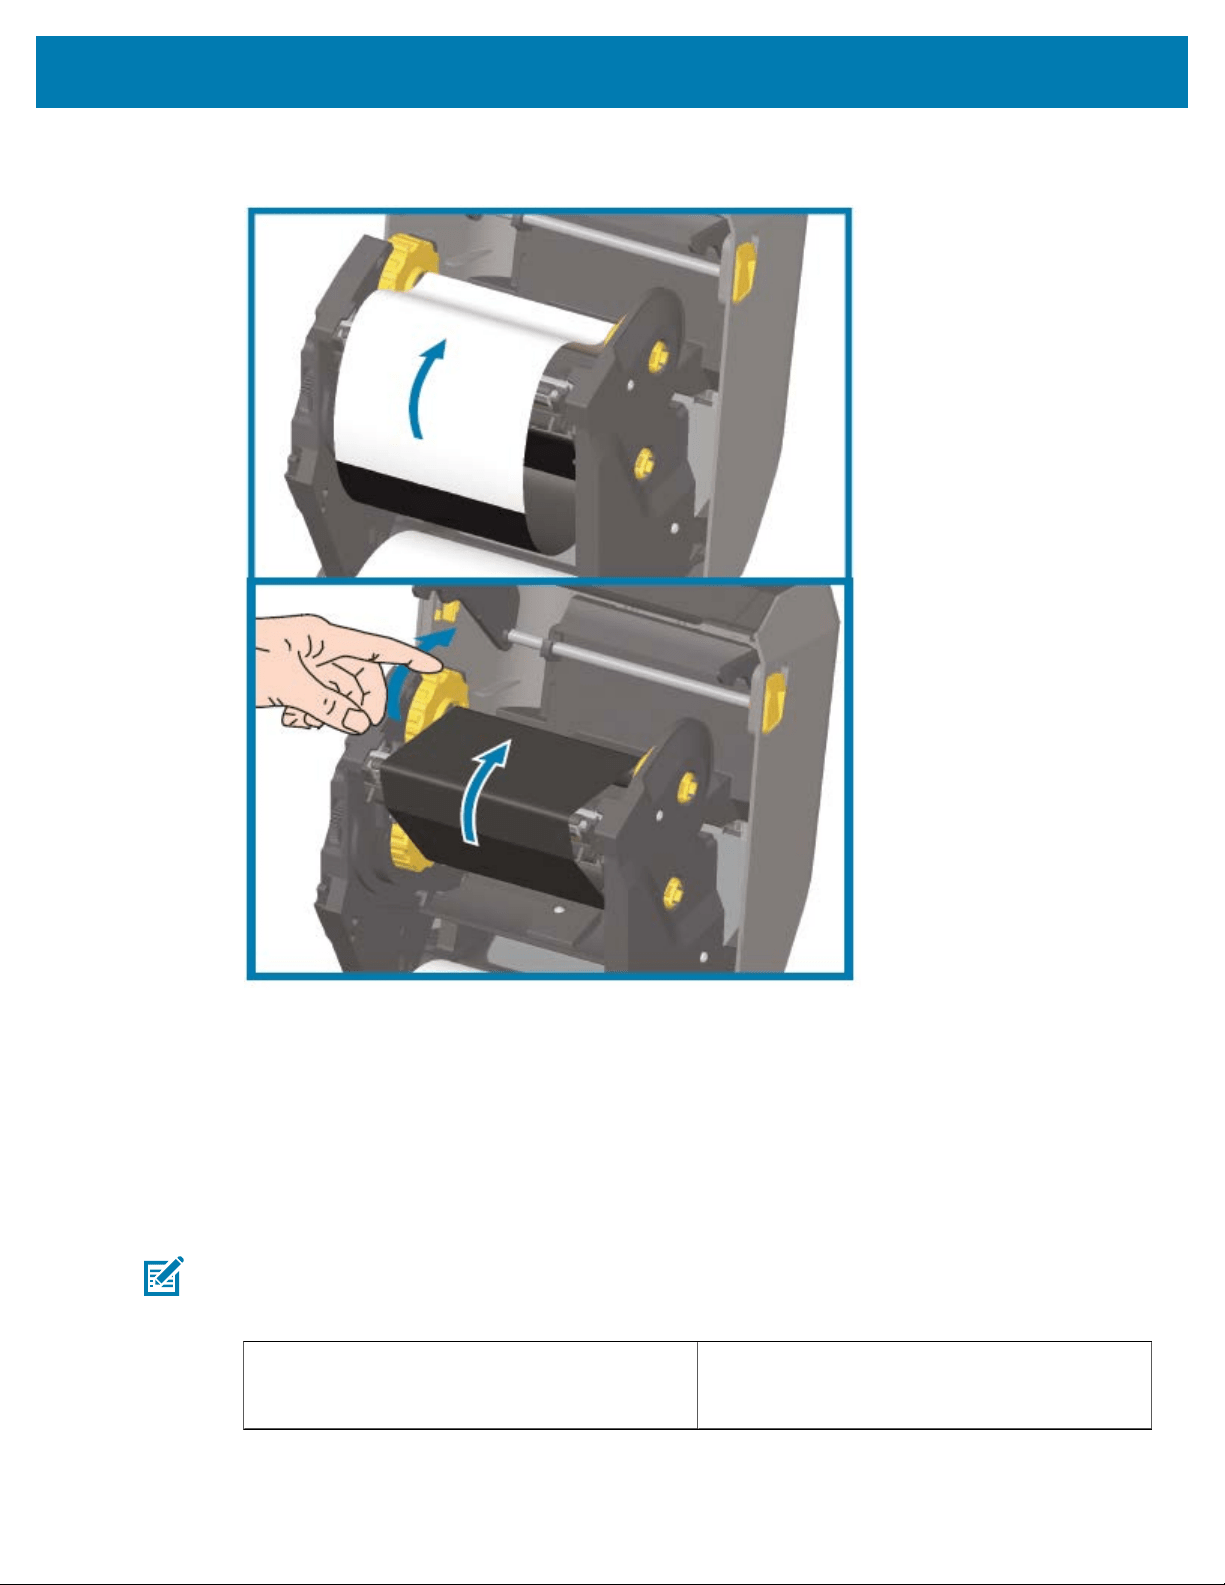
Setup
4. Attach the ribbon to the take-up core. Use the adhesive strip on new rolls; otherwise, use a thin strip of
tape. Align the ribbon so that it will be taken straight onto the core.
5. Turn the ribbon take-up hub with the top moving toward rear to remove slack from the ribbon. Rotate
the hub to finish aligning the take-up ribbon position to the ribbon supply roll. The ribbon leader should
be completely covered by the ribbon.
6. Verify that media is loaded correctly and is ready for printing, then close the printer cover.
7. If printer power is ON, press FEED to advance the media a minimum of 20 cm (8 in.) tostraighten the
ribbon and remove any slack and ribbon wrinkle and align the ribbon on the spindles.
8. Change the print mode setting from DIRECT THERMAL to THERMAL TRANSFERusing the printer driver,
the application software, or printer programming commands.
NOTE: The printer cannot print in Direct Thermal mode and with direct thermal media loaded
when ribbon is also loaded.Attempting to print in Direct Thermal mode with ribbon loaded
generatesa ribbon-in print error.
When controlling printer operations using ZPL
programming...
Refer to the Media TypeZPL II command
^MT and,follow the instructions, in the ZPL
Programming Guide.
190
Setup
When controlling printer operations using EPL
Page Mode...
Refer to the OptionsEPL command O, and
follow the instructions, in the EPL Page Mode
Programmer’s Guide.
9. To verify the mode change from Direct Thermal printing to Thermal Transfer printing, print a
configuration report.Forinstructions on printing this report, see
Printing the Printer and Network
Configuration Reports (CANCEL Self Test) on page 324.
The PRINT METHOD shown on the printer configuration report should read THERMAL-TRANS.
Loading Non-Zebra 300-Meter Transfer Ribbon
To load non-Zebra 300-meter transfer ribbon onto your printer, you will need Zebra ribbon core adapters.
The minimum requirements to use non-Zebra 300-meter ribbons with your printer are as follows:
Inside core diameter (I.D.) 25.4 mm (1.0 in., with a range of 1.004 in. to 1.016 in.)
Inside core material Fiberboard (hard materials such as plastic cores may NOT function
correctly)
Ribbon width range 33 mm to110 mm(1.3 in. to4.3 in.)
Ribbon's maximum outer
diameter (O.D.)
66 mm (2.6 in.)
CAUTION—PRODUCT DAMAGE: Using non-Zebra media or ribbons not approved for use in
your Zebra printer may damage your printer or printhead. Image quality may also be affected by:
• poor or marginal ribbon performance (maximum print speed, ink formulation, etc.)
• core material that is too soft or too hard)
• loose or tight ribbon core fit or a ribbon core that exceeds the maximum outer diameter of 66 mm)
The adapters help you align the ribbon and core to the media (and printer’s) center. They include a core-
lock spring to engage the soft fiberboard inside the ribbon core. They scale, as measured from the printer’s
center-line, when mounted in the printer.
191
8. Change the print mode setting from DIRECT THERMAL to THERMAL TRANSFERusing the printer driver,
the application software, or printer programming commands.
NOTE: The printer cannot print in Direct Thermal mode and with direct thermal media loaded
when ribbon is also loaded.Attempting to print in Direct Thermal mode with ribbon loaded
generatesa ribbon-in print error.
When controlling printer operations using ZPL
programming...
Refer to the Media TypeZPL II command
^MT and,follow the instructions, in the ZPL
Programming Guide.

Setup
1 Center line
2 Core lock spring
1. Load an empty ribbon core onto a ribbon core adapter. The empty ribbon core should be the same
width (or larger) than the ribbon roll. Roughly center the core over the adapter's center line.
NOTE: An empty Zebra ribbon core may be used instead of the ribbon-core adapter and
empty non-Zebra ribbon core. One 300-meter empty ribbon core is supplied with your
printer.
192
Setup
2. Load the non-Zebra ribbon roll onto the ribbon-core adapter. Orient the adapter flange on the left side
and verify that the ribbon unwraps on the backside of the roll as shown here. Roughly center the core
over the center line (CL) of the adapter.
1 Flange–place on left
2 Ribbon exiting the roll in the back
NOTE:
The maximum roll width of 110 mm (4.3 in.) does NOT require centering.
193
Setup
For media less than maximum width down to the minimum width of 33 mm (1.3 in.), use the
graduated scale on the adapter core to align the ribbon rolls to the media and printer.
Width = 110 mm (4.3 in.) Width = 33 mm (1.3 in.)
3. Place the adapter with an empty core on the take-up spindles and the adapter with the ribbon roll
on the lower supply spindles. The right side of the core adapter fits on the cone-tip on each of the
spring-loaded right-side spindles. Continue pushing the adapter onto right-side spindle and swing
194
Setup
the adapter onto the left-side spindle hubs. Rotate the adapters and hubsuntil the notches on the
adapters flange align and lock on the left spindles' hub spokes.
195
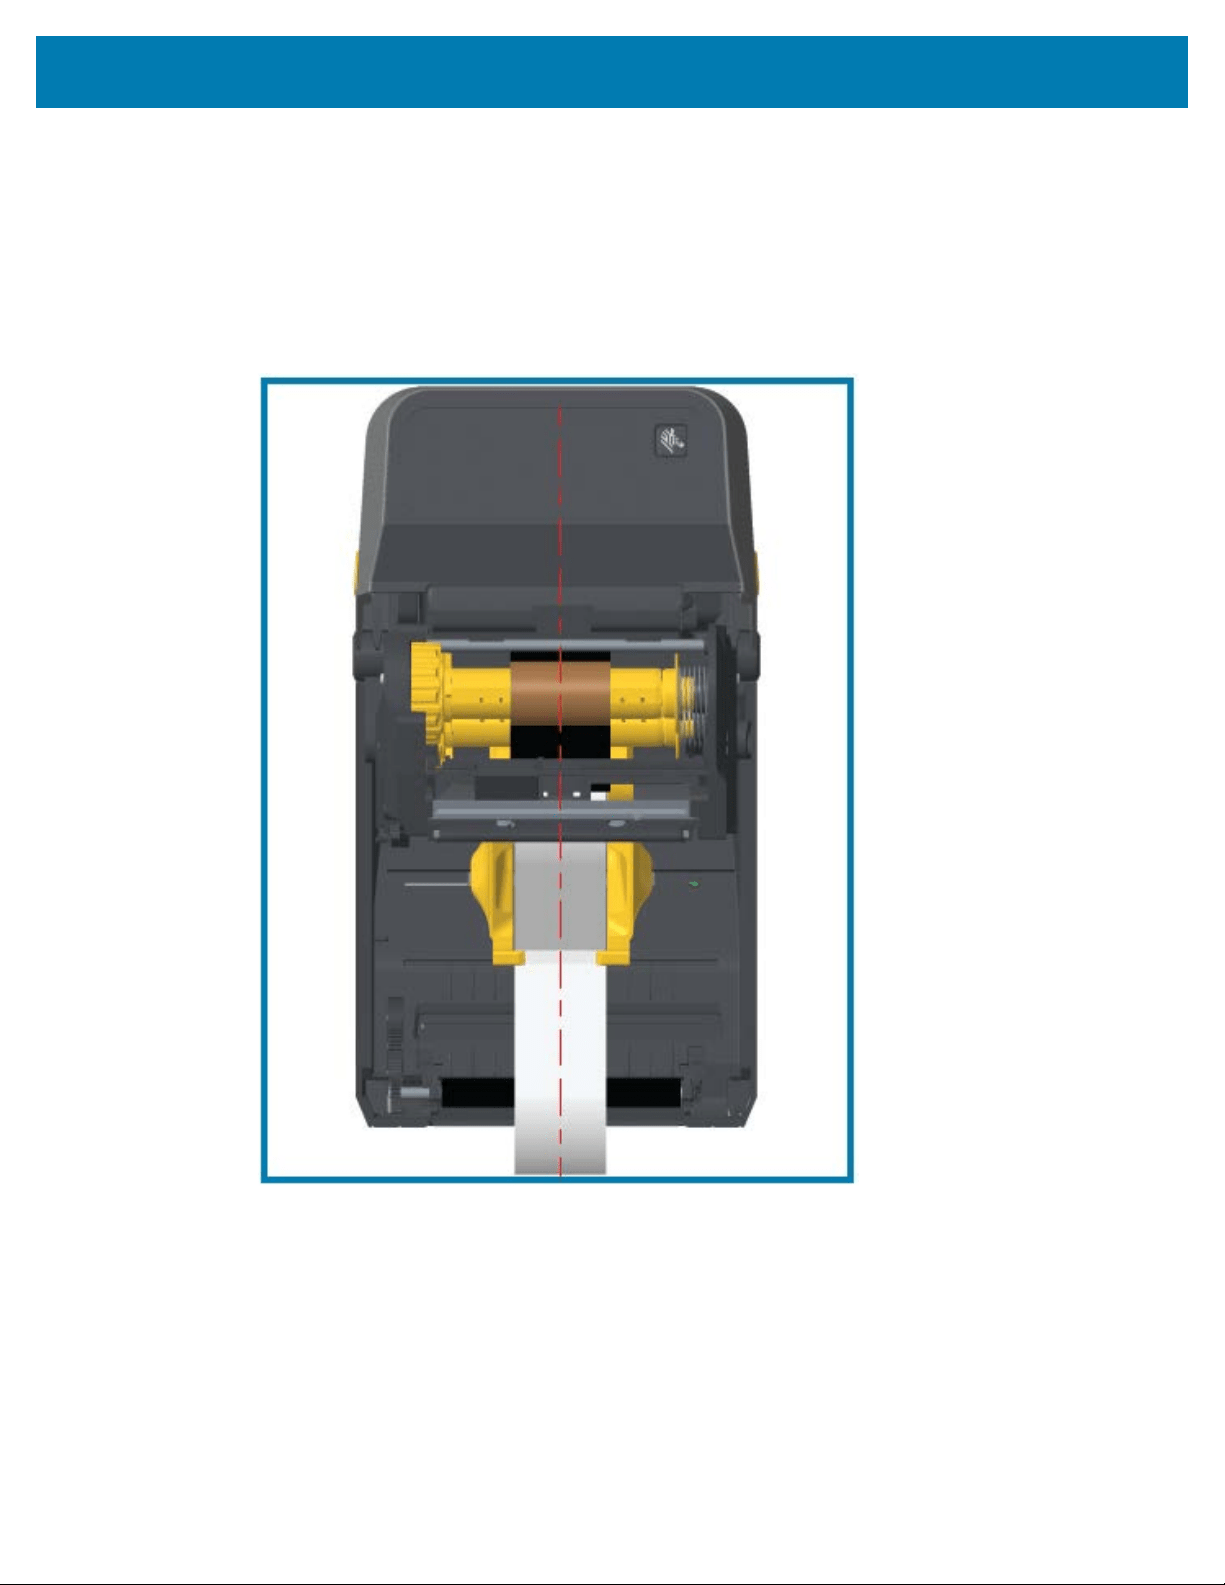
Setup
4. While the ribbon and empty cores were being installed during the previous steps, they may have been
bumped off center.
• Verify that the ribbon roll and empty core are aligned to the center of the media (labels, paper,
tags, etc.). Use the center line scales on the ribbon core adapter as a guide to return them to the
proper positions.
• If you have not yet checked if the ribbon is wide enough the for the media in use, do so now. To
protect the printhead, the ribbon must be wider than the media (where the width includes the label
liner or backing).
196
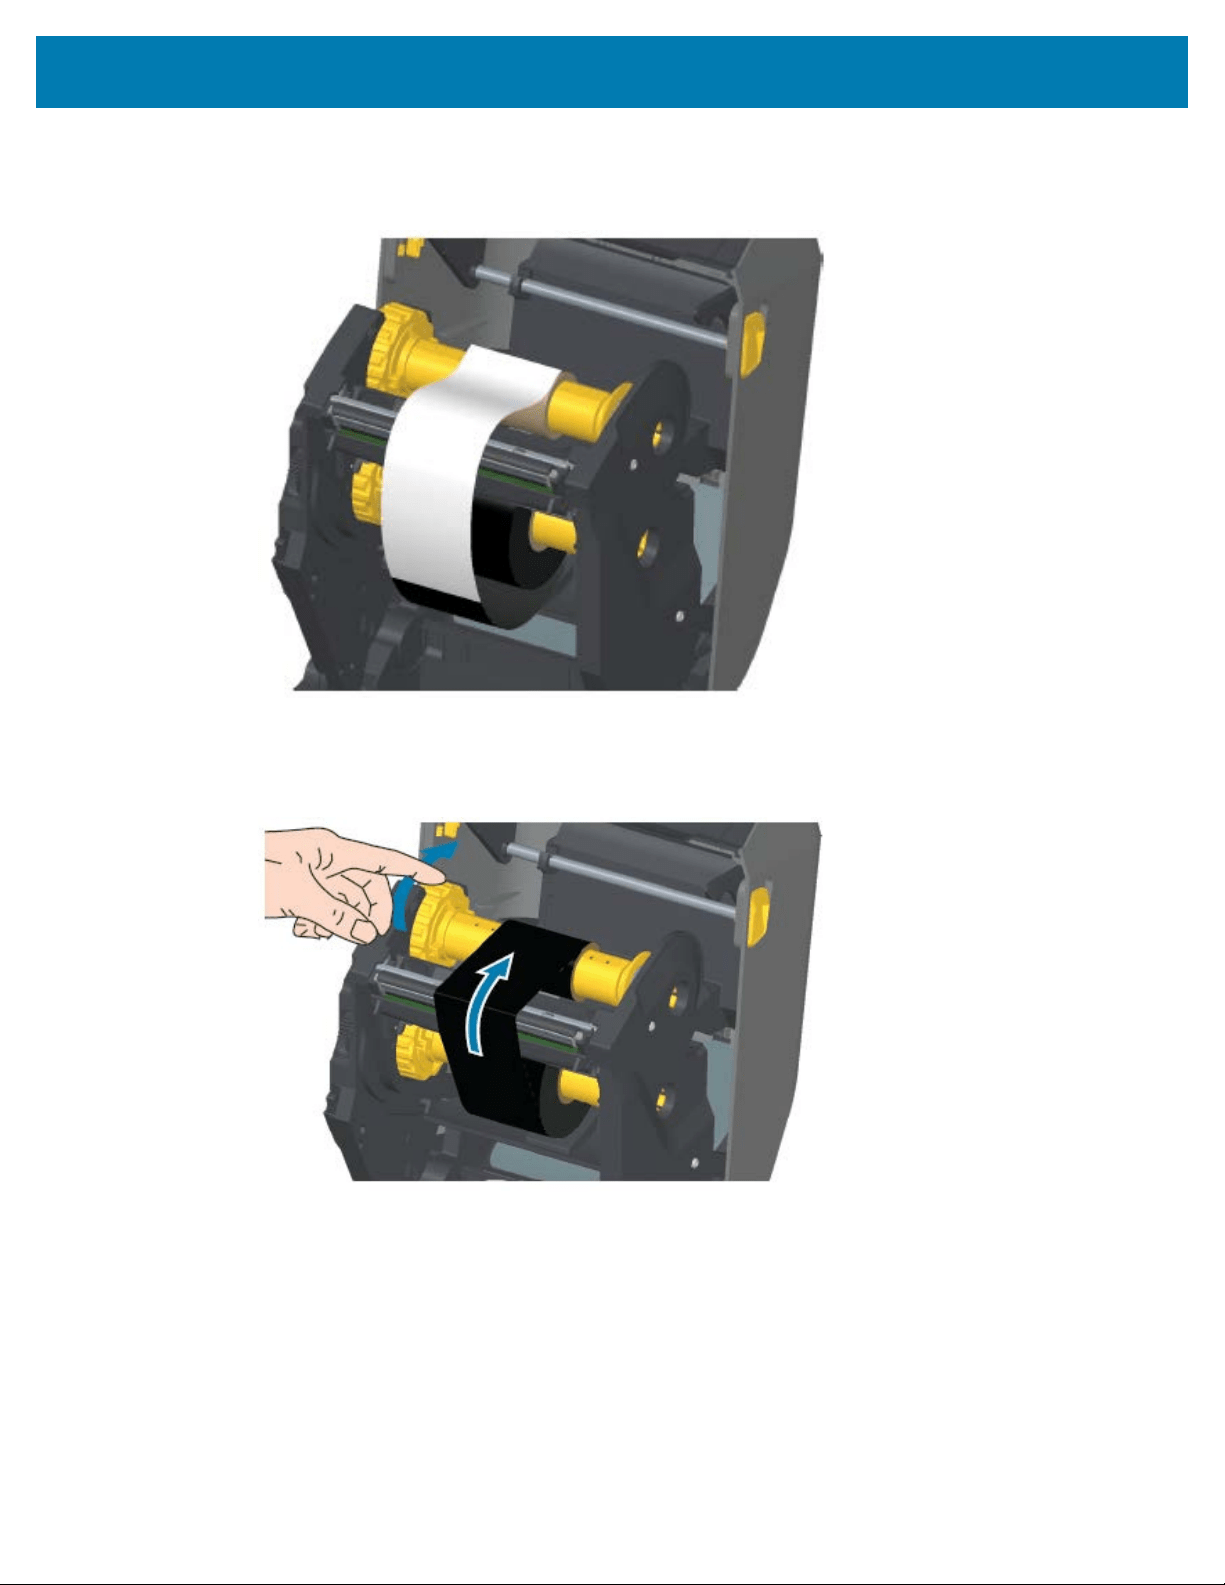
Setup
5. Attach the ribbon to the take up core. If your media does NOT have an adhesive strip on the ribbon
leader as Zebra-manufactured ribbon does,use a thin strip of tape to secure the ribbon to the take-up
core. Align the ribbon so that it will be taken straight onto the core.
6. Turn the ribbon take-up hub with the top moving towards the rear to remove slack from the ribbon.
Rotate the hub to finish aligning the take-up ribbon position with the supply-ribbon roll. The ribbon
should be wound, at a minimum, one-and-a-half times around the take-up ribbon core.
7. Verify that the media is loaded properly and is ready for printing, then close the printer cover.
8. If printer power is ON, press FEED to advance a minimum of 20 cm (8 in.) of media to remove slack
and ribbon wrinkle (straighten the ribbon), and align the ribbon on the spindles.
197
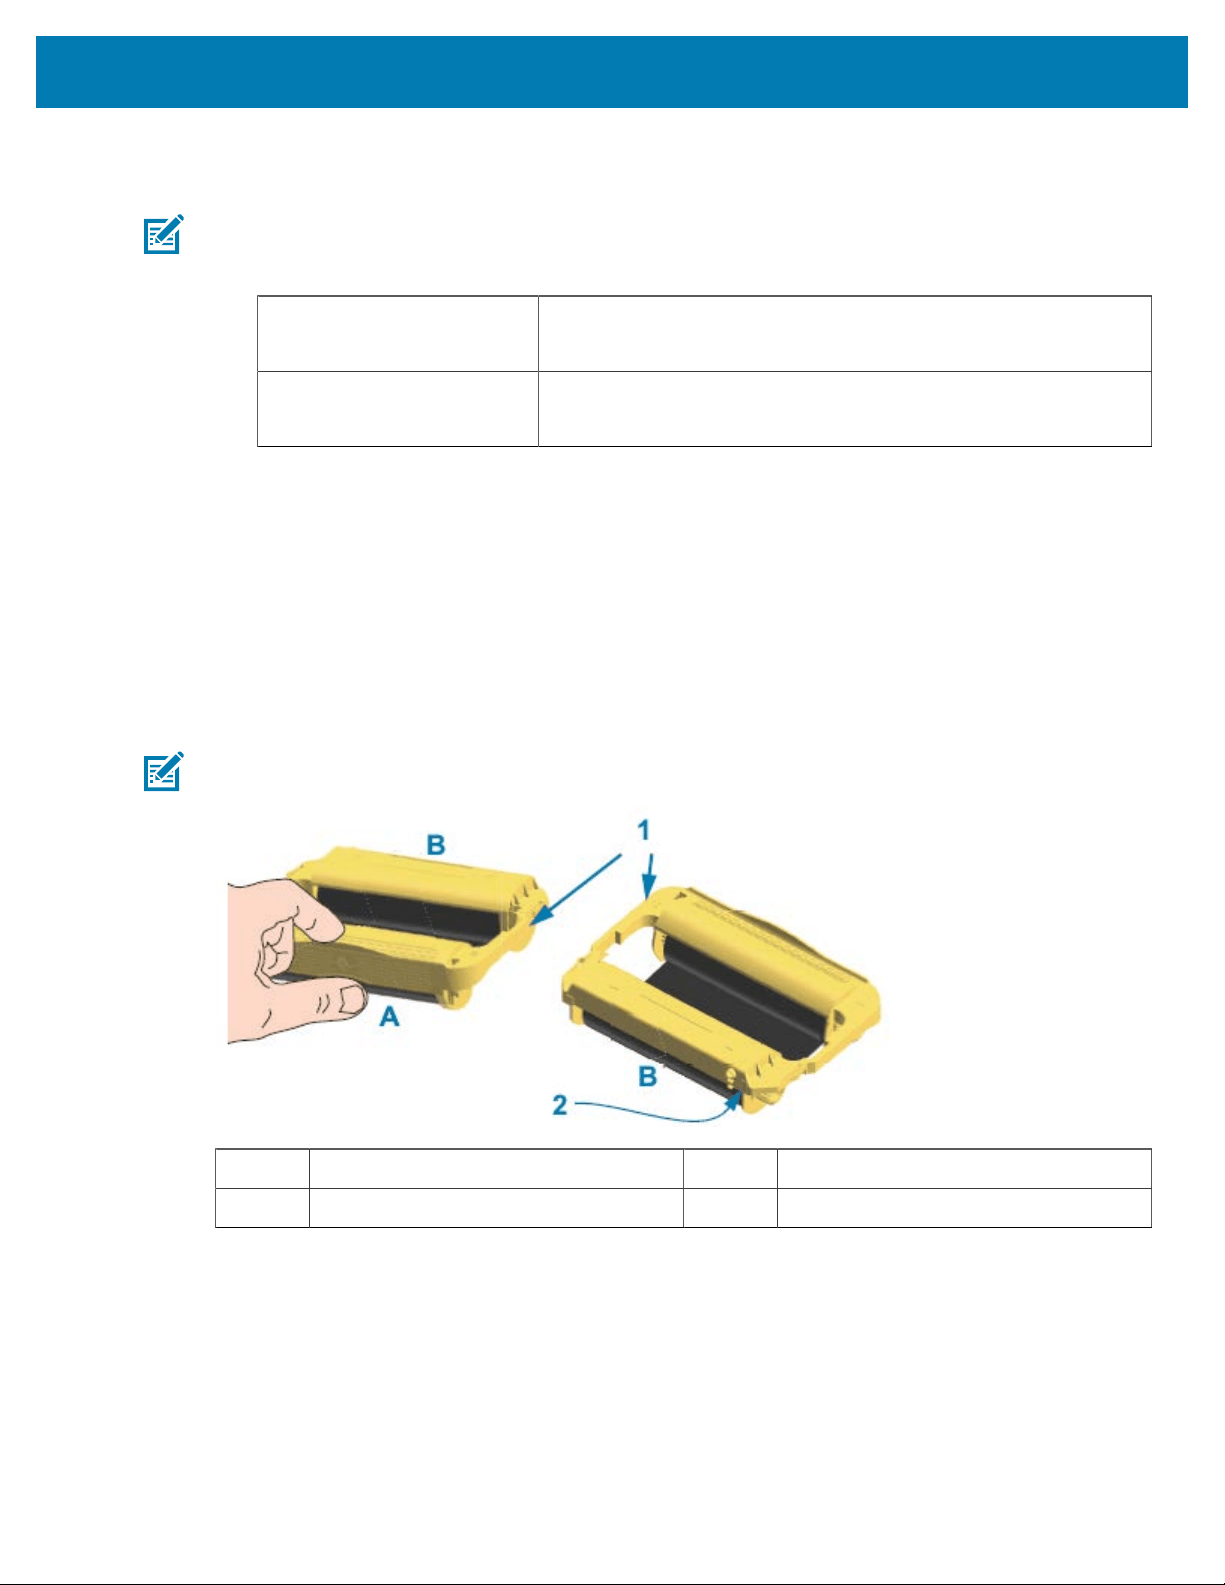
Setup
9. Change the print mode setting from Direct Thermal printing to Thermal Transfer usingthe printer
driver, the application software, or printer programming commands.
NOTE: The printer cannot print in Direct Thermal mode and with direct thermal media
loaded when ribbon is also loaded.Attempting to print in Direct Thermal mode with ribbon
loaded generatesa ribbon-in print error.
When controlling printer
operations with ZPL
programming...
Refer to the Media TypeZPL II command (^MT), and follow the
instructions, in the ZPL Programming Guide).
When controlling printer
operations with EPL Page
Mode...
Refer to the OptionsEPL command (O), and follow the instructions,
in the EPL Page Mode Programmer’s Guide).
10. To verify the mode change from Direct Thermal printing to Thermal Transfer printing, print a
configuration report.Forinstructions on printing this report, see
Printing the Printer and Network
Configuration Reports (CANCEL Self Test) on page 324.
The PRINT METHOD on the printer configuration status report should read THERMAL-TRANS.
Loading the Ribbon Cartridge (ZD421ribbon cartridge printers only)
The printer uses a transfer ribbon cartridge for thermal transfer printing. This procedure involves sliding
the cartridge into the ribbon transport and then closing the printer. The printer automatically reads the
information about the cartridge that is stored on the cartridge.
NOTE: Only Genuine Zebra Ribbon Cartridges are supported.
1 Cartridge guide rails A Hold the ribbon cartridge here.
2 Cartridge information smart chip B Insert this end of the cartridge
198
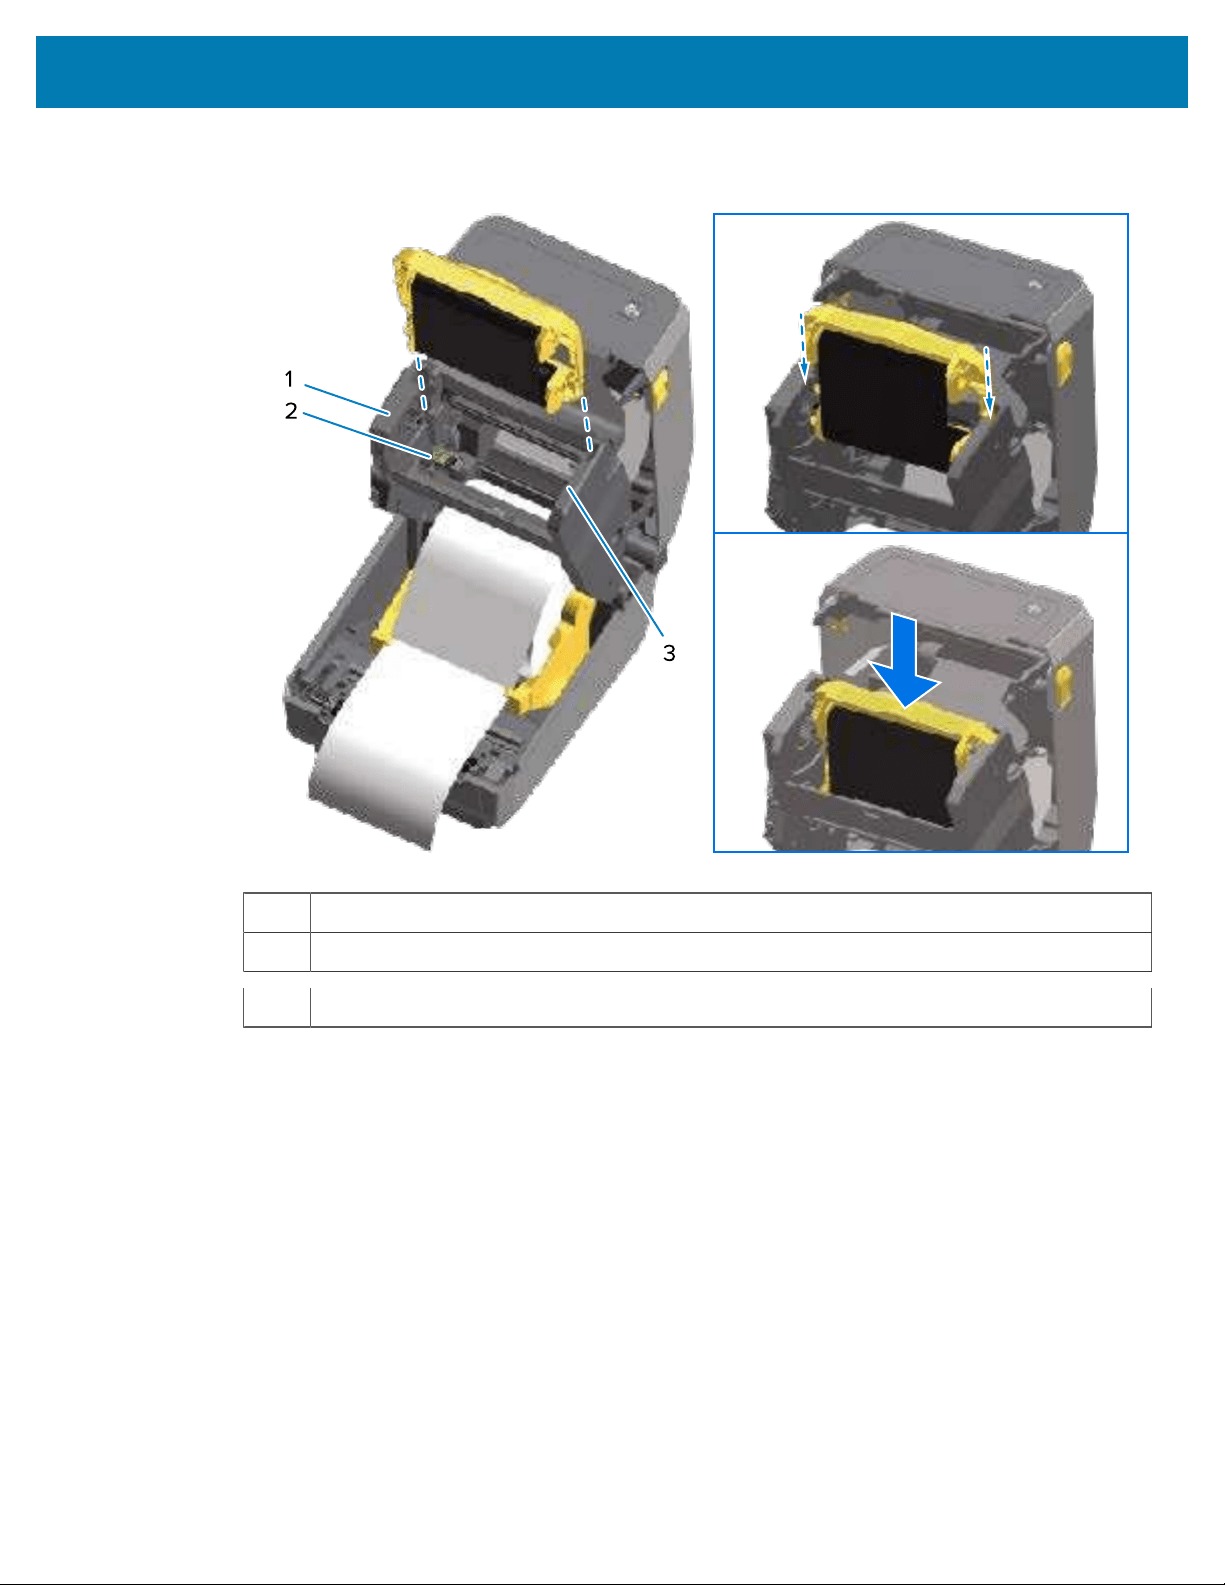
Setup
1. Open the printer and insert the ribbon cartridge into the ribbon cartridge slot on the ribbon transport in
your printer.
1 Front of ribbon transport
2 Smart chip reader
3 Cartridge guides
2. Push until the cartridge is nearly flush to the front of the ribbon transport.
You will hear and feel the cartridge lock into place.
Running a SmartCal Media Calibration
The printer must set media parameters for optimal operation prior to printing. To do this, it automatically
determines the media type (web/gap, black mark/notch, or continuous) and the measure media
characteristics for printing.
1. Make sure media is loaded (and also ribbon if you are using thermal transfer mode) properly in the
printer and the top cover of the printer is closed.
2. Press POWER to turn printer power on and waituntil the printer is in the Ready state .
The STATUS Indicator lights solid green
199
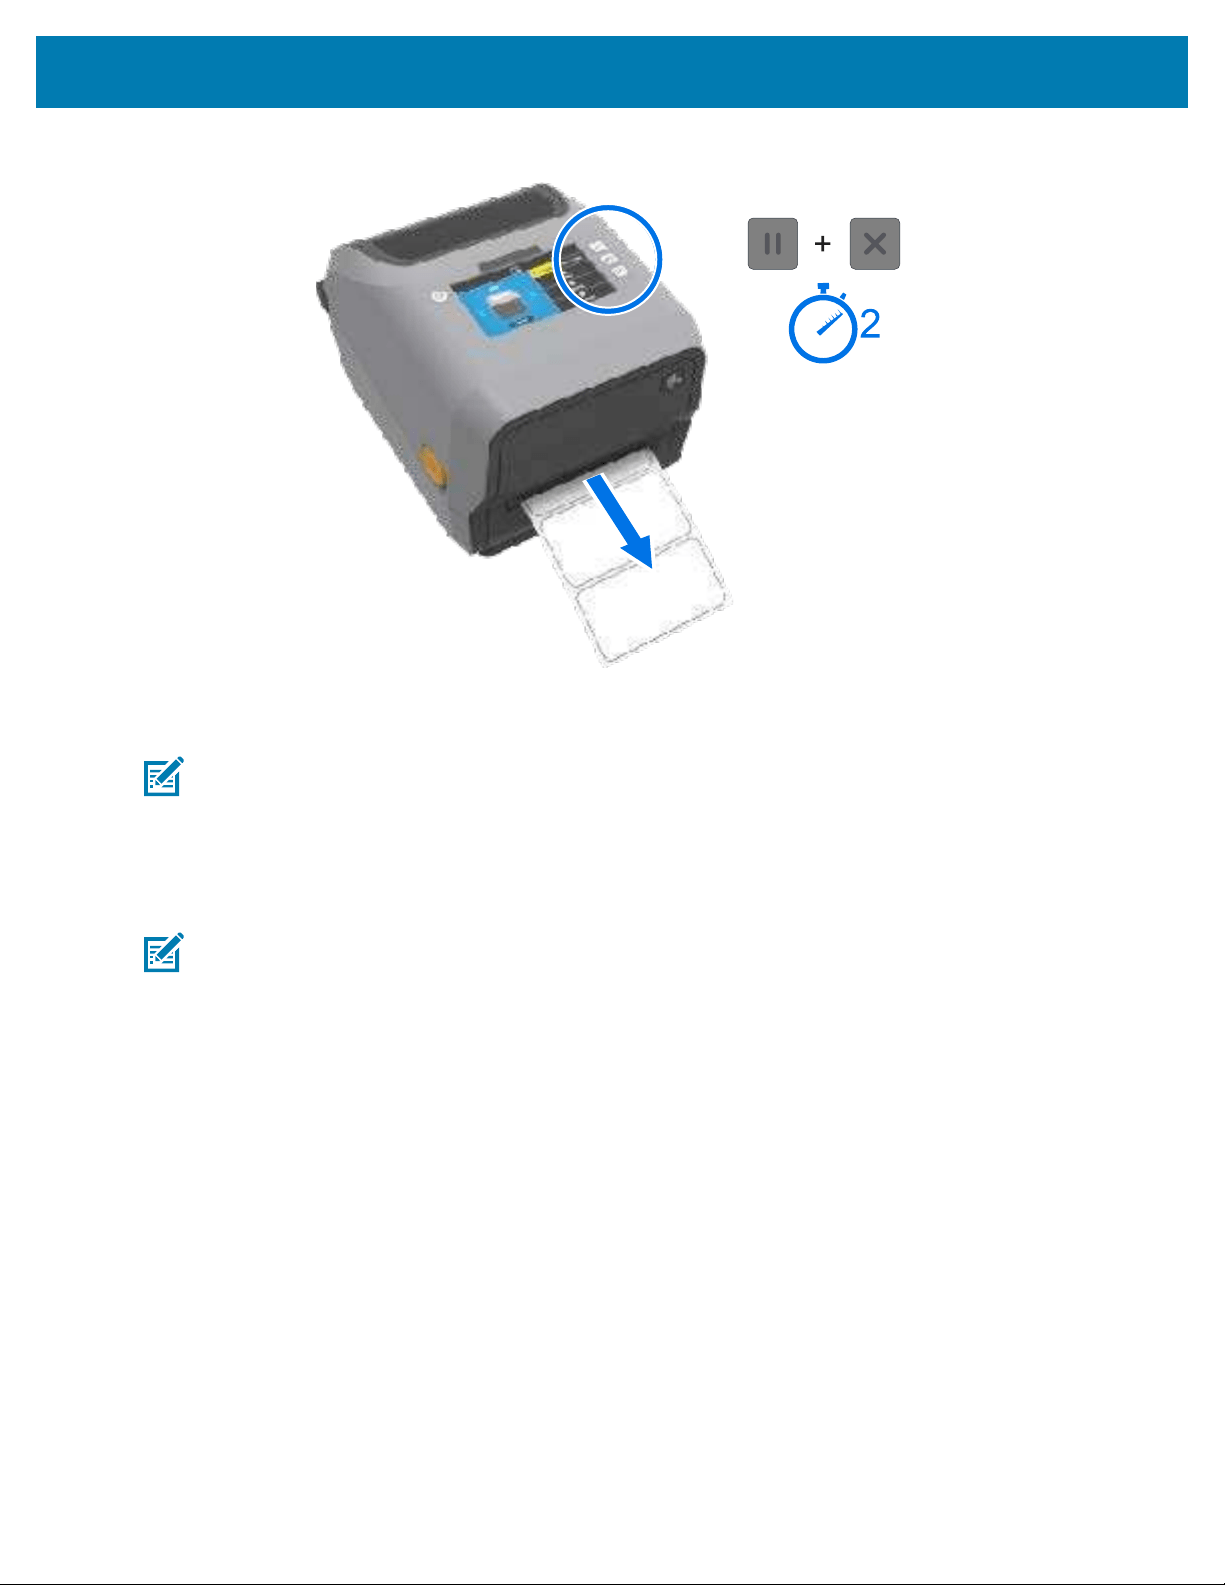
Setup
3. Press and hold PAUSE and CANCEL simultaneously for two seconds, then release.
The printer feeds and measures a few labels and adjusts media sensing levels.When it completes
measuring, the STATUS indicator lights solid Green.
NOTE: After initial calibration to a specific media, additional calibrations are not necessary
for newly-loaded media as long as it is of the same type as the prior media used (media type,
vendor, batch, size, etc.). The printer automatically measures the newly-loaded media and adjusts
for any small changes in its characteristicswhen printing.
After you load a roll of new media from the same batch, you can simply press FEED (Advance)
once or twice to synchronize the labels and get the media set for printing.
NOTE: If the printer should fail to recognize and correctly calibrate to the media, see Manually
Calibrating Media on page 336.
Test Printing with a Configuration Report
Before connecting the printer to a computer, make sure that the printer is in working order by printing a
configuration report.
The information in the configuration reports may come in handy during printer installation and
troubleshooting.
1. Make sure the media (and ribbon, if you printing on thermal transfer media) are loaded properly in the
printer and the printer's top cover is closed.
2. Turn printer power ON.
3. Afterthe printer enters ready state (the STATUS indicator lights solid green), press and hold FEED and
CANCEL simultaneously for two seconds, then release.
The printer and network configuration reports print.When the printer stops printing the reports, the
STATUS indicator turns solid green.
200
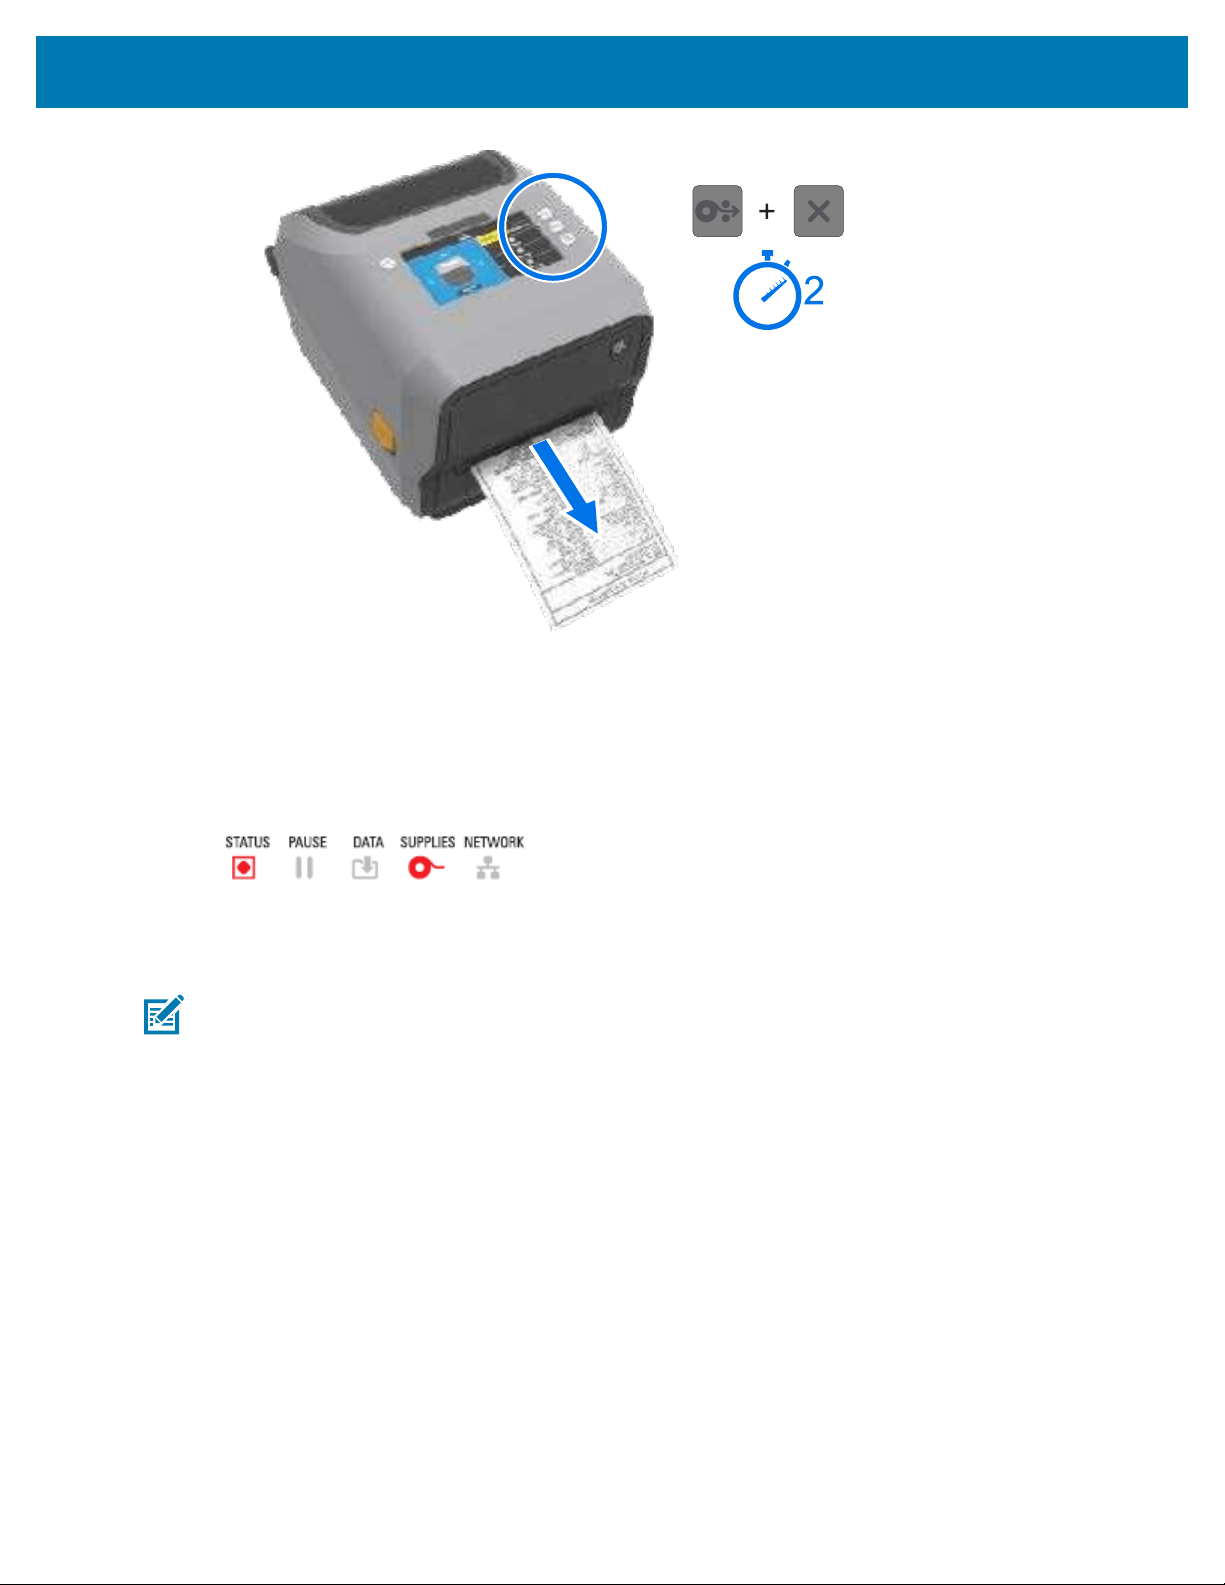
Setup
If you cannot get these reports to print, see Troubleshooting on page 311.
Detecting and Recovering from a Media-Out Condition
When you run out of media, your printer reports a Media Out condition. The STATUS Indicator flashes red
and the SUPPLIES indicator light up red. This is part of the normal media usage cycle.
To recovery from a Media Out condition:
1. Open the printer.
NOTE: During the Media Out alert condition, the media is usually at the end of the roll or
nearly at the end of the roll, with a label missing from the liner.
201
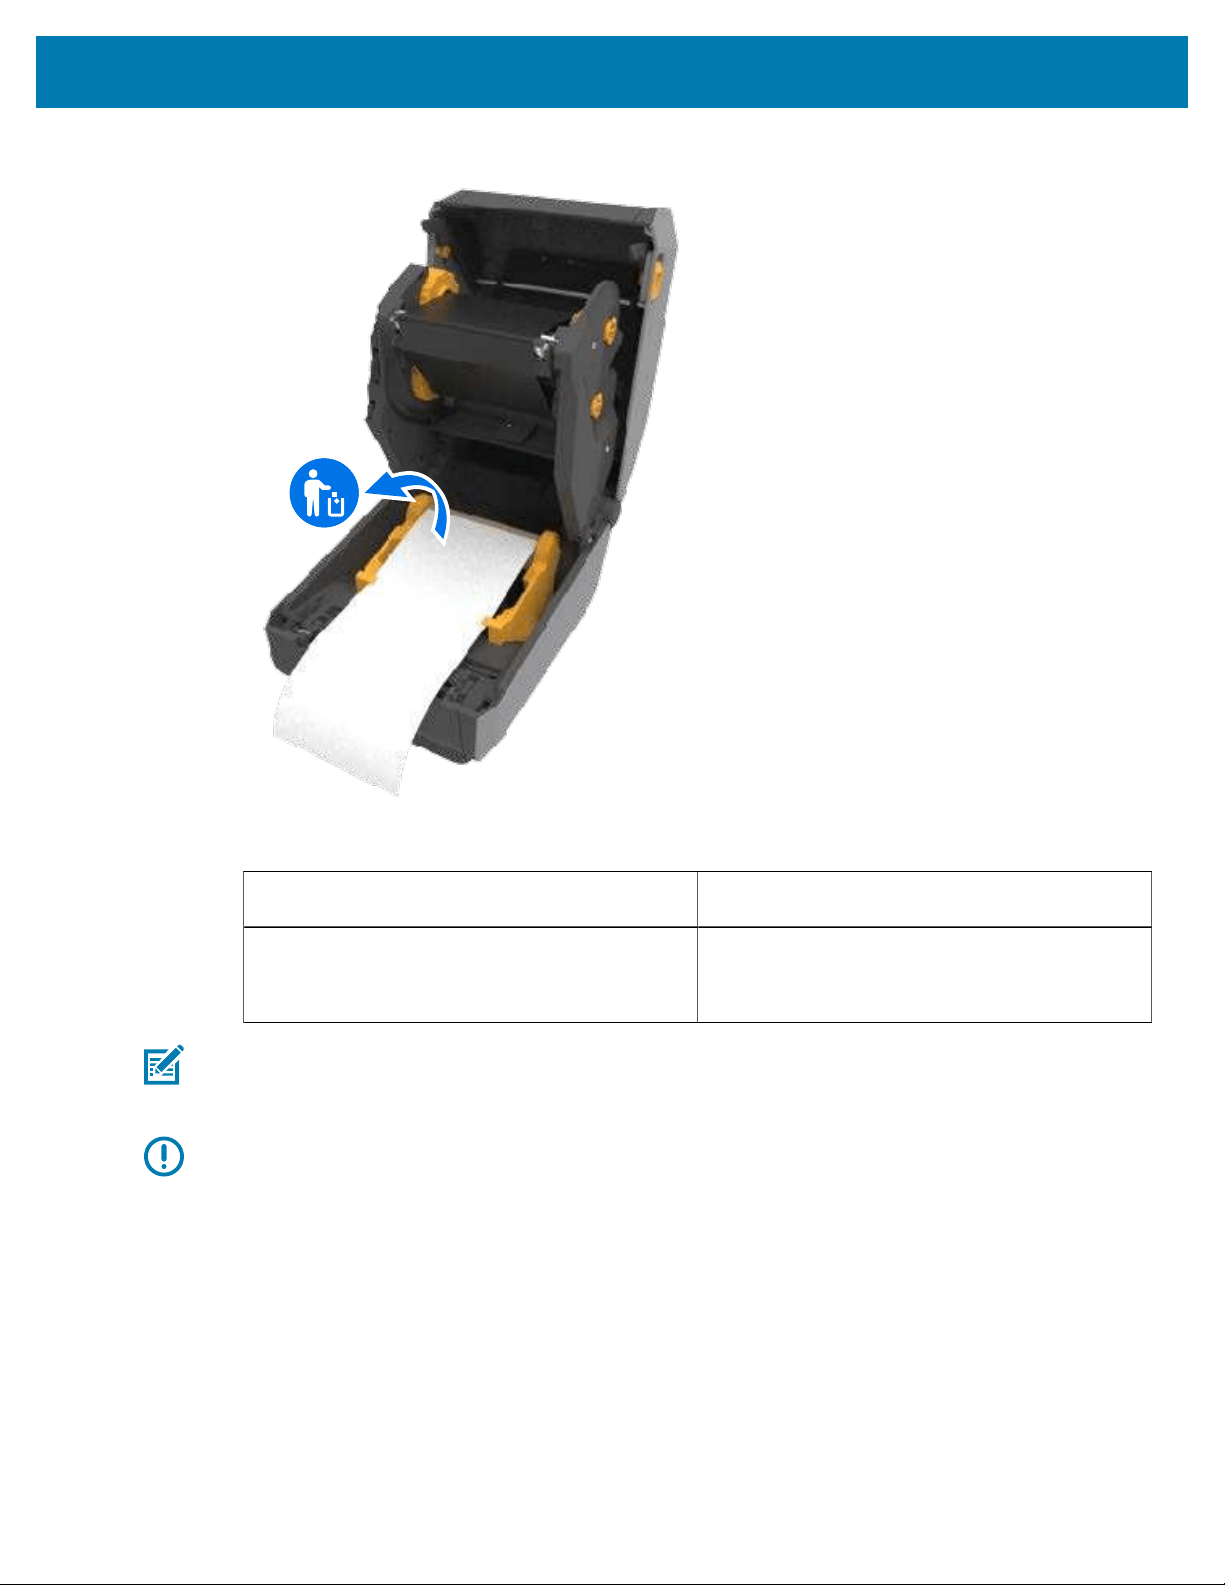
Setup
2. Remove the remaining media and roll core.
3. Insert a new roll of media.
If you are installing more of the same media... Load the new media and press FEED (Advance)
one time to resume printing.
If the new media you have loaded is NOT the
same as the prior media used with this printer
(different size or length, or from a different
vendor or batch)...
Load the new media and use the SmartCal
procedure to calibrate the printer to the new
media to ensure optimal print results.
NOTE: If you loadmedia of a different size (length or width), you will usually need to change
the programmed media dimensions or the active label format by adjusting the printer settings
using the menu or through printer programming commands..
IMPORTANT: At times a label may be missing somewhere in the middle of your roll of labels
instead of at the end of the media roll. This may cause the printer to issue a Media Out alert. To
recover from this alert condition:
1. Pull the media past the missing label until the next label is over the platen roller.
2. Close the printer.
202
3. Press FEED (Advance) once.
The printer resynchronizes the label position and readies to continue printing.
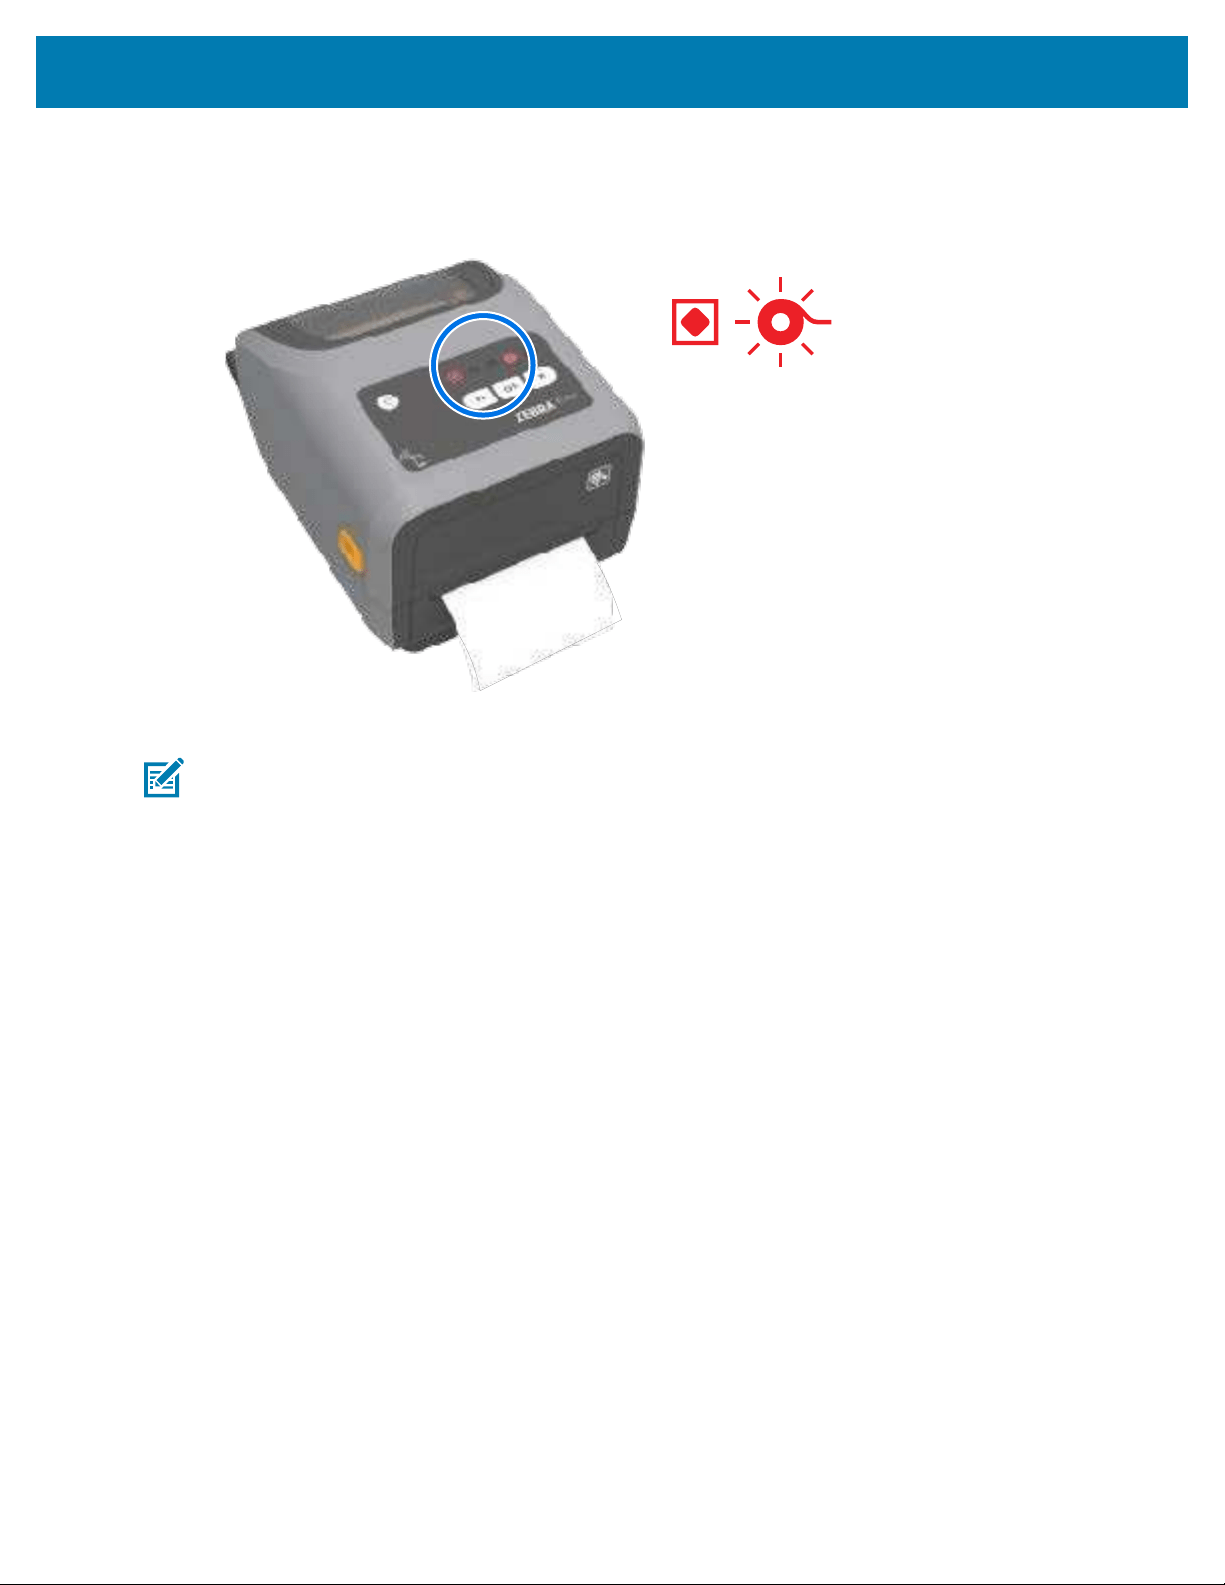
Setup
Detecting and Recovering from a Ribbon-Out Condition
When the printer runs out of ribbon, it alerts you of the condition. This is part of the normal printing cycle.
Use these steps to replace the ribbon and continue printing.
1. Open the printer.
NOTE: Typically, in the ribbon-out-condition, the reflective ribbon—which the printer uses to
detect an end-of-ribbon condition—is exposed on the underside of the ribbon cartridge or
ribbon roll. The front ribbon/top roll is also full.
2. Remove the used ribbon roll or ribbon cartridge from the take-up spindlesand dispose of it
properly.Keepthe empty ribbon core (roll) so you can use it to load the new ribbon roll.
3. Load a new ribbon roll (or insert a new ribbon cartridge if the printer is a ribbon cartridge model).
4. Press FEED (Advance) once to resume printing.
203

Setup
Connecting Your Printer to a Computer
Use these steps to connect your printer to a computer.
1. Decide how you will connect to the printer.
Your printer supports these interface options and configurations:
• Universal Serial Bus (USB 2.0) interface — Standard. For cable requirements, see
Interface Cable
Requirements on page 205, Universal Serial Bus (USB) Interface on page 341, andUniversal
Serial Bus (USB) Interface on page 341.
• RS232 Serial — Standard on ZD621 printers, and field upgrade option on ZD421 printers.See Serial
Port Interface on page 342.
• Ethernet / LAN —Standard on ZD621 printers, and field upgrade option on ZD421 printers.See
Interface Cable Requirements on page 205 and Ethernet (LAN, RJ-45) on page 206 for cable
requirements.
• Internal Wi-Fi (802.11ac) and Bluetooth Classic 4.1 (3.0 Compatible) — Factory-installed option. See
Wi-Fi and Bluetooth Classic Wireless Connectivity Option on page 208.
NOTE: Zebra ZD Series printers which are equipped with the Wi-Fi connectivity option
have support for Bluetooth Low Energy (low-speed connection). You can configure them
using Zebra Setup Utilities installed on an Android or iOS device.
Be sure to review the cabling and unique parameters for each physical printer communication
interface.This will help you set up the printer with the correct settings. For detailed instructions on
configuring network (Ethernet / Wi-Fi) and Bluetooth communication, see theWired and Wireless Print
Server User Guide and the Bluetooth Wireless Guide available from the product information links listed
in About this Guide.
2. Switch printer power OFF.
3. Connect the printer to the computer or device you will use to manage the printer using your selected
connection method (USB, Ethernet / LAN, Wi-Fi, or Bluetooth).
4. RunZebra Setup Utilities (ZSU) from your central device. See Running the Printer Installation Wizard on
page 219.
The central device may bea Windows PC or laptop running the operating systems listed in Setup for
Windows on page 215, an Android device, or an Apple device. Supported printer connection options
areWired/Ethernet, USB, and Wireless, Bluetooth Classic, and Bluetooth Low Energy (Bluetooth LE).
Zebra Setup Utilities (ZSU) are designed to assist you with installing these interfaces.(For ZSU user
guides, go to zebra.com/setup.)
IMPORTANT: Wait to turn printer power ON until you areinstructed to do so by the
Installation Wizard. Keep the power switchin the OFF position when attaching the interface
cable. The power cord must be inserted into the power supply and the power receptacle on
the back of the printer BEFORE you connect or disconnect the communications cables.
The ZSU wizard installs the Zebra Windowsdrivers.
5. When theZSU installation wizardprompts you do to so, turn printer power ON, then follow the on-
screen instructions to complete the printer setup.
204
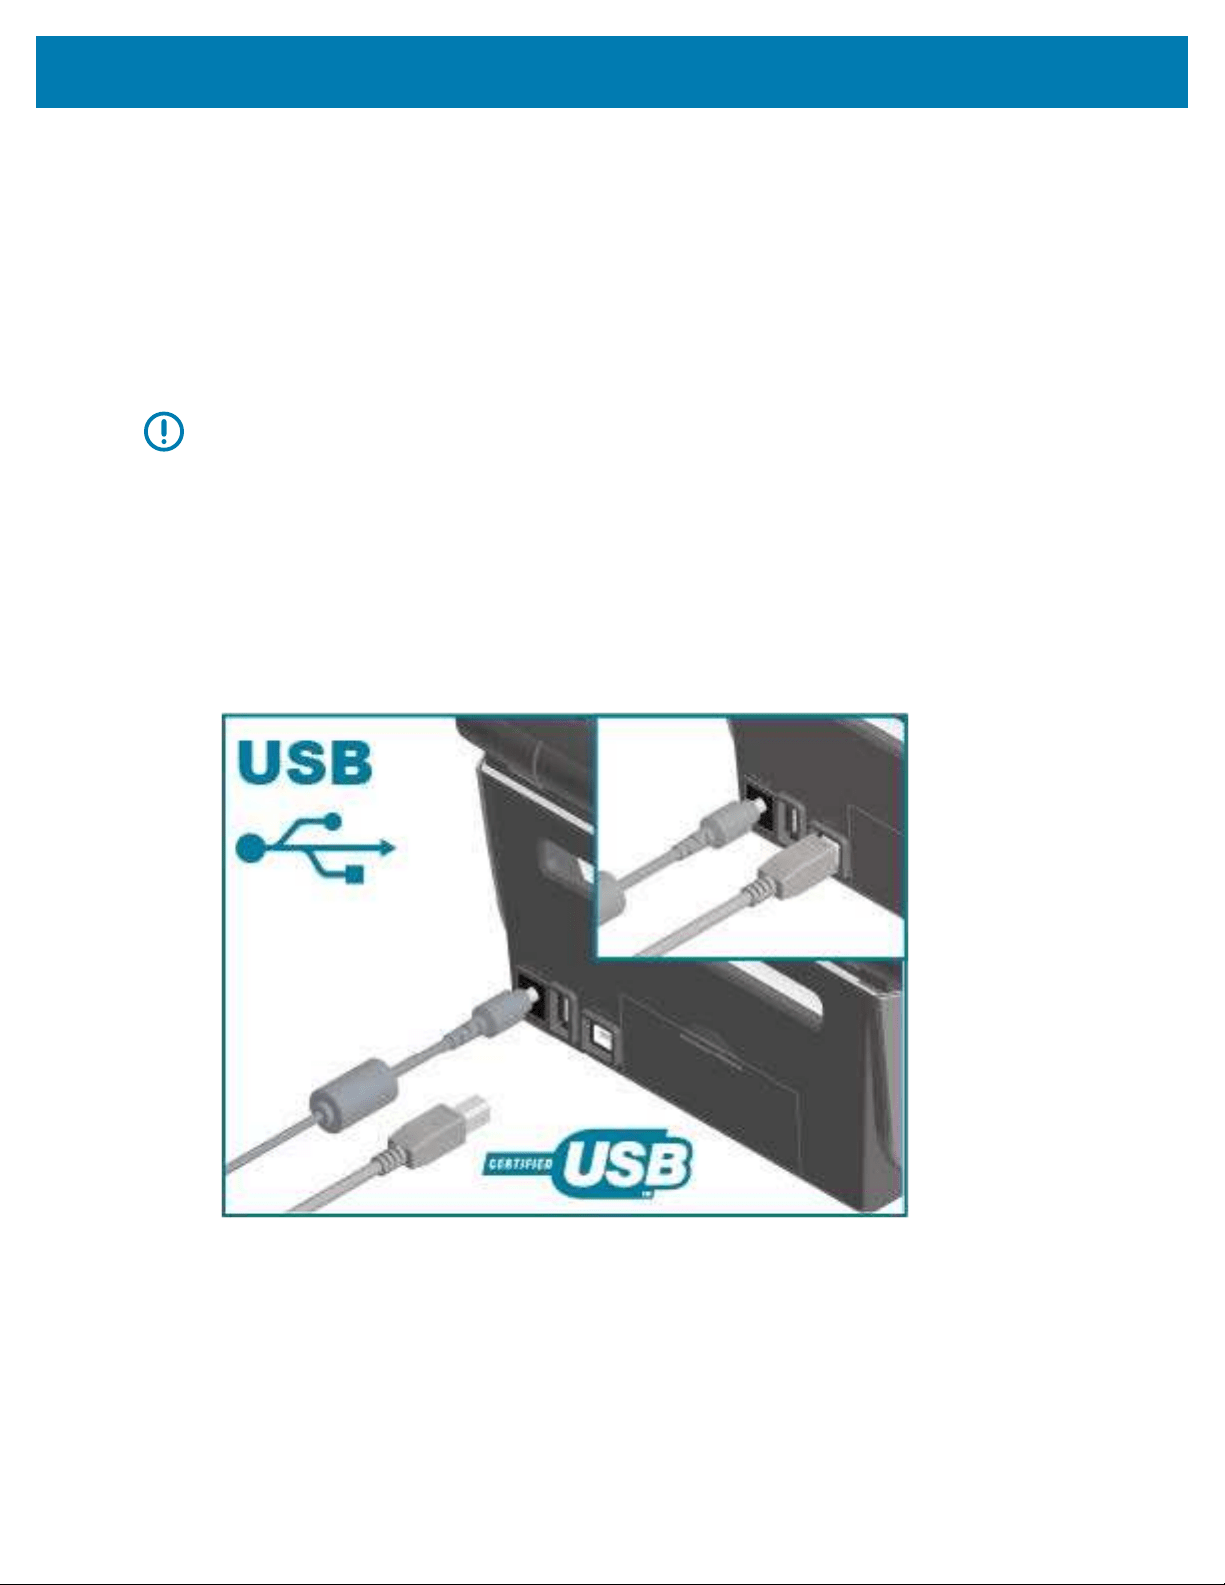
Setup
Interface Cable Requirements
Data cables must be of fully-shielded construction and fitted with metal or metalized connector shells.
Shielded cables and connectors are required to prevent radiation and reception of electrical noise.
To minimize electrical noise pickup in the cable:
• Keep data cables as short as possible (1.83 m [6 ft.] recommended).
• Do NOT tightly bundle the data cables with power cords.
• Do NOT tie the data cables to power wire conduits.
IMPORTANT: This printer complies with FCC Rules and Regulations, Part 15, for Class B
Equipment, using fully-shielded data cables. Use of unshielded cables may increase radiated
emissions above the Class B limits.
USB Interface
Universal Serial Bus (version 2.0 compliant) provides a fast interface that is compatible with your existing
PC hardware. USB’s plug-and-play design simplifies the installation. Multiple printers can share a single
USB port/hub.
When using a USB cable, verify that the cable or cable packaging bears the “Certified USB™” mark (see
below) to guarantee USB 2.0 compliance.
Serial Interface
The printer uses a Null Modem (cross-over) cable for DTE communications. The required cable must have a
nine-pin D-type (DB-9P) male connector on one end which plugs into the mating (DB-9S) serial port located
on the back of the printer. The other end of this signal interface cable connects to a serial port on the host
computer. See Interface Connector Wiring in this guide for pinout information.
205
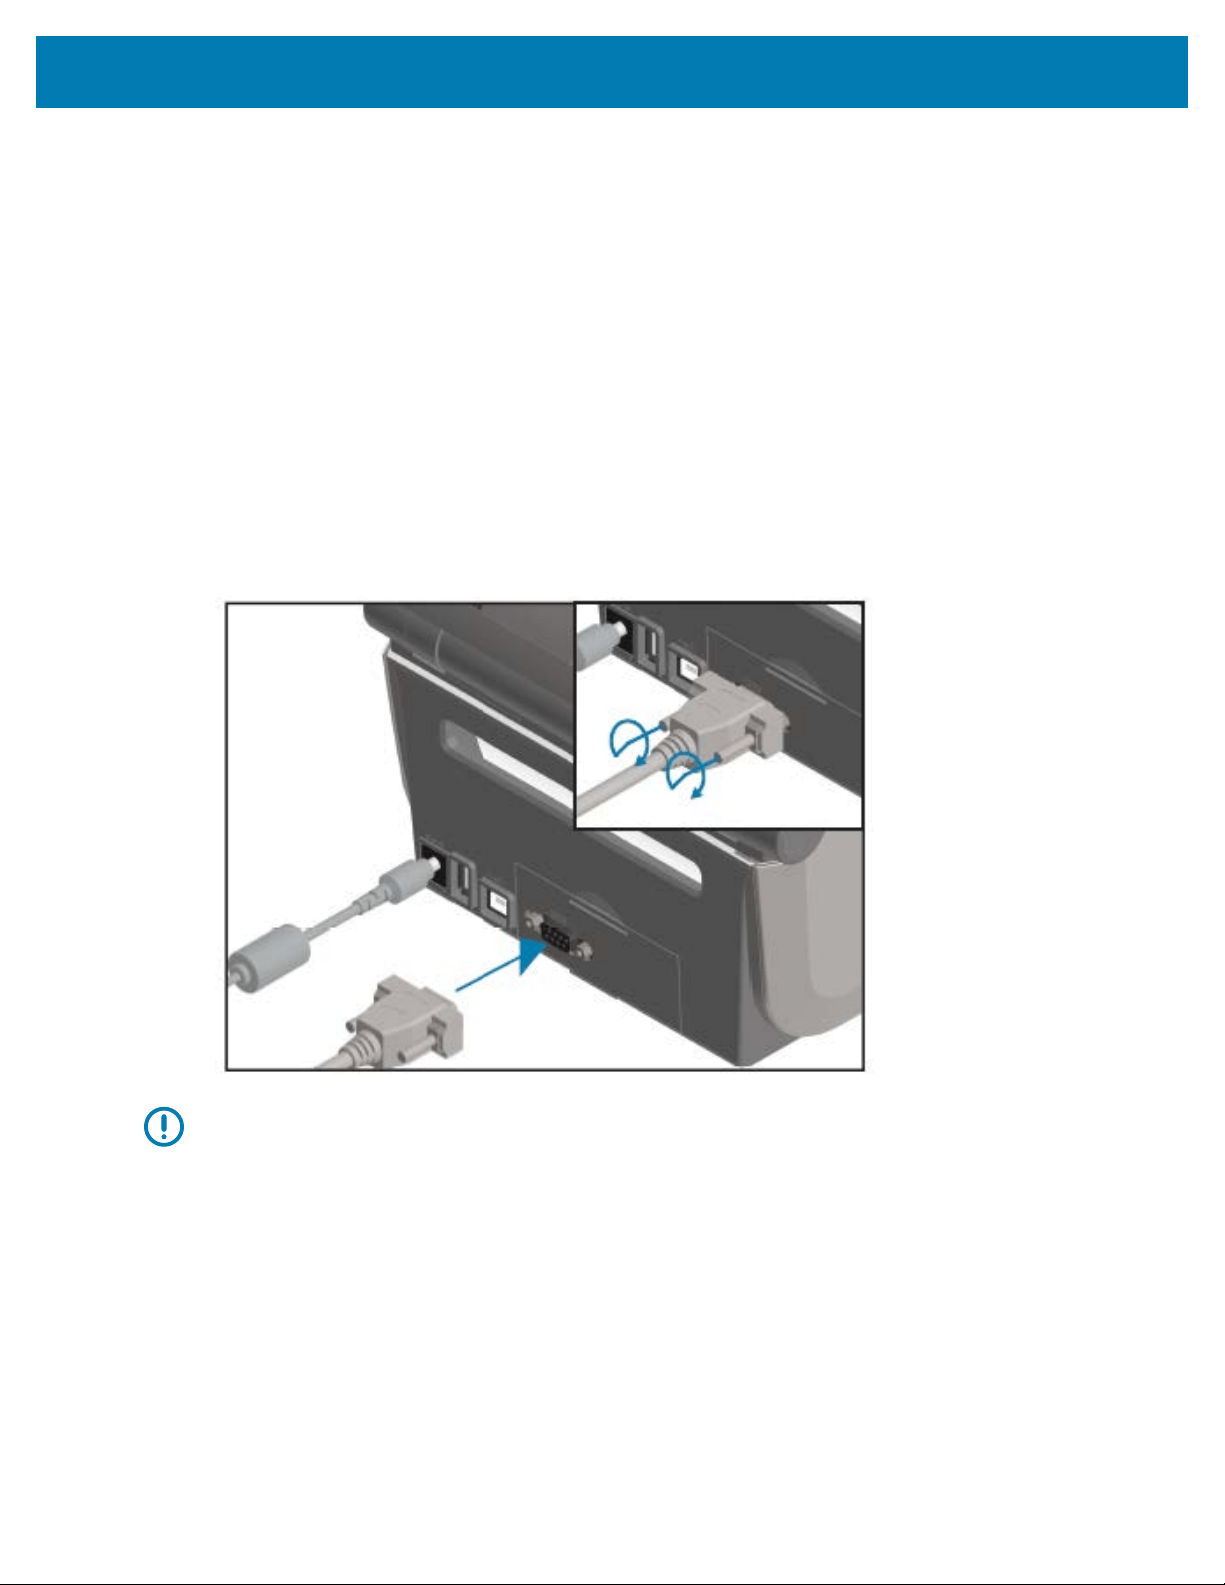
Setup
The serial port communication settings between the printer and host (typically a PC) must match for reliable
communication. The Bits per second (or Baud rate) and Flow control are the most common settings that get
changed.
Serial communications between the printer and the host computer can be set by:
• ZPL ^SC command.
• resetting the printer to its default printer configuration.
Factory defaults for serial communication settings are:
• 9600 baud
• 8 bit word length
• NO parity
• 1 stop bit
• XON/XOFF
• ‘Software’ data flow control in Windows-based host systems
IMPORTANT: Do not use RS-232 cable adapter dongles (DTE<=>DCE) with this printer. Some
dongles can interfere with the operation of USB host port devices at printer power-up.
Ethernet (LAN, RJ-45)
Your printer requires UTP RJ-45 Ethernet cable rated CAT-5 or better.
Your printer must be physically connected to your Ethernet / LAN network using the appropriate cable and
be configured properly to make a network connection and operate on your network.
The printer includes an in-built network print server whichcan be accessed through the printer’s print
server web pages.
206
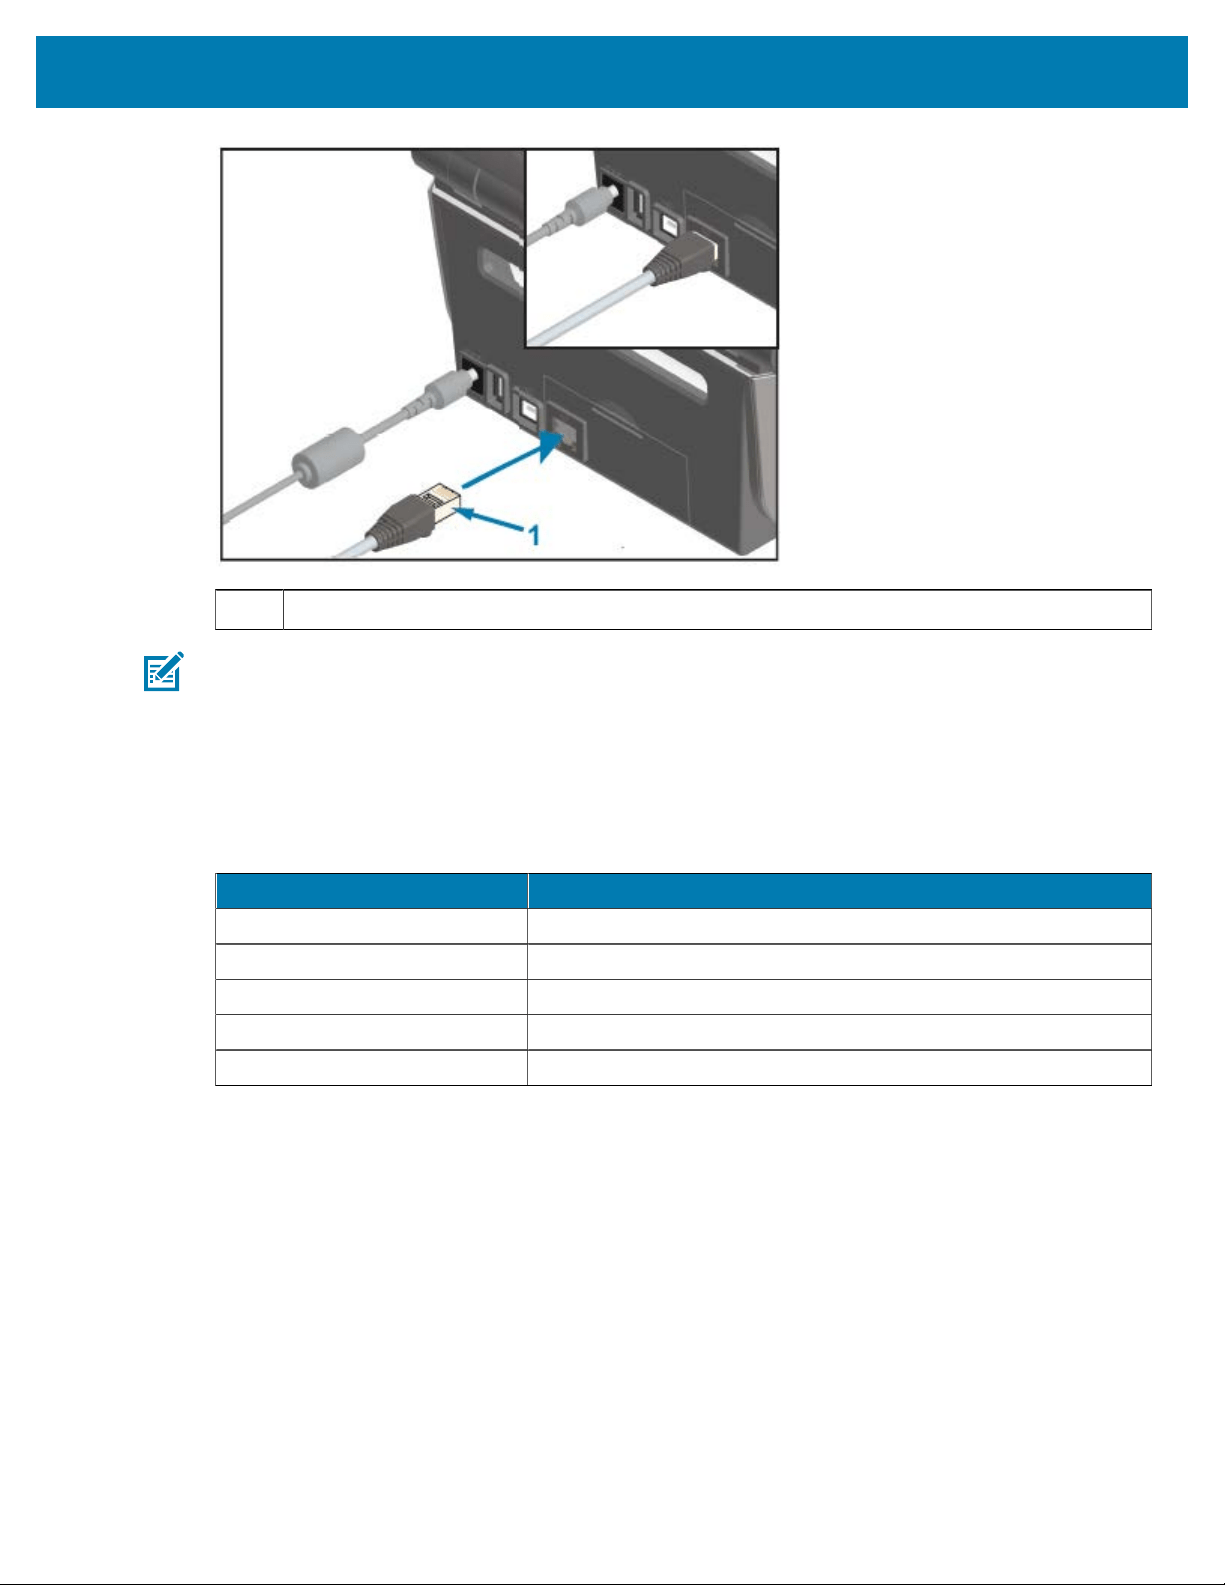
Setup
1 Ethernet cable (RJ-45 connector)
NOTE: For information on how to configure your printer to run on a compatible Ethernet / LAN,
see the Wired and Wireless Print Server User Guide.
Ethernet Status / Activity Indicators
The Ethernet connector on the printer has two status / activity indicators. These indicators are partially
visible to provide interface status at the connector.
The printer has user interface also has indicator lights. These lights display printer network operation
status. See Meaning of the Indicator Light Patterns on page 53 for more details.
LED Status Description
Both OFF No Ethernet link detected.
Green 100 Mbps link detected.
Green with the Amber flashing 100 Mbps link and Ethernet activity detected.
Amber 10 Mbps link detected.
Amber with the Green flashing 10 Mbps link and Ethernet activity detected.
Assigning an IP Address for Network Access
All devices on an Ethernet network (LAN and WLAN) including your printer require a network IP (Internet
Protocol) address.
You will need the printer’s IP address to access the device for printer configuration and for printing.
There arefive ways to assign an IP address:
• DHCP (Dynamic Host Configuration Protocol) (default setting)
• Zebra Setup Utilities (includes the ZebraDesigner Windows printer driver)
• Telnet
• Mobile Apps
207
• ZebraNet Bridge.

Setup
DHCP for Personal Networks
Your printer is set to operate on an Ethernet LAN or Wi-Fi network with DHCP by default.
This setting is intended primarily for personal networks. The network automatically provides a new network
IP address each time printer power is turned ON.
The Windows printer driver uses a Static IP address to connect to the printer. You must change the IP
address set in the printer driver to access the printer if its assigned IP address has changed after initial
printer installation.
Using Your Printer on a Managed Network
Using the printer in a structured network (LAN or Wi-Fi) requires a network administrator to assign the
printer a Static IP address and establish other settings that your printer needs to operate on the network.
Print Server User ID and Password Defaults
You will need the default User ID and/or default password for the printer's in-built print serverto access
some printer's features and its WiFi option.
Factory default User ID: admin
Factory default Password: 1234
Wi-Fi and Bluetooth Classic Wireless Connectivity Option
This user guide covers only basic configuration of your Internal Wi-Fi Print Server and Bluetooth Classic 4.X
wireless connectivity options as described in
Setting Up the Wi-Fi Print Server Option on page 222 and
Configuring the Printer Using Bluetooth on page 232.
For details on your printer's Ethernet and Bluetooth operations, see the Wired/Wireless Print Server User
Guide and theBluetooth Printer Management Guideavailable from zebra.com.
Update Printer Firmware to Finish Option Installations
It is recommended that you always update the printer’s firmware with the latest version for optimal printer
performance.
For instructions on how to update printer firmware, see Updating Printer Firmware on page 310. See
About This Guide on page 13 forlinks to printer support pages for your specific Link-OS printer model and
firmware updates for your printer model(s).
What To Do If You Forget to Install the Printer Drivers First
If you plug your Zebra printer into a power source and printer power is turned ON before installing the
drivers, the printer displays as an Unspecified device on your host computer. Use this procedure to make
sure the printer is identifiable by name on your host device.
1. From the Windows menu, open the Control Panel.
208
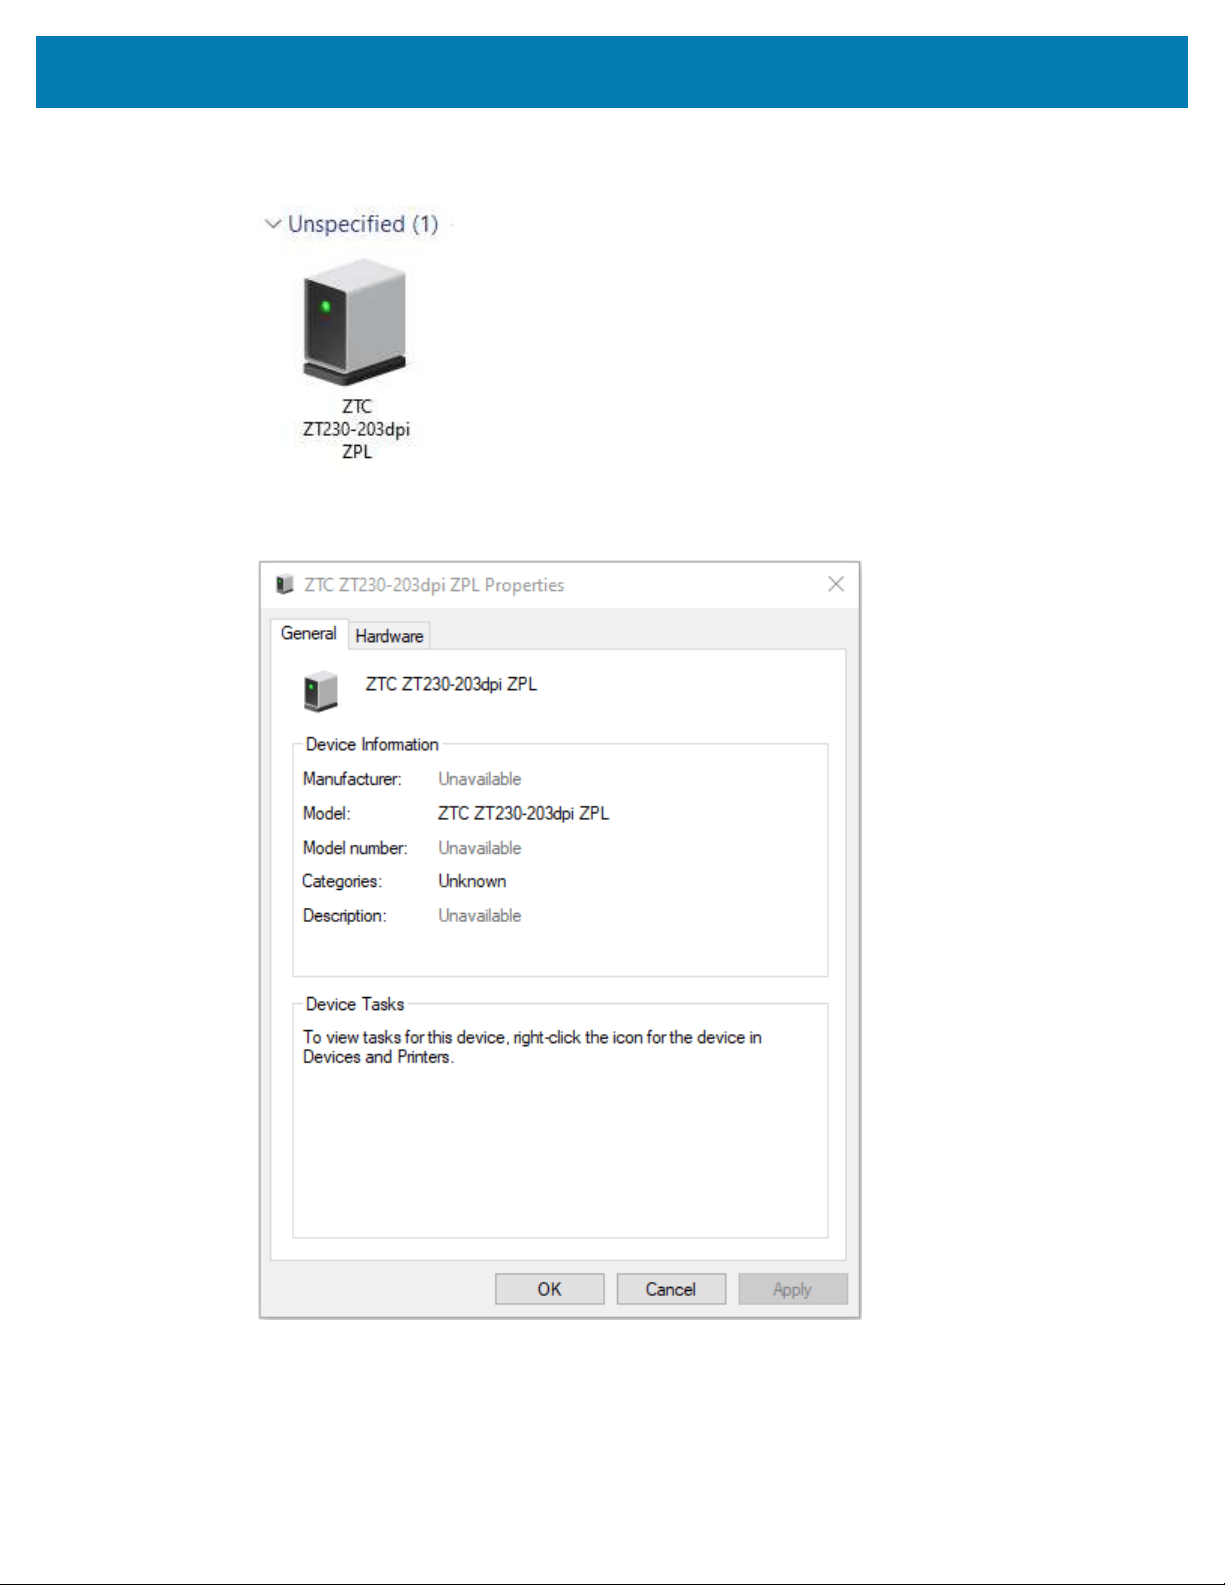
Setup
2. Click Devices and Printers.
In this example, the ZTC ZT320-203dpi ZPL is an incorrectly installed Zebra printer.
3. Right-click on the icon representing the device, then select Properties.
The properties for the device display.
209
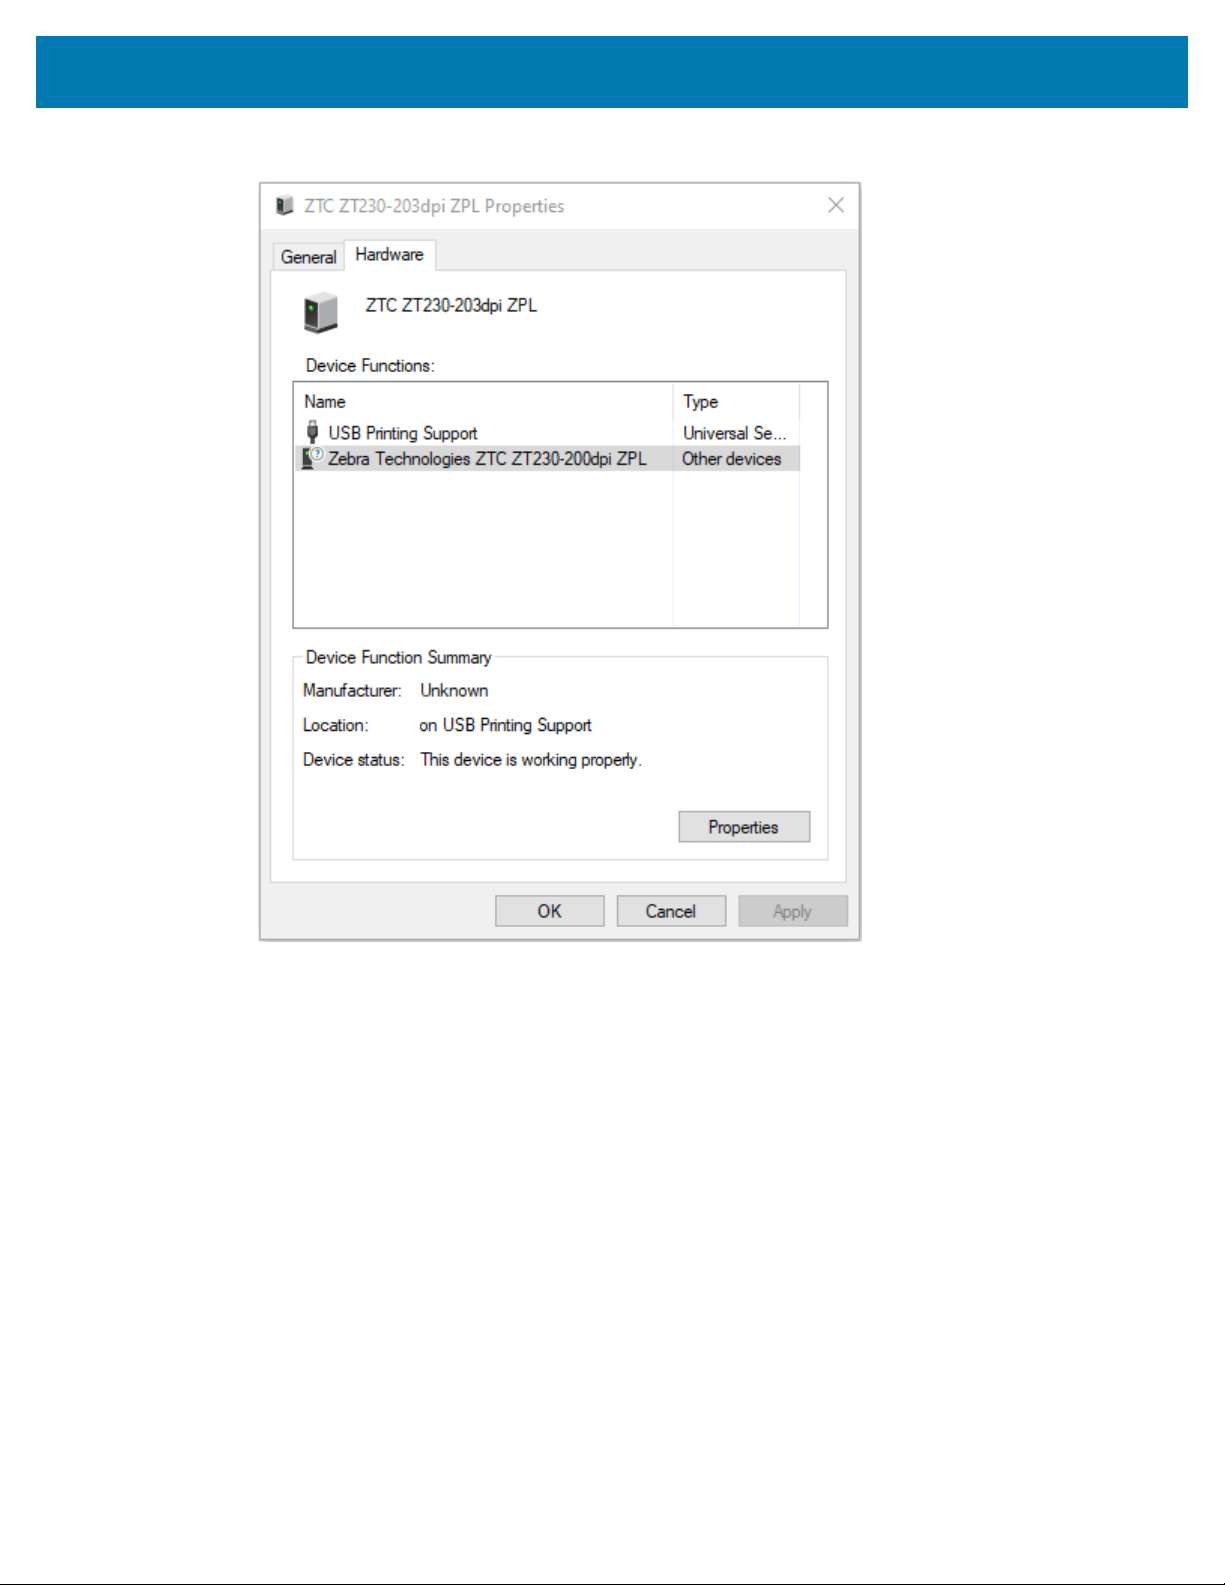
Setup
4. Click the Hardware tab.
210
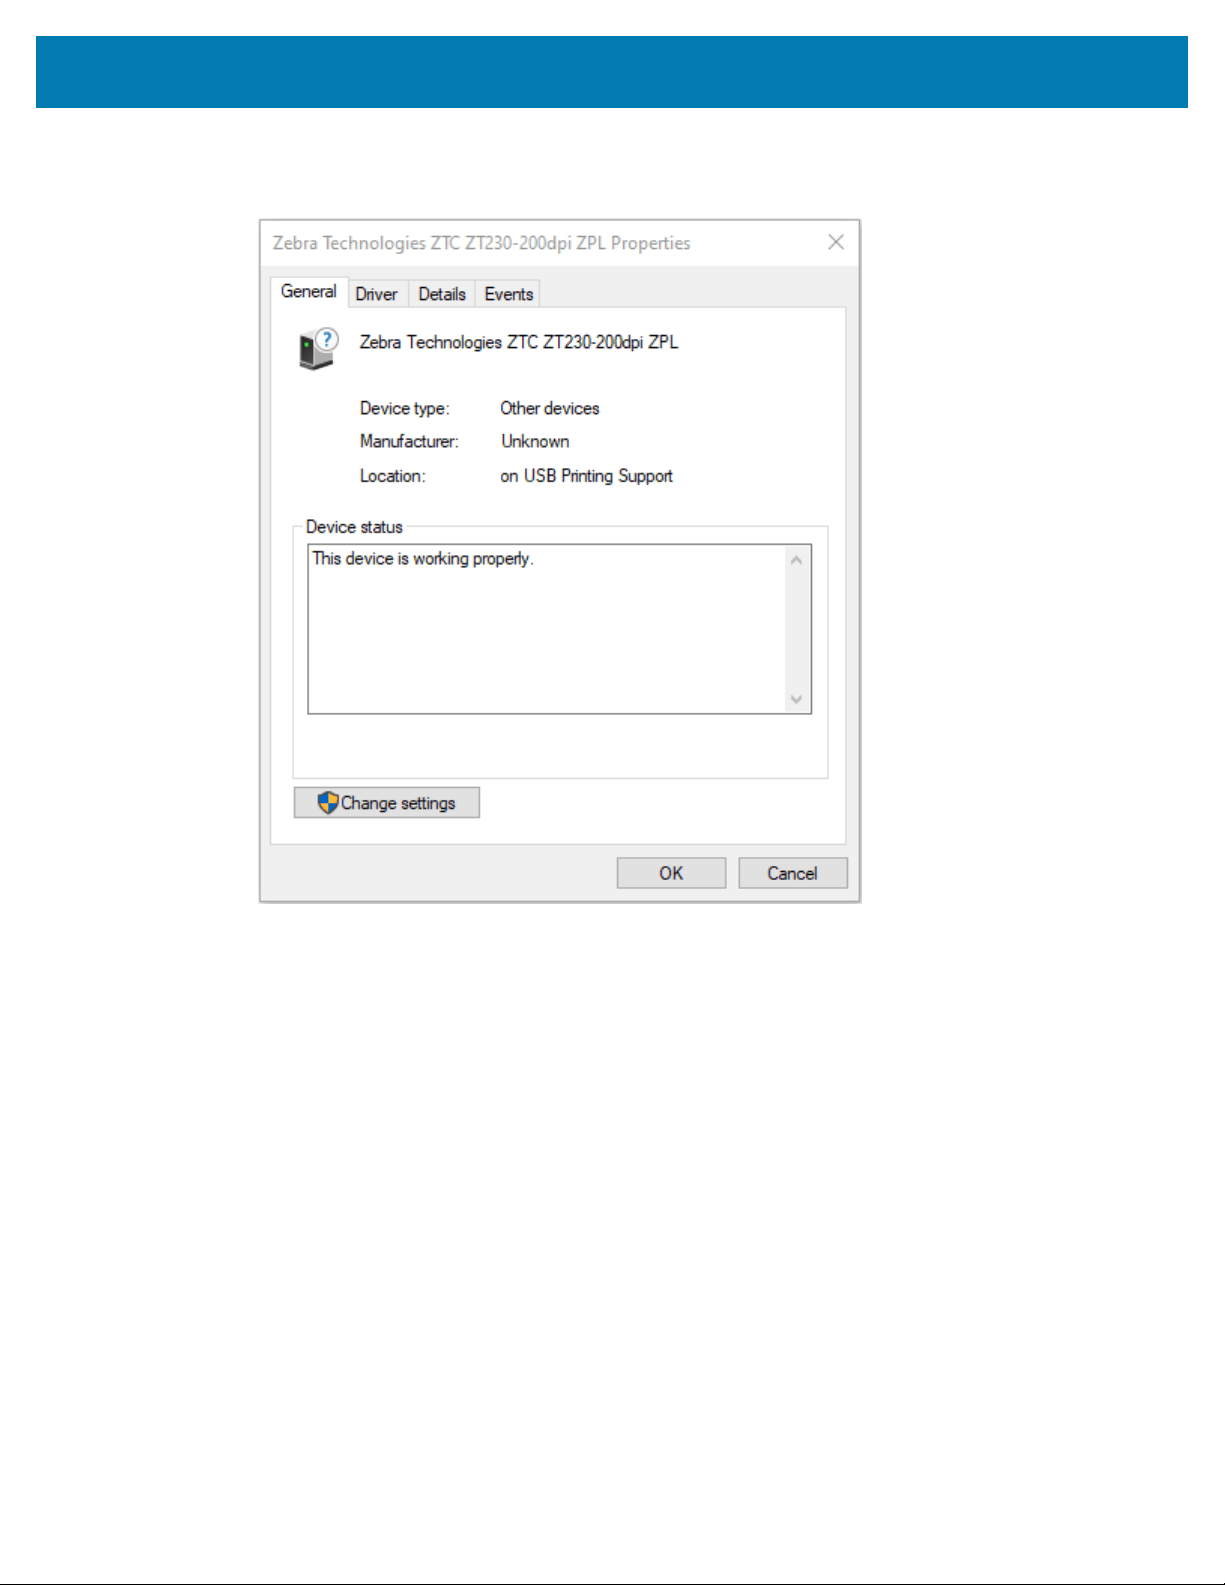
Setup
5. Select the printer in the Device Functions list, and then click Properties.
The properties display.
211
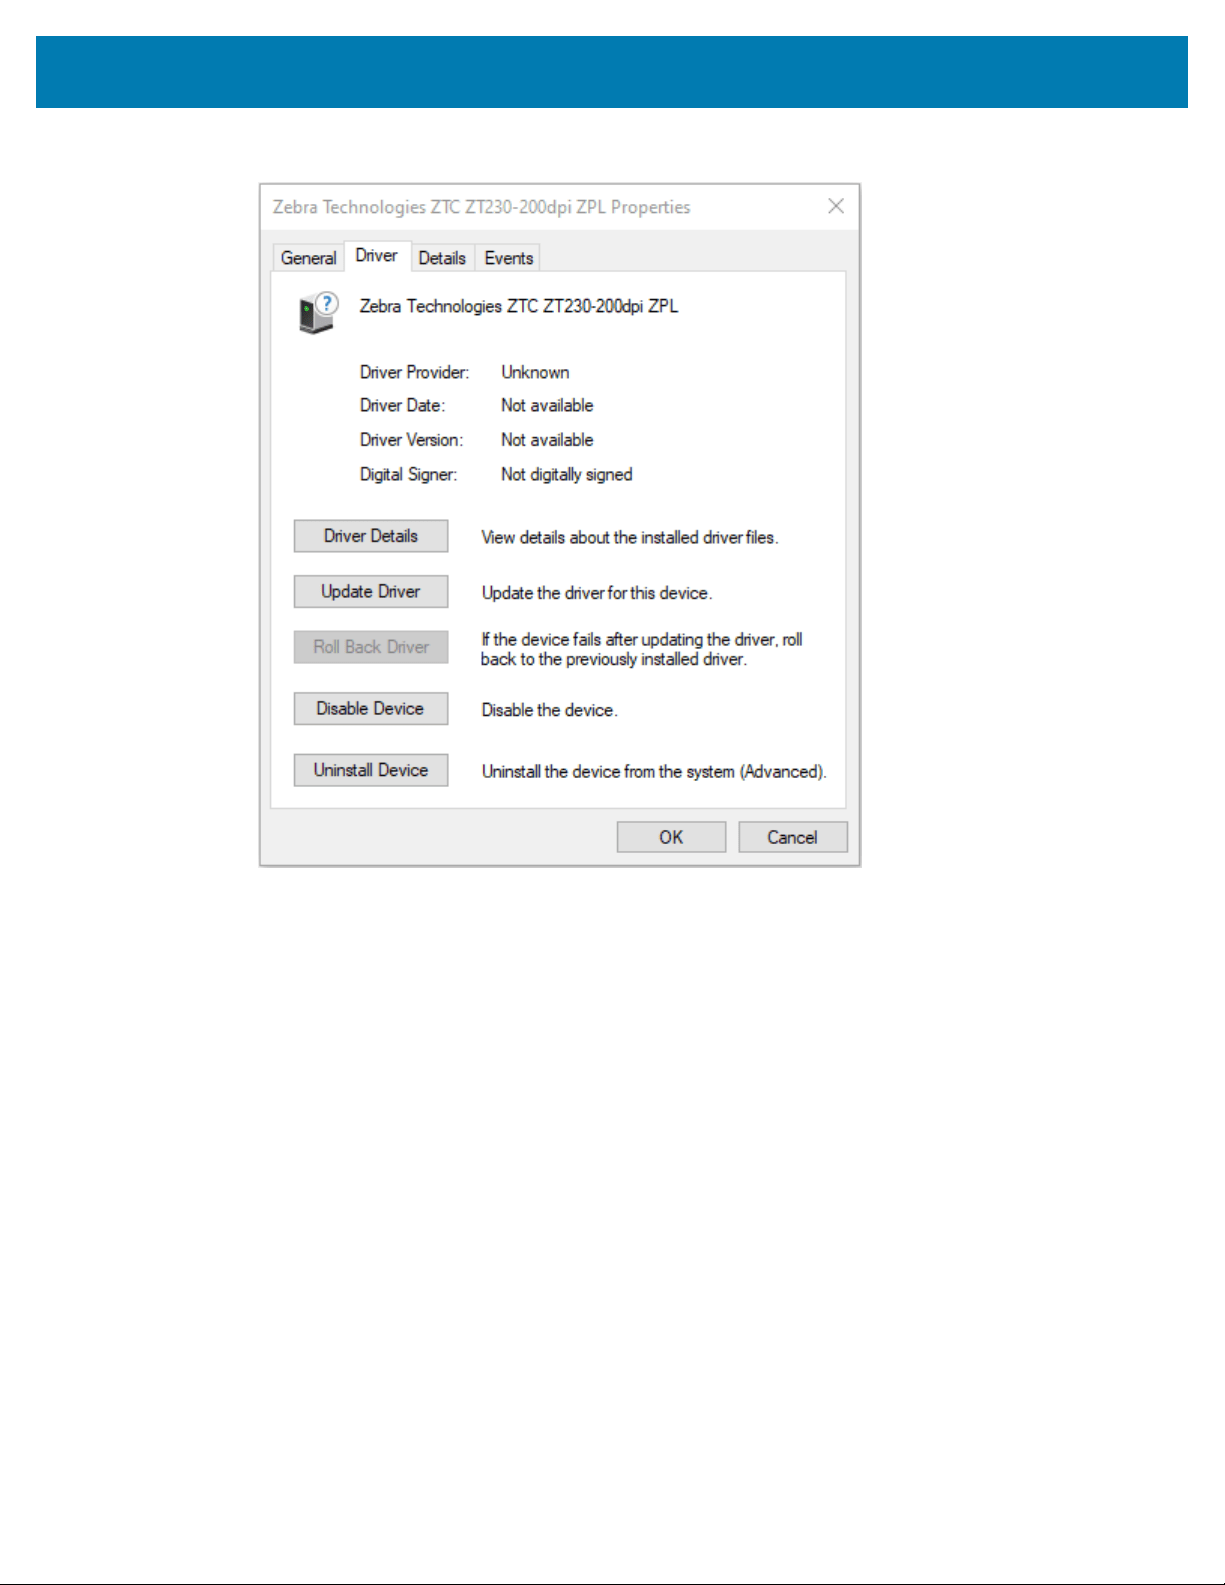
Setup
6. Click Change settings and then click the Driver tab.
212
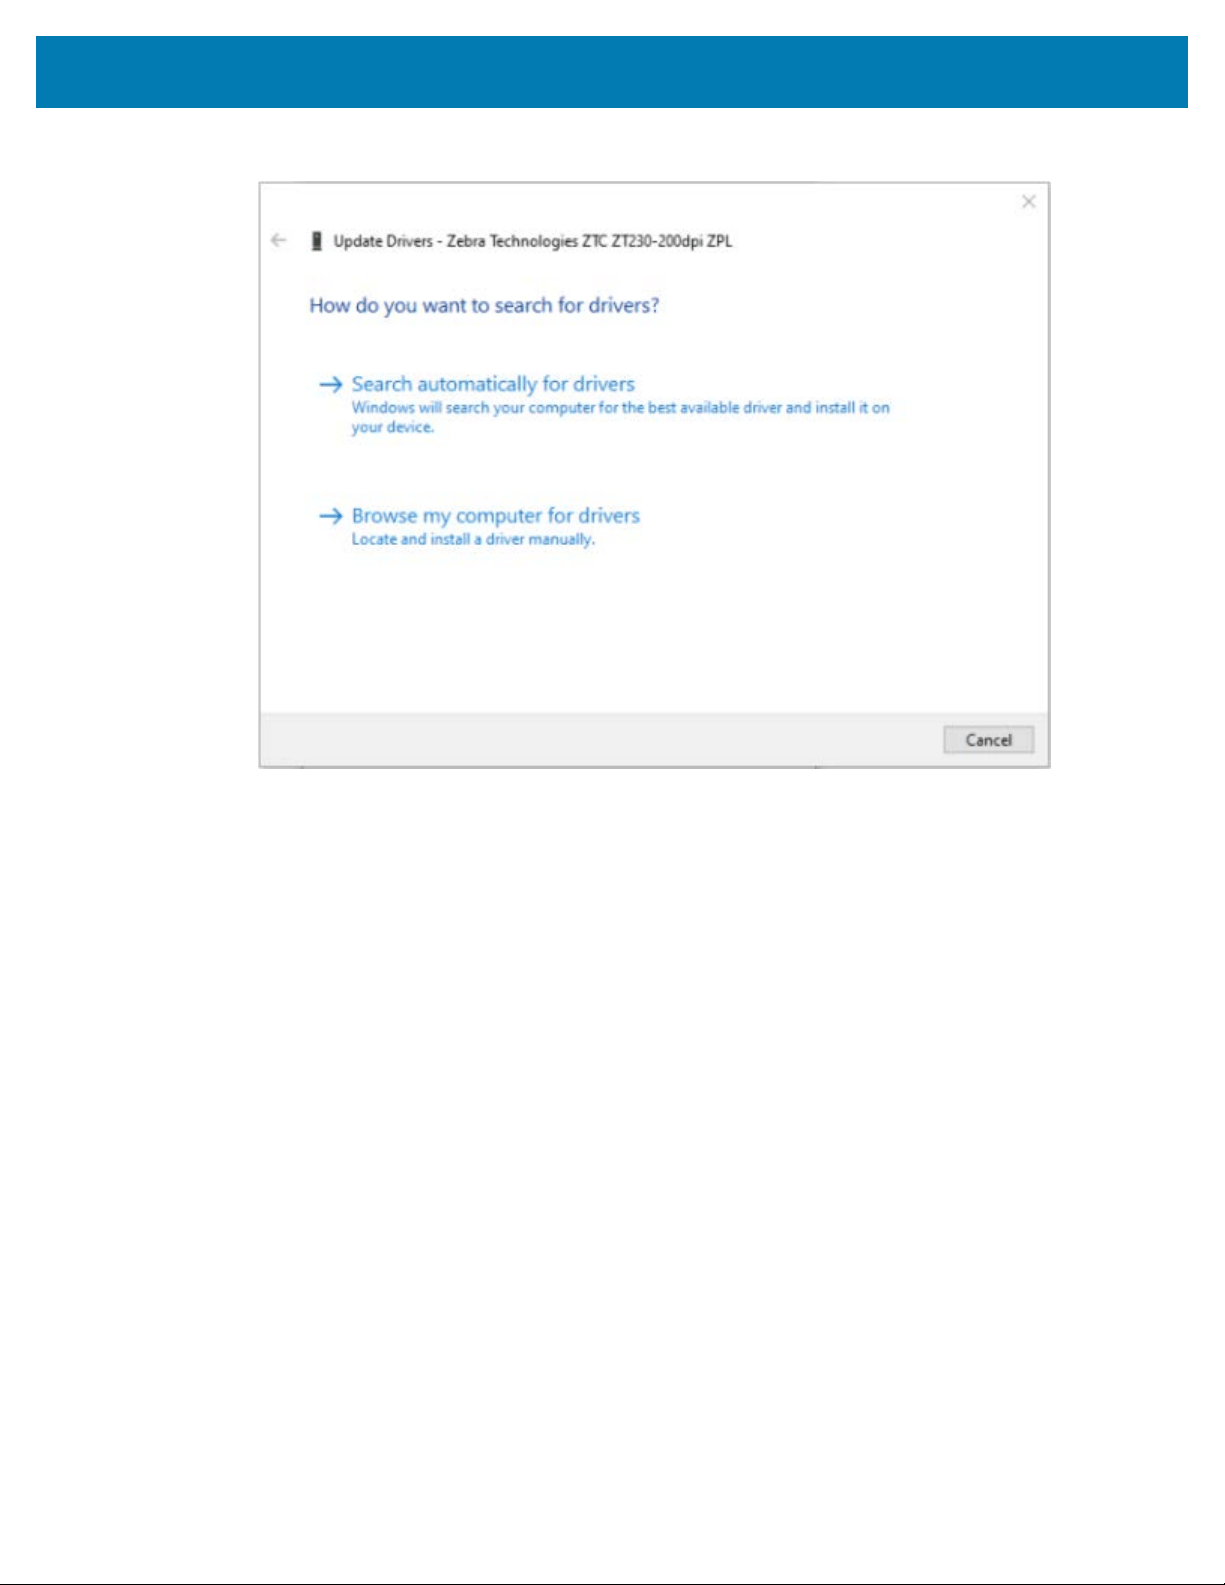
Setup
7. Click Update Driver.
8. Click Browse my computer for driver software.
9. Click Browse... and navigate to the Downloads folder.
213
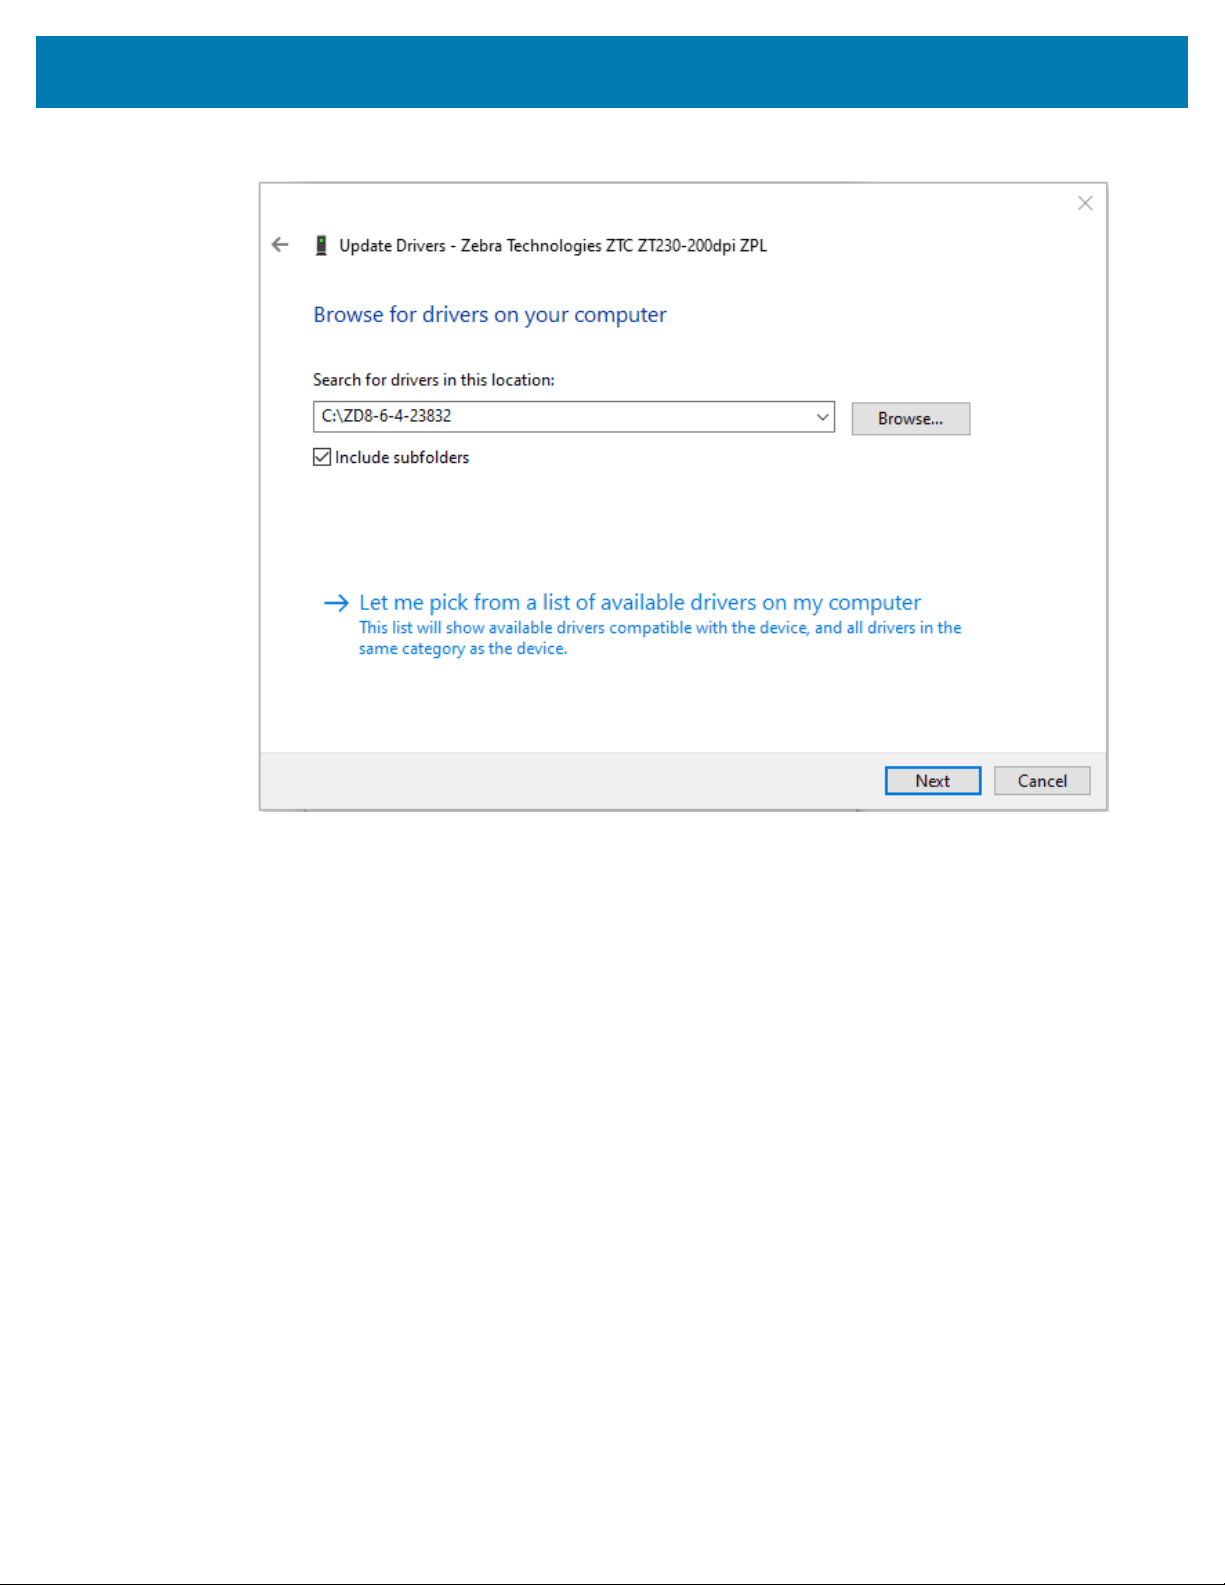
Setup
10. Click OK to select the folder.
11. Click Next.
The device is updated with the correct drivers.
214

Setup for Windows
Setup for Windows
The section helps you setup communications between your printer and the Windows operating system
environment.
Windows-to-Printer Communication Setup (Process Overview)
Use this overview to understand how to set up your printer using the most common (supported) Windows
operating systems and a local (wired) connection.
You may also set up your printer using factory-installed Wi-Fi or Bluetooth as described in asas Setting Up
the Wi-Fi Print Server Option on page 222 and Configuring the Printer Using Bluetooth on page 232.
1. Download the Zebra Setup Utilities (ZSU) from one of the printer information pages listed in About This
Guide on page 13.
2. Make sure printer power is OFF.
3. Run Zebra Setup Utilities (ZSU) from your Download directory.
4. Click Install New Printer and run the installation wizard.
5. Click Install Printer, then select your printer’s model number from the list of Zebra printers.
6. Select the appropriate USB port and connect to the PC.
You can use the USB interface for a wizard-guided installation of networked devices or Bluetooth
Classic (4.0) devices.
7. When the installation wizard instructs you to do so, turn printer power ON.
8. Use the wizard to configure printer communications for the selected interface type.
9. Perform a print test to verify that your printer has been set up properly.See how to output a test print in
After Your Printer is Connected on page 239.
IMPORTANT: If you did not install the printer drivers before connecting to the printer when it was
powered ON, see What To Do If You Forget to Install the Printer Drivers First on page 208.
Installing the Windows Printer Drivers
To use your printer with a Microsoft Windows-based computer, you must install the correct drivers first.
Use the Zebra Setup Utilities to install the printer drivers on your central device and run the Utilities with
power to the printer is switched OFF.These drivers enable you to set up and manage your printer from the
convenience of your central device: a Windows PC, an Android device, or an Apple device.
215

Setup for Windows
NOTE: You may connect your printer to your computer using any of the supported connections
that are available to you to use. However, do NOT connect any cables from your computer to the
printer UNTIL you are instructed to do so by the installation wizards. If you connect the cables at
the wrong time, your printer will not install the correct printer drivers. To recover from incorrect
driver installation, see What To Do If You Forget to Install the Printer Drivers First on page 208.
NOTE: If using a PC, it must run a Zebra-driver-supported Windows OS. (See the Zebra Setup
Utilities Release Notes for a list of supported Windows operating systems.)
If you are using a physical cable to connect your computer to the printer, be sure to review the
cabling specifications and the parameters specific to the physical communication interface you
plan to use.This information will help you make the appropriate configuration setup choices both
prior to and immediately after you apply power to the printer.
• For basic interface cabling requirements, see Interface Cable Requirements on page 205.
• For USB cable requirements and information on basic USB connectivity, see USB Interface on
page 205.
• For Ethernet cable specifications and information on basic Ethernet connectivity, see Ethernet
(LAN, RJ-45) on page 206.
• For detailed information on installingEthernet/LAN and Bluetooth interfaces, see theWired/
Wireless Print Server User Guide and theBluetooth Printer Management Guideavailable from
zebra.com.
1. Navigate to zebra,com/drivers.
2. Click Printers.
3. Select your printer model.
4. On the product page for your printer, click Drivers.
5. Download the appropriate driver for Windows.
The driver executable file (such as zd86423827-certified.exe) is added to your Download folder.
6. Ensure printer power is OFF.
IMPORTANT: Do NOT turn printer power on until you are instructed to do so by the Setup
Wizard.
216
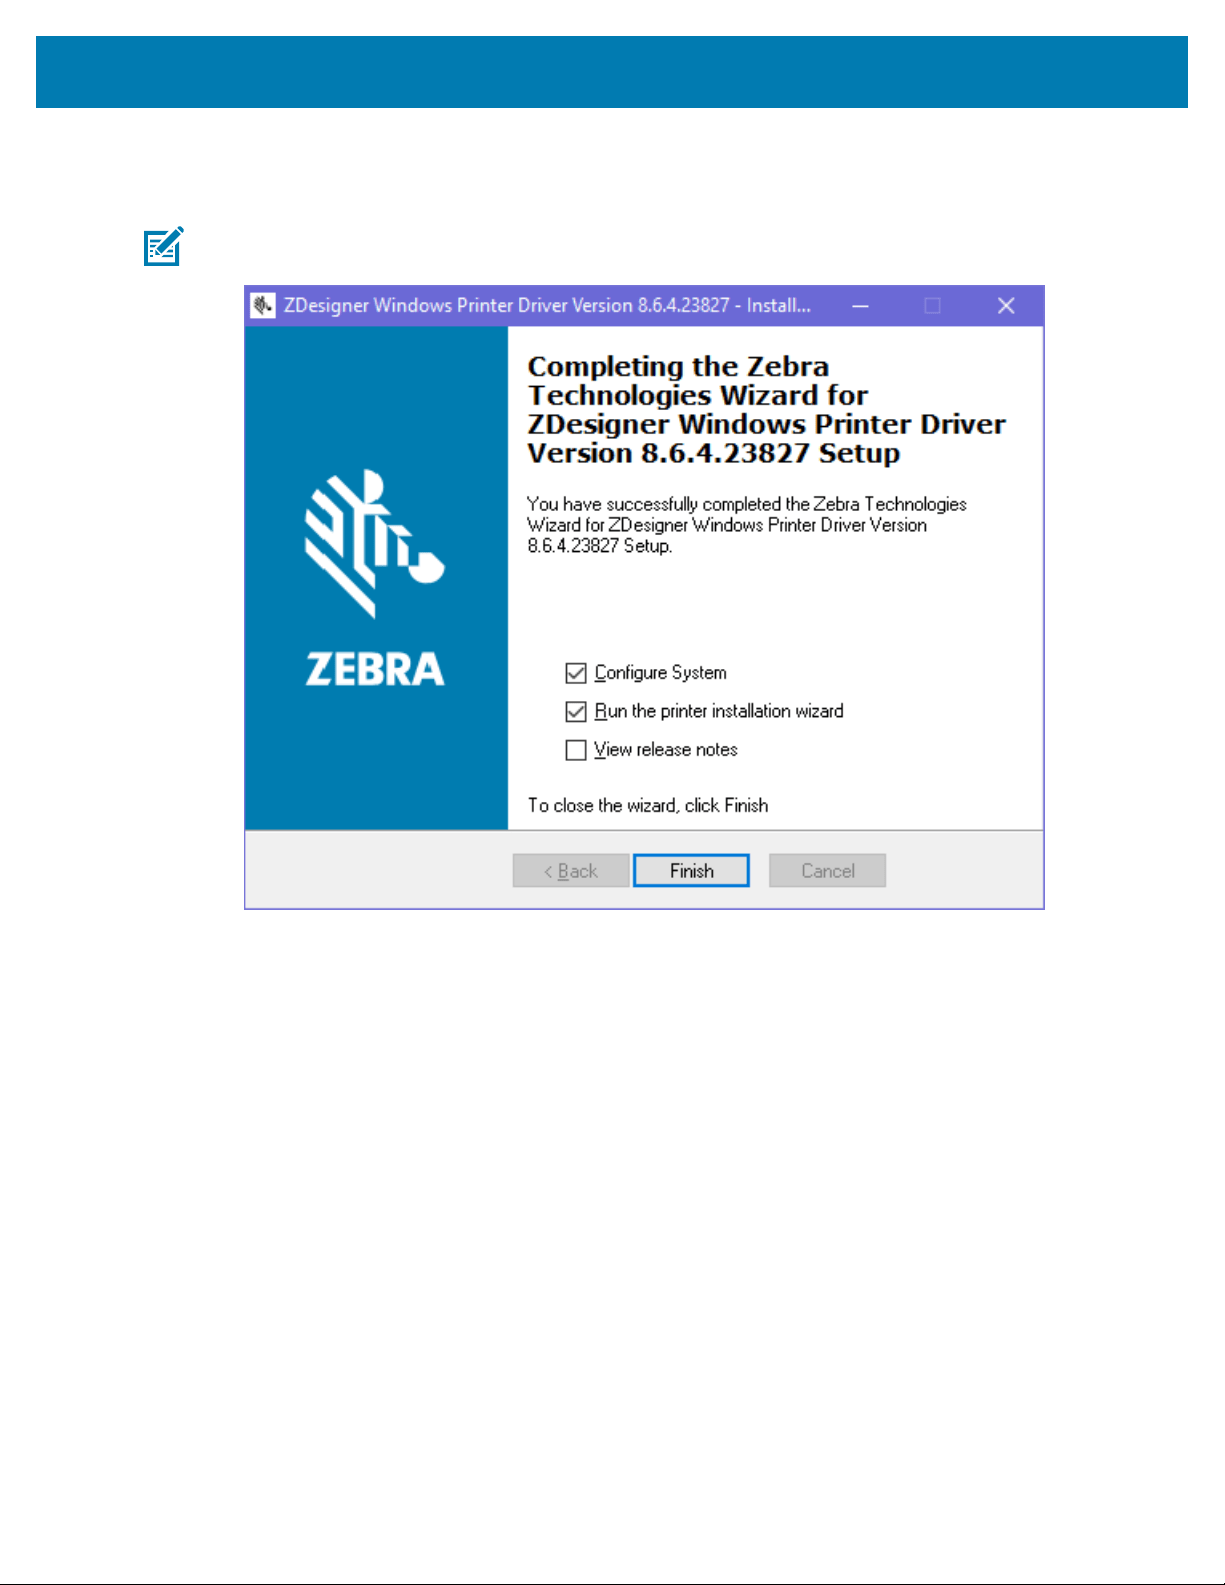
Setup for Windows
7. From your PC, run theZebra Setup Utilities (ZSU)executable and follow the prompts.
The setup wizard installs the printer drivers and prompts you to turn printer power ON.
NOTE: When setup is complete, you may select to add the drivers to your system (Configure
System) or elect to add specific printers in a later step.
217
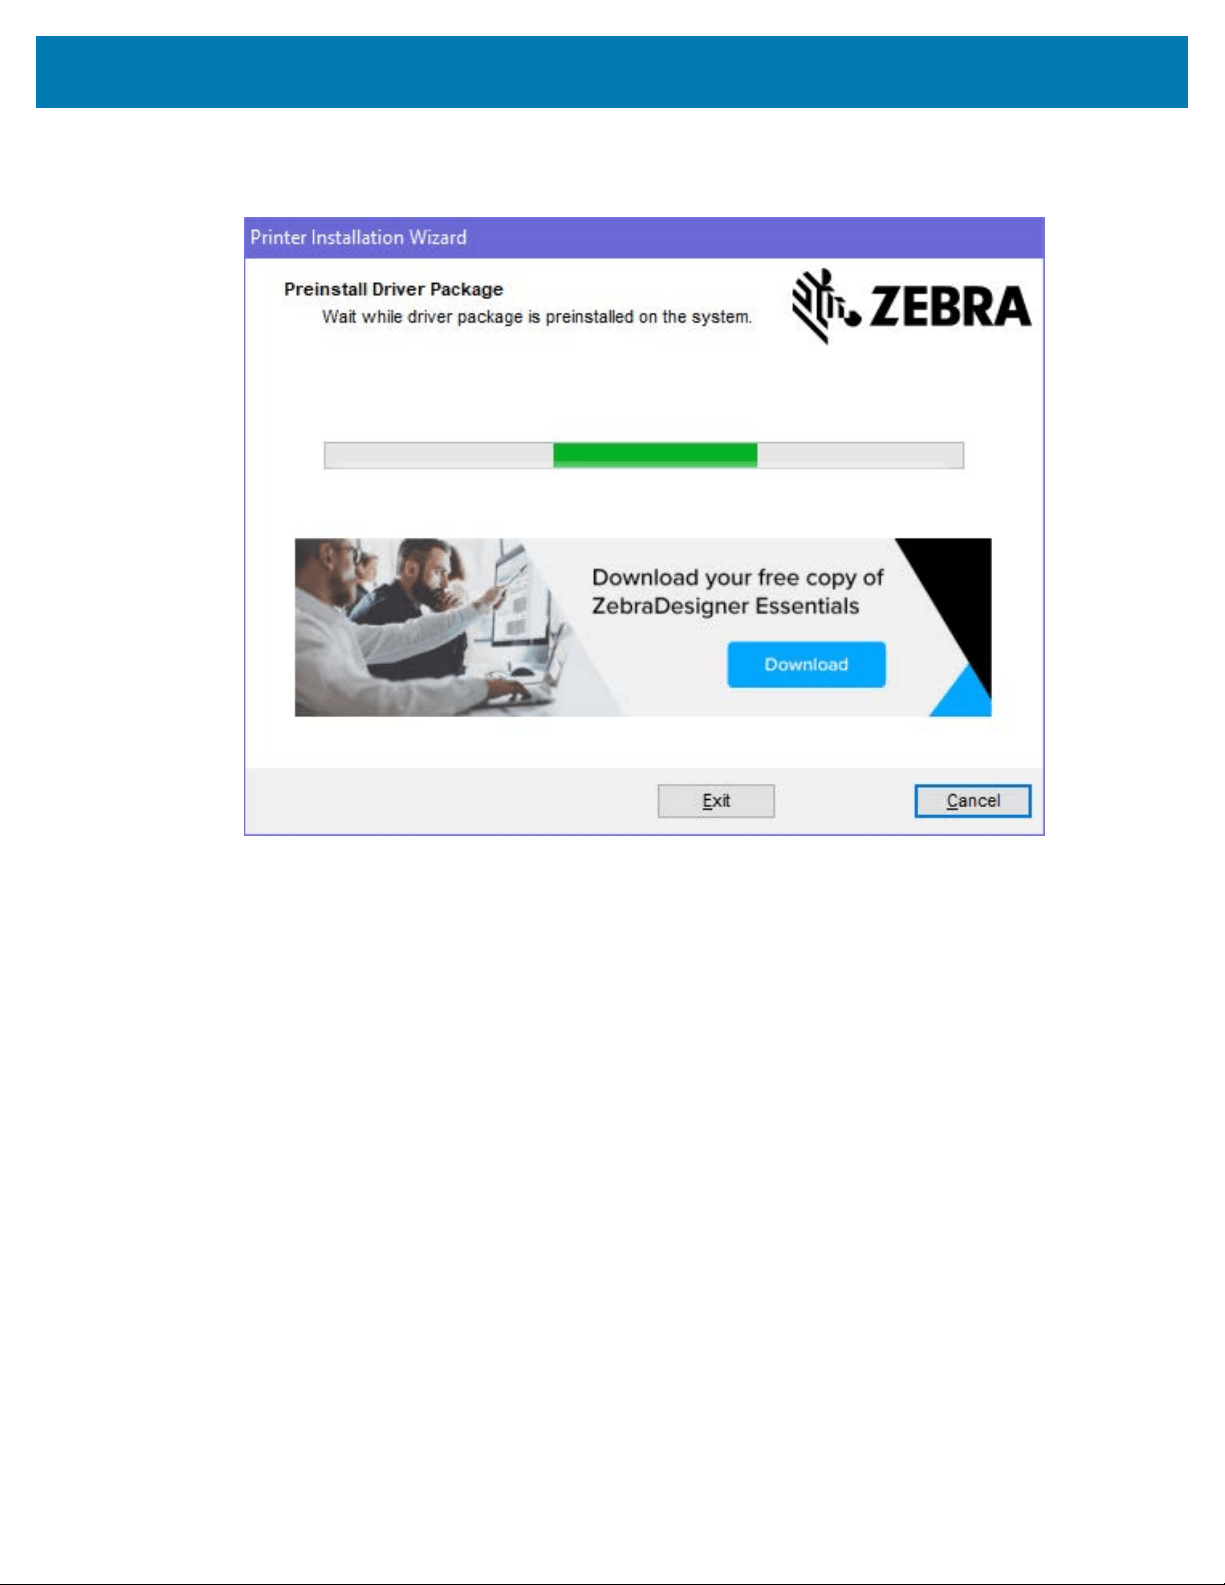
Setup for Windows
8. Select Configure Systemandclick Finish.
The Printer Installation Wizard installs the drivers.
218
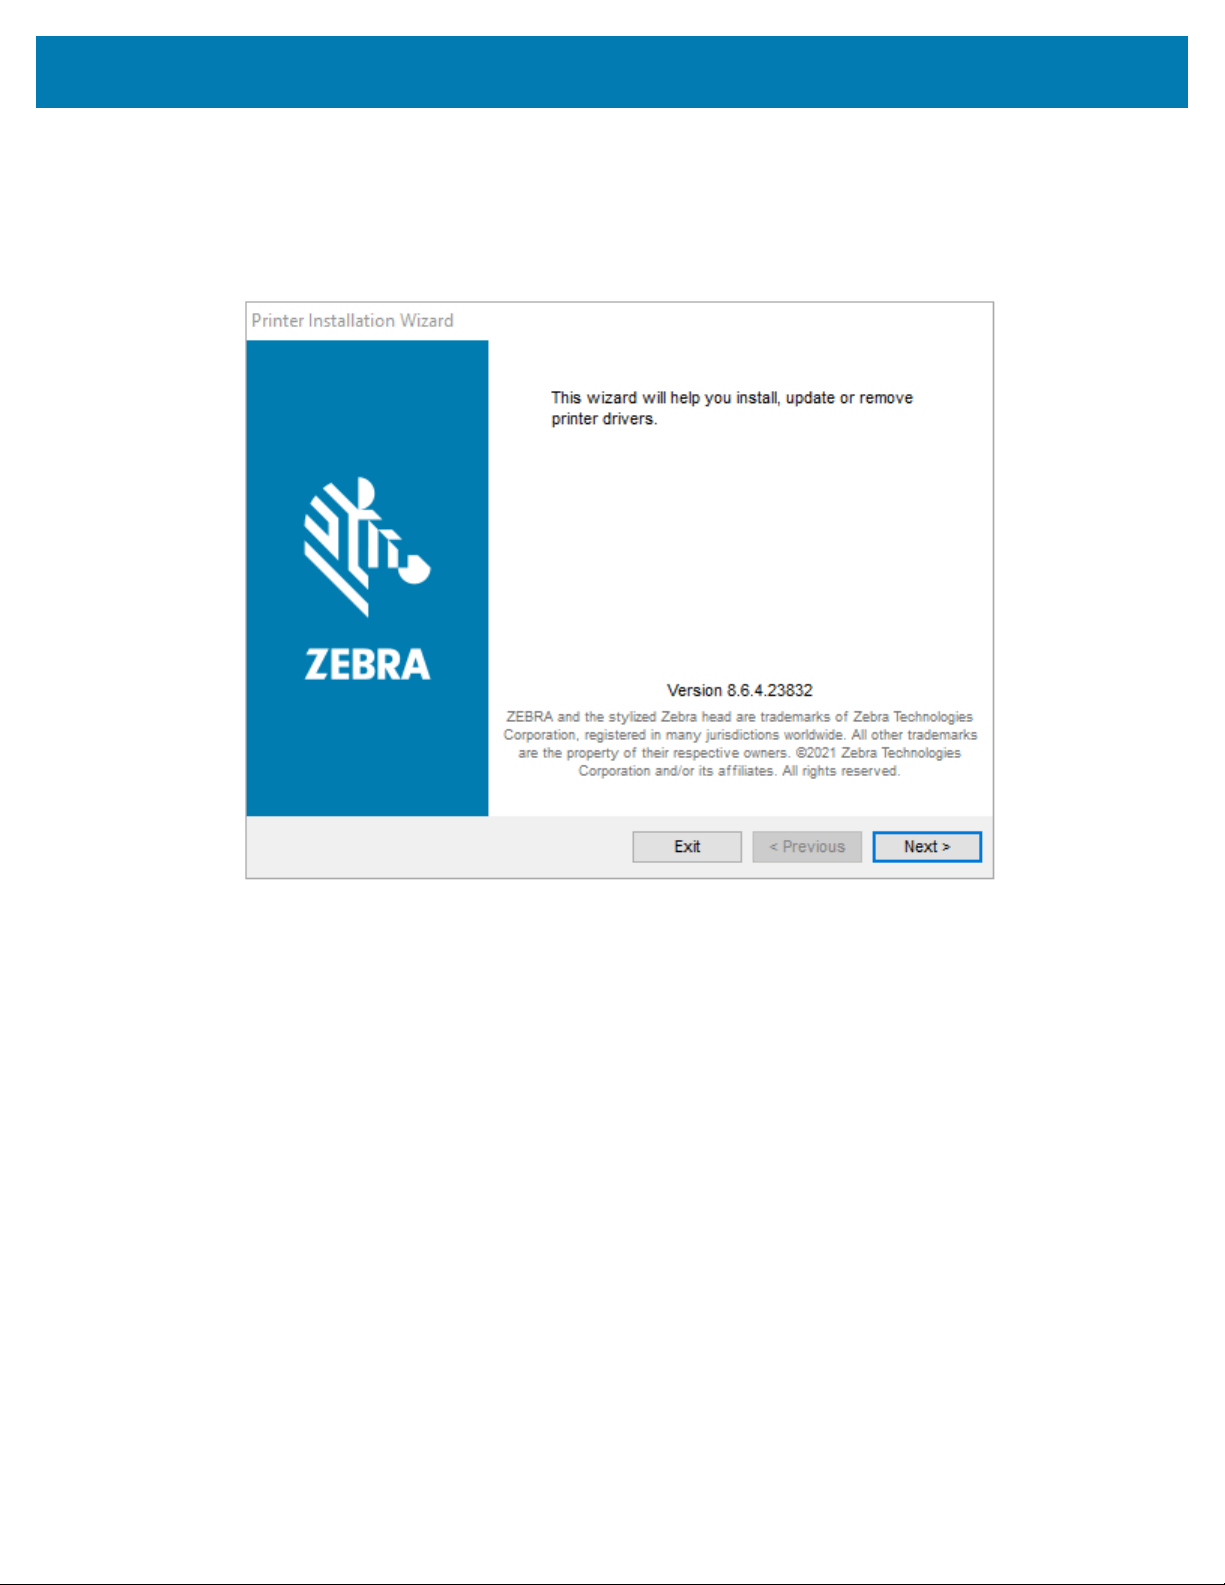
Setup for Windows
Running the Printer Installation Wizard
1. On the last screen of the driver installer, leave Run the Printer Installation Wizard checked, then click
Finish.
The Printer Driver Wizard displays.
219
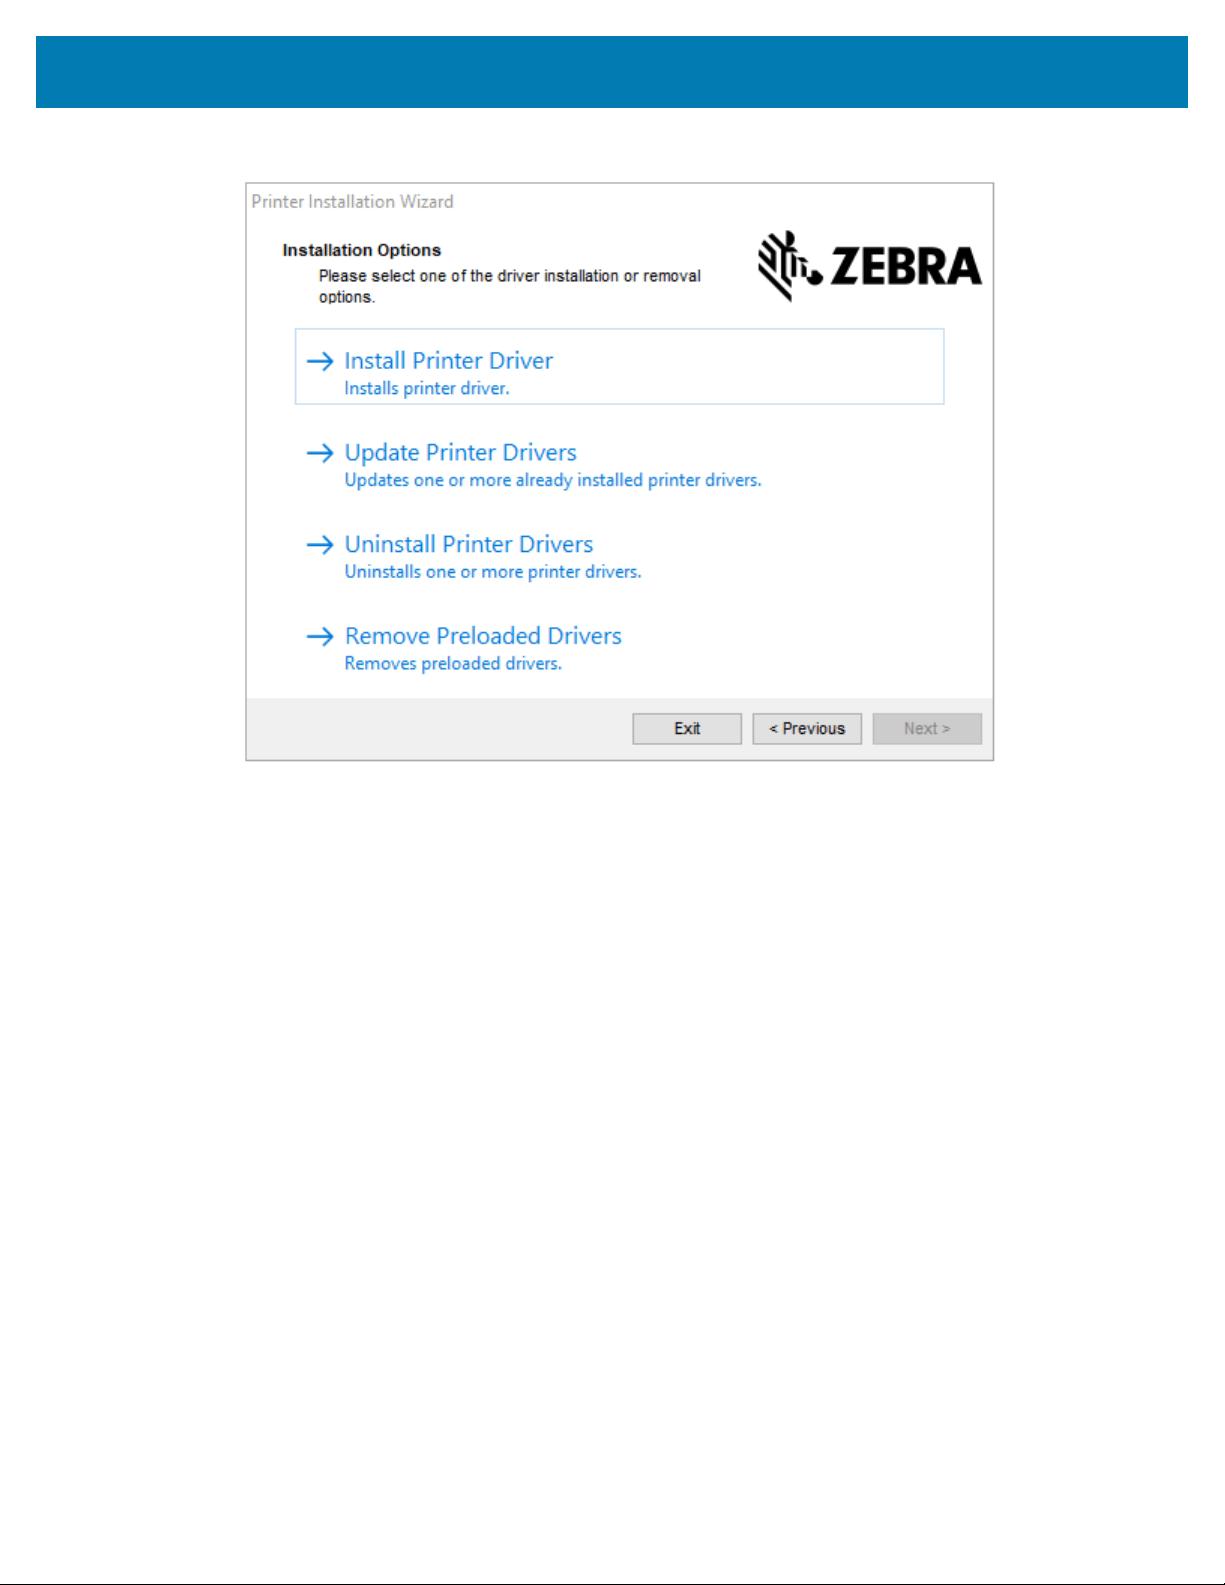
Setup for Windows
2. Click Next.
220
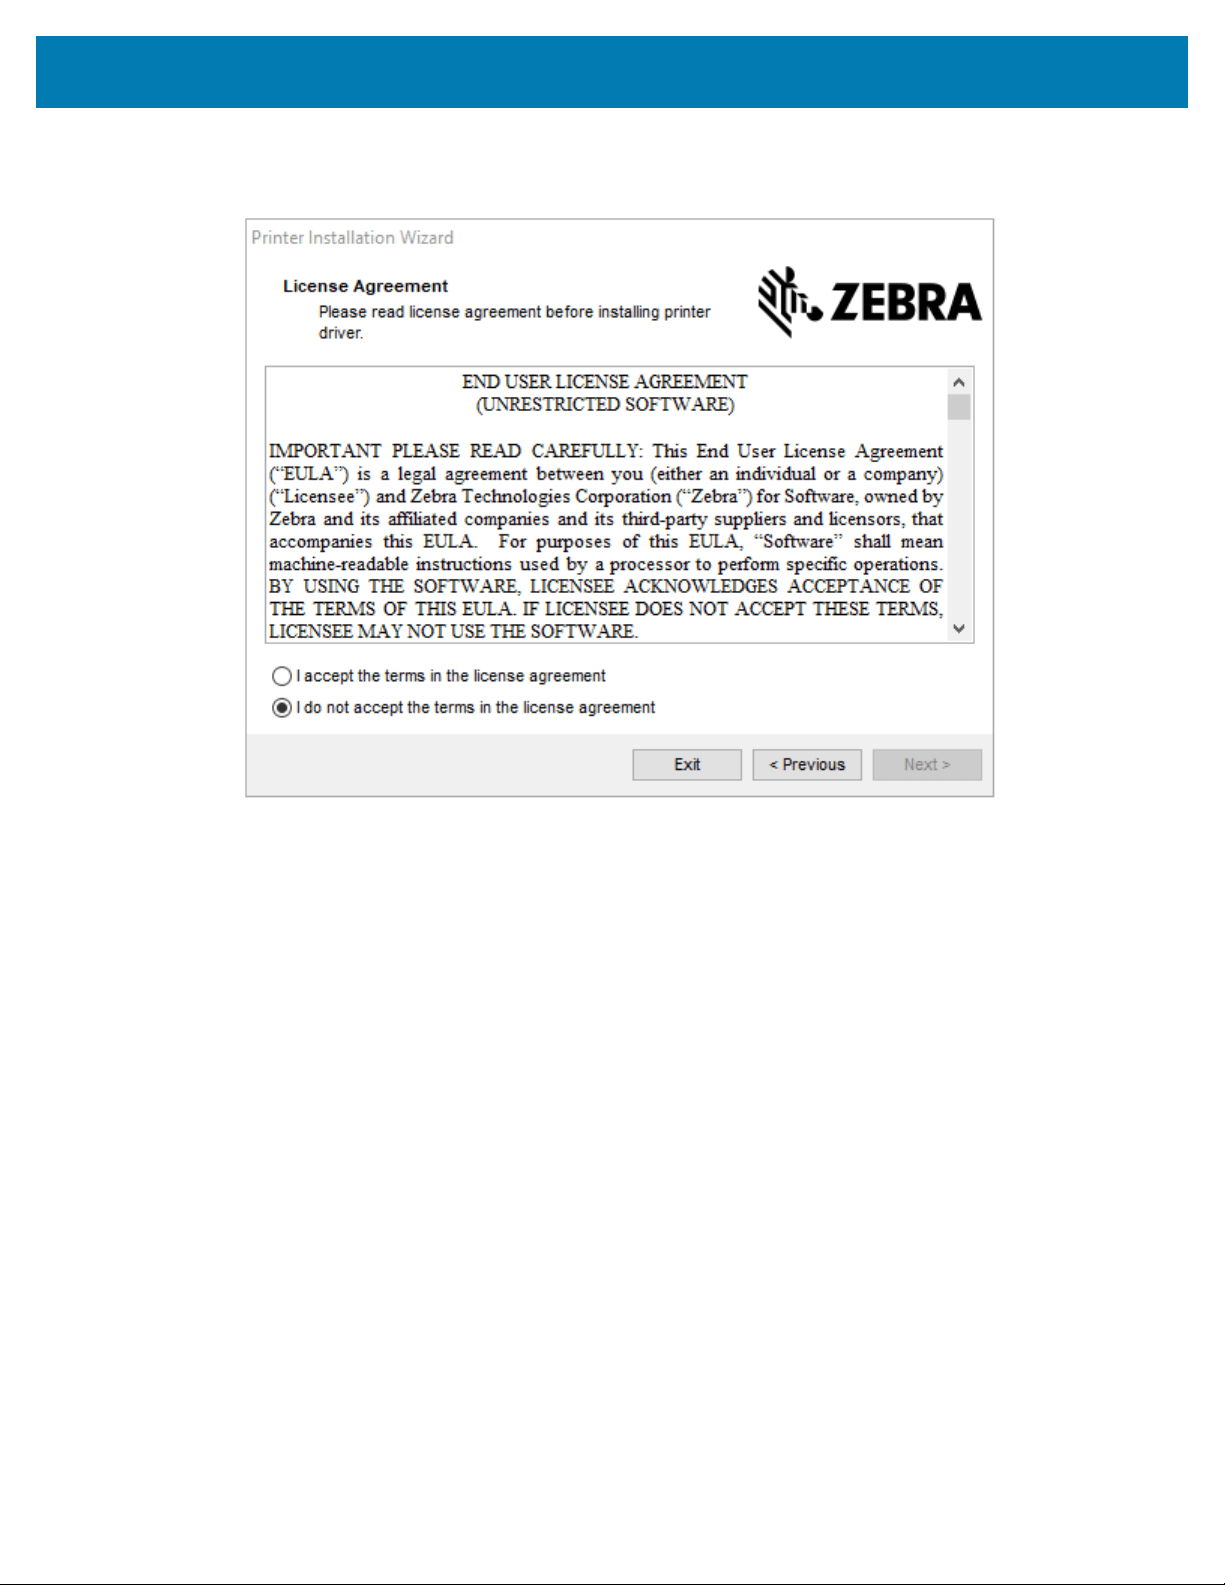
Setup for Windows
3. Click Install Printer Driver.
The license agreement displays.
221
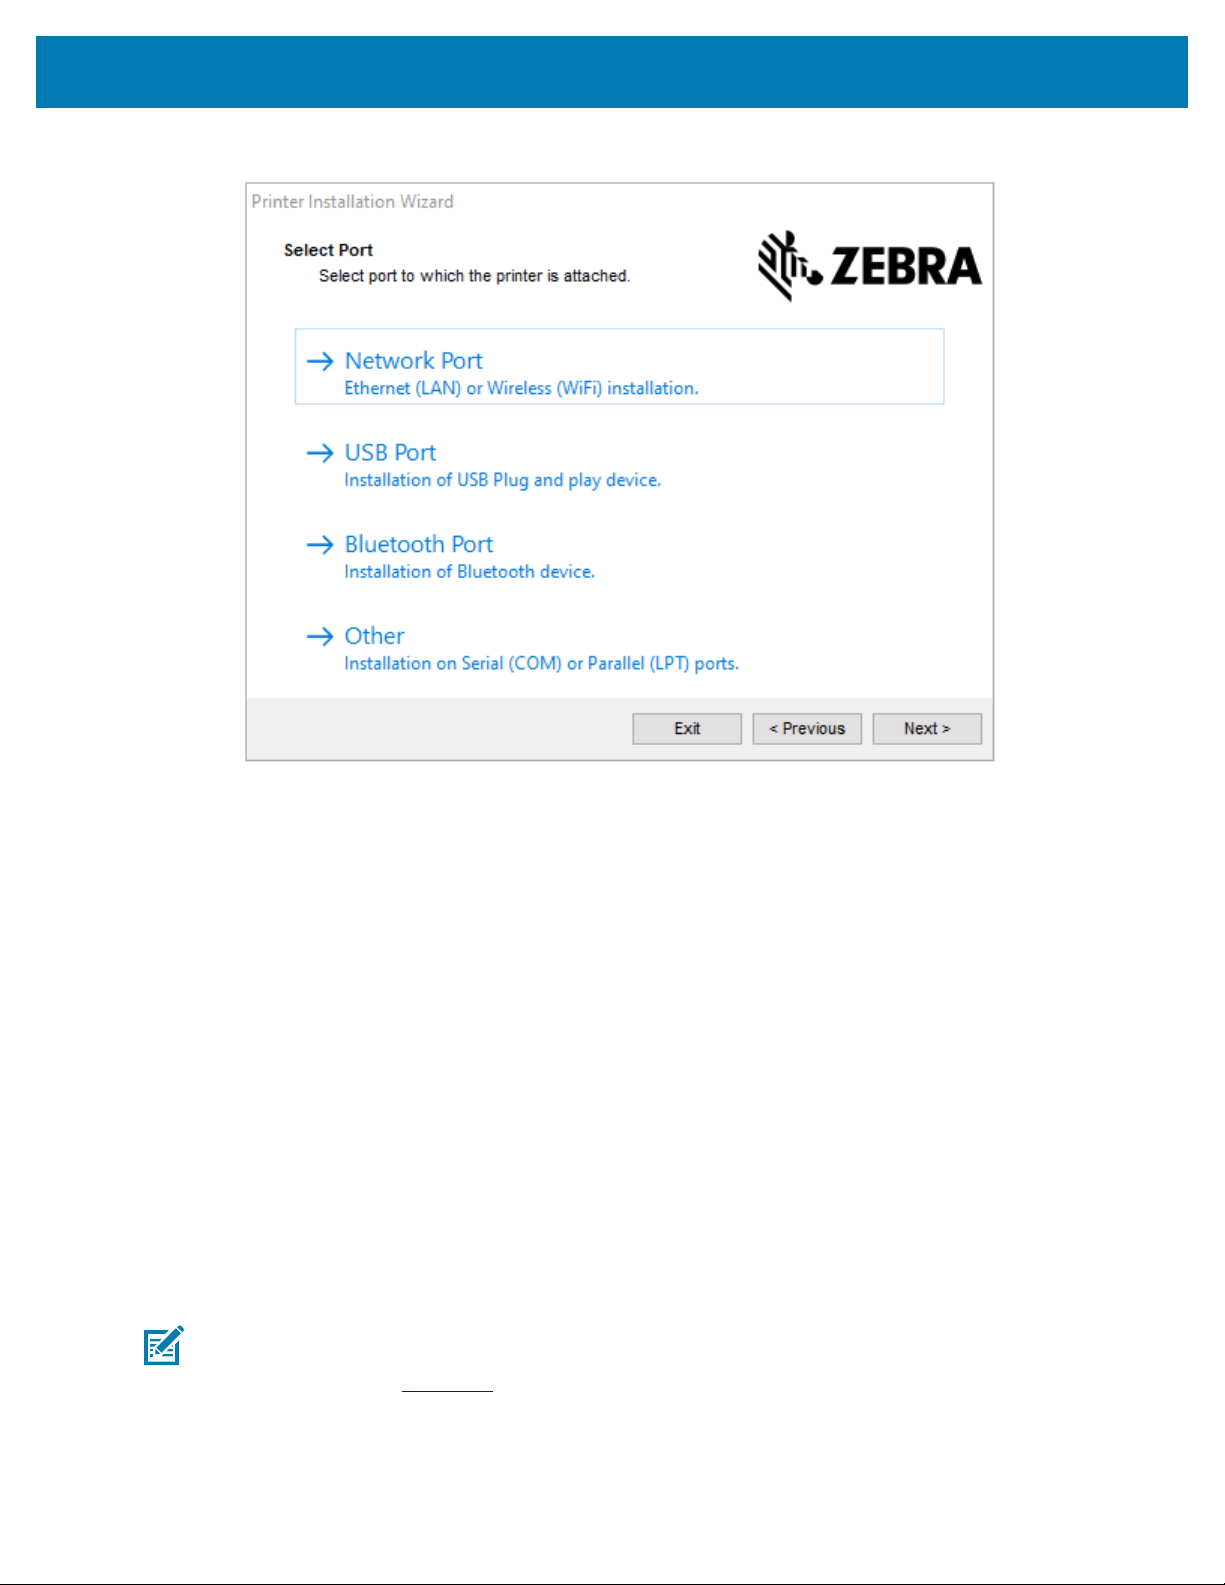
Setup for Windows
4. Read and accept the terms of the license agreement, and then click Next.
5. Select the communication option that you want to configure for your printer:
• Network Port: To install printers with an Ethernet (LAN) or wireless (Wi-Fi) network connection.Wait
for the driver to scan your local network for devices and follow the prompts.
• USB Port: To install printers connected with the USB cable.Connect the printer to the computer. If
the printer is already connected and powered on, you may need to remove the USB cable and install
it again. The driver will automatically search for the model of the connected printer.
• Bluetooth Port: To install printers with a Bluetooth connection.
• Other: For installation on another type of cable, such as Serial (COM).No additional configuration is
necessary.
6. If prompted, select your printer model and resolution.
The model and resolution are listed on the printer configuration label. For instructions on printing a
label, see Printing the Printer and Network Configuration Reports (CANCEL Self Test) on page 324.
Setting Up the Wi-Fi Print Server Option
The wireless radio option (which includes Wi-Fi, Bluetooth Classic and Bluetooth Low Energy) is available
ONLY as a factory-installed configuration.These instructions guide you through basic configuration of your
internal Wi-Fi Print Server option using the Connectivity Wizard.
NOTE: For detailed information on installingEthernet/LAN and Bluetooth interfaces,
see theWired/Wireless Print Server User Guide and theBluetooth Printer Management
Guideavailable from zebra.com.
You may configure your printer for wireless operation using one of these methods:
222
Setup for Windows
Using the Connectivity
Wizard (covered in this
guide)
When run, the wizard writes a ZPL script to enable your PC to communicate
with your printer over Wi-Fi.
Towards the end of the process, the wizard will prompt you to eithersend the
command directly to your printer, or save the ZPL script to a file. If you elect
to save this ZPL file:
• You can send the file to one or more printers that will use the same
network settings, using any available connection (serial, parallel, USB, or
wired print server).
• You can resend the file to the printer at a future time if the printer's
network settings were restored to their factory defaults.
Using a ZPL script that
you write yourself*
Use the ^WX command to set the basic parameters for Security Type.
Using Set/Get/Do (SGD)
commands that you
send to the printer
Begin with wlan.security to set the Wireless Security type. Then add
other SGD commands (which will be necessary based on the security type
you select)to specify the other required parameters.
NOTE: * Refer to the ZPL Programming Guide for more information on these options.You can
send these commands through any available connection (serial, parallel, USB, or wired print
server).
Configuring the Printer Using ZebraNet Bridge’s Connectivity Wizard
While you have several options to connect to and configure your printer for cloud, WLAN and LAN
operations, the recommended tool to use is Link-OS Profile Manager.Link-OS Profile Manager is provided
with the ZebraNet Bridge Enterprise (for local and LAN configurations), a configuration utility that is
available for download from
zebra.com/software.
The Connectivity Wizard (which is part of this software) allows you to easily configure your printer for
wireless operation by authoring the appropriate ZPL script for your printer. Use this utility to configure your
printer's wireless print server either for the first time orafter you reset the printer's network options to their
factory defaults.
1. If it is not already downloaded and installed, download ZebraNet Bridge Enterprise version 1.2.5 or
laterfrom zebra.com/software andinstall it on your computer.
NOTE: You will need ZebraNet Bridge Enterprise version 1.2.5 or later to configure the
printer.
2. Launch the ZebraNet Bridge Enterprise utility.If you are prompted for a serial number, you can choose
to click Cancel and continue using the Connectivity Wizard.
223
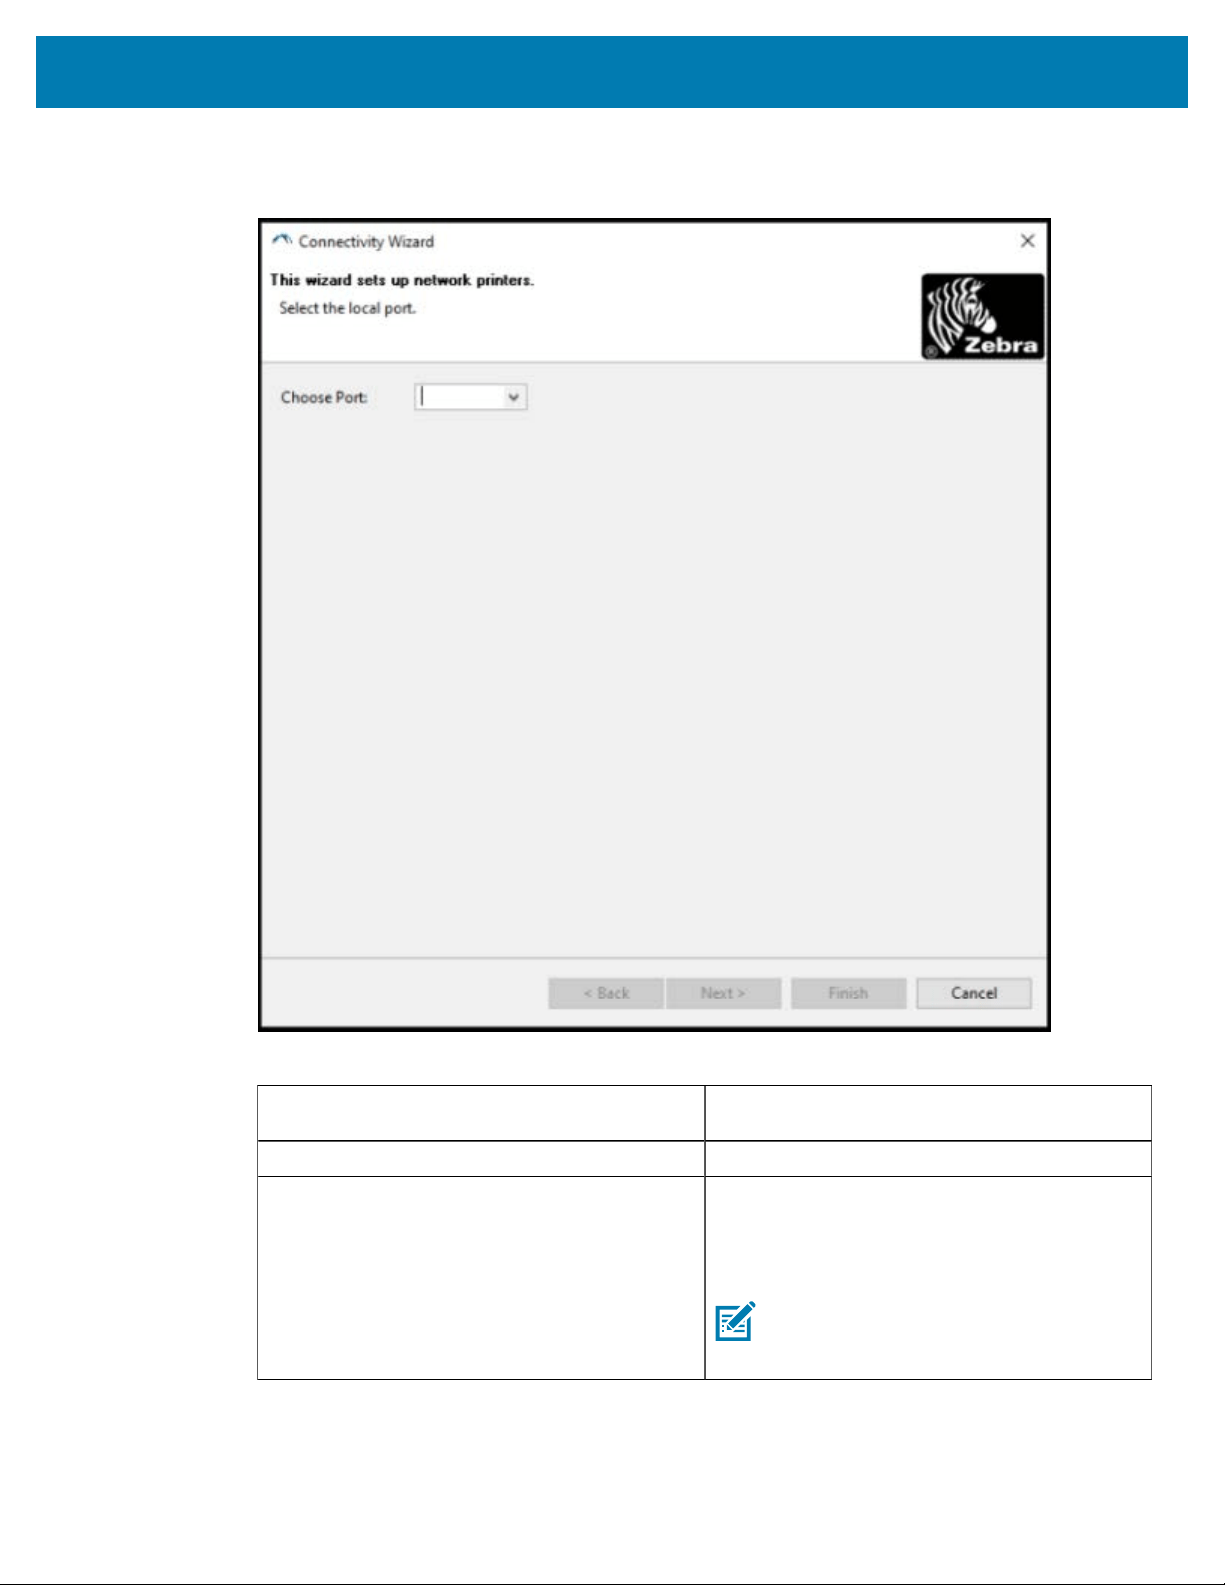
Setup for Windows
3. From the Windows Menu bar, select Tools > Connectivity Wizard.
The Connectivity Wizard opens.
4. From the Choose Port list, select the port to which your printer is connected.
If you want to save the file without sending it to
a printer...
Select any available port.
If you decide to select File... Browse to the location of the file.
If you select a serial port...
Serial port configuration information appears
below the Choose Port list. If necessary, change
the serial communication settings to match your
printer’s settings.
NOTE: If a port is in use by another
device, it will NOT appear in the drop-
down list.
224
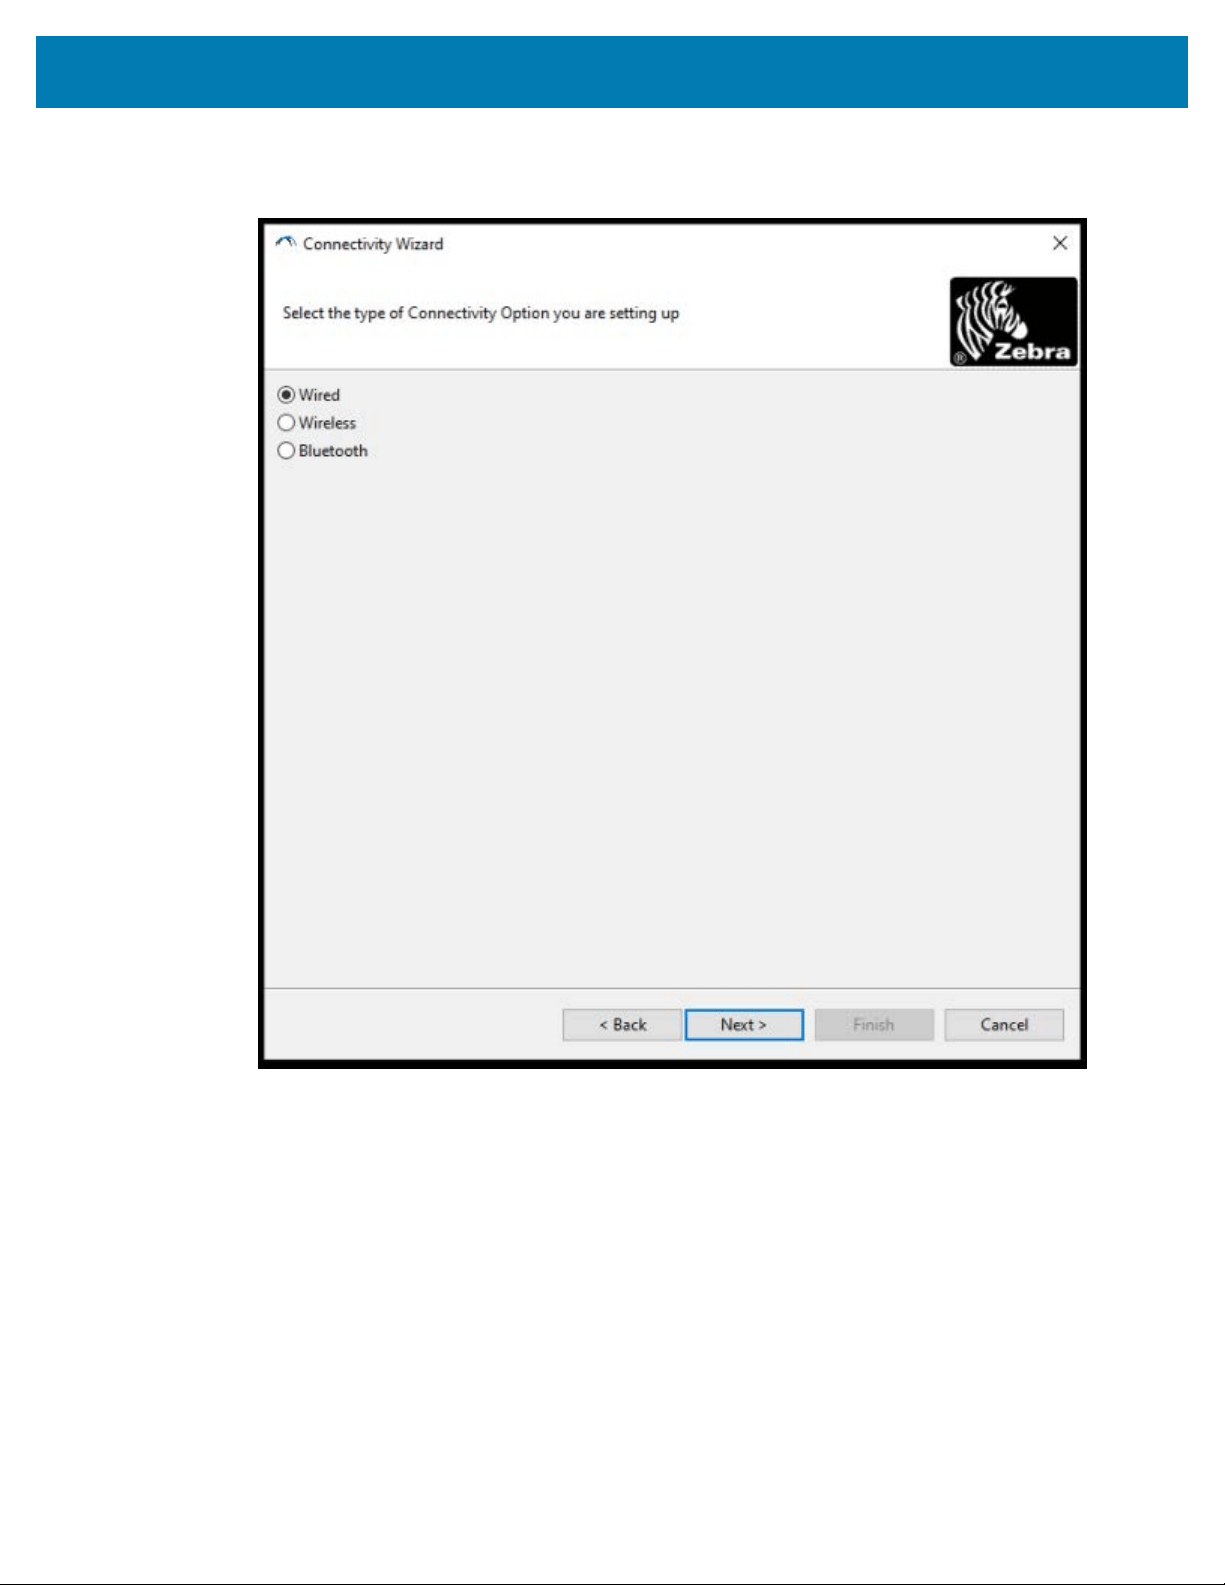
Setup for Windows
5. Click Next.
The wizard prompts you to select the print server device to configure.
225

Setup for Windows
6. Select Wireless,then click Next.
The wizard prompts you for the type of printer you are using.
226
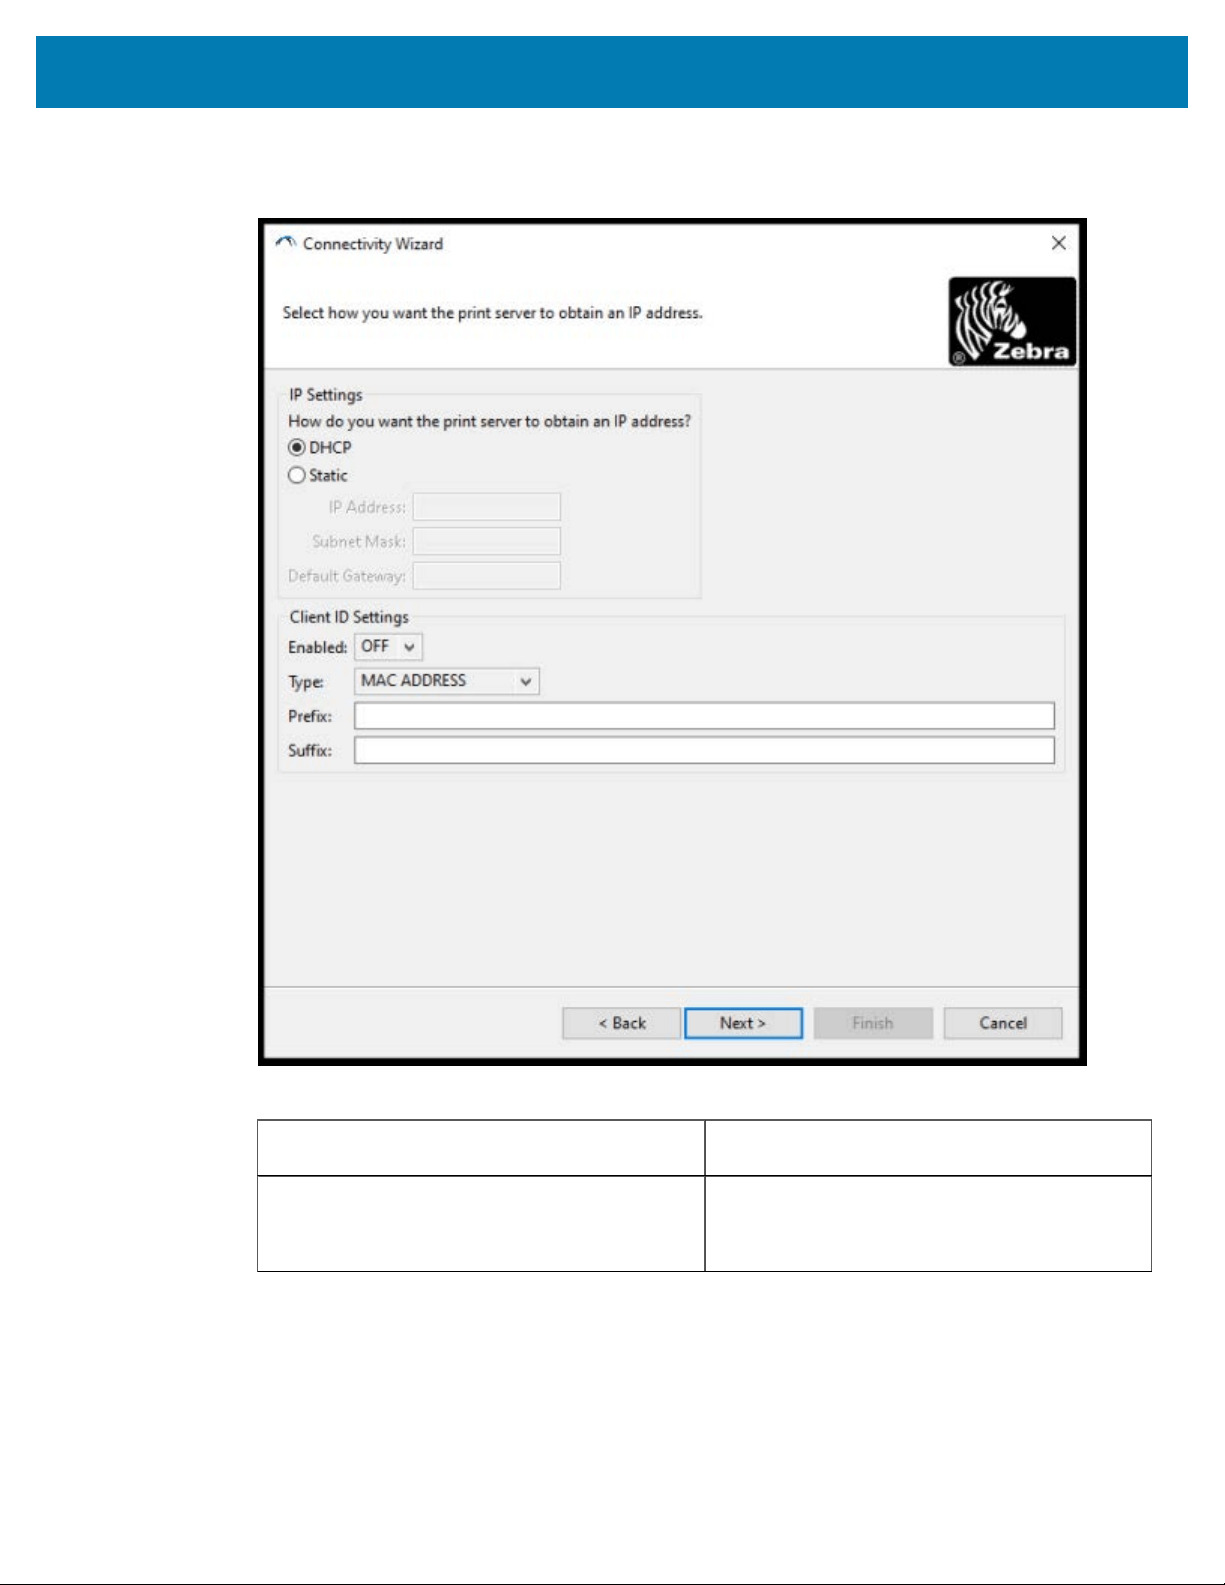
Setup for Windows
7. Select the type of printer you are using, then click Next.
The wizard prompts asks you to enter the wireless IP details.
8. Enable the DHCP (dynamic) option or the Static IP option.
If you chose DHCP... Click Next and proceed to the next step in this
procedure.
227
If you chose Static... Enter the IP Address, Default Gateway, and
Subnet Mask for the wireless print server and
click Next.Contact your network administrator
for the correct values to use.
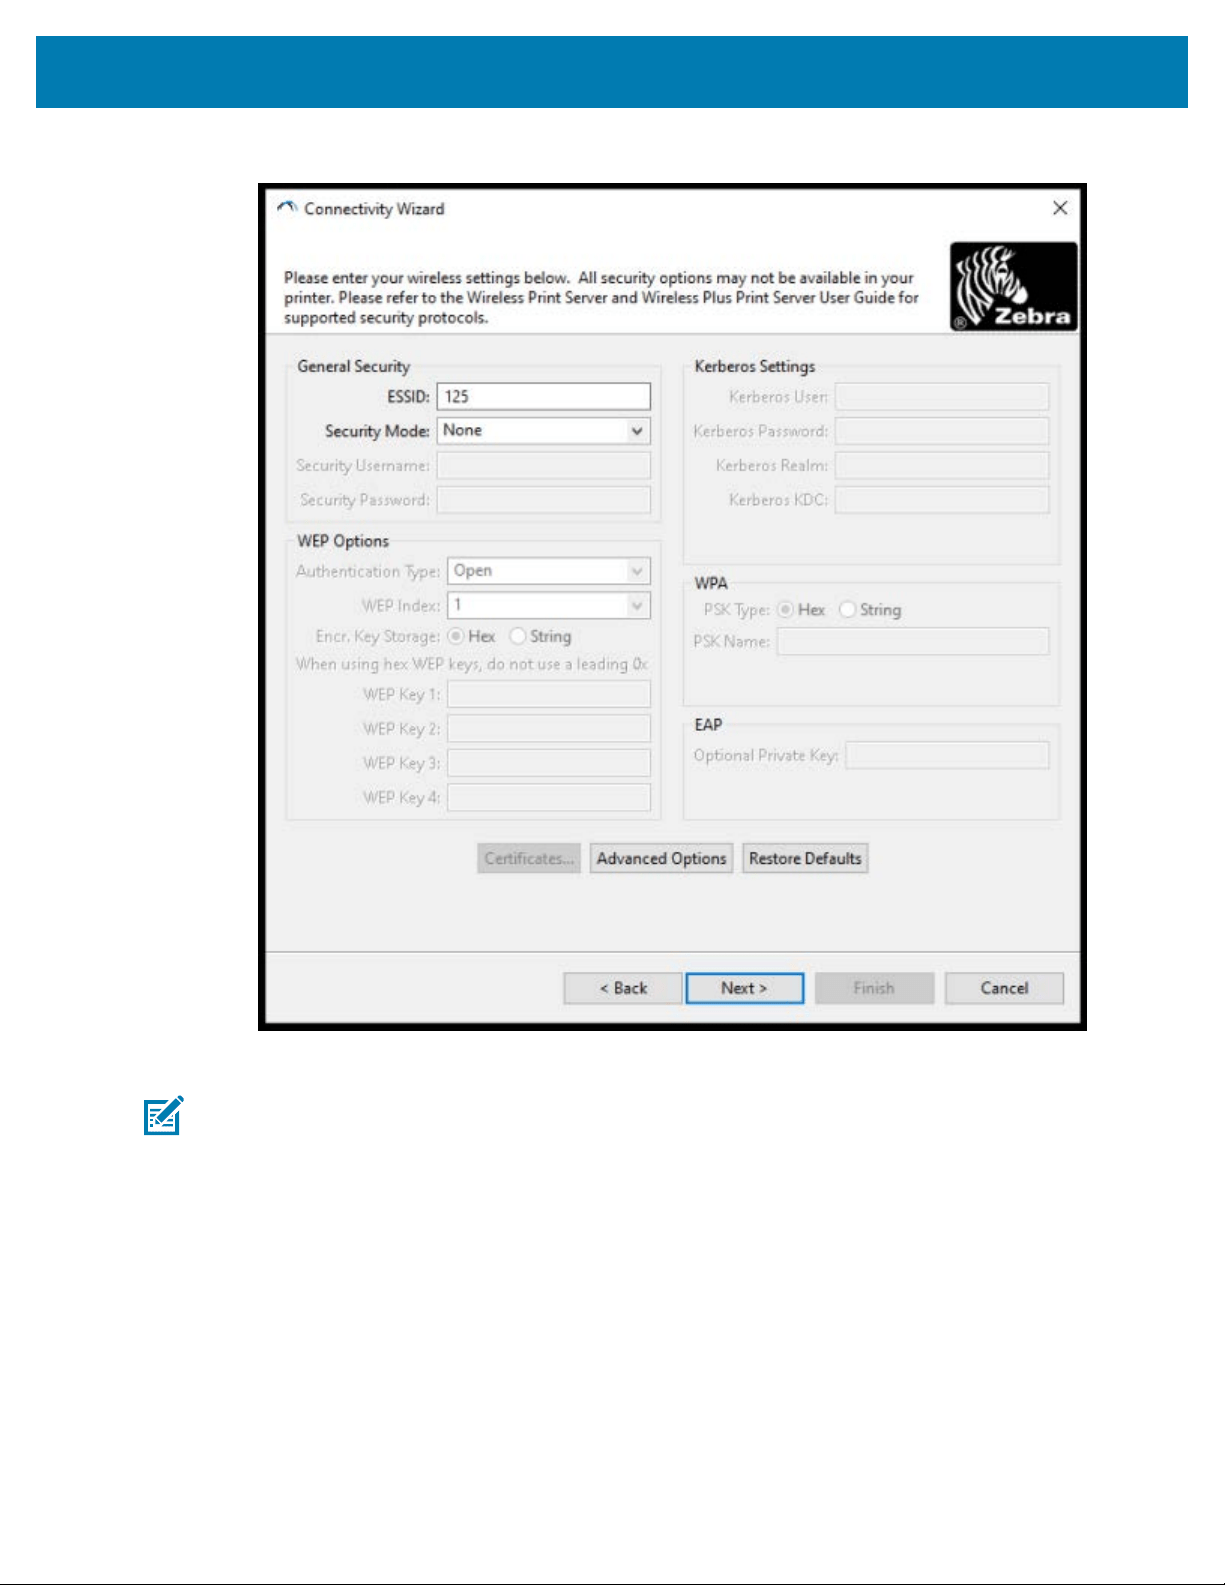
Setup for Windows
The Wireless Settings window opens.
9. Enter the ESSID.
NOTE: You must set the ESSID (and passphrase, if you use one) at your access point before
completing these steps.
228
Setup for Windows
10. From the Security Mode dropdown, select the appropriate mode.Depending on the option you
choose, complete the additional steps listed below the option you decide to use, before moving on to
the next step in this procedure.
If you select... Perform these additional steps, then
proceed to the next step in this procedure.
None (no security protocol) Skip this step.
WEP 40-Bit or WEP 128-Bit
In the WEP Options section of the window, enter the following
values:
• Authentication Type
• WEP Index
• Encryption Key Storage
• WEP Keys
EAP-TLS, EAP-TTLS, EAP-
FAST, or WPA-EAP-TLS
In the EAP section, if necessary, enter an Optional Private Key.
PEAP, LEAP, WPA-EAP-TTLS,
WPA-PEAP, or WPA-LEAP
In the General Security section, enter the Security Username and
Password.
WPA-PSK
In the WPA section, select the PSK Type, and enter the PSK
Name.
WPA-EAP-FAST
In the General Security section, enter the Security Username and
Password.
In the EAP section, if needed,enter an Optional Private Key.
KERBEROS
Under Kerberos Settings, enter values for Kerberos User,
Kerberos Password, Kerberos Realm, and Kerberos KDC.
NOTE: KERBEROS is NOT supported on Internal
Wireless Plus print servers or radio cards.
11. Click Next.
229
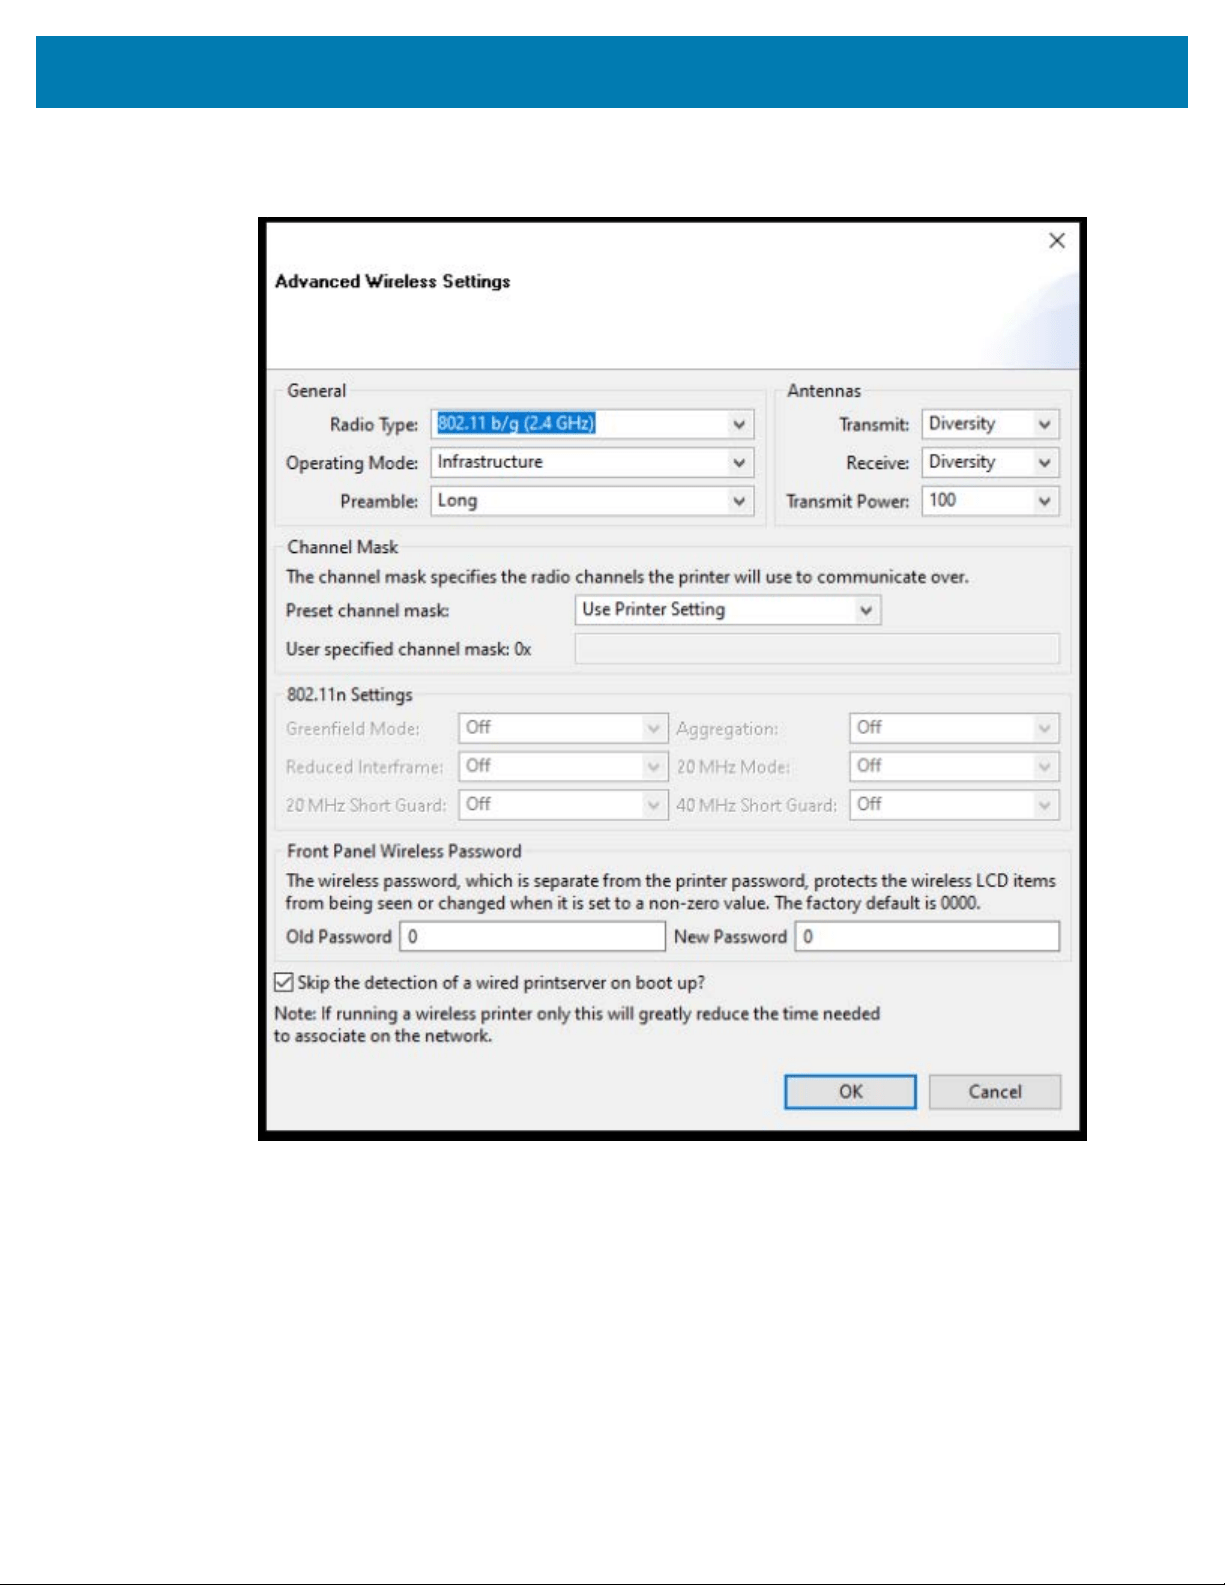
Setup for Windows
12. In the Wireless Settings window, click Advanced Options.
The Advanced Wireless Settings window opens.
13. Review and change the settings in the Advanced Wireless Settings window as needed.
14. Click OK to return to the Wireless Settings window.
230
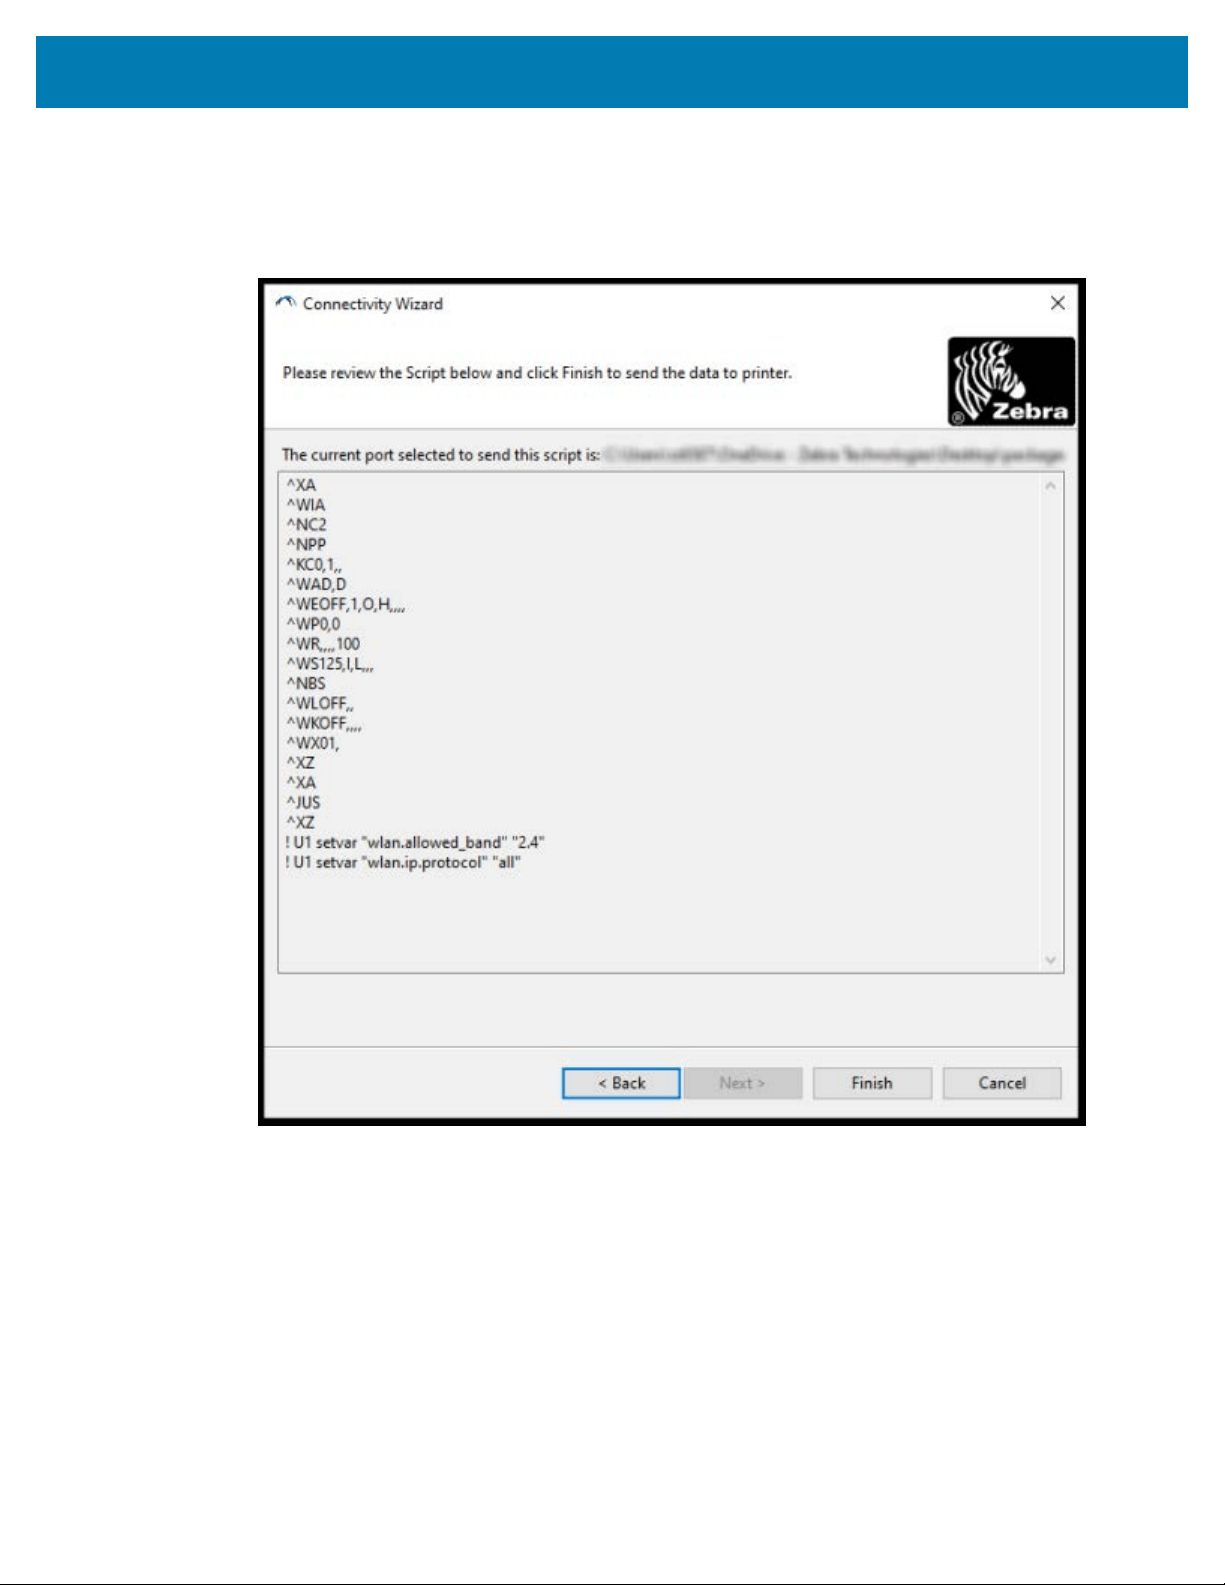
Setup for Windows
15. Click Next.
Based on the selections you made in the preceding steps, the wizard creates a script file with the
appropriate ZPL commands and displays them for your review.
If you selected Tabletop/Desktop, a dialog box similar to this one displays:
16. Decide if you will send the script immediately, or save it for use at a later time.
Sending a ZPL Configuration Script to the Printer
Complete printer Wi-Fi server setup by sending the ZPL script to the printer through the port you selected
in Configuring the Printer Using ZebraNet Bridge’s Connectivity Wizard on page 223.You may want to
save the ZPL script and use it to restore the printer network configuration if the printer is reset to its factory
defaults in the future. Saving the script will also allow you to quickly configure multiple printers if they need
the same settings.
1. Verify that the printer is connected to the computer through the wired cable connection to the USB port.
231

Setup for Windows
2. If the printer is switched off, turn printer power ON.
3. In the Connectivity Wizard: Review and Send ZPL for Wireless window, click Finish.
The computer sends the ZPL script to the printer through the interface port. The Wireless Setup Wizard
screen closes.
4. Turn printer power OFFand then back ON.
5. Observe the wireless status on the printer’s indicator lights to confirm that you have set up your printer
for wireless connectivity.
6. At this point, you can save the ZPL script for later use with this printer and to configure other printers
that may need the same network settings. To save the script:
a) In the Review and Send ZPL for Wireless window, highlight the script, right-click it, and select Copy.
b) Open a text editor such as Notepad and paste the script into the application.
c) Save the script.
d) Back in the Connectivity Wizard, you may click Cancel to exit the Wizard without sending the script
to the printer at this time.
To configure either the same printer again (in case it was reset to its factory defaults) or to configure
other printers with the same settings, send the saved ZPL script file to the printer through the
connection of your choice as detailed in the prior steps in this procedure.
Configuring the Printer Using Bluetooth
The Zebra Setup Utilities provides a quick and easy way to configure a Bluetooth wireless connection with
your printer.
1. Double-click the Zebra Setup Utilities (ZSU) icon on your desktop.
2. Connect your computer and the printer with a USB cable.
3. On the first ZSU screen, highlight the printer displayed in the window and click Configure Printer
Connectivity.
232
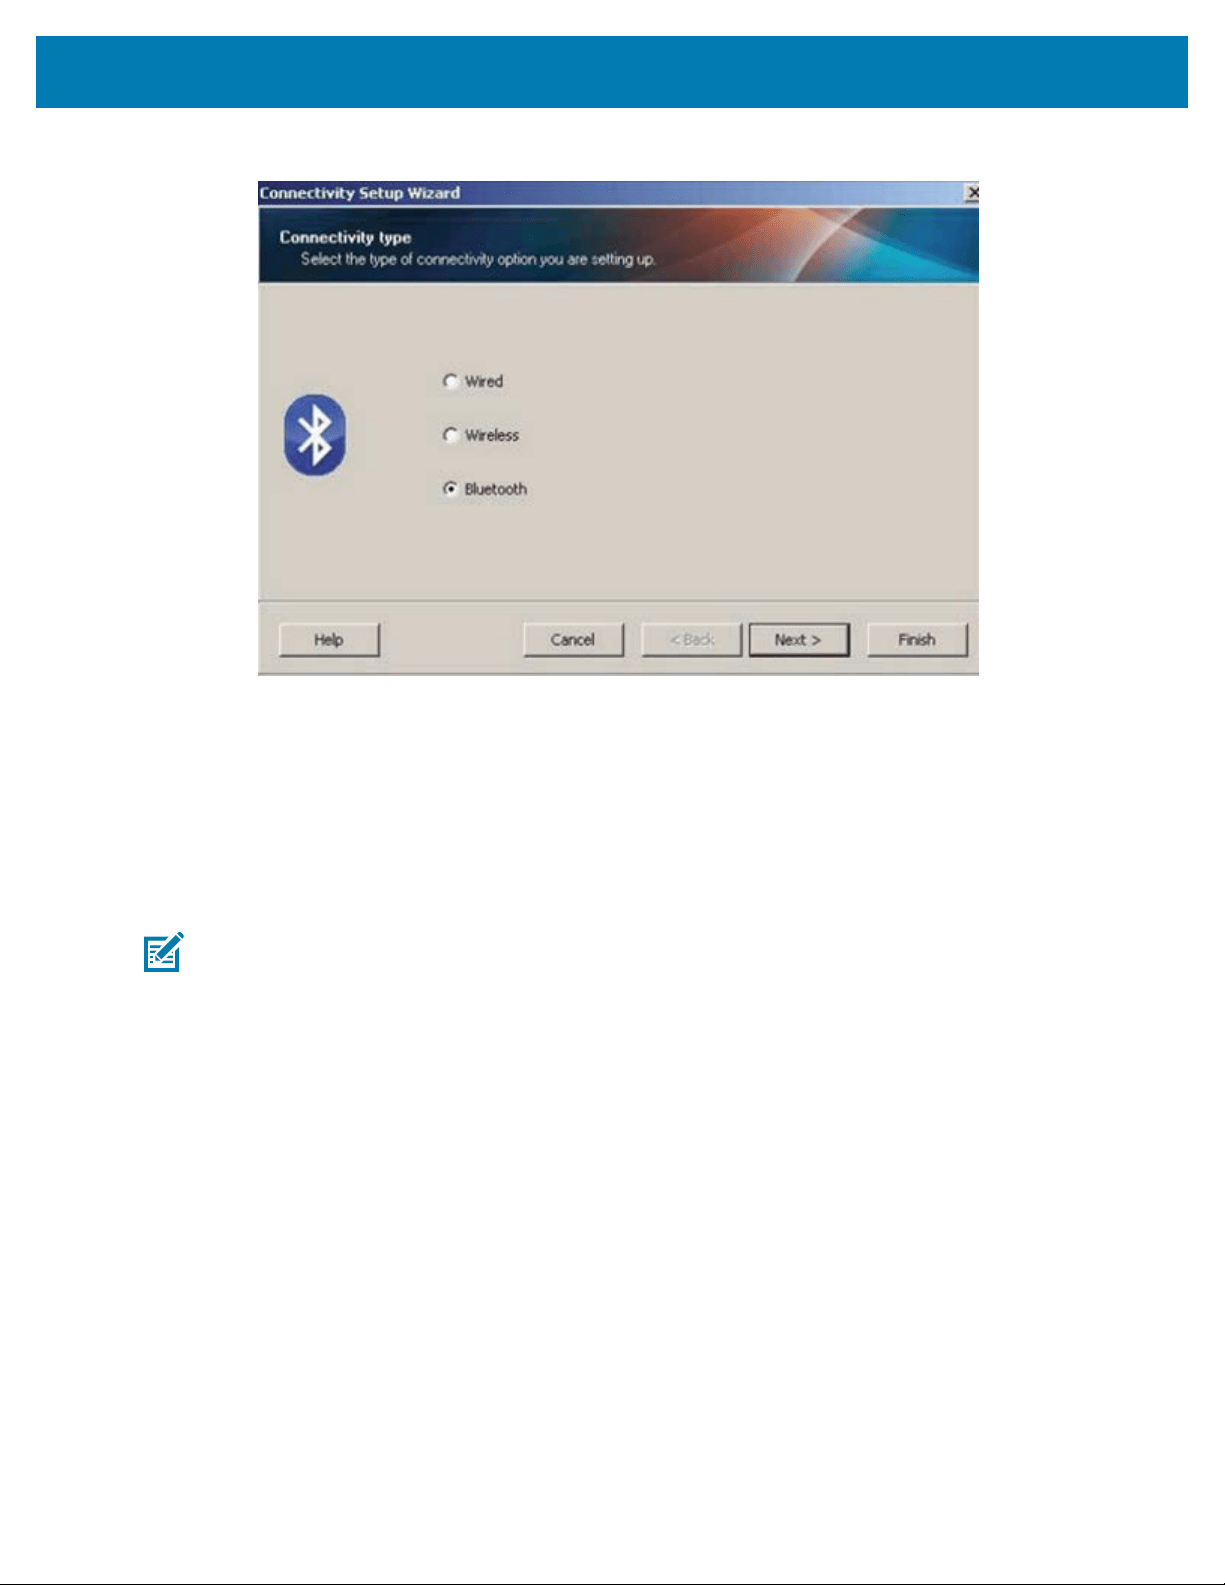
Setup for Windows
4. On the Connectivity type screen,select Bluetooth, thenclick Next.
5. On the Bluetooth Settings screen, check Enabled to enable Bluetooth functionality.
6. In the Friendly Name field, set the Bluetooth name of the device that you will use to discover the
device on the network.
This is the name that the central device will apply to the printer.
7. If you want the device to appear when central devices are looking for new devices to pair with, set the
Discoverable field to On .If not, set it to Off.
8. Set Authentication to On.
NOTE: This setting does not exist in Link-OS Profile Manager, but you must set it to On if
you want to enter a PIN in the Zebra Setup Utilities. The actual authentication setting on the
printer is set by accessing Advanced Settings > Security Mode.
9. The values required to set the Authentication PIN will vary based on the Bluetooth version used
by the central device which you use to manage your printer. If the central device uses BT v2.0 or
older, enter a numeric value in this field. You will be prompted to enter this same value on the central
233
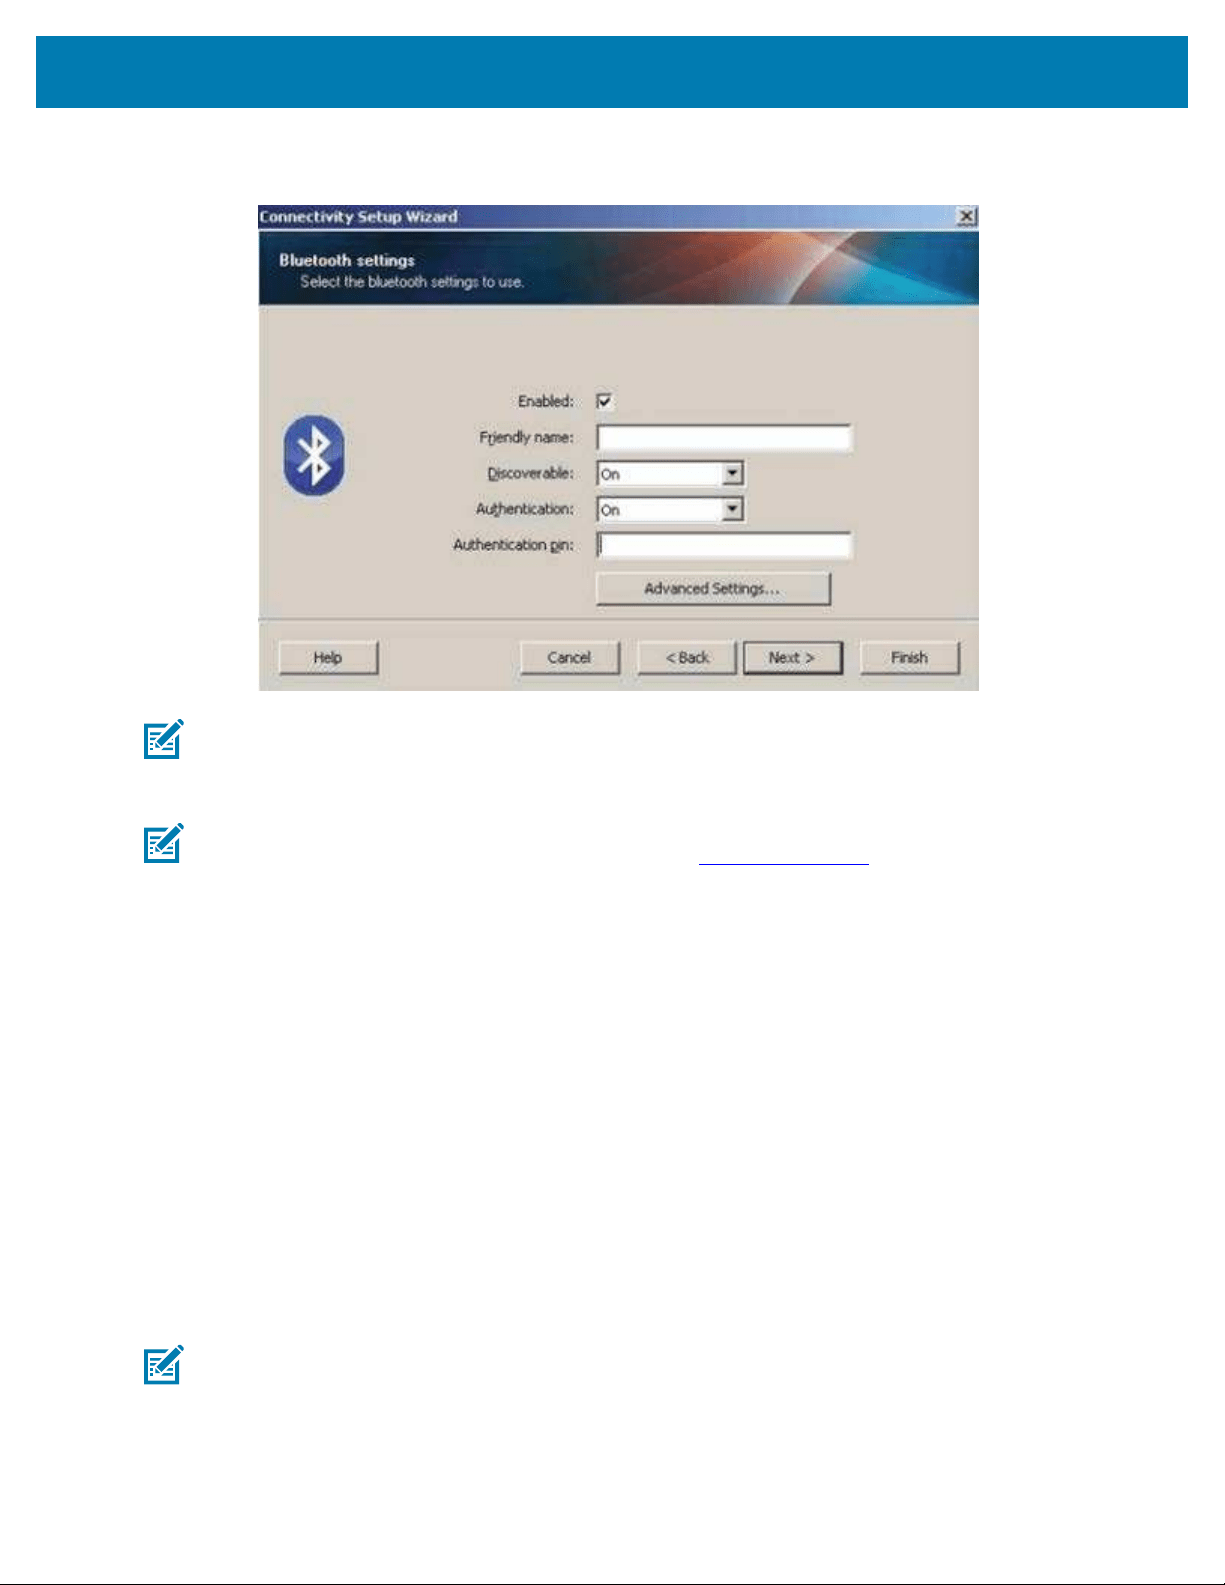
Setup for Windows
device to verify Bluetooth pairing. For PIN pairing, also select Security Mode2 or Security Mode 3 in
Advanced Settings .
NOTE: If the central device uses BT v2.1 or newer, this setting has no effect. BT v2.1 and
newer versions use Secure Simple Paring (SSP) which does not require the use of a PIN.
10. To view Advanced Bluetooth settings, click Advanced Settings....
NOTE: For more information on Advanced Settings, refer to the Wired and Wireless Print
Server Guide. This guide is available to download from zebra.com/manuals.
11. Click Next to continue configuring your printer.
The specific SGD commands you need to configure your printer from your central device are
displayed.
12. On the Send Data screen, click the name of the printer that you want to send the commands to. You
can also click File to save the commands to a file for later use.
13. Send the commands to the printer you chose by clicking Finish.
The printer updates and reboots with the programming settings you specified.
14. At this point, you may disconnect the USB interface from your printer.
15. To complete the Bluetooth pairing process, enable Bluetooth device discovery on your central device
and follow the instructions provided by the central device to complete the pairing.
Connecting the Printer to a Windows 10 OS
Before adding (also called pairing) a Bluetooth-enabled device to your central device, make sure the
device to be paired is turned on and discoverable.
NOTE: Your Windows device may need a Bluetooth adapter to connect to a Bluetooth device.
Check with your Windows device user guide for details.
234
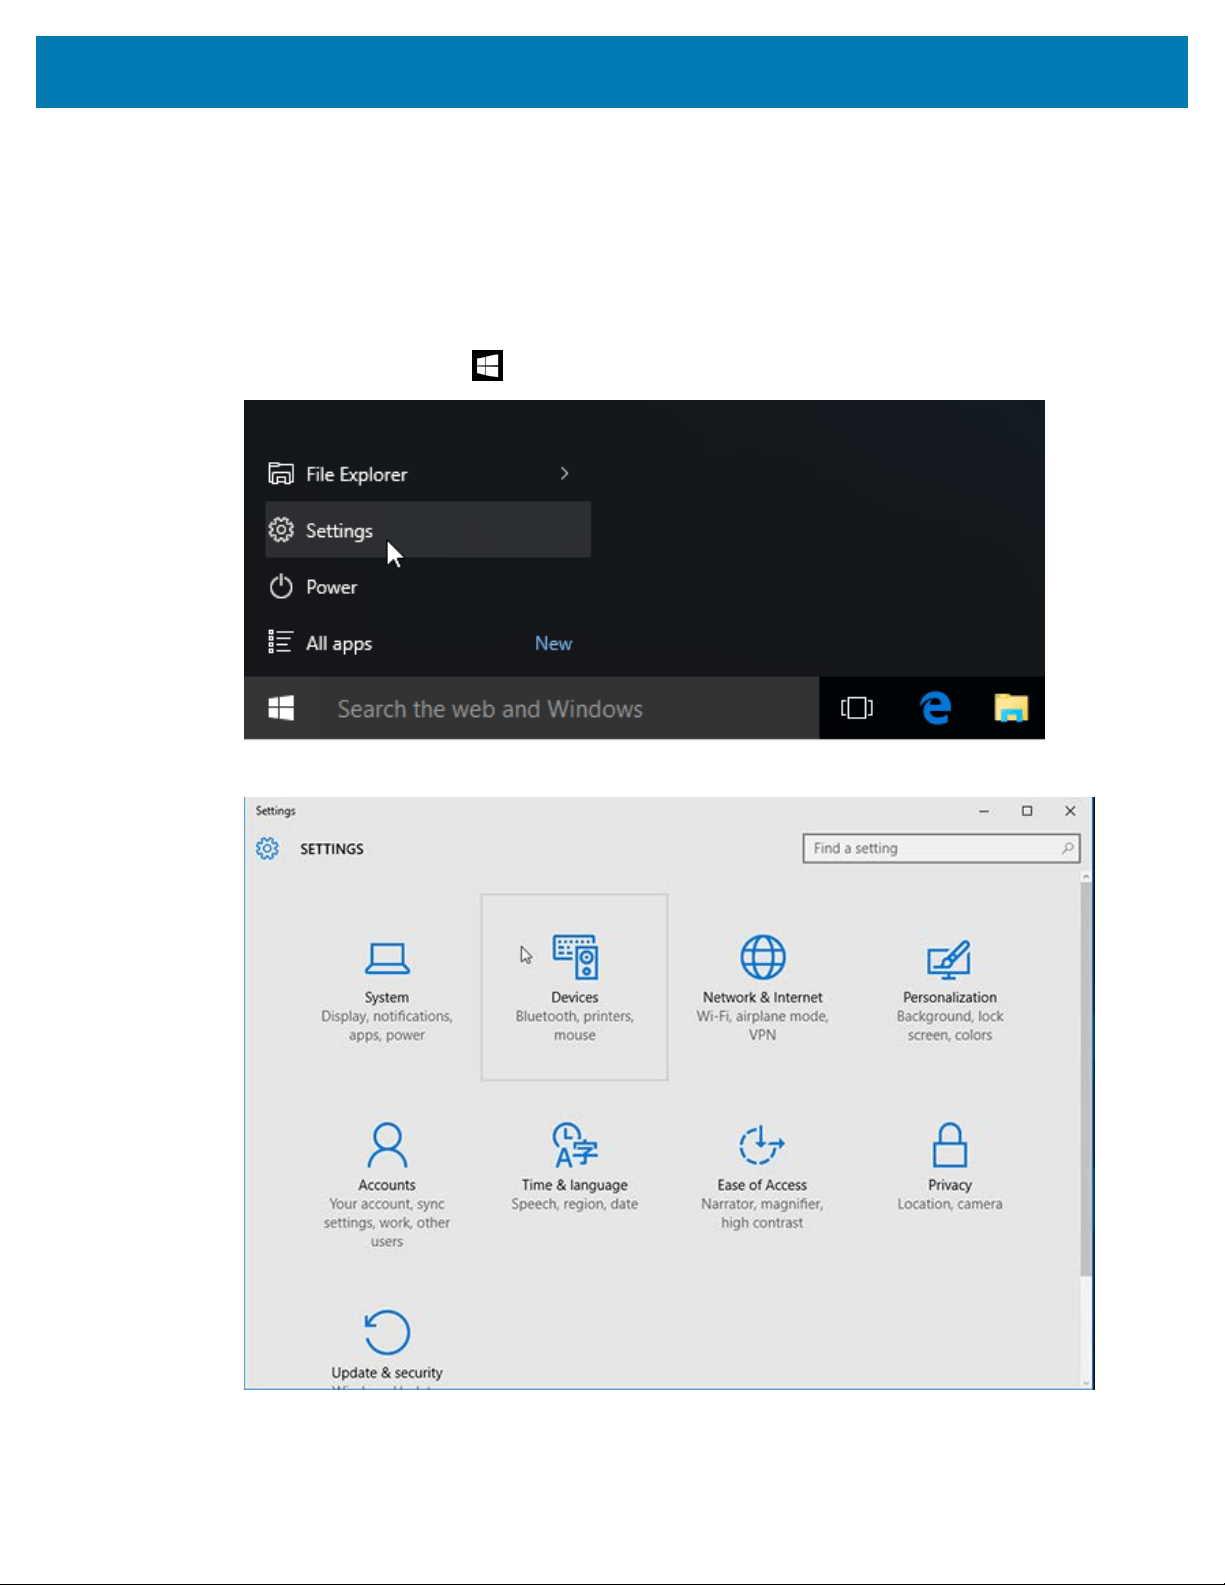
Setup for Windows
Some non-Microsoft Bluetooth dongles and built-in Bluetooth devices in the host PCs have ONLY
marginal driver support for Secure Simple Paring (SSP) printing and may not complete the Add
printer wizard normally.
You may need to access Bluetooth Devices under Windows Settings and activate SPP for the
'device' (the Bluetooth-capable printer you are setting up).
Install the printer to a local printer (USB, for your printer), and then change the Port after the
completing the installation to SPP (virtual serial port) COM port.
1.
Click the Windows Start ( ) button, then select Settings.
2. Click Devices.
235
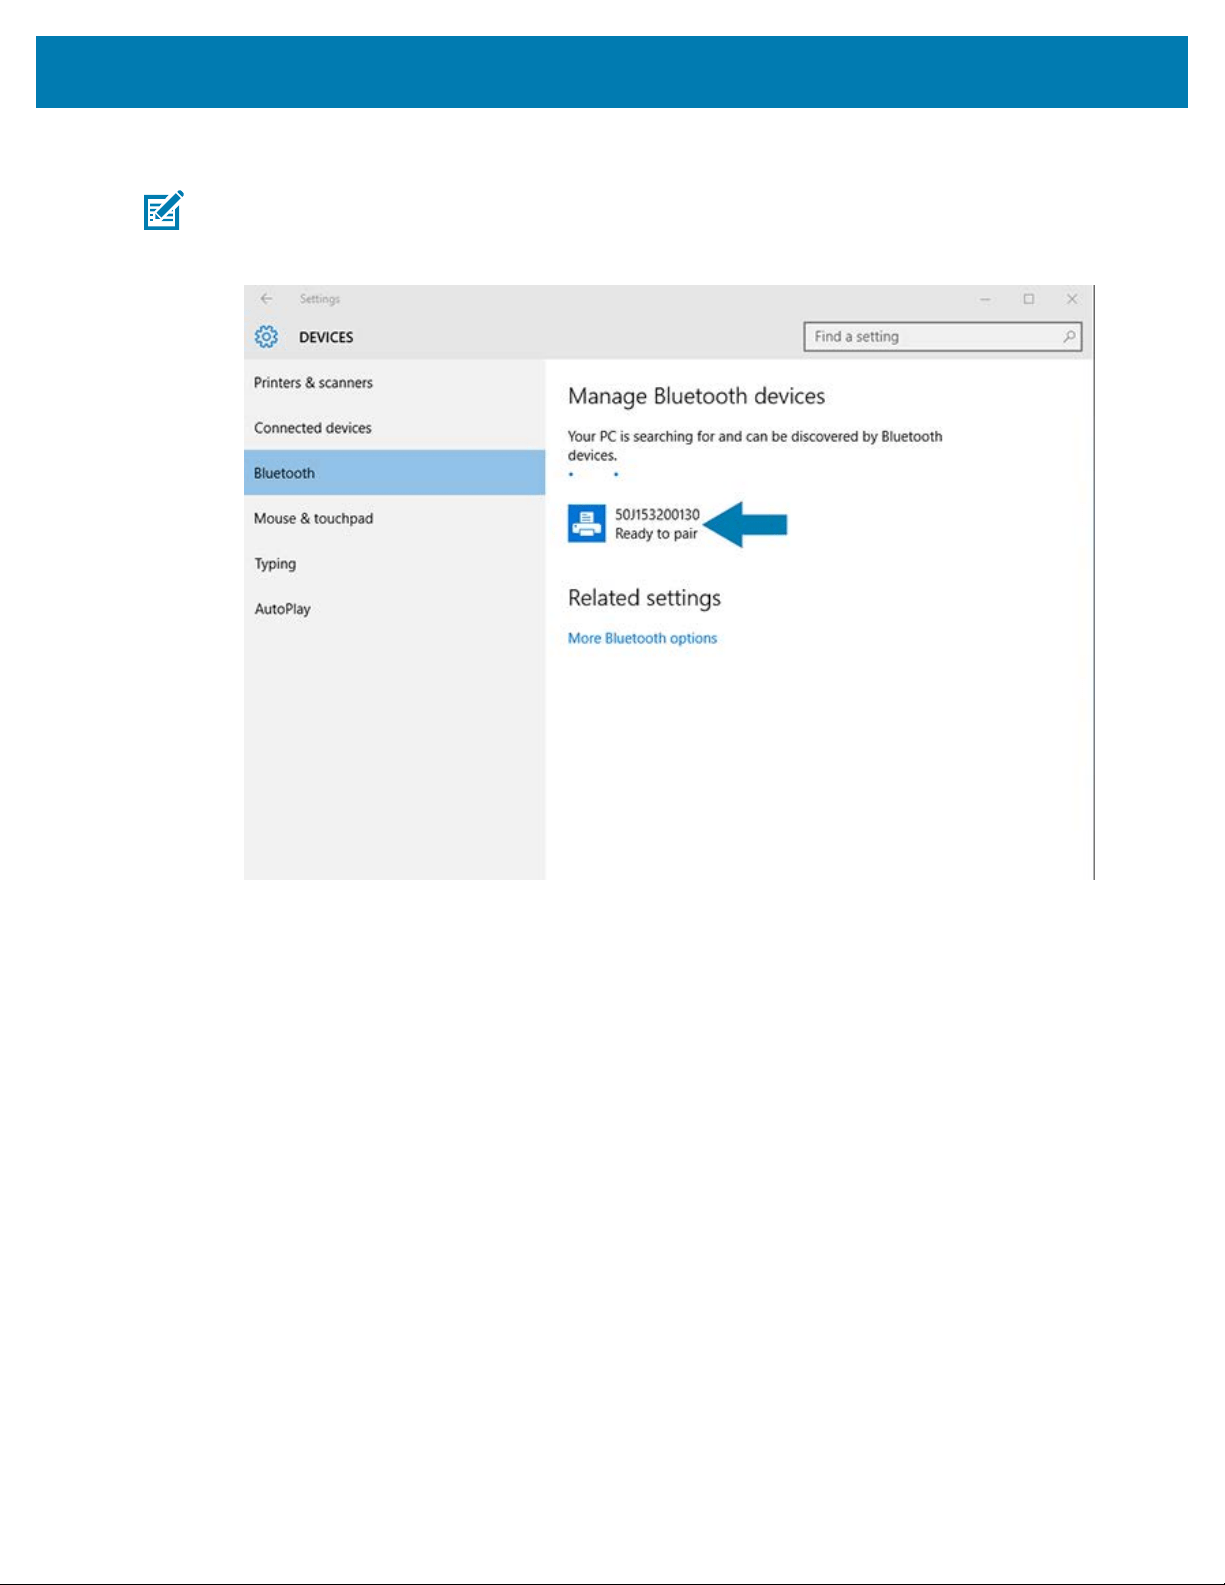
Setup for Windows
3. Click Bluetooth.
NOTE: If your PC does not have Bluetooth installed, the Bluetooth category is NOT displayed
in the list of device categories.
The printer is identified by its serial number as shown here.
236
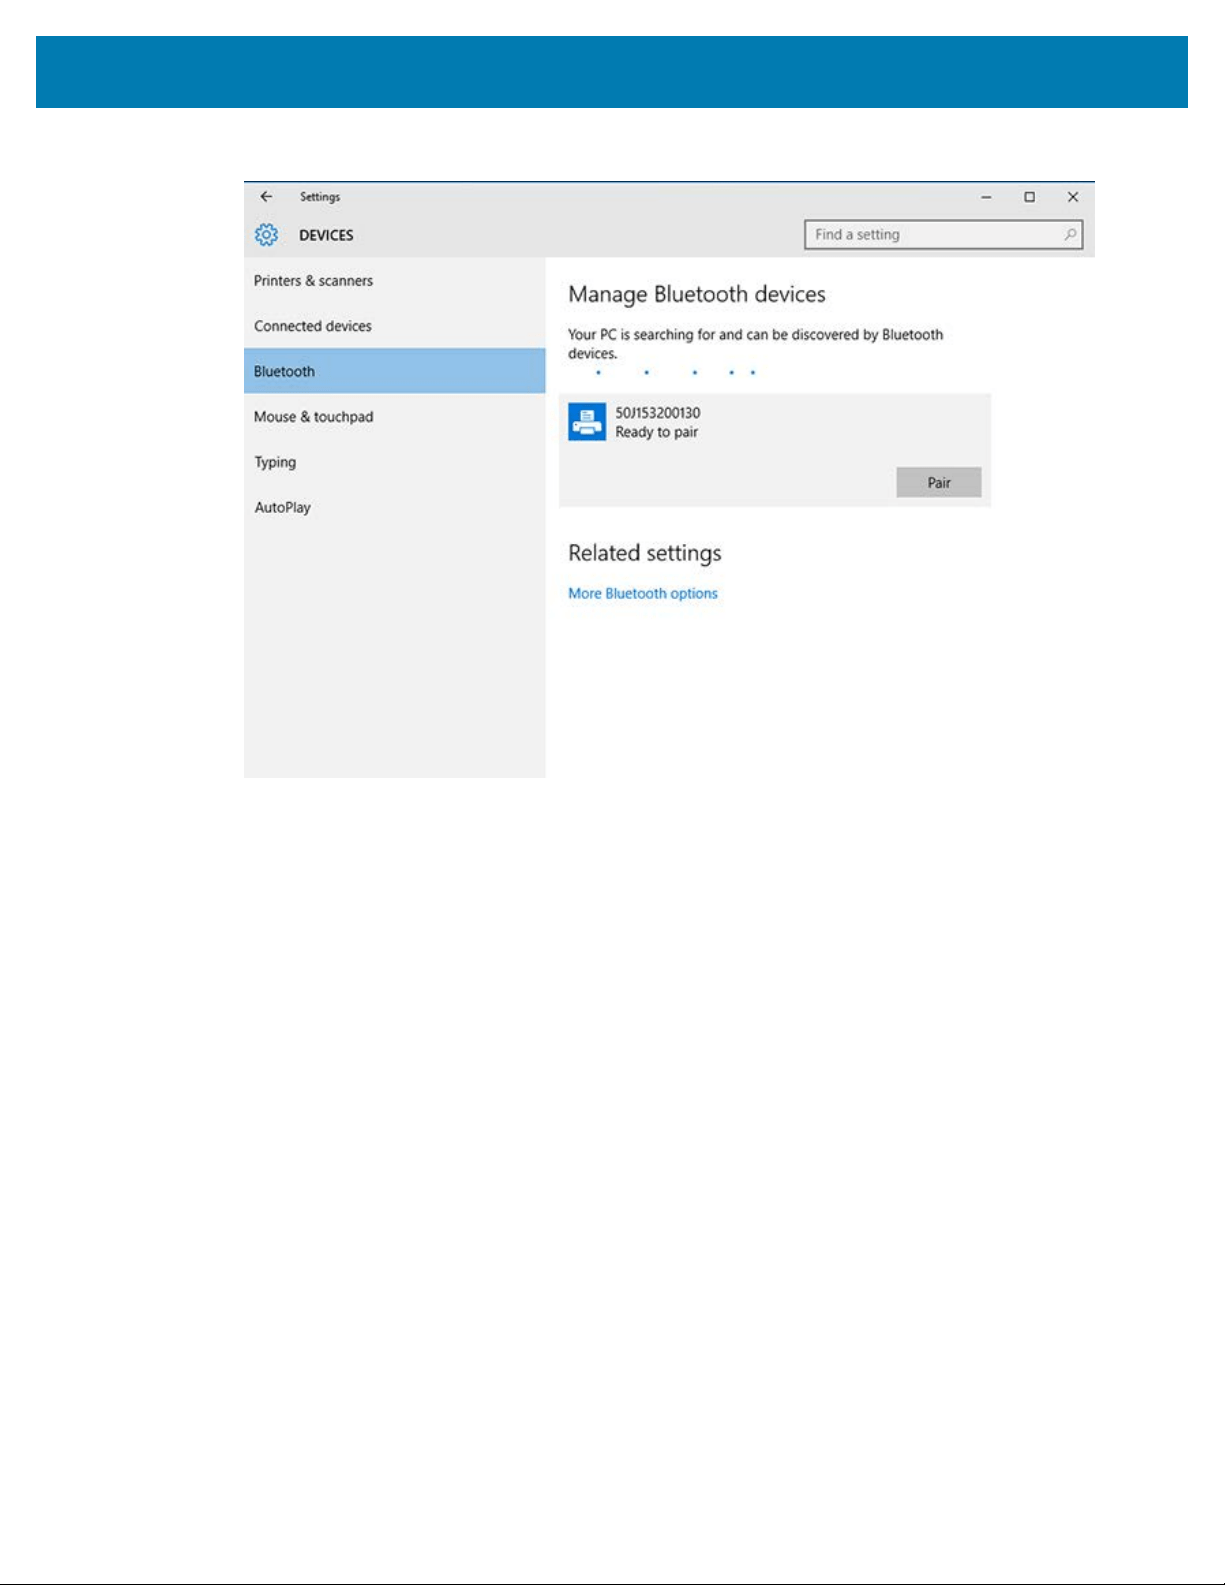
Setup for Windows
4. Click the printer icon, then click Pair.
The printer prints a passcode.
237
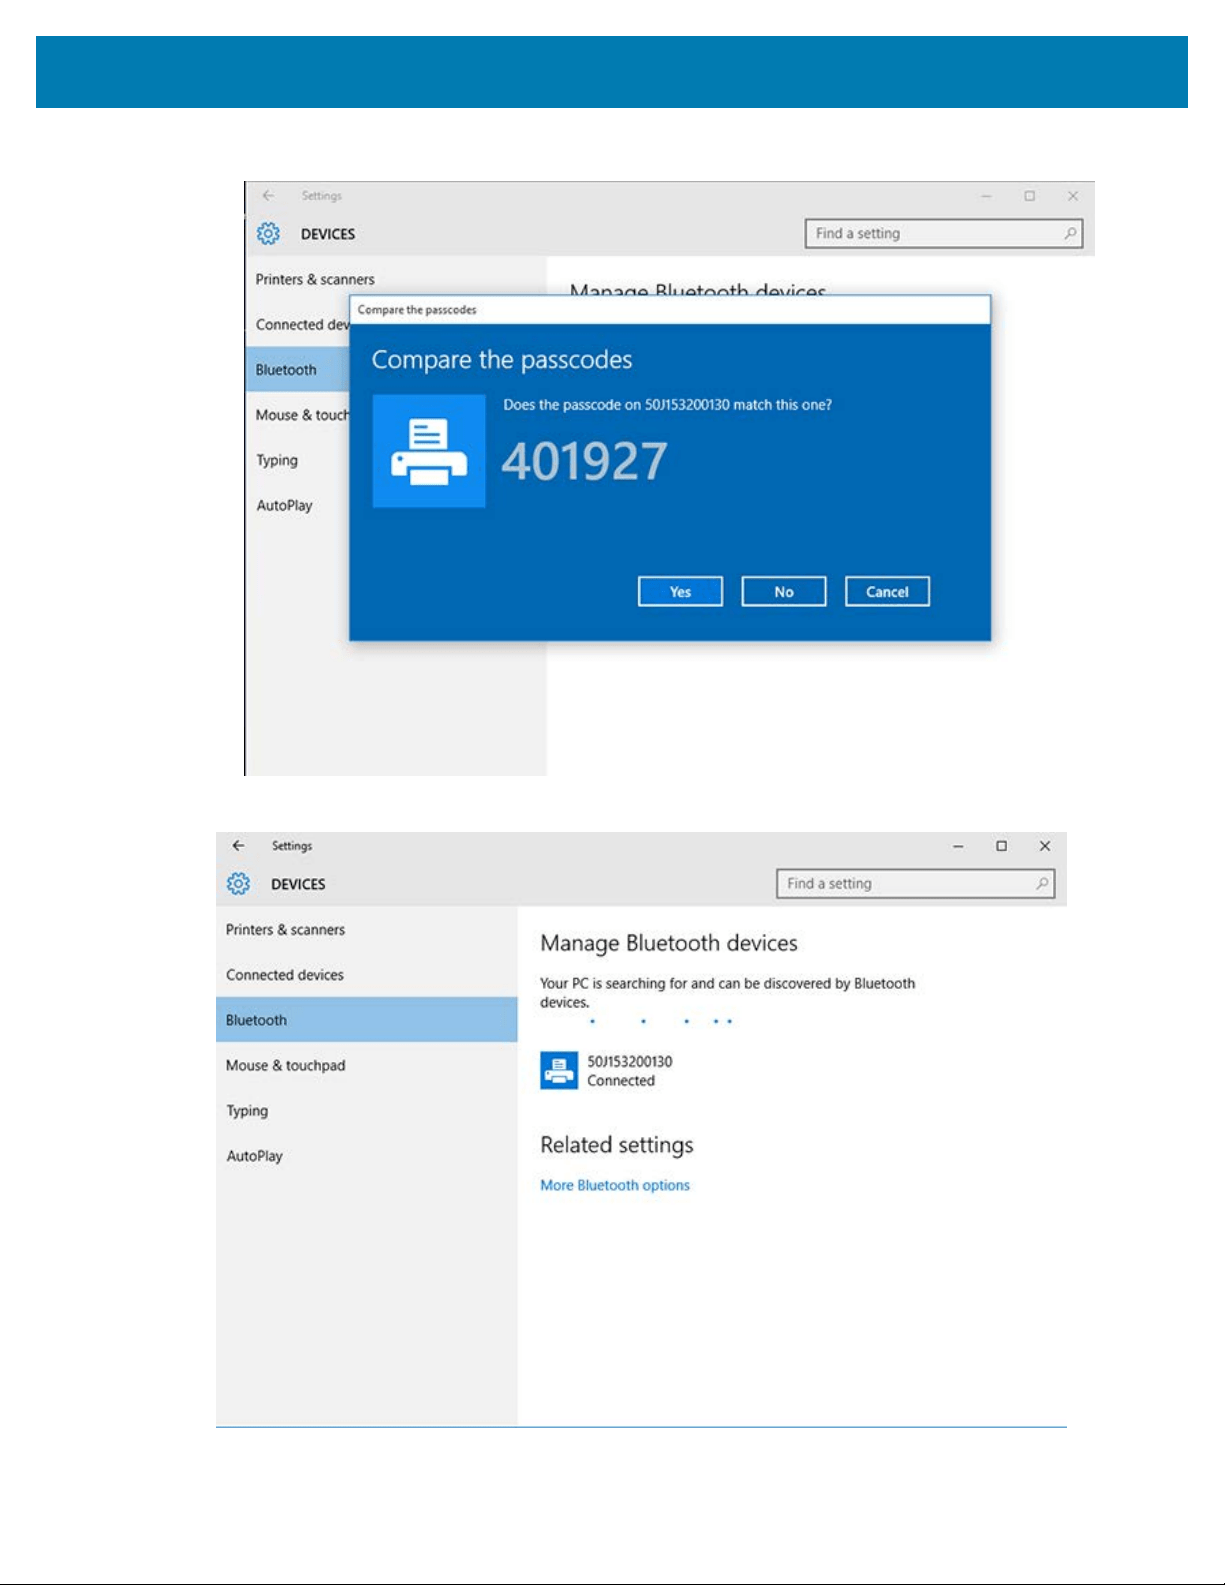
Setup for Windows
5. Compare the passcode with the one on the screen. If they match, click Yes.
The printer status changes to Connected when pairing is complete.
238

Setup for Windows
After Your Printer is Connected
When you have established basic communication to your printer, you may want to test printer
communications and then install other printer related applications, drivers, or utilities.
Verifying printer operation is a relatively simple process:
• For Windows operating systems, you can use the Zebra Setup Utility or the Windows Printers and
Faxes feature in the Control Panel to access and print a test label.
• For non-Windows operating systems, you can send an ASCII text file to the printer with a single
command (~WC) instructing it to print a printer configuration report.
Test Printing with Zebra Setup Utilities
1. Open the Zebra Setup Utilities.
2. Click on the newly-installed printer’s icon to select the printer.
3. Click Open Printer Tools.
4. Access the Print tab, click on Print configuration label, and click Send.
The printer should print a configuration report.If it doesn't, make sure the printer is set up according to the
instructions in this guide and use the information in the Troubleshooting section to resolve any issues.
Test-Printing with the Windows Printer and Faxes Menu
1. Click the Windows Start menu button or the Control Panel to access the Printers and Faxes menu, then
open the menu.
2. Select the newly-installed printer’s icon to select the printer, and right-click to access the printer
Properties menu.
3. From the printer’s General tab window, click Print Test Page.
The printer prints a Windows test print page.
Test-Printing with an Ethernet Printer Connected to a Network
You cantest-print on an Ethernet printer connected to a network (LAN / WLAN) using either an MS-DOS
command from the command prompt or selecting Run from the Windows Start menu:
1. Create a text file with this ASCII string: ~WC
2. Save the filean arbitrary filename such as TEST.ZPL.
3. Find the IP address on the printer Configuration Report– Network Status printout.
4. From a central device that is connected to the same LAN or WAN as the printer, type the following in
a web browser window address bar and press Enter: ftp x.x.x.x (where the x.x.x.x is the IP
address of your printer).
For an IP address that reads 123.45.67.01, you would enter ftp 123.45.67.01
5. Type the word put followed by the filename and press Enter.
For a test print using the file TEST.ZPL, the command to use is put TEST.ZPL.
The printer prints a printer configuration report.
239

Setup for Windows
Test-Printing with a Copied ZPL Command File for Non-Windows Operating
Systems
1. Create a text file with this ASCII string: ~WC
2. Save the file using an arbitrary filename such as TEST.ZPL.
3. Copy the file to the printer. For DOS, sending this file to a printer connected to the system’s serial port
would be as simple as issuing this command to the printer from the central device: COPY TEST.ZPL
COM1
NOTE: Other interface connection types and operating systems will require different
command strings. See your OS documentation for detailed instructions on how to copy to the
appropriate printer interface for this test.
240

Print Operations
Print Operations
This section provides general information on media and print handling, font and language support, and the
setup of less common printer configurations.
Thermal Printing
Zebra ZD Series printers use heat to expose direct thermal media or use heat and pressure to melt and
transfer ‘ink’ to the media. Extra care should be taken to avoid touching the printhead which gets hot and is
sensitive to electrostatic discharge.
CAUTION—HOT SURFACE: The printhead may be hot and could cause severe burns. Allow the
printhead to cool.
CAUTION: To protect from damaging the printhead and risk of personal injury, AVOID touching
the printhead. Use ONLY the cleaning pen to perform printhead maintenance.
CAUTION—ESD: The discharge of electrostatic energy that accumulates on the surface of
the human body or other surfaces can damage or destroy the printhead and other electronic
components used in this device. You must observe static-safe procedures when working with the
printhead or the electronic components under the top cover.
Determining Your Printer’s Configuration Settings
TheZD Series printer is capable of printing a configuration report listing printer settings and hardware
details.
Included in this report are:
• operational status (darkness, speed, media type, etc.)
• installed printer options (network, interface settings, cutter, etc.)
• printer details (serial number, model name, firmware version, etc.)
For instructions on printing this
label...
See Printing the Printer and Network Configuration Reports
(CANCEL Self Test) on page 324.
For information on interpreting
the configuration report andthe
associated programming
command and command states
identified in the report...
For information on how to interpret the configuration report and the
associated programming command and command states listed in the
report, see Managing the ZPL Printer Configuration on page 376.
241

Print Operations
Select a Print Mode or Collection Method
To set the printer to use a specific print mode, see instructions on using the ^MM command in theZPL
Programming Guide. To download this manual, go to one of the printer information links listed in
zebra.com/support.
Your printer supports these print modes:
Tear Off (default; available with any
printer option and with most media
types)
The printer prints the labels as it receives them. The labels
can be torn off after they print.
Peel (if you have the Label Dispenser
option installed)
The printer peels the label from the liner while printing.
It pauses to print the next label until the current one is
removed.
Cutter (if you have the Cutter option
which isfactory-installed)
The printer cuts each label after it is printed.
To set the printer to use an available print mode:
• Access the setting for Collection Method. See
Print > Label Position > Collection Method on page 143.
• Use the ^MM command described inthe ZPL Programming Guide. This guide is available for download
from zebra.com/manuals.
Adjusting the Print Quality
Print quality is affected by a combination of the heat (or density) setting of the printhead, print speed, and
the media loaded. Experiment with these settings to find the optimal mix for your application.
You can set print quality using the Configure Print Quality wizard in Zebra Setup Utilities.
Print a print quality report using FEED self-test to print a range of labels that help you identify print
darkness and print speed settings to optimize general print quality and barcode quality. For instructions on
printing this report, see Printing a Print Quality Report(FEED Self Test) on page 327.
Before adjusting any settings, verifythe printer’s media settings by printing a printer configuration report.
See Printing the Printer and Network Configuration Reports (CANCEL Self Test) on page 324.
1. To adjustthe print darkness (or density) setting, use one of these methods:
• Use the Set Darkness (~SD) ZPL command. For details, see the ZPL Programming Guide which you
can download from zebra.com/manuals.
• Try a Manual Print Darkness Adjustment on page 338.
2. To adjust the print speed, use one of these methods:
• application software such as ZebraDesigner which is available for download from zebra.com/
zebradesigner.
• The ZPLPrint Rate (^PR) command.For details, see the ZPL Programming Guide which you can
downloaded from zebra.com/manuals.
NOTE: Media manufacturers may recommend specific speed settings when using your printer
with their media. The recommended speed may be lower than your printer’s maximum speed
setting.
242
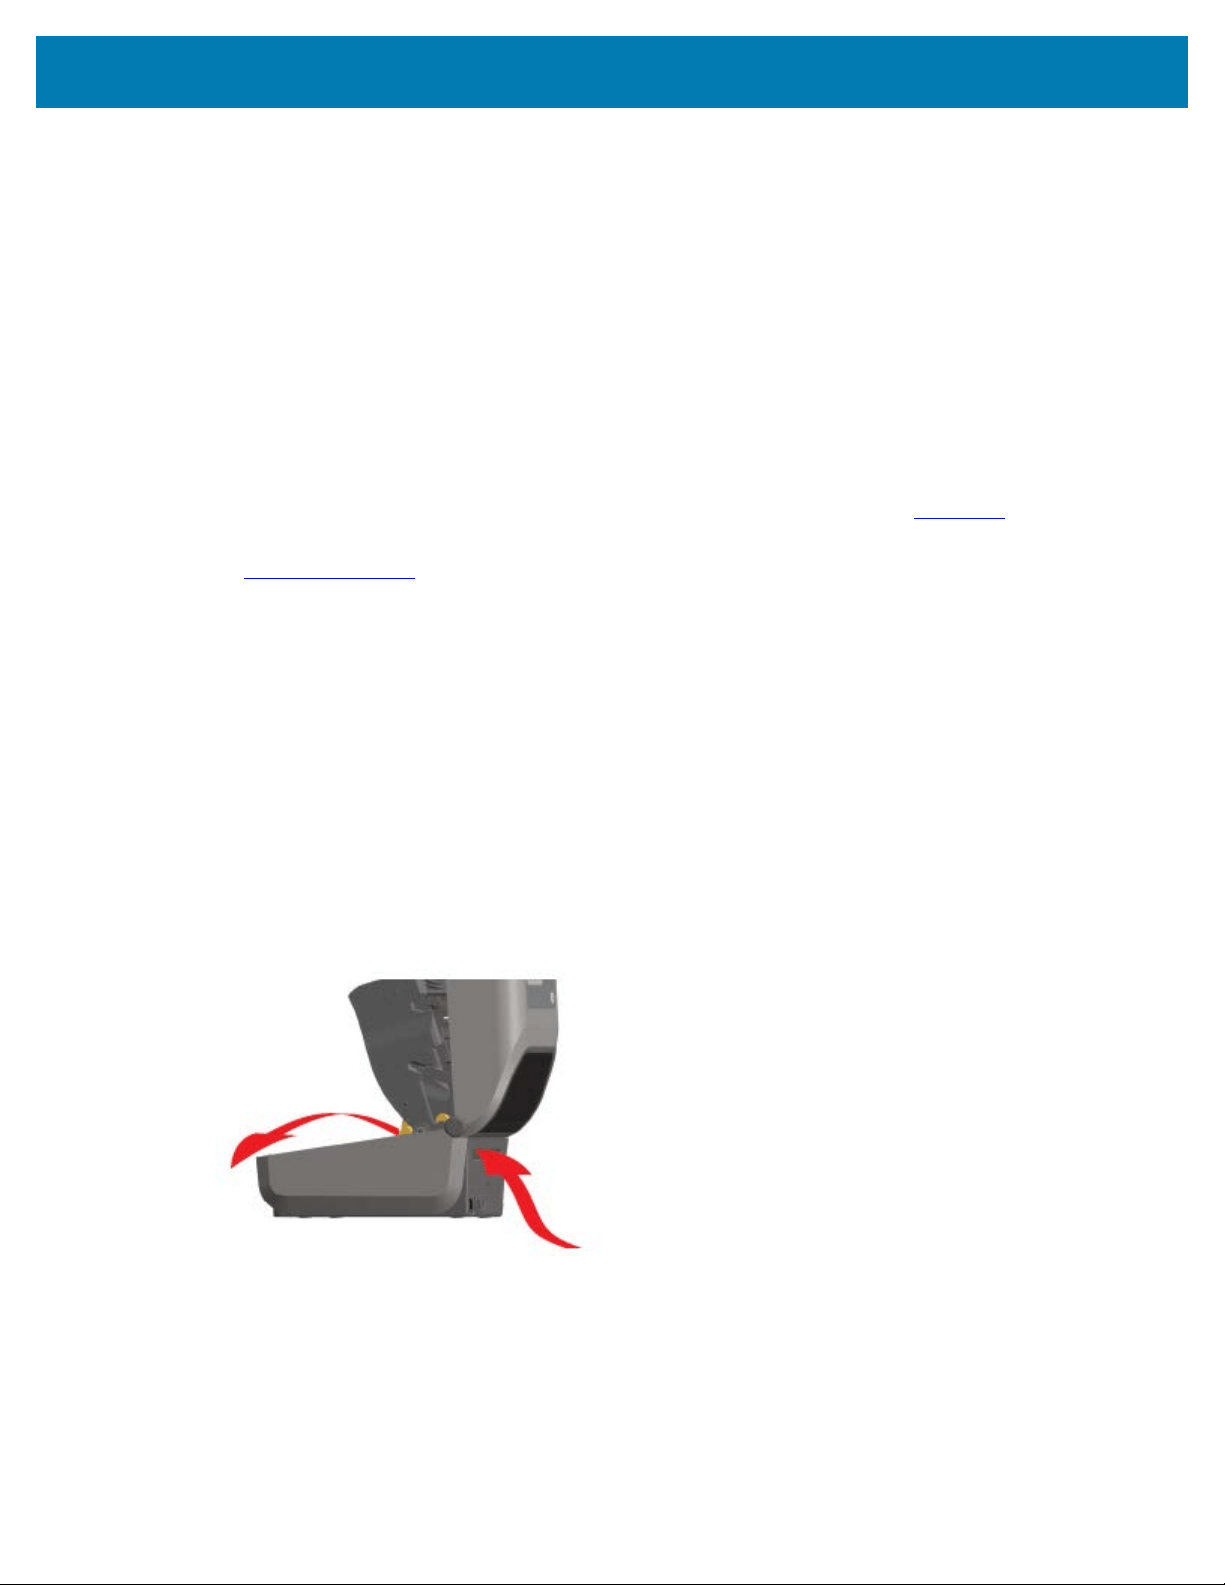
Print Operations
3. To reduce the maximum distance for automatic media type detection and sensing, usethe ZPL
Maximum Label Length command (^ML).
The minimum distance should be no less than twice the longest label to be printed. If the largest label
being printed is 2 inches by 6 inches, the maximum label (media) length detection distance can be
reduced from the default distance of 39 inches to 12 inches.
Adjusting the Print Width
You must set the print width before you use the printer for the first time. You must also set it when you load
media into the printer that is of a different width than the one you loaded for the previous print job.
To set the print width, you can use one of the following:
• Windows printer driver
• application software such as ZebraDesignerwhich can be downloaded from zebra.com
• ZPL programming Print Width (^PW) command. See the ZPL Programming Guide available from
zebra.com/manuals for details.)
• For instructions on adjusting the width, see Manual Print Width Adjustment on page 337.
Replacing Supplies while Using the Printer
If the media supply (ribbon, labels, receipts, tags, tickets, etc.) runs out while printing, leave the printer
power ON while reloading. (Data loss occurs if you turn off the printer). After you load a new roll of media
or ribbon, simply press FEED to resume printing.
Printing on Fanfold Media
Use this procedure to print on fanfold media.
Fanfold media enters the printer from the back and exits through the front of the printer during the print
job.
1. Remove media from the printer.
2. If you have thermal transfer printers and it has a fanfold cover installed, remove the cover.
3. Open the top cover of your printer.
243
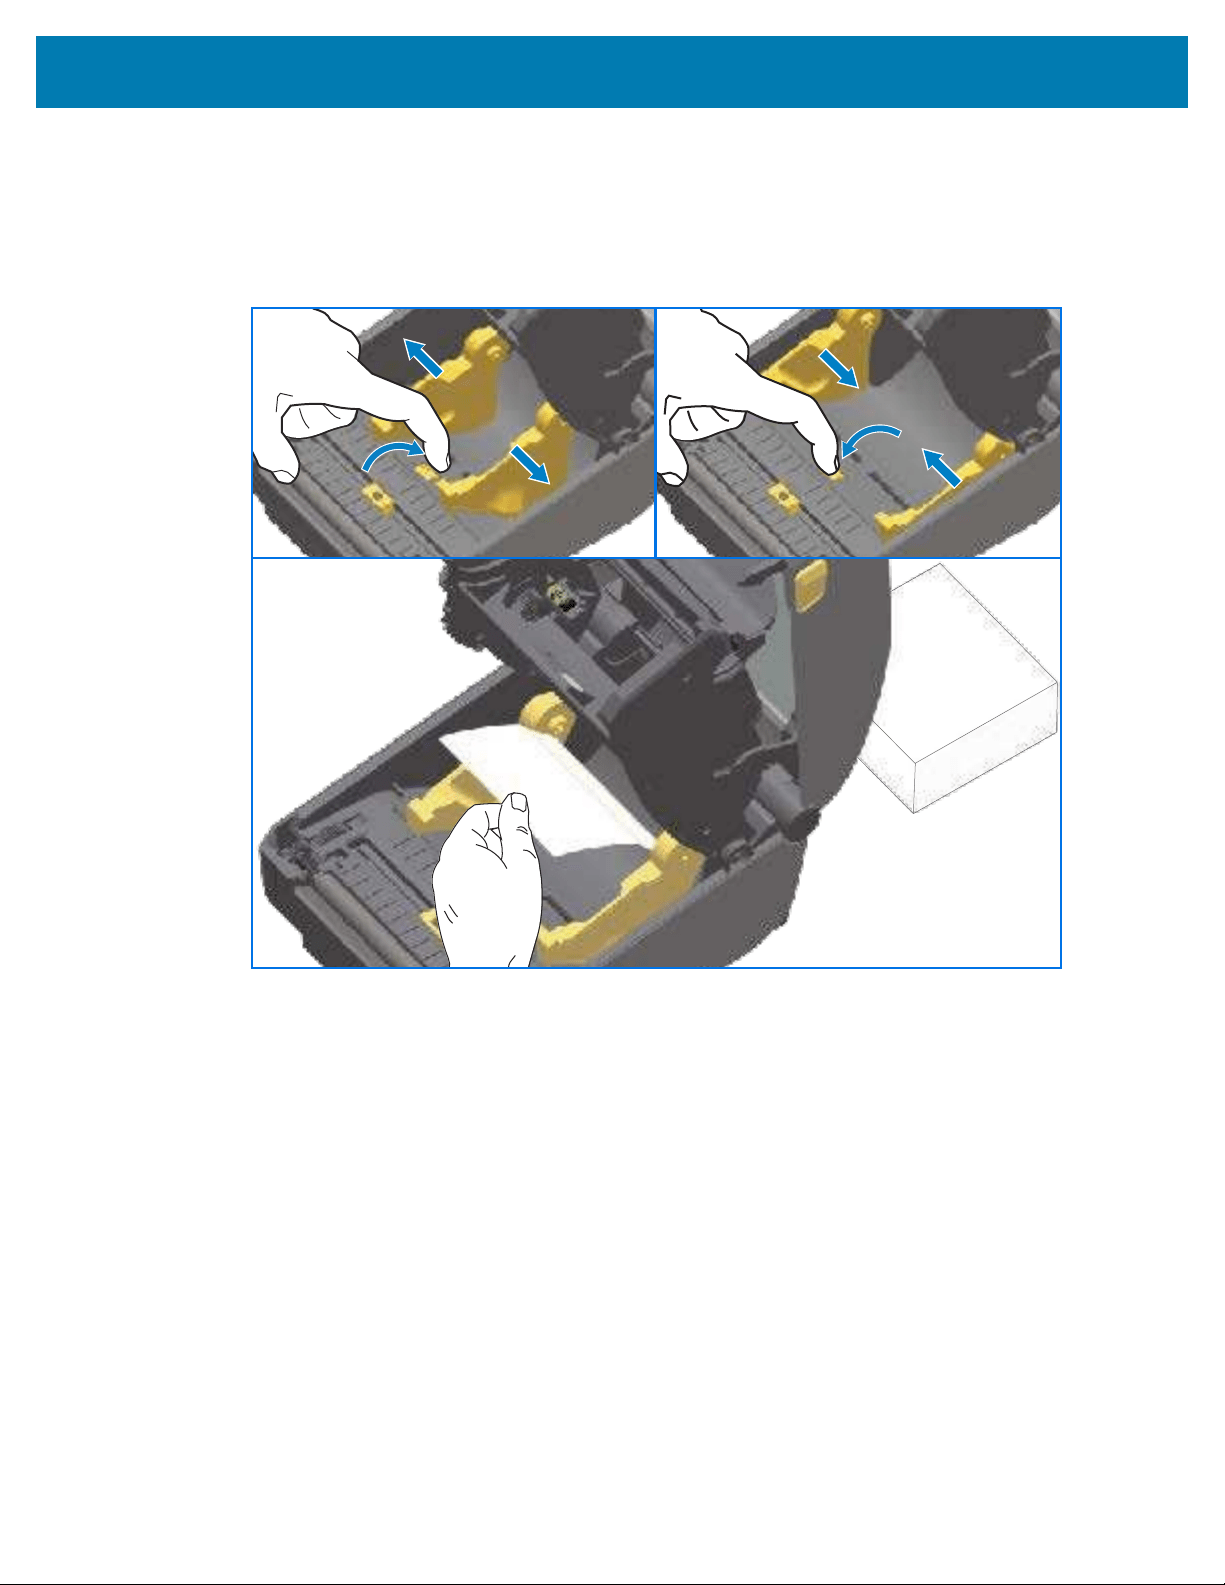
Print Operations
4. For ZD621 printers and the ZD421 Cartridge printer, adjust the media guide stop position with the gold
thumb wheel.
a) Use a piece of the fanfold media to set the stop position.
b) To make the space between the guides wider,rotate the wheel away from you. To make the space
narrower, rotate the wheel toward you.
244
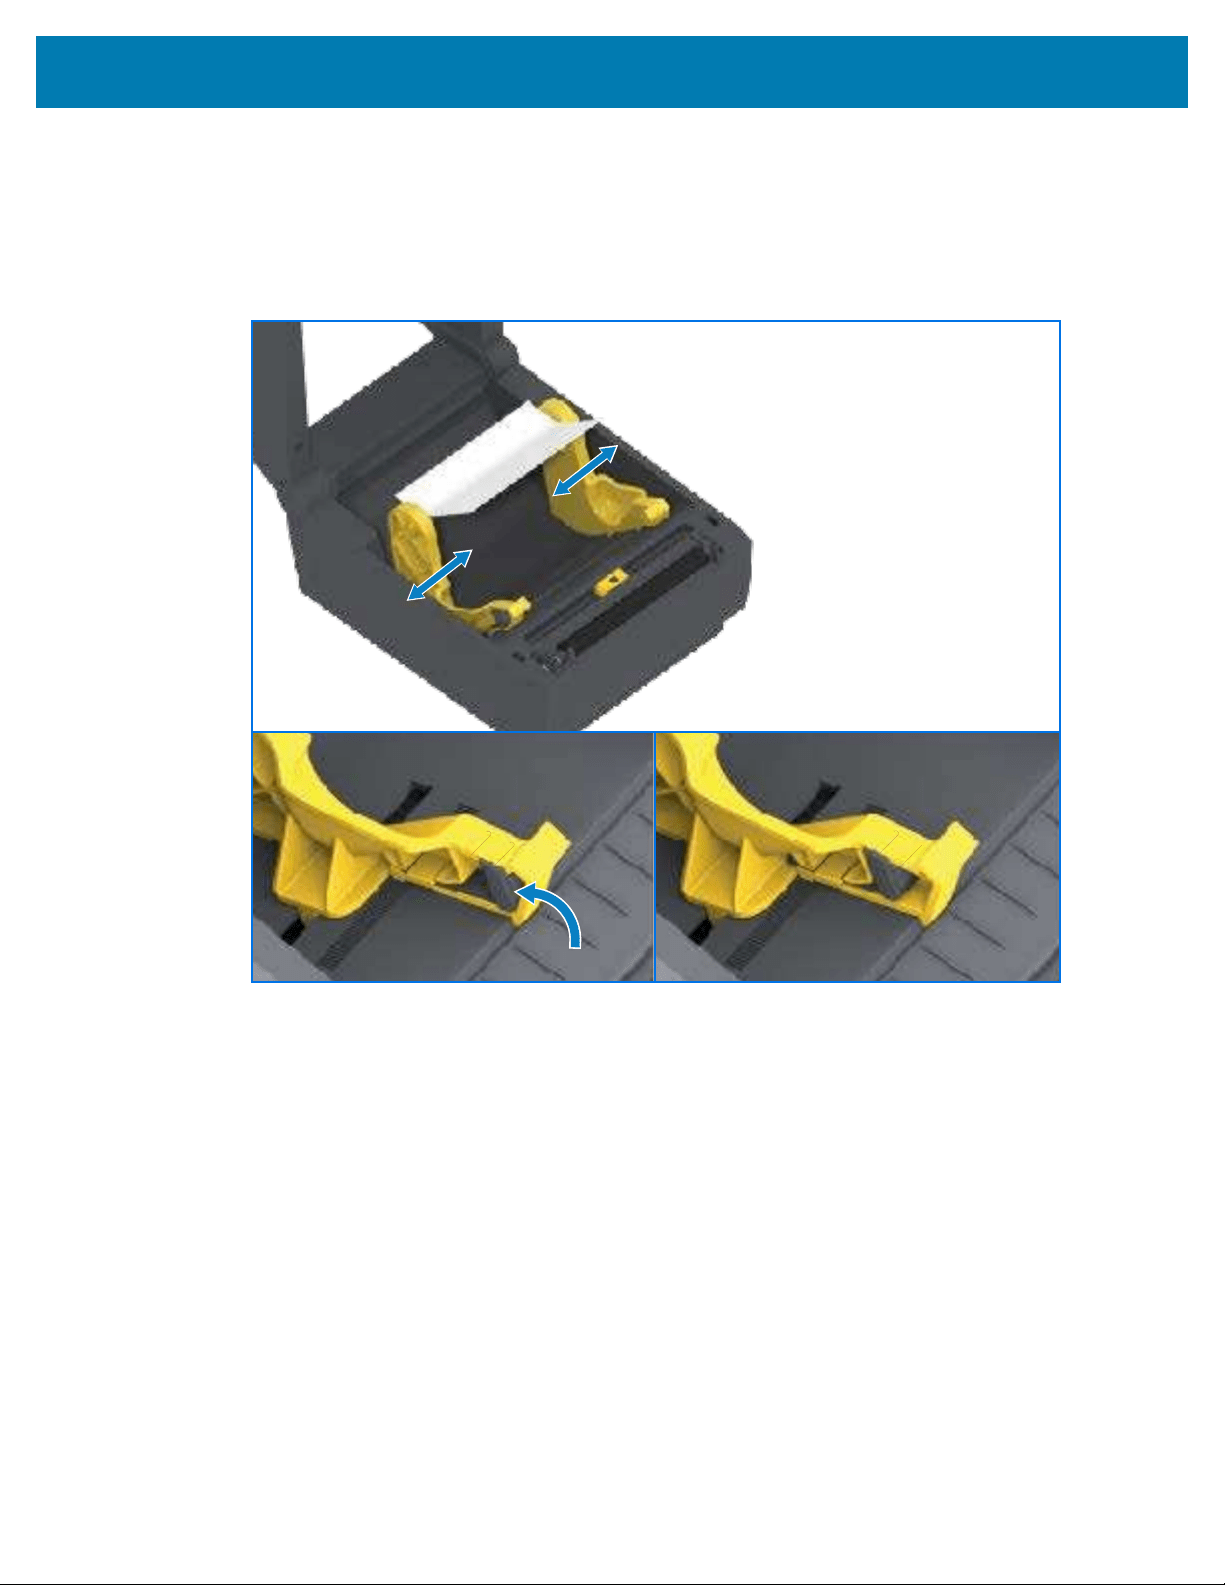
Print Operations
5. For non-cartridge ZD421 printers—Adjust the media guide stop position with the slide lock on the left
side media guide.
a) Use a piece of the fanfold media to set the stop position.
b) Push the gray lock down towards the base of the media roll holder to secure the roll in position.
c) Rotate the wheel toward you to make the space between the media guides narrower.
245
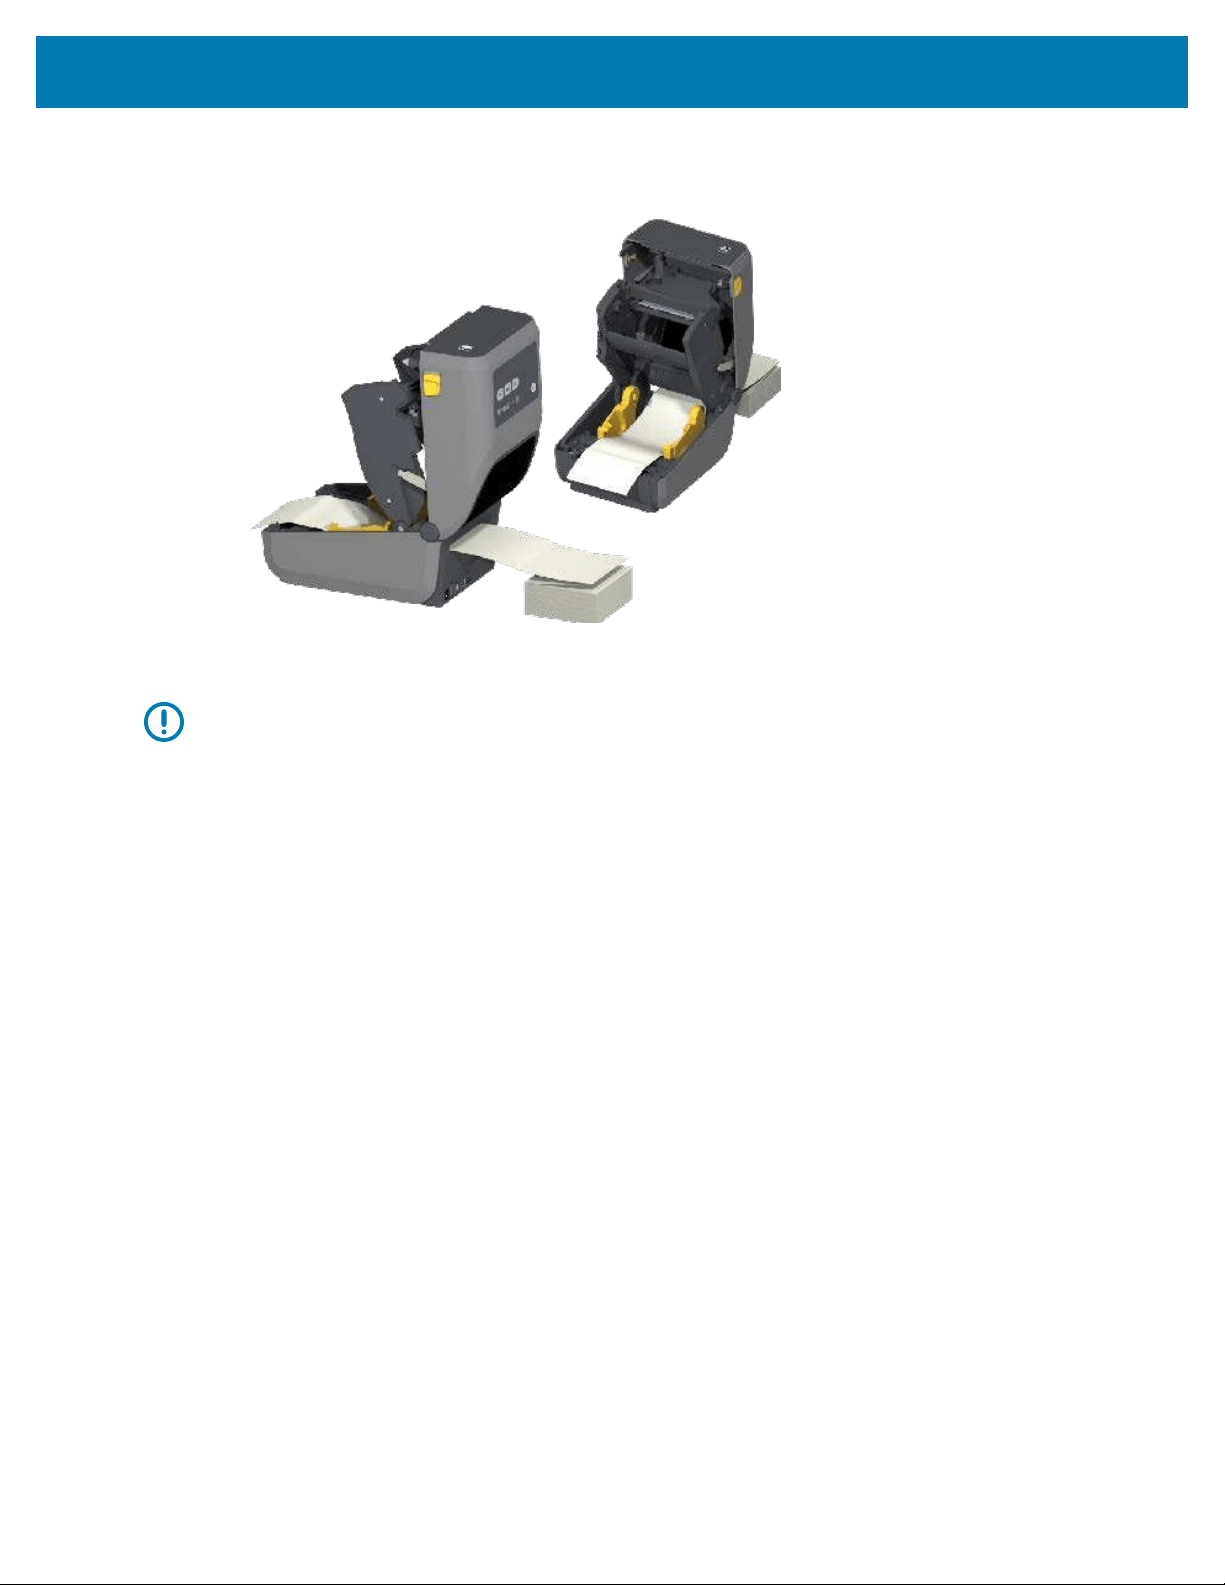
Print Operations
6. Insert the media through the slot at the rear of the printer, and place the media between the media
guide and roll holders.
7. Close the top cover.
IMPORTANT: The media guide stop position may need further adjustment if, after printing or
after pressing FEED to advance several labels:
• the media does not track down the center (moves from side to side), or
• the sides of the media (liner, tag, paper, etc.) are frayed or damaged when exiting the printer
If additional adjustment does not correct the problem, route the media over the two roll-holding
pins on the media guide.
You can also provide additional support for thin media by placing an empty roll core (of the same
width as the fanfold media stack) between the roll holders.
Printing with Externally-Mounted Roll Media
Your printer accommodates externally-mounted roll media (as it does for fanfold media). It requires a
media-roll-and-stand combination to ensure low (initial) inertia when pulling the media off the roll.
Make note of these considerations when using externally-mounted roll media:
• The media should ideally enter the printer from directly behind the printer and pass through the fanfold
media slot in the rear of the printer.
246
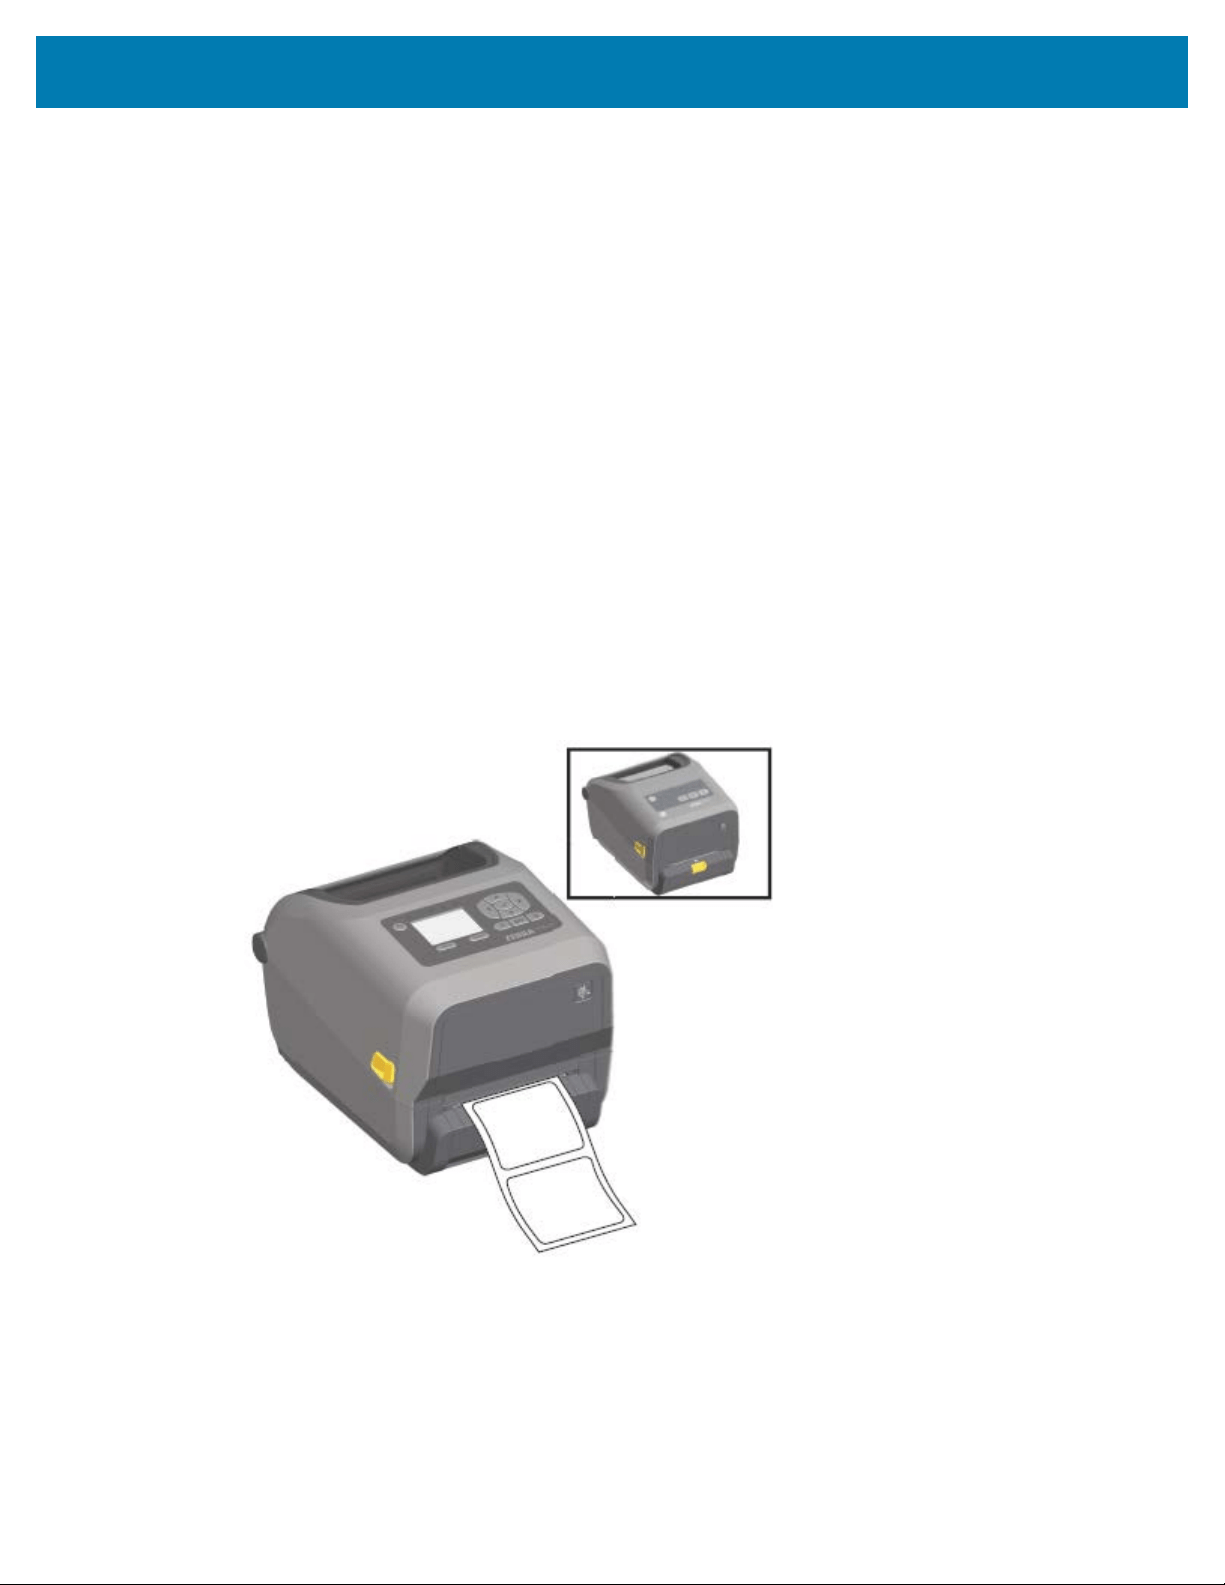
Print Operations
• The media should move smoothly and freely. It should not slip, skip, jerk, bind and then move, etc. when
mounted on your media stand.
• The movement of the media roll should not be impeded by contact withany printer or other surfaces.
• The printer should be placed such that it may not slip or lift up away from its operating surface while
printing.
Using the Label Dispenser Option
The label dispenser option allows you to print a label and have the backing material (liner/web)
automatically removed before the label is dispensed. If you are printing multiple labels and the printer
has been programmed appropriately, the printer prints and dispenses the next label after you remove an
already printed anddispensed, peeled label.
To use label dispense mode, use the Windows printer driver—or the Configure Printer Settings wizard in
Zebra Setup Utilities—to set the printer's Media Handling setting to Peel-Off.
You can also configure the printer to dispense labels by sending it programming commands.If using ZPL,
use these command sequences:
• ^XA ^MMP ^XZ
• ^XA ^JUS ^XZ
1. Load the labels into the printer. Close the printer and press FEED until a minimum of 100 mm (4 in.) of
exposed labels exit the printer. Leave the labels on the liner.
247
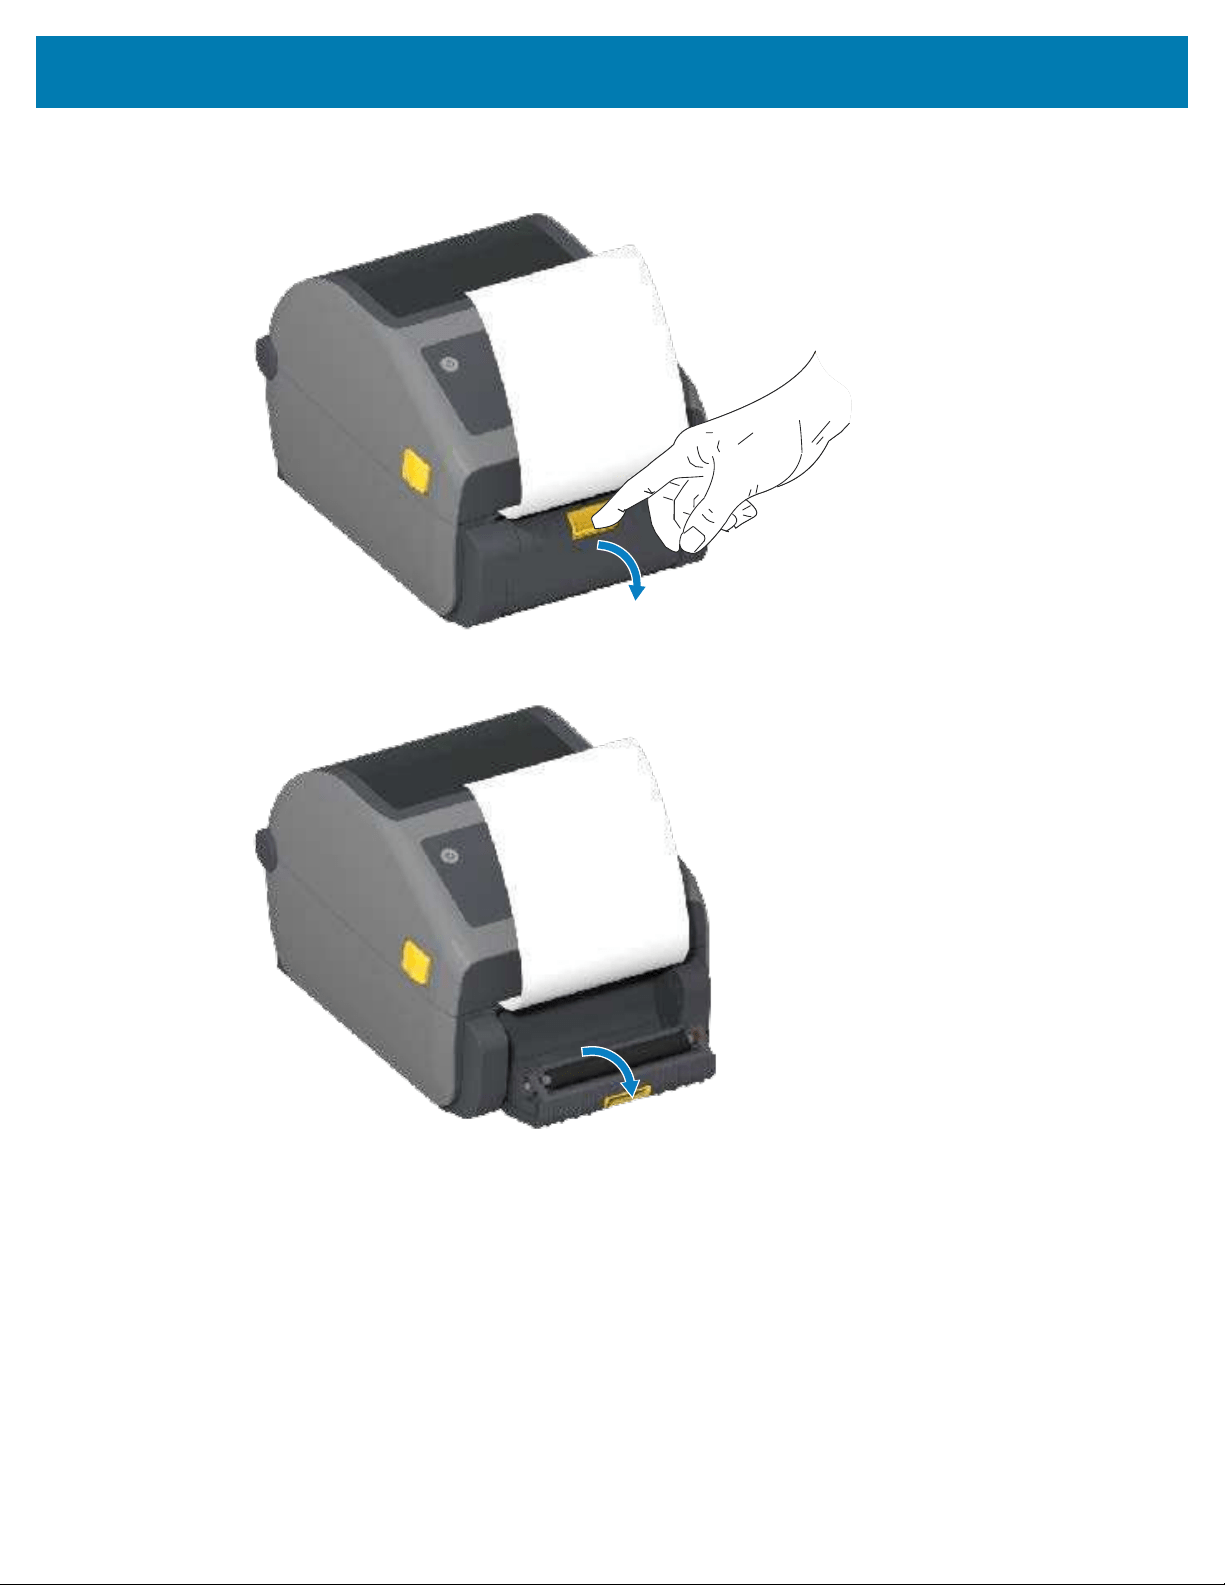
Print Operations
2. Lift the liner over the top of the printer, then open the door by pulling the gold latch in the center of
dispenser door away from the printer.
248
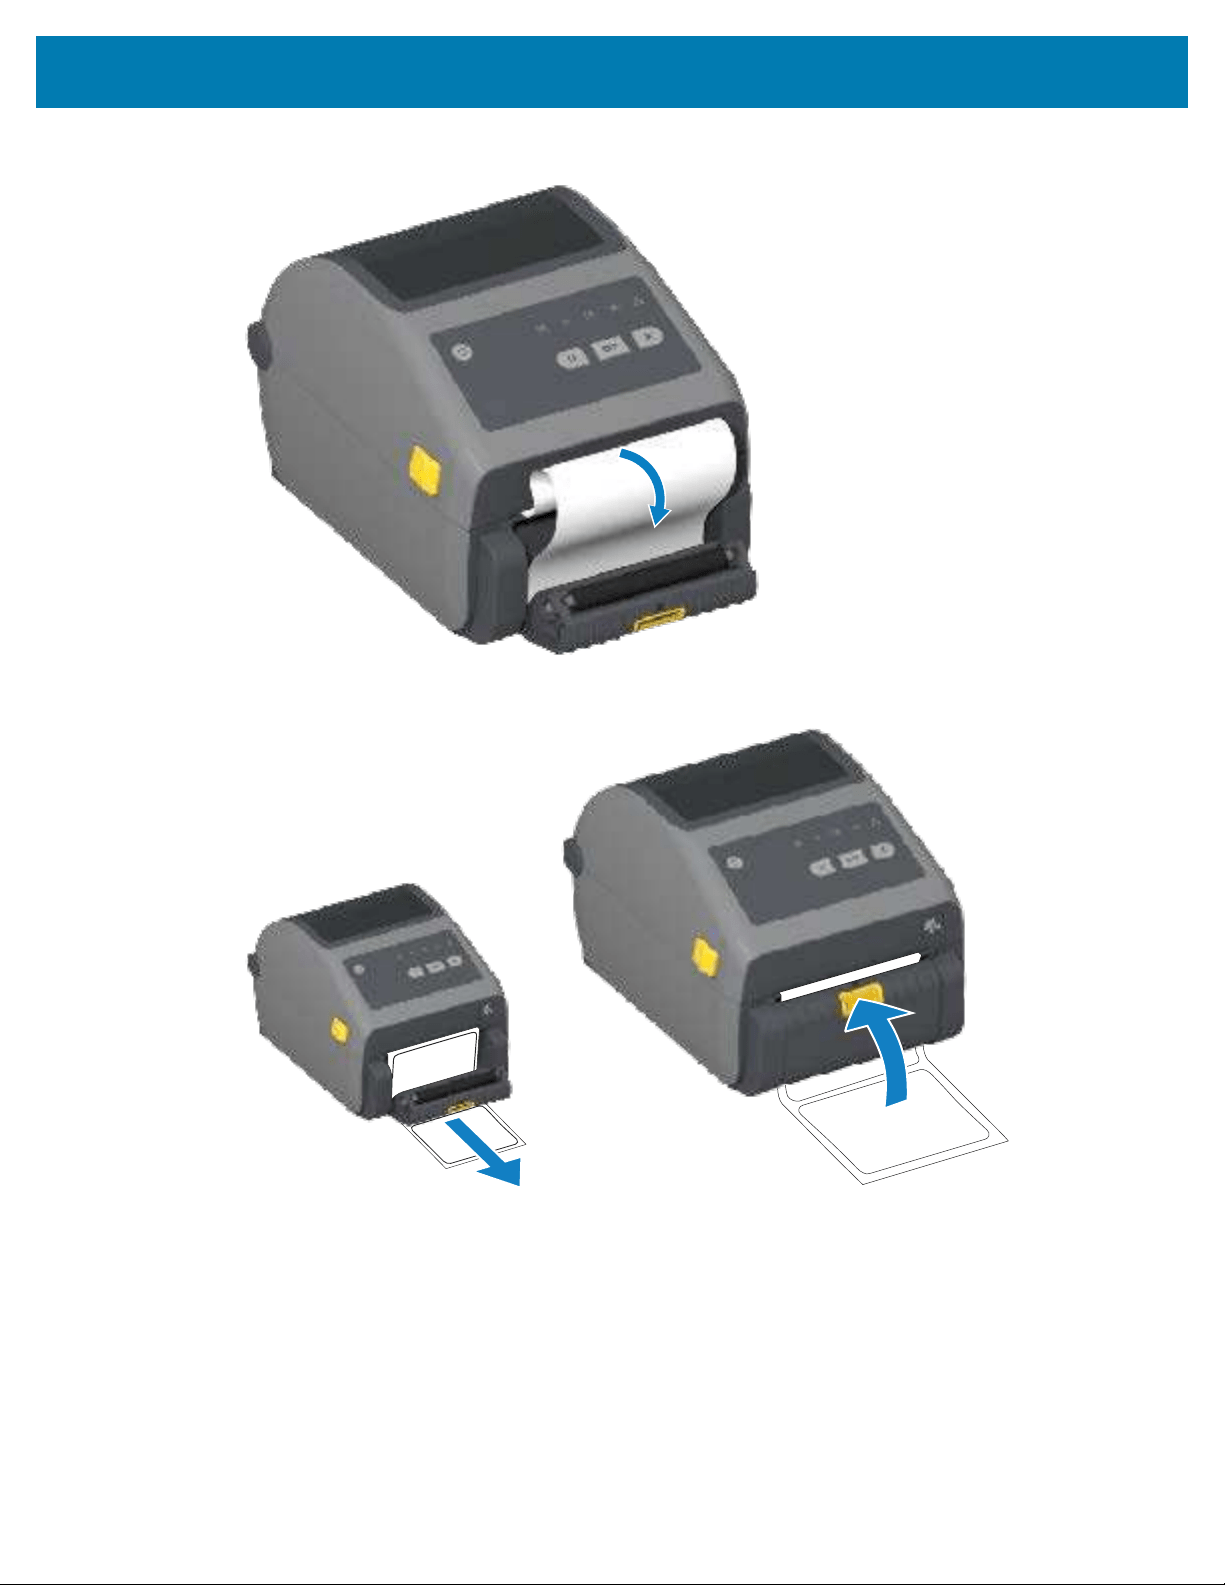
Print Operations
3. Insert the label liner between the dispenser door and the printer body.
4. Close the dispenser door while pulling the end of the label liner tight.
249
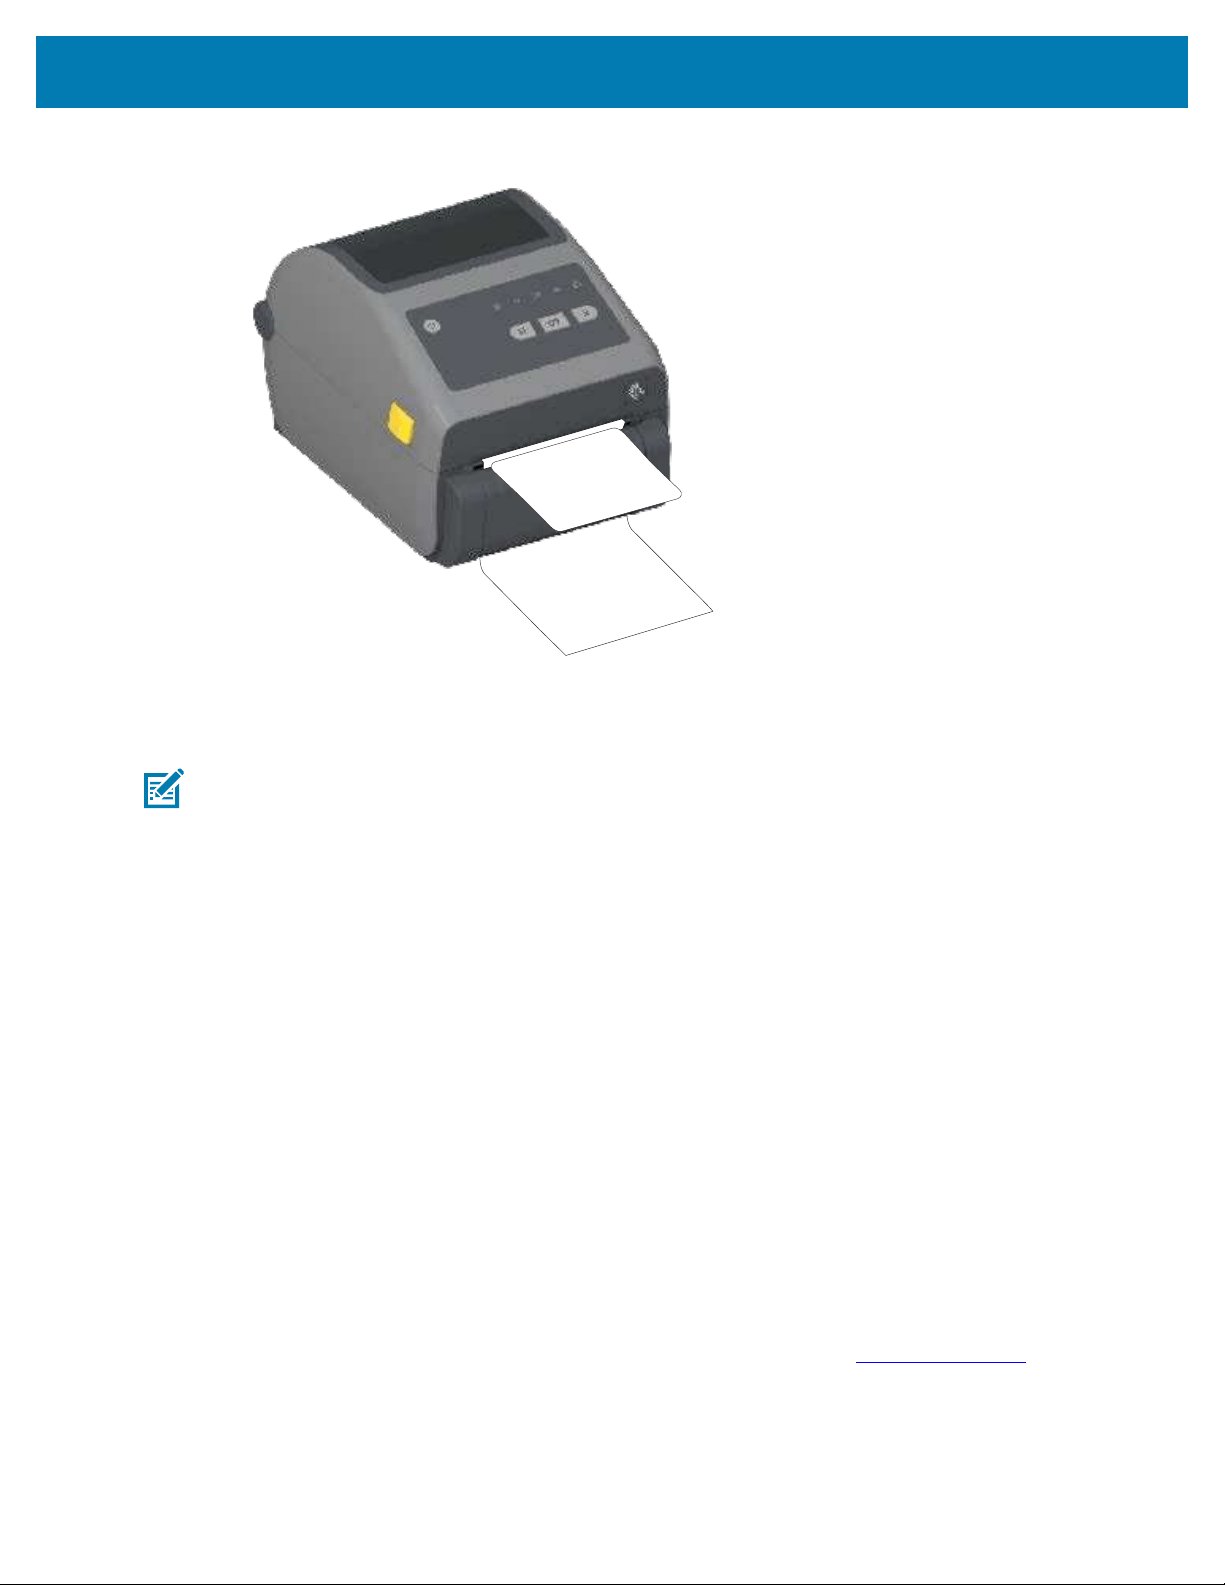
Print Operations
5. Press and release FEED (Advance) one or more times until a label is presented for removal.
6. During the print job, the printer will peel off the backing and present a single label. Take the label from
the printer to allow the printer to print the next label.
NOTE: If you did not activate the label-taken sensor—using printer programming commands
—to detect the removal of the dispensed (peeled) label, the printed labels will stack and may
bind the mechanism.
Using the Linerless Options
The Linerless Media Tear-Off and Cutter options operate much like the standard media printers. These
options include an additional sensor to detect when a printed and presented label is taken from the printer.
Linerless printers require special cleaning processes to maximize the platen (drive) roller and special non-
stick surfaces in the printer and media path areas.
The Linerless printing option allows you to print a multi-label format/form that stops between each label.
Removing the dispensed (peeled) label triggers the printer to print and dispense the next label until all
labels have been printed.
To use dispense mode, set MEDIA HANDLING to PEEL-OFF in the printer driver or with the Zebra Setup
Utilities using the Configure Printer Settings wizard.
Alternatively, send the appropriate ZPL programming commands to the printer.When programming in ZPL,
you can use the command sequences shown below to configure the printer to use the dispenser option:
• ^XA ^MMP ^XZ
• ^XA ^JUS ^XZ
250
For details, see the ZPL Programming Guide available for download from zebra.com/manuals.

Print Operations
Linerless Printing
Linerless media loads the same as models with the standard tear-off bezel or the general factory-installed
cutter options.
For information on loading the media. see
Loading Media on page 179 and Loading Roll Media for Cutter
Models on page 185.
• Media Reloading—Clean the printhead and inspect the media path and platen roller for build up of
adhesive and debris. Remove particles with the adhesive side of your linerless media. Lightly touch
the media path and platen roller with the label to lift particles off the exposed area of the platen roller
and the media path areas. For more information, see the Linerless Platen (Drive) Roller entry in the
Recommended Cleaning Schedule on page 271.
• Do not remove new media from it’s protective wrapping until you are ready to place it in the printer.
Setting the roll on its side will pick up contaminants and may stick to surfaces.
IMPORTANT: The platen roller can accumulate adhesive on the outer edges of the roller. After
using many rolls of media, these rings of adhesive may dislodge as the printer is used routinely.
These particle clumps can transfer to other areas. Clean the platen as needed to remove this
build-up. using the instructions in the Maintenance section of this guide.
Sending Files to the Printer
Graphics, fonts and programming files can be sent to the printer from supported Microsoft Windows
operating systems using Link-OS Profile Manager, Zebra Setup Utilities (and driver), ZebraNet Bridge or
Zebra ZDownloader available from the Zebra website at zebra.com/software.
Ribbon Cartridge Programming Commands
The Ribbon Cartridge printer available with this Zebra printer series offers several Set-Get-Do (SGD)
programming commands to support the use of the ribbon cartridge.
See the ZPL Programmer’s Guide for more details on SGD commands and, in particular, SGD ribbon
cartridge commands.The guide can be downloaded from zebra.com/manuals.
The following are examples of SGD ribbon cartridge commands.
! U1 getvar "device.feature.ribbon_cartridge"
! U1 getvar "ribbon.cartridge.part_number"
! U1 getvar "ribbon.cartridge.authenticated"
! U1 getvar "ribbon.cartridge.length_remaining"
! U1 getvar "ribbon.cartridge.serial_number"
! U1 getvar "ribbon.cartridge.width"
! U1 getvar "ribbon.cartridge.type"
! U1 getvar "ribbon.cartridge.length"
! U1 getvar "ribbon.cartridge.inserted"
ribbon.ribbon_low.warning : 50 , Choices: off,5,10,15,25,50,75,100
! U1 getvar "ribbon"
251

Print Operations
! U1 getvar "ribbon.ribbon_low.warning"
! U1 setvar "ribbon.ribbon_low.warning" "75"
! U1 setvar "ribbon.ribbon_low.warning" "off"
You can use Zebra Setup Utilities to send commands and receive status from the printer using the Open
Communication With Printer feature.
Printing with the Attached Battery Base and Battery Option
Printer operating procedures change slightly when using the battery. Power connections and power
loss scenarios necessitate the differences in operation. The battery is designed to maximize battery life,
maintain print quality, and have simple operation.
• When you connect the printer’s external power supply to the battery, it 'wakes up' anddetermines if it
needs charging (charge level below 90%).
• The battery will not start charging until the battery’s charge drops below 90% charge. This charging
design extends your battery’s life.
• After the battery begins charging, the battery will charge to 100% capacity and then enter Sleep Mode.
• The printer receives external power that passes through the battery circuitry to the printer. The battery
does not charge when the printer is printing or moving media.
• The battery uses only a very minimal power during Sleep Mode to maximize the available charge that it
stores.
• It takes about two hours to charge a fully-discharged battery.
Uninterrupted Power Supply (UPS) Mode
In UPS mode, the printer receives external power which passes through the battery circuitry to the printer.
1. Press Battery Control to ‘wake up’ the battery and check the battery has charge.
After 60 seconds, the battery enters sleep mode. In this mode, the battery uses loss of external power
as a cue to wake up and supply the printer with power.
2. Turn printer power OFF and ON as you normally would.The printer does not require the battery be
manually turned on to operate when it in UPS mode.
Battery Mode
In this mode, the printer is powered solely by the battery.
1. Press Battery Control on the attached battery to wake up the battery and check if the battery has
sufficient charge. After 60 seconds, the battery goes to sleep if the printer is OFF.
2. Turn printer power ON.
3. Use the printer as you normally would.
4. Check the battery charge status when needed by pressing Battery Control.
5. Change or charge your battery when the last battery charge level indicator is flashing.
NOTE: Print operation may be interrupted if the battery charge is used up and the printer
turns off.
252

Print Operations
Printer Fonts
The ZD Series printer supports multiple languages and fonts.
You can avail of advanced font mapping and scaling technology available with your printer using the ZPL
programming language. ZPL commands support the following:
• Outline fonts (TrueType and OpenType)
• Unicode character mapping
• Basic bitmapped fonts
• Character code pages
The font capabilities of your printer are programming-language dependent.
• For descriptions and documentation of the fonts, code pages, character access, listing fonts, and
limitations for their respective printer programming languages,see the ZPL and the legacy EPL
programming guides downloadable from
zebra.com/manuals.
• For information on text, fonts and character support, see the printer programming guides.
Zebra has variety of utilities and application softwareto enable font downloads to the printer for the ZPL
and EPL printer programming languages.
IMPORTANT: Some ZPL fonts that are factory-installed in your printer are license-restricted. They
CANNOT be copied, cloned, or restored to your printer by reloading or updating the firmware.If
these license-restricted ZPL fonts are removed using an explicit ZPL object delete command, you
will need to repurchase and reinstall them using a font activation and installation utility.
EPL fonts do not have this restriction.
Identifying Fonts in Your Printer
Fonts can be loaded into various storage locations in the printer.Fonts and memory are shared by the
programming languages in the printer.
The ZPL programming language can recognize EPL and ZPL fonts. However, EPL programming can only
recognize EPL fonts. See the respective programming guides for more information on fonts and printer
memory.
Specific to ZPL fonts:
To manage and
download fonts for ZPL
print operation
Use the Zebra Setup Utility or ZebraNet Bridge Utilities.
To display all fonts
loaded onto your printer
Send the printer the ^WD ZPL commandto the printer. See the ZPL
Programming Guide for details.
In ZPL:
• The bitmap fonts in the various printer memory areas are identifiable by
the .FNT file extension.
• The scalable fonts are identified with the .TTF, .TTE or .OTF file
extensions. (EPL does not support these fonts.)
253

Print Operations
Localizing the Printer with Code Pages
For each printer programming language, ZPL and EPL, your printer supports two sets of language, region
and character sets for the permanent fonts loaded onto the printer.
Your printer supports localization with common international character map code pages.
For ZPL code page support, including Unicode, see the ^CI command in the ZPL Programming Guide.
Asian Fonts and Other Large Font Sets
Both of the printer’s programming languages, ZPL and EPL, support the large pictographic double-byte
character Asian font sets.The ZPL programming language supports Unicode.
Asian language ideographic and pictographic fonts have large character sets with thousands of
characters that support single language code page.Tosupport for these large character sets, printer
manufacturers adopted a double-byte (67840 maximum) character system (instead of the single-byte, 256-
maximumcharacter system used by Latin-based language characters to address this issue).
With the invention of Unicode came the ability tosupport multiple languages using a single font set. A
Unicode font supports one or more code points (relate these to code page character maps) accessed in a
standard method that resolves character mapping conflicts.
The number of fonts that can be downloaded to your printer is dependent upon the amount of available
Flash memory not already in use and the size of the font to be downloaded.
NOTE: Some Unicode fonts are large-sized. These include MS (Microsoft) Arial Unicode font (23
MB) available from Microsoft and the Andale font (22 MB) offered by Zebra. These large font sets
typically support a large number of languages.
Procuring and Installing Asian Fonts
Asian bitmap font sets are typically downloaded into the printer either by the printer user or an integrator.
ZPL fonts are purchased separately from the printer.
The following EPL Asian Fonts are available as free downloads from zebra.com:
• Simplified and Traditional Chinese (The SimSun scalable Simplified Chinese font is pre-loaded onto
printers that ship with a power cord designed for use in China.)
• Japanese (JIS and Shift-JIS mappings)
• Korean including Johab
• Thai
EPL Line Mode– Direct Thermal Printers only
Your direct thermal printer supports Line Mode printing. EPL Line Mode printing is designed to be
command compatible with EPL1 programming language.
Line Mode printing is ideal for basic retail (also referred to as point of sale or POS), shipping, inventory,
work flow control, and general labeling. EPL printers with Line Mode are versatile printers than can print a
wide range media and barcodes.
254

Print Operations
Line mode printing only prints single lines the height of the largest element present in the line of text and
data–barcode, text, a logo or simple vertical lines. Line mode has many limitations due to the single line of
print: no fine element placement, no overlapping elements, and no horizontal (ladder) barcodes.
• To enterLine Mode printer operation, send the printer the EPL OEPL1 command. See the EPL
Programming Guide (Page Mode) or the EPL Line Mode Programming Guide for details.
• Exit Line Mode printer operation by sending the printer the escOEPL2 line mode command. See the
EPL Line Mode Programming Guide for details.
• When Line Mode is active, ZPL and EPL (EPL2) Page Mode programming is processed as Line Mode
programming and data.
• When default ZPL and EPL (EPL2) Page Mode are active, Line Mode programming is processed as ZPL
and/or EPL programming and data.
You can determine and verify the printer programming mode (that the printer is set to) by printing a printer
configuration report.
ZD621 Locking Printer Option
The locking printer option is available only as a healthcare model.
The following features are built into the locking printer:
• Lock and key access to the printer’s media compartment.
• Metal locking mechanism built into the printer.
• Precision fabricated metal parts for repeatable movement.
• The locking mechanism comes with two keys.
• Supports industry recognized Kensington lock slot that allows you to lock printer to any immovable
object such as a desk.
• For added security, includes a permanently-sealed media window (not serviceable).
• The FEED button is disabledon the locking printer models. This is to prevent users from manually
advancing media when the printer is locked. The FEED button will always boot up in FEED disabled
mode.
• Supports only media that can be loaded within the printer. This model is not recommended if you need
to you fanfold media for printing.
For an illustration of the locking printer features, see ZD621 Direct Thermal Locking Printer Feature
(Healthcare Models Only) on page 45.
255
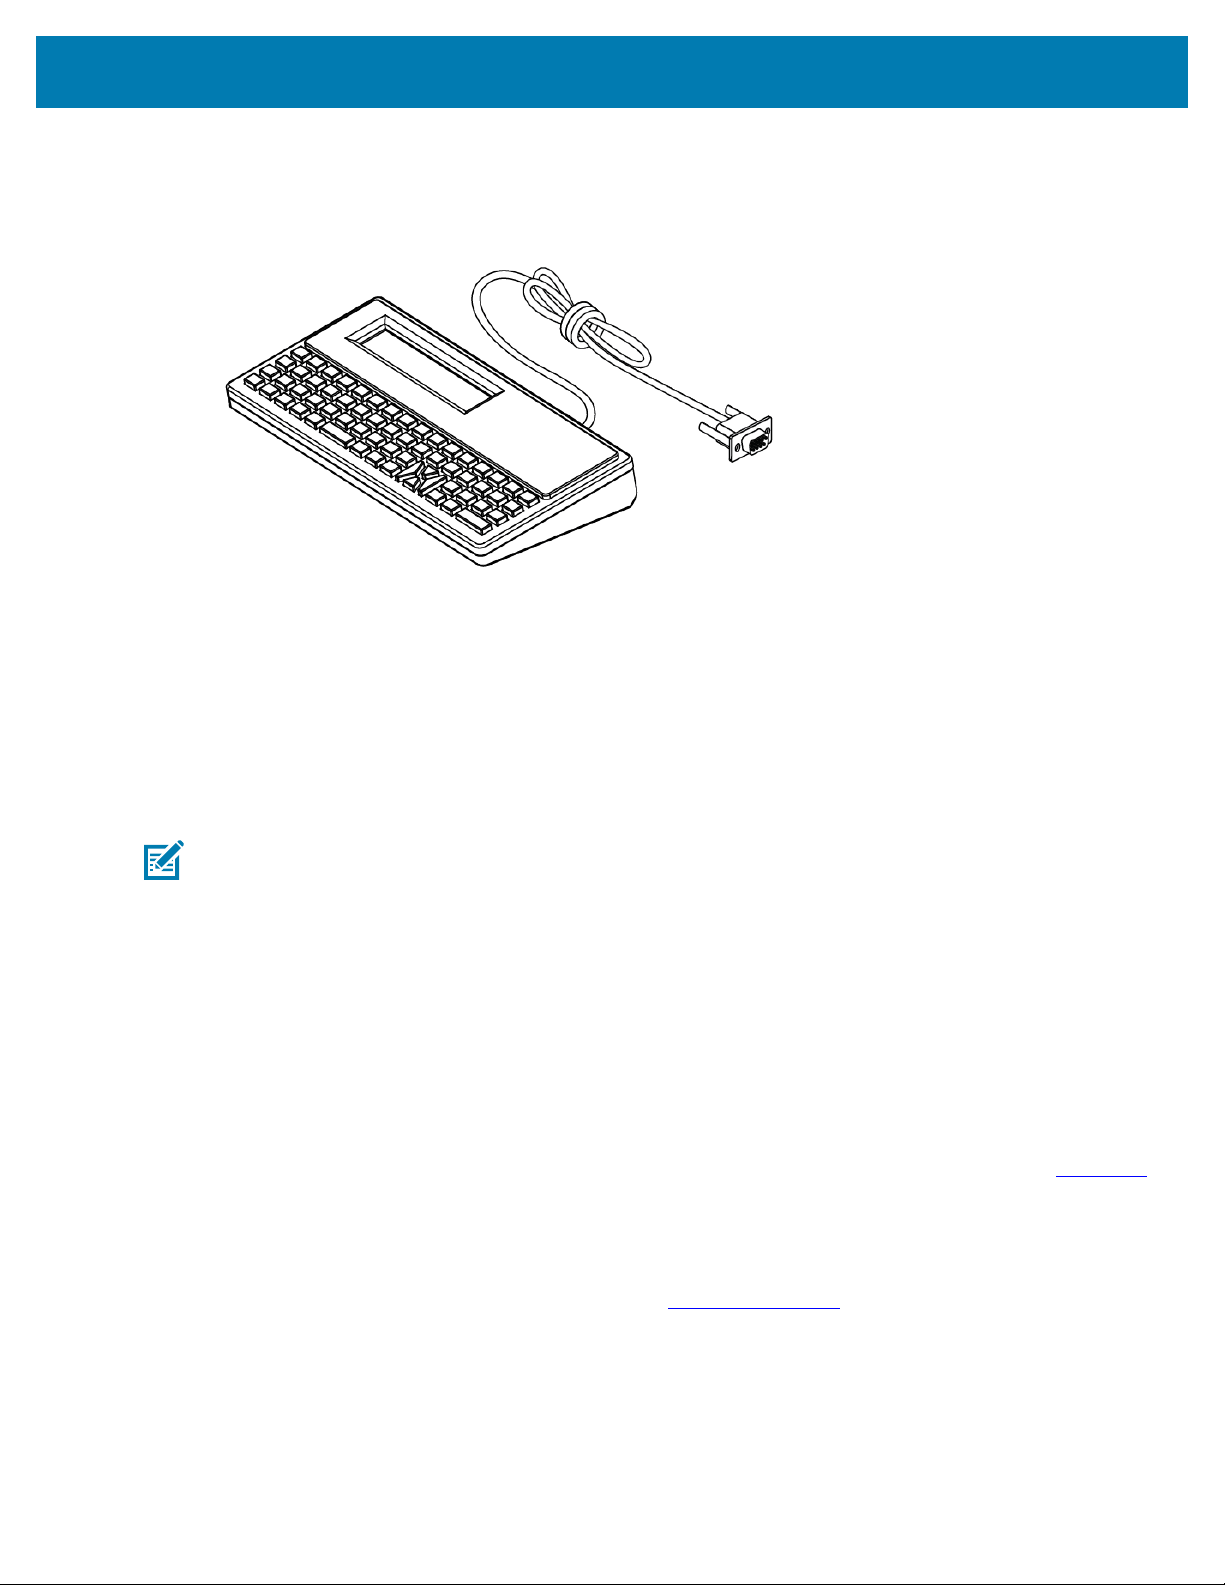
Print Operations
Zebra Keyboard Display Unit (ZKDU) – Printer Accessory
The ZKDU is a small terminal unit that interfaces with the printer to enable ease of access to EPL or ZPL
label forms stored in the printer.
The ZKDU is used for the following functions:
• List label forms stored in the printer
• Retrieve label forms stored in the printer
• Input variable data
• Printing labels
• Switching between EPL and ZPL to support dual-format printer language format/form types. These
forms can be stored and printed in late model Zebra label printers.
NOTE: The ZKDU is strictly a terminal unit. It does not store data and cannot be used to change
printer or printing parameters.
Zebra Basic Interpreter (ZBI)
Customize and enhance your printer using the ZBI 2.0 programming language. ZBI 2.0 allows Zebra
printers to run applications and take input from scales, scanners and other peripherals without a PC
or network connection. ZBI 2.0 works with the ZPL printer command language so that printers can
understand non-ZPL data streams and convert them into labels. That means the Zebra printer can create
barcodes and text from input received, non-ZPL label formats, sensors, keyboards, and peripherals.
Printers can also be programmed to interact with PC-based database applications to retrieve information
for use on printed labels.
• ZBI 2.0 can be activated by ordering a ZBI 2.0 Key Kit, or activated by purchasing a key from zebra.com.
• Use the ZBI Key Manager (also know as ZDownloader utility) to apply the key.
• An intuitive ZBI-Developer is used to create, test and distribute ZBI 2.0 applications. The built-in virtual
printer allows you to quickly create, test and prepare programs for use.
ZBI-Developer is available on the Zebra web site at zebra.com/software. Look for Zebra Basic Interpreter
2.0.
256

Print Operations
Setting the Power Failure Recovery Mode Jumper
The printer can be configured to restart itselfunattended and unaidedafter a power failure by setting it to
this mode.
NOTE: Power Failure Recovery Mode is available ONLY on printers with a printer connectivity
module installed.
The printer connectivity modules have a power failure recovery jumper. The jumper is set to OFF by
default. By setting the jumper to ON, you can make the printer automatically Power ON when it is plugged
into an active AC power source (meaning printer power is ON).
NOTE: The discharge of electrostatic energy that accumulates on the surface of the human
body or other surfaces can damage or destroy the printhead or electronic components used in
this device. You must observe static-safe procedures when working with the printhead or the
electronic components.
1. Disconnect the DC power plug and any interface connectors from the rear of the printer.
2. Remove the module access door and connectivity module. See Removing Printer Connectivity Modules
on page 65which includes instructions for ZD421 printers.
NOTE: The module removal steps for ZD621 printers is similar to that for ZD421 printers.
3. Move the AUTO (Power Failure Recovery Mode) jumper from the OFF position to the ON position.
4. Reinstall the connectivity module and module access door. See Installing the Internal Ethernet (LAN)
Module on page 64 or Installing the Serial Port Module on page 63.
NOTE: The procedures for the connectivity module installation are the same for the ZD621
printers as they are for the ZD421 printers.
5. Reconnect the printer DC power plug and interface cables to the printer.
257
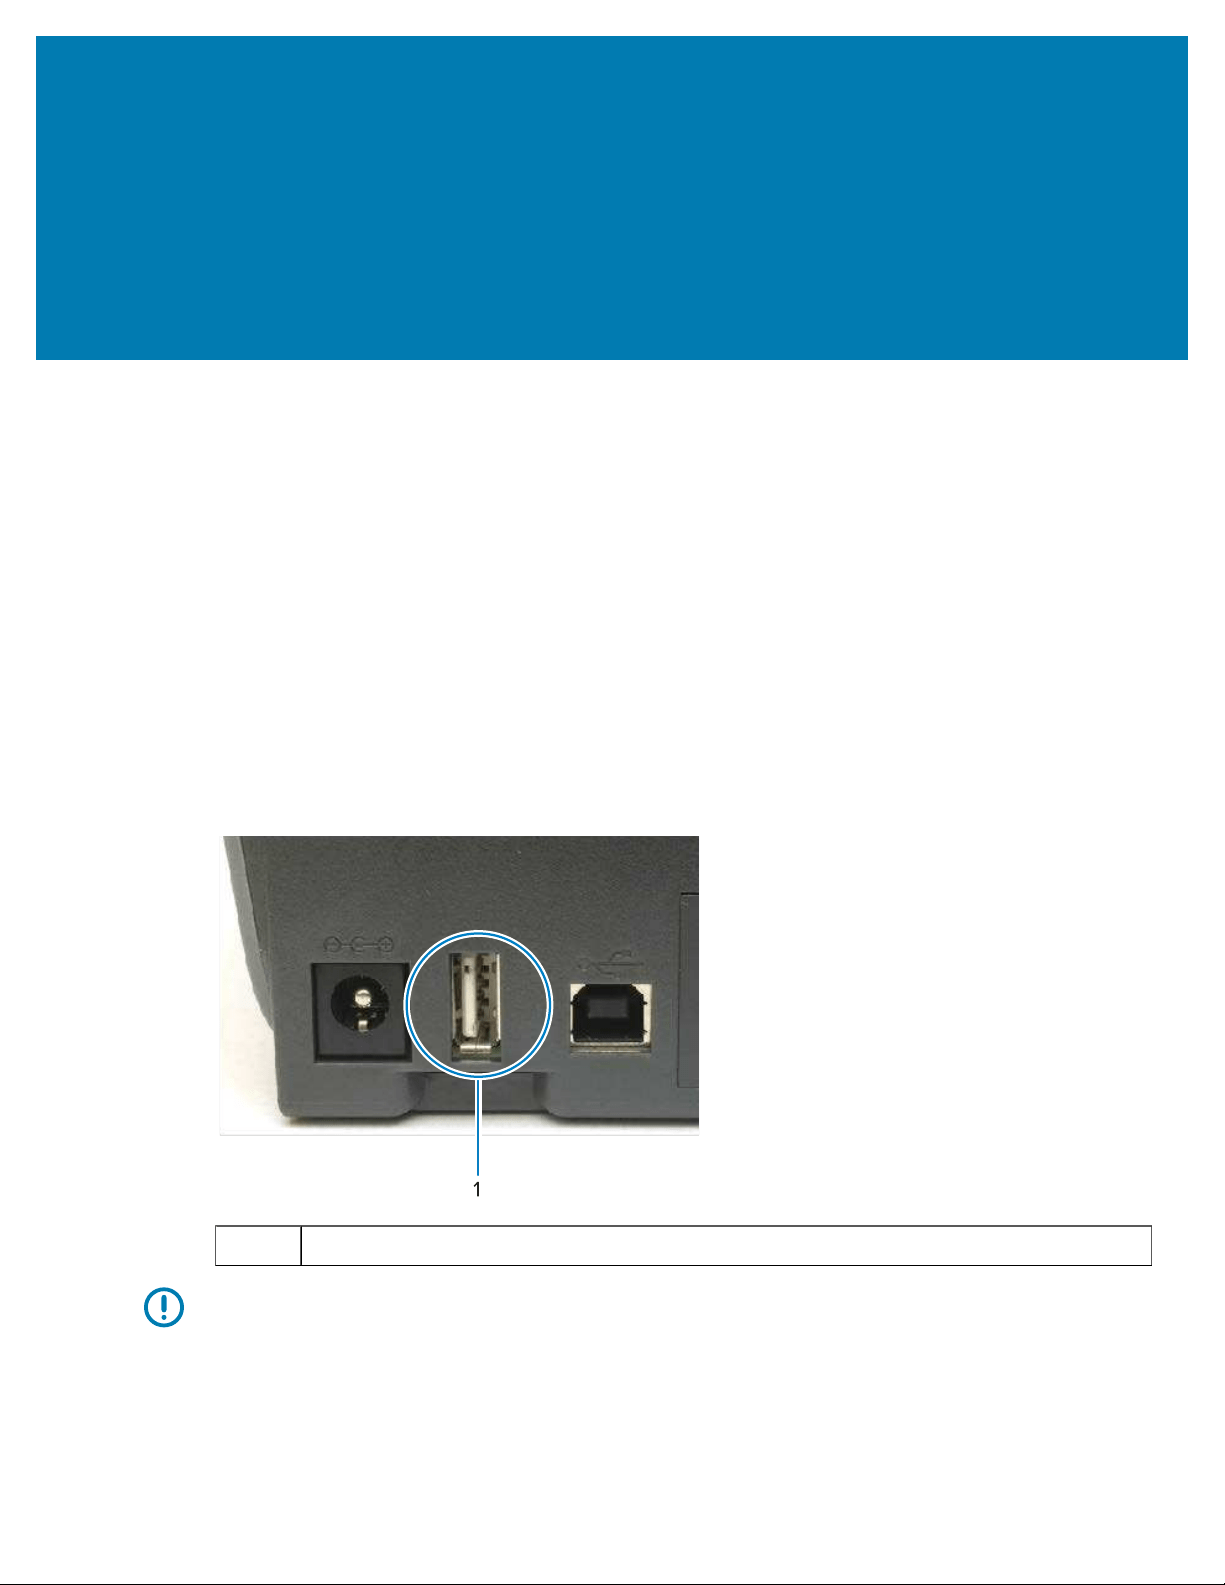
USB Host Port and Link-OS
UsageExamples
USB Host Port and Link-OS UsageExamples
This section has information on using the printer’s USB Host port along with Link-OS features and apps
(applications).Try these example tasks in the sequence provided, so you develop a good understanding of
how to use the USB Host Port.
USB Host
The USB host port allows you to connect USB devices—such as a keyboard, scanner, or USB flash
(memory) drive—to the printer.
Uses for the USB Host are as follows:
• Firmware updates
• File transfers and management
• A port for low power USB data entry devices (keyboards, scales, scanners, and other wedge devices).
258
1 USB host port
IMPORTANT: The USB Flash drive must be formatted using the FAT file system. Filenames can
be 1 to 16 alphanumeric characters (A, a, B, b, C, c, ..., 0, 1, 2, 3, ...) only. Use only ASCII characters.
Do NOT use Asian characters, Cyrillic characters, or accented characters in filenames. Some
functions may not work properly if there are underscores in a filename. Use periods instead.

USB Host Port and Link-OS UsageExamples
Using a USB Host for Firmware Updates
The USB host port allows you to connect an USB Flash drive to the printer to perform firmware updates.
Zebra "mirror" functions enable you to easily accomplish important printer management tasks.
For example, you can update the printer firmware by downloading the latest version from
zebra.com,
copying the files to a USB Flash drive (of up to a 1 TB storage capacity), connecting the USB drive to the
printer, and uploading them to printer memory.
See the printer ZPL Programming Guide for information on the Mirror and Set-Get-Do (usb.mirror) SGD
commands.
Files for Completing the Exercises
Most of the files you need to complete the exercises in these section are available from zebra.comas
a .ZIP file located here on the Zebra website.Download this archive file and extract its contents on your
central device (host computer).
Where possible, the contents of the files are shown in this section. Contents of files that include coded
content—which cannot be viewed either as text or as an image—are not shown.
File 1: ZEBRA.BMP
File 2: SAMPLELABEL.TXT
^XA
^FO100,75^XGE:zebra.bmp^FS
^FO100,475^A0N,50,50^FDMirror from USB Completed^FS
^XZ
This simple label format prints the Zebra logo and a line of text at the end of the mirroring exercise.
File 3: LOGO.ZPL
Uses the Zebra logo bitmap file.
259

USB Host Port and Link-OS UsageExamples
^XA~TA012~JSN^LT0^LH0,0^JMA^PR4,4~SD15^LRN^CI0^XZ
~DG000.GRF,07680,024,,[image data]
^XA
^LS0
^SL0
^BY3,3,91^FT35,250^BCN,,Y,N^FC%,{,#^FD%d/%m/%Y^FS
^FT608,325^XG000.GRF,1,1^FS
^FT26,75^A0N,28,28^FH\^FDThis label was printed from a format stored^FS
^FT26,125^A0N,28,28^FH\^FDon a USB Flash Memory drive. ^FS
^BY3,3,90^FT33,425^BCN,,Y,N
^FD>:Zebra Technologies^FS
^PQ1,0,1,Y^XZ
^XA^ID000.GRF^FS^XZ
This label format prints an image and text. This file will be stored on the USB memory device at the root
level so that it can be printed.
File 5: VLS_BONKGRF.ZPL
File 6: VLS_EIFFEL.ZPL
File 7: KEYBOARDINPUT.ZPL
^XA
^CI28
^BY2,3,91^FT38,184^BCN,,Y,N^FC%,{,#^FD%d/%m/%Y^FS
^FO385,75^XGE:zebra.bmp^FS
^FT40,70^A0N,28,28^FH\^FDThis label was printed using a keyboard input.
^FS
^FT35,260^A0N,28,28^FH\^FDThis label was printed by:^FS
^FT33,319^A0N,28,28^FN1"Enter Name"^FS
^XZ
This label format, used for the USB keyboard input exercise, does the following:
• Creates a barcode with the current date, based on your Real-Time Clock (RTC) setting. (RTC may not be
present in the printer version you purchased).
• Prints the Zebra logo graphic.
• Prints fixed text.
• Prints text entered with the keyboard by a user.
File 8: SMARTDEVINPUT.ZPL
^XA
^CI28
^BY2,3,91^FT38,184^BCN,,Y,N^FC%,{,#^FD%d/%m/%Y^FS
^FO385,75^XGE:zebra.bmp^FS
^FT40,70^A0N,28,28^FH\^FDThis label was printed using a smart device input.
^FS
260
File 4: USBSTOREDFILE.ZPL
CT~~CD,~CC^~CT~

USB Host Port and Link-OS UsageExamples
^FT35,260^A0N,28,28^FH\^FDThis label was printed by:^FS
^FT33,319^A0N,28,28^FN1"Enter Name"^FS^XZ
The same label format as the previous label, only with different text printing. This format is used for the
smart device input exercise.
Exercise 1: Copy Files to a USB Flash Drive and Perform USB Mirror
1. On your USB flash drive, create the following:
• A folder called Zebra
• In that folder, three subfolders:
• appl
• commands
• files
2. In the /appl folder, place a copy of the latest firmware for your printer.
NOTE: Avoid underscores in the filenames. Some functions may NOT work properly if there
are underscores. Use periods instead.
3. In the /files folder, place the following file: ZEBRA.BMP
4. In the /commands folder, place the following files: SAMPLELABEL.TXT and LOGO.ZPL.
5. Insert the USB flash drive into a USB host port situated on the front of your printer.
6. Observe the user interface and wait for the following:
• If the firmware on the USB flash drive is different than what is on the printer, the firmware downloads
to the printer. The printer then restarts and prints a printer configuration label. (If there is no firmware
on the USB flash drive or if the firmware version is the same, the printer skips this action.)
• The printer downloads the files in the /files folder and briefly shows on the display and, in case
ofprinters that have a Color Touch display, the names of the files that are downloading to the printer
form the USB drive.
• The printer executes any files you added to the /commands folder.
• The printer restarts, then displays the message MIRROR PROCESSING FINISHED.
7. Remove the USB Flash drive from the printer.
Exercise 1: Informationfor Advanced Operators
See the ZPL Programming Guide for more information about these commands.
Enable/disablemirroring:
! U1 setvar "usb.mirror.enable" "value" — Values: "on" or "off"
Enable/disable automatic mirroringthat occurs when a USB Flash drive is inserted into the USBhost port:
261
! U1 setvar "usb.mirror.auto" "value" — Values: "on" or "off"

USB Host Port and Link-OS UsageExamples
Mirror operation retry number —Specify the number of times that the mirror operation will be repeated if it
fails:
! U1 setvar "usb.mirror.error_retry" "value" — Values: 0 to 65535
Change file path from USB— Reprogram the file location the printer searches to retrieve files from the USB
memory during mirror operations.
! U1 setvar "usb.mirror.appl_path" "new_path" — Default: "zebra/appl"
Change file path to USB —Reprogram the file location the printer places files into USB memory during
mirror operations:
! U1 setvar "usb.mirror.path" "path" — Default: "zebra"
Enable/disable the USB host port:
! U1 setvar "usb.host.lock_out" "value" — Values: "on" or "off"
Exercise 2: Print a Label Format from a USB Flash Drive
The Print USB File option allows you to print files from a USB mass storage device, such as a USB Flash
drive.
The files must be printable (.ZPL and .XML) and they must be located at the root level of the USB drive,
not placed within a directory.
1. Copy the following files to your USB Flash drive:
• File 4: USBSTOREDFILE.ZPL
• File 5: VLS_BONKGRF.ZPL
• File 6: VLS_EIFFEL.ZPL
2. Insert the USB Flash drive into a USB host port on the front of your printer.
262
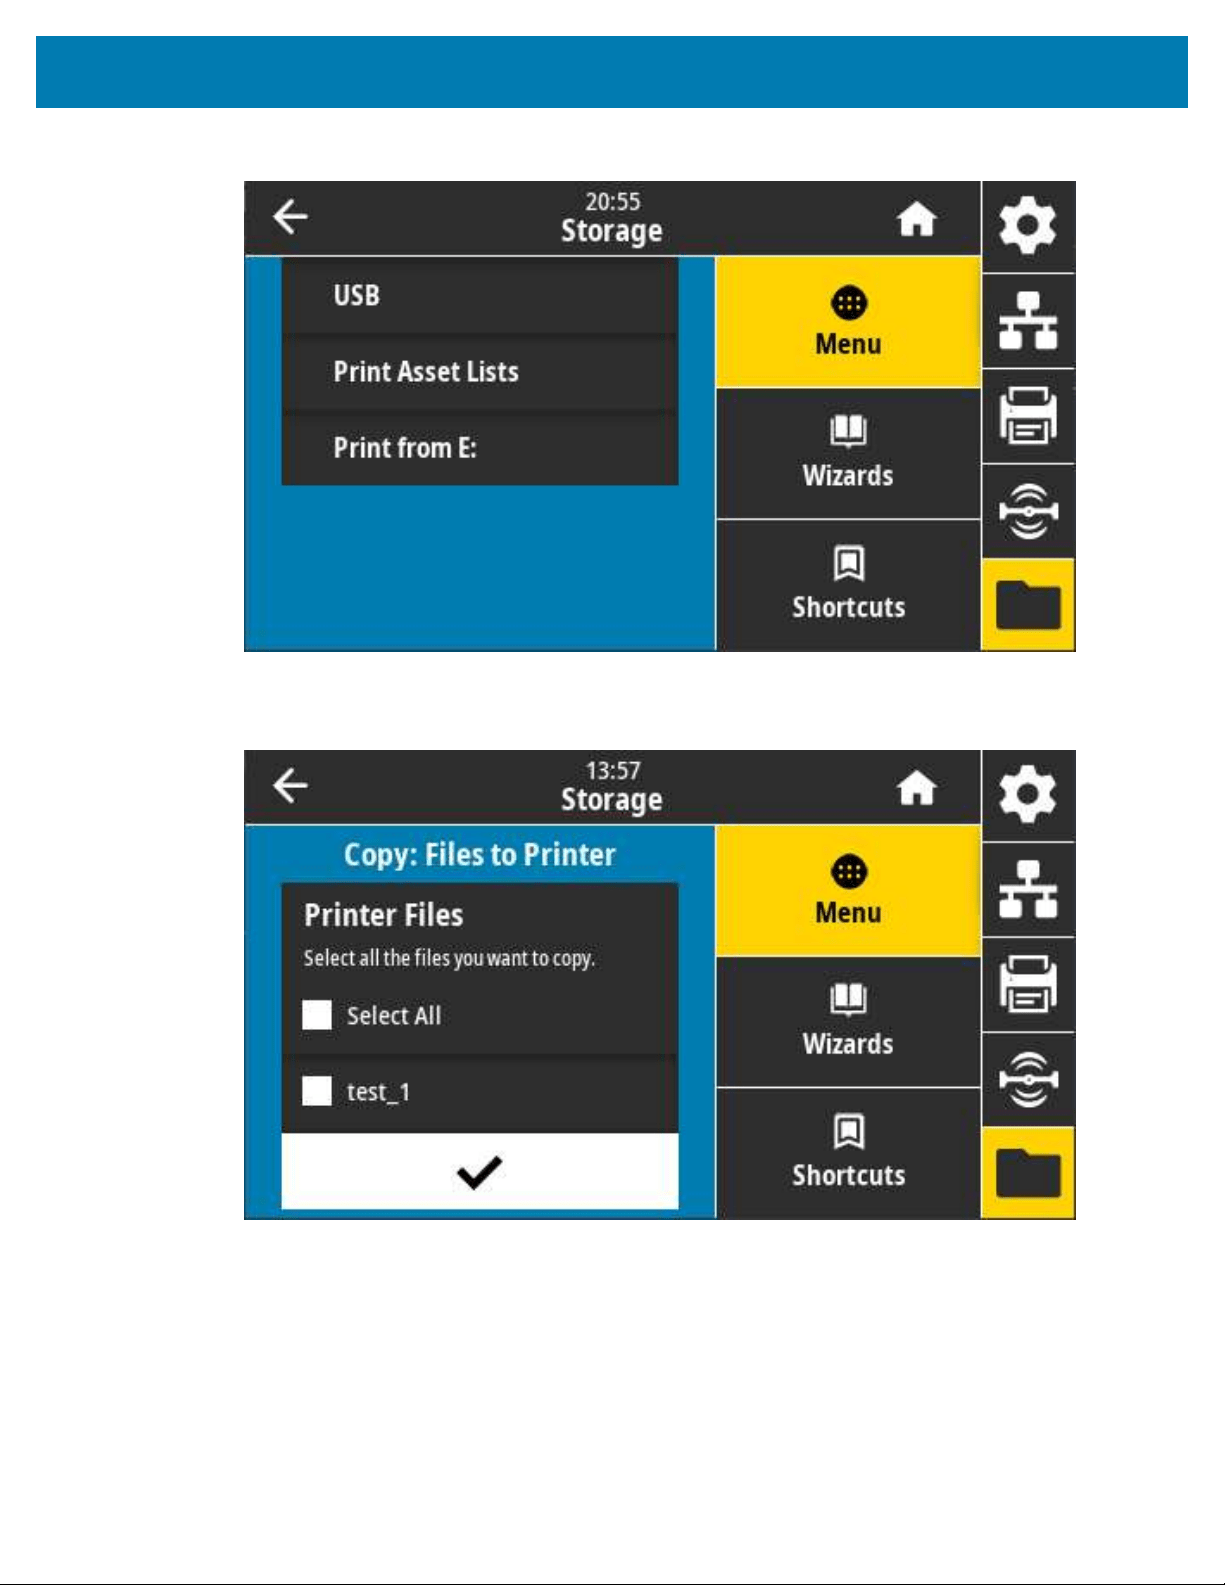
USB Host Port and Link-OS UsageExamples
3. From the printer's display, touch Menu > Storage on the printer's Home screen.
4. Touch and select Menu > Storage > USB > Print: From USB. The printer lists the available files.
5. Touch the box next to the desired files. You also have the option to Select All.
6. Touch the checkmark to print the selected files.
263
7. Remove the USB Flash drive from the printer.
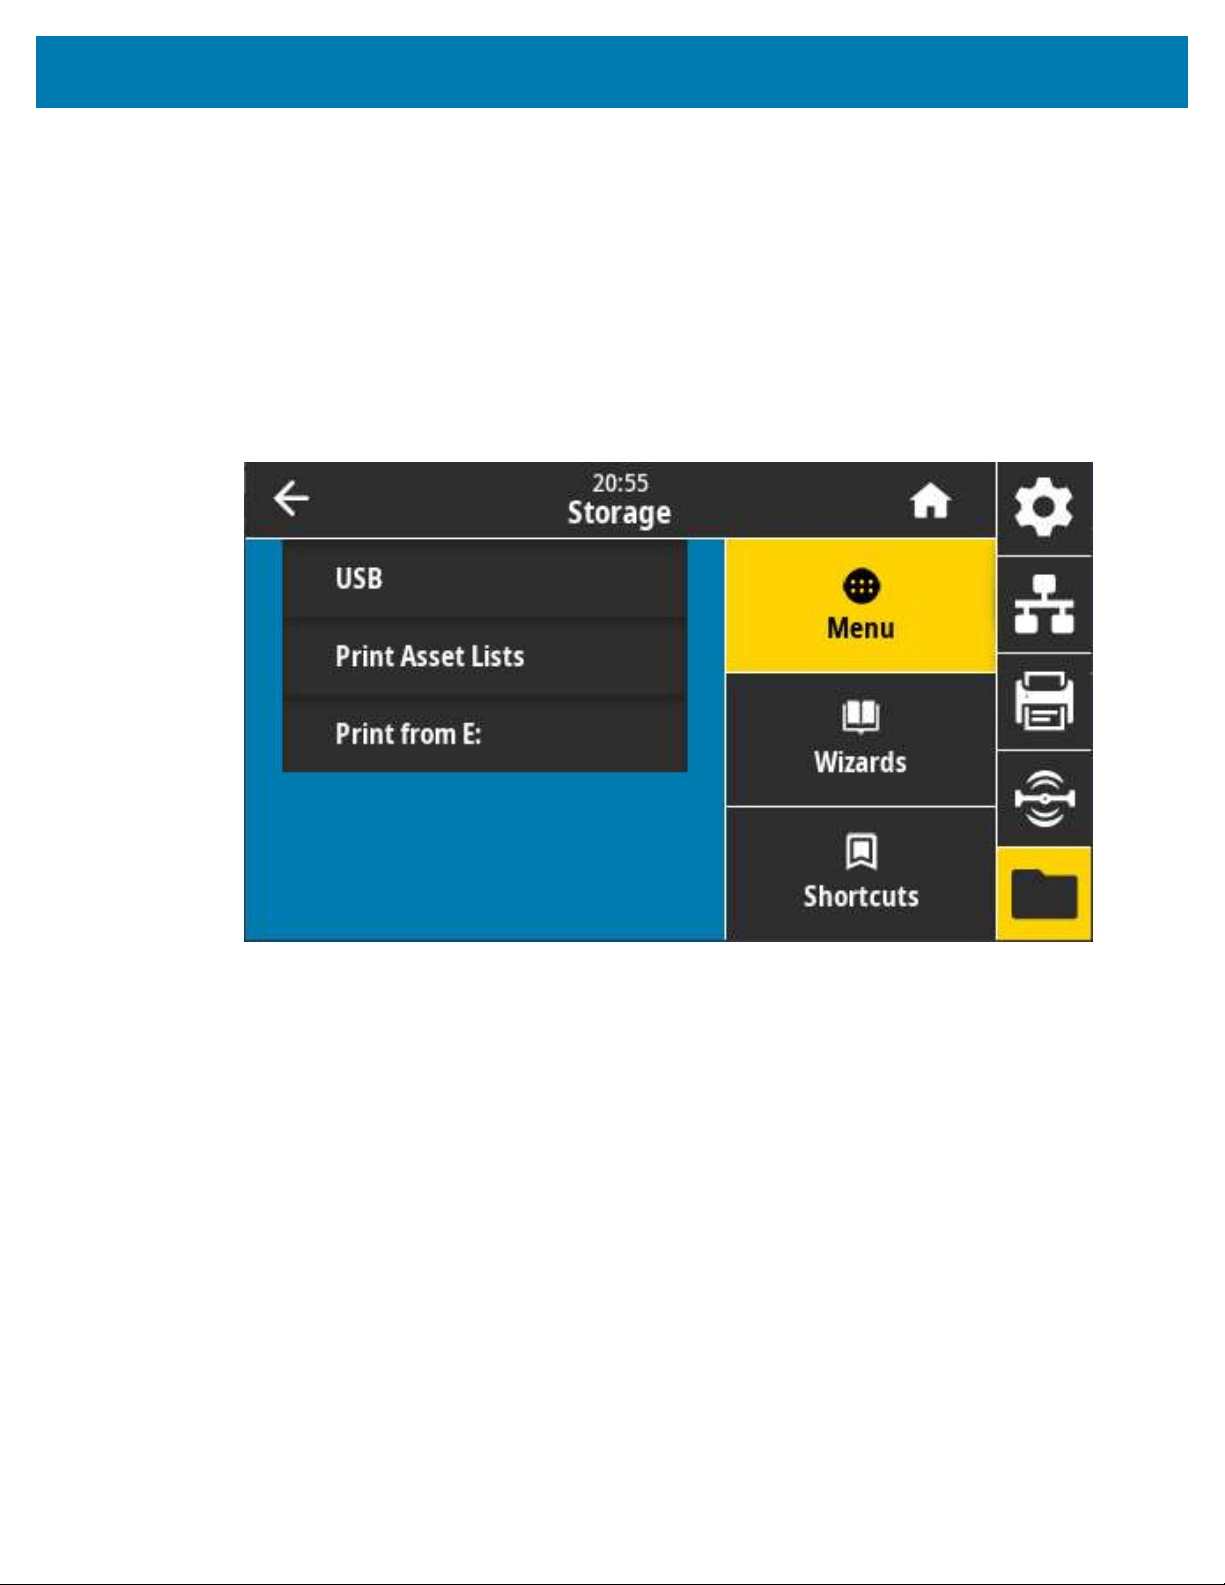
USB Host Port and Link-OS UsageExamples
Exercise 3: Copy Files to/from a USB Flash Drive
The Copy USB File option allows you to copy files from a USB mass storage device to the printer’s Flash
memory E: drive.
1. Copy the files listed below to the root directory of your USB Flash drive. (The files should not be placed
in a subfolder.)
• File 7: KEYBOARDINPUT.ZPL
• File 8: SMARTDEVINPUT.ZPL
2. Insert the USB Flash drive into a USB host port on the front of your printer.
3. On the printer's display, touch Menu on the printer's Home screen.
264
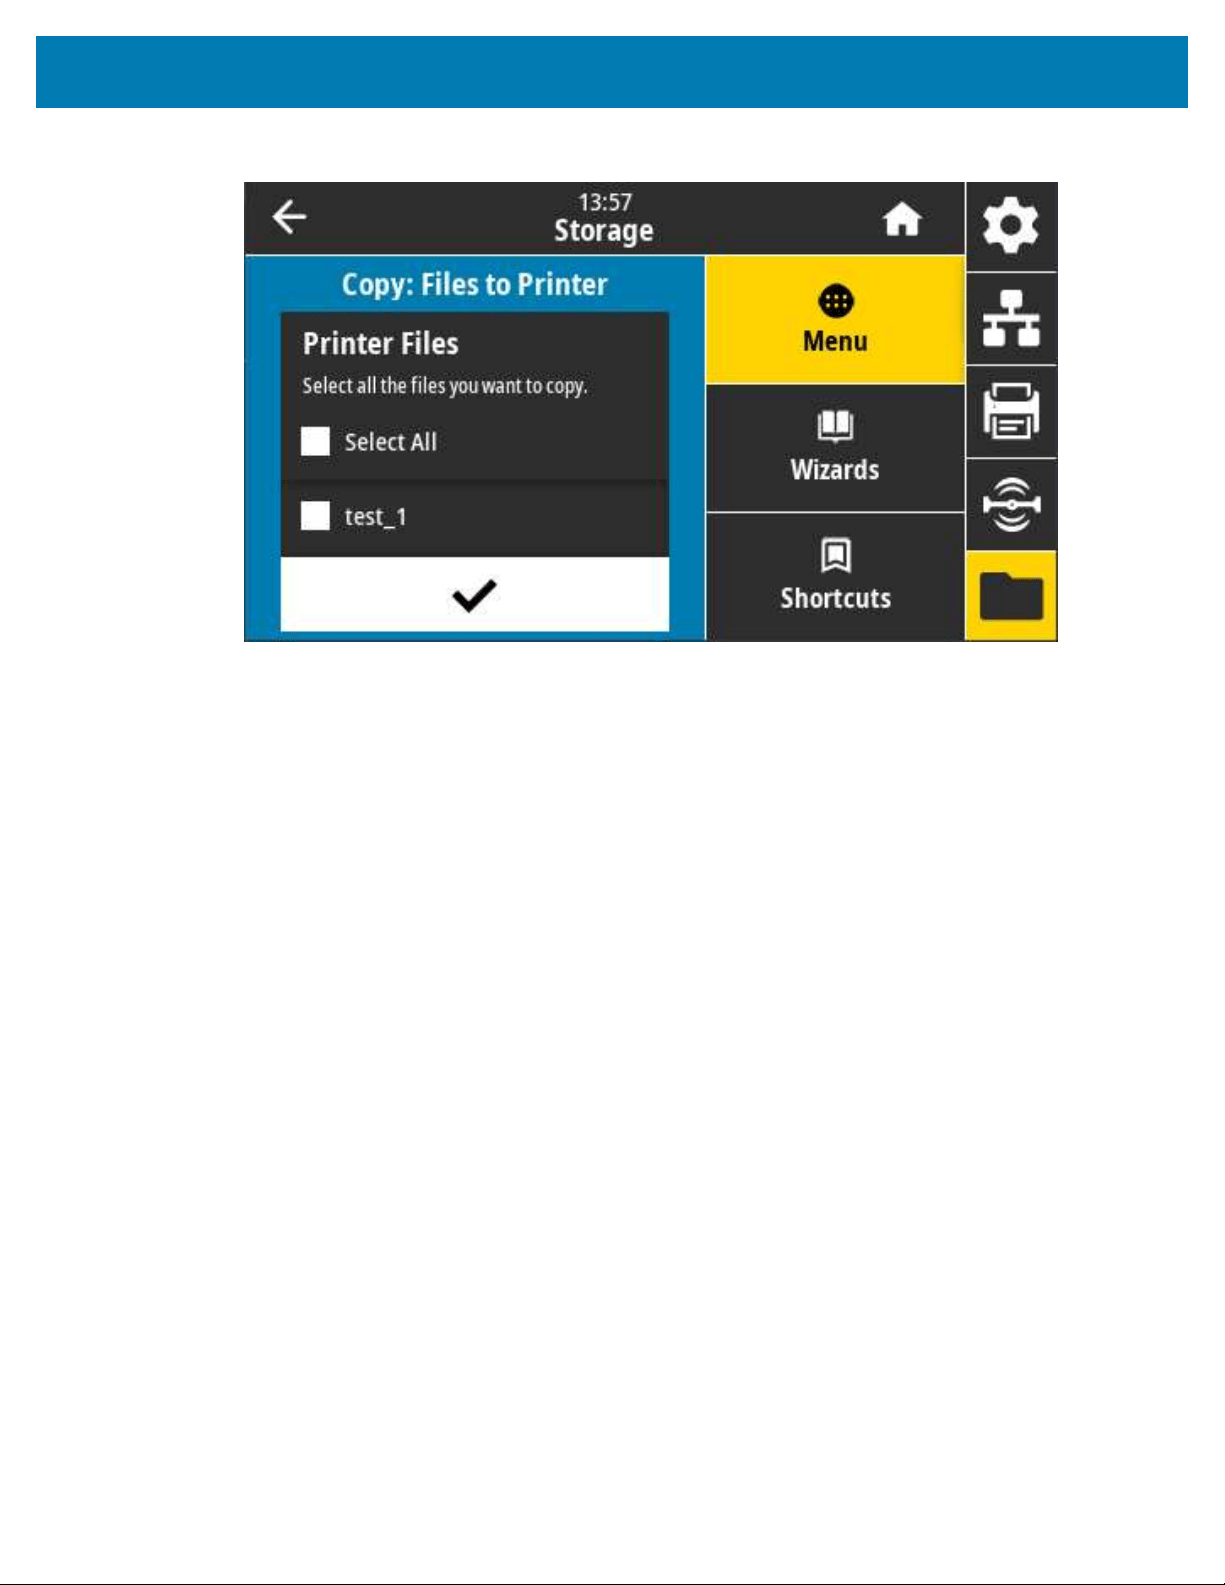
USB Host Port and Link-OS UsageExamples
4. Touch Menu > Storage > USB > Copy: Files to Printer.
The printer lists available files.
5. Touch the box next to the files you want to copy. You can also Select All.
6. Touch the checkmark to copy the selected files.
7. Remove the USB Flash drive from the USB host port.
The printer stores the file in E: memory.
8. You can now copy files from the printer to a USB Flash drive using the Menu > Storage > USB > Copy:
Files to USB.
265
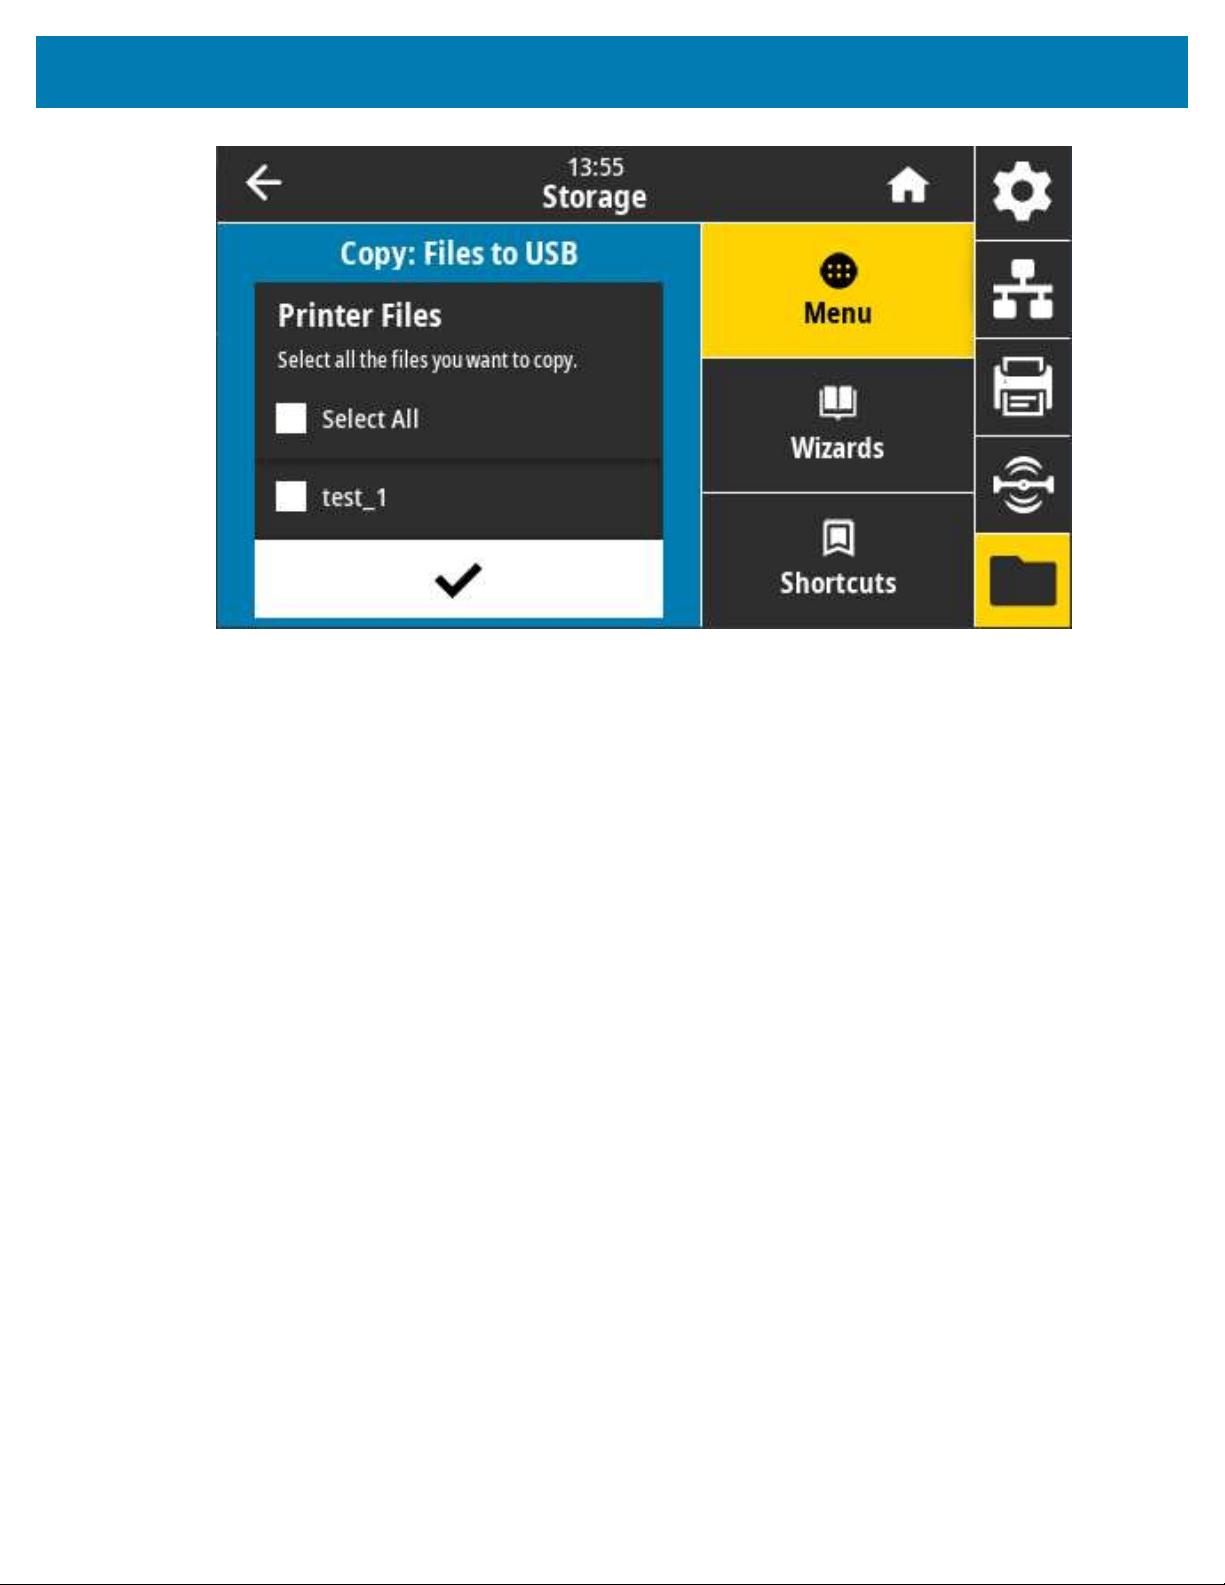
USB Host Port and Link-OS UsageExamples
The Select All option is available to copy all files stored in the printer to the USB Flash drive. Any file with
the .ZPL extension that is copied to the USB drive is post-processed so that its contents can be sent to a
printer for normal execution.
Exercise 4: Enter Data for a Stored File with a USB Keyboard and Print a
Label
The Print Station feature allows you to use a USB Human Interface Device (HID)—such as a keyboard or a
barcode scanner— to enter ^FN field data into a *.ZPL template file.
1. After performing the previous exercise, plug a USB keyboard into a USB host port located on the front
of your printer.
266
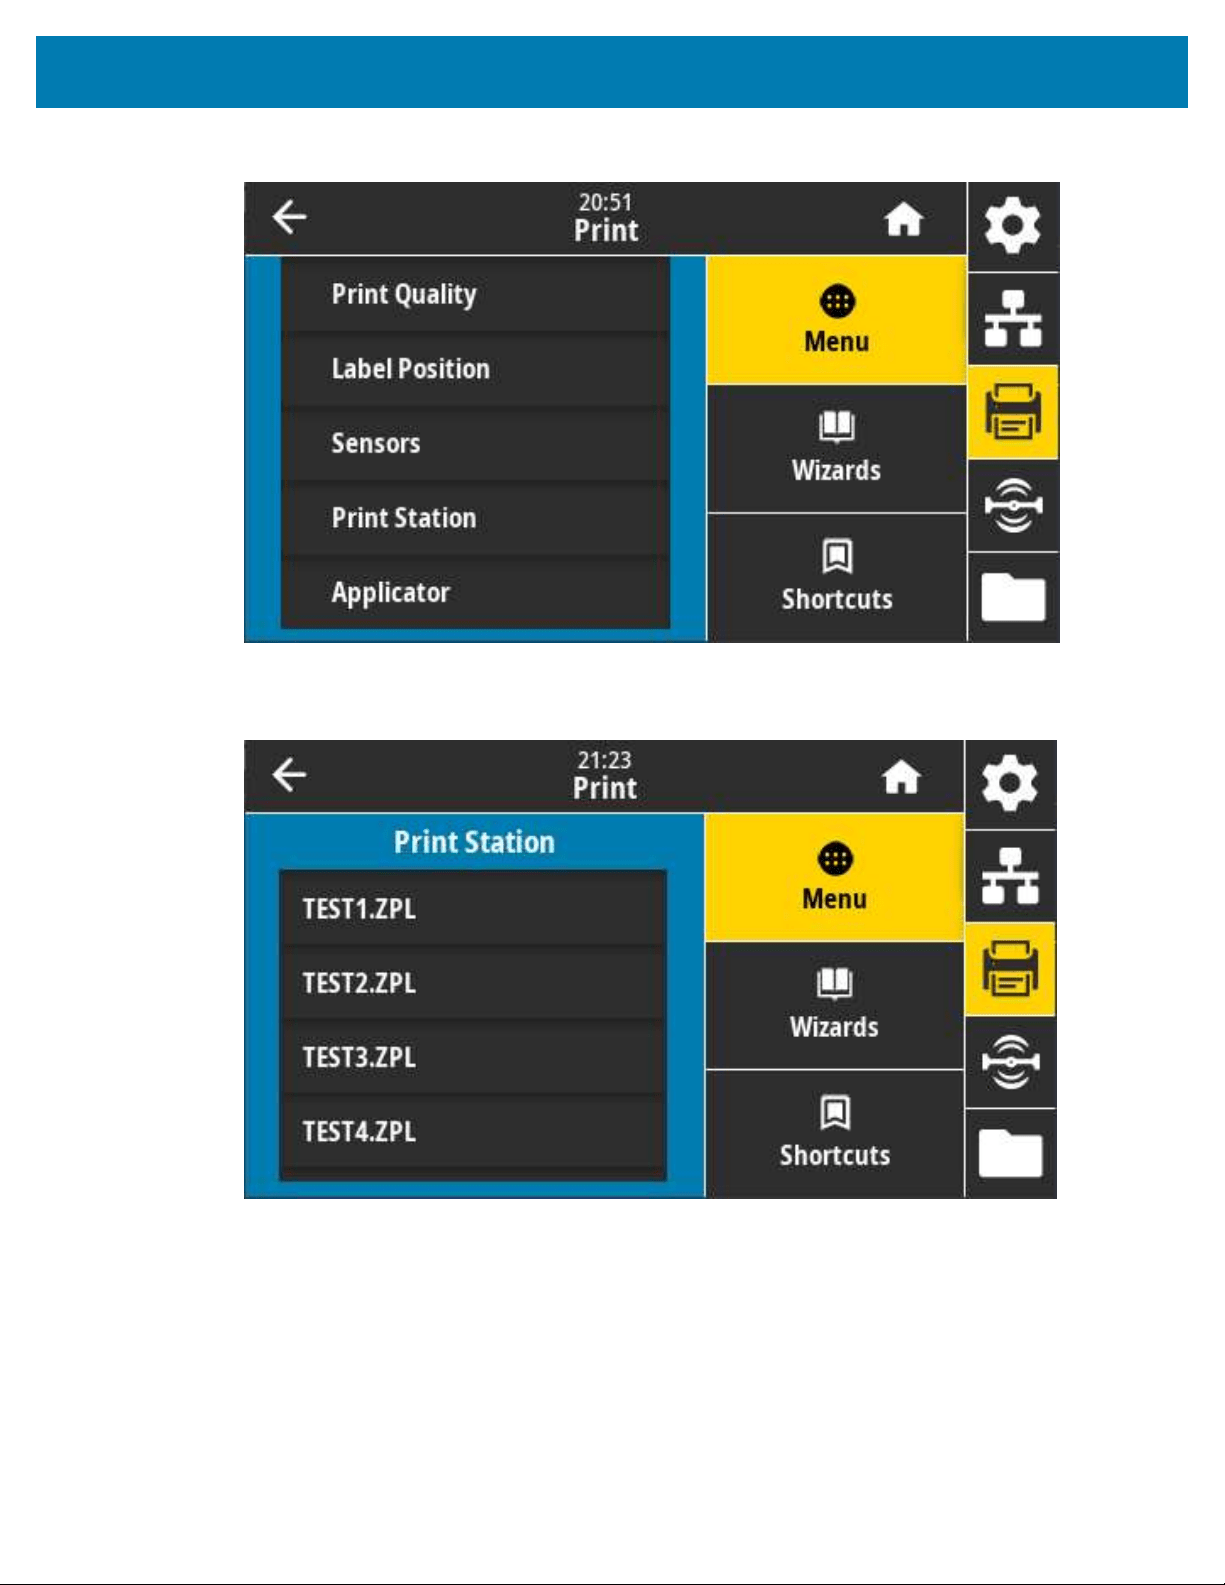
USB Host Port and Link-OS UsageExamples
2. Touch Menu > Print.
The Print screen displays.
3. Touch Menu > Print > Print Station.
The printer loads any executable files and processes them. The available files are listed.
267
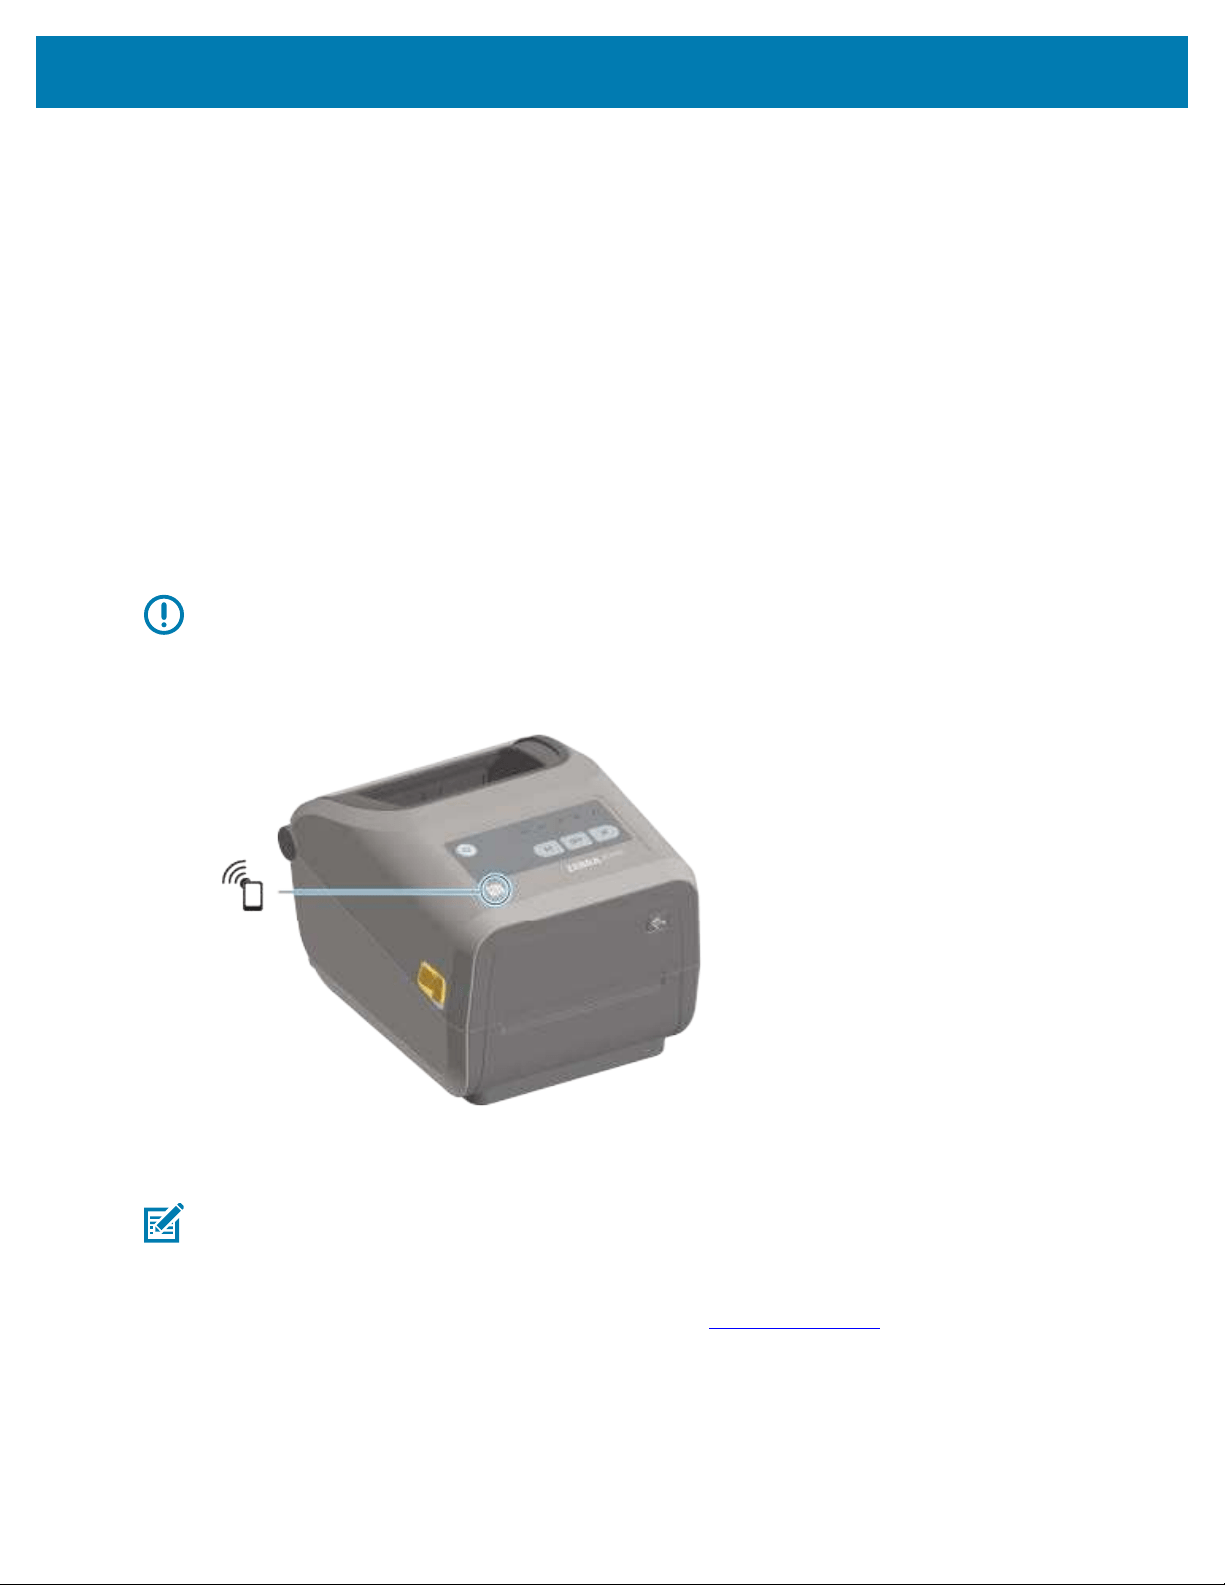
USB Host Port and Link-OS UsageExamples
4. Select the file KEYBOARDINPUT.ZPL.
The printer accesses the file and prompts you for the information in the ^FN fields in the file. In this
case, it prompts you for your name.
5. Using the external keyboard, type your name and press ENTER.
The printer prompts you for the number of labels to print.
6. Using the external keyboard, specify the desired quantity of labels and press ENTER.
The specified number of labels is printed, with your name in the appropriate fields.
Using the USB Host Port and Near Field Communication (NFC)
Capabilities
The Zebra Print Touch feature allows you to touch an Android-based, NFC-enabled device (such as a
smart phone or tablet) to the printer’s NFC logo to pair the device to the printer. You can use this feature to
supply information for which you are prompted and then print a label using that information.
IMPORTANT: Some devices may not support NFC communication with the printer until you
change their settings. If you encounter difficulties, consult your service provider or your smart
device manufacturer for more information.
Figure 7Print Touch Location (Passive NFC)
Exercise 5: Enter Data for a Stored File with a Smart Device and Print a Label
NOTE: The steps in this exercise may vary somewhat based on your smart device, on your
service provider, or on whether you already have the free Zebra Utilities app installed on your
smart device.
Refer to the Zebra Bluetooth User Guide for specific instructions for configuring your printer to use a
Bluetooth interface. A copy of this manual is available at zebra.com/manuals.
268
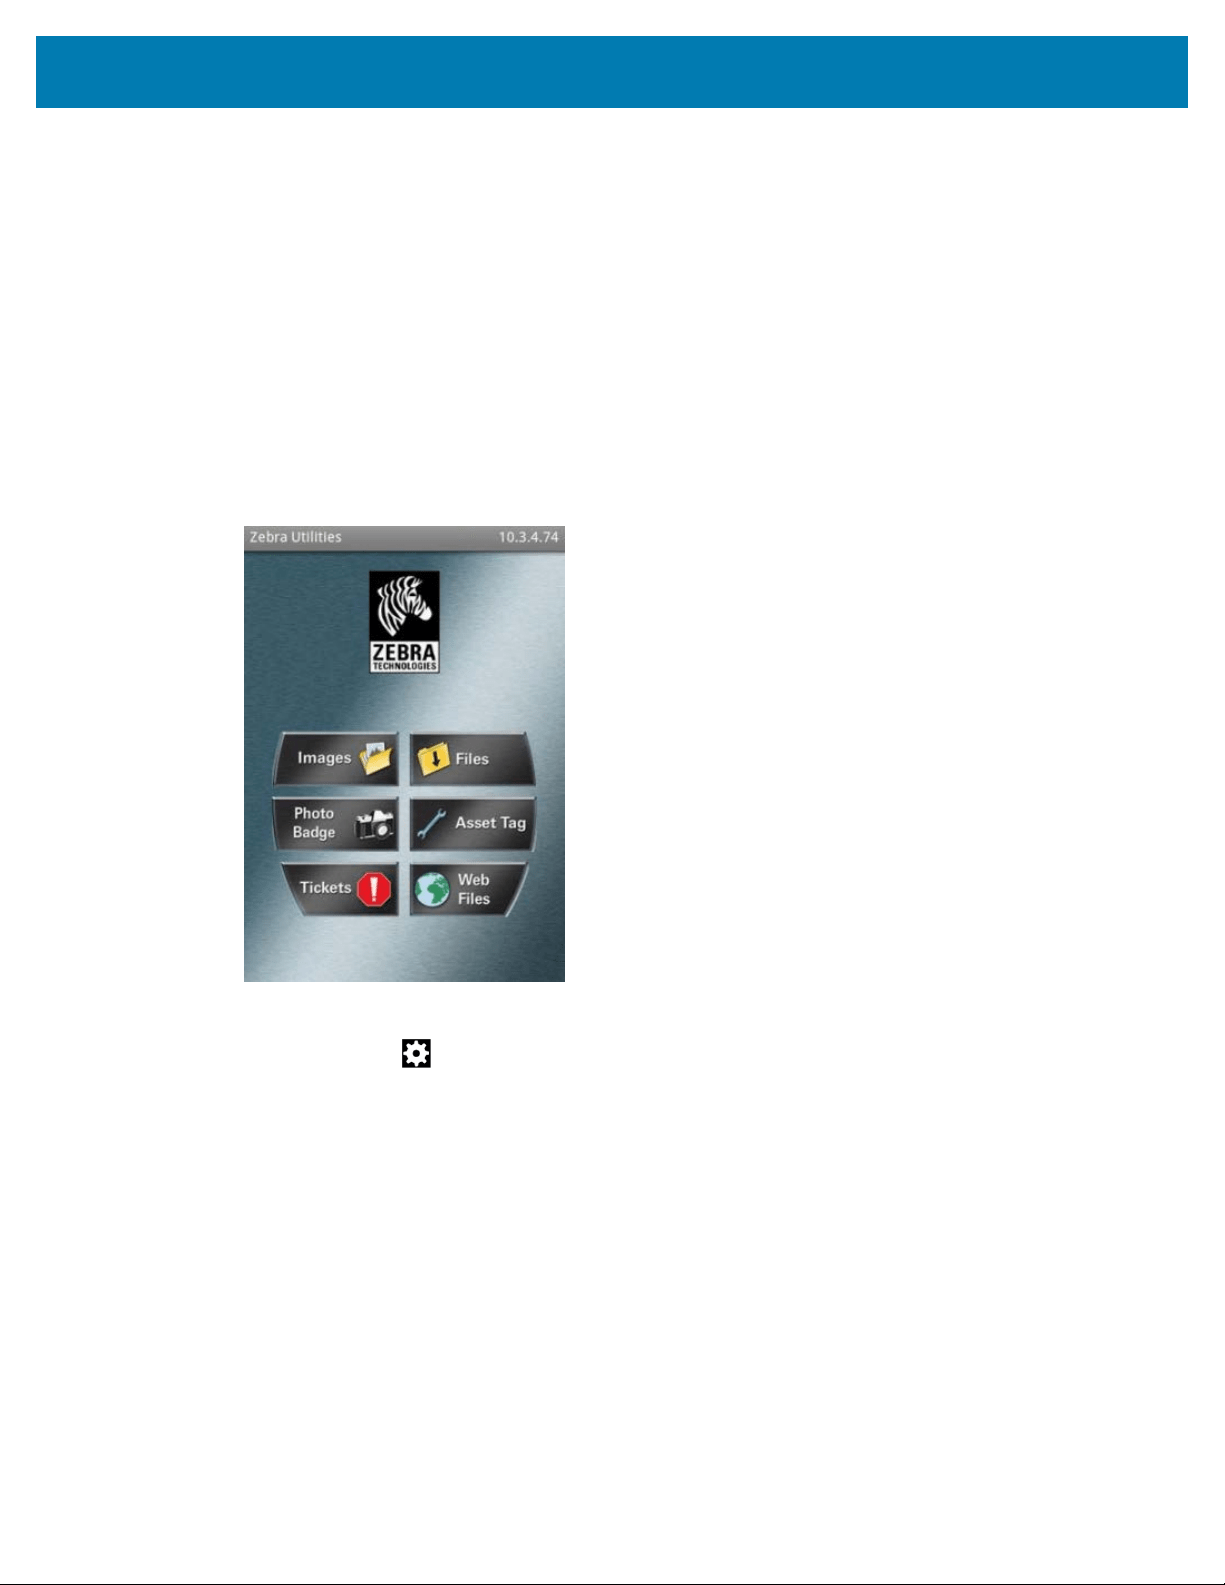
USB Host Port and Link-OS UsageExamples
1. If you do not have the Zebra Utilities app installed on your device, go to the app store for your device,
search for the Zebra Utilities app, and install it.
2. Pair your smart device with the printer by holding the smart device next to the Zebra Print Touch icon
on your printer.
a) If necessary, access the Bluetooth information about your printer using your smart device. For
instructions, refer to the manufacturer documentation made available for your device.
b) If necessary, select the Zebra printer’s serial number to pair it with the device.
c) After your smart device is detected by the printer, the printer may prompt you to accept or reject
the pairing. If necessary, press ACCEPT.Some smart devices will pair with the printer without this
prompt.
3. Start the Zebra Utilities app on your device.
The Zebra Utilities main menu displays.
4. Perform these steps if you have an Apple device: If not, skip to the next step.
a)
Tap Settings ( ) in the lower right corner.
b) Change the setting for Get Labels From Printer to ON.
c) Tap Done.
d) Tap Files.
The smart device gets data from the printer and displays it.This retrieval process may take a minute
or more to complete.
5. Scroll through the formats shown and select E:SMARTDEVINPUT.ZPL.
Based on the ^FN field in the label format, the smart device prompts you for your name.
6. Enter your name at the prompt.
7. If desired, change the quantity of labels to print.
8. Tap Print to print the label.
269
Maintenance
Maintenance
This section provides routine cleaning and maintenance procedures. It is recommended that you procure
designed to work with your printer from zebra.com/supplies.
Cleaning
Your Zebra printer may require periodic maintenance to keep it functional and printing high quality labels,
receipts, and tags.
IMPORTANT: The cutter mechanism does NOT require maintenance cleaning. DO NOT clean
the blade or mechanism. The blade has a special coating to resist adhesives and wear.
Using too much alcohol can result in contamination of the electronic components requiring a
much longer drying time before the printer will function properly.
CAUTION—PRODUCT DAMAGE: DO NOT use an air compressor in place of the can of
compressed air. Air compressors have micro-contaminants and particles that can get into the air
system and damage your printer.
CAUTION—EYE INJURY: When using compressed air to clean the sensors, use eye protection to
protect your eyes from flying particles and objects.
Cleaning Supplies
The following printer cleaning supplies are recommended for use with your printer:
These and other printer supplies and cleaning accessories are available from zebra.com/supplies.
Printhead cleaning pens For routine printhead cleaning.
99.7% min. pure isopropyl
alcohol
Use a labeled alcohol dispenser.
NOTE: Never re-moisten cleaning materials used to clean
the printer. Always use clean supplies.
Fiber-free cleaning swabs To clean the media path, guides, and sensors.
Cleaning wipes To clean the media path and interior (for example Kimberly-Clark
Kimwipes)
270
Maintenance
Can of compressed air
CAUTION—PRODUCT DAMAGE: DO NOT use an air
compressor in place of the can of compressed air. Air
compressors have micro-contaminants and particles that
can get into the air system and damage your printer.
IMPORTANT: To avoid product damage and risk of personal injury, followthe precautions
included in each cleaning procedure when cleaning the printer.
Recommended Cleaning Schedule
Cleaning is a routine part of printer maintenance. Be sure to clean your printer and its components using
the schedule listed here.
Component / Area Recommendations
Printhead Clean the printhead after printing every five rolls of media printed. See
Cleaning the Printhead on page 272.
Standard platen (drive)
roller
As needed to improve print quality. Platen rollers can slip causing print image
distortion and in worst case scenarios not move the media (labels, receipts,
tags, etc.) Usethe detailed instructions in this Maintenance section to clean
and, if necessary, replace the platen.
Standard platen rollers come in two colors, black (203 dpi) and gray (300 dpi).
Linerless Platen (Drive)
Roller
The linerless platen normally does not require cleaning. The adhesive side of
the media picks up particles as you print. Clean if you observe a build-up of
particles on the platen roller.
The platen roller can accumulate adhesive on the outer edges of the roller.
After using many rolls of media, these ‘rings’ of adhesive can get dislodged
when using the printer. These particle clumps can then get transferred
to other areas in the printer, most importantly, the printhead.To remove
adhesive particles, use the adhesive side of a piece of linerless media to
gently press and remove the particles from the plater roller.Seethe
instructions in this Maintenance section for information on cleaning and
replacing the platen.
If the linerless media is sticking and binding in the printer, the silicon non-stick
coating may have been used up. In this case, the linerless platen normally
needs to be replaced.
Linerless platen rollers come in two colors, reddish-brown (203 dpi) and
brown (300 dpi).
CAUTION: Cleaning the roller with solutions or rubbing the delicate
surface of this type of roller will permanently damage or shorten the
usable life of the linerless platen.
Media path Clean thoroughly as neededwith fiber-free cleaning swabs and cloths
moistened with 99.7% pure isopropyl alcohol. Let the alcohol evaporate
completely. See Cleaning the Media Path on page 276.
271
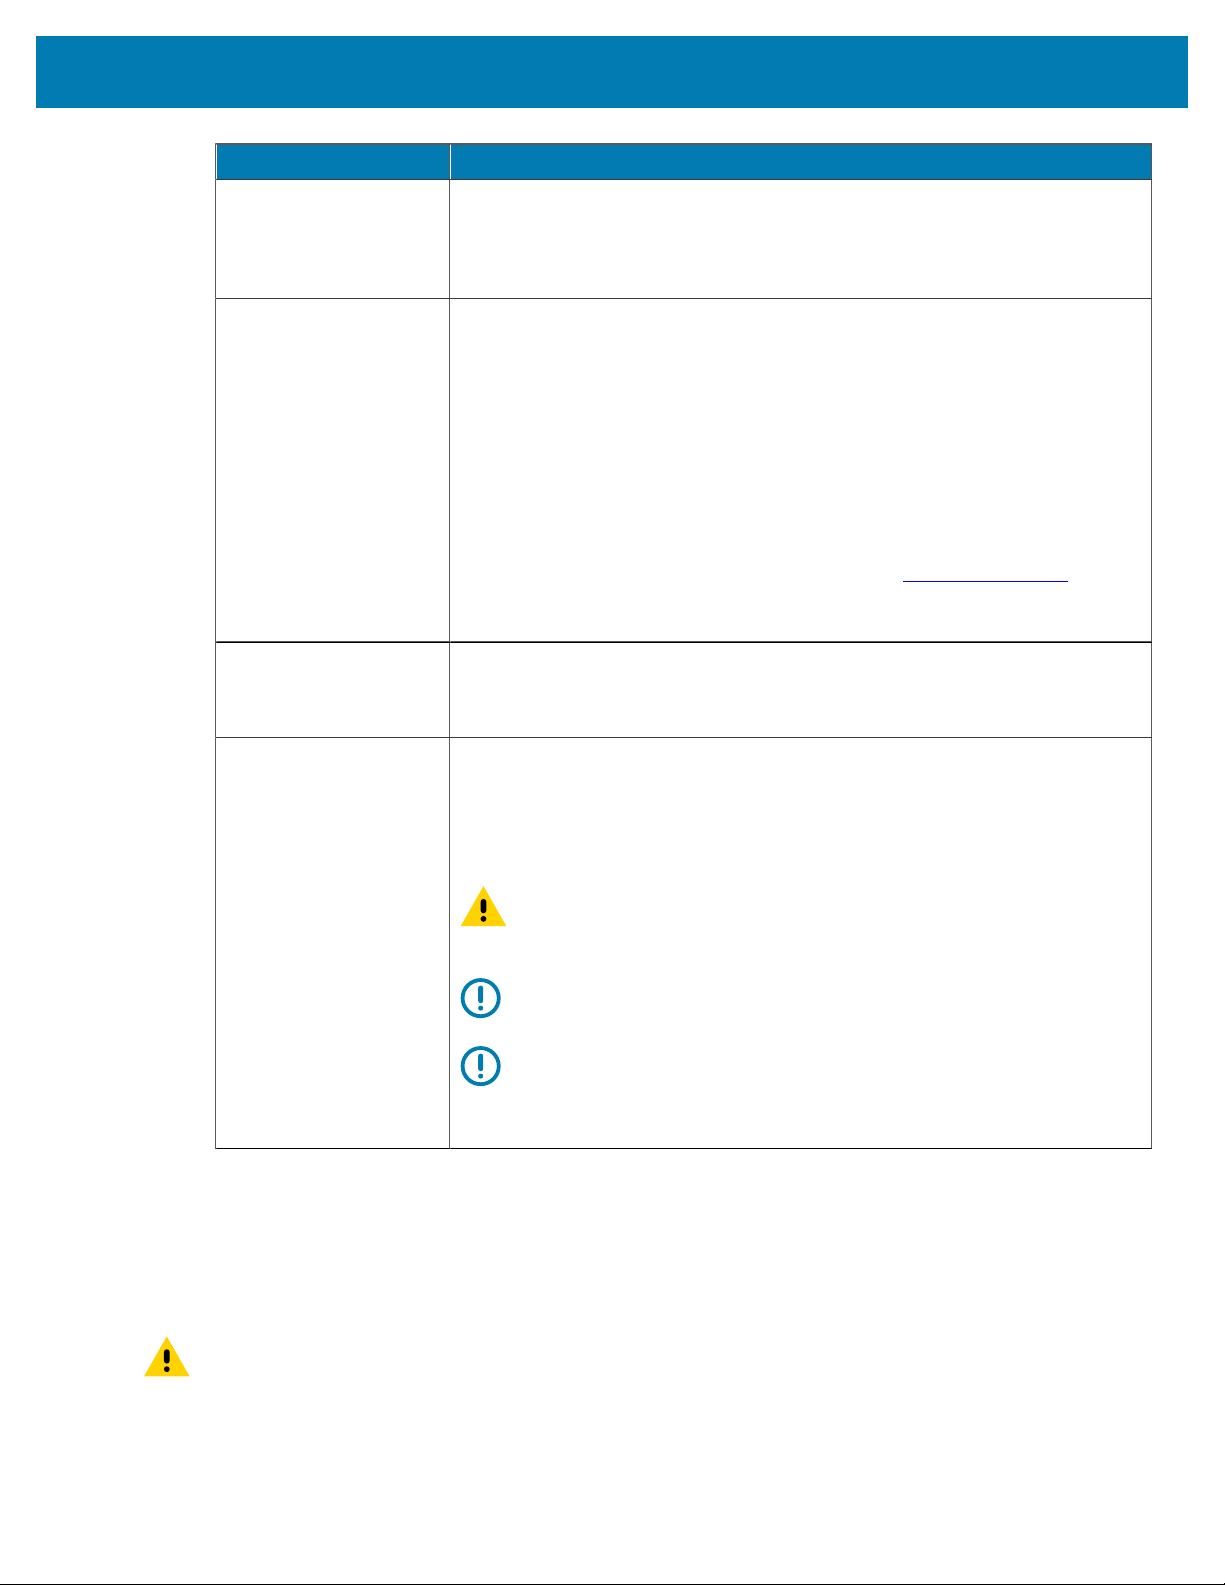
Maintenance
Component / Area Recommendations
Interior Clean as needed usinga soft cloth, brush or compressed air to wipe or blow
dust and particles out of the printer.
Use 99.7% pure isopropyl alcohol and a fiber-free cleaning cloth to dissolve
contaminants like oils and grime.
Exterior Clean as needed using asoft cloth, brush, or compressed air to wipe or blow
dust and particles out of the printer.
The exterior of the printer can be cleaned using plain soap and water
solutions to moisten the cloth. Only use the minimum amount of cleaning
solution to avoid getting solution in the printer or other areas. Do NOT clean
connectors or interior of the printer with this method.
The latest healthcare printer models now include ultraviolet (UV) and
disinfectant-ready plastics for hospital and other similar environments. The
printer user interface controls are sealed so they can be cleaned with the
rest of the printer’s exterior. See the Guide To Disinfecting and Cleaning
Zebra Healthcare Printers on the Zebra website at zebra.com/support for the
latest information on tested and approved cleaning materials and cleaning
methods.
Label dispenser option Clean as needed to improve label dispenser operations.
For details on operating the dispenser, see Cleaning the Label Dispenser
Option on page 280.
Cutter option The cutter is not a user-serviceable component.
Do NOT clean inside the cutter opening or blade mechanism.
Use the exterior cleaning procedure to clean the cutter bezel (housing).
For cleaning and maintenance of this option, call a service technician.
CAUTION: There are no operator serviceable parts in the cutter
unit. Never remove the cutter cover (bezel). Never attempt to insert
objects or fingers in to the cutter mechanism.
IMPORTANT: The blade has a special coating to resist adhesives
and wear. Cleaning it may ruin the blade.
IMPORTANT: Use the recommended cleaning supplies listed in this
guide.Using unapproved tools, cotton swabs, solvents (including
alcohol), etc. may damage or shorten the cutter’s usable life or
cause the cutter to bind.
Cleaning the Printhead
For optimal print operations, clean the printhead each time you load a new roll of media.
Always use a new cleaning pen on the printhead. Old, used cleaning pens carry contaminants from
previous use that may damage the printhead.
CAUTION: The printhead becomes hot while printing. To protect from damaging the printhead
and risk of personal injury, avoid touching the printhead. Only use the cleaning pen to perform
printhead maintenance.
272

Maintenance
CAUTION—ESD: Observe static-safe procedures when working with the printhead or the
electronic components under the top cover. The discharge of electrostatic energy that
accumulates on the surface of the human body or other surfaces can damage or destroy the
printhead and other electronic components used in this device.
Cleaning the Printhead–ZD421/ZD621 Direct Thermal Printers
Zebra recommends that you clean the printhead when you load a new roll of media.
1. Rub the cleaning pen across the dark area of the printhead. Clean from the middle to the outside,to
move adhesive transferred from the edges of media out and away from the media path.
2. Wait one minute before you close the printer to allow the wet areas to dry fully.
Cleaning the Printhead – ZD421/ZD621 Thermal Transfer Printers
Clean the printhead each time you load a new roll of media.
1. If transfer ribbon is installed, remove it before proceeding.
273
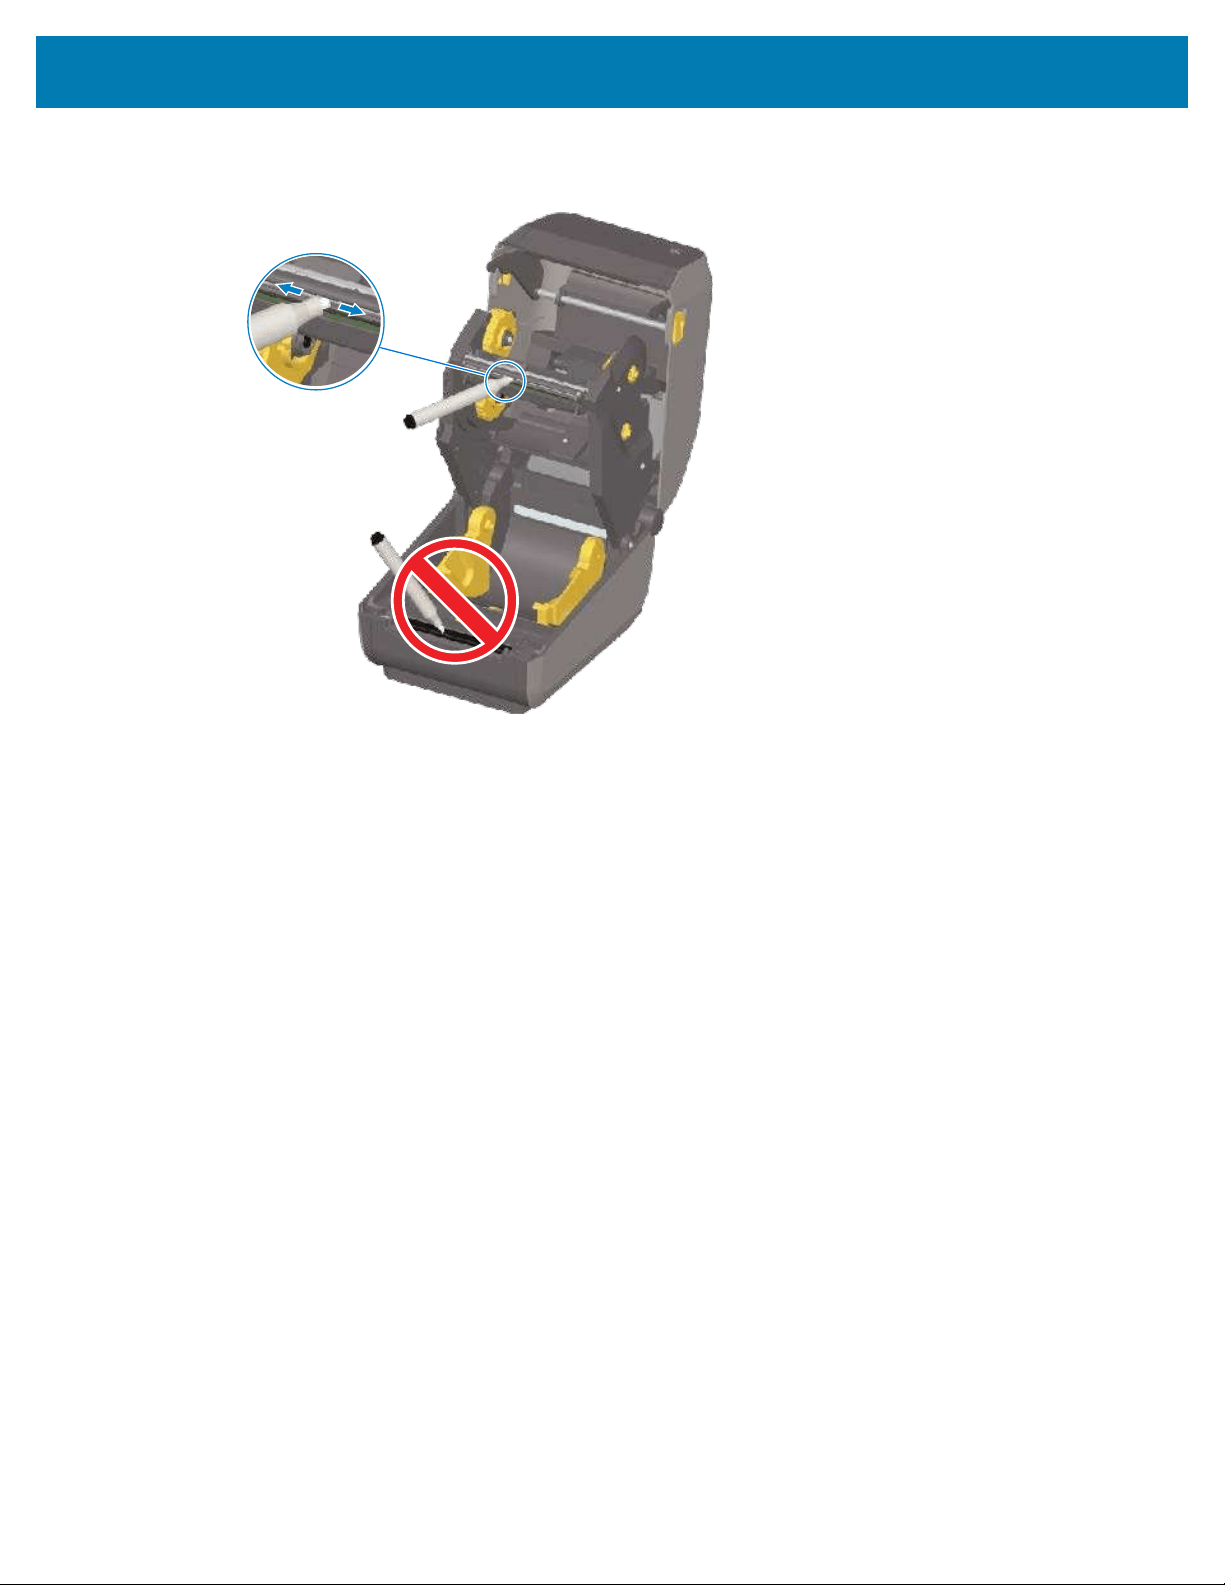
Maintenance
2. Rub the cleaning pen across the dark area of the printhead. Clean from the middle to the outside, to
move adhesive transferred from the edges of media to the outside of media path.
3. Wait one minute before closing the printer or loading ribbon to allow all components to dry.
Cleaning the Printhead – ZD421 Ribbon Cartridge Printers
Zebra recommends that you clean the printhead when you load a new roll of media.
1. Pull the two release arms out to release the ribbon drive transport. For instructions on how to access
the printhead, see Accessing the Printhead of the ZD421 Ribbon Cartridge Printer on page 35.
2. Lift the printhead actuator arm up to access the printhead.
274
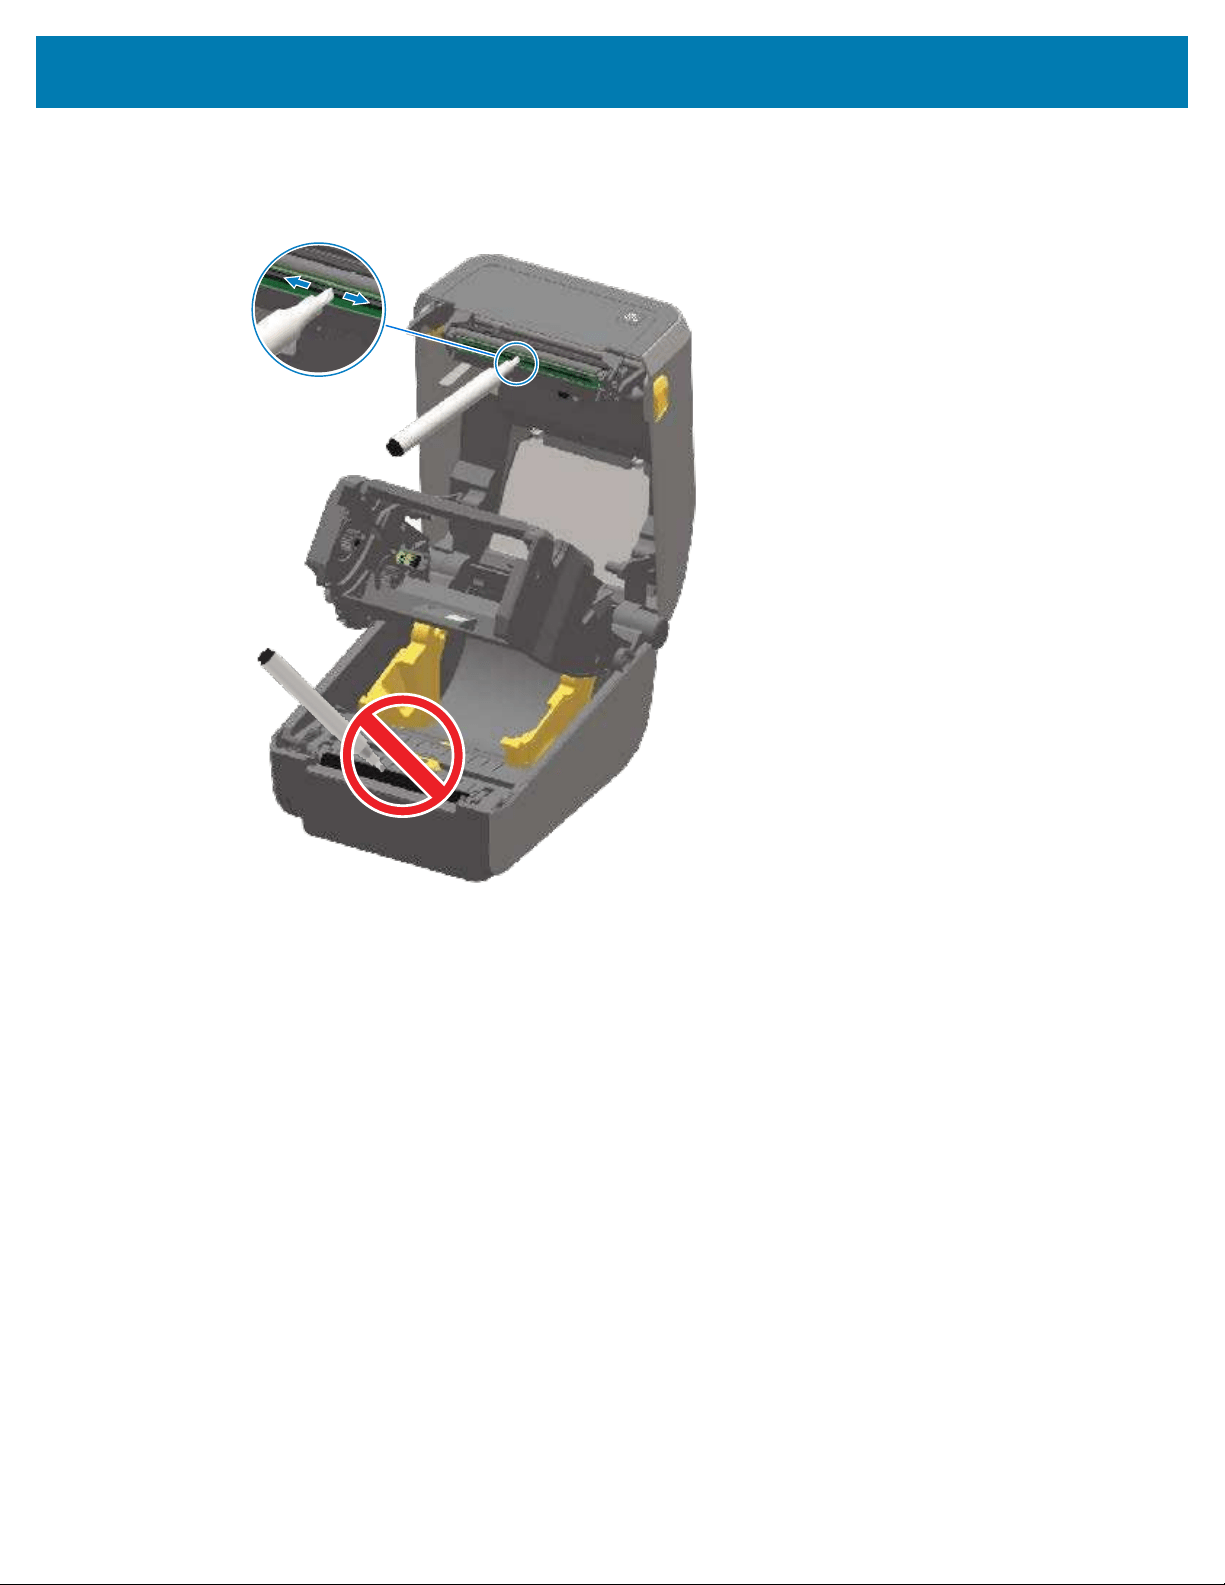
Maintenance
3. Rub the cleaning pen across the dark area of the printhead. Make sure you clean from the middle to
the outside. This moves adhesive transferred from the outer edges of media away from and outside the
media path.
4. Wait one minute for the surface of the printhead to dry.
5. Release the printhead actuator arm, then push the ribbon drive transport into the printhead actuator
arm.
The release arms snap into place, relinking the ribbon drive transport to the top cover and the printhead
actuator arm.
275
Maintenance
Cleaning the Media Path
Use a cleaning swab and or a lint-free cloth to remove debris, dust or crust that has built-up on the holders,
guides, and the media path surfaces.
Lightly moisten the swab or cloth with 99.7% pure medical-grade alcohol.
For hard-to-clean areas, use extra alcohol on a cleaning swab to soak the debris to break up any adhesive
that may have accumulated on surfaces in the media compartment.
IMPORTANT: Do NOT clean the printhead, movable sensor, or platen as part of this process.
Cleaning the Media Path– Lower Half of ZD421/ZD621 Printers
The lower half of all printer models covered in this guide get cleaned the same way, as described in this
procedure.
IMPORTANT: Do NOT clean the printhead, sensors, or platen as part of this process.
1. Wipe the inside surfaces of the roll holders and the underside of the media guides with either wipes or
cleaning swabs lightly moistened with99.7% pure isopropyl alcohol.Use extra alcohol if necessary to
soak accumulated debris for removal.
2. Wipe the inside surfaces of the roll holders and the underside of the media guides with a swab.
1 Media roll holders
2 Media guides
276
3 Sensor (do NOT clean)
NOTE: Use a clean swab for each cleaning.Discard all used cleaning swabs.
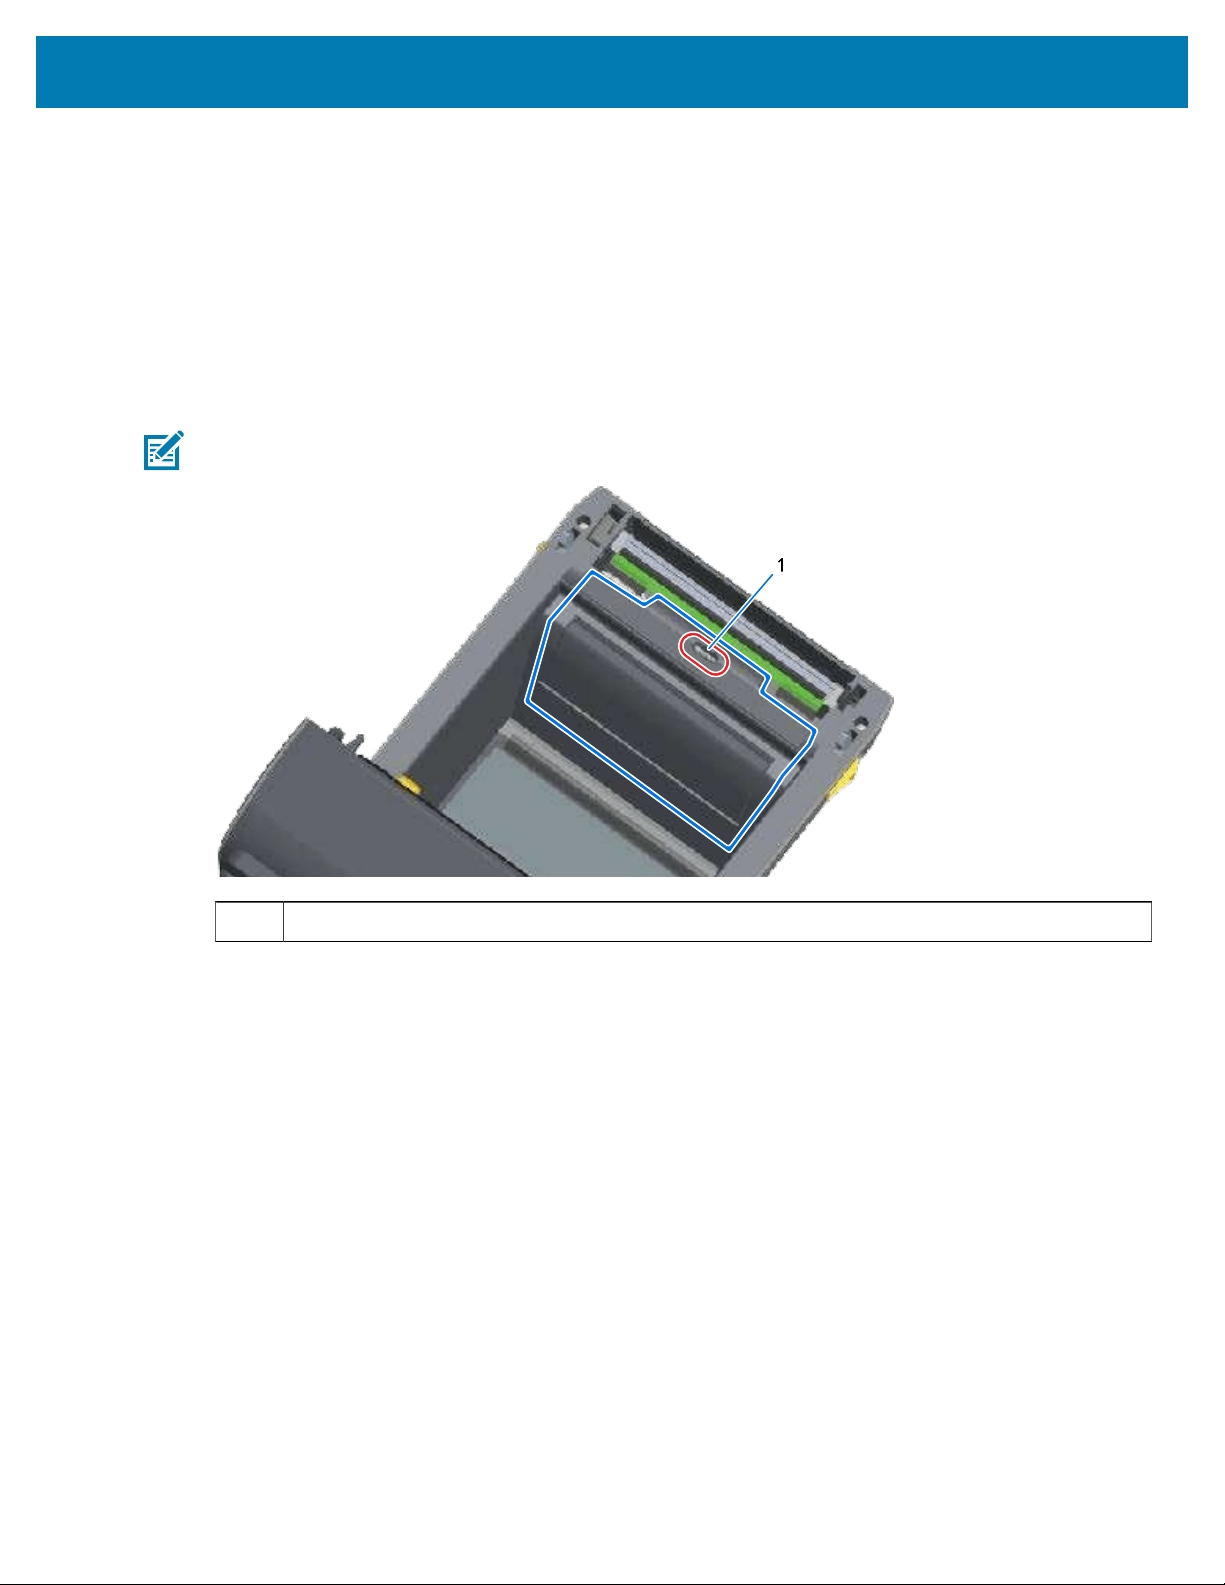
Maintenance
3. Wipe the movable sensor slide channel (but NOT the sensor itself). Move the sensor gently as needed
to get to all areas.
4. Wait one minute before closing the printer to allow time for all cleaned areas to dry thoroughly.
Cleaning the Media Path – Upper Half of ZD421/ZD621 Direct Thermal Printers
See Cleaning the Media Path on page 276 for information on the cleaning solution and swabs or cloth to
use to clean the media path.
Use a clean swab or lint-free cloth lightly moistened with 99.7% pure isopropyl alcohol to wipe the areas
(outlined in blue in the figure below) to remove adhesive and other contaminants.
NOTE: Do NOT clean the sensor array.
1 Sensor (do NOT clean)
Cleaning the Media Path – Upper Half of ZD421/ZD621 Thermal Transfer Printers
See
Cleaning the Media Path on page 276 for information on the cleaning solution and swabs or cloth to
use to clean this path.
Use a clean swab or lint-free cloth lightly-moistened with 99.7% pure isopropyl alcohol solution to wipe the
area (outlined in the figure below), near the printhead and on the front of the printer's ribbon carriage.
277
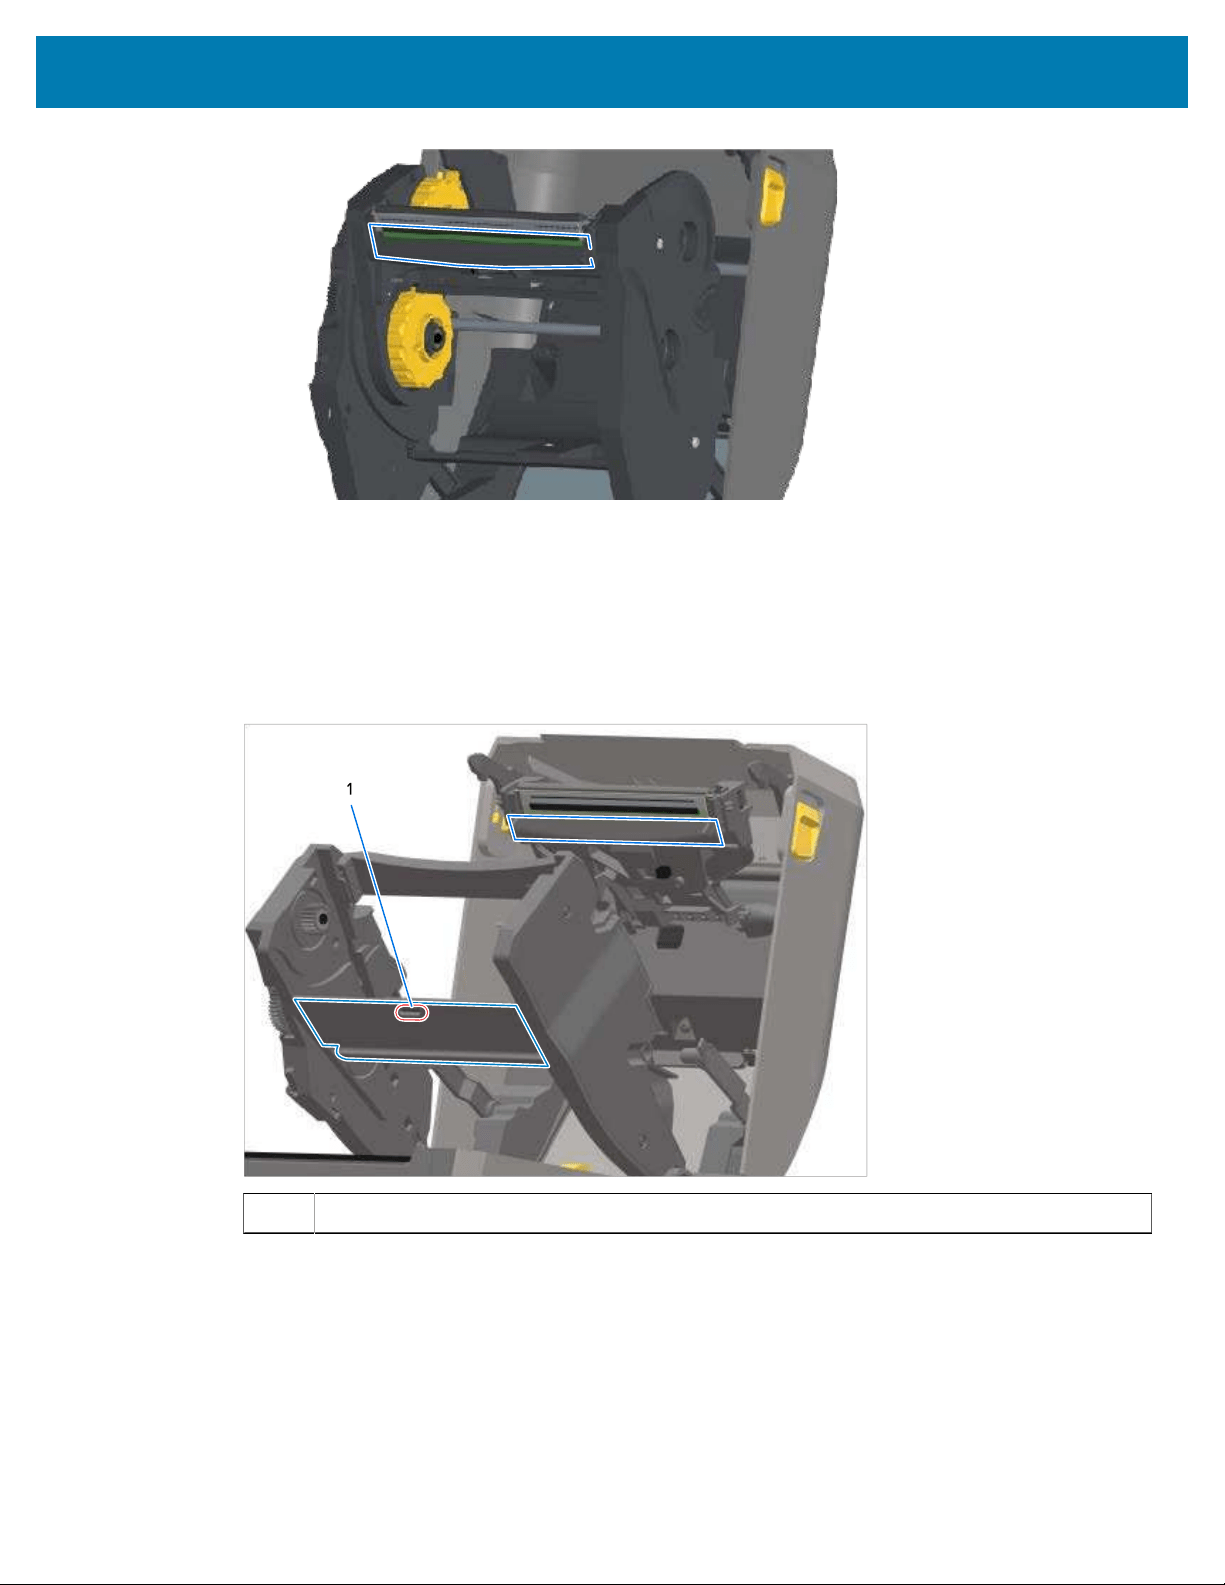
Maintenance
Cleaning the Media Path – Upper Half of ZD421 Thermal Transfer Ribbon Cartridge Printers
1. Pull the two release arms out to release the ribbon drive transport. Forinstructions on how to access
the printhead, see
Accessing the Printhead of the ZD421 Ribbon Cartridge Printer on page 35.
278
2. Wipe the areas (outlined in blue in the figure) which are below the printhead actuator arm and the
ribbon drive transport.
1 Sensor (do NOT clean)
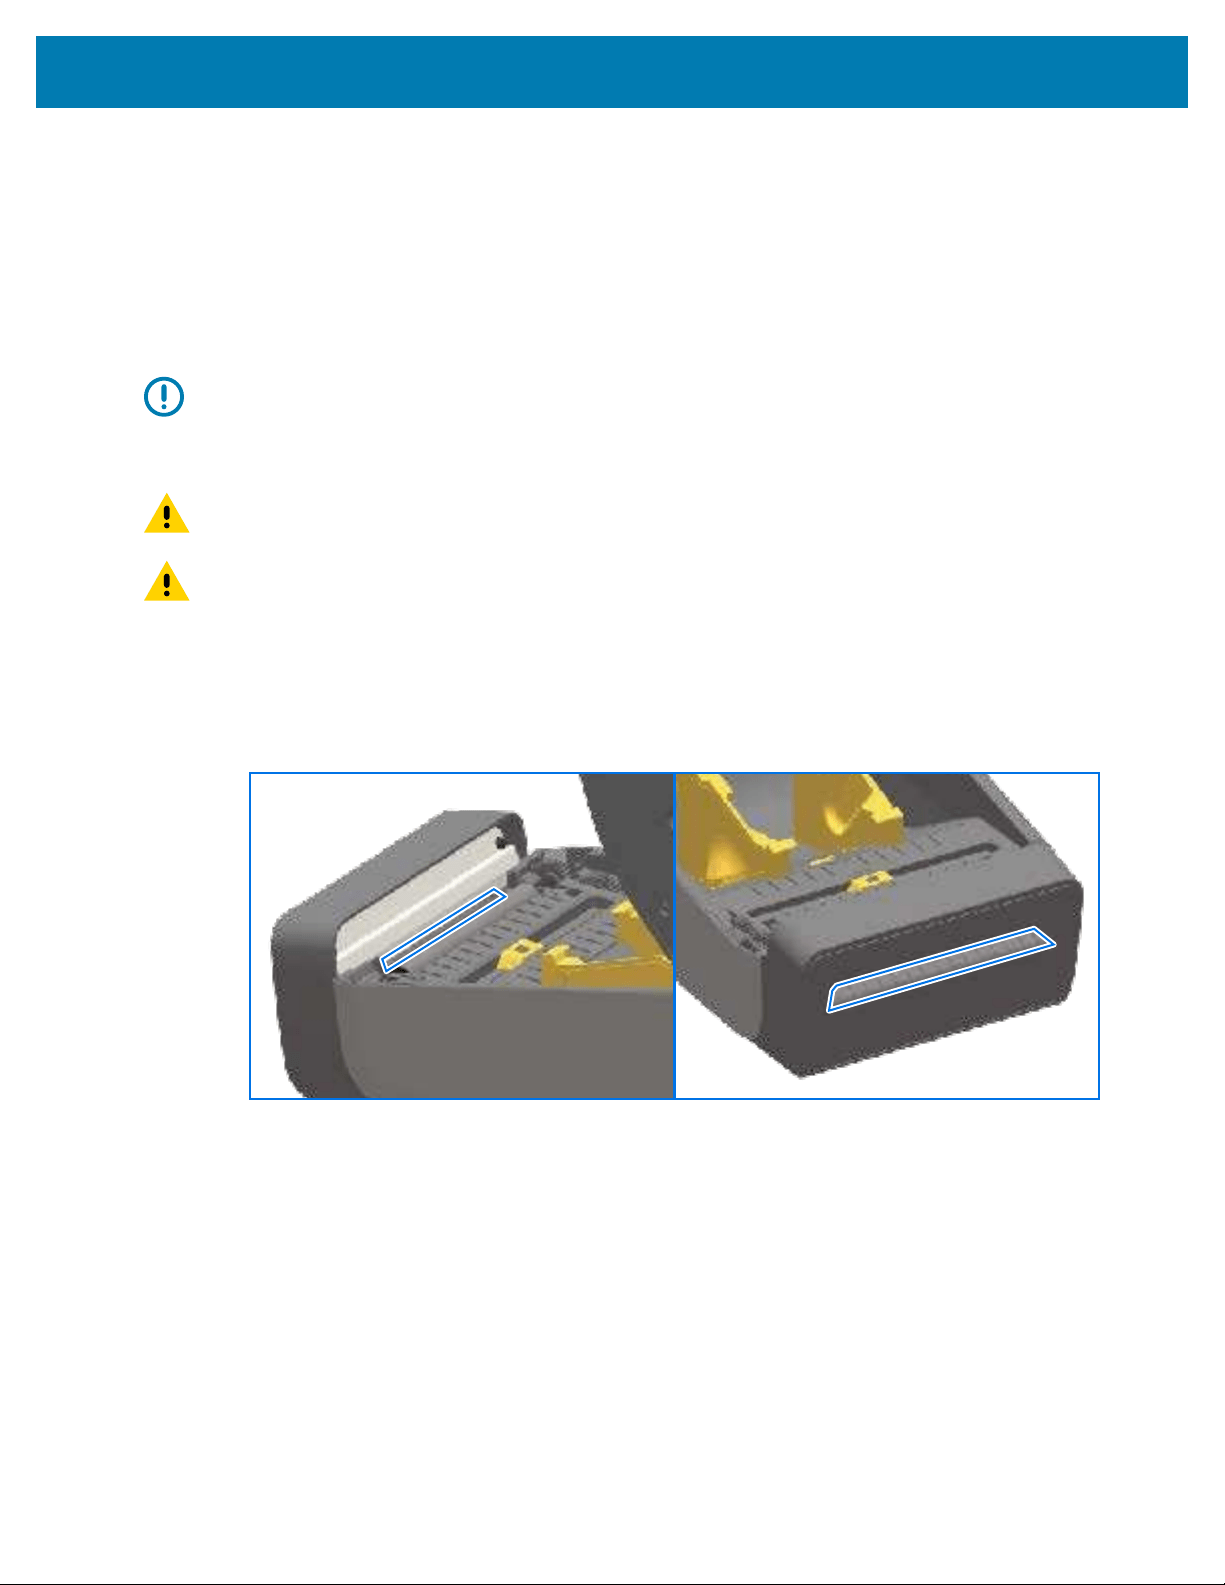
Maintenance
3. Release the printhead actuator arm, then push the ribbon drive transport into the printhead actuator
arm.
The release arms snap into place, relinking the ribbon drive transport to the top cover and the printhead
actuator arm.
Cleaning the Cutter Option
This is a continuation of cleaning the media path for either option (if installed).
IMPORTANT: Clean only the plastic media path surfaces, and not the internal cutter blades or
cutter mechanism.The cutter blade mechanism does NOT require maintenance cleaning. DO
NOT clean the blade. This blade has a special coating to resist adhesives and wear which may
be damaged if cleaned.
CAUTION: There are no operator serviceable parts in the cutter unit. Never remove the cutter
cover (bezel), or attempt to insert objects or fingers into the cutter mechanism.
CAUTION: Using un-approved tools, cotton swabs, solvents (including alcohol), etc. all may
damage or shorten the cutter’s usable life or cause the cutter to jam.
279
1. Use a clean swab or lint-free cloth lightly-moistened with 99.7% pure isopropyl alcohol to wipe the
ridges and the plastic surfaces of the media entry on the inside and the exit slot on the outside of the
cutter. Clean inside the areas outlined in the figure shown.
2. Repeat as necessary to remove any adhesive or contaminate residue and allow to dry.
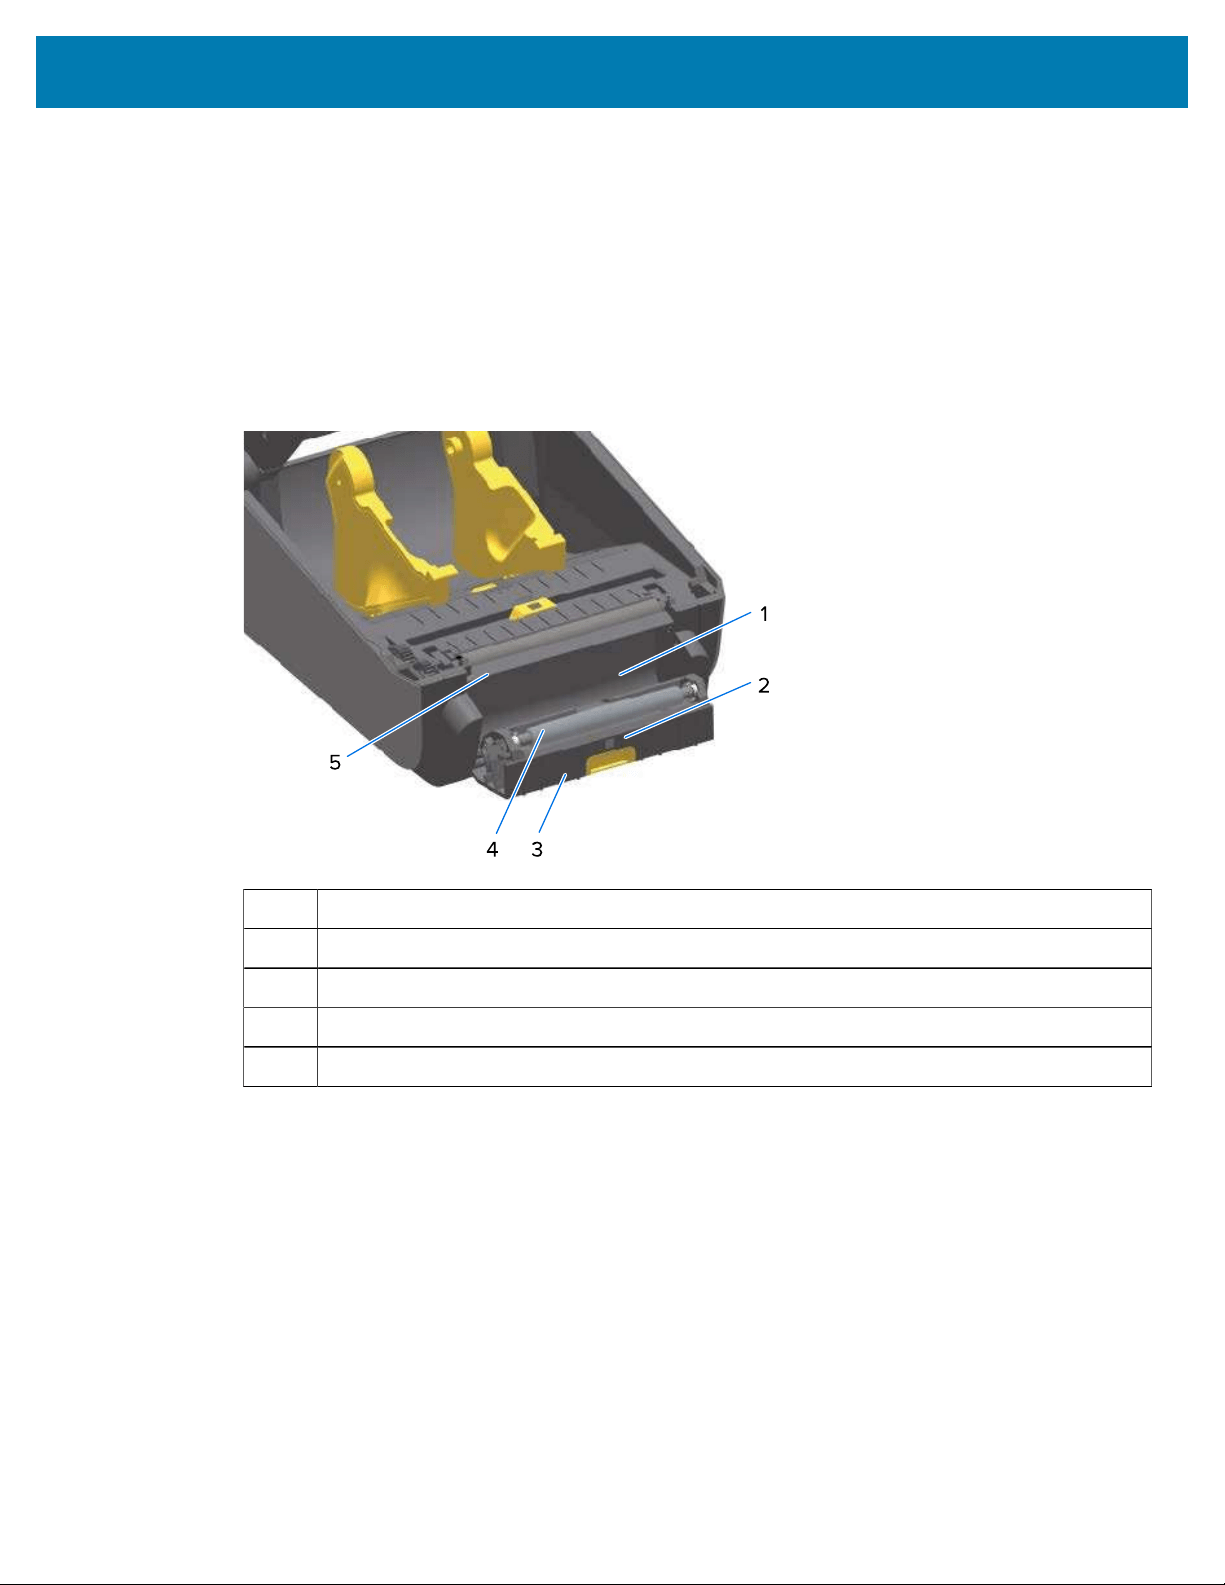
Maintenance
Cleaning the Label Dispenser Option
For the cleaning supplies to use to clean the label dispenser, see
Cleaning Supplies on page 270.
1. Open the door and clean the peel bar, the inner surfaces, and the ridges on the door using a clean
swab or lint-free cloth lightly moistened with 99% pure isopropyl alcohol.
2. Rotate the roller and wipe its surfaces.
3. Discard the swab or cloth.
4. Use a new swab or cloth to remove any diluted residue.
280
5. Clean the sensor window thoroughly until it is clear of streaks and residue.
1 Inside wall
2 Label-taken sensor
3 Ridges
4 Pinch roller
5 Peel bar
Maintenance
Cleaning the Sensor
Dust can accumulate on the media sensors and must be cleaned periodically.
NOTE: Do NOT use an air compressor to remove dust. The action of air compressors tends to
add moisture, fine grit, and lubricant which can contaminate your printer.
281
Cleaning the Sensor – Lower Half of the ZD421/ZD621 Printers
The lower half of all ZD621/ZD421 model printers are all cleaned the same way. Use this procedure
toclean the sensor window.
1. Clean the window of the movable sensor by gently brushing away dust or using a can of compressed
air. If necessary, use a dry swab to brush away dust.
1 Movable sensor (black mark and lower web/gap)
2. If adhesives or other contaminants remain, use a swab moistened with 99.7% pure isopropyl alcohol to
break them up.Discard the used swab(s).
3. Use a dry swab to remove any residue that may be left from the first cleaning.
4. Repeat the preceding steps as required until all residue and streaks are removed from the sensor.
Maintenance
Cleaning the Sensor – Upper Half of ZD421/ZD621 Direct Thermal Printers
1. Spray the upper web (gap) array sensor below the printhead with a can of compressed air. If necessary,
use a swab moistened with 99.7% pure isopropyl alcohol to break up adhesive or other non-dust
contaminants.
2. Discard the used swab.
282
3. Use a clean dry swab to remove any residue that may be left from the first cleaning.
Maintenance
283
Cleaning the Sensor – Upper Half of the ZD421/ZD621 Thermal Transfer Printers
1. Use a can of compressed air to spray the upper web (gap) array sensorlocated below the printhead.
IMPORTANT: If the entire sensor needs a complete cleaning (which is a very rare
occurrence), a service technician should perform the cleaning.
2. Close the printer cover when done.
Maintenance
Cleaning the Sensor – Upper Half of the ZD421 Ribbon Cartridge Printers
1. Pull the two release arms out to release the ribbon drive transport. For instructions on how to access
the printhead, see
Accessing the Printhead of the ZD421 Ribbon Cartridge Printer on page 35.
2. Swing the printhead actuator arm up until it touches the printer’s top cover. Hold the actuator arm in this
position for access to the area below the printhead.
3. Spray the upper web (gap) array sensor under the ribbon drive transport and the ribbon-out sensor on
the underside of the printhead actuator arm with a can of compressed air. If necessary, use an alcohol-
moistened swab to break up any accumulated debris.
284
4. Use a dry swab to remove any residue that may be left from the first cleaning.
1 Upper web (gap) array
2 Ribbon-out sensor
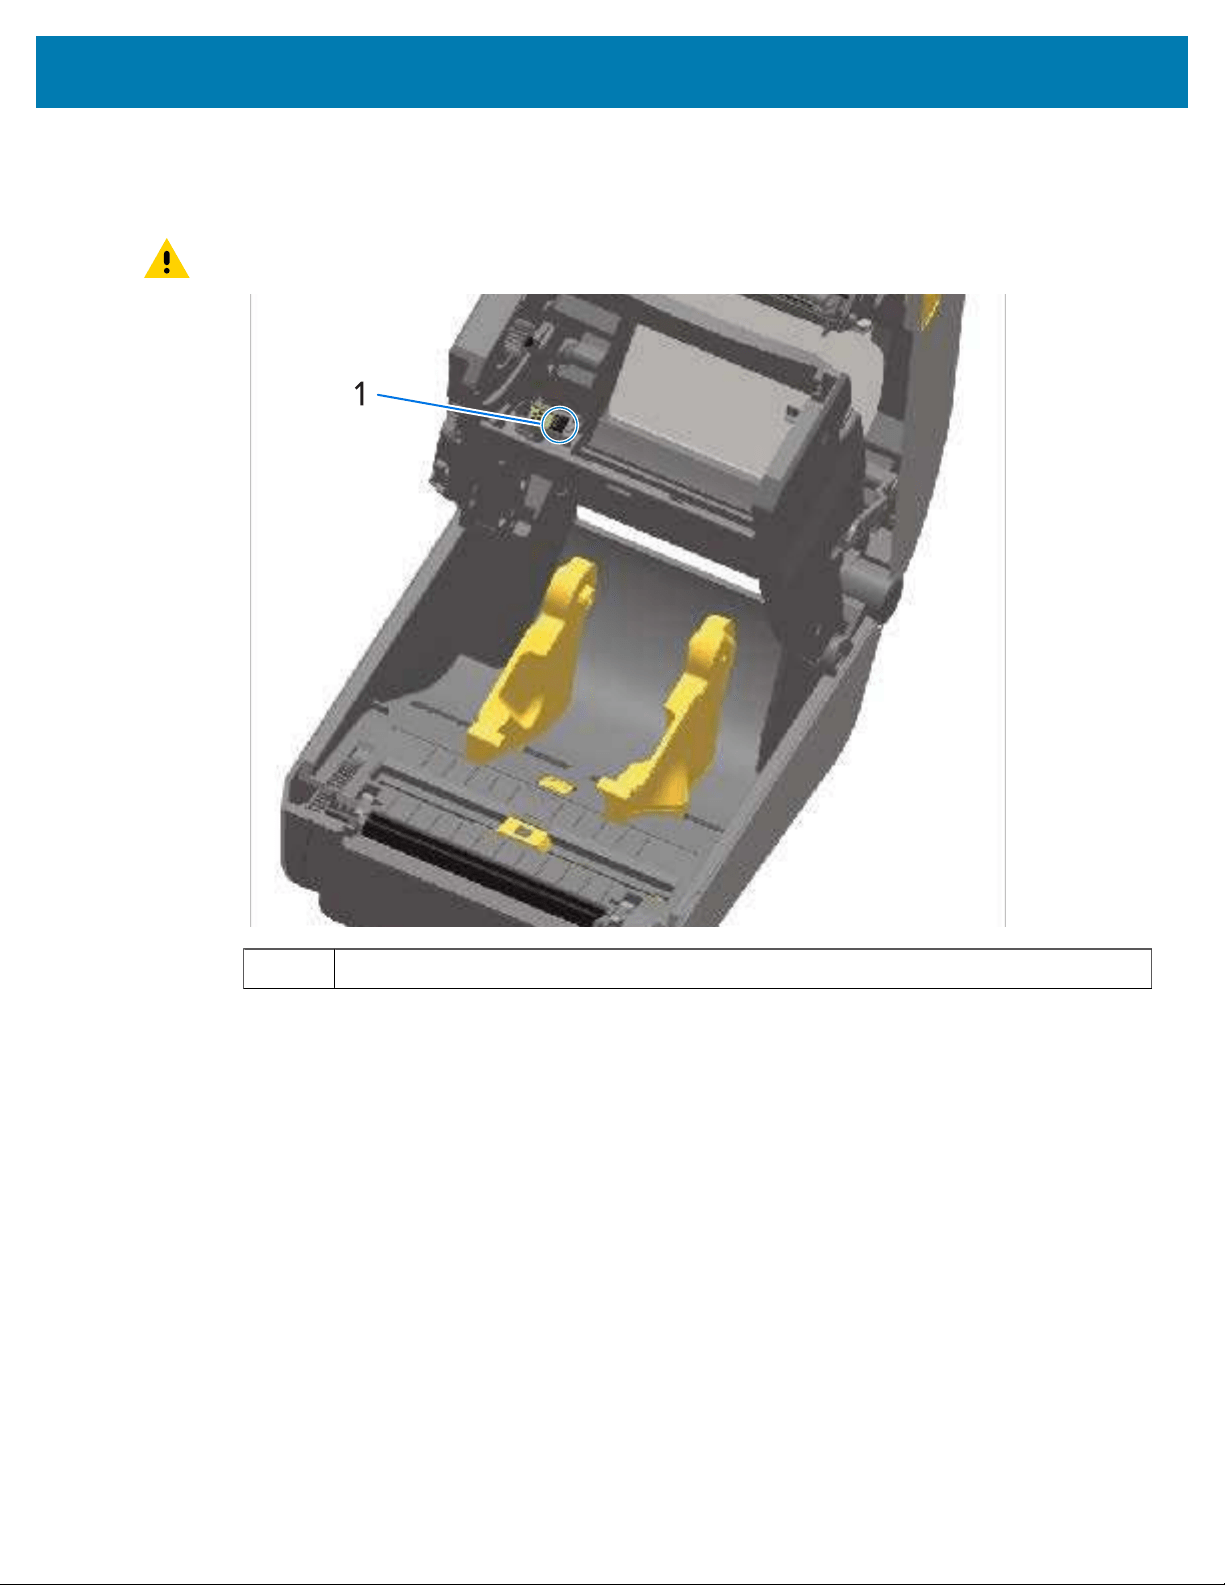
Maintenance
285
5. If the cartridges are not being detected, you may need to clean the ribbon cartridge sensor interface
pins. Clean the pins using a clean swab or lint-free cloth lightly moistened with 99.7% pure isopropyl
alcohol, usinga gentle wiping motion from right to left.
CAUTION: Up and down motions may damage the pins. Wipe gently, ONLY left to right.
1 Ribbon cartridge sensor contact pins

Maintenance
Cleaning and Replacing the Platen
286
The platen is the print surface and drive roller for your media.Clean the platen (and media path) whenever
the printer has significantly poorer performance, print quality or media handling. If sticking or jamming
continues even after cleaning, you must replace the platen.
IMPORTANT: Contaminants on the platen roller can damage the printhead or cause the media
to slip or stick when printing. Adhesive, dirt, general dust, oils and other contaminants should be
cleaned PROMPTLY off the platen.
CAUTION: When cleaning Linerless Platens, do NOT wash or scrub. Washing or scrubbing may damage
the platen. Remove adhesive particles ONLY using the adhesive side of linerless media. Lightly touch the
platen roller with a linerless label to lift particles off the exposed area of the platen roller and
the media path areas.
The platen can be cleaned with a fiber and lint free swab (such as a Texpad swab) or a lint-free, clean,
damp cloth very lightly moistened with99.7% pure. medical-grade isopropyl alcohol.
1. Open the cover (and if a label dispenser is installed. the dispenser door).
2. Remove media from platen area.
3. Pull the platen-bearing latch release tabs on the right and left sides towards the front of the printer
and rotate them up.
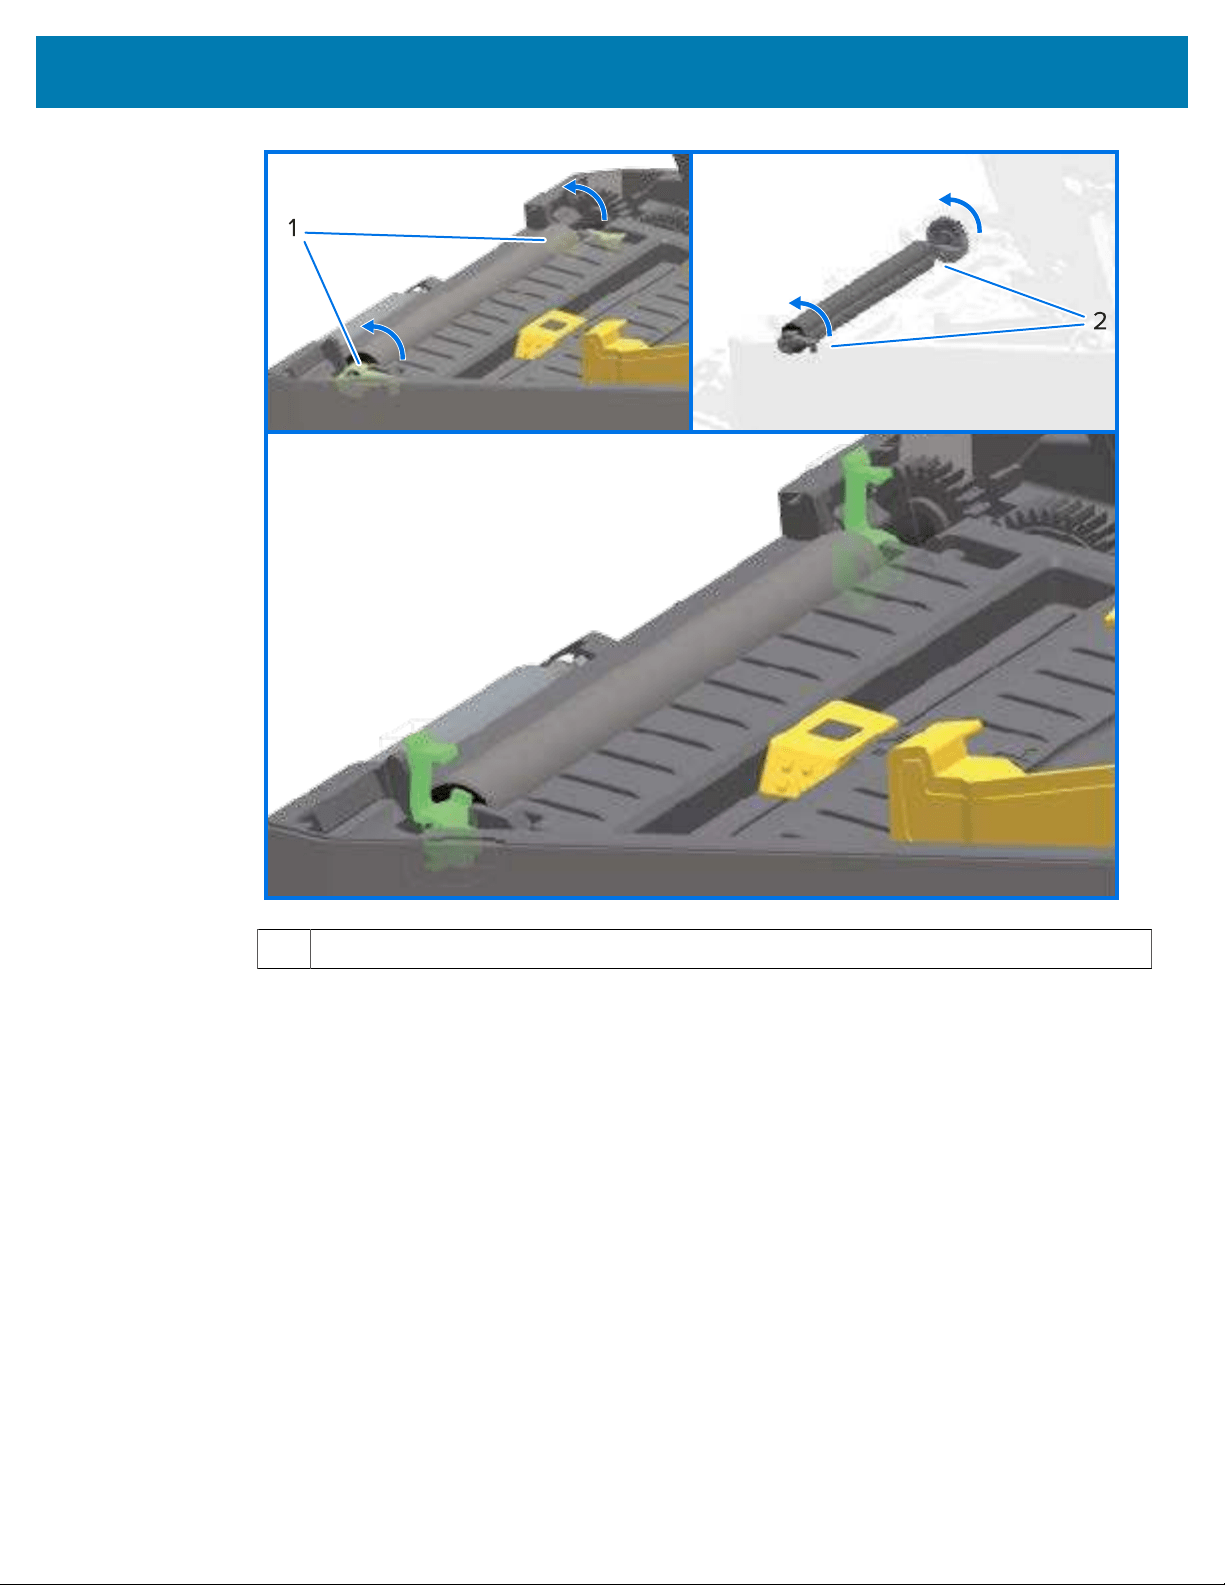
Maintenance
1 Platen bearings
287
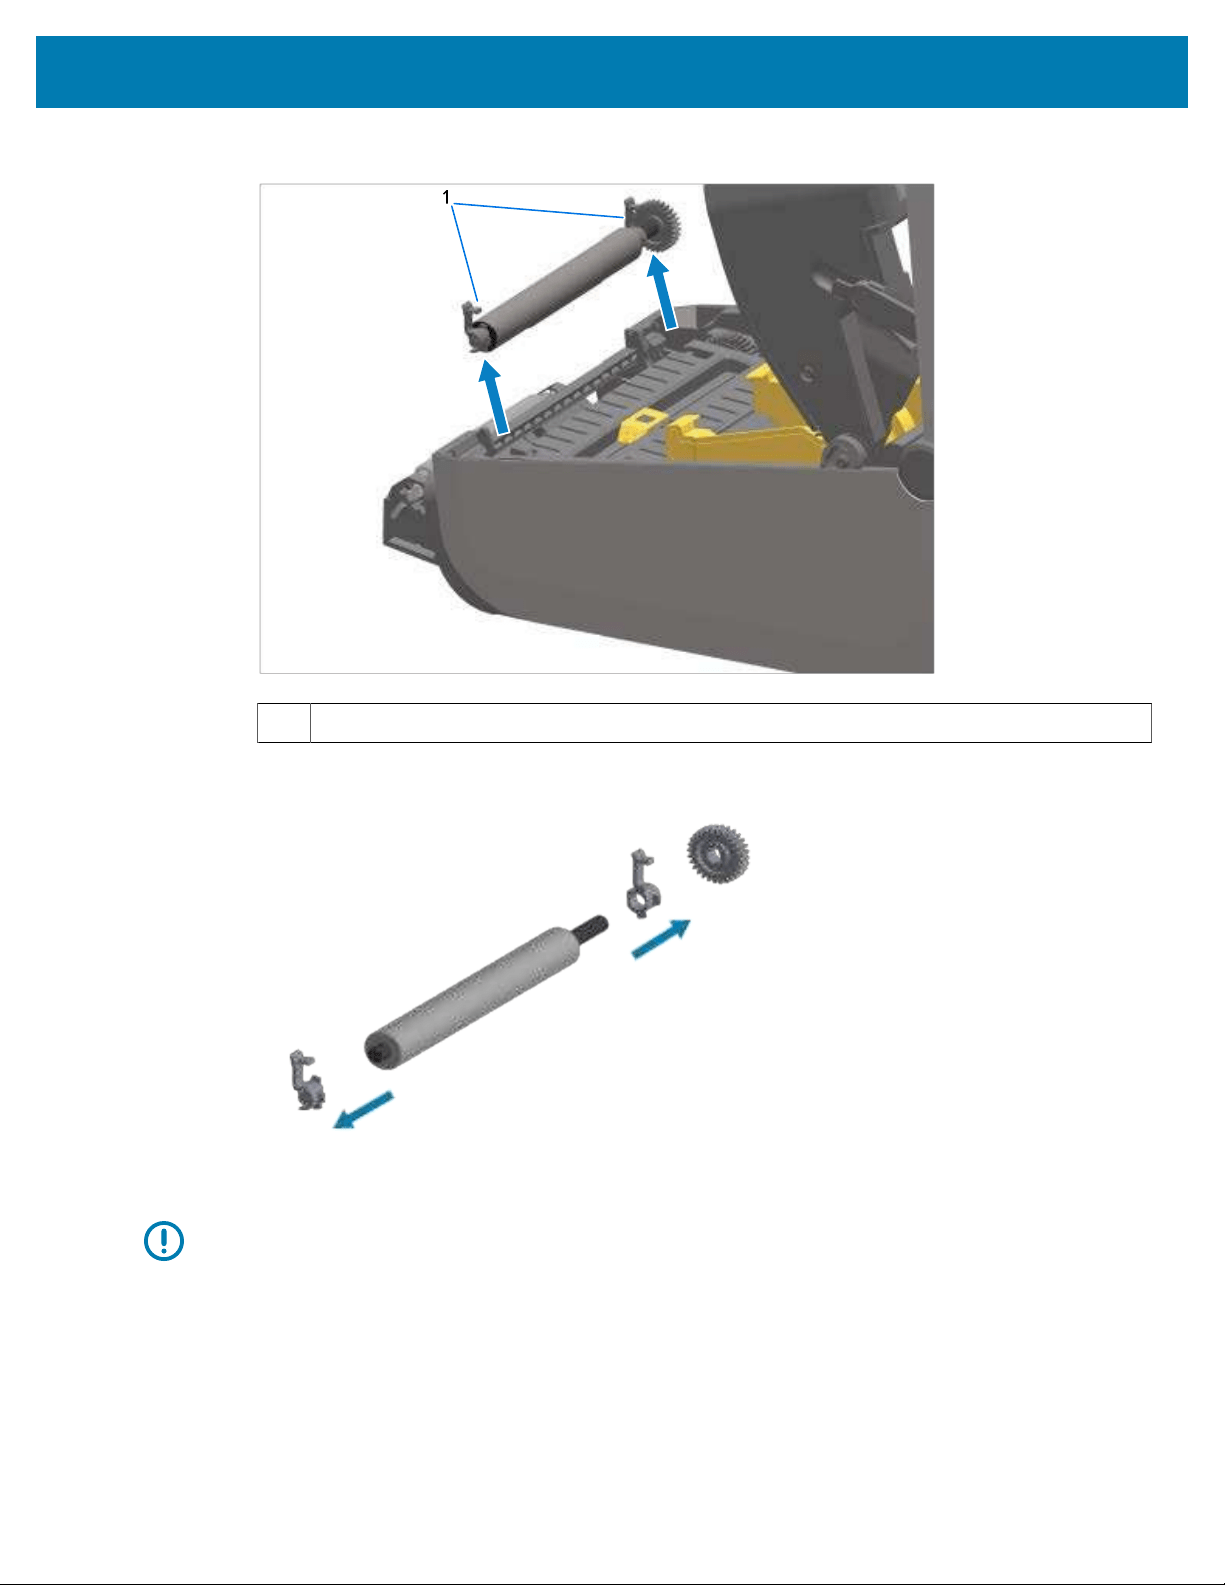
Maintenance
4. Lift the platen out of the printer’s bottom frame.
1 Platen bearings
5. Slide the gear and the two bearings off the shaft of the platen roller.
6. To clean a regular platen, use alcohol moistened swab or lint-free clothvery lightly moistened
with99.7% pure, medical-gradeisopropyl alcohol using the steps below.
IMPORTANT: To clean a linerless platen, instead of using the substeps below, use ONLY
the adhesive side of a piece of linerless media to gently lift the particles from the plater
288
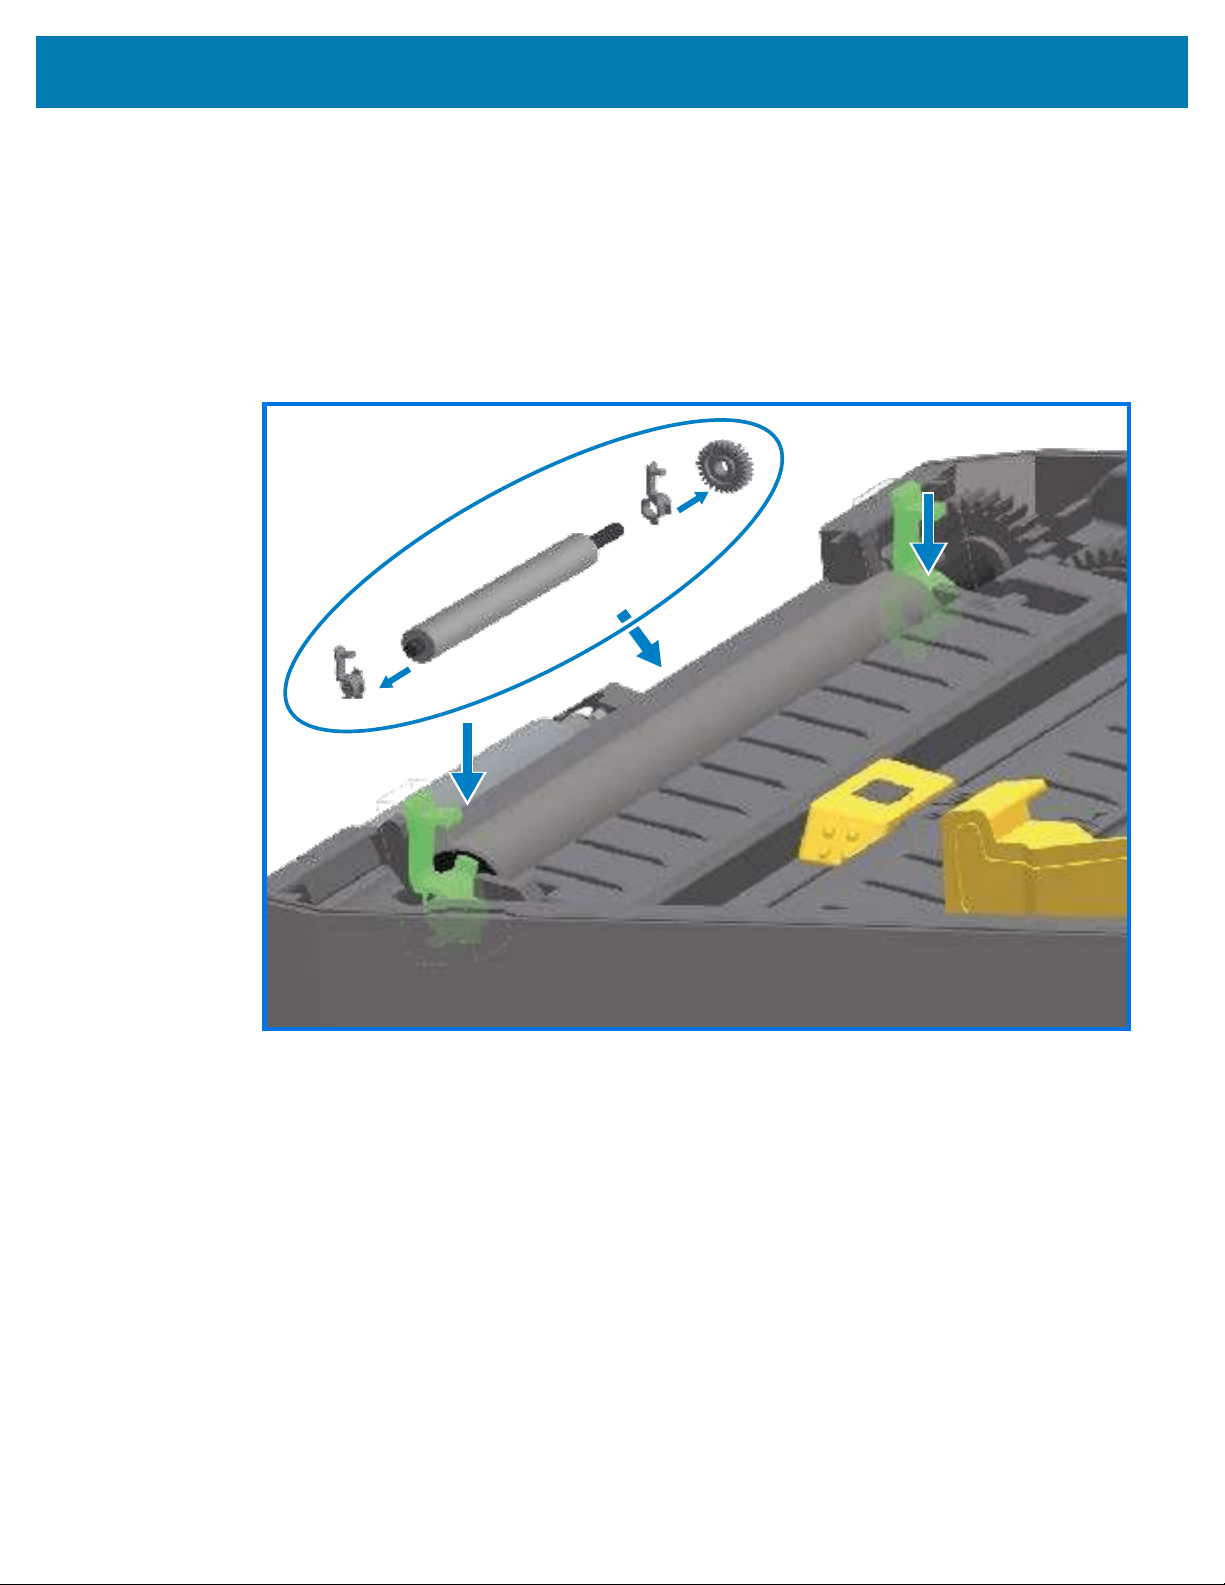
Maintenance
roller.The surface of a linerless platen may be damaged if it is washed or rubbed with a
cleaning solution.
a) Clean from the center out. Discard the used swab or cloth.
b) Repeat this process until all of the roller surface has been cleaned.
c) If there has been heavy adhesive build-up or label jam, repeat with a new swab to remove residual
contaminants. (Adhesives and oils, for example, may be thinned by the initial cleaning but not
completely removed.)
7. Make sure the bearings and drive gear are on the shaft of the platen roller.
8. Align the platen with the gear to the left and lower it into the printer’s bottom frame.
9. Rotate the platen bearing latch release tabs down on the right and left sides towards the rear of the
printer and snap them into place.
10. Allow the printer to dry for one minute before closing the dispenser door and the media cover, and
before loading labels.
289
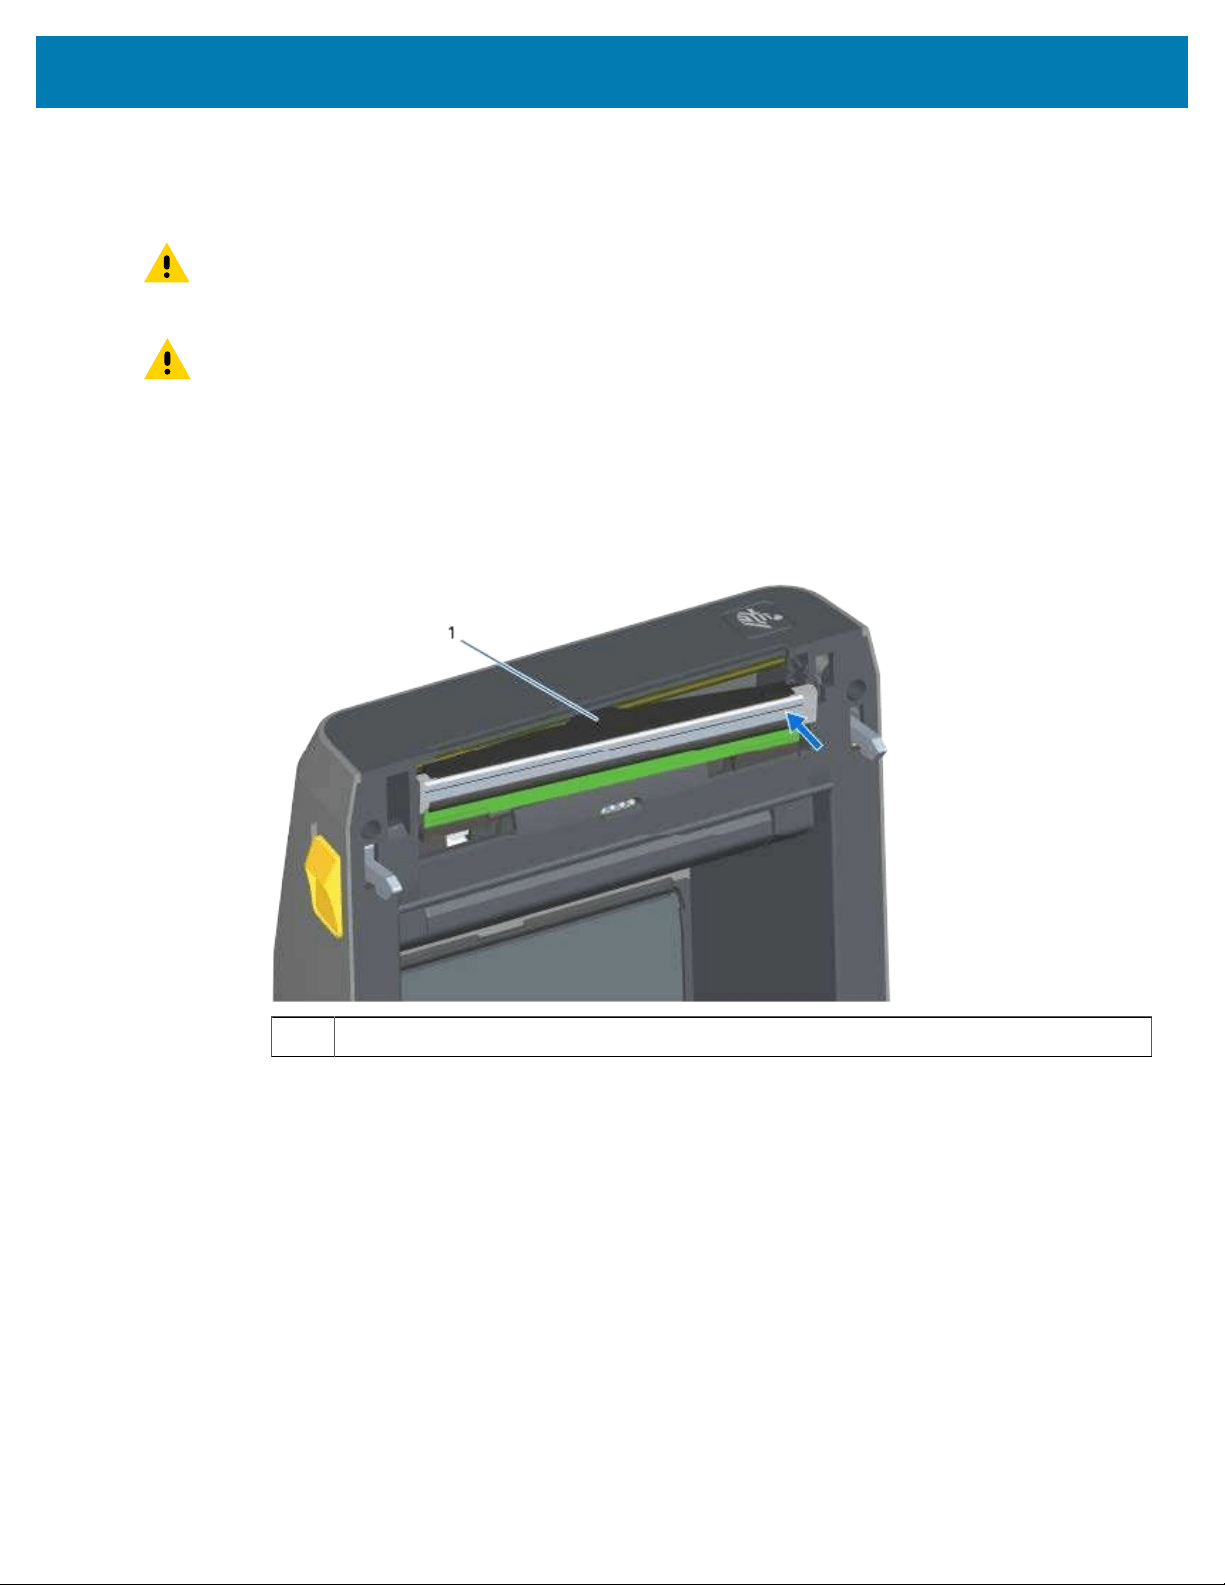
Maintenance
CAUTION: Unplug the printer from the power supply and allow the printer to cool to prevent
injuries or damage to printer circuitry.
290
Replacing the Printhead
Review these printheadremoval/installation steps before you proceed to replace the printhead.
CAUTION: Prepare your work area by protecting against static discharge. Your work area must
be static-safe. You must use a properly grounded conductive cushioned mat to hold the printer
and use a conductive wrist strap to protect yourself.
Replacing the Printhead – ZD421/ZD621 Direct Thermal Printer Models
1. Use these steps to remove the printhead:
a) Turn printer power OFF.
b) Open the printer cover.
1 Printhead
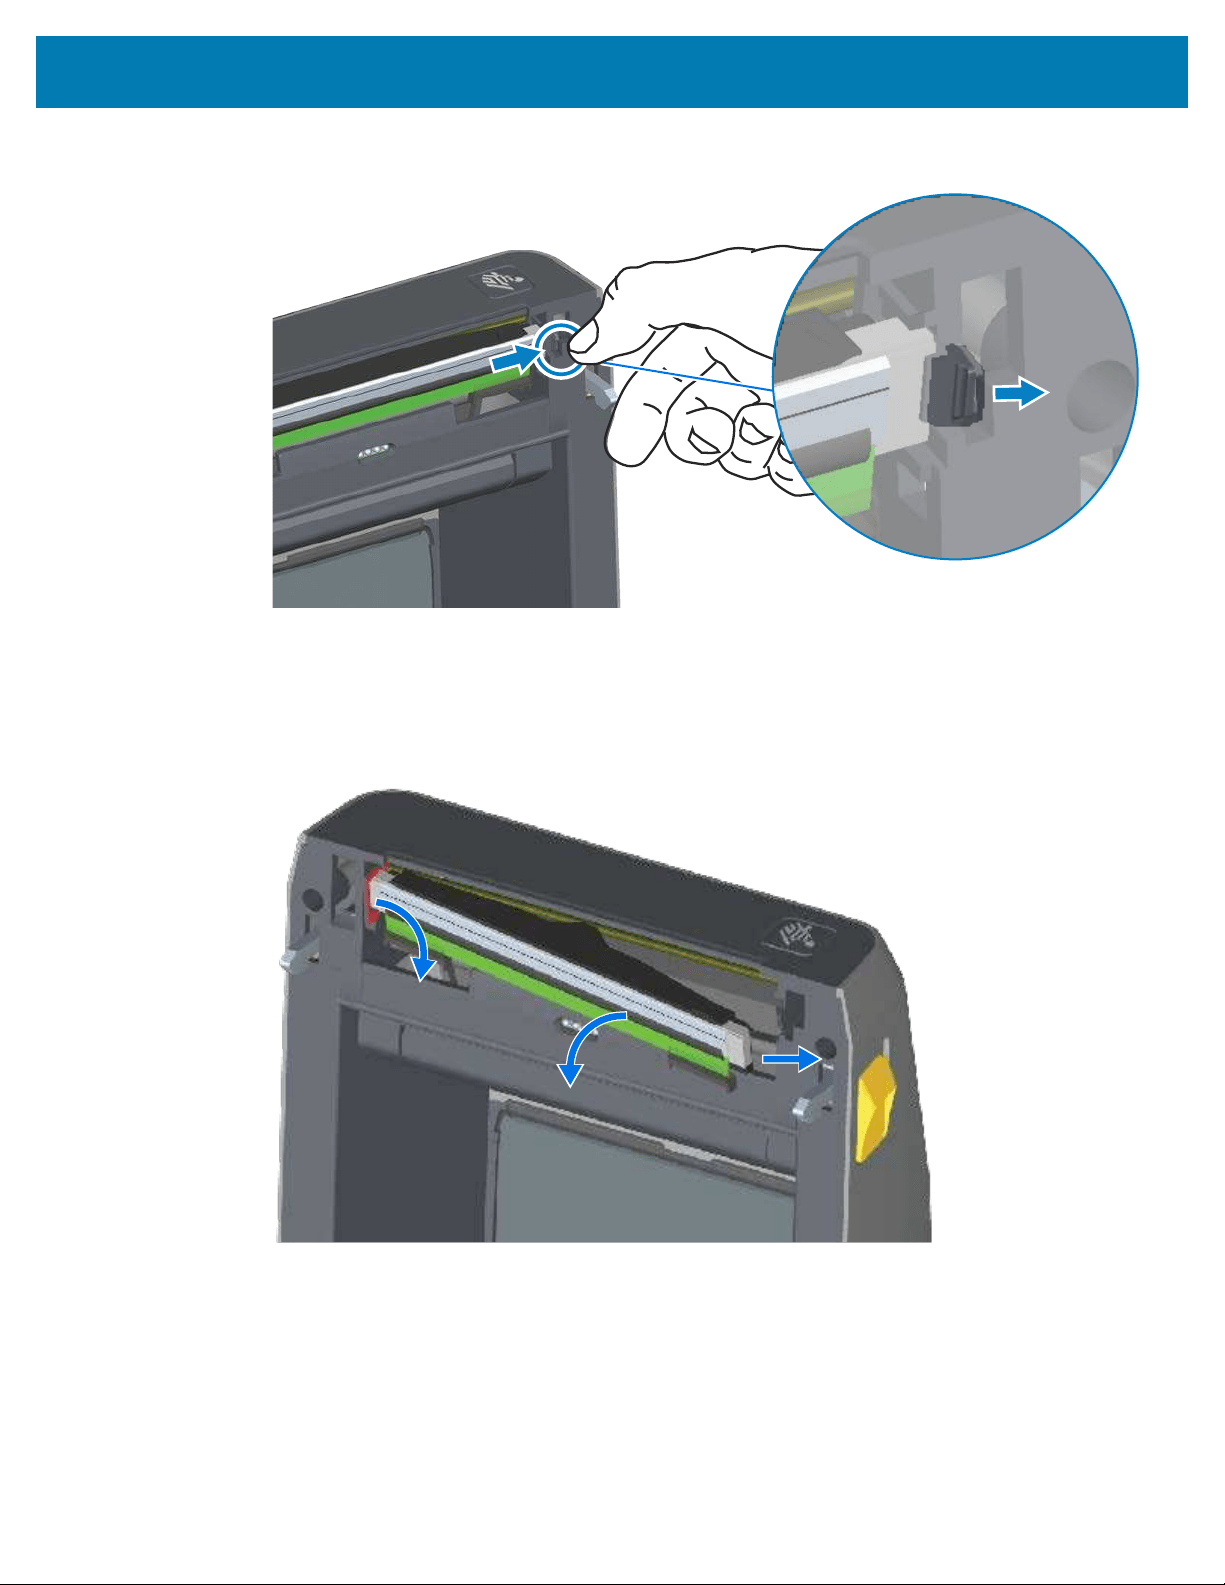
Maintenance
c) Push the printhead release latch away from the printhead. The right side of printhead releases.
291
d) Swing the loose, right side of the printhead out of the printer. Pull it out and to the right a little to get
the left side of the printhead clear.
e) Pull the printhead out and free of the top cover to gain access to its attached cables on the backside
of the printhead.In the figure that follows,the red outline indicates the printhead retainer slot which
is on the left side as you face the open printer.
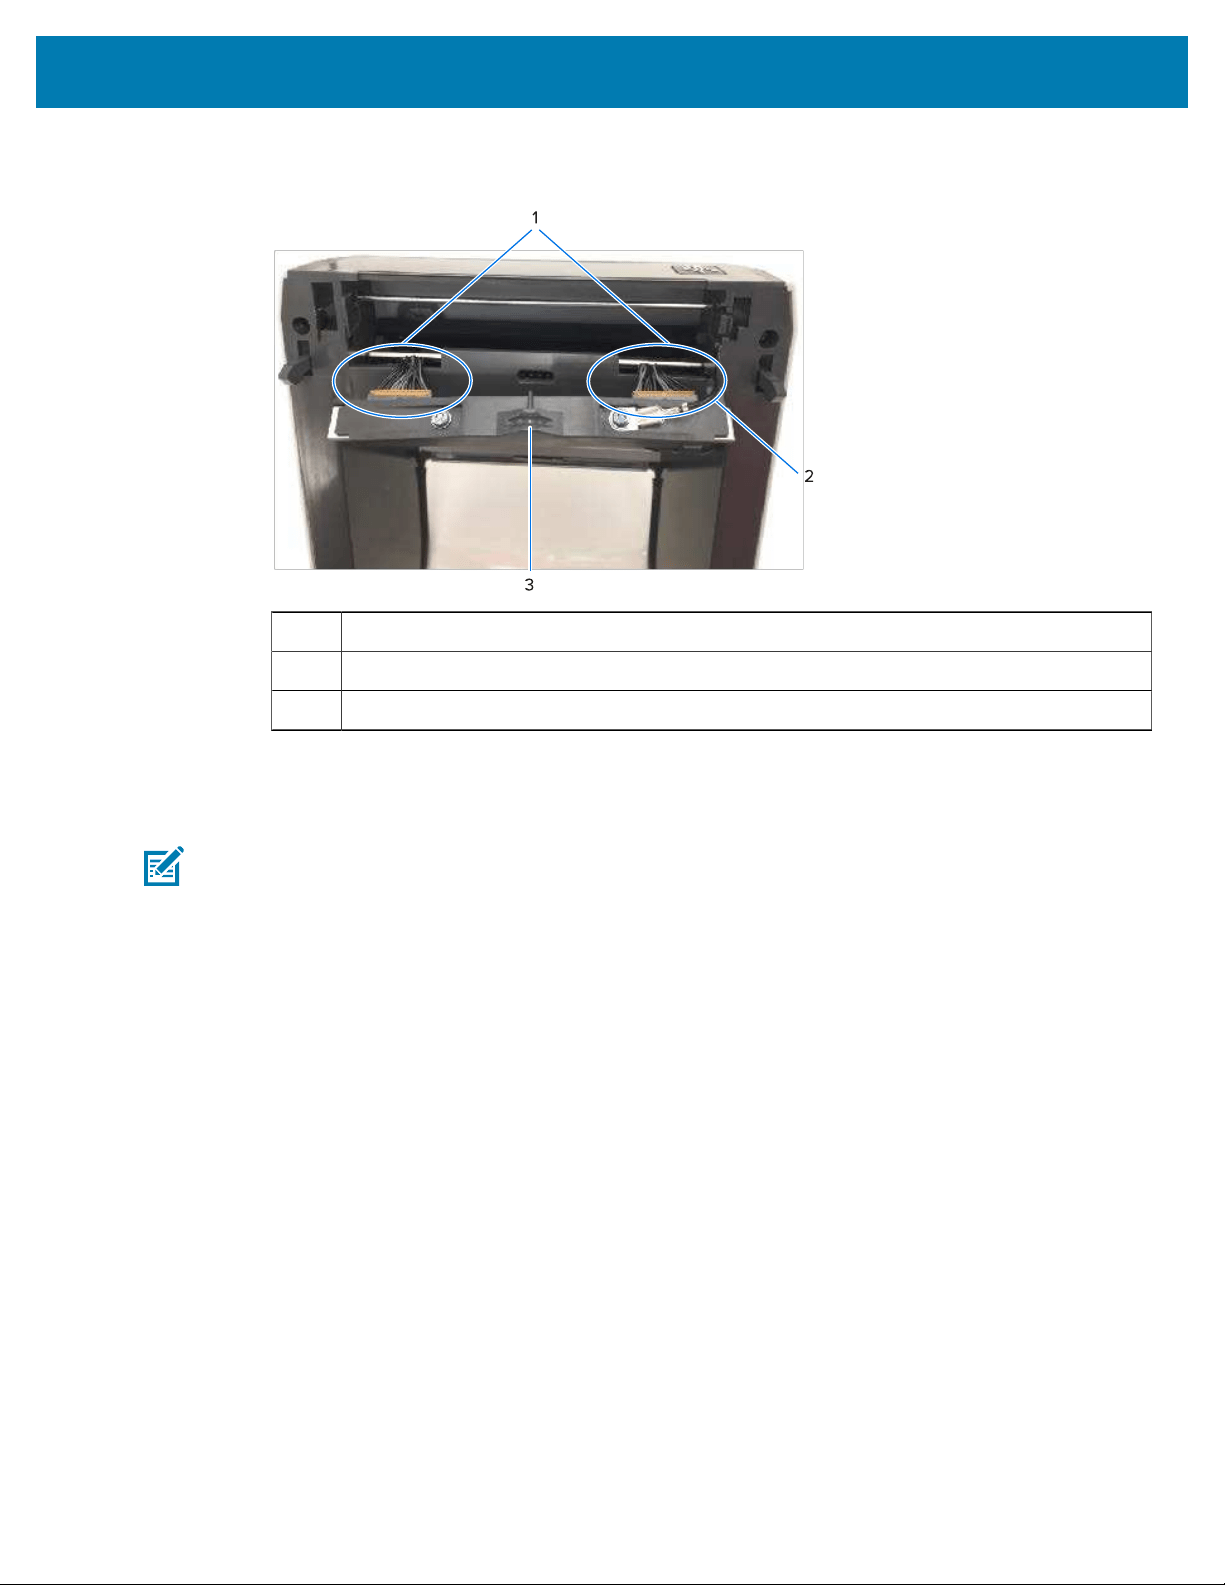
Maintenance
f) Gently but firmly pull the two printhead cable bundle connectors off the printhead. Then pull the
ground wire off the printhead.
292
1 Connectors
2 Printhead ground wire
3 Printhead assembly
2. To replace the printhead:
a) Push the right-side printhead cable connector into the printhead.
NOTE: The connector is keyed to only insert one way.
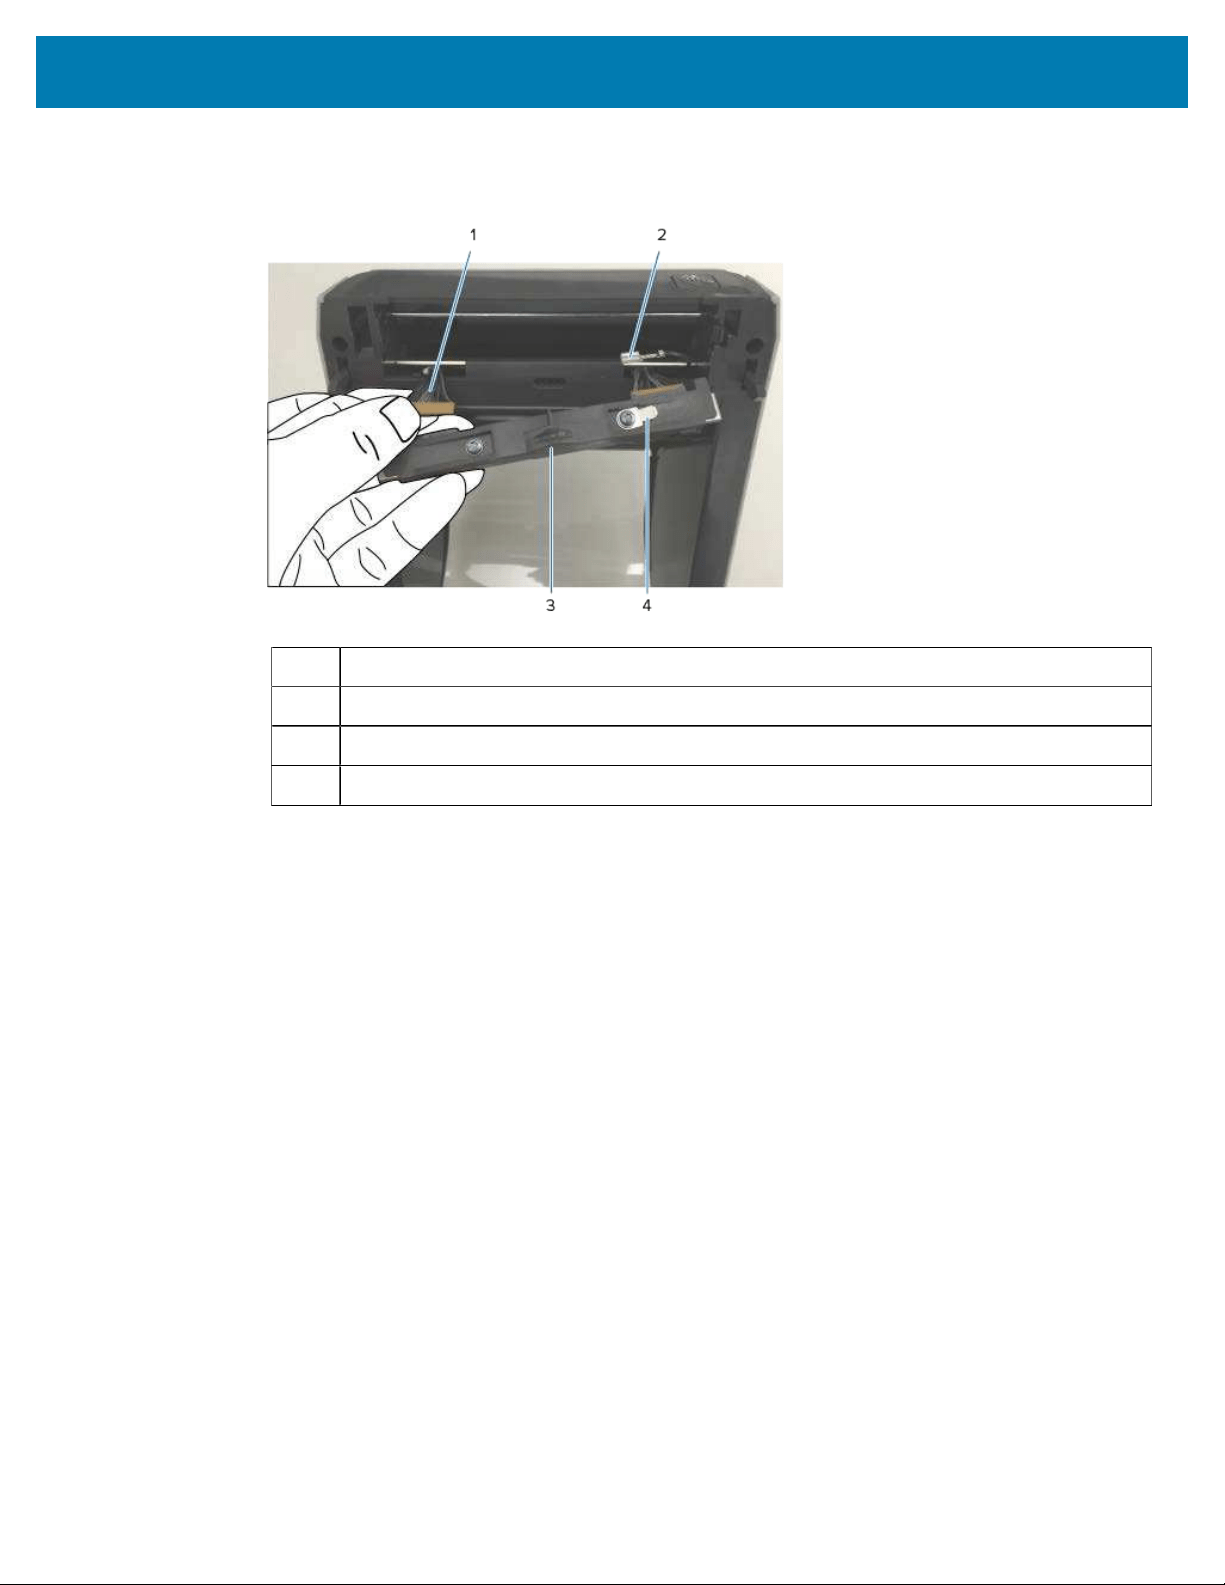
Maintenance
293
b) Attach the ground wire to the printhead’s ground tab.
c) Push the left-side printhead cable connector onto the printhead.
1 Connector with key
2 Printhead ground wire
3 Printhead ground tab
4 Spring wire notch
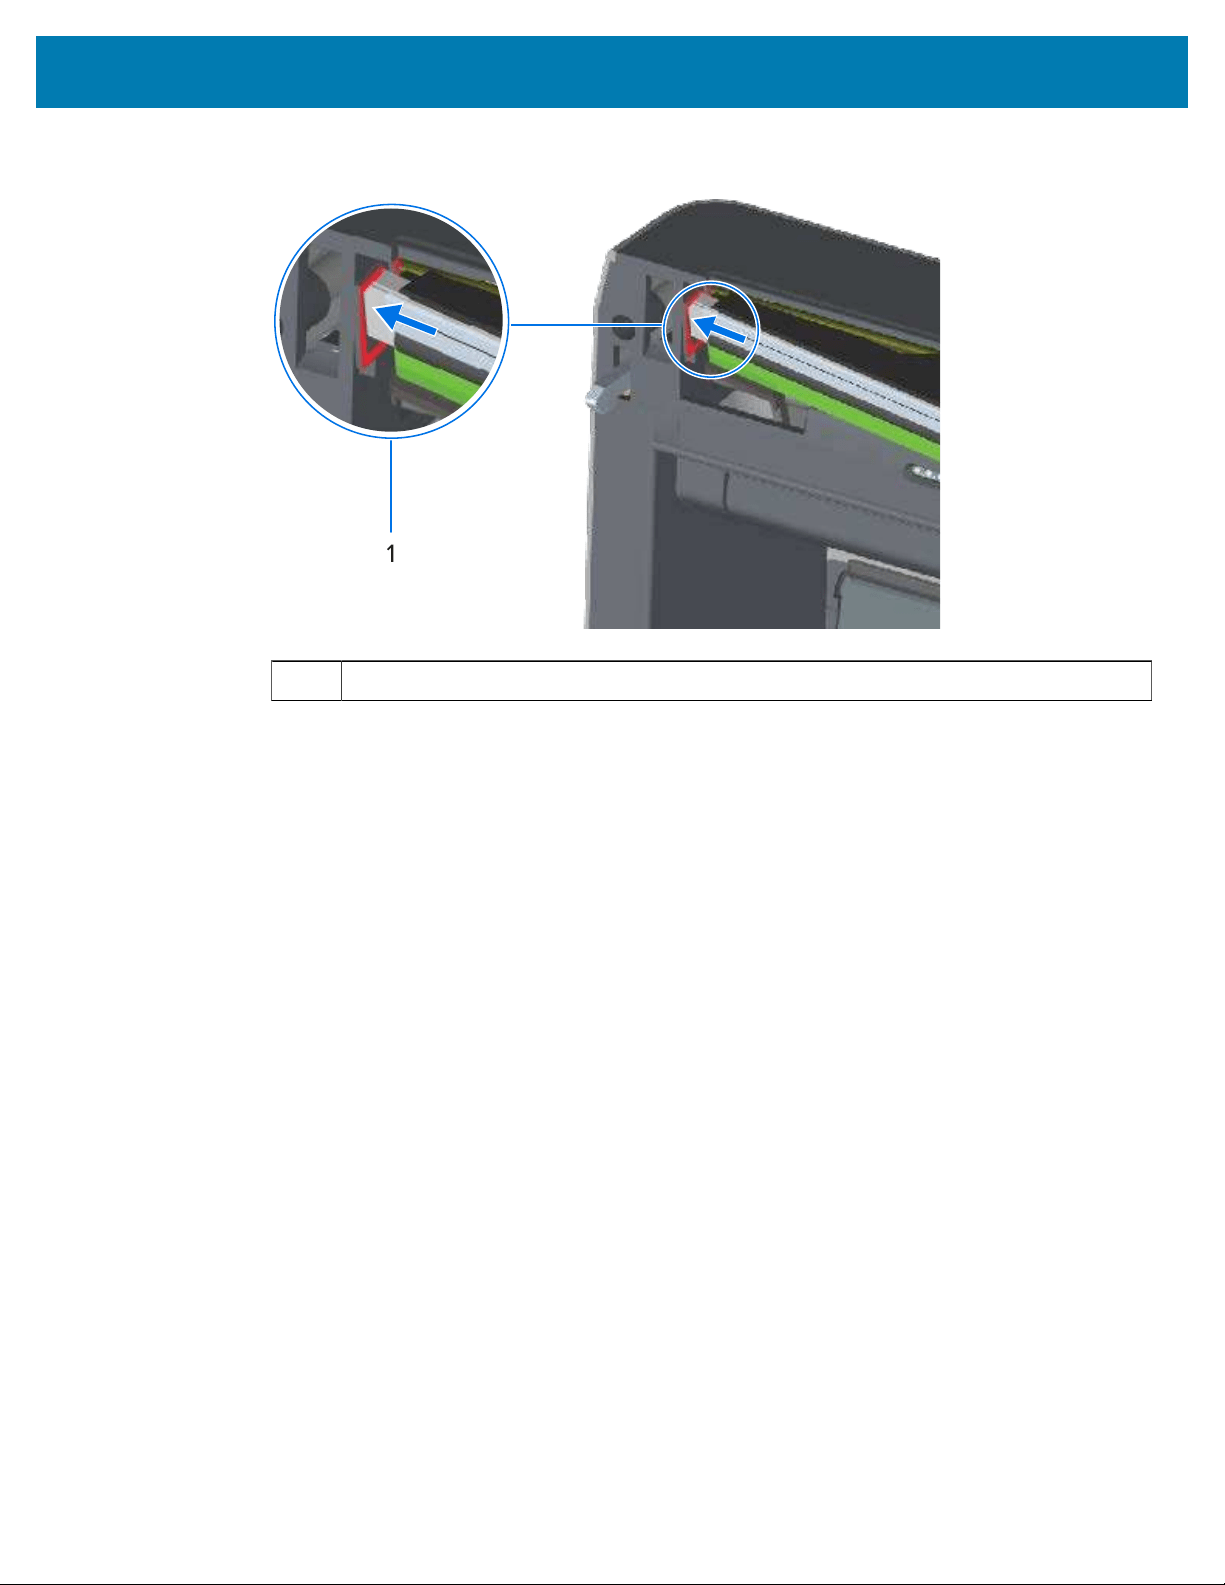
Maintenance
294
d) Insert the left side of the printhead assembly into the recessed slot (highlighted in red) on the left
side of the printer.
1 Slot
e) Align the spring wire notch on the backside of the printhead to the spring wire. Push the right side of
the printhead into the printer until the latch locks the right side of the printhead into the printer.
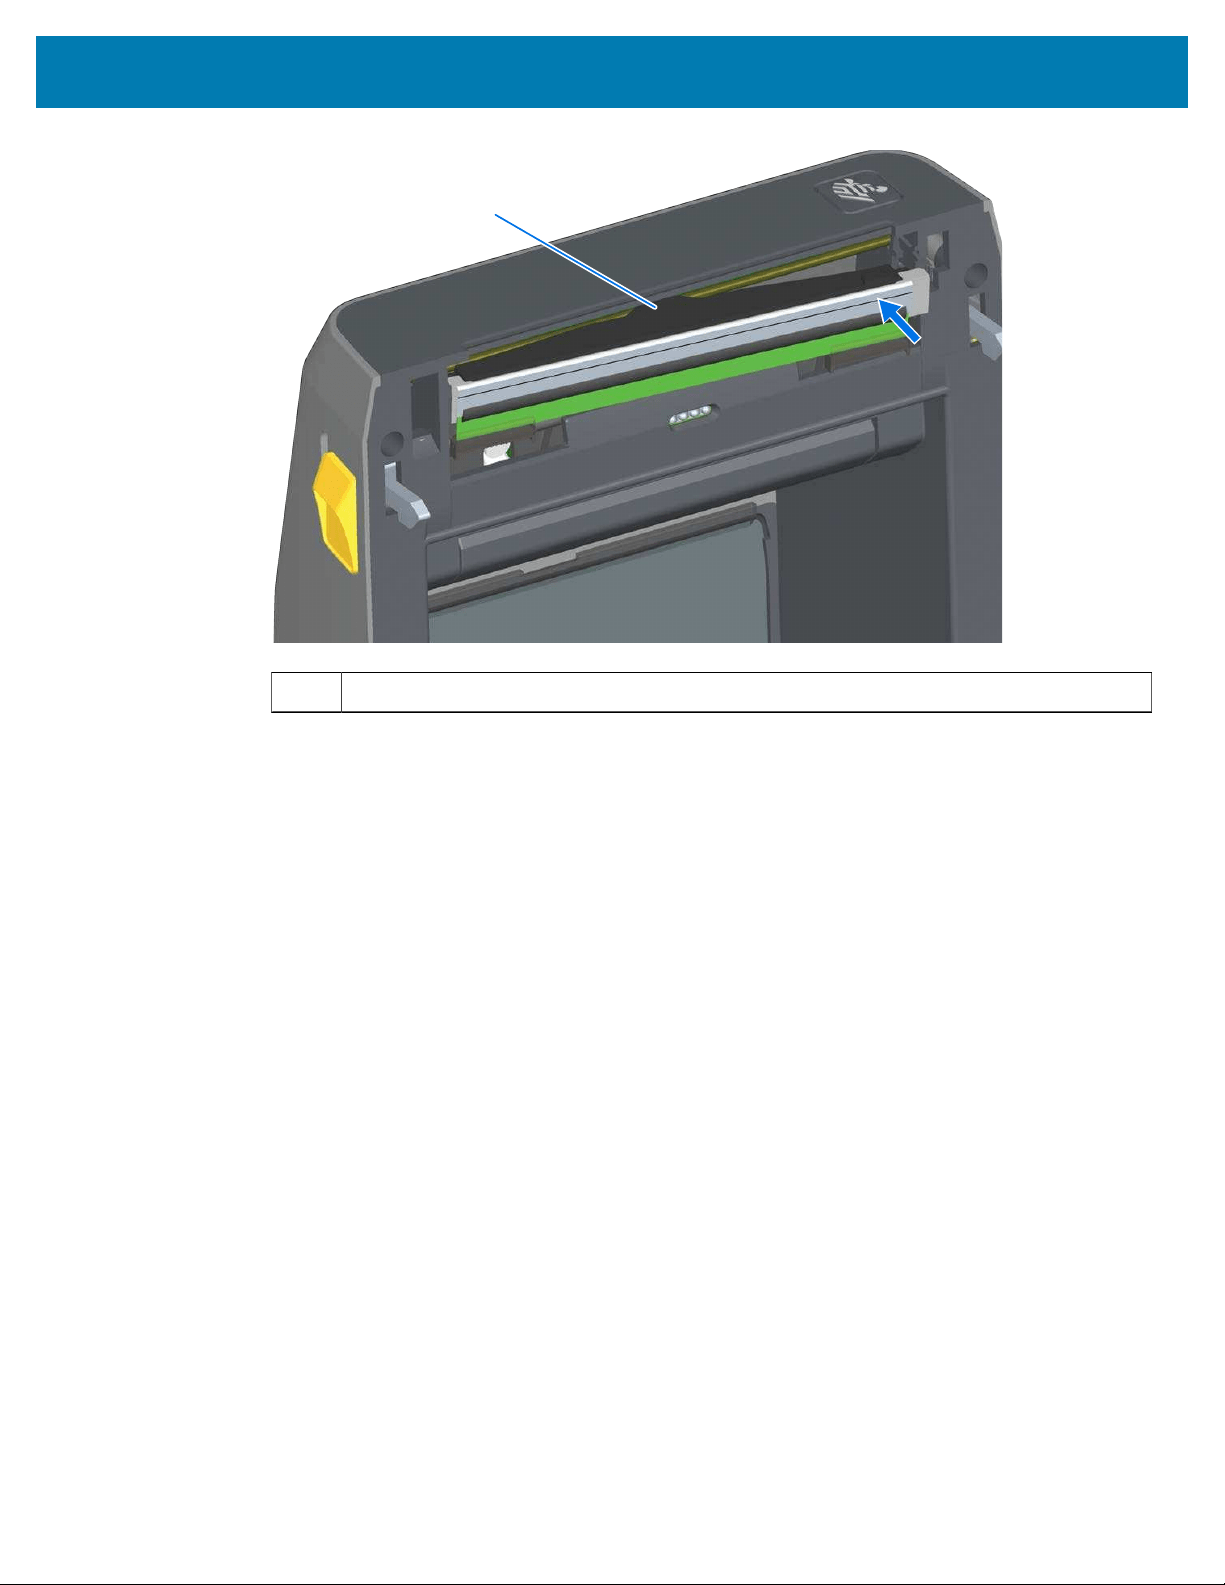
Maintenance
295
1
1 Spring wire in notch
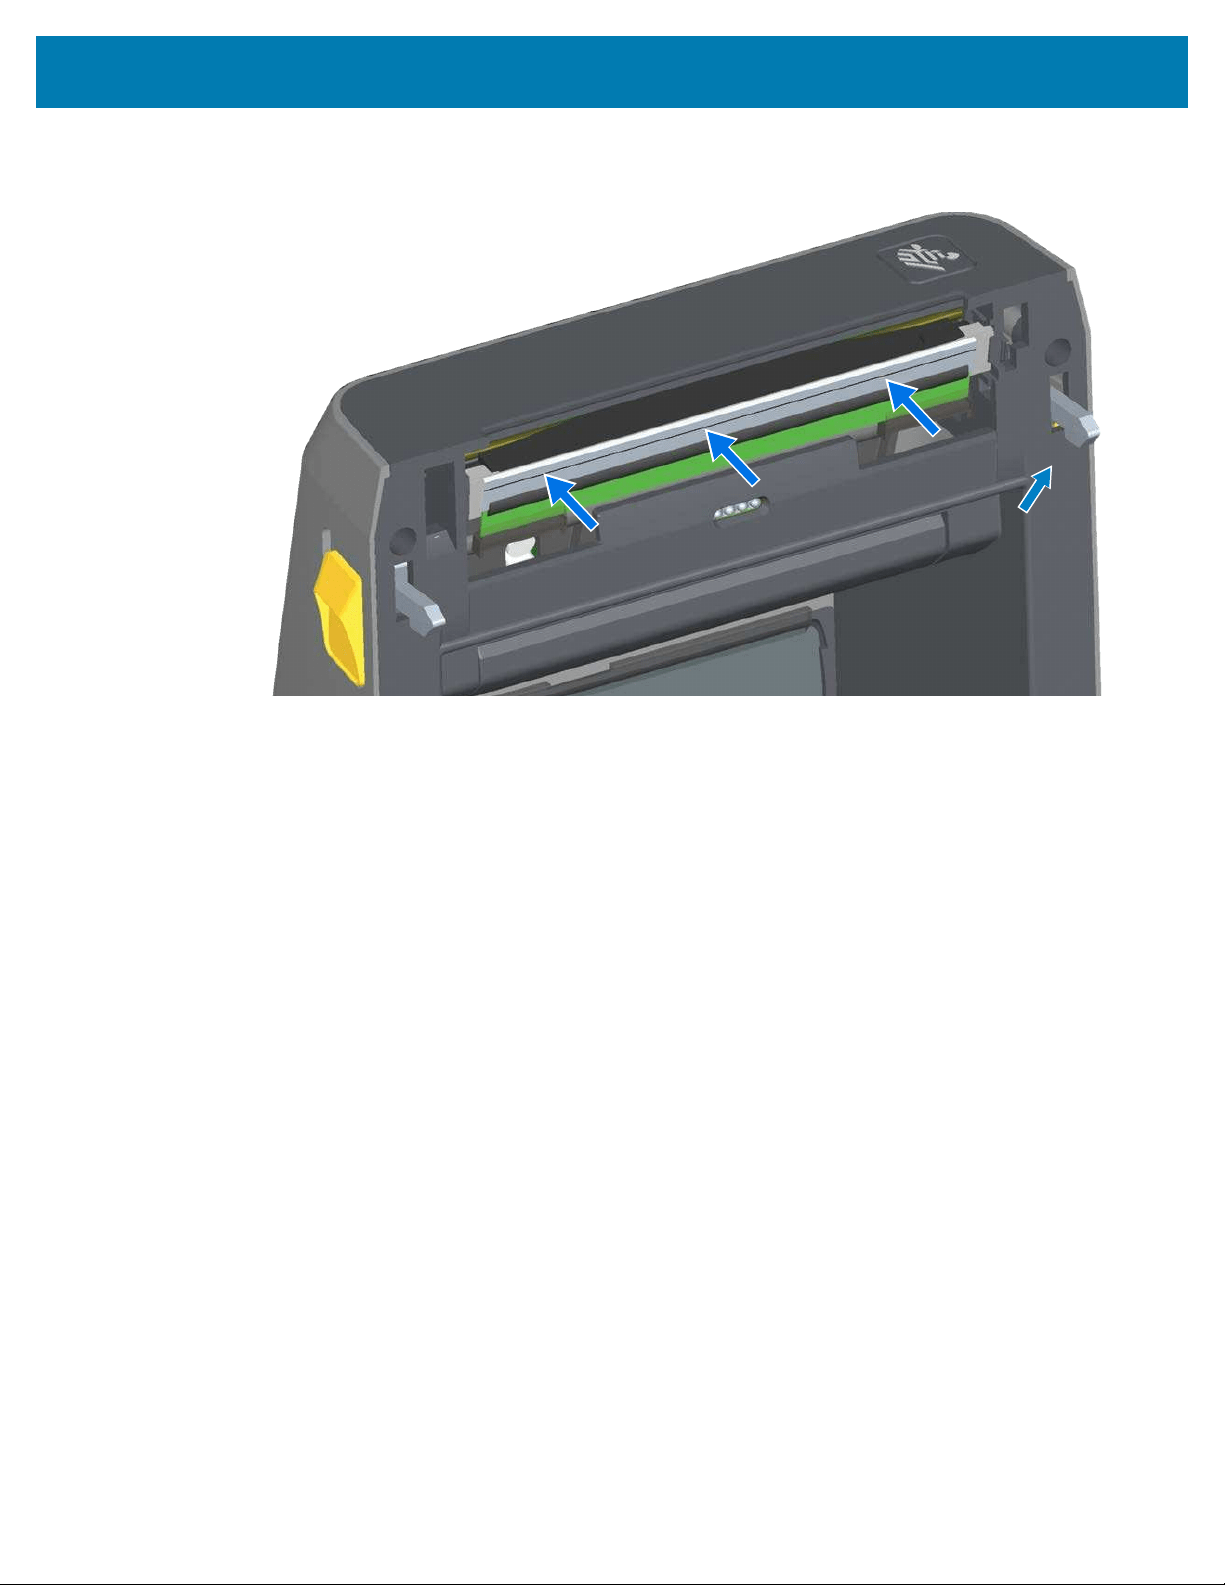
Maintenance
f) Verify that the printhead moves up and down freely when pressure is applied and remains locked
when released.
296
g) Clean the printhead. Use a new pen to wipe body oils (fingerprints) and debris of the printhead.
Clean from the center of the printhead to the outside. See the detailed instructions for cleaning the
printhead in the Maintenance section of this guide.
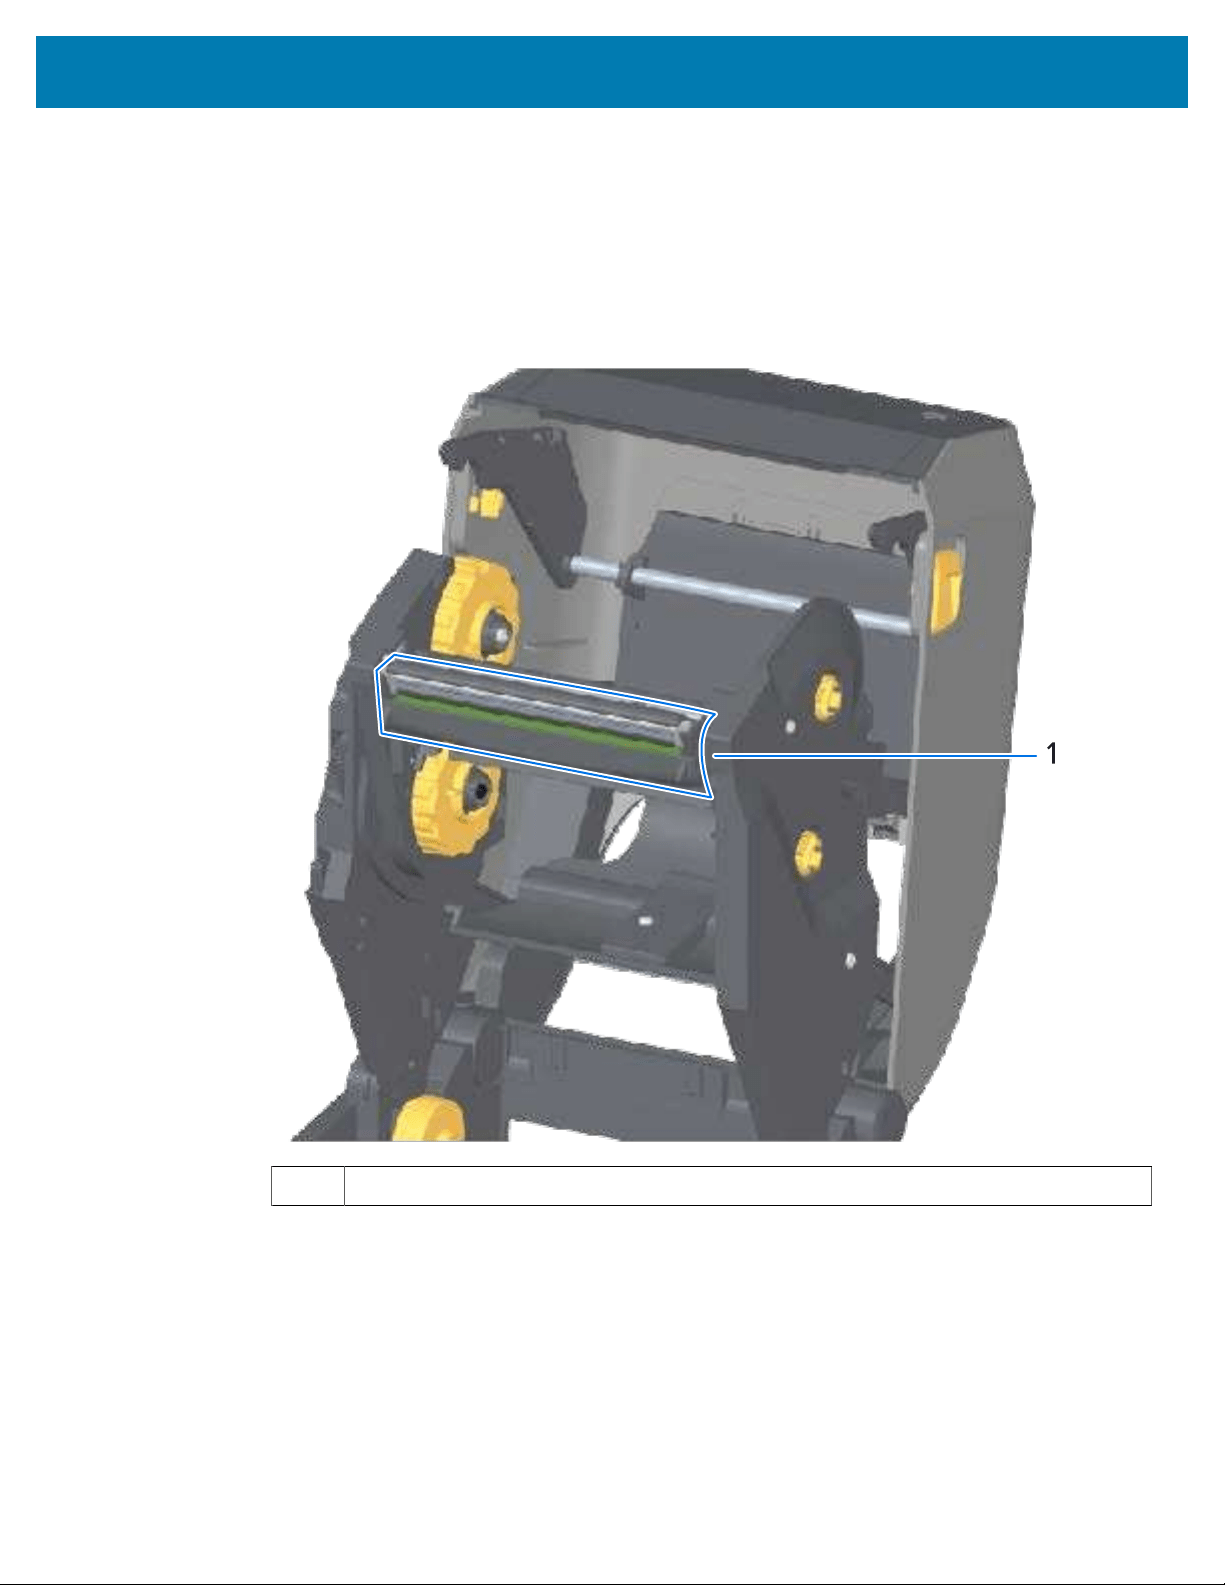
Maintenance
3. Reload media, plug in the power cord (if removed), turn printer power ON, and print a configuration
report to ensure proper function.See Test Printing with a Configuration Report on page 200.
297
Replacing the Printhead – ZD421/ZD621 Thermal Transfer Ribbon Roll Printer Models
1. Use these steps to remove the printhead:
a) Turn printer power OFF and open the printer.
1 Printhead
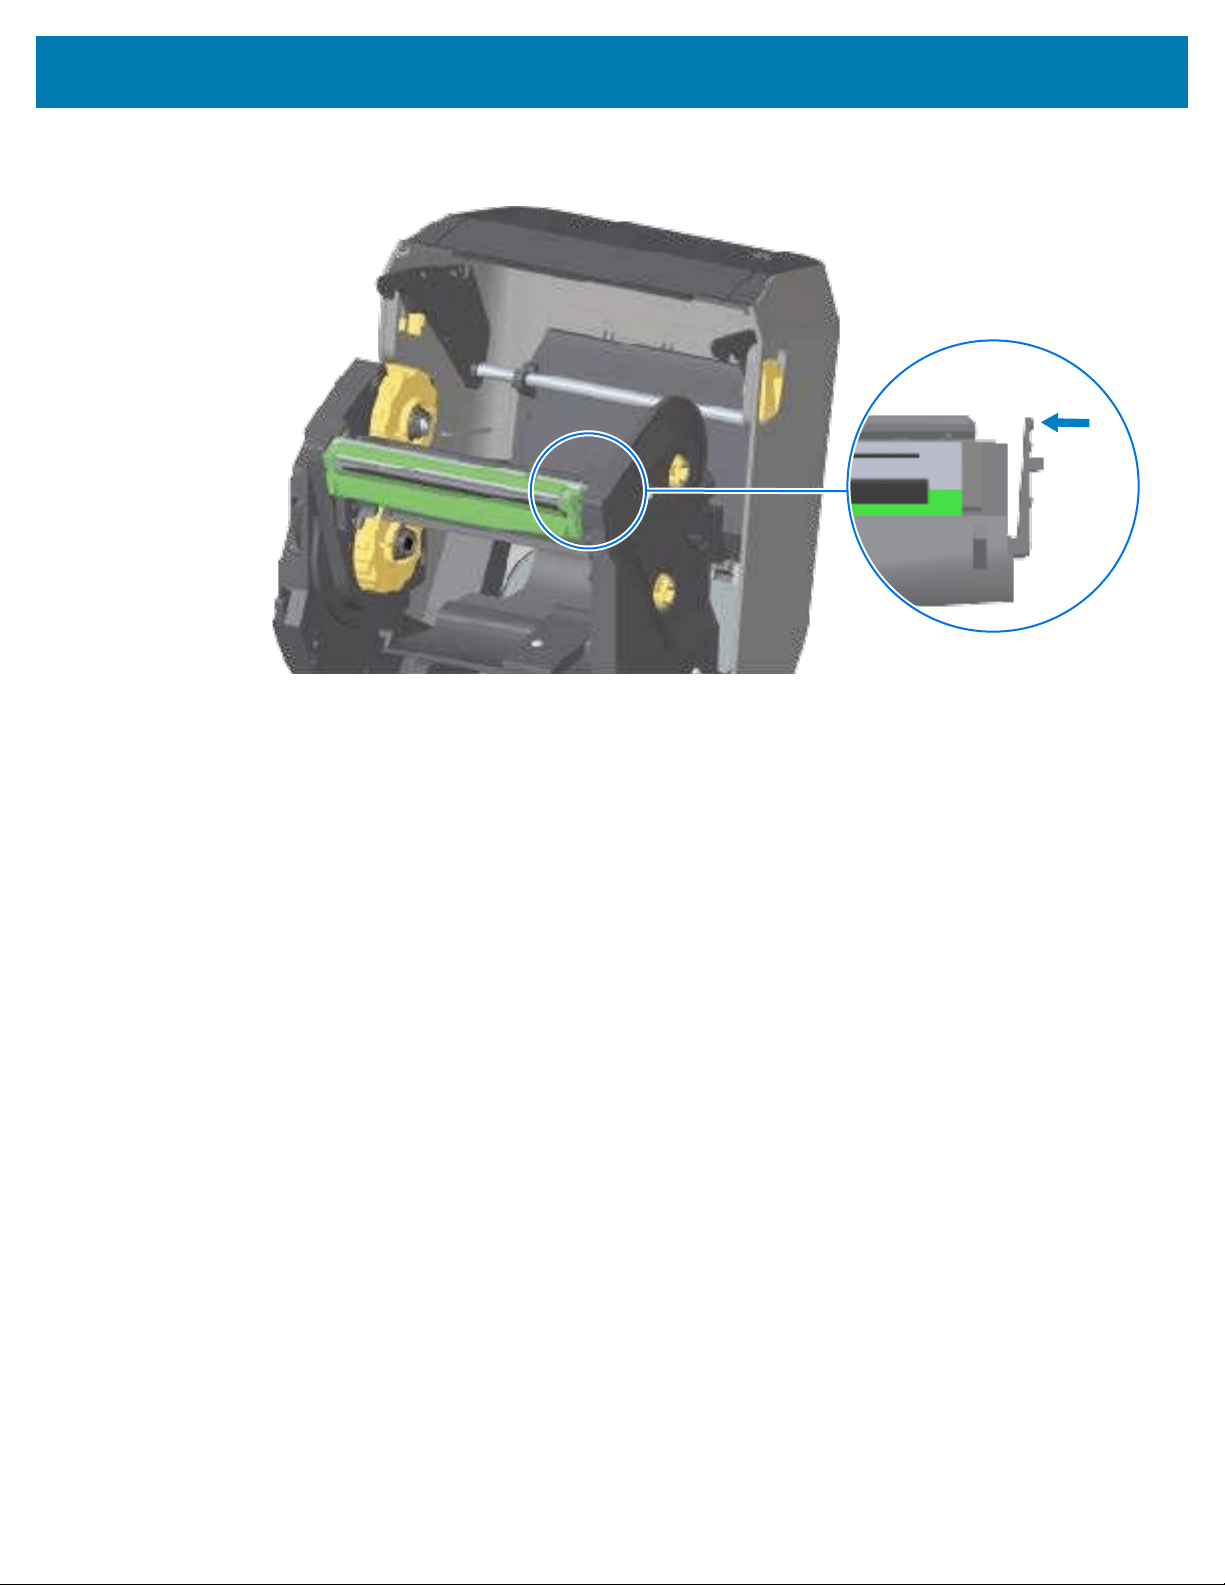
Maintenance
b) Push the printhead release latch toward the printhead (shown in green for visibility in the following
figure).
298
The right side of the printhead releases down and away from the printhead actuator arm.

Maintenance
c) Swing the loose right side of the printhead out of the printer. Pull it to the right a little to get the left
side of the printhead clear. Pull the printhead down and free of the ribbon carriage to gain access to
its attached cables.
d) Gently but firmly pull the two printhead cable bundle connectors off of the printhead.
299
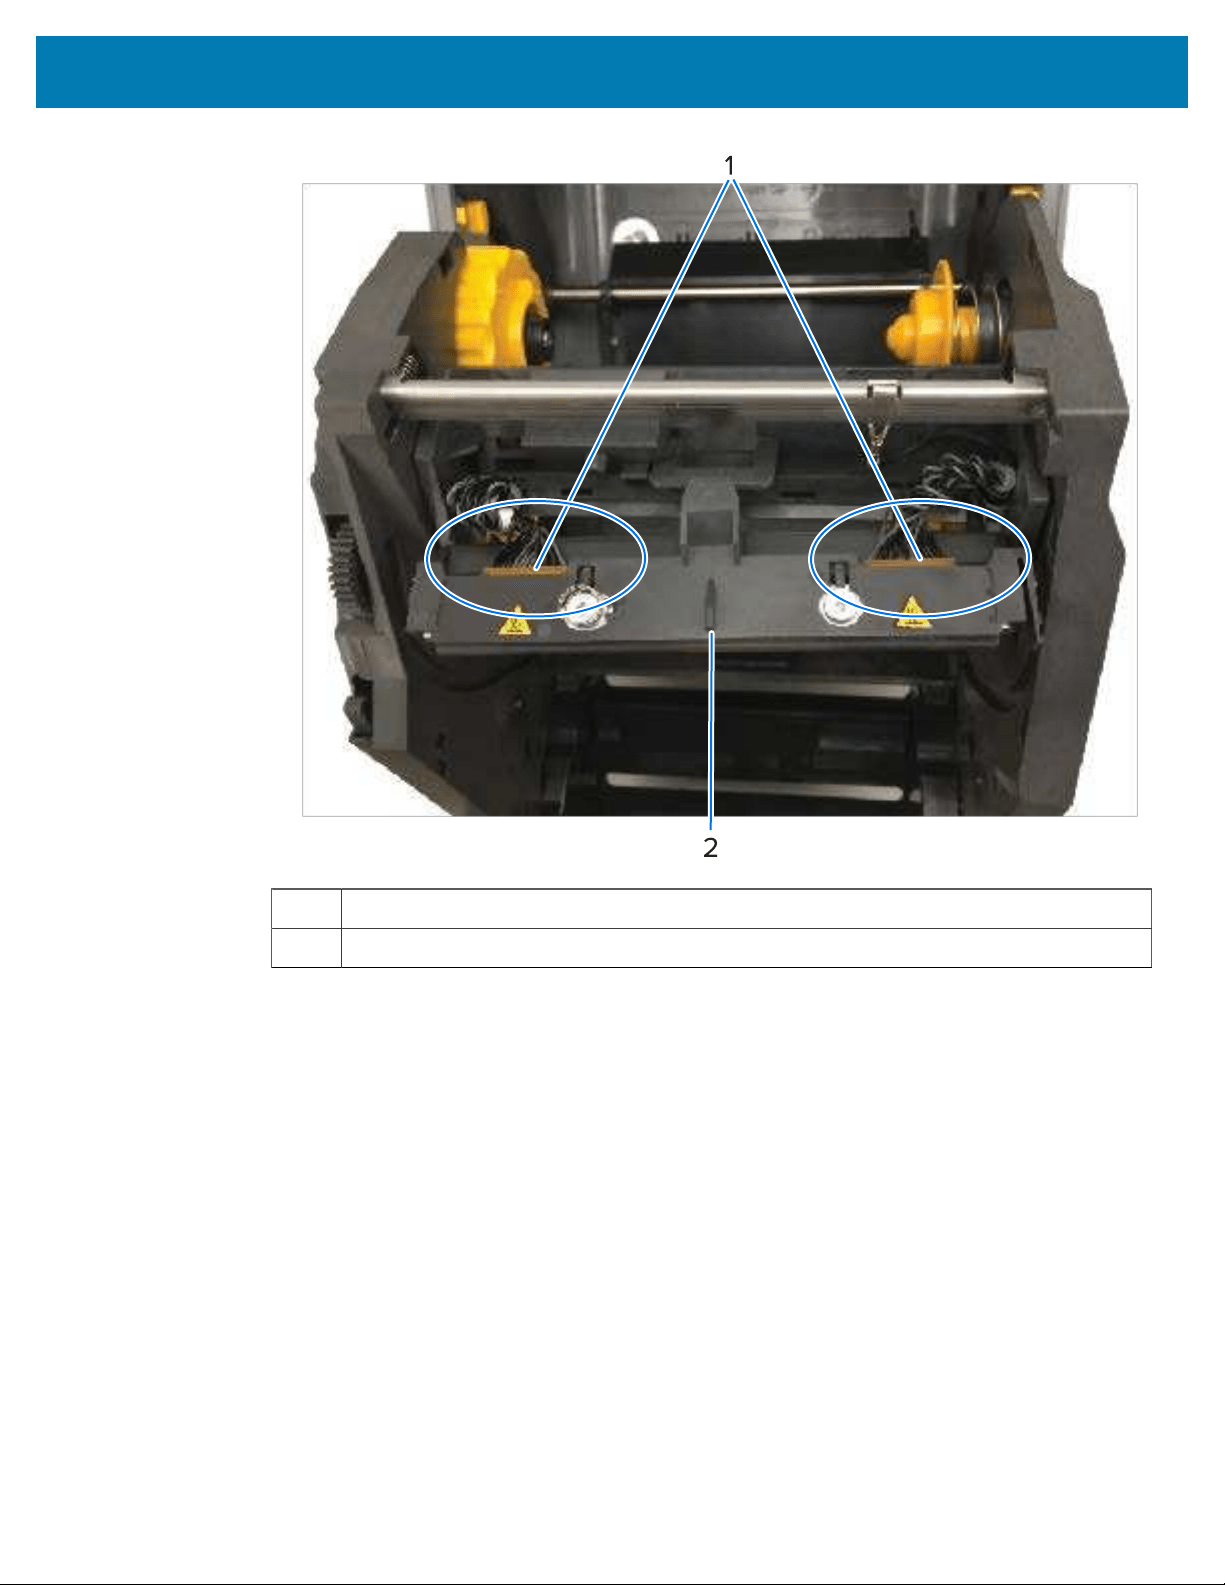
Maintenance
1 Connectors
2 Printhead assembly
300
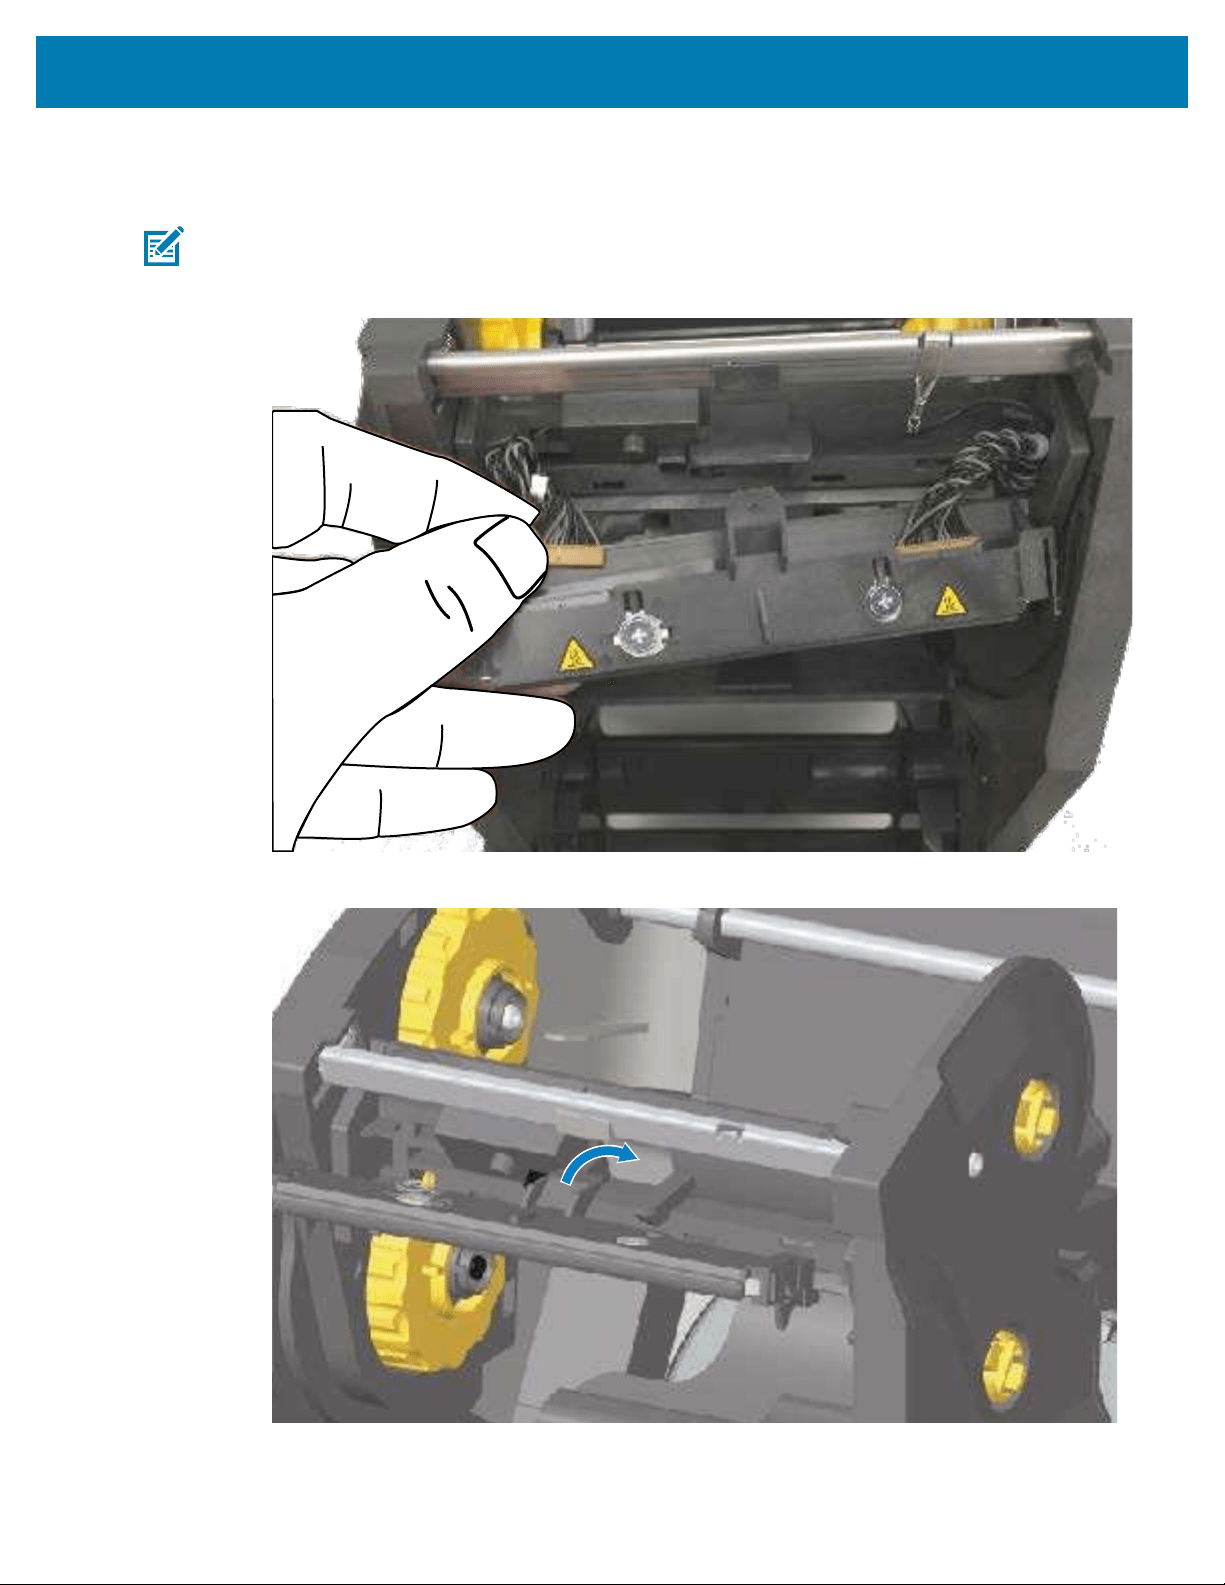
Maintenance
2. To replace the printhead:
a) Push the right side printhead cable connector into the printhead.
NOTE: The connector is keyed to only insert one way.
b) Push the left side printhead cable connector onto the printhead.
c) Insert the center tab on the printhead assembly into the center slot on the printhead actuator arm.
301
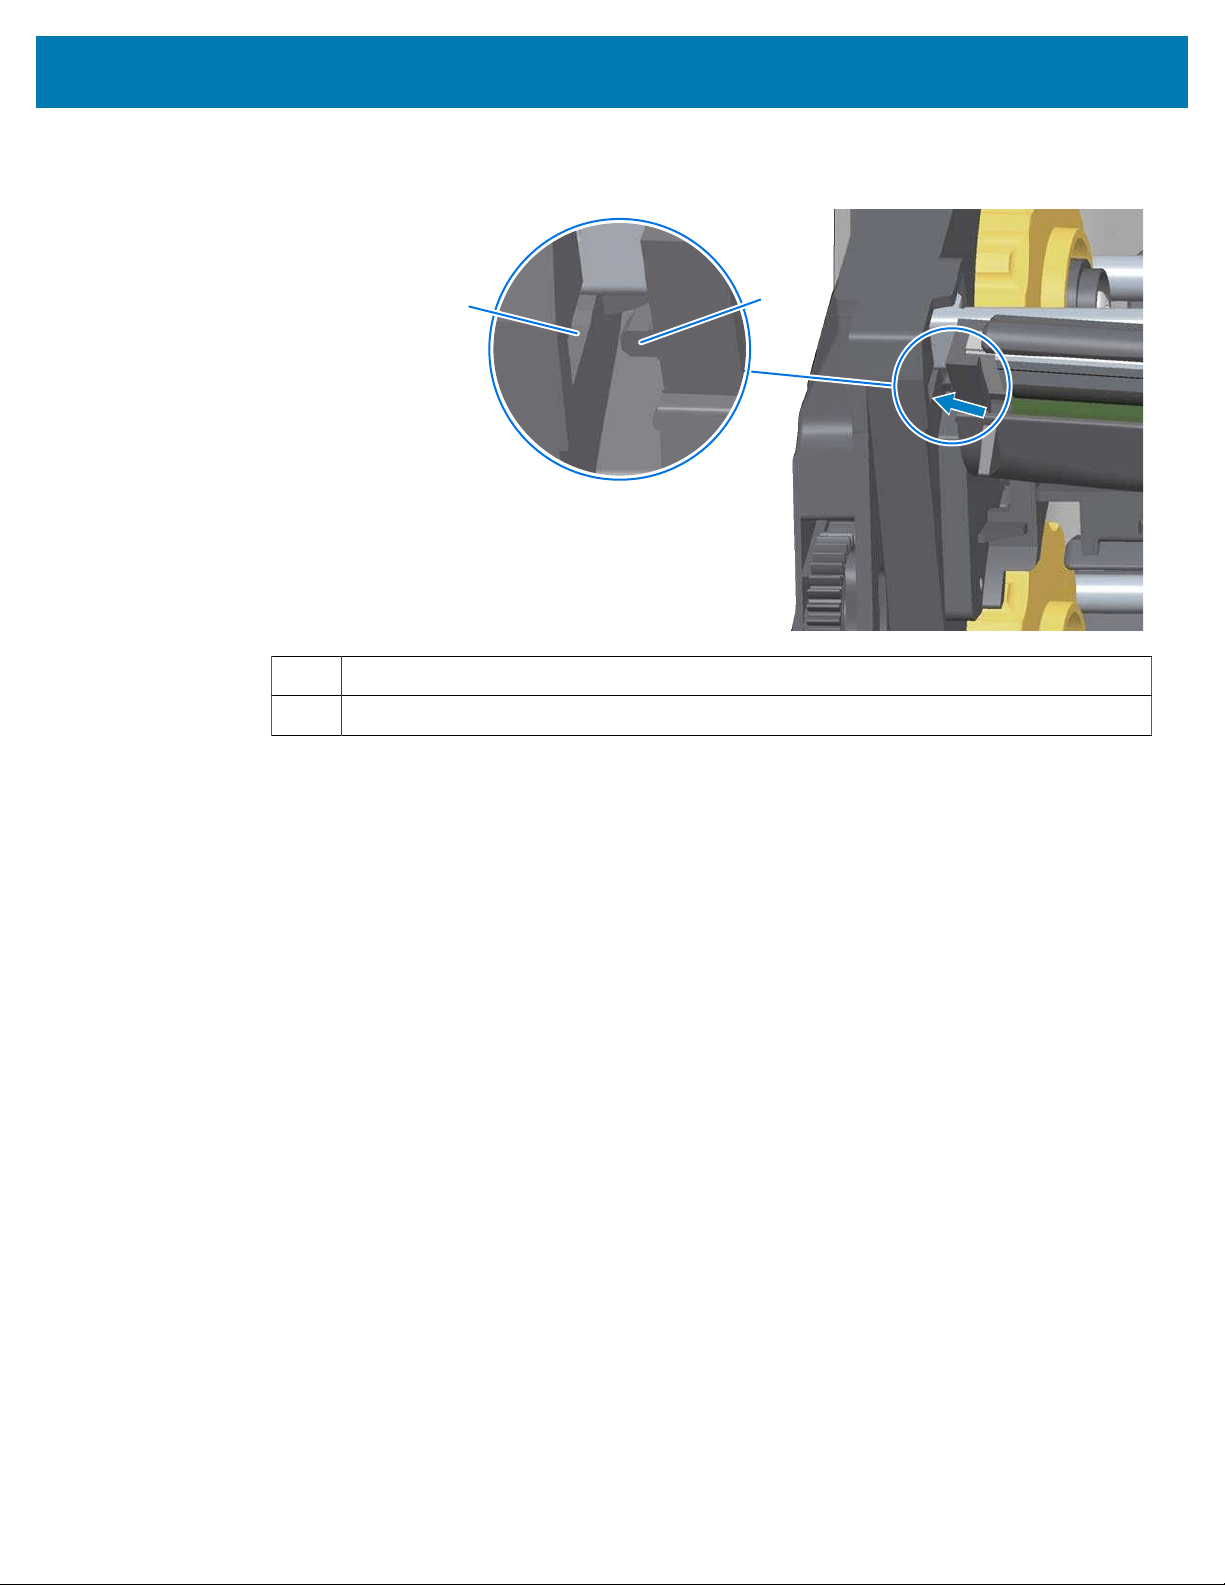
Maintenance
d) Insert the left side tab of the printhead assembly into the recessed slot on the left side of the
printhead actuator arm.
1
2
1 Slot
302
2 Tab
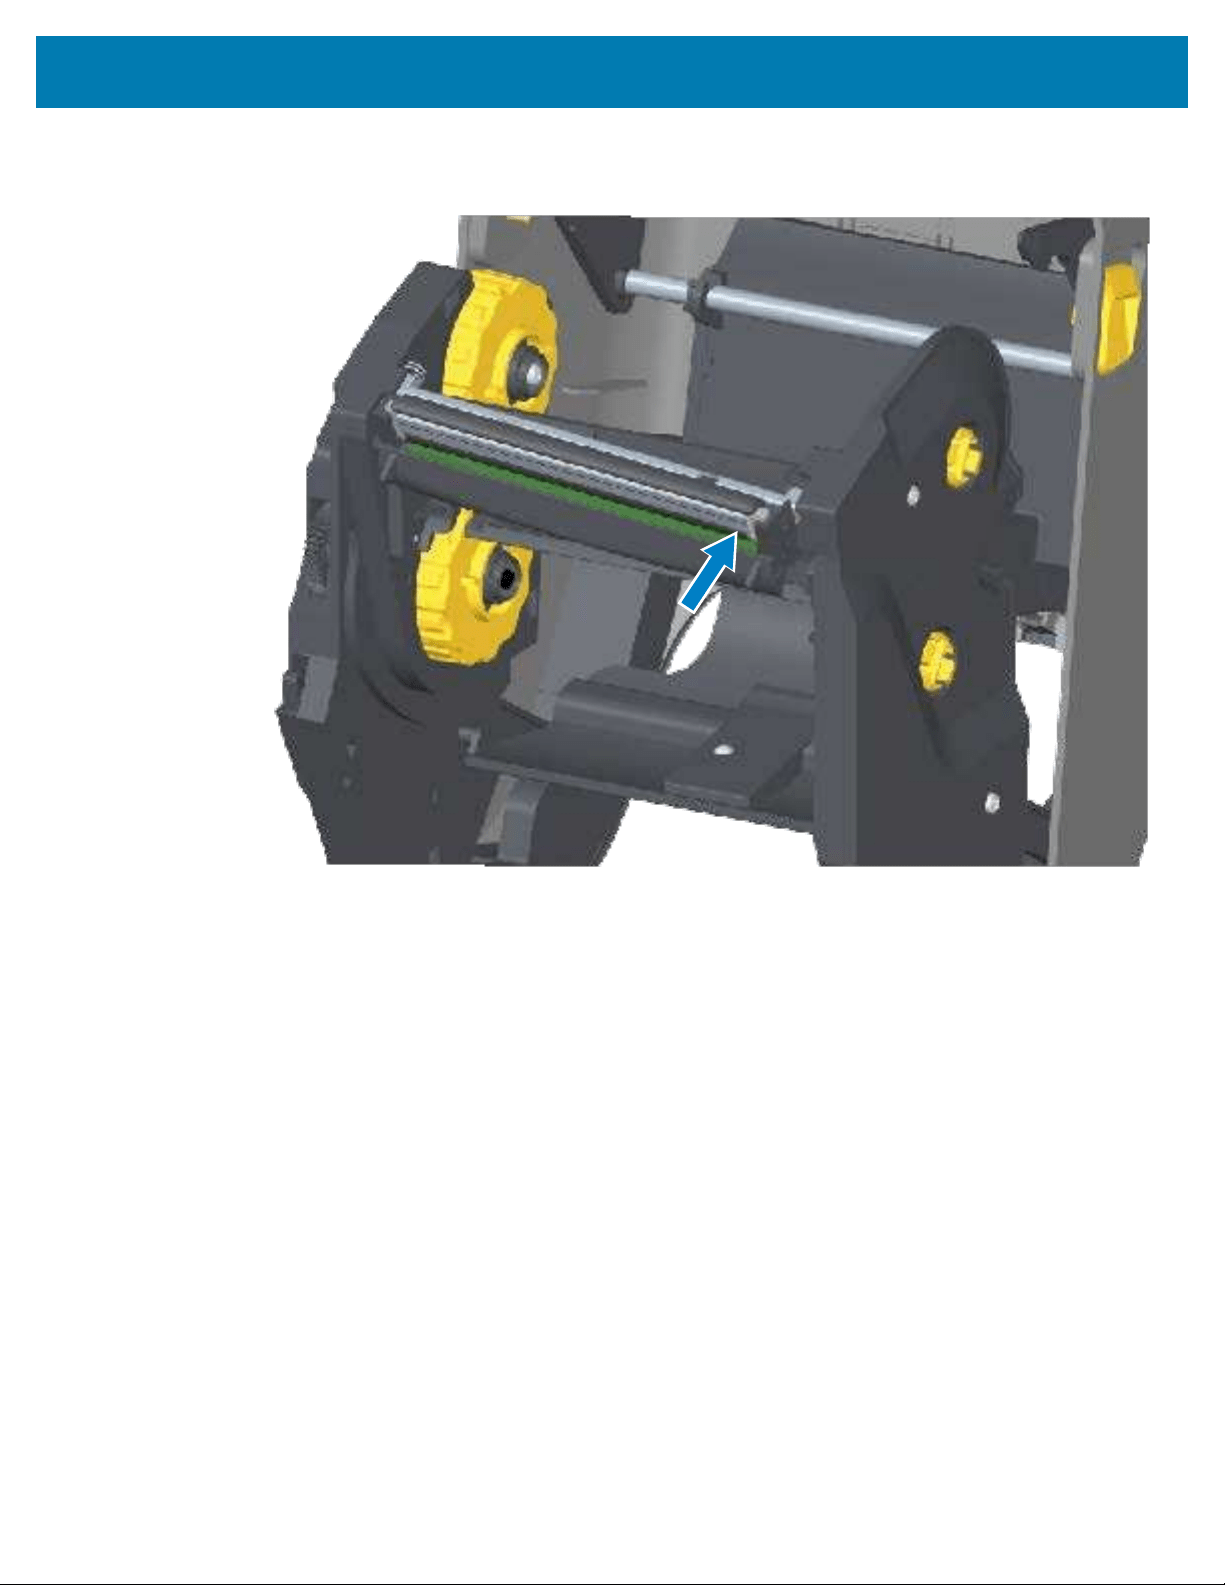
Maintenance
e) Push the right side of the printhead into the printer until the latch locks the right side of the printhead
into the printer.
f) Verify that the printhead moves up and down freely when pressure is applied and remains locked
when released.
303
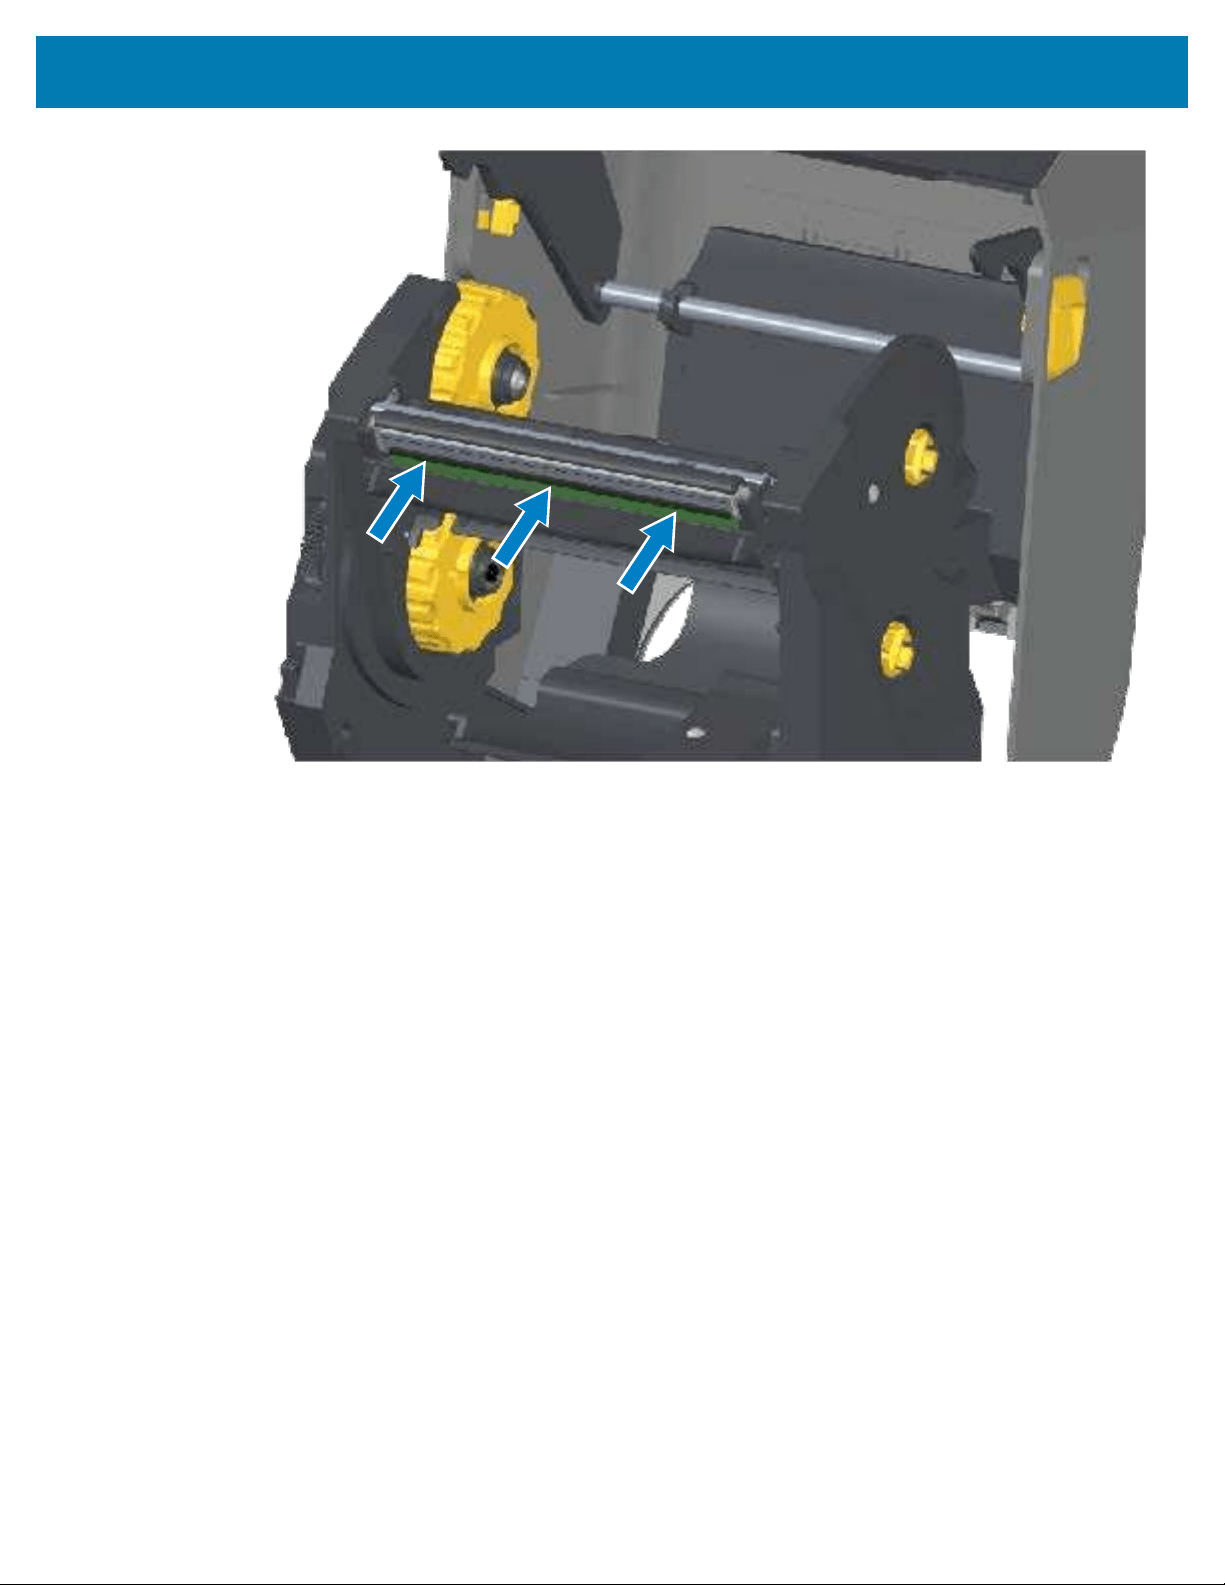
Maintenance
g)Clean the printhead. Use a new pen to wipe body oils (fingerprints) and debris of the printhead.
Clean from the center of the printhead to the outside to avoid damaging the printhead. See Cleaning
the Printhead on page 272.
h)Reload media. Plug in the power cord, turn on the printer, and print a configuration report to ensure
proper function.See Test Printing with a Configuration Report on page 200.
304
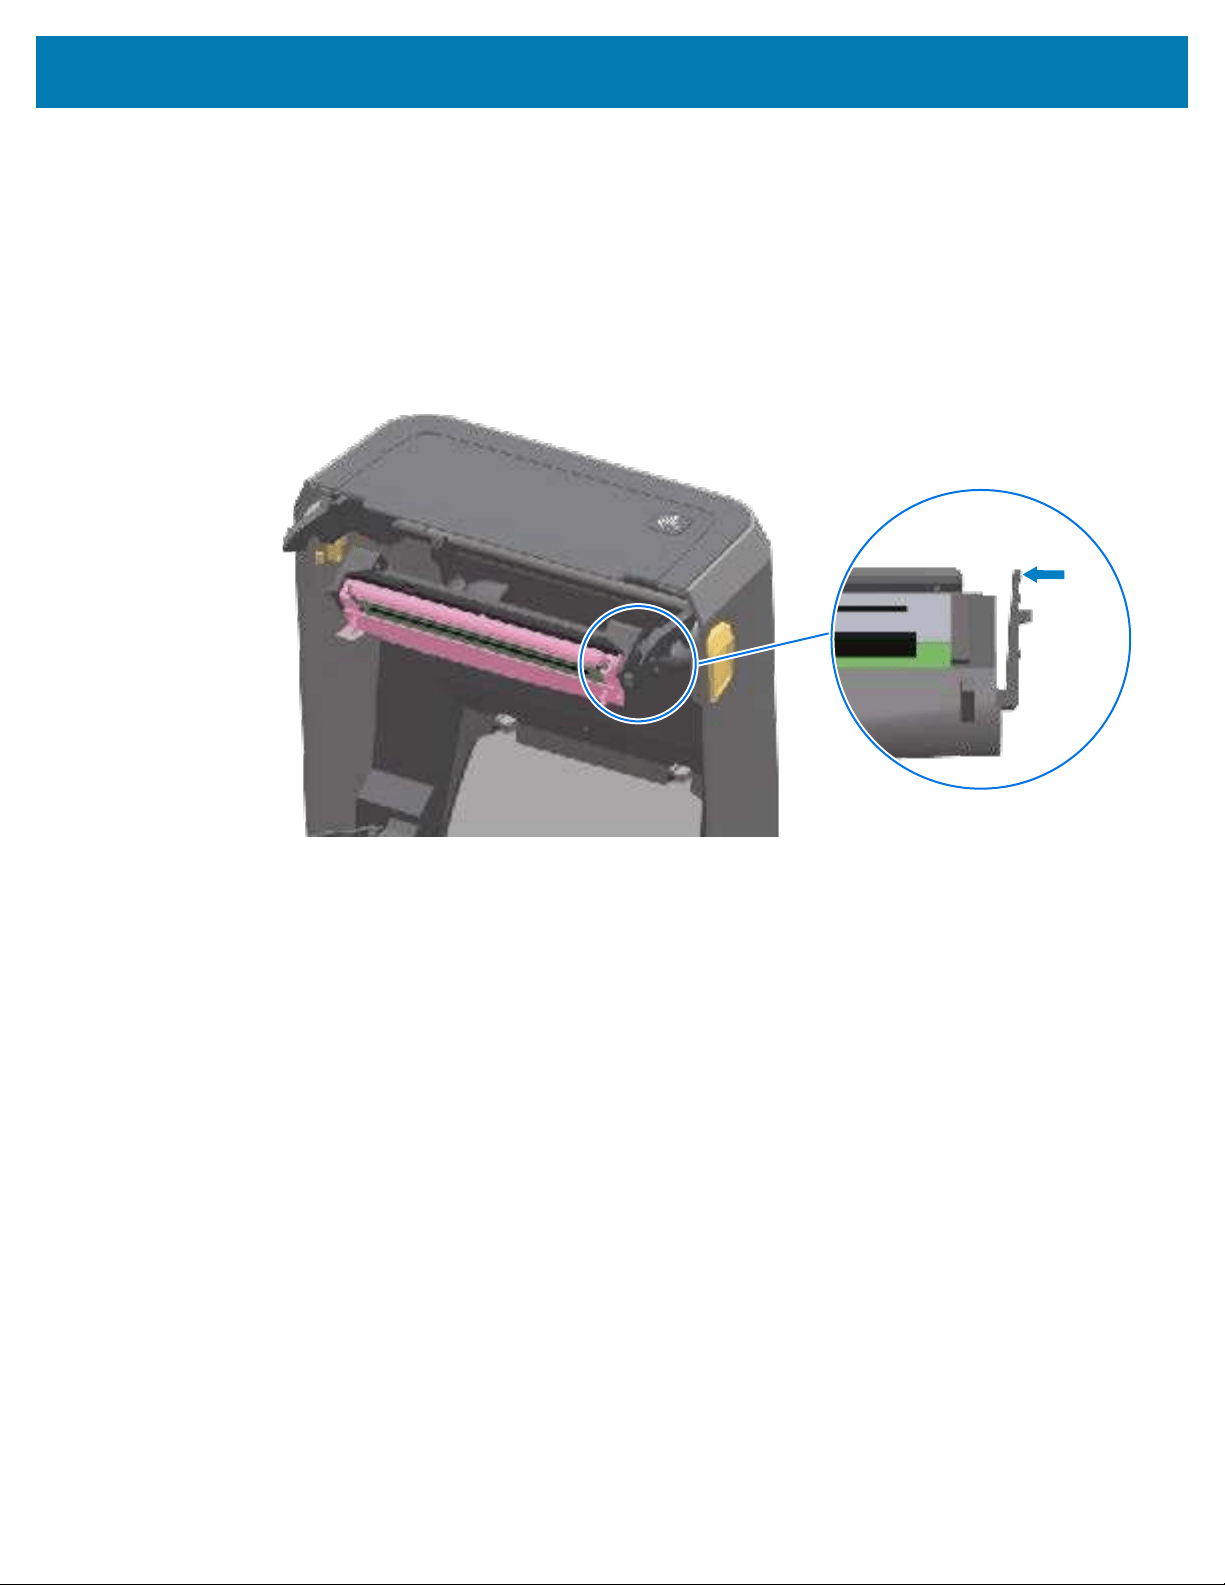
Maintenance
Replacing the Printhead – ZD421 Thermal Transfer Ribbon Cartridge Printer Models
1. To remove the printhead:, follow these steps:
a) Turn printer power OFF and open the printer.
b) Pull the two release arms out to release the ribbon drive transport. See
Accessing the Printhead of
the ZD421 Ribbon Cartridge Printer on page 35.
c) Swing the printhead actuator arm up until it touches the printer’s top cover. Hold it in the position
shown below for access to the printhead, then push the printhead release latch toward the printhead
(shown as pink for visibility in the image).
The right side printhead releases down and away from the printhead actuator arm.
d) Swing the loose right side of the printhead out of the printer. Pull it to the right a little to get the left
side of the printhead clear. Pull the printhead down and free of the printhead actuator arm to gain
access to its attached cables.
305
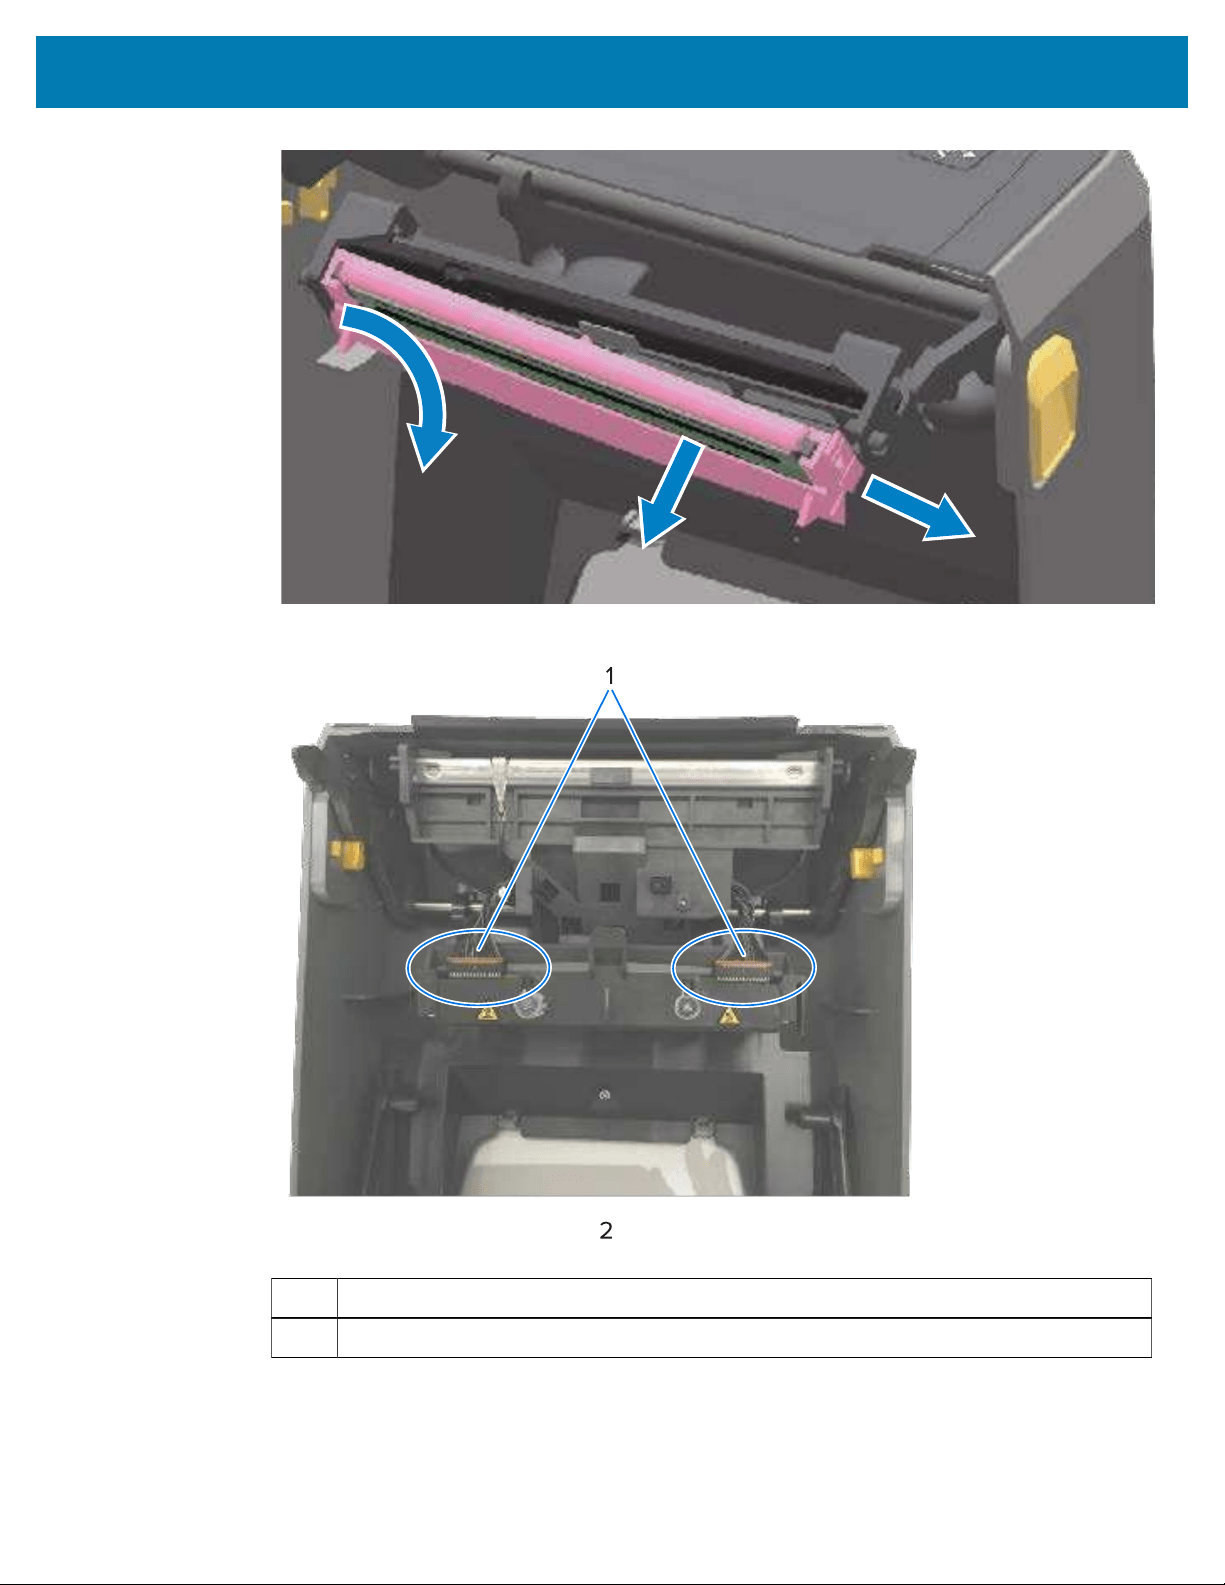
Maintenance
e) Gently but firmly pull the two printhead cable bundle connectors off of the printhead.
1 Connectors
306
2 Printhead assembly
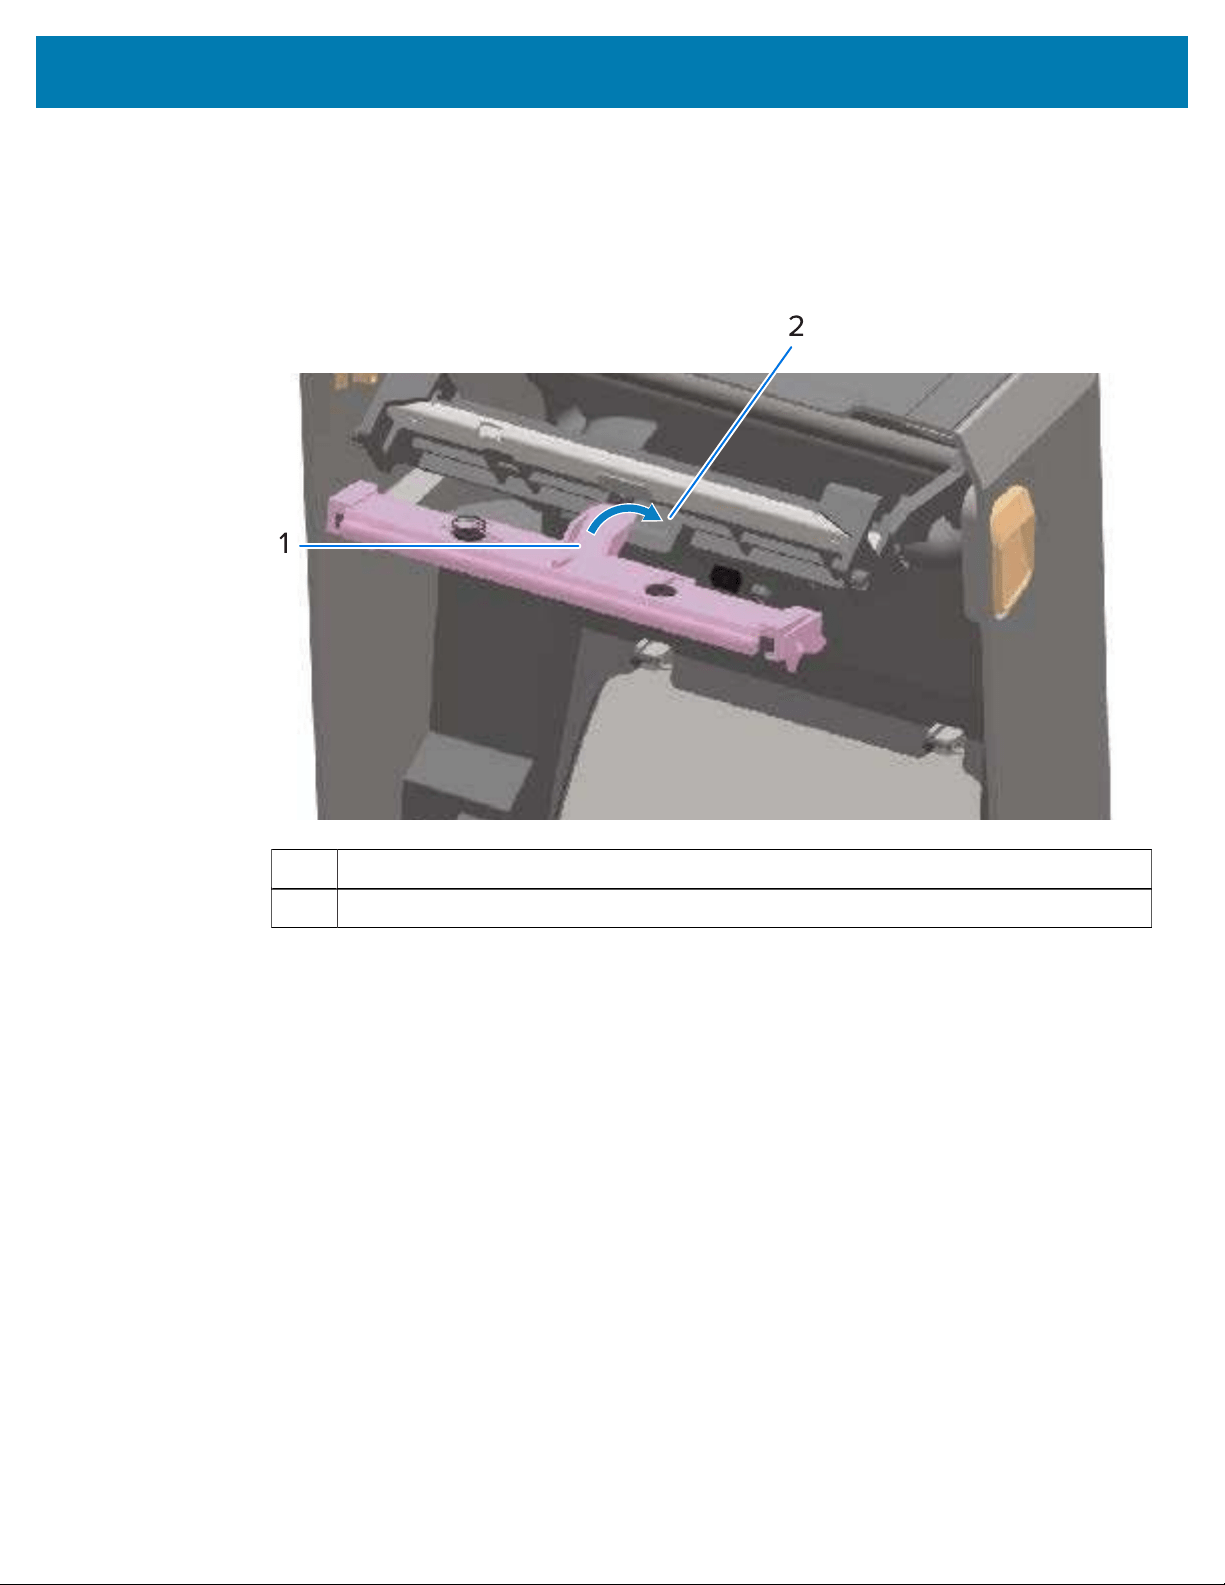
Maintenance
2. Follow these steps to replace the printhead:
a) Push the right side printhead cable connector into the printhead. The connector is keyed to only
insert one way.
b) Push the left side printhead cable connector onto the printhead.
c) Insert the center tab on the printhead assembly into the center slot on the printhead actuator arm.
1 Tab
307
2 Slot
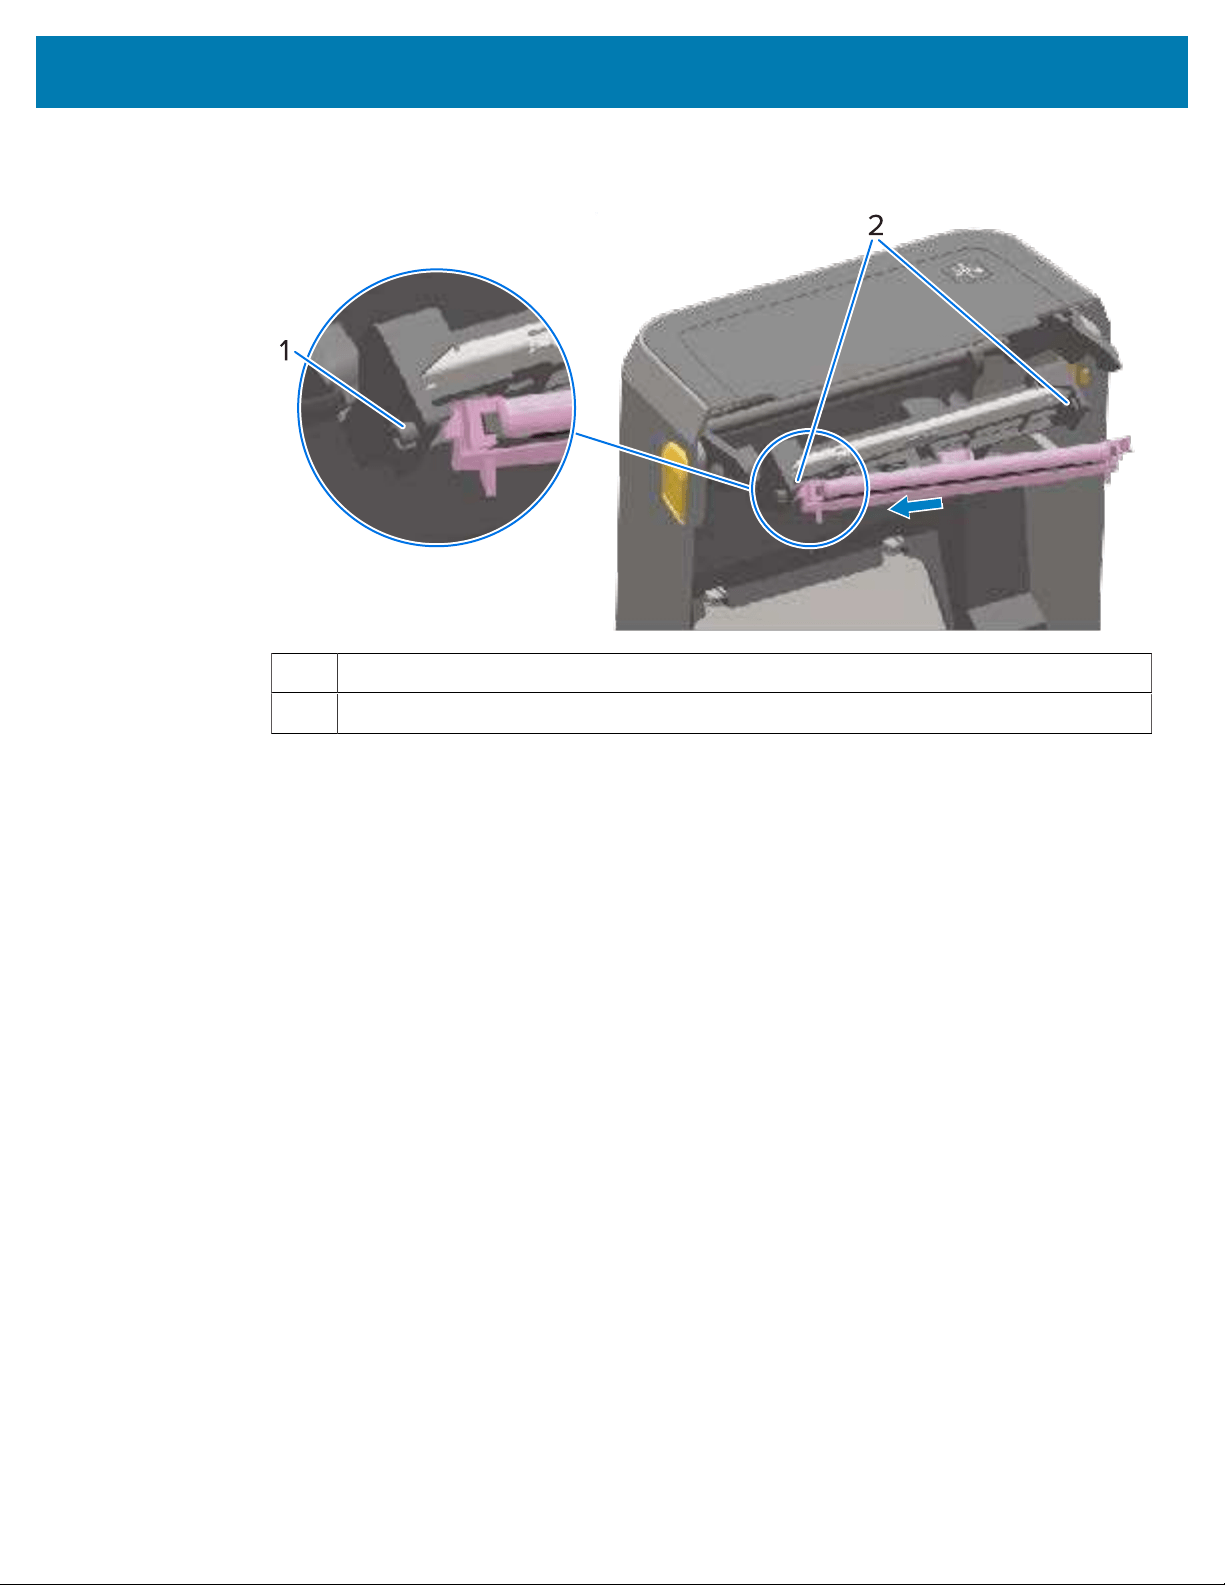
Maintenance
d) Insert the left side tab of the printhead assembly into the recessed slot on the left side of the
printhead actuator arm.
1 Tab
308
2 Slot– both sides
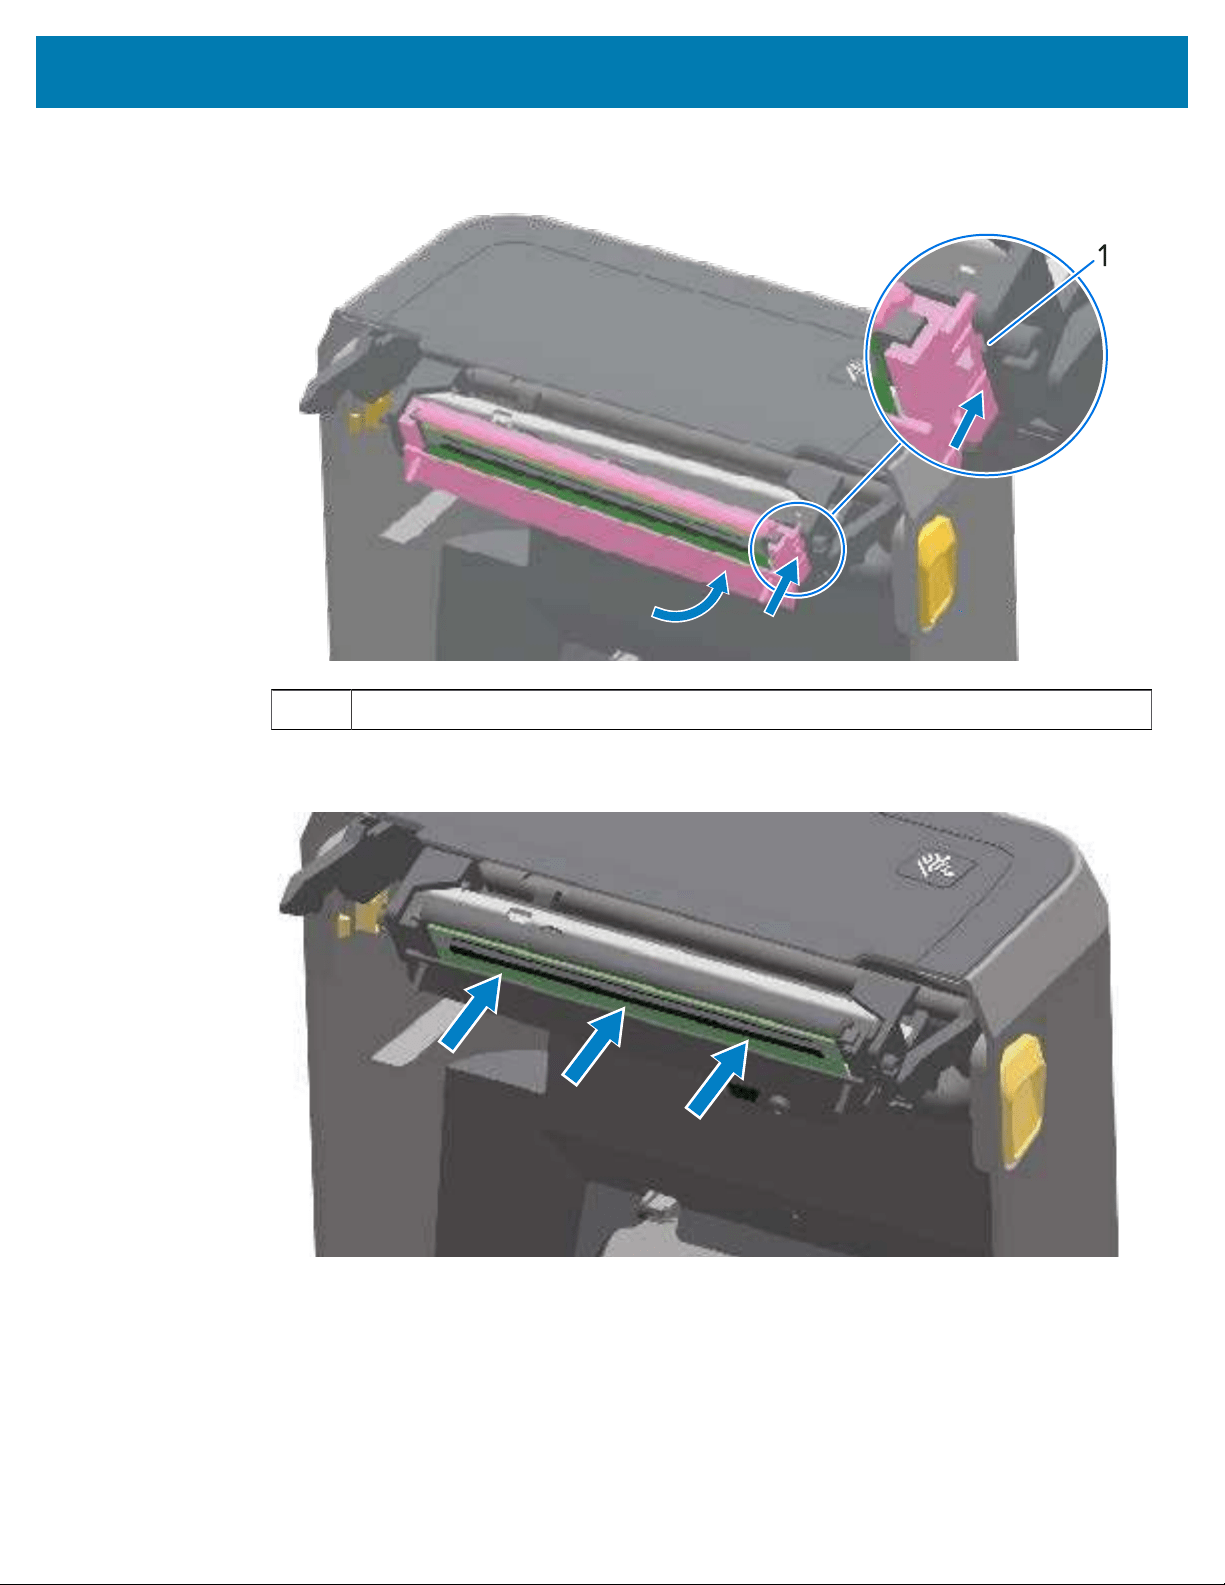
Maintenance
e) Push the right side of the printhead into the printer until the latch locks the right side of the printhead
into the printer.
1 Slot guide
f) Verify that the printhead moves freely into the printer when pressure is applied (see arrows) and
remains locked when pressure is released.
g) Clean the printhead by using a new cleaning pen to wipe body oils (finger prints) and debris off the
printhead.See Cleaning the Printhead on page 272.
309
h) Reload media. Turn on the printer and print a status report to ensure proper function. See
Test
Printing with a Configuration Report on page 200.

Maintenance
Updating Printer Firmware
Zebra recommends that youperiodically update the printer with the latest firmware to get new features,
improvements, and printer upgrades for media handling and communications.
Download the firmware from the appropriate support page for your printer listed in in About This Guide.
Use Zebra Setup Utilities (ZSU) to load new firmware.
1. Open Zebra Setup Utilities.
2. Select your printer.
3. Click Open Printer Tools.
The Tools window opens.
4. Click the Action tab.
5. Load media in the printer.
6. Click Send file.
The lower half of the window displays a filename and path.
7. Click Browse (...) and select the latest firmware file you downloaded from the Zebra web site.
8. Observe the user interface and wait for the firmware update to complete.
If the firmware version of the transferred file differs from the version installed on the printer, the
firmware will download to the printer. The data indicator flashes green as firmware downloads.The
printer then restarts with all indicators flashing.
The firmware update is complete when the STATUS indicator turns solid green during firmware
validation and installation. The printer also prints a printer configuration report.
Other Printer Maintenance
There are no user-level maintenance procedures beyond those detailed in this section.
Fuses
There are no replaceable fuses in the ZD Series printers or power supplies.
310
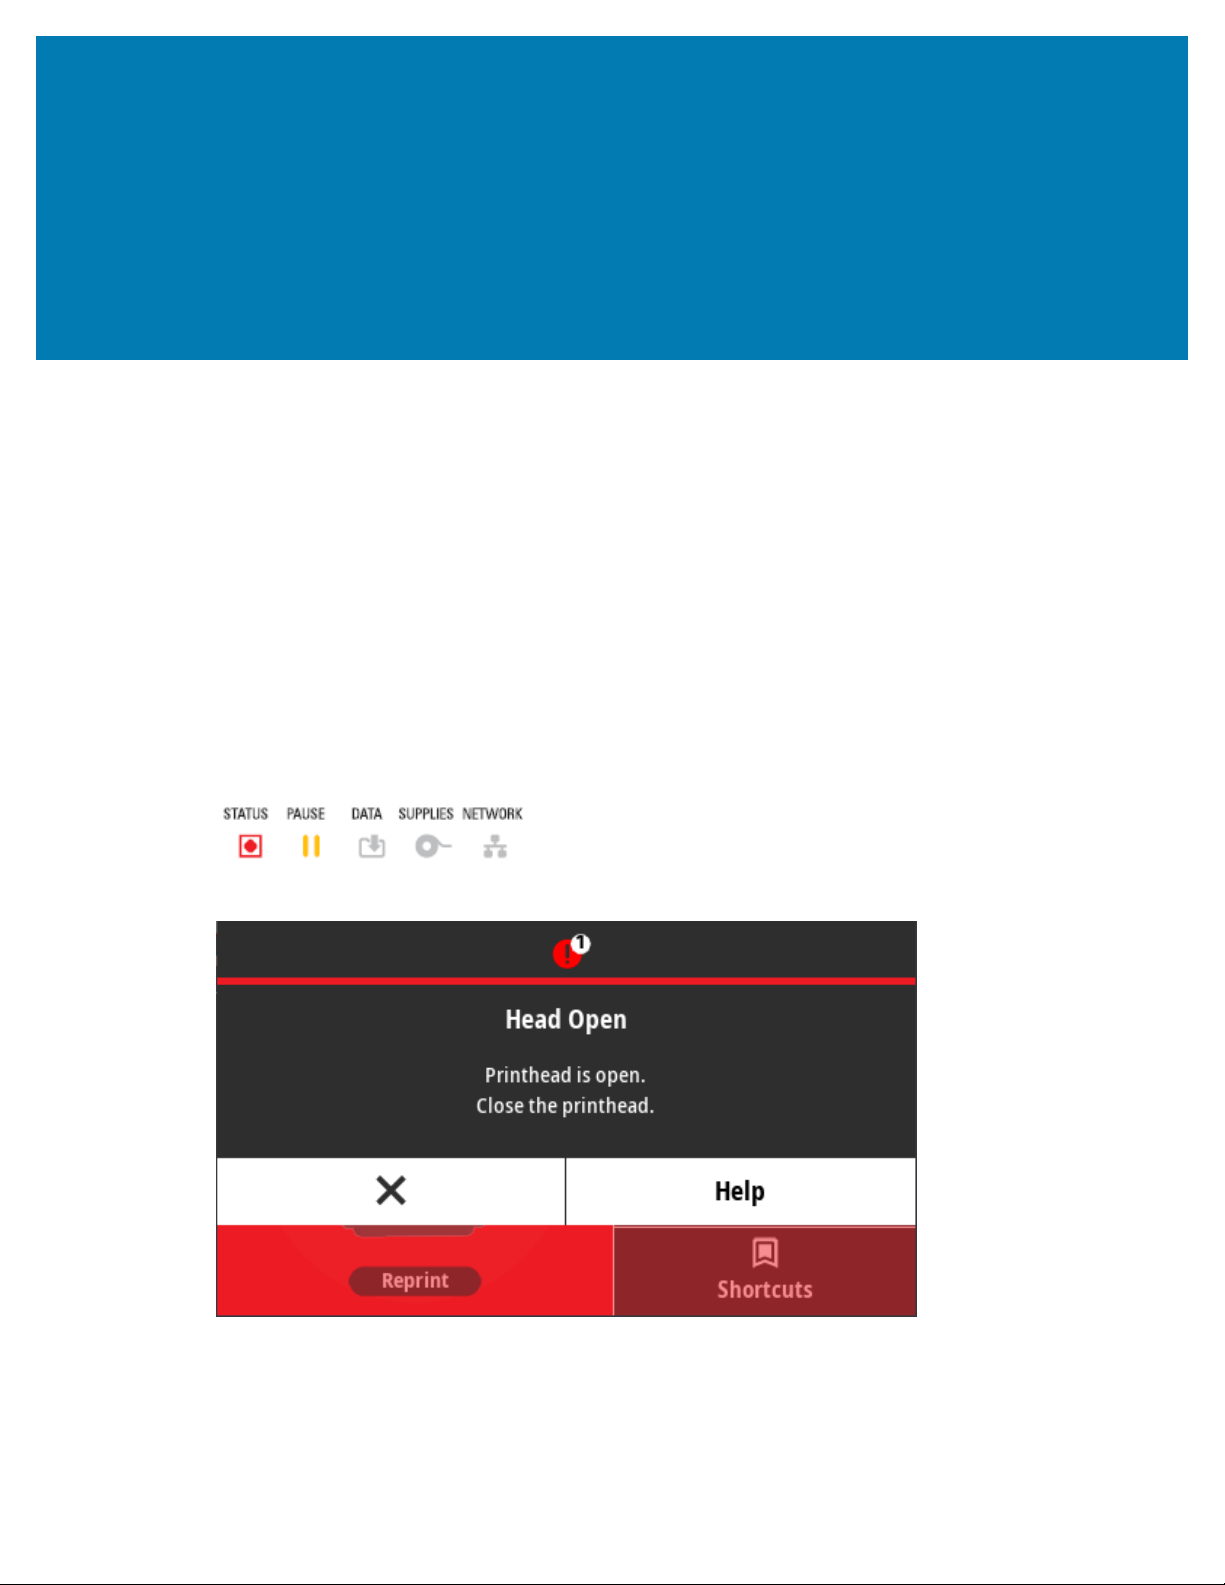
Troubleshooting
Troubleshooting
This section provides troubleshooting procedures and information.
Resolving Alerts and Errors
The printer usesalerts to notify you that the printer needs attention.
Alert: Printhead Open
The printer has received a print command or sensed a FEED button press, but it cannot proceed. The
printhead (cover) may not be closed (or closed properly) or theprinter’s Head-Open switch needs service.
Status indicator alert:
Display alert:
311
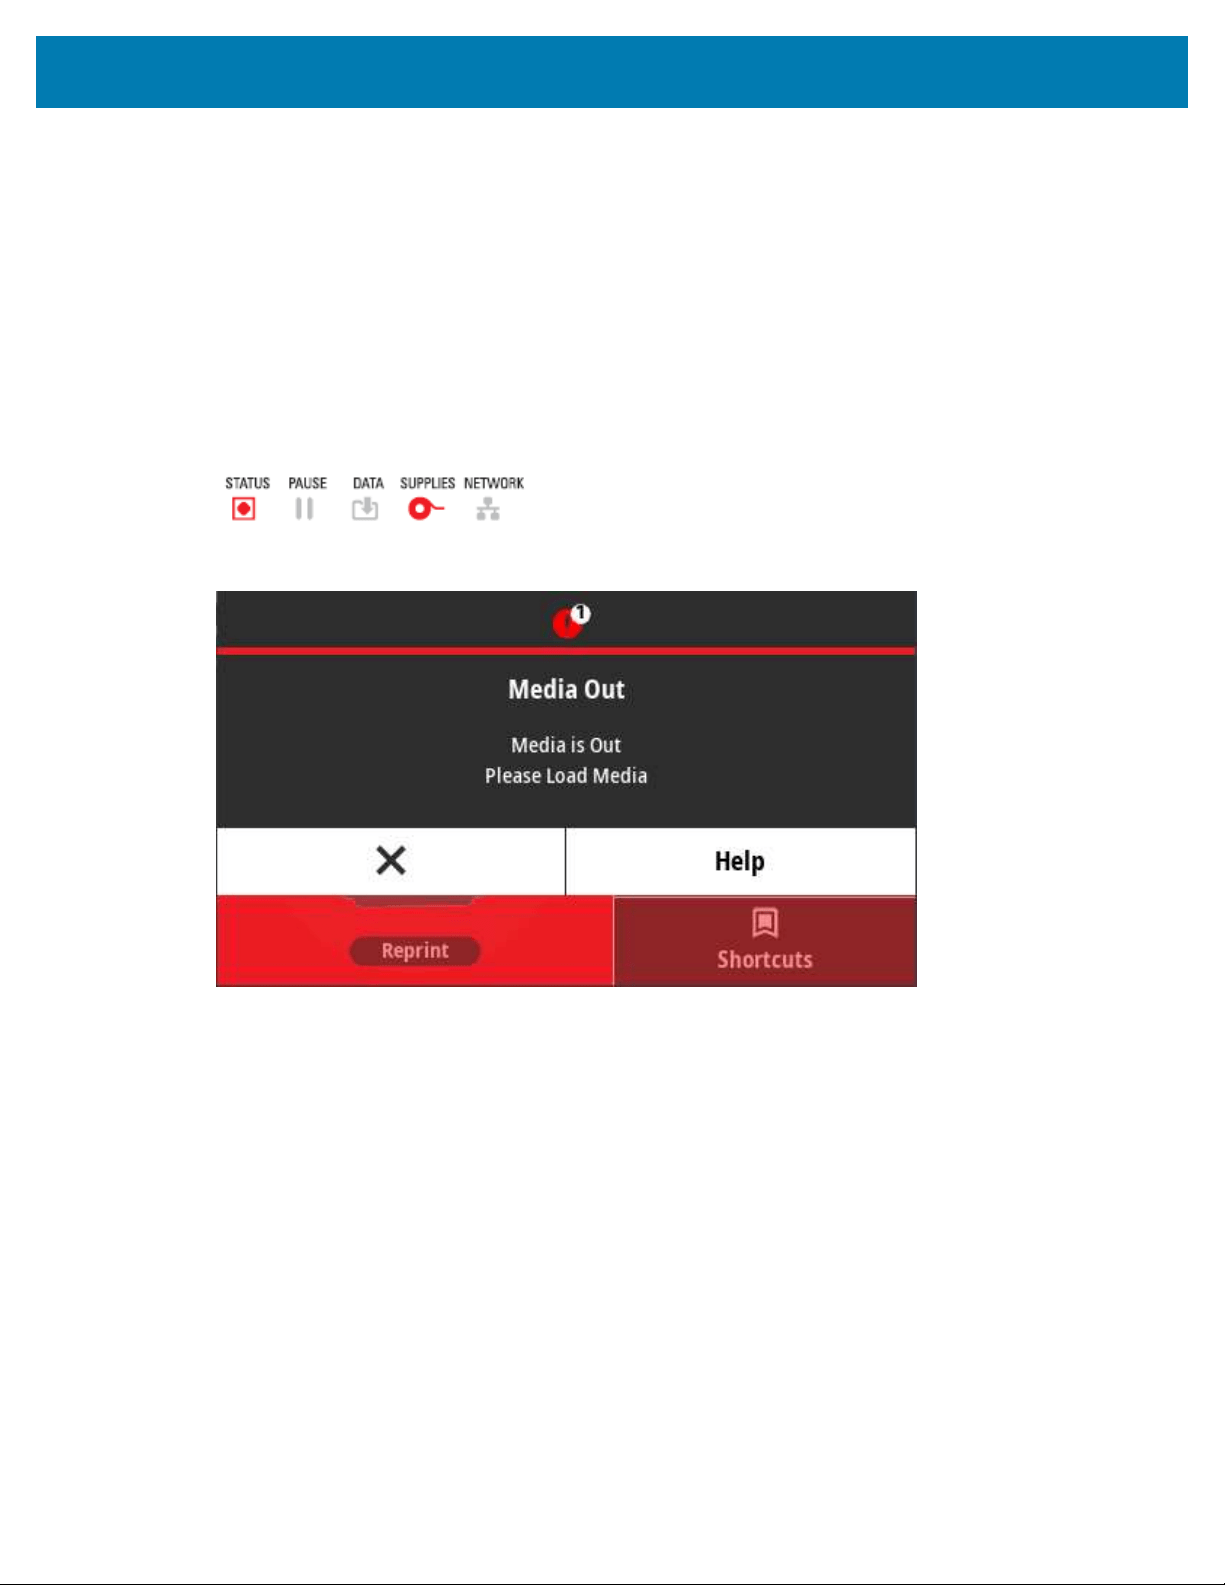
Troubleshooting
Possible causes and resolutions:
• The cover is open or it has not been closed properly.Close the cover/printhead. Push down on the front
top corners of the printer’s cover. You should normally hear and feel the cover latches snap in place to
lock the cover closed for printing.
• The printer’s Head-Open switch needs service.Call a service technician.
Alert: Media Out
A print command, FEED has been pressed, or a print job is in progress; but the printer cannot detect
media in the print path.
Status indicator alert:
Display alert:
Possible causes and resolutions:
• No media (roll) in the printer.Load your chosen media in the printer and close the printer.See Roll
MediaTypes and Loading on page 178. You may need to press FEED once or press PAUSE to get the
printer to resume printing.
• The printer has detected a missing label on the roll.Open the printer: If there is a missing label on the
roll between two labels at the end of a roll of labels, then this is a method used by the label roll
manufacture to identify the end of the roll. See Detecting and Recovering from a Media Out Condition
on page 201.Replace the empty media roll and continue printing. Do NOT turn printer power OFF.
You will lose your print job if you do.
• Misaligned media sensor.Check the position of the media sensor. TThe printer may need to be
calibrated for the media after the adjusting the sensor location. See Running a SmartCal Media
Calibration on page 199.
• The printer is set for non-continuous (labels or black mark) media, but continuous media is
loaded.Check the position of the media sensor is in the center default location. See Movable Sensor
Adjustment
on page 182.The printer may need to be calibrated for the media after the adjusting the
sensor location. See Running a SmartCal Media Calibration on page 199.
312
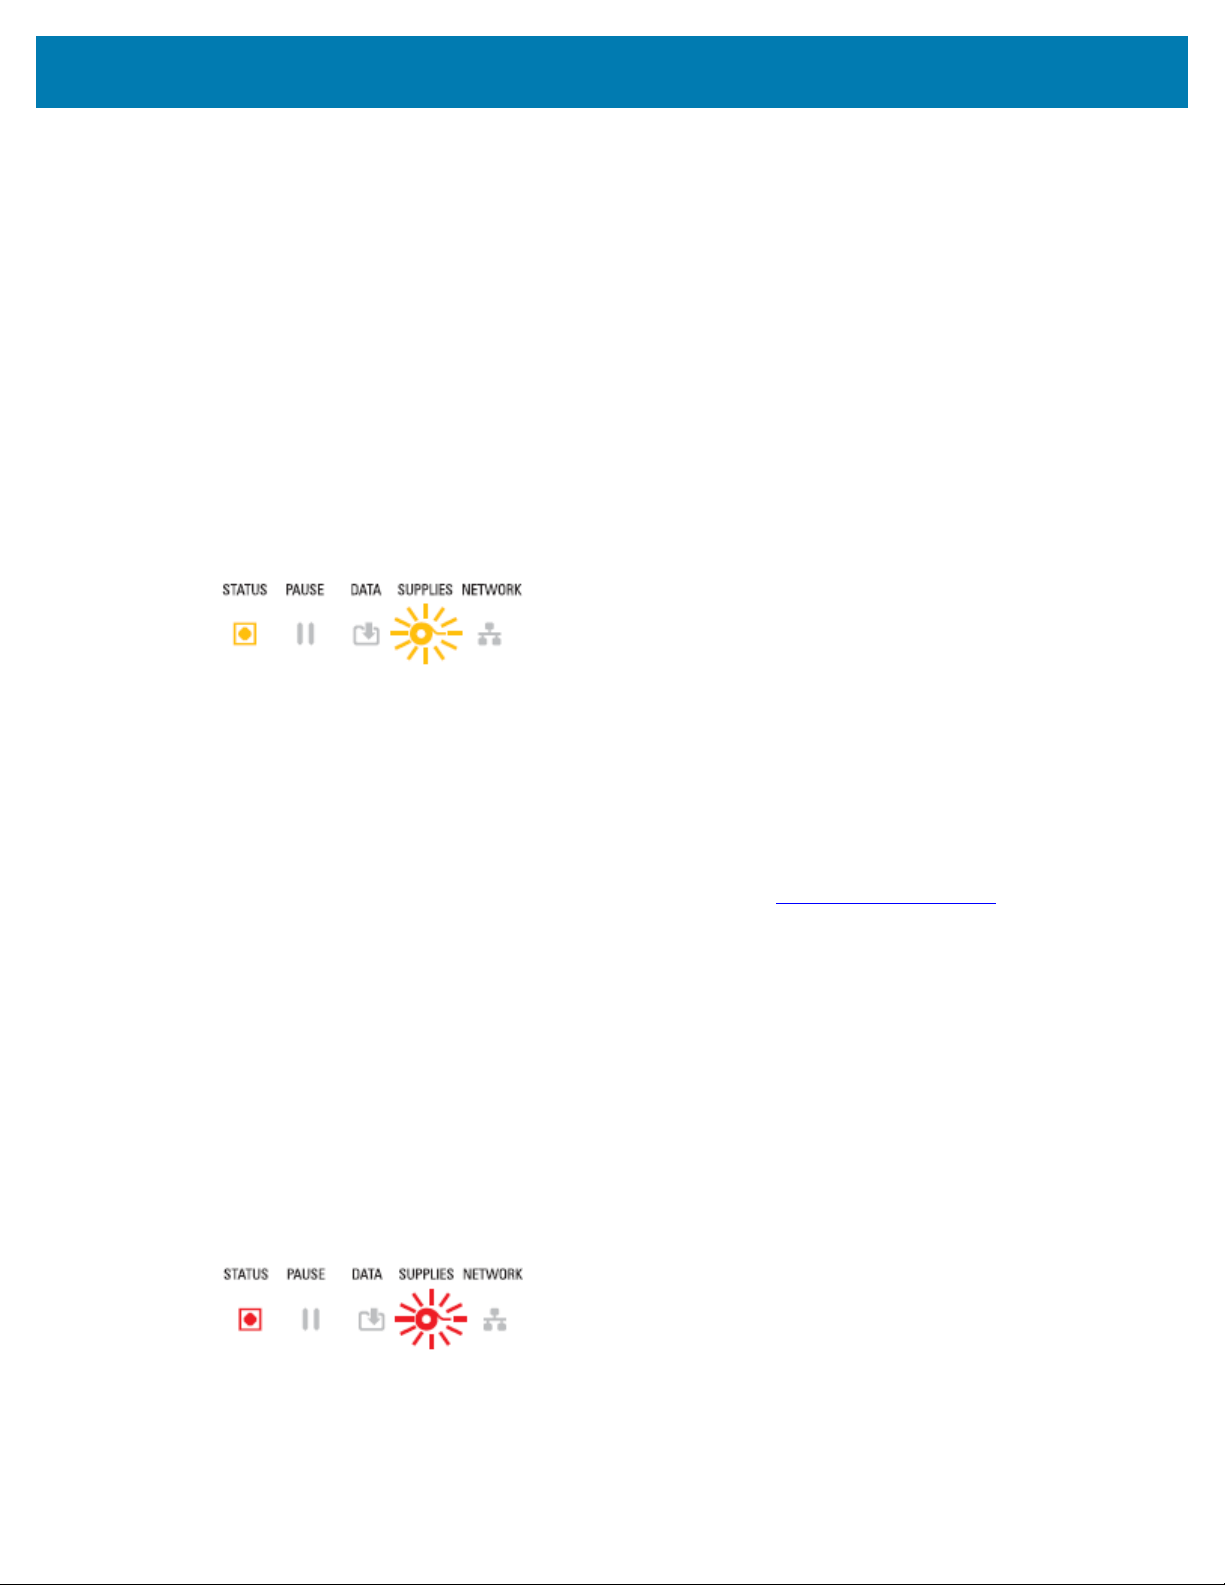
Troubleshooting
• The media sensor is dirty.Clean the Upper Web (Gap) Sensor Array and the lower Movable Media
sensors. See Cleaning the Sensor on page 281.Reload your media, adjust the Movable Media sensor’s
position for your media, and recalibrate the printer for the media. See Movable Sensor Adjustment on
page 182, Roll MediaTypes and Loading on page 178,and Running a SmartCal Media Calibration on
page 199.
• The printer is unable to sense the media due to possible data corruption of memory or faulty
components.Reload the printer’s firmware. See Updating Printer Firmware on page 310.If this does not
fix this issue, call a service technician.
Alert: Ribbon In – ZD421 Ribbon Cartridge Printer Only
When you see this alert, a print command has been sent to the printer and it is in Direct Thermal mode
with ribbon installed.The printer has two heat settings–one for Direct Thermal printing and another for
Thermal Transfer printing. They are designed to have equivalent print density/darkness at the same setting
level.Direct Thermal mode does not use or require ribbon.
Status indicator alert:
Possible causes and resolutions:
• There is a Ribbon Cartridge in the printer while the printer is set to Direct Thermal mode (and printing on
direct thermal media).Remove the ribbon cartridge from the printer without turning the printer OFF.
Close the printer. You may need to press FEED once or PAUSE the get the printer to resume printing.
• The printer is incorrectly set to Direct Thermal mode when you are trying to print using transfer media
and a ribbon cartridge to print.Change the PRINT METHOD to THERMAL TRANS (Thermal Transfer)
mode. The print format (form) send for this print job may have Direct Thermal mode set with a ^MTD set
instead of ^MTT. The ZPL Programming Guide is available at
http://zebra.com/manuals.
• To change this setting:
• Use the printer’s Color Touch display user interface (if present) to change the setting. See Print >
Print Quality > Print Type
on page 139.
• Use an Ethernet (LAN or WLAN) printer’s Print Server Web page to access and set the PRINT
METHOD to THERMAL TRANS (Thermal Transfer) mode. See Print > Print Quality > Print Type on
page 139 to learn how to navigate the print server user interface.
Alert: Ribbon Out
The printer is printing and stops while printing.Or,a print job has been sent to the printer and the printer
immediately reports this alert.
Status indicator alert:
313
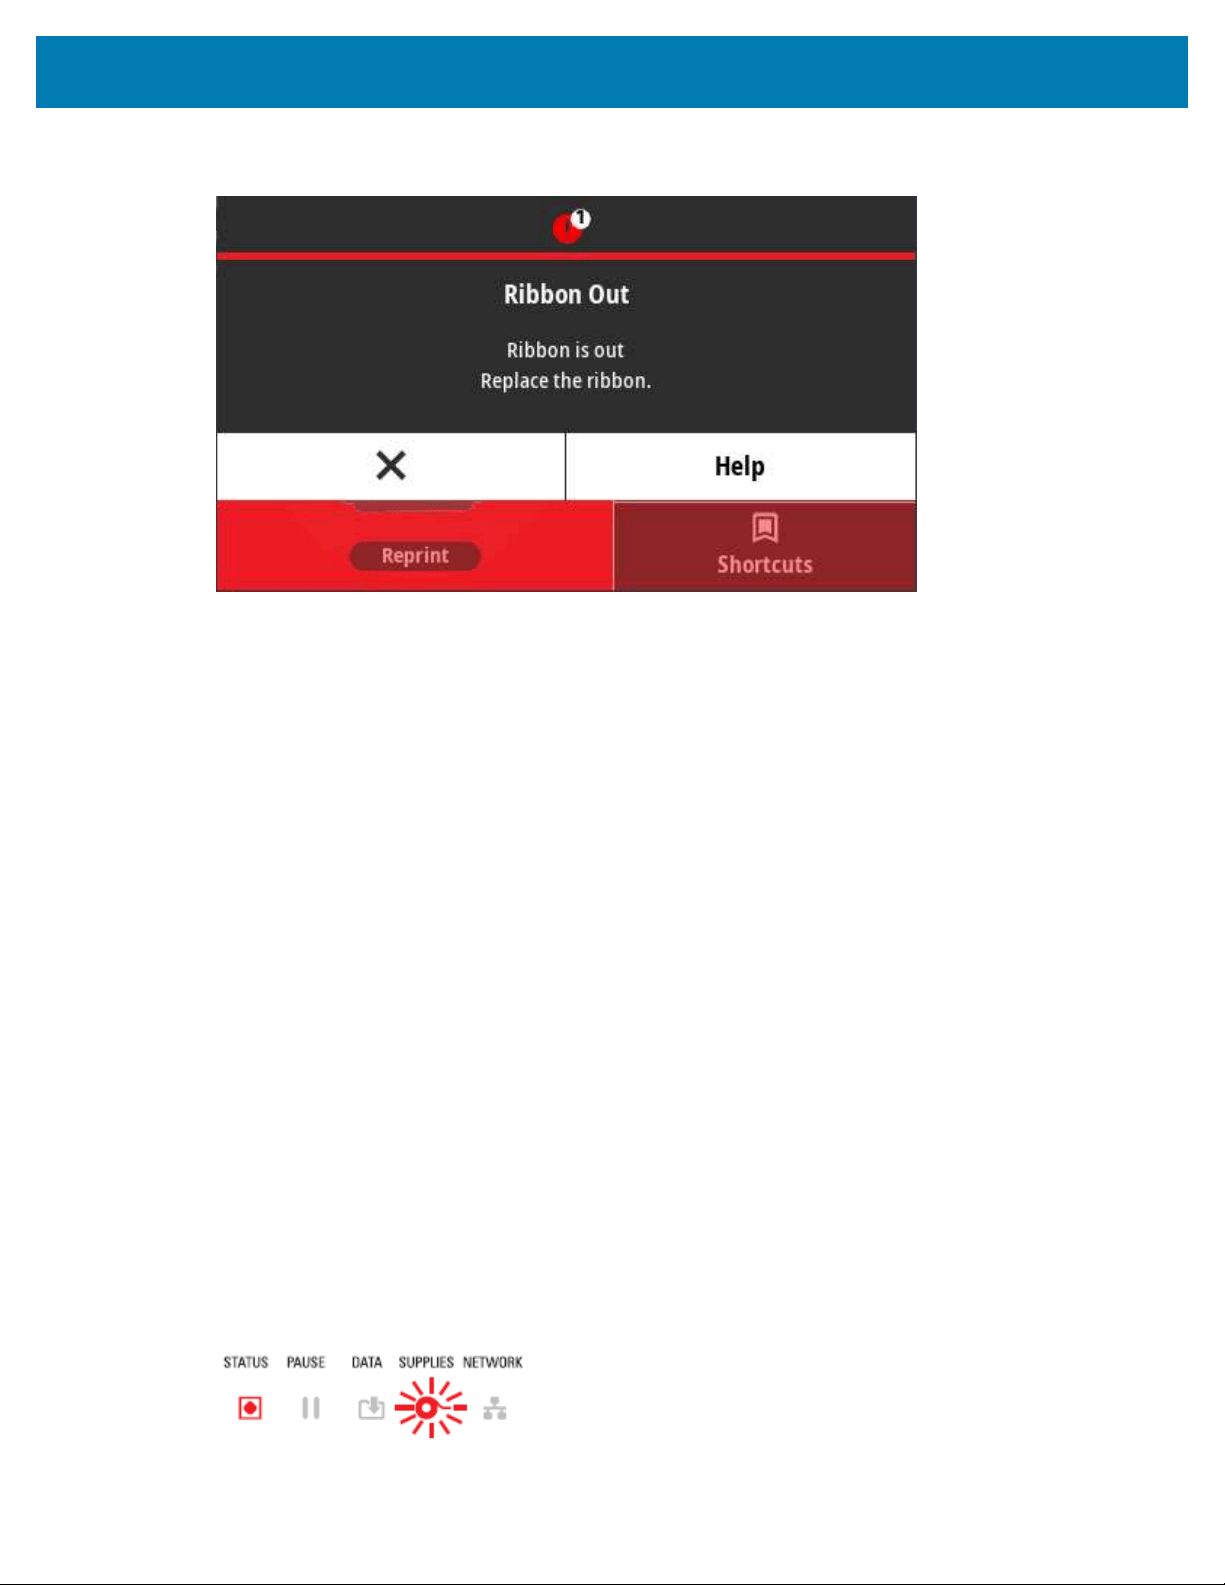
Troubleshooting
Possible causes and resolutions:
• The printer has detected the end of the ribbon. The ends of Genuine Zebra Transfer Ribbons have
reflective trailers which the printer interprets as End of Ribbon, meaning the ribbon supply has been
used up.Remove the ribbon and replace the ribbon rolls or ribbon cartridge, then close the printer. You
may need to press FEED one time or press PAUSE to get the printer to resume your print operation.See
Detecting and Recovering from a Ribbon Out Condition on page 203.
• ForZD421 Ribbon Cartridge Printers only:A ribbon cartridge needs to be loaded in the printer. The
printer is set for Thermal Transfer mode. See
Loading the Ribbon Cartridge (ZD421ribbon cartridge
printers only) on page 198.
• ForZD421 Ribbon Cartridge printers only:The printer is unable to sense media possibly because:
• The ribbon cartridge data chip or cartridge sensor contacts is dirty.
• Data in memory is corrupted.
• The cartridge or printer components are faulty.
To fix this problem:
• Try another working ribbon cartridge if you have one.
• Clean the ribbon cartridge chip with an alcohol-moistened swab.
• Clean the ribbon cartridge sensor’s contact pins. See
Cleaning the Sensor – Upper Half of the ZD421
Ribbon Cartridge Printers on page 284 for cleaning instructions.
• Reload the printer’s firmware. See Updating Printer Firmware on page 310.
• If this does not fix this issue, call a service technician.
Alert: Ribbon Low – ZD421 Ribbon Cartridge Printer Only
Printer only) Status indicator alert:
314
Display alert:
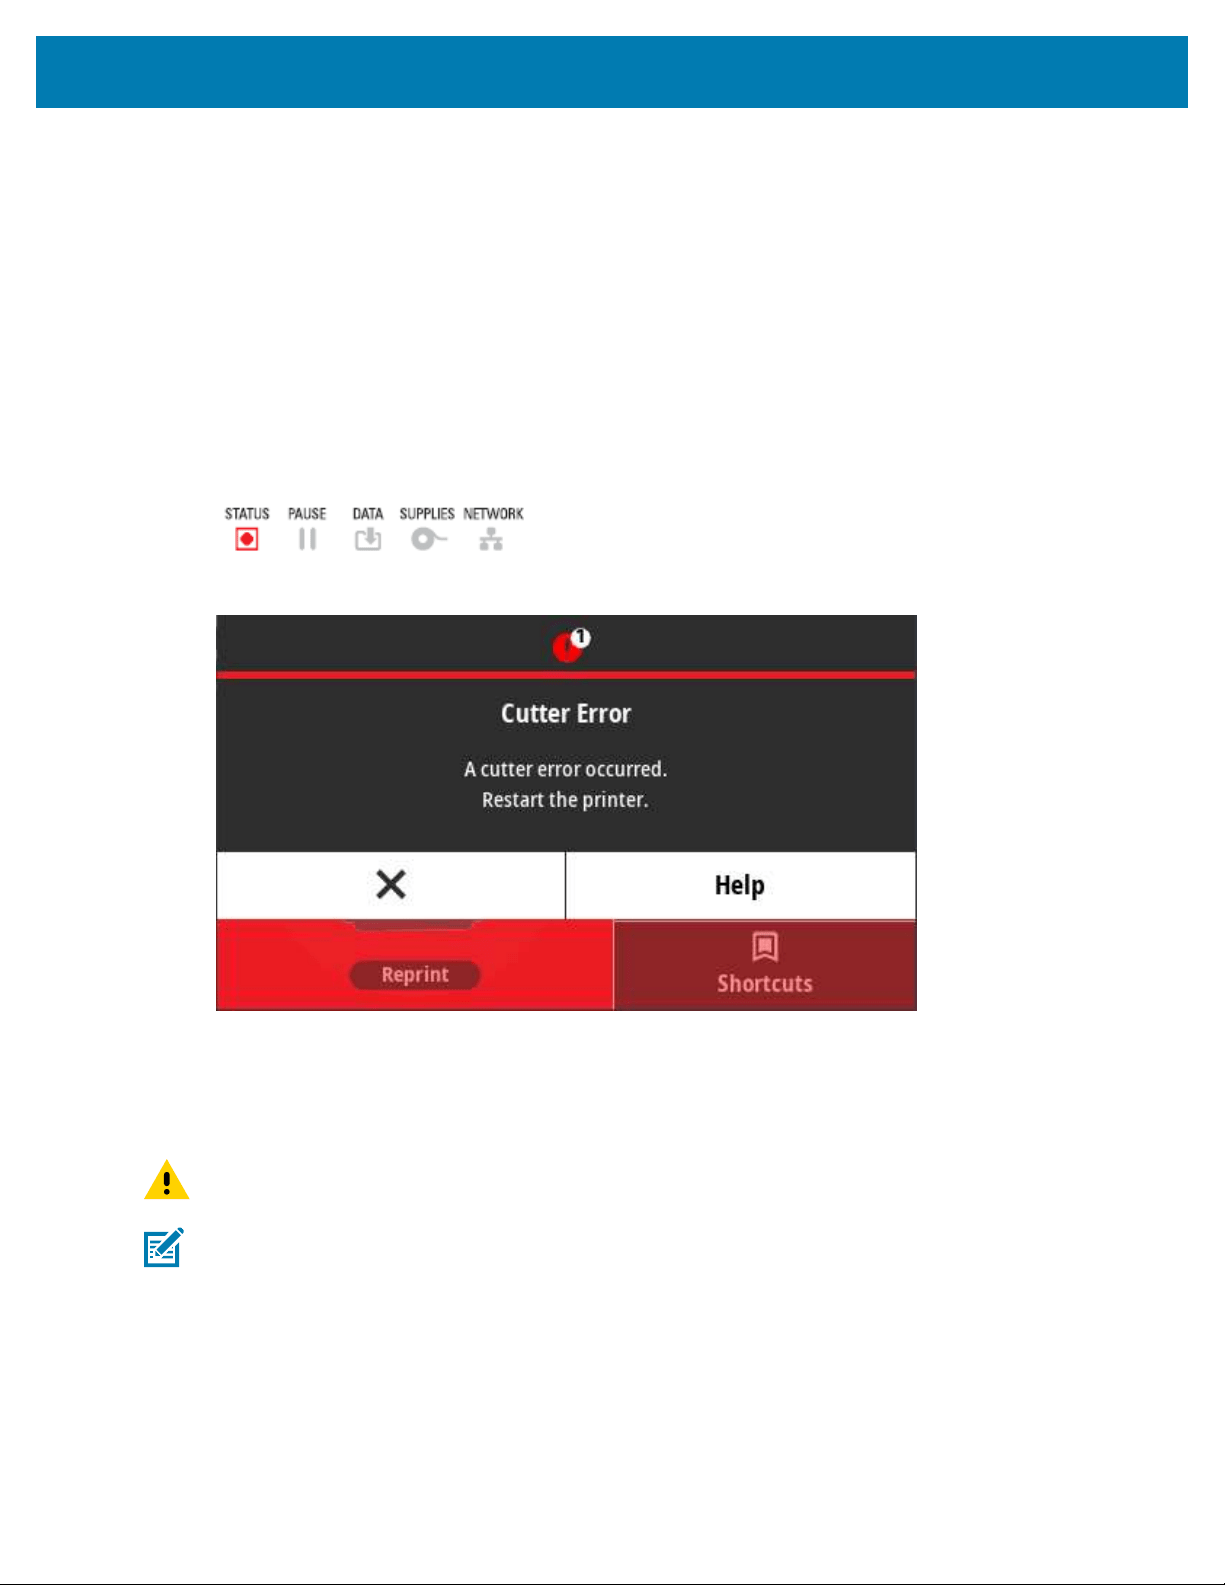
Troubleshooting
Possible causes and resolutions:
The printer has calculated that the ribbon cartridge has only 10% of the ribbon left in the cartridge.
You can change the ribbon low value if needed using programming commands.
Check for the availability of ribbon cartridges. For information on changing the Ribbon Low warning point,
see Ribbon Cartridge Programming Commands on page 251.See also the ZPL Programming Guide for
details on printer programming.For links to the Zebra support pages for these and other manuals, see
About This Guide on page 13.
Alert: Cutter Error
The cutter blade is bound and is not moving properly.
Status indicator alert:
Display alert:
Possible causes and resolutions:
Media, adhesive, or an foreign object has stopped the cutter blade from operating.Turn printer power OFF
by holding POWER down for five seconds. Wait for the printer to shutdown completely, then turn printer
power ON.If the printer does not recover from this error, call a service technician for assistance.
CAUTION: There are no operator serviceable parts in the cutter unit. Never remove the cutter
cover (bezel). Never attempt to insert objects or fingers in to the cutter mechanism.
NOTE: Using unapproved tools, cotton swabs, solvents (including alcohol), etc. may damage or
shorten the cutter’s usable life or cause the cutter to jam.
Alert:Printhead Over Temp
The printhead is over temperature and paused to allow the printhead to cool.
Status indicator alert:
315
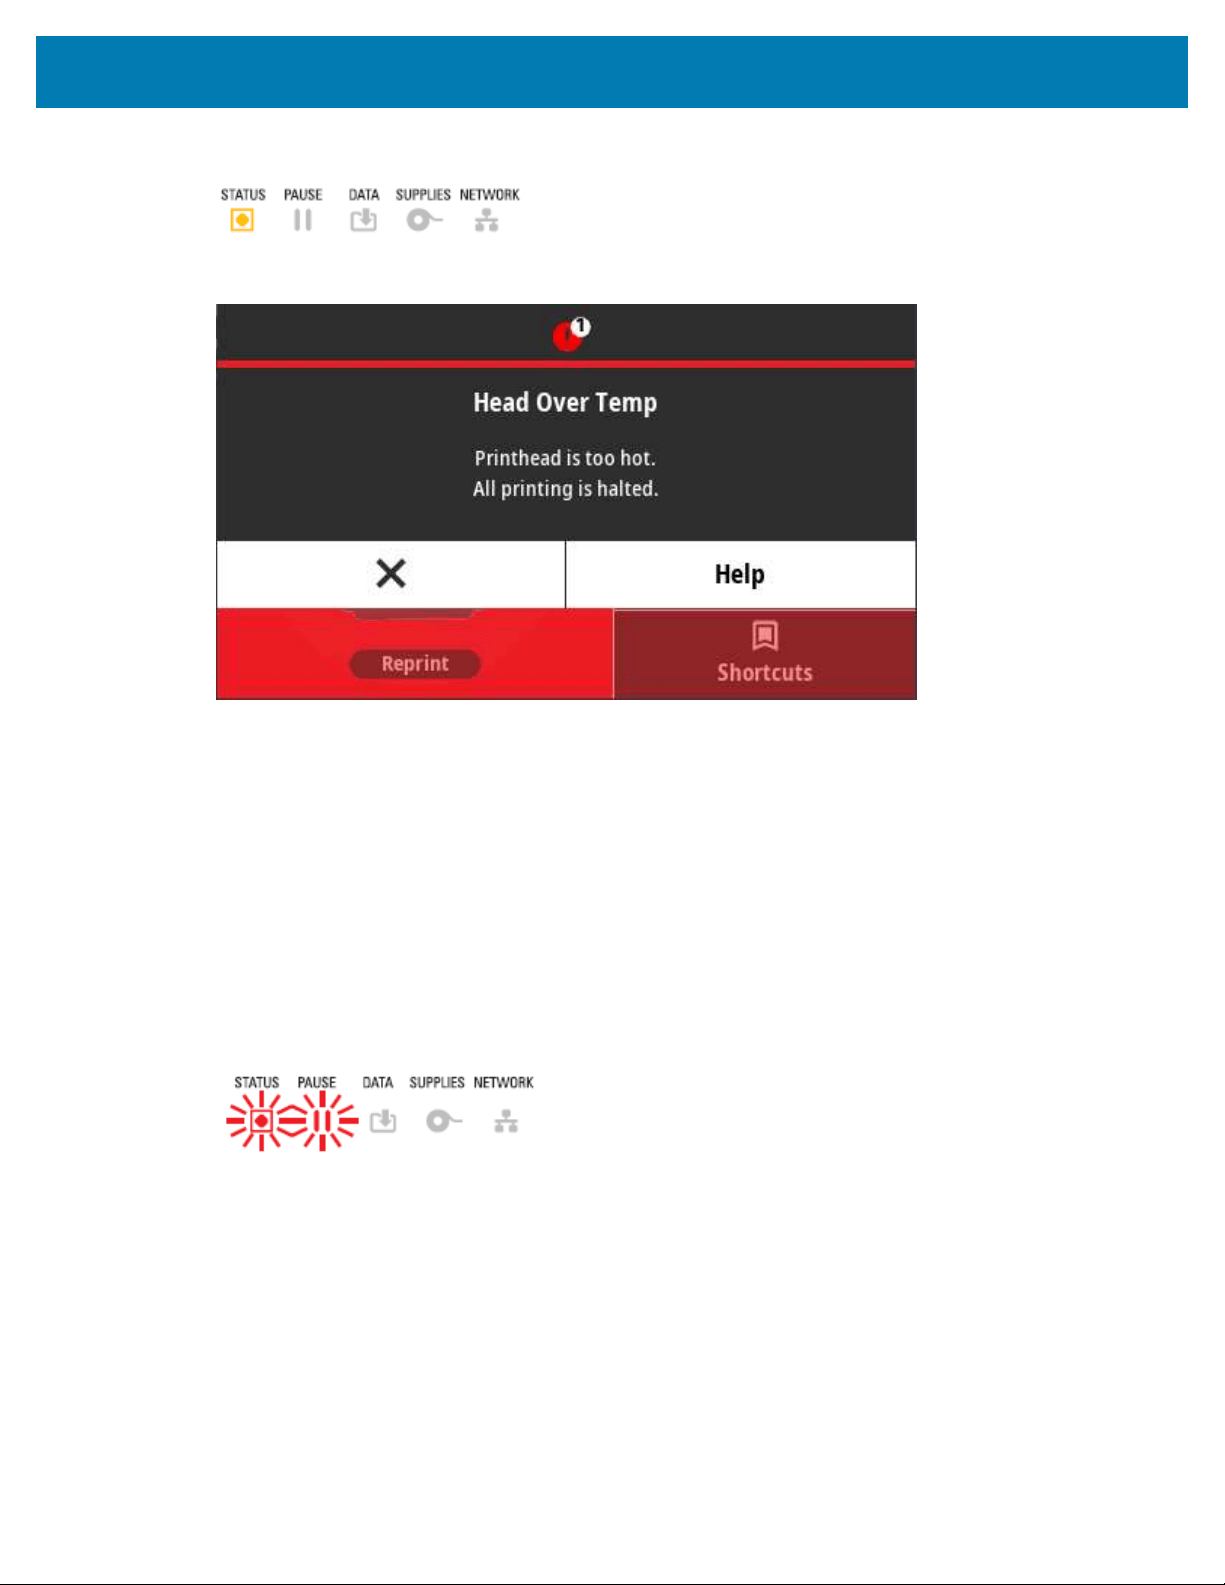
Troubleshooting
Display alert:
Possible causes and resolutions:
• The printer is printing a large batch job, typically with large amounts of print.The print operation will
resume after the printhead has cooled.
• The ambient temperature at the printer's location exceeds the specified operating range. Ambient
temperatures in the printer can at times rise if it is in a location that receives direct sunlight.Move
the printer to a different location, or cool the ambient temperature in the location where the printer is
operating.
Alert: Printhead Shutdown
The printhead is below operating temperature for proper printing.
Status indicator alert:
The printhead has had a critical temperature or power failure.Turn printer power OFF by holding POWER
down for five seconds. Wait for the printer to shutdown completely, then turn printer power ON.If
the printer does not recover from this error, call a service technician. The printhead is not a operator-
serviceable item.
Alert: Printhead Under Temp
The printhead is below operating temperature for proper printing.
316
Status indicator alert:
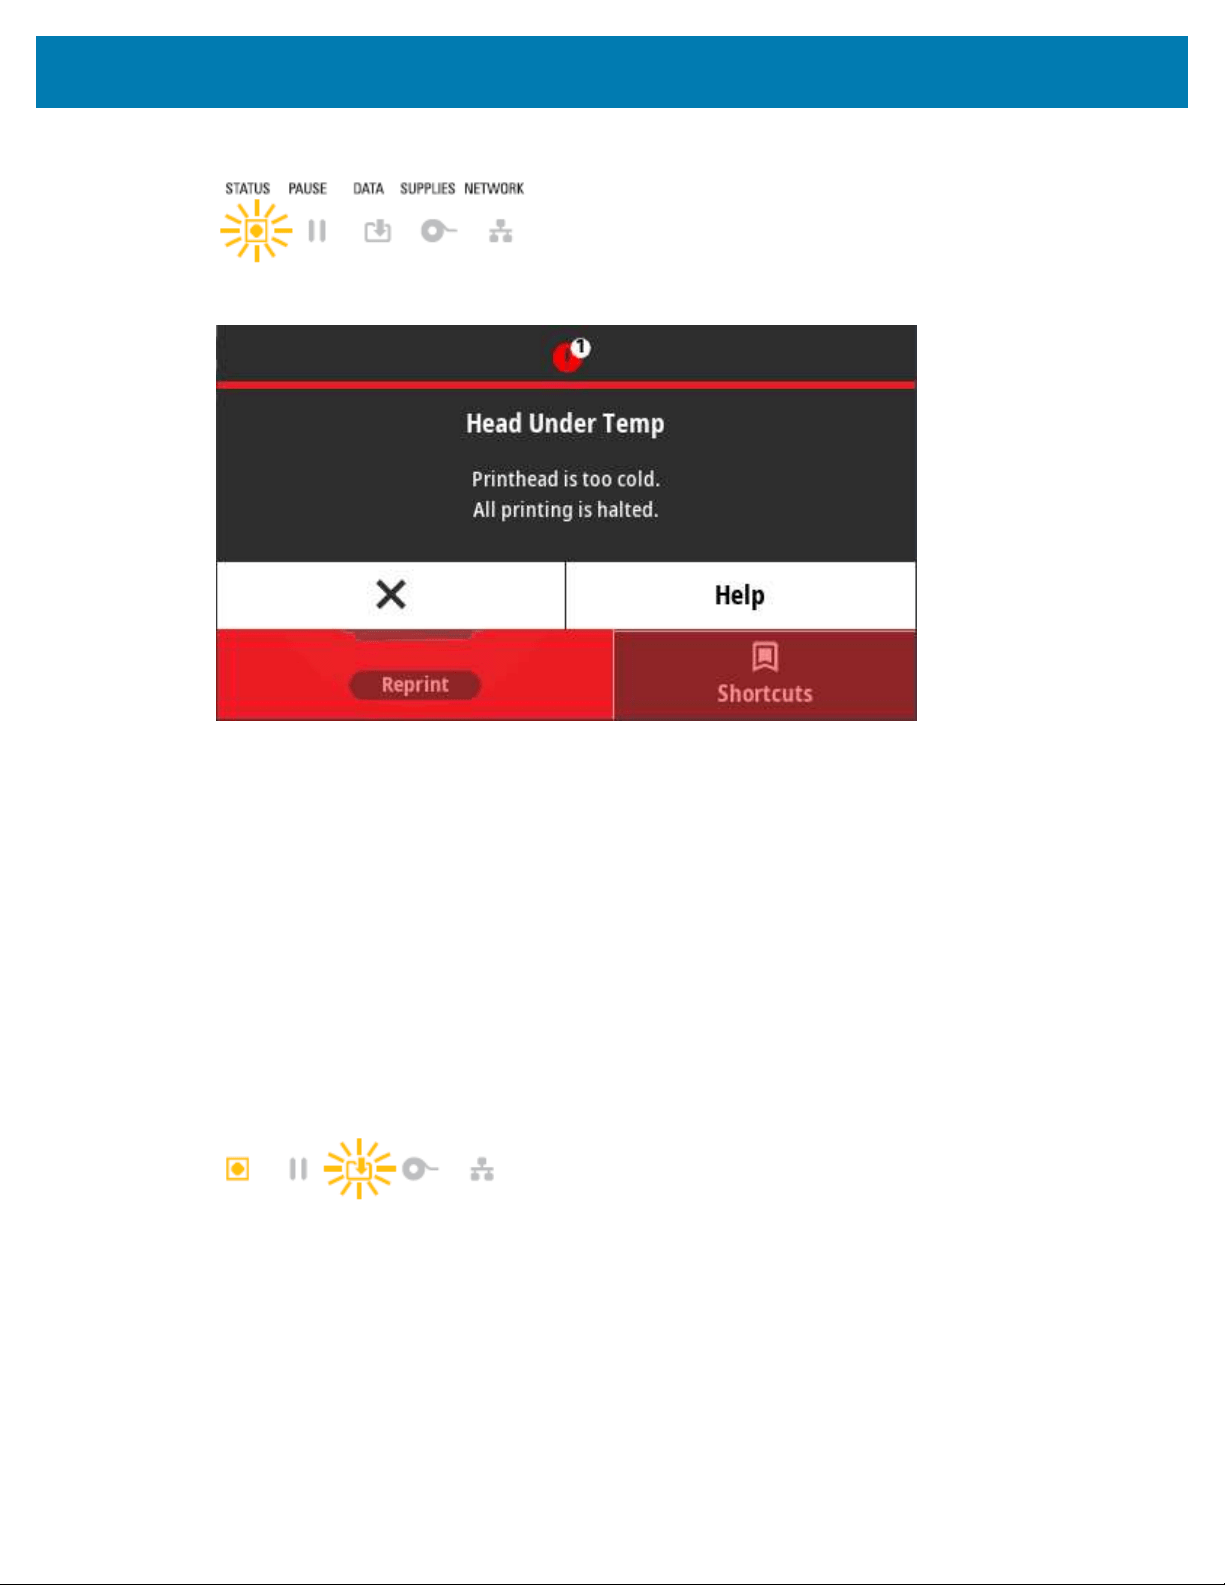
Troubleshooting
Display alert:
Possible causes and resolutions:
• The ambient temperature at the printer's location is below the specified operating range.Turn printer
power OFF, then move the printer to a warmer location and wait for it to warm naturally. Moisture may
condense in and on the printer if the temperature changes too quickly.
• The printhead thermistor has failed.Turn printer power OFF by holding POWER down for five seconds.
Wait for the printer to shutdown completely and turn printer power ON.If the printer does not recover
from this error, call a service technician.
Alert: Out of Memory
Data can not be stored in the specified memory location. There are four types of storage memory: Graphic,
Format, Bitmap and Font. There is not enough memory to perform the function specified on the second line
of the error message.
Status indicators alert:
317
Status indicator alert:
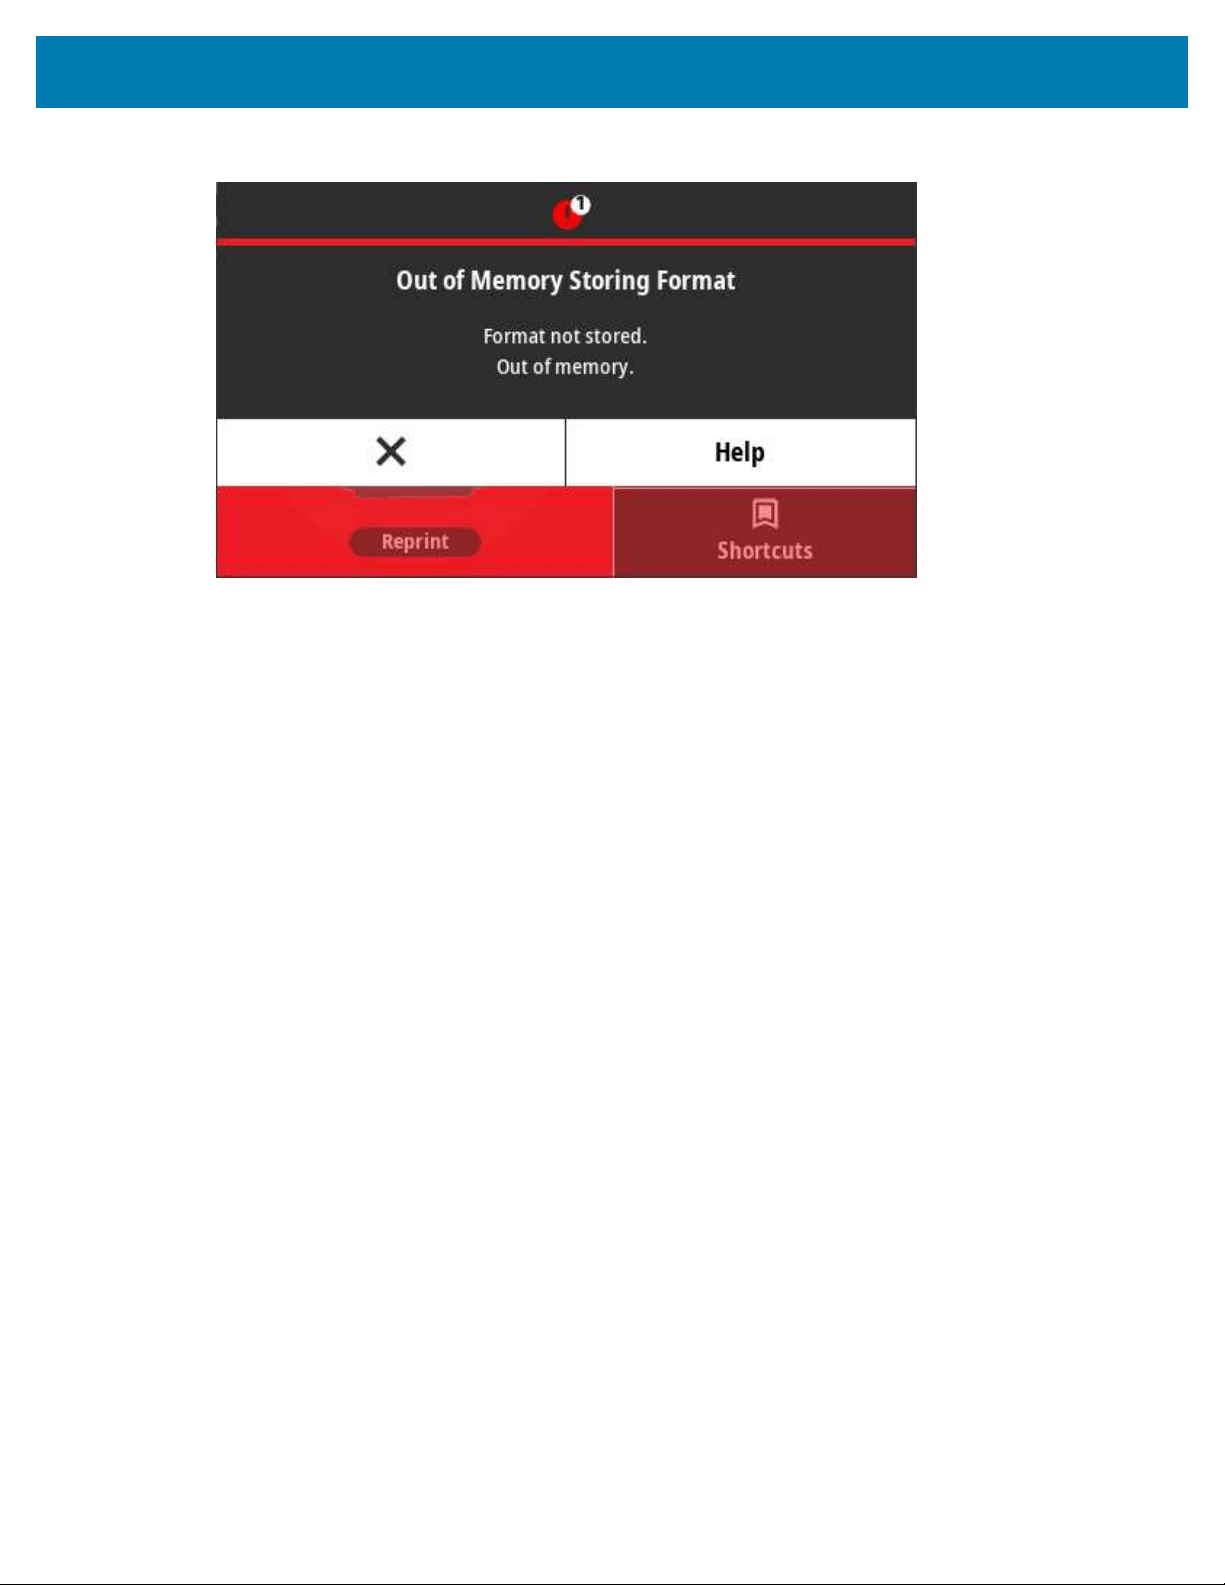
Troubleshooting
Possible causes and resolutions:
There is not enough memory to perform the function specified on the second line of the error message.
• Free up some of the printer’s memory by adjusting the label format or printer parameters to make the
print area smaller.
• Remove unused graphics, fonts, or formats.
• Ensure that the data is not directed to a device that is not installed or is unavailable.
Resolving Print Issues
This section helps you identify issues with printing or print quality, the possible causes, and the
recommended solutions.
Issue: General Print Quality Issues
The printer image does not look right.
Possible cause and resolutions:
• The printer is set at an incorrect darkness level and/or print speed. Perform the Print Quality Report
(FEED self test) to determine the ideal darkness and speed settings for your application. Do not set
print speeds above the manufacturer’s maximum rated speed for your media (print material and ribbons
both). See Printing a Print Quality Report(FEED Self Test) on page 327 and Adjusting the Print Quality
on page 242.
• The printhead is dirty.Clean the printhead. See Cleaning the Printhead on page 272.
• The platen roller is dirty or damaged.Clean or replace the platen. Platens can wear out or get damaged.
See Cleaning and Replacing the Platen on page 286.
• The printhead has worn out.Replace the printhead. The printhead can wear out and be damaged. See
Cleaning the Printhead on page 272.
• During thermal Transfer printing, printing looks fuzzy, has smudge marks, or has voids or holes
in print with no particular pattern.The print material (wax, wax-resin, or resin) may not match the
material (paper, media coating, or synthetics) in use. Set the printer for no higher than the maximum
318
Display alert:

Troubleshooting
recommended print speed of the ribbon cartridge. For information on reading ribbon cartridge features,
see Ribbon Cartridge Programming Commands on page 251.
• You may be using the wrong power supply.Verify you are using the power supply that came with this
printer.
Issue: No Print on the Label
The printed image does not look right.
Possible causes and resolutions:
• The media may not be direct thermal media (and is thermal media made for thermal transfer
printers).See Determining Thermal Media Types on page 371.
• Media has been loaded incorrectly.The media printable surface must face up towards the printhead.
See What You WillNeed to Print on page 21 and Roll MediaTypes and Loading on page 178.
Issue: Labels Are Distorted in Size or Print Area Start Position Varies
Coincident with this issue,the printed image may skips between labels (mis-registration).
• Media has been loaded incorrectly or the movable media sensor is not set properly.Verify that the
sensor is set and positioned correctly for your media type and sensing location. See the following
topics:
• Roll MediaTypes and Loading on page 178
• Setting Media Sensing by Media type on page 179
• Adjusting the Movable Sensor for Black Marks or Notches on page 183
• Adjusting the Movable Sensor for Web (Gap) Sensing on page 183
• The media sensors are not calibrated for your media length, physical properties, or sensing type (gap/
notch, continuous, or mark).See Running a SmartCal Media Calibration on page 199. If the printer still
skips labels, try a manual media calibration. See Print > Sensors > Manual Calibration on page 147.
• The platen (drive) roller is slipping or damaged.Clean or replace the platen. Platens can wear out or get
damaged. See Cleaning and Replacing the Platen on page 286.
• The printer has communication issues with cables or communication settings.See Communication
Issues.
Communication Issues
This section identifies problems with communications, the possible causes, and the recommended
solutions.
Issue: Label Job Sent, No Data Transfer
A label format was sent to the printer but was not recognized. The DATA light does not flash.
The communication parameters are incorrect.
• Check the printer driver or software communications settings (if applicable).
319

Troubleshooting
• Serial Port only: Check the printer’s handshake protocol and serial port settings. The setting used
must match the one being used by the host computer. See Serial Port Interface on page 342 for the
printer’s default serial port settings.
• The serial cable you are trying to use may not be a standard DTE or DCE type cable, is damaged, or is
too long per the RS-232 serial ports specifications. See Serial Port Interface on page 342.
Issue: Label Job Sent, Skips Labels or Prints Bad Content
A label format was sent to the printer. Several labels print, then the printer skips, misplaces, misses, or
distorts the image on the label.
The serial communication settings are incorrect.Check the printer driver or software communications
settings (if applicable). Ensure that the flow control settings and other serial port handshake setting match
the host system.
Issue: Label Job Sent, Data Transfers, But No Print
A label format was sent to the printer but was not recognized. The DATA light flashes but no printing
occurs.
• The prefix and delimiter characters set in the printer do not match the ones in the label format.Verify
the ZPL command prefix (COMMAND CHAR) and delimiter (DELIM./CHAR) characters. See
Configuration Setting to Command Cross-reference on page 378.
• Incorrect data is being sent to the printer.Check the communication settings on the computer. Ensure
that they match the printer settings.
• Incorrect data is being sent to the printer.Check the label format. Refer to the ZPL Programming Guide
for details on printer programming. Links to the manual are available from the support pages for each
printer model listed in About This Guide on page 13.
Miscellaneous Issues
This section identifies miscellaneous issues with the printer, the possible causes, and the recommended
solutions for them.
Issue: Settings are Lost or Ignored
Some parameters are set incorrectly.
• Printer settings were changed without saving them.The ZPL ^JU command was not used to save your
configuration before turning the printer off. Turn printer power OFF and back ON to verify settings have
been saved.
• The label format/form commands or commands sent directly to the printer have syntax errors or have
been used incorrectly.
• A firmware command turned off the ability to change the parameter.
• A firmware command changed the parameter back to default setting.
Refer to the ZPL Programming Guide to verify command usage and syntax. The guide is available from
the support pages listed in About This Guide on page 13.
• The prefix and delimiter characters set in the printer do not match the ones in the label format.Verify
the ZPL programming settings of the Control, Command and Delimiter settings are correct for your
320

Troubleshooting
system software environment. Print a Configuration Report or use the display Language Menu (if
present) for these three menu items and compare it the commands in label format/form you are trying to
print. See Test Printing with a Configuration Report on page 200, System > Language on page 93, and
ZPL Configuration on page 376.
• The Main Logic board may not be working properly. Firmware is corrupted or the printer needs service.
• Reset the printer to factory defaults. See System > Settings > Restore Defaults on page 104 or use
the Zebra Setup Utility and select Open Printer Tools > Action > Load printer defaults.
• Reload printer firmware. See Updating Printer Firmware on page 310.
• If the printer does not recover from this error, call a service technician. This is not a user-serviceable
item.
Issue: Non-continuous labels act as Continuous labels
The printer was not calibrated for the media being used, or the printer is configured for continuous media.
Set the printer for the correct media type (gap/notch, continuous, or mark) and calibrate the printer. See
Running a SmartCal Media Calibration on page 199.if necessary use Print > Sensors > Manual Calibration
on page 147 to calibrate the printer for the media type you are using.
On ZD621 printers with color touch display, check and set the media typeby accessing Print > Print Quality
> Label Type on page 140.
Issue: Printer Locks Up
All indicator lights are on and the printer locks up or the printer locks up while restarting.
The printer memory has been corrupted by an unknown event.
• Reset the printer to factory defaults. See System > Settings > Restore Defaults on page 104 or use the
Zebra Setup Utility and select Open Printer Tools > Action > Load printer defaults.
• Reload printer firmware. See Updating Printer Firmware on page 310.
• If the printer does not recover from this error, call a service technician. This is not a user-serviceable
item.
Issue: Erroneous Ribbon Cartridge Faults
Printer indicates a Ribbon Out warning, but a ribbon cartridge is installed.Or a Ribbon Cartridge
Authentication error occurs even when a Genuine Zebra Ribbon Cartridge is installed and has not been
refurbished or altered.
The ribbon cartridge sensor contact pins or the ribbon cartridge’s smart chip’s contacts may be dirty or
the chip may be damaged.Clean the ribbon cartridge’s smart chip contact, if they look contaminated, with
alcohol and a lightly moistened cotton. Try a different cartridge if this does not work.
Also clean the ribbon cartridge sensor contact pins. See the steps that explain how to clean the pins in
Cleaning the Media Path – Upper Half of ZD421 Thermal Transfer Ribbon Cartridge Printers on page 278.
Issue: Battery has a Red Indicator
The battery has a fault.
321

Troubleshooting
The battery has reached its usable life or has a general component failure.Orbattery is too hot or too cold.
• Remove the battery from the printer and check charge status by charging the battery.
• Let the battery cool down or warm up to ambient temperature and recheck the battery charge.
• Replace the battery.
322

Tools
Tools
This section provides a variety of tools and utilities built into the printer. They are designed to assist you
with setup, configuration, and debugging (printer and command programming).
Printer Diagnostics
A variety of diagnostic tools and procedures are available to help you operate your printer and diagnose
problems. These include printer configuration and network configuration reports, diagnosticreports,
calibration procedures, and the ability to restore the printer settings to their factory defaults if needed.
Diagnostic Testing Tips
IMPORTANT: When performing self-tests, use full-width media. If the media is not wide enough,
the test labels may print on the platen (drive) roller.
To initiate a printer self test, you will need to press a specific user interface button or a combination of
buttons while turning printer power ON. Keep the button(s) pressed until the first indicator light turns off.
The selected self test automatically starts at the end of the normal power-up operation.
• When performing these self tests, do NOT send data to the printer from the central device.
• If your media is shorter than the label to be printed, the test label continues on the next label.
• If canceling a self test before it completes, always reset the printer by turning printer power OFF and
then ON.
• If the printer is dispensing the printer reports and liner is being taken up by the applicator, manually
remove the reports as they become available.
Power-On Self Test
The printer performs a Power-On Self Test (POST) each time printer power is turned ON.
During the Power-On Self Test, the control panel indicators turn on and off as the printer ensures readiness
to operate and handle print jobs.
At the end of this self test, only the STATUS indicator remains lit.
323
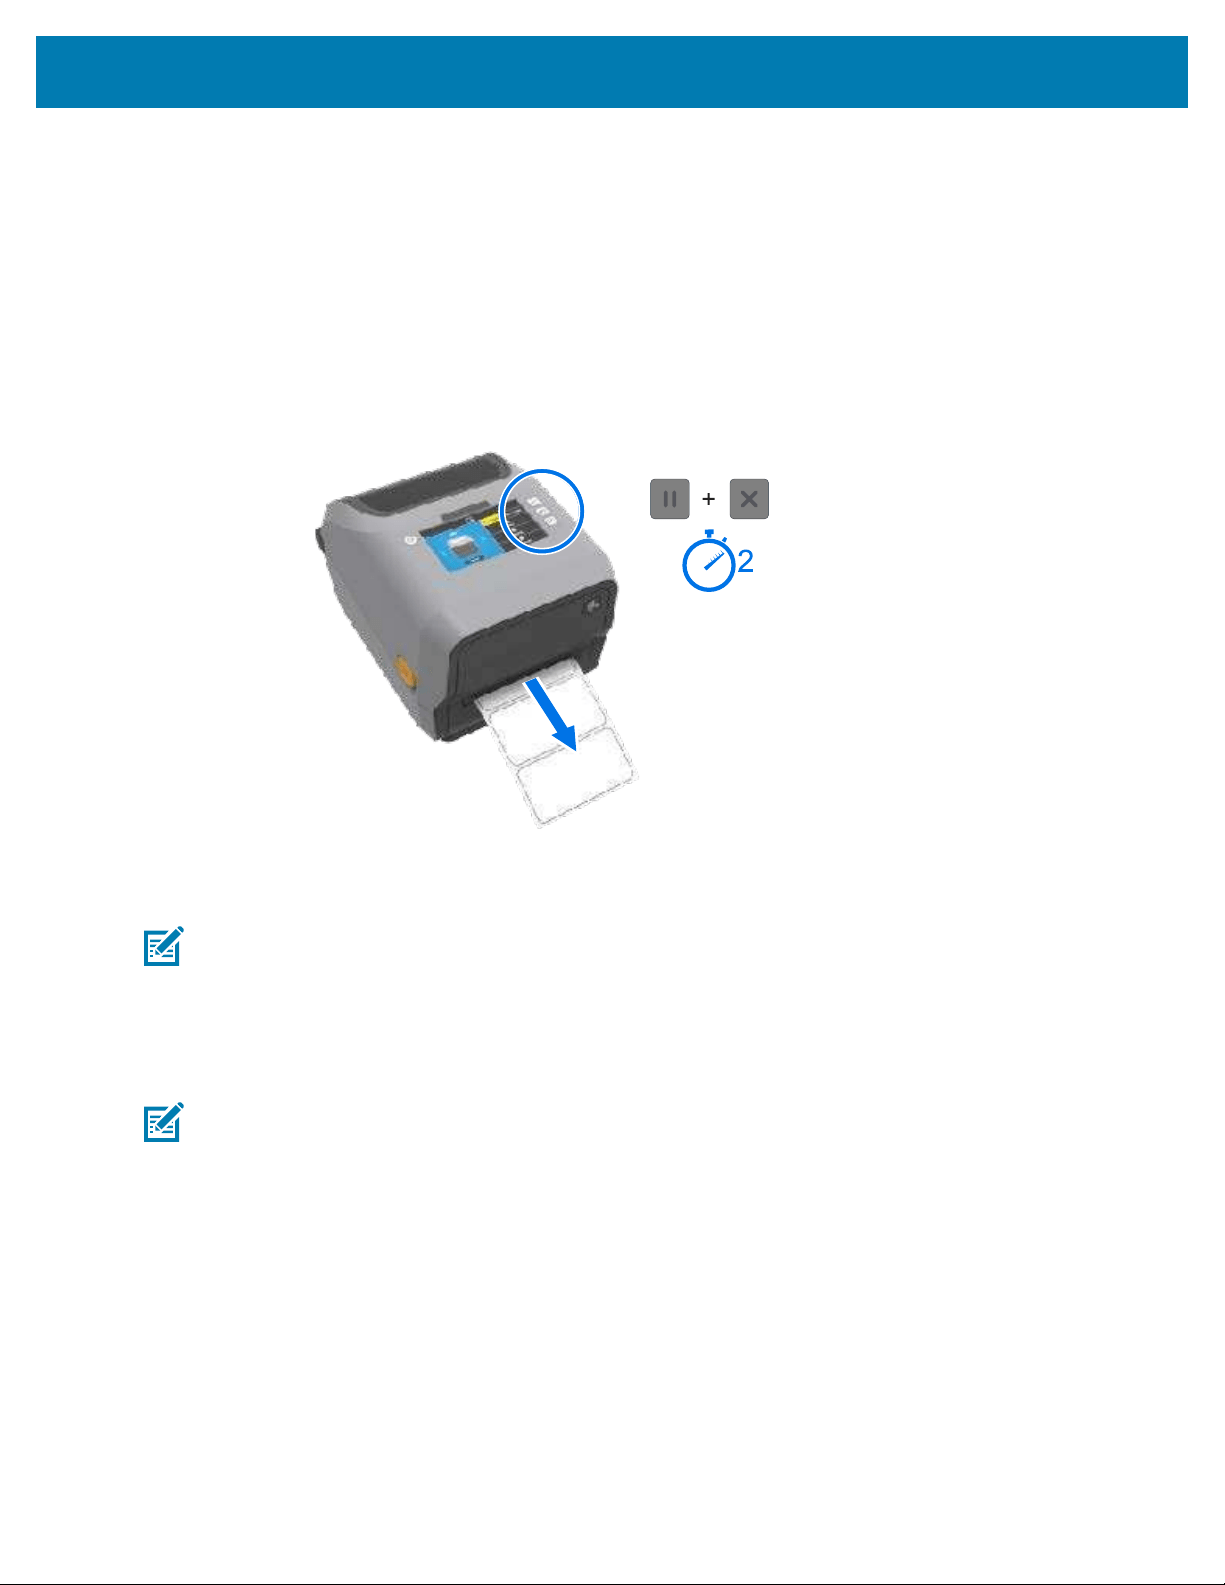
Tools
Running a SmartCal Media Calibration
The printer must set media parameters for optimal operation prior to printing. To do this, it automatically
determines the media type (web/gap, black mark/notch, or continuous) and the measure media
characteristics for printing.
1. Make sure media is loaded (and also ribbon if you are using thermal transfer mode) properly in the
printer and the top cover of the printer is closed.
2. Press POWER to turn printer power on and waituntil the printer is in the Ready state .
The STATUS Indicator lights solid green
3. Press and hold PAUSE and CANCEL simultaneously for two seconds, then release.
The printer feeds and measures a few labels and adjusts media sensing levels.When it completes
measuring, the STATUS indicator lights solid Green.
NOTE: After initial calibration to a specific media, additional calibrations are not necessary
for newly-loaded media as long as it is of the same type as the prior media used (media type,
vendor, batch, size, etc.). The printer automatically measures the newly-loaded media and adjusts
for any small changes in its characteristicswhen printing.
After you load a roll of new media from the same batch, you can simply press FEED (Advance)
once or twice to synchronize the labels and get the media set for printing.
NOTE: If the printer should fail to recognize and correctly calibrate to the media, see Manually
Calibrating Media on page 336.
Printing the Printer and Network Configuration Reports (CANCEL Self Test)
To print the configuration report:
324
1. Make sure media is loaded, the printer cover is closed, and printer power is ON.
If printer power is OFF, press and hold CANCEL while turning printer power ON, until the STATUS
indicator is the only indicator lit.
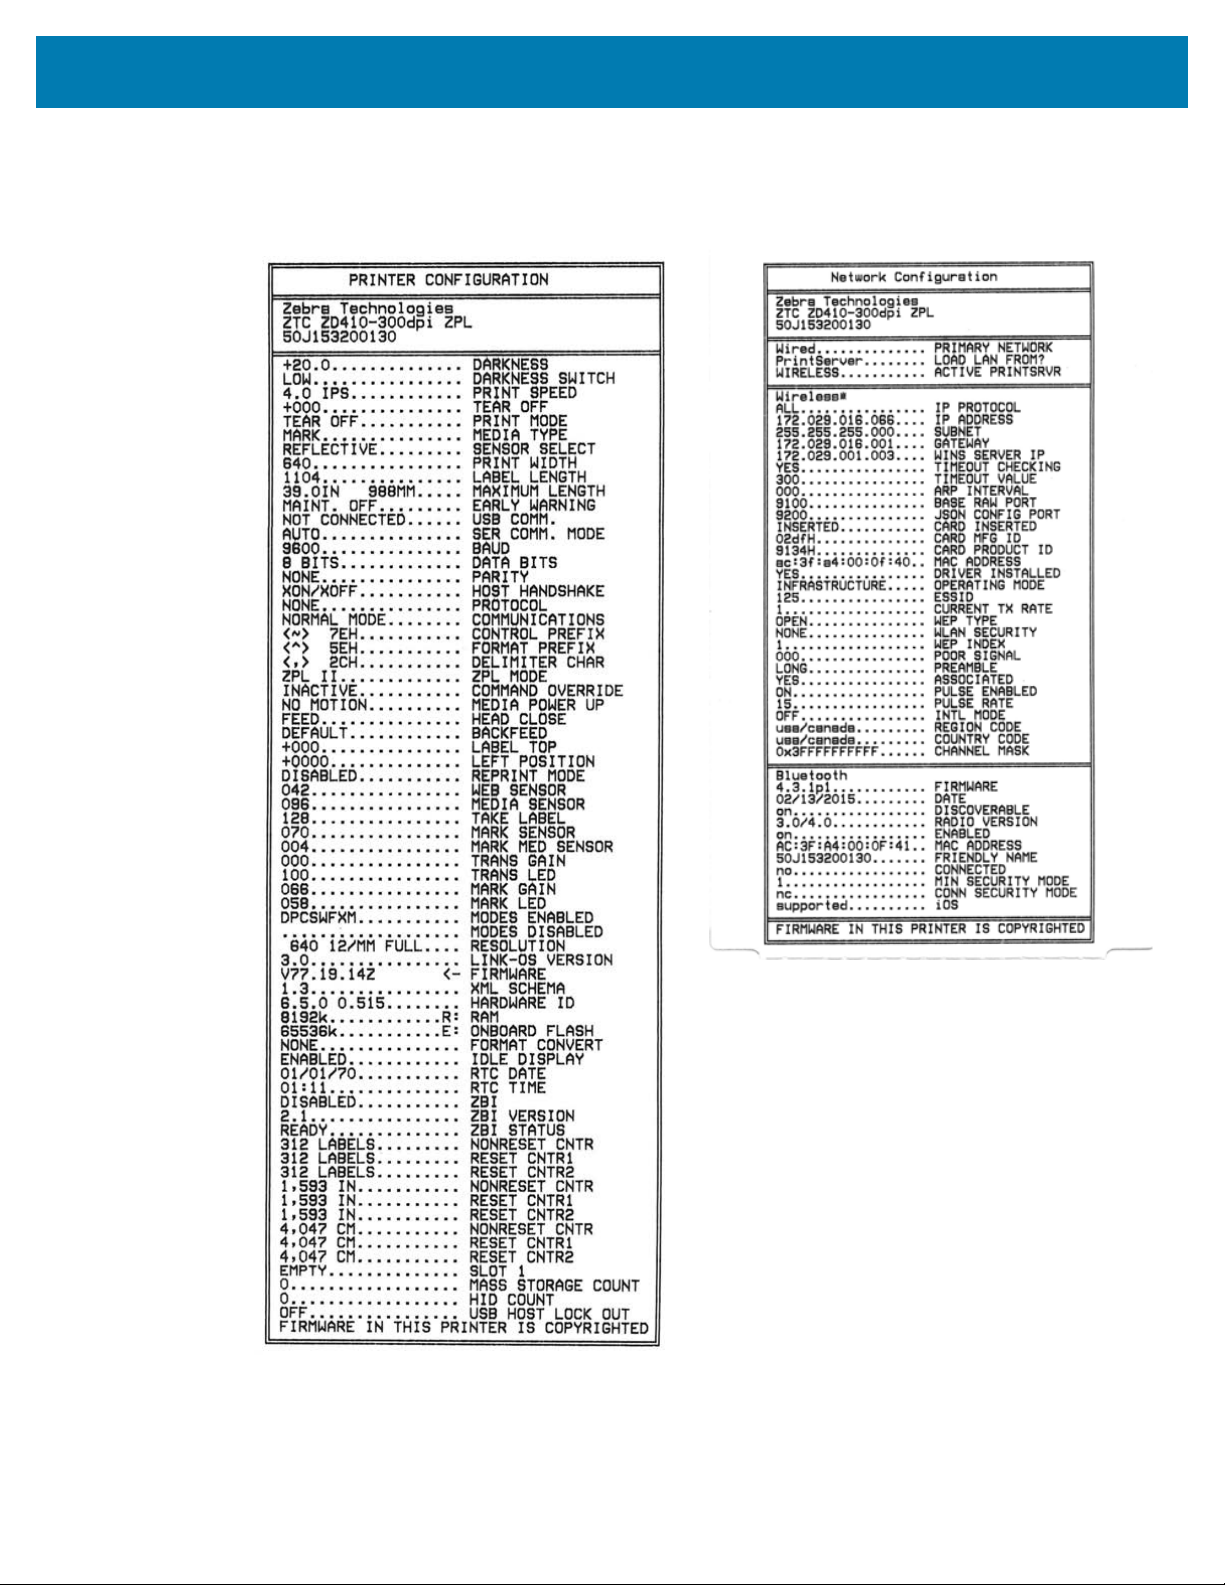
Tools
Press FEED + CANCEL for two seconds.
The Printer and Network Configuration Reports will print and the printer will return to READY
status.(The reports show here are samples. They may vary for your printer.)
325
2.
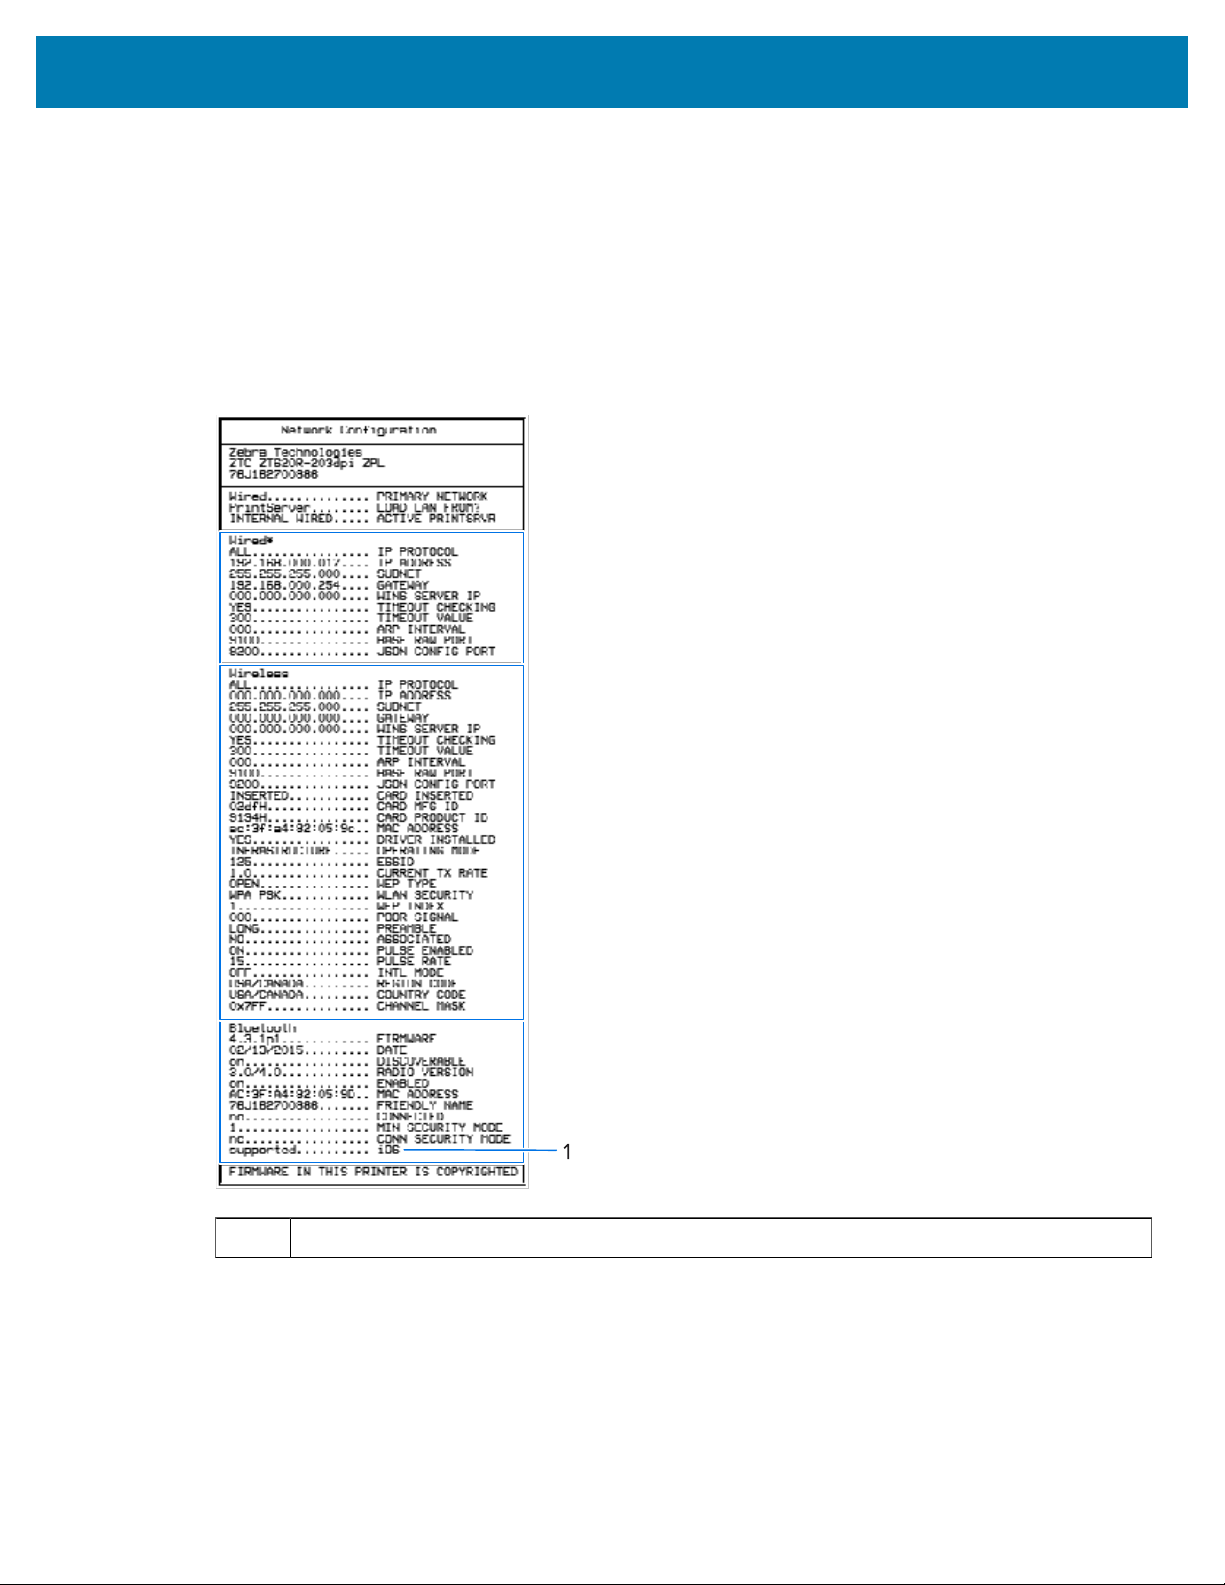
Tools
Network (and Bluetooth) Configuration Report
ZD Series printers that have wired or wireless connectivity options installed will print a network
configuration report in addition to a printer configuration report during a CANCEL self-test.
You will need the information in this report to establish and troubleshoot Ethernet (LAN and WLAN),
Bluetooth 4.1 and Bluetooth LE network printing.
In addition to the CANCEL self test, you can also output this report by sending the ~WL ZPL command to
the printer.
The report shown below is an example. The contents of the report may vary for your printer model.
1 iOS Support Setting
iOS devices have Bluetooth Classic 4.X (with 3.0 compatibility). When the Wi-Fi and Bluetooth Classic
wireless connectivity option is installed in your printer, it is listed as supported at the end of the Network
(and Bluetooth) Configuration report.
When the wireless connectivity option is NOT installed, the iOS setting is noted at the end of the Network
(and Bluetooth) Configuration report as not supported.
326
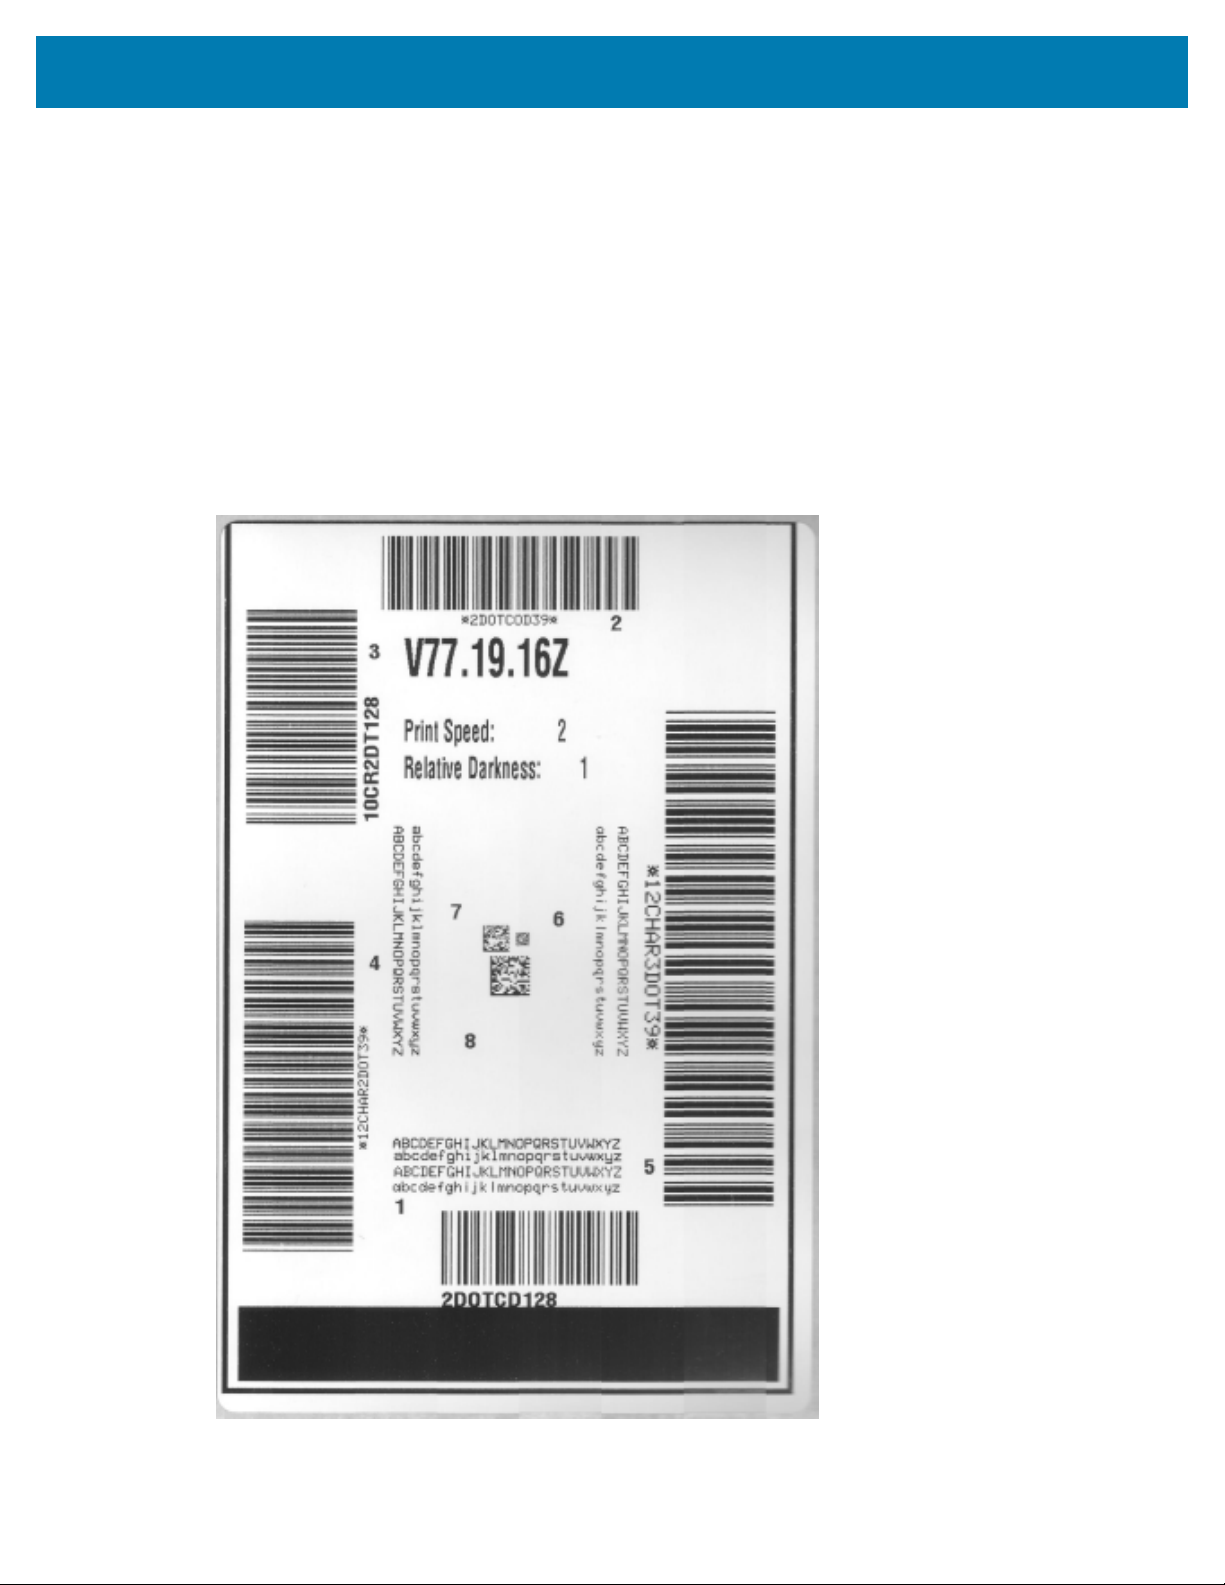
Tools
Printing a Print Quality Report(FEED Self Test)
Different types of media may require different darkness settings. Use this simple but effective method for
determining the ideal darkness for printing barcodes that are within specifications.
During the FEED self test, the printer prints a series of labels at different darkness settings at two different
print speeds.The barcodes on these labels may be ANSI-graded to show print quality.
During this test, one set of labels is printed at low speed, and another set is printed at the high speed. The
darkness value starts at three settings lower than the printer’s current darkness value (relative darkness
of -3) and increase until the darkness is three settings higher than the current darkness value (relative
darkness of +3).
Each label shows the relative darkness and the print speed.
Figure 8Print Quality Report
327

Tools
The speed at which labels are printed during this print quality test depends on the dot density of the
printhead.
• 300 dpi printers: Prints 7 labels at 51mm/sec (2 ips) and 102 mm/sec (4 ips) print speeds
• 203 dpi printers: Prints 7 labels at 51mm/sec (2 ips) and 152 mm/sec (6 ips) print speeds
Printing a Print Quality Report
You canprint a configuration report to use as a reference on the printer’s current settings.
1.
Press and hold FEED (
)and CANCEL ( ) simultaneouslyfor two seconds.
2. Turn printer power OFF.
328
3.
Press and hold FEED ( ) while turning printer power ON. Release FEED whenthe status indicator is
the only indicator lit.
The printer prints a series of labelsat various speeds and darkness settings that are higher and lower
than the darkness value shown on the configuration label.
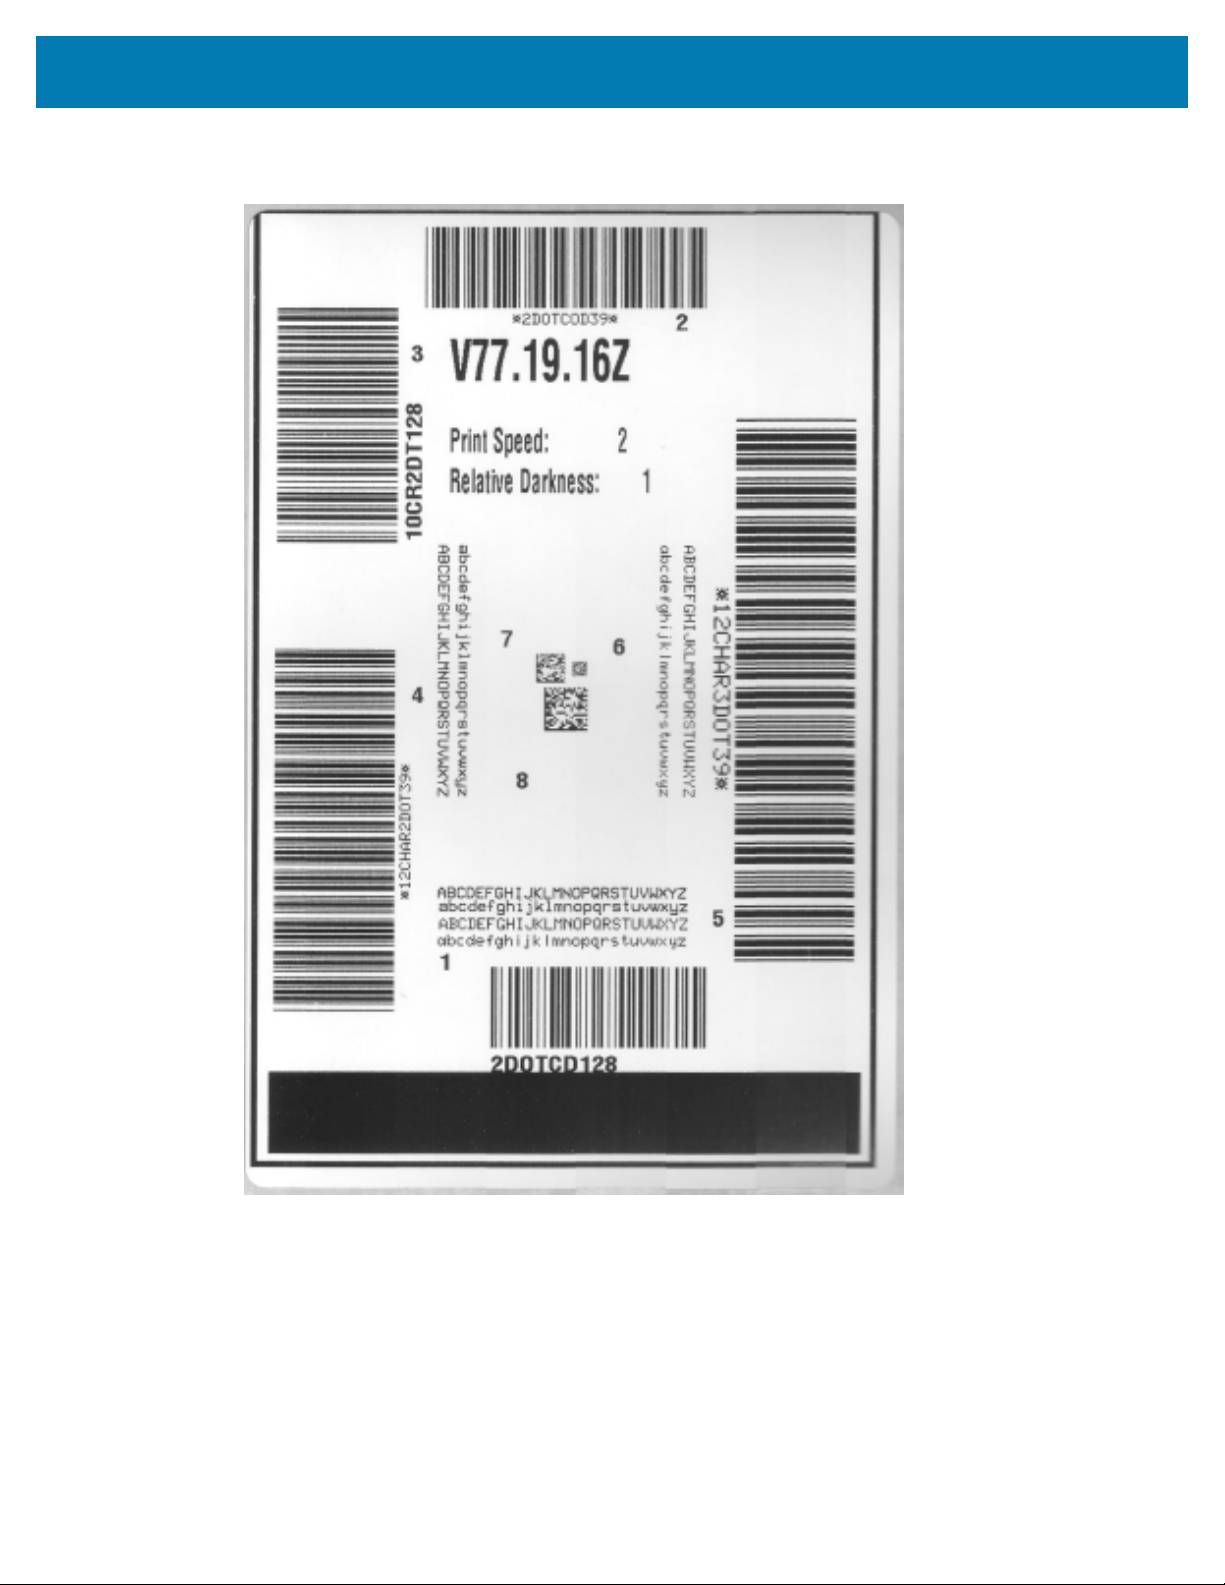
Tools
Figure 9Print Quality Report
329
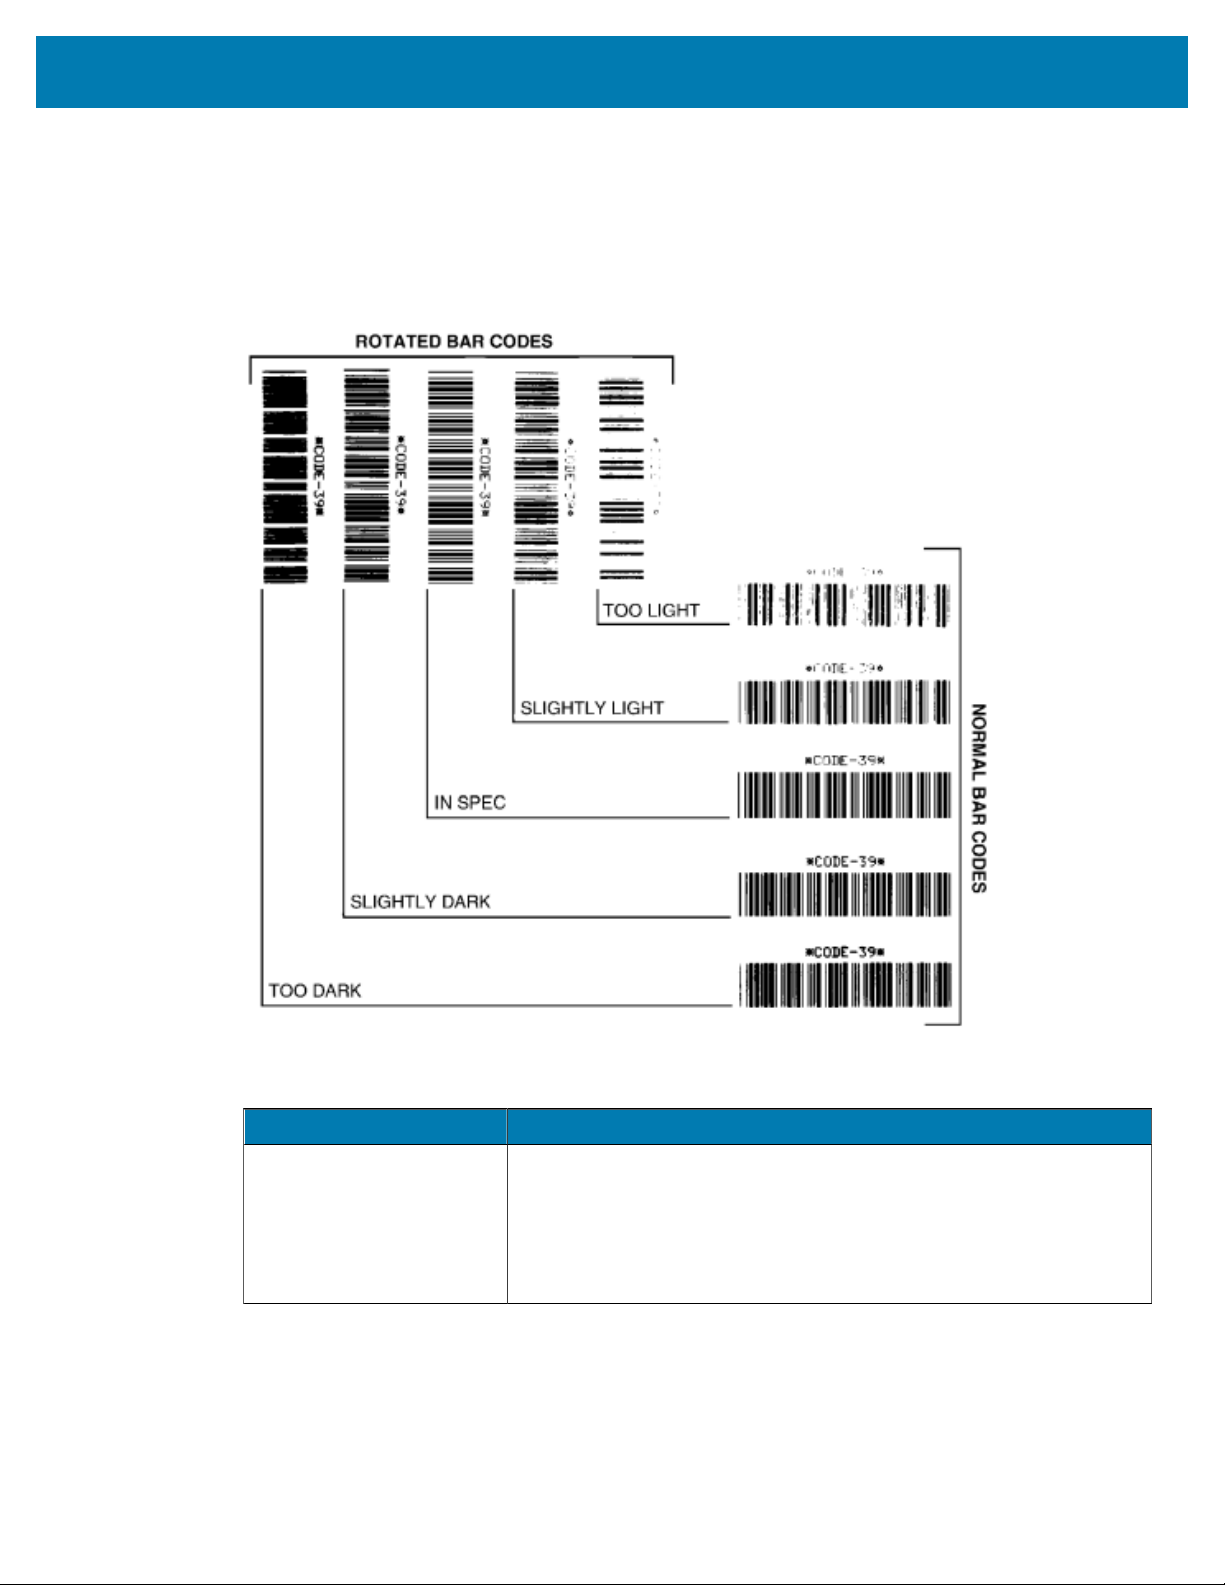
Tools
4. Inspect the test labels and determine which one has the best print quality for your application.
a) If you have a barcode verifier, use it to measure bars and spaces and calculate the print contrast.
b) If you do not have a barcode verifier, use your eyes or the system scanner to choose the optimal
darkness setting based on the labels printed in this self test.
Figure 10Barcode Darkness Comparison
Print Quality Description
Too dark Labels that are too dark are fairly obvious. They may be readable but
not
'in-spec.'
The normal barcode bars increase in size.
The openings in small alphanumeric characters may appear filled in.
Rotated barcode have bars and spaces run together.
Table 11Visual Darkness Descriptions
330

Tools
Print Quality Description
Slightly dark Slightly dark labels are not as obvious.
The normal barcode will be 'in-spec'.
Small character alphanumeric characters will appear bold and could be
slightly filled in.
The rotated barcode spaces are small when compared to the 'in-spec'
code, possibly making the code unreadable.
“In-spec” The 'in-spec' barcode can only be confirmed by a verifier, but it should
exhibit the following visible characteristics.
• The normal barcode will have complete, even bars and clear,
distinct spaces.
• The rotated barcode will have complete, even bars and clear,
distinct spaces. Although it may not look as good as a slightly dark
barcode, the barcode will be 'in-spec'.
• In both normal and rotated styles, small alphanumeric characters
look complete.
Slightly light Slightly light labels are, in some cases, preferable to slightly dark ones
for 'in-spec' barcodes.
Slightly light labels are, in some cases, preferable to slightly dark ones
for 'in-spec' barcodes.
Both normal and rotated barcodes will be in spec, but small
alphanumeric characters may not be complete.
Too light Labels that are too light are obvious.
Both normal and rotated barcodes have incomplete bars and spaces.
Small alphanumeric characters are unreadable.
Table 11Visual Darkness Descriptions(Continued)
5. Note the relative darkness value and the print speed printed on the best test label.
6. Add or subtract the relative darkness value from the darkness value specified on the Printer
Configuration label. The resulting numeric value is the best darkness value for that specific label and
print speed combination.
7. If necessary, change the current darkness value of the printer to the darkness value on the best test
label.
8. If necessary, change the current print speed to the speed value on the best test label.See two options
for how to do this in Adjusting the Print Quality on page 242.
Resetting Non-Network Printer Configuration Settings to their Factory Defaults
Use these instructions to reset the non-network printer settings to their factory defaults
1. Turn printer power OFF.
2.
Press and hold PAUSE (
) and FEED ( ) simultaneously and turn printer power ON.
331

Tools
3.
Continue holding these buttonsuntil the STATUS indicator ( ) is the only indicator lit.
NOTE: The printer has a RESET button on its underside. See RESET Button Functions in this
sectionfor information on how to use this button.
After the non-network printer configuration settings are reset, calibrate the sensor.You can run a SmartCal
Media Calibration or, if that is insufficient for your media, manually calibrate the printer for the media you
have loaded
Resetting the Printer's Network Settings to Their Factory Defaults
Use this procedure to reset only the printer's network settings to their factory defaults.
1. Turn printer power OFF.
2.
Press and hold PAUSE (
) and CANCEL ( ) simultaneously and turn printer power ON.
3.
Continue holding these buttons until the Status indicator ( ) is the only indicator that is lit.
The printer’s network configuration is reset to factory defaults.The printer does NOT print the printer
configuration report or the network configuration report at the end of the reset.
RESET Button Functions
Your printer has a dedicated RESET button on its lower surface which is pressed using a paper clip or
similar small object.
Press this RESET button for the length of time specified below as needed to perform the listed functions.
332
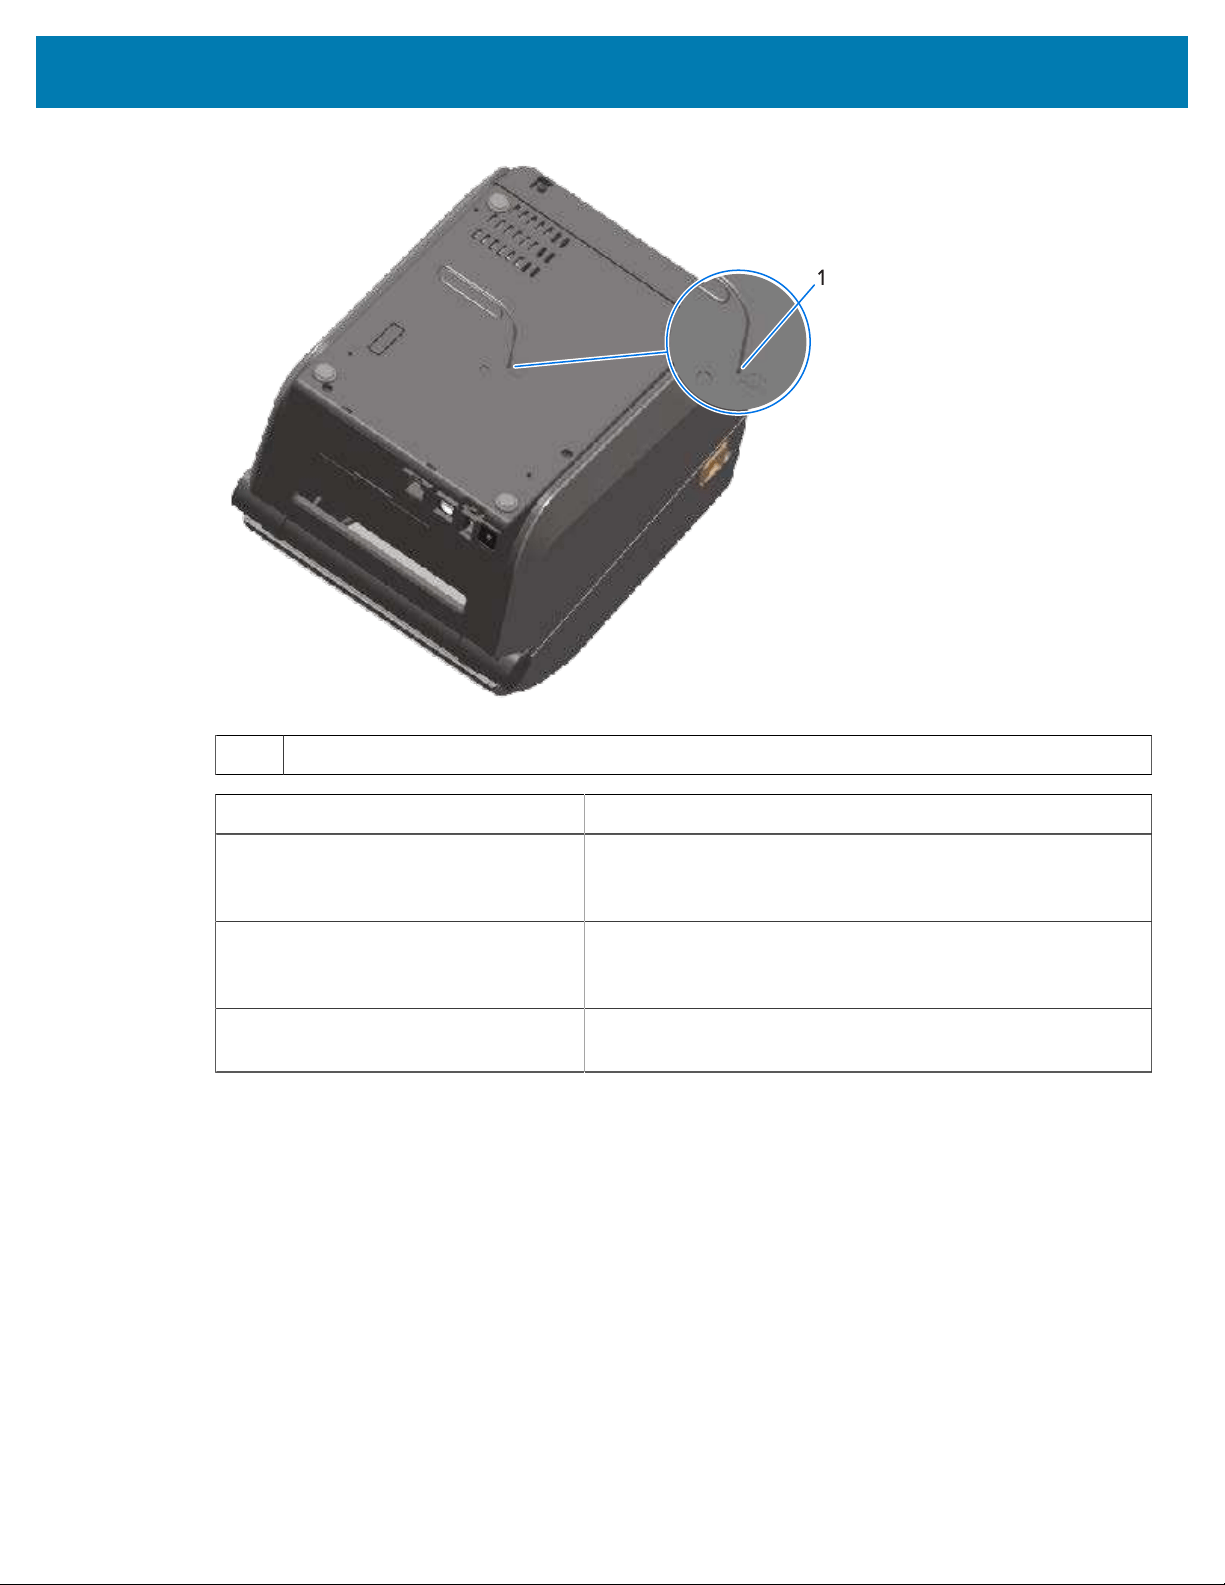
Tools
1 Reset access aperture
1 second or under No effect.
1–5 seconds (printer reset) The printer performs a factory reset, then prints a printer
configuration report (and a network configuration report if it is
configured to operate on a network).
6–10 seconds (network connection
reset, for printers connected to a
network)
The printer drops the network connection, resets its
network settings to their factory defaults, and prints a printer
configuration report and a network configuration report.
More than 10 seconds (reset mode exit) The printer does NOT reset. The printer and network
parameters are left unchanged.
333
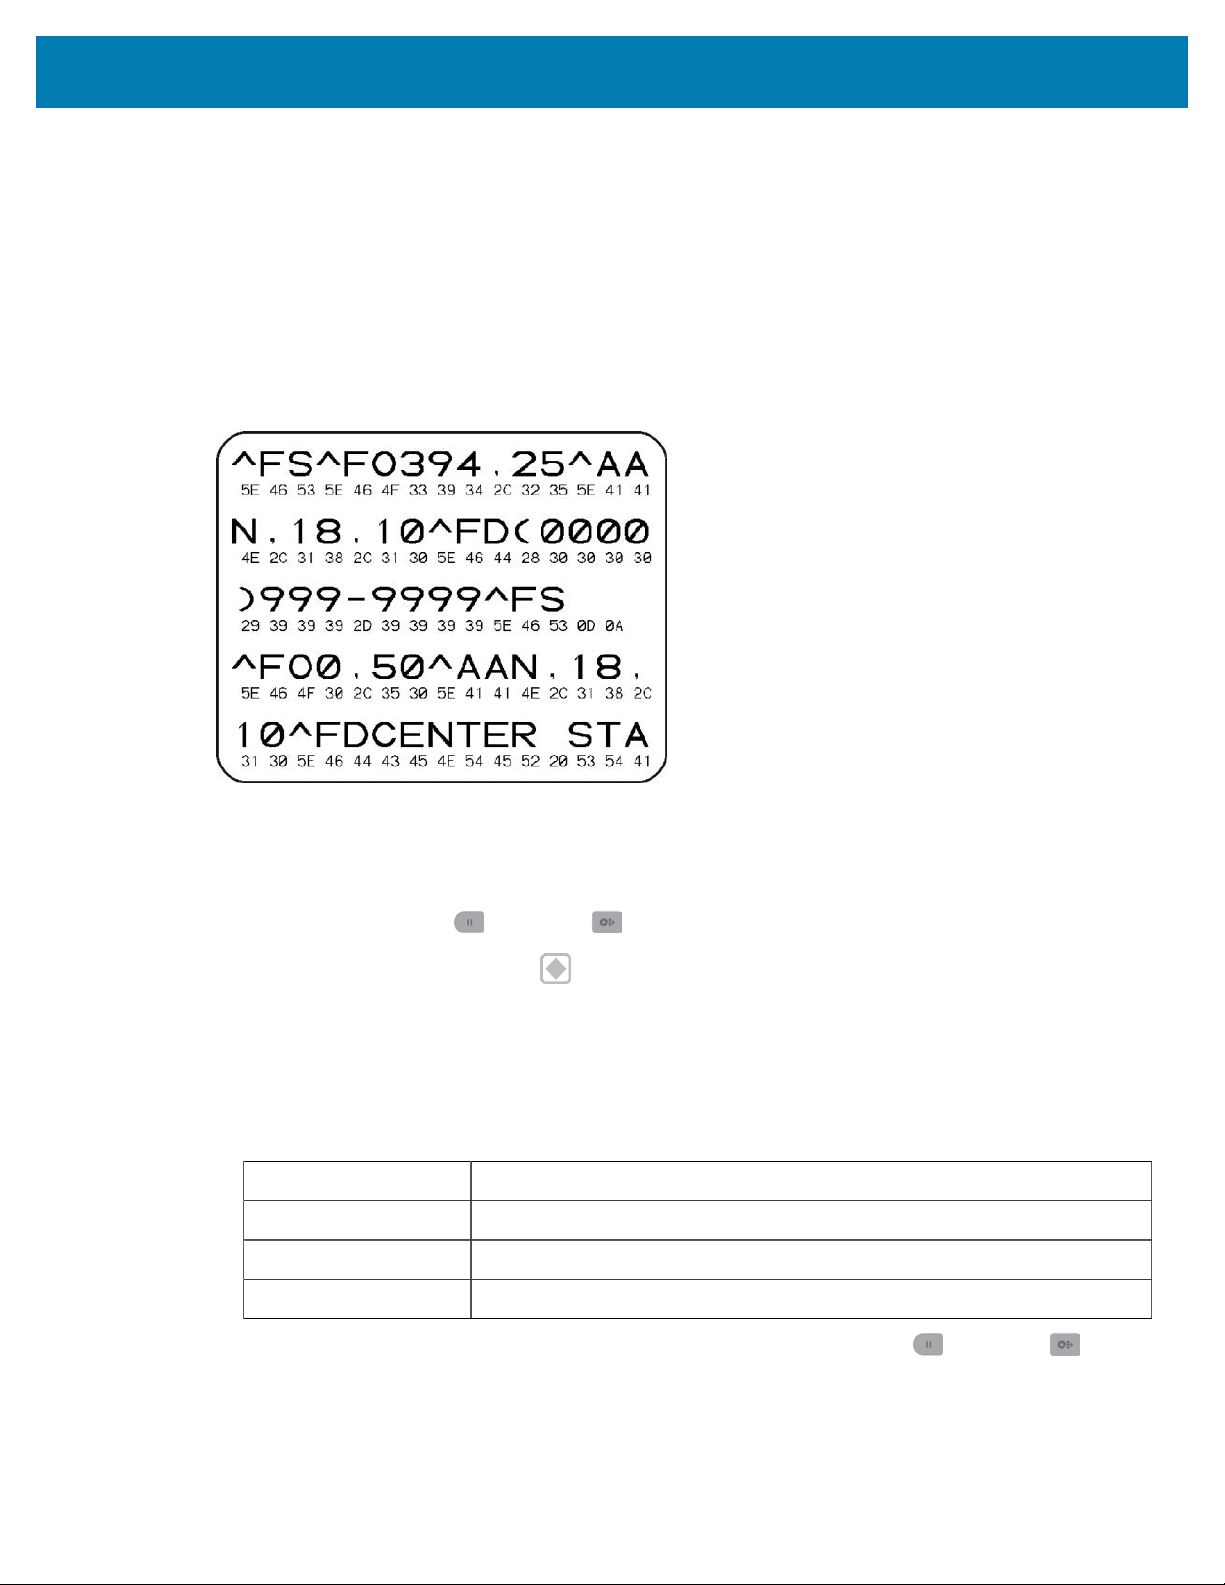
Tools
Performing a Communication Diagnostics Test
This is a troubleshooting test used to check the connection between the printer and its host computer or
device.
When the printer is in Diagnostics mode, it prints all data received from the host computer as straight ASCII
characters, with the hex values printed below the ASCII text. The printer prints all the characters it receives.
This includes control codes such as CR (carriage return).The test label prints upside-down as it exits the
printer.
Figure 11Typical Communications Diagnostics Test Label
To print this test label:
1. Ensure media is loaded and printer power is ON.
2. Set the print width equal to, or less than, the width of the label being used for the test.
3.
Press and hold PAUSE (
) and FEED ( ) simultaneously for two seconds.
When active, the Status indicator ( ) alternately lights up Green and Yellow.
The printer enters Diagnostics mode and prints any data received from the host computer or
management device on a test label.
4. Check the test label for error codes. If any errors are shown, verify if the communication parameters are
correctly set.
Errors show on the test label as follows:
FE Framing error
OE Overrun error
PE Parity error
NE Noise
5.
To exit the self-test and return to normal operations, press and hold PAUSE (
) and FEED ( )
simultaneously for two seconds, or turn printer power OFF and back ON.
334
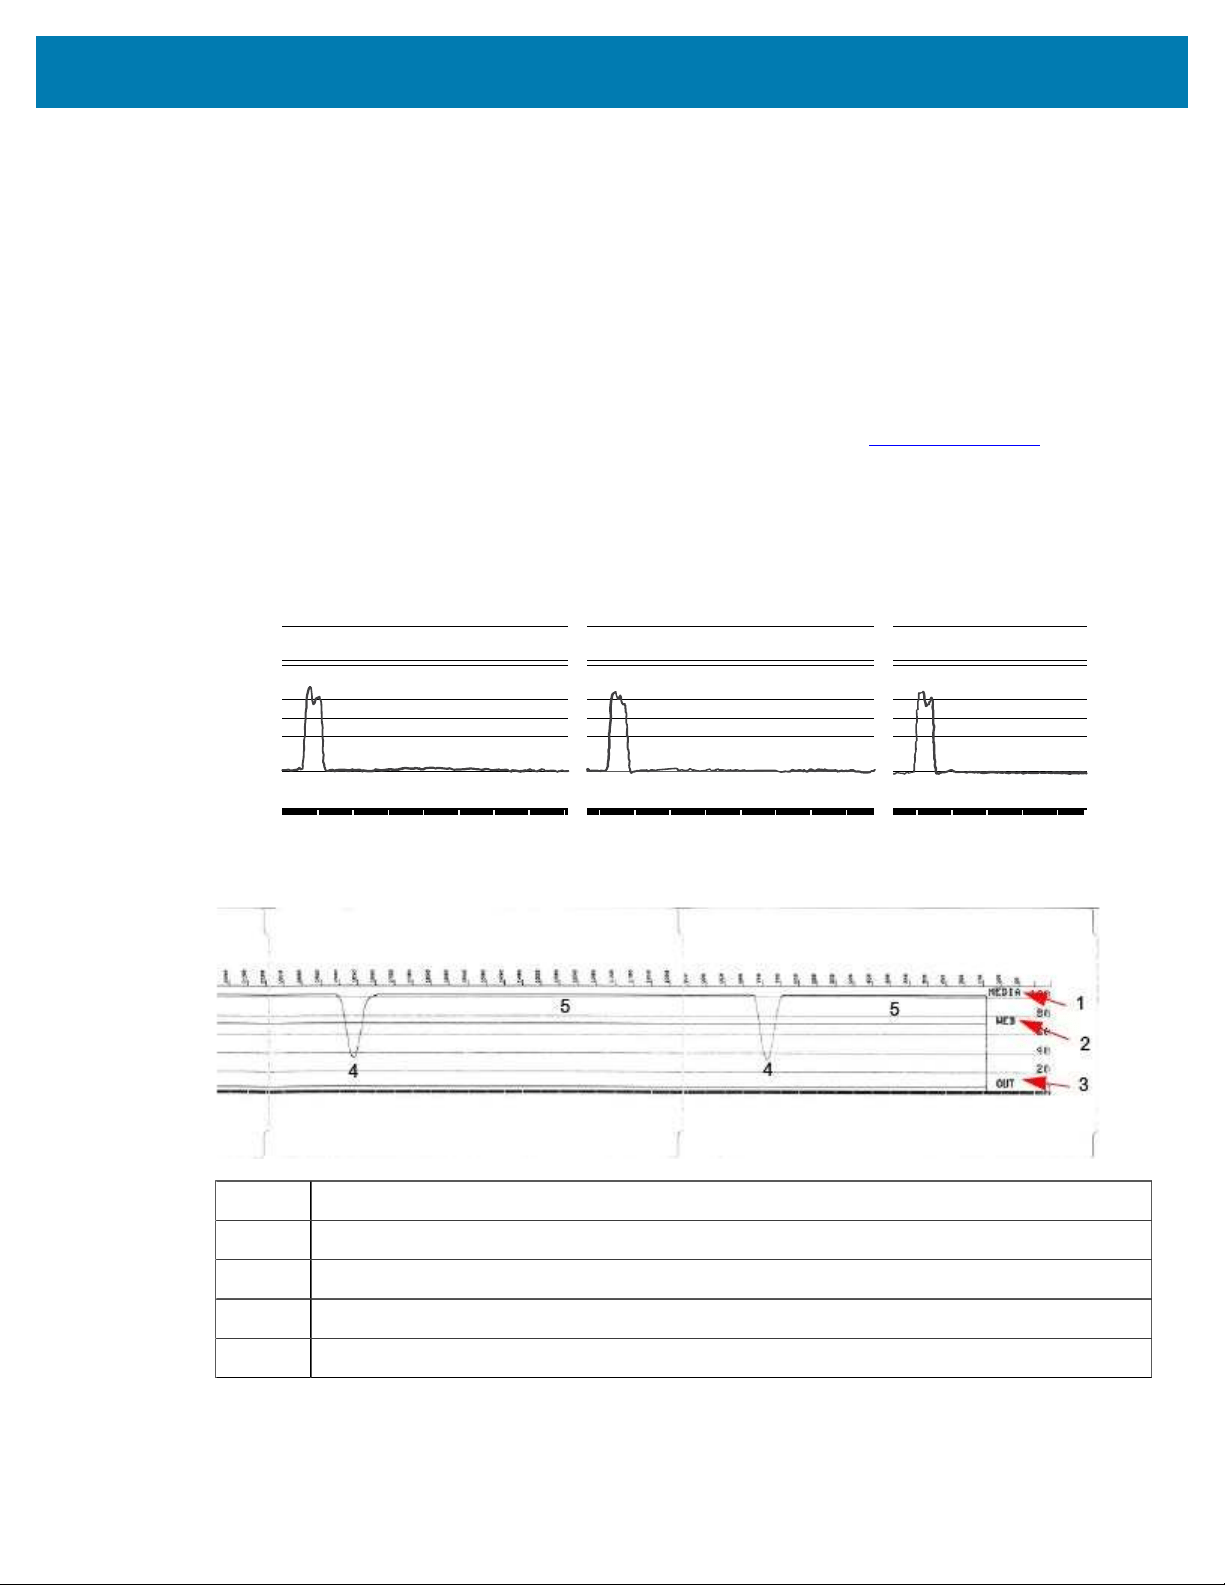
Tools
Sensor Profile
Use the sensor profile image—which typically prints across several labels or tags—for diagnostics if the
printer is not accurately sensing gaps between labels, if it incorrectly identifies pre-printed areas on a label
as gaps, or cannot detect ribbon.
With the printer in the Ready state, print a sensor profile in one of these ways:
• Using the printer buttons— Turn printer power OFF, then turn printer power ON while holding down
FEED and CANCEL simultaneously. Continue pressing these buttons until the Status indicator is the
only indicator lit.
• Using ZPL— Send a ~JG command to the printer. See the ZPL Programming Guide for more
information on this command. The guide is available for download from
zebra.com/manuals.
Compare your results to the examples shown in Performing a Communication Diagnostics Test on page
334. If sensor sensitivity must be adjusted, calibrate the printer. See Manually Calibrating Media on page
336.
Figure 12Sensor Profile (Gap Media)
100
80OUT
WEB
MEDIA
60
40
20
0
1
2
3
444
55
Figure 13Sensor Profile (Black Mark Tag Media)
1 MEDIA (indicates media sensor readings line)
2 WEB (indicates media sensor threshold settings line)
3 OUT (indicates media out threshold line)
4 Upward spikes (indicate gaps between labels (the 'web')
5 Lines between the spikes (indicate where labels are located)
335

Tools
Compare the sensor profile printout to a length of one media form (ex., a label). The spikes should be the
same distance apart as the gaps are on the media.
NOTE: If the gap distances are not the same, the printer is having difficulty determining where
the gaps are located.Try calibrating the printer to the media that is loaded.
Activating Advanced Mode
UseAdvanced mode to access the printer's manual adjustment modes.
1. Ensure media is loaded and printer power is turned ON.
2.
Press PAUSE (
)for two seconds.
All indicators flash yellow.The Status indicator ( ) lights solid yellow, indicating Manual Media
Calibration mode is selected.
3.
To sequentially cycle through the available modes, press FEED (
).
4.
To activate the selected mode, press PAUSE (
).
5.
To exit Advanced mode, press CANCEL (
).
Manually Calibrating Media
Use these steps to manually calibrate the printer for the loaded media.
This Advanced mode is typically used to calibrate the printer to media that is not correctly recognized
during SmartCal media calibration.
You may have to perform manual calibration several times. This involves moving the media sensor each
time until the printer completes the calibration process and returns to ready state.
To manually calibrate the printer to the media:
1. Place the printer in Advanced Mode (see Activating Advanced Mode) and press PAUSE
(
)while the Status indicator ( ) is lit yellow.
The Supplies indicator (
) flashes yellow, after which the Pause indicator ( ) flashes.
336
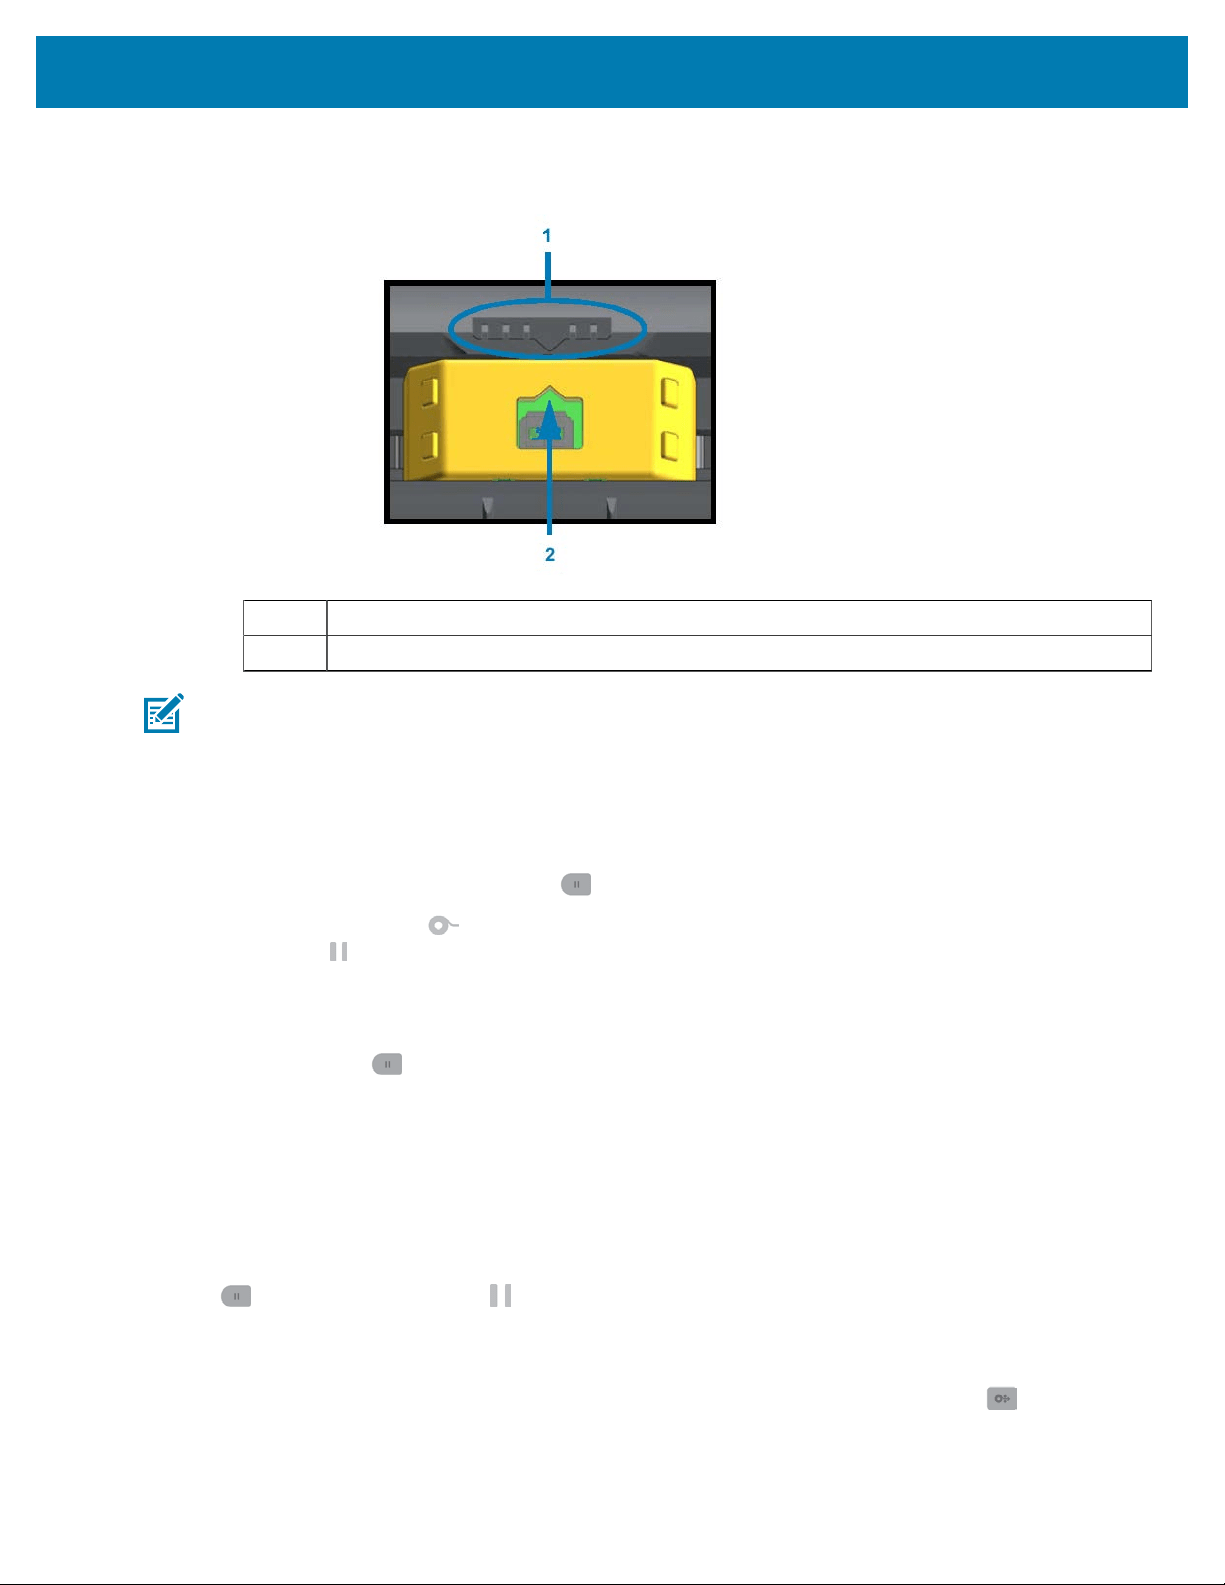
Tools
2. Open the printer and verify the media sensor is in the center position for label/gap (transmissive)
sensing.
1 Sensor alignment key
2 Alignment arrow (default position)
NOTE: For black-mark or notch media, set the media sensor to the proper location to sense
the mark or notch.
For pre-printed media with print located on the front of the label or on the back of the liner,
position the sensor to a place where it will minimally sense/encounter the pre-print.
3. Remove 80 mm (3 in.) of labels from the liner, then place the label-free area of the liner over the platen
(drive) roller such that the leading edge of the first label is under the media guides.
4.
Close the printer and press PAUSE (
) one time.
The Media indicator (
) flashes while the printer measures the media liner. When complete, the Pause
indicator (
) begins to flash.
5. Open the printer and reposition the media to locate a label directly above the movable sensor.
6. Close the printer.
7.
Press PAUSE (
) one time.
The printer feeds and measures several labels. If it is able to determine the correct media type (gap, black
mark,or notch) and measure the media length, it returns to Ready state.
Manual Print Width Adjustment
You can manually adjust the print width for your printer depending on your printing needs.
Place the printer in Advanced mode. See Activating Advanced Mode on page 336. Then press PAUSE
(
) while the Pause indicator ( ) lights up yellow.
The printer prints a 16 mm (0.63 in.) box, pauses momentarily, prints a slightly larger box, pauses again, and
so on.
When you see the printer print a box that matches the width of your media, press FEED (
) to select that
print width and return the printer to Ready state for printing.
337
Tools
To return to the maximum print width setting,allow the printer to proceed until it reaches that width without
pressing FEED (
).
Manual Print Darkness Adjustment
To initiate aManual Print Darkness Adjustment,press PAUSE (
) while the data indicator ( ) is lit yellow.
The printer prints a test pattern showing the current darkness number and several barcode patterns and
pauses momentarily. Itrepeats the pattern with the next darkness level and the next.
When the printer has finished printing a pattern that has solid, even black lines that conform to the
requirements for your print job, press FEED ( )to set the darkness to that value and return the printer
to Ready state.
338
Tools
339
Tools
Factory Test Modes
When placed in these modes, the printer begins printing various test patterns which you can use to
evaluate printer performance.
Your printer supports two print print modes which are intended for factory tests.
NOTE: These test modes consume a quite a bit of media.
Test mode 1
To initiate this mode, hold PAUSE ( ) as you turning printer power ON .
Test mode 2
To initiate this mode, hold PAUSE ( ), FEED ( ), and CANCEL ( )
simultaneously for two seconds with printer power ON.
To exit either mode, press and hold POWER downwhile switching printer power OFF. Release the button
when the printer has fully powered down.
340
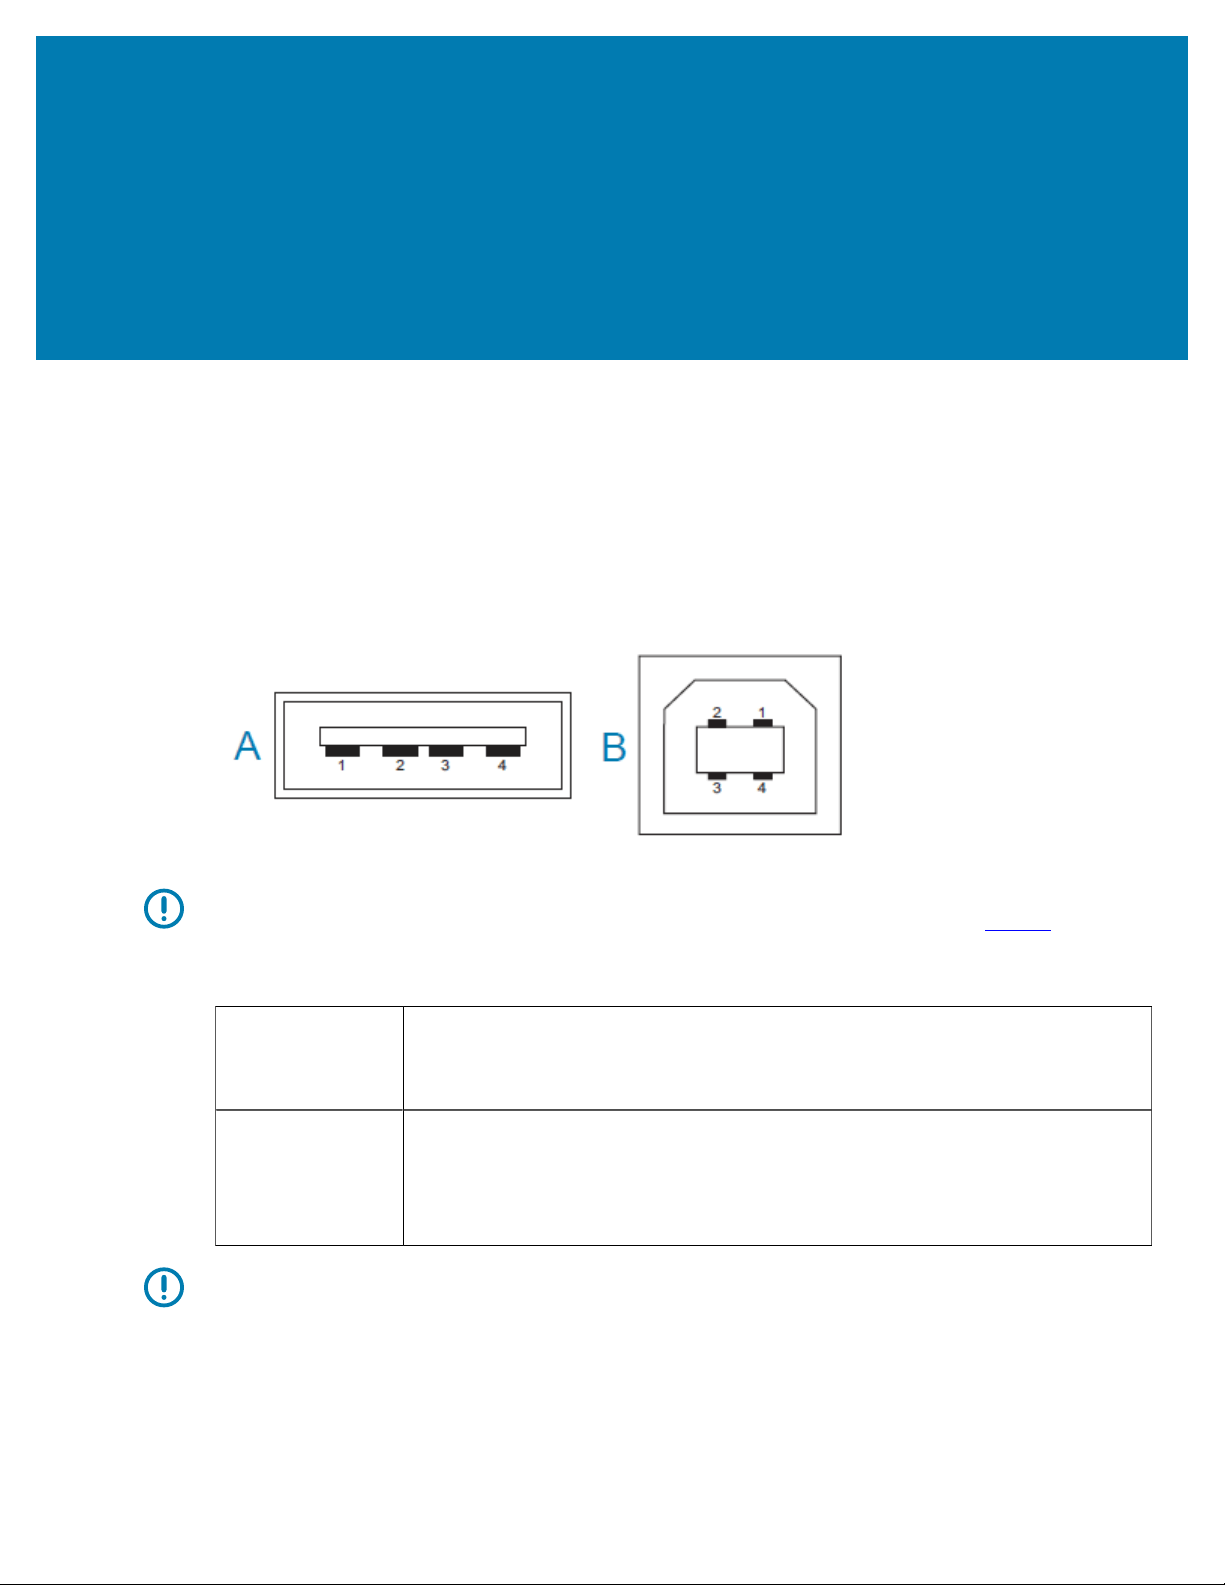
Interface Connector Wiring
Interface Connector Wiring
This section details the connector wiring for the printer connector interface.
Universal Serial Bus (USB) Interface
This figure shows the cable wiring required to use the printer’s USB two interfaces.
IMPORTANT: When used with third-party cables, your printer requires USB cables—or USB cable
packaging—that bears the “Certified USB” mark to guarantee USB 2.0 compliance.Visit usb.org
for details.
Type A and Type B connectors require different pinouts.
USB A style
connector pinouts
(A in the image
shown)
Pin 1 — Vbus (+5 VDC). (Pin 2 — D- (Data Signal, Negative Side)
Pin 3 — D+ (Data Signal, Positive Side)
Pin 4 — Shell (Shield/Drain Wire)
USB B style
connector pinouts
(B in the image
shown)
Pin 1 — Vbus (Not Connected)
Pin 2 — D- (Data Signal, Negative Side)
Pin 3 — D+ (Data Signal, Positive Side)
Pin 4 — Shell (Shield/Drain Wire)
IMPORTANT: USB Host +5 VDC power source is shared with serial-port phantom power. It is
limited to 0.5mA per USB Specification and with on-board current limiting. The maximum current
available through the serial port and USB port should not exceed a total of 0.75 Amps.
341

Interface Connector Wiring
Serial Port Interface
Your printer usesZebra Auto-Detecting DTE and DCE for the 9-pin RS-232 interface.
The pinouts for this interface are as follows:
Pin DTE DCE Description (DTE)
1 — 5V Not used
2 RXD TXD RXD (receive data) input to the printer.
3 TXD RXD TXD (transmit data) output from the printer.
4 DTR DSR DTR (data terminal ready) output from the printer—
controls when the host may send data.
5 GND GND Circuit ground.
6 DSR DTR DSR (data set ready) input to the printer.
7 RTS CTS RTS (request to send) output from the printer --
always in the ACTIVE condition when the printer is
turned on.
8 CTS RTS CTS (clear to send) - Not used by the printer.
9 5V — +5 V @ 0.75 A - FET Circuit current limited.
DB-25S Connector to
DTE Device (PC)
DB-9P Connector to
Printer
DB-9S Connector to
DTE Device (PC)
DB-9P Connector to
Printer
IMPORTANT: Themaximum current available through the serial port, USB port or both will not
exceed a total of 0.75 Amps.
When XON/XOFF handshaking is selected in the printer driver, data flow is controlled by the ASCII control
codes DC1 (XON) and DC3 (XOFF). The DTR control lead will have no effect.
Interconnecting to DTE Devices
The printer is configured as data terminal equipment (DTE). To connect the printer to other DTE devices
such as the serial port of a PC, use an RS-232 null modem (crossover) cable. This table shows the
required cable connections.
Table 12Connecting the Printer to a DTE Device
Interconnecting to DCE Devices
: When the printer is connected using its RS-232 interface to data communication equipment (DCE) such
as a modem, you must use a standard RS-232 (straight-through) interface cable. Te figure belowshows the
connections required for this cable.
342
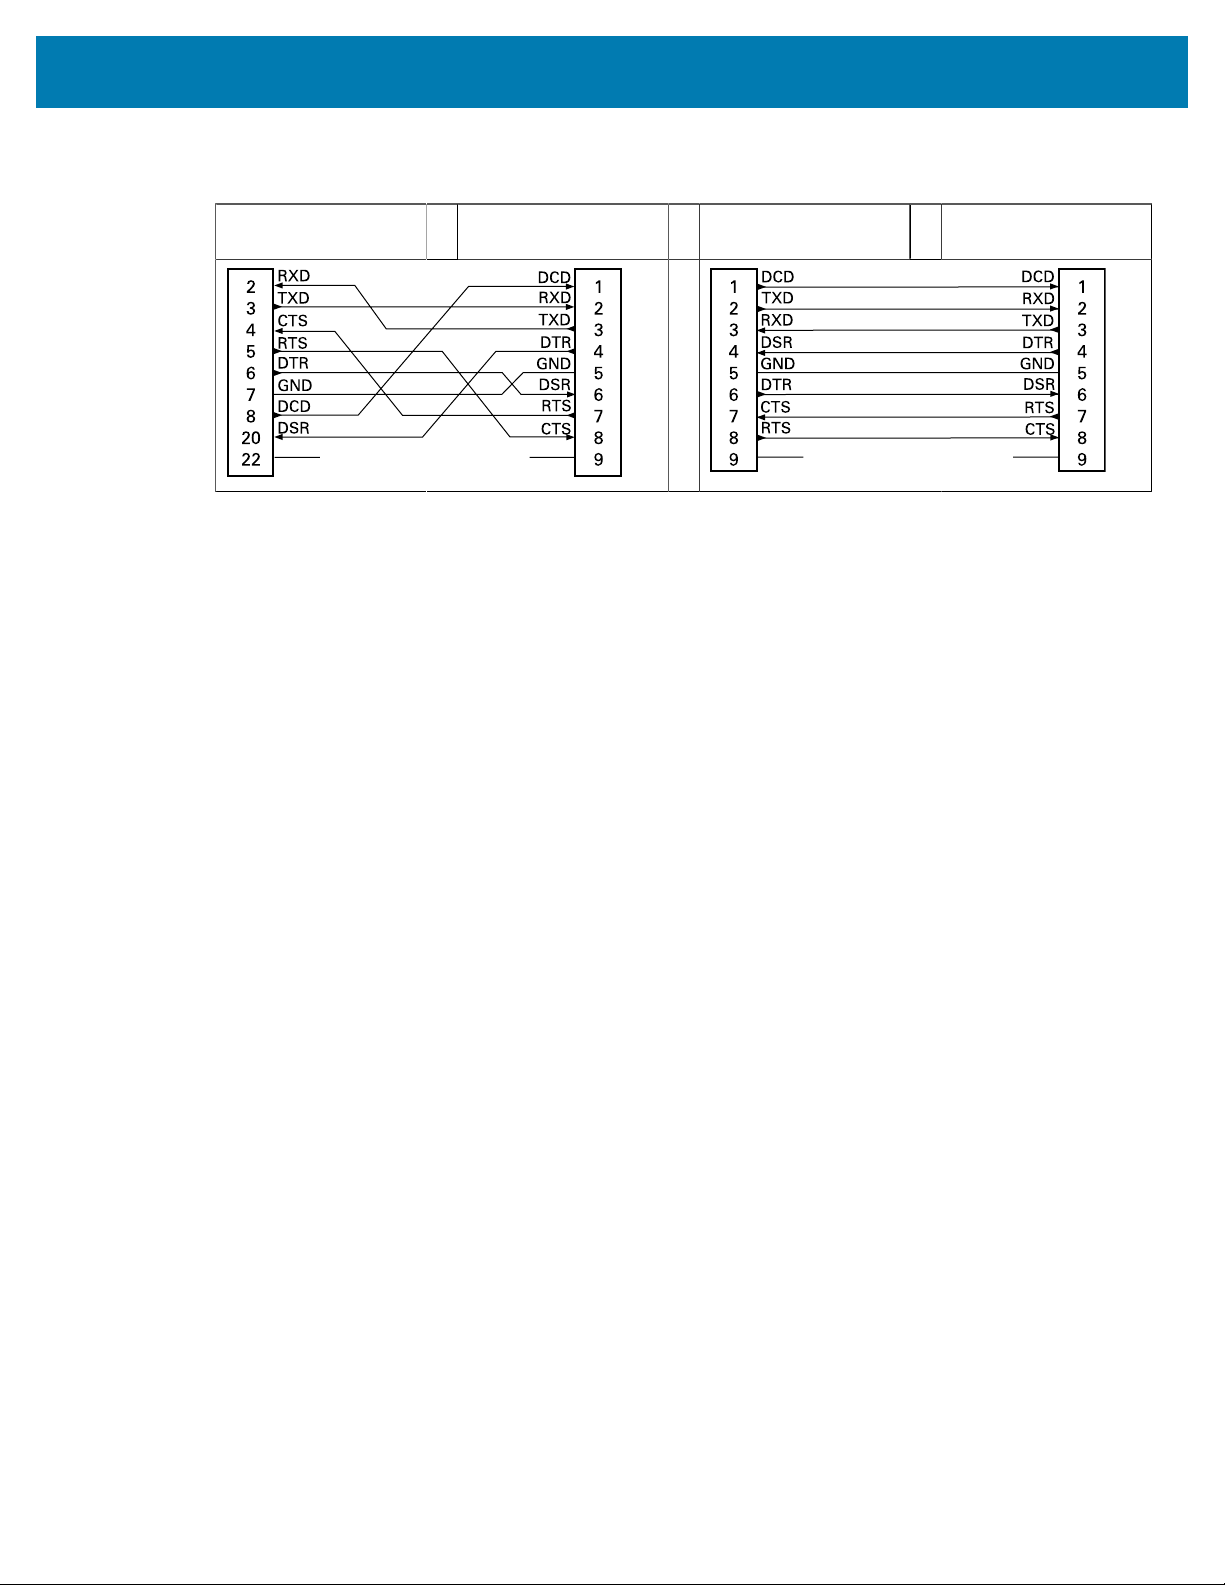
Interface Connector Wiring
DB-25S Connector to
DCE Device
DB-9P Connector to
Printer
DB-9S Connector to
DCE Device
DB-9P Connector to
Printer
Table 13Connecting the Printer to a DCE Device
343

Dimensions
Dimensions
This section provides external printer dimensions for the printers, and many of the accessories that are
available for theprinters.
Dimensions– ZD421/ZD621 Thermal Transfer Printer Models
All dimensions are in millimeters.
344
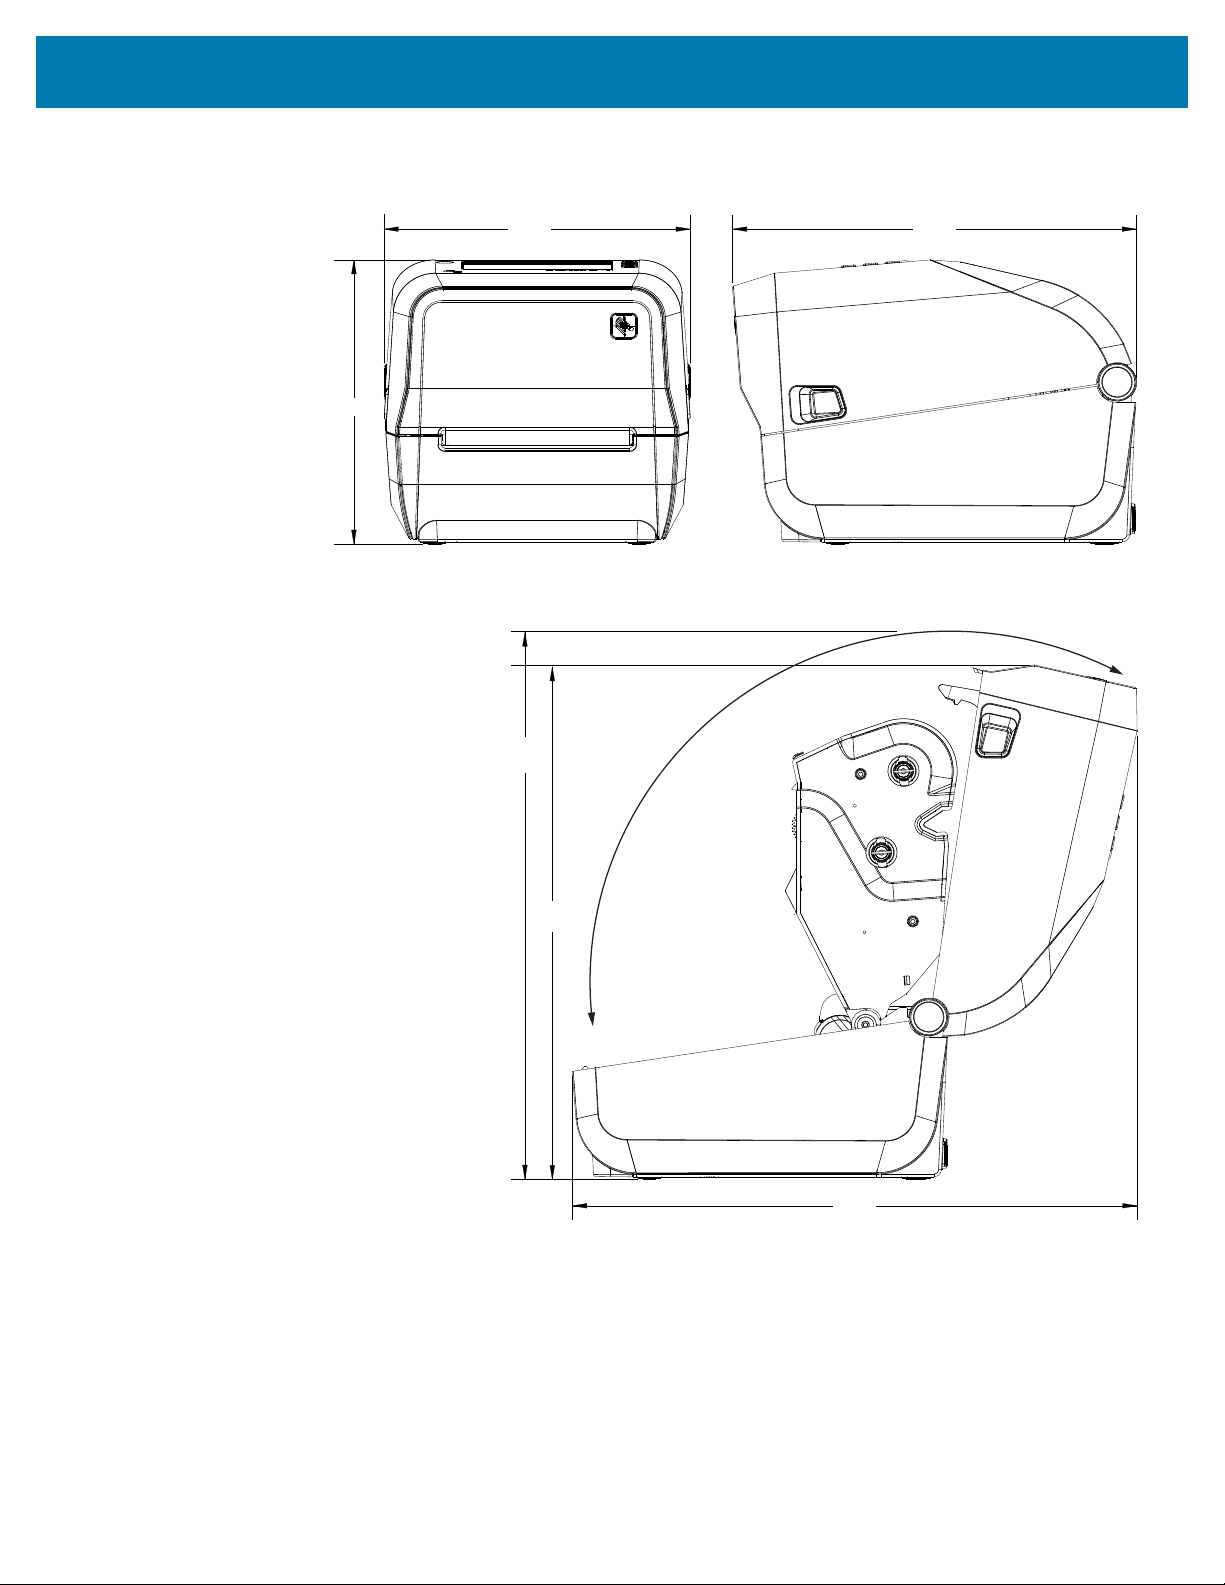
Dimensions
Figure 15ZD421/ZD621 Thermal Transfer Models– Dimensions for a Standard Printer
202.3
266.7
192.4
372.7
348.0
371.0
All dimensions are in millimeters.
345

Dimensions
Figure 16ZD621 / ZD421 Thermal Transfer Models–Dimensions for Printer with the Label Dispenser
Option Installed
192.4
202.3
413.7
348.0
371.0
289.2
All dimensions are in millimeters.
346
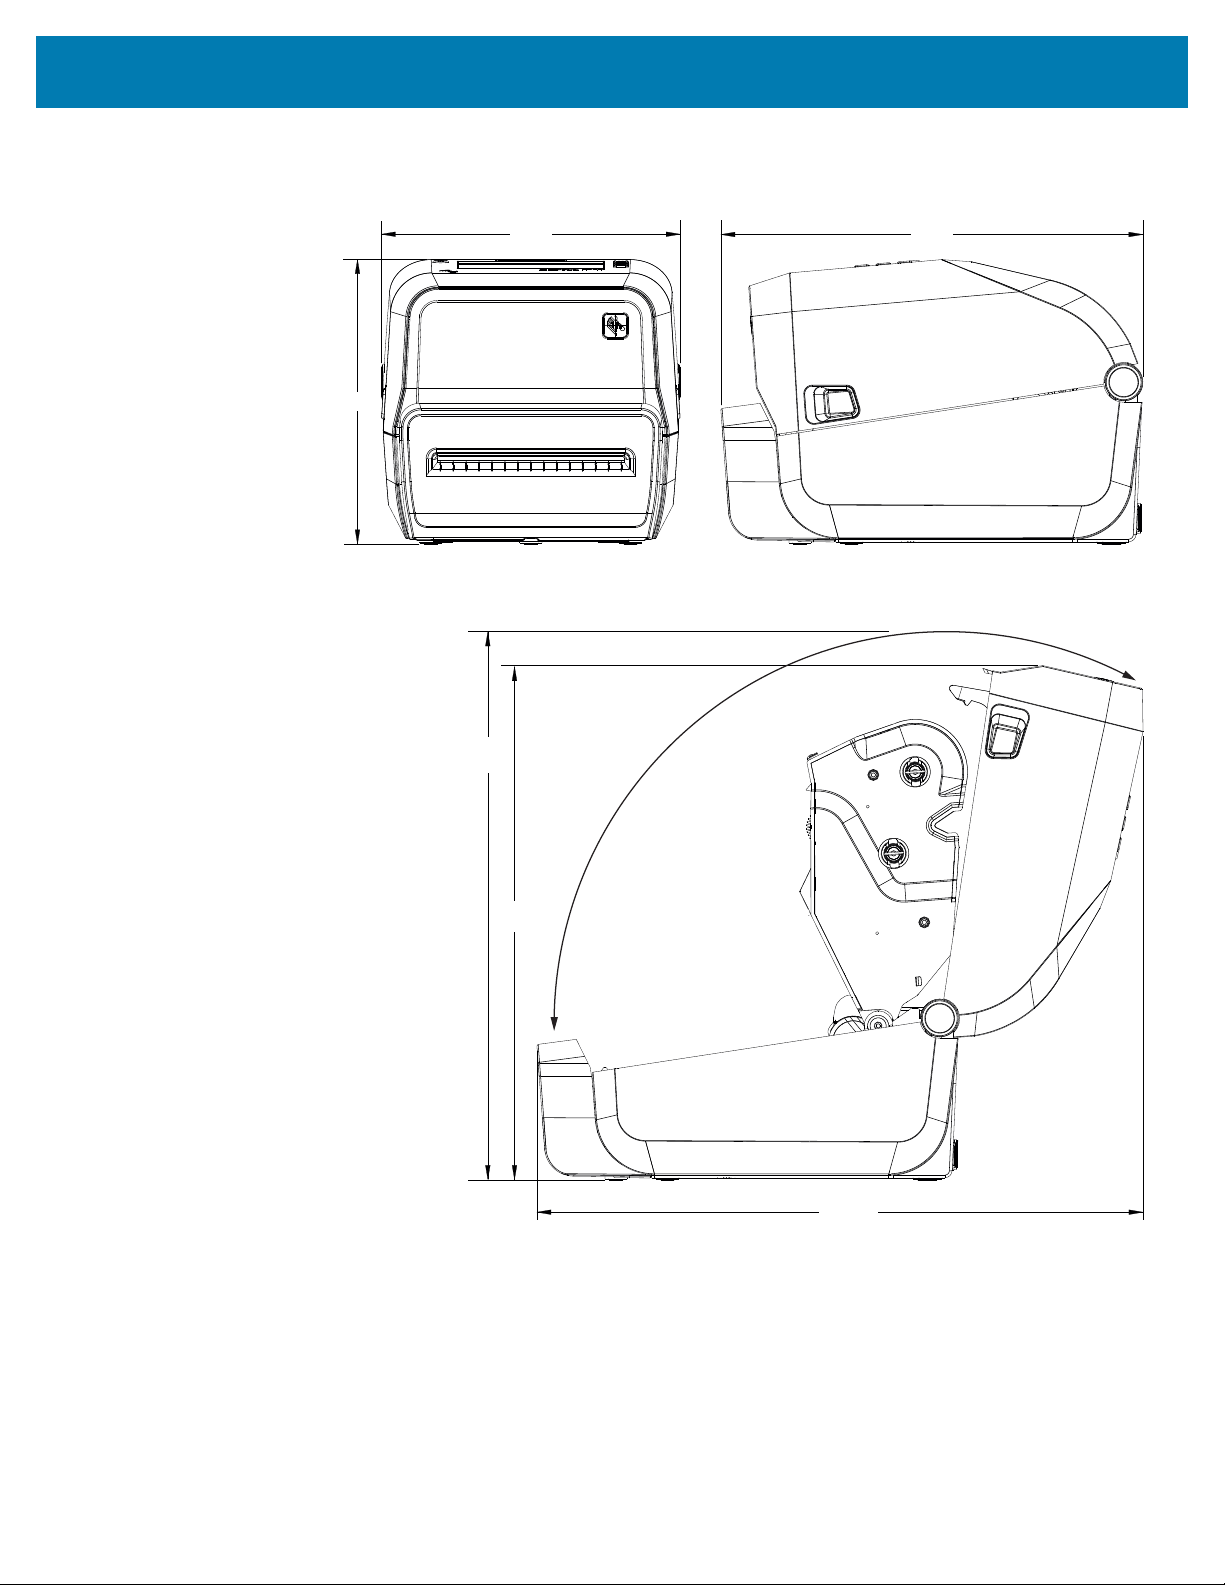
Dimensions
Figure 17ZD421 / ZD621 Thermal Transfer Models–Dimensions for Printer with Cutter Option Installed
410.1
371.0
348.0
202.3
285.6
194.2
All dimensions are in millimeters.
347
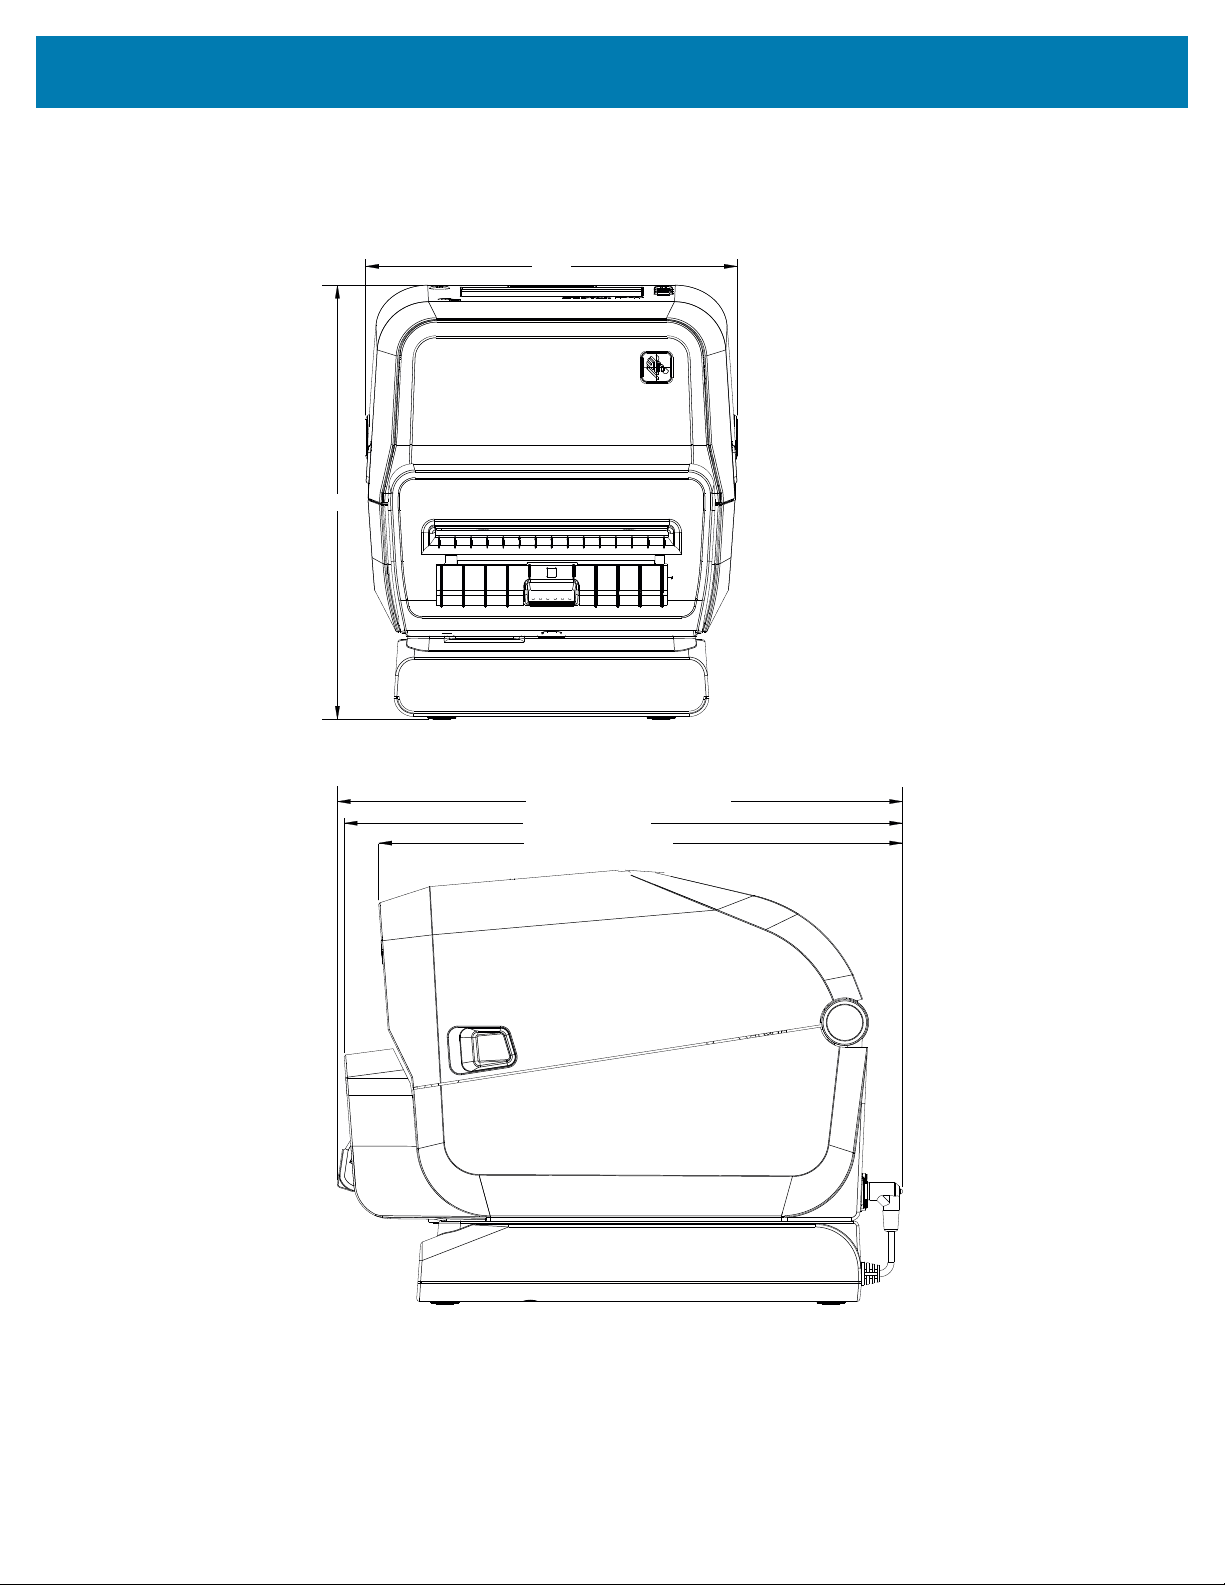
Dimensions
Figure 18ZD421 / ZD621 Thermal Transfer Models–Dimensions for Printer with the External
BatteryPlugged In
307.8 (DISPENSER OPEN)
304.1 (CUTTER)
285.3 (STANDARD)
236.4
202.3
All dimensions are in millimeters.
348

Dimensions
Figure 19ZD421 / ZD621 Thermal Transfer Models–Dimensions for Printer with External Battery
Plugged In and with Printer Open
372.7 (STANDARD)
389.1 (DISPENSER)
410.1 (CUTTER)
413.7 (DISPENSER OPEN)
392.0
415.0
All dimensions are in millimeters
349
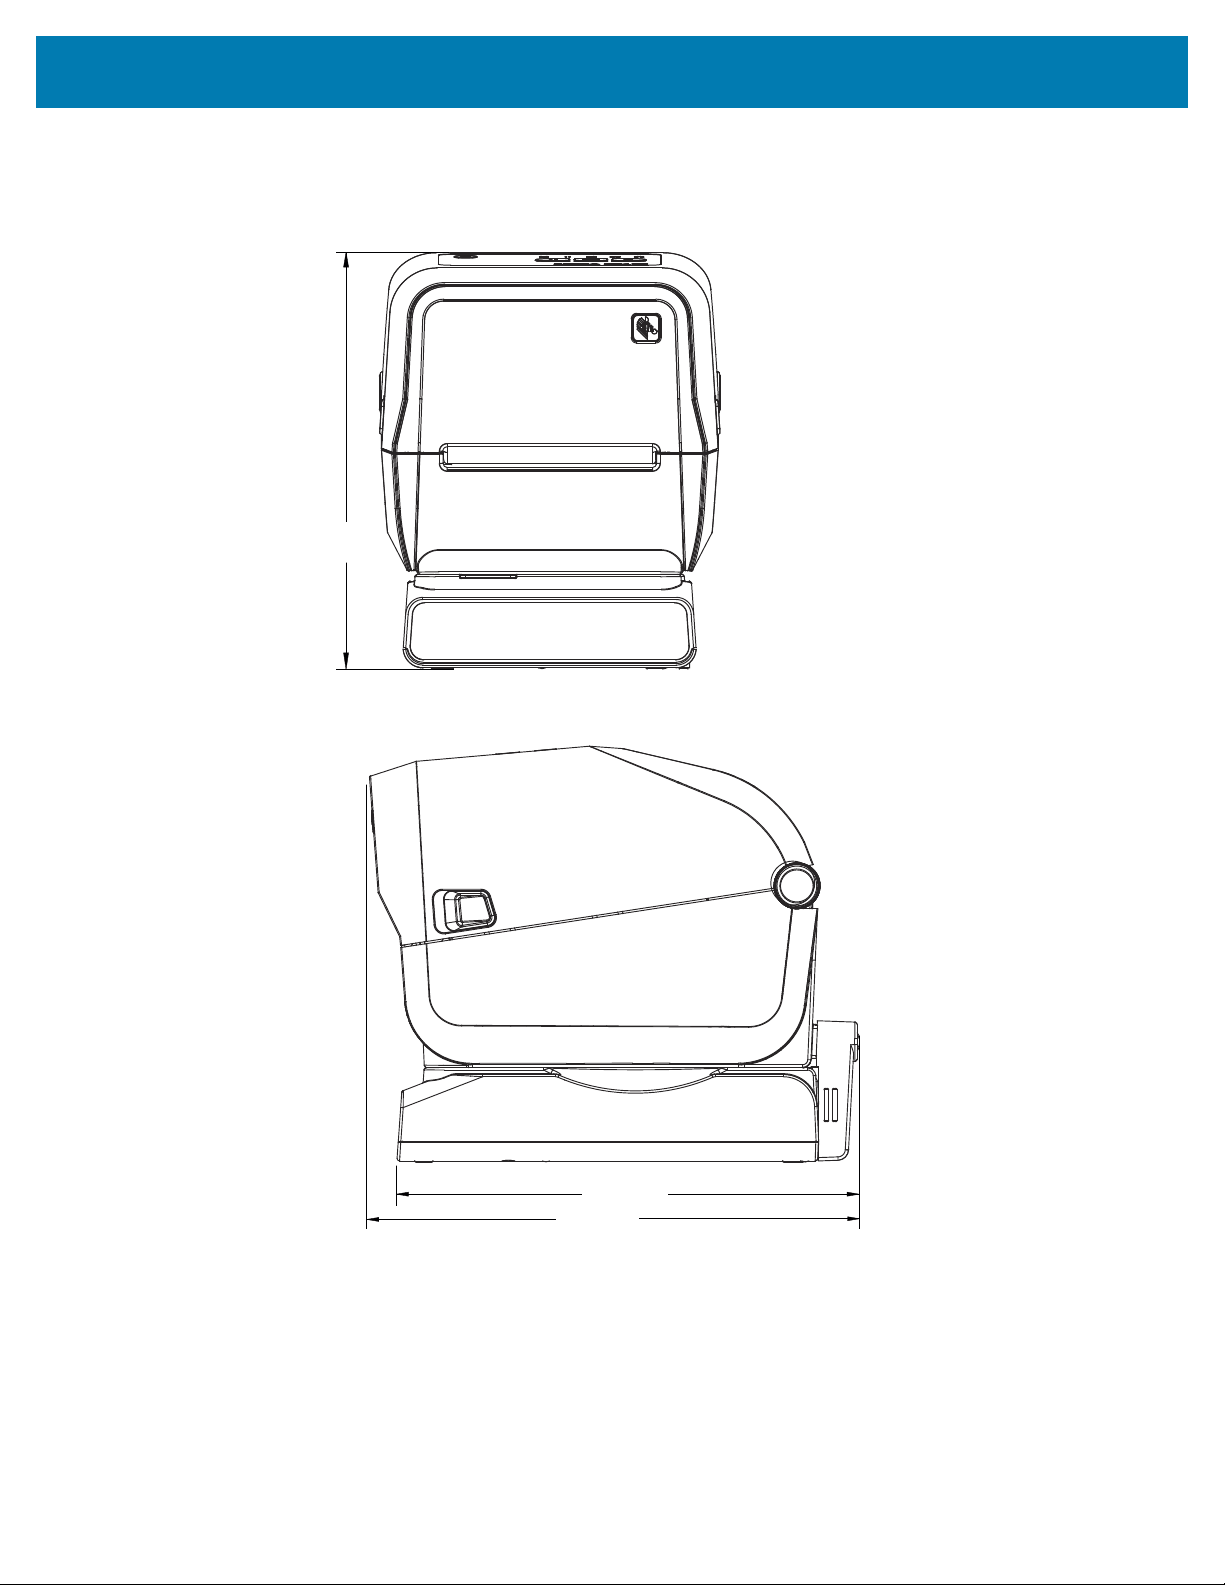
Dimensions
Figure 20ZD421 / ZD621 Thermal Transfer Models–Dimensions for Printer with Power Supply Base
Attached
275.0
291.5
247.0
All dimensions are in millimeters.
350
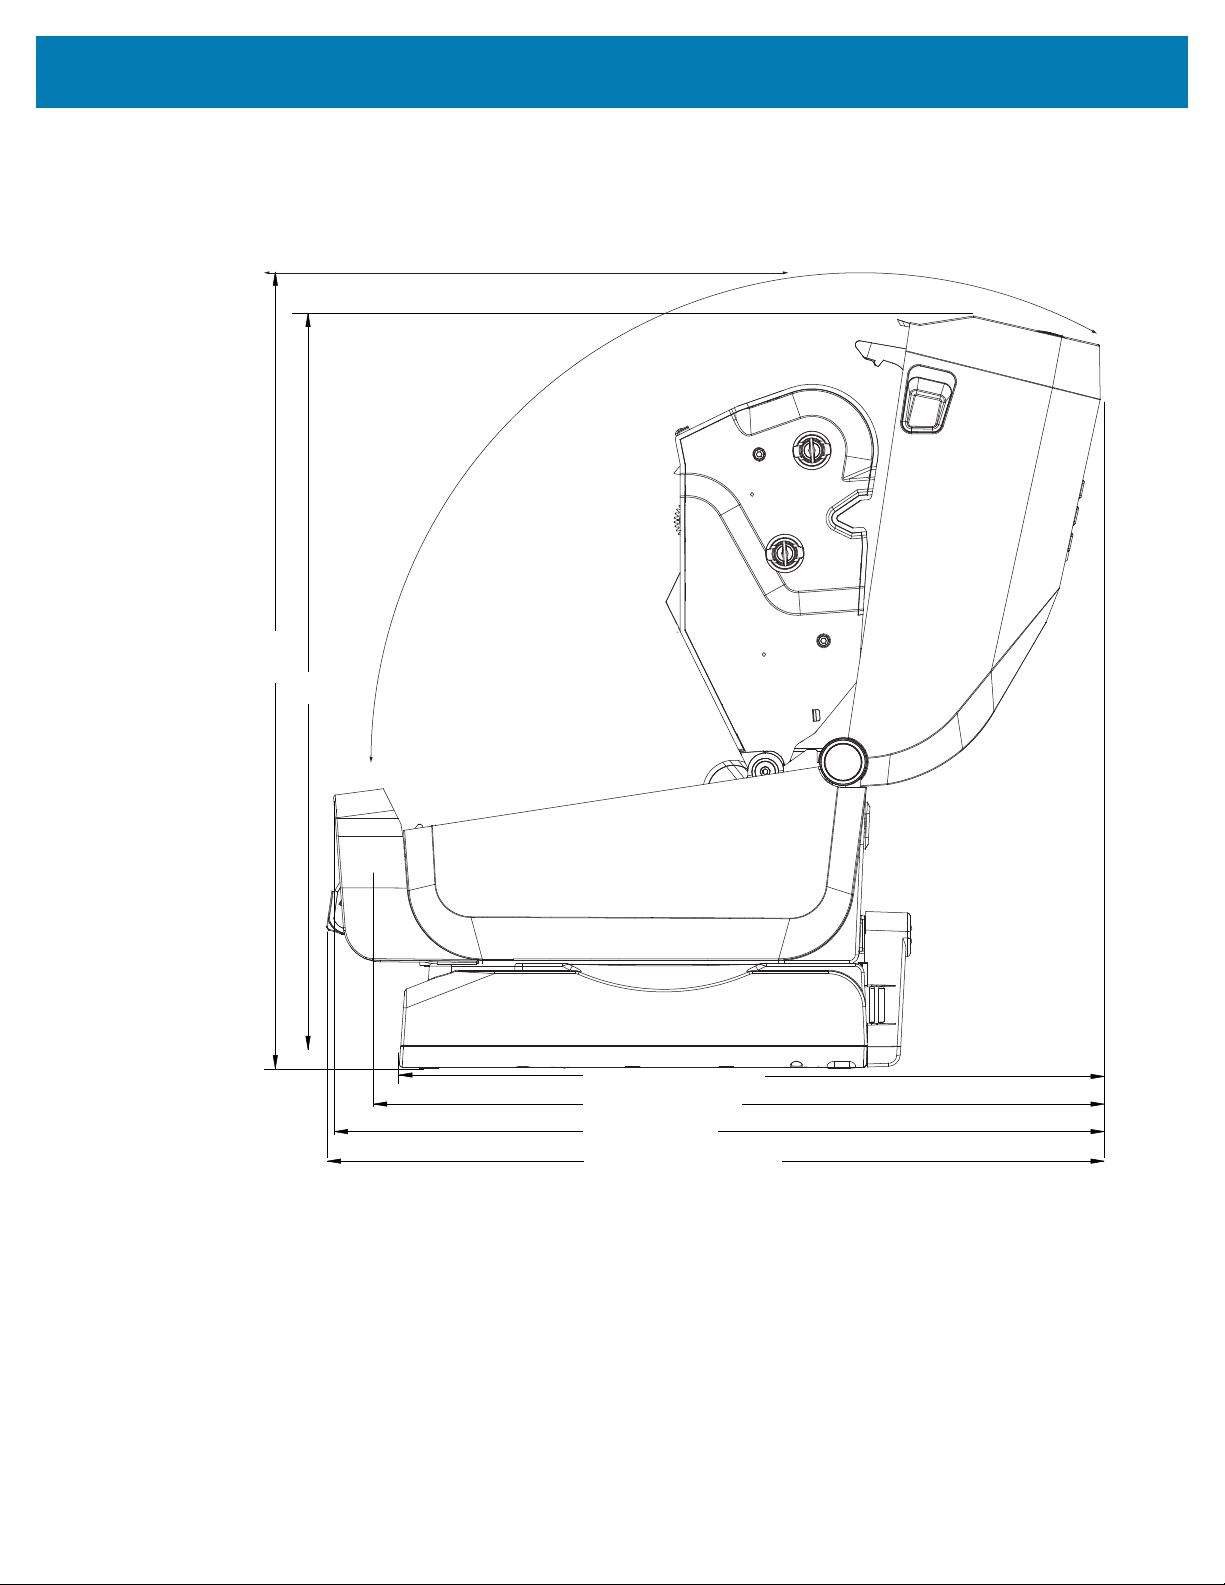
Dimensions
Figure 21ZD421 / ZD621 Thermal Transfer Models–Dimensions for Printer with Power Supply Base
Attached and Printer Open
374.9 (BATTERY BASE)
389.1 (DISPENSER)
410.1 (CUTTER)
413.7 (DISPENSER OPEN)
415.0
392.0
All dimensions are in millimeters.
351
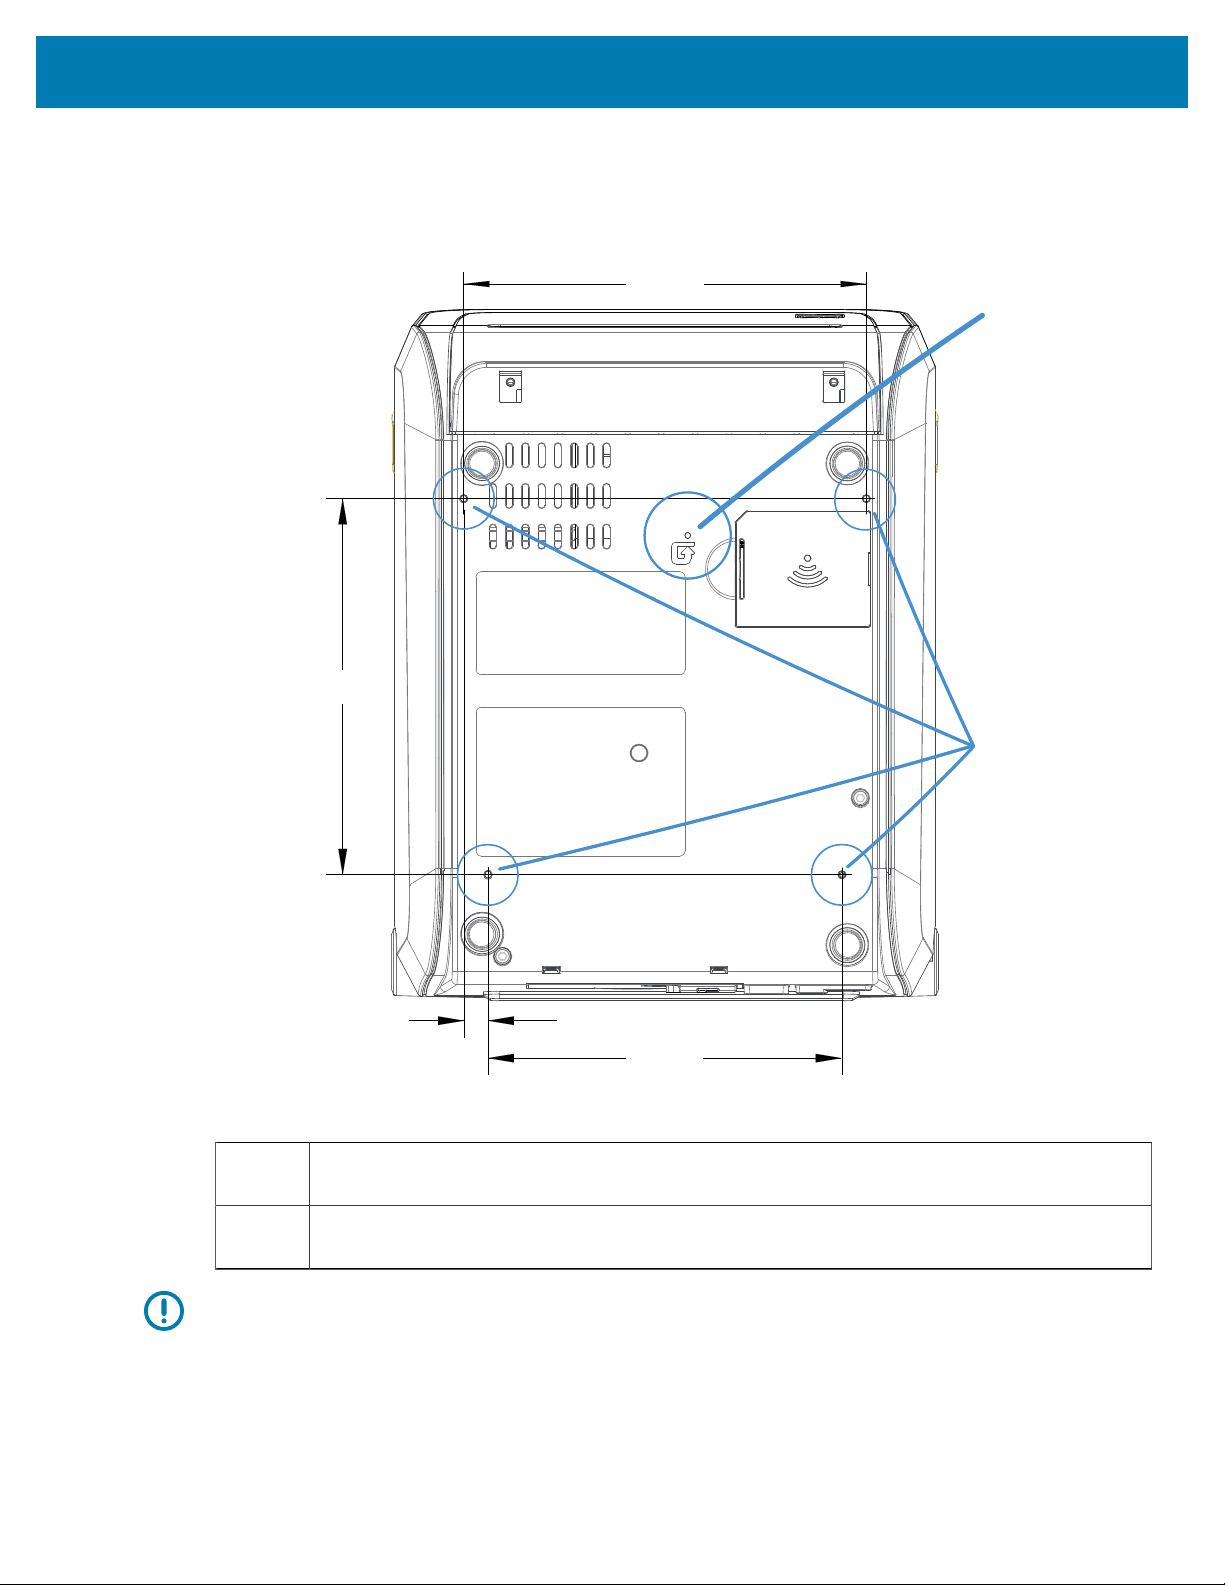
Dimensions
Figure 22ZD421 / ZD621 Thermal Transfer Models– Mounting Screw Locations
139.0
130.8
9.0
148.
8
2
1
1 Hardware Reset Access–Provide a20-25 mm hole in mounting plate or surface to keep this
area accessible after the printer is mounted onto a surface.
2 Mounting screw locations–Use M3 thread-forming screws that will fit in the maximum printer
base hole depth of 6 mm.
IMPORTANT: Do NOT remove the rubber feet located on the printer base. Theyare designed to
keep the printer from overheating.
352
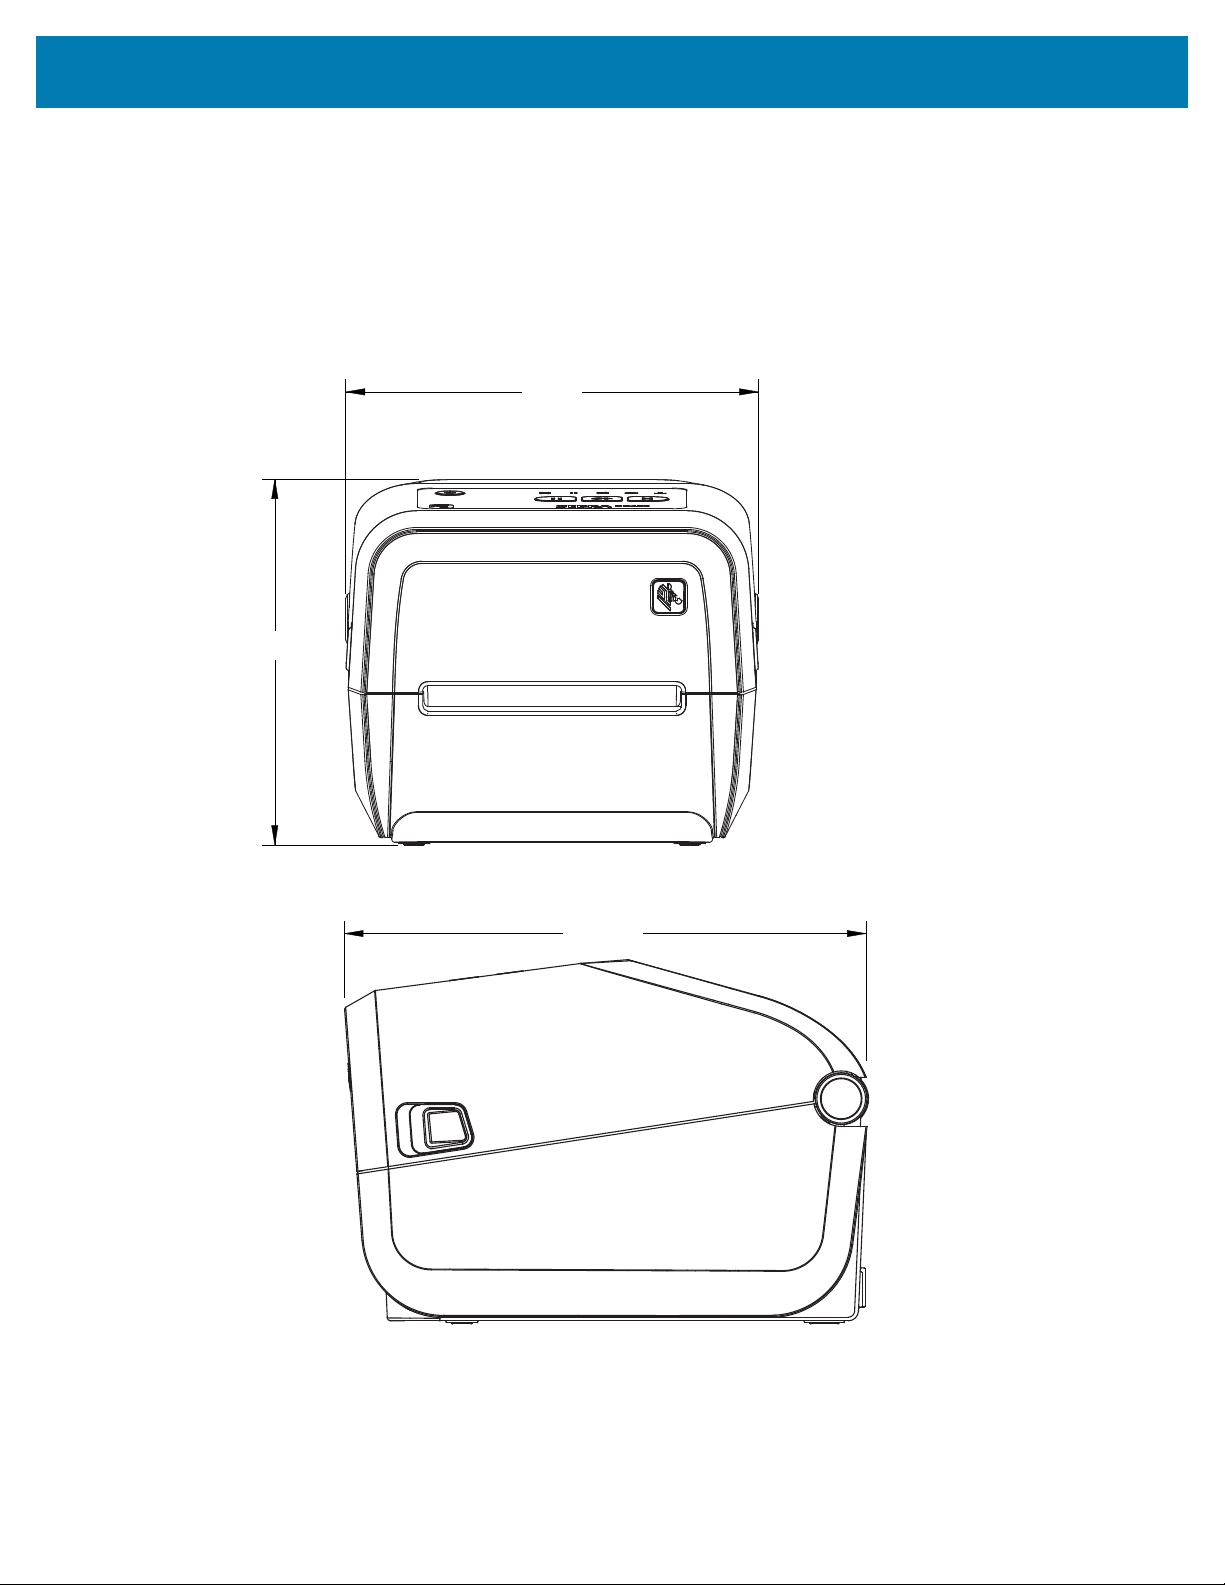
Dimensions
Dimensions–ZD421C (Ribbon Cartridge Thermal Transfer) Printer Models
All dimensions are in millimeters.
Figure 23ZD421C (Ribbon Cartridge Thermal Transfer) Printer Models–Dimensions of the Standard
Printer
254.4
202.3
176.4
All dimensions are in millimeters.
353
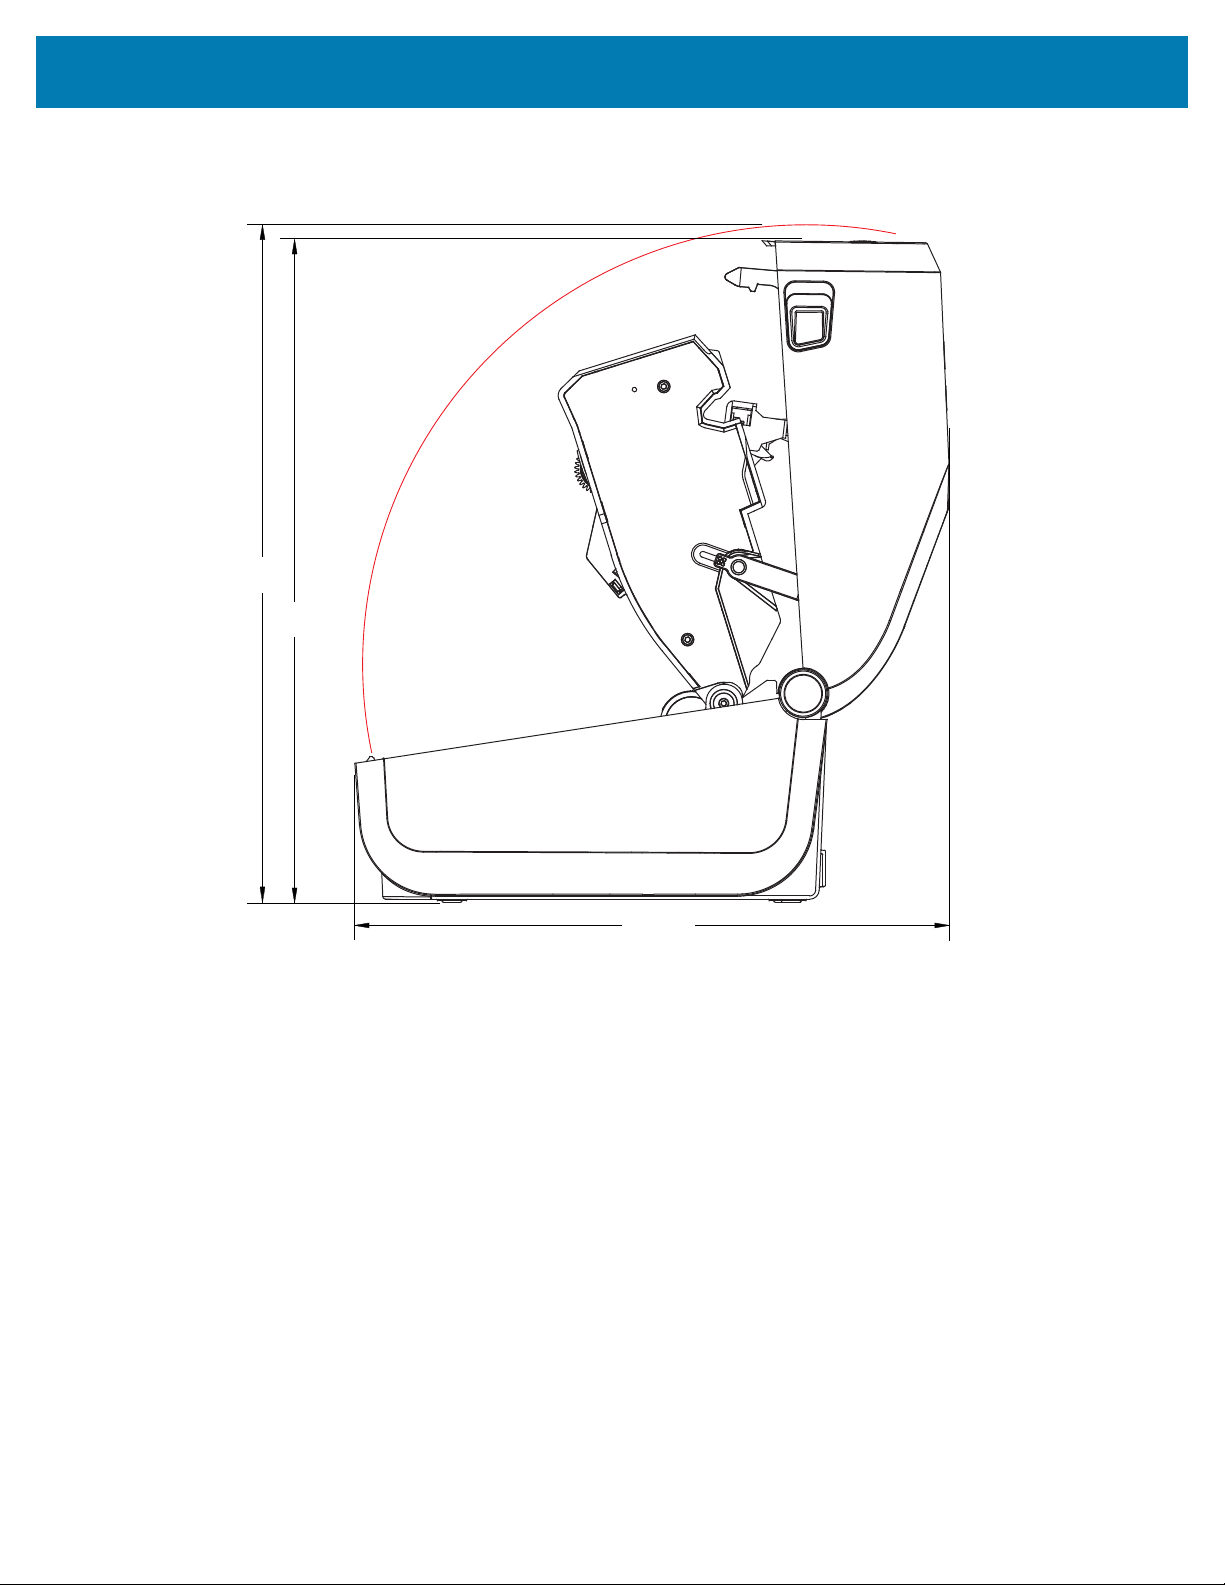
Dimensions
Figure 24ZD421C (Ribbon Cartridge Thermal Transfer) Printer Models–Dimensions of the Standard
Printerwith Cover Open
311.5
346.9
354.5
All dimensions are in millimeters.
354

Dimensions
Figure 25ZD421C (Ribbon Cartridge Thermal Transfer) Printer Models–Dimensions of the Printerwith
the Label Dispenser Option Installed
28 9.5
26 4.9
All dimensions are in millimeters.
355
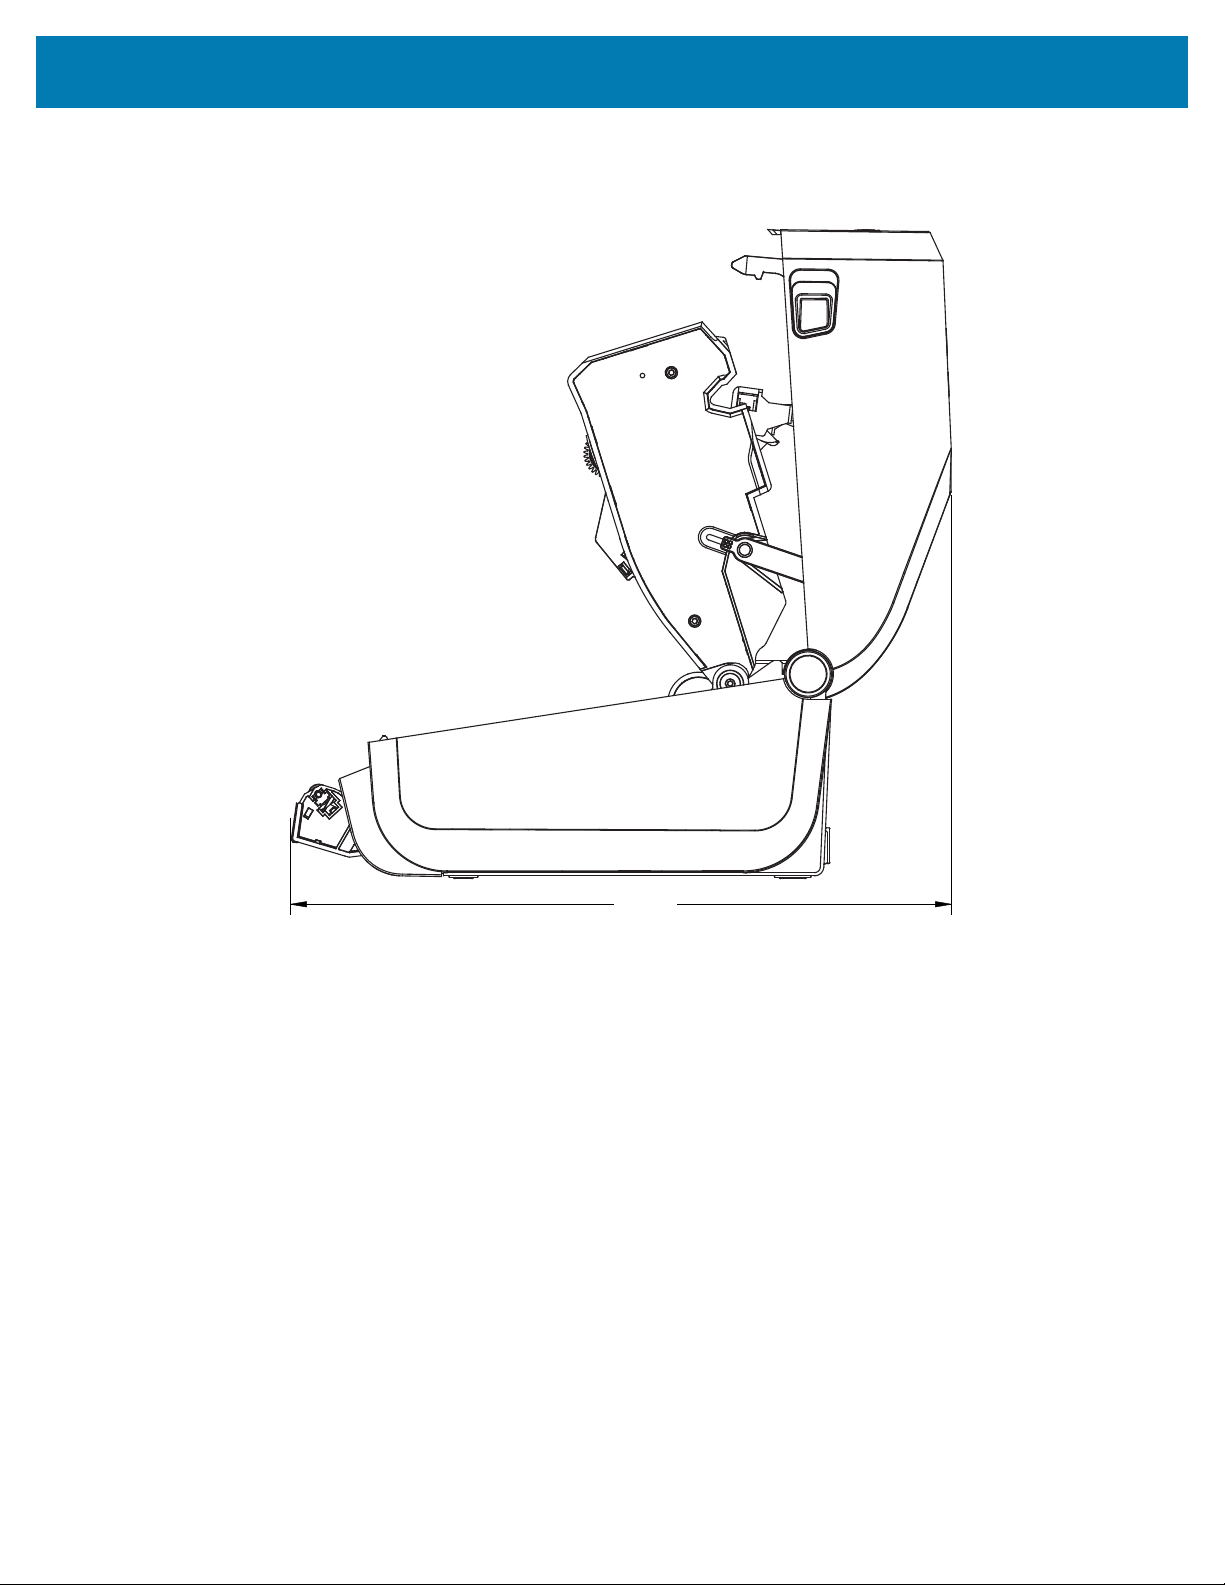
Dimensions
Figure 26ZD421C (Ribbon Cartridge Thermal Transfer) Printer Models–Dimensions of the Printerwith
the Label Dispenser Option Installedand Cover Open
352.6
All dimensions are in millimeters.
356
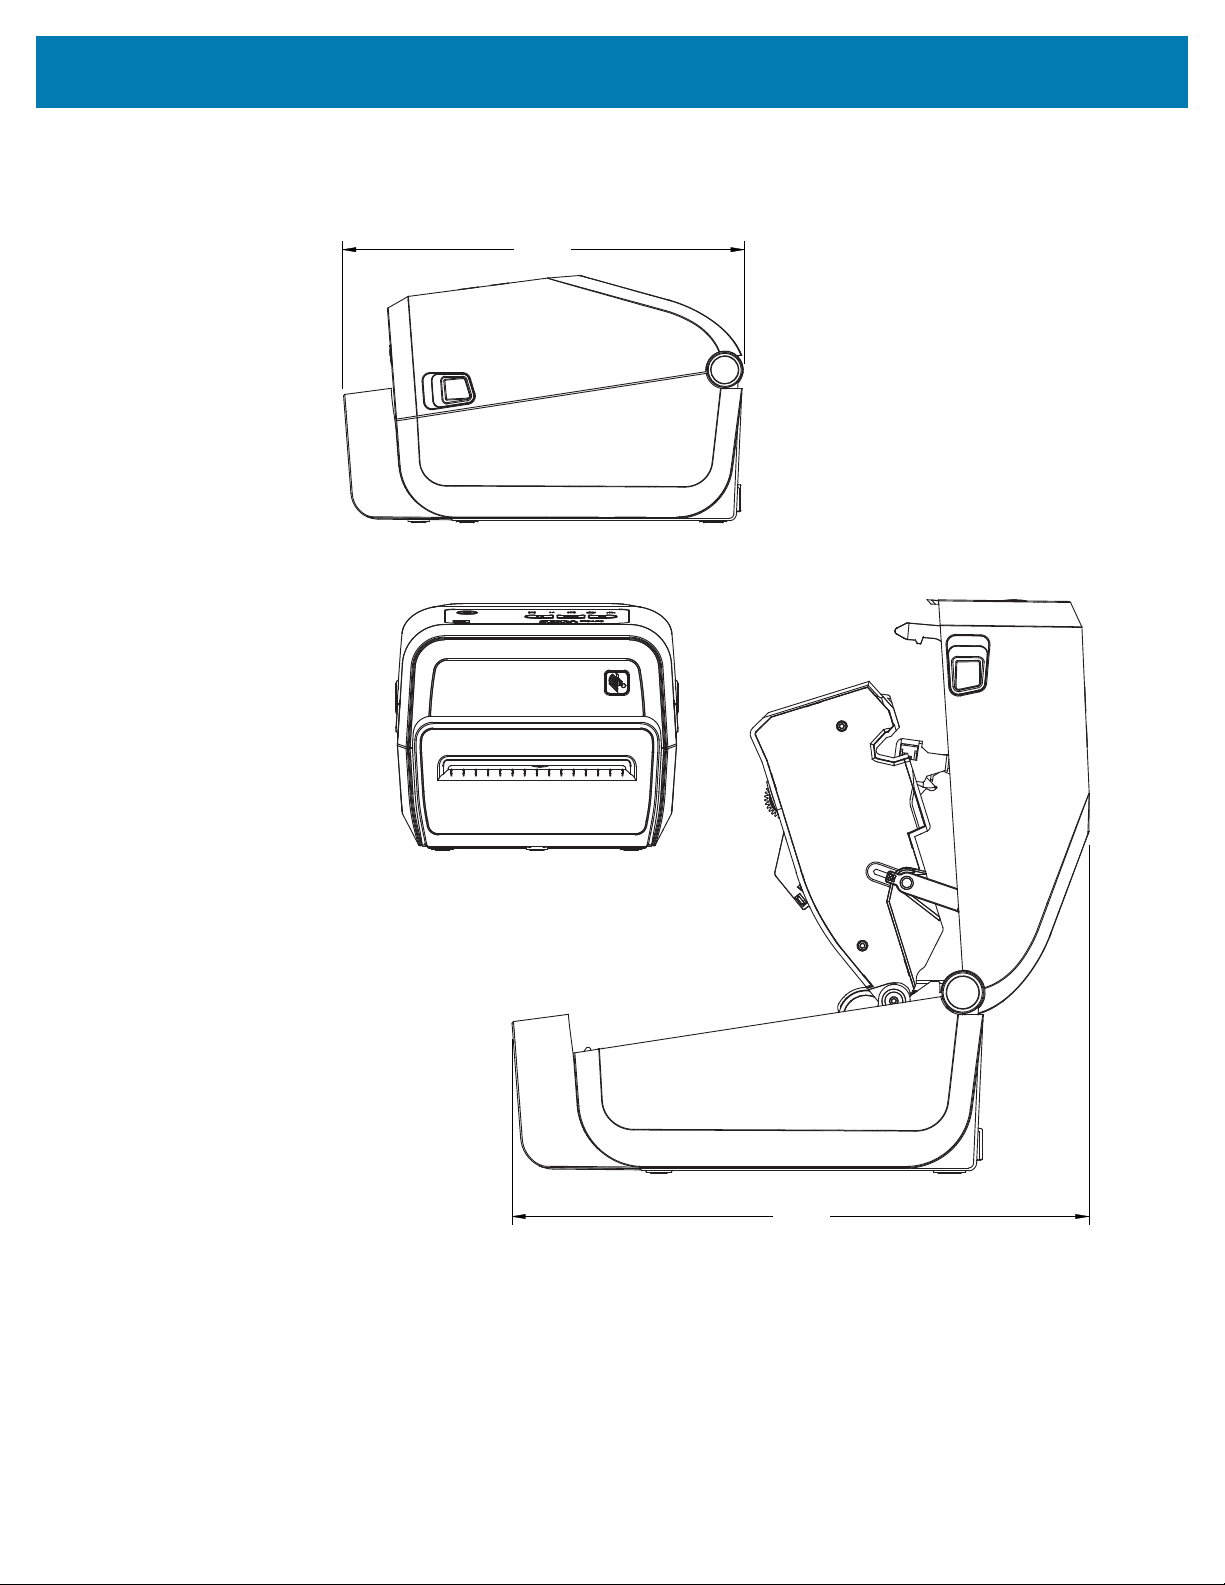
Dimensions
Figure 27ZD421C (Ribbon Cartridge Thermal Transfer) Printer Models–Dimensions of the Printerwith
the Cutter Option Installed
285.8
348.9
All dimensions are in millimeters.
357
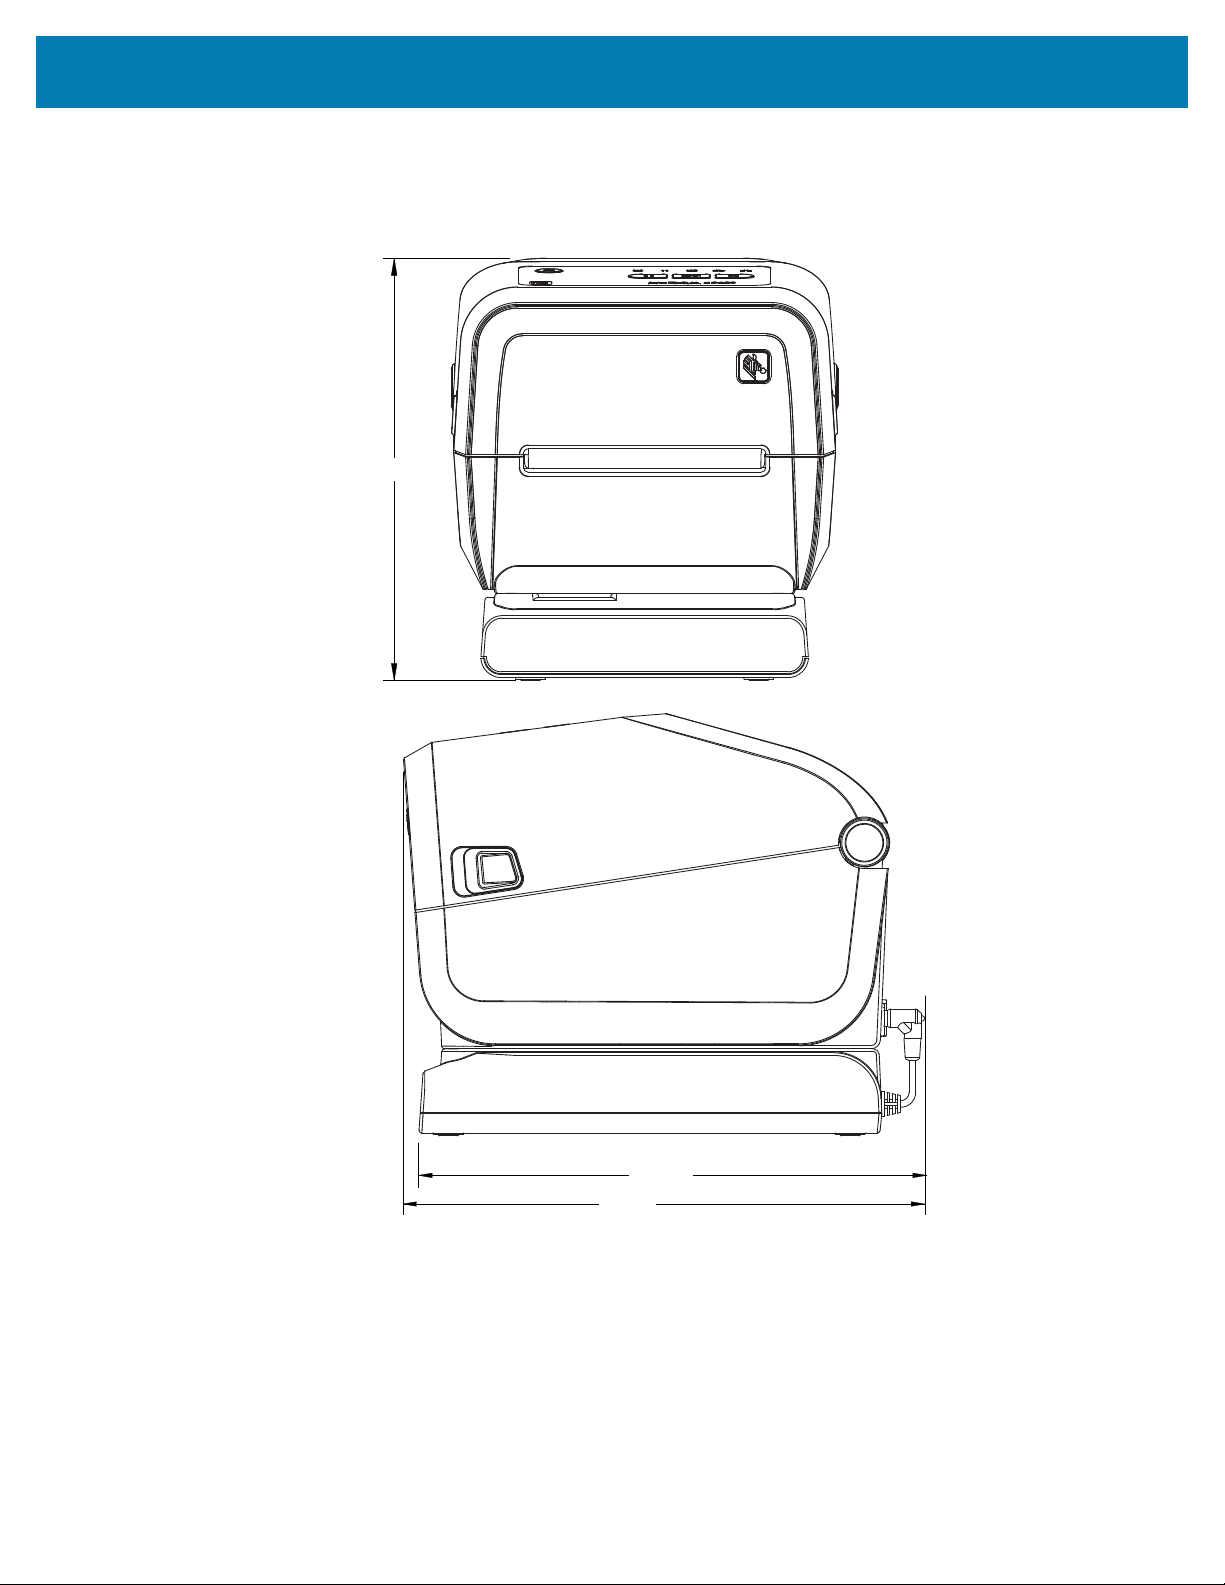
Dimensions
Figure 28ZD421C (Ribbon Cartridge Thermal Transfer) Printer Models–Dimensions of the Printerwith
Attached Power Supply Base
220.9
264.6
272.7
All dimensions are in millimeters.
358
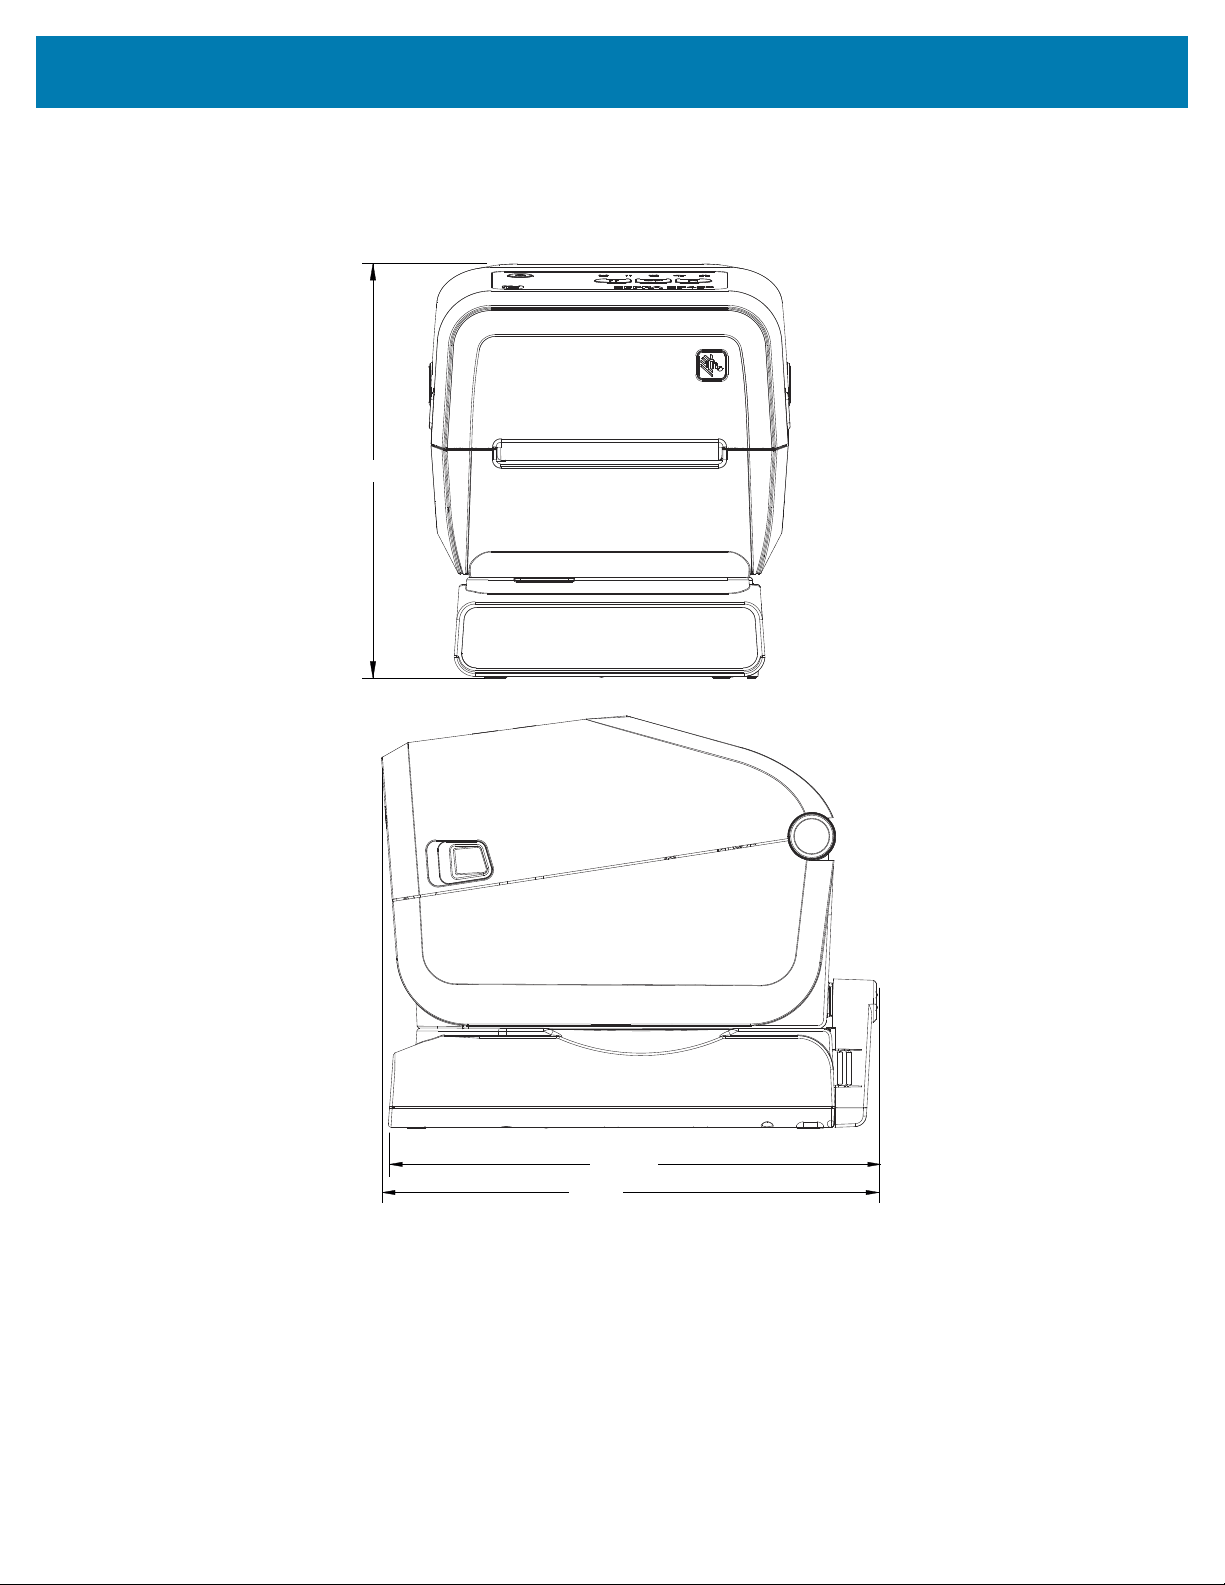
Dimensions
Figure 29ZD421C (Ribbon Cartridge Thermal Transfer) Printer Models–Dimensions of the Printerwith
Attached Power Supply Baseand Battery
231.5
274.5
278.0
All dimensions are in millimeters.
359
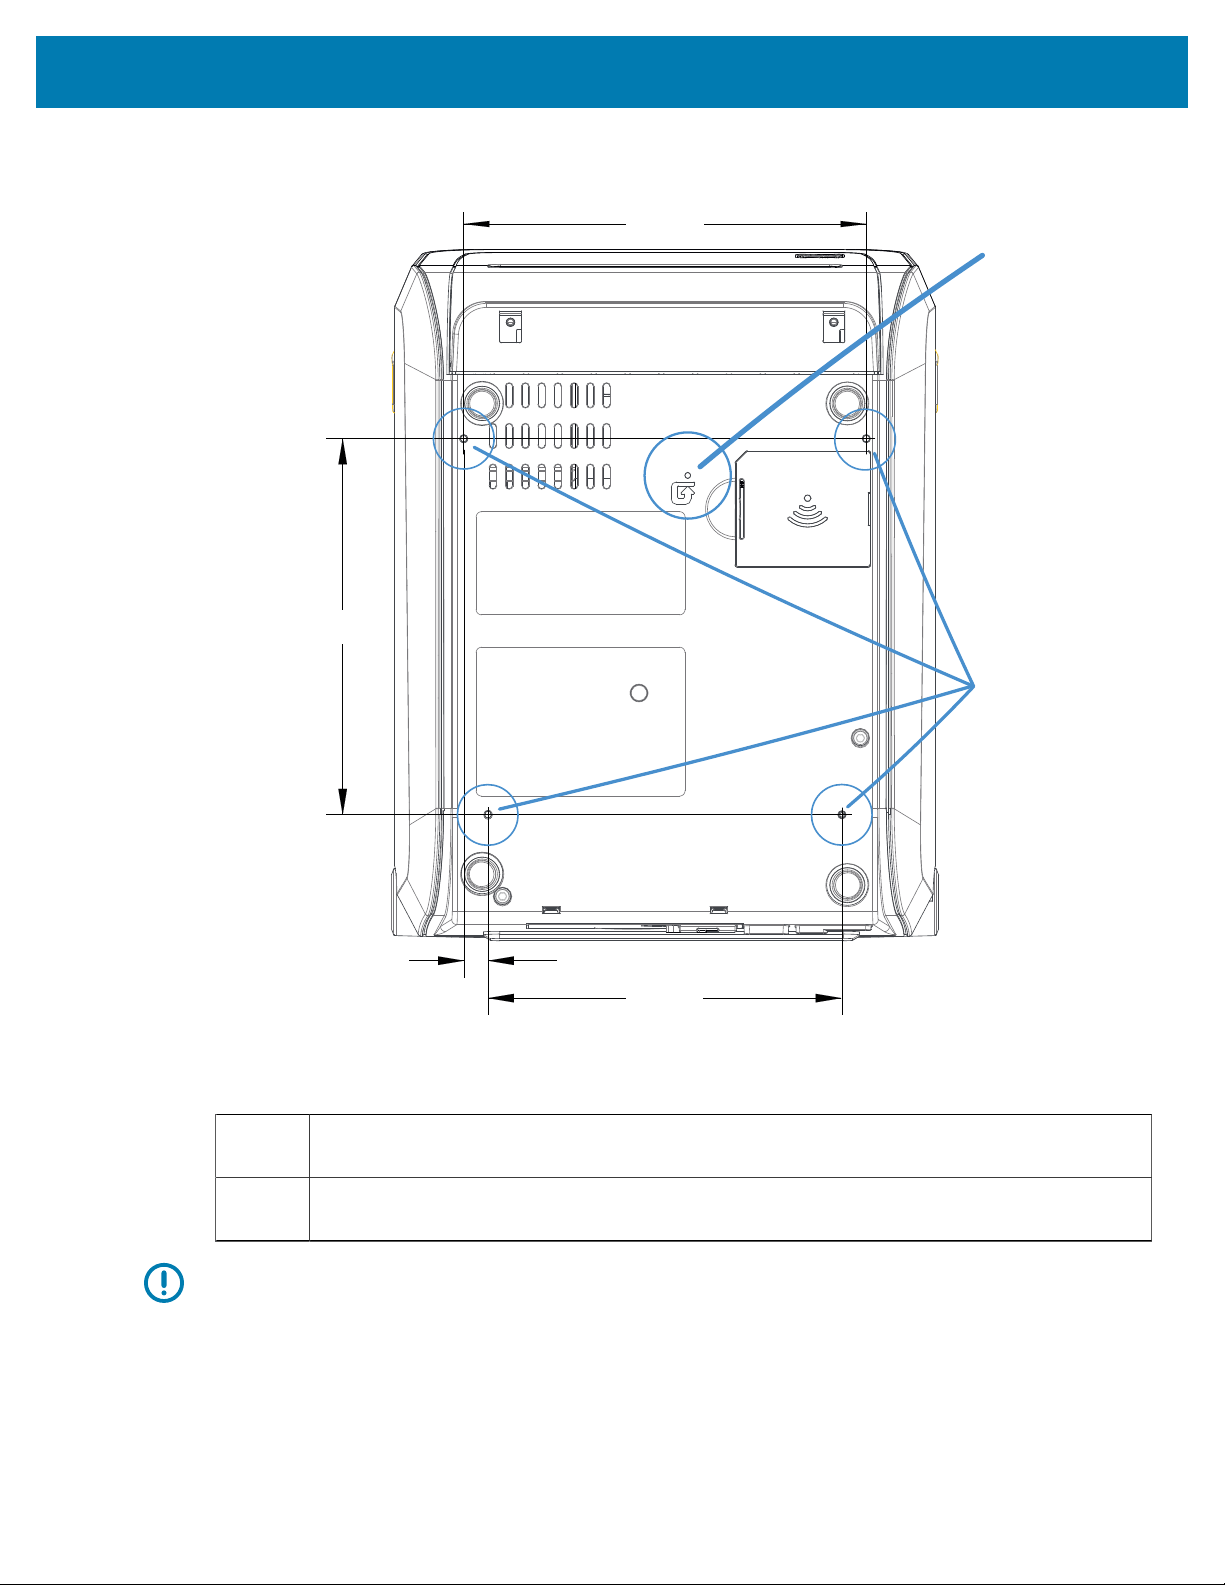
Dimensions
Figure 30ZD421C (Ribbon Cartridge Thermal Transfer) Printer Models–Mounting Screw Locations
139.0
130.8
9.0
148.8
2
1
1 Hardware Reset Access — Provide a 20-25 mm hole on the mounting plate or surface to
retain accessibility after mounting.
2 Mounting screws–Use M3 thread-forming screws that fit the maximum printer base hole
depth of 6 mm.
IMPORTANT: Do NOT remove the rubber feet. They are meant to keep the printer from
overheating.
360
All dimensions are in millimeters.
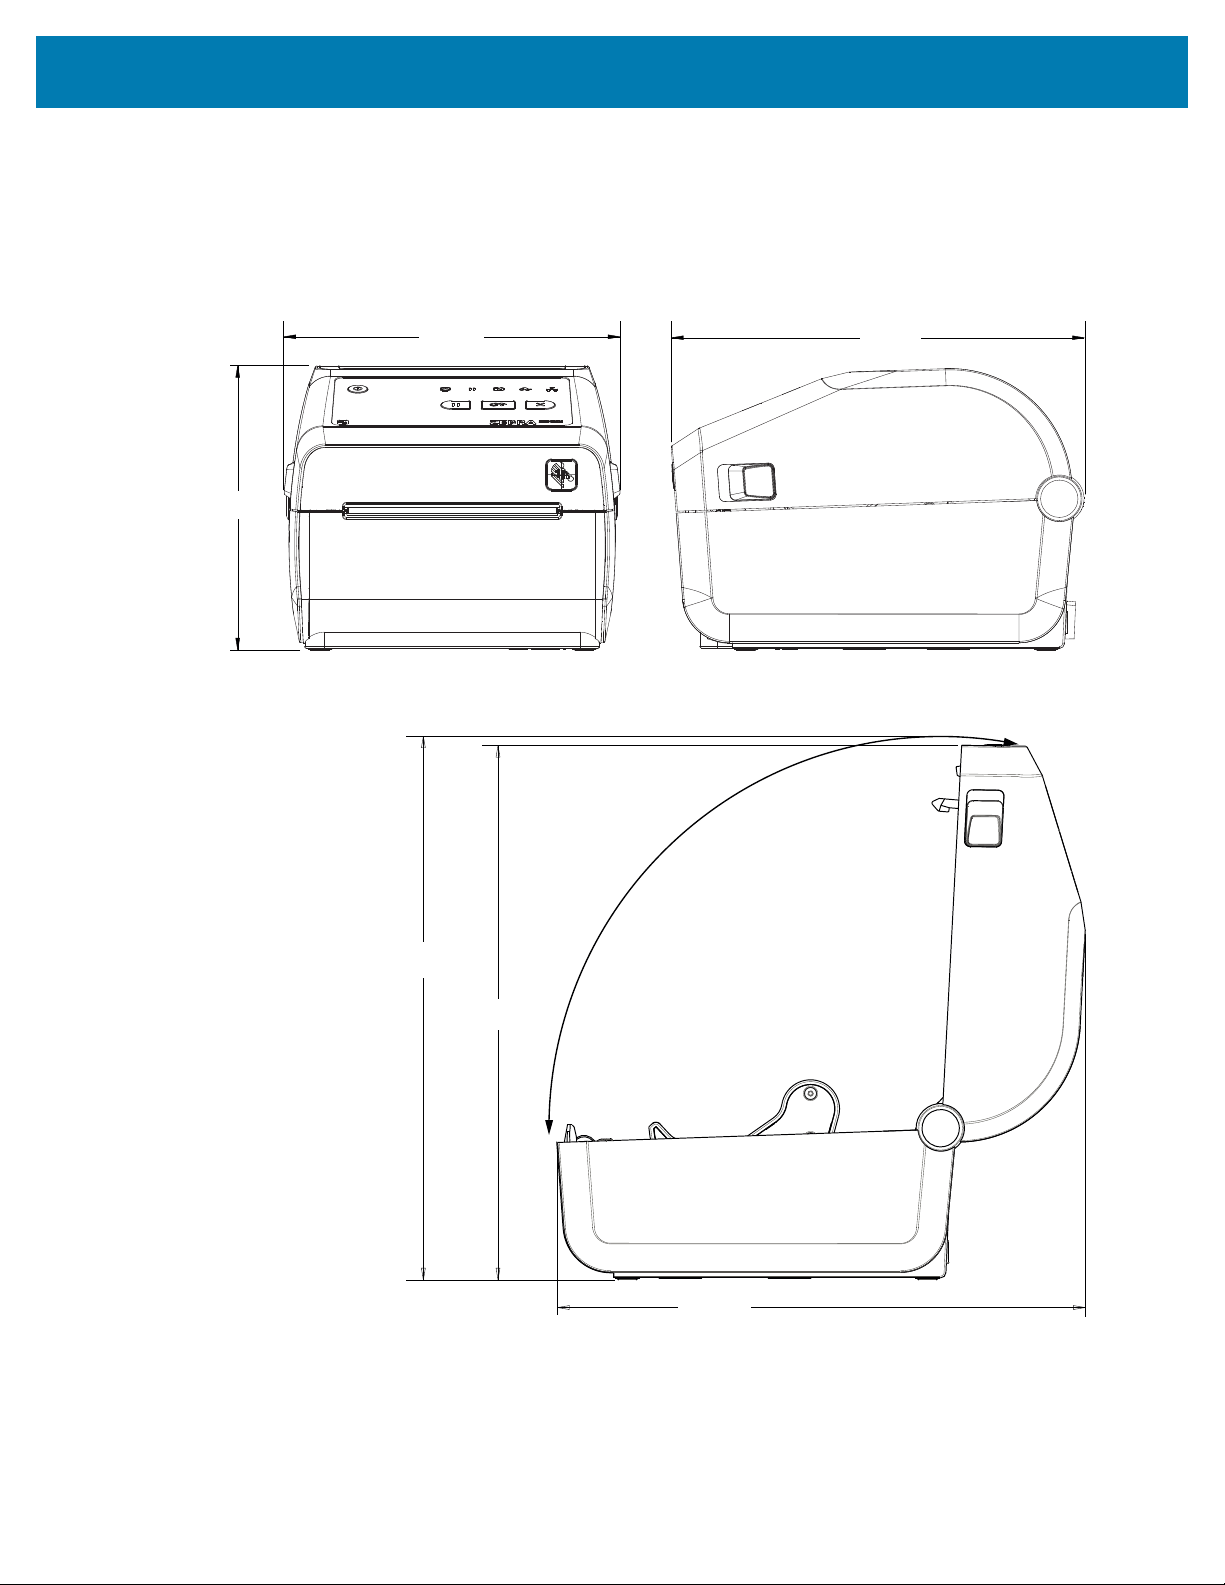
Dimensions
Dimensions– ZD421/ZD621 Direct Thermal Printer Models
All dimension are in millimeters
Figure 31ZD421/ZD621 Direct Thermal Printer Models–Dimensions of the Standard Printer
286.0
282.2
291 .0
220.8
177.5
150.7
All dimensions are in millimeters.
361
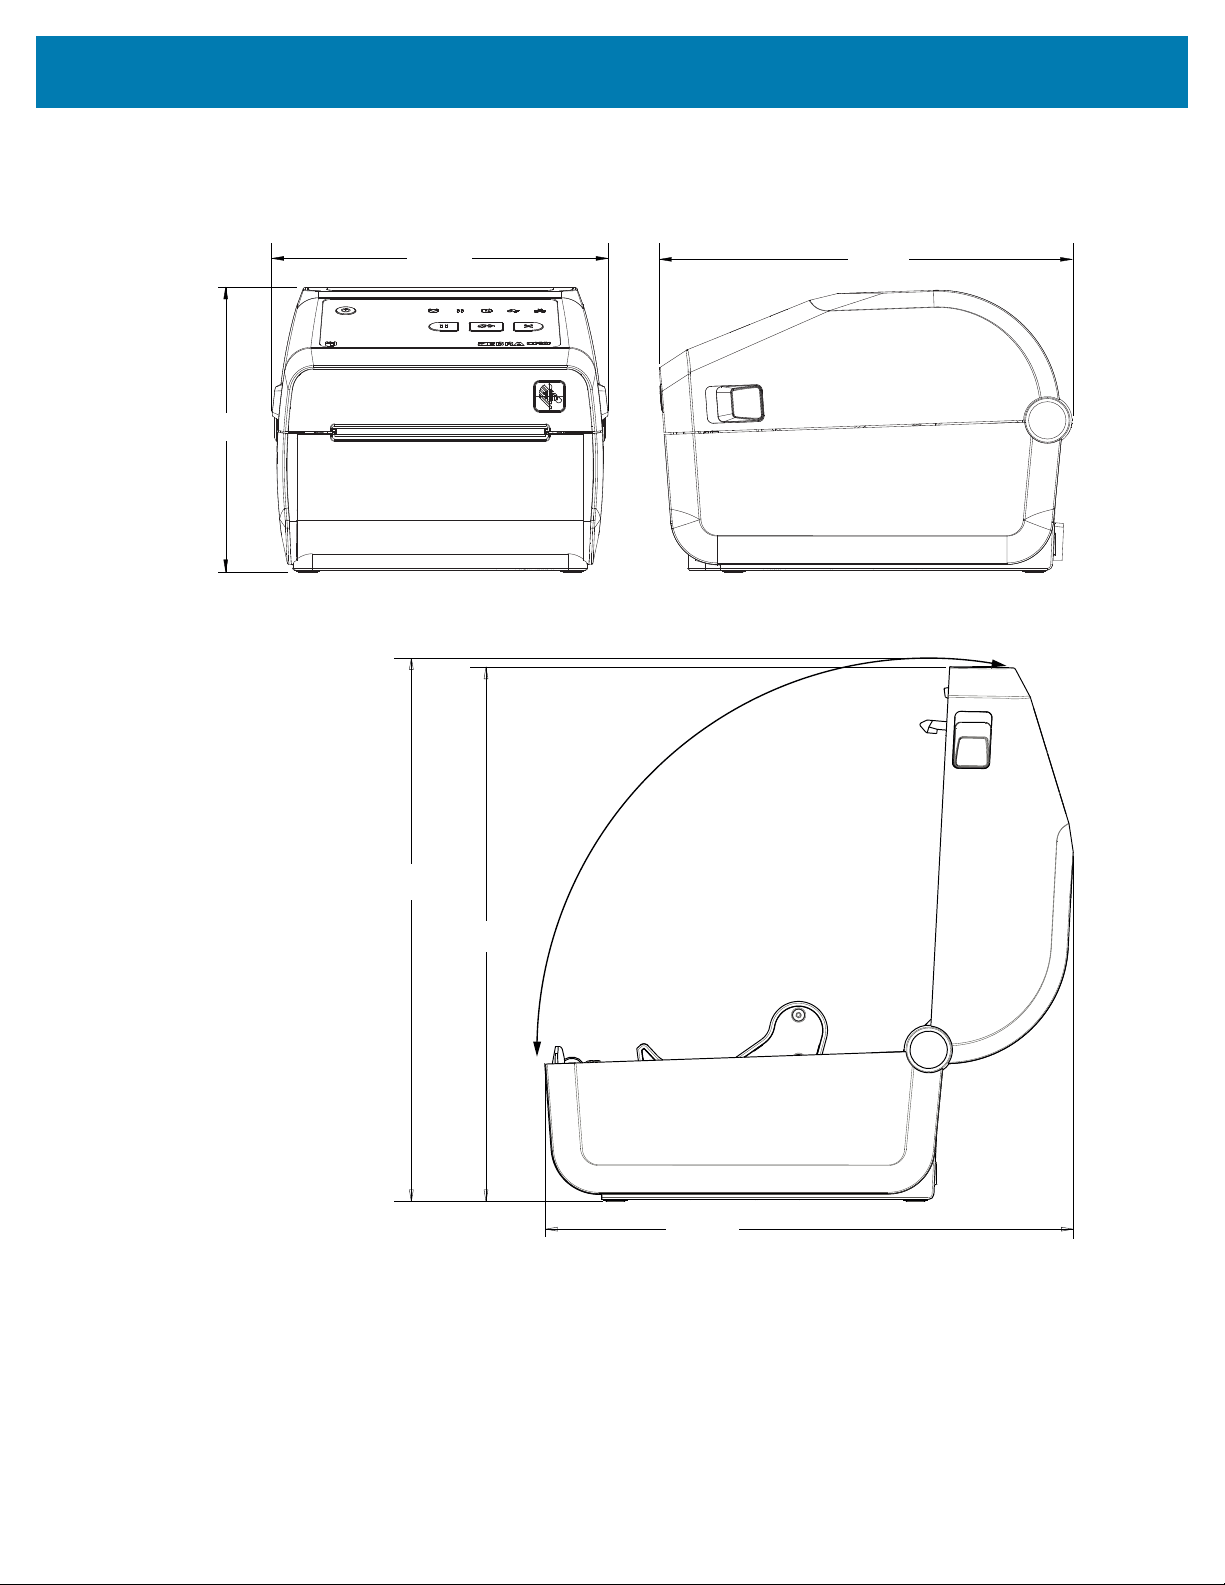
Dimensions
Figure 32ZD421/ZD621 Direct Thermal Printer Models–Dimensions of the Printerwith the Label
Dispenser Option Installed
286.0
282.2
291 .0
220.8
177.5
150.7
All dimensions are in millimeters.
362
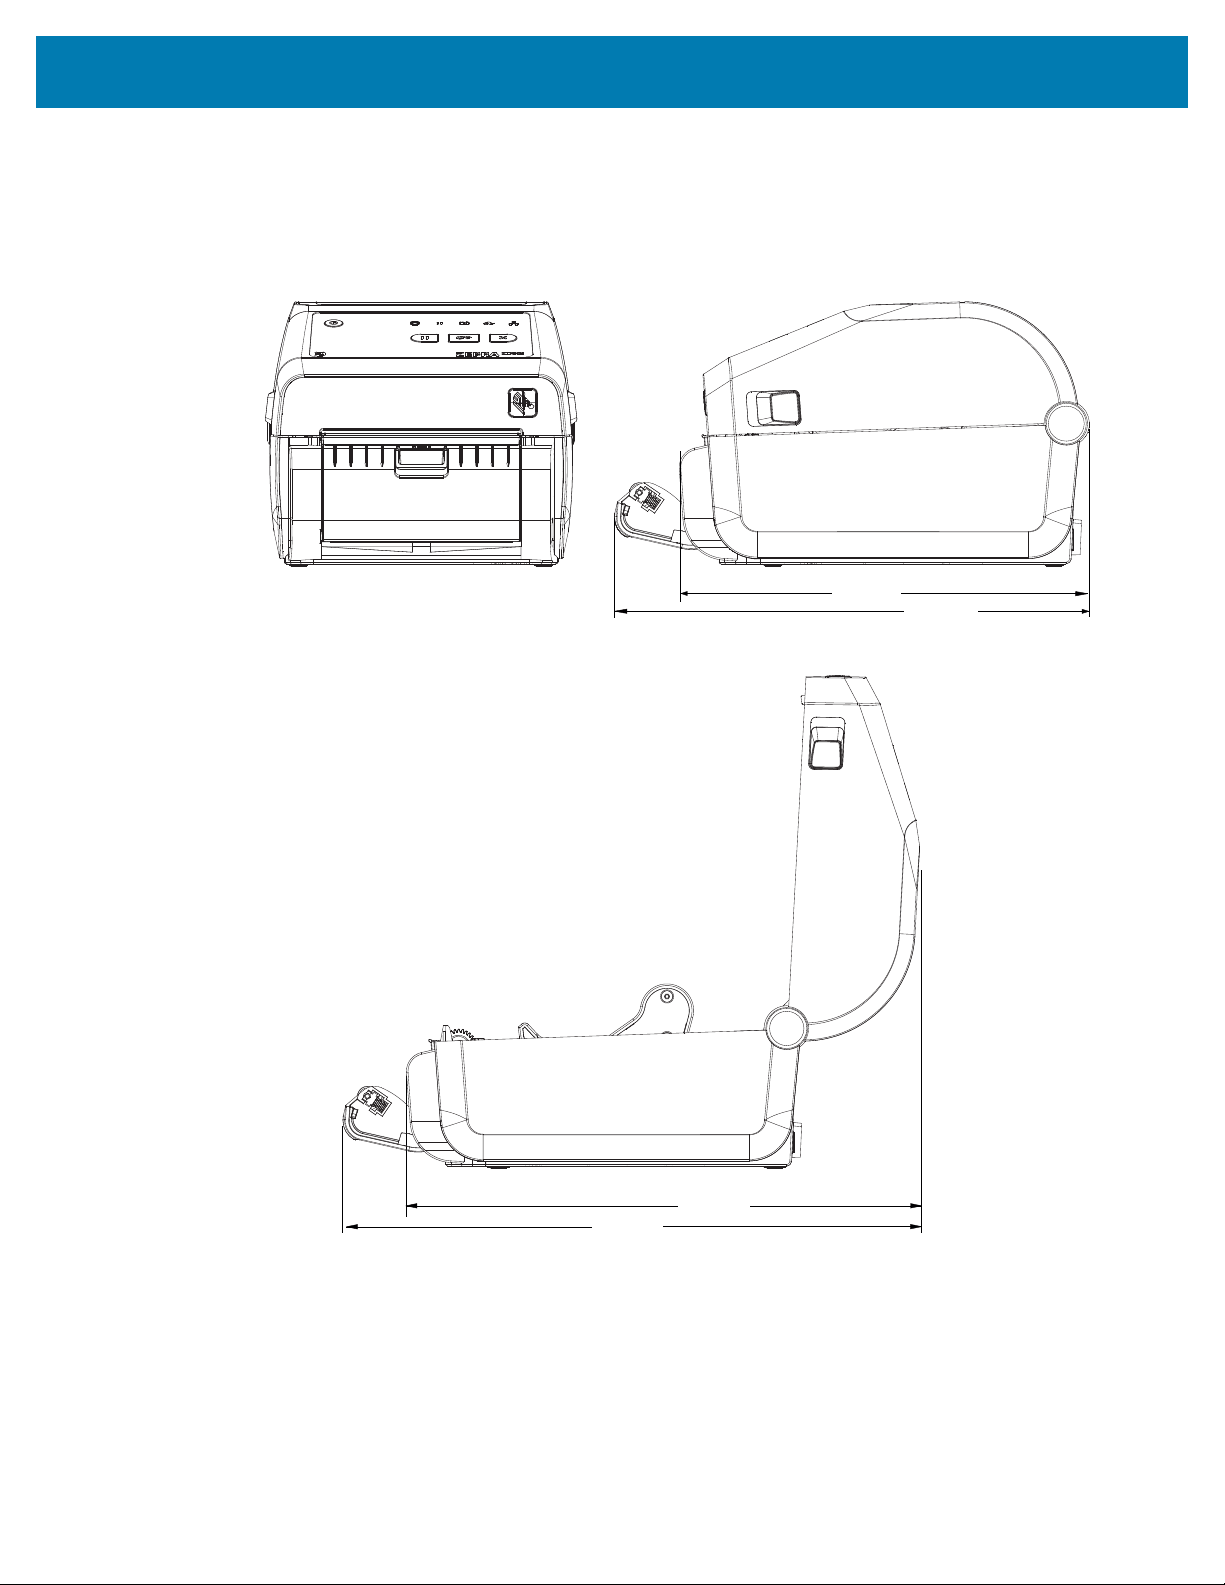
Dimensions
Figure 33ZD421/ZD621 Direct Thermal Printer Models–Dimensions of the Printerwith the Label
Dispenser Option Installed
235.3
286.3
234.6
271.6
All dimensions are in millimeters.
363
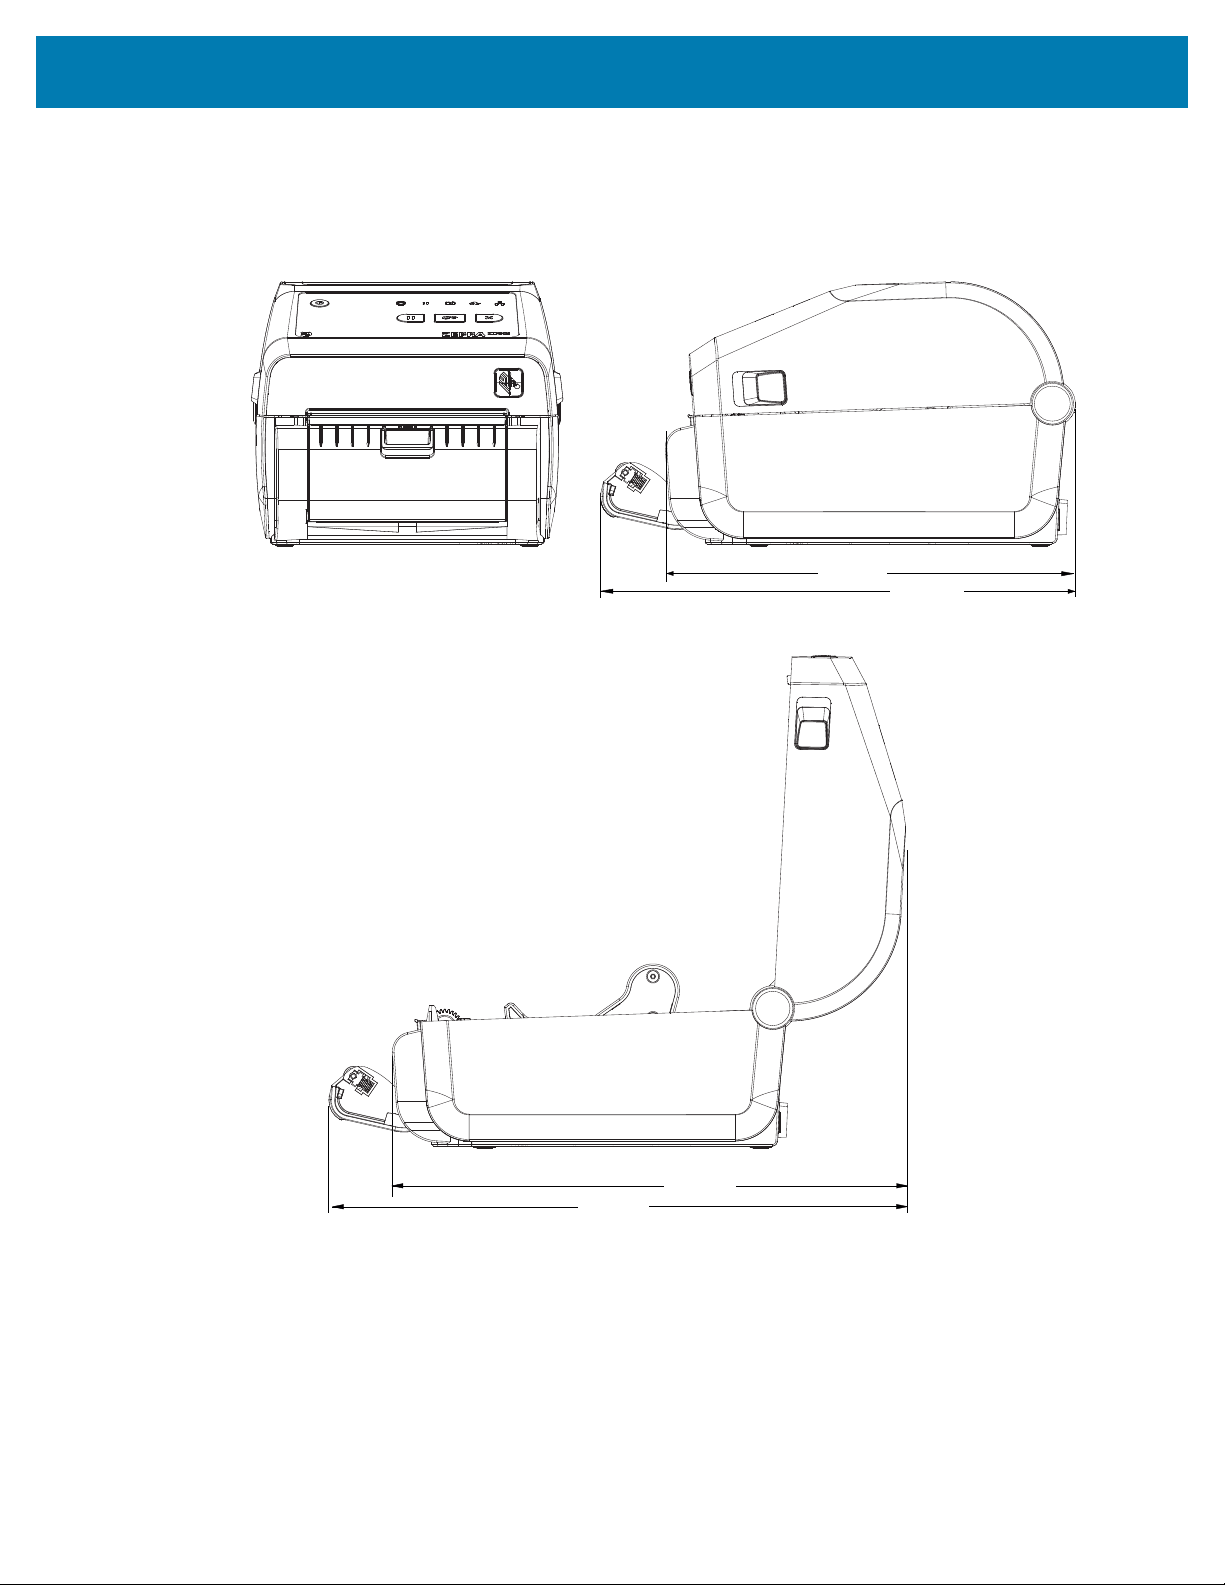
Dimensions
Figure 34ZD421/ZD621 Direct Thermal Printer Models–Dimensions of the Printerwith the Label
Dispenser Option Installed
235.3
286.3
234.6
271.6
All dimensions are in millimeters.
364
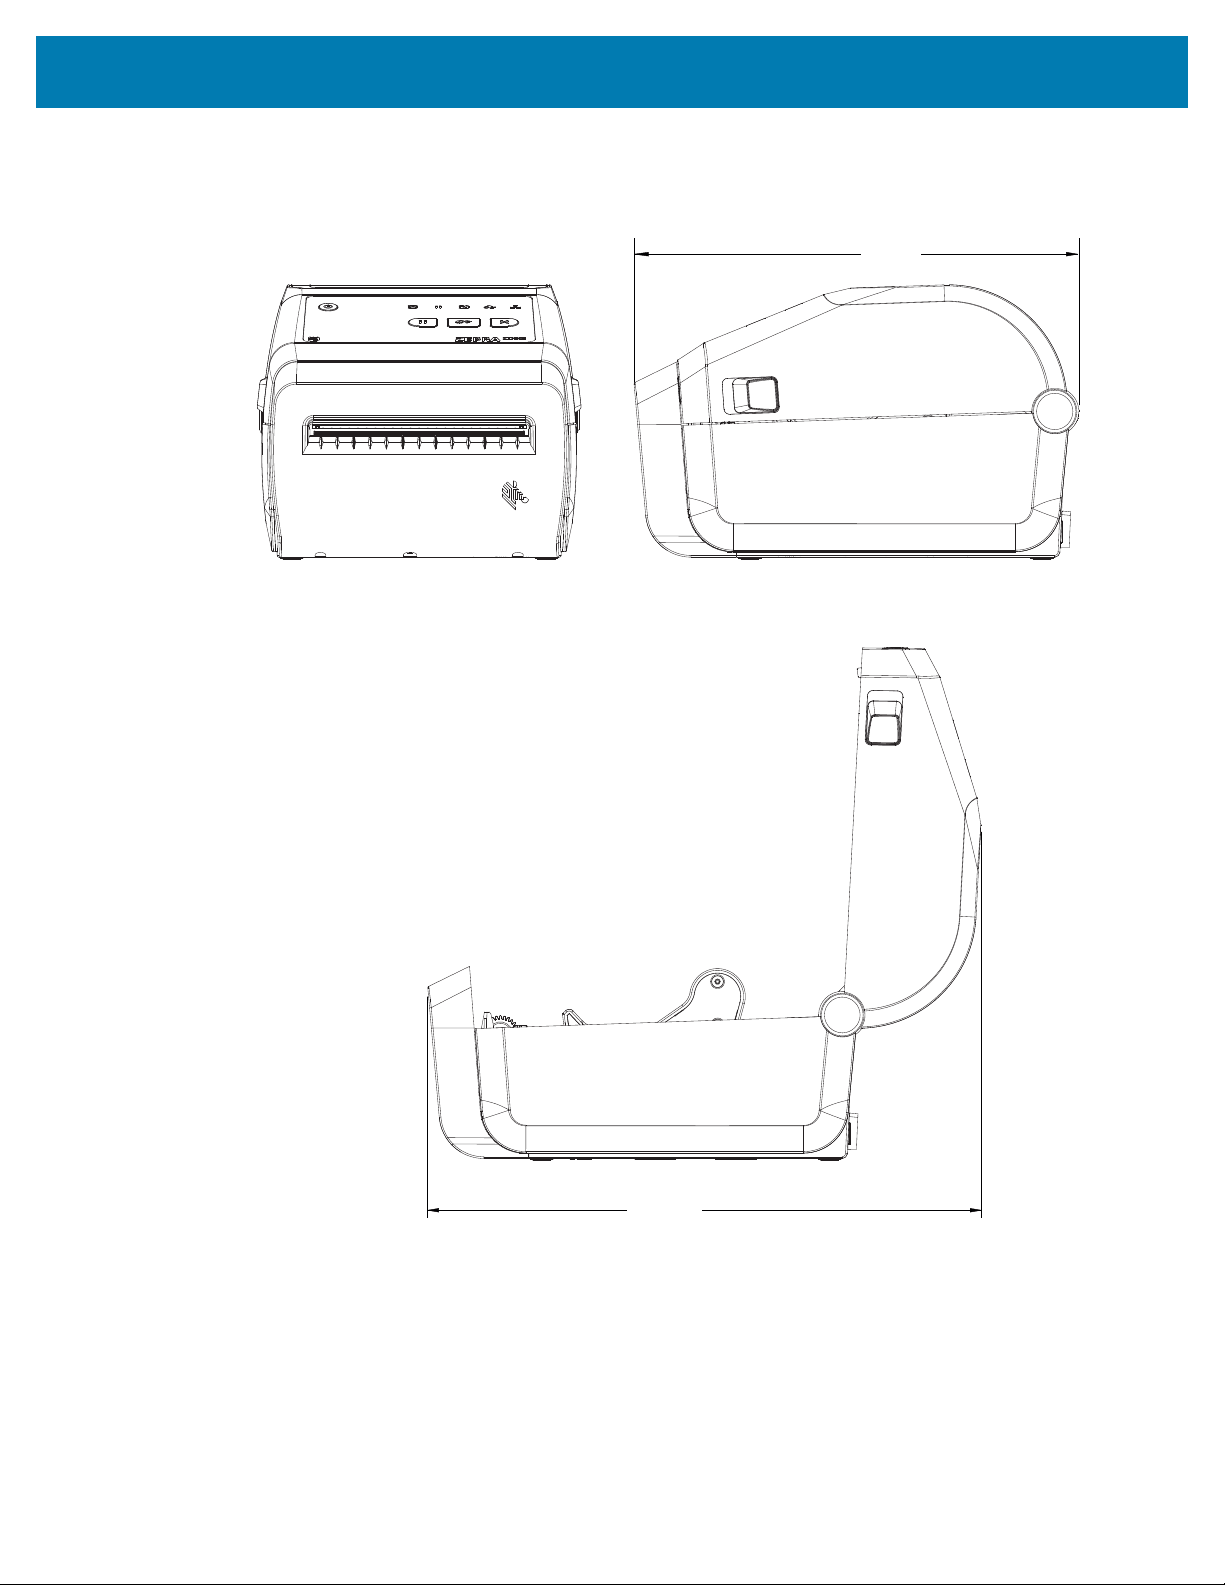
Dimensions
Figure 35ZD421/ZD621 Direct Thermal Printer Models–Dimensions of the Printerwith the Cutter Option
Installed
244.5
317.0
All dimensions are in millimeters.
365
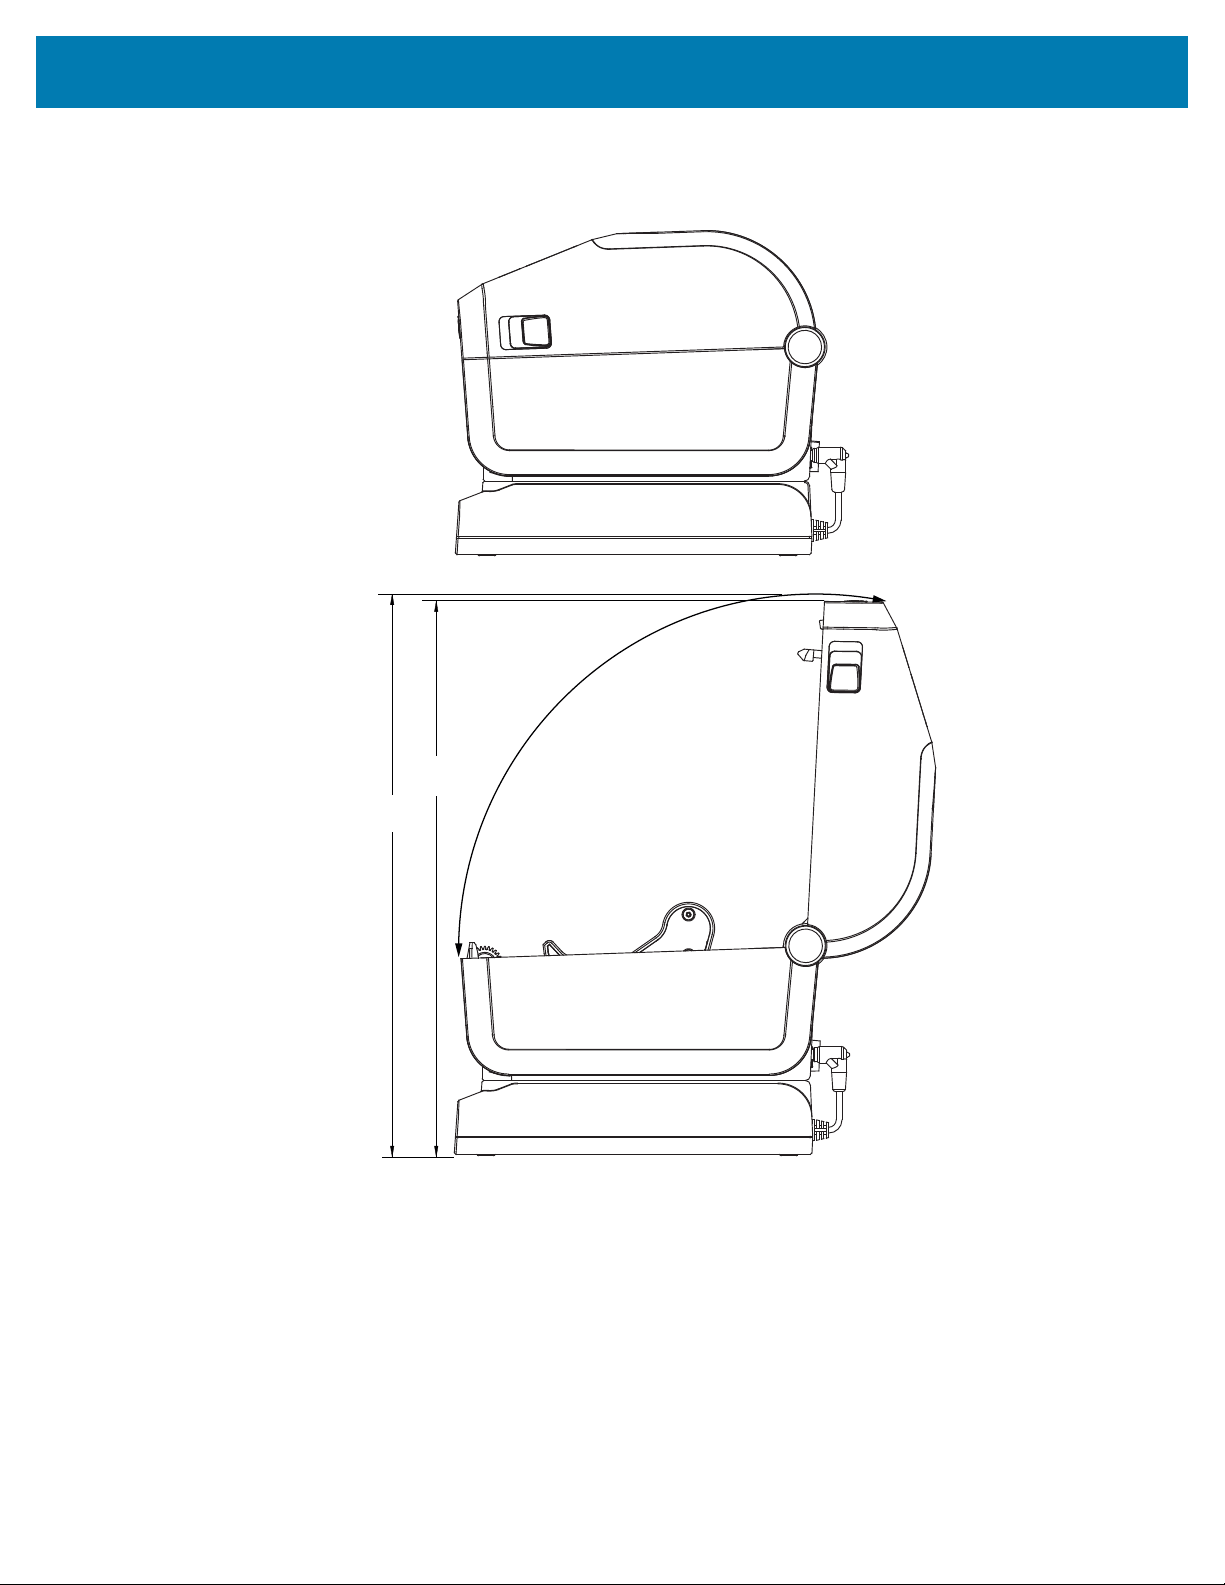
Dimensions
Figure 36ZD421/ZD621 Direct Thermal Printer Models–Dimensions of the Printerwith the Power Supply
Base Plugged in
328.0
343.0
All dimensions are in millimeters.
366
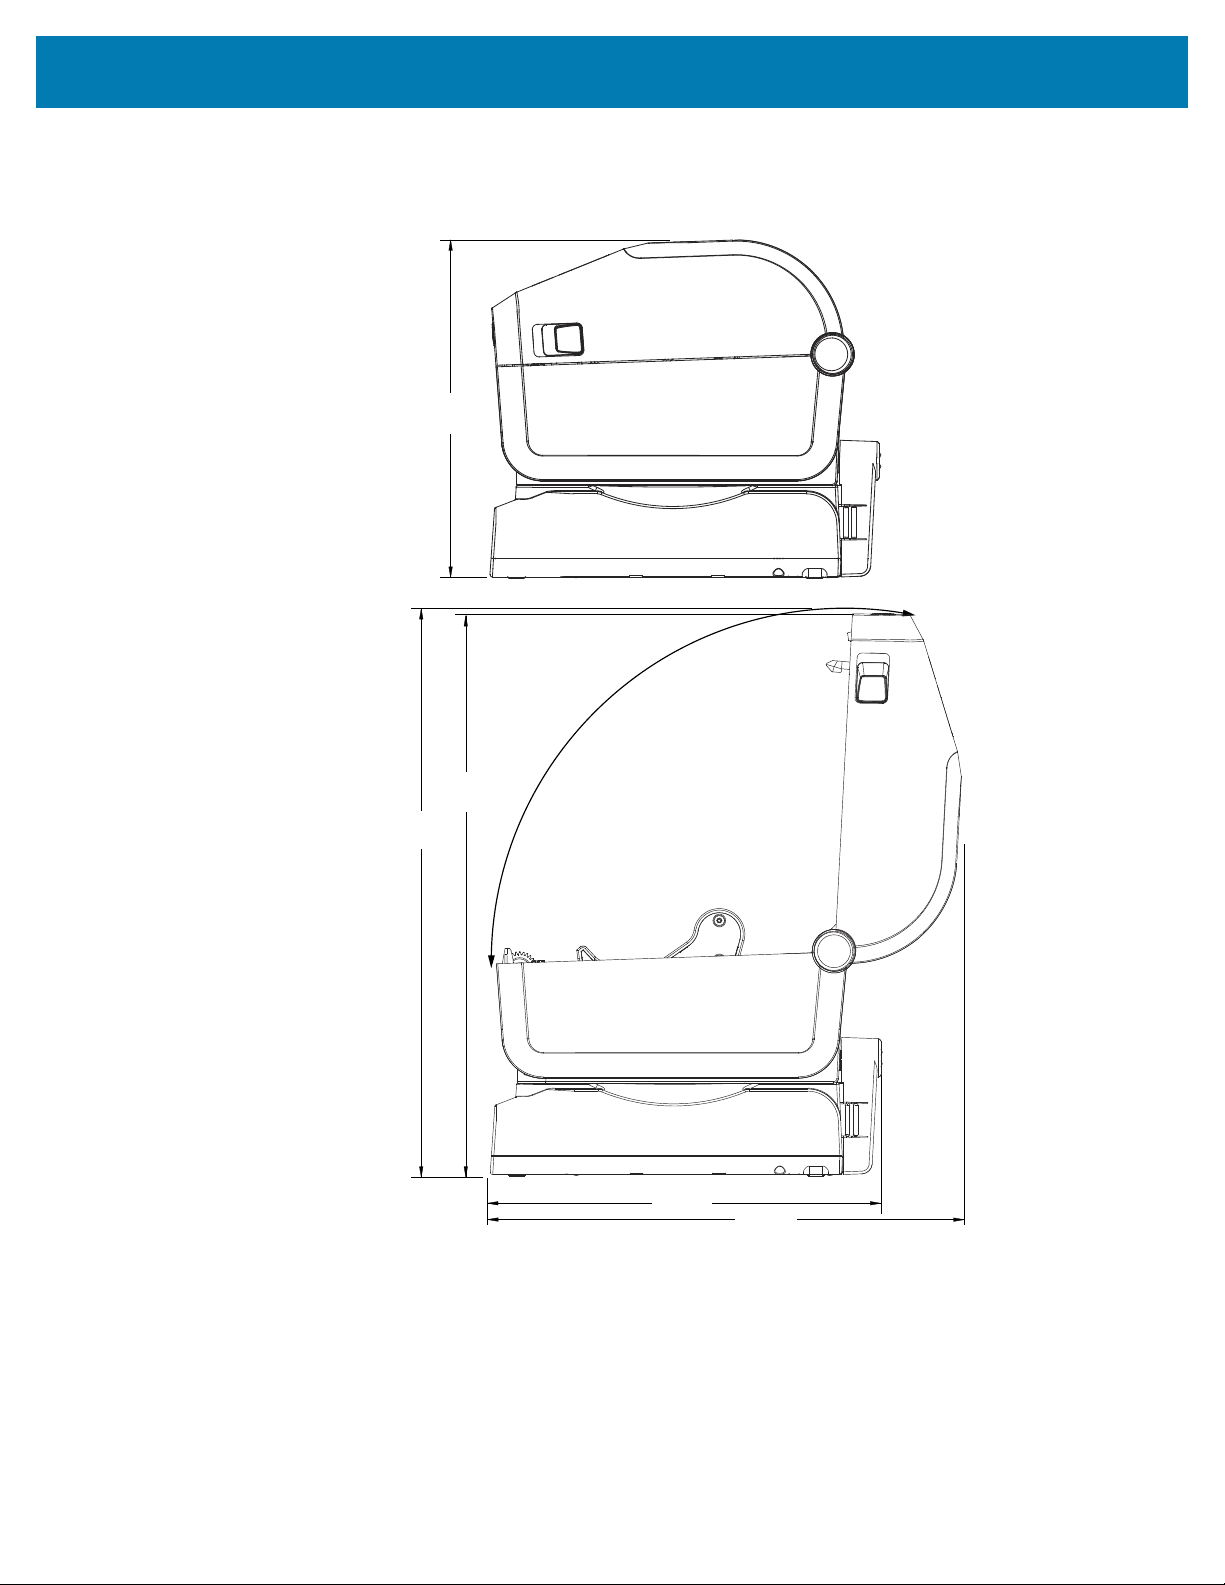
Dimensions
Figure 37ZD421/ZD621 Direct Thermal Printer Models–Dimensions of the Printerwith the Attached
Battery Baseand Battery
194 .5
220 .0
286.3
328.0
343.0
All dimensions are in millimeters.
367
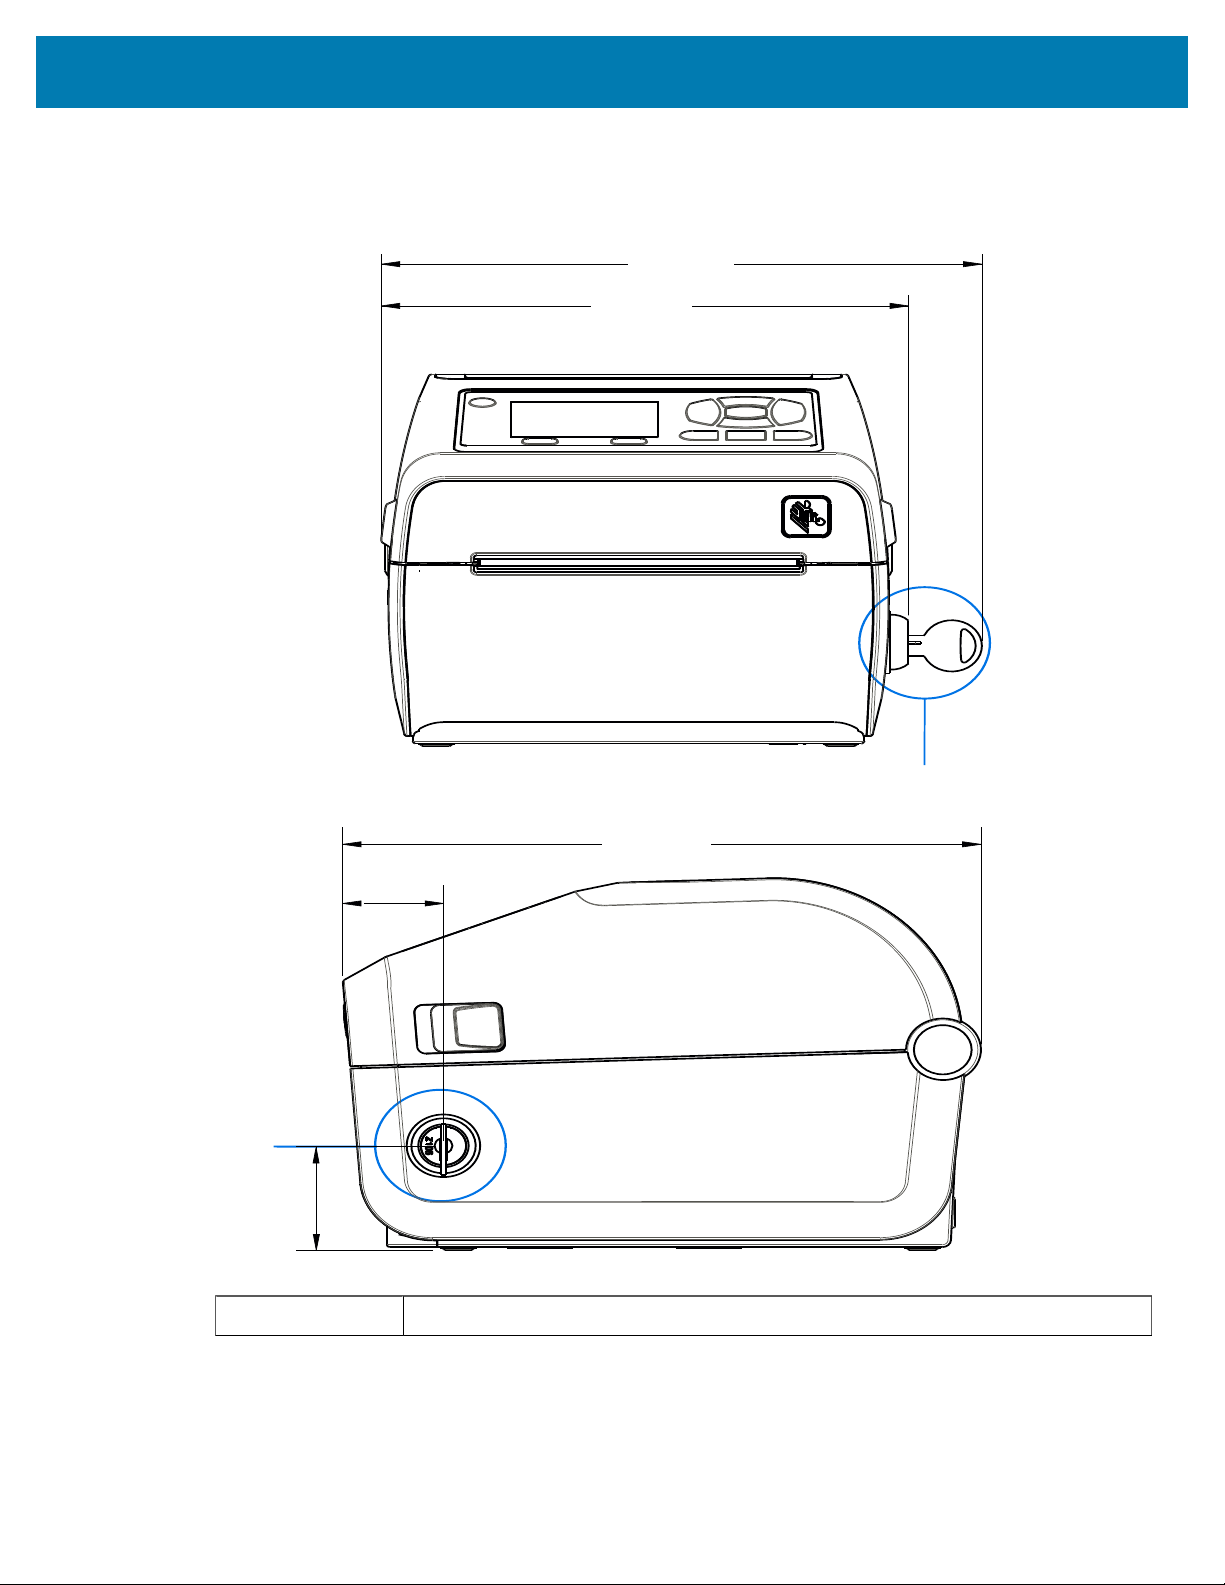
Dimensions
Figure 38ZD621 Direct Thermal Printer (Healthcare ModelsOnly) with Locking Media Cabinet
–Dimensions
207.7
182.3
220.8
34.9
42.3
1 & 2 Locking media cabinet (shown with key in lock)
All dimensions are in millimeters.
368
2
1

Dimensions
Figure 39ZD421/ZD621 Direct Thermal Printers – Mounting Screw Locations
130. 0
116.0
55 .0
10.0
3.0
2
1
1
1 Mounting holes—Use M3 thread-forming screws that fit the maximum printer base hole
depth of 6 mm.
2 Hardware reset access — Provide a 20-25 mm hole in the mounting plate or surface to retain
accessibility after the printer is mounted.
369
NOTE: Do NOT remove the rubber feet. They are designed to prevent overheating.

Dimensions
This page is intentionally left blank.
370

Media
Media
This section provides a simple media overview for your printer.
Types of Thermal Media
IMPORTANT: Zebra strongly recommends the use of Zebra-brand supplies in order to ensure
consistent high-quality printing. A wide range of paper, polypropylene, polyester, and vinyl
stock has been specifically engineered to enhance the printing capabilities of the printer and to
prevent premature printhead wear.
To purchase supplies, go to zebra.com/supplies.
Your printer can use various types of media:
• Standard media—Most standard (non-continuous) media uses an adhesive backing that sticks individual
labels or a continuous length of labels to a liner.
• Continuous roll media—Most continuous roll media is direct thermal media (similar to fax paper) and is
used for receipt or ticket style printing.
• Tag stock—Tags are usually made from a heavy paper (up to 0.19mm or0.0075 in.thick). Tag stock
does not have adhesive or a liner, and it is typically perforated between tags.
Whereas roll media is the most common type of media used, your printer can also use continuous media
and fanfold media.
NOTE: The locking printer models can handle only media that is loadable within the printer's
media compartment. They are not recommended for fanfold media printing.
Determining Thermal Media Types
Thermal transfer media requires ribbon for printing while direct thermal media does not. To determine if
ribbon must be used with a particular media, perform a media scratch test.
To perform a media scratch test,scratch the print surface of the media with a fingernail or pen cap. Press
firmly and quickly while dragging it across the media surface.
NOTE: Direct thermal media is chemically treated to print (expose) when heat is applied. This
method of testing the media uses friction heat to help identify the media.
Did a black mark appear on the media?
371

Media
If a black mark... The media print mode is...
appears... Direct Thermal. Your printer supports this media. You do NOT have
to load ribbon.
does not appear... Thermal Transfer. A ribbon is required. You will need to load ribbon.
General Media and Print Specifications
The printer has a wide variety of media and print handling variations. The range of basic media support
isspecified here.
NOTE: For supplies that meet these requirements and are designed to work with your printer, go
to zebra.com/supplies.
• Max media width:
• Direct Thermal printers:108 mm (4.25 in.)
• Thermal TransferZD621, ZD621R, and ZD421 Cartridge printers: 118 mm (4.65 in.)
• Thermal Transfer ZD421, ZD421CN printers: 112 mm (4.41 in.)
• Min. Media width for all ZD421 and ZD621 models: 15 mm (0.585 in.)
• Media length:
• Maximum: 991 mm (39 in.)
• Minimum forTear Off and Label options:6.35 mm (0.25 in.) min. –
• Minimum for Peel and Cutter options:12.7 mm (0.50 in.) min. – Peel
• Media thickness:
• Minimum (all requirements): 0.06 mm (0.0024 in.)
• Maximum (all requirements): 0.1905 mm (0.0075 in.)
• Media Roll Outer Diameter (O.D.) max.–127 mm (5.0 in.)
• Media Roll Core Inner Diameter (I.D.):
• Standard roll configuration:
• 12.7 mm (0.5 in.) I.D.
• 25.4 mm (1 in.) I.D.
• With optional media roll adapter:
• 38.1 mm (1.5 in.) I.D.
• 50.8 mm (2.0 in.) I.D.
• 76.2 mm (3.0 in.) I.D.
372

Media
• Ribbon Rolls(74 meter)
• Ribbon length: 74 m (243 ft.)
• Ribbon width max:110 mm (4.33 in.)
• Ribbon width min. (ZD421 Ribbon Cartridge printers):33 mm (1.3 in.)
• Ribbon core I.D.: 12.7 mm (0.5 in.)
• Wax, wax/resin, and resin transfer materials
• Ribbon Rolls (300 meter)
• Ribbon length:300 m (984 ft.)
• Ribbon width max.:110 mm (4.33 in.)
• Ribbon width min.(ZD421 Ribbon Cartridge printers):33 mm (1.3 in.)
• Wax, wax/resin, and resin transfer materials
IMPORTANT: Transfer ribbon should always cover the entire width of the media (and liner) to
prevent damaging the printhead.
• ZD421C Ribbon Cartridges
• Ribbon Length:74 m (243 ft.)
• Ribbon width max.–110 mm (4.33 in.)
• Ribbon width min.:33 mm (1.3 in.)
• Colors available in black:Wax, wax resin, and resin transfer materials
• Dot pitch:
• 203 dpi: 0.125mm (0.0049 in.)
• 300 dpi: 0.085mm (0.0033 in.)
• Barcode modulus x-dim:
• 203 dpi: 0.005–0.050 in.
• 300 dpi: 0.00327–0.03267 in.
Label Dispenser (Peeler)
The printer supports a field-installed label dispense option with a label-taken sensor for batch processing
labels.
• Paper Thickness:
• Min.: 0.06 mm (0.0024 in.)
• Max.: 0.1905 mm (0.0075 in.)
• Media Width:
• Min.: 15 mm (0.585 in.)
• Max. forDirect Thermal printers: 108 mm (4.25 in.)
• Max forThermal Transfer ZD621, ZD621R, and ZD421 Cartridge printers: 118 mm (4.65 in.)
• Max. forThermal Transfer ZD421 and ZD421CN printers: 112 mm (4.41 in.)
373

Media
• Label Length:
• Max. for all printers (theoretical): 990 mm (39 in.)
• Max. for Direct Thermal printers (tested): 330 mm (13 in.).
• Max. forThermal Transfer printers (tested): 279.4 mm (11 in.)
• All Printers Min.: 12.7 mm (0.5 in.)
Standard (Media) Cutter
The printer supports a field-installed media cutter option for full-width cutting of label liner, tag or receipt
media.
• Medium-duty cutter for cutting label liner and light tag media (LINER/TAG).
IMPORTANT: Do NOT use the cutter to cut through labels, adhesive, or embedded circuitry.
• Paper Thickness:
• Min.:0.06 mm (0.0024 in.)
• Max.: 0.1905 mm (0.0075 in.)
• Cut Width:
• Min.:15 mm (0.585 in.)
• Max. for Direct Thermal printers: 109 mm (4.29 in.)
• Max. forThermal Transfer ZD621, ZD621R, and ZD421 Cartridge printers: 118 mm (4.65 in.)
• Max. forThermal Transfer ZD421 and ZD421CN printers: 118 mm (4.65 in.)
• Min. distance between cuts (label length): 25.4 mm (1 in.).
IMPORTANT: Cutting shorter media lengths between the cuts may cause the cutter to jam or
show error conditions.
NOTE: By design, the cutter is self-cleaning. The internal cutter mechanism does NOT require
preventive maintenance.
Linerless (Media) Cutter–Direct Thermal only
The printer supports a field-installed media cutter option for full-width cutting of linerless media.
• A full width linerless media cutter (LINERLESS CUT).
• Paper thickness:
• Min.: 0.06 mm (0.0024 in.)
• Max.: 0.1905 mm (0.0075 in.)
• Cut width:
• Min.:15 mm (0.585 in.)
• Max.:109 mm (4.29 in.)
IMPORTANT: Cutting shorter media lengths between the cuts may cause the cutter to jam
and show error conditions.
• Minimum distance between cuts (label length): 25.4 mm (1 in.).
374

Media
NOTE: By design, the cutter is self-cleaning. The internal cutter mechanism does NOT require
preventive maintenance. See Recommended Cleaning Schedule on page 271 and the following
media path cleaning procedures in the Maintenance section of this guide to maintain optimal
operation of the cutter.
375

ZPL Configuration
ZPL Configuration
This section provides an overview of managing printer configuration, the Configuring Status Report, and
Printer and Memory Printouts.
Managing the ZPL Printer Configuration
The ZPL printer is designed to allow you to change printer settings dynamically for fast first label out
printing. Printer parameters that are persistent will be retained for future formats to use. Those settings will
remain in effect until they are changed by subsequent commands, the printer is reset, power is cycled, or
when you restore a parameter that has a factory default by resetting the printer to its factory defaults.
The ZPL Configuration Update command ^JU saves and restores printer configurations to initialize (or re-
initialize) the printer with pre-configured settings.
• To keep settings after a power cycle or printer reset, a ^JUS can be sent to the printer to save all
current persistent settings.
• The values are recalled with a ^JUR command to restore the last saved values to the printer.
ZPL stores all parameters at once with a single command mentioned above. The legacy EPL programming
language (supported by this printer) changes and saves individual commands immediately. Most printer
settings are shared between ZPL and EPL. For example, changing the speed setting with EPL will also
change the speed set for ZPL operations. The changed EPL setting will persist even after a power cycle or
reset issued by either printer language.
You can print a printer configuration report to determine the printer settings. It lists operating parameters,
sensor settings and printer status. For instructions on printing the report, see Printing the Printer and
Network Configuration Reports (CANCEL Self Test) on page 324. You can also use the Zebra Setup Utilities
and the ZebraDesigner Windows driver to print this report and other printer reports to help you manage
your printer.
ZPL Printer Configuration Format and Reusable Files
To set up and manage multiple printers that need the same configuration, create a printer configuration
programming file to download to all of them. The other option is to use ZebraNet Bridge to clone many
printers with the same file that you used to configure one printer.
For information on creating a programming file to send to one or more printers, see the ZPL programmer’s
guide and the Configuration Setting to Command Cross-reference on page 378. You can useWindows
Notepad as the text editor to create programming files and Zebra Setup Utilities to send these files to the
printer(s).
376

ZPL Configuration
The figure below shows the basic recommended structure for a ZPL programming configuration file.This
simple format makes the file reusable.
Figure 40Configuration Parameter Format Structure
377
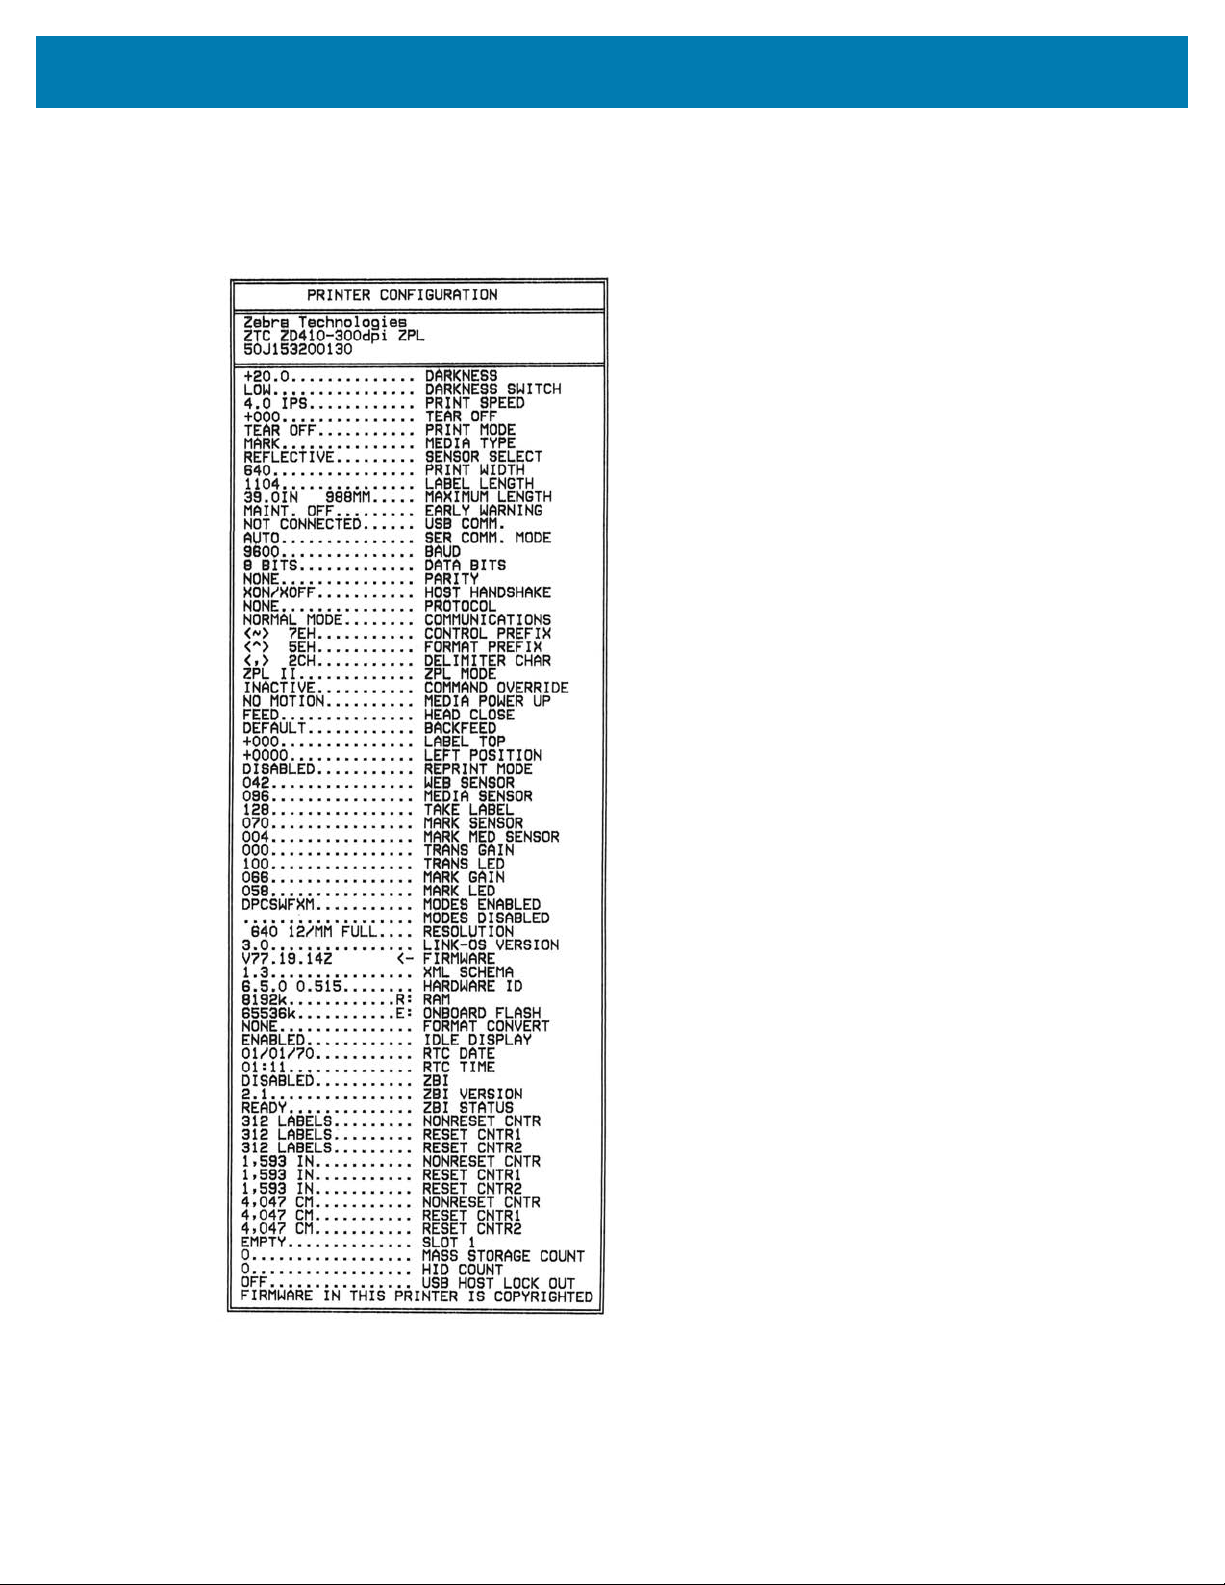
ZPL Configuration
Configuration Setting to Command Cross-reference
The Printer Configuration Report, shown below, provides a listing of a majority of the configurations
settings that can be set by ZPL command.
The sensor settings shown in this image, for example, areused for service purposes.
378
ZPL Configuration
Command Listing Name Default (or description)
^SD DARKNESS 10.0
— DARKNESS SWITCH LOW (Default), MEDIUM, or HIGH
^PR PRINT SPEED
• 152 mm/s / 6 ips(max.)- 203 dpi
• 102 mm/s / 4 IPS (max.) - 300 dpi
^TA TEAR OFF +000
^MN MEDIA TYPE GAP/NOTCH
SENSOR SELECT AUTO (^MNA - Auto-Detect)
^MT PRINT METHOD THERMAL-TRANS or DIRECT-THERMAL
^PW PRINT WIDTH 448 (dots for 203 dpi) or 640(dots for
300 dpi)
^LL LABEL LENGTH 1225 (dots) (dynamically updated while
printing)
^ML MAXIMUM LENGTH 989 mm (39.0 in.)
— USB COMM. (Connection Status: Connected / Not
Connected)
^SCa BAUD 9600
^SC,b DATA BITS 8 BITS
^SC,,c PARITY NONE
^SC,,,,e HOST HANDSHAKE AUTO
^SC,,,,,f PROTOCOL NONE
— SGD —** COMMUNICATIONS NORMAL MODE
^CT / ~CT CONTROL CHAR <~> 7EH
^CC / ~CC COMMAND CHAR <^> 5EH
^CD / ~CD DELIM./CHAR <,> 2CH
^SZ ZPL MODE ZPL II
— SGD —
COMMAND OVERRIDE
NOTE: Not supported
with a ZPL command.
Uses the Set-Get-Do
command listed in
the ZPL manual. (See
device.command_override.xxxxx
in the ZPL Programming
Guide.)
INACTIVE
^MFa MEDIA POWER UP NO MOTION
^MF,b HEAD CLOSE FEED
Table 14ZPL Commands and Configuration Report Callout Cross-Reference
379
ZPL Configuration
Command Listing Name Default (or description)
~JS BACKFEED DEFAULT
^LT LABEL TOP +000
^^LS LEFT POSITION +0000
~JD / ~JE HEXDUMP NO (~JE)
REPRINT MODE DISABLED
Table 14ZPL Commands and Configuration Report Callout Cross-Reference(Continued)
From this point in the Configuration Report, the printout lists sensor settings and values which can be used
to troubleshoot sensor and media operations. These are typically used by Zebra Tech Support to diagnose
printer problems.
The configuration settings listed here are listed on the Printer Configuration Report after the TAKE LABEL
sensor value. This listing includes commands that are:
• used to generate status information, or
• relate to printer features whose settings are seldom changed from their defaults.
Command Listing Name Description
MODES ENABLED Default:CWF(See ^MP Command)^MP
MODES DISABLED (No default set)
^JM RESOLUTION Default:448 8/mm (203 dpi); 640 8/
mm (300 dpi)
— FIRMWARE Lists ZPL Firmware Version
— XML SCHEMA 1.3
— HARDWARE ID Lists Firmware Boot-block Version
LINK-OS VERSION
— CONFIGURATION CUSTOMIZED (after first use)
— RAM 2104k........ R:
— ONBOARD FLASH 6144k.........E:
^MU FORMAT CONVERT NONE
— RTC DATE Date Displayed
— RTC TIME Time Displayed
^JI / ~JI ZBI DISABLED (Requires key to enable)
— ZBI VERSION 2.1 (Displayed if installed)
— ZBI STATUS READY
LAST CLEANED X,XXX IN
HEAD USAGE X,XXX IN
^JH
^MA
~RO
TOTAL USAGE X,XXX IN
Table 15ZPL Commands and Configuration Report Callout Cross-Reference
380
ZPL Configuration
Command Listing Name Description
RESET CNTR1 X,XXX IN
RESET CNTR2 X,XXX IN
NONRESET CNTR0 (1, 2) X,XXX IN
RESET CNTR1 X,XXX IN
RESET CNTR2 X,XXX IN
NONRESET CNTR0 (1, 2) X,XXX IN
RESET CNTR1 X,XXX IN
RESET CNTR2 X,XXX IN
SLOT1 EMPTY / SERIAL / WIRED
MASS STORAGE COUNT 0
HID COUNT 0
USB HOST LOCK OUT OFF / ON
— SERIAL NUMBER XXXXXXXXXXX
^JH EARLY WARNING MAINT. OFF
Table 15ZPL Commands and Configuration Report Callout Cross-Reference(Continued)
The printer can set a command or a group of commands at one (1) time for all receipts or labels that follow.
Those settings remain in effect until:
• they are changed by subsequent commands
• the printer is reset, or
• you restore the printer to its factory defaults.
Printer Memory Management and Related Status Reports
The printer has various memory resources and storage for building and printing.
To help you manage printer resources, the printer supports a variety of format commands. You can use
these commands to manage memory, transfer objects (between memory areas and import / export files),
name object nams, test printer functions, and generate printer operating status reports. They are very
similar to the old DOS commands such as DIR (directory listing) and DEL (delete file). The most common
reports are also part of the Zebra Setup Utility and ZebraDesigner Windows driver.
It is recommended that a single command be processed within this type of format (form). A single
command is easily reused as a maintenance and development tool.
Command Description
^XA Start Format Command
Put your commands
here
Use a single command to manage the printer, test functions, and reports.
Table 16Printer Management and Format Program Structure
381
ZPL Configuration
Command Description
^XZ End Format Command
Table 16Printer Management and Format Program Structure(Continued)
Many of the commands that transfer objects, manage, and report on memory are Control (~) commands.
They do not need the be within a format (form). They will be processed immediately upon receipt by the
printer whether in a format (form) or not.
ZPL Programming for Memory Management
Programming for memory management andfile naming is outlined here.
ZPL has various printer memory locations that are used to run the printer, assemble the print image, store
formats (forms), graphics, fonts, and configuration settings.
The printer file naming requirements as as follows:
• ZPL treats formats (forms), fonts, and graphics like files; and memory locations like disk drives in the
DOS operating system environment:
• Memory Object Naming: Up to 16 alphanumeric characters followed by a three alphanumeric
character file extension, for example, 123456789ABCDEF.TTF.
• Legacy ZPL printers with v60.13 firmware and earlier can only use the 8.3 filename format versus
today’s 16.3 filename format.
• Allows moving objects between memory locations and deleting objects.
• Supports DOS-directory-style file list reports as printouts or status to the host.
• Allows use of wildcards (*) iwhen accessing files.
Command Name Description
^WD Print Directory Label Prints a list of objects and resident barcodes and fonts
in all addressable memory locations.
~WC Print Configuration Label Prints a configuration Status Receipt (Label).Same as
FEED button mode one flash routine.
^ID Object Delete Deletes objects from printer memory.
^TO Transfer Object Used to copy an object or group of objects from one
memory area to another.
^CM Change Memory Letter
Designation
Reassigns a letter designation to a printer memory
area.
^JB Initialize Flash memory Similar to formatting a disk. Erases all objects from the
specified memory locations B: or E:.
~JB Reset Optional Memory Similar to formatting a disk. Erases all objects from the
B: memory (factory option).
Table 17Object Management and Status Report Commands
382

ZPL Configuration
Command Name Description
~DY Download Objects Downloads and installs a variety of printer-usable
programming objects: fonts (OpenType and TrueType),
graphics, and other object data types.
You can use ZebraNet Bridge to download graphics
and fonts to the printer.
~DG Download Graphic Downloads an ASCII Hex representation of a graphic
image. This is used by ZebraDesigner (label creation
application) for graphics.
^FL Font Linking Appends secondary TrueType font or fonts to the
primary TrueType font to add glyphs (characters).
^LF List Font Links Prints a list of the linked fonts.
^CW Font Identifier Assigns a single alphanumeric character as an alias to
a font stored in memory.
Table 17Object Management and Status Report Commands(Continued)
IMPORTANT: Some ZPL fonts that are factory-installed in yourprinter cannot be copied, cloned,
or restored to the printer by reloading or updating firmware. If these license-restricted ZPL fonts
are removed using an explicit ZPL object delete command, they must be repurchased and
reinstalled using a font activation and installation utility. EPL fonts do not have this restriction.
383
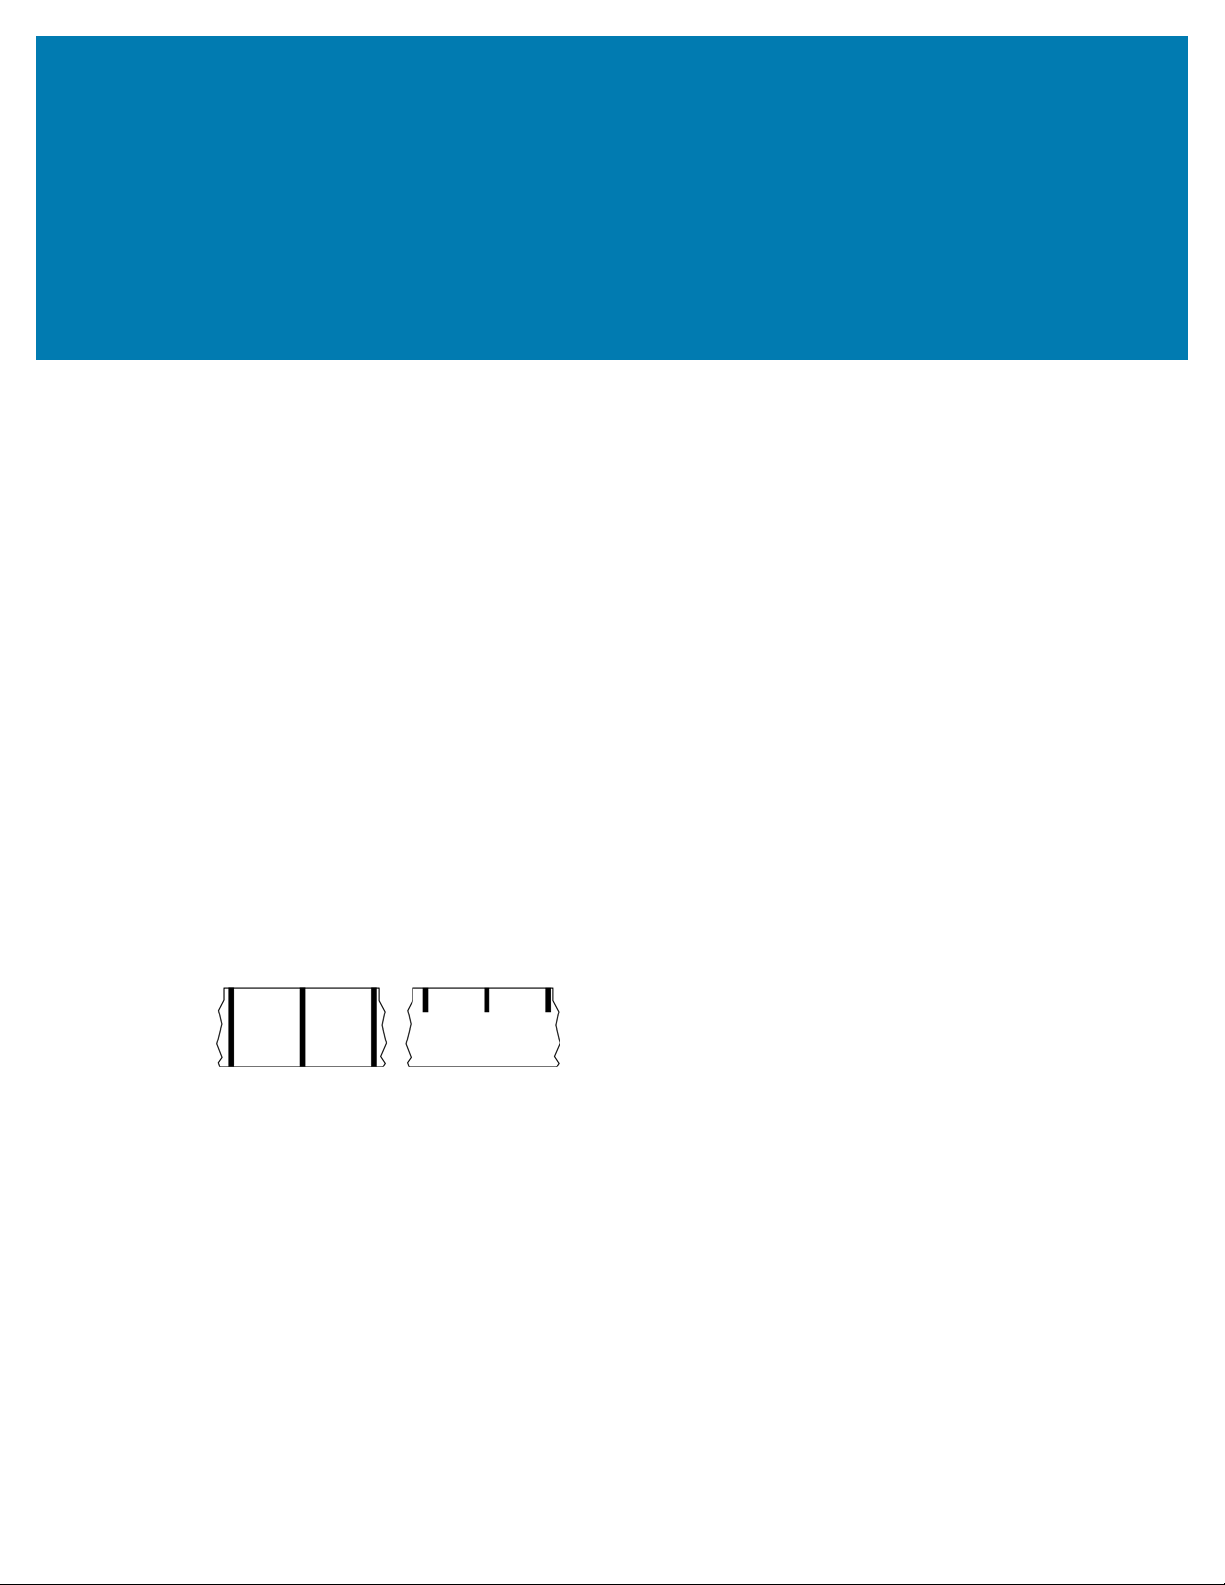
Glossary
Glossary
alphanumeric
Indicating letters, numerals, and characters such as punctuation marks.
backfeed
When the printer pulls the media and ribbon (if used) backward into the printer so that the beginning of
the label to be printed is properly positioned behind the printhead. Backfeed occurs when operating the
printer in Tear-Off and Applicator modes.
barcode
A code by which alphanumeric characters can be represented by a series of adjacent stripes of different
widths. Many different code schemes exist, such as the universal product code (UPC) or Code 39.
black mark media
Media with registration marks found on the underside of the print media that act as start-of-label indications
for the printer. The reflective media sensor is the generally-selected option for use with black mark media.
Contrast this with continuous media on page 385 or gap/notch media on page 387.
calibration (of a printer)
A process in which the printer determines some basic information needed to print accurately with a
particular media and ribbon combination. To do this, the printer feeds some media and ribbon (if used)
and senses whether to use the direct thermal or thermal transfer print method, along with (if using non-
continuous media) the length of individual labels or tags.
384

Glossary
collection method
Select a media collection method that is compatible with your printer options. Selections include tear-off,
peel-off, cutter, and rewind. The basic media and ribbon loading instructions are the same for all collection
methods with some additional steps necessary for using any media collection options.
configuration
The printer configuration is a group of operating parameters specific to the printer application. Some
parameters are user selectable, while others are dependent on the installed options and mode of
operation. Parameters may be switch selectable, control panel programmable, or downloaded as ZPL II
commands. A configuration label listing all the current printer parameters may be printed for reference.
continuous media
Label or tag-stock media that does not have gaps, holes, notches, or black marks to indicate label
separations. The media is one long piece of material wound into a roll. This allows the image to be printed
anywhere on the label. Sometimes a cutter is used to cut apart individual labels or receipts.
A transmissive (gap) sensor is typically used for the printer to detect when the media runs out.
Contrast this with black mark media on page 384 or gap/notch media on page 387.
core diameter
The inside diameter of the cardboard core at the center of a roll of media or ribbon.
diagnostics
Information about which printer functions are not working that is used for troubleshooting printer problems.
die-cut media
A type of label stock that has individual labels stuck to a media liner. The labels may be lined up against
each other or separated by a small distance. Typically the material surrounding the labels has been
removed. (See non-continuous media on page 389.)
385

Glossary
direct thermal
A printing method in which the printhead presses directly against the media. Heating the printhead
elements causes a discoloration of the heat-sensitive coating on the media. By selectively heating the
printhead elements as the media moves past, an image is printed onto the media. No ribbon is used with
this printing method.
Contrast this with
thermal transfer on page 392.
direct thermal media
Media that is coated with a substance that reacts to the application of direct heat from the printhead to
produce an image.
fanfold media
Non-continuous media that comes folded in a rectangular stack and folded in a zigzag pattern. Fanfold
media is either gap-notch media or black mark media, meaning it uses black marks or notches to track
media format positioning.
Fanfold media can have the same label separations as non-continuous roll media. The separations fall
either on or near the folds.
Contrast this with roll media on page 391.
firmware
This is the term used to specify the printer's operating program. This program is downloaded to the printer
from a host computer and stored in flash memory. Each time the printer power is turned on, this operating
program starts. This program controls when to feed the mediaforward or backward and when to print a
dot on the label stock.
FLASH memory
Non-volatile memory that maintains the stored information intact when power is off. This memory area is
used to store the printer's operating program. Can also be used to store optional printer fonts, graphic
formats, and complete label formats.
font
A complete set of
alphanumeric characters in one style of type. Examples include CG Times™, CG
Triumvirate Bold Condensed™.
386
Glossary
gap/notch media
Media that contains a separation, notch, or hole, indicating where one label/printed format ends and the
nextbegins.
Contrast this with black mark media on page 384 or continuous media on page 385.
ips (inches-per-second)
The speed at which the label or tag is printed. Many Zebra printers can print from 1 ips to 14 ips.
label
An adhesive-backed piece of paper, plastic, or other material on which information is printed. A non-
continuous label has a defined length, as opposed to a continuous label or a receipt which can have a
varying length.
label backing (liner)
The material on which labels are affixed during manufacture and which is discarded or recycled.
label type
The printer recognizes the following label types.
Continuous
Gap/Notch
387
Glossary
Mark
void
A space on which printing should have occurred, but did not due to an error condition such as wrinkled
ribbon or faulty print elements. A void can cause a printed barcode symbol to be read incorrectly or not at
all.
LCD (liquid crystal display)
A backlit display that provides the user with either operating status during normal operation or option
menus when configuring the printer to a specific application.
LED (light emitting diode)
Indicators of specific printer status conditions. Each LED is either off, on, or blinking depending on the
feature being monitored.
linerless media
Linerless media does not use backing to keep the layers of labels on a roll from sticking to one another.
It is wound like a roll of tape, with the sticky side of one layer in contact with the non-sticky surface of the
one below it. Individual labels may be separated by perforations, or they can be cut apart. Because there is
no liner, more labels can potentially fit on a roll, cutting down the need to change media as often. Linerless
media is considered an environmentally-friendly option because no backing is wasted, and the cost per
label can be considerably less than that of standard labels.
mark media
See black mark media on page 384.
388
Glossary
media
Material onto which data is printed by the printer. Types of media include: tag stock, die-cut labels,
continuous labels (with and without media liner), non-continuous media, fanfold media, and roll media.
media sensor
This sensor is located behind the printhead to detect the presence of media and, for
non-continuous
media, the position of the web, hole, or notch used to indicate the start of each label.
media supply hangar
The stationary arm that supports the media roll.
non-continuous media
Media that contains an indication of where one label/printed format ends and the next one begins. Types
of non-continuous media include gap-notch media and black mark media. (Contrast this with continuous
media.)
Non-continuous roll media usually comes in the form oflabels with an adhesive backing on a liner. Tags (or
tickets) are separated by perforations.
Individual labels or tags are tracked and position-controlled using one of these methods:
• Web media separates labels by gaps, holes, or notches.
• Black mark media uses pre-printed black marks on the back side of the media to indicate label
separations.
389
Glossary
• Perforated media has holes—to allow the labels or tags to be separated from each other easily—along
with position-control marks, notches, or label gaps.
non-volatile memory
Electronic memory that retains data even when the power to the printer is turned off.
notched media
A type of tag stock containing a cutout area that can be sensed as a start-of-label indicator by the printer.
This is typically a heavier, cardboard-like material that is either cut or torn away from the next tag. See
gap/
notch media on page 387.
peel-off mode
A mode of operation in which the printer peels a printed label away from the backing and allows the user
to remove it before another label is printed. Printing pauses until the label is removed.
perforated media
Media with perforations that allow the labels or tags to be separated from each other easily. The media
may also have black marks or other separations between labels or tags.
print speed
The speed at which printing occurs. For thermal transfer printers, this speed is expressed in terms of inches
per second (ips).
print type
The print type specifies whether the type of mediabeing used requires ribbonto print. Thermal
transfermedia requires ribbon while direct thermalmedia does not.
printhead wear
The degradation of the surface of the printhead and/or the print elements over time. Heat and abrasion
can cause printhead wear. Therefore, to maximize the life of the printhead, use the lowest print darkness
setting (sometimes called burn temperature or head temperature) and the lowest printhead pressure
390

Glossary
necessary to produce good print quality. In the thermal transferprinting method, use ribbonthat is as wide
or wider than the media to protect the printhead from the rough media surface.
Radio frequency identification (RFID) "smart" media
Each RFID label has an RFID transponder (sometimes called an "inlay"), made of a chip and an antenna,
embedded between the label and the liner. The shape of the transponder varies by manufacturer and is
visible through the label. All "smart" labels have memory that can be read, and many have memory that can
be encoded.
RFID media can be used in a printer that is equipped with an RFID reader/encoder. RFID labels are made
from the same materials and adhesives as non-RFID labels.
receipt
A receipt is a variable length printout. One example of a receipt is in retail stores, where each purchased
item occupies a separate line on the printout. Therefore, the more items purchased, the longer the receipt.
registration
Alignment of printing with respect to the top (vertical) or sides (horizontal) of a label or tag.
ribbon
Ribbon is a thin film that is coated on one side with wax, resin, or wax resin (usually called ink), which
is transferred to the media during the thermal transfer process. Ink is transferred onto the media when
heated by the small elements within the printhead.
Ribbon is only used with the thermal transfer print method. Direct thermal media does not use ribbon.
When ribbon is used, it must be as wide as or wider than the media being used. If the ribbon is narrower
than the media, areas of the printhead are unprotected and subject to premature wear. Zebra ribbons have
a coating on the back that protects the printhead from wear.
ribbon wrinkle
A wrinkling of the ribbon caused by improper alignment or improper printhead pressure. This wrinkle can
cause voids in the print and/or the used ribbon to rewind unevenly. This condition should be corrected by
performing adjustment procedures.
roll media
Media that comes supplied rolled onto a core (usually cardboard). It can be continuous (no separations
between labels)
391
Glossary
or non-continuous (some type of separation between labels).
Contrast this with fanfold media on page 386.
supplies
A general term for media and ribbon.
symbology
The term generally used when referring to a barcode.
tag stock
A type of media having no adhesive backing but featuring a hole or notch by which the tag can be hung
on something. Tags are usually made of cardboard or other durable material and are typically perforated
between tags. Tag stock can come on rolls or in a fanfold stack. (See
gap/notch media on page 387.)
tear-off mode
A mode of operation in which the user tears the label or tag stock away from the remaining media by hand.
thermal transfer
A printing method in which the printhead presses an ink or resin coated ribbon against the media. Heating
the printhead elements causes the ink or resin to transfer onto the media. By selectively heating the
printhead elements as the media and ribbon move past, an image is printed onto the media.
Contrast this with direct thermal on page 386.
392

www.zebra.com