
ZT200 Series
Industrial Printer
User Guide
P1048261-07EN Rev A

Copyright
ZEBRA and the stylized Zebra head are trademarks of Zebra Technologies Corporation, registered in many
jurisdictions worldwide. All other trademarks are the property of their respective owners. ©2022 Zebra
Technologies Corporation and/or its affiliates. All rights reserved.
Information in this document is subject to change without notice. The software described in this document
is furnished under a license agreement or nondisclosure agreement. The software may be used or copied
only in accordance with the terms of those agreements.
For further information regarding legal and proprietary statements, please go to:
SOFTWARE: zebra.com/linkoslegal.
COPYRIGHTS: zebra.com/copyright.
WARRANTY: zebra.com/warranty.
END USER LICENSE AGREEMENT: zebra.com/eula.
Terms of Use
Proprietary Statement
This manual contains proprietary information of Zebra Technologies Corporation and its subsidiaries
(“Zebra Technologies”). It is intended solely for the information and use of parties operating and
maintaining the equipment described herein. Such proprietary information may not be used, reproduced,
or disclosed to any other parties for any other purpose without the express, written permission of Zebra
Technologies.
Product Improvements
Continuous improvement of products is a policy of Zebra Technologies. All specifications and designs are
subject to change without notice.
Liability Disclaimer
Zebra Technologies takes steps to ensure that its published Engineering specifications and manuals are
correct; however, errors do occur. Zebra Technologies reserves the right to correct any such errors and
disclaims liability resulting therefrom.
Limitation of Liability
In no event shall Zebra Technologies or anyone else involved in the creation, production, or delivery of the
accompanying product (including hardware and software) be liable for any damages whatsoever (including,
without limitation, consequential damages including loss of business profits, business interruption, or loss
of business information) arising out of the use of, the results of use of, or inability to use such product, even
if Zebra Technologies has been advised of the possibility of such damages. Some jurisdictions do not allow
the exclusion or limitation of incidental or consequential damages, so the above limitation or exclusion may
not apply to you.

Contents
About this Guide.............................................................................................................................................. 6
Notational Conventions......................................................................................................................... 6
Icon Conventions.....................................................................................................................................6
Introduction....................................................................................................................................................... 8
Printer Components................................................................................................................................8
Control Panel............................................................................................................................................ 9
ZT230 Printer Control Panel.......................................................................................................10
ZT220 Printer Control Panel.......................................................................................................12
ZT210 Printer Control Panel........................................................................................................13
Navigating through Screens in the ZT230 Printer Display.................................................14
Idle Display, Home Menu, and User Menus...........................................................................15
Media Types............................................................................................................................................ 17
Ribbon Overview....................................................................................................................................19
When to Use Ribbon.................................................................................................................... 19
Coated Side of Ribbon.................................................................................................................19
Printer Setup and Operation........................................................................................................................22
Handling the Printer.............................................................................................................................22
Unpacking and Inspecting the Printer.................................................................................... 22
Storing the Printer.........................................................................................................................22
Shipping the Printer..................................................................................................................... 22
Selecting a Location for the Printer................................................................................................ 23
Selecting a Print Mode........................................................................................................................23
Loading the Ribbon..............................................................................................................................25
3

Contents
Loading the Media............................................................................................................................... 29
Final Steps for Tear-Off Mode...................................................................................................37
Final Steps for Peel-Off Mode (with or without Liner Take-Up)........................................39
Final Steps for Cutter Mode...................................................................................................... 44
Connecting the Printer to a Device.................................................................................................46
Connecting to a Phone or Tablet.............................................................................................46
Installing Drivers and Connecting to a Windows-Based Computer.................................47
Addinga Printer through Zebra Setup Utilities............................................................................ 63
Printing a Test Label and Making Adjustments............................................................................72
Installing Label Design Software...................................................................................................... 76
ZebraDesigner System Requirements.................................................................................... 76
Printer Configuration and Adjustment....................................................................................................... 78
Changing Printer Settings...................................................................................................................78
Changing Printer Settings through the Windows Driver.................................................... 78
Changing Printer Settings through theUser Menus........................................................... 79
Calibrating the Ribbon and Media Sensors...................................................................................111
Performing Auto Calibration....................................................................................................... 111
Performing Manual Sensor Calibration...................................................................................112
Adjusting the Printhead Pressure.................................................................................................... 117
Adjusting Ribbon Tension..................................................................................................................119
Removing Used Ribbon.....................................................................................................................120
Routine Maintenance...................................................................................................................................122
Cleaning Schedule and Procedures.............................................................................................. 122
Cleaning the Exterior, the Media Compartment, and the Sensors................................ 123
Cleaning the Printhead and Platen Roller............................................................................ 124
Cleaning the Peel Assembly.................................................................................................... 128
Cleaning and Lubricating the Cutter Module...................................................................... 132
Replacing Printer Components........................................................................................................136
Ordering Replacement Parts.................................................................................................... 137
Recycling Printer Components.................................................................................................137
Lubrication..............................................................................................................................................137
4

Contents
Troubleshooting............................................................................................................................................138
Meaning of Indicator Lights..............................................................................................................138
Printing Issues...................................................................................................................................... 140
Ribbon Problems..................................................................................................................................143
Error Messages.................................................................................................................................... 144
QuickHelp Pages......................................................................................................................... 144
Error Message Lookup...............................................................................................................144
Communications Problems............................................................................................................... 148
Miscellaneous Issues..........................................................................................................................149
Printer Diagnostics............................................................................................................................... 151
Power-On Self Test......................................................................................................................151
CANCEL Self Test........................................................................................................................ 151
PAUSE Self Test.......................................................................................................................... 152
FEED Self Test..............................................................................................................................153
FEED and PAUSE Self Test......................................................................................................156
CANCEL and PAUSE Self Test................................................................................................156
Communication Diagnostics Test............................................................................................157
Sensor Profile............................................................................................................................... 158
Specifications................................................................................................................................................ 160
General Specifications....................................................................................................................... 160
Power Cord Specifications....................................................................................................... 160
Communication Interface Specifications...................................................................................... 162
Standard......................................................................................................................................... 162
Optional.......................................................................................................................................... 162
Printing Specifications........................................................................................................................164
Ribbon Specifications.........................................................................................................................164
Media Specifications...........................................................................................................................165
5

About this Guide
About this Guide
This document is intended for use by any person who needs to perform routine maintenance, upgrade, or
troubleshoot problems with the printer.
Notational Conventions
The following conventions are used in this document:
• Bold text is used to highlight the following:
• Dialog box, window, and screen names
• Drop-down list and list box names
• Checkbox and radio button names
• Icons on a screen
• Key names on a keypad
• Button names on a screen
• Bullets (•) indicate:
• Action items
• List of alternatives
• Lists of required steps that are not necessarily sequential.
• Sequential lists (for example, those that describe step-by-step procedures) appear as numbered lists.
Icon Conventions
The documentation set is designed to give the reader more visual clues. The following graphic icons are
used throughout the documentation set. These icons and their associated meanings are described below.
NOTE: The text here indicates information that is supplemental for the user to know and that is
not required to complete a task.
IMPORTANT: The text here indicates information that is important for the user to know.
CAUTION—EYE INURY: Wear protective eyewear when performing certain tasks.
6
About this Guide
CAUTION—PRODUCT DAMAGE: If the precaution is not taken, the product could be damaged.
CAUTION: If the precaution is not heeded, the user could receive a minor or moderate injury.
[OTHER]: Touching this area could result in burns.
CAUTION—ESD: Observe proper electrostatic safety precautions.
CAUTION—ELECTRIC SHOCK: Disconnect the printer power before performing certain
procedures to avoid the risk of electric shock.
WARNING: If danger is not avoided, the user CAN be seriously injured or killed.
DANGER: If danger is not avoided, the user WILL be seriously injured or killed.
NOTE: This is an icon for wired networking notes.
7

Introduction
Introduction
This section provides a high-level overview of the printer and its components.
Printer Components
The components inside your printer are color-coded.
• The touch points that you will need to handle are colored gold inside the printers and are highlighted in
gold in the illustrations in this manual.
• The components associated with the ribbon system are made of black plastic, while the components
associated with media are made of gray plastic. Those components and others are highlighted in light
blue in the illustrations in this manual as needed.
There are various components inside the media compartment of your printer. Depending on the printer
model and the installed options, your printer may look slightly different. The labeled components are
mentioned in procedures throughout this manual.
8
Introduction
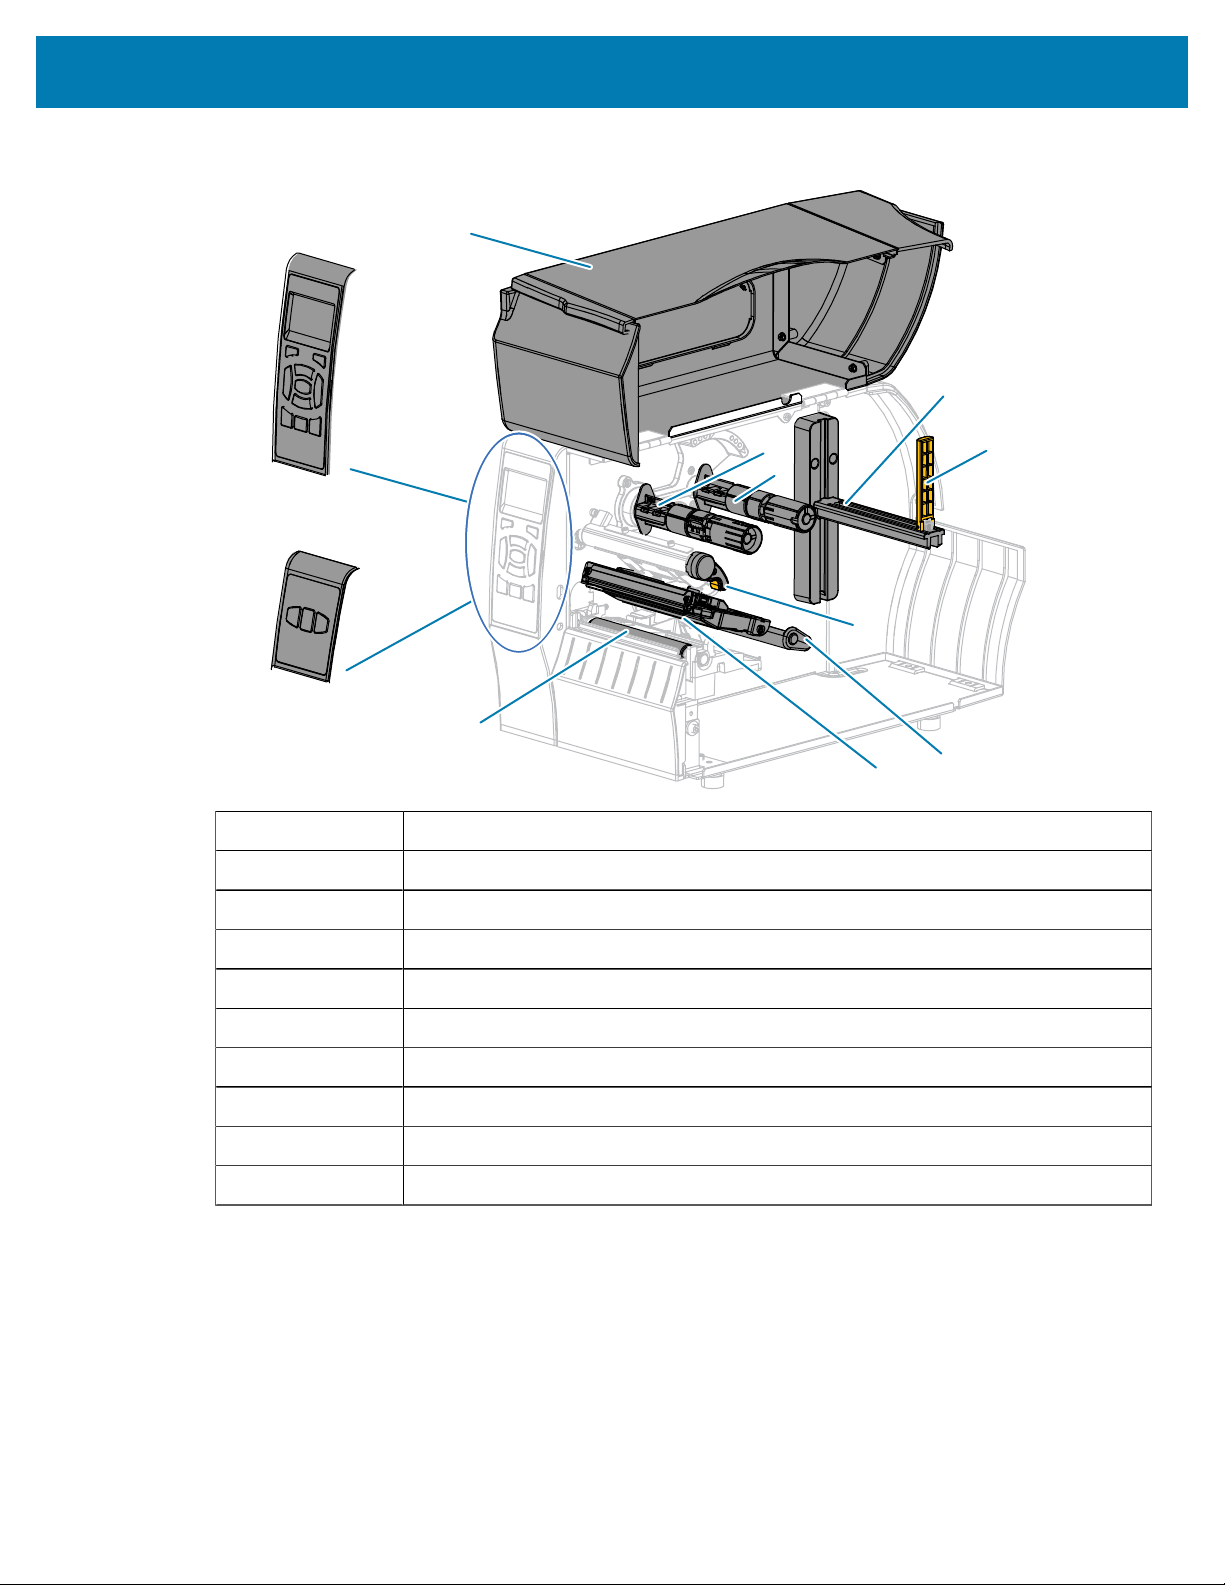
Figure 1Printer Components
ZT230
1
2
3
4
8
10
9
7
5
6
1
ZT220
ZT210
1 Control panel
2 Media door
3 Ribbon take-up spindle*
4 Ribbon supply spindle*
5 Media supply hanger
6 Media supply guide
7 Media dancer assembly
8 Printhead-open lever
9 Printhead assembly
10 Platen roller
* This component appears only in printers that have the Thermal Transfer option installed.
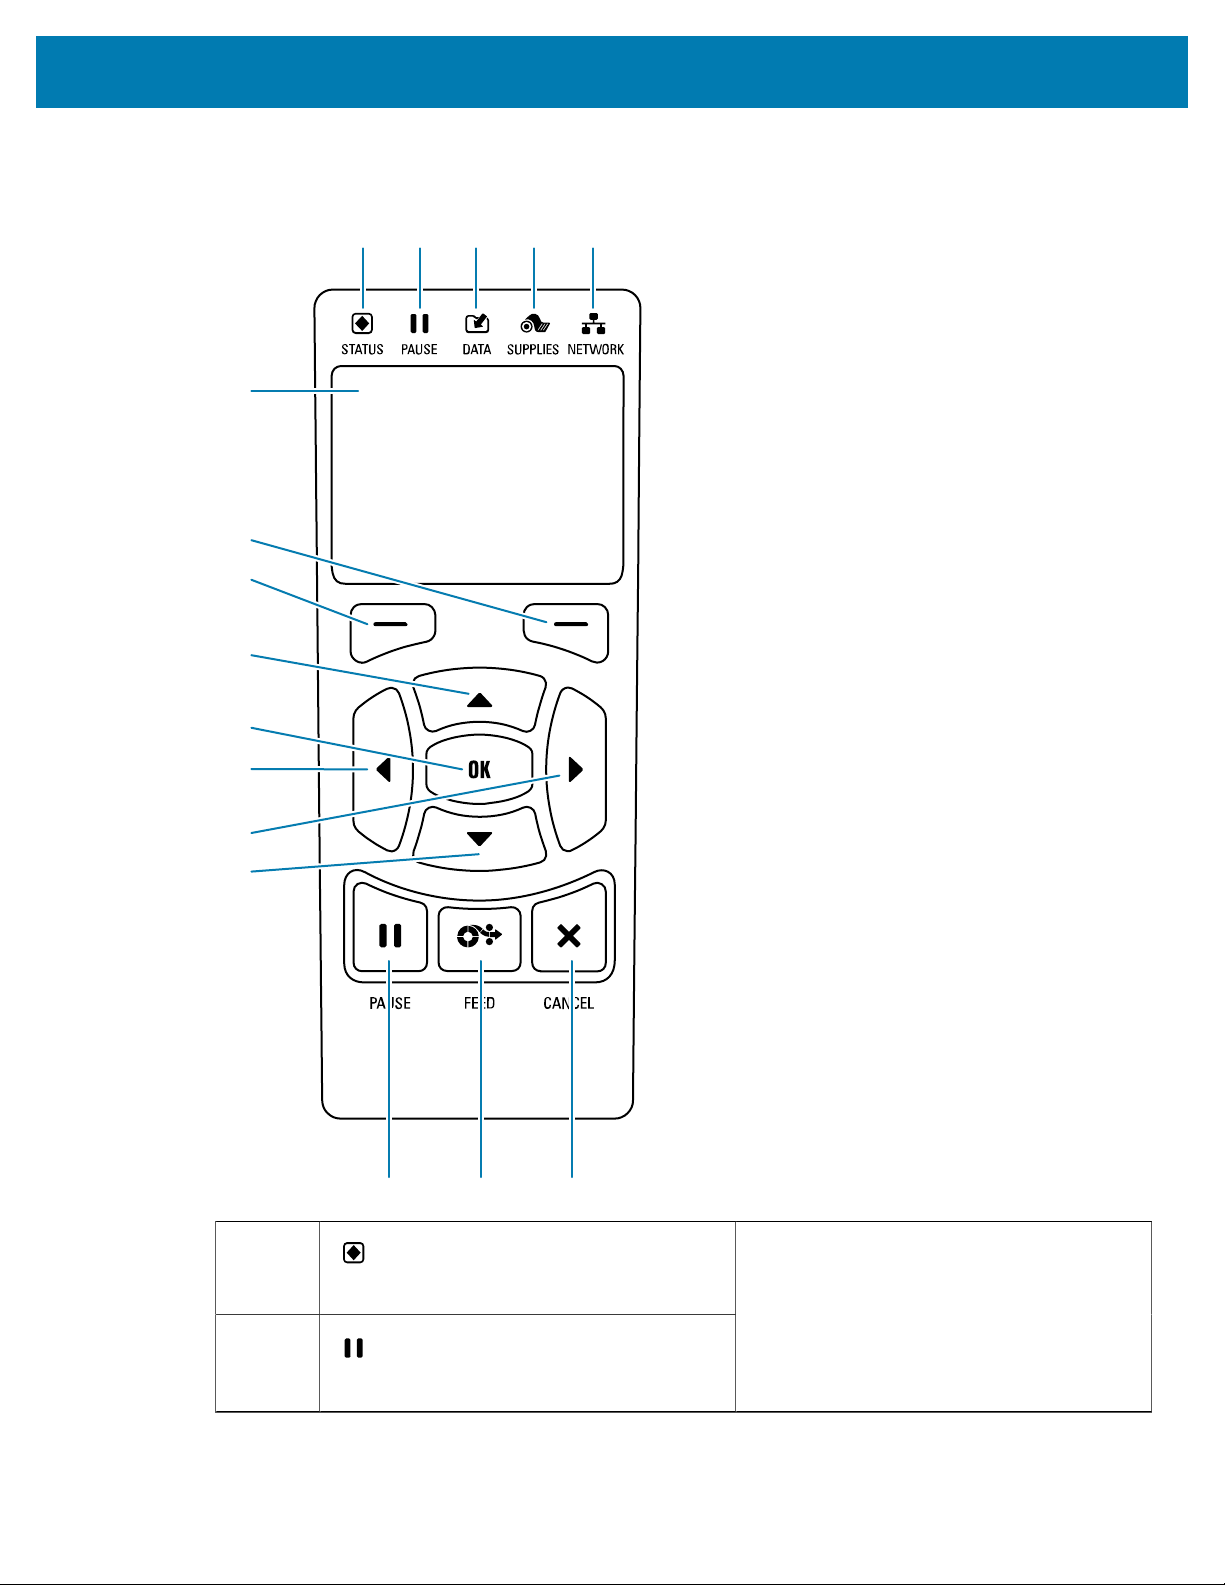
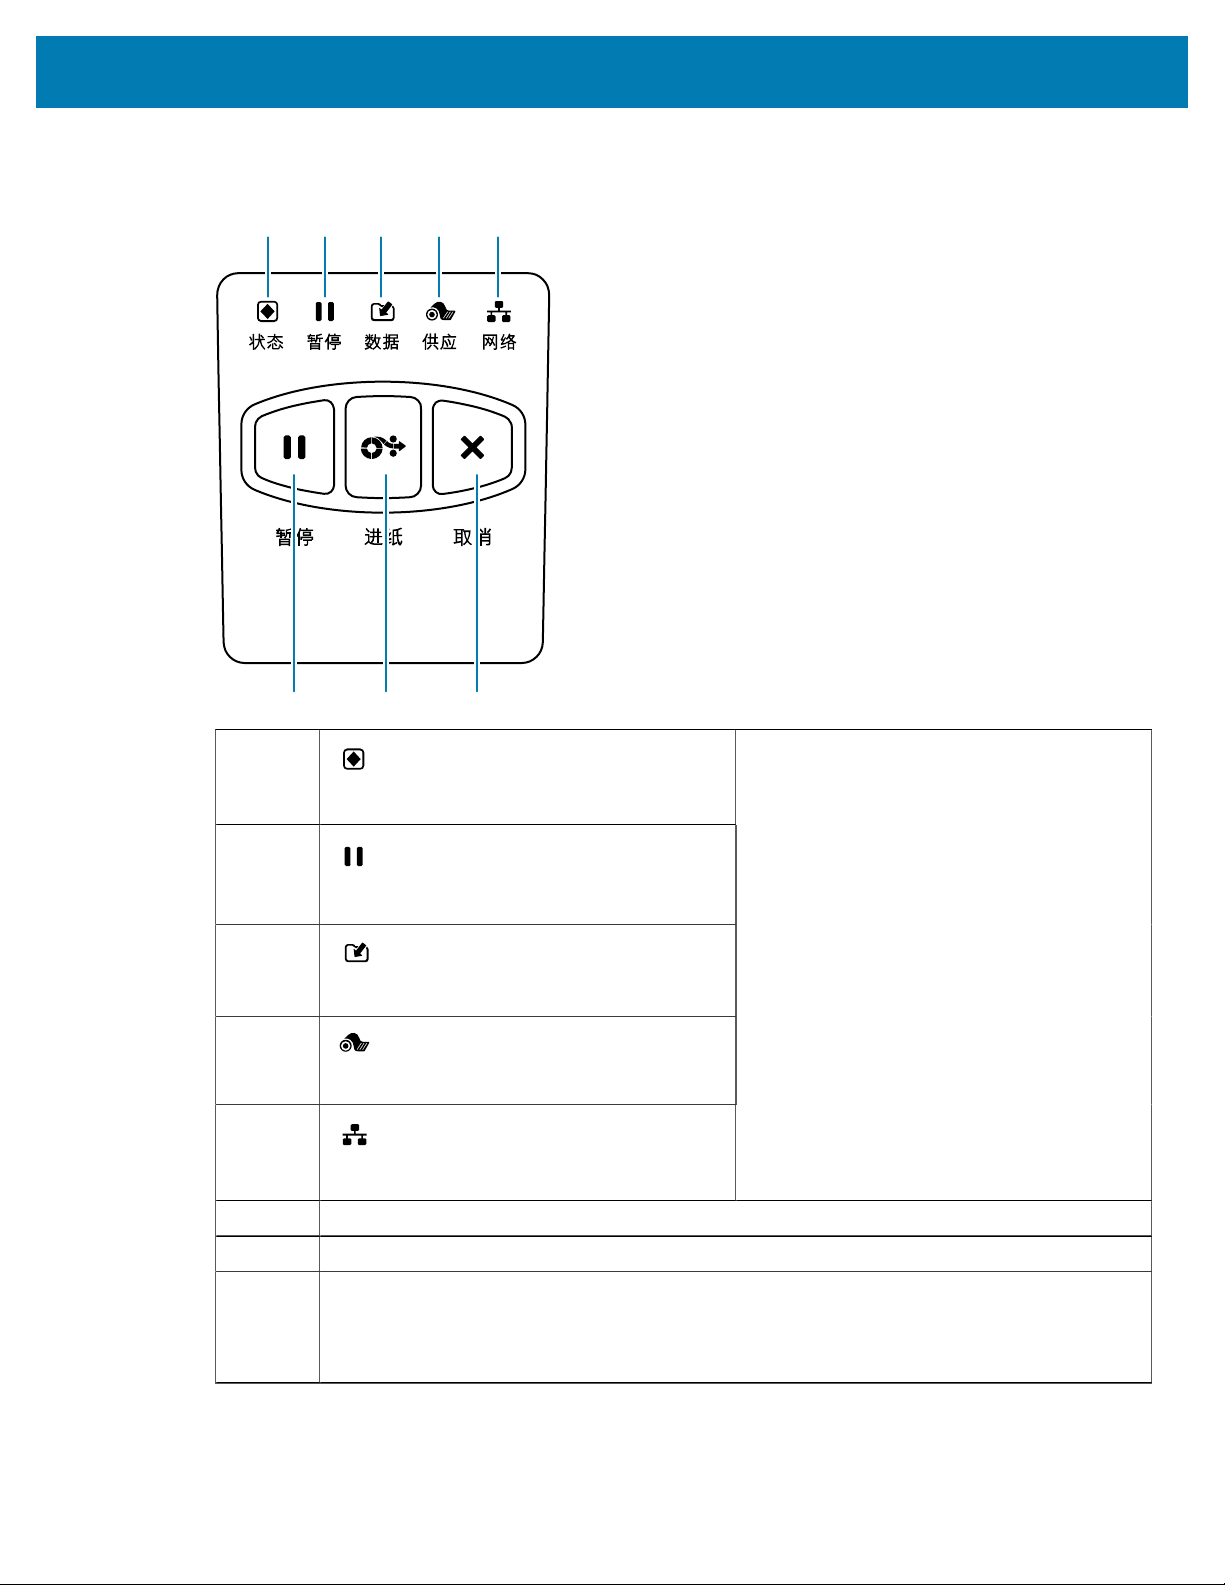
Control Panel
The control panel indicates the printer’s current status and allows the user to control basic printer
operation.
9
Introduction
3
DATA light
4
SUPPLIES light
5
NETWORK light
6 The display shows the printer’s current status and allows the user to navigate the menu
system.
7 RIGHT SELECT button
8 LEFT SELECT button
These buttons execute the commands
shown directly above them in the display.
9 The UP ARROW button changes the parameter values. Common uses are to increase a
value or to scroll through choices.
10 The OK button selects or confirms what is shown on the display.
11 The LEFT ARROW button, which is active only in the menu system, navigates to the left.
12 The RIGHT ARROW button, which is active only in the menu system, navigates to the right.
13 The DOWN ARROW button changes the parameter values. Common uses are to decrease a
value or to scroll through choices.
14 The PAUSE button starts or stops printer operation when pressed.
15 The FEED button forces the printer to feed one blank label each time the button is pressed.
16 The CANCEL button cancels label formats when the printer is paused.
• Press once to cancel the next label format.
• Press and hold for 2seconds to cancel all label formats.
11
Introduction
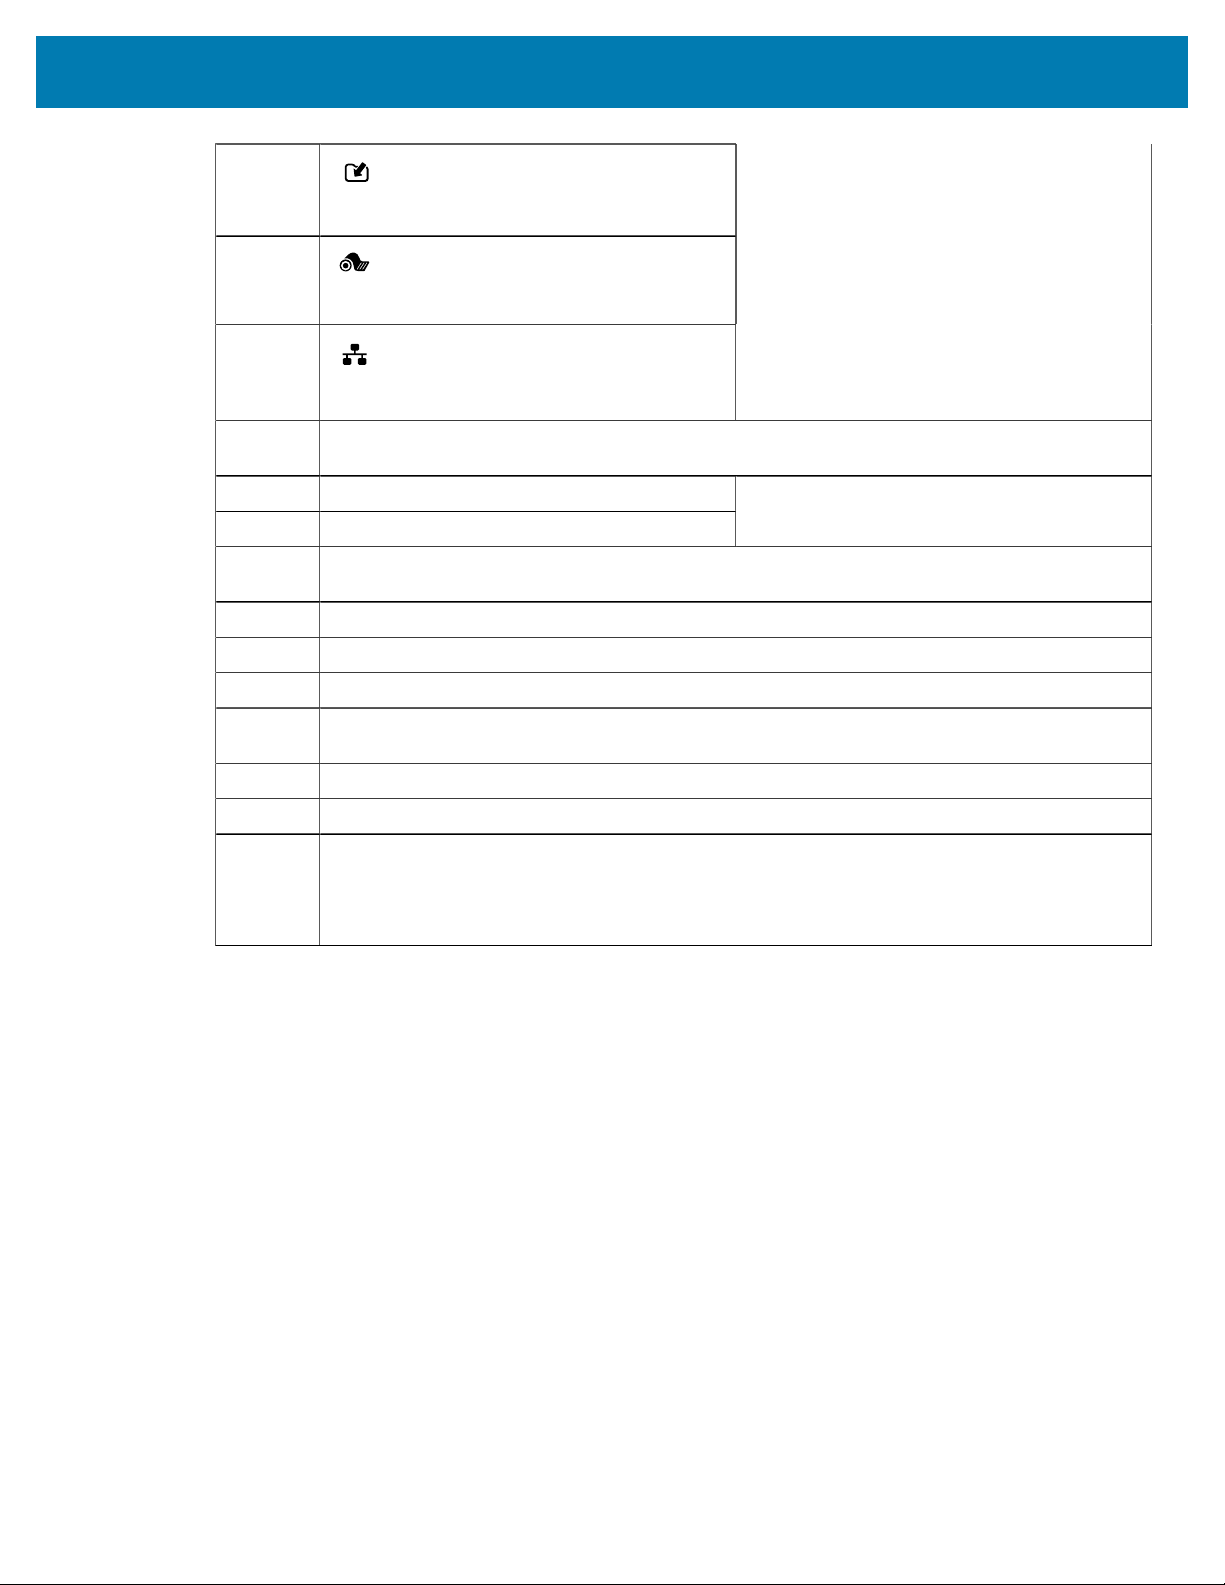
ZT220 Printer Control Panel
1
6 7 8
2 3 4 5
1
STATUS light
2
PAUSE light
3
DATA light
4
SUPPLIES light
5
NETWORK light
These indicator lights show the current
status of the printer. For more information,
see Table 11Status of Printer As Shown by
Indicator Lights on page 138.
6 The PAUSE button starts or stops printer operation when pressed.
7 The FEED button forces the printer to feed one blank label each time the button is pressed.
8 The CANCEL button cancels label formats when the printer is paused.
• Press once to cancel the next label format.
• Press and hold for 2seconds to cancel all label formats.
12
Introduction
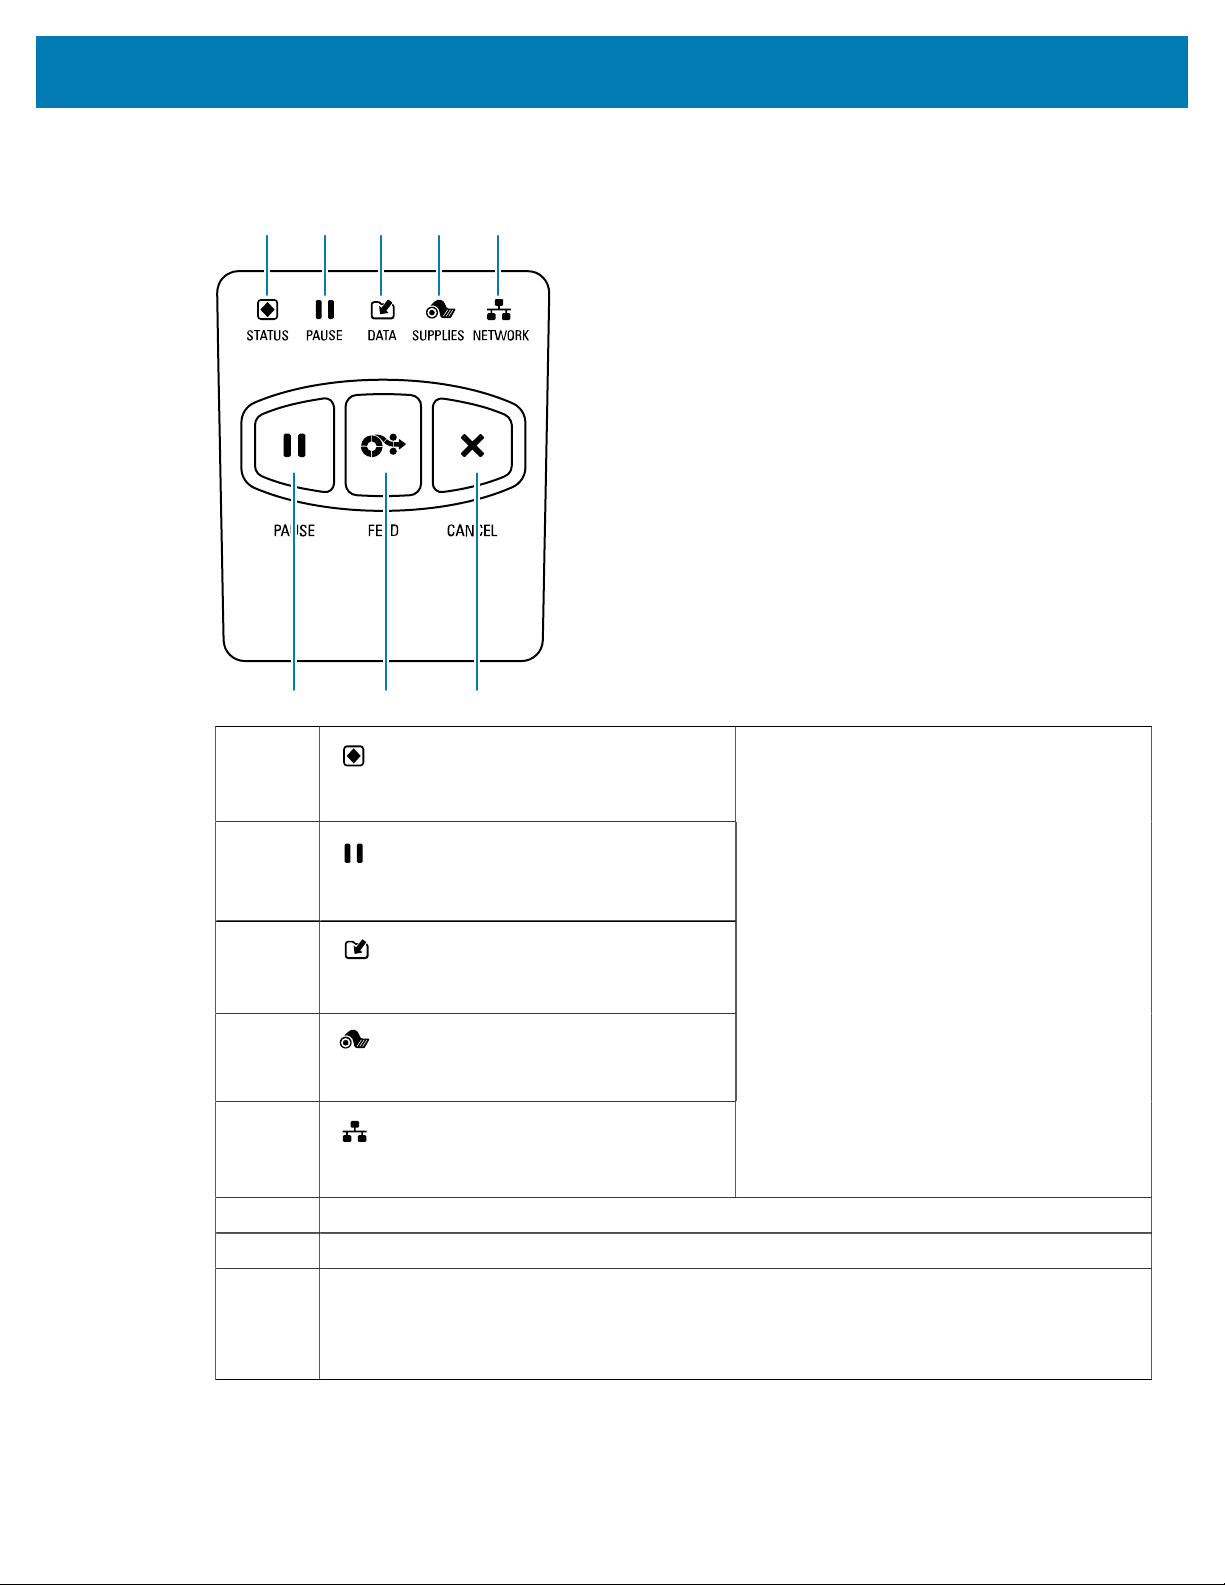
ZT210 Printer Control Panel
1
6 7 8
2 3 4 5
1
STATUS light
2
PAUSE light
3
DATA light
4
SUPPLIES light
5
NETWORK light
These indicator lights show the current
status of the printer. For more information,
see Table 11Status of Printer As Shown by
Indicator Lights on page 138.
6 The PAUSE button starts or stops printer operation when pressed.
7 The FEED button forces the printer to feed one blank label each time the button is pressed.
8 The CANCEL button cancels label formats when the printer is paused.
• Press once to cancel the next label format.
• Press and hold for 2seconds to cancel all label formats.
13
Introduction
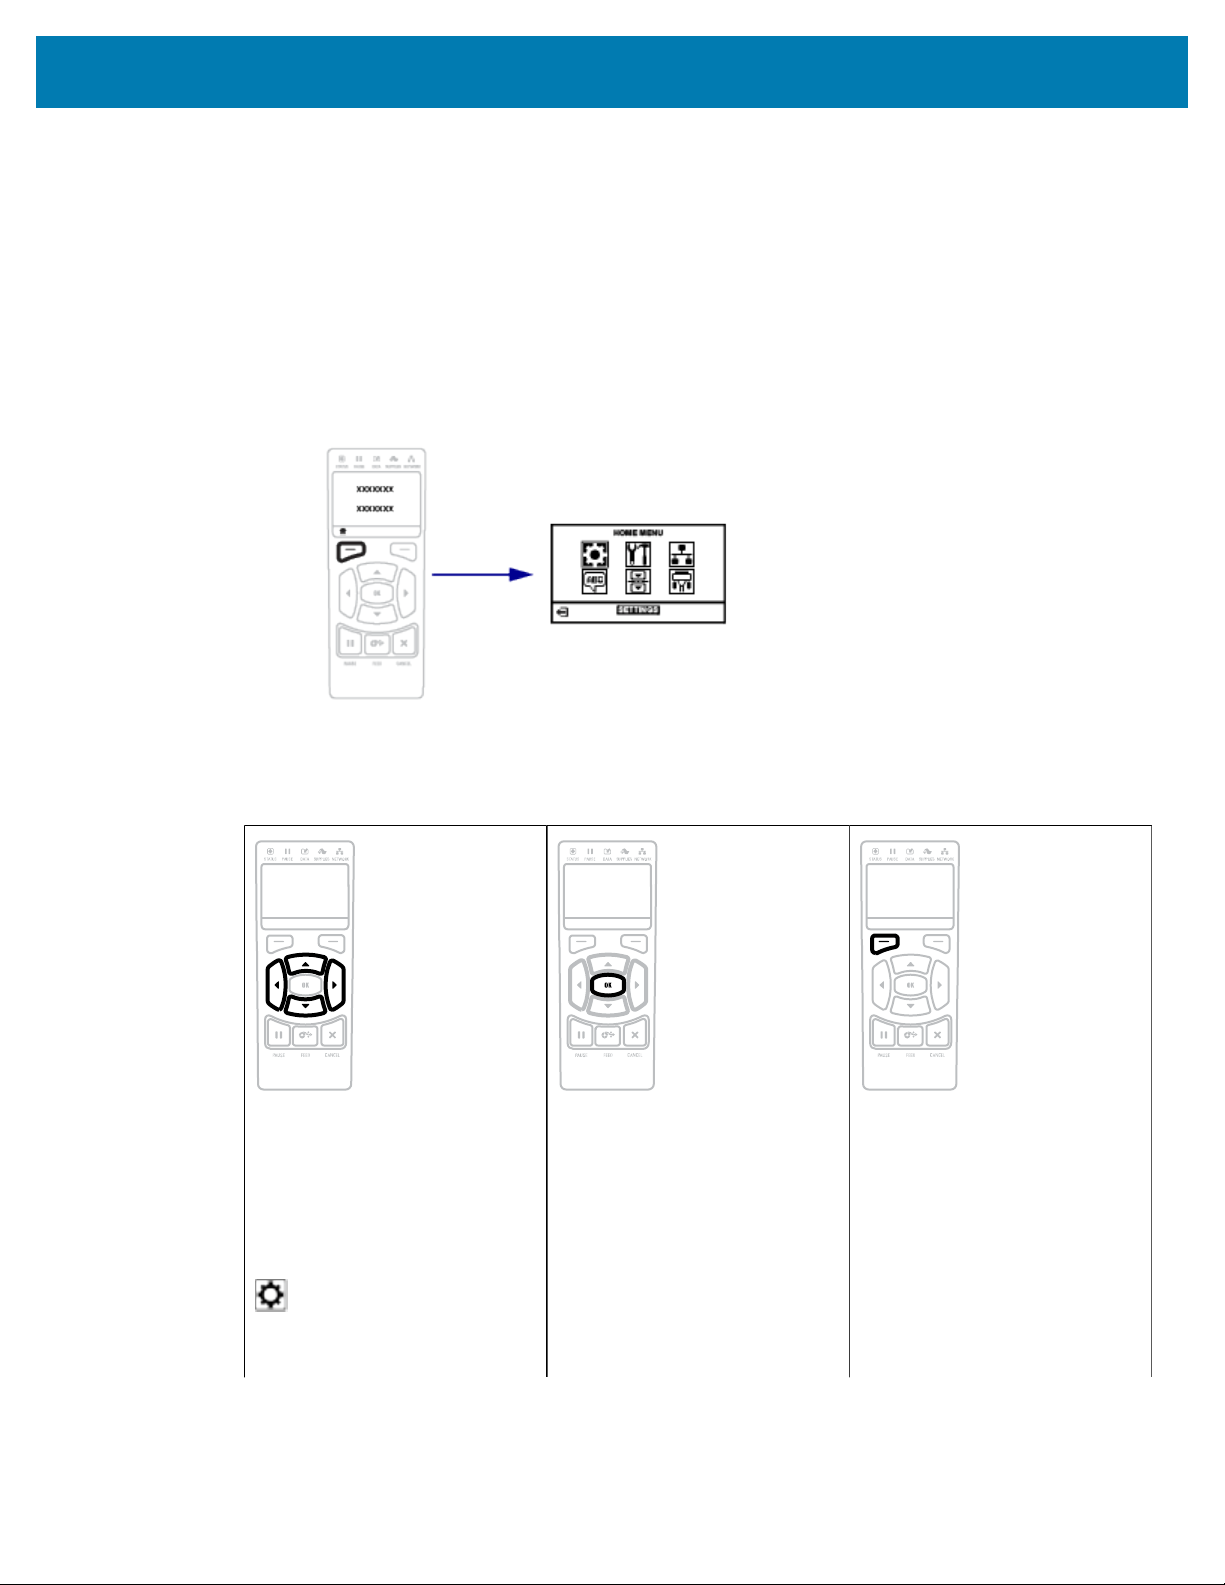
Navigating through Screens in the ZT230 Printer Display
The following topics detail:
• the options available for navigating through the screens in the ZT230 printer control panel display
• how to select or modify things shown on the display
Idle Display
• At the Idle Display (
Figure 2Idle Display on page 16), press LEFT SELECT to go to the printer’s
Home menu (Figure 3Home Menu on page 16).
Home Menu
• This section describes how to navigate the Home menu.
To move from icon to icon in
the Home menu, press any of
the ARROW buttons. When an
icon is selected, its colors are
reversed to highlight it.
SETTINGS menu icon
SETTINGS menu
iconhighlighted
To select the highlighted menu
icon and enter the menu, press
OK.
Press LEFT SELECT to exit
the Home menu and return to
the Idle Display. The printer
automatically returns to the
Idle Display after 15 seconds of
inactivity in the Home menu.
14
Introduction
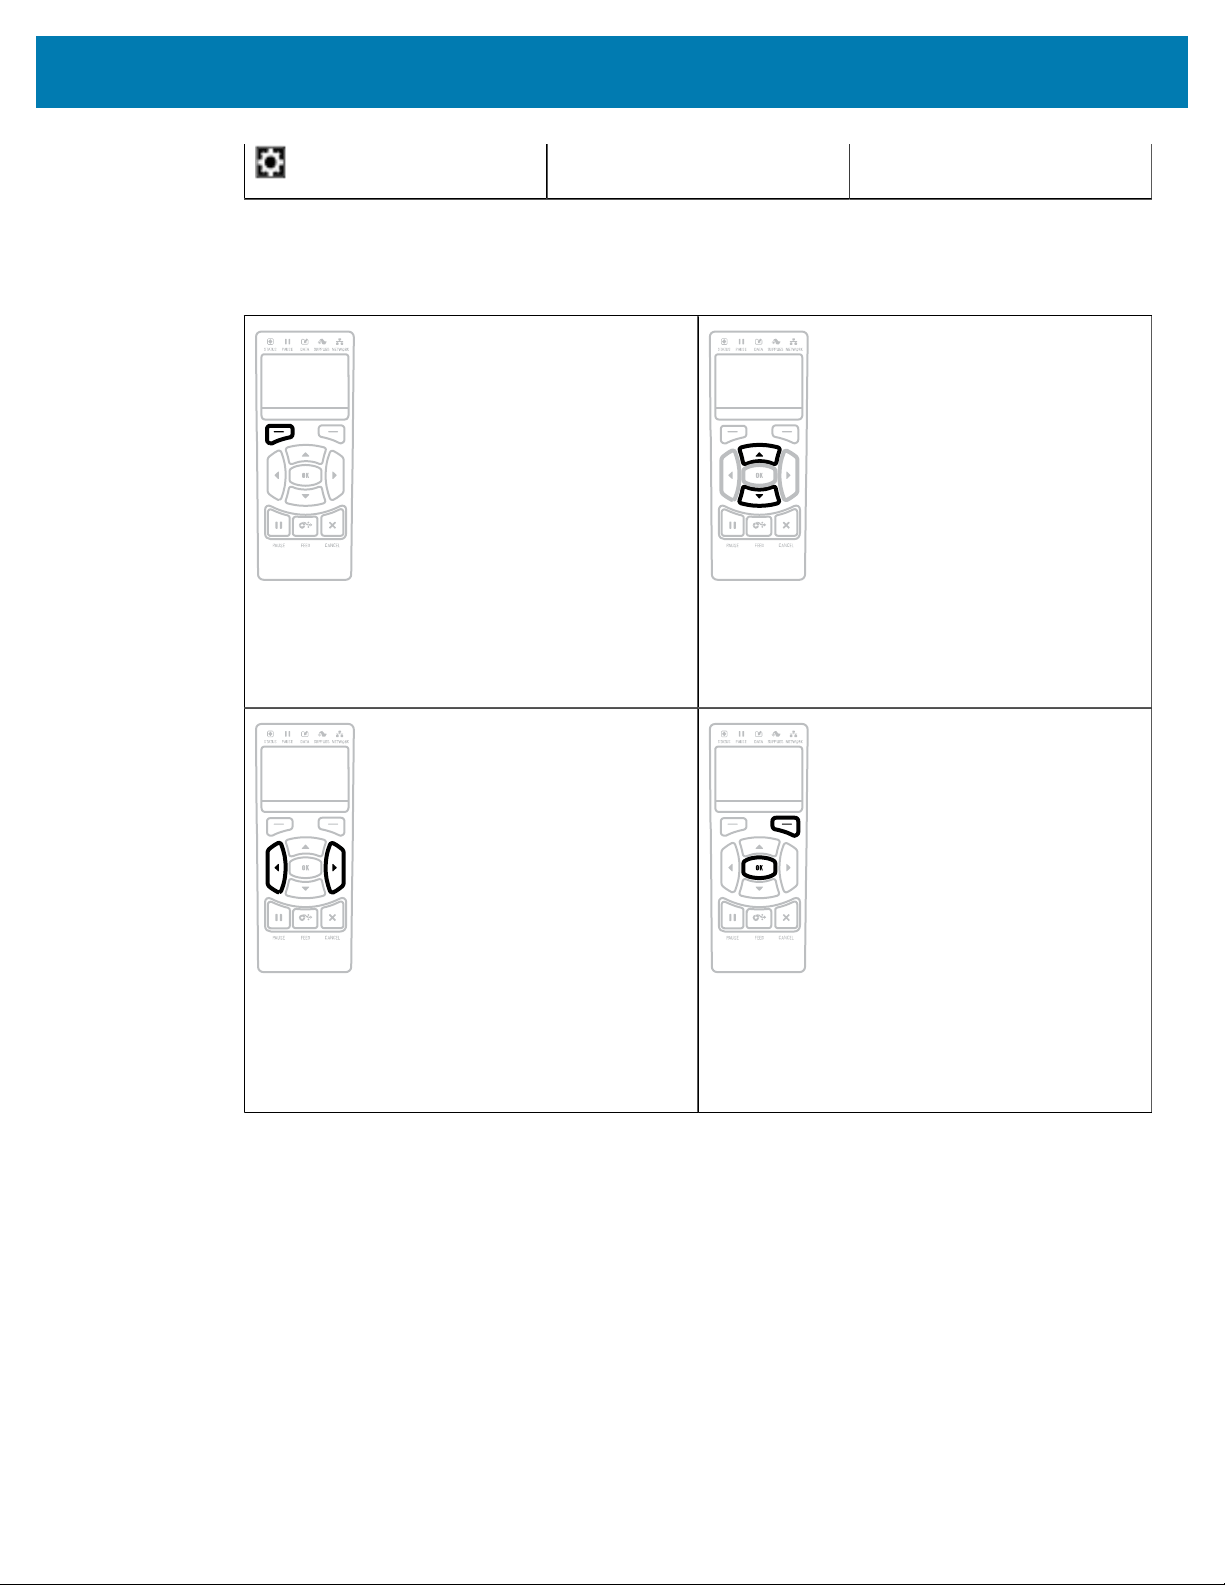
User Menus
• This section describes how to navigate the User menus.
Press LEFT SELECT to return to the Home menu.
The printer automatically returns to the Home
menu after 15 seconds of inactivity in a user
menu.
▼ and ▲ indicate that a value can be changed.
Any changes that you make are saved
immediately.Press the UP ARROW or DOWN
ARROW to scroll through accepted values.
To scroll through the items in a user menu, press
the LEFT ARROW or RIGHT ARROW.
A word in the bottom-right corner of the display
indicates an available action.
Press OK or press RIGHT SELECT to perform the
action shown.
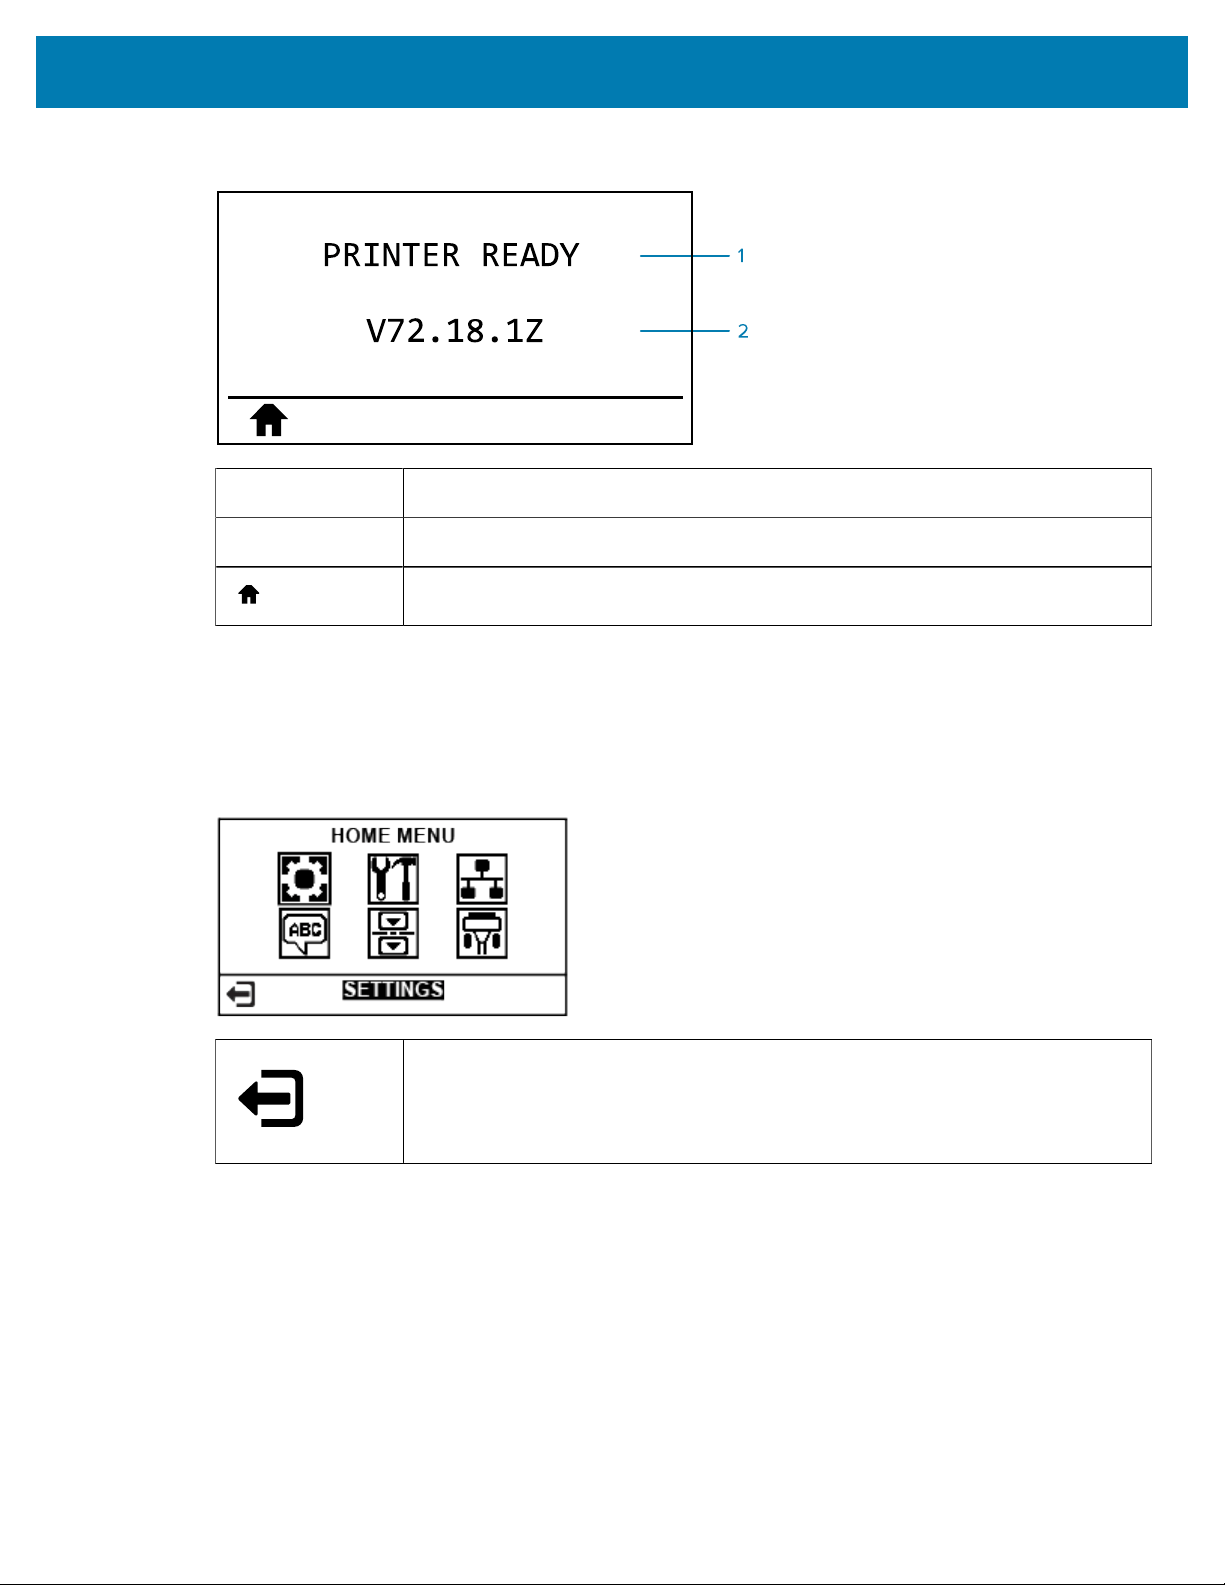
Idle Display, Home Menu, and User Menus
The ZT230 printer’s control panel includes a display, where you can view the printer’s status or change its
operating parameters. In this section, you will learn how to navigate through the printer’s menu system and
change values for menu items.
After the printer completes the power-up sequence, it moves to the Idle Display. If a print server is
installed, the printer cycles through its IP address and information configured by the user.
15
Introduction
Figure 2Idle Display
1
The printer’s current status
2
Information that you set through Idle Display
Home menu shortcut
Home Menu
Use the Home menu to access the printer’s operating parameters through the six user menus (
User
Menus).
Figure 3Home Menu
Exit and return to the Idle Display.
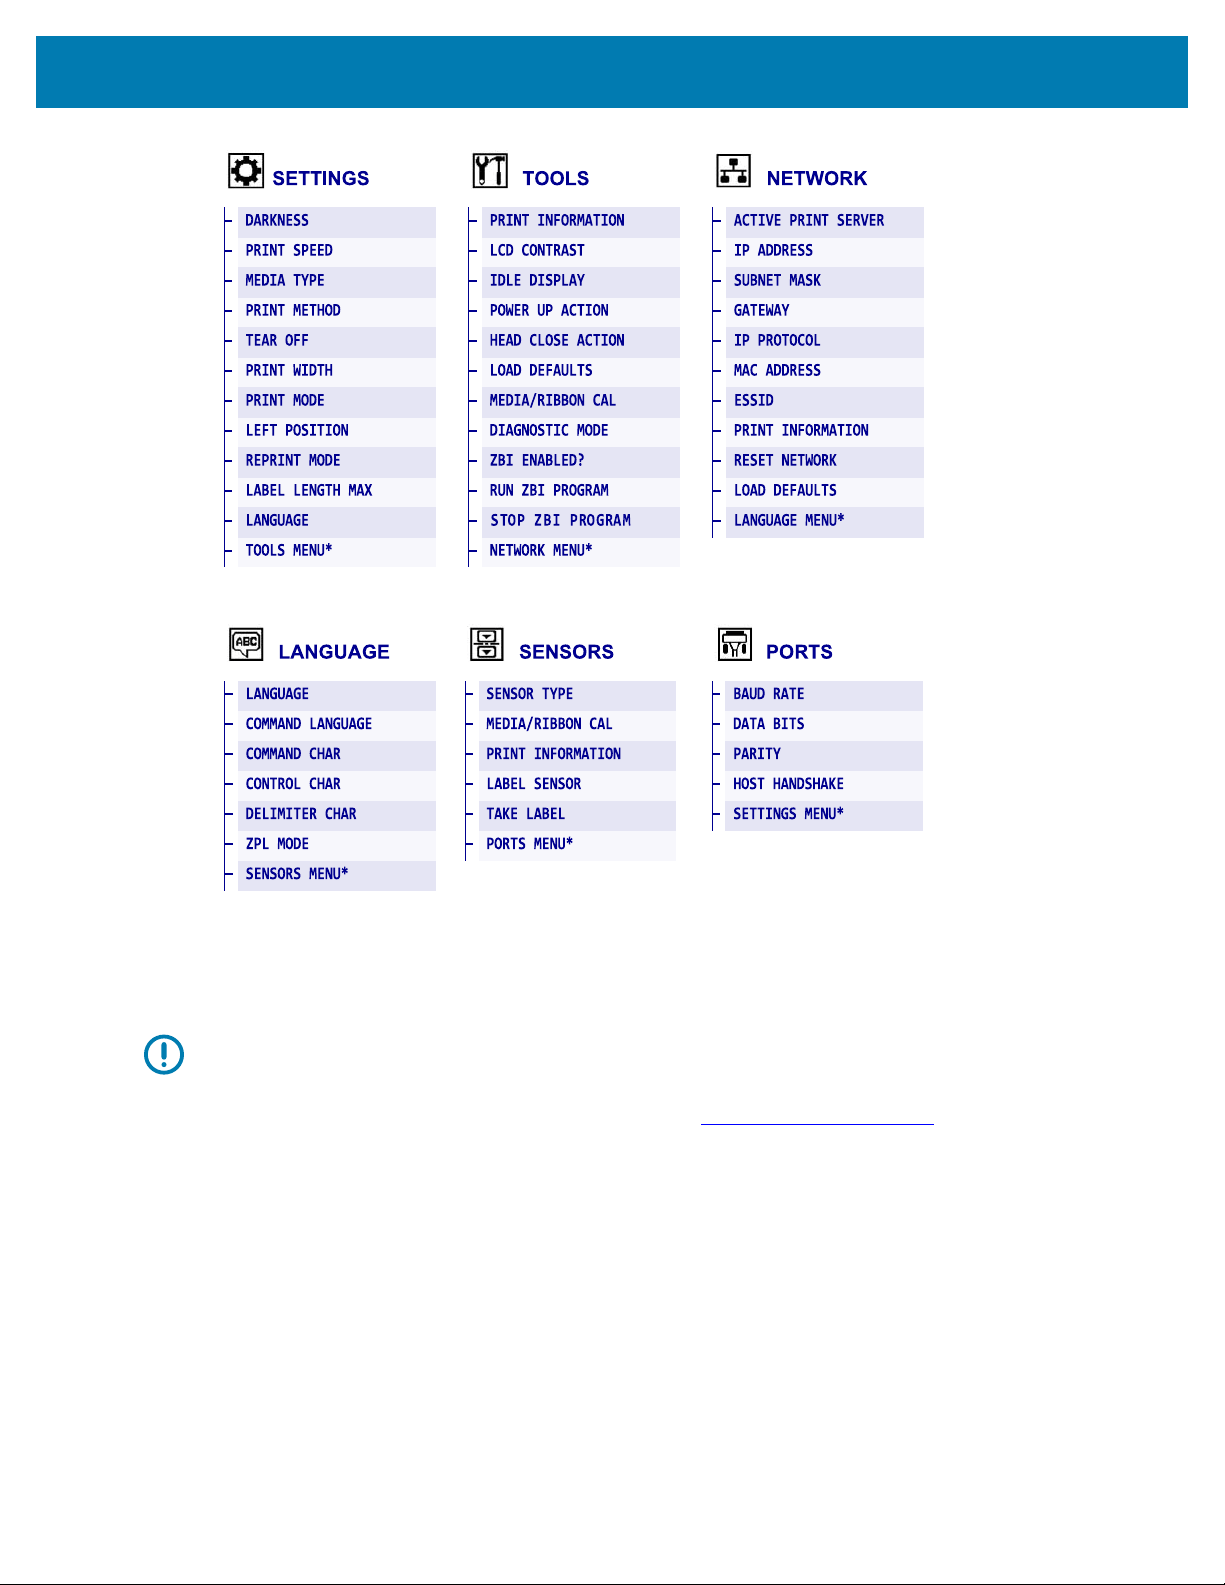
Changing Printer Settings through theUser Menus
The following are the user menus and the items that appear in each.
16
Introduction
* Denotes a shortcut to the next user menu.
Media Types
IMPORTANT: Zebra strongly recommends the use of Zebra-brand supplies for continuous
high-quality printing. A wide range of paper, polypropylene, polyester, and vinyl stock has
been specifically engineered to enhance the printing capabilities of the printer and to prevent
premature printhead wear. To purchase supplies, go to www.zebra.com/howtobuy.
Your printer can use various types of media:
• Standard media—Most standard media uses an adhesive backing that sticks individual labels or a
continuous length of labels to a liner. Standard media can come on rolls or in a fanfold stack.
• Tag stock—Tags are usually made from a heavy paper. Tag stock does not have adhesive or a liner,
and it is typically perforated between tags. Tag stock can come on rolls or in a fanfold stack.
17
Introduction
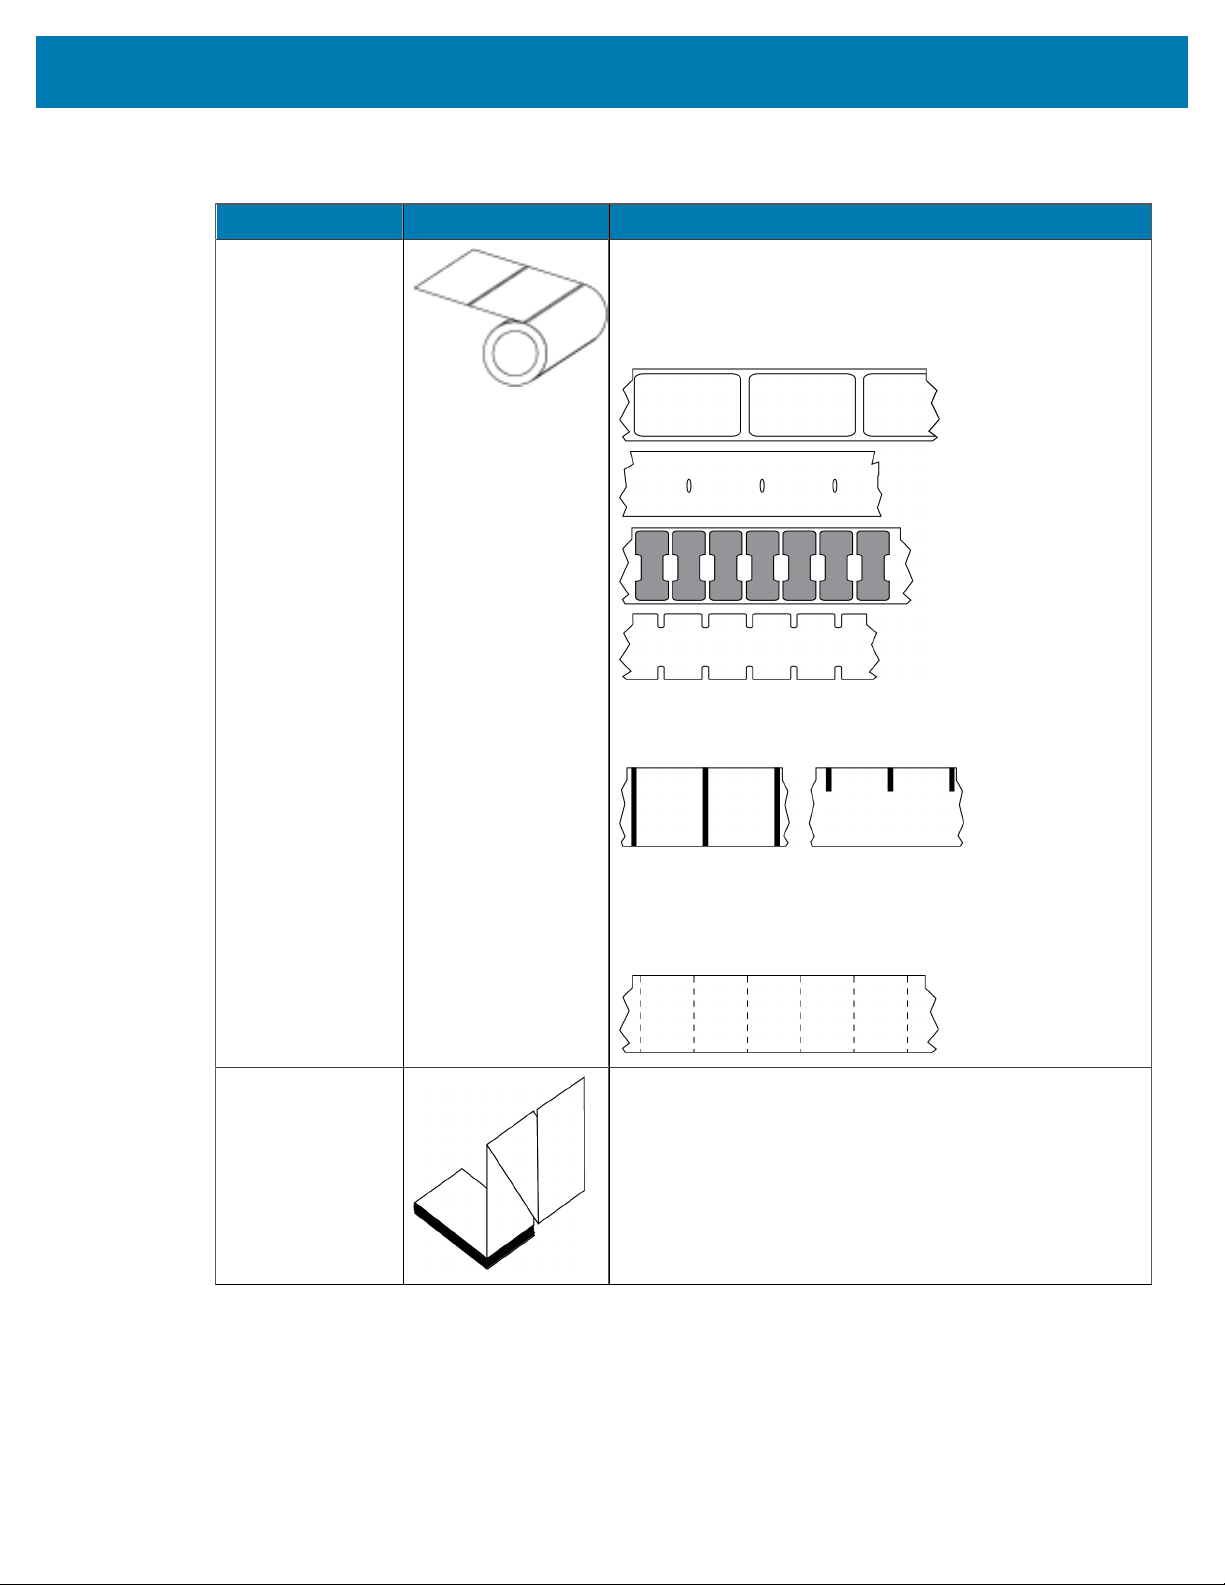
Media Type How it Looks Description
Non-Continuous
RollMedia
Roll media is wound on a core that can be 25 to 76 mm
(1 in. to 3in.) in diameter. Individual labels or tags are
separated by one or more of the following methods:
• Web media separates labels by gaps, holes, or notches.
• Black mark media uses pre-printed black marks on the
back side of the media to indicate label separations.
• Perforated media has perforations that allow the labels
or tags to be separated from each other easily. The
media may also have black marks or other separations
between labels or tags.
Non-Continuous
Fanfold Media
Fanfold media is folded in a zigzag pattern. Fanfold media
can have the same label separations as non-continuous roll
media. The separations would fall on or near the folds.
Table 1Roll and Fanfold Media
18
Introduction
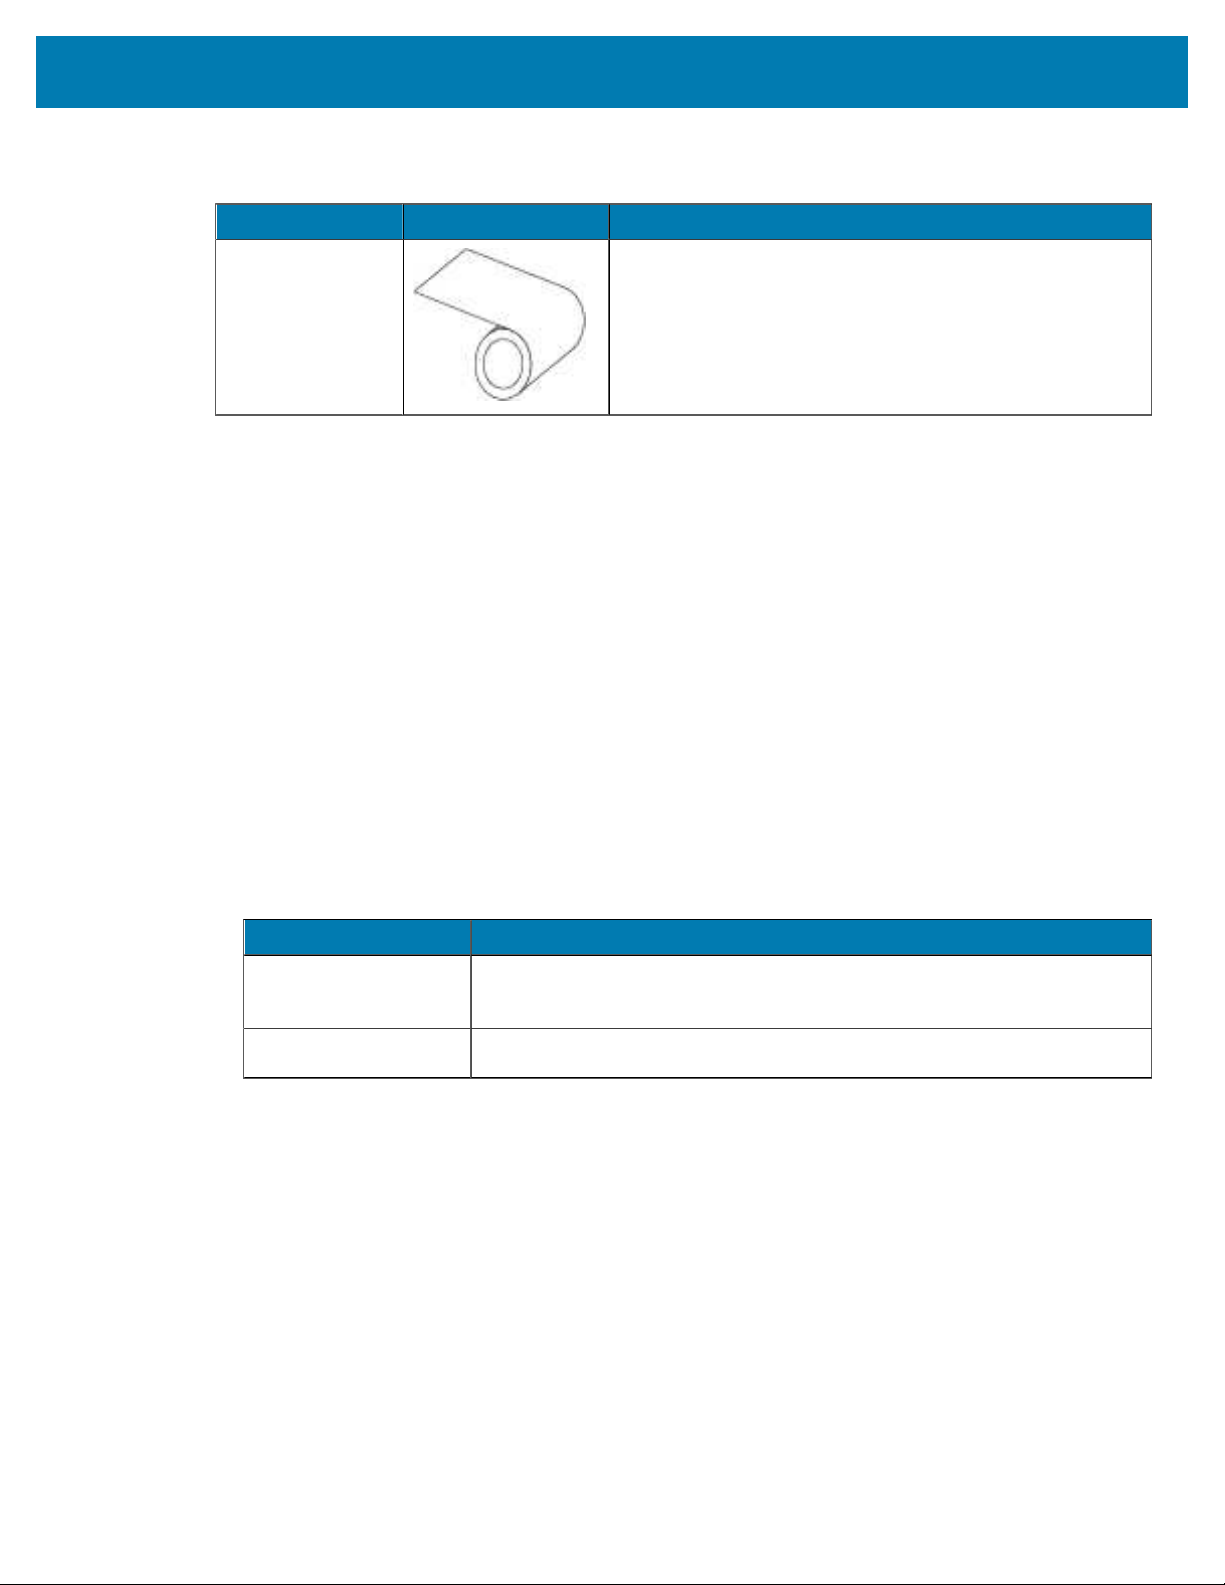
Media Type How it Looks Description
Continuous
RollMedia
Roll media is wound on a core that can be 25 to 76 mm (1
in. to 3in.) in diameter.
Continuous roll media does not have gaps, holes, notches,
or black marks to indicate label separations. This allows the
image to be printed anywhere on the label. Sometimes a
cutter is used to cut apart individual labels.
Table 1Roll and Fanfold Media(Continued)
Ribbon Overview
Ribbon is a thin film that is coated on one side with wax, resin, or wax resin, which is transferred to the
media during the thermal transfer process. The media determines whether you need to use ribbon and
how wide the ribbon must be.
When ribbon is used, it must be as wide as or wider than the media being used. Ifthe ribbon is narrower
than the media, areas of the printhead are unprotected and subject to premature wear.
When to Use Ribbon
Thermal transfer media requires ribbon for printing while direct thermal media does not. Todetermine if
ribbon must be used with a particular media, perform a media scratch test.
Scratch Test
1. Scratch the print surface of the media rapidly with your fingernail.
2. Did a black mark appear on the media?
If a black mark... Then the media is...
Does not appear on
the media
Thermal transfer. A ribbon is required.
Appears on the media Direct thermal. No ribbon is required.
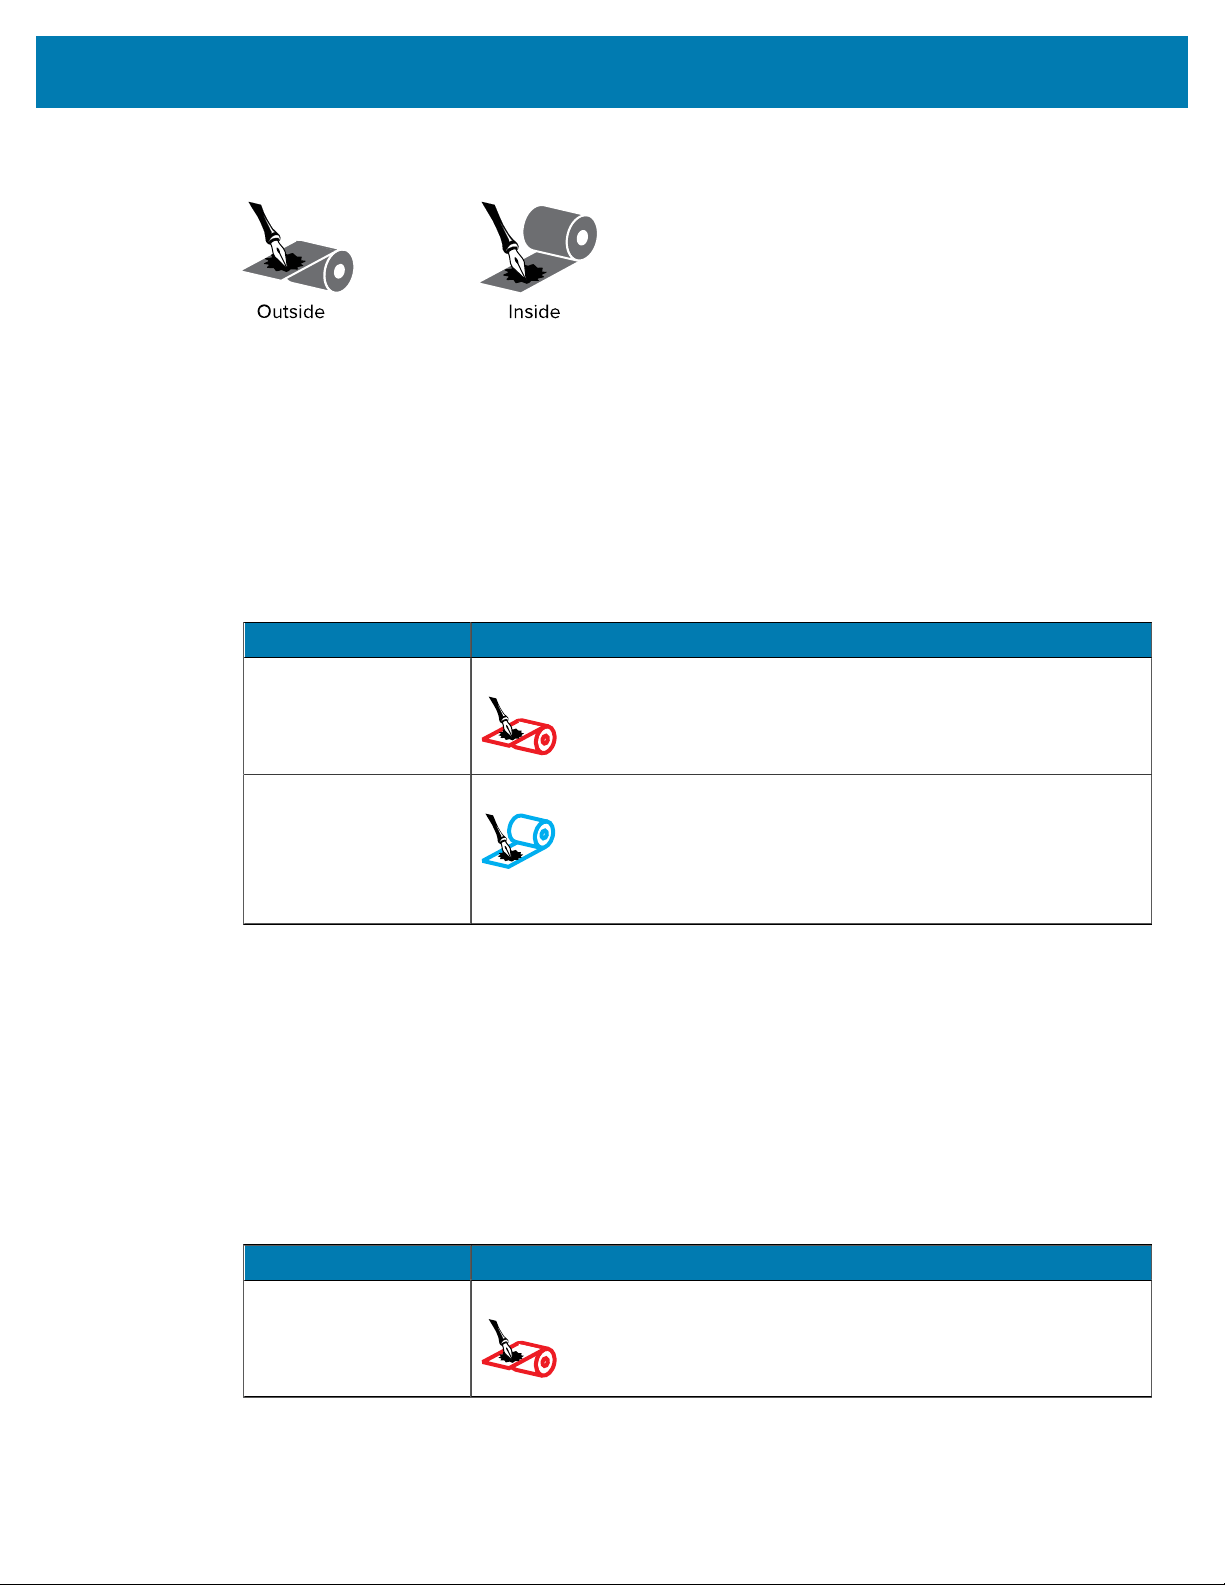
Coated Side of Ribbon
Ribbon can be wound with the coated side on the inside or outside. This printer can only use ribbon that
is coated on the outside. If you are unsure which side of a particular roll of ribbon is coated, perform an
adhesive test or a ribbon scratch test to determine which side is coated.
19
Introduction
Figure 4Ribbon Coated on Outside or Inside
Adhesive Test
If you have labels available, perform the adhesive test to determine which side of a ribbon is coated. This
method works well for ribbon that is already installed.
1. Peel a label from its liner.
2. Press a corner of the sticky side of the label to the outer surface of the roll of ribbon.
3. Peel the label off of the ribbon.
4. Observe the results. Did flakes or particles of ink from the ribbon adhere to the label?
If ink from the ribbon... Then...
Adhered to the label
The ribbon is coated on the outside and can be used in this printer.
Did not adhere to
thelabel
The ribbon is coated on the inside and cannot be used in this printer.
To verify this, repeat the test on the other surface of the roll of ribbon.
Ribbon Scratch Test
Perform the ribbon scratch test when labels are unavailable.
1. Unroll a short length of ribbon.
2. Place the unrolled section of ribbon on a piece of paper with the outer surface of the ribbon in contact
with the paper.
3. Scratch the inner surface of the unrolled ribbon with your fingernail.
4. Lift the ribbon from the paper.
5. Observe the results. Did the ribbon leave a mark on the paper?
If ink from the ribbon... Then...
Left a mark on the
paper
The ribbon is coated on the outside and can be used in this printer.
20

Introduction
If ink from the ribbon... Then...
Did not leave a mark
on the paper
The ribbon is coated on the inside and cannot be used in this printer.
To verify this, repeat the test on the other surface of the roll of ribbon.
21

Printer Setup and Operation
Printer Setup and Operation
This section assists the technician with initial setup and operation of the printer.
Handling the Printer
This section describes how to handle your printer.
Unpacking and Inspecting the Printer
When you receive the printer, immediately unpack it and inspect for shipping damage.
• Save all packing materials
• Check all exterior surfaces for damage.
• Raise the media door, and inspect the media compartment for damage to components.
If you discover shipping damage upon inspection:
• Immediately notify the shipping company and file a damage report.
• Keep all packaging material for shipping company inspection.
• Notify your authorized Zebra reseller.
IMPORTANT: Zebra Technologies is not responsible for any damage incurred during the
shipment of the equipment and will not repair this damage under warranty.
Storing the Printer
If you are not placing the printer into immediate operation, repackage it using the original packing
materials. You may store the printer under the following conditions:
• Temperature: –40° to 60°C(–40°F to 140°F)
• Relative humidity: 5% to 85% non-condensing
Shipping the Printer
If you must ship the printer:
1. Turn off (O) the printer, and disconnect all cables.
2. Remove any media, ribbon, or loose objects from the printer interior.
22

Printer Setup and Operation
3. Close the printhead.
4. Carefully pack the printer into the original container or a suitable alternate container to avoid damage
during transit. A shipping container can be purchased from Zebra if the original packaging has been lost
or destroyed.
Selecting a Location for the Printer
Select a location for the printer that meets these conditions:
• Surface: The surface where the printer will be located must be solid, level, and of sufficient size and
strength to hold the printer.
• Space: The area where the printer will be located must include enough space for ventilation and for
accessing the printer components and connectors. To allow for proper ventilation and cooling, leave
open space on all sides of the printer.
CAUTION: Do not place any padding or cushioning material behind or under the printer
because this restricts air flow and could cause the printer to overheat.
• Power: The printer should be within a short distance of an appropriate power outlet that is easily
accessible.
• Data communication interfaces: The printer must be within range of your WLAN radio (if applicable) or
within an acceptable range for other connectors to reach your data source (usually a computer). For
more information on maximum cable lengths and configuration, see General Specifications on page
160.
• Operating conditions: Your printer is designed to function in a wide range of environmental and
electrical conditions, including a warehouse or factory floor. These are the temperature and relative
humidity requirements for the printer when it is operating.
Mode Temperature Relative Humidity
Thermal Transfer 5° to 40°C (41° to 104°F)
Direct Thermal 0° to 40°C(32° to 104°F)
20 to 85% non-condensing
Table 2Operating Temperature and Humidity
Selecting a Print Mode
Use a print mode that matches the media being used and the printer options available.The media path
is the same for roll and fanfold media. To set the printer to an available print mode, see Print Settings on
page 80.
Print Mode When to Use/Printer Options Required Printer Actions
Tear-Off
(defaultsetting)
Use for most applications. This mode can
be used with any printer options and most
media types.
The printer prints label formats as it
receives them. The printer operator can
tear off the printed labels any time after
they print.
Table 3Print Modes and Printer Options
23
Printer Setup and Operation
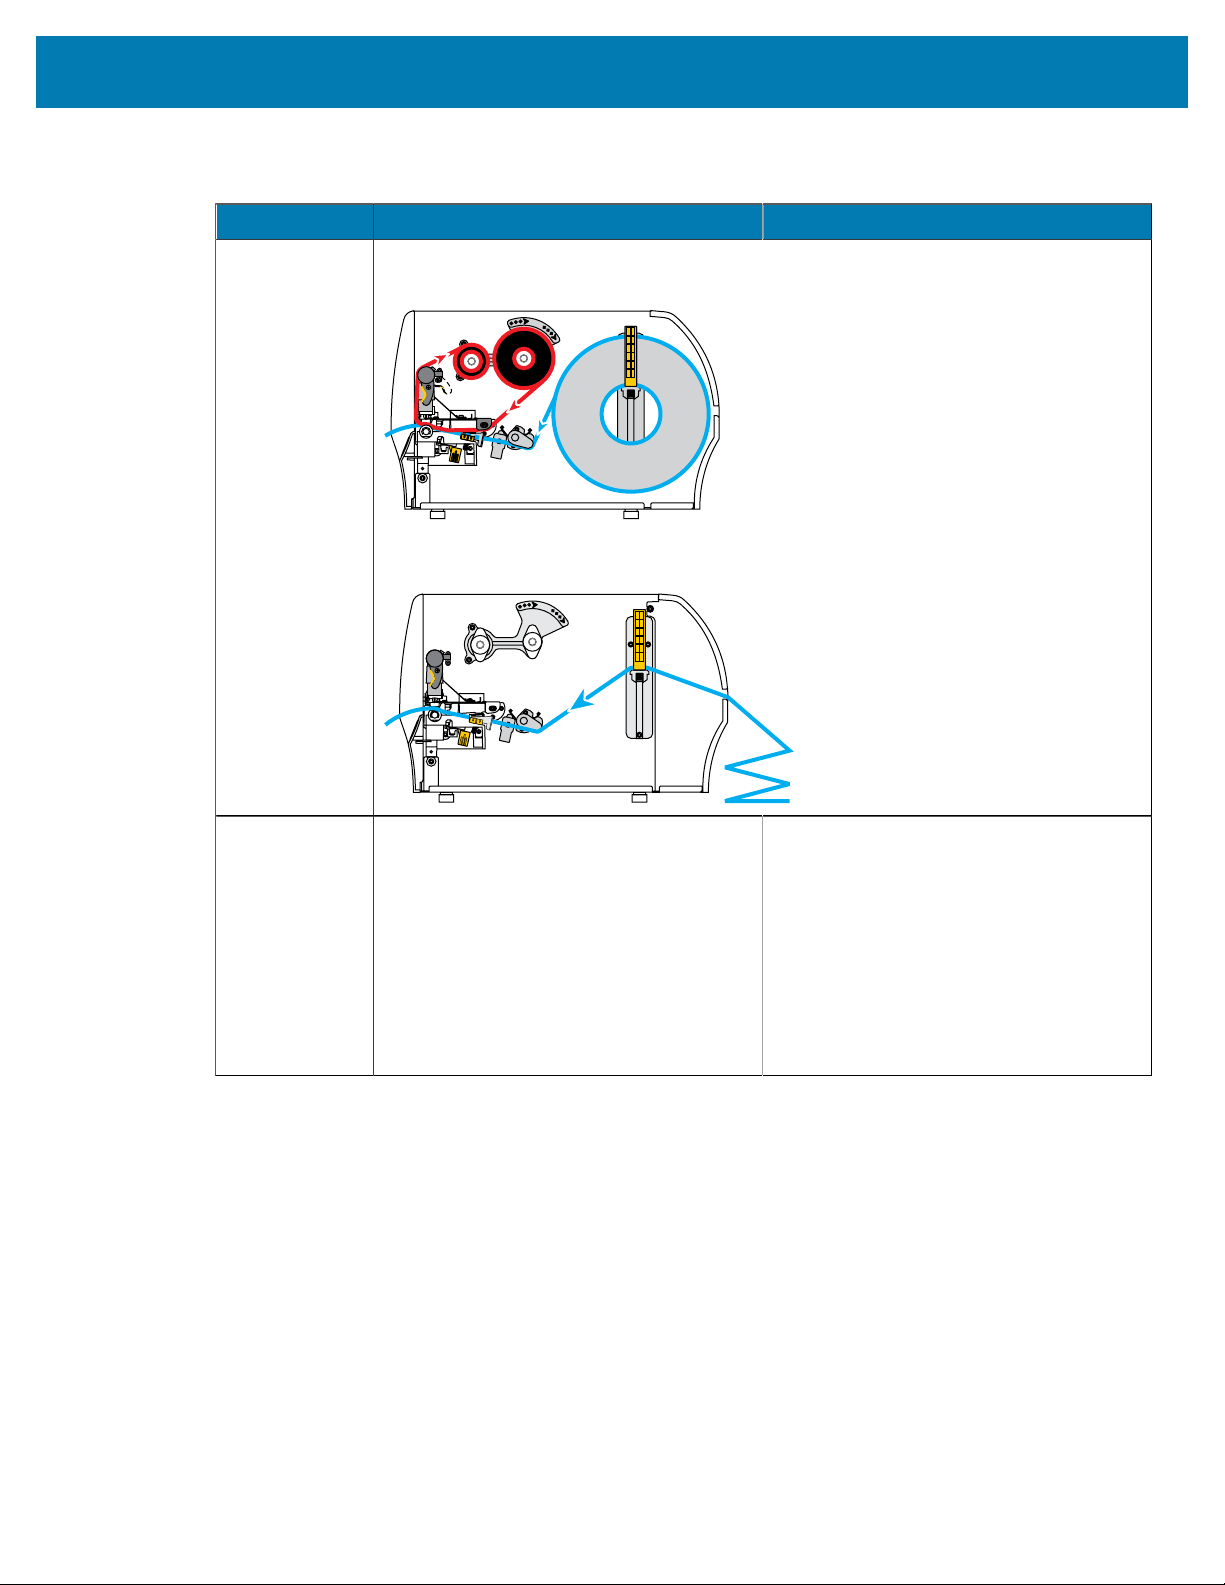
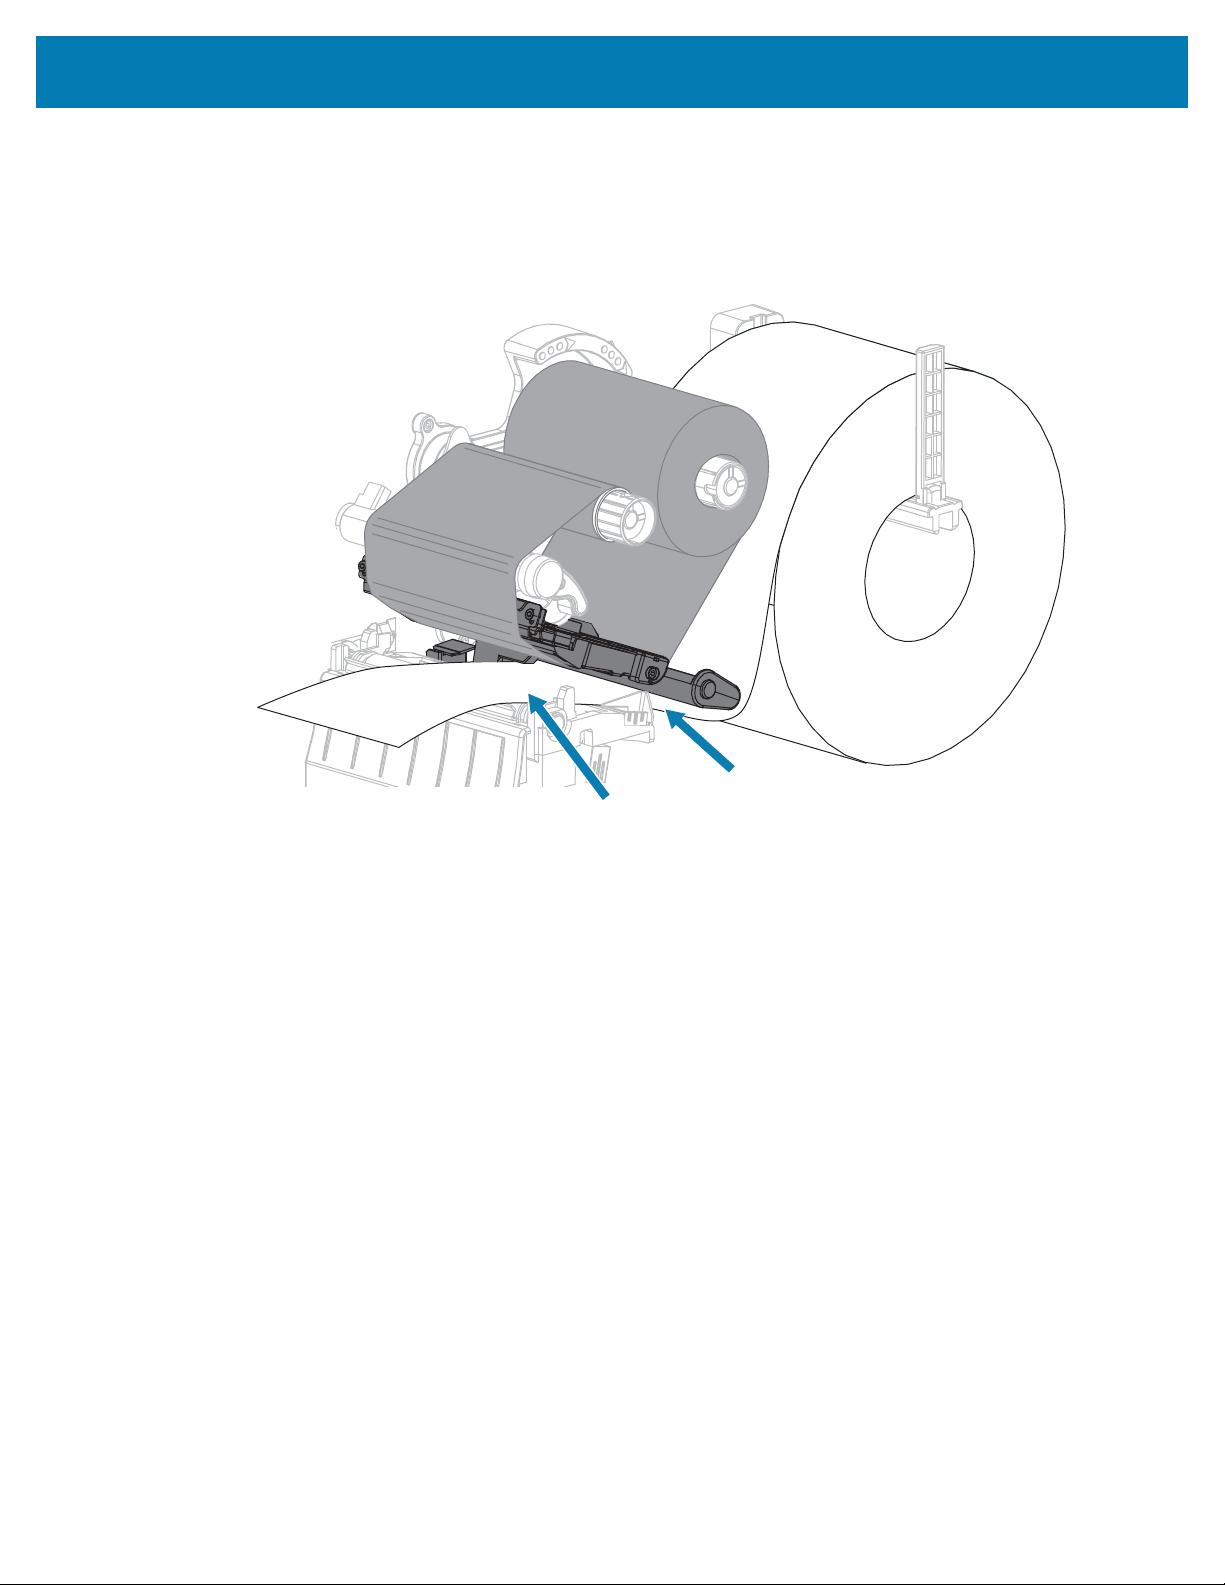
Print Mode When to Use/Printer Options Required Printer Actions
Roll media in Tear-Off mode
(shown using thermal transfer media with ribbon loaded)
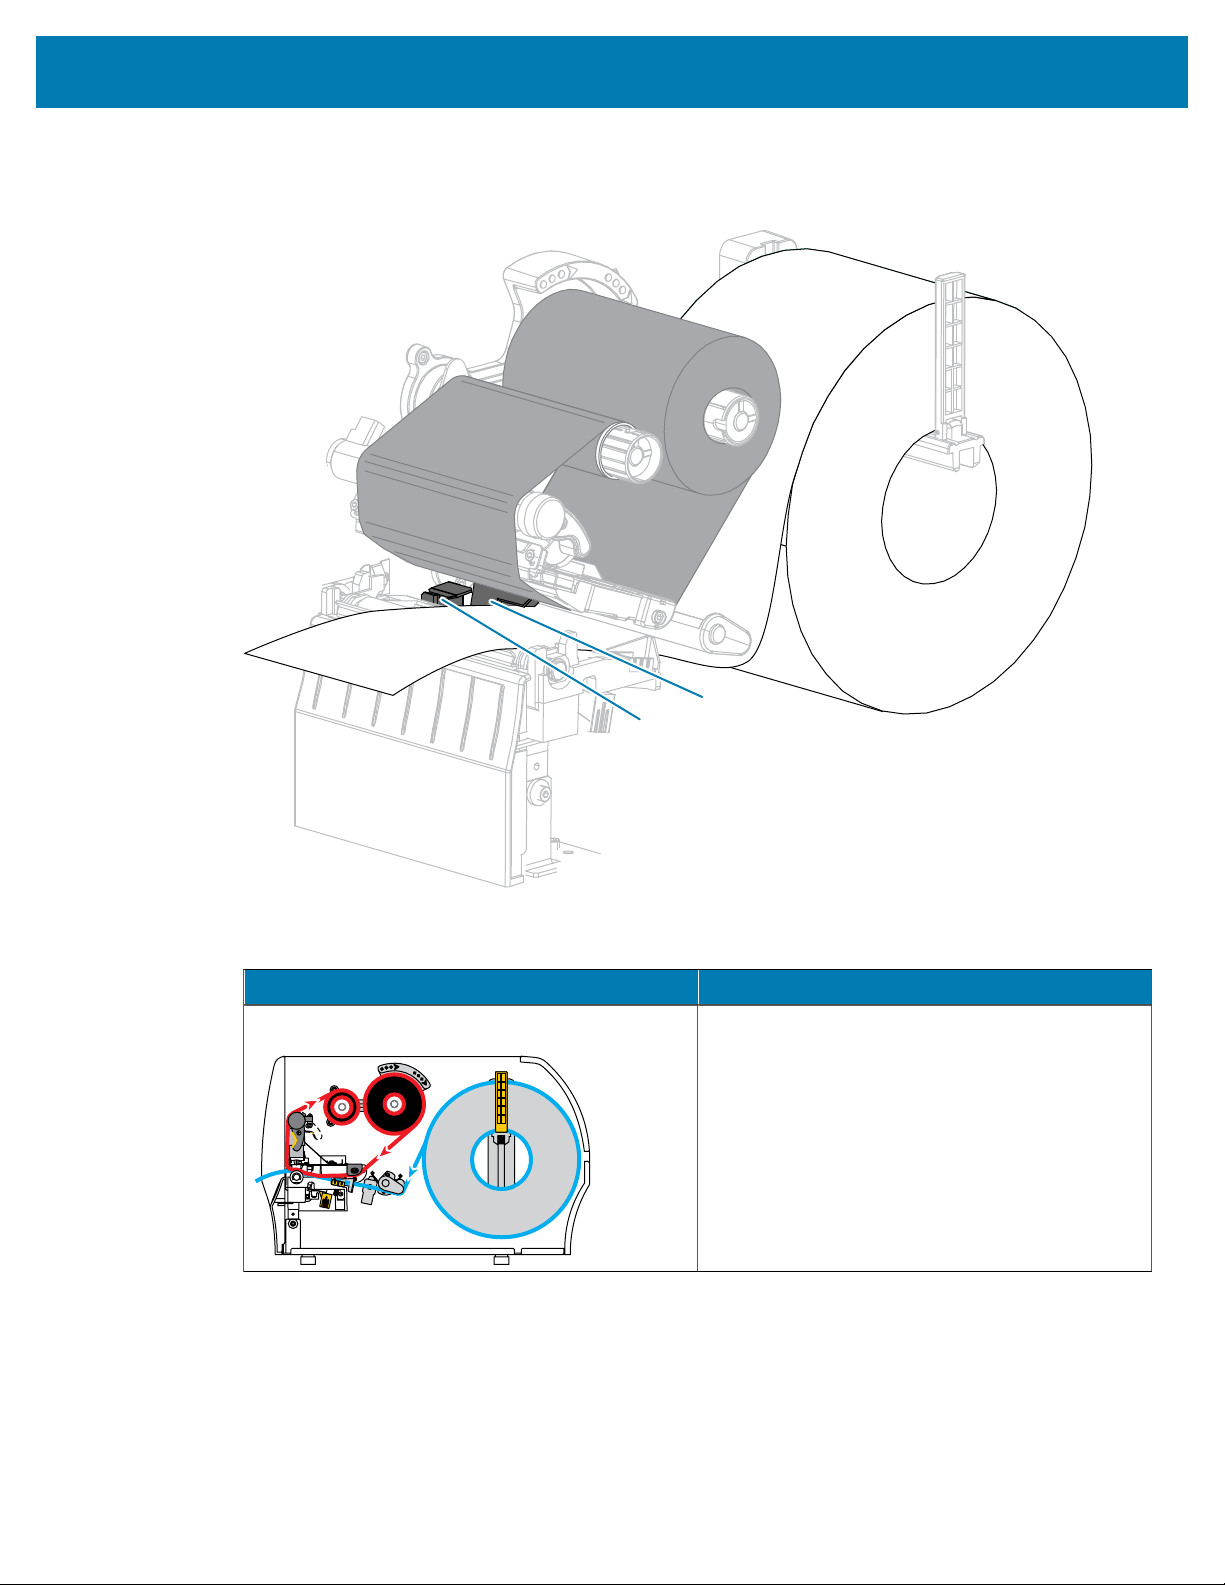
Fanfold media in Tear-Off mode
(shown using direct thermal media and no ribbon)
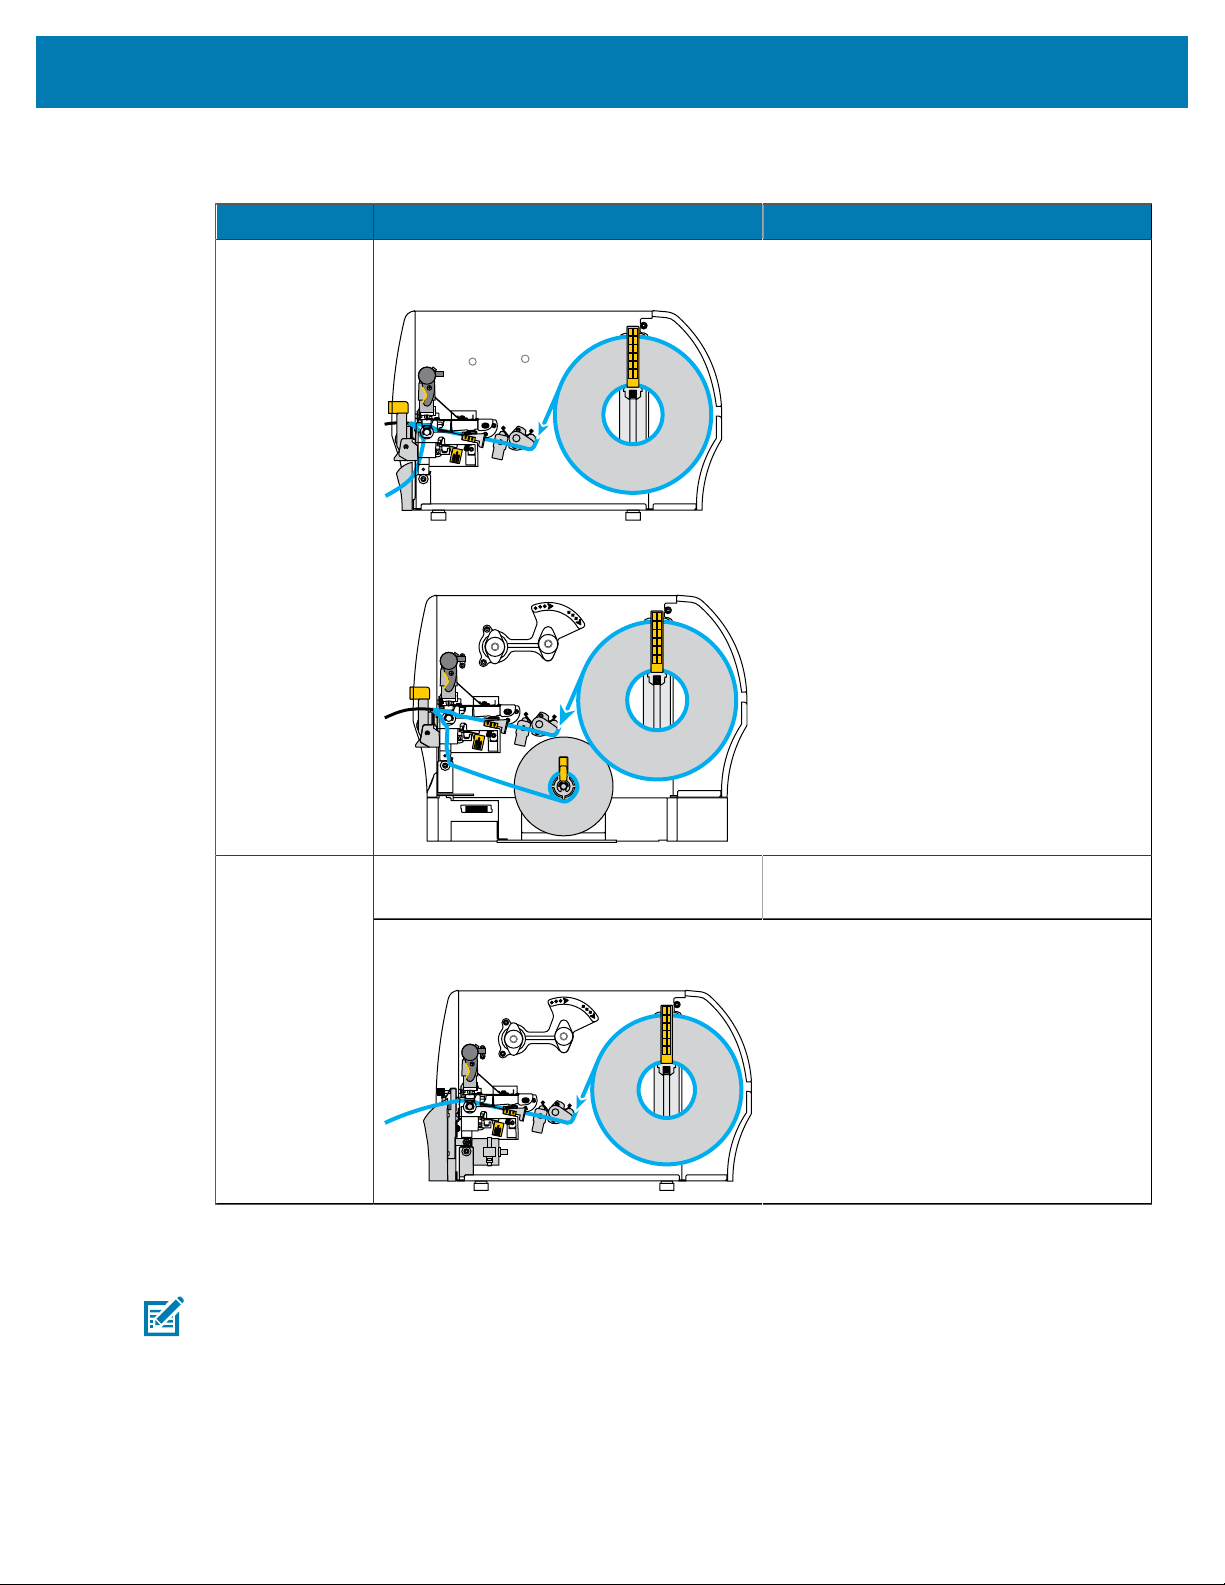
Peel-Off Use if the printer has the Peel#Off option
or the Liner Take-Up option. The Liner
Take-Up option is available only on the
ZT230 printer.
The printer peels the label from the liner
during printing and then pauses until the
label is removed. The liner exits the front
of the printer.
• In Peel-Off mode, the liner exits the
front of the printer.
• In Peel-Off mode with Liner Take-Up,
the liner winds onto the Liner Take-up
spindle or the rewind spindle.
Table 3Print Modes and Printer Options(Continued)
24
Printer Setup and Operation
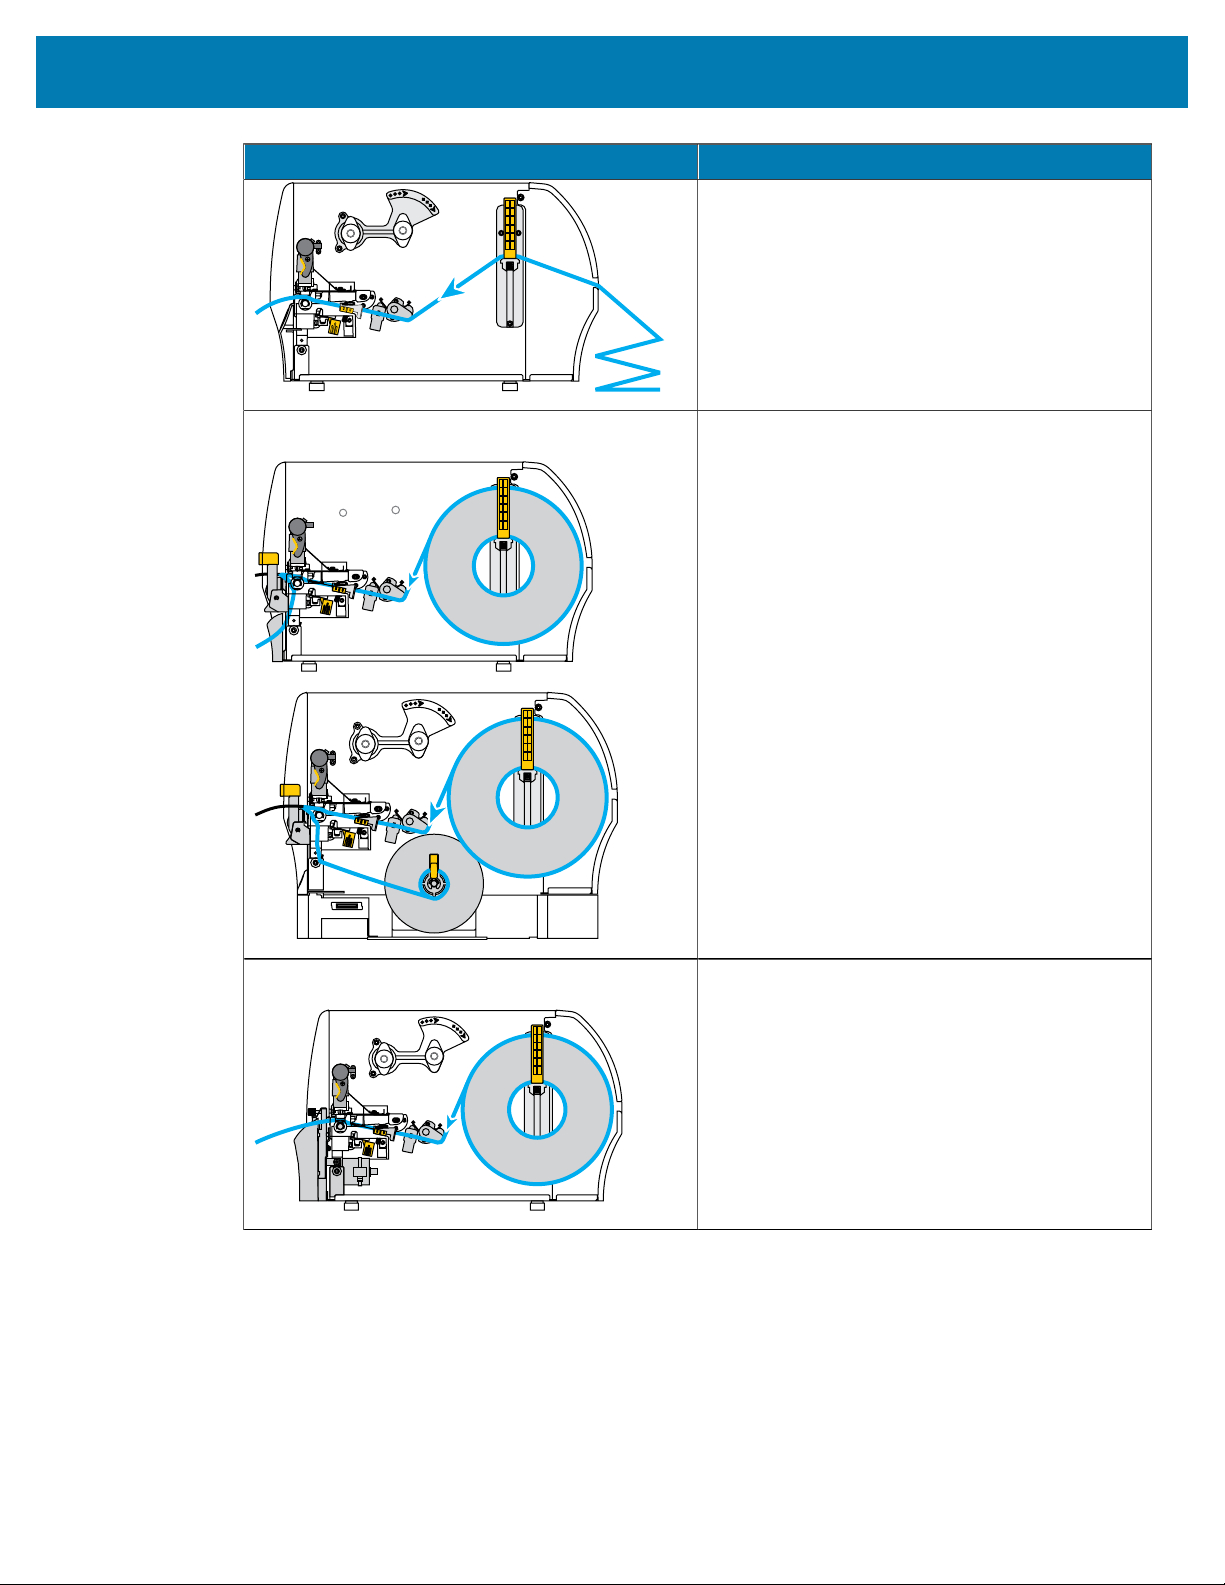
Print Mode When to Use/Printer Options Required Printer Actions
Peel-Off mode
(shown without a ribbon system)
Peel-Off mode with Liner Take-Up*
(shown using direct thermal media and no ribbon)
Use if the printer has a cutter option when
you want the labels to be cut apart.
The printer prints a label and then cuts it
free.
Cutter
Cutter mode
(shown using direct thermal media and no ribbon)
Table 3Print Modes and Printer Options(Continued)
Loading the Ribbon
NOTE: This section applies only to printers that have the Thermal Transfer option installed.
Ribbon is used only with thermal transfer labels. For direct thermal labels, do not load ribbon in the printer.
Todetermine if ribbon must be used with a particular media, see
When to Use Ribbon on page 19.
25
Printer Setup and Operation
CAUTION: While performing any tasks near an open printhead, remove all rings, watches,
hanging necklaces, identification badges, or other metallic objects that could touch the
printhead. You are not required to turn off the printer power when working near an open
printhead, but Zebra recommends it as a precaution. If you turn off the power, you will lose all
temporary settings, such as label formats, and you must reload them before you resume printing.
IMPORTANT: Use ribbon that is wider than the media to protect the printhead from wear. Ribbon
must be coated on the outside.
Watch the video: Loading the Ribbon.
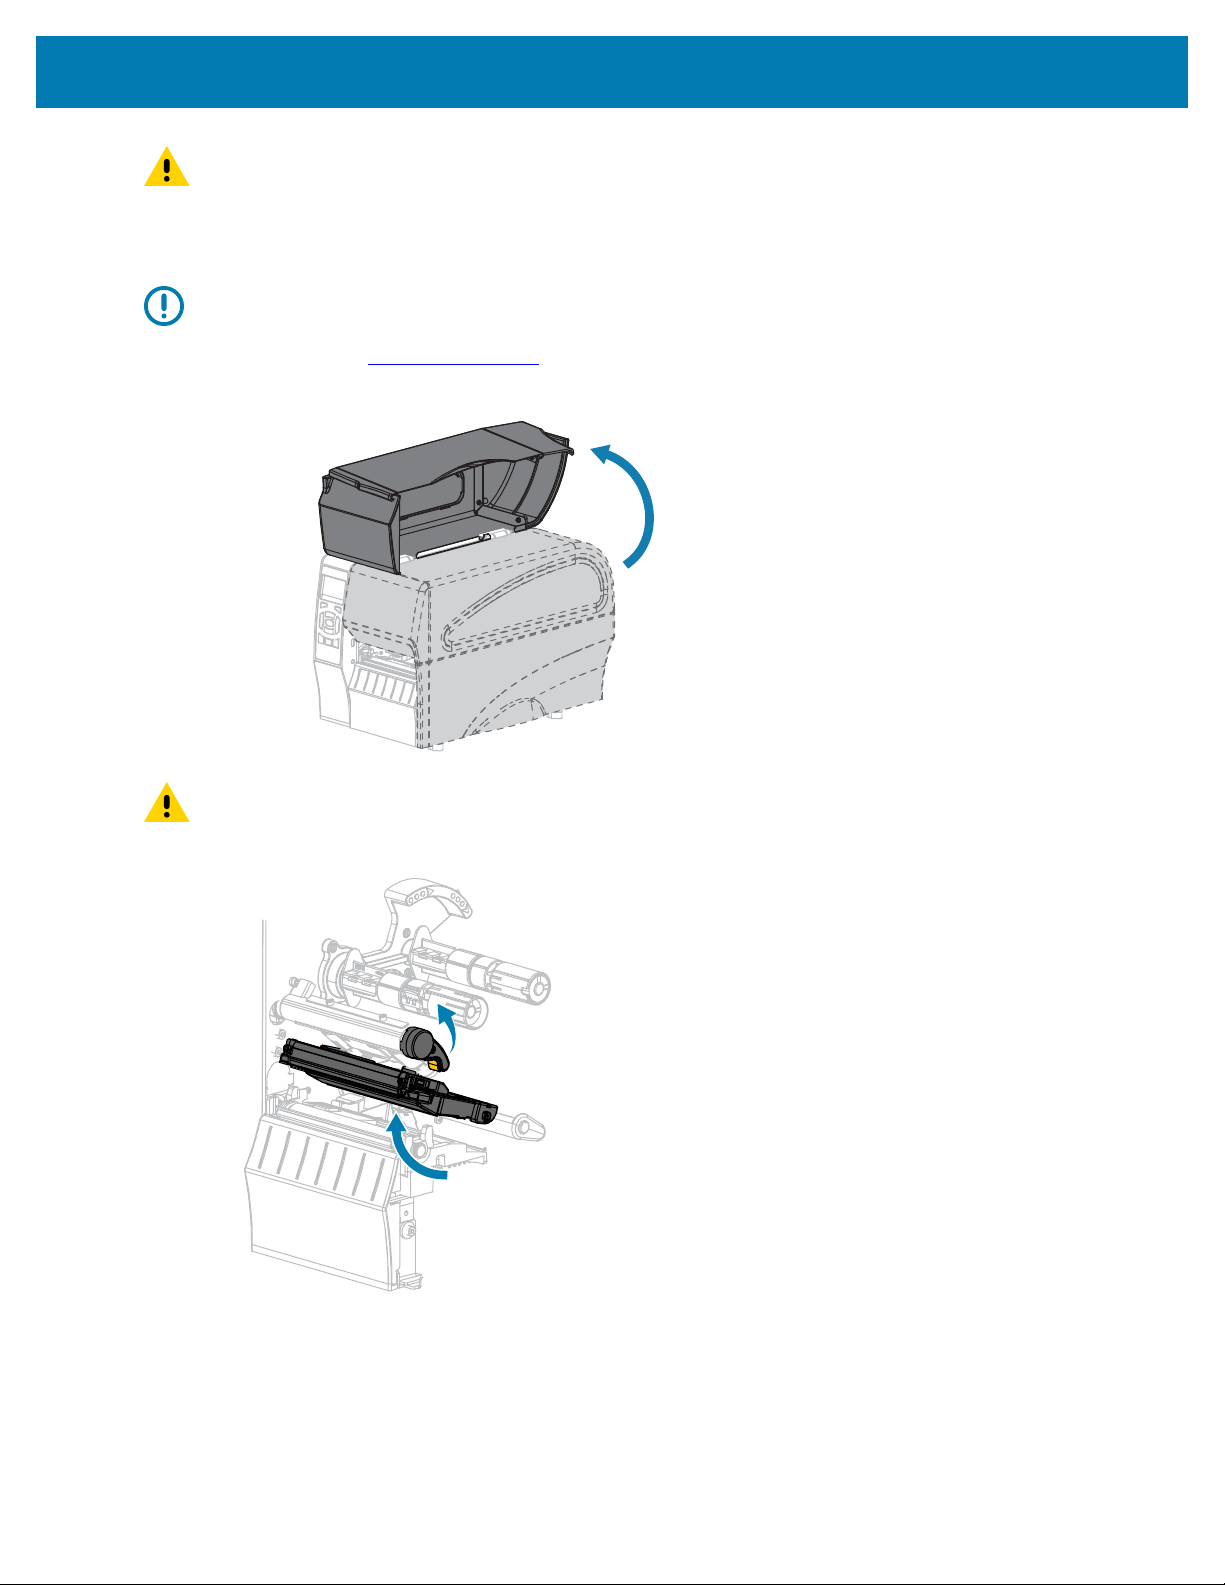
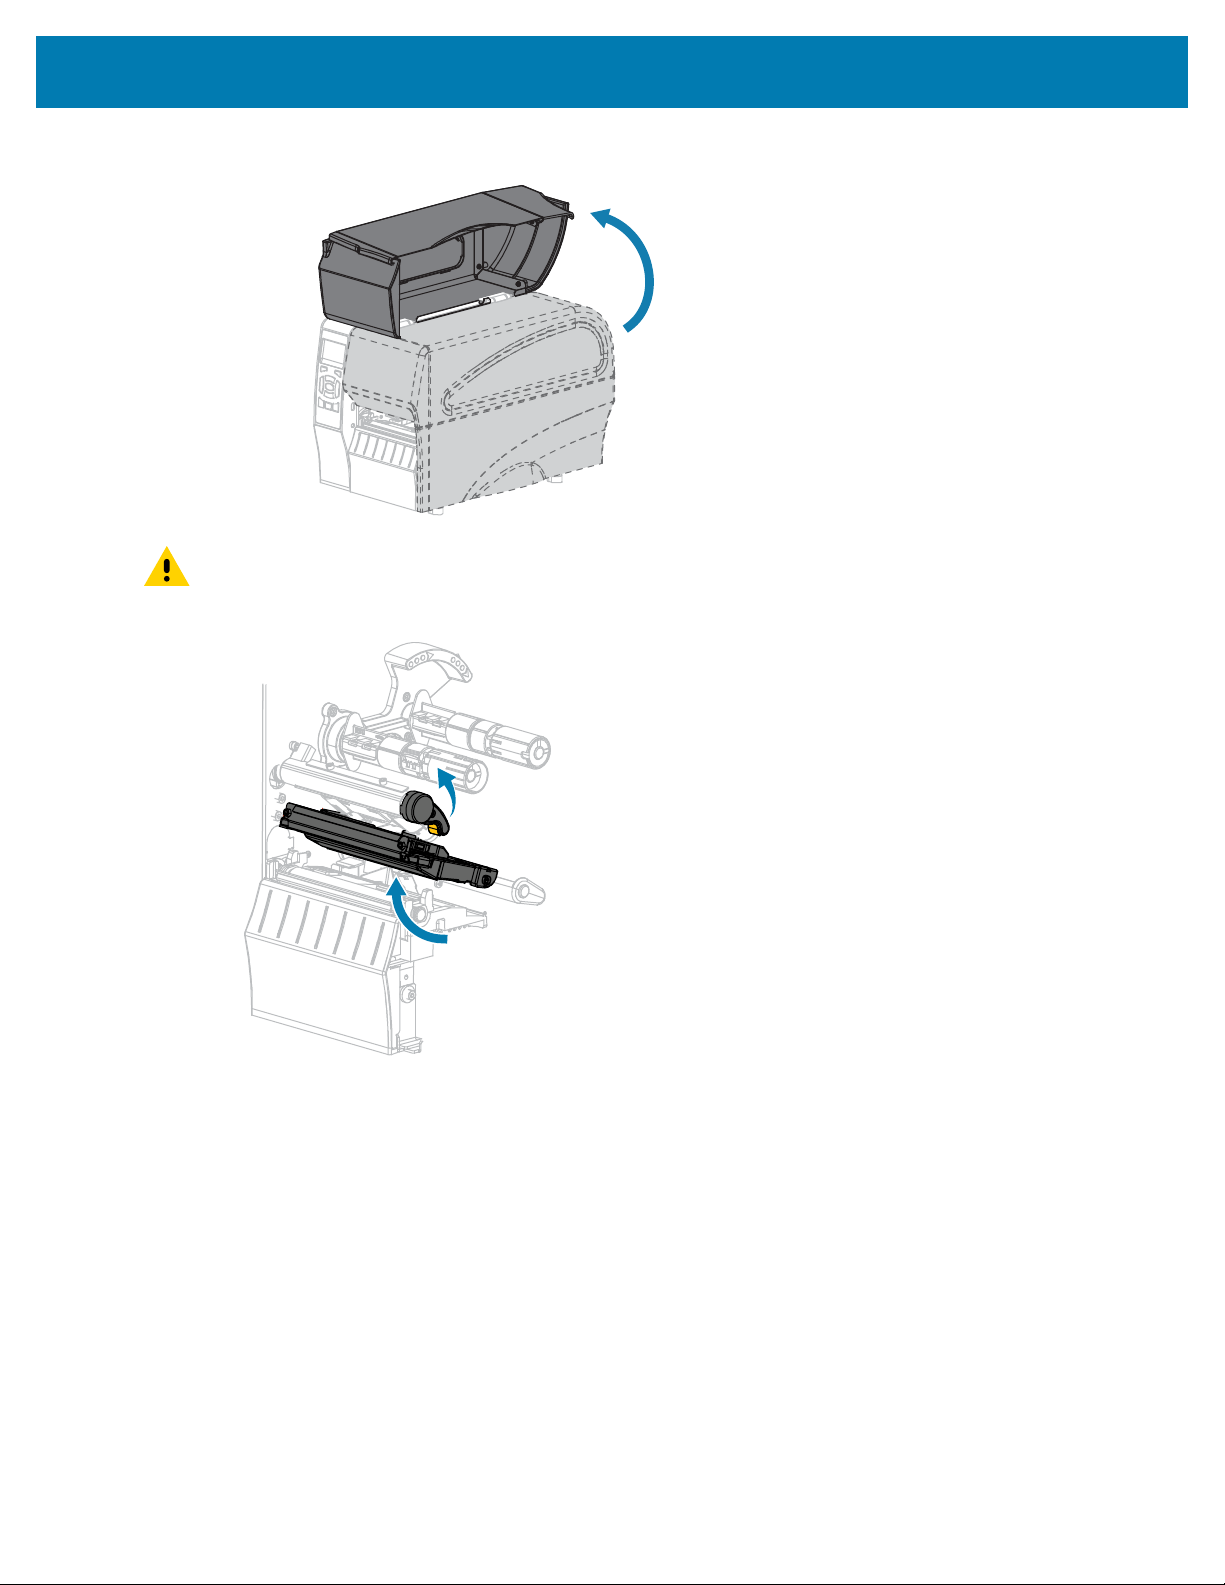
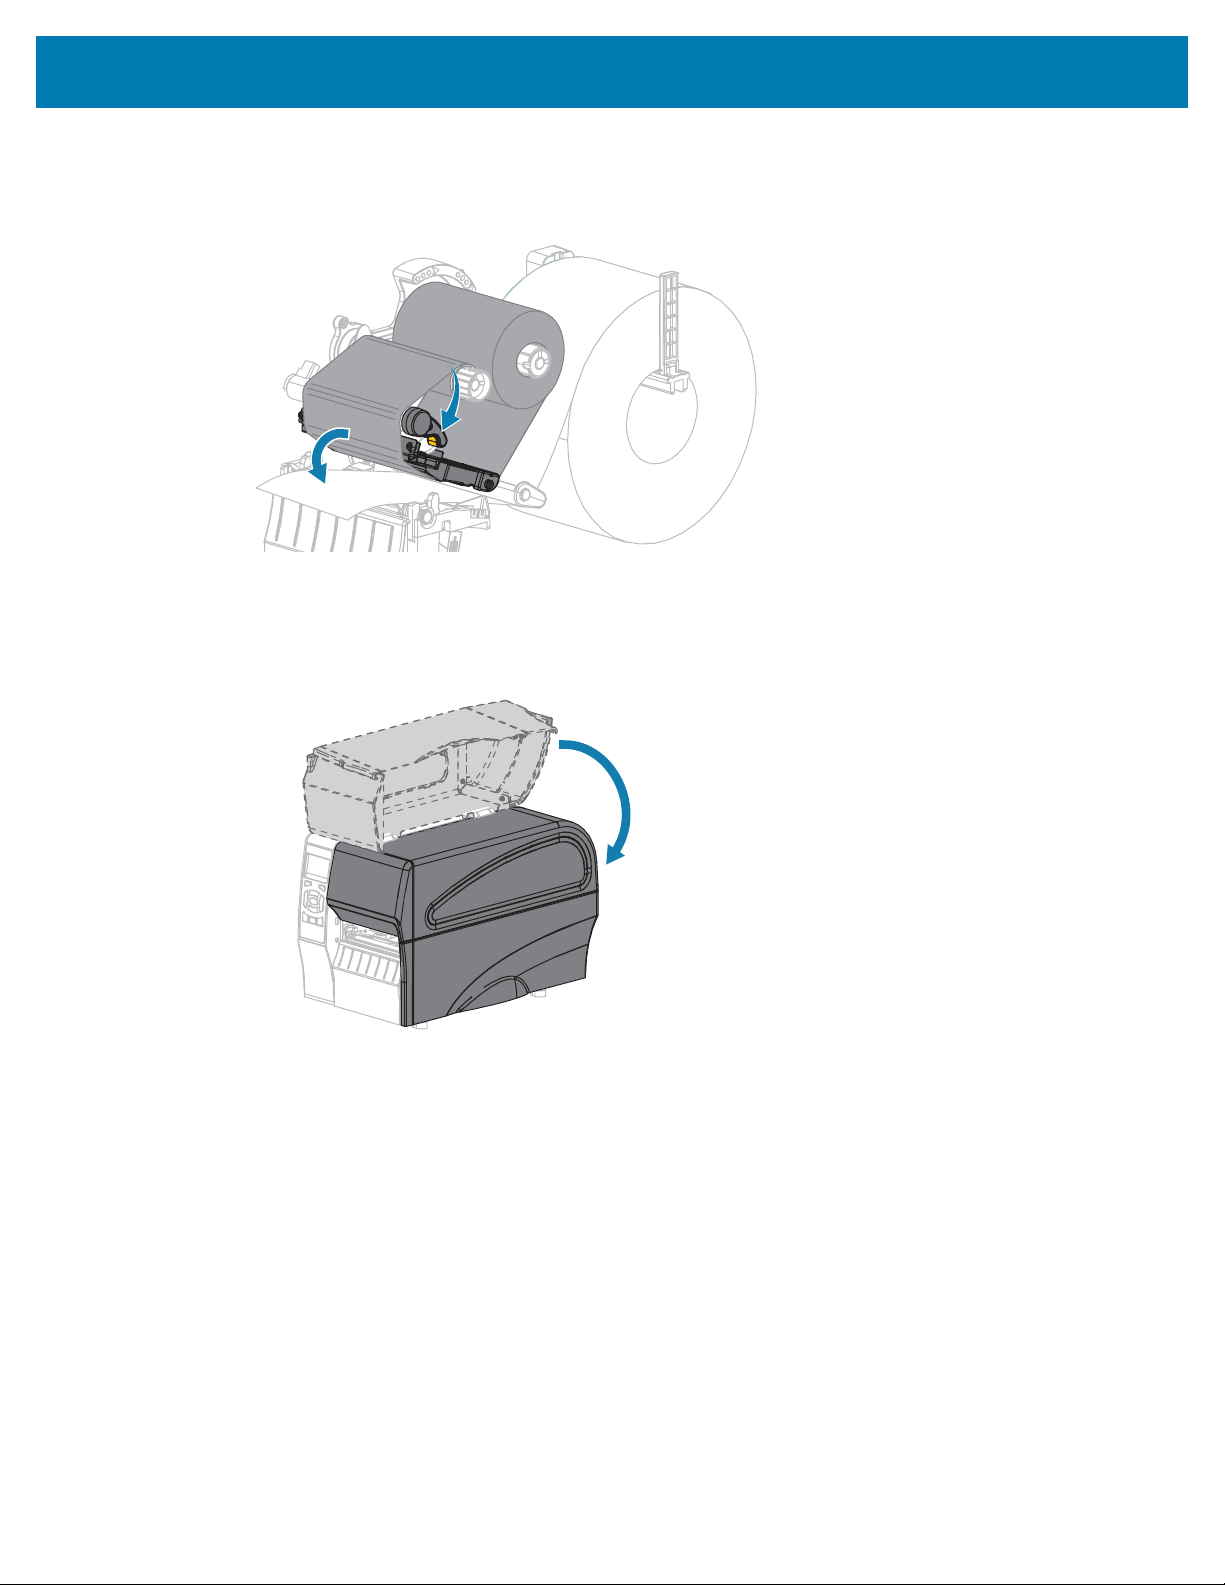
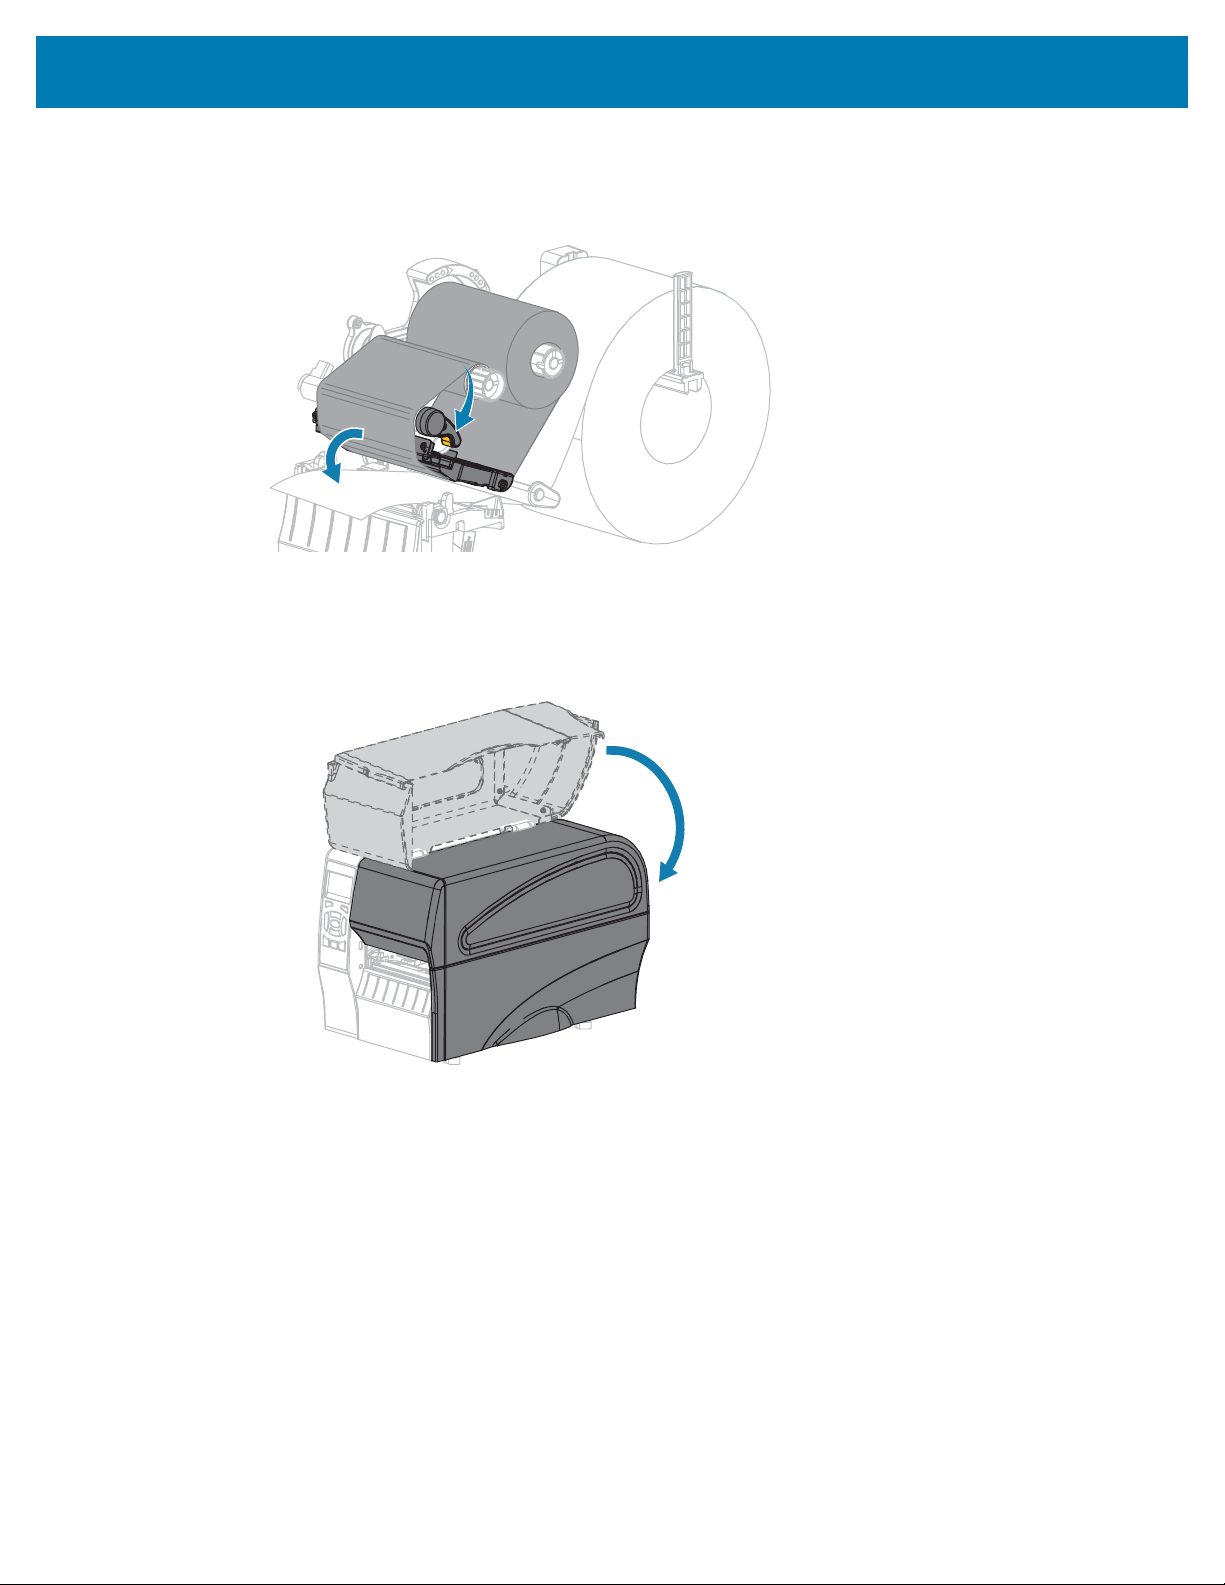
1. Raise the media door.
CAUTION: The printhead may be hot and could cause severe burns. Allow the printhead to
cool.
2. Open the printhead assembly by rotating the printhead-open lever.
26

Printer Setup and Operation
3. Place the roll of ribbon on the ribbon supply spindle with the loose end of the ribbon unrolling as
shown. Push the roll back as far as it will go.
4. Your printer shipped with an empty ribbon core on the ribbon take-up spindle. If this core is no longer
there, place an empty ribbon core on the ribbon take-up spindle. Push the core back as far as it will go.
27

Printer Setup and Operation
5. Bring the ribbon under the printhead assembly as shown.
6. With the ribbon tracking as far back as it can under the printhead assembly:
a) Wrap the ribbon around the core on the ribbon take-up spindle.
b) Rotate the spindle several turns in the direction shown to tighten and align the ribbon.
28
Printer Setup and Operation
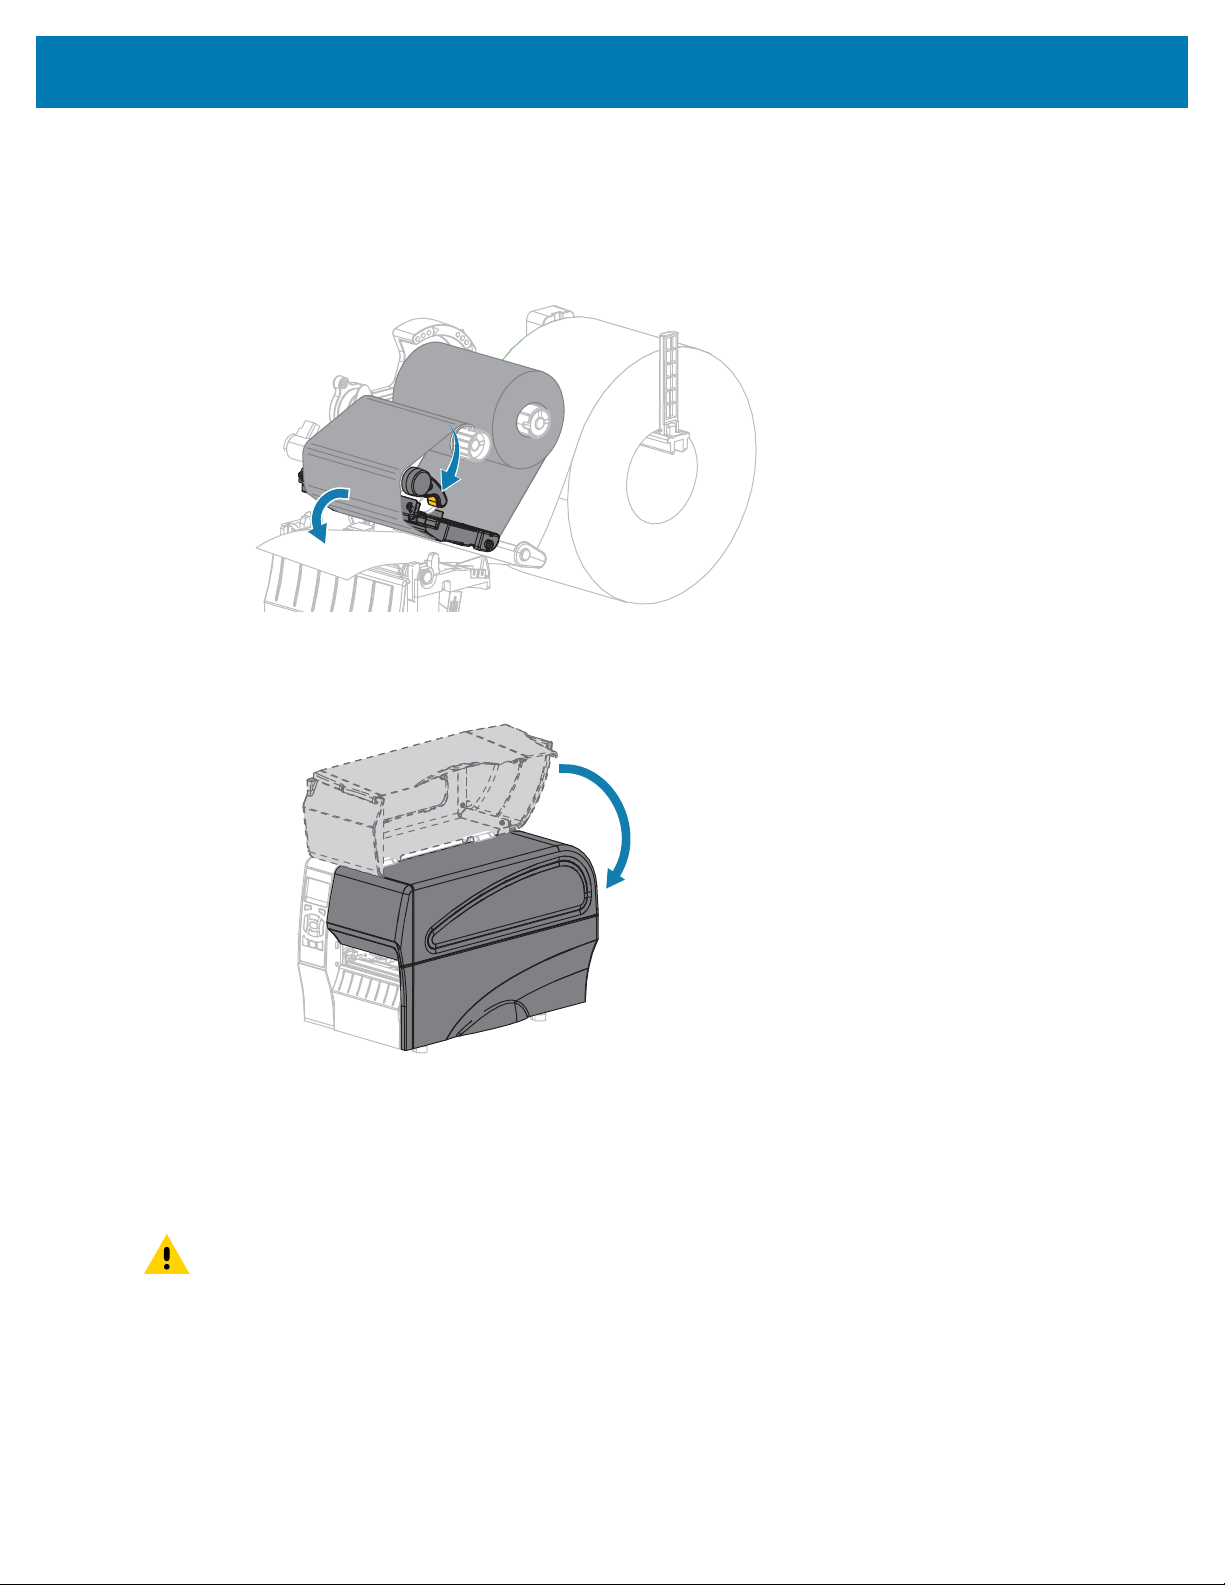
7. If media is already loaded, rotate the printhead-open lever downward until it locks the printhead in
place.
Otherwise, continue with Loading the Media on page 29.
8. Close the media door.
9. If necessary, press PAUSE to enable printing.
Loading the Media
Use the instructions in this section for loading roll or fanfold media in any print mode.
CAUTION: While performing any tasks near an open printhead, remove all rings, watches,
hanging necklaces, identification badges, or other metallic objects that could touch the
printhead. You are not required to turn off the printer power when working near an open
printhead, but Zebra recommends it as a precaution. If you turn off the power, you will lose all
temporary settings, such as label formats, and you must reload them before you resume printing.
29
Printer Setup and Operation
1. Raise the media door.
CAUTION: The printhead may be hot and could cause severe burns. Allow the printhead to
cool.
2. Open the printhead assembly by rotating the printhead-open lever.
30
Printer Setup and Operation
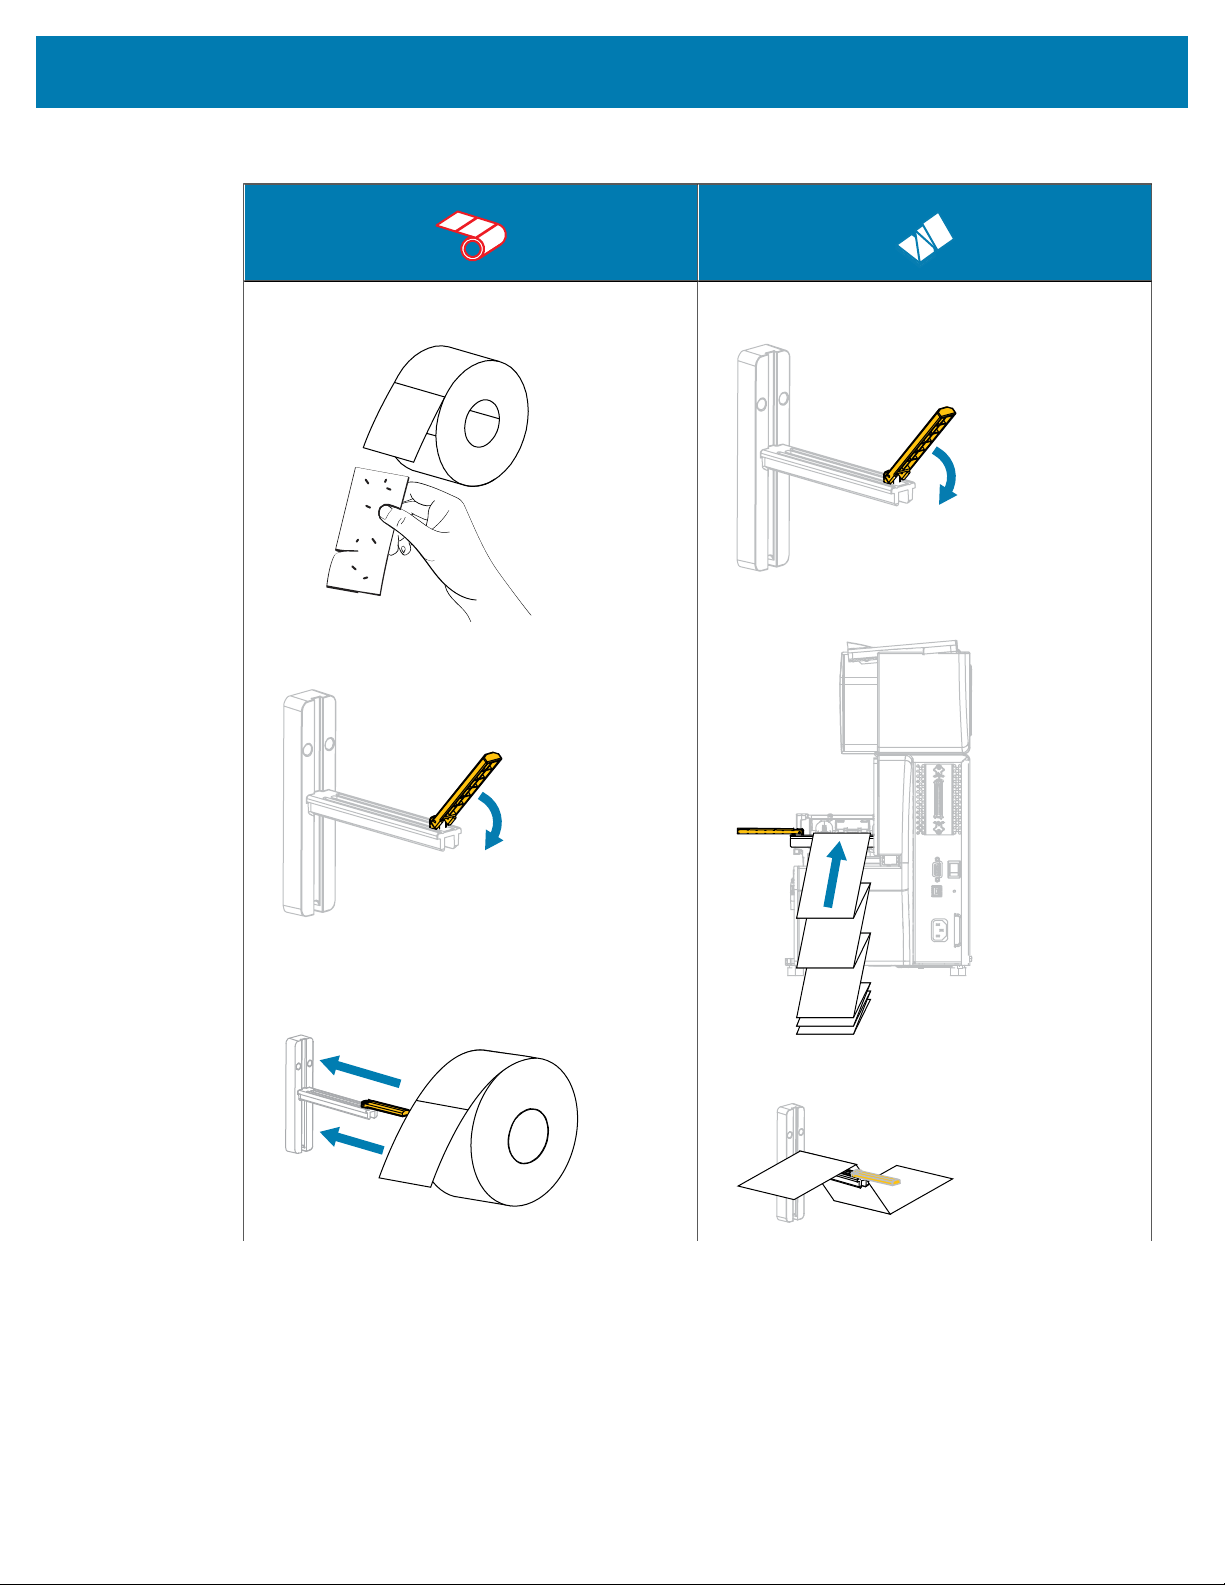
3. Insert media into the printer. Follow the instructions for roll or fanfold media, as appropriate.
Roll Media Fanfold Media
a. Remove and discard any tags or labels that
are dirty or that are held by adhesives or tape.
b. Slide out and flip down the media supply
guide.
c. Place the roll of media on the media supply
hanger. Push the roll back as far as it will go.
a. Slide out and flip down the media supply
guide.
b. Insert the fanfold media through the rear of
the printer.
c. Drape the media over the media supply
hanger.
31
Printer Setup and Operation
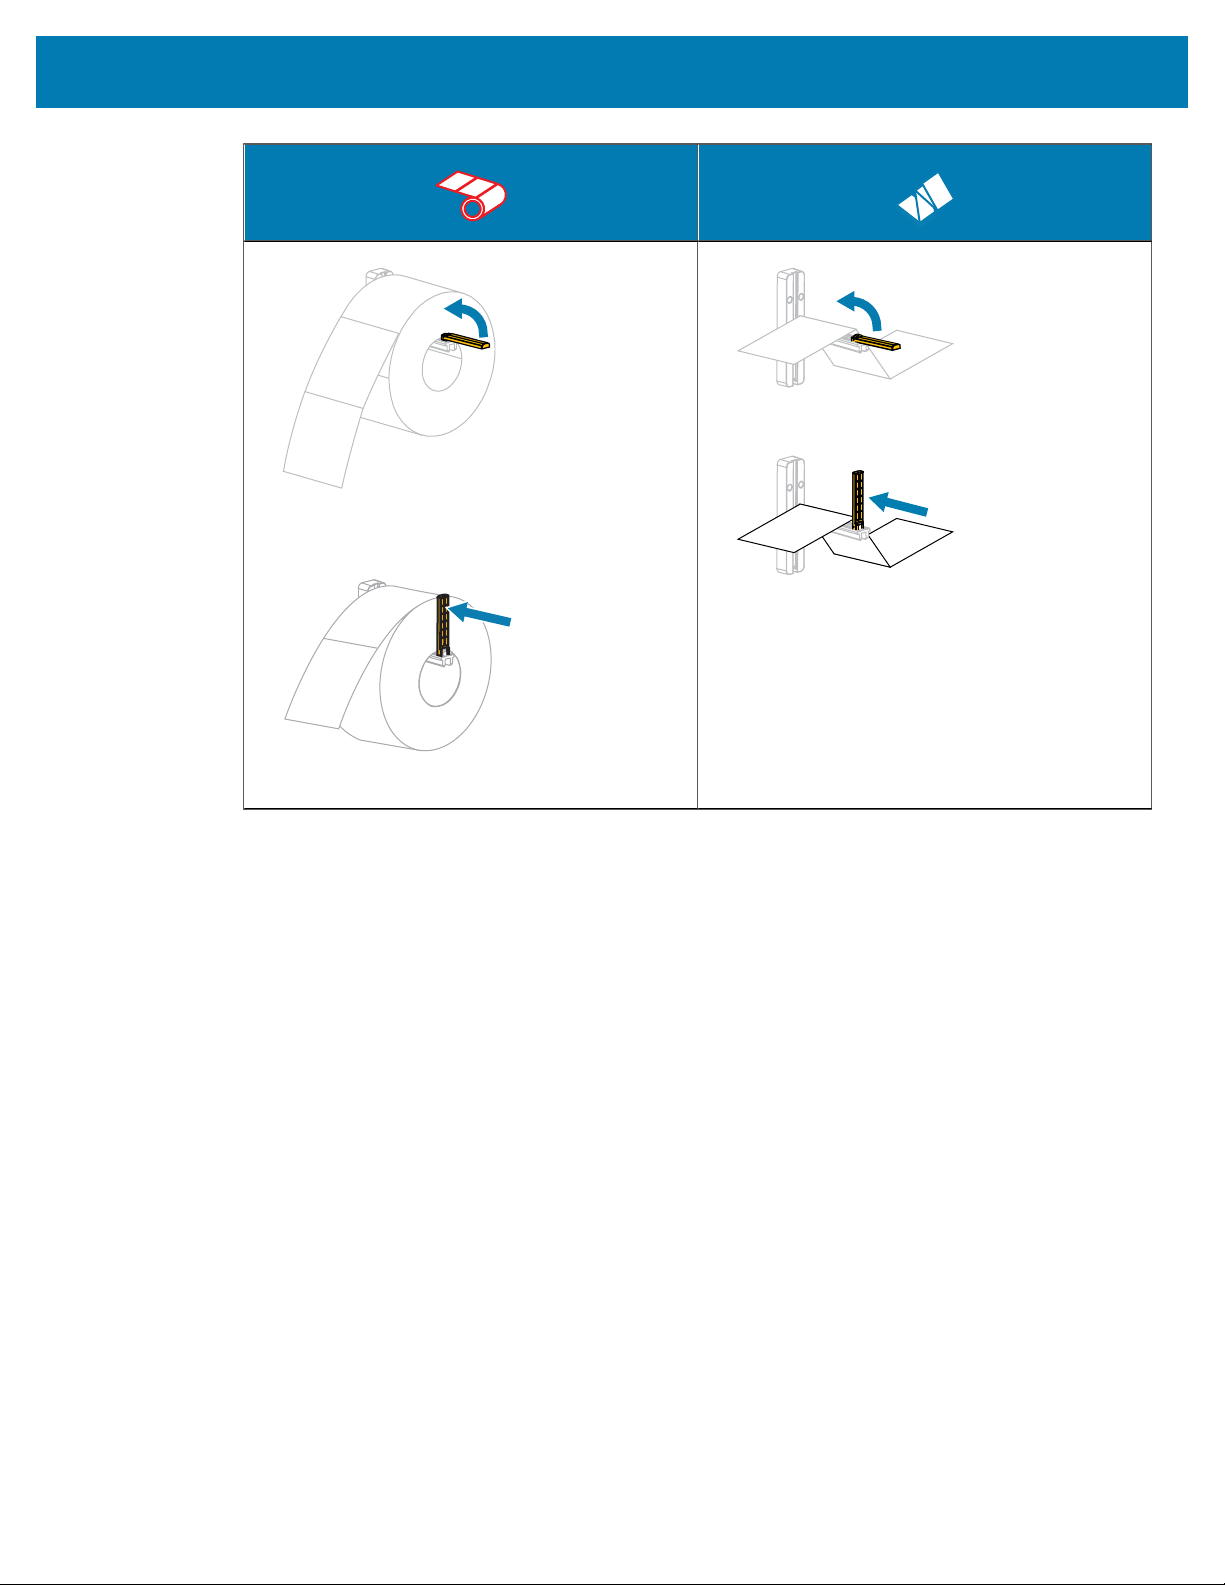
Roll Media Fanfold Media
d. Flip up the media supply guide.
e. Slide in the media supply guide until it
touches the edge of the roll.
d. Flip up the media supply guide.
e. Slide in the media supply guide until it
touches the edge of the media.
f. Continue with the remaining steps as shown
for roll media.
32
Printer Setup and Operation
4. Slide the outer media guide all the way out.
33
Printer Setup and Operation
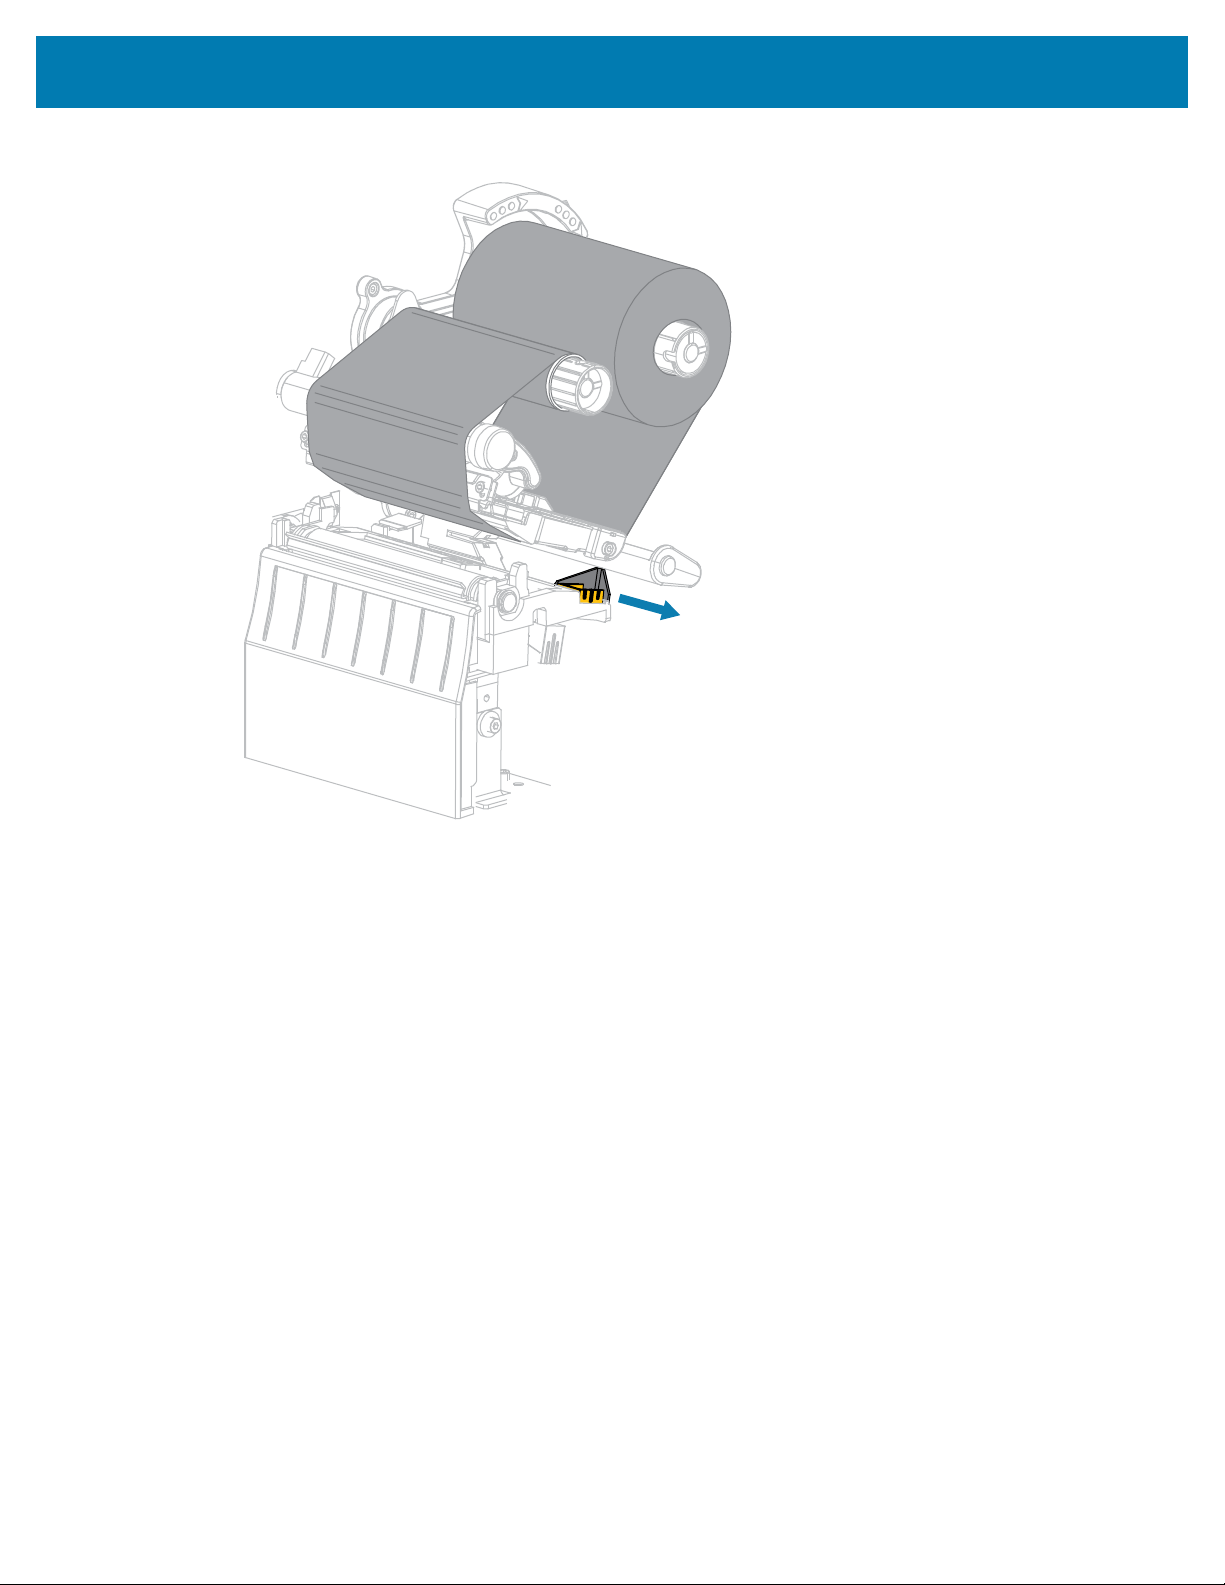
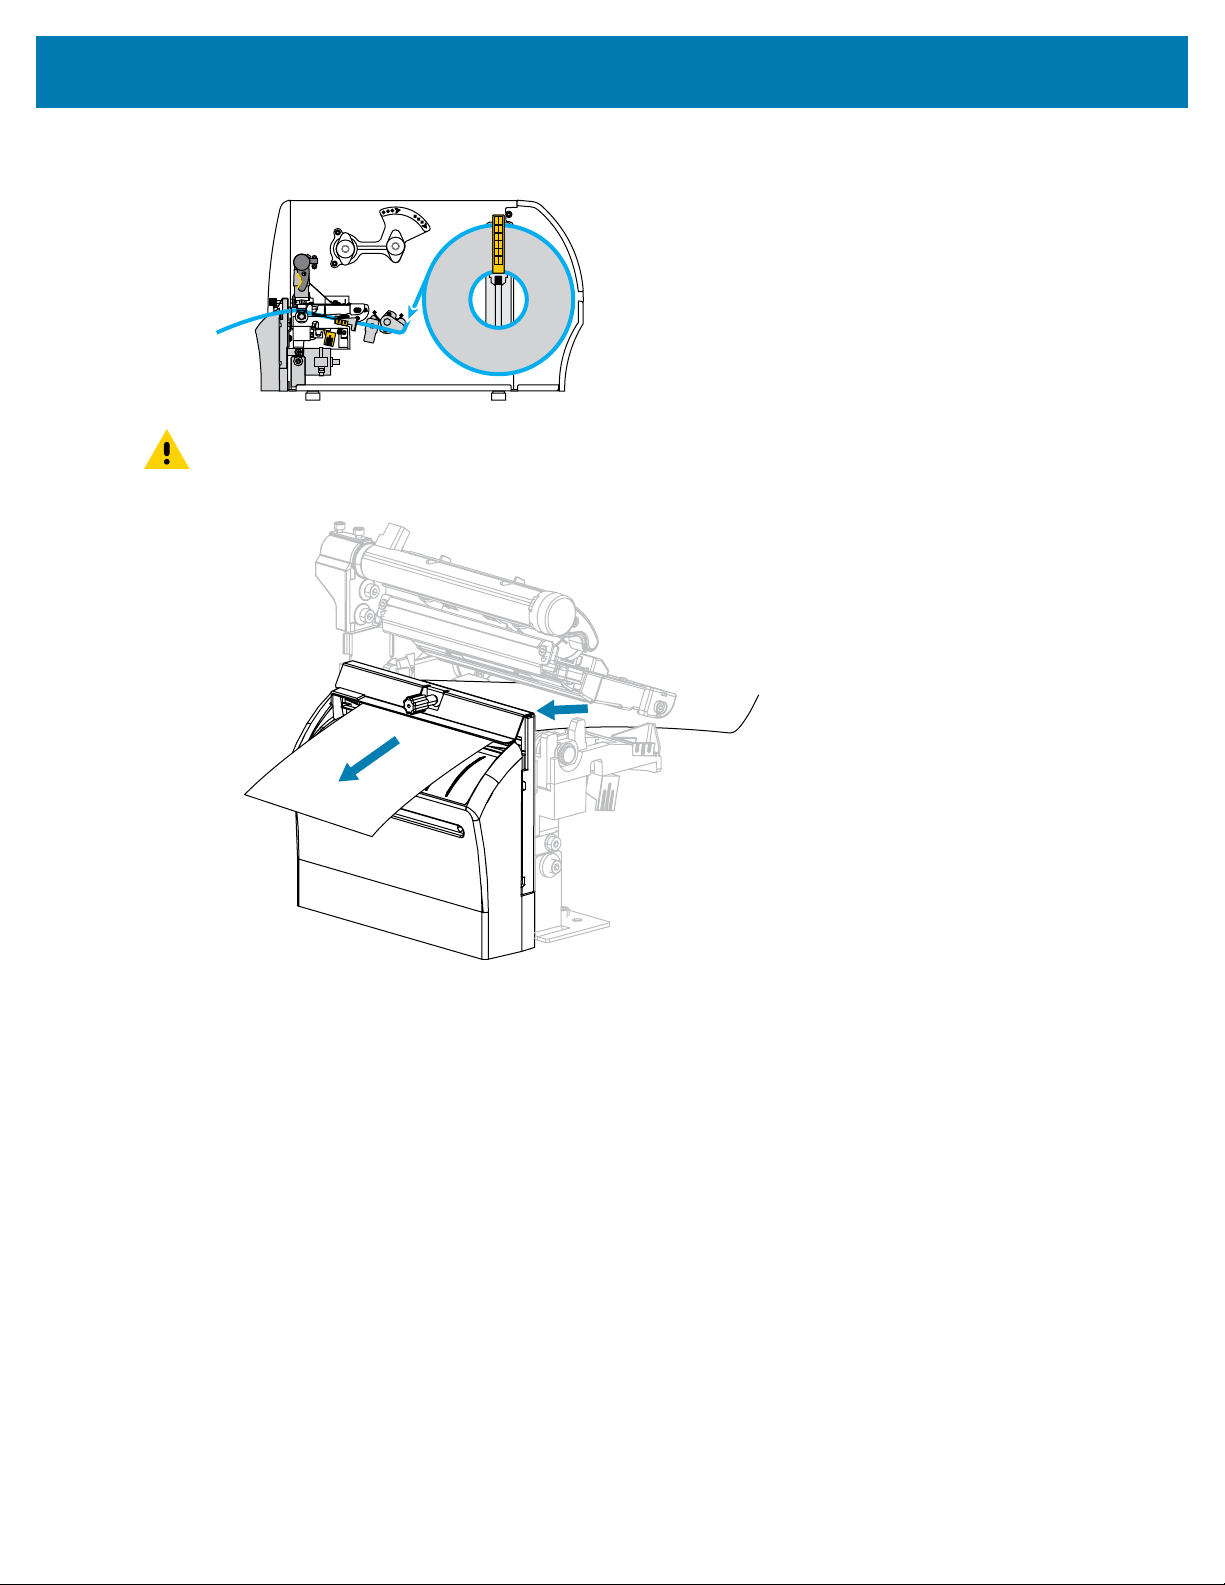
5. Slide the media under the media dancer assembly and the printhead assembly.Allow the end of the
media to extend out of the front of the printer.
34
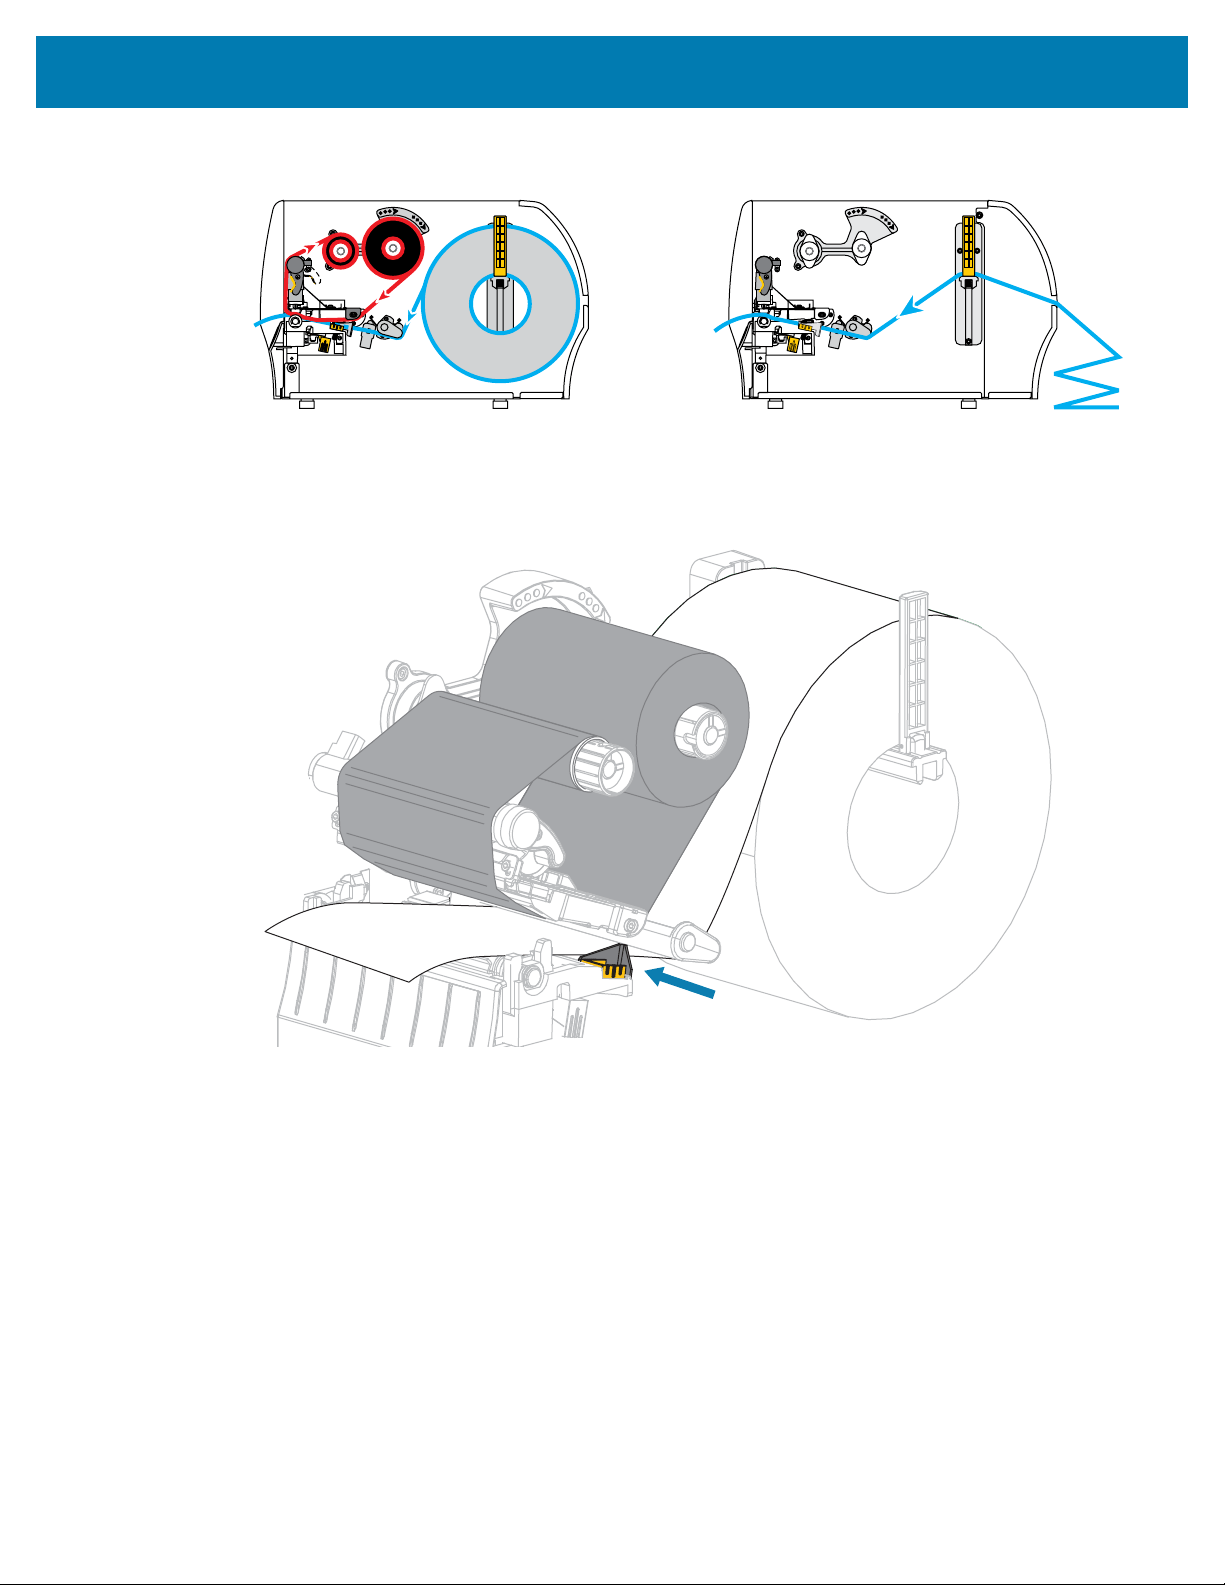
Printer Setup and Operation
6. Make sure that the media passes through the slot in the transmissive media sensor (1) and under the
inner media guide (2).
The media should just touch the back of the transmissive media sensor slot.
1
2
7. Determine the print mode of your printer.For more information on print modes, see Selecting a Print
Mode on page 23.)
If... Then...
Tear-Off Mode Continue with Final Steps for Tear-Off Mode on
page 37.
35
Printer Setup and Operation
Final Steps for Tear-Off Mode
1. Slide in the outer media guide until it just touches the edge of the media.
37
Printer Setup and Operation
2. Rotate the printhead-open lever downward until it locks the printhead in place.
3. Set the printer toTear-Off mode(for more information, see Print Mode).
4. Close the media door.
5. Press PAUSE to exit pause mode and enable printing.
The printer may perform a label calibration or feed a label, depending on your settings.
6. For optimal results, calibrate the printer. See Calibrating the Ribbon and Media Sensors on page 111.
7. Verify that your printer is able to print a configuration label by holding both the FEED and CANCEL keys
for 2 seconds.
Media loading in Tear-Off mode is complete.
38

Printer Setup and Operation
Final Steps for Peel-Off Mode (with or without Liner Take-Up)
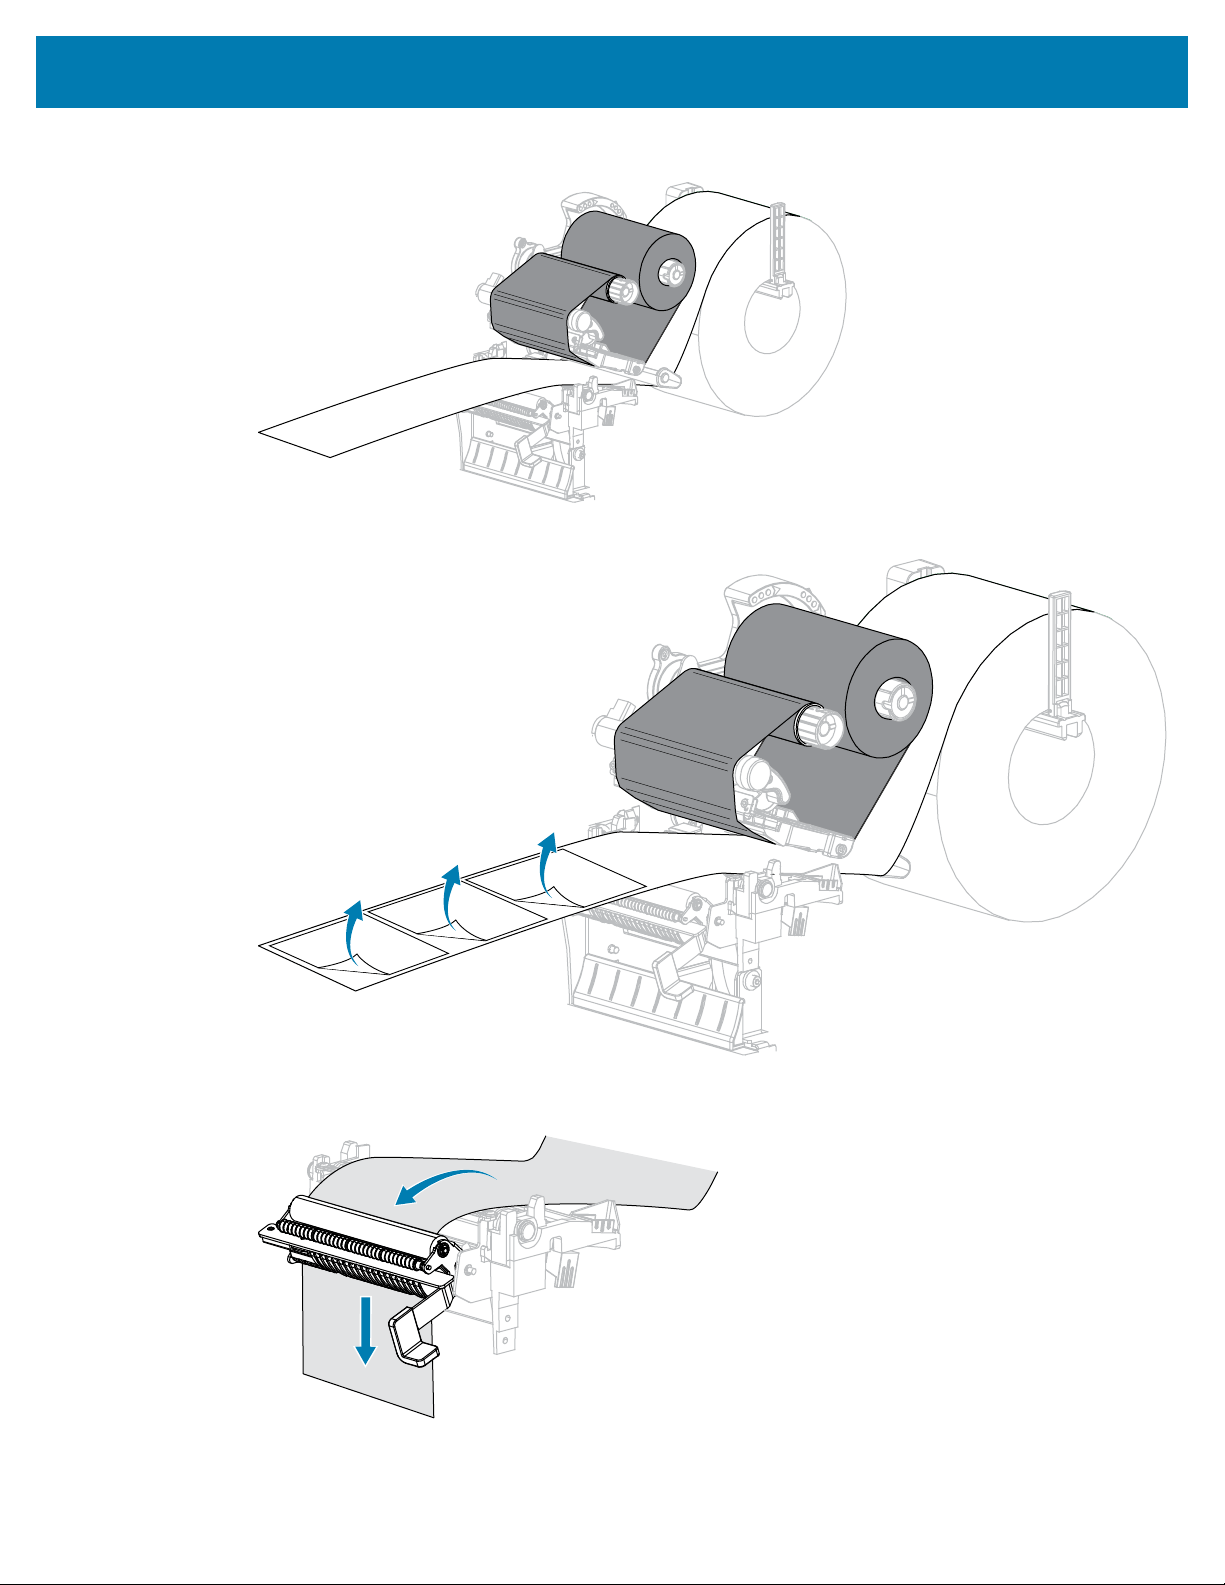
1. Push down the peel-off mechanism release lever to open the peel assembly.
39
Printer Setup and Operation
2. Extend the media approximately 18 in. (500 mm) out of the printer.
3. Remove the exposed labels so that only the liner remains.
4. Feed the liner behind the peel assembly. Make sure that the end of the liner falls outside of the
printer.
40
Printer Setup and Operation
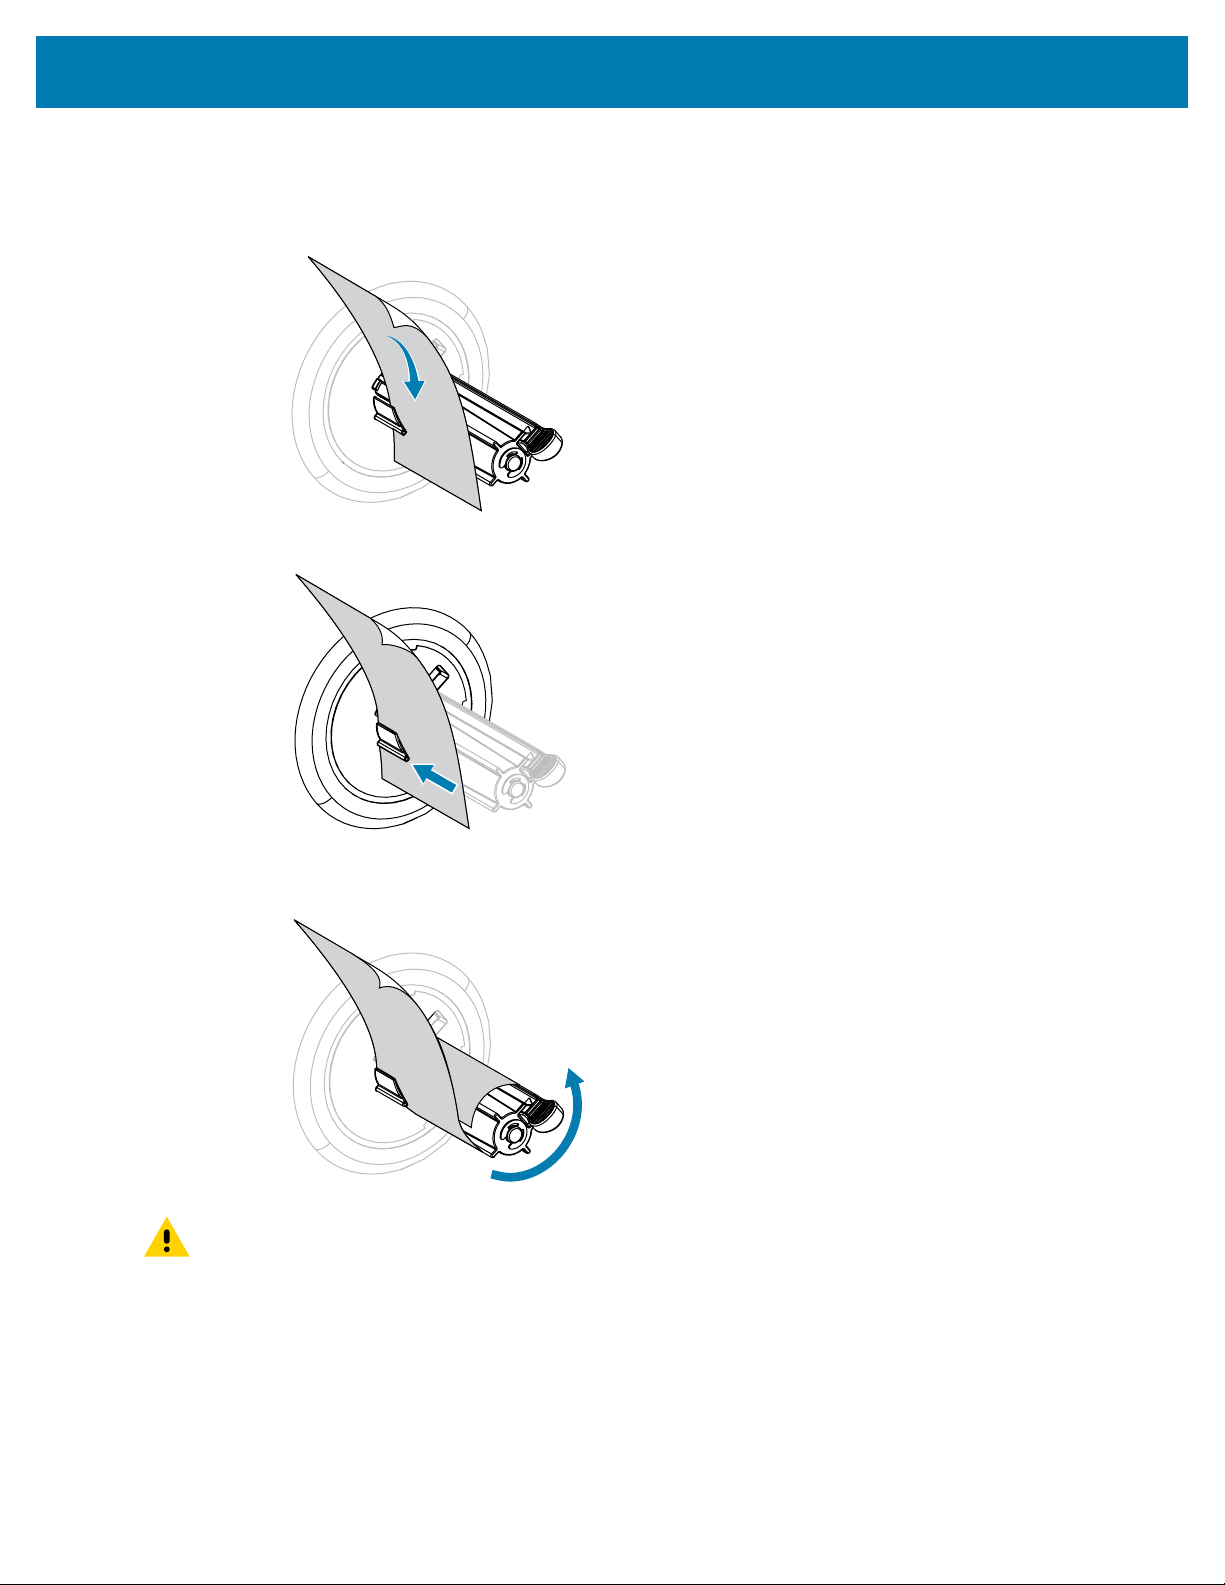
5. Complete this step only if you want to use Peel-Off mode with Liner Take-Up.
Your printer must have the Liner Take-Up option installed.
a) Slide the liner into the slot in the liner take-up spindle (1).
b) Push the liner back until it touches the back plate of the liner take-up spindle assembly.
c) Wrap the liner around the liner take#up spindle and turn the spindle counterclockwise to tighten
the liner.
CAUTION: In the next step, use the peel release lever and your right hand to close the peel
assembly. Do not use your left hand to assist in closing. The top edge of the peel roller/
assembly could pinch your fingers.
41
Printer Setup and Operation
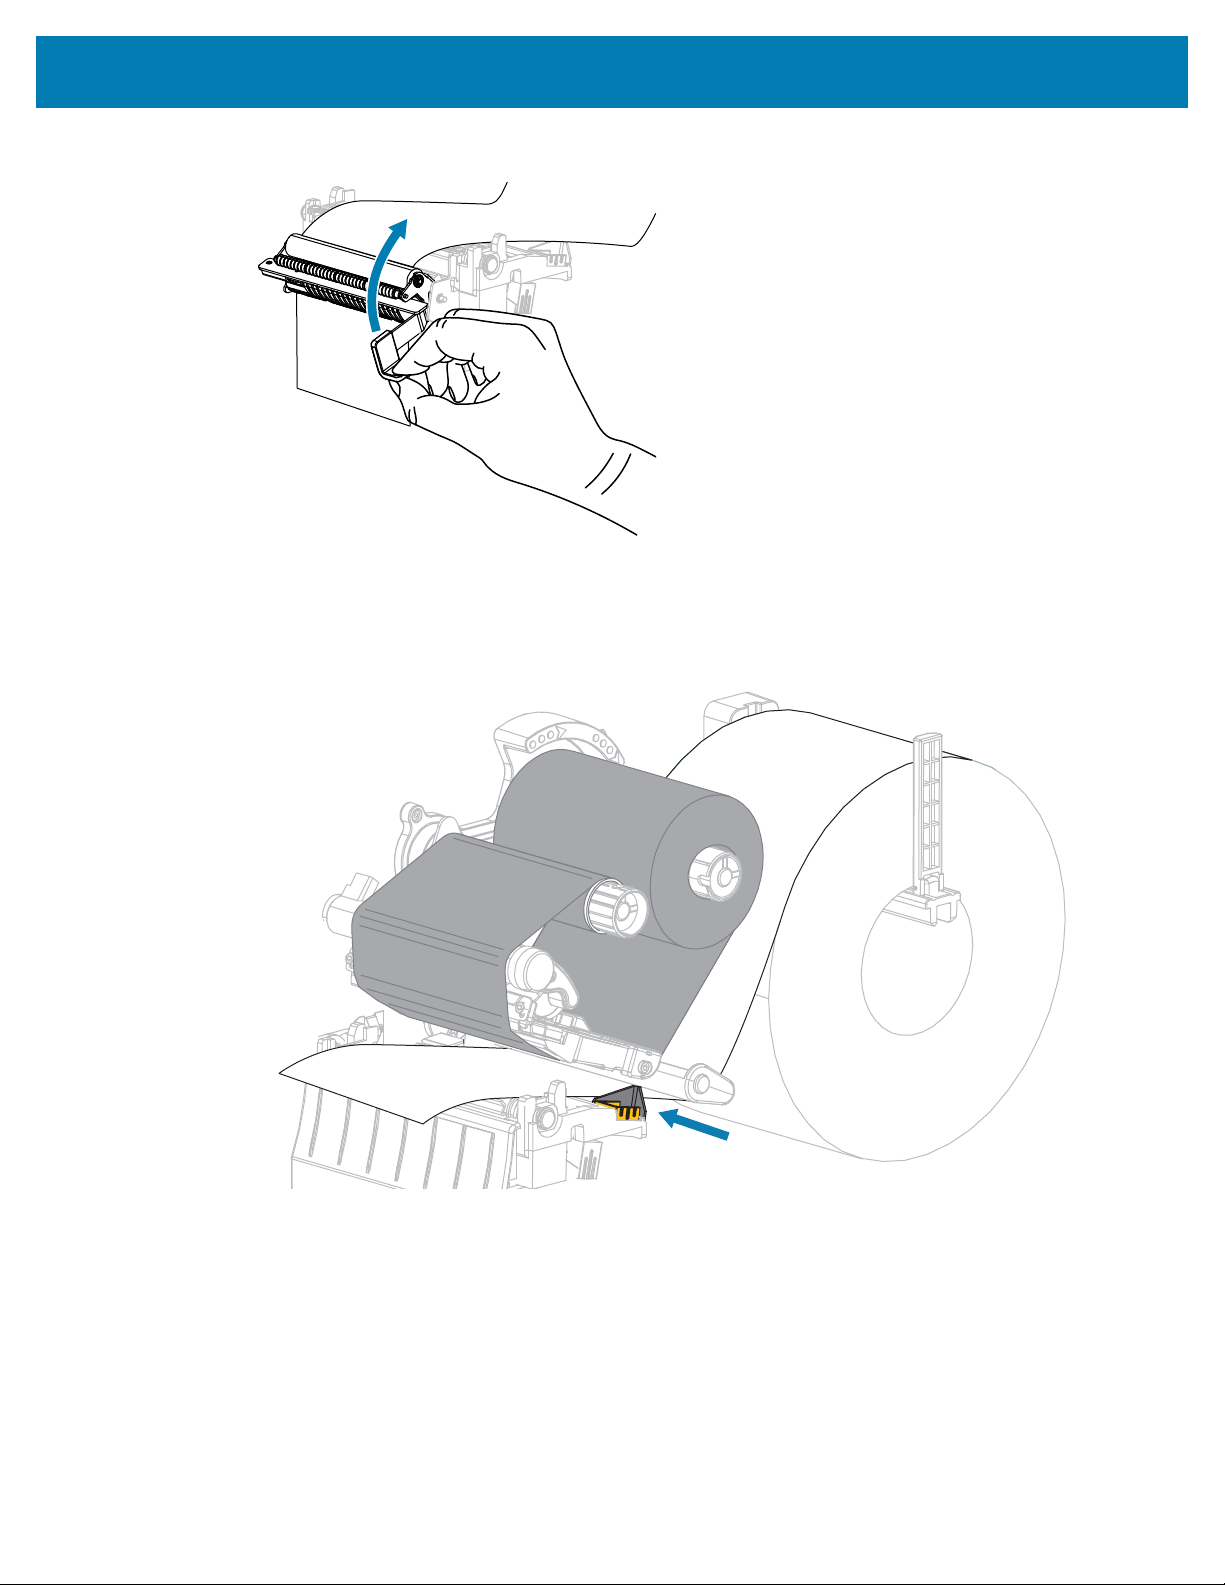
6. Close the peel assembly using the peel-off mechanism release lever.
7. Slide in the outer media guide until it just touches the edge of the media.
42
Printer Setup and Operation
8. Rotate the printhead-open lever downward until it locks the printhead in place.
9. Set the printer to Peel-Off mode (for more information, see Print Mode).
10. Close the media door.
11. Press PAUSE to exit pause mode and enable printing.
The printer may perform a label calibration or feed a label, depending on your settings.
12. For optimal results, calibrate the printer. See Calibrating the Ribbon and Media Sensors on page
111.
13. Perform the CANCEL Self Test on page 151 to verify that your printer is able to print a configuration
label.
Media loading in Peel-Off mode is complete.
43
Printer Setup and Operation
Final Steps for Cutter Mode
CAUTION: The cutter blade is sharp. Do not touch or rub the blade with your fingers.
1. Feed the media through the cutter.
44

Printer Setup and Operation
2. Slide in the outer media guide until it just touches the edge of the media.
3. Rotate the printhead-open lever downward until it locks the printhead in place.
4. Set the printer to Cutter mode (for more information, see Print Mode).
45

Printer Setup and Operation
5. Close the media door.
6. Press PAUSE to exit pause mode and enable printing.
The printer may perform a label calibration or feed a label, depending on your settings.
7. For optimal results, calibrate the printer.
See Calibrating the Ribbon and Media Sensors on page 111.
8. Perform the CANCEL Self Test on page 151 to verify that your printer is able to print a configuration
label.
Media loading in Cutter mode is complete.
Connecting the Printer to a Device
After you have set up the printer and verified that it can print a configuration label, you are ready to
connect the printer to your device (such as a computer, phone, or tablet).
Connecting to a Phone or Tablet
Download the free Zebra Printer Setup Utility app for your device.
• Android devices
• Apple devices
The applications support the following types of connectivity:
• Bluetooth Classic
• Bluetooth Low Energy (Bluetooth LE)
• Wired/Ethernet
• Wireless
• USB On-The-Go
For the User Guides for these printer setup utilities, go to www.zebra.com/setup.
46
Printer Setup and Operation
Installing Drivers and Connecting to a Windows-Based Computer
To use your printer with a Microsoft Windows-Based computer, you must install the correct drivers first.
IMPORTANT: You may connect your printer to your computer using any of the connections that
you have available. However, do not connect any cables from your computer to the printer until
you are instructed to do so. If you connect them at the wrong time, your printer will not install the
correct printer drivers. To recover from incorrect driver installation, see What to Do If You Forget
to Install Printer Drivers First on page 57.
Installing the Drivers
1. Navigate to www.zebra.com/drivers.
2. Click Printers.
3. Select your printer model.
4. On the printer product page, click Drivers.
5. Download the appropriate driver for Windows.
The driver executable file (such as zd86423827-certified.exe) is added to your Download folder.
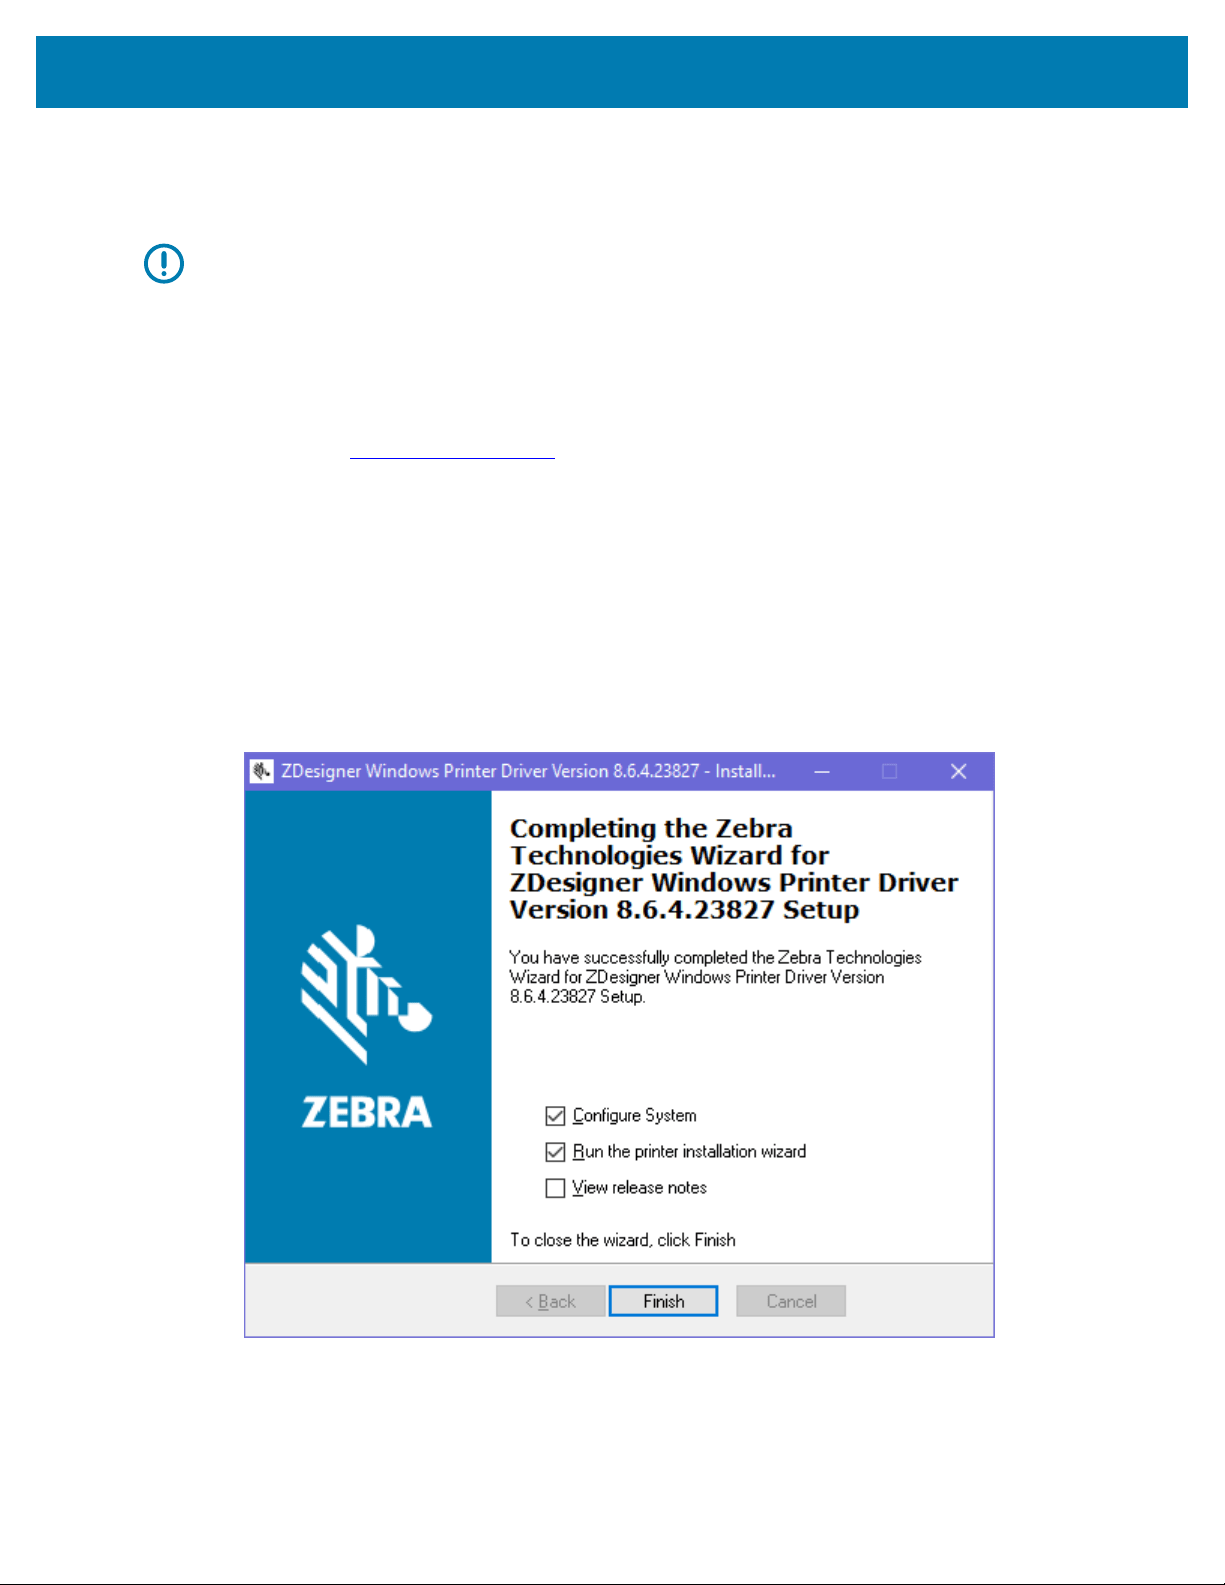
6. Run the executable file and follow the prompts.
When the setup is complete, you may select to add the drivers to your system (Configure System) or to
add specific printers, see Running the Printer Installation Wizard on page 49.
47

Printer Setup and Operation
7. Select Configure System, and then click Finish.
The Printer Installation Wizard installs the drivers.
48
Printer Setup and Operation
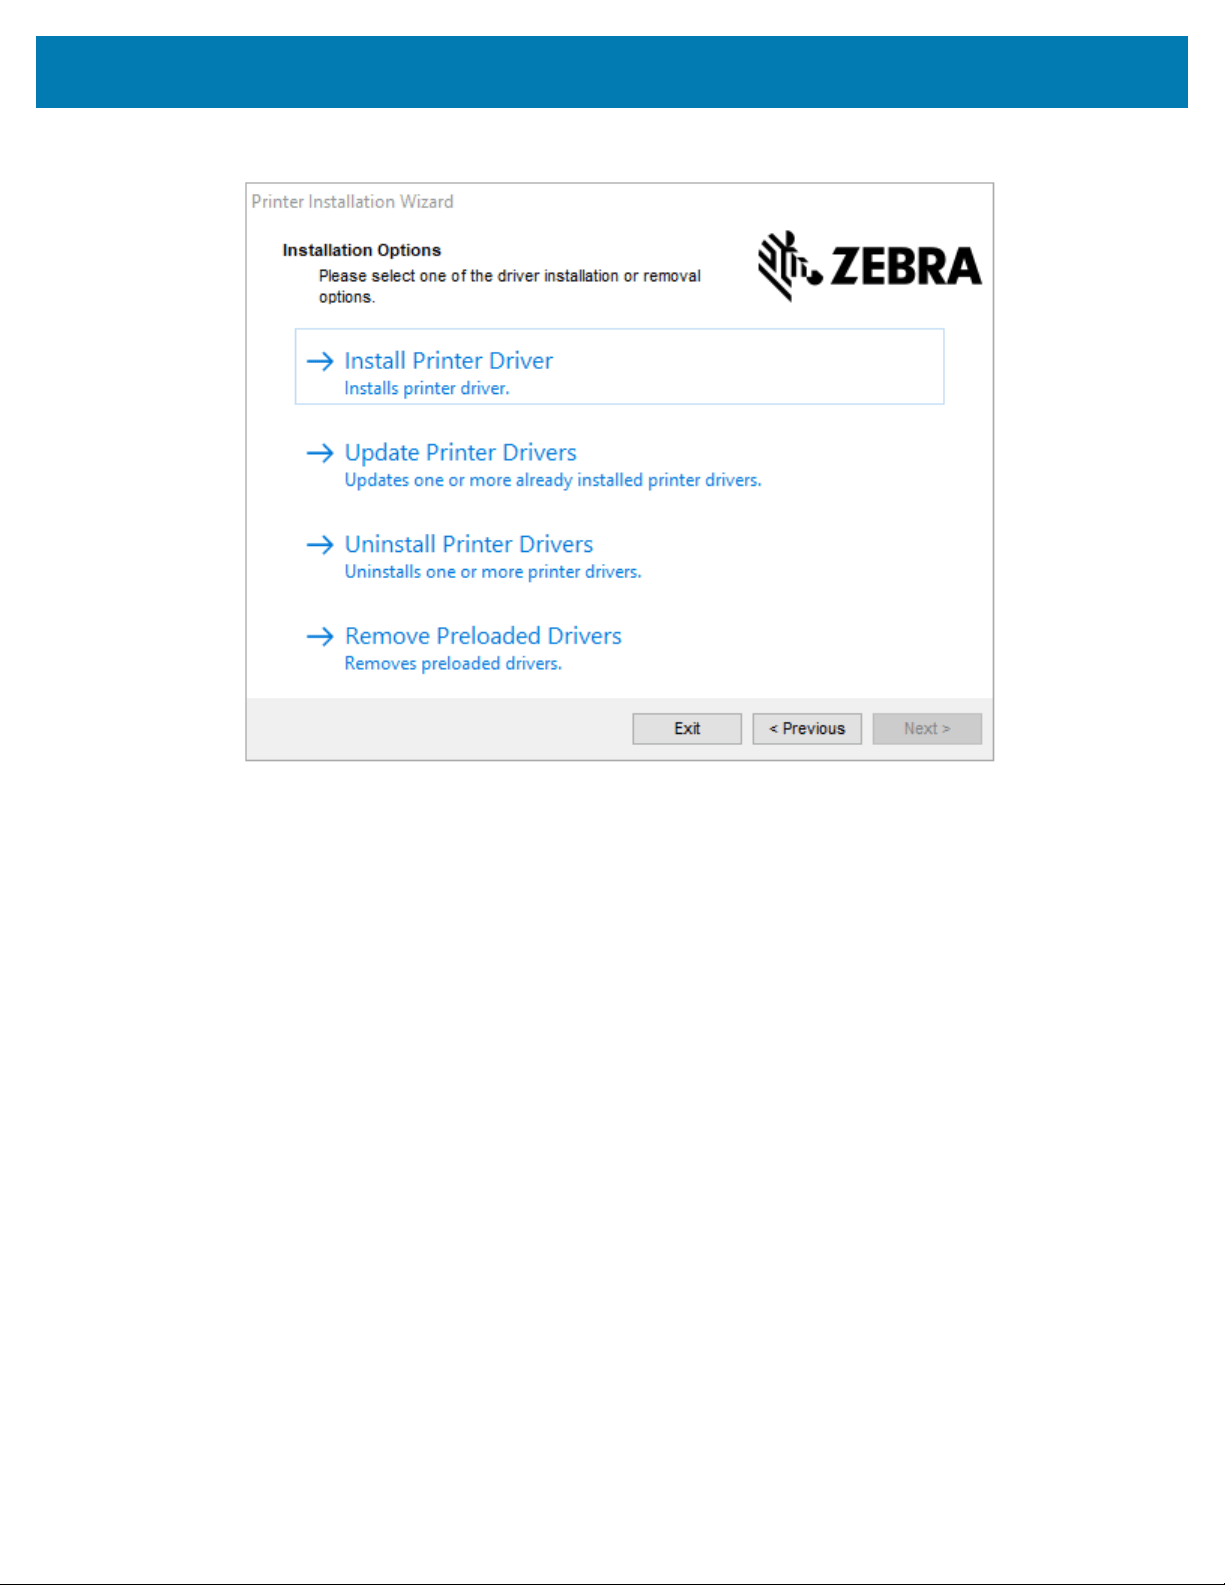
Running the Printer Installation Wizard
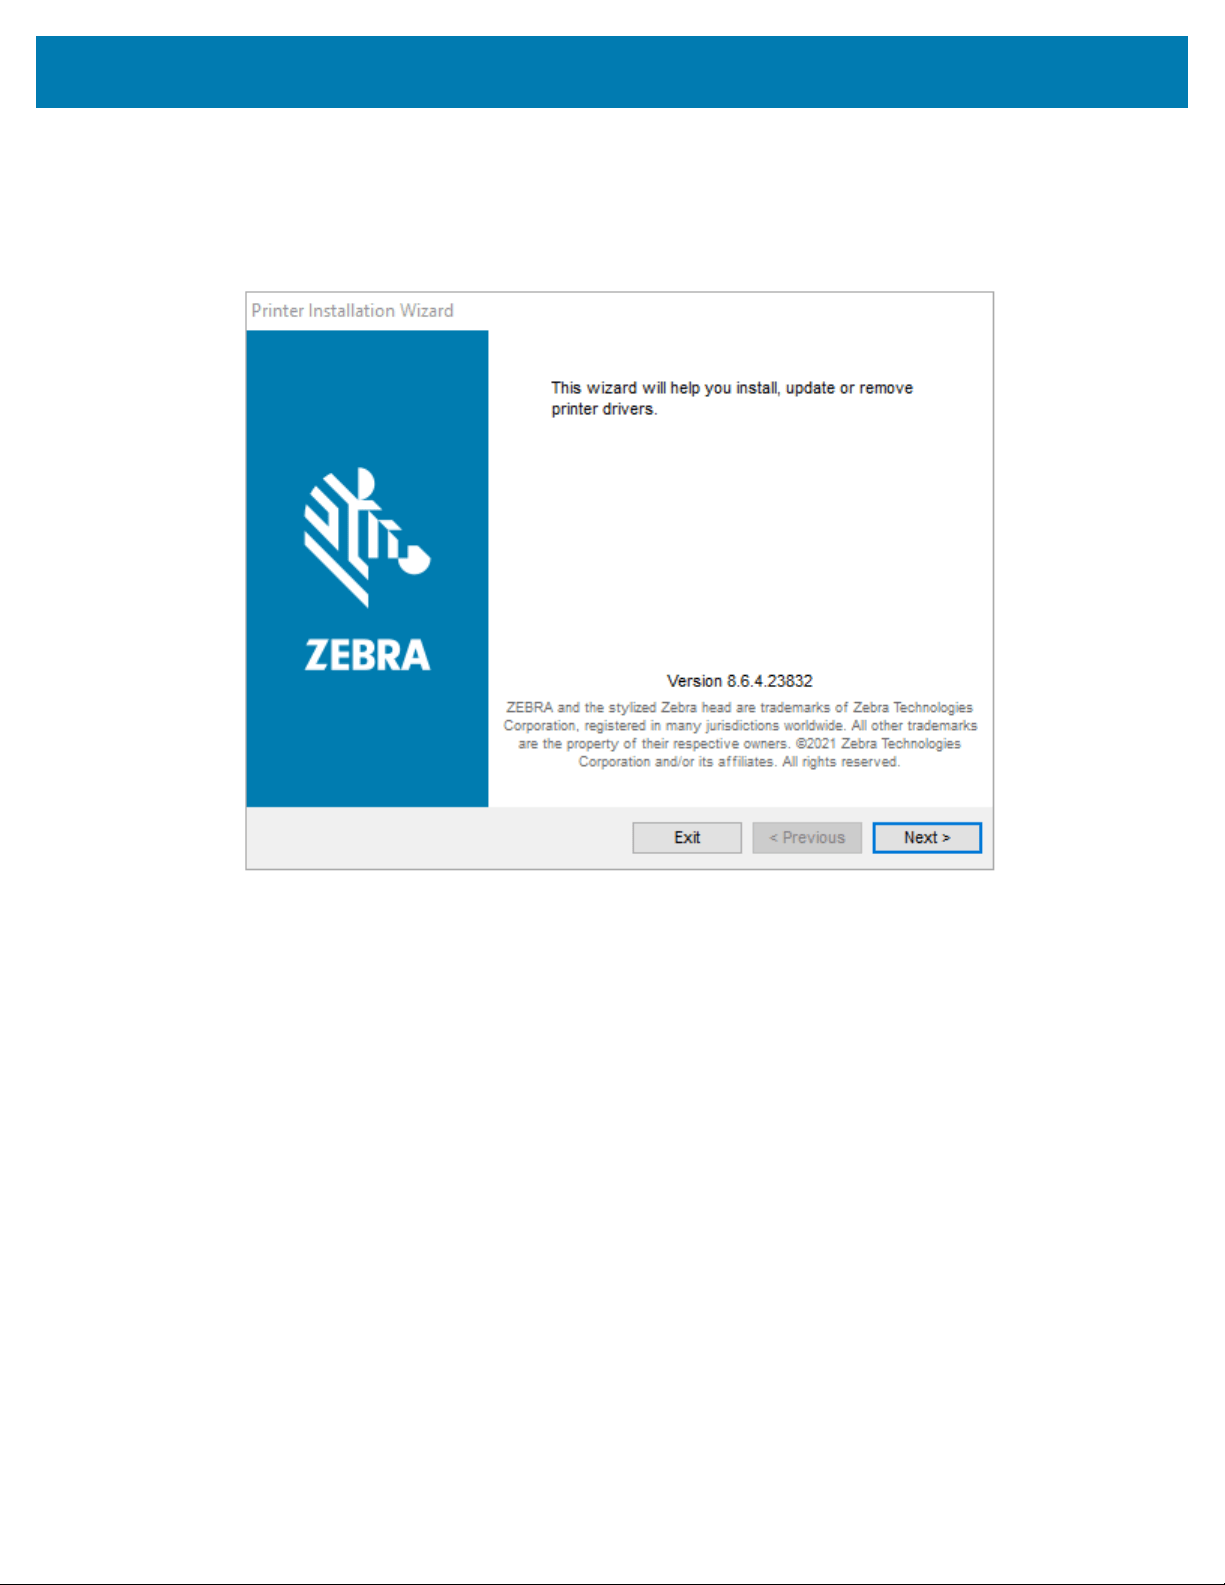
1. On the last screen of the driver installer, leave Run the Printer Installation Wizard checked, and then
click Finish.
The printer driver wizard displays.
49
Printer Setup and Operation
2. Click Next.
50
Printer Setup and Operation
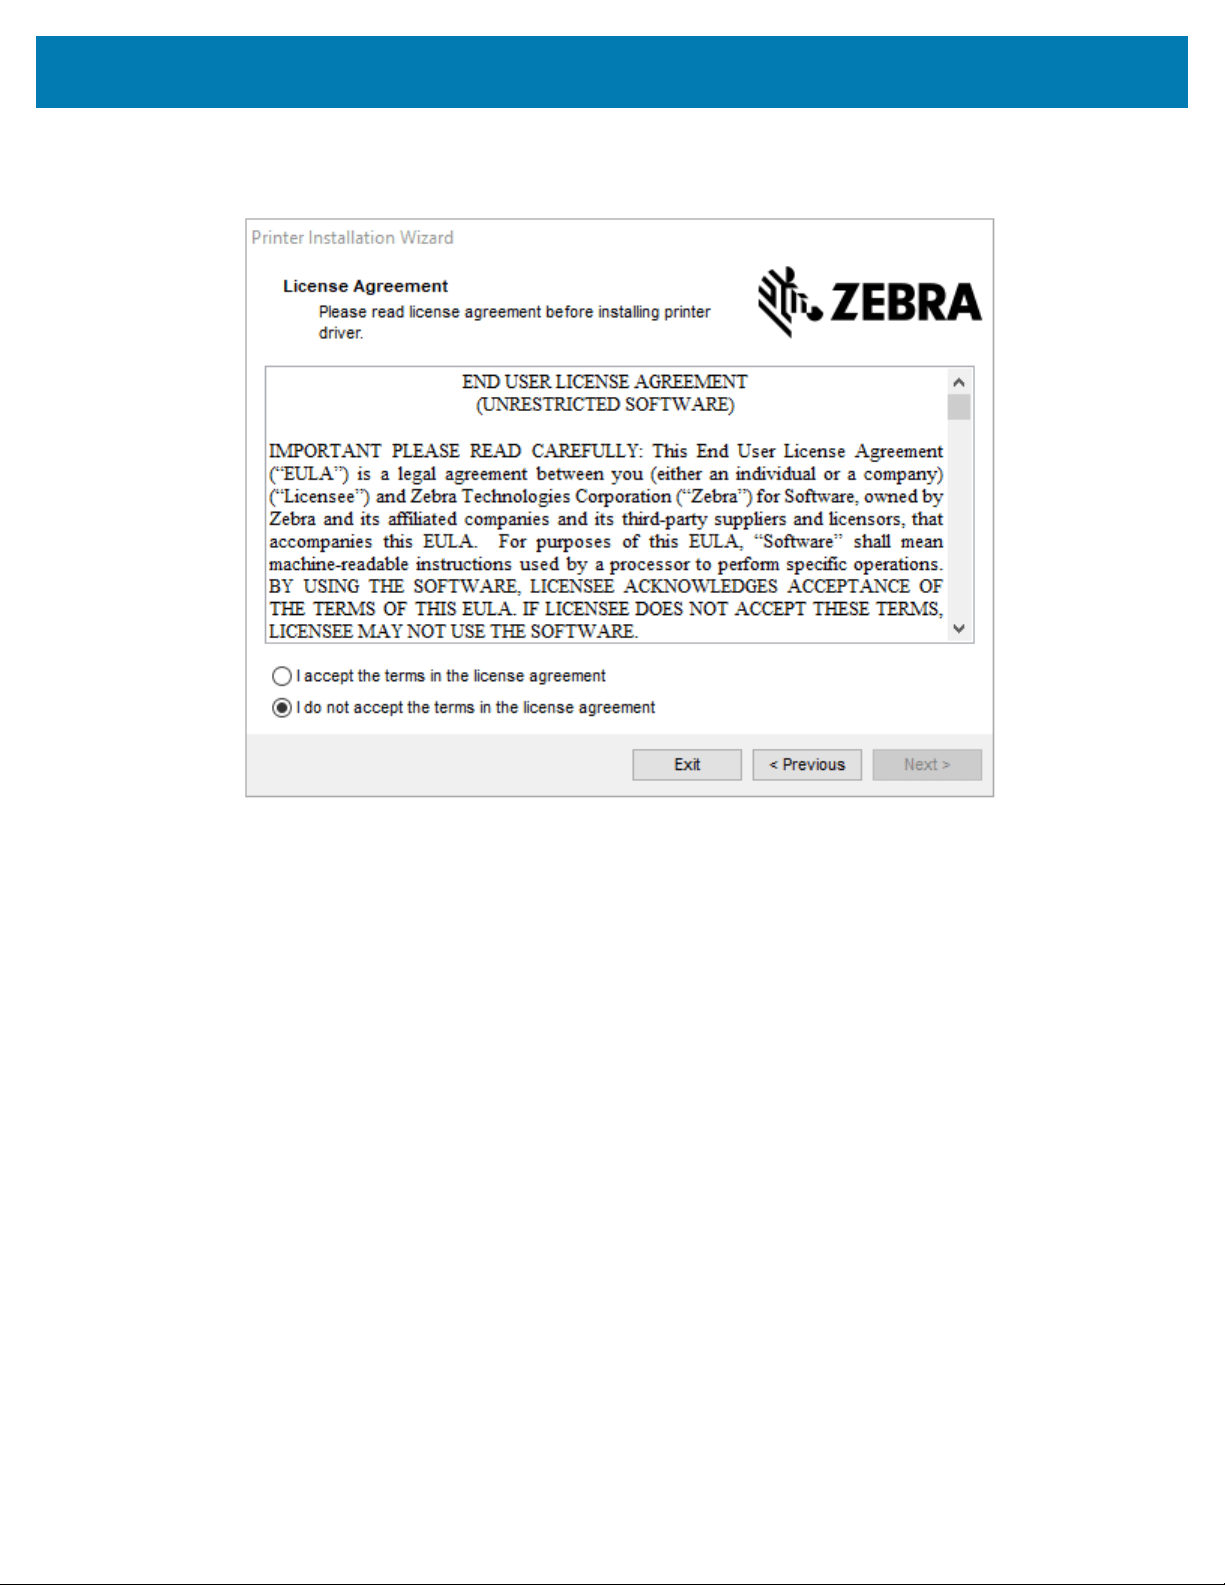
3. Click Install Printer Driver.
The license agreement displays.
51

Printer Setup and Operation
4. Read and accept the terms of the license agreement, and then click Next.
5. Select the communication option that you want to configure for your printer:
• Network Port: For installing printers with an Ethernet (LAN) or wireless (Wi-Fi) network
connection.Wait for the driver to scan your local network for devices and follow the prompts. If
necessary, set the values as directed in Connect to Your Network through the Printer’s Ethernet Port
on page 57 or Connect the Printer to Your Wireless Network on page 58.
• USB Port: For installing printers connected with the USB cable.Connect the printer to the computer
as shown in Connect to a Computer Using the Printer’s USB Port on page 55. If the printer is already
connected and powered on, you may need to remove the USB cable and install it again. The driver
will automatically search for the model of the connected printer.
• Bluetooth Port: For installing printers with a Bluetooth connection.Not applicable for this printer.
• Other: For installation on another type of cable, such as Parallel (LPT) and Serial (COM).No
additional configuration is necessary.
52
Printer Setup and Operation
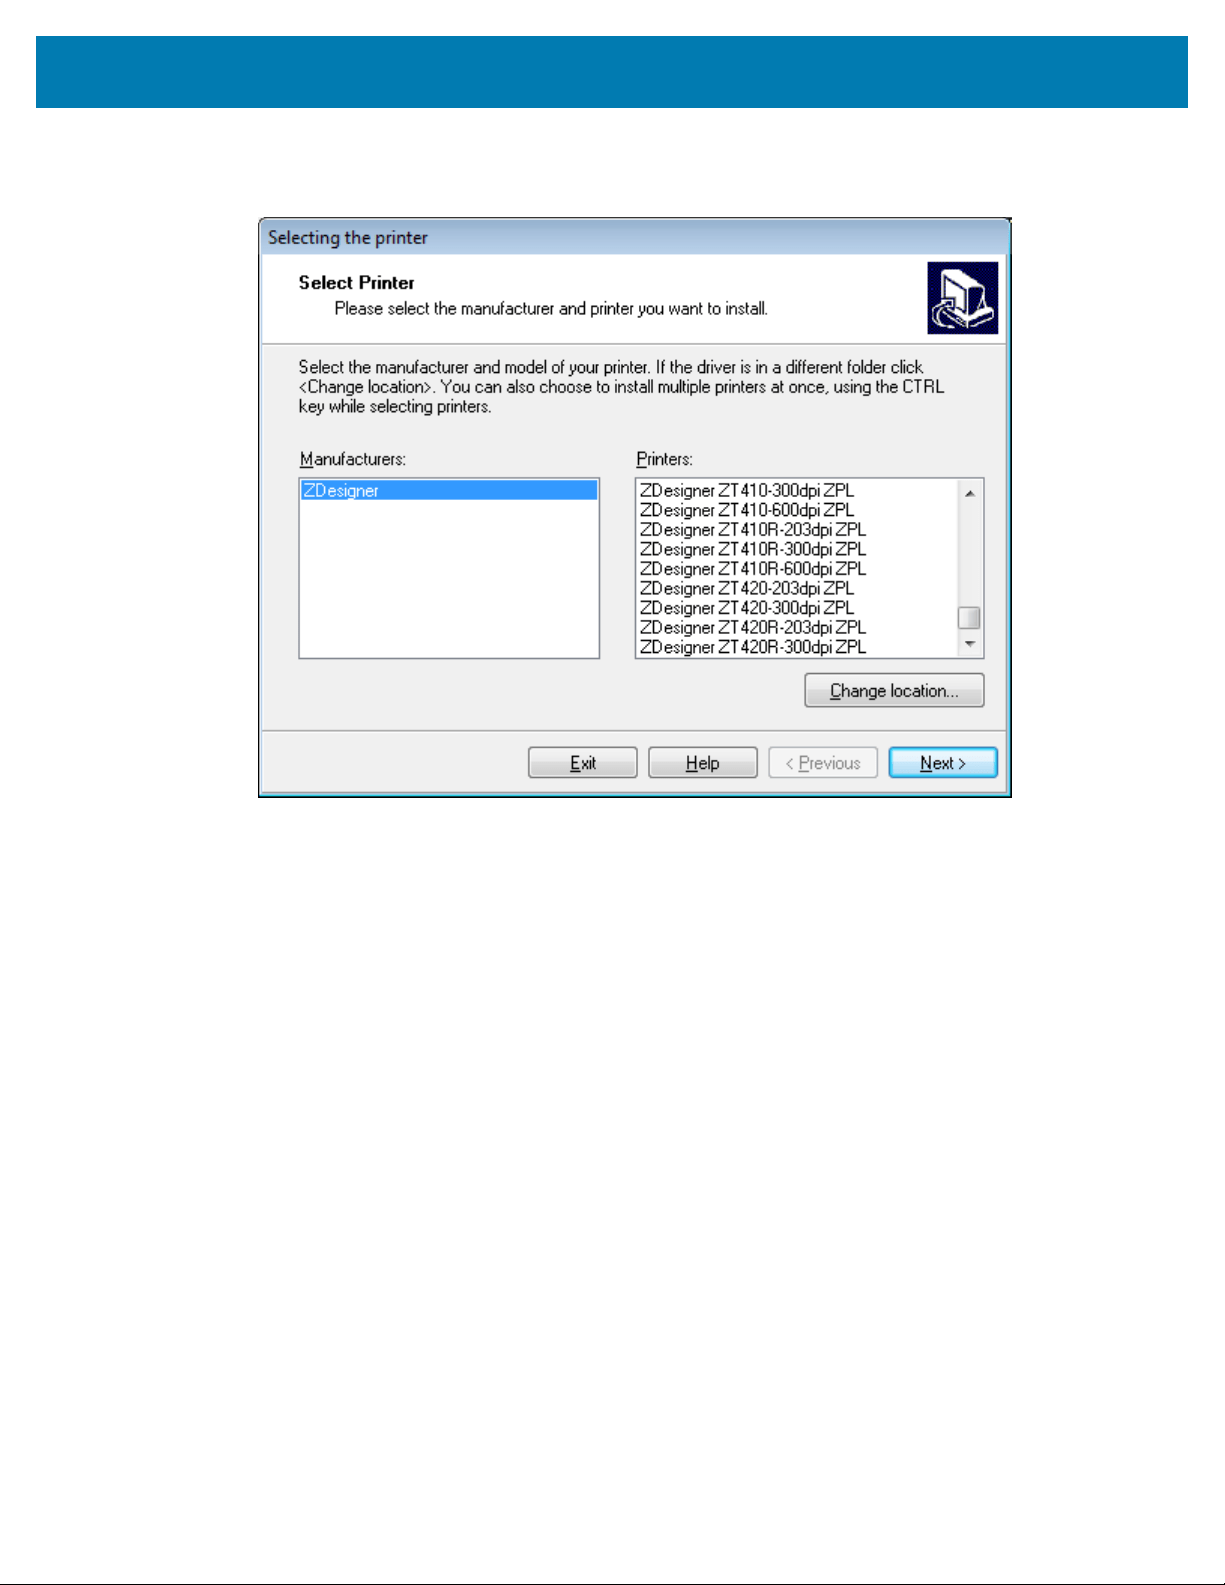
6. If prompted, select your printer model and resolution.
The model and resolution are on a part number sticker on the printer, usually located below the media
hanger. The information will be in the following format:
Part Number: XXXXXxY – xxxxxxxx where XXXXX = the printer model Y = the printer resolution (2 = 203
dpi, 3 = 300 dpi, 6 = 600 dpi) For example, in the part number ZT230x3 – xxxxxxxx ZT230 indicates that
the printer is a ZT230 model 3 indicates that the printhead resolution is 300 dpi
where
XXXXX = the printer model
Y = the printer resolution (2 = 203 dpi, 3 = 300 dpi, 6 = 600 dpi)
Part Number: XXXXXxY – xxxxxxxx where XXXXX = the printer model Y = the printer resolution (2 = 203
dpi, 3 = 300 dpi, 6 = 600 dpi) For example, in the part number ZT230x3 – xxxxxxxx ZT230 indicates that
the printer is a ZT230 model 3 indicates that the printhead resolution is 300 dpi
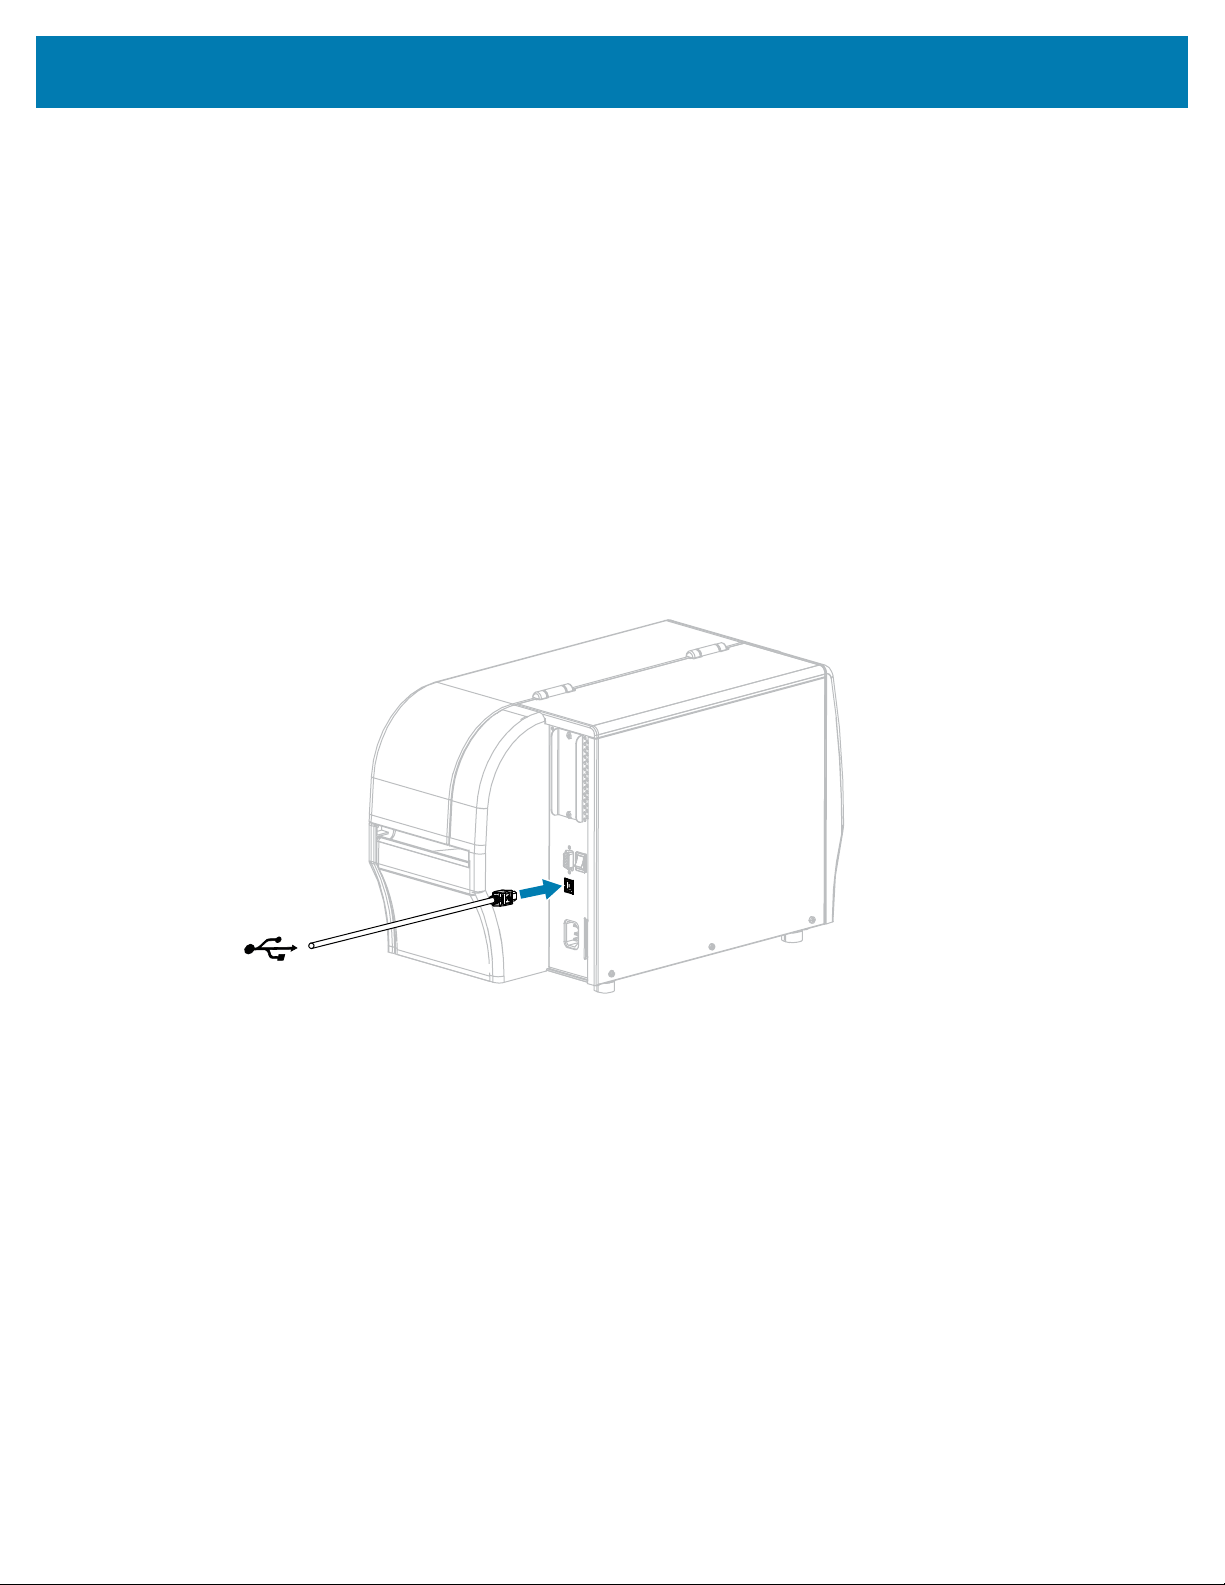
Connecting to a Computer Using the Printer’s USB Port
1. After you install the drivers, connect the USB cord to the USB port on your printer.
2. Connect the other end of the USB cord to your computer.
53
Printer Setup and Operation
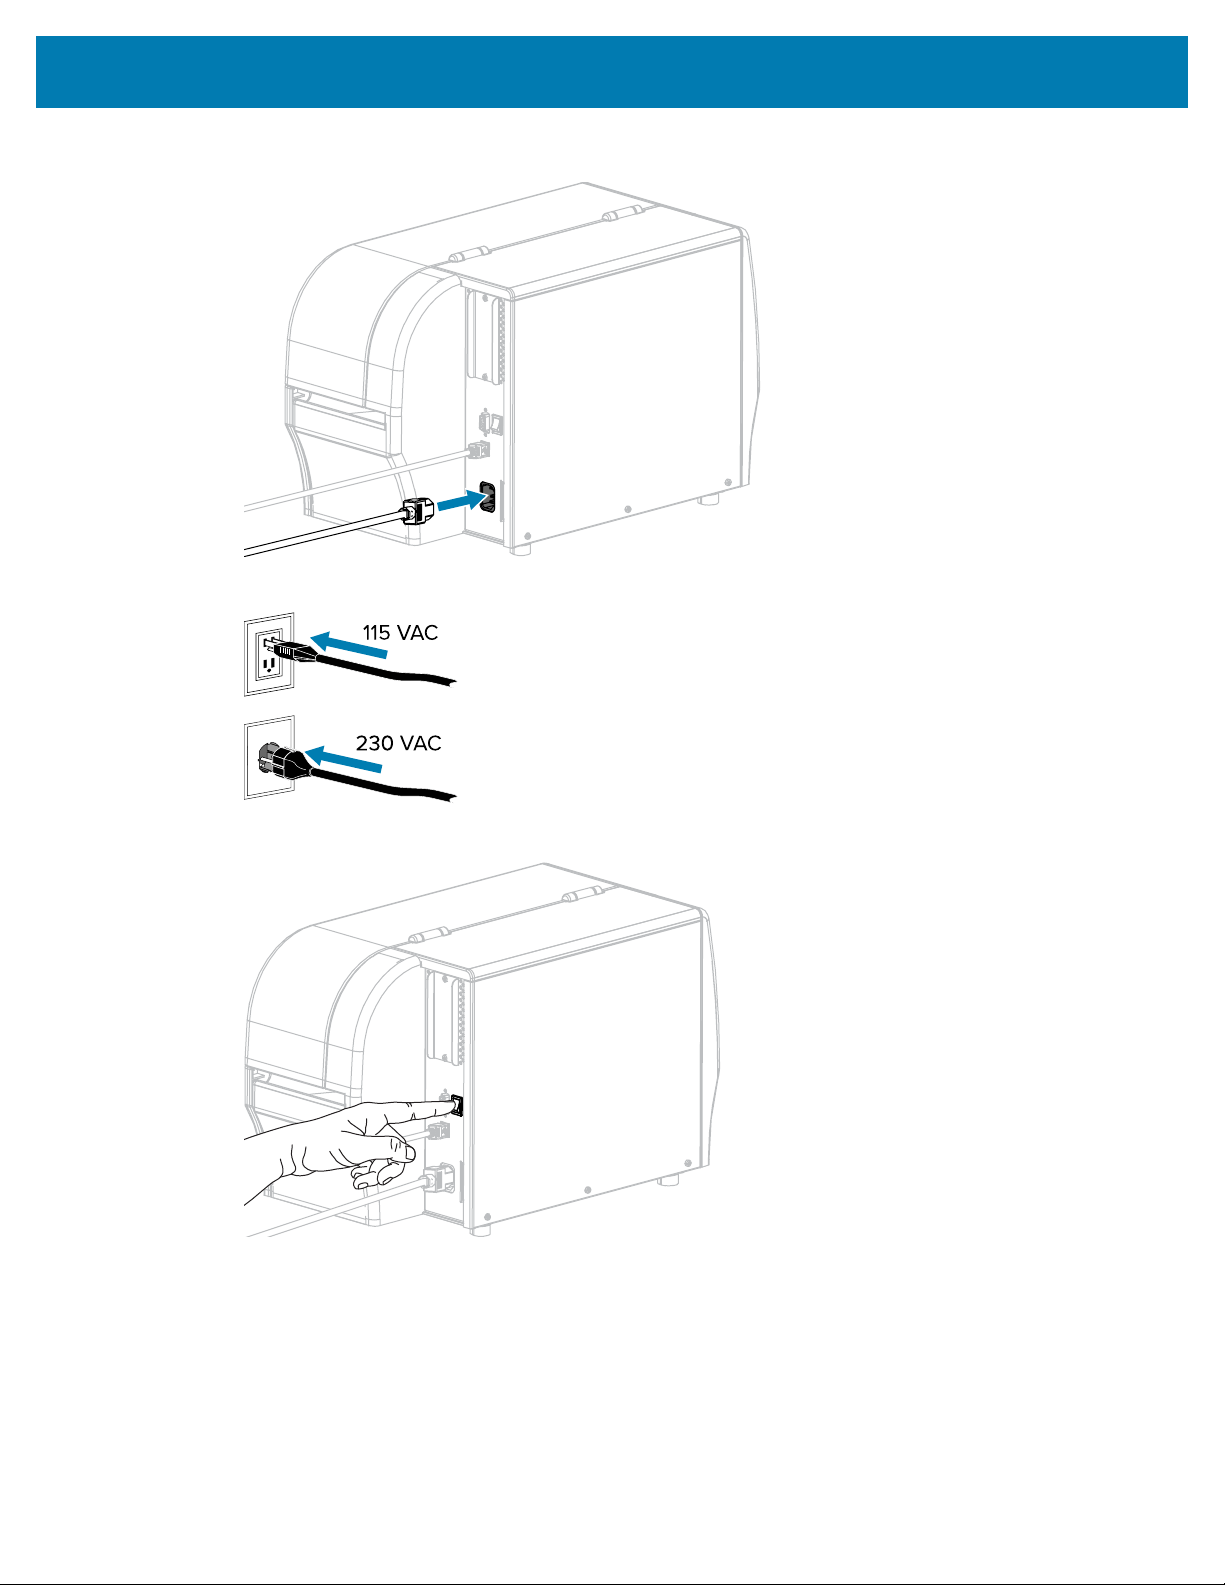
3. Plug theA/C power cord into the A/C power connector on the back of the printer.
4. Plug theA/C power cord into an appropriate power outlet.
5. Turn on (I) the printer.
As the printer boots up, your computer completes the driver installation and recognizes your printer.
If you did not install the drivers first, see What to Do If You Forget to Install Printer Drivers First on page
57.
54
Printer Setup and Operation
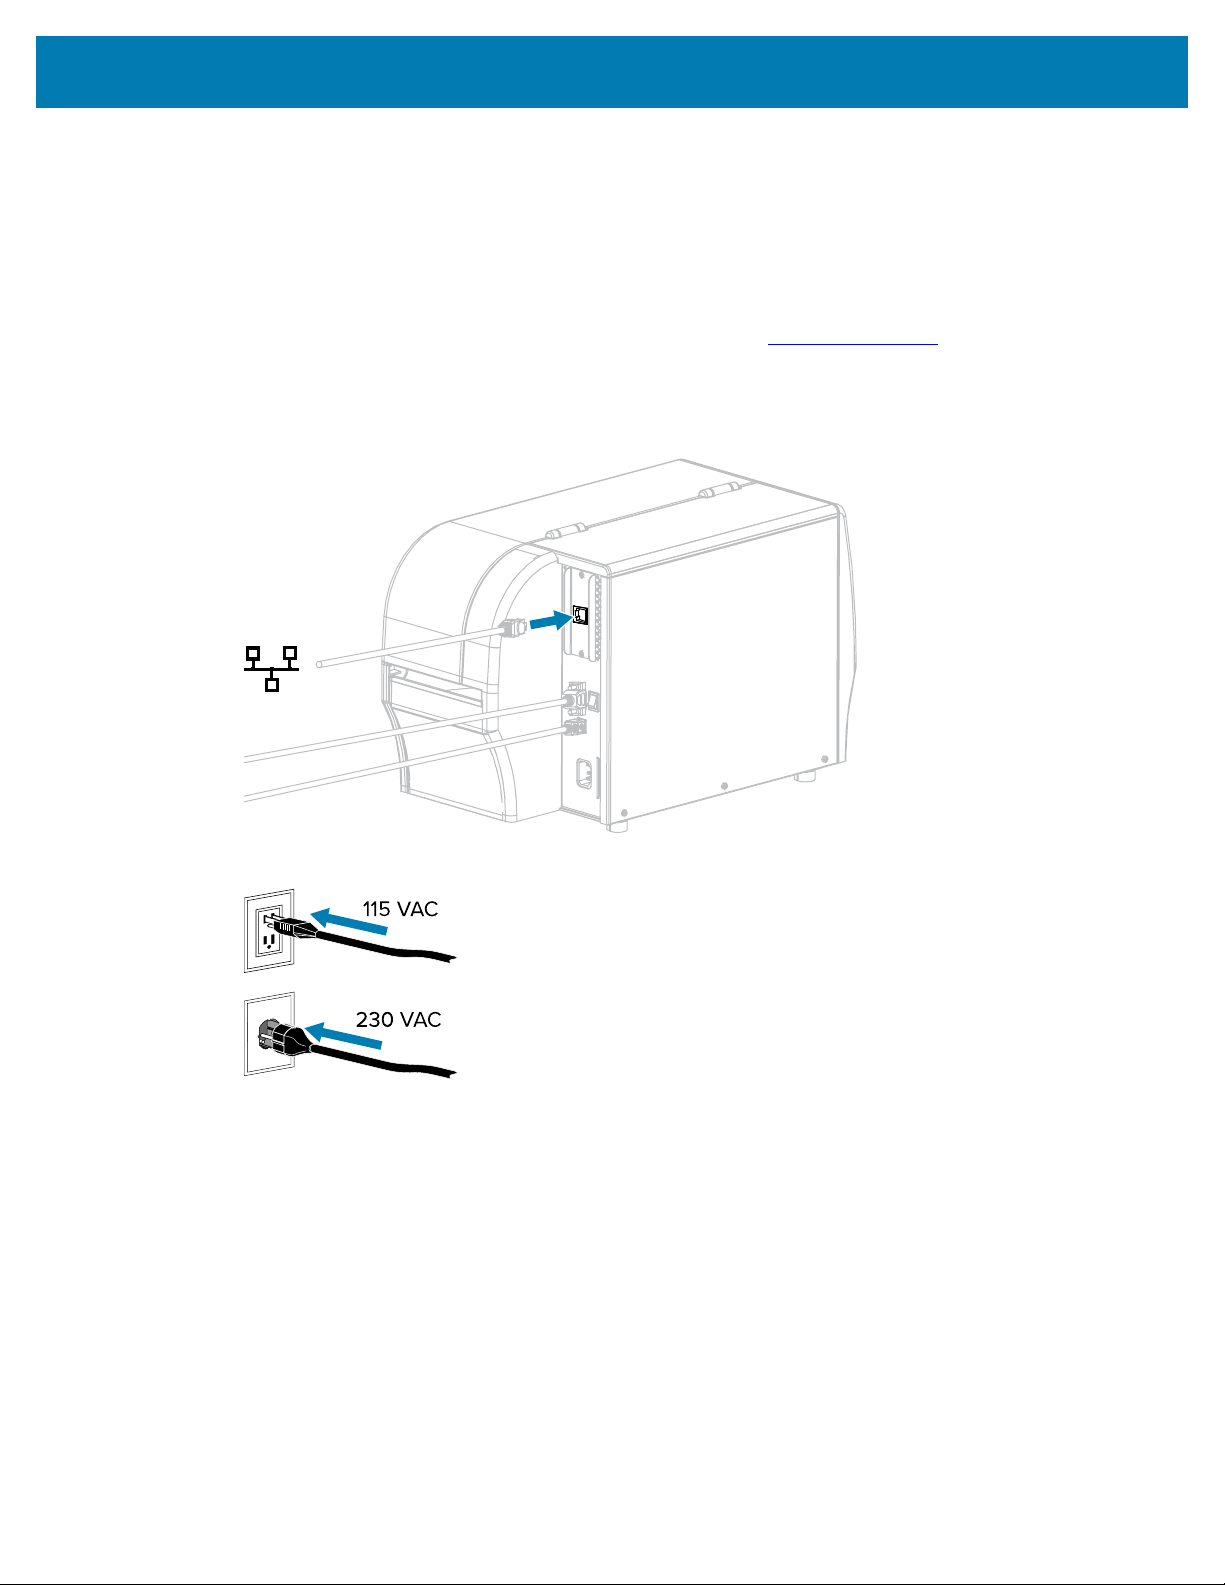
Connecting to Your Network through the Printer’s Ethernet Port
If you wish to use a wired print server (Ethernet) connection, you may need to connect the printer to your
computer using one of the other available connections. While the printer is connected via one of those
connections, you would configure the printer to communicate with your Local Area Network (LAN) through
the printer’s wired print server.
For additional information about Zebra print servers, refer to the ZebraNet Wired and Wireless Print Server
User Guide. To download the latest version of this guide, go to
zebra.com/manuals.
1. Install the drivers as instructed in Installing Drivers and Connecting to a Windows-Based Computer on
page 47.
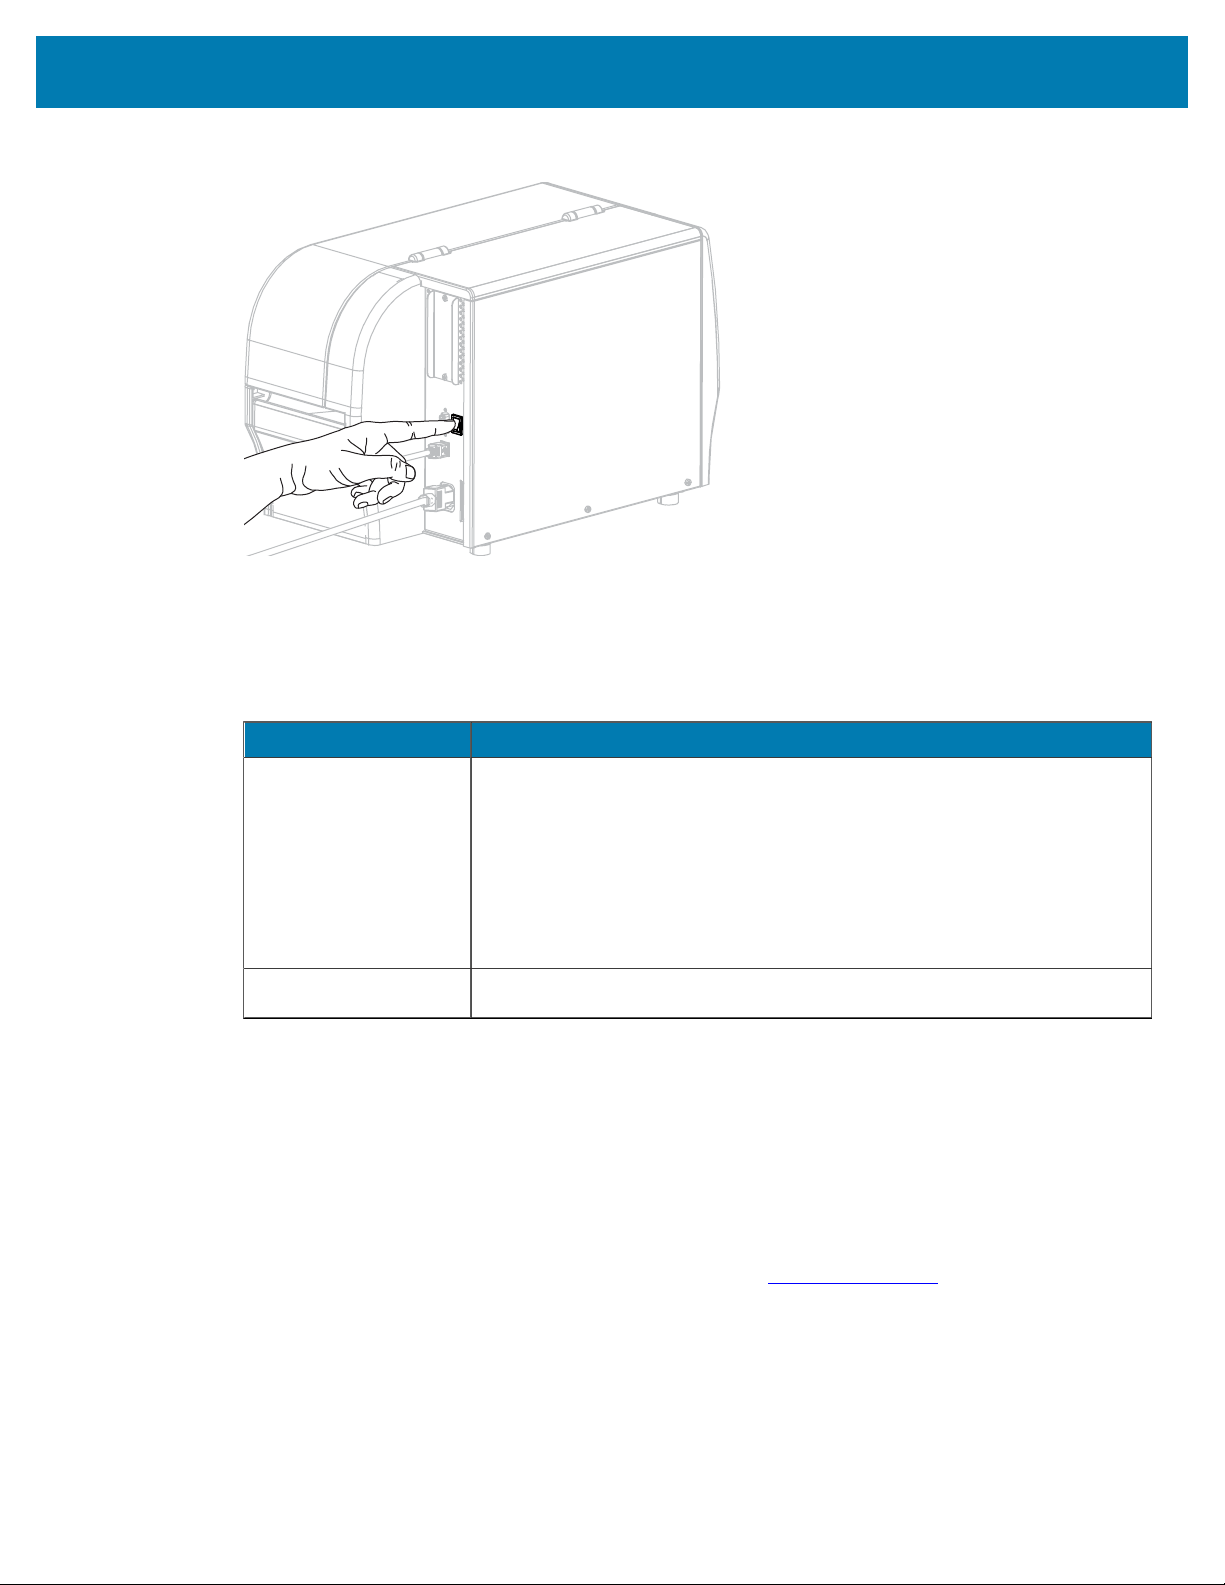
2. Connect the printer to an Ethernet cable that is connected to your network.
3. Plug theA/C power cord into an appropriate power outlet.
55
Printer Setup and Operation
4. Turn on (I) the printer.
The printer attempts to communicate with your network. If it is successful, it fills in your LAN’s gateway
and subnet values and gets an IP address. The printer display will alternate between the printer’s
firmware version and its IP address.
5. Check the display to see if an IP address was assigned to the printer. See IP Address for additional
ways to view the IP address. What is the printer’s IP address?
If... Then...
0.0.0.0
or
000.000.000.000
Configure the following printer settings. Contact your network administrator
for the proper values for your network.
• IP Protocol (change the value from ALL to PERMANENT)
• Gateway (match the gateway value of your LAN)
• Subnet Mask (match the subnet value of your LAN)
• IP Address (assign a unique IP address to the printer)
any other value The connection was successful.
6. Reset the network to allow changes to the network settings to take effect.
Connecting the Printer to Your Wireless Network
If you wish to use the printer’s optional wireless print server, you must first connect the printer to your
computer using one of the other available connections. While the printer is connected via one of those
connections, you configure the printer to communicate with your Wireless Local Area Network (WLAN)
through the wireless print server.
For additional information about Zebra print servers, refer to the ZebraNet Wired and Wireless Print Server
User Guide. To download the latest version of this guide, go to
zebra.com/manuals.
1. Install the drivers as instructed in Installing Drivers and Connecting to a Windows-Based Computer on
page 47.
56
Printer Setup and Operation
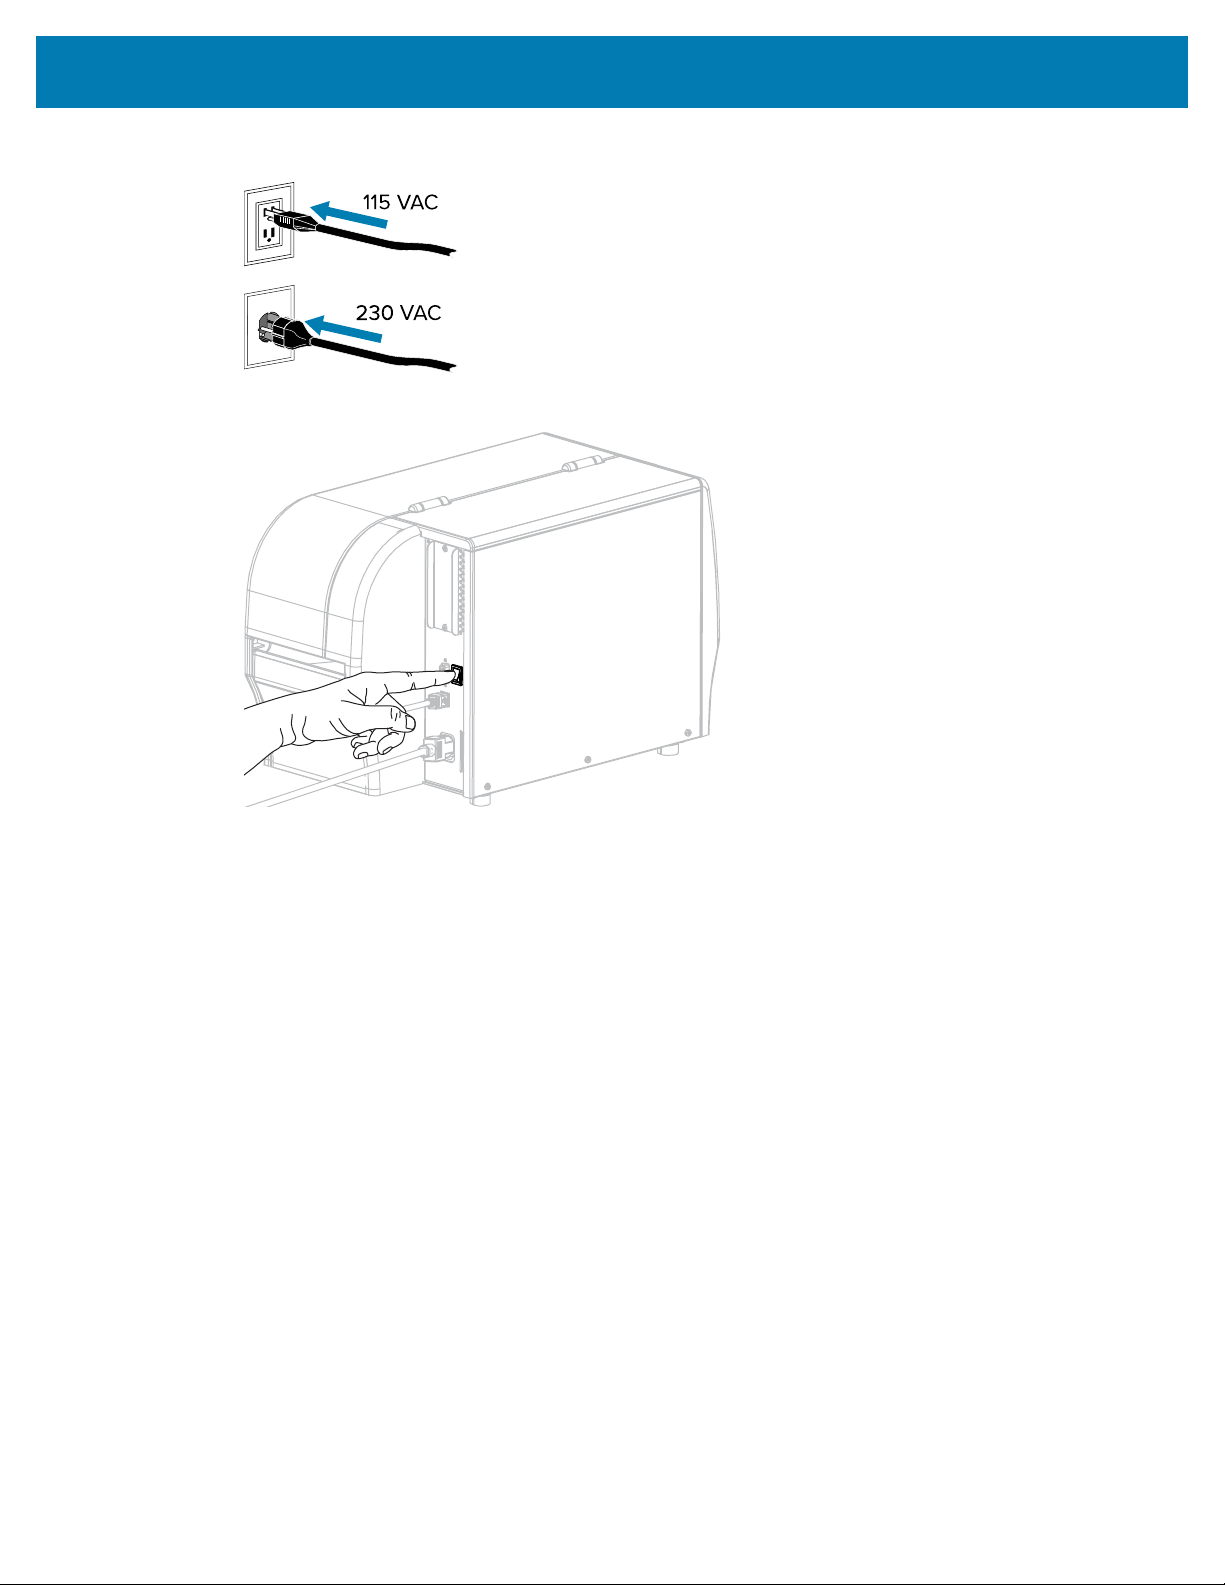
2. Plug theA/C power cord into an appropriate power outlet.
3. Turn on (I) the printer.
4. Configure the following printer settings. You can change the values through the Zebra Setup Utilities
(click Configure Printer Connectivity on the Zebra Setup Utilities screen) or by the ways listed at the
following links. Contact your network administrator for the proper values for your network.
• IP Protocol (change the value from ALL to PERMANENT)
• Gateway (match the gateway value of your WLAN)
• Subnet Mask (match the subnet value of your WLAN)
• IP Address (assign a unique IP address to the printer)
5. Reset the network to allow changes to the network settings to take effect.
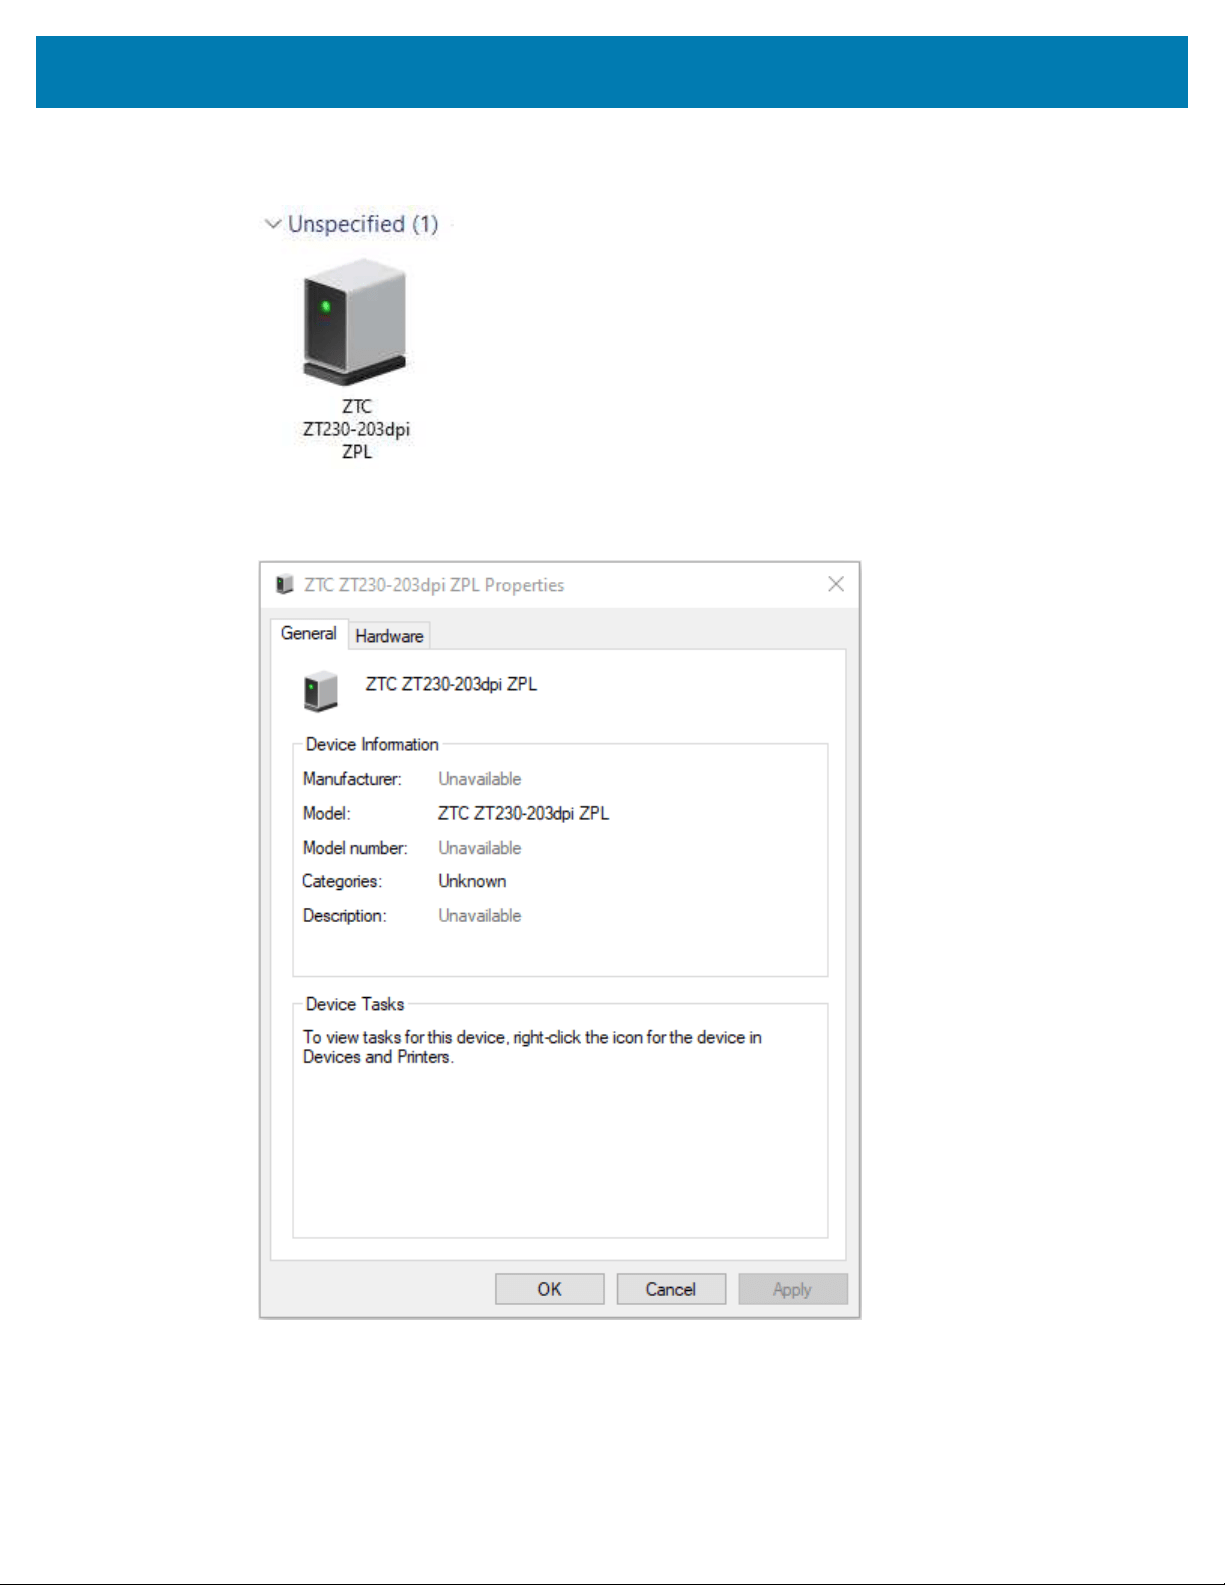
What to Do If You Forget to Install Printer Drivers First
If you plug in your Zebra printer before installing the drivers, the printer displays as an Unspecified device.
1. Follow the instructions in Installing the Drivers on page 47 to download and install the drivers.
2. From the Windows menu, open the Control Panel.
57
Printer Setup and Operation
3. Click Devices and Printers.
In this example, the ZTC ZT320-203dpi ZPL is an incorrectly installed Zebra printer.
4. Right-click on the device, and select Properties.
The properties for the device display.
58
Printer Setup and Operation
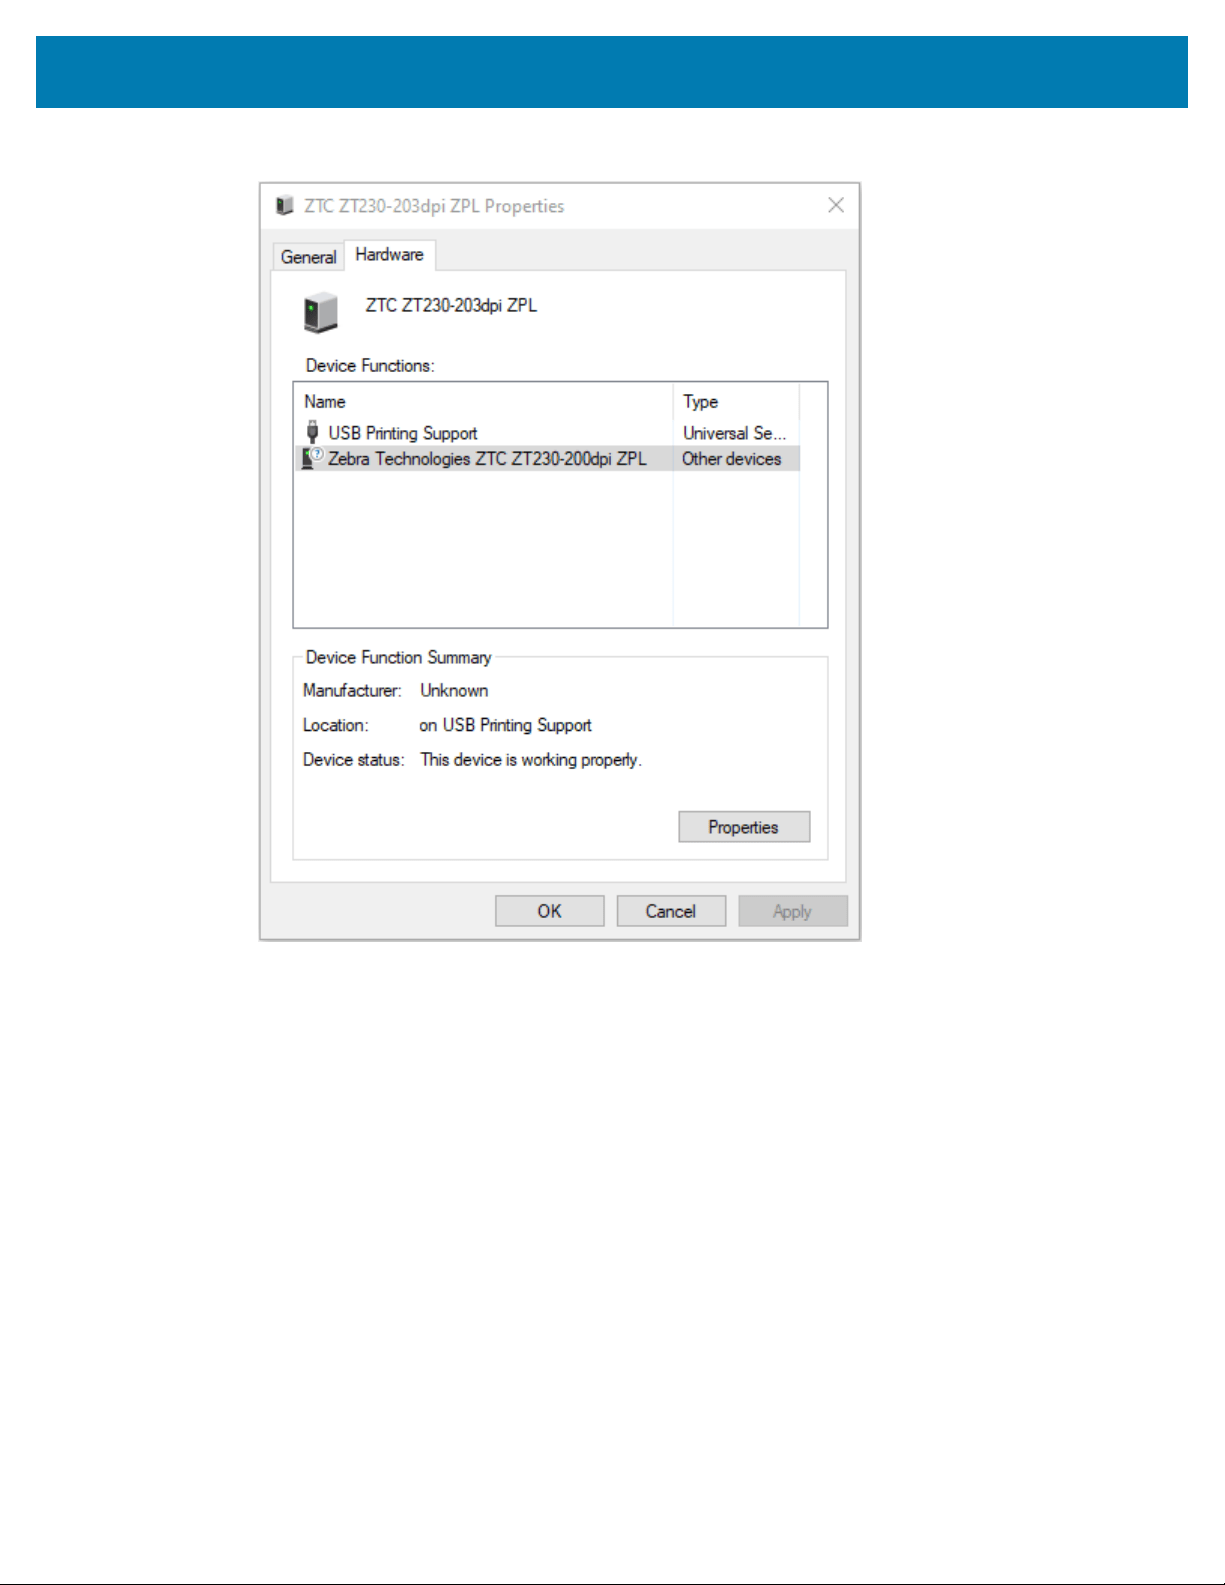
5. Click the Hardware tab.
59
Printer Setup and Operation
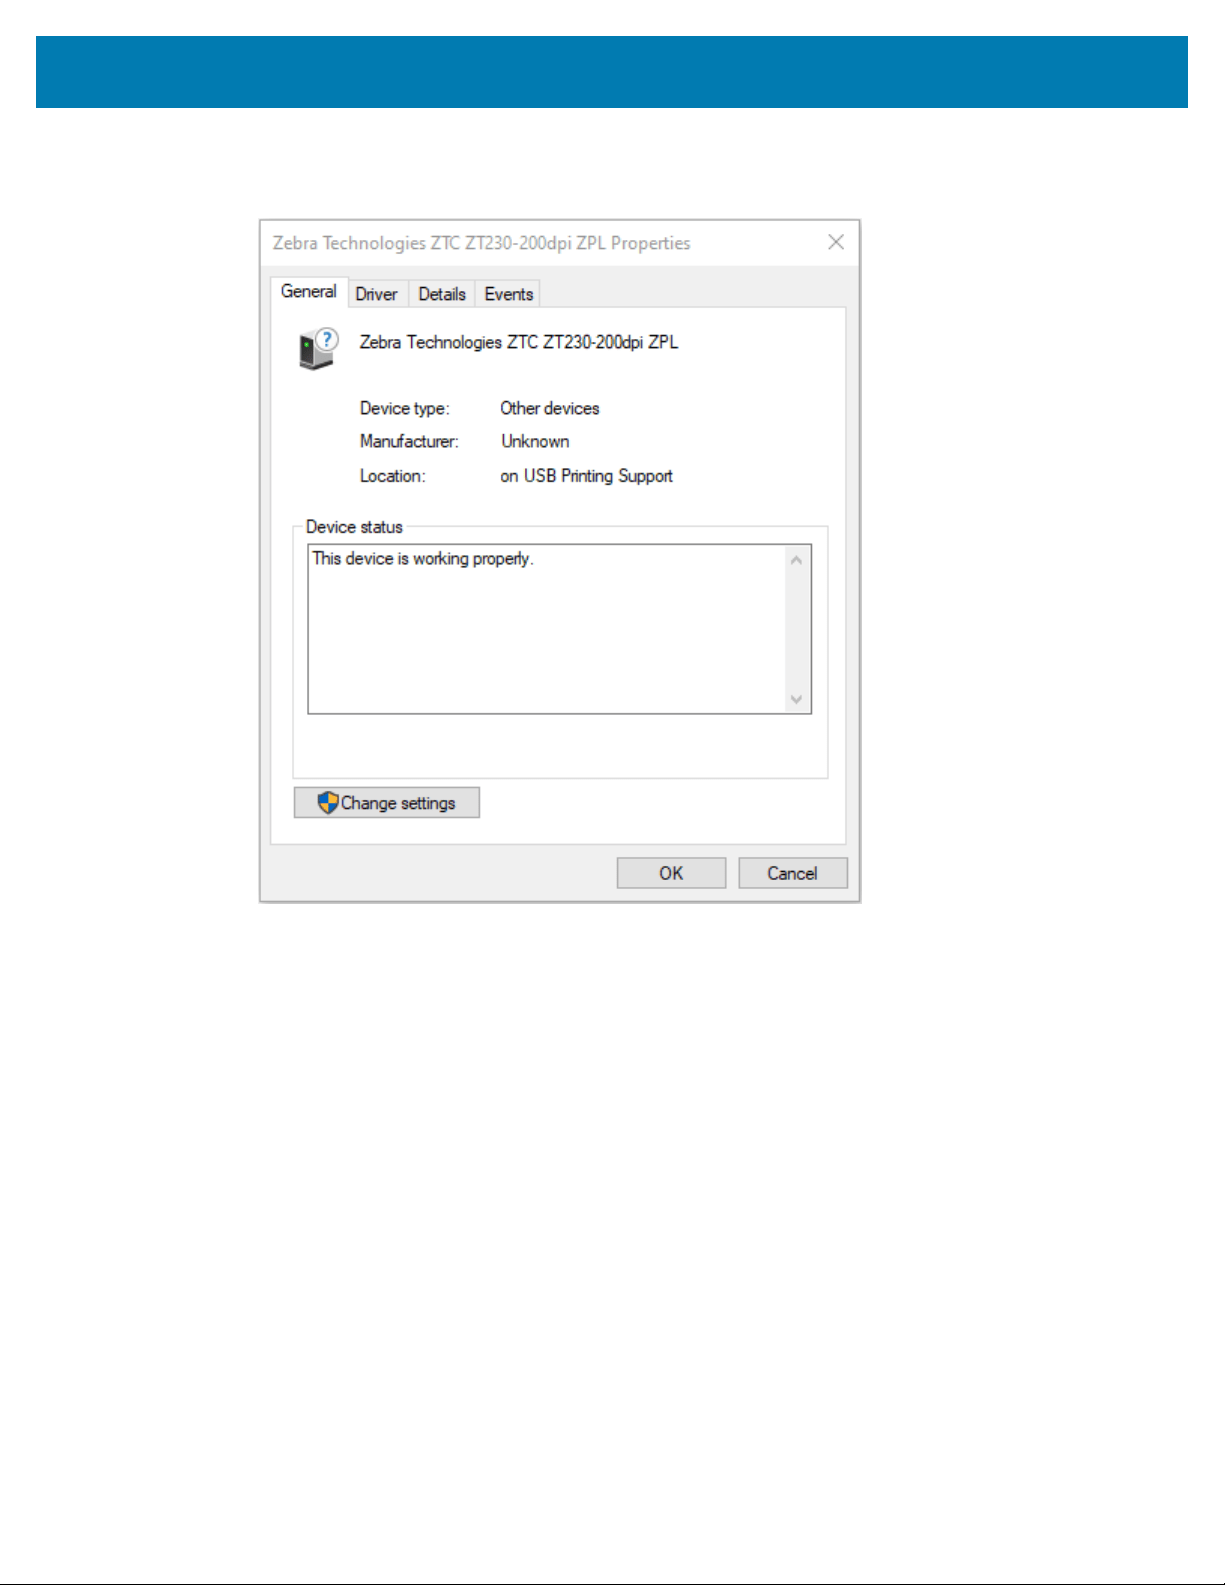
6. Select the Zebra printer in the Device Functions list, and then click Properties.
The properties display.
60
Printer Setup and Operation
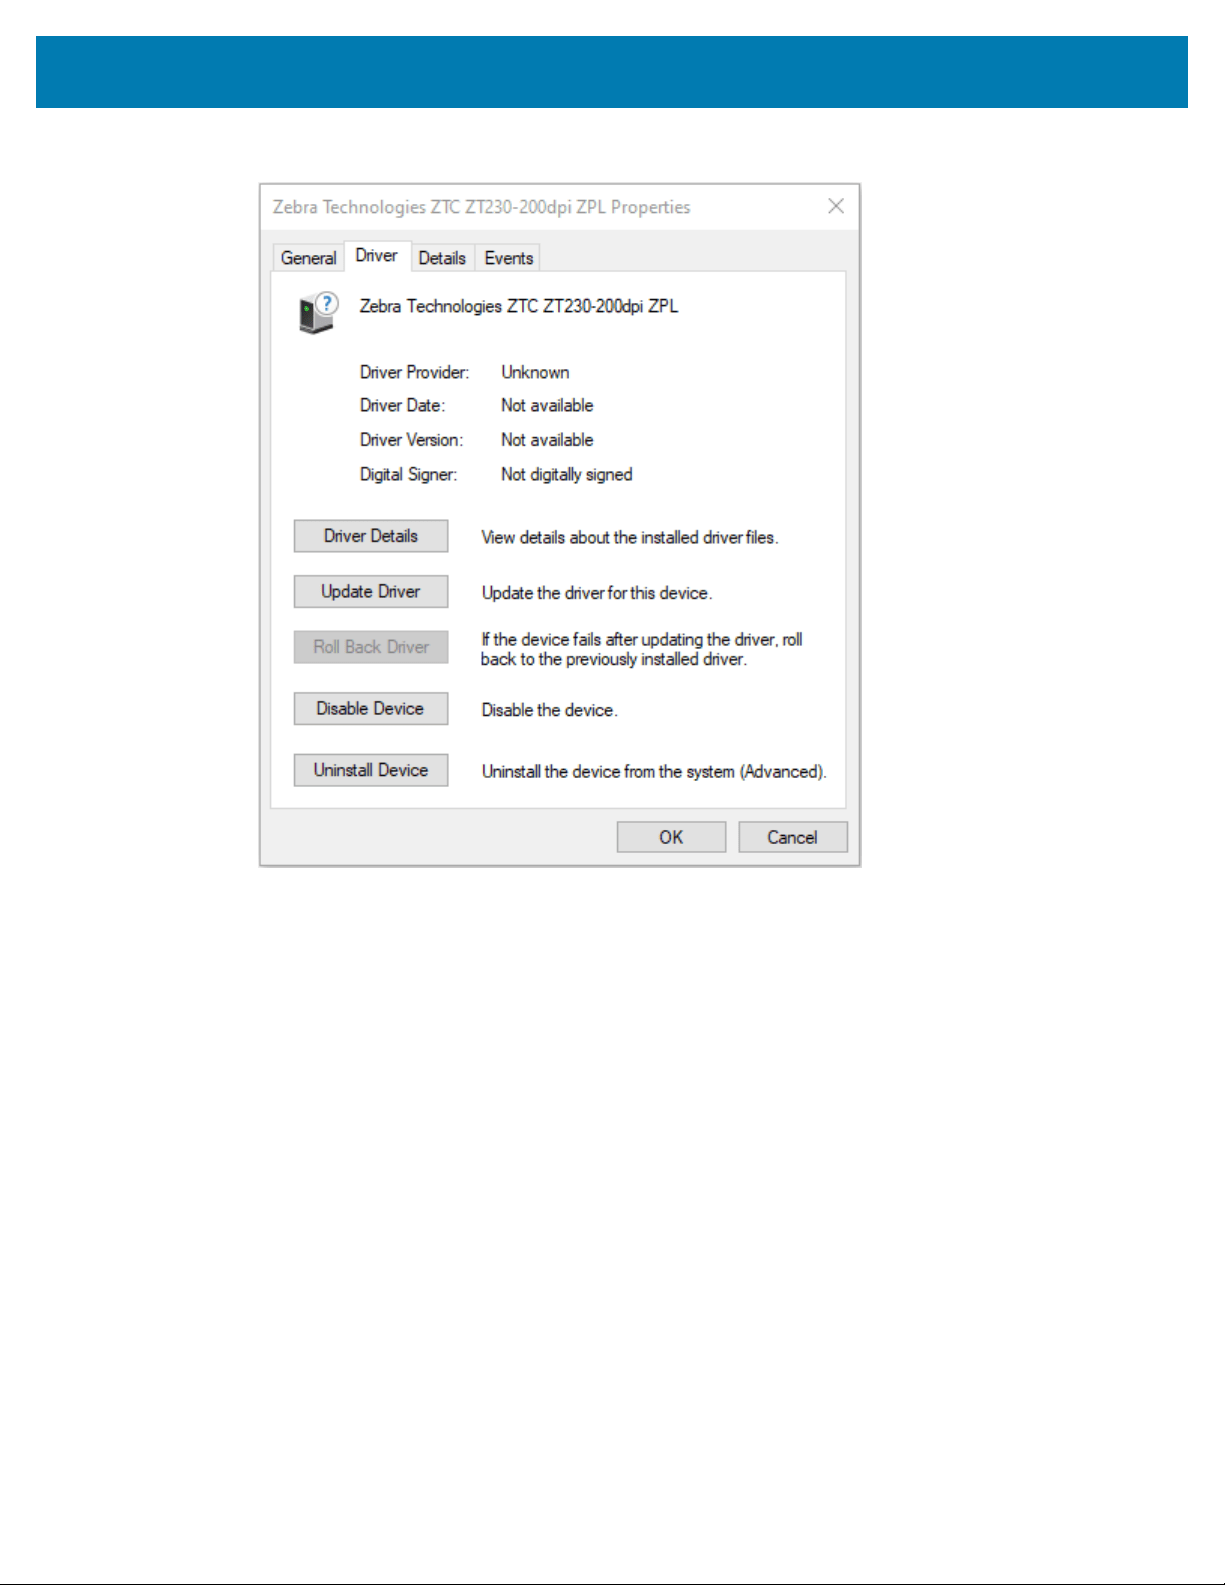
7. Click Change settings and then click the Driver tab.
61
Printer Setup and Operation
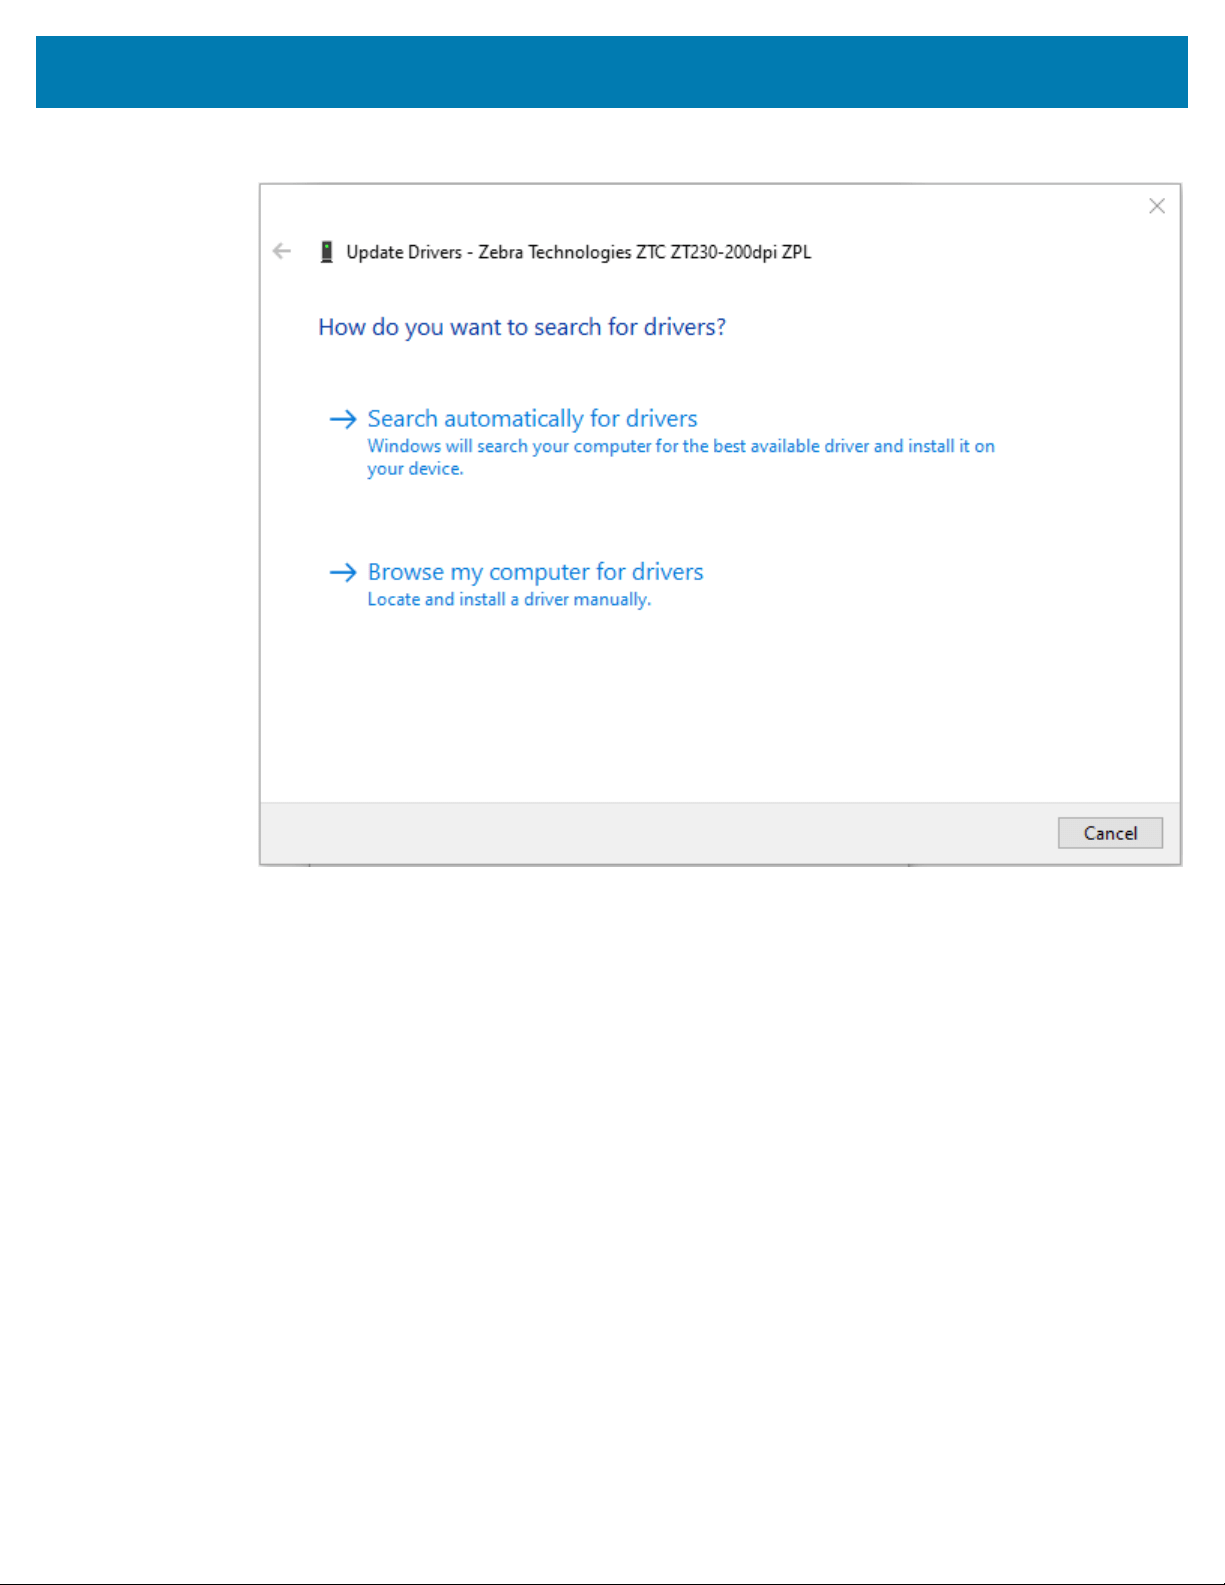
8. Click Update Driver.
9. Click Browse my computer for driver software.
10. Click Browse... and navigate to the Downloads folder.
62
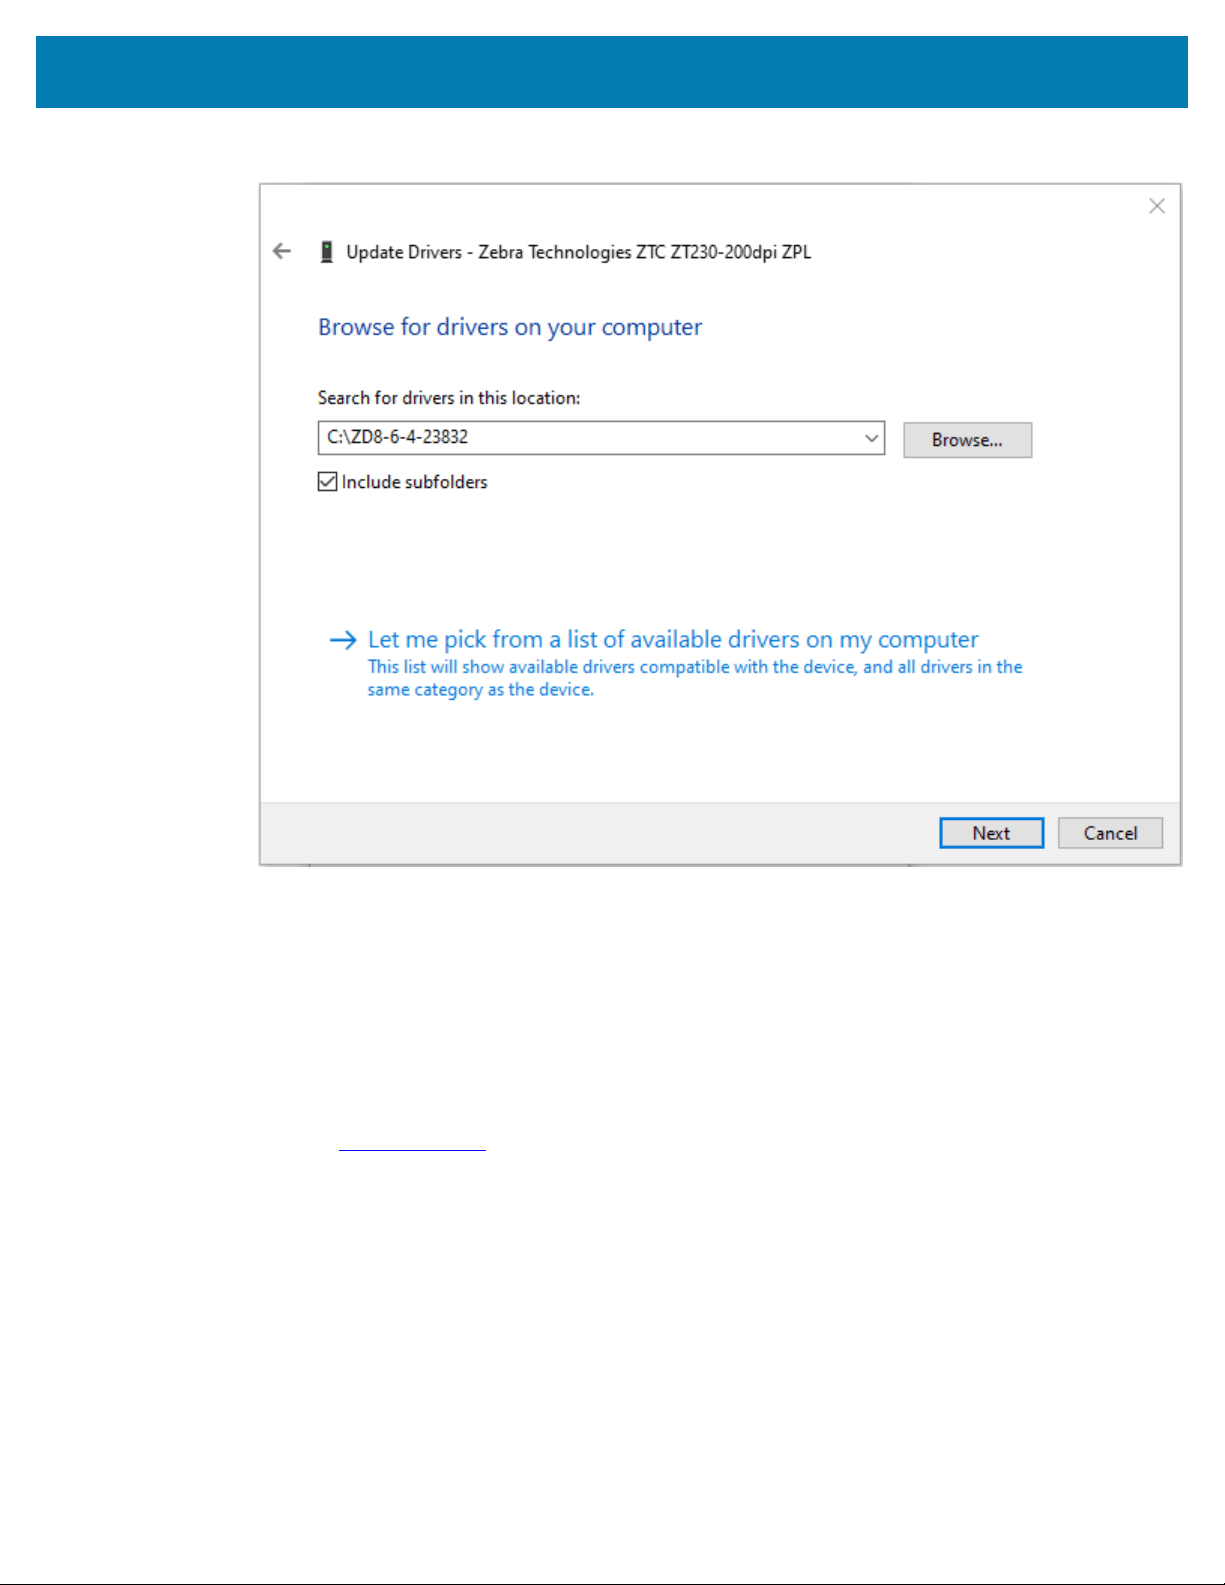
Printer Setup and Operation
11. Click OK to select the folder.
12. Click Next.
The device is updated with the correct drivers.
Addinga Printer through Zebra Setup Utilities
If desired, you may use Zebra Setup Utilities to add printers to Windowsusing this procedure,after
installing the drivers.
1. If necessary, install the Zebra Setup Utilities program.
a) Go to zebra.com/setup and download Zebra Setup Utilities for Windows.
b) Run the zsu-xxxxxxx.exe file that you downloaded.
c) Follow the prompts in the InstallAware Wizard.
d) In the final screen of the wizard, click the checkbox next to Run Zebra Setup Utilities now, and
then click Finish.
e) Follow the prompts in the System Prepare Wizard.
63
Printer Setup and Operation
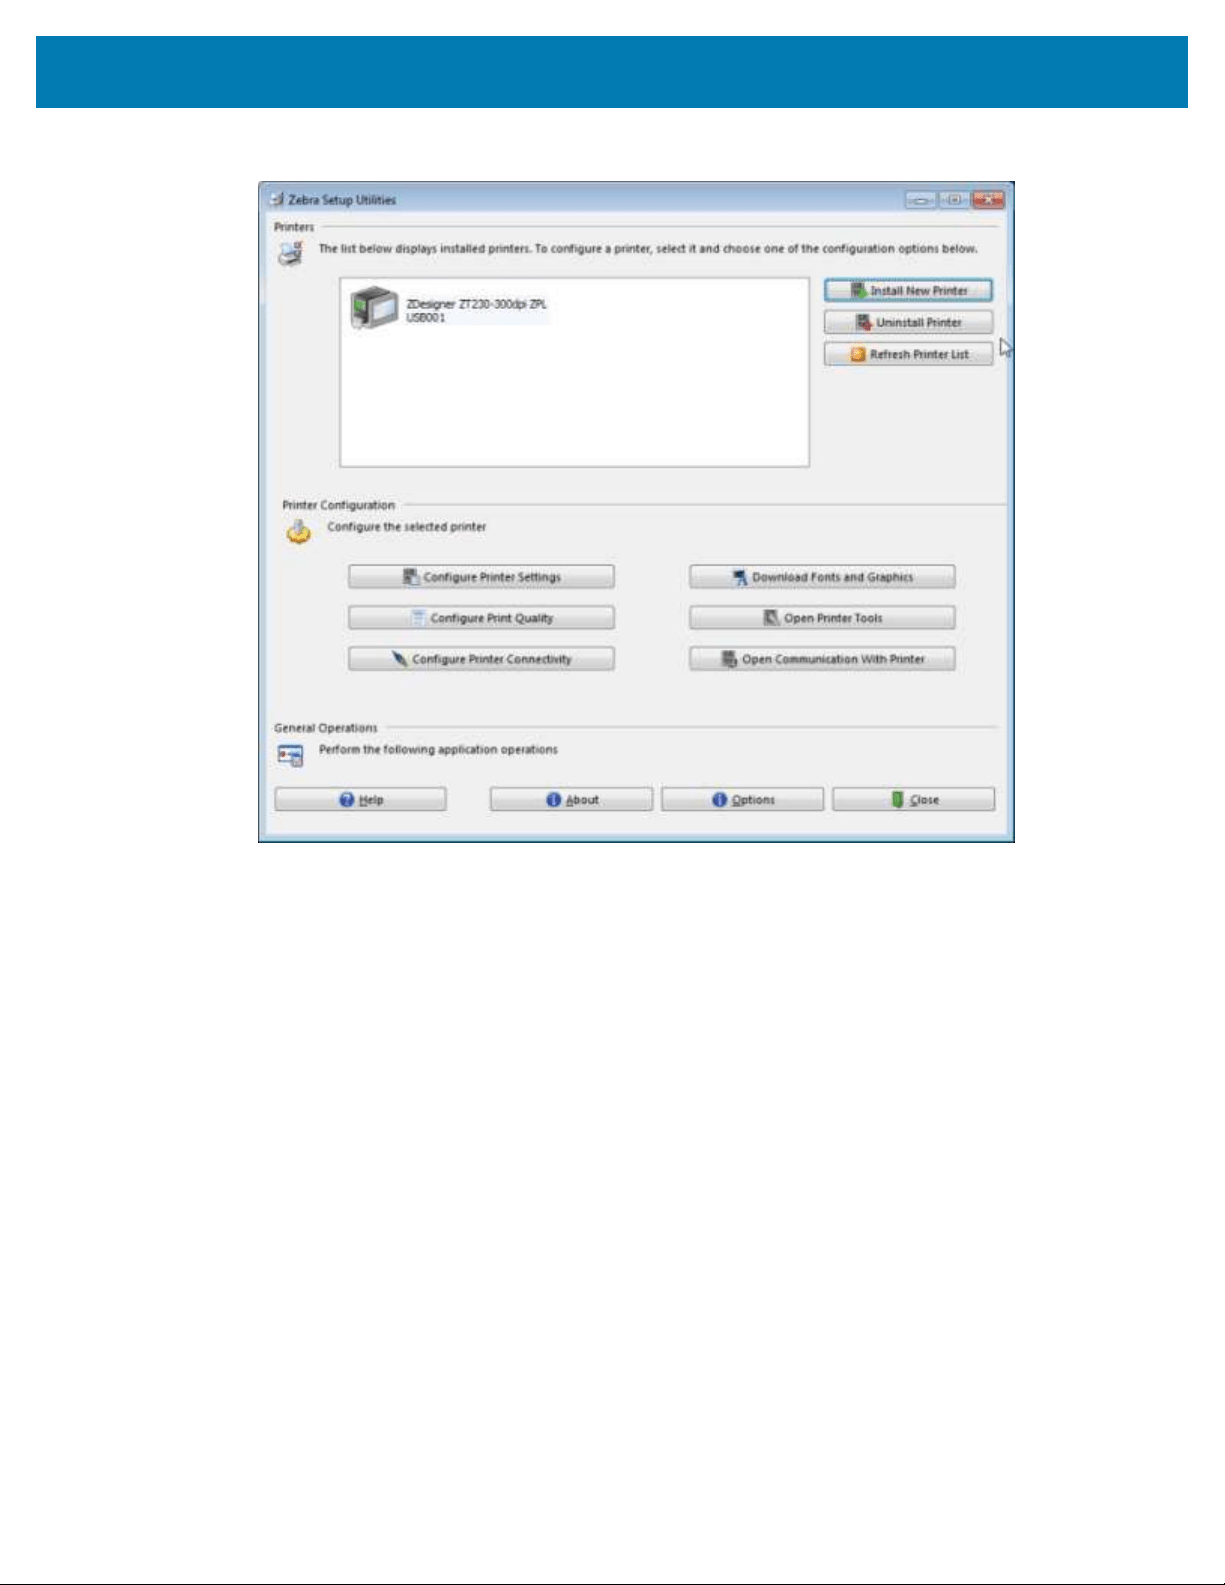
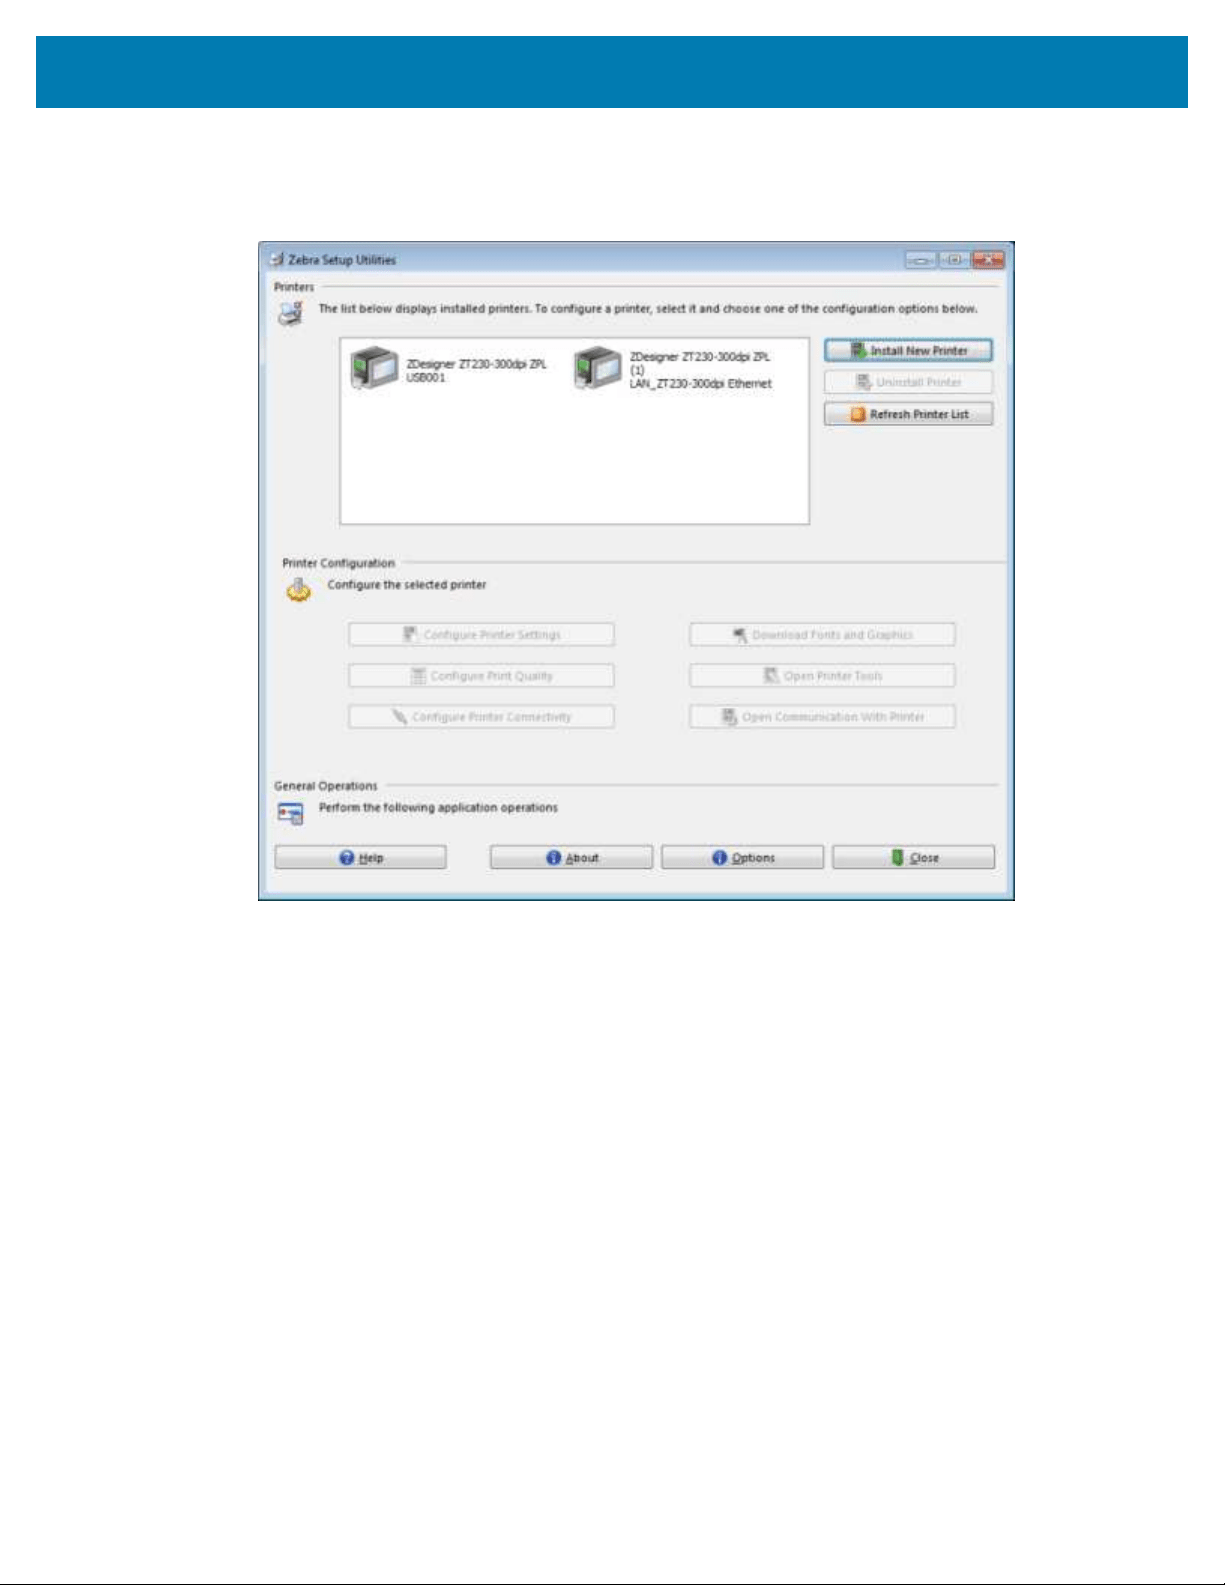
2. If necessary, open the Zebra Setup Utilities program.
64
Printer Setup and Operation
3. Click Install New Printer.
The printer driver wizard displays.
65
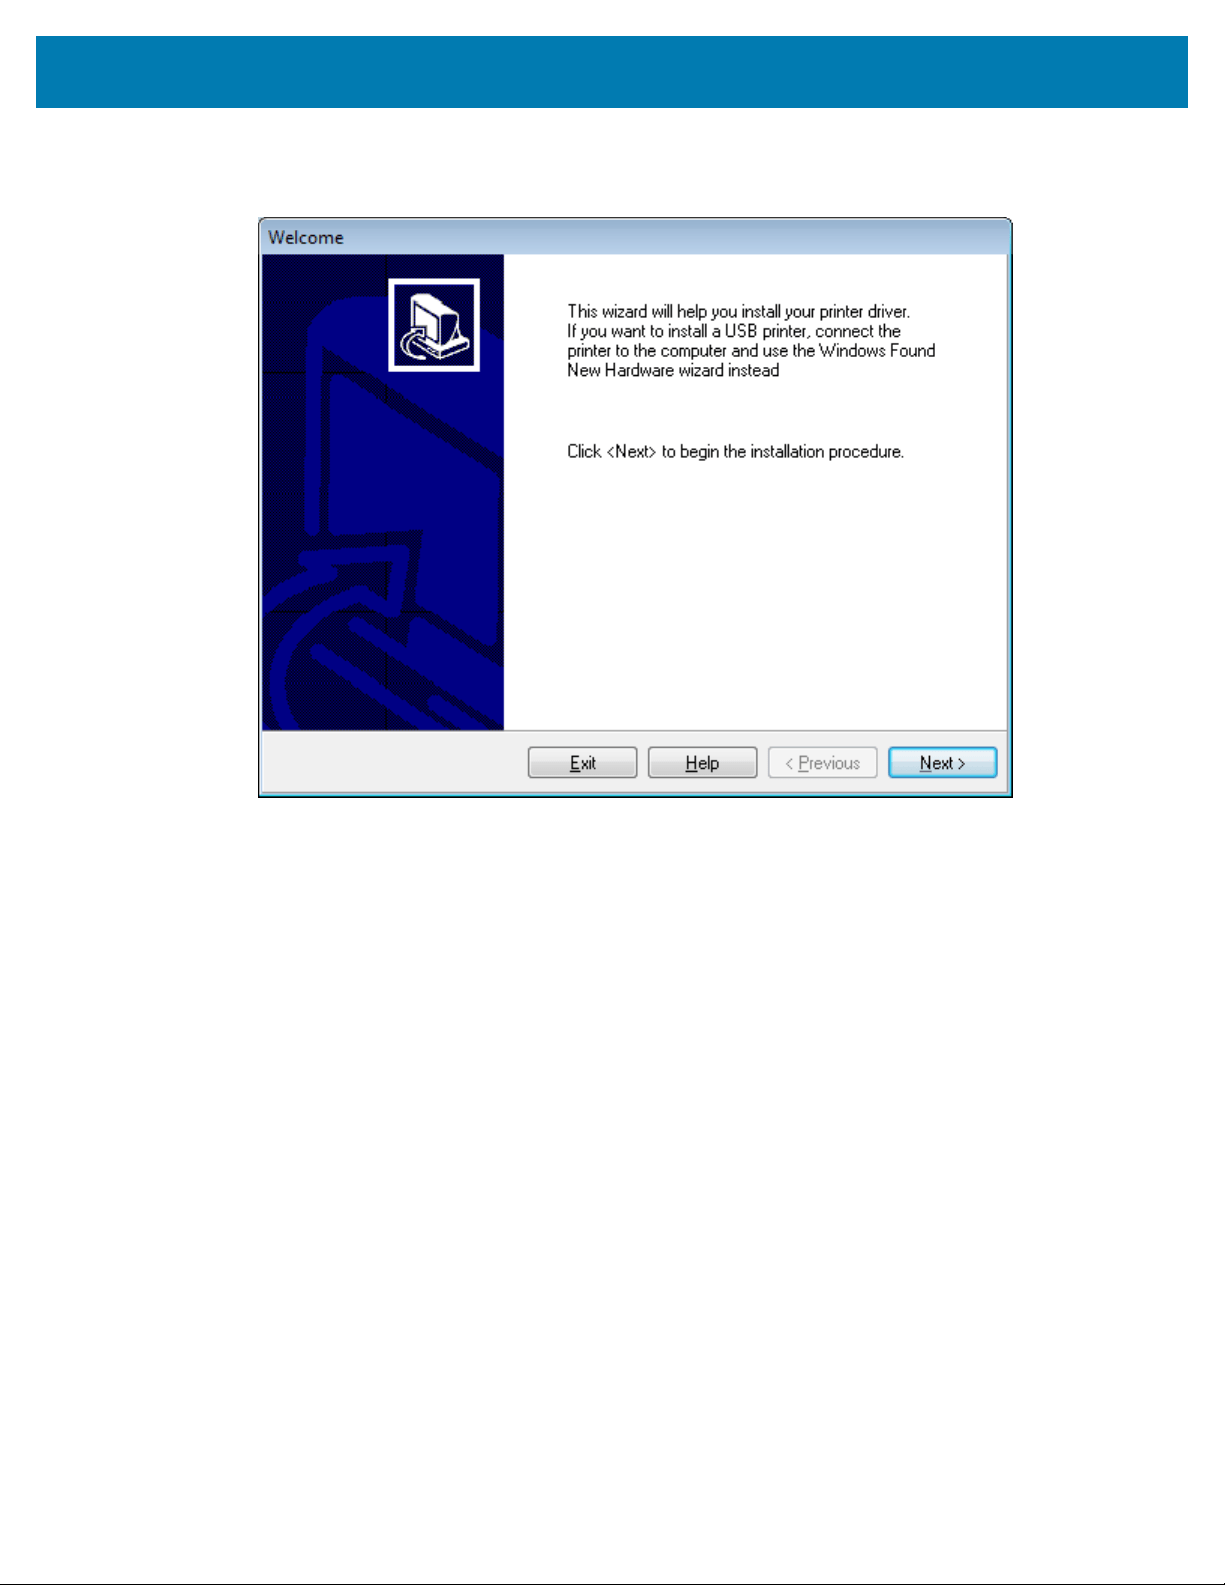
Printer Setup and Operation
4. Click Next.
You are prompted to select an installation option.
66
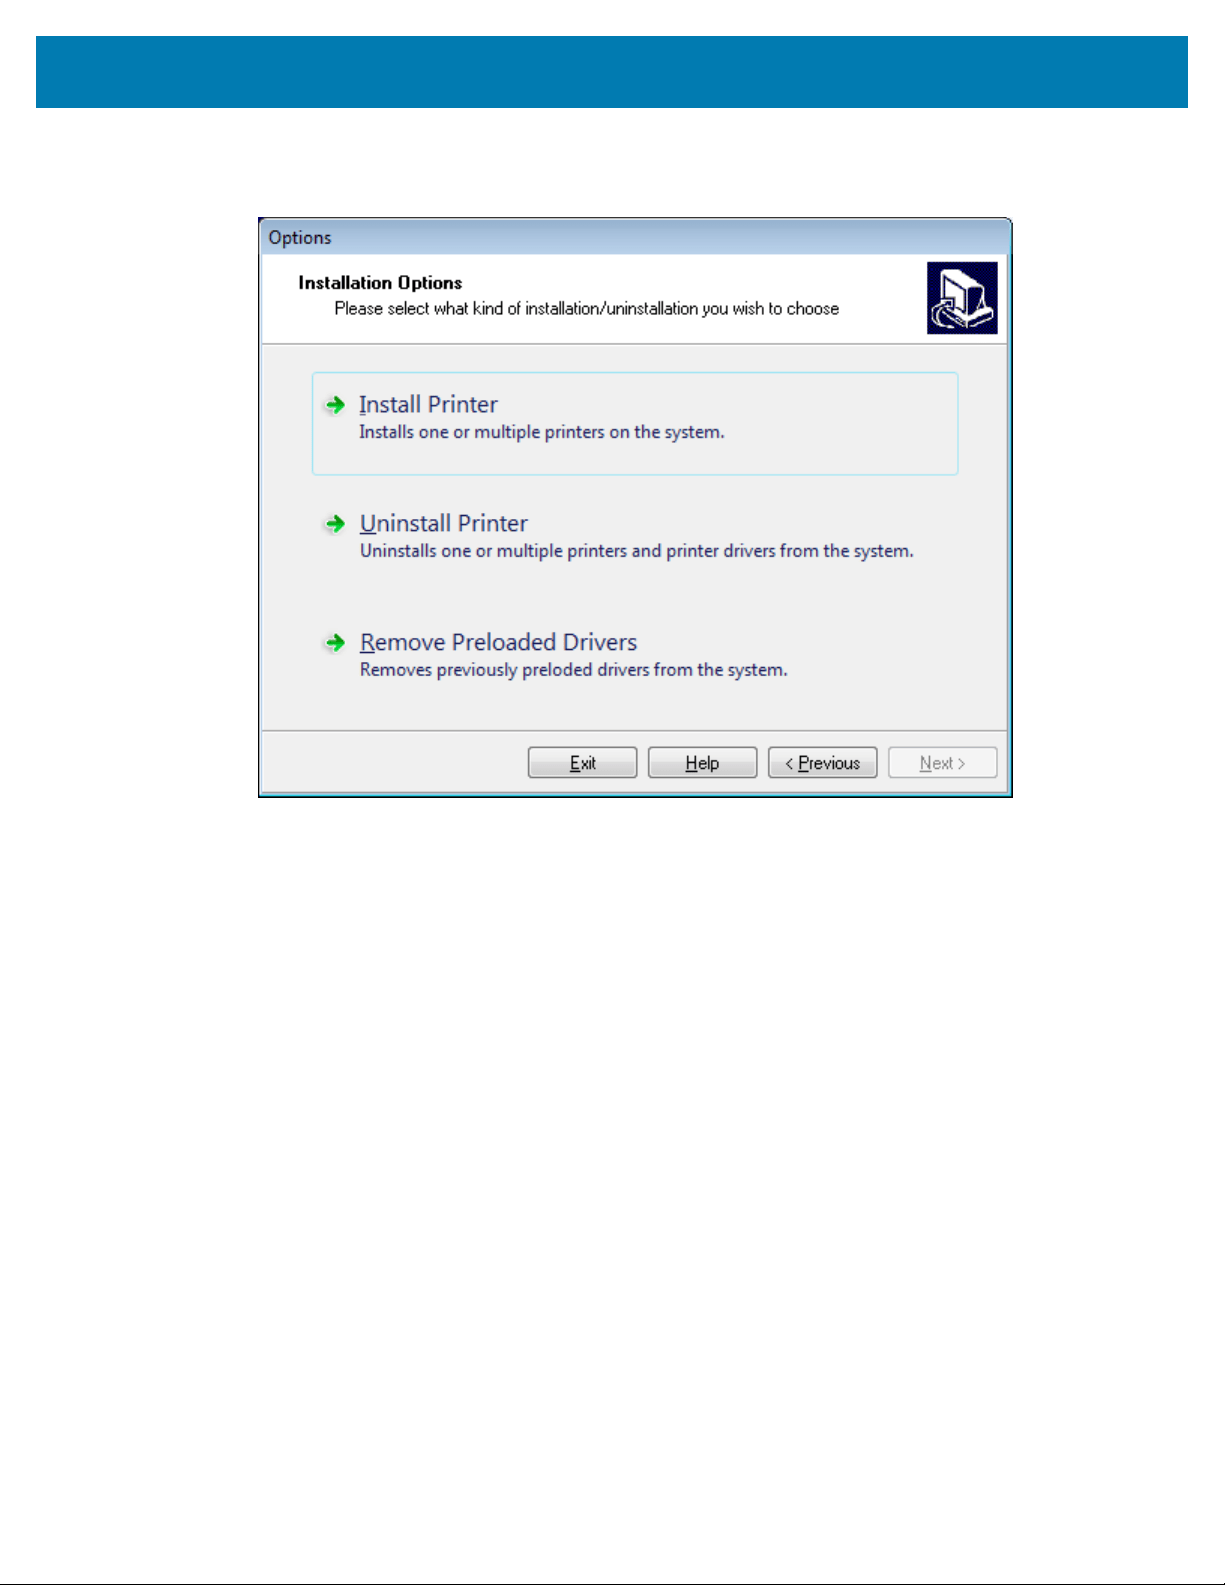
Printer Setup and Operation
5. Click Install Printer.
You are prompted to select a printer type.
6. Select your printer model and resolution.
The model and resolution are on a part number sticker on the printer, usually located below the media
hanger. The information will be in the following format:
Part Number: XXXXXxY – xxxxxxxx
where
XXXXX = the printer model
Y = the printer resolution (2 = 203 dpi, 3 = 300 dpi, 6=600 dpi)
For example, in the part number ZT230x3 – xxxxxxxx
ZT230 indicates that the printer is a ZT230 model
3 indicates that the printhead resolution is 300 dpi
67
Printer Setup and Operation
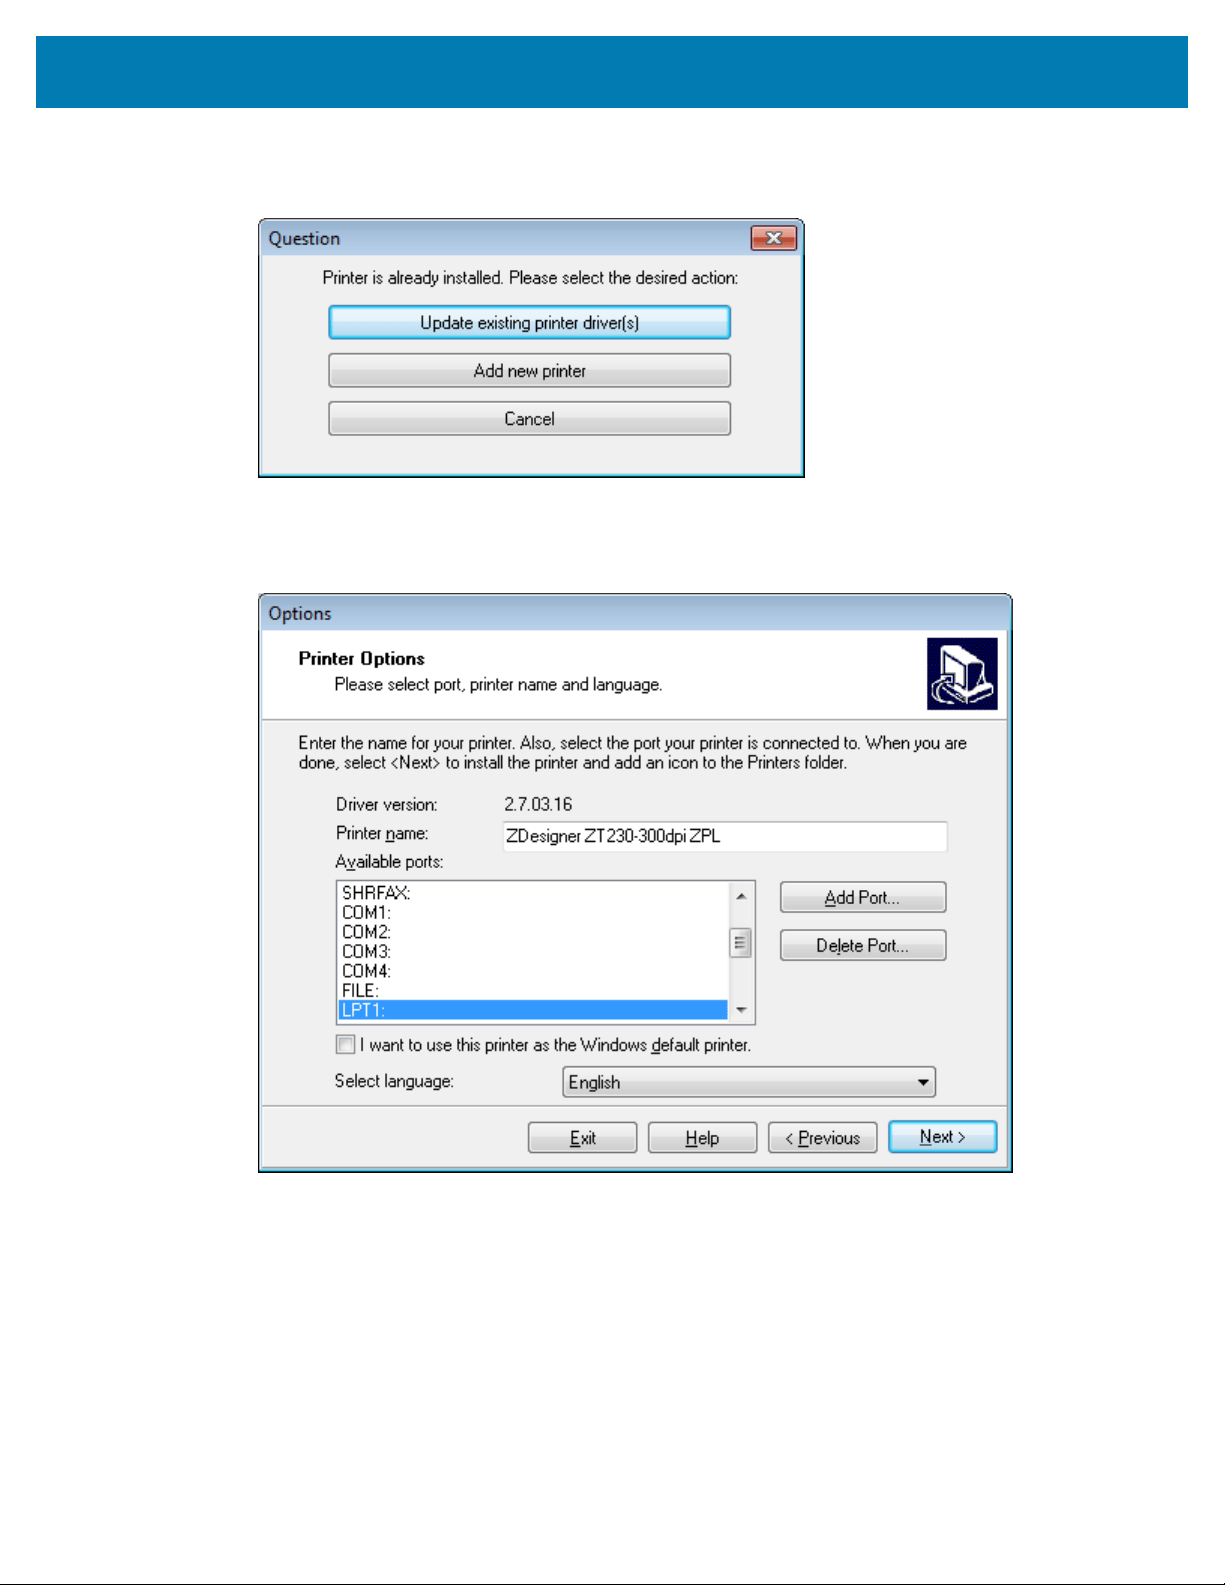
7. Click Next.
You are notified that the printer is already installed.
8. Click Add new printer.
You are prompted for a printer name, the port to which the printer will be connected, and the
language for the printer display.
68
Printer Setup and Operation
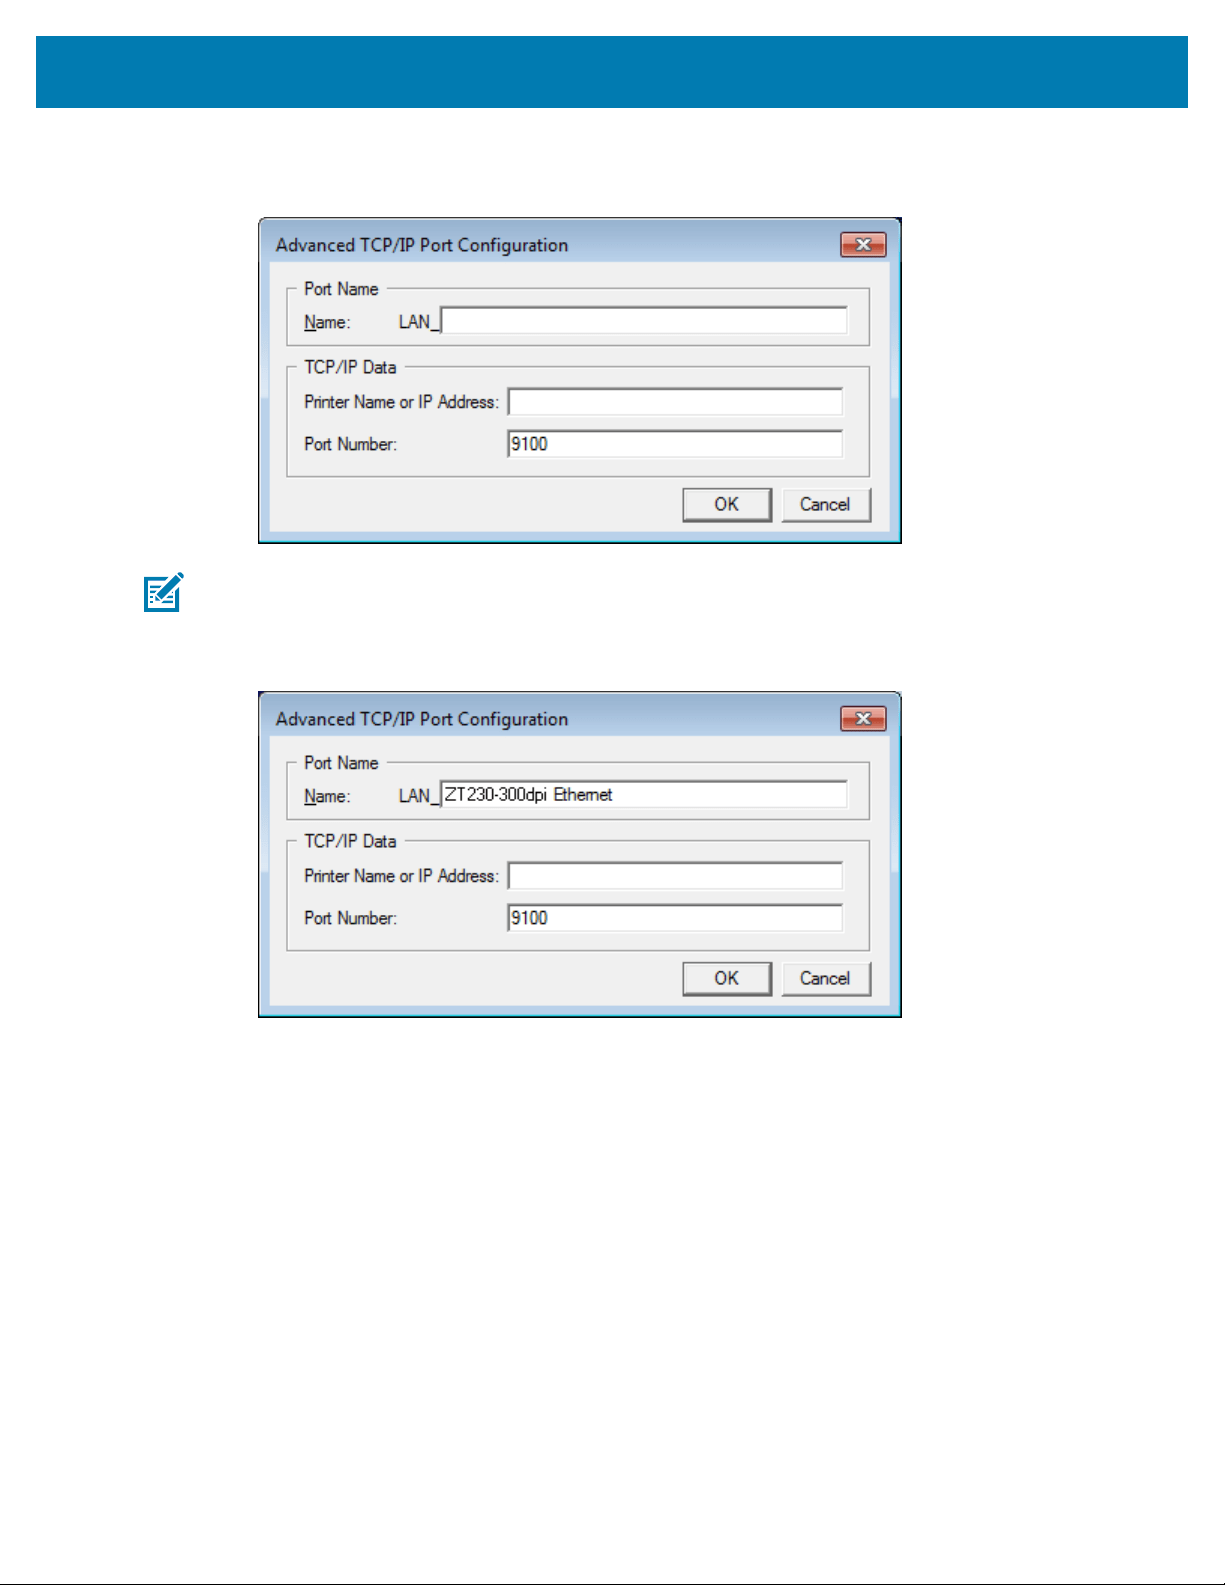
9. Click Add Port.
The wizard prompts you for a name for the port and the IP address of your printer.
NOTE: If you have other applications open, you may be prompted that the driver is locked
by another process. You may click Next to continue or Exit to allow you to save your work
before continuing with this installation.
10. Give the port a name that you can recognize when it appears in the list of available ports.
11. Enter the printer’s IP address.
This could be one that was assigned automatically or one that you specified manually in the previous
section.
69
Printer Setup and Operation
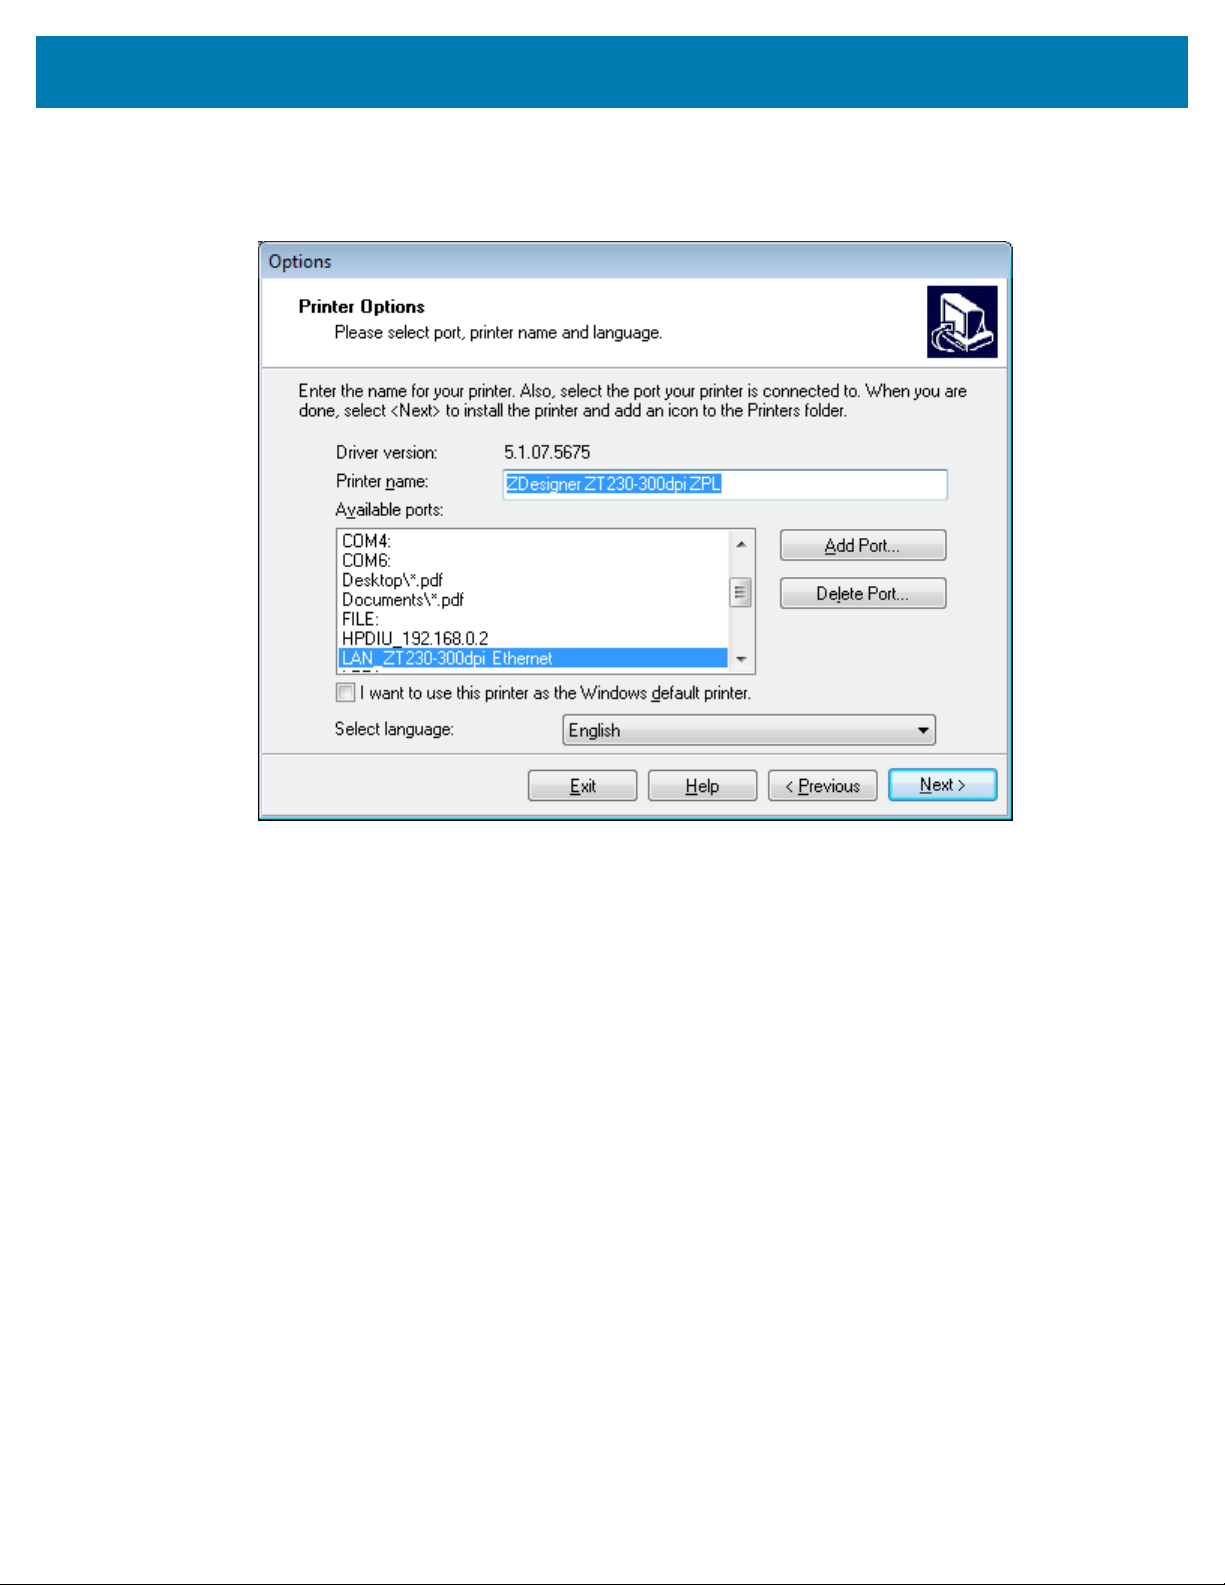
12. Click OK.
A printer driver is created with the port name that you assigned. The new printer port appears in the
list of available ports.
70
Printer Setup and Operation
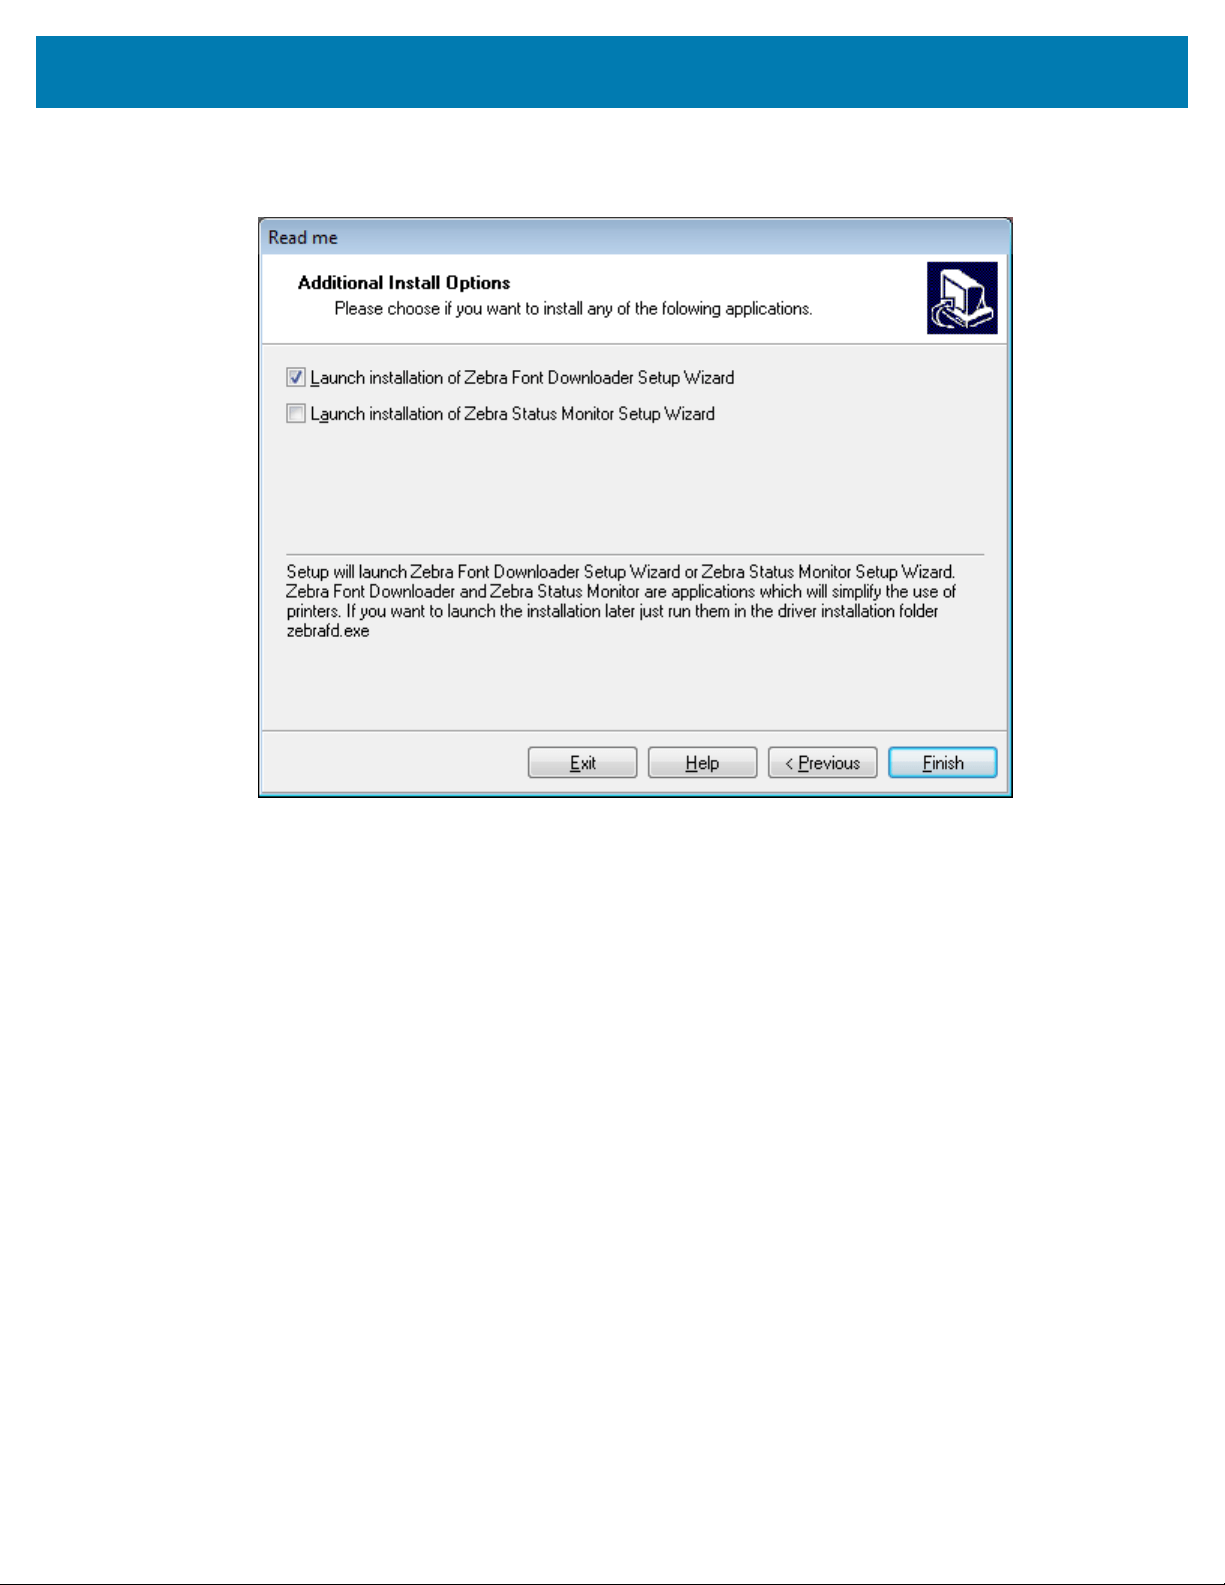
13. Click Next.
You are prompted to launch other setup wizards.
71
Printer Setup and Operation
14. Check the desired options, and then click Finish.
The printer driver is installed. If you are prompted that other programs might be affected, click the
appropriate option to continue.
Printing a Test Label and Making Adjustments
After you have loaded media, loaded ribbon (if using Thermal Transfer mode), installed the printer driver,
and connected your printer to your computer, use the directions in this section to print a test label. Printing
this label allows you to see if your connection is working and if you need to adjust any of the printer
settings.
72
Printer Setup and Operation
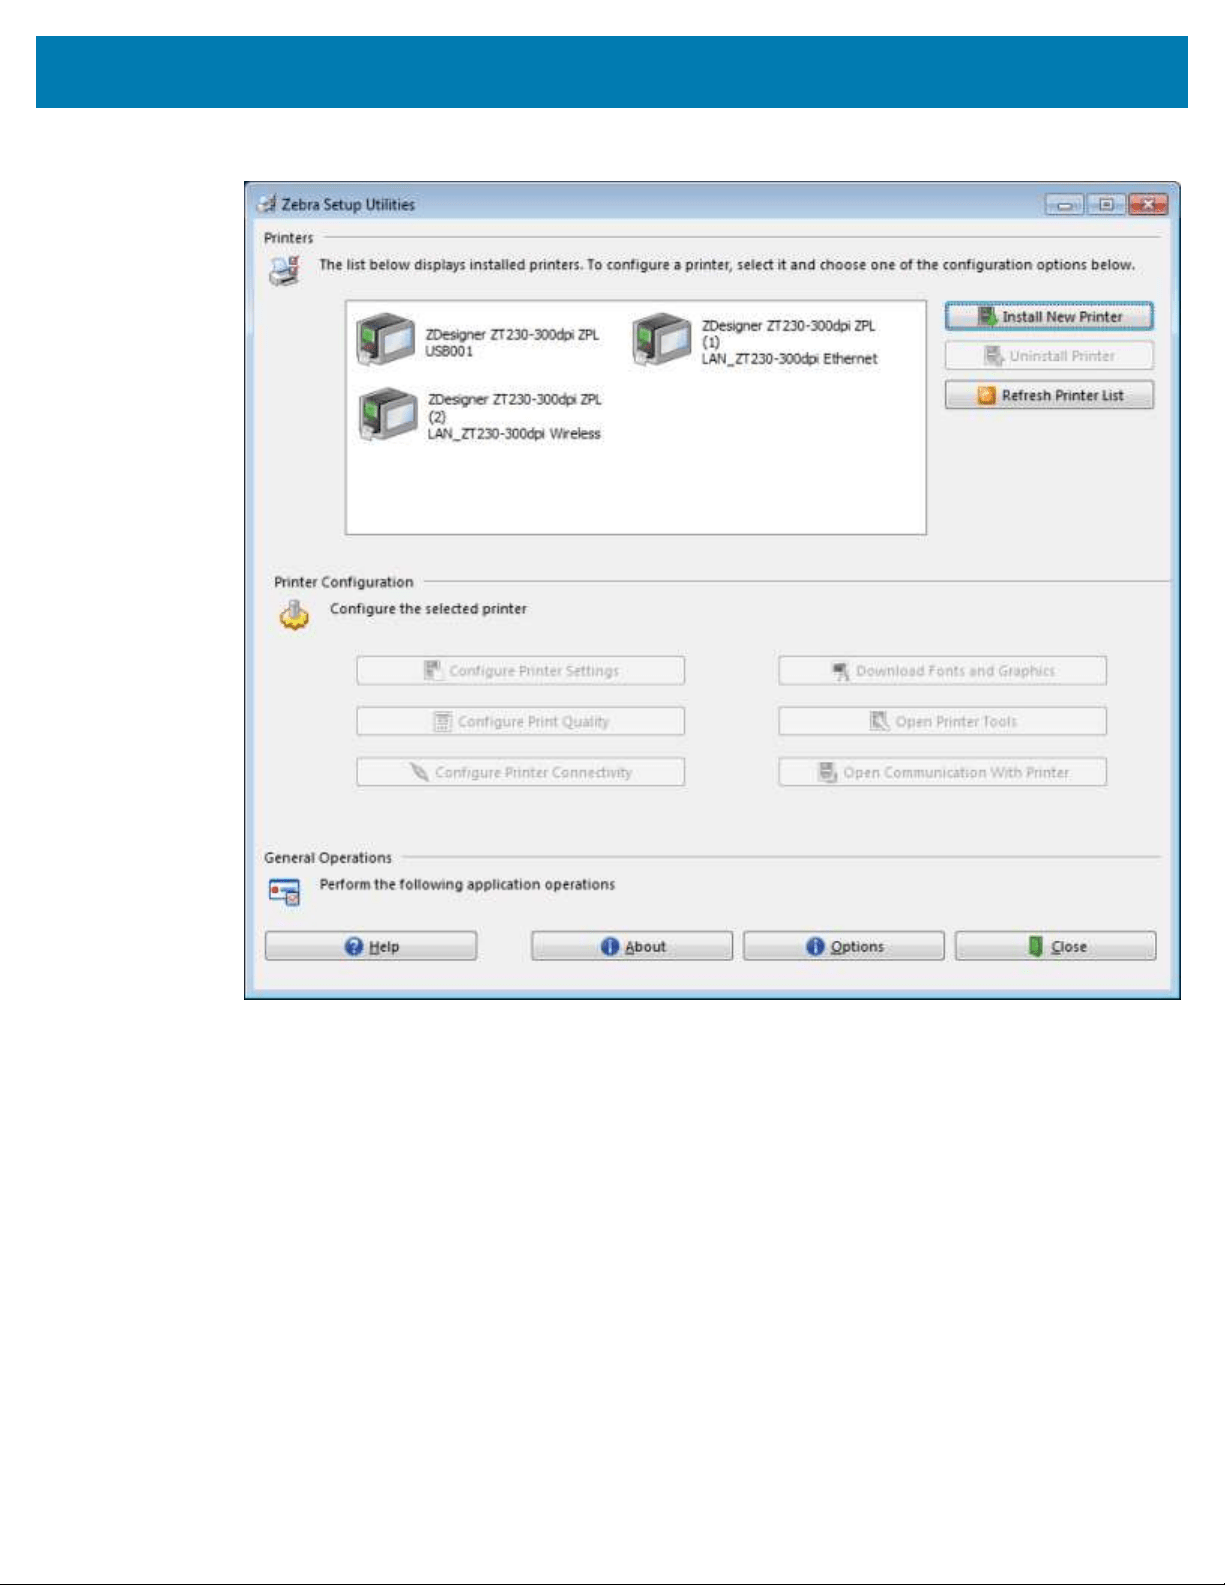
1. Open the Zebra Setup Utilities to return to the Zebra Setup Utilities screen.
2. Click on one of the available print drivers for your printer.
73
Printer Setup and Operation
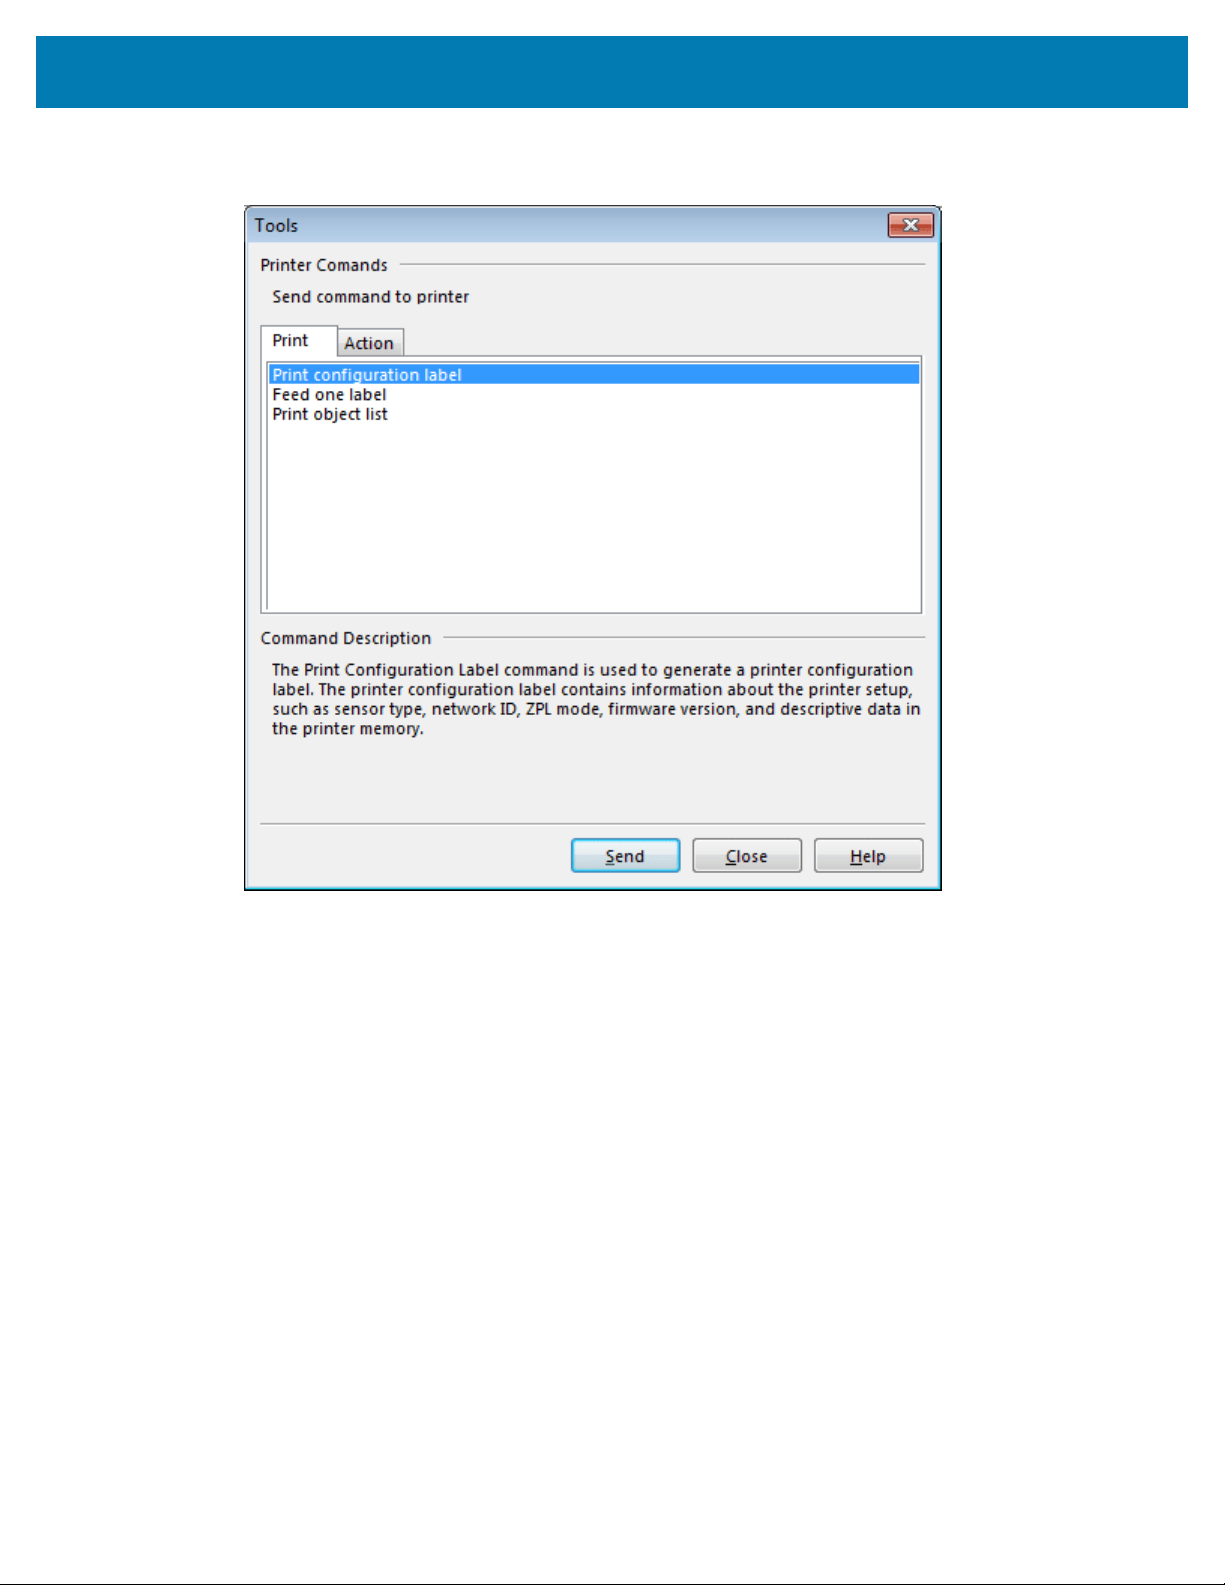
3. Click Open Printer Tools.
The Tools window displays the available printer commands.
74
Printer Setup and Operation
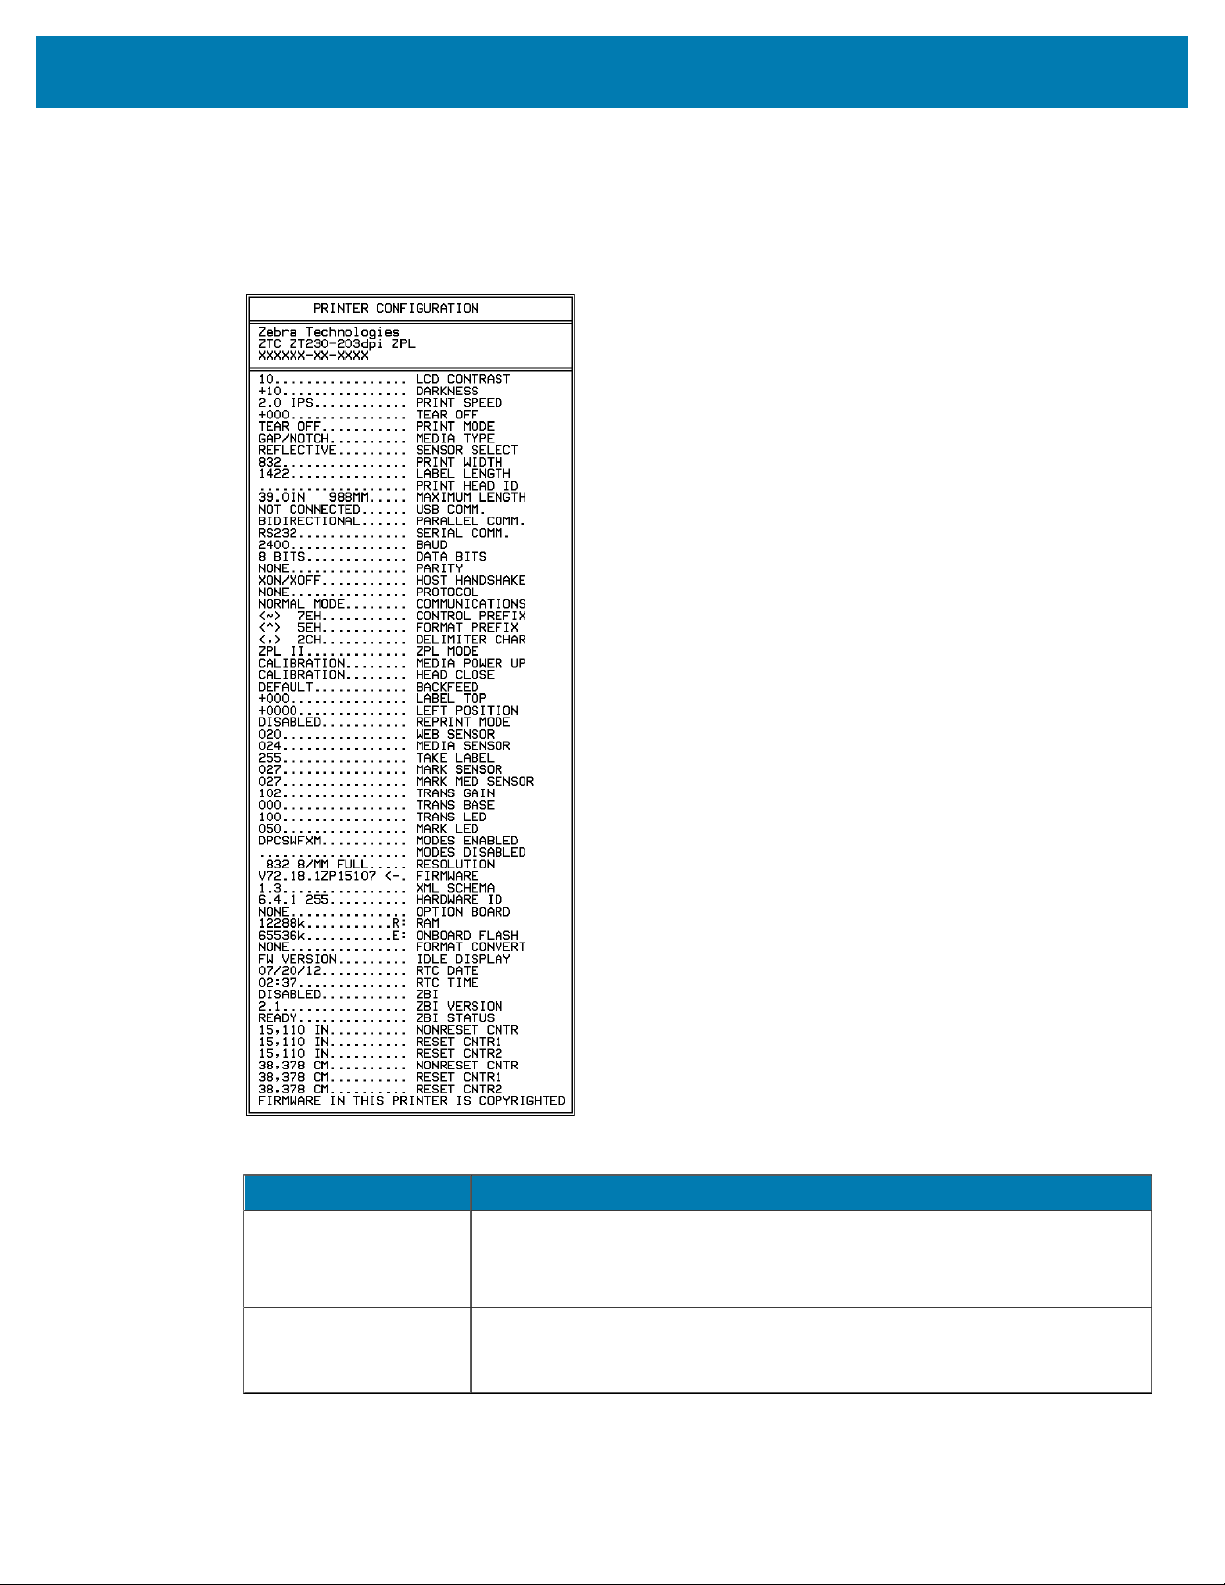
4. Click Send to print a printer configuration label.
If your connection is working correctly and your printer is correctly loaded with media and ribbon (if
used), a printer configuration label prints.
Figure 5Sample Printer ConfigurationLabel
5. Based on the printer configuration label print, and the print quality choose from the following.
If... Then...
The label printed and
the print quality is
acceptable
Your printer is ready for printing. See Installing Label Design Software on
page 76.
The label did not print a. Close the Tools window and make sure that you selected the correct
printer driver before you click Open Printer Tools. Try printing the label
again.
75
Printer Setup and Operation
If... Then...
b. If the label still did not print, check the connections between your
printer and your computer or your printer and your network.
c. If necessary, modify the printer's settings to make them match your
computer's settings.
The label prints, but
with poor quality or
other issues
See Printing Issues on page 140 for troubleshooting instructions.
Installing Label Design Software
Select and install the software that you will use to create label formats for your printer.
One option is ZebraDesigner, which you can download from
www.zebra.com/zebradesigner. You can
choose to use ZebraDesigner Essentials for free or purchase ZebraDesigner Professional for a more robust
toolset.
ZebraDesigner System Requirements
• 32-bit or 64-bit Windows 10 desktop editions, Windows 11 desktop editions, Windows Server 2016,
Windows Server 2019, Windows Server 2022 operating systems.
76

Printer Setup and Operation
• CPU: Intel or compatible x86 family processor
• Memory: 2 GB or more RAM
• Hard drive: 1 GB of available disk space
• Microsoft .NET Framework Version 4.7.2
• Display: 1366 × 768 or higher resolution monitor
• ZDesigner printer drivers
Remote Desktop Services and Virtual Machines are not supported.
77

Printer Configuration and
Adjustment
Printer Configuration and Adjustment
This section assists you with configuration of and adjustments to the printer.
Changing Printer Settings
This section presents the printer settings that you can change and identifies the tools for changing them.
These tools include the following:
• ZPL and Set/Get/Do (SGD) commands (See the Zebra® Programming Guide for more information.)
• The Windows driver installed previously. (See Changing Printer Settings through the Windows Driver on
page 78 for more information.).
• For ZT230 printers only, the printer’s user menus (See Idle Display, Home Menu, and User Menus on
page 15 for more information.)
• The printer’s web pages when the printer has an active wired or wireless print server connection (See
the ZebraNet Wired and Wireless Print Servers User Guide for more information.)
Copies of the referenced manuals are available at zebra.com/manuals.
Changing Printer Settings through the Windows Driver
1. From the Windows Start Menu, go to Printers & Scanners.
2. Click your printer in the list of available printers, and then click Manage.
78
Printer Configuration and Adjustment
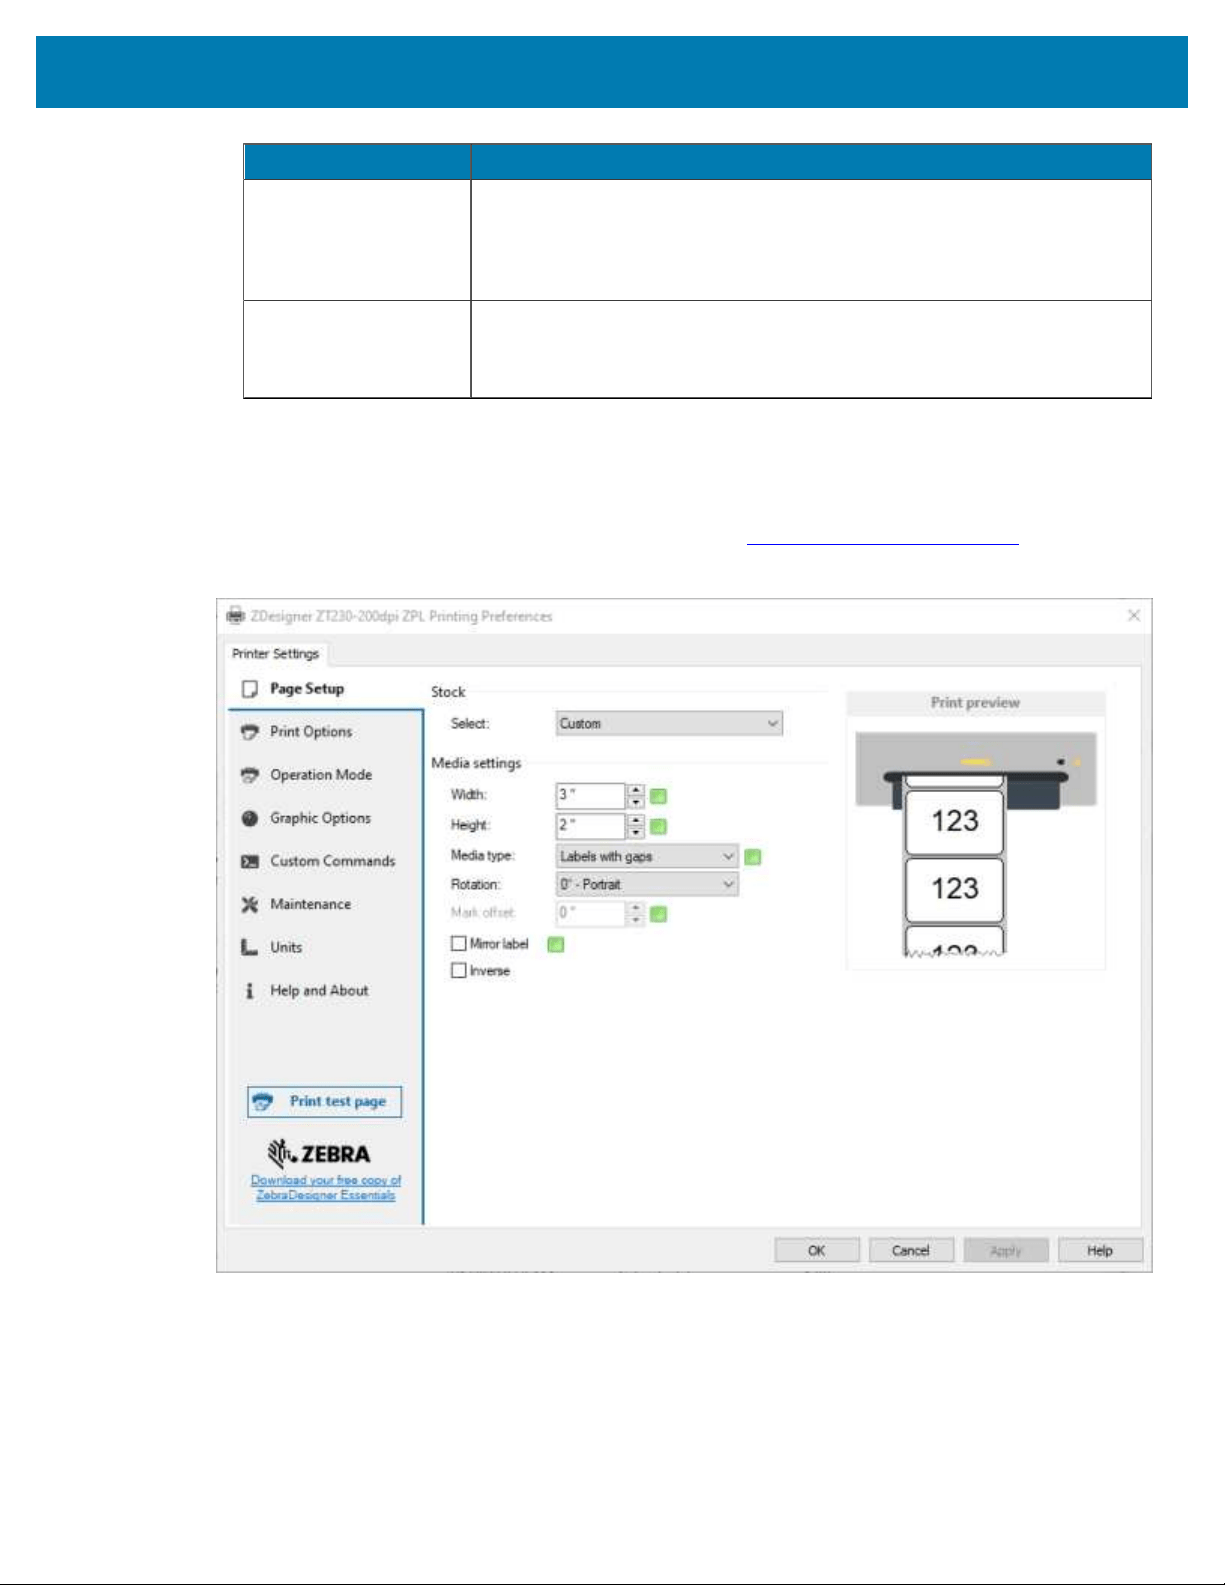
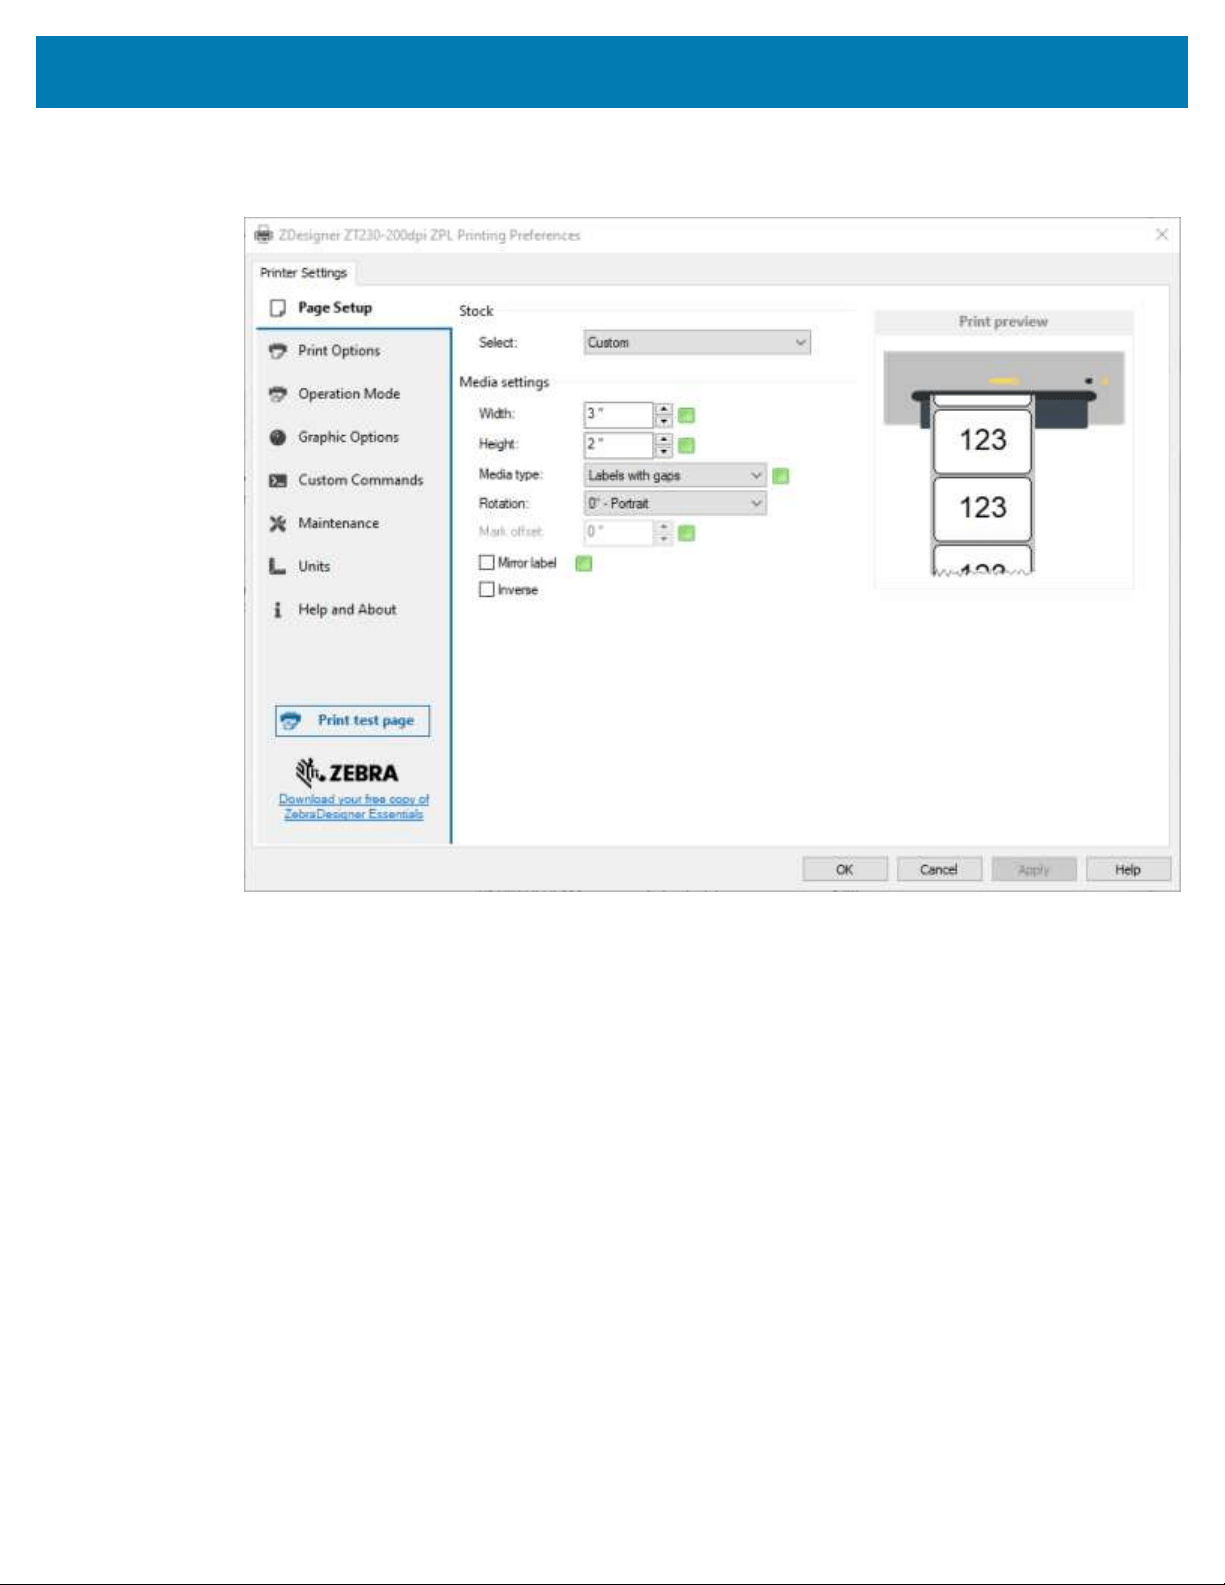
3. Click Printing Preferences.
The ZDesigner window for your printer displays.
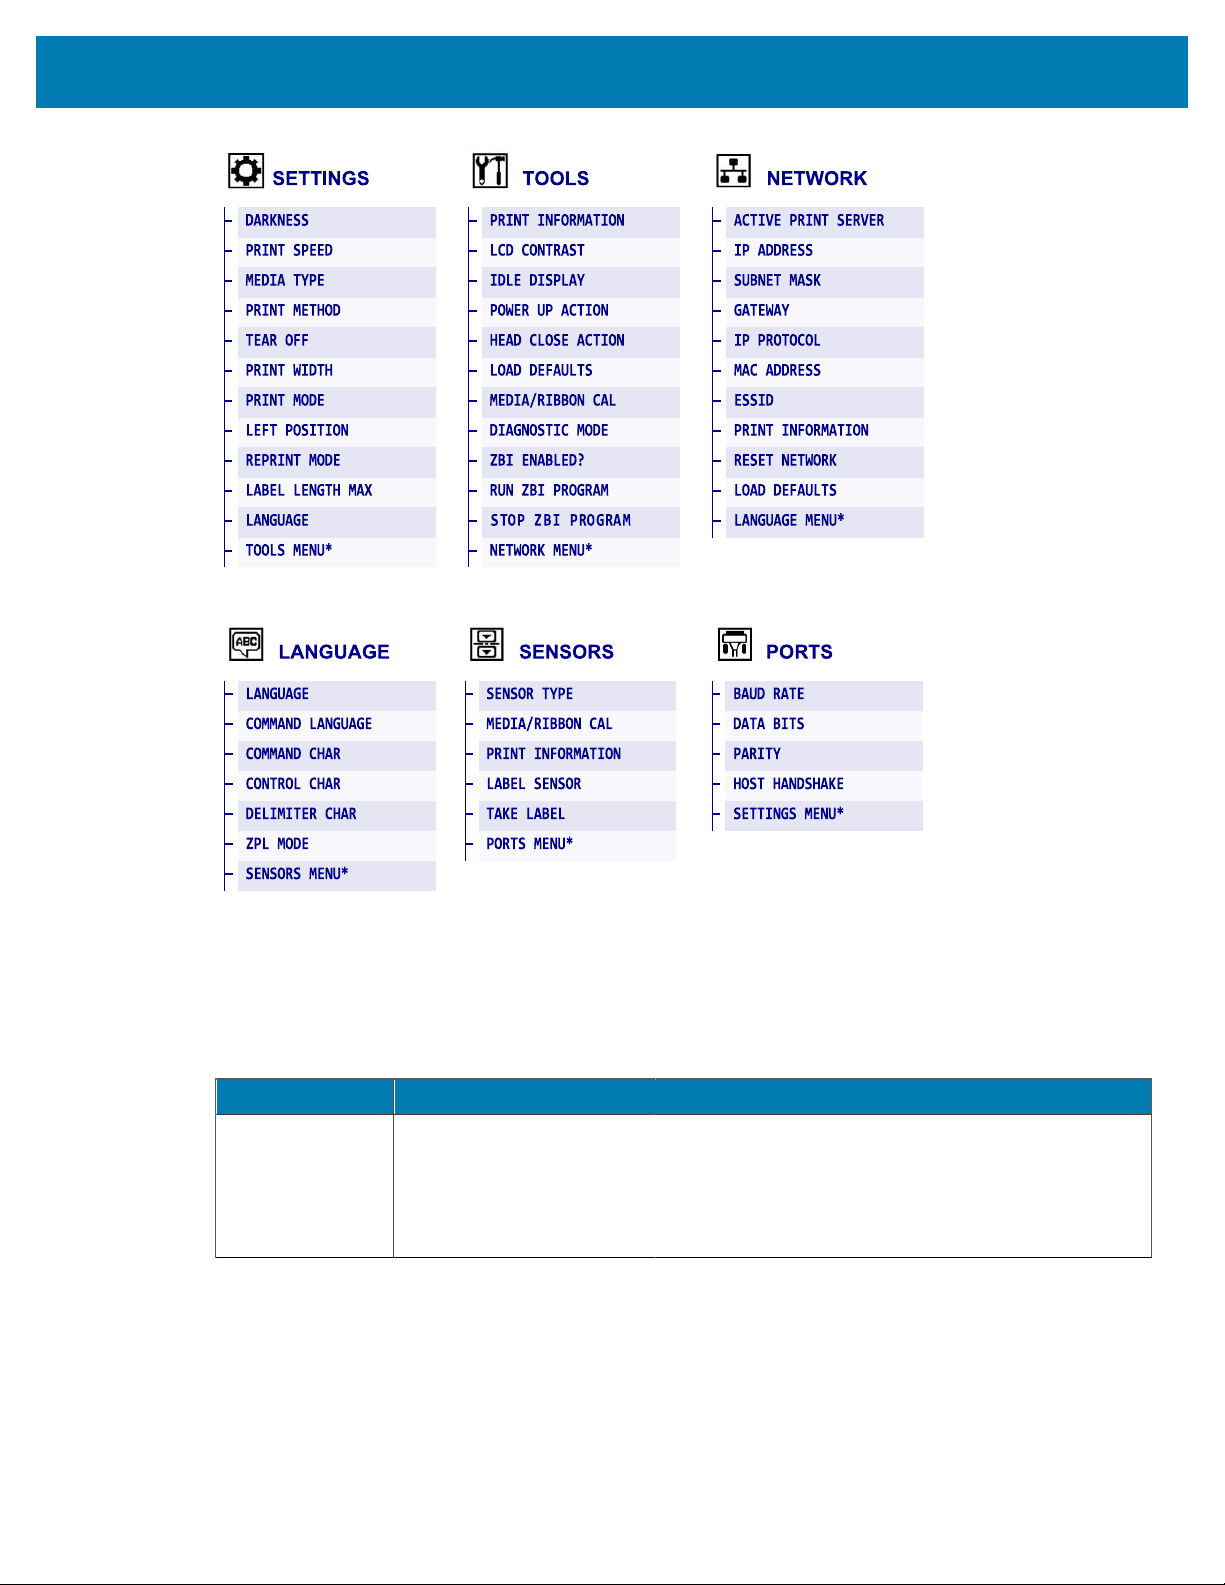
Changing Printer Settings through theUser Menus
The following are the user menus and the items that appear in each.
79
Printer Configuration and Adjustment
* Denotes a shortcut to the next user menu.
Print Settings
Print Setting Description
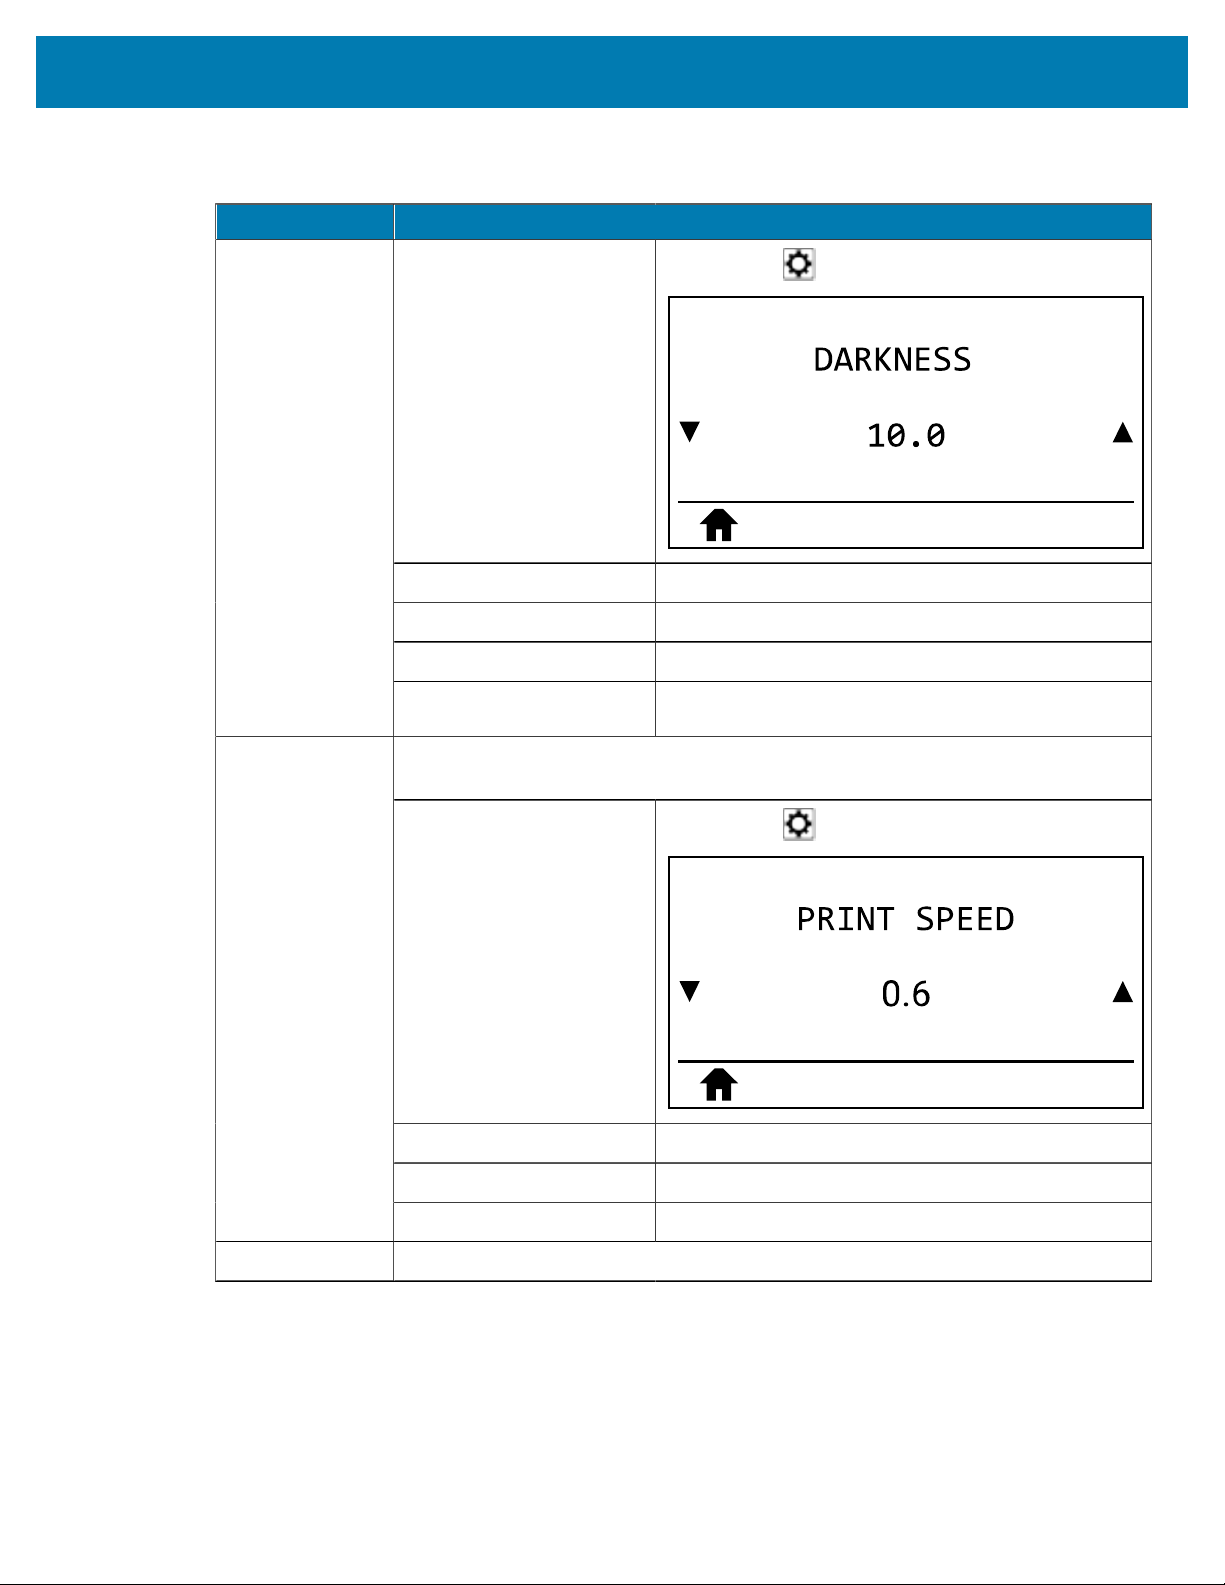
Print Darkness Set the darkness to the lowest setting that provides good print quality. If you set
the darkness too high, the label image may print unclearly, bar codes may not scan
correctly, the ribbon may burn through, or the printhead may wear prematurely.
If desired, use the FEED Self Test on page 153 to determine the optimal darkness
setting.
Table 4Print Settings
80
Printer Configuration and Adjustment
Print Setting Description
User menu item:
Main Menu > SETTINGS
Accepted values: 0.0 – 30.0
Related ZPL command(s): ^MD, ~SD
SGD command used: print.tone
Printer web page:
View and Modify Printer Settings > General Setup >
Darkness
Select the speed for printing a label (given in inches per second). Slower print
speeds typically yield better print quality.
User menu item:
Main Menu > SETTINGS
Accepted values: 2, 3, 4, 5, 6
Related ZPL command(s): ^PR
Print Speed
SGD command used: media.speed
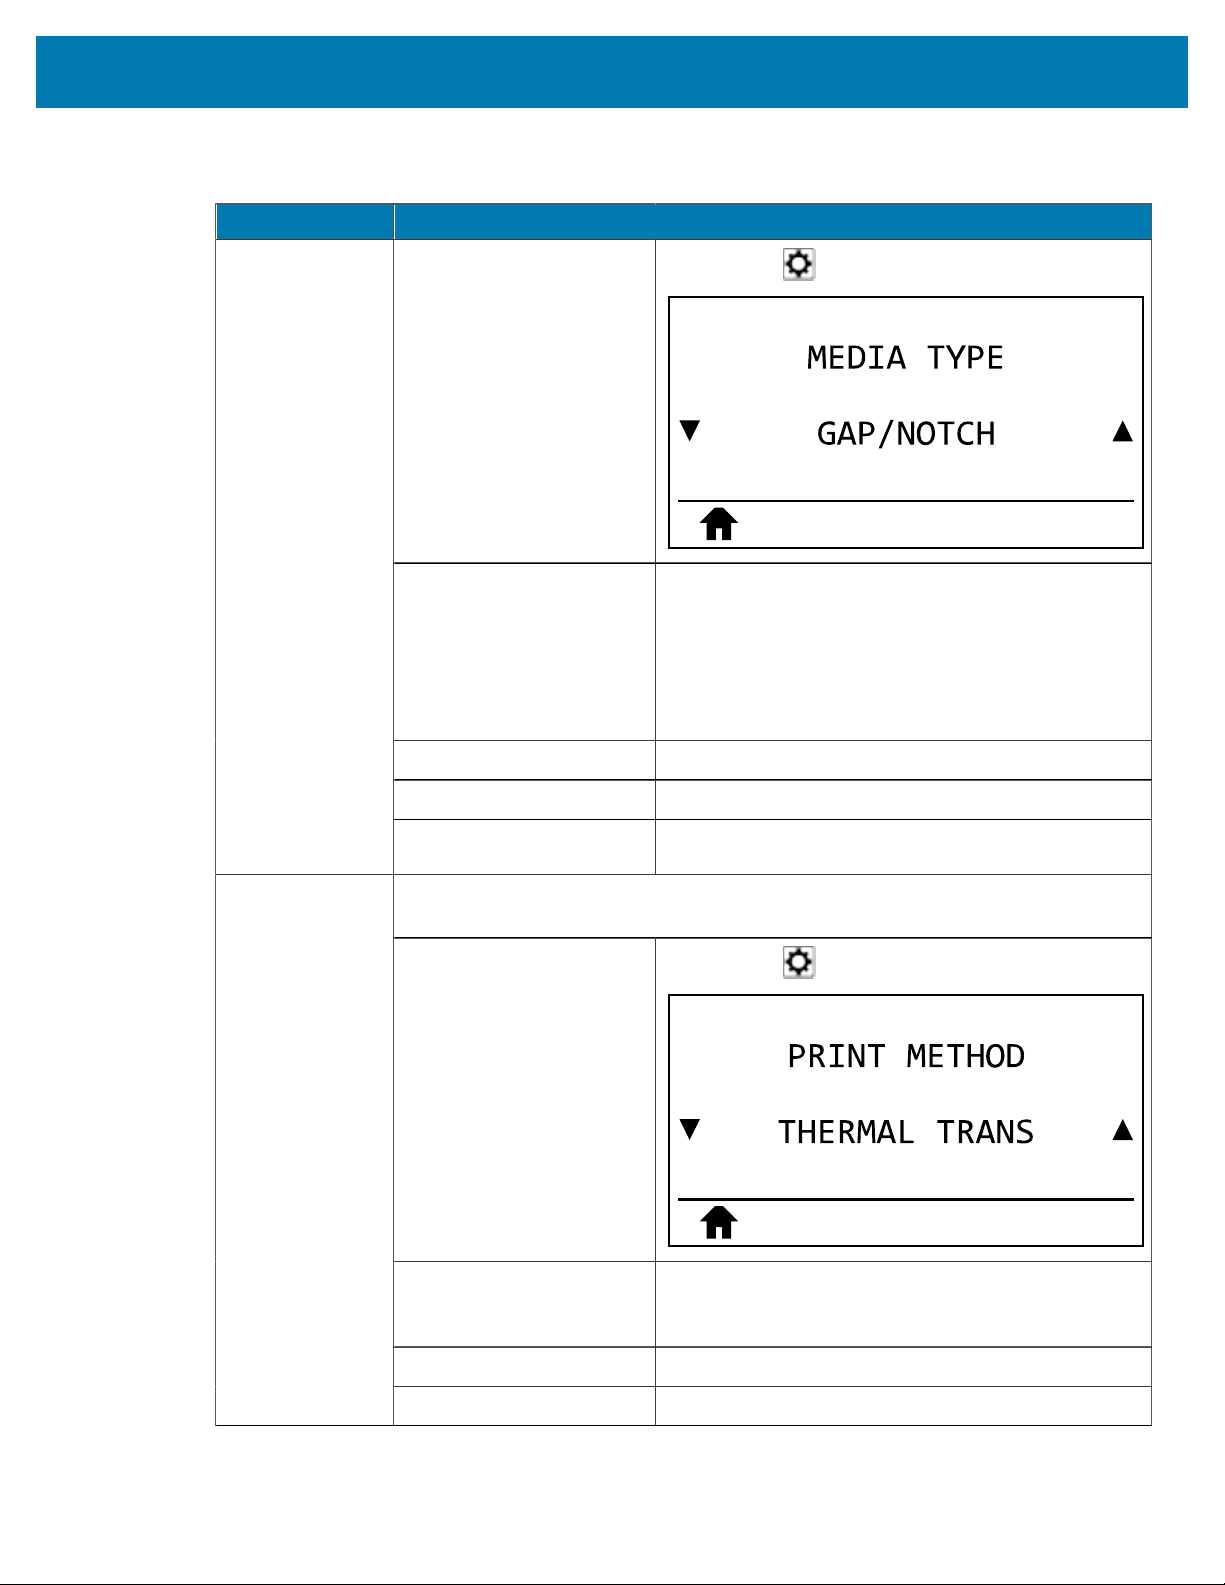
Media Type Select the type of media that you are using.
Table 4Print Settings(Continued)
81
Printer Configuration and Adjustment
Print Setting Description
User menu item:
Main Menu > SETTINGS
Accepted values:
• CONTINUOUS
• GAP/NOTCH
• MARK
If you select CONTINUOUS, you must include a label
length in your label format (^LL if you are using ZPL).
Related ZPL command(s): ^MN
SGD command used: ezpl.media_type
Printer web page:
View and Modify Printer Settings > Media Setup >
Media Type
Specify if the printer is to use Direct Thermal mode (no ribbon) or Thermal Transfer
mode (using thermal transfer media and ribbon).
User menu item:
Main Menu > SETTINGS
Accepted values:
• THERMAL TRANS
• DIRECT THERMAL
Related ZPL command(s): ^MT
Print Method
SGD command used: ezpl.print_method
Table 4Print Settings(Continued)
82
Printer Configuration and Adjustment
Print Setting Description
Printer web page:
View and Modify Printer Settings > Media Setup >
Print Method
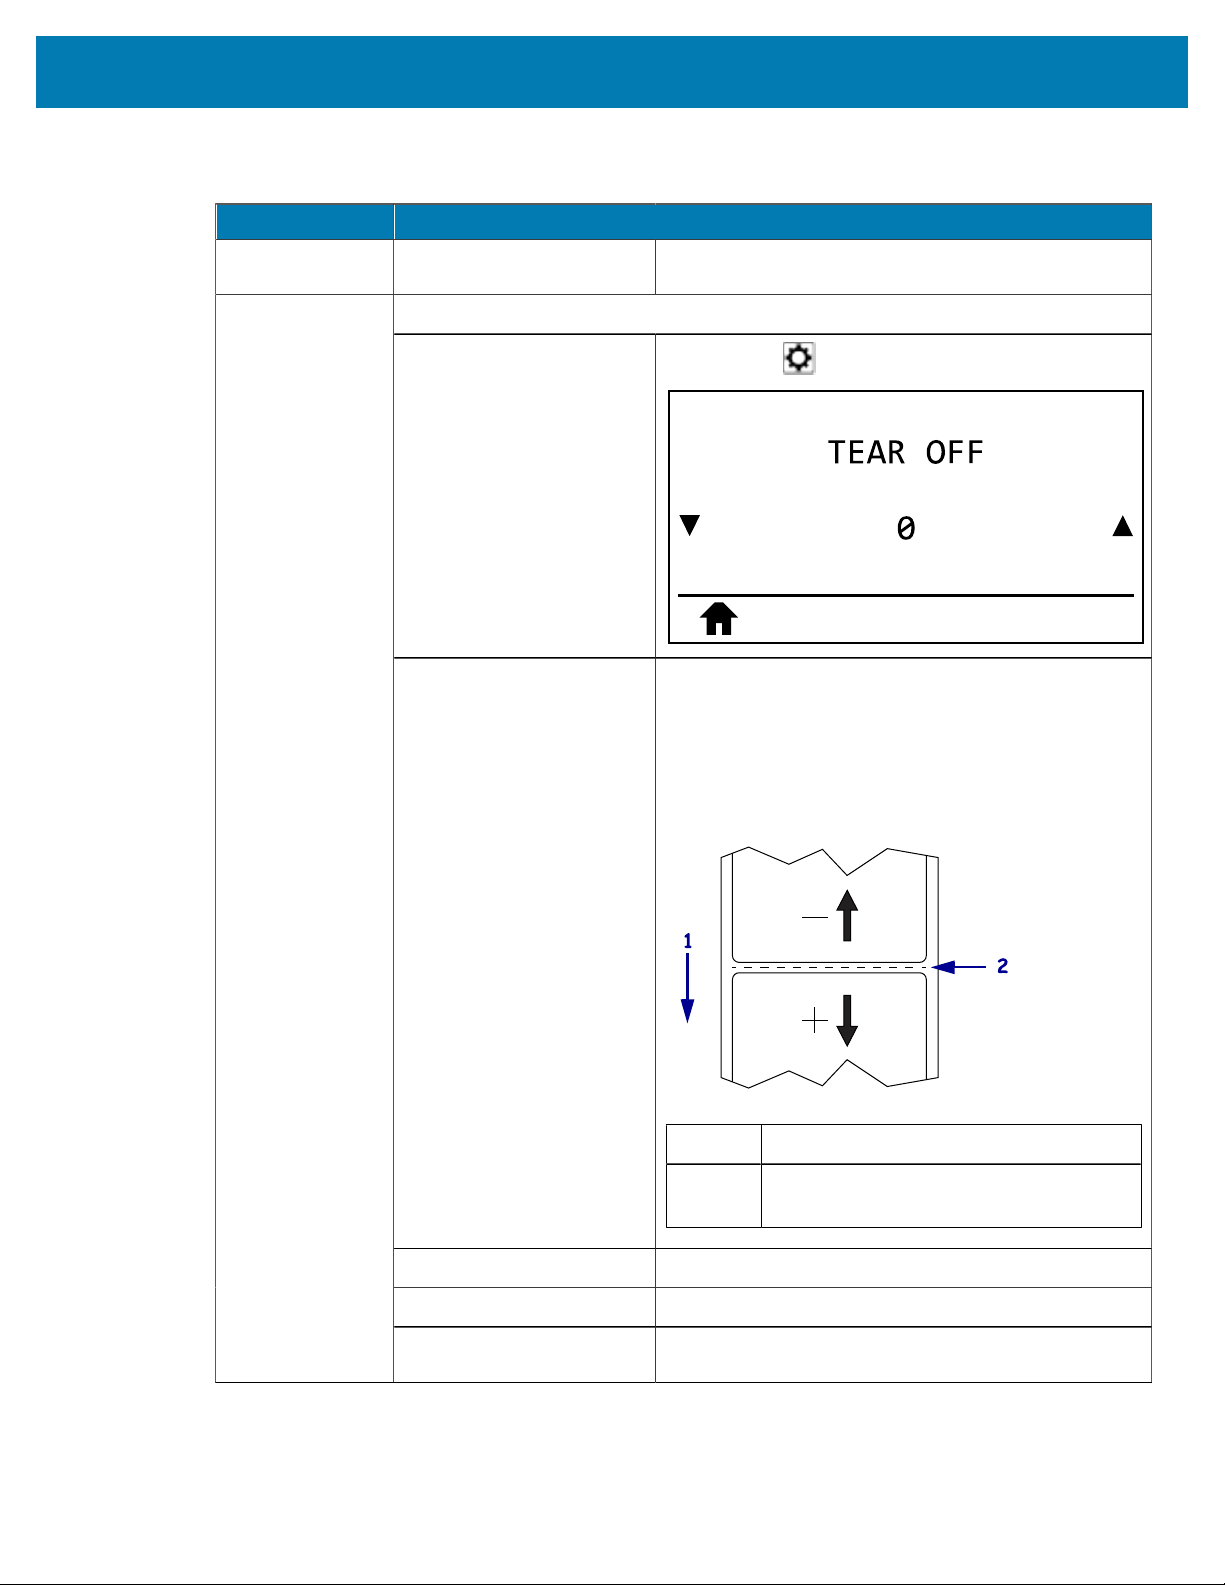
If necessary, adjust the position of the media over the tear#off bar after printing.
User menu item:
Main Menu > SETTINGS
Accepted values: –120 to 120
• Higher numbers move the media out (the tear
line moves closer to the leading edge of the next
label).
• Lower numbers move the media in (the tear line
moves closer to the edge of the label just printed).
1 Media direction
2 Factory-set tear line location at position
000
Related ZPL command(s): ~TA
SGD command used: ezpl.tear_off
Tear-Off Position
Printer web page:
View and Modify Printer Settings > General Setup >
Tear Off
Table 4Print Settings(Continued)
83
Printer Configuration and Adjustment
Print Setting Description
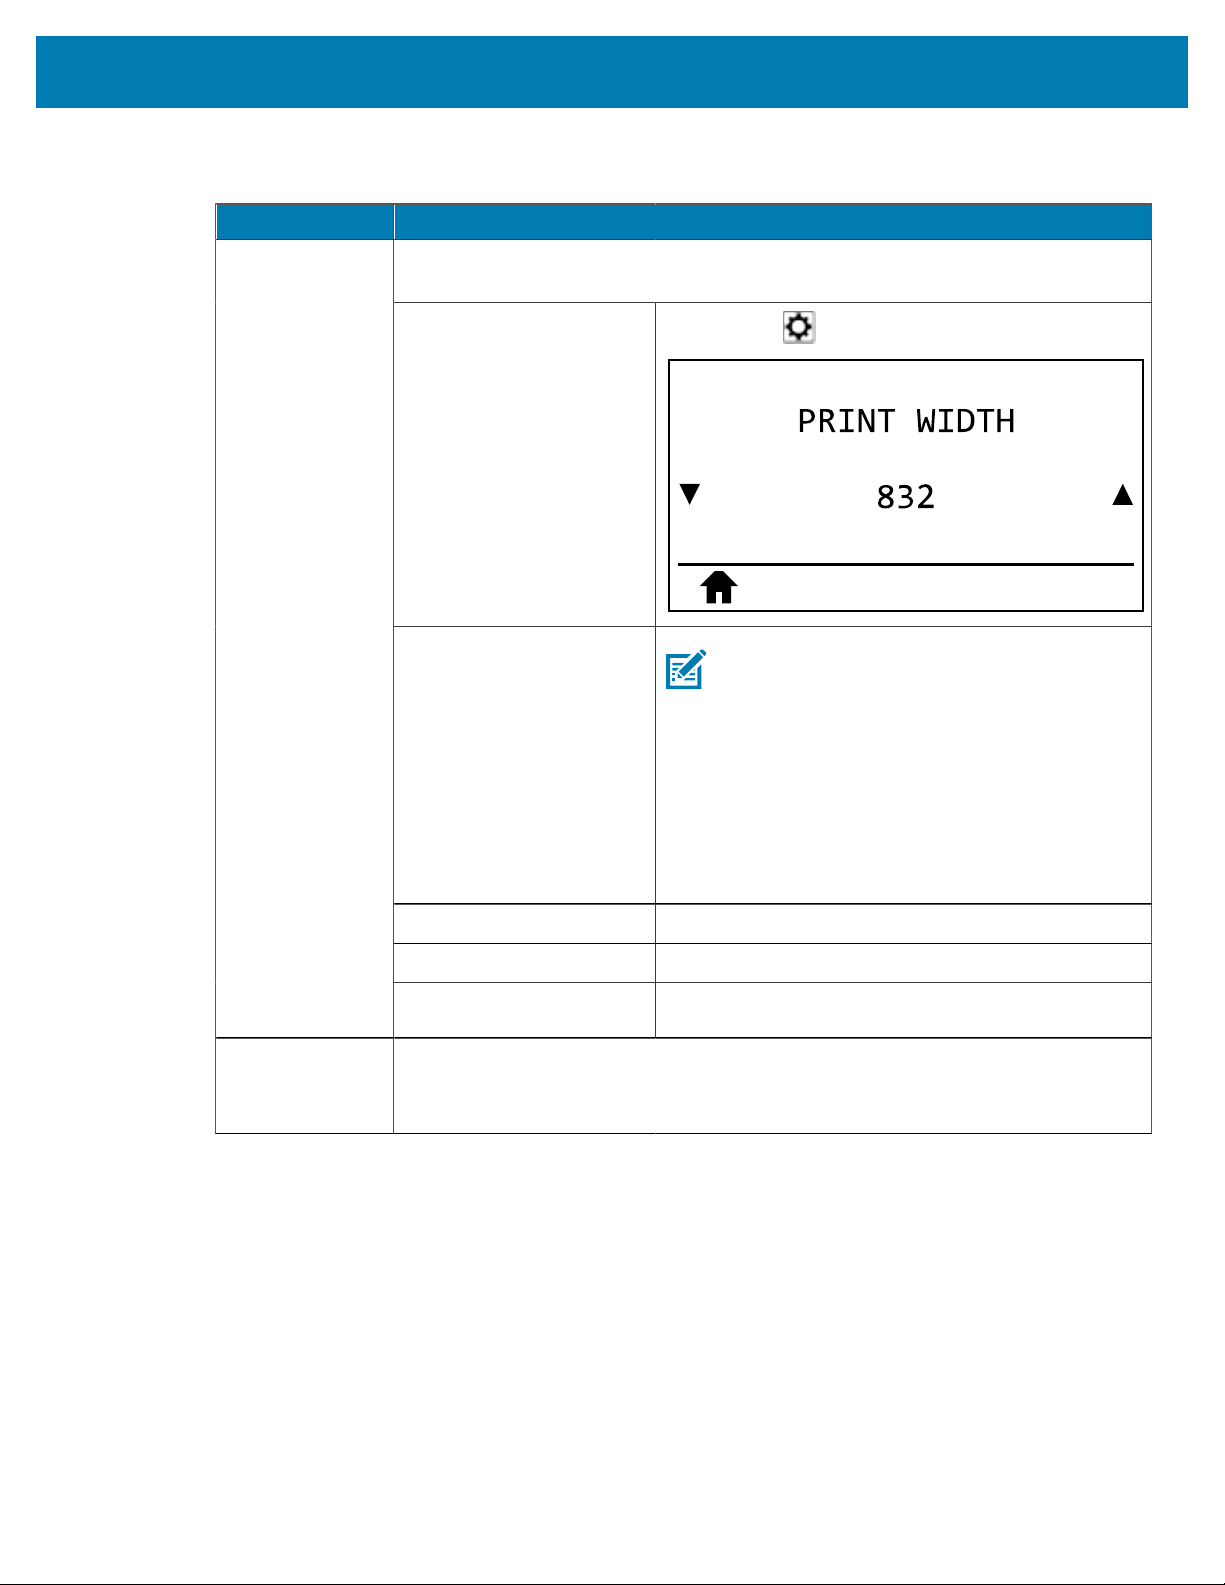
Specify the width of the labels being used, in dots. The default value is the
maximum width for the printer, based on the printhead’s DPI value.
User menu item:
Main Menu > SETTINGS
Accepted values:
NOTE: Setting the width too narrow can
result in portions of a label format not being
printed on the media. Setting the width too
wide wastes formatting memory and can
cause the printer to print off of the label and
onto the platen roller. This setting can affect
the horizontal position of the label format if
the image was inverted using the ^POI ZPLII
command.
0000 to 1248 dots
Related ZPL command(s): ^PW
SGD command used: ezpl.print_width
Print Width
Printer web page:
View and Modify Printer Settings > Media Setup >
Print Width
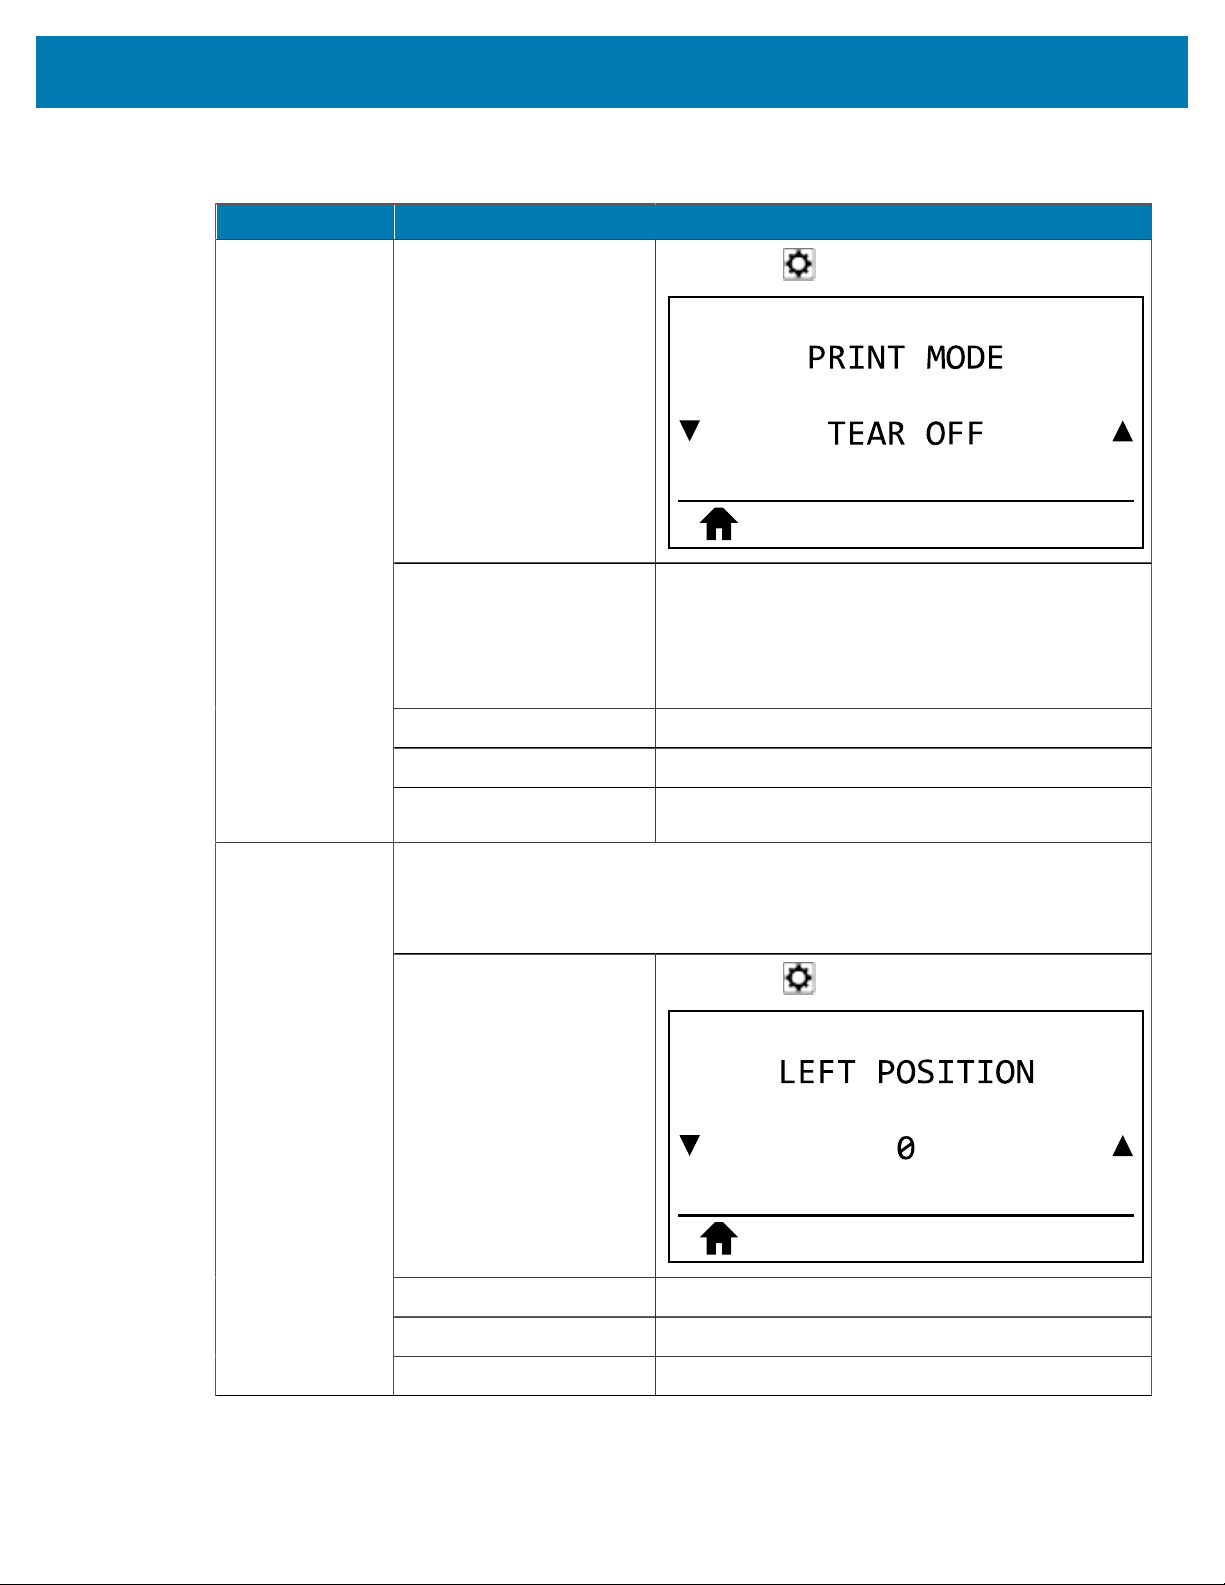
Print Mode Select a print mode that is compatible with your printer options.
For information about how the print mode selections work with different printer
options, see Selecting a Print Mode on page 23.
Table 4Print Settings(Continued)
84
Printer Configuration and Adjustment
Print Setting Description
User menu item:
Main Menu > SETTINGS
Accepted values:
• TEAR OFF
• CUTTER
• PEEL (use this value for peel-off or liner take-up
printing)
Related ZPL command(s): ^MM
SGD command used: media.printmode
Printer web page:
View and Modify Printer Settings > General Setup >
Print Mode
If necessary, shift the print position horizontally on the label. Positive numbers move
the left edge of the image toward the center of the label by the number of dots
selected, while negative numbers move the left edge of the image toward the left
edge of the label.
User menu item:
Main Menu > SETTINGS
Accepted values: –9999 to 9999
Related ZPL command(s): ^LS
Label Left
Position
SGD command used: zpl.left_position
Table 4Print Settings(Continued)
85

Printer Configuration and Adjustment
Print Setting Description
Printer web page:
View and Modify Printer Settings > Advanced Setup
> Left Position
When reprint mode is enabled, you can reprint the last label printed by pressing the
DOWN ARROW on the printer’s control panel.
User menu item:
Main Menu > SETTINGS
Accepted values:
• ON
• OFF
Related ZPL command(s): ^JZ
Reprint Mode
SGD command used: ezpl.reprint_mode
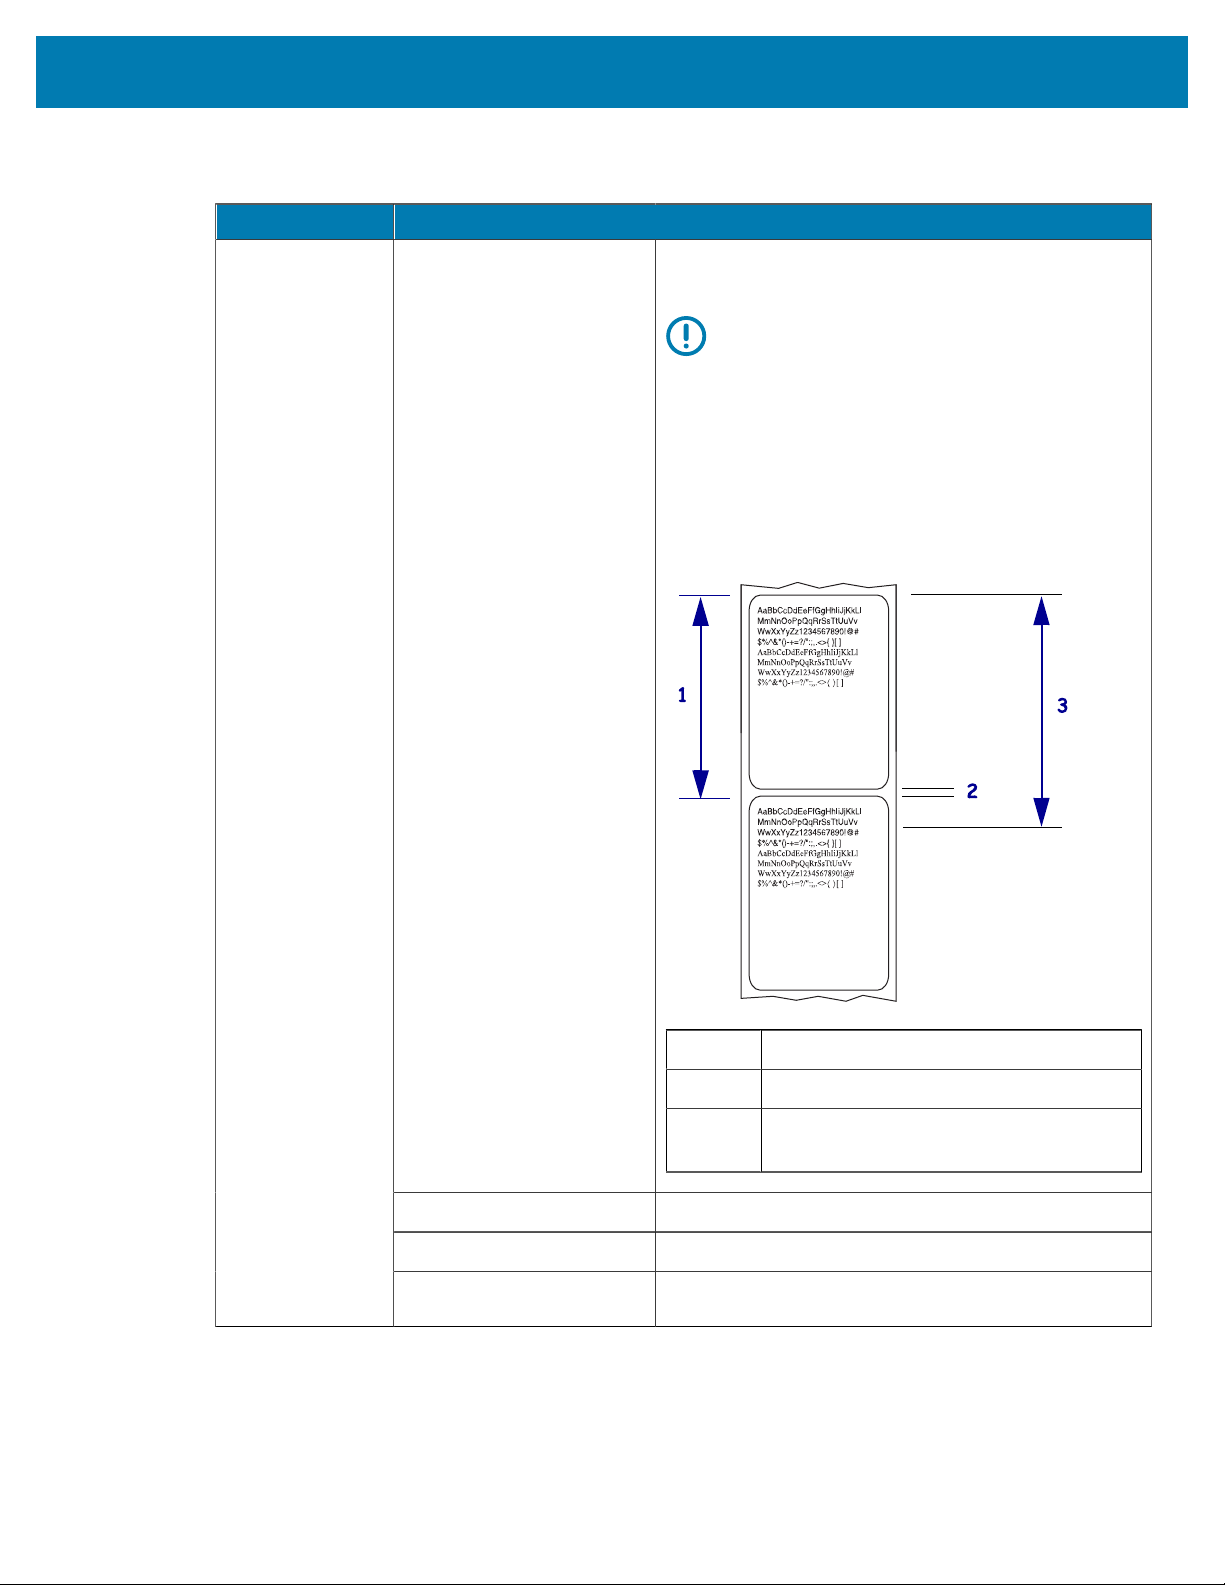
Set the maximum label length.Maximum Label
Length
User menu item:
Main Menu > SETTINGS
Table 4Print Settings(Continued)
86
Printer Configuration and Adjustment
Print Setting Description
Accepted values: 0 to the maximum label length supported by the
printer
IMPORTANT: Specify a value that is at least
1.0 in. (25.4mm) greater than the actual
label length plus the interlabel gap. If you
set the value to one that is smaller than
the label length, the printer assumes that
continuous media is loaded, and the printer
cannot calibrate.
For example, if the label length is 6.0inches (152mm)
including the interlabel gap, set the parameter for at
least 7.0inches (178mm).
1 Label length (including interlabel gap)
2 Interlabel gap
3 Set the maximum label length to
approximately this value
Related ZPL command(s): ^ML
SGD command used: ezpl.label_length_max
Printer web page:
View and Modify Printer Settings > Media Setup >
MaximumLength
Table 4Print Settings(Continued)
87

Printer Configuration and Adjustment
Calibration and Diagnostic Tools
Item Description
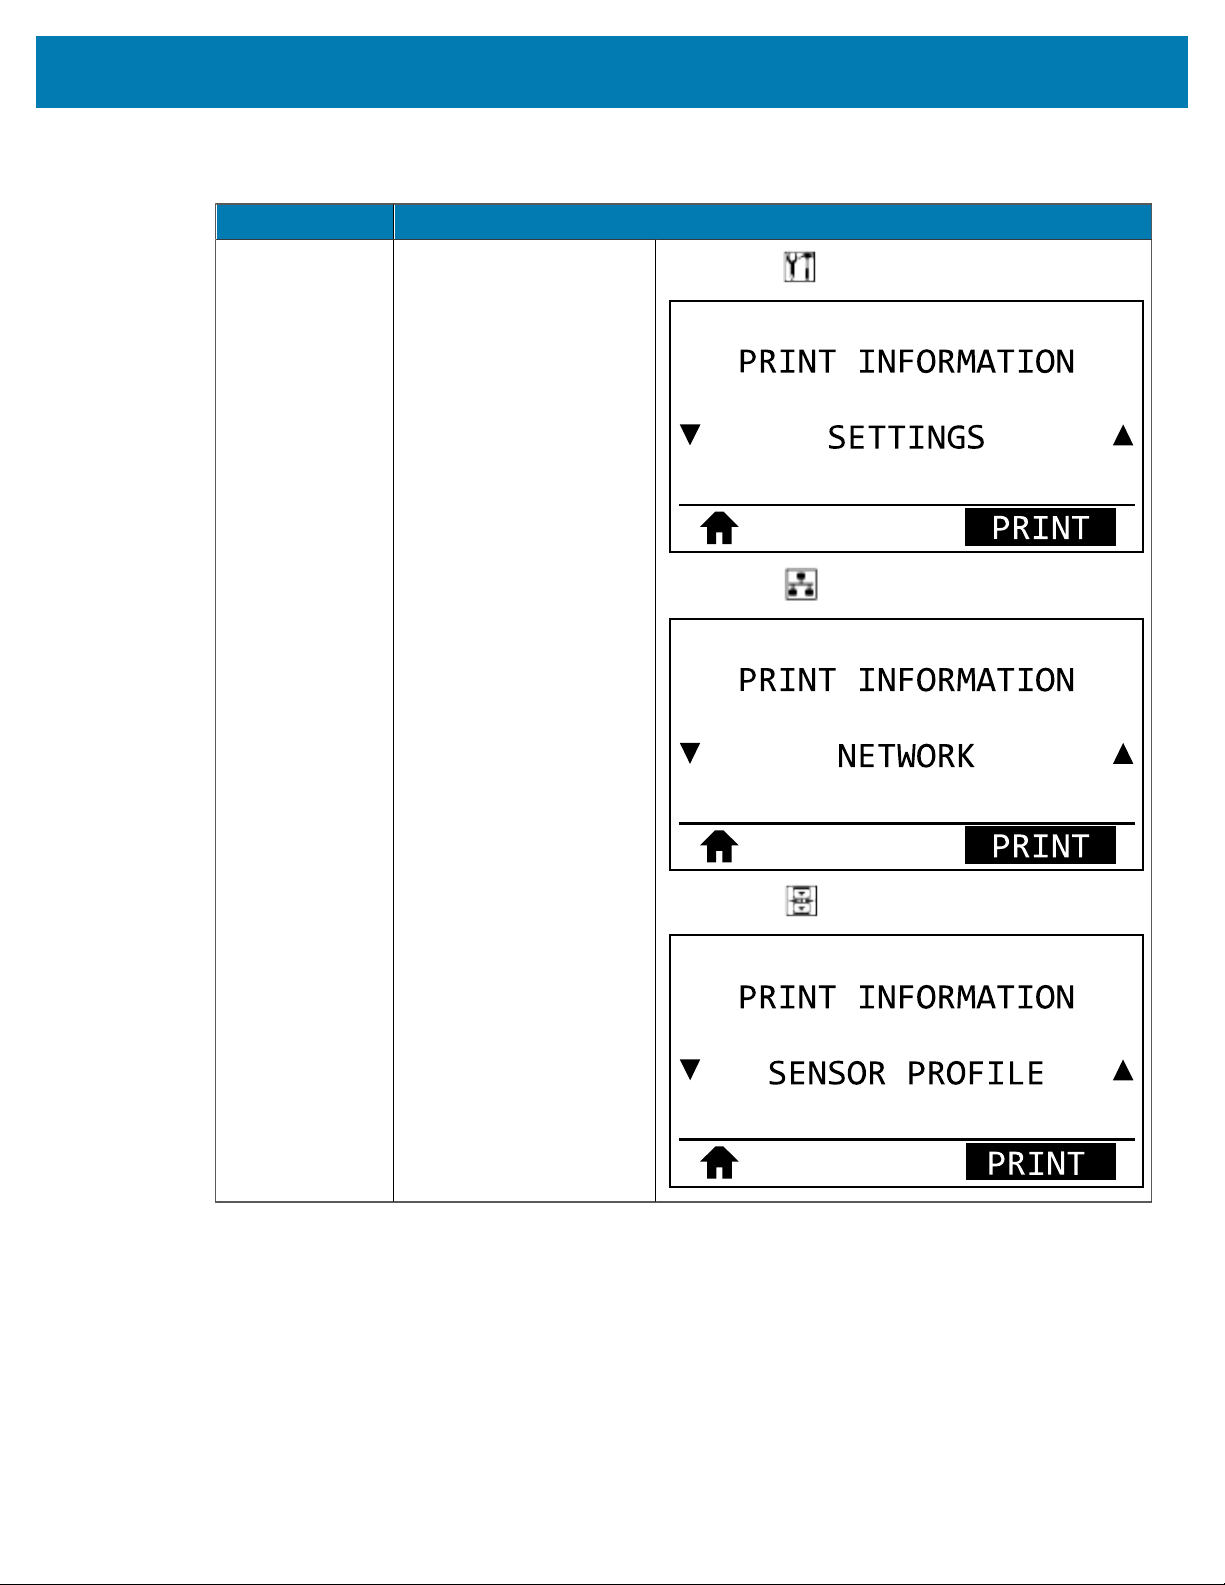
Print Information Print the specified information on one or more labels.
Table 5Calibration and Diagnostic Tools
88
Printer Configuration and Adjustment
Item Description
User menu item:
Main Menu > TOOLS
Main Menu > NETWORK
Main Menu > SENSORS
Table 5Calibration and Diagnostic Tools(Continued)
89
Printer Configuration and Adjustment
Item Description
Accepted values:
• SETTINGS—prints the printer configuration label.
• NETWORK—prints the settings for any print server
that is installed.
• FORMATS—prints the available formats stored
in the printer’s RAM, Flash memory, or optional
memory card.
• IMAGES—prints the available images stored in the
printer’s RAM, Flash memory, or optional memory
card.
• FONTS—prints the available fonts in the printer,
including standard printer fonts plus any optional
fonts. Fonts may be stored in RAM or Flash
memory.
• BARCODES—prints the available bar codes in the
printer. Bar codes may be stored in RAM or Flash
memory.
• ALL—prints the previous six labels.
• SENSOR PROFILE—shows the sensor settings
compared to actual sensor readings. To interpret
the results, see Sensor Profile on page 158.
Related ZPL command(s):
SETTINGS: ~WC
NETWORK: ~WL
SENSOR PROFILE: ~JG
Others: ^WD
Control panel key(s):
SETTINGS and NETWORK: Do one of the following:
• Hold CANCEL during printer power-up.
• Hold FEED + CANCEL for 2 seconds when the
printer is in the Ready state.
SENSOR PROFILE: Hold FEED + CANCEL during
printer power-up.
Print Information
Printer web page: View and Modify Printer Settings >
PrintListingsonLabel
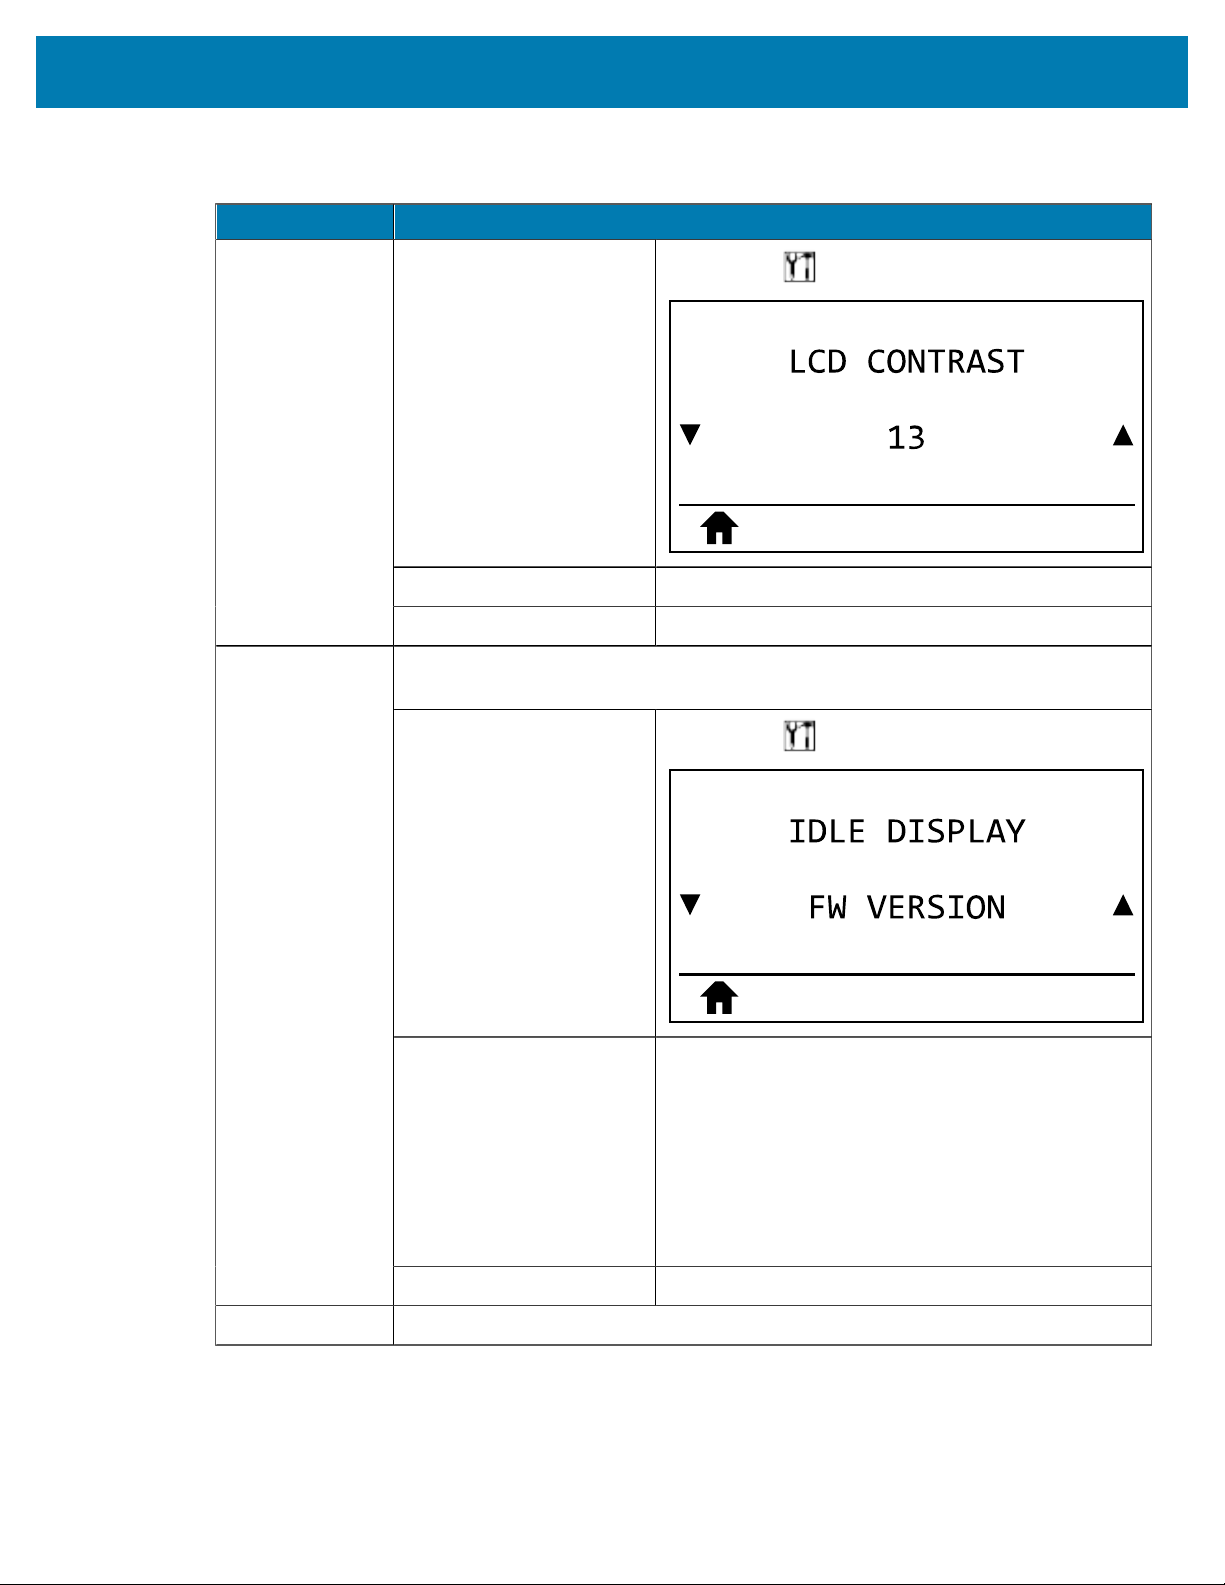
LCD Contrast Change the contrast on the printer’s display. (ZT230only)
Table 5Calibration and Diagnostic Tools(Continued)
90
Printer Configuration and Adjustment
Item Description
User menu item:
Main Menu > TOOLS
Accepted values:
3 to 15
SGD command used:
display.contrast
Select the information shown on the printer’s display when the printer is idle.
(ZT230only)
User menu item:
Main Menu > TOOLS
Accepted values:
• FW VERSION
• IP ADDRESS
• MM/DD/YY 24 HR
• MM/DD/YY 12 HR
• DD/MM/YY 24 HR
• DD/MM/YY 12 HR
Idle Display
SGD command used:
device.idle_display_format
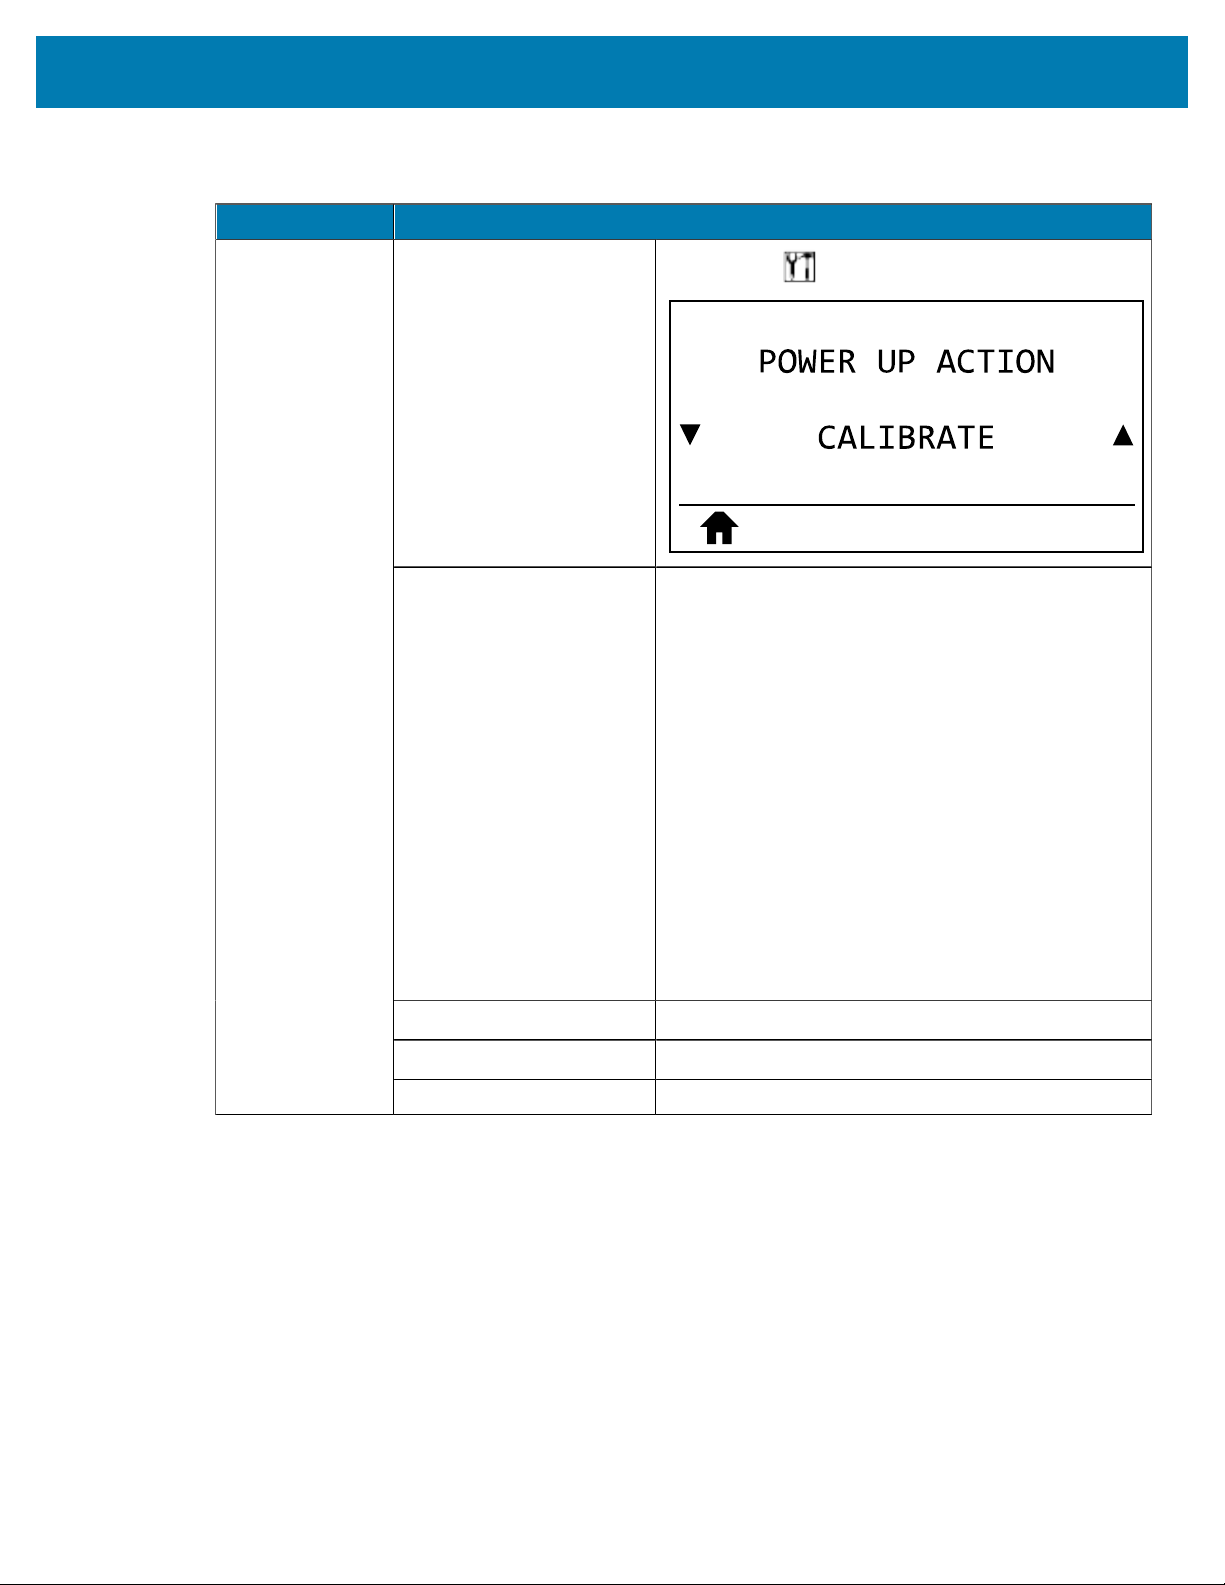
Power-Up Action Set the action for the printer to take during the power-up sequence.
Table 5Calibration and Diagnostic Tools(Continued)
91
Printer Configuration and Adjustment
Item Description
User menu item:
Main Menu > TOOLS
Accepted values:
• CALIBRATE—adjusts sensor levels and thresholds,
determines the label length, and feeds the media
to the next web.
• FEED—feeds the labels to the first registration
point.
• LENGTH—determines the label length using
current sensor values, and feeds the media to the
next web.
• NO MOTION—tells the printer not to move the
media. You must manually ensure that the web is
positioned correctly, or press feed to position the
next web.
• SHORT CAL—sets the media and web thresholds
without adjusting sensor gain, determines the label
length, and feeds the media to the next web.
Related ZPL command(s):
^MF
SGD command used:
ezpl.power_up_action
Printer web page: View and Modify Printer Settings > Calibration
Table 5Calibration and Diagnostic Tools(Continued)
92
Printer Configuration and Adjustment
Item Description
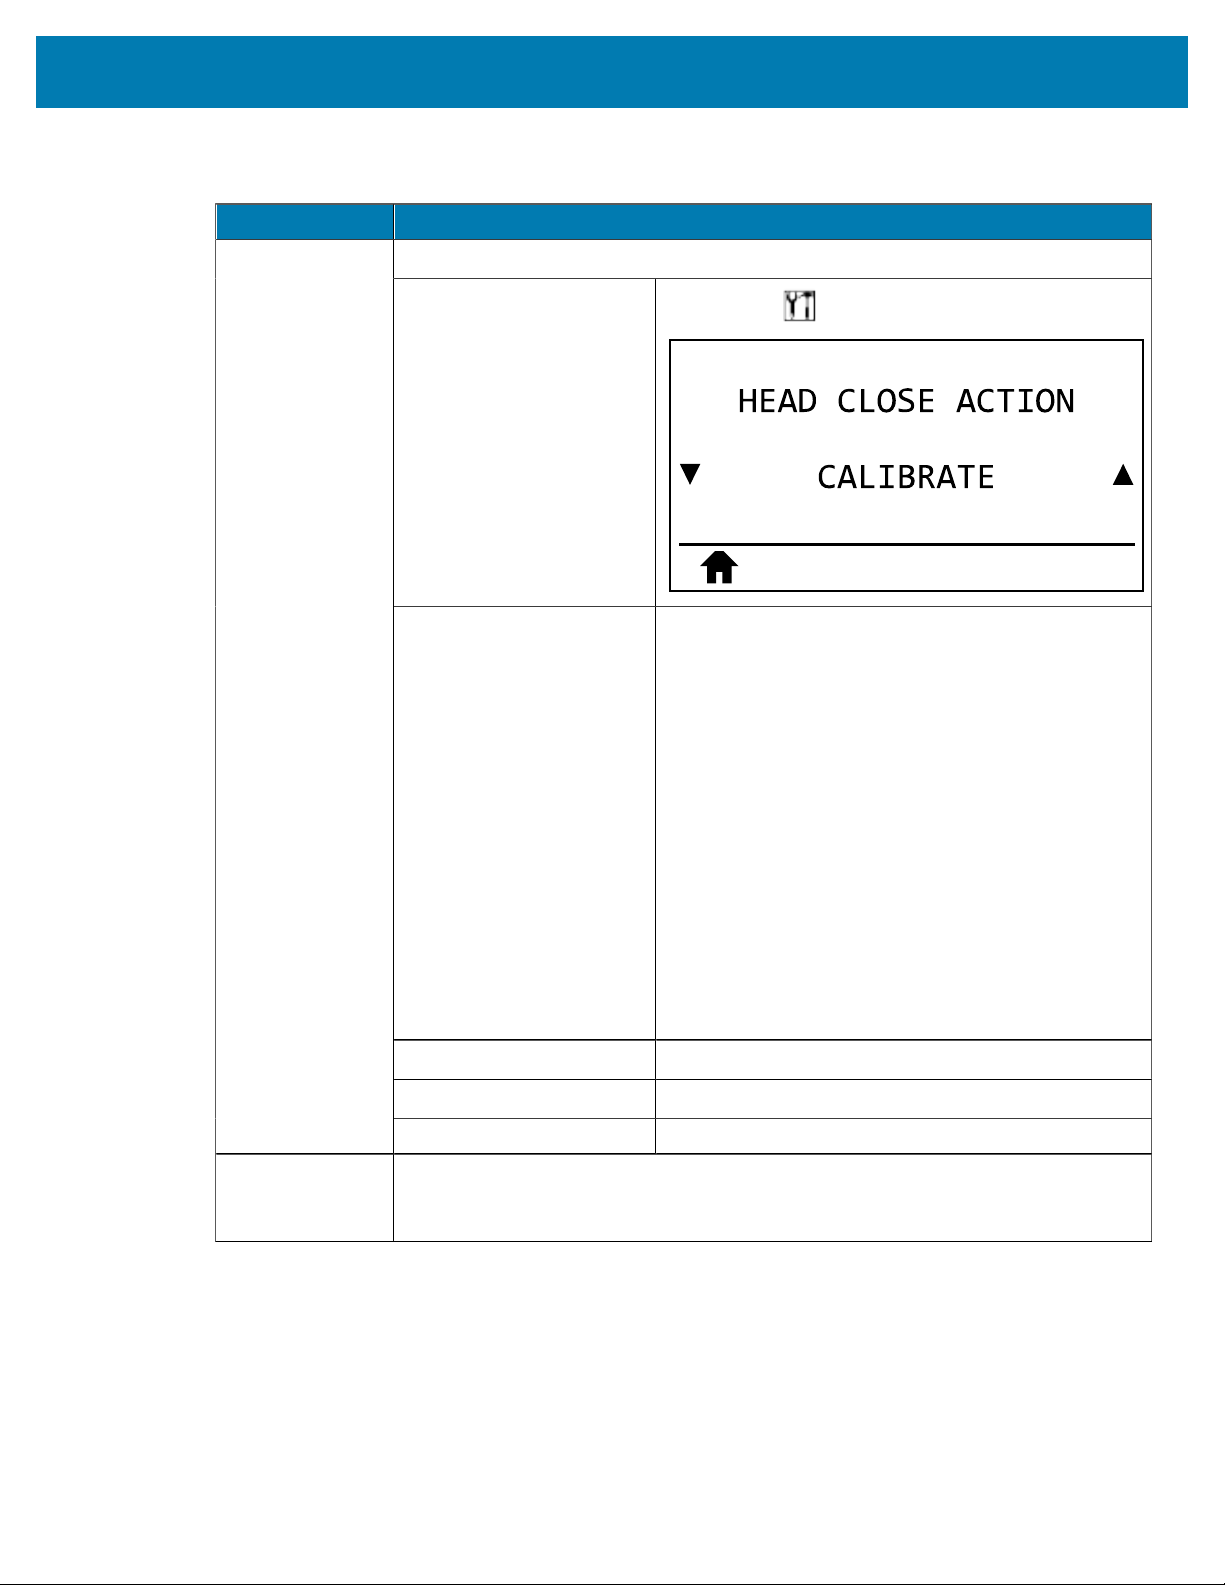
Set the action for the printer to take when you close the printhead.
User menu item:
Main Menu > TOOLS
Accepted values:
• CALIBRATE—adjusts sensor levels and thresholds,
determines the label length, and feeds the media
to the next web.
• FEED—feeds the labels to the first registration
point.
• LENGTH—determines the label length using
current sensor values, and feeds the media to the
next web.
• NO MOTION—tells the printer not to move the
media. You must manually ensure that the web is
positioned correctly, or press feed to position the
next web.
• SHORT CAL—sets the media and web thresholds
without adjusting sensor gain, determines the label
length, and feeds the media to the next web.
Related ZPL command(s):
^MF
SGD command used:
ezpl.head_close_action
Head-Close
Action
Printer web page: View and Modify Printer Settings > Calibration
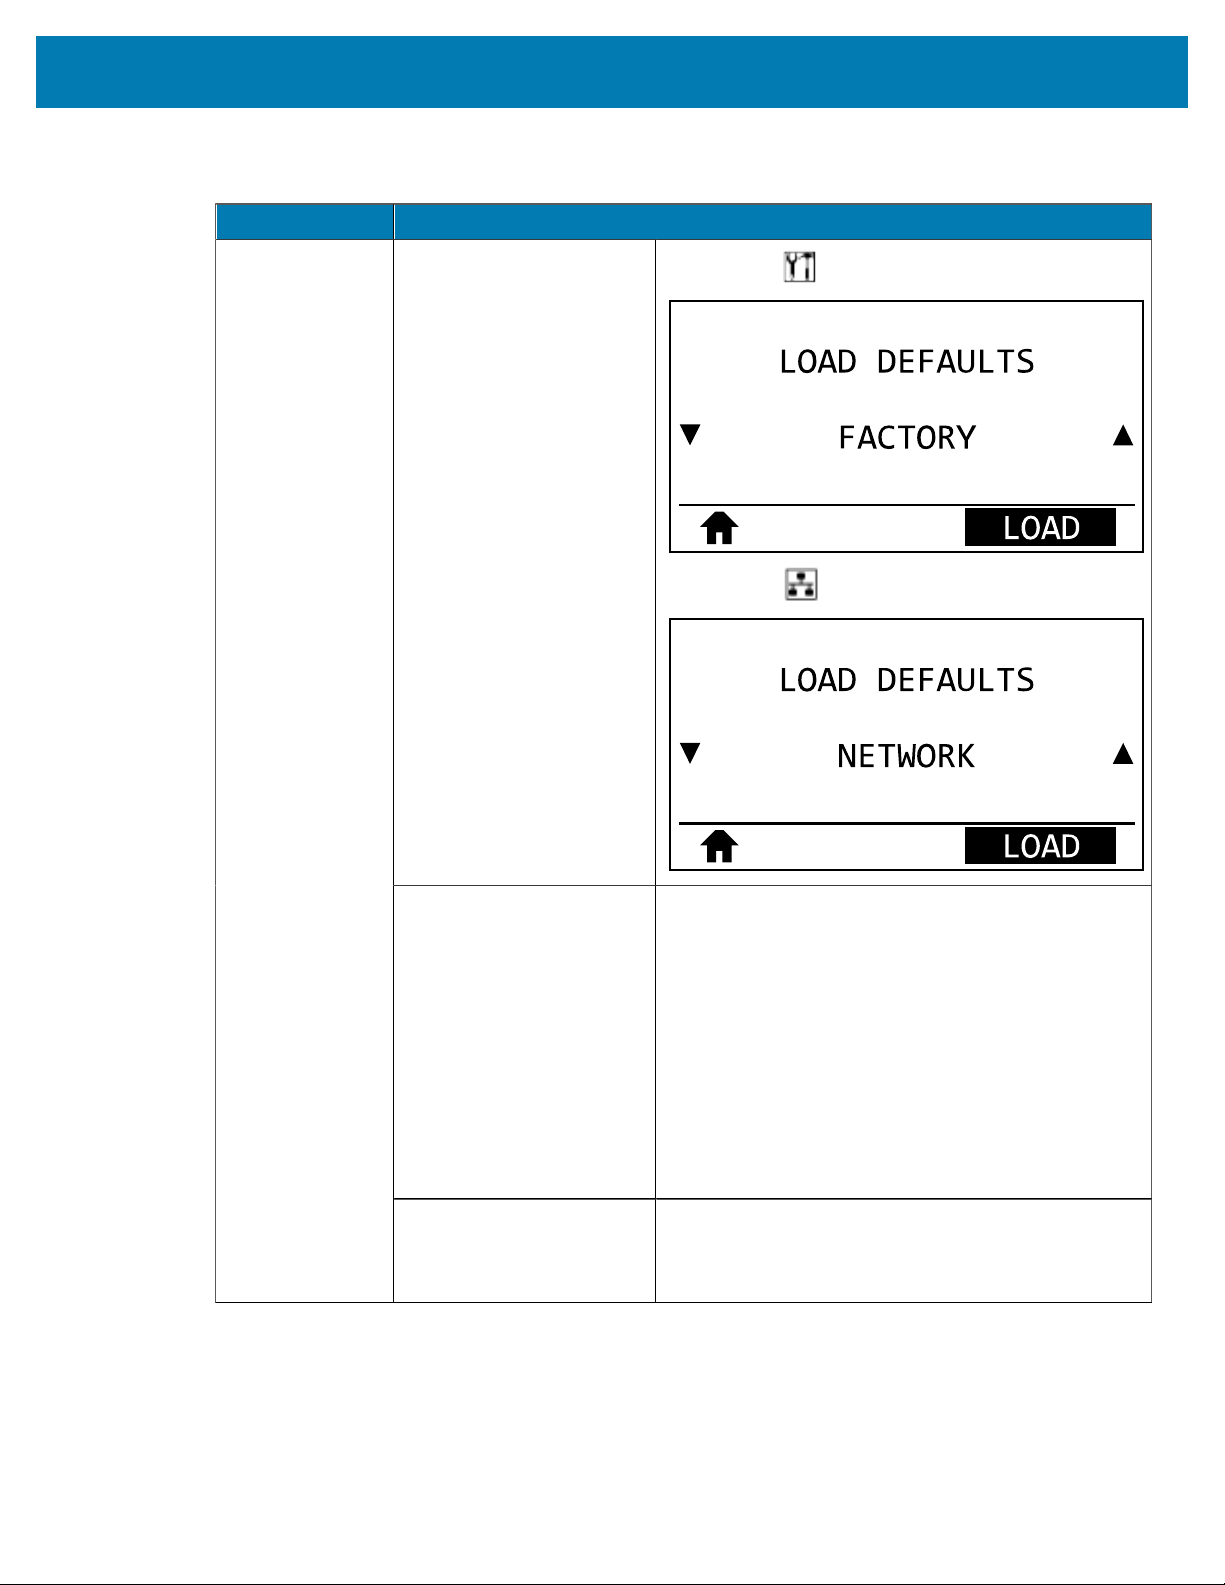
Load Defaults Restore specific printer, print server, and network settings back to the factory
defaults. Use care when loading defaults because you will need to reload all
settings that you changed manually.
Table 5Calibration and Diagnostic Tools(Continued)
93
Printer Configuration and Adjustment
Item Description
User menu item:
Main Menu > TOOLS
Main Menu > NETWORK
Accepted values:
• FACTORY—Restores all printer settings other than
the network settings back to the factory defaults.
Use care when loading defaults because you
will need to reload all settings that you changed
manually.
• NETWORK—Reinitializes the printer’s wired or
wireless print server. With a wireless print server,
the printer also reassociates with your wireless
network.
• LAST SAVED—Loads settings from the last
permanent save.
Related ZPL command(s):
FACTORY: ^JUF
NETWORK: ^JUN
LAST SAVED: ^JUR
Table 5Calibration and Diagnostic Tools(Continued)
94
Printer Configuration and Adjustment
Item Description
Control panel key(s):
FACTORY: Hold FEED + PAUSE during printer power-
up to reset the printer parameters to factory values.
NETWORK: Hold CANCEL + PAUSE during printer
power-up to reset the network parameters to factory
values.
LAST SAVED: N/A
Printer web page:
FACTORY: View and Modify Printer Settings > Restore
Default Configuration
NETWORK: Print Server Settings > Reset Print Server
LAST SAVED: View and Modify Printer Settings >
Restore Saved Configuration
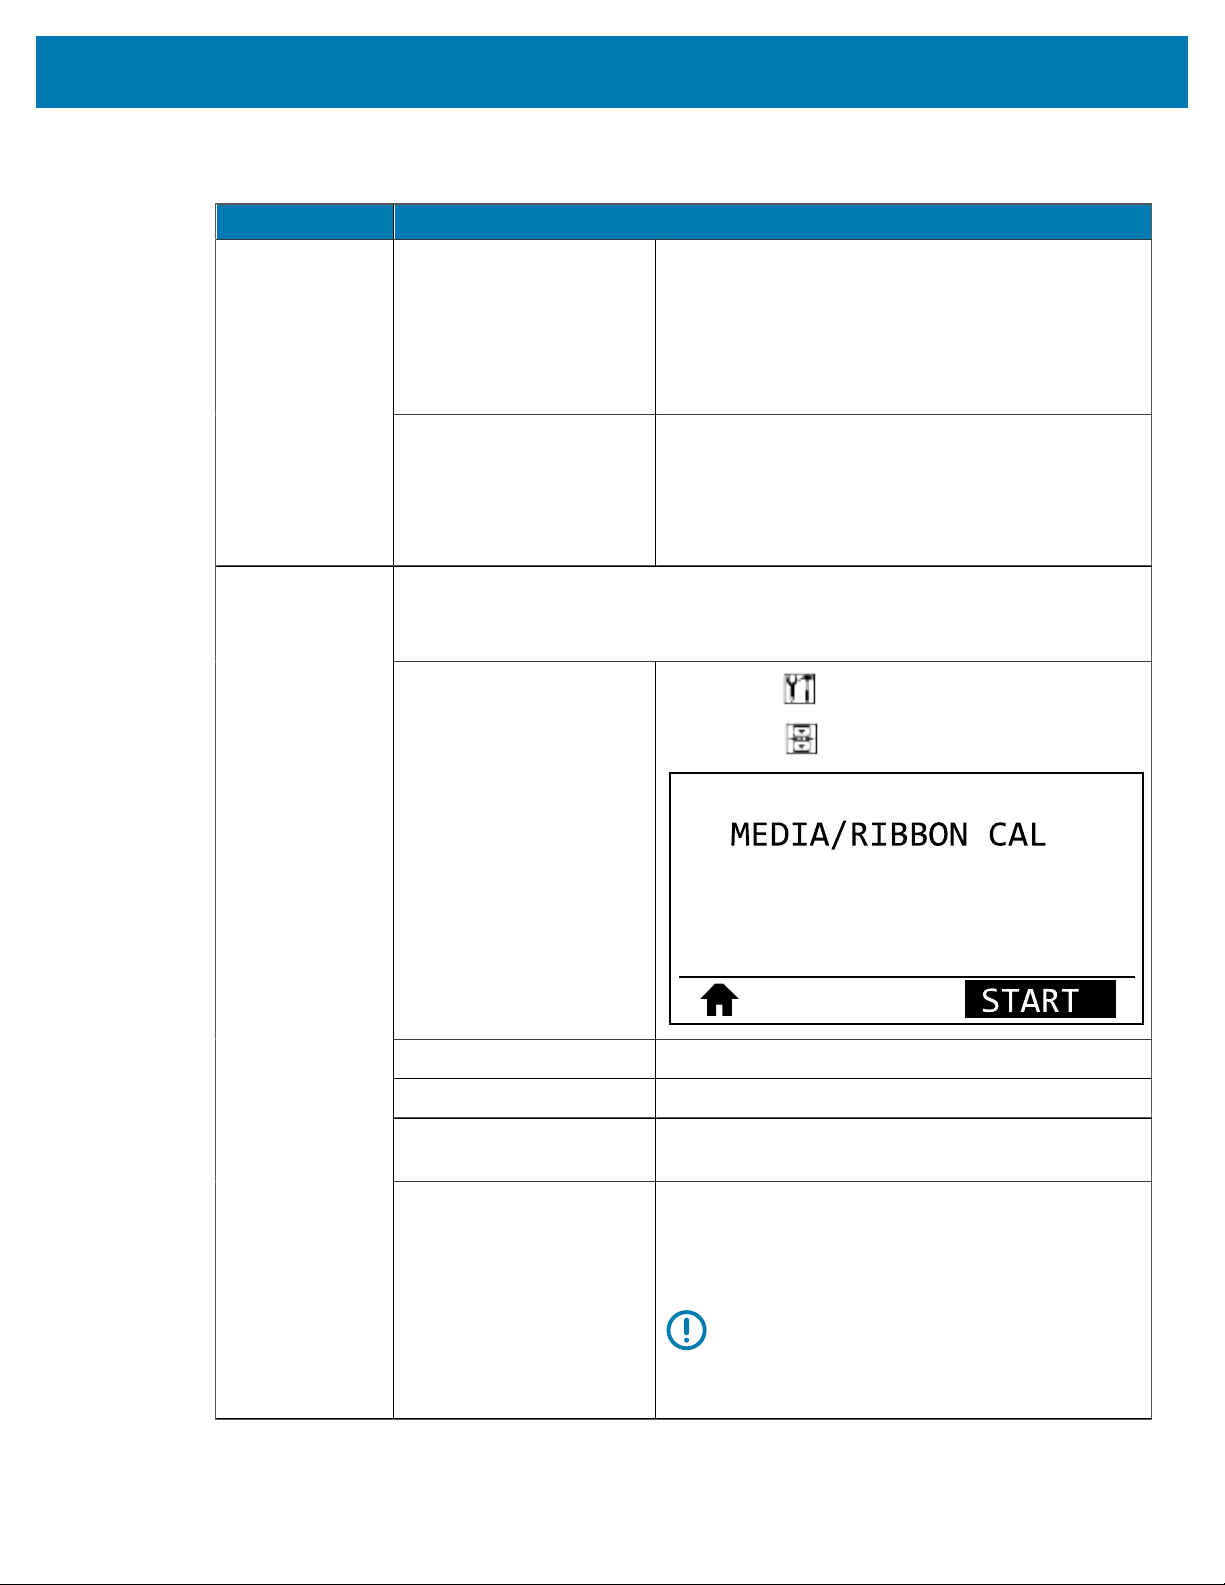
Calibrate the printer to adjust the sensitivity of the media and ribbon sensors.
For complete instructions on how to perform a calibration procedure, see
Calibrating the Ribbon and Media Sensors on page 111.
User menu item:
Main Menu > TOOLS
Main Menu > SENSORS
Related ZPL command(s):
~JC
SGD command used:
ezpl.manual_calibration
Control panel key(s):
Hold PAUSE + CANCEL for 2seconds to initiate
calibration.
Media and
Ribbon Sensor
Calibration
Printer web page:
The calibration procedure cannot be initiated through
the web pages. See the following web page for
settings that are set during sensor calibration:
View and Modify Printer Settings > Calibration
IMPORTANT:
Do not change these settings unless you are
told to do so by Zebra Technical Support or
by an authorized service technician.
Table 5Calibration and Diagnostic Tools(Continued)
95
Printer Configuration and Adjustment
Item Description
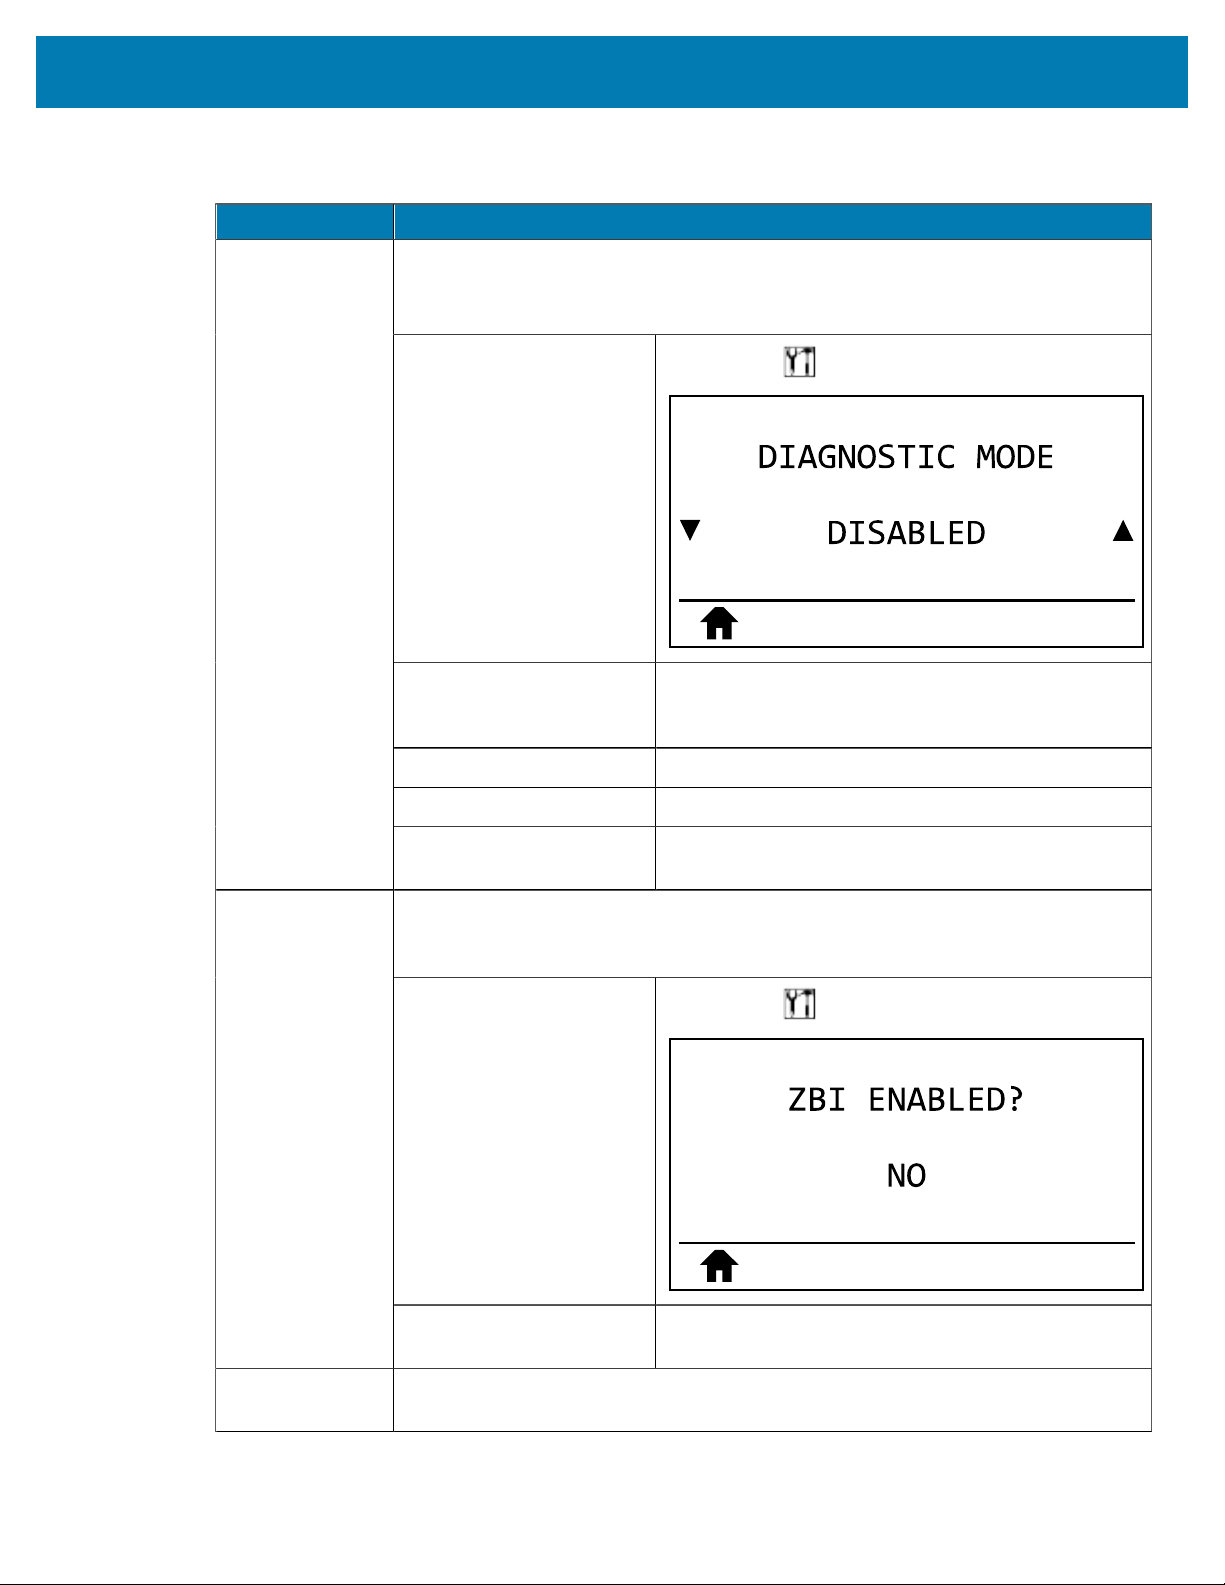
Use this diagnostics tool to cause the printer to output the hexadecimal values for
all data received by the printer.
For more information, see Communication Diagnostics Test on page 157.
User menu item:
Main Menu > TOOLS
Accepted values:
• DISABLED
• ENABLED
Related ZPL command(s):
~JD to enable, ~JE to disable
SGD command used:
device.diagnostic_print
Communication
Diagnostics
Mode
Control panel key(s):
Hold PAUSE + FEED for 2 seconds when the printer is
in the Ready state.
Zebra Basic Interpreter (ZBI2.0) is a programming option that may be purchased for
your printer. If you would like to purchase this option, contact your Zebra reseller for
more information.
User menu item:
Main Menu > TOOLS
Enable ZBI
SGD command used:
zbi.key (identifies if the ZBI 2.0 option is enabled or
disabled on the printer)
Run a ZBI
Program
If you have ZBI installed, you may choose to run a ZBI program that you have
downloaded to your printer.
Table 5Calibration and Diagnostic Tools(Continued)
96

Printer Configuration and Adjustment
Item Description
User menu item: *
* This menu item appears
only if ZBI is enabled on
your printer and no ZBI
program is running.
Main Menu > TOOLS
If ZBI programs exist on your printer, they are listed. If
no program exists, NONE is listed.
If you wish to run a ZBI program that you have
downloaded to your printer:
Use the UP ARROW or DOWN ARROW to select a file
from this menu. Press RIGHTSELECT to select RUN. If
no program exists, the RUN option does not perform
an action.
Related ZPL command(s):
^JI, ~JI
SGD command used:
zbi.control.run
Printer web page: Directory Listing
If your printer is running a ZBI program, you may stop that program.
User menu item: *
* This menu item appears
only if ZBI is enabled on
your printer and no ZBI
program is running.
Main Menu > TOOLS
If ZBI programs are running, the printer lists them.
If you wish to stop a program:
Use the UP ARROW or DOWN ARROW to select the
file from this menu. Press RIGHT SELECT to select
STOP.
Stop a ZBI
Program
Related ZPL command(s):
~JQ
Table 5Calibration and Diagnostic Tools(Continued)
97
Printer Configuration and Adjustment
Item Description
SGD command used:
zbi.control.terminate
Printer web page: Directory Listing
Table 5Calibration and Diagnostic Tools(Continued)
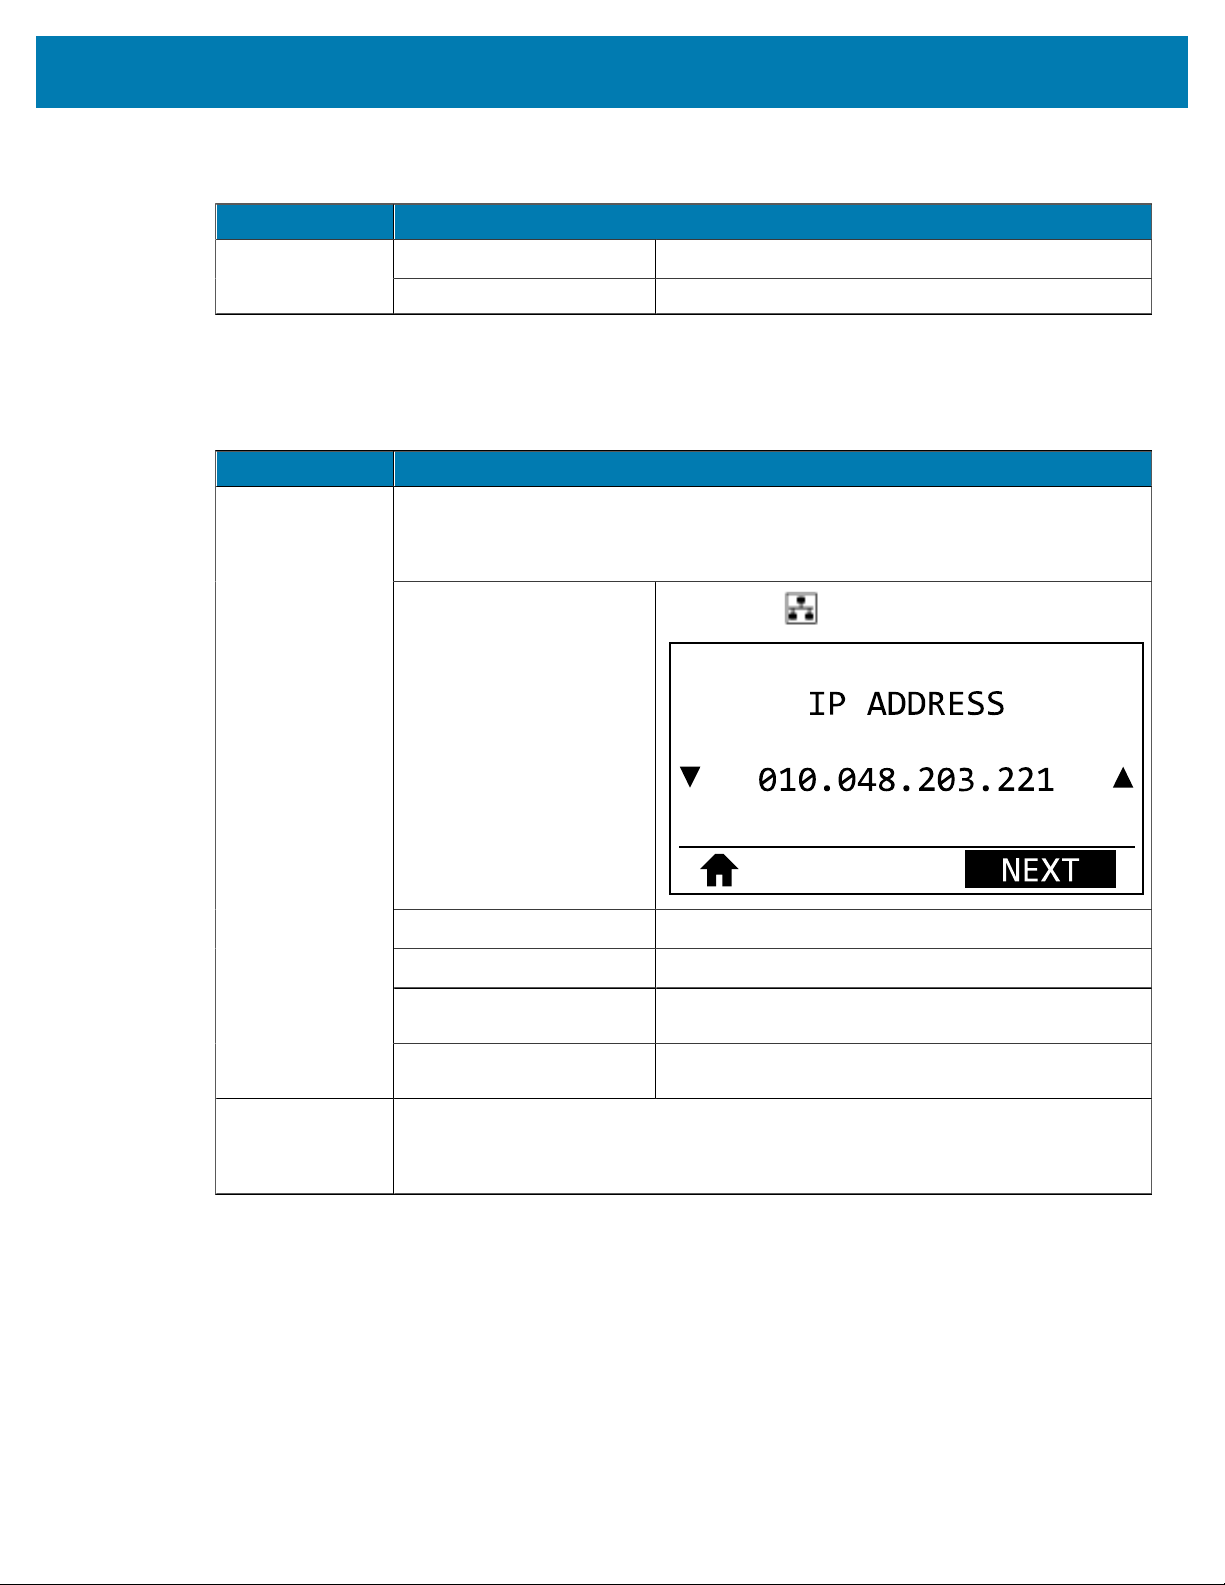
Network Settings
Network Setting Description
View and, if necessary, change the printer’s IP address.
To save changes to this setting, set IP Protocol to PERMANENT, and then reset the
print server, see Reset Network.
User menu item: *
* This menu item appears
only if a wired or wireless
print server is installed in
your printer.
Main Menu > NETWORK
Accepted values:
000 to 255 for each field
Related ZPL command(s):
^ND
SGD command used: Wired: internal_wired.ip.addrWireless: ip.addr,
wlan.ip.addr
IP Address
Printer web page: View and Modify Printer Settings >
NetworkCommunications Setup > TCP/IP Settings
Subnet Mask View and, if necessary, change the subnet mask.
To save changes to this setting, set IP Protocol to PERMANENT, and then reset the
print server, see Reset Network.
Table 6Network Settings
98
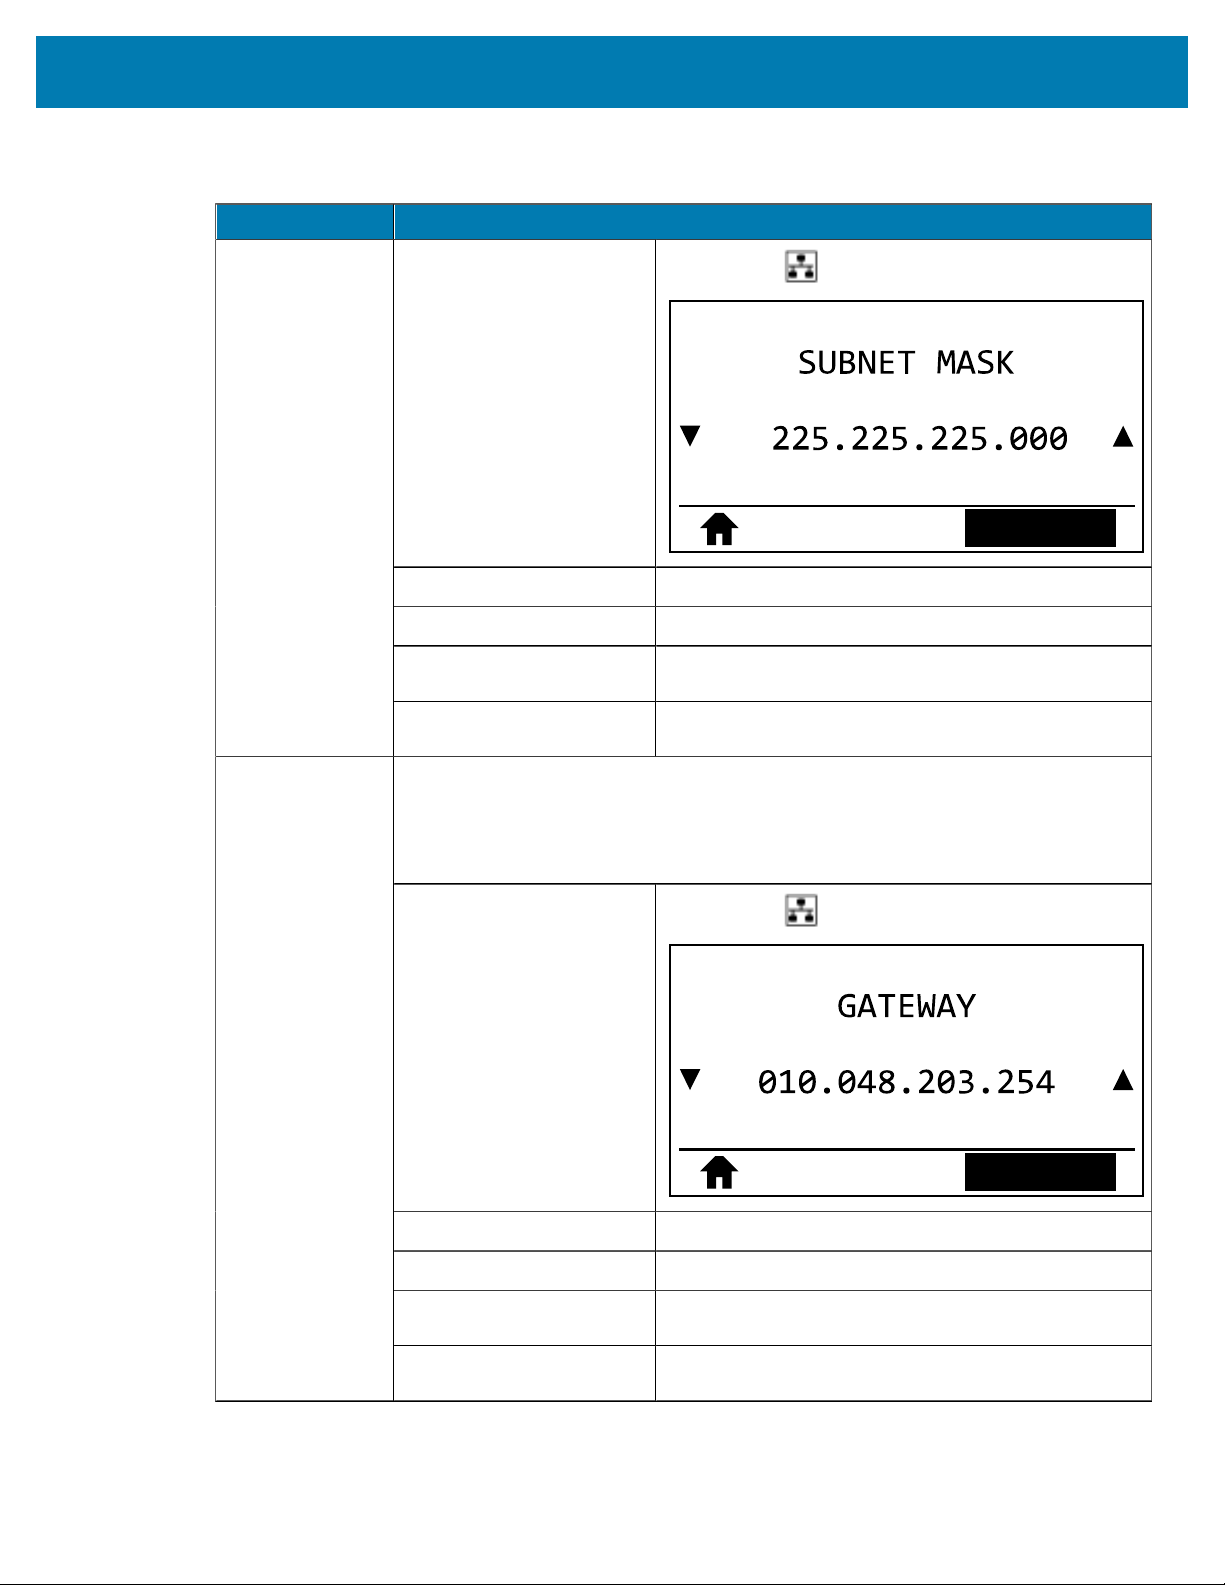
Printer Configuration and Adjustment
Network Setting Description
User menu item: *
* This menu item appears
only if a wired or wireless
print server is installed in
your printer.
Main Menu > NETWORK
NEXT
Accepted values:
000 to 255 for each field
Related ZPL command(s):
^ND
SGD command used: Wired: internal_wired.ip.netmaskWireless:
wlan.ip.netmask
Printer web page: View and Modify Printer Settings >
NetworkCommunications Setup > TCP/IP Settings
View or Set the Default Gateway
View and, if necessary, change the default gateway.
To save changes to this setting, set IP Protocol to PERMANENT, and then reset the
print server, see Reset Network.
User menu item: *
* This menu item appears
only if a wired or wireless
print server is installed in
your printer.
Main Menu > NETWORK
NEXT
Accepted values:
000 to 255 for each field
Related ZPL command(s):
^ND
SGD command used: Wired: internal_wired.ip.gatewayWireless:
wlan.ip.gateway
Gateway
Printer web page: View and Modify Printer Settings >
NetworkCommunications Setup > TCP/IP Settings
Table 6Network Settings(Continued)
99
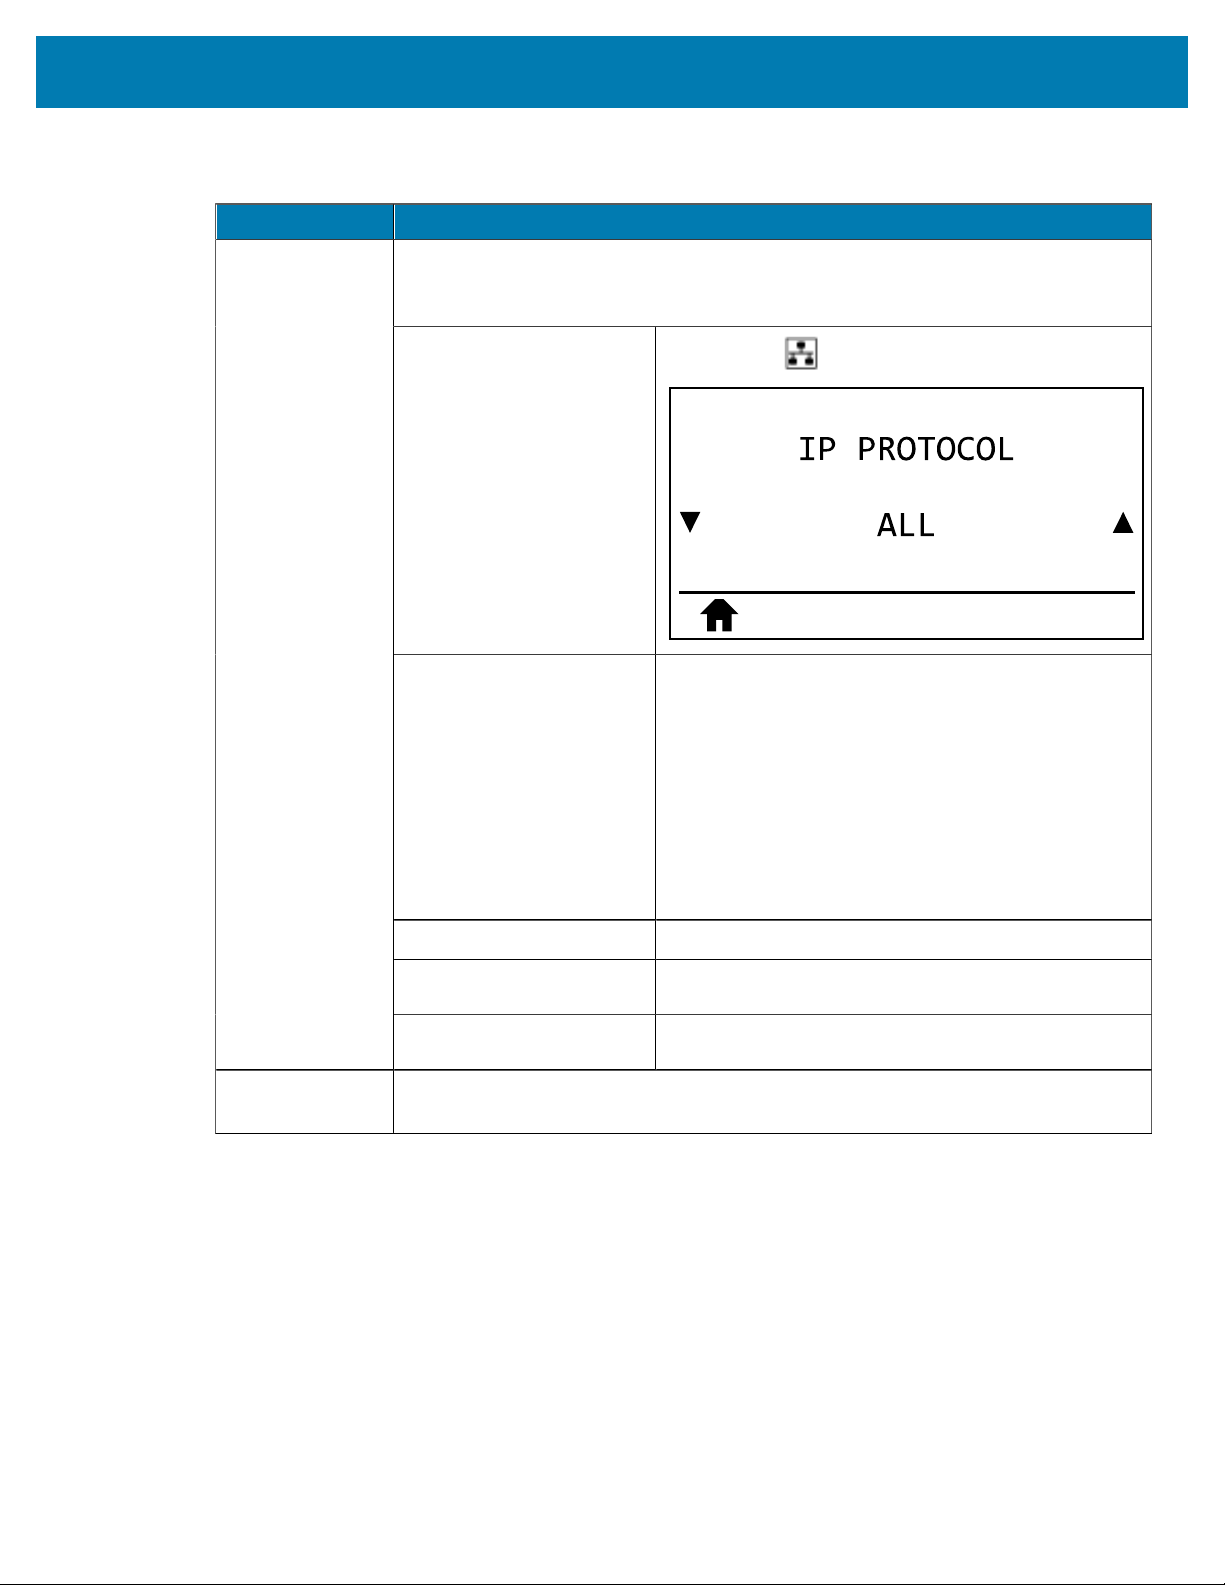
Printer Configuration and Adjustment
Network Setting Description
This parameter tells if the user (permanent) or the server (dynamic) selects the
IPaddress. When a dynamic option is chosen, this parameter tells the method(s) by
which the wired or wireless print server receives the IP address from the server.
User menu item: *
* This menu item appears
only if a wired or wireless
print server is installed in
your printer.
Main Menu > NETWORK
Accepted values:
• ALL
• GLEANING ONLY
• RARP
• BOOTP
• DHCP
• DHCP & BOOTP
• PERMANENT
Related ZPL command(s):
^ND
SGD command used: Wired: internal_wired.ip.protocolWireless:
wlan.ip.protocol
IP Protocol
Printer web page: View and Modify Printer Settings >
NetworkCommunications Setup > TCP/IP Settings
Active Print
Server
Only one print server (wired or wireless) can be installed at a time. Therefore, the
print server installed is the active print server.
Table 6Network Settings(Continued)
100
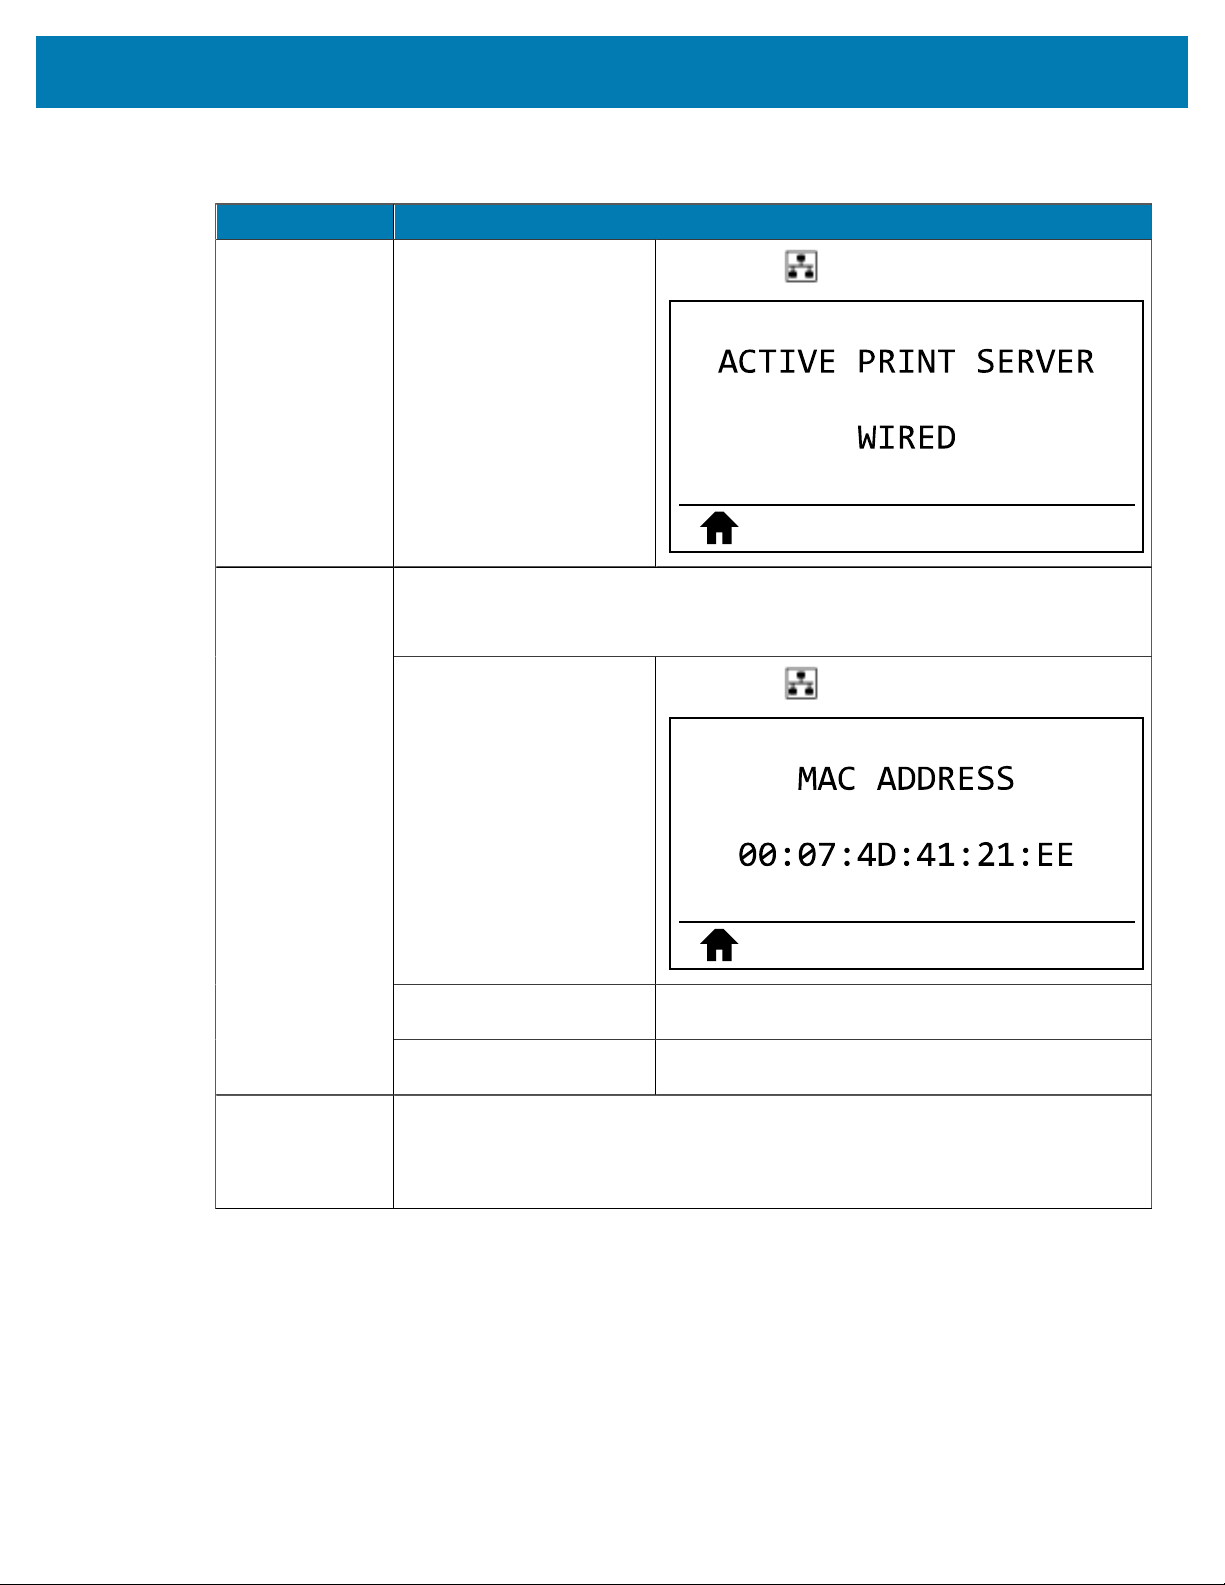
Printer Configuration and Adjustment
Network Setting Description
User menu item: *
* This menu item appears
only if a wired or wireless
print server is installed in
your printer. It cannot be
modified from the control
panel.
Main Menu > NETWORK
View the MAC Address
View the Media Access Control (MAC) address of the print server that is installed in
the printer (wired or wireless).
User menu item: *
* This menu item appears
only if a wired or wireless
print server is installed in
your printer. It cannot be
modified from the control
panel.
Main Menu > NETWORK
SGD command used: Wired: internal_wired.mac_addrWireless:
wlan.mac_addr
MAC Address
Printer web page: View and Modify Printer Settings >
NetworkCommunications Setup > WirelessSetup
ESSID
View the ESSID Value
The Extended Service Set Identification (ESSID) is an identifier for your wireless
network. This setting, which cannot be modified from the control panel, gives the
ESSID for the current wireless configuration.
Table 6Network Settings(Continued)
101
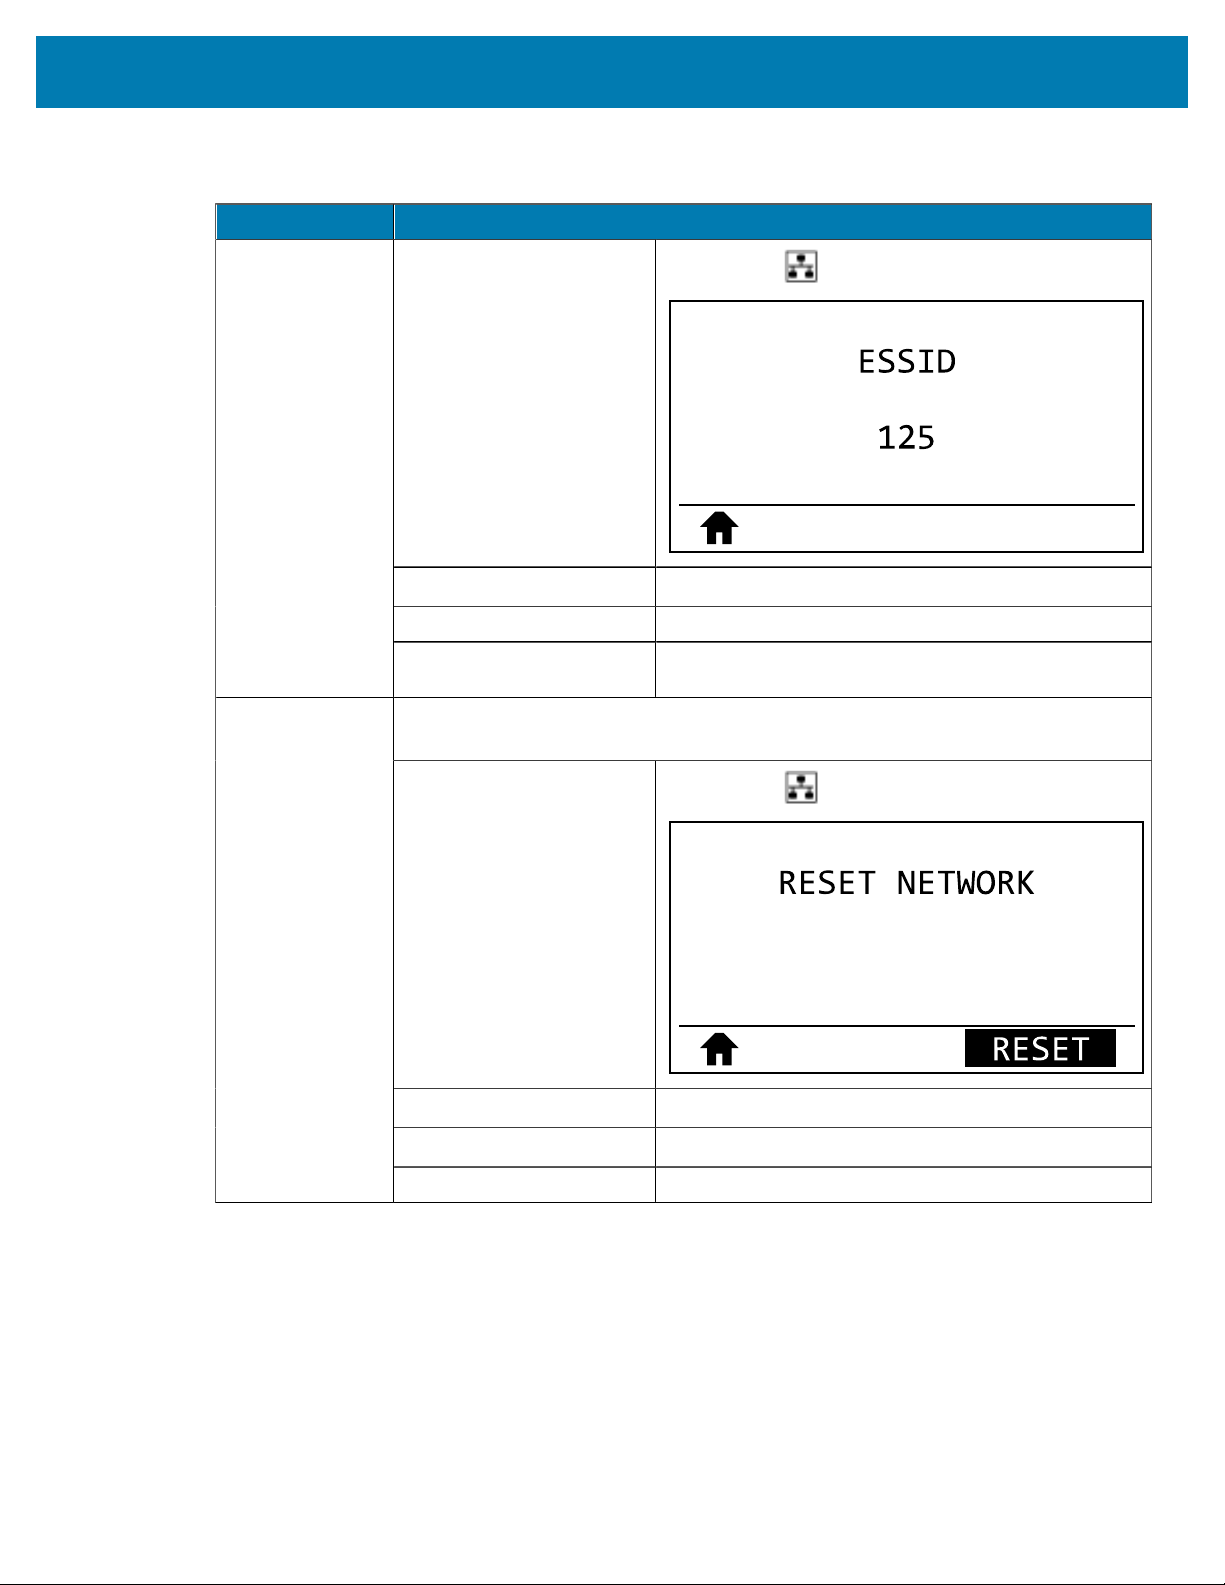
Printer Configuration and Adjustment
Network Setting Description
User menu item: *
* This menu item appears
only if a wired or wireless
print server is installed in
your printer. It cannot be
modified from the control
panel.
Main Menu > NETWORK
Accepted values:
32-character alphanumeric string (default 125)
SGD command used: wlan.essid
Printer web page: View and Modify Printer Settings >
NetworkCommunications Setup > WirelessSetup
This option resets the wired or wireless print server. You must reset the print server
to allow any changes to the network settings to take effect.
User menu item:
Main Menu > NETWORK
Related ZPL command(s):
~WR
SGD command used:
device.reset
Reset Network
Printer web page: Print Server Settings > FactoryPrintServerSettings
Table 6Network Settings(Continued)
102
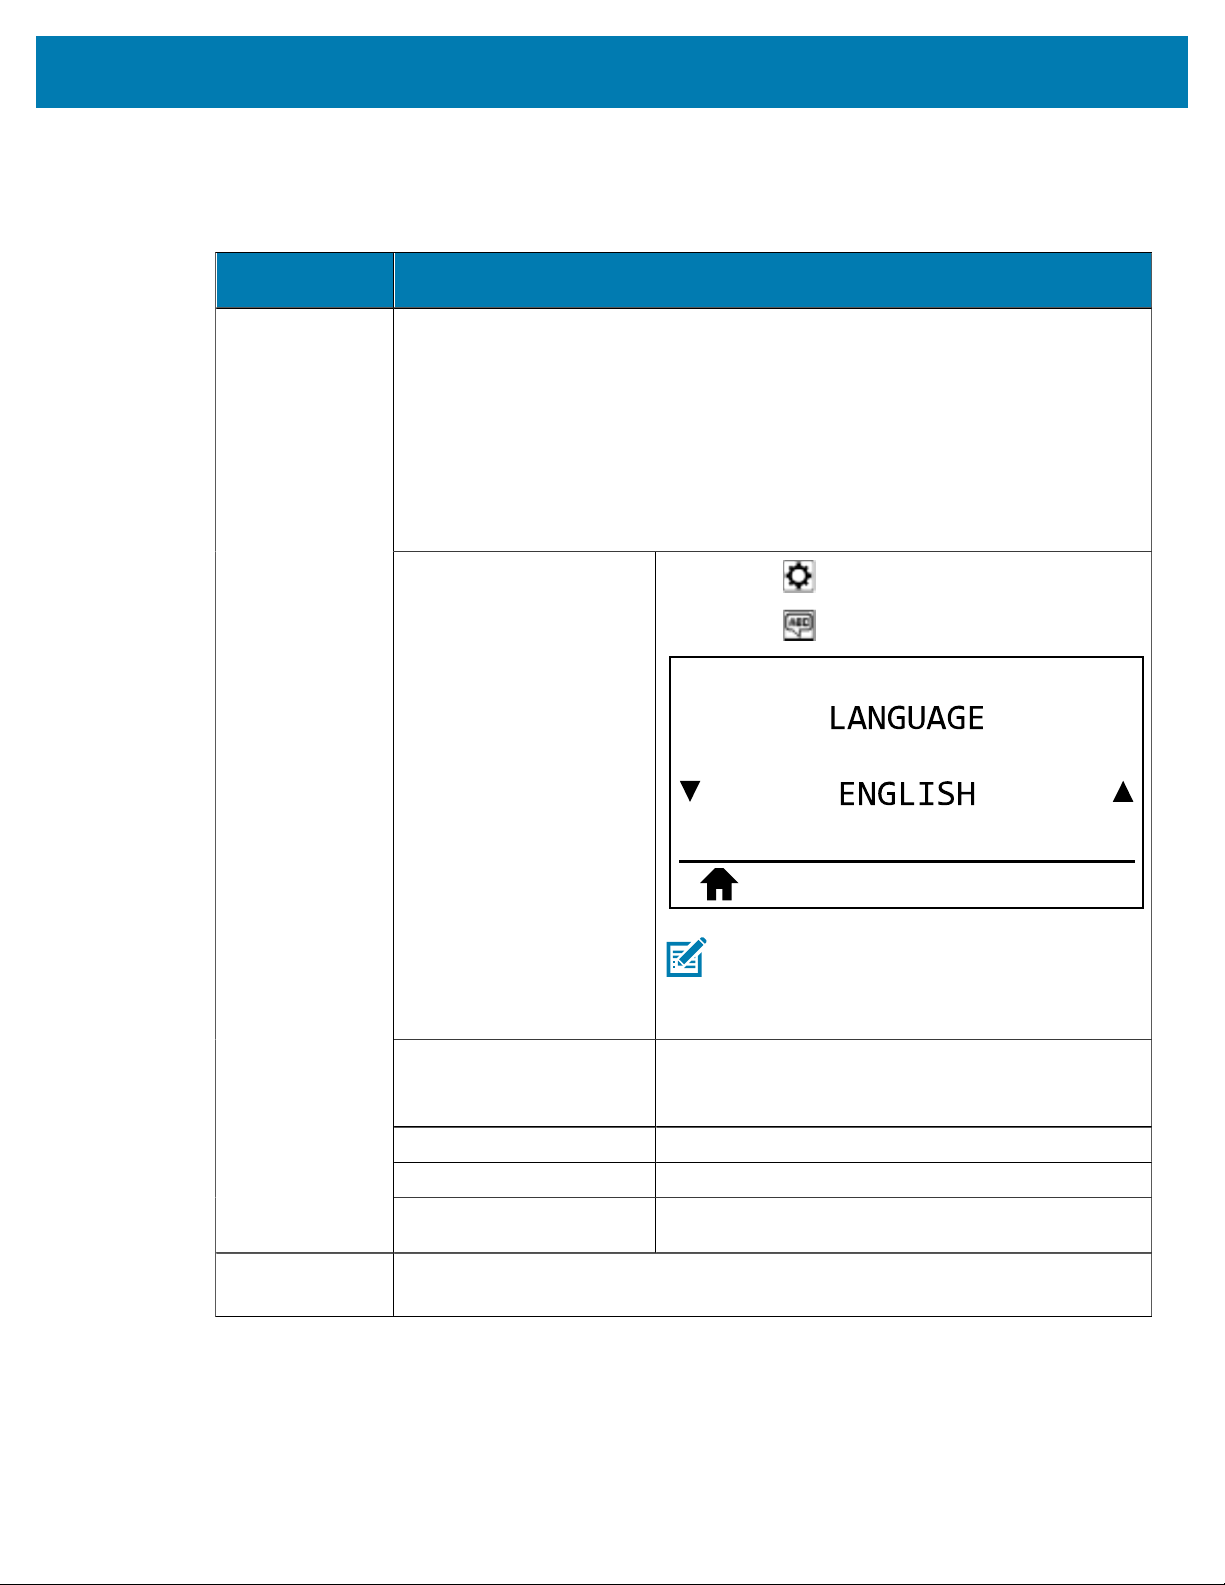
Printer Configuration and Adjustment
Language Settings
Language
Setting
Description
If necessary, change the language that the printer displays.
This change affects the words shown on the following:
• the Home menu
• the user menus
• error messages
• the printer configuration label, the network configuration label, and other labels
that you can select to print through the user menus
User menu item:
Main Menu > SETTINGS
Main Menu > LANGUAGE
NOTE: The selections for this parameter are
displayed in the actual languages to make it
easier for you to find one that you are able
to read.
Accepted values: ENGLISH, SPANISH, FRENCH, GERMAN, ITALIAN,
NORWEGIAN, PORTUGUESE, SWEDISH, DANISH,
SPANISH 2, DUTCH, FINNISH
Related ZPL command(s): ^KL
SGD command used: display.language
Language
Printer web page: View and Modify Printer Settings > General Setup >
Language
Command
Language
Enable this menu item to allow certain ZPL commands to override the printer’s
current settings.
Table 7Language Settings
103
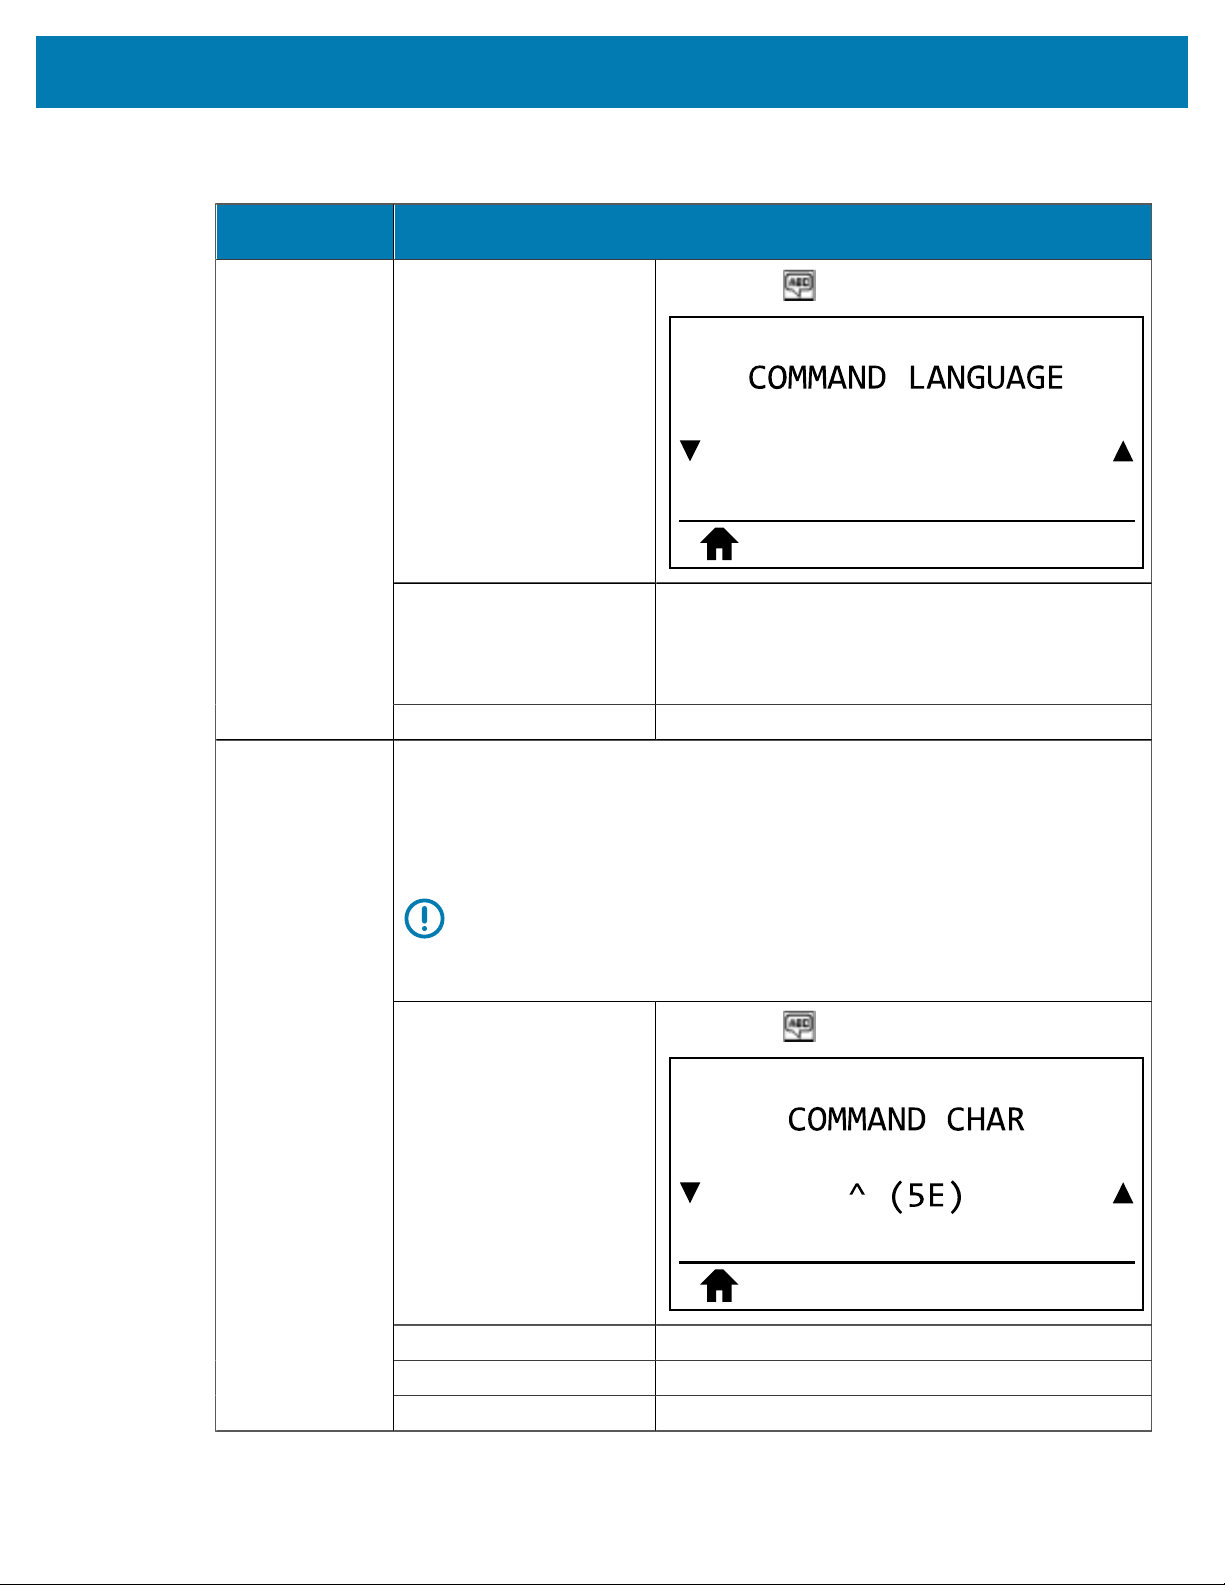
Printer Configuration and Adjustment
Language
Setting
Description
User menu item:
Main Menu > LANGUAGE
Accepted values:
• EPL_ZPL
• HYBRID_XML_ZPL
• EPL
SGD command used: device.languages
Set the Format Command Prefix Value
The format command prefix is a two-digit hex value used as a parameter place
marker in ZPL/ZPL II format instructions. The printer looks for this hex character to
indicate the start of a ZPL/ZPL II format instruction.
Set the format command character to match what is used in your label formats.
IMPORTANT: You cannot use the same hex value for the format command
prefix, control character, and delimiter characters. The printer must see
different characters to work properly. If you are setting the value through
the control panel, the printer will skip any value that is already in use.
User menu item:
Main Menu > LANGUAGE
Accepted values: 00 to FF
Related ZPL command(s): ^CC or ~CC
Command
Character
SGD command used: zpl.caret
Table 7Language Settings(Continued)
104
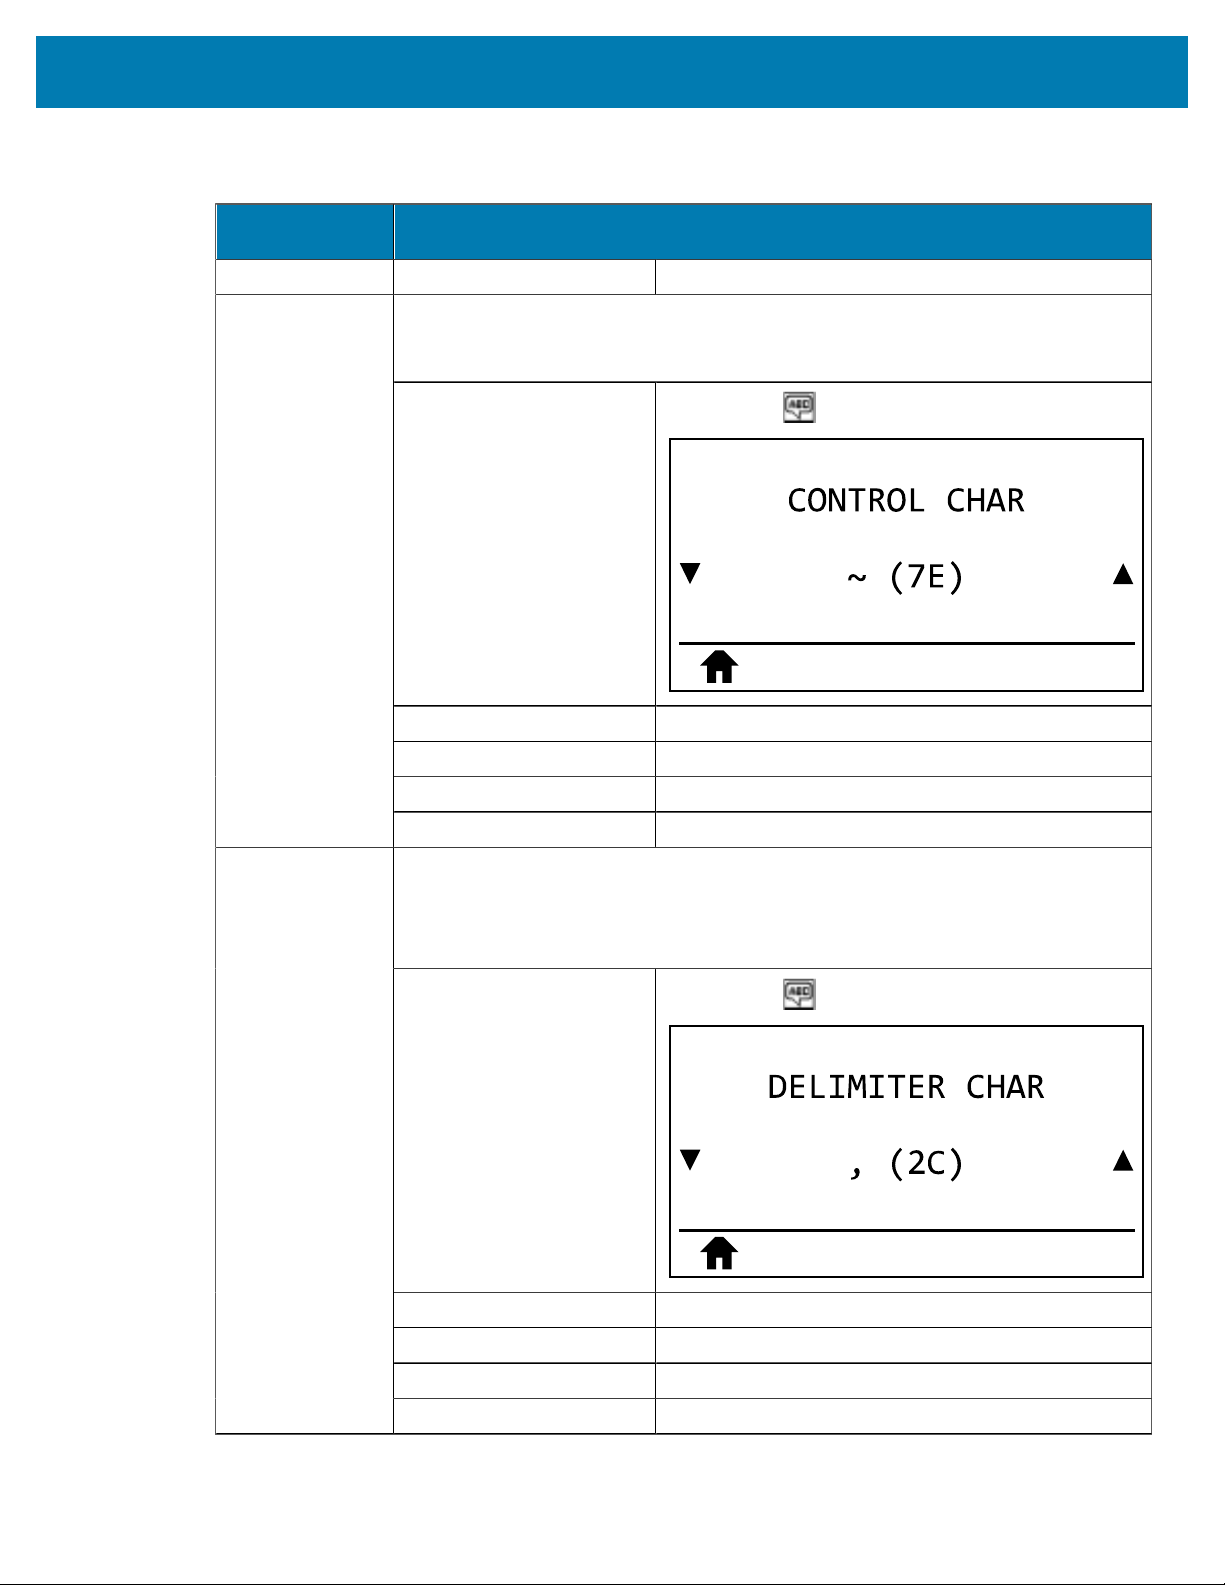
Printer Configuration and Adjustment
Language
Setting
Description
Printer web page: View and Modify Printer Settings > ZPL Control
The printer looks for this two-digit hex character to indicate the start of a ZPL/ZPL
II control instruction. Set the control prefix character to match what is used in your
label formats.
User menu item:
Main Menu > LANGUAGE
Accepted values: 00 to FF
Related ZPL command(s): ^CT or ~CT
SGD command used: zpl.control_character
Control Character
Printer web page: View and Modify Printer Settings > ZPL Control
Set the Delimiter Character Value
The delimiter character is a two-digit hex value used as a parameter place marker in
ZPL/ZPL II format instructions.
Set the delimiter character to match what is used in your label formats.
User menu item:
Main Menu > LANGUAGE
Accepted values: 00 to FF
Related ZPL command(s): ^CD or ~CD
SGD command used: zpl.delimiter
Delimiter
Character
Printer web page: View and Modify Printer Settings > ZPL Control
Table 7Language Settings(Continued)
105
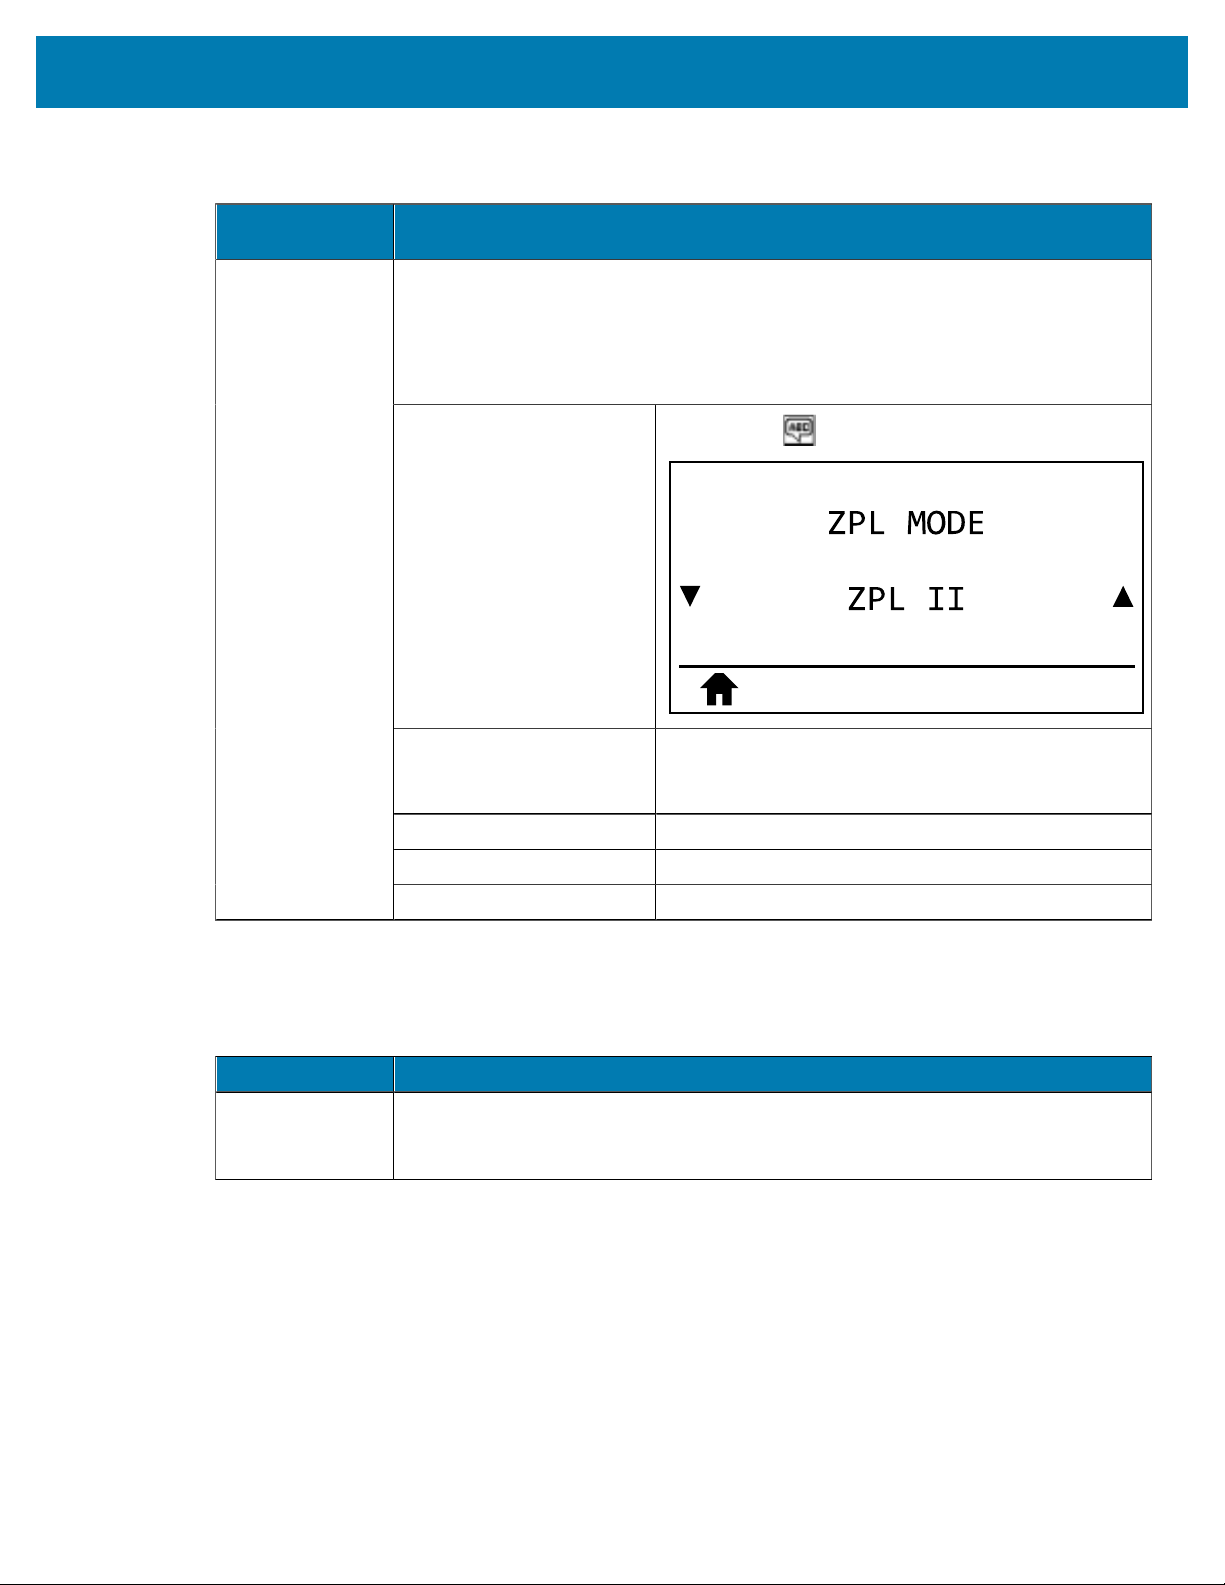
Printer Configuration and Adjustment
Language
Setting
Description
Set the ZPL Mode
Select the mode that matches what is used in your label formats.
This printer accepts label formats written in either ZPL or ZPL II, eliminating the need
to rewrite any ZPL formats that already exist. The printer remains in the selected
mode until it is changed in one of the ways listed here.
User menu item:
Main Menu > LANGUAGE
Accepted values:
• ZPL II
• ZPL
Related ZPL command(s): ^SZ
SGD command used: zpl.zpl_mode
ZPL Mode
Printer web page: View and Modify Printer Settings > ZPL Control
Table 7Language Settings(Continued)
Sensor Settings
Sensor Setting Description
Sensor Type Select the media sensor that is appropriate for the media that you are using. The
reflective sensor can be used with all media types. The transmissive sensor should
be used only for simple gap media.
Table 8Sensor Settings
106
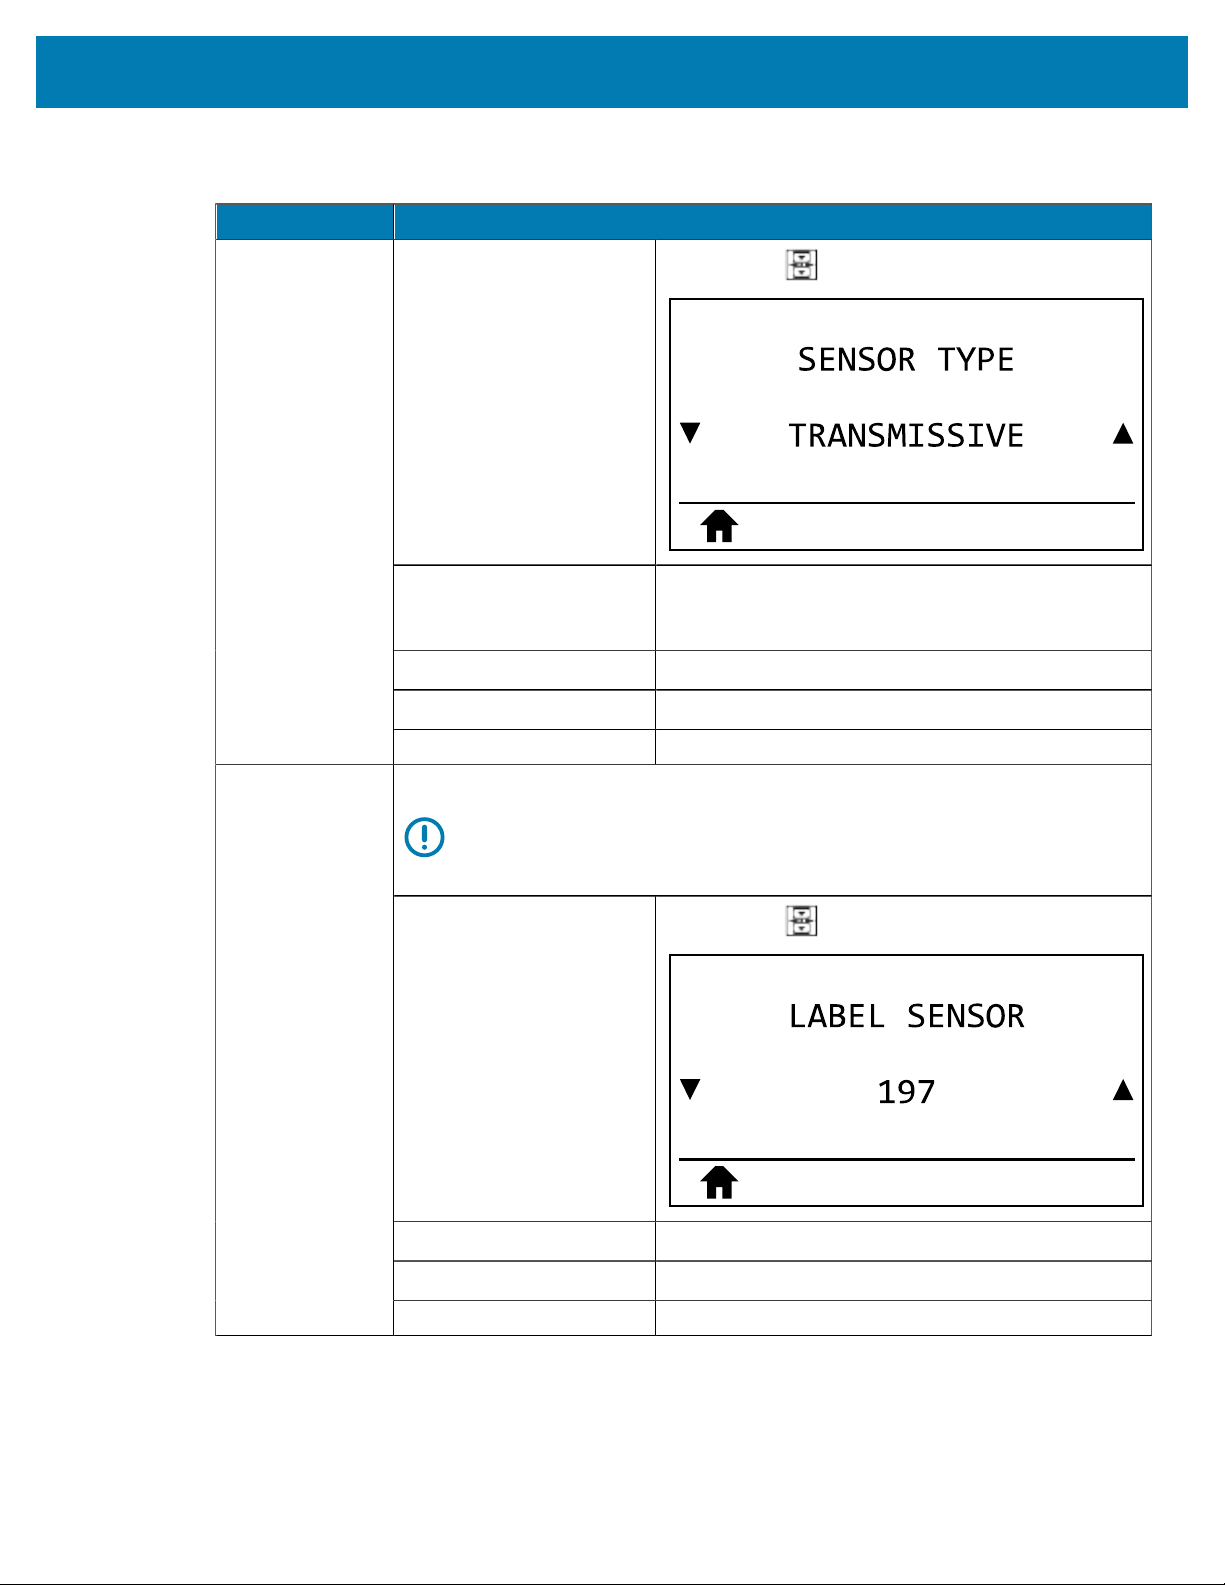
Printer Configuration and Adjustment
Sensor Setting Description
User menu item:
Main Menu > SENSORS
Accepted values:
• TRANSMISSIVE
• REFLECTIVE
Related ZPL command(s):
^JS
SGD command used:
device.sensor_select
Printer web page: View and Modify Printer Settings > Media Setup
Set the sensitivity of the label sensor.
IMPORTANT: This value is set during sensor calibration. Do not change
this setting unless you are told to do so by Zebra Technical Support or by
an authorized service technician.
User menu item:
Main Menu > SENSORS
Accepted values:
0 – 255
SGD command used:
ezpl.label_sensor
Label Sensor
Printer web page: View and Modify Printer Settings > Calibration
Table 8Sensor Settings(Continued)
107
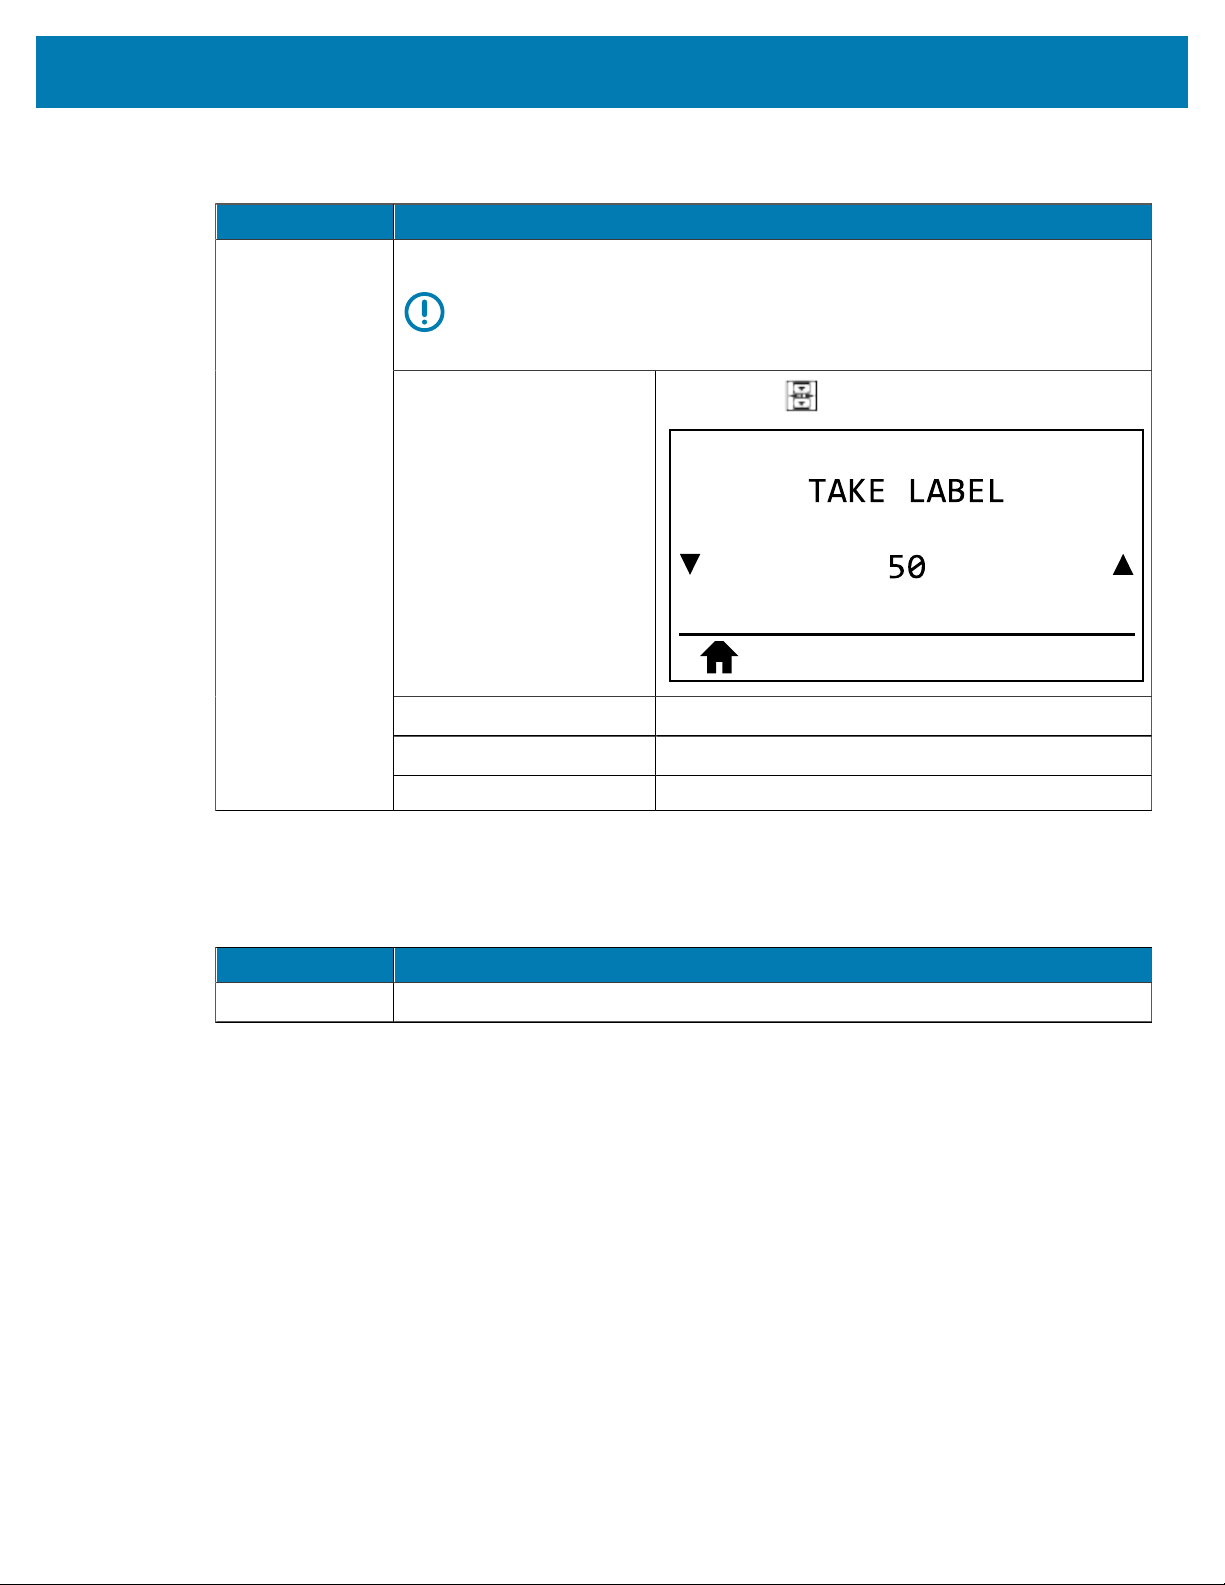
Printer Configuration and Adjustment
Sensor Setting Description
Set the intensity of the take label LED.
IMPORTANT: This value is set during sensor calibration. Do not change
this setting unless you are told to do so by Zebra Technical Support or by
an authorized service technician.
User menu item:
Main Menu > SENSORS
Accepted values:
0 – 255
SGD command used:
ezpl.take_label
Take Label
Printer web page: View and Modify Printer Settings > Calibration
Table 8Sensor Settings(Continued)
Port Settings
Port Setting Description
Baud Rate Select the baud value that matches the one being used by the host computer.
Table 9Port Settings
108
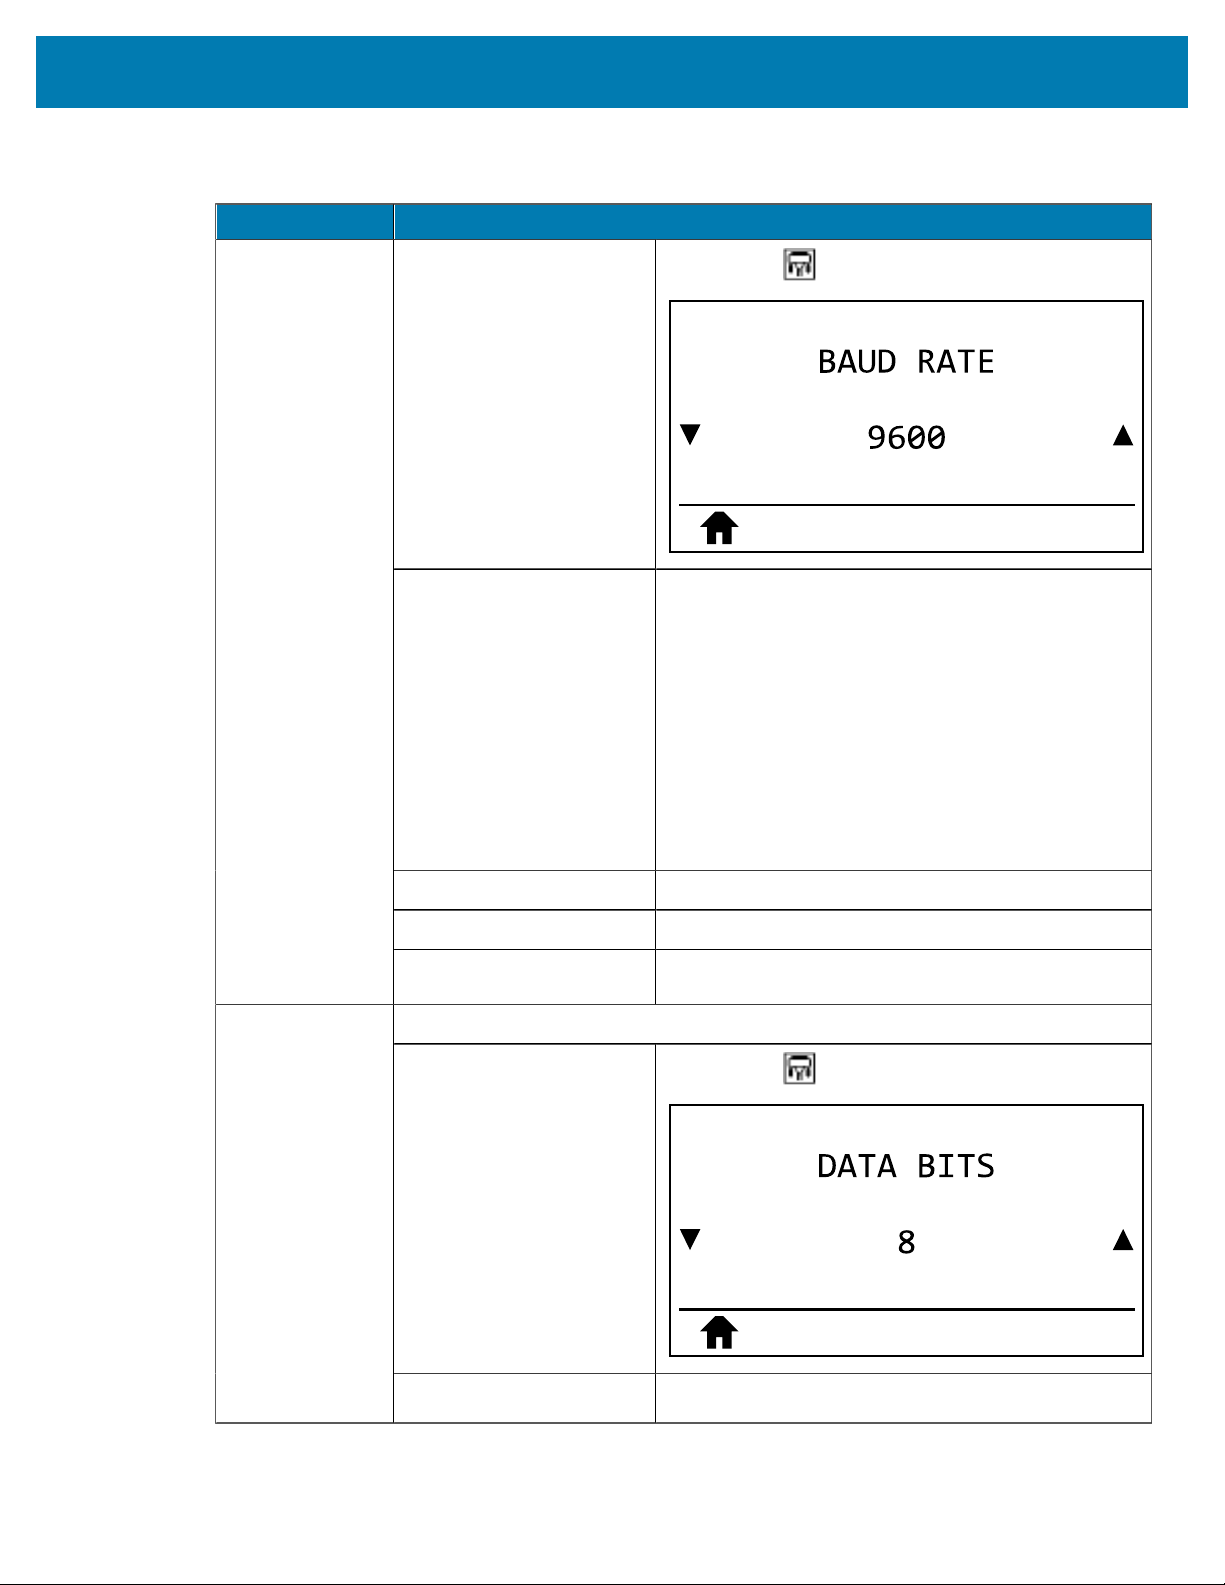
Printer Configuration and Adjustment
Port Setting Description
User menu item:
Main Menu > PORTS
Accepted values:
• 115200
• 57600
• 38400
• 28800
• 19200
• 14400
• 9600
• 4800
Related ZPL command(s):
^SC
SGD command used:
comm.baud
Printer web page: View and Modify Printer Settings > Serial
Communications Setup
Select the data bits value that matches the one being used by the host computer.
User menu item:
Main Menu > PORTS
Data Bits
Accepted values:
• 7 or 8
Table 9Port Settings(Continued)
109
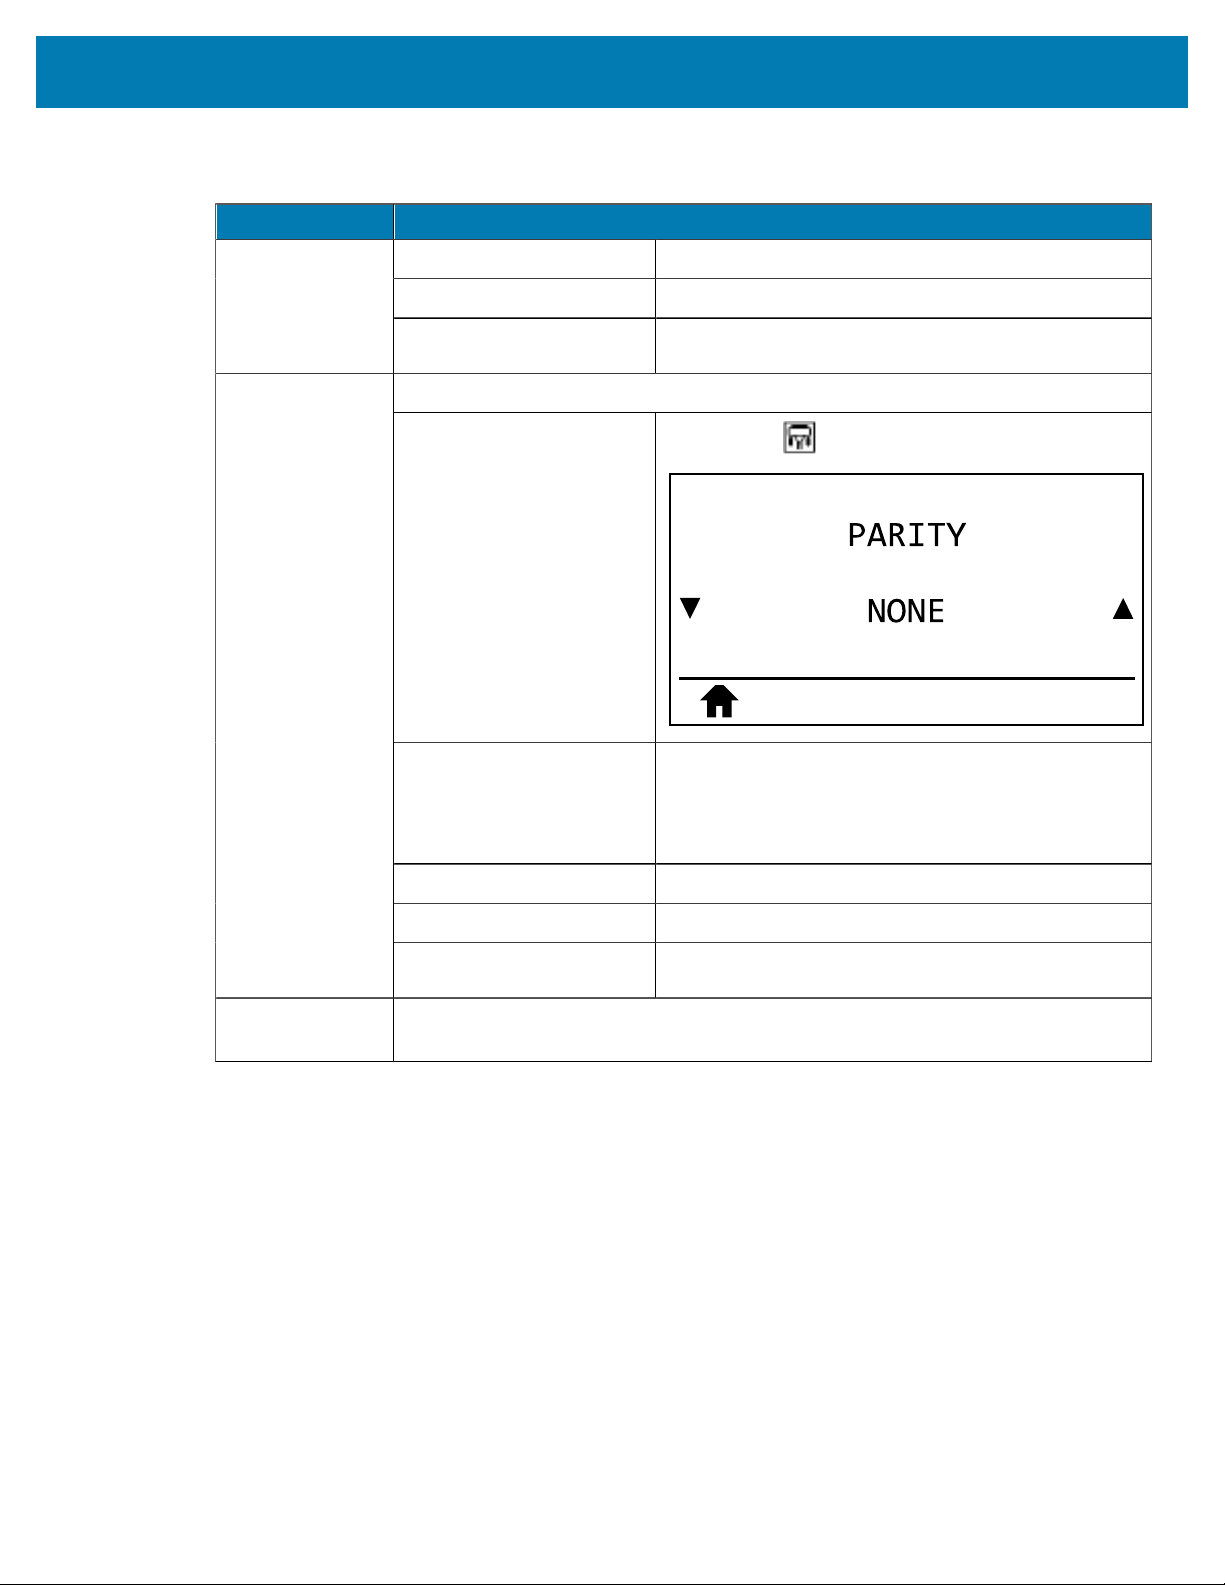
Printer Configuration and Adjustment
Port Setting Description
Related ZPL command(s):
^SC
SGD command used:
comm.data_bits
Printer web page: View and Modify Printer Settings > Serial
Communications Setup
Select the parity value that matches the one being used by the host computer.
User menu item:
Main Menu > PORTS
Accepted values:
• NONE
• EVEN
• ODD
Related ZPL command(s):
^SC
SGD command used:
comm.parity
Parity
Printer web page: View and Modify Printer Settings > Serial
Communications Setup
Host Handshake Select the handshake protocol that matches the one being used by the host
computer.
Table 9Port Settings(Continued)
110

Printer Configuration and Adjustment
Port Setting Description
User menu item:
Main Menu > PORTS
Accepted values:
• XON/XOFF
• RTS/CTS
• DSR/DTR
Related ZPL command(s):
^SC
SGD command used:
comm.handshake
Printer web page: View and Modify Printer Settings > Serial
Communications Setup
Table 9Port Settings(Continued)
Calibrating the Ribbon and Media Sensors
Use the procedure in this section to calibrate the printer, which adjusts the sensitivity of the media and
ribbon sensors. Calibration assures proper alignment of the image being printed and the optimal print
quality.
Perform calibration in the following situations:
• You switched to a different size or type of ribbon or media.
• The printer experiences any of the following issues:
• skipping labels
• the printed image is wandering/drifting side-to-side or up-down
• ribbon is not being detected when it is installed or when it runs out
• non-continuous labels are being treated as continuous
Performing Auto Calibration
You can set the printer to perform an auto calibration or a short calibration using the POWERUP ACTION
or HEAD CLOSE ACTION parameters.
• CALIBRATE—adjusts sensor levels and thresholds, determines the label length, and feeds the media to
the next web.
111
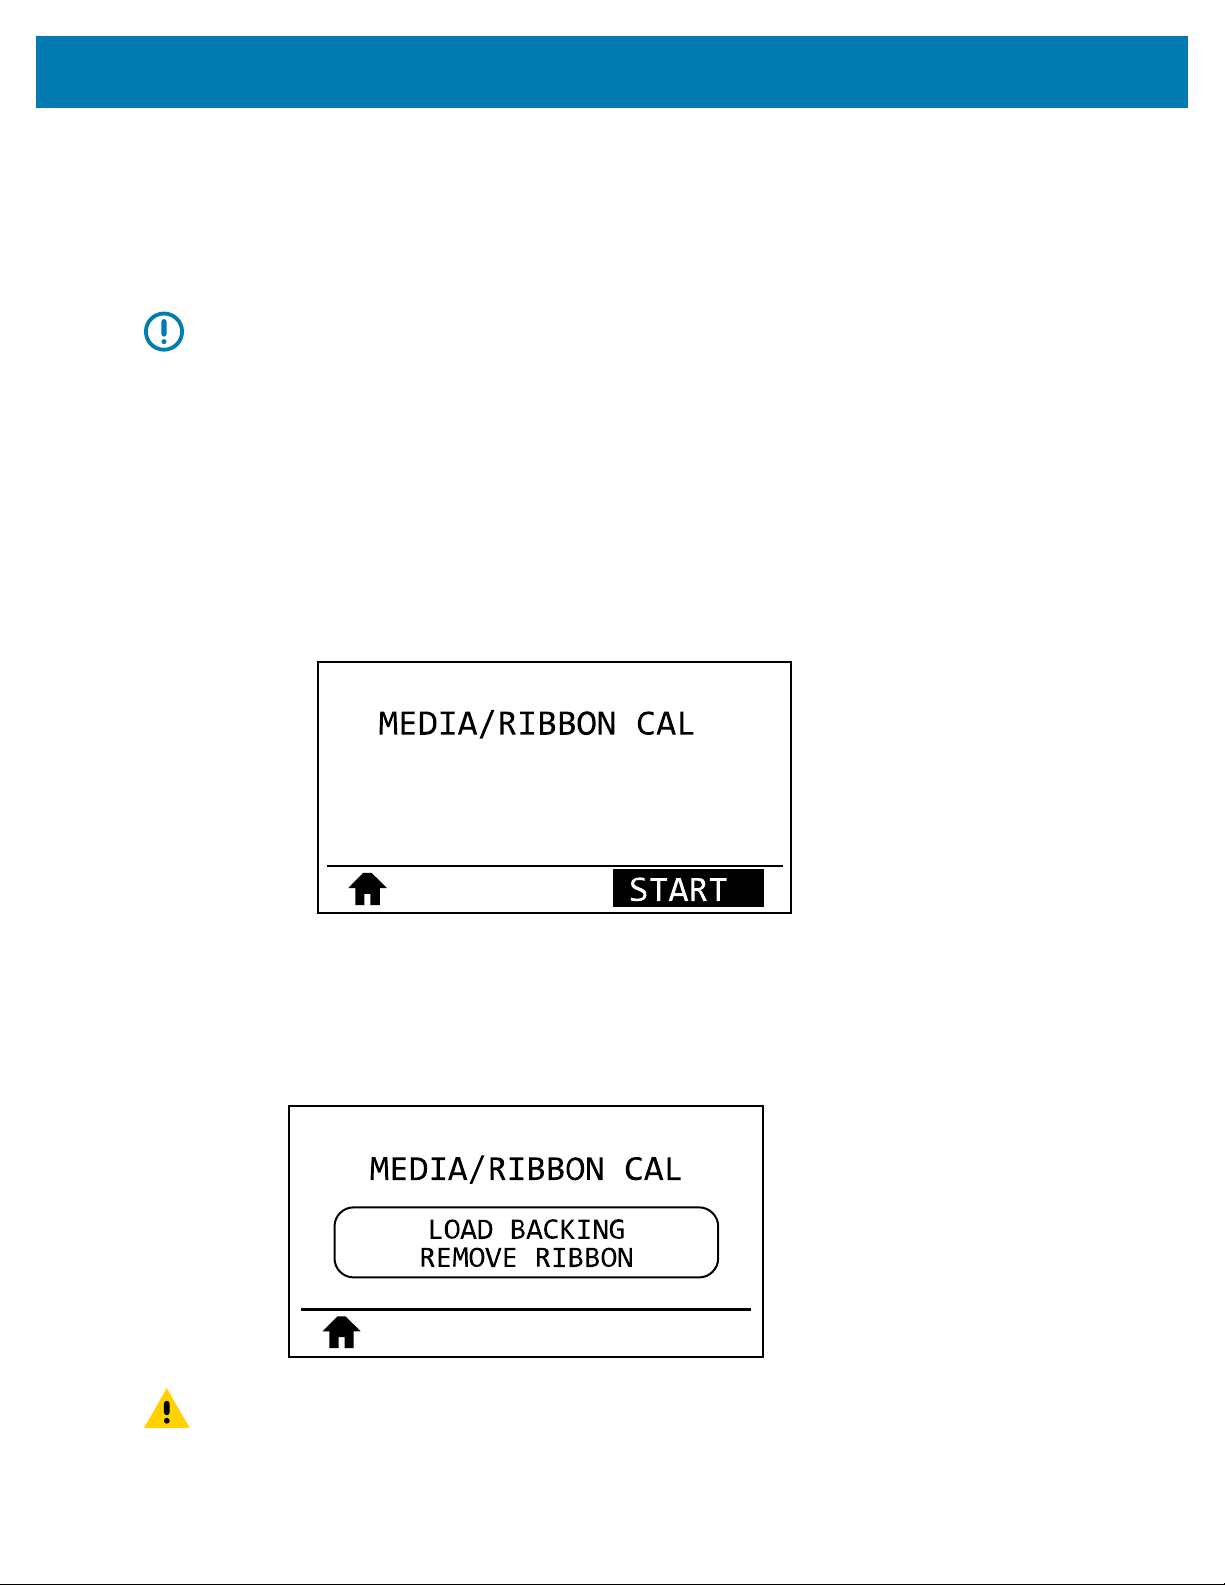
Printer Configuration and Adjustment
• SHORT CAL—sets the media and web thresholds without adjusting sensor gain, determines the label
length, and feeds the media to the next web.
See Power-Up Action or Head-Close Action.
Performing Manual Sensor Calibration
IMPORTANT: Follow the calibration procedure exactly as presented. All of the steps must be
performed even if only one of the sensors requires adjustment. You may press and hold CANCEL
at any step in this procedure to cancel the process.
1. With the printer in the Ready state, initiate media and ribbon calibration in one of these ways:
• Press and hold PAUSE + CANCEL for 2 seconds.
• Send the ezpl.manual_calibration SGD command to the printer. See the Zebra Programming Guide
for more information about this command.
• ZT230 printer only:
• Navigate to the following menu item on the control panel display. This item is located under the
TOOLS menu and the SENSORS menu. See Idle Display, Home Menu, and User Menus on page
15 for information about using the control panel and accessing the menus. See the User Guide
for information about using the control panel and accessing the menus.
• Press RIGHT SELECT to select START.
The printer does the following:
• The STATUS light and SUPPLIES light flash yellow once.
• The PAUSE light blinks yellow.
• The control panel (ZT230 printer only) displays:
CAUTION: The printhead may be hot and could cause severe burns. Allow the printhead to
cool.
112
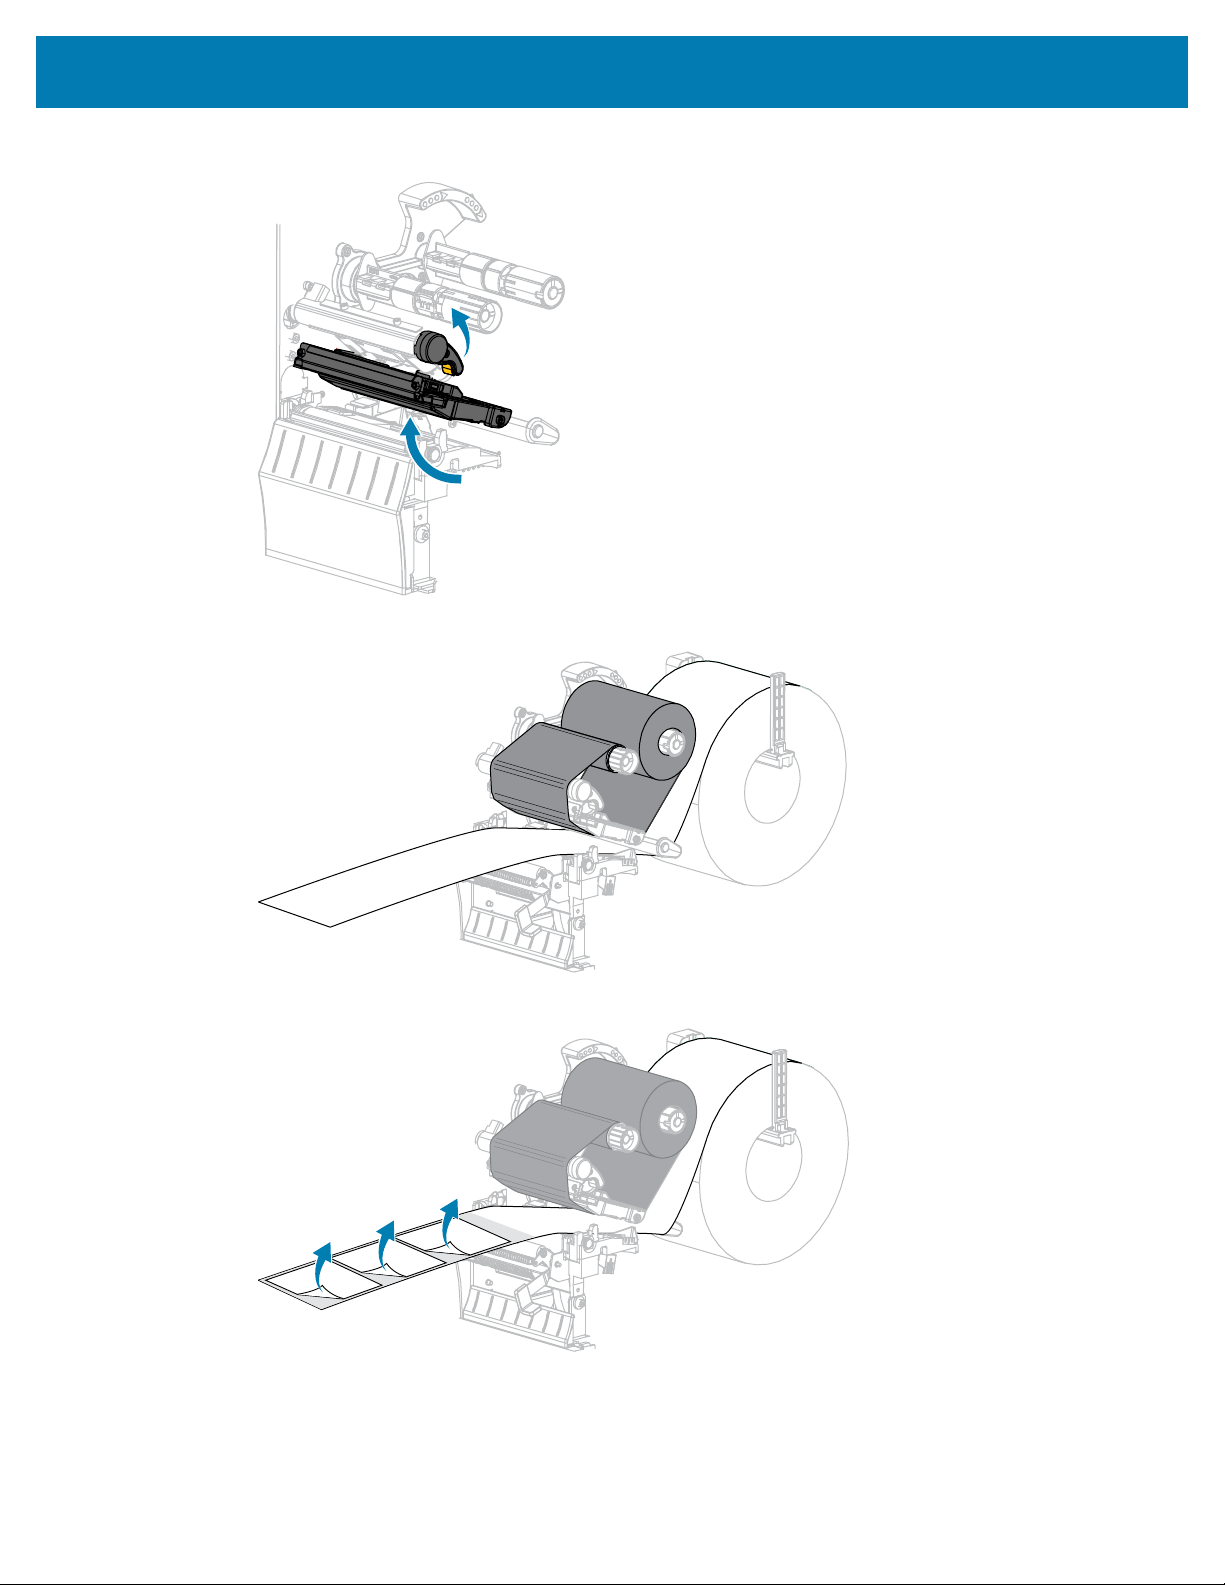
Printer Configuration and Adjustment
2. Open the printhead assembly by rotating the printhead-open lever.
3. Extend the media approximately 8 in. (203 mm) out of the printer.
4. Remove the exposed labels so that only the liner remains.
113
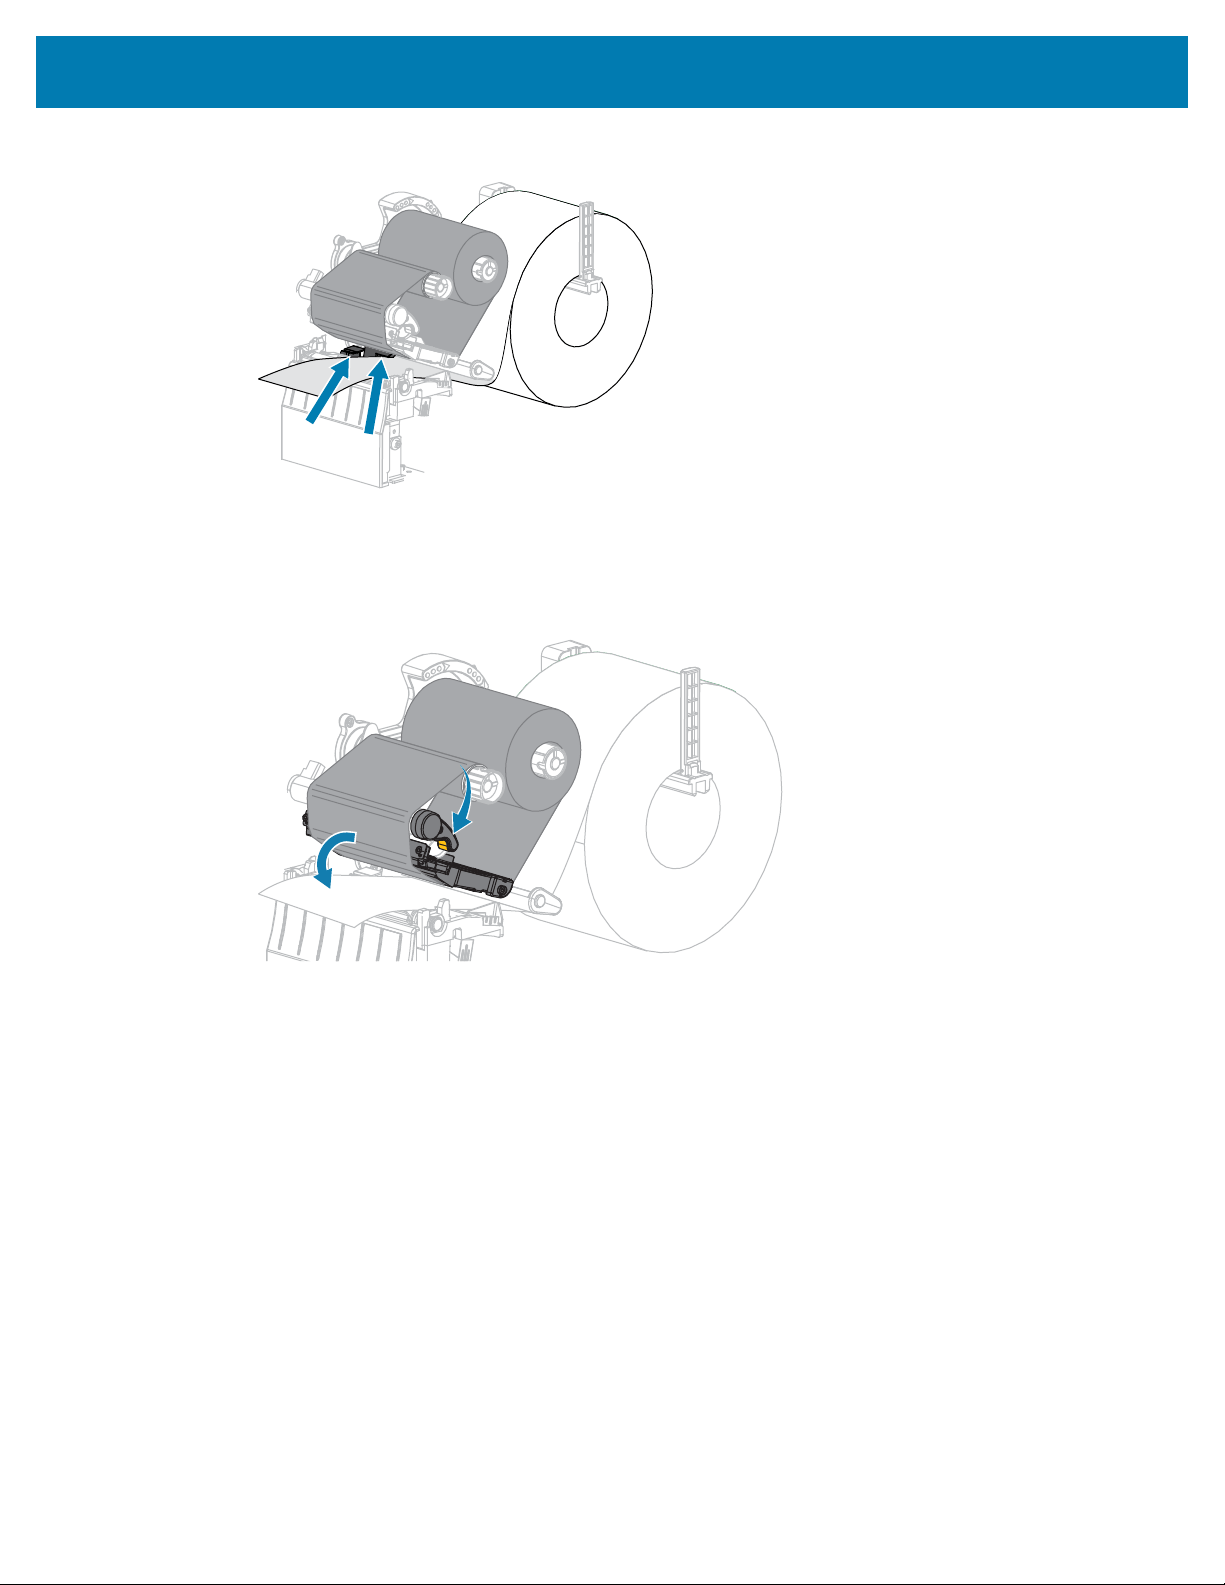
Printer Configuration and Adjustment
5. Pull the media into the printer so that only the backing is between the media sensors.
6. Remove the ribbon (if used).
7. Rotate the printhead-open lever downward until it locks the printhead in place.
114

Printer Configuration and Adjustment
8. Press PAUSE to begin the media calibration process.
The following happens:
• The PAUSE light turns off.
• The SUPPLIES light flashes.
• The control panel (ZT230 printer only) displays:
When the process is complete:
• The SUPPLIES light stops flashing.
• The PAUSE light flashes yellow.
• The control panel (ZT230 printer only) displays:
115
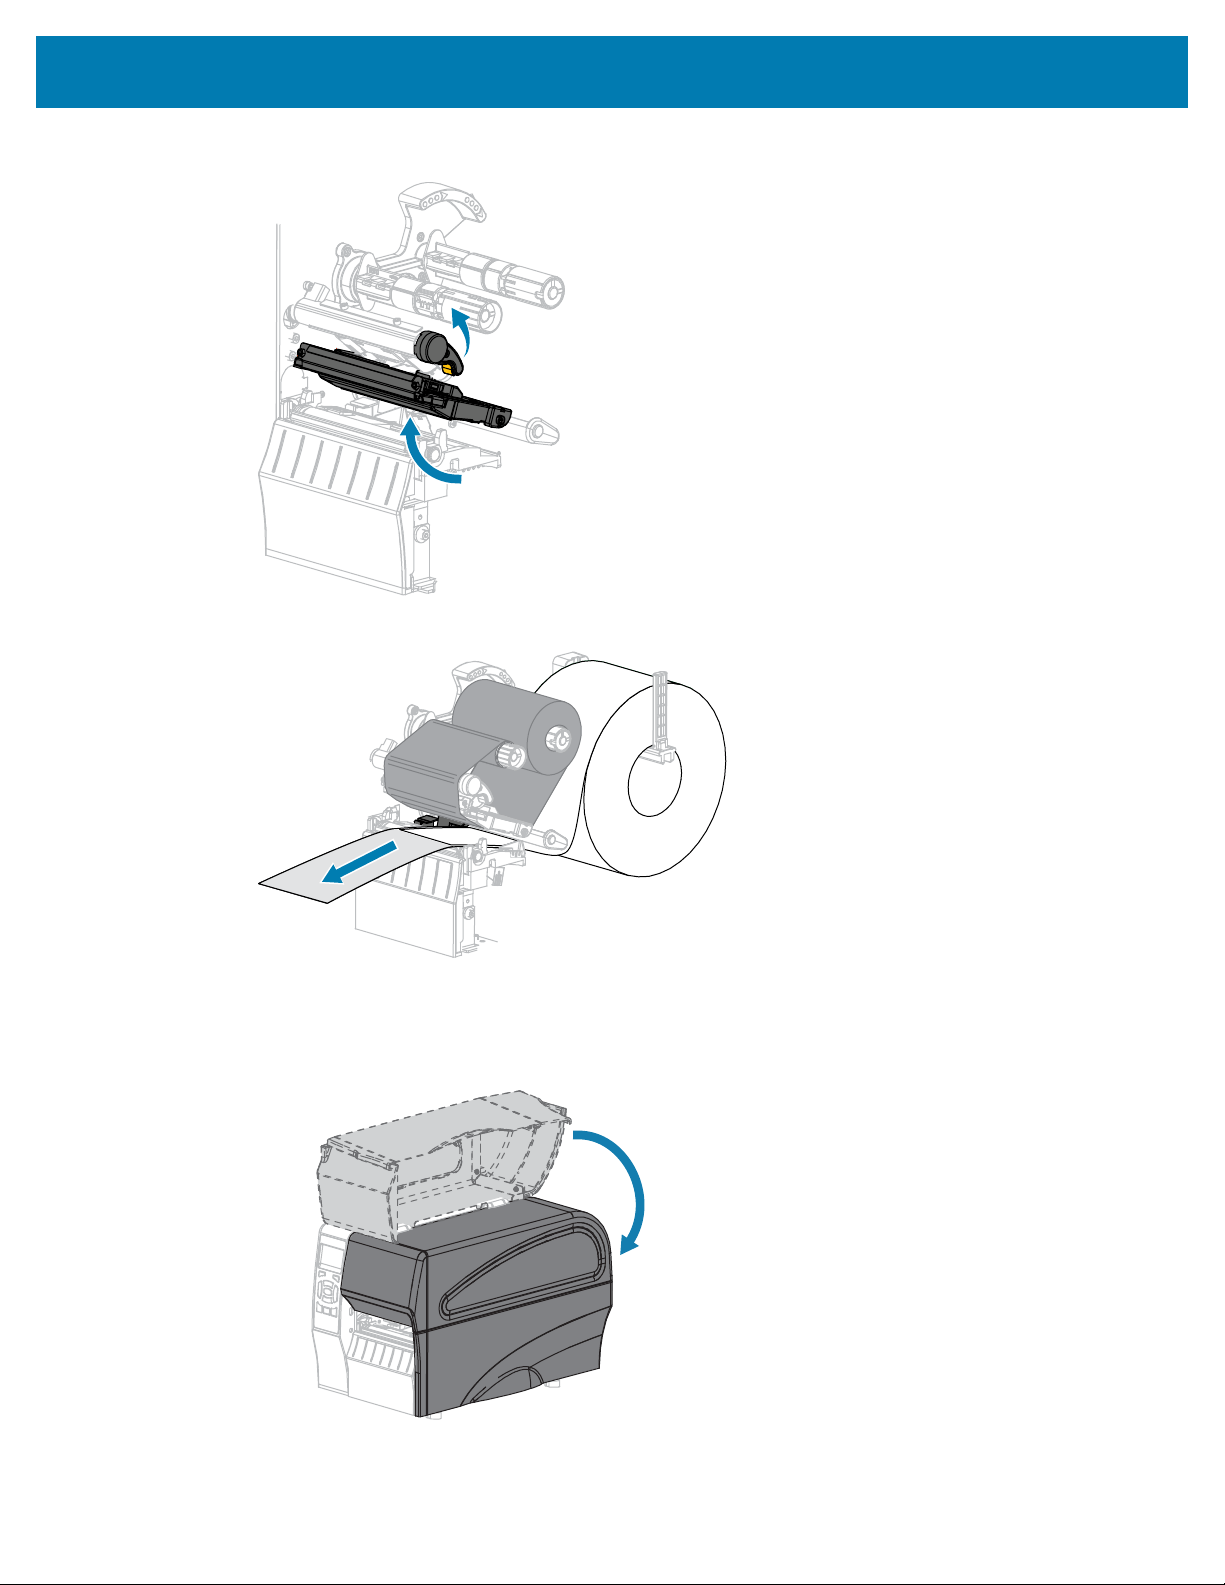
Printer Configuration and Adjustment
9. Open the printhead assembly by rotating the printhead-open lever.
10. Pull the media forward until a label is positioned under the media sensors.
11. Reload the ribbon (if used).
12. Close the printhead.
13. Close the media door.
116
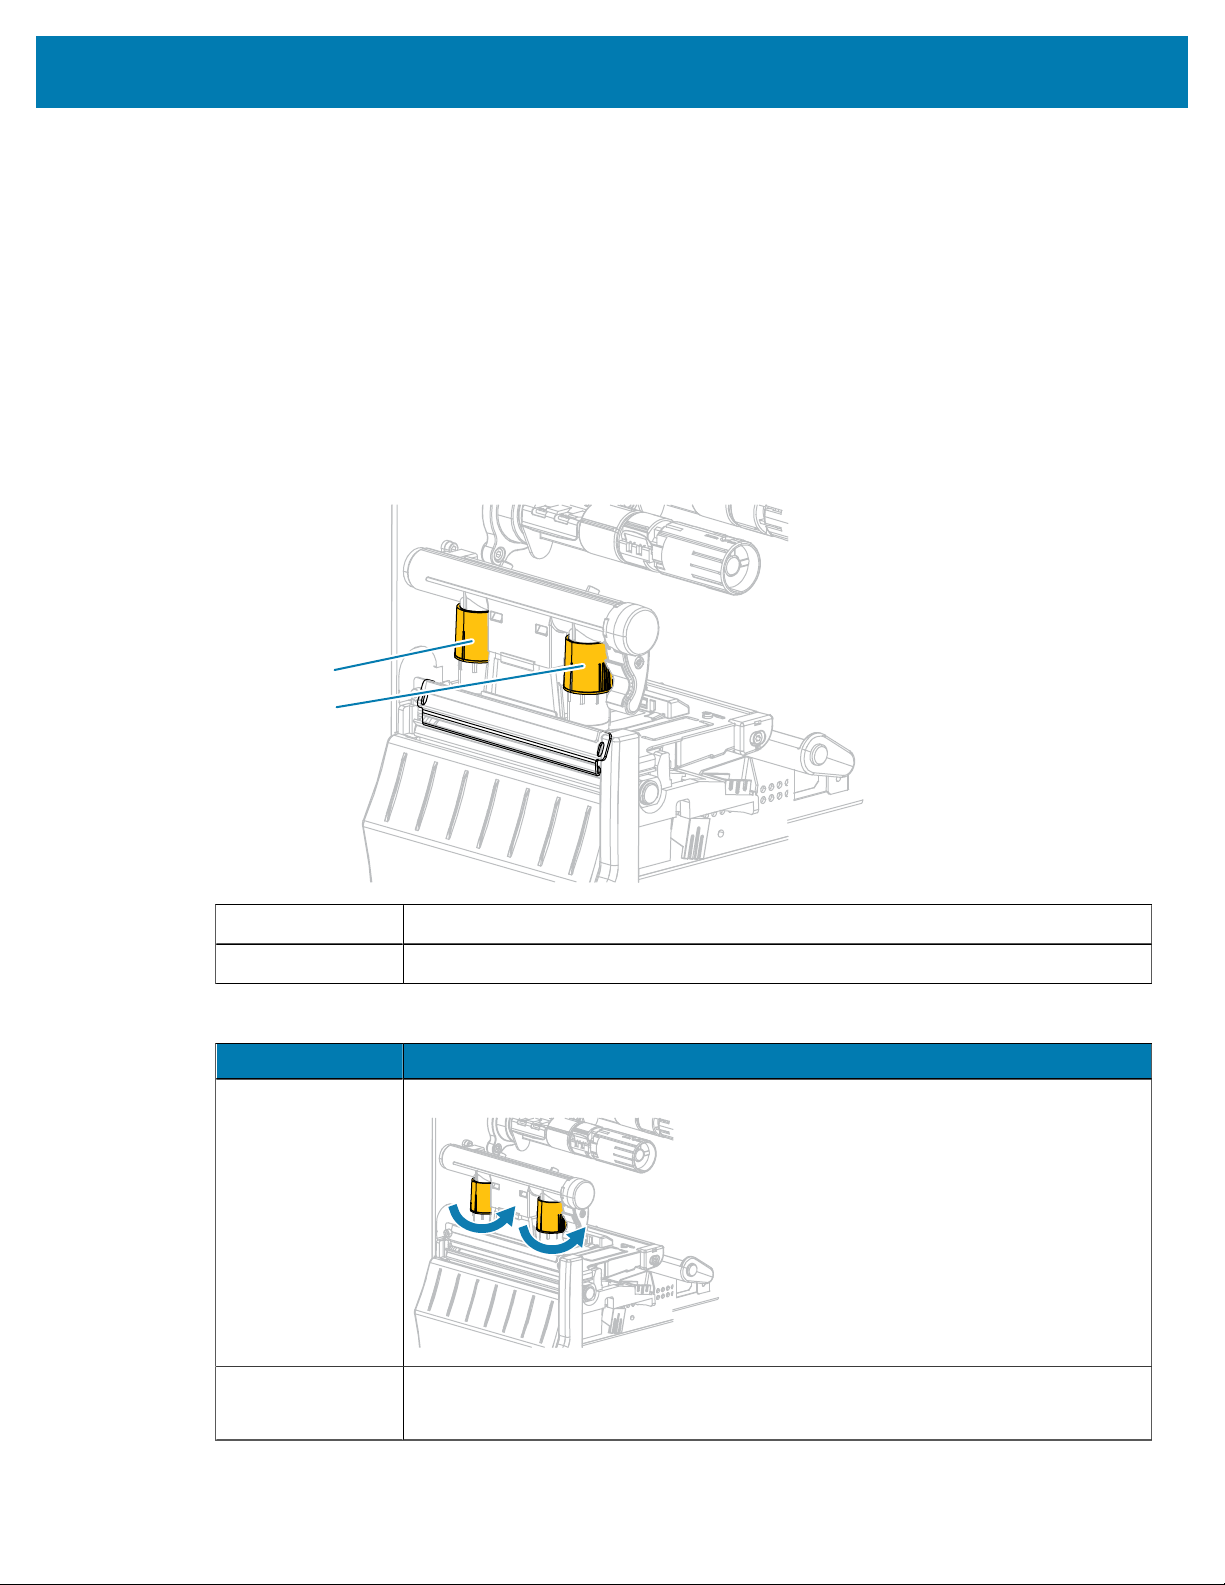
Printer Configuration and Adjustment
14. Press PAUSE to enable printing.
15. Press FEED to test if calibration was successful.
If one label feeds correctly each time, the printer is properly calibrated.
Adjusting the Printhead Pressure
You may need to adjust printhead pressure if printing is too light on one side, if you use thick media, or if
the media drifts from side to side during printing. Use the lowest printhead pressure necessary to produce
good print quality.
The printhead pressure adjustment dials have setting marks from 1 to 4 in half#mark increments.
Figure 6Printhead Pressure Adjustment Dials
1
2
1 Inside dial
2 Outside dial
If necessary, adjust the printhead pressure adjustment dials as follows:
If the Media... Then...
Requires higher
pressure to print
well
Increase both dials one position.
Shifts left while
printing
Increase the outside dial setting one position.
117
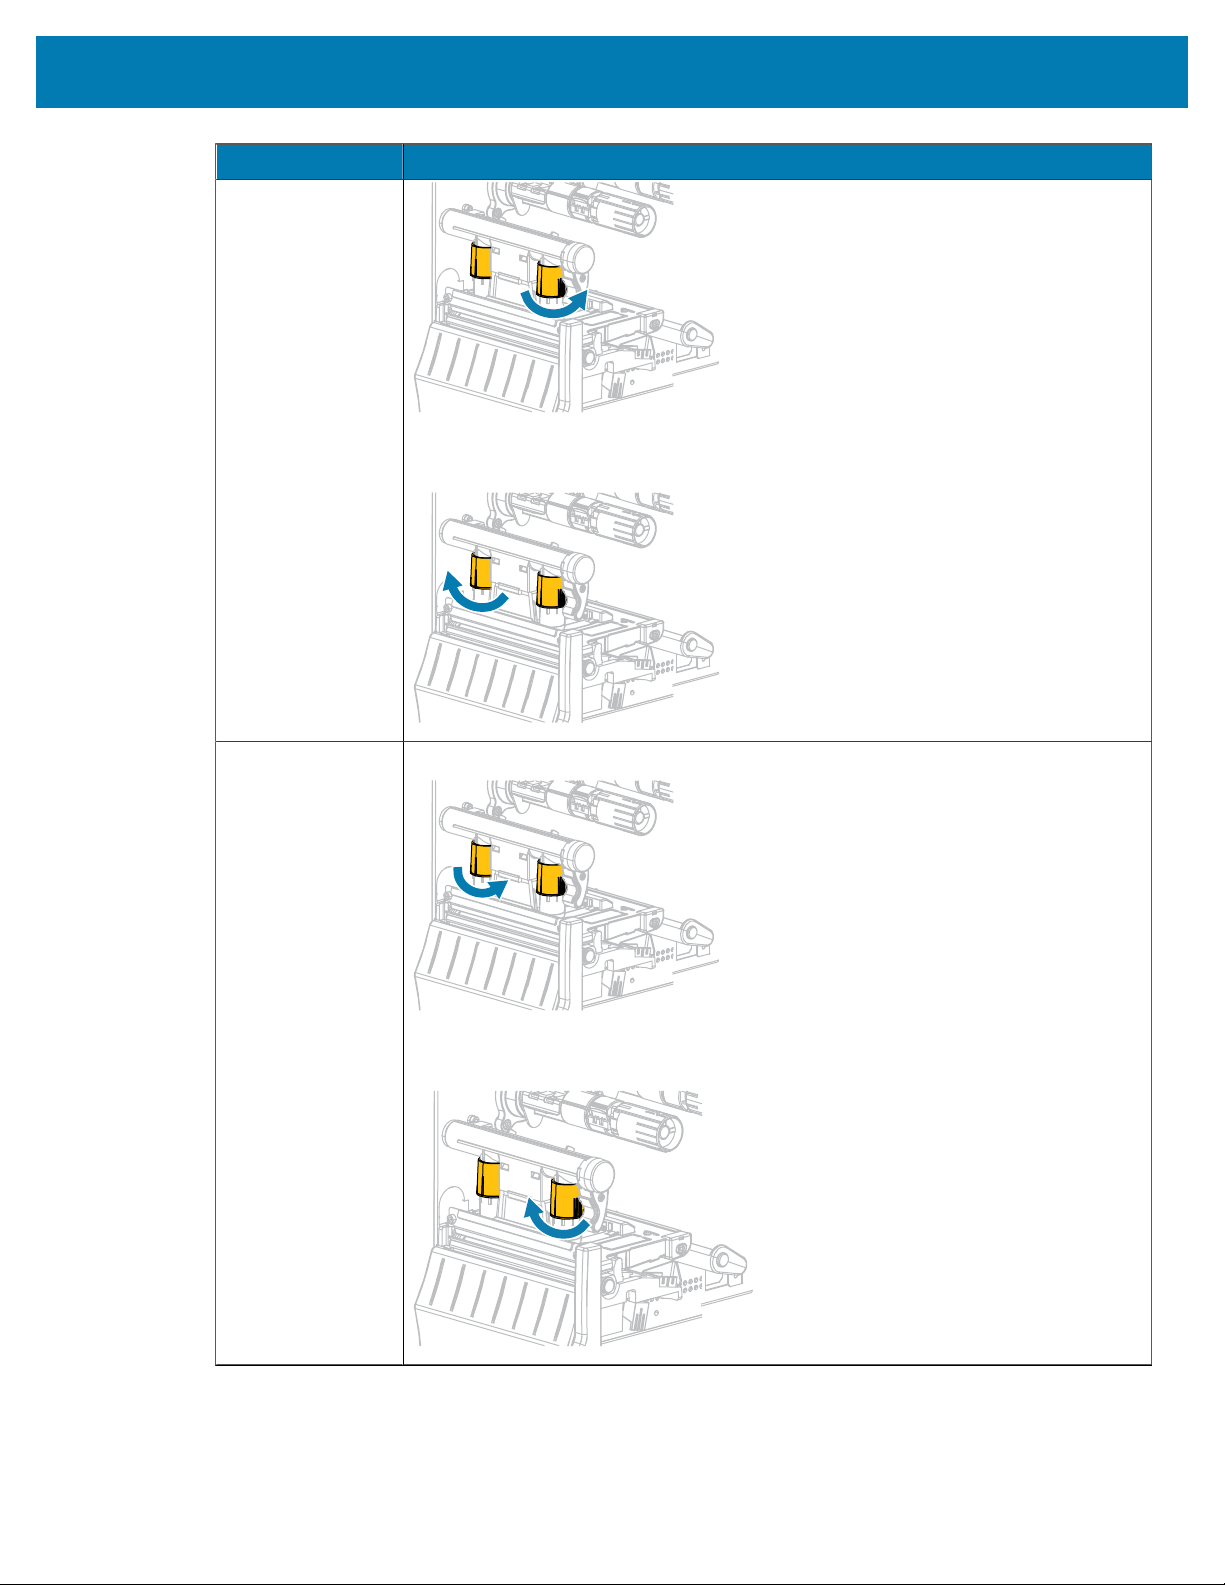
Printer Configuration and Adjustment
If the Media... Then...
OR
Decrease the inside dial setting one position.
Shifts right while
printing
Increase the inside dial setting one position.
OR
Decrease the outside dial setting one position.
118
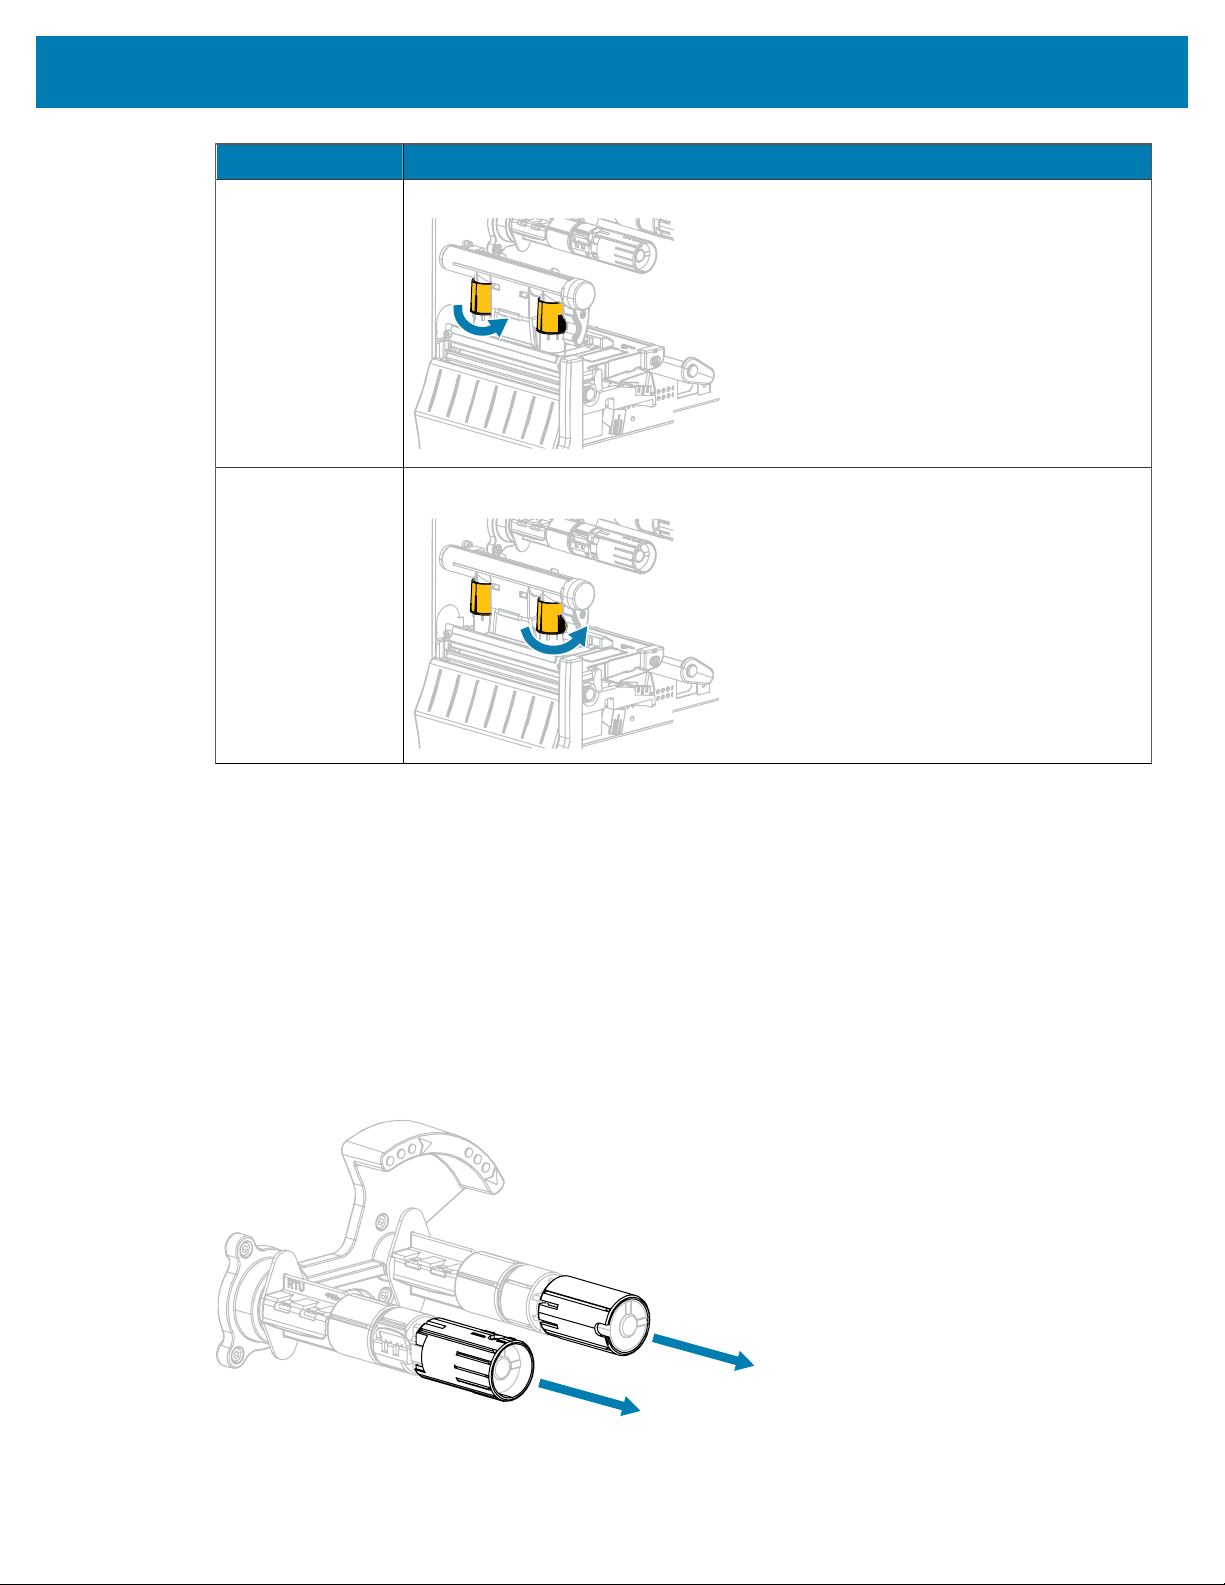
Printer Configuration and Adjustment
If the Media... Then...
Prints too lightly
on the left side of
the label.
Increase the inside dial setting one position.
Prints too lightly
on the right side of
the label.
Increase the outside dial setting one position.
Adjusting Ribbon Tension
For the printer to operate correctly, the ribbon supply spindle and ribbon take-up spindle must use
the same tension setting (normal or low tension). Use the normal tension setting seen here for most
applications. If you are using narrow ribbon or experience certain ribbon issues, you may need to lower the
ribbon tension.
Normal Tension Setting
To place the ribbon spindles in the normal position, firmly pull out each spindle end cap until it extends and
clicks in place. Use this setting for most applications.
Figure 7Normal Tension Setting (Spindle End Caps Pulled Out)
119
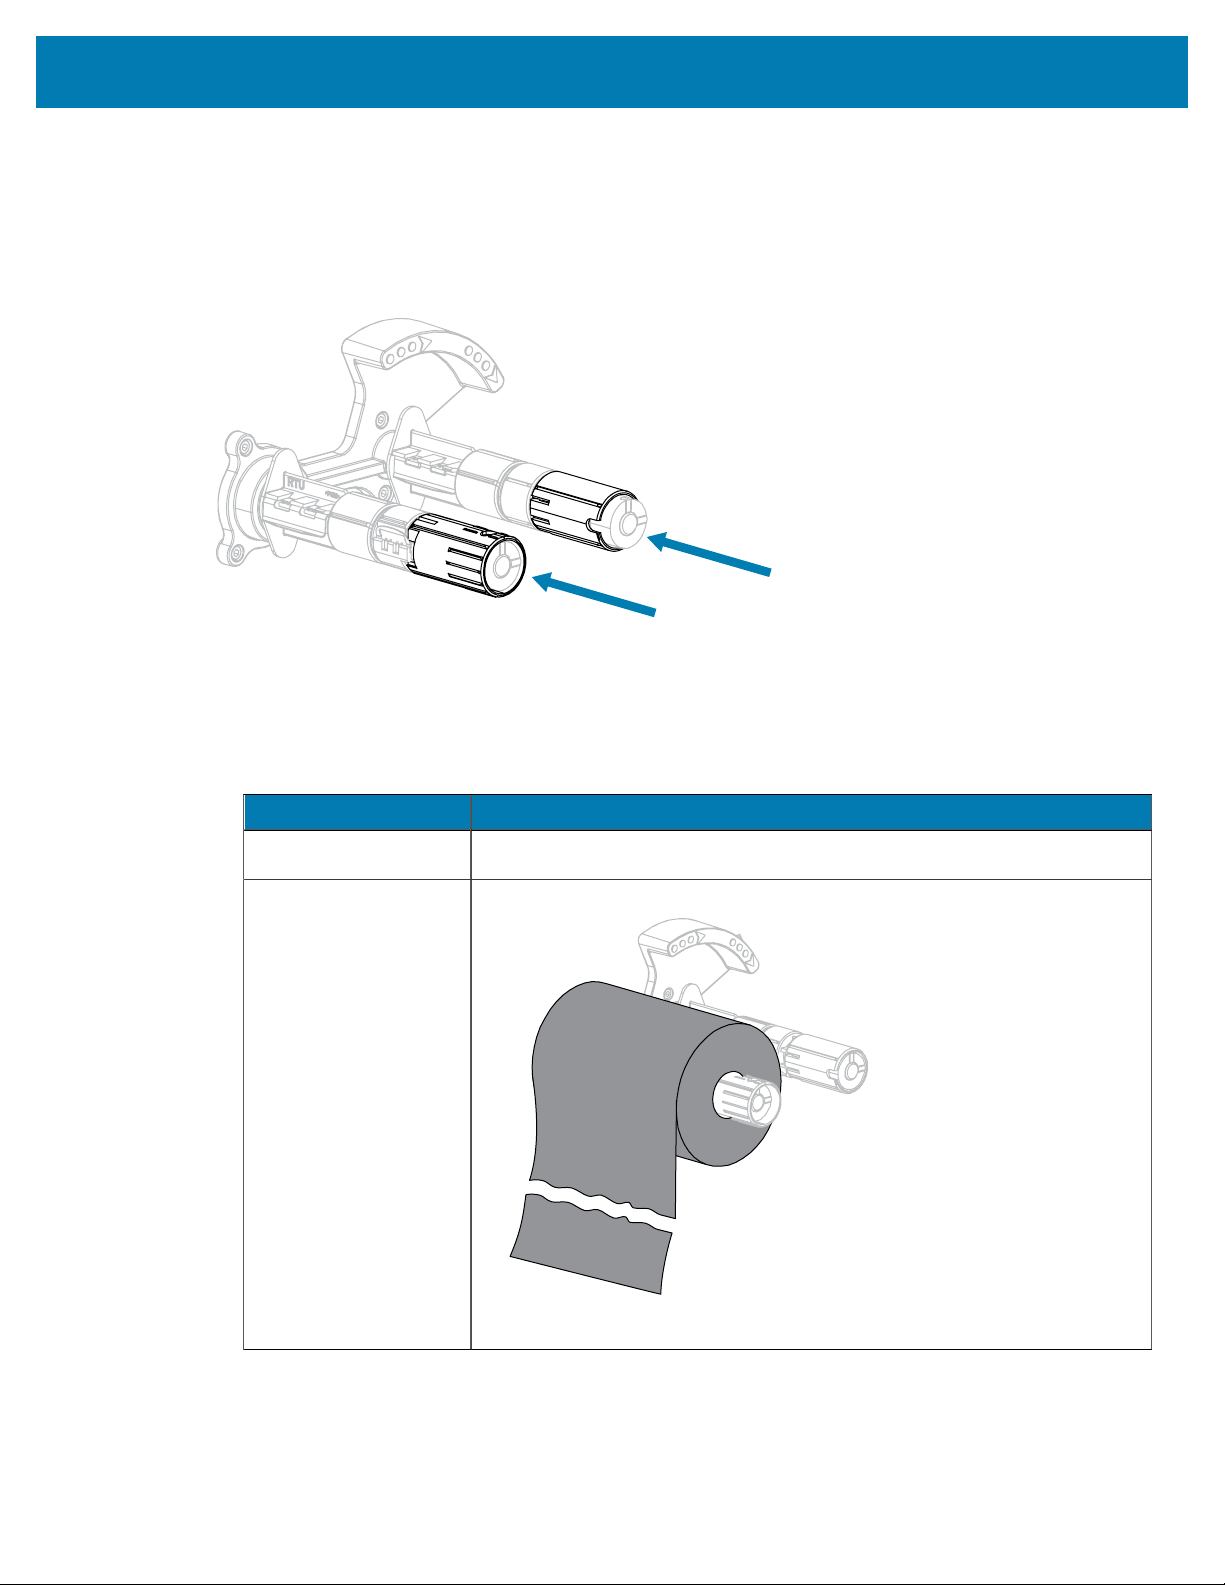
Printer Configuration and Adjustment
Low Tension Setting
To place a spindle in the low-tension position, firmly push in the end cap until it retracts and clicks in place.
Use this setting only when necessary, such as if the ribbon causes scuff marks at the beginning of a roll or
if normal tension causes the ribbon to stall at the end of the roll.
Figure 8Ribbon Spindles— Low Tension Setting (SpindleEndCapsPushedIn)
Removing Used Ribbon
Remove used ribbon from the ribbon take-up spindle each time you change the roll of ribbon.
1. Has the ribbon run out?
If... Then...
Ran out Continue with the next step.
Did not run out a. Cut or break the ribbon before the ribbon take-up spindle.
b. Continue with the next step.
120
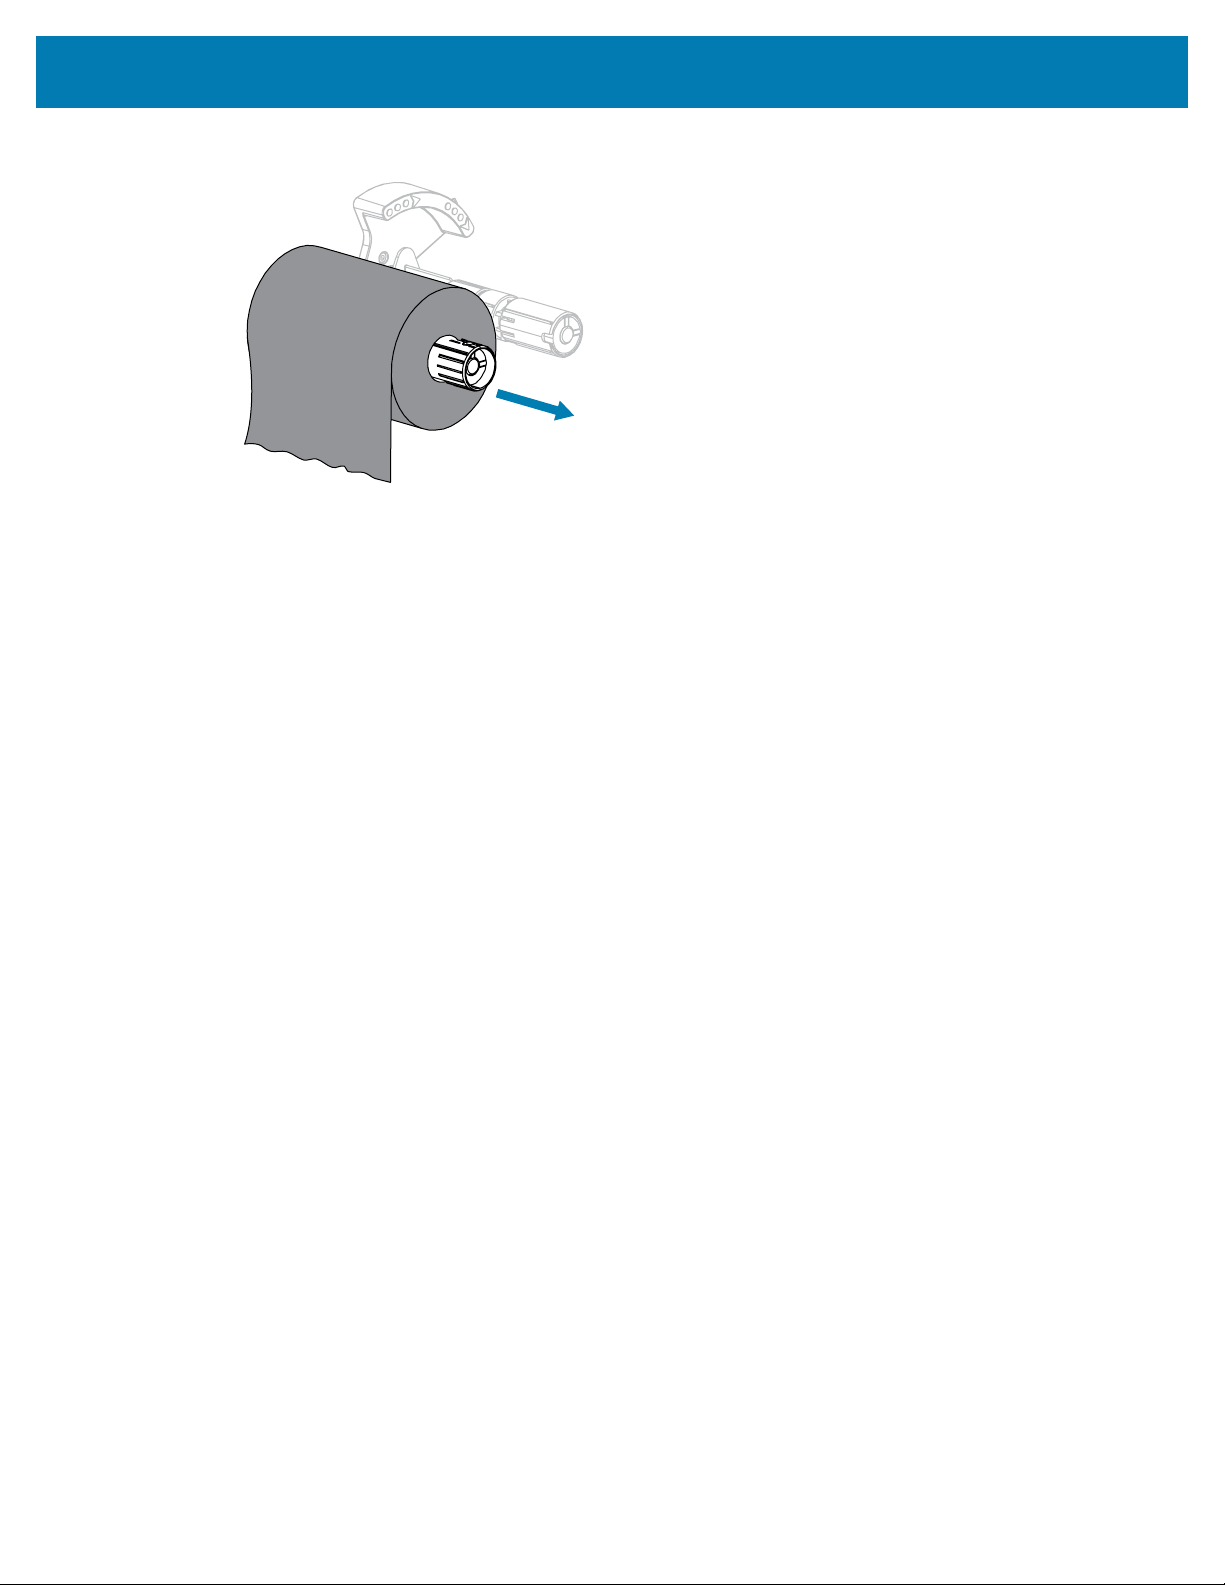
Printer Configuration and Adjustment
2. Slide the core with the used ribbon off of the ribbon take-up spindle.
3. Discard the used ribbon. You may reuse the empty core from the ribbon supply spindle by moving it to
the ribbon take-up spindle.
4. Reload the ribbon following the instructions in Loading the Ribbon on page 25.
121

Routine Maintenance
Routine Maintenance
This section provides routine cleaning and maintenance procedures.
Cleaning Schedule and Procedures
Routine preventive maintenance is a crucial part of normal printer operation. By taking good care of your
printer, you can minimize the potential problems that you might have with it and help to achieve and to
maintain your standards for print quality.
Over time, the movement of media or ribbon across the printhead wears through the protective ceramic
coating, exposing and eventually damaging the print elements (dots). To avoid abrasion:
• Clean the printhead frequently.
• Minimize printhead pressure and burn temperature (darkness) settings by optimizing the balance
between the two.
• When using Thermal Transfer mode, ensure that the ribbon is as wide or wider than the media to
prevent exposing the printhead elements to the more abrasive label material.
IMPORTANT: Zebra is not responsible for damage caused by the use of cleaning fluids on
this printer.
Specific cleaning procedures are provided on the following pages. This table shows the recommended
cleaning schedule. These intervals are intended as guidelines only. You may have to clean more often,
depending upon your application and media.
Area Method Interval
Printhead Solvent*
Platen roller Solvent*
Media sensors Air blow
Ribbon sensor Air blow
Media path Solvent*
Ribbon path Solvent*
Pinch roller (part of Peel-Off option) Solvent*
Direct Thermal Mode: After every roll of media
(or 500 feet of fanfold media).
Thermal Transfer Mode: After every roll of
ribbon.
Table 10Recommended Cleaning Schedule
122
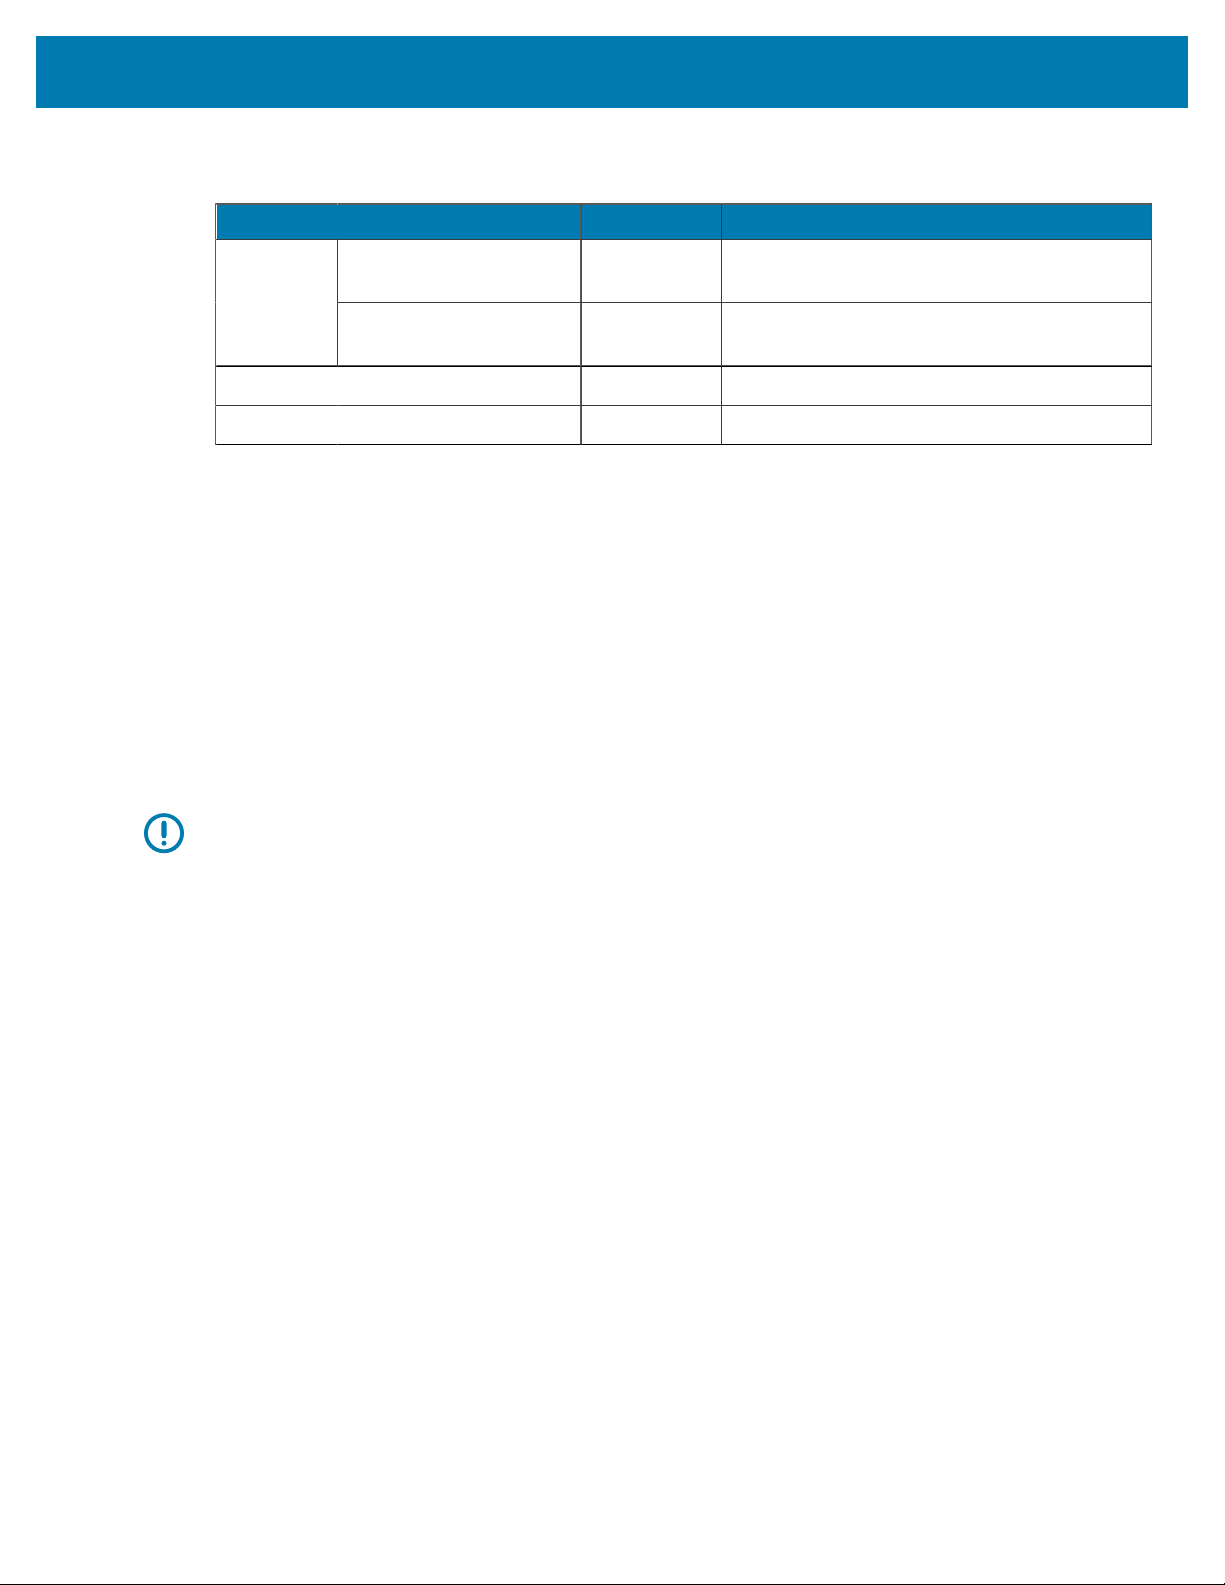
Routine Maintenance
Area Method Interval
If cutting continuous,
pressure-sensitive media
Solvent* After every roll of media (or more often,
depending upon your application and media).
Cutter
module
If cutting tag stock or
label liner material
Solvent* and
air blow
After every two or three rolls of media.
Tear-off/peel-off bar Solvent* Once a month.
Take-label sensor Air blow Once every six months.
Table 10Recommended Cleaning Schedule(Continued)
* Zebra recommends using Preventive Maintenance Kit (part number 47362). In place of this kit, you may
use a clean swab dipped in a solution of isopropyl alcohol (minimum 90%) and deionized water (maximum
10%).
Cleaning the Exterior, the Media Compartment, and the Sensors
Over time, dust, grime, and other debris may build up on the outside and inside of your printer, particularly
in a harsh operating environment.
Printer Exterior
You may clean the exterior surfaces of the printer with a lint-free cloth and a small amount of a mild
detergent, if necessary. Do not use harsh or abrasive cleaning agents or solvents.
IMPORTANT:
Zebra is not responsible for damage caused by the use of cleaning fluids on this printer.
Media Compartment and Sensors
To clean the sensors:
1. Brush, air blow, or vacuum any accumulated paper lint and dust away from the media and ribbon paths.
123
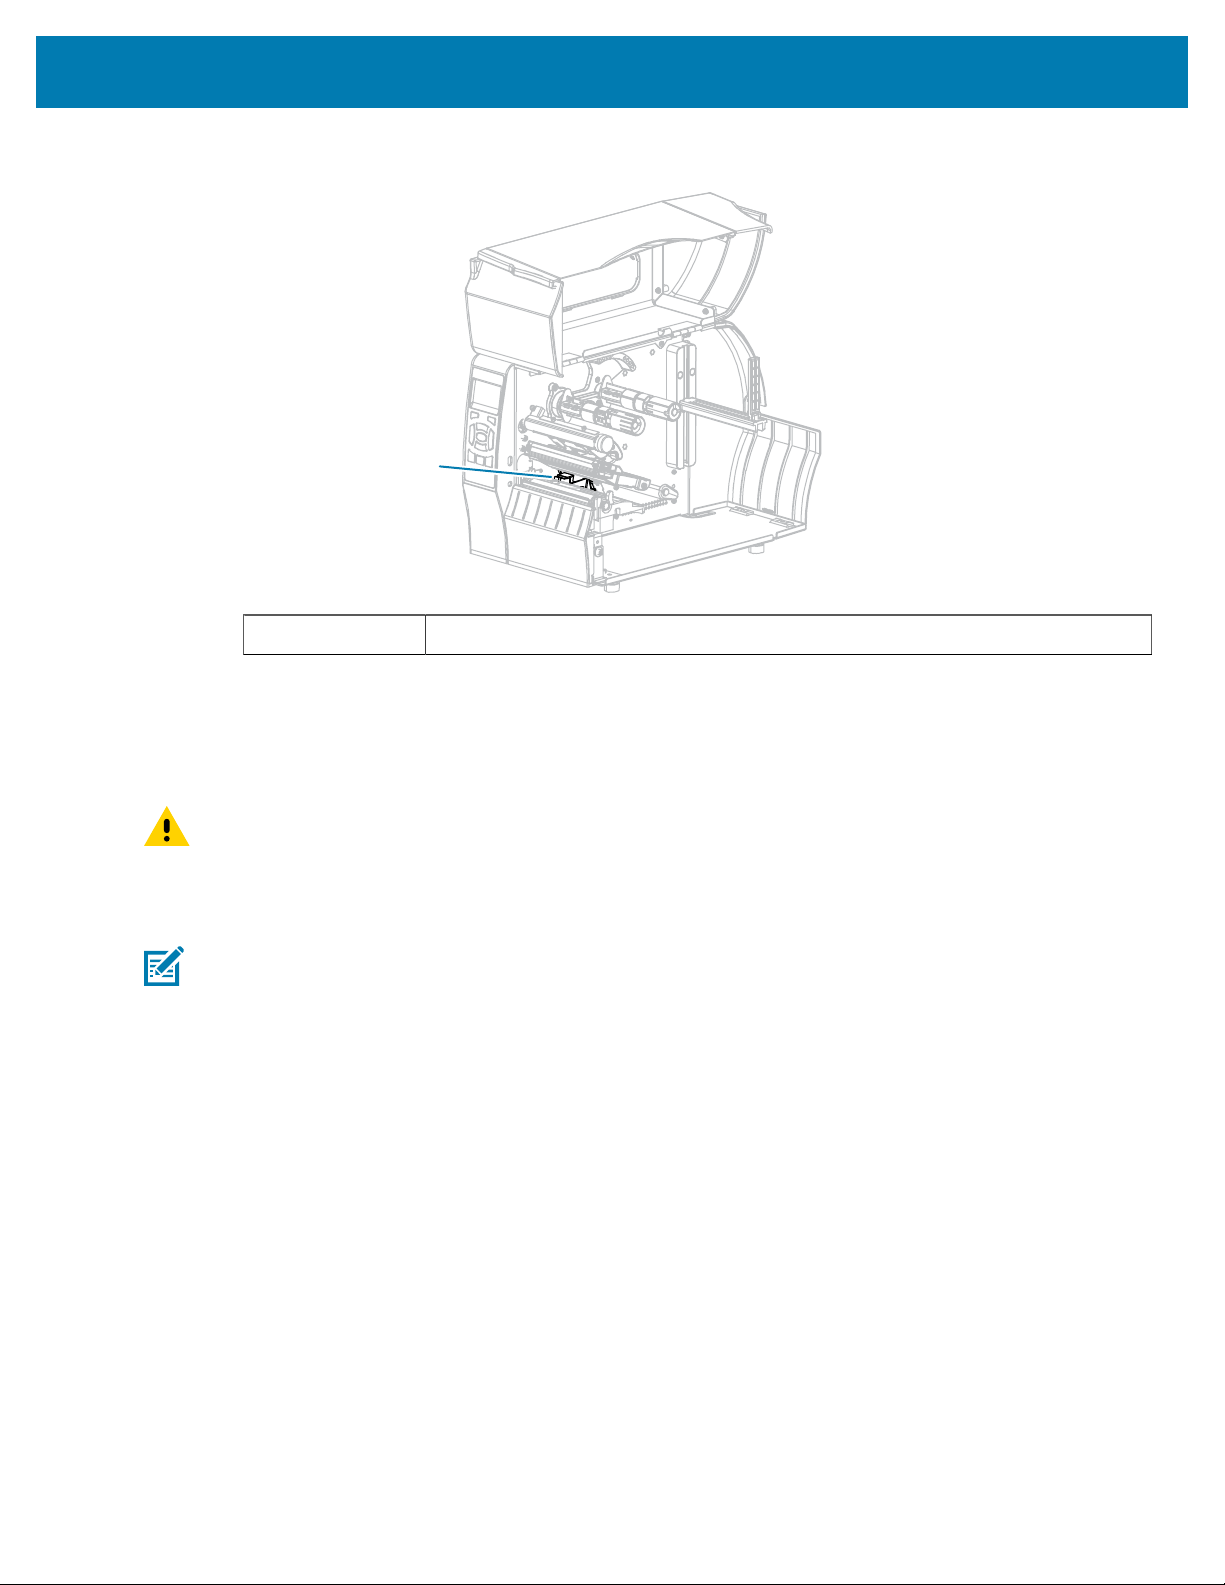
Routine Maintenance
2. Brush, air blow, or vacuum any accumulated paper lint and dust away from the sensors.
1
1 Sensors
Cleaning the Printhead and Platen Roller
Inconsistent print quality, such as voids in the bar code or graphics, may indicate a dirty printhead. For the
recommended cleaning schedule, see
Table 10Recommended Cleaning Schedule on page 122.
CAUTION: While performing any tasks near an open printhead, remove all rings, watches,
hanging necklaces, identification badges, or other metallic objects that could touch the
printhead. You are not required to turn off the printer power when working near an open
printhead, but Zebra recommends it as a precaution. If you turn off the power, you will lose all
temporary settings, such as label formats, and you must reload them before you resume printing.
NOTE: For printers with a peel assembly, keep the peel assembly closed while cleaning the
platen roller to reduce the risk of bending the tear#off/peel-off bar.
124
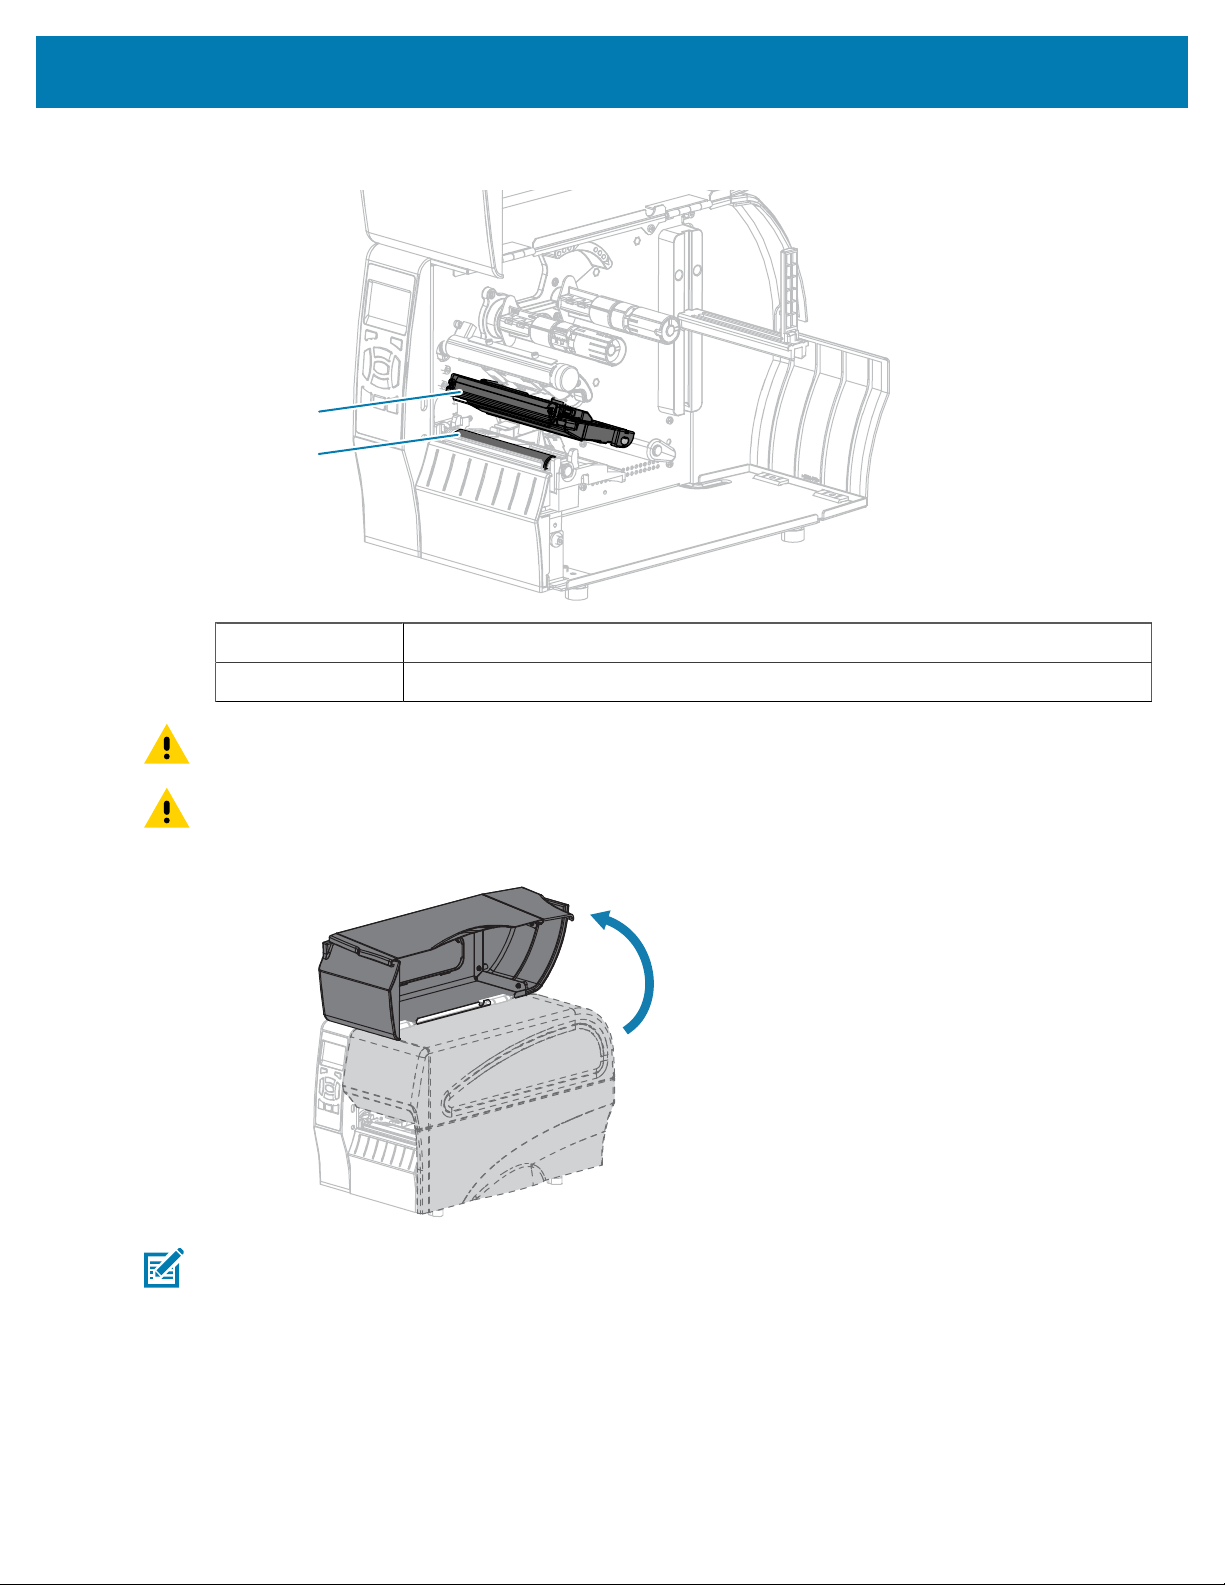
Routine Maintenance
Figure 9Location of the Printhead and Platen Roller
1
2
1 Printhead assembly
2 Platen roller
CAUTION: The printhead may be hot and could cause severe burns. Allow the printhead tocool.
CAUTION: Before touching the printhead assembly, discharge any built-up static electricity by
touching the metal printer frame or by using an antistatic wriststrap and mat.
1. Raise the media door.
NOTE: The printhead may be hot and could cause severe burns. Allow the printhead to cool.
125
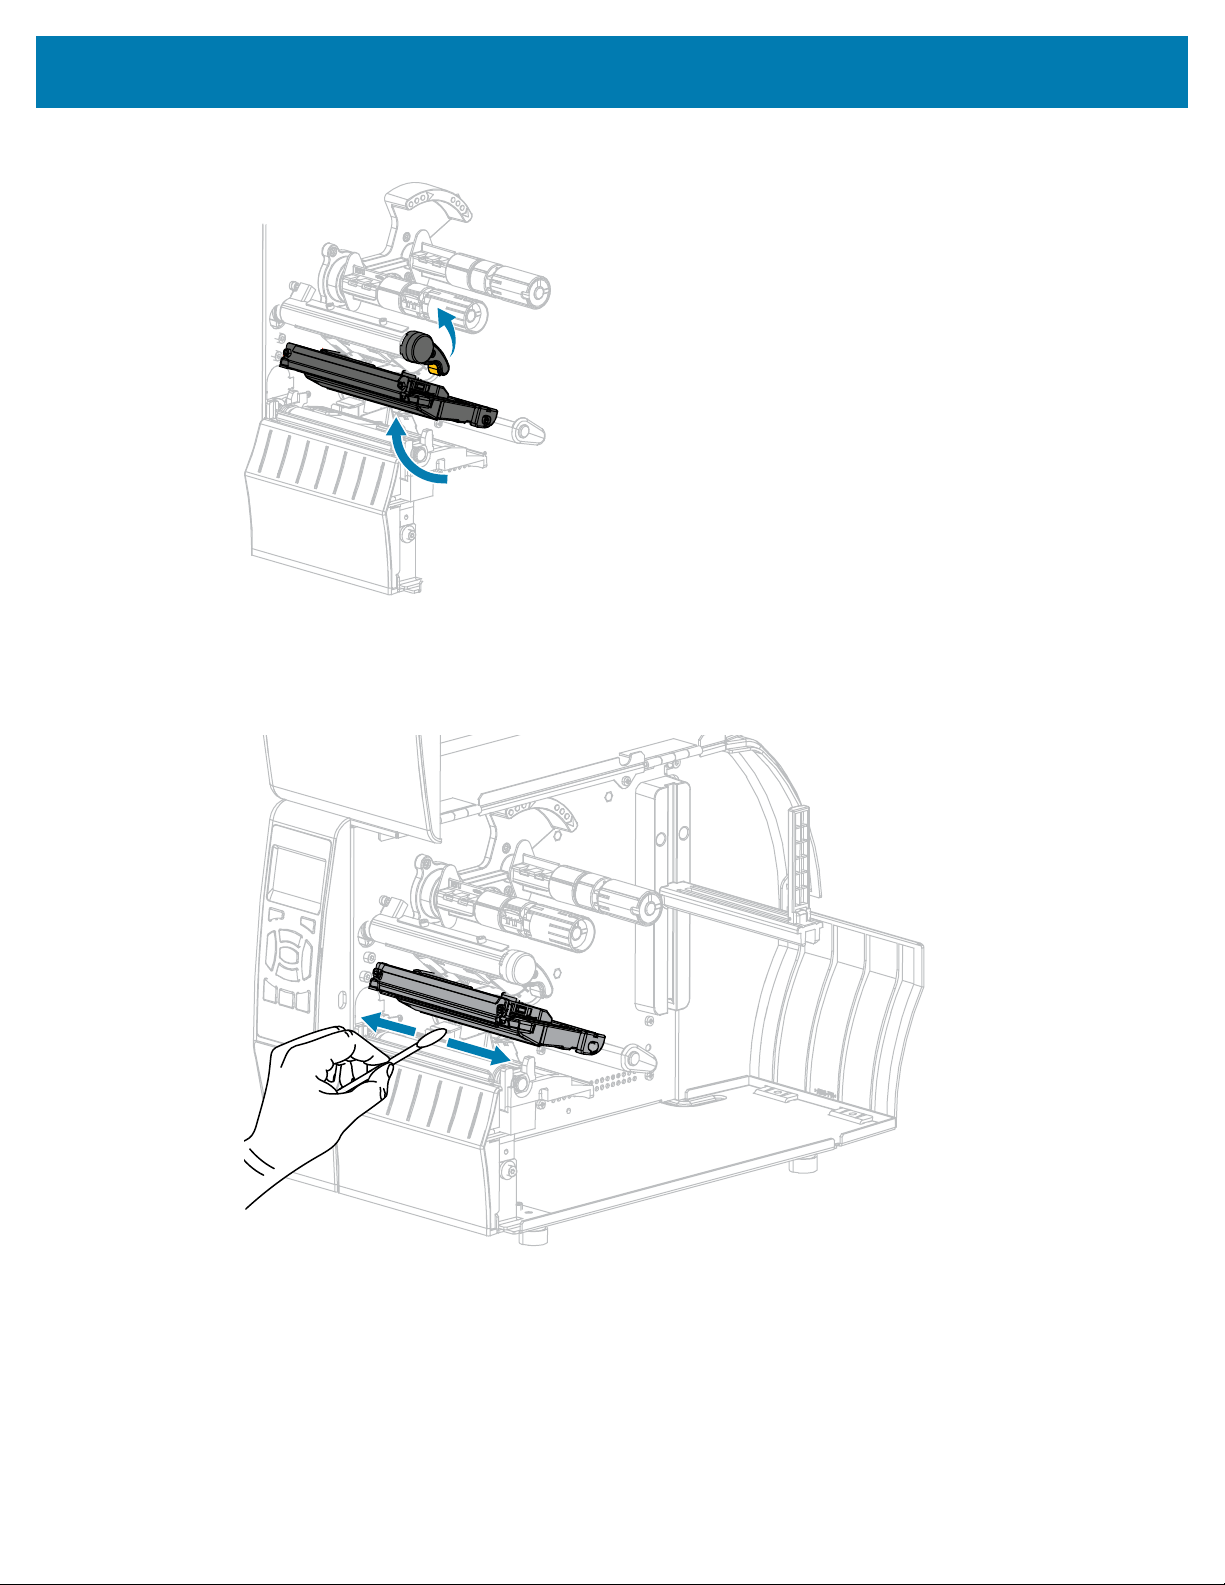
Routine Maintenance
2. Rotate the printhead-open lever upward to release the printhead assembly.
3. Remove the ribbon (if used) and the media.
4. Using the swab from a Zebra Preventive Maintenance Kit, wipe along the brown strip on the printhead
assembly from end to end.In place of the Preventive Maintenance Kit, you may use a clean swab
dipped in 99.7% isopropyl alcohol. Allow the solvent to evaporate.
126
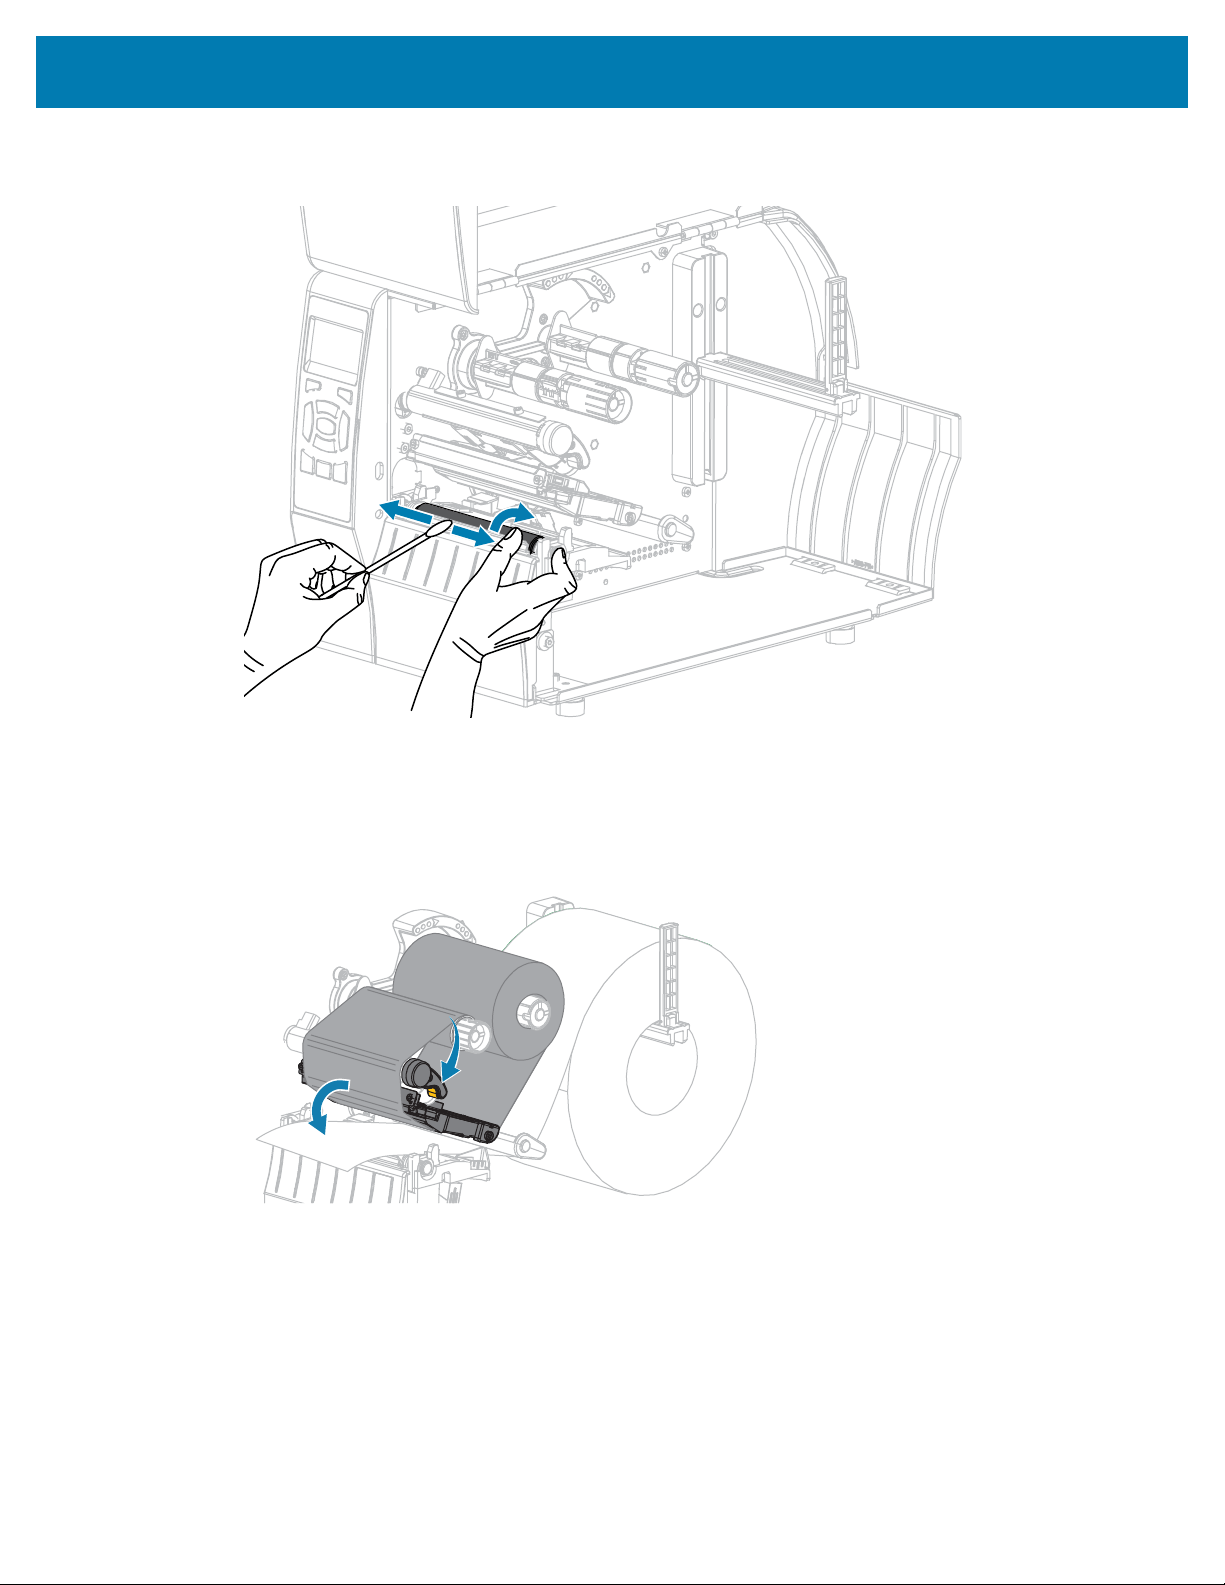
Routine Maintenance
5. While manually rotating the platen roller, clean it thoroughly with the swab. Allow the solvent to
evaporate.
6. Reload the ribbon (if used) and the media. For instructions, see Loading the Ribbon on page 25 or
Loading the Media on page 29. Refer to the User Guide for instructions.
7. Rotate the printhead-open lever downward until it locks the printhead in place.
127
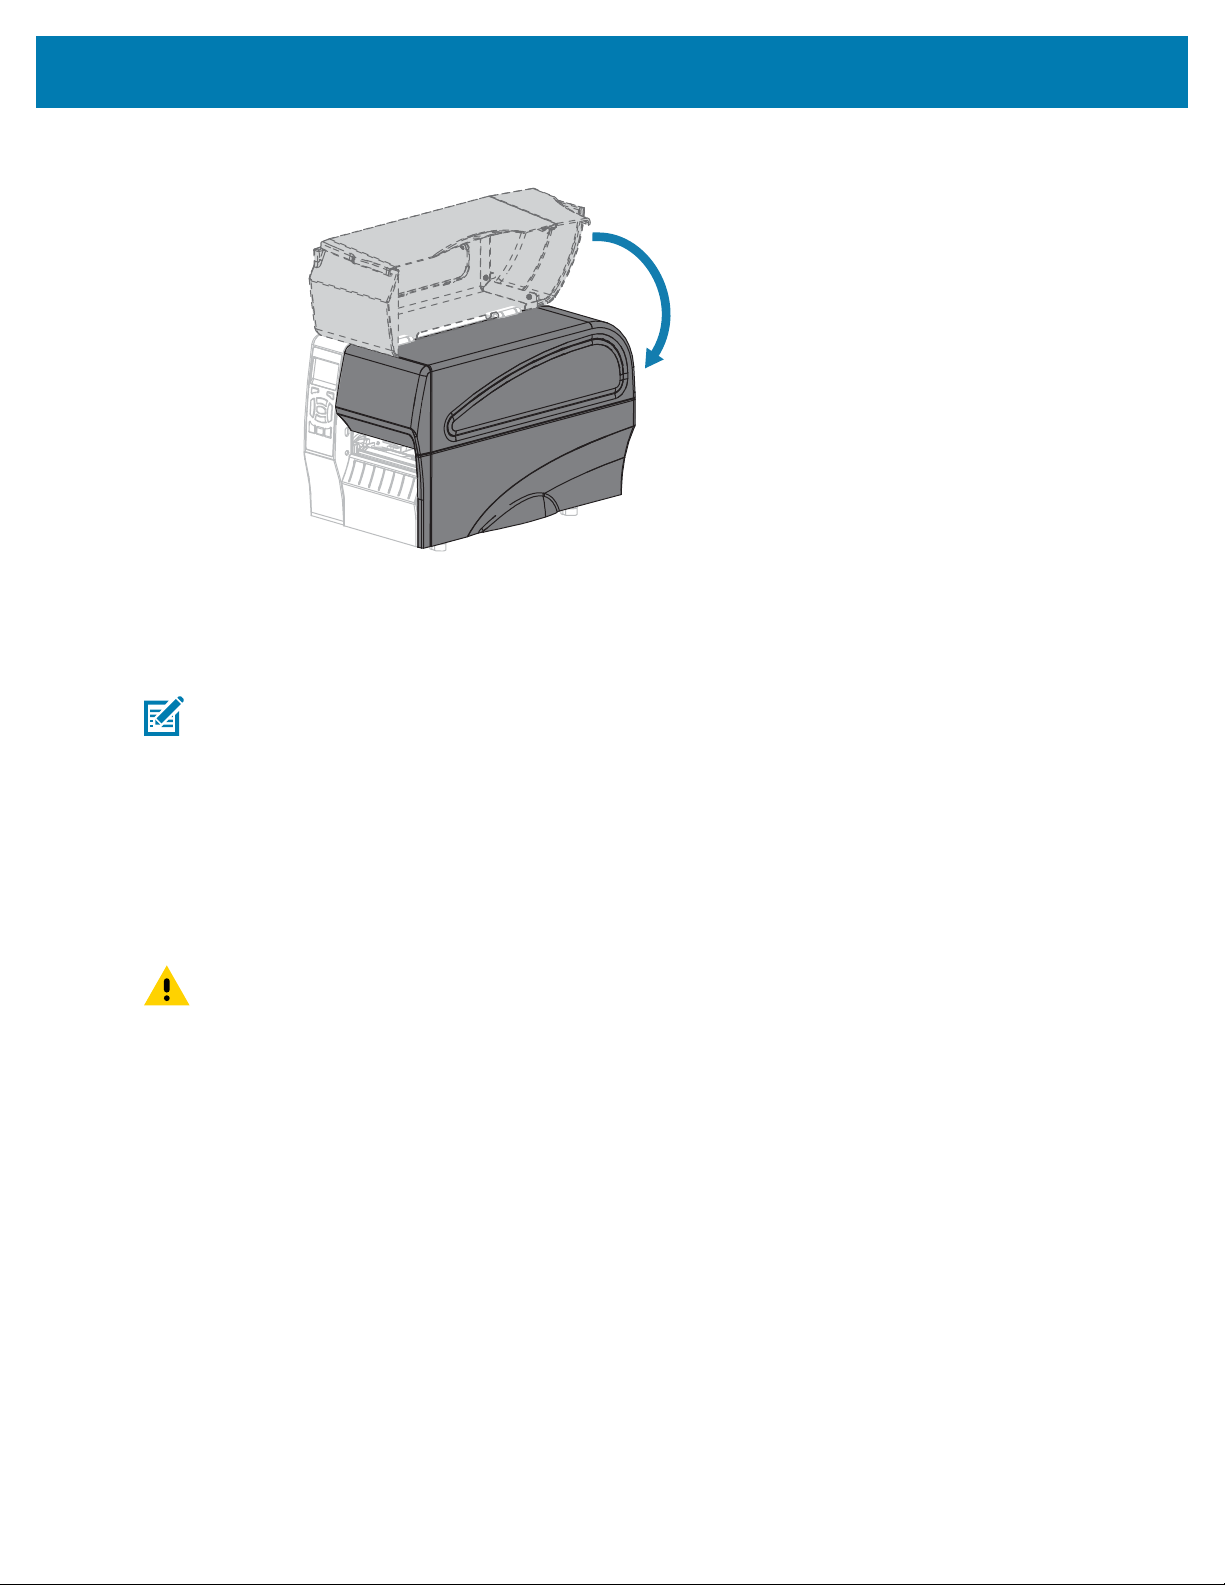
Routine Maintenance
8. Close the media door.
The printer is ready to operate.
9. Press PAUSE to exit pause mode and enable printing.
The printer may perform a label calibration or feed a label, depending on your settings.
NOTE: If performing this procedure does not improve print quality, try cleaning the printhead
with Save-A-Printhead cleaning film. This specially coated material removes contamination
buildup without damaging the printhead. Call your authorized Zebra reseller for more
information.
Cleaning the Peel Assembly
The peel assembly, which is part of the Peel-Off and Liner Take-Up options, consists of several spring-
loaded rollers to ensure the proper roller pressure. Clean the pinch roller and tear-off/peel-off bar if
adhesive buildup begins to affect peel performance.
CAUTION: Do not use your left hand to assist in closing the Peel assembly. The top edge of the
Peel roller/assembly could pinch your fingers.
If adhesive buildup affects peel-off performance, complete these steps.
128
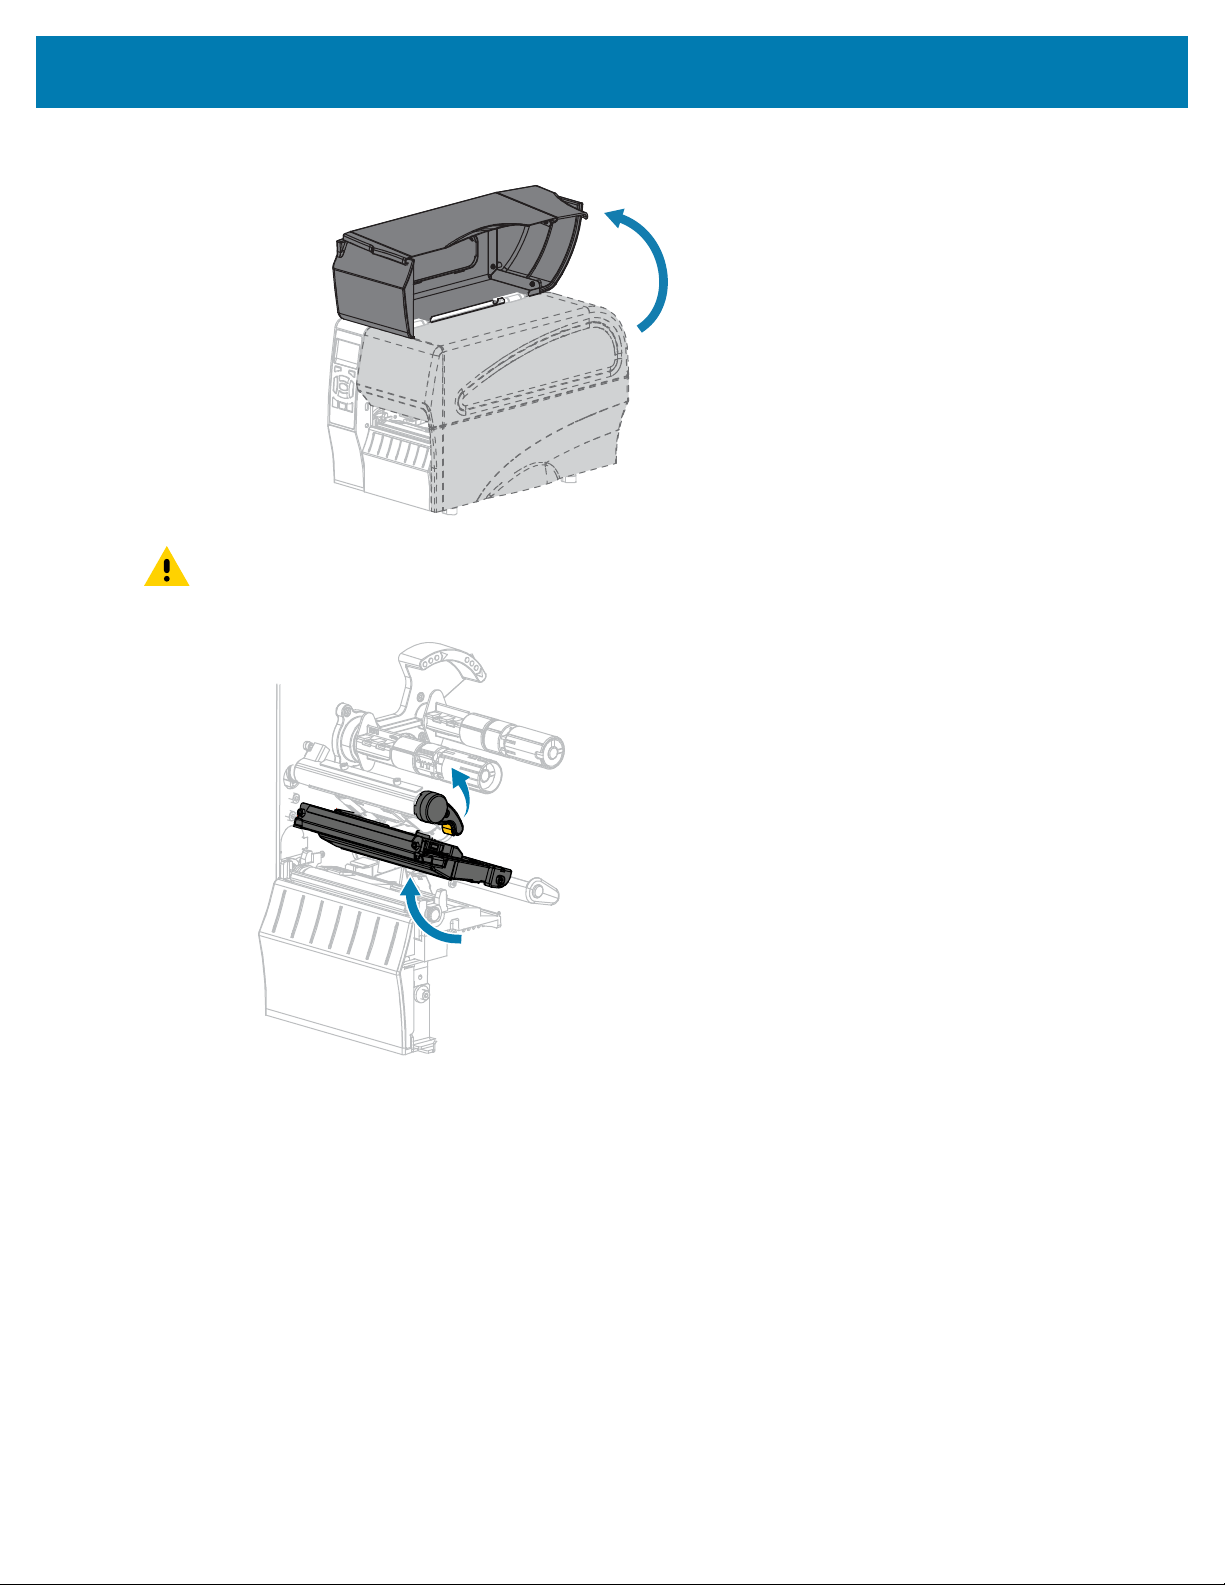
Routine Maintenance
1. Raise the media door.
CAUTION: The printhead may be hot and could cause severe burns. Allow the printhead to
cool.
2. Open the printhead assembly by rotating the printhead-open lever.
129
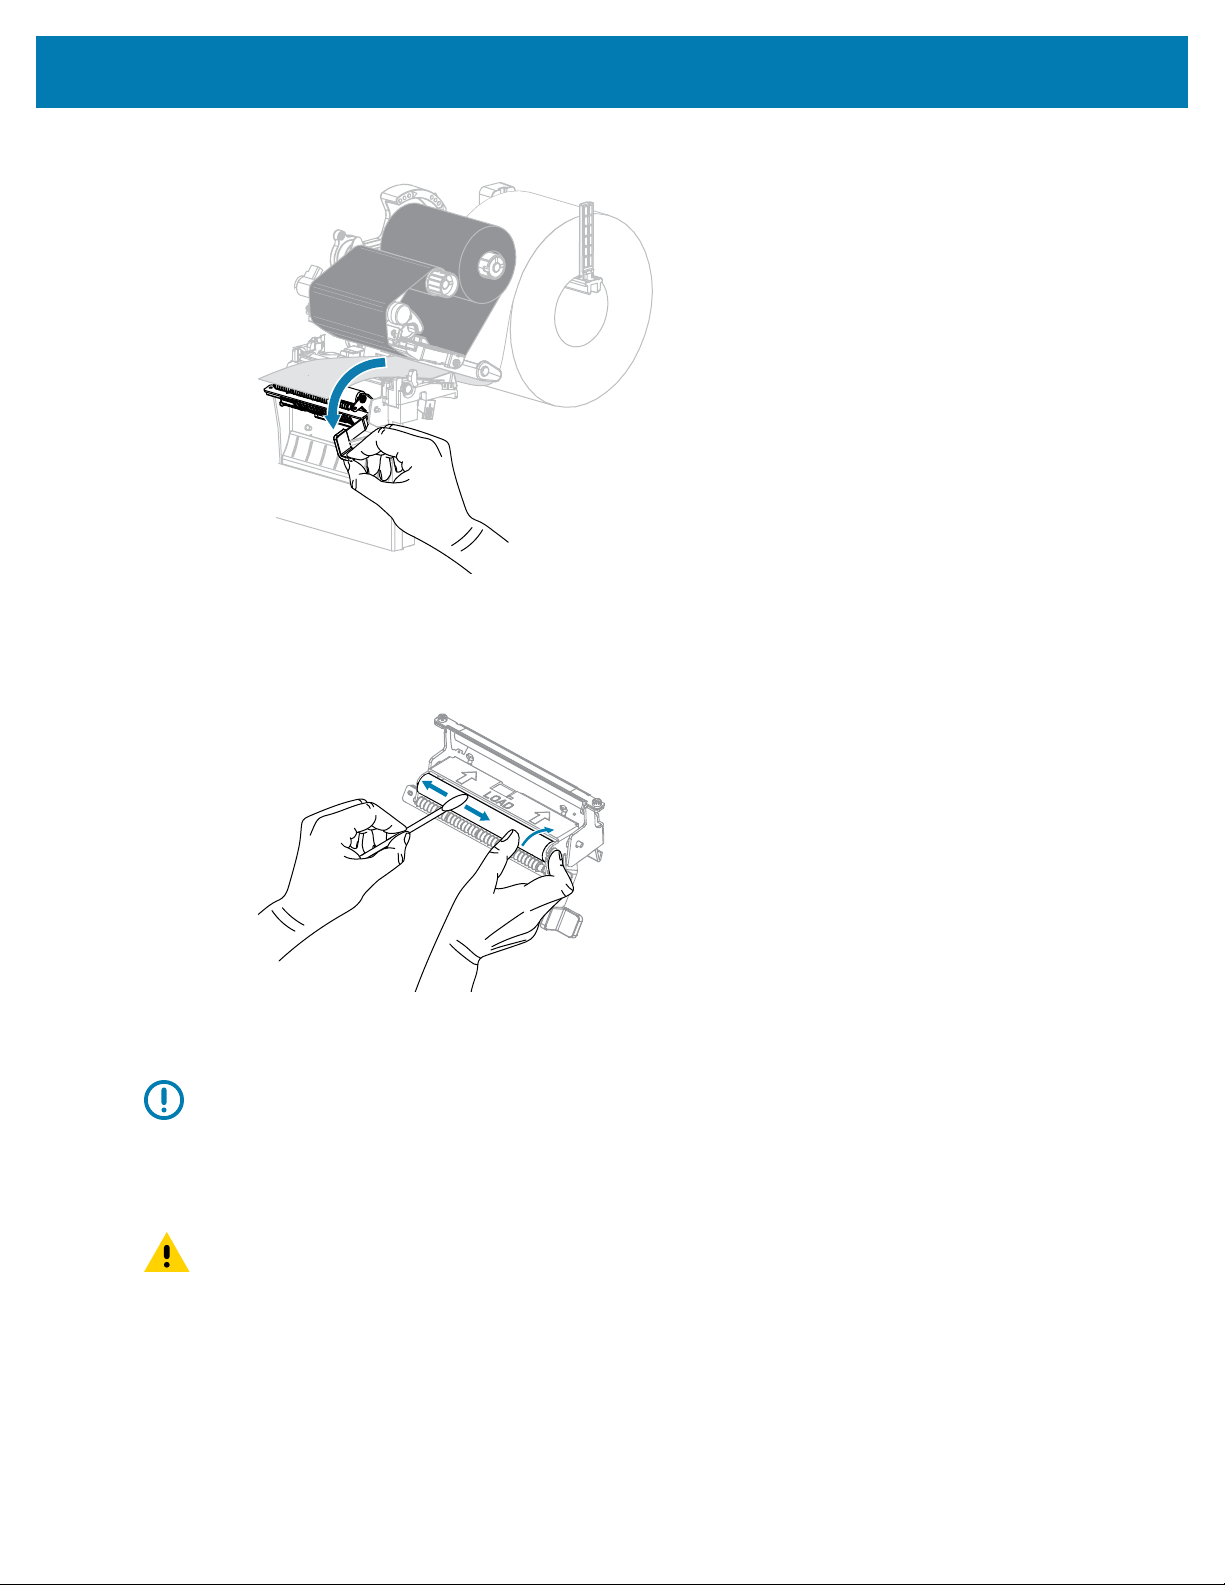
Routine Maintenance
3. Push down the peel-off mechanism release lever to open the peel assembly.
4. Remove any media liner to expose the pinch roller.
5. While manually rotating the pinch roller, clean it thoroughly with the swab from the Preventive
Maintenance Kit (part number 47362).In place of the Preventive Maintenance Kit, you may use a clean
swab dipped in 99.7% isopropyl alcohol.Allow the solvent to evaporate.
6. Use the swab to remove excess adhesive from the tear-off/peel-off bar.Allow the solvent to
evaporate.
IMPORTANT: Apply minimum force when cleaning the tear-off/peel-off bar. Excessive force
can cause the tear-off/peel-off bar to bend, which could have a negative effect on peel
performance.
7. Reload the media liner through the peel mechanism. For instructions, see Final Steps for Peel-Off
Mode (with or without Liner Take-Up) on page 39.
CAUTION: Use the peel release lever and your right hand to close the peel assembly. Do
not use your left hand to assist in closing. The top edge of the peel roller/assembly could
pinch your fingers.
130
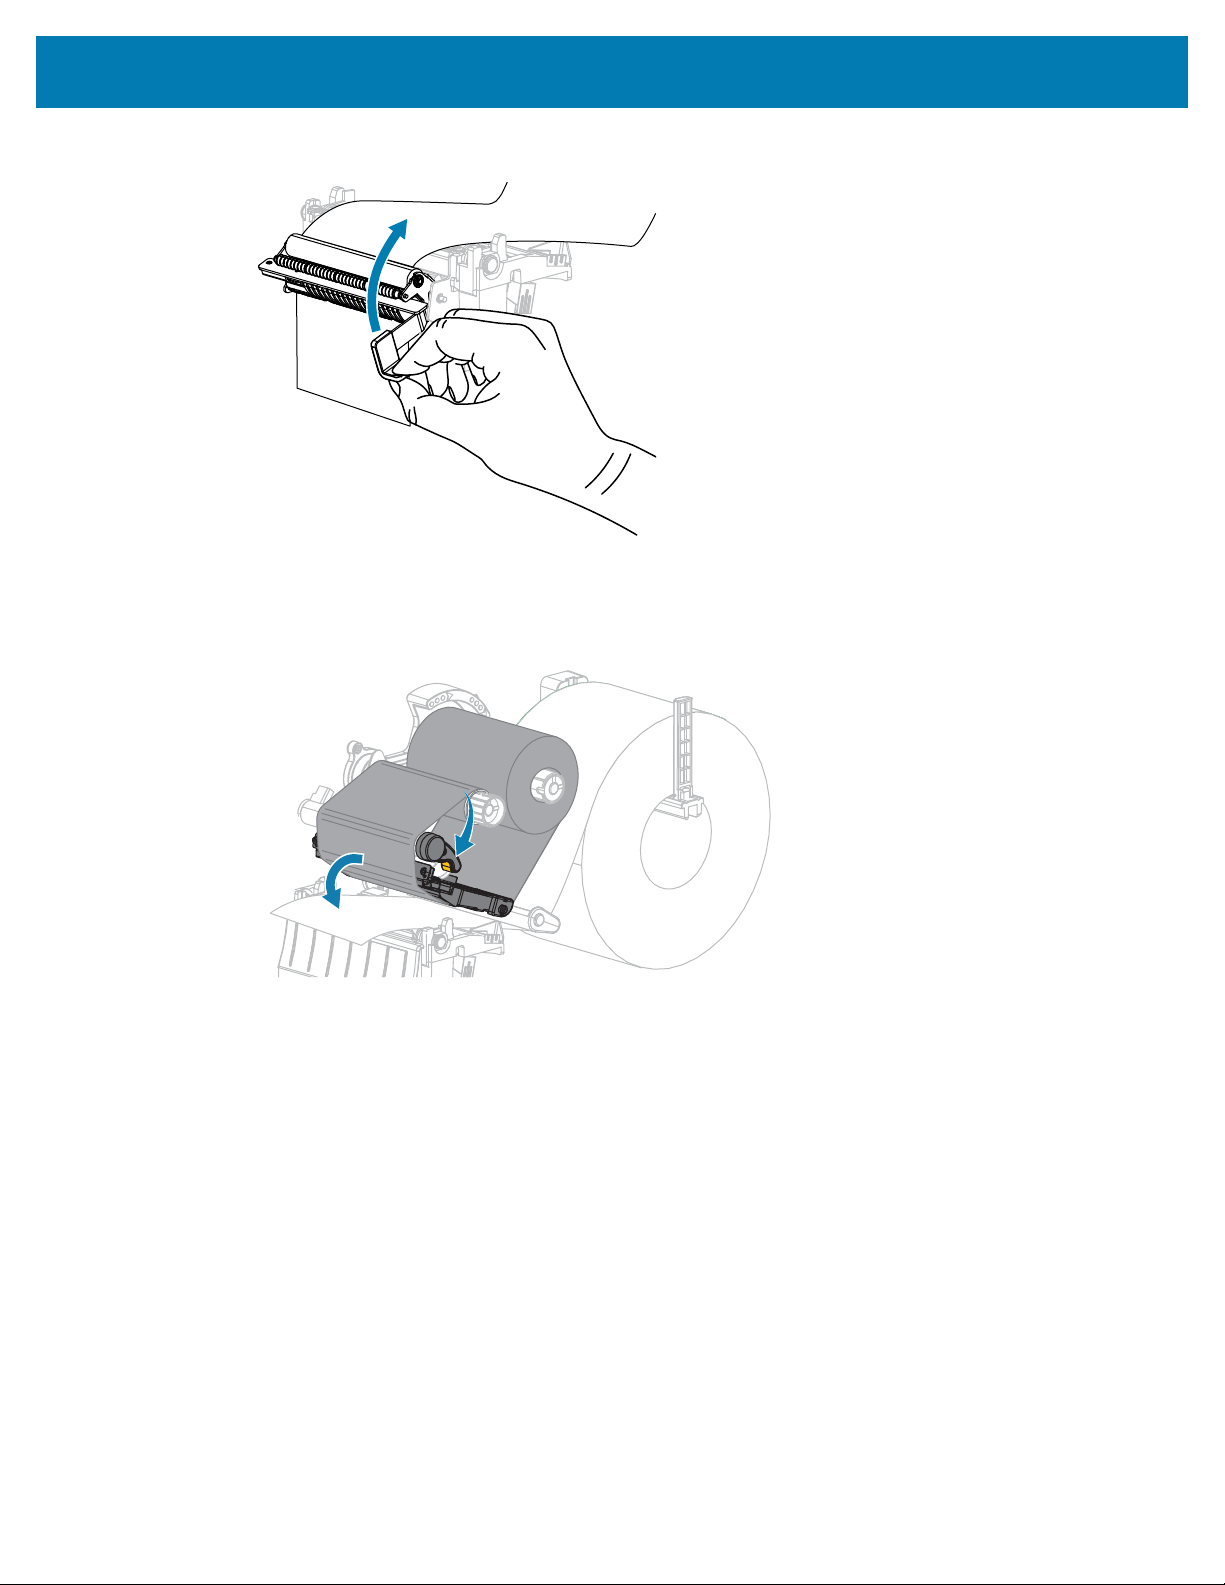
Routine Maintenance
8. Close the peel assembly using the peel-off mechanism release lever.
9. Rotate the printhead-open lever downward until it locks the printhead in place.
131
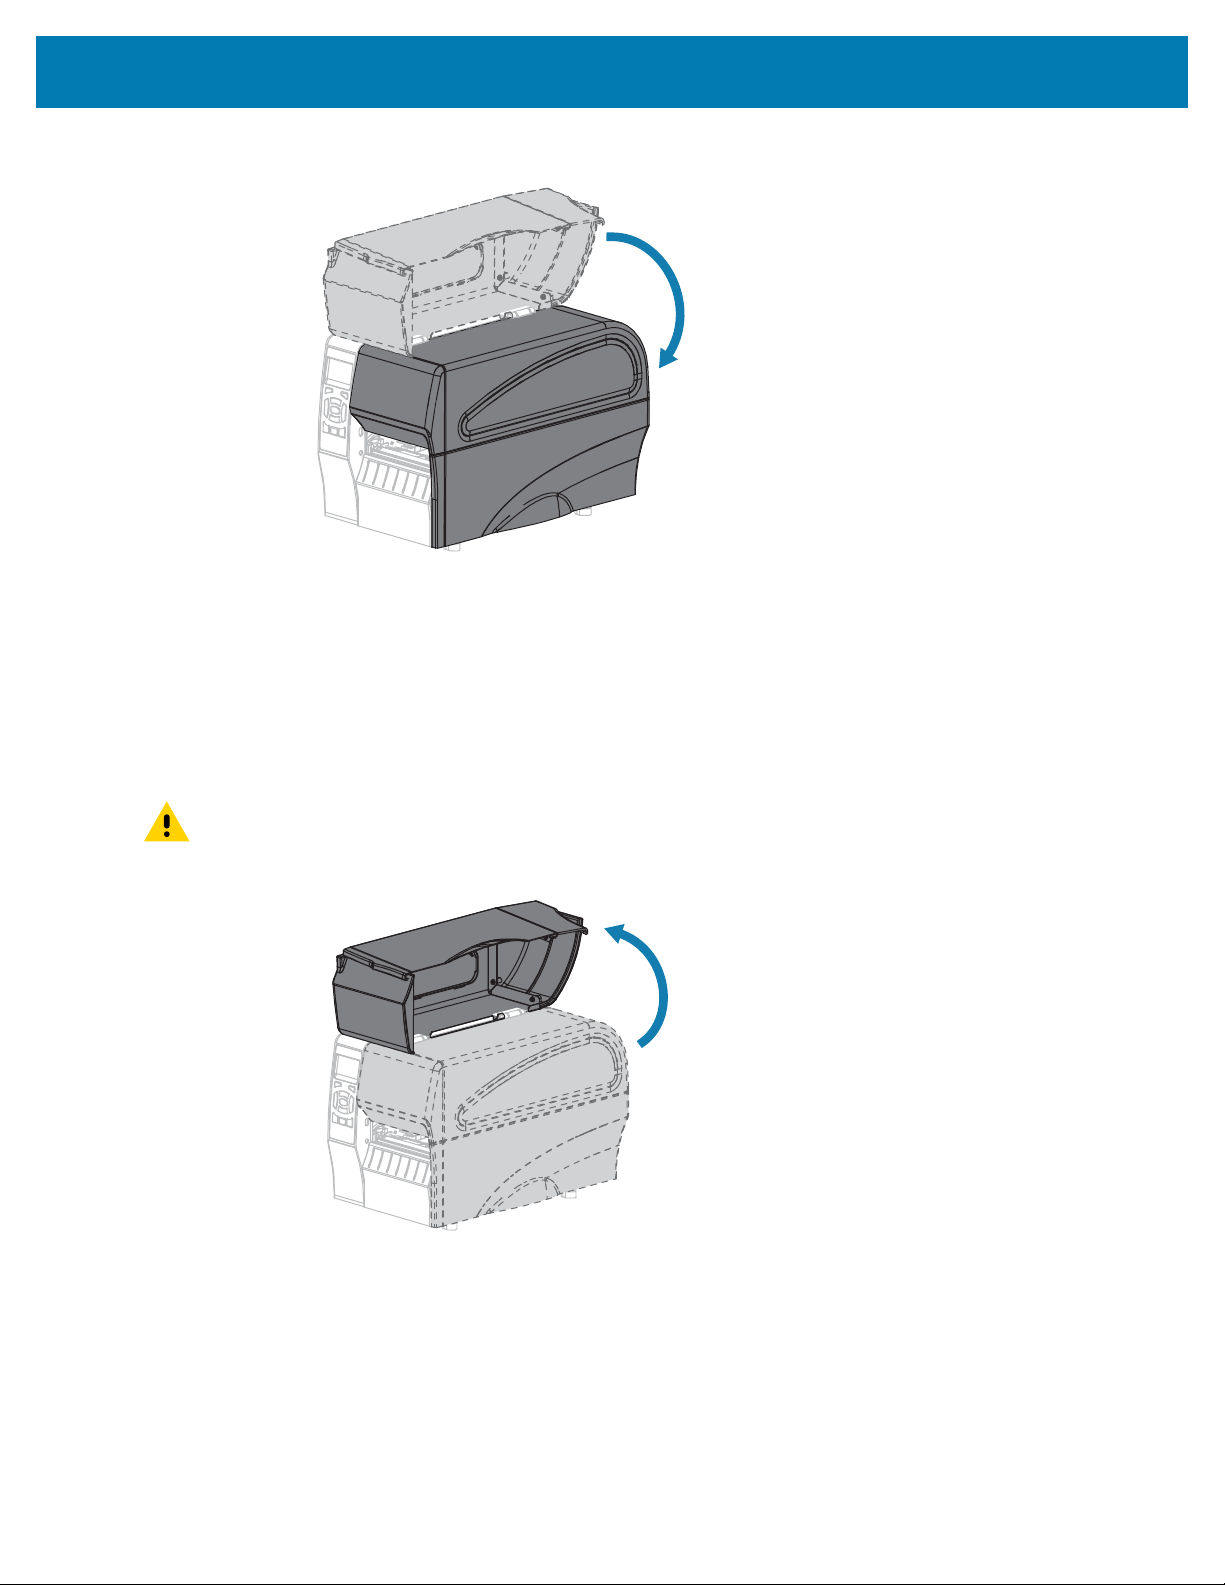
Routine Maintenance
10. Close the media door.
The printer is ready to operate.
11. Press PAUSE to exit pause mode and enable printing.
The printer may perform a label calibration or feed a label, depending on your settings.
Cleaning and Lubricating the Cutter Module
If the cutter is not cutting the labels cleanly or if it jams with labels, clean the cutter.
CAUTION: For personnel safety, always power off and unplug the printer before performing this
procedure.
1. Raise the media door.
2. Turn off (O) the printer and disconnect the AC power cord.
3. Remove media that is loaded through the cutter module.
132
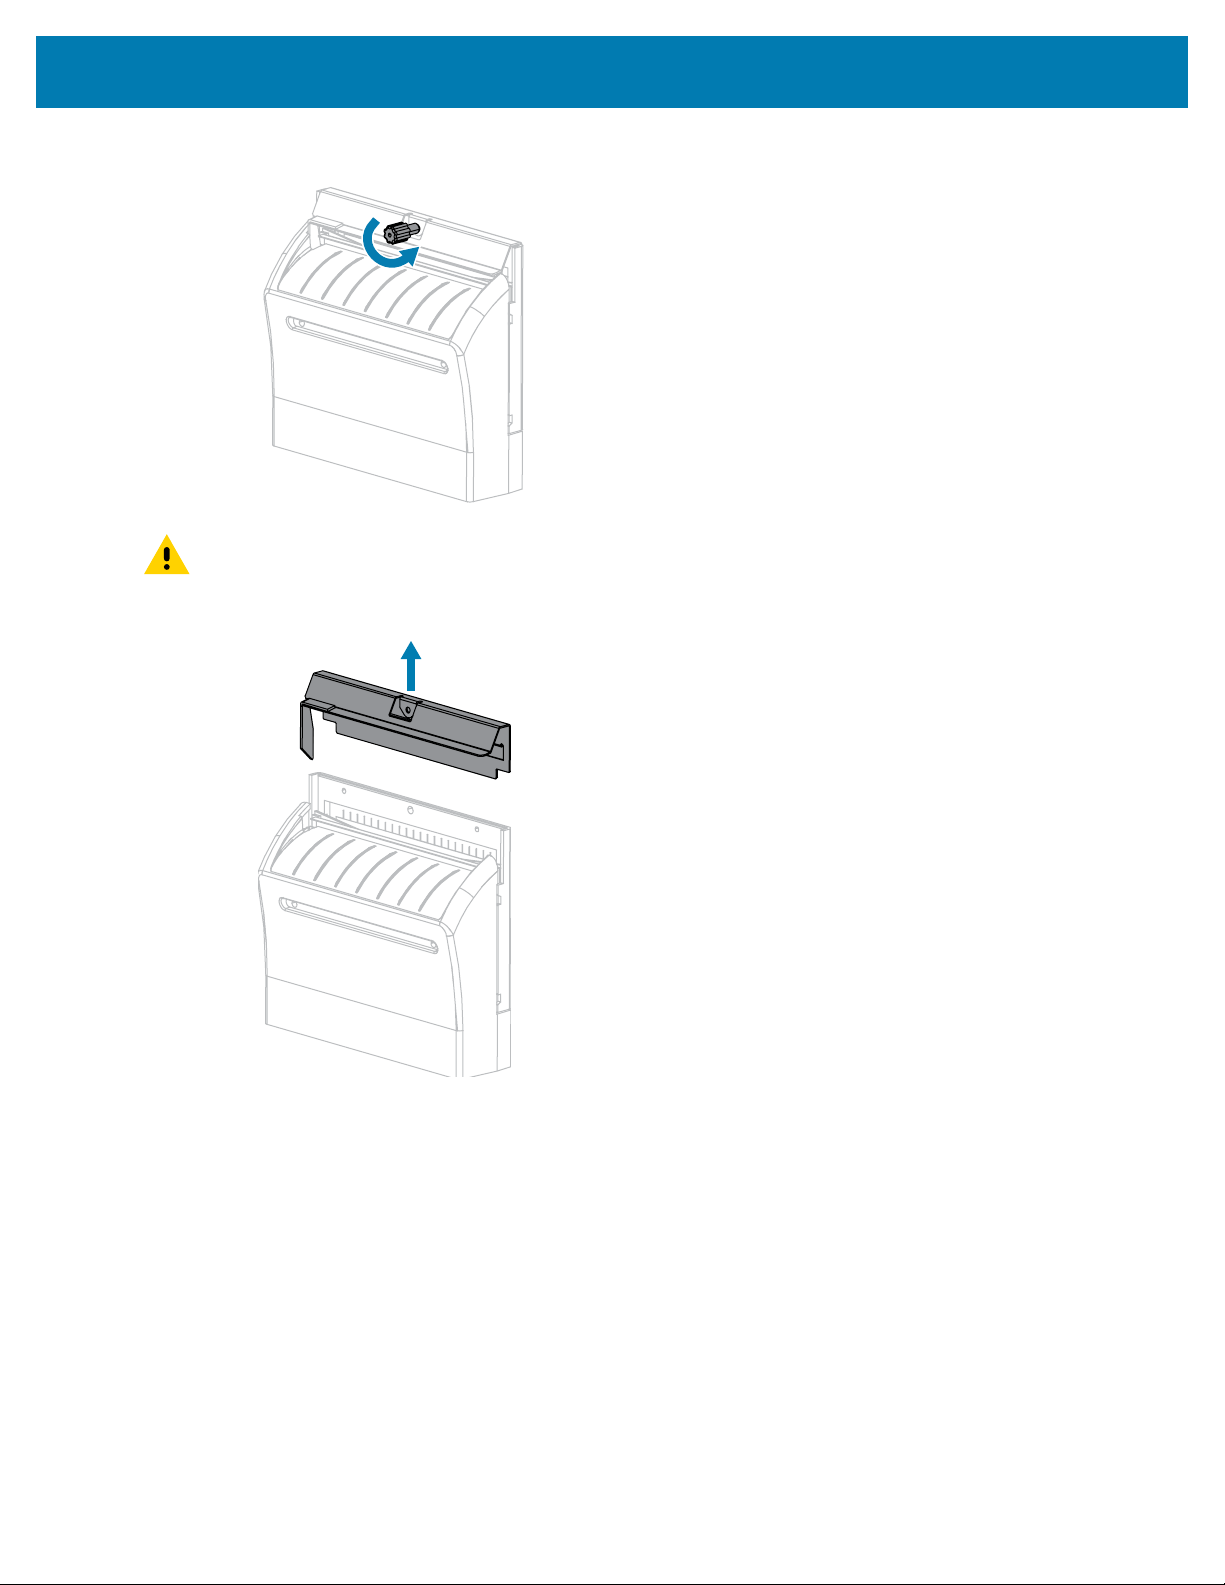
Routine Maintenance
4. Loosen and remove the thumbscrew and lock washer on the cutter shield.
CAUTION: The cutter blade is sharp. Do not touch or rub the blade with your fingers.
5. Remove the cutter shield.
133
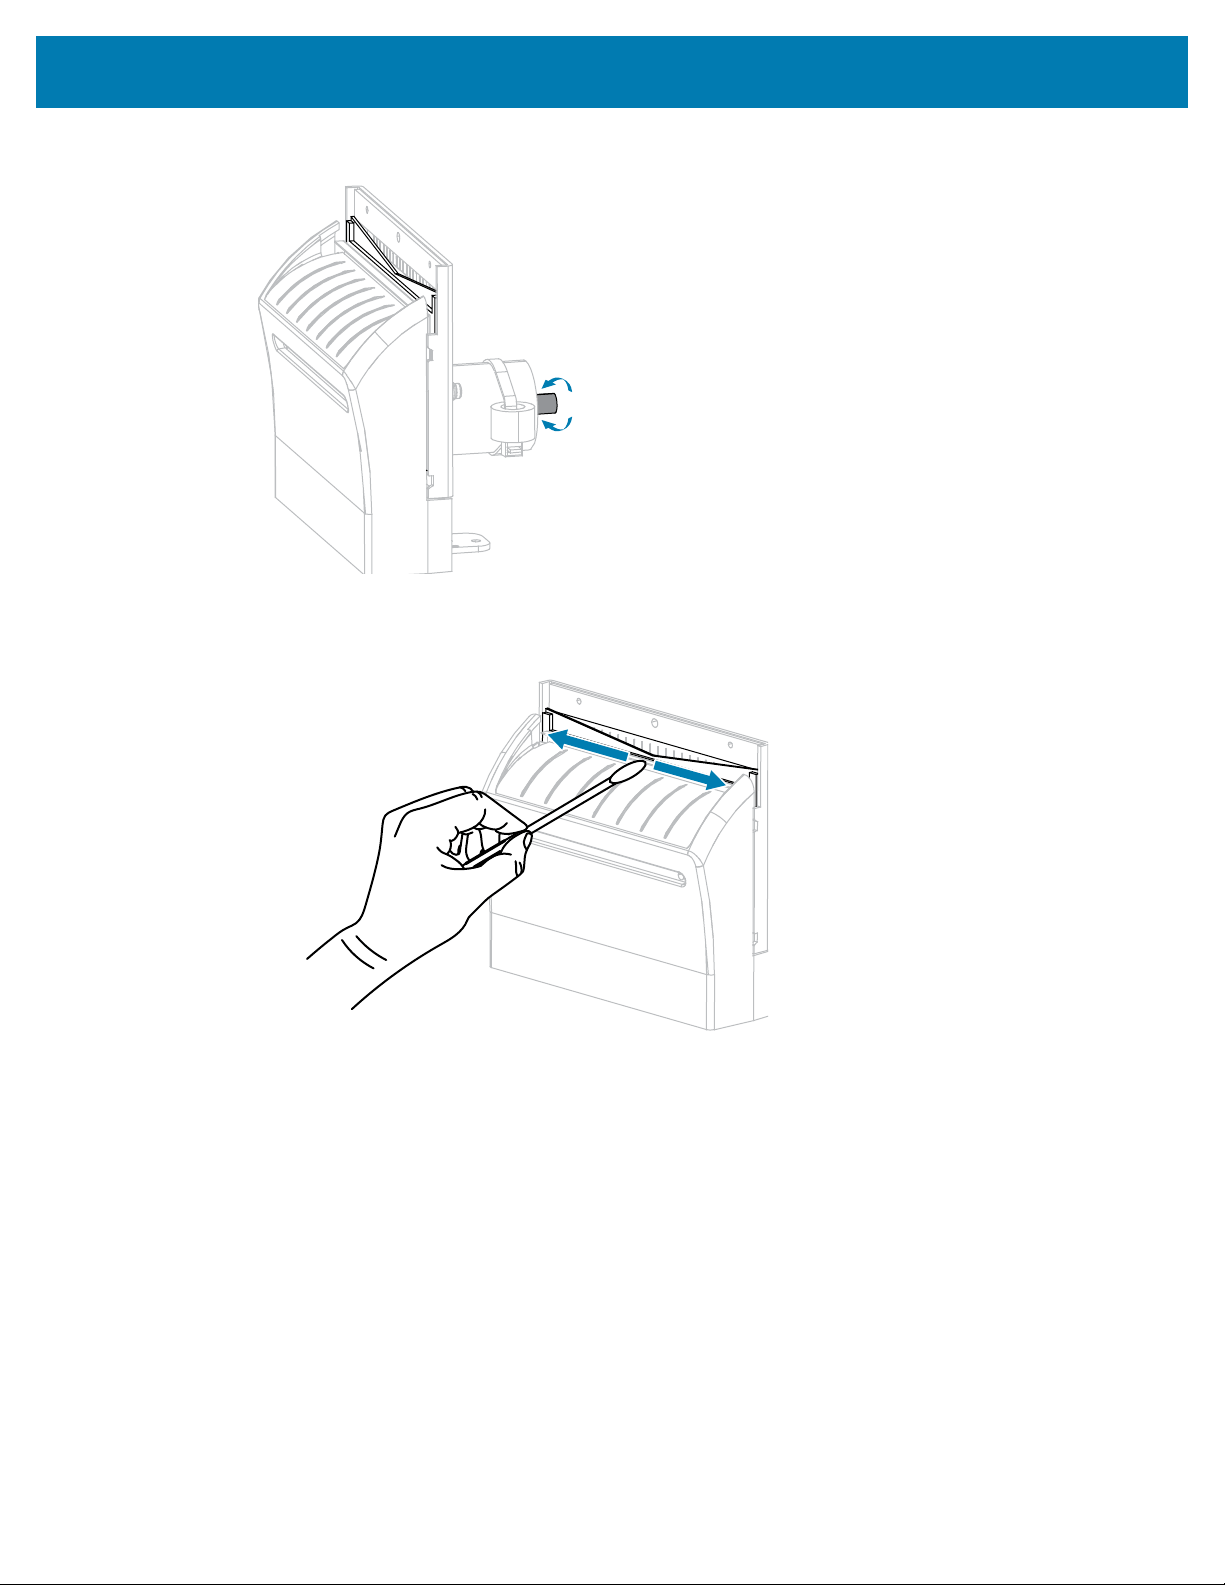
Routine Maintenance
6. If necessary, rotate the cutter motor thumbscrew to fully expose the V-shaped cutter blade.
7. Using the swab from the Preventive Maintenance Kit (part number 47362), wipe along the upper
cutting surface (1) and the cutter blade (2). In place of the Preventive Maintenance Kit, you may use a
clean swab dipped in 90% isopropyl alcohol. Allow the solvent to evaporate.
134
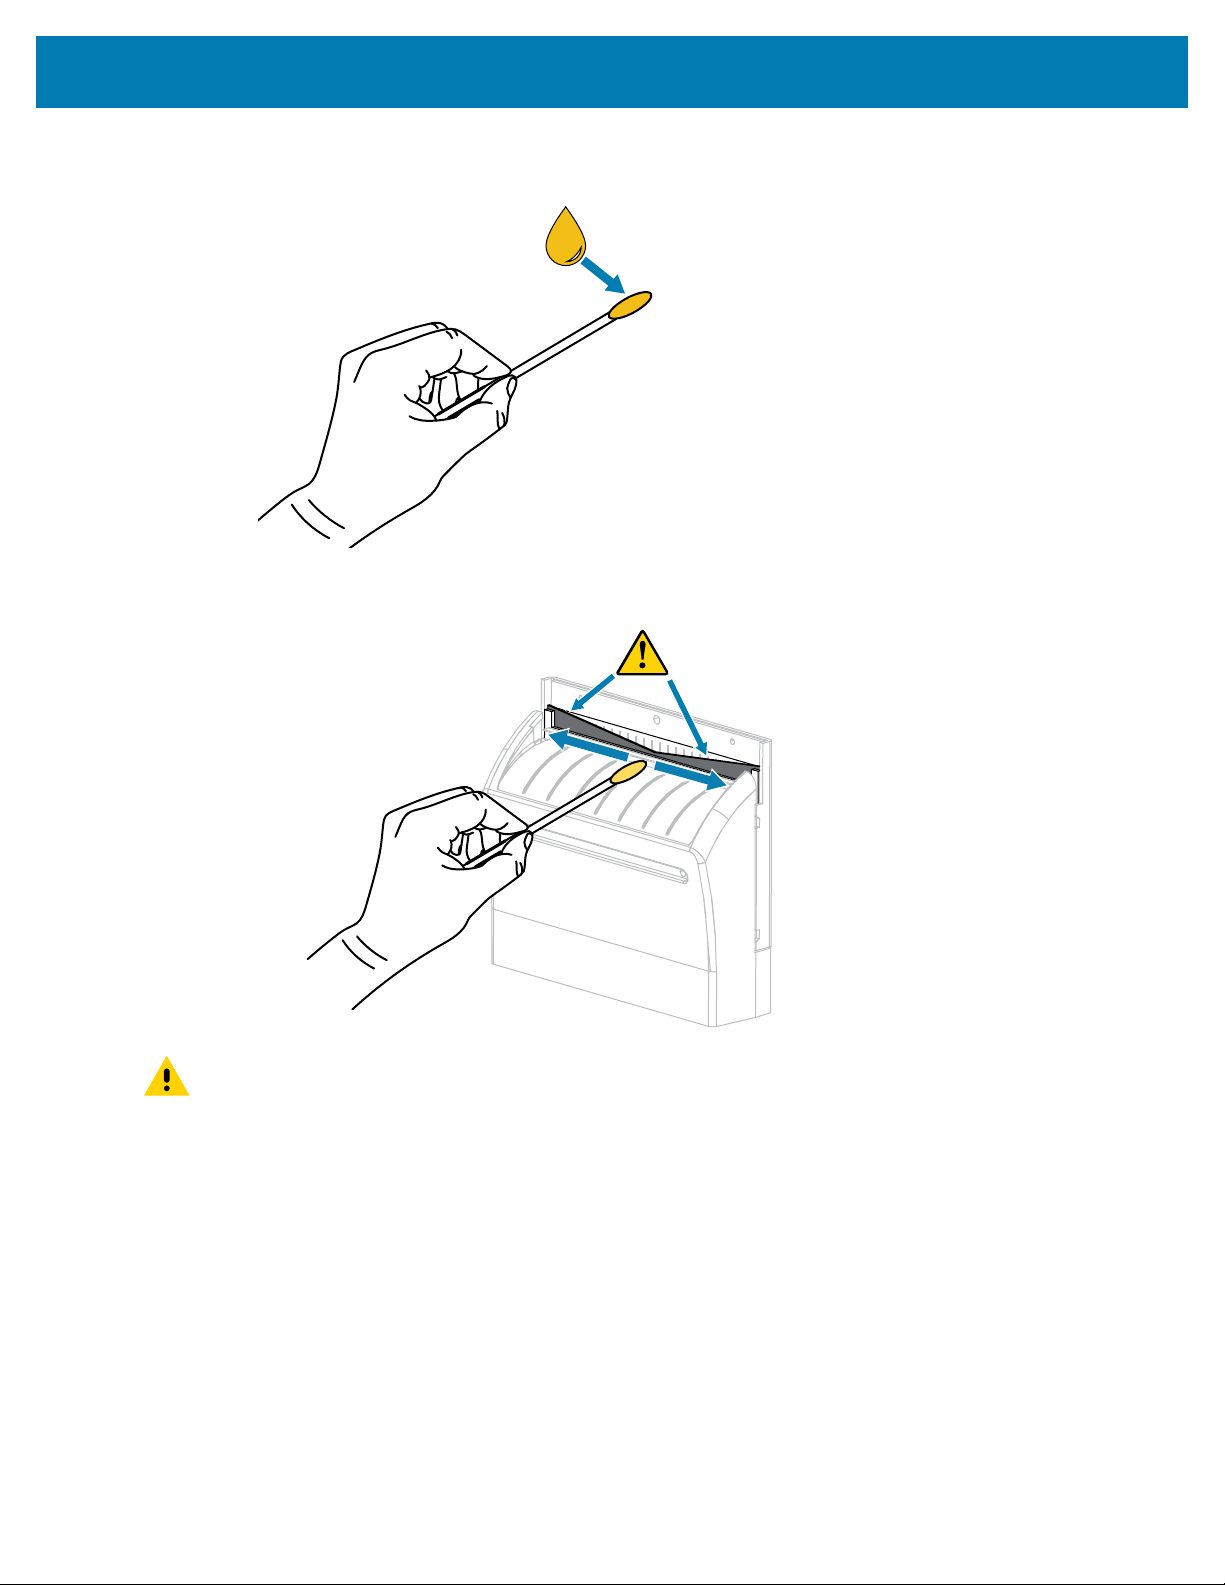
Routine Maintenance
8. When the solvent has evaporated, soak a clean swab in a general-purpose, higher-viscosity silicone or
PTFE oil lubricant.
9. Apply an even layer along all exposed surfaces of both cutter blades. Remove any excess oil so that
none of it comes in contact with the printhead or platen roller.
CAUTION: The cutter blade is sharp. For operator safety, replace the cutter shield.
135
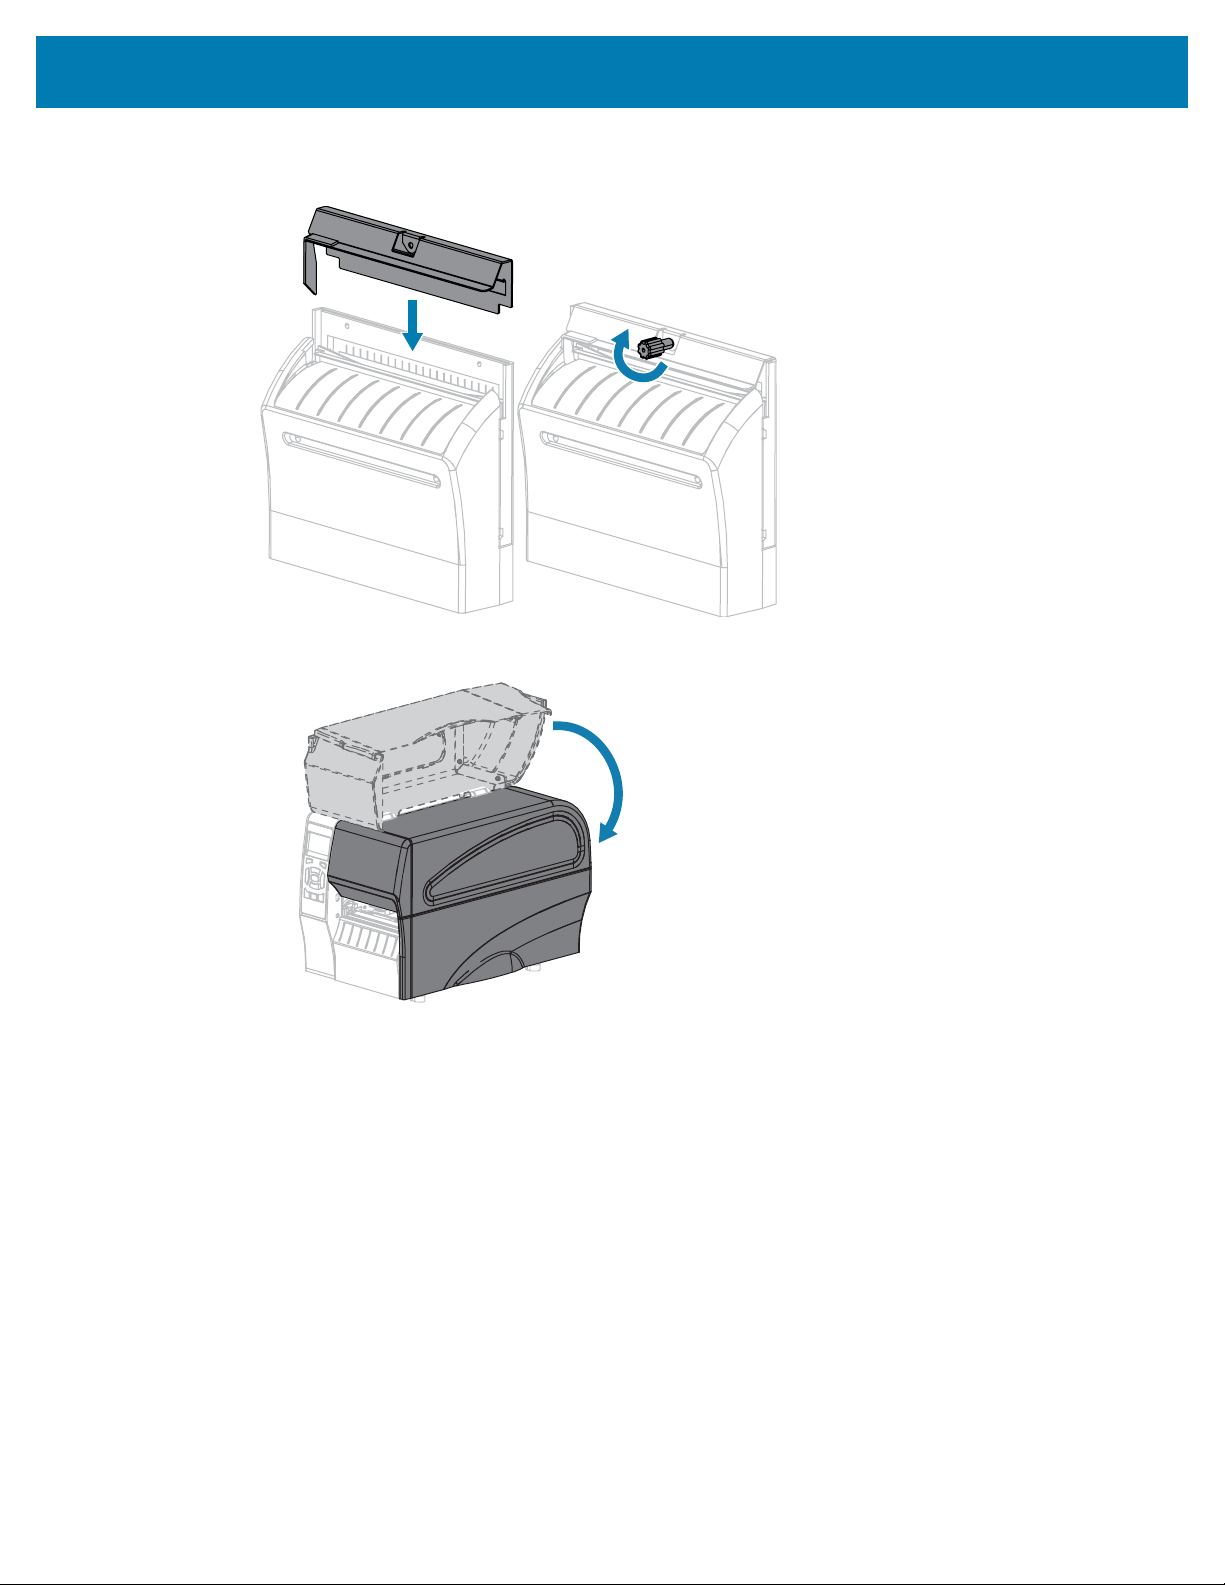
Routine Maintenance
10. Replace the cutter shield and secure it with the thumbscrew and lock washer that you removed
earlier.
11. Close the media door.
12. Plug the printer into its power source, and then turn on (I) the printer.
The cutter blade returns to its operating position.
13. If the cutter continues to perform unsatisfactorily, contact an authorized service technician.
Replacing Printer Components
Some printer components, such as the printhead and platen roller, may wear out over time and can be
replaced easily. Regular cleaning may extend the life of some of these components.
For more information onrecommended cleaning intervals, see Cleaning Schedule and Procedures on page
122.
136

Routine Maintenance
Ordering Replacement Parts
For optimal printing quality and proper printer performance across our product line, Zebra strongly
recommends the use of genuine Zebra supplies as part of the total solution. Specifically, the ZT210, ZT220,
and ZT230 printers are designed to work only with genuine Zebra printheads, thus maximizing safety and
print quality.
Contact your authorized Zebra reseller for part ordering information.
Recycling Printer Components
The majority of this printer’s components are recyclable. The printer’s main logic board may include a
battery that you should dispose of properly.
Do not dispose of any printer components in unsorted municipal waste. Please dispose of the battery
according to your local regulations, and recycle the other printer components according to your local
standards. For more information, see
www.zebra.com/environment.
Lubrication
The only lubrication needed for this printer is for the cutter module. Follow the instructions in Cleaning and
Lubricating the Cutter Module on page 132. Do not lubricate any other parts of the printer.
CAUTION: Some commercially available lubricants will damage the finish and the mechanical
parts if used on this printer.
137
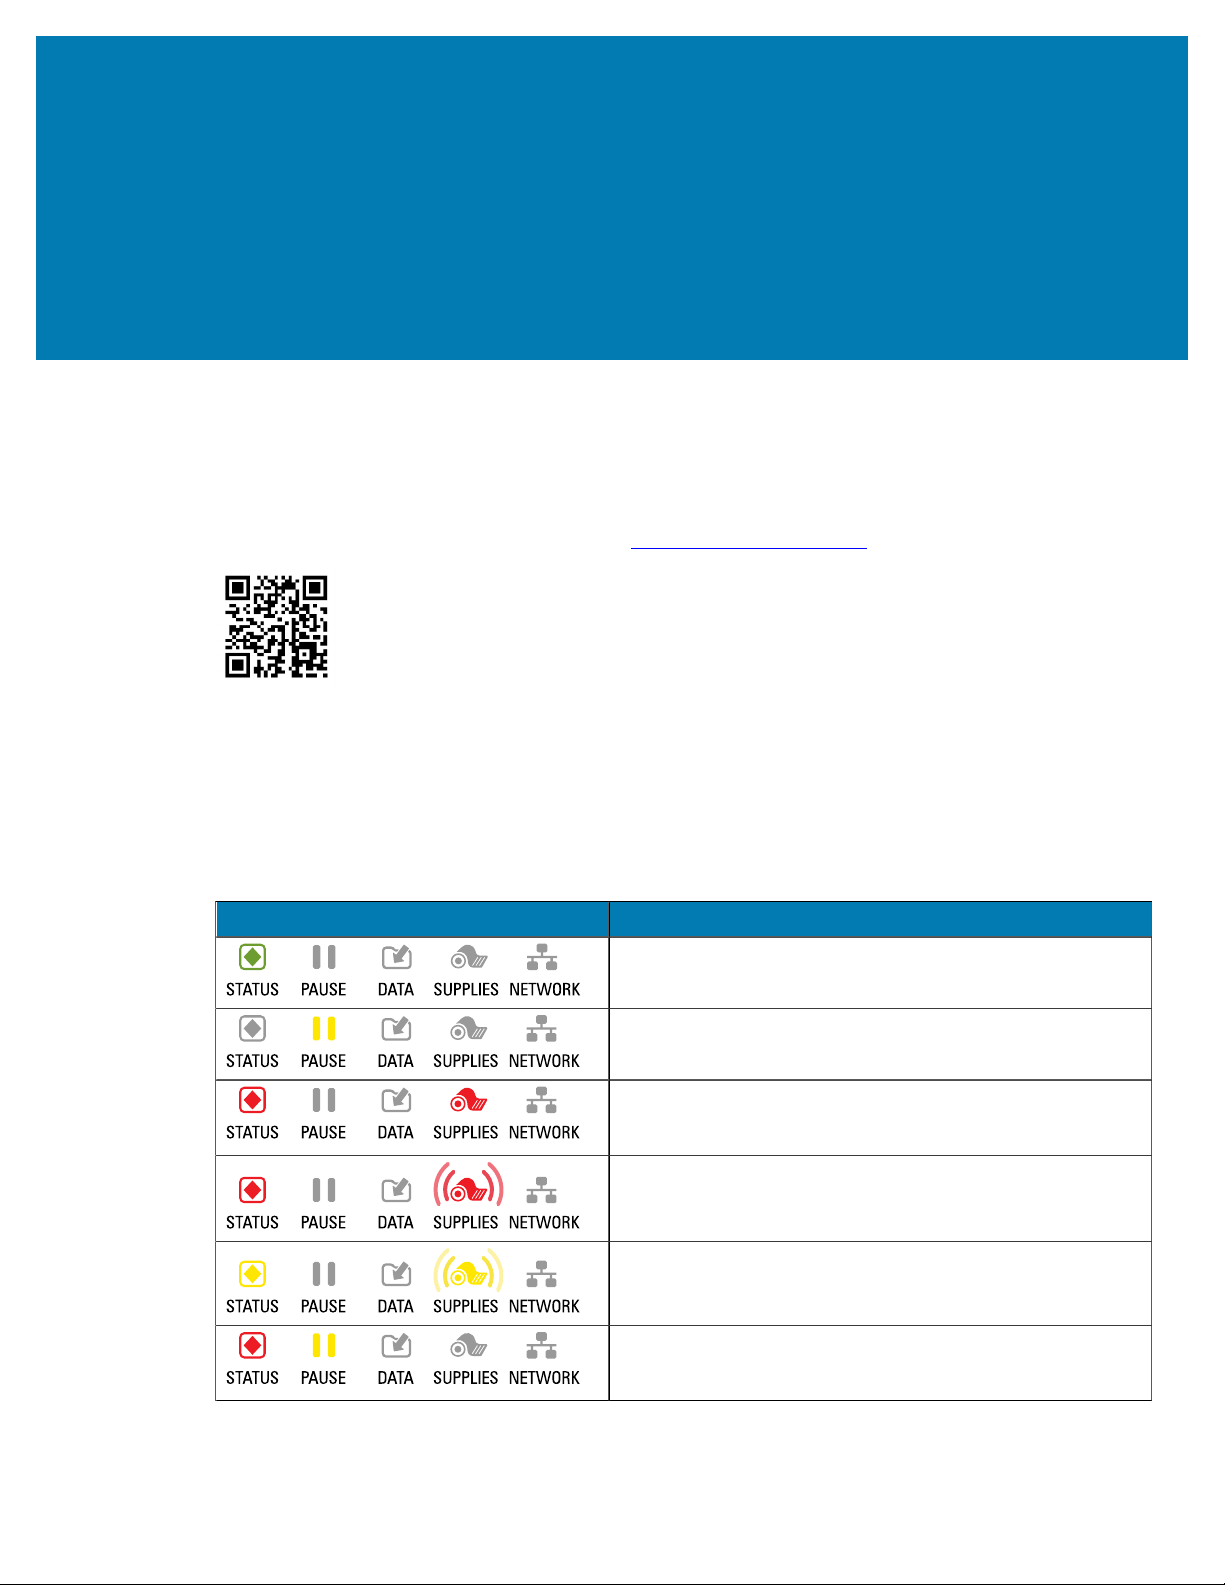
Troubleshooting
Troubleshooting
This section provides information about errors that you might need to troubleshoot. Assorted diagnostic
tests are included.
For videos of some common procedures, go to www.zebra.com/zt200-info.
Meaning of Indicator Lights
The indicator lights on the control panel show the current status of the printer. See,
Control Panel on page
9.
Indicator Lights Status
STATUS light steady green (other lights steady yellow for
2seconds during printer power-up). The printer is ready.
PAUSE light steady yellow. The printer is paused.
STATUS light steady red SUPPLIES light steady red. The
media supply is out. The printer needs attention and cannot
continue without user intervention.
STATUS light steady red SUPPLIES light flashing red.
The ribbon supply is out. The printer needs attention and
cannot continue without user intervention.
STATUS light steady yellowSUPPLIES light flashing yellow.
The printer is in Direct Thermal mode, which does not
require ribbon; however, ribbon is installed in the printer.
STATUS light steady red PAUSE light steady yellow. The
printhead is open. The printer needs attention and cannot
continue without user intervention.
Table 11Status of Printer As Shown by Indicator Lights
138
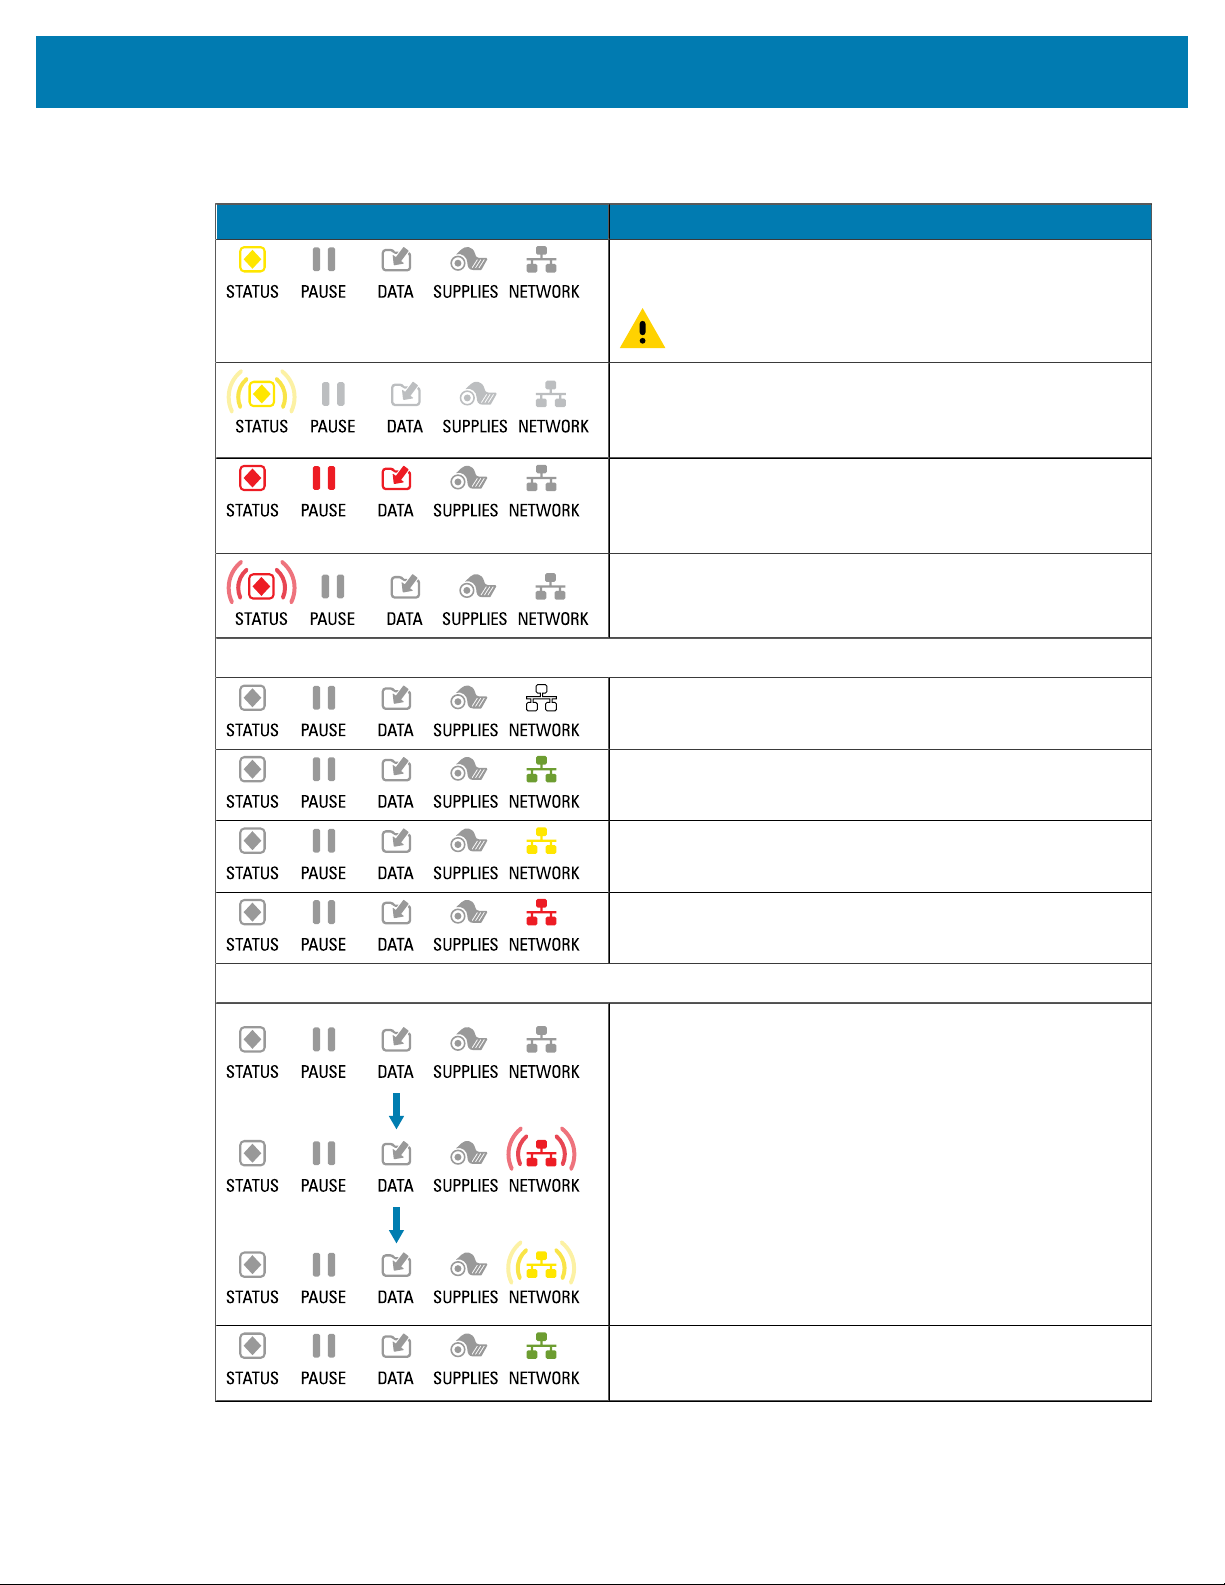
Troubleshooting
Indicator Lights Status
STATUS light steady yellow. The printhead is over
temperature.
CAUTION: The printhead may be hot and could
cause severe burns. Allow the printhead to cool.
STATUS light flashing yellow. This indicator light flashing
indicates one of the following: The printhead is under
temperature. The power supply is over temperature. The
main logic board (MLB) is over temperature.
STATUS light steady red PAUSE light steady redDATA light
steady red. The printhead was replaced with one that is
not a genuine Zebra printhead. Install a genuine Zebra
printhead to continue.
STATUS light flashing red. The printer is unable to read the
dpi setting of the printhead.
Printers with a ZebraNet wired Ethernet option
NETWORK light offNo Ethernet link is available.
NETWORK light steady green. A 100Base-T link was found.
NETWORK light steady yellow. A 10Base-T link was found.
NETWORK light steady red. An Ethernet error condition
exists. The printer is not connected to your network.
Printers with a ZebraNet wireless option
NETWORK light offA radio was found during power-up.
The printer is attempting to associate with the network.
The light flashes red while the printer associates with the
network. The light then flashes yellow while the printer is
authenticating with the network.
NETWORK light steady green. The radio is associated with
your network and authenticated, and the WLAN signal is
strong.
Table 11Status of Printer As Shown by Indicator Lights(Continued)
139
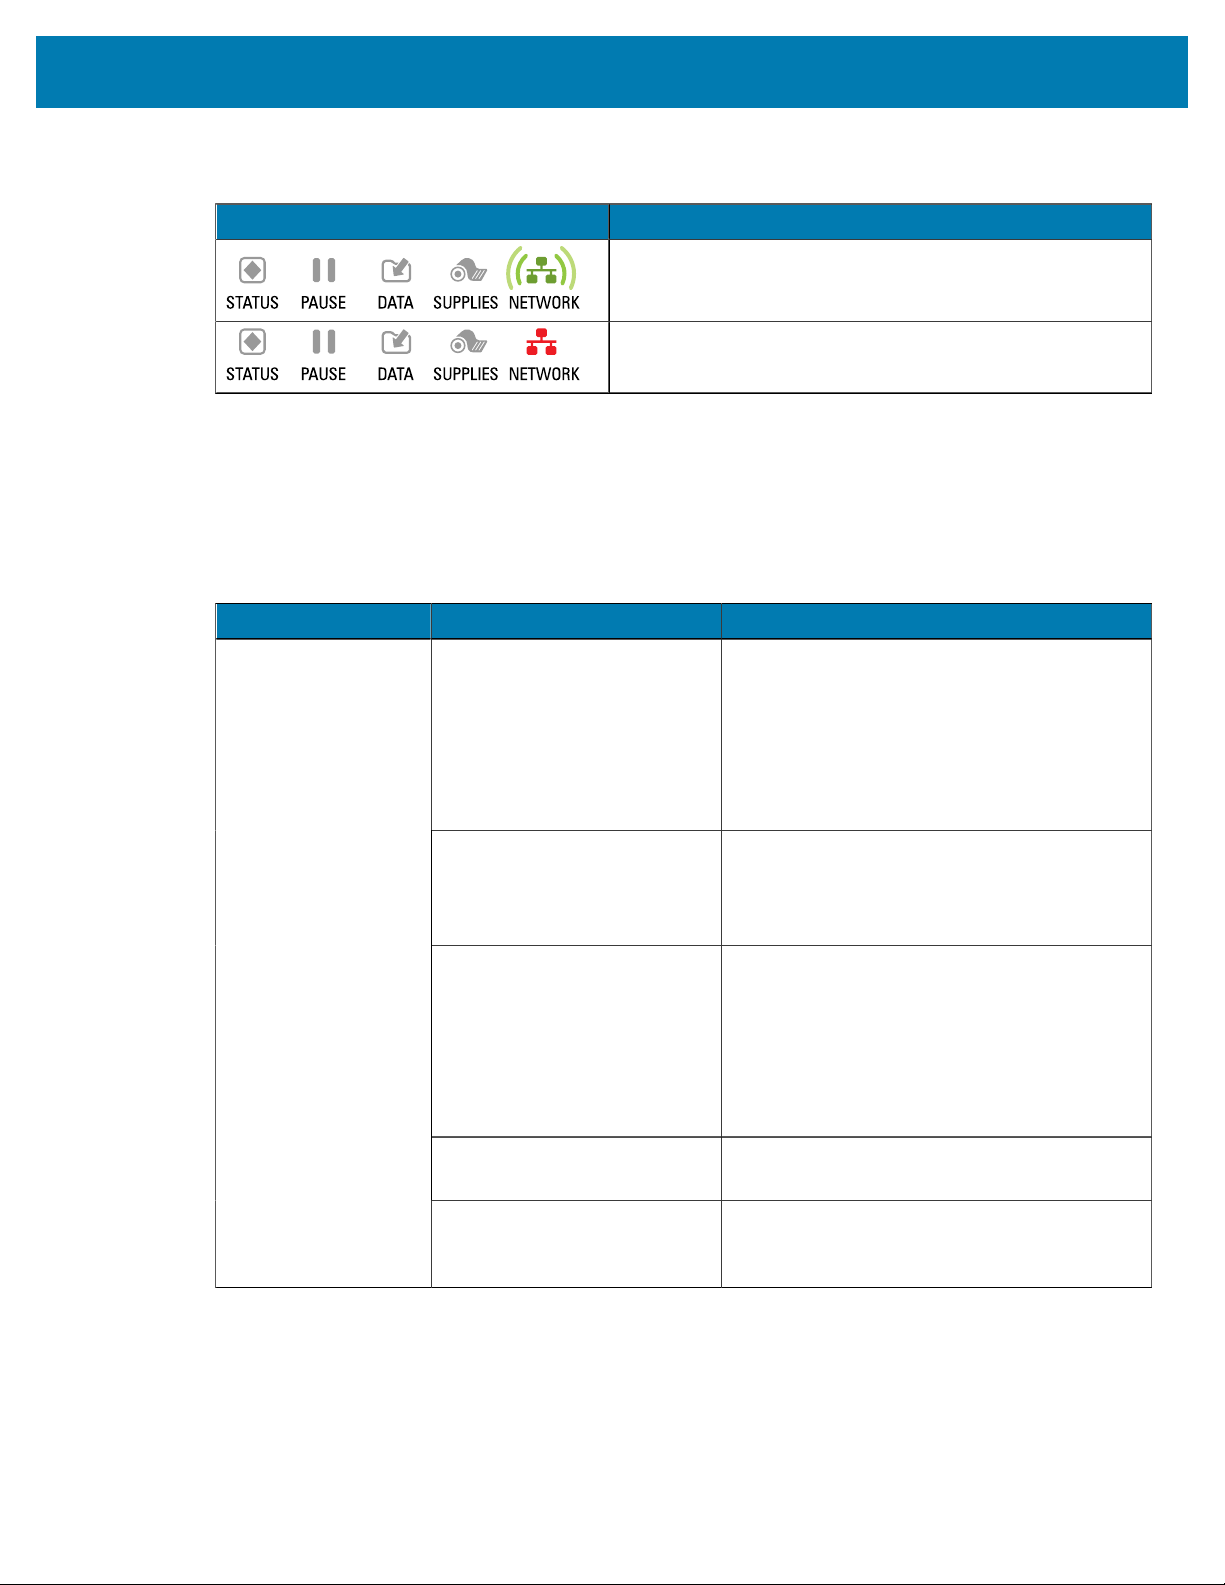
Troubleshooting
Indicator Lights Status
NETWORK light flashing green. WLAN—The radio is
associated with your network and authenticated, but the
WLAN signal is weak.
NETWORK light steady red. A WLAN error condition exists.
The printer is not connected to your network.
Table 11Status of Printer As Shown by Indicator Lights(Continued)
Printing Issues
This table identifies possible issues with printing or print quality, the possible causes, and the
recommended solutions.
Issue Possible Cause Recommended Solution
The printer is set at the
incorrect print speed.
For optimal print quality, set the print speed to
the lowest possible setting for your application
via control panel, the driver, or the software.
You may want to perform the Feed Self Test to
determine the optimal settings for your printer.
See Print Speed for how to change the print
speed.
You are using an incorrect
combination of labels and
ribbon for your application.
Switch to a different type of media or ribbon
to try to find a compatible combination.If
necessary, consult your authorized Zebra
reseller or distributor for information and
advice.
The printer is set at an
incorrect darkness level.
For optimal print quality, set the darkness
to the lowest possible setting for your
application. You may want to perform the
Feed Self Test to determine the ideal darkness
setting.
See Print Darkness for how to change the
darkness setting.
The printhead is dirty. Clean the printhead and platen roller. See
Clean the Printhead and Platen Roller.
General print quality
issues
Incorrect or uneven printhead
pressure.
Set the printhead pressure to the minimum
needed for good print quality. See Adjust the
Printhead Pressure.
Table 12Printing Issues
140
Troubleshooting
Issue Possible Cause Recommended Solution
The platen roller is dirty. Clean the printhead and platen roller. See
Clean the printhead and platen roller.
Media guides are positioned
improperly.
Ensure that the media guides are properly
positioned. See Load the Media.
The media type is set
incorrectly.
Set the printer for the correct media type (gap/
notch, continuous, or mark). See Media Type.
Loss of printing
registration on labels.
Excessive vertical
drift in top-of-form
registration.
The media is loaded
incorrectly.
Load media correctly. See Load the Media.
Print element damaged. Call a service technician.Long tracks of
missing print on
several labels
Wrinkled ribbon. See wrinkled ribbon causes and solutions in
Ribbon Problems.
Fine, angular gray
lines on blank labels
Wrinkled ribbon. See wrinkled ribbon causes and solutions in
Ribbon Problems.
The media or ribbon is not
designed for high#speed
operation.
Replace supplies with those recommended for
high-speed operation.
You are using an incorrect
combination of media and
ribbon for your application.
Switch to a different type of media or ribbon
to try to find a compatible combination.If
necessary, consult your authorized Zebra
reseller or distributor for information and
advice.
You are using ribbon with
direct thermal media.
Direct thermal media does not require ribbon.
To determine if you are using direct thermal
media, perform the label scratch test in When
to Use Ribbon on page 19.
Printing too light or
too dark over the
entire label
Incorrect or uneven printhead
pressure.
Set the printhead pressure to the minimum
needed for good print quality. See Adjusting
the Printhead Pressure on page 117.
Smudge marks on
labels
The media or ribbon is not
designed for high#speed
operation.
Replace supplies with those recommended for
high-speed operation.
The printer is not calibrated. Calibrate the printer. See Calibrating the
Ribbon and Media Sensors on page 111.
Misregistration/skips
labels
Improper label format. Check your label format and correct it as
necessary.
The platen roller is dirty. Clean the printhead and platen roller. See
Cleaning the Printhead and Platen Roller on
page 124.
Misregistration and
misprint of one to
three labels
Media does not meet
specifications.
Use media that meets specifications. See
Media Specifications on page 165.
Table 12Printing Issues(Continued)
141
Troubleshooting
Issue Possible Cause Recommended Solution
The printer is out of
calibration.
Calibrate the printer. See Calibrating the
Ribbon and Media Sensors on page 111.
Vertical drift in
top#of-form position
The platen roller is dirty. Clean the printhead and platen roller. See
Cleaning the Printhead and Platen Roller on
page 124.
The printer is using
non#continuous labels but
is configured in continuous
mode.
Set the printer for the correct media type (gap/
notch, continuous, or mark—see Media Type)
and calibrate the printer, if necessary (see
Calibrating the Ribbon and Media Sensors on
page 111).
The media sensor is calibrated
improperly.
Calibrate the printer. See Calibrating the
Ribbon and Media Sensors on page 111.
The platen roller is dirty. Clean the printhead and platen roller. See
Cleaning the Printhead and Platen Roller on
page 124.
Improper printhead pressure
settings (toggles).
a
Adjust the printhead pressure to ensure
proper functionality. See Adjusting the
Printhead Pressure on page 117.
The media or ribbon is loaded
incorrectly.
Ensure that the media and ribbon are loaded
correctly. See Loading the Ribbon on page 25
and Loading the Media on page 29.
Vertical image or
label drift
Incompatible media. You must use media that meets the printer
specifications. Ensure that the interlabel gaps
or notches are 2to 4 mm and consistently
placed (see Media Specifications on page
165).
The bar code is not within
specifications because the
print is too light or too dark.
Perform the FEED Self Test on page 153.
Adjust the darkness or print speed settings as
necessary.
The bar code printed
on a label does not
scan.
There is not enough blank
space around the bar code.
Leave at least 1/8 in. (3.2 mm) between the bar
code and other printed areas on the label and
between the bar code and the edge of the
label.
The media or ribbon is loaded
incorrectly.
Ensure that the media and ribbon are loaded
correctly. See Loading the Ribbon on page 25
and Loading the Media on page 29.
The sensors could not detect
the media or ribbon.
Calibrate the printer. See Calibrating the
Ribbon and Media Sensors on page 111.
Auto Calibrate failed.
The sensors are dirty or
positioned improperly.
Ensure that the sensors are clean and properly
positioned.
Table 12Printing Issues(Continued)
142
Troubleshooting
Issue Possible Cause Recommended Solution
The media type is set
incorrectly.
Set the printer for the correct media type (gap/
notch, continuous, or mark). See Media Type.
Table 12Printing Issues(Continued)
Ribbon Problems
This table identifies problems that may occur with ribbon, the possible causes, and the recommended
solutions.
For videos of some common procedures, go to
www.zebra.com/zt200-info.
Problem Possible Cause Recommended Solution
Darkness setting too high.
Reduce the darkness setting. See Print
Darkness for how to change the darkness
setting. Clean the printhead thoroughly. See
Cleaning the Printhead and Platen Roller on
page 124.
Broken or melted
ribbon
The ribbon is coated on the
wrong side and cannot be
used in this printer.
Replace the ribbon with one coated on the
correct side. For more information, see Coated
Side of Ribbon on page 19.
Ribbon slips or does
not advance correctly
Ribbon tension is set
incorrectly.
Change the tension settings on the ribbon
spindles. See Adjusting Ribbon Tension on
page 119.
Ribbon was loaded
incorrectly.
Load the ribbon correctly. See Loading the
Ribbon on page 25.
Incorrect burn temperature. For optimal print quality, set the darkness
to the lowest possible setting for your
application. You may want to perform the
FEED Self Test on page 153 to determine
the ideal darkness setting.
See Print Darkness for how to change the
darkness setting.
Incorrect or uneven printhead
pressure.
Set the printhead pressure to the minimum
needed for good print quality. See Adjusting
the Printhead Pressure on page 117.
Wrinkled ribbon
Media not feeding properly;
“walking” from side to side.
Make sure that media is snug by adjusting the
media guide, or call a service technician.
Table 13Ribbon Problems
143
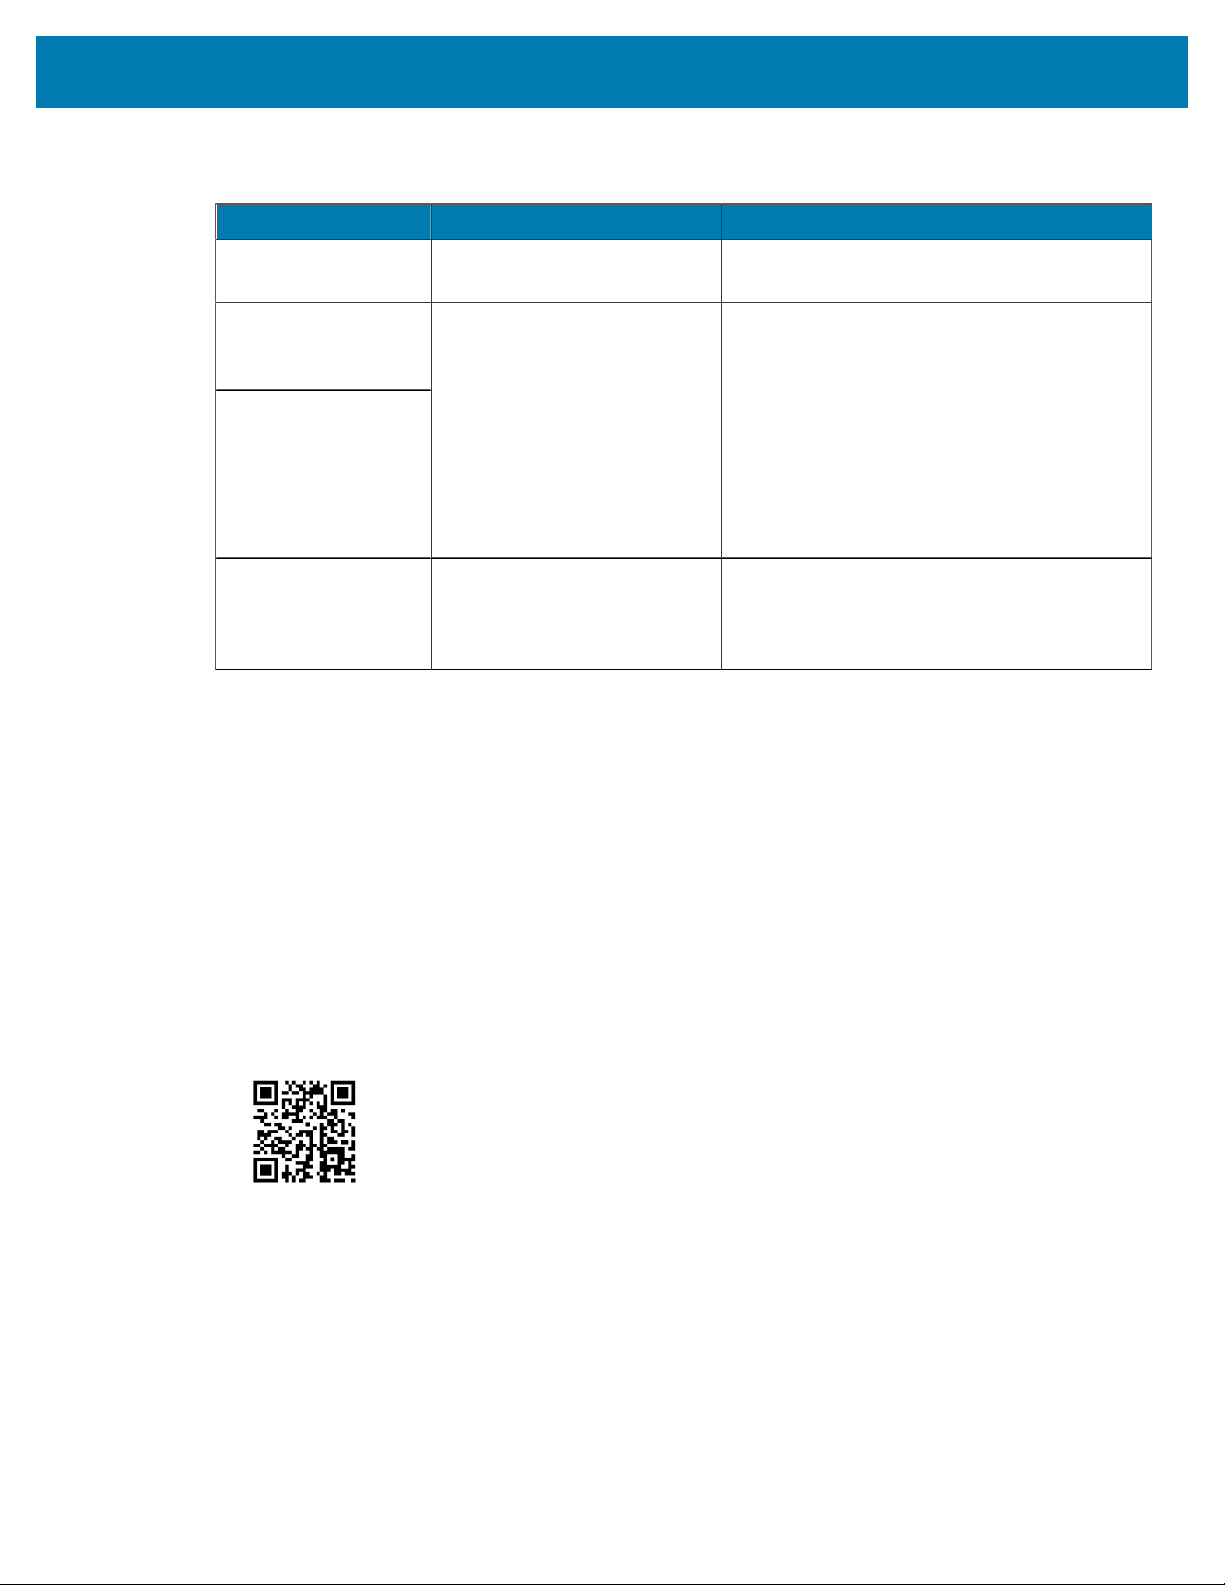
Troubleshooting
Problem Possible Cause Recommended Solution
The printhead or platen roller
may be installed incorrectly.
Call a service technician.
The printer does
not detect when the
ribbon runs out.
In thermal transfer
mode, the printer
did not detect the
ribbon even though it
is loaded correctly.
The printer may have been
calibrated without ribbon or
without the ribbon loaded
properly.
Make sure that ribbon is loaded correctly so
that it can be detected by the ribbon sensor.
Under the printhead, the ribbon should track
all the way back, near the printer’s firewall.
See Loading the Ribbon on page 25. Make
sure that ribbon is loaded correctly so that it
can be detected by the ribbon sensor. Under
the printhead, the ribbon should track all the
way back, near the printer’s firewall. Refer to
the User Guide for instructions for loading
ribbon. Calibrate the printer. See Calibrating
the Ribbon and Media Sensors on page 111.
The printer indicates
that ribbon is out,
even though ribbon is
loaded correctly.
The printer was not calibrated
for the label and ribbon being
used.
Calibrate the printer. See Calibrating the
Ribbon and Media Sensors on page 111.
Table 13Ribbon Problems(Continued)
Error Messages
The ZT230 control panel displays messages when there is an error. See
Table 14Error Messages on
page 145 for errors, the possible causes, and the recommended solutions.
QuickHelp Pages
Most error messages will include the option to view a QuickHelp page. The lower right-hand corner of the
message displays QR.
To access a QuickHelp page from an error message:
1. Press RIGHT SELECT to select QR.
The printer displays a QuickHelp page specific to that error message. This page includes a QR code,
such as this.
2. Scan the QR code with a smartphone.
Your phone accesses either a video specific to that error message or the Zebra support page for your
printer.
Error Message Lookup
Review the display or indicator lights, review the possible causes, and implement a recommended solution.
144
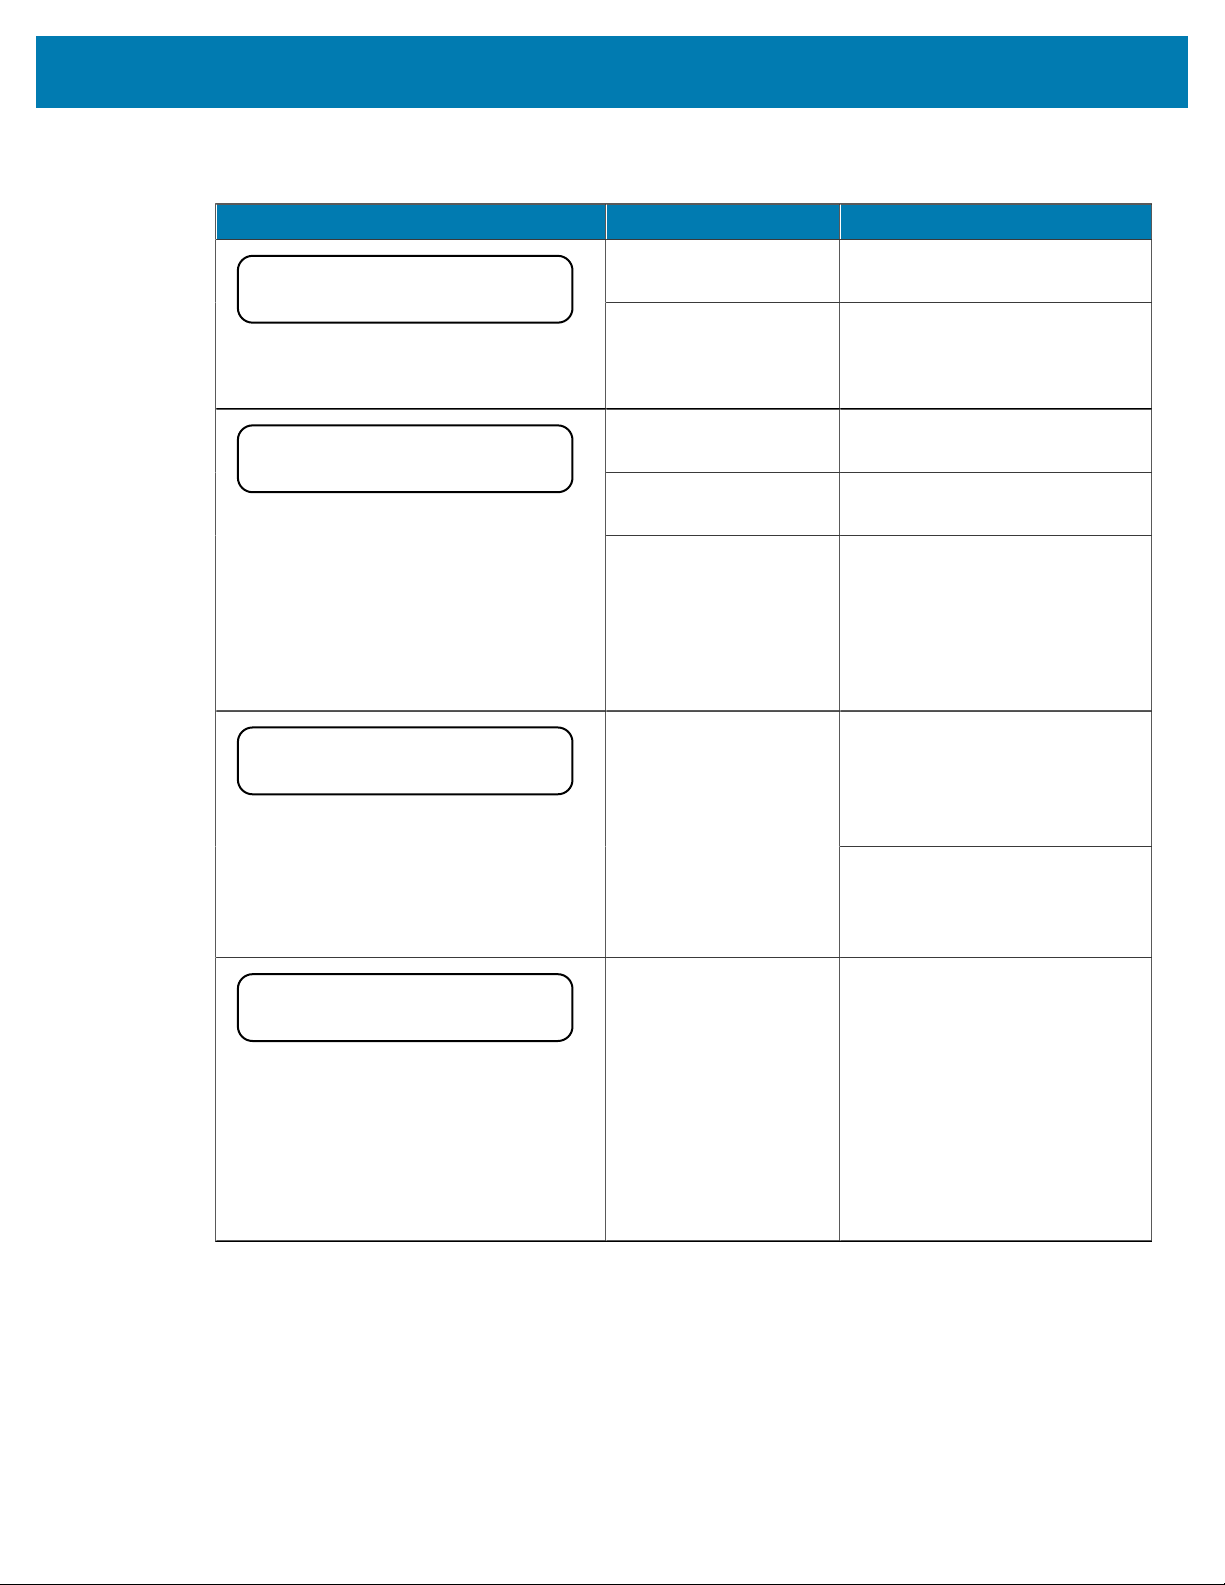
Troubleshooting
Display/Indicator Lights Possible Cause Recommended Solution
The printhead is not
fully closed.
Close the printhead completely.
HEAD OPEN
CLOSE HEAD
STATUS light steady red
PAUSE light steady yellow
The printhead open
sensor is not working
properly.
Call a service technician to
replace the sensor.
The media is not loaded
or is loaded incorrectly.
Load media correctly.
Misaligned media
sensor.
Check the position of the media
sensor.
MEDIA OUT
LOAD MEDIA
STATUS light steady red
SUPPLIES light steady red
The printer is set for
noncontinuous media,
but continuous media is
loaded.
Install the proper media type,
or reset printer for the current
media type.
Calibrate the printer.
See Media and Ribbon Sensor
Calibration.
Ribbon is not required with direct
thermal media. If you are using
direct thermal media, remove the
ribbon. This error message will
not affect printing.
WARNING
RIBBON IN
STATUS light steady yellow
SUPPLIES light flashing yellow
Ribbon is loaded, but
the printer is set for
direct thermal mode.
If you are using thermal transfer
media, which requires ribbon, set
the printer for Thermal Transfer
mode. See Thermal Transfer.
ALERT
RIBBON OUT
STATUS light steady red
SUPPLIES light flashing yellow
In thermal transfer
mode:
• ribbon is not loaded
• ribbon is loaded
incorrectly
• the ribbon sensor is
not detecting ribbon
• media is blocking
the ribbon sensor
Load ribbon correctly. See Load
the Ribbon.Calibrate the printer.
See Media and Ribbon Sensor
Calibration.
Table 14Error Messages
145
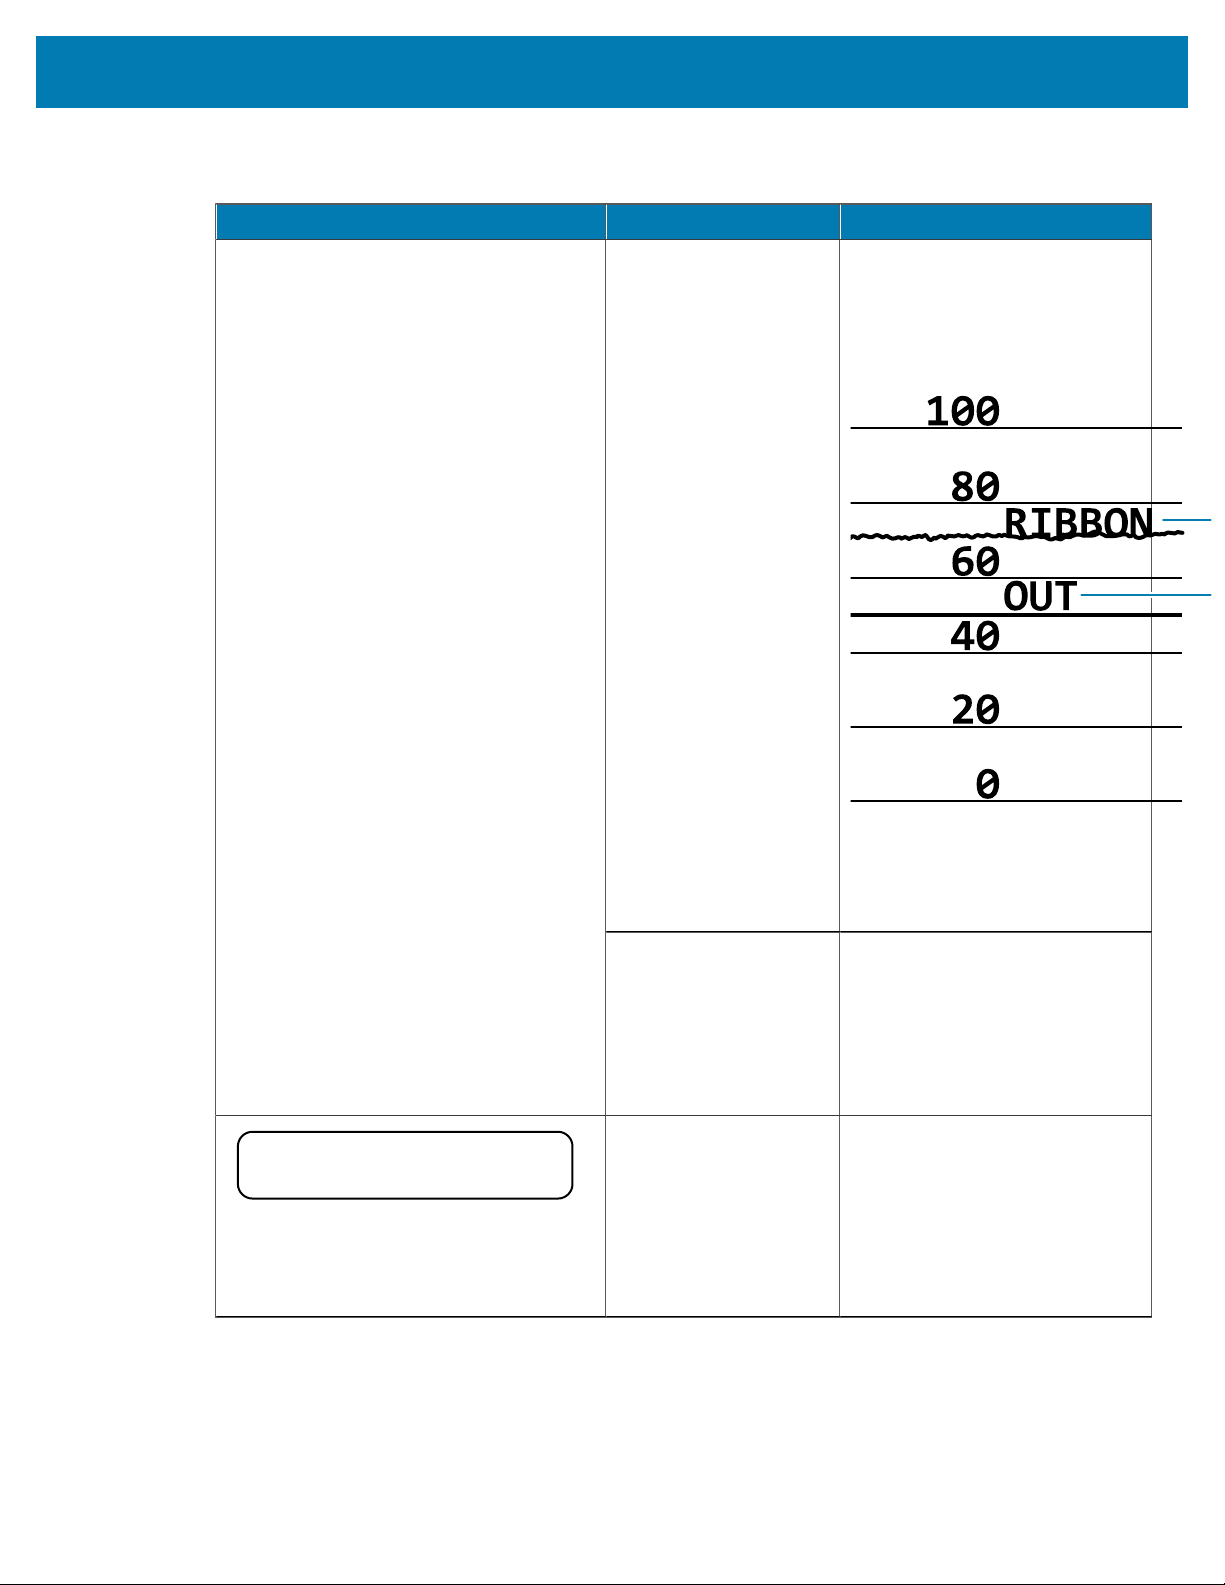
Troubleshooting
Display/Indicator Lights Possible Cause Recommended Solution
In thermal transfer
mode, the printer did
not detect the ribbon
even though it is loaded
correctly.
Print a sensor profile (see Print
Information). The ribbon out
threshold (2) is likely too high,
above the line that indicates
where the ribbon is detected (1).
2
1
Calibrate the printer (see Media
and Ribbon Sensor Calibration)
or load printer defaults (see Load
Defaults).
If you are using direct
thermal media, the
printer is waiting for
ribbon to be loaded
because it is incorrectly
set for thermal transfer
mode.
Set the printer for Direct Thermal
mode.
PH NOT AUTHENTICATED
REPLACE PRINT HEAD
STATUS light steady red
PAUSE light steady red
DATA light steady red
The printhead was
replaced with one that
is not a genuine Zebra
printhead.
Install a genuine Zebra
printhead.
Table 14Error Messages(Continued)
146

Troubleshooting
Display/Indicator Lights Possible Cause Recommended Solution
PRINT HEAD OVERTEMP
PRINTING HALTED
STATUS light steady yellow
The printhead is over
temperature.
Allow the printer to cool. Printing
automatically resumes when
the printhead elements cool
to an acceptable operating
temperature.
If this error persists, consider
changing where the printer is
located or using a slower print
speed.
CAUTION: An improperly connected printhead
data or power cable can cause these error
messages. The printhead may be hot enough to
cause severe burns. Allow the printhead to cool.
The printhead data
cable is not properly
connected.
Call a service technician to hook
up the printhead properly.
HEAD COLD
PRINTING HALTED
THERMISTOR
REPLACE PRINTHEAD
STATUS light steady yellow
The printer shows one of these messages
or cycles between them.
The printhead has a
faulty thermistor.
Call a service technician to
replace the printhead.
CAUTION: An improperly connected printhead
data or power cable can cause this error
message. The printhead may be hot enough to
cause severe burns. Allow the printhead to cool.
The printhead
temperature is
approaching its lower
operating limit.
Continue printing while the
printhead reaches the correct
operating temperature. If the
error remains, the environment
may be too cold for proper
printing. Relocate the printer to a
warmer area.
The printhead data
cable is not properly
connected.
Call a service technician to hook
up the printhead properly.
HEAD COLD
PRINTING HALTED
STATUS light flashing yellow
The printhead has a
faulty thermistor.
Call a service technician to
replace the printhead.
Table 14Error Messages(Continued)
147
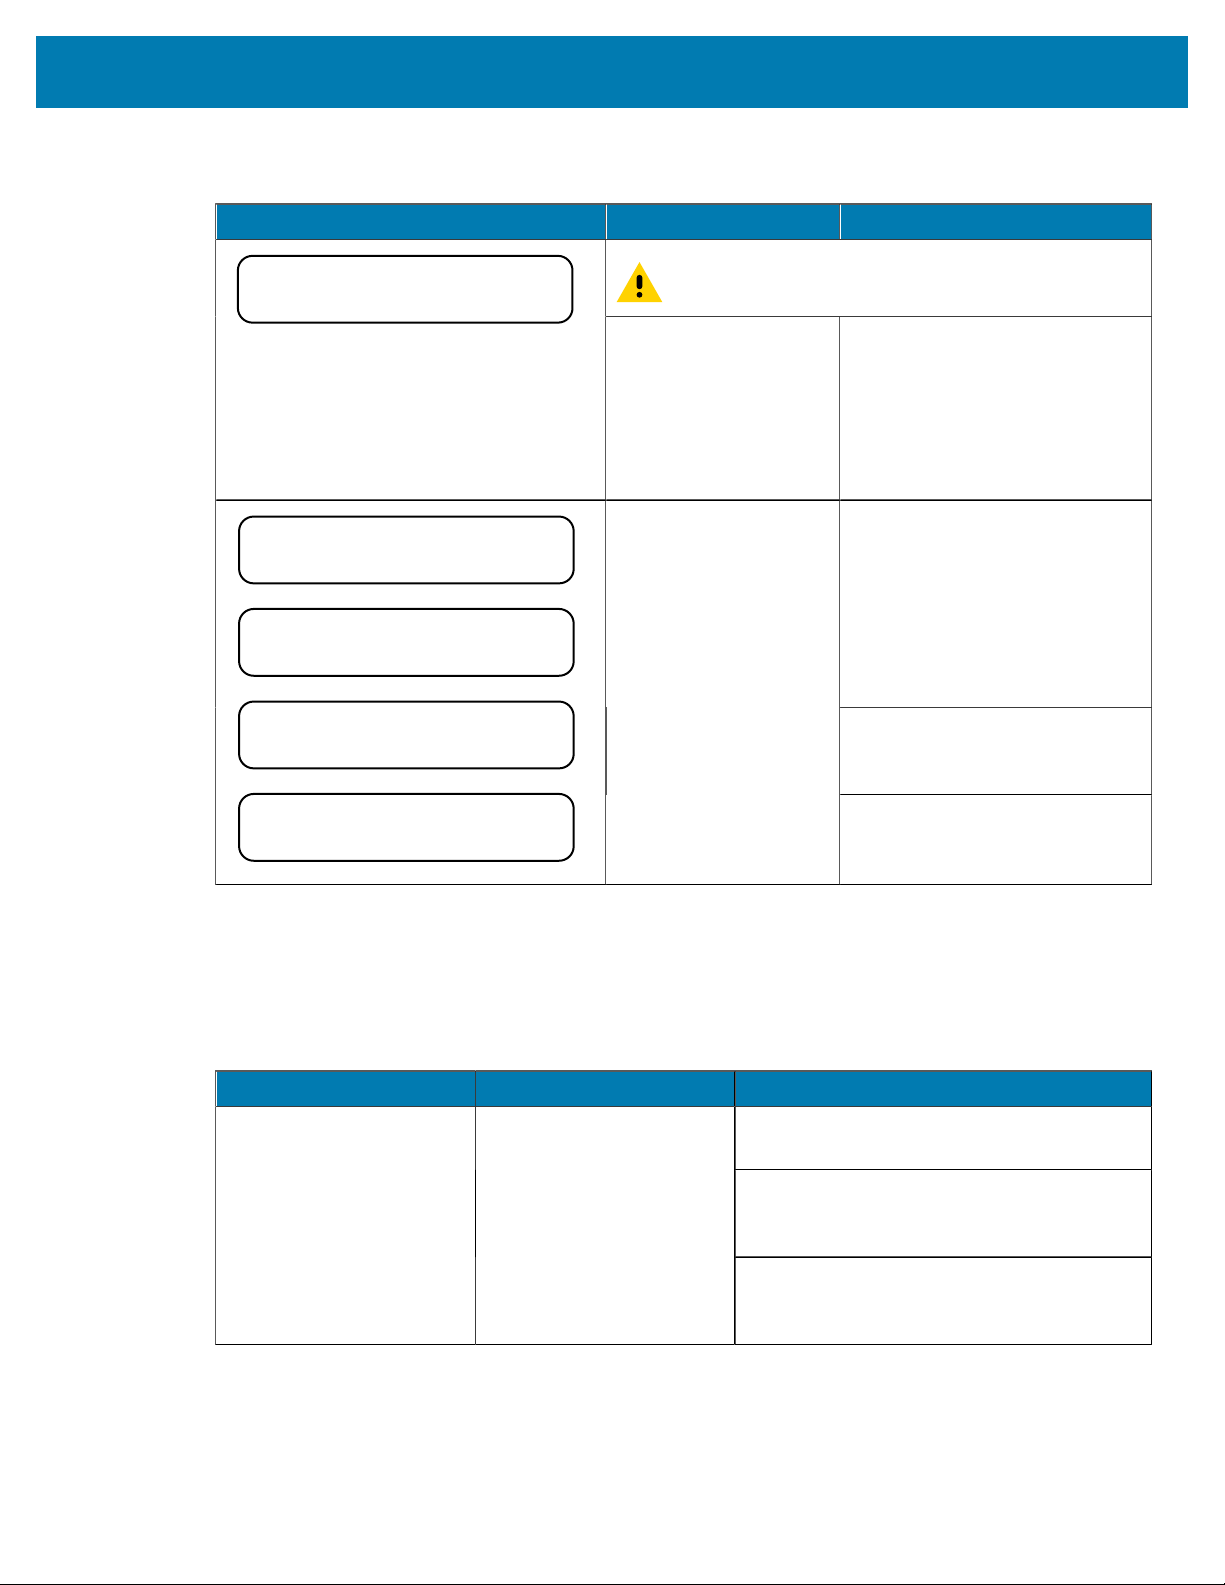
Troubleshooting
Display/Indicator Lights Possible Cause Recommended Solution
CAUTION: The cutter blade is sharp. Do not touch
or rub the blade with your fingers.
CUT ERROR
STATUS light steady red
PAUSE light steady yellow
The cutter blade is in
the media path.
Turn off the printer power and
unplug the printer. Inspect the
cutter module for debris and
clean as needed following the
cleaning instructions in Cleaning
and Lubricating the Cutter
Module on page 132.
Free up some of the printer’s
memory by adjusting the label
format or printer parameters.
One way to free up memory is
to adjust the print width to the
actual width of the label instead
of leaving the print width set to
the default. See Print Width.
Ensure that the data is not
directed to a device that is not
installed or is unavailable.
OUT OF MEMORY
STORING GRAPHIC
OUT OF MEMORY
STORING FORMAT
OUT OF MEMORY
STORING BITMAP
HEAD COLD
PRINTING FONT
There is not enough
memory to perform the
function specified on
the second line of the
error message.
If the problem persists, call a
service technician.
Table 14Error Messages(Continued)
Communications Problems
This table identifies problems with communications, the possible causes, and the recommended solutions.
Problem Possible Cause Recommended Solution
Check the printer driver or software
communications settings (if applicable).
If you are using serial communication, check
the serial port settings. See Port Settings on
page 108.
A label format was sent
to the printer but was not
recognized. The DATA
light does not flash.
The communication
parameters are incorrect.
If you are using serial communication, make
sure that you are using a null modem cable
or a null modem adapter.
Table 15Communications Problems
148
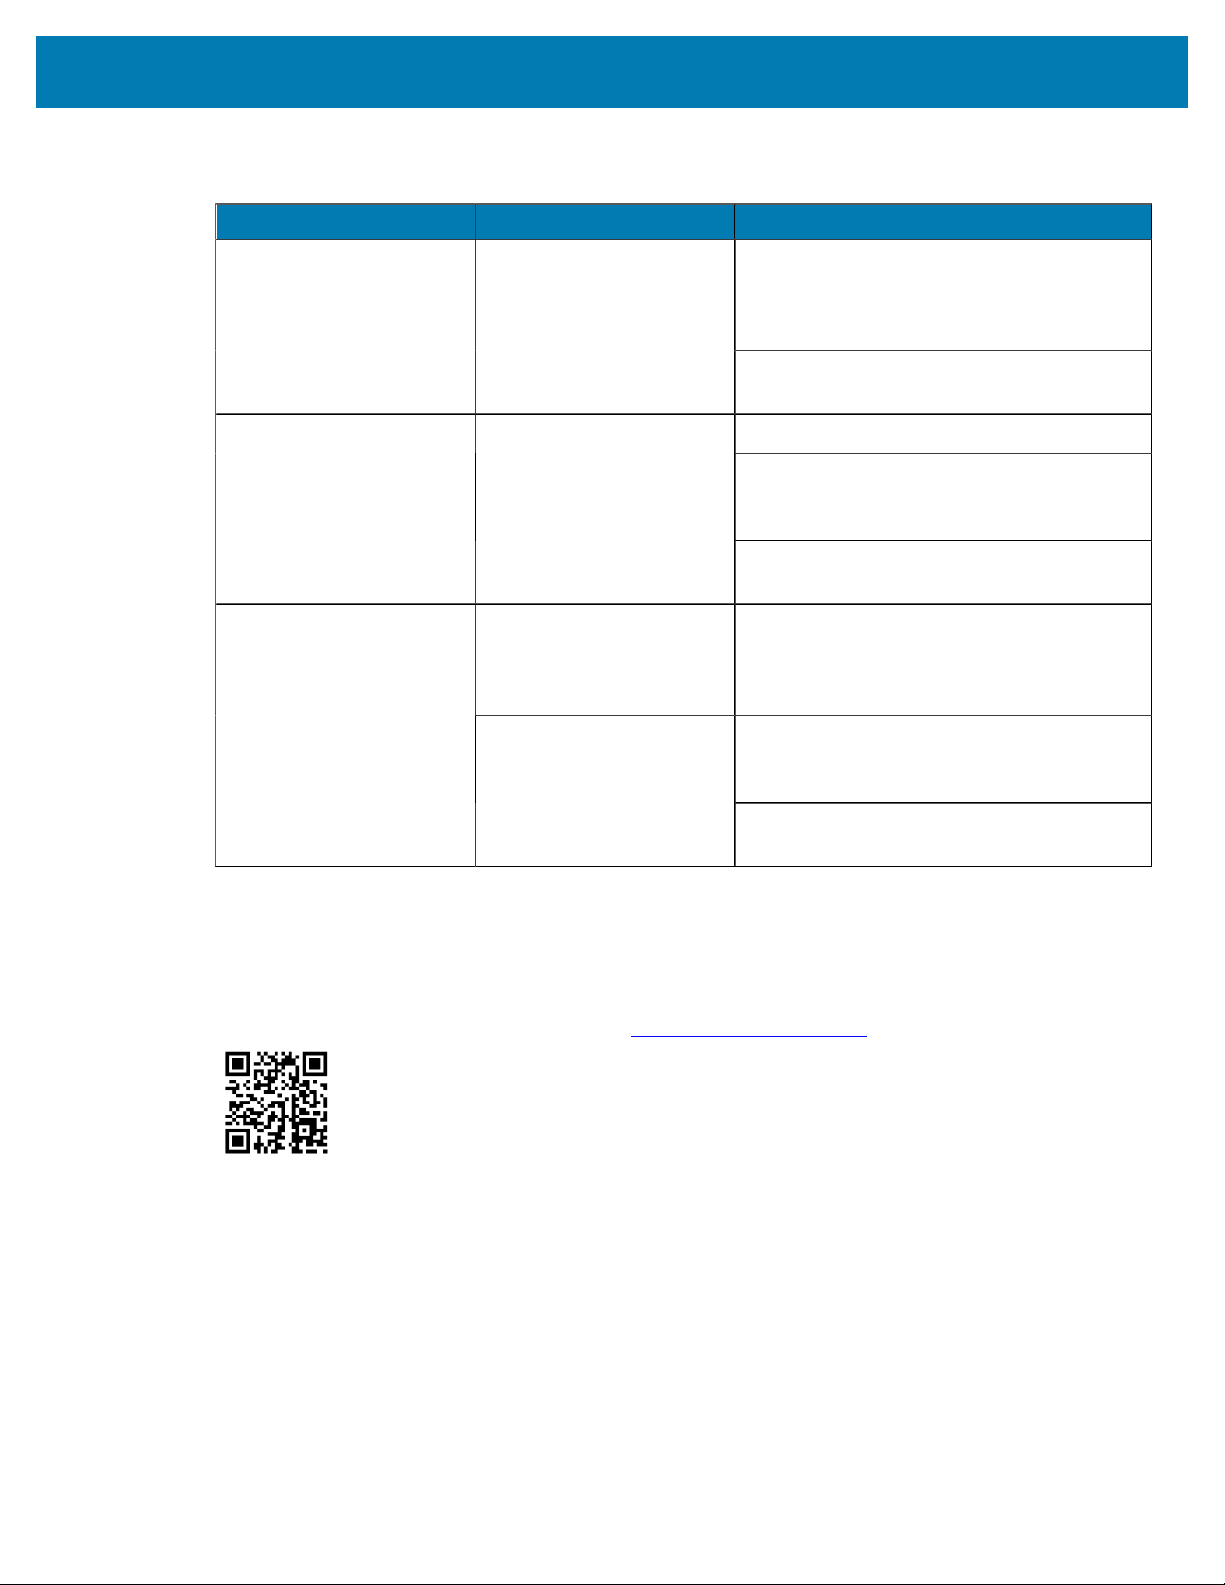
Troubleshooting
Problem Possible Cause Recommended Solution
Check the printer’s handshake protocol
setting. The setting used must match the one
being used by the host computer. See Host
Handshake.
If a driver is used, check the driver
communication settings for your connection.
Ensure that the flow control settings match.
Check the communication cable length. See
General Specifications on page 160 for
requirements.
A label format was sent to
the printer. Several labels
print, then the printer
skips, misplaces, misses,
or distorts the image on
the label.
The serial communication
settings are incorrect.
Check the printer driver or software
communications settings (if applicable).
The prefix and delimiter
characters set in the
printer do not match the
ones in the label format.
Verify the prefix and delimiter characters.
See Control Character and Delimiter
Character.
Check the communication settings on the
computer. Ensure that they match the printer
settings.
A label format was sent
to the printer but was not
recognized. The DATA
light flashes but no printing
occurs.
Incorrect data is being sent
to the printer.
If the problem continues, check the label
format.
Table 15Communications Problems(Continued)
Miscellaneous Issues
This tableidentifies miscellaneous issues with the printer, the possible causes, and the recommended
solutions.
For videos of some common procedures, go to
www.zebra.com/zt200-info.
149
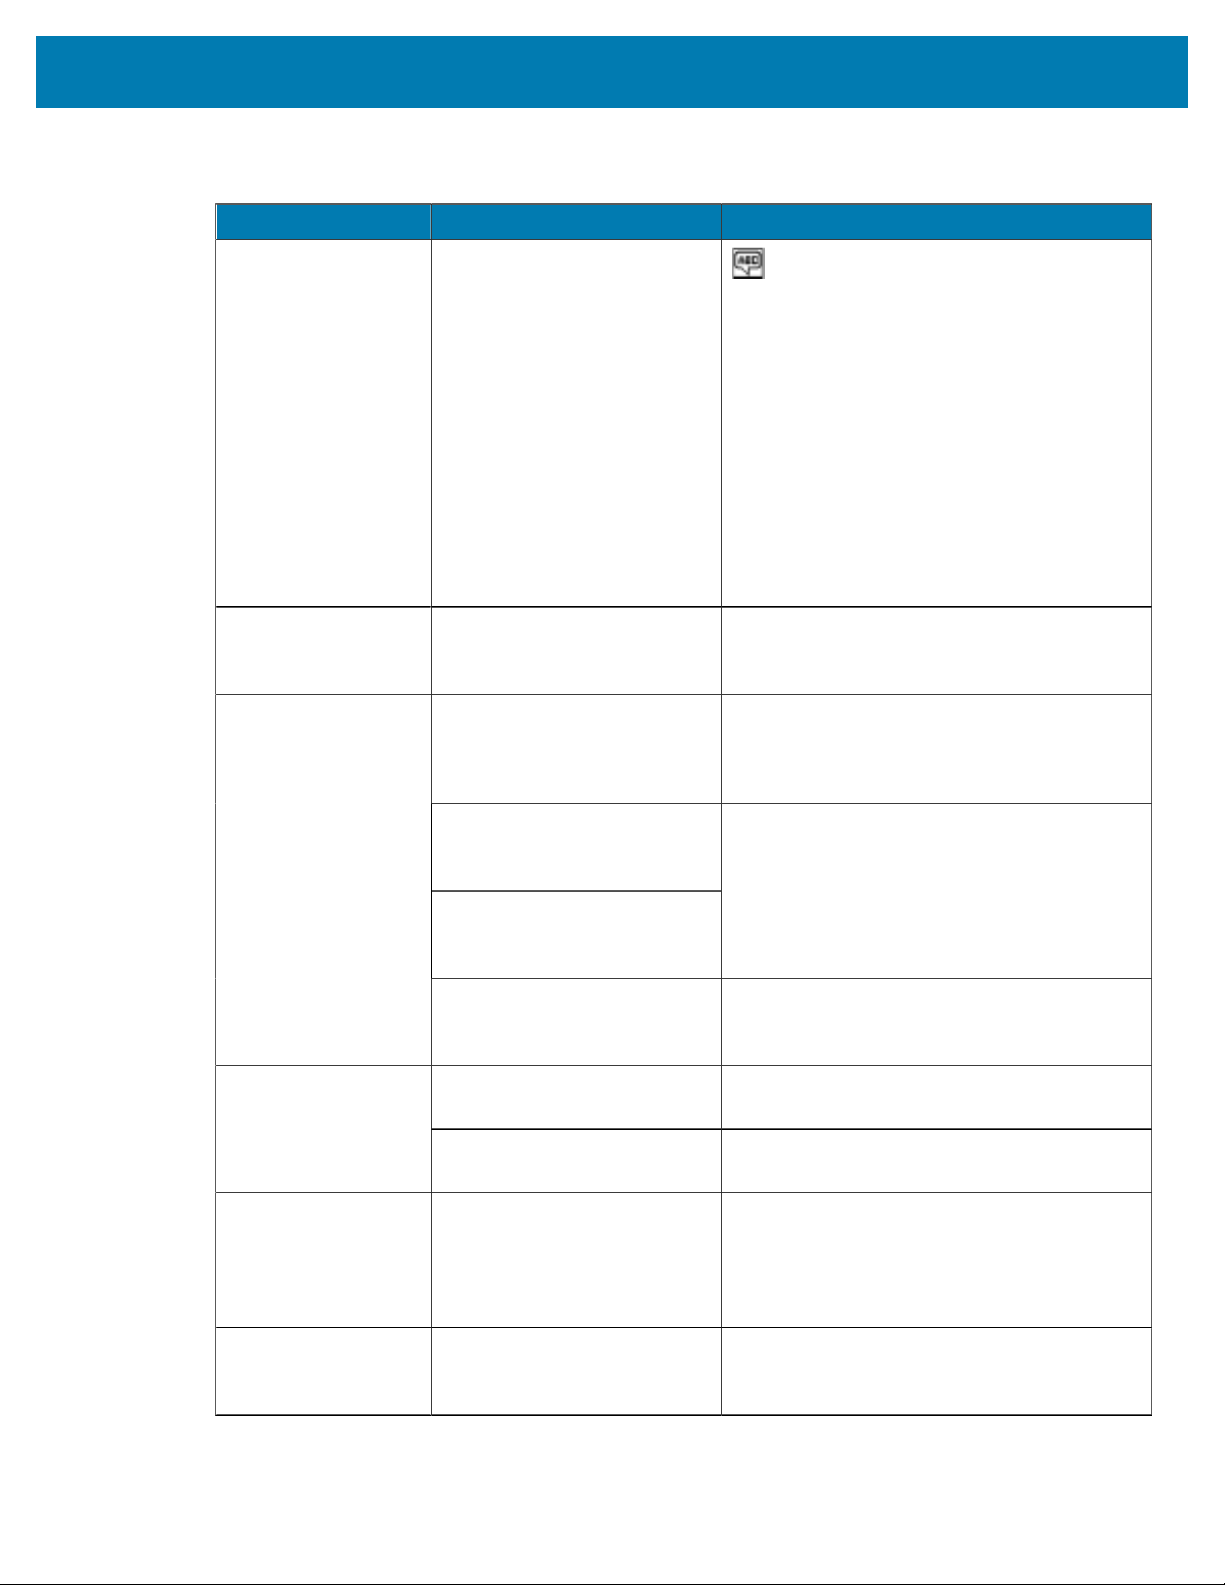
Troubleshooting
Problem Possible Cause Recommended Solution
The control panel
display shows a
language that I
cannot read
The language parameter was
changed through the control
panel or a firmware command.
1. On the control panel display, scroll to
LANGUAGE Menu.
2. Press OK to access the items in this menu.
3. Use the UP ARROW or DOWN ARROW to
scroll through the language selections. The
selections for this parameter are displayed
in the actual languages to make it easier
for you to find one that you are able to
read.
4. Select the language that you want to
display.
The display is missing
characters or parts of
characters
The display may need
replacing.
Call a service technician.
Some parameters are set
incorrectly.
1. Check the parameters and change or reset
if necessary.
2. Turn the printer off (O) and then on(I).
A firmware command turned
off the ability to change the
parameter.
A firmware command changed
the parameter back to the
previous setting.
Refer to the Programming Guide for ZPL, ZBI,
Set#Get#Do, Mirror, and WML or call a service
technician.
Changes in
parameter settings
did not take effect
If the problem persists, there
may be a problem with the
main logic board.
Call a service technician.
The printer was not calibrated
for the media being used.
Calibrate the printer. See Calibrating the
Ribbon and Media Sensors on page 111.
Non-continuous
labels are being
treated as continuous
labels.
The printer is configured for
continuous media.
Set the printer for the correct media type (gap/
notch, continuous, or mark). See Media Type.
All indicator lights are
on, nothing is on the
display (if the printer
has a display), and
the printer locksup.
Internal electronic or firmware
failure.
Call a service technician.
The printer locks up
while running the
Power#On Self Test.
Main logic board failure. Call a service technician.
Table 16Miscellaneous Printer Problems
150

Troubleshooting
Printer Diagnostics
Self tests and other diagnostics provide specific information about the condition of the printer. The self
tests produce sample printouts and provide specific information that helps determine the operating
conditions for the printer.
IMPORTANT: Use full-width media when performing self tests. If your media is not wide enough,
the test labels may print on the platen roller. To prevent this from happening, check the print
width, and ensure that the width is correct for the media that you are using.
Each self test is enabled by pressing a specific control panel key or combination of keys while turning on
(I) the printer power. Keep the key(s) pressed until the first indicator light turns off. The selected self test
automatically starts at the end of the Power-On Self Test.
NOTE:
• When performing these self tests, do not send data to the printer from the host.
• If your media is shorter than the label to be printed, the test label continues on the next label.
• When canceling a self test prior to its actual completion, always reset the printer by turning it
off (O)
Power-On Self Test
A Power-On Self Test (POST) is performed each time the printer is turned on (l). During this test, the control
panel lights (LEDs) turn on and off to ensure proper operation. At the end of this self test, only the STATUS
LED remains lit. When the Power-On Self Test is complete, the media is advanced to the proper position.
• Turn on (I) the printer.
The POWER LED illuminates. The other control panel LEDs and the LCD monitor the progress and
indicate the results of the individual tests. All messages during the POST display in English; however, if
the test fails, the resulting messages cycle through the international languages as well.
CANCEL Self Test
The CANCEL self test prints a printer configuration label and a network configuration label. For other ways
to print these labels, see Print Information.
1. Turn off (O) the printer.
151
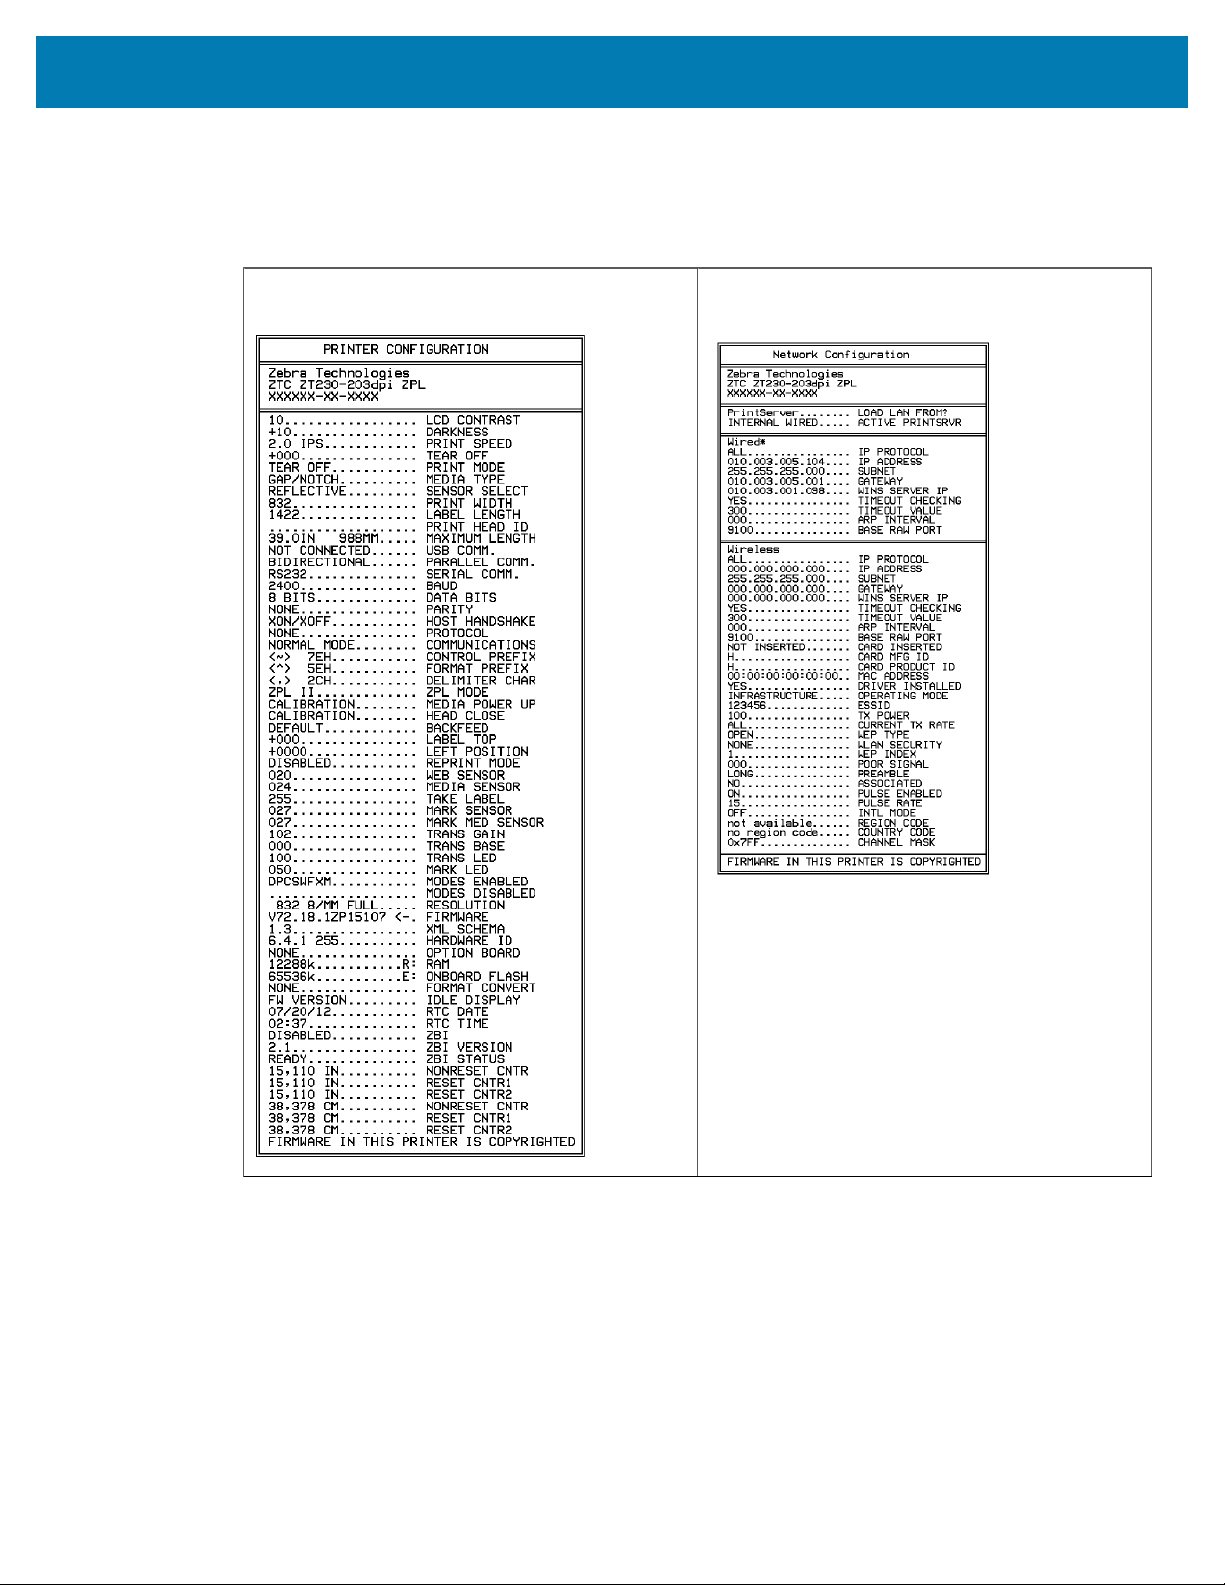
Troubleshooting
2. Press and hold CANCEL while turning on (I) the printer. Hold CANCEL until the first control panel light
turns off.
The printer prints a printer configuration label and then a network configuration label as shown in these
examples.
Figure 10Sample Printer ConfigurationLabel Figure 11Sample Network Configuration Label
PAUSE Self Test
This self test can be used to provide the test labels required when making adjustments to the printer’s
mechanical assemblies or to determine if any printhead elements are not working.
1. Turn off (O) the printer.
152

Troubleshooting
2. Press and hold PAUSE while turning on (I) the printer. Hold PAUSE until the first control panel light turns
off.
• The initial self test prints 15 labels at the printer’s slowest speed, and then automatically pauses the
printer. Each time PAUSE is pressed, an additional 15 labels print. A sample of the labels is shown
here.
Figure 12PAUSE Test Label
1234567890123456789012345678901234567890123456789012345678901234567
• While the printer is paused, pressing CANCEL alters the self test. Each time PAUSE is pressed, 15
labels print at 6in. (152 mm) per second.
• While the printer is paused, pressing CANCEL again alters the self test a second time. Each time
PAUSE is pressed, 50 labels print at the printer’s slowest speed
• While the printer is paused, pressing CANCEL again alters the self test a third time. Each time
PAUSE is pressed, 50 labels print at 6in. (152 mm) per second.
• While the printer is paused, pressing CANCEL again alters the self test a fourth time. Each time
PAUSE is pressed, 15 labels print at the printer’s maximum speed.
3. To exit this self test at any time, press and hold CANCEL.
FEED Self Test
Different types of media may require different darkness settings. This section contains a simple but
effective method for determining the ideal darkness for printing bar codes that are within specifications.
During the FEED self test, labels are printed at different darkness settings at two different print speeds.
The relative darkness and the print speed are printed on each label. The bar codes on these labels may be
ANSI-graded to check print quality.
During this test, one set of labels is printed at 2 ips, and another set is printed at 6 ips. The darkness
value starts at three settings lower than the printer’s current darkness value (relative darkness of –3) and
increase until the darkness is three settings higher than the current darkness value (relative darkness of
+3).
1. Print a configuration label to show the printer’s current settings.
2. Turn off (O) the printer.
153
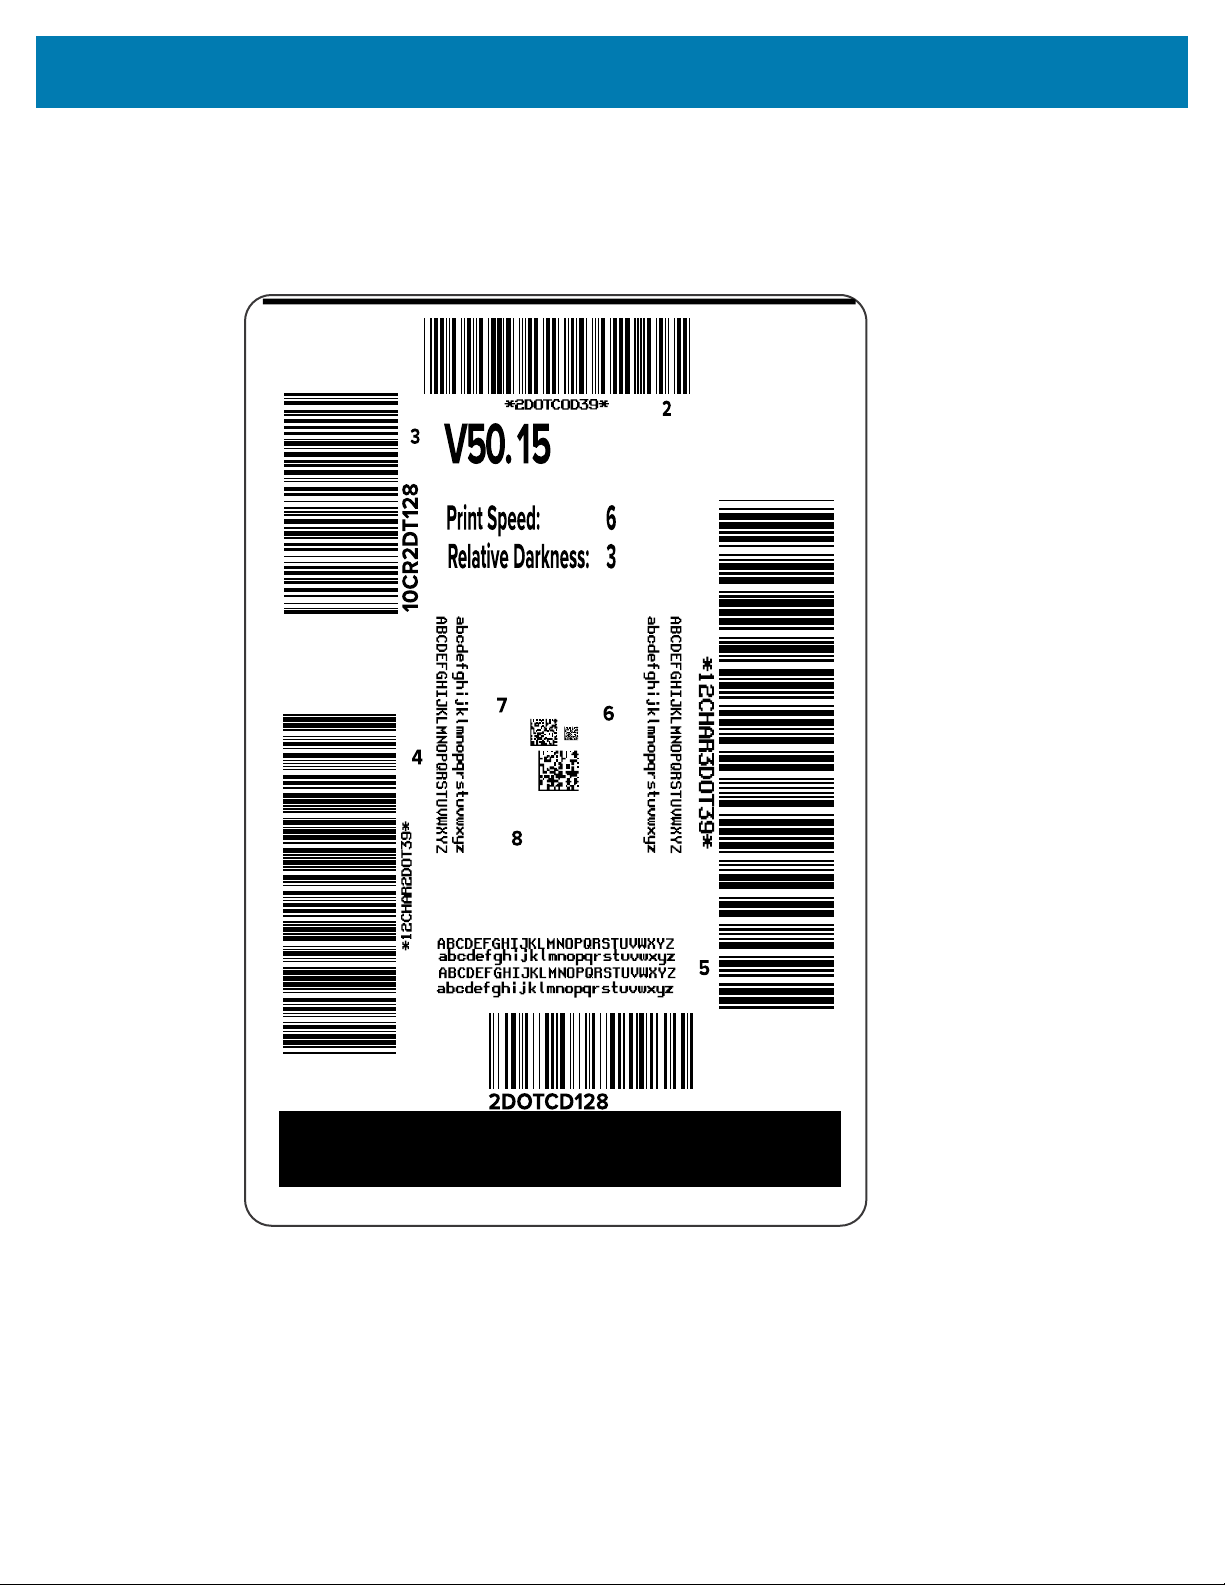
Troubleshooting
3. Press and hold FEED while turning on (I) the printer. Hold FEED until the first control panel light turns off.
The printer prints a series of labels at various speeds and at darkness settings higher and lower than
the darkness value shown on the configuration label.
Figure 13FEED Test Label
1
4. Inspect these test labels and determine which one has the optimal print quality for your application.
If you have a bar code verifier, use it to measure bars/spaces and calculate the print contrast. If you
154
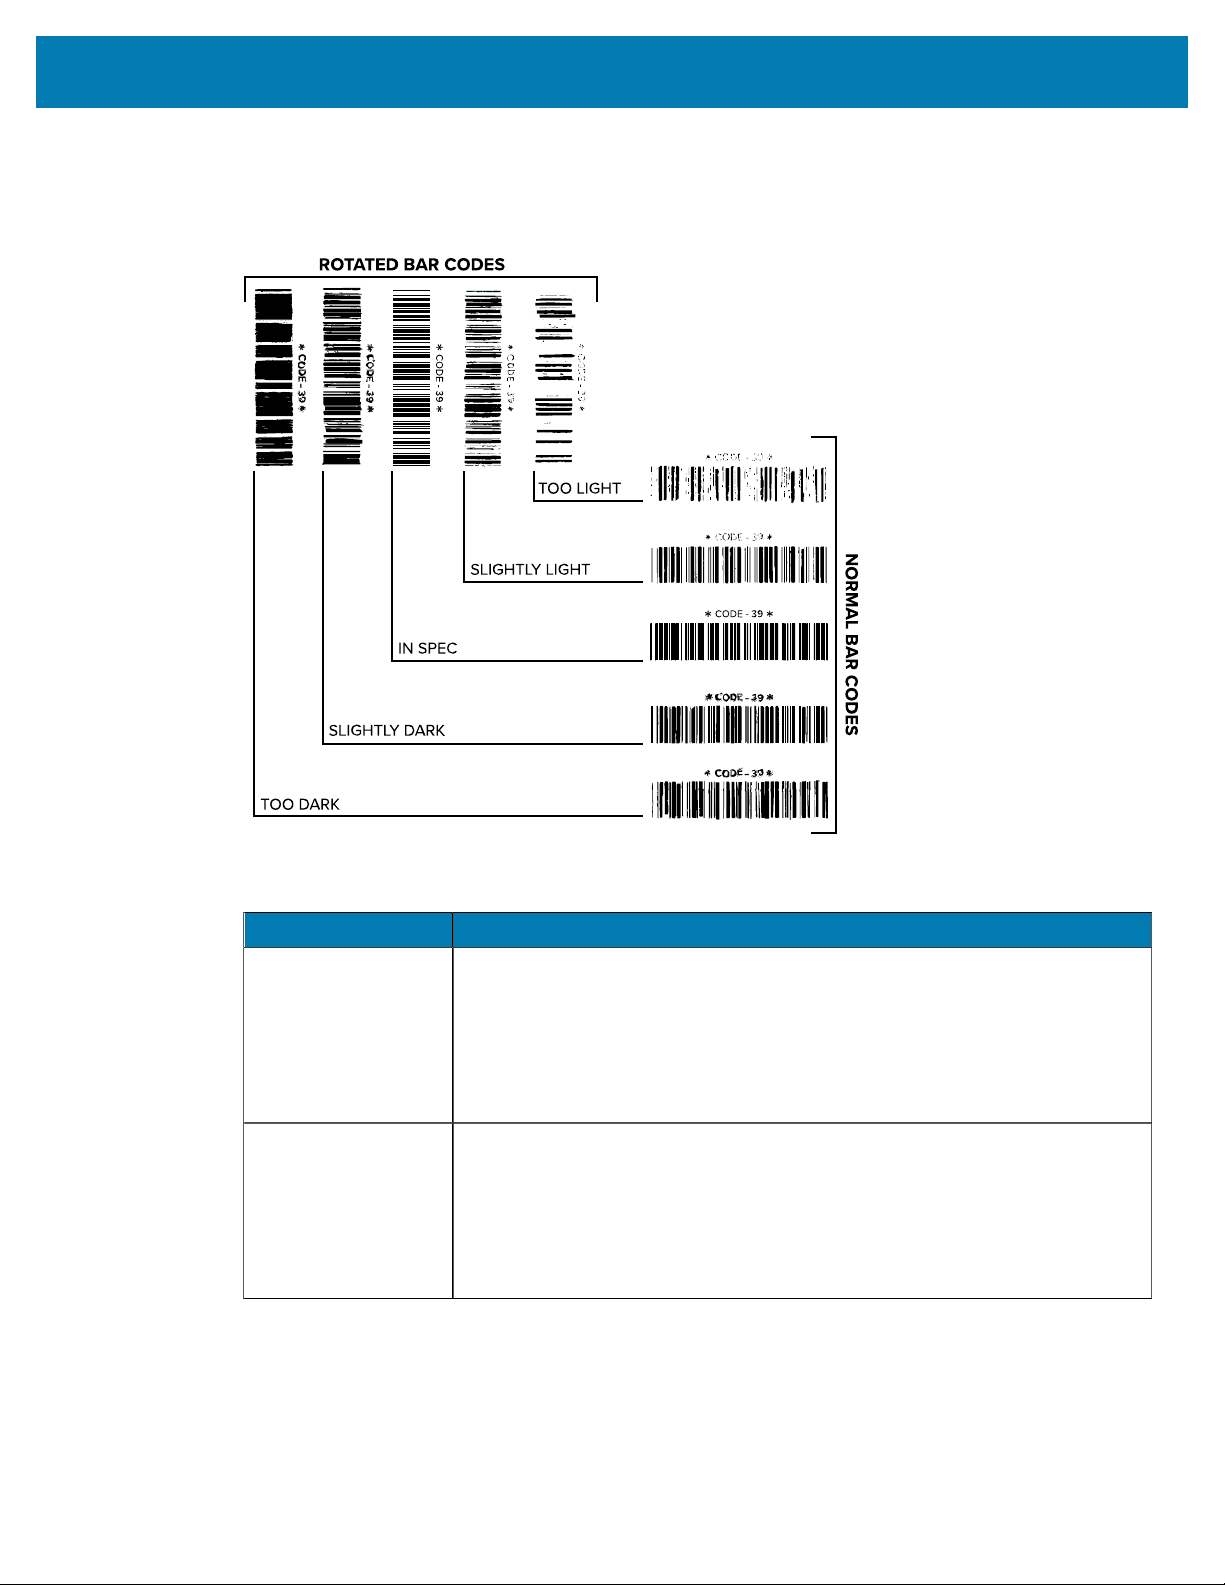
Troubleshooting
do not have a bar code verifier, use your eyes or the system scanner to choose the optimal darkness
setting based on the labels printed in this self test.
Figure 14Bar Code Darkness Comparison
Print Quality Description
Too dark Labels that are too dark are fairly obvious. They may be readable but not
in#spec.
• The normal bar code bars increase in size.
• The openings in small alphanumeric characters may fill in with ink.
• Rotated bar code bars and spaces run together.
Slightly dark Slightly dark labels are not as obvious.
• The normal bar code will be in-spec.
• Small character alpha numerics will be bold and could be slightly filled in.
• The rotated bar code spaces are small when compared to the in-spec
code, possibly making the code unreadable.
Table 17Judging Bar Code Quality
155
Troubleshooting
Print Quality Description
In-spec The in-spec bar code can only be confirmed by a verifier, but it should exhibit
some visible characteristics.
• The normal bar code will have complete, even bars and clear, distinct
spaces.
• The rotated bar code will have complete, even bars and clear, distinct
spaces. Although it may not look as good as a slightly dark bar code, the
bar code will be in-spec.
• In both normal and rotated styles, small alphanumeric characters look
complete.
Slightly light Slightly light labels are, in some cases, preferred to slightly dark ones for in-
spec bar codes.
• Both normal and rotated bar codes will be in spec, but small alphanumeric
characters may not be complete.
Too light Labels that are too light are obvious.
• Both normal and rotated bar codes have incomplete bars and spaces.
• Small alphanumeric characters are unreadable.
Table 17Judging Bar Code Quality(Continued)
5. Note the relative darkness value and the print speed printed on the best test label.
6. Add or subtract the relative darkness value from the darkness value specified on the configuration
label. The resulting numeric value is the optimal darkness value for that specific label/ribbon
combination and print speed.
7. If necessary, change the darkness value to the darkness value on the selected test label.
8. If necessary, change the print speed to the same speed as on theselected test label.
FEED and PAUSE Self Test
Performing this self test resets the printer configuration to the factory default values. Perform a sensor
calibration after this self test. (See Calibrating the Ribbon and Media Sensors on page 111.)
1. Turn off (O) the printer.
2. Press and hold FEED + PAUSE while turning on (I) the printer.
3. Hold FEED + PAUSE until the first control panel light turns off.
The printer configuration is reset to the factory default values. No labels print at the end of this test.
CANCEL and PAUSE Self Test
Performing this self test resets the network configuration to the factory default values.
1. Turn off (O) the printer.
2. Press and hold CANCEL + PAUSE while turning on (I) the printer.
156
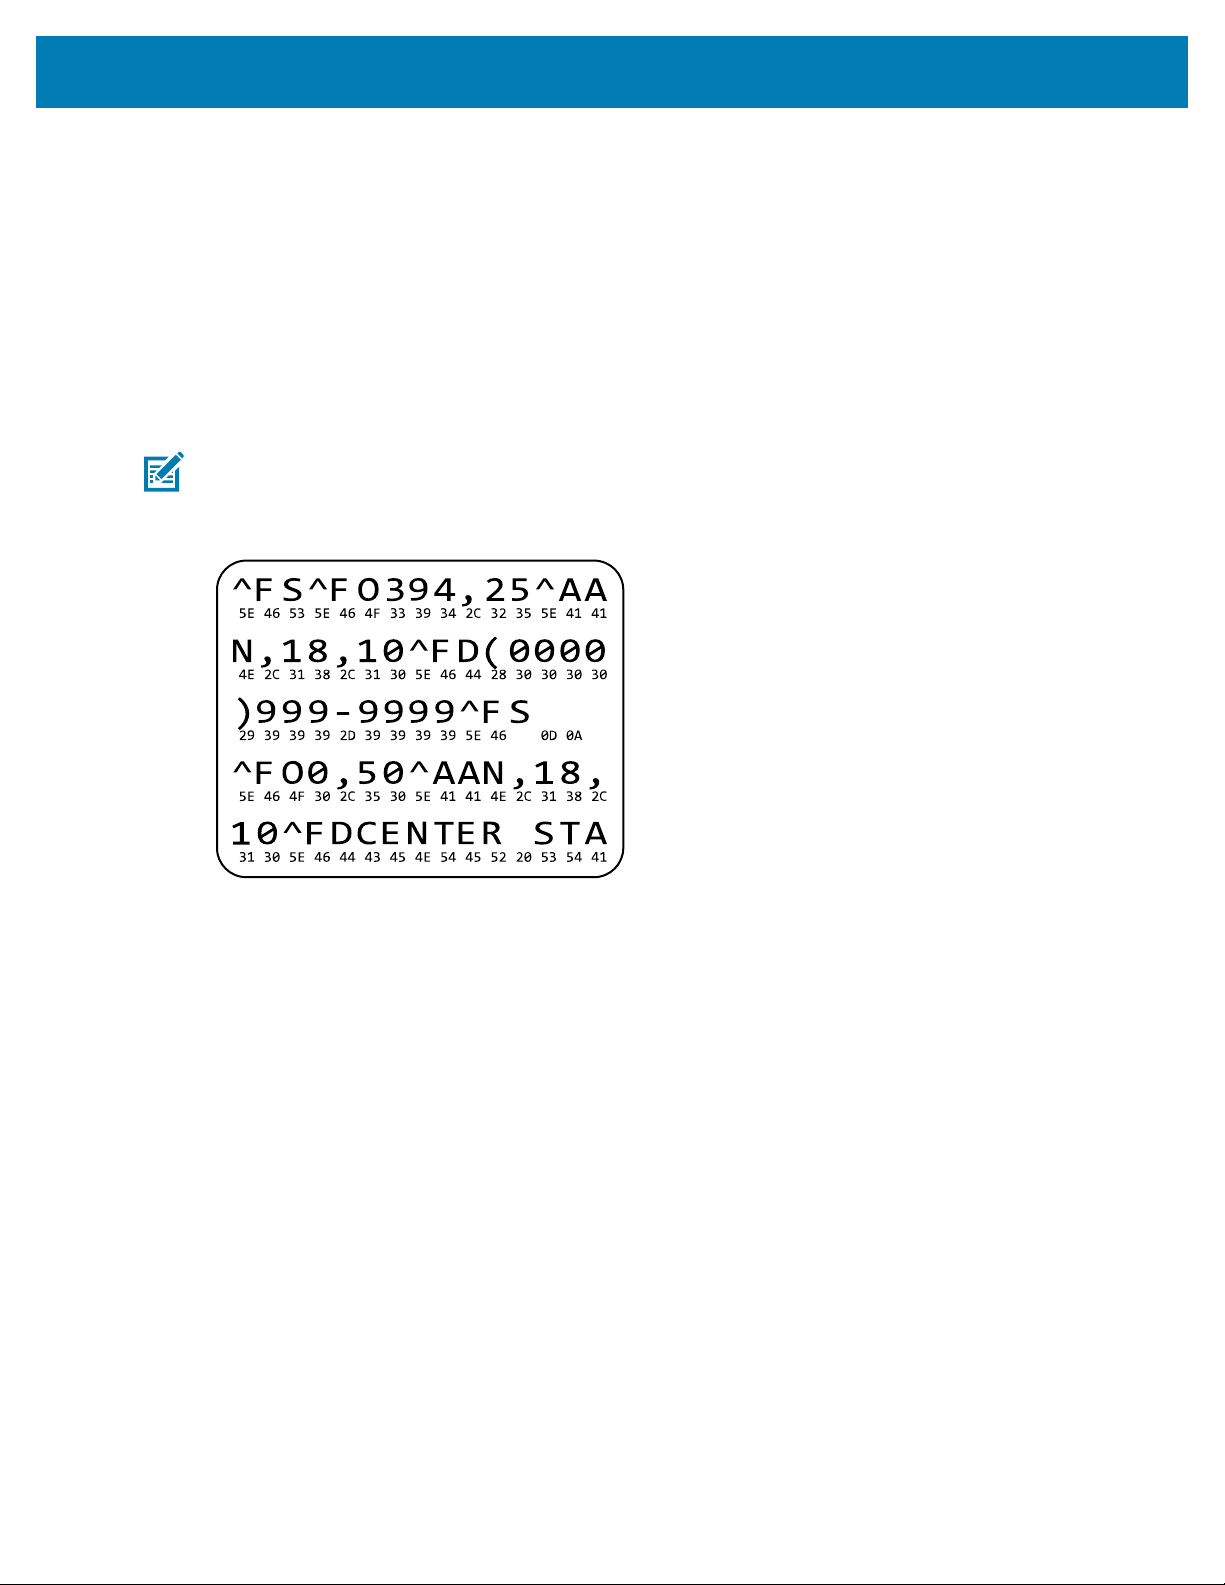
Troubleshooting
3. Hold CANCEL + PAUSE until the first control panel light turns off.
The printer’s network configuration is reset to the factory default values. No labels print at the end of
this test.
Communication Diagnostics Test
The communication diagnostics test is a troubleshooting tool for checking the interconnection between the
printer and the host computer. When the printer is in diagnostics mode, it prints all data received from the
host computer as straight ASCII characters with the hex values below the ASCII text. The printer prints all
characters received, including control codes such as CR (carriage return). Here is an example of a typical
test label from this test.
NOTE: The test label prints upside-down.
Figure 15Communications Diagnostics Test Label
53
1. Set the print width equal to or less than the label width being used for the test. See Print Width for more
information.
2. Set the DIAGNOSTICS MODE option to ENABLED. For methods, see Communication Diagnostics
Mode. See the User Guide for methods for changing this setting.
The printer enters diagnostics mode and prints any data received from the host computer on a test
label.
3. Check the test label for error codes. For any errors, check that your communication parameters are
correct.
Errors show on the test label as follows:
• FE indicates a framing error.
• OE indicates an overrun error.
• PE indicates a parity error.
• NE indicates noise.
4. Turn the printer off(O) and then back on (I) to exit this self test and return to normal operation.
157

Troubleshooting
Sensor Profile
Use the sensor profile image (which will extend across several actual labels or tags) to troubleshoot the
following situations:
• The printer experiences difficulty in determining gaps (web) between labels.
• The printer incorrectly identifies preprinted areas on a label as gaps (web).
• The printer cannot detect ribbon.
With the printer in the Ready state, print a sensor profile in one of these ways:
Using the buttons on the
control panel
1. Turn off (O) the printer.
2. Press and hold FEED + CANCEL while turning on (I) the printer.
3. Hold FEED + CANCEL until the first control panel light turns off.
Using ZPL
Send the ~JG command to the printer. See the Zebra Programming Guide
for more information about this command.
ZT230 printer only
1. On the control panel display, navigate to the following item under the
SENSORS menu.See Idle Display, Home Menu, and User Menus on
page 15 for information about using the control panel and accessing
the menus. See the User Guide for information about using the control
panel and accessing the menus.
2. Press RIGHT SELECT to select PRINT.
Compare your results to the examples shown in this section. If the sensitivity of the sensors must be
adjusted, calibrate the printer (see
Calibrating the Ribbon and Media Sensors on page 111).
Ribbon Sensor Profile
The line labeled RIBBON (1) on the sensor profile indicates the ribbon sensor readings. The ribbon sensor
threshold setting is indicated by OUT(2). If the ribbon readings are below the threshold value, the printer
does not acknowledge that ribbon is loaded.
158
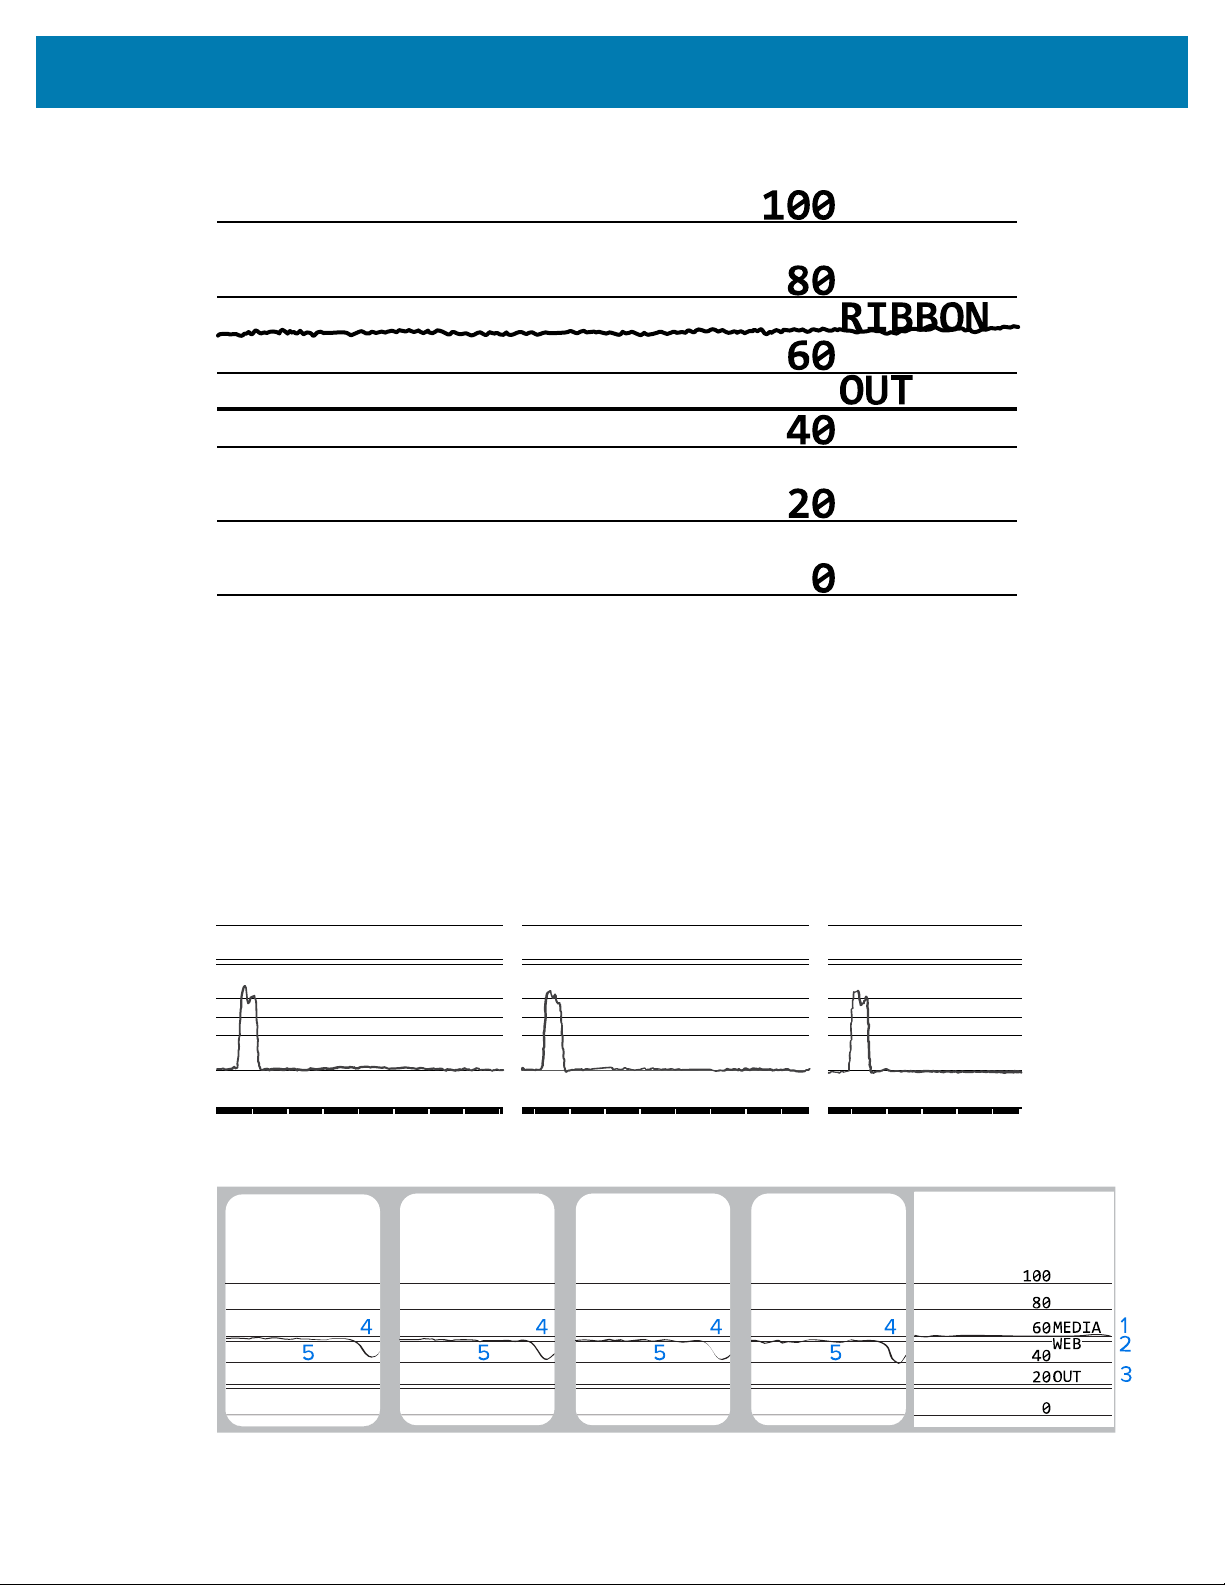
Troubleshooting
Figure 16Sensor Profile (Ribbon Section)
2
1
Media Sensor Profile
The line labeled MEDIA (1) on the sensor profile indicates the media sensor readings. The media sensor
threshold settings is indicated by WEB (2). The media out threshold is indicated by OUT (3). The upward
or downward spikes (4) indicate divisions between labels (the web, notch, or black mark), and the lines
between the spikes (5) indicate where labels are located.
If you compare the sensor profile printout to a length of your media, the spikes should be the same
distance apart as the gaps on the media. If the distances are not the same, the printer may be having
difficulty determining where the gaps are located.
Figure 17Media Sensor Profile (Gap/Notch Media)
100
80OUT
WEB
MEDIA
60
40
20
0
4 4
5 5 1
2
3
Figure 18Media Sensor Profile (Black Mark Media)
159
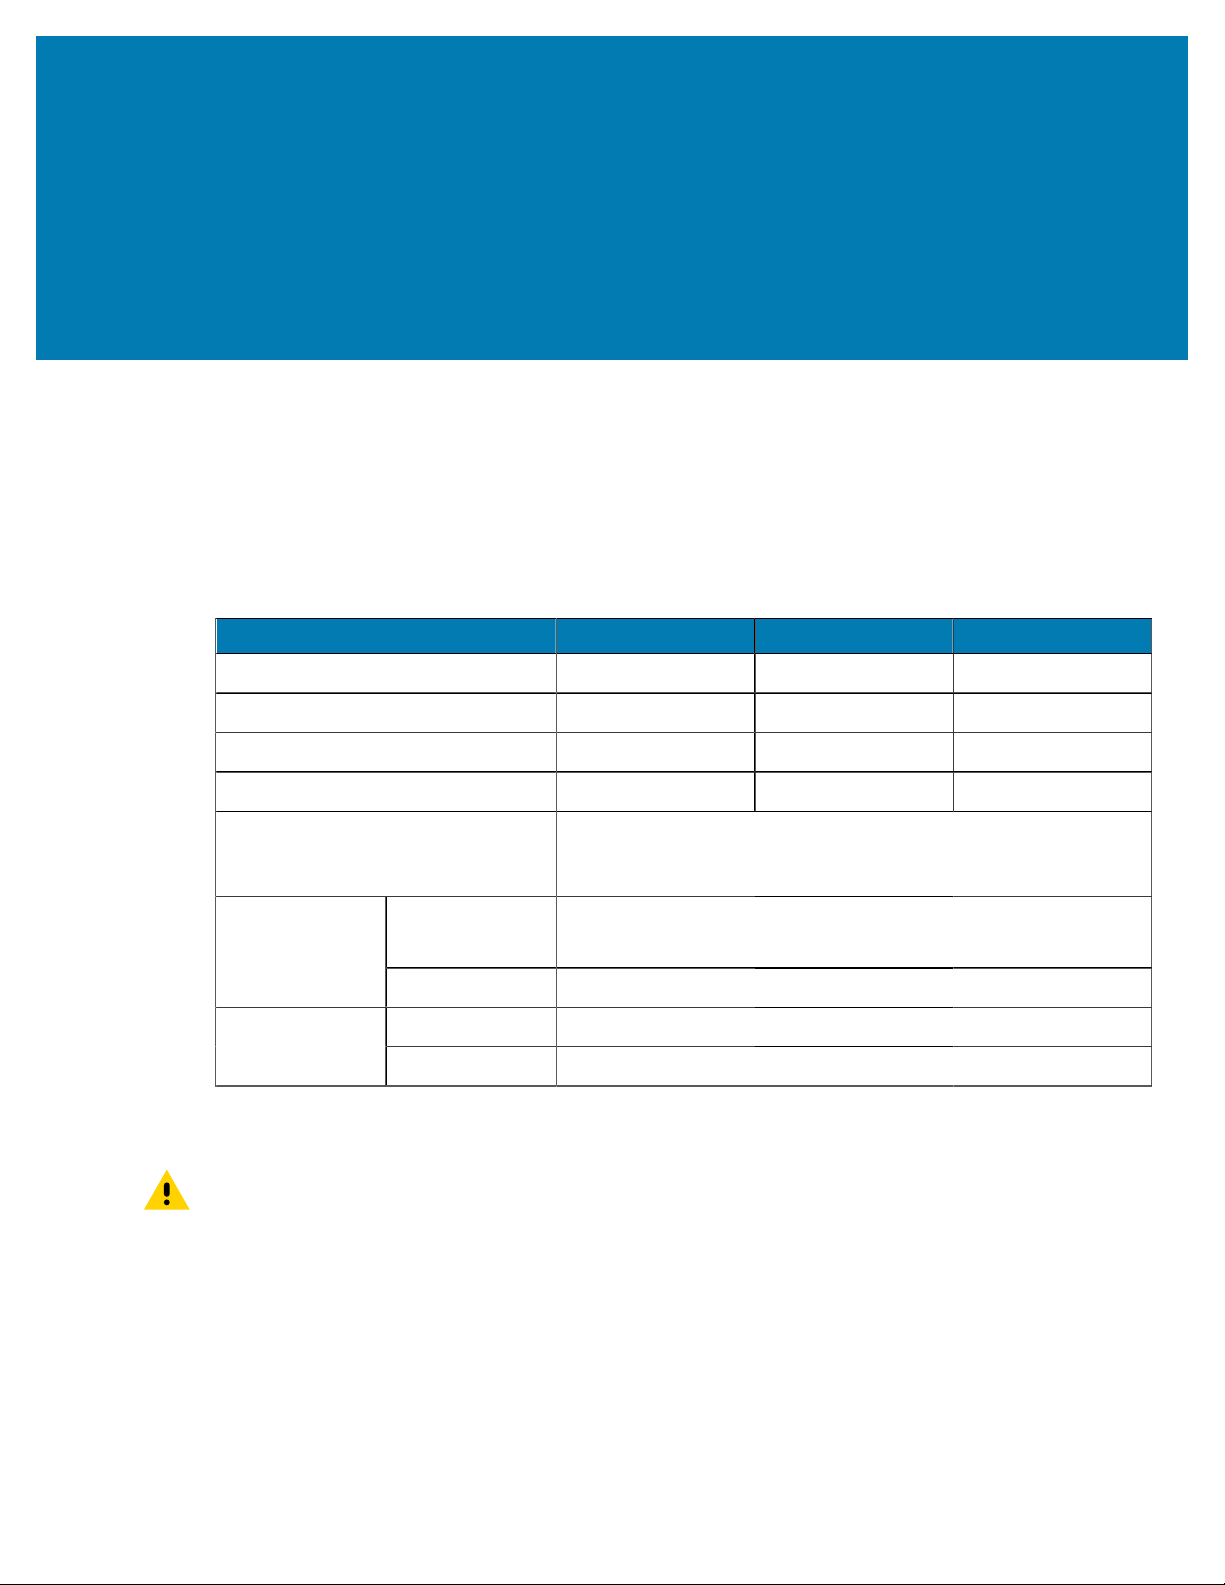
Specifications
Specifications
This section lists general printer specifications, printing specifications, ribbon specifications, and media
specifications.
General Specifications
Model ZT230 ZT220 ZT210
Height 277 mm (10.9 in.) 280 mm(11.0 in.) 277 mm(10.9 in.)
Weight 242 mm (9.5 in.) 239 mm(9.4 in.) 242 mm(9.5 in.)
Depth 432 mm(17 in.) 432 mm(17 in.) 432 mm(17 in.)
Weight 9.1 kg(20 lb) 7.8 kg(17 lb) 9.1 kg(20 lb)
Electrical
• ZT200 Series is Energy Star certified
• Auto-ranging power supply, 100–240 VAC, 50–60 Hz, 100 W
Operating Thermal Transfer:5° to 40°C(41° to 104°F)
Direct Thermal:0° to 40°C(32° to 104°F)
Temperature
Storage –40° to 60°C(–40° to 140°F)
Operating 20% to 85%, non-condensingRelative
Humidity
Storage 5% to 85%, non-condensing
Power Cord Specifications
CAUTION: For personnel and equipment safety, always use an approved three-conductor
power cord specific to the region or country intended for installation. This cord must use an IEC
320 female connector and the appropriate region-specific, three#conductor grounded plug
configuration.
Depending on how your printer was ordered, a power cord may or may not be included. If one is not
included or if the one included is not suitable for your requirements, refer to the following guidelines:
• The overall cord length must be less than 9.8ft. (3 m).
• The cord must be rated for at least 10 A, 250 V.
160
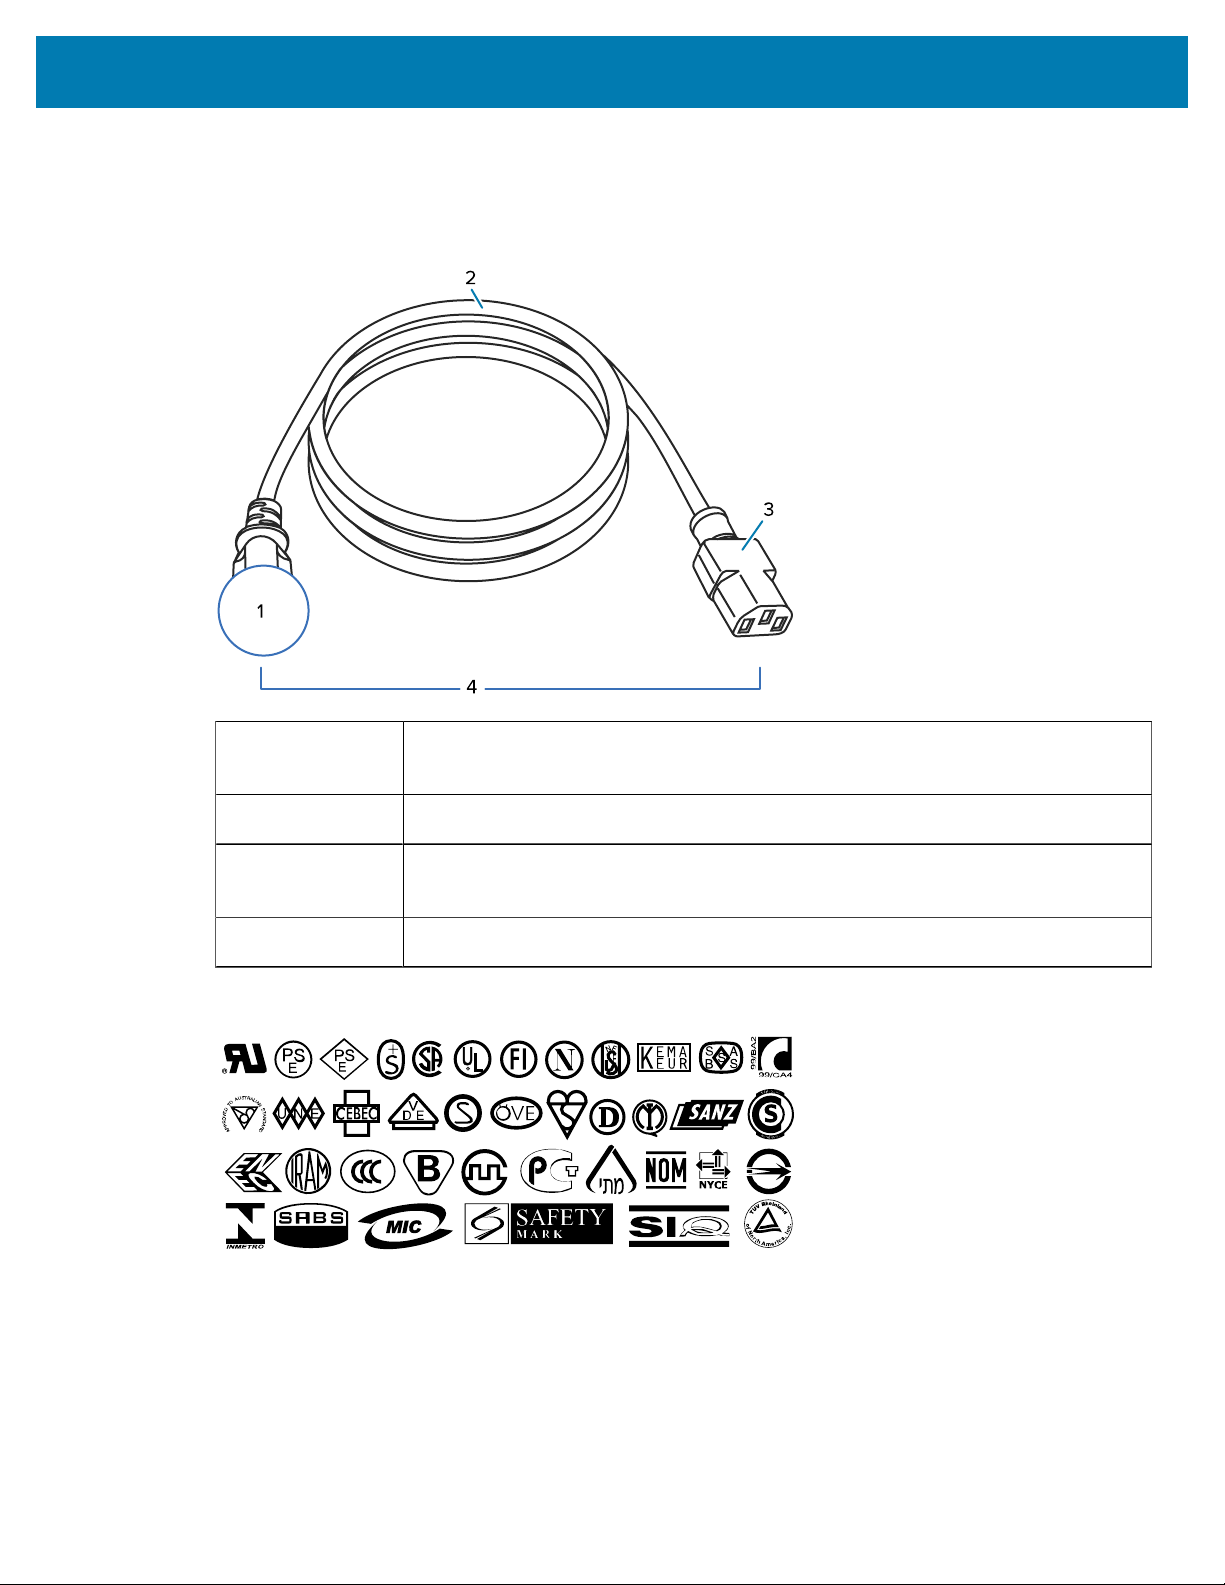
Specifications
• The chassis ground (earth) must be connected to ensure safety and reduce electromagnetic
interference.
Figure 19Power Cord Specifications
1
AC power plug for your country—This should bear the certification mark of at least
one of the known international safety organizations.
2
3-conductor HAR cable or other cable approved for your country.
3
IEC 320 connector—This should bear the certification mark of at least one of the
known international safety organizations.
4
Length # 9.8 ft. (3 m). Rating 10 Amp, 250 VAC.
Figure 20International Safety Organization CertificationSymbols
161

Specifications
Communication Interface Specifications
This section describes standard and optional specifications.
Standard
The following are standard specifications.
USB 1.1 Data Interface
Limitations and Requirements -Maximum cable length of 16.4 ft (5m).
Connections and Configuration - No additional configuration is necessary.
RS-232/CCITT V.24 Serial Data Interface
• 2400 to 115000 baud
• parity, bits/character
• 7 or 8 data bit
• XON-XOFF, RTS/CTS, or DTR/DSR handshake protocol required
• 750mA at 5 V from pins 1 and 9
Limitations and Requirements
• You must use a null-modem cable to connect to the printer or a null-modem adaptor if using a standard
modem cable.
• Maximum cable length of 50 ft (15.24 m).
• You may need to change printer parameters to match the host computer.
Connections and Configuration
The baud rate, number of data and stop bits, the parity, and the XON/XOFF or DTR control must match
those of the host computer.
Optional
Only one of the following may be installed at a time.
IEEE 1284 Bidirectional Parallel Data Interface
Limitations and Requirements
• Use an IEEE 1284 compliant cable.
• Maximum cable length of 10 ft (3 m).
• Recommended cable length of 6 ft (1.83 m).
• No printer parameter changes required to match the host computer.
• Can be installed in either the top or bottom option slot.
162

Specifications
Connections and Configuration
No additional configuration is necessary.
Wired 10/100 Internal Ethernet Print Server
Limitations and Requirements
• The printer must be configured to use your LAN.
• A second wired print server can be installed in the bottom option slot.
Connections and Configuration
Refer to the ZebraNet Wired and Wireless Print Servers User Guide for configuration instructions. A copy of
this manual is available at www.zebra.com/manuals.
Wireless Print Server (802.11a/b/g/n wireless card support)
Type = Omni directional antenna; Gain 3dBi @ 2.4GHz; 5dBi @ 5GHz
802.11 b
• 2.4GHz
• DSSS (DBPSK, DQPSK and CCK)
• RF power 10 mW (ZebraNet b/g Print Server)
802.11 g
• 2.4GHz
• OFDM (16-QAM and 64-QAM with BPSK and QPSK)
• RF power 10 mW (ZebraNet b/g Print Server)
802.11 n
• 2.4 GHz
• OFDM (16-QAM and 64-QAM with BPSK and QPSK)
• RF power 18.62 dBm (EIRP)
802.11 a/n
• 5.15-5.25 GHz, 5.25-5.35 GHz, 5.47-5.725 GHz
• OFDM (16-QAM and 64-QAM with BPSK and QPSK)
• RF power 17.89 dBm (EIRP)
Limitations and Requirements
• Can print to the printer from any computer on your Wireless Local Area Network (WLAN).
• Can communicate with the printer through the printer’s web pages.
• The printer must be configured to use your WLAN.
• Can be installed only in the top option slot.
163
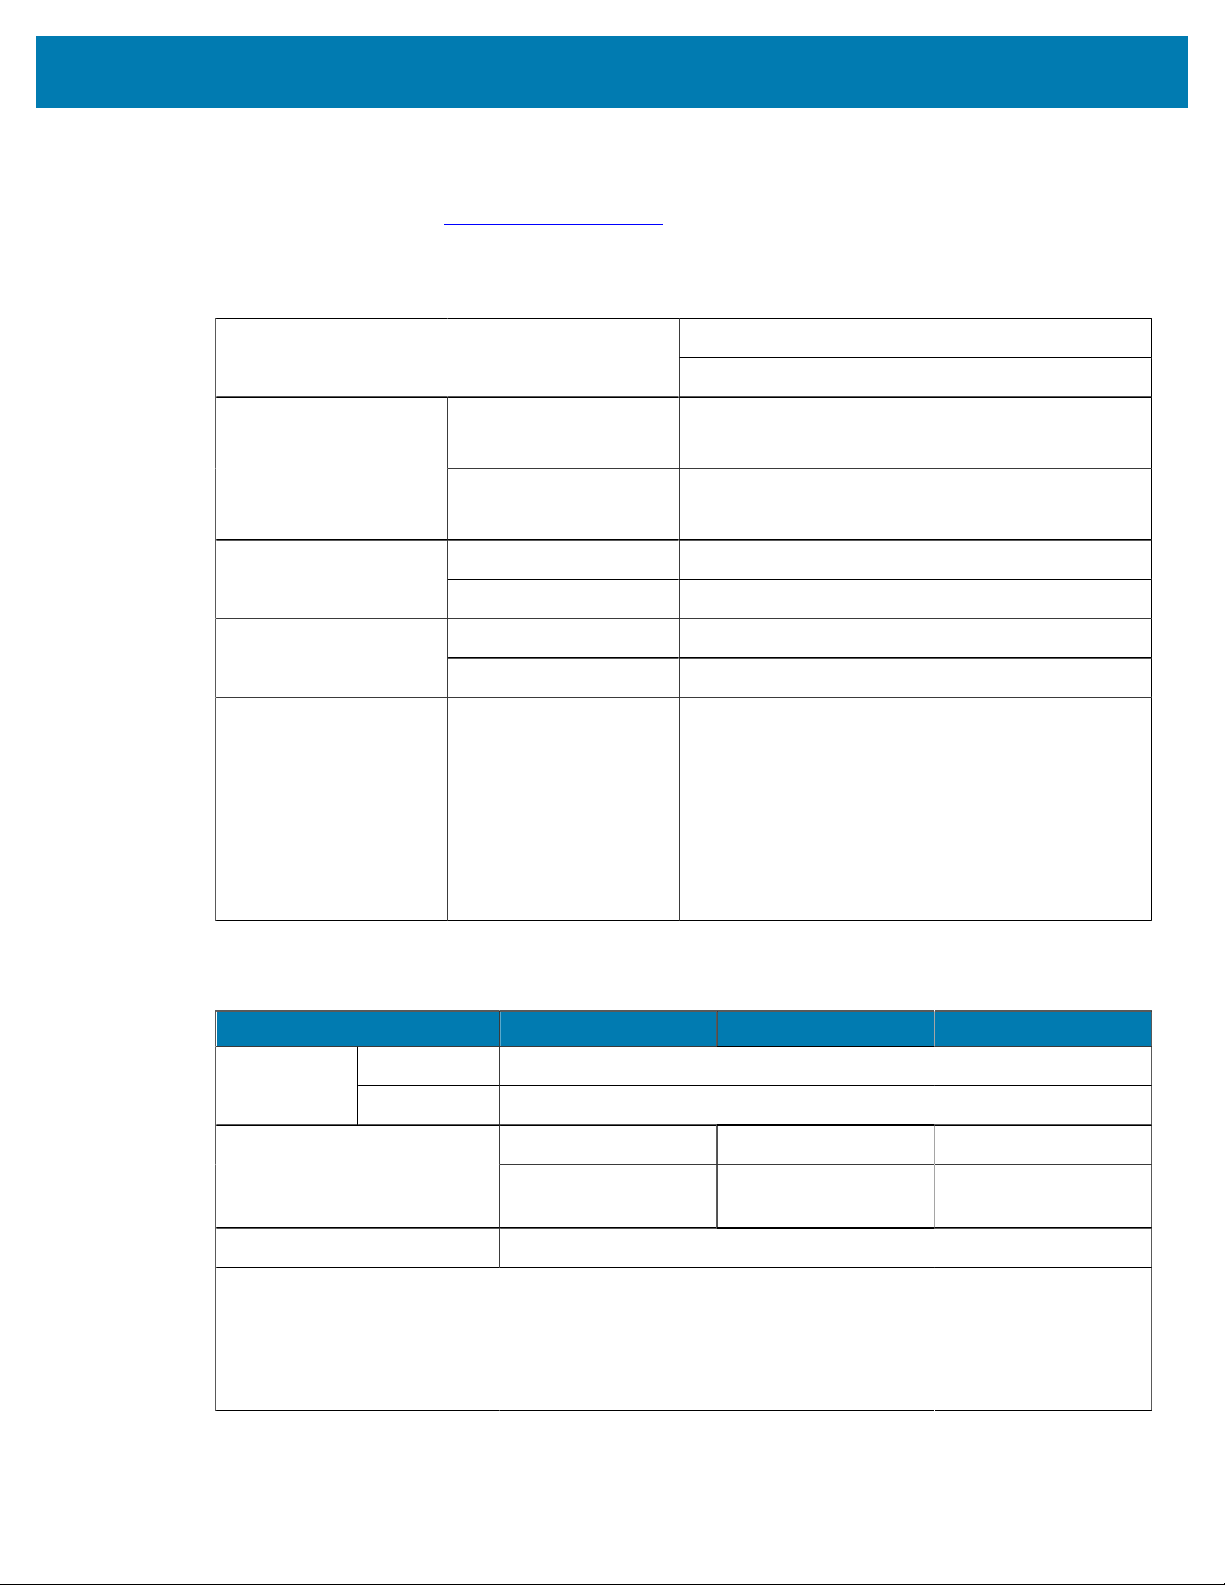
Specifications
Configuration
Refer to the ZebraNet Wired and Wireless Print Servers User Guide for configuration instructions. A copy of
this manual is available at www.zebra.com/manuals.
Printing Specifications
203 dpi (dots per inch) (8 dots/mm)Print resolution
300 dpi (12 dots/mm)
203 dpi 0.110 mm x 0.132 mm
(0.0043 in. x 0.0052 in.)
Dot size (nominal)
(width x length)
300 dpi 0.110 mm x 0.132 mm
(0.0043 in. x 0.0052 in.)
203 dpi 108 mm (4.25 in.)Maximum print width
300 dpi 105.7 mm (4.16 in.)
203 dpi 5 mil to 50 milBar code modulus (X)
dimension
300 dpi 3.3 mill to 33 mil
Programmable constant
print speeds
203 dpi and 300 dpi Per second:
• 51mm (2 in.)
• 76 mm (3 in.)
• 102 mm (4 in.)
• 127 mm (5 in.)
• 152 mm (6 in.)
Ribbon Specifications
Model ZT230 ZT220 ZT210
Minimum >51 mm** (> 2 in.**)Ribbon
width*
Maximum 110 mm (4.3 in.)
450 m (1476 ft) 300 m (984 ft) 300 m (984 ft)Maximum ribbon length
3:1 media to ribbon
roll ratio
2:1 media to ribbon
roll ratio
2:1 media to ribbon
roll ratio
Ribbon core inside diameter 25 mm (1 in.)
* Zebra recommends using ribbon that is at least as wide as the media to protect the printhead from
wear.
** Depending on your application, you may be able to use ribbon narrower than 2 in. (51 mm), as long as
the ribbon is wider than the media being used. To use a narrower ribbon, test the ribbon’s performance
with your media to assure that you get the desired results.
164
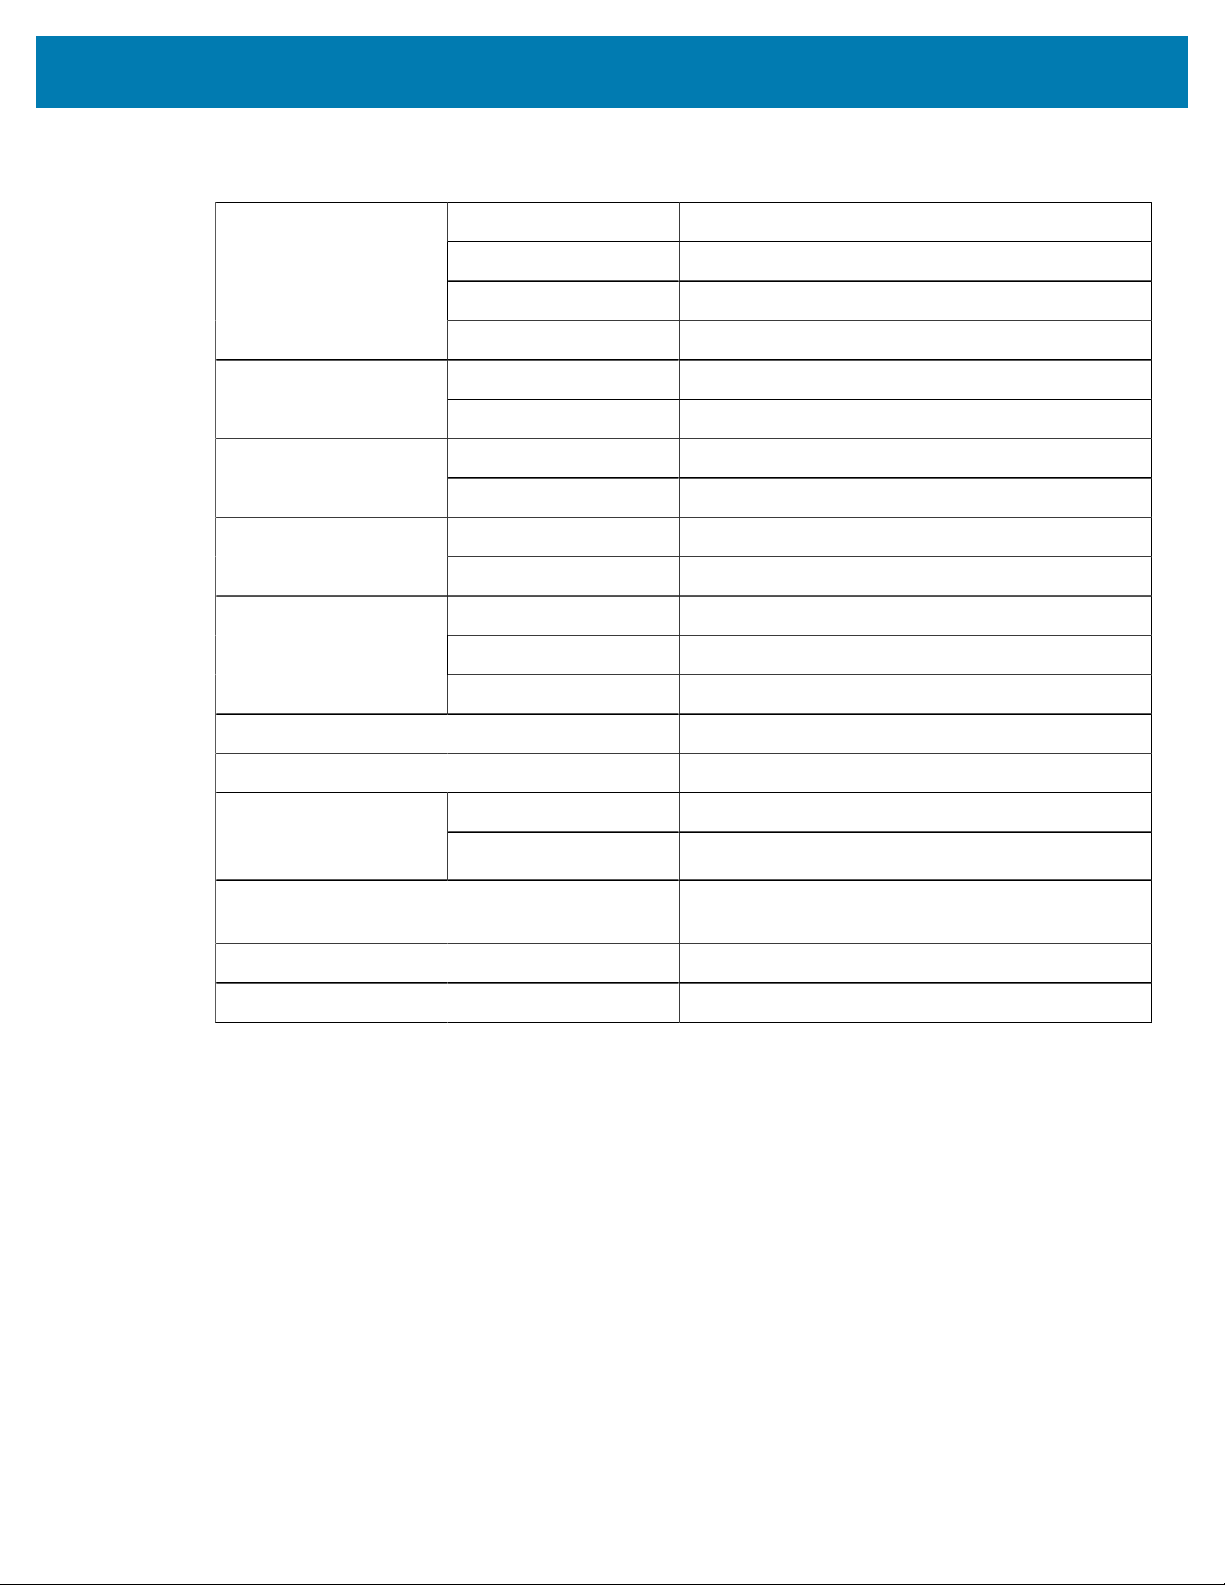
Specifications
Media Specifications
Minimum (Tear-Off) 17.8 mm (0.7 in.)
Minimum (Peel-Off) 12.7 mm (0.5 in)
Minimum (Cutter) 25.4 mm (1.0 in.)
Label length
Maximum 991 mm (39 in.)
Minimum 19 mm (0.75 in.)Label width
Maximum 114 mm (4.5 in.)
Minimum 0.076 mm (0.003 in.)Total thickness
(includes liner, if any)
Maximum 0.25 mm (0.010 in.)
76 mm (3-in.) core 203 mm (8 in.)Maximum roll outside
diameter
25 mm (1-in.) core 152 mm (6 in.)
Minimum 2 mm (0.079 in.)
Preferred 3 mm (0.118 in.)
Inter-label gap
Maximum 4 mm (0.157 in.)
Ticket/tag notch size (width x length) 6 mm x 3 mm (0.25 in. x 0.12 in.)
Hole diameter 3.18 mm (0.125 in.)
Minimum 3.8 mm (0.15 in.)Notch or hole position
(centered from inner
media edge)
Maximum 57 mm (2.25 in.)
Density, in Optical Density Units (ODU) (black
mark)
> 1.0 ODU
Maximum media density ≤ 0.5 ODU
Transmissive media sensor (fixed position) 11 mm (7/16 in.) from inside edge
165

www.zebra.com