CLM12VIN


(VSRQM DDF~VWL FD

• asegúrese de ensamblar las esponjas/panel acústicos, que pueden
reducir efectivamente el ruido causado por la máquina mientras trabaja,
para brindarle un entorno de vida más tranquilo y silencioso.
Nota!
Esponja acústico
2x
2x
1,Coloque la máquina en el suelo, usando algún material suave como
espuma o ropa, entre la máquina y el suelo para una protección;
2,Pegue las esponjas más largas en los bordes inferiores más largos
de la máquina y las esponjas más cortas en los bordes inferiores más
cortos. La instalación del panel es igual que con las esponjas.
Boost
12345
Main
wash
Prewash
Softener
234
1
• Não coloque gotas de roupa no compartimento de detergente.
Sport
Prelavado
Lavado principal
Suavizante
I I
I
Botón de liberación para
extraer el dispensador
• Sólo es necesario añadir detergente en el “compartimento I” después
de seleccionar la función de prelavado.,
• No ponga perlas de ropa en el dosificador de detergente.
Mix
Roba Bebe
Jeans
Higiene Vapor
ECO 40-60
45'/
Sport
/ 09/0604
20/
30/40
Mix
Mix
Tipo De
Mancha/Nodoas
Roba Bebe
SportSport
12.0
12.0
12.0
6.0
12.0
6.0
–
12.0
6.0
6.0
12.0
2.0
2.0
12.0
12.0
0:45
2:28
4:00
1:01
1:07
0:12
1:18
1:35
0:47
2:01
1:20
3:18
3:39
Algodón, Mezcla, Sintético son programas de pesaje automático.
•
Higiene Vapor
Jeans
de 45'/
Sport
Mix
de 45'/
2.0
6.0
12.0
12.0
12.0
12.0
6.0
3.0
20
20
60
40
60
-
-
-
0:45
1:01
3:44
1:20
1:30
4:00
3:00
3:00
0.131
0.206
1.919
0.988
1.684
1.186
0.618
0.253
31
58
99
99
99
84.0
58.0
45.0
20
20
60
40
60
44
32
22
75%/800
65%/1000
53%/1400
65%/1000
65%/1000
53.9%/1350
53.9%/1350
53.9%/1350
12
12
6
3 0
kg
kg
kg kg
Mix
Mix
Mix
Roba Bebe

1400
20
800
60
1000
–
20
1400
1000
40
600
–
1000
90
–
30
20
800
800
60
1000
40
1000
40
1200
40
1400
Higiene Vapor
Jeans
45'/
Sport
Roba Bebe
Mix
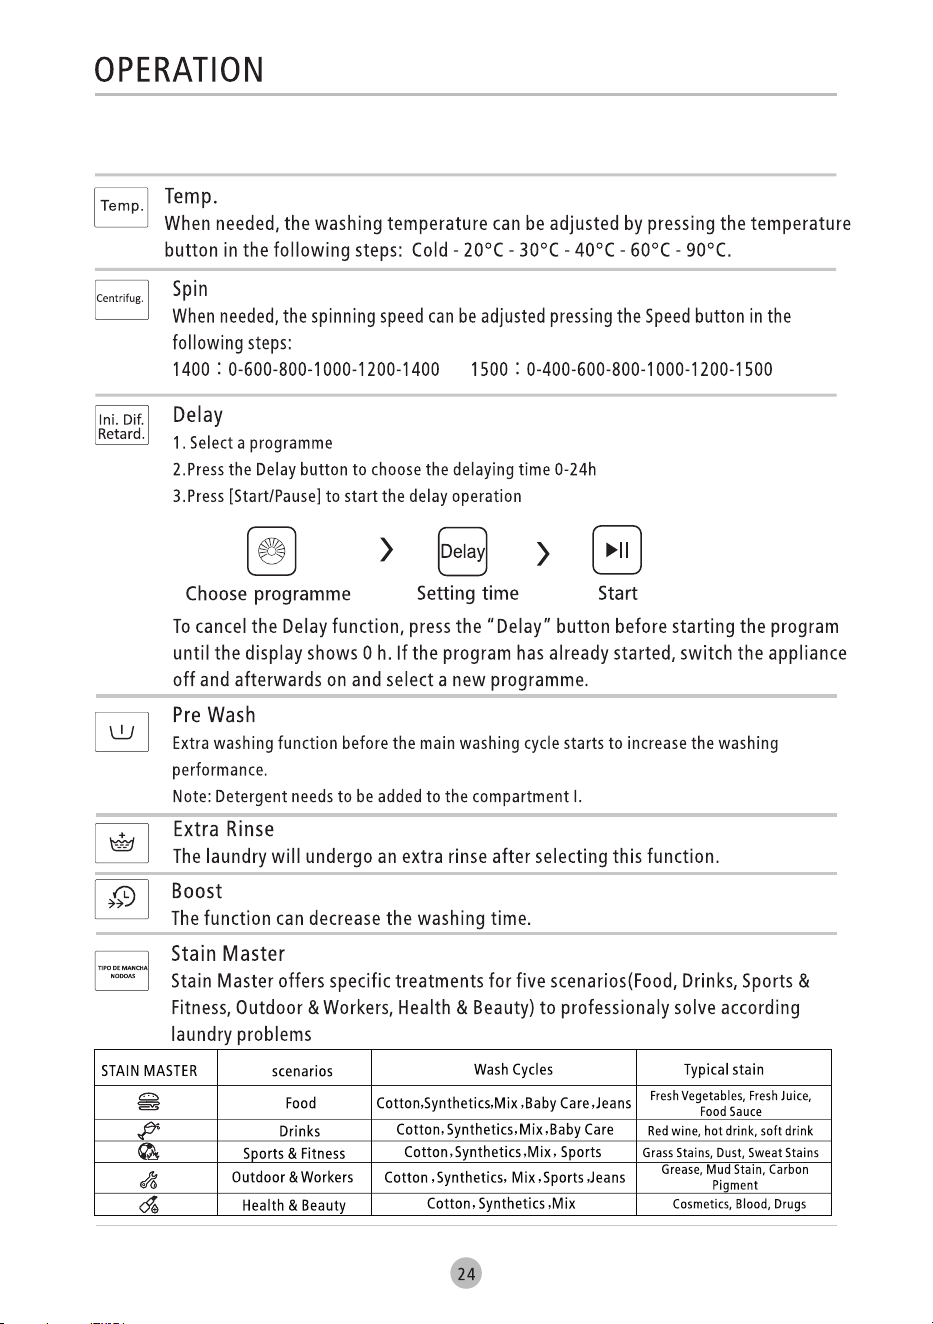
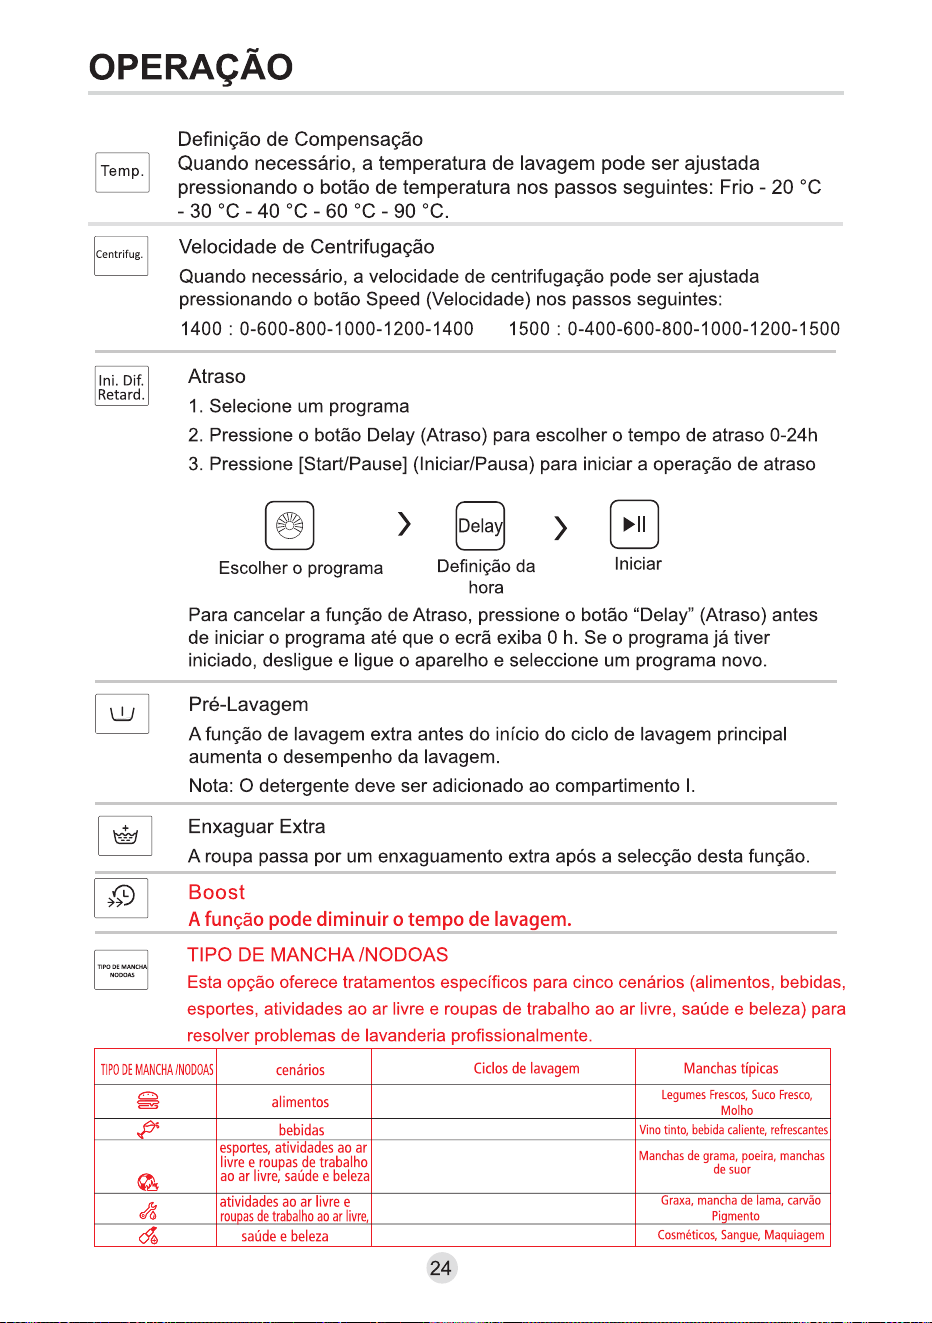
1400:0-600-800-1000-1200-1400 1500:0-400-600-800-1000-1200-1500
Boost
La función puede bajar el tiempo de lavado.
Tipo De Mancha/Nodoas
Este opcion ofrecetratamientos específicos para cinco escenarios(alimentos, bebidas,
deportes,actividades al aire libre&ropa de trabajo al aire libre, salud&belleza)para
resolver de forma profesional los problemas de lavado.
HIGIENE VAPOR
Scenarios
Ciclos de Lavado Mancha tipica
alimentos
Verduras Frescas, Zumo Fresco,
Salsa
bebidas
Algodón,Sintético,Mix,Ropa Bebé
Vino tinto, bebida caliente, refrescantes
deportes
Algodón,Sintético,Mix,Sport
Manchas de hierba, polvo, manchas de sudor
actividades al aire
libre&ropa
Grasa, mancha de barro, carbón
Algodón,Sintético,Mix,Sport,Jeans
Pigmento
salud&belleza
Algodón,Sintético,Mix
Cos méticos, Sangre, Maquillaje
Algodón,Sintético,Mix,Ropa Bebé,Jeans
de trabajo al aire libre
y [ ]Boost
Boost
Función
Función
Tipo De Mancha/Nodoas
Función
Función
Tipo De Mancha/Nodoas
[Centrifug.]
Centrifug.

Ini. Dif. Retard"
Contador de uso,
1, Desenchufe el equipo durante 10 s y vuelva a conectarlo.
2, Encienda y dentro de 10 s, presione " y "
control de forma simultánea y continua durante unos 5 s hasta que la
pantalla del dispositivo muestre dígitos – el valor puede indicar los
tiempos de uso del equipo.
3, Repita el paso 1 nuevamente y el cliente puede reanudar el
funcionamiento normal.
" en el panel de
Boost
Nota!

1
2
3
4
12
34
3
CLM12VIN
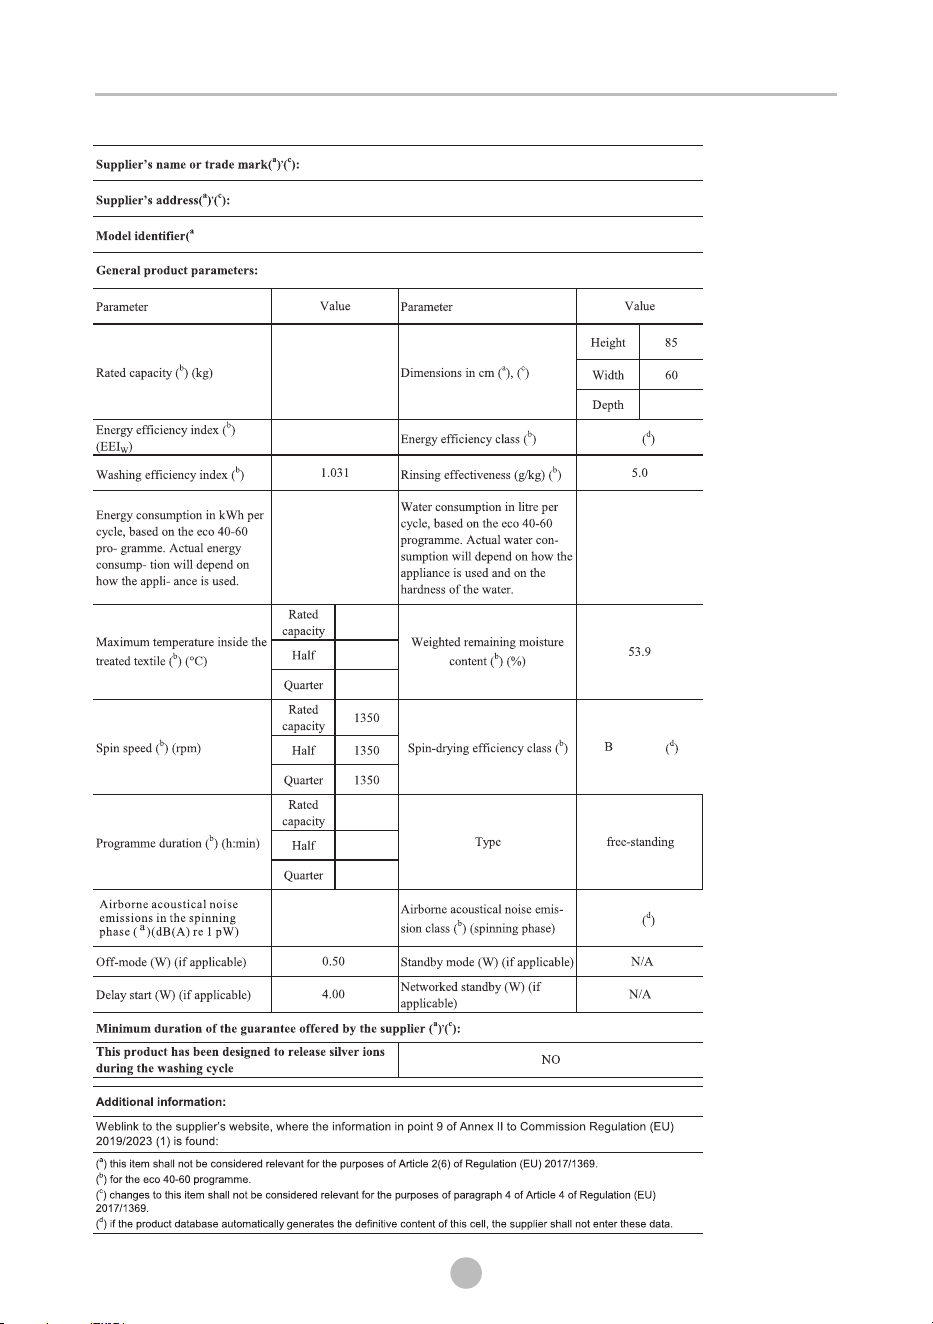
12.0kg 595x595x850 76kg 2000W
CLM12VIN
12
4:00
57
52.0
44
32
22
3:00
3:00
1.031
0.544
1350
1350
1350

CONTENTS
1
SAFETY INSTRUCTIONS
Safety Instructions ..................................................
INSTALLATION
Product Description ................................................
Installation ...........................................................
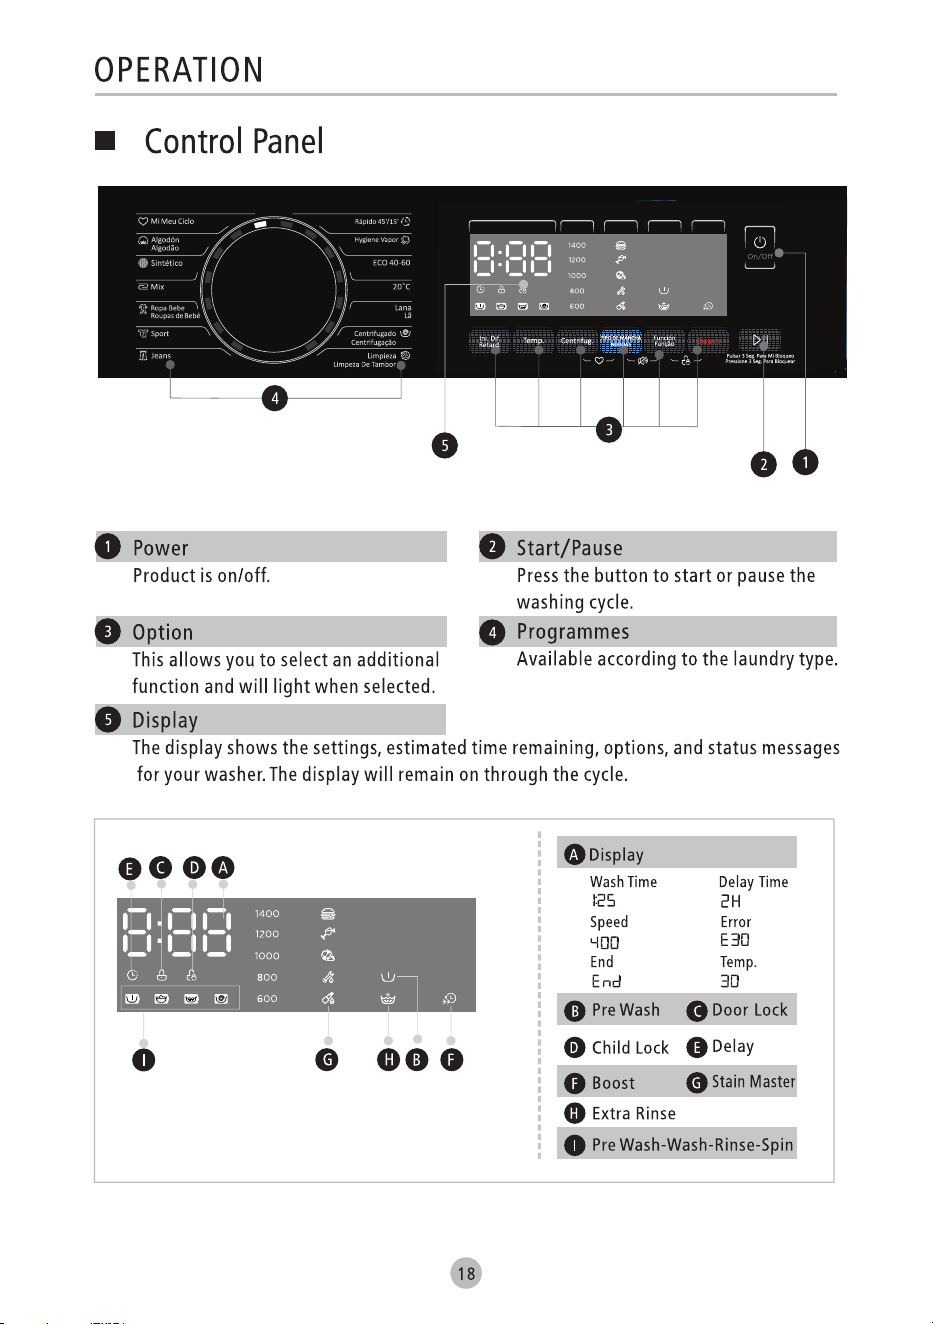
OPERATION
Quick Start .............................................................
Before Each Washing ..............................................
Detergent Dispenser ...............................................
Control Panel .........................................................
Programmes............................................................
Option...................................................................
MAINTENANCE
Cleaning and Care .................................................
Trouble Shooting ....................................................
Customer Service ....................................................
Technical Specifications .........................................
Product Fiche .........................................................
2
9
10
13
15
16
18
19
23
27
30
31
32
33
Please read the following safety information thoroughly and follow it
strictly to minimize the risk of fire or explosion, electric shock and to
prevent property damage, personal injury or loss of life. Failing to follow
these instructions shall void any warranty.
its service agent or similarly qualified persons in order to avoid a hazard.
•If the machine is damaged, it must not be operated unless repaired by
the manufacturer, its service agent or similarly qualified persons.
Risk of electric shock!
•If the supply cord is damaged, it must be replaced by the manufacturer,
ELECTRIC SHOCK HAZARD
SAFETY INSTRUCTIONS
Safety Instructions
a potentially dangerous situation which may result in
death or serious injuries unless it’s avoided.
This combination of symbol and signal word indicates
Warning!
!
a potentially dangerous situation which may result in
slight or minor injuries.
This combination of symbol and signal word indicates
Note!
a potentially dangerous situation which may result in
slight or minor injuries or damage to property and the
environment.
This combination of symbol and signal word indicates
Caution!
Warning!
!
2

SAFETY INSTRUCTIONS
•The appliance can be used by children aged from 8 years and above
and persons with reduced physical, sensory or mental capabilities or
lack of experience and knowledge if they have been given
supervision or instruction concerning use of the appliance in a safe
way and understand the hazards involved. Children shall not play
with the appliance. Cleaning and user maintenance shall not be
made by children without supervision.
•Children should be supervised that they do not play with the
appliance.
•Children 3 years and under shall be kept away from the appliance
or continuously supervised.
•Animals and children may climb into the machine. Check the
machine before every operation.
•Do not climb or sit on the appliance.
INSTALLATION LOCATION AND SURROUNDING
•All washing and additional substances are to be kept in a safe place
out of the reach of children.
•Do not install the machine on a carpet floor. The obstruction of the
openings by a carpet can damage the machine.
•Keep the appliance clear from heating sources and direct sunlight
to avoid plastic and rubber parts to corrode.
•Do not use the appliance in humid environments or rooms
containing explosive or caustic gas. In case of water leakage or
water splashes let the appliance dry in the open air.
•The appliance must not be installed behind a lockable door, a
sliding door or a door with a hinge on the opposite side to that of the
washing machine.
3

SAFETY INSTRUCTIONS
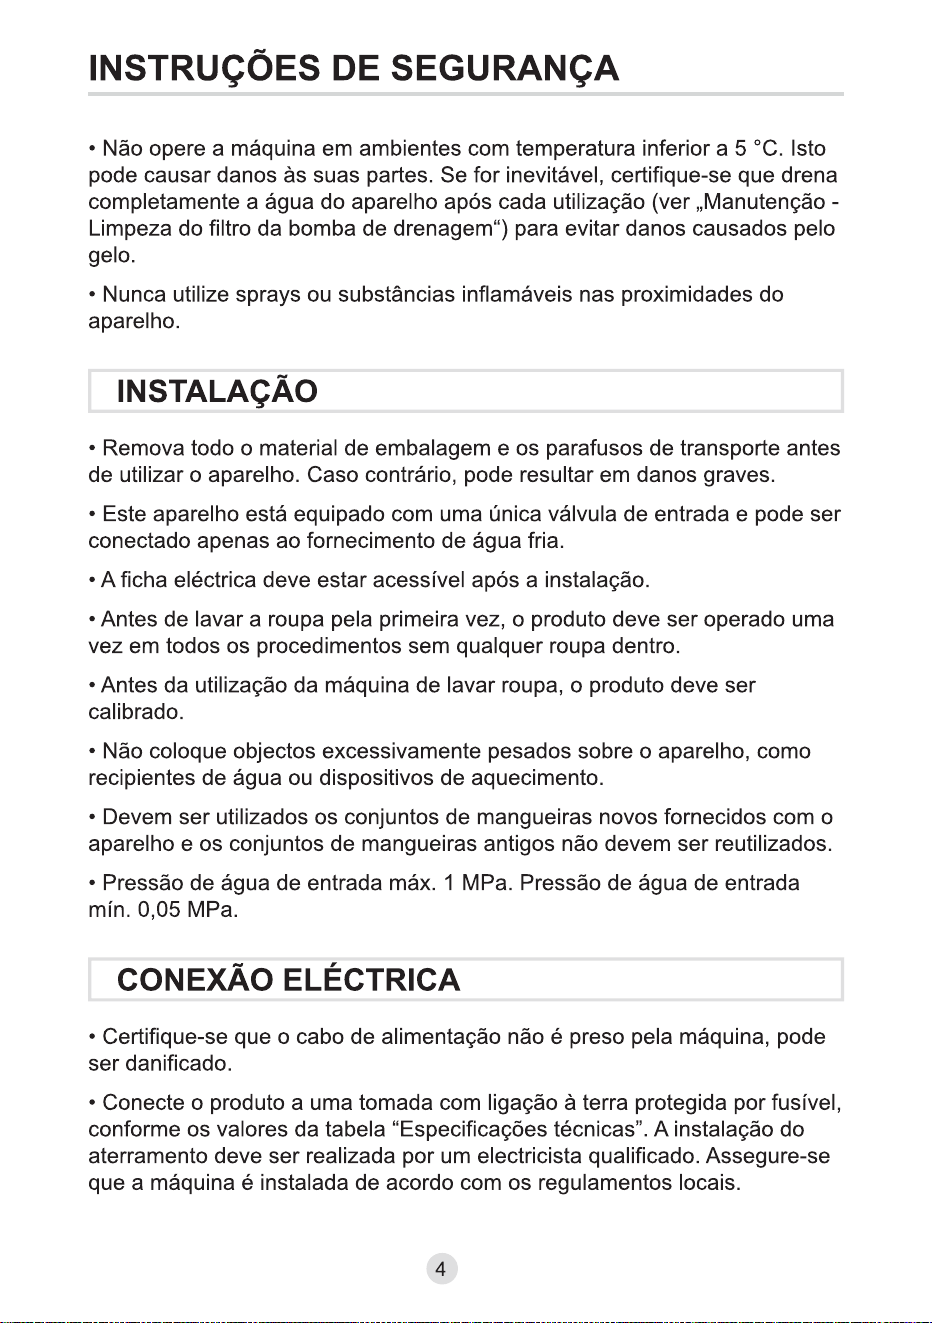
•Do not operate the machine in rooms with a temperature of below
5°C. This can cause damages to parts of it. If it is unavoidable, make
sure to drain the water completely from the appliance after every
use (see „Maintenance - Cleaning of drain pump filter“) to avoid
damages caused by frost.
•Never use flammable sprays or substances in the immediate
proximity of the appliance.
INSTALLATION
•Remove all packaging material and transport bolts before using the
appliance. Otherwise, serious damage may result.
•This appliance is equipped with a single inlet valve and can be
connected to the cold water supply only.
•Mains plug must be accessible after installation.
•Before washing clothes for the first time, the product shall be
operated once throughout all the procedures without any clothes
inside.
•Before using the washing machine, the product shall be calibrated.
•Do not put any excessively heavy objects on the appliance, like
water containers or heating devices.
•The new hose-sets supplied with the appliance are to be used and
that old hose-sets should not be reused.
•Max. Inlet water pressure 1 MPa. Min. inlet water pressure 0.05
MPa.
ELECTRICAL CONNECTION
•Make sure the supply cable is not trapped by the machine, it can get
damaged.
•Connect the product to a grounded outlet protected by a fuse
complying with the values in the “ Technical specifications“ table.
The grounding installation has to be made by a qualified electrician.
Ensure that the machine is installed in accordance with the local
regulations.
4

SAFETY INSTRUCTIONS
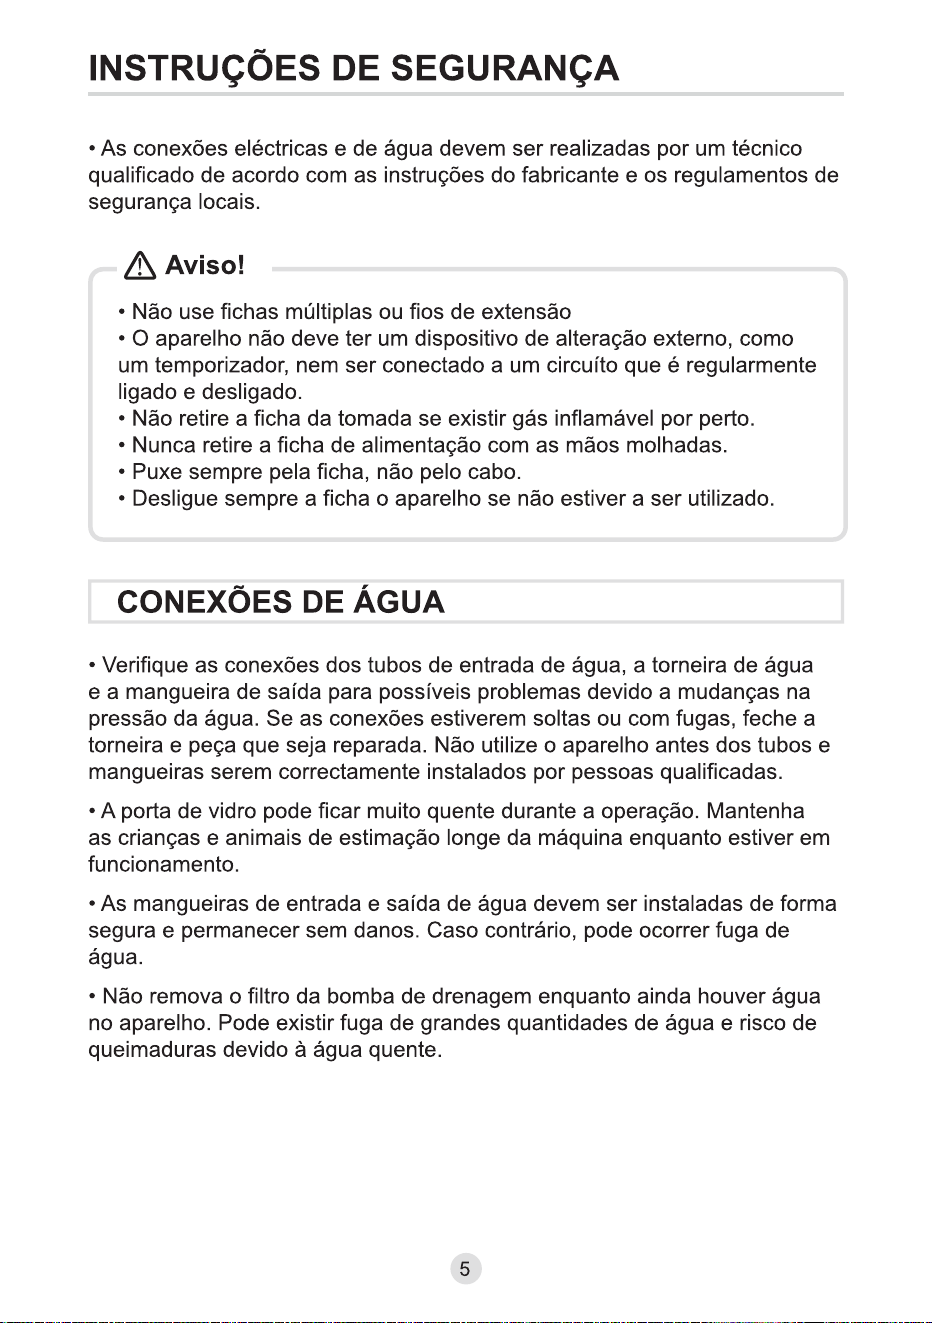
•Water and electrical connections must be carried out by a qualified
technician in accordance with the manufacturer‘s instructions and
local safety regulations.
•Don´t use multiple plugs or extension cords.
•The appliance must not have an external switching device such as a timer or
connected to a circuit that is regularly switched on and off.
•Do not pull the plug out of the mains outlet if there is flammable gas around.
•Never pull out power plug with wet hands.
•Always pull at the plug, not at the cable.
•Always unplug the appliance if it is not being used.
Warning!
!
WATER CONNECTIONS
•Check the connections of the water inlet tubes, the water tap and
the outlet hose for possible problems due to changes of water
pressure. If the connections loosen or leak close the water tap and
get it repaired. Do not use the appliance before the pipes and hoses
are installed properly by qualified persons.
•Glass door may become very hot during the operation. Keep
children and pets far away from the machine while it is operating.
•The water inlet and outlet hoses have to be safely installed and
remain undamaged. Otherwise, water leakage can occur.
•Do not remove the drain pump filter while there is still water in the
appliance. Big quantities of water can leak out, and there is a risk of
scalding due to hot water.
5

SAFETY INSTRUCTIONS
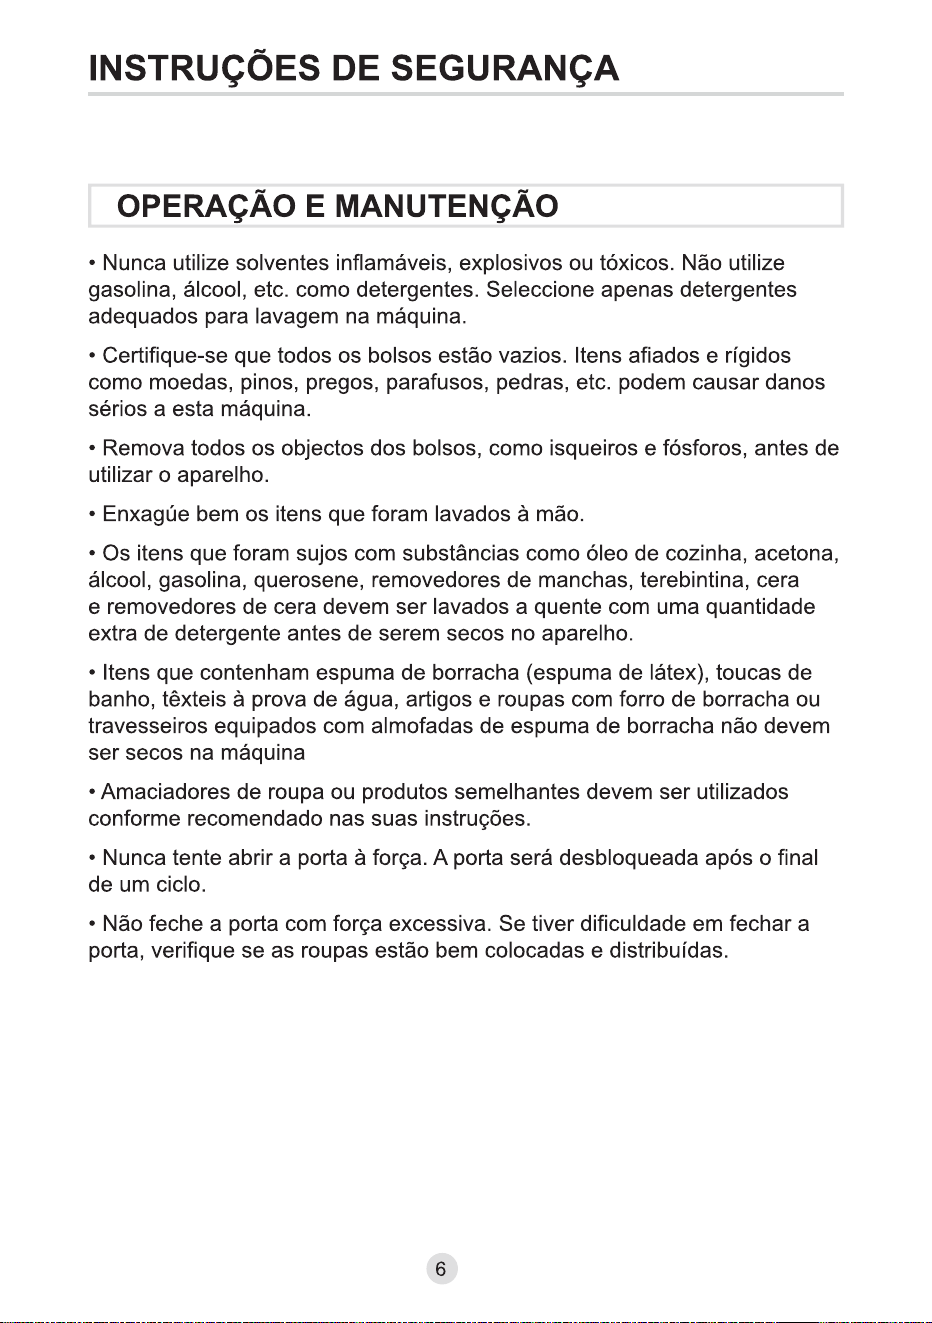
OPERATION AND MAINTENANCE
•Never use any flammable, explosive or toxic solvents. Do not use
gasoline and alcohol etc. as detergents. Only select detergents that
are suitable for machine washing.
•Make sure that all pockets are emptied. Sharp and rigid items such
as coins, brooches, nails, screws, stones etc. may cause serious
damages to this machine.
•Remove all objects from pockets such as lighters and matches
before use the appliance.
•Thoroughly rinse items that have been washed by hand.
•Items that have been soiled with substances such as cooking oil,
acetone, alcohol, petrol, kerosene, spot removers, turpentine, wax
and wax removers should be washed in hot with an extra amount of
detergent before being dried in the appliance.
•Items containing foam rubber (latex foam), shower caps, water
proof textiles, rubber backed articles and clothes or pillows fitted
with foam rubber pads should not be dried in the machine
•Fabric softeners or similar products should be used as
recommended in their instructions.
•Never try to open the door forcefully. The door will unlock shortly
after the end of a cycle.
•Please do not close the door with excessive force. If it is found
difficult to close the door, please check if the clothes are properly
inserted and distributed.
6

SAFETY INSTRUCTIONS
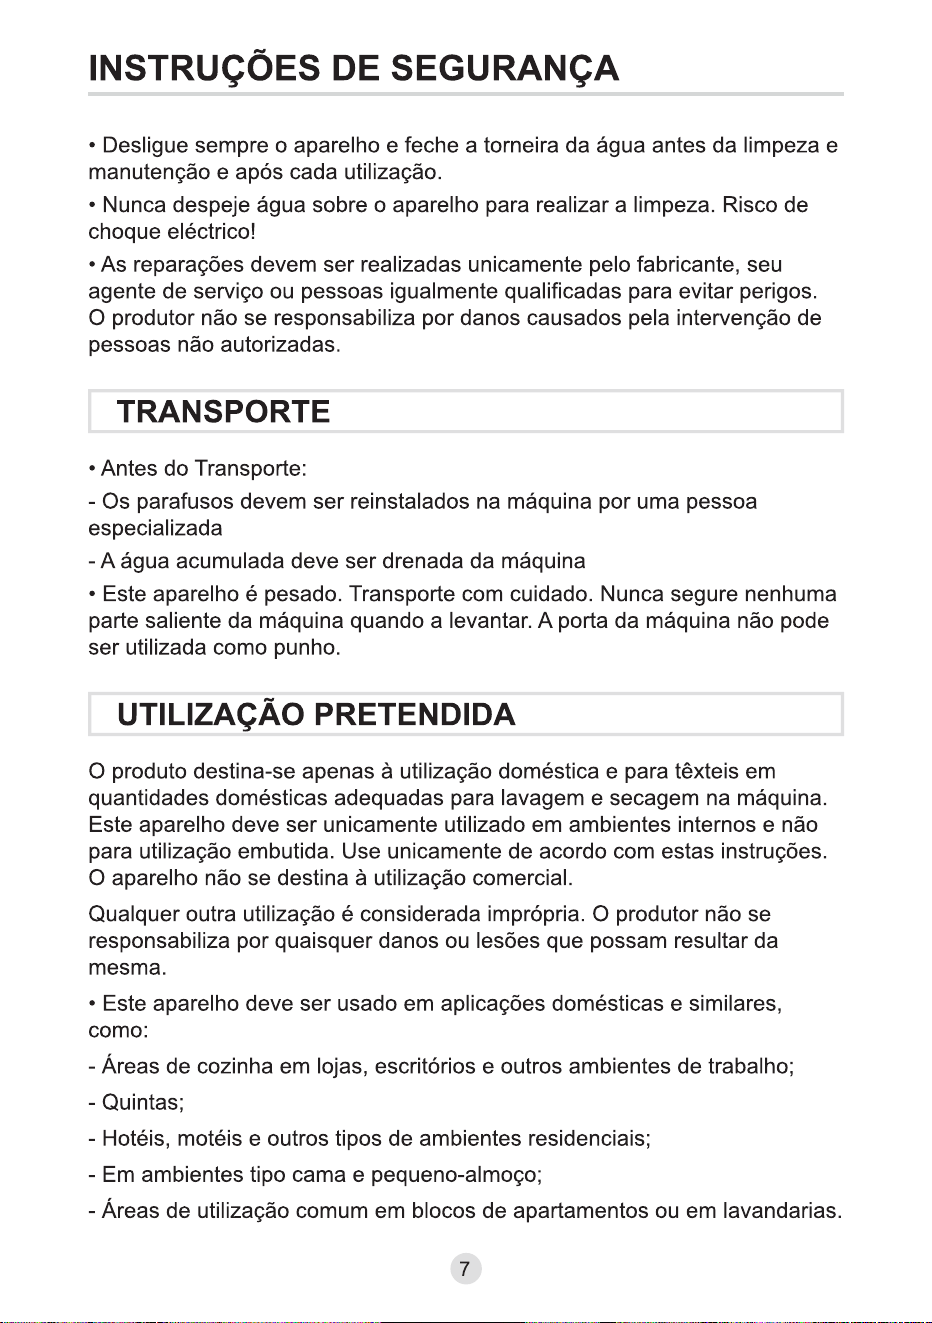
•Always unplug the appliance and close the water tap before
cleaning and maintenance and after each use.
•Never pour water over the appliance for cleaning purpose. Risk of
electric shock!
•Repairs shall only be carried out by the manufacturer, its service
agent or similarly qualified persons in order to avoid a hazard. The
producer will not be responsible for damages caused by the
intervention of not authorized persons.
TRANSPORT
•Before Transport:
-Bolts shall be reinstalled to the machine by a specialized person
-Accumulated water shall be drained out of the machine
•This appliance is heavy. Transport with care. Never hold any
protruding part of the machine when lifting. The machine door
cannot be used as a handle.
INTENDED USE
The product is intended only for home use and for textiles in
household amounts suitable for machine washing and drying. This
appliance is for indoor use only and not intended for built in use.
Only use according to these instructions. The appliance is not
intended for commercial use.
Any other use is considered as improper use. The producer is not
responsible for any damage or injuries that may result of it.
•Thisapplianceisintendedtobeusedinhouseholdand similar
applicationssuchas:
-Staffkitchenareasinshops,officesandother workingenvironments;
-Farmhouses;
-Byclientsinhotels,motelsandother residentialtypeenvironments;
-Bedandbreakfasttypeenvironments;
-Areasforcommunaluseinblocksofflatsorin launderettes.
7

SAFETY INSTRUCTIONS
This marking indicates that this product should not be
disposed with other household wastes throughout the
EU.To prevent possible harm to the environment or
human health from uncontrolled waste disposal,recycle
it responsibly to promote the sustainable reuse of
material resources.To return your used device, please use
the collection systems or contact the retailer where the
product was purchased. They return and can take this
product for environmental safe recycling.
Packaging/Old appliance
8

INSTALLATION
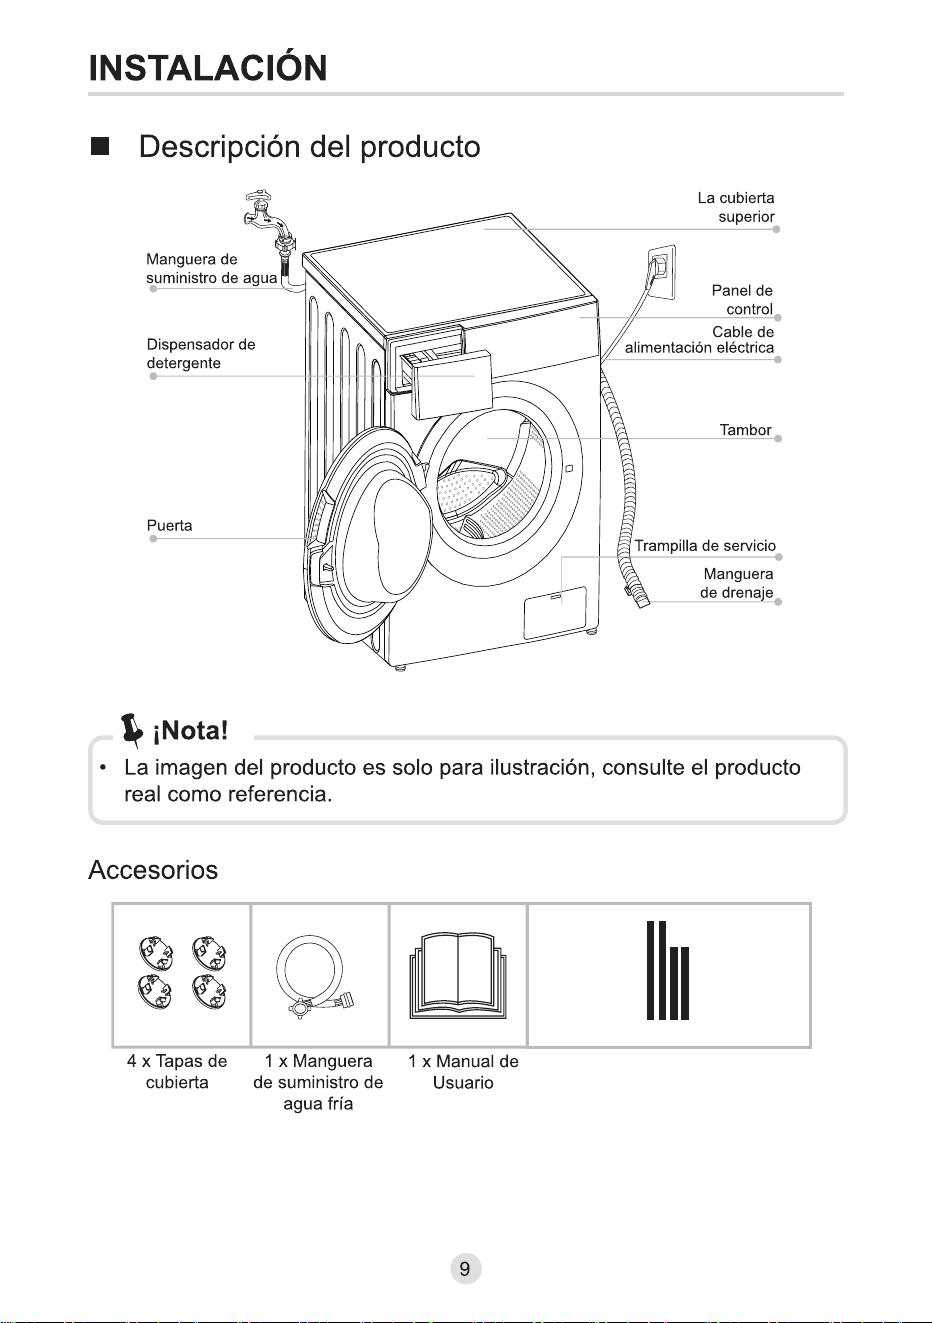
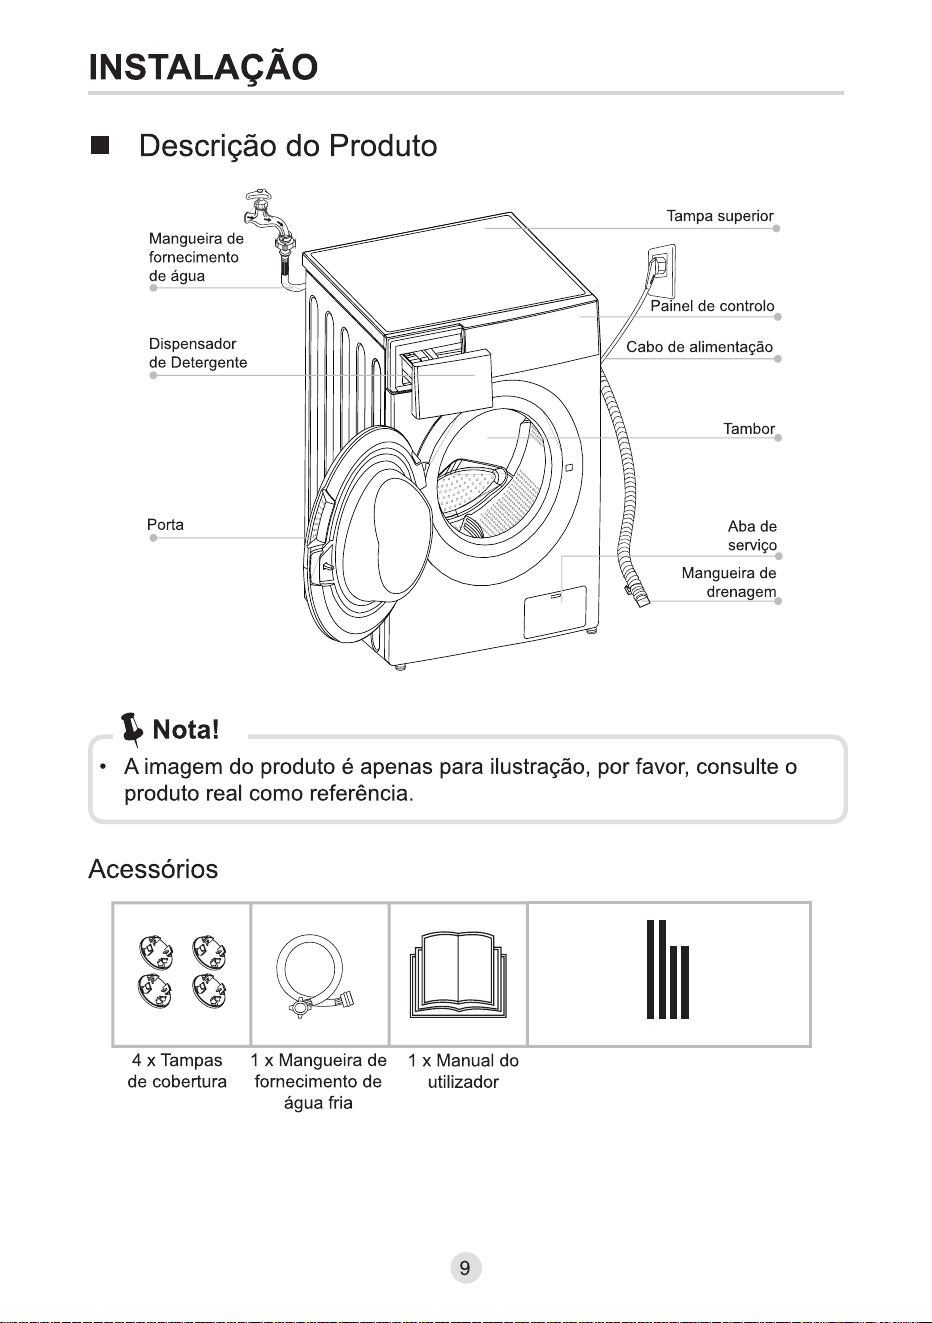
Accessories
Product Description
4 x Cover caps
1 x Supply hose
cold water
• The product picture is for illustration only, please refer to real product as
reference.
Note!
Drum
Power supply cord
Control panel
Detergent dispenser
Service flap
Door
Water supply hose
Top cover
Drain hose
1 x Owner’s manual
9
Acoustic sponge
INSTALLATION
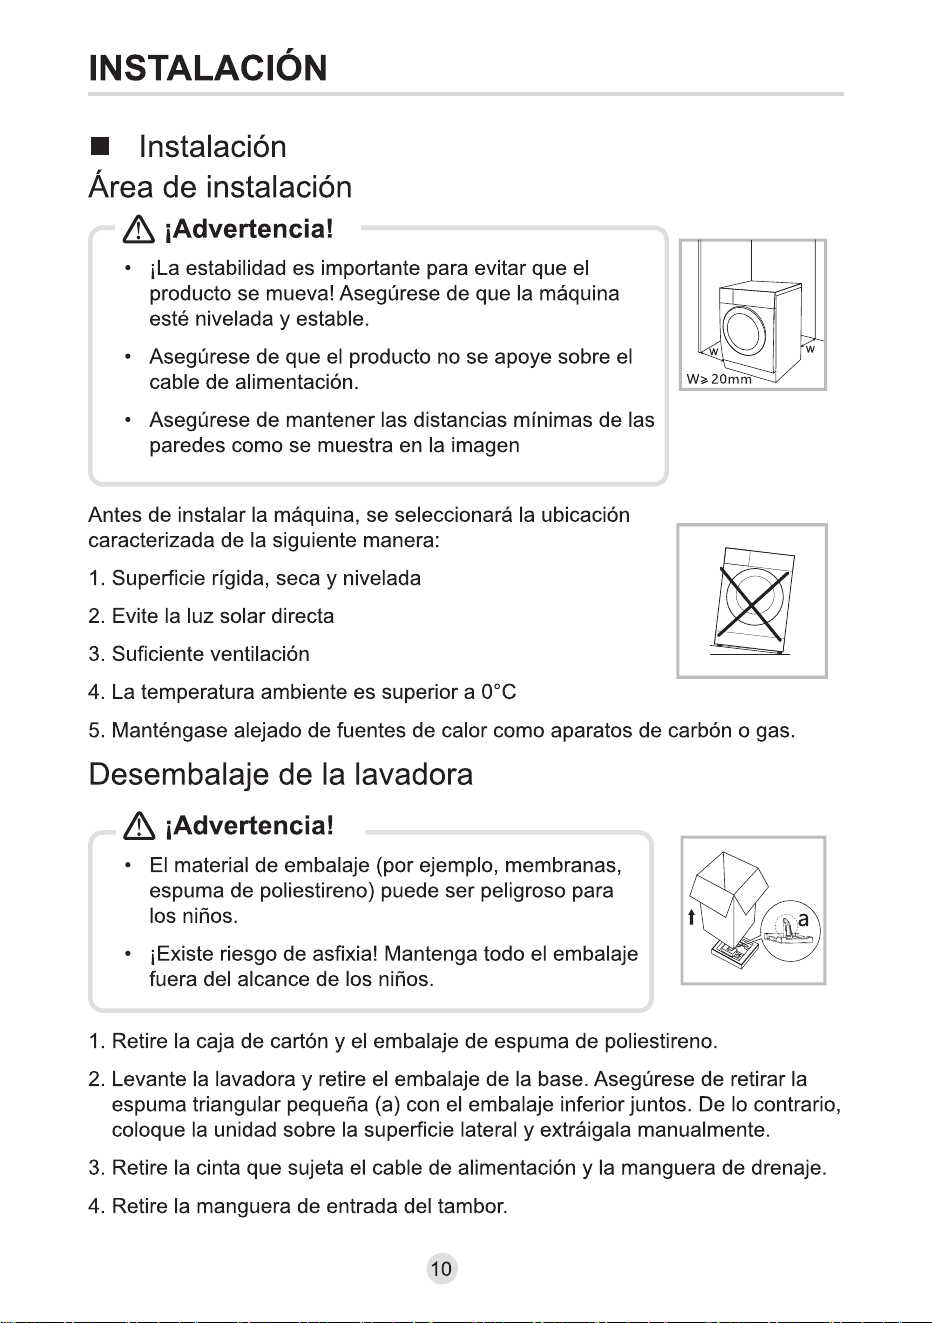
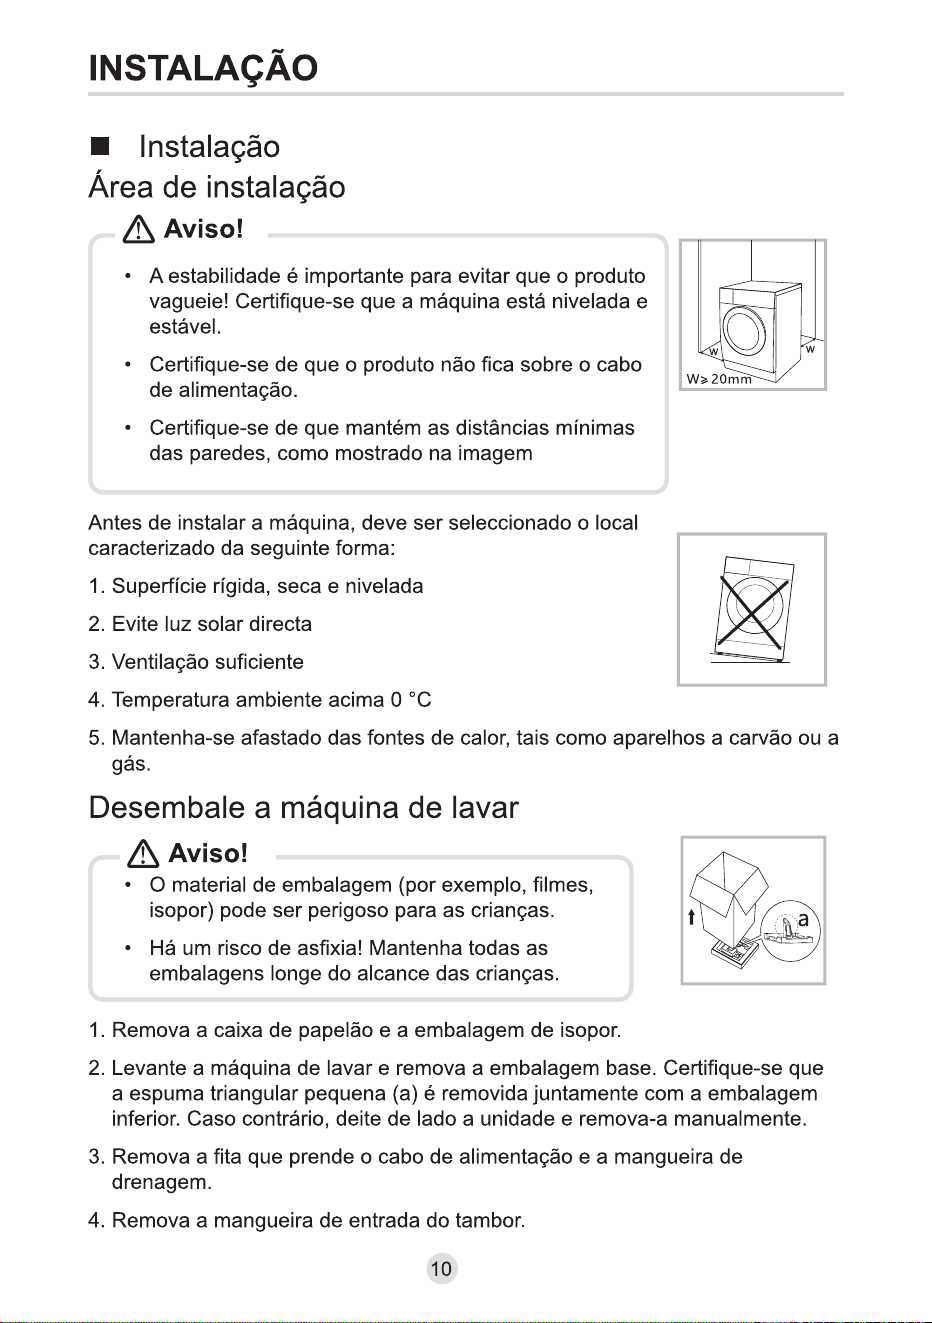
Installation
Before installing the machine, the location characterized
as follows shall be selected:
1.Rigid, dry, and level surface
2.Avoid direct sunlight
3.Sufficient ventilation
4.Room temperature is above 0°C
5.Keep far away from the heat sources such as coal or gas burning appliances.
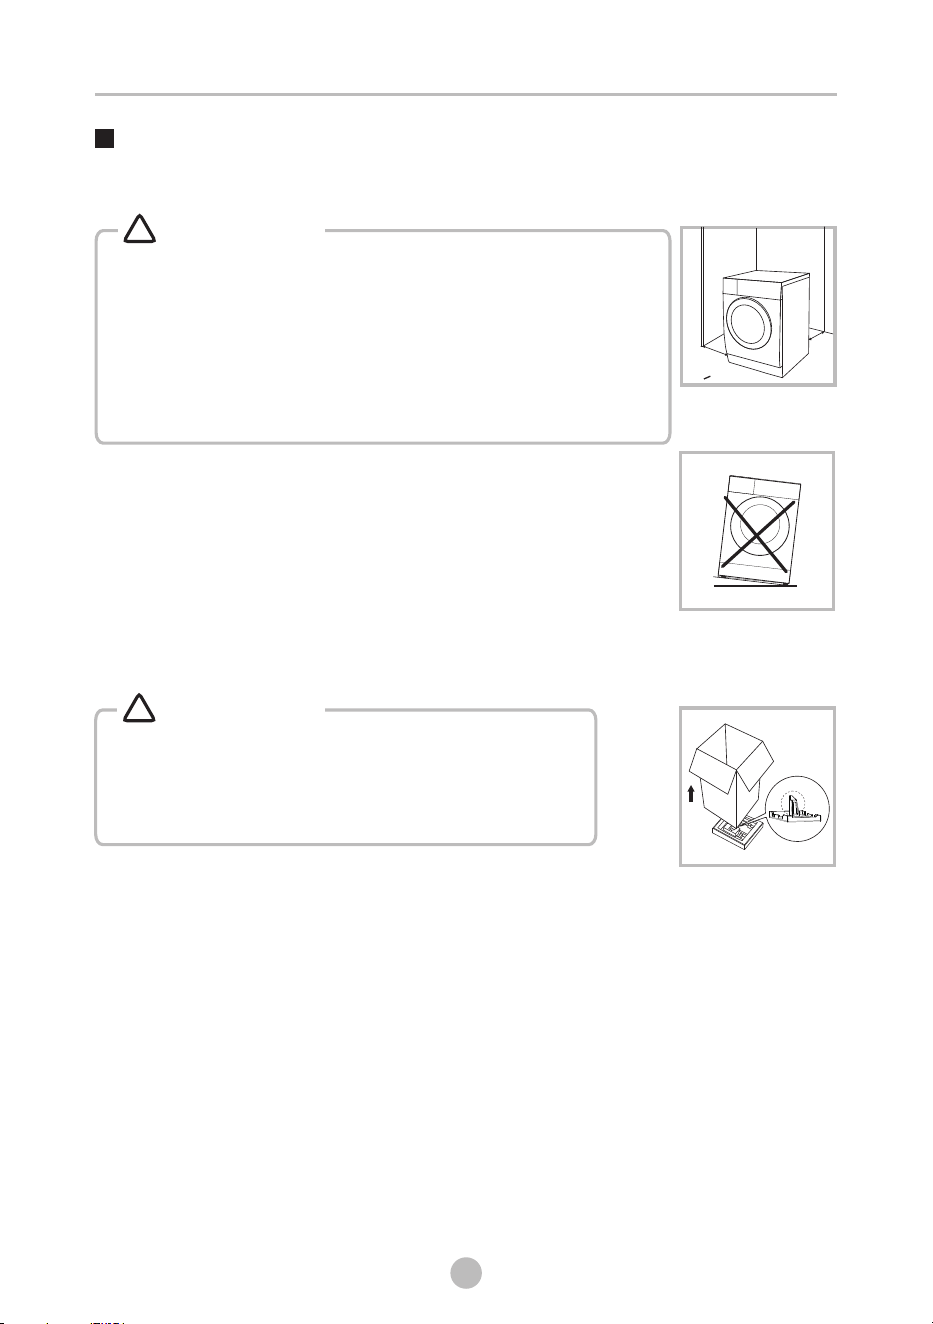
Unpacking the washing machine
1. Remove the cardboard box and styrofoam packing.
2. Lift the washing machine and remove the base packaging.Make sure the small triangle
foam (a) is removed with the bottom packaging together. If not, lay the unit down on
the side surface and remove it manually.
4. Remove the inlet hose from the drum.
3. Remove the tape securing the power supply cord and drain hose.
• Stability is important to prevent the product from
wandering! Make sure the machine is standing leveled and
stable.
• Make sure that the product does not stand onto the power
cord.
• Make sure to maintain the minimum distances from the
walls as shown in the picture
Warning!
!
• Packaging material (e.g. Films, Styrofoam) can be
dangerous for children.
• There is a risk of suffocation ! Keep all packaging
well away from children.
Warning!
!
w
w
W> 20mm
Installation area
a
10

INSTALLATION
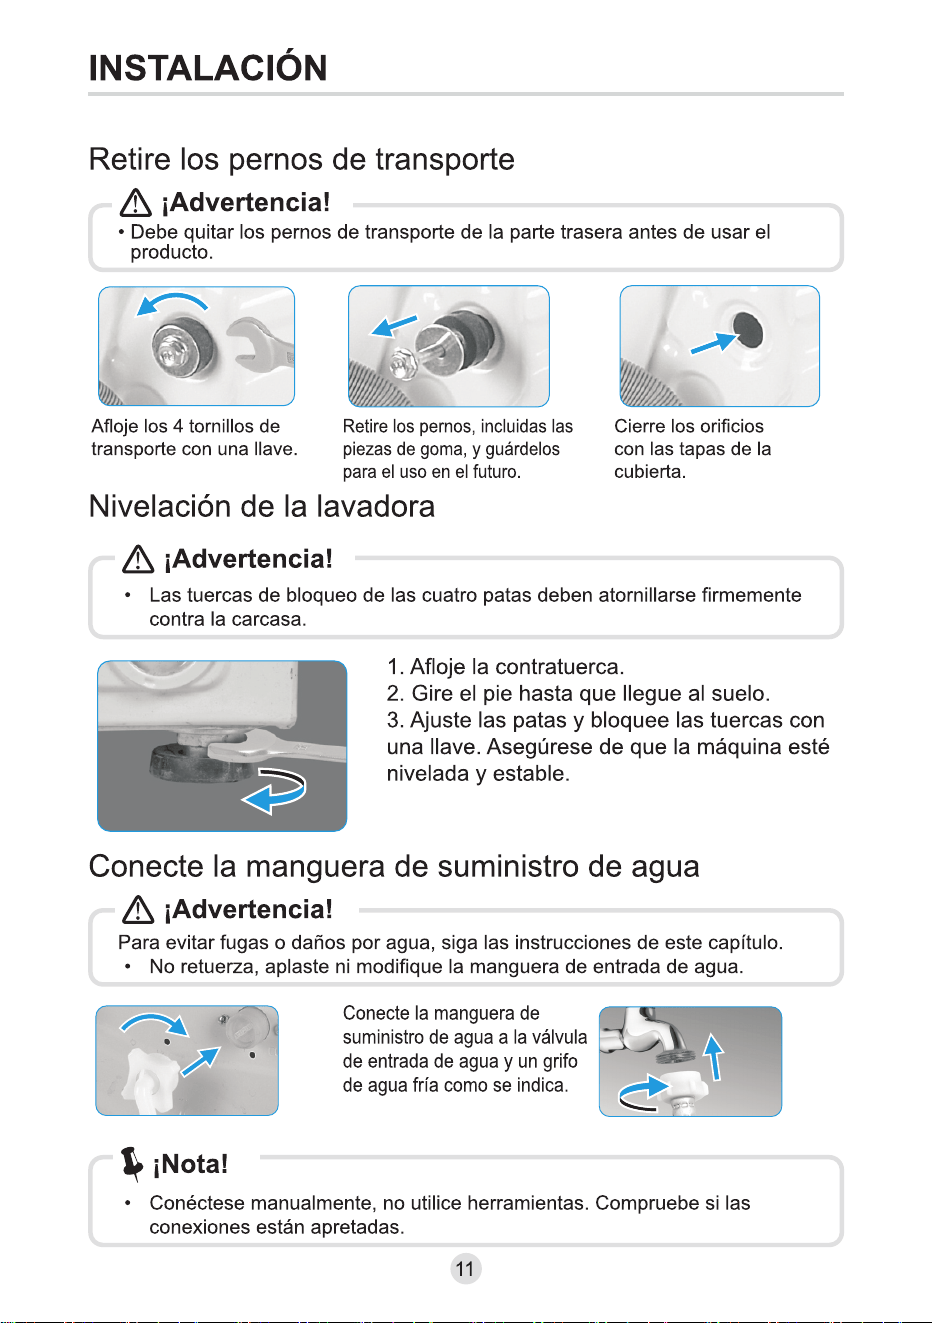
Remove transport bolts
• You must remove the transport bolts from the backside before using the product.
Warning!
!
Loosen the 4 transport
bolts with a spanner.
Remove the bolts
including the rubber parts
and keep them for future
use.
Close the holes using the
cover caps.
Levelling the washing machine
• The lock nuts on all four feet must be screwed tightly against the housing.
Warning!
!
1. Loosen the lock nut.
2. Turn the foot until it reaches the floor.
3. Adjust the legs and lock the nuts with a
spanner. Make sure the machine is level and
steady.
Connect the water supply hose
To prevent leakage or water damage, follow the instructions in this chapter
• Do not kink, crush or modify water inlet hose.
Warning!
!
Connect the water supply hose
to the water inlet valve and a
water tap with cold water as
indicated.
• Connect manually, do not use tools. Check if the connections are tight.
Note!
11
INSTALLATION
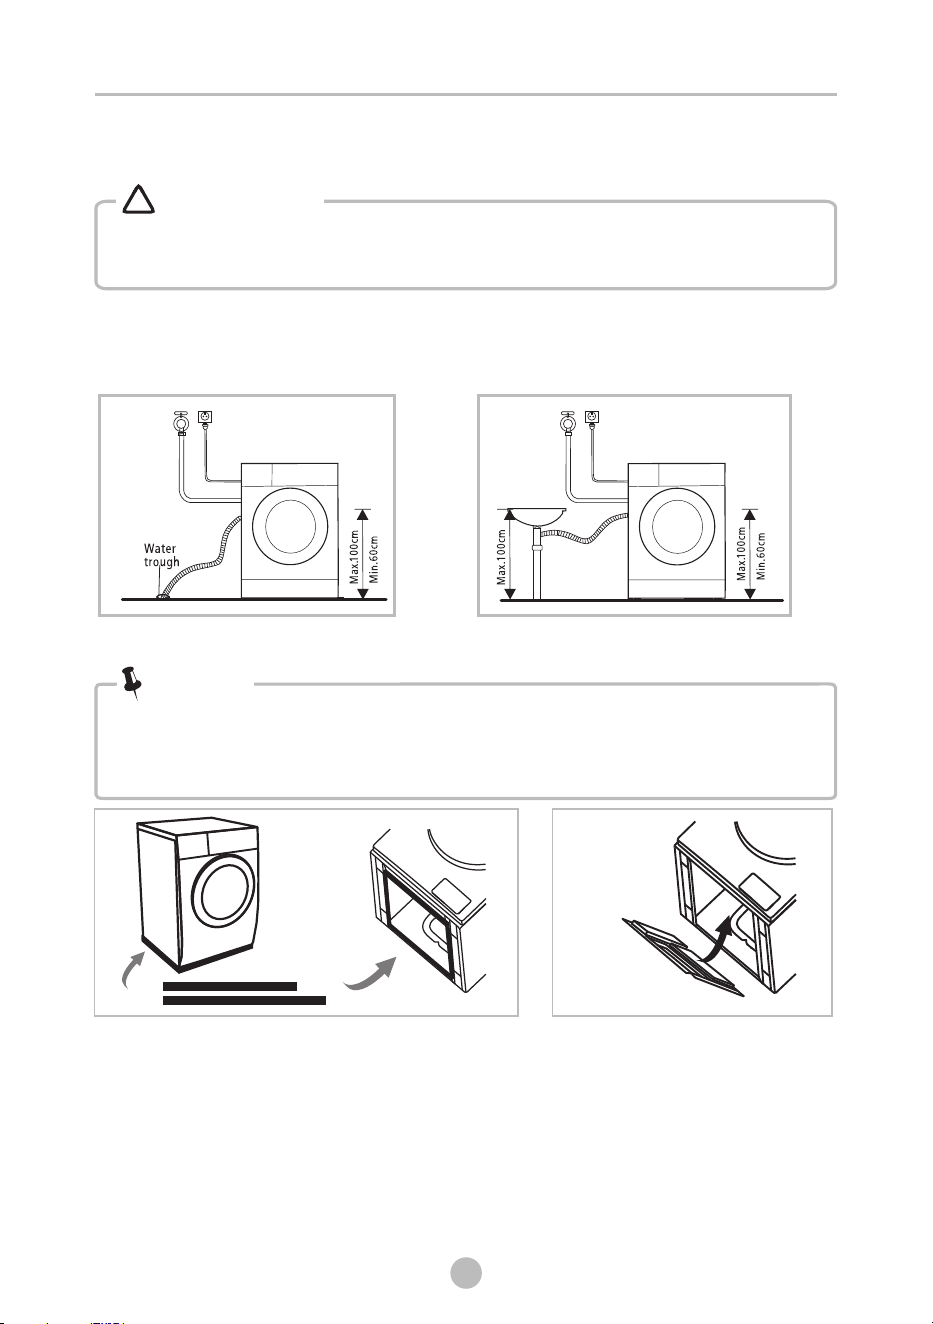
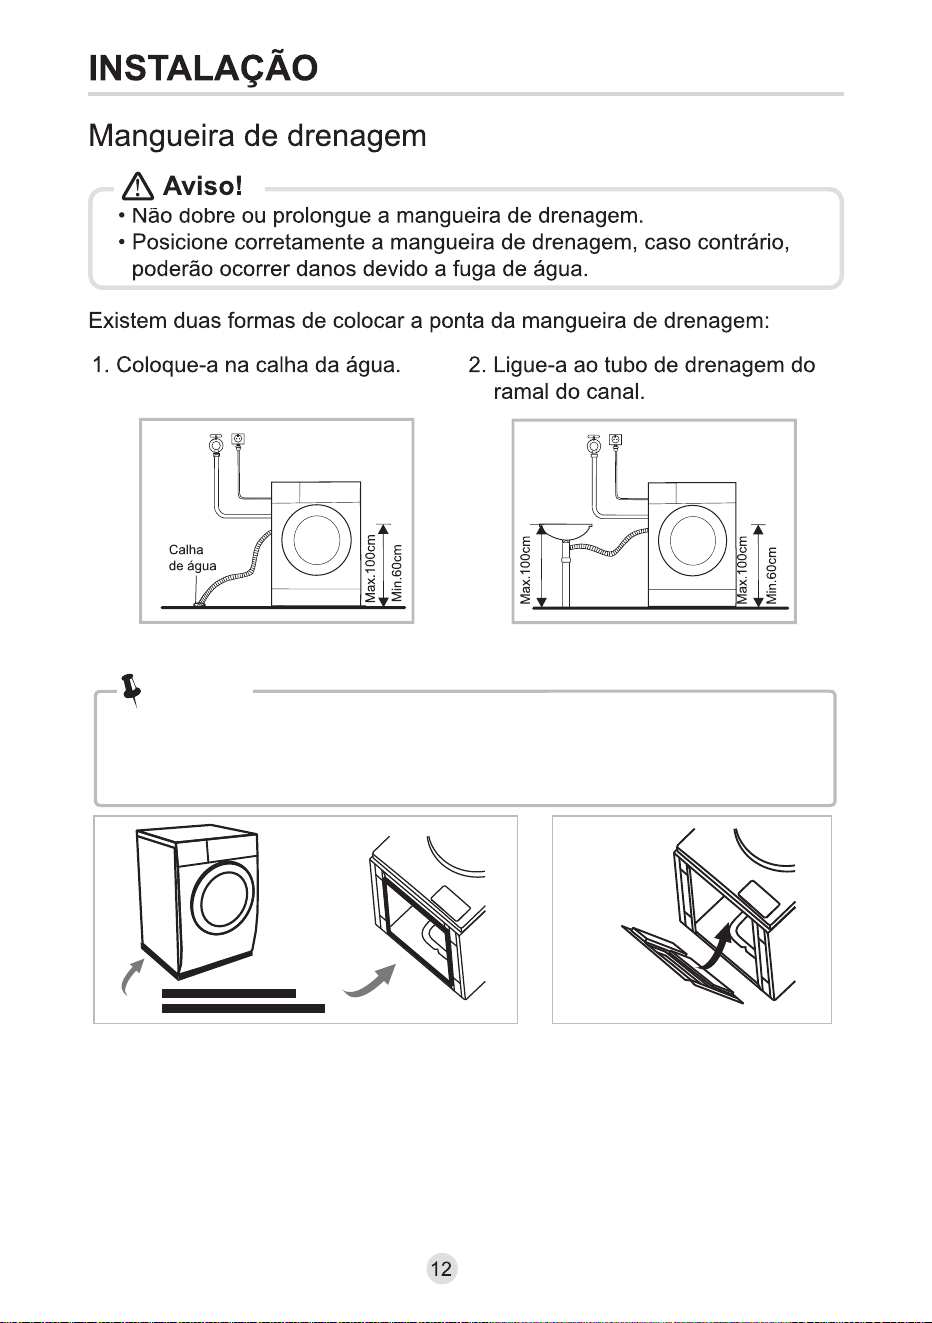
Drain Hose
There are two ways to place the end of drain hose:
1.Put it into the water trough.2.Connect it to the branch drain pipe of
the trough.
•
• Position drain hose properly ,otherwise damage might result of water leakage.
Do not kink or protract the drain hose.
Warning!
!
Warning!
!
12
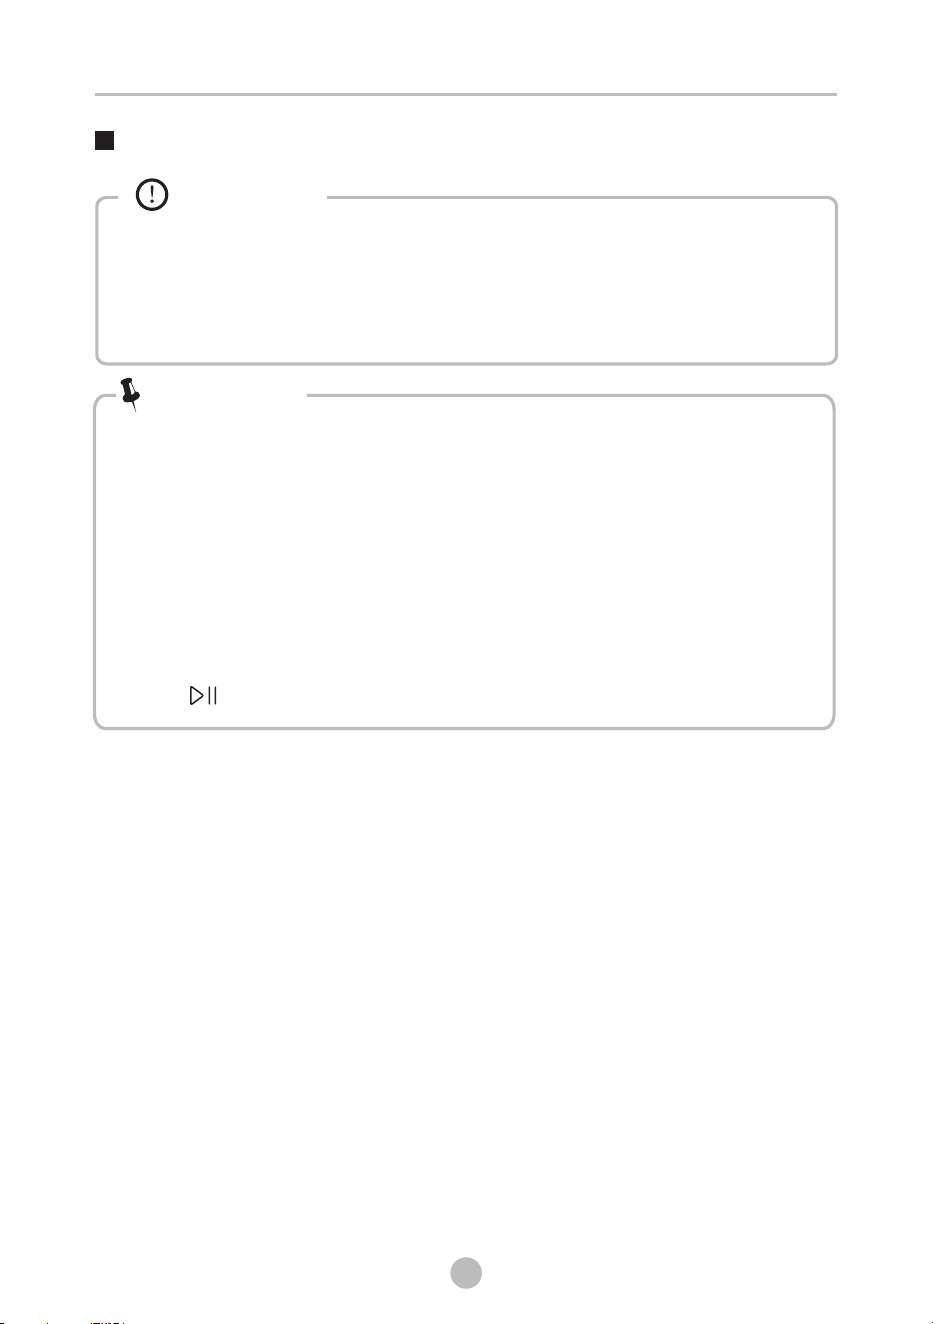
• Please make sure to assemble the acoustic sponges/panel, which can
effectively reduce the noise caused by the machine while working, in order
to provide you with a more peaceful and quiet living environment.
Note!
Acoustic Sponge
2x
2x
1. Get the machine laid on the floor, using some soft material like foam or clothes
between the machine and floor for a protection;
2. Stick the longer sponges to the longer bottom edges of machine, and the shorter
sponges to the shorter bottom edges, Installation of panel is same as sponges.
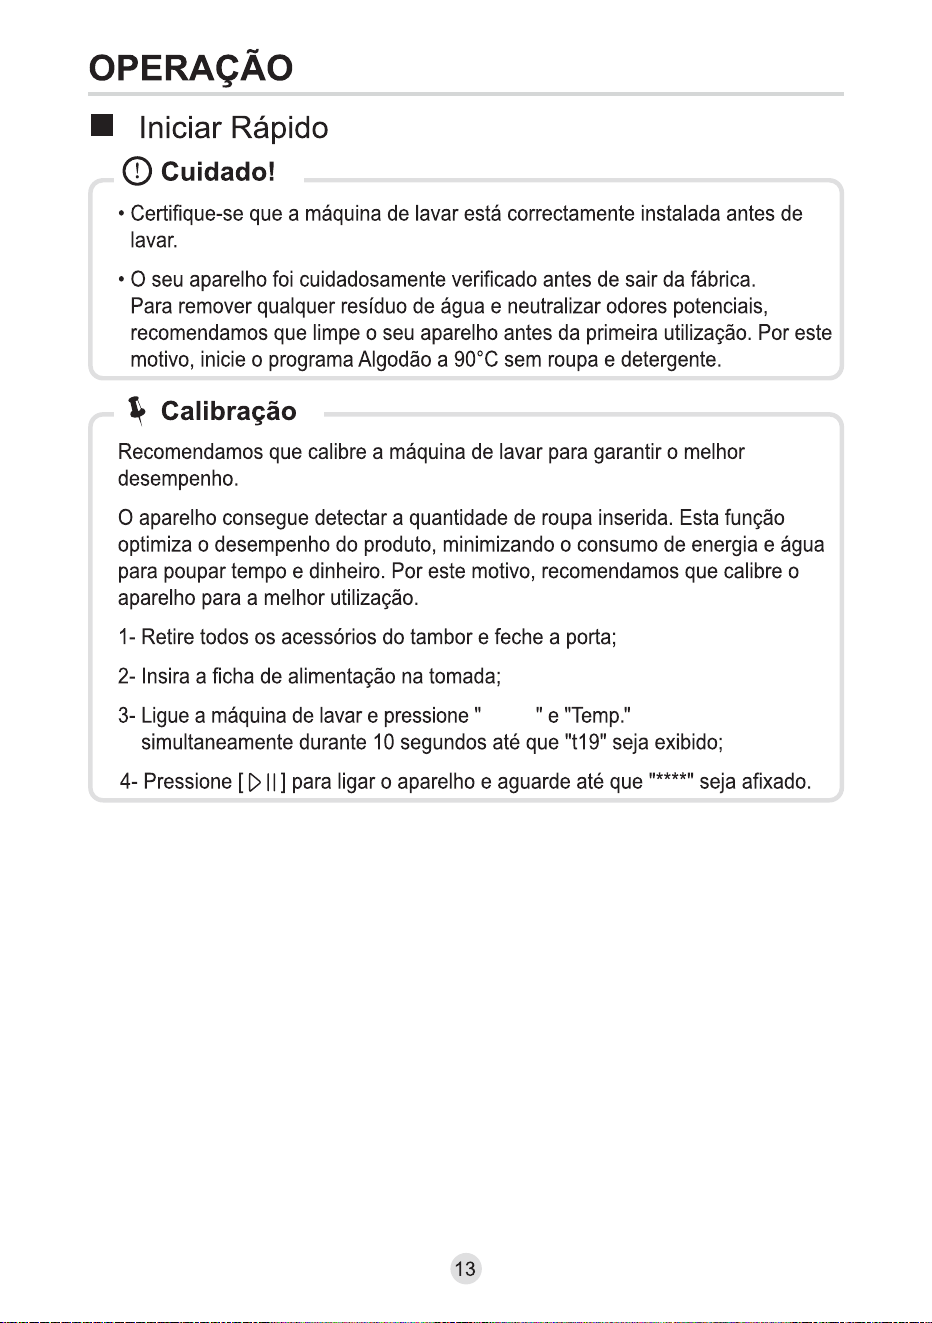
Quick Start
OPERATION
• Before washing, please make sure the washing machine is installed properly.
• Your appliance was thoroughly checked before it left the factory. To remove
any residual water and to neutralize potential odors, it’s recommended to
clean your appliance before first use. For this reason, start the Cotton program
at 90°C without laundry and detergent.
Caution!
It’s recommended to calibrate the washing machine, so that provide the best
performance.
The appliance is able to detect the amount of laundry loaded. This function is
optimizing the product performance by minimizing energy and water
consumption, saving you money and time. For this reason it’s recommended to
calibrate the appliance for best use.
1- Remove all accessories from the drum and close the door;
2- Insert the mains plug to the socket;
3- Switch on the washing machine and press “Boost” and “Temp.”
simultaneously for 10 seconds until “t19” is displayed;
4- Press [ ] to start the appliance and wait till “****” is displayed.
Calibration
13
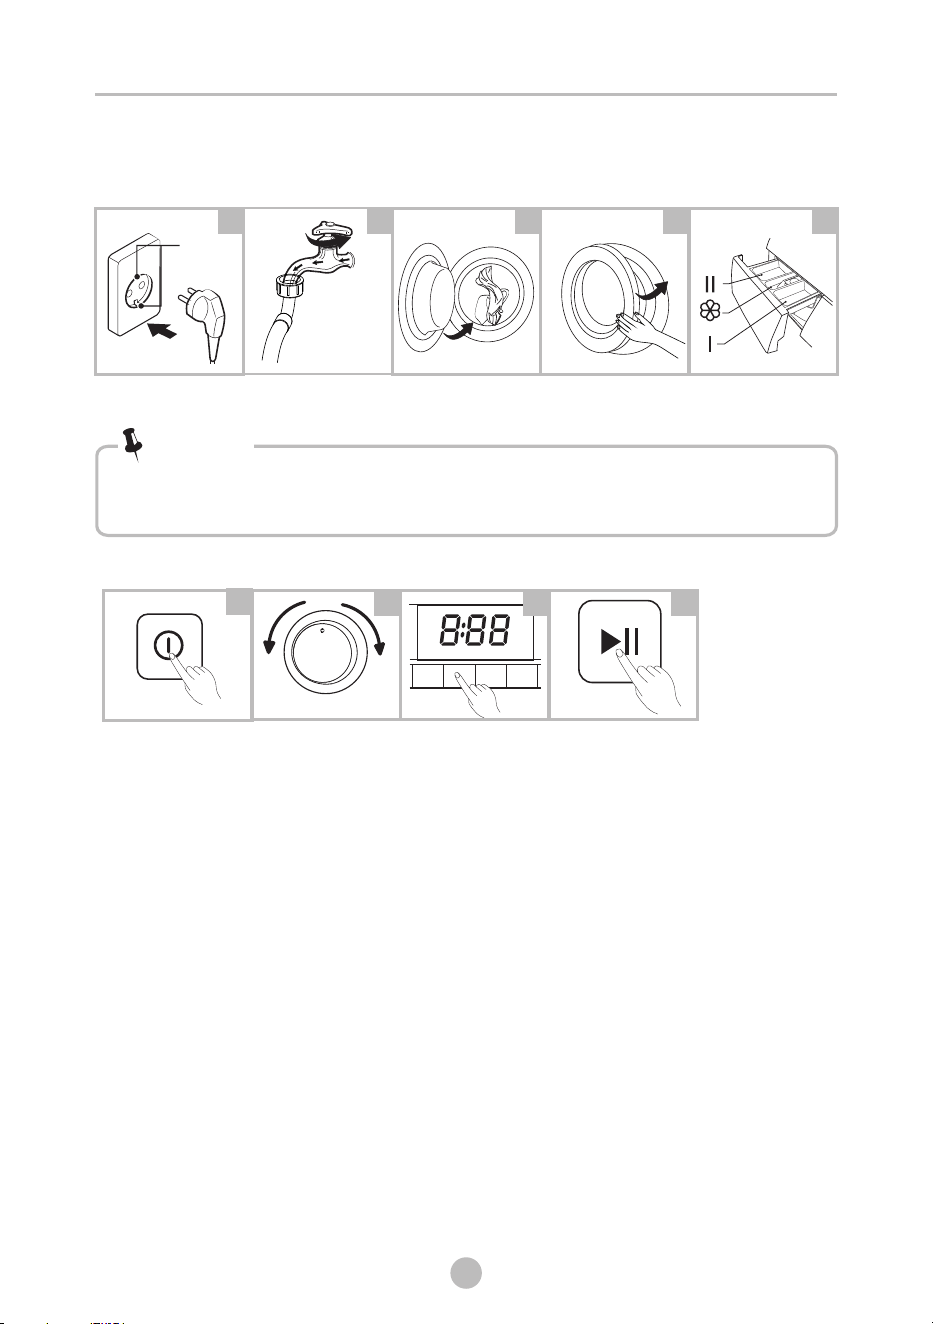
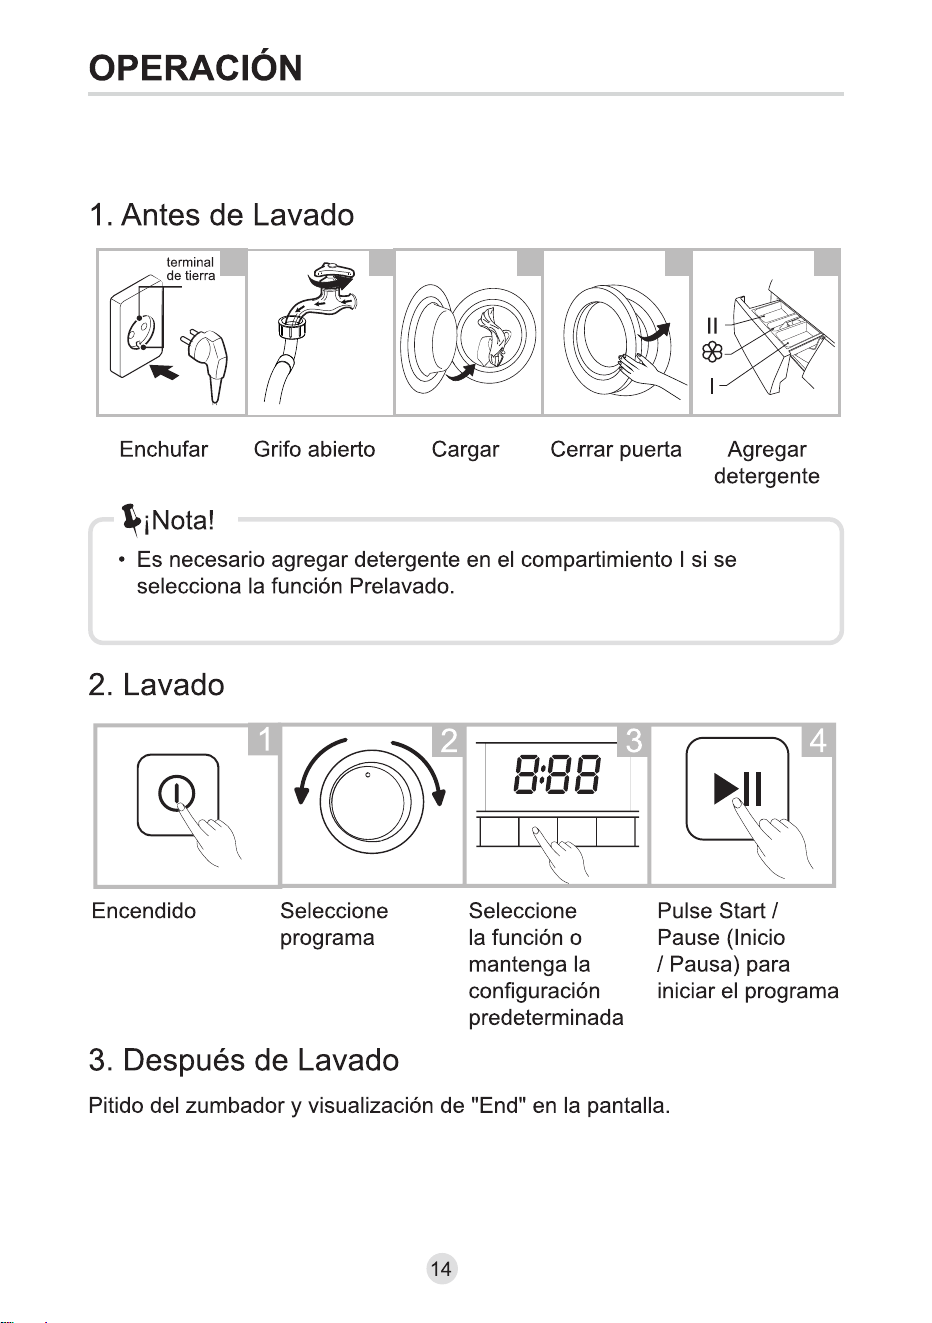
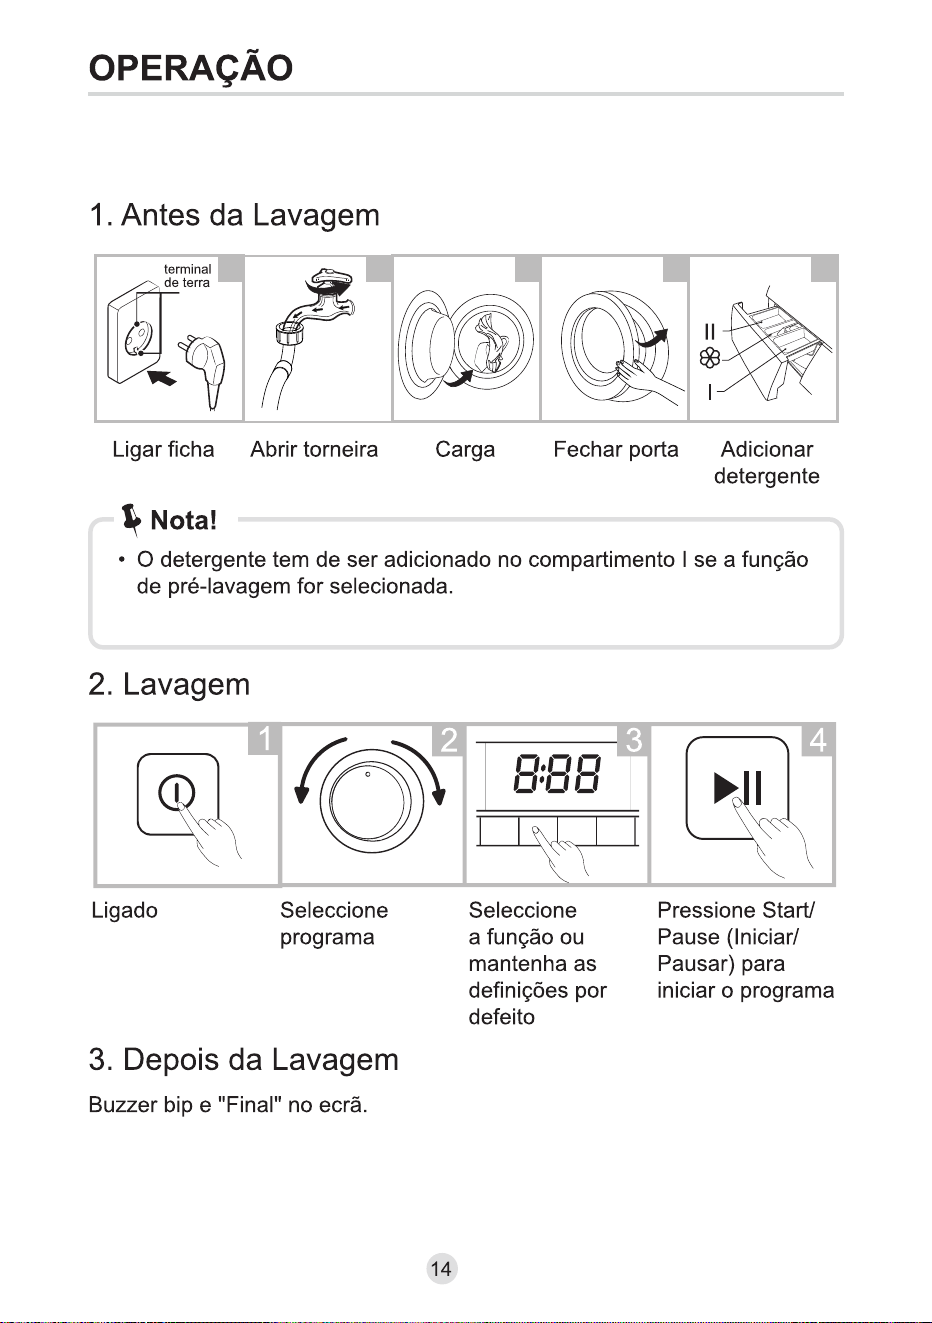
2. Washing
Select programme
Select function or
remain default
settings
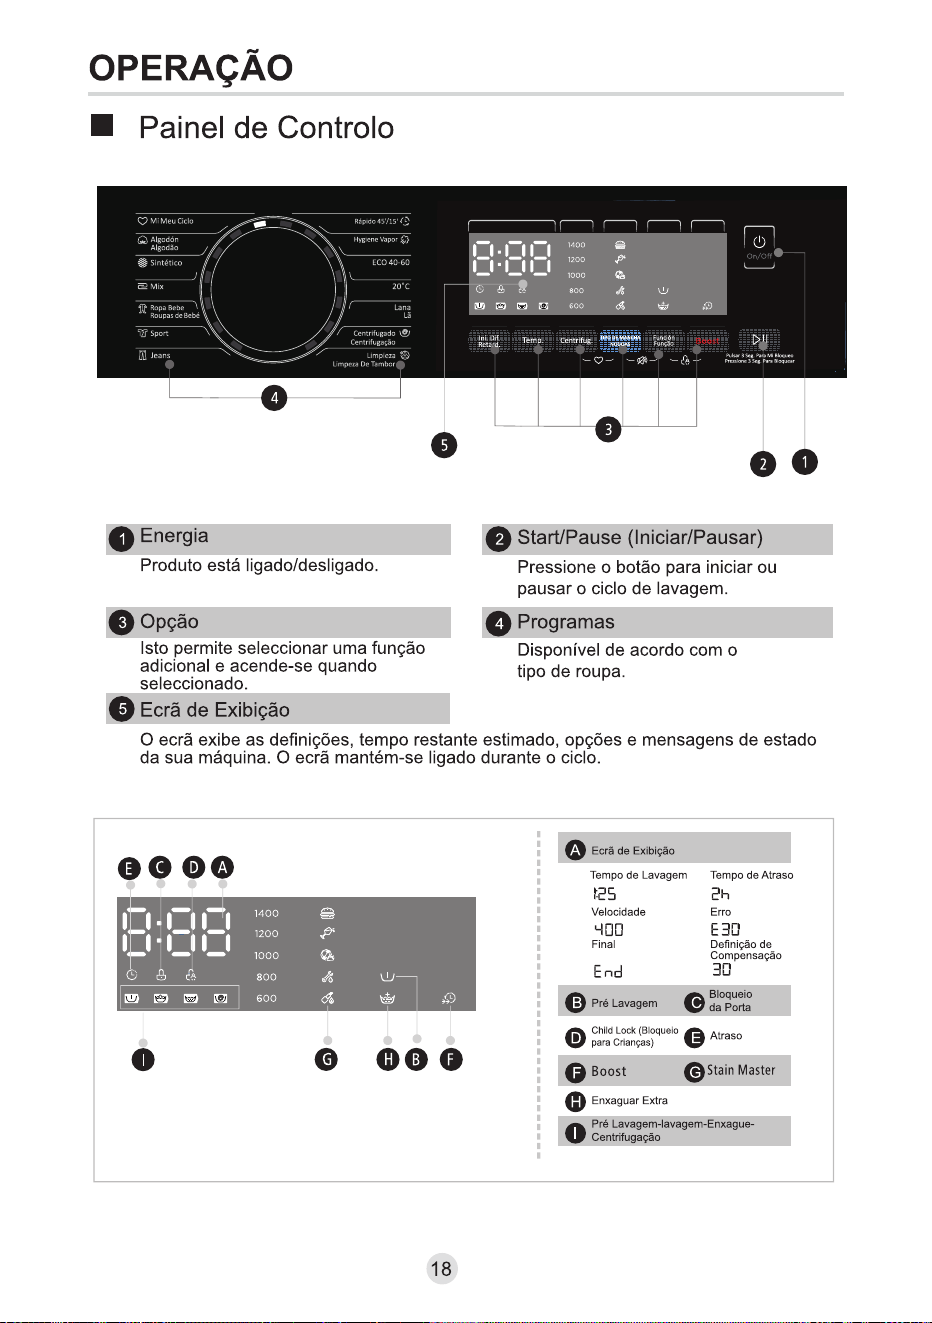
Press
Start/Pause to
start the program
234
Buzzer beep and “End” on display.
3. After Washing
1. Before Washing
Open tap
Load
Close door
Plug in
Add detergent
• Detergent need to be added in compartment I if the pre-wash function is selected.
• Do not put laundry beads into the detergent dispenser.
12345
Note!
Main
wash
Prewash
Softener
earth
terminal
OPERATION
Power On
1
14
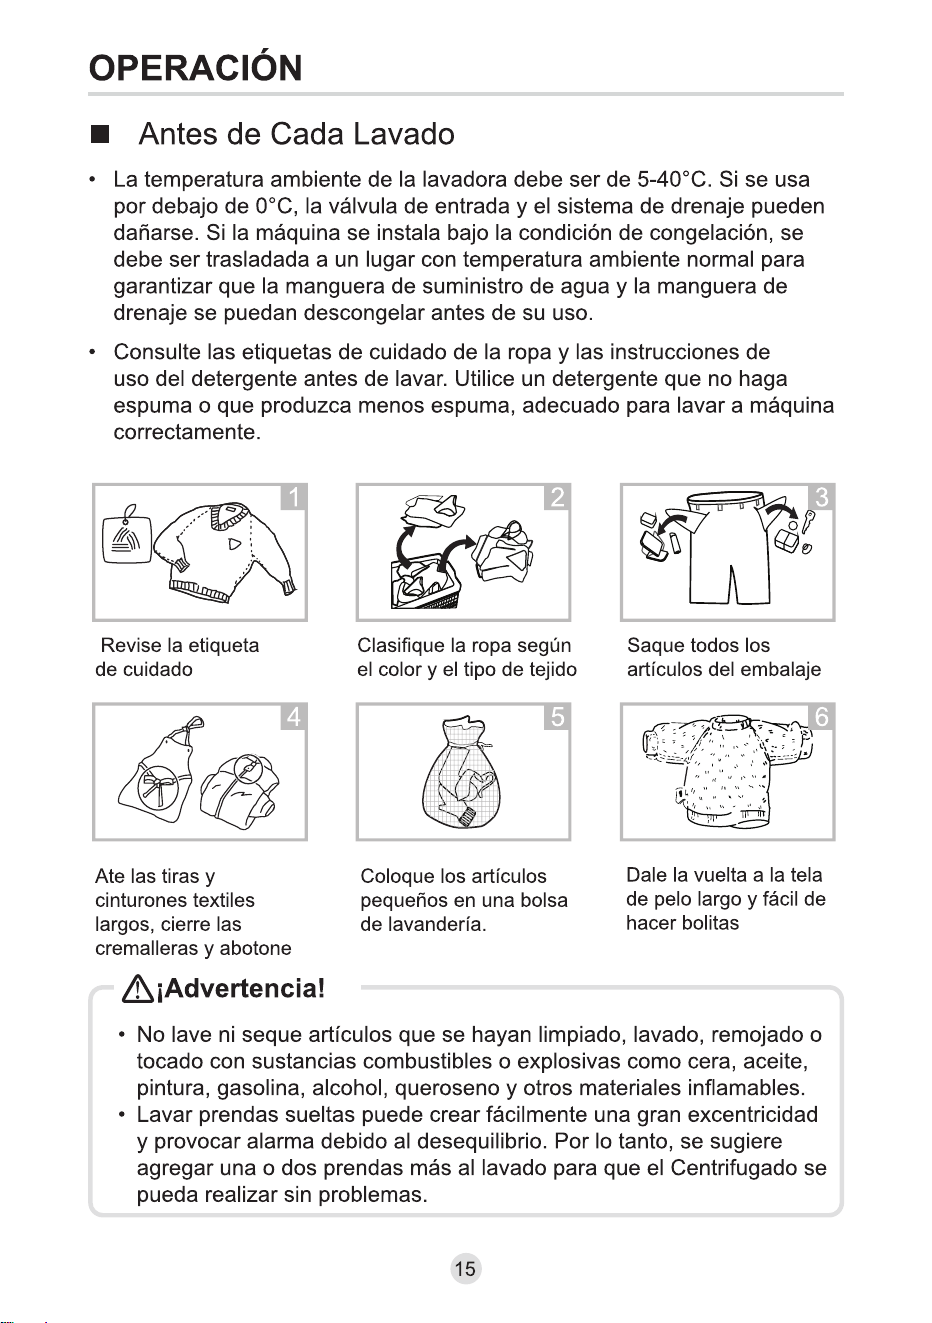
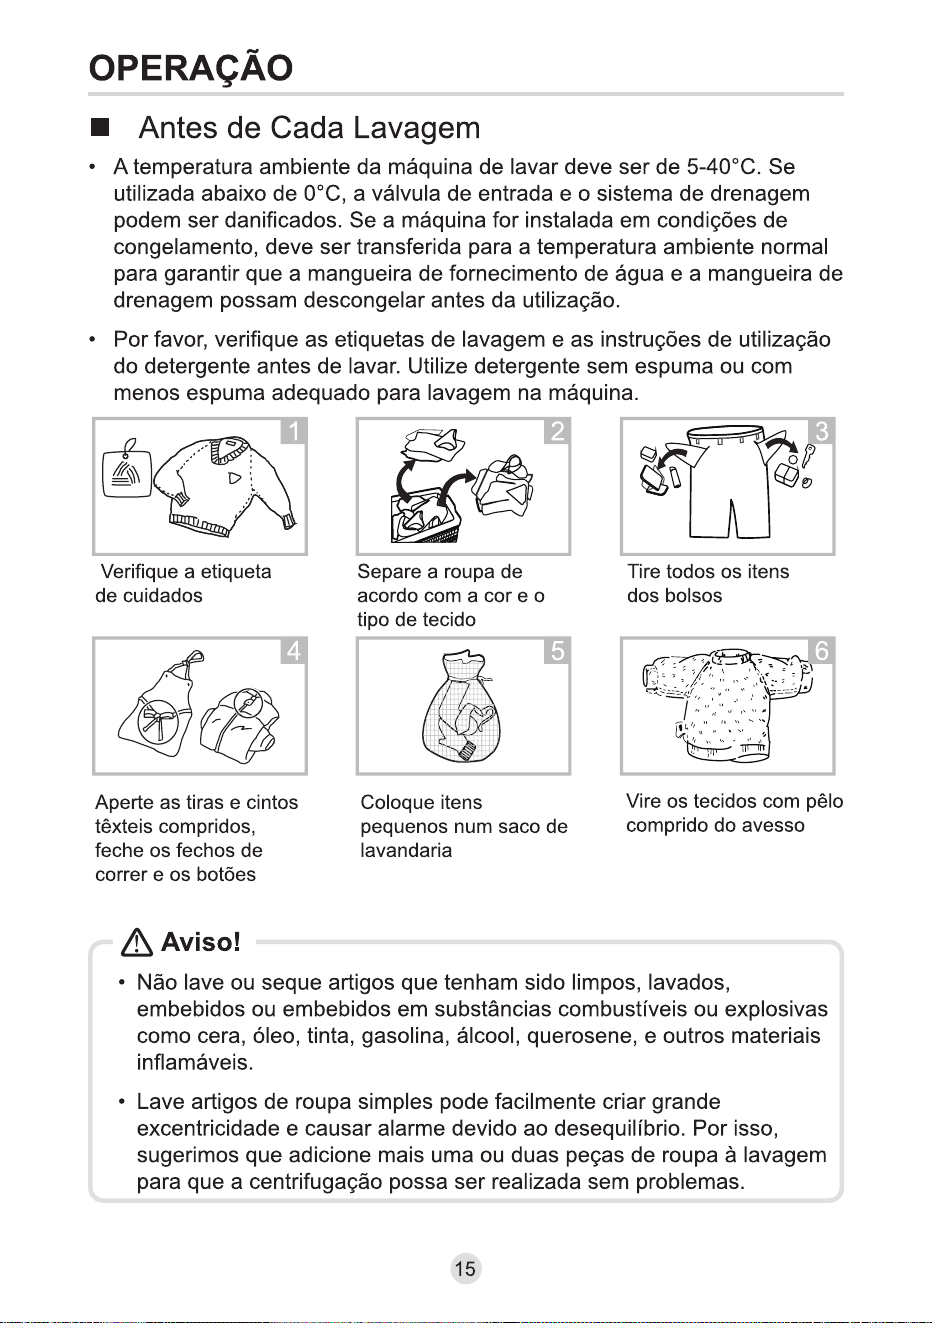
• The ambient temperature of the washing machine should be 5-40°C. If used under
0°C, the inlet valve and draining system may be damaged. If the machine is
installed under freezing conditions, it should be transferred to normal ambient
temperature to ensure the water supply hose and drain hose can unfreeze before
use.
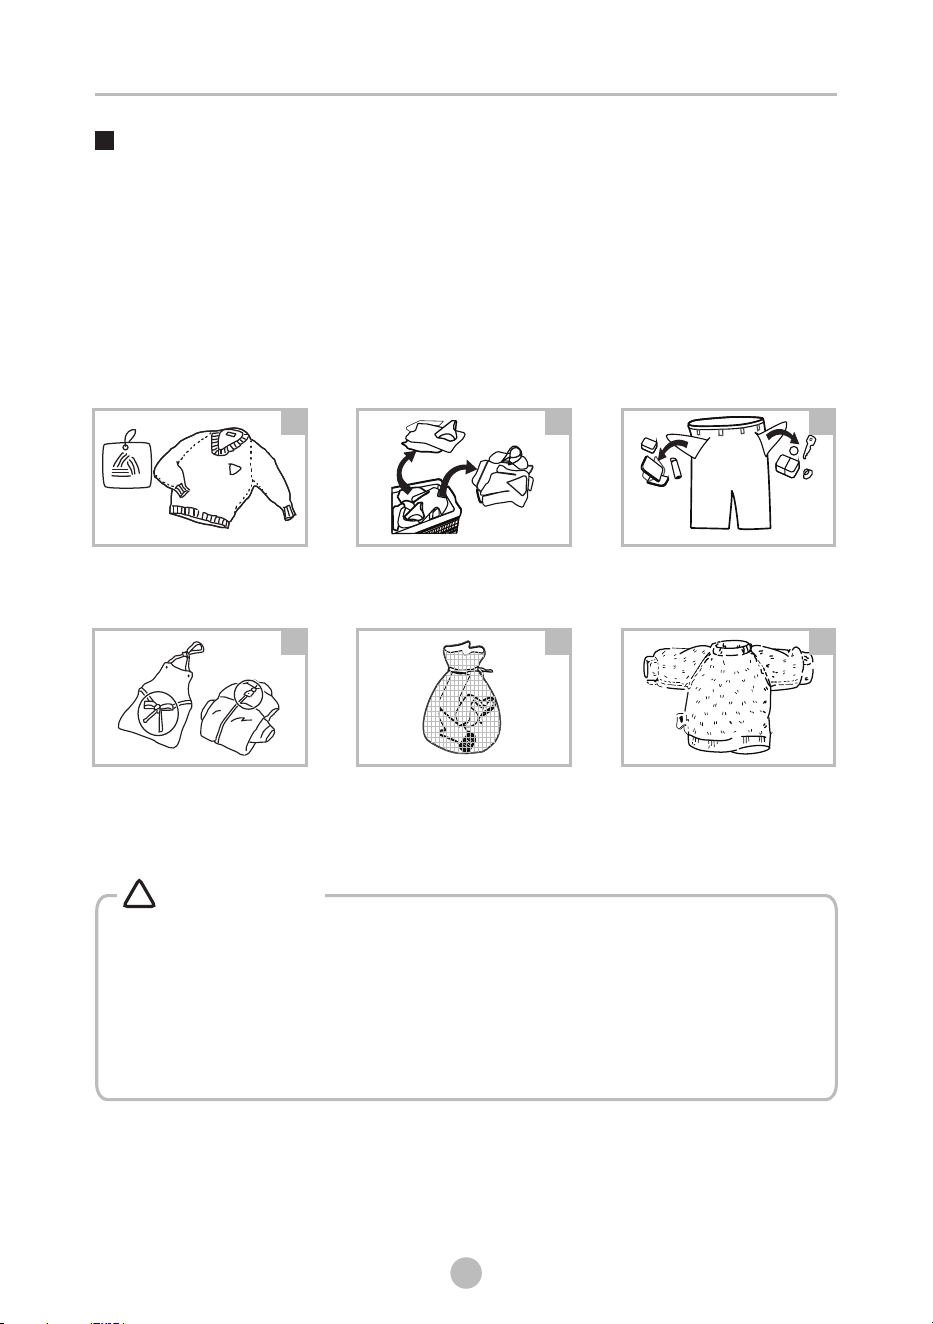
• Please check your laundry care labels and the detergent use instructions before
wash. Use non-foaming or less-foaming detergent suitable for machine
washing properly.
Tie together long textile
strips and belts, close zips
and button
Take all items out of the
pockets
Put small items into a
laundry bag
Check the care label
Before Each Washing
Turn easy-pilling and
long-pile fabric inside out
Sort laundry according to
color and textile type
OPERATION
123
456
15
Do not wash,spin,or dry water-proof seats,mats,or clothing.
• When washing a single clothes, it may easily cause great eccentricity and give
alarm due to great unbalance. Therefore it is suggested to add one or two
more clothes to be washed together so that draining can be done smoothly.
• Don’t washing the clothes touching with kerosene, gasoline, alcohol and
other flammable materials.
•
Warning!
!
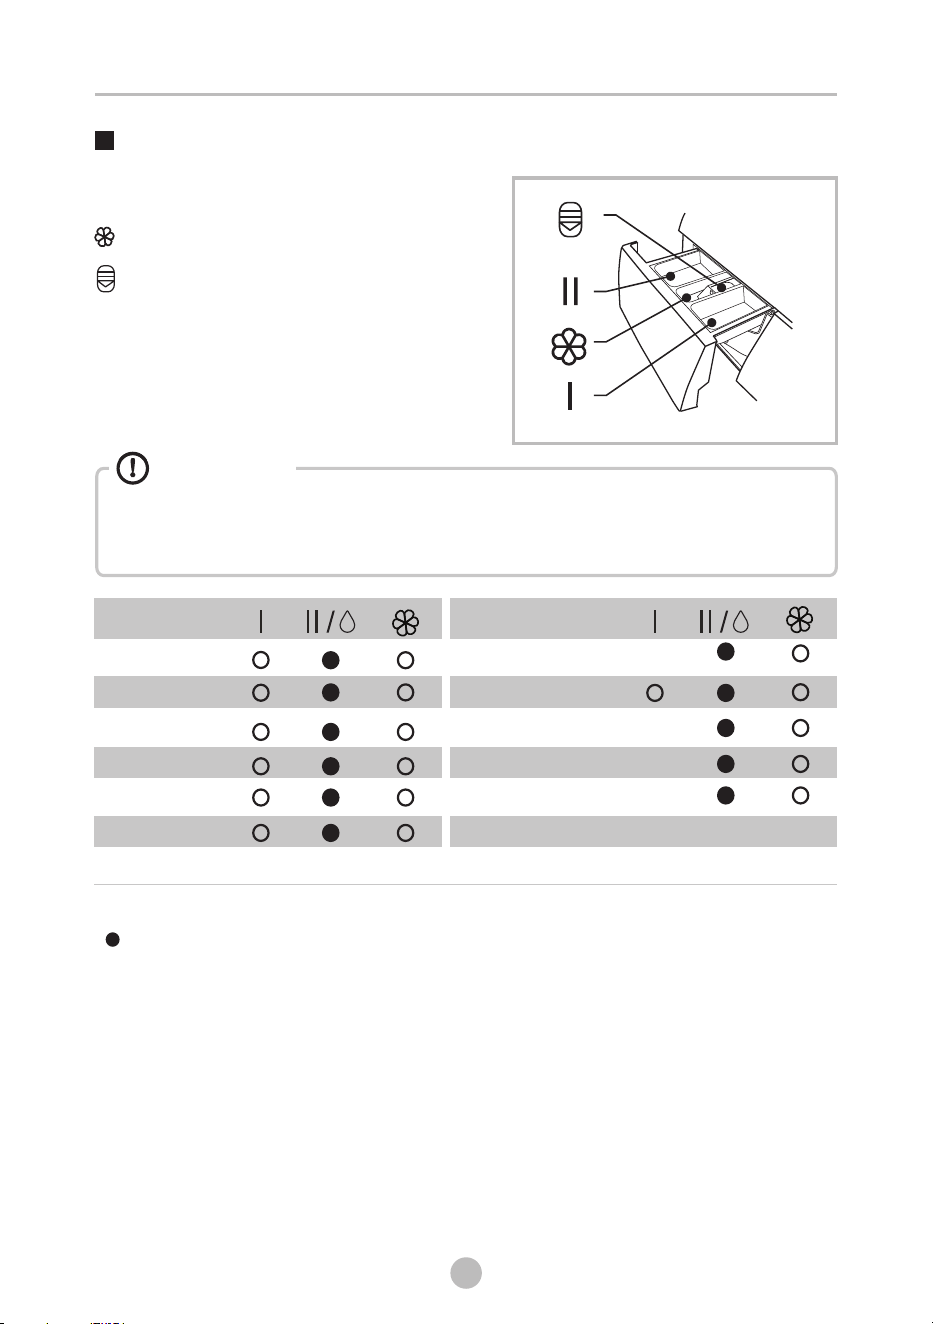
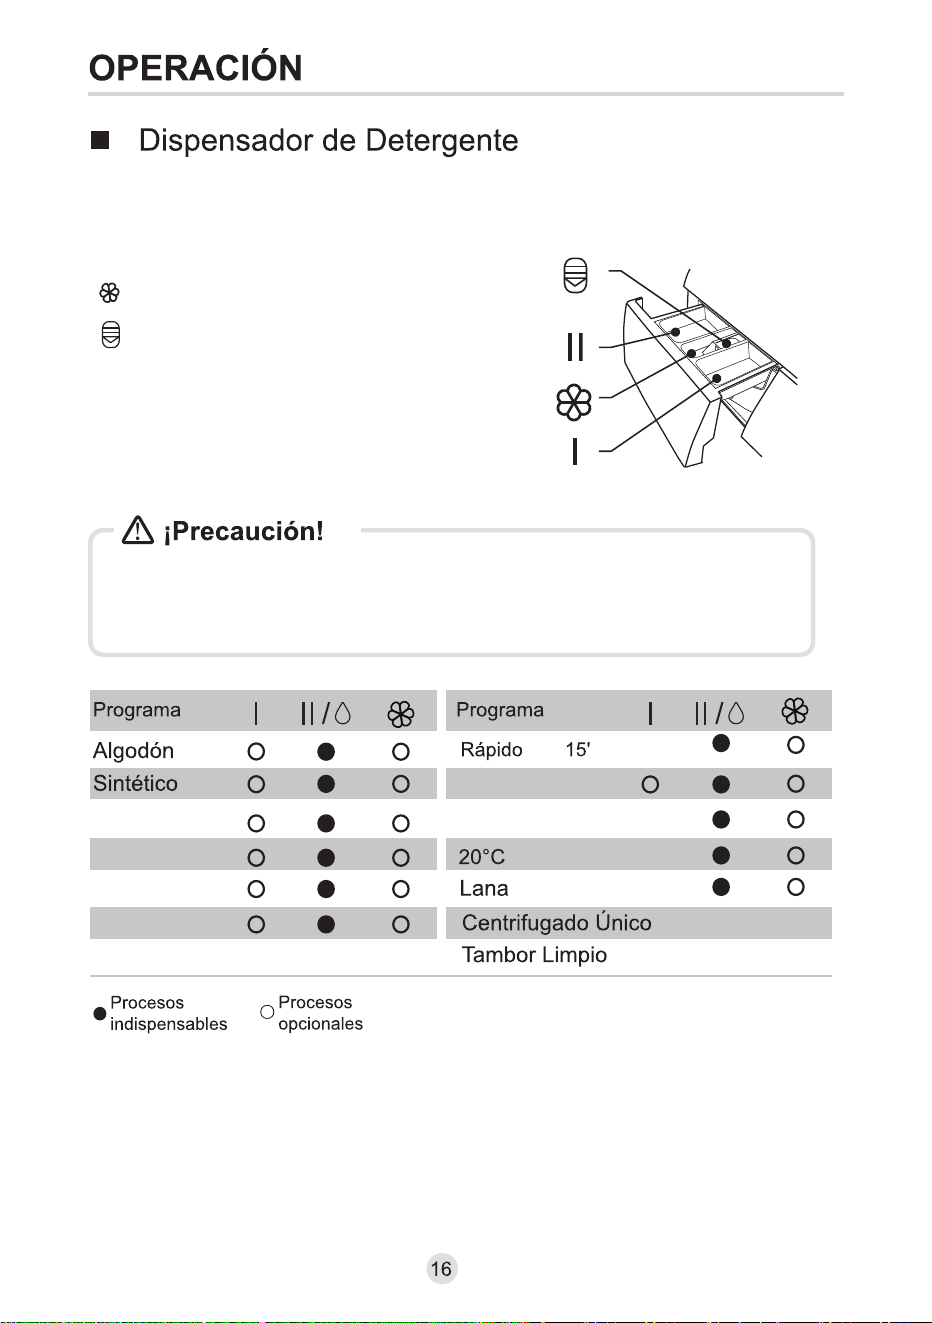
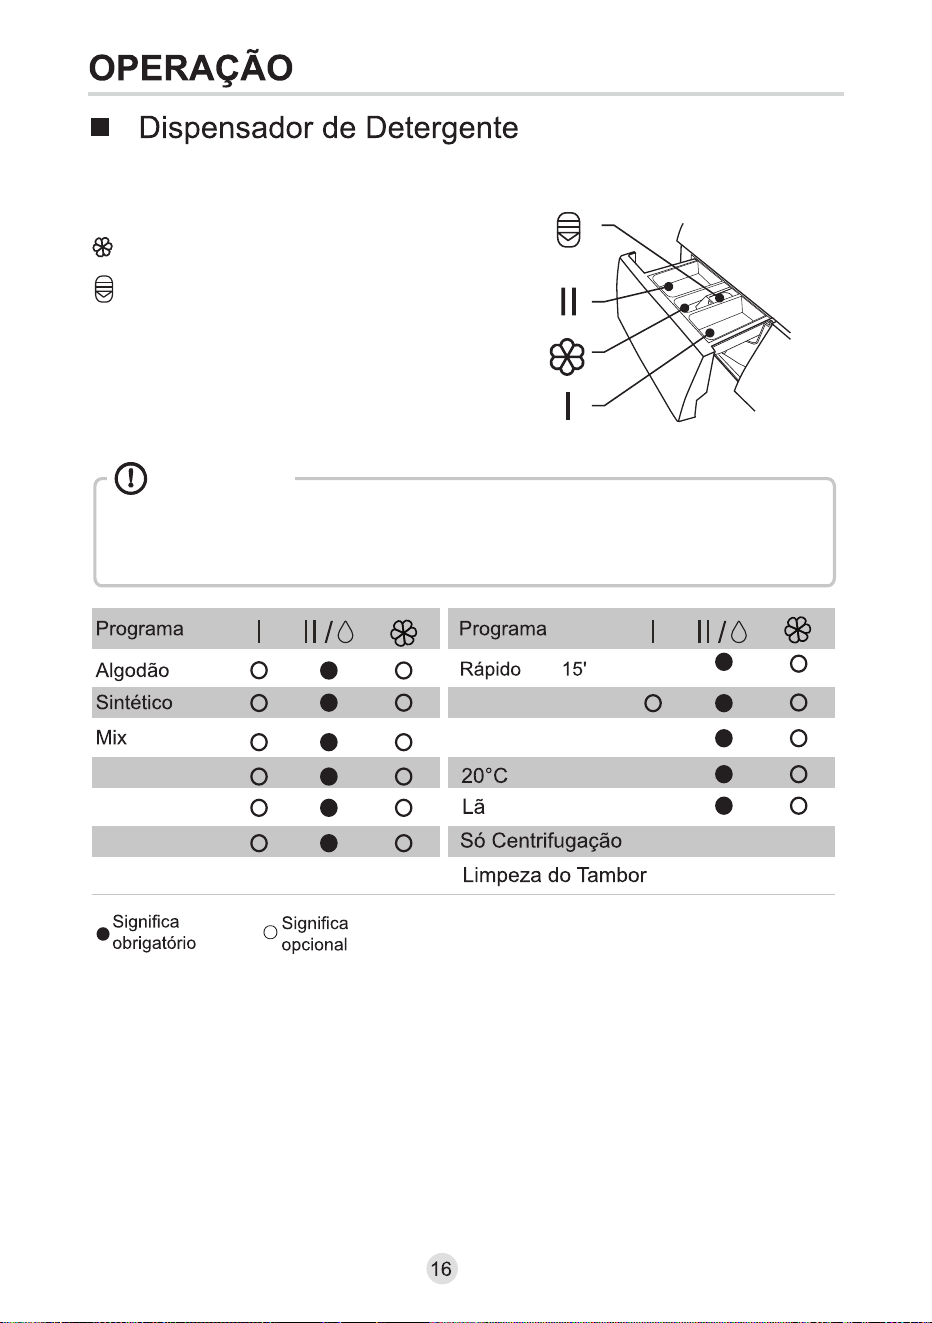
Detergent Dispenser
OPERATION
Pre wash
Main wash
Softener
II
I
Release button to
pull out the dispenser
Programme
Cotton
Mix
Baby Care
Synthetic
Sports
Jeans
Programme
Steam Hygiene
Wool
Quick 45'/15'
ECO 40-60
20℃
Spin Only
Drum Clean
Means must ○ Means optional
16
Caution!
Caution!
• Detergent only need to be added in compartment I ”after selecting pre-wash
function.
Do not put laundry beads into the detergent dispenser.
“
•
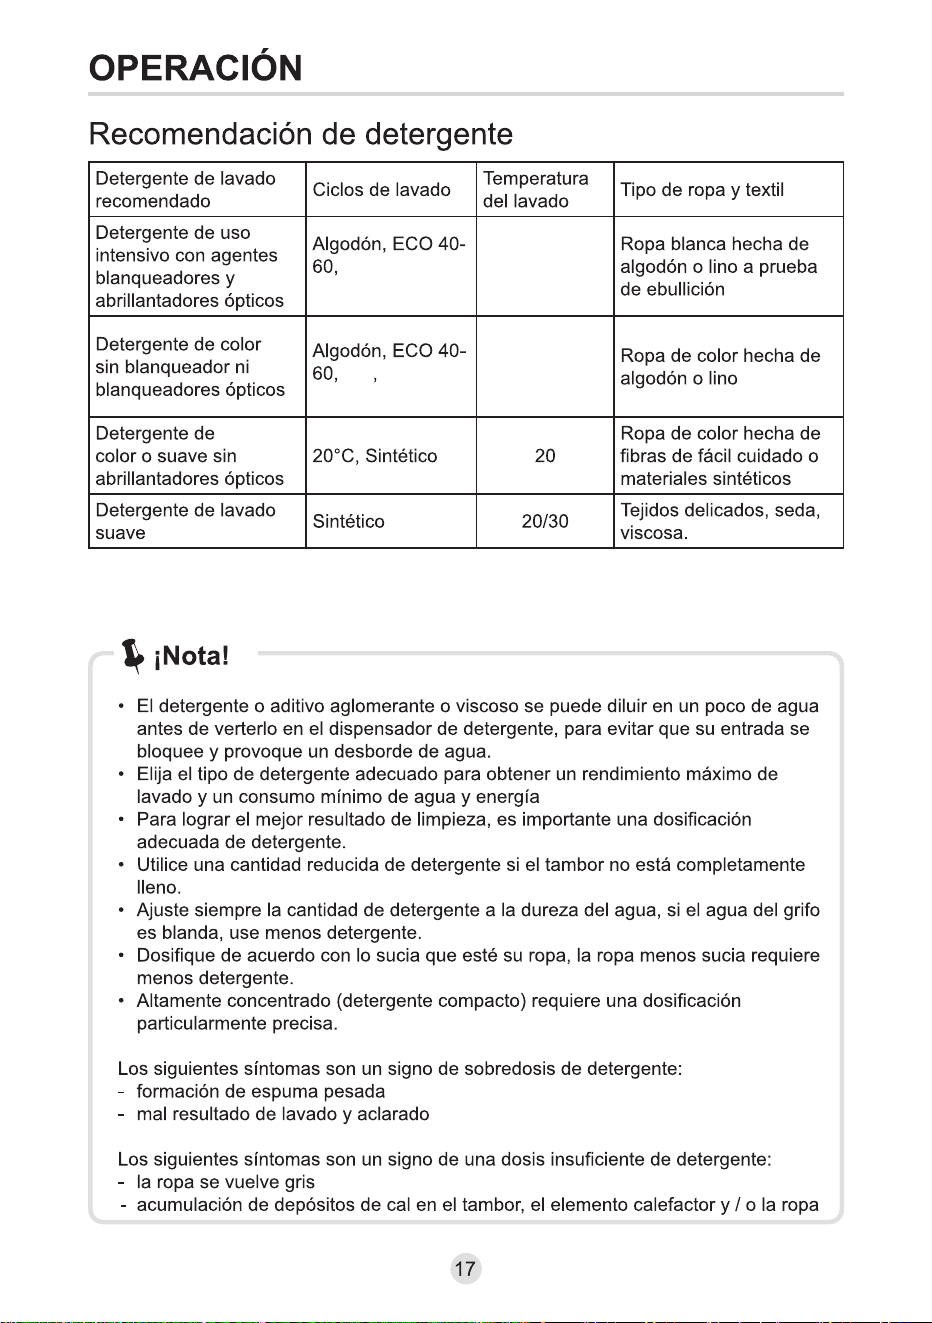
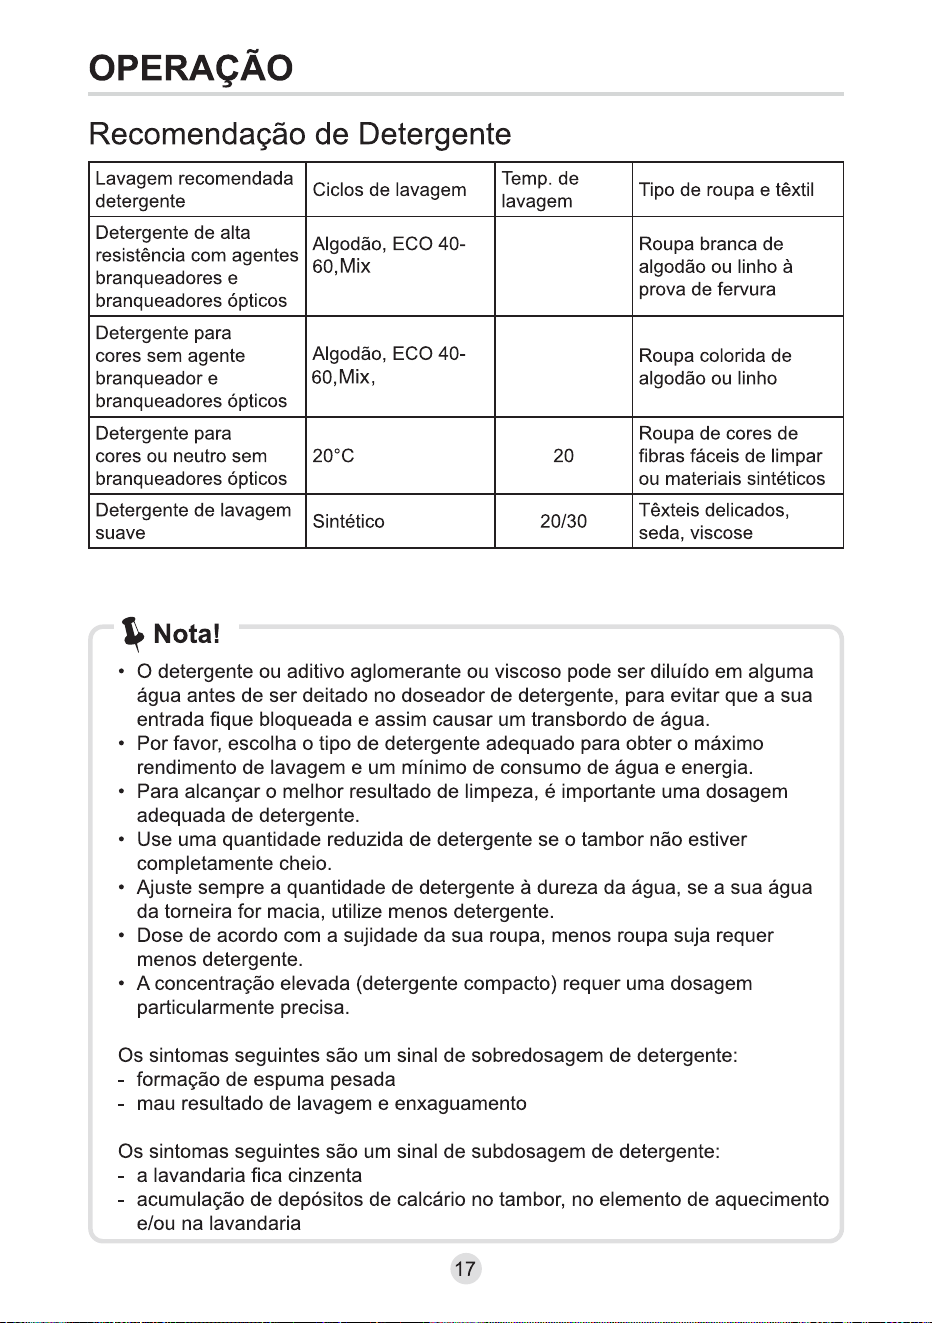
Detergent Recommendation
OPERATION
Agglomerating or ropy detergent or additive can be diluted in some water
before pouring it into the detergent dispenser, to avoid its inlet to get blocked
and thus cause a water overflow.
• Please choose the suitable type of detergent to get a maximum of washing
performance and a minimum of water and energy consumption
• To achieve the best cleaning result a proper detergent dosing is important.
• Use a reduced detergent amount if the drum is not filled completely.
• Always adjust the amount of detergent to the water hardness, if your tap
water is soft, use less detergent.
• Dose according to how dirty your laundry is, less dirty clothes require less
detergent.
• Highly concentrated (compact detergent) requires particularly accurate
dosing.
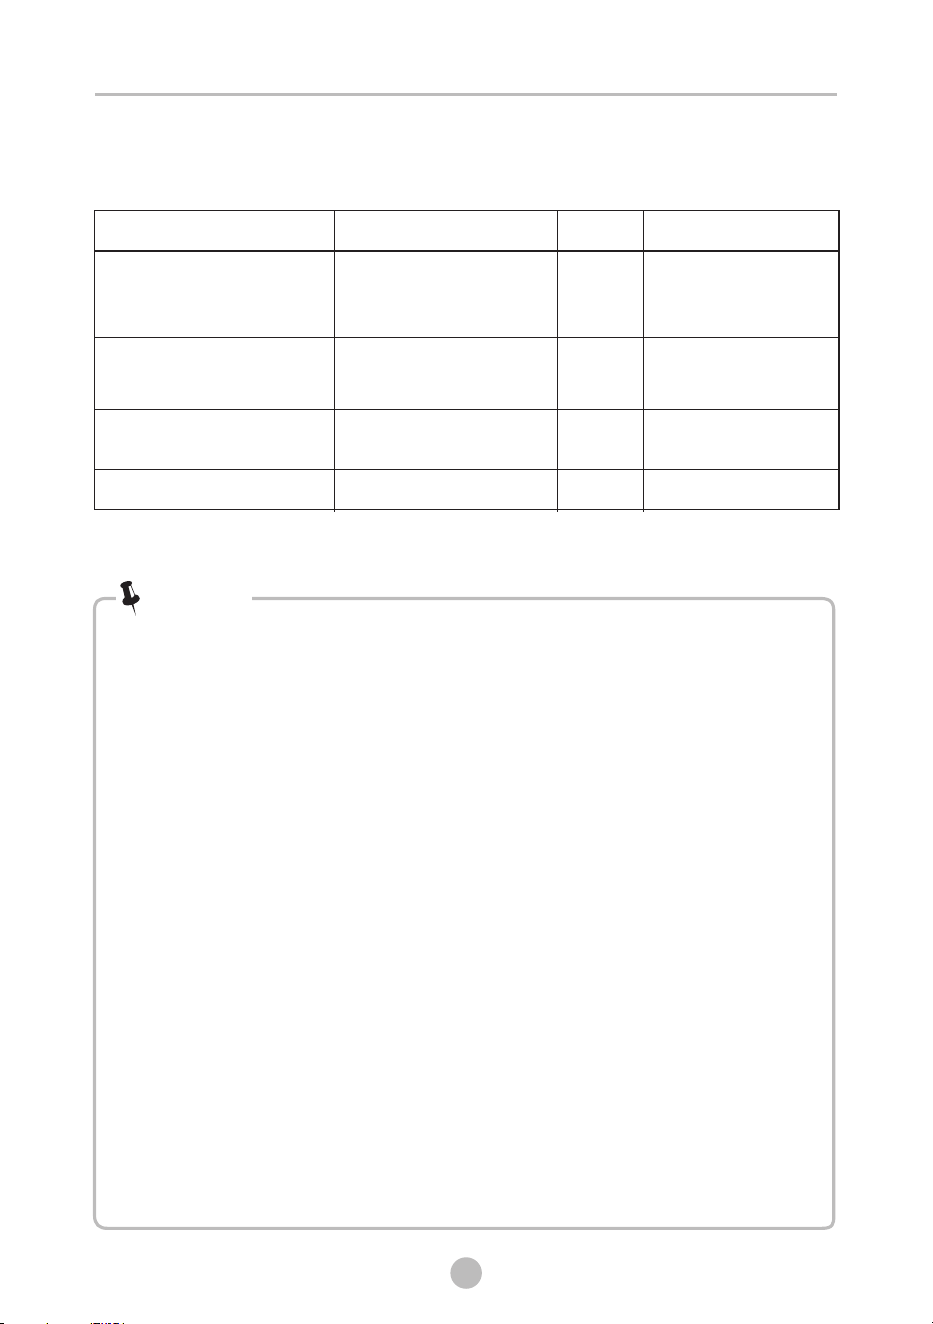
Following symptoms are a sign of detergent overdosing:
- heavy foam formation
- poor washing and rinsing result
Following symptoms are a sign of detergent underdosing:
- laundry turns grey
- built-up of limescale deposits on the drum, the heating element and/or the
laundry
•
Note!
Recommended w ashing
det ergent
Heavy-duty detergent with
bleaching agents and
optical brighteners
Colour detergent without
bleaching agent and optical
brighteners
Color or mild detergent
without optical brighteners
Mild washing detergent
Wash cycles
CottonECO 40-60Mix,,
Cotton,ECO 40-60,Mix,
Sports
20°C
Delicate
Washing
t emp.
4060/90/
20 30/
Type of laundry and textile
White laundry made from
boil-proof cotton or linen
Coloured laundry made
from cotton or linen
Coloured laundry made
from easy care fibres or
synthetic materials
Delicate textiles, silk,
viscose
20/
30/40
20
17

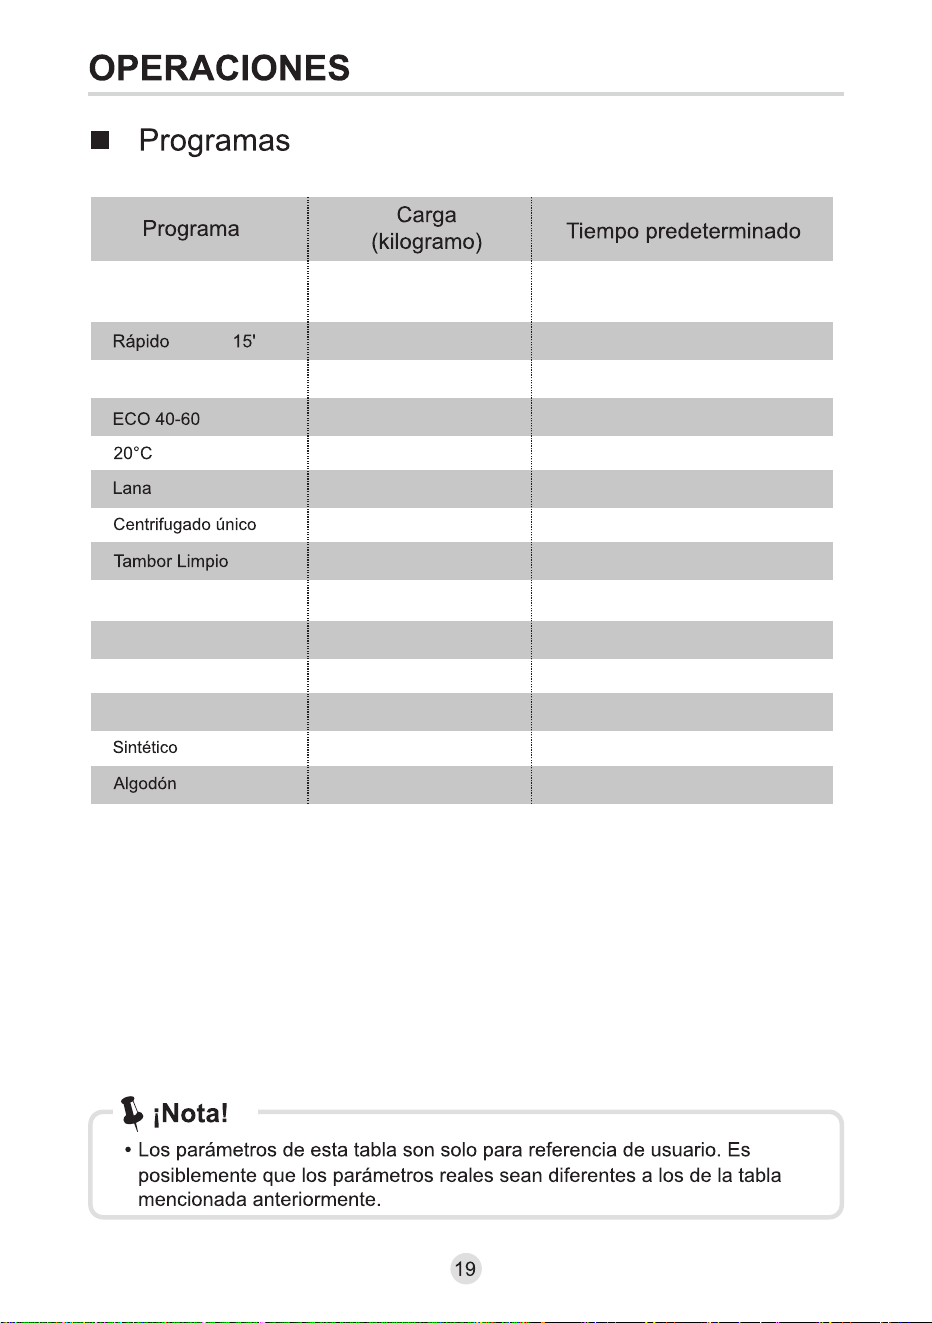
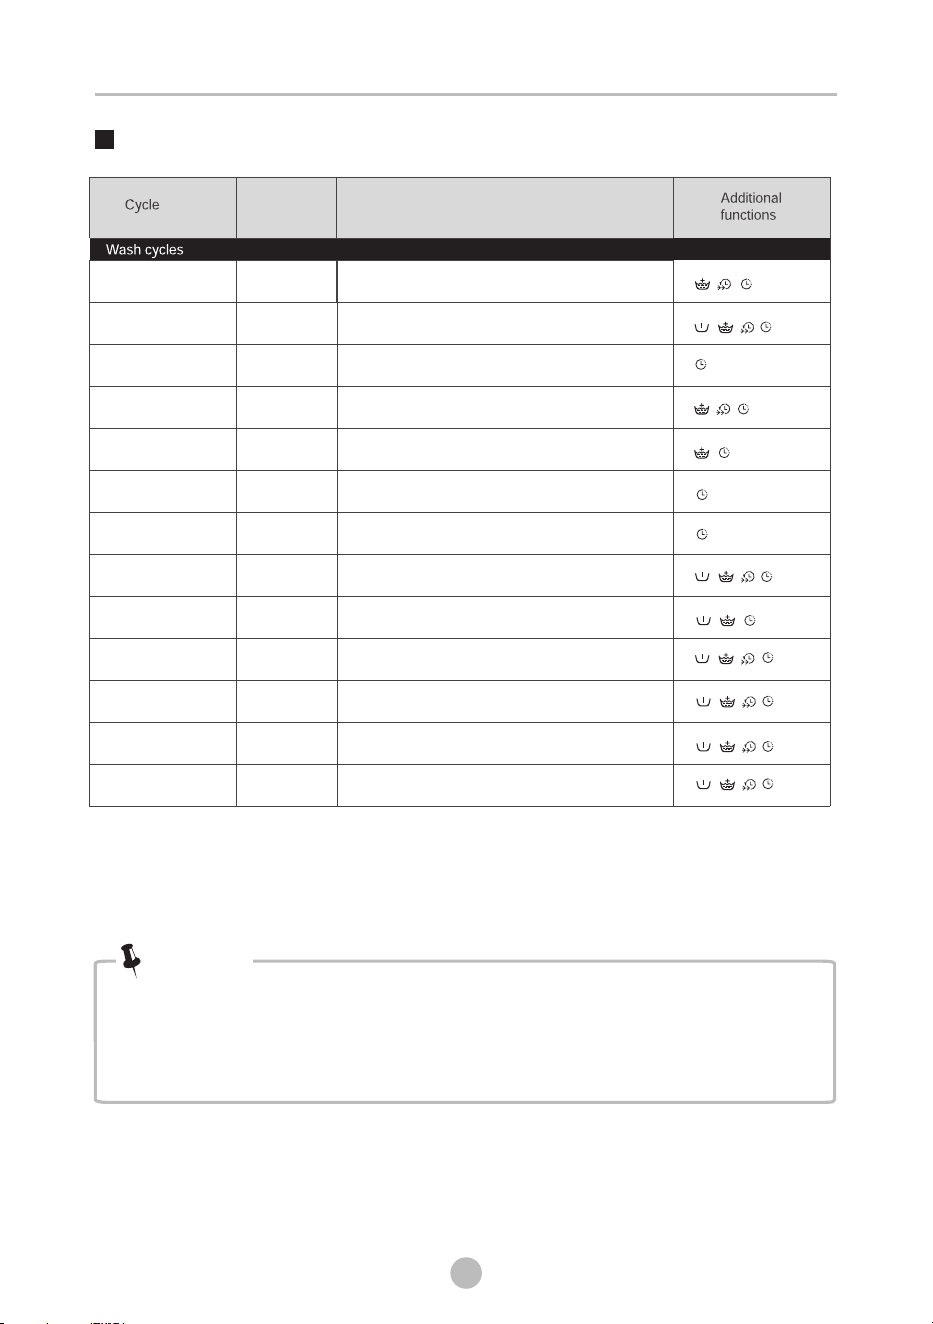
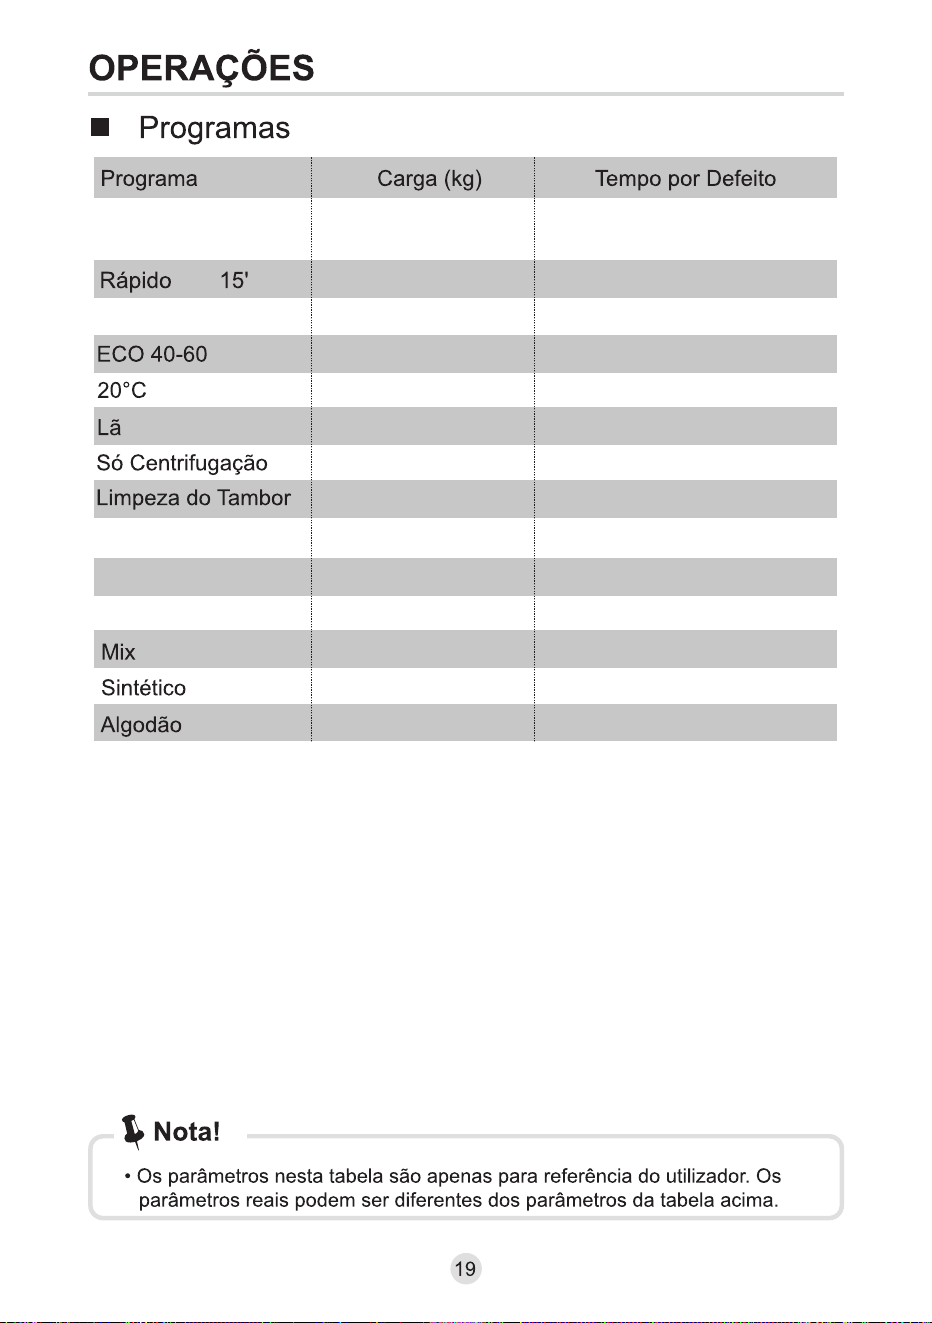
Programme
Load(kg)Default Time
OPERATION
Programmes
19
12.0
12.0
12.0
6.0
12.0
6.0
–
12.0
6.0
6.0
12.0
Quick 45’/15’
Steam Hygiene
ECO 40-60
20°C
Wool
Spin Only
Drum Clean
Jeans
Sports
Baby Care
Mix
Synthetic
Cotton
2.0
2.0
12.0
12.0
0:45
2:28
4:00
1:01
1:07
0:12
1:18
1:35
0:47
2:01
1:20
3:18
3:39
Cotton, Mix, Synthetic are auto Weighting programs. When these 3 programs
are selected, the washing machine will automatically adjust the appropriate
water level and wash time according to the weight of the laundry during the
washing process.
•

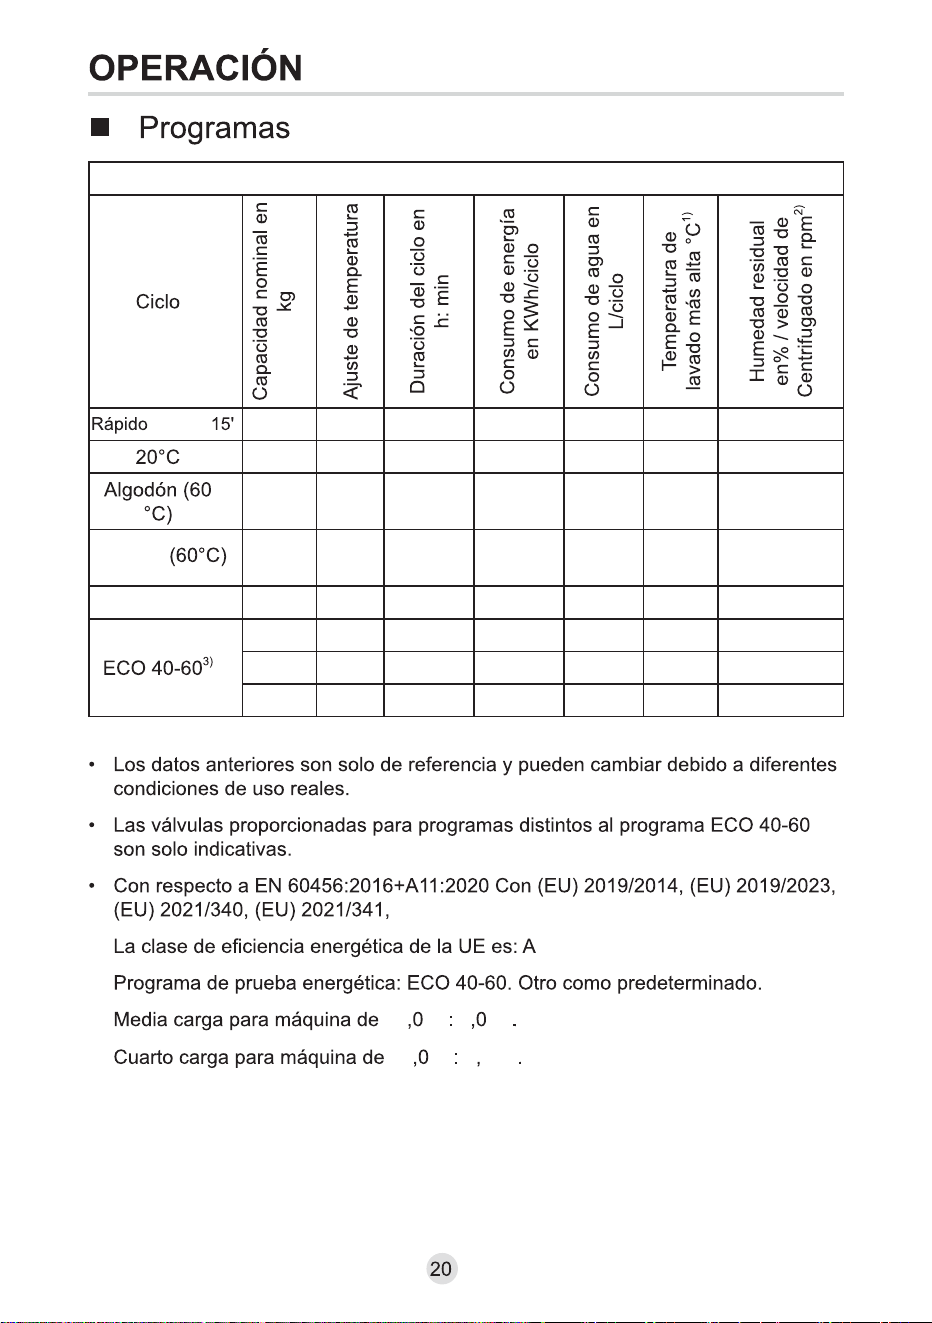
OPERATION
Programmes
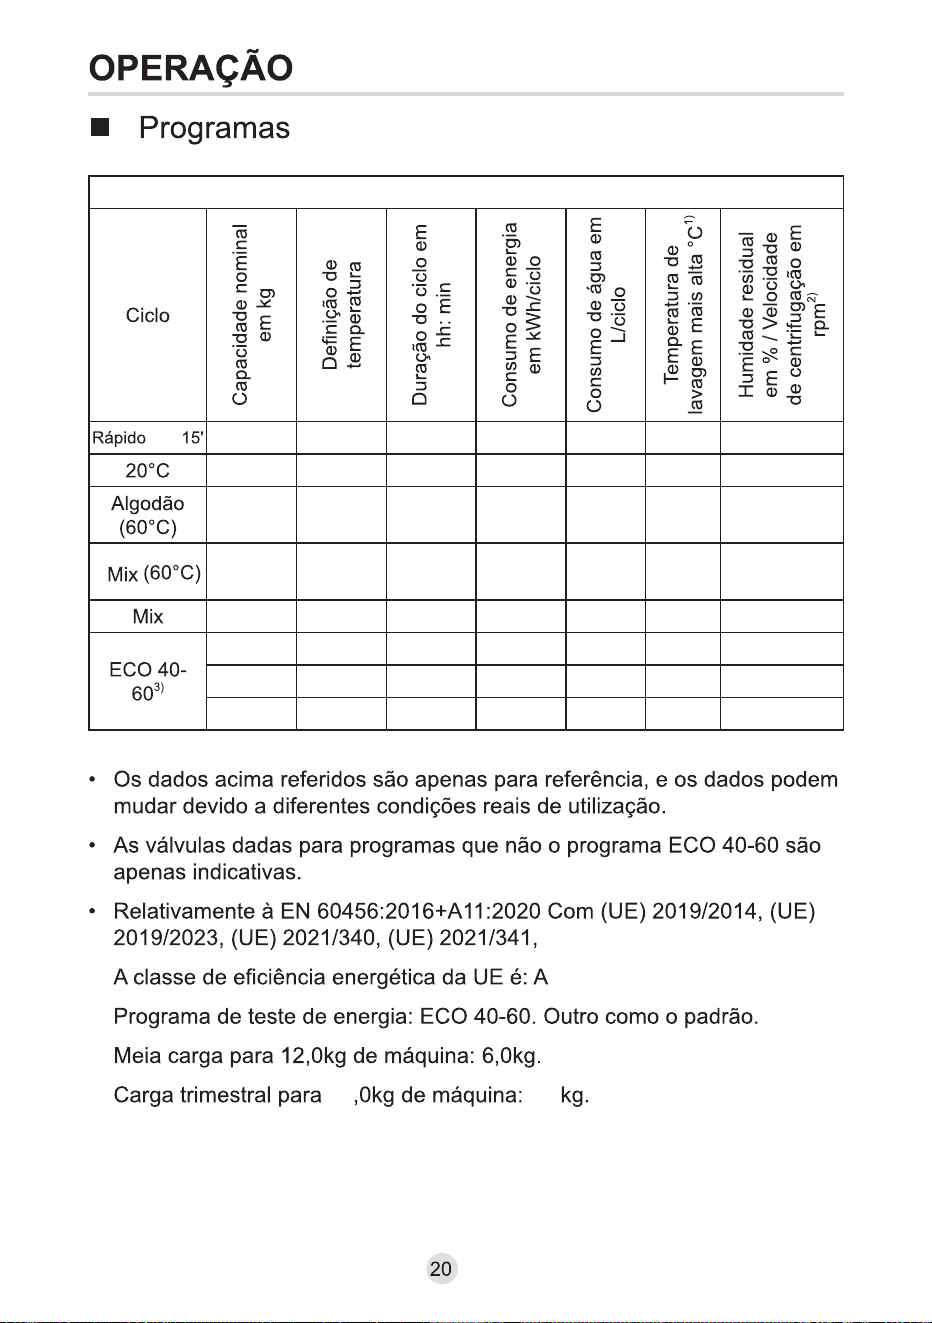
actual use conditions.
• The valves given for programmes other than the ECO 40-60 programme
are indicative only.
• Concerning to EN 60456:2016+A11:2020 With(EU) 2019/2014, (EU) 2019/2023,
(EU) 2021/340, (EU) 2021/341,
The EU energy efficiency class is: A
Energy test program: ECO 40-60. Other as the default.
Half load for 12.0kg machine:6.0kg.
Quarter load for 12.0kg machine:3.0kg.
• The above data is for reference only, and the data may change due to different
20
Cycle
Nominal capacity in kg
Temperaturesetting
Cycle duration inh:min
Energyconsumption in
kWh/cycle
Water consumption in
L/cycle
Highest washing
temperature
℃
1)
Residual moisturein %
/spin speed in rpm
2)
Quick 45'/ 15'2.0200:450.131312075%/800
206.0201:010.206582065%/1000
Cotton 6012.0603:441.919996053%/1400
Mix12.0401:200.988994065%/1000
Mix 6012.0601:301.684996065%/1000
12.0-4:001.18684.04453.9%/1350
6.0
-
3:00
0.618
58.0
32
53.9%/1350
3.0
-
3:00
0.253
45.0
22
53.9%/1350
ECO40-60
3)
CLM12VIN
℃
℃
℃

OPERATION
Programmes
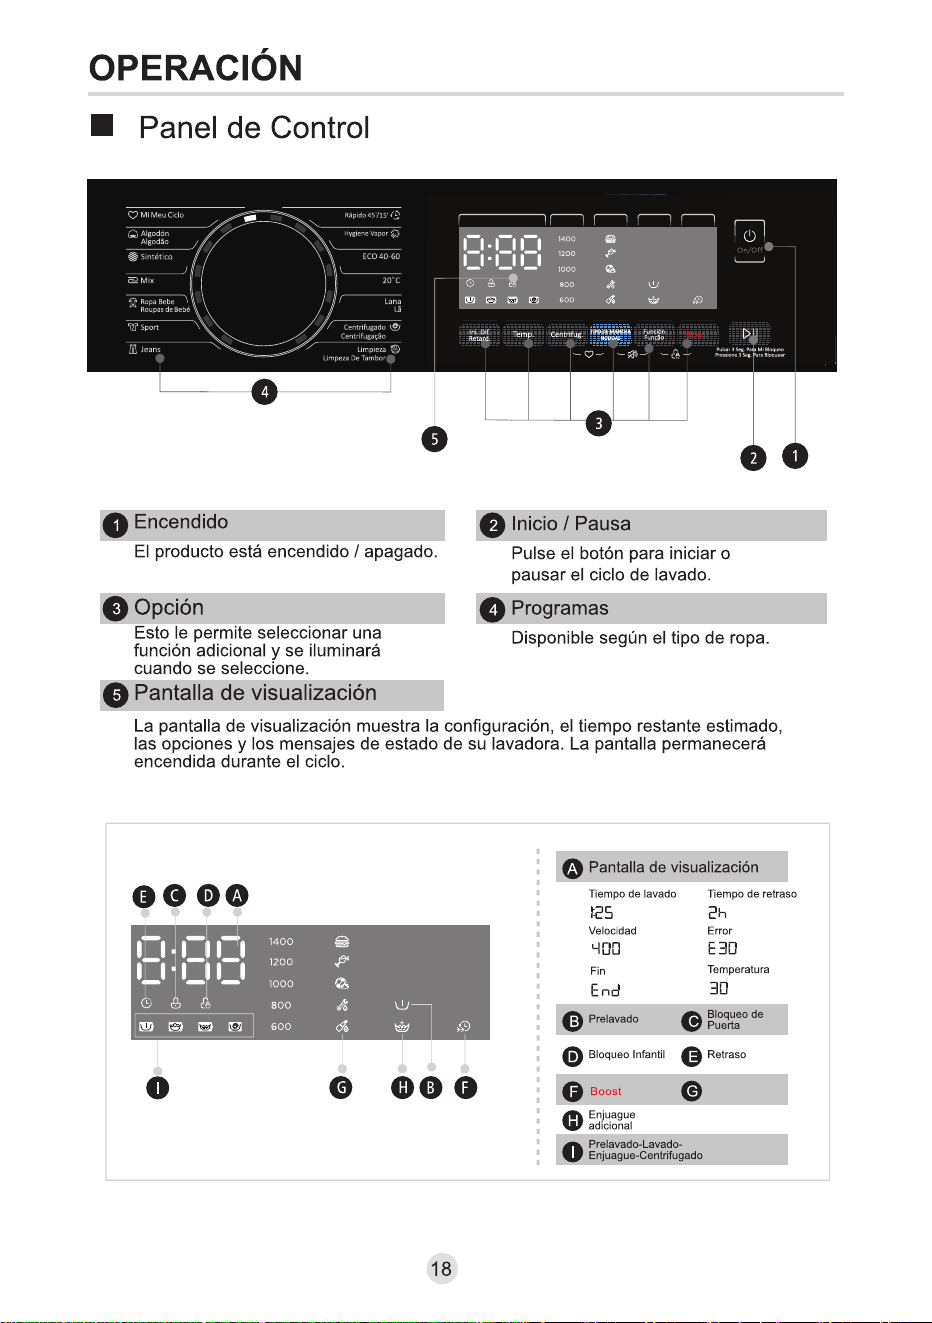
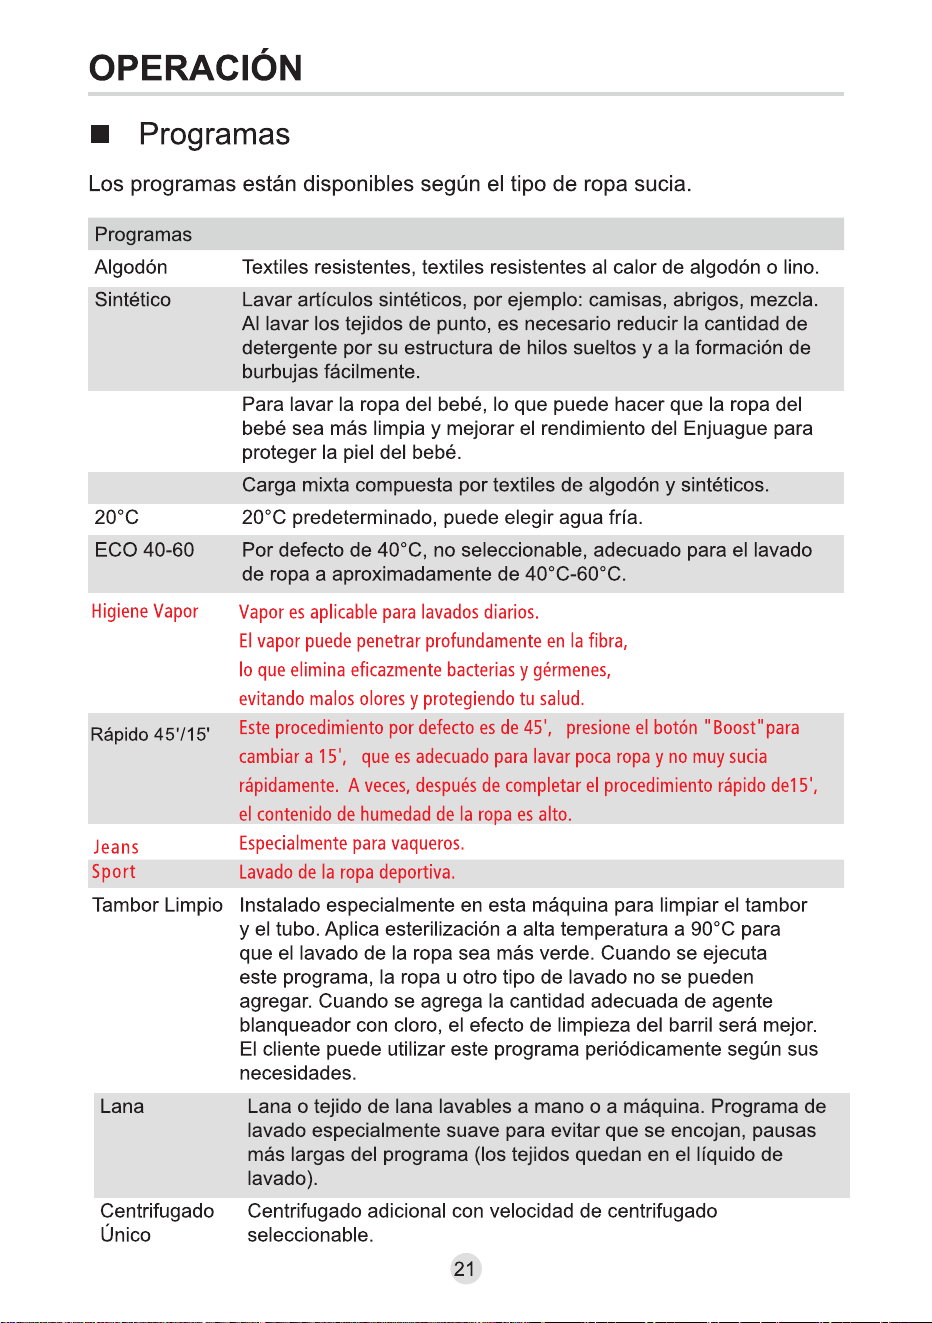
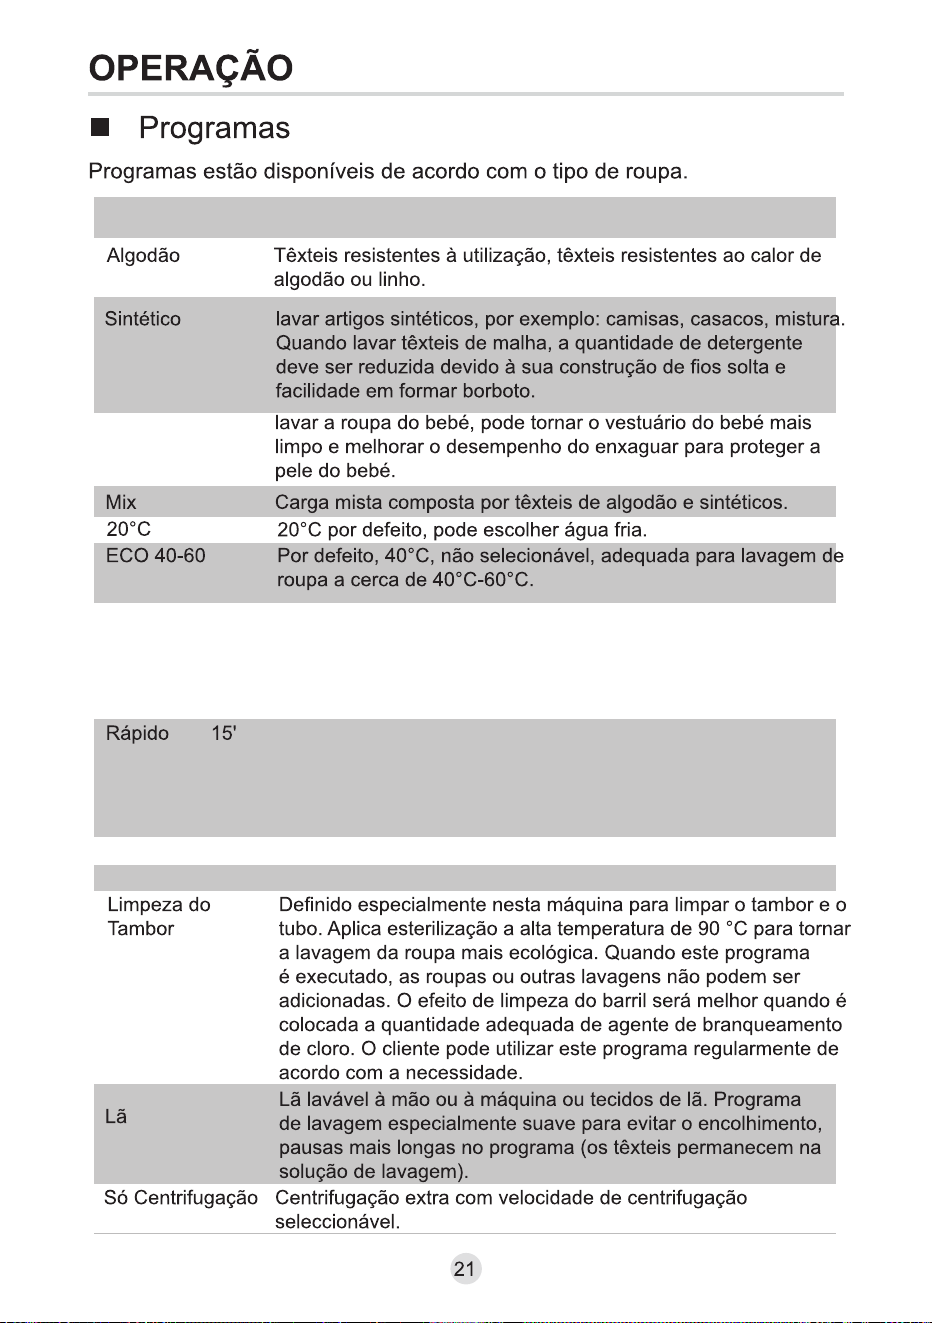
Programmes are available according to the laundry type.
Programmes
Mix
Cotton
Hard-wearing textiles, heat-resistant textiles made of cotton or
linen.
Wash synthetic articles, for example: shirts, coats, blending.
While washing the knitting textiles, detergent quantity shall be
reduced due to its loose string construction and easily forming
bubbles.
Washing the baby’s clothes, it can make the baby's wear cleaner
and make the rinse performance better to protect the baby skin.
Mixed load consisting of textiles made of cotton and synthetics.
20℃ default, can choose cold water.
Default 40℃,not selectable,suitabale for laundry washing at
about 40℃-60℃.
Steam is applicable for daily laundries.
The steam can deeply penetrate the fiber, which effectively
eliminate bacterias and germs, preventing odors and protecting
your health.
Specially for jeans.
Washing the activewear.
Hand or machine-washable wool or richwool textiles.Especially
gentle wash programme to prevent shrinkage, longer
programme pauses (textiles rest in wash liquor).
Extra spin with selectable spin speed.
This procedure defaults to 45',press the “Boost” to switch to 15',
which is suitable for washing few and not very dirty clothes
quickly. Sometimes, after the quick 15’ procedure is completed,
the moisture content of clothes is high.
Specially set in this machine to clean the drum and tube. It
applys 90 °C high temperature sterilization to make the
clothes washing more green. When this programme is
performed, the clothes or other washing cannot be added.
When proper amount of chlorine bleaching agent is put in,
the barrel cleaning effect will be better. The customer can use
this programme regularly according to the need.
Baby Care
20℃
Synthetic
Drum Clean
ECO 40-60
21
Jeans
Sports
Steam Hygiene
Quick 45'/15'
Wool
Spin Only

OPERATION
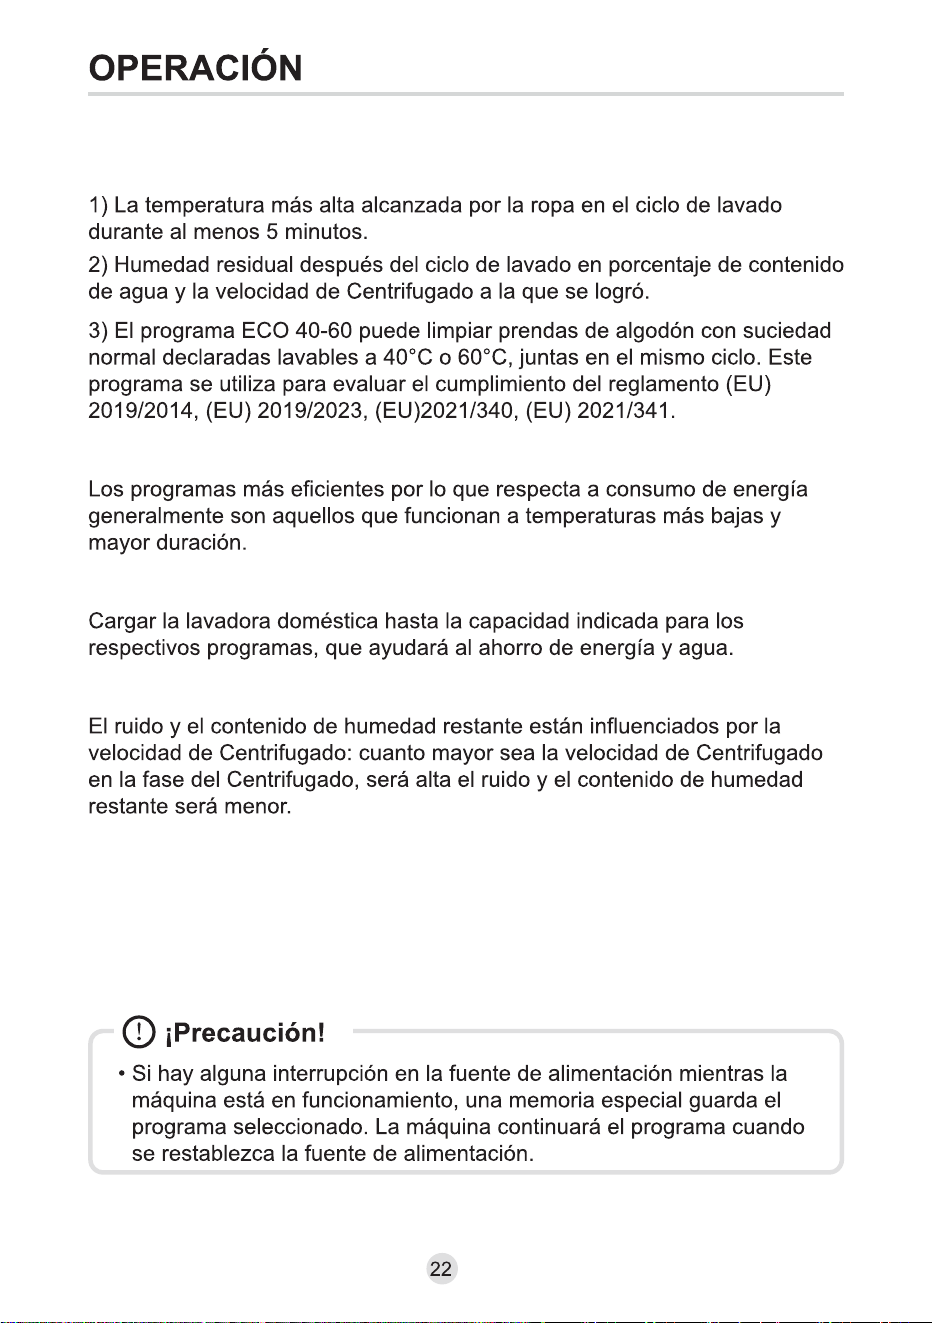
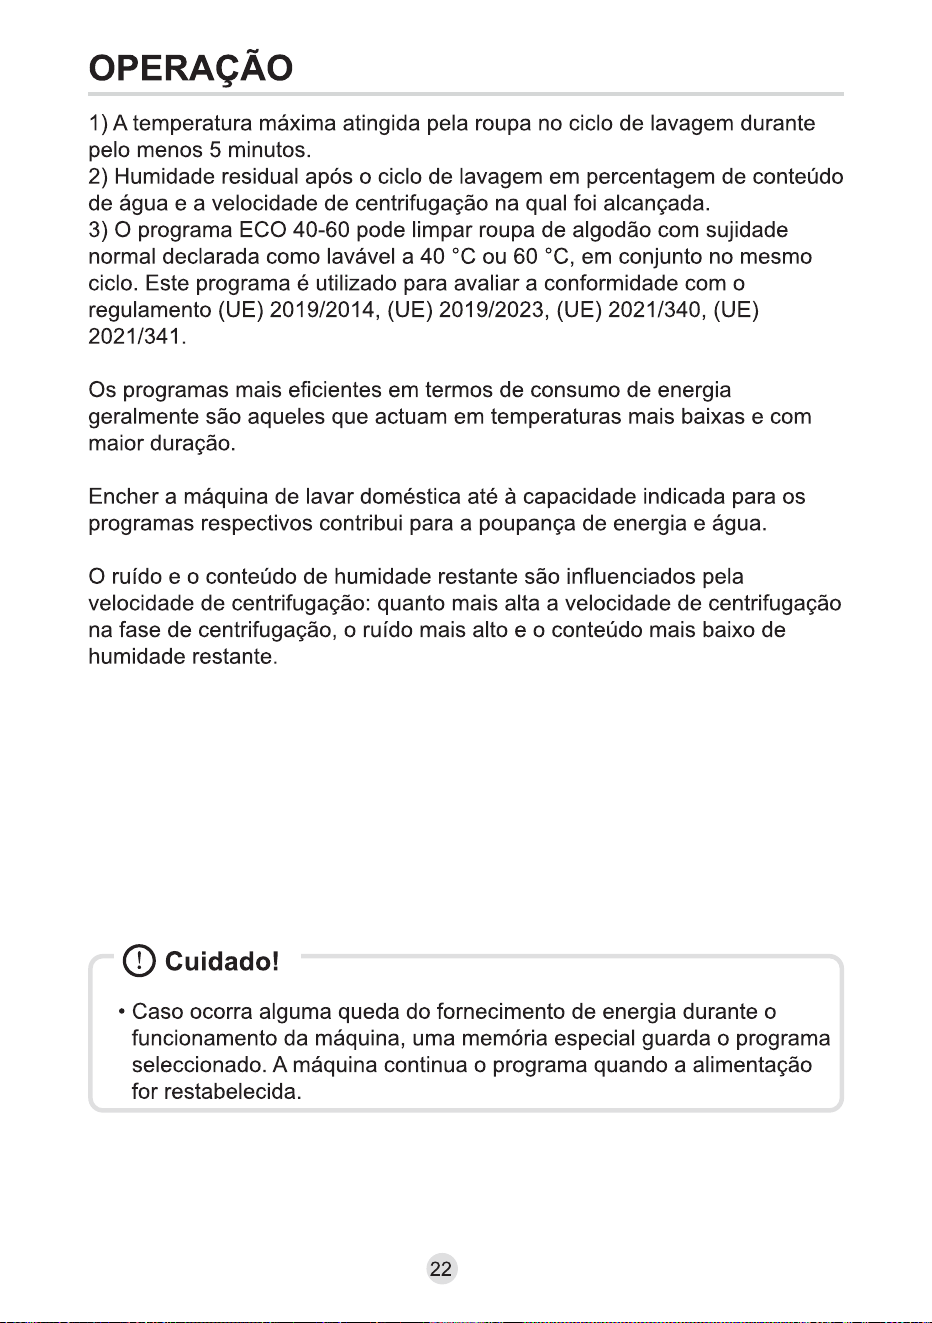
1) The highest temperature reached by the laundry in the wash cycle for at least 5
minutes.
2) Residual moisture after the wash cycle in water content percent and the spin speed at
which this was achieved.
3) The ECO 40-60 programme is able to clean normally soiled cotton laundry declared to
be washable at 40°C or 60°C, together in the same cycle. This programme is used to
assess the compliance with the regulation (EU) 2019/2014, (EU) 2019/2023,
(EU)2021/340, (EU) 2021/341.
The most efficient programmes in terms of energy consumption are generally those that
perform at lower temperatures and longer duration.
Loading the household washing machine up to the capacity indicated for the respective
programmes will contribute to energy and water savings.
Noise and remaining moisture content are influenced by the spinning speed: the higher
the spinning speed in the spinning phase, the higher the noise and the lower the
remaining moisture content.
Caution!
• If there is any break in the power supply while the machine is operating, a
special memory stores the selected programme. The machine will continue
the programme when the power supply is re-established.
22
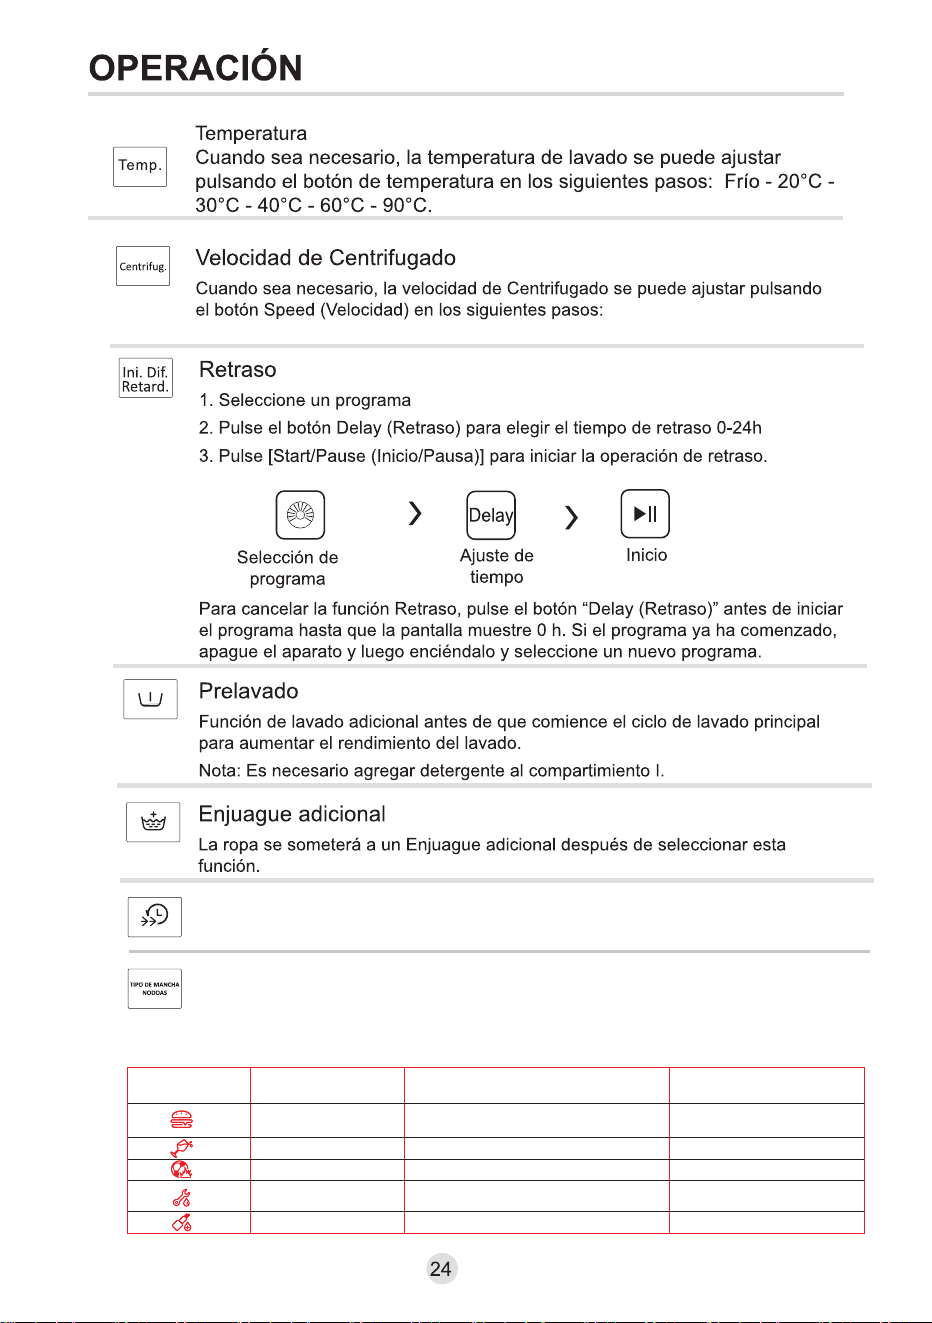
OPERATION
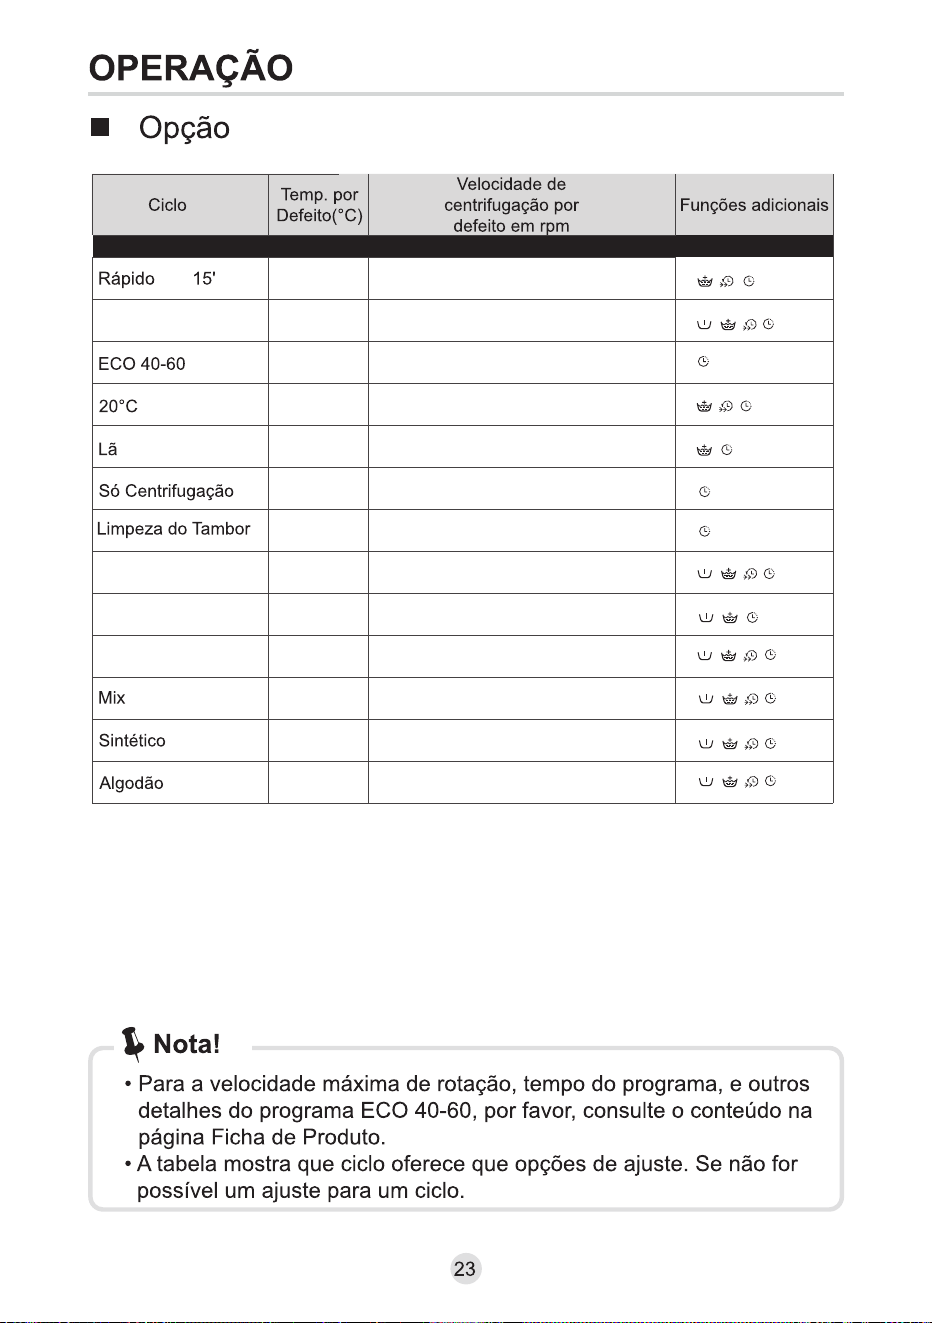
Option
1400
Default
Temp.(℃)
Default spin
speed in rpm
For the maximum spin speed, program time, and other details of the
ECO 40-60 program, please refer to the content on the Product Fiche page.
• The table shows which cycle offers which options for adjustment. If an
adjustment is not possible for a cycle.
•
Note!
23
20
800
60
1000
–
20
1400
1000
40
600
–
1000
90
–
30
20
800
800
60
1000
40
1000
40
1200
40
1400
Quick 45’/15’
Steam Hygiene
ECO 40-60
20°C
Wool
Spin Only
Drum Clean
Jeans
Sports
Baby Care
Mix
Synthetic
Cotton
OPERATION
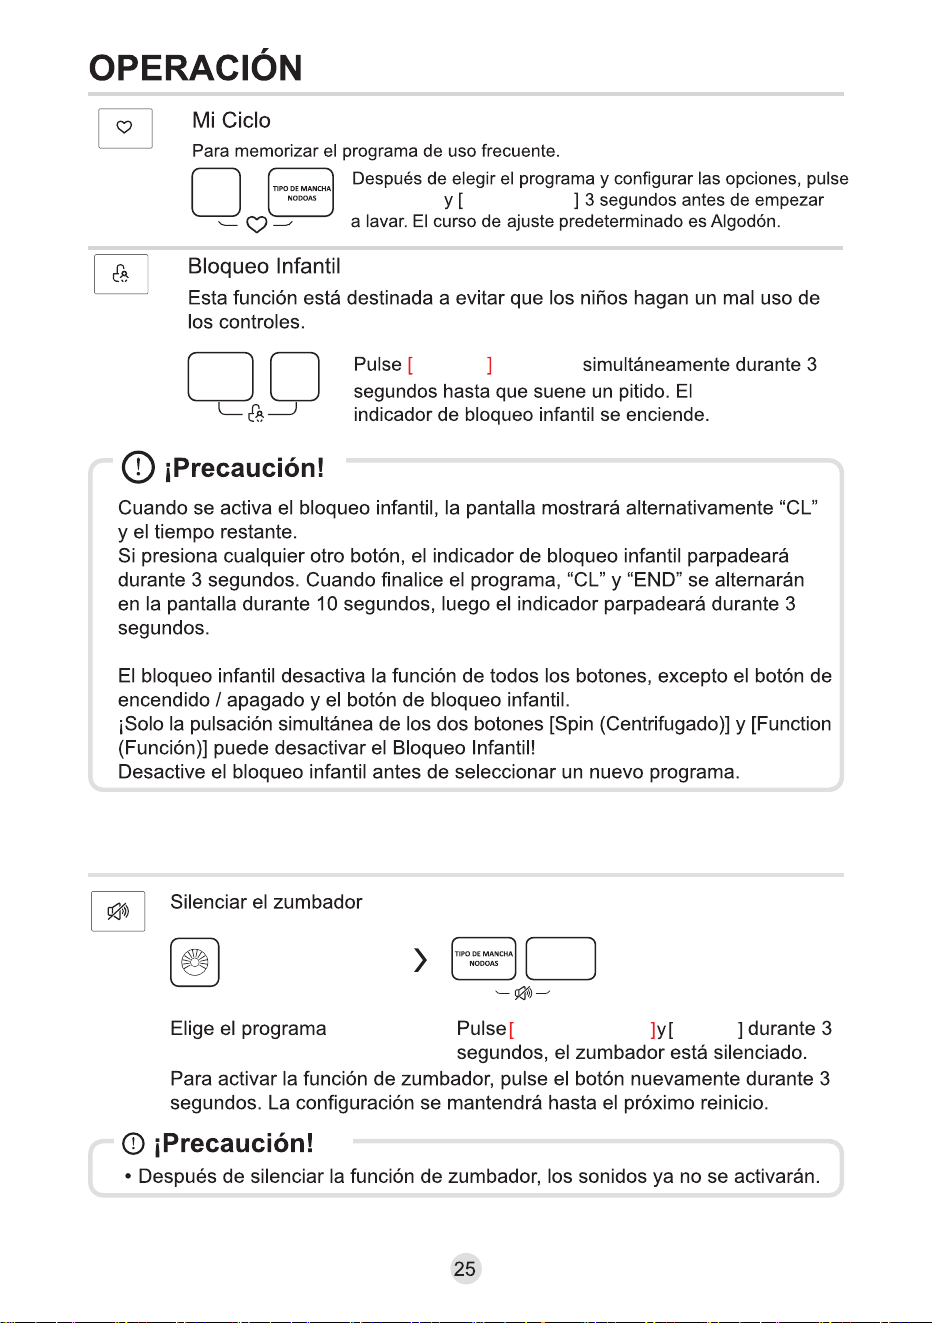
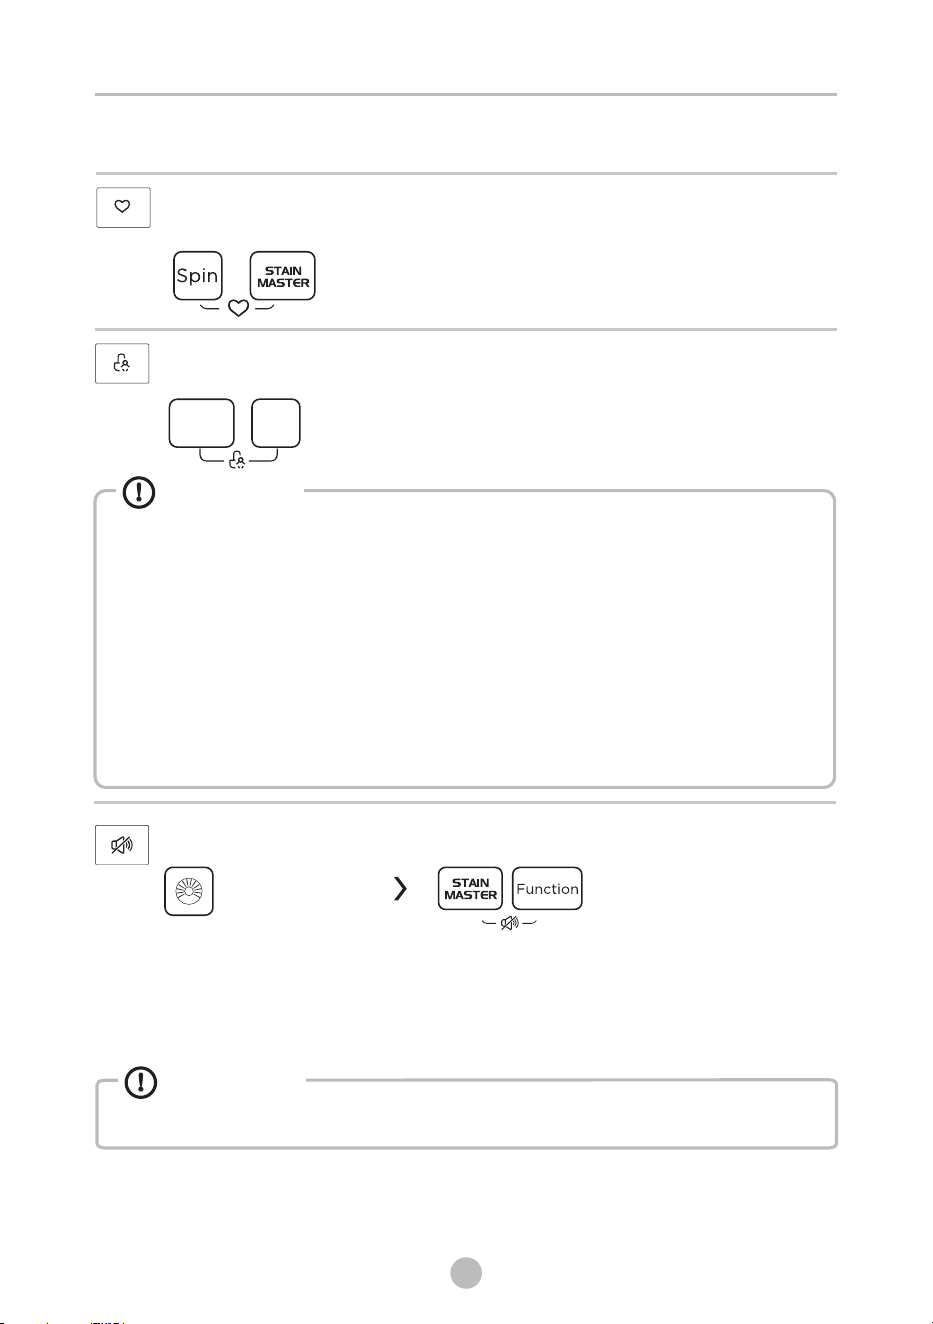
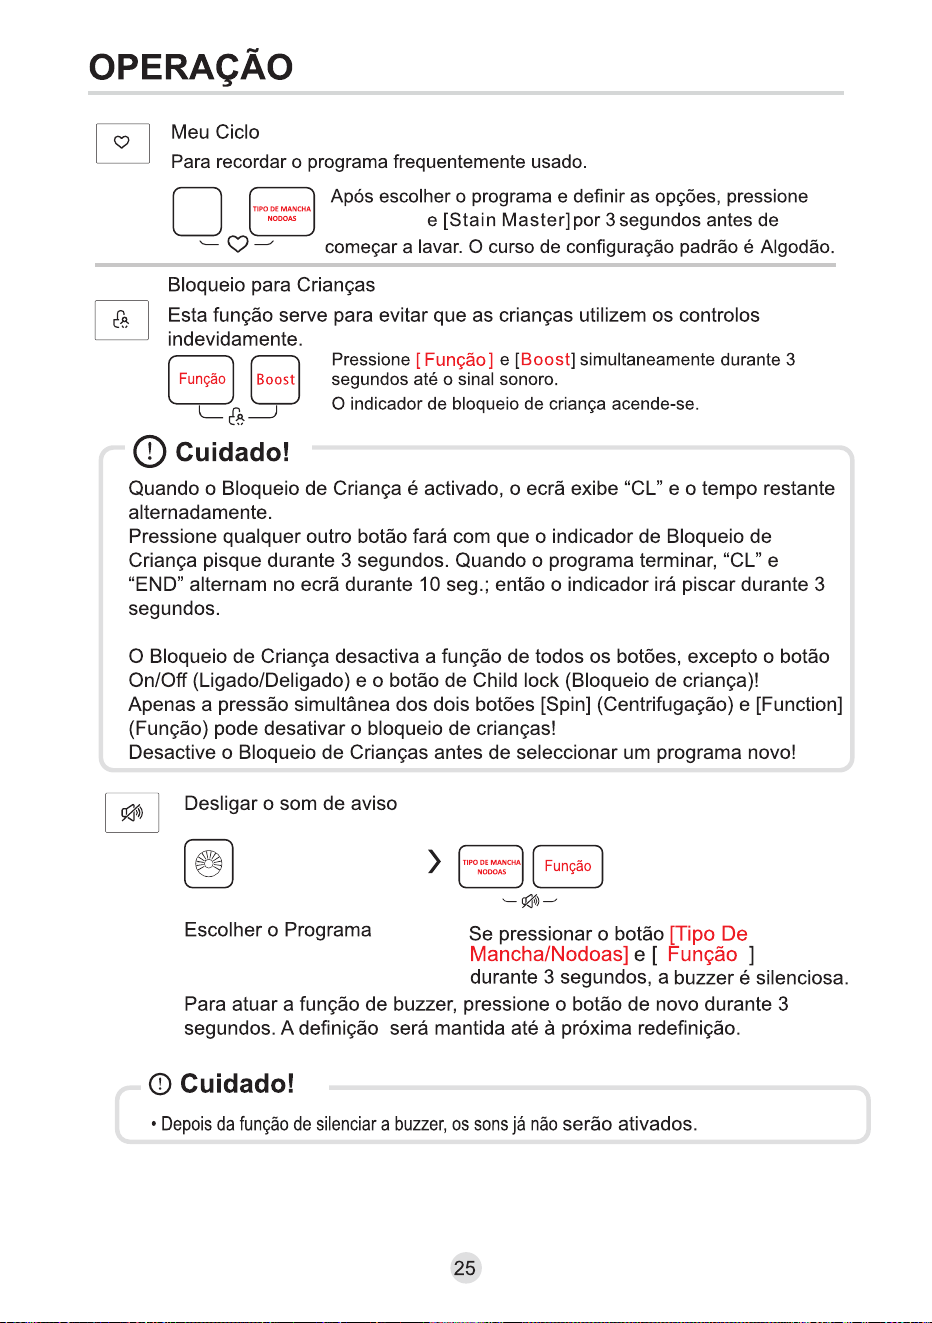
When the Child Lock is activated, the display will alternately show “CL” and the
remaining time.
Pressing any other button will cause the Child Lock indicator to flash.
When the program ends, “END” will alternate on the display.
The Child Lock deactivates the function of all buttons except the On/Off button and
the Child lock button!
Only the simultaneous pressing of the two buttons can
deactivate the Child Lock!
Please deactivate the Child Lock before selecting a new program!
“Cl” and
[Function] and [Boost]
Caution!
Child Lock
This function is meant to keep children from misusing the controls.
Press [Function] and [] simultaneously for 3 sec
until the buzzer beep. The child lock indicator switches on.
Boost
Mute the buzzer
To act the buzzer function, press the button again for 3 seconds. The setting
until the next reset.
will be kept
• MuAfter ting the buzzer function, the sounds will not be activated any more.
Caution!
Press the [Stain Master] and
button for 3sec.,the buzzer is mute.
[Function]
Choose the Programme
Boost
Function
25
My Cycle
To memory the frequently used programme.
After choosing the programme and setting the options, press
[Spin] and [Stain Master] button 3 sec. before start to wash.
The default setting course is Cotton.
OPERATION
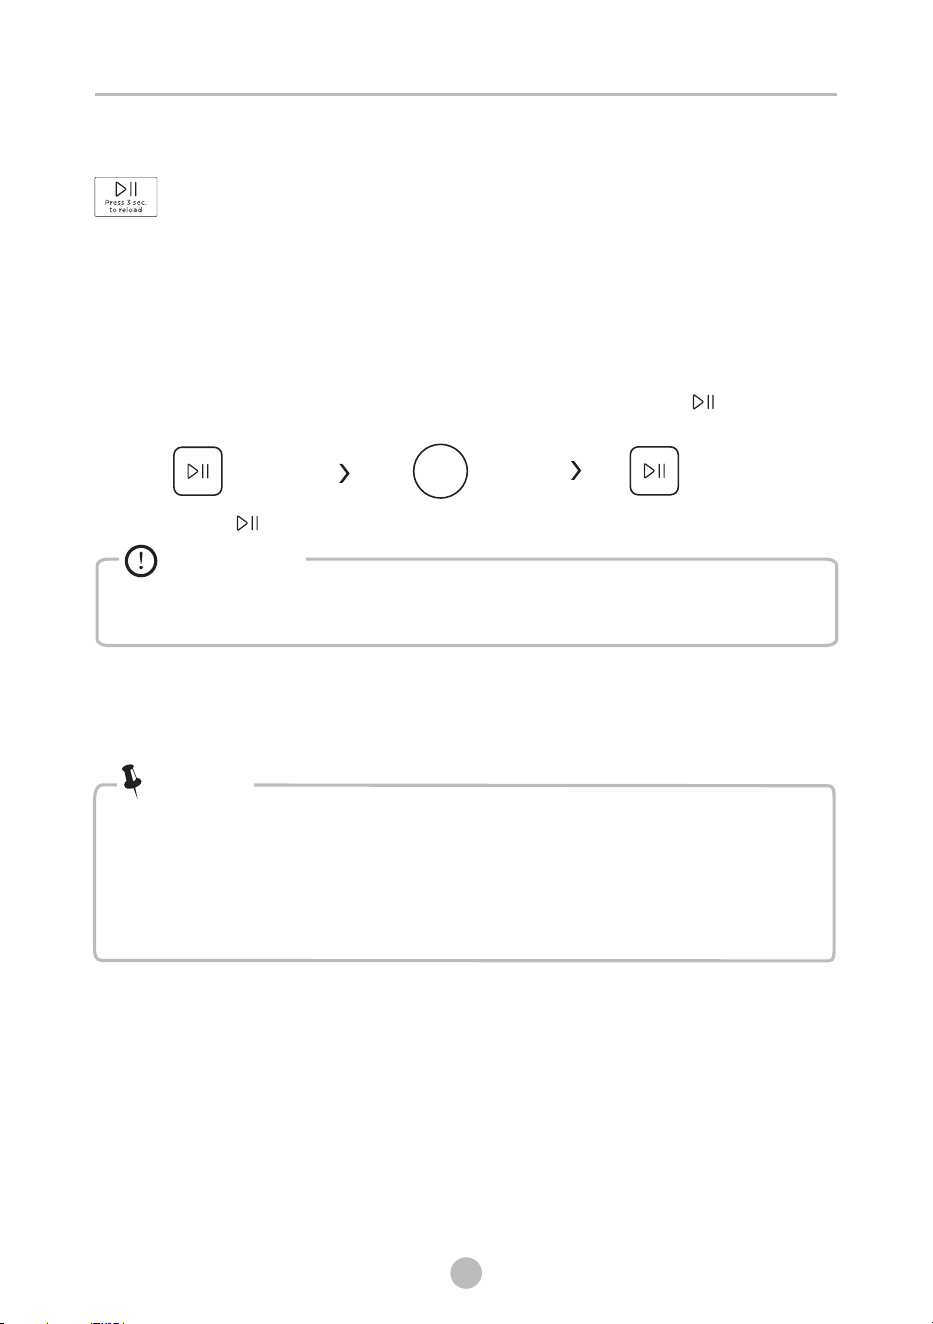
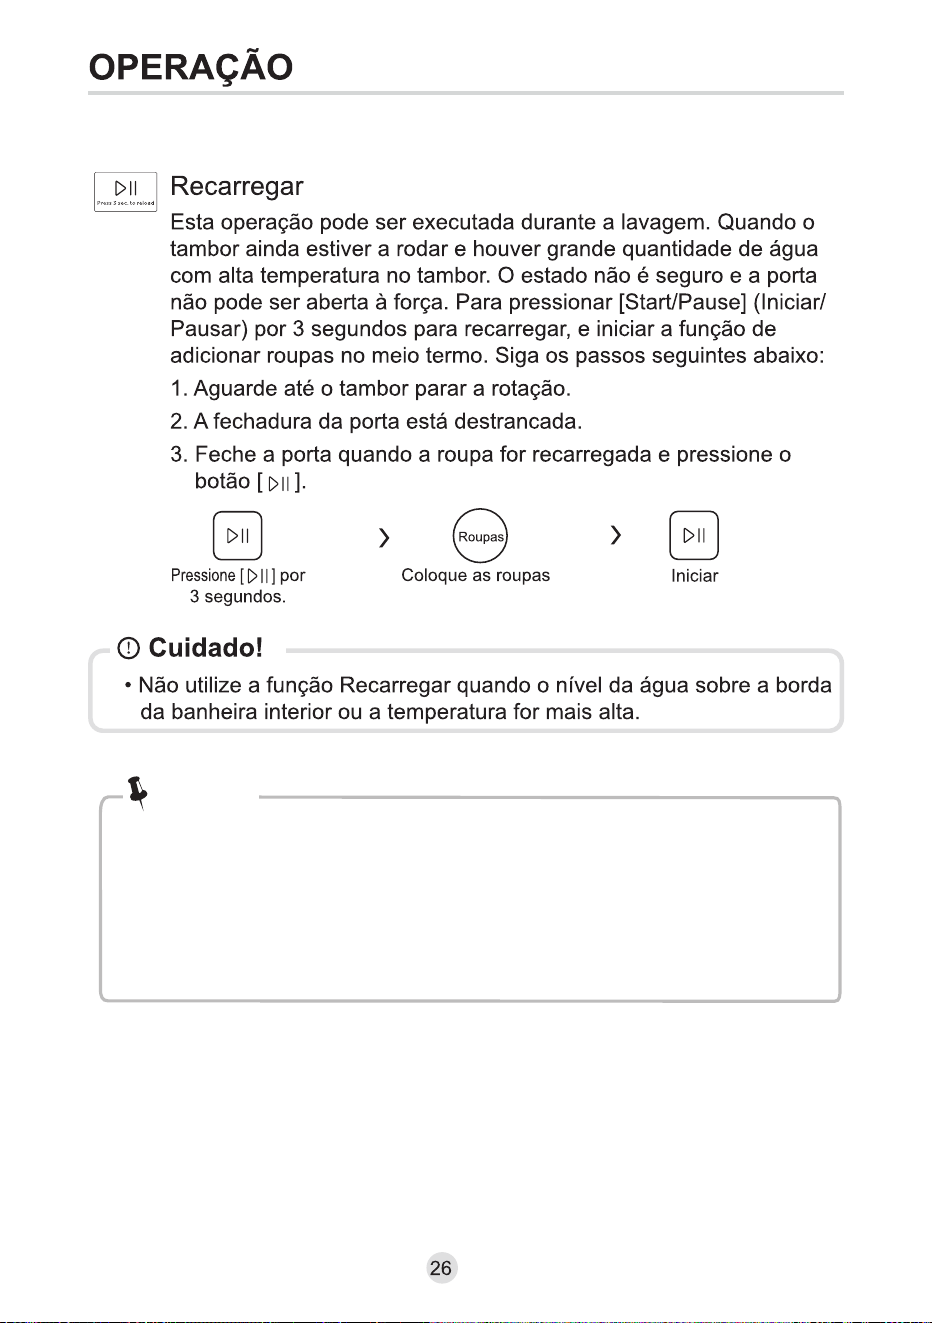
• Don't use the Reload function when the water level over the edge of the
inner tub or the temperature is higher.
Reload
This operation can be executed during the washing progress. When the drum is
still rolling and there is large amount of water with high temperature in the drum.
The state is unsafe and the door cannot be opened forcefully. To press
[Start/Pause] for 3 sec. to reload, and start the clothes adding in the midway
function. Please follow the steps as bellow:
1.Wait until the drum stops rotation.
2.The door lock is unlocked.
3.Close the door when the clothes are reloaded and press the [ ]
button.
Start
P3sress[ ]ec.
Clothes
Reload the clothes
Caution!
26
Usage counter
1Unplug the equipment for 10s and reconnect again.
2Power on and within 10s, please press " Delay" and "Boost" on control panel
for around 5s until the device display shows
digits--the value can indicate the times of equipment usage.
3Repeat step 1 again and customer can resume to normal operation.
.
.
simultaneously and continuously
.
Note!
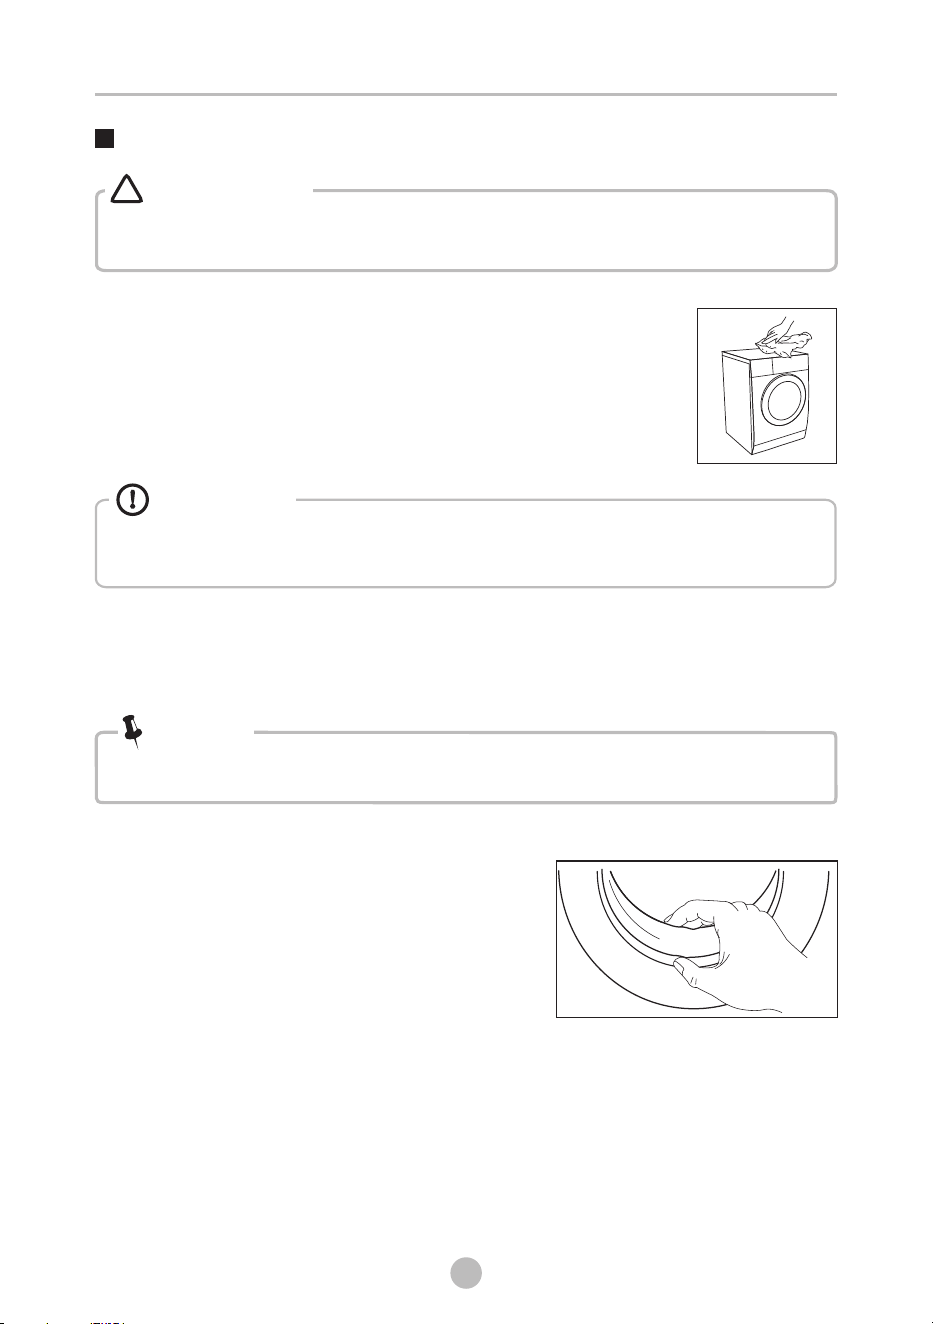
• Always unplug the appliance and close the water tap before cleaning and
maintenance.
Cleaning the Cabinet
Cleaning the Drum
• Keep any laundry away from the machine while cleaning the drum.
Cleaning the Door Seal and Glass
Warning!
!
Note!
Cleaning and Care
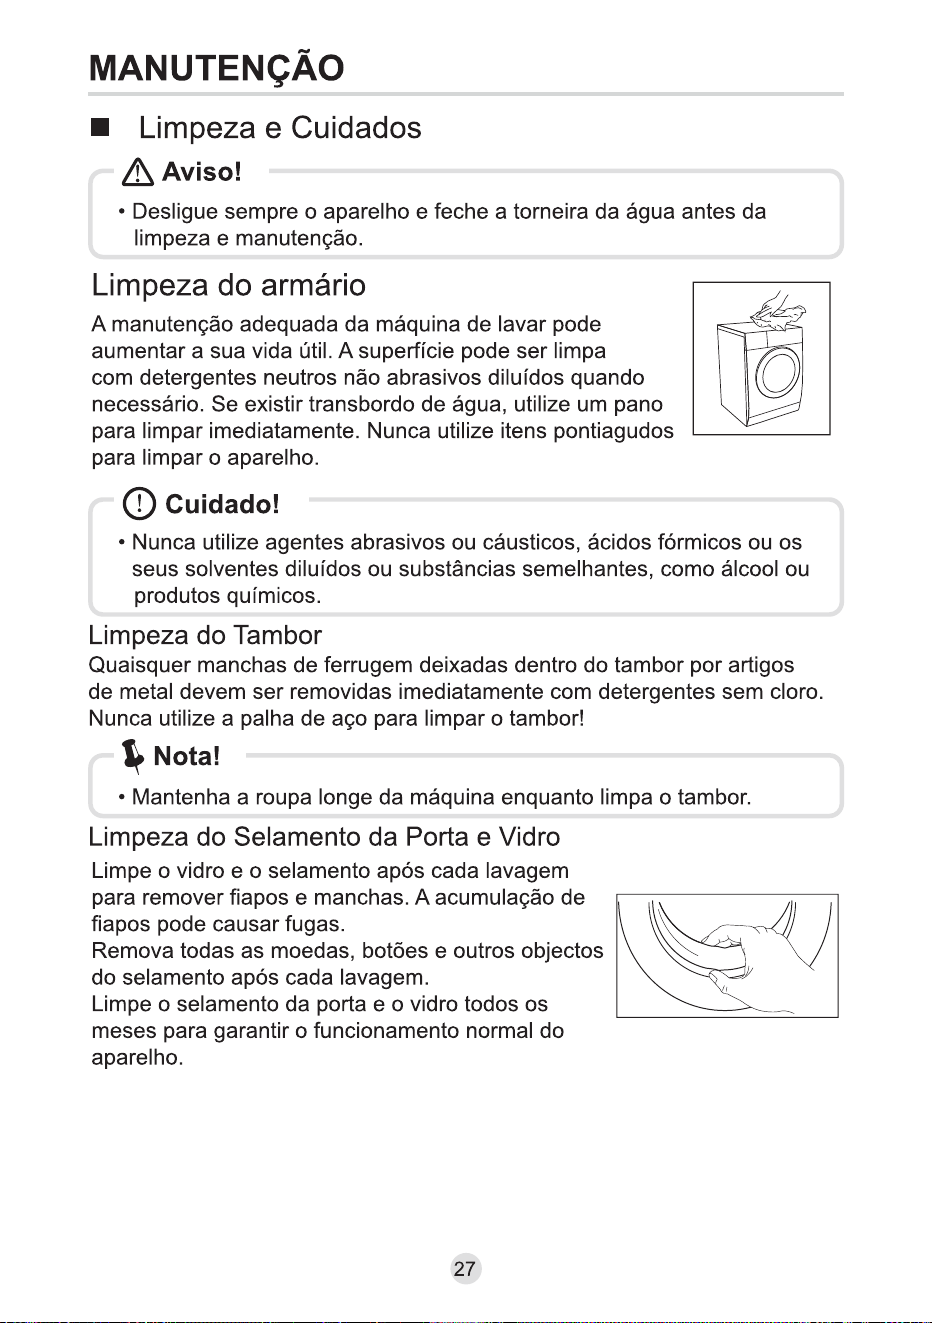
Any rust stains left inside the drum by metal articles must be removed immediately
using chlorine-free detergents. Never use steel wool for cleaning the drum!
Proper maintenance on the washing machine can extend its
working life. The surface can be cleaned with diluted
non-abrasive neutral detergents when necessary. If there is
any water overflow, use a cloth to wipe it off immediately.
Never use sharp items to clean the appliance.
MAINTENANCE
Caution!
• Never use abrasive or caustic agents. formic acids or its diluted solvents or
similar substances, like alcohol or chemical products.
Wipe the glass and seal after each wash
to remove lint and stains. If lint builds up it
can cause leakages.
Remove any coins, buttons and other objects
from the seal after each wash.
Clean the Door Seal and Glass every month to
ensure the normal operation of the appliance.
27
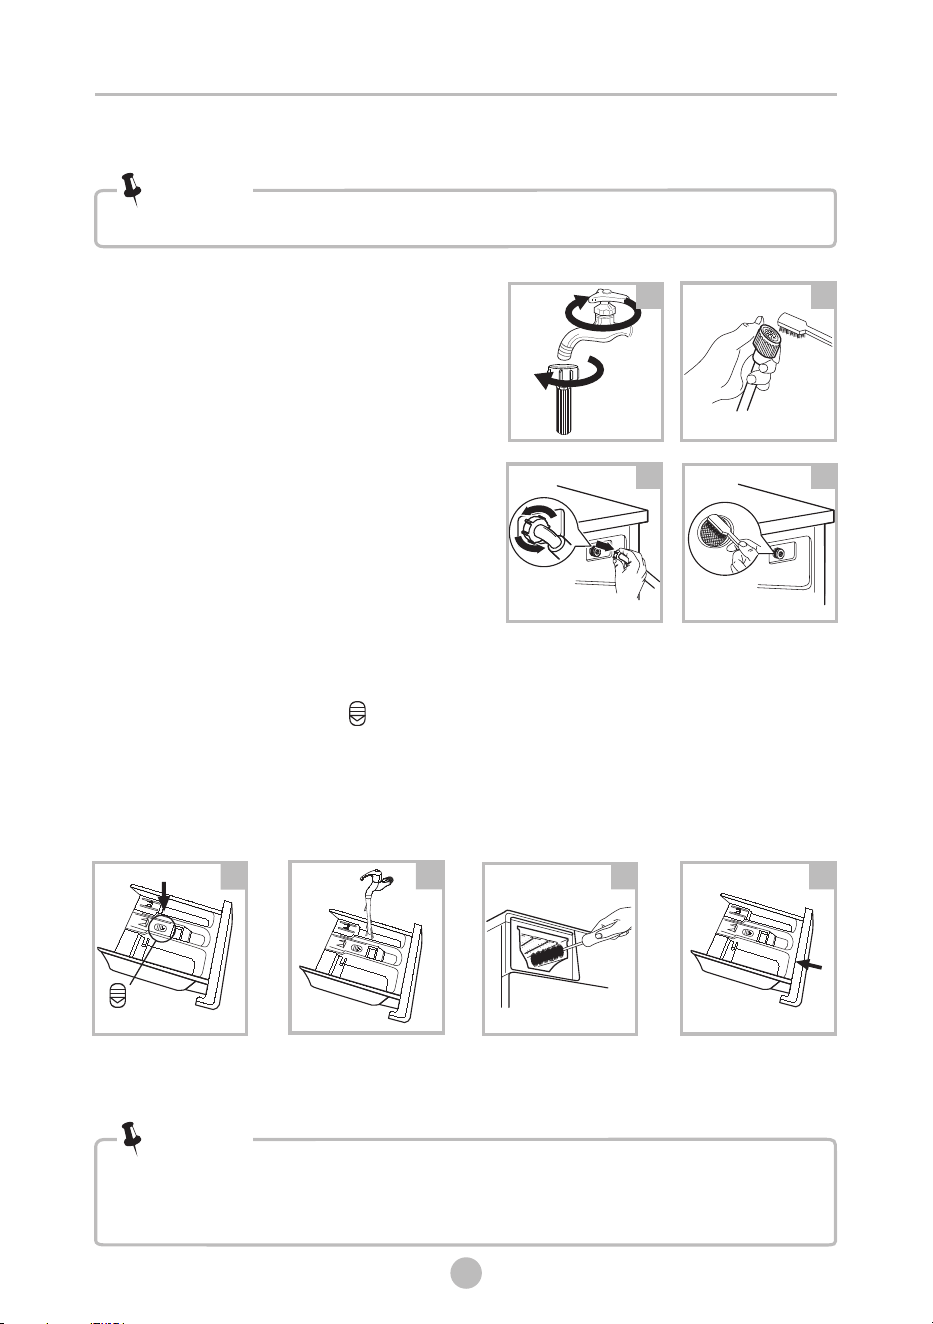
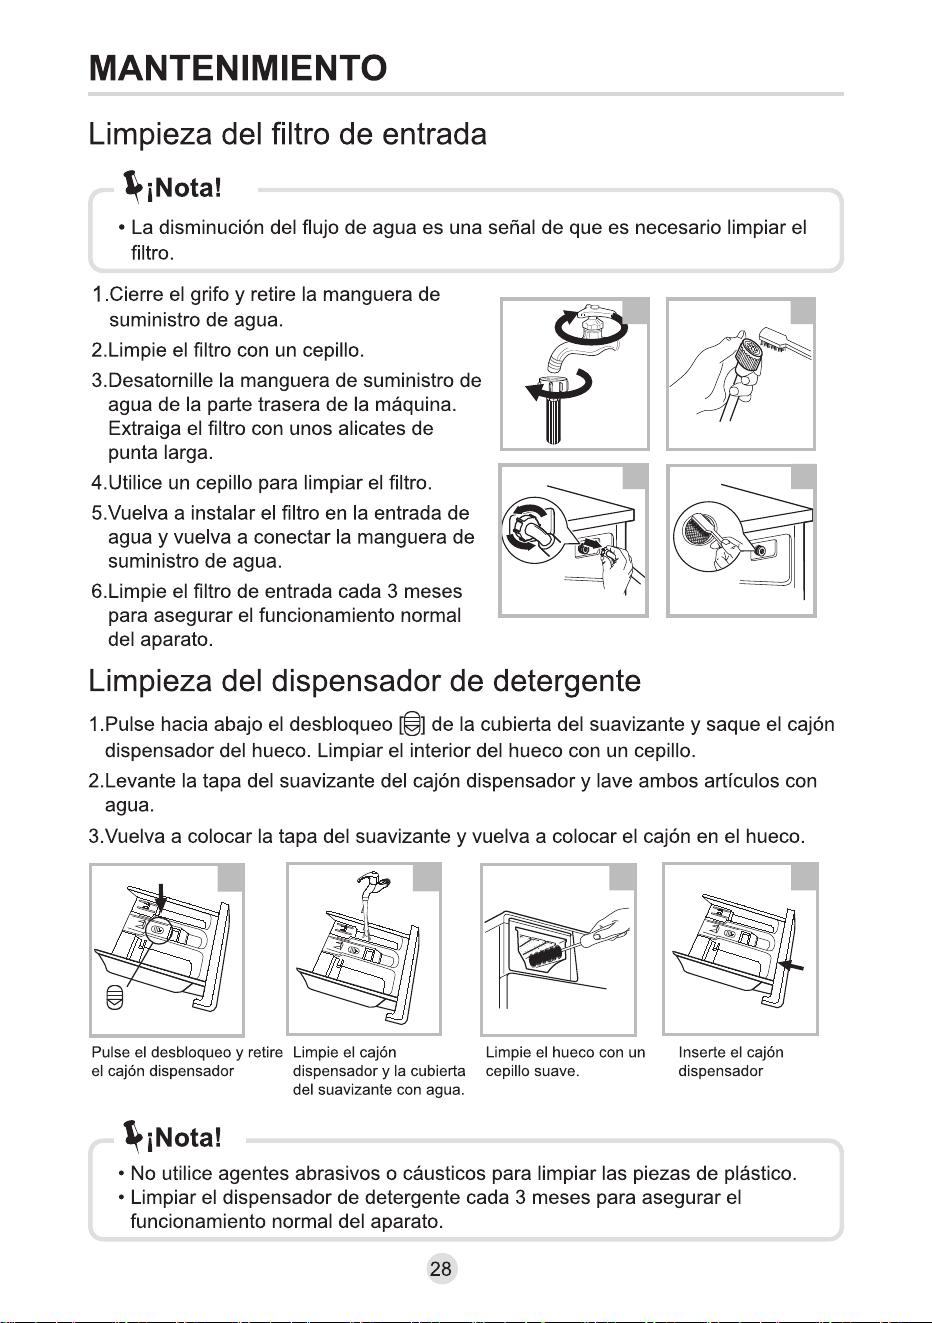
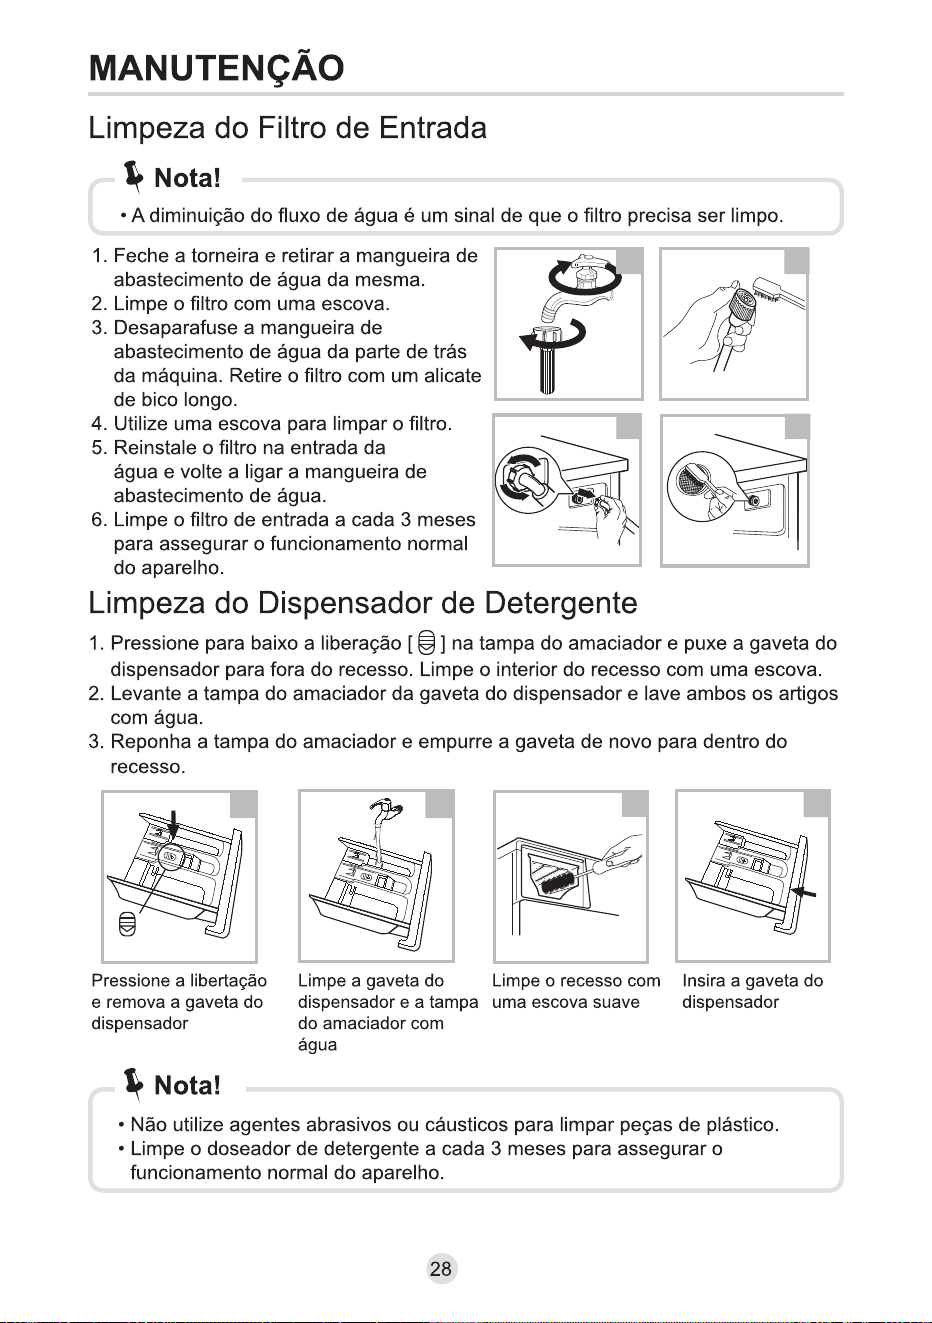
1. Close the tap and remove the water supply
hose from it.
2. Clean the filter with a brush.
3. Unscrew the water supply hose from the
backside of the machine. Pull out the filter
with long nose pliers.
4. Use a brush to clean the filter.
5. Reinstall the filter to the water inlet and
reconnect the water supply hose.
6. Clean the Inlet filter every 3 months
to ensure the normal operation of the
appliance.
Cleaning the Inlet Filter
• Diminishing water flow is a sign that the filter need to be cleaned.
Note!
Clean The Detergent Dispenser
• Do not use abrasive or caustic agents to clean plastic parts.
• Clean the detergent dispenser every 3 months to ensure the normal operation of the
appliance.
Press the release and
remove the dispenser
drawer
Clean the dispenser
drawer and the softener
cover under water
Clean the recess with
an soft brush
Insert the dispenser
drawer
Note!
1. Press down the release [ ] on the softener cover and pull the dispenser
drawer out of the recess. Clean the inside of the recess with a brush.
2. Lift the softener cover off the dispenser drawer and wash both items with water.
3. Restore the softener cover and push the drawer back into the recess.
1
3
4
2
12
34
MAINTENANCE
28
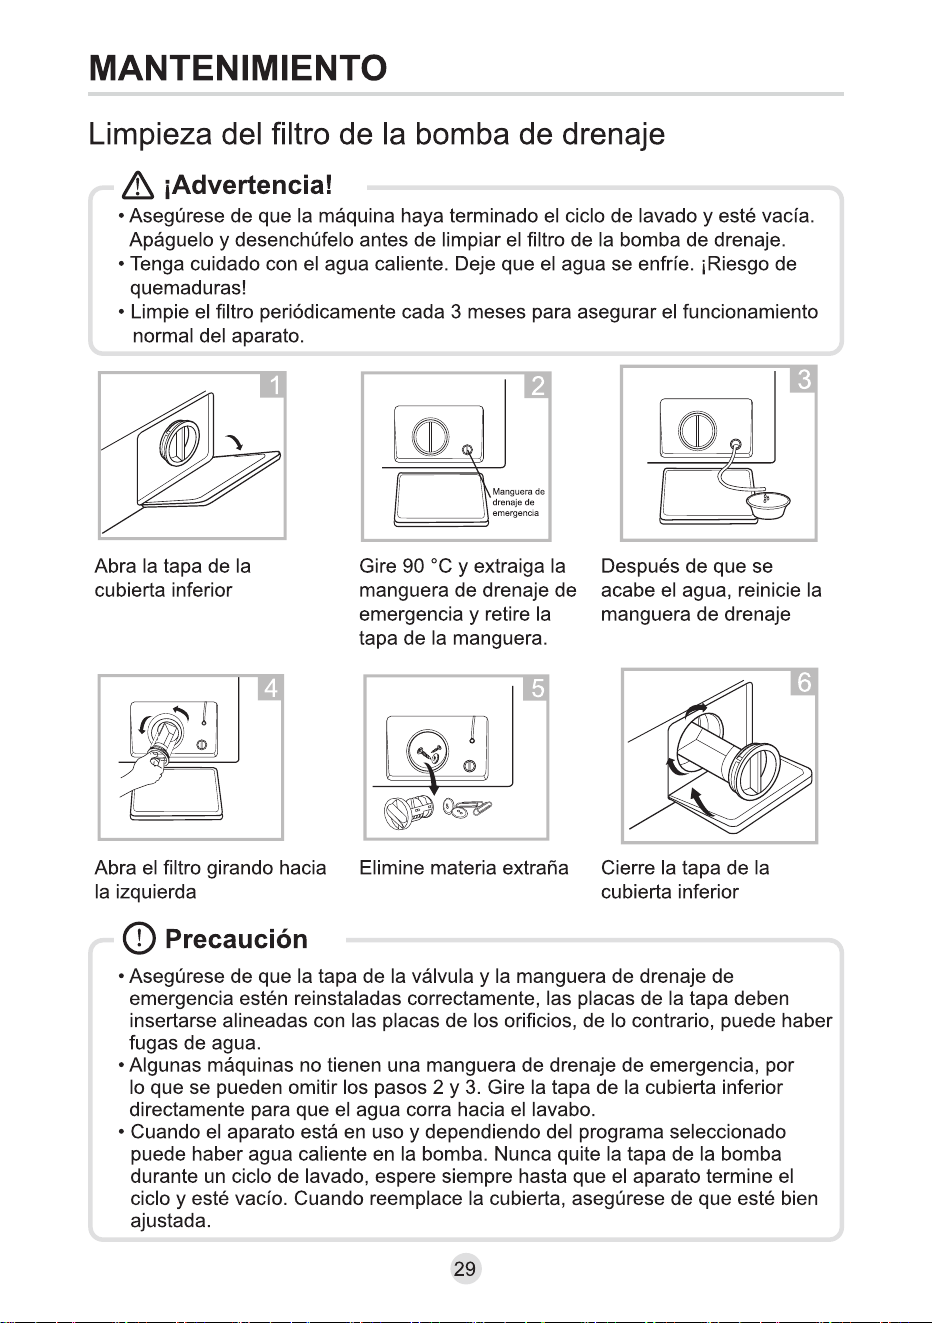
Cleaning the Drain Pump Filter
•
and unplug it before cleaning the drain pump filter.
• Be careful of hot water. Allow the water to cool down. Risk of scalding!
• Clean the filter periodically every 3 months to ensure the normal operation of the
appliance.
Make sure that the machine has finished the washing cycle and is empty. Switch it off
Warning!
MAINTENANCE
29
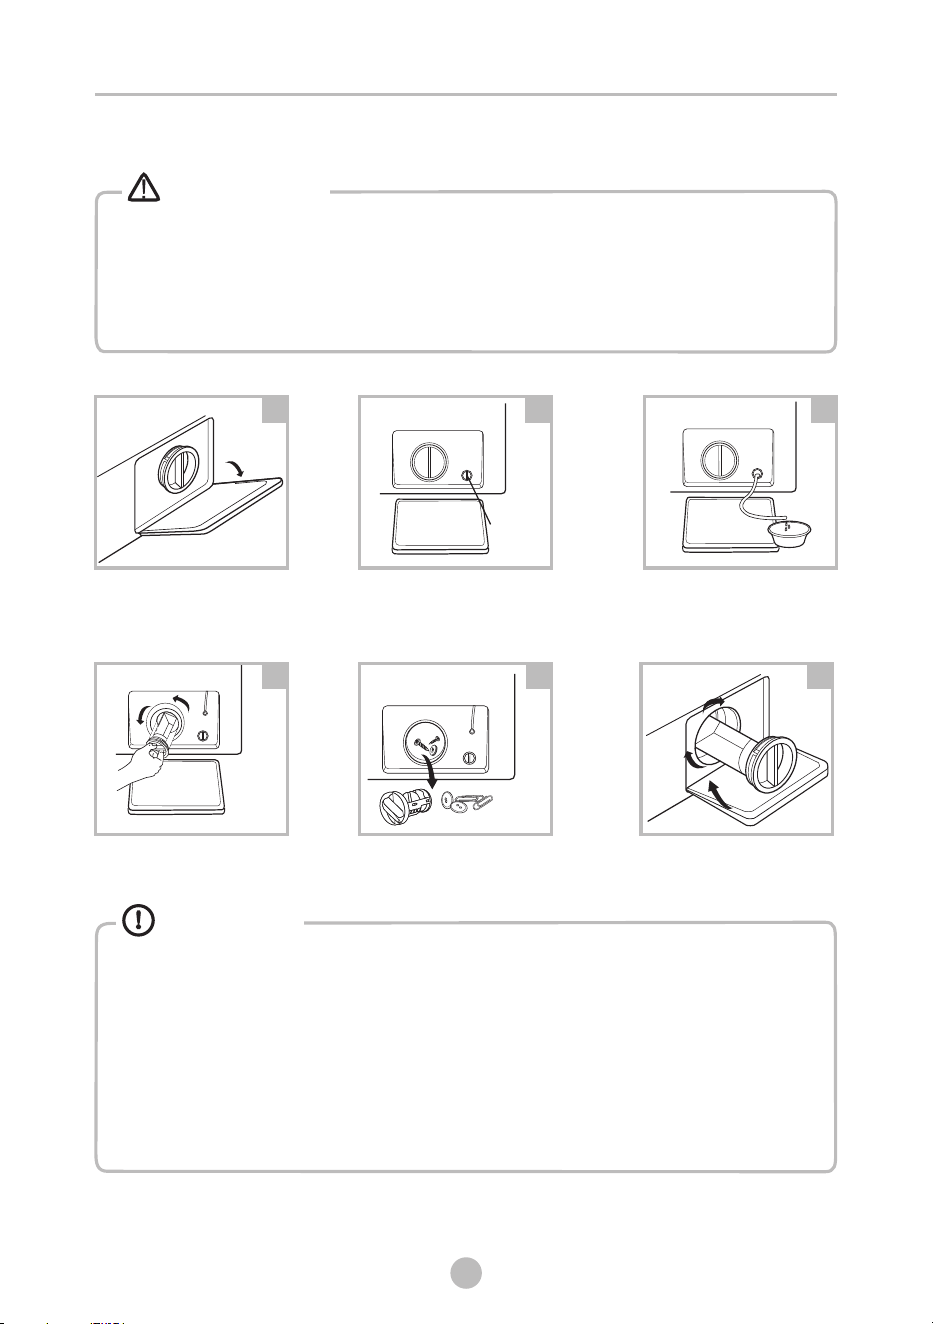
• Make sure that valve cap and emergency drain hose are reinstalled properly, cap
plates should be inserted aligning to hole plates otherwise water may leak.
• Some machines don’t have emergency drain hose, so step 2 and step 3 can be skipped.
Rotate lower cover cap directly to make water run into basin.
• When the appliance is in use and depending on the programme selected there can
be hot water in the pump. Never remove the pump cover during a wash cycle, always
wait until the appliance has finished the cycle, and is empty. When replacing the
cover, ensure it is securely re-tightened.
Caution!
Open the lower cover cap
Rotate 90°C and pull out
the emergency drain hose,
and take off the hose cap
Open the filter by turning
to the counter clockwise
Remove extraneous matter
1
2
3
Close the lower cover cap
6
5
4
Emergency
drain hose
After water runs out,reset
the drain hose
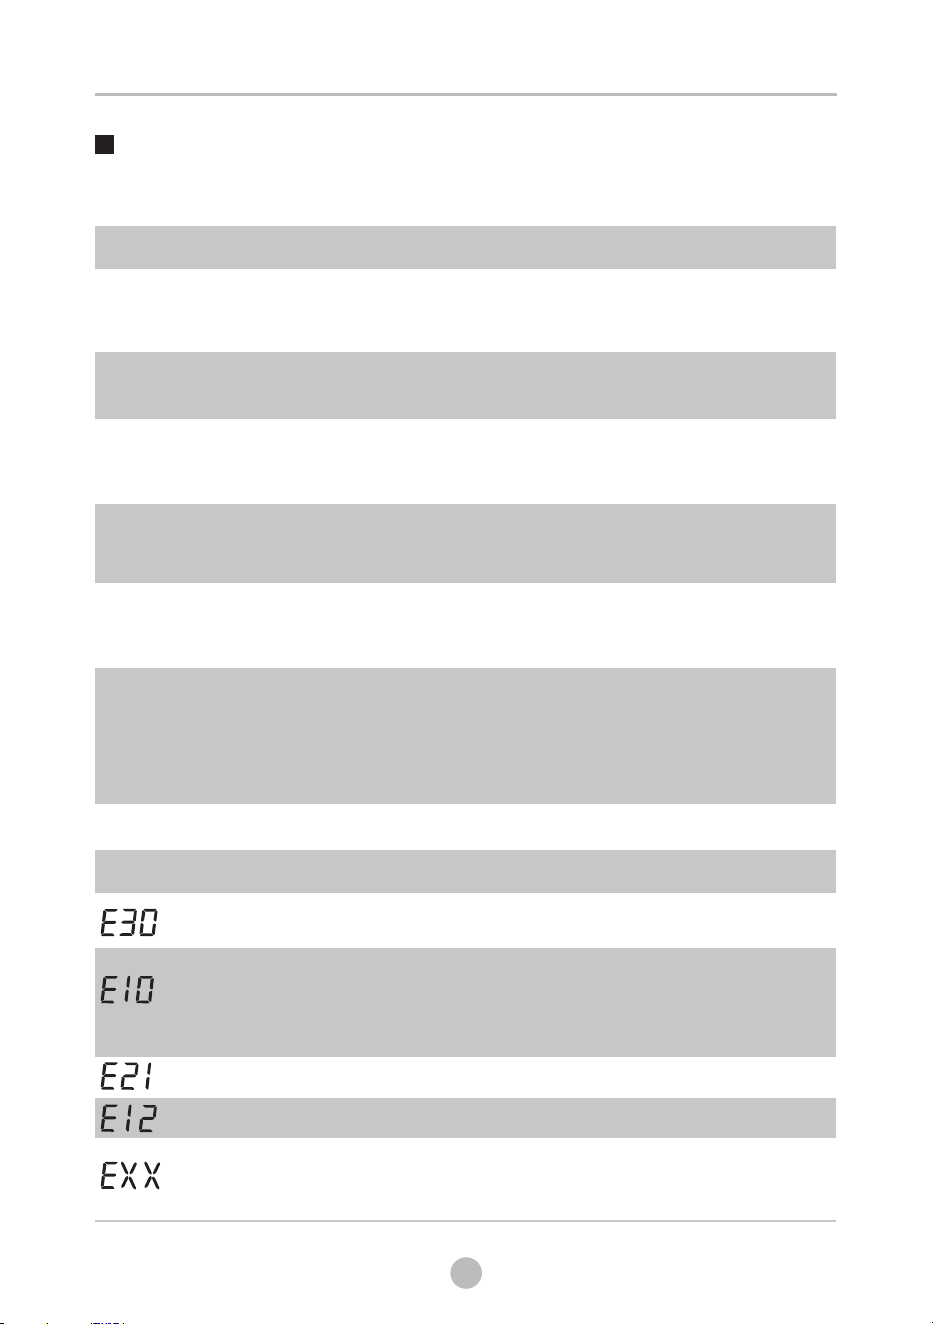
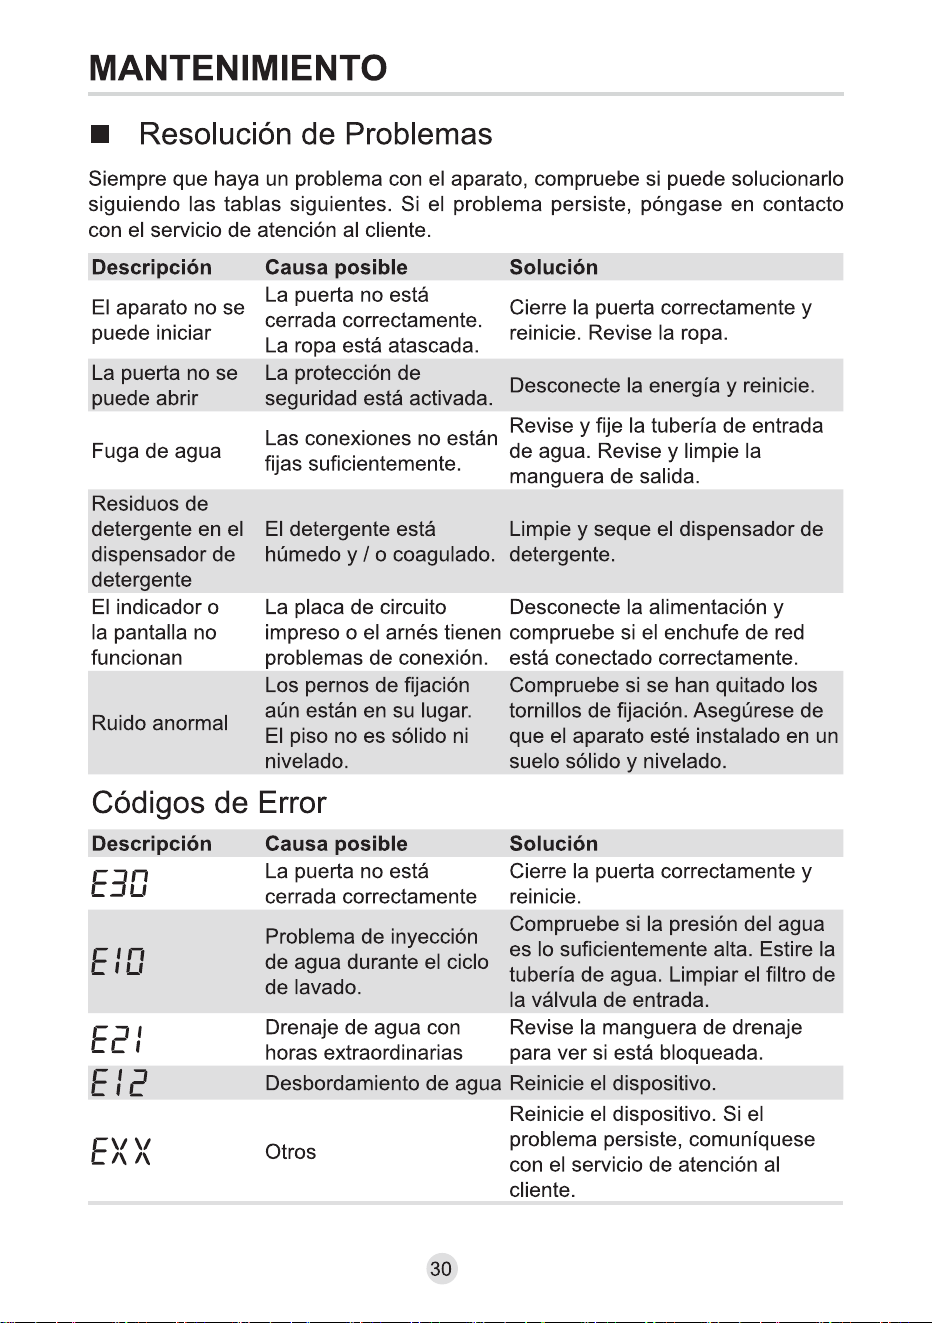
Description
Possible cause
Solution
Check if the water pressure
is high enough.
Straighten the water pipe.
Clean the inlet valve filter.
Check the drain hose for blockage.
Water injecting
problem during
wash cycle.
Overtime water draining
Restart the appliance. If problem
persists, please contact the
customer service.
Others
Water overflow
Restart the appliance.
Close the door properly and
restart.
Door is not closed properly
Trouble Shooting
Whenever there is a problem with the appliance, check if you can solve it following
the tables below. If the problem persists, please contact the customer service.
Description
Possible cause
Solution
Close the door properly and
restart.
Check the laundry.
Door is not closed properly.
Clothes are stuck.
Safety protection
is activated.
Disconnect the power and
restart.
Water leakage
Connections are
not tight enough.
Check and fasten the water inlet
pipe.
Check and clean the outlet hose.
Clean and wipe the detergent
dispenser dry.
Abnormal noise
Check if the fixing bolts have
been removed
Make sure the appliance is
installed on a solid and level
floor.
Indicator or display
does not work
PC board or harness have
connection problems.
Switch off the power and check
if the mains plug is connected
properly.
Appliance does
not start
Detergent residues
in the detergent
dispenser
Detergent is damp
and/or clotted.
Door can´t be
opened
Fixing bolts still in place.
Floor is not solid or level.
Error Codes
MAINTENANCE
30

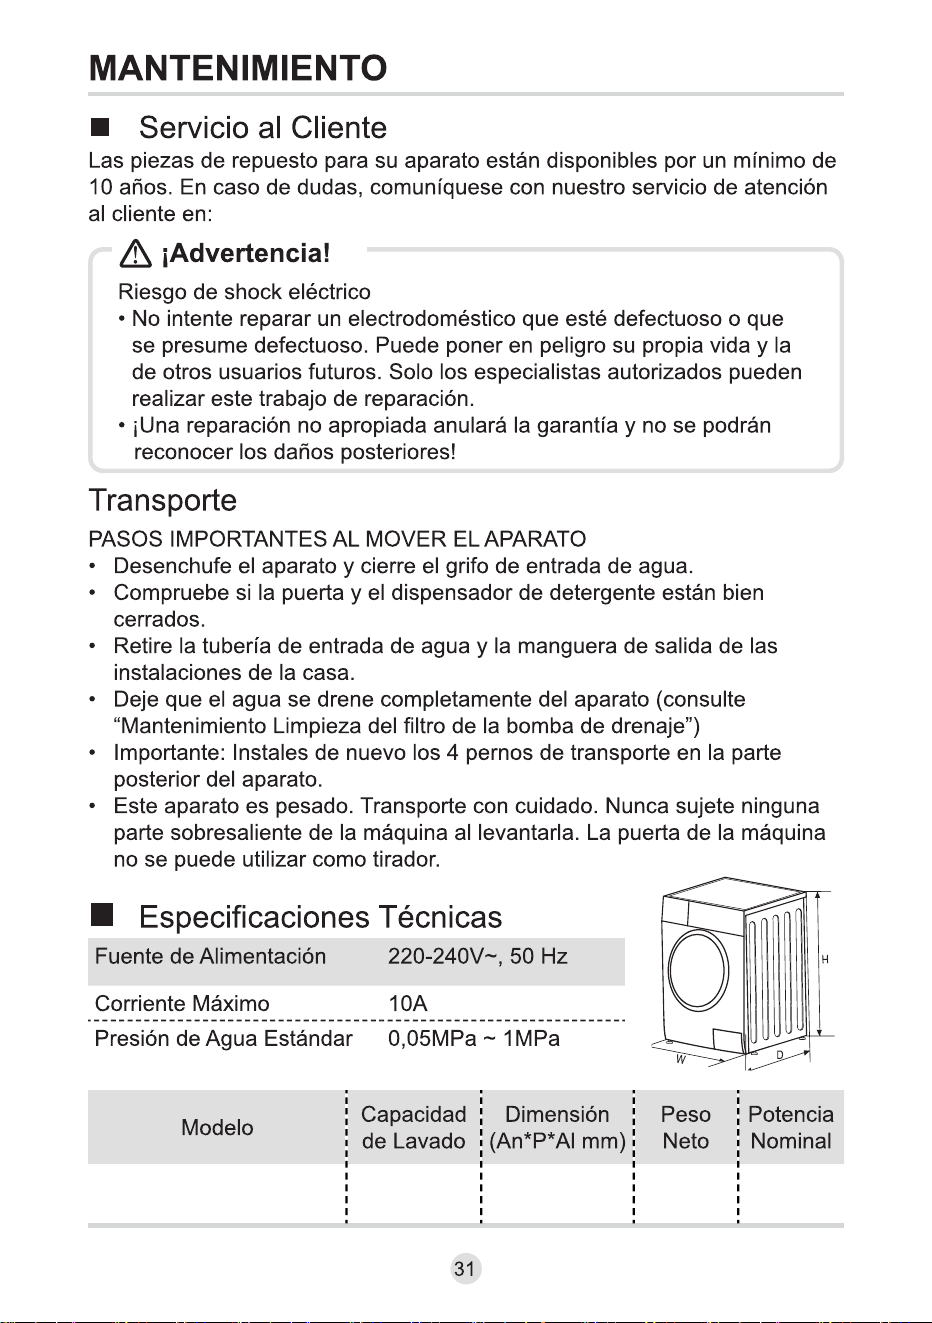
Customer service
In case of questions please contact our customer service at:
Risk of electric shock
• Never try repair an appliance which is defective of presumed to be defective.
You may put your own and future users' lives in danger.Only authorised specialists are
allowed to carry out this repair work.
• Improper repair will void the warranty and subsequent damages can't be recogniced!
Warning!
!
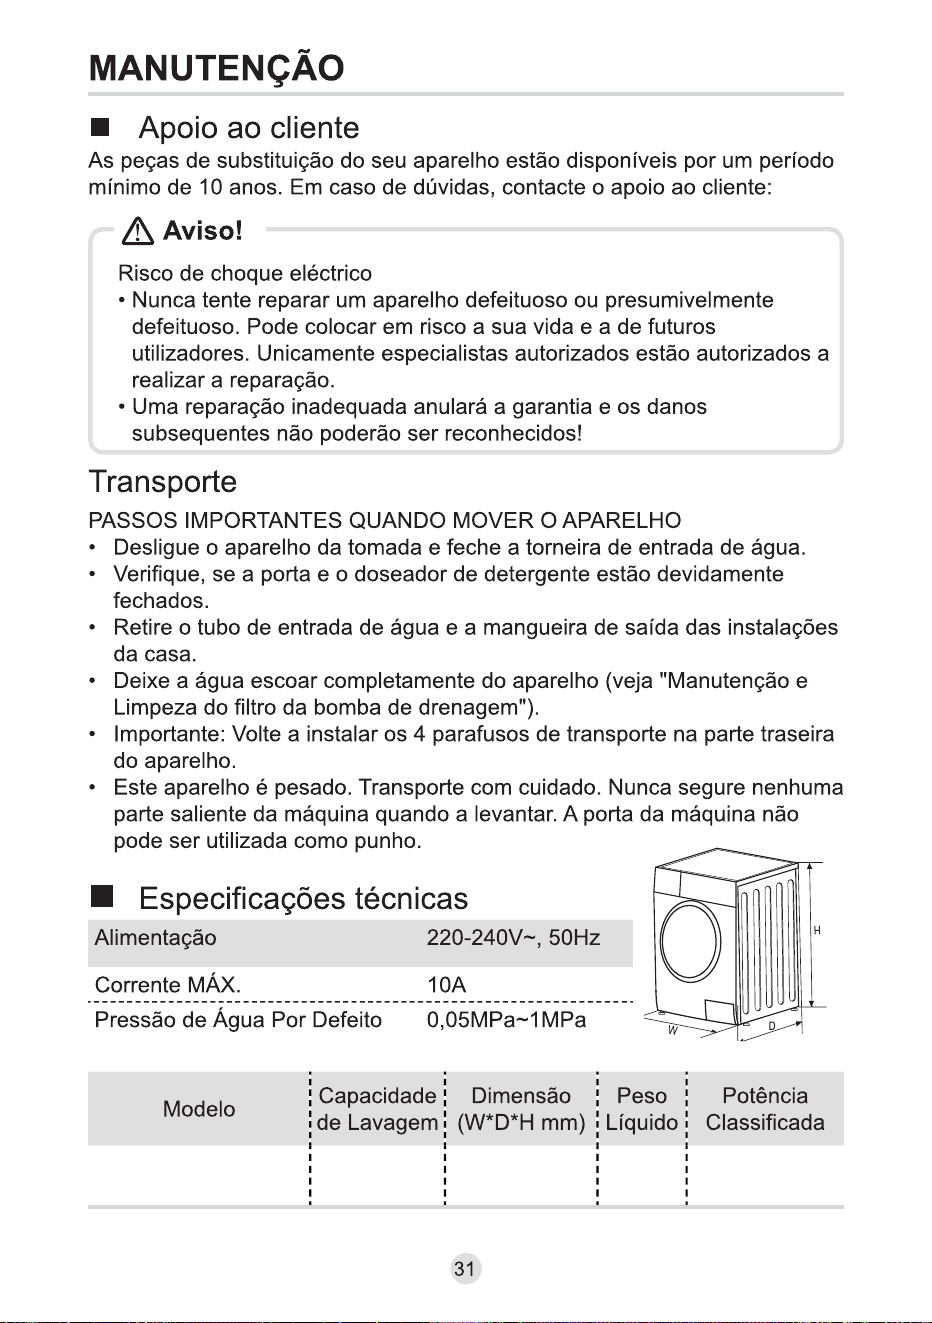
Spare part for your appliance are available for a minimum of 10 years.
Transport
IMPORTANT STEPS WHEN MOVING THE APPLIANCE
•
• Check, if the door and the detergent dispenser are closed properly.
• Remove the water inlet pipe and the outlet hose from the house installations.
• Let the water drain completely from the appliance (see “Maintenance Cleaning the
drain pump filter”)
• Important: Re-install the 4 transport bolts in the back of the appliance.
• This appliance is heavy. Transport with care. Never hold any protruding part of the
machine when lifting. The machine door cannot be used as a handle.
Unplug the appliance and close the water inlet tap.
MAINTENANCE
31
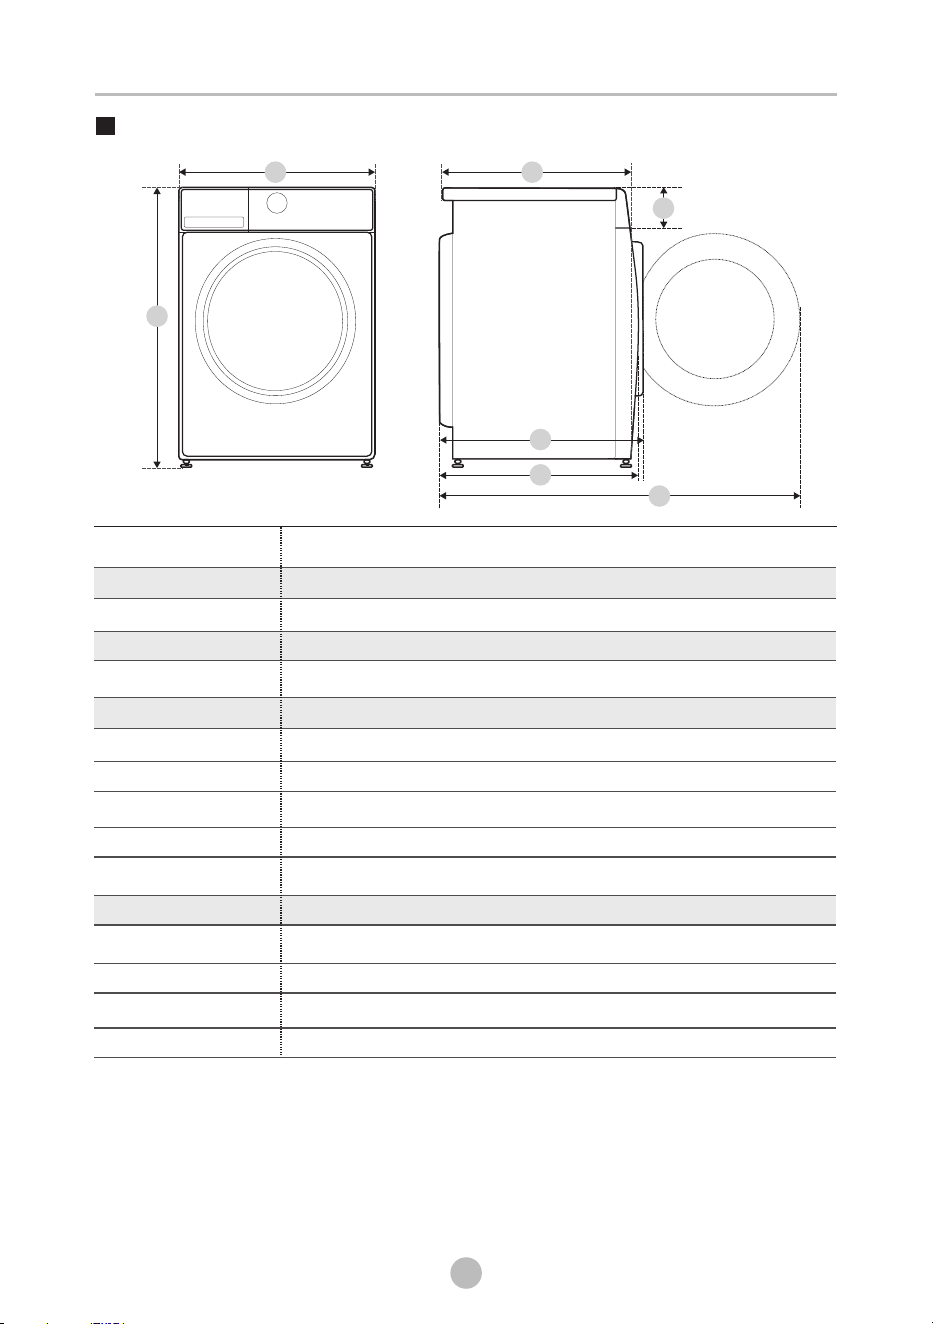
Model
Technical Specifications
CLM12VIN
MAX.Current
Standard Water Pressure
Power Supply
220-240V~,50Hz
0.05MPa~1MPa
10A
Washing Capacity
Dimension
A
B
C
Weight
Rated Power
Reference Dimension
D
E
F
G
12.0kg
595mm
850mm
595mm
76kg
2000W
659mm
641mm
1105mm
135mm
MAINTENANCE
32
A
B
E
F
D
G
C
MAINTENANCE
33
):CLM12VIN
12
A
4:00
80
C
57
52.0
0.544
44
32
22
3:00
3:00
60

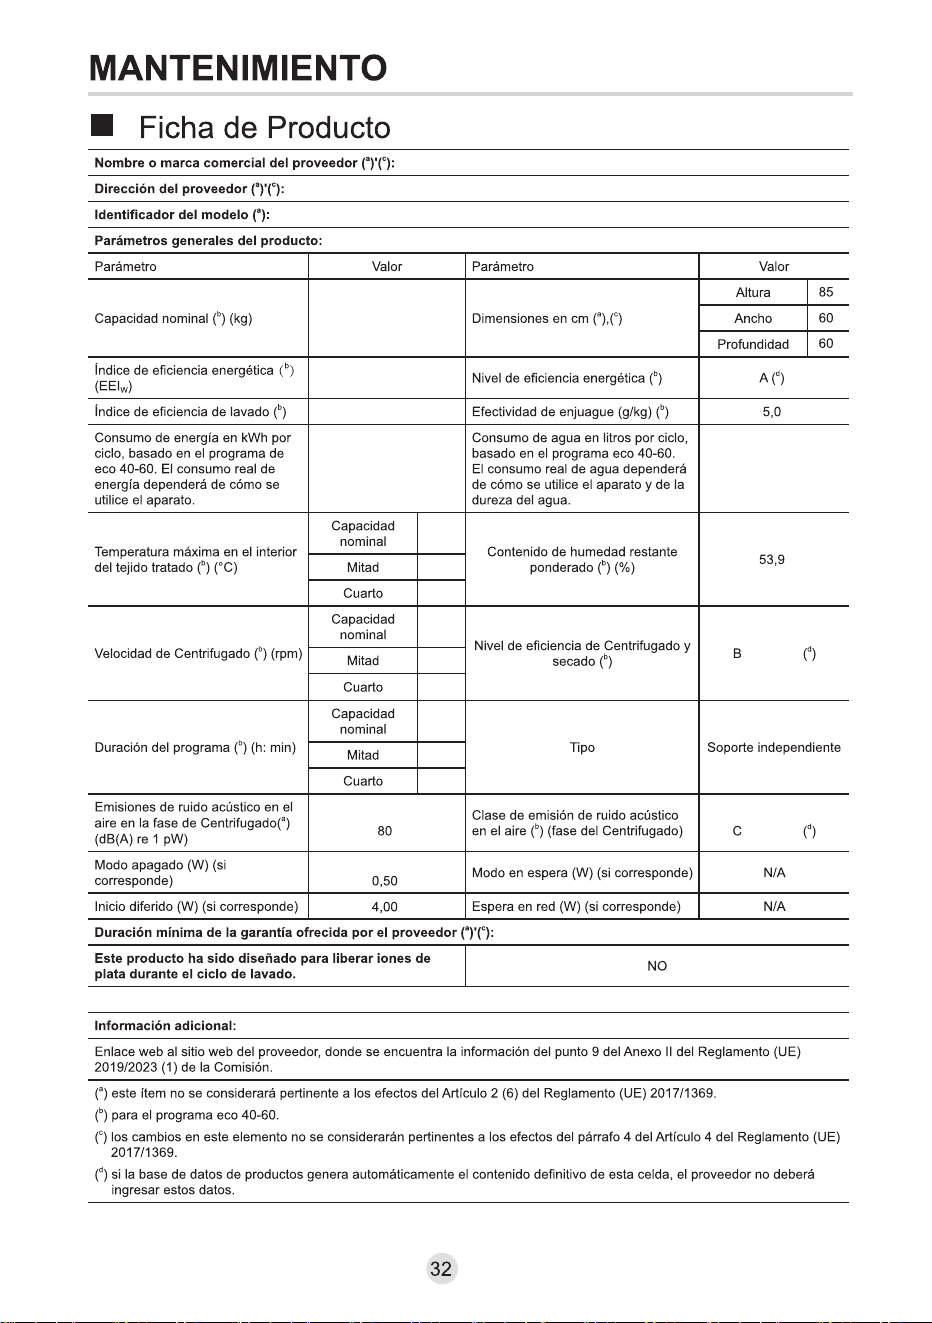
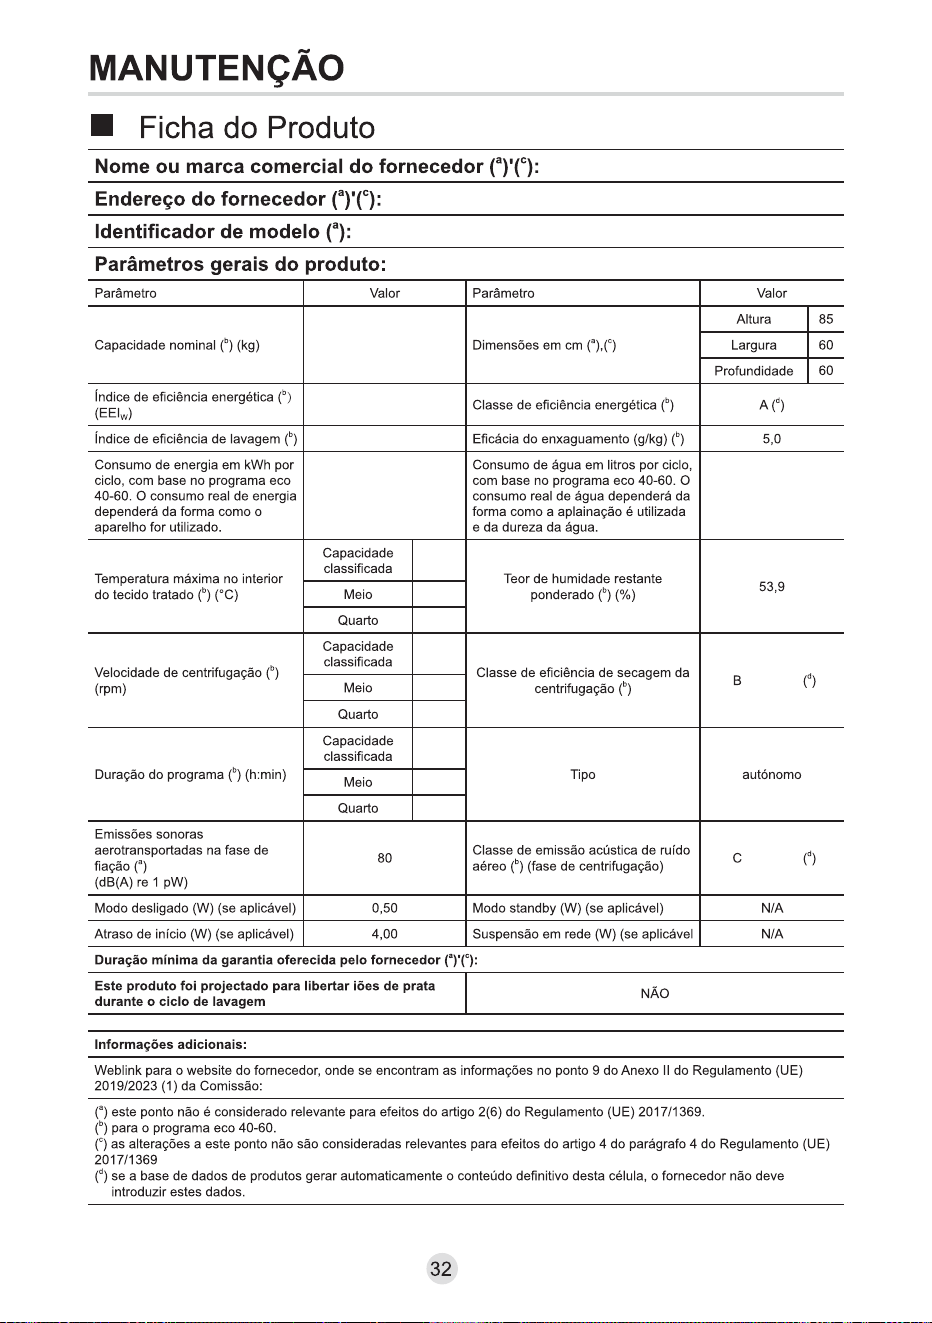
1) The actual energy consumption will depend on how the appliance is used.
2) The actual water consumption will depend on how the appliance is used and on the
hardness of the water.
3) Delivery of the spare parts within 15 working days after having received the order.
Product Data Sheet concerning (EU) 2019/2014, (EU) 2019/2023, (EU)2021/340, (EU)
2021/341.
The product data sheet for your appliance can be found online.
Go to https://eprel.ec.europe.eu and enter the model identifier for your appliance to
download the data sheet.
The model identifier for your appliance can be found in the technical specifications
section.
MAINTENANCE
34
Esponja acústica

• certifique-se de montar as esponjas/painel acústico, que podem
efetivamente reduzir o ruído causado pela máquina durante o trabalho,
a fim de proporcionar a você um ambiente de vida mais tranquilo.
Nota!
Esponja acústico
2x
2x
1, Coloque a máquina no chão, usando algum material macio como espuma
ou roupas, entre a máquina e o chão para proteção;
2,Cole as esponjas mais longas nas bordas inferiores mais longas da
máquina e as esponjas mais curtas nas bordas inferiores mais curtas.
A instalação do painel é igual à das esponjas.
Boost
234
• Não coloque gotas de roupa no compartimento de detergente.
12345
Main
wash
Prewash
Softener
1
Pré-lavagem
Lavagem principal
Amaciante
I I
I
Solte o botão para
retirar o dispensador
Higiene Vapor
ECO 40-60
Caution!
Caution!
• O detergente só precisa ser adicionado no “compartimento I ”depois de
selecionar a função de pré-lavagem.,
• Não coloque gotas de roupa no compartimento de detergente.
45'/
Sport
Jeans
Roupas de Bebé
/ 09/0604
20/
30/40
Sport
12.0
12.0
12.0
6.0
12.0
6.0
–
12.0
6.0
6.0
12.0
Higiene Vapor
Jeans
Sport
2.0
2.0
12.0
12.0
0:45
2:28
4:00
1:01
1:07
0:12
1:18
1:35
0:47
2:01
1:20
3:18
3:39
Algodão, Misto, Sintético são programas de pesagem automáticos.
•
45'/
Roupas de Bebé
45'/
2.0
6.0
12.0
12.0
12.0
12.0
6.0
3.0
20
20
60
40
60
-
-
-
0:45
1:01
3:44
1:20
1:30
4:00
3:00
3:00
0.131
0.206
1.919
0.988
1.684
1.186
0.618
0.253
31
58
99
99
99
84.0
58.0
45.0
20
20
60
40
60
44
32
22
75%/800
65%/1000
53%/1400
65%/1000
65%/1000
53.9%/1350
53.9%/1350
53.9%/1350
123,0
Programas
O vapor é aplicável para alavagem diária. O vapor pode
penetrar profundamente na fibra, efetivamente matando
bactérias e germes, evitando maus odores e protegendo
sua saúde.
Este procedimento padrão é 45', pressione o botão "Boost"
para mudar para 15', que é adequado para lavarpoucas roupas
e não muito sujas rapidamente. Às vezes, após completar
oprocedimento rápido de 15', o teor de umidade das roupas é alto.
Especialmente para jeans.
Lavagem de roupas esportivas.
Jeans
Sport
Higiene Vapor
45'/
Roupas de Bebé
1400
20
800
60
1000
–
20
1400
1000
40
600
–
1000
90
–
30
20
800
800
60
1000
40
1000
40
1200
40
1400
Higiene Vapor
Jeans
45'/
Sport
Roupas de Bebé
Algodão,Sintético,Mix,Roupas de Bebé
Algodão,Sintético,Mix,Sport
Algodão,Sintético,Mix,Sport,Jeans
Algodão,Sintético,Mix
Algodão,Sintético,Mix,Roupas de Bebé
Jeans
Centrifug.
[Centrifug.]
Contador de uso,
1.desconecte o equipamento por 10s e reconecte.
2.Ligue e dentro de 10s, pressione " e "
controle simultaneamente e continuamente por cerca de 5s até que o
display do dispositivo mostre dígitos, o valor pode indicar os tempos de
uso do equipamento.
3.Repita a etapa 1 novamente e o cliente pode retomar a operação
normal.
Ini. Dif. Retard"
" no painel de
Boost
Nota!
1
2
3
4
12
34

3

CLM12VIN
12.0kg 595x595x850 76kg 2000W
CLM12VIN
12
4:00
57
52.0
44
32
22
3:00
3:00
1.031
0.544
1350
1350
1350


CERTIFICADO DE GARANTÍA
Imprescindible la presentación de la factura de compra acompañada del presente certificado de garantía.
Riesgos cubiertos.
Este aparato está garantizado contra cualquier defecto de funcionamiento, siempre que se destine a uso doméstico,
procediéndose a su reparación dentro del plazo de garantía y sólo por la red de SAT autorizados.
Nuestros electrodomésticos Corberó cuentan con la garantía legal del fabricante que cubre cualquier avería o defecto durante36
meses, desde su fecha factura de 1 de enero del 2022. En caso de que fuera necesario, nosotros nos ocupamos de cualquier posible
incidencia siempre que se deba a un componente defectuoso o fallo de fabricación.
Excepciones de garantía.
• Que la fecha del certificado no coincida con la fecha de venta de la factura original.
• Averías producidas por golpe, por caída o cualquier otra causa de fuerza mayor.
• Si el apa
rato ha sido manipulado por personal no autorizado.
• Las averías producidas o derivadas como consecuencia de un uso inadecuado, por defectos de instalación,
por introducir modificaciones en el aparato que alteren su funcionamiento.
• Puestas en marcha, mantenimiento, limpiezas, componentes sujetos a desgaste, lámparas, piezas estéticas,
oxidaciones, plásticos, gomas, carcasas y cristales.
“ESTAS EXCEPCIONES ANULAN LA GARANTÍA, SIENDO LA REPARACIÓN CON CARGO AL CLIENTE”
Periodo amparado en aparatos según ley de garantias en la venta de bienes de consumo Ley vigente es “RD 7/2021”
Horario de atención Lunes a Viernes de 9h00 a 19h00. Teléfono de contacto_ 911 08 08 08 Mail de contacto_ [email protected] web_ www.corbero.es
Dirección de Servicio técnico oficial_Vidal i Ribes 8-10 08950 Esplugues de Llobregat Barcelona
Sevicio Técnico Oficial: 911 08 08 08
Los hornos microondas (a excepción de los integrables) y los hornos sobremesa en el caso de cualquier incidencia de
funcionamiento, deben de llevarse al servicio técnico más próximo por parte del cliente. No se recojen ni reparan en el
domicilio.
•
Garantía termos eléctricos. Garantía de 3 años incluyendo los costes de desplazamiento y mano de obra que
correspondan de la reparación del producto, teniendo que tener un mantenimiento una vez cada 12 meses.
Especialmente si Ud. ha instalado un aparato a gas, tenga presente como titular de la instalación, la obligatoriedad de
realizar una revisión completa de los equipos, (según Real Decreto 238 / 2013, del 5 Abril. RITE. IT3, M. Lo termos
eléctricos y calderas que incluyen depósitos acumuladores de agua caliente, para que se aplique la prestación de la
Garantía, es obligatorio que el ánodo de magnesio esté operativo y que realice la función de protección
adecuadamente. Para ello es recomendable que el ánodo se revise bianualmente por el Servicio Oficial y sea renovado
cuando fuera necesario. Periodicidad que deberá ser anual en aquellas zonas con aguas críticas (contenido de CaCO3
superiores a 200mg/L, es decir a partir de 20ºfH de dureza). Depósitos sin el correcto estado del ánodo de protección, no
tienen la cobertura de la garantía. Independientemente del tipo de depósito o producto, todas las válvulas de
sobrepresión de calefacción o a.c.s., deberán ser canalizadas para evitar daños en Ia vivienda por descargas de agua. La
garantía del producto no asume los daños causados por Ia no canalización del agua derramada por esta válvula.
•

CERTIFICATE OF GUARANTEE
The presentation of the purchase invoice accompanied by this guarantee certificate is essential.
Covered Risks.
This appliance is guaranteed against any malfunction, provided that it is intended for domestic use, proceeding to its repair within
the warranty period and only by the authorized SAT network.
Our Corberó appliances have the manufacturer's legal warranty that covers any breakdown or defect for 36 months, from the
invoice date of January 1, 2022. If necessary, we take care of any possible incident whenever it is due to a defective component or
manufacturing fault. Warranty Exceptions
Warranty Exceptions
•
That the date of the certificate does not coincide with the date of sale of the original invoice.
•
Faults produced by blow, by fall or any other cause of force majeure.
•
If the device has been manipulated by unauthorized personnel.
•
Faults produced or derived as a consequence of improper use, installation defects, or modifications to the device that
alter its operation.
•
Start-up, maintenance, cleaning, components subject to wear, lamps, aesthetic parts,
oxidation, plastics, rubbers, housings and crystals.
“THESE EXCEPTIONS VOID THE WARRANTY, THE REPAIR BEING CHARGED TO THE CUSTOMER”
Period covered in devices according to the law of guarantees in the sale of consumer goods Current law is “RD 7/2021”
Hours of operation Monday to Friday from9h00 a 19h00. Telephone contact_ 911 08 08 08 Contact email_ [email protected] web_ www.corbero.es
Official Technical Service Address_Vidal i Ribes 8-10 08950 Esplugues de Llobregat Barcelona
Official Technical Service: 911 08 08 08
Microwave ovens (with the exception of built-in ones) and tabletop ovens in the event of any incident of
operation, they must be taken to the nearest technical service by the customer. They are not collected or repaired at
home.
•
Electric thermos guarantee. 3-year warranty including travel and labor costs that correspond to the repair of the
product, having to have maintenance once every 12 months. Especially if you have installed a gas appliance, keep in
mind as the owner of the installation, the obligation to carry out a complete review of the equipment, (according to
Royal Decree 238 / 2013, of April 5. RITE. IT3, M. Lo thermos electrical and boilers that include hot water storage tanks,
for the benefit of the Guarantee to apply, it is mandatory that the magnesium anode is operational and that it performs
the protection function adequately.For this, it is recommended that the anode be checked biannually by the Official
Service and is renewed when necessary Periodicity that must be annual in those areas with critical waters (CaCO3
content greater than 200mg/L, that is, from 20ºfH of hardness) Deposits without the correct state of the protection
anode are not covered by the warranty Regardless of the type of tank or product, all heating or DHW overpressure
valves must be channeled to avoid damage and n the house due to water discharges. The product warranty does not
cover damages caused by not channeling the water spilled by this valve.
•

CERTIFICADO DE GARANTIA
A apresentação da factura de compra acompanhada deste certificado de garantia é indispensável.
Riscos cobertos.
Este aparelho está garantido contra qualquer avaria, desde que se destine ao uso doméstico, reparando-o dentro do período de
garantia e apenas pela rede SAT autorizada.
Nossos eletrodomésticos Corberó têm garantia legal do fabricante que cobre qualquer avaria ou defeito por 36 meses, a partir da
data da fatura de 1º de janeiro de 2022. Se necessário, cuidamos de qualquer eventual incidente desde que seja devido a um
componente ou fabricação defeituoso falta.
Exceções de garantia.
•
Que a data do certificado não coincida com a data de venda da fatura original.
•
Avarias causadas por pancadas, quedas ou qualquer outra causa de força maior.
•
Se o dispositivo foi adulterado por pessoal não autorizado.
•
Avarias produzidas ou derivadas como resultado de uso indevido, defeitos de instalação, fazendo alterações no
dispositivo que alteram seu funcionamento.
•
Comissionamento, manutenção, limpeza, componentes sujeitos a desgaste, lâmpadas, peças estéticas,
oxidação, plásticos, borrachas, invólucros e vidros.
“ESTAS EXCEÇÕES ANULAM A GARANTIA, SENDO A REPARAÇÃO POR CONTA DO CLIENTE.” Período
abrangido em dispositivos de acordo com a lei de garantias na venda de bens de consumo A lei atual é "Decreto-Lei n.º 84/2021"
Horário de atendimento de segunda a sexta das 9h às 19h. Telefone de contato_ 351 961 789 806 Email de contato_ [email protected]
web_ www.corbero.es Serviço Técnico Oficial Endereço_Vidal i Ribes 8-10 08950 Esplugues de Llobregat Barcelona
Serviço Técnico Oficial: 351 961 789 806
Fornos de microondas (exceto os embutidos) e fornos de mesa em caso de qualquer incidência de
operação, devem ser levados ao serviço técnico mais próximo pelo cliente. Eles não são recolhidos ou reparados em
casa.
•
Garantia térmica elétrica. Garantia de 3 anos incluindo despesas de deslocação e mão-de-obra que correspondam à
reparação do produto, devendo ter manutenção a cada 12 meses. Especialmente se instalou um aparelho a gás, tenha
em atenção como proprietário da instalação, a obrigação de realizar uma revisão completa do equipamento, (de acordo
com o Decreto-Lei n.º 84/2021. Lo thermos eléctricos e caldeiras que incluam acumuladores de água quente, para o
benefício da Garantia a aplicar, é obrigatório que o ânodo de magnésio esteja operacional e que desempenhe a função
de protecção de forma adequada. ser verificado a cada dois anos no Serviço Oficial e renovado quando necessário
Periodicidade que deve ser anual nas áreas com águas críticas (teor de CaCO3 superior a 200mg/L,
ou seja, a partir de 20ºfH de dureza) Depósitos sem o estado correto do ânodo de proteção não estão cobertos pela
garantia Independentemente do tipo de tanque ou produto, todas as válvulas de aquecimento ou de sobrepressão de
água quente sanitária devem ser canalizadas para evitar danos e na casa devido a descargas de água. A garantia do
produto não cobre danos causados pela não canalização da água derramada por esta válvula.
•