User Manual and Installation Instructions
1
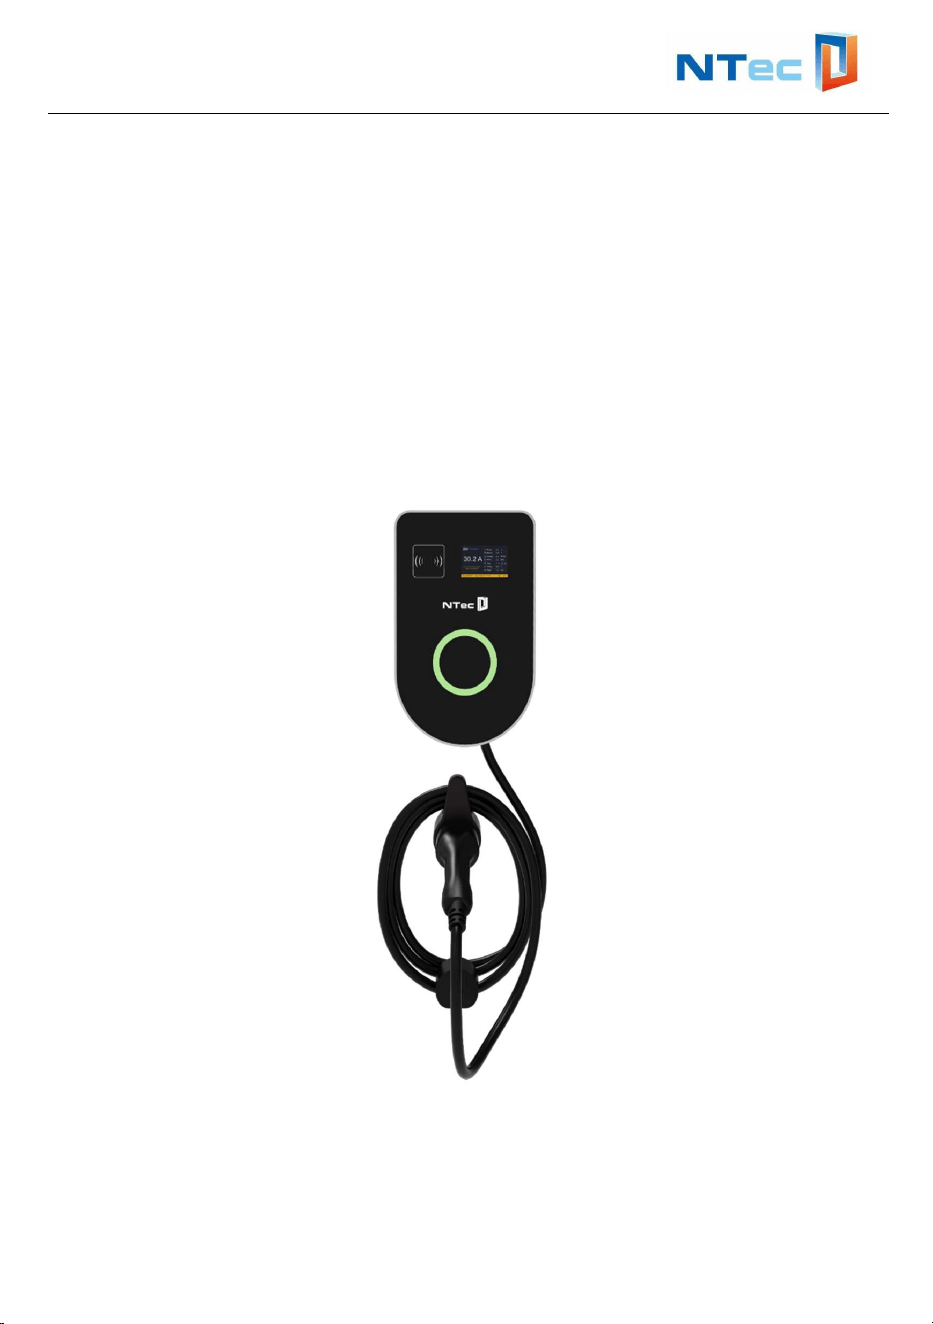
BVEVCS Series EV Charger
User Manual and Installation Instructions
version: 1.4

User Manual and Installation Instructions
2
Contents
1. Safety Instructions ................................................................................... 3
2. Introduction .............................................................................................. 4
2.1 Technical Specifications: .......................................................... 4
2.2 External Structure ..................................................................... 5
3. Verify Contents ........................................................................................ 5
4. Gather Tools ............................................................................................ 6
5. Location Requirements ........................................................................... 6
6. Wire the circuit ......................................................................................... 7
7. Mount EV Charger ................................................................................... 8
8. Configuration and Operation ................................................................. 10
8.1 Power-on Checking ................................................................ 10
8.2 Start and stop charging station by RFID card .......................... 10
9. Reset the charger’s WIFI network ...................................................... 15
10. Troubleshooting ................................................................................. 16
10.1 Indicator Status ..................................................................... 16
10.2 Fault Code and Resolution ................................................... 16
11. Quality Assurance .............................................................................. 18
12. Contact Information ........................................................................... 19
User Manual and Installation Instructions
3
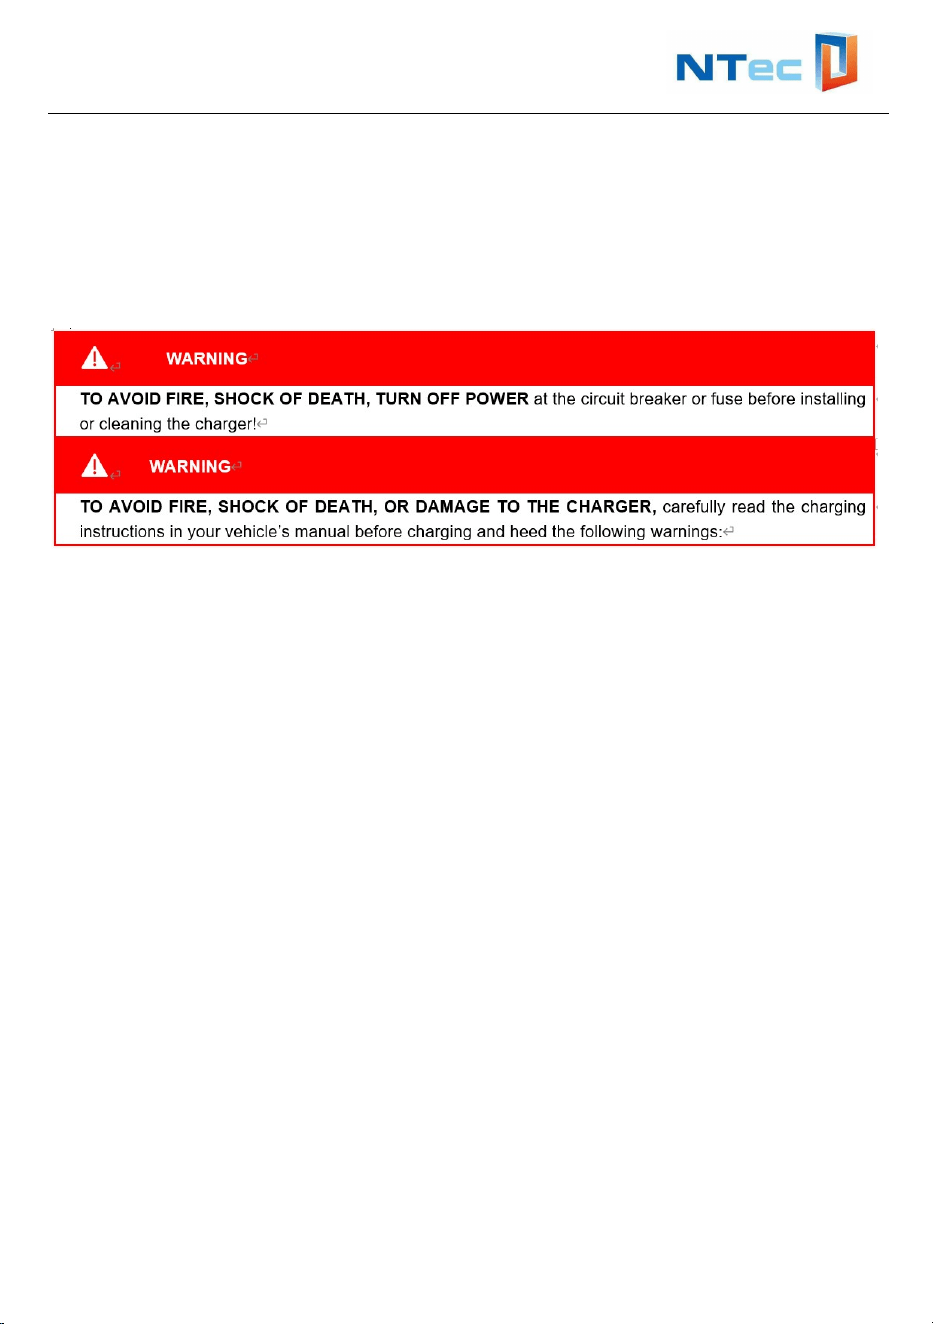
1. Safety Instructions
This manual contains important instructions for BVEVCS Series EV Charger.
Read and follow all warnings and instructions before installing and operating the
charger. Install and operate only as instructed.
Failure to do so may lead to death, injury, or property damage, and will void the
Limited Warranty.
1. This device MUST be installed, adjusted and serviced by qualified electrical
personnel familiar with the construction and operation of this type of charger
and the dangers involved.
2. This device MUST be grounded through a permanent wiring system or an
equipment grounding conductor.
3. The device is designed only for vehicles that are compatible with the SAE
J1772 Level 2 charging standard.
4. Do not install or use the charger near flammable explosive, or combustible
materials, chemicals, vapors and other hazard objects.
5. Incorrect installation and testing of the device could potentially damage the
vehicle’s battery, components and / or the device itself.
6. Children should be supervised when around this equipment.
7. Do not use the charger if it is defective, appears cracked, frayed, broken or
damaged.
8. Do not use the charger when the charger is exposed to severe rain, snow or
other severe weather.
9. Do not forcefully pull the charging cable, damage it with sharp objects, put
fingers or insert foreign objects into any part of the charging connector.
10. Do not operate the charger outside its operating temperature range of -22℉ to
122℉ (-30℃ to 50℃).
11. Ensure the charging cable is positioned so it is not stepped on, tripped over, or
subjected to damage or stress. Do not close a garage door on the charging
cable.
12. Ensure that BVEVCS Series EV Charger charging cable is positioned so it is
not stepped on, tripped over, or subjected to damage or stress. Do not close a
garage door on the charging cable.

User Manual and Installation Instructions
4
13. Do not attempt to repair or service any part of the device yourself, the charger
contains no field serviceable parts. If the device requires servicing, contact us.
14. When transporting the charger, do not subject it to strong force, or otherwise
pull, twist, tangle, drag or step on the device.
No Accuracy Guarantee
Commercially reasonable efforts were made to ensure that the specifications
and other information in this manual are accurate and complete at the time of its
publication, However, the specifications and other information in this manual are
subject to change at any time without prior notice.
2. Introduction
2.1 Technical Specifications:
Model BVEVCS-32A BVEVCS-48A
Charging capacity Up to 7.6kW Up to 11.5kW
Input voltage range 192-265VAC/60Hz
Mode of connection Hardwired, L1+L2+PE
MAX. Charger Current 32A 48A
Standby power
≦
3W
AC measurement
accuracy
1%
Communication WIFI
User interface RFID, 3.5’LCD
Charging Cable SAE J1772 Plug MAX.48A, Cable 16.4ft/5m
Safety protection
Over current protection, Residual current
protection, Ground protection, Surge protection,
Over/Under voltage protection, Over/Under
current protection, Over/Under temperature
protection
Protection NEMA 3S/IP54
Installation Wall-mount/Pole-mount
Operating temperature -22
℉
~ 122
℉
Humidity 95% non-condensing
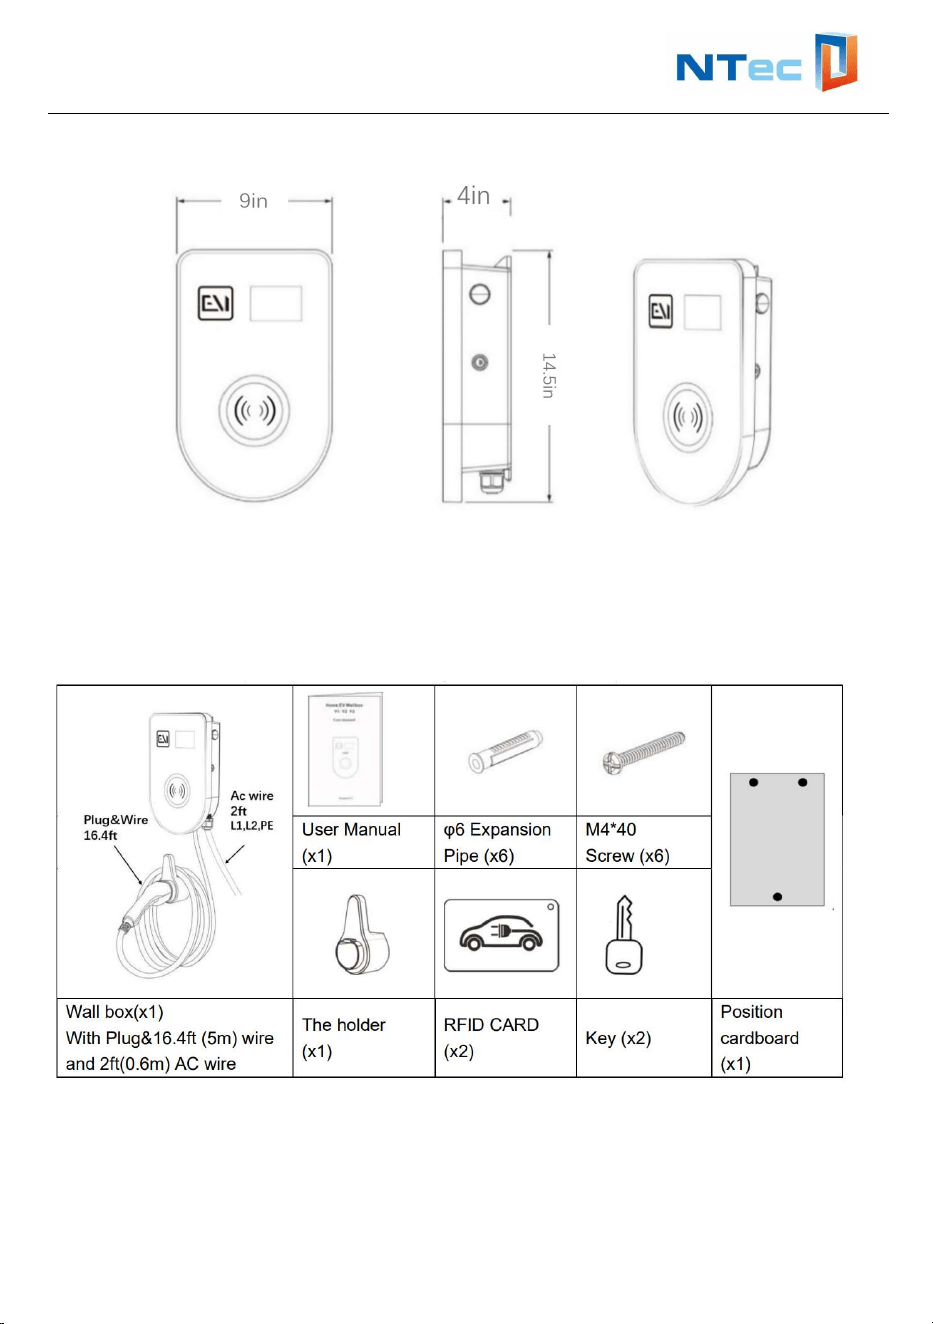
Product Dimension 14.5*9*4 in(L*W*H)
Package Dimension 18.3*12.8*10.6 in (L*W*H)
Net Weight 13.2lb/6kg
Gross Weight 18lb/8.15kg
User Manual and Installation Instructions
5
2.2 External Structure
3. Verify Contents
Check the box to ensure you have the Quick Start guide, this installation guide, and
these parts:
Note: If there is a shortage in the quantity of any item or if any items are missing,
please contact the seller at once.
User Manual and Installation Instructions
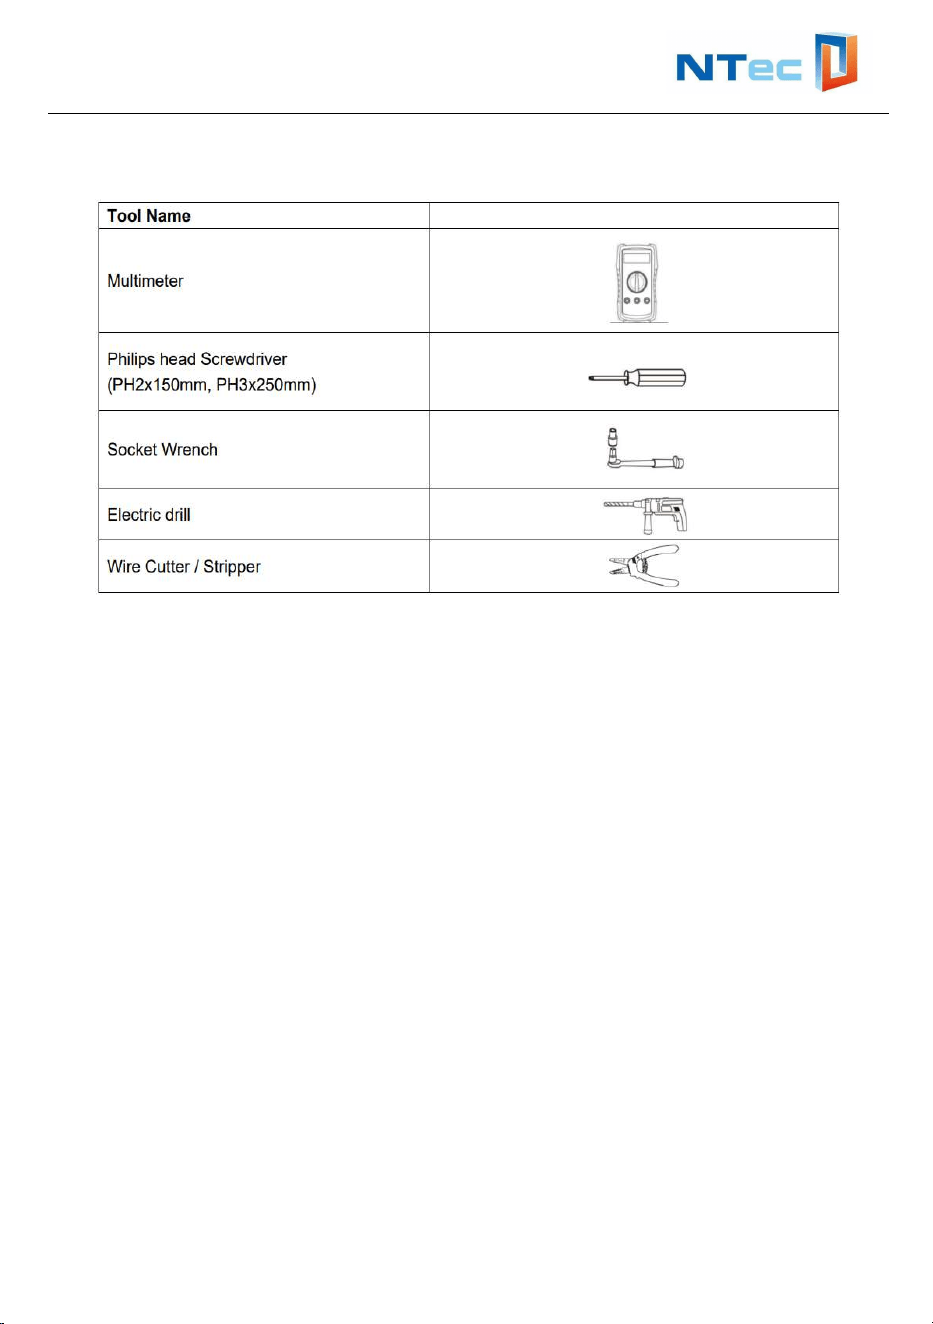
6
4. Gather Tools
You may also need:
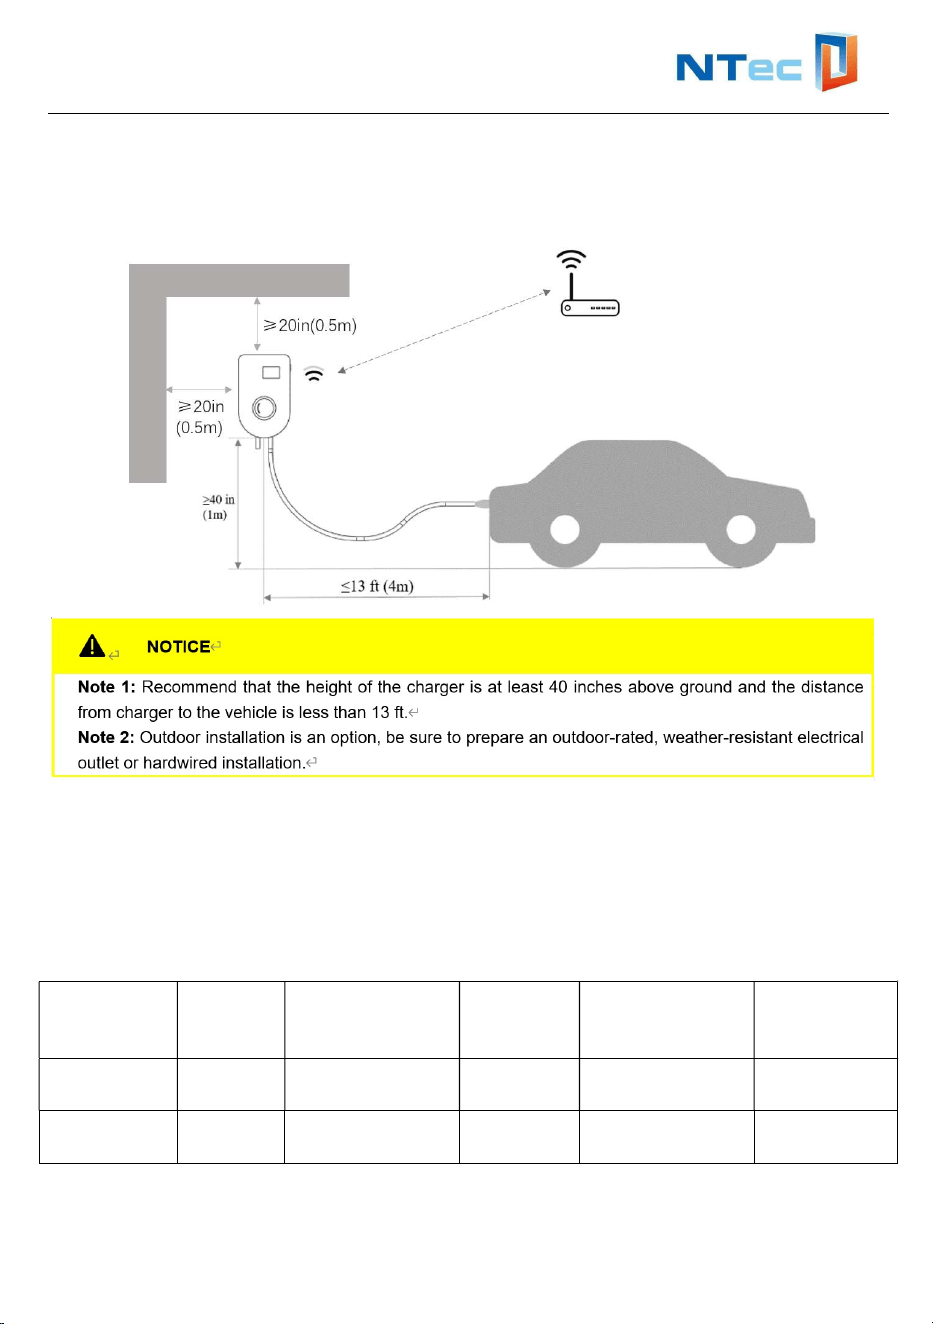
5. Location Requirements
Select an optimal mounting location for safe operation, long service life and
expected performance.
Ensure the location allow the charging cable to reach the car's charging port
while still providing slack.
Ensure that the installation surface is solid enough to bear 4.5timers the weight
of the charger and is suitable for the dimensions of the charger.
Ensure the mounting structure where the charger is installed comply with local /
national standards and guidelines.
Make sure that the EV charger is installed at least 20 inches away from the
surrounding walls, roofs or other large objects.
If you use the mobile phone APP to control the EV charger, please ensure that
User Manual and Installation Instructions
7
the installation position has a strong enough WIFI signal (You can refer to the
WIFI signal strength of the phone at the installation location).
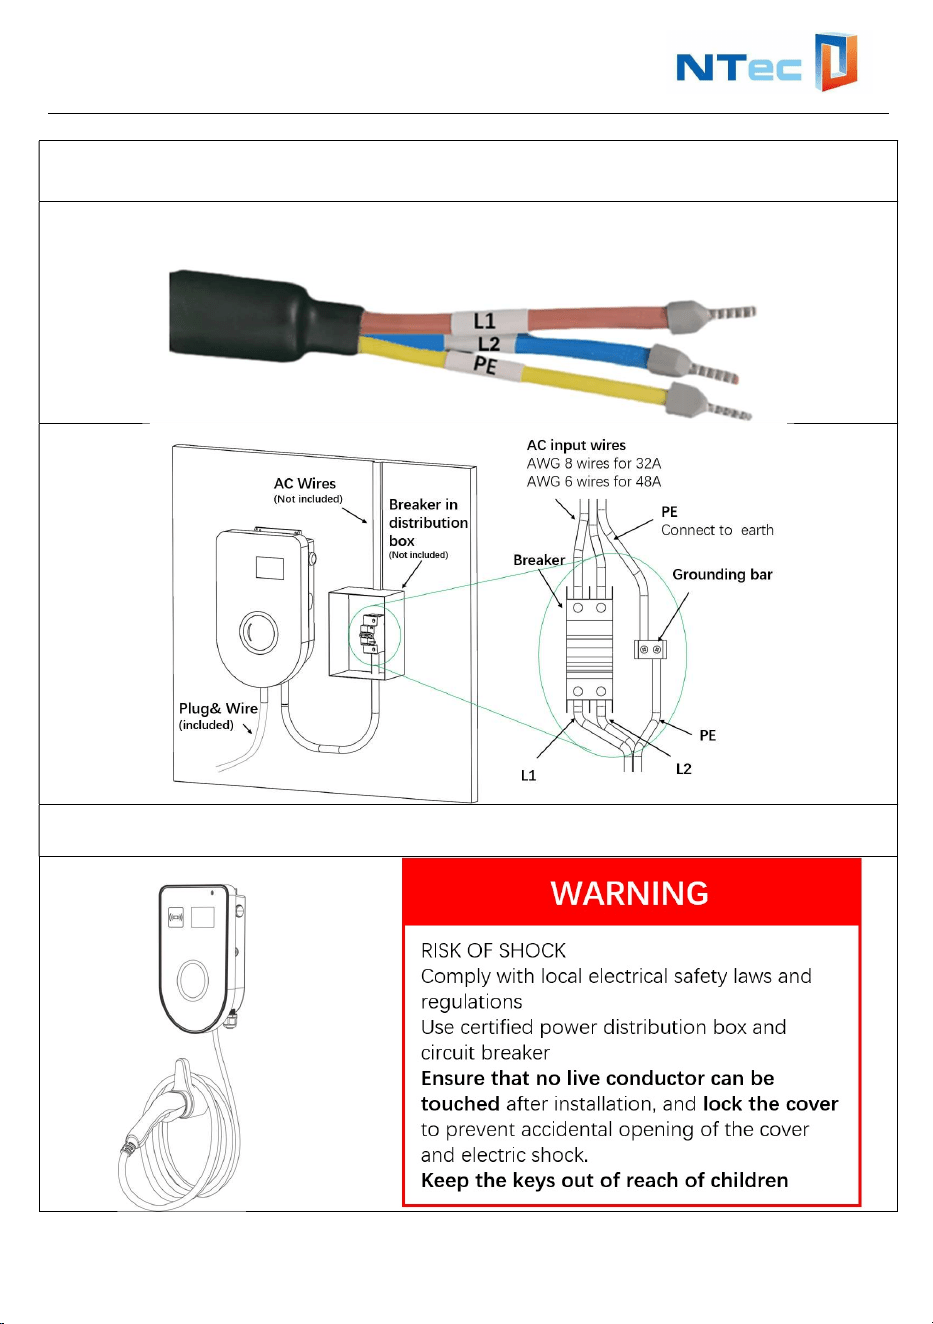
6. Wire the circuit
BVEVCS Series EV Charger can also be wired for 32A or 48A amperages. Consult
all applicable codes for breaker and wire sizing requirements. Use only copper
conductors.
Model Max
Load
Recommended
wire gauge
(AWG)
Rated
voltage
Recommended
circuit Breaker
Mode of
connection
BVEVCS-
32A
32A AWG8(*1) 240Vac 40~60A Hardwire
BVEVCS-
48A
48A AWG6(*1) 240Vac 60~80A Hardwire
User Manual and Installation Instructions
8
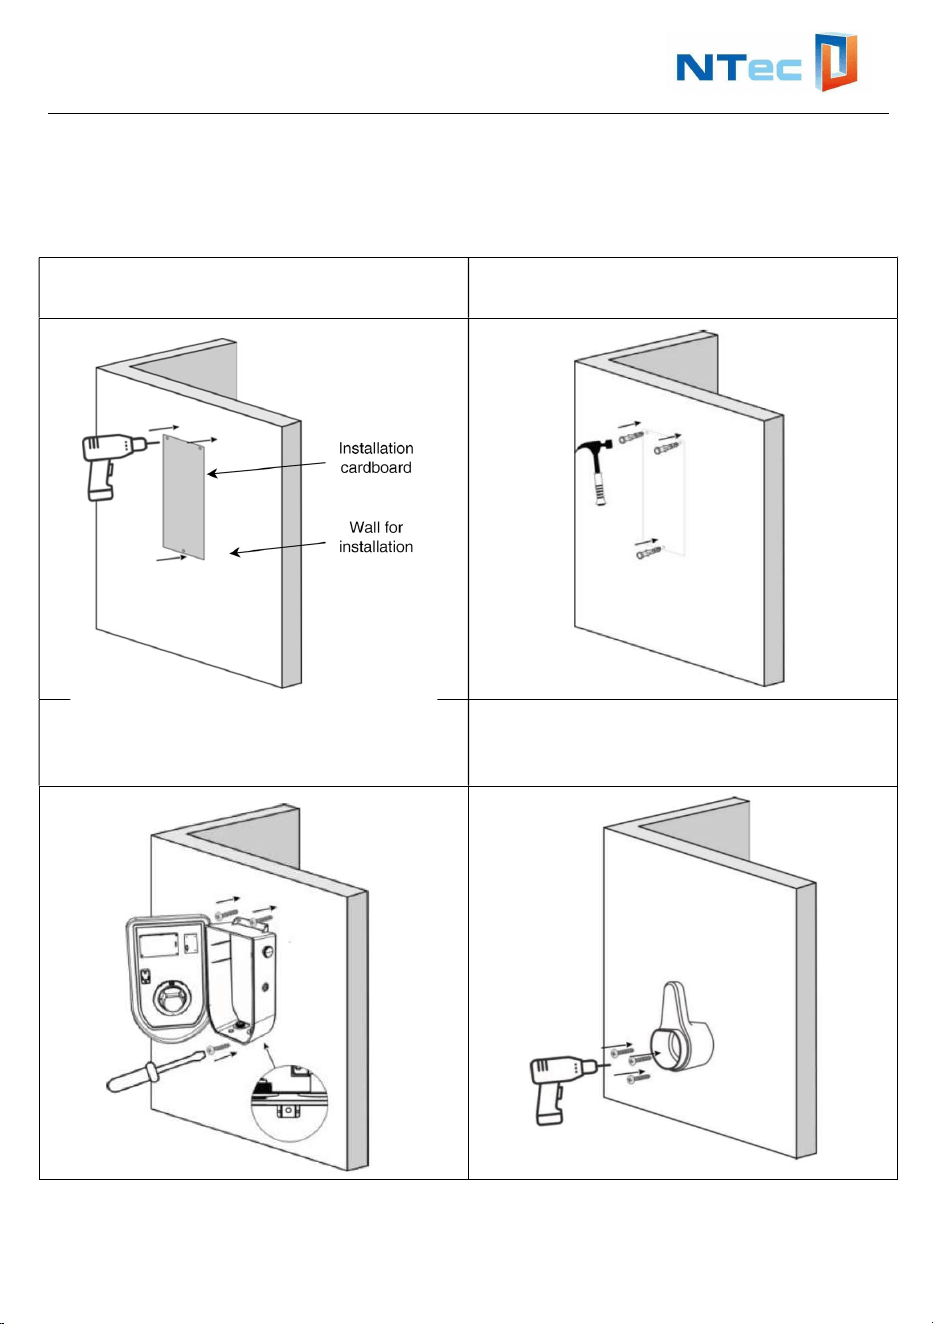
7. Mount EV Charger
Please follow the steps below to install the charger
Step1: Drill holes with Position
Cardboard
Step2: Install Expansion
Pipes(3xM6x60mm)
Step3: Open the charger cover with Wall
Box Key, fix the charger with Screws
(3xM5x50mm)
Step4: Mounting the Charging Gun
Holder on the wall with Expansion Pipes
and Screws (3xM5x50mm)
User Manual and Installation Instructions
9
Step5: Connect power cable L1 and L2 to the grid via a circuit breaker and connect
PE to Earth.
Note: The terminals of L1 L2 and PE cables have been applied in the factory as
following:
Step6: Lock the charger cover and pull-out Wall Box Key, Lock the cover of
distribution box.
User Manual and Installation Instructions
10
8. Configuration and Operation
8.1 Power-on Checking
Please check / re-check the following items prior to initial Power-on:
The charger’s location allows good operational access to normal use and
repair & maintenance.
The AC input components within the premise’s power supply are fitted
correctly with required protection items prior to installation of the charger.
Double confirm the charger is installed properly.
No components or other items have been left on the top of the charger.
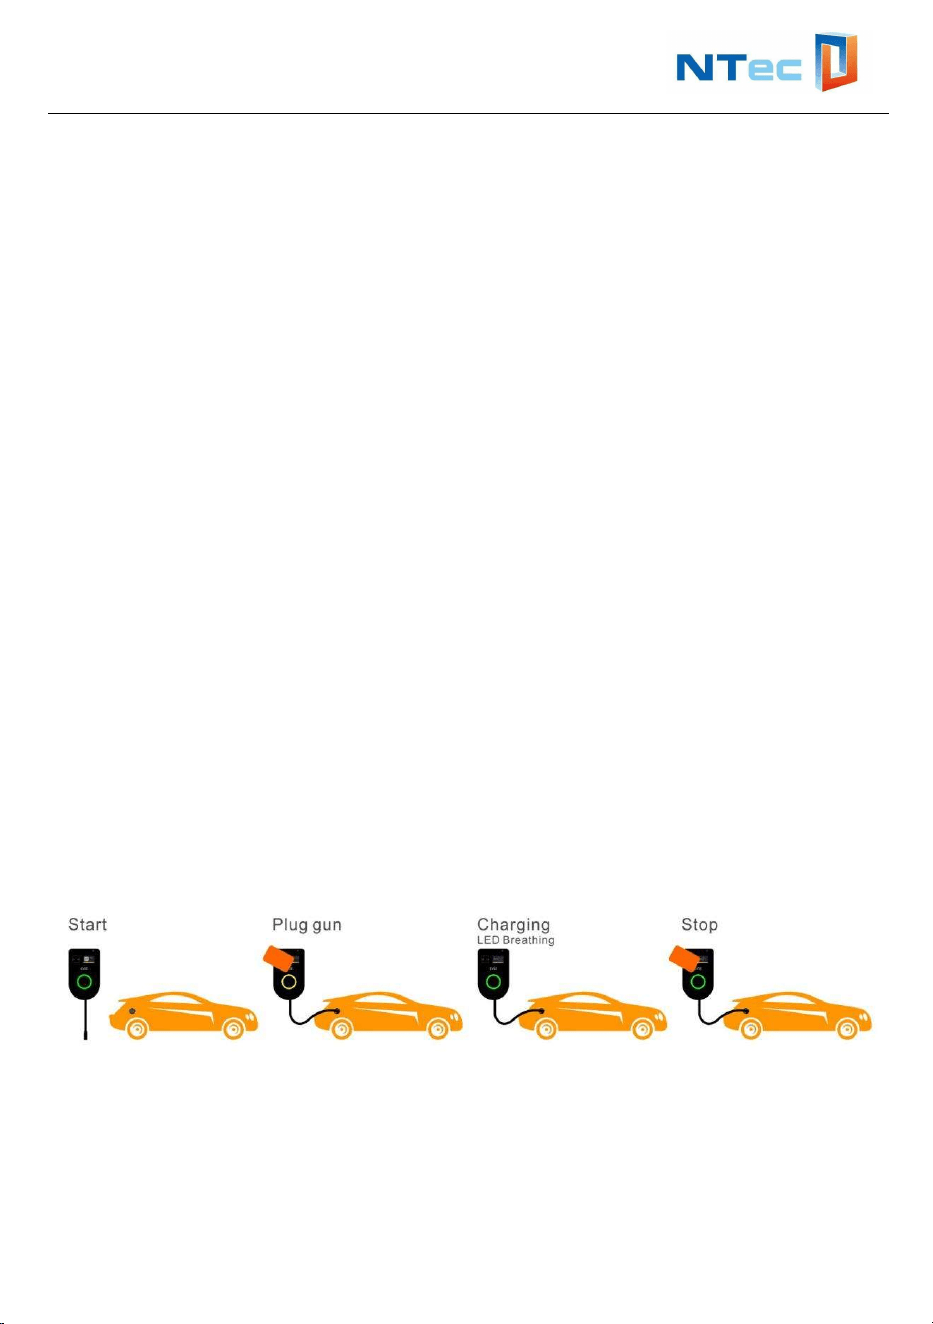
8.2 Start and stop charging station by RFID card
Start charging
1. Plug charging cable into your car and LED ring turns yellow.
2. Hold your charge card (RFID Card) in front of the reader, waiting 3 seconds.
3. LED ring turns green (Breathing state) when it starts charging.
Stop charging
1. Hold your charge card (RFID Card) in front of the reader, waiting 3 seconds.
2. LED ring turns green when it stops charging.
3. Unplug charging cable from your car and place the charging cable back into
charger station cable holder.
User Manual and Installation Instructions
11
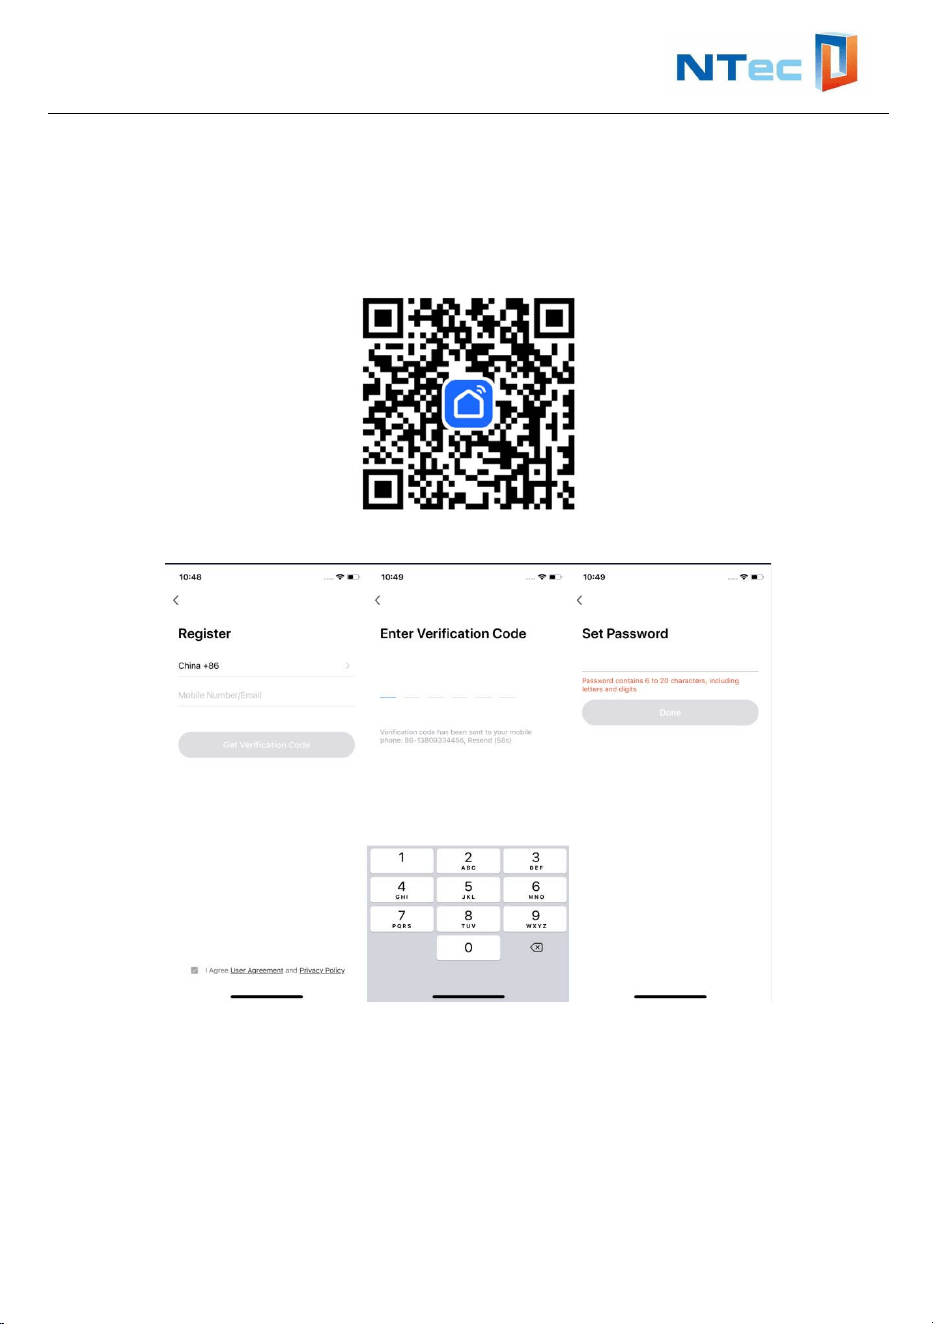
8.3 Start and stop charging station by APP
Step1- Download the APP “Smart Life” from Apple Store or Google Play, or scan the
QR code below to download.
Step 2- Sign up and log in using your phone number or email address.
Note:
1.Use your email address or mobile number to register. The country/region of the
app will be the same as the phone's. You can also change it when registering. (You
cannot change the country/region after registration). Enter your mobile number/email
and click “Get Verification Code.
2.Enter the verification code and go to the password setting page. Set your
password as required and click “Done"
User Manual and Installation Instructions
12
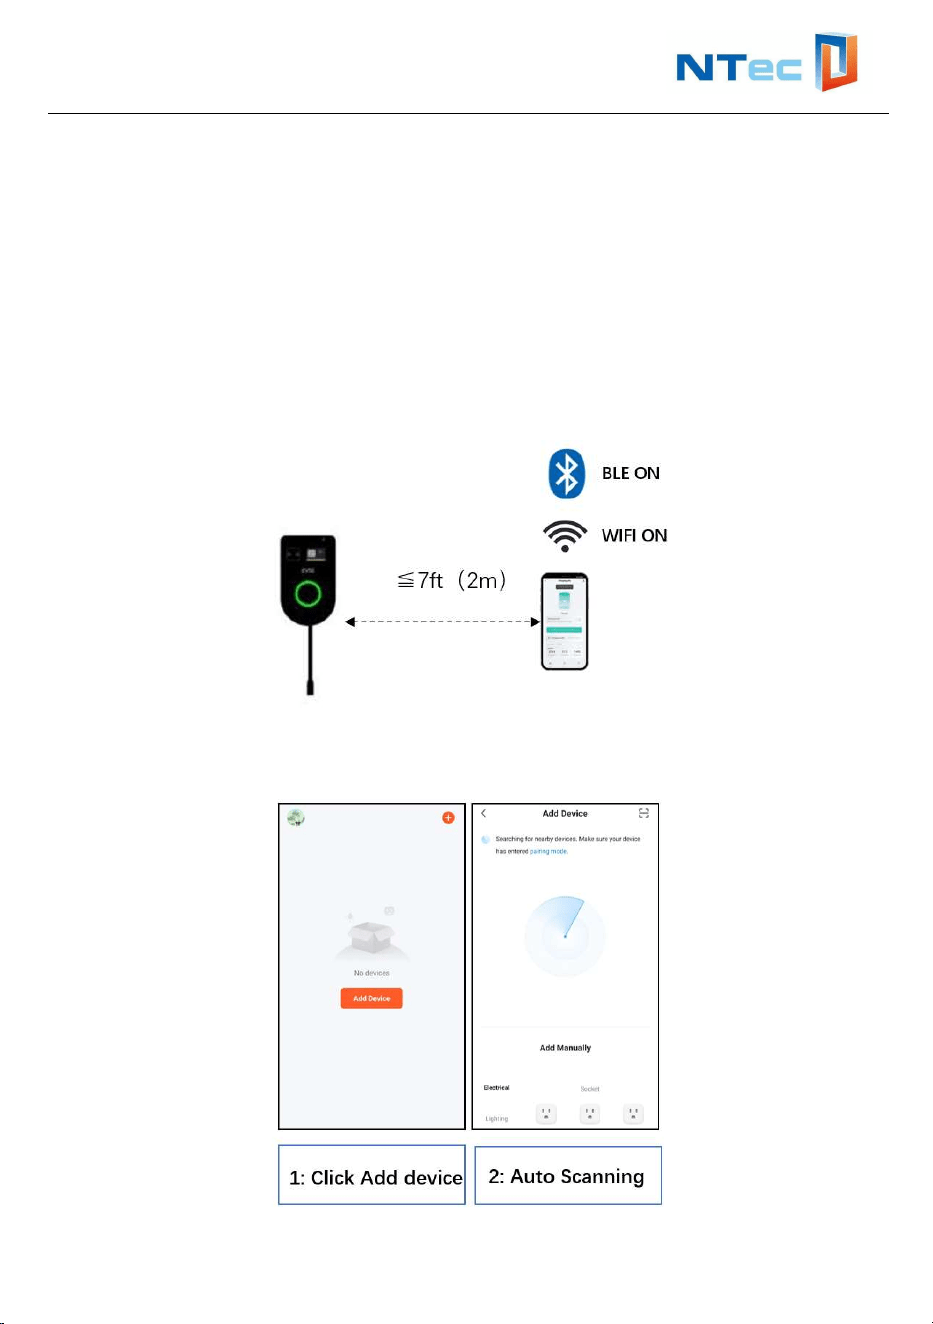
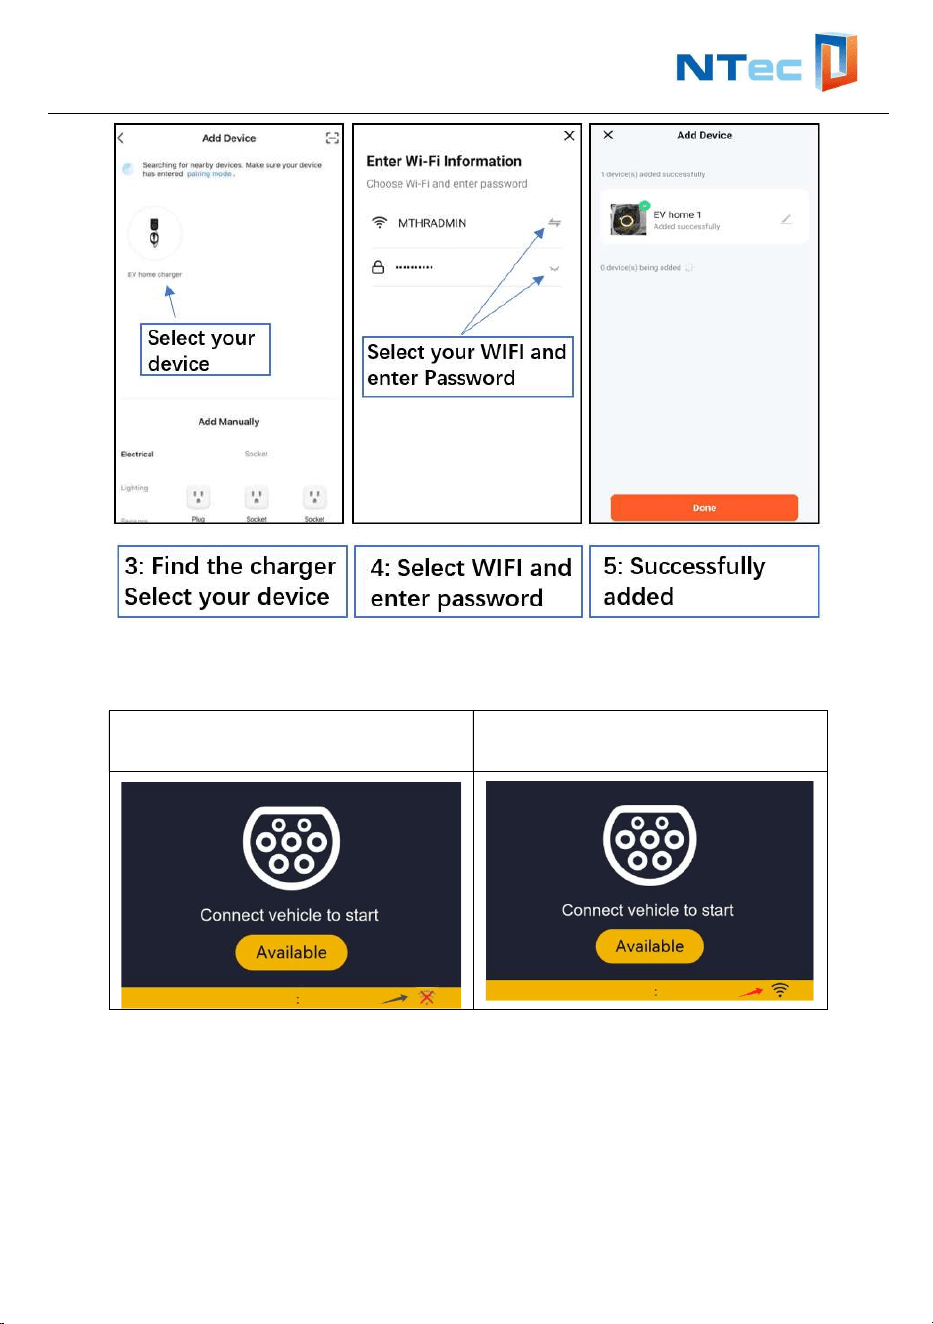
Step 3-Set up the WIFI network of the EV charger
Pre-preparation
Power-on the EV charger;
Keep your phone no more than 7ft(2m) away from the EV charger, turn on your
phone’s WIFI and Bluetooth;
Near the installation location, make sure the phone can be connected to the
Internet through the WIFI network
Open the “Smart Life” APP and follow the steps below to configure the charger's
WIFI network.
User Manual and Installation Instructions
13
Note: The EV charger only supports WIFI in 2.4G mode.
Check the WIFI network configuration status
No WIFI signal or network
configuration
WIFI signal is normal
User Manual and Installation Instructions
14
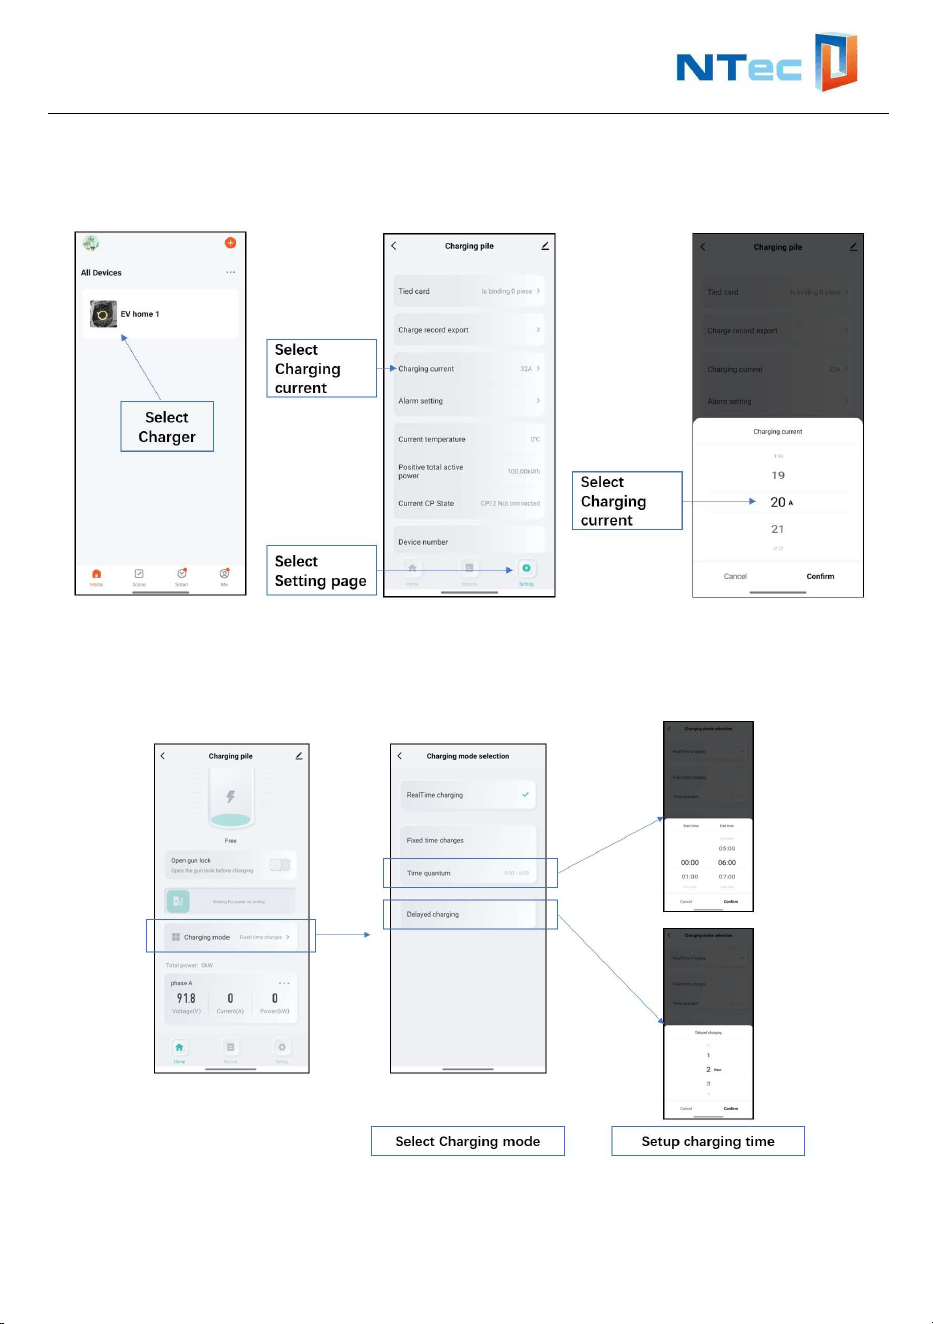
Step 4- Set the maximum charging current
Set the maximum charging power based on your distribution capacity.
Step 5- Set charging mode
The charger provides 3 timing mode options, immediate charging, timed charging
and delayed charging.
User Manual and Installation Instructions
15
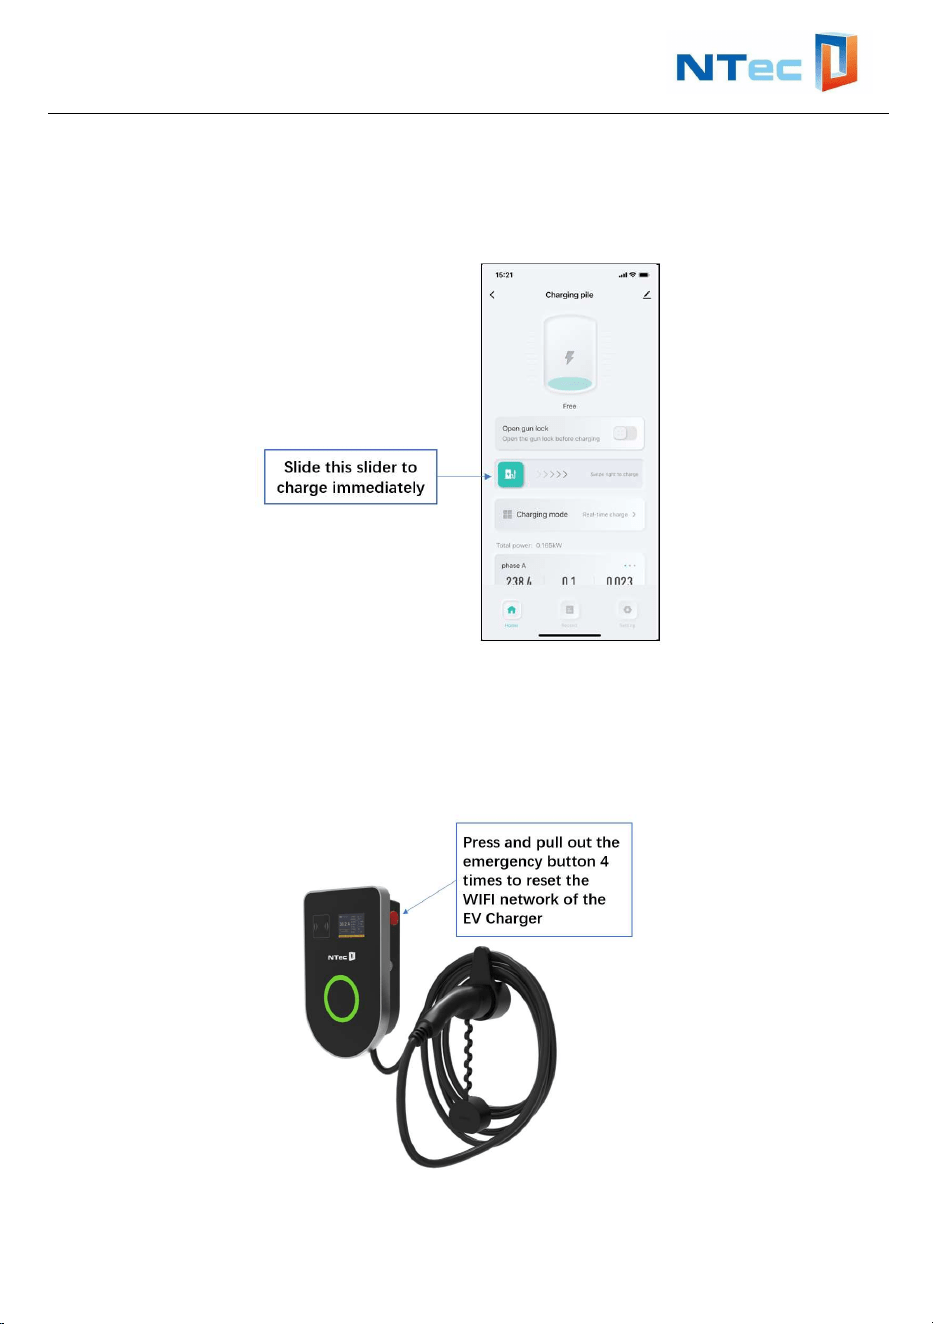
Step 6- Start charging by real-time charge
Plug charging cable into your car and LED ring turns yellow, slide to charge your car
immediately.
9. Reset the charger’s WIFI network
Press in and pull out the emergency button 4 times to reset the WIFI network of the
EV charger.
Refer to Step 3 in Chapter 8 of the manual to reconfigure the WIFI network.
User Manual and Installation Instructions
16
10. Troubleshooting
10.1 Indicator Status
10.2 Fault Code and Resolution
When a problem occurs, error messages are often shown on the display.
With this information you can quickly identify and investigate the problem.
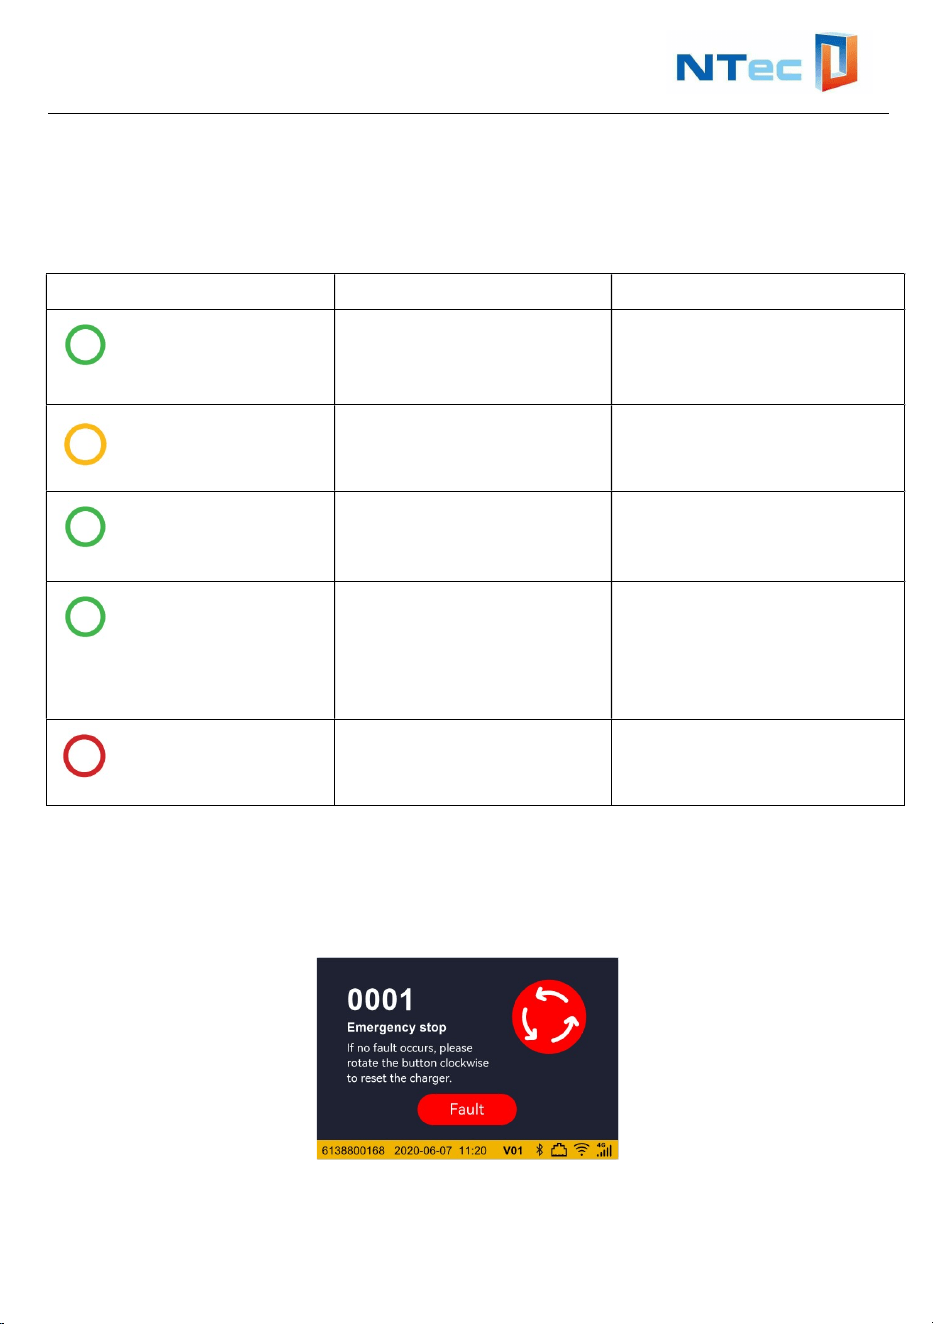
What you see What it means What to do
LED ring off or green
Charger station is ready
for use.
Plug Charger station
charging cable into the car
LED ring yellow
Charger stationcharging
cable connected the car
successfully
Hold your charge card
(RFID Card) in front of the
reader
LED ring green
breathing
Charger station is
charging the car
The car is charging.
LED ring green
The car is fully charged. Unplug charging cable
from your car and place
the charging cable back
into Charger station cable
holder.
LED ring red
Charger station is
experiencing an error
Check the troubleshooting
chapter in this manual for
solutions.

User Manual and Installation Instructions
17
Picture Reason Troubleshooting
Input voltage over range
Wait till power grid recover normal voltage
range or power off and restart.
Input voltage under range
AC input current over
range
Shut off the breaker of AC line
immediately. Check whether there is low
resistance connection between two AC
output wires.
Leakage
current fault
Shut off the breaker of AC line
immediately. Check whether there is
insulation problem between the AC inlet
cable and the charging gun. Power on
again. If the fault persists, please contact
us.
Fault Numb LCD Show Handling method
0001 Emergency stop
If no fault occurs, please rotate the
button clockwise to re set the
charger.
0002 Over Voltage
Voltage has risen above an
acceptable leve
0003 Under Voltage
Voltage has dropped below an
acceptable level.
0004 Over Current
Over current protection device has
tripped
0005 Over DC 6MA
Over leakage current protection
device has tripped.
0006 Grond Failure
Ground fault circuit interrupter has
been activated.
0007 Ecmu Error Ecmu model self- check failure
0008 CP short CE and PE short
0009 Relay Failure Failure with Power relay
0010 Socket Lock Failure
Failure to lock or unlock socket
connector

User Manual and Installation Instructions
18
Fault Numb LCD Show Handling method
0011 Reader Failure Failure with id Tag reader
0012 Weak Signal
Wireless communication device
reports a weak signa
0013 Meter Failure Failure to read power meter.
0014 High Temperature
Temperature inside Charge Point is
too high.
0015 Other Error
Other type of error. More information
in vendor Error Code
11. Quality Assurance
In the event of a defect during the warranty period, NTEC will provide free of charge
service or replace the product with a new one.
Service and Repair
●During the warranty period, the customer shall provide the product purchase
invoice and date. In addition, the trademark on the product shall be undamaged and
legible. Otherwise, NTEC has the right to refuse to honor the quality guarantee.
●If the charger fails during the warranty period due to a defect in materials or
workmanship, NTEC will, at its option, repair or replace the charger at no charge to
the original end-user customer.
●The original end-user customer is responsible for shipping the charger to NTEC’s
service center for warranty service. NTEC will return the repaired or replacement
charger to the original end-user customer at its own expense.
Exclusion of Liability
In the following circumstances, NTEC has the right to refuse to honor the quality
guarantee:
The free warranty period for the whole machine/components has expired.
The device is damaged during transportation.
The device is incorrectly installed, refitted or used.
The device operates in harsh conditions beyond those described in this manual.
The fault or damage is caused by the use of non-standard or non-NTEC
components or software.
The installation and use range are beyond the stipulations of relevant
international standards.

User Manual and Installation Instructions
19
The damage is caused by unexpected natural factors.
For faulty products in any of the above cases, if the customer requests maintenance,
paid maintenance service may be provided based on the judgment of NTEC.
12. Contact Information
In case of questions, please contact us.
BRIGHTVILLE HK LIMITED
Building A, Unit 3K,140 58th Street Brooklyn,NY 11220
1-855-916-0081
customerservice@brightvillehk.com