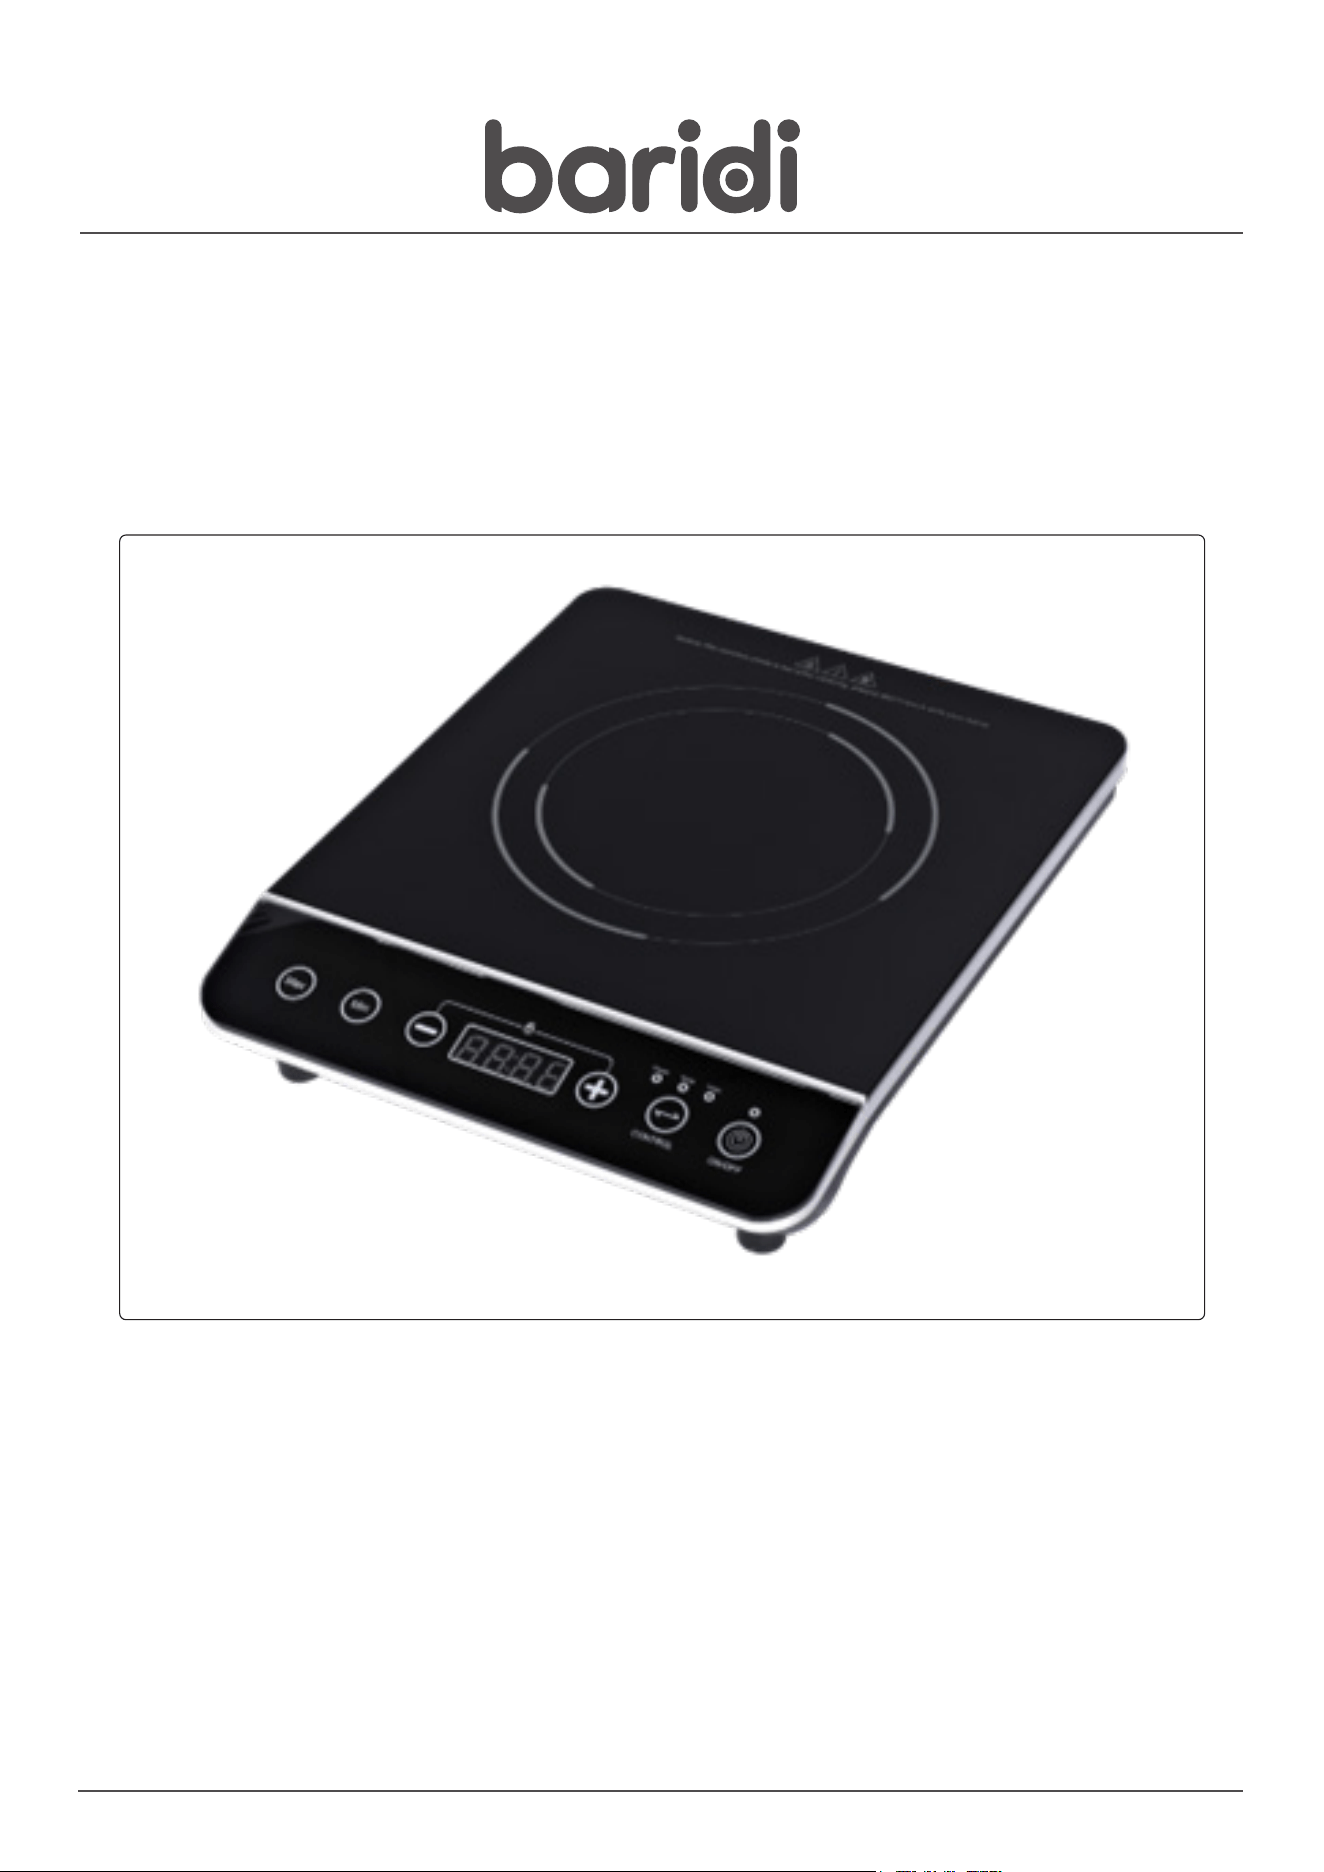
Baridi Portable Induction Hob: Single Zone, 2000W
10 Power Settings, Timer Function, Black
Model No. DH145
Thank you for purchasing a Dellonda product. Manufactured to a high standard, this product will,
if used according to these instructions, and properly maintained, give you years of trouble free performance.
DH145 Issue:1 09/08/22
www.dellonda.co.uk
Important Information
Please read these instructions carefully. Note the safe operational requirements, warnings & cautions. Use the product correctly and with care
for the purpose for which it is intended. Failure to do so may cause damage and/or personal injury and will invalidate the warranty. Keep these
instructions safe for future use.
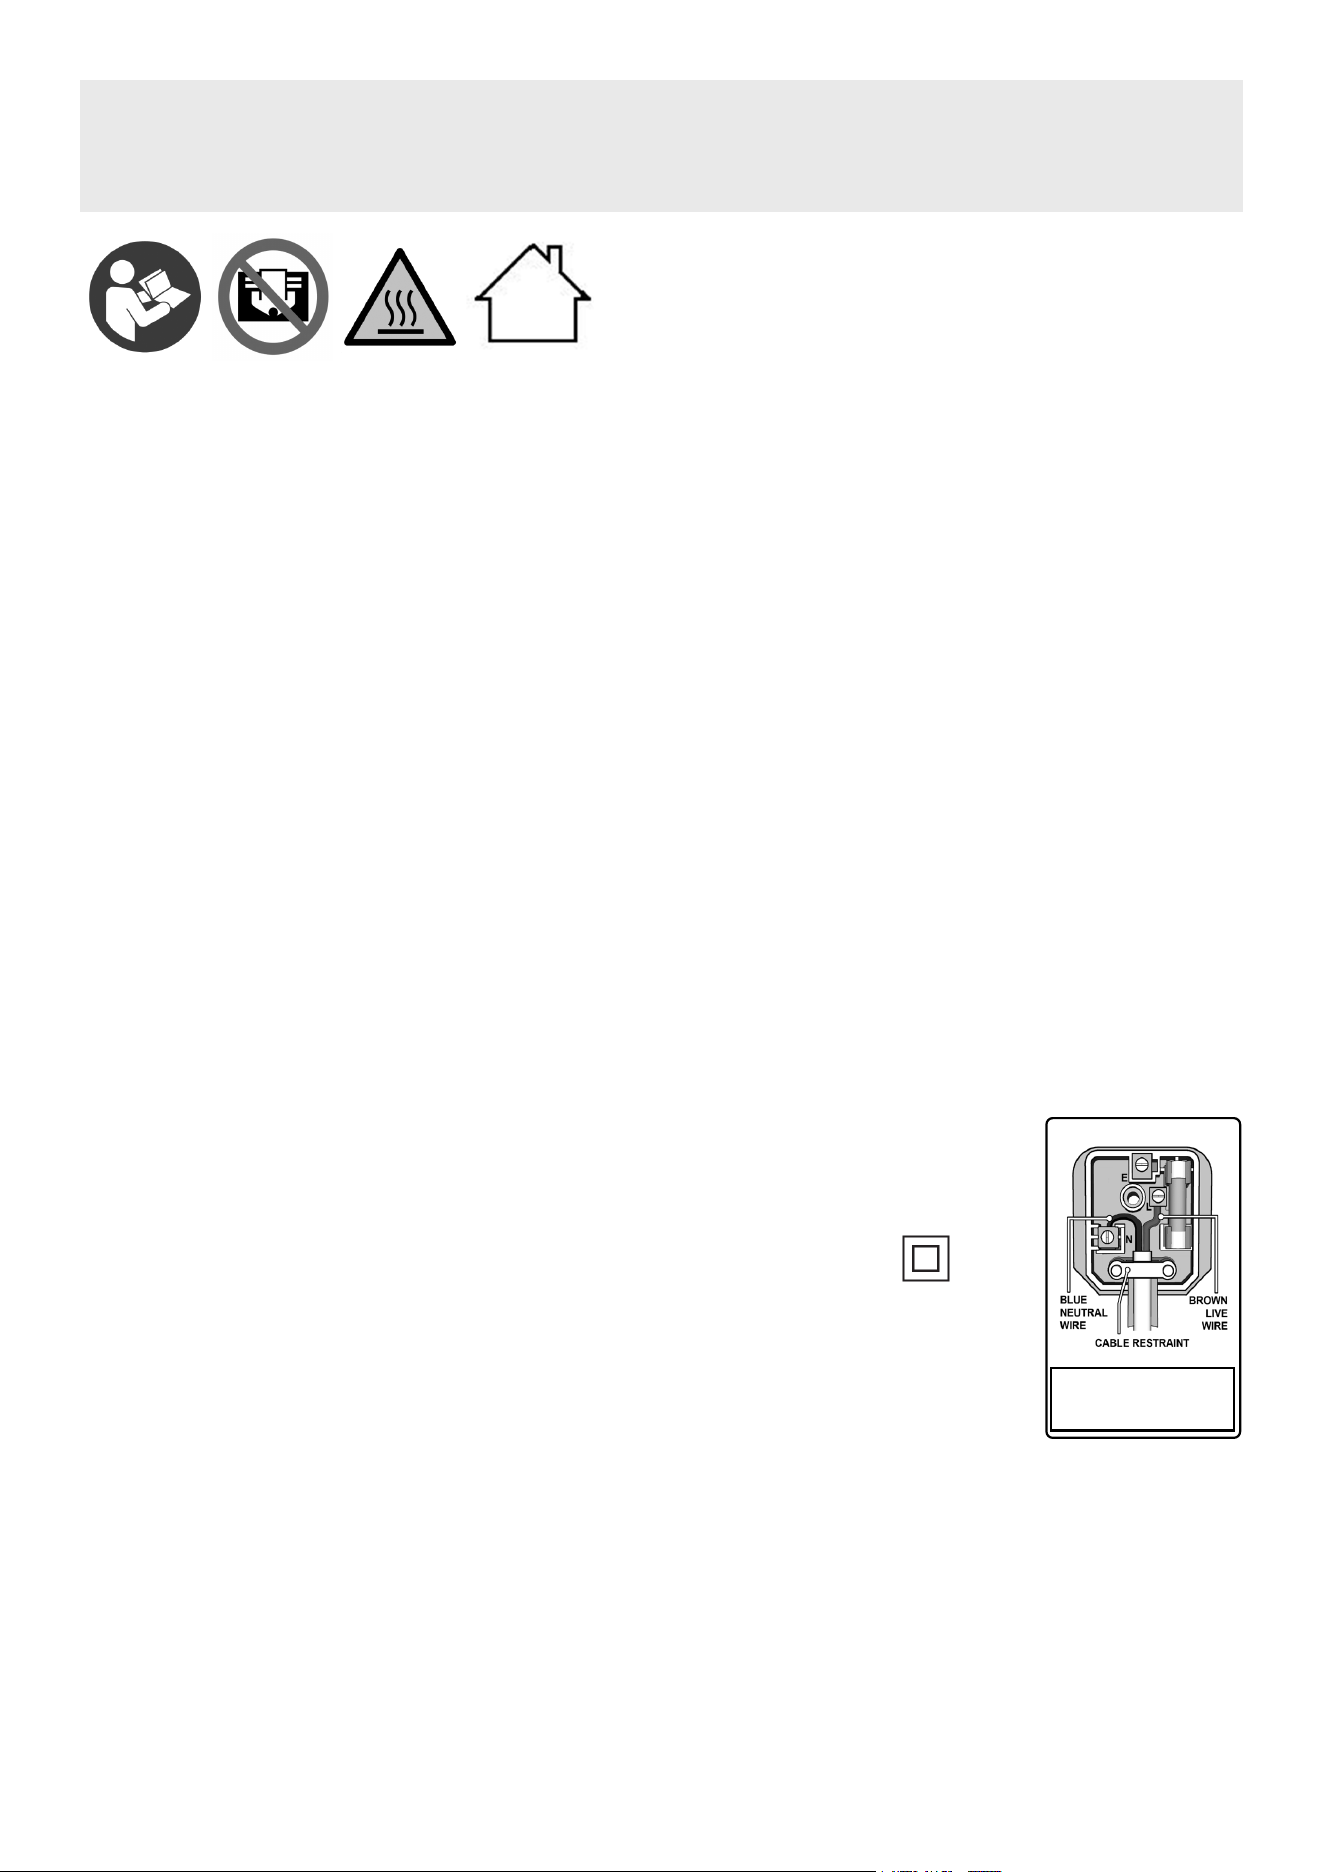
Refer to
instruction
manual
Warning:
Hot
Surface
Specication
Cable Length: .................................................................... 1.5m
Colour: .............................................................................. Black
Installation: ..............................................................Countertop
Number of Hobs: ..................................................................... 1
Power: .............................................................................2000W
Product Dimensions (W x D x H): ...............290 x 355 x 70mm
Supply: .......................................................................220-240V
Type: ...........................................................................Induction
Safety Instructions
WARNING! The warnings, cautions and instructions in this manual cannot cover all possible conditions and situations that
may occur. It must be understood by the operator that common sense and caution are factors which cannot be built into
this product, but must be applied by the operator.
1.1. ELECTRICAL SAFETY
WARNING! It is the user’s responsibility to check the following:
Check all electrical equipment and appliances to ensure that they are safe before using. Inspect power supply leads, plugs and
all electrical connections for wear and damage. Sealey recommend that an RCD (Residual Current Device) is used with all electrical
products. You may obtain an RCD by contacting your local Sealey stockist.
If the product is used in the course of business duties, it must be maintained in a safe condition and routinely PAT (Portable
Appliance Test) tested.
Electrical safety information, it is important that the following information is read and understood.
1.1.1. Ensure that the insulation on all cables and on the appliance is safe before connecting it to the power supply.
1.1.2. Regularly inspect power supply cables and plugs for wear or damage and check all connections to ensure that they are secure.
1.1.3. IMPORTANT:Ensurethatthevoltageratingontheappliancesuitsthepowersupplytobeusedandthattheplugisttedwiththe
correct fuse - see fuse rating in these instructions.
8 DO NOT pull or carry the appliance by the power cable.
8 DO NOTpulltheplugfromthesocketbythecable.Removetheplugfromthesocketbymaintainingarmgripontheplug.
8 DO NOT usewornordamagedcables,plugsorconnectors.Ensurethatanyfaultyitemisrepairedorreplacedimmediatelybya
qualiedelectrician.
1.1.4. ThisproductisttedwithaBS1363/A13Amp3pinplug.
If the cable or plug is damaged during use, switch the electricity supply and remove from use.
ReplaceadamagedplugwithaBS1363/A13Amp3pinplug.Ifindoubtcontactaqualiedelectrician.
Class II products are wired with live (brown) and neutral (blue) only are marked with the
Class II symbol;
A) Connect the BROWN live wire to the live terminal ‘L’.
B) Connect the BLUE neutral wire to the neutral terminal ‘N’.
C) After wiring, check that there are no bare wires and ensure that all wires have been correctly connected.
Ensure that the cable outer sheath extends inside the cable restraint and that the restraint is tight.
DO NOT connect either wire to the earth terminal.
Sealeyrecommendthatrepairsarecarriedoutbyaqualiedelectrician.
1.2. GENERAL SAFETY
WARNING! Disconnect hob from the mains power supply before carrying out any servicing or maintenance.
9 Disconnect the hob from the power supply before handling or cleaning.
9 Maintain the hob in good order and clean condition for best and safest performance.
9 Replace or repair damaged parts. Use genuine parts only. Unauthorised parts may be dangerous and will invalidate the warranty.
9 Ensure there is adequate lighting and keep the immediate area in front of the outlet grille clear.
9 Only use the hob standing on its feet in the upright position.
9 Place heat resistant mat underneath the hob to avoid damage to counter, table top or work surface.
8 DO NOT allow any untrained persons to use the hob. Ensure they are familiar with the controls and hazards of the hob.
8 DO NOT let power lead hang over an edge (i.e. table), or touch a hot surface, lie in hob hot air flow, or run under a carpet.
8 DO NOT touch the top of the hob during and immediately after use as it will be hot.
8 DO NOT place the hob near items that may be damaged by heat.
Recommended fuse rating:
13A
Warning:
Do not cover
Warning:
Indoor use only
8 DO NOT place hob too close to yourself or any object, allow the air to circulate freely. Maintain a minimum air gap of 250mm.
8 DO NOT use the hob for any purpose other than that for which it is designed.
8 DO NOT stand hob on carpets, cloth, cardboard or fibrous materials when in use.
8 DO NOT use the hob outdoors. These hobs are designed for indoor use only.
8 DO NOT use hob if the power cord, plug or the hob is damaged, or if the hob has become wet.
8 DO NOT use in bathroom, shower room, or in any wet or damp environments or where there is high condensation.
8 DO NOT operate the hob when you are tired or under the influence of alcohol, drugs or intoxicating medication.
8 DO NOT allow the hob to get wet as this may result in an electric shock and personal injury.
8 DO NOT insert or allow objects to enter any openings of hob as this may cause an electric shock,a fire or damage to the hob.
8 DO NOT use the hob where there are flammable liquids, solids or gases such as petrol, solvents, aerosols etc, or where heat sensitive
materials may be stored.
8 DO NOT place the hob immediately below any electrical outlet.
8 DO NOT cover hob when in use, and do not obstruct the air vents (i.e. with clothing, curtain, furniture, bedding etc).
9 Allow the hob to cool before storage. When not in use, disconnect from the mains power supply and store in a safe, cool, dry, childproof
area.
NOTE: Children of less than 3 years should be kept away unless continuously supervised.
Children aged from 3 years and less than 8 years shall only switch on/off the appliance provided that it has been placed or installed
in its intended normal operating position and they have been given supervision or instruction concerning use of the appliance in a safe
way and understand the hazards involved. Children aged from 3 years and less than 8 years shall not plug in, regulate and clean the
appliance or perform user maintenance.
Operation
• Power / Temperature ranges
• NOTE: Suitable cookware consists of pots and pans with a base made of steel or cast iron. You can identify these either by means of the
markings on the pan or by ascertaining whether a magnet clings to the base of pan.
• NOTE: Unsuitable cookware is made from any kinds of material that is non-magnetic, such as aluminium, copper and stainless steel, as well as
non-metal vessels made of porcelain, glass, ceramic, plastics etc. If unsuitable cookware is placed on the hob ,“E0” appears in the LED.
• NOTE: Thin pan bases are better suited to induction cooking than thick sandwich bases, The very short response times to setting
modications(shortpreheatingperiod,rapidandcontrollablebrowning)arenotpossiblewhenpanswiththickbasesareused.
• NOTE: Only use cookware that is suitable for the size of the hob. This will ensure that the induction hob function works perfectly. The base of
thepanmaynotbecurvedoruneven,itmustsitat.
• NOTE: Thediametermaynotbelessthan16cmtoensurethattheenergyeldhasaneffect.DO NOTusepanswithadiameterinexcess26cm.
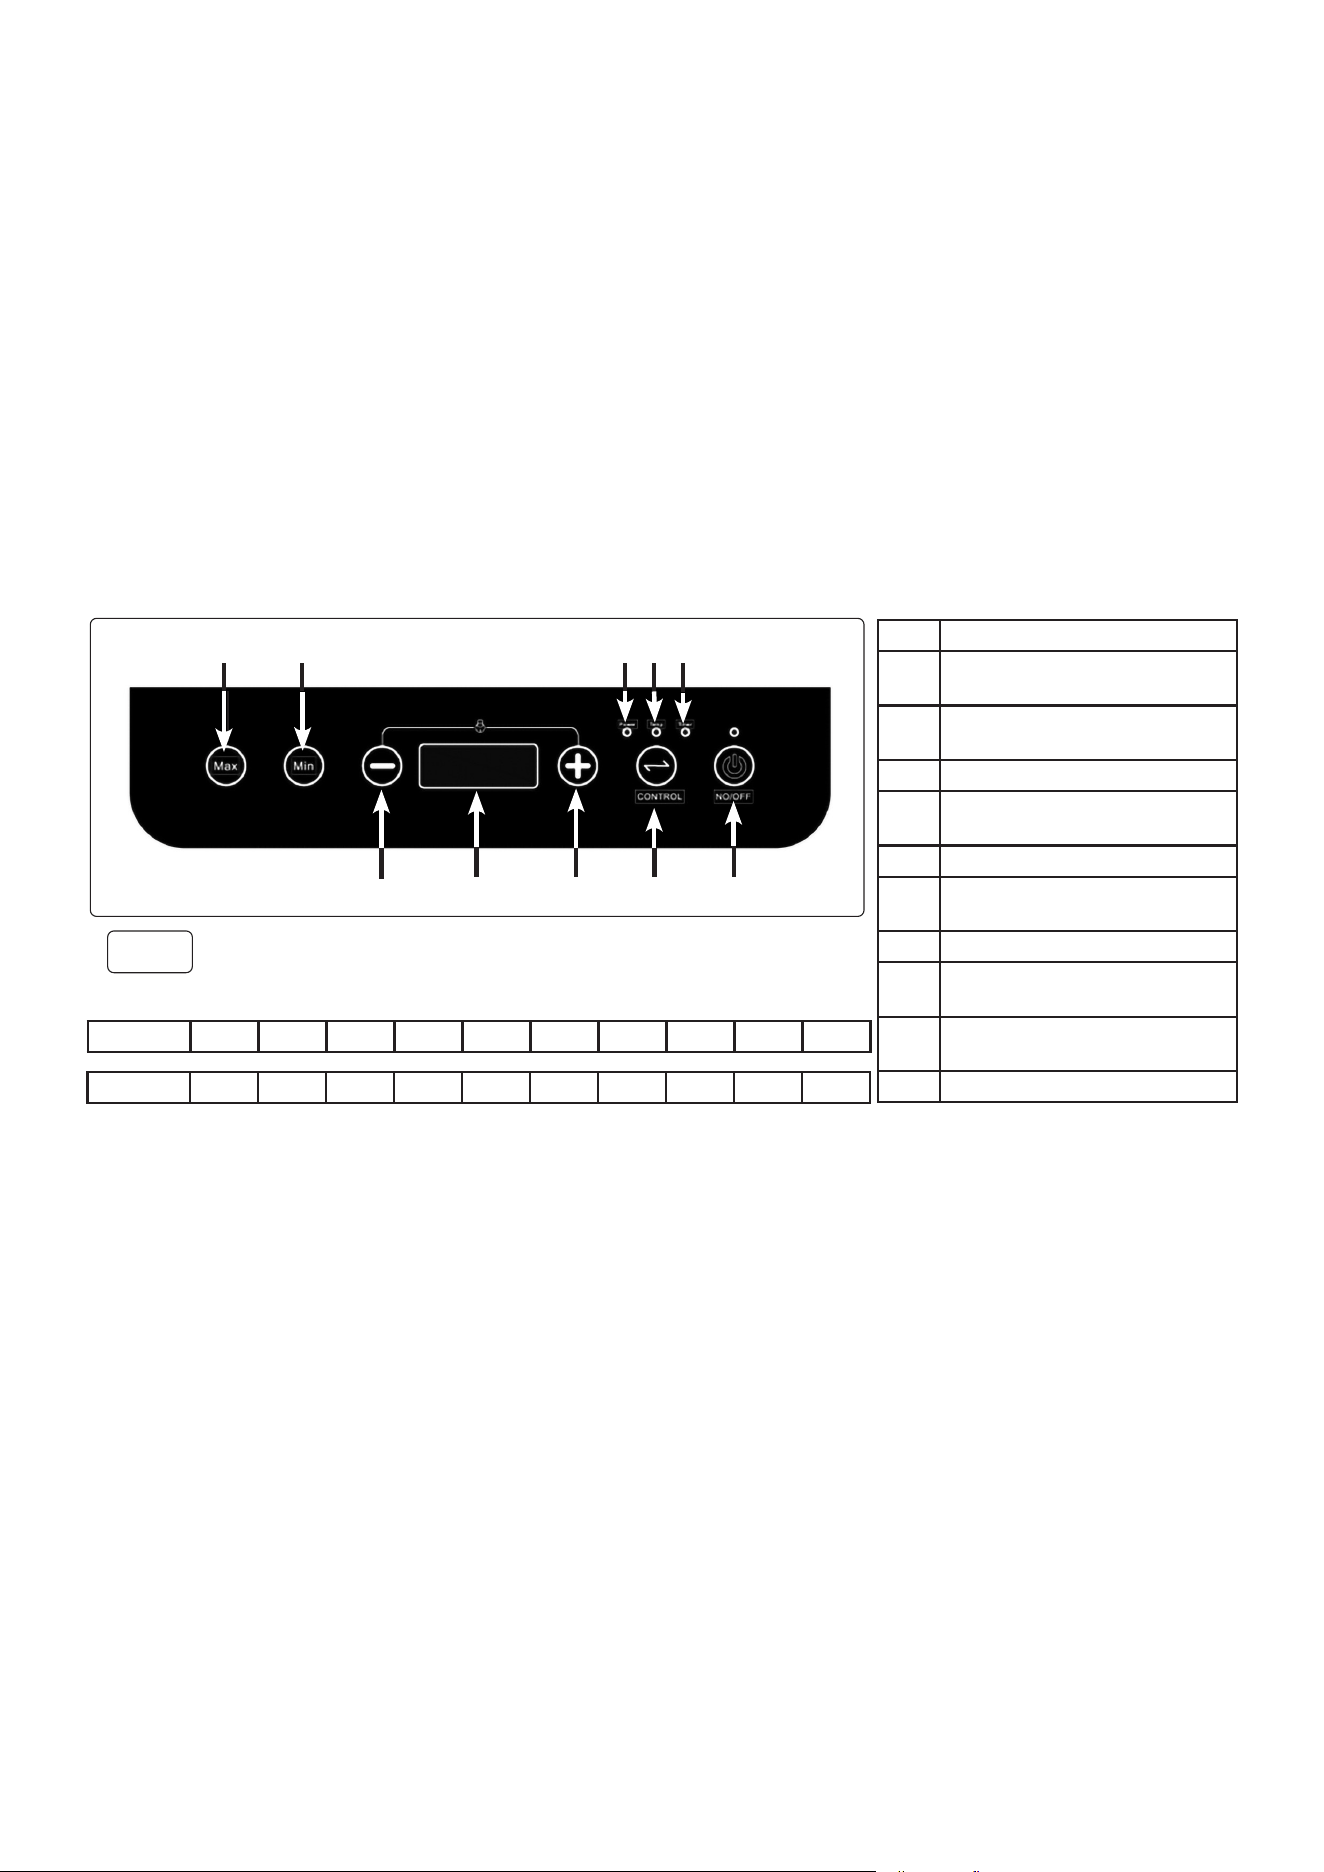
• Use the “CONTROL”button(g.1.9)toselectthemoderequiredi.e.power,temperatureortimersetting.TherelevantLED will light
(g.1.3,1.4,1.5)toshowwhichmodeisactive.
• Use the “+, - “buttons(g.1.6,1.8)toadjustthesettingaccordingly.
• NOTE: The hob controls can be locked by pressing the “Max” and “Min”buttonssimultaneously,repeattounlockthecontrols(g.1.1.g.1.2).
• Maintenance
• Before starting any cleaning or maintenance, ensure the power supply disconnected and the hob plate is completely cooled.
• Clean the hob with a damp cloth or sponge.
X DO NOT wash the hob with water directly.
X DO NOT clean with abrasive sponges or chemical detergents.
• Avoid any surface friction between the pots and cooking plate.
1
2
3 4
5
6 7
8
9
10
Item Description
1 Max: To run at highest power/
temperature.
2 Min: To run at lowest power/
temperature.
3 Power control mode indicator.
4 Temperature control mode
indicator.
5 Timer control mode indicator.
6 Decrease power, temperature or
timer setting.
7 LED Display.
8 Increase power, temperature or
timer setting.
9 Mode selector - press to cycle
through options.
10 On/Off button.
Power (W) 200 400 600 800 1000 1200 1400 1600 1800 2000
Temp
o
C 60 80 100 120 140 160 180 200 220 240
fig.
1
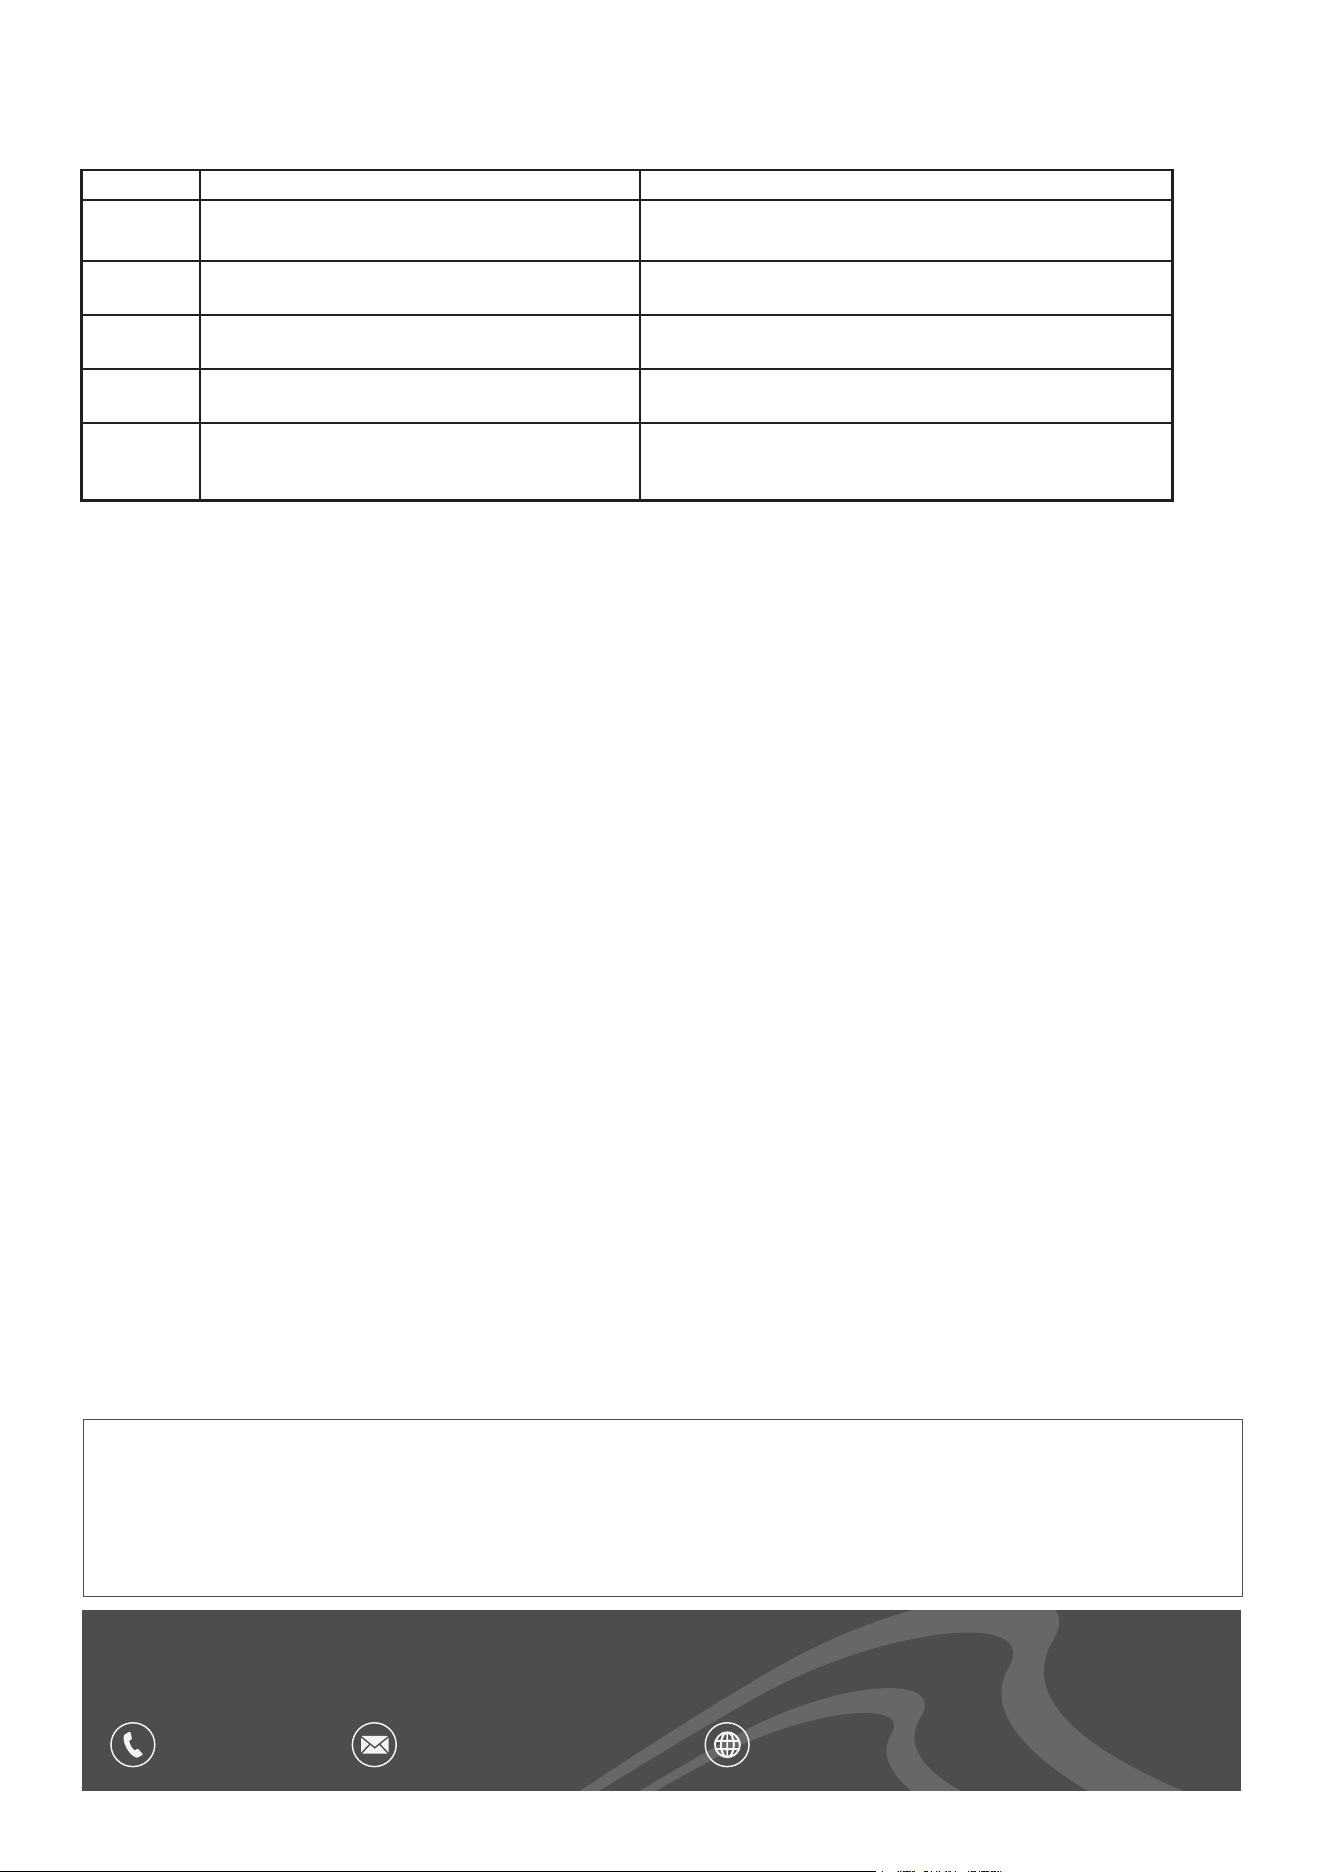
Error codes
•
Error code Possible Cause Solutions
E0 There is no vessel on the respective hob .
The vessel is not suitable for induction hobs.
Place a suitable vessel on the respective hob.
E2 The temperature sensor beneath the hob is
defective or there is a short circuit
Disconnect the plug from the mains power socket and contact
the customer service department .
E3 Voltage supply is too high. Check and ensure that the cooker is connected to a properly
installed mains power socket with 220-240V,50/60hz.
E4 The cooker is not being supplied with enough
voltage.
Check and ensure that the cooker is connected to a properly
installed mains power socket with 220-240V, 50/60hz.
E5 or E6 The cooker has overheated . Disconnect the plug from the mains power socket and wait
until the cooker has cooled down. If the problem remains, seek
advice from a qualied engineer.
Environment Protection and Waste Protection and Electrical Equipment Regulations (WEEE)
Recycle unwanted packaging materials. When this product is no longer required, or has reached the end of it’s useful life, please dispose of it in
an environmentally friendly way. Drain any fluids (if applicable) into approved containers, in accordance with local waste regulations. Under the
Waste Batteries and Accumulators Regulations 2009, Dellonda would like to inform the user that this product contains one or more batteries. It
is our policy to continually improve products and we reserve the right to alter data, specifications and parts without prior notice. No liability is
accepted for incorrect use of this product. Guarantee is 12 months from purchase date, proof of which is required for any claim.
Dellonda Limited, Sole UK Distributor of Baridi
Kempson Way, Suffolk Business Park, Bury St Edmunds, Suffolk. IP32 7AR
01284 757575 suppor[email protected] www.dellonda.co.uk