Loading ...
Loading ...
Loading ...

X3001/00, X3002/00, X3003/00,
X3051/00, X3052/00, X3053/00
ENGLISH
Introduction
Congratulations on your purchase and welcome
to Philips! To fully benet from the support
that Philips oers, register your product at
www.philips.com/welcome.
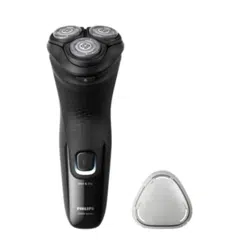
General description (Fig. 1)
1 Protection cap
2 Shaving unit
3 Shaving unit release button
4 On/o button
5 Charging light
6 Socket for small plug
7 Trimmer release slide switch
8 Pop-up trimmer
9 USB cable
Note: A suitable supply unit (e.g. Philips HQ87) is
available via www.philips.com/support.
10 Small plug
Important safety information
Only use the product for its intended purpose. Read
this important information carefully before you use the
product and its batteries and accessories, and save it for
future reference. Misuse can lead to hazards or serious
injuries.
Warning
- To charge the product, only use a certied safety
extra low voltage (SELV) supply unit with output
rating 5 V, ≥ 1 A. For safe charging in a moist
environment (e.g. in a bathroom), only use an IPX4
(splash-proof) supply unit. A suitable supply unit
(e.g. Philips HQ87) is available via www.philips.com/
support. If you need support nding the correct USB
supply unit, contact the Consumer Care Center in
your country. Using a non-certied supply unit may
cause hazards or serious injuries.
- Keep the USB cable and the USB supply unit dry.
- This shaver is waterproof (Fig. 2). It is suitable for use
in the bath or shower and for cleaning under the
tap. For safety reasons, the shaver can therefore only
be used without cord.
- This appliance can be used by children aged from 8
years and above and persons with reduced physical,
sensory or mental capabilities or lack of experience
and knowledge if they have been given supervision
or instruction concerning use of the appliance in
a safe way and understand the hazards involved.
Children shall not play with the appliance. Cleaning
and user maintenance shall not be made by children
without supervision.
- Do not modify the supply unit.
- Do not use the supply unit in or near wall sockets
that contain an electric air freshener to prevent
irreparable damage to the supply unit.
- Do not use a damaged appliance. Replace damaged
parts with new Philips parts.
- Because of hygiene, only one person should use the
appliance.
- Unplug the appliance before cleaning it with water.
- Only use cold or lukewarm water to clean the
appliance.
- Never use compressed air, scouring pads, abrasive
cleaning agents or aggressive liquids to clean the
appliance.
- Water may drip from the socket at the bottom of
the shaver when you rinse it. This is normal and not
dangerous because all electronics are enclosed in a
sealed power unit inside the shaver.
- Only use original Philips accessories or consumables.
- Charge, use and store the product at a temperature
between 10°C and 35°C.
- Keep product and batteries away from re and
do not expose them to direct sunlight or high
temperatures.
- If the product becomes abnormally hot or smelly,
changes color or if charging takes longer than usual,
stop using and charging the product and contact
Philips.
- Do not place products and their batteries in
microwave ovens or on induction cookers.
- Do not open, modify, pierce, damage or dismantle
the product or battery to prevent batteries
from heating up or releasing toxic or hazardous
substances. Do not short-circuit, overcharge or
reverse charge batteries.
- If batteries are damaged or leaking, avoid contact
with the skin or eyes. If this occurs, immediately rinse
well with water and seek medical care.
Electromagnetic elds (EMF)
This Philips appliance complies with all applicable
standards and regulations regarding exposure to
electromagnetic elds.
Charge indications
Battery fully charged
When the battery is fully charged, the charging light
lights up white continuously (Fig. 3).
Note: After approx. 30 minutes, the charging light goes
out to save energy.
Battery low
When the battery is almost empty (when there are only
5 or fewer shaving minutes left), the charging light
ashes orange (Fig. 4).
When you switch o the product, the charging light
continues to ash orange for a few seconds.
Charging
When the shaver is charging, the charging light ashes
white (Fig. 4).
Quick charge
When you start charging the empty battery, the
charging light ashes white quickly. After approx. 5
minutes the charging light ashes white slowly. The
shaver now contains enough energy for a 5-minute
shave.
Charging
Charge the shaver before you use it for the rst time
and when the charging light indicates that the battery
is almost empty.
When you charge the shaver for the rst time or after
a long period of disuse, let it charge until the charging
light lights up continuously.
- Charging takes approx. 1 hour.
- Quick charge: After approx. 5 minutes of charging,
the battery contains enough energy for one full
shave.
- A fully charged shaver has a shaving time of up to
40 minutes (X3001, X3002 and X3003 only) or 45
minutes (X3051, X3052 and X3053 only).
Note: You cannot use the appliance while it is charging.
Charging with a USB supply unit
Warning: Keep the USB cable and the USB supply
unit dry.
1 Make sure that the appliance is switched o.
2 Insert the small plug of the USB cable into the socket
in the bottom of the appliance.
3 Insert the USB plug into the USB supply unit (not
provided) (Fig. 5).
4 Insert the USB supply unit into the wall socket
(Fig. 6).
5 The charging light will indicate the charging status
(see 'Charge indications').
6 After charging, remove the USB supply unit from the
wall socket, pull the USB plug out of the supply unit
and then pull the small plug out of the appliance.
Using the appliance
Warning: Always check the appliance and all
accessories before use. Do not use the appliance
or any accessory if it is damaged, as this may
cause injury. Always replace a damaged part
with one of the original type.
Note: This appliance is waterproof (Fig. 2). It is suitable
for use in the bath or shower and for cleaning under the
tap. For safety reasons, the appliance can therefore only
be used without cord.
Switching the appliance on and o
1 To switch on the appliance, press the on/o button
once (Fig. 7).
2 To switch o the appliance, press the on/o button
once (Fig. 7).
Shaving
For the best results on skin comfort, pre-trim your beard
if you have not shaved for 3 days or longer.
You can use this appliance either wet or dry, or even
under the shower. For a wet shave, apply some water
and shaving foam or gel to your skin and rinse the
shaving heads under the tap with warm water before
following the steps below.
1 Switch on the appliance.
2 Move the shaver in circular movements over your
skin to catch hair growing in all directions (Fig. 8).
Make sure each shaving head is fully in contact
with the skin. Exert gentle pressure for a close,
comfortable shave.
Note: Do not press too hard, as this can cause skin
irritation.
Note: If you are shaving with gel or foam, rinse the
shaving unit regularly during your shave to ensure
that it continues to glide smoothly over your skin
(Fig. 9).
3 Use the narrow sides of the shaving unit to shave in
hard-to-reach areas such as along your jawline and
under your nose (Fig. 10).
4 Switch o and clean the appliance after each use
(see 'Cleaning and maintenance').
5 Put the protection cap on the shaver after use
to prevent damage and dirt accumulation in the
shaving heads (Fig. 11).
Note: Make sure you rinse all foam or shaving gel o
the appliance.
Skin adaptation period
Your rst shaves may not bring you the result you
expect and your skin may even become slightly irritated.
This is normal. Your skin and beard need time to adapt
to any new shaving system. To allow your skin to adapt
to this new appliance, we advise you to shave regularly
(at least 3 times a week) and exclusively with this
appliance for a period of 3 weeks.
Trimming with pop-up trimmer
You can use the trimmer to groom your sideburns and
moustache.
1 Push the trimmer release slide downwards to open
the trimmer (Fig. 12).
2 Switch on the appliance.
3 Hold the trimmer perpendicular to the skin and
move the appliance downwards while you exert
gentle pressure (Fig. 13).
4 Switch o the appliance and clean the trimmer
after each use to prevent clogging and damage (see
'Cleaning and maintenance').
5 Close the trimmer ('click') (Fig. 14).
Cleaning and maintenance
Cleaning the shaver
Clean the shaver after every shave for optimal shaving
performance.
Caution: Always check if the water is too hot, to
prevent burning your hands.
While rinsing shaving heads, water may drip out of the
base of shaver. This is a normal occurrence. Internal
electric parts are in a waterproof compartment so the
shaver will be protected against water damage.
1 Switch on the shaver.
2 Rinse the shaving unit with cold or lukewarm water
(Fig. 9).
3 Switch o the shaver. Press the shaving unit release
button to open the shaving unit (Fig. 15).
4 Rinse the shaving unit and hair chamber with
lukewarm water (Fig. 15).
5 Rinse the outside of the shaving unit with lukewarm
water (Fig. 16).
6 Carefully shake o excess water and let the shaver
air dry.
Caution: Never dry the shaving unit with a towel
or tissue, as this may damage the shaving heads
(Fig. 17).
7 Close the shaving unit.
Cleaning the pop-up trimmer
Caution: Never dry the trimmer teeth with a towel or
tissue, as this may damage the trimmer teeth.
Clean the trimmer after each use to prevent clogging
and damage.
1 Switch o the shaver.
2 Push the trimmer release slide downwards to open
the trimmer (Fig. 12).
3 Switch on the shaver and rinse the pop-up trimmer
under warm water (Fig. 18).
4 Switch the shaver o after cleaning.
5 Carefully shake o excess water and let the pop-up
trimmer air dry.
6 Close the trimmer ('click') (Fig. 14).
Tip: For optimal performance, lubricate the teeth of
the pop-up trimmer with a drop of mineral oil every six
months (oil not included).
Thorough cleaning
Clean the shaving heads thoroughly once a month for
optimal performance.
1 Switch o the shaver.
2 Press the shaving unit release button to open the
shaving unit. Pull the shaving unit o the shaver
(Fig. 19).
3 Turn the lock counterclockwise (1) and remove the
retaining frame (2). Place it aside in a safe place
(Fig. 20).
4 Remove and clean one shaving head at a time.
Each shaving head consists of a cutter and a guard
(Fig. 21).
Note: Do not clean more than one cutter and
guard at a time, since they are all matching sets.
If you accidentally mix up the cutters and guards,
it may take several weeks before optimal shaving
performance is restored.
5 Remove the cutter from the shaving guard and clean
both parts under the tap (Fig. 22).
6 Put the cutter back into the guard (Fig. 23).
7 Put the shaving heads back into the shaving unit
(Fig. 24).
Note: Make sure that the shaving heads with the
projections t exactly onto the hooks of the shaving
head holder when placing them (Fig. 25). The
shaving heads supplied with the shaver either have
notches or projections. Both shaving systems are the
same.
8 Put the retaining frame back into the shaving unit
(1) and turn the lock clockwise (2) (Fig. 26).
9 Insert the hinge of the shaving unit into the slot in
the top of the shaver. Then close the shaving unit
(Fig. 27).
Note: If the shaving unit does not close smoothly,
check if you have inserted the shaving heads
properly and if the retaining frame is locked.
Replacement
Replacing the shaving heads
For maximum shaving performance, we advise you to
replace the shaving heads every two years (Fig. 28).
Replace damaged shaving heads immediately. Always
replace the shaving heads with original Philips shaving
heads (see 'Ordering accessories').
1 Switch o the shaver.
2 Press the shaving unit release button to open the
shaving unit. Pull the shaving unit o the shaver
(Fig. 19).
3 Turn the lock counterclockwise (1) and remove the
retaining frame (2). Place it aside in a safe place
(Fig. 20).
4 Remove the shaving heads from the shaving unit.
Discard the used shaving heads immediately to
avoid mixing them with the new shaving heads
(Fig. 29).
5 Place new shaving heads in the shaving unit
(Fig. 24).
Note: Make sure that the shaving heads with the
projections t exactly onto the hooks of the shaving
head holder when placing them (Fig. 25). The
shaving heads supplied with the shaver either have
notches or projections. Both shaving systems are the
same.
6 Put the retaining frame back into the shaving unit
(1) and turn the lock clockwise (2) (Fig. 26).
7 Insert the hinge of the shaving unit into the slot in
the top of the shaver. Then close the shaving unit
(Fig. 27).
Note: If the shaving unit does not close smoothly,
無料修理規定
17
1.
取扱説明書、本体貼付ラベル等の注意書に従った正常な使用状態で
保証期間内に故障した場合には、無料修理します。
2.
保証期間内に故障して無料修理をお受けになる場合には、フィリップス
サポートセンターにお問い合わせください。
3.
ご贈答品の修理に関するご相談は、フィリップスサポートセンターに
お問い合わせください。
4.
保証期間内でも次の場合には有料修理になります。
○
1
使用上の誤り及び不当な修理や改造による故障及び損傷。
○
2
お買い上げ後の輸送、移動、落下等による故障及び損傷。
○
3
火災、地震、水害、落雷、その他の天災地変、公害や異常電圧による故障及び損傷。
○
4
一般家庭以外(例えば、業務用の長時間使用)に使用された場合の故障及び損傷。
○
5
保証書の提示がない場合。
○
6
保証書にお買い上げ年月日、お客様名、販売店名の記入のない場合、或は字句を書
き換えられた場合。
※保証書は、本書に明示した条件のもとにおいて無料修理をお約束するも
のです。従って保証書を発行している者(保証責任者)、及びそれ以外の
事業者に対するお客様の法律上の権利を制限するものではありません。
保証期間経過後の修理についてご不明の場合は、フィリップスサポートセ
ンターにお問い合わせください。
※保証期間経過後の修理・補修用性能部品の保有期間について詳しく
は取扱説明書の保証とアフターサービスの項目をご覧ください。
※お客様にご記入いただいた個人情報(保証書の控え)は保証期間内
のサービス活動及びその後の安全点検活動のために利用させていた
だく場合がございます。ご了承ください。また個人情報は、株式会社
フィリップス・ジャパンのホームページ
http://www.philips.co.jp/
に掲載されている「プライバシーに関する通知」に基づき適切に管理い
たします。
〈無料修理規定〉
お買い上げ日
年 月 日
お買い上げ店名
TEL.
(
)
便 利メモ
このような症状の時は、故障や事故防止のため、電源を
OFF
に し 、充 電 ケ ー ブ ル を
本体 から外して、必ずフィリップスサポートセンターにお問い合わせください。
ご使用の時、このような症状はありませんか?
●
本 体 にさわると時 々電 気 を感 じる。
● こ げくさい 臭 い が す る。
●
電 源 コード部 を動 かすと通 電したり、しな かったりする。
●
その他の異常、故障がある。
仕様
16
※改良の為、仕様を予告なく変更することがあります。
株式会社 フィリップス・ジャパン
〒
106-0041
東京都港区麻布台
1-3-1
麻布台ヒルズ森
JP
タワー
15
階
【補修用性能部品の保有期間】
●
補修用性能部品の保有期間は製造打ち切り後
6
年です。
●
性能部品とは、その製品の機能を維持するために必要な部品です。
【ご不明な点や修理に関するご相談は】
●
修理に関するご相談ならびにご不明な点は、フィリップスサポートセンターにお
問い合わせください。
【修理を依頼されるときは】
●
修理をご依頼される前に、この取扱説明書をよくお読みいただき、再度点検くだ
さい。尚、異常のあるときはご使用を中止し、フィリップスサポートセンターにお
問い合わせください。
【保証期間中は】
●
製品と保証書をご用意いただき、フィリップスサポートセンターにお問い合わせく
ださい。保証書の記載内容により無料修理いたします。
【保証期間が過ぎているときは】
●
修理によって商品の機能が維持できる場合は、補修用性能部品の保有期間内で
あれば、ご希望により有料で修理させていただきます。
【
海外での本製品の保証及びアフターサービスについて
】
●
本製品の保証は海外においても有効です。(同シリーズ製品の取り扱いがある国に
限ります )
●
日本国以外のフィリップスサービス部門においても保証期間内及び保証期間の
経過後のアフターサービスを受けることができますが、この場合多少日数を要す
ることも あります。
●
海外にてアフターサービスを受けられる場合は、現地のフィリップスサービス部門
にお問い合わせください。尚、お困りの点がございましたら下記までご連絡くだ
さい。
Philips Service Department P.O.Box 20100 9200 CA DRACHTEN
The Netherlands, www.philips.com/support
【お客様の個人情報のお取り扱いについて】
●
お受けしましたお客様の個人情報は、株式会社フィリップス・ジャパンのホームペー
ジ
http://www.philips.co.jp/
に掲載されている「プライバシーに関する通知」
に基づき適切に管理いたします。
保 証とアフターサービス
15
保証書と修理サービスについて(必ずお読みください。)
保証期間 お買い上げ日から
2
年間
対象部分 本体、充電ケーブル(シェービングユニット、保護キャップを除く)
〈保証書・表面左側に付属〉
●
保証書は、必ず「お買い上げ日・販売店名」等の記入をお確かめのうえ、販売店か
ら受け取っていただき内容をよくお読みのあと大切に保管してください。
English
1
2
1
2
1
2
2
1
2
1
2
1
2
1
2
×
2yrs
品番
X3001/00
X3002/00 X3003/00 X3051/00 X3052/00 X3053/00
ハンドル
品番
X3001 X3002 X3003 X3051 X3052 X3053
替刃
品番
SH30
本体
寸法
( 高 さ× 幅
×奥行)
160
×
58
×
56mm
本体
質量
約
186g
電源
方式
充電式
定格
入力
DC 5V 1A
充電
時間
約
1
時間
使用
時間
約
40
分 約
45
分
使用
充電池
ニッケル水 素 充 電 池
(Ni-MH)
2
1
5
8
6
9
7
10
11
14
17
20 21 22
23 24 25
26
29
27
30 31
32
35
38
33
36
39
34
37
28
12
15
18
13
16
19
3
4
4
2
1
7
8
3
4
5
9
6
10
check if you have inserted the shaving heads
properly and if the retaining frame is locked.
Storage
Put the protection cap on the shaver to prevent damage
(Fig. 11).
Note: Always let the shaver dry completely before
storing.
Ordering accessories
To buy accessories or spare parts, visit
www.philips.com/parts-and-accessories or go to
your Philips dealer. You can also contact the Philips
Consumer Care Center in your country.
Recycling
- This symbol means that electrical products and
batteries shall not be disposed of with normal
household waste (Fig. 30).
- Follow your country’s rules for the separate
collection of electrical products and batteries.
Removal of built-in rechargeable battery
The built-in rechargeable battery must only be removed
by a qualied professional when the appliance is
discarded. Before removing the battery, make sure that
the appliance is disconnected from the wall socket and
that the battery is completely empty.
Take any necessary safety precautions when you
handle tools to open the appliance and when
you dispose of the rechargeable battery.
When you handle batteries, make sure that your
hands, the product and the batteries are dry.
To avoid accidental short-circuiting of batteries
after removal, do not let battery terminals
come into contact with metal objects (e.g.
coins, hairpins, rings). Do not wrap batteries in
aluminum foil. Tape battery terminals or put
batteries in a plastic bag before you discard
them.
Be careful, the battery strips are sharp.
1 Press the shaving unit release button to open the
shaving unit. Pull the shaving unit o the shaver
(Fig. 19).
2 Remove the two screws inside the hair chamber
(Fig. 31).
3 Pull the hair chamber upwards to remove it (Fig. 32).
4 Remove the screw from the back cover of the shaver
(Fig. 33).
5 Insert a athead screwdriver into the slot in the
bottom of the shaver. Twist it to separate the back
cover from the front cover (Fig. 34). You may need
to insert the screwdriver all along the edges of the
back cover.
6 Remove the front cover and take out the inner
housing (Fig. 35).
7 Bend the eight snap hooks of the transparent cover
with a athead screwdriver (Fig. 36).
8 Pull the transparent cover upwards with some force
to remove it (Fig. 37).
9 To remove the battery module from the inner
housing, rst rmly pull up the top part with your
ngers and then rmly pull up the bottom part
(Fig. 38).
10 Break the battery tags with a pair of cutting pliers.
Remove the two rechargeable batteries (Fig. 39).
Warranty and support
If you need information or support, please visit
www.philips.com/support.
Warranty restrictions
The shaving heads (cutters and guards) are not covered
by the terms of the international warranty because they
are subject to wear.