
www.samsung.com/caEnglish (CA). 08/2024. Rev.1.1
USER GUIDE
SM-L300
SM-L305F
SM-L310
SM-L315F
SM-L705F

2
Table of Contents
Getting started
6 About the Galaxy Watch7 / Galaxy
Watch Ultra
7 Device layout and functions
7 Watch
12 Wireless charger
12 Charging the battery
12 Wireless charging
14 Battery charging tips and
precautions
15 Using power saving mode
16 Wearing the Watch
16 Attaching and removing the
band
18 Putting on the Watch
18 Band tips and precautions
19 How to wear the Watch for
accurate measurements
21 Turning the Watch on and off
23 Connecting the Watch to a phone
23 Installing the Galaxy Wearable
app
23 Connecting the Watch to a
phone through Bluetooth
25 Remote connection
25 Adding accounts to your Watch
26 Controlling the screen
26 Touch bezel
27 Screen
28 Screen composition
29 Turning the screen on and off
29 Switching the screen
30 Apps screen
31 Lock screen
32 Watch
32 Watch screen
32 Changing the watch face
34 Turning on the Always On
Display feature
34 Turning on Watch only mode
34 Returning to the feature you
are using directly from the
Watch screen
35 Notifications
35 Notification panel
36 Checking incoming
notifications
36 Selecting apps for receiving
notifications
37 Quick panel
40 Entering text
40 Keyboard layout
41 Additional keyboard functions

Table of Contents
3
91 Settings
92 Samsung Health Monitor
92 Introduction
92 Precautions for measuring
biometric data
96 Starting to measure blood
pressure
98 Starting to measure ECG
100 GPS
101 Music
101 Introduction
101 Using Music
102 Managing audio files saved on
your Watch
102 Media Controller
102 Introduction
102 Controlling the music player
103 Controlling the video player
104 Reminder
105 Calendar
105 Bixby
107 Weather
107 Alarm
108 World clock
108 Timer
109 Stopwatch
109 Gallery
109 Introduction
109 Managing pictures saved on
your Watch
110 Using Gallery
110 Viewing images
111 Customizing a watch face
111 Deleting images
112 Samsung Find
112 Sending an SOS
Apps and features
42 Installing and managing apps
42 Play Store
42 Managing apps
43 Messages
45 Phone
45 Introduction
45 Making calls
47 Options during calls
47 Receiving calls
48 Contacts
49 Samsung Wallet
50 Samsung Pay
50 Introduction
50 Setting up Samsung Pay
50 Making payments
51 Samsung Health
51 Introduction
52 Energy score
54 Daily activity
55 Steps
56 Exercise
69 Workouts this week
71 Sleep
74 Measuring the advanced
glycation end products (AGEs)
during sleep
76 Food
77 Body composition
81 Heart rate
83 Stress
85 Cycle tracking
87 Water
88 Blood oxygen
90 Together

Table of Contents
4
134 Software update
134 Tips and tutorials
134 About watch
Galaxy Wearable app
135 Introduction
136 Watch faces
138 Apps screen
138 Tiles
138 Quick panel
139 Watch settings
139 Introduction
139 Samsung account
139 Modes
139 Notifications
140 Sounds and vibration
140 Display
140 Battery
140 Buttons and gestures
140 Health
140 Wallet
141 Safety and emergency
141 Accounts and backup
142 Advanced features
142 Device care
142 Apps
143 Manage content
144 Mobile plans (Mobile network
enabled models)
144 General
144 Accessibility
144 Watch software update
144 About watch
145 Find My Watch
112 Introduction
112 Presets the SOS request
113 Requesting an SOS
114 Requesting an SOS when you
are hurt from a fall
116 Stop sharing location
information
116 Voice Recorder
117 Calculator
118 Compass
118 Buds Controller
119 Camera Controller
120 Samsung Global Goals
120 SmartThings
120 Google apps
121 Settings
121 Introduction
121 Samsung account
121 Connections
125 Modes
126 Notifications
126 Sounds and vibration
127 Display
128 Battery
128 Buttons and gestures
129 Health
130 Security and privacy
130 Location
130 Safety and emergency
131 Accounts and backup
131 Google
131 Advanced features
132 Device care
132 Apps
133 General
133 Accessibility

Table of Contents
5
Usage notices
147 Precautions for using the device
150 Maintaining the device’s water and
dust resistance
153 Precautions for overheating
153 Cleaning and managing the Watch
154 Use caution if you are allergic to any
materials on the Watch
Appendix
155 Troubleshooting
159 Removing the battery
Health and Safety

6
Getting started
About the Galaxy Watch7 / Galaxy Watch Ultra
The Galaxy Watch7 / Galaxy Watch Ultra (hereafter referred to as the Watch) is a
smartwatch that can analyze your exercise pattern, manage your health, and provide
you with a variety of convenient apps for making phone calls and playing music. You can
browse the various features by using the touch bezel and launch them by tapping the
screen, and you also can change the watch face to match your taste.
You can use your Watch after connecting it to your phone.
Getting started
7
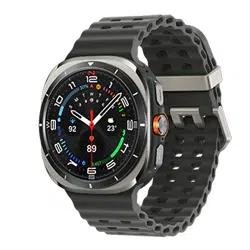
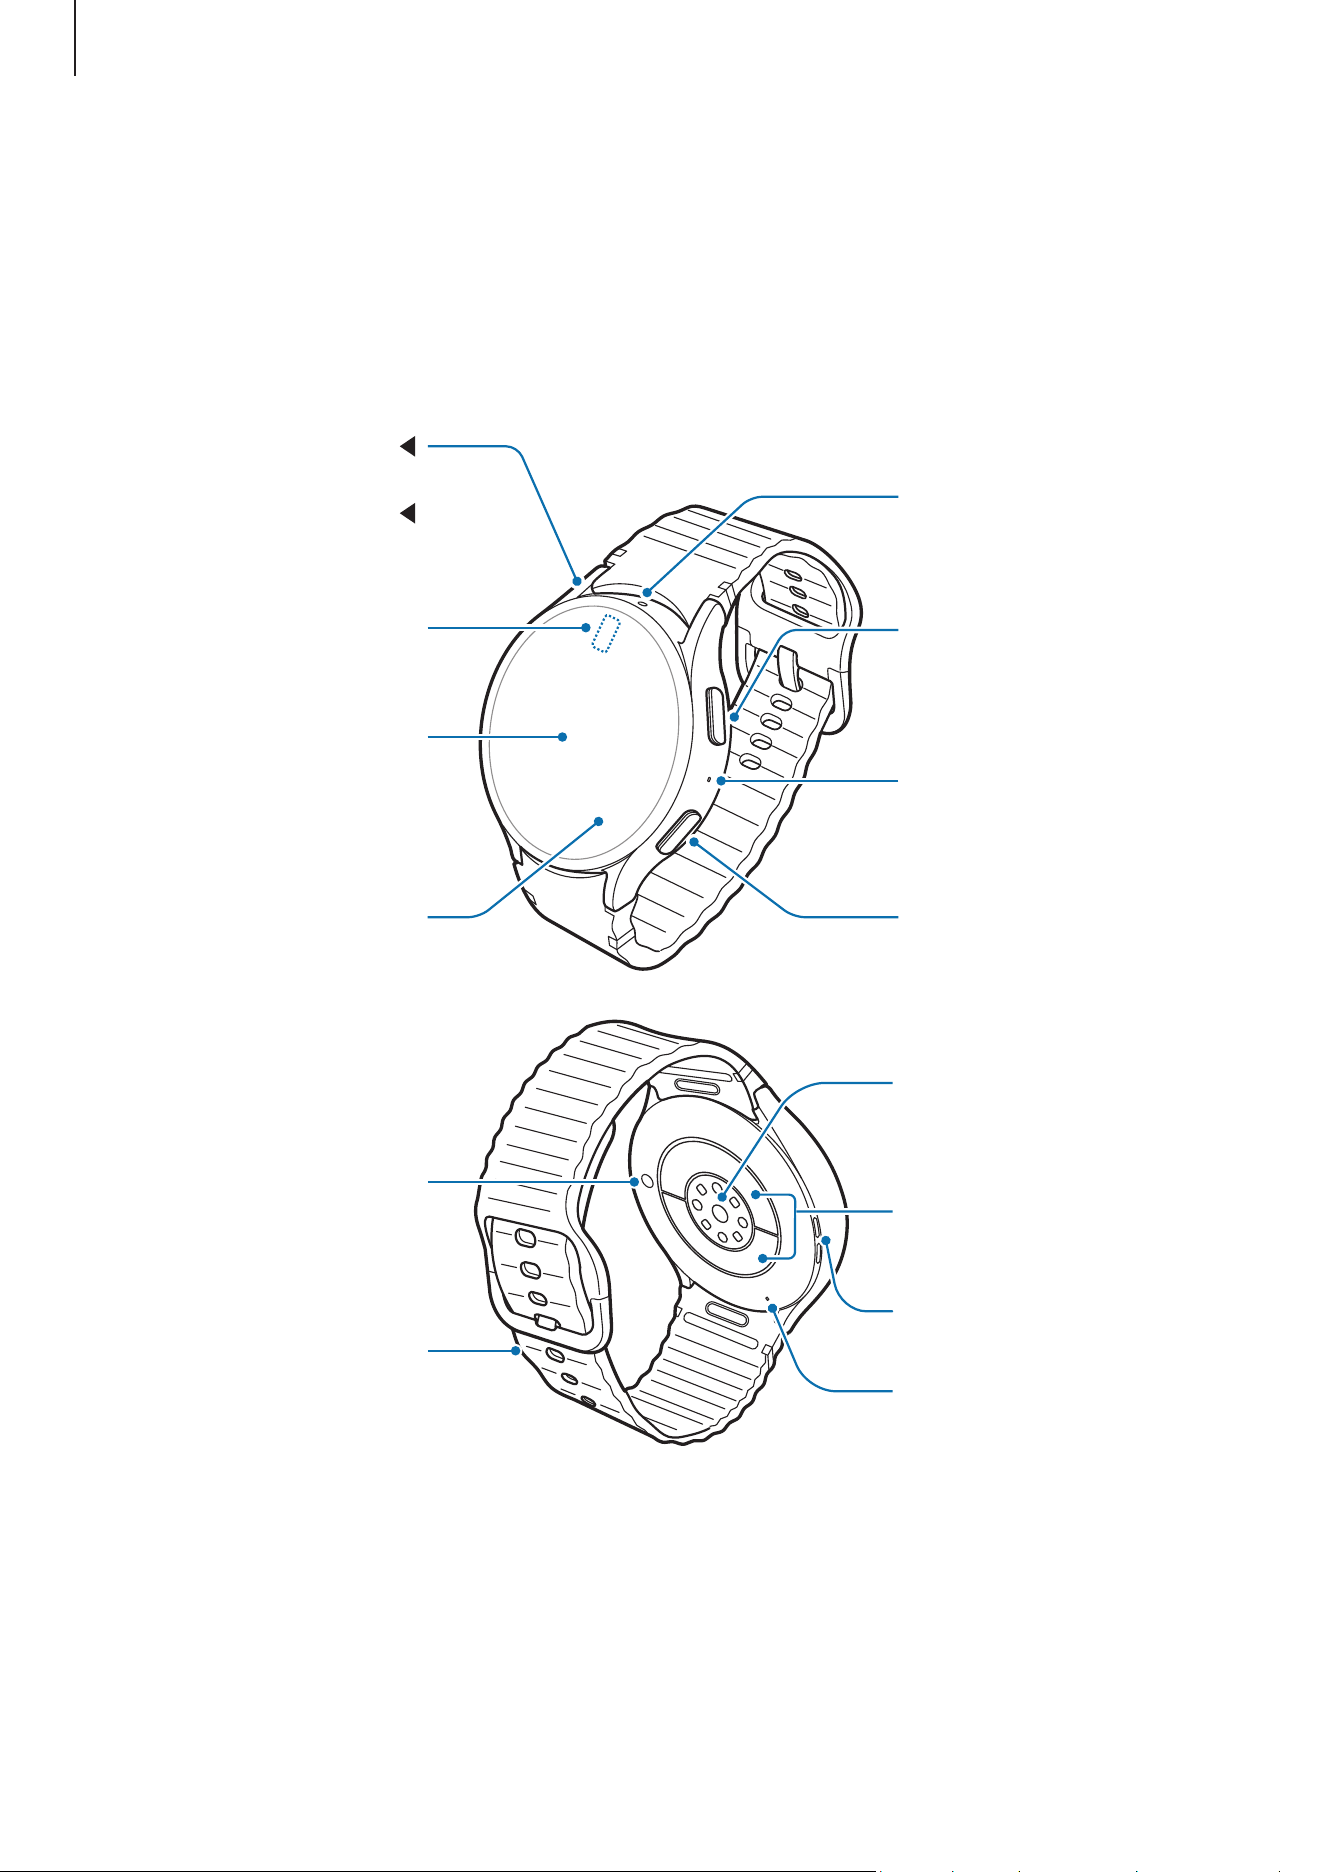
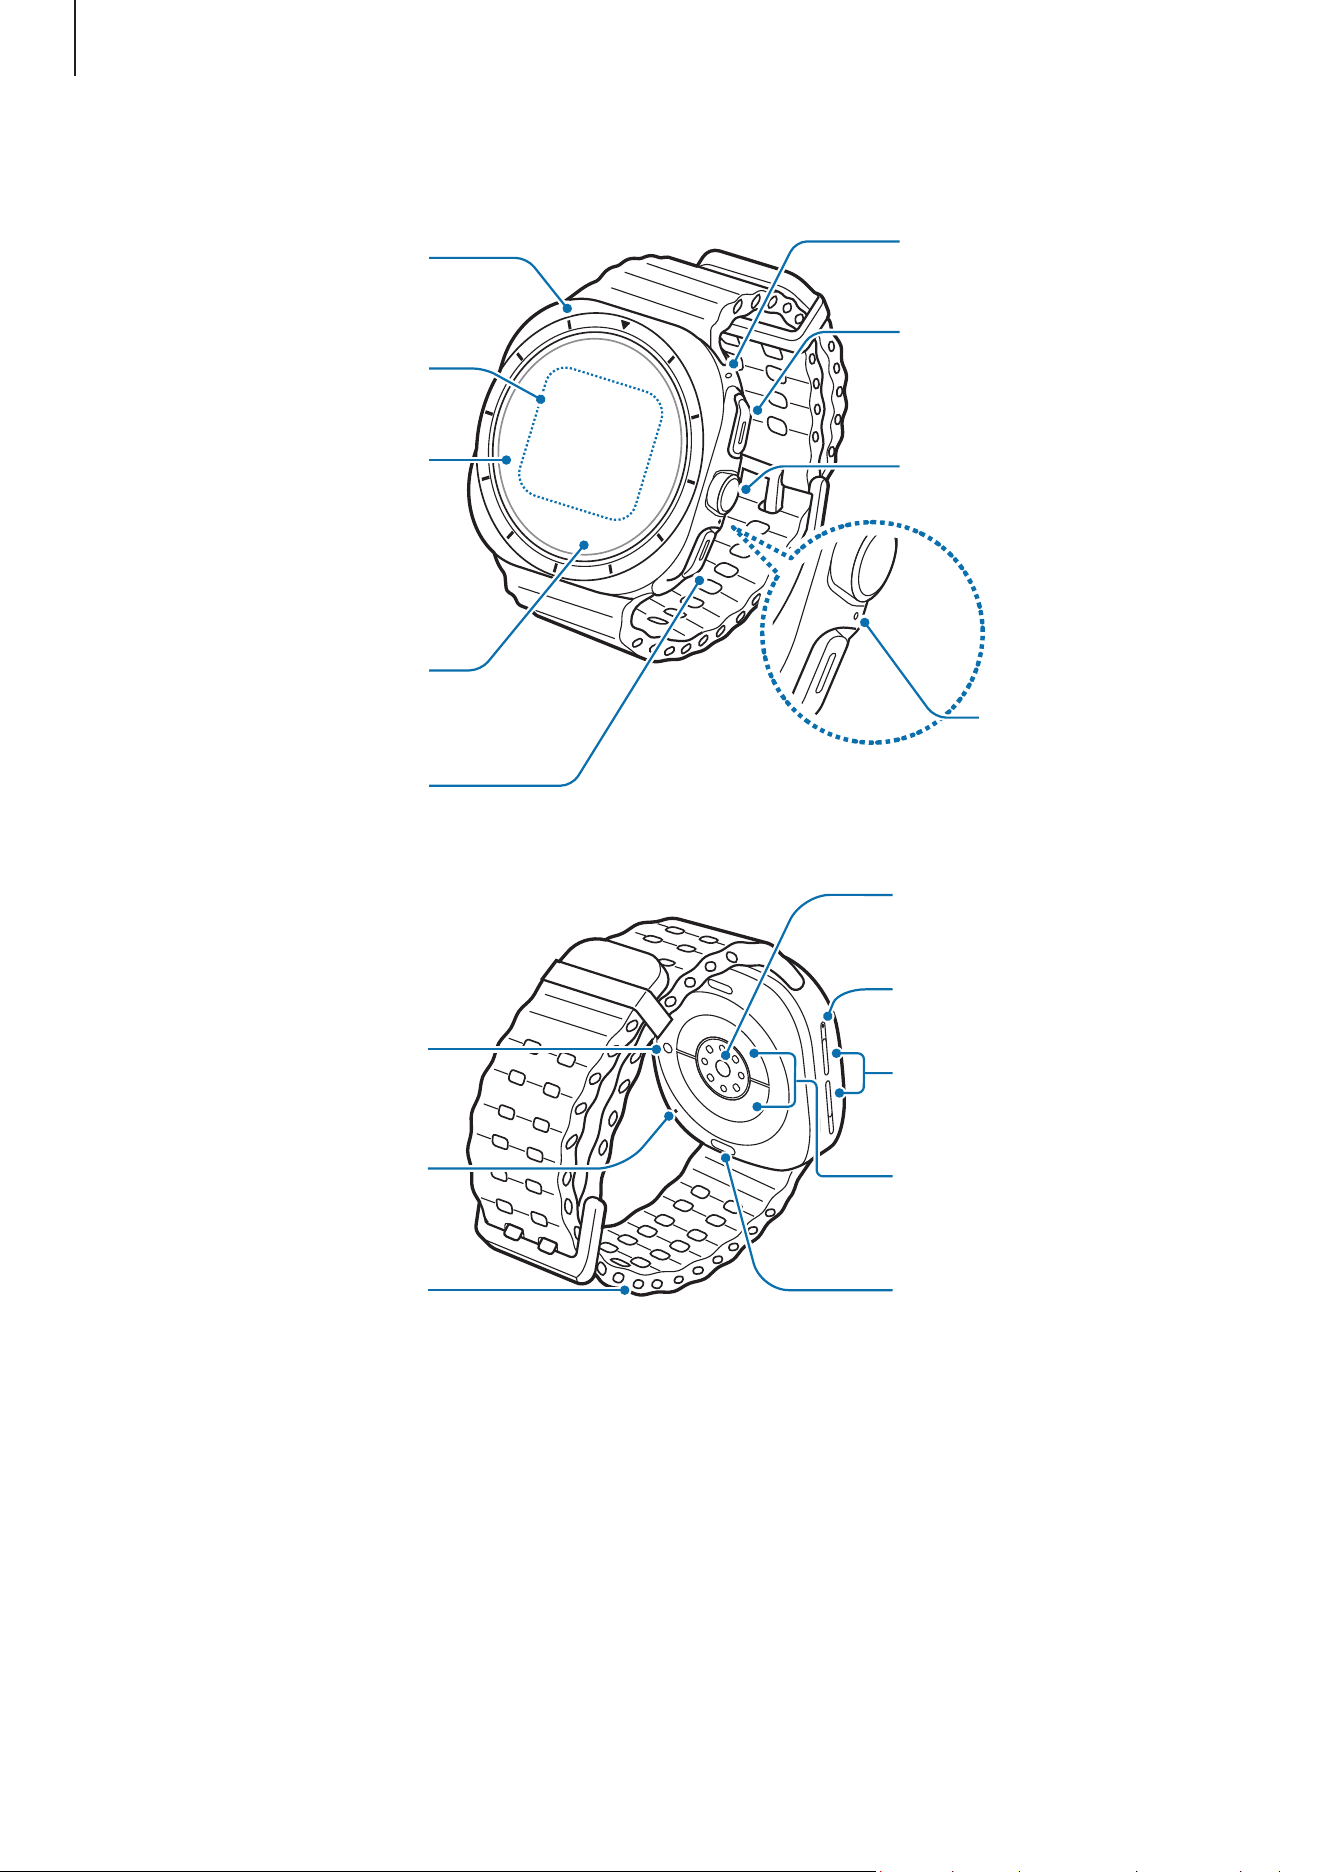
Device layout and functions
Watch
▶
Galaxy Watch7:
Home button (Power
button) / Electrical
bio-signal sensor
Back button / Electrical
bio-signal sensor
Microphone
NFC antenna
SM-L300, SM-L310:
GPS antenna
SM-L305F, SM-L315F:
LTE/GPS antenna
Atmospheric pressure
sensor
Light sensor
Screen
Optical bio-signal
sensor
Speaker
Pressure vent
Infrared temperature
sensor
Band
Electrical bio-signal
sensors
Getting started
8
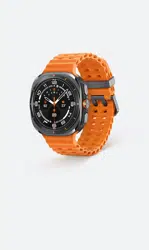
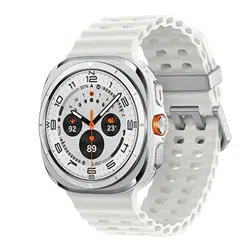
▶
Galaxy Watch Ultra:
Home button (Power
button) / Electrical
bio-signal sensor
Back button / Electrical
bio-signal sensor
Screen
LTE/GPS antenna
Atmospheric pressure
sensor
Light sensor
Quick button
NFC antenna
Microphone
Optical bio-signal
sensor
Speaker
Microphone
Infrared temperature
sensor
Electrical bio-signal
sensors
Band release button
Pressure vent
Band
Getting started
9
•
Use the device in a place without magnetic interference for the device to operate
normally.
•
Your device and some accessories (sold separately) contain magnets. Keep
it away from credit cards, implanted medical devices, and other devices that
may be affected by magnets. In the case of medical devices, keep your device
more than 15 cm apart. Stop using your device if you suspect any interference
with your medical device and consult your physician or your medical device
manufacturer.
•
If you have a medical implant in your heart, do not place your device in a pocket
close to your implanted device, such as your chest or inner jacket pocket.
•
Keep a safe distance between objects that are affected by magnets, and your
device and some accessories (sold separately) that contain magnets. Objects
such as credit cards, passbooks, access cards, boarding passes, or parking passes
may be damaged or disabled by the magnets in the device.
•
When using the speakers, such as when playing media files, do not place the
Watch close to your ears.
•
Ensure that the band is kept clean. Contact with contaminants, such as dust and
dye, can cause stains on the band that may not be fully removed.
•
Do not insert sharp objects into the Watch’s external holes. The inner
components may be damaged along with the water-resistance feature.
•
If you use the Watch with its glass or acrylic body broken, there may be a risk of
injury. Use the Watch only after it has been repaired at a Samsung Service Centre
or an authorized service centre.
•
If dust or foreign materials enter the microphone or speaker, the Watch’s sound
may become quiet or certain features may not work. If you attempt to remove
the dust or foreign materials with a sharp object, the Watch may be damaged
and its appearance may be affected.
Getting started
10
•
Connectivity problems and battery drain may occur in the following situations:
‒
If you attach metallic stickers on the antenna area of the Watch
‒
If you use a metallic band
‒
If you cover the Watch’s antenna area with your hands or other objects while
using certain features, such as calls or the mobile data connection
•
If the pressure vent is covered by an accessory, such as a sticker, unwanted
noises may occur during calls or media playback.
•
Do not cover the light sensor area with accessories, such as stickers or a cover.
Doing so may cause the sensor to malfunction.
•
Make sure the Watch’s microphone is not obstructed when you are speaking into
it.
•
The pressure vent ensures that Watch’s inner parts and sensors work correctly
when you use the Watch in an environment where the atmospheric pressure
changes.
•
The Galaxy Watch Ultra has dual microphones, meaning it has two microphones
in total.
•
The images in this guide are of a Galaxy Watch Ultra.
Using the Home button or Back button
Button Function
Home button
•
When the Watch is off, press and hold to turn it on.
•
When the screen is off, press to turn on the screen.
•
Press and hold to start a conversation with Bixby. Refer to
Using Bixby for more information.
•
Press twice or press and hold to open the app or feature
you set.
•
Press to open the Watch screen when you are on any other
screen.
Back button
•
When the screen is off, press to turn on the screen.
•
Press to launch the feature you set.
Home button + Back
button
•
Press simultaneously to capture a screenshot.
•
Press and hold simultaneously to turn off the Watch.
Getting started
11
Setting the Home button or Back button
Select an app or feature to launch by pressing the Home button or Back button.
On the Apps screen, tap (
Settings
)
→
Buttons and gestures
, and then select an
option you want under
Home button
or
Back button
.
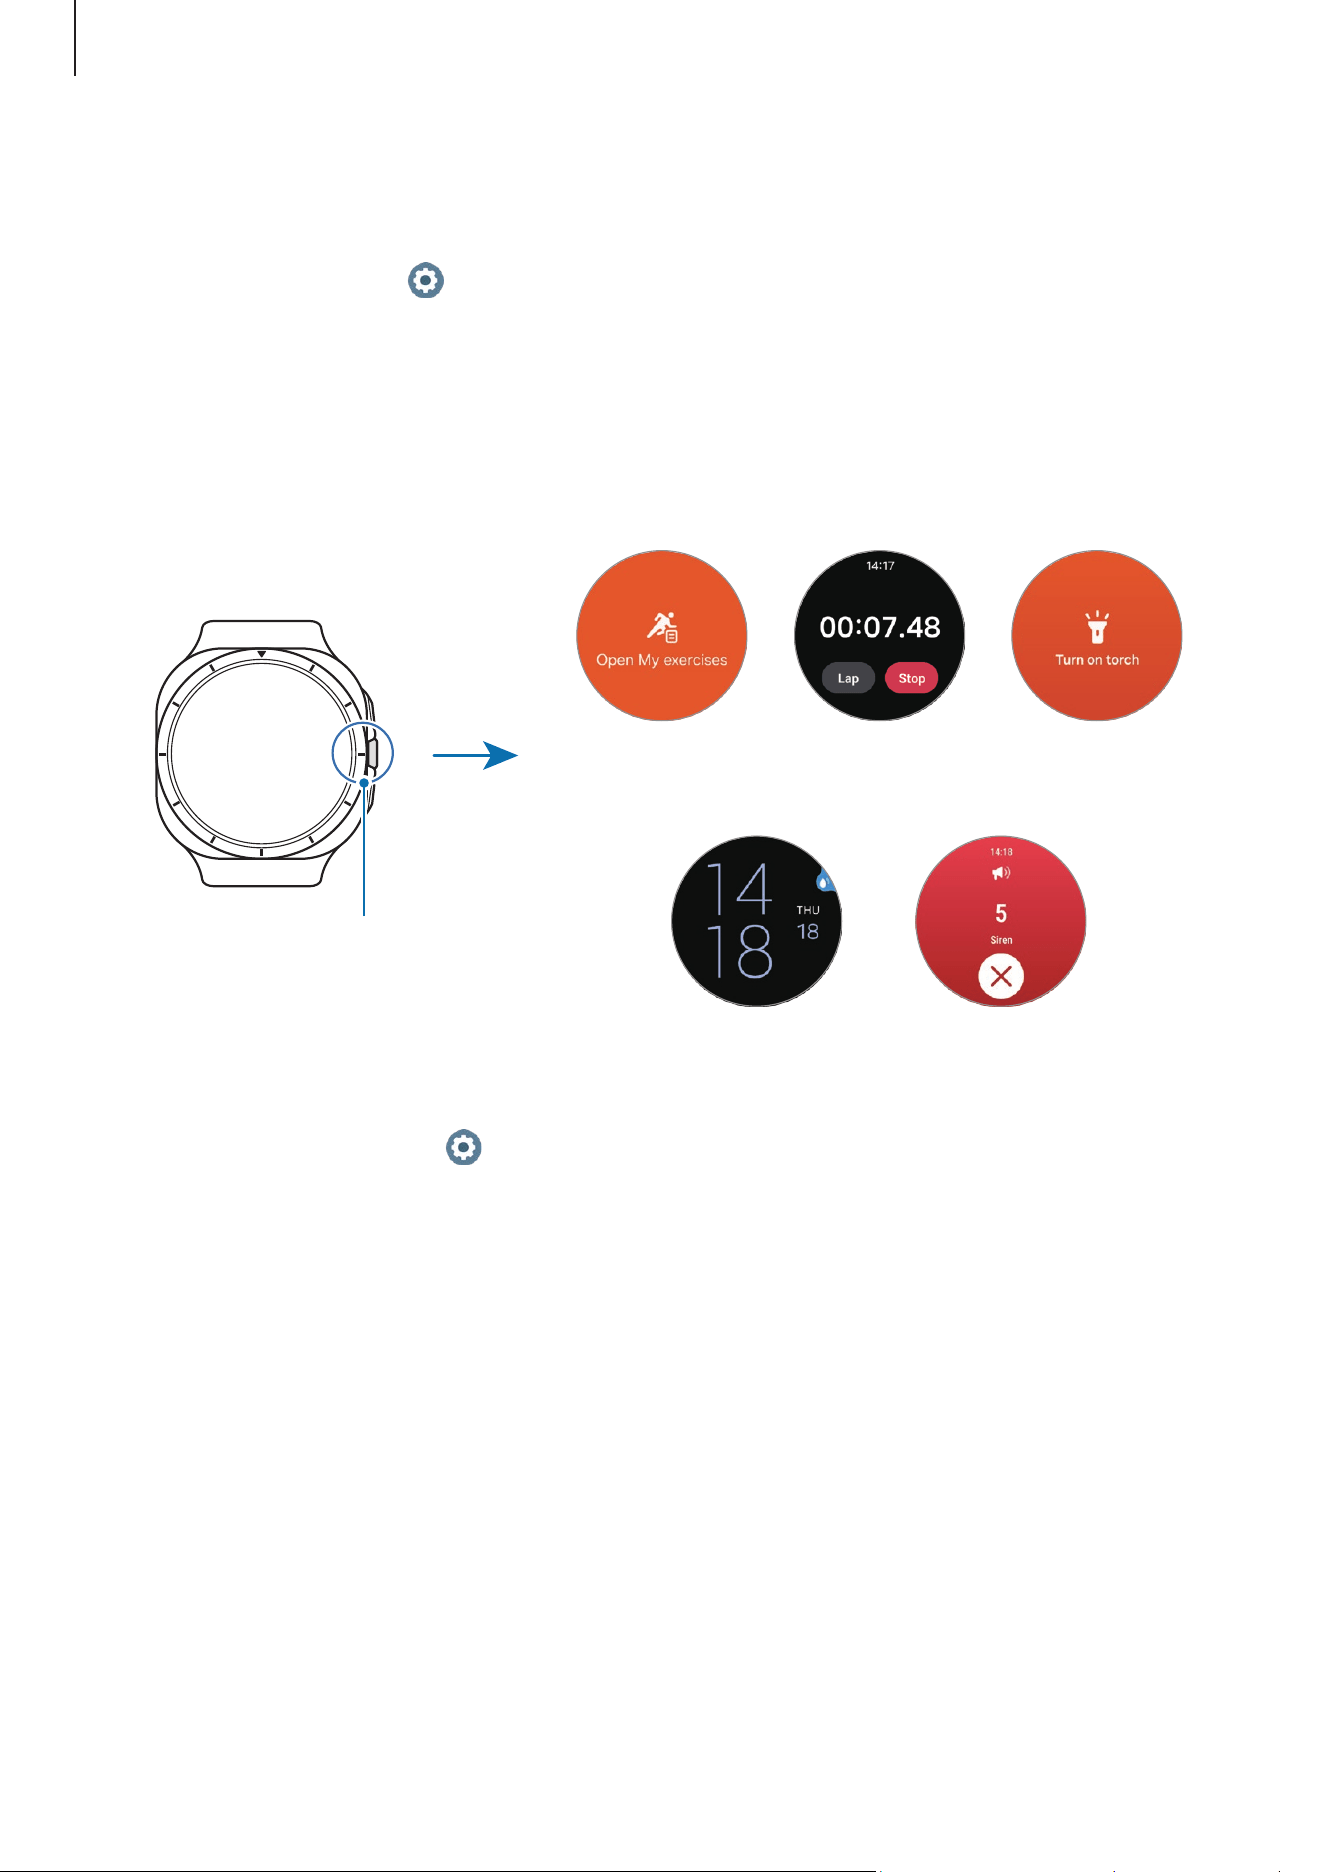
Setting the Quick button and using it (Galaxy Watch Ultra)
The Quick button is a circular button between the Home and Back buttons that you can
press to instantly launch the features you need for working out and outdoor activities.
Quick button
Open Samsung
Health exercises.
Turn on the
torch.
Turn on Water
lock mode.
Sound a siren.
Open the
stopwatch.
1 On the Apps screen, tap (
Settings
)
→
Buttons and gestures
.
2 Select a desired action under
Quick button
.
•
Action
: Set the Quick button to launch the exercise or feature. The action you
select determines what happens when you press the Quick button. If you do not
want the Quick button to launch any features when you press it, select
None
.
‒
Exercise
: You can set to open the exercise list or start a workout. During a
workout, you can pause or stop the exercise, and you can perform detailed
operations for each exercise by pressing the Quick button.
‒
Features
: You can set to open a stopwatch or turn on the flashlight or Water
lock mode.
Getting started
12
•
Start action with
: You can set the Quick button to open the exercise or feature you
set by pressing it once or twice. Tap
Start action with
and select the option you
want.
•
Siren
: Set the Quick button to make a siren sound in an emergency when pressing
and holding it for more than 5 seconds.
•
If you frequently find that the buttons are being pressed unintentionally because
of the thickness of your clothes, gloves, or the way your Watch fits, try employing
one of the following techniques:
‒
Refer to How to wear the Watch for accurate measurements and try wearing
your Watch again.
‒
Wear your Watch so that the buttons are facing the opposite direction. If the
screen appears reversed, on the Apps screen, tap (
Settings
)
→
General
→
Orientation
and set the button position to match the actual orientation
under
Button position
.
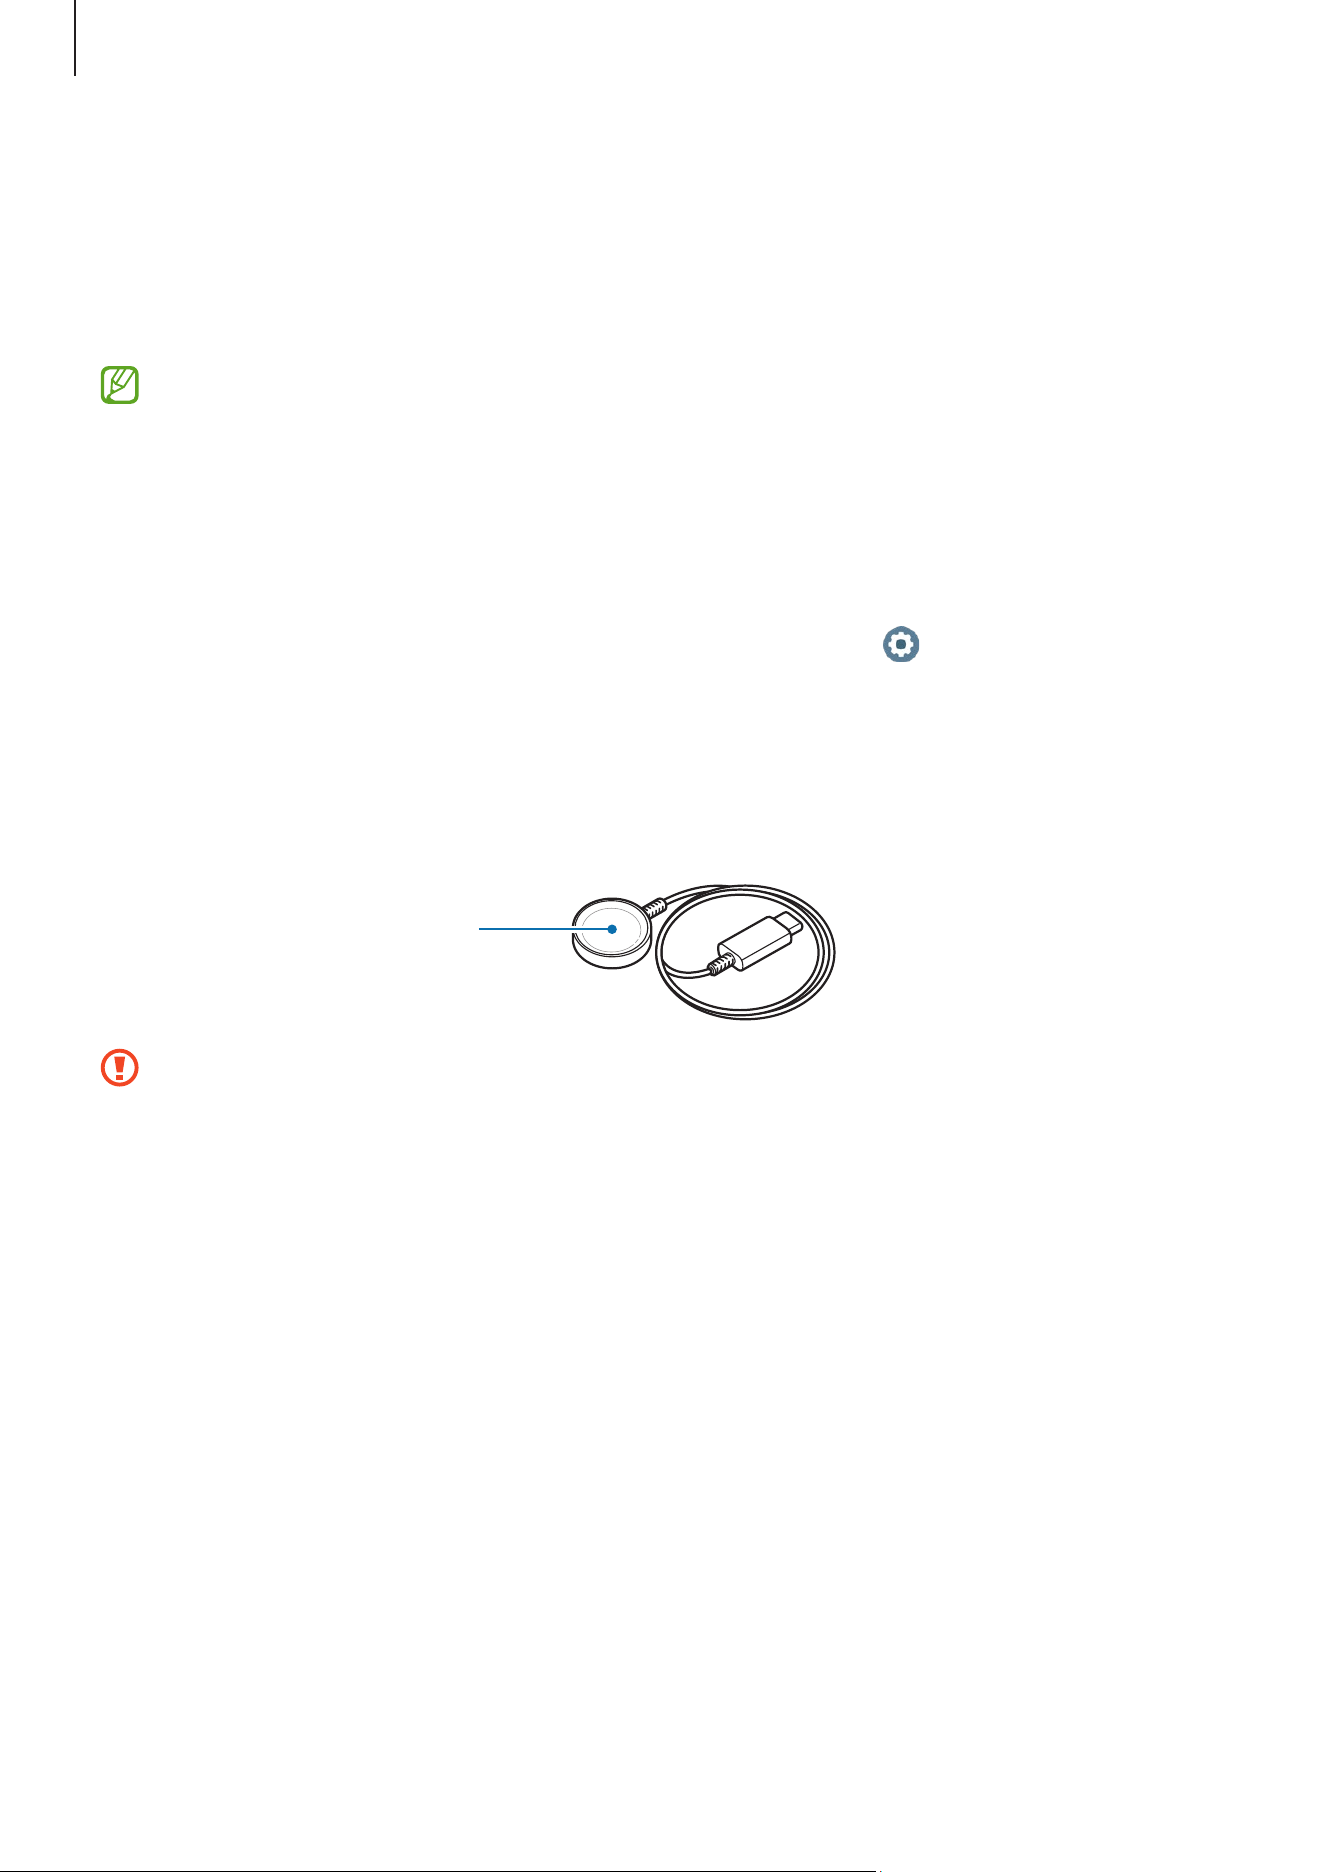
Wireless charger
Wireless charging
surface
Do not expose the wireless charger to water. The wireless charger does not have
same water-resistance certification as your Watch.
Charging the battery
Charge the battery before using your Watch for the first time or when it has been unused
for an extended period.
Wireless charging
1 Connect the wireless charger to the USB power adapter.

Getting started
13
2 Place the Watch on the wireless charger aligning the centre of your Watch’s backside
with the centre of the wireless charger. Wireless charging may not work smoothly
depending on the type of accessory or cover. For stable wireless charging, it is
recommended to separate the cover or accessory from the Watch.
Wireless charger
3 After fully charging, disconnect the Watch from the wireless charger.
Checking the charging status
You can check the charging status on the screen during wireless charging. If the
charging status does not appear on the screen, on the Apps screen, tap
(
Settings
)
→
Display
and tap the
Show charging info
switch to turn it on.
The Watch will be turned on automatically when you start charging while it is
turned off and the battery is charged to more than 10%. To charge the Watch
and have it remain off, on the Apps screen, tap (
Settings
)
→
Battery
and tap
the
Auto power on
switch to turn it off. You can check the charging status on the
screen by pressing any button when you charge the Watch while it is turned off.
Getting started
14
Battery charging tips and precautions
Use only Samsung-approved charger and cable specifically designed for your
Watch. An incompatible charger or cable can cause serious injuries or damage to
your device.
•
Connecting the charger improperly may cause serious damage to the device. Any
damage caused by misuse is not covered by the warranty.
•
Use only the wireless charger supplied with the Watch. The Watch cannot be
charged properly with a third-party wireless charger.
•
If you charge the Watch while the wireless charger is wet, the device may be
damaged. Thoroughly dry the wireless charger before charging the Watch.
•
To save energy, unplug the charger when not in use. The charger does not have a
power switch, so you must unplug the charger from the electric socket when not
in use to avoid wasting power. The charger should remain close to the electric
socket and easily accessible while charging.
•
The Galaxy Watch Ultra and Galaxy Watch7 do not support the Wireless power
sharing feature.
•
The Watch has a built-in wireless charging coil. You can charge the battery by
using a wireless charging pad. However, the Watch is not chargeable with some
wireless charging pads when the band is attached because of the structure of
some bands. To charge the Watch with the wireless charging pad, first remove
the band from your Watch. Also, the wireless charging pads are sold separately.
For more information about available wireless charging pads, refer to the
Samsung website.
•
When using a charger, it is recommended to use an approved charger that
guarantees the charging performance.
•
If there are obstructions between the Watch and the wireless charger, it may
not charge properly. Check if there is any sweat, liquid, or dust on them before
charging.
•
If the battery is completely discharged, the Watch cannot be turned on
immediately after the wireless charger is connected. Allow a depleted battery to
charge for a few minutes before turning it on.
•
If you use multiple apps at once, network apps, or apps that need a connection to
another device, the battery will drain quickly. To avoid losing power during a data
transfer, always use these apps after fully charging the battery.
Getting started
15
•
When connecting the wireless charger to another power source, such as a
computer or multi-charging hub, the Watch may not charge properly or it may
charge more slowly because of a lower electric current.
•
The Watch can be used while it is charging, but it may take longer to fully charge
the battery.
•
If the Watch’s power supply is unstable while being used and charged at the
same time, the screen may not be responsive. If this happens, disconnect the
Watch from the wireless charger.
•
While charging, the Watch may heat up. This is normal and should not affect
the Watch’s lifespan or performance. Before wearing the Watch, allow it to cool
down for a while before using it. If the battery gets hotter than usual, the charger
may stop charging.
•
If the Watch is not charging properly, take the Watch and the wireless charger to
a Samsung Service Centre or an authorized service centre.
•
Avoid using a bent or damaged wireless charger cable. If the wireless charger
cable is damaged, stop using it.
Using power saving mode
Turn on power saving mode to extend the battery’s usage time.
Open the quick panel by dragging downwards from the top edge of the screen and tap
to turn the feature on. Alternatively, on the Apps screen, tap (
Settings
)
→
Battery
and tap the
Power saving
switch to turn it on.
Power saving mode will be turned on and some features can be restricted.
If the battery power drops below a certain level, the power saving screen will
appear. Tap
Turn on
to turn power saving mode on. In this case, power saving mode
will be turned off automatically when your Watch’s battery is charged more than
15%. However, if you turn on power saving mode from Settings or quick panel,
power saving mode will not be turned off automatically, even if your Watch’s
battery is charged to more than 15%.
Getting started
16
Wearing the Watch
Attaching and removing the band
Attach the band before using your Watch. You can detach the band from the Watch and
replace it with a new one.
Be careful not to hurt your fingernails when attaching or removing bands.
•
The supplied band may vary depending on the region or model.
•
The supplied band’s size may vary depending on the model. Use the proper band
that fits your model’s size.
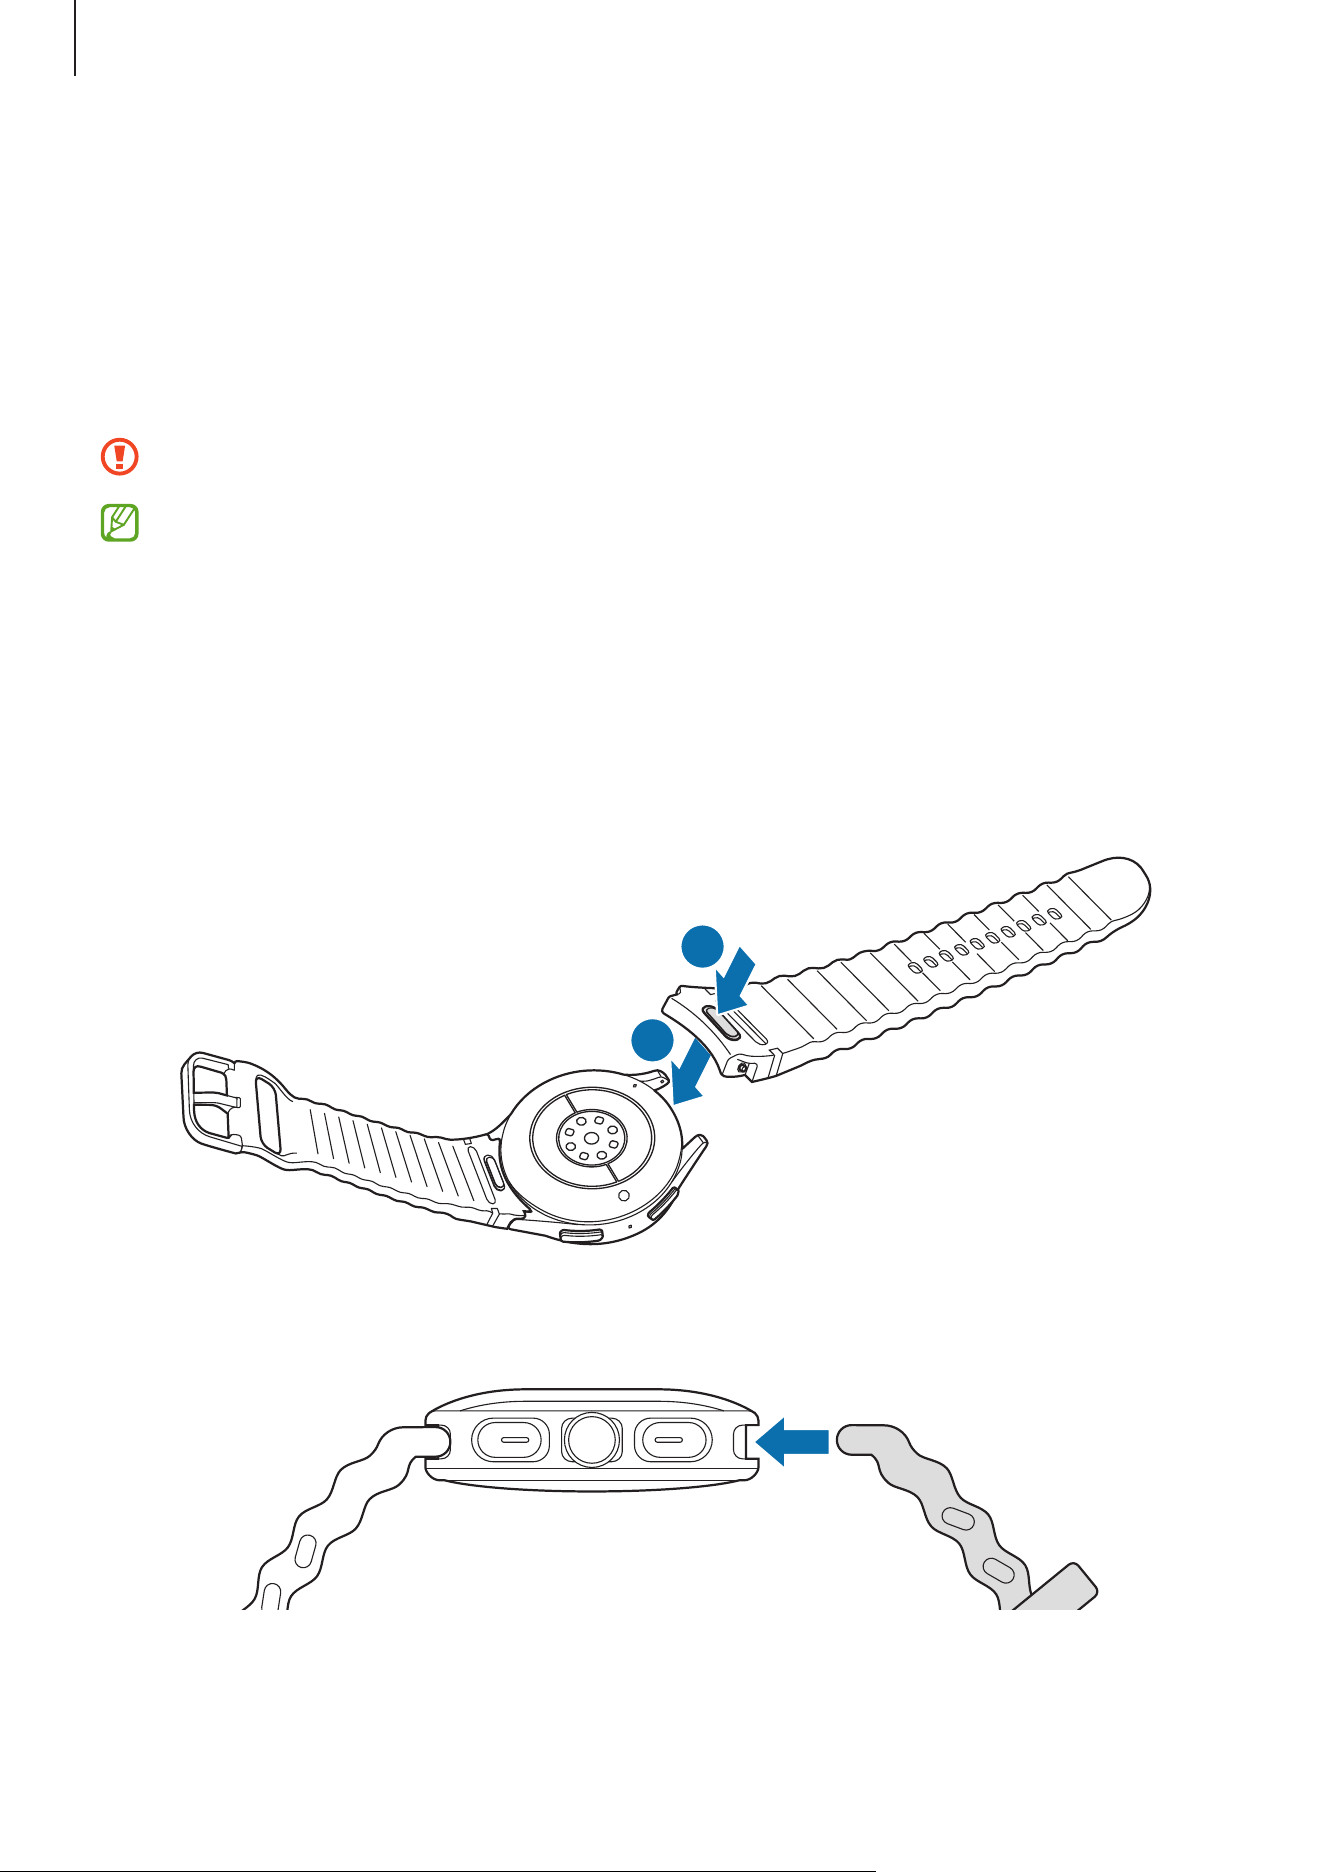
Attaching the band
1
▶
Galaxy Watch7: Attach the band to your Watch while pressing the band’s button
firmly.
2
1
▶
Galaxy Watch Ultra: Align the band with the Watch so that they line up, then push
it in until it clicks.
Getting started
17
2 Gently pull on both sides of the band to make sure it is tightly connected and not
detached from your Watch.
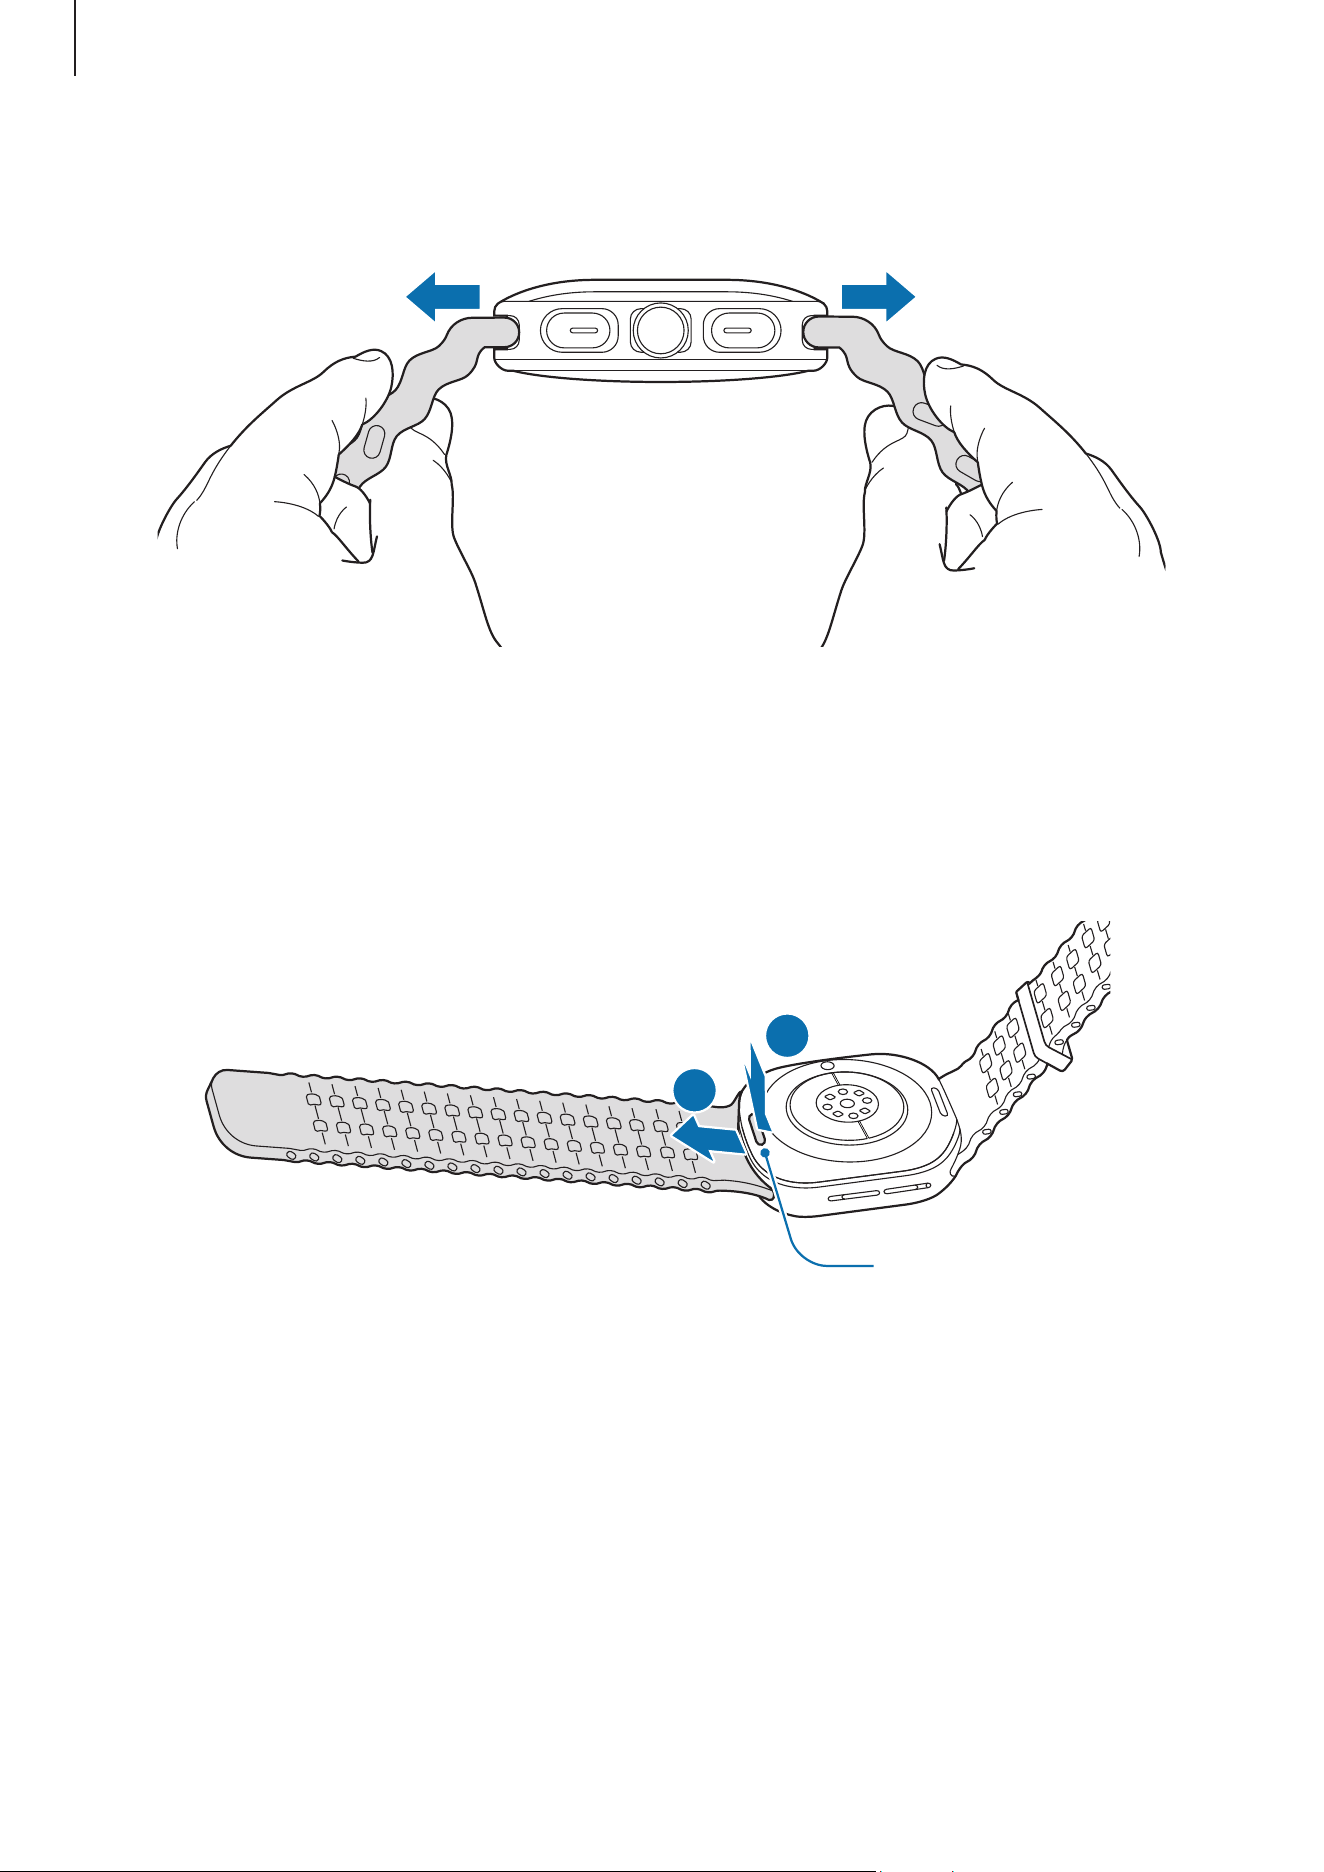
Removing the band
▶
Galaxy Watch7: Remove the band while pressing the band’s button.
▶
Galaxy Watch Ultra: Remove the band while pressing the band release button.
2
1
Band release button
Getting started
18
Putting on the Watch
▶
Galaxy Watch7: Place your Watch around your wrist. Fit the band to your wrist, insert
the pin into an adjustment hole, and then secure the buckle to close it. If the band is too
tight, use a looser hole.
▶
Galaxy Watch Ultra: Adjust the loop that fits around your wrist and place your Watch
around your wrist. Fit the band to your wrist, insert the pin into the adjustment holes,
and then slide the end of the band through the loop to secure it. If the band is too tight,
use a looser hole.
Do not bend the band excessively. Doing so may damage the Watch.
•
To measure your physical condition accurately, wear the Watch firmly around
your lower arm above the wrist. Refer to How to wear the Watch for accurate
measurements for more information.
•
When certain materials come into contact with the back of the Watch, your
Watch may recognize that you are wearing it on your wrist depending on the
type of material.
•
If the sensors on the back of your Watch do not come into contact with your wrist
for more than 10 minutes, your Watch may determine that you are not wearing it
on your wrist.
Band tips and precautions
•
For accurate measurement, you have to wear the Watch so that it fits your wrist.
After measuring, loosen the band to allow air to reach your skin. It is recommended
to wear the Watch so that it is not too loose or tight, and that it feels comfortable in
normal circumstances.
•
When you wear the Watch for a long time or do high-intensity exercise while wearing
it, skin irritation may occur because of certain factors, such as friction, pressure, or
moisture. If you have been wearing your Watch for a long time, remove it from your
wrist for a while to keep your skin healthy and allow your wrist to rest.
•
Skin irritation may occur because of an allergy, environment factors, other factors,
or when your skin is exposed to soap or sweat for long periods. In this case, stop
using your Watch immediately and wait 2 or 3 days for the symptoms to ease. If the
symptoms persist or worsen, call your doctor.
Getting started
19
•
Make sure your skin is dry before wearing your Watch. If you wear a wet Watch for a
long time, your skin may be affected.
•
If you use your Watch in the water, remove foreign materials from your skin and
Watch and dry them thoroughly to prevent the skin irritation.
•
Do not use any accessories except the Watch in the water.
•
If you frequently find that the buttons are being pressed unintentionally because of
the thickness of your clothes, gloves, or the way your Watch fits, try employing one of
the following techniques:
‒
Refer to How to wear the Watch for accurate measurements and try wearing your
Watch again.
‒
Wear your Watch so that the buttons are facing the opposite direction. If the
screen appears reversed, on the Apps screen, tap (
Settings
)
→
General
→
Orientation
and set the button position to match the actual orientation under
Button position
.
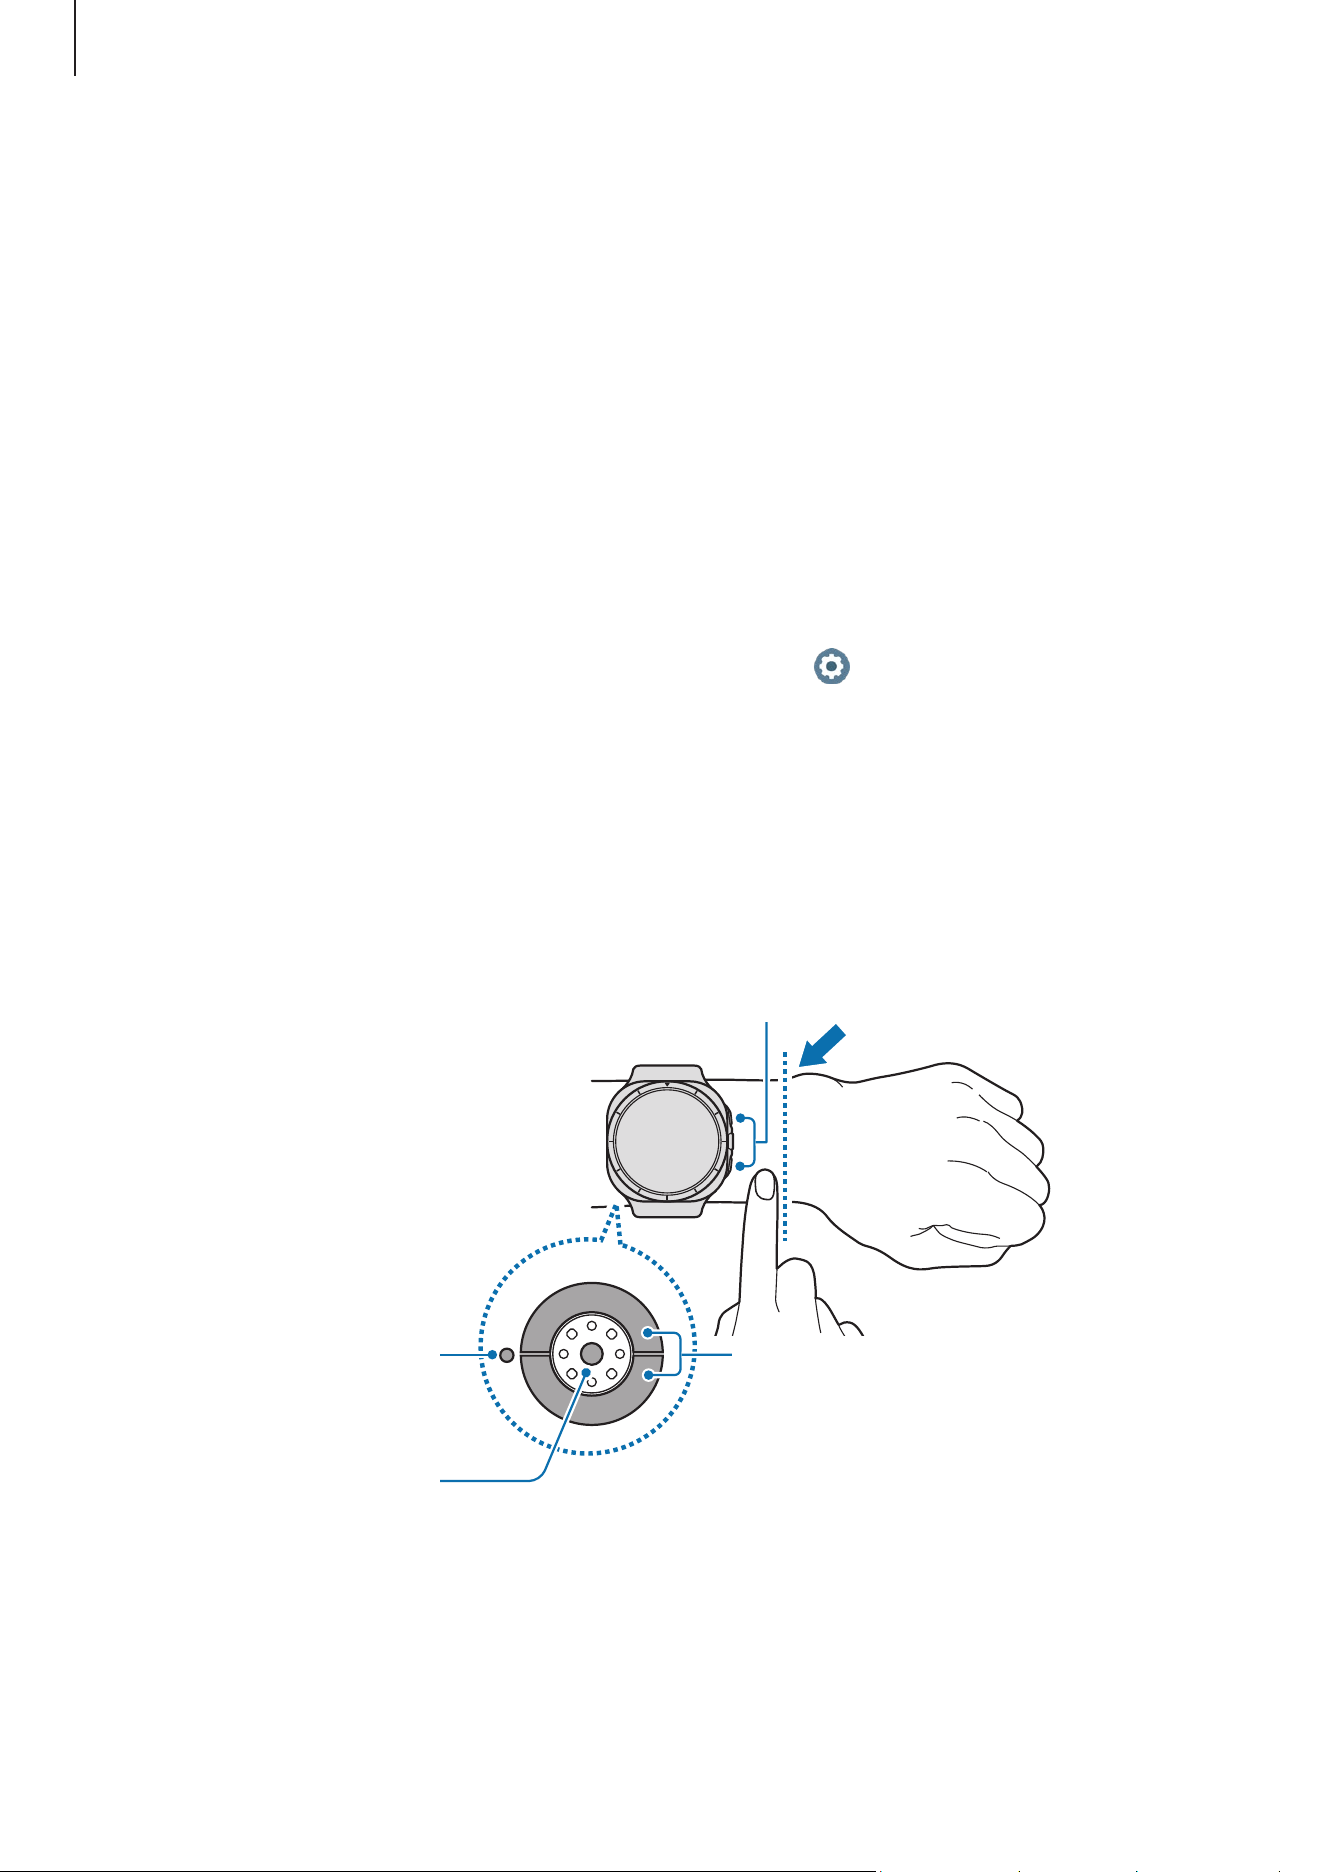
How to wear the Watch for accurate measurements
For accurate measurements, wear the Watch firmly around your lower arm above the
wrist while leaving a finger’s worth of space as shown in the figure.
Electrical bio-signal sensors
Optical bio-signal sensor
<Rear>
Infrared temperature
sensor
Electrical bio-signal
sensors
Getting started
20
•
If you fasten the Watch too tightly, skin irritation may occur, and if you fasten it
too loosely, friction may occur.
•
Do not look directly at the optical bio-signal sensor’s lights. Make sure children
do not look directly at the lights. Doing so may impair their vision.
•
If the Watch becomes hot to the touch, remove it until it cools. Exposing your
skin to the Watch’s hot surface for a long time may cause low-temperature
burns.
•
Remove all water from your Watch and the band before measuring your body
composition and ECG.
•
If any water, dust, or stains are on the infrared temperature sensor, the
measurements may be inaccurate.
•
Clean the infrared temperature sensor with a soft cloth or cotton bud.
•
Use the HR feature only for measuring your heart rate. The accuracy of the
optical bio-signal sensor may be diminished depending on the surroundings,
measurement conditions, and your physiological state.
•
As cold ambient temperatures may affect your measurement, keep yourself
warm when checking your heart rate during winter or cold weather.
•
Smoking or consuming alcohol before taking measurements may cause your
heart rate to be different from your normal heart rate.
•
Do not move, talk, yawn, or breathe deeply while taking heart rate
measurements. Doing so may cause your heart rate to be recorded inaccurately.
•
If your heart rate is extremely high or low, the measurement may not be
accurate.
•
If measuring children’s heart rates, the measurement may not be accurate.
•
If you have thin wrists, you may experience inaccurate heart rate measurements
when the Watch is loose, causing the light to be reflected unevenly. In this case,
wear the Watch on your inner arm.
•
If heart rate measurement is not working properly, adjust the position of the
Watch’s optical bio-signal sensor to the right, left, up, or down on your wrist, or
wear the Watch on your inner arm so that the sensor is in contact with your skin.
•
If the optical bio-signal sensor and the electrical bio-signal sensors are dirty,
wipe the sensors and try again. If foreign materials prevent the light from
reflecting evenly, the measurement may not be accurate.
Getting started
21
•
The optical bio-signal sensor may be affected by tattoos, marks, and hair on the
wrist you wear your Watch on. These may cause your Watch not to recognize that
you are wearing it, and the Watch’s features may not work properly. Therefore,
wear your Watch on a wrist that does not interfere with the Watch’s features.
•
The measurement features may not work properly because of certain factors,
such as the light from the optical bio-signal sensor being blocked, depending
on your skin brightness, blood flow under your skin, and the cleanliness of the
sensor area.
•
For accurate measurements, use the Ridge sport band. The Ridge sport band
may be sold separately depending on the model.
•
For accurate measurements, your wrist and the button position must be the
same as the settings on your Watch. On the Apps screen, tap (
Settings
)
→
General
→
Orientation
and check the position of the buttons and how you are
wearing the Watch.
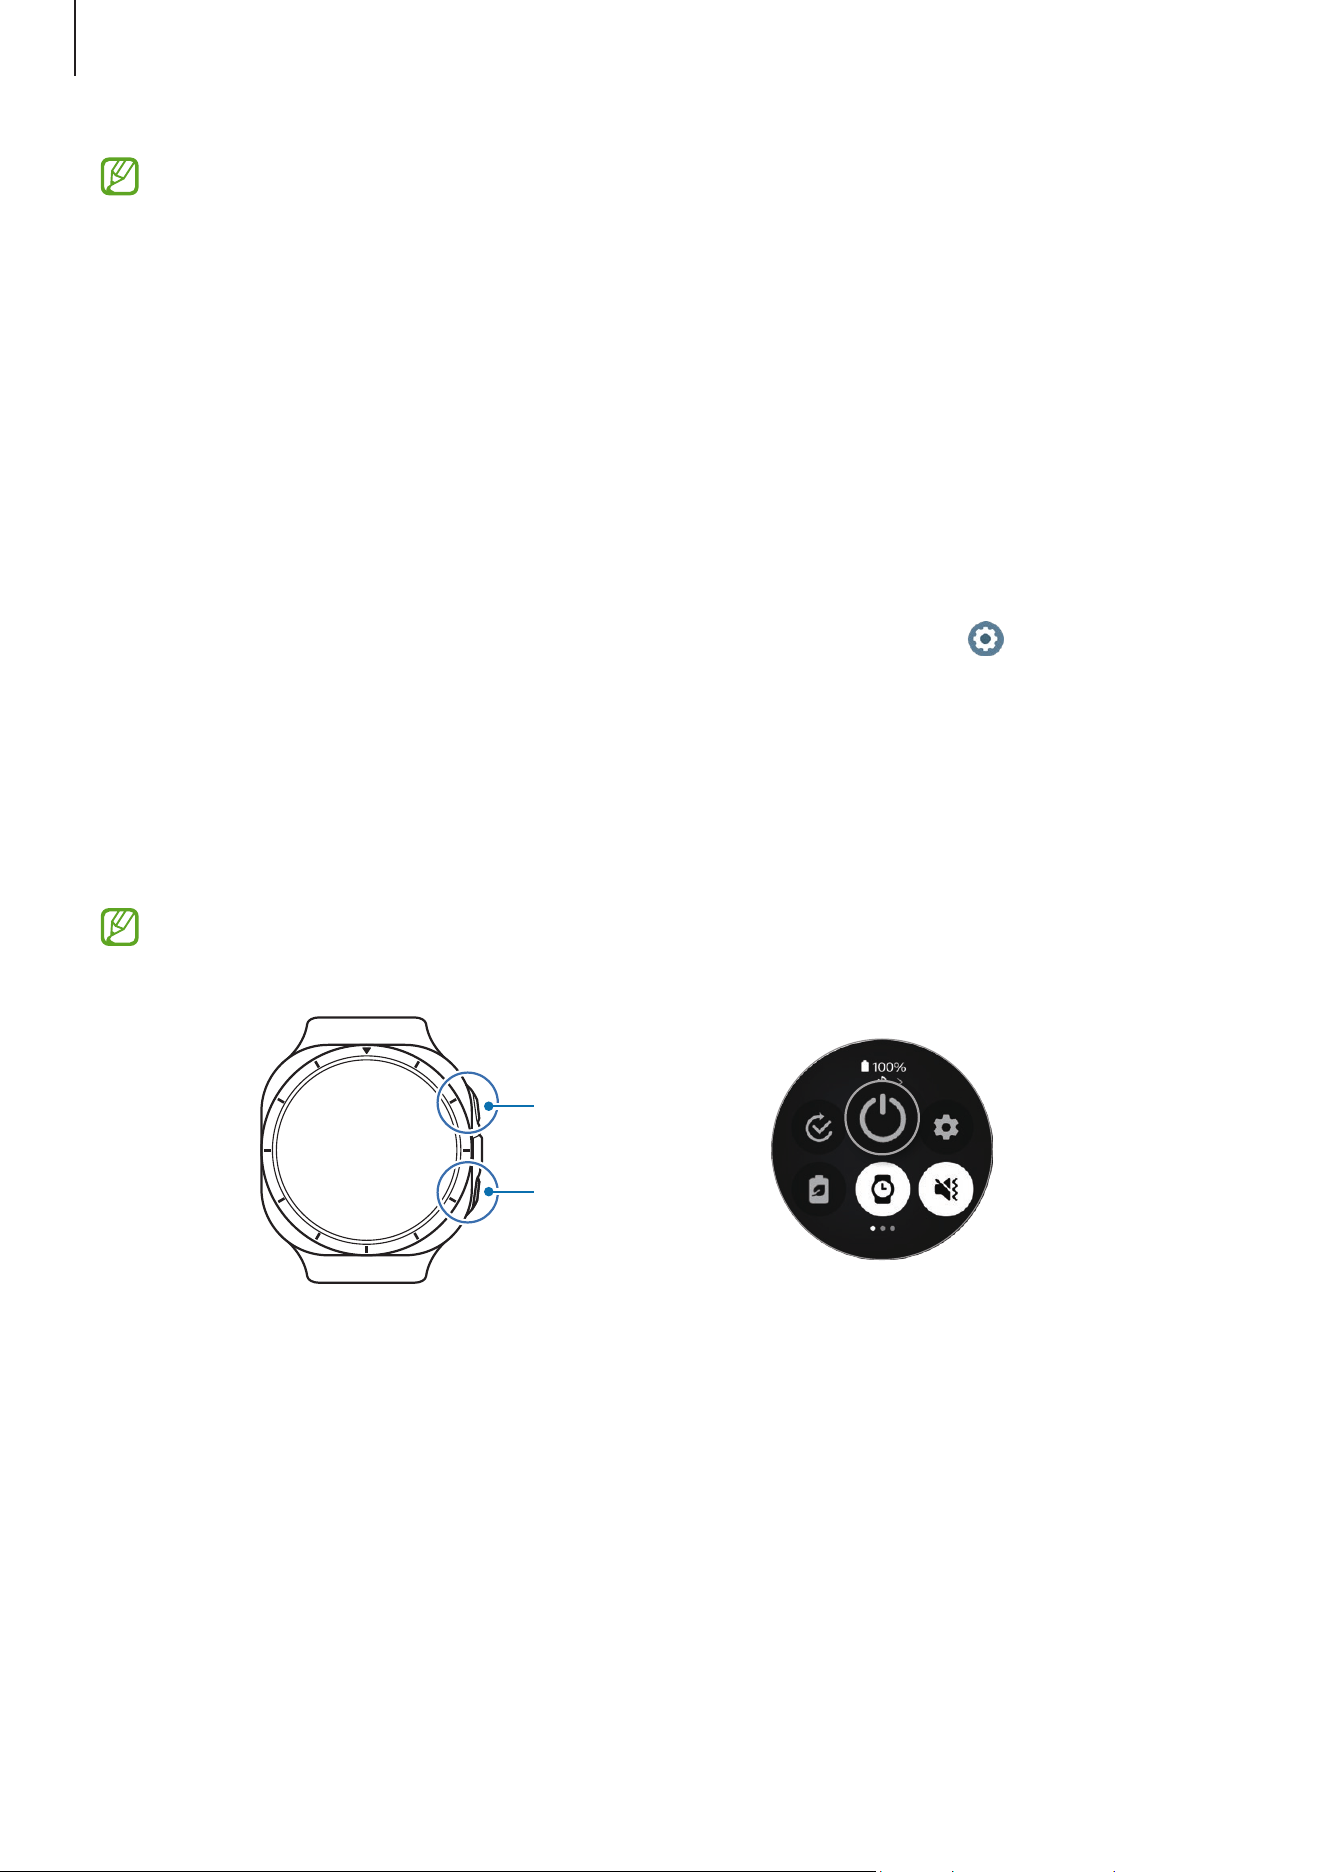
Turning the Watch on and off
Follow all posted warnings and directions from authorized personnel in areas
where the use of wireless devices is restricted, such as airplanes and hospitals.
Home button
Back button
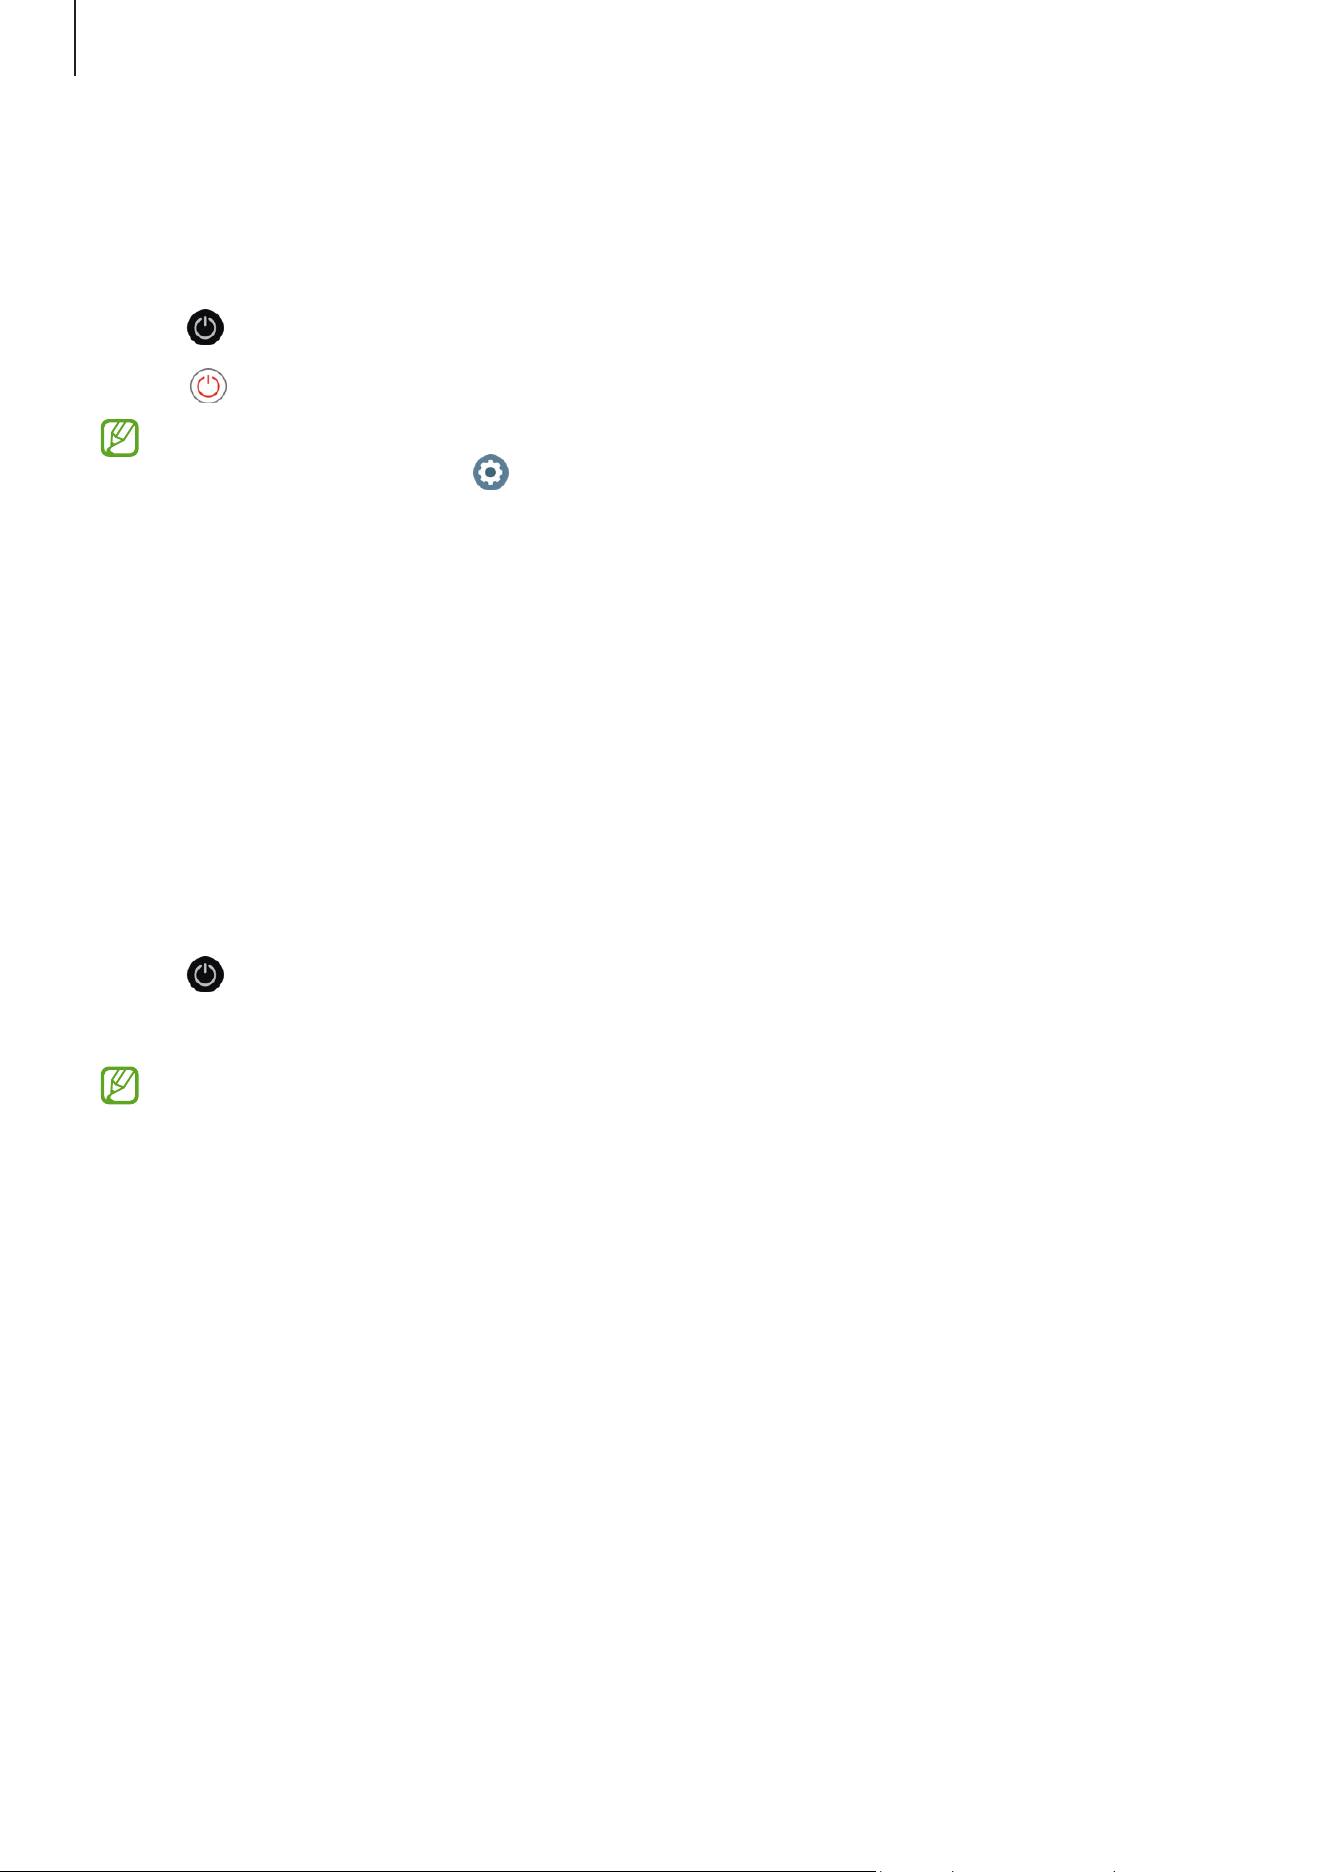
Turning the Watch on
Press and hold the Home button for a few seconds to turn on the Watch.
When you turn on the Watch for the first time or reset it, on-screen instructions for
connecting the Watch to your phone will appear. Refer to Connecting the Watch to a
phone for more information.
Getting started
22
Turning the Watch off
1 Press and hold the Home button and the Back button simultaneously. Alternatively,
open the quick panel by dragging downwards from the top edge of the screen and
tap .
2 Tap .
If you want to set the Watch to turn off when you press and hold the Home button,
on the Apps screen, tap (
Settings
)
→
Buttons and gestures
, tap
Press and hold
under
Home button
, and then select
Power off menu
.
Forcing restart
If your Watch is frozen and unresponsive, press and hold the Home button and the Back
button simultaneously for more than 7 seconds to restart it.
Emergency calls and medical information
You can make an emergency call or check the medical information you saved.
1 Press and hold the Home button and the Back button simultaneously. Alternatively,
open the quick panel by dragging downwards from the top edge of the screen and
tap .
2 Tap
Emergency call
or
Medical info
.
To manage your medical information and emergency contacts, open the
Galaxy
Wearable
app on your phone and tap
Watch settings
→
Safety and emergency
.
Getting started
23
Connecting the Watch to a phone
Installing the Galaxy Wearable app
To connect your Watch to a phone, install the Galaxy Wearable app on the phone.
Depending on your phone, you can download the Galaxy Wearable app from the
following places:
•
Samsung Android phones:
Galaxy Store
•
Other Android phones:
Play Store
•
It is compatible with Android phones that support Google mobile services.
•
You cannot install the Galaxy Wearable app on phones that do not support
Watch syncing. Ensure that your phone is compatible with a Watch.
•
You cannot connect your Watch to a tablet or a computer.
Connecting the Watch to a phone through Bluetooth
1 Turn on the Watch.
2 Select a language to use and tap .
3 Select a country or region, and tap
Restart
.
The Watch will turn off and then restart.
4 Swipe upwards from the bottom of the screen.
On-screen instructions for connecting the Watch to your phone will appear.
5 Open the
Galaxy Wearable
app on your phone.
If the Galaxy Wearable app is not the latest version, update the Galaxy Wearable app
to the latest version.
6 Tap
More
→
Start
.
7 Select your Watch on the screen.
If you cannot find your Watch, tap
Get help
.
Getting started
24
8 Follow the on-screen instructions to complete the connection.
When completing the connection, tap
Start
and follow the on-screen instructions to
learn about the Watch’s basic controls.
•
The initial setup screen may differ depending on your region.
•
Connection methods may vary depending on your region, model, phone, and
software version.
•
The Watch is smaller than normal phones so the network quality may be lower,
especially in areas with weak signals or poor reception. When a Bluetooth
connection is unavailable, your cellular network or internet connection may be
poor or become disconnected.
•
When you connect your Watch to a phone for the first time or reset it, the Watch’s
battery may drain more quickly while syncing data, such as contacts.
•
Supported phones and features may vary depending on your region, carrier, or
device manufacturer.
•
When you cannot make a Bluetooth connection, between your Watch and the
phone, the status indicator icon will appear at the top of the Watch screen.
Connecting your Watch to a new phone
You can connect your Watch to a new phone that uses the same Google Account as your
previous phone without resetting the Watch’s data.
1 On the Apps screen, tap (
Settings
)
→
General
→
Transfer watch to new phone
→
.
2 On your new phone, open the
Galaxy Wearable
app to connect to your Watch.
If you want to connect your Watch to a new phone after resetting the Watch, tap
(
Settings
) on the Apps screen and tap
General
→
Reset
.

Getting started
25
Remote connection
Your Watch and phone are connected through Bluetooth. You can sync your phone to
your Watch when both devices are remotely connected to each other, even though a
Bluetooth connection is not available. The Remote connection uses your mobile network
or Wi-Fi.
If this feature is not turned on, open the
Galaxy Wearable
app on your phone, tap
Watch
settings
→
Advanced features
→
Remote connection
, and then tap the switch to turn
it on.
Adding accounts to your Watch
Register your Samsung or Google account on your connected phone and add them to
your Watch to access the various Watch features.
Registering a Samsung account on your Watch
1 Open the
Galaxy Wearable
app on your phone.
2 Tap
Watch settings
→
Accounts and backup
.
3 Tap
Samsung account
and follow the on-screen instructions to sign in to your
Samsung account on your phone.
If your Samsung account is signed in, you can check the registered Samsung account.
Adding a Google Account to your Watch
1 Open the
Galaxy Wearable
app on your phone.
2 Tap
Watch settings
→
Accounts and backup
.
3 Tap
Google account
.
4 Tap
Add Google account
and follow the on-screen instructions to add your Google
Account from the phone to your Watch.
Getting started
26
Controlling the screen
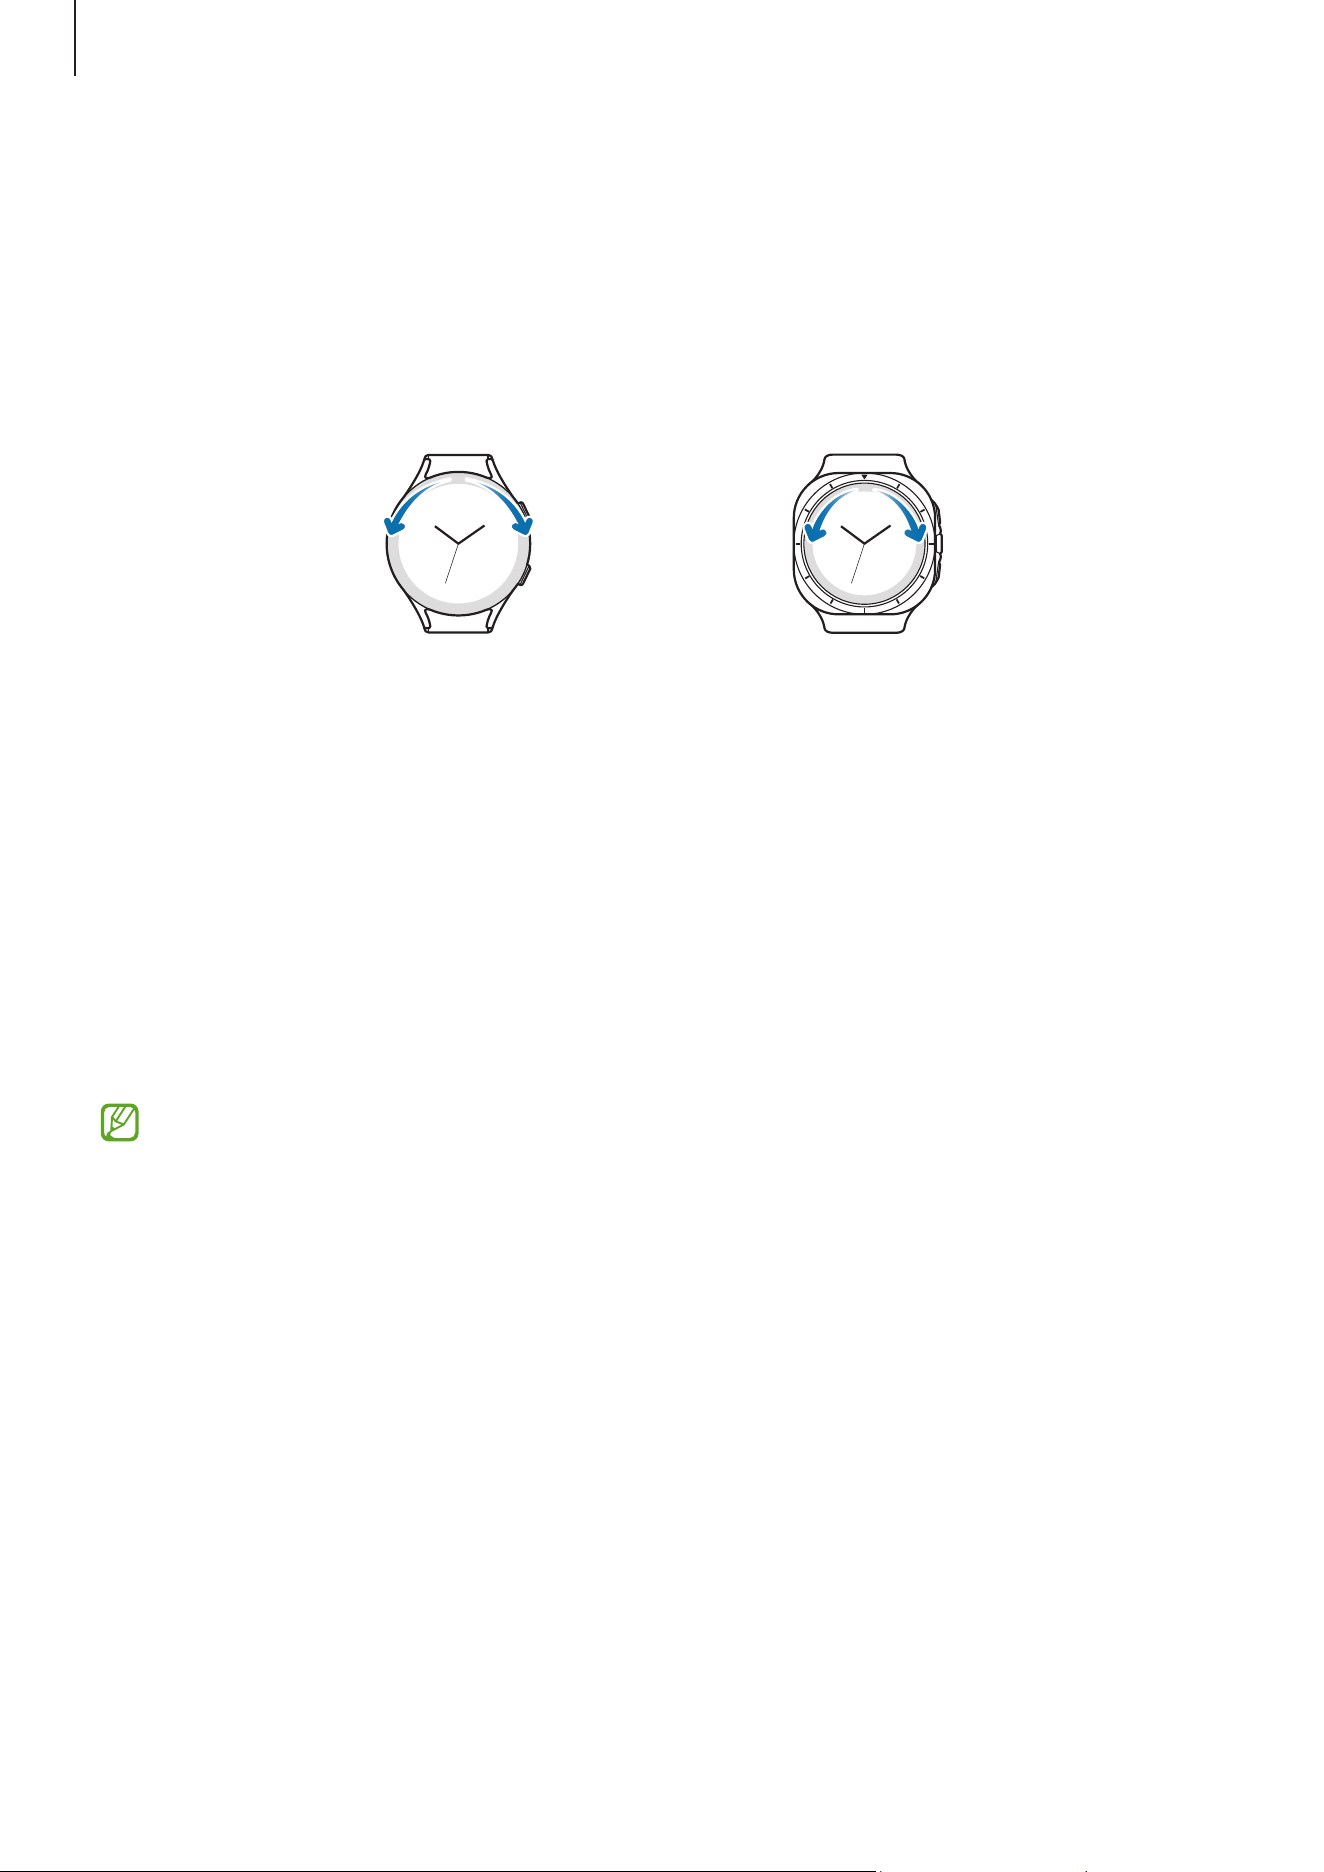
Touch bezel
Your Watch has a touch bezel around the screen. Swipe the touch bezel clockwise or
counter-clockwise to control various Watch functions.
Galaxy Watch UltraGalaxy Watch7
•
Scrolling through screens: Swipe the touch bezel to move to other screens.
•
Moving from item to item: Swipe the touch bezel to move from item to item.
•
Adjusting the input value: Swipe the touch bezel to adjust the volume or brightness.
When adjusting the brightness, swipe the touch bezel clockwise to make the screen
brighter.
•
Using the phone or alarm feature: Swipe the touch bezel clockwise to receive
incoming calls or dismiss alarms. Swipe the touch bezel counter-clockwise to
decline incoming calls or to turn on the snooze feature for an alarm.
If the touch bezel does not work, take the Watch to a Samsung Service Centre or an
authorized service centre without disassembling it.
Getting started
27
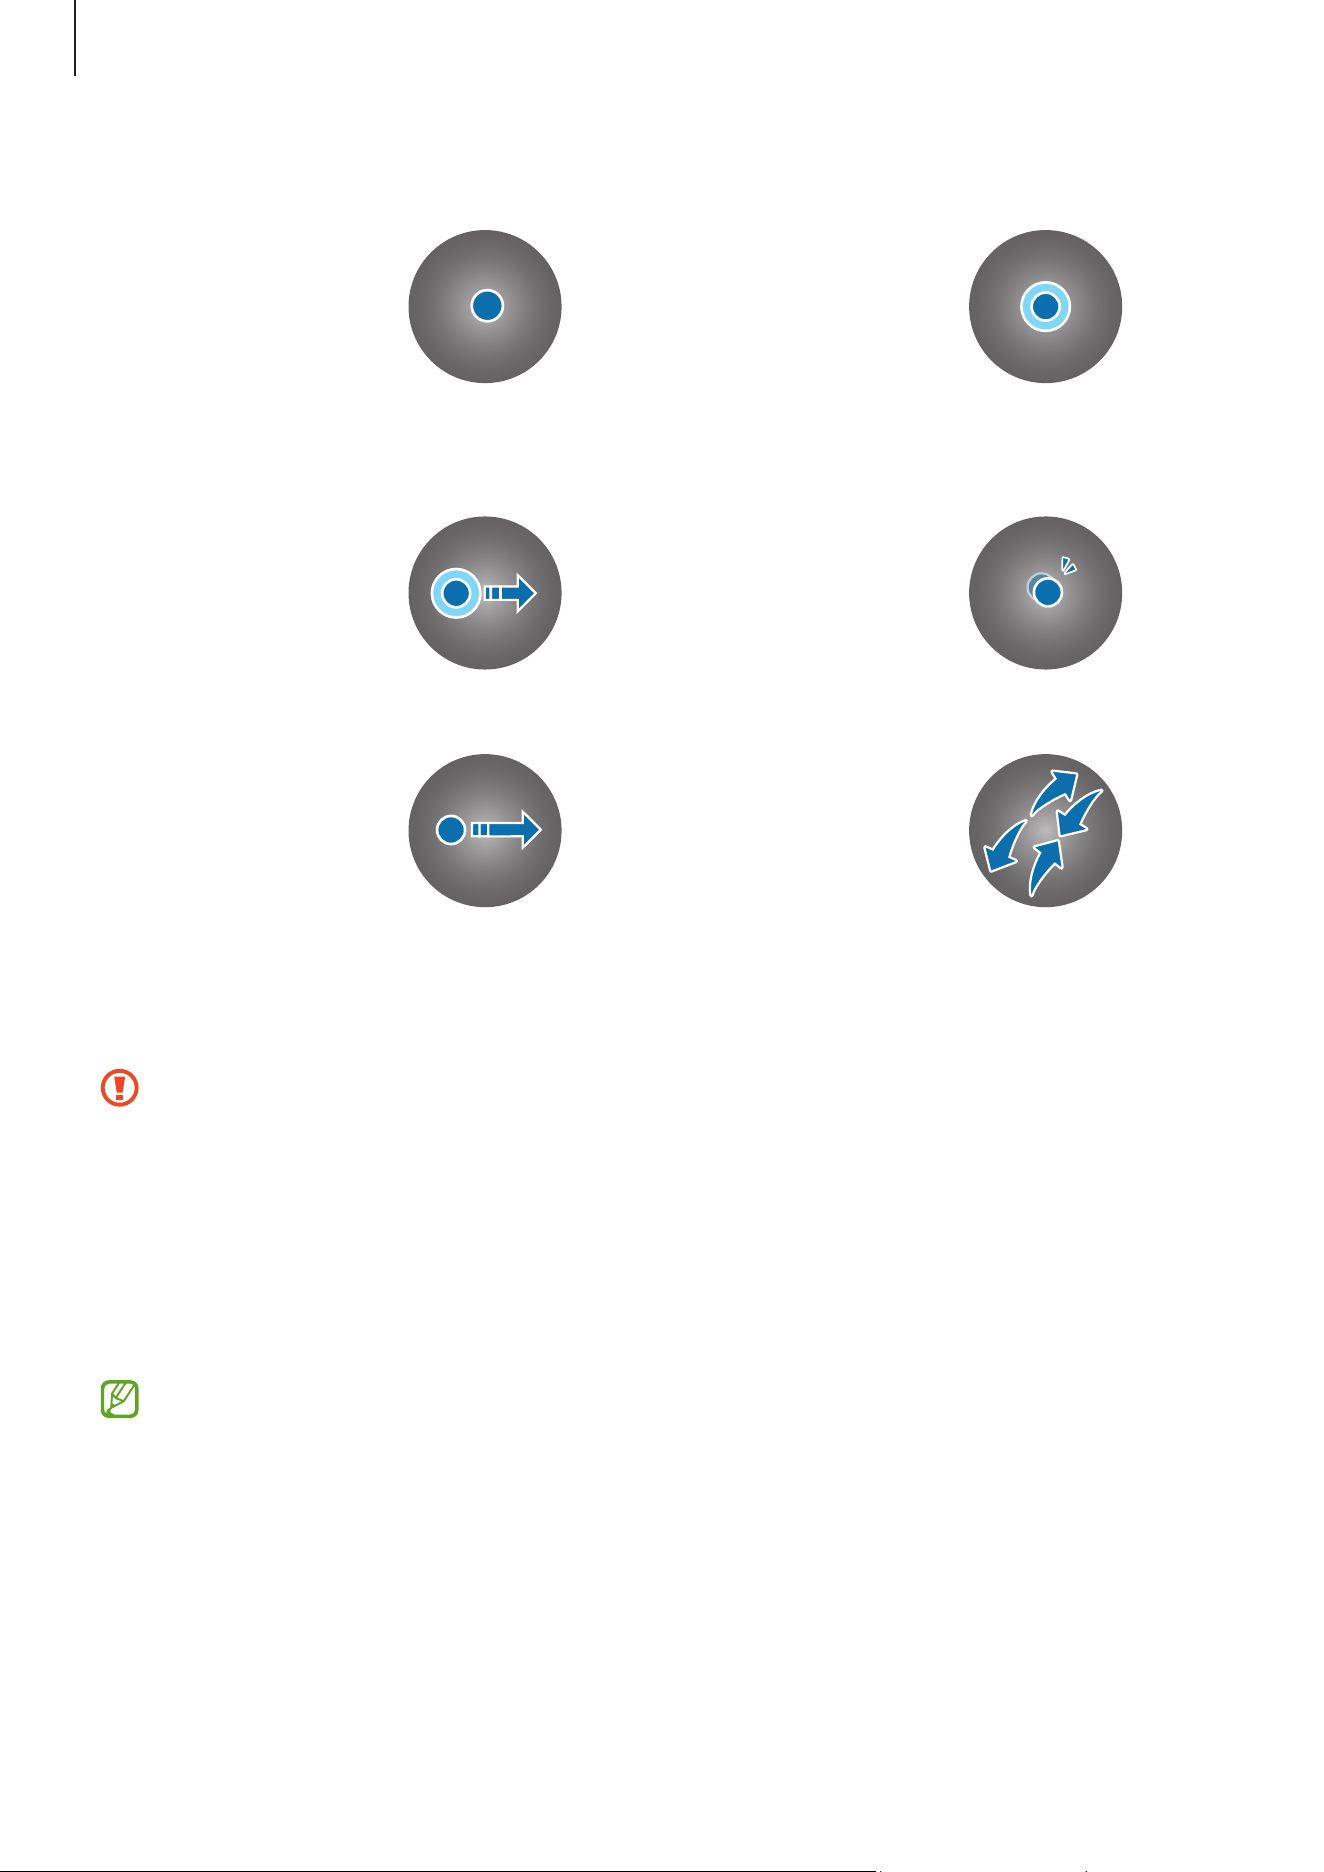
Screen
Tapping
Tap the screen.
Touching and
holding
Touch and hold
the screen for
approximately
2 seconds.
Dragging
Touch and hold
an item and drag
it to the target
position.
Double tapping
Double tap the
screen.
Swiping
Swipe upwards,
downwards, to
the left, or to the
right.
Spreading and
pinching
Spread two
fingers apart
or pinch on the
screen.
•
Do not allow the screen to come into contact with other electrical devices.
Electrostatic discharges can cause the screen to malfunction.
•
To avoid damaging the screen, do not tap it with anything sharp or apply
excessive pressure to it with your fingertips or other objects.
•
It is recommended not to use fixed graphics on part or all of the screen for
extended periods. Doing so may result in afterimages (screen burn-in) or
ghosting.
•
The Watch may not recognize touch inputs close to the edges of the screen,
which are outside of the touch input area.
•
Touch recognition may not be available when Water lock mode is turned on.
Getting started
28
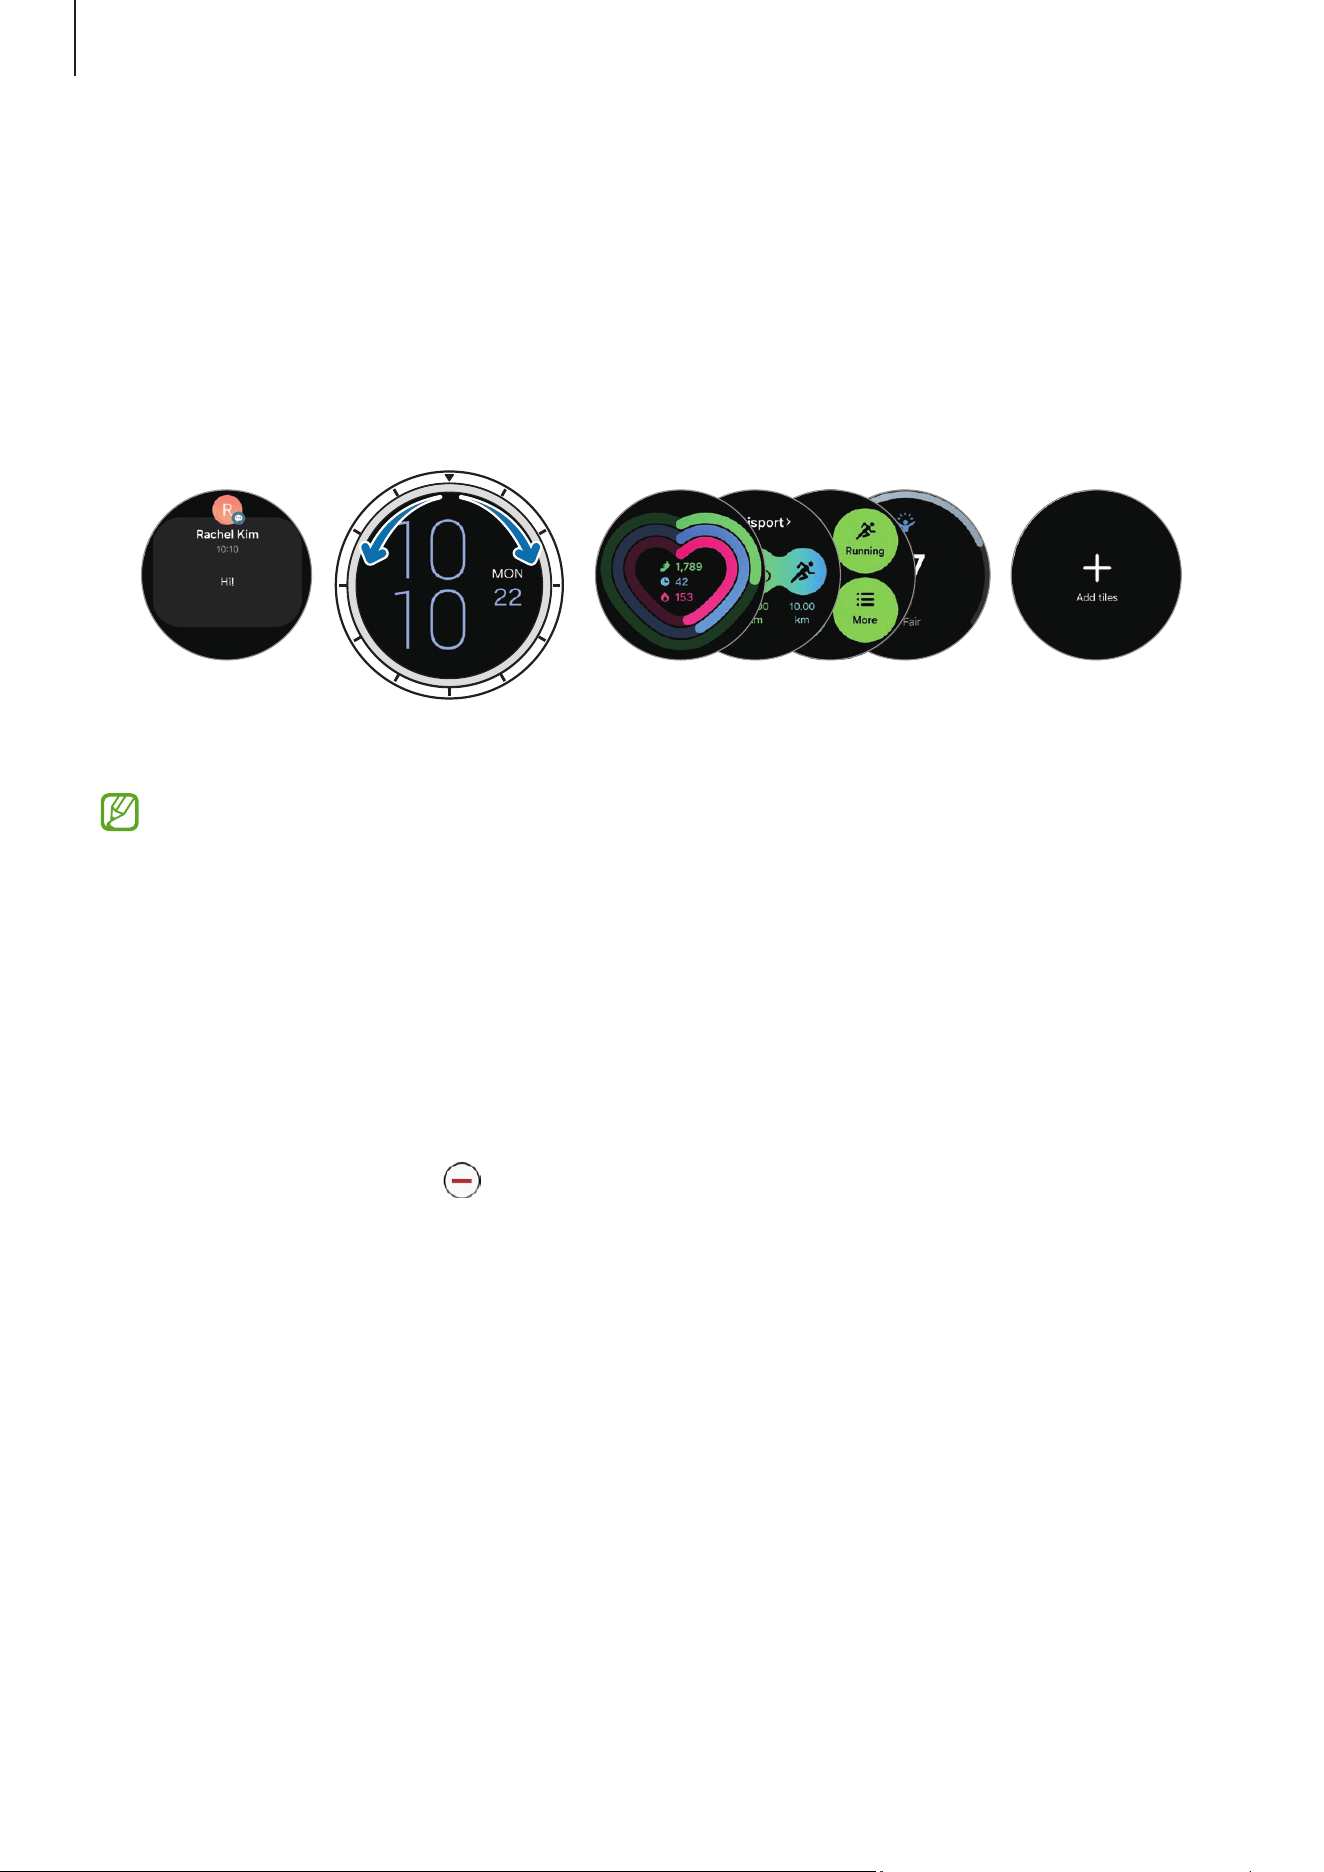
Screen composition
The Watch screen is the starting point of the Home screen, which is composed of several
pages.
You can check tiles or open the notification panel by swiping the screen to the left or
right or by using the touch bezel.
Notification
panel
Tiles Add tiles.
Watch screen
The available panels, tiles, and their arrangement may vary depending on the
software version.
Using tiles
To add a tile, tap
Add tiles
and select a tile.
When touching and holding a tile, you can access the edit mode to change the tile’s
arrangement or remove the tiles.
•
Moving the tile: Touch and hold a tile to move and drag it to the desired location.
•
Removing the tile: Tap
on the tile to remove it.
Getting started
29
Turning the screen on and off
Turning the screen on
To turn the screen on, use one of the following methods:
•
Turn the screen on with the buttons: Press the Home button or Back button.
•
Turn the screen on by raising your wrist: Raise your wrist where you wear the Watch.
If the screen does not turn on after you raise your wrist, tap (
Settings
) on the
Apps screen, tap
Display
, and then tap the
Raise wrist to wake
switch under
Screen
wake-up
to turn it on.
•
Turn the screen on by tapping the screen: Tap the screen. If the screen does not turn
on after you tap the screen, tap (
Settings
) on the Apps screen, tap
Display
, and
then tap the
Touch screen to wake
switch under
Screen wake-up
to turn it on.
Turning the screen off
To turn off the screen, cover it with your palm or another object. Also, the screen will
automatically turn off if the Watch is not used for a specified period.
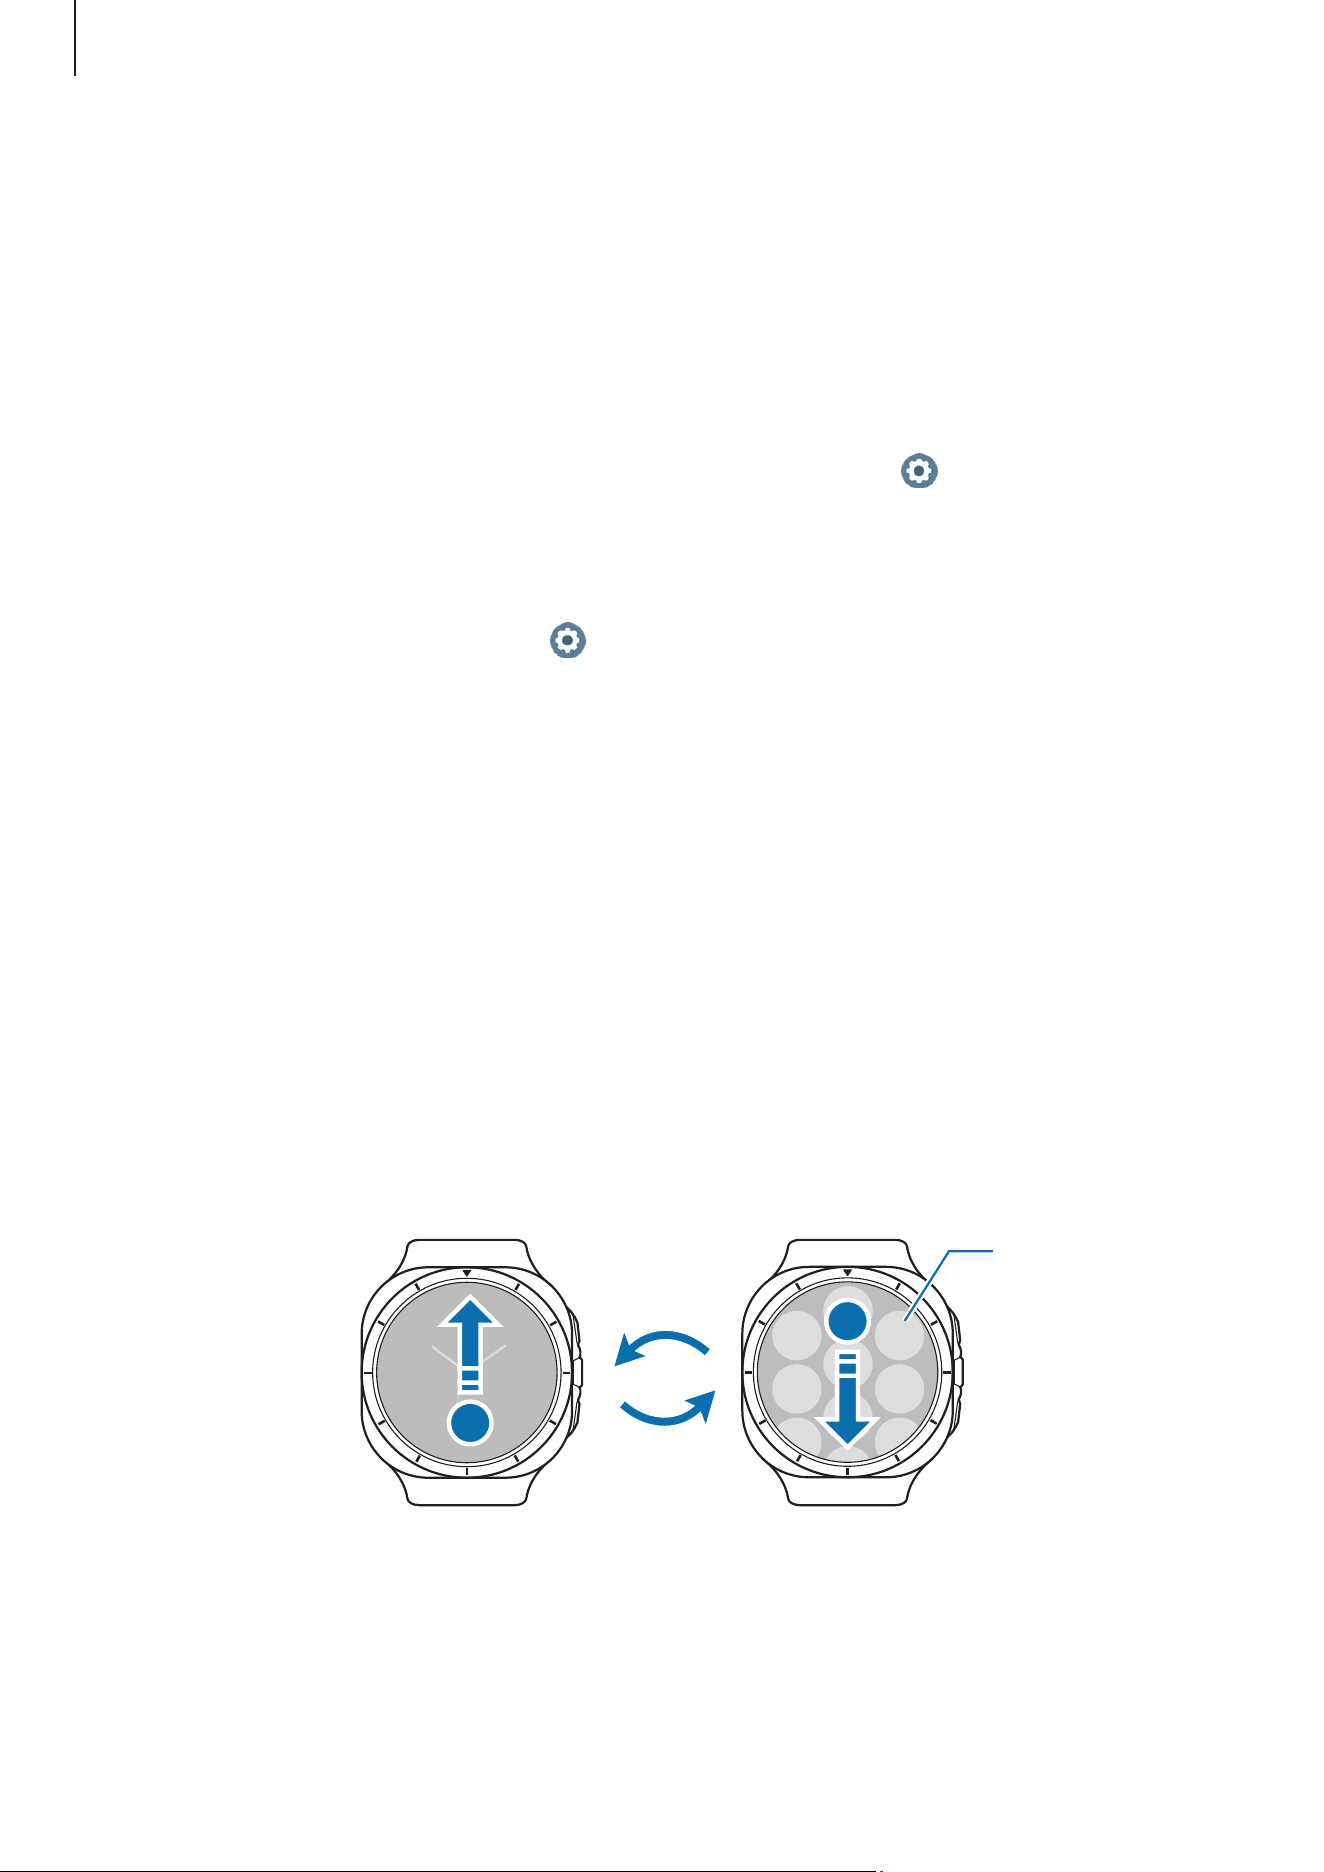
Switching the screen
Switching between the Watch and Apps screen
On the Watch screen, swipe upwards to open the Apps screen.
To return to the Watch screen, swipe downwards from the top of the Apps screen.
Alternatively, press the Home button or Back button.
Watch screen Apps screen
An app
Getting started
30
Returning to the previous screen
To return to the previous screen, swipe right on the screen or press the Back button.
Apps screen
The Apps screen displays icons for all apps installed on the Watch.
The available apps may vary depending on the software version.
Opening apps
On the Apps screen, tap an app icon to open the app.
To open an app from the list of recent apps, on the Apps screen, tap (
Recent apps
).
Closing apps
1 On the Apps screen, tap
(
Recent apps
).
2 Use the touch bezel or swipe left or right on the screen to move to the app to close.
3 Swipe upwards on the app to close it.
To close all opened apps, tap
Close all
.
Editing the Apps screen
Moving items
Drag an item to a new location.
Getting started
31
Creating folders
Drag an app over another app.
A new folder containing the selected apps will be created. Tap
Folder name
and enter a
folder name.
•
Adding more apps
Tap
on the folder. Tick the apps to add and tap
Done
. You can also add an app by
dragging it to the folder.
•
Moving apps from a folder
Drag an app to a new location outside of the folder.
•
Deleting a folder
Touch and hold a folder, and then tap
Delete
→
. Only the folder will be deleted.
The folder’s apps will be relocated to the Apps screen.
Lock screen
Use the screen lock feature to protect your data, such as your personal information
saved on your Watch. When turning on this feature, the Watch will require you to unlock
it whenever you use it. However, if you unlock it once while wearing the Watch, it will
remain unlocked.
Setting the screen lock
On the Apps screen, tap (
Settings
)
→
Security and privacy
→
Lock type
and select
the lock method.
•
Pattern
: Draw a pattern with four or more dots to unlock the screen.
•
PIN
: Enter a PIN with numbers to unlock the screen.
Getting started
32
Watch
Watch screen
You can check the current time or check other information. When you are not on the
Watch screen, press the Home button to return to the Watch screen.
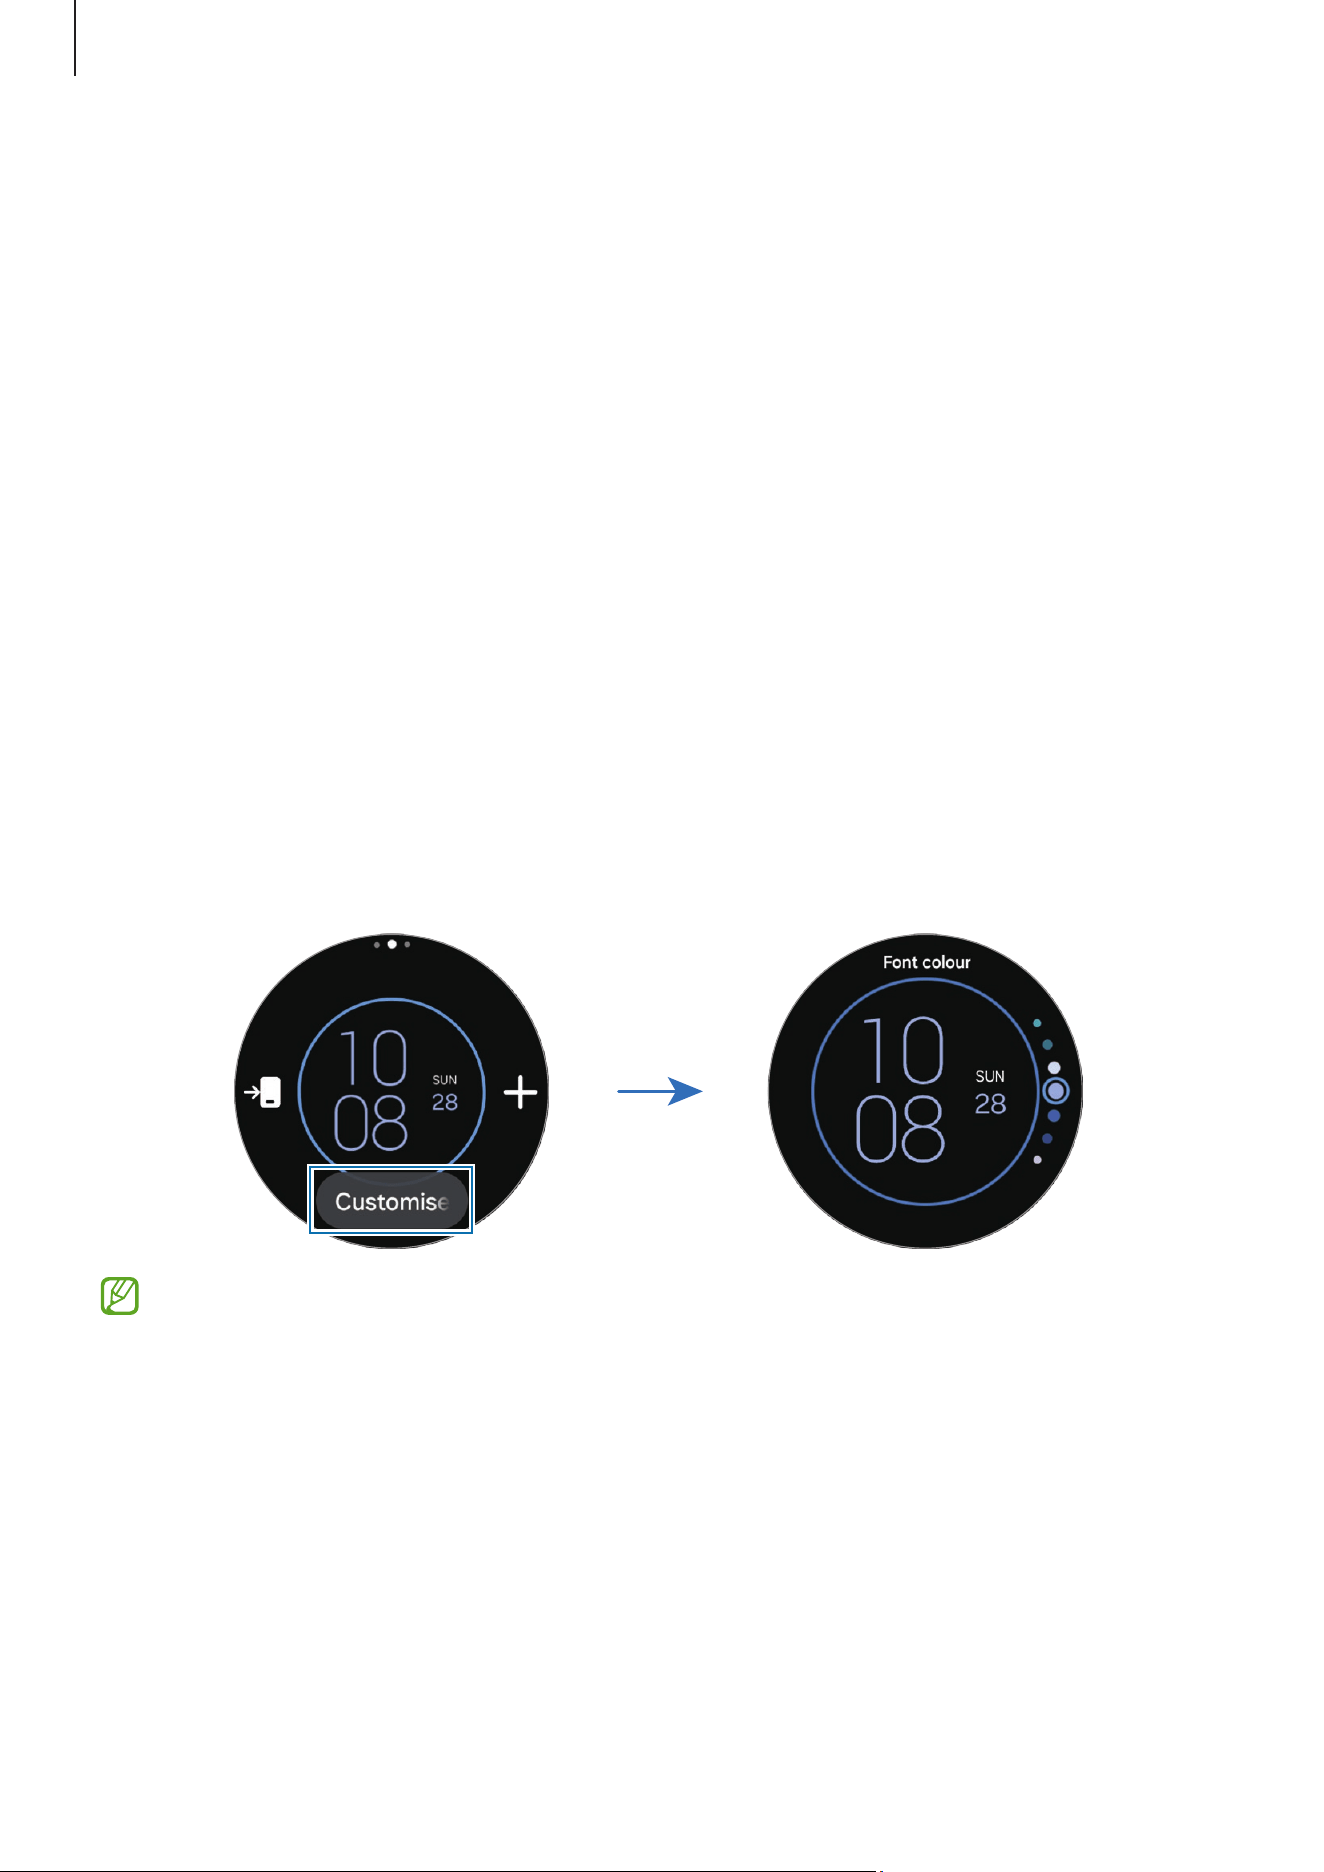
Changing the watch face
1 Touch and hold the Watch screen and tap
+
.
2 Use the touch bezel or swipe upwards or downwards on the screen, and then select a
watch face.
If you tap
More watch faces on Google Play
, you can download more watch faces.
3 Tap
Customize
to customize the watch face. Swipe left or right on the screen to
move to an item you want to customize, and then select the desired colour and other
options by using the touch bezel or swiping upwards or downwards on the screen. To
set the complications, tap each complication area you want.
You can also change the watch face and customize it from your phone. Open the
Galaxy Wearable
app on your phone and tap
Watch faces
.
Getting started
33
Turning on Night mode (Galaxy Watch Ultra)
Some watch faces are available with Night mode. When Night mode is turned on, the
brightness and colours of the watch face are adjusted to make the watch face more
visible at night or in low light and reduce eye strain.
1 Touch and hold the Watch screen and tap
Add watch face
.
2 Select
Ultra Analogue
or
Simple Ultra
under
Featured
.
3 Tap
Customize
.
4 Swipe left or right on the screen to move to the
Night mode
item.
5 Tap the screen to set the Night mode into
Auto
,
On
or
Off
.
Customizing a watch face with a picture
Apply a picture as your watch face after importing a picture from your phone. Refer to
Managing pictures saved on your Watch for more information about importing pictures
from a phone.
1 Touch and hold the Watch screen and tap
+
.
2 Select a watch face under
Photos
.
3 Tap
Customize
.
4 Swipe left or right on the screen to move to the
Background
or
Photo
item.
5 Tap the screen, select a picture to use as a watch face, and then tap
OK
.
To zoom in or out on the picture, double tap the picture, or spread two fingers apart or
pinch the picture. When the picture is zoomed in, swipe the screen to make a part of
the picture appear on the screen.
To select several pictures at the same time, touch and hold a picture, select
pictures by using the touch bezel or swiping left or right on the screen, and then
tap . To add extra pictures after selecting pictures, tap
Add photo
.
6 Tap
OK
.
7 Swipe the screen to change other items, such as complication, and return to the
previous screen.
The picture will appear on the Watch screen. When you select
Photos
for the watch
face and add two or more pictures, the pictures you add will appear in turn when you
tap the screen.
Getting started
34
Turning on the Always On Display feature
Set the Watch screen and some apps’ screens to always stay on while wearing your
Watch. However, the battery will drain more quickly than normal while using this
feature.
To not use this feature, open the quick panel by dragging downwards from the top edge
of the screen and tap . Alternatively, on the Apps screen, tap (
Settings
)
→
Display
and tap the
Always On Display
switch to turn it off.
Turning on Watch only mode
In Watch only mode, only the time will display and all other functions cannot be used.
On the Apps screen, tap (
Settings
)
→
Battery
→
Watch only
and tap
Turn on
.
To turn off Watch only mode, press and hold the Home button. Alternatively, place the
Watch on the wireless charger to charge it to a certain level. The Watch will turn off and
then turn on again.
Watch only mode automatically turns on when the battery drops below 1%. Watch
only mode will automatically turn off when the battery is charged to a certain level.
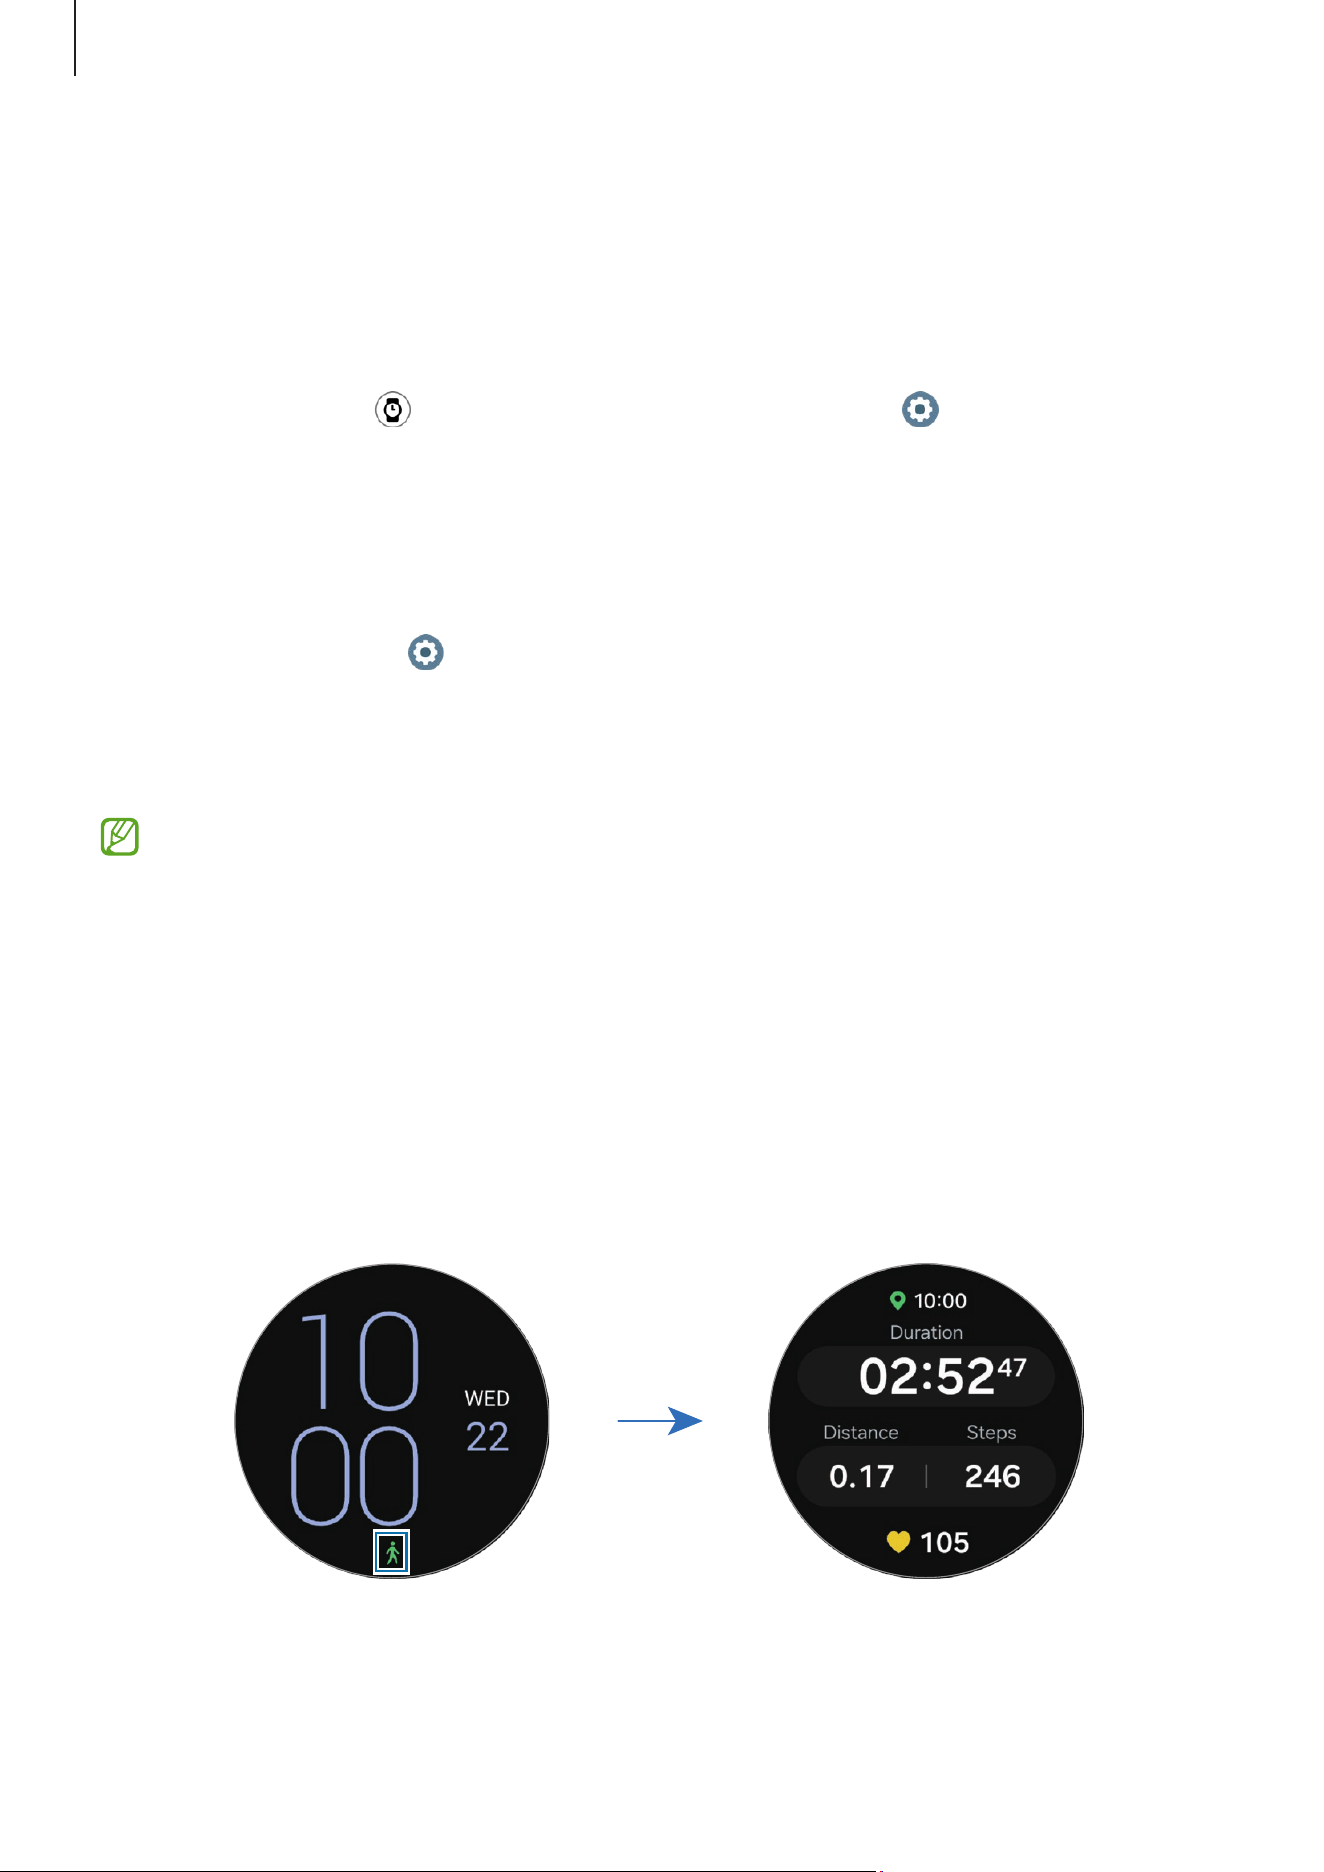
Returning to the feature you are using directly from the
Watch screen
If you are using some features, such as recording a workout or voice recording, and press
the Home button to open the Watch screen, an icon that shows the feature you are
currently using appears at the bottom of the Watch screen.
Tap the icon to go back to the feature screen you are using by opening it directly.
Getting started
35
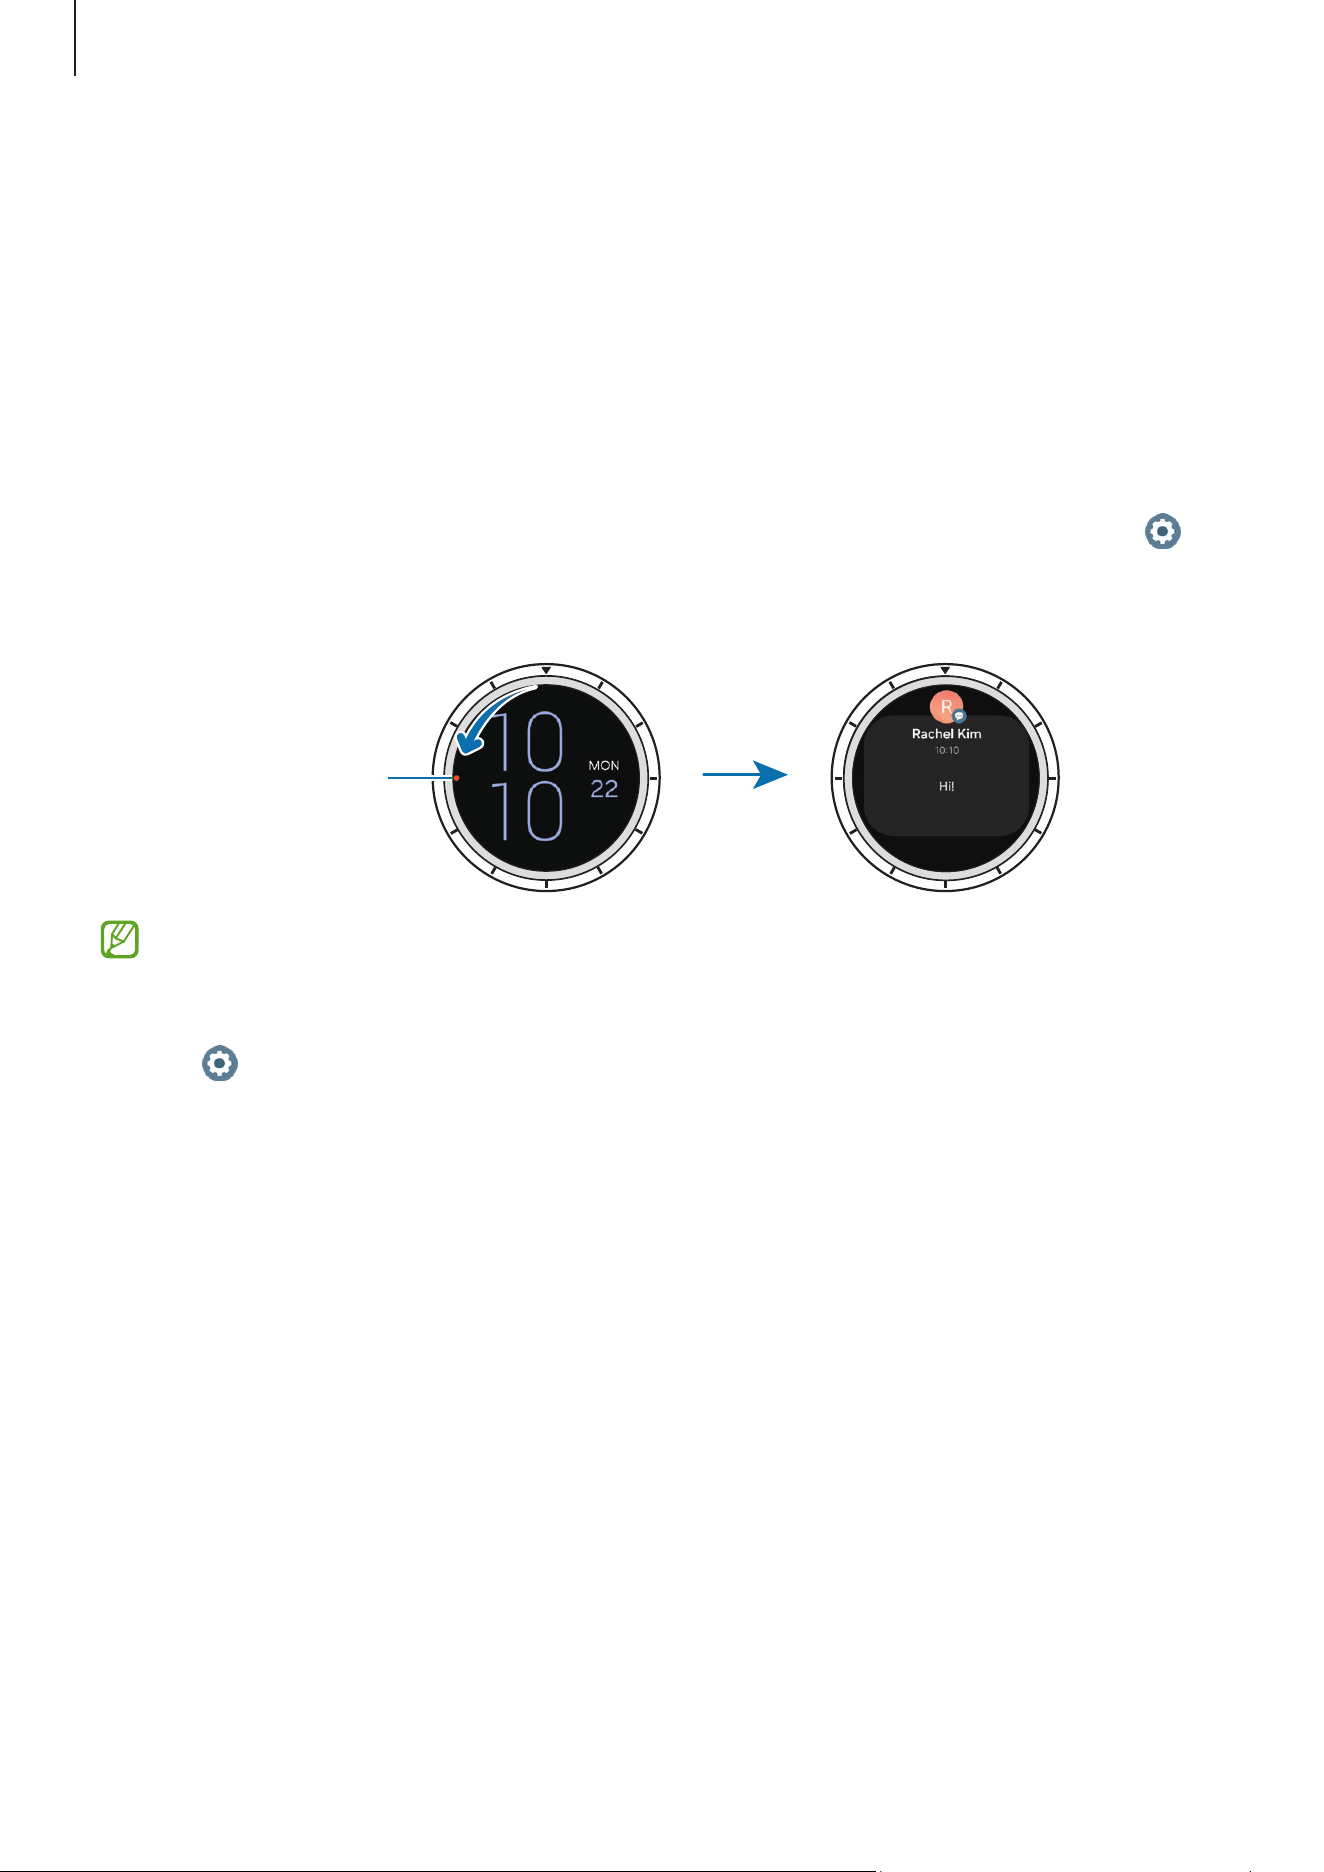
Notifications
Notification panel
Check a notification such as a new message or a missed call on the notification panel. On
the Watch screen, swipe the touch bezel counter-clockwise. Alternatively, swipe right on
the screen to open the notification panel.
When there are new notifications, an orange notification indicator will appear on the
Watch screen. If the notification indicator does not appear, on the Apps screen, tap
(
Settings
)
→
Notifications
→
Advanced settings
and tap the
New notification indicator
on watch face
switch to turn it on.
Notification
indicator
•
You can receive notifications only when wearing the Watch.
•
You cannot receive notifications on your Watch when using your phone. To
check notifications on your Watch even while you are using your phone, tap
(
Settings
) on the Apps screen, tap
Notifications
→
Show phone notifications
on watch
, and then select
Show alerts even when phone in use
.
Getting started
36
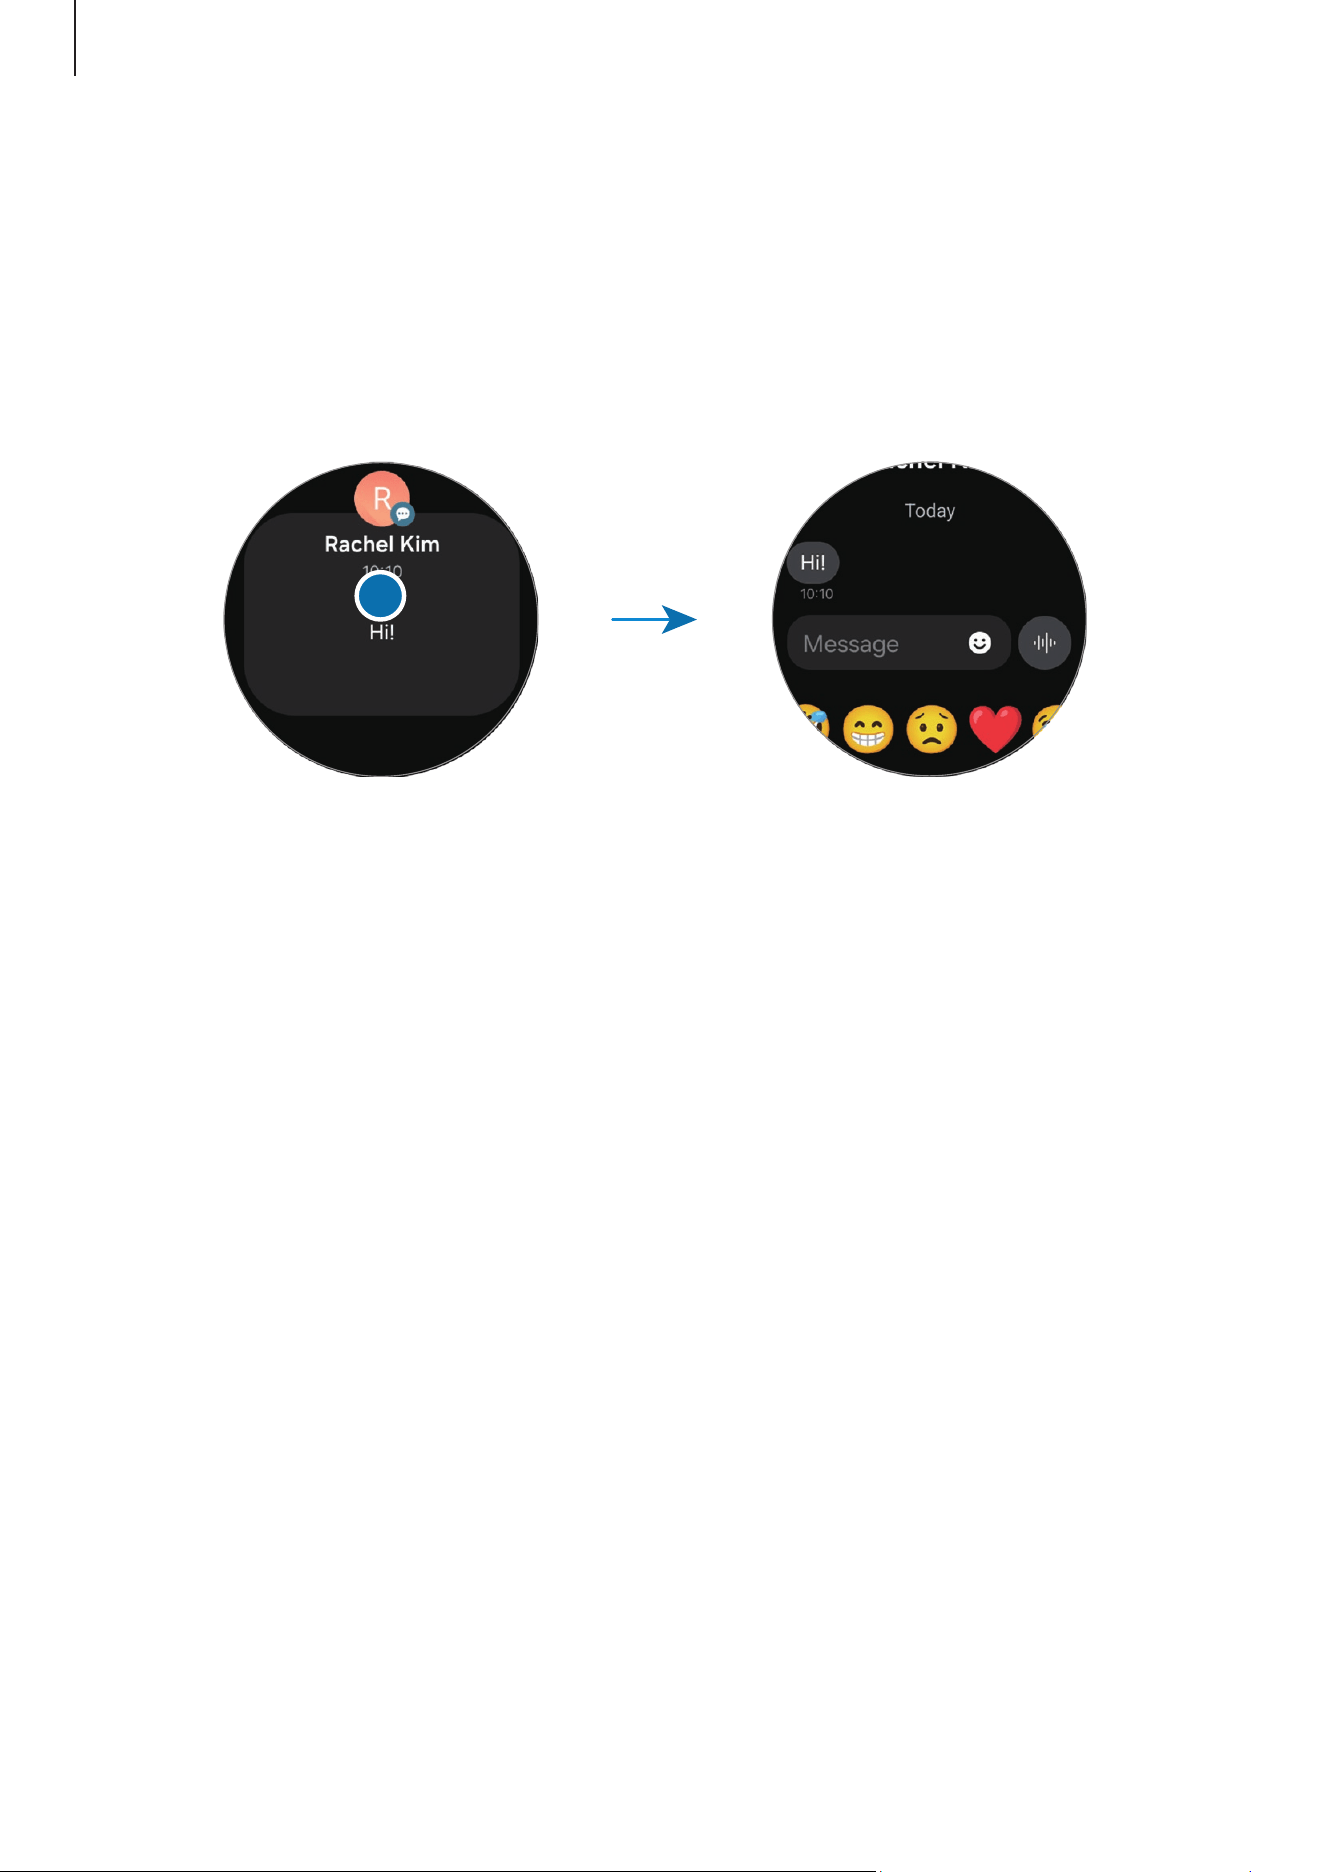
Checking incoming notifications
When you receive a notification, information about the notification, such as its type
or the time you received it, will appear on the screen. If more than two notifications
are received, use the touch bezel or swipe left or right on the screen to check more
notifications.
Tap the notification to check the details.
Deleting notifications
Swipe upwards on the screen while checking a notification.
Selecting apps for receiving notifications
Select a phone or Watch app to receive notifications for on your Watch.
1 Open the
Galaxy Wearable
app on your phone.
2 Tap
Watch settings
→
Notifications
→
App notifications
.
3 Tap the switch next to apps to receive notifications from the apps list.
Getting started
37
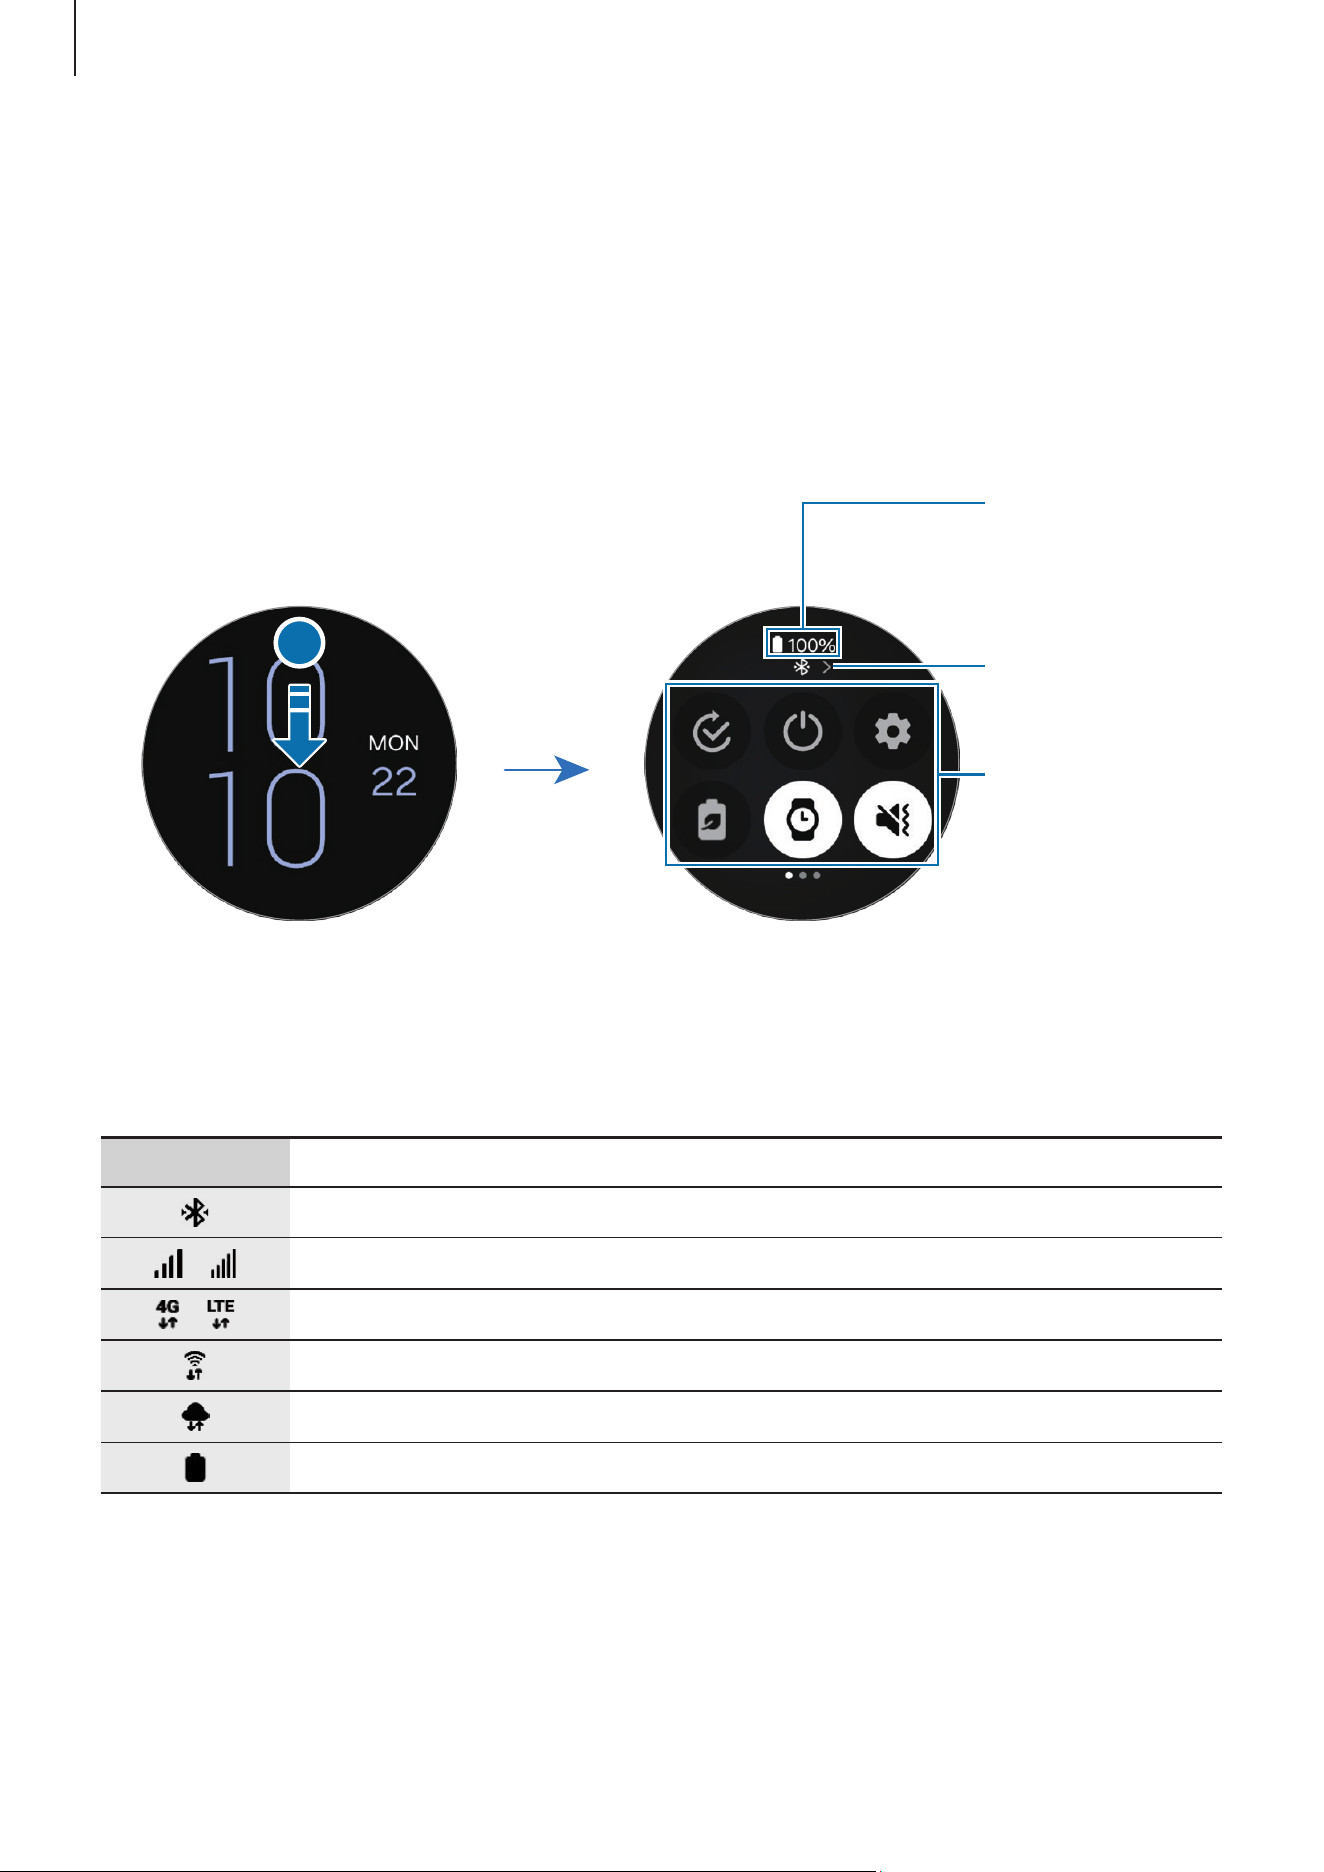
Quick panel
Check the Watch’s current status and configure settings from the quick panel.
To open the quick panel, drag downwards from the top edge of the screen. To close the
quick panel, swipe upwards on the screen.
Use the touch bezel or swipe left or right on the screen to move to the next or previous
quick panel.
Status indicator
icon
Remaining
battery power
and status
indicator icon
Quick setting
icons
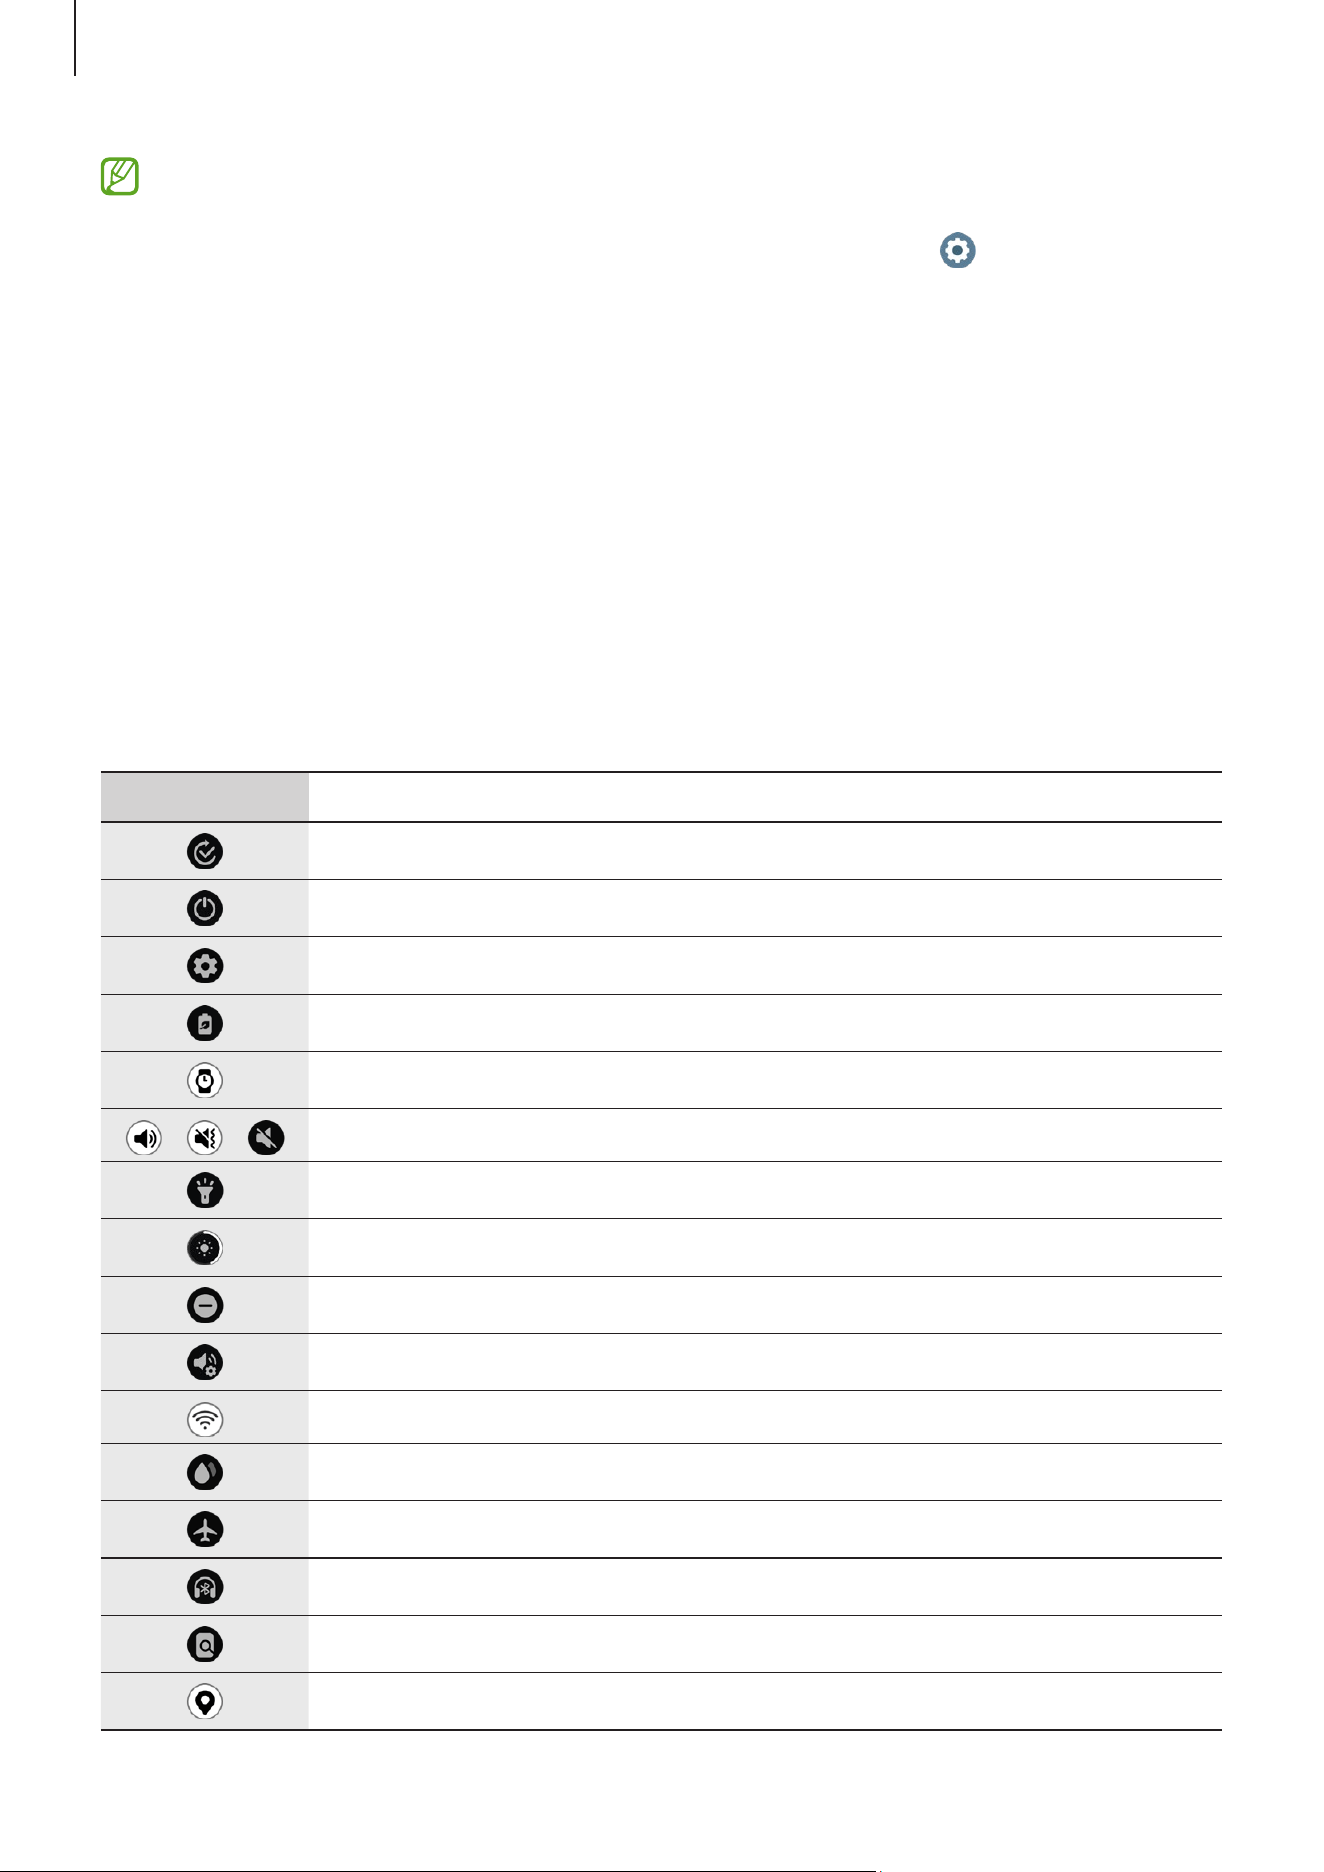
Checking the status indicator icons
Status indicator icons appear at the top of the quick panel and inform you of the Watch’s
current status. The icons listed in the table are the most common.
Icon Meaning
Bluetooth connected
/
Signal strength
/
LTE network connected
Wi-Fi connected
Watch and phone are remotely connected
Battery power level
Getting started
38
•
Some status indicator icons that show certain situations, such as when you use
some modes or charge the Watch, also appear at the top of the Watch screen.
To hide the status indicator icons on the Watch screen, tap (
Settings
) on the
Apps screen, tap
Advanced features
→
Status indicators
, and then select
Hide
after 2 seconds
.
•
The status indicator icons may appear differently depending on the region,
carrier, or model.
Checking quick settings icons
Quick settings icons appear on the quick panel. Tap the icon to change the basic settings
or launch the feature. To check more detailed settings, touch and hold a quick settings
icon.
Refer to Editing a quick panel for more information about adding or removing the quick
settings icons on the quick panel.
Icon Meaning
Open the Mode settings
Access the power options
Open
Settings
Turn on power saving mode
Turn on the Always On Display feature
/ /
Turn on sound, vibrate, or silent mode
Turn on the flashlight
Adjust the brightness
Turn on Do not disturb mode
Open the Volume settings
Connect the Wi-Fi network
Turn on Water lock mode
Turn on Flight mode
Connect the Bluetooth audio
Launch the find my phone feature
Turn on the GPS feature
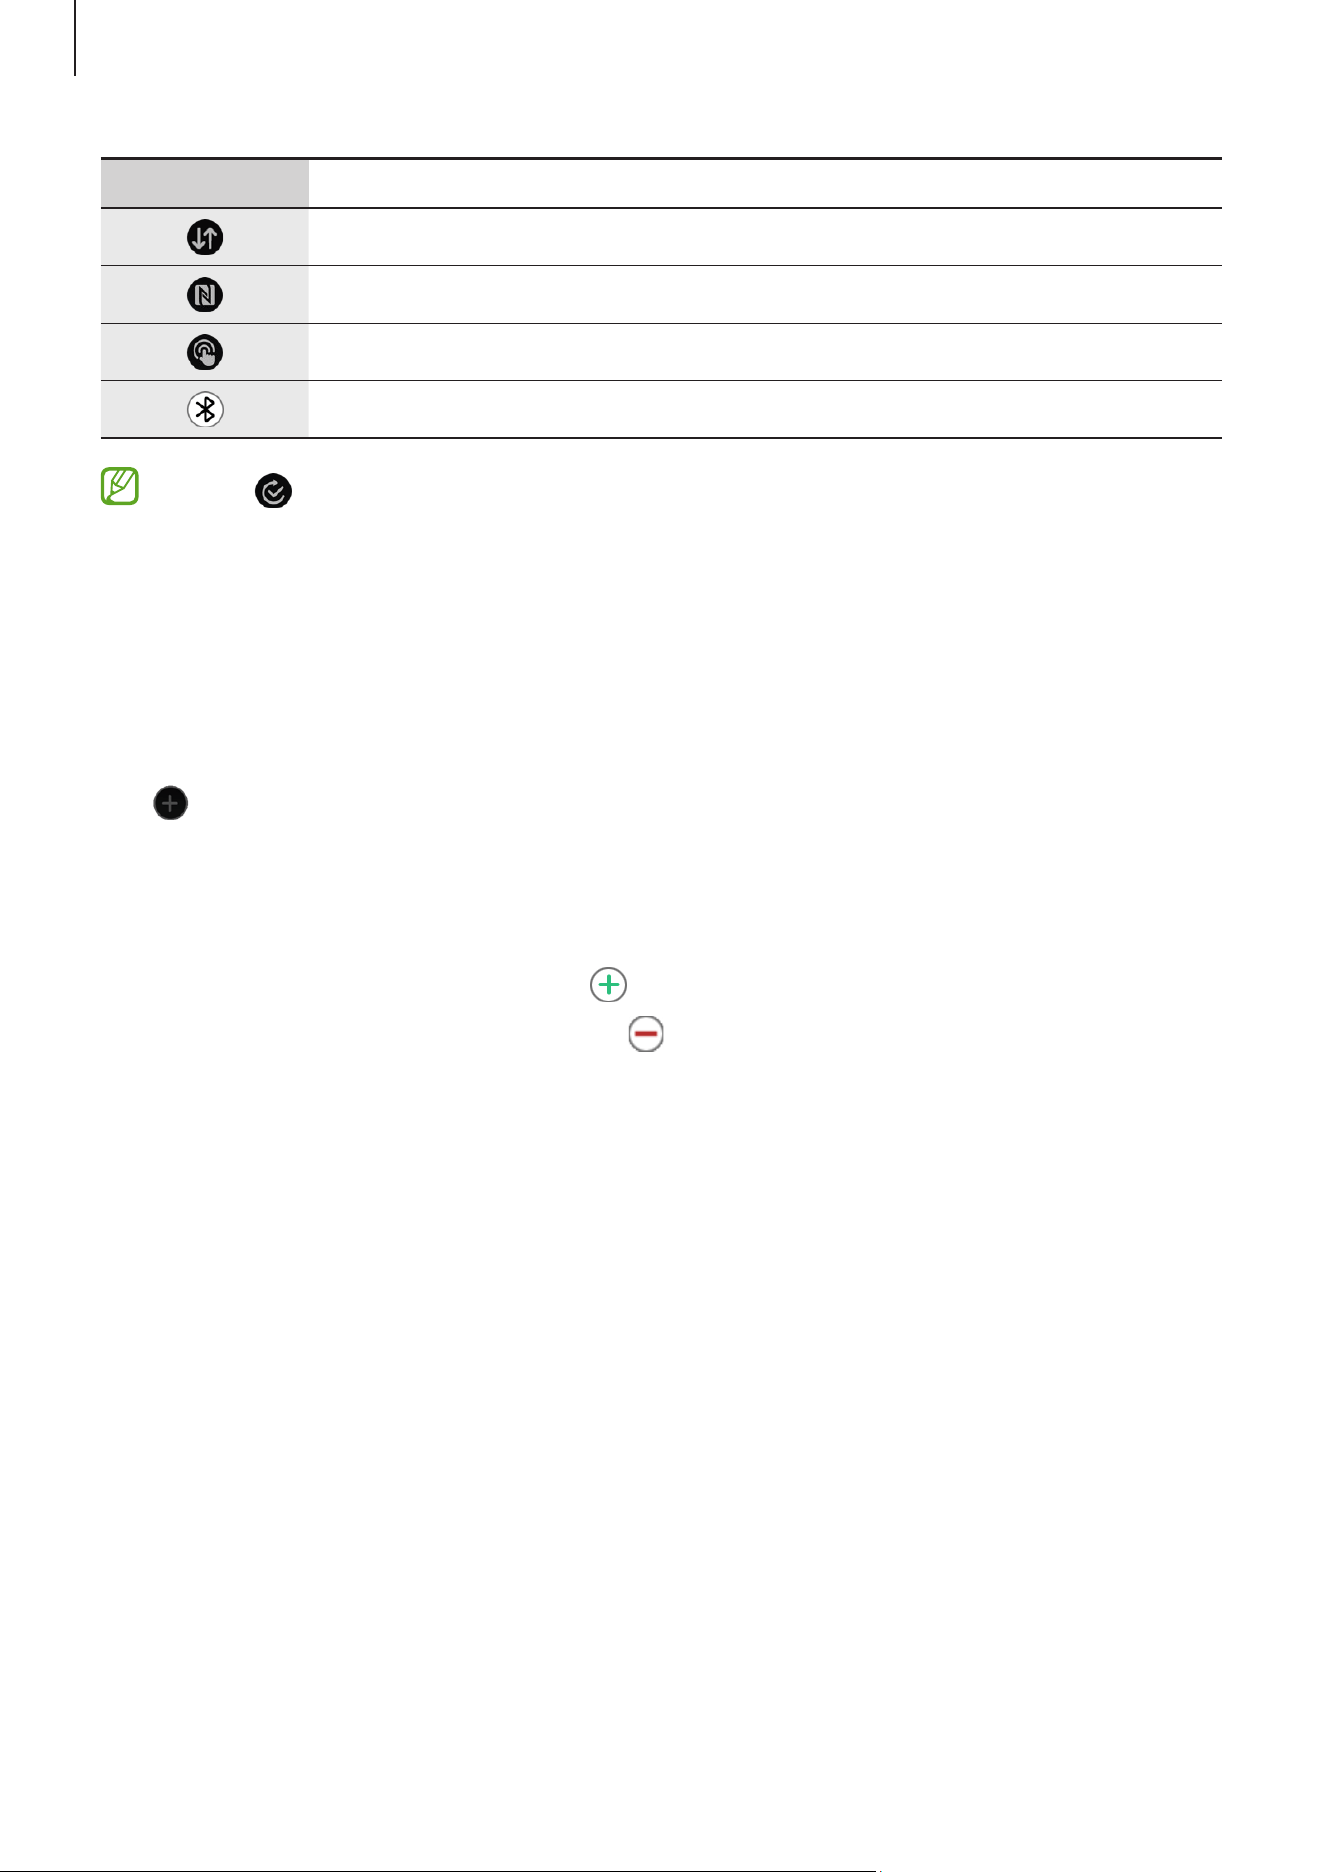
Getting started
39
Icon Meaning
Connect the mobile network (Mobile network enabled models)
Turn on the NFC feature
Turn on the touch sensitivity feature
Connect to Bluetooth (Mobile network enabled models)
•
The quick setting icon may appear differently depending on the running
mode, and you can turn off the mode by tapping the icon when the mode is
being used.
•
The quick setting icons may appear differently depending on the software
version of the connected phone.
Editing a quick panel
Tap to access the edit mode to change the quick settings icon’s arrangement, or add
or remove the quick settings icon.
•
Moving the quick setting icon: Touch and hold a quick settings icon to move and
drag it to the desired location.
•
Adding the quick setting icon: Tap on the quick settings icon to add.
•
Removing the quick setting icon: Tap on the quick settings icon to remove.
Getting started
40
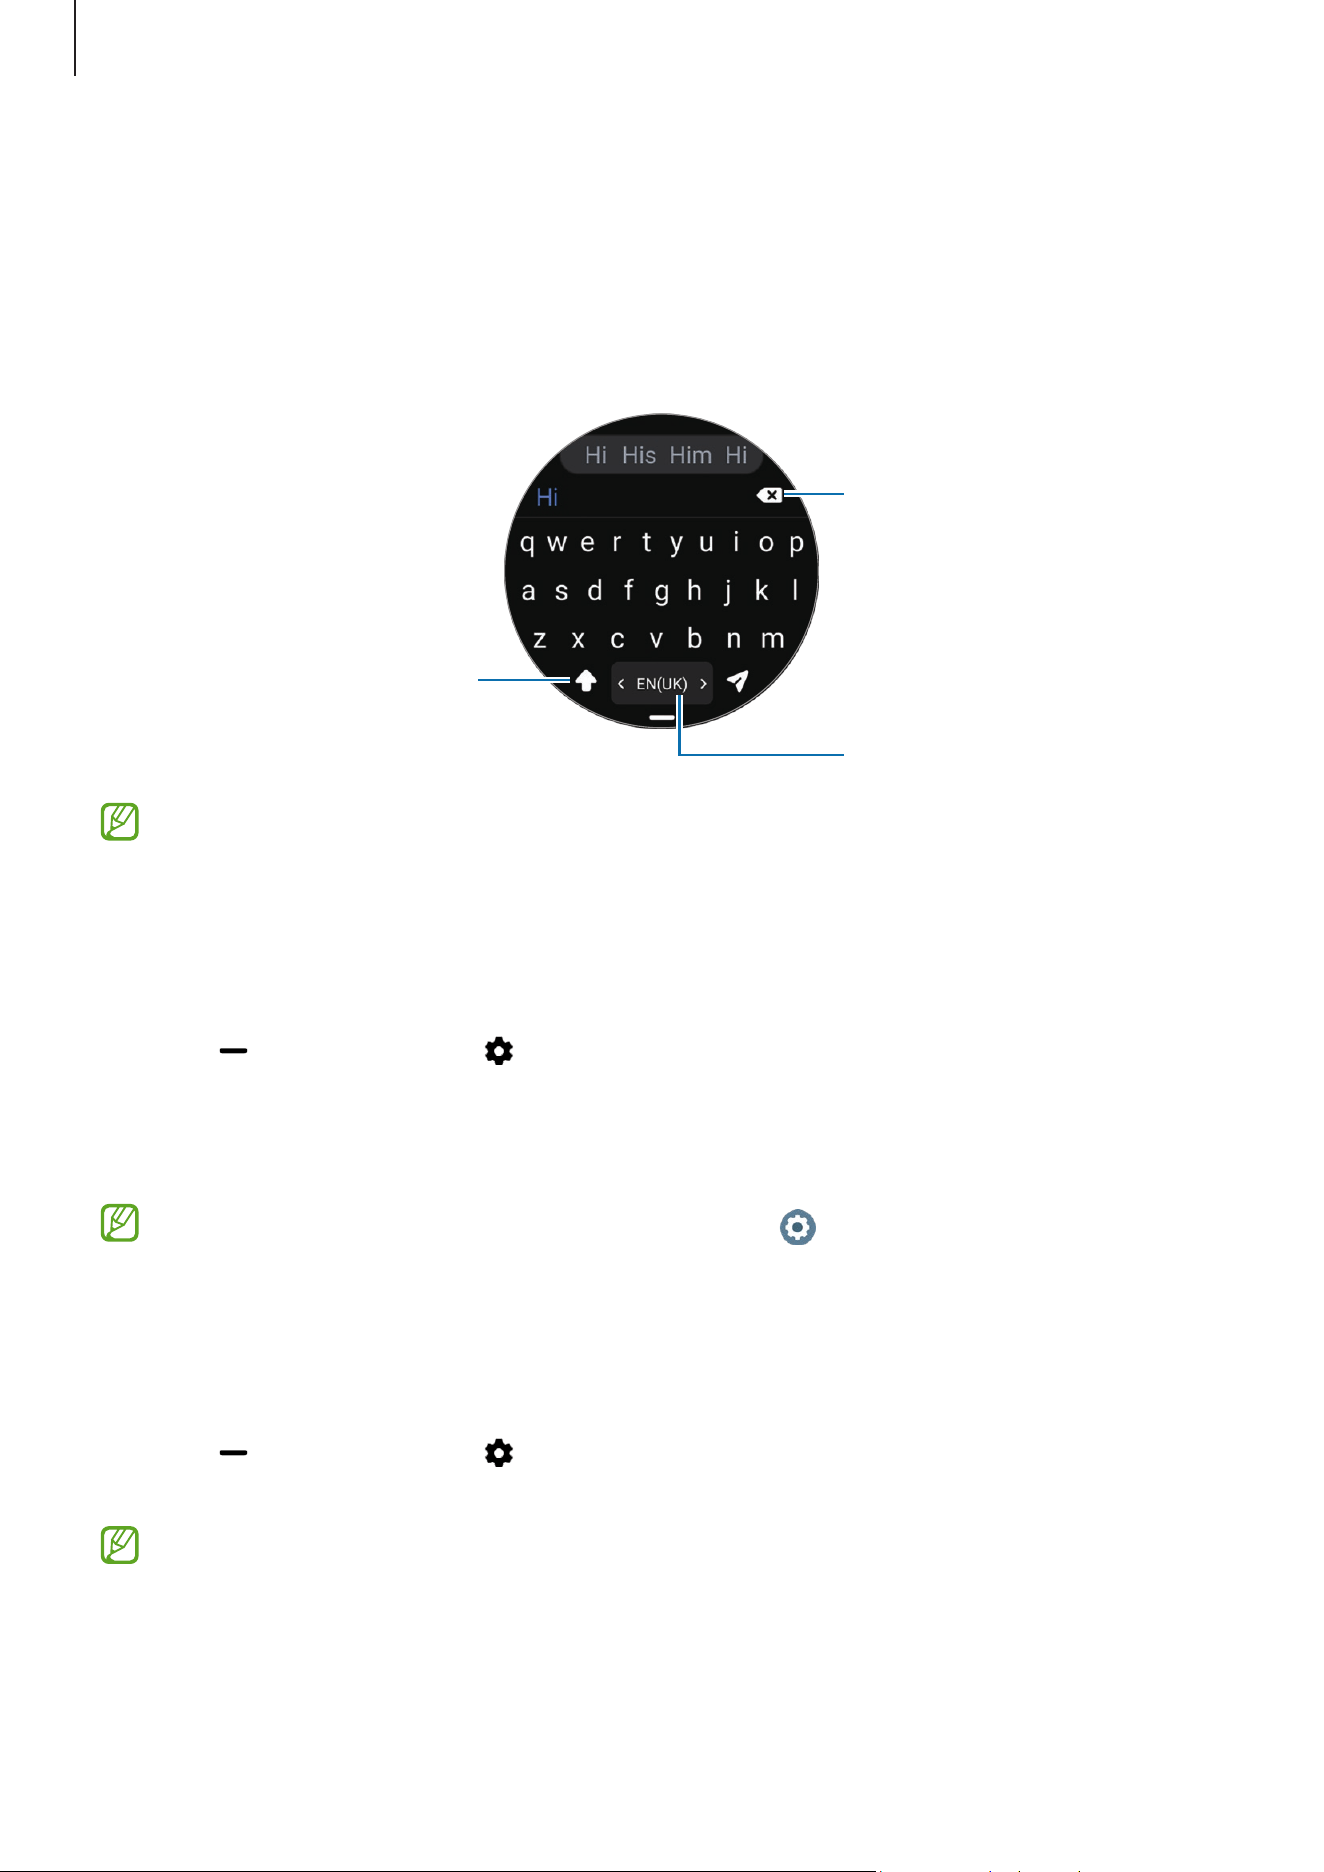
Entering text
Keyboard layout
A keyboard appears when you enter text.
Delete a preceding character.
Enter a space.
Enter uppercase. For all caps,
tap it twice.
•
The text input screen may be different depending on the app you open.
•
Text entry is not supported in some languages. To enter text, you must change
the input language to one of the supported languages.
Changing the input language
Drag the icon upwards, tap
→
Input languages
→
Manage languages
, and then
select the languages to use. When you select two languages, you can switch between
the input languages by swiping to the left or right on the space key. You can add up to
two languages.
You can also set the input languages by tapping (
Settings
) on the Apps screen
and tapping
General
→
Input
→
Samsung Keyboard
→
Input languages
→
Manage languages
.
Changing the keyboard type
Drag the icon upwards, tap
→
Input languages
, select a language, and then select
the keyboard type you want.
On a
3 x 4
keyboard, a key has three or four characters. To enter a character, tap the
corresponding key repeatedly until the desired character appears.
Getting started
41
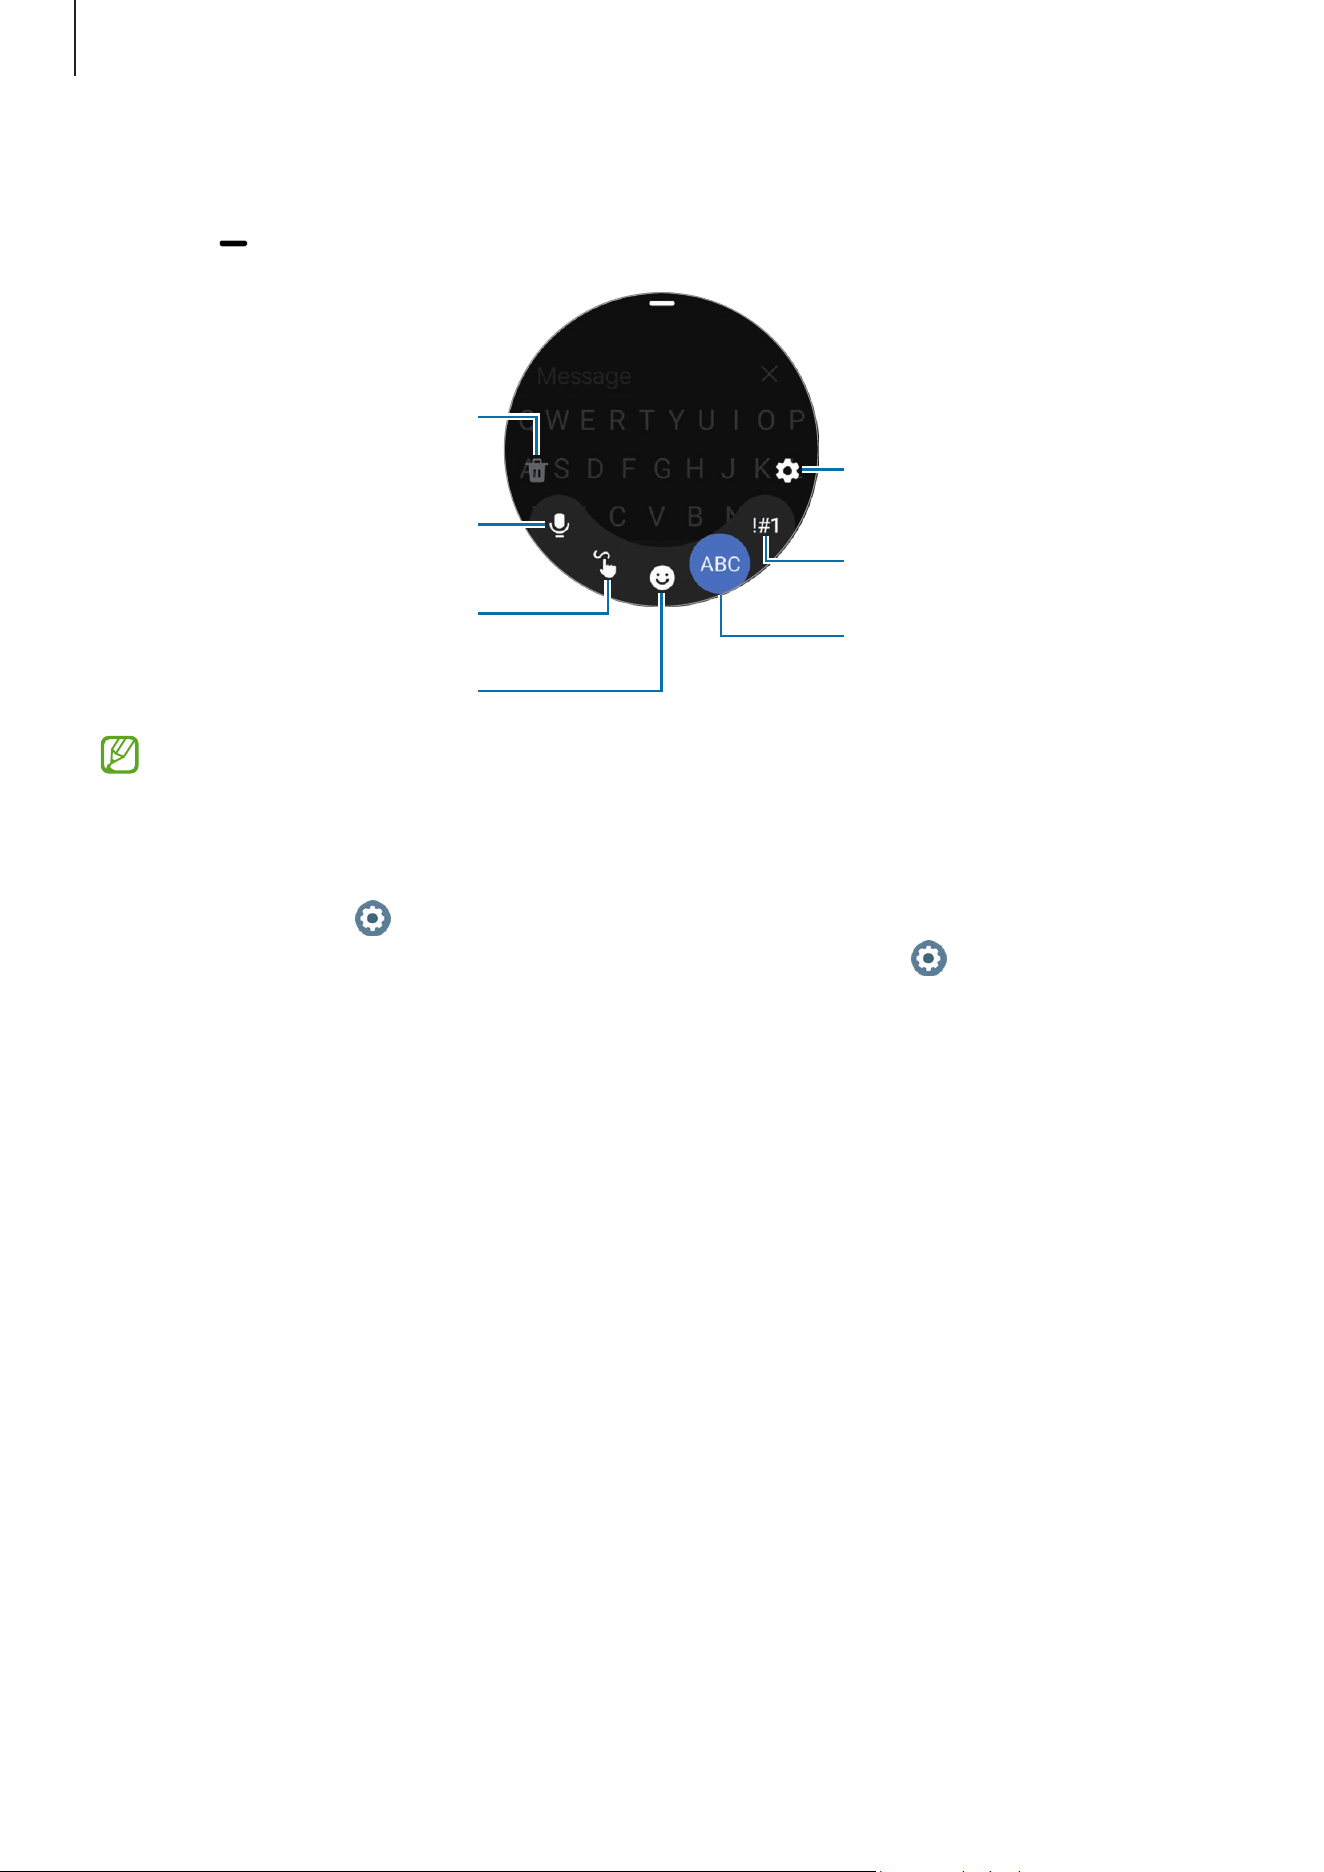
Additional keyboard functions
Drag the icon upwards on the keyboard screen to use additional keyboard functions.
Change the keyboard settings.
Enter numbers and symbols.
Enter text using the keyboard.
Enter text by handwriting.
Enter emojis.
Enter text by voice input.
Discard entered text.
•
Some features may not be available depending on the language, carrier, or
model.
•
The feature to enter text by voice input can also be launched directly from any
other text input screen by pressing and holding the Home button. To use this
feature, tap (
Settings
)
→
Apps
→
Choose default apps
→
Digital assistant
app
→
Default app
, and select
Bixby Voice
, and also tap (
Settings
)
→
General
→
Input
→
Keyboard list and default
→
Default keyboard
and then
select
Samsung Keyboard
.
42
Apps and features
Installing and managing apps
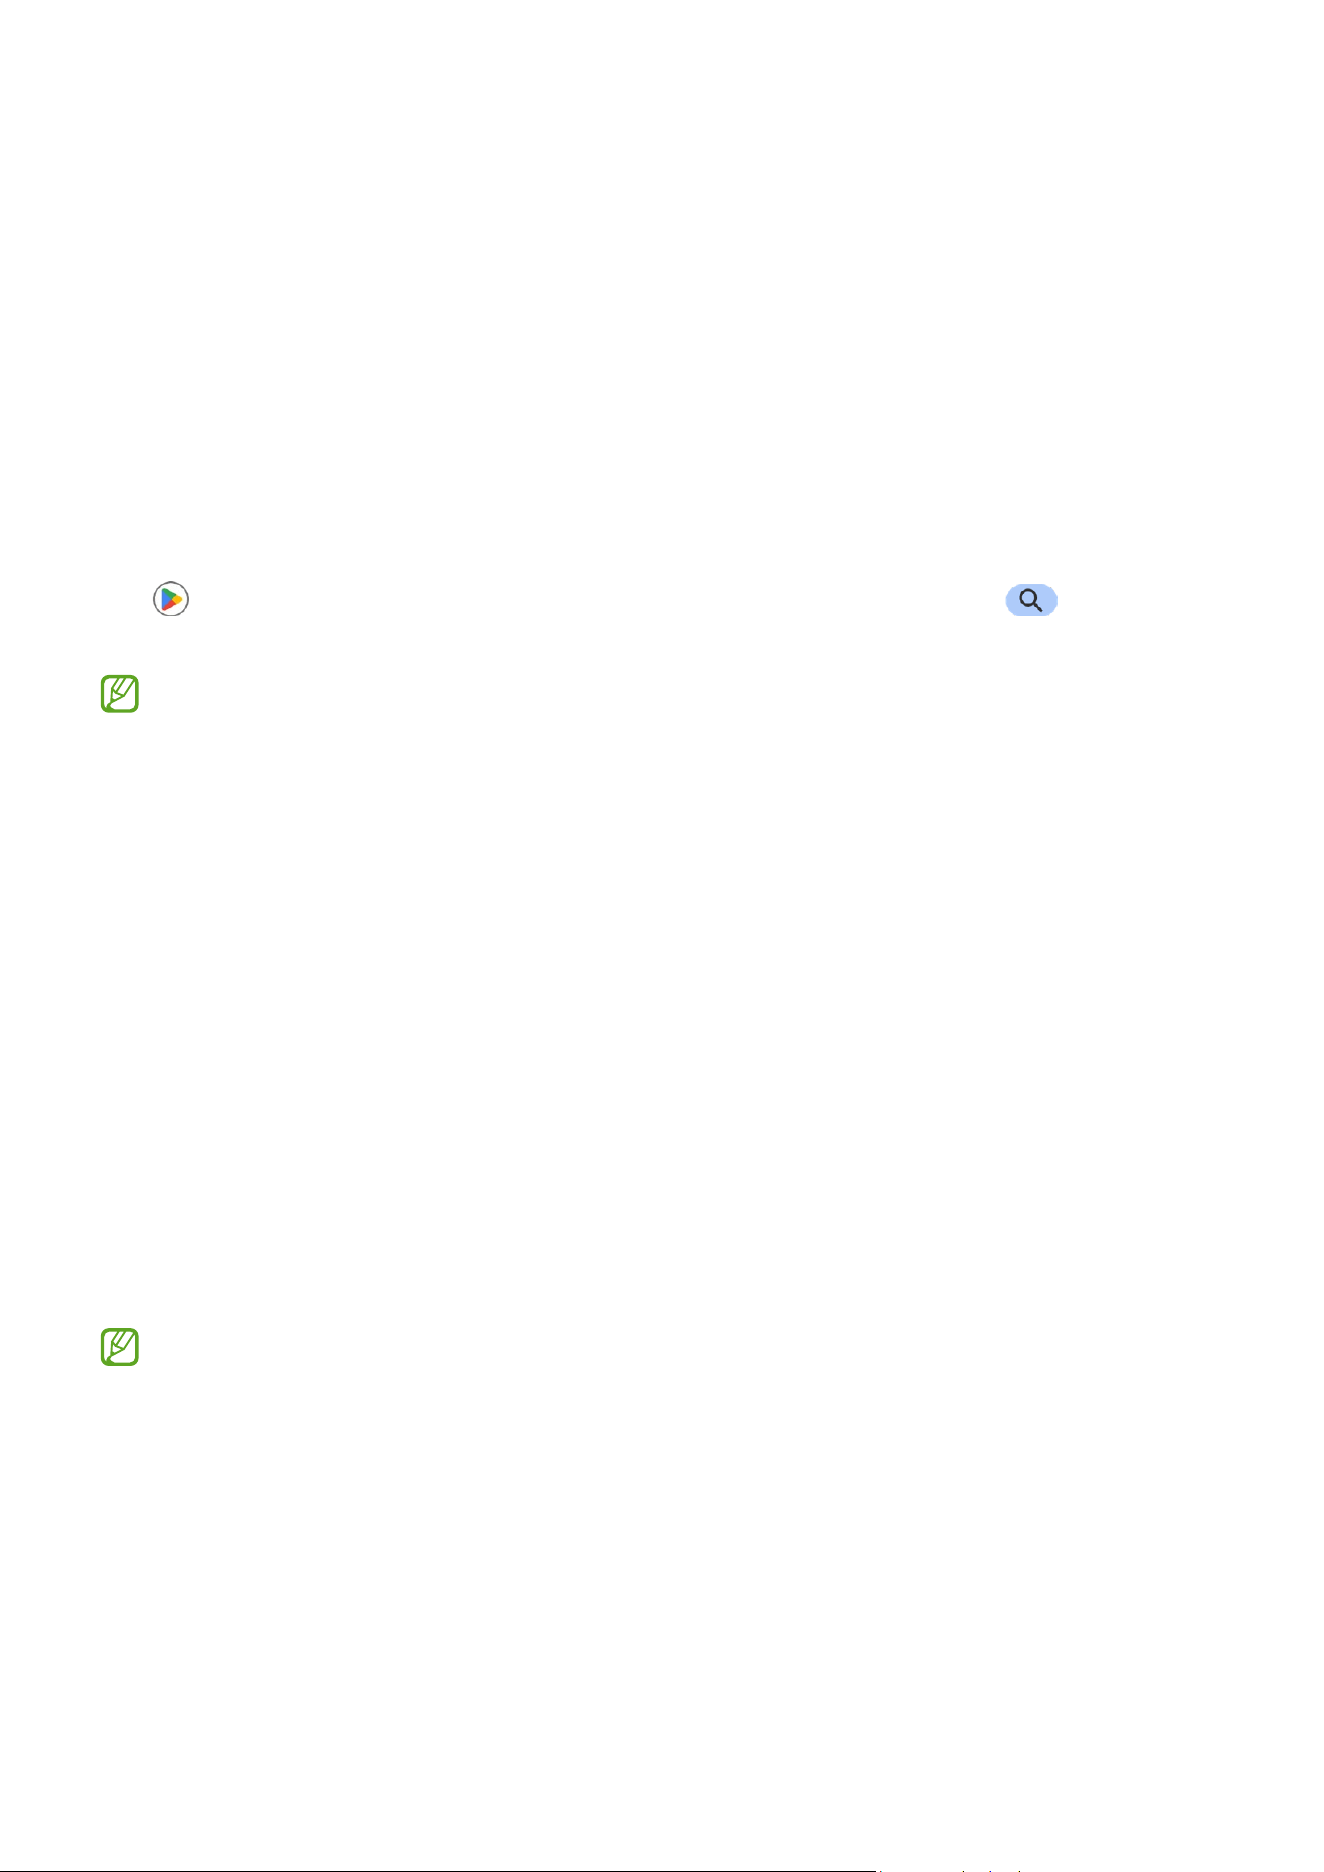
Play Store
Purchase and download apps.
Tap (
Play Store
) on the Apps screen. Browse apps by category or tap and search
for a keyword.
•
Register the Google Account on your Watch to use the Play Store app. Refer to
Adding a Google Account to your Watch for more information.
•
To change the auto-update settings, tap
Settings
and tap the
Auto-update apps
switch to turn it on or off.
•
When you download an app on your phone, if there is a companion app for the
Watch, it may be automatically installed on the Watch.
Managing apps
Uninstalling or disabling apps
Open the
Galaxy Wearable
app on your phone, tap
Watch settings
→
Apps
, tap an app,
and then select an option.
•
Uninstall
: Uninstall downloaded apps.
•
Disable
: Disable selected default apps that cannot be uninstalled from the Watch.
•
Some apps may not support this feature.
•
Some apps can be removed by touching and holding the app on the Watch’s Apps
screen and tapping
Uninstall
.
Apps and features
43
Enabling apps
Open the
Galaxy Wearable
app on your phone, tap
Watch settings
→
Apps
, select ,
and then tap
Disabled
→
OK
. Select an app and tap
Enable
.
Setting app permissions
For some apps to operate properly, they may need permission to access or use
information on your Watch.
To check or change app permission settings by permission category, on the Apps screen,
tap (
Settings
)
→
Apps
→
Permission manager
. Select an item and select an app.
If you do not grant permissions to apps, the basic features of the apps may not
function properly.
Messages
Check messages and reply to using the Watch.
You may incur additional charges for sending or receiving messages when you are
roaming.
The Android Messages app may be available depending on the region, and the
settings for the default messages app are synced with the connected phone.
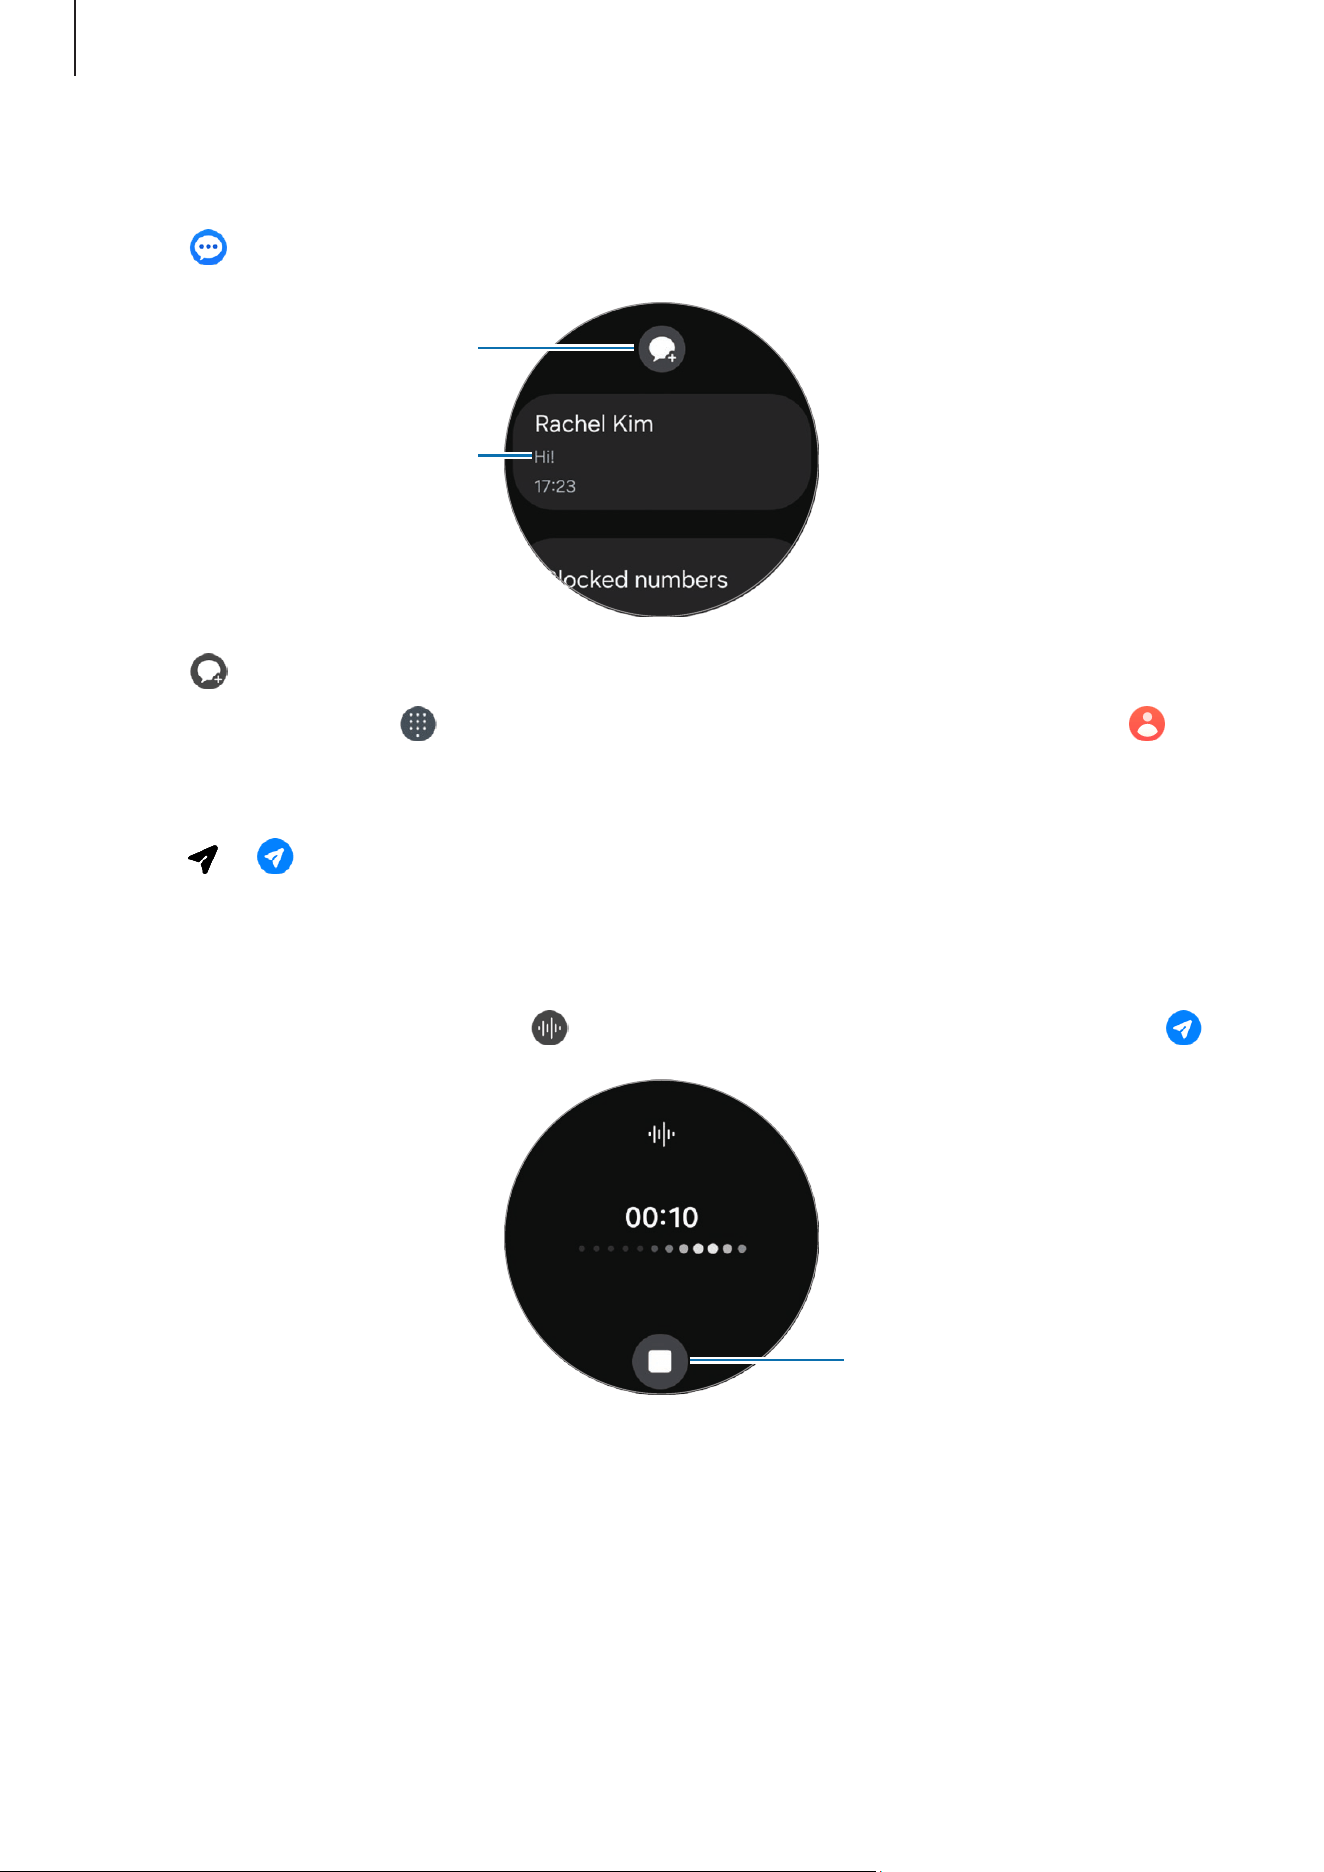
Checking messages
1 Tap (
Messages
) on the Apps screen.
Or, open the notification panel and check a new message.
2 Scroll through the message list or use the touch bezel, and then select a contact to
check your conversations.
To check a message on your phone, tap
Show on phone
.
To reply to a message, tap the message input field and enter a message.
Apps and features
44
Sending message
1 Tap (
Messages
) on the Apps screen.
Create a new message.
Messages list
2 Tap .
3 Tap
Recipient
or tap to enter a message recipient or phone number. Or, tap and
select a message recipient from the contacts list.
4 Tap the message input field and enter a message or select a text template, and then
tap or .
Recording and sending a voice message
You can send a voice file after recording what you want to say.
On the message input screen, tap , record what you want to be sent, and then tap .
Stop recording.
Apps and features
45
Deleting messages
1 Tap (
Messages
) on the Apps screen.
2 Scroll through the message list or use the touch bezel, and then select a contact to
check your conversations.
3 Touch and hold a message, then tap
Delete
.
The message will be deleted both from the Watch and the connected phone.
Phone
Introduction
You can make calls and check incoming calls and receive them.
The sound may not be heard clearly during a call and only brief calls are available
in areas with weak signals.
Making calls
Tap (
Phone
) on the Apps screen.
Keypad
Contacts
Log list
To make calls, use one of the following methods:
•
Tap , enter a number using the keypad, and then tap .
•
Tap , use the touch bezel or scroll through the contact list, select a contact, and
then tap .
•
Use the touch bezel or scroll through the log list, select a log entry, and then tap .
Apps and features
46
Selecting the number to use for making calls (Mobile network enabled
models)
You can select the number you want to use between the Watch’s number and the
connected phone’s number when making calls. Also, if your Watch is connected to a
phone that supports dual SIM cards, you can select a SIM card to make calls.
1 Tap (
Phone
) on the Apps screen.
2 Tap .
3 Tap and select the option you want.
•
Phone
: Make calls with the number of the connected phone.
•
SIM 1
: Make calls with the number of the connected phone’s SIM card 1.
•
SIM 2
: Make calls with the number of the connected phone’s SIM card 2.
•
Watch
: Make calls with the Watch’s number.
•
Some features may not be available depending on the connected phone.
•
You can also select a number to use by touching and holding the call button after
selecting a log entry.
Setting a preferred number in advance (Mobile network enabled models)
1 Tap
(
Phone
) on the Apps screen.
2 Tap
Settings
.
3 Tap
Preferred number
and select the option you want.
•
Phone
: Set to make calls with the number of the connected phone.
•
Watch
: Set to make calls with the Watch’s number.
•
Always ask
: Set to always ask which number to use whenever making calls.
Apps and features
47
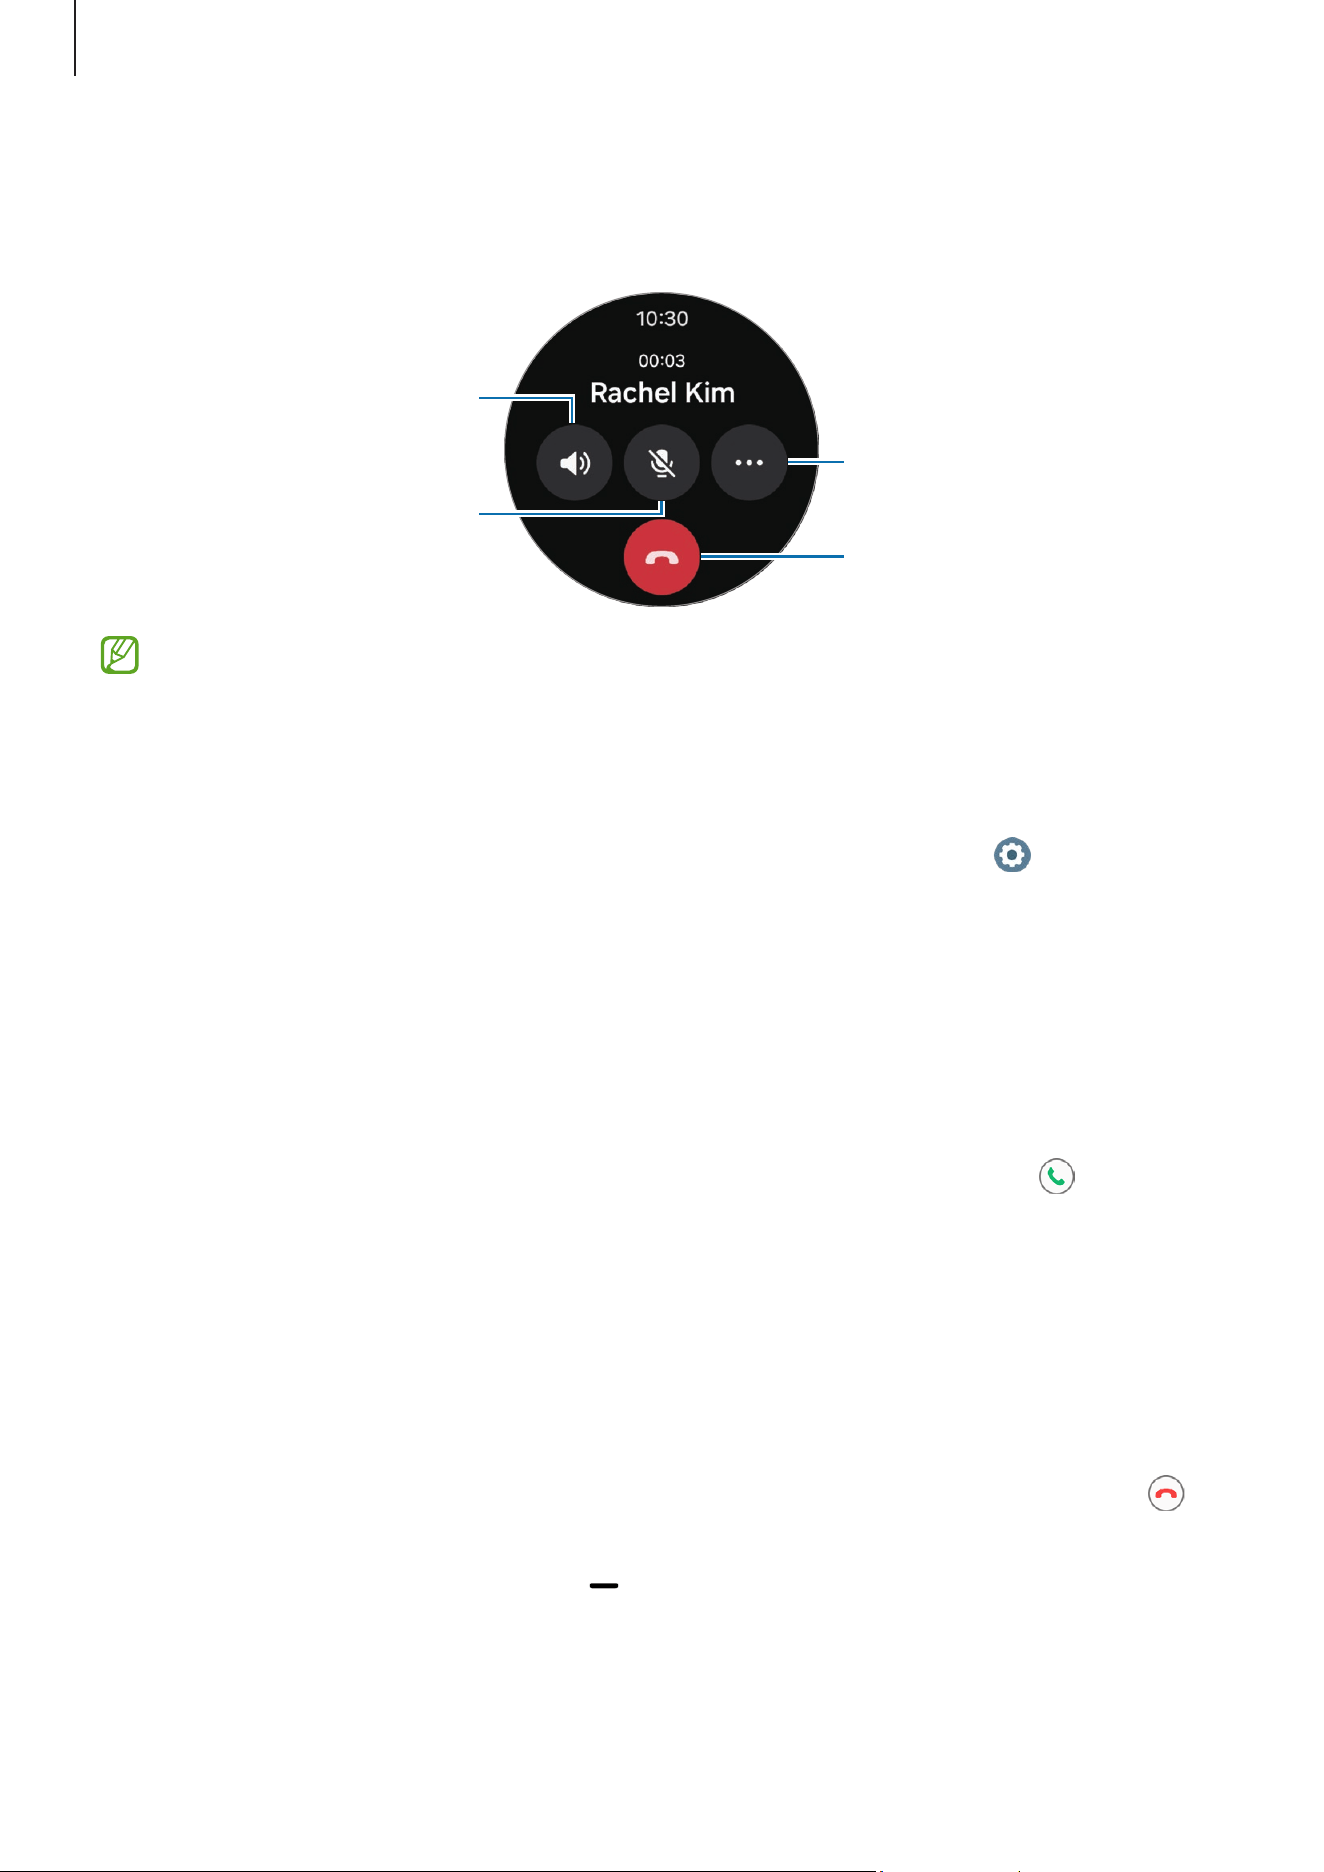
Options during calls
The following actions are available:
Turn off the microphone so
that the other party cannot
hear you.
Adjust the volume.
End the current call.
Access additional options.
The screen’s appearance may differ depending on the model.
Making a phone call with a Bluetooth headset
When a Bluetooth headset is connected, the call will be directed to it.
While the Bluetooth headset is not connected, on the Apps screen, tap (
Settings
)
→
Connections
→
Bluetooth
. When the available Bluetooth devices list appears, select a
Bluetooth headset you want to use.
Receiving calls
Answering a call
When a call comes in, swipe the touch bezel clockwise. Alternatively, drag outside
the large circle.
You can have phone conversations using the Watch’s internal microphone, speaker, or a
connected Bluetooth headset.
Declining a call
You can decline incoming calls and send a declining message to the caller.
When a call comes in, swipe the touch bezel counter-clockwise. Alternatively, drag
outside the large circle.
To send a declining message, drag the icon upwards and select the message you
want.
Apps and features
48
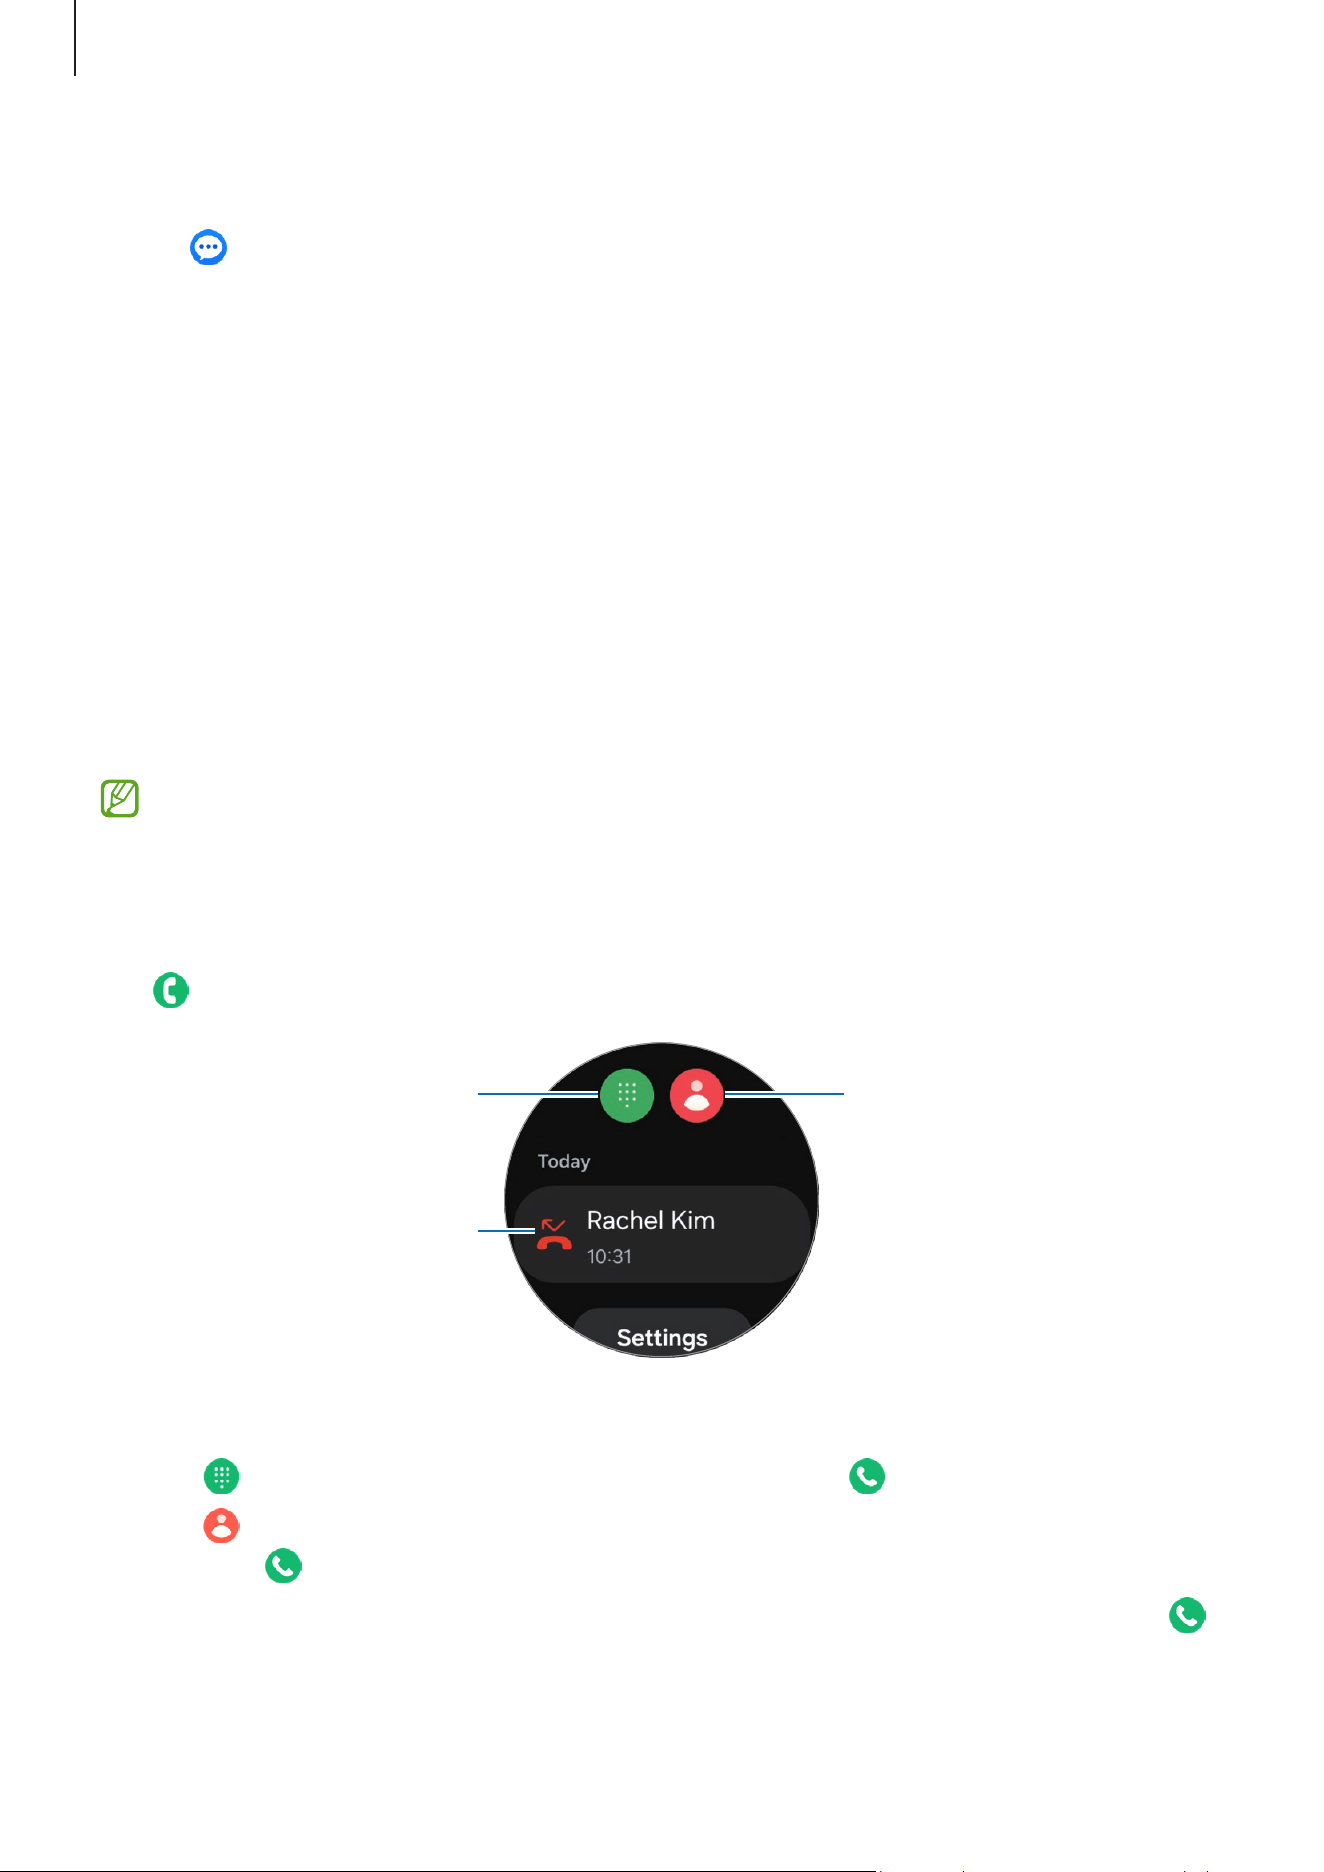
Missed calls
If a call is missed, a missed call notification appears on the notification panel. On the
notification panel, check missed call notifications. Alternatively, tap (
Phone
) on the
Apps screen to check missed calls.
Contacts
You can make a call or send a message to a contact. The contacts saved on your
connected phone will be also saved to your Watch.
Tap (
Contacts
) on the Apps screen.
The favourite contacts list on the phone will appear on the top of the contacts list.
Use one of the following search methods:
•
Tap on the top of the contacts list and enter the search criteria.
•
Scroll through the contacts list.
•
Use the touch bezel. When you swipe the touch bezel quickly, the list scrolls
alphabetically by the first letter.
Once a contact is selected, take one of the following actions:
•
: Make a voice call.
•
: Compose a message.
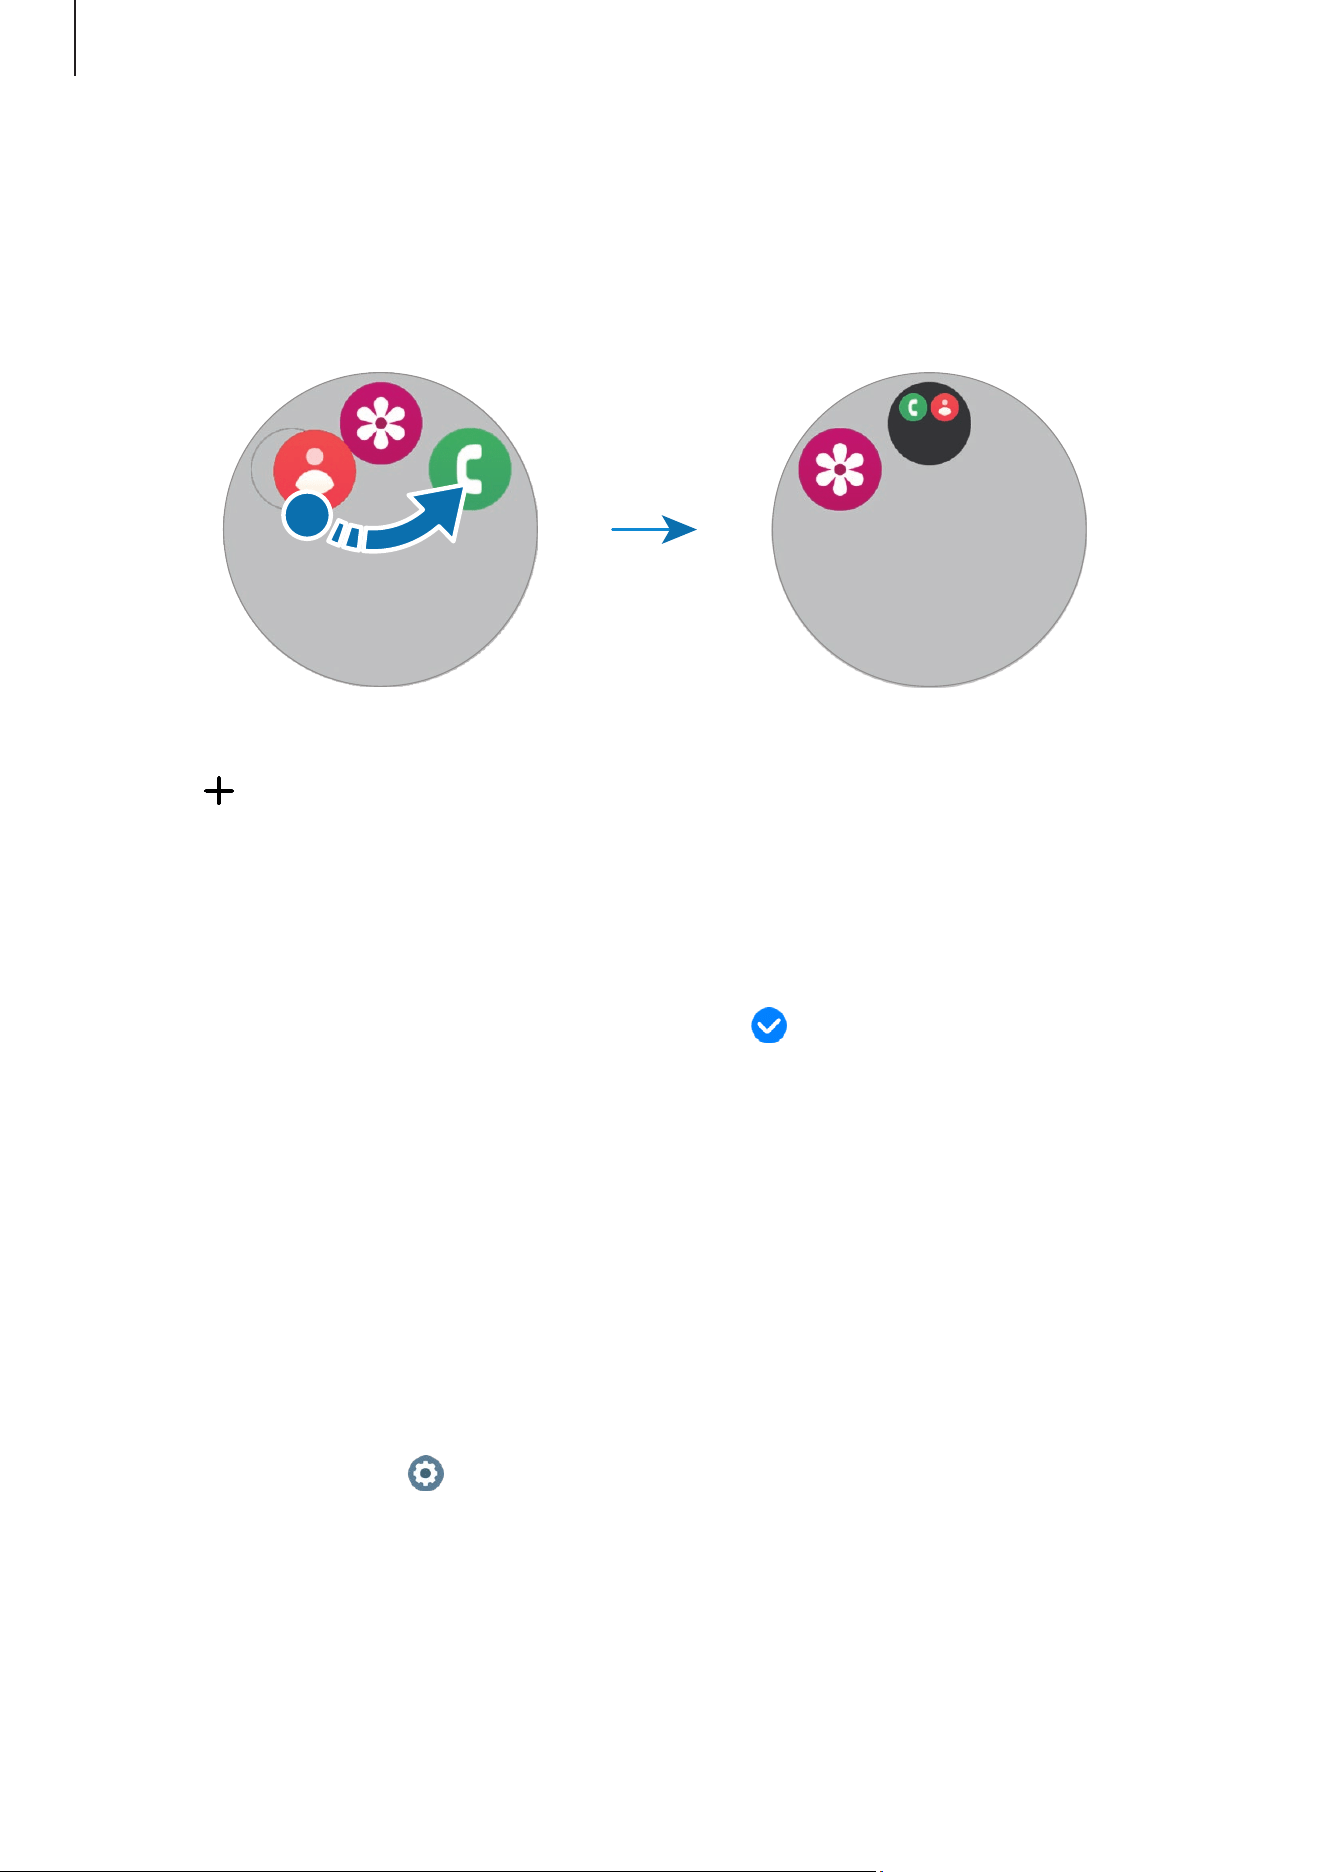
Selecting the frequently used contacts on the tile
Add the frequently used contacts from the
Contacts
tile to contact them directly
through a text message or phone call. Touch and hold the
Contacts
tile, tap
Edit
→
Add
,
select contacts you want, and then tap
Done
.
•
To use this feature, you must add the
Contacts
tile. Refer to Using tiles for more
information.
•
Up to four contacts can be added on the tile.

Apps and features
49
Samsung Wallet
Use various convenient features in Samsung Wallet. You can make a payment, check
tickets or boarding passes, and more.
Tap (
Wallet
) on the Apps screen and select a feature you want.
•
This app may not be available depending on the region, carrier, model, or
connected phone.
•
Some features may not be available depending on the region.
•
The procedures for the initial setup may vary depending on the region or carrier.
Setting up Samsung Wallet
1 Open the
Galaxy Wearable
app on your phone.
2 Tap
Watch settings
→
Wallet
and follow the on-screen instructions to complete the
setup.
Making payments
Register cards to Samsung Pay to make payments. Refer to Samsung Pay for more
information.
Using tickets
Add boarding passes and tickets for movies, sports, and more, to access and use them in
one place.

Apps and features
50
Samsung Pay
Introduction
Register cards to Samsung Pay to make payments.
You can check out more information, such as cards that support this feature at
www.samsung.com/samsung-pay.
•
To make payments with Samsung Pay, the device may require a connection to a
Wi-Fi or mobile network depending on the region.
•
This app may not be available depending on the region, carrier, model, or
connected phone.
•
The procedures for the initial setup and card registration may vary depending on
the region or carrier.
Setting up Samsung Pay
1 Open the
Galaxy Wearable
app on your phone.
2 Tap
Watch settings
→
Pay
and follow the on-screen instructions to complete your
card registration.
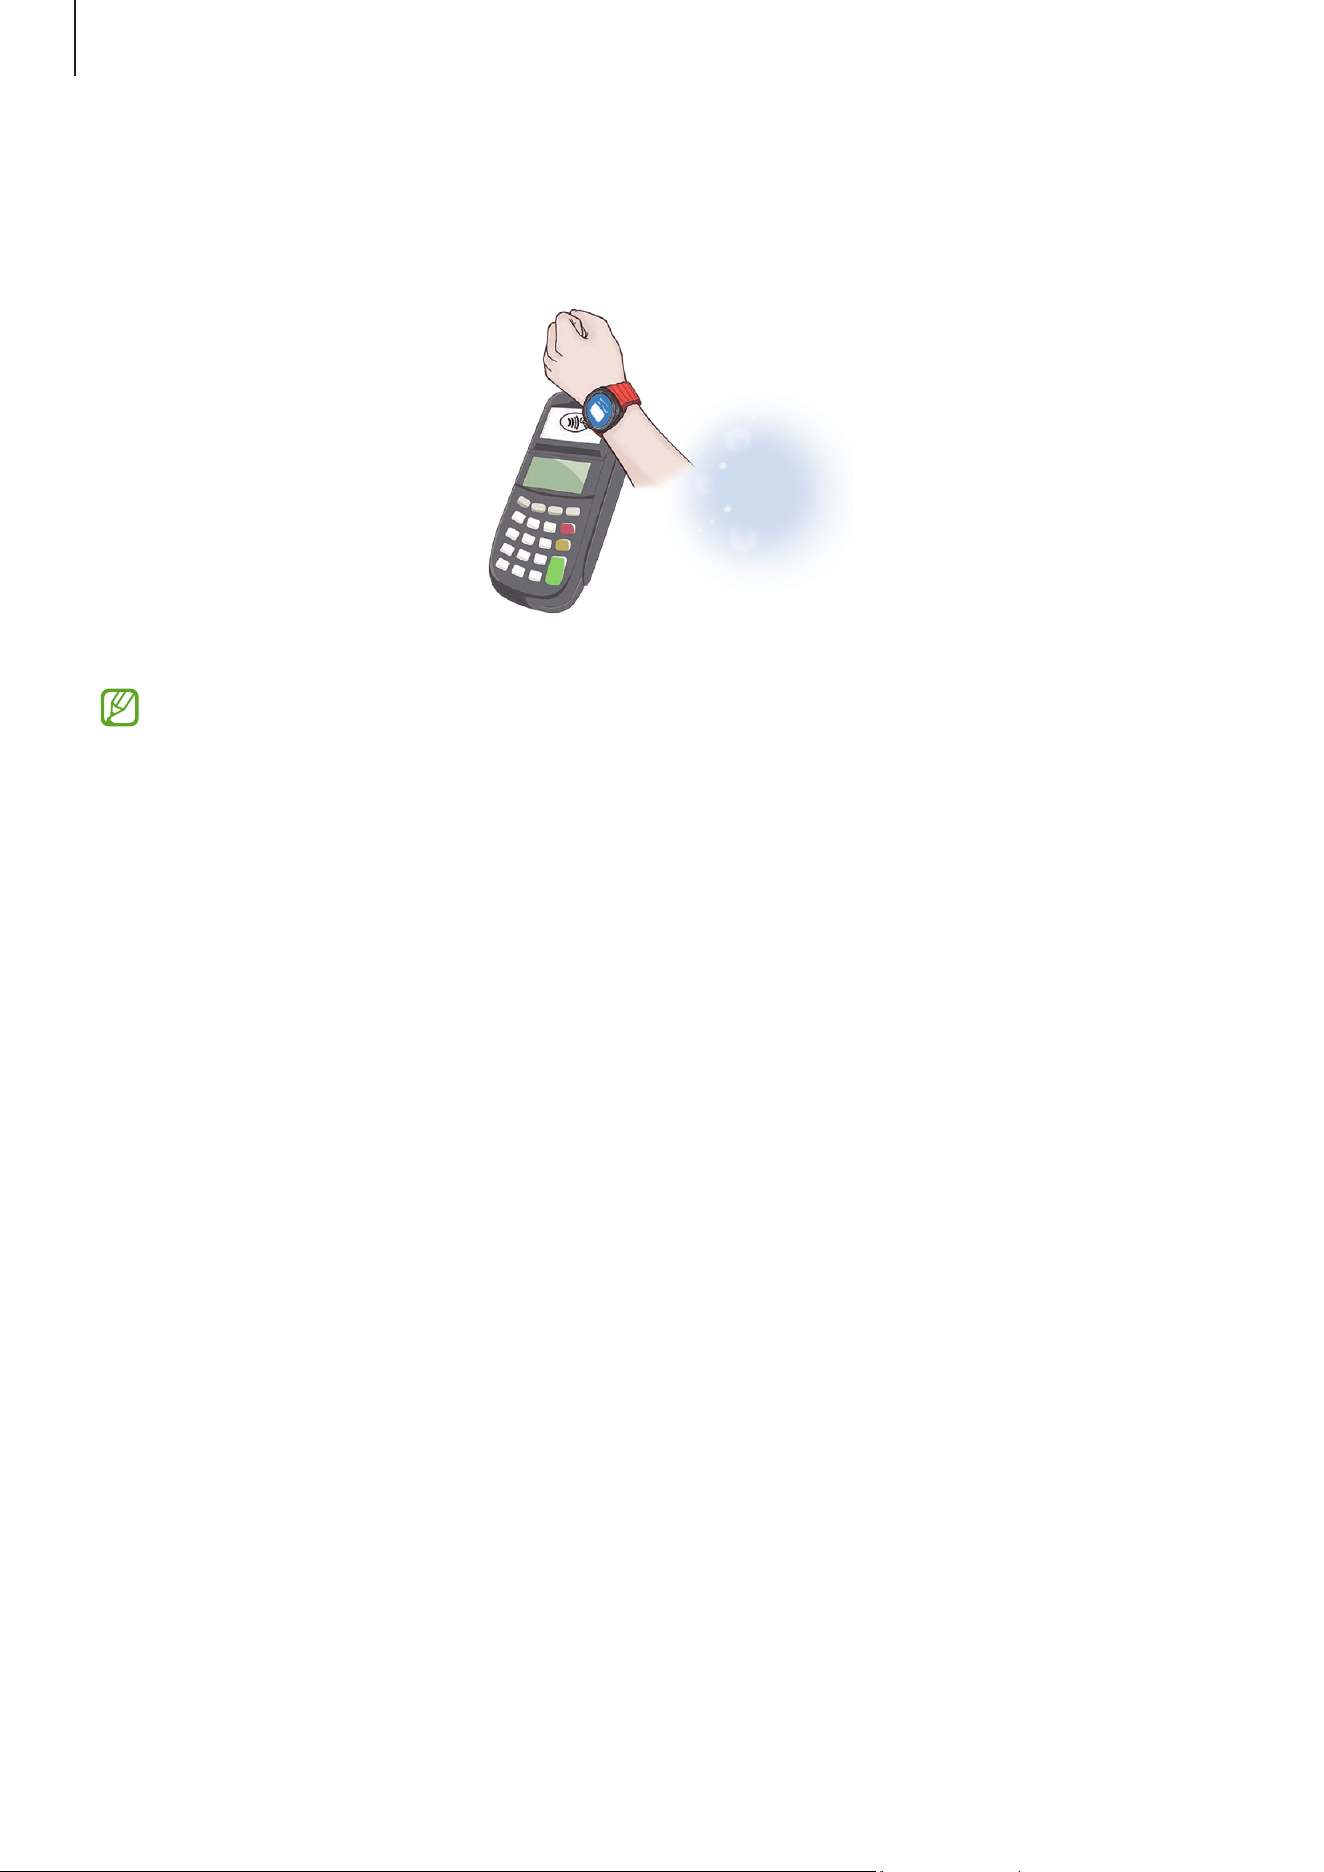
Making payments
1 To make a payment on your Watch, press and hold the Back button on the Watch
screen or on the Samsung Pay intro page.
2 Enter your PIN or draw the pattern you set.
3 Scroll through the cards list, select a card, and then tap
PAY
.
Apps and features
51
4 Place your Watch close to the card reader.
When the card reader recognises the card information, the payment will be
processed.
•
Payments may not be processed depending on your network connection.
•
The verification method for payments may vary depending on the card readers.
Samsung Health
Introduction
Samsung Health records and manages your 24-hour activity and sleep pattern to
cultivate a healthy habit. You can save and manage health-related data on the Samsung
Health app of the connected phone.
After continuously exercising for a certain period while wearing the Watch, the auto
detect workouts feature will be turned on. Also, the Watch will notify you and show
you some stretching motions to follow or it will show you a screen encouraging you to
engage in light activity when the Watch recognizes inactivity for more than 50 minutes.
When your Watch recognizes that you are driving or sleeping, it may not notify you and
not show a stretching screen although you are physically inactive.
Visit www.samsung.com/samsung-health for more information.

Apps and features
52
•
Samsung Health features are intended only for leisure, well-being, and fitness
purposes. They are not intended for medical use. Before using these features,
read the instructions carefully.
•
If you use the Samsung Health features while wearing another wearable device
with your Watch, such as a Galaxy Ring, it may take a while for the data from all
your wearable devices to be integrated because of the different data sync times
between each wearable device and your phone. As a result, the measurement
data you may find between the Samsung Health app on your phone and your
Watch may temporarily not match.
•
The order in which features appear in the Samsung Health app may change
depending on your set interests.
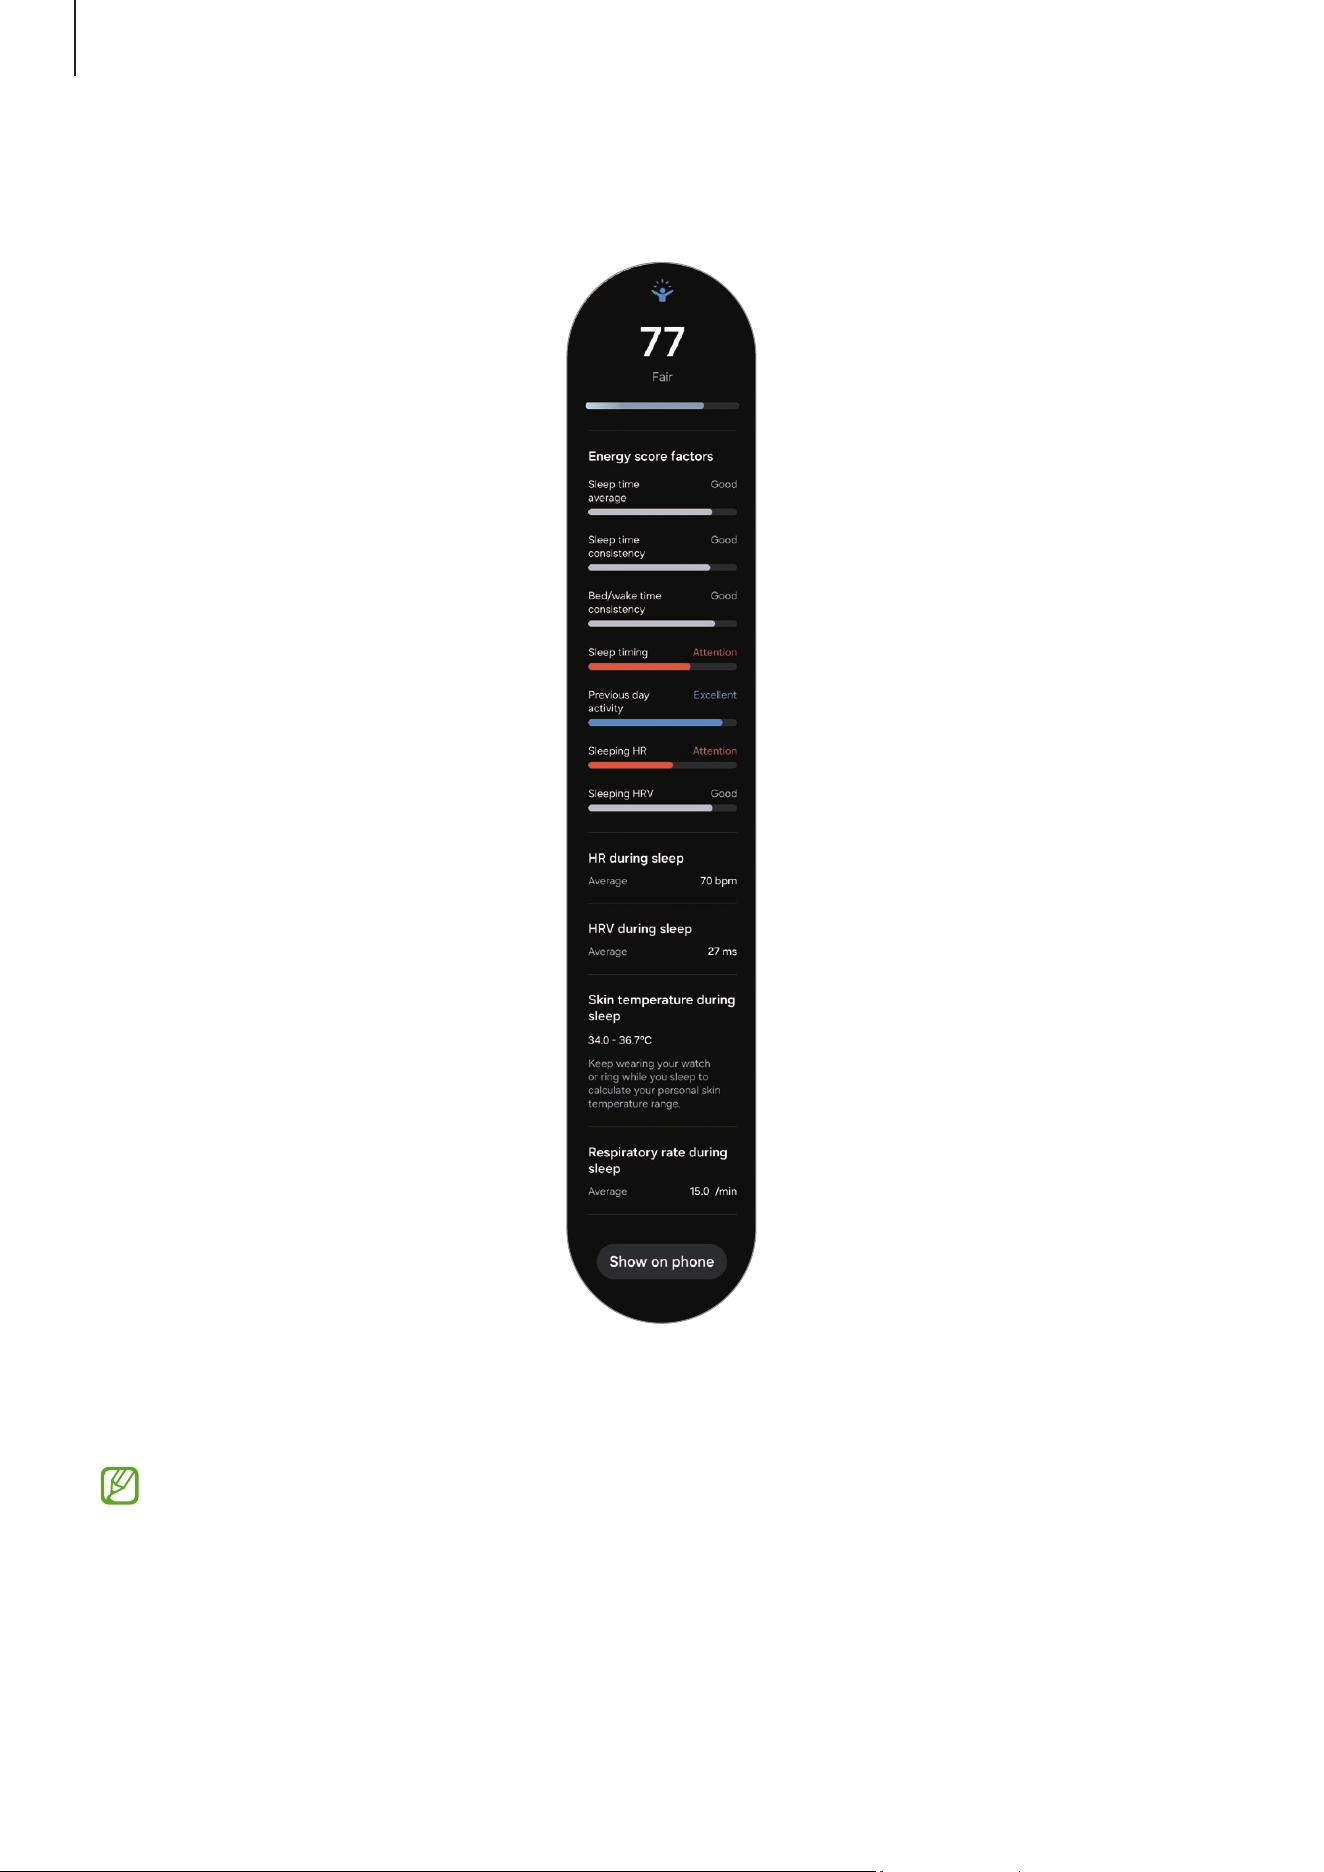
Energy score
Check your energy score based on a comprehensive analysis of daily measured sleep,
activities, and heart rate during sleep and get guidance for healthy daily living with a
balance between rest and activities from the Samsung Health app on your connected
phone.
The energy score is determined by analyzing the recent trends.
1 Tap (
Health
) on the Apps screen.
Apps and features
53
2 Tap
Energy score
and check your energy score for today and additional information
that is related to your energy score.
Tap
Show on phone
to check detailed information related to the Energy score feature on
your connected phone.
The Energy score feature is available if the connected phone has version 6.27 or
later of the Samsung Health app installed.
Apps and features
54
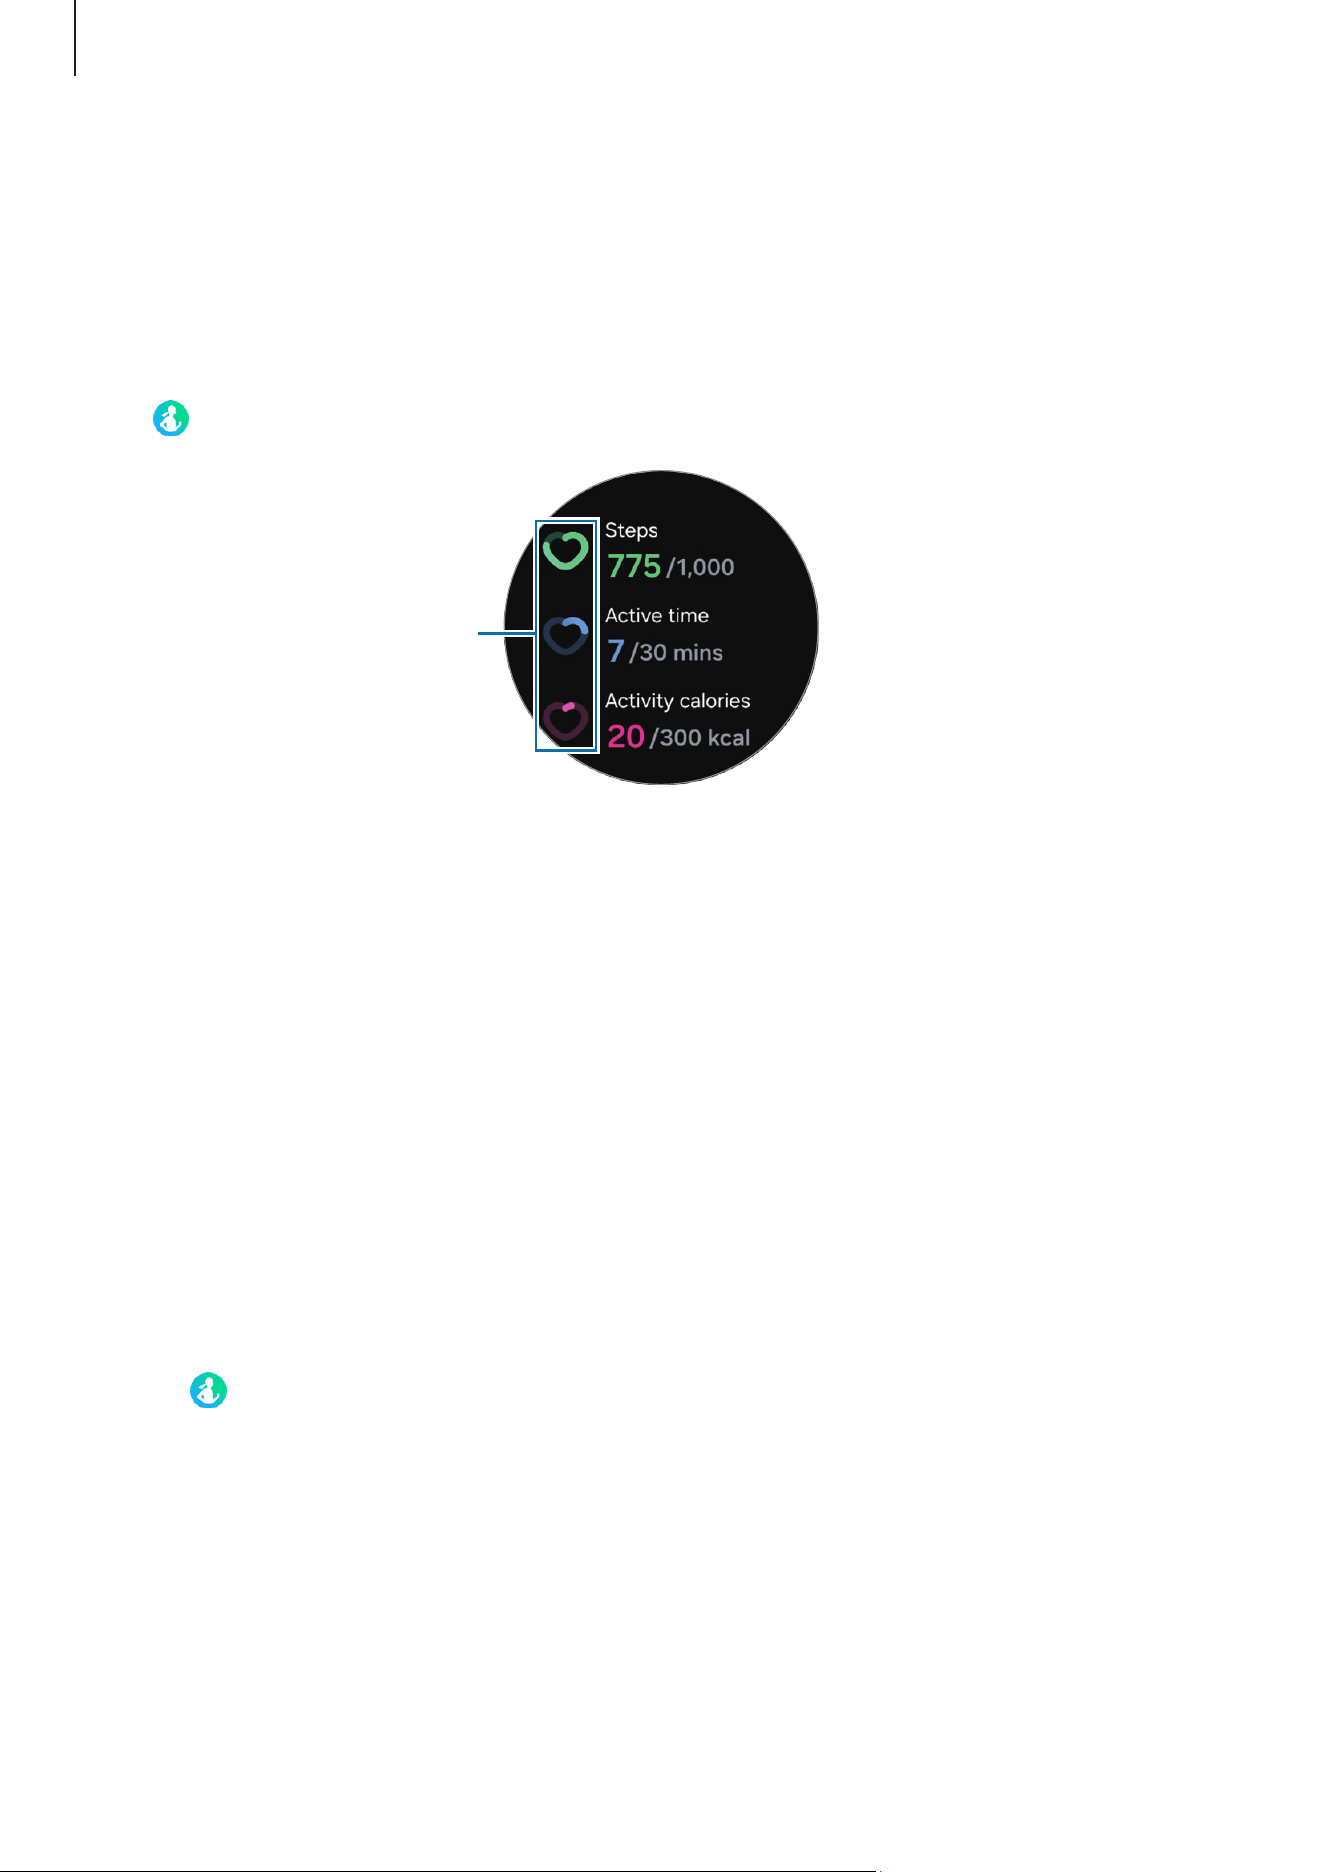
Daily activity
Check your current daily status, such as steps, active times, activity calories, and their
targets, and related information.
Checking your daily activity
Tap (
Health
) on the Apps screen and tap
Daily activity
.
Target achievement graphs
•
Steps
: Check the number of steps you walk throughout the day. As you approach
your step target, the graph will increase.
•
Active time
: Check the total time you were physically active throughout the day. As
you approach your active time target by doing light activities, such as stretching, or
walking, the graph will increase.
•
Activity calories
: Check the total number of calories you spent doing an activity
throughout the day. As you approach your activity calories target, the graph will
increase.
To check additional information which is related to your daily activity, use the touch
bezel or swipe upwards or downwards on the screen.
Setting the daily activity target
1 Tap (
Health
) on the Apps screen.
2 Tap
Daily activity
and tap
Set targets
.
3 Tap
Motion
,
Time
,
Calories
, and select an activity option you want for each target.
4 Use the touch bezel or swipe upwards or downwards on the screen to set the target.
5 Tap
Done
.
Apps and features
55
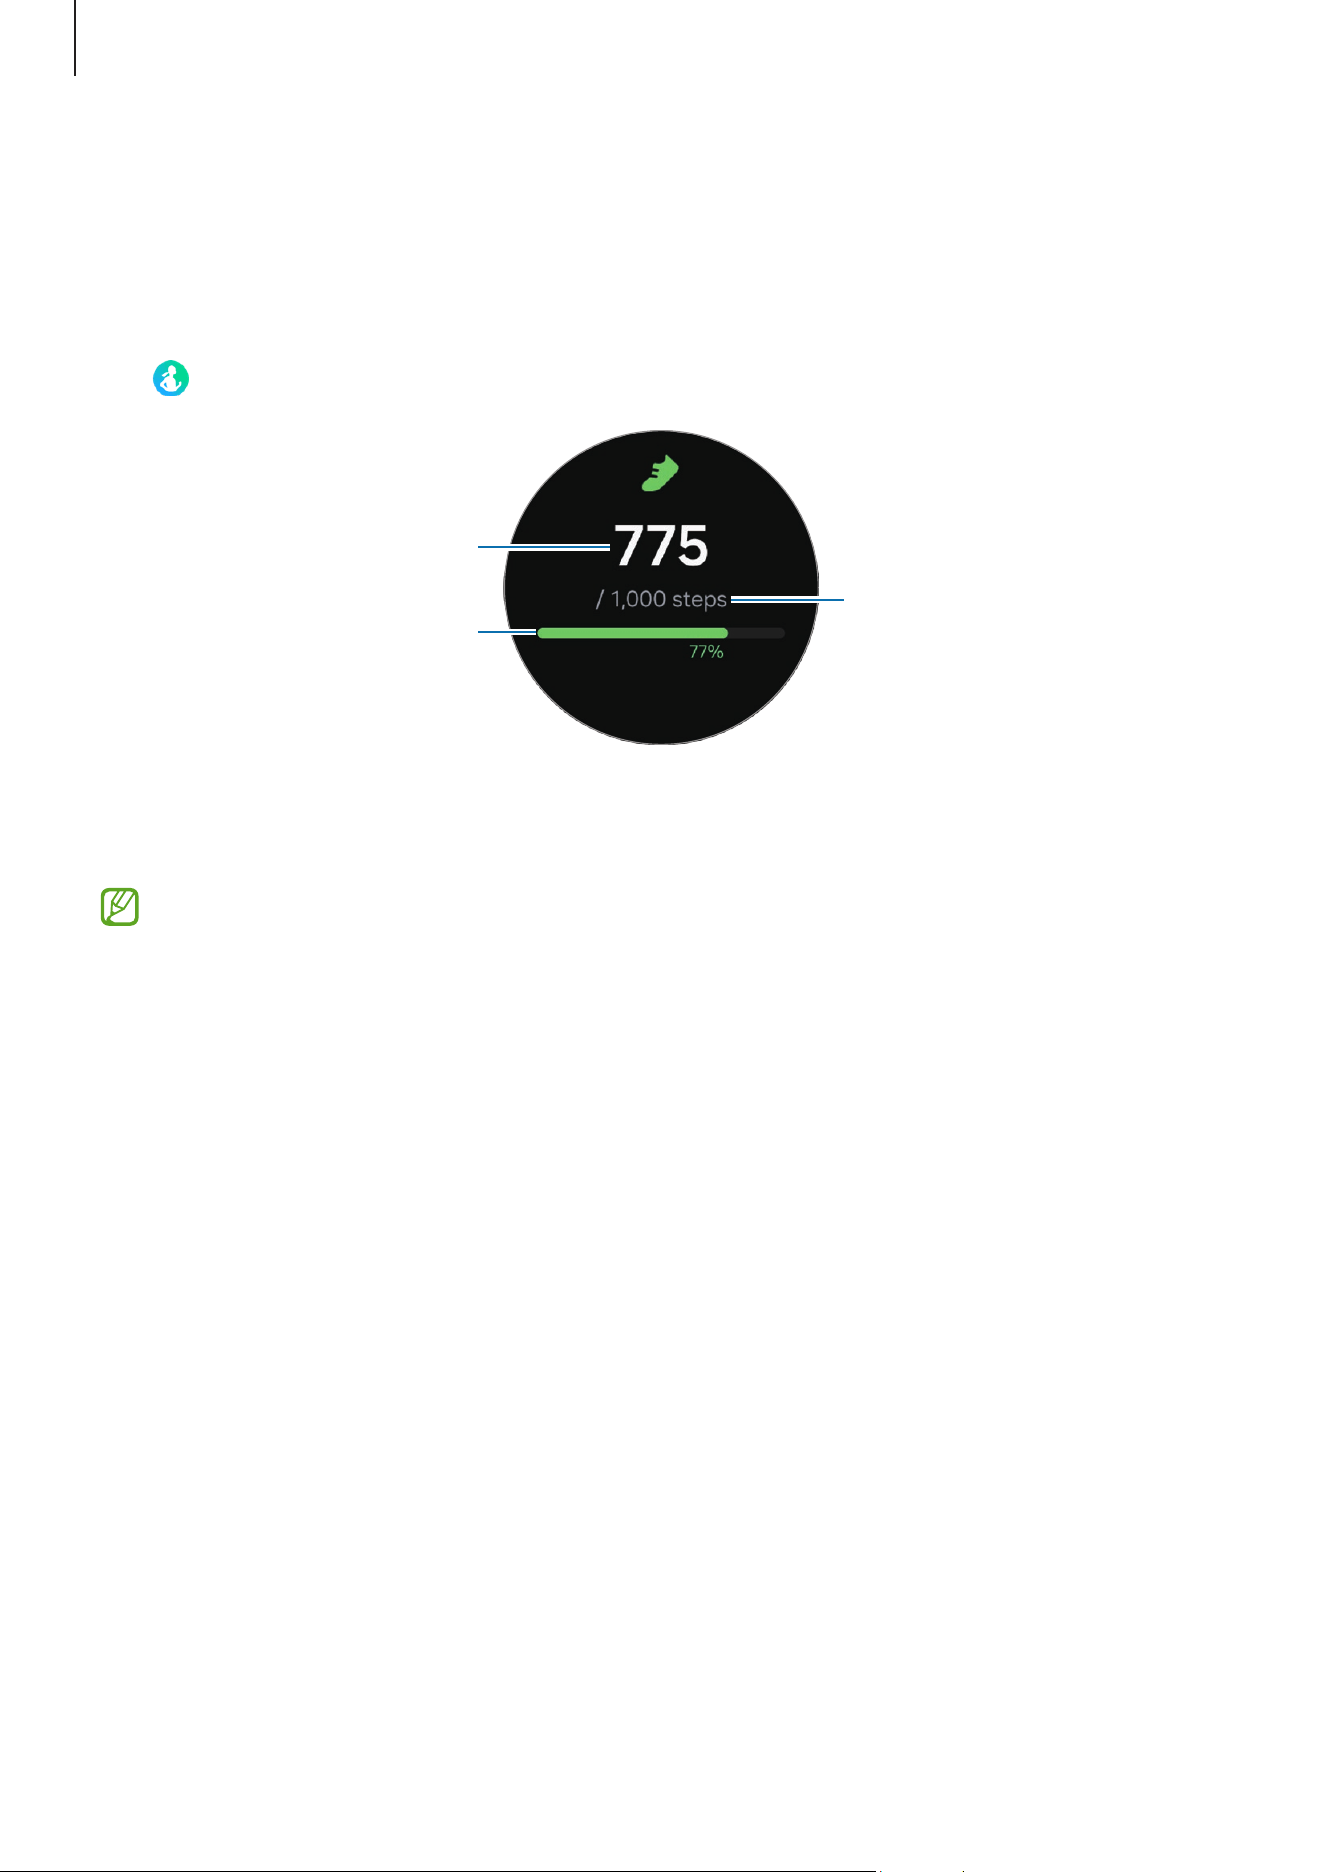
Steps
The Watch counts the number of steps you have taken.
Measuring your step count
Tap (
Health
) on the Apps screen and tap
Steps
.
Target
Target achievement graph
Current step total
To check additional information that is related to the steps, use the touch bezel or swipe
upwards or downwards on the screen.
•
When you start to measure your step count, the step tracker monitors your steps
and shows your step count after a brief delay because your Watch accurately
recognizes your movement after you walk for a while. Also, for an accurate step
count, you may experience a brief delay before the notification indicates that a
certain goal has been reached and this notification will appear only when using
the Samsung Health app after downloading and installing the app.
•
If you use the steps tracker while travelling by car or train, vibration may affect
your step count.
•
One floor is calculated as approximately 3 metres. The floors measured may not
match the actual floors you climb.
•
The floors measured may not be accurate depending on the environment, your
movements, and the conditions of buildings.
•
The floors measured may not be accurate if water (shower and water activity)
or foreign materials enter the atmospheric pressure sensor. If there is any
detergent, sweat, or raindrops on the Watch, rinse it with clean water and dry the
Watch, including the atmospheric pressure sensor thoroughly before use.
Apps and features
56
Setting the step target
1 Tap (
Health
) on the Apps screen.
2 Tap
Steps
and tap
Set target
.
3 Use the touch bezel or swipe upwards or downwards on the screen to set the target.
4 Tap
Done
.
Exercise
Record your exercise information and check the results.
•
Before using this feature, seek the advice of a licensed medical professional,
such as a doctor, if any of the following apply to you:
‒
If you have a chronic medical condition, such as heart disease or high blood
pressure
‒
If you are pregnant
‒
If you are not of the appropriate age to exercise independently
•
If you feel dizzy, experience pain, or have difficulty breathing during exercise,
stop exercising immediately and seek the advice of a licensed medical
professional, such as a doctor.
•
Your heart rate is measured when you start exercising. For accurate
measurements, wear the Watch firmly around your lower arm above the
wrist. Refer to How to wear the Watch for accurate measurements for more
information.
•
Do not move until your heart rate appears on the screen so it can be measured
more accurately.
•
Your heart rate may not appear temporarily because of various conditions such
as the environment, your physical state, or how the Watch is worn.
Be aware of following conditions before exercising in cold weather:
•
Avoid using the Watch in cold weather. If possible, use the Watch indoors.
•
If you use the Watch outside in cold weather, cover the Watch with your sleeves
before using it.
Apps and features
57
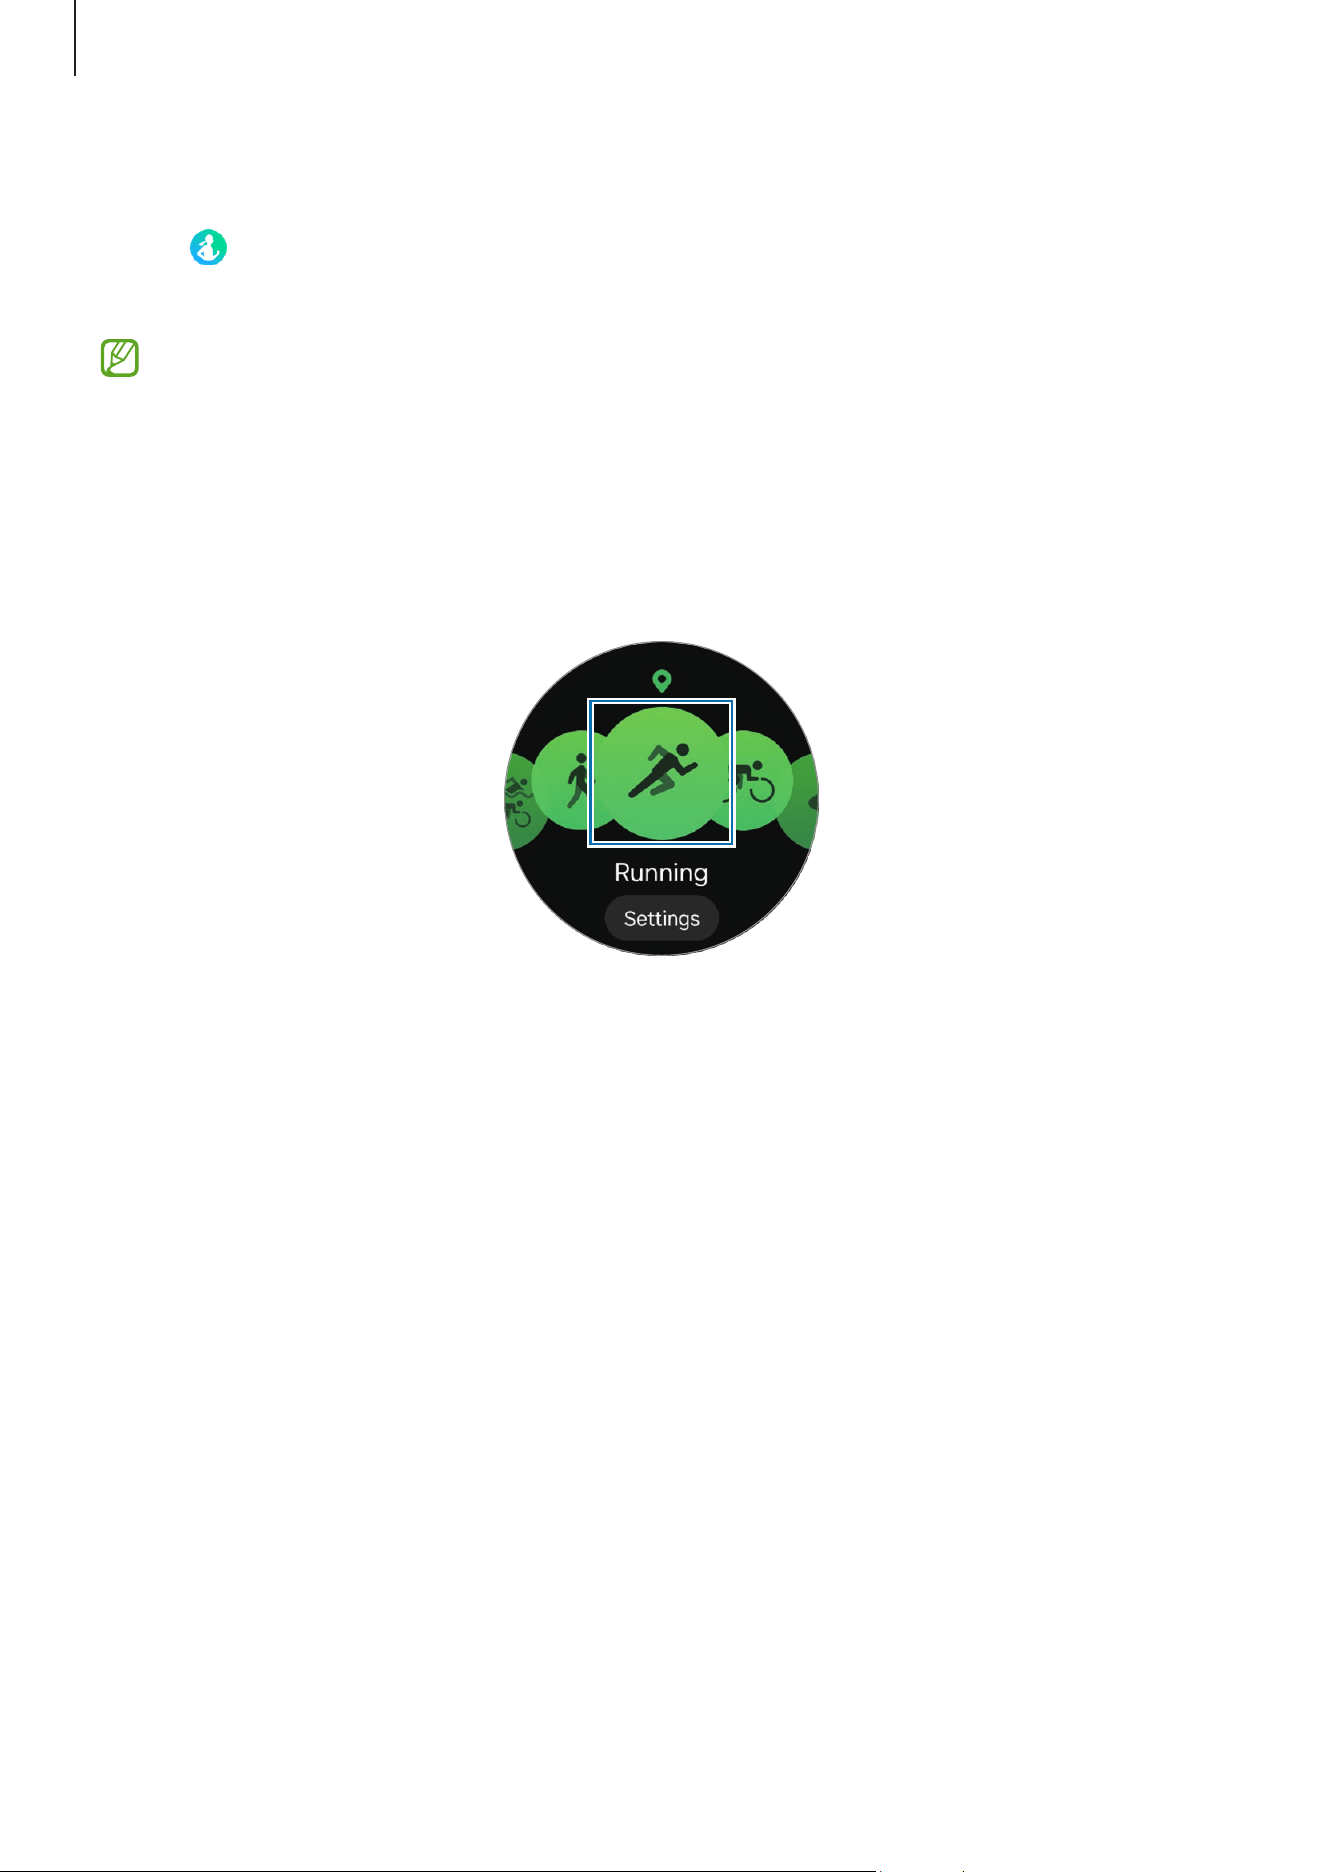
Starting exercises
1 Tap (
Health
) on the Apps screen.
2 Tap
Exercise
.
You can start exercising directly from the
Exercises
tile after adding workouts to it.
3 Use the touch bezel or swipe left or right on the screen to select an exercise type you
want.
If the exercise type you want is not listed, tap
Add
, and then select the exercise type
you want. Or, tap
Edit on phone
to add an exercise type from the Samsung Health app
to your phone.
The exercise will begin. For certain exercise types, tap
Start
to initiate the exercise.
Apps and features
58
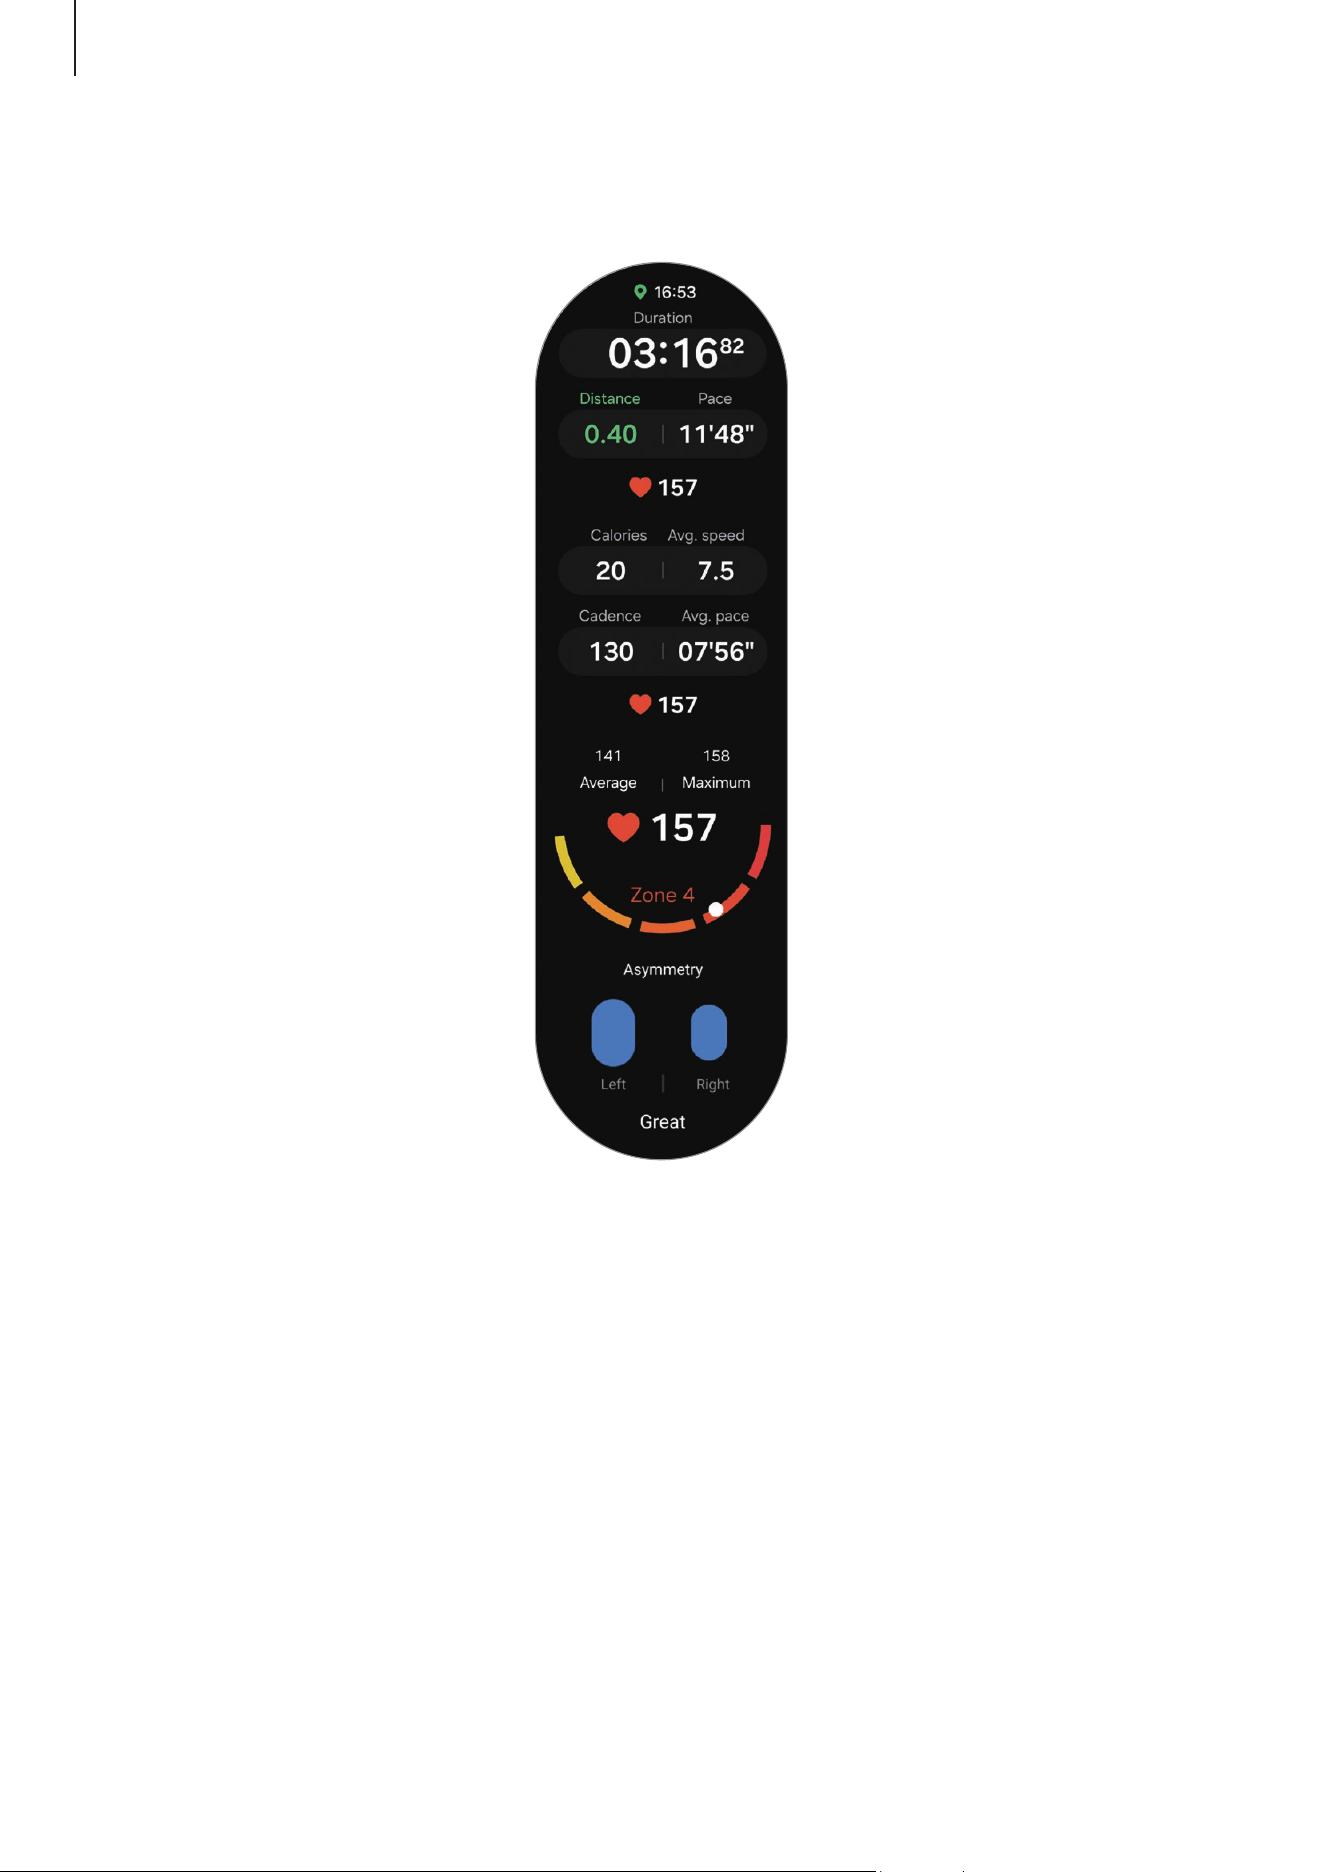
4 Use the touch bezel or swipe upwards or downwards on the screen to check exercise
information, such as your heart rate, distance, or time, on the workout screen.
You can play music by swiping left on the screen.
Apps and features
59
•
When you select a water sport (swimming, snorkeling, etc.), Water lock mode will
be automatically turned on and touch recognition may not be available. Water
lock mode prevents unintentional actions, such as tapping the screen or making
inputs, while exercising in the water.
•
When you select
Pool swim
or
Open water swim
, the recorded value may not be
accurate in following cases:
‒
If you stop swimming before reaching the completion point
‒
If you change your swimming stroke midstream
‒
If you stop moving your arms before reaching the completion point
‒
If you swim without moving your arms
‒
If you swim with only one arm
‒
If you swim under water
‒
If you get out of the water and walk after starting the exercise
‒
If you do not pause or restart the exercise, but finish the exercise while
resting
•
When Water lock mode is turned on, you can switch the workout screen by
pressing the Back button.
5 Swipe right on the screen and tap
Finish
.
To pause or restart the exercise, swipe right on the screen and tap
Pause
or
Resume
.
Alternatively, press and hold the Back button.
•
To finish swimming, first press and hold the Home button to turn off Water lock
mode, shake your Watch to completely remove any water from it to ensure that
the atmospheric pressure sensor will work properly, and then tap
OK
.
•
Music will continue to play even if you finish exercising. To stop playing music,
stop music before finishing exercising or open the
Music
app or
Media Controller
app to stop playing music.
6
Use the touch bezel or swipe upwards or downwards on the screen after finishing the
exercise to check your exercise results.
Apps and features
60
Doing multiple exercises
You can log various exercises and go straight through an entire routine by starting
another exercise right after finishing the current exercise.
Swipe right on the screen while working out, tap
New
, and then select the next exercise
type to begin.
To finish swimming, first press and hold the Home button to turn off Water lock
mode, shake your Watch to completely remove any water from it to ensure that the
atmospheric pressure sensor will work properly, and then tap
OK
.
Breaking your past records
As you run or bike on the same route, you can compare your previous and current records
to check your progress and stay motivated. This feature is only available for some
exercises, and is described here using running as an example.
1 Tap (
Health
) on the Apps screen.
2 Tap
Exercise
.
3 Use the touch bezel or swipe left or right on the screen to move to
Running
.
4 Tap
Settings
or the target on the bottom of the screen.
5 Select
Race
under
Target
.
6 Start your workout by choosing a route to run while comparing your past records
under
Recent routes
.
•
Only workouts with more than 1 km recorded are available in recent routes.
•
If you cannot find the route, tap
Refresh
or make sure you are within 50 m of
your starting point and try again.
•
To display your route history, you must start your workout after GPS is connected.
On the exercise settings screen, tap
Workout start
and select
Manual
.
•
Only the last 14 days of routes are displayed.
•
If the path deviates more than 10% from the previous record, the records will not
be compared.
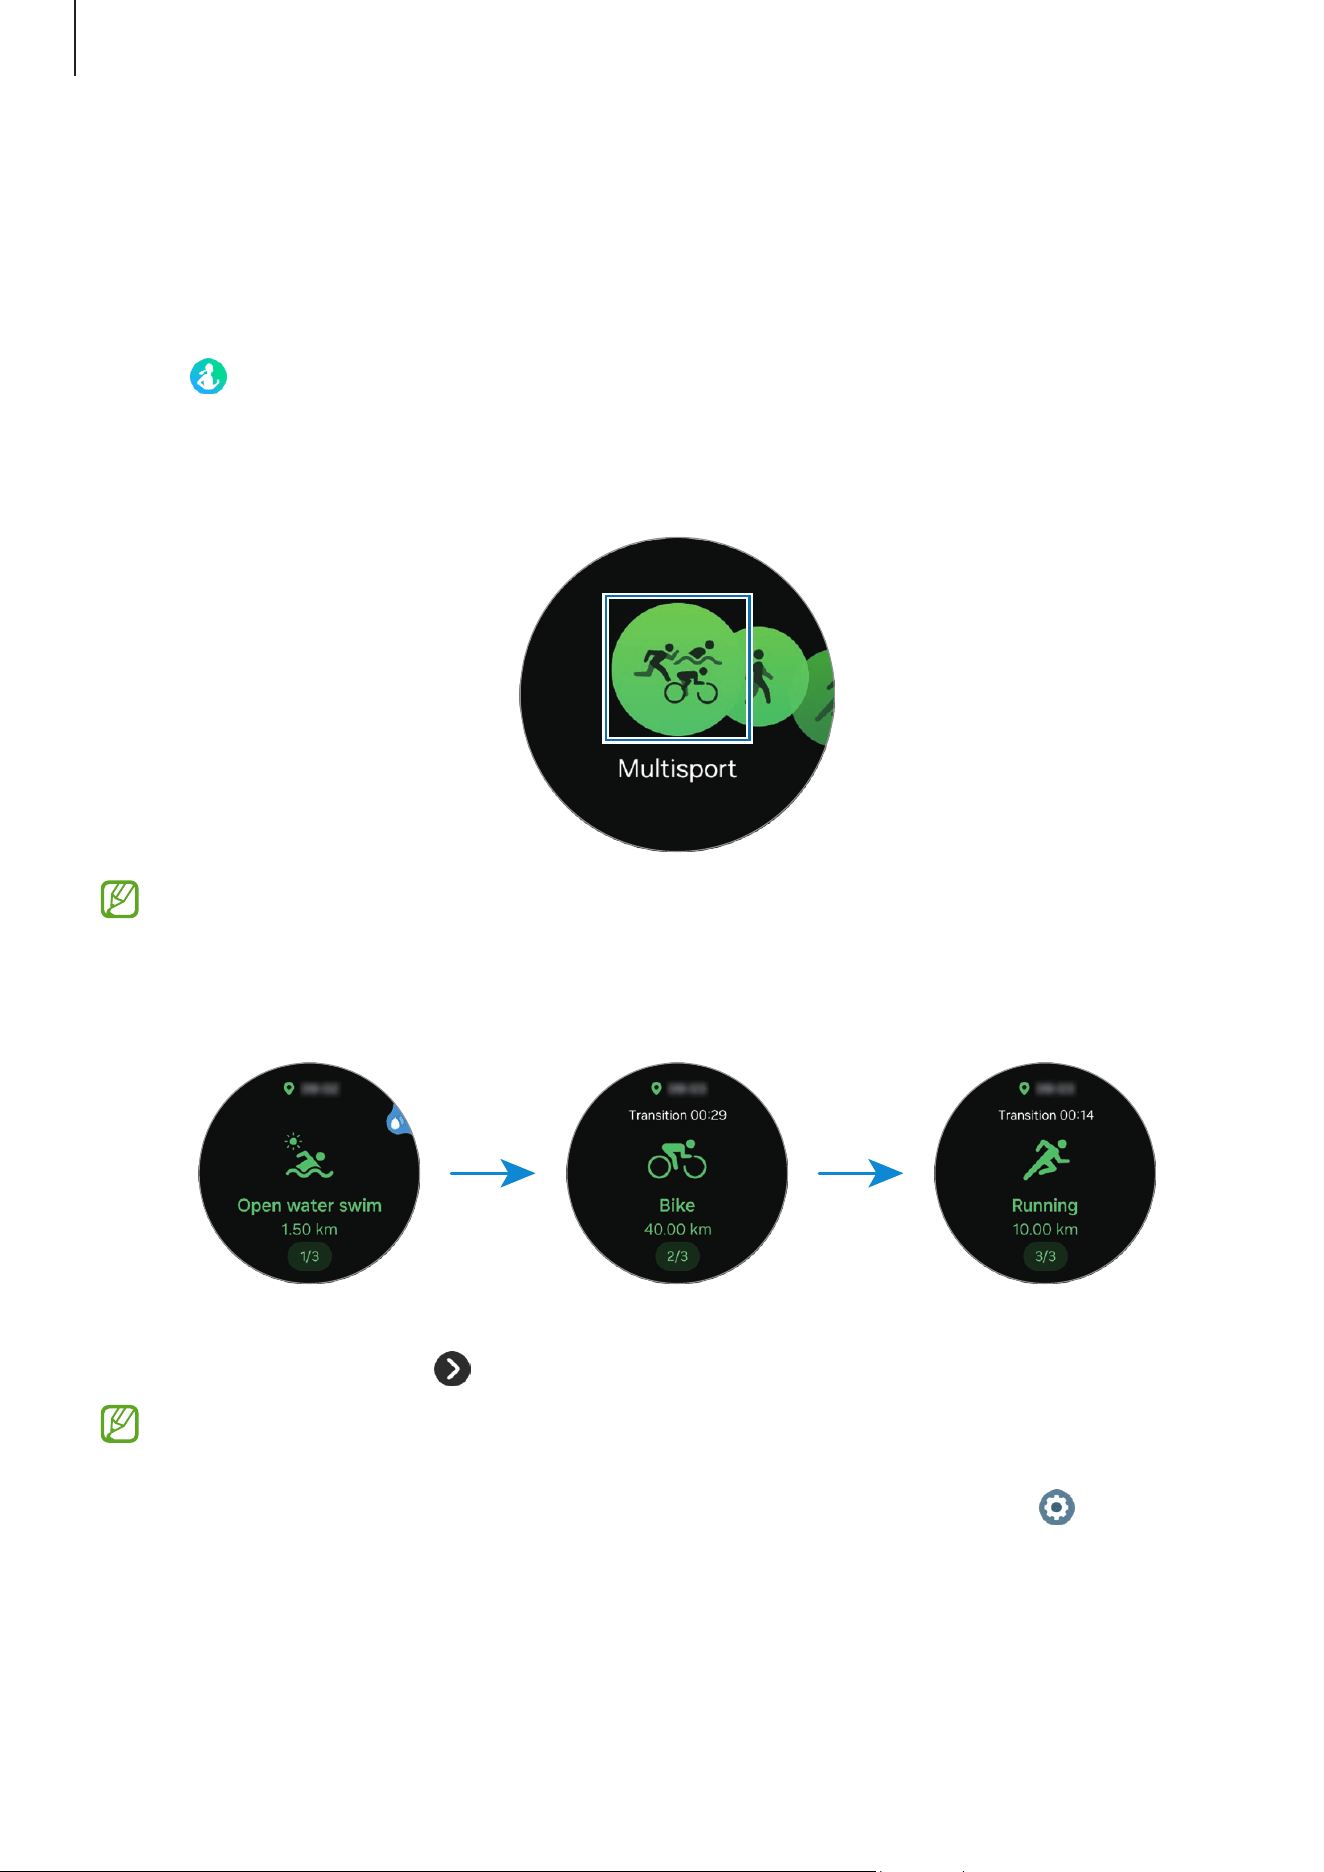
Apps and features
61
Starting multi-discipline workouts (Galaxy Watch Ultra)
You can record and check results of multi-discipline workouts, such as triathlons,
duathlons, and aquathlons, where you engage in two or three exercises in a row from
among running, biking, and swimming.
1 Tap (
Health
) on the Apps screen.
2 Tap
Exercise
.
3 Select
Multisport
.
You can start exercising directly from the
Multisport
tile.
4 Select a multi-discipline workout type and tap
Start
.
The exercise will begin.
To switch exercises, press and hold the Quick button. Alternatively, swipe right on the
screen and tap
Next
→
, or select
Multisport
and then select the next exercise.
•
If you have set targets for each exercise, you will automatically move on to the
next exercise when you reach your target.
•
To switch exercises with the Quick button, on the Apps screen, tap (
Settings
)
→
Buttons and gestures
→
Action
and select
Samsung Health
. (Galaxy Watch
Ultra)
Apps and features
62
Working out after adding your own multi-discipline workouts (Galaxy Watch Ultra)
In addition to the default multi-discipline workouts provided by your Watch, you can add
your own multi-discipline workouts by combining and changing the order of running,
cycling and swimming as you want.
1 Tap (
Health
) on the Apps screen.
2 Tap
Exercise
.
3 Select
Multisport
.
4 Tap
Add
→
Add exercises
, and select up to three exercises of your choice and tap
Add
.
5 Tap
Save
→
Start
.
The exercise will begin and your own multi-discipline workout will be added to the
list.
To switch exercises, press and hold the Quick button. Alternatively, swipe right on the
screen and tap
Next
→
, or select
Multisport
and then select the next exercise.
•
If you have set targets for each exercise, you will automatically move on to the
next exercise when you reach your target.
•
To switch exercises with the Quick button, on the Apps screen, tap (
Settings
)
→
Buttons and gestures
→
Action
and select
Samsung Health
. (Galaxy Watch
Ultra)
Starting repetitive exercises
When you perform repetitive exercises such as squats or deadlifts, your Watch will count
how many times you repeat the motion with beeping. Here it is described with squats
being used as an example.
1 Tap (
Health
) on the Apps screen.
2 Tap
Exercise
.
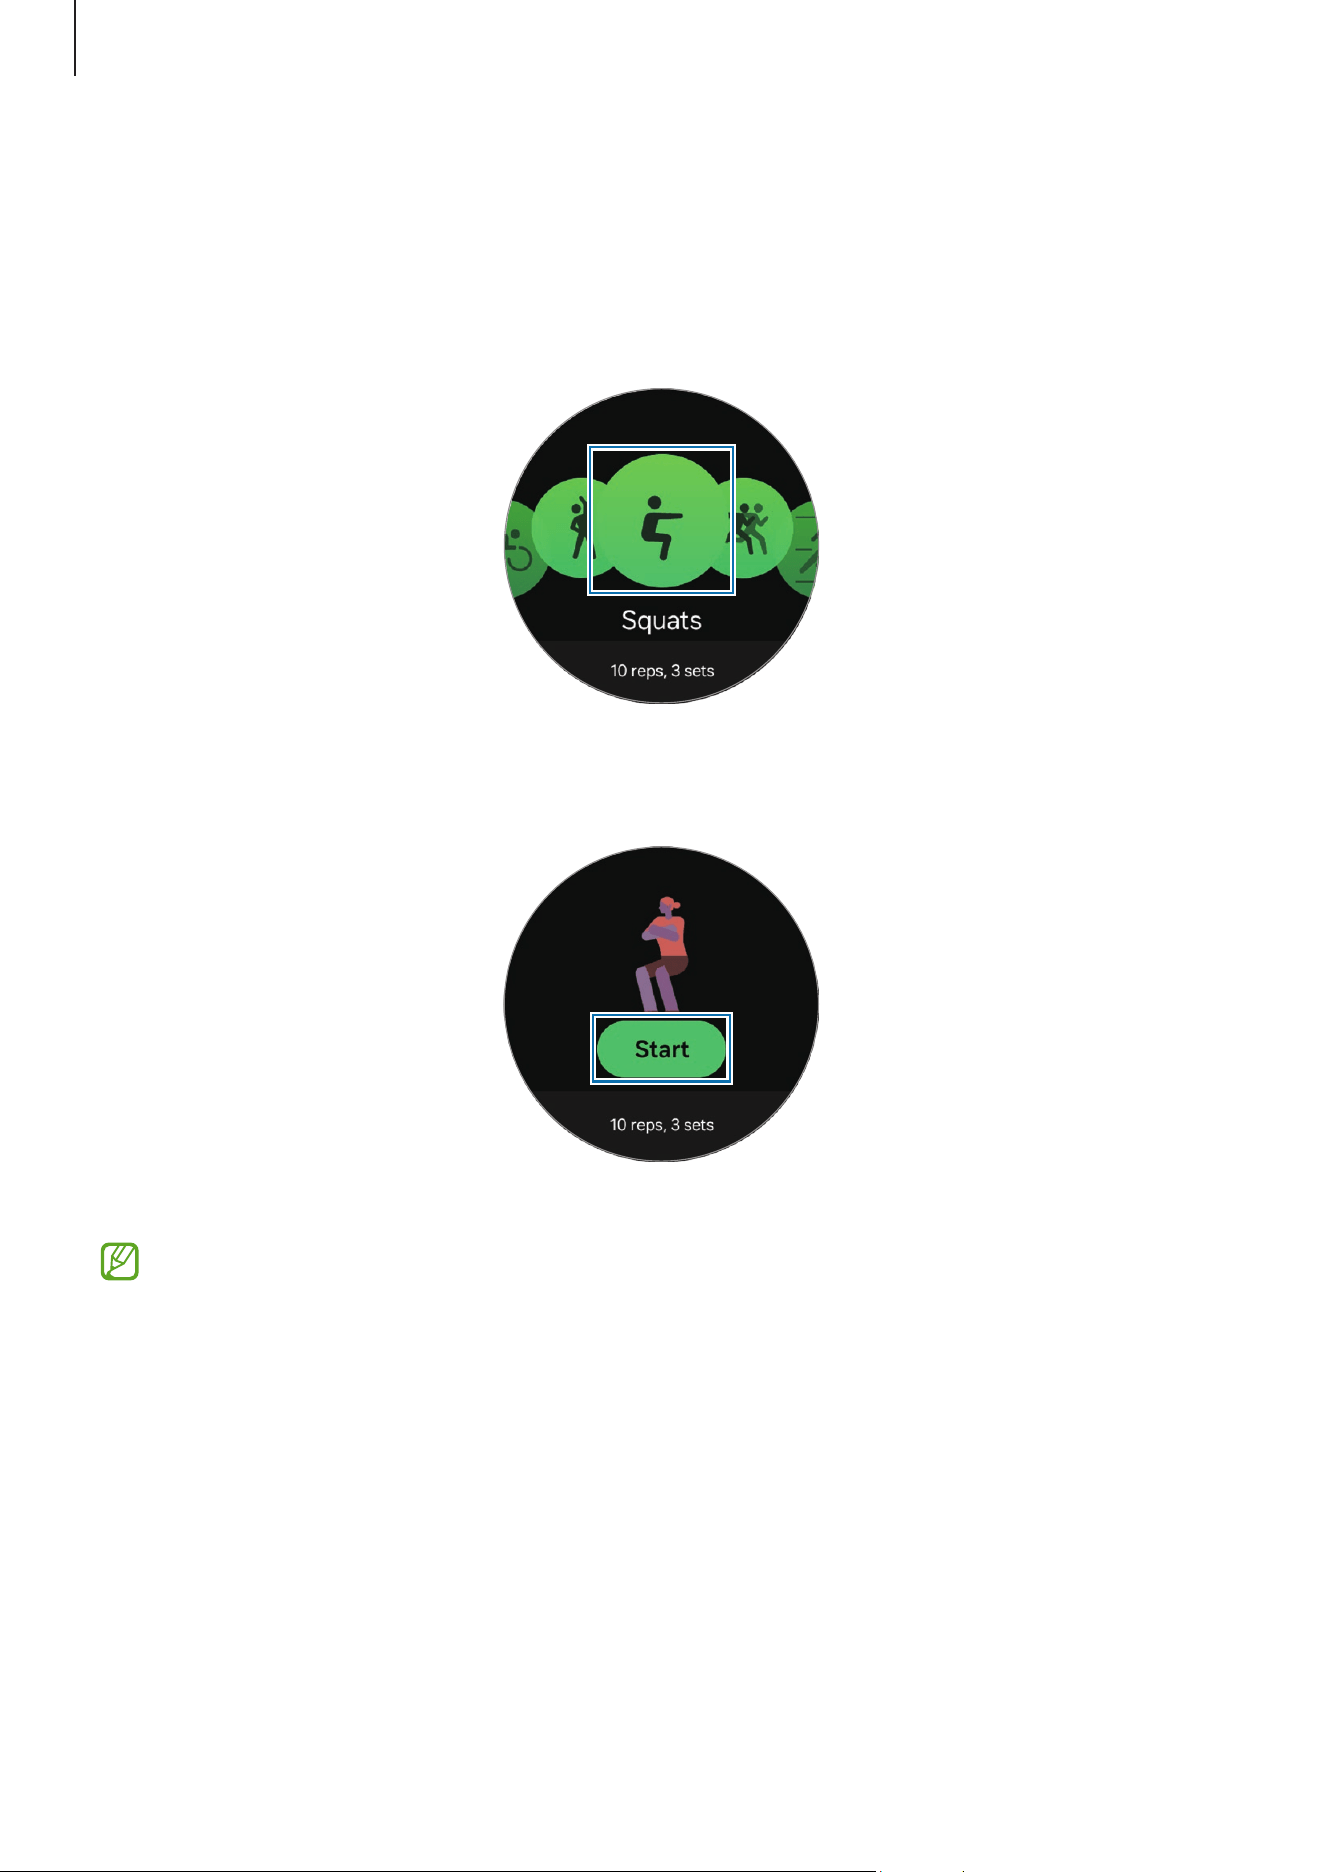
Apps and features
63
3 Use the touch bezel or swipe left or right on the screen to select a type of repetitive
exercise you want and begin.
When there is no repetitive exercise type you want, tap
Add
, and then select the
exercise type you want. Or, tap
Edit on phone
to add an exercise type from the
Samsung Health app to your phone.
4 Tap
Start
and get into the proper position to start by following the pose on the
screen.
Counting will begin with beeping.
If you do not get into the position displayed on your Watch, or if your position
changes during your exercise, the count may not start or may not count correctly.
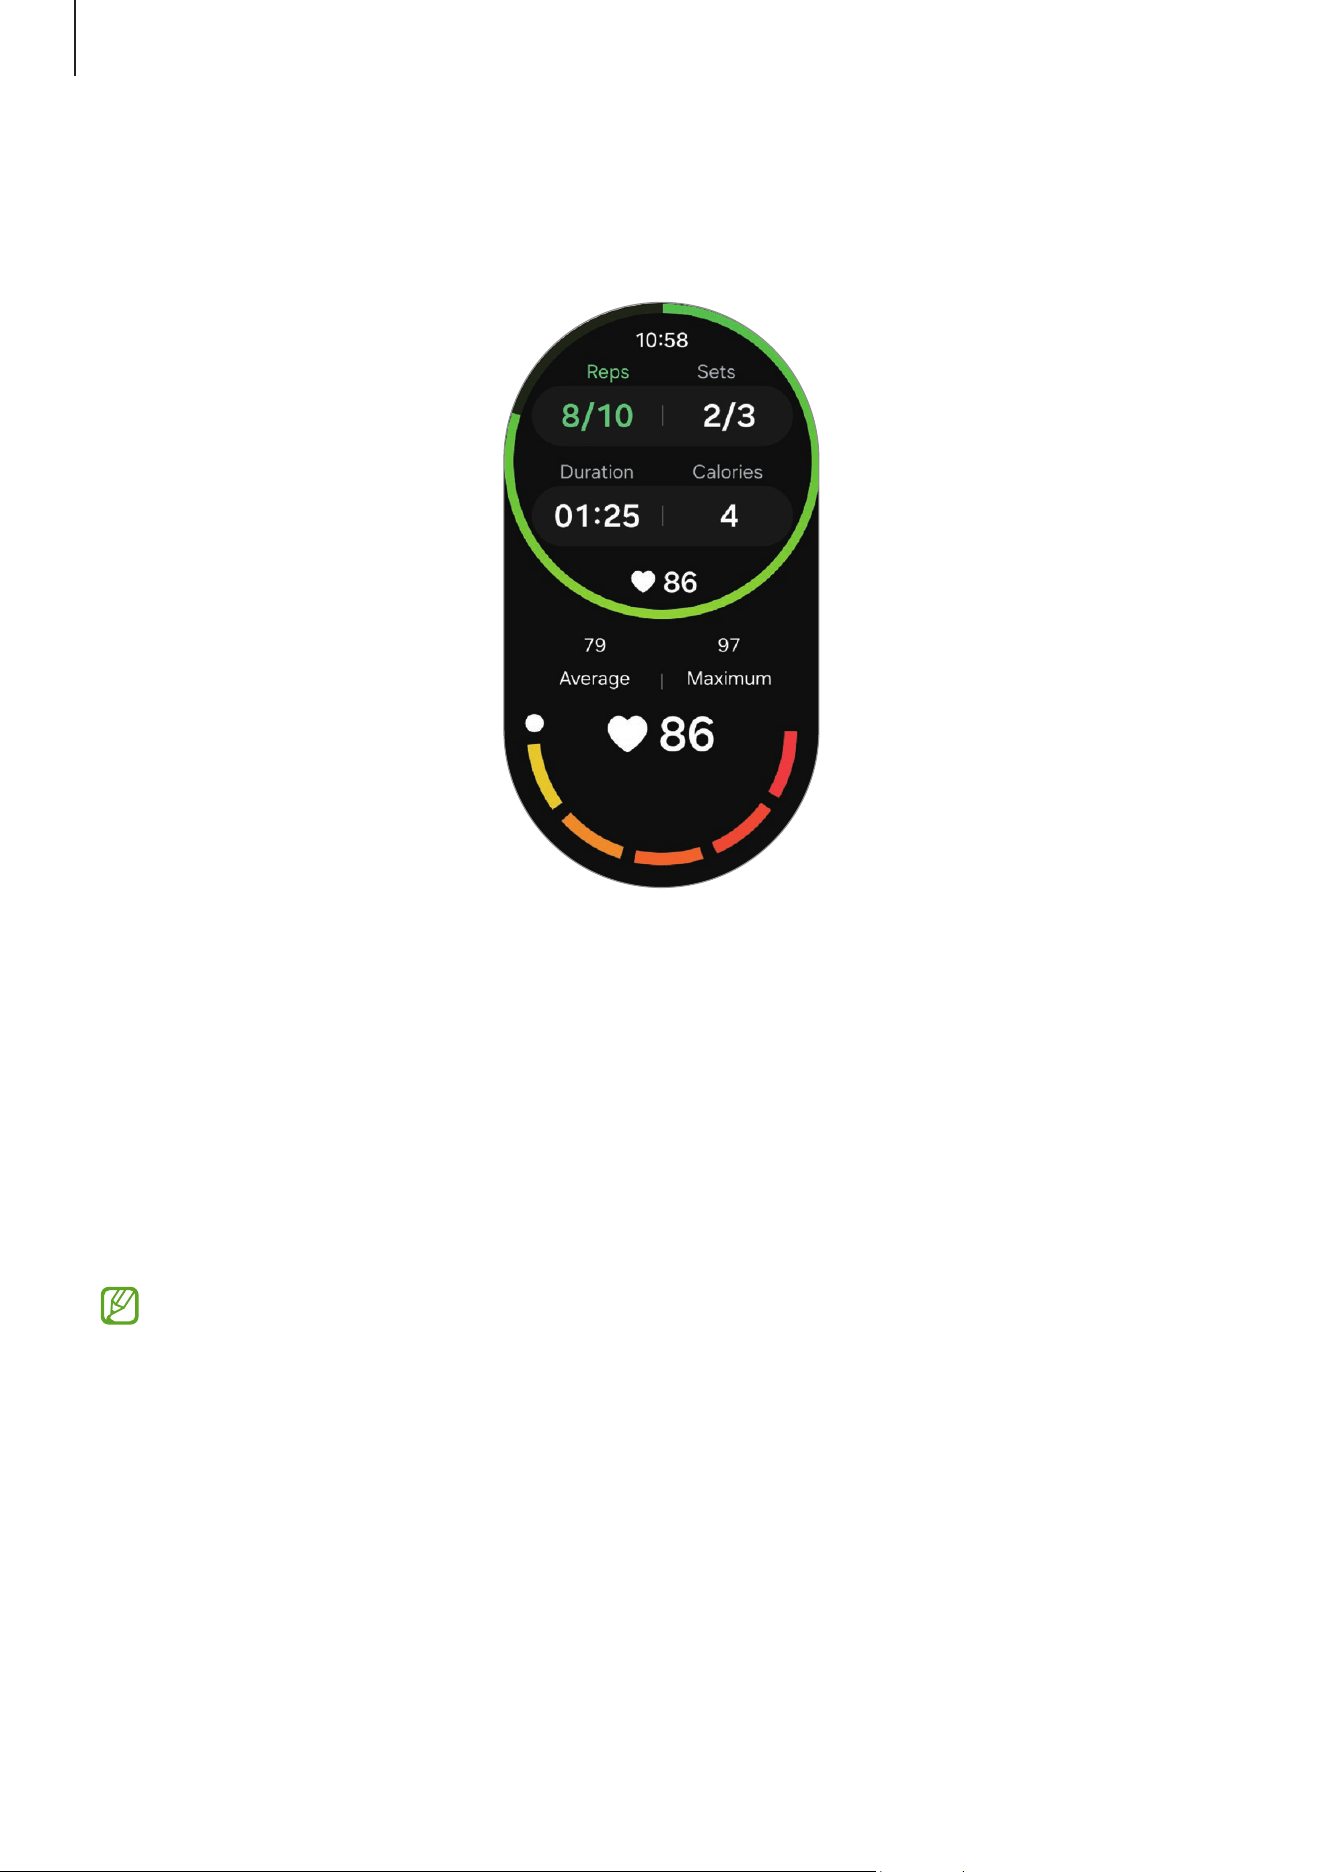
Apps and features
64
5 Use the touch bezel or swipe upwards or downwards on the screen to check exercise
information, such as your heart rate, the number of repetitions, or calories, on the
workout screen.
You can play music by swiping left on the screen.
6 Take a rest after completing a set. Or, if you want to skip to the next set without
resting, tap
Skip
.
The exercise will begin after you get into the proper position to start it by following
the pose on the screen.
7 Swipe right on the screen and tap
Finish
.
To pause or restart the exercise, swipe right on the screen and tap
Pause
or
Resume
.
Alternatively, press and hold the Back button.
Music will continue to play even if you finish exercising. To stop playing music, stop
music before finishing exercising or open the
Music
app or
Media Controller
app to
stop playing music.
8
Use the touch bezel or swipe upwards or downwards on the screen after finishing the
exercise to check your exercise results.
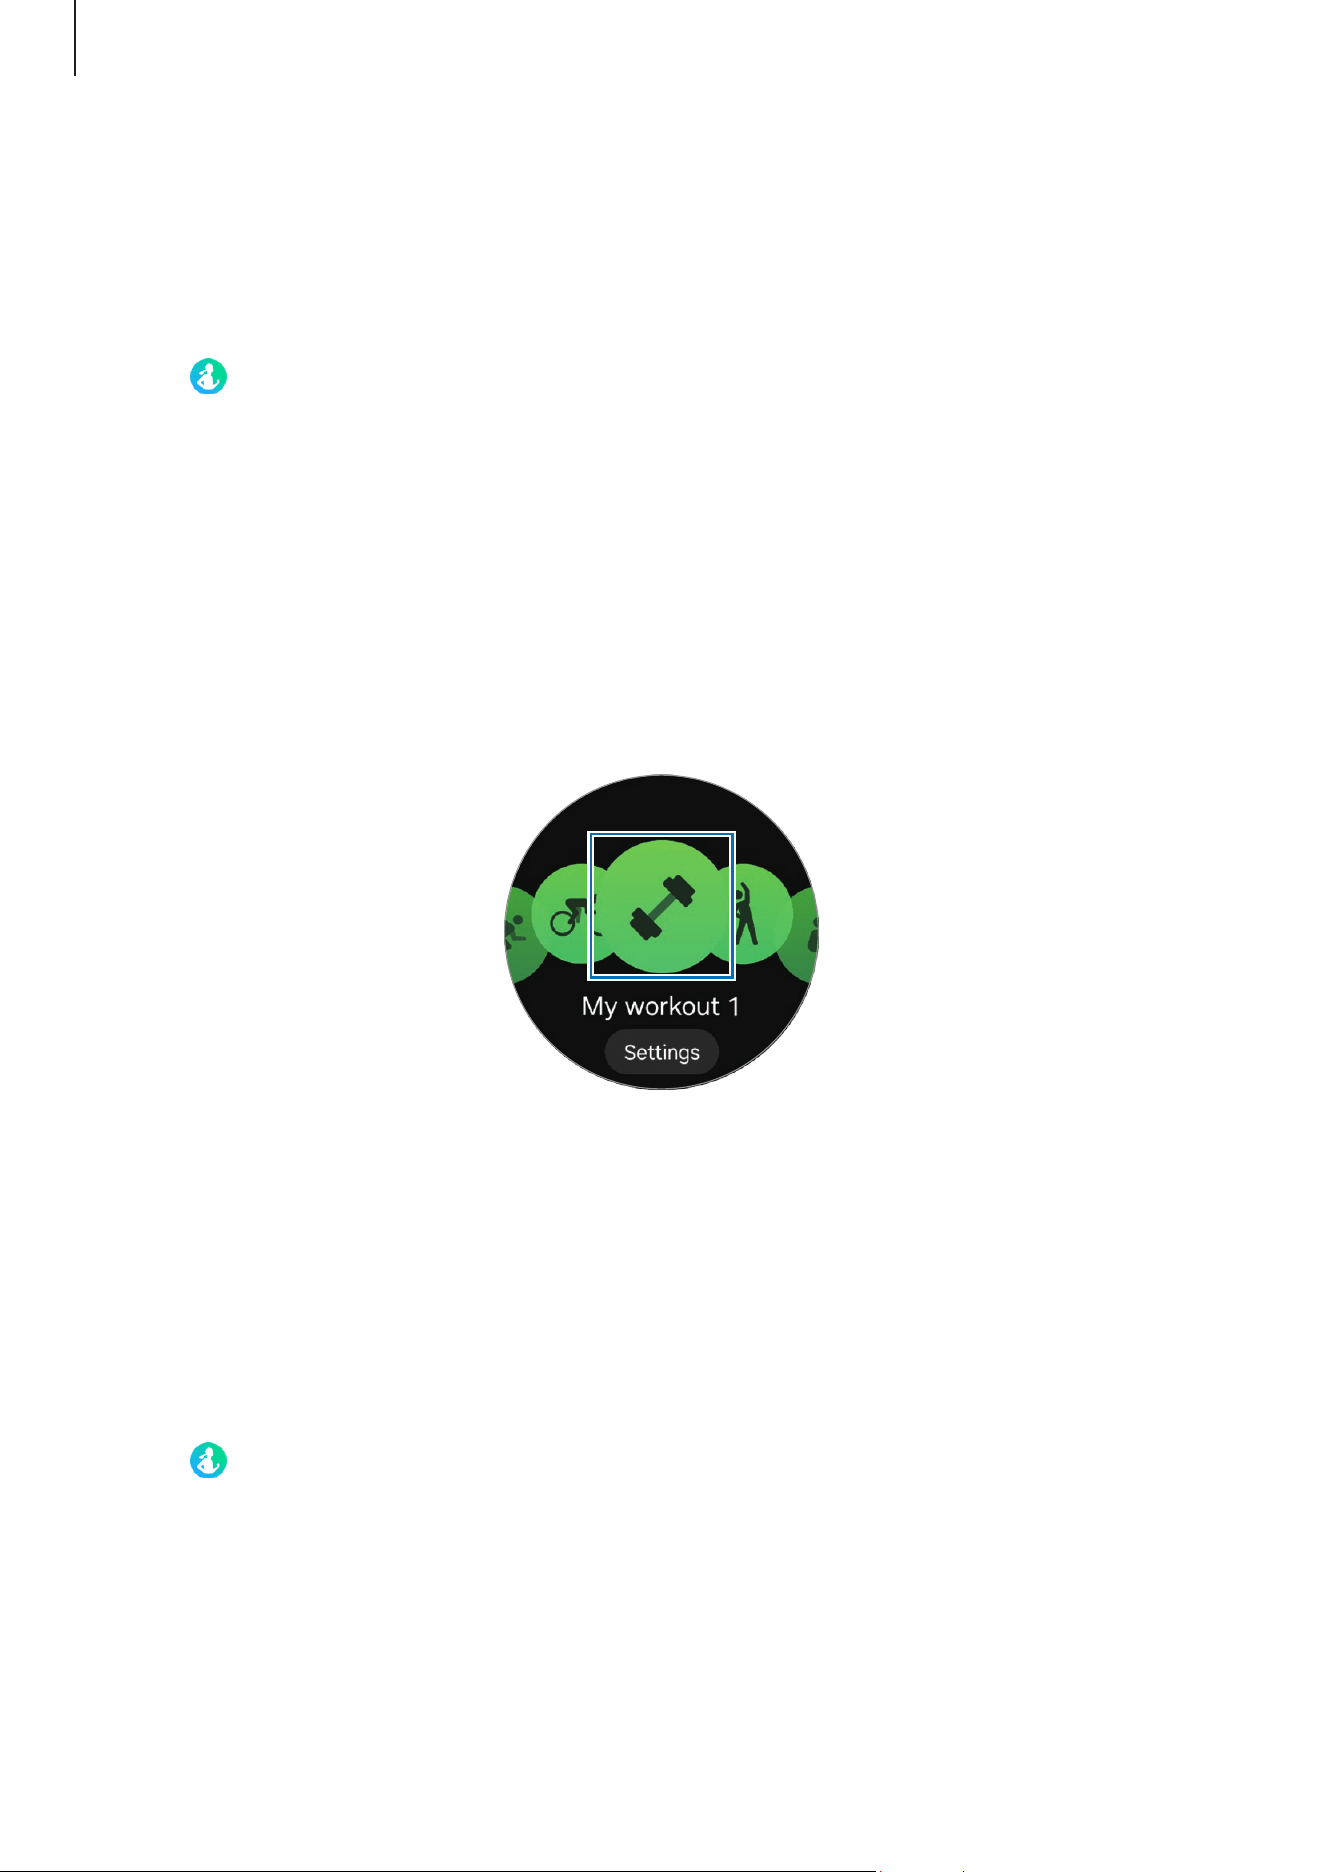
Apps and features
65
Working out after adding your own exercise
In addition to the default exercise types provided by your Watch, you can add your own
exercises, and measure the duration and calories burned, and then check your exercise
results.
1 Tap (
Health
) on the Apps screen.
2 Tap
Exercise
.
3 Tap
Add
→
Create new exercise
.
4 Enter a name and configure your own exercise.
•
Data to record
: Select the exercise data to record.
•
Category
: Select a category for your exercise.
5 Tap
Save
.
Your exercise will be added.
6 Select the exercise you added and begin.
Creating your own routines
You can create your workout routines by combining different exercises of your choice,
including warm ups and rest periods. For example, you can create an exercise routine
that alternates between high-intensity and low-intensity exercises to create an interval
workout.
1 Tap
(
Health
) on the Apps screen.
2 Tap
Exercise
.
3 Tap
Add
→
Create workout routine
.
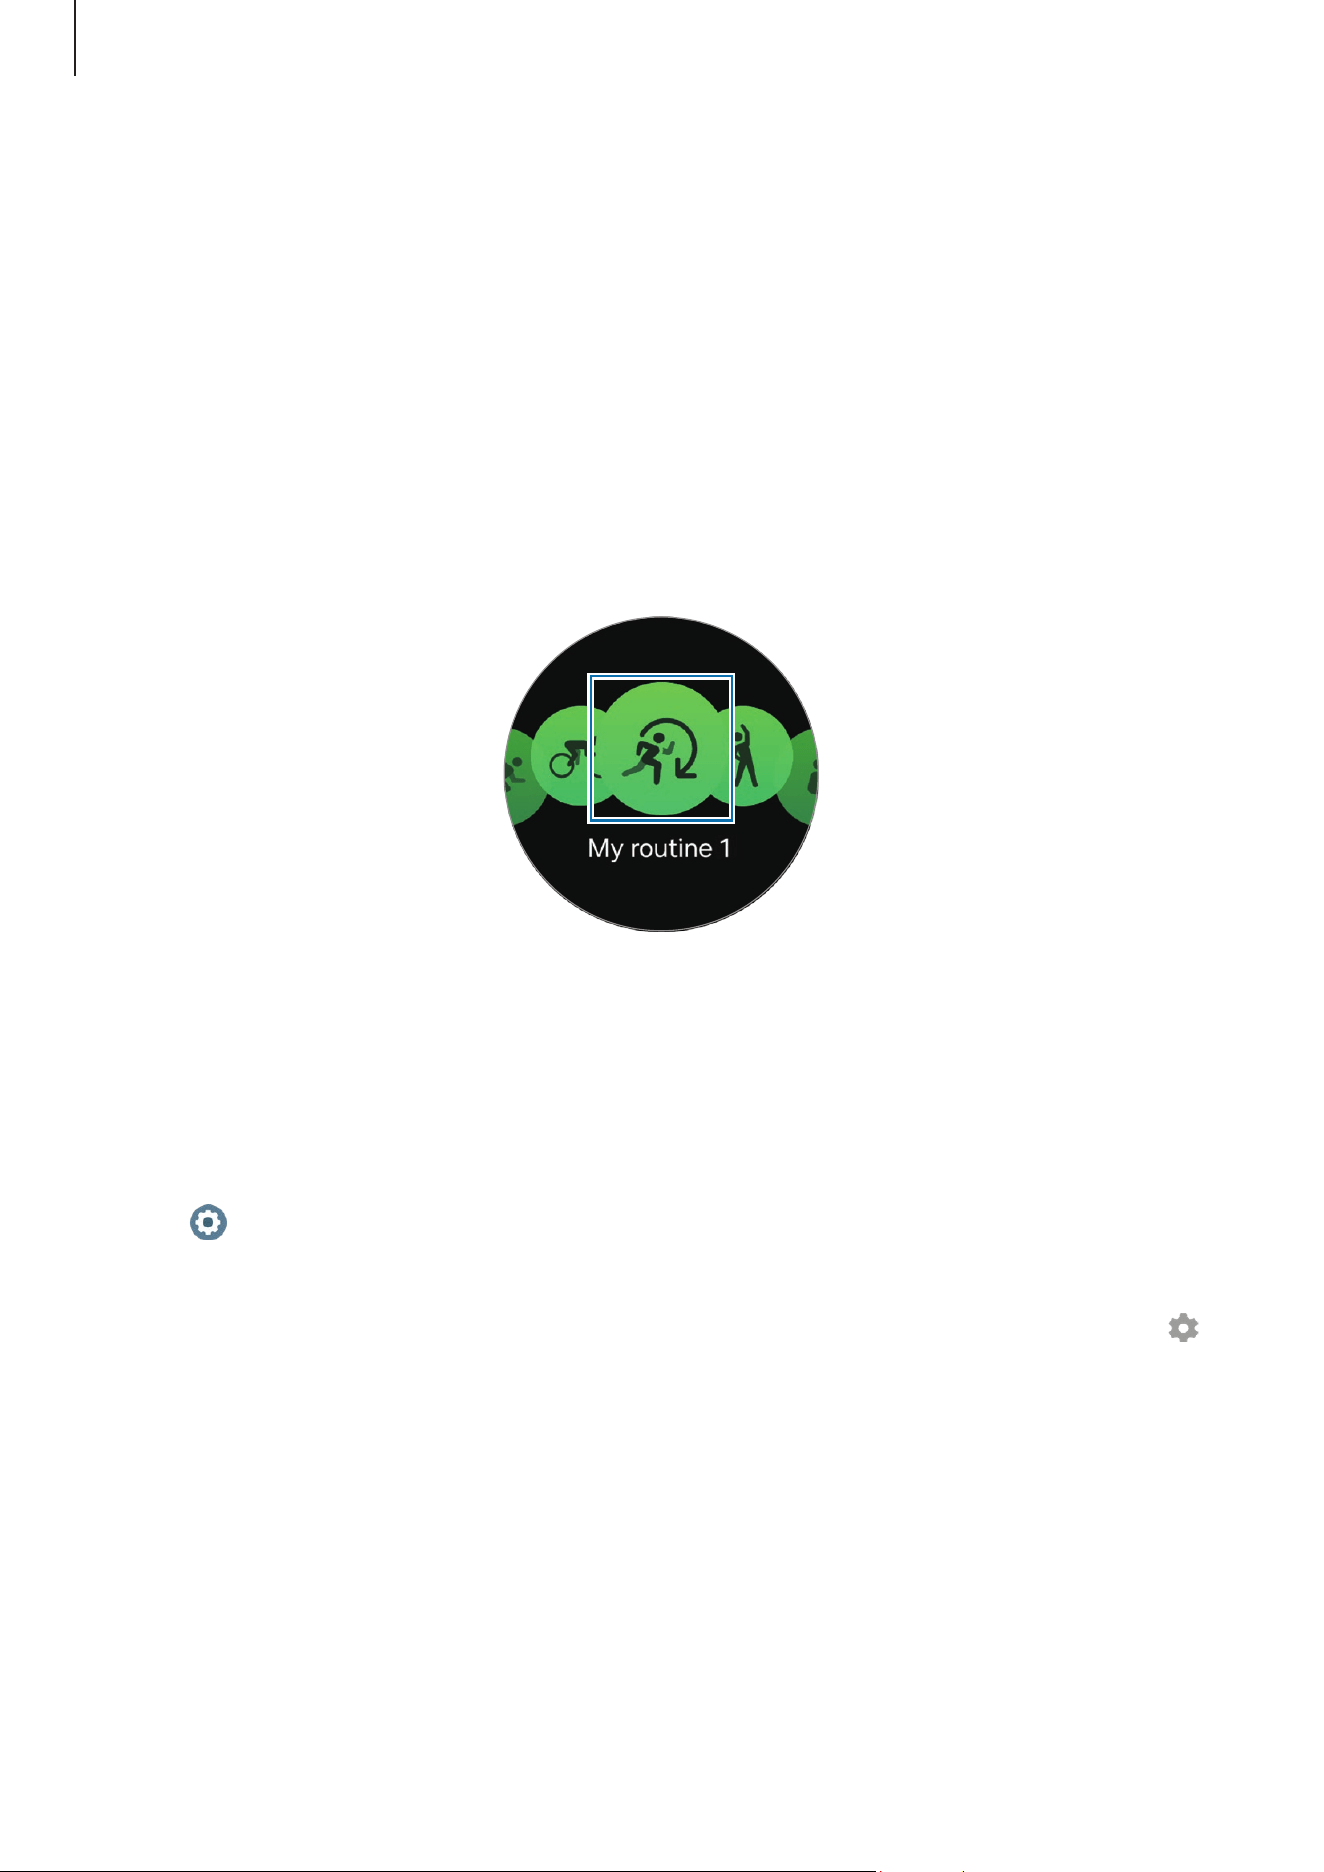
Apps and features
66
4 Enter a name and configure your own routine.
•
Warm-up
: Add warm-up exercises to your routine and set up a warm up you can do
before your workout.
•
Add exercises
: Select an exercise to add to your routine.
•
Cool-down
: Add a cool-down workout to your routine to recover after exercising
and set it up.
•
Include breaks
: Add rest periods between exercises.
•
Circuits
: Set the number of repetitions for the routine.
5 Tap
Save
.
Your routine will be added.
6 Select the routine you added and begin.
Using the Quick button during a workout (Galaxy Watch Ultra)
If you have set a feature for the Quick button in Samsung Health, you can use the Quick
button to start and control your workout.
1 Tap (
Settings
) on the Apps screen, and tap
Buttons and gestures
→
Action
.
2 Select
Samsung Health
.
To select an exercise to start or an exercise list to open with the Quick button, tap .
3 Press the Quick button to start the selected workout or open the exercise list.
Apps and features
67
4 After the workout has started, you can do the following to control the workout by
pressing the Quick button:
•
Press the Quick button during a workout to pause or resume the workout.
•
Press the Quick button twice while running or biking to manually record a lap.
•
Press and hold the Quick button during a workout to finish the workout.
•
Press and hold the Quick button during multi-discipline workouts or a routine
workout to switch to the next workout. If it is the last exercise, you can finish the
workout.
Setting the exercise
1 Tap (
Health
) on the Apps screen.
2 Tap
Exercise
.
3 Tap
Settings
under each exercise type and set the various exercise options.
If you have set a target, it may appear instead of
Settings
. Tap the target on the
bottom of the screen to display the workout settings screen.
•
Target
: Turn on the exercise target feature and set it.
•
Pause when target reached
: Set the Watch to pause the workout automatically
when you reach a target.
•
Track back
: Set to receive route guidance to return to your start point. (Galaxy
Watch Ultra)
•
Workout screen
: Set the screens that appear while you are working out.
•
Split guide
: Set a lap target and receive a notification when you reach the lap you
have set as your target.
You can manually record a lap by pressing the Back button twice while running
or biking.
•
HR zones
: Set heart rate zones and receive notifications to remind you to work out
in your target heart rate zone.
•
Auto pause
: Set the Watch’s exercise feature to pause automatically when you stop
working out.
•
Workout start
: Set how to start working out.
•
Audio guide
: Turn the audio guide on to check your target and laps by audio.
•
Screen always on
: Set to turn the screen always on during workouts.
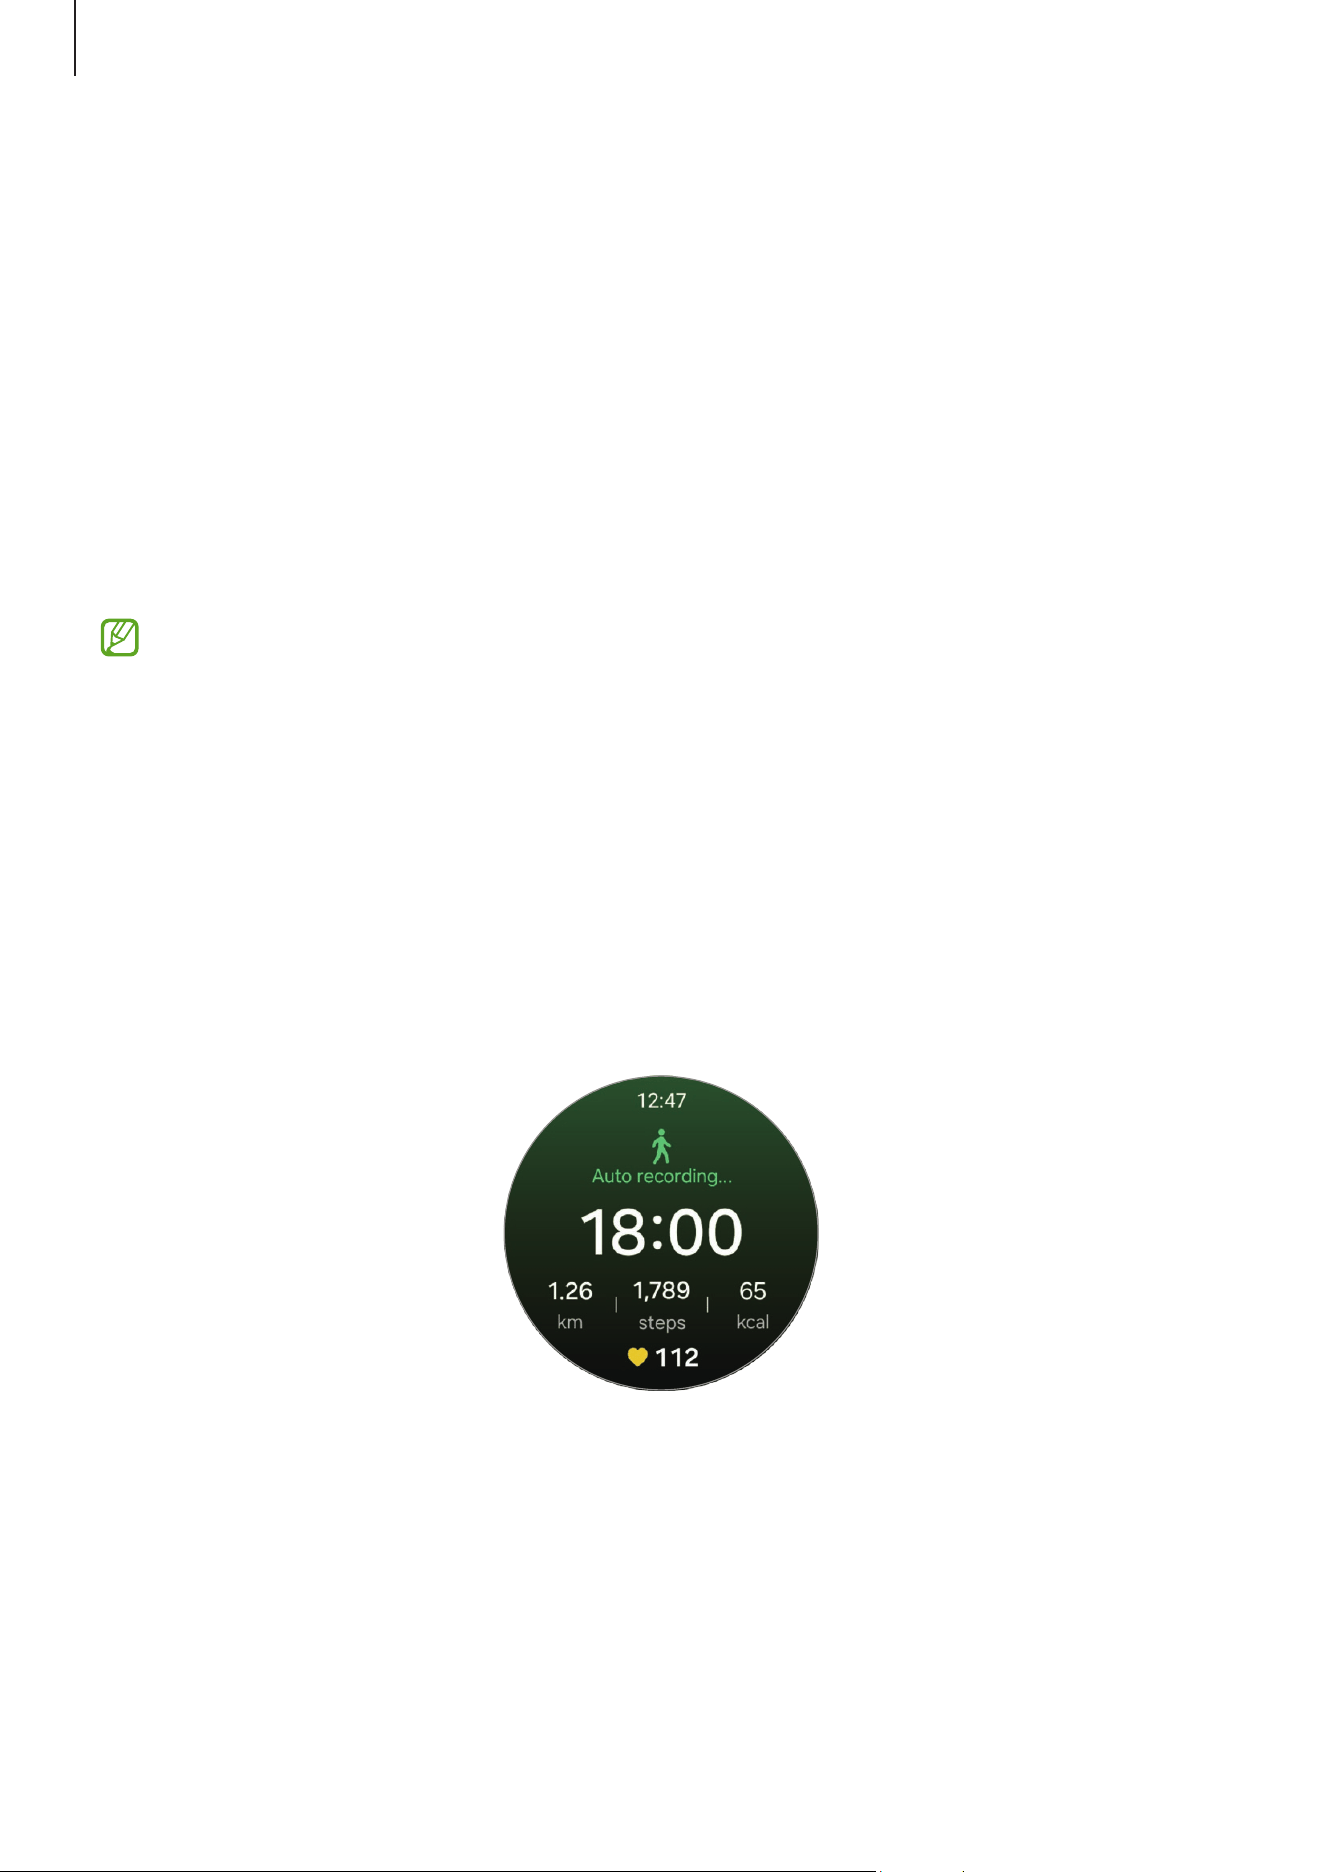
Apps and features
68
•
Exercise power saving
: Record your workouts for a longer amount of time by
setting your Watch to turn on the exercise power saving mode whenever you start
a workout. However, some features will be restricted. (Galaxy Watch Ultra)
•
Auto detect workouts
: Turn the auto detect workouts feature on and set it. Refer
to Auto detect workouts feature for more information.
•
Coaching messages
: Set to receive coaching messages for proper pacing while
working out.
•
Lane
: Choose your lane when running on a track.
•
Pool length
: Set the pool length.
•
Check position before starting
: Turn on or off the posture check before starting a
workout.
•
You can also change certain settings right before starting the exercise or while
exercising. Before starting the exercise, tap
Settings
on the countdown screen or
GPS screen. Alternatively, while working out, swipe right on the screen and tap
Settings
.
•
The available exercise setting options may vary depending on the exercise type.
Auto detect workouts feature
After continuously exercising for a certain period while wearing the Watch, it
automatically recognizes that you are exercising and records exercise information such
as the exercise type, duration, and calories burned.
Apps and features
69
When you stop for more than one minute, the Watch automatically recognizes that you
have stopped exercising and recording will end.
•
You can check the list of exercises that are supported by the auto detect
workouts feature. On the Apps screen, tap (
Health
) and tap
Settings
→
Activities to detect
. If the exercises are not recognized automatically, turn on
the auto detect workouts feature and tap the switch of the exercise type that
uses this feature under
Activities to detect
.
•
The auto detect workouts feature measures something, such as the time you
spent exercising and calories burnt by using the acceleration and heart rate
sensor. The measurements may not be accurate depending on your manner of
walking, exercise routines, and lifestyle.
Workouts this week
You can check your exercise history, which is sorted by date and exercise type.
1 Tap (
Health
) on the Apps screen.
2 Tap
Workouts this week
.
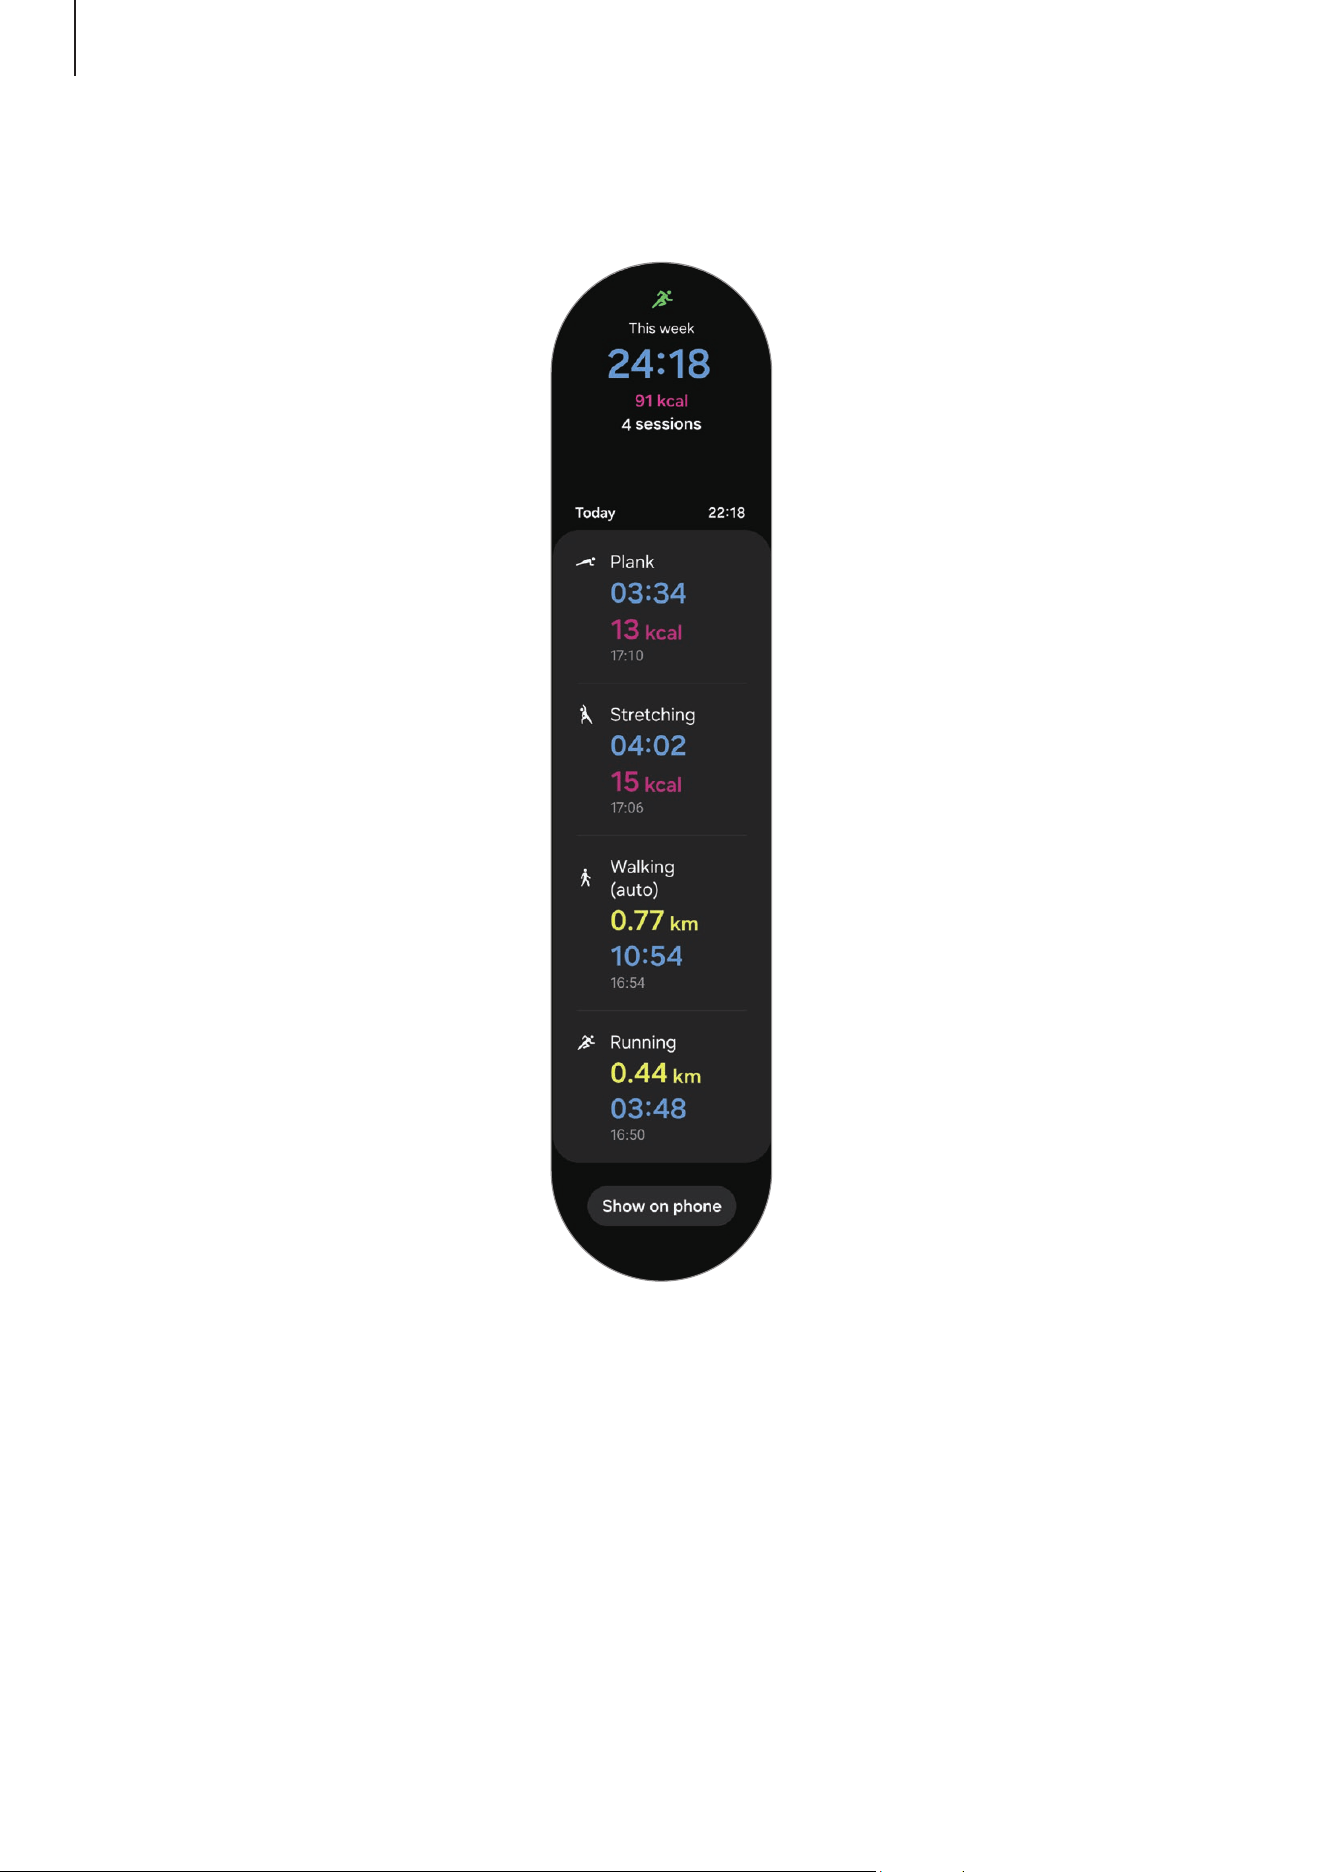
Apps and features
70
3 Use the touch bezel or swipe upwards or downwards on the screen to check all your
exercise history.
Apps and features
71
Sleep
Analyze your sleep and record it by measuring your heart rate and your movement while
you are sleeping.
This feature is only for your general wellness and fitness. Therefore, do not use it
for medical purposes, such as diagnosing the symptoms, treatment, or prevention
of disease.
•
The sleep pattern will have its four states (Awake, REM, Light, Deep) analyzed by
using your movement and changes in your heart rate while you are sleeping. You
can check the recommended ranges for each measured sleep state in the graph
on your connected phone.
•
You can check the detailed sleep analysis only when your Watch is connected to
your phone.
•
Before measuring, charge the Watch’s battery so it is more than 30%.
•
For accurate measurements, wear the Watch firmly around your lower arm above
the wrist. Refer to How to wear the Watch for accurate measurements for more
information.
Measuring your sleep
1 Sleep while wearing the Watch.
The Watch will start to measure your sleep.
2 Tap (
Health
) on the Apps screen after you wake up.
3 Tap
Sleep
.
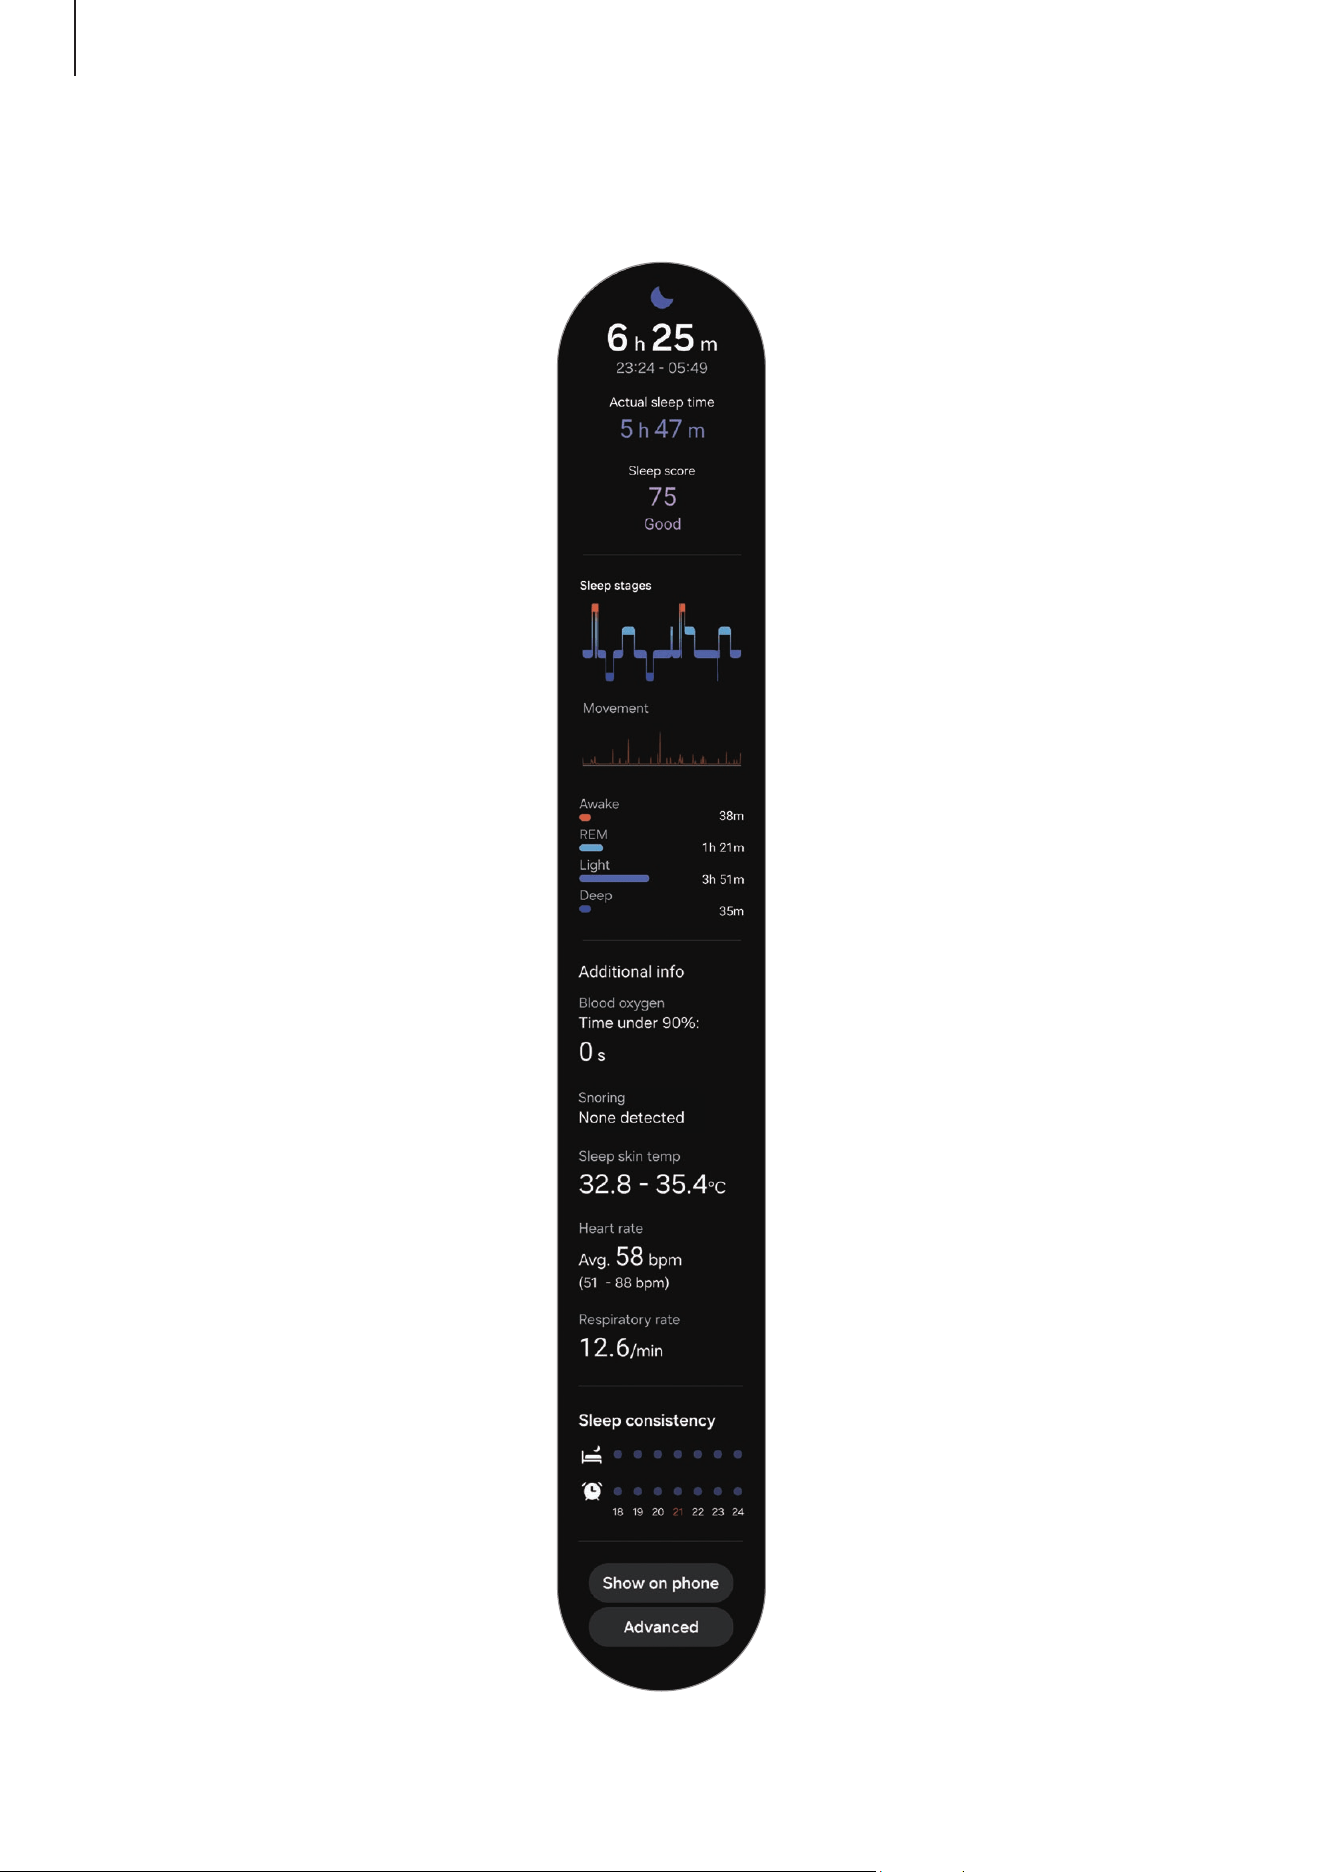
Apps and features
72
4 Use the touch bezel or swipe upwards or downwards on the screen to check all
information related to your measured sleep.
Apps and features
73
Using the snore detection feature
1 Tap (
Health
) on the Apps screen.
2 Tap
Settings
→
Sleep
.
3 Tap
Snore detection
.
The Samsung Health app will open on your phone.
4 Tap the switch to turn it on.
5 Select
Always
under
Detect snoring
to measure your snoring whenever you are
sleeping.
6 Connect your phone to the charger and place the phone’s microphone so it faces you
before sleeping.
Your snoring will be measured along with your other sleep records when you sleep
while wearing the Watch.
•
The snore detection feature can be turned on in the Samsung Health app
(version 6.18 or later) of the connected phone.
•
Snoring may not be measured if you do not set the snore detection feature to
Always
, do not connect your phone to the charger before sleeping, or do not
place the phone’s microphone so it faces you before sleeping.
Using the skin temperature during sleeping feature
Record the change in your skin temperature while you sleep and receive assistance in
creating an optimal sleeping environment.
1 Tap (
Health
) on the Apps screen.
2 Tap
Settings
→
Sleep
.
3 Tap the
Skin temperature during sleep
switch to turn it on.
Your skin temperature will be measured along with your other sleep records when you
sleep while wearing the Watch.
Apps and features
74
•
If your skin temperature is measured continuously while sleeping, the battery
will drain more quickly than normal.
•
The Watch may measure your skin temperature even if you are not sleeping
because your Watch can recognize your sleep status even while reading books or
watching TVs or movies.
•
Wear the Watch firmly to ensure that you will not create space between your
wrist and the Watch when turning over in your sleep.
•
If you are wearing another wearable device with your Watch, such as the Galaxy
Ring, the measured skin temperature data during sleep is not integrated and the
data measured with the Galaxy Ring will be displayed.
Measuring the advanced glycation end products (AGEs)
during sleep
The advanced glycation end products (AGEs) are chemicals produced by combining
proteins or lipids in the body with sugar. It accumulates in most parts of the body,
including blood vessels, organs, joints, and retinas, causing aging and chronic diseases.
Also, high-sugar diets and bad lifestyles (such as smoking, lack of exercise, lack of sleep)
can accelerate AGEs production and accumulation. Recent studies have shown that
AGEs index slowly changes over 6 months, but higher index is associated with premature
aging and chronic disease. Galaxy Watch Ultra and Galaxy Watch7 can measure AGEs
index accumulated on the skin through advanced optical bio-signal sensor. Check your
AGEs index by measuring it when you sleep.
•
This feature is only for your general wellness and fitness. Therefore, do not
use it for medical purposes, such as diagnosing the symptoms, treatment, or
prevention of disease. Make sure to consult your physician for more information
about your medical condition.
•
Do not use a wrist that has skin problems or open wounds when measuring your
AGEs index.
•
The Galaxy Watch uses light sensors that operate within the limits set by safety
regulations. However, individuals with photosensitive skin may have adverse
reactions to light, such as skin discolouration or rashes. Do not measure your
AGEs index if you have any symptoms of photosensitivity.
Apps and features
75
•
Cosmetics that contain the photosensitizing ingredients may make your skin
sensitive to Ultraviolet (UV) rays. Do not measure your AGEs index if you use
cosmetics that contain the following ingredients:
‒
Retinoids (for example, retinol or tretinoin)
‒
Alpha Hydroxy Acids (AHAs)
‒
Beta Hydroxy Acids (BHAs)
‒
Some essential oils (for example, citrus oil)
‒
Some medications and herbal extracts
Be aware of following conditions before measuring your AGEs index during sleep:
You can get more accurate AGEs index results when you go to bed with your Watch on if
you follow the following measurement conditions:
•
Make sure your wrist with the Watch on is dry and clean.
•
Make sure the sensors on the back of your Watch are clean.
•
The optical bio-signal sensor may be affected by tattoos, scars, and hair on the wrist.
Consider wearing your Watch in a place without these interferences or on your other
wrist.
•
Do not consume alcohol excessively before bedtime.
1 Sleep while wearing the Watch.
Your AGEs index will be measured along with your other sleep records when you sleep
while wearing the Watch.
2 Tap (
Health
) on the Apps screen after you wake up.
3 Tap
AGEs index
.
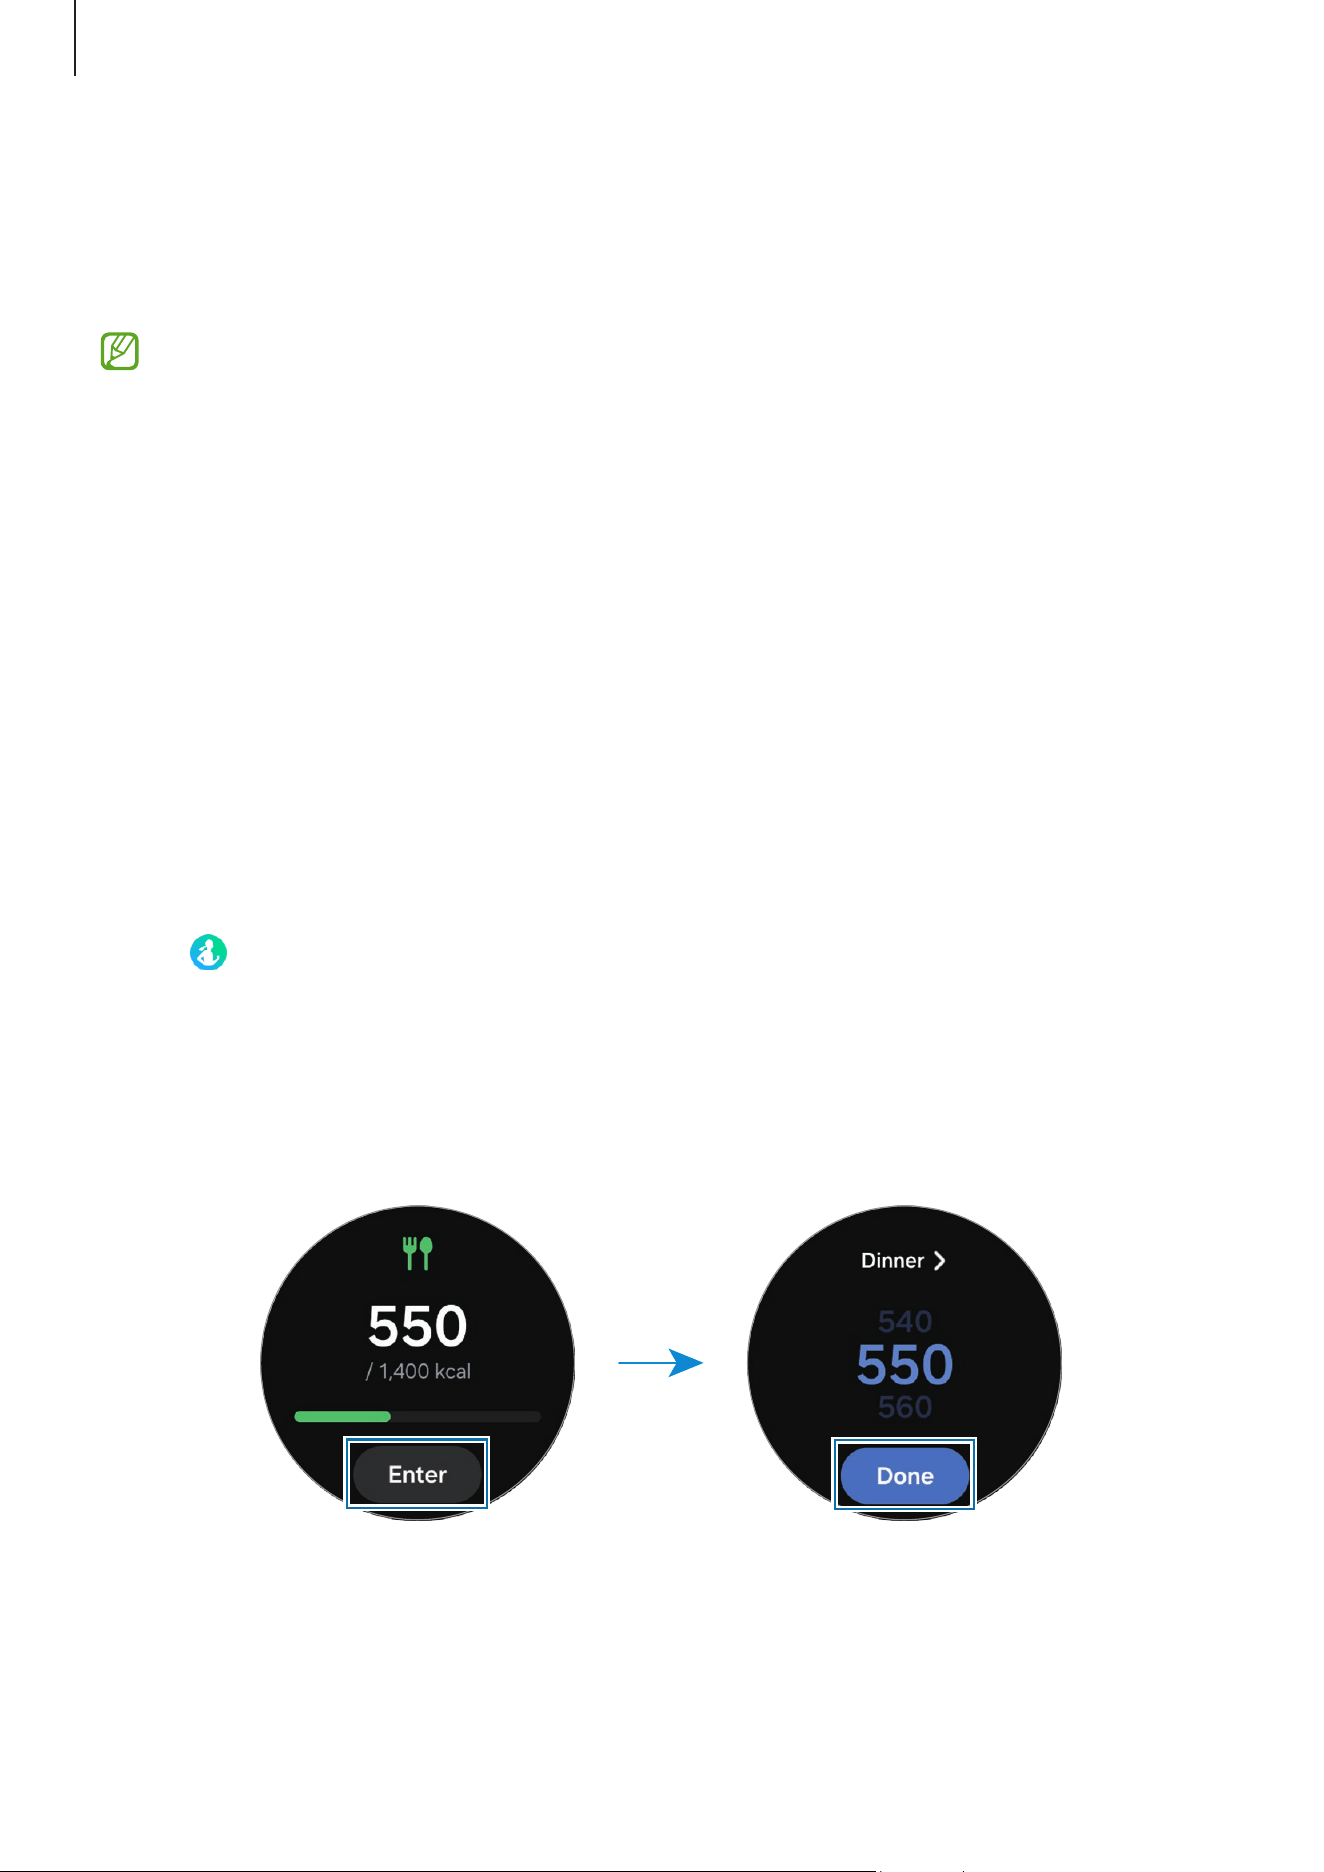
Apps and features
76
4 Use the touch bezel or swipe upwards or downwards on the screen to check all
information related to your measured AGEs index.
You can check your previous measurements and information in the Samsung Health
app on your connected phone.
•
You can see the light because of the flickering optical bio-signal sensor while
measuring your AGEs index.
•
The Watch may measure your AGEs index even if you are not sleeping because
your Watch can recognize your sleep status even while reading books or
watching TVs or movies.
•
Wear the Watch firmly to ensure that you will not create space between your
wrist and the Watch when turning over in your sleep.
Food
Record the calories you eat in a day and compare with your target calories to get help to
manage your weight.
Recording the calories
1 Tap (
Health
) on the Apps screen.
2 Tap
Food
.
3 Tap
Enter
, tap the meal type on the top of the screen, and then select an option.
4 Use the touch bezel or swipe upwards or downwards on the screen to set the caloric
intake, and then tap
Done
.
To check additional information that is related to the caloric intake, use the touch bezel
or swipe upwards or downwards on the screen.
Apps and features
77
Deleting logs
1 Tap (
Health
) on the Apps screen.
2 Tap
Food
and tap
Delete
.
3 Select data to delete and tap
Delete
.
Setting your caloric intake target
1 Tap (
Health
) on the Apps screen.
2 Tap
Food
and tap
Set target
.
3 Use the touch bezel or swipe upwards or downwards on the screen to set the target.
4 Tap
Done
.
Body composition
Measure your body composition, such as your skeletal muscle mass or fat mass.
•
This feature is only for your general wellness and fitness. Therefore, do not
use it for medical purposes, such as diagnosing the symptoms, treatment, or
prevention of disease.
•
If you have an implanted cardiac pacemaker, defibrillator, or if any other
electronic device is inside of your body, do not measure your body composition.
•
A low electric current goes through your body when measuring your body
composition. Although it is harmless to humans, do not measure your body
composition if you are pregnant.

Apps and features
78
•
For accurate measurements, wear the Watch firmly around your lower arm above
the wrist. Refer to How to wear the Watch for accurate measurements for more
information.
•
For accurate body composition measurements, you must enter your actual
height, weight, and gender on the Samsung Health app profile of the connected
phone, and also enter your actual birthday on your Samsung account. If the
measured body composition results are inaccurate, check your user profile in the
Samsung Health app on the phone and modify it.
•
Unlike professional body composition measuring instruments, the Watch, which
has to be worn your wrist, measures the upper body’s composition and estimates
your entire body’s composition to provide the results.
Therefore, the measured body composition results may be inaccurate in the
following cases:
‒
When your upper and lower body’s composition is too unbalanced
‒
When you are extremely obese
‒
When you are very muscular
•
The Watch uses the Bioelectrical Impedance Analysis (BIA) method when
measuring body composition, which has more than 98% correlation compared
to the Dual-energy X-ray absorptiometry (DXA) method, which is regarded as the
golden standard.
Apps and features
79
Be aware of following conditions before measuring your body composition:
•
If you are an individual under the age of 20, the results may not be accurate when
you measure your body composition.
•
You can get more accurate body composition results if you follow the following
measurement conditions:
‒
Measuring at the same time of the day (recommended to measure in the
morning)
‒
Measuring on an empty stomach
‒
Measuring after going to the toilet
‒
Measuring when you are not having your menstrual period
‒
Measuring before doing activities that cause your body temperature to rise, such
as exercising, taking showers, or going to the sauna.
‒
Measuring after removing metal objects from your body, such as necklace
‒
Using the band included with the Watch instead of a metallic band
Measuring your body composition
1 Tap (
Health
) on the Apps screen.
2 Tap
Body composition
.
3 Tap
Measure
.
You can learn about how to measure your body composition in detail on the screen
by tapping
How to measure
.
4 Enter your weight and tap
Confirm
.
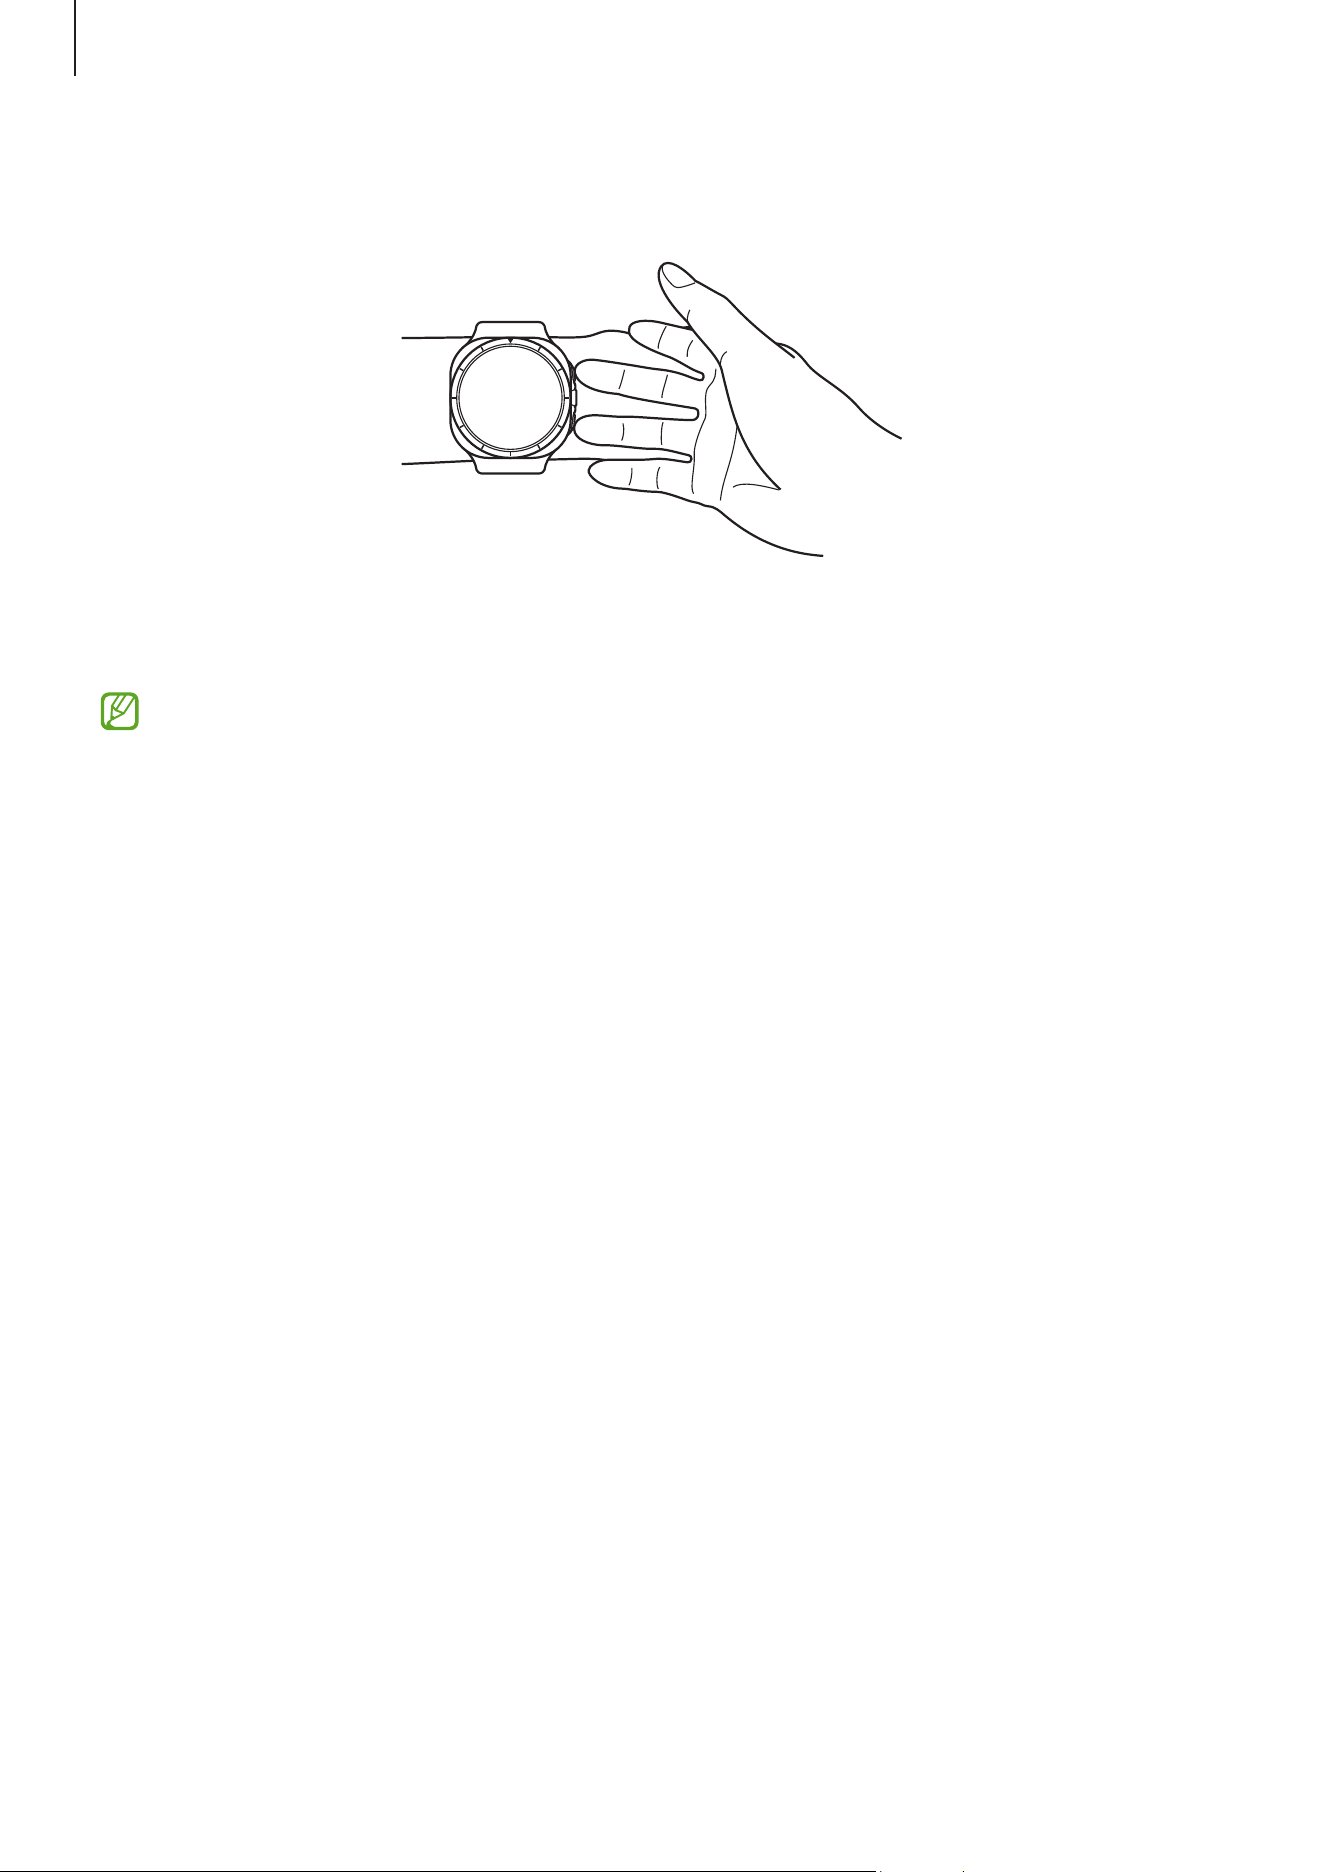
Apps and features
80
5 Place your two fingers on the Home and Back buttons and follow the on-screen
instructions to begin measuring your body composition.
Correct position for measuring your body composition when
wearing the Watch on your left wrist while the buttons are
located on the right side
Correct measurement posture
•
Put both of your arms to chest level while not making contact with your body.
•
Ensure that the two fingers placed on the Home and Back buttons do not come
into contact with each other. Also, do not touch the other parts of your Watch
except the buttons.
•
Stay stable and do not move for accurate measurement results.
•
The signal may experience interruptions when your finger is dry. In this case,
measure your body composition after applying toner or lotion to make your
finger’s skin moist.
•
Measurement results may not be accurate because of the dryness of your skin or
hair.
•
Wipe the back of the Watch clean before measuring for accurate measurement
results.
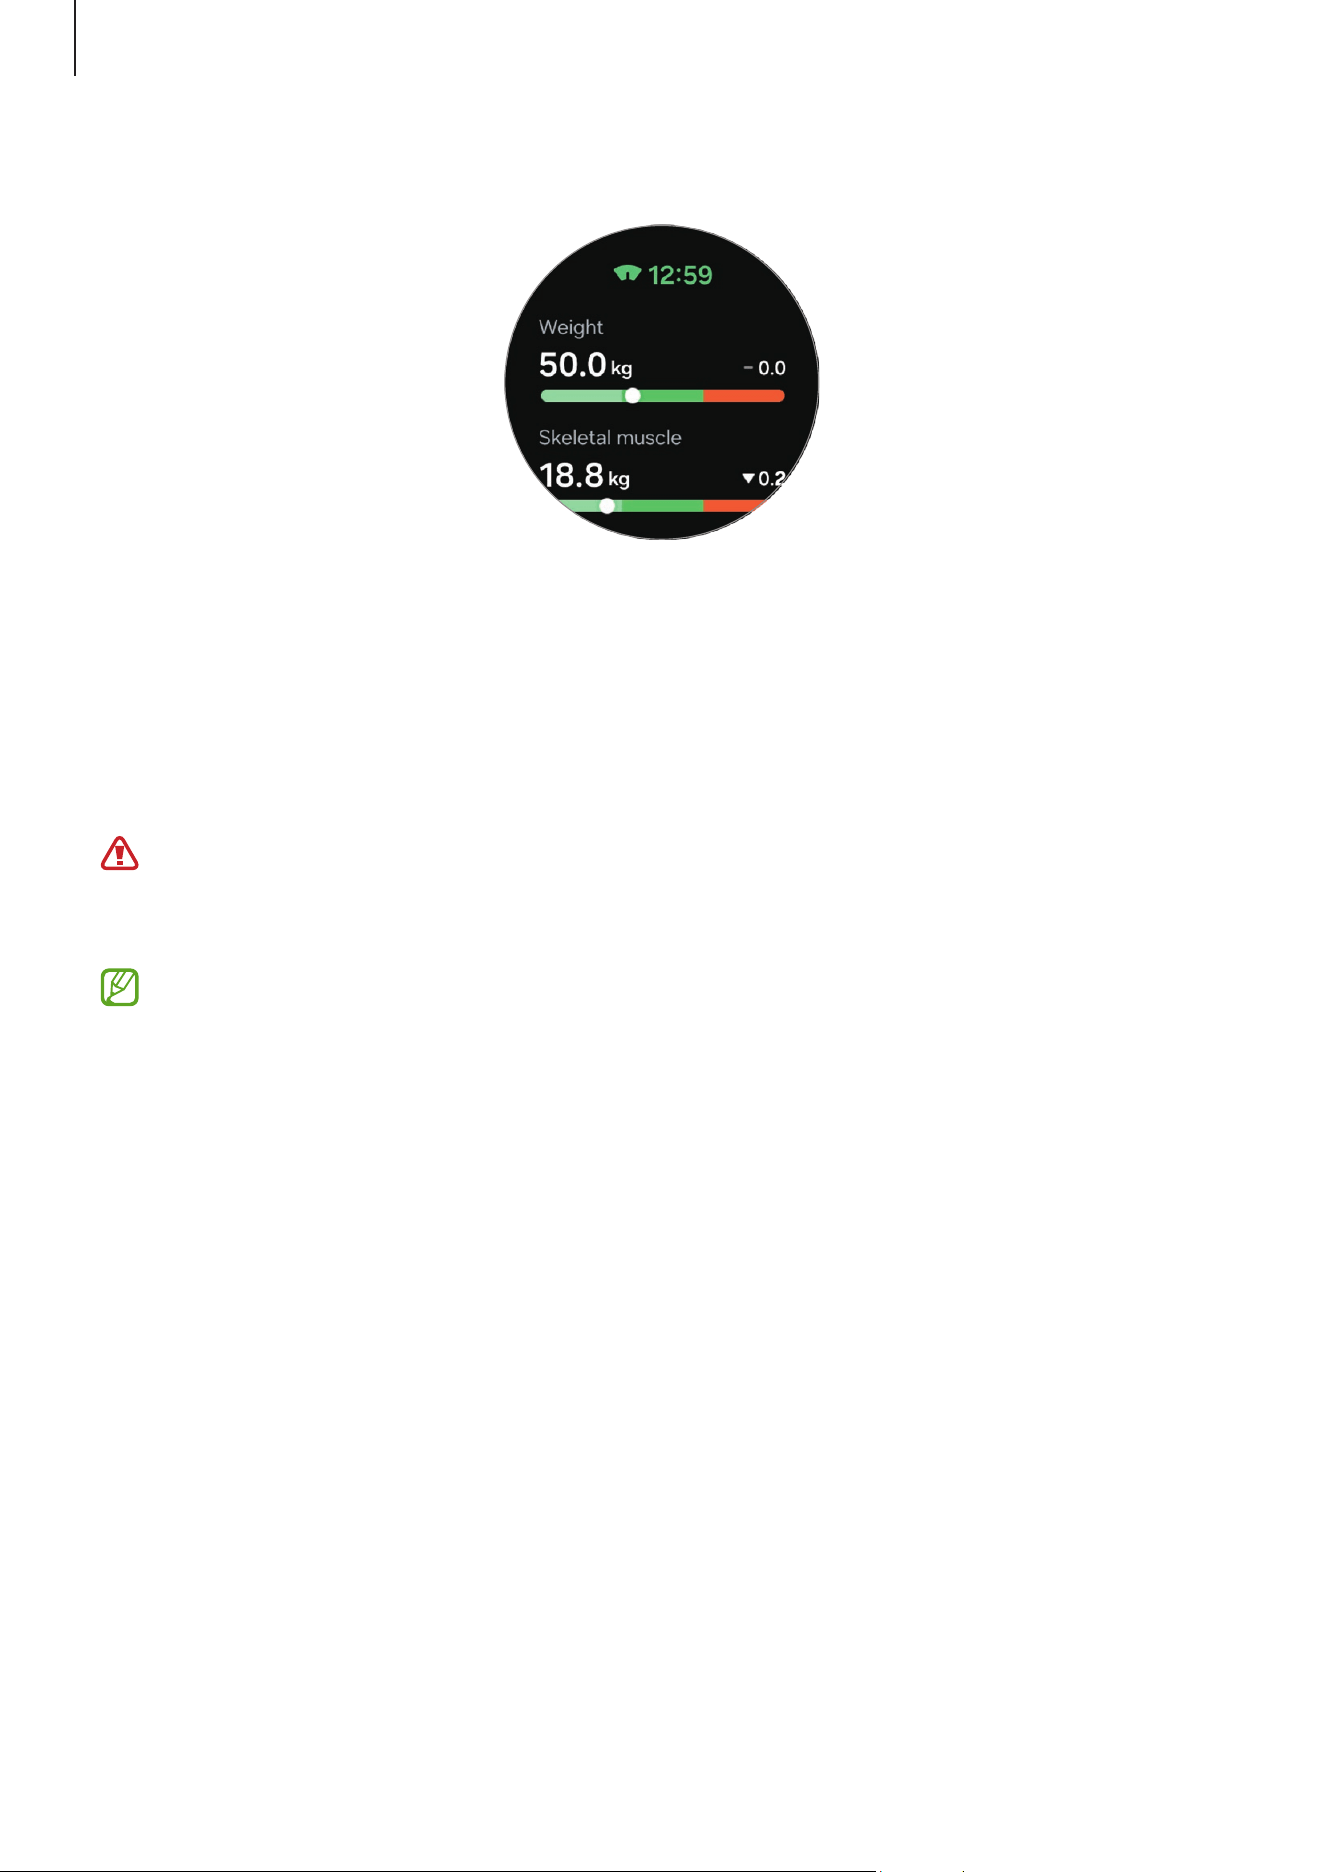
Apps and features
81
Check measured body composition results on the screen.
To check the additional information that is related to the body composition, use the
touch bezel or swipe upwards or downwards on the screen.
Heart rate
Measure and record your heart rate.
The Watch’s heart rate tracker is intended for fitness and informational purposes
only and is not intended for use in the diagnosis of disease or other conditions, or in
the cure, mitigation, treatment, or prevention of disease.
For accurate measurements, wear the Watch firmly around your lower arm above
the wrist. Refer to How to wear the Watch for accurate measurements for more
information.
Be aware of following conditions before measuring your heart rate:
•
Rest for five minutes before taking measurements.
•
If the measurement is very different from the expected heart rate, rest for
30 minutes and then measure it again.
•
During winter or in cold weather, keep yourself warm when measuring your heart
rate.
•
Smoking or consuming alcohol before taking measurements increases heart rate
and may cause your heart rate to be different from your normal heart rate.
•
Do not talk, yawn, or breathe deeply while taking heart rate measurements. Doing so
may cause your heart rate to be recorded inaccurately.
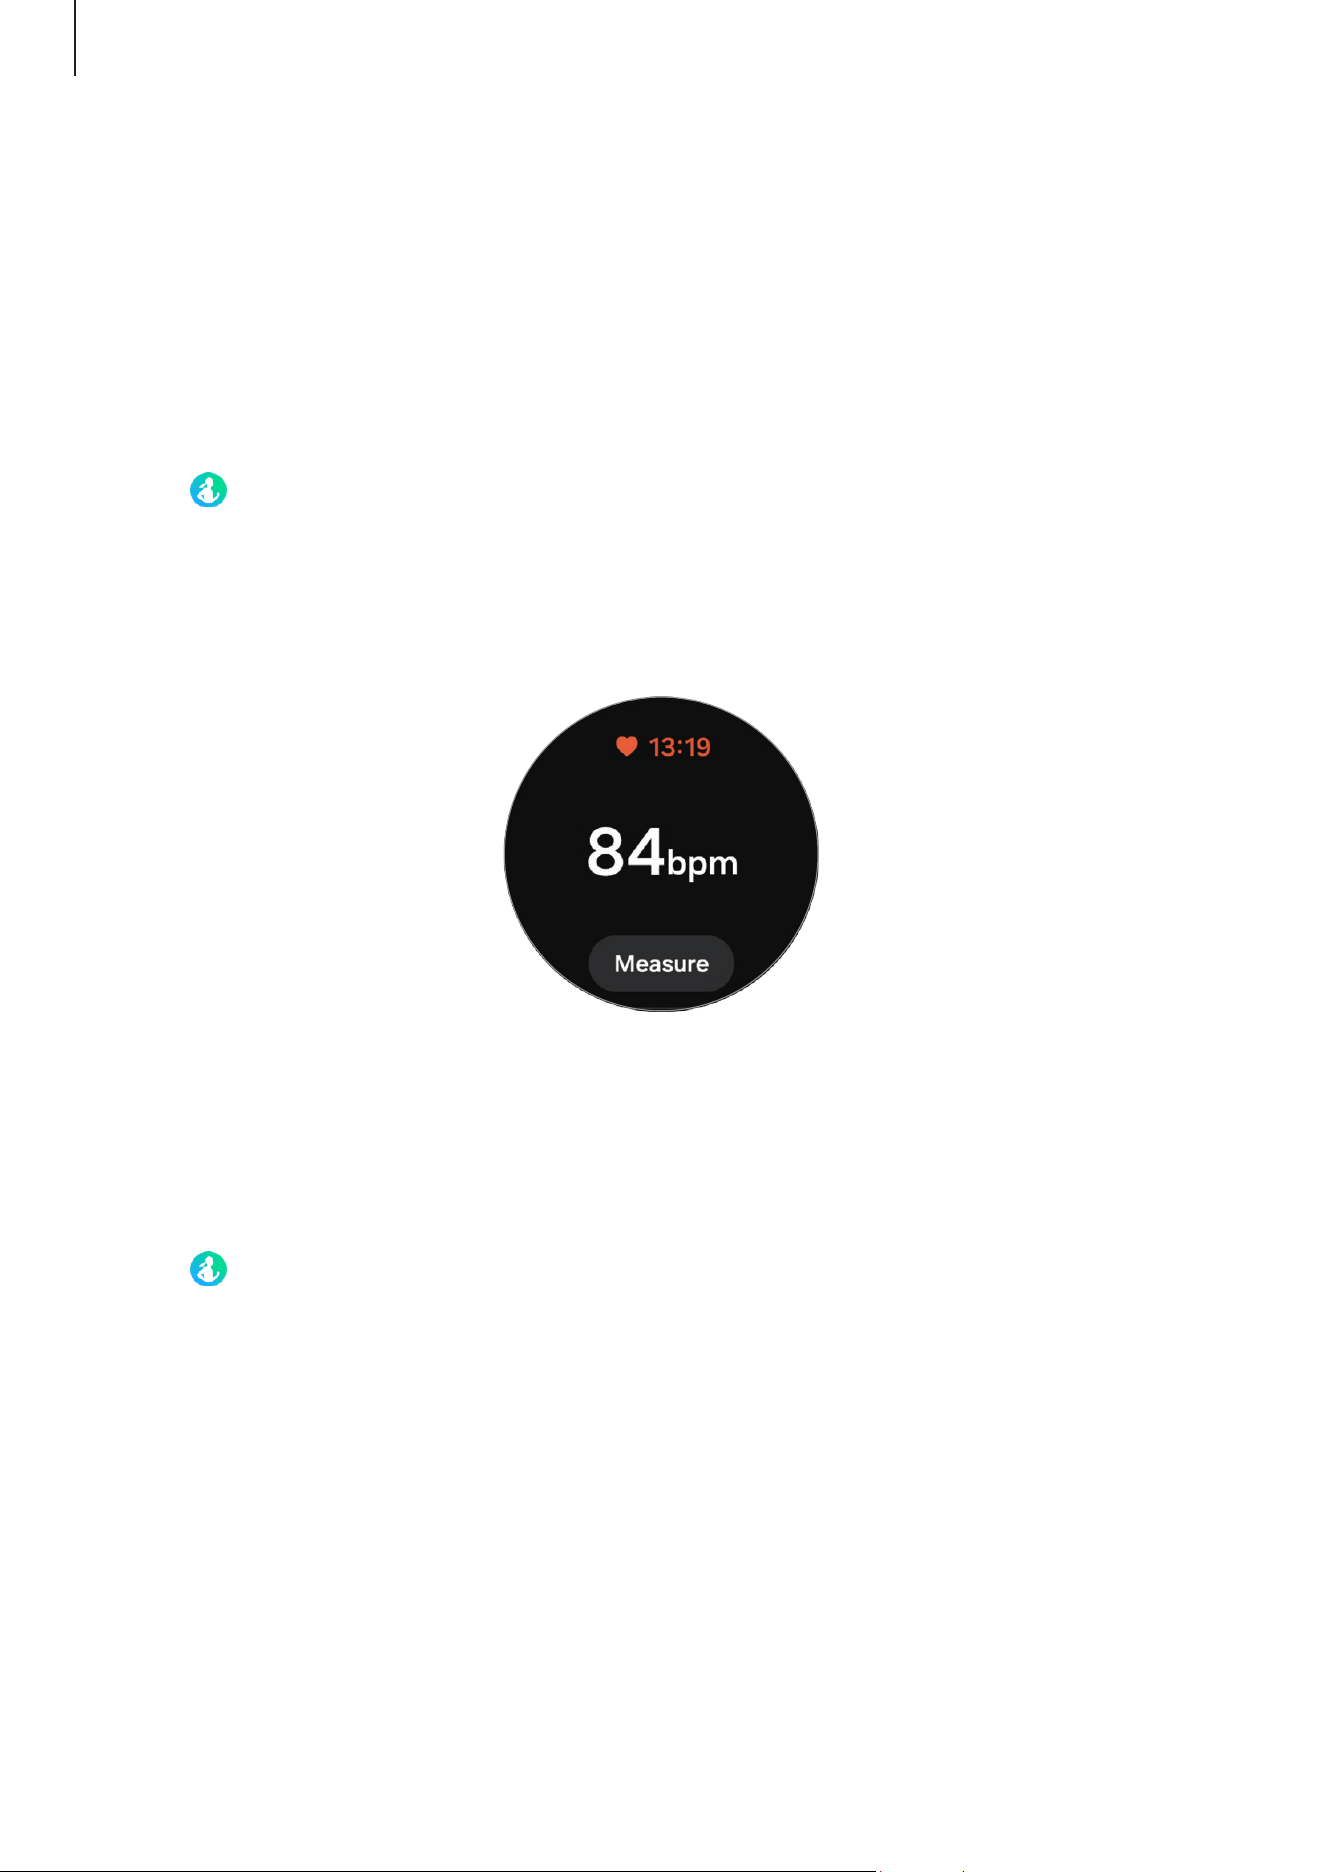
Apps and features
82
•
Heart rate measurements may vary depending on the measurement method and the
environment they are taken in.
•
If the sensor is not working, check the Watch’s position on your wrist and make sure
nothing is obstructing the sensor. If the sensor continues to have the same problem,
visit a Samsung Service Centre or an authorized service centre.
Measuring your heart rate manually
1 Tap
(
Health
) on the Apps screen.
2 Tap
Heart rate
.
3 Tap
Measure
to begin measuring your heart rate.
Check the measured heart rate on the screen.
To check additional information that is related to the heart rate, use the touch bezel or
swipe upwards or downwards on the screen.
Changing the heart rate measurement settings
1 Tap (
Health
) on the Apps screen.
2 Tap
Heart rate
.
3 Tap
Settings
and select the measurement method under
Measurement
.
•
Measure continuously
: Your heart rate will be measured continuously.
•
Every 10 mins while still
: Your heart rate will be measured every 10 minutes while
resting.
•
Manual only
: Your heart rate will be measured manually only when tapping
Measure
.
Apps and features
83
Setting the heart rate alert
You can receive an alert when your heart rate is higher or lower than the resting heart
rate value you set and it lasts more than 10 minutes.
1 Tap (
Health
) on the Apps screen.
2 Tap
Heart rate
.
3 Tap
Settings
and set the heart rate range under
Heart rate alert
.
•
High HR
: Set to receive an alert when your heart rate is consistently higher than
the heart rate value you set.
•
Low HR
: Set to receive an alert when your heart rate is consistently lower than the
heart rate value you set.
Stress
Check your stress level by utilizing the bio data collected by your Watch and reduce your
stress by following the breathing exercise that the Watch provides.
•
The more frequently you measure your stress level, the more accurate your
results will be because of the accumulated data.
•
Your measured stress level is not necessarily related to your emotional state.
•
Your stress level may not be measured while you are sleeping, working out,
moving a lot, or right after you finish a workout.
•
For accurate measurements, wear the Watch firmly around your lower arm above
the wrist. Refer to How to wear the Watch for accurate measurements for more
information.
•
This feature may not be available depending on the region.
Measuring your stress level manually
1 Tap (
Health
) on the Apps screen.
2 Tap
Stress
.
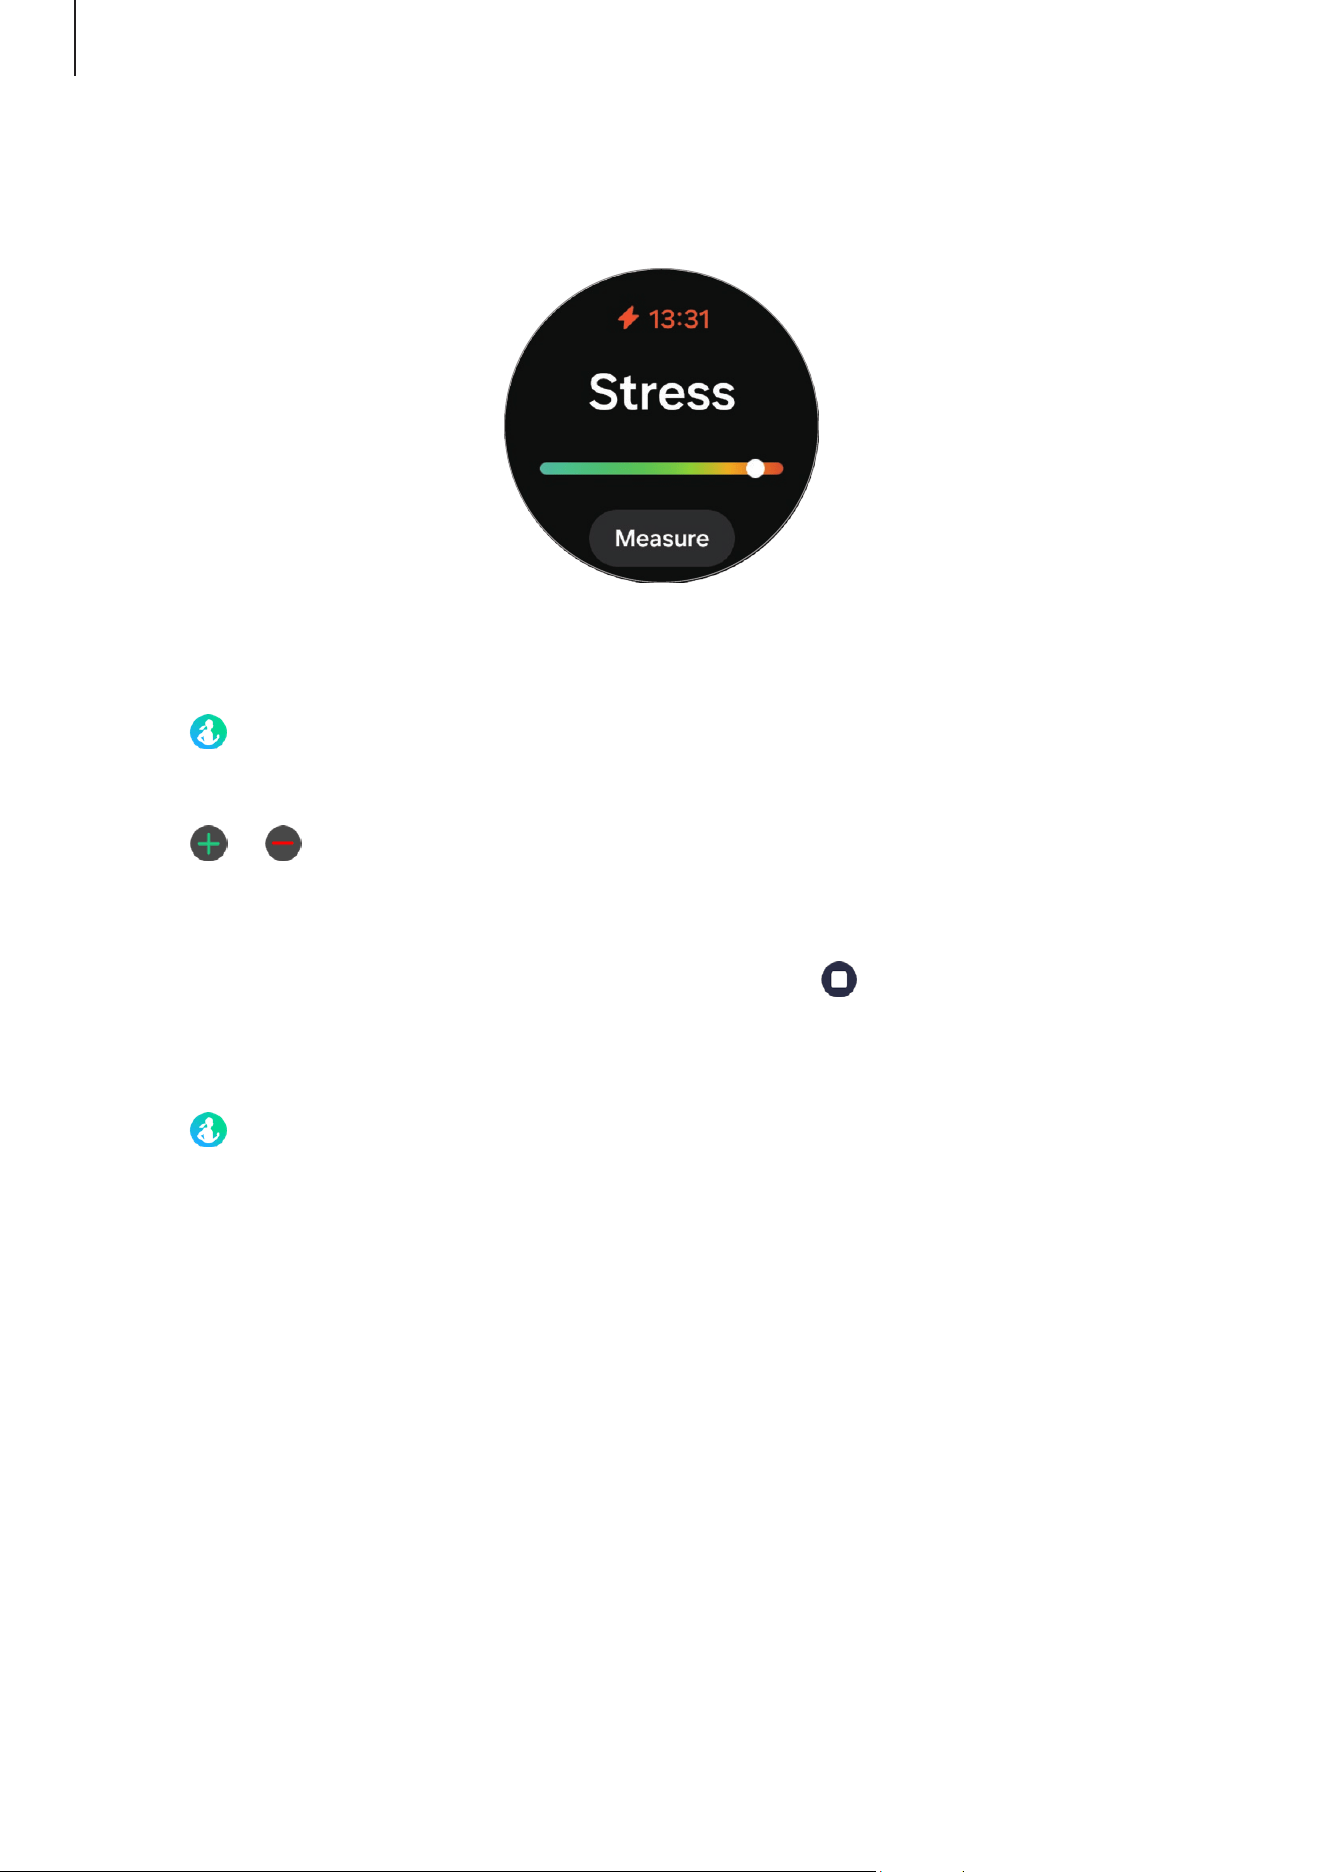
Apps and features
84
3 Tap
Measure
to begin measuring your stress level.
Check the measured stress level on the screen.
Alleviating stress with the breathing exercise
1 Tap (
Health
) on the Apps screen.
2 Tap
Stress
.
3 Tap or under
Breathe
to change the time and the number for the breath
exercise. To change the breath exercise duration, tap
Breathe duration
.
4 Tap
Start
and start breathing.
To stop the breathing exercise, tap the screen and tap .
Changing the stress measurement settings
1 Tap (
Health
) on the Apps screen.
2 Tap
Stress
.
3 Tap
Settings
and select the measurement method under
Measurement
.
•
Measure continuously
: Your stress level will be measured continuously.
•
Manual only
: Your stress level will be measured manually only when tapping
Measure
.
Apps and features
85
Cycle tracking
Enter your menstrual period to begin tracking your cycle. When you are managing and
tracking your menstrual cycle, you can predict dates like your next period.
When the predict period with skin temp feature is supported
•
Cycle tracking is available for cycle and period prediction. NOT INTENDED FOR
CONTRACEPTION.
•
If you are currently using hormonal birth control or undergoing hormonal
treatment that inhibits ovulation, this feature will not be useful for tracking
ovulation.
•
This information is for personal reference only.
•
Predictions may vary depending on use of the Watch, input data, environmental
conditions, and other factors.
•
To improve the accuracy of predictions, it is recommended to wear your Watch
for at least four hours during sleep at night, five times a week.
•
Not intended for diagnosing, curing, mitigating, treating, or preventing any
disease or health conditions.
•
Do not interpret or take clinical action based on the predictions made without
consultation of a qualified healthcare professional.
•
This feature is not intended for users under 18 years of age.
•
Availability may vary by country, region, carrier, Watch model, or connected
phone.
•
Turn on the cycle tracking feature in the Samsung Health app on your phone to
use this feature on your Watch.
•
Predicted dates may vary depending on the input information.
Apps and features
86
When the predict period with skin temp feature is not supported
•
This feature is only for managing and tracking your menstrual cycle. Therefore,
do not use it for medical purposes, such as diagnosing the symptoms, or treating
or preventing disease.
•
This feature is not intended to be used for pregnancy planning or contraception
purposes.
•
Predicted dates are only for personal reference. Predicted dates may differ from
actual dates.
•
Individuals under the age of 18 should use this feature with a guardian.
•
Do not make any medical decisions based on predicted dates without consulting
a physician. Also, do not use the information provided from the Samsung Health
app or take medical action without consulting a qualified medical expert.
•
Turn on the cycle tracking feature in the Samsung Health app on your phone to
use this feature on your Watch.
•
Predicted dates may not be accurate if you are currently taking birth control or
undergoing hormone therapy to suppress ovulation. (Only when the predict with
skin temp feature is not supported)
•
Predicted dates may vary depending on the input information. (Only when the
predict with skin temp feature is not supported)
Entering your cycle information
1 Tap (
Health
) on the Apps screen.
2 Tap
Cycle tracking
.
3 Tap
Enter period
.
4 Tap the input field, use the touch bezel or swipe upwards or downwards on the screen
to set your period’s start date.
5 Tap
Save
.
To check additional information that is related to your cycle tracking, use the touch bezel
or swipe upwards or downwards on the screen.
Apps and features
87
Water
Record and track how much water you have drunk.
Recording water consumption
1 Tap (
Health
) on the Apps screen.
2 Tap
Water
.
3 Tap
+ 250 ml
every time you drink water.
If you accidentally added an incorrect value, select
Delete
, select the data to delete,
and then tap
Delete
.
To change the cup volume, tap
Set cup size
and change it to the desired volume.
Setting your target consumption
1 Tap (
Health
) on the Apps screen.
2 Tap
Water
→
Set target
.
3 Use the touch bezel or swipe upwards or downwards on the screen to set the daily
target.
4 Tap
Done
.
Apps and features
88
Blood oxygen
Measure your blood’s oxygen level to check whether your blood is properly delivering
oxygen to the different parts of your body.
This feature is only for your general wellness and fitness. Therefore, do not use it
for medical purposes, such as diagnosing symptoms, treatment, or prevention of
disease.
Be aware of following conditions before measuring your blood oxygen level:
•
Rest for five minutes before taking measurements.
•
During winter or in cold weather, keep yourself warm when measuring your blood
oxygen level.
•
Blood oxygen level measurements may vary depending on the measurement
method and the environment they are taken in.
Measuring your blood oxygen level manually
1 Tap (
Health
) on the Apps screen.
2 Tap
Blood oxygen
.
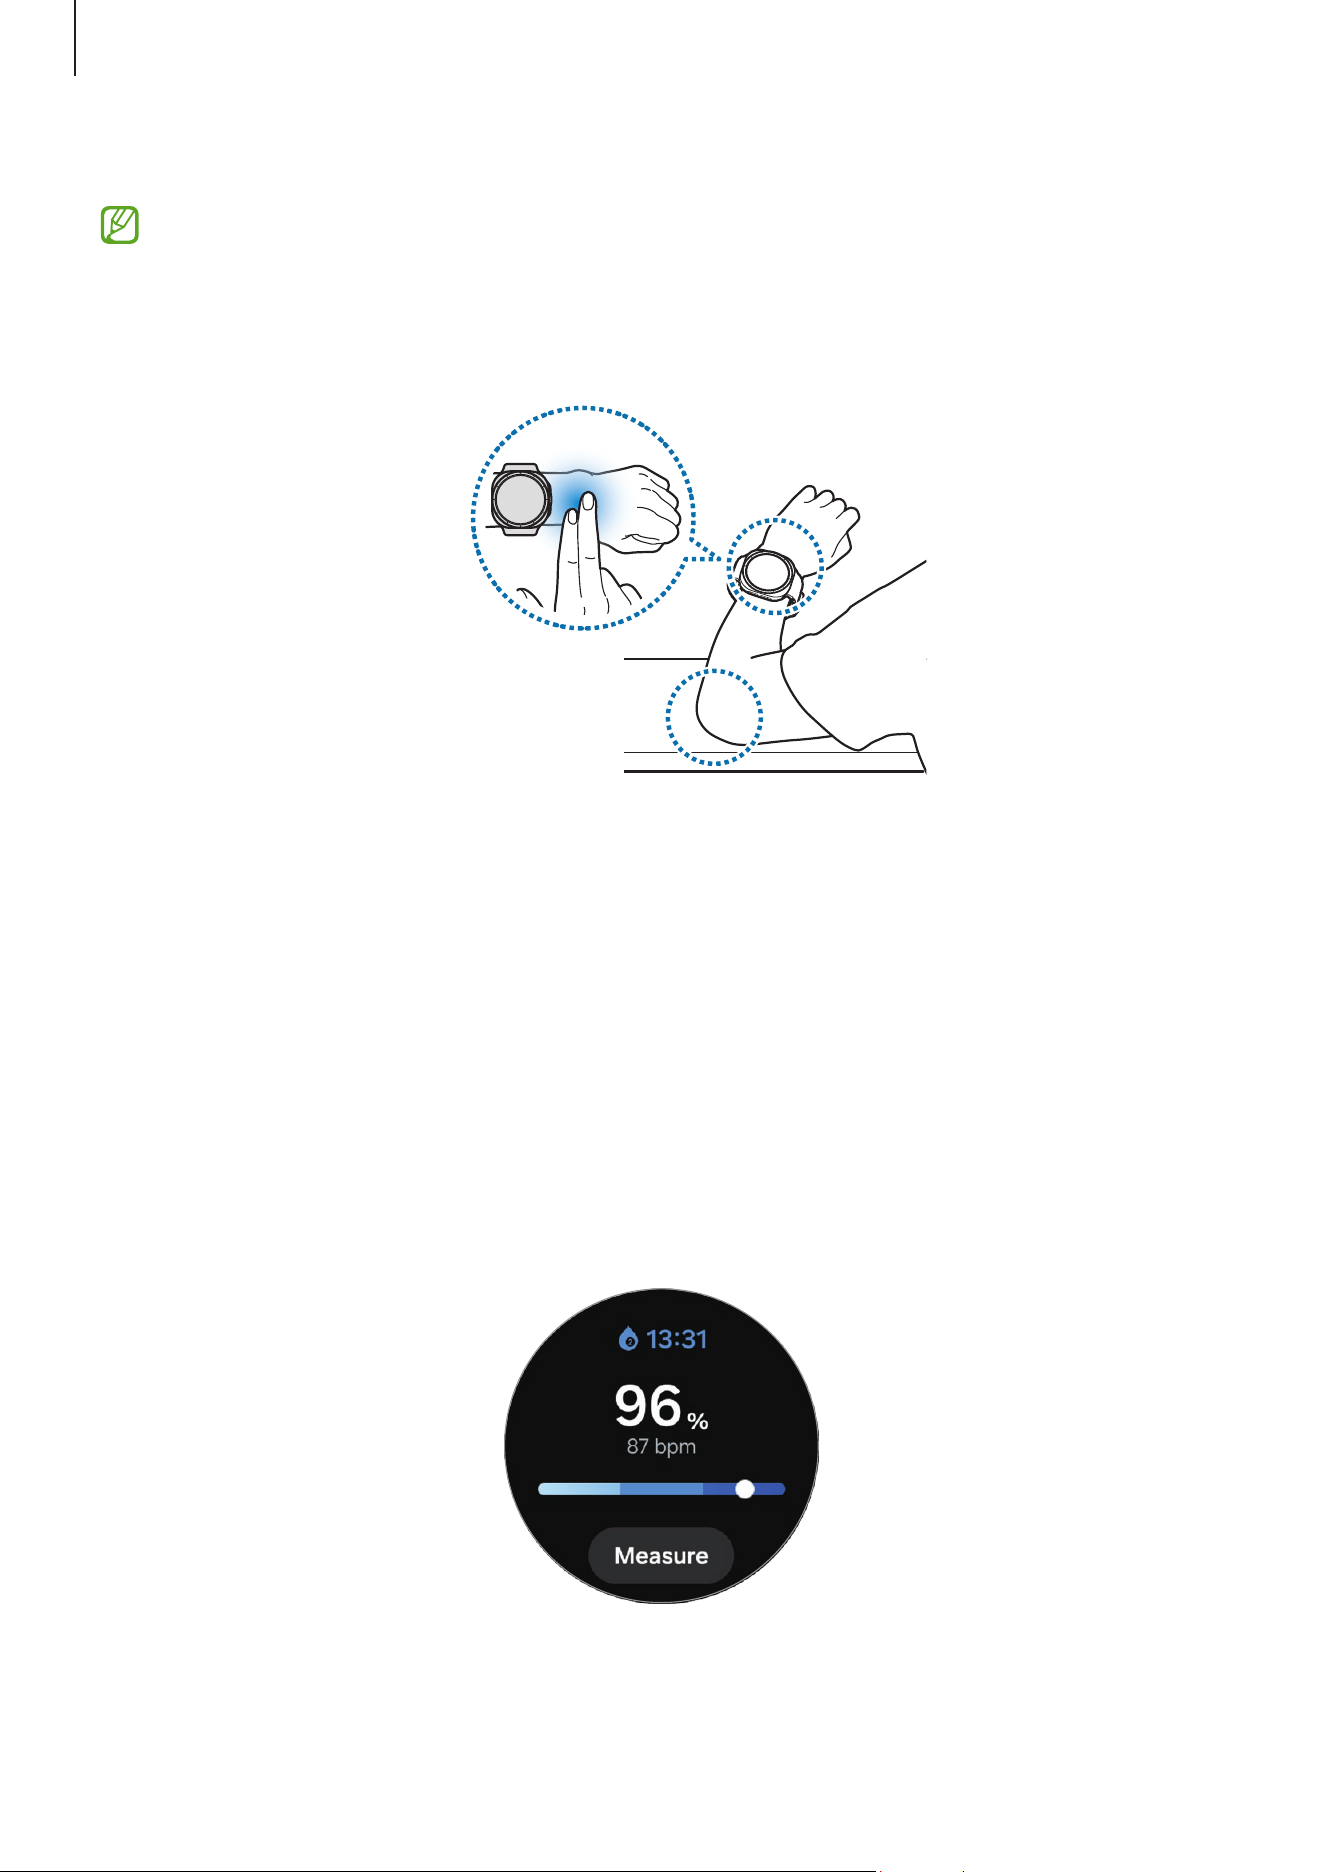
Apps and features
89
3 Tap
Measure
to begin measuring your blood oxygen level.
Correct measurement posture
•
For accurate measurements, wear the Watch firmly around your lower arm above
the wrist while leaving two fingers’ worth of space as shown in the figure. Also,
place your elbow on the table while positioning your wrist close to your heart.
•
Do not move and stay in the correct posture until finishing the measurement.
•
You can learn about how to measure your blood oxygen level in detail on the
screen by tapping
How to measure
.
•
If your blood oxygen level is not being measured properly, loosen the band by
one or more of the holes and wear the Watch closer to your elbow. For accurate
measurements, wear the Watch firmly around your lower arm above the wrist.
Before measurement, ensure that the Watch is tight but that you do not feel any
discomfort.
Check the measured blood oxygen level on the screen. If your resting blood oxygen
level is between 95% and 100%, it is assumed to be within the normal range.
Apps and features
90
Measuring your blood oxygen level while sleeping
Set to measure your blood oxygen level continuously while sleeping.
1 Tap (
Health
) on the Apps screen.
2 Tap
Settings
→
Sleep
.
3 Tap the
Blood oxygen during sleep
switch to turn it on.
Your sleeping blood oxygen level will be measured along with your other sleep
records when you sleep while wearing the Watch.
•
If your blood oxygen level is measured continuously while sleeping, the battery
will drain more quickly than normal.
•
You can see the light because of the flickering optical bio-signal sensor while
measuring your blood oxygen level.
•
The Watch may measure your blood oxygen level even if you are not sleeping
because your Watch can recognize your sleep status even while reading books or
watching TV or movies.
•
Wear the Watch firmly to ensure that you will not create space between your
wrist and the Watch when turning over in your sleep.
Together
Compare your step count records with your friends who also use the Together feature
of the Samsung Health app. When you start step challenges with your friends, you can
check the challenge status on your Watch.
1 Tap (
Health
) on the Apps screen.
2 Tap
Together
.
Tap
Show on phone
to check detailed information related to the Together feature on
your connected phone.
Turn on the Together feature in the Samsung Health app on your phone to check
the together information on your Watch.
Apps and features
91
Settings
Configure the various settings related to exercise and fitness.
Tap (
Health
) on the Apps screen and tap
Settings
.
•
Measurement
: Set how to measure your heart rate and stress, and turn the
additional features that can be measured during sleep on or off.
•
Auto detect workouts
: Turn on the auto detect workouts feature and configure the
settings, such as selecting the exercise types to be detected.
•
Inactive time
: Turn the feature on to receive alerts after 50 minutes of inactivity, and
set the time and days you want to be notified.
•
Make visible to other devices
: Give permission to other devices to find your Watch.
•
Share data with devices and services
: Set to share information with other connected
health platform apps, exercise machines, and TVs.
•
Privacy
: Select apps or service providers to share information with to display the
necessary information during exercise.
Some features may not be available depending on the region, carrier, or model.
Apps and features
92
Samsung Health Monitor
Introduction
You can measure biometric data, such as your blood pressure or ECG, whenever you
want to with the Samsung Health Monitor of your Watch, which includes both the optical
bio-signal sensor and the electrical bio-signal sensor. You can check the measurement
history using the Samsung Health Monitor app on your connected phone since your
Watch and phone have been synced automatically.
•
If you have not installed the Samsung Health Monitor app on your connected
phone, open the
Samsung Health Monitor
app on your Watch and follow the on-
screen instructions to download it on the phone.
•
The Samsung Health Monitor app is only supported on Samsung phones.
•
Individuals under the age of 22 cannot use the Samsung Health Monitor app to
measure biometric data.
•
This app may not be available depending on the region.
Precautions for measuring biometric data
Common precautions
•
The Samsung Health Monitor app cannot be used for medical purposes, such
as diagnosing hypertension, cardiac disorders, and other heart conditions. Do
not use this app for purpose of replacing a physician’s medical judgment or
treatment under any circumstances. In case of an emergency, contact a nearby
hospital immediately.
•
Do not change your medication, dosage, or usage without your physician’s
advice.
•
The readings and results from the Samsung Health Monitor app are only
for reference. Do not use them for making medical decisions without your
physician’s opinion under any circumstances.

Apps and features
93
•
For accurate measurements, wear the Watch firmly around your lower arm above
the wrist. Refer to How to wear the Watch for accurate measurements for more
information.
•
Always connect your Watch to your phone at home or in a safe place through
Bluetooth for security reasons. It is not recommended to connect to a phone in a
public place.
Precautions for measuring blood pressure
•
Before measuring, prepare a comfortable chair and a table to rest your arm and
phone on.
•
Sit upright in the comfortable chair with your back supported.
•
Be sure to place your arm comfortably on a table when you are measuring your
blood pressure.
•
Rest for at least five minutes in a comfortable position before measuring your
blood pressure.
•
Measure your blood pressure in a quiet place indoors.
•
Do not measure your blood pressure while engaging in physical activity.
•
Stay still and do not speak once you start measuring your blood pressure, and do
not move or speak until the measurement is complete.
•
Do not measure your blood pressure when you are in close vicinity of machines
that produce strong magnetic fields, such as MRIs (Magnetic Resonance
Imaging), X-ray machines, electromagnetic anti-theft systems, or metal
detectors.
•
Do not measure your blood pressure during medical treatments, such as
operations or defibrillation.
•
Measure your blood pressure in an environment where the temperature is
between 12 °C to 40 °C, and the relative humidity is between 30% to 90%.
•
Avoid consuming alcohol or food that includes caffeine, smoking, exercising, or
taking a bath 30 minutes before measuring your blood pressure.
•
Make sure your wrist is dry when measuring your blood pressure and do not
measure it when you have applied lotion or are sweating excessively.
•
Do not take a deep breath or breathe slowly on purpose. Breathe normally while
measuring your blood pressure.
•
If you are pregnant, your results may not be accurate when you measure your
blood pressure.

Apps and features
94
•
Do not measure your blood pressure with the Samsung Health Monitor app if you
have any of the following conditions:
‒
Arrhythmia
‒
Underlying heart disease or have suffered a heart attack
‒
Circulatory or peripheral vascular disease
‒
Valvular heart disease (Aortic valve disease)
‒
Myocardiopathy
‒
Other cardiovascular disease
‒
End-stage renal disease (ESRD)
‒
Diabetes
‒
Neurological dysfunction (for example, tremors)
‒
Blood clotting dysfunction or you are taking a blood thinner
•
Do not use a wrist that has been tattooed or has marks on it when measuring
your blood pressure because the optical bio-signal sensor may be affected by the
tattoos or marks.
•
The Samsung Health Monitor app calibrates and measures blood pressure based
on the readings from the arm that is wearing the blood pressure manometer.
If there is a large difference between the blood pressure in both of your arms
(more than 10 mmHg), you must consult your physician.
•
Do not use a Watch that has been calibrated for other people for measuring your
blood pressure.
•
The measurable reading range of the Samsung Health Monitor app for blood
pressure is as follows: In case of calibration, the systolic blood pressure range
is 80 mmHg to 170 mmHg, and the diastolic blood pressure is 50 mmHg to
110 mmHg. In case of measurement, the systolic blood pressure range is
70 mmHg to 180 mmHg, and the diastolic blood pressure is 40 mmHg to
120 mmHg.
•
The signal may be affected by the brightness of the individual’s skin, the amount
of blood under their skin, and the cleanliness of the sensor.

Apps and features
95
Precautions for measuring ECG
•
Before measuring, prepare a comfortable chair and a table to rest your arm and
phone on.
•
Sit upright in the comfortable chair with your back supported.
•
Be sure to place your arm comfortably on a table when you taking an ECG.
•
Rest for at least five minutes in a comfortable position before taking your ECG.
•
Measure your ECG in a quiet place indoors.
•
Do not measure your ECG while engaging in physical activity.
•
Stay still and do not speak once you start taking your ECG, and do not move or
speak until the measurement is complete.
•
Do not take your ECG when you are in close vicinity of machines that produce
strong magnetic fields, such as MRIs (Magnetic Resonance Imaging), X-ray
machines, electromagnetic anti-theft systems, or metal detectors.
•
Do not take your ECG during medical treatments, such as operations or
defibrillation.
•
Measure your ECG in an environment where the temperature is between 12 °C to
40 °C, and the relative humidity is between 30% to 90%.
•
Make sure your wrist is not too dry when measuring your ECG. You can get more
accurate ECG signals when your skin that comes in contact with the sensor is
moist with a moderate amount of sweat, toner, or lotion.
•
If you have an implanted cardiac pacemaker, defibrillator, or if any other
electronic device is inside of your body, do not measure your ECG.
•
If you have an arrhythmia other than atrial fibrillation, do not take your ECG with
the Samsung Health Monitor app.
•
The Samsung Health Monitor app cannot detect heart attacks. If you have
any suspicious symptoms of a heart attack, contact emergency services
immediately.
•
You can get more accurate ECG results if you follow the following measurement
conditions:
‒
Measuring after removing metal objects from your body, such as necklace
‒
Using the band included with the Watch instead of a metallic band
Apps and features
96
Starting to measure blood pressure
Presets before measuring the blood pressure
Enter your profile on the Samsung Health Monitor app and calibrate your Watch before
measuring your blood pressure. If you do not enter a profile, you cannot measure your
blood pressure, and if you do not calibrate the Watch or have someone else calibrate it,
the readings will not be valid.
Be sure to calibrate the Watch with a cuff-type blood pressure manometer when
measuring your blood pressure with the Samsung Health Monitor app for the first
time. After initial calibration, recalibrate it every 28 days. Cuff-type blood pressure
manometers are sold separately.
1 Tap (
Samsung Health Monitor
) on the Apps screen.
2 Tap
Blood pressure
→
Open phone app
.
The Samsung Health Monitor app will open on your phone.
3 Tap
Accept
.
4 Enter your profile information, such as your name, gender, and birthday, and tap
Continue
.
5 Tap
Calibrate the watch
.
6 Wear the cuff of the blood pressure manometer on the upper part of the arm not
wearing the Watch. Refer to the blood pressure manometer’s user guide for more
information about correctly wearing the cuff.
7 Follow the on-screen instructions to complete the calibration.
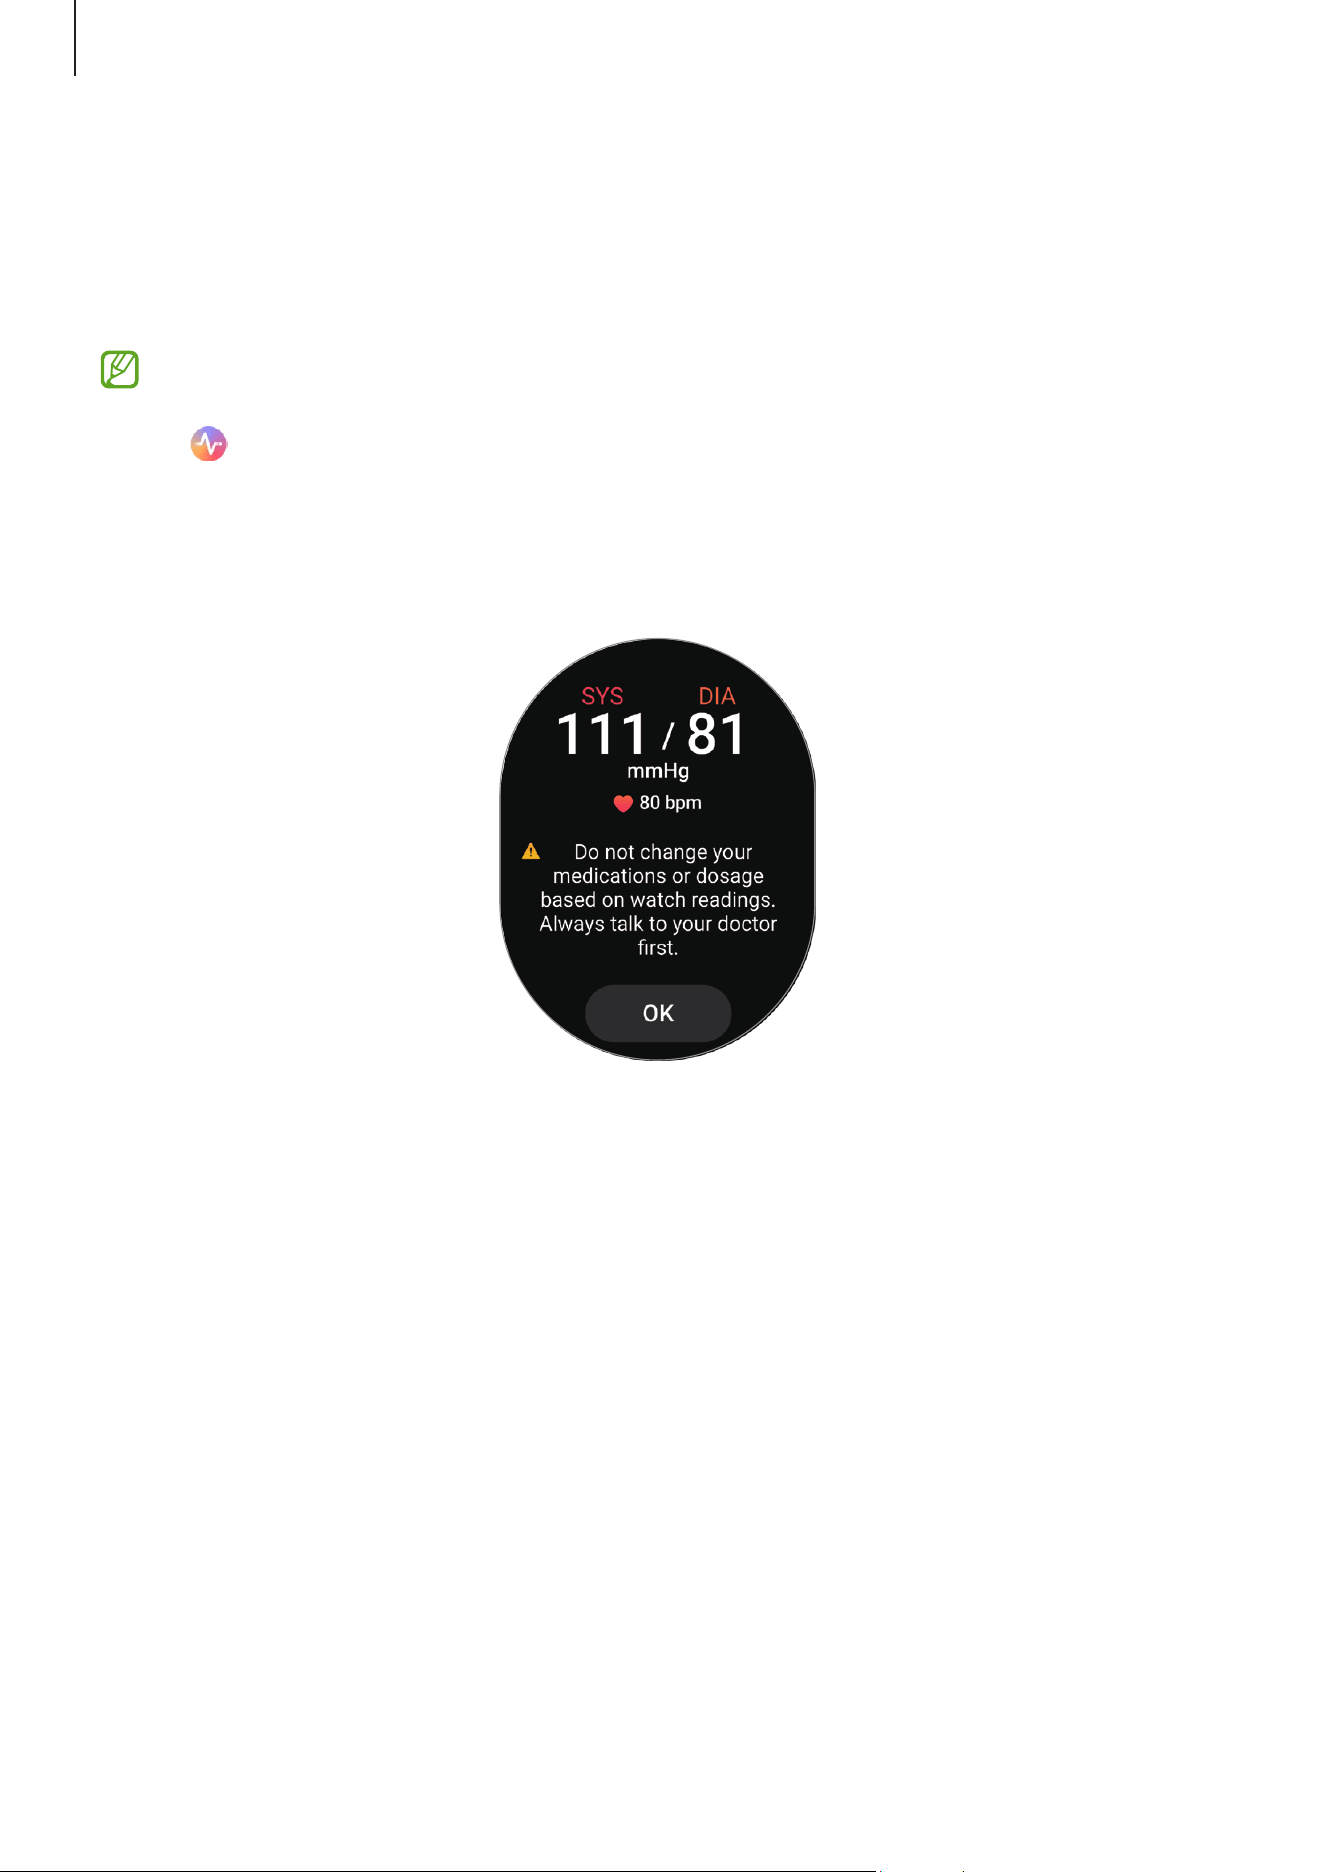
Apps and features
97
Measuring blood pressure
You can measure your blood pressure by using your Watch’s optical bio-signal sensor
without using any other medical devices, such as the cuff-typed blood pressure
manometer, after calibration.
You must wear your Watch on the same wrist used for calibration.
1 Tap (
Samsung Health Monitor
) on the Apps screen.
2 Tap
Blood pressure
→
Measure
.
Check the measured systolic and diastolic blood pressure and pulse rate on the
screen.
Checking the blood pressure readings
Check the readings on the Watch’s screen after measuring your blood pressure. You can
check previous readings and information on the connected phone’s Samsung Health
Monitor app. Share, delete, and manage your results on the phone’s Samsung Health
Monitor app.
If your readings are abnormally high or low and you feel some unusual physical
symptoms, contact a nearby hospital immediately for proper medical attention.

Apps and features
98
Starting to measure ECG
Presets before measuring ECG
Enter your profile on the Samsung Health Monitor app before measuring your ECG. If you
do not enter a profile, you cannot measure your ECG.
1 Tap (
Samsung Health Monitor
) on the Apps screen.
2 Tap
ECG
→
Open phone app
.
The Samsung Health Monitor app will open on your phone.
3 Tap
Accept
.
4 Enter your profile information, such as your name, gender, and birthday, and tap
Continue
.
5 Tap
Get started
and follow the on-screen instructions to get ready for measuring your
ECG.
Measuring the ECG
Manage your health by checking your heart status through the ECG measurement
results.
1 Tap (
Samsung Health Monitor
) on the Apps screen.
2 Tap
ECG
→
OK
and place a finger lightly on the electrical bio-signal sensor. Do not
leave any space between your wrist and your Watch.
Electrical bio-signal
sensor
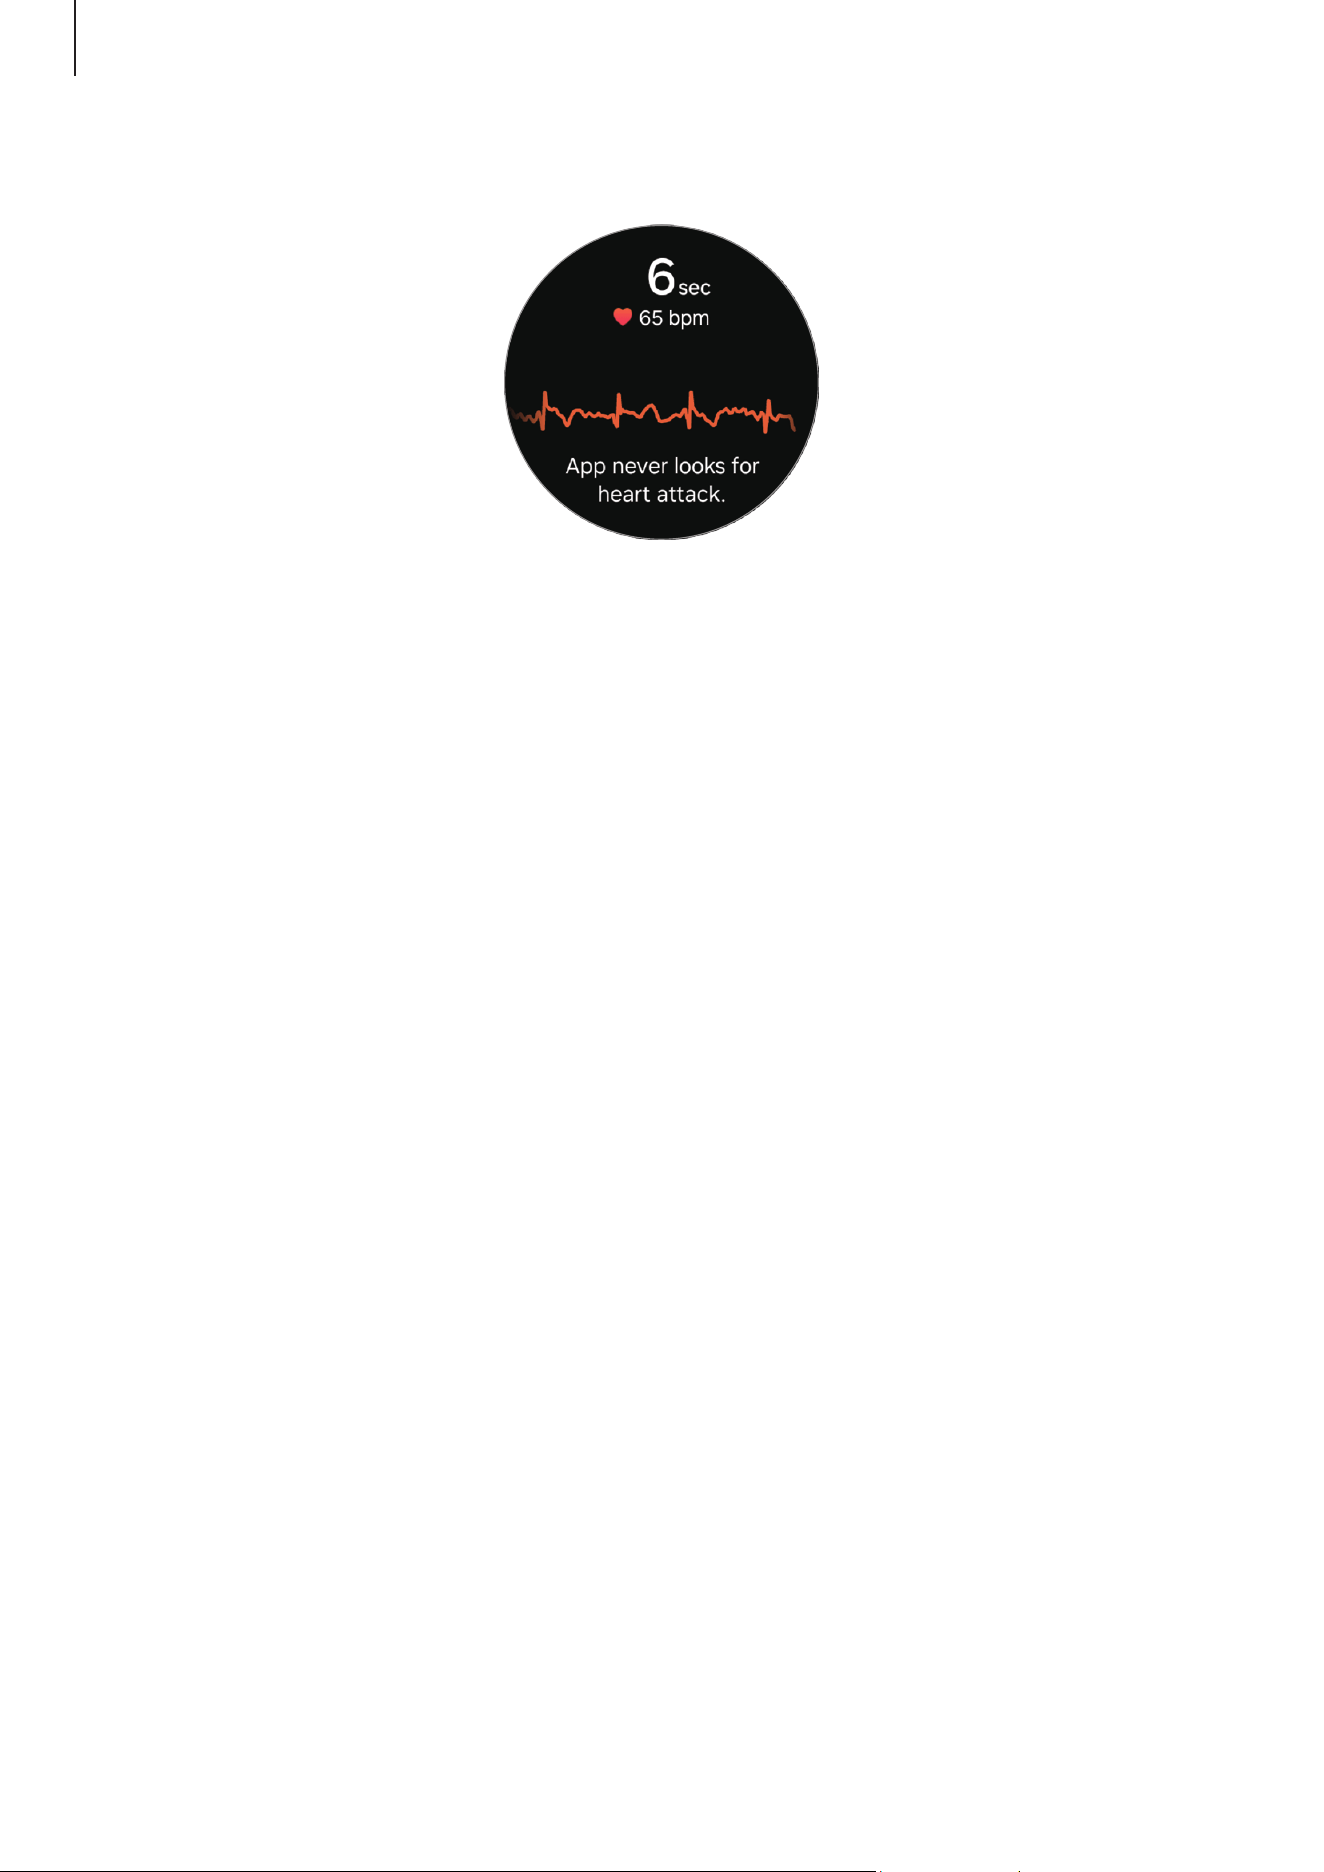
Apps and features
99
The measurement will start and the ECG wave will appear on the screen.
Check the measured ECG results on the screen.
3 Tap
Add
, select additional physical symptoms that you are currently experiencing,
and then tap
Save
.
4 Tap
Done
.
Checking the ECG results
Check the results and ECG wave on the Watch and the connected phone’s Samsung
Health Monitor app screen after taking your ECG. The ECG wave shows heart rate rhythm
and electric activities of your heart, and it is divided into several parts. Share the ECG
graph and results with your physician to get an accurate diagnosis through a more
thorough checkup when you find abnormal results in your ECG wave and readings.
You can check previous results and information on the connected phone’s Samsung
Health Monitor app. Share, delete, and manage your results on the phone’s Samsung
Health Monitor app.
•
Sinus rhythm
: A normal heartbeat rhythm that is between 50–100 BPM.
•
AFib
: A type of arrhythmia where the heart beats irregularly. Consult your physician.
•
Inconclusive
: The result is not a type of
Sinus rhythm
nor
AFib
and falls into one of
the following conditions:
‒
When the heart rate is less than 50 or more than 100 BPM while recording the
ECG wave and there is also no
AFib
‒
When the ECG wave is not sorted as
Sinus rhythm
nor
AFib
‒
When the heart rate is more than 120 BPM and the ECG wave indicates
AFib
Apps and features
100
•
Poor recording
: It appears when the signals used for analyzing the ECG
measurement result are not measured properly. If this case, take the measurement
again.
Contact your physician or a nearby hospital immediately if
Inconclusive
or
Poor
recording
appears continuously and you feel some unusual physical symptoms.
•
If
Poor recording
appears continuously, wipe out the electrical bio-signal sensor
and measure your ECG again. The signal may be experiencing interruptions
because of the dryness of the skin on the sensor or hair on your wrist. In this
case, measure your ECG after applying toner or lotion to make your skin moist or
after removing some hair first.
•
If the ECG wave appears upside down, it may not be analyzing your ECG properly.
Tap (
Settings
) on the Apps screen and tap
General
→
Orientation
to check
the settings on the wrist where you wear the Watch and the buttons’ location.
Then, wear your Watch in the correct direction and measure your ECG again.
GPS
The Watch has a GPS antenna so that you can check your real-time location information
without connecting to a phone.
On the Apps screen, tap
(
Settings
)
→
Location
and tap the switch to turn it on.
•
When your Watch and phone are connected, this feature uses your phone’s GPS.
Turn on the phone’s location feature to use the GPS sensor.
•
The GPS antenna in your Watch will be used when using the Samsung Health
feature and the health platform apps, even though your Watch is connected to
your phone.
•
GPS signal strength may decrease in locations where the signal is obstructed in
low-lying areas, such as between buildings, or indoors, wooded or mountainous
terrain, underwater, or in bad weather.
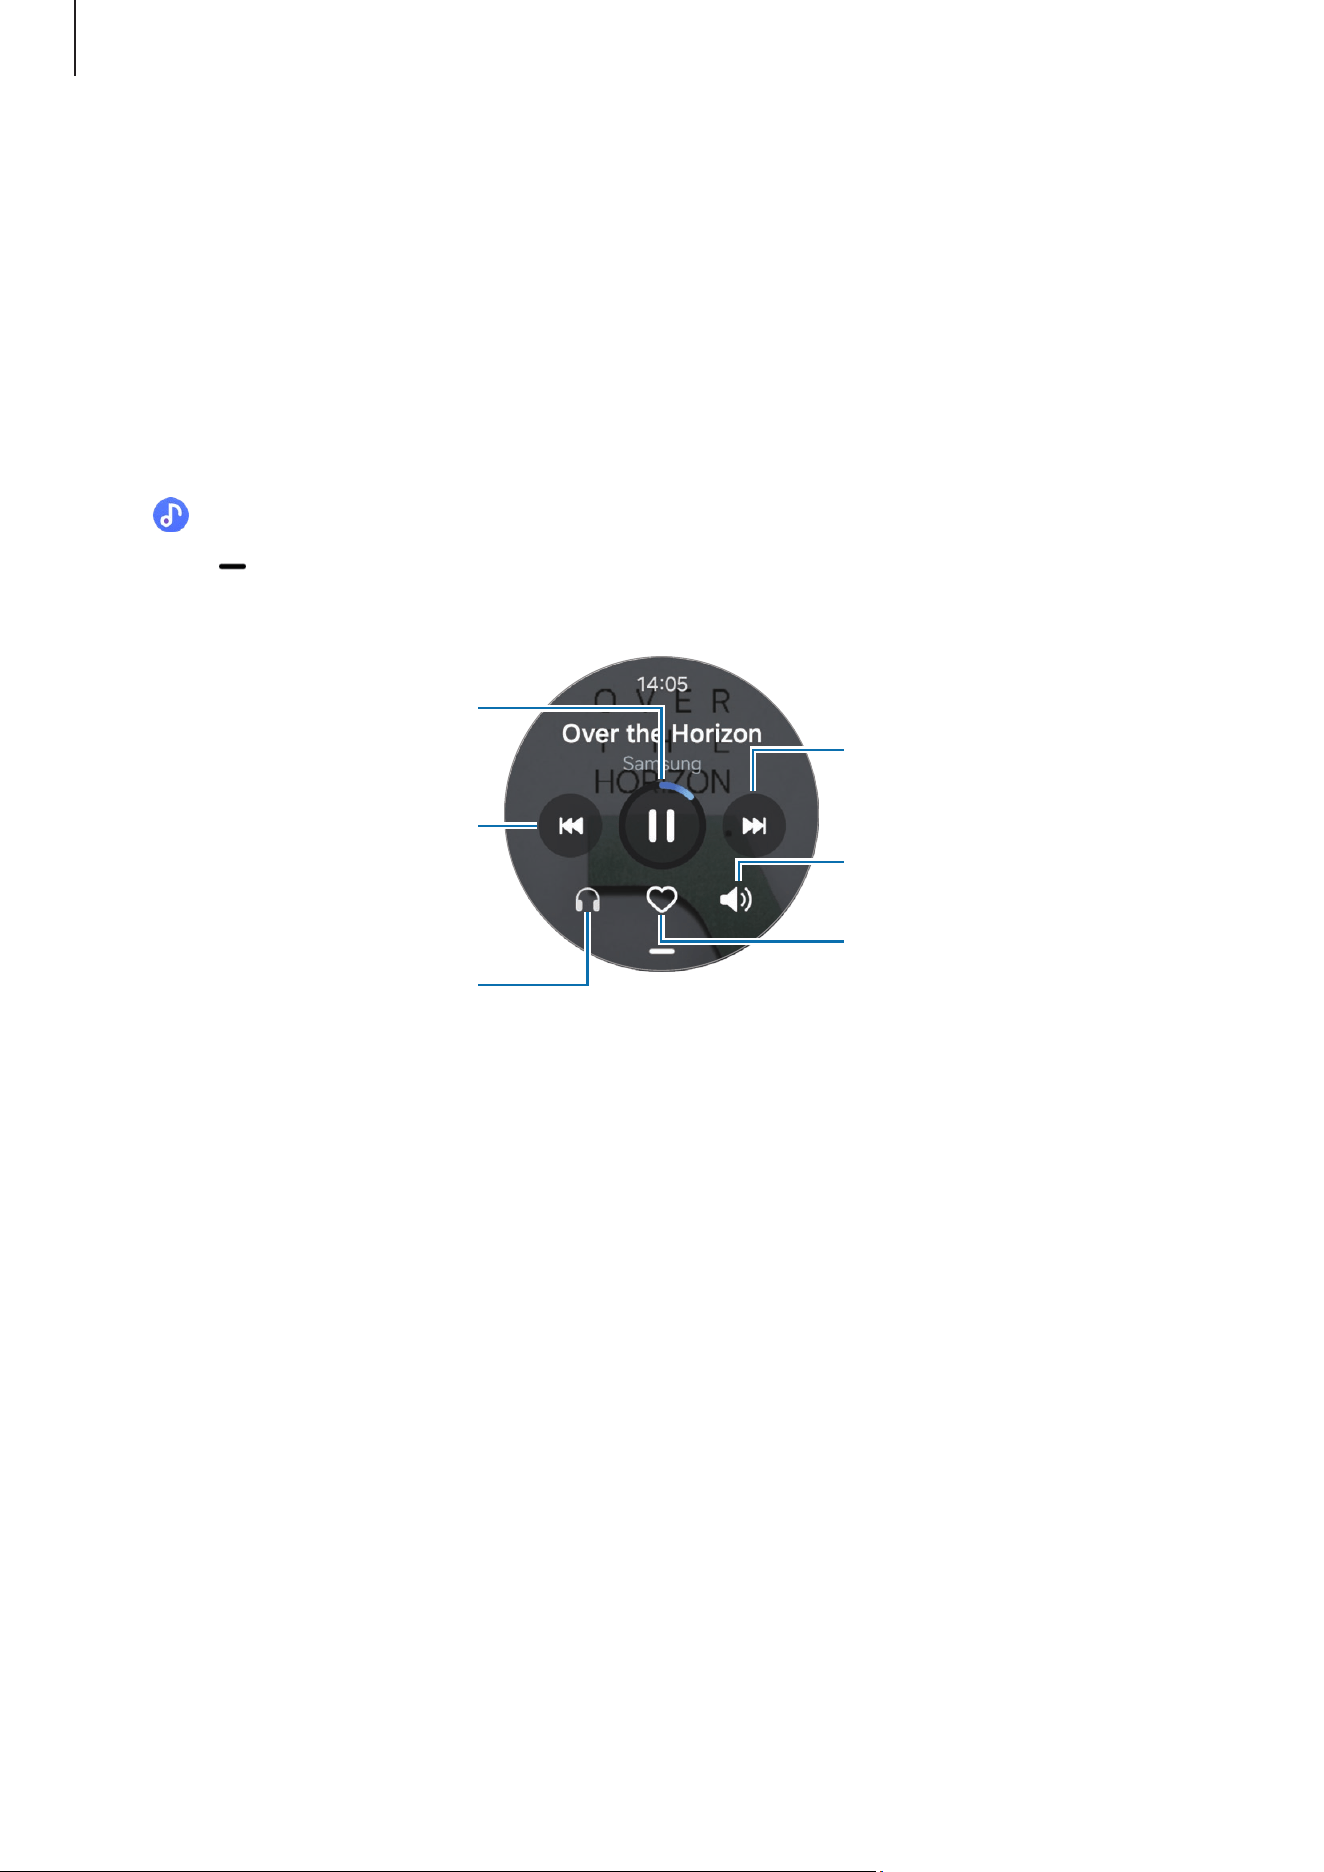
Apps and features
101
Music
Introduction
Listen to music saved on your Watch.
Using Music
Tap (
Music
) on the Apps screen.
Drag the
icon upwards and tap
Library
to open the Library screen. On the Library
screen, you can check the playlist and arrange music by tracks, albums, and artists.
Skip to the next file. Touch and
hold to move forwards quickly.
Select the audio output.
Add to favourites.
Adjust the volume.
Pause and resume playback.
Restart the currently playing
file or skip to the previous file.
Touch and hold to move
backwards quickly.
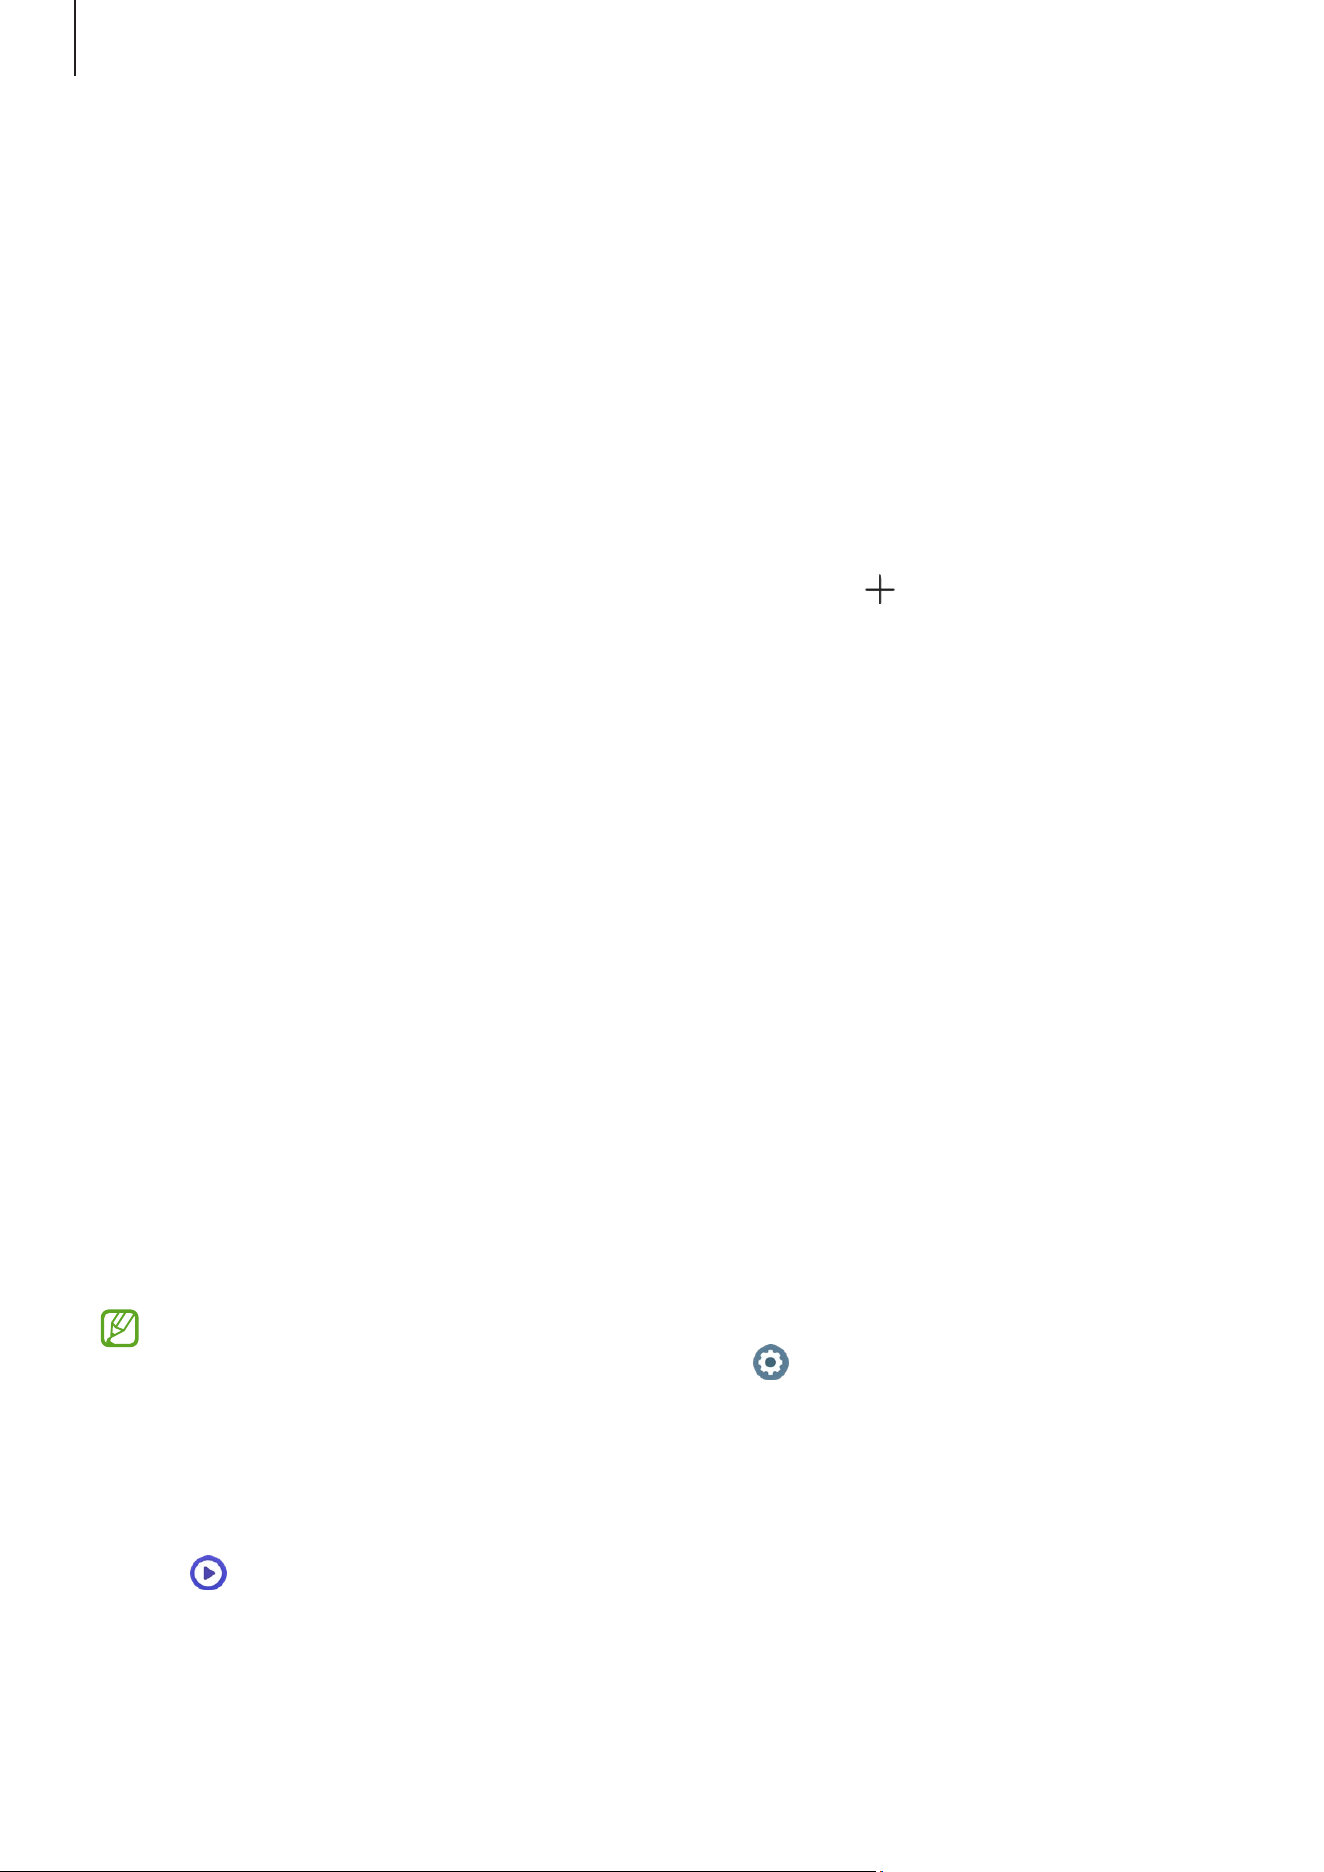
Apps and features
102
Managing audio files saved on your Watch
Check the audio files on your Watch, categorized by type, and manage them by adding
or removing them as desired. You can automatically sync audio files from your phone to
your Watch.
1 Open the
Galaxy Wearable
app on your phone.
2 Tap
Watch settings
→
Manage content
.
3 Select
Tracks on watch
.
The audio files saved on your Watch will appear, sorted by category.
•
To send audio files from your phone to your Watch, tap , select audio files, and
then tap
Add to watch
.
•
To delete audio files saved on your Watch, touch and hold a file you want to delete,
and tap
Delete
.
To sync audio files on your phone with your Watch every 6 hours, tap the
Auto sync
switch to turn it on. Then, tap
Playlists to sync
, select playlists to import to your Watch,
and then tap
Done
. The selected playlists will be automatically synced with your Watch
when it has more than 15% of remaining battery power and when power saving mode is
turned off on your Watch.
Media Controller
Introduction
Control the media app installed on your Watch or the connected phone to play or pause
music and video.
To open this app automatically from your Watch when you play music or videos on
the connected phone, on the Apps screen, tap (
Settings
)
→
Advanced features
and tap the
Auto launch media controls
switch to turn it on.
Controlling the music player
1 Tap (
Media Controller
) on the Apps screen.
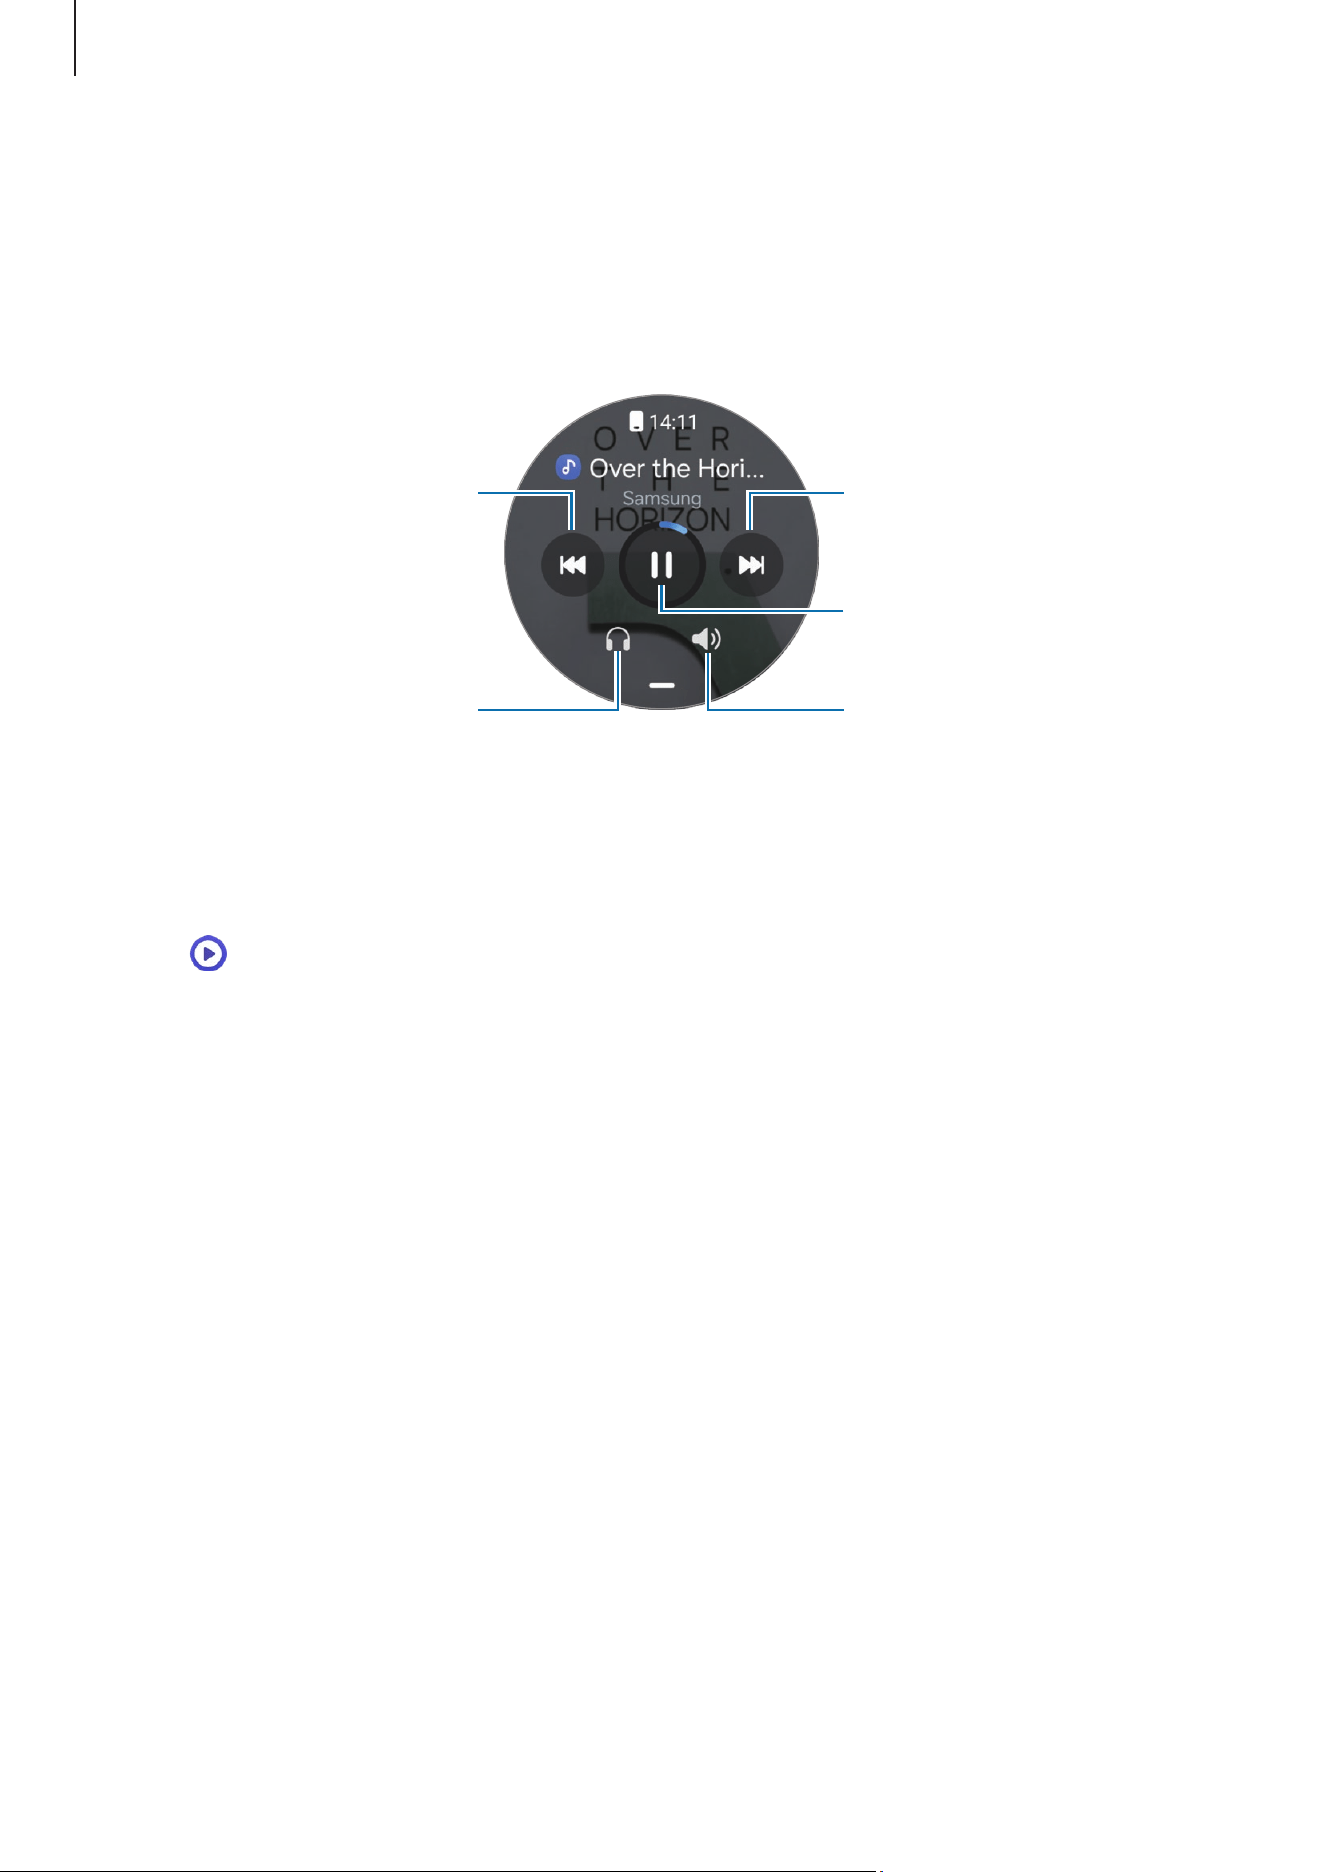
Apps and features
103
2 Select
Phone
or
Watch
.
When you select
Phone
, music will play from the connected phone’s music app and
you can control the music player with your Watch.
When you select
Watch
, music will play from your Watch’s music app and you can
listen to music with your Watch’s speaker or a connected Bluetooth headset.
Skip to the next file. Touch and
hold to move forwards quickly.
Adjust the volume.
Select the audio output.
Pause and resume playback.
Restart the currently playing
file or skip to the previous file.
Touch and hold to move
backwards quickly.
Controlling the video player
1 Play video on the connected phone.
2 Tap (
Media Controller
) on the Apps screen.
You can control the video player with your Watch.
Apps and features
104
Reminder
Register to-do items as reminders and receive notifications according to the condition
you set.
•
To receive reminder notifications in a specific place, you have to connect your
Watch to your phone through Bluetooth. However, the feature for setting you to
receive reminder notifications in a specific place is only available on your phone.
•
All reminders on your Watch will be synced with the connected phone
automatically so that you can also receive alerts and check them from the
phone.
1 Tap (
Reminder
) on the Apps screen and tap .
2 Enter the reminder.
3 Tap
Time
to set a notification.
4 Tap the input field, use the touch bezel, or swipe upwards or downwards on the
screen to set the date and time, and tap
Done
.
5 Set other notification options, such as whether to repeat the reminder or the alert
style, and tap
Save
.
The saved reminder is added to the reminders list and the reminder will appear at the
time you set with an alarm.
Completing reminders
On the reminders list, tap or select a reminder and tap
Completed
.
Restoring reminders
Restore reminders that have been completed.
1 On the reminders list, tap
→
Completed
.
2 Select a reminder to restore and tap
Restore
.
Reminders will be added to the reminders list and you will be reminded again.
Deleting reminders
Touch and hold the reminder on the reminder list, and then tap
Delete
.
Apps and features
105
Calendar
You can add events to your Watch and phone to help you manage your schedule more
effectively.
Events saved on your phone are also automatically synced to your Watch and can
be checked on your Watch.
1 Tap (
Calendar
) on the Apps screen and tap .
2 Enter the date, time, and event details, and then tap
Save
.
The saved event is added to the list and it will appear at the time you set.
To check events for the week by date, tap
Weekly view
and select a date.
To check the calendar, tap and use the touch bezel, or swipe upwards or downwards
on the screen to move to the desired month.
Bixby
Bixby is a user interface that helps you use your Watch more conveniently.
You can talk to Bixby. Bixby will launch a feature you request or show the information
you want. Visit www.samsung.com/bixby for more information.
•
Make sure the Watch’s microphone is not obstructed when you are speaking into
it.
•
Bixby is only available in some languages, and certain features may not be
available depending on your region.
Starting Bixby
Press and hold the Home button to launch Bixby and complete the setup by following
the on-screen instructions.
If you cannot launch Bixby with the Home button, on the Apps screen, tap (
Settings
)
→
Buttons and gestures
, tap
Press and hold
under
Home button
, and then select
Bixby
.
Apps and features
106
Using Bixby
While pressing and holding the Home button, say what you want to Bixby. Alternatively,
say the wake-up phrase after turning on the screen and say what you want.
For example, while pressing and holding the Home button, say “How’s the weather
today?” The weather information will appear on the screen.
If Bixby asks you a question during a conversation, you can continue to talk to Bixby
without pressing the Home button or
.
Waking up Bixby using your voice
You can start a conversation with Bixby by saying “Hi, Bixby” or “Bixby”.
1 Tap (
Settings
) on the Apps screen and tap
Advanced features
→
Bixby
.
2 Tap
Settings
→
Voice wake-up
.
3 Tap the
Wake with “Hi, Bixby”
switch to turn it on.
4 Tap
Wake-up phrase
and select a wake-up phrase you want.
Now you can say the wake-up phrase and start a conversation.
Creating and using quick commands
You can create quick commands to perform multiple commands at once by speaking a
specific word or short sentence to Bixby. For example, you can press and hold the Home
button and say “Good morning” to turn off Sleep mode and receive today’s weather
information and schedule all at once.
1 Open the
Galaxy Wearable
app on your phone.
2 Tap
Watch settings
→
Advanced features
→
Bixby
.
3 Tap
→
Quick commands
.
4 Select the quick command you want or tap to add your own quick command.
Apps and features
107
Weather
Check weather information on the Watch for locations set on the connected phone.
Tap (
Weather
) on the Apps screen.
To check the weather information, such as the time-specific weather or weekly
information, use the touch bezel or swipe upwards or downwards on the screen.
To add another city’s weather information, tap
Manage locations
→
Manage on phone
and add the city from the connected phone.
Alarm
Set and manage the Watch’s alarms and the phone’s alarms individually.
When your Watch is connected to your phone through Bluetooth, you can check all
alarm lists on your phone from the Watch.
Setting alarms
1 Tap (
Alarm
) on the Apps screen.
2 Tap
Add on watch
to set alarms that only go off on your Watch.
You can also add an alarm on the connected phone by tapping
Add on phone
.
3 Tap the input field, use the touch bezel or swipe upwards or downwards on the screen
to set the alarm time, and tap
Next
.
4 Set other alarm options, such as the date to go off and whether to repeat the alarm,
and tap
Save
.
The saved alarm is added to the alarms list.
To turn on or off alarms, tap the switch next to the alarm in the alarms list.
Turning off alarms
Drag outside the large circle to turn off an alarm. Alternatively, swipe the touch bezel
clockwise.
If you want to use the snooze feature, drag outside the large circle. Alternatively,
swipe the touch bezel counter-clockwise.

Apps and features
108
Deleting alarms
In the alarms list, touch and hold an alarm, and then tap
Delete
.
World clock
Tap (
World clock
) on the Apps screen to check the world clocks added from the
phone.
To add a world clock, tap
Add on phone
. Or, if you have added world clocks, tap
Manage
on phone
, and then add or remove a world clock on the connected phone.
Timer
Setting a timer
1 Tap (
Timer
) on the Apps screen.
2 Tap .
3 Tap the input field, use the touch bezel or swipe upwards or downwards on the screen
to set the duration, and tap .
If you select a preset, the timer will start right away. You can also check more
presets by using the touch bezel or swiping upwards or downwards on the screen.
Dismissing a timer
Drag outside the large circle when your timer finishes. Alternatively, swipe the touch
bezel clockwise.
To restart the timer, drag
outside the large circle. Alternatively, swipe the touch bezel
counter-clockwise.
Apps and features
109
Stopwatch
1 Tap (
Stopwatch
) on the Apps screen.
2 To change the stopwatch style, touch and hold the screen.
Select the stopwatch style you want by using the touch bezel or swiping left or right
on the screen.
3 Tap
Start
to time an event.
To record lap times while timing an event, tap
Lap
or .
4 Tap
Stop
or to stop timing.
•
To restart the timing, tap
Resume
or .
•
To clear lap times, tap
Reset
or .
On the Apps screen, tap (
Settings
)
→
Buttons and gestures
→
Action
and
select
Stopwatch
to start and control the stopwatch directly with the Quick button.
During use, press the Quick button to stop or resume the timer, and press it twice
to record the lap time. While it is stopped, press and hold the Quick button to clear
all lap times. (Galaxy Watch Ultra)
Gallery
Introduction
You can access images, albums, and stories saved on your Watch or synced with your
phone. Also, you can personalize the watch face by using pictures.
Managing pictures saved on your Watch
Check the pictures on your Watch, categorized by type, and manage them by adding or
removing them as desired. You can automatically sync pictures from your phone to your
Watch.
1 Open the
Galaxy Wearable
app on your phone.
2 Tap
Watch settings
→
Manage content
.

Apps and features
110
3 Select
Images on watch
.
The pictures saved on your Watch will appear, sorted by category.
•
To send pictures from your phone to your Watch, tap , select pictures, and then
tap
Done
.
•
To delete pictures saved on your Watch, touch and hold a file you want to delete,
and tap
Delete
.
To sync images on your phone with your Watch every six hours, tap the
Auto sync albums
switch to turn it on. Then, tap
Albums to sync
, select albums to import to your Watch,
and then tap
Done
. The selected albums will be automatically synced with your Watch
when it has more than 15% of remaining battery power and when power saving mode is
turned off on your Watch.
Using Gallery
Tap (
Gallery
) on the Apps screen.
View your albums on your
Watch, including albums
added from your phone.
View the stories added from
your phone.
View your saved images on
your Watch.
Viewing images
Check and manage the images saved on your Watch.
1 Tap (
Gallery
) on the Apps screen.
2 Select a category.
3 Use the touch bezel or swipe upwards or downwards on the screen to scroll through
the list and select an image.
Apps and features
111
Zooming in or out
While checking an image, double tap the image, spread your two fingers apart, or pinch
on an image to zoom in or out.
When an image is magnified, you can view the rest of the image by scrolling around the
screen.
Customizing a watch face
You can view pictures on your watch face after personalizing it with pictures. Refer to
Customizing a watch face with a picture for more information.
1 Tap (
Gallery
) on the Apps screen.
2 Touch and hold the image to use.
To select more images, use the touch bezel or swipe left or right on the screen and
select them.
3 Tap and select a watch face type.
Deleting images
1 Tap (
Gallery
) on the Apps screen.
2 Touch and hold the image to delete it.
To select more images you want to delete, use the touch bezel or swipe left or right on
the screen and select the other images you wish to delete.
To select all images, tap
All
.
3 Tap .
Apps and features
112
Samsung Find
If you lose your phone or another wearable device that is registered to the same
Samsung account as your Watch, you can use your Watch to find it.
1 Tap (
Samsung Find
) on the Apps screen.
2 Select the device that you want to find from the list.
The map will show the location of your device. Tap to check the detailed address.
If this app does not work properly, on the Apps screen, tap (
Settings
)
→
Apps
→
App list
→
Samsung Find
→
Permissions
→
Location
and select the
All the time
.
Sending an SOS
Introduction
In an emergency, including when you are hurt from a fall, make an emergency call and
send an SOS message that includes your location information to previously registered
contacts. Also, you can set up your Watch to display your medical information on it after
sending the SOS.
•
If the GPS feature of your Watch is not turned on and it is needed to send your
location information, it will be turned on automatically to determine your
location.
•
Your location information may not be sent depending on your region or situation.
Presets the SOS request
Entering medical information
Enter your medical information, such as your name and blood type. This information can
be accessed directly on your Watch during an emergency.
1 Open the
Galaxy Wearable
app on your phone and tap
Watch settings
→
Safety and
emergency
.

Apps and features
113
2 Tap
Medical info
, enter your information, and then tap
Save
.
When sending an SOS, the entered medical information will appear on your Watch’s SOS
screen.
Registering emergency contacts
Add contacts who can help you when requesting an SOS.
1 Open the
Galaxy Wearable
app on your phone and tap
Watch settings
→
Safety and
emergency
.
2 Tap
Emergency contacts
.
3 Tap
Add emergency contact
, select contacts you want from your existing contact, and
then tap
Done
.
Requesting an SOS
Setting the SOS request
1 Open the
Galaxy Wearable
app on your phone and tap
Watch settings
→
Safety and
emergency
.
2 Tap
Emergency SOS
and set the SOS request.
•
To select a contact to call if there’s an emergency, tap
Emergency number to call
and select a contact or enter one manually.
•
To send an SOS message that includes your current location to emergency
contacts, tap the
Share info with emergency contacts
switch to turn it on. Refer
to Registering emergency contacts for more information about setting the
emergency contacts to send a message.
•
To automatically initiate an emergency call and send an SOS message after a
countdown on the SOS request screen, tap the
Require swipe to call
switch to turn
it off and tap
Countdown
to set the countdown time before the SOS request.

Apps and features
114
Sending an SOS request
1 In an emergency, press the Watch’s Home button five times.
2 Drag outside the large circle. Alternatively, swipe the touch bezel counter-
clockwise.
A call will be placed to your emergency contact.
3 When the call is completed, drag
outside the large circle. Alternatively, swipe the
touch bezel counter-clockwise.
Your current location will be shared with your emergency contacts and the SOS
screen will appear on your Watch.
•
To not place a call or share your current location, drag outside the large circle
on the SOS request screen. Alternatively, swipe the touch bezel clockwise.
•
If the
Share info with emergency contacts
feature is turned off, a message that
includes your current location will not be sent to emergency contacts.
Playing the siren (Galaxy Watch Ultra)
In an emergency, you can play a siren to get someone’s attention, inform them where
you are, and ask for help. When the SOS screen appears on your Watch after an SOS
request, tap
Siren
to play the siren.
You can also press and hold the Quick button to play the siren. Press and hold the
Quick button for 5 seconds to start a countdown before the siren sounds. To turn
off the siren during the countdown, press any button on your Watch or tap . To
stop the siren after it starts sounding, press or press and hold the Quick button
for more than 3 seconds. If the siren is not played, tap (
Settings
) on the Apps
screen, tap
Buttons and gestures
, and then tap the
Siren
switch to turn it on.
Requesting an SOS when you are hurt from a fall
Setting the SOS request when you are hurt from a fall
1 Open the
Galaxy Wearable
app on your phone and tap
Watch settings
→
Safety and
emergency
.
Apps and features
115
2 Tap
Hard fall detection
, tap the switch to turn it on, and then set the SOS request to
be sent when you are hurt from a fall.
•
To set the conditions in which your Watch will determine you have been hurt from
a fall, tap
When to detect falls
.
•
To select a contact to make an emergency call, tap
Emergency number to call
and
select a contact or enter one manually.
•
To send an SOS message that includes your current location to emergency
contacts when you are hurt from a fall, tap the
Share info with emergency
contacts
switch to turn it on. Refer to Registering emergency contacts for more
information about setting the emergency contacts to send a message.
Sending an SOS request when you are hurt from a fall
When there is a large impact, the Watch will detect the hurt from a fall through your
arm’s movement. If there is no movement detected for more than 30 seconds after
the fall, it will display the alert while emitting sound and vibrating. If there is still no
response after 60 seconds, the emergency call will be placed, and the SOS message will
be sent automatically to the previously registered contact after the countdown.
•
When you are doing a high impact exercise, the Watch may believe that you have
been hurt in a fall. If it is so, cancel the alert to not send the SOS message.
•
If the
Share info with emergency contacts
feature is turned off, a message that
includes your current location will not be sent to emergency contacts.
•
If you want to manually place an emergency call and send the SOS message after
a hard fall, open the
Galaxy Wearable
app on your phone, tap
Watch settings
→
Safety and emergency
→
Hard fall detection
, and then tap the
Require swipe to
call
switch to turn it on.
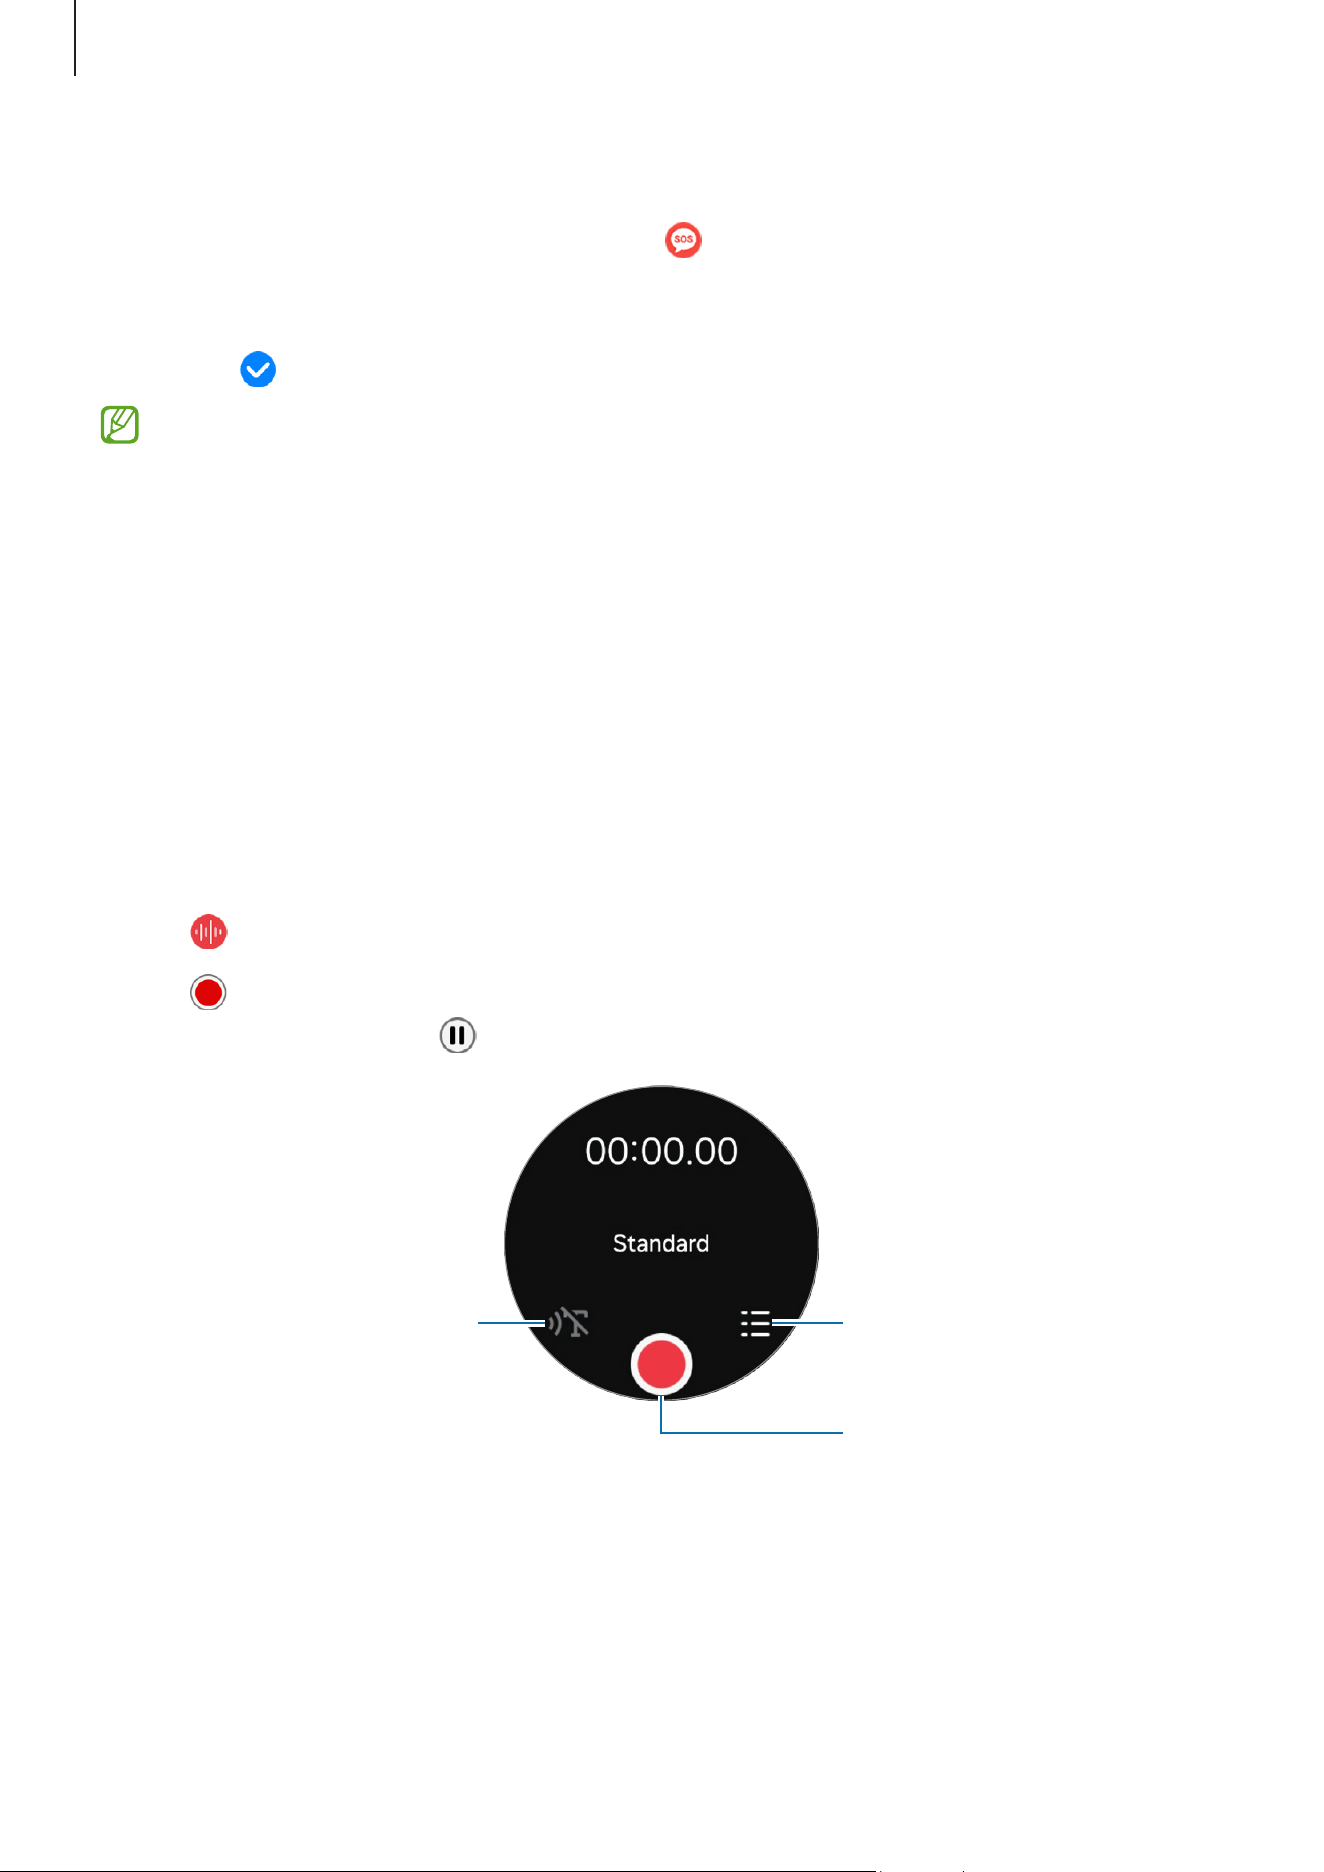
Apps and features
116
Stop sharing location information
While sharing your location information, the icon appears on the Watch screen, and
you can check the sharing status on the notification panel.
To stop sharing your location information, tap the notification panel and tap
Stop
sharing
→
.
If you do not stop sending SOS messages, additional messages that include your
location information will be continuously sent to the previously registered contacts
every 15 minutes for 24 hours after the first SOS message is sent. However, the
message will be sent only when your current location is some distance away from
the location where the last message was sent.
Voice Recorder
Record or play voice recordings.
Making voice recordings
1 Tap (
Voice Recorder
) on the Apps screen.
2 Tap to start recording. Speak into the Watch’s microphone.
To pause recording, tap .
Change the recording mode.
Start recording.
Check your saved recordings.
Apps and features
117
3 Tap to finish recording.
The recording will be saved. To listen to the recorded sound, select a recording file.
The recorded audio files from your Watch are automatically synced to your
connected phone and transcribed to text, and then you can check out a summary.
The transcribed text can also be translated into other languages. These features
may not be supported depending on the model of your connected phone.
Changing the recording mode
Tap (
Voice Recorder
) on the Apps screen.
Select a mode you want.
•
: This is the standard recording mode.
•
: The Watch records your voice for up to 10 minutes, converts it to text, and then
saves it. For best results, keep the Watch near your mouth and speak loudly and
clearly in a quiet place.
If the speech-to-text language does not match the language you are speaking,
the Watch will not recognize your voice. Before using this feature, tap
Speech-
to-text
on the voice recorder screen to set the speech-to-text language.
Calculator
You can perform calculations.
Tap
(
Calculator
) on the Apps screen.
Tap and check the calculation history. To clear the history, tap
Clear history
.
Drag the icon upwards to calculate a tip or use the unit conversion tool.
Apps and features
118
Compass
You can use your Watch as a compass.
1 Tap (
Compass
) on the Apps screen.
2 Drag the icon upwards and tap
Calibrate
to calibrate the compass by swinging the
wrist you are wearing the Watch on.
After calibrating, the compass will appear.
Drag the icon upwards to check additional information, such as the incline, altitude,
and atmospheric pressure.
•
The presence of magnetic substances, such as the wireless charger, may affect
your Watch’s internal compass sensor and lower its accuracy. Also, the metallic
band, which contains magnetic substances, may affect your Watch’s internal
compass sensor by magnetic flux, depending on how you wear the band.
•
The compass sensor may be affected by magnetic interference, leading to a
decrease in accuracy, even if the compass was calibrated in a densely built-up
city, inside a building, or in a confined indoor space like an indoor parking lot or
inside of a car.
Buds Controller
You can check the battery status of the Galaxy Buds connected to the Watch and change
their settings.
Tap (
Buds Controller
) on the Apps screen.
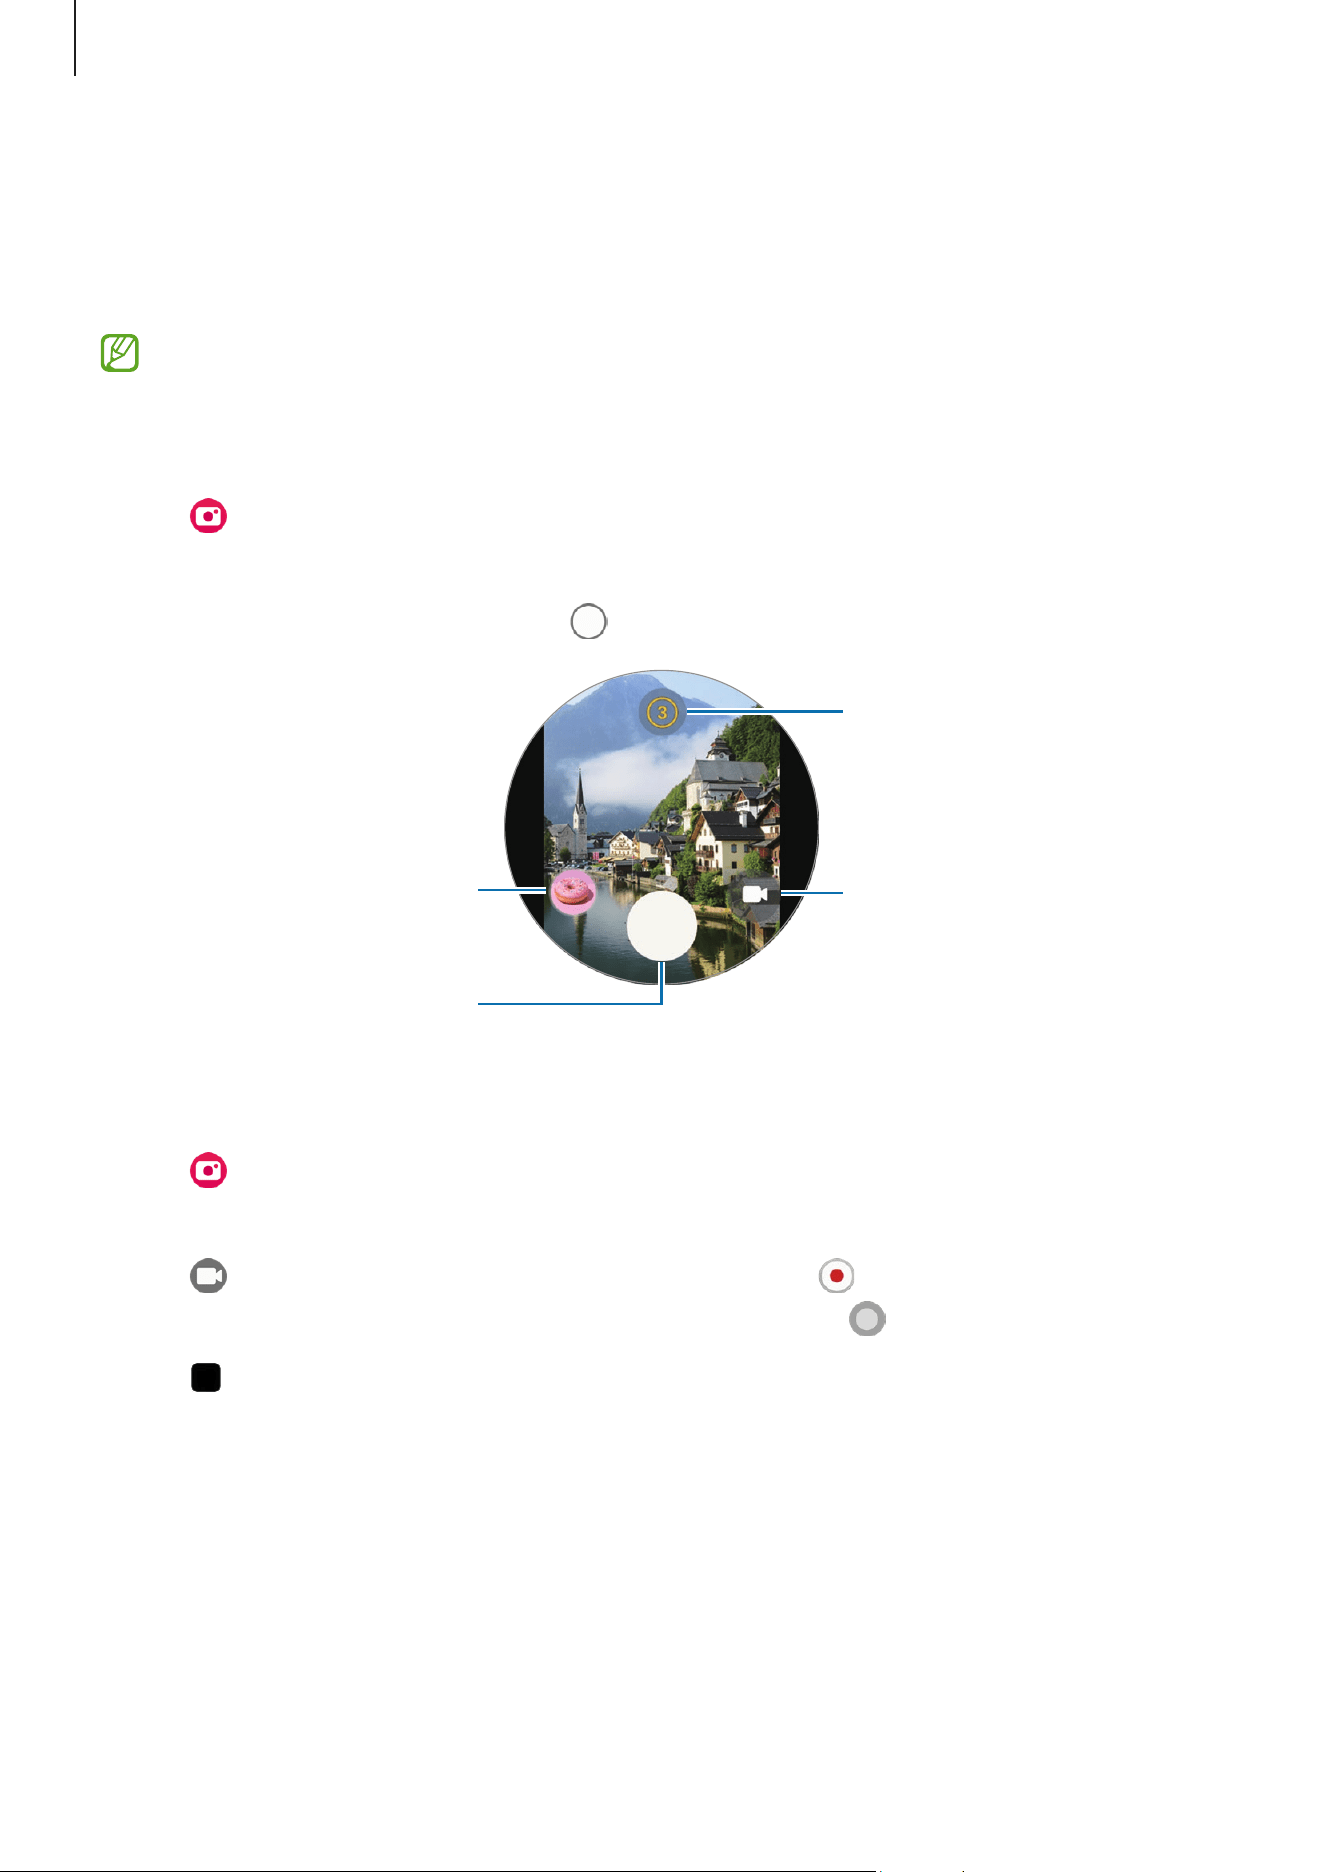
Apps and features
119
Camera Controller
You can remotely control the cameras of the phone connected to the Watch and take
pictures or record videos from a distance.
This app may not be available depending on the connected phone.
Taking a picture
1 Tap (
Camera Controller
) on the Apps screen.
The Camera app will be opened on the connected phone.
2 Check the preview screen and tap to take a picture.
Preview thumbnail
Select the length of the delay
before the camera
automatically takes a picture.
Take a picture.
Change the shooting mode.
Recording a video
1 Tap (
Camera Controller
) on the Apps screen.
The Camera app will be opened on the connected phone.
2 Tap to change the shooting mode to video and tap to record a video.
To capture an image from the video while recording, tap .
3 Tap to stop recording the video.

Apps and features
120
Samsung Global Goals
The Global Goals, which were set up by the United Nations General Assembly in 2015,
consist of goals that aim to create a sustainable society. These goals have the power to
end poverty, fight inequality, and stop climate change.
With Samsung Global Goals, learn more about the global goals and join the movement
for a better future.
SmartThings
You can control smart appliances and Internet of Things (IoT) products that are
connected to your phone with your Watch.
1 Tap (
SmartThings
) on the Apps screen.
2 Tap
All routines
or
All devices
, and then select a device or routine to control.
To add routines or devices, tap
Show on phone
and add them on the connected phone.
If you have not installed the SmartThings app on your connected phone or if the
versions of the SmartThings app on your Watch and phone do not match, you will
not be able to use this app. Download the latest version of the app on your phone
when you tap
Show on phone
.
Google apps
Google provides some apps for Watch. You may require a Google Account to access some
apps.
•
Maps
: Find your location on the map and search the map using GPS.
•
Messages
: Send and receive messages on your Watch or phone.
•
Assistant
: Use the Watch’s features or search for information using your voice.
Some apps may not be available depending on the carrier or model.

Apps and features
121
Settings
Introduction
Customize settings for functions and apps. Set your Watch depending on your usage
pattern by configuring the various settings.
Tap (
Settings
) on the Apps screen.
Some features in Settings may not be available depending on the region, carrier, or
model.
Samsung account
Register the Samsung account on your connected phone or check the previously
registered Samsung account.
On the Settings screen, tap
Samsung account
.
Connections
Bluetooth
Connect to a phone through Bluetooth. You can also connect other Bluetooth-enabled
devices, such as a Bluetooth headset.
On the Settings screen, tap
Connections
→
Bluetooth
.
Precautions for using Bluetooth
•
Samsung is not responsible for the loss, interception, or misuse of data sent or
received through Bluetooth.
•
Always ensure that you share and receive data with devices that are trusted and
properly secured. If there are obstacles between the devices, the operating distance
may be reduced.
•
Some devices, especially those that are not tested or approved by the Bluetooth SIG,
may be incompatible with your device.
•
Do not use the Bluetooth feature for illegal purposes (for example, pirating copies of
files or illegally tapping communications for commercial purposes). Samsung is not
responsible for the repercussions of illegal use of the Bluetooth feature.

Apps and features
122
Wi-Fi
Turn on the Wi-Fi feature to connect to a Wi-Fi network.
1 On the Settings screen, tap
Connections
→
Wi-Fi
, and tap the switch to turn it on.
2 Select a network from the Wi-Fi network list.
Networks that require a password appear with a lock icon.
3 Tap
Connect
.
•
If you cannot connect to a Wi-Fi network properly, restart your Watch’s Wi-Fi
feature or the wireless router.
•
The device is restricted to indoor use only when operating in the 5150–5350 MHz
frequency range.
NFC and contactless payments
You can use this feature to make payments after downloading the required apps.
On the Settings screen, tap
Connections
→
NFC and contactless payments
.
The Watch contains a built-in NFC antenna. Handle the Watch carefully to avoid
damaging the NFC antenna.
Making payments with the NFC feature
Before you can use the NFC feature to make payments, you must register for a mobile
payment service. To register or get more information about services, contact your service
provider.
1 On the Settings screen, tap
Connections
→
NFC and contactless payments
and tap
the switch to turn it on.
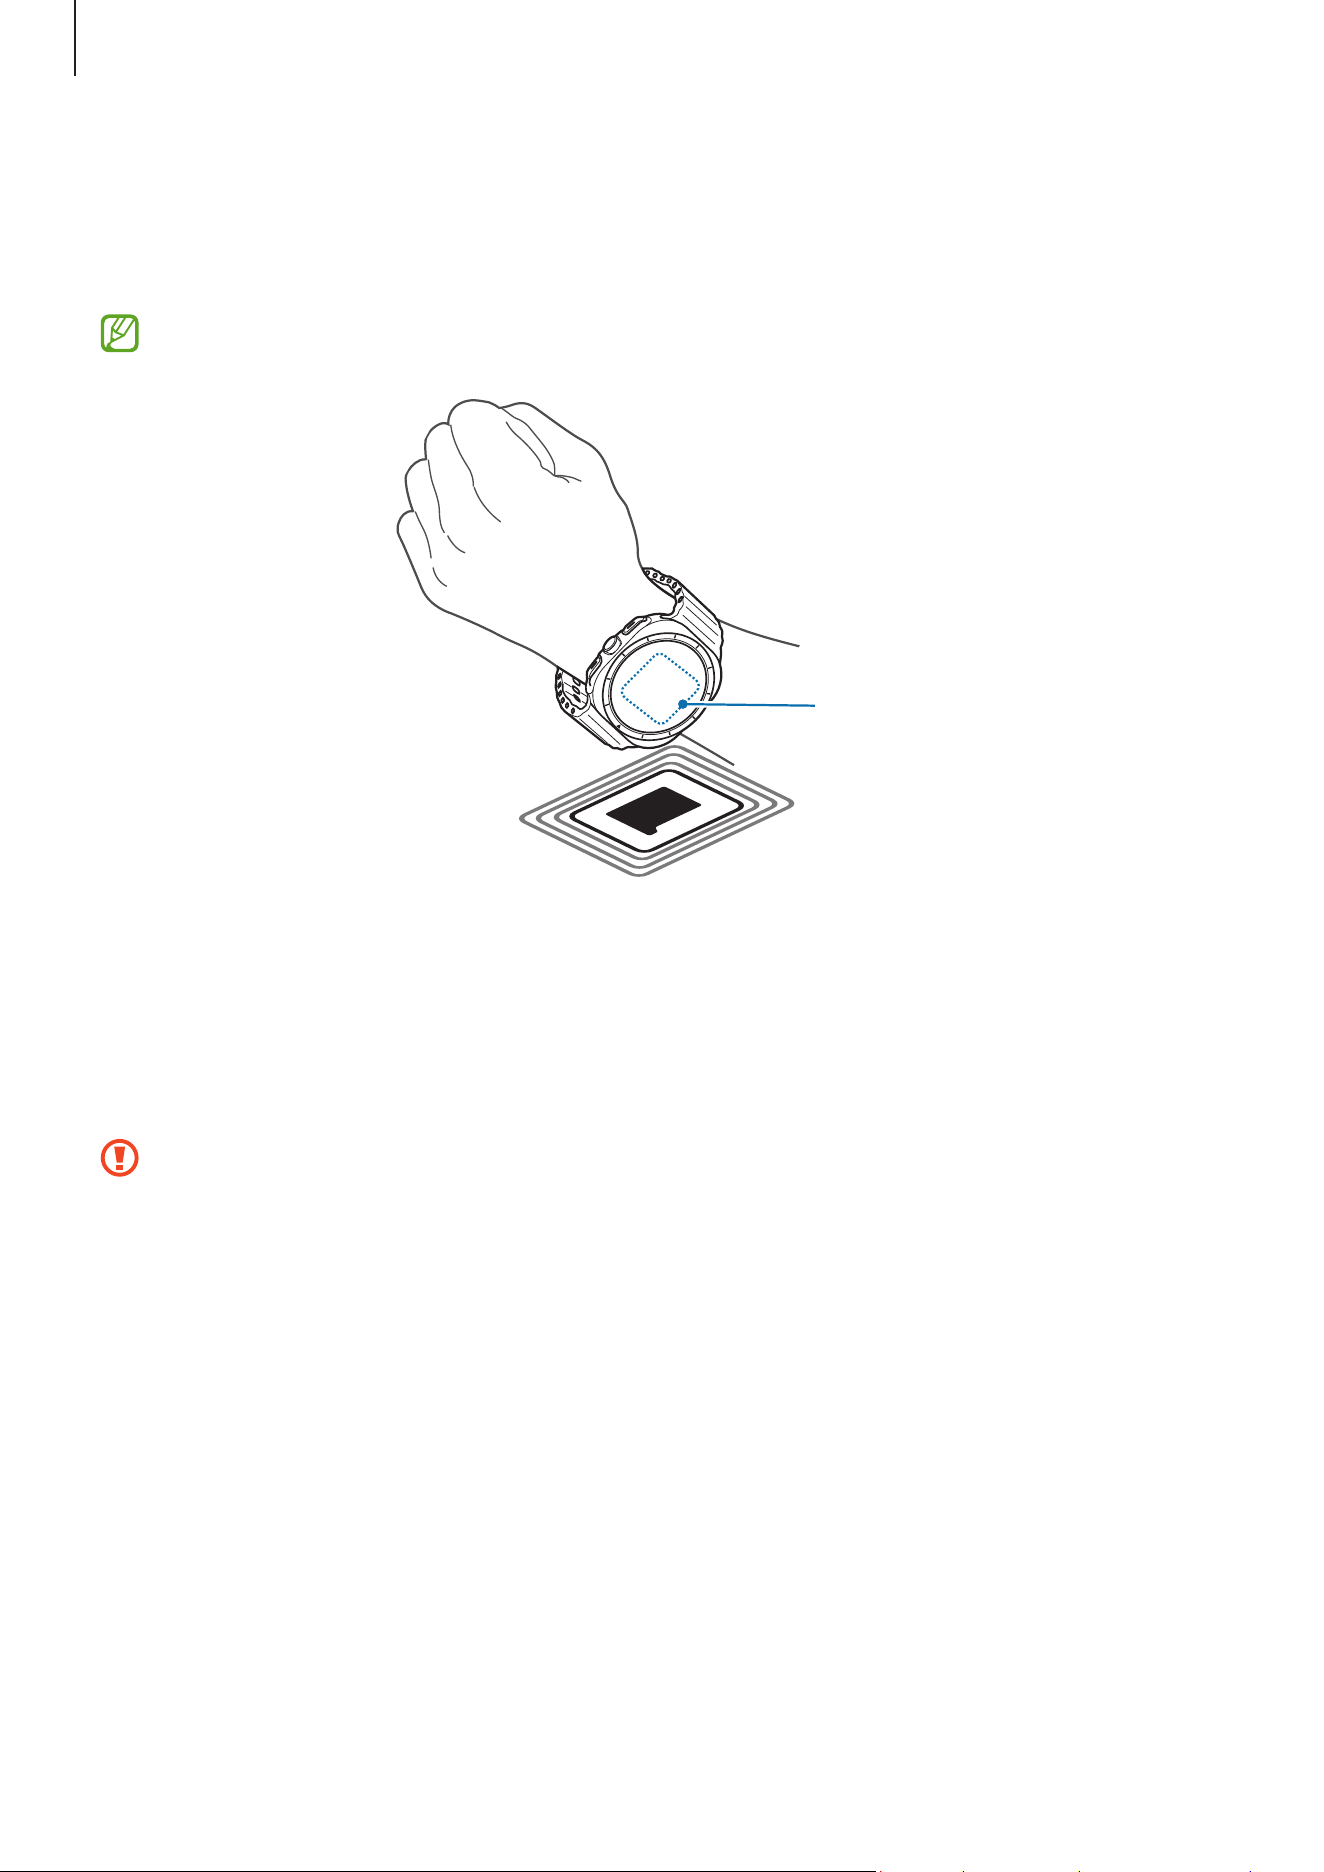
Apps and features
123
2 Touch the NFC antenna area of the Watch to the NFC card reader.
To set the default app, on the Settings screen, tap
Connections
→
NFC and contactless
payments
→
Payment
and select an app.
The payment services list may not include all available payment apps.
NFC antenna
Flight mode
Set the Watch to turn off all wireless functions on your Watch. You can use only non-
network services.
On the Settings screen, tap
Connections
and tap the
Flight mode
switch to turn it on.
Follow the regulations provided by the airline and the instructions of aircraft
personnel. In cases where it is allowed to use the device, always use it in Flight
mode.
Apps and features
124
Mobile networks (Mobile network enabled models)
Customize the settings to control mobile networks.
On the Settings screen, tap
Connections
→
Mobile networks
and select a mobile
network connection option.
•
Auto
: Set to automatically use the Watch’s mobile network when the Bluetooth
connection with your phone is disconnected.
•
When the Watch is connected to the phone through Bluetooth, the Watch’s
mobile network is turned off to save battery power. Then, you cannot receive
messages and calls made to the Watch’s number.
•
When the Bluetooth connection with your phone is disconnected, the
Watch’s mobile network will automatically connect. Then, you can receive
messages and calls made to the Watch’s number.
•
Always on
: Set to always use the Watch’s mobile network regardless of the
connection with the phone.
•
Always off
: Set not to use the Watch’s mobile network.
•
Mobile plans
: Subscribe to the carrier’s mobile plan or additional services.
•
Some services that require a network connection may not be available
depending on the carrier.
•
When you are not subscribed to the carrier’s mobile plan, the Watch’s mobile
network is turned off to save battery power and the network services may not be
available.
Data usage (Mobile network enabled models)
Keep track of your data usage amount and customize the limit settings. Set the Watch to
automatically disable the mobile data connection when you have reached your specified
mobile data limit.
On the Settings screen, tap
Connections
→
Data usage
.
•
Start billing cycle on
: Set the monthly start date of your plan’s data usage.
•
Set data limit
: Turn on or off the feature to automatically disable the mobile data
connection when you have reached your specified mobile data limit.
•
Data limit
: Set the mobile data limit.
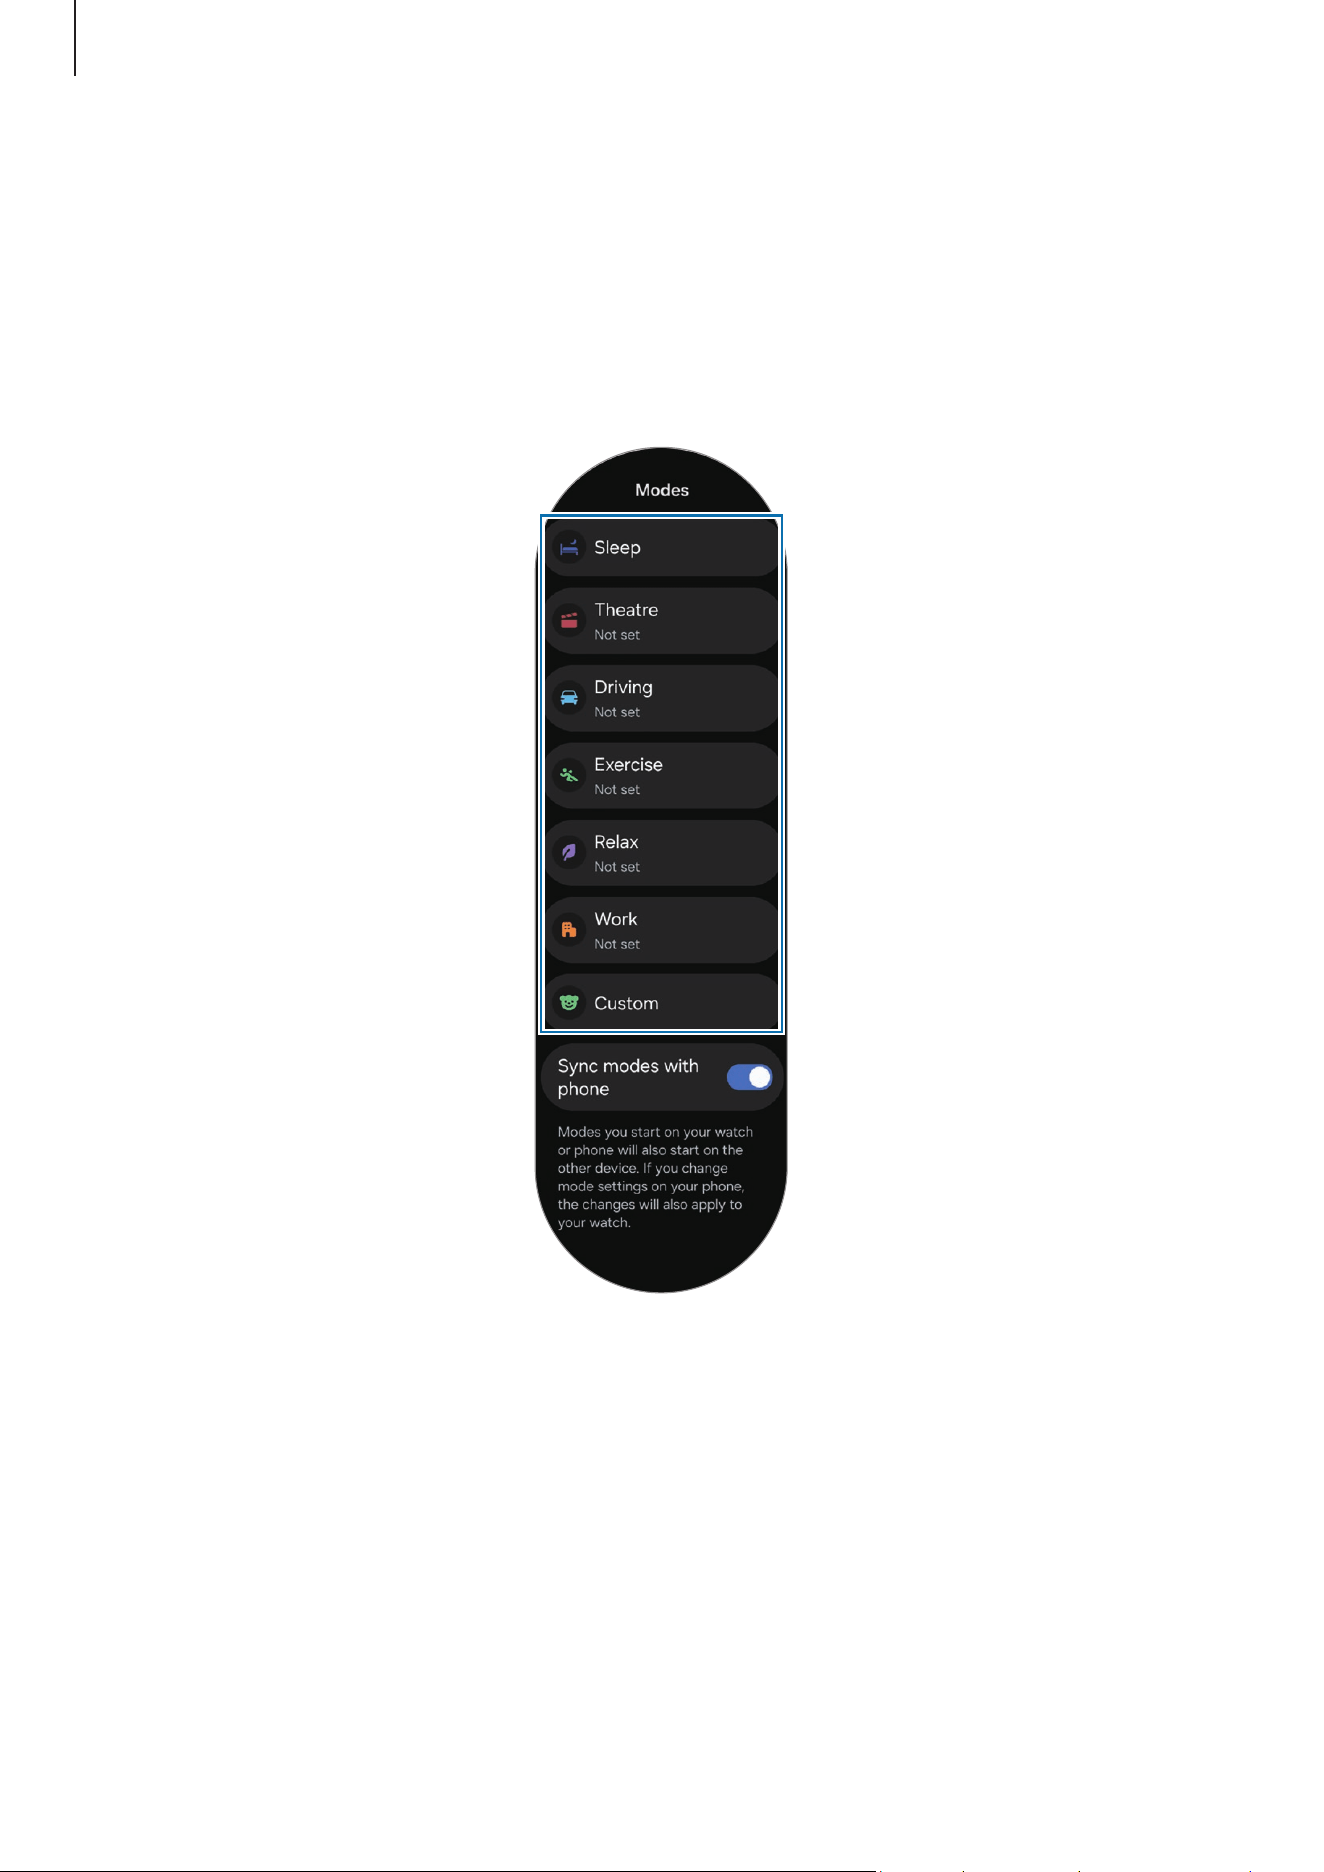
Apps and features
125
Modes
Turn modes that sync with your connected phone based on your current activity or
location on or off.
On the Settings screen, tap
Modes
.
1 Select the mode you want.
2 Tap
Turn on
.
For modes that run automatically, it will be turned on when the conditions added on
the connected phone are detected.
To change the mode settings, tap
Set on phone
and configure the settings on the
connected phone.

Apps and features
126
If mode sync is not working between your connected phone and Watch, tap the
Sync
modes with phone
switch to turn it on. Any new modes added or mode settings changed
on the connected phone are synced with the Watch, as is the running status of the
modes.
Only some modes are available if the
Sync modes with phone
feature is turned off,
or if the connected phone has a different software version.
Notifications
Change the notification settings.
On the Settings screen, tap
Notifications
.
•
App notifications
: Select a phone or Watch app to receive notifications for on your
Watch.
•
Show phone notifications on watch
: Set the Watch to display phone notifications
depending on the phone’s usage status.
•
Mute notifications on phone
: Set to mute app notifications on your phone when they
will be displayed on the Watch.
•
Do not disturb
: Set the Watch to mute all notifications except for those you allow.
•
Advanced settings
: Configure advanced settings for notifications.
•
Help with notifications
: Check more information related to the notifications.
Sounds and vibration
Change the sound and vibration settings.
On the Settings screen, tap
Sounds and vibration
.
•
Sound
/
Vibrate
/
Mute
: Set the Watch to use sound mode, vibrate mode, or silent
mode.
•
Vibrate with sound
: Set the Watch to vibrate with sound.
•
Vibration
: Set the vibration duration and intensity.
•
Call vibration
: Change the call vibration settings.
•
Notification vibration
: Change the notification vibration settings.
•
System vibration
: Select actions to receive vibration feedback.
•
Volume
: Adjust the volume level.

Apps and features
127
•
Ringtone
: Change the call ringtone.
•
Notification sound
: Change the notification sound.
•
System sounds
: Enable sounds for certain actions.
Display
Change the screen settings.
On the Settings screen, tap
Display
.
•
Brightness
: Adjust the brightness of the screen.
•
Adaptive brightness
: Set the Watch to keep track of your brightness adjustments
and apply them automatically in similar lighting conditions.
•
Always On Display
: Set the Watch screen and some apps’ screens to always stay on
while wearing your Watch. However, the battery will drain more quickly than normal
while using this feature.
•
Screen wake-up
: Select how to turn the screen on. Refer to Turning the screen on for
more information.
•
Screen timeout
: Set the length of time the Watch waits before turning off the screen
when it is idle.
•
Show last app
: Set the time to keep the last-used app on after the screen is turned
off. If you turn the screen on again within the time you set after it has been turned
off, the app screen you last used will appear instead of the Watch screen.
•
Font
: Set the font style for the screen.
•
Touch sensitivity
: Increase the touch sensitivity of the screen so it can be used with
gloves.
•
Show charging info
: Set the Watch to display the charging information when the
screen is off while charging.
Apps and features
128
Battery
Check the remaining battery power and time to use the Watch. If the battery is low, turn
on power saving mode to reduce battery consumption.
On the Settings screen, tap
Battery
.
•
Power saving
: Turn on power saving mode to extend the battery’s usage time.
•
Limit health features
: Turn off some Samsung Health features to extend the
battery’s usage time when power saving mode is turned on.
•
Battery usage
: Check which apps you have used since the last time you fully charged
your Watch and how much battery they have used.
•
Sleeping apps
: Select apps to sleep in the background. Sleeping apps only run in the
background occasionally to extend the battery’s usage time.
•
Watch only
: Only the watch appears on the screen and all other features will be
turned off to reduce battery consumption. Press the Home button to check the
watch. To turn off Watch only mode, press and hold the Home button. Alternatively,
place the Watch on the wireless charger to charge it to a certain level. The Watch will
turn off and then turn on again.
•
Show charging info
: Set the Watch to display the charging information when the
screen is off while charging.
•
Auto power on
: Set the Watch to turn on automatically when you start charging
while it is turned off and the battery is charged to more than 10%.
The usage time left shows the time remaining before the battery power runs
out. Usage time left may vary depending on your Watch settings and operating
conditions.
Buttons and gestures
Turn on the buttons and gestures feature and configure the settings.
On the Settings screen, tap
Buttons and gestures
.
•
Quick button
: Select an app or feature to launch using the Quick button. Refer to
Setting the Quick button and using it (Galaxy Watch Ultra) for more information.
(Galaxy Watch Ultra)
•
Siren:
Enable continuous high-pitched siren sound when Quick button is pressed for
more than 5 seconds. (Galaxy Watch Ultra)
•
Home button
: Select an app or feature to launch when you press the Home button
twice or press and hold it.

Apps and features
129
•
Back button
: Select an app or feature to launch when you press the Back button.
•
Double pinch
: Set to launch the features related to running apps, such as answering
calls or dismissing alerts, when you double tap your thumb and index finger of the
hand you are wearing the Watch together.
•
Shake to dismiss
: Set to dismiss alerts and decline calls by rotating the wrist you are
wearing your Watch on twice.
•
Knock knock
: Set to launch the selected feature by bending the wrist you are
wearing your Watch on up and down twice within 5 seconds after turning on the
screen while closing your fist. Tap
Select an option
and set the feature to be turned
on with this method.
Health
Configure the various settings related to exercise and fitness.
On the Settings screen, tap
Health
.
•
Measurement
: Set how to measure your heart rate and stress, and turn the
additional features that can be measured during sleep on or off.
•
Auto detect workouts
: Turn on the auto detect workouts feature and configure the
settings, such as selecting the exercise types to be detected.
•
Inactive time
: Turn the feature on to receive alerts after 50 minutes of inactivity, and
set the time and days you want to be notified.
•
Make visible to other devices
: Give permission to other devices to find your Watch.
•
Share data with devices and services
: Set to share information with other connected
health platform apps, exercise machines, and TVs.
•
Privacy
: Select apps or service providers to share information with to display the
necessary information during exercise.

Apps and features
130
Security and privacy
Check the Watch’s security and privacy status and change the settings.
On the Settings screen, tap
Security and privacy
.
•
Lock type
: Change the screen lock method. Refer to Lock screen for more
information.
•
Privacy
: Change the privacy settings, and set to get personalized service based on
your interests and how you use your Watch.
•
Wrist detection
: Set to detect whether you are wearing the Watch.
Location
Change settings for location information usage.
On the Settings screen, tap
Location
.
•
App permissions
: Check the list of apps that have permission to access the Watch’s
location and edit the permission settings.
•
Location services
: Check the location services your Watch is using.
Safety and emergency
Manage your medical information and emergency contacts. You can also set to request
an SOS when you have an emergency. Refer to Sending an SOS for more information.
On the Settings screen, tap
Safety and emergency
.
•
Medical info
: Set or check your medical information.
•
Emergency contacts
: Add your emergency contacts.
•
Emergency SOS
: Set to request an SOS in an emergency by pressing the Watch’s
Home button five times.
•
Hard fall detection
: Set to request an SOS when your Watch detects a hard fall.
•
Emergency sharing
: Send a message that includes your location information and a
low battery alert warning to emergency contacts.
•
Wireless Emergency Alerts
: Change settings for emergency features, such as
wireless emergency alerts.

Apps and features
131
Accounts and backup
You can use various features of the Watch after registering your Samsung or Google
account on your connected phone and add them to your Watch. You can also regularly
back up your Watch’s data and files automatically with Smart Switch on your connected
phone.
On the Settings screen, tap
Accounts and backup
.
•
Accounts
: Register your Samsung or Google account on your connected phone and
add it to your Watch. Refer to Adding accounts to your Watch for more information.
•
Backup
: Check the data of your Watch that is backed up automatically with Smart
Switch on your connected phone.
Google
Change the settings for Google.
On the Settings screen, tap
Google
.
•
Assistant
: Use the Watch’s features or search for information using your voice.
•
Accounts
: Check the Google Account registered on your connected phone and add it
to your Watch.
Advanced features
Turn on the advanced features.
On the Settings screen, tap
Advanced features
.
•
Disconnection alerts
: Set to receive alerts when your Watch loses its Bluetooth
connection to your phone while wearing it.
•
Water lock
: Turn on Water lock mode before entering the water. Touch recognition
may not be available when Water lock mode is turned on.
•
Status indicators
: Change the display settings for the status indicator icons at the
top of the Watch screen.
•
Auto launch media controls
: Set to automatically open the
Media Controller
app on
your Watch when music or video is played on the connected phone.
Apps and features
132
•
Show ongoing icon
: Set to show an in progress icon at the bottom of the Watch
screen when music or video is playing on the connected phone.
•
Bixby
: Bixby is a user interface that helps you use your Watch more conveniently.
Refer to Bixby for more information.
Device care
The device care feature provides an overview of the status of your Watch’s battery,
storage, and memory.
•
Battery
: Check the remaining battery power and time to use the Watch. If the
battery is low, turn on power saving mode to reduce battery consumption. Refer to
Battery for more information.
•
Storage
: Check the status of used and available storage and tap
Manage on phone
to free up storage by deleting unnecessary files after checking them.
The actual available capacity of the internal storage is less than the specified
capacity because the operating system and default apps occupy part of the
storage. The available capacity may change when you update the Watch.
•
Memory
: Check memory usage or tap
Clean now
to free up memory by stopping
background apps.
Apps
Configure the settings for the Watch’s app.
On the Settings screen, tap
Apps
.
•
Choose default apps
: Choose default apps for similar features.
•
Health Platform
: Set your profile to be used for managing your health data and set
to share information with other connected health apps.
•
App list
: Manage the Watch’s apps. You can also check the apps’ usage information
and uninstall or disable unnecessary apps.
•
Permission manager
: Check the permission list for all apps, including the system
apps, and change their permission settings.
•
Samsung app updates
: Check for updates for some preinstalled Samsung apps.

Apps and features
133
General
Customize your Watch’s general settings. You can also connect your Watch to a new
phone or reset the Watch.
On the Settings screen, tap
General
.
•
Touch bezel
: Change the touch bezel settings.
•
Text-to-speech
: Change the settings for text-to-speech features used when
TalkBack is turned on, such as languages, speed, and more.
•
Input
: Change the settings for the keyboard and set the quick responses feature.
•
Date and time
: Set the date and time manually.
Disconnect your Watch from the phone to use this feature, since it is synced
with the connected phone.
•
Orientation
: Set the Watch to match the wrist you wear it on, whether left or right,
and the orientation of the buttons while wearing your Watch.
•
Transfer watch to new phone
: Connect your Watch to a new phone that uses the
same Google Account as your previous phone without resetting the Watch’s data.
Refer to Connecting your Watch to a new phone for more information.
•
Reset
: Delete all data on your Watch. However, if your Watch is connected to your
phone before being reset, your Watch’s data and files will be backed up.
Accessibility
Configure various settings to improve accessibility to the Watch.
On the Settings screen, tap
Accessibility
.
•
Functions you’re using
: Check the accessibility features you are using.
This feature appears only when using the accessibility feature.
•
TalkBack
: Turn on TalkBack, which provides voice feedback. To check help
information to learn how to use this feature, tap
Settings
→
Tutorial
or
Help
.
•
Vision enhancements
: Customize the settings to improve accessibility for users who
have impaired vision.
•
Hearing enhancements
: Customize the settings to improve accessibility for users
who have impaired hearing.

Apps and features
134
•
Interaction and dexterity
: Customize the settings to improve accessibility for users
who have reduced dexterity.
•
Advanced settings
: Manage other advanced functions.
•
Installed apps
: Check accessibility services installed on the Watch.
Software update
Update your Watch’s software through the firmware over-the-air (FOTA) service. You can
also change the update settings.
On the Settings screen, tap
Software update
.
•
Download and install
: Check for and install updates manually.
•
Auto update
: Set the Watch to install updates automatically.
Tips and tutorials
Access useful tips and a tour of your watch.
About watch
Access the Watch’s additional information.
On the Settings screen, tap
About watch
.
•
Status information
: Check information such as the Wi-Fi MAC address, Bluetooth
address, and serial number.
•
Legal information
: Access legal information related to the Watch. You can also send
the Watch’s diagnostic information to Samsung.
•
Software information
: Access the software version and security status.
•
Battery information
: Check battery information, such as the battery capacity.
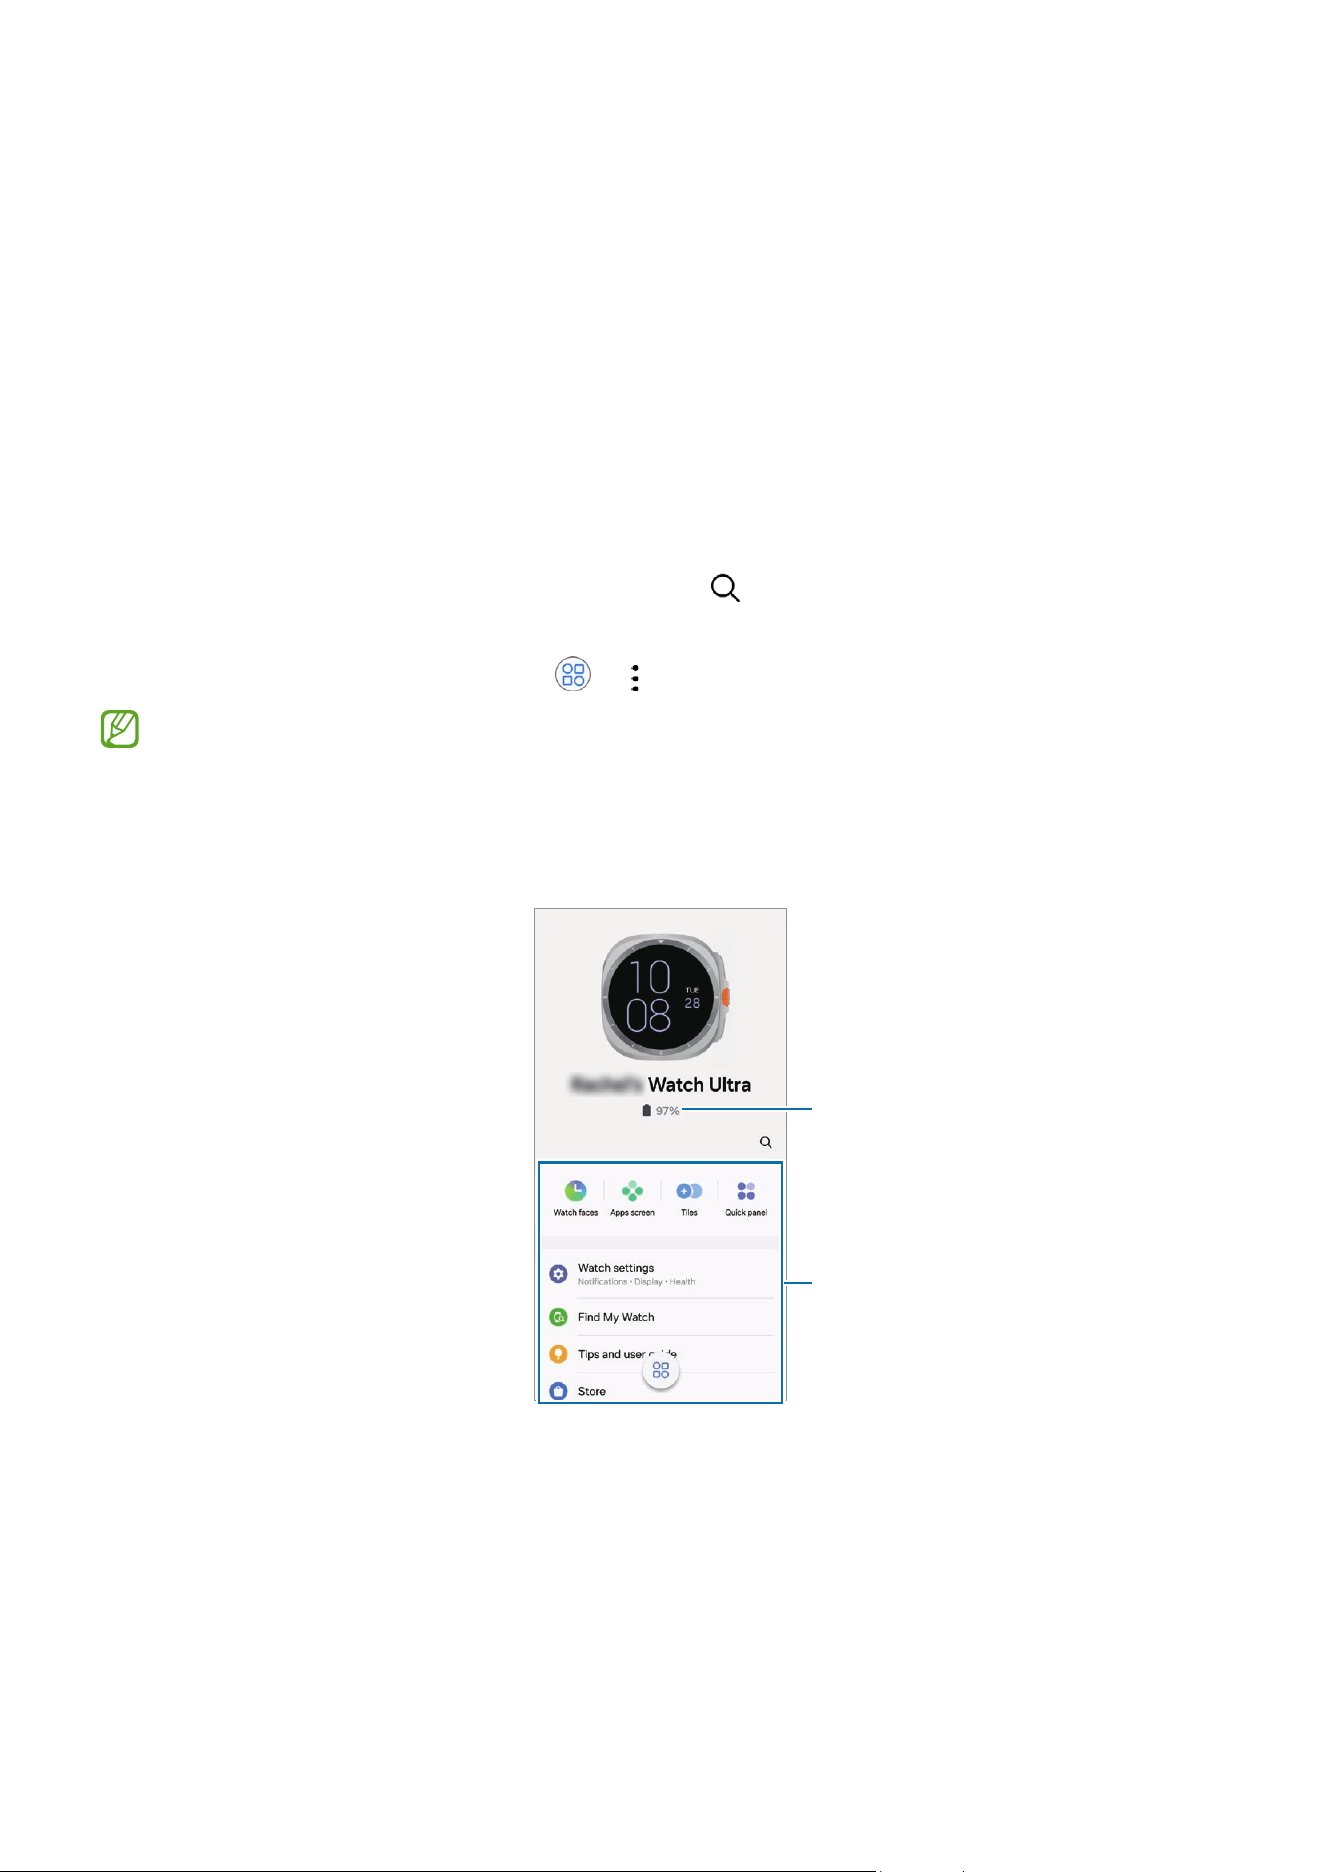
135
Galaxy Wearable app
Introduction
You can check the Watch’s remaining battery and configure the settings with the Galaxy
Wearable app.
Open the
Galaxy Wearable
app on your phone.
To search for settings by entering keywords, tap . You can also search for settings by
selecting a tag under
Suggestions
.
To set the Galaxy Wearable app, tap
→
, and then tap
Settings
.
•
To use the Galaxy Wearable app, you must connect your Watch to a phone. Refer
to Connecting the Watch to a phone for more information.
•
Some features may not be available depending on the type of connected phone,
carrier, or model.
Watch's remaining battery
Configure the Watch settings
and launch the features you
want.
Managing devices connections
You can manage various device connections, such as checking your wearable devices
connected to your phone or connecting a new device with the Galaxy Wearable app.
Galaxy Wearable app
136
Managing the connected device
On the Galaxy Wearable screen of the phone, tap .
Currently connected devices and previously connected devices will appear on the list.
•
To disconnect the currently connected device from the phone, tap next to the
connected device from the list.
•
To reconnect with a device you have previously connected, select the device from the
list and tap
Connect
.
Adding a new device and removing devices
1 On the Galaxy Wearable screen of the phone, tap .
2 Tap and follow the on-screen instructions to connect a new wearable device.
The new wearable device will be connected and added to the list.
To remove wearable devices from the list, tap
→
Remove device
, select a device, and
then tap
Remove
.
Watch faces
You can change the watch face displayed on the Watch screen.
On the Galaxy Wearable screen of the phone, tap
Watch faces
.
Select a watch face you want and tap
Customize
to change screen colours or
components, such as clock hands and dials, and even select items to display on the
Watch screen.
Making My style watch faces
Change your watch face into a pattern image that uses a colour combination abstracted
from a picture you took. You can match your Watch’s watch face with any fashion you
want.
This feature is only available on Samsung and Android phones.
1 On the Galaxy Wearable screen of the phone, tap
Watch faces
.
2 Select
My style
under
Motion graphics
.
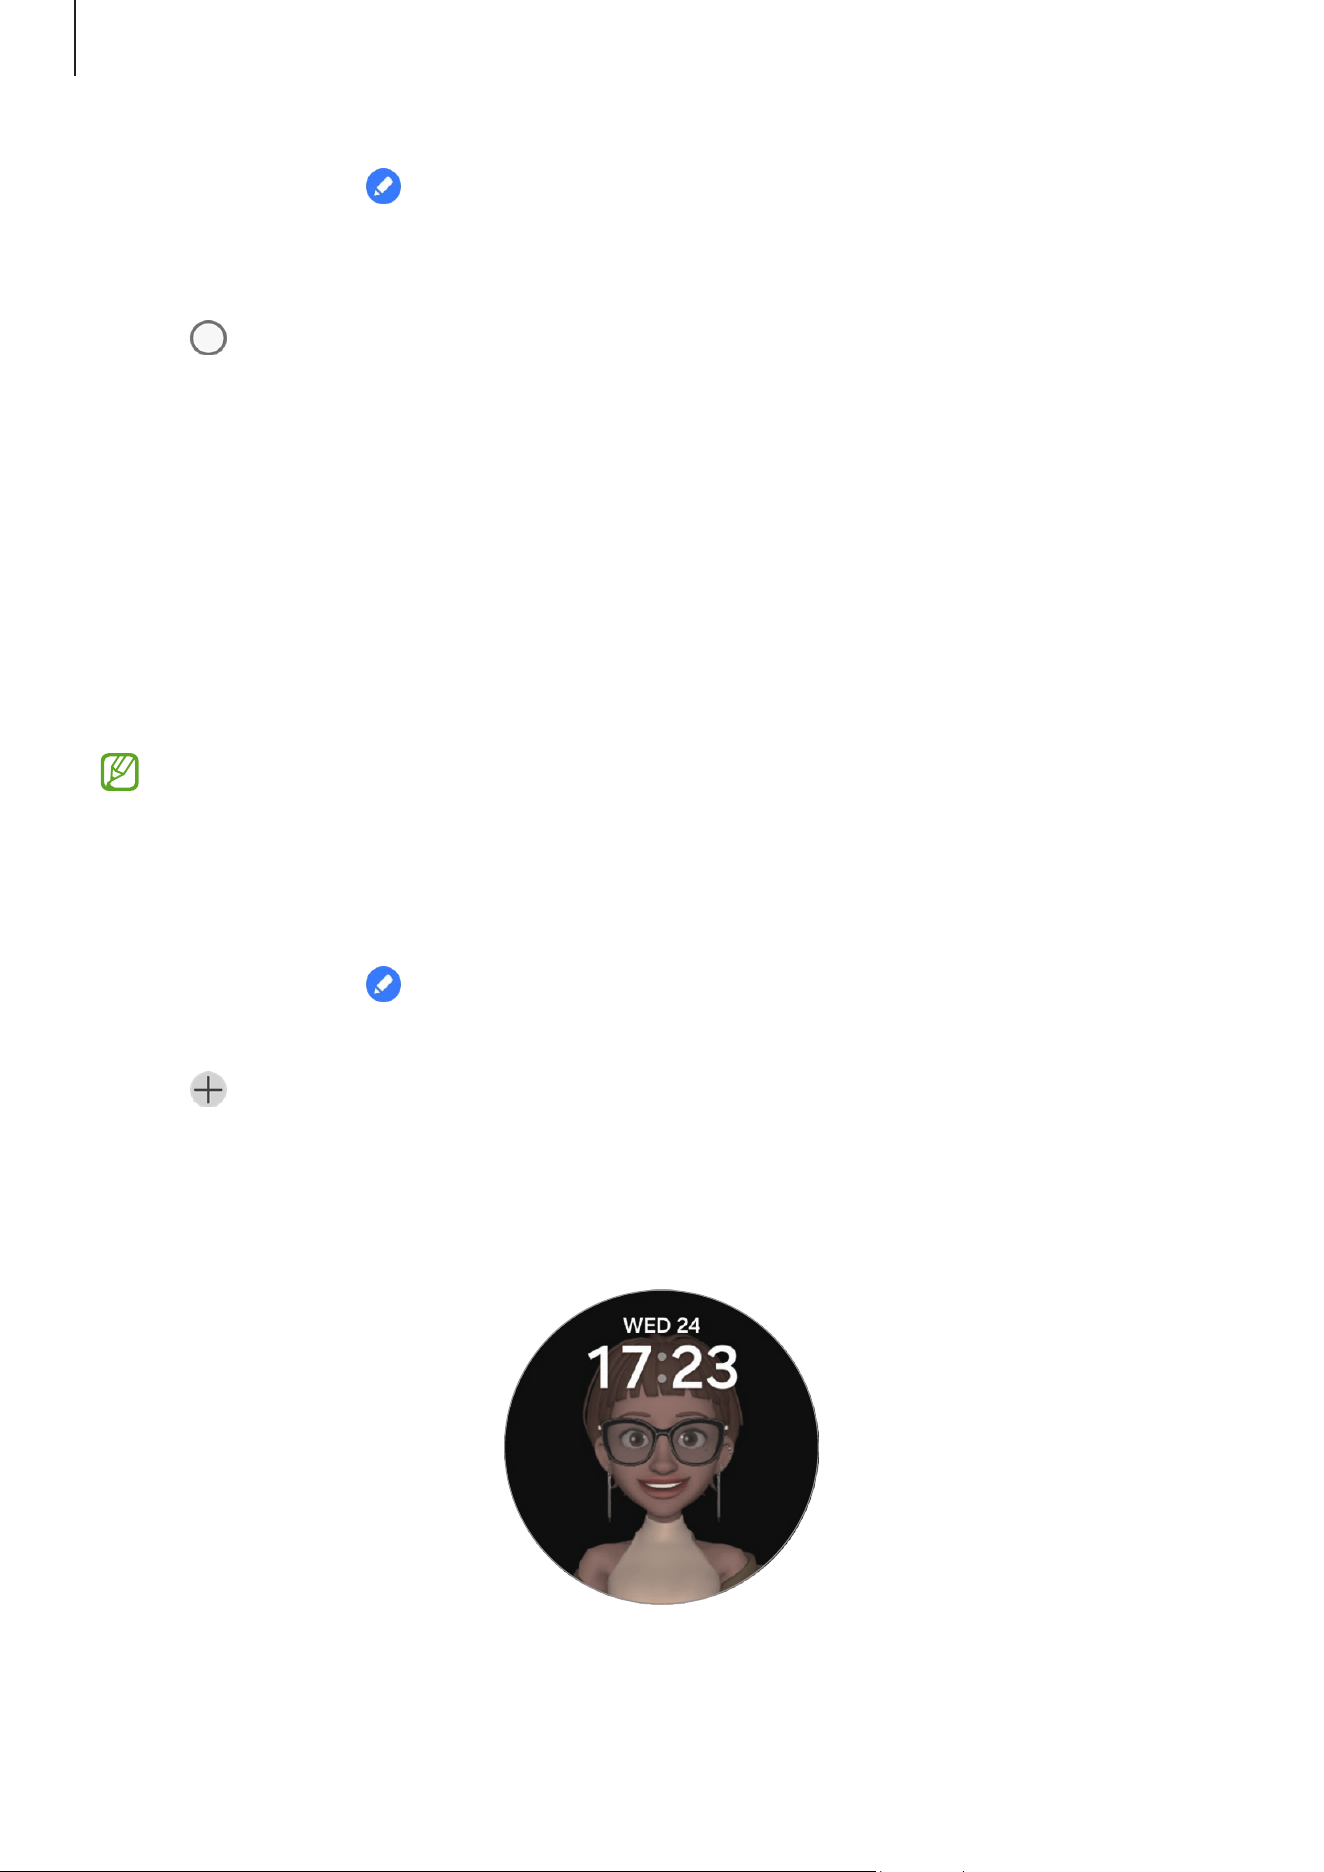
Galaxy Wearable app
137
3 Tap
Customize
or .
4 Tap
Background
→
Camera
.
To select a picture saved on your phone, tap
Gallery
.
5 Tap to take a picture and then tap
OK
.
6 Drag the part of the picture you want to use into the circle, or adjust the size of the
picture to select the colour you want to use.
7 Select a pattern type and tap
Done
.
8 Tap
Save
.
The watch face will be changed into the My style one.
Making AR emoji watch faces
Change your watch face into your own AR emoji.
This feature is only available on Samsung phones that support the AR emoji
features.
1 On the Galaxy Wearable screen of the phone, tap
Watch faces
.
2 Select
AR Emoji
under
Emojis
.
3 Tap
Customize
or .
4 Tap
Character
.
5 Tap and follow the on-screen instructions to create your AR emoji.
6 Select the created AR emoji under
Other emojis
to transfer it to your Watch.
7 Tap
Save
.
The watch face will be changed into the AR emoji one.

Galaxy Wearable app
138
Apps screen
Rearrange apps on the Apps screen.
On the Galaxy Wearable screen of the phone, tap
Apps screen
.
To rearrange apps, touch and hold an app to move, drag it to the desired position, and
then tap
Save
.
Tiles
Customize the tiles on the Watch. You can also rearrange tiles.
On the Galaxy Wearable screen of the phone, tap
Tiles
.
Adding or removing tiles
Tap the tiles you want to add under
Add tiles
or tap on the tiles you want to remove,
and then tap
Save
.
Rearranging tiles
Touch and hold a tile you want to move, drag it to the desired position, and then tap
Save
.
Quick panel
Select the quick settings icons displayed on the quick panel of your Watch. You can also
rearrange quick settings icons.
On the Galaxy Wearable screen of the phone, tap
Quick panel
.
Adding or removing quick settings icons
Tap on the icon to add under
Available buttons
or tap on the icon to remove, and
then tap
Save
.
Rearranging quick settings icons
Touch and hold an icon to move, drag it to the desired position, and then tap
Save
.
Galaxy Wearable app
139
Watch settings
Introduction
Check your Watch’s status and configure your Watch settings.
On the Galaxy Wearable screen of the phone, tap
Watch settings
.
Samsung account
Register a Samsung account on your connected phone or check the previously registered
Samsung account.
On the Galaxy Wearable screen of the phone, tap
Watch settings
→
Samsung account
.
Refer to Registering a Samsung account on your Watch for more information.
Modes
Set to sync the mode settings of your Watch and phone.
On the Galaxy Wearable screen of the phone, tap
Watch settings
→
Modes
.
•
Sync modes with phone
: Set to sync the mode settings of your Watch and phone.
When turning on this feature, any new modes added or mode settings changed on
your connected phone will be synced with the Watch, along with the running status
of the modes.
Only some mode syncing features may be supported depending on the software
version of the connected phone.
Notifications
Change the notification settings.
On the Galaxy Wearable screen of the phone, tap
Watch settings
→
Notifications
. Refer
to Notifications in Apps and features for more information about other features besides
those listed.
•
Sync Do not disturb with phone
: Set to sync the Do not disturb settings of your
Watch and phone.

Galaxy Wearable app
140
Sounds and vibration
Change the sound and vibration settings.
On the Galaxy Wearable screen of the phone, tap
Watch settings
→
Sounds and
vibration
. Refer to Sounds and vibration in Apps and features for more information.
Display
Change the screen settings.
On the Galaxy Wearable screen of the phone, tap
Watch settings
→
Display
. Refer to
Display in Apps and features for more information.
Battery
Check the remaining battery power and time to use the Watch. If the battery is low, turn
on power saving mode to reduce battery consumption.
On the Galaxy Wearable screen of the phone, tap
Watch settings
→
Battery
. Refer to
Battery in Apps and features for more information.
Buttons and gestures
Turn on the buttons or gestures feature and configure the settings.
On the Galaxy Wearable screen of the phone, tap
Watch settings
→
Buttons and
gestures
. Refer to Buttons and gestures in Apps and features for more information.
Health
Configure the various settings related to exercise and fitness.
On the Galaxy Wearable screen of the phone, tap
Watch settings
→
Health
. Refer to
Health in Apps and features for more information.
Wallet
Use various convenient features in Samsung Wallet.
On the Galaxy Wearable screen of the phone, tap
Watch settings
→
Wallet
.
This feature may not be available depending on the region or connected phone.
Galaxy Wearable app
141
Safety and emergency
Manage your medical information and emergency contacts. You can also set to request
an SOS when you are in an emergency. Refer to Safety and emergency in Apps and
features or Sending an SOS for more information.
On the Galaxy Wearable screen of the phone, tap
Watch settings
→
Safety and
emergency
.
Accounts and backup
You can use various features of the Watch after registering your Samsung or Google
account on your connected phone and adding them on your Watch. You can also
regularly back up your Watch’s data and files automatically with Smart Switch on your
connected phone and save the backup to Samsung Cloud.
On the Galaxy Wearable screen of the phone, tap
Watch settings
→
Accounts and
backup
.
•
Save the Watch’s data and files that are automatically backed up periodically to
Samsung Cloud, so that you can restore them if the data and files are damaged
or lost caused by an unintended factory data reset.
•
The data from your Watch will be automatically backed up between 1 AM and
5 AM if your Watch is connected to your phone, your phone has more than 30%
battery, and the screen is off.
•
Accounts
: Register your Samsung or Google account on your connected phone and
add it to your Watch. Refer to Adding accounts to your Watch for more information.
•
Backup
: Back up your data automatically to your connected phone, and tap the
Save
backup to Samsung Cloud
switch to turn it on to store the backup on the Samsung
Cloud.

Galaxy Wearable app
142
Advanced features
Turn on the advanced features.
On the Galaxy Wearable screen of the phone, tap
Watch settings
→
Advanced features
.
Refer to Advanced features in Apps and features for more information about other
features besides those listed.
•
Remote connection
: Set the Watch to remotely connect to your phone with the
mobile network or Wi-Fi network when a Bluetooth connection between devices is
unavailable.
Device care
The device care feature provides an overview of the status of your Watch’s battery,
storage, and memory. You can also test your Watch.
On the Galaxy Wearable screen of the phone, tap
Watch settings
→
Device care
. Refer
to Device care in Apps and features for more information about other features besides
those listed.
•
Diagnostics
: Test your Watch using Samsung Members.
Apps
Configure the settings for the Watch’s app.
On the Galaxy Wearable screen of the phone, tap
Watch settings
→
Apps
.
•
App settings
: Change the detailed settings for some of the Watch’s apps.
•
Your apps
: Manage the Watch’s apps and check each app’s usage information, or
uninstall or disable unnecessary apps.
Galaxy Wearable app
143
Manage content
Sync saved audio files or images from your phone to your Watch, or transfer them to your
Watch.
On the Galaxy Wearable screen of the phone, tap
Watch settings
→
Manage content
.
•
Music
‒
Tracks on watch
: Check and manage the audio files on your Watch by category.
Refer to Managing audio files saved on your Watch for more information.
‒
Auto sync
: Set the phone to automatically sync audio files added to the playlists
selected as
Playlists to sync
every six hours with the Watch.
‒
Playlists to sync
: Select a playlist to sync with the Watch automatically.
This feature will appear only when the Samsung Music app is installed on your
phone and when you turn on the
Auto sync
feature.
•
Gallery
‒
Images on watch
: Check and manage images on your Watch by category. Refer to
Managing pictures saved on your Watch for more information.
‒
Auto sync albums
: Set the phone to automatically sync images added to the
albums selected as
Albums to sync
with the Watch.
‒
Albums to sync
: Select an album to sync with the Watch automatically.
‒
Auto sync image limit
: Set the maximum number of images that can be sent
during auto sync.
Albums to sync
and
Auto sync image limit
will appear when you turn on the
Auto sync albums
feature.
‒
Select story to sync
: Select a story saved on your phone to sync with the Watch.
‒
Auto sync latest story
: Set the phone to automatically sync your most recent
story with the Watch.
File syncing between your Watch and phone can occur only when your Watch has
more than 15% of battery power remaining and when power saving mode is turned
off on your Watch.

Galaxy Wearable app
144
Mobile plans (Mobile network enabled models)
Use various other services through the mobile network after activating it on the Watch.
On the Galaxy Wearable screen of the phone, tap
Watch settings
→
Mobile plans
.
General
Customize your Watch’s general settings. You can also connect your Watch to a new
phone or reset the Watch.
On the Galaxy Wearable screen of the phone, tap
Watch settings
→
General
. Refer to
General in Apps and features for more information.
Accessibility
Configure various settings to improve accessibility to the Watch.
On the Galaxy Wearable screen of the phone, tap
Watch settings
→
Accessibility
. Refer
to Accessibility in Apps and features for more information.
Watch software update
Update your Watch’s software through the firmware over-the-air (FOTA) service. You can
also change the update settings.
On the Galaxy Wearable screen of the phone, tap
Watch settings
→
Watch software
update
. Refer to Software update for more information.
About watch
Access the Watch’s additional information.
On the Galaxy Wearable screen of the phone, tap
Watch settings
→
About watch
. Refer
to About watch in Apps and features for more information.

Galaxy Wearable app
145
Find My Watch
If you misplace your Watch, you can use the Galaxy Wearable app, the SmartThings Find
feature of the SmartThings app, or the Samsung Find app installed on the connected
phone to find it.
•
Support for the SmartThings Find feature and the Samsung Find app may vary
depending on the connected phone’s software version.
•
The screen may switch automatically to find your Watch if the SmartThings Find
feature or Samsung Find app on the connected phone has those features. If both
the SmartThings Find feature and the Samsung Find app are supported, the
Samsung Find app will be opened.
Searching with the Galaxy Wearable app
1 On the Galaxy Wearable screen of the phone, tap
Find My Watch
.
2 Tap
Start
.
The Watch will make a sound and vibrate, and its screen will turn on.
To stop making sound and vibrating, drag outside the large circle on the Watch.
Alternatively, use the touch bezel. You can also stop it by tapping
Stop
on the phone.
Controlling the Watch remotely
When your Watch is lost or stolen, tap
Find My Watch
on the Galaxy Wearable screen of
the phone, tap
Set security
, and then control your Watch remotely.
•
Lock watch
: Remotely lock the Watch to prevent unauthorized access. This feature
can be used when your phone is connected to your Watch through Bluetooth or a
remote connection. When your Watch is locked, unlock it manually by entering a
preset PIN, or connect the Watch to your phone through Bluetooth again to unlock it
automatically.
•
Reset watch
: All data stored in your Watch is deleted. After the Watch is reset, you
cannot restore the information or use the Find My Watch feature. However, data that
was backed up and stored while your Watch and phone were connected before the
reset is available on the Samsung Cloud.

Galaxy Wearable app
146
Searching with the SmartThings Find feature from the SmartThings app
or the Samsung Find app
On the Galaxy Wearable screen of the phone, tap
Find My Watch
.
The SmartThings Find screen that is available through the SmartThings app will appear
or the Samsung Find app will be opened on the phone, and you will then be able to
check the location of your misplaced Watch. Also, you can find it by following the sound
emitted from your Watch.
To find your Watch using the Samsung Find app, Samsung Find’s Lost mode must
be turned on, and the features related to finding devices offline must also be
turned on.
Tips and user guide
Access useful tips, new features, and the online user guide.
Store
Download the apps and watch faces to be used on your Watch.
On the Galaxy Wearable screen of the phone, tap
Store
.

147
Usage notices
Precautions for using the device
Please read this guide when using the device to ensure safe and proper use.
•
Descriptions are based on the device’s default settings.
•
Some content may differ from your device depending on the region, service provider,
model specifications, or device’s software.
•
The device may require a connection to a Wi-Fi or mobile network when using some
apps or features.
•
Content (high quality content) that requires high CPU and memory usage will affect
the overall performance of the device. Apps related to the content may not work
properly depending on the device’s specifications and the environment that it is
used in.
•
Samsung is not liable for performance issues caused by apps supplied by providers
other than Samsung.
•
Samsung is not liable for performance issues or incompatibilities caused by edited
registry settings or modified operating system software. Attempting to customize
the operating system may cause the device or apps to work improperly.
•
Software, sound sources, wallpapers, images, and other media provided with
this device are licensed for limited use. Extracting and using these materials for
commercial or other purposes is an infringement of copyright laws. Users are
entirely responsible for illegal use of media.
•
You may incur additional charges for data services, such as messaging, uploading
and downloading, auto-syncing, or using location services depending on your data
plan. For large data transfers, it is recommended to use the Wi-Fi feature.
•
Default apps that come with the device are subject to updates and may no longer be
supported without prior notice.
•
This device’s operating system is different from some previous series of the Galaxy
Watch, and you cannot use previously purchased content because of compatibility
issues.
Usage notices
148
•
The model specifications and supported services may differ depending on the
region.
•
Modifying the device’s operating system or installing software from unofficial
sources may result in device malfunctions and data damage or loss. These actions
are violations of your Samsung licence agreement and will void your warranty.
•
Some features may not work as described in this guide depending on the maker and
model of the phone you connect to your Watch.
•
You can see the screen clearly even in strong outdoor sunlight by automatically
adjusting the contrast range based on the surrounding environment. Because of the
nature of the product, displaying fixed graphics for extended periods may result in
afterimages (screen burn-in) or ghosting.
‒
It is recommended not to use fixed graphics on part or all of the screen for
extended periods and turn off the screen when not using the device.
‒
You can set the screen to turn off automatically when you are not using it. On
the Watch’s Apps screen, tap (
Settings
)
→
Display
→
Screen timeout
, and
then select the length of time you want the device to wait before turning off the
screen.
‒
To set the screen to automatically adjust its brightness based on the surrounding
environment, on the Watch’s Apps screen, tap (
Settings
)
→
Display
, and then
tap the
Adaptive brightness
switch to turn it on.
•
Your device contains magnets. Keep it away from credit cards, implanted medical
devices, and other devices that may be affected by magnets. In the case of medical
devices, keep your device more than 15 cm apart. Stop using your device if you
suspect any interference with your medical device and consult your physician or your
medical device manufacturer.
Instructional icons
Warning: situations that could cause injury to yourself or others
Caution: situations that could cause damage to your device or other equipment
Notice: notes, usage tips, or additional information

Usage notices
149
Notes on package contents and accessories
•
The items supplied with the Watch and any available accessories may vary
depending on the region or carrier.
•
The supplied items are designed only for this device and may not be compatible with
other devices.
•
Appearances and specifications are subject to change without prior notice.
•
You can purchase additional accessories from your local Samsung retailer. Make sure
they are compatible with the Watch before purchase.
•
Some supplied items and accessories may not have the same water- and dust-
resistance certification as the Watch.
•
Use Samsung-approved accessories. Using unapproved accessories may cause
performance problems and malfunctions that are not covered by the warranty.
•
Availability of all accessories is subject to change depending entirely on
manufacturing companies. For more information about available accessories, refer
to the Samsung website.

Usage notices
150
Maintaining the device’s water and dust
resistance
▶
Galaxy Watch7:
•
This device is water and dust resistant, and meets the following international
standards.
‒
5ATM water resistance classification certification: Was tested by submerging
the device in 50 m of fresh water for 10 minutes, leaving it still, without any
movement, to meet the requirements of ISO 22810:2010.
‒
IPX8 water resistance classification certification: Was tested by submerging
the device in 1.5 m of fresh water for 30 minutes, leaving it still, without any
movement, to meet the requirements of IEC 60529.
‒
IP6X dust resistance classification certification: Was tested to meet the
requirements of IEC 60529.
•
You can use this device when you are exercising, washing your hands or on a rainy
day.
•
You can use this device when you are swimming in a pool or the sea where the water
level is not deep.
•
The water resistance of your Galaxy device is not permanent and may diminish over
time because of normal wear and tear, depending on the usage environment or
conditions. It is recommended to have your Galaxy device’s water resistance tested
once a year at a Samsung Service Centre or an authorized service centre.
•
You must follow these guidelines to maintain the water and dust resistance of your
device.
‒
After swimming, and before the pool water or seawater has dried, rinse the device
with fresh water and dry it thoroughly with a soft, clean cloth to maintain its
water resistance. The water resistance may be affected by the disinfectants in
swimming pool water or the salt in seawater.
‒
If the device gets wet with liquid other than fresh water, such as coffee, drinks,
soapy water, oil, perfume, sunscreen, hand sanitizer, or chemical products like
cosmetics, rinse the device with fresh water and dry it thoroughly with a soft,
clean cloth to maintain its water resistance.

Usage notices
151
‒
Do not stay submerged underwater, go snorkeling, diving or scuba diving, or play
water sports like water-skiing or surfing, and do not swim in fast-moving water,
such as a river, while wearing your device. Also, do not expose it to high-pressure
cleaning machines or similar things. This would result in a dramatic rise in water
pressure which could cause the water resistance guaranteed by our company to
change.
‒
If the device is hit or damaged, its water and dust resistance may be
compromised.
‒
Do not disassemble your device without proper guidance.
‒
If you dry your device with a machine that gives off hot air, like a hair dryer, or if
you use your device in a hot environment like a sauna, the water resistance could
be damaged from a dramatic change in the air or water temperature.
▶
Galaxy Watch Ultra:
•
This device is water and dust resistant, and meets the following international
standards.
‒
10ATM water resistance classification certification: Was tested by submerging
the device in fresh water, applying pressure equivalent to 100 m and leaving
it still without any movement for 10 minutes, to meet the requirements of
ISO 22810:2010.
‒
IPX8 water resistance classification certification: Was tested by submerging
the device in 1.5 m of fresh water for 30 minutes, leaving it still, without any
movement, to meet the requirements of IEC 60529.
‒
IP6X dust resistance classification certification: Was tested to meet the
requirements of IEC 60529.
•
The device is not intended for divers.
•
You can use this device when you are exercising, washing your hands or on a rainy
day.
•
You can use this device when you are swimming in a pool or the sea where the water
level is not deep.
•
The water resistance of your Galaxy device is not permanent and may diminish over
time because of normal wear and tear, depending on the usage environment or
conditions. It is recommended to have your Galaxy device’s water resistance tested
once a year at a Samsung Service Centre or an authorized service centre.

Usage notices
152
•
You must follow these guidelines to maintain the water and dust resistance of your
device.
‒
After swimming, and before the pool water or seawater has dried, rinse the device
with fresh water and dry it thoroughly with a soft, clean cloth to maintain its
water resistance. The water resistance may be affected by the disinfectants in
swimming pool water or the salt in seawater.
‒
If the device gets wet with liquid other than fresh water, such as coffee, drinks,
soapy water, oil, perfume, sunscreen, hand sanitizer, or chemical products like
cosmetics, rinse the device with fresh water and dry it thoroughly with a soft,
clean cloth to maintain its water resistance.
‒
Do not go freediving or scuba diving, or engage in fast-moving water sports, such
as jet skiing, and do not swim in fast-moving water, such as a river, while wearing
your device. Also, do not expose it to high-pressure cleaning machines or similar
things. This would result in a dramatic rise in water pressure which could cause
the water resistance guaranteed by our company to change.
‒
If the device is hit or damaged, its water and dust resistance may be
compromised.
‒
Do not disassemble your device without proper guidance.
‒
If you dry your device with a machine that gives off hot air, like a hair dryer, or if
you use your device in a hot environment like a sauna, the water resistance could
be damaged from a dramatic change in the air or water temperature.
Usage notices
153
Precautions for overheating
If you feel discomfort because of overheating while using the device, stop using it
immediately and remove it from your wrist.
•
To avoid problems, such as device malfunction, skin discomfort or damage,
and battery draining, a warning will appear on the device if it reaches a specific
temperature. When the initial warning appears, device features will be turned off
until the device cools down to a specific temperature. However, the emergency call
feature will be available on the LTE model.
•
If the device temperature continues to increase, a second warning will appear. At this
time, the device will power off. Do not use the device until the device’s temperature
is within the recommended operating temperature range. However, when using
the LTE model, the emergency call feature that has been previously connected will
remain enabled until you are finished, even though the second warning will appear.
Recommended operating temperature range
The device’s recommended operating temperature is between 0 °C to 35 °C. Using
the device outside of the recommended temperature range may damage the
device or reduce the battery’s lifespan.
Cleaning and managing the Watch
Follow these points to ensure your Watch works correctly and maintains its appearance.
Failure to do so may damage the Watch and cause the skin irritation.
•
Turn off the Watch and remove the band before cleaning it.
•
Prevent the device from being exposed to dust, sweat, ink, oil, and chemical
products such as cosmetics, antibacterial spray, hand cleaner, detergent, and
insecticides. The Watch’s exterior and interior parts may be damaged or it could
result in poor performance. If your Watch is exposed to any of the previously
mentioned substances, use a lint-free, soft cloth to clean it.
•
Do not use soap, cleaning agents, abrasive materials and compressed air when
cleaning your Watch and do not clean it with ultrasonic waves or external heat
sources. Doing so may damage the Watch. Skin irritation may be caused by soap,
detergents, hand sanitizers, or cleaning agents left on the Watch.

Usage notices
154
•
When you remove sunblock, lotion, or oil, use a soap-free detergent, then rinse and
dry your Watch thoroughly.
The supplied band may vary depending on the region or model. Be sure to properly
clean and maintain your band accordingly.
Use caution if you are allergic to any materials
on the Watch
•
Samsung has tested the noxious materials found on the Watch through the internal
and external certificate authorities, including the test for all materials which contact
with skin, skin toxicity test, and the Watch-wearing test.
•
The Watch includes nickel. Take the necessary precautions if your skin is
hypersensitive or you have an allergy to any materials found on the Watch.
‒
Nickel: The Watch contains a small amount of nickel, which is below its reference
point limited by the Europe REACH regulation. You will not be exposed to the
nickel inside the Watch and the Watch has passed the international certificated
test. However, if you are sensitive to nickel, be careful when using the Watch.
•
Only materials that meet the standards of the U.S Consumer Product Safety
Commission (CPSC), the regulations of the European countries, and other
international standards are used to make a Watch.
•
For more information about how Samsung manages chemicals, refer to the Samsung
website.

155
Appendix
Troubleshooting
Before contacting a Samsung Service Centre or an authorized service centre, please
attempt the following solutions. Some situations may not apply to your Watch.
You can also use Samsung Members to solve any problems you might encounter while
using your device.
The Watch displays network or service error messages
•
When you are in areas with weak signals or poor reception, you may lose reception.
Move to another area and try again. While moving, error messages may appear
repeatedly.
•
You cannot access some options without a subscription. For more information,
contact your carrier.
Your Watch does not turn on
When the battery is completely discharged, your Watch will not turn on. Fully charge the
battery before turning on the Watch.
Touch recognition works slowly or improperly
•
Touch recognition may not work properly in the following situations:
‒
If you attach a screen protector or optional accessories to the screen
‒
If you are wearing gloves, if your hands are not clean while touching the screen, or
if you tap the screen with a sharp object or your fingertips
‒
In humid conditions or when exposed to water

Appendix
156
•
Restart your Watch to clear any temporary software problems.
•
Ensure that your Watch software is updated to the latest version.
•
If the screen is scratched or damaged, visit a Samsung Service Centre or an
authorized service centre.
Your Watch freezes or encounters a problem
Try the following solutions. If the problem is still not resolved, contact a Samsung
Service Centre or an authorized service centre.
Restarting the Watch
If your Watch freezes or hangs, you may need to close apps or turn off the Watch and turn
it on again.
Forcing restart
If your Watch is frozen and unresponsive, press and hold the Home button and the Back
button simultaneously for more than 7 seconds to restart it.
Resetting the Watch
If the methods above do not solve your problem, perform a factory data reset.
On the Apps screen, tap (
Settings
)
→
General
→
Reset
→
Reset
. Alternatively, open
the
Galaxy Wearable
app on your phone and tap
Watch settings
→
General
→
Reset
→
Reset
. If your Watch and phone are not connected at the time of the Watch reset, the
data stored on your Watch will be deleted.
Another Bluetooth device cannot locate your Watch
•
Ensure that the Watch’s Bluetooth feature is turned on.
•
Reset your Watch and try again.
•
Ensure that your Watch and the other Bluetooth device are within the Bluetooth
connection range (10 m). The distance may vary depending on the environment the
devices are used in.
If the tips above do not solve the problem, contact a Samsung Service Centre or an
authorized service centre.

Appendix
157
A Bluetooth connection is not made or your Watch and the phone are
disconnected
•
Ensure that the Bluetooth feature on both devices is turned on.
•
Ensure there are no obstacles, such as walls or electrical equipment, between the
devices.
•
Ensure that the latest version of the Galaxy Wearable app is installed on the phone.
If the Galaxy Wearable app is not the latest version, update the Galaxy Wearable app
to the latest version.
•
Ensure that your Watch and the other Bluetooth device are within the Bluetooth
connection range (10 m). The distance may vary depending on the environment the
devices are used in.
•
Restart both devices and open the
Galaxy Wearable
app on the phone again.
Calls are not connected
•
Ensure that your Watch is connected to a phone through Bluetooth.
•
Ensure that your phone and Watch have accessed the right cellular network.
•
Ensure that you have not set call barring for the phone number you are dialing on
the phone.
•
Ensure that you have not set call barring for the incoming phone number on the
phone.
•
Check if some modes are turned on. If some modes have been turned on, incoming
calls may be muted and the screen may not turn on when receiving incoming calls.
Others cannot hear you speaking on a call
•
Ensure that you are not covering the built-in microphone.
•
Ensure that the microphone is close to your mouth.
•
If using a Bluetooth headset, ensure that it is properly connected.

Appendix
158
Sound echoes during a call
Adjust the volume or move to another area.
A cellular network or the internet is often disconnected or audio
quality is poor
•
Ensure that you are not blocking the Watch’s internal antenna.
•
When you are in areas with weak signals or poor reception, you may lose reception.
You may have connectivity problems because of issues with the carrier’s base
station. Move to another area and try again.
•
When using the device while moving, wireless network services may be unavailable
because of issues with the carrier’s network.
The battery does not charge properly (For Samsung-approved
chargers)
•
Ensure that you connect the Watch to the wireless charger properly.
•
Visit a Samsung Service Centre or an authorized service centre and have the battery
replaced.
The battery depletes faster than when first purchased
•
When you expose the Watch or the battery to very cold or very hot temperatures, the
useful charge may be reduced.
•
Battery consumption increases when you use some apps.
•
The battery is consumable and the useful charge will get shorter over time.
Your Watch is hot to the touch
When you use apps that require more power or use apps on your Watch for an extended
period of time, your Watch may feel hot to the touch. This is normal and should not affect
your Watch’s lifespan or performance.
If the Watch overheats or feels hot for a prolonged period, do not use it for a while. If the
Watch continues to overheat, contact a Samsung Service Centre or an authorized service
centre.

Appendix
159
Your Watch cannot find your current location
The Watch uses your phone’s location information. GPS signals may be obstructed in
some locations, such as indoors. Set to use Wi-Fi or a mobile network to find your current
location.
A small gap appears around the outside of the Watch case
•
This gap is a necessary manufacturing feature and some minor rocking or vibration
of parts may occur.
•
Over time, friction between parts may cause this gap to expand slightly.
There is not enough space in the Watch’s storage
Delete unnecessary data, unused apps, or files to free up storage space.
Removing the battery
•
To remove the battery, contact an authorized service centre.
•
For your safety, you must not attempt to remove the battery. If the battery is not
properly removed, it may lead to damage to the battery and device, cause personal
injury, and result in the device being unsafe.
•
Samsung does not accept liability for any damage or loss (whether in contract or
tort, including negligence) which may arise from failure to precisely follow these
warnings and instructions, other than death or personal injury caused by Samsung’s
negligence.
160
Health and Safety
Please read this important safety information before you use the device. It contains
general safety information for devices and may include content that does not apply to
your device. Follow the warning and caution information to prevent injury to yourself or
others and to prevent damage to your device.
The term ‘device’ refers to the product and its battery, charger, the items supplied
with the product, and any Samsung-approved accessories used with the product.
Warning: Failure to comply with safety warnings and
regulations can cause serious injury or death.
Do not use damaged power cords or plugs, or loose electrical sockets
Unsecured connections can cause electric shock or fire.
Do not touch the device, power cords, plugs, or the electric socket with wet hands or
other wet body parts
Doing so may cause electric shock.
Do not pull the power cord excessively when disconnecting it
Doing so may cause electric shock or fire.
Do not bend or damage the power cord
Doing so may cause electric shock or fire.
Do not use the device with wet hands while the device is charging
Doing so may cause electric shock.
Do not directly connect together the charger’s positive and negative terminals
Doing so may cause fire or serious injury.
Do not use your device outdoors during a thunderstorm
Doing so may result in electric shock or device malfunction.
Use manufacturer-approved batteries, chargers, accessories, and supplies
•
Using generic batteries or chargers may shorten the life of your device or cause the
device to malfunction. They may also cause a fire or cause the battery to explode.
•
Use only a Samsung-approved battery and charger specifically designed for your
device. An incompatible battery or charger can cause serious injuries or damage to
your device.
•
Samsung cannot be responsible for the user’s safety when using accessories or
supplies that are not approved by Samsung.

Health and Safety
161
Do not carry your device in your back pockets or on your waist
•
The device may be damaged, explode, or result in a fire if too much pressure is
applied to it.
•
You may be injured if you are bumped or fall.
Do not drop or cause an impact to the charger or the device
Handle and dispose of the device and charger with care
•
Never dispose of the battery or device in a fire. Never place the battery or device
on or in heating devices, such as microwave ovens, stoves, or radiators. The device
may explode when overheated. Follow all local regulations when disposing of used
battery or device.
•
Never crush or puncture the device.
•
Avoid exposing the device to high external pressure, which can lead to an internal
short circuit and overheating.
Protect the device, battery and charger from damage
•
Avoid exposing your device and battery to very cold or very hot temperatures.
Extreme temperatures can damage the device and reduce the charging capacity and
life of your device and battery.
•
Do not directly connect together the battery’s positive and negative terminals and
prevent them from coming into contact with metal objects. Doing so may cause the
battery to malfunction.
•
Never use a damaged charger or battery.
Do not store your device near or in heaters, microwaves, hot cooking equipment, or high
pressure containers
•
The battery may leak.
•
Your device may overheat and cause a fire.
Do not use or store your device in areas with high concentrations of dust or airborne
materials
Dust or foreign materials can cause your device to malfunction and may result in fire or
electric shock.
Prevent the multipurpose jack and the small end of the charger from contact with
conductive materials, such as liquids, dust, metal powders, and pencil leads. Do not touch
the multipurpose jack with sharp tools or cause an impact to the multipurpose jack
Conductive materials may cause a short circuit or corrosion of the terminals, which may
result in an explosion or fire.
Health and Safety
162
When using the wireless charger, do not place foreign materials, such as metal objects,
magnets, and magnetic stripe cards, between the device and the wireless charger
The device may not charge properly or may overheat.
Do not bite or suck the device or the battery
•
Doing so may damage the device or result in an explosion or fire.
•
Children or animals can choke on small parts.
•
If children use the device, make sure that they use the device properly.
Do not insert the device or supplied accessories into the eyes, ears, or mouth
Doing so may cause suffocation or serious injuries.
Do not handle a damaged or leaking Lithium Ion (Li-Ion) battery
For safe disposal of your Li-Ion battery, contact your nearest authorized service centre.
Caution: Failure to comply with safety cautions and
regulations can cause injury or property damage
Do not use your device near other electronic devices
•
Most electronic devices use radio frequency signals. Your device may interfere with
other electronic devices.
•
Using an LTE data connection may cause interference with other devices, such as
audio equipment and telephones.
Do not use your device in a hospital, on an aircraft, or in automotive equipment that can
be interfered with by radio frequency
•
Avoid using your device within a 15 cm range of a pacemaker, if possible, as your
device can interfere with the pacemaker.
•
To minimize possible interference with a pacemaker, use your device only on the side
of your body that is opposite the pacemaker.
•
If you use medical equipment, contact the equipment manufacturer before using
your device to determine whether or not the equipment will be affected by radio
frequencies emitted by the device.
•
On an aircraft, using electronic devices can interfere with the aircraft’s electronic
navigational instruments. Make sure the device is turned off during takeoff and
landing. After takeoff, you can use the device in flight mode if allowed by aircraft
personnel.
•
Electronic devices in your car may malfunction because of radio interference from
your device. Contact the manufacturer for more information.

Health and Safety
163
Do not expose the device to heavy smoke or fumes
Doing so may damage the outside of the device or cause it to malfunction.
If you use a hearing aid, contact the manufacturer for information about radio
interference
The radio frequency emitted by your device may interfere with some hearing aids. Before
using your device, contact the manufacturer to determine whether or not your hearing
aid will be affected by radio frequencies emitted by the device.
Do not use your device near devices or apparatuses that emit radio frequencies, such as
sound systems or radio towers
Radio frequencies may cause your device to malfunction.
Turn off the device in potentially explosive environments
•
Turn off your device in potentially explosive environments instead of removing the
battery.
•
Always comply with regulations, instructions and signs in potentially explosive
environments.
•
Do not use your device at refuelling points (gas stations), near fuels or chemicals, or
in blasting areas.
•
Do not store or carry flammable liquids, gases, or explosive materials in the same
compartment as the device, its parts, or accessories.
If you notice strange smells or sounds coming from your device or the battery, or if
you see smoke or liquids leaking from the device or battery, stop using the device
immediately and take it to a Samsung Service Centre
Failure to do so may result in fire or explosion.
Comply with all safety warnings and regulations regarding mobile device usage while
operating a vehicle
While driving, safely operating the vehicle is your first responsibility. Never use your
mobile device while driving if it is prohibited by law. For your safety and the safety of
others, use your common sense and remember the following tips:
•
Get to know your device and its convenience features, such as speed dial and redial.
These features help you reduce the time needed to place or receive calls on your
mobile device.
•
Position your device within easy reach. Make sure you can access your wireless
device without taking your eyes off the road. If you receive an incoming call at an
inconvenient time, let your voicemail answer it for you.

Health and Safety
164
•
Suspend use in heavy traffic or hazardous weather conditions. Rain, sleet, snow, ice,
and heavy traffic can be hazardous.
•
Do not take notes or look up phone numbers. Jotting down a “to do” list or flipping
through your address book takes attention away from your primary responsibility of
driving safely.
•
Dial sensibly and assess the traffic. Place calls when you are not moving or before
pulling into traffic. Try to plan calls when your car will be stationary.
•
Do not engage in stressful or emotional conversations that may be distracting. Make
the person you are talking to aware that you are driving and suspend conversations
that could potentially divert your attention from the road.
Care for and use your mobile device properly
Store your device only on flat surfaces
•
If your device falls, it may be damaged.
The device can be used in locations with an ambient temperature of 0°C to 35°C. You
can store the device at an ambient temperature of -20°C to 50°C. Using or storing the
device outside of the recommended temperature ranges may damage the device or
reduce the battery’s lifespan
•
Do not store your device in very hot areas such as inside a car in the summer. Doing
so may cause the screen to malfunction, result in damage to the device, or cause the
battery to explode.
•
Do not expose your device to direct sunlight for extended periods of time (on the
dashboard of a car, for example).
•
For a device with a removable battery, the battery can be stored separately in
locations with an ambient temperature of 0 °C to 45 °C.
Do not store your device with metal objects, such as coins, keys, and necklaces
•
Your device may be scratched or may malfunction.
•
If the battery terminals come into contact with metal objects, this may cause a fire.

Health and Safety
165
Do not store your device near magnetic fields
•
Your device may malfunction or the battery may discharge from exposure to
magnetic fields.
•
Magnetic stripe cards, including credit cards, phone cards, passbooks, and boarding
passes, may be damaged by magnetic fields.
Prolonged exposure of your skin to an overheated device may cause low temperature
burn symptoms, such as red spots and pigmentation
Do not use your device with the back cover removed
The battery may fall out of the device, which may result in damage or malfunction.
If your device has a camera flash or light, do not use it close to the eyes of people or pets
Using a flash close to the eyes may cause temporary loss of vision or damage to the eyes.
Use caution when exposed to flashing lights
•
While using your device, leave some lights on in the room and do not hold the screen
too close to your eyes.
•
Seizures or blackouts can occur when you are exposed to flashing lights while
watching videos or playing Flash-based games for extended periods. If you feel any
discomfort, stop using the device immediately.
•
If anyone related to you has experienced seizures or blackouts while using a similar
device, consult a physician before using the device.
•
If you feel discomfort, such as a muscle spasm, or disoriented, stop using the device
immediately and consult a physician.
•
To prevent eye strain, take frequent breaks while using the device.
Reduce the risk of repetitive motion injuries
When you repetitively perform actions, such as pressing keys, drawing characters on
a touch screen with your fingers, or playing games, you may experience occasional
discomfort in your hands, neck, shoulders, or other parts of your body. When using your
device for extended periods, hold the device with a relaxed grip, press the keys lightly,
and take frequent breaks. If you continue to have discomfort during or after such use,
stop using the device and consult a physician.

Health and Safety
166
Protect your hearing and ears when using a headset
•
Excessive exposure to loud sounds can cause hearing damage.
•
Exposure to loud sounds while walking may distract your attention and
cause an accident.
•
Always turn the volume down before plugging the headphones into an audio source
and use only the minimum volume setting necessary to hear your conversation or
music.
•
In dry environments, static electricity can build up in the headset. Avoid using
headsets in dry environments or touch a metal object to discharge static electricity
before connecting a headset to the device.
•
Do not use a headset while driving or riding. Doing so may distract your attention
and cause an accident, or may be illegal, depending on your region.
Use caution when using the device while walking or moving
•
Always be aware of your surroundings to avoid injury to yourself or others.
•
Make sure the headset cable does not become entangled in your arms or on nearby
objects.
Do not paint or put stickers on your device
•
Paint and stickers can clog moving parts and prevent proper operation.
•
If you are allergic to paint or metal parts of the device, you may experience itching,
eczema, or swelling of the skin. When this happens, stop using the device and
consult your physician.
Do not use the device if the screen is cracked or broken
•
Broken glass or acrylic could cause injury to your hands and face. Take the device to a
Samsung Service Centre to have it repaired.
Install mobile devices and equipment with caution
•
Ensure that any mobile devices or related equipment installed in your vehicle are
securely mounted.
•
Avoid placing your device and accessories near or in an airbag deployment area.
Improperly installed wireless equipment can cause serious injury when airbags
inflate rapidly.
Do not drop your device or cause impacts to your device
•
Your device may be damaged or may malfunction.
•
If bent or deformed, your device may be damaged or parts may malfunction.

Health and Safety
167
Ensure maximum battery and charger life
•
Batteries may malfunction if they are not used for extended periods.
•
Over time, unused device will discharge and must be recharged before use.
•
Disconnect the charger from power sources when not in use.
•
Use the battery only for its intended purpose.
•
Follow all instructions in this manual to ensure the longest lifespan of your device
and battery. Damage or poor performance caused by failure to follow warnings and
instructions can void your manufacturer’s warranty.
•
Your device may wear out over time. Some parts and repairs are covered by the
warranty within the validity period, but damages or deterioration caused by using
unapproved accessories are not.
When using the device, mind the following
•
Hold the device lose to your mouth, as you would with a traditional phone.
•
Speak directly into the microphone.
Do not disassemble, modify, or repair your device
•
Any changes or modifications to your device can void your manufacturer’s warranty.
If your device needs servicing, take your device to a Samsung Service Centre.
•
Do not disassemble or puncture the battery, as this can cause explosion or fire.
•
Turn off the device before removing the battery. If you remove the battery with the
device turned on, it may cause the device to malfunction.
When cleaning your device, mind the following
•
Wipe your device or charger with a towel or an eraser.
•
Clean the battery terminals with a cotton ball or a towel.
•
Do not use chemicals or detergents. Doing so may discolour or corrode the outside
the device or may result in electric shock or fire.
Do not use the device for anything other than its intended use
•
Your device may malfunction.
Avoid disturbing others when using the device in public
Allow only qualified personnel to service your device
•
Allowing unqualified personnel to service your device may result in damage to your
device and will void your manufacturer’s warranty.

Health and Safety
168
Handle memory cards and cables with care
•
When inserting a card or connecting a cable to your device, make sure that the card
is inserted or the cable is connected to the proper side.
•
Do not remove a card while the device is transferring or accessing information, as
this could result in loss of data or damage to the card or device.
•
Protect cards from strong shocks, static electricity, and electrical noise from other
devices.
•
Do not touch gold-coloured contacts or terminals with your fingers or metal objects.
If dirty, wipe the card with a soft cloth.
•
Inserting a card or connecting a cable by force or improperly may result in damage to
the multipurpose jack or other parts of the device.
Ensure access to emergency services
Emergency calls from your device may not be possible in some areas or circumstances.
Before travelling in remote or undeveloped areas, plan an alternative method of
contacting emergency services personnel.
Protect your personal data and prevent leakage or misuse of sensitive information
•
While using your device, be sure to back up important data. Samsung is not
responsible for the loss of any data.
•
When disposing of your device, back up all data and then reset your device to
prevent misuse of your personal information.
•
Carefully read the permissions screen when downloading applications. Be
particularly cautious with applications that have access to many functions or to a
significant amount of your personal information.
•
Check your accounts regularly for unapproved or suspicious use. If you find any sign
of misuse of your personal information, contact your service provider to delete or
change your account information.
•
In the event your device is lost or stolen, change the passwords on your accounts to
protect your personal information.
•
Avoid using applications from unknown sources and lock your device with a pattern,
password, or PIN.
Do not distribute copyright-protected material
Do not distribute copyright-protected material without the permission of the content
owners. Doing this may violate copyright laws. The manufacturer is not liable for any
legal issues caused by the user’s illegal use of copyrighted material.

Health and Safety
169
Malware and viruses
To protect your device from malware and viruses, follow these usage tips. Failure to
do so may result in damages or loss of data that may not be covered by the warranty
service
•
Do not download unknown applications.
•
Do not visit untrusted websites.
•
Delete suspicious messages or email from unknown senders.
•
Set a password and change it regularly.
•
Deactivate wireless features, such as Bluetooth, when not in use.
•
If the device behaves abnormally, run an antivirus program to check for infection.
•
Run an antivirus program on your device before you launch newly-downloaded
applications and files.
•
Install antivirus programs on your computer and run them regularly to check for
infection.
•
Do not edit registry settings or modify the device’s operating system.

Health and Safety
170
Specific Absorption Rates (SAR) for Wireless Devices
The SAR is a value that corresponds to the relative amount of RF energy absorbed by the
user of a wireless device.
The SAR value of a device is the result of an extensive testing, measuring and calculation
process. It does not represent how much RF the device emits. All devices are tested
at their highest value in strict laboratory settings. But when in operation, the SAR of
a device can be substantially less than the level reported to ISED (Innovation, Science
and Economic Development Canada). This is because of a variety of factors including
its proximity to a base station antenna, design and other factors. What is important to
remember is that each device meets strict federal guidelines. Variations in SAR values
do not represent a variation in safety.
All devices must meet the federal standard, which incorporates a substantial margin of
safety. As stated above, variations in SAR values between different model devices do not
mean variations in safety.
SAR values at or below the federal standard limit are considered safe for use by the
public. The federal standard limits are 4.0 W/ kg (10g) of extremity SAR and 1.6W/kg
(1g) of Head/Wrist SAR. The extremity SAR (wrist SAR) has been used for non-speaker
modes at a 0 cm device distance from the body when worn in contact with the wrist.
Additionally, for voice activated transmission, the front of this device has been tested
when worn on the wrist and positioned a minimum of 1.0 cm from the head.
If your device supports the wireless power sharing function, this equipment should be
operated with a minimum distance of 10cm between the device and your body.
If Wireless charger is supported, the wireless charger complies with ISED Radiation
exposure limits set forth for an uncontrolled environment. This device and its
antenna must not be co-located or operating in conjunction with any other antenna or
transmitter. This equipment should be installed and operated with a minimum distance
of 10 cm between the radiator and your body.
Health and Safety
171
Correct disposal of this product
(Waste Electrical & Electronic Equipment)
This marking on the product, accessories or literature indicates that the
product and its electronic accessories (for example, charger, headset, USB
cable) should not be disposed of with other household waste.
To prevent possible harm to the environment or human health from
uncontrolled waste disposal, please separate these items from other types
of waste and recycle them responsibly to promote the sustainable reuse of
material resources.
Household users should contact either the retailer where they purchased this product, or
their local government office, for details of where and how they can take these items for
environmentally safe recycling.for ec
Business users should contact their supplier and check the terms and conditions of the
purchase contract. This product and its electronic accessories should not be mixed with
other commercial wastes for disposal.
This product is RoHS compliant.
Correct disposal of batteries in this product
This marking on the battery, manual or packaging indicates that the
batteries in this product should not be disposed of with other household
waste at the end of their working life. Where marked, the chemical symbols
Hg, Cd or Pb indicate that the battery contains mercury, cadmium or lead
above the reference levels in EC Directive 2006/66.

Health and Safety
172
Disclaimer
Some content and services accessible through this device belong to third parties and are
protected by copyright, patent, trademark and/or other intellectual property laws. Such
content and services are provided solely for your personal non-commercial use. You may
not use any content or services in a manner that has not been authorized by the content
owner or service provider. Without limiting the foregoing, unless expressly authorized by
the applicable content owner or service provider, you may not modify, copy, republish,
upload, post, transmit, translate, sell, create derivative works, exploit, or distribute in any
manner or medium any content or services displayed through this device.
“THIRD PARTY CONTENT AND SERVICES ARE PROVIDED “AS IS.” SAMSUNG DOES NOT
WARRANT CONTENT OR SERVICES SO PROVIDED, EITHER EXPRESSLY OR IMPLIED,
FOR ANY PURPOSE. SAMSUNG EXPRESSLY DISCLAIMS ANY IMPLIED WARRANTIES,
INCLUDING BUT NOT LIMITED TO, WARRANTIES OF MERCHANTABILITY OR FITNESS FOR
A PARTICULAR PURPOSE. SAMSUNG DOES NOT GUARANTEE THE ACCURACY, VALIDITY,
TIMELINESS, LEGALITY, OR COMPLETENESS OF ANY CONTENT OR SERVICE MADE
AVAILABLE THROUGH THIS DEVICE AND UNDER NO CIRCUMSTANCES, INCLUDING
NEGLIGENCE, SHALL SAMSUNG BE LIABLE, WHETHER IN CONTRACT OR TORT, FOR ANY
DIRECT, INDIRECT, INCIDENTAL, SPECIAL OR CONSEQUENTIAL DAMAGES, ATTORNEY
FEES, EXPENSES, OR ANY OTHER DAMAGES ARISING OUT OF, OR IN CONNECTION WITH,
ANY INFORMATION CONTAINED IN, OR AS A RESULT OF THE USE OF ANY CONTENT OR
SERVICE BY YOU OR ANY THIRD PARTY, EVEN IF ADVISED OF THE POSSIBILITY OF SUCH
DAMAGES.”
Third party services may be terminated or interrupted at any time, and Samsung makes
no representation or warranty that any content or service will remain available for
any period of time. Content and services are transmitted by third parties by means
of networks and transmission facilities over which Samsung has no control. Without
limiting the generality of this disclaimer, Samsung expressly disclaims any responsibility
or liability for any interruption or suspension of any content or service made available
through this device.
Samsung is neither responsible nor liable for customer service related to the content and
services. Any question or request for service relating to the content or services should be
made directly to the respective content and service providers.

Health and Safety
173
Technical requirements for Wi-Fi operation in the 5 GHz band
Wi-Fi access points that are capable of allowing your device to operate in the 5.15 -
5.25GHz band are optimized for indoor use only. If your Wi-Fi network is capable of
operating in this mode, please restrict your Wi-Fi use to indoors to not violate federal
regulations to protect mobile satellite services.

Copyright
Copyright © 2024 Samsung Electronics Co., Ltd.
This guide is protected under international copyright laws.
No part of this guide may be reproduced, distributed, translated, or transmitted in any
form or by any means, electronic or mechanical, including photocopying, recording, or
storing in any information storage and retrieval system.
Trademarks
•
SAMSUNG and the SAMSUNG logo are registered trademarks of Samsung
Electronics Co., Ltd.
•
Bluetooth
®
is a registered trademark of Bluetooth SIG, Inc. worldwide.
•
Wi-Fi
®
, Wi-Fi Direct
™
, Wi-Fi CERTIFIED
™
, and the Wi-Fi logo are registered
trademarks of the Wi-Fi Alliance.
•
All other trademarks and copyrights are the property of their respective owners.
ISED Notice
This Class B digital apparatus complies with Canadian ICES-003.
This device complies with Innovation, Science and Economic Development Canada
licence-exempt RSS standard(s). Operation is subject to the following two conditions:
(1) this device may not cause interference, and
(2) this device must accept any interference, including interference that may cause
undesired operation of the device.