
OWNER’S MANUAL
(LED SCREEN)
Please read the safety information carefully before using this product.
After reading this manual, keep it in an easily accessible location for future reference.
www.lg.com
Copyright © 2023 LG Electronics Inc. All Rights Reserved.
LSAB012-N22
LSAB012-T22
LSAB012-U22
LSAB009-N33
LSAB009-T33
LSAB009-U33

2
ENGLISH
TABLE OF CONTENTS
SAFETY PRECAUTIONS .............3
- Precautions for the AC Cable and Power ...... 4
- Precautions for Moving the Product ................ 6
- Precautions for Installing the Product ............. 7
- Precautions for Cleaning the Product ............. 9
- Precautions for Using the Product .................10
- Product Disposal ...................................................... 11
ASSEMBLING AND
PREPARING ............................. 12
- Essential Accessories .............................................12
- Optional Accessories ..............................................13
- Handling for Protecting
LED Package Screen ...............................................15
- Installation Precautions Guide .......................... 18
- Installation Location ............................................... 20
- Terminal ......................................................................... 22
CONNECTING LAN
(LSAB012-N22, U22 /
LSAB009-N33, U33) ............... 23
CONNECTING AC
(LSAB012-N22 /
LSAB009-N33) ........................ 24
INSTALLATION GUIDE ............ 26
SETTINGS ................................ 31
- Home .............................................................................. 31
- Ez Setting .....................................................................32
- General ..........................................................................41
- Display ............................................................................52
- Sound..............................................................................59
- Admin ............................................................................. 62
CONTENT MANAGER ............. 64
- Web Login .................................................................... 64
- Content Manager .....................................................64
- Group Manager 2.0 .................................................71
- Gallery Mode .............................................................. 74
- ScreenShare ................................................................ 75
- LG Presenter ...............................................................75
MANAGEMENT TOOLS ........... 78
- Control Manager ...................................................... 78
- Picture ID ...................................................................... 79
- Dehumidification Mode .........................................80
IR CODE ................................... 81
CONTROLLING MULTIPLE
PRODUCTS ............................... 83
- Connecting cables ...................................................83
- Communication Parameter ................................. 84
- Command Reference List ....................................85
- Transmission/Reception Protocol ....................90
TROUBLESHOOTING ............. 118
PRODUCT SPECIFICATIONS . 120

3
ENGLISH
SAFETY PRECAUTIONS
The safety precautions are intended to prevent unexpected danger or harm by helping the user to use the product
safely and for its intended purpose.
WARNING
If you ignore the warning message, you may be seriously injured or there is a possibility of accident or death.
CAUTION
If you ignore the caution message, you may be slightly injured or the product may be damaged.
WARNING
• Indoor Use Only.

4
ENGLISH
Precautions for the AC Cable and Power
WARNING
• Before using an AC cable, make sure it conforms to the national standards.
• Operate the display only from a power source (i.e. voltage) indicated in the product specification.
- Otherwise the product can be damaged, fire can occur or you may be electrocuted. If you are not sure what type of
power supply you have, consult a certified installation company.
• Be sure to connect the AC cable to a grounded power disconnecting device.
- If you do not you may be electrocuted or injured or the product can be damaged.
• Insert the AC cable securely so that it does not come loose.
- Poor connection may cause a fire or electric shock.
• In the presence of thunder and lightning, never touch the power cord and signal cable because it can be very
dangerous.
- It can cause electric shock.
• Be careful not to place heavy objects (electronic appliances, clothes, etc.) on or step on the AC cable. In addition, do
not bend or pull the AC cable with excessive force.
- Damaged power cords may cause a fire or electric shock.
• Do not connect the AC cable to a power disconnecting device if it has been damaged by a sharp object.
- You may be electrocuted.
• Do not insert a conductor (such as a metal chopstick) into the power disconnecting device while the AC cable is
connected on the other side of the same power disconnecting device. In addition, do not touch the AC cable directly
after removing it from the power disconnecting device.
- You may be electrocuted.

5
ENGLISH
• If water or any foreign substance enters the product, disconnect the AC cable immediately and contact the service
center.
- Otherwise, this may cause a fire or electric shock due to damage to the product.
• Keep the AC cable away from heating devices.
- The cord coating may melt and cause fire or electric shock.
• Never disassemble, repair, or modify the AC cable.
- This may cause a fire or electric shock.
• As long as this unit is connected to the AC wall outlet, it is not disconnected from the AC power source even if the
unit is turned off.
• For the power consumption to be zero, the AC cable must be disconnected.
CAUTION
• If there is dust on the AC cable or the power disconnecting device, wipe them clean.
- Overheating due to layers of dust may cause a fire or electric shock.
• If there is moisture on the AC cable or the power disconnecting device, wipe them clean. In addition, do not touch
them if your hands are wet.
- This may cause an electric shock.
• Do not turn the product on or off by connecting or disconnecting the AC cable. In other words, do not use the AC
cable as a switch.
- This may cause an electric shock or product malfunction.
• Do not disconnect the AC cable while using the product.
- Electrical shock can damage the product.

6
ENGLISH
Precautions for Moving the Product
WARNING
• Contact the service center before moving the product.
- It may cause electric shock and damage the product.
• Make sure the product is turned off, unplugged, and all cables have been removed before the product is moved.
- You may be electrocuted or the product can be damaged.
• When moving the product, do not shock or cause an impact on the front panel.
- You may be electrocuted or the product can be damaged.
• Usethecorrectnumberofpeopleaccordingtotheweightoftheproduct.(Under25kg(55.1lbs)perpersonuse
liftingequipmentwhenexceeding100kg(220.4lbs))
- If use the damaged product again, contact the service center because it can cause electric shock or fire.
• Do not hold it upside down while holding only the stand. (It is for stand supported models only.)
- This may cause stand warping, panel damage and other types of product damage.
CAUTION
• Do not dispose of the product-packing box. Use it when moving by putting the product in the box to carry it.

7
ENGLISH
Precautions for Installing the Product
WARNING
• Contact the service center before installing the product.
- It can cause electric shock and damage the product.
• Do not drop an object on or impact on the product. Keep out of reach of children and do not place toys or objects
near the product to prevent throwing things on the product screen.
- It can cause injury to human, problem to product and damage the display.
• Do not put heavy objects on, or hang from, the product.
- If the product collapses or is dropped, you may be injured.
• Do not touch the surface of the product if it overheats.
- It can cause injury to human.
• Install the product firmly fixed on a floor, wall, etc. to prepare against external impact such as wind and earthquake.
- You must refer to the manual provided.
• Prevent Children from climbing or hanging on the product.
- If the product collapses or is dropped, you may be injured.
• Do not install it where there are heating devices such as electrical heaters or lighting equipment.
- Fire, electrical shock, malfunction may occur.
• Do not install this product by yourself as you may injure yourself or cause damage to the product. Please contact
service engineer authorised by service center.
• Do not install this product on a wall if it could be exposed to oil or oil mist.
- This may damage the product and cause it to fall.
• Do not leave the AC cable, signal cables, etc. in one’s walking path.
- This could cause a trip or fall, which could cause an electrical shock, fire, product breakdown, or injury.
• Do not let the product drop when connecting it to an external device connected with a short cable.
- This may cause injury and damage to the product.
• If you drop the product or the case is broken, turn off the product and unplug the power cord and contact the service
center.
- If you continue to use without taking proper measures, electrical shock or fire can occur.
• Install the product in a dry place where it is not near dust and water. Avoid high temperatures and humidity.
- This may cause electrical shock, fire or product damage.
• Safely install the product in a place that can hold the weight of the product.
- A lack of strength may cause the product to fall.
• Take a comfortable and natural position to relax the muscles when working with a product.
• A readily accessible disconnect device shall be incorporated external to the equipment. The maximum rating of an
overcurrent protective device to be provided external to the equipment may be one of the protective device ratings
available in the country of installation.
• Power docking should include no more than 7 units. (LSAB012-*22)
• Power docking should include no more than 5 units. (LSAB009-*33)

8
ENGLISH
CAUTION
• Install the product where no Electromagnetic Interference occurs.
• If you install the product in a place that does not meet the recommended conditions, this may cause serious damage
to the product’s picture quality, life cycle, and appearance. Please check with service engineer before installing. Please
do not install the product in places such as where there is an abundance of fine dust or oil mist, chemical substances
are used, exposed to direct sunlight, the temperature is very high or low, the humidity is very high.
• MakesuretheproductiswellventilatedbyInstallingatadistance(30mm(1.1inches)ormore)fromthewall.
- If you install the product too close to the wall, it may be deformed or fire can break out due to internal heat buildup.
• When the AC cable is connected, make sure that the vents are not blocked by tablecloths, curtains, or other objects
(such as plastic).
- The product can be deformed or fire can break out due to overheating inside the product.
• Do not install the product in an area with poor ventilation (e.g. on a bookshelf, in a closet) or outside and avoid placing
on cushions or carpets.
- The product could catch fire due to overheating inside the product.
• Install the product on a flat and stable place that is large enough to support the product.
- If the product is dropped, you may be injured or the product may be broken.
• When installing the product on a shelf or cabinet, make sure that the bottom end of the product is not protruding
forward.
- The product may fall due to unbalanced center of gravity, which may cause personal injury or damage to the
product. Be sure to use cabinets or shelves that fit your product.

9
ENGLISH
Precautions for Cleaning the Product
WARNING
• Keep the product clean at all times.
- If you don’t clean the unit for a long time and it becomes covered in dust, it can cause fire or product damage.
• When you need to clean the inside of the product, you must contact the service center.
- Otherwise, cleaning without support may cause a fire, electric shock, or damage to the product.
• When cleaning the product, disconnect the AC cable and wipe it gently with a soft cloth to prevent scratches.
- An electric shock may occur or damage to the screen if its scratched.
• Do not physically come in contact with the screen of the LED Package.
- This may cause damage to the product.
• To clean the product, use an air gun to lightly remove dust from the front frame and the screen.
- If there are foreign substances in between the LEDs on the screen, it may cause a defect on the screen.
CAUTION
• When cleaning the product or the screen, unplug the power cord and wipe it gently with a soft cloth. Do not spray
water or other liquids directly on the product. Especially, do not clean your product with chemicals including glass
cleaner, any type of air freshener, insecticide, lubricants, wax (car, industrial), abrasive, thinner, benzene, alcohol, etc.,
which can damage the product or its panel.
- This may result in fire, electric shock or product damage (deformation, corrosion or breakage).

10
ENGLISH
Precautions for Using the Product
WARNING
• Do not use the product in any environment with excessively high temperatures or humidity.
- It may cause electrical shock or damage the product.
• If you use the product for a long period of time, take a rest from time to time to protect your vision.
- Extended viewing could result in impaired vision.
• Listening at high volume or using for a long time can cause damage to your hearing.
• If water or any foreign substance enters a unit, turn off the unit, disconnect it from the AC cable, and contact the
service center.
- Otherwise, the product may cause fire or electric shock.
• In the event that no image appears on the screen or no sound is heard, stop using the product. Disconnect the AC
cable from the power disconnecting device immediately and contact the service center.
- Otherwise, the product may cause fire or electric shock.
• Do not drop an object or impact on the product or screen.
- It can cause injury to human, problem to product and damage the screen.
• If there is smoke or a strange sound or smell, disconnect the AC cable and contact the service center.
- If you continue to use the product without taking proper measures, it may cause electrical shock or fire.
• Do not attempt to disassemble, repair or modify the product yourself. Please contact service center if you need to
repair it.
- Fire or electric shock can occur.
• Do not place objects filled with liquids such as vases, cups etc. on or over the product to prevent liquid from entering
the product.
- Failure to do so may result in fire, electric shock, malfunction or deformation.
• The product must be installed in an environment out of human reach. If a person touches the product, its
performance may deteriorate. If the product needs to be installed in a place where human contact with the product is
likely, a separate measure to prevent people from touching it needs to be taken.
• Do not push hard on or scratch the product’s surface with your hands or sharp objects, such as nails, pencils or pens.
Do not shock or scratch the front and sides of the screen with metallic objects.
- This may damage the products and cause it to malfunction.
• Do not touch the product if it has been exposed to sunlight or an intense light because it could be hot.

11
ENGLISH
• Do not use high voltage electrical goods near the product (e.g., a bug zapper).
- This may result in product malfunction if it receives an electrical shock.
• If there is a gas leak, do not touch the outlet, and open the windows for ventilation.
- Otherwise, the product may cause fire or electric shock.
• If the product or case is dropped and damaged, turn off the power and disconnect the AC cable.
- If you continue to use without taking proper measures, electrical shock or fire can occur. Contact the service center.
• Keep small accessories out of the reach of children.
- If a child swallows it, consult a doctor immediately.
• Keep out of reach of children from the product. Also, do not throw toys or objects at the product or screen.
- It can cause injury to human, problem to product and damage the screen.
• To shut off the power of the unit, you must disconnect all connected AC cables.
CAUTION
• This panel is an advanced product that contains millions of pixels. You may occasionally see pixel spots when viewing
the screen. Since these deactivated pixels are not a defect, the performance and reliability of the product is not
affected.
• Do not put or store inflammable substances near the product.
- There is a danger of explosion or fire.
• Keep the proper distance from the product.
- It can cause damage to your vision if you look at the product too closely.
• Set the appropriate resolution and frequency by products.
- It can cause damage to your vision.
• Take a regular break when working with the product for a long time.
Product Disposal
• Do not dispose of this product with general household waste.
• Disposal of this product must be carried out in accordance to the regulations of your local authority.
12
ENGLISH
ASSEMBLING AND PREPARING
CAUTION
• Always use genuine components to ensure safety and durability of the product.
• The product warranty will not cover damage or injury caused by the use of unauthorised components.
NOTE
• The accessories provided with your product may vary depending on the model or region.
• Product specifications or contents in this manual may be changed without prior notice due to upgrade of product
functions.
• The warranty will not cover any damage caused by using the product in an excessively dusty environment.
Essential Accessories
Essential accessories are subject to change or to be added without prior notices to improve the performance of the
product.
The images of the product in this manual are to aid comprehension and may differ from the actual appearance.
System Controller
CSAD
NOTE
• Essential accessories are only available for some models. If necessary, please purchase them separately.
13
ENGLISH
Optional Accessories
Without prior notice, optional accessories are subject to change to improve the performance of the product, and new
accessories may be added. The illustrations in this manual may differ from the actual product and accessories.
Wall Mount
x 2
WM-LS2-2 WM-LC2-2 WM-LH2-2
x 2
WM-LS3-2 WM-LC3-2 WM-LH3-2
WM-LS4-2 WM-LC4-2
14
ENGLISH
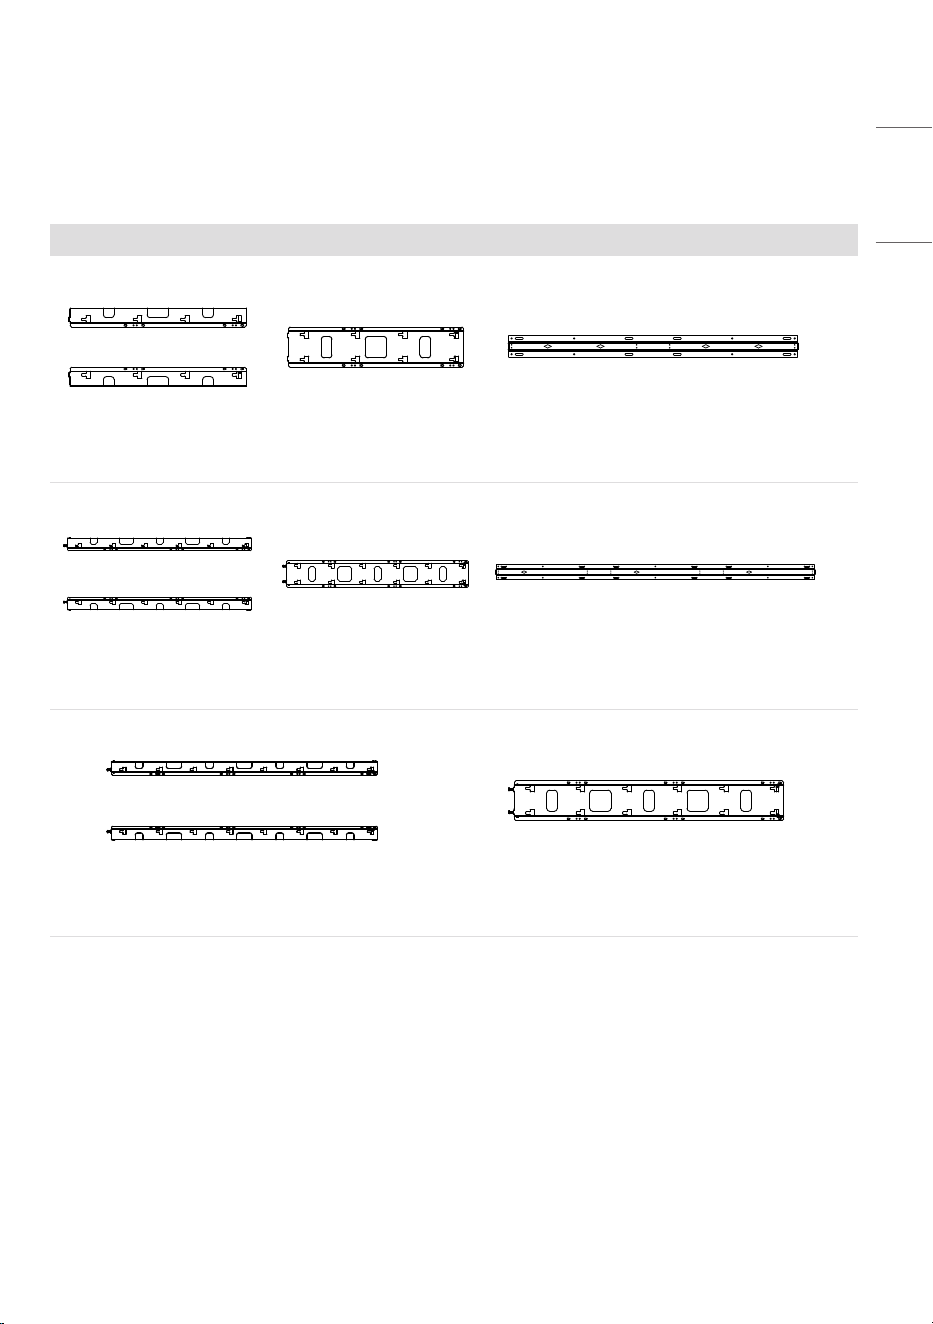
Middle Frame
KT-BZ1080-2
KT-BZ1360-2
KT-BZ1630-2
15
ENGLISH
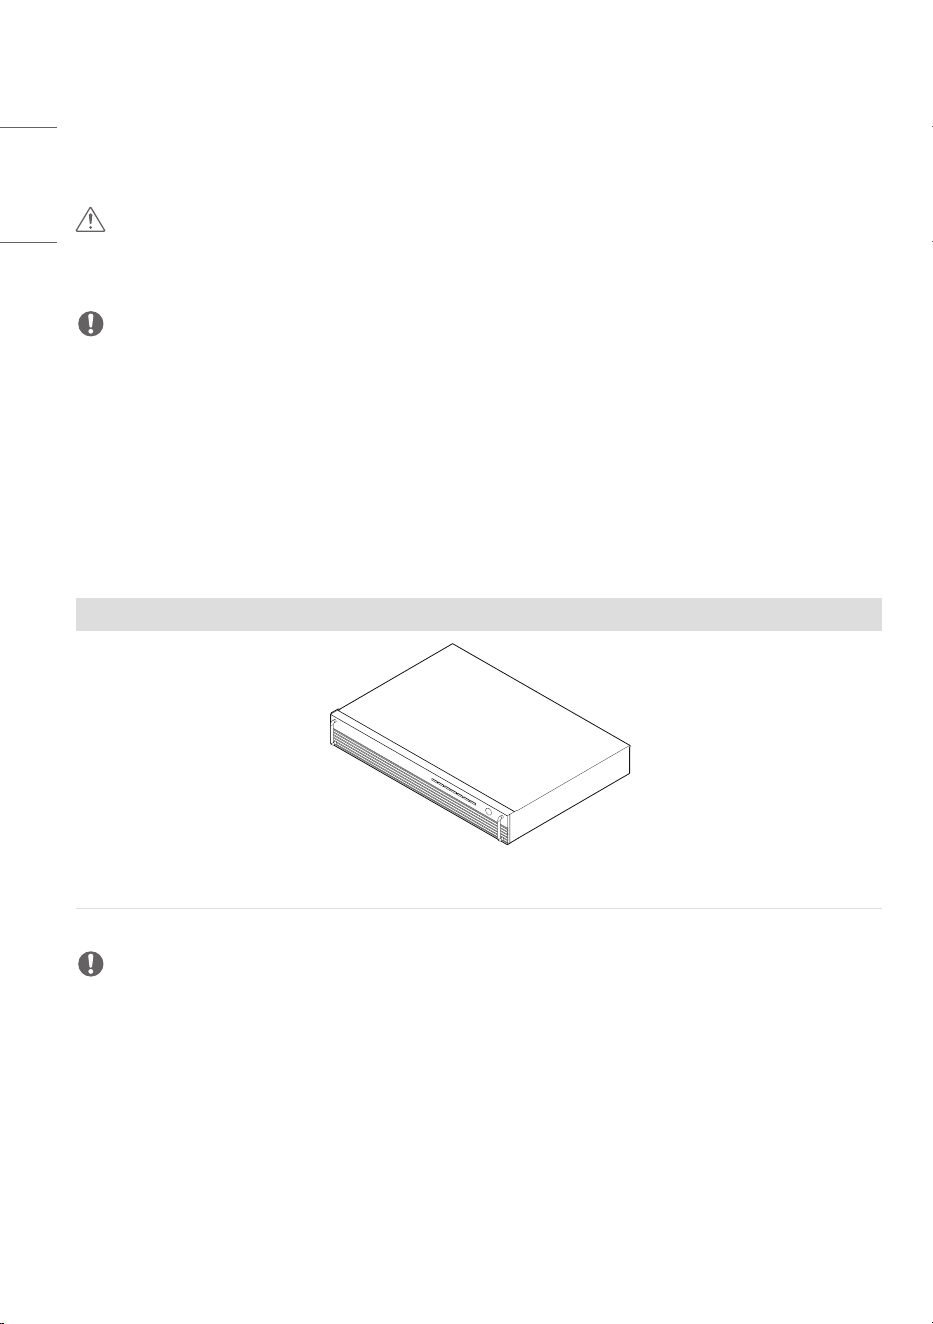
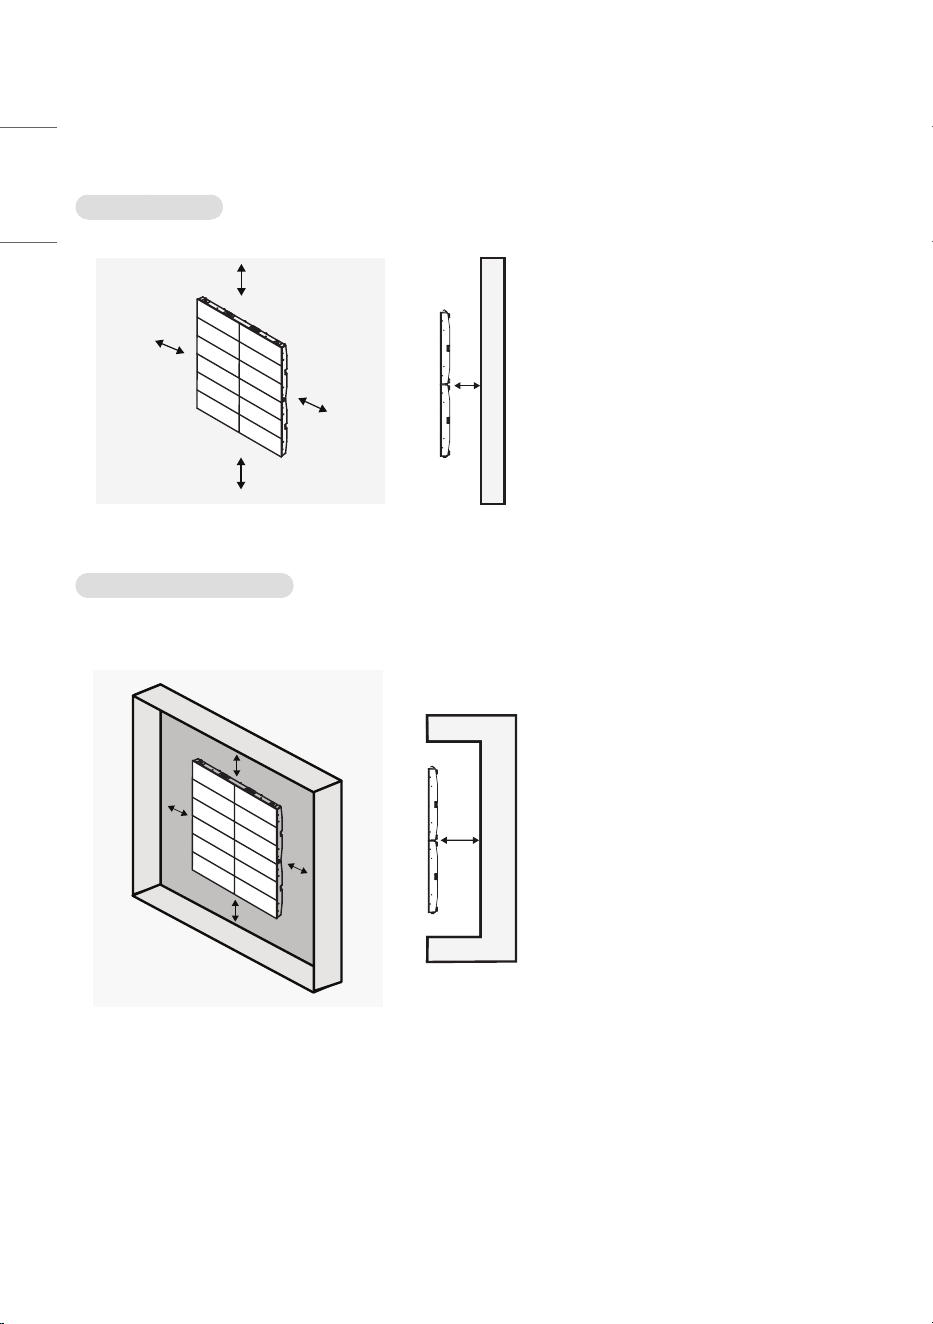
Handling for Protecting LED Package Screen
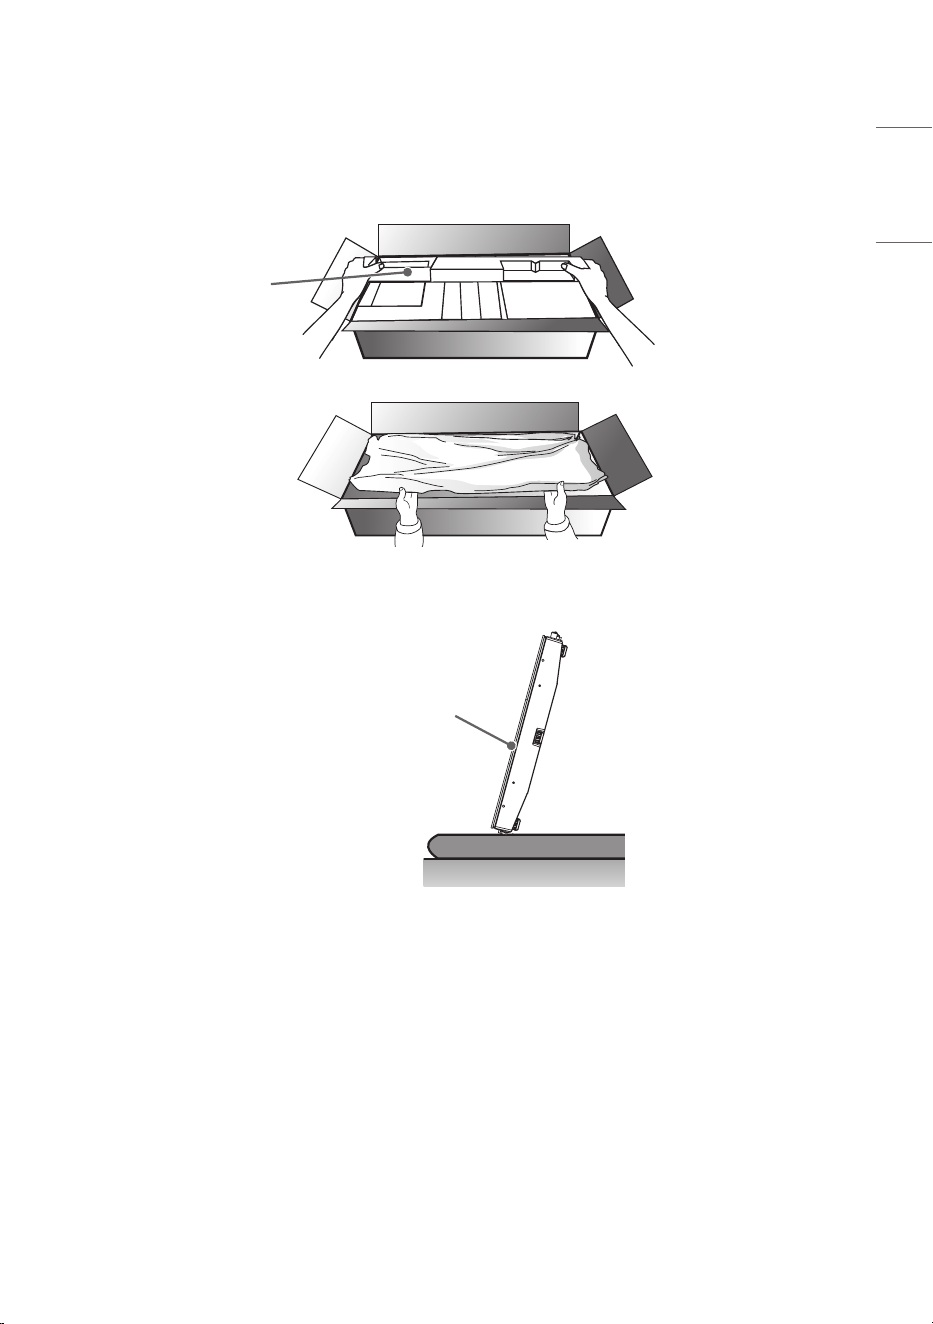
1 When taking out the product, make sure the screen is not pressed.
Protection Pad
2 To stand the product upright, hold it on both sides so that the LED package screen does not touch the floor.
LED Package Screen
16
ENGLISH
3 Place the product with the LED package screen facing down. To protect the screen, lay the protective pad in the box
on the floor.
Protection Pad
LED Package Screen
4 If you do not have a pad, make sure that there is no foreign object on the floor when you lay the product on the
floor, and then carefully place the LED package screen facing down or up. Be careful not to drop objects on the LED
package screen.
LED Package Screen
17
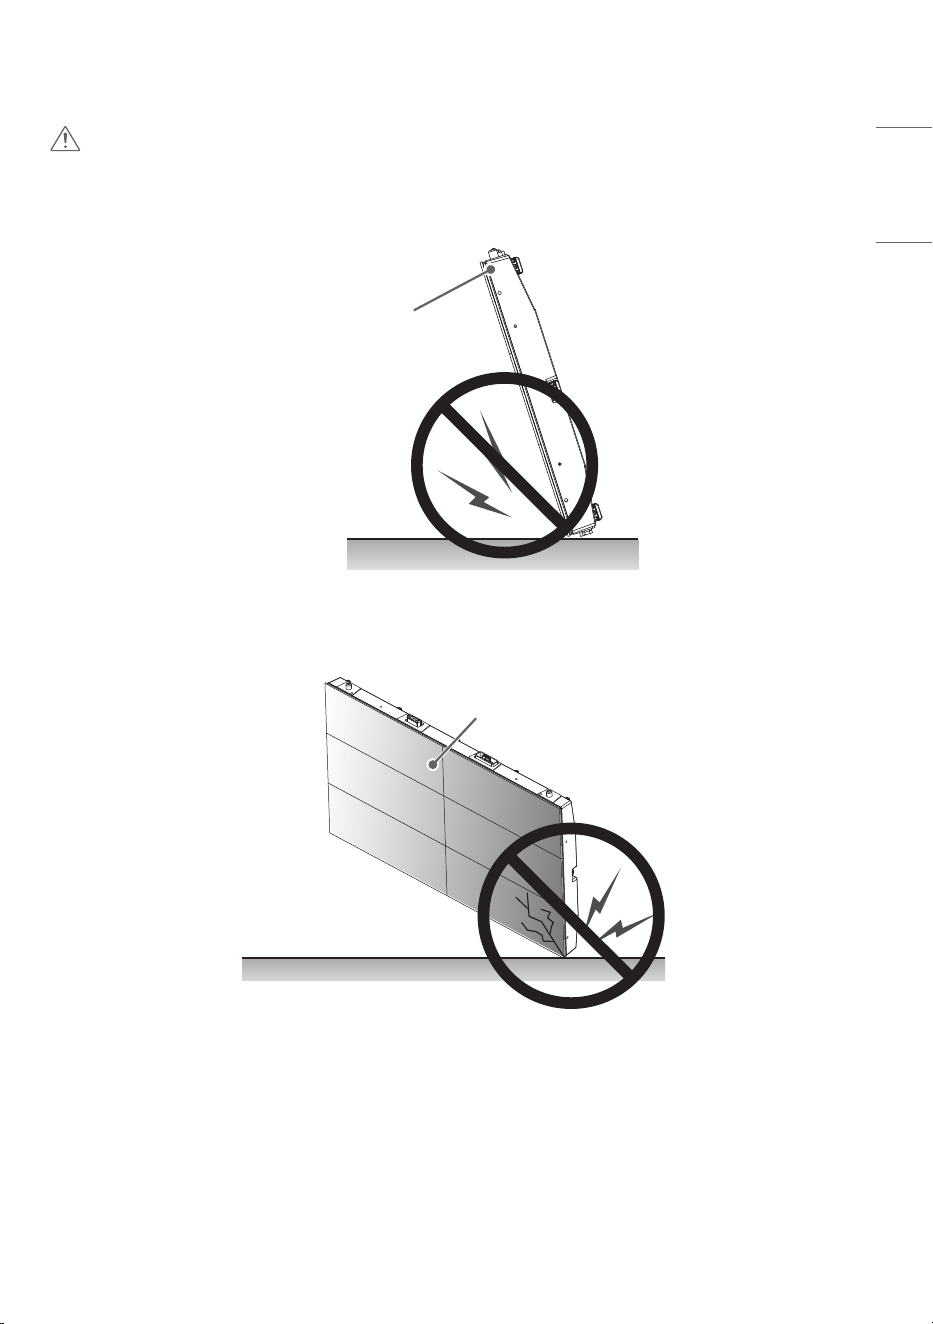
ENGLISH
CAUTION
1 If the product is tilted towards the LED package screen, the bottom of the product may be damaged.
LED Package Screen
2 If the product is tilted towards the edge of the LED package screen, the bottom (corner) of the product may be
damaged.
LED Package Screen
18
ENGLISH
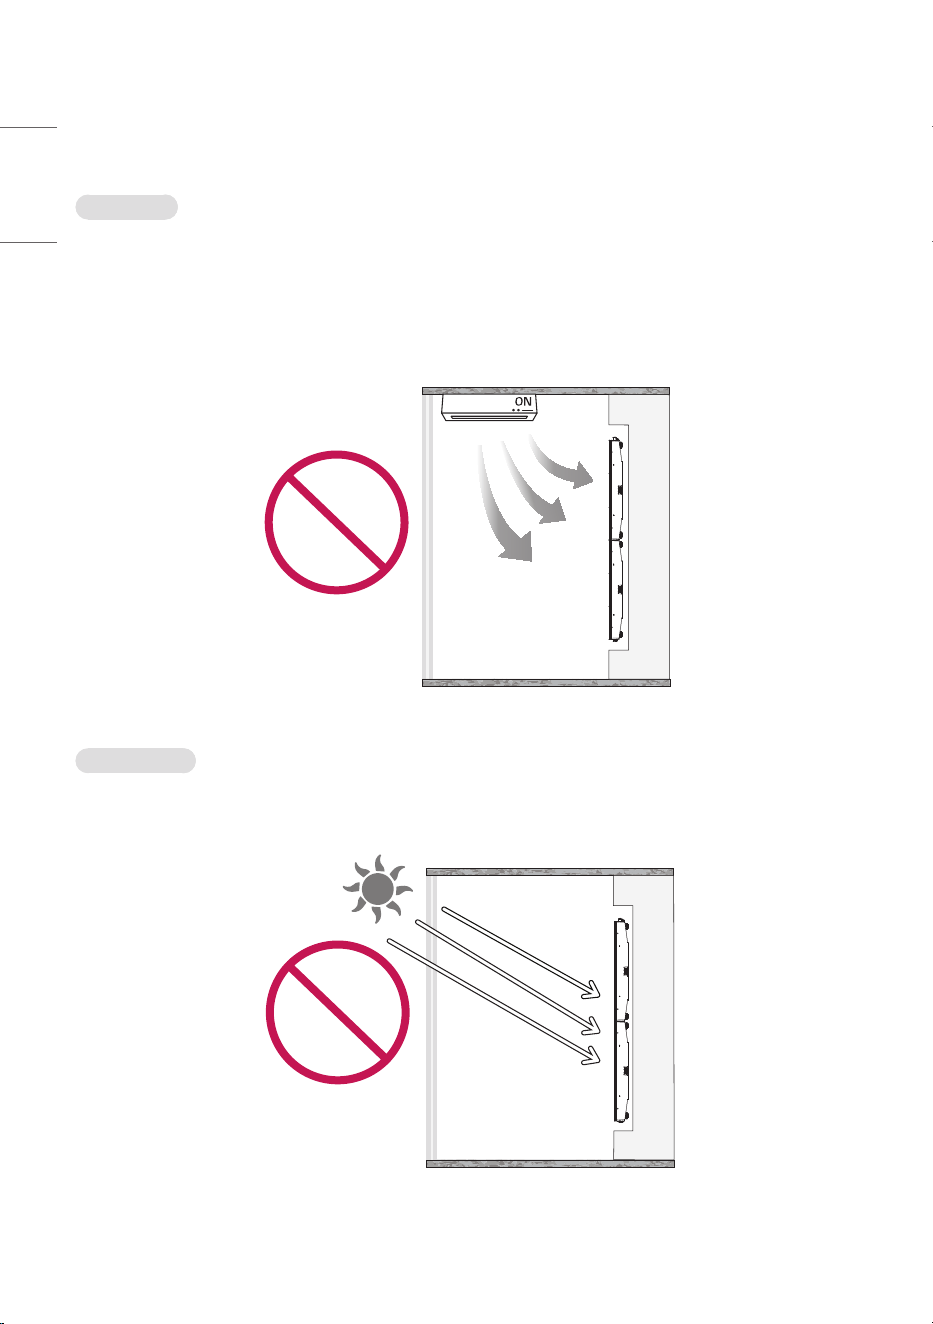
Installation Precautions Guide
Temperature
• Make a cooling system for the enclosure so that the operating temperature of the product can be maintained.
- Productoperatingtemperature:0°Cto40°C(32°Fto104°F)(therecommendedroomtemperatureisbelow
25°C(77°F).)
• Install in a location where the warm air from an air conditioner does not directly affect the product.
- This will prevent malfunctions such as the screen turning off.
Direct Sunlight
• Install in a location that is not exposed to direct sunlight.
- This will prevent the screen from appearing blurry due to light reflection.
19
ENGLISH
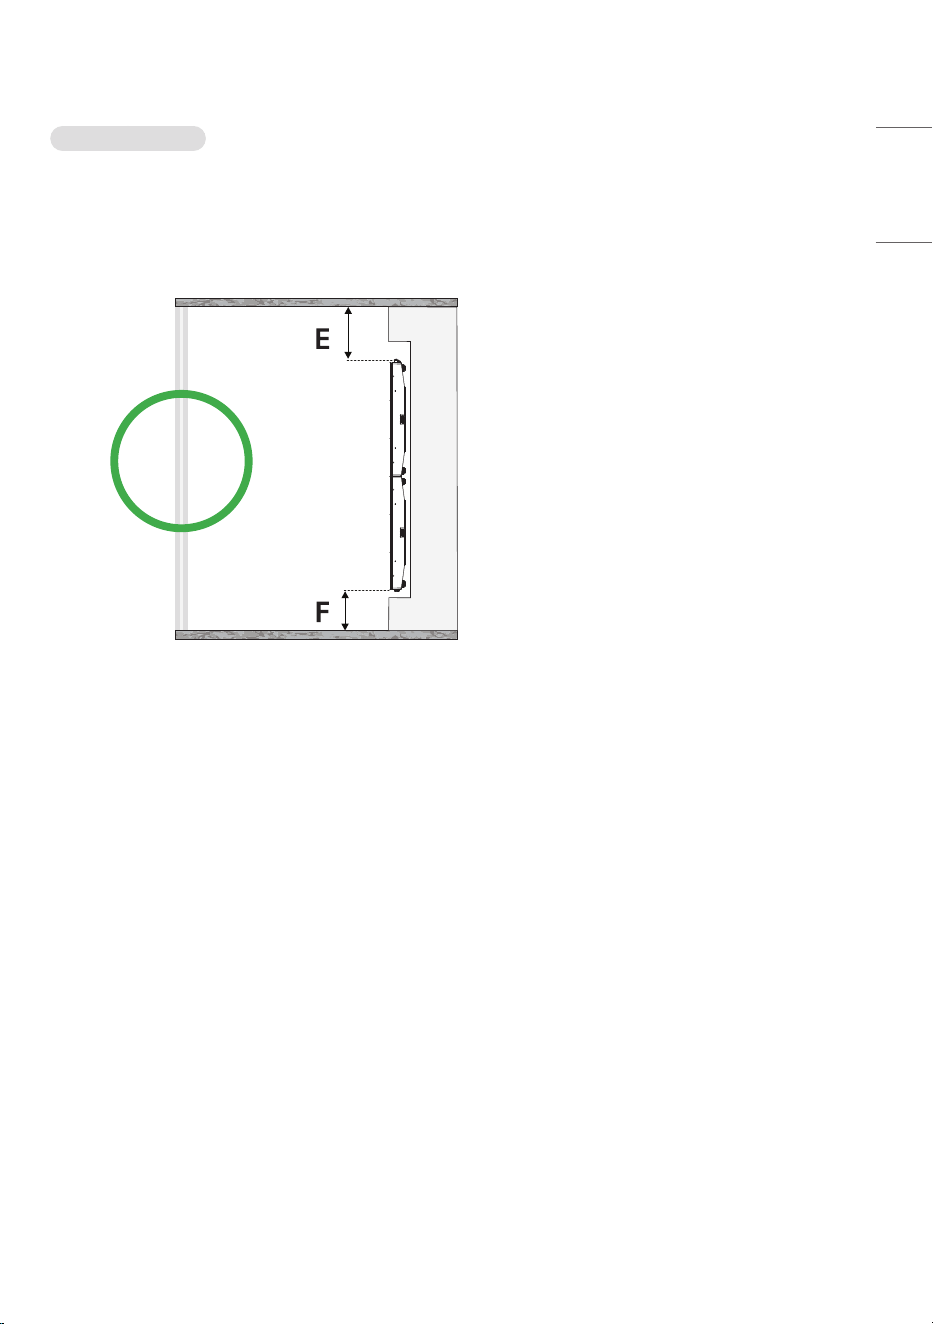
Installation Position
• Ensurethedistancefromtheceilingoftheinstallationroomtotheproductisatleast400mm(15.7inches).
- The high temperature air collected at the ceiling will naturally circulate to prevent malfunction.
• Ensurethedistancefromtheflooroftheinstallationroomtotheproductisatleast100mm(3.9inches).
- The air from the floor will easily circulate to the ceiling to prevent malfunctions.
E:400mm(15.7inches)ormore
F:100mm(3.9inches)ormore
20
ENGLISH
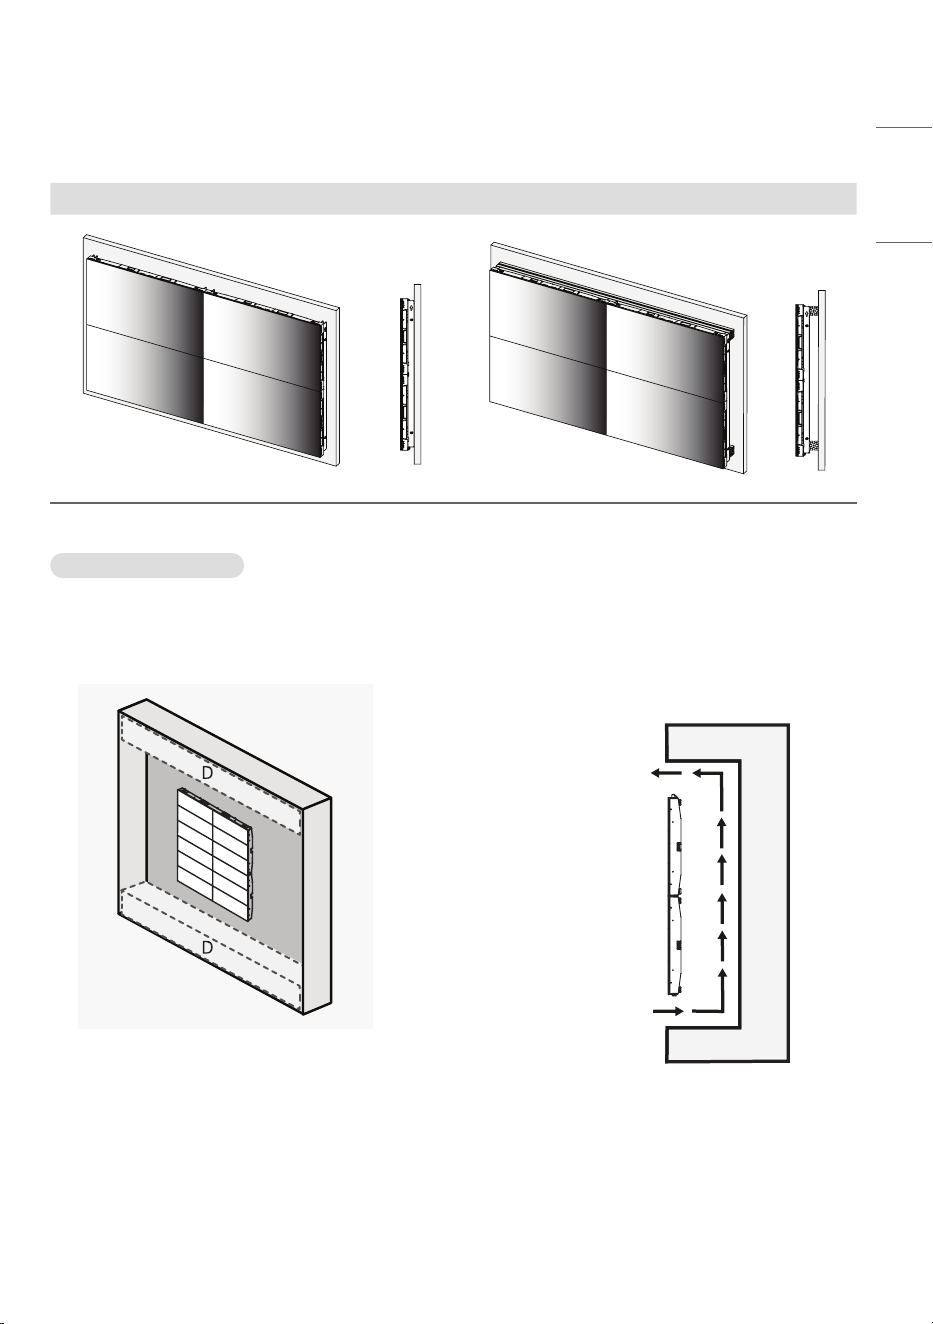
Installation Location
Installing on a Wall
A
B
C
C
B
A
C
C
B
B
A:30mm(1.1inches)ormore
(recommended)
- Can be installed directly on our own wall
mount without using a structure. (see
example)
B:25mm(0.9inches)ormore
C:60mm(2.3inches)ormore
Installing on a Recessed Wall
• After installation on a recessed wall, a bezel can be installed for interior purposes.
A
B
C
C
B
A
C
C
B
B
A:30mm(1.1inches)ormore
(recommended)
- Can be installed directly on our own wall
mount without using a structure. (see
example)
B:25mm(0.9inches)ormore
C:60mm(2.3inches)ormore
21
ENGLISH
• Example
- Depending on the model, the shape of the wall mount may difference.
Wall mount usage scene Wall mount and structure usage scenes
When Installing the Bezel
• Ensure it can be detached for product repair.
• Forthetop/bottombezels,secureatleast60%oftheairventtofacilitateaircirculation.
- This will prevent malfunction.
Airflow
D : Air Vent
(60%ormore)
22
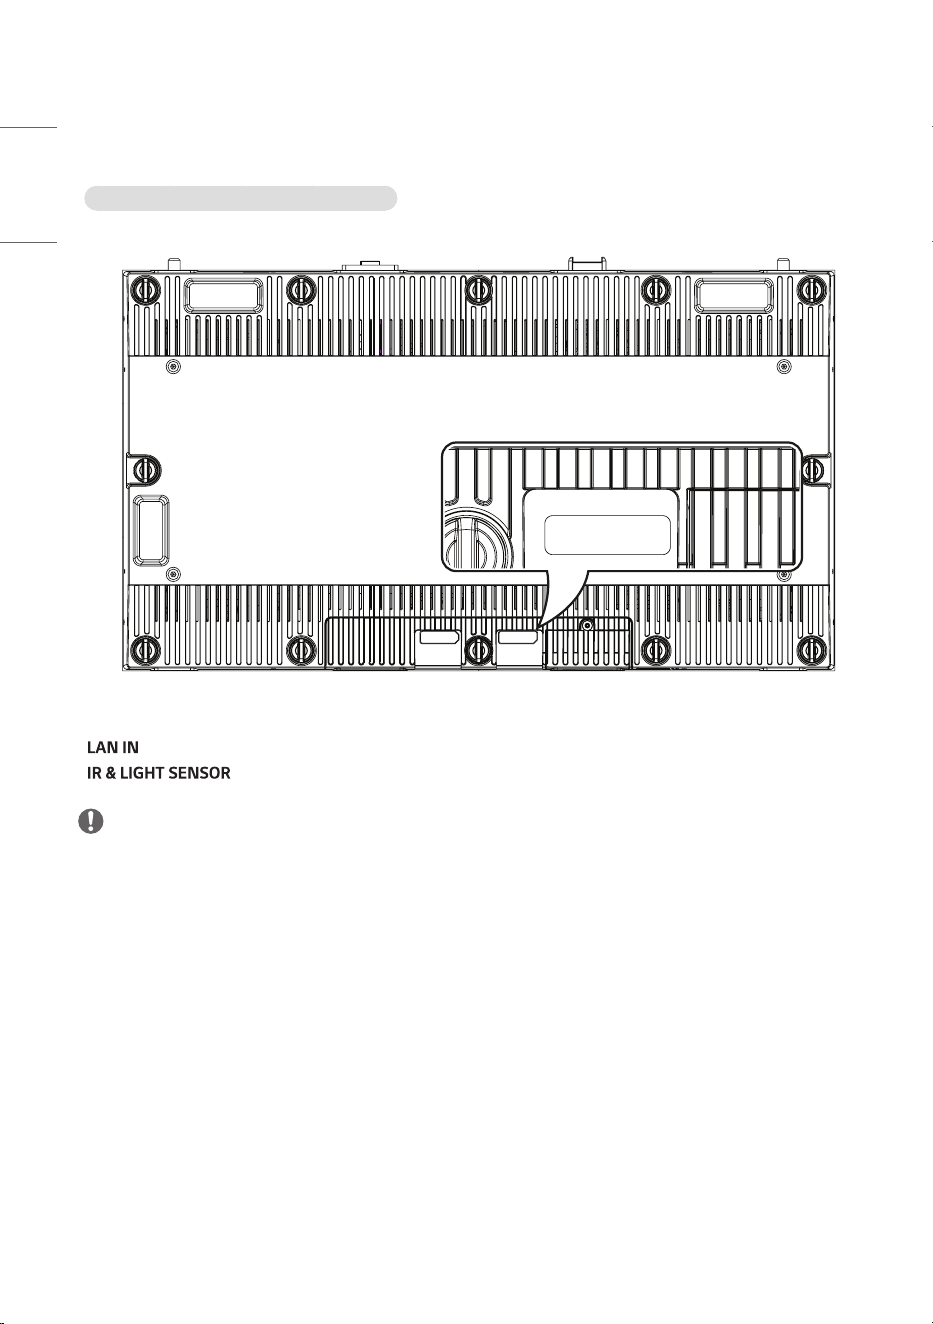
ENGLISH
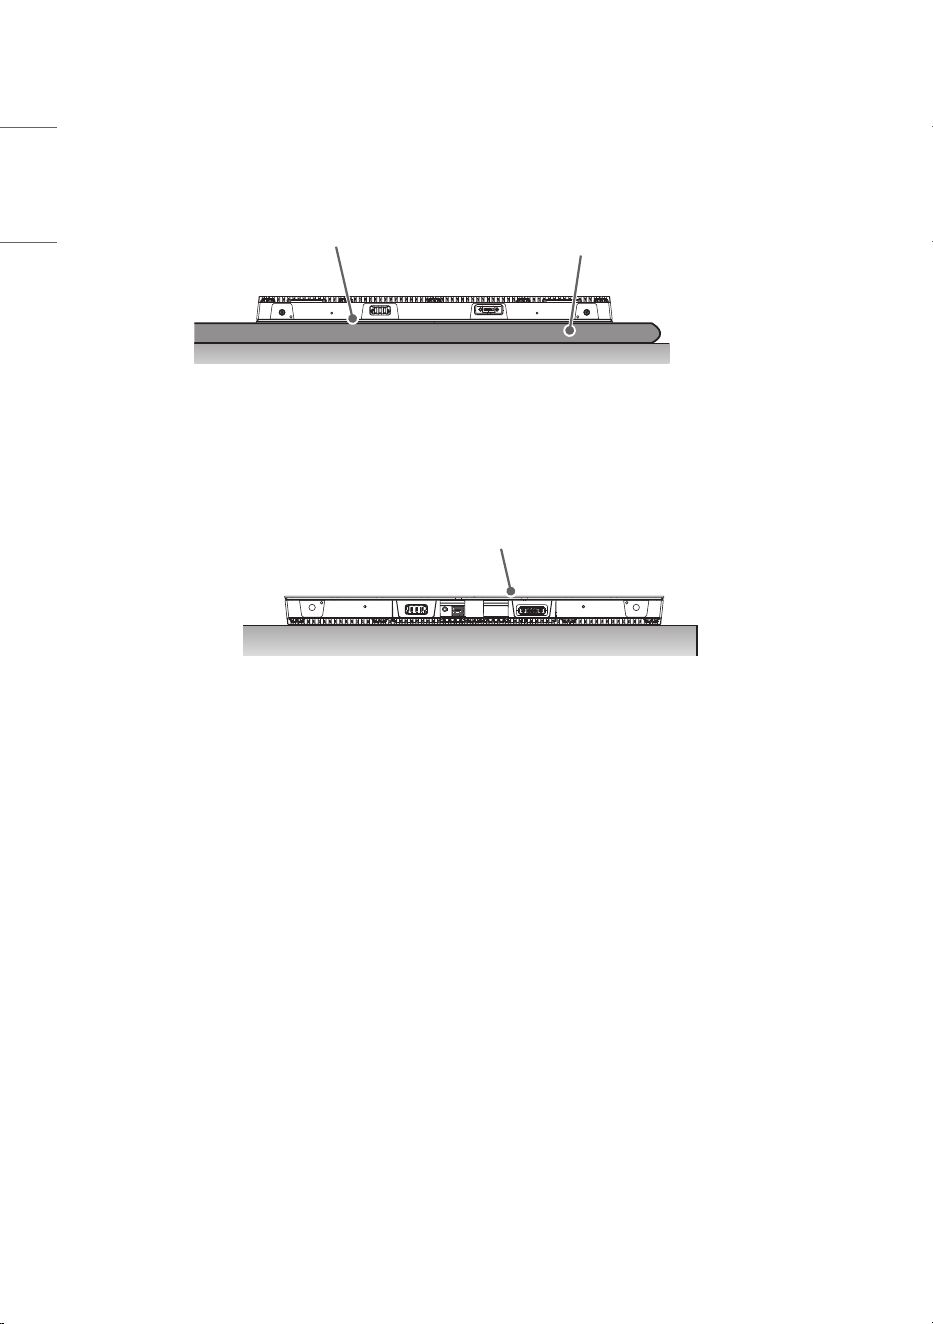
Terminal
LSAB012-N22, U22 / LSAB009-N33, U33
LAN IN
ENTRÉE LAN
IR&LIGHT SENSOR
CAPTEUR
DE LUMIÈRE IR
SVC Only
SVC Uniquement
LAN IN
ENTRÉE LAN
IR&LIGHT SENSOR
CAPTEUR
DE LUMIÈRE IR
• : Sends the LAN signal to another set.
• : Sends the IR signal to another set.
NOTE
• The IR sensor is not provided with this product.
• For CSAD the IR sensor and remote control are provided.
• Please refer to the CSAD’s manual for how to use the IR sensor and remote control.
23
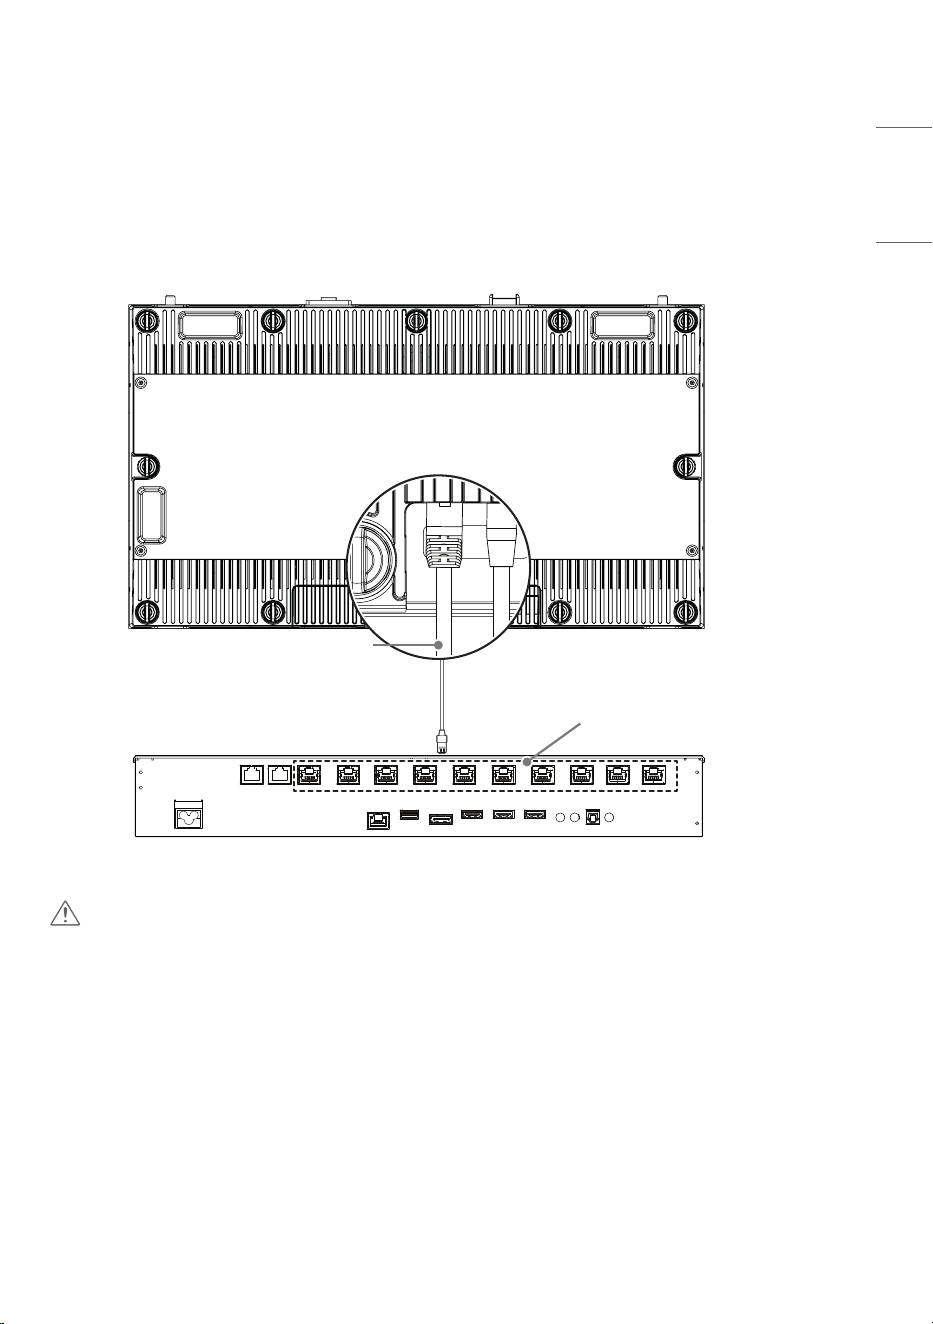
ENGLISH
CONNECTING LAN (LSAB012-N22, U22 /
LSAB009-N33, U33)
You can connect to the CSAD (System Controller) by using an LAN cable.
LAN cable
(*Not provided)
CSAD
CAUTION
• Check the direction so that the LAN cable is not damaged.
• Inserting the LAN cable with excessive force may damage the contact point.
24
ENGLISH
CONNECTING AC (LSAB012-N22 /
LSAB009-N33)
You can connect the unit to a power disconnecting device using an AC cable.
G
L
N
L
G
N
• Use the AC cable to connect to the power disconnecting device. (Please use a cable that is long enough to be
connected to the screen.)
• Please use a ferrite core to block out the noise from the power supply.
• Please use 7 or more cores each to GND, L, and N when connecting to a master cabinet power cable.
* Manufacturer: TNC CO.,LTD.
14(0.5)
7(0.2)
8(0.3)
(Unit: mm (inches))
Power Connection
• Preparethepowercableof9A(16AWG)ormore.
• Check power cable color connection.
• Avoid water or dust.
25
ENGLISH
Country Live Neutral Ground
Europe Brown Blue Green & Yellow
North America Black White Green & Yellow
India Red Black Green & Yellow
Japan / Taiwan Black White Green & Yellow
Korea Brown Blue Green & Yellow
You can connect the AC cable connected to the power disconnecting device to the screen.
G
N
L
100mm(3.9inches)
Fixing parts
Structure
• Connect the AC cable to the screen using an angle type O-type crimp terminal to connect to the screen power supply.
• The AC cable needs to be secured to the fixing parts once it is connected to the screen. (Make sure it is secured near
thescreen.*100mm(3.9inches)orlessrecommended)
LSAB012-N22 LSAB012-T22 LSAB012-U22
LSAB009-N33 LSAB009-T33 LSAB009-U33
(M5 x L6)
x 4
(M3 x L6)
x 1
x 2
(M4 x L12)
x 4
x 1
LSAB012-N22
LSAB009-N33
LSAB012-T22, U22
LSAB009-T33, U33
LG MAGNIT
(LED SCREEN)
LG MAGNIT
(ÉCRAN LED)
LG MAGNIT
(PANTALLA LED)
ENGLISH Installation Guide
Please read this manual carefully before operating your set and retain it for future reference.
FRANÇAIS Guide d’installation
Veuillez lire ce manuel attentivement avant d’utiliser l’appareil et conservez-le pour pouvoir vous y
reporter ultérieurement.
ESPAÑOL Guía de instalación
Lea atentamente este manual antes de poner en marcha el equipo y consérvelo para futuras consultas.
Depending upon country / Selon le pays / Según el país
Printed in Korea / Imprimé en Corée
INSTALLATION GUIDE
ʣ www.lg.com/id-manual
Kg
ENGLISH
Dimensions
(Width x Height x Depth)
/ Weight
600 mm x 337.5 mm x 44.9 mm / 7.8 kg
(23.6 inches x 13.2 inches x 1.7 inches / 17.1 lbs)
ESPAÑOL
Dimensiones
(ancho x alto x
profundidad) / Peso
600 mm x 337,5 mm x 44,9 mm / 7,8 kg
Alimentación
LSAB012-N22, T22, U22 100-240V 50/60Hz4,8A
LSAB009-N33, T33, U33 100-240V 50/60Hz3,6A
LSAB012-N22, T22, U22, LSAB009-N33, T33, U33
FRANÇAIS
Dimensions
(largeur x hauteur x
profondeur) / poids
600 mm x 337,5 mm x 44,9 mm / 7,8 kg
(23,6 po x 13,2 po x 1,7 po / 17,1 lb)

A readily accessible disconnect device shall be incorporated external to the equipment.
The maximum rating of an overcurrent protective device to be provided external to
the equipment may be one of the protective device ratings available in the country of
installation.
Preparethepowercableof9A(16AWG)ormore.
Un sectionneur facilement accessible doit être installé à l’extérieur de l’équipement.
La puissance maximale d’un dispositif de protection contre les surintensités à installer
à l’extérieur de l’équipement doit être celle des dispositifs de protection disponibles
dans le pays d’installation.
Préparezlecâbled’alimentationde9A(16AWG)ouplus.
Se debe incorporar un dispositivo de desconexión de fácil acceso externo al equipo.
Laclasicaciónmáximadeundispositivodeproteccióncontrasobrecorrientequese
proporcioneexternaalequipodebeserunadelasclasicacionesdedispositivode
protección disponibles en el país de instalación.
Prepare el cable de alimentación de 9 A (16 AWG) o más.

30
ENGLISH
To obtain the source code that is contained in this product, under GPL, LGPL, MPL, and other open source licenses
that have the obligation to disclose source code, and to access all referred license terms, copyright notices and other
relevant documents, please visit https://opensource.lge.com.
LG Electronics will also provide open source code to you on CD-ROM for a charge covering the cost of performing such
distribution(suchasthecostofmedia,shipping,andhandling)uponemailrequesttoopensour[email protected].
Thisofferisvalidtoanyoneinreceiptofthisinformationforaperiodofthreeyearsafterourlastshipmentofthis
product.
NOTE
• Software-related content may be changed without prior notice due to upgrades of the product functions.
• Some features described in the User Manual may not be supported in certain models and countries.
• Some submenus of each function may not be supported depending on the model.
• SNMP 2.0 is supported.
31
ENGLISH
SETTINGS
Home
Global Buttons
CSAB, CSAA, CSAC, CSAD, CBAE, CBAF, CBAA, LAAA(AIO)
• [MOBILE URL]: Provides information necessary to access the monitor set through an external device's browser.
With this feature, you can view QR code and URL information. In addition, by accessing the URL, you can also run
Content Manager and Group Manager 2.0, and Control Manager. (This feature is optimized for Google Chrome.)
• [Input]: Navigate to the external input selection screen
• [Setting]: Navigate to the Settings screen
Dashboard
CSAB, CSAA, CSAC, CSAD, CBAE, CBAF, CBAA, LAAA(AIO)
• This feature displays key information about your Signage monitor in the center of the home screen. In the Dashboard,
you can manually change settings by selecting the corresponding items.
• [Manual Download]: Downloads a manual by scanning a QR code.
NOTE
• If the dashboard is locked, the focus does not move.
• Some QR code apps on mobile devices may not work. (You can access the page to download manuals by visiting the
provided address.)
[Content Manager]
CSAB, CSAA, CSAC, CSAD, CBAE, CBAF, CBAA, LAAA(AIO)
• [Player]: Play a variety of content including images, videos, and SuperSign content.
• [Scheduler]: Manage schedules for content that will be played at different times.
• [Editor]: You can create your own content using templates and media files.
• [Group Manager 2.0]: Distribute content schedules and setting data to the connected device.
[Gallery Mode]
CSAB, CSAA, CSAC, CSAD, CBAE, CBAF, CBAA, LAAA(AIO)
• This mode allows you to appreciate the natural environment and famous paintings.
32
ENGLISH
Ez Setting
[Video Wall]
LAAA(AIO)
[Ez Setting] [Video Wall]
Set Video Wall options to create a wide visual canvas.
• [Tile Mode]: Turn [Tile Mode] on or off.
• [Tile Mode Settings]: Display a single integrated screen on multiple Signage monitors.
• [Simple Configuration]: automatically sets [Tile ID] based on the connection direction of the set RS232C.
- When the [Set ID] of the connected set is complete, the performance of [Simple Configuration] is guaranteed only
for the master set ([Set ID] 1).
Run this function for the master set ([Set ID] 1).
• [Natural Mode]: Display the image excluding the area that overlaps with the monitor's bezel so that the image
displayed has a more natural feel to it.
• [Frame Control]: Adjust the sets that run [Scan Inversion] and frame deviation.
- When running [Scan Inversion], please run [Frame Control] for the sets that do not run [Scan Inversion].
• [Scan Inversion]: Reduce screen deviation between adjoining video walls by changing screen scanning method.
• [White Balance]: Configure white balance settings (White Pattern, R/G/B-Gain, and Luminance).
• [Reset]: Reset to initial settings.
• [Reboot to Apply]: Reboot the set to configure a changed Frame Control/Scan Inversion value.
NOTE
• When Tile Mode is enabled, automatically set [Frame Control] for odd numbered rows and [Scan Inversion] for even
numbered rows.
[On/Off Scheduler]
CSAB, CSAA, CSAC, CSAD, CBAE, CBAF, CBAA, LAAA(AIO)
[Ez Setting] [On/Off Scheduler]
Set a schedule to use your signage by time and day of the week.
• [On/Off Time Setting]: Set on/off times for each day of the week.
• [Holiday Setting]: Set holidays by date and by day of the week.

33
ENGLISH
[SI Server Setting]
CSAB, CSAA, CSAC, CSAD, CBAE, CBAF, CBAA, LAAA(AIO)
[Ez Setting] [SI Server Setting] [SI Server Setting]
Set up to connect your signage to an external SI server. Set up a server environment for SI app installation.
[Ez Setting] [SI Server Setting] [Developer Mode & Beanviser]
This feature provides great convenience to the app developers.
Set up to install and activate the Developer mode and BEANVISER app.
NOTE
• To use these features, an account (ID/PASSWORD) for webOS Signage developer website (http://webossignage.
developer.lge.com/) is required.
[Server Setting]
CSAB, CSAA, CSAC, CSAD, CBAE, CBAF, CBAA, LAAA(AIO)
[Ez Setting] [Server Setting]
Set up to connect your signage to a SuperSign server.
• CMS Server
• Control Server

34
ENGLISH
[Fail Over]
CSAB, CSAA, CSAC, CSAD, CBAE, CBAF, CBAA, LAAA(AIO)
[Ez Setting] [Fail Over]
Set the priority of the input devices when a fault occurs. Automatically play the content stored in the device or run the
set app.
• [On/Off]: Turns [Fail Over] on or off.
• [Input Priority]: Set the priority of input sources for fail over.
• [Backup via storage]: When there is no input signal, this feature automatically plays the content stored in the device
or runs the set app. When set to [On], [Auto], [Manual], [SuperSign Contents], and [SI App /
Play via URL] items are activated.
- [Auto]: When the automatic input switches due to taking screenshots of an image or video that is playing at
regular intervals, this feature will play back the file. (OLED model is not supported.)
>- Capture time Interval: The time interval can be set to 30 min, 1 hour, 2 hours and 3 hours.
- [Manual]: When the automatic input switches due to the image and video file being uploaded, the feature will play
back the file.
>- [Backup media select]: Using the settings button, you can upload a single file in the internal / external memory.
>- [Preview]: You can preview the uploaded file.
- [SuperSign Contents]: When the automatic input switches, this feature will play the file(s) distributed in SuperSign
CMS.
- [SI App / Play via URL]: Run SI App or Play via URL when automatic input switch occurs.
>- [SI App]: SI App behavior depends on the settings from [SI Server Setting] menu in [Ez Setting].
>- [Play via URL]: Play via URL behavior depends on the settings from [Play via URL] menu in [Ez Setting].
>- If both [Play via URL] and [SI Server Setting] can be run, it runs [Play via URL] when automatic input switch
occurs.
• [reset]: Reset to initial settings.
NOTE
• If multiple input devices are connected simultaneously, the input device switches automatically to the one with the
highest priority among the devices with valid signal, even if a failure does not occur.

35
ENGLISH
[Status Mailing]
CSAB, CSAA, CSAC, CSAD, CBAE, CBAF, CBAA, LAAA(AIO)
[Ez Setting] [Status Mailing]
This feature configures the system so that the status of the device is assessed and then notified to the administrator
by e-mail.
• [On/Off]: Turns [Status Mailing] on or off.
• [Mailing Option], [Scheduling]: Sets the email sending interval.
• [User E-mail Address]: Set the user email address of the sender.
• [Sending Server(SMTP)]: Set the address of the SMTP server.
• [ID]: Enter the account ID of the sender.
• [Password]: Enter the password for the sender's account.
• [Receiver E-mail Address]: Set the email address of the recipient.
• [Send message]: Immediately assess the status of the device and deliver the information to the specified email
address.
• [reset]: Reset to initial settings.
NOTE
• If the status regarding any of the following items changes or becomes abnormal, a status message can be sent.
- 1. Temp. Sensor: If the set reaches a dangerous temperature, its current temperature is recorded, and an email
containing such information is sent.
- 2. Temp. Sensor Validation: An email is sent if there is no temperature sensor connected, if the communication
status of the temperature sensor is unknown, or if the information provided by the chip provider is abnormal.
- 3. LAN Status, WiFi Status: An email is sent when the network's connection status is changed. The maximum
number of network status changes that can be saved is limited to 50. The saved value is reset once the power turns
off.
- 4. No Signal Check: Checks whether there is a signal. If there are no signals for more than 10 seconds, an email is
sent.
- 5. Schedule Play Status: An email is sent if content cannot be played between the scheduled start time and end
time in either Content Management Schedule status or SuperSign Content status. However, this does not apply
when terminated using the remote control.
- 6. Fail Over Status: An email is sent in case of failure or automatic switch to the input device with the highest
priority. (Input switches by the user (RC, RS232C, SuperSign) are excepted.)
- 7. Motion Detection Status: When the product detects movement or shock caused by the external environment, an
e-mail is sent to you.
• Only SMTP ports 25, 465, and 587 are supported.
• The occurrence of internal input switches, excluding external input switches (RC, RS232C, SuperSign), are considered
as Fail Over Status.
• One email containing the “Failover status : Failover” message is sent when switching to Fail Over Status, and the
following status emails sent regularly or upon status changes contain the message “Failover status : None”.
36
ENGLISH
[Play via URL]
CSAB, CSAA, CSAC, CSAD, CBAE, CBAF, CBAA, LAAA(AIO)
[Ez Setting] [Play via URL]
Play content you want to play automatically through the built-in web browser.
• [URL Loader]: Turns [Play via URL] on or off.
• [Set URL]: Enter the URL address to display automatically.
• [Preview]: Preview your desired website by accessing the specified URL.
• [Save]: Save the specified URL.
• [Reboot to Apply]: Restarts the monitor set after saving the specified URL.
• [Reset]: Reset to initial settings.
NOTE
• This feature does not apply when [Screen Rotation] is enabled, and using this feature disables [Preview].
• If [Time Setting] is not set to [Set Automatically], website navigation may be difficult.
- Check [General] [Time Setting ] [Set Automatically]
[Setting Data Cloning]
CSAB, CSAA, CSAC, CSAD, CBAE, CBAF, CBAA, LAAA(AIO)
[Ez Setting] [Settings Data Cloning]
This feature is used to copy and import the settings of the device to other devices.
• [Export Setting Data]: Export the settings of the device to another device.
• [Import Setting Data]: Import the settings of another device into the device.
[Sync Mode]
CSAB, CSAA, CSAC, CSAD, CBAE, CBAF, CBAA, LAAA(AIO)
[Ez Setting] [Sync Mode]
Sync up time and content among multiple signage.
• [RS-232C Sync]: Sync up multiple signage connected by RS-232C.
• [Backlight Sync]: Shares values to control backlights using illumination sensors between devices connected by RS-
232C.
• [Network contents sync]: Sync up multiple signage connected to the same network.
37
ENGLISH
[Multi Screen]
CSAB, CSAA, CSAC, CSAD, CBAE, CBAF, CBAA, LAAA(AIO)
[Ez Setting] [Multi Screen]
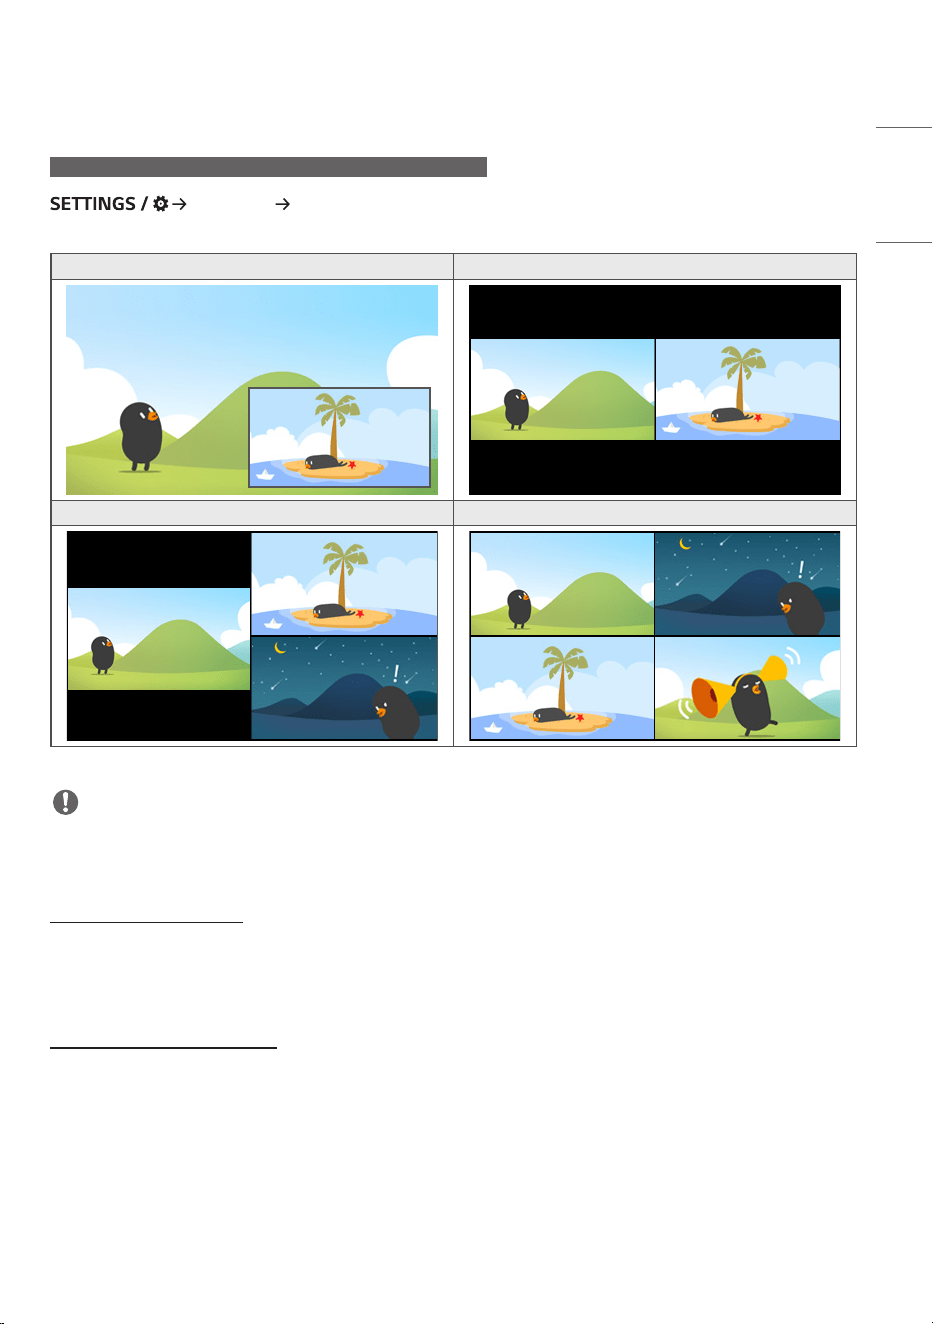
This feature allows you to view multiple external inputs and videos on a single screen.
PIP Mode PBP Mode
3-Screen Split Mode 4-Screen Split Mode
NOTE
• In multi-screen mode, the DP daisy chain feature is not supported.
• The number of split screens you can have may vary depending on the model.
Selecting Screen Layout
When you enter multi-screen mode without having set any screen layout, the screen layout selection menu appears.
When the screen layout selection menu is not displayed on the screen, go to the screen layout menu bar by pressing
the up arrow key on your remote control and select your desired screen layout.
Closing Screen Layout Menu
From the screen layout menu, press the up arrow key on the remote control to go to the screen layout menu bar and
select it or press the back key to close the screen layout menu.
38
ENGLISH
Changing Screen Input
Press the button on the top right of each split screen to select the desired input.
NOTE
• Inputs which have already been selected for other split screens cannot be selected again. To select them, press the
RESET button to reset the inputs for all screens first.
• The PIP mode works only when External Input Rotation is set to Off and Screen Rotation is set to Off or 180.
• In the PIP mode, supported resolutions for subscreen are as follows: Other resolutions are not supported.
- 1680 x 1050 / 1920 x 1080
• Interlaced formats are not supported. E.g. 1080i
• This applies to both External Input/Media.
• Models with 4-screen split mode support external input resolution of 3840 x 2160 on PIP Sub screens.
Playing Videos on Split Screens
Press the button on the upper right of each split screen, select Video File, and then select a storage device to view
the list of videos in the selected device. Next, select your desired video from the list to play it.
NOTE
• Videos created with HEVC, MPEG-2, H.264, or VP9 codecs can be played on split screens. When using PIP mode, the
following combinations cannot be used.
Main Sub
HEVC HEVC
H.264 HEVC
MPEG2 HEVC
VP9 VP9
H.264 4K MPEG2
H.264 4K VP9
• The limitations of 3 and 4-screen split are as below.
When Using 4K It supports only up to 2 videos.
A combination of max. 4K @ 60 fps + 2K @ 60 fps is available.
However, H.264 4K supports max. 30 fps.
When Using Only 2K 60fps You can combine up to 1 MPEG2, 2 H.264, and 4 other codecs.
30fps You can combine up to 2 MPEG2 and 4 other codecs.
• Recommended Framerate: 24, 25, 30, 60 (including 23.9, 24.9, 29.9, 59.9)
We do not guarantee performance when you play contents with other framerates.

39
ENGLISH
[LG ConnectedCare (Signage 365 Care)]
CSAB, CSAA, CSAC, CSAD, CBAE, CBAF, CBAA, LAAA(AIO)
[Ez Setting] [LG ConnectedCare (Signage 365 Care)]
You can install the LG ConnectedCare (fault diagnosis) solution for fault diagnosis and prediction service.
• [Install]: Installs the LG ConnectedCare solution.
1) [ENTER ACCOUNT NUMBER]: Enters the 6-digit account number to install the LG ConnectedCare solution.
- Account Number: The number assigned when the LG ConnectedCare solution is registered. When the account
number is entered, the account name corresponding to the number is obtained.
2) [CONFIRM ACCOUNT NUMBER]: Displays the account number and the account name corresponding to the
account number and validates the account number.
- If the account number is registered, the account name corresponding to the account number is displayed, and you
can continue to install the LG ConnectedCare solution.
- If the account number is not registered, “Unknown” is displayed as the account name, and you cannot continue to
install the solution.
• [Enable]/[Disable]: Sets whether to Enable/Disable the LG ConnectedCare solution.
• [Account]: Displays user’s currently connected account number and name.
• [Version]: Displays the version of the LG ConnectedCare solution.
• [Check for Update]: Checks for available updates in the server.
• [Update]: Updates the LG ConnectedCare solution to the latest version.
• [Server Status]: Displays the status of connection between the set and server.
- [Connected]: Displayed when the set and server are connected.
- [Not Connected]: Displayed when the set and server are disconnected.
- [Waiting for Approval]: Displayed when the server is waiting for approval.
- [Rejected]: Displayed when the server rejected the connection.
• [Reset]: Deletes the installed LG ConnectedCare solution.
40
ENGLISH
[Office Meeting Mode]
LAAA(AIO)
[Ez Setting] [Office Meeting Mode]
You can set up Quick Functions to use the product in a conference room.
• Office Meeting Mode: Turning on this feature enables you to set functions related to the conference room meeting
mode.
• Meeting Guide Screen
- Meeting Guide Screen: Turning on this feature will allow you to use the conference information screen. This feature
is for outputting a background image when there is no external input. Turning on this feature turns on the [No
Signal Image] feature.
- Meeting Room Name: When the conference information screen is on, you can change the conference room name
displayed on the screen or select whether or not to display the conference room name.
- Time: When the conference information screen is on, you can select whether or not to display the current time on
the screen.
• Advanced Settings
- Auto Bright: Turning on this feature will automatically adjust the monitor screen brightness to match the
surrounding environment.
- Picture Mode: Set the same picture mode for all external input supported by this product.
- Input Auto Switching: When an external input has been inserted, this feature automatically switches to the relevant
external input. Turning on this feature ends the [Ez Setting] [Fail Over] feature.
- Auto Power Off: Switch the power off automatically. When this feature is turned on, the [No Signal Power
Off(15Min)] and [No IR Power Off (4hour)] features will be turned on.
- Edit Input Name: Change the name of each external input.
- Presentation Timer: Use the presentation timer. Turning on this feature will display the [Presentation Timer] on the
screen for selecting an external input.
>- [Presentation Timer]
>- The time of operation can be set up to 120 minutes in intervals of ten minutes. When the time has been set,
press [Start] to begin the timer.
>- Press the yellow button on the remote control to pause the timer. When the timer is paused, the time is
displayed in blue.
>- Press the yellow button on the remote control to restart the timer.
>- The time is displayed in red when the remaining time is less than three minutes. The time will blink when the
remaining time is less than one minute.
>- Press the blue button on the remote control to end the timer.
>- The UI automatically disappears 10 minutes after the timer ends.
>- The product may turn off while the timer is still in operation due to the auto-off and power saving settings.
NOTE
• If the No Signal image has been downloaded, turning on [Meeting Guide Screen] will display the downloaded image
first when there is no signal.
• If using the [Meeting Room Name] and [Time] items in the [Meeting Guide Screen], and if using the downloaded
image as the No Signal image, it is recommended to use a brightly-colored image in accordance with the optimal
resolution of the Signage model.

41
ENGLISH
General
[Language]
CSAB, CSAA, CSAC, CSAD, CBAE, CBAF, CBAA, LAAA(AIO)
[General] [Language]
You can select the menu language to be displayed on the screen.
• [Menu Language]: Sets the language of your Signage monitor.
• [Keyboard Language]: Sets the language of the keyboard displayed on the screen.
[System Information]
CSAB, CSAA, CSAC, CSAD, CBAE, CBAF, CBAA, LAAA(AIO)
[General] [System Information]
This feature displays information such as the device name, software version, and storage space.
[Set ID]
CSAB, CSAA, CSAC, CSAD, CBAE, CBAF, CBAA, LAAA(AIO)
[General] [Set ID]
• [Set ID] (1-1000): Assigns a unique Set ID number to each product when several products are connected via RS-
232C. Assign numbers ranging from 1 to 1000 and exit the option. You can control each product separately by using
the Set ID you assigned to each product.
• [Auto Set ID]: Automatically assigns a unique Set ID number to each product when several products are connected
for display.
• [Reset Set ID]: Reset the Set ID of the product to 1.
42
ENGLISH
[Time & Date]
CSAB, CSAA, CSAC, CSAD, CBAE, CBAF, CBAA, LAAA(AIO)
[General] [Time & Date]
This feature enables you to view and change the time and date on the device.
• [Set Automatically]: Set [Time] and [Date].
• [Daylight Saving Time]: Set the start and end times for Daylight Saving Time. The DST start/end times function only
when you set them more than one day apart from each other.
• [NTP Server Setting]: Allows you to set other NTP servers other than the basic NTP server.
• [Time Zone]: Allows you to change the time zone based on continent, country/region, city or user settings.
[Power]
CSAB, CSAA, CSAC, CSAD, CBAE, CBAF, CBAA, LAAA(AIO)
[General] [Power]
Power-related feature settings
[No Signal Power Off (15 Min)]
Set whether to use the 15 Min Auto Off feature.
• You can set this option to [On] or [Off].
• If you set this feature to [On], the product turns off after it’s remained in No Signal status for 15 minutes.
• If you set this feature to [Off], the 15 Min Force Off feature is disabled.
• It is recommended that you set this feature to [Off] if you intend to use the product for long periods of time as the
feature turns the power of the product off.
[No IR Power Off (4hour)]
Set whether to use 4 Hours Off feature.
• You can set this option to [On] or [Off].
• If you set this feature to [On] the product turns off if there is no input from the remote control for 4 hours.
• If you set this feature to [Off], the 4 Hours Off feature is disabled.
• It is recommended that you set this feature to [Off] if you intend to use the product for long periods of time as the
feature turns the power of the product off.

43
ENGLISH
[DPM] / [DPM (Standby Mode)]
Set the Display Power Management (DPM) mode.
• If this feature is not set to [Off], the monitor will enter DPM mode when there is no input signal.
• If you set this feature to [Off], [DPM] / [DPM (Standby Mode)] is disabled.
NOTE
• For some LED models, when [PM Mode] is set to [Power Off(Default)], the Energy Saving mode remains enabled even
when there is an input signal.
[DPM Wake Up Control] / [DPM (Standby Mode) Wake Up Control]
Turns on the set according to the digital signal processing of the connected DVI-D/HDMI port.
• When set to [Clock], the set only checks for digital clock signals and turns on once it finds the clock signal.
• When set to [Clock+DATA], the set turns on if the digital clock and data signals are both input.
[PM Mode]
• [Power Off (Default)]: Set the normal DC off mode.
• [Sustain Aspect Ratio]: The PC retains the Extended Display Identification Data (EDID) even when the power is off.
• [Screen Off]: Switches to [Screen Off] status when entering DPM, Auto Power Off (15 min, 4 hours), or Abnormal
Shut Down mode.
• [Screen Off Always]: Switches to [Screen Off] status when entering DPM, Auto Power Off (15 min, 4 hours), Off
Time Scheduling, or Abnormal Shut Down mode, or when there is input from the remote control's Power button or
the monitor's Off button.
• [Screen Off & Backlight On]: Partially turns on the backlight to keep the display at a proper temperature when in
Screen Off status.
• [Network Ready]: Monitor is turned off, but you can control power internally through the network.
NOTE
• In order for the screen to switch from [Screen Off] to On status, there must be input from the remote control's
Power or Input button, or the monitor's On button.
[Power On Delay](0-250)
• This feature prevents overload by implementing a power-on delay when multiple monitor sets turn on.
• You can set the delay interval in the range of 0 to 250 seconds.
[Power On Status]
• Select the operating status of the monitor when the main power has turned on.
• You can choose from among [PWR (Power On)], [STD (Standby)], [and LST (Last Status)].
• [PWR (Power On)] keep the monitor powered on when the main power has turned on.
• [STD (Standby)] switch the monitor to Standby status when the main power has turned on.
• [LST (Last Status)] switches the monitor back to its previous status.
44
ENGLISH
[Wake On LAN] / [Wake On LAN (Networked Standby Mode)]
• Set whether to use [Wake On LAN] / [Wake On LAN (Networked Standby Mode)].
• You can set the feature to On or Off for each wired/wireless network.
• [Wired]: When set to [On], the [Wake On LAN] / [Wake On LAN (Networked Standby Mode)] feature is enabled,
letting you turn the product on remotely through a wired network.
• [Wireless]: When set to [On], the [Wake On LAN] / [Wake On LAN (Networked Standby Mode)] feature is enabled,
letting you turn the product on remotely through a wireless network.
[Power Indicator]
• This function enables you to change the [Power Indicator] settings.
• Setting to [On] will turn on [Power Indicator].
• Setting to [Off] will turn off [Power Indicator].
• Regardless of [On] or [Off] settings in [Power Indicator], [Power Indicator] will be turned on for approximately 15
seconds.
[Power On/Off History]
Display the device's power on/off history.
[Network]
CSAB, CSAA, CSAC, CSAD, CBAE, CBAF, CBAA, LAAA(AIO)
[General] [Network]
[Wired Connection (Ethernet)]
• Wired Connection: Connects the monitor to a local area network (LAN) via the LAN port and configures wired
network settings. Only wired network connections are supported. After setting up a physical connection, the display
will automatically connect without any adjustments on most networks. A small number of networks may require the
display settings to be adjusted. For detailed information, contact your Internet provider or consult your router manual.
• 802.1X EAP: Authentication based on IEEE 802.1X is available for wired connection. Select the desired EAP type and
Phase 2 Authentication, enter the ID/Password registered with the authentication server, and press the CONNECT
button to attempt the connection.
[Wi-Fi Connection]
If you have set your monitor up for a wireless network, you can view and connect to available wireless Internet
networks.
• [Add a Hidden Wireless Network]: You can add a wireless network by manually typing in its name.
• [Connect via WPS PBC]: Press the button on the wireless router that supports PBC to easily connect to the router.
• [Connect via WPS PIN]: Enter the PIN number in the web page of the PIN-supporting wireless router to connect to
the router in a simple manner.
• [Advanced Wi-Fi Settings]: When there is no available wireless network displayed on the screen, you can connect to
the wireless network by entering the network information directly.

45
ENGLISH
[Certificate Download]
• Download the certificates used for 802.1X EAP stored in USB.
• Only pem file extension can be downloaded.
NOTE
• On models that support Wi-Fi dongles, the Wireless Network Connection menu is enabled only when a Wi-Fi dongle
is connected.
• When connected to a network that supports IPv6, you can select IPv4 / IPv6 in the wired / wireless network
connection. But, IPv6 connection only supports automatic connection.
[LAN Daisy Chain]
• LAN Daisy Chain forms a daisy chain of LAN ports so that even if you connect only one monitor set to a network, the
other sets in the daisy chain are connected to the network.
• However, the first monitor set in the daisy chain must be connected to the network through a port that is not used
for the daisy chain connection.
[SoftAP]
If you set up a SoftAP, you can connect many devices via a Wi-Fi connection without a wireless router and use wireless
Internet.
• The SoftAP and ScreenShare features cannot be used at the same time.
• On models that support Wi-Fi dongles, the SoftAP menu is enabled only when a Wi-Fi dongle is connected to the
product.
• Wi-Fi Channel: You can directly select a Wi-Fi channel.
• SoftAp Access Information
- SSID: A unique identifier necessary to make a wireless Internet connection
- Security Key: The security key you enter to connect to the desired wireless network
- Number of connected devices: Shows the number of devices currently connected to your Signage device via a Wi-Fi
connection. Up to 10 devices are supported.
[UPnP]
Open and block UDP port 1900, which is used for UPnP.
• The default setting is [On]. Setting this feature to [Off] blocks UDP port 1900, making the UPnP function
unavailable.
• If you set this feature to [Off], Sync Mode's "Network" option will be deactivated. When the value for Sync Mode is
"Network," the value switches to "Off," deactivating the "Network" option.
• If you change the UPnP value, the change will not be applied before a [reboot].
• If you set UPnP to [Off], you cannot use Group Manager 2.0 properly.

46
ENGLISH
[Ping Test]
Check your network status with the ping test.
[Port Control]
Unused ports can be blocked for network security.
[Connection Domain]
Change domain for checking network connection.
NOTE
• A reboot is recommended for the settings to be applied properly.
Tips for Network Settings
• Use a standard LAN cable (Cat5 or higher with an RJ45 connector) with this display.
• Many network connection problems during set up can often be fixed by re-setting the router or modem. After
connecting the display to the home network, quickly power off and/or disconnect the power cable of the home
network router or cable modem, Then power on and/or connect the power cable again.
• Depending on the Internet service provider (ISP), the number of devices that can receive INTERNET service may be
limited by the applicable terms of service. For details, contact your ISP.
• LG is not responsible for any malfunction of the display or Internet connection failures due to communication errors/
malfunctions associated with your Internet connection or other connected equipment.
• LG is not responsible for problems within your INTERNET connection.
• You may experience undesired results if the network connection speed does not meet the requirements of the
content being accessed.
• Some INTERNET connection operations may not be possible due to certain restrictions set by the Internet service
provider (ISP) supplying your Internet connection.
• Any fees charged by an ISP including, without limitation, connection charges are your responsibility.
NOTE
• If you want to access the Internet directly on your display, the INTERNET connection should always be on.
• If you cannot access the Internet, check the network conditions from a PC on your network.
• When you use Network Setting, check the LAN cable or check if DHCP in the router is turned on.
• If you do not complete the network settings, the network may not function correctly.
CAUTION
• Do not connect a modular phone cable to the LAN port.
• Since there are various connection methods, please follow the specifications of your telecommunication carrier or
INTERNET service provider.
• Network setting menu will not be available until the display connected to physical network.

47
ENGLISH
Tips for When Configuring Wireless Network Settings
• The wireless network may be affected by interference from a device that uses 2.4 GHz frequency, such as a wireless
telephone, Bluetooth device or microwave. Interference may also be caused by a device that uses 5 GHz frequency
such as Wi-Fi devices.
• The wireless network service may run slowly depending on the surrounding wireless environment.
• Some devices may have a network traffic jam if any local home networks are turned on.
• To connect to a wireless router, a router that supports wireless connection is necessary; the wireless connection
function of the corresponding router must also be activated. Ask the router manufacturer whether the router
supports wireless connection.
• To connect to a wireless router, verify the SSID and security settings of the wireless router. Please refer to the user
guide of the corresponding router regarding SSID and security settings of the wireless router.
• The monitor may not work properly if network devices (wired/wireless router or hub, etc.) are incorrectly set up. Be
sure to install the devices correctly by referring to their user guides before configuring the network connection.
• The connection method may vary according to the manufacturer of the wireless router.

48
ENGLISH
[Advanced Setting]
CSAB, CSAA, CSAC, CSAD, CBAE, CBAF, CBAA, LAAA(AIO)
[General] [Advanced Setting]
[Beacon]
• This option enables BLE Beacon, one of Bluetooth 4.0's features.
• Beacon Mode (On/Off Toggle): enables the Beacon feature.
• The LG Beacon/iBeacon/Eddystone Type Beacon features are supported.
• iBeacon
- Beacon UUID (hex): Set the UUID.
1. Field1: 4byte hex value (8 digits)
2. Field2: 2byte hex value (4 digits)
3. Field3: 2byte hex value (4 digits)
4. Field4: 2byte hex value (4 digits)
5. Field5: 6byte hex value (12 digits)
- Major (0–65535): Sets the Major value.
- Minor (0–65535): Sets the Minor value.
• Eddystone
- Frame: Set UUID or URL.
• 1. Setting the URL method
- Beacon UUID (hex): Set the UUID.
1 - Field1: 10byte hex value (20 digits)
2 - Field2: 6byte hex value (12 digits)
• 2. Setting the URL method
- URL Prefix: Sets the prefix of the URL.
- URL Suffix: Set the suffix of the URL.
- URL: Enter the part of the URL that excludes the prefix and suffix.
- URL string length is limited to 15 characters.
• [Check] button: The button used to complete and apply the Beacon settings.
NOTE
• Some models do not support background screening services in iOS.
• A reboot is recommended for the settings to be applied properly.
• The UUID value is hexadecimal and the exact number of digits must be entered.
• The distance to Beacon may vary depending on the device.
• The distance to Beacon may vary depending on the application used in the device.
• The Beacon function is affected by radio waves because it employs the Bluetooth Low Energy (BLE) technology. It
may not function properly if the frequency range is not around 2.4GHz.
• When you set iBeacon, LG Beacon will be set to be the same as the value of iBeacon field. But the LG Beacon setting
item won’t be provided separately.

49
ENGLISH
[Control Interface]
Devices connected to the display can be controlled via the interface.
• [PC/OPS Power Control]: Enable you to control the power of PC or OPS as you turn the display on and off.
- [Disable]: Disable [PC/OPS Power Control].
- [Sync(On)]: Set the PC/OPS power to be turned on when the display is turned on.
- [Sync(On/Off)]: Set the PC/OPS power to be turned on when the display is turned on and set the PC/OPS power to
be turned off when the display is turned off.
• [Control Interface Selection]: Select the serial communication path between the display and the connected devices.
- [Display]: Serial communication is available via a display RS-232C IN terminal.
- [OPS]: Serial communication is available with the OPS installed in the display.
NOTE
• Depending on the model, it can be displayed as [PC/OPS Control].
• Depending on the supported interface, the sub-menu of [Control Interface Selection] may be different.
• The PC products that support the power control are MP500/MP700, and you have to purchase them separately if
necessary.
• If you change [Control Interface Selection], the [RS232C SYNC] feature of [Sync Mode] may be restricted.
[Background Image]
This feature enables you to set the default background image.
• [Booting Logo Image]: Change the logo image that appears when the device boots up. If you set this option to Off, no
logo image appears when the device boots up. Download or initialize an image file on the storage device.
• [No Signal Image]: Change the image that appears when there is no signal. If you set this option to Off, no image
appears when there is no signal. Download or initialize an image file on the storage device.
NOTE
• To download an image, an image file must exist in a folder named “LG_MONITOR” or “lg_monitor” in the external
memory (USB).
• Supported image file formats : “BMP”, “JPG”
[Input Manager]
You can set the PC or DTV label for each external input.
NOTE
• SDI Inputs are not supported.
50
ENGLISH
[SIMPLINK Setup]
• When the [SIMPLINK Setup] is set to [On], you can use the SIMPLINK provided by LG Signage.
• [Device ID]: Set the ID of the device connected via CEC wiring. You can choose a value between [All] and [E].
• [Standby]: Sets the scenarios for sending and receiving the OpStandBy (0x0c) command. Detailed scenarios are as
follows:
Transmission Reception
All O O
Send Only O X
Receive Only X O
[Crestron]
(Depending on model)
[Crestron Connected] V1
• This function enables synchronization with applications provided by Crestron.
• [Server]: This menu sets the server’s IP address for the network connection with the server (equipment provided by
Crestron).
• [Port] (1024~65535): This menu sets the port for the network connection with the server. The default port number
is 41794.
• [IP ID] (3-254): This menu sets a unique ID for synchronizing with the application.
[Crestron Connected] V2
• The connection status of the server type shall be indicated by pictures and phrases. (Disconnected, Connecting,
Connected)
• [Type]: You can select the server type you want to connect to (Off, , , )
• [CONNECT]: If you press the button once, a set tries to connect to the server and the button phrase is changed into
[DISCONNECT]. In this case, the upper items are immutable. To disconnect and change upper items, pressing the
button again is needed.
• Information for connecting with the server
- [Type]:
- [Server]: Enter the IP information of the server
- [Port]: Enter the Port information for the server
- [IP ID]: A unique ID that distinguishes crestron equipment from server
- [Type]:
- [Room ID]: A unique ID that distinguishes room from server. If the [IP ID] is the same, but the [Room ID] is
different, the server recognizes it as a different equipment.
- [Server], [Port], [IP ID] are the same as ’s.
- [Type]:
- [Method]: Connection direction can be selected. ([Device to Fusion], [Fusion to Device])
- [Device to Fusion]: How to connect from set to server
- [URL]: Server URL
- [Port]: Server Port
- [Fusion to Device] : How to connect from server to set

51
ENGLISH
• [Auto Discovery]: The ability to locate other Crestron equipment in the network
• [SSL]: Communication security with server can be established. The following items are meaningful only at [SSL] on
- [User], [Password]: When the [Authentication] function is turned on on the server, [User] and [Password] must be
entered to connect with the server.
- [Verify Certificate]: A feature that checks whether a certificate installed on a server is valid. If it is not valid, it does
not connect to the server
- [Certificate Download]: The certificate must be stored in the set to perform the [Verify Certificate] function. Only
certificates with extensions .pem, .crt in the USB root directory are recognized and can be added or deleted through
the menu. All certificates stored at the time of [Factory Reset] are deleted.
[XiO Cloud]
• The connection status with [XiO Cloud] is displayed. (Disconnected, Connecting, Connected)
• [CONNECT]: If you press the button once, a set tries to connect to the server and the button phrase is changed into
[DISCONNECT]. To disconnect, pressing the button again is needed.
[LED Controller]
• Allows a specific LED display manufacturer to remotely control some features of the linked display.
[Quiet Mode]
This mode is used to reduce the noise of the fan.
Adjusted to the set fan control and brightness.
[LG promota]
This feature allows connection of promota app on mobile device.
For more information on how to use it, please visit the promota website (https://www.promota.net/)
Autorun promota App function automatically runs promota after booting.
[Pointer Options]
You can set the speed and size of the pointer that appears on the screen to your liking.
• Speed: You can set the movement speed of the pointer.
• Pointer Size: You can set the size of the pointer.

52
ENGLISH
Display
[Picture Mode]
CSAB, CSAA, CSAC, CSAD, CBAE, CBAF, CBAA, LAAA(AIO)
[Display] [Picture Mode]
[Mode]
This feature enables you to choose the optimal picture mode for your installation environment.
• [Mall/QSR], [Transportation], [Education], [Gov./Corp.]: Display the picture optimally for your installation environment.
• [General]: Display the picture at normal contrast, brightness, and sharpness.
• [Auto Power Save]: Adjust the screen brightness to reduce power consumption.
• [Expert], [Calibration]: Allow an expert, or anyone who loves picture quality, to manually tune to the best picture
quality.
• [Hospital]: An image setting mode optimized for medical images.
For some LED models, select an image mode as follows:
• [Shopping Mall], [Airport & Station], [Office & School], [Control Room]: displays the mode optimized for the installing
environment.
• [Calibration]: Allow an expert, or anyone who loves picture quality, to manually tune to the best picture quality.
NOTE
• The type of [Picture Mode] you can select may vary depending on the model or input signal.
• [Expert] is an option that allows a picture quality expert to fine-tune the picture quality using a specific image. Thus,
it may not be effective for a normal picture.
[HDR]
This feature enables you to choose the optimal picture mode for your installation environment.
• [Mall/QSR]: sharpens the image by increasing the contrast, brightness and sharpness.
• [General]: In a normal viewing environment, it opens a screen that can properly show the expressiveness and
brightness of HDR.
• [Gov./Corp.]: The screen appears brighter and clearer than of the General screen.
• [Education]: Suitable picture for education.
For some LED models, select an image mode as follows:
• [Shopping Mall], [Airport & Station], [Office & School], [Control Room]: displays the mode optimized for the installing
environment.

53
ENGLISH
[Customize]
• [Backlight]: Adjust the brightness of the screen by adjusting the brightness of the backlight. The closer the value is to
100, the brighter the screen is.
• [OLED Light]: Adjusts the brightness of the OLED panel to control the brightness of the screen.
• [LED Light]: Adjust screen brightness by tuning the LED Light. Higher values increase brightness.
• [Contrast]: Adjust the difference between the light and dark areas of the picture. The closer the value is to 100, the
greater the difference is.
• [Brightness]: Adjust the overall brightness of the screen. The closer the value is to 100, the brighter the screen is.
• [Sharpness]: Adjust the sharpness of the edges of objects. The closer the value is to 50, the clearer and the sharper
the edge becomes.
• [Color]: Soften or deepen the tints on the screen. The closer the value is to 100, the deeper the colors become.
• [Tint]: Adjust the balance between red and green levels displayed on the screen. The closer to Red 50, the redder the
color will be. The closer to Green 50, the greener the color will be.
• [Color Temperature]: The higher you set the color temperature, the cooler the colors on the screen will feel. The lower
you set the color temperature, the warmer the colors on the screen will feel.
• [Expert Controls]: Customize the advanced options.
- [Dynamic Contrast]: Optimize the difference between the light and dark parts of the screen according to the
brightness of the image.
- [Super Resolution]: Sharpen the areas of the screen that are blurry or barely distinguishable.
- [Color Gamut]: Select the range of colors available.
- [Dynamic Color]: Adjust the tint and saturation of the image for a more vivid and lively display.
- [Color Filter]: Accurately adjust color and tint by filtering a specific color area of RGB space.
- [Preferred Color]: Adjust the skin tint, grass tint, and sky tint to your preference.
- [Gamma]: Adjust gamma settings to compensate for the brightness of the input signal.
- [White Balance]: Adjust the overall color fidelity of the screen to your liking. In Expert mode, you can fine-tune the
picture using the Method/Pattern options.
- [Color Management System]: Experts use the color management system when they adjust the colors by using the
test pattern. The color management system allows you to make an adjustment by selecting from among 6 different
color spaces (Red/Yellow/Blue/Cyan/Magenta/Green) without affecting other colors. In a normal picture, you may
not notice the color changes you have made.
- [Dynamic tone mapping]: Suitable contrast settings based on image brightness of the HDR content.
54
ENGLISH
• [Picture Option]: Customize the picture options.
- [Noise Reduction]: Remove randomly popping dots to make the picture look clearer.
- [MPEG Noise Reduction]: Reduce the noise generated in the process of creating a digital video signal.
- [Black Level]: Adjust the brightness and contrast of the screen by adjusting the black level of the screen.
(Recommended settings based on input signals: RGB 0 - 255: High, RGB 16 - 235: Low, YCbCr: Low)
- [Real Cinema]: Optimize the video image for a cinematic look.
- [Motion Eye Care]: Reduce eye fatigue by adjusting brightness levels and lessening blurriness based on the
displayed image.
- [LED Local Dimming]: Make the light areas of the screen lighter and the dark areas darker for maximum contrast.
Setting this feature to Off may increase the monitor's power consumption.
- [TruMotion]: Reduce image shaking and image sticking that can occur with /moving images. (If you set the [External
Input Rotation], this feature is unavailable.)
- [CamSync(V-Sync)]: Control output frame for the installing environment (for some LED models)
• [Apply to all inputs]: Copies the current value of the detailed setting menu to the entire input, and applies only to the
selected picture mode.
• [Reset]: Reset the picture settings. Because the picture settings are reset according to the monitor's picture mode,
please select the picture mode before resetting the picture settings.
[Aspect Ratio]
CSAB, CSAA, CSAC, CSAD, CBAE, CBAF, CBAA, LAAA(AIO)
[Display] [Aspect Ratio]
This feature enables you to change the picture size to view the picture at its optimal resolution.
• [Full]: Stretch the picture to fill the screen.
• [Original]: Display the picture at its original resolution.

55
ENGLISH
[Advanced Setting]
CSAB, CSAA, CSAC, CSAD, CBAE, CBAF, CBAA, LAAA(AIO)
[Display] [Advanced Setting]
[UHD Deep Color]
If you connect an HDMI, DP, or OPS device to one of the Deep Color adjustable ports, you can select between UHD
Deep Color On (6G) or Off (3G) in the UHD Deep Color settings menu.
If a compatibility issue occurs with a graphics card when the Deep Color option is set to On at 3840 x 2160 @ 60 Hz,
set the Deep Color option back to Off.
• HDMI, DP, and OPS specifications may vary depending on the input port. Check the specifications of each device
before connecting.
• HDMI input port 1, 2 is best suited for high definition videos that are 4K@60 Hz (4:4:4, 4:2:2). However, video or
audio may not be supported depending on the specifications of the external device. If this is the case, please connect
the device to a different HDMI port.
• This feature may not be available on some models.
[Energy Saving]
• [Smart Energy Saving]: Automatically adjust the brightness of the screen according to the brightness of the picture
to save energy.
- [On]: Enable the Smart Energy Saving feature.
- [Off]: Disable the Smart Energy Saving feature.
• [Brightness Control]: Adjust the brightness of the screen to save energy.
- [Auto:] Automatically adjust the brightness of the screen according to ambient light.
- [Off]: Disable energy saving.
- Minimum/Medium/Maximum: Use energy saving according to the energy saving level set for the monitor.
• [Brightness Range Adjustment]: Sets the min/max values of the brightness range for the backlights adjusted by the
illumination sensors.
- [Min Backlight]: Sets the min value of the backlights.
- [Max Backlight]: Sets the max value of the backlights.
• [Brightness Scheduling]: Adjust the backlight at specified times.
- You can set this feature to [On/Off].
- Add schedule by setting the schedule time and backlight/OLED Light/LED Light value.
- If the current time has not been set, [Brightness Scheduling] is disabled.
- You can add up to six schedules, and they are sorted in ascending order by time.
- You can edit a schedule by selecting it from the list and pressing the [OK] button.
NOTE
• Return to default settings by clicking [Admin] > [Factory Reset].

56
ENGLISH
[Adjustment (RGB-PC)]
Set PC display options in RGB mode.
• Intelligent Auto : Select Enable auto-tuning for the first recognized resolution of the RGB input.
• [Set Automatically]: Sets the screen position, clock, and topology to be automatically adjusted. The image may display
unstable for a few seconds while the configuration is in progress.
• [Resolution]: Choose from 1024 x 768, 1280 x 768, 1360 x 768 resolutions.
• [Position]/[Size]/[Phase]: Adjust the option if the image is not clear after automatic configuration, especially if the
letter is shaken.
• [Reset]: Returns the option to its default settings.
[HDMI IT Content]
Set the HDMI IT Contents function.
• [Off]: Disable the HDMI IT Contents function.
• [On]: Enable the HDMI IT Contents function.
This feature automatically changes the monitor's picture mode based on HDMI Contents information when an HDMI
signal is entered.
Even if the monitor's picture mode has been changed by the HDMI IT Contents feature, you can change the picture
mode again manually.
As this has a higher priority than the picture mode set by the user, the existing picture mode may be changed when
the HDMI signal changes.
[Color Calibration]
Sets the screen color to match the actual color temperature.
• [Off]: Disables the Color Calibration feature. The screen color is set to the default value.
• [On]: Enables the Color Calibration feature. The screen color is set to match the actual color temperature.
NOTE
• The screen color may change if you enable or disable the feature.
• If the Picture Mode is ‘Calibration’, this feature will not be available.

57
ENGLISH
[LED Local Dimming]
Make the light areas of the screen lighter and the dark areas darker for maximum contrast.
NOTE
• Return to default settings by clicking [Admin] > [Factory Reset].
[Average Picture Level Auto Control]
Can use image quality control based on APL (Average Picture Level) of the monitor input image. When using the
monitor as a Video Wall, it is recommended to set this function off to prevent an image quality difference between the
monitors.
NOTE
• Return to default settings by clicking [Admin] > [Factory Reset].
[Low Latency]
Sets whether to use dithering processing.
• [Off]: Use dithering processing.
• [On]: Do not use dithering processing. Since frame delay does not occur due to dithering processing, it is
recommended to be used when delay is sensitive.
[Dynamic Brightness]
Set whether to use the peak luminance that can produce the maximum brightness in a local area.
• [Off]: Do not use peak luminance. The brightness that can be expressed at the maximum decreases and the ability to
express low gradations improves.
• [On]: Use peak luminance. The brightness that can be expressed to the maximum increases, and the expressive power
of low gradation deteriorates.
[Genlock]
When the Genlock signal is connected to the REF IN port and the Genlock feature is turned on, the monitor can use the
video signal synchronisation feature.
• [Off] : Genlock is disabled
• [On] : Genlock is enabled
NOTE
• Genlock setting of video source equipment is more important than Genlock of LED System Controller.
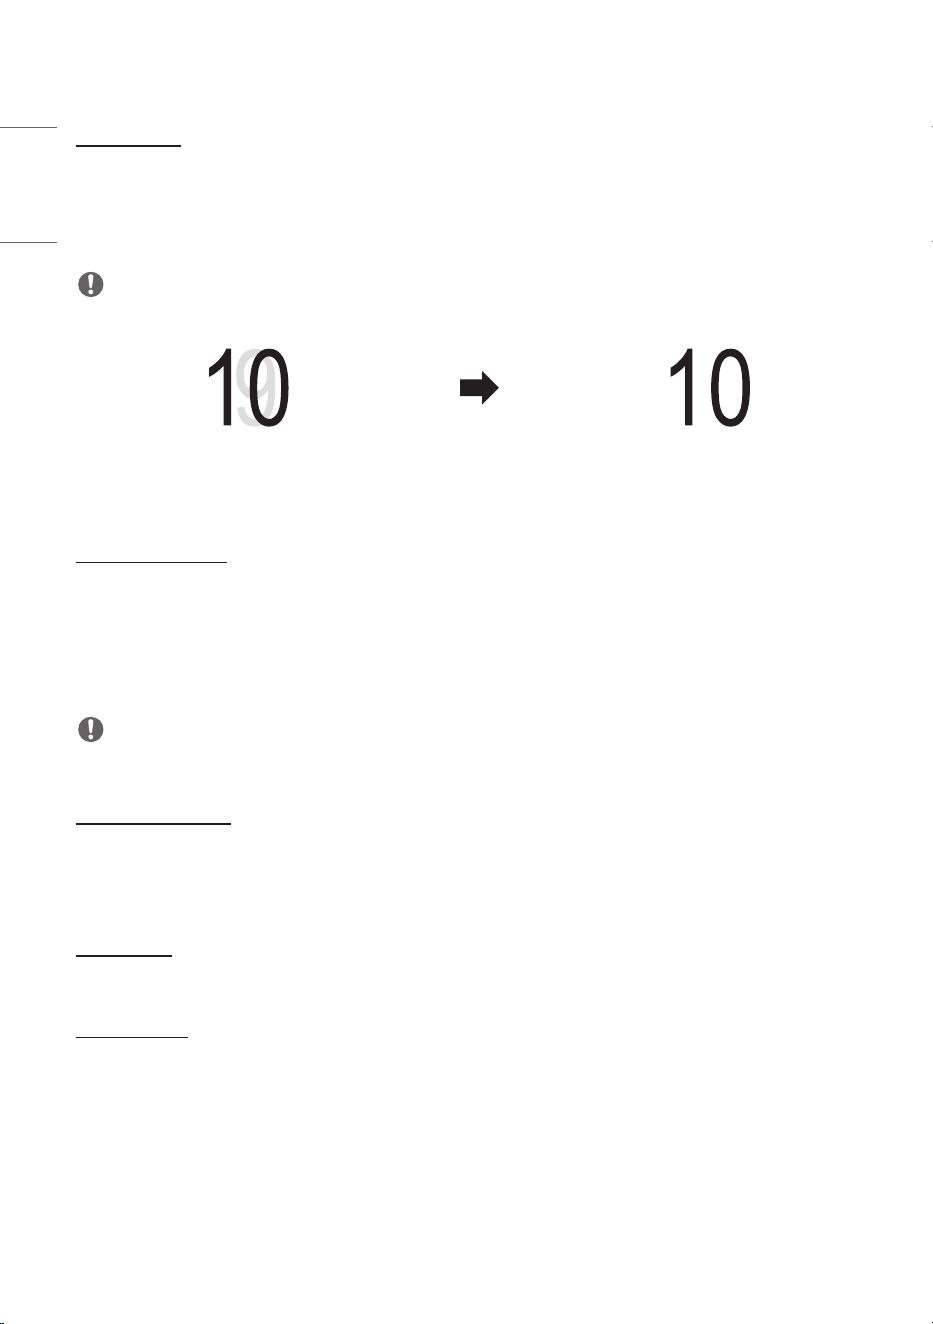
58
ENGLISH
[Phase Shift]
Phase Shift can make adjustment of LED screen output timming.
LED screen can adjust timing manually to remove visual artefacts with Phase Shift, if camera recoding result make
double image(double frame).
• Range : 0~360 (0: Don’t use Phase Shift, 180: 0.5 Frame delay added)
NOTE
• Camera sync shift is more good to control visiual atrefacts than LED screen. (ex: ARRI camera’s Sync Shift)
Camera capture image has double frame image
Camera capture image has single frame image
: Phase Shift can fine control
[SDI Color Format]
Sets the pixel encoding value, which is part of the SDI Packet AVI Infoframe.
• [Auto]: Sets to the pixel encoding value received from the device.
• [RGB444]: Sets the pixel encoding value to RGB444.
• [YCbCr444]: Sets the pixel encoding value to YCbCr444.
• [YCbCr422]: Sets the pixel encoding value to YCbCr422.
NOTE
• This feature works in SDI.
[Frequency Spread]
Spreads the noise generated by electronic devices.
• [Off]: Scan-line effect is removed when shooting with the camera.
• [On]: Minimizes the impact on the human body and peripheral devices by lowering electromagnetic waves.
[Waveform]
View the luminance information of the current input picture as a waveform.
[Vectorscope]
View the saturation components of the current input picture through a vectorscope.

59
ENGLISH
Sound
[Sound Mode]
LAAA(AIO)
[Sound] [Sound Mode]
[Sound Mode]
The best sound quality will be selected automatically depending on the video type currently being watched.
• [Standard]: This sound mode works well for content of all types.
• [Cinema]: Optimize sound for watching movies.
• [Clear Voice III] Enhance voices so they can be heard more clearly.
• [Sports]: Optimize sound for watching sports.
• [Music]: Optimize sound for listening to music.
• [Game]: Optimize sound for playing video games.
[Balance]
• [Balance]: Adjust the output volume for the left speaker and the right speaker.
[Equalizer]
• [Equalizer]: Manually adjust sound by using the equalizer.
[Reset]
• [Reset]: Resets sound settings.
60
ENGLISH
[Sound Out]
CSAB, CSAA, CSAC, CSAD, LAAA(AIO)
[Sound] [Sound Out]
• [Internal Speaker] / [External Speaker]: You can output audio either through your Signage monitor's internal speaker
or through an external speaker connected to it.
- [Use Speaker Sound]: Enables you to turn the speaker on and off. If you are using an external audio device,
turning off this feature allows you to play sound through the external audio device only.
• [SIMPLINK External Speaker]: This function connects Home Theater device by SIMPLINK. When it is set to Home
Theater device input, it outputs voice through the connected device. This option is activated when SIMPLINK has been
set to On.
• [LG Sound Sync / Bluetooth]: Enables you to connect Bluetooth audio devices or Bluetooth headsets wirelessly to
Sigange monitor so that you can enjoy richer audio conveniently.
• [Optical]: applied only to the models with digital optical sound output ports. You can output audio through external
speaker audio devices connected to the digital audio output port.
• [Digital Sound Out]: allows you to change settings for digital audio output.
Audio Input Digital Audio Output
Auto Dolby Digital Plus Dolby Digital
Dolby Digital Dolby Digital
AAC (Media) Dolby Digital
AAC Dolby Digital
HE-AAC Dolby Digital
DTS-HD, DTS-Express, DTS DTS
MPEG PCM
PCM All PCM
NOTE
• Some recently connected devices may automatically attempt to reconnect to the Signage monitor when it is turned
on.
• It is recommended that you set LG audio devices that support LG Sound Sync to LG TV mode or LG Sound Sync mode
before connecting.
• Press Device Selection to view the devices that are or that can be connected and connect other devices.
• You can use the signage remote control to adjust the volume of the connected device.
• If the audio device fails to connect, check that it is switched on and available for connection.
• Depending on the type of the Bluetooth device, the device may not connect correctly or an abnormal behavior may
occur such as unsynchronized video and audio.
• Sound may stutter or sound quality may be reduced if:
- The Bluetooth device is too far from the Signage monitor.
- There is an obstructing object between the Bluetooth device and the Signage monitor.
- The Bluetooth device is used together with radio equipment such as a microwave oven or wireless LAN.
61
ENGLISH
[Audio Out]
[Sound] [Audio Out]
• [Off]: Disables the use of [Audio Out]. (No audio outputted.)
• [Variable]: You can specify an output range for the external audio device connected to the monitor and adjust the
volume within the range. You can change the volume of an external audio device within the range of 0 to 100 (the
same as the Signage speaker volume). However, there may be a difference in the actual volume level outputted.
• [Fixed]: Sets a fixed audio output level for the external audio device.
- If there is no external input, no external audio is outputted.
- The variable audio output level 100 is the same as the fixed audio output level.
[AV Sync Adjustment]
CSAB, CSAA, CSAC, CSAD, LAAA(AIO)
[Sound] [AV Sync Adjustment]
This feature adjusts audio timing to synchronize video and audio.
• [External Speaker] (0~15): Adjust the sync between video and audio coming from external speakers, such as those
connected to the digital audio output port, LG audio equipment, or headphones. The larger the number is, the slower
the voice output is than the default value.
• [Internal Speaker] (0~15): Adjust the sync of sound from the internal speakers. The larger the number is, the slower
the voice output is than the default value.
• [Optical] (0~15): Adjusts sync for the sound from digital optical audio output. A greater number means slower audio
output compared to the default.
• [Bypass]: Output the broadcast signals or the sound from external devices without any audio delay. Audio may be
outputted earlier than video due to the processing time for video that is inputted into the monitor.
[Digital Audio Input]
[Sound] [Digital Audio Input]
This feature enables you to choose an input source for audio output.
• [Digital]: Output the audio contained in the digital signal inputted from the connected digital input source (HDMI,
DISPLAYPORT, OPS).
• [Analog]: Output audio from the digital input source (HDMI, DISPLAYPORT, OPS) connected to the monitor through
the Audio In port.

62
ENGLISH
Admin
[Lock Mode]
CSAB, CSAA, CSAC, CSAD, CBAE, CBAF, CBAA, LAAA(AIO)
[Admin] [Lock Mode]
[Home Dashboard Lock]
When you set the Home Dashboard Lock, you can limit the change in the settings of the Home Dashboard.
[USB Lock]
This feature enables you to configure the USB lock feature so that settings or content cannot be changed.
[OSD Lock]
This feature enables you to configure the OSD lock feature so that settings or content cannot be changed.
• Press and hold the Settings key for at least 10 seconds and enter password to access the settings menu in OSD Lock.
[IR Operation Lock]
• If you set this feature to [Off (Normal)], you can use your remote control.
• If you set this feature to [On (Power Key Only)], you can only use the power key.
• If you set this feature to [On (Block All)], you cannot use your remote control. (However, Power On feature is
available.)
• Press and hold the Settings key for at least 10 seconds and enter password to access the settings menu in IR
Operation Lock.
[Local Key Lock]
This feature enables you to configure the Local Key Operation Lock feature so that settings or content cannot be
changed.
• If you set this feature to [Off (Normal)], you can use the local keys on the monitor.
• If you set this feature to [On (Power Key Only)], you can only use the power key. (When you use a joystick, press and
hold a local key to turn on/off the monitor.)
• If you set this feature to [On (Block All)], you cannot use the local keys. (However, Power On feature is available.)
[Wi-Fi Lock]
This feature enables you to turn the Wi-Fi feature on or off.
[Screen Share Lock]
• On: This feature enables you to turn the Screen Share feature off.
• Off: This feature enables you to turn the Screen Share feature on.
• Off (PIN): This feature enables you to use the Screen Share feature using PIN number.
If the Screen Share Lock value is changed, the function is not applied without a reboot.

63
ENGLISH
[Change Password]
CSAB, CSAA, CSAC, CSAD, CBAE, CBAF, CBAA, LAAA(AIO)
This feature enables you to set the password you use to enter the Installation menu. (The default password: 000000)
1 Enter your current password.
2 Enter a new 6-digit password.
3 Enter the same password again in the Confirm Password field for confirmation.
[Enterprise Settings]
CSAB, CSAA, CSAC, CSAD, CBAE, CBAF, CBAA, LAAA(AIO)
• Enter your company account code to apply the corresponding enterprise settings.
• When your code has been entered, the monitor set gets reset, thereby applying the corresponding enterprise
settings.
• This feature does not get activated if a code has already been entered.
[Factory Reset]
CSAB, CSAA, CSAC, CSAD, CBAE, CBAF, CBAA, LAAA(AIO)
Initializes all settings in [Setting] and files from the internal storage.
The exceptions are RGB gain value of [Calibration] mode, [Video Wall]([Tile Mode], [Tile Mode Setting], [Natural Mode],
[Frame Control], [Scan Inversion]) and [Server Setting] items of [Ez Setting], and [Set ID] items of [General].
NOTE
• It keeps the existing settings because the Off / On button in the User menu only affects the active / inactive status
of the submenu.
64
ENGLISH
CONTENT MANAGER
Web Login
LAAA(AIO)
• Different features are supported depending on the product.
This Signage product comes with a feature that enables you to access it on your PC or mobile device.
- Content Manager, Group Manager 2.0, Control Manager, Log Out, Change Password menus are provided.
• URL: https://set ip:3777
• The default password: (Serial Number) + LGe12#
E.g. If the serial number is ABCD123456789, enter ABCD123456789LGe12# as the password.
- The serial number can be found on the tag attached to the product or on the [General]
[System Information] menu.
CAUTION
• Supported resolutions (this program is optimized for the following resolutions):
- PC: 1920 x 1080 / 1280 x 1024
- Mobile: 360 x 640(1440 x 2560, 1080 x 1920), DPR
• Supported browsers (this program is optimized for the following browsers):
- Chrome 56 or later (recommended)
• For security, please Login with the initial password and change the password.
Content Manager
CSAB, CSAA, CSAC, CSAD, CBAE, CBAF, CBAA, LAAA(AIO)
[Player]
(Player)
The Content Manager app's player feature enables you to play/manage contents of video, image, template, SuperSign
and playlist in an integrated way. (The OLED models do not support the playback and management of image content
and template content.)
[Continuous Play]
1 Select your desired type of content from the tab on the left and then select your desired content.
2 Click [Play] in the upper right-hand corner of the screen and enjoy the content you have selected.

65
ENGLISH
[Export]
1 Select your desired type of content from the tab on the left and click [Export] in the upper right-hand corner of the
screen.
2 Select the content you wish to export.
3 Click [Copy]/[Move] in the upper right-hand corner of the screen and select the device to which you wish to export
the content. (If a content file stored on the target device has been selected, the processing of the content file is
skipped.)
4 You can see that the content has been moved/copied to the device.
[Delete]
1 Select your desired type of content from the tab on the left and click [Delete] in the upper right-hand corner of the
screen.
2 Select the content you wish to delete.
3 Click [Delete] in the upper right-hand corner of the screen.
4 You can see that the content has been deleted.
[Filter / Sort]
1 Click [Filter / Sort] in the upper right-hand corner of the screen.
2 1) Choose your desired sort criterion to sort content files either by file name or in the order they have been
recently played.
2) It is possible to only view the content stored on your desired device by filtering content files by device.
3) It is possible to only view the content of your desired type by filtering content files by content type.
[Create Playlist]
When creating a playlist, you cannot include characters that cannot be used in file names on Windows — such as , ,
, , , , , , , , , , and . — in the names of the files in the playlist. In addition, if the playlist contains content files whose
names include such characters, you cannot move or copy the playlist.
1 Select the [Playlist] tap from the tab on the left and click [Create Playlist] in the upper right-hand of the screen.
2 Select the content you wish to add to the playlist and click [NEXT] in the upper right-hand of the screen.
3 Set a play time for each piece of content (applicable only for photo and template content), as well as other items
such as Conversion Effect, Ratio, and Auto Playback, and then click [DONE] button in the upper right-hand corner
of the screen.
4 You can see a new [Playlist] has been created.
[Distribution]
1 Click [Distribute] in the upper right-hand corner of the screen.
2 Go to the Group Manager app to distribute the created playlists.
NOTE
• The Distribute button shows only when playlist is selected as media type.
66
ENGLISH
[Scheduler]
(Scheduler)
The Content Manager app's scheduler feature enables certain content to be played at a scheduled time through a
playlist or external input.
[Creating a Schedule]
1 Click [New Schedule] in the upper right-hand corner of the screen.
2 Choose between [Playlist] and [Input Source].
3 1) If you have selected [Playlist], select the playlist you wish to schedule the playback of.
2) If you have selected [Input Source], select the external input source you wish to schedule the playback of.
4 Enter schedule information and create a new schedule. (When creating a schedule, you cannot include characters
that cannot be used in file names on Windows — such as , , , , , , , , , , , , and . — in the name of the
schedule file. In addition, if the playlist linked to the schedule contains content files whose names include such
characters, you cannot move or copy the playlist.)
5 Watch the playlist or external input you selected play back at its scheduled time.
[Importing a Schedule]
1 Click [Import] in the upper right-hand corner of the screen.
2 Select the external storage device from which you wish to import a schedule.
3 Select the schedule you wish to import to your monitor. (You can only choose a single schedule.)
4 Click [Select] in the upper right-hand corner of the screen.
5 Check that the schedule has been imported to the monitor's internal storage memory.
[Exporting a Schedule]
1 Click [Export] in the upper right-hand corner of the screen.
2 Select the external storage device to which you wish to export a schedule.
3 Select the schedule you wish to export from your monitor. (You can choose multiple schedules.)
4 Click [Select] in the upper right-hand corner of the screen.
5 Check that the schedule has been exported to the external storage device you selected.
67
ENGLISH
[Delete Schedule]
1 Click [DELETE] in the upper right-hand corner of the screen.
2 Select the schedules you wish to delete.
3 Click [DELETE].
4 Check that the schedules have been deleted.
[Calendar View]
1 When you have registered schedules, click [Calendar View].
2 You can see that the schedules registered are displayed in the form of a timetable.
[Distribute]
1 Click [Distribute] in the upper right-hand corner of the screen.
2 Go to the Group Manager app to distribute the created schedules.
NOTE
• If the schedule creation time overlaps, the previously created schedule is deleted.
• When a schedule that has not been set repeatedly is completed, the schedule is automatically deleted.
• Schedule does not work while Scheduling list app is running.
[Editor]
(Editor)
The Content Manager app's editor feature enables you to add your desired templates.
1 Select the template of your desired format. (You can choose between Landscape mode and Portrait mode.)
2 Modify the template's text.
2-1. Apply your desired font style (Size, Weight, Underline, Italic)
3 Modify the media file.
3-1. Select and apply the rate you want.
4 Save the template by clicking [Save] in the top right-hand corner of the screen.
5 Check that the template you saved is shown in the template list.
68
ENGLISH
Supported Photo & Video Files
NOTE
• Subtitles are not supported.
• The photo feature is not supported in OLED model.
Supported video codecs
Extension Codec
.asf, .wmv Video VC-1 Advanced Profile (except for WMVA), VC-1 Simple and Main Profiles
Audio WMA Standard (excluding WMA v1/WMA Speech)
.avi Video Xvid (excluding 3 warp-point GMC), H.264/AVC, Motion Jpeg, MPEG-4
Audio MPEG-1 Layer I, II, MPEG-1 Layer III (MP3), Dolby Digital, LPCM, ADPCM,
DTS
.mp4, .m4v, .mov Video H.264/AVC, MPEG-4, HEVC
Audio Dolby Digital, Dolby Digital Plus, AAC, MPEG-1 Layer III (MP3)
.3gp
.3g2
Video H.264/AVC, MPEG-4
Audio AAC, AMR-NB, AMR-WB
.mkv Video MPEG-2, MPEG-4, H.264/AVC, VP8, VP9, HEVC
Audio Dolby Digital, Dolby Digital Plus, AAC, PCM, DTS, MPEG-1 Layer I, II, MPEG-1
Layer III (MP3)
.ts, .trp, .tp, .mts Video H.264/AVC, MPEG-2, HEVC
Audio MPEG-1 Layer I, II, MPEG-1 Layer III (MP3), Dolby Digital, Dolby Digital Plus,
AAC, PCM
.mpg, .mpeg, .dat Video MPEG-1, MPEG-2
Audio MPEG-1 Layer I, II, MPEG-1 Layer III (MP3)
.vob Video MPEG-1, MPEG-2
Audio Dolby Digital, MPEG-1 Layer I, II, DVD-LPCM
Maximum transmit ratio
Full HD movie H.264 1920 x 1080@60P BP/MP/[email protected] 40Mbps
HEVC 1920 x 1080@60P Main/[email protected] 40Mbps
ULTRA HD movie
(UHD models only.)
H.264 3840 x 2160@30P BP/MP/[email protected] 50Mbps
HEVC 3840 x 2160@60P Main/[email protected] 60Mbps

69
ENGLISH
Supported Photo File Formats
File type Format Resolution
.jpeg, .jpg, .jpe JPEG • Minimum: 64 x 64
• Maximum: Normal Type: 15360 (W) x 8640 (H)
Progressive Type: 1920 (W) x 1440 (H)
.png PNG • Minimum: 64 x 64
• Maximum: 5760 (W) x 5760 (H)
.bmp BMP • Minimum: 64 x 64
• Maximum: 1920 (W) x 1080 (H)
Tips for using USB storage devices
• Only USB storage devices are recognized.
• USB storage devices connected to the monitor through a USB hub may not work properly.
• USB storage devices that use an automatic recognition program may not be recognized.
• USB storage devices that use their own drivers may not be recognized.
• The recognition speed of a USB storage device may depend on each device.
• Please do not turn off the display or unplug the USB device when the connected USB storage device is working.
When the device is suddenly separated or unplugged, the stored files or the USB storage device may be damaged.
• Please do not connect the USB storage device which was artificially maneuvered on the PC. The device may cause
the product to malfunction or fail to be played. Remember to only use USB storage devices that store normal music,
image, and/or movie files.
• Storage devices formatted with utility programs that are not supported by Windows may not be recognized.
• Please connect power to a USB storage device (over 0.5 A) which requires an external power supply. Otherwise, the
device may not be recognized.
• Please connect a USB storage device with the cable offered by the device maker.
• Some USB storage devices may not be supported or operated smoothly.
• File alignment methods of the USB storage device is similar to Windows XP and filenames can include up to 100
English characters.
• Be sure to back up important files since data stored in a USB memory device may be damaged. We will not be
responsible for any data loss.
• If the USB HDD does not have an external power source, the USB device may not be detected. So make sure to
connect it to an external power source.
- Please use a power adapter for an external power source. No USB cable is provided for an external power source.

70
ENGLISH
• If your USB storage device has multiple partitions, or if you use a USB multi-card reader, you can use up to four
partitions or USB memory devices.
• If a USB storage device is connected to a USB multi-card reader, its volume data may not be detected.
• If the USB storage device does not work properly, remove it and connect it again.
• If the USB storage device is connected in Standby Mode, a specific hard disk will automatically be loaded when the
display is turned on.
• The recommended capacity is 1 TB or less for a USB external hard disk and 32 GB or less for USB memory.
• Any device with more than the recommended capacity may not work properly.
• If a USB external hard disk with an energy saving feature does not work, turn the hard disk off and on again to make
it work properly.
• USB storage devices (USB 2.0 or below) are also supported. However, they may not work properly in the videos list.
• A maximum of 999 folders or files can be recognized under one folder.
• When distributing contents to USB while playing a video in UHD resolution, the video might experience temporary
stuttering.
• USB storage devices supported by a mobile device may not be recognized.
• Even if multiple USB storage devices are connected, only one USB storage device can be used.

71
ENGLISH
Group Manager 2.0
This feature enables you to group together multiple monitor sets on a single network into the same group and to
distribute content (schedules and playlists) or copy setting data on a group basis. This feature has two modes, Master
and Slave, and it can access the browser on your PC or mobile device.
[Master]
• Add, edit, and delete group.
• Clone your device's settings data.
• Distribute [Schedule] and [Playlists] on a group basis.
• All monitor sets initially come in Master mode.
[Slave]
• Play [Schedule] and [Playlists] distributed in Master mode.
• Remove monitor sets for their groups.
• Monitor sets that have been added to a group are automatically switched to Slave mode. Conversely, when a monitor
set has been deleted from a group, it is automatically initialized and switched to Master mode.
• If a new Slave has been added to an existing group, or if the [Data Cloning] or the distribution of [schedule]/[Playlist]
has not been properly performed, the [Data Cloning] or [SYNCHRONIZE] button will be activated.
• You can duplicate the master device's setting data to the group by using [Data Cloning].
• Youcanre-downloadthecontentdistributedtothegroupbyusing[Synchronıze].

72
ENGLISH
[GROUP MANAGEMENT]
• Creating a New Group
1. Click [Add New Group].
2. Enter a group name.
3. Click [Add Device], select the devices you wish to add to the group, and add them.
4. Click [Done], and you will see that a new group has been created.
• Editing a Group
1. Click the group you wish to edit.
2. Add a new device by using [Add Device].
3. Delete a device by using [Delete Device].
4. Check whether the devices in the group are connected to a network by using [Device Check].
5. If there are any sets of devices in the group that are not [Data Cloning] or content synchronized, [Data Cloning] or
[Synchronıze]buttonwillbeactivated.
6. You can re-copy the master device's setting data to the group by using [Data Cloning].
7.Youcanre-distributethecontentdistributedtothegroupbyusing[Synchronıze].
• Deleting a Group
1. Click [Delete Group].
2. Select the group you wish to delete and click [Delete].
3. Check that the group you selected has been deleted.
• ALL DEVICES VIEW: All Devices View: This page enables you to manage all slave monitor sets that are connected to
the same network.
1. Click [All Devices View].
2. Click [Reset Device Mode].
3. Select the slave monitor set whose device mode you wish to change and click [Reset].

73
ENGLISH
[Setting Data Cloning]
1 Select your desired group and click Clone.
2 Check that the data have been copied on the slave sets.
[Content Distribute]
1 Select the type of content you wish to distribute (Schedules or Playlists).
2 Select the content you wish to distribute.
3 Select the group to which you wish to distribute the content and click [Distribute].
4 Run the Content Manager app on the slave sets and check that the content has been distributed.
How to Use
• Monitor: Run, add, delete or edit app on the home screen.
• Mobile: Mobile devices: Run the app in the Launcher bar or access the app from a mobile device using the QR code or
URL provided.
CAUTION
• You can create up to 25 groups.
• You can add up to 12 slave devices to a group.
• You can distribute the schedules stored on external devices after executing Content Manager's import operation.
• Make sure to delete all schedules stored on the slave sets before distributing any schedules.
• A list of devices you can add to your desired group appears only when the following conditions have been met:
- The devices you wish to add must be on the same network as the master device.
- The devices you wish to add must be in Master mode, and they must not belong to any existing group.
- The UPnP feature must be enabled (go to [General] > [Network] > UPnP and set it to [On]).
• It may not work properly in wireless network environments. It is recommended you use a wired network.
• Run the initial settings for Slave function when deleting the group.

74
ENGLISH
Gallery Mode
CSAB, CSAA, CSAC, CSAD, CBAE, CBAF, CBAA, LAAA(AIO)
This mode allows you to appreciate the natural environment and famous paintings.
Open the [Gallery Mode] app.
• You can click and play the representative theme image that appears in the middle of the screen, or click the theme
preview image that appears at the bottom of the screen to play.
• You can also go to [MY THEMES] at the top right of the screen and set the order of the themes to play.
• Within the theme player, you can go to the theme selection list through [GO TO LIST] and turn on or off the
background music through [THEME SOUND].
• A total of 5 themes ([Sunny Day], [Rainy Day], [Art Gallery], [Art Photos], and [Colorful Spring]) are available, and the
supported images are as follows.

75
ENGLISH
ScreenShare
CSAB, CSAA, CSAC, CSAD, CBAA, LAAA(AIO)
This feature allows the screen of a user's device such as a mobile or PC Windows to be shared with a display using a
wireless connection such as WiDi or Miracast.
How to Use [ScreenShare]
[ScreenShare]
1 Connect according to the instructions provided by the guide that can be accessed through the CONNECTION GUIDE
button in the upper right.
2 Once the connection is established, Screen Share between the user device and the monitor is enabled.
NOTE
• For the information on how to use Intel WiDi, visit PC/laptop manufacturer webpage.
• This feature only works properly with WiDi 3.5 or later versions.
• This feature only works on Windows 8.1 or later.
LG Presenter
LAAA(AIO)
This feature is to display the PC (Windows or Mac OS) screen on the Signage monitor with wired/wireless connection
to the PC. To use this feature, you need to install LG Presenter PC Client (“Client”) on the PC.
You can use LG Presenter in the following ways.
- Connect: Enter the PIN code to connect your Signage device to the Client.
- Screen Share: Share the PC screen of the connected Client with your Signage device.
- Hand over: If a Client is already connected and another Client needs to share screen, you can request for a hand over
to the connected Client to get permission to share screen.
- Settings: You can see the information of the Client or change the language used by the Client.
NOTE
This feature may not be available on some models.
Only sharing PC screen is supported and not voice sharing.
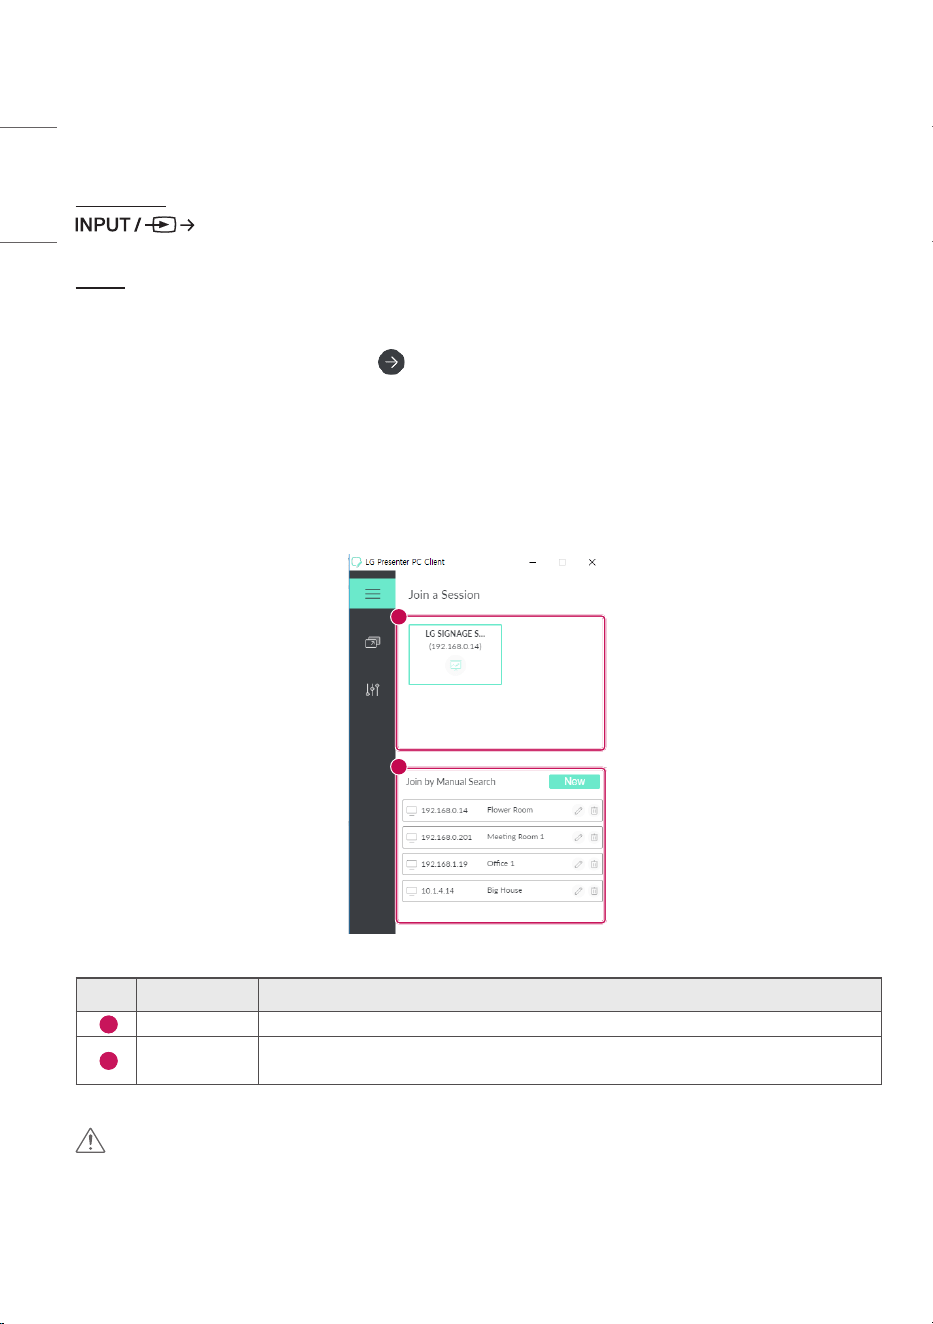
76
ENGLISH
Connect
On Signage
[LG Presenter]
On PC
1 Go to www.lge.com/LGP to download the Client.
2 Install and run the downloaded Client.
3 Enter the username you want and press the button.
4 Select either auto search or manual search to connect your device.
Auto search
- When the list of Signage devices found in the network appears, select the one you want to connect to.
Manual search
- Click “New”, type the name of the device you want to connect and the IP address shown on Signage and click
[Connect].
5 Enter the PIN code you see on your Signage device into the PIN code field on the Client.
1
2
No. Item Description
1
Auto search Automatically search Signage in the same network.
2
Manual search
Type the IP address and name manually, or select the device you want to connect in the
connection list.
CAUTION
• Signage and the PC need to be in the network that they can be connected to each other.
• If a certain port (UDP 1900) of Signage is blocked, Client program cannot automatically search Signage.
• Client program might not be able to connect to or share the screen with Signage via manual search, depending on the
network configuration.

77
ENGLISH
Screen Share
1 Select the screen you want to share and press the “Share” button.
2 To leave Screen Share, press the [STOP] button.
CAUTION
• if Screen Share does not work or won’t connect to the Signage device, check the firewall settings on your PC.
Handover
PC1: The PC where the client currently connected to your Signage device is running.
PC2: The PC you want to connect to the Signage device connected to PC1
On PC2
1 Run Client program to connect Signage that PC1 is connected to.
On PC1
1 When the hand over request pop-up appears on PC2, select whether to approve or deny the request.
2 If you approve the request for hand over, the Signage device will be disconnected, and the Client on PC2 will be
connected to the Signage device.
3 If you deny the request for hand over, the Signage device will remain connected, so you can continue to use the
features of LG Presenter.

78
ENGLISH
MANAGEMENT TOOLS
Control Manager
Control and check the status of the display through the Web browser.
This function is available for PCs and mobile devices.
Different features are supported depending on the product.
Function
• [Dashboard]: Display a summary of the product's status and provides links to each page.
• [Display & sound]: Provides features such as Screen Brightness, Sound, Input, and Reboot.
• [Time Setting]: Enable/disable Set Automatically feature and displays/changes the time set for the product.
• [Network]: Set the name and IP address of your Signage monitor.
• [Tile Mode]: Display the tile mode settings of the product.
• [Fail Over]: Turns the Fail Over feature on or off and sets related items.
• [Play via URL]: Turn Play via URL on or off and set URLs.
• [S/W Update]: Update the firmware of the product.
• [Charts]: Output the product's status information such as its temperature and fan status.
• [Log]: Output product malfunction records.
• [System Information]: Output information such as the product's software version and model name.
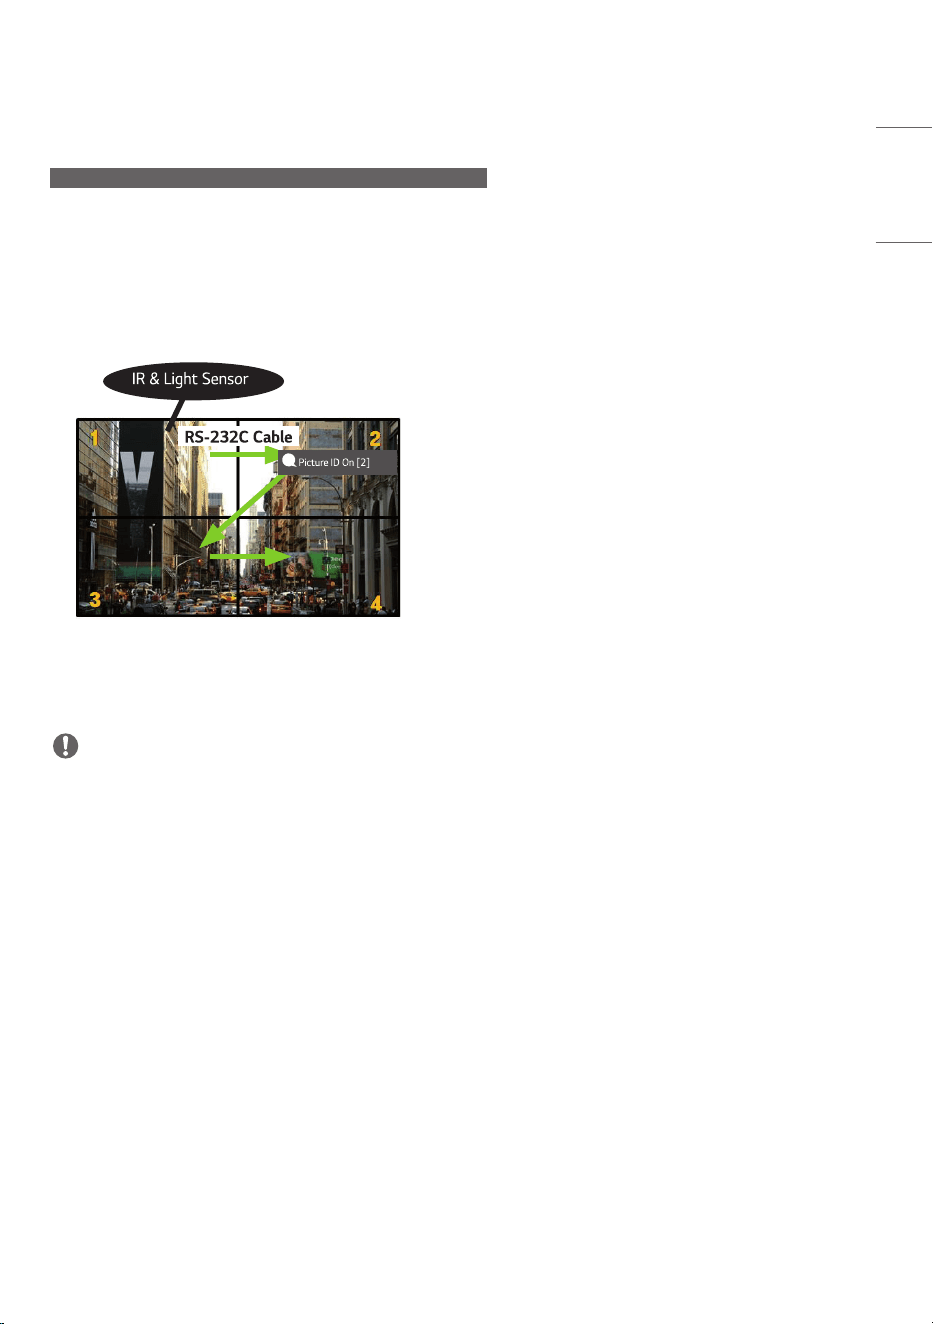
79
ENGLISH
Picture ID
CSAB, CSAA, CSAC, CSAD, CBAE, CBAF, CBAA, LAAA(AIO)
[Picture ID] is used to change the settings of a specific set (display) using a single IR receiver for multi-vision.
Communication is possible between a monitor with an IR receiver and other monitors using RS-232C cables. Each
monitor is identified by a Set ID. Setting [Picture ID] allows you to only use the remote control with monitors with a
[Set ID] that matches the [Picture ID].
1 Assign [Set ID] to the installed monitors as shown below:
AUDIO
(RGB/DVI)
REMOTE
CONTROL IN
RS-232C OUT
RS-232C IN
RS-232C OUT
RS-232C IN
RS-232C OUT
RS-232C IN
2 Press the red [Picture ID] [On] button on the remote control.
3 Make sure that the Picture ID you set is identical to the [Set ID] of the monitory you wish to control.
• A set with a [Set ID] that is different from the [Picture ID] cannot be controlled by IR signals.
NOTE
• If [Picture ID] has been set to 2, only the upper right monitor, which has a [Set ID] of 2, can be controlled by IR signals.
• If you press the green [Picture ID] [Off] button on your remote control, the [Picture ID] for all monitors are turned
off. If you then press any button on the remote control, all monitors can be controlled by IR signals regardless of their
[Set ID]'s.

80
ENGLISH
Dehumidification Mode
LAAA(AIO)
The dehumidification mode is designed to prevent LED malfunctions caused by moisture ingress.
1 Enter the dehumidification mode using the remote control key combination (Yellow button 1 2 3 4) in
the Power On state.
2 You can stop [Dehumidification Mode] by entering the remote control key combination (Yellow button 1 2
3 4) while the dehumidification mode is running.
3 You can schedule auto mode using the LED Assistant. (1 - 30 days)
NOTE
• When the dehumidification mode is running, an icon with a white pattern and a progress rate is displayed on the
screen. It runs for 24 hours and brightens every 2 hours.
• When the dehumidification mode is running, you can only use the remote control key combination (Yellow button 1
2 3 4) and the Power button.
81
ENGLISH
IR CODE
• All models do not support the HDMI/USB function.
• Some key codes may not be supported depending on the model.
Code (Hex) Function Remarks
08
(Power)
Remote control button
C4 MONITOR ON Remote control button
C5 MONITOR OFF Remote control button
95 Remote control button
0B INPUT (Select input) Remote control button
10 Number Key 0
Remote control button
11 Number Key 1 Remote control button
12 Number Key 2
Remote control button
13 Number Key 3
Remote control button
14 Number Key 4 Remote control button
15 Number Key 5 Remote control button
16 Number Key 6
Remote control button
17 Number Key 7 Remote control button
18 Number Key 8 Remote control button
19 Number Key 9 Remote control button
02
(Vol +)
Remote control button
03
(Vol -)
Remote control button
E0 Brightness (Page Up)
Remote control button
E1 Brightness (Page Down)
Remote control button
DC (3D) Remote control button
32 1/a/A Remote control button
2F CLEAR Remote control button
7E Remote control button
79 ARC (Mark/Aspect Ratio) Remote control button
4D PSM (Picture Mode)
Remote control button
09 (MUTE) Remote control button
82
ENGLISH
Code (Hex) Function Remarks
43 (Settings/Menu) Remote control button
99 Auto Configuration Remote control button
40 (Up) Remote control button
41 (Down) Remote control button
06
(Right)
Remote control button
07
(Left)
Remote control button
44
(OK)
Remote control button
28 (BACK) Remote control button
7B Tile Remote control button
5B
Exit Remote control button
72
Picture ID On (red) Remote control button
71
Picture ID Off (green) Remote control button
63
Yellow Remote control button
61 Blue Remote control button
5F
W.Bal Remote control button
3F
(S.Menu) Remote control button
7C
(Home) Remote control button
97 Swap Remote control button
96 Mirror Remote control button
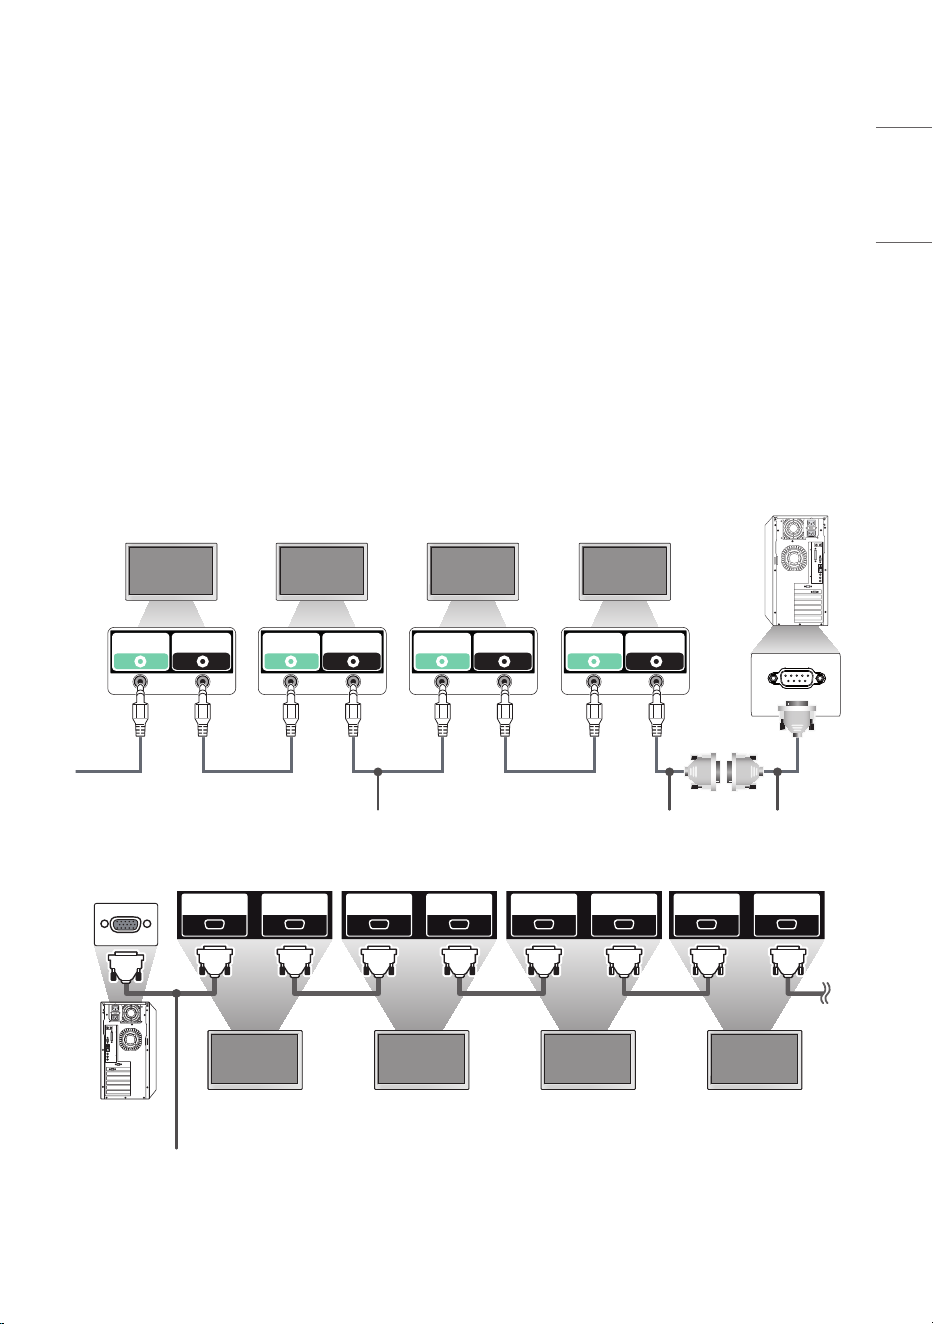
83
ENGLISH
CONTROLLING MULTIPLE PRODUCTS
• This only applies to certain models.
Use this method to connect several products to a single PC. You can control several products at a time by connecting
them to a single PC.
In the Option menu, the Set ID must be between 1 and 1000 without being duplicated.
Connecting cables
• Images may differ according to the model.
Connect the RS-232C cable as shown in the picture.
The RS-232C protocol is used for communication between the PC and product. You can turn the product on/off, select
an input source and adjust the OSD menu from your PC.
Monitor 4 Monitor 3 Monitor 2 Monitor 1 PC
RS-232C IN
ENTRÉE RS-232C
RS-232C OUT
SORTIE RS-232C
RS-232C IN
ENTRÉE RS-232C
RS-232C OUT
SORTIE RS-232C
RS-232C IN
ENTRÉE RS-232C
RS-232C OUT
SORTIE RS-232C
RS-232C IN
ENTRÉE RS-232C
RS-232C OUT
SORTIE RS-232C
4P Cable (sold separately) RS-232C Gender RS-232C Cable
(sold separately)
Monitor 1PC Monitor 2 Monitor 3 Monitor 4
RS-232C IN
ENTRÉE RS-232C
RS-232C OUT
SORTIE RS-232C
RS-232C IN
ENTRÉE RS-232C
RS-232C OUT
SORTIE RS-232C
RS-232C IN
ENTRÉE RS-232C
RS-232C OUT
SORTIE RS-232C
RS-232C IN
ENTRÉE RS-232C
RS-232C OUT
SORTIE RS-232C
RS-232C Cable (sold separately)
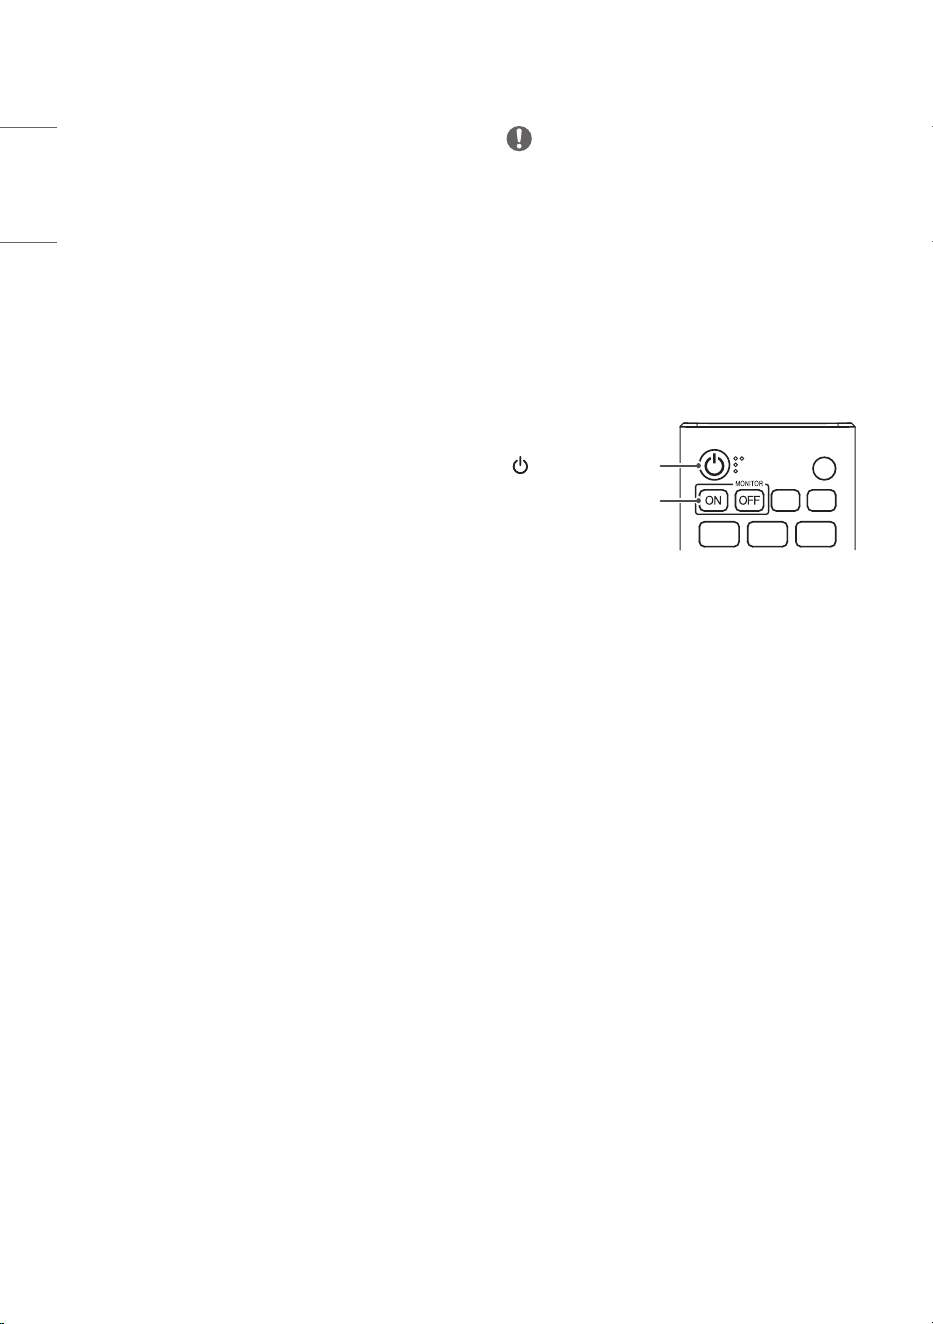
84
ENGLISH
Communication Parameter
Baud Rate: 9600 BPS
Data Length: 8 bits
Parity Bit: None
Stop Bit: 1 bit
Flow Control: None
Communication Code: ASCII
NOTE
• When using 3-wire connections (non-standard), an IR
daisy chain cannot be used.
• Be sure to only use the provided gender to connect
properly.
• When you have daisy-chained multiple Signage
products to control them simultaneously, if you
attempt to turn on/off the master device in a
continuous manner, some products may not turn
on. In this case, you can turn those monitors on by
pressing the MONITOR ON button, not the Power
button.
ID
BACK
TILE
ON
OFF
EXIT
(Power)
MONITOR ON

85
ENGLISH
Command Reference List
Command
Data
(Hexadecimal)
1 2
01 [Power] k a 00 to 02
02 Select Input x b See Select Input
03 [Aspect Ratio] k c See [Aspect Ratio]
04 [Brightness Control] j q 00 to 04
05 [Picture Mode] d x See [Picture Mode]
06 [Contrast] k g 00 to 64
07 [Brightness] k h 00 to 64
08 [Sharpness] k k 00 to 32
09 [Color] k i 00 to 64
10 [Tint] k j 00 to 64
11 [Color Temperature] x u 70 to D2
12 [Balance] k t 00 to 64
13 [Sound Mode] d y See [Sound Mode]
14 [Mute on] k e 00 to 01
15 Volume Control k f 00 to 64
16
[Current Time] 1 (year/month/
day)
f a See [Current Time] 1
17
[Current Time] 2 (hour/minute/
second)
f x See [Current Time] 2
18 [No Signal Power Off (15 Min)] f g 00 to 01
19 [No IR Power Off (4hour)] m n 00 to 01
20 [Language] f i See [Language]
21 Default Settings f k 00 - 02
22 Current Temperature d n FF
23 [Key] m c See [Key]
24 Time Elapsed d l FF

86
ENGLISH
Command
Data
(Hexadecimal)
1 2
25 Check product serial number f y FF
26 [Software Version] f z FF
27 [White Balance] Red Gain j m 00 to FE
28 [White Balance] Green Gain j n 00 to FE
29 [White Balance] Blue Gain j o 00 to FE
30 [White Balance] Red Offset s x 00 to 7F
31 [White Balance] Green Offset s y 00 to 7F
32 [White Balance] Blue Offset s z 00 to 7F
33 [Backlight] m g 00 to 64
34 [Screen Off] k d 00 to 01
35 [Tile Mode] d d 00 to FF
36 Check [Tile Mode] d z FF
37 [Tile ID] d i See [Tile ID]
38 [Natural Mode] d j 00 to 01
39 [DPM] / [DPM (Standby Mode)] f j See [DPM] / [DPM (Standby Mode)]
40 Remote Control/Local Key Lock k m 00 to 01
41 [Power On Delay] f h 00 to FA
42 Select [Fail Over] Mode m i 00 to 02
43 Select [Fail Over] Input m j See Select [Fail Over] Input
44 Remote Control Key Lock t p 00 to 02
45 Local Key Lock t o 00 to 02
46 [Status Check] s v See [Status Check]
47 [Daylight Saving Time] s d See [Daylight Saving Time]
48 [PM Mode] s n, 0c 00 to 05
49 [ISM Method] j p See [ISM Method]

87
ENGLISH
Command
Data
(Hexadecimal)
1 2
50 [Network Setting] s n, 80(81)(82) See [Network Setting]
51 [Power On Status] t r 00 to 02
52
Wired [Wake On LAN] / [Wake On
LAN (Networked Standby Mode)]
f w 00 to 01
53 [Screen Rotation] t h 00 to 03
54 [Time Sync] s n, 16 00 to 01
55 [Contents Sync] t g 00 to 01
56 [LAN Daisy Chain] s n, 84 00 to 01
57 [External Input Rotation] s n, 85 00 to 03
58 [Beacon] s n, 88 00 to 01
59 [Brightness Scheduling] Mode s m 00 to 01
60 [Brightness Scheduling] s s See [Brightness Scheduling]
61 [Multi Screen] Mode & Input x c See [Multi-screen] Mode & Input
62 [Aspect Ratio] (Multi screen) x d See [Aspect Ratio] (Multi screen)
63 [Screen Off] (Multi screen) x e See [Screen Off] (Multi screen)
64 [Screen Off Always] s n, 0d 00 to 01
65 Stop Video k x 00 to 01
66
Wireless [Wake On LAN] / [Wake
On LAN (Networked Standby
Mode)]
s n, 90 00 to 01
67 [OSD Lock] k l 00 to 01
68 [HDMI IT Content] s n, 99 00 to 01
69 [Holiday Setting] s n, 9b See [Holiday Setting]
70 [UPnP] s n, 9c 00 to 01
71 [Home Dashboard Lock] s n, 9d 00 to 01
72 [USB Lock] s n, 9e 00 to 01

88
ENGLISH
Command
Data
(Hexadecimal)
1 2
73 [Wi-Fi Lock] s n, 9f 00 to 01
74 [Screen Share Lock] s n, a0 00 to 01
75 [Backup via Storage] s n, a1 See [Backup via Storage]
76 [Digital Audio Input] s n, a2 00 to 01
77 [Booting Logo Image] s n, a3 00 to 01
78 [SoftAP] s n, a4 00 to 01
79 [Natural Size] s n, a5 00 to 64
80 Play Saved Internal Media s n, a8 See Playback of Saved Internal Media
81 [No Signal Image] s n, a9 00 to 01
82 [Audio Out] s n, aa 00 to 02
83
[DPM Wake Up Control] /
[DPM (Standby Mode) Wake Up
Control]
s n, 0b 00 to 01
84 Check [Fan] Failure d w FF
85 [Apply to all inputs] s n, 52 01
86 [Timer Power On] f d See [Timer Power On]
87 [Timer Power Off] f e See [Timer Power Off]
88 LCIN008 Control s n, b8 See LCIN008 Control
89 [Transfer Control] s n, cb See Transfer Control
90 Multichannel s n, 76 01 to 09
91 Change Setid j x See Change Setid
92 [Gamma] s n, ad 00 to 03
93 [Black Level] s n, ae 00 to 02
94 [UHD Deep Color] s n, af See [UHD Deep Color]
95 [Sync Mode] s n, b0 00 to 01
96 [Input Manager] s n, b1 See [Input Manager]
97 [PC/OPS Power Control] s n, 8b 00 to 02
98 [LED Local Dimming] s n, c1 00 to 01
99 [Scan Inversion] s n, 87 00 to 01

89
ENGLISH
Command
Data
(Hexadecimal)
1 2
100 [Frame Control] s n, b7 00 to 01
101
[Average Picture Level Auto
Control]
s n, be 00 to 01
102 Read Brightness Value m u FF
103 [Screen Fault Detection] t z 00 to 01
104 [Stereo Mode] s n, c2 00 to 02
105 [HDR Picture Mode] s n, c4 See [HDR Picture Mode]
106 [Dynamic Tone Mapping] s n, c5 00 to 01
107 [LED Local Dimming] s n, c6 00 to 03
108 [USB2 to HDBaseT] s n, c3 00 to 01
109 [Change Password] s n, a7 See [Change Password]
110 [Brightness Range Adjustment] s n, ab See [Brightness Range Adjustment]
111 [Color Calibration] s n, d6 00 to 01
112 [Quiet Mode] s n, c7 00 to 01
113 Automatic adjustment j u 01
114 Horizontal location f q 00 to 64
115 Vertical location f r 00 to 64
116 Horizontal Size f s 00 to 64
117 Intelligent Auto t i 00 to 01
118 Genlock s n, dc 00 to 01
119 [Vectorscope] On/Off s n, e7 00 to 01
120 [Waveform] On/Off s n, e8 00 to 01
121 False Color Mode s n, e9 00 to 02
122 False Color – Zebra s n, ea 00 to 64
123 False Color – Color s n, eb 00 to 64
124 SDR/HDR Signal Format s n, ec 00 to 02
125 HDR EOTF s n, ed 00 to 0e
126 [Phase Shift] s n, ee 0000 to 0168
* Note Commands may not work when there is no external input used.
* Some commands may not be supported on some models.

90
ENGLISH
Transmission/Reception Protocol
Transmission
(Command1)(Command2)( )(Set ID)( )(Data)(Cr)
* (Command1): This command is used to identify between the adjustment setting or the user adjustment modes.
* (Command2): This command is used to control the monitor.
* (Set ID): Used for selecting a set you want to control. A unique Set ID can be assigned to each set ranging from 1 to
1000 (01H to 3E8H) under Settings in the OSD menu. Selecting '00H' for Set ID allows the simultaneous
control of all connected monitors. (The maximum value may differ depending on the model.)
* (Data): Transmits command data. Data count may increase depending on the command.
* (Cr): Carriage Return. This parameter corresponds to '0 x 0D' in ASCII code.
* ( ): White Space. This parameter corresponds to '0 x 20' in ASCII code.
Acknowledgment
(Command2)( )(Set ID)( )(OK/NG)(Data)(x)
* The product transmits an ACK (acknowledgment) based on this format when receiving normal data. At this point,
if the data is FF, it indicates the present status data. If the data is in data write mode, it returns the data of the PC
computer.
* If a command is sent with Set ID '00' (=0 x 00), the data is reflected to all monitors and they do not send an
acknowledgment (ACK).
* If you send "FF" as the value of the data in control mode via RS-232C, you can check the value currently set for the
relevant feature (not applicable to some features).
* Some commands may not be supported on some models.

91
ENGLISH
01. [Power] (Command: k a)
Controls the power on/off status of the monitor.
Transmission
(k)(a)( )(Set ID)( )(Data)(Cr)
Data 00: [Off]
01: [On]
02: Restart
Acknowledgment
(a)( )(Set ID)( )(OK/NG)(Data)(x)
* The Acknowledgment signal is returned properly only when
the monitor is fully powered on.
* There may be a delay between the Transmission and
Acknowledgment signals.
* This feature may not be available for all models.
02. Select Input (Command: x b)
Selects an input signal.
Transmission
(x)(b)( )(Set ID)( )(Data)(Cr)
Data 20: AV
40: COMPONENT
60: RGB
70: DVI-D (PC)
80: DVI-D (DTV)
90: HDMI1 (DTV)
A0: HDMI1 (PC)
91: HDMI2 (DTV)
A1: HDMI2 (PC)
92: OPS/HDMI3/DVI-D (DTV)
A2: OPS/HDMI3/DVI-D (PC)
95: OPS/DVI-D (DTV)
A5: OPS/DVI-D (PC)
96: HDMI3/DVI-D (DTV)
A6: HDMI3/DVI-D (PC)
97: HDMI3/HDMI2/DVI-D (DTV)
A7: HDMI3/HDMI2/DVI-D (PC)
98: OPS (DTV)
A8: OPS (PC)
99: HDMI2/OPS (DTV)
A9: HDMI2/OPS (PC)
C0: DISPLAYPORT (DTV)
D0: DISPLAYPORT (PC)
C1: DISPLAYPORT/USB-C (DTV)
D1: DISPLAYPORT/USB-C (PC)
C2: HDMI3 (DTV)
D2: HDMI3 (PC)
C3: HDBaseT (DTV)
D3: HDBaseT (PC)
E0: SuperSign webOS Player
E1: Others
E2: Multi Screen
E3: Play via URL
E8: SI App
F0 : SDI 1
F1 : SDI 2
F2 : SDI 3
F3 : SDI 4
F4 : SDI DUAL 12
F5 : SDI DUAL 34
F6 : SDI QUAD AUTO
F7 : SDI QUAD 2SI
F8 : SDI QUAD SQUARE
F9 : SDI QUAD VIEW
Acknowledgment
(b)( )(Set ID)( )(OK/NG)(Data)(x)
* Some input signals may not be available for all models.
* If it is not distributed from SuperSign W, WebOS Player
returns NG.
* If it says “Read” from the IDB mode, it will respond as a PC
Label type.
* SI App only supports Set operation through RS232C.
03. [Aspect Ratio] (Command: k c)
Adjusts the aspect ratio of your monitor.
Transmission
(k)(c)( )(Set ID)( )(Data)(Cr)
Data 02: [Full Screen]
06: [Original]
Acknowledgment
(c)( )(Set ID)( )(OK/NG)(Data)(x)
* The aspect ratio may differ depending on the model's input
configuration.
04. [Brightness] (Command: j q)
Sets the brightness of your monitor.
Transmission
(j)(q)( )(Set ID)( )(Data)(Cr)
Data 00: [Off]
01: [Minimum]
02: [Medium]
03: [Maximum]
04: [Auto]
Acknowledgment
(q)( )(Set ID)( )(OK/NG)(Data)(x)
* This feature may not be available for all models.

92
ENGLISH
06. [Contrast] (Command: k g)
Adjusts the screen contrast.
Transmission
(k)(g)( )(Set ID)( )(Data)(Cr)
Data 00-64: Contrast 0-100
Acknowledgment
(g)( )(Set ID)( )(OK/NG)(Data)(x)
07. [Brightness] (Command: k h)
Adjusts the screen brightness.
Transmission
(k)(h)( )(Set ID)( )(Data)(Cr)
Data 00-64: Brightness 0-100
Acknowledgment
(h)( )(Set ID)( )(OK/NG)(Data)(x)
08. [Sharpness] (Command: k k)
Adjusts the screen sharpness.
Transmission
(k)(k)( )(Set ID)( )(Data)(Cr)
Data 00-32: Sharpness 0-50
Acknowledgment
(k)( )(Set ID)( )(OK/NG)(Data)(x)
09. [Color] (Command: k i)
Adjusts the screen colors.
Transmission
(k)(i)( )(Set ID)( )(Data)(Cr)
Data 00-64: Color 0-100
Acknowledgment
(i)( )(Set ID)( )(OK/NG)(Data)(x)
05. [Picture Mode] (Command: d x)
Selects a picture mode.
Transmission
(d)(x)( )(Set ID)( )(Data)(Cr)
Data 00: [Mall/QSR]
01: [General]
02: [Gov./Corp.]
03: [Transportation]
04: [Education]
05: [Expert1]
08: [Auto Power Save]
11: [Calibration]
12: [Hospital]
Acknowledgment
(x)( )(Set ID)( )(OK/NG)(Data)(x)
* Some picture modes may not be available for all models.

93
ENGLISH
13. [Sound Mode] (Command: d y)
Selects a sound mode.
Transmission
(d)(y)( )(Set ID)( )(Data)(Cr)
Data 01: [Standard]
02: [Music]
03: [Cinema]
04: [Sports]
05: [Game]
07: [News (Clear Voice III)]
Acknowledgment
(y)( )(Set ID)( )(OK/NG)(Data)(x)
* This feature may not be available for all models.
14. [Mute on] (Command: k e)
Mutes/unmutes audio.
Transmission
(k)(e)( )(Set ID)( )(Data)(Cr)
Data 00: [Mute] (Volume off)
01: Mute off (Volume on)
Acknowledgment
(e)( )(Set ID)( )(OK/NG)(Data)(x)
* This feature may not be available for all models.
15. Volume Control (Command: k f)
Adjusts the playback volume.
Transmission
(k)(f)( )(Set ID)( )(Data)(Cr)
Data 00-64: Volume 0-100
Acknowledgment
(f)( )(Set ID)( )(OK/NG)(Data)(x)
* This feature may not be available for all models.
10. [Tint] (Command: k j)
Adjusts the screen tints.
Transmission
(k)(j)( )(Set ID)( )(Data)(Cr)
Data 00-64: Tint Red 50-Green 50
Acknowledgment
(j)( )(Set ID)( )(OK/NG)(Data)(x)
11. [Color Temperature] (Command: x u)
Adjusts the screen color temperature.
Transmission
(x)(u)( )(Set ID)( )(Data)(Cr)
Data 70-D2: 3200K-13000K
Acknowledgment
(u)( )(Set ID)( )(OK/NG)(Data)(x)
12. [Balance] (Command: k t)
Adjusts the sound balance.
Transmission
(k)(t)( )(Set ID)( )(Data)(Cr)
Data 00-64: Left 50-Right 50
Acknowledgment
(t)( )(Set ID)( )(OK/NG)(Data)(x)
* This feature may not be available for all models.

94
ENGLISH
16. [Current Time] 1 (year/month/day) (Command:
f a)
Sets the Clock 1 (year/month/day) values and Auto Time.
Transmission
1. (f)(a)( )(Set ID)( )(Data1)( )(Data2)( )(Data3)(Cr)
2. (f)(a)( )(Set ID)( )(0)(0)( )(Data1)(Cr)
1. When setting Clock 1 (year/month/day)
Data1 00-: 2010 -
Data2 01-0C: January - December
Data3 01-1F: 1-31
* The minimum and maximum values for Data1 differ
depending on the product's release year.
* Enter "fa [Set ID] ff" to view Clock 1 (year/month/day)
settings.
2. When Setting Auto Time
Data1 00: [Auto]
01: [Manual]
* To view the set value of the Auto time, enter “fa [Set ID] 00
f f ”.
Acknowledgment
1. (a)( )(Set ID)( )(OK/NG)(Data1)(Data2)(Data3)(x)
2. (a)( )(Set ID)( )(OK/NG)(0)(0)(Data1)(x)
17. [Current Time] 2 (hour/minute/second)
(Command: f x)
Sets the Clock 2 values (hour/minute/second).
Transmission
(f)(x)( )(Set ID)( )(Data1)( )(Data2)( )(Data3)(Cr)
Data1 00-17: 00-23 hours
Data2 00-3B: 00 - 59 minutes
Data3 00-3B: 00-59 seconds
* Enter "fx [Set ID] ff" to view the Time 2 (hour/minute/
second) settings.
* This feature is only available when Clock 1 (year/month/day)
has been set.
Acknowledgment
(x)( )(Set ID)( )(OK/NG)(Data1)(Data2)(Data3)(x)
18. [No Signal Power Off(15Min)] (Command: f g)
Sets the monitor to enter Automatic Standby mode if there is
no signal for 15 minutes.
Transmission
(f)(g)( )(Set ID)( )(Data)(Cr)
Data 00: [Off]
01: [On]
Acknowledgment
(g)( )(Set ID)( )(OK/NG)(Data)(x)
19. [No IR Power Off] (4Hour) (Command: m n)
Activates Auto Power Off when there is no IR signal for 4 hours.
Transmission
(m)(n)( )(Set ID)( )(Data)(Cr)
Data 00: [Off]
01: [On]
Acknowledgment
(n)( )(Set ID)( )(OK/NG)(Data)(x)
20. [Language] (Command: f i)
Sets the OSD language.
Transmission
(f)(i)( )(Set ID)( )(Data)(Cr)
Data 00: Czech
01: Danish
02: German
03: English
04: Spanish (Europe)
05: Greek
06: French
07: Italian
08: Dutch
09: Norwegian
0A: Portuguese
0B: Portuguese (Brazil)
0C: Russian
0D: Finnish
0E: Swedish
0F: Korean
10: Chinese (Mandarin)
11: Japanese
12: Chinese (Cantonese)
13: Arabic
14: Turkish
Acknowledgment
(i)( )(Set ID)( )(OK/NG)(Data)(x)
* Some languages may not be available for all models.

95
ENGLISH
21. [Default] Settings (Command: f k)
Executes Reset.
(Initialize Screen can only be executed in RGB input mode.)
Transmission
(f)(k)( )(Set ID)( )(Data)(Cr)
Data 00: [Picture Reset]
02: [Reset to Initial Settings]
Acknowledgment
(k)( )(Set ID)( )(OK/NG)(Data)(x)
* This feature may not be available for all models.
22. Current Temperature (Command: d n)
Checks the current temperature of the product.
Transmission
(d)(n)( )(Set ID)( )(Data)(Cr)
Data FF: Status Check
Acknowledgment
(n)( )(Set ID)( )(OK/NG)(Data)(x)
* The temperature is displayed in hexadecimal.
23. [Key] (Command: m c)
Sends a key code for the IR remote control.
Transmission
(m)(c)( )(Set ID)( )(Data)(Cr)
Data IR_KEY_CODE
Acknowledgment
(c)( )(Set ID)( )(OK/NG)(Data)(x)
* For key codes, see IR Codes.
* Some key codes may not be supported depending on the
model.
24. Time Elapsed (Command: d l)
Displays the time that has elapsed after your monitor has
turned on.
Transmission
(d)(l)( )(Set ID)( )(Data)(Cr)
Data FF: Read status
Acknowledgment
(l)( )(Set ID)( )(OK/NG)(Data)(x)
* The data received is displayed in hexadecimal.
25. Product Serial Number Check (Command: f y)
Checks the serial number of the product.
Transmission
(f)(y)( )(Set ID)( )(Data)(Cr)
Data FF: Check product serial number
Acknowledgment
(y)( )(Set ID)( )(OK/NG)(Data)(x)
* Data is in ASCII format.
26. [Software Version] (Command: f z)
Checks the software version of the product.
Transmission
(f)(z)( )(Set ID)( )(Data)(Cr)
Data FF: Check the software version
Acknowledgment
(z)( )(Set ID)( )(OK/NG)(Data)(x)

96
ENGLISH
27. [White Balance] Red Gain (Command: j m)
Adjusts the red gain value for white balance.
Transmission
(j)(m)( )(Set ID)( )(Data)(Cr)
Data 00-FE: Red Gain 0-254
FF: Checks red gain value
Acknowledgment
(m)( )(Set ID)( )(OK/NG)(Data)(x)
28. [White Balance] Green Gain (Command: j n)
Adjusts the green gain value for white balance.
Transmission
(j)(n)( )(Set ID)( )(Data)(Cr)
Data 00-FE: Green Gain 0-254
FF: Checks green gain value
Acknowledgment
(n)( )(Set ID)( )(OK/NG)(Data)(x)
29. [White Balance] Blue Gain (Command: j o)
Adjusts the blue gain value for white balance.
Transmission
(j)(o)( )(Set ID)( )(Data)(Cr)
Data 00-FE: Blue Gain 0-254
FF: Checks blue gain value
Acknowledgment
(o)( )(Set ID)( )(OK/NG)(Data)(x)
30. [White Balance] Red Offset (Command: s x)
Adjusts the red offset value for white balance.
Transmission
(s)(x)( )(Set ID)( )(Data)(Cr)
Data 00-7F: Red Offset 0-127
FF: Checks red offset value
Acknowledgment
(x)( )(Set ID)( )(OK/NG)(Data)(x)
31. [White Balance] Green Offset (Command: s y)
Adjusts the green offset value for white balance.
Transmission
(s)(y)( )(Set ID)( )(Data)(Cr)
Data 00-7F: Green Offset 0-127
FF: Checks green offset value
Acknowledgment
(y)( )(Set ID)( )(OK/NG)(Data)(x)
32. [White Balance] Blue Offset (Command: s z)
Adjusts the blue offset value for white balance.
Transmission
(s)(z)( )(Set ID)( )(Data)(Cr)
Data 00-7F: Blue Offset 0-127
FF: Checks blue offset value
Acknowledgment
(z)( )(Set ID)( )(OK/NG)(Data)(x)

97
ENGLISH
33. [Backlight] (Command: m g)
Adjusts the backlight brightness.
Transmission
(m)(g)( )(Set ID)( )(Data)(Cr)
Data 00-64: Backlight 0-100
Acknowledgment
(g)( )(set ID)()(OK/NG)(Data)(x)
* The LED Light of the LED model uses the corresponding
command.
34. [SCREEN OFF] (Command: k d)
Turns off/off the screen.
Transmission
(k)(d)( )(Set ID)( )(Data)(Cr)
Data 00: Screen On
01: Screen Off
Acknowledgment
(d)( )(Set ID)( )(OK/NG)(Data)(x)
* This feature may not be available for all models.
35. [Tile Mode] (Command: d d)
Sets a tile mode and values for the tile rows and columns.
Transmission
(d)(d)( )(Set ID)( )(Data)(Cr)
Data 00-FF: The first byte - tile column
The second byte - tile row
* 00, 01, 10, and 11 mean that the tile mode is off.
* The maximum value may differ depending on the model.
Acknowledgment
(d)( )(Set ID)( )(OK/NG)(Data)(x)
* This feature may not be available for all models.
* If you change the values on a Video Wall model, please reboot
for it to work normally.
36. [Tile Mode] Check (Command: d z)
Checks the tile mode.
Transmission
(d)(z)( )(Set ID)( )(Data)(Cr)
Data FF: Check Tile Mode
Acknowledgment
(z)( )(Set ID)( )(OK/NG)(Data1)(Data2)(Data3)(x)
Data1 00: Tile Mode off
01: Tile Mode on
Data2 00-0F: Tile column
Data3 00-0F: Tile row
* This feature may not be available for all models.
37. [Tile ID] (Command: d i)
Sets the tile ID value of the product.
Transmission
(d)(i)( )(Set ID)( )(Data)(Cr)
Data 01-E1: Tile ID 1-225
FF: Checks the Tile ID
* The data value cannot exceed the value of row x column.
Acknowledgment
(i)( )(Set ID)( )(OK/NG)(Data)(x)
* If you enter a value that exceeds the value of row x column
for the Data parameter (except for 0xFF), Ack becomes NG.
* This feature may not be available for all models.
* If you change the values on a Video Wall model, please reboot
for it to work normally.
38. [Natural Mode] (In Tile Mode) (Command: d j)
To display the image naturally, the part of the image that
would normally be displayed in the gap between the monitors
is omitted.
Transmission
(d)(j)( )(Set ID)( )(Data)(Cr)
Data 00: [Off]
01: [On]
Acknowledgment
(j)( )(Set ID)( )(OK/NG)(Data)(x)
* This feature may not be available for all models.

98
ENGLISH
39. [DPM] / [DPM (Standby Mode)] (Command: f j)
Sets the DPM(Display Power Management) function.
Transmission
(f)(j)( )(Set ID)( )(Data)(Cr)
Data 00: [Off]
02: 10 seconds
04: 1 minute
05: 3 minutes
06: 5 minutes
07: 10 minutes
Acknowledgment
(j)( )(Set ID)( )(OK/NG)(Data)(x)
* This feature may not be available for all models.
40. Remote Control/Local Key Operation Lock
(Command: k m)
Adjusts the remote control/local key (front) lock.
Transmission
(k)(m)( )(Set ID)( )(Data)(Cr)
Data 00: [Off] (Lock Off)
01: [On] (Lock On)
* When the monitor is turned off, the power key works even in
On (01) mode.
Acknowledgment
(m)( )(Set ID)( )(OK/NG)(Data)(x)
* This feature may not be available for all models.
41. [Power On Delay] (Command: f h)
Sets the schedule delay for when the power turns on. (Unit:
seconds)
Transmission
(f)(h)( )(Set ID)( )(Data)(Cr)
Data 00-FA: Min 0- Max 250 (sec)
Acknowledgment
(h)( )(Set ID)( )(OK/NG)(Data)(x)
* The maximum value may differ depending on the model.
42. [Fail Over] Mode (Command: m i)
Selects a sound mode.
Transmission
(m)(i)( )(Set ID)( )(Data)(Cr)
Data 00: [Off]
01: [Auto]
02: [User Setting]
Acknowledgment
(i)( )(Set ID)( )(OK/NG)(Data)(x)
43. [Fail Over] Input Select (Command: m j)
Selects an input source for fail over. (This feature is only
available when Fail Over is set to Custom.)
Transmission
(m)(j)( )(Set ID)( )(Data1)( )(Data2)( )(Data3)( )(Data4)
… ( )(DataN)(Cr)
Data1-N (Input priority 1-N)
60: RGB
70: DVI-D
90: HDMI1
91: HDMI2
92: OPS/HDMI3/DVI-D
95: OPS/DVI-D
96: HDMI3/DVI-D
97: HDMI3/HDMI2/DVI-D
98: OPS
99: HDMI2/OPS
C0: DISPLAYPORT
C1: DISPLAYPORT/USB-C
C2: HDMI3
C3: HDBaseT
Acknowledgment
(j)( )(SetID)( )(OK/NG)(Data1)(Data2)(Data3)(Data4)
… (DataN)(x)
* Some input signals may not be available for all models.
* The data number (N) may vary depending on the model. (The
data number depends on the number of supported input
signals.)
* This feature operates as the last input, and supports data in
DTV format.

99
ENGLISH
44. Remote Control Key Lock (Command: t p)
Configures the settings of the product's remote control key.
Transmission
(t)(p)( )(Set ID)( )(Data)(Cr)
Data 00: Unlocks all keys
01: Locks all keys except Power key
02: Locks all keys
Acknowledgment
(p)( )(Set ID)( )(OK/NG)(Data)(x)
* When the monitor is turned off, the power key works even in
the locks on all of the keys (02) mode.
45. [Local Key Operation Lock] (Command: t o)
Configures the local key operation settings of the product.
Transmission
(t)(o)( )(Set ID)( )(Data)(Cr)
Data 00: Unlocks all keys
01: Locks all keys except Power key
02: Locks all keys
Acknowledgment
(o)( )(Set ID)( )(OK/NG)(Data)(x)
* When the monitor is turned off, the power key works even in
the locks on all of the keys (02) mode.
* This feature may not be available for all models.
46. Status Check (Command: s v)
Checks the current signal of the product.
Transmission
(s)(v)( )(Set ID)( )(Data)( )(FF)(Cr)
Data 02: Check whether there is a signal
03: The monitor is currently in PM Mode
07: Checks whether the Top, Bottom and Main
temperature sensors are functioning normally.
09: Fan Speed
10: RGB Sensing OK/NG (screen fault detection)
16: Check the humidity value
17: Check the value of the intensity of illumination
18: Check the status value of the slope of the
product
Acknowledgment
(v)( )(Set ID)( )(OK/NG)(Data)(Data1)(x)
Data 02 (when a signal is found)
Data1 00: No signal
01: Signal present
Data 03 (when the monitor is currently in PM mode)
Data1 00: Screen is on
01: Screen is off
02: Screen Off Always is activated
03: Sustain Aspect Ratio is activated
04: Screen Off & Backlight On is activated
Data 07 (when checking whether the Top, Bottom
and Main temperature sensors are working
properly)
Data1 00: All temperature sensors are faulty
01: Top normal, Bottom faulty, Main faulty
02: Top faulty, Bottom normal, Main faulty
03: Top normal, Bottom normal, Main faulty
04: Top faulty, Bottom faulty, Main normal
05: Top normal, Bottom faulty, Main normal
06: Top faulty, Bottom normal, Main normal
07: All temperature sensors are normal
Data 10 (when executing Screen Fault Detection)
Data 1 00: Screen Fault Detection result NG
07: Screen Fault Detection result OK
* When screen Fault Detection is set to Off or not supported,
execution results are rendered “NG.”
Data 16 (for checking the humidity value)
Data1 0~100:Readsthe%RHvalueofthecurrent
humidity (indicated as a Hex value).
Data 17 (for checking the value of the intensity of
illumination)
Data 1 1~1000: Reads the Lux value of the current
intensity of illumination (indicated as a Hex value).
Data 18 (for checking the status value of the slope of
the product)
Data 1 00: 0 degrees
01: 90 degrees
02: 180 degrees
03: 270 degrees
04: Fallen forward
05: Fallen backward

100
ENGLISH
Data 09 (when checking the fan speed)
Acknowledgement
(v)( )(Set ID)( )(OK/NG)(Data)(Data1_1)(Data1_2)
…(DataN_1)(DataN_2)(x)
Data1_1:00~ff: First fan speed top 1 Byte
Data1_2: 00~ff: First fan speed bottom 1 Byte
…
DataN_1: 00~ff: Nth fan speed top 1 Byte
DataN_2: 00~ff: Nth fan speed bottom 1 Byte
Fan Speed: Hex 0~2008, Decimal 0~8200
* The data number (N) may vary depending on the model.
* This feature may not be available for all models.
47. [Daylight Saving Time] (Command: s d)
Sets Daylight Savings Time.
Transmission
(s)(d)( )(Set ID)( )(Data1)( )(Data2)( )
(Data3)( )(Data4)( )(Data5)( )(Cr)
Data1 00: Off (Data2-5: FF)
01: Start Time
02: End Time
Data2 01~0C: January - December
Data3 01-06: Week 1 - 6
* The maximum value of [Data3] may vary depending on the
date.
Data4 00-06: (Sunday - Saturday)
Data5 00-17: 00 - 23 hours
* If you wish to read the start/end times, enter FF for
parameters [Data2] through [Data5].
(Example 1: sd 01 01 ff ff ff ff - Checks the start time.
Example 2: sd 01 02 ff ff ff ff - Checks the end time.)
* This feature only works when Clock 1 (year/month/day) and
Clock 2 (hour/minute/second) have been set.
Acknowledgment
(d)( )(Set ID)( )(OK/NG)(Data1)(Data2)
(Data3)(Data4)(Data5)(x)
* This feature may not be available for all models.
48. [PM Mode] (Command: s n, 0c)
Sets the PM mode.
Transmission
(s)(n)( )(Set ID)( )(0c)( )(Data)(Cr)
Data 00: [Power Off] (Basic)
01: [Sustain Aspect Ratio]
02: [Screen Off]
03: [Screen Off Always]
04: [Screen Off & Backlight On]
05: [Network Ready]
Acknowledgment
(n)( )(Set ID)( )(OK/NG)(0c)(Data)(x)
* This feature may not be available for all models.
49. [ISM Method] (Command: j p)
Selects an ISM method.
Transmission
(j)(p)( )(Set ID)( )(Data)(Cr)
Data 02: [Orbiter]
04: [White Wash]
08: [Off]
90: [User Image]
91: [User Video]
Acknowledgment
(p)( )(Set ID)( )(OK/NG)(Data)(x)
* This feature may not be available for all models.
* “02: [Orbiter]” is not supported while “91: [User Video]” is
turned on.

101
ENGLISH
50. [Network Setting] (Command: s n, 80 or 81 or
82)
Configures network and DNS settings.
Transmission
(s)(n)( )(Set ID)( )(Data1)( )(Data2)( )
(Data3)( )(Data4)( )(Data5)(Cr)
Data1 80: Configures/views the temporary IP mode
(Auto/Manual), subnet mask, and gateway.
81: Configures/views the temporary DNS address.
82: Saves temporary settings and views
information about the current network.
* If Data1 is 80,
Data2 00: Auto
01: Manual
FF: Views the temporary IP mode (Auto/Manual),
subnet mask, and gateway.
* If Data2 is 01 (Manual),
Data3 Manual IP address
Data4 Subnet mask address
Data5 Gateway address
* If Data1 is 81,
Data2 DNS address
FF: Displays the temporary DNS address.
* If Data1 is 82,
Data2 80: Applies the temporary IP mode (Auto/
Manual), subnet mask, and gateway.
81: Applies the temporary DNS address
FF: I nformation on the current network (IP, subnet
gateway and DNS)
* An example of settings,
1. Auto: sn 01 80 00
2. Manual: sn 01 80 01 010177223241 255255254000
010177222001(IP:10.177.223.241, subnet:
255.255.254.0, gateway: 10.177.222.1)
3. Network read: sn 01 80 ff
4. DNS setting: sn 01 81 156147035018 (DNS:
156.147.35.18)
5. Applying the settings: sn 01 82 80 (applies the saved IP
mode (auto/manual), subnet mask, and
gateway), sn 01 82 81 (applies the
saved DSN)
* Each IP address contains 12 decimal digits.
Acknowledgment
(n)( )(Set ID)( )(OK/NG)(Data1)(Data)(x)
* This feature is available only for wired networks.
* This feature may not be available for all models.
51. [Power On Status] (Command: t r)
Sets the Power On status of the monitor.
Transmission
(t)(r)( )(Set ID)( )(Data)(Cr)
Data 00: [LST(Last Status)]
01: [STD(Standby)]
02: [PWR(Power On)]
Acknowledgment
(r)( )(Set ID)( )(OK/NG)(Data)(x)
52. Wired [Wake On LAN] / [Wake On LAN
(Networked Standby Mode)] (Command: f w)
Selects a Wired Wake On LAN option.
Transmission
(f)(w)( )(Set ID)( )(Data)(Cr)
Data 00: [Off]
01: [On]
Acknowledgment
(w)( )(Set ID)( )(OK/NG)(Data)(x)
53. [OSD Rotation] (Command: t h)
Sets the Screen Rotation feature.
Transmission
(t)(h)( )(Set ID)( )(Data) (Cr)
Data 00: [Off]
01: 90 degrees
02: 270 degrees
03: 180 degrees
Acknowledgment
(h)( )(Set ID)( )(OK/NG)(Data)(x)
* This feature may not be available for all models.

102
ENGLISH
57. [External Input Rotation] (Command: s n, 85)
Sets the External Input Rotation feature.
Transmission
(s)(n)( )(Set ID)( )(8)(5)( )(Data)(Cr)
Data 00: [Off]
01: 90 degrees
02: 270 degrees
03: 180 degrees
Acknowledgment
(n)( )(Set ID)( )(OK/NG)(8)(5)(Data)(x)
* This feature may not be available for all models.
58. [Beacon] (Command: s n, 88)
Turns on/off Beacon.
Transmission
(s)(n)( )(Set ID)( )(8)(8)( )(Data)(Cr)
Data 00: [Off]
01: [On]
Acknowledgment
(n)( )(Set ID)( )(OK/NG)(8)(8)(Data)(x)
* This feature may not be available for all models.
59. [Brightness Scheduling] Mode (Command: s m)
Selects a Brightness Scheduling mode.
Transmission
(s)(m)( )(Set ID)( )(Data)(Cr)
Data 00: [Off]
01: [On]
Acknowledgment
(m)( )(Set ID)( )(OK/NG)(Data)(x)
* This feature does not work if the current time is not set.
* This feature may not be available for all models.
54. [Time Sync] (Command: s n, 16)
Sets Time Sync.
Transmission
(s)(n)( )(Set ID)( )(1)(6)( )(Data)(Cr)
Data 00: [Off]
01: [On]
* This feature only works when the monitor is in Master mode.
* This feature does not work if the current time is not set.
Acknowledgment
(n)( )(Set ID)( )(OK/NG)(1)(6)(Data)(x)
* This feature may not be available for all models.
55. [Contents Sync] (Command: t g)
Sets Content Sync.
Transmission
(t)(g)( )(Set ID)( )(Data)(Cr)
Data 00: [Off]
01: [On]
Acknowledgment
(g)( )(Set ID)( )(OK/NG)(Data)(x)
* This feature may not be available for all models.
56. [LAN Daisy Chain] (Command: s n, 84)
Turns on/off LAN Daisy Chain.
Transmission
(s)(n)( )(Set ID)( )(8)(4)( )(Data)(Cr)
Data 00: [Off]
01: [On]
Acknowledgment
(n)( )(Set ID)( )(OK/NG)(8)(4)(Data)(x)
* This feature may not be available for all models.

103
ENGLISH
60. [Brightness Scheduling] (Command: s s)
Sets Brightness Scheduling.
Transmission
(s)(s)( )(Set ID)( )(Data1)( )(Data2)( )(Data3)(Cr)
Data 1
1. f1 to f6 (data reading)
F1: Reads the 1st brightness schedule’s data
F2: Reads the 2nd brightness schedule’s data.
F3: Reads the 3rd brightness schedule’s data.
F4: Reads the 4th brightness schedule’s data.
F5: Reads the 5th brightness schedule’s data.
F6: Reads the 6th brightness schedule’s data.
2. FF: Reads all stored lists
3. e1 to e6 (Deletes one index), e0 (Deletes all indexes)
E0: Deletes all brightness schedules.
E1: Deletes the 1st brightness schedule.
E2: Deletes the 2nd brightness schedule.
E3: Deletes the 3rd brightness schedule.
E4: Deletes the 4th brightness schedule.
E5: Deletes the 5th brightness schedule.
E6: Deletes the 6th brightness schedule.
4. 00-17: 00 - 23 hours
Data 2 00-3B: 00 - 59 minutes
Data 3 00~64: Backlight 0 - 100
* To read or delete a brightness schedule you have set, (Data2)
(Data3) must be set to FF.
* If you want to read all configured brightness schedules
through FF, do not enter any values in (Data2)(Data3).
* When retrieving all items of the set Brightness Scheduling
list through FF, OK will be acknowledged (ACK) even if there
is no saved list.
ex1: ss 01 f1 ff ff – Reads the 1st index data in Brightness
Schedule.
ex2: ss 01 ff - Reads all index data in Brightness Schedule.
ex3: ss 01 e1 ff ff – Deletes the 1st index data in Brightness
Schedule.
ex4: ss 01 07 1E 46 - Adds a schedule whose time is 07:30
and whose backlight is 70.
Acknowledgement
(s)( )(Set ID)( )(OK/NG)(Data1)(Data2)(Data3)(x)
* This feature may not be available for all models.
61. [Multi Screen] Mode & Input (Command: x c)
Saves and controls Multi Screen modes and inputs.
Transmission
(x)(c)( )(Set ID)( )(Data1)( )(Data2)( )(Data3)( )(Data4)
( )(Data5)( )(Cr)
Data1 (Sets MultiScreen mode)
10: PIP
22: PBP2
23: PBP3
24: PBP4
25: PBP3 (1:2:1)
Data2 (Sets the Main input of Multi screen)
Data3 (Sets the Sub1 input of Multi screen)
Data4 (Sets the Sub2 input of Multi screen)
Data5 (Sets the Sub3 input of Multi screen)
80: DVI-D
90: HDMI1
91: HDMI2
92: OPS/HDMI3/DVI-D
95: OPS/DVI-D
96: HDMI3/DVI-D
97: HDMI3/HDMI2/DVI-D
98: OPS
99: HDMI2/OPS
C0: DISPLAYPORT
C1: DISPLAYPORT/USB-C
C2: HDMI3
C3: HDBaseT
Acknowledgment
(c)( )(Set ID)( )(OK/NG)( )(Data1)(Data2)(Data3)
(Data4)(Data5)(x)
* This feature may not be available for all models.
* Only the input modes supported by the model works.
* This feature operates as the last input, and supports data in
DTV format.
* When the Read operation is performed, 00 is returned if it is
not for an external input.

104
ENGLISH
62. [Aspect Ratio] (Multi screen) (Command: x d)
Controls the aspect ratio of Multi Screen.
Transmission
(x)(d)( )(Set ID)( )(Data1)( )(Data2)(Cr)
Data1 01: Controls the Main input
02: Controls the Sub1 input
03: Controls the Sub2 input
04: Controls the Sub3 input
Data2 00: Full Screen
01: Original
Acknowledgment
(d)( )(Set ID)( )(OK/NG)(Data1)(Data2)(x)
* This feature may not be available for all models.
63. [Screen Off] (Multi screen) (Command: x e)
Turns on/off each screen in the Multi Screen.
Transmission
(x)(e)( )(Set ID)( )(Data1)( )(Data2)(Cr)
Data1 01: Controls the Main input
02: Controls the Sub1 input
03: Controls the Sub2 input
04: Controls the Sub3 input
Data2 00: Screen On
01: Screen Off
* This feature only works when the Multi Screen app is running.
* This feature does not work when there is no signal.
Acknowledgment
(e)( )(Set ID)( )(OK/NG)(Data1)(Data2)(x)
* This feature may not be available for all models.
64. [Screen Off Always] (Command: s n, 0d)
If you activate the Screen Off Always feature, the monitor
enters Screen Off mode regardless of whether or not you have
activated PM mode.
Transmission
(s)(n)( )(Set ID)( )(0)(d)( )(Data)(Cr)
Data 00: [Off]
01: [On]
Acknowledgment
(n)( )(Set ID)( )(OK/NG)(0)(d)(Data)(x)
* This feature may not be available for all models.
65. Stop Video (Command: k x)
Controls Stop Video.
Transmission
(k)(x)( )(Set ID)( )(Data)(Cr)
Data 00: The Stop Video feature is on.
01: The Stop Video feature is off.
* This feature only works in single input mode.
Acknowledgment
(x)( )(Set ID)( )(OK/NG)(Data)(x)
* This feature may not be available for all models.
66. Wireless [Wake On LAN] / [Wake On LAN
(Networked Standby Mode)] (Command: s n, 90)
Sets the Wireless Wake-on-LAN feature.
Transmission
(s)(n)( )(Set ID)( )(9)(0)( )(Data)(Cr)
Data 00: [Off]
01: [On]
Acknowledgment
(n)( )(Set ID)( )(OK/NG)(9)(0)(Data)(x)
* This feature may not be available for all models.
67. [OSD Lock] (Command: k l)
Sets OSD Lock.
Transmission
(k)(l)( )(Set ID)( )(Data)(Cr)
Data 00: OSD Lock
01: Unlock OSD Lock
Acknowledgment
(l)( )(Set ID)( )(OK/NG)(Data)(x)
68. [HDMI IT Content] (Command: s n, 99)
Automatically sets the picture mode based on HDMI data.
Transmission
(s)(n)( )(Set ID)( )(9)(9)( )(Data)(Cr)
Data 00: [Off]
01: [On]
Acknowledgment
(n)( )(Set ID)( )(OK/NG)(9)(9)(Data)(x)
* This feature may not be available for all models.

105
ENGLISH
69. [Holiday Setting] (Command: s n, 9b)
Sets holidays.
Transmission
1. (s)(n)( )(Set ID)( )(9)(b)( )
(Data1)( )(Data2)( )(Data3)( )
(Data4)( )(Data5)( )(Data6)(Cr)
2. (s)(n)( )(Set ID)( )(9)(b)( )(Data1)( )(Data2)(Cr)
3. (s)(n)( )(Set ID)( )(9)(b)( )(Data1)(Cr)
1. Setting a Holiday
Data1 Start year
00-: 2010-
Data2 Start month
01 - 0c: January - December
Data3 Start date
01 - 1F: 01-31
Data4 For how long from the start year/month/date
01-07: For 1 to 7 days
Data5 Repetition
00: None
01: Every month
02: Every Year
Data6 Repeats the schedule on a date/day-of-the-week
basis.
01: On a date basis.
02: On a day-of-the-week basis.
* The minimum and maximum values for Data1 differ
depending on the product's release year.
* You can input a value for [Data 6] only when a value has
already been set for [Data 5] (every year or every month).
2. Checking a Schedule
Data1 Select the desired schedule.
F1: Reads the 1st schedule
F2: Reads the 2nd schedule
F3: Reads the 3rd schedule
F4: Reads the 4th schedule
F5: Reads the 5th schedule
F6: Reads the 6th schedule
F7: Reads the 7th schedule
Data2
FF
3. Deleting a Schedule
E0: Deletes all holiday schedules
E1: Deletes the 1st holiday schedule
E2: Deletes the 2nd holiday schedule
E3: Deletes the 3rd holiday schedule
E4: Deletes the 4th holiday schedule
E5: Deletes the 5th holiday schedule
E6: Deletes the 6th holiday schedule
E7: Deletes the 7th holiday schedule
* This feature does not work if the current time is not set.
Acknowledgment
1. (n)( )(Set ID)( )(OK/NG)(9)(b)
(Data1)(Data2)(Data3)(Data4)(Data5)(Data6)(x)
2. (n)( )(Set ID)( )(OK/NG)(9)(b)(f)(1~7)
(Data1)(Data2)(Data3)(Data4)(Data5)(Data6)(x)
3. (n)( )(Set ID)( )(OK/NG)(9)(b)(Data1)(x)
* This feature may not be available for all models.

106
ENGLISH
70. [UPnP] (Command: s n, 9c)
Sets UPnP.mode.
Transmission
(s)(n)( )(Set ID)( )(9)(c)( )(Data)(Cr)
Data 00: [Off]
01: [On]
Acknowledgment
(n)( )(Set ID)( )(OK/NG)(9)(c)(Data)(x)
* This feature may not be available for all models.
* Changing UPnP mode results in a reboot.
71. [Home Dashboard Lock] (Command: s n, 9d)
Sets Home Dashboard Lock.
Transmission
(s)(n)( )(Set ID)( )(9)(d)( )(Data)(Cr)
Data 00: Home Dashboard Unlock
01: Home Dashboard Lock
Acknowledgment
(n)( )(Set ID)( )(OK/NG)(9)(d)(Data)(x)
* This feature may not be available for all models.
72. [USB Lock] (Command: s n, 9e)
Sets USB Lock.
Transmission
(s)(n)( )(Set ID)( )(9)(e)( )(Data)(Cr)
Data 00: USB Unlock
01: USB Lock
Acknowledgment
(n)( )(Set ID)( )(OK/NG)(9)(e)(Data)(x)
* This feature may not be available for all models.
73. [Wi-Fi Lock] (Command: s n, 9f)
Sets Wi-Fi Lock.
Transmission
(s)(n)( )(Set ID)( )(9)(f)( )(Data)(Cr)
Data 00: Wi-Fi Unlock
01: Wi-Fi Lock
Acknowledgment
(n)( )(Set ID)( )(OK/NG)(9)(f)(Data)(x)
* This feature may not be available for all models.
74. [Screen Share Lock] (Command: s n, a0)
Sets Screen Share Lock.
Transmission
(s)(n)( )(Set ID)( )(a)(0)( )(Data)(Cr)
Data 00: Screen Share Unlock
01: Screen Share Lock
02: Screen Share Lock (PIN)
Acknowledgment
(n)( )(Set ID)( )(OK/NG)(a)(0)(Data)(x)
* This feature may not be available for all models.

107
ENGLISH
75. [Backup via Storage] (Command: s n, a1)
Sets Backup via Storage.
Transmission
1. (s)(n)( )(Set ID)( )(a)(1)( )(Data1)(Cr)
2. (s)(n)( )(Set ID)( )(a)(1)( )(Data1)(Data2)(Cr)
1. Disabling Backup via Storage.
Data1 00: Off
2. Setting Backup via Storage to Auto
Data1 01: Auto
Data2 01: 30 minute
02: 1 hour
03: 2 hours
04: 3 hours
3. Setting Backup via Storage to Manual
Data1 02: Manual
4. Setting Backup via Storage to SuperSign Content
Data1 03: SuperSign Contents
5. Set to SI App / Play via URL
Data 1 04: [SI App / Play via URL]
Acknowledgment
1. (n)( )(Set ID)( )(OK/NG)(a)(1)(Data1)(x)
2. (n)( )(Set ID)( )(OK/NG)(a)(1)(Data1)(Data2)(x)
* This feature may not be available for all models.
76. [Digital Audio Input] (Command: s n, a2)
Sets Digital Audio Input.
Transmission
(s)(n)( )(Set ID)( )(a)(2)( )(Data)(Cr)
Data 00: Digital
01: Analog
Acknowledgment
(n)( )(Set ID)( )(OK/NG)(a)(2)(Data)(x)
* This feature may not be available for all models.
77. [Booting Logo Image] (Command: s n, a3)
Sets Booting Logo Image.
Transmission
(s)(n)( )(Set ID)( )(a)(3)( )(Data)(Cr)
Data 00: [Off]
01: [On]
Acknowledgment
(n)( )(Set ID)( )(OK/NG)(a)(3)(Data)(x)
* This feature may not be available for all models.
78. [SoftAP] (Command: s n, a4)
Sets SoftAP Mode.
Transmission
(s)(n)( )(Set ID)( )(a)(4)( )(Data)(Cr)
Data 00: [Off]
01: [On]
Acknowledgment
(n)( )(Set ID)( )(OK/NG)(a)(4)(Data)(x)
* This feature may not be available for all models.

108
ENGLISH
79. [Natural Size] (Command: s n, a5)
Sets the Natural Size feature.
Transmission
(s)(n)( )(Set ID)( )(a)(5)( )(Data)(Cr)
Data 00-64: Natural Size 0 - 100
Acknowledgment
(n)( )(Set ID)( )(OK/NG)(a)(5)(Data)(x)
* This feature may not be available for all models.
80. Play Saved Internal Media (Command: s n, a8)
Plays media files saved on internal storage. Internal storage
media: videos and images stored on the monitor's internal
storage after being exported via Contents Management Player.
* Not applicable: Template content, SuperSign content, and
playlist content.
Transmission
(s)(n)( )(Set ID)( )(a)(8)( )(Data)(Cr)
Data 01: Play
Acknowledgment
(n)( )(Set ID)( )(OK/NG)(a)(8)( )(Data)(x)
* This feature may not be available for all models.
81. [No Signal Image] (Command: s n, a9)
Sets the No Signal Image feature.
Transmission
(s)(n)( )(Set ID)( )(a)(9)( )(Data)(Cr)
Data 00: [Off]
01: [On]
Acknowledgment
(n)( )(Set ID)( )(OK/NG)(a)(9)(Data)(x)
* This feature may not be available for all models.
82. [Audio Out] (Command: s n, aa)
Sets Audio Out to Off/Variable/Fixed.
Transmission
(s)(n)( )(Set ID)( )(a)(a)( )(Data)(Cr)
Data 00: [Off]
01: [Variable]
02: [Fixed]
Acknowledgment
(n)( )(Set ID)( )(OK/NG)(a)(a)(Data)(x)
* This feature may not be available for all models.
83. [DPM Wake Up Control] / [DPM (Standby Mode)
Wake Up Control] (Command: s n, 0b)
Controls the DPM Wake Up Control settings.
Transmission
(s)(n)( )(Set ID)( )(0)(b)( )(Data)(Cr)
Data 00: [Clock]
01: [Clock+DATA]
Acknowledgment
(n)( )(Set ID)( )(OK/NG)(0)(b)(Data)(x)
* This feature may not be available for all models.
84. [Fan] Failure Check (Command: d w)
Check the fan malfunction.
Transmission
(d)(w)( )(Set ID)( )(Data)(Cr)
Data FF: Read status
Acknowledgment
(w)( )(Set ID)( )(OK/NG)(Data1)(Data2)(x)
Data1 00: Fan failure
01: Fan normal
Data2 00: 0 faults (Fan Normal)
01: 1 fault
02: 2 faults
03: 3 faults
04: 4 faults
05: 5 faults
06: 6 faults
07: 7 faults
08: 8 faults
09: 9 faults
0A: 10 faults
* This feature may not be available for all models.

109
ENGLISH
85. [Apply to all inputs] (Command: s n, 52)
Apply the video mode and low value of the current input to the
same video value of all inputs.
Transmission
(s)(n)( )(Set ID)( )(5)(2)( )(Data)(Cr)
Data 01: Apply
Acknowledgment
(n)( )(Set ID)( )(OK/NG)(5)(2)(Data)(x)
* This feature may not be available for all models.
* Other commands do not work for a certain time after
applying.
86. [Timer Power On] Scheduling (Command: f d)
Sets On Timer settings.
Transmission
(f)(d)( )(Set ID)( )(Data1)( )(Data2)( )(Data3)(Cr)
Data1
1. f1h to f7h (data reading)
F1: Reads the 1st Timer Power On’s data
F2: Reads the 2nd Timer Power On’s data
F3: Reads the 3rd Timer Power On’s data
F4: Reads the 4thTimer Power On’s data
F5: Reads the 5th Timer Power On’s data
F6: Reads the 6th Timer Power On’s data
F7: Reads the 7th Timer Power On’s data
2. e1h to e7h (Deletes one index), e0h (Deletes all
indexes)
E0: Delete all Timer Power On’s
E1: Delete the 1st Timer Power On
E2: Delete the 2nd Timer Power On
E3: Delete the 3rd Timer Power On
E4: Delete the 4th Timer Power On
E5: Delete the 5th Timer Power On
E6: Delete the 6th Timer Power On
E7: Delete the 7th Timer Power On
3. 01h to 0ch (Timer Power On days setting)
02: Repeat Daily
03: Repeat from Monday to Friday
04: Repeat from Monday to Saturday
05: Repeat from Saturday to Sunday
06: Repeat on Sunday
07: Repeat on Monday
08: Repeat on Tuesday
09: Repeat on Wednesday
0A: Repeat on Thursday
0B: Repeat on Friday
0C: Repeat on Saturday
Data2 00-17: 00 - 23 hours
Data3 00-3B: 00 - 59 minutes
* To read or delete a Timer Power On you have set, [Data2]
[Data3] must be set to FF.
Example 1: fd 01 f1 ff ff - Reads the 1st index data in Timer
Power On.
Example 2: fd 01 e1 ff ff - Reads the 1st index data in Timer
Power On.
Example 3: fd 01 04 02 03 - Sets the Timer Power On as
Monday - Saturday 02:03.
* This feature only works when Clock 1 (year/month/day) and
Clock 2 (hour/minute/second) have been set.
Acknowledgment
(d)( )(Set ID)( )(OK/NG)(Data1)(Data2)(Data3)(x)

110
ENGLISH
87. [Time to OFF] Scheduling (Command: f e)
Sets Off Timer settings.
Transmission
(f)(e)( )(Set ID)( )(Data1)( )(Data2)( )(Data3)(Cr)
Data1
1. f1h to f7h (data reading)
F1: Reads the 1st Timer Power Off’s data
F2: Reads the 2nd Timer Power Off’s data
F3: Reads the 3rd Timer Power Off’s data
F4: Reads the 4th Timer Power Off’s data
F5: Reads the 5th Timer Power Off’s data
F6: Reads the 6th Timer Power Off’s data
F7: Reads the 7th Timer Power Off’s data
2. e1h to e7h (Deletes one index), e0h (Deletes all
indexes)
E0: Delete all Timer Power Off’s
E1: Delete the 1st Timer Power Off
E2: Delete the 2nd Timer Power Off
E3: Delete the 3rd Timer Power Off
E4: Delete the 4th Timer Power Off
E5: Delete the 5th Timer Power Off
E6: Delete the 6th Timer Power Off
E7: Delete the 7th Timer Power Off
3. 01h to 0ch (Timer Power Off days setting)
02: Repeat Daily
03: Repeat from Monday to Friday
04: Repeat from Monday to Saturday
05: Repeat from Saturday to Sunday
06: Repeat on Sunday
07: Repeat on Monday
08: Repeat on Tuesday
09: Repeat on Wednesday
0A: Repeat on Thursday
0B: Repeat on Friday
0C: Repeat on Saturday
Data2 00-17: 00 - 23 hours
Data3 00-3B: 00 - 59 minutes
* To read or delete a Timer Power Off you have set, [Data2]
[Data3] must be set to FF.
Example 1: fe 01 f1 ff ff - Reads the 1st index data in Timer
Power Off.
Example 2: fe 01 e1 ff ff - Reads the 1st index data in Timer
Power Off.
Example 3: fe 01 04 02 03 - Sets the Timer Power Off as
Monday - Saturday 02:03.
* This feature only works when Clock 1 (year/month/day) and
Clock 2 (hour/minute/second) have been set.
Acknowledgment
(e)( )(Set ID)( )(OK/NG)(Data1)(Data2)(Data3)(x)
88. LCIN008 Control (Command: s n, b8)
It controls the LCIN008 device.
Transmission
(s)(n)( )(Set ID)( )(b)(8)( )(Data1)(Data2)(Cr)
Data 1 00: LCIN008 Power
01: LCIN008 Brightness
Data 2
1. For Power
0 x 00: Off
0 x 01: On
2. For Brightness
0 x ff: Read
0 x 00 ~ 0 x 64: Applies a set value
Acknowledgement
(n)( )(Set ID)( )(OK/NG)(b)(8)(Data1)(Data2)(x)
* This feature may not be available for all models.
* Other commands do not work for a certain time after
applying.
89. [Transfer Control] (Command: s n, cb)
It transfers the command to RS232C out.
Transmission
(s)(n)( )(Set ID)( )(c)(b)( )(Data)(Cr)
Data Data that goes out to RS232C out
Acknowledgment
(n)( )(Set ID)( )(OK/NG)(c)(b)(Data)(x)
Data Response value of Data transferred to RS232C
out
* This feature may not be available for all models.
* Other commands do not work for a certain time after
applying.
90. Multichannel (Command: s n, 76)
It changes the channel.
Transmission
(s)(n)( )(Set ID)( )(7)(6)( )(Data)(Cr)
Data 01 - 09: Channel to switch to
Acknowledgment
(n)( )(Set ID)( )(OK/NG)(7)(6)(Data)(x)
* This feature may not be available for all models.

111
ENGLISH
91. Change Setid (Command: j x)
Changes and checks Setid.
1. When it is a general LED model
Transmission
(j)(x)( )(Set ID)( )(Data1)( )(Data2)(Cr)
Data1 Data2 : 00 01 ~ 03 e8 (1~1000)
Acknowledgment
(x)( )(Set ID)( )(OK/NG)(Data1)(Data2)(x)
2. When it is another model (read only)
Transmission
(j)(x)( )(Set ID)( )(Data)(Cr)
Data FF: Check the value of Setid
The returned value is indicated as a value of hexadecimal
numbers corresponding to the ASCII code value.
(Return when Setid is 1: x 01 OK31x
Return when Setid is 1000: x 3e8 OK31303030x)
Acknowledgment
(x)( )(Set ID)( )(OK/NG)(Data)(x)
* It works even if the Setid does not match.
* This feature may not be available for all models.
92. [Gamma] (Command: s n, ad)
Sets Gamma Mode.
Transmission
(s)(n)( )(Set ID)( )(a)(d)( )(Data)(Cr)
Data 00: [low](1.9)
01: [medium](2.2)
02: [High1](2.4)
03: [High2](BT.1886)
Acknowledgment
(n)( )(Set ID)( )(OK/NG)(a)(d)(Data)(x)
* This feature may not be available for all models.
93. [Black Level] (Command: s n, ae)
It sets the Black Level mode.
Transmission
(s)(n)( )(Set ID)( )(a)(e)( )(Data)(Cr)
Data 00: Low
01: High
02: Auto
Acknowledgment
(n)( )(Set ID)( )(OK/NG)(a)(e)(Data)(x)
* This feature may not be available for all models.
94. [UHD Deep Color] (Command: s n, af)
It sets the UHD Deep Color mode for each input.
Transmission
(s)(n)( )(Set ID)( )(a)(f)( )(Data1)( )(Data2)(Cr)
Data1 70: DVI-D
90: HDMI1
91: HDMI2
92: OPS/HDMI3/DVI-D
95: OPS/DVI-D
96: HDMI3/DVI-D
97: HDMI3/HDMI2/DVI-D
98: OPS
99: HDMI2/OPS
C0: DISPLAYPORT
C1: DISPLAYPORT/USB-C
C2: HDMI3
C3: HDBaseT
Data2 00: [Off]
01: [On]
Acknowledgment
(n)( )(Set ID)( )(OK/NG)(a)(f)(Data1)(Data2)(x)
* This feature may not be available for all models.
95. [Sync Mode] (Command: s n, b0)
Sets Sync Mode.
Transmission
(s)(n)( )(Set ID)( )(b)(0)( )(Data)(Cr)
Data 00: [Slave Mode]
01: [Master Mode]
Acknowledgment
(n)( )(Set ID)( )(OK/NG)(b)(0)(Data)(x)
* This feature may not be available for all models.

112
ENGLISH
96. [Input Manager] (Command: s n, b1)
It sets labels by input.
Transmission
(s)(n)( )(Set ID)( )(b)(1)( )(Data1)( )(Data2)(Cr)
Data1 90: HDMI1
91: HDMI2
92: OPS/HDMI3/DVI-D
95: OPS/DVI-D
96: HDMI3/DVI-D
97: HDMI3/HDMI2/DVI-D
98: OPS
99: HDMI2/OPS
C0: DISPLAYPORT
C1: DISPLAYPORT/USB-C
C2: HDMI3
C3: HDBaseT
Data2 00: DTV
01: PC
Acknowledgment
(n)( )(Set ID)( )(OK/NG)(b)(1)(Data1)(Data2)(x)
* This feature may not be available for all models.
97. [PC/OPS Power Control] (Command: s n, 8b)
It sets the OPS/PC Power Control mode.
Transmission
(s)(n)( )(Set ID)( )(8)(b)( )(Data)(Cr)
Data 00: [Disable]
01: [Sync(On)]
02: [Sync(On/Off)]
Acknowledgment
(n)( )(Set ID)( )(OK/NG)(8)(b)(Data)(x)
* This feature may not be available for all models.
98. [LED Local Dimming] (Command: s n, c1)
It sets [LED Local Dimming].
(A feature to set the LED Local Dimming in a sub-item under
[Settings] [Display] [Expert Controls])
Transmission
(s)(n)( )(Set ID)( )(c)(1)( )(Data)(Cr)
Data 00: [Off]
01: [On]
Acknowledgment
(n)( )(Set ID)( )(OK/NG)(c)(1)(Data)(x)
* This feature may not be available for all models.
99. [Scan Inversion] (Command: s n, 87)
It controls the on/off status of Scan Inversion.
Transmission
(s)(n)( )(Set ID)( )(8)(7)( )(Data)(Cr)
Data 00: Off
01: On
Acknowledgment
(n)( )(Set ID)( )(OK/NG)(8)(7)(Data)(x)
* This feature may not be available for all models.
* If you change the values on a Video Wall model, please reboot
for it to work normally.
100. [Frame Control] (Command: s n, b7)
It controls the Frame Control.
Transmission
(s)(n)( )(Set ID)( )(b)(7)( )(Data)(Cr)
Data 00: Off
01: On
Acknowledgment
(n)( )(Set ID)( )(OK/NG)(b)(7)(Data)(x)
* This feature may not be available for all models.
* If you change the values on a Video Wall model, please reboot
for it to work normally.
101. [Average Picture Level Auto Control] (Command: s
n, be)
Sets Average Picture Level Auto Control.
Transmission
(s)(n)( )(Set ID)( )(b)(e)( )(Data)(Cr)
Data 00: [Off]
01: [On]
Acknowledgment
(n)( )(Set ID)( )(OK/NG)(b)(e)(Data)(x)
* This feature may not be available for all models.

113
ENGLISH
102. Read Brightness Value (Command: m u)
Checks the brightness value.
Transmission
(m)(u)( )(Set ID)( )(FF)(Cr)
Acknowledgment
(u)()(SetID)()(OK/NG)(Data1)(Data2)(Data3)(Data4)
(Data5)(Data6)(Data7)(x)
Data 1 00~64: Backlight PWM figure 0-100
Data 2 00~ff: The upper 1-byte of the value measured by
the CA210.
Data 3 00~ff: The lower 1-byte of the value measured by
the CA210.
The CA210 measurement is Hex: 0000~ffff, Decimal:
0 - 65535
Data 4 00~ff: The upper 1-byte of the value measured by
BLU 1 Sensor.
Data 5 00~ff: The lower 1-byte of the value measured by
BLU 1 Sensor
Data 6 00~ff: The upper 1-byte of the value measured by
BLU 2 Sensor
Data 7 00~ff: The lower 1-byte of the value measured by
BLU 2 Sensor
The BLU measurement is Hex: 0000~ffff, Decimal: 0 -
65535
* The CA210 measurement is entered as “Calibration” when
the product is released from the factory. It is Default 0 before
the calibration.
* This feature may not be available for all models.
103. [Screen Fault Detection] (Command: t z)
Sets the Screen Fault Detection feature.
Transmission
(t)(z)( )(Set ID)( )(Data)(Cr)
Data 00: [Off]
01: [On]
Acknowledgment
(z)( )(Set ID)( )(OK/NG)(Data)(x)
* This feature may not be available for all models.
104. [Stereo Mode] (Command: s n, c2)
Controls Stereo Mode.
Transmission
(s)(n)( )(Set ID)( )(c)(2)( )(Data)(Cr)
Data 00: Left/Right
01: Left/Left
02: Right/Right
Acknowledgment
(n)( )(Set ID)( )(OK/NG)(c)(2)(Data)(x)
* This feature may not be available for all models.
105. [HDR Picture Mode] (Command: s n, c4)
Selects a HDR Picture Mode.
Transmission
(s)(n)( )(Set ID)( )(c)(4)( )(Data)(Cr)
Data 00: Mall/QSR
01: General
02: Gov./Corp.
04: Education
Acknowledgment
(n)( )(Set ID)( )(OK/NG)(c)(4)(Data)(x)
* Depending on the model, some picture modes may not be
supported.
* It works only when the HDR content is running.
106. [Dynamic Tone Mapping] (Command: s n, c5)
Selects Dynamic Tone Mapping.
Transmission
(s)(n)( )(Set ID)( )(c)(5)( )(Data)(Cr)
Data 00: [Off]
01: [On]
Acknowledgment
(n)( )(Set ID)( )(OK/NG)(c)(5)(Data)(x)
* Depending on the model, some picture modes may not be
supported.
* It works only when the HDR content is running.
107. [LED Local Dimming] (Command: s n, c6)
Sets the LED Local Dimming.
(A feature to set the LED Local Dimming in a sub-item under
[Settings] [Display] [Picture Mode] [Picture Options])
Transmission
(s)(n)( )(Set ID)( )(c)(6)( )(Data)(Cr)
Data 00: [Off]
01: [low]
02: [Medium]
03: [High]
Acknowledgment
(n)( )(Set ID)( )(OK/NG)(c)(6)(Data)(x)
* This feature may not be available for all models.

114
ENGLISH
108. [USB2 to HDBaseT] (Command: s n, c3)
Sets USB2 to HDBaseT.
Transmission
(s)(n)( )(Set ID)( )(c)(3)( )(Data)(Cr)
Data 00: [Off]
01: [On]
Acknowledgment
(n)( )(Set ID)( )(OK/NG)(c)(3)(Data)(x)
* This feature may not be available for all models.
109. [Change Password] (Command: s n, a7)
Changes password.
Transmission
(s)(n)( )(Set ID)( )(a)(7)( )(Data1)(Data2)(Data3)
(Data4)(Data5)(Data6)( )(Data7)(Data8)(Data9)
(Data10)(Data11)(Data12)(Cr)
Data 1~6 : 0~9(Previously set password)
Data 7~12 : 0~9(New password)
Acknowledgement
(n)( )(Set ID)( )(OK/NG)(a)(7)( )(Data1)(Data2)(Data3)
(Data4)(Data5)(Data6)( )(Data7)(Data8)(Data9)
(Data10)(Data11)(Data12)(x)
* This feature may not be available for all models.
110. [Brightness Range Adjustment] (Command: s n, ab)
Adjust the brightness range.
Transmission
(s)(n)( )(Set ID)( )(a)(b)( )(Data1)( )(Data2)(Cr)
Data 1 00: Minimum brightness control
01: Maximum brightness control
Data 1 00~64: Range control
Acknowledgement
(n)( )(Set ID)( )(OK/NG)(a)(b)(Data1)(Data2)(x)
* This feature may not be available for all models.
* Data2 only supports Hex values that are multiples of 5.
* The range of minimum brightness value cannot exceed the
range of maximum brightness, and the range of maximum
brightness value cannot be less than the range of minimum
brightness.
111. [Color Calibration] (Command: s n, d6)
Selects Colour Calibration.
Transmission
(s)(n)( )(Set ID)( )(d)(6)( )(Data)(Cr)
Data 00: Off
01: On
Acknowledgement
(n)( )(Set ID)( )(OK/NG)(d)(6)(Data)(x)
* It may not be supported depending on the model.
112. [Quiet Mode] (Command: s n, c7)
Selects Quiet Mode.
Transmission
(s)(n)( )(Set ID)( )(c)(7)( )(Data)(Cr)
Data 00: Off
01: On
Acknowledgement
(n)( )(Set ID)( )(OK/NG)(c)(7)(Data)(x)
* It may not be supported depending on the model.

115
ENGLISH
113. Automatic adjustment (Command: j u)
Automatically adjusts image location and shake. (Only be
executed in RGB-PC input mode.)
Transmission
(j)(u)( )(Set ID)( )(Data)(Cr)
Data 01: On
Acknowledgement
(u)( )(Set ID)( )(OK/NG)(Data)(x)
* It may not be supported depending on the model.
114. Horizontal location (Command: f q)
Adjust the screen horizontal location. (Only be executed in
RGB-PC input mode.)
* However, the operating range varies depending on the RGB
input resolution.
Transmission
(f)(q)( )(Set ID)( )(Data)(Cr)
Data 00~64: Min -50 (Left) ~ Max 50 (Right)
Acknowledgement
(q)( )(Set ID)( )(OK/NG)(Data)(x)
* It may not be supported depending on the model.
115. Vertical location (Command: f r)
Adjust the screen vertical location. (Only be executed in RGB-
PC input mode.)
* However, the operating range varies depending on the RGB
input resolution.
Transmission
(f)(r)( )(Set ID)( )(Data)(Cr)
Data 00~64: Min -50 (Down) ~ Max 50 (Up)
Acknowledgement
(r)( )(Set ID)( )(OK/NG)(Data)(x)
* It may not be supported depending on the model.
116. Horizontal Size (Command: f s)
Adjust the screen horizontal Size. (Only be executed in RGB-PC
input mode.)
* However, the operating range varies depending on the RGB
input resolution.
Transmission
(f)(s)( )(Set ID)( )(Data)(Cr)
Data 00~64: Min -50 (Reduce) ~ Max 50 (Enlarge)
Acknowledgement
(s)( )(Set ID)( )(OK/NG)(Data)(x)
* It may not be supported depending on the model.
117. Intelligent Auto (Command: t i)
Select Intelligent Auto settings.
Transmission
(t)(i)( )(Set ID)( )(Data)(Cr)
Data 00: Off
01: On
Acknowledgement
(i)( )(Set ID)( )(OK/NG)(Data)(x)
* It may not be supported depending on the model.
118. [Genlock] (Command: s n, dc)
Adjusts the Gen Lock On/Off.
Transmission
(s)(n)( )(Set ID)( )(d)(c)( )(Data)(Cr)
Data 00: Off
01: On
Acknowledgement
(n)( )(Set ID)( )(OK/NG)(d)(c)(Data)(x)
* It may not be supported depending on the model.

116
ENGLISH
119. [Vectorscope] On/Off (Command: s n, e7)
Adjusts the Vectorscope On/Off.
Transmission
(s)(n)( )(Set ID)( )(e)(7)( )(Data)(Cr)
Data 00: Off
01: On
Acknowledgement
(n)( )(Set ID)( )(OK/NG)(e)(7)(Data)(x)
* It may not be supported depending on the model.
120. [Waveform] On/Off (Command: s n, e8)
Adjusts the Waveform On/Off.
Transmission
(s)(n)( )(Set ID)( )(e)(8)( )(Data)(Cr)
Data 00: Off
01: On
Acknowledgement
(n)( )(Set ID)( )(OK/NG)(e)(8)(Data)(x)
* It may not be supported depending on the model.
121. False Color Mode (Command: s n, e9)
Sets the False Color Mode.
Transmission
(s)(n)( )(Set ID)( )(e)(9)( )(Data)(Cr)
Data 00: Off
01: Run the Zebra Pattern
02 : Run the Color Pattern
Acknowledgement
(n)( )(Set ID)( )(OK/NG)(e)(9)(Data)(x)
* It may not be supported depending on the model.
122. False Color – Zebra (Command: s n, ea)
Sets the False Color and Zebra Pattern.
Transmission
(s)(n)( )(Set ID)( )(e)(a)( )(Data)(Cr)
Data 00~64: Zebra pattern 0~100
Acknowledgement
(n)( )(Set ID)( )(OK/NG)(e)(a)(Data)(x)
* It may not be supported depending on the model.
123. False Color – Color (Command: s n, eb)
Sets the False Color and Color Pattern.
Transmission
(s)(n)( )(Set ID)( )(e)(b)( )(Data)(Cr)
Data 00~64: Color pattern 0~100
Acknowledgement
(n)( )(Set ID)( )(OK/NG)(e)(b)(Data)(x)
* It may not be supported depending on the model.
124. SDR/HDR Signal Format (Command: s n, ec)
Sets the SDR/HDR Signal Format.
Transmission
(s)(n)( )(Set ID)( )(e)(c)( )(Data)(Cr)
Data 00: Auto
01: SDR
02: HDR
Acknowledgement
(n)( )(Set ID)( )(OK/NG)(e)(c)(Data)(x)
* It may not be supported depending on the model.

117
ENGLISH
125. HDR EOTF (Command: s n, ed)
Sets the HDR EOTF.
Transmission
(s)(n)( )(Set ID)( )(e)(d)( )(Data)(Cr)
Data 00: Auto
01: PQ100
02: PQ200
03: PQ300
04: PQ400
05: PQ500
06: PQ600
07: PQ700
08: PQ800
09: PQ900
0A: PQ1000
0B: PQ2000
0C: PQ4000
0D: PQ10000
0E: HLG
Acknowledgement
(n)( )(Set ID)( )(OK/NG)(e)(b)(Data)(x)
* It may not be supported depending on the model.
126. [Phase Shift] (Command: s n, ee)
Sets the Phase Shift.
Transmission
(s)(n)( )(Set ID)( )(e)(e)( )(Data)(Cr)
Data 0000~0168: Shift 0~360
Acknowledgement
(n)( )(Set ID)( )(OK/NG)(e)(b)(Data)(x)
* It may not be supported depending on the model.

118
ENGLISH
TROUBLESHOOTING
No image is displayed.
• Is the AC cable connected to the product?
- Make sure the AC cable is properly connected to the power disconnecting device.
• Is the ‘No Signal’ message displayed?
- There is no connection between CSAD and the input source. Check the connection status of the LAN cable.
- Access the Input menu to check the input source.
• Does the ‘Invalid Mode’ message appear?
- Refer to the manual of CSAD.
The ‘Unknown Product’ message appears when the product is connected.
• Did you install the driver?
- Refer to the manual of CSAD.
The screen image looks abnormal.
• Is the screen position wrong?
- Refer to the manual of CSAD.
• The screen is displayed abnormally.
- The proper input source is not connected to the port. Connect a cable that matches the input source signal.
• The screen flickers or shakes.
- Check if CSAD is powered off.

119
ENGLISH
The display color is abnormal.
• Screen has poor color resolution (16 colors).
- Refer to the manual of CSAD.
• The screen color is unstable or looks black and white.
- Refer to the manual of CSAD.
• Does a black dot appear on the screen?
- The few pixels (red, green, blue, white and black) that appear on the screen are due to the inherent characteristics
of the LED surface. This is not a malfunction of the Screen.
The operation does not work normally.
• The power suddenly turned off.
- Refer to the manual of CSAD
NOTE
• Without prior notice, the software is subject to change to improve the functionality of the product.
• The above items are only applicable to the LSAB012-N22, T22, U22 / LSAB009-N33, T33, U33 model. Please read
“TROUBLESHOOTING” in the manual of CSAD.
120
ENGLISH
PRODUCT SPECIFICATIONS
Without prior notice, the product specifications are subject to change to enhance the functionality of the product.
The symbol means alternating current, and the symbol means direct current.
LSAB012-N22, T22, U22 / LSAB009-N33, T33, U33
Pixel pitch (distance between
pixels)
LSAB012-N22, T22, U22 1.25mm
LSAB009-N33, T33, U33 0.9375mm
Resolution
LSAB012-N22, T22, U22 480x270
LSAB009-N33, T33, U33 640x360
Pixel density 640,000pixels/m
2
Number of pixels per screen
LSAB012-N22, T22, U22 129,600pixels
LSAB009-N33, T33, U33 230,400pixels
Number of color output bits Internal20bit
Number of expressible colors 4.398x10
12
Data connection
LSAB012-N22, U22
LSAB009-N33, U33
LAN IN
LSAB012-T22
LSAB009-T33
Not Applied
Input/ Output ports
LSAB012-N22
LSAB009-N33
AC-IN, IR & LIGHT SENSOR, SVC Only
LSAB012-T22
LSAB009-T33
SVC Only
LSAB012-U22
LSAB009-U33
IR & LIGHT SENSOR, SVC Only
Dimensions
(Width x Height x Depth) / Weight
600mmx337.5mmx44.9mm/7.8kg
(23.6 inches x 13.2 inches x 1.7 inches / 17.1 lbs)
Luminance Max600nit/Peak1,500nit
Color temperature (K) 3,200-9,300K
Power Rating
LSAB012-N22, T22, U22 100-240V 50/60Hz4.8A
LSAB009-N33, T33, U33 100-240V 50/60Hz3.6A
Operating Temperature 0°Cto40°C(32°Fto104°F)
Operating Humidity 10%to80%
Storage Temperature -20°Cto60°C(-4°Fto140°F)
Storage Humidity 5%to85%
Manufactured in Republic of Korea
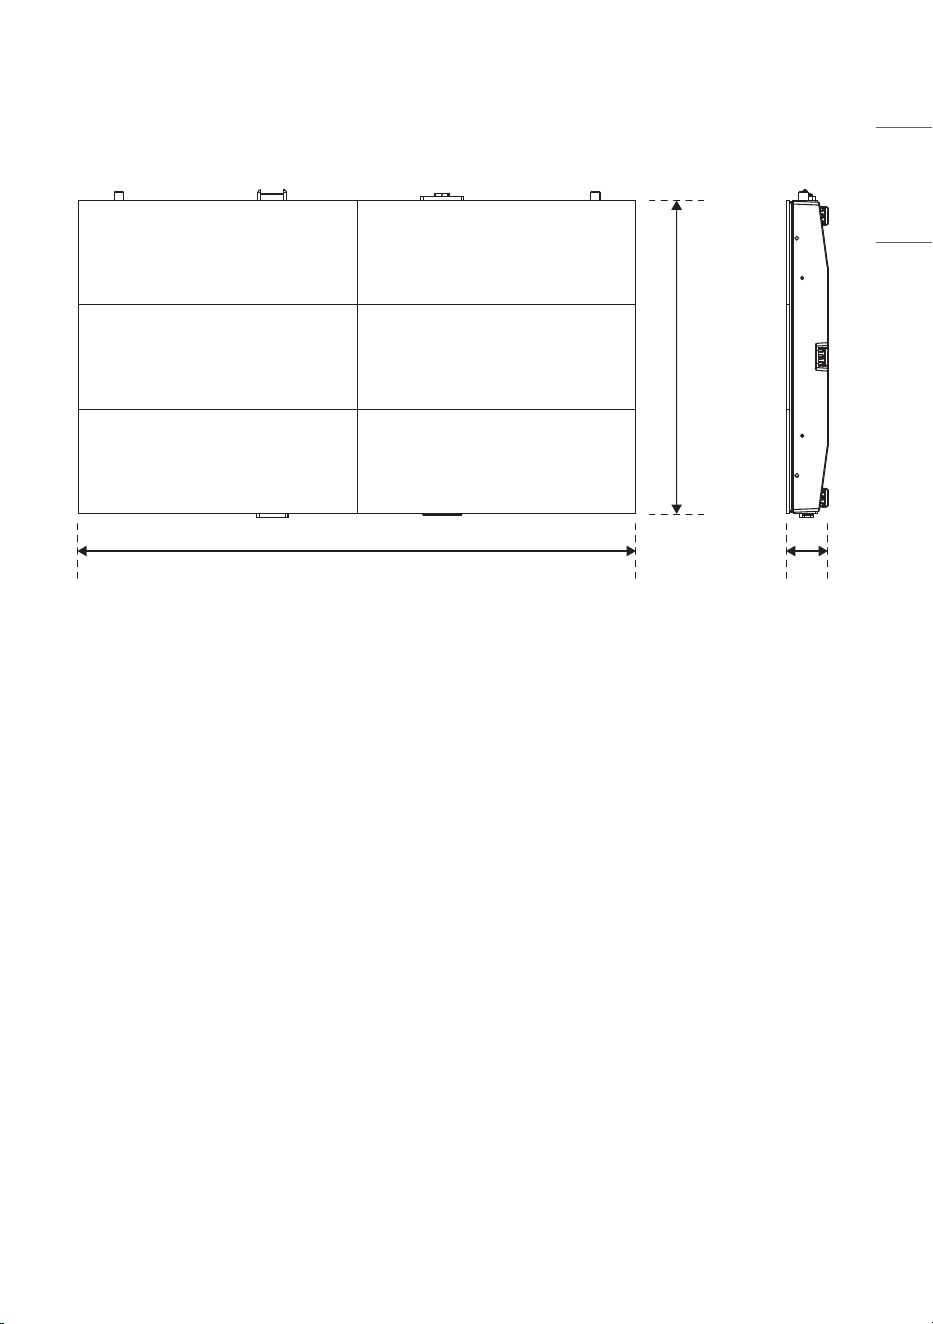
121
ENGLISH
(Unit: mm (inches))
600
(23.6)
44.9
(1.7)
337.5
(13.2)

Temporary noise is normal when powering ON or OFF this
device.
MODEL
SERIAL NO.
The model and serial number of the product are located on
the back and on one side of the product.
Record them below in case you ever need service.
Supplier’s Declaration of Conformity
Trade Name LG
Responsible Party LG Electronics USA, Inc.
Address 111 Sylvan Avenue, North Building,
Englewood Cliffs, NJ 07632
E-mail [email protected]