2
www.costway.com
Contact Us!
Do NOT return this item.
Contact our friendly customer service department for help first.
E-mail
US: cs.us@costway.com
UK: cs.uk@costway.com
Before You Start
6
www.costway.com
www.costway.com
THIS INSTRUCTION BOOKLET CONTAINS IMPORTANT SAFETY INFORMATION. PLEASE READ AND KEEP FOR FUTURE REFERENCE.
Visit us: www.costway.com
Follow Costway
Please give us a chance to make it right and do better!
Contact our friendly customer service department for help first.
Replacements for missing or damaged parts will be shipped ASAP!
5
www.costway.com
4
www.costway.com
7
www.costway.com
Before You Start
Please read all instructions carefully.
Retain instructions for future reference.
Seperate and count all parts and hardware.
Read through each step carefully and follow the proper order.
We recommend that, where possible, all items are assembled near to the
area in which they will be placed in use, to avoid moving the product
unnecessarily once assembled.
Always place the product on a flat, steady and stable surface.
Keep all small parts and packaging materials for this product away from
babies and children as they potentially pose a serious choking hazard.
3
www.costway.com
USER'S MANUAL/HANDBUCH/MANUEL DE L'UTILISATEUR
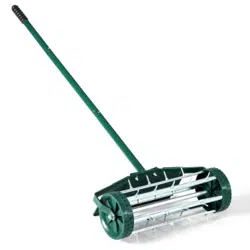
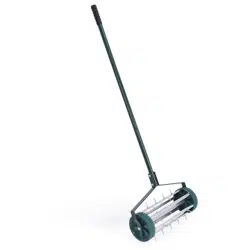
GRASS LAWN AERATOR/AERATEUR DE LA PELOUSE/
RASENL ÜFTER
GT2980
EN DE FR
ASSEMBLY
1. Fit the protective shield over the bar on the top of the spike
Aerator, tighten it .
2. Position the lower handle section between both sides of the
protective shield. Line up the two sets of holes and fix together
using the bolts , washers and nuts provided .
3. Attach the middle handle to the upper handle section ,
ensuring the buttons pop out and secure into place.
PIECES
1 x aérateur avec long clou
2 x l’écran de protection
1 x partie inférieure de la poignée
1 x partie intermédiaire de la poignée
1 x partie supérieure de la poignée
2 x boulon
2 x rondelle
2 x contre-écrou
MAINTENANCE
Nettoyez-le après l’utilisation
Gardez-le dans un endroit frais et sec, comme un garage ou une
remise
Vérifiez périodiquement que toutes les longs clous sont bien fixés
et serrés si nécessaire
Huilez périodiquement l’essieu
ATTENTION : Les longs clous sont incroyablement tranchants,
manipulez-le avec prudence
AVERTISSEMENT DE SECURITE : Les enfants et les infirmes
sont doivent être surveillés pendant l’utilisation
partie inférieure de la poignée
Boulon
de
protection
crous et rondelles
avec long clou
La partie
supérieure
de la poignée
La partie
Intermédiaire
de la poignée
ASSEMBLAGE
1. Placez l’écran de protection sur la barre en haut de l’aérateur
avec long clou, et serrez-le.
2. Installez la partie inférieure de la poignée entre les deux
côtés de l’écran de protection. Alignez les deux trous et fixez-les
ensemble en utilisant les boulons, les rondelles et les écrous
fournis.
3. Fixez la partie intermédiaire de la poignée à la partie
supérieure de la poignée, en veillant à ce que les boutons
ressortent bien et restent sécurisé en place.
8
www.costway.com
9
Welcome to visit our website and purchase our quality products!
Reward Points
Exclusive Customer Service
Permanent Shopping Cart
Order History
this product and giving us valuable feedbacks.
www.costway.com
Your suggestions and comments for COSTWAY are really important to us!
We sincerely solicit you to go back to our shop and leave a good rating in just a
simple click. It would be quite encouraging if you could kindly do so like below:
February 24, 2019
Great products so far. Fast delivery, easy setup, and working without any issues.
Great products so far
With your inspiring rating, COSTWAY will be more consistent to offer you
EASY SHOPPING EXPERIENCE, GOOD PRODUCTS and EFFICIENT SERVICE!
US office: Fontana, California
UK office: Ipswich
www.costway.com
TEILE
1 x Rollkultivator
2 x Schutzhülle
1 x Unterer Stielabschnitt
1 x Mittlerer Stielabschnitt
1 x Oberer Stielabschnitt
2 x Bolzen
2 x Unterlegscheibe
2 x Spannmutter
WARTUNG
Reinigen nach Verwendung
Bewahren Sie ihn an einem kühlen, trockenen Ort auf, z. B. in
einer Garage oder einem Schuppen
Überprüfen Sie regelmäßig, um alle Spikes fest sicherzustellen
und ziehen Sie sie gegebenenfalls fest
Ölen Sie die Achse regelmäßig
VORSICHT: Spikes sind unglaublich scharf, vorsichtig bei der
Verwendung.
SICHERHEITSWARNUNG: Kinder und Gebrechliche sind bei
der Verwendung zu beaufsichtigen.
Unterer S el
Bolzen
Schutzhülle
Unterlegscheiben
und Spannmü
er
Rollkul vator
Oberer S el
Mi lerer S el
Montage
1. Montieren Sie die Schutzhülle über der Stange oben am
Rollkultivator und ziehen Sie es fest.
2. Positionieren Sie den unteren Stielabschnitt zwischen den
beiden Seiten der Schutzhülle. Richten Sie die zwei Gruppe von
Bohrungen aus und befestigen Sie sie mit den mitgelieferten
Bolzen, Unterlegscheiben und Muttern.
3. Befestigen Sie den mittleren Stiel am oberen Stielabschnitt
und stellen Sie sicher, dass die Knöpfe herausspringen und an
Ihrem Platz fixieren.