
Technical Support and E-Warranty Certificate
www.vevor.com/support
VACUUM PACKING MACHINE
USER MANUAL
Model: DZ600-2S-V1
We continue to be committed to provide you tools with competitive price.
"Save Half", "Half Price" or any other similar expressions used by us only represents an
estimate of savings you might benefit from buying certain tools with us compared to the major
top brands and does not necessarily mean to cover all categories of tools offered by us. You
are kindly reminded to verify carefully when you are placing an order with us if you are
actually saving half in comparison with the top major brands.
- 1 -
Model: DZ600-2S-V1
Have product questions? Need technical support? Please feel free to
contact us:
Technical Support and E-Warranty Certificate
www.vevor.com/support
NEED HELP? CONTACT US!
This is the original instruction, please read all manual instructions
carefully before operating. VEVOR reserves a clear interpretation of our
user manual. The appearance of the product shall be subject to the
product you received. Please forgive us that we won't inform you again if
there are any technology or software updates on our product.
VACUUM PACKING MACHINE

- 2 -
1. Read carefully and understand all ASSEMBLY AND OPERATION
INSTRUCTIONS before operating.
2. Failure to follow the safety rules and other basic safety precautions may
result in serious personal injury.
GENERAL SAFETY RULES
Please read the entire operating instructions before using the products for
the first time; They contain important information about the correct
operation.
The guarantee/warranty will be void if damage is incurred resulting from
non-compliance with the operating instructions.Liability for any and all
consequential damage is excluded!
We do not assume any liability for damage to property or personal injury
caused by improper use or the failure to observe the safety instructions! In
such cases the guarantee/warranty will be void
The unauthorized conversion,modification of disassembly of the products
is inadmissible because of safety and approval reasons (CE).
The product is not a toy and must be kept out of the reach of children.
Particular care must therefore be exercised if children are present.
The product must not get damp or wet,it is only intended for use in dry,
indoor locations(not bathrooms or similarly damp areas).There is a risk of a
fatal electric shock.
Do not expose the product or its accessories to damp or extremely high or
low temperatures.
Do not leave packing materials unattended.They may become dangerous
playing material for children.

- 3 -
Dropping,falling,pressure or tensile forces could destroy or at least limit the
function of the product.
Never position the device in the vicinity of combustible or easily
inflammable materials.
Always make sure that the rotary table on which the object is placed is
located in the center of the housing!
This machine uses plastic film or plastic aluminum film as materials to
vacuum package paste foods, fruits, sauce vegetables, chemicals,
pharmaceuticals, electronic components, precision instruments, rare
metals, and other items. Products packaged under vacuum are not easily
oxidized or moldy. Especially suitable for industries such as tea, food, and
medicine.
If you have reason to assume that safe operation is no longer
possible,disconnect the device immediately and secure it against
inadvertent operation.
It can be assumed that safe operation is no longer possible if:
- the device shows visible signs of damage,
- the device no longer functions,
- after a longer period of storage under unfavourable conditions,
- following heavy stress during transportation.
SAVE THESE INSTRUCTIONS

- 4 -
MODEL AND PARAMETERS
Model
DZ-600-2S-V1
Seal Length
600mm
Chamber Dimensions
670*550*40mm
Vacuum Pump Type
Oil Pump
Pumping Speed of Vacuum Pump
19.8m³/h
Voltage
AC 120V 60Hz
Max. Power
4500W
Vacuum Pump Power
900W
Machine Material
201 Stainless Steel
- 5 -
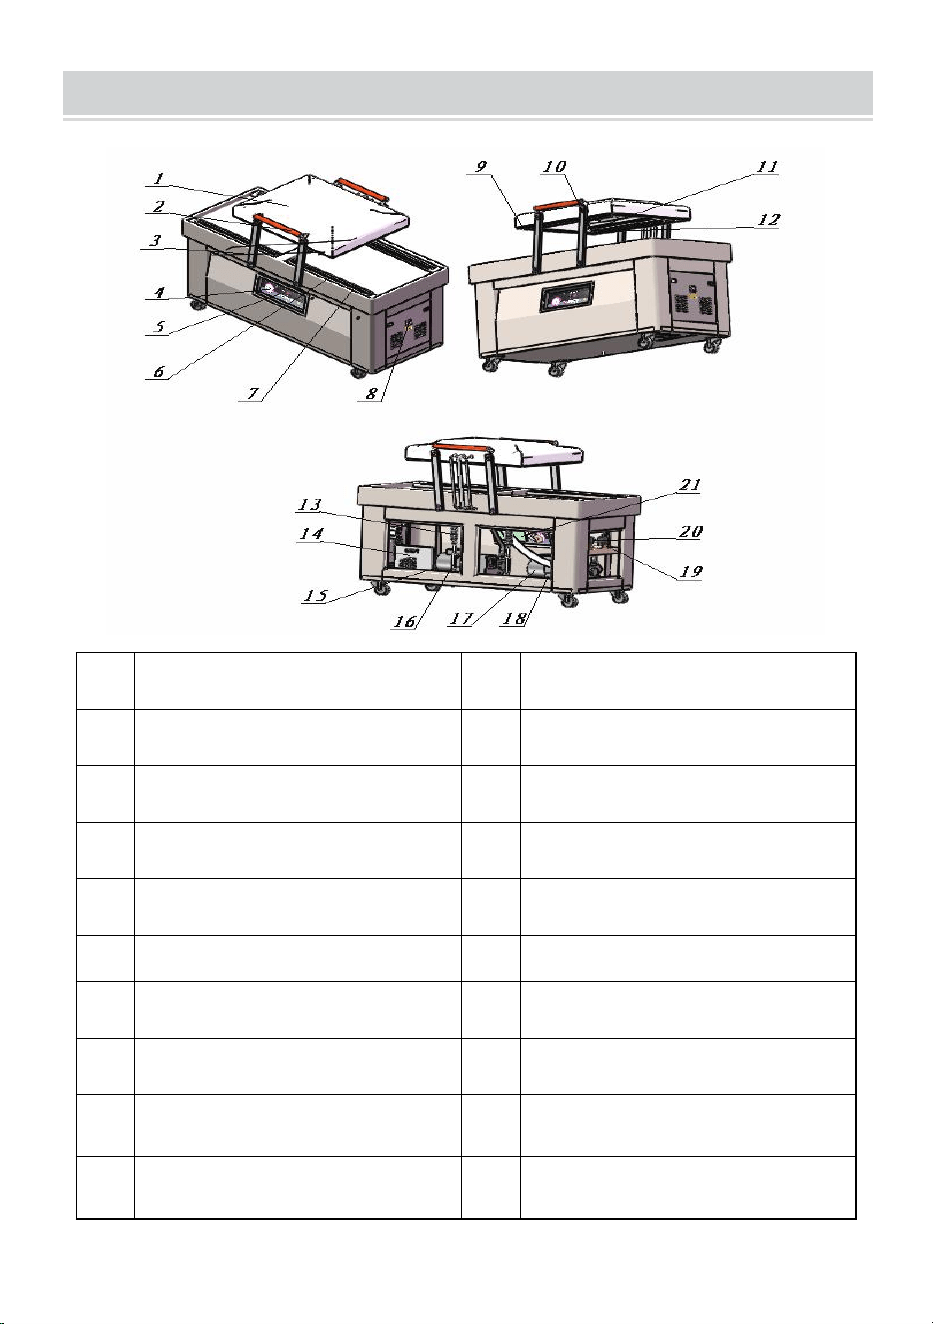
STRUCTURE DIAGRAM
1
Vacuum cover
12
Heating strip
2
handle
13
Tension spring
3
Swing arm
14
Circuit board
4
Vacuum gauge
15
Heating transformer
5
Control panel
16
Oil filler
6
Bag pressing rod
17
Vacuum pump
7
Silicone strip
18
Oil drain port
8
Air Switch
19
Exhaust solenoid valve
9
Sealing strip
20
Air release solenoid valve
10
Spring
21
circuit board
- 6 -
PARTS LIST
DZ-600-2S-V1
Heating Wire
×2
Teflon Cloth
×2
Vacuum Pump Oil
×2
Vacuum Bag
×60
Chamber Sealing Strip
×1
Vacuum Pump Oil Seal
×2
User Manual
×1
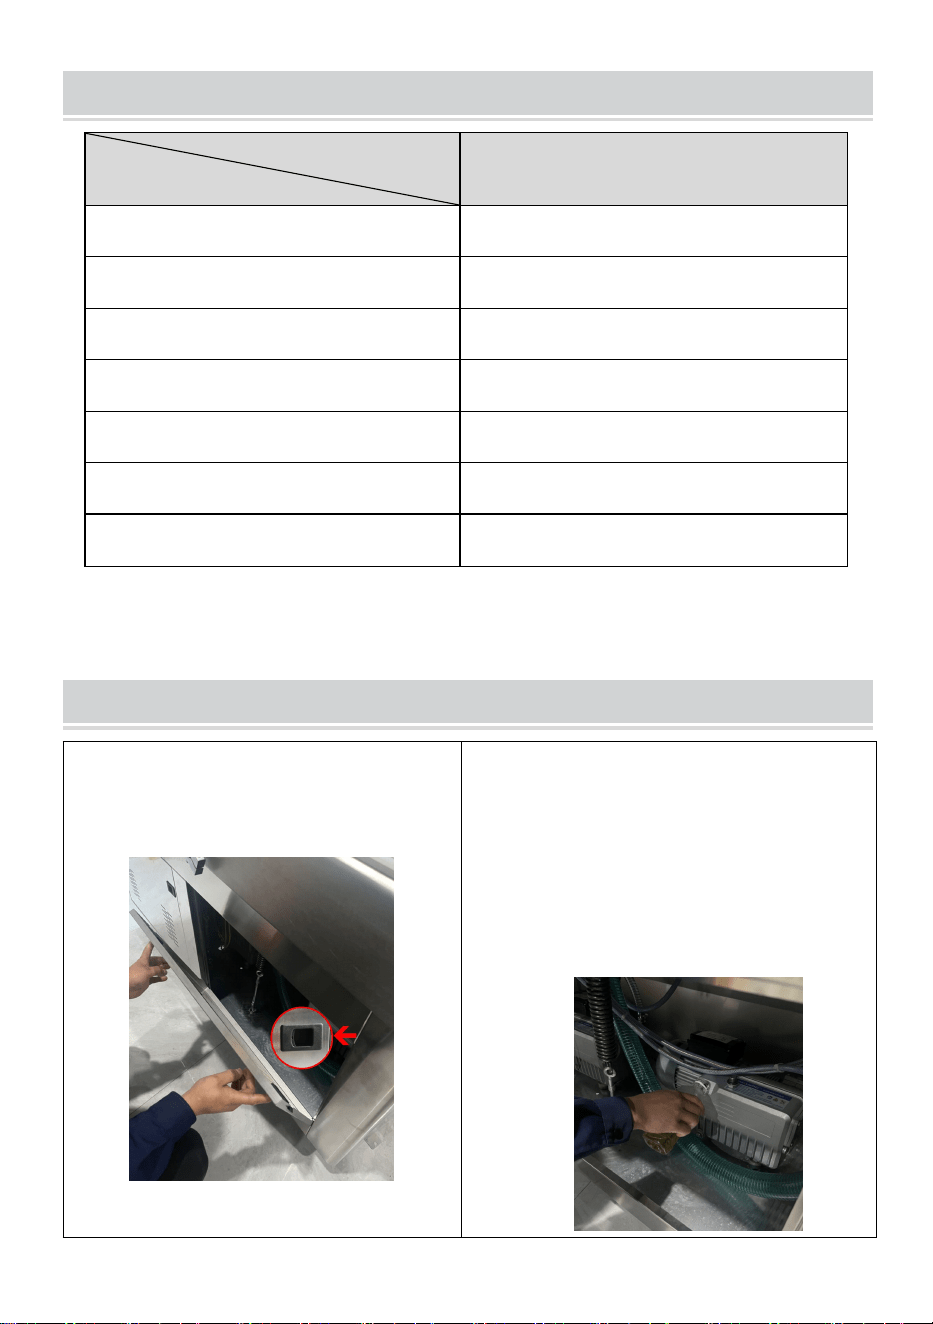
OPERATING INSTRUCTIONS
1.Push the door latch towards the
center by hand and remove the side
door.
2.Unscrew the oil mist filter of the
vacuum pump and fill it with oil. The oil
level should not be lower than half of
the oil window. The oil level should not
exceed 3/4 of the visible oil window. It is
strictly prohibited to start the vacuum
pump without oil.(Note:two vacuum
pumps)
Model
Parts

- 7 -
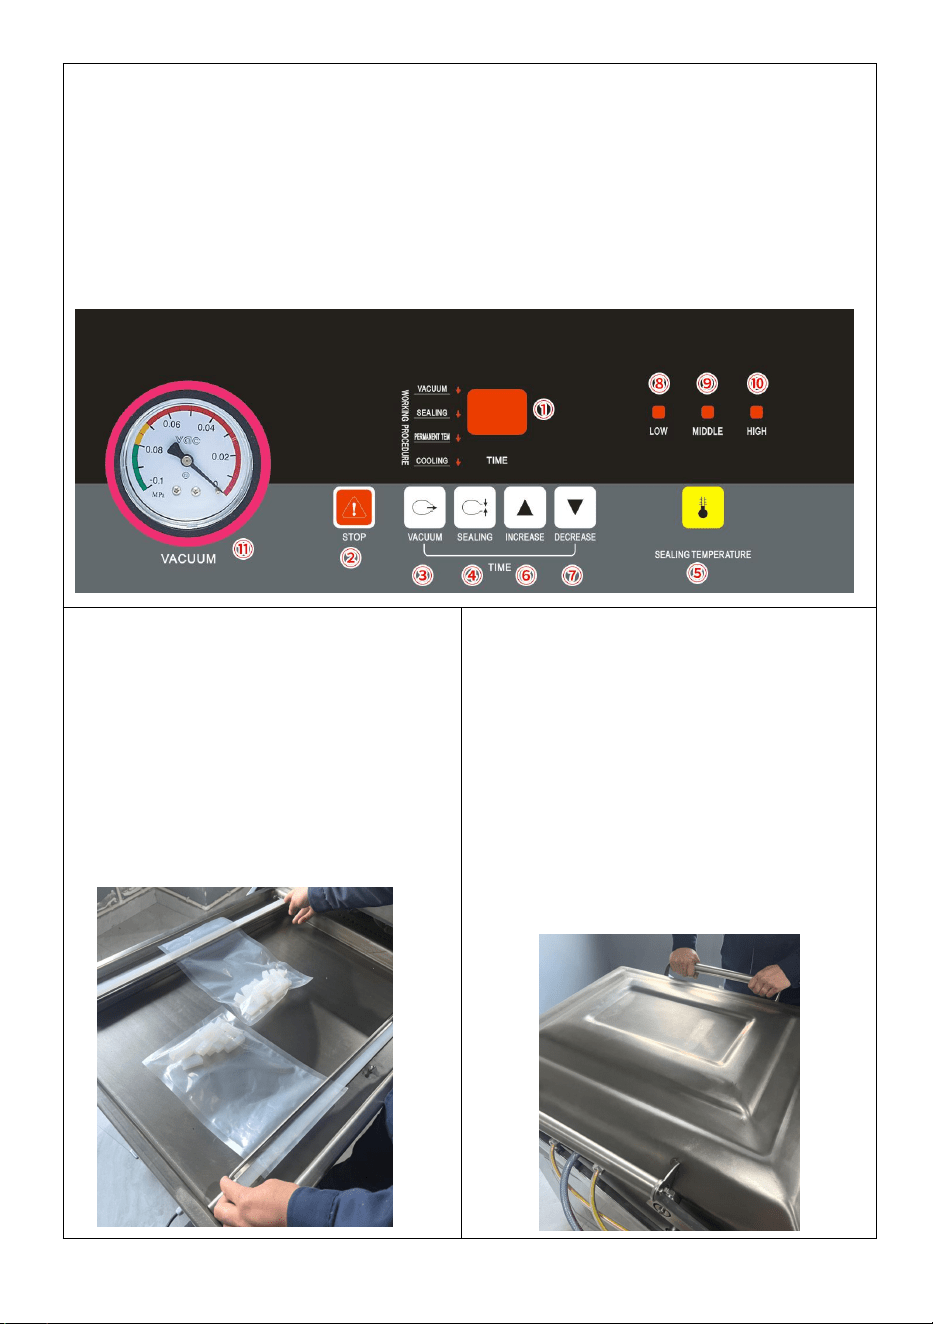
3.PANEL OPERATION INSTRUCTIONS
1): ①Time and status display. Display "_" as standby mode; Display "00" as the
deflation status;
The displayed numbers indicate the status of vacuum, sealing, permanent tem,
or cooling (with decimal points).
2): ②Emergency stop button. Use when there is a problem with the machine ,
operation or when it is need to stop urgently.
3): ③VACUUM time setting key : In the standby state, press the key for the first
time, and the single digit number in the ① flashes; press the second time, the
ten-digit number flashes; press the third time to confirm the effective time and
save to return to the standby state. ( Adjusting time range:0-99S)
4): ④SEALING time setting key: In the standby state, press the key for the first
time, and the single digit number in the ① flashes; press the second time, the
ten-digit number flashes; press the third time to confirm the effective time and
save to return to the standby state. ( Adjusting time range:0-9.9S)
5): ⑤SEALING TEMPERATURE setting key.
a: For setting the ⑤SEALING TEMPERATURE, press this key to change the
sealing temperature setting value.
Press the ⑧LOW indicator light once, indicating that it is in a low temperature
state;
Press twice to display ⑨MIDDLE ,indicating that it is in a medium
temperature;(Recommended)
Press three times to show the ⑩HIGH indicator light, indicating that it is in a high
temperature state;
Press four times ⑧⑨⑩ The indicator does not show, indicating no temperature
state.
b: For setting the cooling time, "after holding down the key for 5S", and the single
digit number in the ① flashes; press the second time, the ten-digit number
flashes; press the third time to confirm the effective time and save to return to the
standby state. ( Adjusting time range:0-9.9S) (Factory setting is 2S).
6): ⑥INCREASE key. When setting vacuum, sealing or cooling time, press this
key to increase one to the flicker bit value.
7): ⑦DECREASE key. When setting vacuum,sealing or cooling time, press this
key to decrease the flicker value by one.
4. PANEL USAGE INSTRUCTIONS
Step 1:Connect the matching power supply
Step 2:Open AIR SWITCH
Step 3:Press the ③VACUUM button for vacuum time, according to the actual
requirements, press ⑥INCREASED to increase the time/⑦DECREASE to
reduce the time, generally about 25 seconds.
Step 4: Press the ④SEALING button for sealing time, according to the actual
- 8 -
requirements, press ⑥INCREASED to increase the time/⑦ECREASE to reduce
the time, generally normal bags for about 2 seconds. It is strictly prohibited to set
the sealing time too long or burn out the sealing heating strip.
Step 5: Press the ⑤SEALING TEMPERATURE button twice, point the indicator
light to ⑨MIDDLE, and the general items are recommended to use the medium
temperature state.
Note:③VACUUM and ⑤DECREASE clicked together refers to the PERMANNT
TEM which has setting by the factory,no need to change.
5. Place the product to be packaged
into a vacuum chamber. Pick up the
bag pressing rod and place the
vacuum bag flat on the sealing strip.
Put down the bag pressing rod.
6.Press the front end of the vacuum
cover by hand during operation. When
operating, press the edge of the
vacuum cover by hand, and the vacuum
machine starts to work. After the
vacuum machine starts to run, the hand
leaves the machine, the ⑪VACUUM
metre pointer will point 0.06-0.08 to
achieve the vacuum purpose, and the
machine will automatically complete the
packaging process.
- 9 -
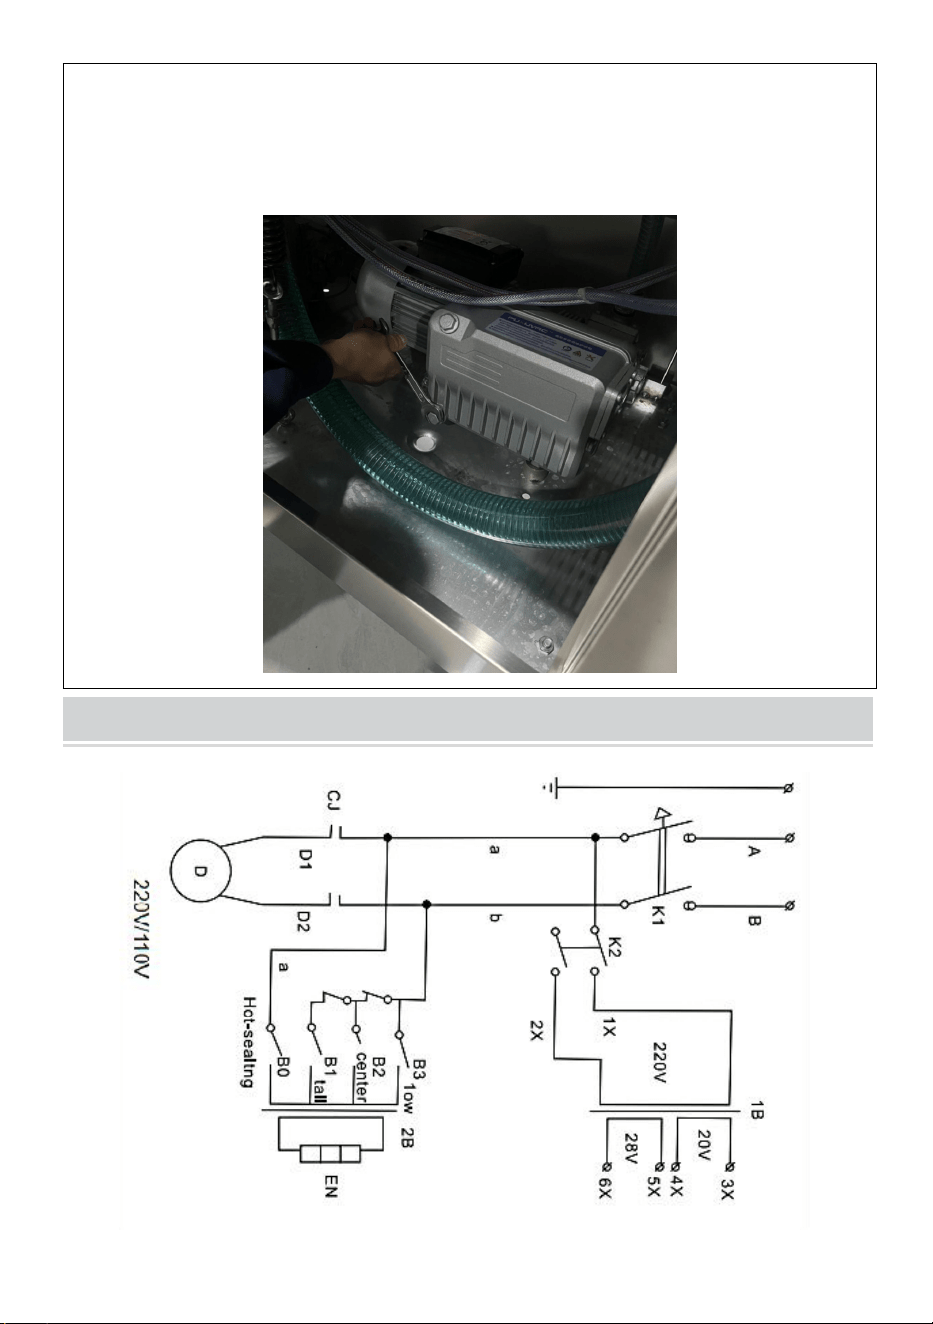
7.When the machine needs to change oil or is not used for a long time, loosen
the screw under the oil window and drain the vacuum pump oil. Suggest
replacing the vacuum pump oil after the machine has been working continuously
for 800 hours
CIRCUIT DIAGRAM
- 10 -
MAINTENANCE
1. After using , the surface of the machine should be cleaned and residual
materials inside the machine should be removed.
2. When storing, keep in a clean, dry, and safe location away from
children.
3. All maintenance, service, and repairs not discussed in the manual
should only be performed by qualified service technicians.
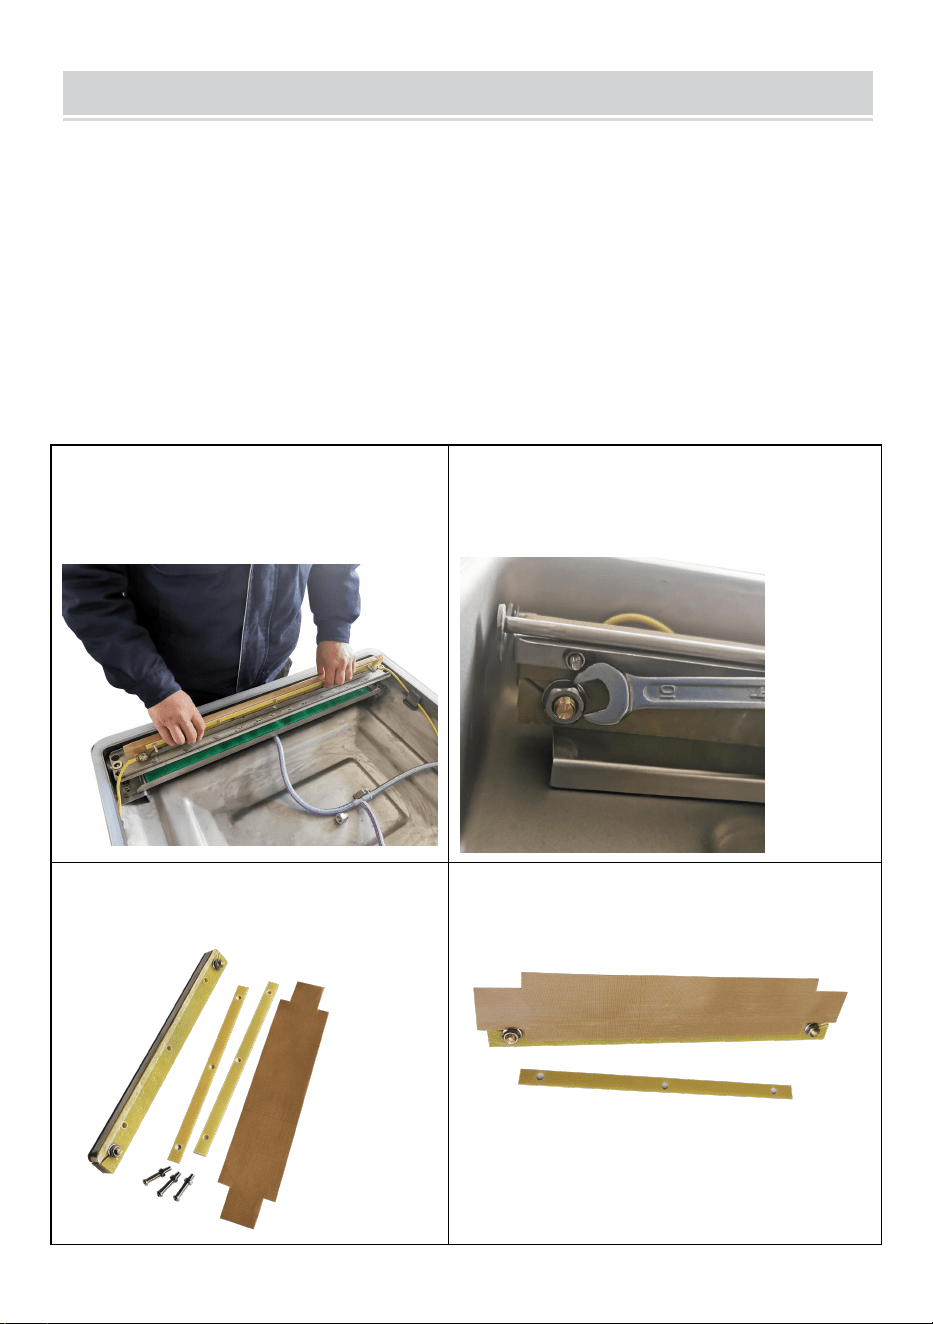
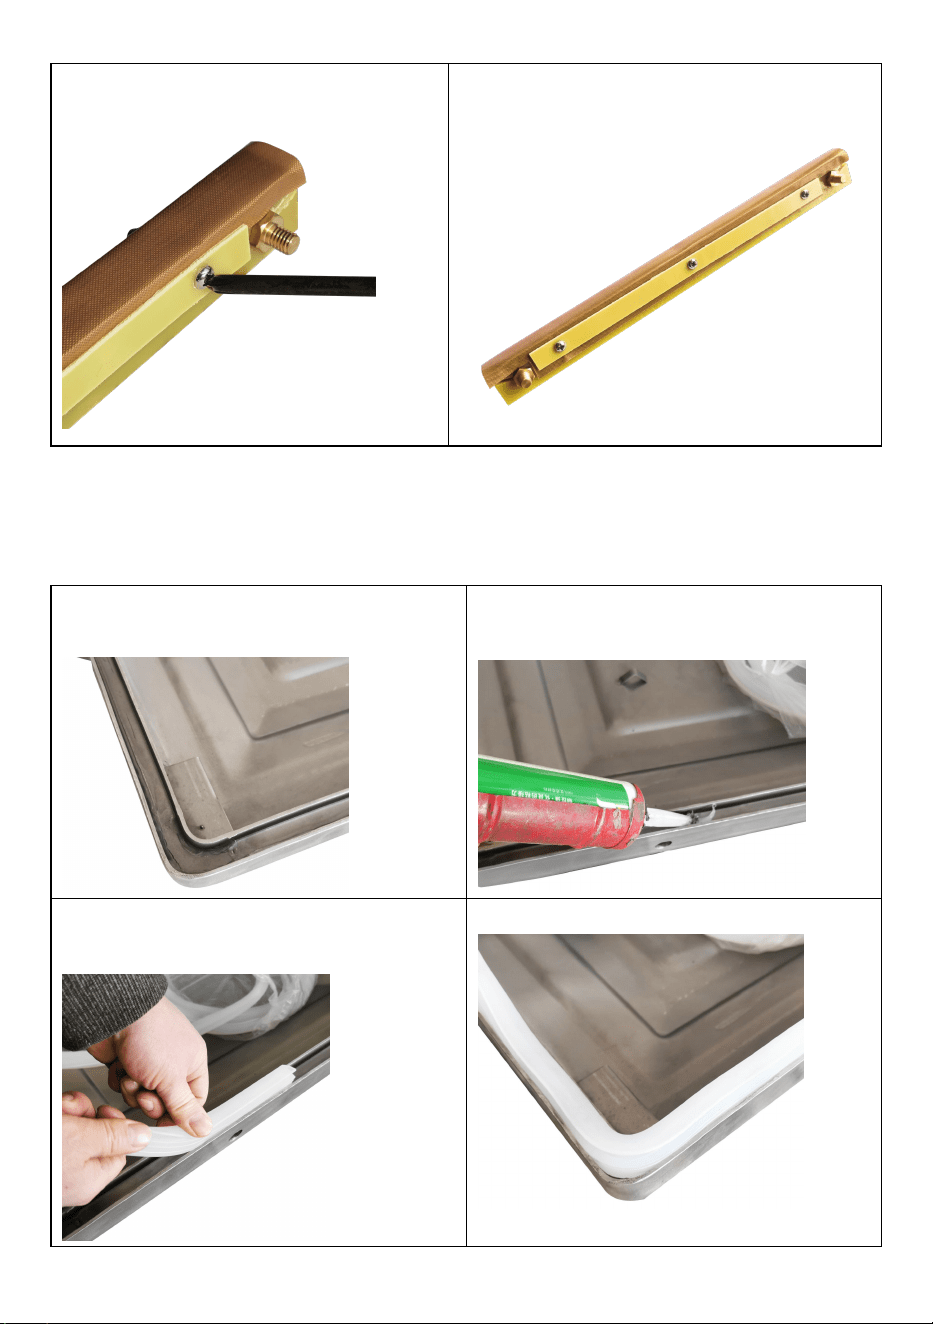
Replace the high temperature cloth(Teflon Cloth)
1. Remove the screws on both
sides of the tray, and then pick up
the whole tray.
2. Remove the upper screws .
3. Remove the old
high-temperature cloth.
4.Apply new high temperature cloth.
- 11 -
5.Reinstall the original screws
6.Completing the Installation.
Replace the Chamber Sealing Strip
1. Remove the Chamber Sealing
Strip
2. Inject new glass glue into the
track to ensure air tightness
3.Replace the Chamber Sealing
Strip with a new one
4. Completing the Installation

- 12 -
TROUBLESHOOTING AND SOLUTIONS
Problem
Possible Cause
Solution
The machine doesn't
work and the control
panel shows nothing.
1.No connection of the
power supply.
2.The contact of the
power switch looses.
1.Check whether the
plug and socket are
effectively connected.
2.Check whether the
wiring of the power input
part inside the machine
is loose or detached.
The control panel
startup,but the machine
doesn't work.
The parameter is being
set.
Complete the parameter
setting.
The best vacuum state
can’t be achieved.The
vacuumizing speed is
slow.
1.Short vacuumizing
time.
2.The oil in the vacuum
pump is not enough or
the oil is not clean.
3.Air leakage and wear
of the sealing ring.
1.Extend the vacuum
time.
2.Check the oil level,
refuel or change the oil
(pay attention to the oil
type (vacuum oil
46#,68#) and oil
quantity.
3.Replace the sealing
ring.
Sealing failure or
poor sealing.
1.The bags are not
correctly placed on the
heating plates.
2.Too long/short sealing
time.
3.Inappropriate heating
temperature..
4.Silicon strip damaged
or with impurity.
5.Damage of electric
heating wire.
1.Place the bags on the
plate in order.
2.Shorten/prolong the
sealing time.
3.Choose proper
temperature.
4.Clean or replace the
silicon
rubber.
5.Change electric
heating wire.

- 13 -
CORRECT DISPOSAL
This product is subject to the provision of European Directive
2012/19/EC. The symbol showing a wheelie bin crossed through
indicates that the product requires separate refuse collection in
the European Union. This applies to the product and all
accessories marked with this symbol. Products marked as such may not
be discarded with normal domestic waste, but must be taken to a collection
point for recycling electrical and electronic devices
Manufacturer: Shanghaimuxinmuyeyouxiangongsi
Address: Baoshanqu Shuangchenglu 803long 11hao 1602A-1609shi
Shanghai
EC REP: SHUNSHUN GmbH.
Römeräcker 9 Z2021,76351 Linkenheim-Hochstetten, Germany
Tel: +49 1727041930 euvertreter@gmail.com
UK REP: Pooledas Group Ltd.
Unit 5 Albert Edward House, The Pavilions Preston, United Kingdom
Tel: 01772418127 pooledas123@gmail.com
Imported to AUS: SIHAO PTY LTD.
1 ROKEVA STREETEASTWOOD NSW 2122 Australia
Imported to USA: Sanven Technology Ltd.
Suite 250, 9166 Anaheim Place, Rancho Cucamonga, CA 91730
Made In China