opalk.
ATRIUM®
SAT300
OUTDOOR
SATELL::
F
TE
ATRIUM® SUIB100
OUTDOOR
SUBWOOFER.
Customer
Service
Hours
of
Operation:
Monday-Friday
9AM-6PM
EST
ENGLISH
IMPORTANT
SAFETY
INSTRUCTIONS
This
product
was
designed
and
manufactured
to
meet
strict
quality
and
safety
standards.
There
are, however,
some
installation
and
operation
precautions
which
you
should
be
particularly
aware
of.
Read
Instructions.
All
the
safety
and
operating
instructions
should
be
read
before
the
system
is
operated.
Retain
Instructions.
The
safety
and
operating
instructions
should
be
retained
for
future
reference.
Heed
Warnings
.
All
warnings
on
the
appliances
and
in
the
operating
instructions
should
be
adhered
to.
Follow
Instructions.
All
operating
and
use
instructions
should
be
followed.
Cleaning.
Unplug
the
appliance
from
wall
outlet
before
cleaning
.
Do
not
use
liquid
cleaners
or
aerosol
cleaners. Use a
damp
cloth
for
cleaning.
Attachments.
Do
not
use
attachments
not
recommended
by
the
product
manufacturer
as
they
may
cause
hazards.
Accessories.
Do
not
place
these
appliances
on
an
unstable
cart,
stand,
tripod,
bracket,
or
table.
The
audio/video
products
may
fall,
causing
serious
injury
to
a
child
or
adult,
and
serious
damage
to
the
products.
Use
only
with
a
cart,
stand,
tripod,
bracket,
or
table
recommended
by
the
manufacturer,
or
sold
with
the
appliances.
Any
mounting
of
the
appliances
should
follow
the
manufacturer's
instructions,
and
should
use
mounting
accessories
recommended
by
the
manufacturer.
Power
Sources. This
product
should
be
operated
only
from
the
type
of
power
source
indicated
on
the
marking
labels.
If
you
are
not
sure
of
the
type
of
power
supply
to
your
home,
consult
your
appliance
dealer
or
local
power
company.
Lightning.
For
added
protection
for
this
audio/video
product
during
a
lightning
storm,
or
when
it
is
left
un-attended
and
unused
for
long
periods
of
time,
unplug
it
from
the
wall
outlet
and
disconnect
the
antenna
or
cable
system.
This
will
prevent
damage
to
the
product
due
to
lightning
and
power-line
surges
.
Object
and
Liquid
Entry.
Never
push
objects
of
any
kind
into
this
product
through
openings,
as
they
may
touch
dangerous
voltage
points
or
short
out
parts
that
could
result
in a
fire
or
electric
shock
.
Servicing
.
Do
not
attempt
to
service
this
product
yourself,
as
opening
or
removing
covers
may
expose
you
to
dangerous
voltage
or
other
hazards. Refer all
servicing
to
qualified
service
personnel.
Damage
Requiring
Service.
Unplug
this
product
from
wall
outlets
and
refer
servicing
to
qualified
service
personnel
under
the
following
conditions:
a.
If
liquid
has
been
spilled,
or
objects
have
fallen
into
the
product.
b.
If
the
product
does
not
operate
normally
by
following
the
operating
instructions.
Adjust
only
those
controls
that
are
covered
by
the
operating
instructions,
as an
improper
adjustment
of
other
controls
may
result
in
damage
and
will
often
require
extensive
work
by
a
qualified
technician
to
restore
the
product
to
its
normal
operation.
c.
If
the
product
has
been
dropped
or
the
cabinet
has
been
damaged.
d.
When
the
product
exhibits
a
distinct
change
in
performance
-
this
indicates
a
need
for
service.
Replacement
Parts.
When
replacement
parts
are
required,
be
sure
the
service
technician
has
used
replacement
parts
specified
by
the
manufacturer
or
that
the
parts
have
the
same
characteristics
as
the
original
part.
Unauthorized
substitutions
may
result
in fire,
electric
shock
or
other
hazards.
Safety
Check.
Upon
completion
of
any
service
or
repairs
to
this
product,
ask
the
service
technician
to
perform
safety
checks
to
determine
that
the
products
are in
proper
operating
condition.
Polk
Audio
Customer
Service
800-377-7655
(Outside
USA
& Canada:
+1
410-358-3600)
SAFE
LIMITS
OF
OPERATION
Polk
Audio
specifies
the
recommended
amplification
range
for
each
of
its passive
(non-amplified)
loudspeakers.
Typically
that
specification
will
be
expressed
as
a
range
of
power
such
as
20-200
Watts
(per
channel).
It
is
important
to
understand
what
those
numbers
mean
when
choosing
a
receiver
or
amplifier
for
your
Polk
Audio
loudspeakers.
The
lower
number
indicates
the
lowest
continuous
rated
power
that
will
yield
acceptable
performance
in a
typical
listening
environment.
The
higher
number
indicates
the
highest
per
channel
power
that
should
be
used
with
your
Polk
Audio
speakers.
That
number
should
not
be
confused
with
a
"Power
Handling"
specification
and
it
does
not
imply
that
the
speaker
will
safely
handle
that
full
amount
of
power
on
a
long-term
basis.
We
specify
a
wide
range
of
power
ratings
because
not
all
electronics
manufacturers
use
the
same
method
for
rating
power. In
fact,
high
quality
lower-rated
amplifiers
sound
better
and
play
louder
than
low
quality
units
with
higher
power
rating.
Automobile
horsepower
is
a
good
analogy.
Your
car
probably
has
far
more
horsepower
than
it
needs
for
your
daily
commute
and
is
likely
capable
of
going
well
over
120mph
(190km/hr).
Having
that
extra
power
is
good
for
on-ramp
acceleration
and
danger
avoidance
(like
getting
away
from
brain-
eating
zombies)
but
that
doesn't
mean
that
it
is
advisable
to
operate
your
car
on
North
American
highways
at
full
power
and
maximum
speed
for
an
extended
period
of
time.
Just
ask
your
local
state
trooper
if
you
are in
doubt.
Similarly,
we
recommend
using
amplifiers
and
receivers
with
rated
power
above
the
power
handling
limits
of
our
speakers
because
having
extra
power
available
for
short
term
peaks
is
conducive
to
better
sound
quality,
maximum
dynamic
range
and
effortless
high
volume
output.
But
we
strongly
urge
you
not
to
use
the
full
power
of
your
amplifier
or
receiver
for
daily
listening.
Loudspeakers
can
be
damaged
when
an
amplifier,
regardless
of
its
wattage,
is
made
to
play
at
higher
listening
levels
than
its
power
can
clearly
produce.
Operation
at
this
level
can
result
in
very
high
levels
of
audible
distortion
originating
in
the
amplifier,
which
can
add
a harsh,
gritty
sound
to
your
listening
material.
If
you
hear
distortion
-
turn
the
volume
down
or
risk
damaging
your
speakers. You
can
damage
just
about
any
speaker,
regardless
of
power
rating,
if
you
drive
an
amplifier
to
or
beyond
the
point
of
distortion.
PRODUCT
DISPOSAL
Certain
international,
national
and/or
local
laws
and/or
regulations
may
apply
regarding
the
disposal
of
this
product.
For
further
detailed
information,
please
contact
the
retailer
where
you
purchased
this
product
or
the
Polk
Audio
Importer/
Distributor
in
your
country.
A
listing
of
Polk
Audio
Importer/
Distributors
can
be
found
on
the
Polk
Audio
website
www.polkaudio.com
or
by
contacting
Polk
Audio
at:
5601
Metro
Drive,
Baltimore,
Maryland
21215,
USA
Phone:
+1
410
358-3600.
TECHNICAL
ASSISTANCE
OR
SERVICE
If,
after
following
the
hookup
directions,
you
experience
difficulty,
please
double-check
all
wire
connections.
Should
you
isolate
the
problem
to
the
speaker,
contact
the
authorized
Polk
Audio
dealer
where
you
made
your
purchase,
or
contact
Polk
Audio
Customer
Service
800-377-7655
(M-F,
9am-
6pm
EST,
US &
Canada
only)
or
via
email
Outside
the
US
& Canada, call
+1
410-358-3600.
More
detailed
information
including
audio
how-
to
articles, FAQs
and
online
manuals are
available
on
our
award-winning
website:
www.polkaudio.com/home.
Customer
Service
Hours
of
Operation:
Monday-Friday
9AM-6PM
EST
polkcs@polkaudio
.
com
INVENTORY
LIST
Important
Note:
If
anything
is
missing
or
damaged,
or
if
your
speaker
fails
to
operate,
notify
Polk
Audio
Customer
Support
Services
immediately
at
800-377-7655.
Atrium
SAT300
Satellite
Carton
Contents
(1)
Atrium
SAT300
satellite
speaker
(1)
Ground
stake
(1)
Security
plate
(1)
Pendant
cap
(1)
Rubber
bumper
(1)
Eyebolt
(2)
Faston
connectors
(1)
Registration
Card
(1)
Mounting
template
(1)
#10
pan
head
screw
(2)
#6
pan
head
screws
(1)
Lock
washer
(2)
Wire
nuts
(1)
Atrium
SAT300/SUB100
Owner's
Manual
Atrium
SUB100
Subwoofer
Carton
Contents
(1)
Atrium
SUBl00
Subwoofer
(1)
Weatherproof
aluminum
grille
(1)
Junction
box
(4)
Wire
nuts
(1)
Owner's
Manual
Polk
Audio
Customer
Service
800-377-7655
(Outside
USA
&
Canada
:
+1
410-358-3600)
.
ATRIUM
SAT300
PAINTING
THE
SAT300
LOUDSPEAKER
While
the
Atrium
SAT300
has a
color-
impregnated
finish
that
enables
it
to
blend
in
with
your
landscaping
and
outdoor
furnishings,
the
cabinet
is
paintable.
Should
you
choose
to
paint
your
speakers,
follow
these
instructions:
Before
you
begin,
you
will
need:
• A
spray
can
of
primer
paint
(Krylon
Sandable
Spray
Primer
#1318).
• A
spray
can
of
the
outdoor
paint
of
your
choice.
• A
paperclip
or
thin
blade
(for
removing
the
paintable
grille).
•
Masking
tape.
•
Paint
mask
(not
included)
to
cover
un-paintable
parts.
PREPARING
TO
PAINT
1.
Separate
the
parts
of
the
speaker:
Remove
the
knob,
clamp
and
bracket.
Remove
the
grille
by
carefully
hooking
it
with
a
bent
paper
clip
or
thin
blade
and
prying
it
gently
away
from
the
cabinet.
2.
Carefully
mask
off
the
following:
•
Driver
•
Tweeter
•
Terminals
•
Threaded
Insert
PAINTING
THE
CABINET,
CLAMP,
BRACKET
KNOB
AND
BRACKET
1.
Apply
two
thin
coats
of
primer
to
the
cabinet,
clamp,
knob
and
bracket.
2.
When
the
primer
is
completely
dry,
apply
the
finish color.
Multiple
coats
may
be
required
for
a
consistent
look.
3.
When
the
paint
is
completely
dry,
remove
the
masking
material.
4. Try
to
keep
all
handling
of
freshly
painted
parts
to
a
minimum.
PAINTING
THE
GRILLE
Note:
Make
sure
the
grille
is
removed
and
remove
the
logo
badge
before
painting.
1.
Paint
the
Atrium
SAT300
grille using a primer.
2.
Using
spray
paint,
spray
two
thin
coats
of
finish color. If
you're
using a
compressor
and
spray
gun,
use
the
finest,
most
diffuse
setting.
Be careful
not
to
fill
the
holes in
the
grille
with
paint.
3.
Paint
the
logo
badge.
4. Replace
the
logo
badge
once
the
paint
is
completely
dry
on
the
badge
and
the
grille.
5.
Carefully
fit
the
grille
into
its recess so
that
it
is
just
resting
on
the
cabinet.
Go
around
the
speaker
and
push
the
grille
into
the
grille
notch
a
little
bit
at
a
time.
Be
gentle;
the
grille
may
be
easily
bent
out
of
shape
by
rough
handling.
Customer
Service
Hours
of
Operation:
Monday-Friday
9AM-6PM
EST
I
ATRIUM
SUB100
PAINTING
THE
SUB100
SUBWOOFER
While
the
Atrium
SUB100
has a
color-
impregnated
finish
that
enables
it
to
blend
in
with
your
landscaping
and
outdoor
furnishings,
the
cabinet
is
paintable.
Should
you
choose
to
paint
your
speakers,
follow
these
instructions:
Before
you
begin,
you
will
need
:
• A
spray
can
of
primer
paint
(Krylon
Sandable
Spray
Primer
#1318).
• A
spray
can
of
the
outdoor
paint
of
your
choice.
•
Masking
tape.
•
Paint
mask
(not
included)
to
cover
un-paintable
parts.
PREPARING
TO
PAINT
Carefully
mask
off
the
following:
•
driver
•
eyebolt
•
cable
PAINTING
THE
CABINET
1.
Apply
two
thin
coats
of
primer
to
the
cabinet.
2.
When
the
primer
is
completely
dry,
apply
the
finish
color.
Multiple
coats
may
be
required
for
a
consistent
look.
3.
When
the
paint
is
completely
dry,
remove
the
masking
material.
4.
Try
to
keep
all
handling
of
freshly
painted
parts
to
a
minimum.
Customer
Service
Hours
of
Operation
:
Monday-Friday
9AM-6PM
EST

MOUNTING
THE
ATRIUM
SAT300
GROUND
MOUNT
To
mount
the
SAT300
into
the
ground
with
a
security
plate,
you
will
need
the
following
hardware:
•
SAT300
speaker
•
Ground
stake
•
Security
plate
•
Rubber
bumper
•
(1)
#10
pan
head
screw
(for
security
plate)
• (1)
.25"
split
ring
lock
washer
•
(2)
#6
pan
head
screws
(for
speaker
assembly
to
the
stake)
Max
Depth
- 7.25"
Exploded
View
of
SAT300
Cabinet
#6
Pan
Rubber
bumper
Ground
stake
Security
plate
(Optional)
#10 Pan
head
screw
Clamp
Knob
Bracket
--.:::::::~~~::::::_
.25"
Split
ring
lock
washer
Ground
Mounting
Depth
Polk
Audio
Customer
Service
800-377-7655
(Outside
USA
& Canada: +l
410-358-3600)
I
Instructions
1.
Attach
stake
to
security
plate
using
the
#10
pan
head
screw
and
.25"
split
ring
lock
washer.
2.
Dig
a
hole
to
the
diameter
of
the
security
plate
(6.5")
and
to
a
depth
(max
7.25" /
min
2.
25")
that
will
stabilize
and
secure
the
speaker
once
the
earth
has
been
tamped
down
around
the
plate.
3. Place
the
stake/security
plate
assembly
in
the
hole
and
cover
with
dirt,
tamping
down
the
soil
with
your
foot
as
you
fill in
the
hole.
4.
Attach
the
Atrium
SAT300
to
the
stake
using
the
rubber
bumper
and
the
#6
pan
head
screws.
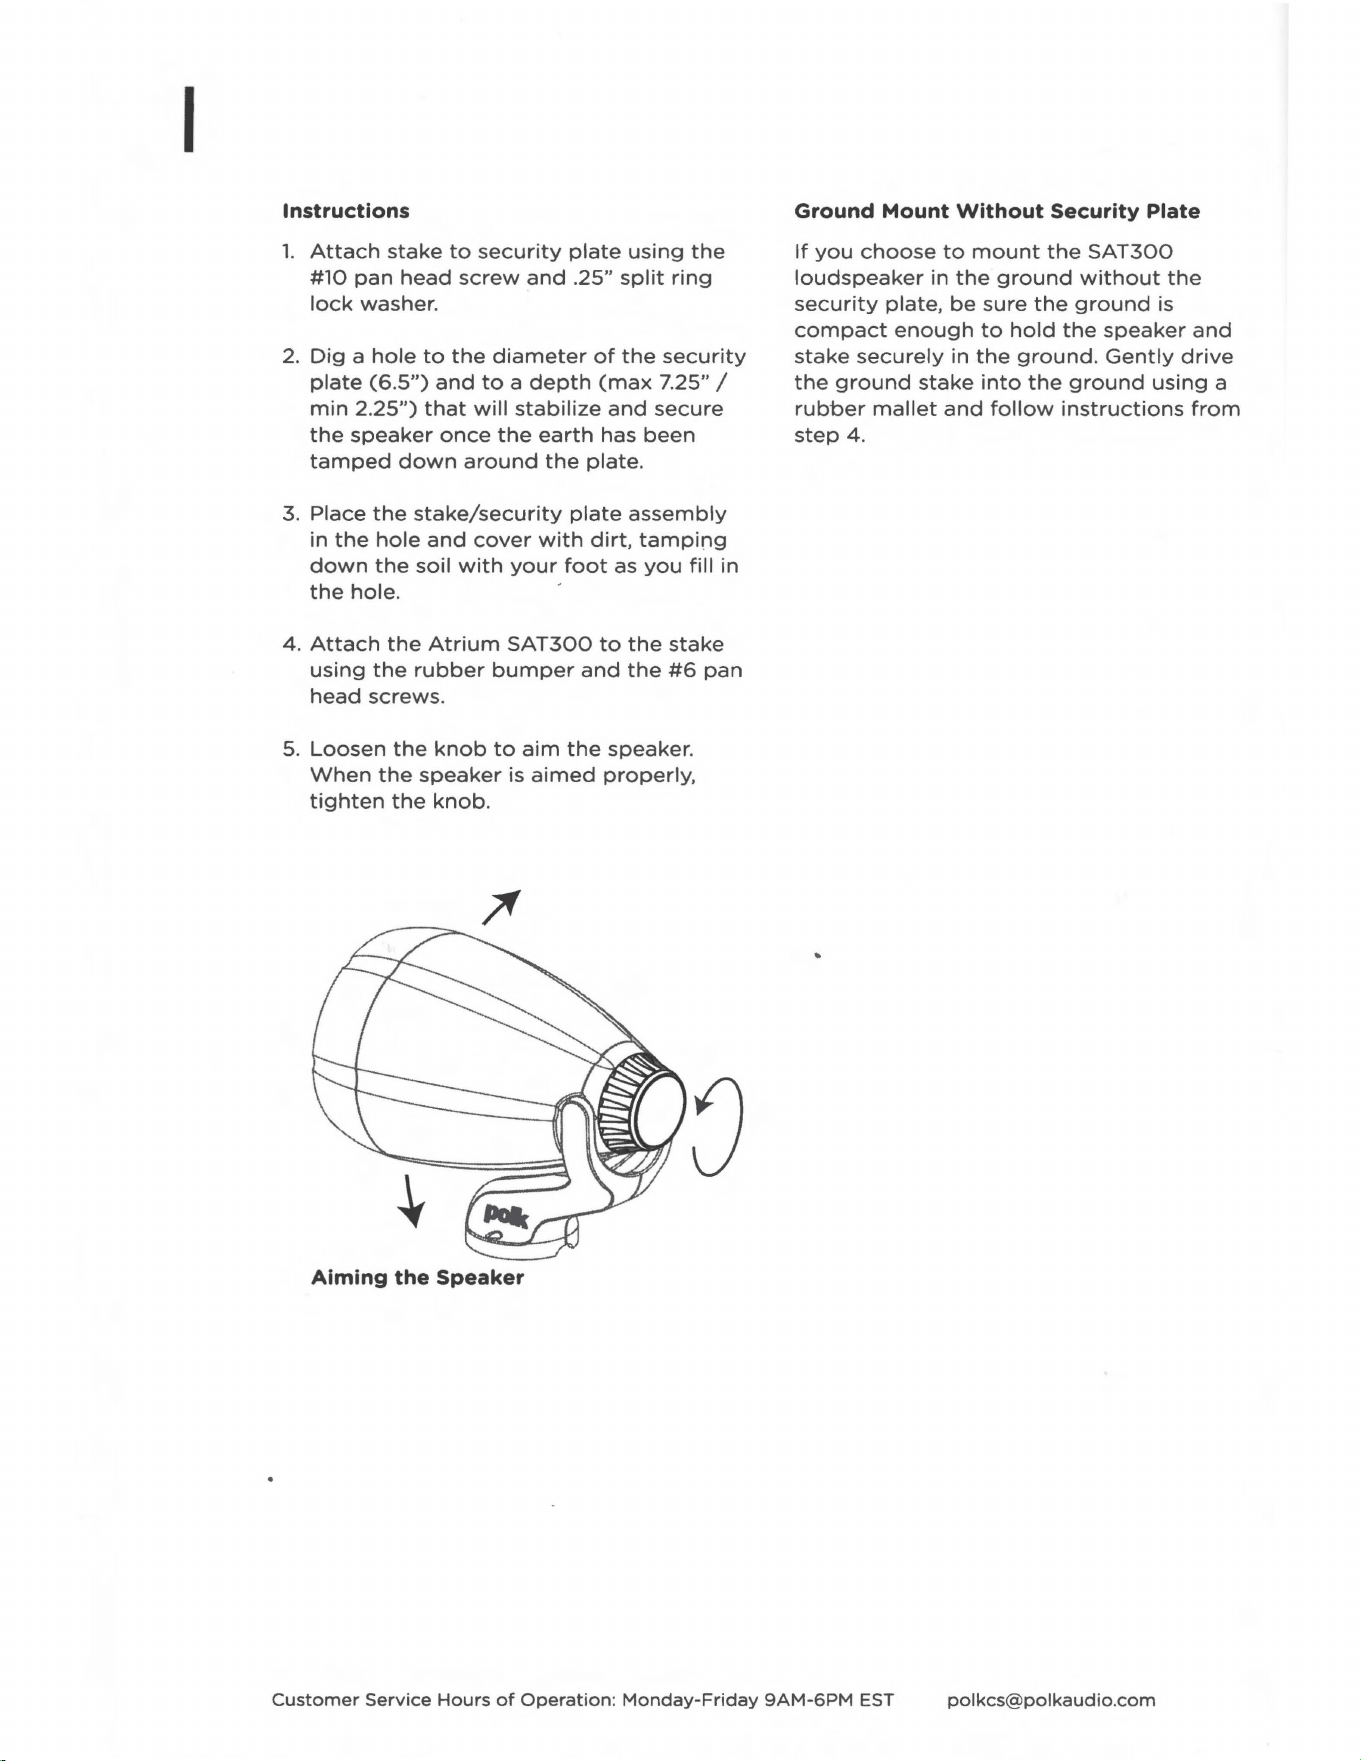
5.
Loosen
the
knob
to
aim
the
speaker.
When
the
speaker
is
aimed
properly,
tighten
the
knob.
Aiming
the
Speaker
Ground
Mount
Without
Security Plate
If
you
choose
to
mount
the
SAT300
loudspeaker
in
the
ground
without
the
security
plate,
be
sure
the
ground
is
compact
enough
to
hold
the
speaker
and
stake
securely
in
the
ground
.
Gently
drive
the
ground
stake
into
the
ground
using
a
rubber
mallet
and
follow
instructions
from
step
4.
Customer
Service
Hours
of
Operation
:
Monday-Friday
9AM-6PM
EST
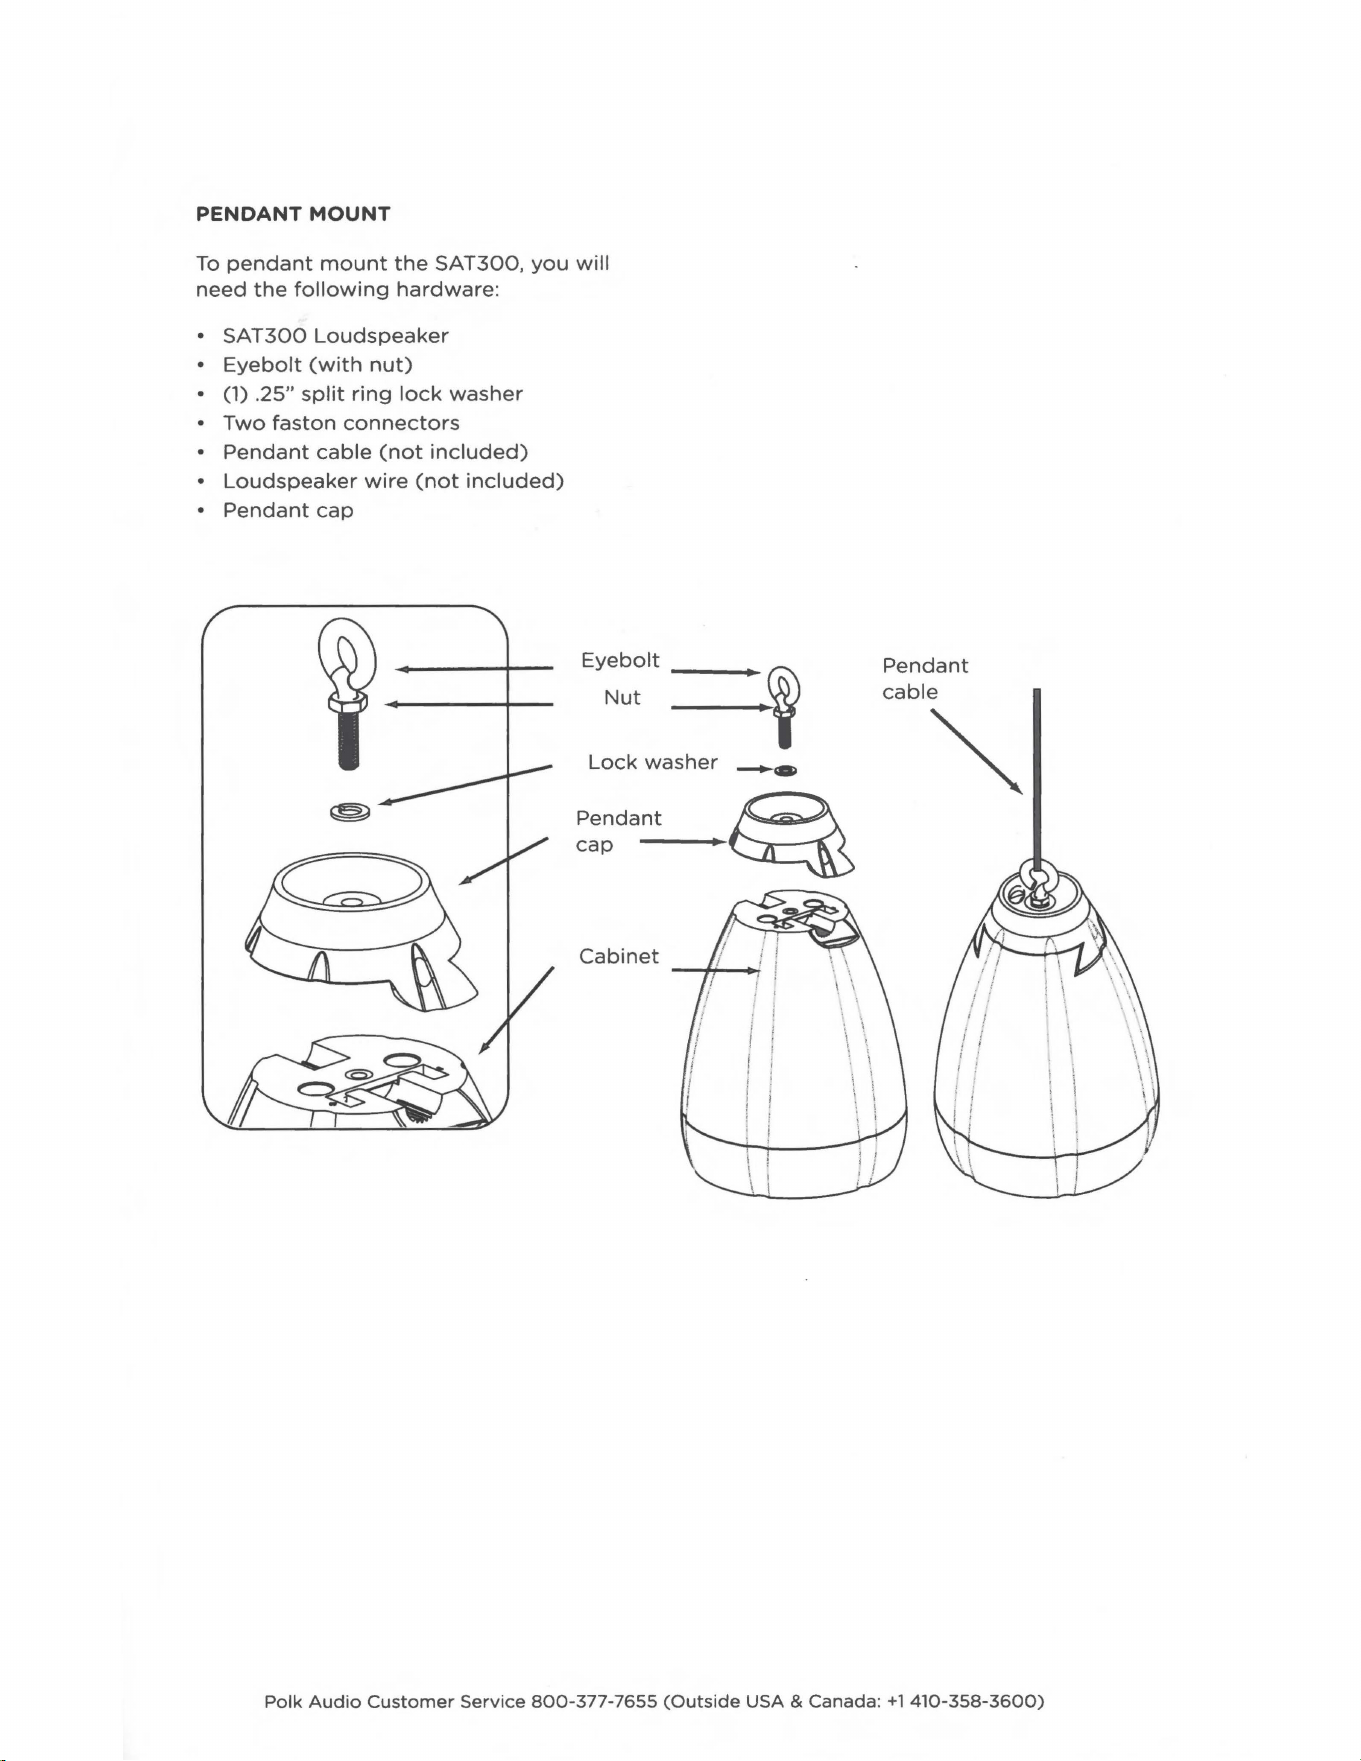
PENDANT
MOUNT
To
pendant
mount
the
SAT300,
you
will
need
the
following
hardware:
•
SAT300
Loudspeaker
•
Eyebolt
(with
nut)
• (1)
.25"
split
ring
lock
washer
•
Two
faston
connectors
•
Pendant
cable
(not
included)
•
Loudspeaker
wire
(not
included)
•
Pendant
cap
Pendant
cable
Eyebolt
---..
~
Nut
1
Lock
washer
-•
~
Penda_n_t _
_,..~
cap
~
Cabinet
Polk
Audio
Customer
Service
800-377-7655
(Outside
USA & Canada: +l
410-358-3600)
I
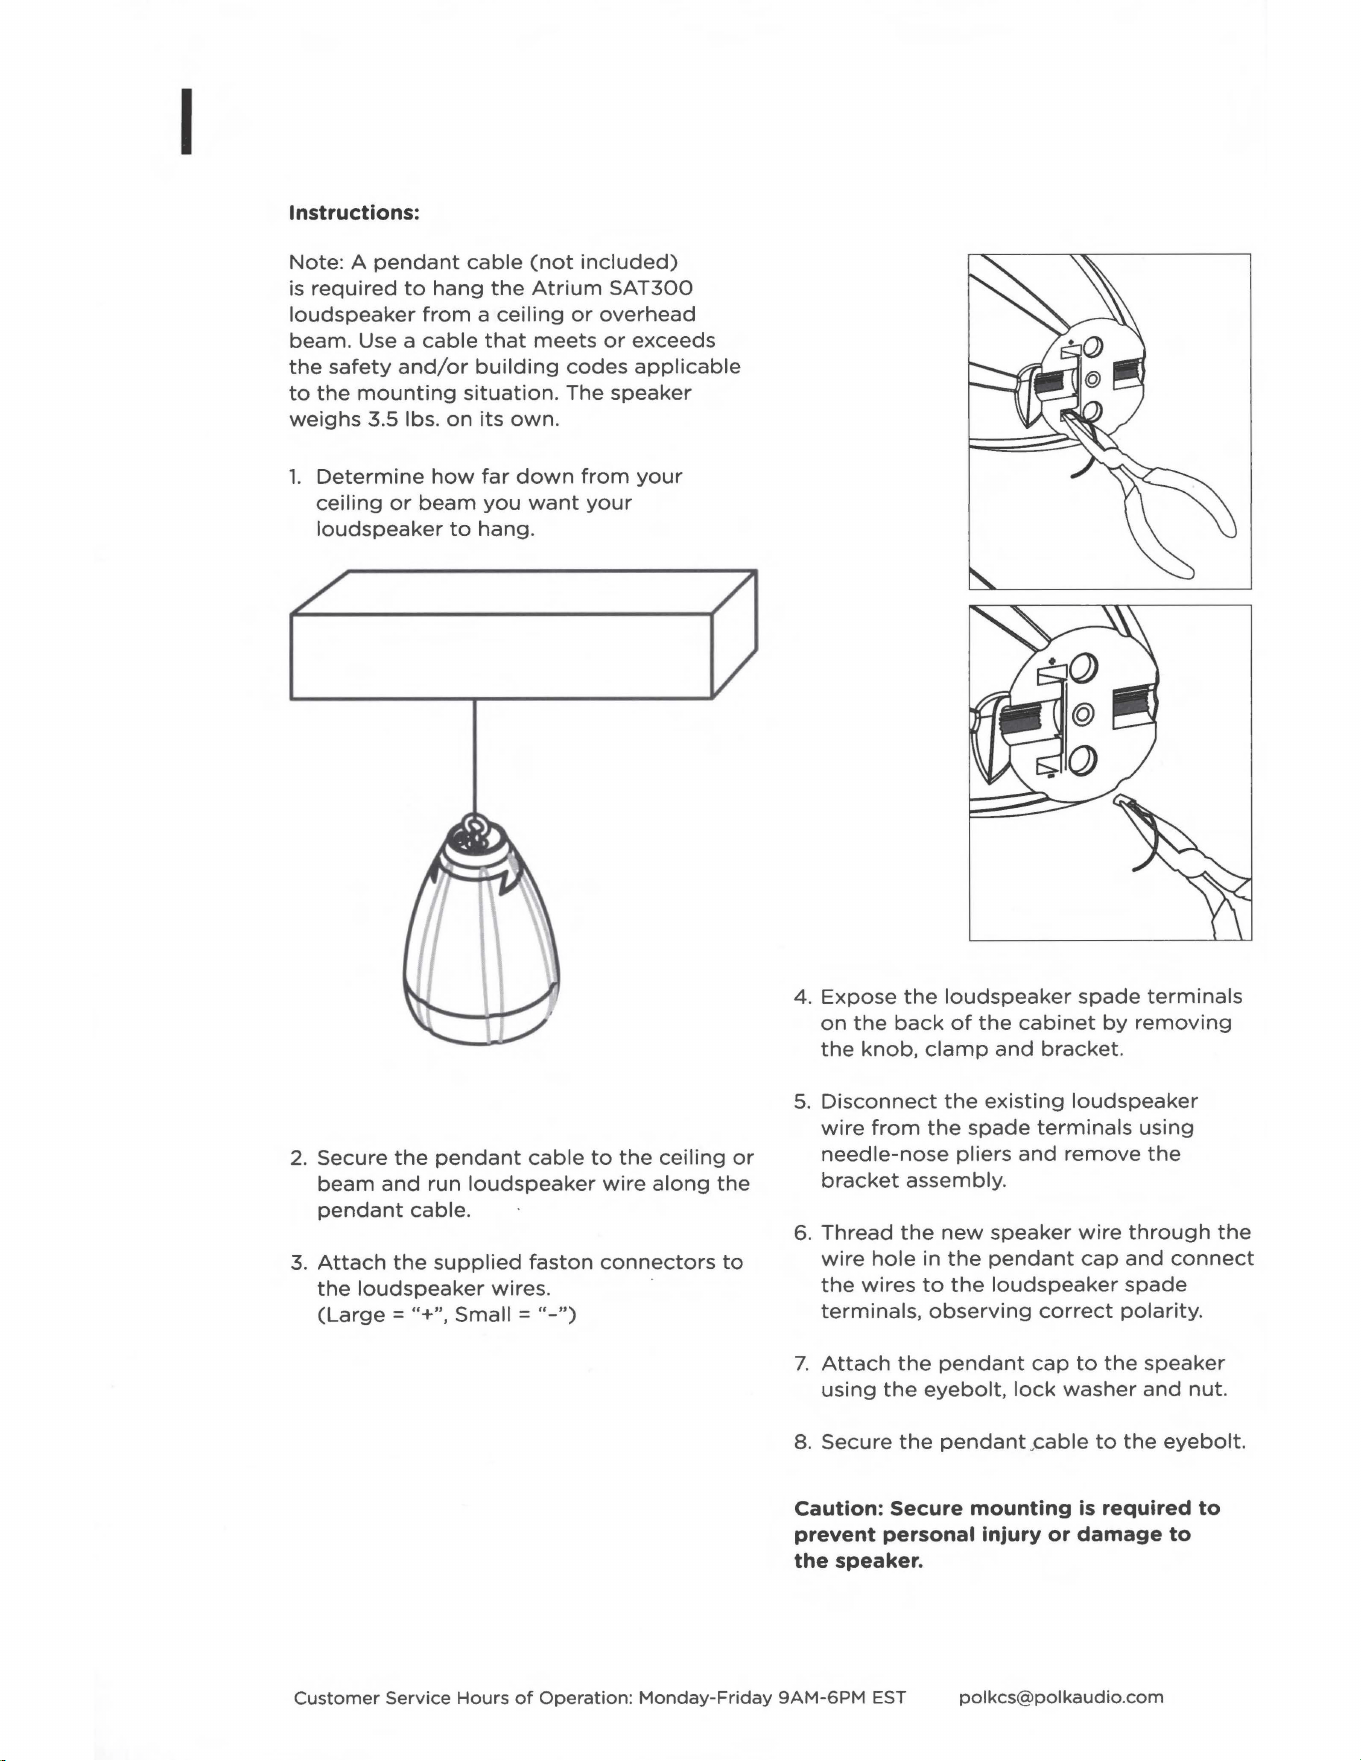
Instructions:
Note:
A
pendant
cable
(not
included)
is
required
to
hang
the
Atrium
SAT300
loudspeaker
from
a
ceiling
or
overhead
beam. Use a
cable
that
meets
or
exceeds
the
safety
and/or
building
codes
applicable
to
the
mounting
situation.
The
speaker
weighs
3.5 lbs.
on
its
own.
1.
Determine
how
far
down
from
your
ceiling
or
beam
you
want
your
loudspeaker
to
hang.
2.
Secure
the
pendant
cable
to
the
ceiling
or
beam
and
run
loudspeaker
wire
along
the
pendant
cable.
3.
Attach
the
supplied
faston
connectors
to
the
loudspeaker
wires. ·
(Large
=
"+",
Small =
"-")
4.
Expose
the
loudspeaker
spade
terminals
on
the
back
of
the
cabinet
by
removing
the
knob,
clamp
and
bracket.
5.
Disconnect
the
existing
loudspeaker
wire
from
the
spade
terminals
using
needle-nose
pliers
and
remove
the
bracket
assembly.
6.
Thread
the
new
speaker
wire
through
the
wire
hole
in
the
pendant
cap
and
connect
the
wires
to
the
loudspeaker
spade
terminals,
observing
correct
polarity.
7.
Attach
the
pendant
cap
to
the
speaker
using
the
eyebolt,
lock
washer
and
nut.
8.
Secure
the
pendant
,
cable
to
the
eyebolt.
Caution: Secure mounting
is
required
to
prevent
personal injury
or
damage
to
the
speaker.
Customer
Service
Hours
of
Operation:
Monday-Friday
9AM-6PM
EST
polkcs@polkaudio
.
com

BRACKET
MOUNT
For
more
solid
mounting,
screw
the
bracket
directly
into
a
weight-bearing
stud
on
the
mounting
surface.
To
bracket
mount
the
SAT300,
you
will
need
the
following
hardware:
•
SAT300
speaker
•
Rubber
bumper
(optional)
•
(2)
#6
pan
head
screws
•
SAT300
Mounting
Template
Instructions
1.
Determine
where
you
want
to
mount
the
speaker.
2.
Hold
the
mounting
template
to
the
mounting
surface
and
mark
the
screw
hole
locations
with
a
pencil.
3. Use an
1/8"
drill
bit
and
drill
the
mounting
holes
(if
necessary).
NOTE: Use
wall
anchors
if
mounting
the
speaker
into
drywall.
4.
Loosen
the
knob
on
the
back
of
the
speaker
so
it
can
swivel.
NOTE:
The
speaker
bracket
has a
notch
for
the
speaker
wires,
which
allows
you
to
run
the
speaker
wires
up
the
mounting
surface,
or
you
may
drill
a
hole
in
the
mounting
surface
and
run
the
speaker
wires
through
the
hole.
5.
Place
the
rubber
bumper
underneath
the
bracket
(optional)
.
6.
Hold
the
speaker
to
the
mounting
surface.
7.
Attach
the
speaker
assembly
using
the
supplied
#6
pan
head
screws.
8.
Once
the
loudspeaker
has
been
adjusted
to
the
desired
angle,
tighten
the
knob
on
the
back
of
the
loudspeaker
to
hold
it
in place.
Mounting Template
WARNING: Aiming
the
SAT300
to
an angle
greater
than
45
degrees
to
the horizontal
may
result in
water
buildup inside
the
grille
that
could cause
damage
to
the
speaker, especially during cold
weather
when
freezing
may
occur.
Polk
Audio
Customer
Service
800-377-7655
(Outside
USA & Canada:
+1
410-358-3600)

MOUNTING
THE
ATRIUM
SUB100
The
SUBl00
can
be
located
anywhere
you
desire.
DECK
MOUNT
1.
Determine
where
you
want
to
l.ocate
the
subwoofer.
2. Measure
the
center-to-center
distance
between
the
key-hole
slots
and
install
two
#10
mounting
screws
into
the
deck,
leaving
.25"
of
the
screws
exposed
above
the
surface.
3. Place
the
subwoofer
onto
the
pan
head
screws
and
rotate
the
SUBl00
clockwise
so
that
the
keyhole
slots
lock
down
onto
the
pan
head
screws.
GARDEN
PLACEMENT
You
may
locate
your
Atrium
SUBl00
anywhere
you
can
run
speaker
wire.
If
you
place
your
subwoofer
in a
garden
bed,
upon
soft
ground
or
mulch,
we
recommend
you
place
it
on
a
paver
or
other
hard
surface.
This
will
prevent
mulch
or
dirt
from
building
up
underneath
the
subwoofer,
which
must
remain
clear
for
optimum
performance
and
to
prevent
damage
to
driver.
The
included
grille
can
be
attached
to
prevent
wildlife
from
taking
residence
under
your
subwoofer
(Part#
AM3387-A).
Note:
The
SUBl00
has a
built-in
security
eyebolt
that
enables
you
to
anchor
it
to
its
location.
.25"
~ii
(.635cm)
(,.....
_
___.
____
(_
Keyhole
Slots
Security
Eyebolt
Polk
Audio
Customer
Service
800-377-7655
(Outside
USA
& Canada: +l
410-358-3600)
ATRIUM
SAT300
& ATRIUM
SUB100
HOOKUP
DIRECTIONS:
Connect
only
two
SAT300
Speakers
per
stereo
channel.
(Not
sold
in pairs.)
The
Atrium
SAT300
and
Atrium
SUBl00
each
come
with
3
feet
of
CL3
speaker
wire,
which
is
rated
for
underground
burial. The
SAT300
has
two
conductors
-
one
red
that
is
labeled
"+"
and
one
black
that
is
labeled
"-".
The SUBlO0 has
four
conductors
(white,
green,
red
and
black)
because
it
has a
dual
voice
coil.
Follow
the
correct
polarity
during
hookup
to
avoid
performance
issues
and/or
damage
to
your
amplifier.
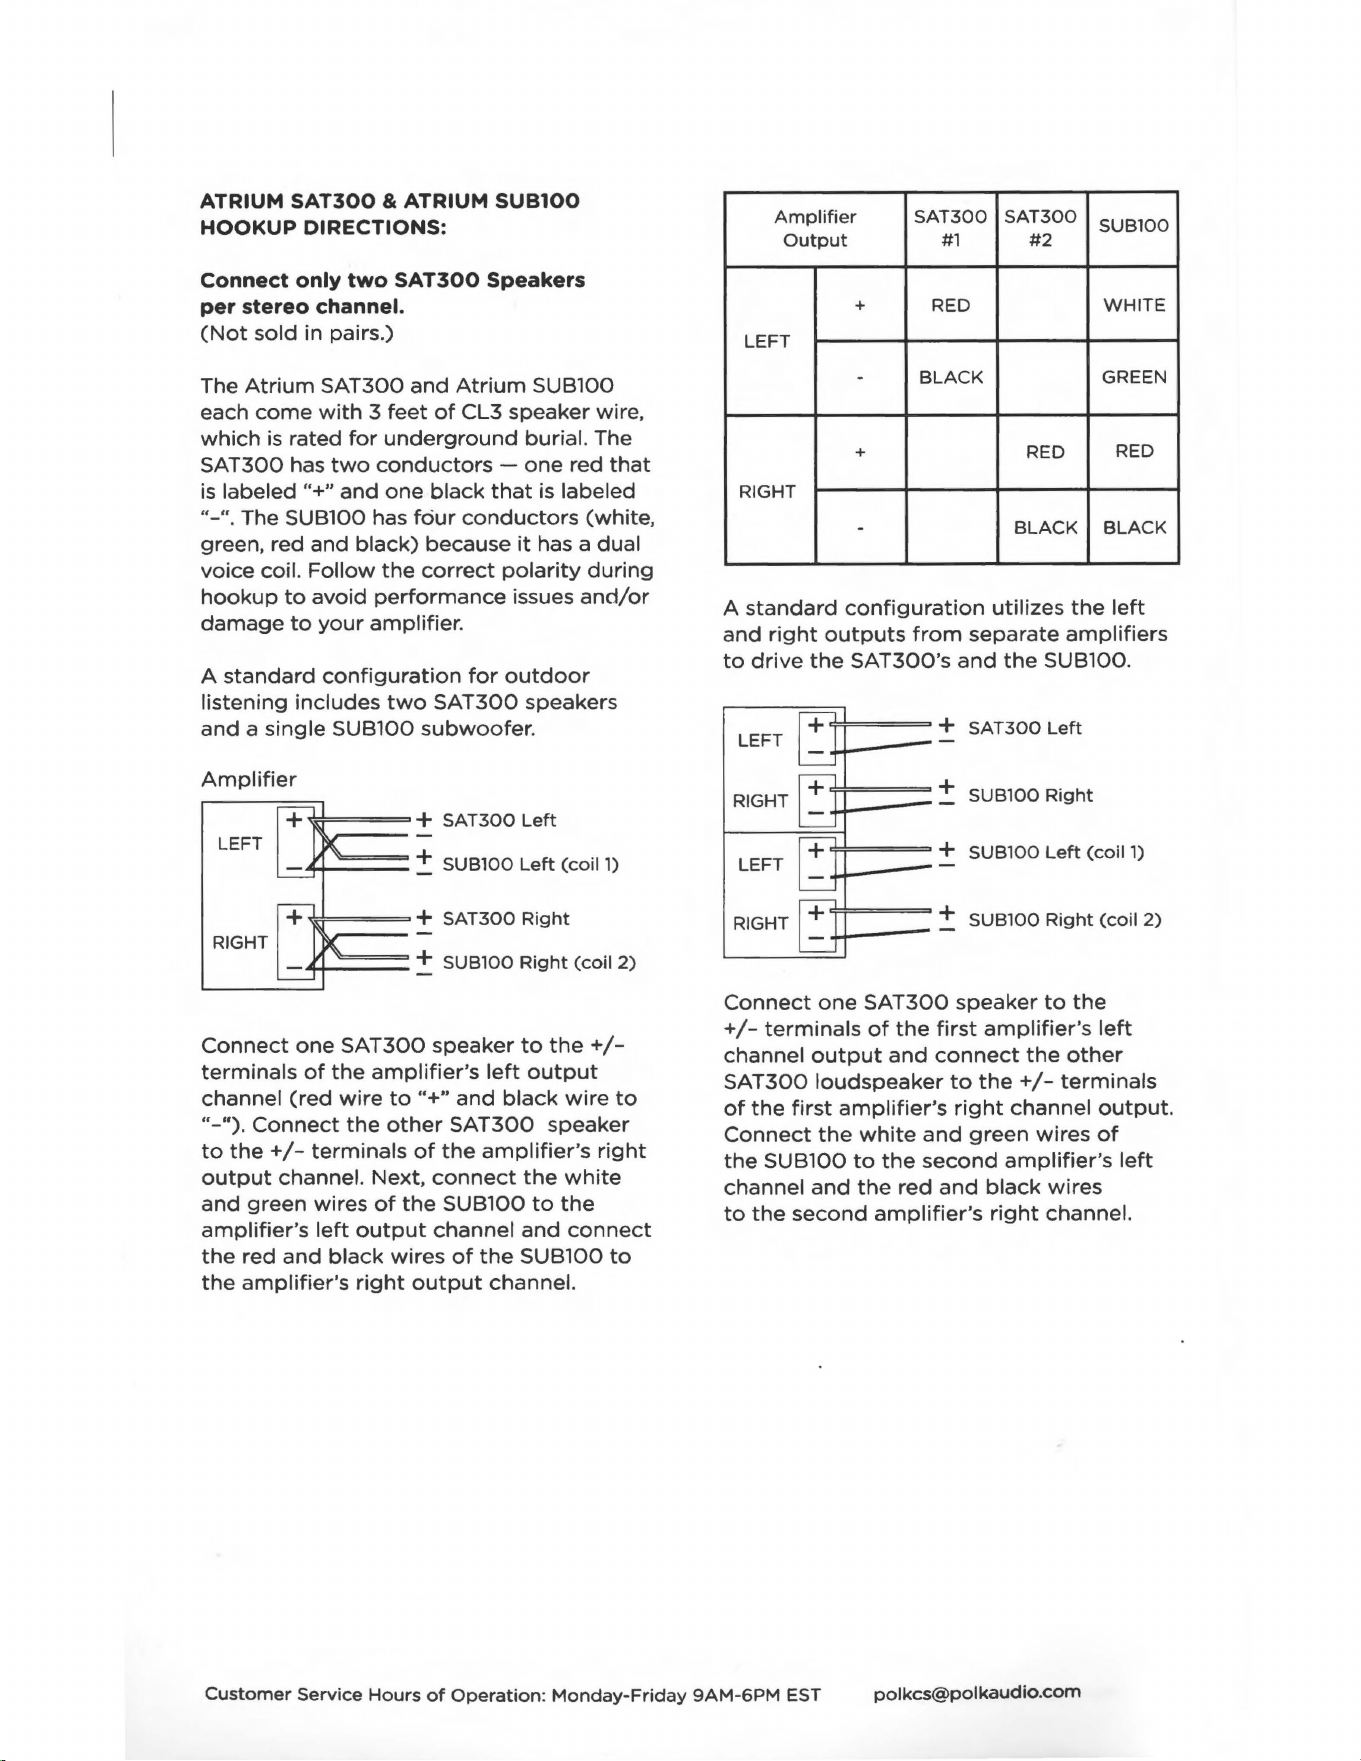
A
standard
configuration
for
outdoor
listening
includes
two
SAT300
speakers
and
a
single
SUBl00
subwoofer.
Amplifier
LEFT
RIGHT
#===
+
SAT300
Left
......,_::_:_=_=_
=_
:!:
SUBl00
Left
(coil
l)
~===
+
SAT300
Right
-'!-+~:;::;::;::;:~
::!:
SUB100
Right
(coil
2)
Connect
one
SAT300
speaker
to
the+/-
terminals
of
the
amplifier's
left
output
channel
(red
wire
to
"+"
and
black
wire
to
"-").
Connect
the
other
SAT300
speaker
to
the+/-
terminals
of
the
amplifier's
right
output
channel.
Next,
connect
the
white
and
green
wires
of
the
SUBl00
to
the
amplifier's
left
output
channel
and
connect
the
red
and
black
wires
of
the
SUBl00
to
the
amplifier's
right
output
channel.
Amplifier
SAT300 SAT300
SUBlOO
Output
#1
#2
+
RED
WHITE
LEFT
-
BLACK
GREEN
+
RED
RED
RIGHT
-
BLACK
BLACK
A
standard
configuration
utilizes
the
left
and
right
outputs
from
separate
amplifiers
to
drive
the
SAT300's
and
the
SUBl00.
+
SAT300
Left
LEFT
+
SUBl00
Right
RIGHT
+
SUBl00
Left
(coil
1)
LEFT
RIGHT
+
SUBl00
Right
(coil
2)
Connect
one
SAT300
speaker
to
the
+/-
terminals
of
the
first
amplifier's
left
channel
output
and
connect
the
other
SAT300
loudspeaker
to
the+/-
terminals
of
the
first
amplifier's
right
channel
output.
Connect
the
white
and
green
wires
of
the
SUBl00
to
the
second
amplifier's
left
channel
and
the
red
and
black
wires
to
the
second
amplifier's
right
channel.
Customer
Service
Hours
of
Operation:
Monday-Friday
9AM-6PM
EST

Amplifier
SAT300
SAT300
SUBl00
Output
#1
#2
+ Red
Left
-
Black
Amp
#1
+
Red
Right
-
Black
+
White
Left
-
Green
+
Red
Right
-
Black
You must always connect
the
left
and right
channels
to
achieve maximum
output.
Observe positive (
+)
and negative
(-)
polarity. Reversing polarity
of
a dual voice
coil subwoofer will result in very
little
bass
output
and possibly
damage
the
speaker
or
amplifier.
All
speaker
connections
should
be
made
with
the
provided
wire
nuts.
We
recommend
filling
each
wire
nut
with
a
little
silicone
sealant
to
ensure a
weatherproof
connection.
Any
number
of
SAT300
loudspeakers
can
be
used in an
installation.
For
applications
requiring
more
than
two
SAT300
loudspeakers, use a
separate
amplifier
channel
for
each
additional
pair
of
SAT300
loudspeakers.
Do
not
use
the
A
and
B
channels
on
your
receiver
to
hook
up
two
pairs
of
SAT300
loudspeakers, as
this
may
overload
and
damage
your
receiver/
amplifier
circuitry.
If
you
need
help
with
wiring
or
connecting
more
than
one
pair
of
SAT300
loudspeakers, please
contact
tech
support.
Polk
Audio
Customer
Service
800-377-7655
(Outside
USA & Canada:
+1
410-358-3600)
NOTE
You
will
need
additional
2
conductor
and
4
conductor
Direct
Burial
Underground
speaker
wire
if
you
want
to
run
the
SAT300's
farther
than
the
3
feet
provided.
For
distances
of
100
feet
or
less
we
recommend
14
AWG
(Gauge)
wire.
For
distances
greater
than
100
feet
we
recommend
12
AWG
(Gauge).
Connecting 2
SAT300
loudspeakers (Parallel
hook
up)
to
the
Direct
Burial IPX 7 Junction
box
provided
The
Atrium
SAT300
and
Atrium
SUBl00
each
come
with
3
feet
of
CL3
speaker
wire,
which
is
rated
for
underground
burial.
If
you
wish
to
place
the
SAT300's
or
SUBlO0
farther
than
3
feet
from
the
supplied
Junction
Box
than
you
will
need
to
use
additional
speaker
wire.
The
SAT300
has
two
conductors-one
red
that
is
labeled"+"
and
one
black
that
is
labeled"-".
The
SUBl00
has
four
conductors
(white,
green,
red
and
black)
because
it
has
a
dual
voice
coil.
Follow
the
correct
polarity
during
hookup
to
avoid
performance
issues
and/or
damage
to
your
amplifier.
All
speaker
connections
should
be
made
with
the
provided
wire
nuts.
We
recommend
filling
each
wire
nut
with
a
little
silicone
sealant
to
ensure
a
weatherproof
connection.
Connect
one
end
of
the
left
and
right
channel
of
the
4
conductor
Direct
Burial
speaker
wire
to
the+/-
terminals
of
the
amplifier's
left
and
right
output
channel.
Next
run
the
other
end
into
the
supplied
IPX7
Junction
Box
as
shown
in
Fig
1.
Run
the
supplied
Direct
Burial
speaker
wire
from
the
SUBl00
subwoofer
to
the
IPX7
Junction
box
as
shown
in
Fig
1.
The
wires
are
coded
in
the
following
manner:
Left
Channel(+)
is
White,
Left
Channel(-)
is Green.
Right
Channel
(
+)
is Red,
Right
Channel
(-)
is Black. You
must
always
connect
the
left
and
right
channels
to
achieve
maximum
output.
Observe
positive
(+)
and
negative(-)
polarity.
Reversing
polarity
of
a
dual
voice
coil
subwoofer
will
result
in
very
little
bass
output
and
possibly
damage
the
speaker
or
amplifier.
Connect
one
end
of
the
2
conductor
Direct
Burial
wire
to
the
Left
SAT300.
Make
sure
to
note
which
color
is
connected
to
the(+)
and(-)
speaker
terminals.
Next
run
the
other
end
into
the
supplied
IPX7
Junction
Box
as
shown
in
Fig
1.
Repeat
this
procedure
for
the
Right
SAT300
as
shown
in
Fig
1.
Connect
the
SUBl00
and
Left
and
Right
SAT300
inside
the
Junction
Box
as
shown
in
Fig
2.
with
the
supplied
wire
nuts.
Customer
Service
Hours
of
Operation:
Monday-Friday
9AM-6PM
EST
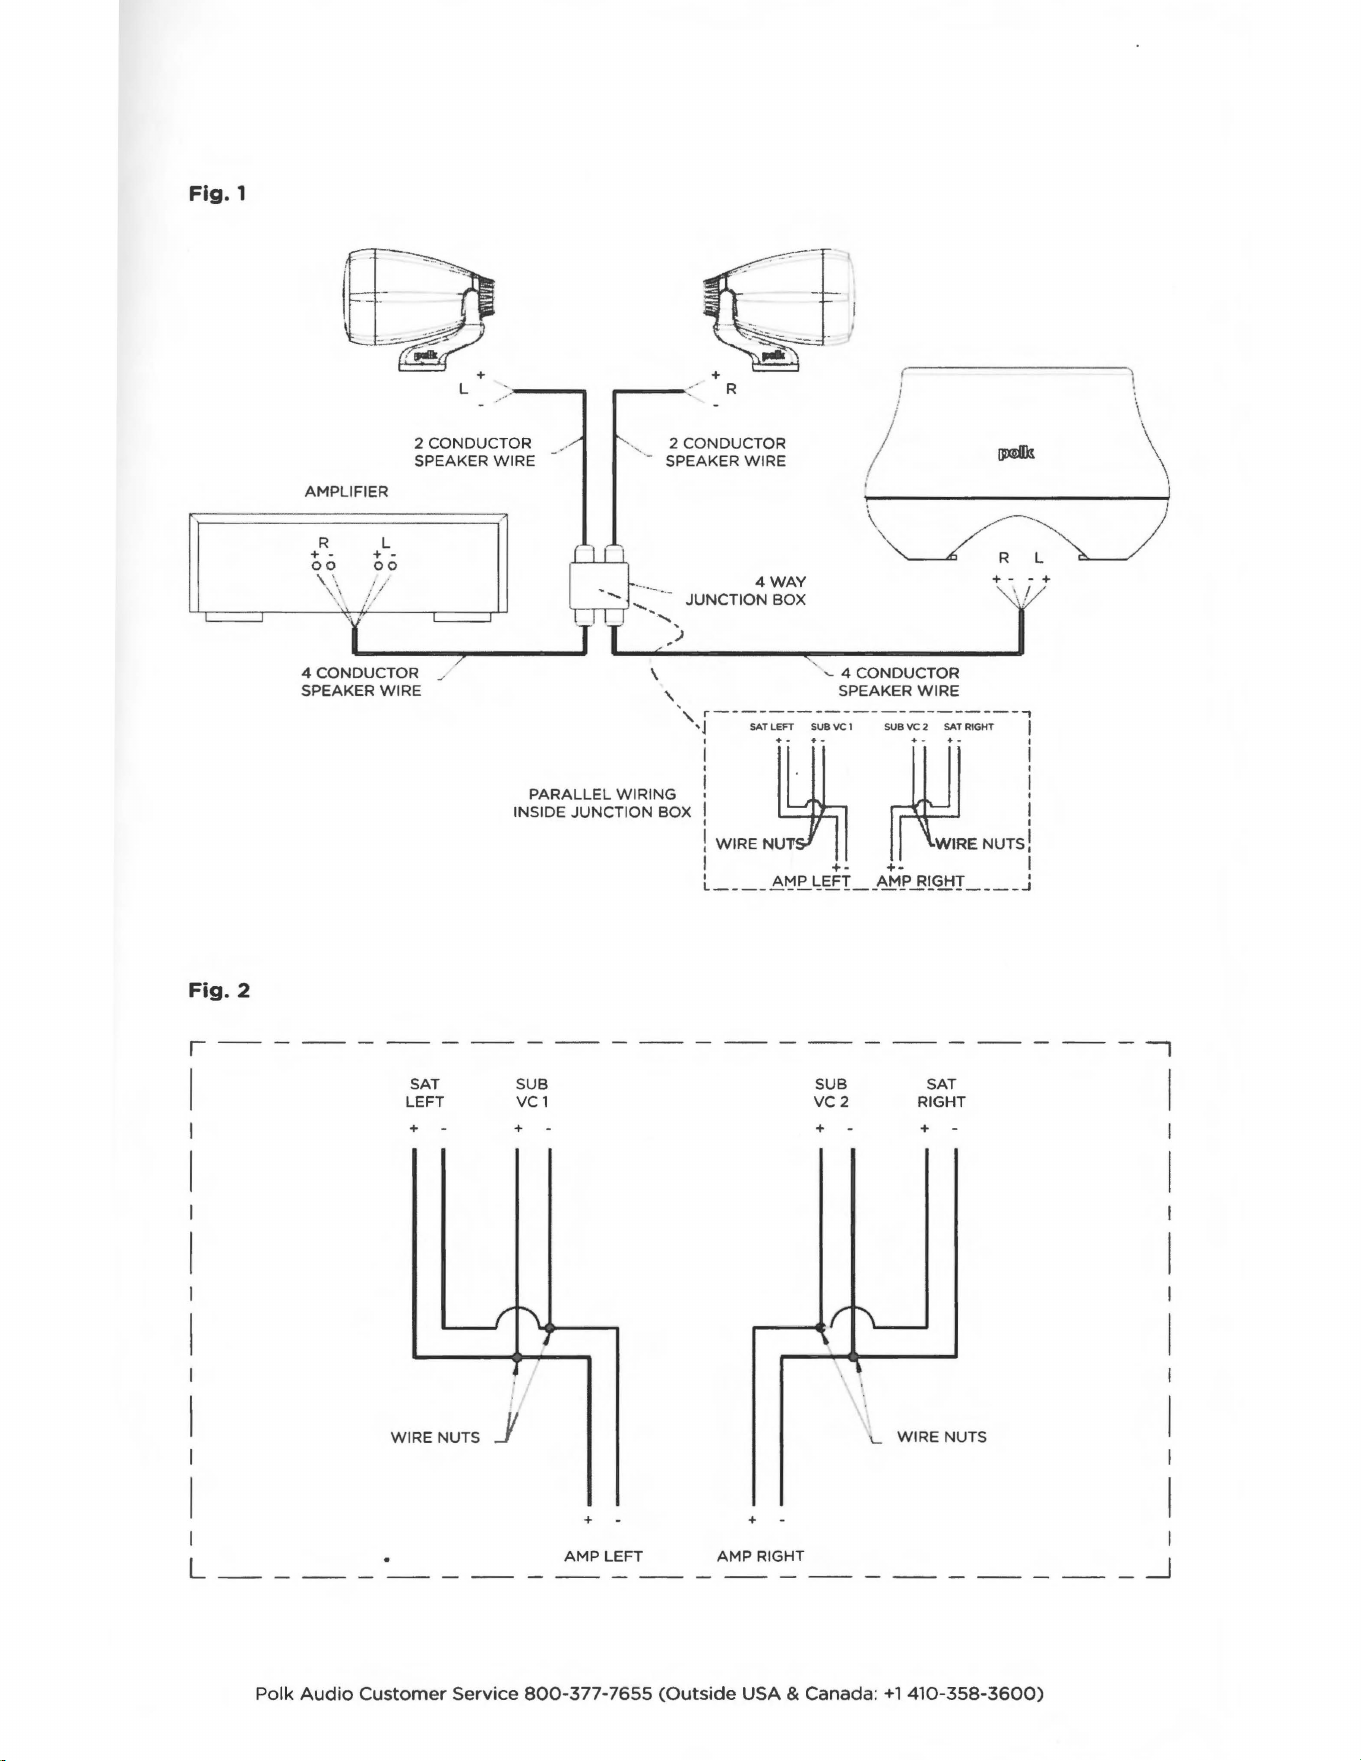
Fig.
1
Fig.
2
r
I
AMPLIFIER
L
2
CONDUCTOR
SPEAKER
WIRE
Q
-
,..
+
R
2
CONDUCTOR
- SPEAKER
WIRE
I
I
I
I
/
\
\
R L
+ - + -
00
00
O~:;
\~
'
'.
\'<
4WAY
JUNCTION
BOX
+ - - +
-
______
-J l ,J
>
r
4
CONDUCTOR
_,,
\
SPEAKER
WIRE
"'
'-
4
CONDUCTOR
SPEAKER
WIRE
\,
r---------------------
-,
, J SAT LEFT SUB VC 1 SUB
vc
2 SAT RIGHT I
1N~~D~;~~~~6~Ne~x
I
w,.J~
~LJ
I
+- +-
I
SAT
LEFT
+ -
SUB
VC1
+ -
____JI\
__
WIRE
NUTS
./
j
'
+ -
L ____
AMP
LEFT_
AMP
RIGHT
____
j
+ -
SUB
VC2
+ -
SAT
RIGHT
+ -
L
WIRE
NUTS
-,
I
L
__
_
AMP
LEFT
AMP
RIGHT
I
_J
Polk
Audio
Customer
Service
800-377-7655
(Outside
USA
& Canada: +l
410-358-3600)
II
NOTE
You
will
need
an
additional
2
conductor
and
4
conductor
Direct
Burial
Underground
speaker
wire
if
you
want
to
run
the
SAT300's
farther
than
the
3
feet
provided.
For
distances
of
100
feet
or
less
we
recommend
14
AWG
(Gauge)
wire.
For
distances
greater
than
100
feet
we
recommend
12
AWG (Gauge).
Connecting 4
SAT300
loudspeakers (Parallel hook
up)
to
the
Direct
Burial IPX 7 junction
box provided
The
Atrium
SAT300
and
Atrium
SUBl00
each
come
with
3
feet
of
CL3
speaker
wire,
which
is
rated
for
underground
burial.
If
you
wish
to
place
the
SAT300's
or
SUB100
farther
than
3
feet
from
the
supplied
Junction
Box
than
you
will
need
to
use
additional
speaker
wire.
The
SAT300
has
two
conductors-one
red
that
is
labeled
"+"
and
one
black
that
is
labeled"-".
The
SUBl0
has
four
conductors
(white,
green, red
and
black)
because
it
has
a
dual
voice
coil.
Follow
the
correct
polarity
during
hookup
to
avoid
performance
issues
and/or
damage
to
your
amplifier.
All
speaker
connections
should
be
made
with
the
provided
wire
nuts.
We
recommend
filling
each
wire
nut
with
a
little
silicone sealant
to
ensure a
weatherproof
connection.
Connect
one
end
of
the
left
and
right
channel
of
the
4
conductor
Direct
Burial
speaker
wire
to
the+/-
terminals
of
the
amplifier's
left
and
right
output
channel.
Next
run
the
other
end
into
the
supplied
IPX7
Junction
Box
as
shown
in
Fig
3.
Run
the
supplied
Direct
Burial
speaker
wire
from
the
SUBl00
subwoofer
to
the
IPX7
Junction
box
as
shown
in
Fig
3.
The
wires
are
coded
in
the
following
manner:
Left
Channel (
+)
is
White
,
Left
Channel
(-)
is
Green.
Right
Channel(+)
is
Red,
Right
Channel
(-)
is Black. You
must
always
connect
the
left
and
right
channels
to
achieve
maximum
output.
Observe
positive
(+)
and
negative(-)
polarity.
Reversing
polarity
of
a
dual
voice
coil
subwoofer
will
result in
very
little
bass
output
and
possibly
damage
the
speaker
or
amplifier.
Connect
the
SUBl00
and
4
Left
and
Right
SAT300's
inside
the
Junction
Box
as
shown
in
Fig
4.
with
the
supplied
wire
nuts.
Customer
Service
Hours
of
Operation:
Monday-Friday
9AM-6PM
EST
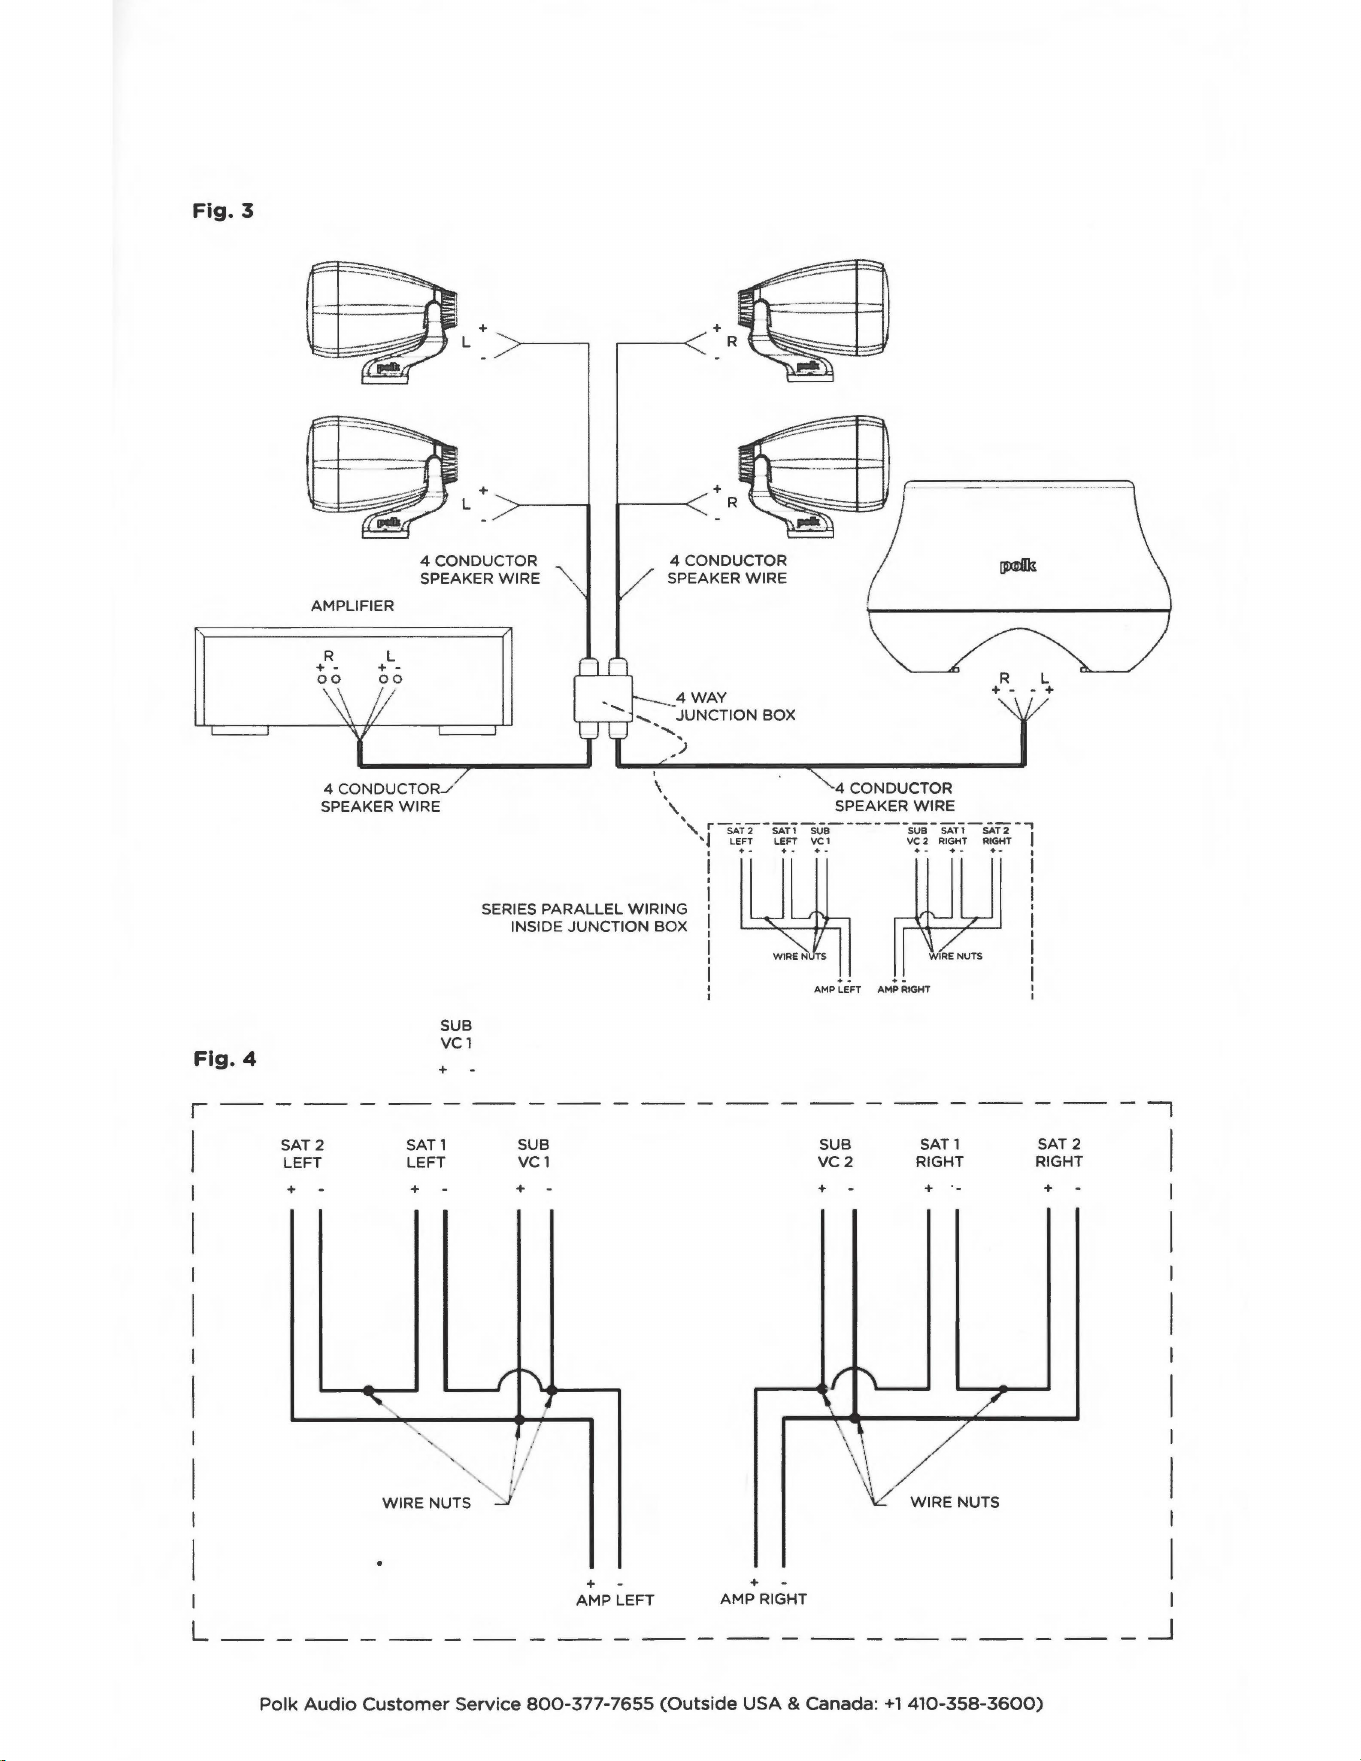
Fig.
3
Fig.
4
r
I
AMPLIFIER
L
+ -
00
/ /
+
+
L
4CONDUCTOR
SPEAKER
WIRE
4 CONDUCTOR_,,
SPEAKER
WIRE
I
+
R
4CONDUCTOR
SPEAKER
WIRE
4WAY
·-JUNCTION BOX
I
\ 4
CONDUCTOR
',,
SPEAKER
WIRE
'r
SAT2
-SAT!
SUB
----
SUB-SAT!
SAT2
--,
' J
Le::
L~F?'
v._c
_,
v:
~
Rl~H__T
R~T
SERIES
PARALLEL
WIRING
INSIDE
JUNCTION
BOX
~~
SAT2
LEFT
+
SUB
VCl
+
SATl
LEFT
+
SUB
VCl
+ -
I
!/
WIRENUTS
~ -
+ - + -
AMP
LEFT
AMP
RIGHT
AMP LEFT AMP RIGHT
SUB
VC2
+ -
SATl
RIGHT
+
\,\
/
\ \
le(
WIRENUTS
SAT 2
RIGHT
+ -
-,
L
_______
_
_
______
_j
Polk
Audio
Customer
Service
800-377-7655
(Outside
USA & Canada:
+1
410-358-3600)
LIMITED
WARRANTY
Polk
Audio,
Inc.
warrants
to
the
original
purchaser
only
that
this
Polk
Audio
Loudspeaker
Product
(the
"Product")
will
be
free
from
defects
in
materials
and
workmanship
for
a
period
of
five
(5)
years
from
the
date
of
original
retail
purchase
from
a
Polk
Audio
Authorized
Dealer.
However,
this
Warranty
will
automatically
terminate
prior
to
the
expiration
of
the
five
(5)
years
if
the
original
retail
purchaser
sells
or
otherwise
transfers
the
Product
to
any
other
party.
The
original
retail
purchaser
shall
hereinafter
be
referred
to
as
"you."
To
allow
Polk
Audio
to
offer
the
best
possible
warranty
service,
please
fill
out
the
Product
Registration
Card(s)
and
send
it
to
the
Factory,
at
the
address
provided
on
the
Product
Cards(s)
within
ten
(10)
days
of
the
date
of
purchase.
Defective
Products
must
be
shipped,
together
with
proof
of
purchase,
prepaid
insured
to
the
Polk
Audio
Authorized
Dealer
from
whom
you
purchased
the
Product,
or
to
the
Factory
at
1
Viper
Way,
Vista,
California
92081.
Products
must
be
shipped
in
the
original
shipping
container
or
its
equivalent;
in
any
case
the
risk
of
loss
or
damage
in
transit
is
to
be
borne
by
you.
If
upon
examination
at
the
Factory
or
Polk
Audio
Authorized
Dealer
it
is
determined
that
the
unit
was
defective
in
materials
or
workmanship
at
any
time
during
this
Warranty
period,
Polk
Audio
or
the
Polk
Audio
Authorized
Dealer
will,
at
its
option,
repair
or
replace
this
Product
at
no
additional
charge,
except
as
set
forth
below.
All
replaced
parts
and
Products
become
the
property
of
Polk
Audio.
Products
replaced
or
repaired
under
this
warranty
will
be
returned
to
you,
within
a
reasonable
time,
freight
prepaid.
This
warranty
does
not
include
service
or
parts
to
repair
damage
caused
by
accident,
disaster, misuse, abuse,
negligence,
inadequate
packing
or
shipping
procedures,
commercial
use,
voltage
inputs
in excess
of
the
rated
maximum
of
the
unit,
cosmetic
appearance
of
cabinetry
not
directly
attributable
to
defect
in
materials
or
workmanship,
or
service, repair,
or
modification
of
the
Product
which
has
not
been
authorized
or
approved
by
Polk
Audio.
This
warranty
shall
terminate
if
the
Serial
number
on
the
Product
has
been
removed,
tampered
with
or
defaced.
This
warranty
is in lieu
of
all
other
expressed
Warranties.
If
this
Product
is
defective
in
materials
or
workmanship
as
warranted
above,
your
sole
remedy
shall
be
repair
or
replacement
as
provided
above.
In
no
event
will
Polk
Audio,
Inc.
be
liable
to
you
for
any
incidental
or
consequential
damages
arising
out
of
the
use
or
inability
to
use
the
Product,
even
if
Polk
Audio,
Inc.
or
a
Polk
Audio
Authorized
Dealer
has
been
advised
of
the
possibility
of
such
damages,
or
for
any
claim
by
any
other
party.
Some
states
do
not
allow
the
exclusion
or
limitation
of
consequential
damages,
so
the
above
limitation
and
exclusion
may
not
apply
to
you.
All
implied
warranties
on
this
Product
are
limited
to
the
duration
of
this
expressed
Warranty.
Some
states
do
not
allow
limitation
on
how
long
an
implied
Warranty
lasts,
so
the
above
limitations
may
not
apply
to
you.
This
Warranty
gives
you
specific
legal
rights,
and
you
also
may
have
other
rights
which
vary
from
state
to
state.
This
Warranty
applies
only
to
Products
purchased
in
the
United
States
of
America,
its possessions,
and
U.S.
and
NATO
armed
forces
exchanges
and
audio
clubs.
The
Warranty
terms
and
conditions
applicable
to
Products
purchased
in
other
countries
are
available
from
the
Polk
Audio
Authorized
Distributors
in
such
countries.
Customer
Service
Hours
of
Operation:
Monday-Friday
9AM-6PM
EST

HBP17978
opalk.
1
VIPER
WAY
VISTA,
CALIFORNIA
92081
+1
(760)
536-5300
(US
& CAN,
OUTSIDE
US
+1
410-358-3600)
WWW.POLKAUDIO.COM
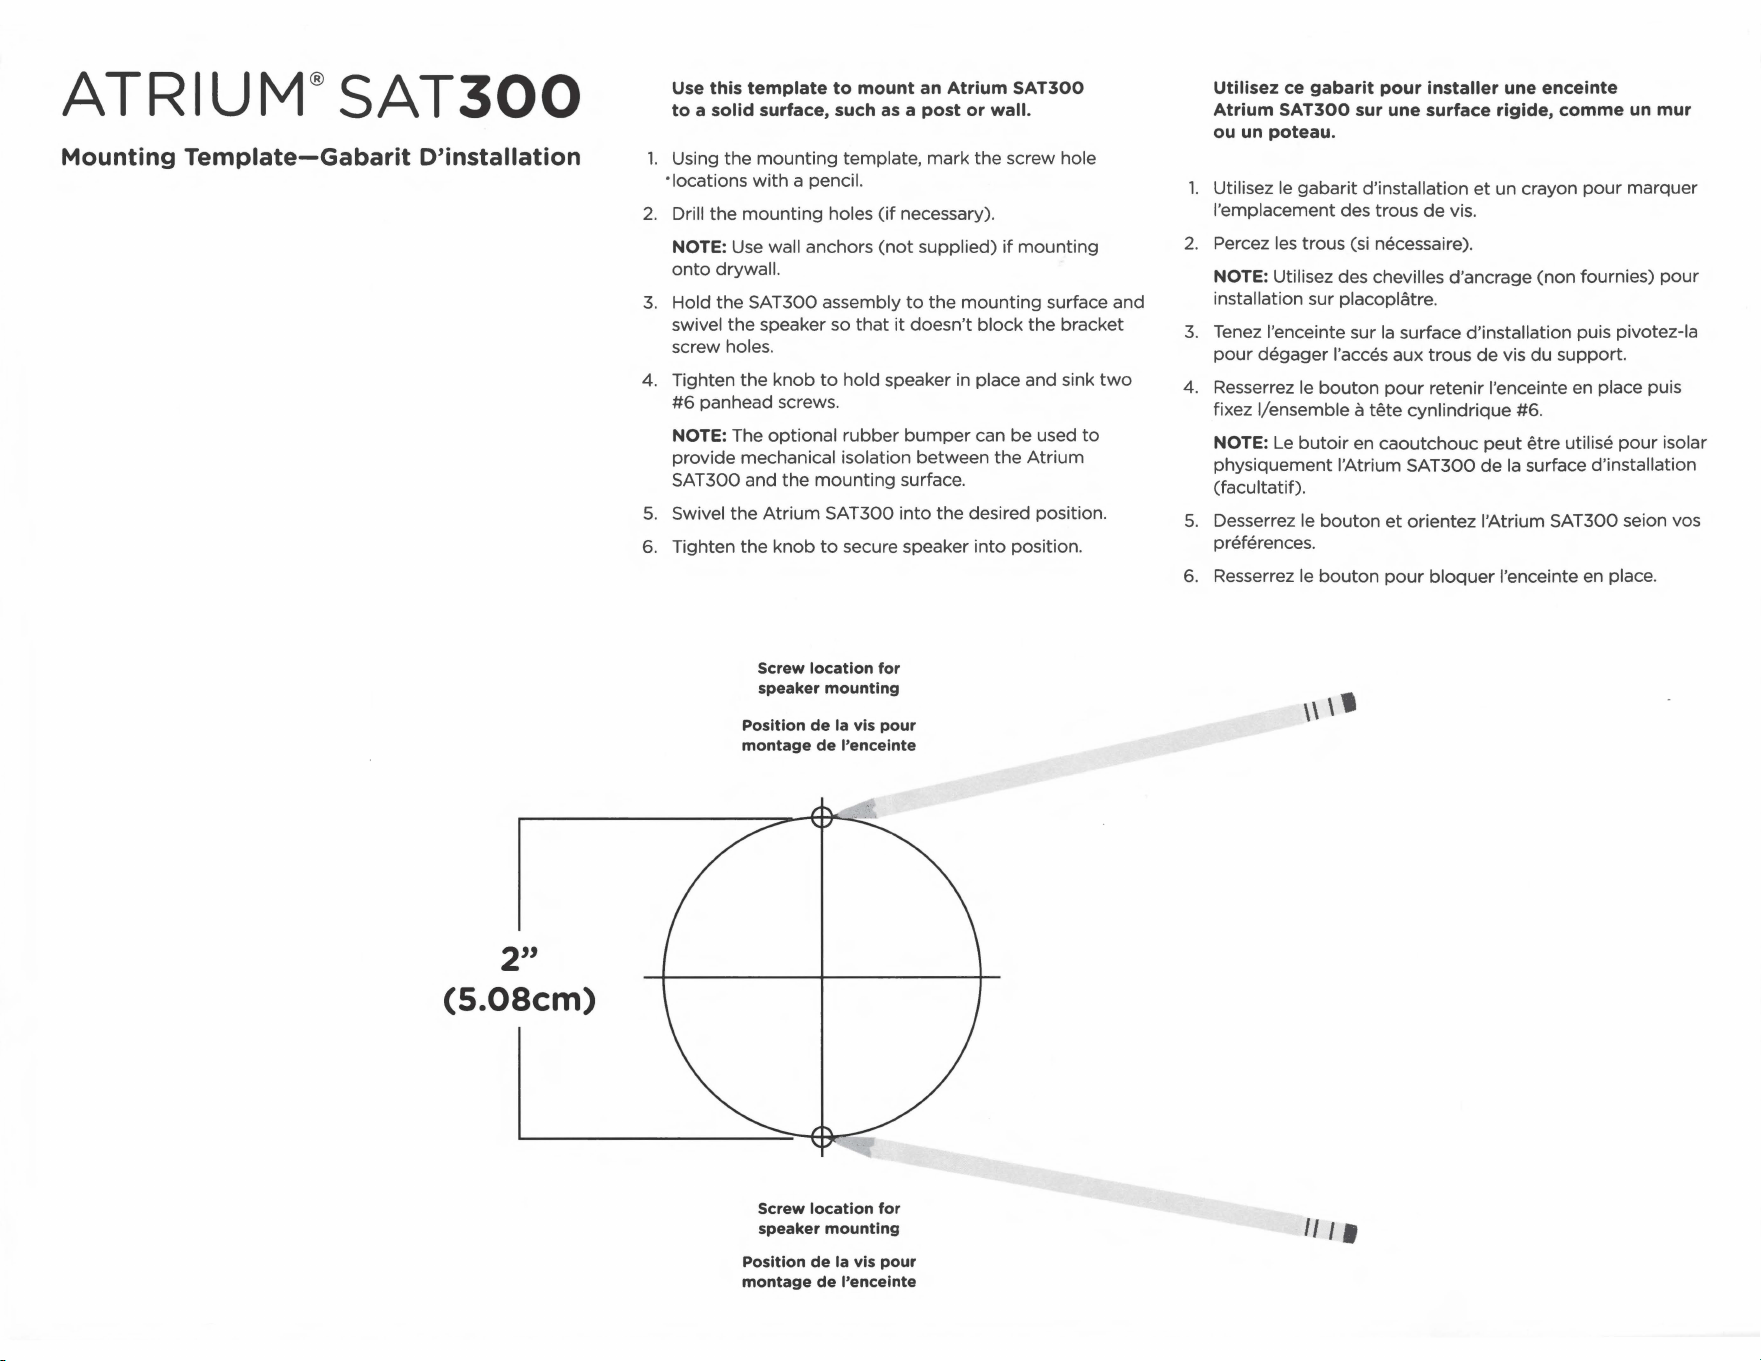
ATRIUM®
SAT300
Mounting
Template-Gabarit
D'installation
2"
(5.08cm)
I
Use this
template
to
mount an Atrium
SAT300
to
a solid surface, such
as
a post or wall.
1.
Using the
mounting
template, mark the screw hole
·locations
with
a pencil.
2.
Drill
the
mounting
holes
(if
necessary).
NOTE: Use wall anchors
(not
supplied)
if
mounting
onto
drywall.
3.
Hold
the
SAT300 assembly
to
the
mounting
surface and
swivel
the
speaker so
that
it
doesn't
block
the
bracket
screw holes.
4. Tighten
the
knob
to
hold
speaker in place and sink
two
#6
panhead screws.
NOTE: The optional
rubber
bumper
can be used
to
provide
mechanical isolation between
the
Atrium
SAT300 and
the
mounting
surface.
5. Swivel
the
Atrium
SAT300
into
the
desired position.
6. Tighten
the
knob
to
secure speaker
into
position.
Screw location for
speaker mounting
Position
de
la
vis
pour
montage de l'enceinte
Screw location for
speaker mounting
Position de la
vis
pour
montage de l'encelnte
Utilisez ce
gabarit
pour
installer une enceinte
Atrium
SAT300
sur une surface rigide,
comme
un
mur
ou un poteau.
1.
Utilisez le
gabarit
d'installation
et
un crayon
pour
marquer
!'emplacement des trous
de
vis.
2.
Percez les trous (si necessaire).
NOTE: Utilisez des chevilles d'ancrage
(non
fournies)
pour
installation sur placoplatre.
3.
Tenez l'enceinte sur
la
surface d'installation puis pivotez-la
pour
degager
l'acces aux trous
de
vis du support.
4. Resserrez le
bouton
pour
retenir l'enceinte en place puis
fixez I/ensemble a
tete
cynlindrique #6.
NOTE:
Le
butoir
en
caoutchouc
peut
etre utilise
pour
isolar
physiquement l'Atrium
SAT300
de
la
surface d'installation
(facultatif).
5.
Desserrez le
bouton
et
orientez !'Atrium SAT300 seion vos
preferences.
6. Resserrez le
bouton
pour
bloquer
l'enceinte en place.
\\\I
II I I

This is
your
Product
Model
and
Serial
Number. Enter
this
number
in
the
"Serial
Number"
space
when
registering
your
product
online. Keep this
card
handy
for
Model
and
Serial
Number
reference
when
calling Polk
Customer
Service.
C
E
ATRIUM
SAT
300
'C(
S/N:AM4386031801536_A
-
-•-"'nEUSA._N_
Register
your
new
Polk
product
online
now!
www.polkaudio.com/registration/
• Creates a
permanent
record
of
your
purchase, in
case
you
misplace
your
original receipt.
• Keeps
you
up
to
date
when
there
is
news and
announcements
about
your
product.
•
Registering
your
product
has
no
effect
on
your
warranty.
Warranties
apply
as
stated
in
your
product
manual.
We
take your privacy seriously. Polk does not share
or sell information
to
any other parties, unless
directed by court order.
No
internet
access? Call Polk
Customer
Service
800-377-7655
(US & Canada
only).
Outside
the
US
&
Canada, call
+1
410-358-3600.
We'll
walk
you
through
the
simple
registration
process!
Questions? Concerns? Contact Polk Customer Service,
9am
-
5:30pm,
M-F,
EST
(USA)
800-377-7655
US
& Canada only •
+1
410-358-3600
outside
US
& Canada • [email protected]