Loading ...
Loading ...
Loading ...
18 Section 4 — Product care
Lubrication
DANGER
Bearing failures and overheating can result in fire/
Always follow the instructions in this manual regarding
lubrications locations and intervals. Contact your authorized
dealer with any questions about the lubrication locations
and intervals or any unusual noises coming from any areas a
bearing may be located.
WARNING
Before lubricating, repairing, or inspecting, always disengage
the PTO, set the parking brake, stop the engine and remove the
key to prevent unintended starting.
Front Wheels
Each of the front wheel axles and rims is equipped
with a grease fitting. See Figure 4-2 for the location of
the grease fitting on the axles and Figure 4-3 for the
location of the grease fitting on the rims. Lubricate
with a No. 2 multi-purpose grease applied with a
grease gun after every 25 hours of tractor operation.
Figure 4-2
Figure 4-3
Deck Wheels
The wheels on the deck which are spherical shaped
(50” and 54” decks have 4) are equipped with a
grease fitting. Lubricate with a No. 2 multi-purpose
grease applied with a grease gun after every 25
hours of tractor operation.
Pivot Points & Linkage
Lubricate all the pivot points on the drive system,
parking brake and lift linkage at least once a
season with light oil.
Note: It is not necessary to grease the steering
pinion/sector gear interface. Doing so will allow dirt
to accumulate and can affect steering performance.
ydrostatic Transmission
The hydrostatic transmission is sealed at the factory
and is maintenance-free. The fluid level cannot be
checked and the fluid cannot be changed.
Adjustments
WARNING
Shut the engine off, remove the ignition key and engage
the parking brake before making adjustments. Protect your
hands by using heavy gloves when handling the blades.
Note : Check the tractor’s tire pressure before
performing any deck leveling adjustments. Refer
to Tires on page 11 for information regarding tire
pressure.
Adjusting the Deck
Leveling the Deck (Front-To-Rear)
The front of the deck is supported by a stabilizer
bar that can be adjusted to level the deck from
front to rear. The front of the deck should be
between ⁄” and ⁄” lower than the rear of the
deck. Adjust if necessary as follows:
1. Park the tractor on a firm, level surface and
place the deck lift lever in the middle position
and rotate the blade nearest the discharge
chute so that it is parallel with the tractor.
2. Measure the distance from the front of the blade
tip to the ground and the rear of the blade tip
to the ground. The front of the deck should be
between ⁄” and ⁄” less than the rear of deck.
3. Determine the approximate distance
necessary for proper adjustment and
proceed, if necessary.
4. To raise the front of the deck, loosen the
outer nut then tighten (thread inward) the nut
against the front hanger bracket. See Figure
4-4. When proper adjustment is achieved,
re-tighten the outer nut to 25-30 ft.-lbs.
Figure 4-4
5. To
lower the front of the deck, loosen the
outer nut then loosen (thread outward) the
nut, away from the front hanger bracket.
See Figure 4-4. When proper adjustment is
achieved, re-tighten the outer nut.
Leveling the Deck (Side-to-Side)
If the deck appears to be mowing unevenly, a
side-to-side adjustment can be performed. Adjust if
necessary as follows:
1. With the tractor parked on a firm, level
surface, place the deck lift lever in the
middle position and rotate both blades so
that they are perpendicular with the tractor.
2. Measure the distance from the outside of
the left blade tip to the ground and the
distance from the outside of the right blade
tip to the ground. Both measurements taken
should be equal. If they’re not, proceed to
the next step.
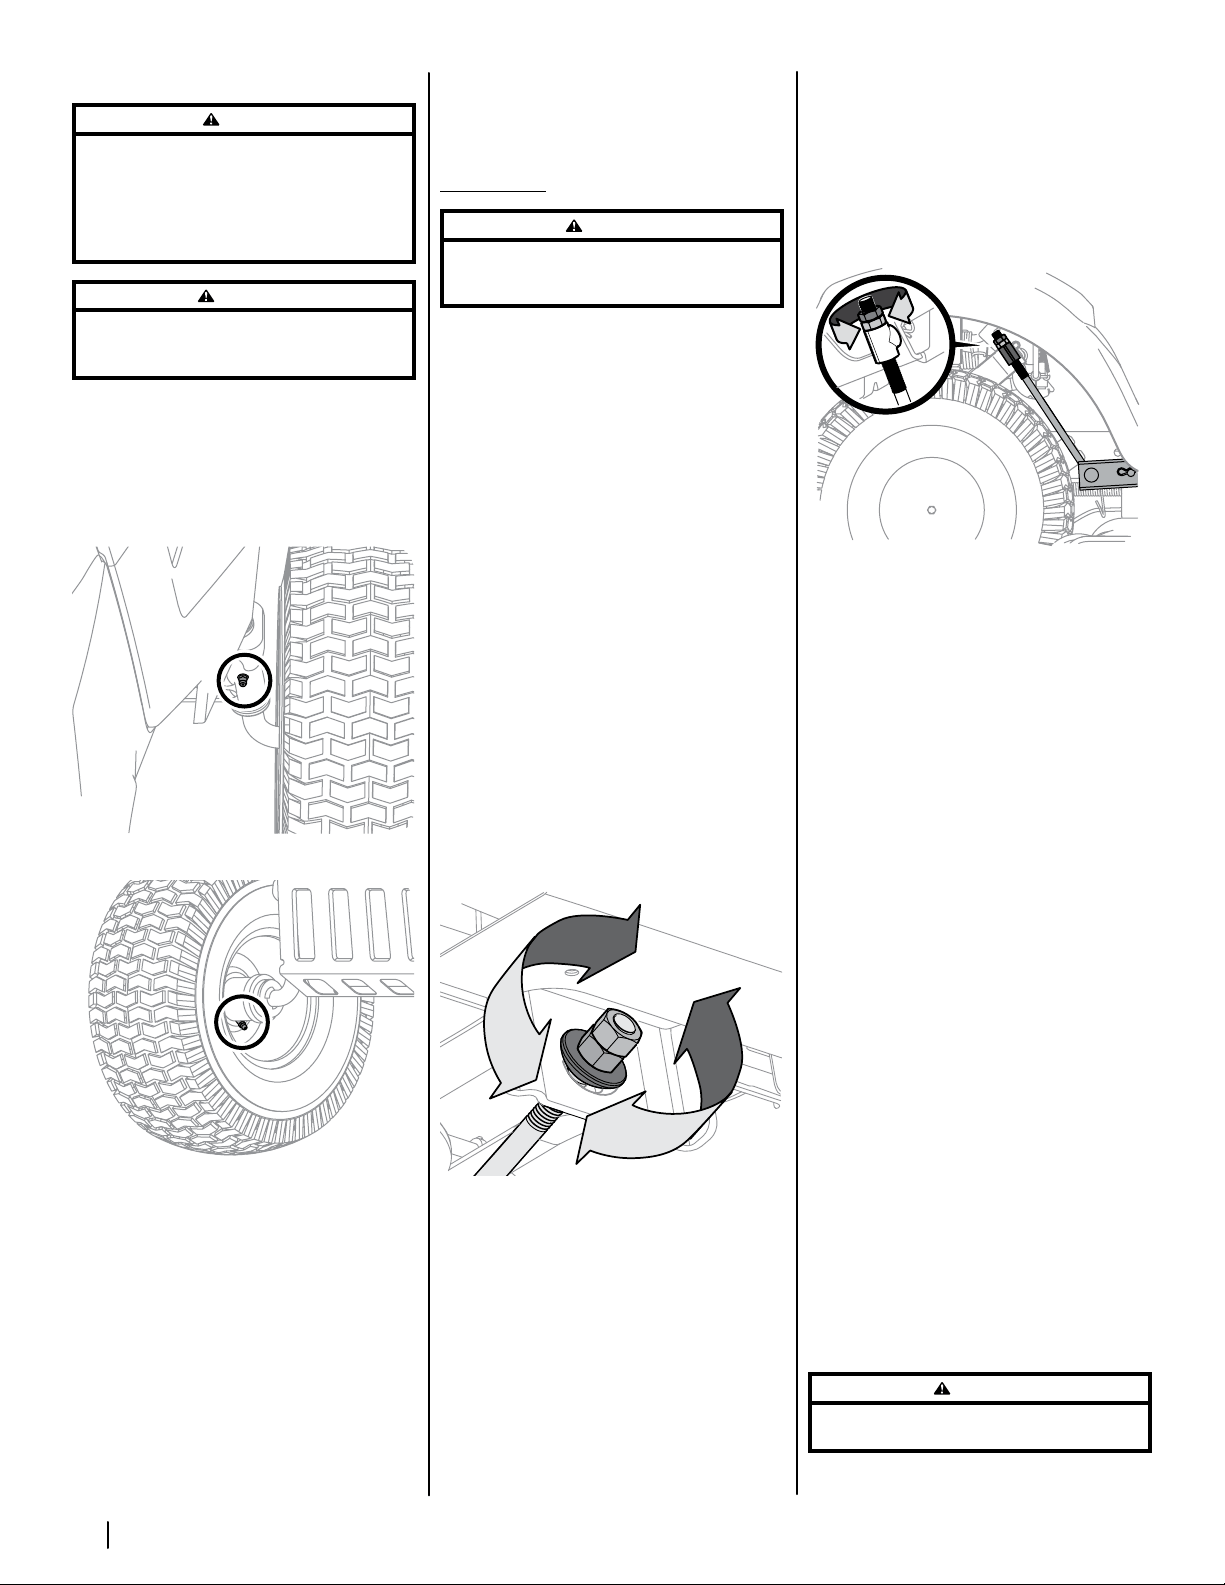
3. Under the rear fenders inside the wheels
there is a lift adjustment rod for each side of
the deck. See Figure 4-5.
Figure 4-5
4. Minor side-to-side adjustments should be
made using primarily the left adjustment rod.
5. To raise the left side of the deck, loosen the
upper nut on the end of the lift rod, then
turn the lower nut clockwise. When the
proper adjustment is achieved, tighten the
upper nut to secure in place. To lower the
left side of the deck, loosen the upper nut
on the end of the lift rod, then turn the lower
nut counterclockwise. When the proper
adjustment is achieved, tighten the upper
nut to 25-30 ft-lbs. to secure in place.
6. The deck is properly leveled when both
blade tip measurements taken earlier are
equal.
Adjusting the Deck Height
The height of the deck can be adjusted to ensure that
the setting on your deck height lever is accurate. To
adjust the deck height proceed as follows:
1. Park the tractor on a firm, level surface
and place the deck lift lever in the
highest position (4”) and rotate the blade
nearest the discharge chute so that it is
perpendicular with the tractor.
2. Measure the distance from the outside of
the left blade tip to the ground and the
distance from the outside of the right blade
tip to the ground. Both measurements taken
should be 4”. If they’re not, proceed to the
next step.
3. Using the right and left lift rods, raise or
lower the necessary side of the deck until
both sides are measured at 4” from the
pavement.
Adjusting the Deck Wheels
WARNING
Keep hands and feet away from the discharge opening of
the deck.
Note: The deck wheels are an anti-scalp feature
of the deck and are not designed to support the
weight of the deck.
Loading ...
Loading ...
Loading ...