
INSTRUCTION MANUAL
MANUEL D’INSTRUCTIONS
MANUAL DE INSTRUCCIONES
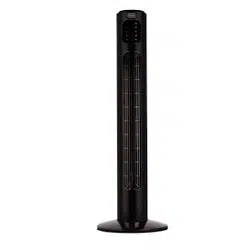
38” DIGITAL TOWER FAN
46” DIGITAL TOWER FAN
VENTILATEUR DE TOUR NUMÉRIQUE 38”
VENTILATEUR DE TOUR NUMÉRIQUE 46”
VENTILADOR TORRE DIGITAL DE 38” (96 CM)
VENTILADOR TORRE DIGITAL DE 46” (117 CM)
Thank you for choosing BLACK+DECKER!
Merci d’avoir choisi BLACK+DECKER!
¡Gracias por elegir BLACK+DECKER!
PLEASE READ BEFORE RETURNING
THIS PRODUCT FOR ANY REASON.
VEUILLEZ LIRE AVANT DE RETOURNER CE PRODUIT POUR UNE
RAISON QUELCONQUE.
POR FAVOR, LEA ESTE MANUAL ANTES DE DEVOLVER ESTE
PRODUCTO POR CUALQUIER MOTIVO.
If you have a question or experience a problem with your BLACK+DECKER purchase, go
to www.blackanddecker.com/instantanswers
If you can’t find the answer or do not have access to the Internet, call
844-299-0879 from 10:30 a.m. to 6:30 p.m. EST Mon. - Fri. to speak with an agent.
Please have the catalog number available when you call.
Si vous avez une question ou rencontrez un problème avec votre achat BLACK+DECKER,
allez sur www.blackanddecker.com/instantanswers
Si vous ne trouvez pas la réponse ou n’avez pas accès à l’internet, appelez au
844-299-0879 de 10 h 30 à 18 h 30 HNE du lundi au vendredi pour parler avec un
agent. Veuillez avoir le numéro de catalogue disponible lorsque vous appelez.
Si tiene una pregunta o sufre un problema con su compra de BLACK+DECKER, diríjase a
www.blackanddecker.com/instantanswers
Si no puede encontrar la respuesta o no tiene acceso a Internet, llame al
844-299-0879 desde 10:30 a.m. a 6:30 p.m. EST, de lun. a vie. para hablar con un
agente. Tenga el número de catálogo a mano cuando llame.
SAVE THIS MANUAL FOR FUTURE REFERENCE.
GARDEZ CE MANUEL POUR RÉFÉRENCE FUTURE.
GUARDE ESTE MANUAL PARA SU REFERENCIA EN EL FUTURO.
CATALOG NUMBER
NUMÉRO DE CATALOGUE
NÚMERO DE CATÁLOGO
BFTR138 BFTR146

Page 2
ENGLISH
CONTENTS
SAFETY INFORMATION
Important Safety Instructions ..........................................................................................................................................3-4
Electrical Requirements ...................................................................................................................................................4-5
SET UP & USE
Parts & Features .......................................................................................................................................................................6
Assembly Instruction ............................................................................................................................................................... 7
Battery Instruction ....................................................................................................................................................................8
Operation Instruction ........................................................................................................................................9-11
BFTR138 LED Display ...................................................................................................................................... 10
BFTR146 LED Display ........................................................................................................................................11
Replacing the Fuse ................................................................................................................................................ 12
CLEANING & CARE ..............................................................................................................................................12
TROUBLE SHOOTING & WARRANTY
Before You Call For Service ............................................................................................................................... 13
Customer Service ................................................................................................................................................... 13
Troubleshooting .....................................................................................................................................................13
Limited Warranty ................................................................................................................................................................... 14
Thank you for purchasing our
BLACK+DECKER product. This
easy-to-use manual will guide you
in getting the best use of your fan.
Remember to record the model and
serial numbers. They are on a label
on the rear.
Staple your receipt to your manual.
You will need it to obtain warranty service.
Model number
Serial number
Date of purchase
PRODUCT REGISTRATION
Page 3
ENGLISH
Page 3
1. READ ALL INSTRUCTIONS BEFORE USE
2. Never insert ngers, pencils, or any other object through the grill
when fan is running
3. Disconnect fan when moving from one location to another.
4. Disconnect fan when not in use and before cleaning.
5. To protect against risk of electrical shock, do not immerse fan in
water or any other liquid.
6. Do not let cord hang over edge of table or counter.
7. Be sure fan is on a stable surface when operating to avoid
overturning.
8. Do not use fan in window. Rain may create electrical hazard.
9. Close supervision is necessary when any appliance is used by or near
children.
10. This product employs overload protection (fuse). A blown fuse
indicates an overload or short-circuit situation. If the fuse blows,
unplug the product from the outlet. Replace the fuse as per the user
manual (follow product marking for proper fuse rating) and check
the product. If the replacement fuse blows, a short-circuit may be
present and the product should be discarded or returned to an
authorized service facility for examination and/or repair.
11. Do not operate any fan with a damaged cord or plug. Discard fan or
return to an authorized service facility for examination and/or repair.
12. Do not run cord under carpeting. Do not cover cord with throw rugs,
runners, or similar coverings. Do not route cord under furniture or
appliances. Arrange cord away from trafc area and where it will not
be tripped over.
13. To reduce the risk of re or electric shock, DO NOT use this fan with
any solid state speed control devices.
14. Do not use outdoors.
IMPORTANT SAFETY INSTRUCTIONS
SAFETY INFORMATION
WARNING
WARNING - Hazards or unsafe
practices which COULD result in
severe personal injury or death
DANGER
DANGER - Immediate hazards
which WILL result in severe
personal injury or death
CAUTION
CAUTION - Hazards or unsafe
practices which COULD result in
minor personal injury
WARNING
When using electrical appliances, basic safety precautions
should be followed, including the following

Page 4
ENGLISH
SAFETY INFORMATION
SAVE THESE INSTRUCTIONS
HOUSEHOLD USE ONLY
ELECTRICAL REQUIREMENTS
This appliance has a polarized plug (one blade is wider than the other). To reduce the
risk of electric shock, this plug is intended to t into a polarized outlet only one way.
If the plug does not t into the outlet, reverse the plug. If it still does not t, contact a
qualied electrician. Do not attempt to modify the plug in any way.
POWER SUPPLY CORD
1. If the power supply cord is too short, do not use an extension cord. Have a qualied
electrician or serviceman to install an outlet near the appliance.
2. If it is absolutely necessary to use longer cord sets or an extension cord, extreme
care must be exercised.
a) The marked electrical rating of the cord set or extension cord must equal to or
be greater than the electrical rating of the appliance. The longer cord should be
arranged so that it will not drape over the counter top or table top where it can be
pulled on by children or tripped over unintentionally.
NOTE: Neither BLACK+DECKER nor the dealer can accept any liability for damage
to the product or personal injury resulting from failure to observe the
electrical connection procedures.

Page 5
ENGLISH
SAFETY INFORMATION
BATTERY INFORMATION
• KEEP OUT OF REACH OF CHILDREN.
Swallowing may lead to serious injury or death. Severe burns can occur
within 2 hours of ingestion. Immediately see a doctor and have the
doctor phone (202) 625- 3333 collect. Keep in original package until
ready to use. Dispose of used batteries immediately. Risk of injury due to
re, explosion or leakage. Do not disassemble, charge, crush or expose
to re or high temperatures.
• LITHIUM COIN CELL SAFETY NOTICE:
Keep lithium coin batteries out of the reach of small children; coin cell
batteries can be accidentally ingested. If ingested, these batteries may
leak harmful contents causing chemical burns, perforation of soft tissue,
and in severe cases may cause death. Lithium coin batteries must be
removed immediately if swallowed. Seek medical attention immediately.
If you or your doctor suspects that a battery has been ingested for
assistance in the US call the NATIONAL BATTERY INGESTION HOTLINE
any time at (202) 625-3333: in Canada call 416-813-5900.
• In order to prevent unnecessary battery drain, do not store anything on
the fan.
• Do not dispose of batteries in re. Batteries may explode or leak.
• Remove the battery if the remote is not used for a long period of time.

Page 6
ENGLISH
Page 6
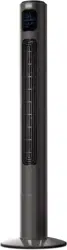
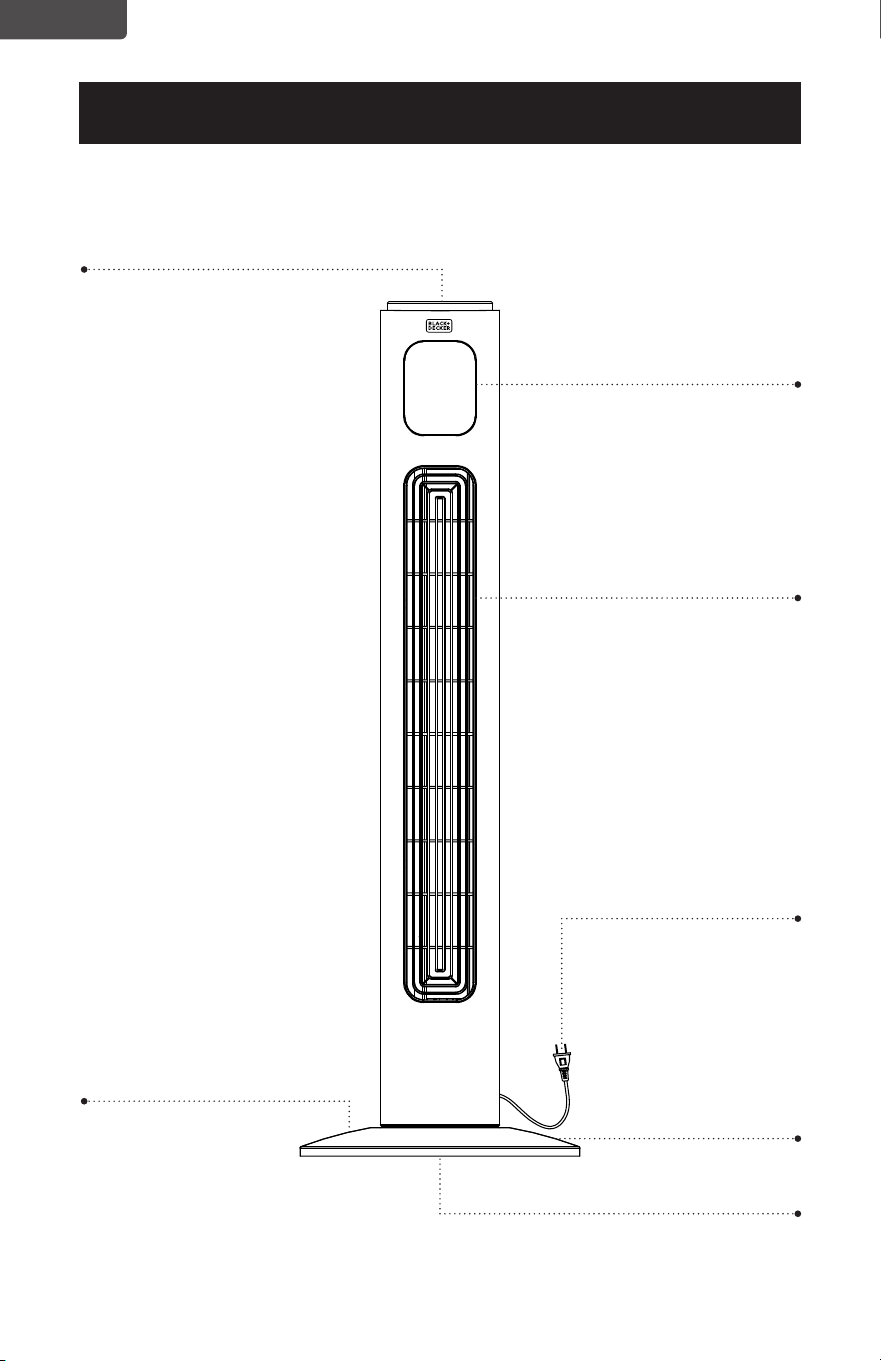
PARTS & FEATURES
SET UP & USE
LED Display
Control Panel
Air Outlet
Front Base
4 Buttery Screws
Rear Base (not shown)
Line Drawing for reference only. Illustration may dier slightly from model.
Power Cord

Page 7
ENGLISH
Page 7
SET UP & USE
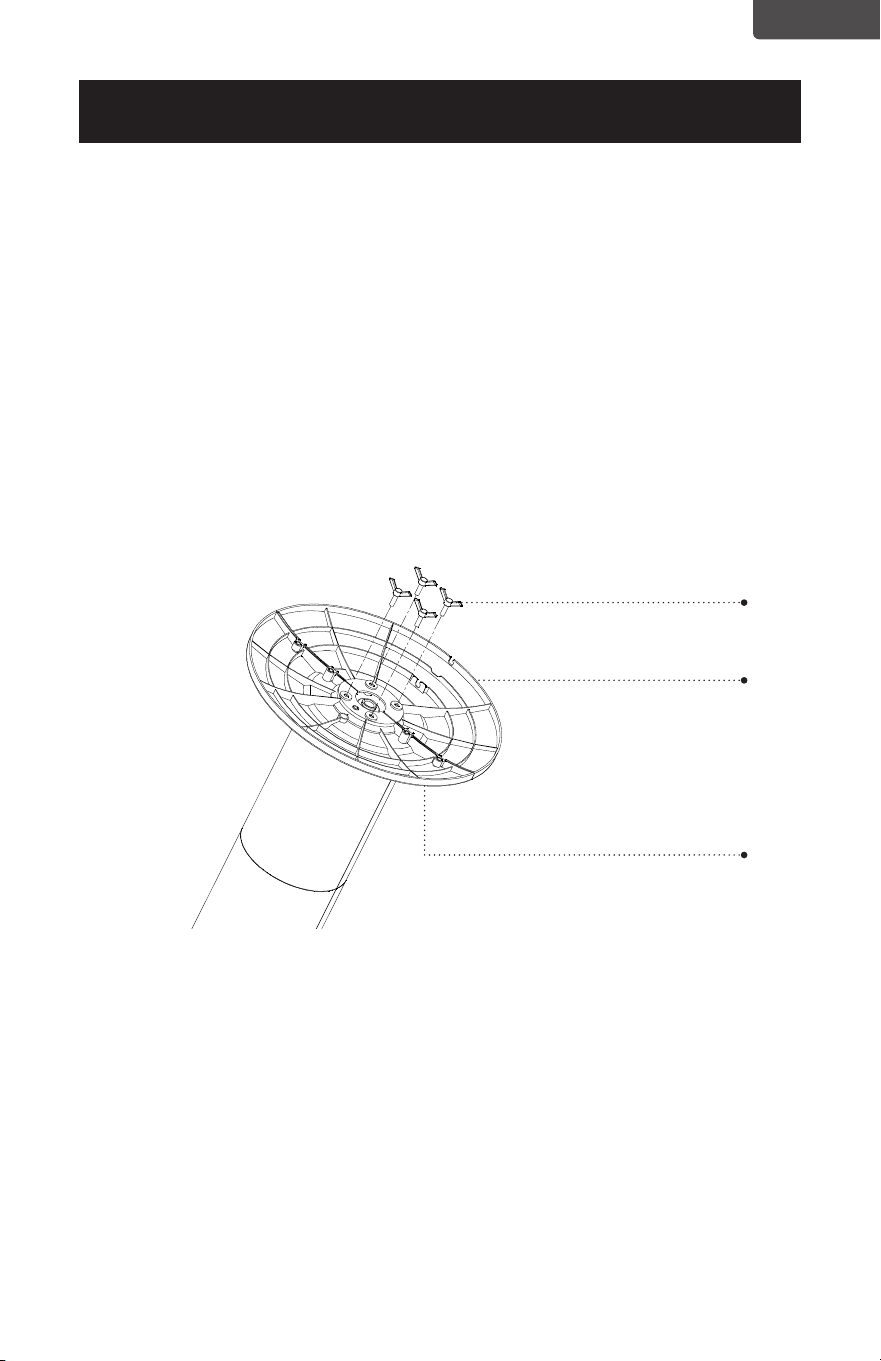
ASSEMBLY INSTRUCTIONS
The base of the tower fan comes with 2 parts. The rear base has a space for the
power cord.
1. Attach the front half of the base, aligning the holes in the base with the screw
holes in the base of the tower fan.
2. Lead the power cord through the center hole and insert the back half of the base
to the front half.
3. Secure with the four supplied buttery screws as shown. Turn each of the screws
clockwise until fully inserted.
4. Thread the power cord through the cut out spaces on the base.
Buttery screws
Rear base
Front base
Page 8
ENGLISH
Page 8
SET UP & USE
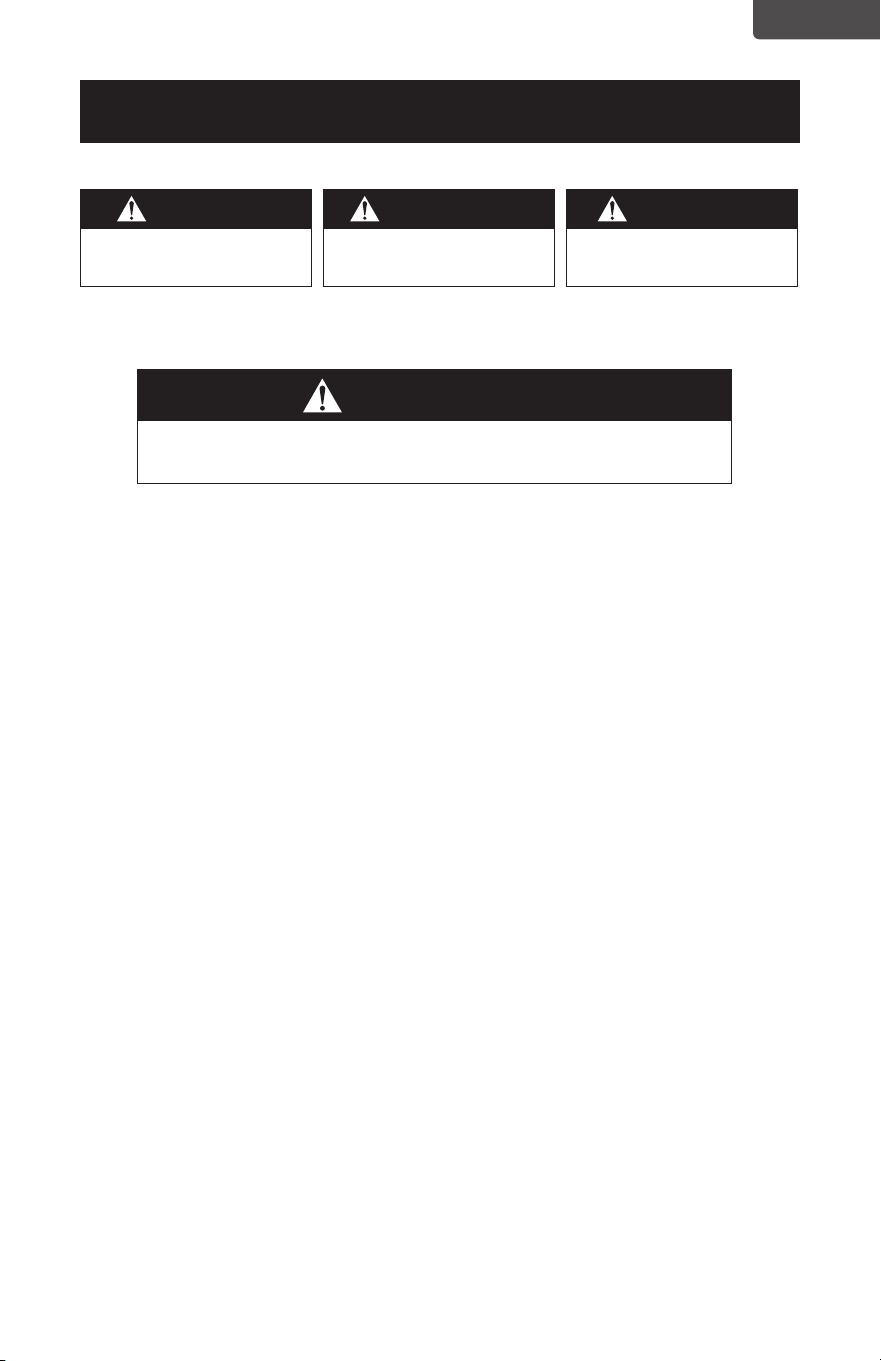
BATTERY INSTRUCTIONS
Batteries not included
The remote control requires a CR2025 Lithium Battery to operate. Battery is not
included.
1. Push the button at the base of the battery cover to release the cover. Pull out the
battery cover as shown in the diagram.
2. Insert the battery making sure the “+” side is facing up.
3. Once battery is installed, push battery cover closed
CR2025
Battery
Remote Control
Battery Cover
Page 9
ENGLISH
Page 9
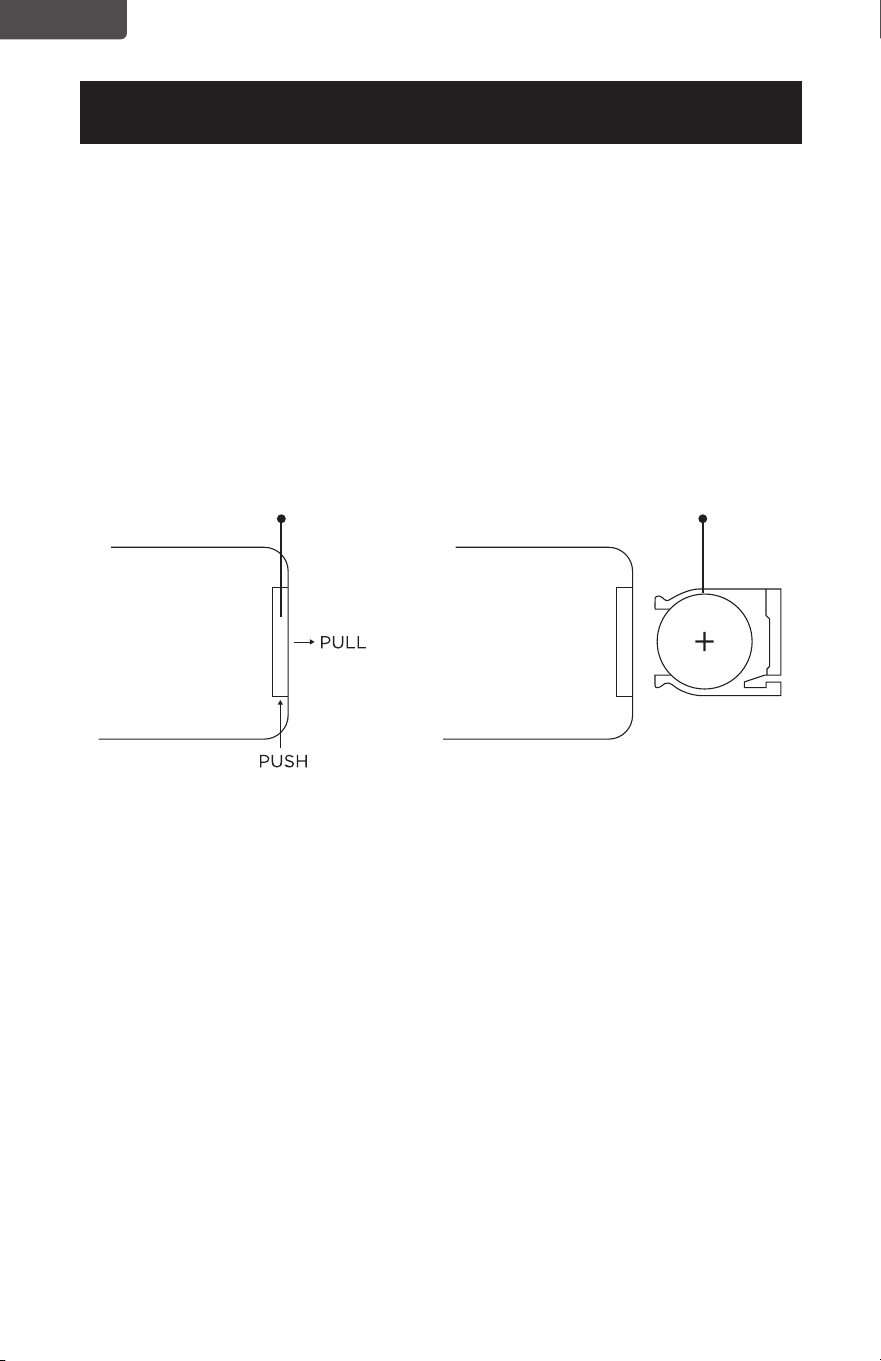
SET UP & USE
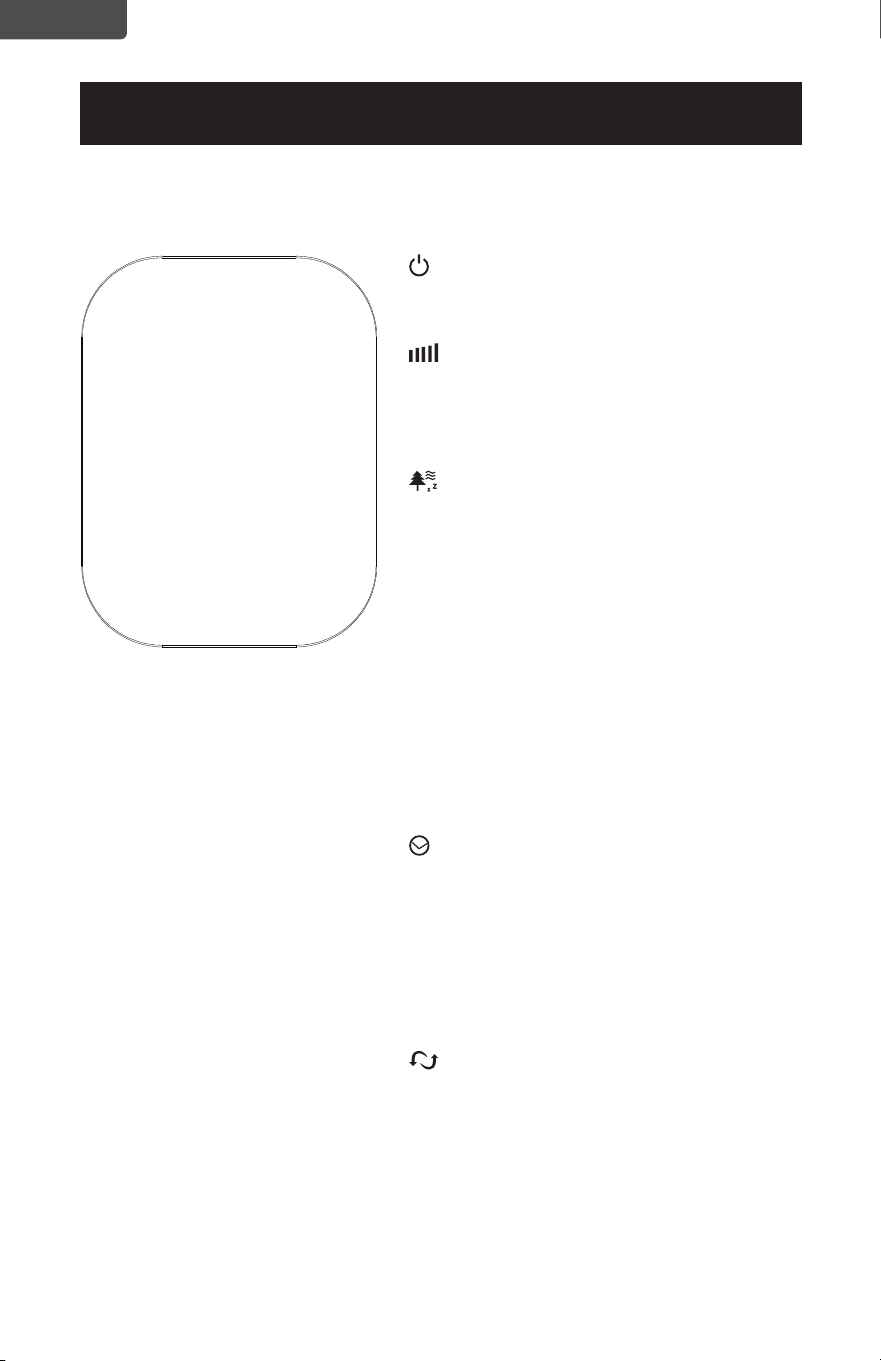
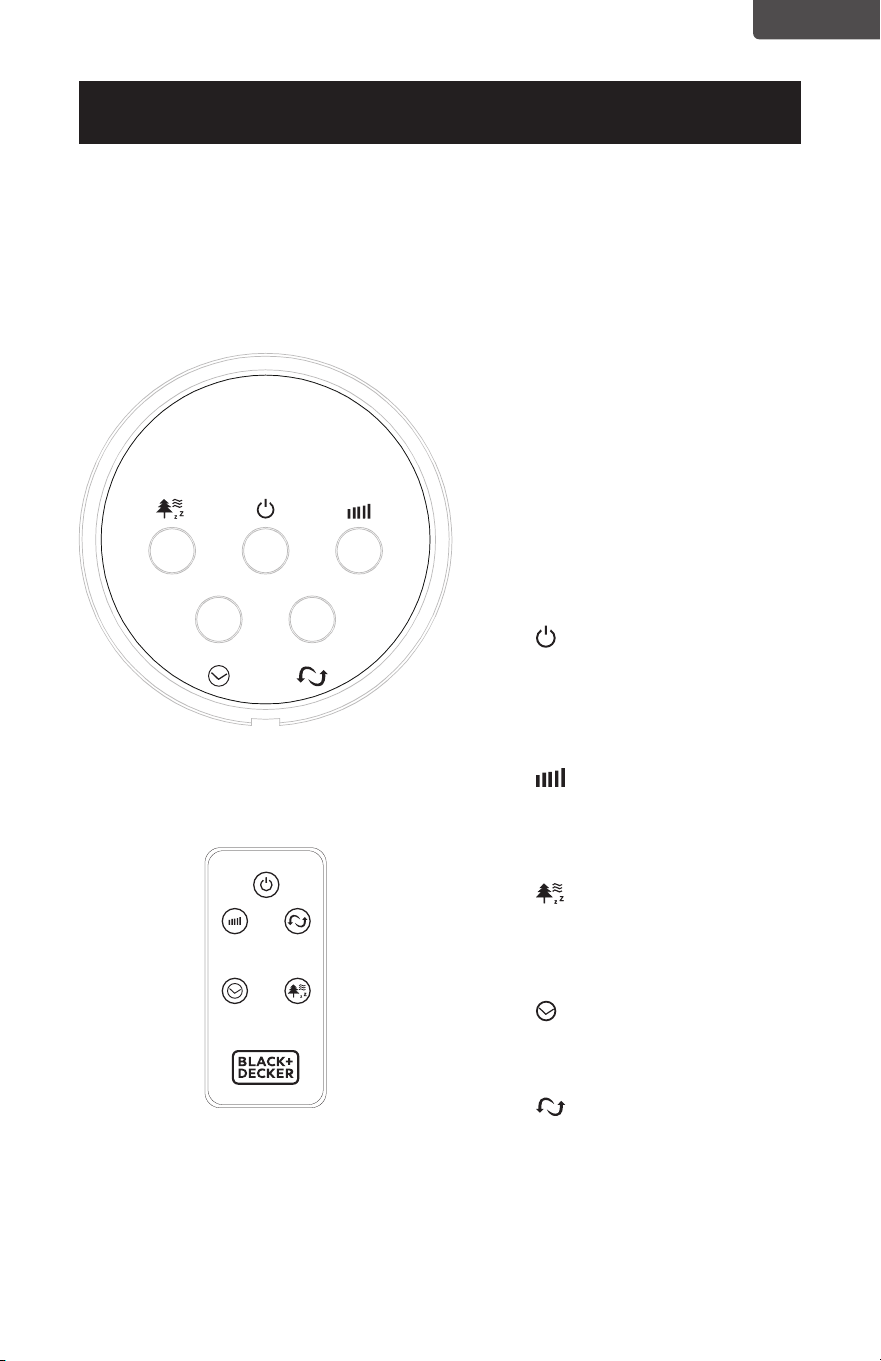
The FAN may be operated by the
manual controls located on the
FAN (as shown in FIGURE 1) or
by your remote control (shown
in FIGURE 2). Place the FAN on a
stable at surface. Plug the cord
set into a 120V A.C. electrical
outlet.
1. POWER: Turn the FAN
on by pressing the ‘POWER’
button; Turn the FAN off by
pressing the ‘POWER’ button
again.
2. SPEED: You can adjust
the fan speed to the desired
level: low, medium, or high by
pressing ‘SPEED’ continuously.
3. MODE: Pressing the’
MODE’ button will set the FAN
into NORMAL, NATURAL, and
SLEEP mode.
4. TIMER: The fan is equipped
with a timer that allows you to
set its length
of operation
5. OSC: Pressing the ‘OSC’
button will start and stop the
oscillation function.
CONTROL PANEL
FIGURE 1
REMOTE CONTROL
FIGURE 2
OPERATION INSTRUCTIONS
CONTROL PANEL
POWER
SPEED
OSC
TIMER
MODE
POWER
SPEED OSC
TIMER MODE
Page 10
ENGLISH
SET UP & USE
Page 10
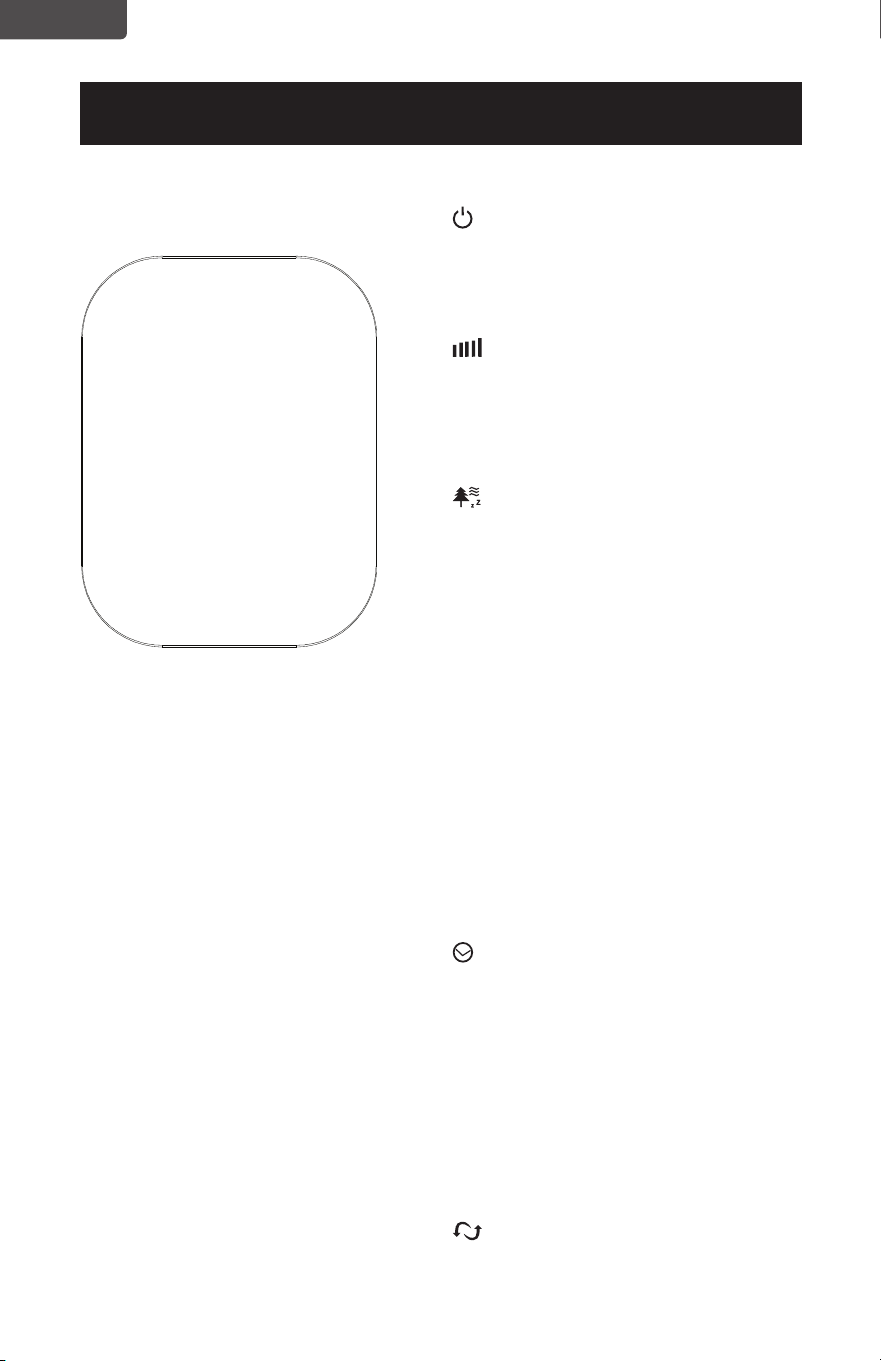
POWER: Turn the FAN on by pressing the
‘POWER’ button; Turn the FAN off by pressing
the ‘POWER’ button again.
SPEED: You can adjust the fan speed to
the desired level: low, medium, or high by
pressing ’SPEED’. The corresponding LED
light I (Low), II (medium) and III (high)
will illuminate.
MODE: Pressing the’ MODE’ button will set
the FAN to NORMAL, NATURAL, or SLEEP
mode.
• The default mode is NORMAL and
provides a steady air ow.
• NATURAL mode cycles through low,
medium and high fan speeds for 5
seconds each.
• In SLEEP mode the fan will cycle to a
lower fan speed after 30 minutes of
operation when set at either a high or
medium fan speed.
The NM (Normal), NT (Natural) and SL (Sleep)
will illuminate to indicate the selection.
TIMER: The fan is equipped with a timer
that allows you to set its length of operation
from 1/2 hour to 7 1/2 hours. Continue to
press the TIMER button to scroll through
the different time selections of 1/2 hour, 1
hour, 2 hours, and 4 hours. The combination
of selections 1/2H, 1H, 2H and 4H will be
illuminated. The fan will automatically shut-off
after the selected duration.
OSC: Pressing the ‘OSC’ button will start
and stop the oscillation function.
I
II
III
1/2 H
1 H
NM
NT
SL
2H
4 H
BFTR138 LED DISPLAY

Page 11
ENGLISH
Page 11
SET UP & USE
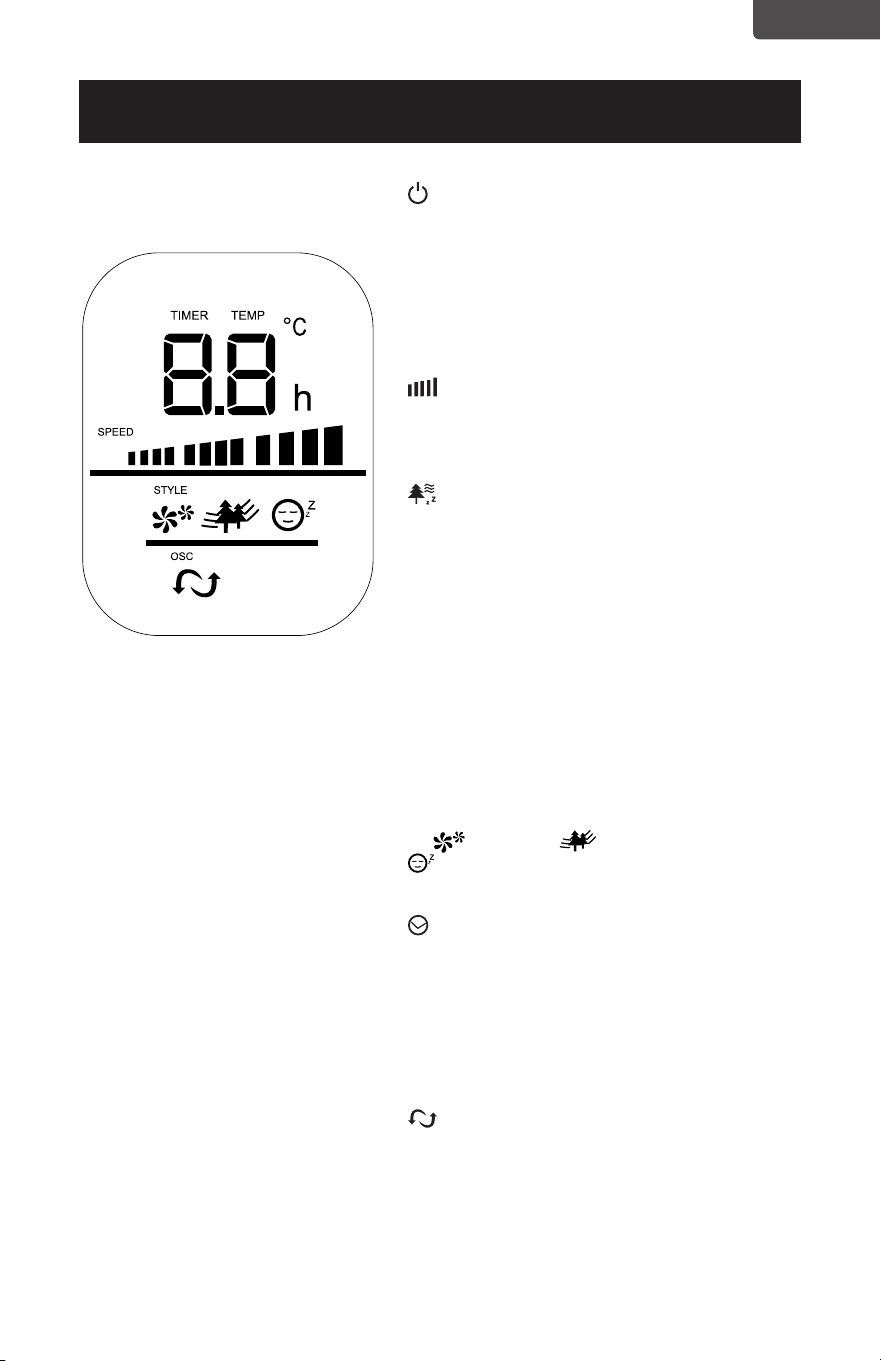
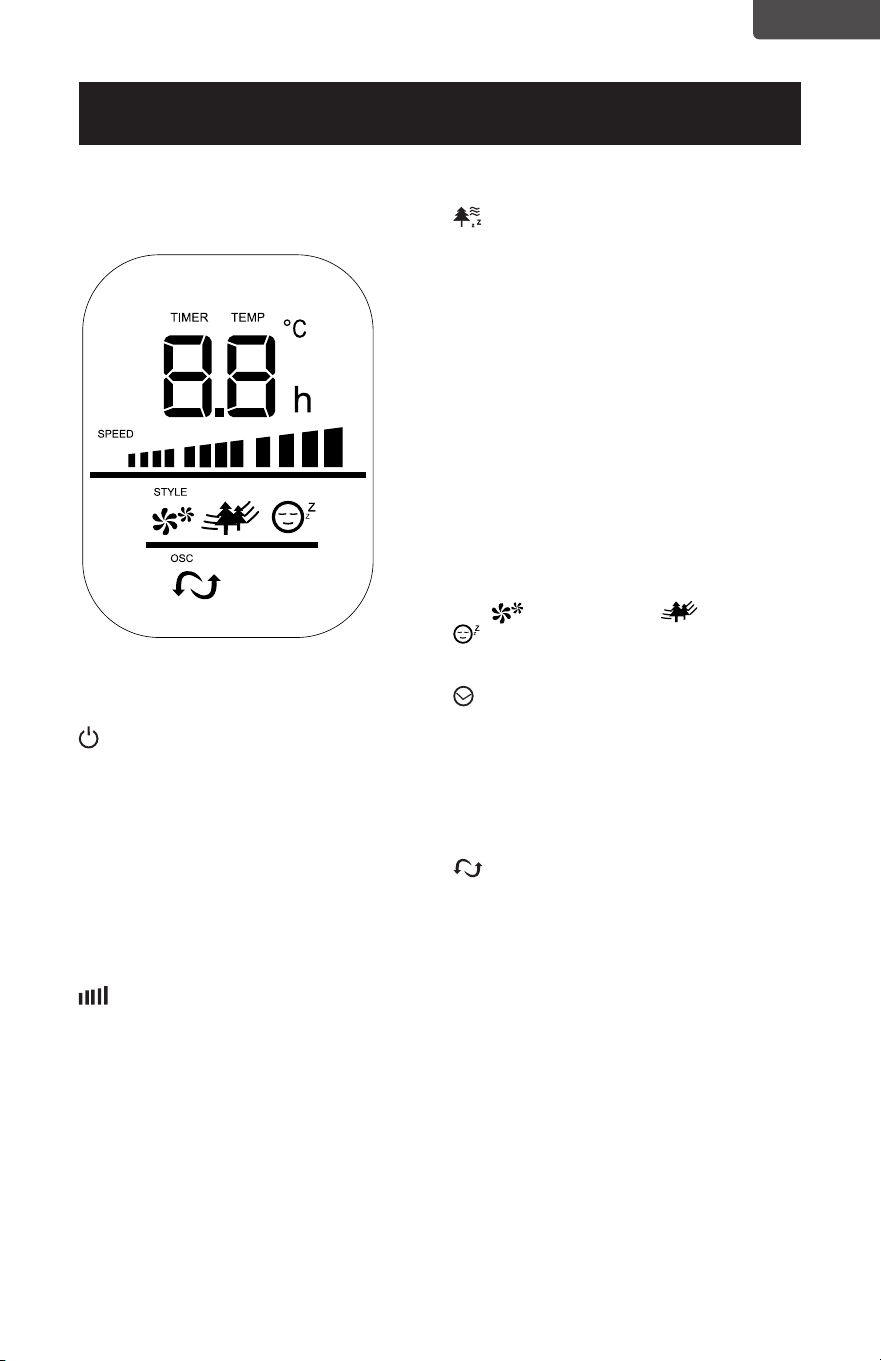
POWER: Turn the FAN on by pressing the
‘POWER’ button; Turn the FAN off by pressing
the ‘POWER’ button again.
TEMPERATURE: The LED display will
illuminate and show the room temperature.
The temperature display will change to
‘TIMER’ when the timer is set.
SPEED: You can adjust the fan speed to
the desired level: low, medium, or high by
pressing ’SPEED’. The selected fan speed will
be displayed on the LED display.
MODE: Pressing the’ MODE’ button will set
the FAN to NORMAL, NATURAL, or SLEEP
mode.
• The default mode is NORMAL and
provides a steady air ow.
• NATURAL mode cycles through low,
medium and high fan speeds for 5
seconds each.
• In SLEEP mode the fan will cycle to a
lower fan speed after 30 minutes of
operation when set at either a high or
medium fan speed.
The (Normal), (Natural) and
(Sleep) will illuminate to indicate the
selection.
TIMER: The fan is equipped with a timer
that allows you to set it’s length of operation
from 1 hour to 12 hours. Continue to press
the TIMER button to add time in 1 hour
increments. The time selected will show on the
LED Display. The fan will automatically shut-
off after the selected duration.
OSC: Pressing the ‘OSC’ button will start
and stop the oscillation function.
POWER SAVE MODE: When the ‘sleep’ mode
or the ‘timer’ is on, the LED display will turn off
after 30 seconds. Press any key to turn on the
display again.
BFTR146 LED DISPLAY
Page 12
ENGLISH
SET UP & USE
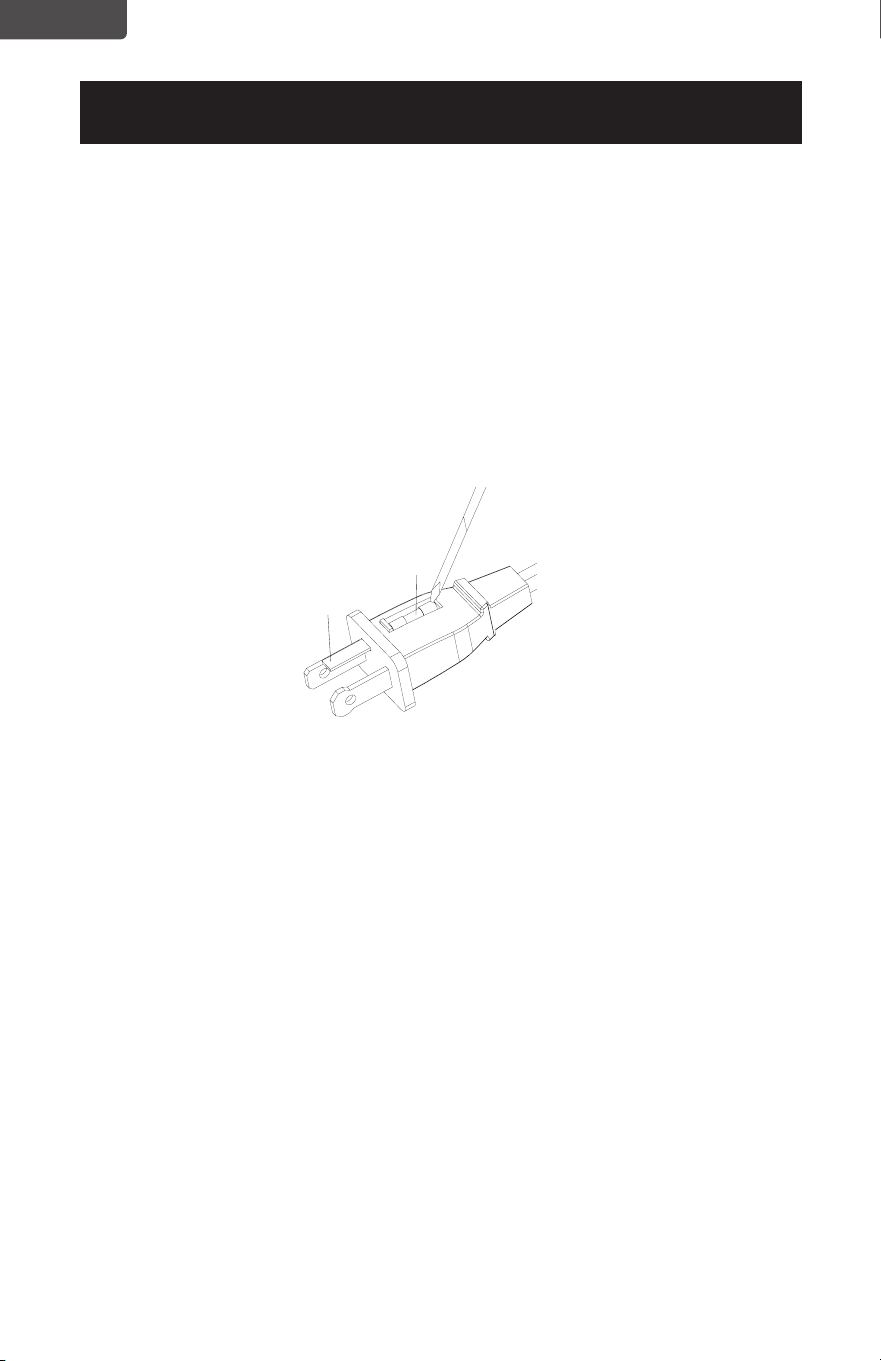
REPLACING THE FUSE
• Disconnect fan from power outlet by grabbing the plug at the end of the cord. Do
not unplug by pulling the cord itself
• Open fuse cover located in the side of the power cord plug by sliding it toward the
plug blades
• Remove fuse carefully by taking a small tool and slowly prying out one end. Once
you have one end out, slowly pry out the other end.
• To avoid the risk of re, replace only with similar 2.5 Amp, 125V fuse.
• Close fuse cover by sliding cover toward the top of the plug.
CAUTION: Do not attempt to replace the plug itself. Discard the product entirely if
the plug itself is damaged.
CLEANING AND MAINTENANCE
• Be sure to unplug from the electrical supply source before cleaning
• Plastic parts of the fan should be cleaned with mild soap and a damp cloth or
sponge. Rinse with clean water to remove any soapy lm residue.
• Be sure not to get water or any other liquid inside the motor.
Fuse
Fuse cover

Page 13
ENGLISH
TROUBLESHOOTING & WARRANTY
BEFORE YOU CALL FOR SERVICE
IF THE APPLIANCE FAILS TO OPERATE:
A) Check to make sure that the appliance is plugged in securely. If it is not, remove
the plug from the outlet, wait 10 seconds and plug it in again securely.
B) Check for a blown circuit fuse or a tripped main circuit breaker. If these seem to
be operating properly, test the outlet with another appliance.
IF NONE OF THE ABOVE SOLVES THE PROBLEM, CONTACT A QUALIFIED
TECHNICIAN. DO NOT TRY TO ADJUST OR REPAIR THE APPLIANCE YOURSELF.
IMPORTANT
DO NOT RETURN THIS PRODUCT TO THE STORE
If you have a problem with this product, please contact the
W Appliance Co. Customer Satisfaction Center at
844-299-0879 or [email protected].
DATED PROOF OF PURCHASE, MODEL # AND SERIAL #
REQUIRED FOR WARRANTY SERVICE
TROUBLE POSSIBLE CAUSE POSSIBLE REMEDY
Appliance does not turn on
Appliance is not plugged in Check that appliance is
plugged into a working outlet
The fuse cover may be open Disconnect the plug from
outlet and close the cover of
the fuse.
Troubleshoot your problem by using the chart below. If the appliance still does not
work properly, contact W Appliance Co. customer service center or the nearest
authorized service center. Customers must never troubleshoot internal components.
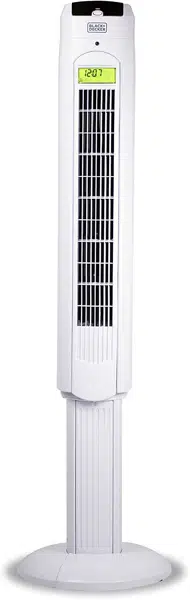
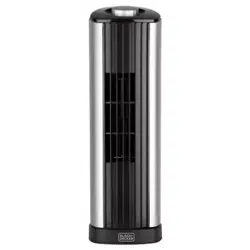
SPECIFICATIONS
BFTR138
• Unit Dimensions (W x D x H):
12.4” x 12.4” x 37.2”
• Net Weight: Approx. 7.1 lb
BFTR146
• Unit Dimensions (W x D x H):
12.4” x 12.4” x 46.2”
• Net Weight: Approx. 7.9 lb

Page 14
ENGLISH
TROUBLESHOOTING & WARRANTY
LIMITED WARRANTY
Any repair, replacement, or warranty service,
and all questions about this product should be
directed to W Appliance Co. at 844-299-0879
from the USA or Puerto Rico.
W Appliance Co. warrants to the original purchaser
that the product will be free from defects in material,
parts and workmanship for the period designated for
this product. The warranty commences the day the
product is purchased and covers up to a period of
1 year (12 months) for labor/1 year (12 months) for
parts (manufacturing defects only).
W Appliance Co. agrees that it will, at its option,
replace the defective product with either a new
or remanufactured unit equivalent to your original
purchase during the warranty period.
Exclusions: This warranty does not apply to the
below:
1. If the appearance or exterior of
the product has been damaged or
defaced, altered or modied in design or
construction.
2. If the product original serial number
has been altered or removed or cannot
be readily determined.
3. If there is damaged due to power line
surge, user damage to the AC power
cord or connection to improper voltage
source.
4. If damage is due to general misuse,
accidents or acts of God.
5. If repair attempts are done by
unauthorized service agents, use of
parts other than genuine parts or parts
obtained from persons other than
authorized service companies.
6. On units that have been transferred
from the original owner.
7. On products that have been purchased
as refurbished, like new, second-hand, in
a “As-Is” or “Final Sale” terms.
8. To products used in a commercial or
rental setting.
9. To products used in settings other than
ordinary household use or used other
than in accordance with the provided
instructions.
10. To damages for service calls for
improper installations.
11. Transportation and shipping costs
associated with the replacement of
the unit.
12. Service calls to instruct you how to use
your product.
13. Service calls to repair or replace the
house fuse, reset the circuit breaker or
correct the wiring in the house.
REPAIR OR REPLACEMENT AS PROVIDED UNDER
THIS WARRANTY IS THE EXCLUSIVE REMEDY OF
THE CUSTOMER; W Appliance Co. SHALL NOT BE
LIABLE FOR ANY INCIDENTAL OR CONSEQUENTIAL
DAMAGES FOR BREACH OF ANY EXPRESS OR
IMPLIED WARRANTY ON THIS PRODUCT, EXCEPT
TO THE EXTENT PROHIBITED BY APPLICABLE LAW.
ANY IMPLIED WARRANTY OF MERCHANTABILITY
OF FITNESS FOR A PARTICULAR PURPOSE ON THIS
PRODUCT IS LIMITED TO THE DURATION OF THE
WARRANTY.
Some states do not allow the exclusion or limitations
of incidental or consequential damages, or limitations
on how long the warranty lasts. In these cases the
above exclusions or limitations may not apply to you.
This warranty gives you specic legal rights and you
may also have other rights which vary from state to
state.
Obtaining Service: To obtain service, product
literature, supplies or accessories please call
844-299-0879 to create a ticket for exchange/repair.
Please make sure to provide the date of purchase,
model number and a brief description of the problem.
Our customer service representative
will contact you or send detailed return instructions.
W Appliance Co. does not warrant that the appliance will work
properly in all environmental conditions, and makes no warranty
and representation, either implied or expressed, with respect
to the quality, performance, merchantability, or tness for a
particular purpose other than the purpose identied within this
user’s manual. W Appliance Co. has made every effort to ensure
that this user’s manual is accurate and disclaims liability for any
inaccuracies or omissions that may have occurred. Information
in this user’s manual is subject to change without notice and
does not represent a commitment on the part of W Appliance
Co.. W Appliance Co. reserves the right to make improvements
to this user’s manual and/or to the products described in this
user’s manual at any time without notice. If you nd information
in this manual that is incorrect, misleading, or incomplete, please
contact us at 844-299-0879.
W Appliance Co.
1356 Broadway
New York, NY 10018

Page 15
ENGLISH
TROUBLESHOOTING & WARRANTY
This device complies with part 15 of the FCC rules. Operation is subject to the
following two conditions: 1) This device may not cause harmful interference, and 2)
This device must accept any interference received, including interference that may
cause undesired operation. This equipment has been tested and found to comply
with the limits for a Class B digital device, pursuant to Part 15 of the FCC rules. These
limits are designed to provide reasonable protection against harmful interference
in a residential installation. This equipment generates, uses and can radiate radio
frequency energy and, if not installed and used in accordance with the instructions,
may cause harmful interference to radio communications. However, there is no
guarantee that the interference will not occur in a particular installation. If this
equipment does cause harmful interference to radio or television reception, which
can be determined by turning the equipment off and on, the user is encouraged
to try to correct the interference by one or more of the following measures: a)
Reorient or relocate the receiving antenna. b) Increase the separation between the
equipment and the receiver. c) Connect the equipment into an outlet different from
that which the receiver is connected. d) Consult the dealer or an experienced radio/
TV technician for help.

Page 16
FRANÇAIS
TABLE DES MATIÈRES
INFORMATION SUR LA SÉCURITÉ
Consignes De Sécurité Importantes ..........................................................................................................................17-18
Exigences Électriques.......................................................................................................................................................18-19
CONFIGURATION ET UTILISATION
Pièces Et Caractéristiques ..................................................................................................................................................20
Instructions d’Assemblage ................................................................................................................................................... 21
Instructions De La Pile ...........................................................................................................................................................22
Mode d’Emploi.................................................................................................................................................. 23-25
Afchage DEL BFTR138 ..................................................................................................................................24
Afchage DEL BFTR146 .................................................................................................................................25
Remplacement Du Fusible ................................................................................................................................26
NETTOYAGE ET ENTRETIEN .............................................................................................................. 26
DÉPANNAGE ET GARANTIE
Avant d’Appeler Pour Le Service ......................................................................................................................27
Service À La Clientèle .........................................................................................................................................27
Dépannage ..............................................................................................................................................................27
Garantie Limitée .....................................................................................................................................................................28
Gracias por comprar nuestro
producto BLACK+DECKER. Este
manual fácil de usar le guiará para
hacer el mejor uso de su ventilador.
N’oubliez pas d’enregistrer les
numéros de modèle et de série. Ils
sont sur une étiquette à l’arrière.
Agrafez votre reçu dans votre manuel.
Vous en aurez besoin pour obtenir du
service de garantie.
Numéro de modèle
Numéro de série
Date d’achat
ENREGISTREMENT DU PRODUIT

Page 17
FRANÇAIS
1. LIRE TOUTES LES INSTRUCTIONS AVANT UTILISATION
2. Ne jamais insérer les doigts, les crayons ou tout autre objet à travers
la grille lorsque le ventilateur est en marche.
3. Débranchez le ventilateur lorsque vous vous déplacez d’un endroit à
un autre.
4. Débrancher le ventilateur lorsqu’il n’est pas utilisé et avant de le
nettoyer.
5. Pour éviter tout risque d’électrocution, ne pas immerger le
ventilateur dans l’eau ou tout autre liquide.
6. Ne pas laisser le cordon pendre par-dessus le bord d’une table ou
d’un comptoir.
7. Assurez-vous que le ventilateur est sur une surface stable en
fonctionnement pour éviter le renversement.
8. N’utilisez pas le ventilateur dans une fenêtre. La pluie peut créer un
danger électrique.
9. Une surveillance étroite est nécessaire lorsque tout appareil est
utilisé par ou à proximité des enfants.
10. Ce produit utilise une protection contre la surcharge (fusible). Un
fusible grillé indique une situation de surcharge ou de court-circuit.
Si le fusible saute, débranchez le produit de la prise. Remplacez
le fusible conformément au manuel de l’utilisateur (suivez les
indications du produit pour obtenir la cote de fusible appropriée)
et vériez le produit. Si le fusible de remplacement saute, un court-
circuit peut être présent et le produit doit être jeté ou renvoyé à un
centre de service agréé pour examen et/ou réparation.
CONSIGNES DE SÉCURITÉ
IMPORTANTES
INFORMATION SUR LA SÉCURITÉ
AVERTISSEMENT
AVERTISSEMENT - Risques
ou pratiques dangereuses qui
POURRAIENT entraîner des
blessures graves ou la mort
DANGER
DANGER - Risques immédiats
qui VONT entraîner des
blessures graves ou la mort
ATTENTION
ATTENTION - Risques ou
pratiques dangereuses qui
POURRAIENTentraîner des
blessures mineures
AVERTISSEMENT
Lors de l’utilisation d’appareils électriques, des précautions de base
devrait être suivi, y compris les suivants

Page 18
FRANÇAIS
INFORMATION SUR LA SÉCURITÉ
11. Ne pas utiliser un ventilateur avec une che ou un cordon
endommagé. Jeter le ventilateur ou retourner à un centre de service
autorisé pour examen et / ou réparation.
12. Ne pas passer le cordon sous un tapis. Ne pas couvrir le cordon avec
des carpettes, des tapis de couloir ou des revêtements similaires.
Ne pas faire passer le cordon sous des meubles ou des appareils.
Disposez le cordon loin de la zone de circulation pour empêcher un
trébuchement.
13. Pour réduire le risque d’incendie ou d’électrocution, N’UTILISEZ PAS
ce ventilateur avec des dispositifs de contrôle de vitesse à semi-
conducteurs.
14. Ne pas utiliser à l’extérieur.
GARDEZ CES INSTRUCTIONS
UTILISATION DOMESTIQUE UNIQUEMENT
EXIGENCES ÉLECTRIQUES
Cet appareil est équipé d’une che polarisée (une lame est plus large que l’autre).
Pour réduire le risque de choc électrique, cette che est destinée à être insérée dans
une prise polarisée dans un seul sens. Si la che ne s’insère pas dans la prise, inversez
la che. Si cela ne fonctionne toujours pas, contactez un électricien qualié. Ne
modiez pas la che en aucune façon.
CORDON D’ALIMENTATION
1. Si le cordon d’alimentation est trop court, n’utilisez pas de rallonge. Ayez un
électricien qualié ou un réparateur pour installer une prise près de l’appareil.
2. S’il est absolument nécessaire d’utiliser des cordons plus longs ou une rallonge, il
faut faire preuve de prudence.
a) La cote électrique marquée du cordon ou de la rallonge doit être égale à ou
supérieure à la puissance électrique de l’appareil. Le cordon le plus long doit être
disposé de manière à ce qu’il ne pende pas sur le comptoir ou le dessus de table
où il peut être tiré par des enfants ou trébuché par inadvertance.
REMARQUE: Ni BLACK+DECKER ni le marchand ne peuvent accepter de
responsabilité pour les dommages au produit ou des blessures résultant
du non-respect des procédures de connexion électrique.

Page 19
FRANÇAIS
INFORMATION SUR LA SÉCURITÉ
INFORMATIONS SUR LA BATTERIE
• RESTEZ HORS DE PORTÉE DES ENFANTS.
L’ingestion peut entraîner des blessures graves ou la mort.Les brûlures
graves peuvent survenir dans les 2 heures suivant l’ingestion.Consultez
immédiatement un médecin et appelez le Docteur (202) 625- 3333
en PCV.Gardez le colis original jusqu’à ce qu’il soit prêt à être utilisé.
Jetez les piles usagées immédiatement.Risque de blessure par incendie,
explosion ou fuite.Ne pas démonter, charger, écraser ou exposer au feu
ou à des températures élevées.
• AVIS DE SÉCURITÉ DES PILES AU LITHIUM:
Garder les piles au lithium hors de la portée des petits enfants;Les piles
peuvent être ingérées accidentellement.Ingérées, ces piles peuvent
laisser échapper un contenu nocif provoquant des brûlures chimiques,
une perforation des tissus mous et, dans les cas graves, la mort.Les
piles au Lithium doivent être retirées immédiatement en cas d’ingestion.
Consultez un médecin immédiatement.Si vous ou votre médecin
soupçonnez qu’une batterie a été ingérée pour assistance aux ÉTATS-
UNIS, appelez la ligne téléphonique nationale pour l’ingestion de batterie
à tout moment au (202) 625-3333: au Canada, appelez le 416-813-5900.
• Pour éviter un vidage inutile de la batterie, ne gardez rien sur le
ventilateur.
• Ne jetez pas les batteries en feu.Les Batteries peuvent exploser ou fuir.
• Retirez la batterie si la télécommande n’est pas utilisée pendant une
longue période.

Page 20
FRANÇAIS
PIÈCES ET CARACTÉRISTIQUES
CONFIGURATION ET UTILISATION
Afchage DEL
Panneau De Commande
Sortie d’Air
Base Avant
4 Vis Papillon
Base Arrière (non illustrée)
Dessin de ligne pour référence seulement.
L’illustration peut diérer légèrement du modèle.
Cordon d’Alimentation
Page 21
FRANÇAIS
CONFIGURATION ET UTILISATION
INSTRUCTIONS DE MONTAGE
La base de la soufante de la tour est fournie avec deux parties.La base arrière a un
espace pour le cordon d’alimentation.
1. Fixer la moitié avant de l’embase en alignant les trous dans l’embase avec les
trous de vis dans la base du ventilateur de la tour.
2. Amenez le cordon d’alimentation par le trou central et insérez la moitié arrière de
la base vers la moitié avant.
3. Fixer avec les quatre vis papillon fournies comme indiqué.Tournez chacune des
vis dans le sens des aiguilles d’une montre jusqu’à ce qu’elle soit complètement
insérée.
4. Enlez le cordon d’alimentation à travers les espaces coupés sur la base.
Vis de papillon
Base arrière
Base avant

Page 22
FRANÇAIS
Page 22
CONFIGURATION ET UTILISATION
INSTRUCTIONS SUR LA PILE
Piles non comprises
La télécommande nécessite une Pile Au Lithium CR2025 pour fonctionner. La pile
n’est pas Incluse.
1. Appuyez sur le bouton à la base du couvercle de la pile pour libérer le couvercle.
Retirez le couvercle de la pile comme indiqué sur le schéma.
2. Insérez la pile en vous assurant que le côté “+” est orienté vers le haut.
3. Une fois la pile installée, poussez le couvercle de la pile pour le fermer.
CR2025
Pile
Télécommande
Couvercle De La Pile
TIRER
POUSSER

Page 23
FRANÇAIS
Page 23
CONFIGURATION ET UTILISATION
Le ventilateur peut être actionné
par les commandes manuelles
situées sur le ventilateur
(voir FIGURE 1) ou par votre
télécommande (voir FIGURE
2).Branchez le câble installé dans
une prise électrique 120V AC.
1. POWER: Allumez le VENT
en appuyant sur le bouton
“POWER”; Éteignez le VENT
en appuyant à nouveau sur le
bouton “POWER”.
2. VIT: Vous pouvez régler
la vitesse du ventilateur sur le
niveau voulu: bas, moyen ou
haut en appuyant sur “VIT”. Le
voyant DEL correspondant I
(bas), II (moyen) et III (haut)
s’allumera.
3. MODE: Appuyez sur le
bouton ‘MODE’ pour régler
le VENT en mode NORMAL,
NATUREL ou SOMMEIL.
4. MINUTERIE: Le ventilateur
est équipé d’un minuteur qui
vous permet de xer sa durée
de fonctionnement.
5. OSC: Appuyez sur le
bouton ‘OSC’ pour démarrer et
arrêter la fonction d’oscillation.
PANNEAU DE COMMANDE
FIGURE 1
TÉLÉCOMMANDE
FIGURE 2
MODE OPÉRATOIRE
PANNEAU DE COMMANDE
POWER
SPEED
OSC
TIMER
MODE
POWER
SPEED OSC
TIMER MODE

Page 24
FRANÇAIS
CONFIGURATION ET UTILISATION
POWER: Allumez le VENT en appuyant
sur le bouton “POWER”; Éteignez le VENT en
appuyant à nouveau sur le bouton “POWER”.
VIT: Vous pouvez régler la vitesse du
ventilateur sur le niveau voulu: bas, moyen ou
haut en appuyant sur “VIT”. Le voyant DEL
correspondant I (bas), II (moyen) et III (haut)
s’allumera.
MODE: Appuyez sur le bouton ‘MODE’
pour régler le VENT en mode NORMAL,
NATUREL ou SOMMEIL.
• Le mode par défaut est NORMAL et
fournit un ux d’air régulier.
• Le mode NATURAL passe par les
vitesses de ventilation bas, moyen et
haut pour 5 secondes chacun.
• En mode SOMMEIL, le ventilateur
passera à une vitesse du ventilateur
inférieure après 30 minutes de
fonctionnement lorsqu’il est réglé à
une vitesse moyenne ou haute du
ventilateur.
Le NM (Normal), NT (Natural) et SL (Sommeil)
s’allume pour indiquer la sélection.
MINUTERIE: Le ventilateur est équipé
d’une minuterie qui vous permet de dénir
sa durée de fonctionnement de 1/2 heure
à 7 1/2 heures. Continuer à appuyez sur le
bouton MINUTERIE pour faire déler les
différentes sélections de temps de 1/2 heure,
1 heure, 2 heures et 4 heures. La combinaison
des sélections 1/2 heure, 1 heure, 2 heures
et 4 heures seront illuminées. Le ventilateur
s’arrêtera automatiquement après la durée
sélectionnée.
OSC: Appuyez sur le bouton ‘OSC’ pour
démarrer et arrêter la fonction d’oscillation.
I
II
III
1/2 H
1 H
NM
NT
SL
2H
4 H
AFFICHAGE DEL BFTR138
Page 25
FRANÇAIS
CONFIGURATION ET UTILISATION
POWER: Allumez le VENT en appuyant
sur le bouton “POWER”; Éteignez le VENT en
appuyant à nouveau sur le bouton “POWER”.
TEMPÉRATURE: l’écran LED illumine et
montre la température ambiante.L’écran de
température change en “MINUTEUR” lorsque
le minuteur est réglé.
VIT: Vous pouvez régler la vitesse du
ventilateur sur le niveau voulu: bas, moyen ou
haut en appuyant sur “VIT”. La vitesse choisie
du ventilateur sera afchée sur l’écran LED.
MODE: Appuyez sur le bouton ‘MODE’
pour régler le VENT en mode NORMAL,
NATUREL ou SOMMEIL.
• Le mode par défaut est NORMAL et
fournit un ux d’air régulier.
• Le mode NATURAL passe par les
vitesses de ventilation bas, moyen et
haut pour 5 secondes chacun.
• En mode SOMMEIL, le ventilateur
passera à une vitesse du ventilateur
inférieure après 30 minutes de
fonctionnement lorsqu’il est réglé à
une vitesse moyenne ou haute du
ventilateur.
Le (Normal), (Naturel) et
(Sommeil) s’allume pour indiquer la
sélection.
MINUTERIE: Le ventilateur est équipé
d’une minuterie qui vous permet de dénir
sa durée de fonctionnement de 1 heure à 12
heures. Continuez d’appuyer sur le bouton
minuteur pour ajouter du temps par tranches
d’une heure.Le temps choisi sera afché
sur l’écran LED. Le ventilateur s’arrêtera
automatiquement après la durée sélectionnée.
OSC: Appuyez sur le bouton ‘OSC’ pour
démarrer et arrêter la fonction d’oscillation.
MODE SAUVEGARDE D’ÉNERGIE: lorsque le
mode “sommeil” ou le “minuteur” est allumé,
l’écran LED s’éteint au bout de 30 secondes.
Appuyez sur n’importe quelle touche pour
réactiver l’afchage.
AFFICHAGE DEL BFTR146

Page 26
FRANÇAIS
CONFIGURATION ET UTILISATION
REMPLACEMENT DU FUSIBLE
• Débranchez le ventilateur de la prise de courant en saisissant la che à l’extrémité
du cordon. Ne débranchez pas en tirant sur le cordon lui-même.
• Ouvrez le couvercle du fusible situé sur le côté de la che du cordon d’alimentation
en le faisant glisser vers les lames.
• Retirez soigneusement le fusible en prenant un petit outil et en retirant lentement
une extrémité. Une fois que vous avez une extrémité, retirez lentement l’autre
extrémité.
• Pour éviter tout risque d’incendie, remplacez-le uniquement par un fusible similaire
de 2.5A, 125V.
• Fermez le couvercle du fusible en faisant glisser le couvercle vers le haut de la che.
ATTENTION: N’essayez pas de remplacer la che elle-même. Jetez le produit
entièrement si la che elle-même est endommagée.
NETTOYAGE ET ENTRETIEN
• Assurez-vous de débrancher de la source d’alimentation électrique avant de
nettoyer
• Les pièces en plastique du ventilateur doivent être nettoyées avec un savon doux et
un chiffon humide ou un éponge. Rincez à l’eau claire pour éliminer tout résidu de
lm savonneux.
• Veillez à ne pas mettre d’eau ou tout autre liquide à l’intérieur du moteur.
Fuse
Fuse cover
Fusible
Couvercle
de fusible

Page 27
FRANÇAIS
Localisez votre problème en utilisant le tableau ci-dessous. Si l’appareil ne fonctionne
toujours pas correctement, contactez le service clientèle de W Appliance Co. ou le
centre de service agréé le plus proche. Les clients ne doivent jamais dépanner les
composants internes.
SPÉCIFICATIONS
DÉPANNAGE ET GARANTIE
AVANT D’APPELER POUR LE SERVICE
SI L’APPAREIL NE FONCTIONNE PAS:
A) Assurez-vous que l’appareil est branché solidement. Si ce n’est pas le cas,
retirez la che de la prise, attendez 10 secondes et branchez-le à nouveau
sécuritairement.
B) Vériez qu’il n’y a pas de fusible de circuit grillé ou de disjoncteur principal
déclenché. Si celles-ci semblent fonctionner correctement, testez la prise avec un
autre appareil.
SI AUCUNE DE CES RÉPONSES RÉSOUT LE PROBLÈME, CONTACTEZ UN
TECHNICIEN QUALIFIÉ. N’ESSAYEZ PAS D’AJUSTER OU DE RÉPARER
L’APPAREIL VOUS-MÊME.
IMPORTANT
NE PAS RETOURNER CE PRODUIT AU MAGASIN
Si vous avez un problème avec ce produit, veuillez
communiquer avec le Centre De Satisfaction Client de W
Appliance Co. au 844-299-0879 ou [email protected].
PREUVE D’ACHAT DATÉE, # DE MODÈLE ET # DE SÉRIE
REQUIS POUR LE SERVICE SOUS GARANTIE
PROBLÈME CAUSE POSSIBLE SOLUTION POSSIBLE
L’appareil ne s’allume pas
L’appareil n’est pas branché Vériez que l’appareil est
branché dans une prise de
courant
Le couvercle du fusible peut
être ouvert
Débranchez la che de la
prise et fermez le couvercle
du fusible.
BFTR138
• Dimensions de L’unité (L x P x
H): 12.4” x 12.4” x 37.2”
• Poids Net: ENV. 7.1 LBS.
BFTR146
• Dimensions de L’unité (L x P x
H): 12.4” x 12.4” x 46.2”
• Poids Net: ENV. 7.9 LBS.

Page 28
FRANÇAIS
DÉPANNAGE ET GARANTIE
GARANTIE LIMITÉE
Toute réparation, remplacement ou service de
garantie, et toutes les questions sur ce produit
doivent être adressées à BLACK+DECKER au
844-299-0879 des États-Unis ou de Porto
Rico.
BLACK+DECKER garantit à l’acheteur d’origine que
le produit sera exempt de défauts de matériaux, de
pièces et de fabrication pendant la période désignée
pour ce produit. La garantie commence le jour de
l’achat du produit et couvre jusqu’à une période de
1 an (12 mois) pour la main-d’œuvre / 1 an (12 mois)
pour les pièces (défauts de fabrication uniquement).
BLACK+DECKER accepte de remplacer, à son gré, le
produit défectueux par une unité neuve ou réusinée
équivalente à votre achat d’origine pendant la période
de garantie.
Exclusions: Cette garantie ne s’applique pas aux
éléments suivants:
1. Si l’apparence ou l’extérieur du produit
a été endommagé ou dégradé, altéré
ou modifié dans sa conception ou sa
construction.
2. Si le numéro de série d’origine du
produit a été modifié ou supprimé ou ne
peut pas être facilement déterminé.
3. S’il est endommagé en raison d’une
surtension, endommagement de
l’utilisateur du cordon d’alimentation
ou connexion à une source de tension
incorrecte.
4. Si les dommages sont dus à une
mauvaise utilisation générale, accidents
ou catastrophes naturelles.
5. Si des tentatives de réparation sont
eectuées par des agents de service non
autorisés, l’utilisation de pièces autres
que des pièces d’origine ou obtenues
auprès de personnes autres que des
compagnies de service autorisées.
6. Sur les unités qui ont été transférées du
propriétaire d’origine.
7. Sur les produits achetés comme remis
à neuf, comme neuf, d’occasion, en
conditions “Tel Quel” ou “Vente Finale”.
8. Aux produits utilisés dans un cadre
commercial ou de location.
9. Aux produits utilisés dans des conditions
autres que usage domestique ordinaire
ou utilisé autrement que conformément
aux instructions fournies.
10. Aux dommages-intérêts pour les appels
de service pour installations incorrectes.
11. Frais de transport et d’expédition
associés au remplacement de l’unité.
12. Appels de service pour vous expliquer
comment utiliser votre produit.
13. Appels de service pour réparer ou
remplacer le fusible de la maison,
réinitialiser le disjoncteur ou corriger le
câblage dans la maison.
LA RÉPARATION OU LE REMPLACEMENT TELS QUE
PRÉVUS DANS LA PRÉSENTE GARANTIE SONT LE
RECOURS EXCLUSIF DU CLIENT; BLACK+DECKER
NE SERA PAS RESPONSABLE DES DOMMAGES
ACCESSOIRES OU INDIRECTS POUR LA VIOLATION
DE TOUTE GARANTIE EXPRESSE OU IMPLICITE
SUR CE PRODUIT, SAUF DANS LA MESURE
INTERDITE PAR LA LOI APPLICABLE. TOUTE
GARANTIE IMPLICITE DE QUALITÉ MARCHANDE
D’ADÉQUATION À UN USAGE PARTICULIER SUR
CE PRODUIT EST LIMITÉE À LA DURÉE DE LA
GARANTIE.
Certains états n’autorisent pas l’exclusion ou la
limitation des dommages accessoires ou indirects, ni
la limitation de la durée de la garantie. Dans ces cas,
les exclusions ou limitations ci-dessus peuvent ne pas
s’appliquer à vous. Cette garantie vous donne des
droits légaux spécifiques et vous pouvez également
avoir d’autres droits qui varient d’un état à l’autre.
Obtention Du Service: Pour obtenir du service, de la
documentation sur les produits, des fournitures ou des
accessoires, veuillez appeler au 844-299-0879 pour
créer un ticket pour échange / réparation. Veuillez
vous assurer de fournir la date d’achat, le numéro de
modèle et une brève description du problème. Notre
représentant du service client vous contactera ou
enverra des instructions de retour détaillées.
BLACK+DECKER ne garantit pas que l’appareil fonctionnera
correctement dans toutes les conditions environnementales et
n’ore aucune garantie ni représentation, implicite ou explicite,
en ce qui concerne la qualité, les performances, la qualité
marchande ou l’adéquation à un usage particulier autre que
celui identifié dans ce manuel d’utilisation. BLACK+DECKER a
fait tout son possible pour garantir l’exactitude de ce manuel
d’utilisation et décline toute responsabilité en cas d’inexactitudes
ou d’omissions éventuelles. Les informations contenues dans ce
manuel d’utilisation sont sujettes à modification sans préavis et ne
représentent pas un engagement de la part de BLACK+DECKER.
BLACK+DECKER se réserve le droit d’apporter des améliorations
à ce manuel d’utilisation et / ou aux produits décrits dans ce
manuel d’utilisation à tout moment et sans préavis. Si vous
trouvez dans ce manuel des informations incorrectes, trompeuses
ou incomplètes, veuillez nous contacter au 844-299-0879.
W Appliance Co.
1356 Broadway
New York, NY 10018

Page 29
FRANÇAIS
DÉPANNAGE ET GARANTIE
Cet appareil respecte la section 15 des directives FCC. Son utilisation est soumise
aux deux conditions suivantes: 1) cet appareil ne doit pas causer aucune interférence
nuisible; et 2) cet appareil doit accepter toute interférence reçue, y compris les
interférences susceptibles de provoquer un fonctionnement indésirable. Ce matériel
a été testé et déclaré conforme aux limites imposées aux appareils électroniques
de classe B, dénies à l’article 15 de la réglementation de la FCC. Ces limites
sont conçues pour assurer une protection raisonnable contre une interférence
dommageable dans une installation résidentielle. Cet appareil produit, utilise et
peut émettre des radiofréquences et, s’il n’est pas installé et utilisé conformément
aux instructions, provoquer des interférences nuisibles aux communications radio.
Cependant, il n’y a aucune garantie qu’aucun brouillage ne se produira dans une
installation en particulier. Si cet équipement cause des interférences nuisibles à la
réception radio ou télévision, ce qui peut être déterminé en éteignant et en rallumant
l’appareil, l’utilisateur est encouragé à essayer de corriger l’interférence par une ou
plusieurs des mesures suivantes: a) Réorienter ou déplacer l’antenne de réception. b)
Augmentez la distance entre l’équipement et le récepteur. c) Branchez l’équipement
dans une prise différente de celle que le récepteur est connecté. d) Consultez le
revendeur ou un technicien radio/TV expérimenté pour obtenir de l’aide.

Página 30
ESPAÑOL
INFORMACIÓN DE SEGURIDAD
INFORMACIÓN DE SEGURIDAD
Instrucciones Importantes de Seguridad...............................................................................................................31-32
Requerimientos Eléctricos ...........................................................................................................................................32-33
CONFIGURACIÓN Y USO
Partes y Características ....................................................................................................................................................... 34
Instrucciones de Armado ....................................................................................................................................................35
Instrucciones de Batería ...................................................................................................................................................... 36
Instrucciones de Operación ..........................................................................................................................37-39
BFTR138 Pantalla LED .....................................................................................................................................38
BFTR146 Pantalla LED .....................................................................................................................................39
Remplazar el Fusible ..........................................................................................................................................40
LIMPIEZA Y CUIDADO ..................................................................................................................................40
SOLUCIÓN DE PROBLEMAS Y GARANTÍA
Antes de Llamar por Servicio...............................................................................................................................41
Atención al Cliente ................................................................................................................................................41
Solución de Problemas ........................................................................................................................................41
Garantía Limitada ................................................................................................................................................................. 42
Gracias por comprar nuestro
producto BLACK+DECKER. Este
manual fácil de usar le guiará para
hacer el mejor uso de su ventilador.
Recuerde anotar el número de
modelo y los números de serie. Se
encuentran en una etiqueta en la
parte posterior del producto.
Grape el recibo de compra a su manual.
Lo necesitará para obtener el servicio
de garantía.
Número de modelo
Número de serie
Fecha de compra
REGISTRO DEL PRODUCTO

Página 31
ESPAÑOL
1. LEA TODAS LAS INSTRUCCIONES ANTES DEL USO
2. Nuca coloque los dedos, lápices, o cualquier otro objeto a través de
la rejilla cuando el ventilador esté en uso.
3. Desconecte el ventilador cuando lo esté moviendo de un lugar a
otro.
4. Desconecte el ventilador cuando no esté en uso y antes de limpiarlo.
5. Para protegerse del riesgo de descarga eléctrica, no sumerja el
ventilador en agua o cualquier otro líquido.
6. No deje que el cable cuelgue del borde de la mesa o la encimera.
7. Asegúrese de que el ventilador esté en una supercie estable
cuando esté en uso para evitar que vuelque.
8. No use el ventilador en una ventana. La lluvia puede crear un riesgo
eléctrico.
9. Se requiere la supervisión estrecha por parte de un adulto cuando
cualquier aparate sea usado por o cerca de niños.
10. Este producto cuenta con protección de sobrecarga (fusible). Un
fusible quemado indica una sobrecarga o un cortocircuito. Si el
fusible se quema, desenchufe el producto de la toma. Remplace
el fusible de acuerdo al manual de usuario (siga las marcas en el
producto para usar el fusible adecuado) y verique el producto. Si el
fusible de recambio se quema, es posible que haya un cortocircuito
y el producto deba ser descartado o devuelto a un Servicio Técnico
autorizado para su examinación y/o reparación.
INSTRUCCIONES IMPORTANTES DE
SEGURIDAD
INFORMACIÓN DE SEGURIDAD
ADVERTENCIA
ADVERTENCIA - Riesgos o
prácticas prácticas peligrosas que
PODRÍAN RESULTAR en
lesiones personales severas o
la muerte.
PELIGRO
PELIGRO - Riesgos inmediatos
que RESULTARÁN en
lesiones personales o la muerte.
CAUTION
PRECAUCIÓN - Riesgos o
prácticas prácticas peligrosas que
PODRÍAN RESULTAR en lesiones
personales menores.
ADVERTENCIA
Cuando se usen aparatos eléctricos, se deben tomar precauciones
de seguridad básicas, incluidas las siguientes

Página 32
ESPAÑOL
INFORMACIÓN DE SEGURIDAD
11. No use ningún ventilador con un cable o enchufe dañado. Descarte
el ventilador o devuélvalo a un Servicio Técnico autorizado para su
examinación y/o reparación.
12. No coloque el cable bajo ningún tipo de alfombrado. No cubra el
cable con tapetes, camineros, alfombras o coberturas similares. No
encamine el cable bajo muebles o aparatos. Organice el cable lejos
de áreas de tránsito y donde no se pueda tropezar con él.
13. Para reducir el riesgo de descarga eléctrica o incendio, NO use este
ventilador con ningún dispositivo de control de velocidad de estado
sólido.
14. No usar en el exterior.
GUARDE ESTAS INSTRUCCIONES
ÚNICAMENTE USO DOMÉSTICO
REQUERIMIENTOS ELÉCTRICOS
Este aparato tiene un enchufe polarizado (una clavija es más ancha de la otra). Para
reducir el riesgo de descarga eléctrica, este enchufe fue diseñado para encajar en
una toma polarizada de una sola manera. Si el enchufe no encaja en la toma, dé
vuelta el enchufe. Si de todas maneras no encaja, contacte a un electricista calicado.
No intente modicar el enchufe de forma alguna.
CABLE DE ALIMENTACIÓN
1. Si el cable de alimentación es muy corto, no use un alargue o una regleta. Haga
que un electricista calicado o un manitas instale una toma cerca del aparato.
2. Si fuese absolutamente necesario utilizar un alargue o una regleta, se debe tener
cuidado extremo.
a) La capacidad eléctrica marcada en el alargue o regleta debe ser igual a, o mayor
que la capacidad eléctrica del aparato. El cable más largo debe ser dispuesto de
manera tal que no cuelgue de la encimera o la mesa para evitar que los niños tiren
de él o que alguien se tropiece accidentalmente.
NOTA: Ni BLACK+DECKER ni el distribuidor pueden aceptar ningún tipo de
responsabilidad por daños al producto o daños personales que resulten del
fallo de respetar los procedimientos de conexión eléctrica.

Página 33
ESPAÑOL
INFORMACIÓN DE SEGURIDAD
INFORMACIÓN DE BATERÍA
• MANTÉNGASE ALEJADO DEL ALCANCE DE LOS NIÑOS.
La ingestión puede resultar en lesiones serias o la muerte. Pueden ocurrir
quemaduras severas dentro de las 2 horas de ingestión. Consulte a un
doctor inmediatamente y haga que el doctor llame por cobrar al (202)
625 - 333. Manténgase en el empaque original hasta que esté listo para
usarse. Deseche las baterías usadas inmediatamente. Riesgo de lesiones
por incendio, explosión o fugas. No desarme, cargue, aplaste o exponga
al fuego o altas temperaturas.
• AVISO SOBRE BATERÍAS BOTÓN DE LITIO:
Mantenga las baterías botón de litio lejos del alcance de los niños; las
baterías botón pueden ser ingeridas accidentalmente. De ser ingeridas,
estas baterías pueden verter sus contenidos nocivos causando
quemaduras químicas, perforación de tejidos blandos, y en casos
severos la muerte. Las baterías botón de litio debes ser extraídas
inmediatamente en caso de ingestión. Busque ayuda médica de
inmediato. Si su doctor sospecha que se ha ingerido una batería, por
asistencia en los EE.UU. llame a la LÍNEA NACIONAL DE INGESTIÓN DE
BATERÍAS a cualquier hora al (202) 625-3333; en Canadá llame al
416-813-5900.
• Para prevenir el desgaste innecesario de la batería, no guarde nada
sobre el ventilator.
• No deseche las baterías en el fuego. Pueden explotar o verter sus
contenidos.
• Quite las baterías si el control remoto no será utilizado por un largo
período de tiempo.
Página 34
ESPAÑOL
PARTES Y FUNCIONALIDADES
CONFIGURACIÓN Y USO
Pantalla LED
Panel de Control
Salida de aire
Base frontal
4 tornillos Mariposa
Base trasera
(no se muestra)
Diagrama solamente para referencia. La ilustración puede diferir ligeramente del modelo.
Cable de alimentación

Página 35
ESPAÑOL
CONFIGURACIÓN Y USO
INSTRUCCIONES DE ARMADO
La base del ventilador torre viene con 2 partes. La base trasera tiene un espacio para
el cable de alimentación.
1. Una la mitad frontal de la base, alineando los oricios en la base con los agujeros
de los tornillos en la base del ventilador torre.
2. Guie el cable de alimentación a través del oricio central e inserte la mitad trasera
de la base en la mitad frontal.
3. Asegure la base con los cuatro tornillos mariposa como se muestra. Gire cada uno
de los tornillos en sentido horario hasta que queden insertados completamente.
4. Pase el cable de alimentación a través de los espacios en la base.
Tornillos mariposa
Base trasera
Base frontal

Página 36
ESPAÑOL
CONFIGURACIÓN Y USO
INSTRUCCIONES DE BATERÍA
Baterías no incluidas
El control remoto requiere una Batería de Litio CR2025 para operar. La batería no
está incluida.
1. Presione el botón de la base de la tapa de la batería para liberarla. Quite la tapa
de la batería como se muestra en el diagrama.
2. Inserte la batería asegurándose de que el lado “+” esté hacia arriba.
3. Una vez que la batería esté instalada, empuje la tapa de la batería para cerrarla.
CR2025
Batería
Control Remoto
Tapa de la batería
Página 37
ESPAÑOL
CONFIGURACIÓN Y USO
El VENTILADOR puede ser
operado con los controles
manuales ubicados en el
VENTILADOR (Como se muestra
en la Fig. 1) o con su control
remoto (mostrado en la Fig. 2).
Coloque el VENTILADOR en
una supercie plana y estable.
Conecte el cable de alimentación
a un tomacorriente de 120 V CA
(Corriente Alterna).
1. ENCENDIDO: Encienda el
VENTILADOR presionando el
botón de “POWER”; Apague
el VENTILADOR presionando
el botón de “ENCENDIDO”
nuevamente
2. VELOCIDAD: Puede ajustar
la velocidad del ventilador al
nivel deseado: bajo, medio, o
algo al presionar “SPEED” de
manera continua.
3. MODE: Presionar el
botón de “MODE” colocará el
VENTILADOR en los modos
NORMAL, NATURAL, y
DORMIR.
4. TIMER: El ventilador está
equipado con un temporizador
que permite que usted dena
la duración de la operación
5. OSC: Apretar el botón
“OSC” iniciará y detendrá la
función de oscilación.
PANEL DE CONTROL
Fig. 1
CONTROL REMOTO
Fig. 2
INSTRUCCIONES DE OPERACIÓN
PANEL DE CONTROL
POWER
SPEED
OSC
TIMER
MODE
POWER
SPEED OSC
TIMER MODE
Página 38
ESPAÑOL
SET UP & USE
ENCENDIDO: Encienda el
VENTILADOR presionando el botón de
“ENCENDIDO”; Apague el VENTILADOR
presionando el botón de “ENCENDIDO”
nuevamente.
VELOCIDAD: Puede ajustar la
velocidad del ventilador al nivel
deseado: bajo, medio, o algo al
presionar “VELOCIDAD”. La luz LED
correspondiente I (Bajo), II (Medio), y III
(Alto) se iluminará.
MODE: Presionar el botón de
“MODO” colocará el VENTILADOR en los
modos NORMAL, NATURAL, o DORMIR.
• El modo por defecto es NORMAL
y brinda un ujo de aire continuo.
• El modo NATURAL hace un ciclo
a través de las velocidades baja,
media y alta durante 5 minutos
cada una.
• El modo DORMIR el ventilador
hará un ciclo a una velocidad de
ventilador menor luego de 30
minutos de operación cuando
se coloca a una velocidad del
ventilador alta o media.
Las luces NM (Normal), NT (Natural) y
SL (Dormir) se iluminarán para indicar la
selección.
TEMPORIZADOR: El ventilador está
equipado con un temporizador que
permite que usted dena la duración
de operación desde 1/2 hora hasta 7
y 1/2 horas. Continúe presionando el
botón TEMPORIZADOR para recorrer
las diferentes opciones de 1/2 hora, 1
hora, 2 horas, y 4 horas. La combinación
de las selecciones 1/2H, 1H, 2H y 4H
será iluminada. El ventilador de apagará
automáticamente luego de la duración
seleccionada.
OSCILACIÓN: Apretar el botón
“OSC” iniciará y detendrá la función de
oscilación.
I
II
III
1/2 H
1 H
NM
NT
SL
2H
4 H
BFTR138 PANTALLA LED
Página 39
ESPAÑOL
SET UP & USE
ENCENDIDO: Encienda el
VENTILADOR presionando el botón de
“ENCENDIDO”; Apague el VENTILADOR
presionando el botón de “ENCENDIDO”
nuevamente.
TEMPERATURA: La pantalla LED se
iluminará y mostrará la temperatura
ambiente. El indicador de temperatura
cambiará a “TEMPORIZADOR” cuando
se encienda el temporizador.
VELOCIDAD: Puede ajustar la
velocidad del ventilador al nivel
deseado: bajo, medio, o algo al
presionar “VELOCIDAD”. La velocidad
seleccionada se mostrará en la pantalla
LED.
BFTR146 PANTALLA LED
MODE: Presionar el botón de
“MODO” colocará el VENTILADOR en los
modos NORMAL, NATURAL, o DORMIR.
• El modo por defecto es
NORMAL y brinda un ujo de
aire continuo.
• El modo NATURAL hace un ciclo
a través de las velocidades baja,
media y alta durante 5 minutos
cada una.
• El modo DORMIR el ventilador
hará un ciclo a una velocidad de
ventilador menor luego de 30
minutos de operación cuando
se coloca a una velocidad del
ventilador alta o media.
Las luces (Normal), (Natural) y
(Dormir) se iluminarán para indicar la
selección.
TEMPORIZADOR: El ventilador está
equipado con un temporizador que
permite que usted dena la duración de
operación desde 1 hora hasta 12 horas.
Presione el botón de TEMPORIZADOR
para añadir tiempo en incrementos de 1
hora.
OSCILACIÓN: Apretar el botón
“OSC” iniciará y detendrá la función de
oscilación.
MODO DE AHORRO DE ENERGÍA:
Cuando el modo “dormir” o
“temporizador” está encendido, la
pantalla LED se apagará luego de 30
segundos. Presione cualquier botón para
encender la pantalla nuevamente.

Página 40
ESPAÑOL
CONFIGURACIÓN Y USO
REMPLAZAR EL FUSIBLE
• Desconecte el ventilador de la toma de corriente tomando el enchufe al
nal del cable. No lo desenchufe tirando del cable.
• Abra la cubierta del fusible ubicada en el lado del enchufe del cable de
alimentación deslizándola hacia las clavijas del enchufe
• Quite cuidadosamente el fusible usando una herramienta pequeña y
levantando lentamente uno de los extremos. Una vez que tenga uno de
los extremos fuera, levante lentamente el otro extremo.
• Para evitar riesgos de incendio, solamente remplácelo con un fusible
similar de 2,5A a 125V.
• Cierre la tapa del fusible deslizándola hacia la parte superior del enchufe.
PRECAUCIÓN: No intente remplazar el enchufe. Descarte completamente el
producto si el enchufe está dañado.
LIMPIEZA Y MANTENIMIENTO
• Asegúrese de desconectarlo de la toma de corriente antes de
la limpieza.
• Las partes plásticas del ventilador deben ser limpiadas con jabón
suave y un paño o esponja húmedos. Enjuague con agua para eliminar
cualquier resto de jabón.
• Asegúrese de no introducir agua ni otros líquidos en el motor.
Fusible
Tapa del
fusible

Página 41
ESPAÑOL
SOLUCIÓN DE PROBLEMAS Y GARANTÍA
ANTES DE LLAMAR AL SERVICIO TÉCNICO
SI EL APARATO NO FUNCIONA:
A) Asegúrese de que el aparato está enchufado rmemente. De lo contrario, retire
el enchufe de la toma, espere 10 segundos y conéctelo nuevamente de forma
segura.
B) Compruebe si hay algún fusible quemado o un disyuntor disparado. Si éstos
parecen estar operando como es debido, pruebe la toma con otro aparato.
SI NINGUNO DE LOS PASOS ANTERIORES RESUELVE EL PROBLEMA,
CONTACTE A UN TÉCNICO CALIFICADO. NO INTENTE AJUSTAR O REPARAR
EL APARATO POR USTED MISMO.
IMPORTANTE
NO DEVUELVA ESTE PRODUCTO A LA TIENDA
Si tiene problemas con este producto, por favor contacte al
Centro de Satisfacción del Cliente de W Appliance Co. a través
del 844-299-0879 o a [email protected].
UNA PRUEBA DE COMPRA CON FECHA, No. DE MODELO Y
No. DE SERIE SON OBLIGATORIOS PARA EL SERVICIO DE
GARANTÍA
PROBLEMA CAUSA POSIBLE POSIBLE SOLUCIÓN
El aparato no enciende
El aparato no está enchufado. Asegúrese de que el aparato
está enchufado a una toma
que funcione
La tapa del fusible puede
estar abierta.
Desconecte el enchufe de
la toma y cierre la cubierta
del fusible
Intente solucionar su problema mediante el siguiente cuadro. Si el aparato aún no
funciona correctamente, contacte al centro de atención al cliente de, o el centro de
servicio autorizado de W Appliance Co. más cercano. Los clientes no deben nunca
intentar solucionar problemas de componentes internos.
ESPECIFICACIONES
BFTR138
• Dimensiones de la unidad (AN x
P x AL): 12.4” x 12.4” x 37.2”
• Peso neto: aprox. 7,1 lb (3,23 kg)
BFTR146
• Dimensiones de la unidad (AN x
P x AL): 12.4” x 12.4” x 46.2”
• Peso neto: aprox. 7,9 lb (3,59 kg)

Página 42
ESPAÑOL
SOLUCIÓN DE PROBLEMAS Y GARANTÍA
GARANTÍA LIMITADA
Cualquier reparación, recambio, o servicio
de garantía, y todas las preguntas sobre este
producto deben ser dirigidas a W Appliance
Co. al 844-299-0879 desde EE.UU. o Puerto
Rico.
W Appliance Co. garantiza al comprador original que
el producto estará libre de defectos de materiales,
partes y mano de obra por el período designado para
este producto. La garantía comienza el día en el que el
producto es comprado y cubre un período de hasta
1 año (12 meses) por la mano de obra/1 año (12
meses) por las partes (solamente defectos de
manufacturación).
W Appliance Co. acepta que, de acuerdo con su
criterio, remplazará el producto defectuoso por
uno nuevo o uno remanufacturado equivalente a su
compra original durante el período de garantía.
Exclusiones; Esta garantía no aplica a lo siguiente:
1. Si la apariencia o el exterior del producto
han sido dañados o desgurados,
alterados o modicados en diseño o
construcción.
2. Si el número de serie original del
producto ha sido alterado o removido o no
puede ser determinado fácilmente.
3. Si hay daños debido a sobretensión en la
línea eléctrica, daño por parte del usuario
al cable de alimentación de CA o conexión
a una fuente de voltaje no adecuada.
4. Si el daño se debe al mal uso general,
accidentes o “actos de Dios”.
5. Si existen intentos de reparación
por parte de agentes de servicio no
autorizados, uso de partes que no sean
originales u obtenidas de personas
que no sean las compañías de servicio
autorizadas.
6. Unidades que hayan sido transferidas
por el dueño original a un tercero.
7. A productos que hayan sido comprados
como renovados, como nuevos, de
segunda mano, en términos de venta nal
o “como se ve”.
8. A productos usados en un entorno
comercial o de alquiler.
9. A productos usados en entornos que no
sean el doméstico ordinario o usados de
otra manera que no sea de acuerdo con las
instrucciones brindadas.
10. A daños por visitas técnicas por
instalaciones inadecuadas.
11. Costos de transporte y envío asociados
con el remplazo de la unidad.
12. Visitas técnicas para darle instrucciones
de cómo usar su producto.
13. Visitas técnicas para reparar o cambiar
el fusible de la casa, reiniciar el disyuntor o
corregir el cableado de la casa.
LA REPARACIÓN O EL REMPLAZO COMO SE
ESTABLECE EN ESTA GARANTÍA SON LA SOLUCIÓN
EXCLUSIVA DEL CLIENTE; W Appliance Co. NO SERÁ
RESPONSABLE POR CUALQUIER DAÑO
ACCIDENTAL O A CONSECUENCIA DEL
INCUMPLIMIENTO DE CUALQUIER GARANTÍA
EXPRESADA O IMPLÍCITA SOBRE ESTE PRODUCTO,
EXCEPTO EN LA MEDIDA DE LO PROHIBIDO POR
LA LEY VIGENTE. CUALQUIER GARANTÍA IMPLÍCITA
DE COMERCIABILIDAD O APTITUD PARA UN
PROPÓSITO EN PARTICULAR DE ESTE PRODUCTO
SE LIMITA A LA DURACIÓN DE LA GARANTÍA.
Algunos estados no permiten la exclusión o las
limitaciones de daños accidentales o consecuentes,
o limitaciones de qué tan larga es la garantía. En
estos casos, las exclusiones o limitaciones antes
mencionadas no se aplican a usted. Esta garantía
le otorga derechos legales especícos y puede que
tenga también otros derechos que varían de estado
a estado.
Obteniendo servicio: para obtener servicio, literatura
del producto, suministros y accesorios, por favor
llame al 844-299-0879 para crear un ticket de cambio
o reparación. Por favor, asegúrese de proporcionar
la fecha de compra, número de modelo y una breve
descripción del problema. Un representante de
nuestro servicio de atención al cliente lo contactará o
le enviará instrucciones detalladas para la devolución.
W Appliance Co. no garantiza que el aparato funcionará
adecuadamente en todas las condiciones ambientales, y no
otorga garantía alguna ni defensa, ya sea implícita o expresada,
con respecto a la calidad, desempeño, comerciabilidad, o aptitud
para un propósito particular más allá del propósito identicado
en este manual de usuario. W Appliance Co. ha realizado todos
los esfuerzos para asegurarse de que este manual es preciso
y renuncia a la responsabilidad sobre cualquier imprecisión
u omisión que pueda haber ocurrido. La información en este
manual de usuario está sujeta a cambiar sin aviso previo y no
representa un compromiso por parte de W Appliance Co. W
Appliance Co. se reserva el derecho de hacer mejoras a este
manual de usuario y/o al producto descrito en este manual de
usuario en cualquier momento sin aviso previo. Si encuentra en
este manual información que sea incorrecta, engañosa, o esté
incompleta, por favor contáctenos al 844-299-0879.
W Appliance Co.
1356 Broadway
New York, NY 10018

Página 43
ESPAÑOL
SOLUCIÓN DE PROBLEMAS Y GARANTÍA
Este dispositivo cumple con la parte 15 de las reglas de la FCC. La operación está
sujeta a estas dos condiciones siguientes: 1) Este dispositivo no deberá causar
interferencias perjudiciales, y 2) Este dispositivo debe aceptar cualquier interferencia
recibida, incluyendo interferencia que pueda causar un funcionamiento no deseado.
Este equipo ha sido probado y cumple con los límites para los dispositivos digitales
Clase B, de acuerdo a la Parte 15 de las reglas de la FCC. Estos límites están
diseñados para brindar protección razonable contra interferencias perjudiciales en
un entorno residencial. Este equipo genera, y utiliza, energía de radiofrecuencia y, de
no instalarse y usarse de acuerdo con las instrucciones, puede causar interferencia
perjudicial para las comunicaciones de radio. Sin embargo, no hay garantía de que
no habrá interferencia en una instalación en particular. Si este aparato causare
interferencias perjudiciales para la recepción de radio o televisión, lo cual puede
determinarse al apagar y encender el aparato, se recomienda al usuario tratar de
corregir la interferencia mediante una o más de las medidas siguientes: a) Reoriente
o cambie de lugar la antena receptora. b) Incremente la separación entre el aparato
y el receptor. c) Conecte el equipo a una toma diferente a la que está conectada
el receptor. d) Consulte con el distribuidor o solicite la ayuda de un técnico
experimentado en radio/TV.

BLACK & DECKER, BLACK+DECKER, the BLACK & DECKER and BLACK+DECKER
logos and product names and the orange and black color scheme are trademarks of
The Black & Decker Corporation, used under license. All rights reserved.
BLACK & DECKER, BLACK+DECKER, les logos et les noms de produits BLACK &
DECKER et BLACK+DECKER et le schéma de couleurs orange et noir sont des marques
déposées de The Black & Decker Corporation, utilisé sous licence. Tous droits réservés.
BLACK & DECKER, BLACK+DECKER, y los logos y nombres de productos de BLACK
& DECKER y BLACK+DECKER y el esquema de colores naranja y rojo son marcas
registradas de The Black & Decker Corporation, usados bajo licencia. Todos los derechos
reservados.
Product in this box may differ slightly from that pictured. Does not affect function. Not
all accessories shown in photography are included in this package.
Le produit dans cette boîte peut différer légèrement de celui illustré. N’affecte pas la
fonction. Tous les accessoires illustrés sur la photographie ne sont pas inclus dans ce
paquet.
El producto en esta caja puede diferir ligeramente del representado en las imágenes. Esto
no afecta su función. No todos los accesorios mostrados en las fotografías son incluidos
en este paquete.
Imported by W Appliance, Inc., 1356 Broadway, New York, NY 10018
Customer Service: 844-299-0879
Importé par W Appliance, Inc., 1356 Broadway, New York, NY 10018
Service à la clientèle: 844-299-0879
Importado por W Appliance, Inc., 1356 Broadway, New York, NY 10018
Servicio al Cliente: 844-299-0879
November 2020 Printed in China