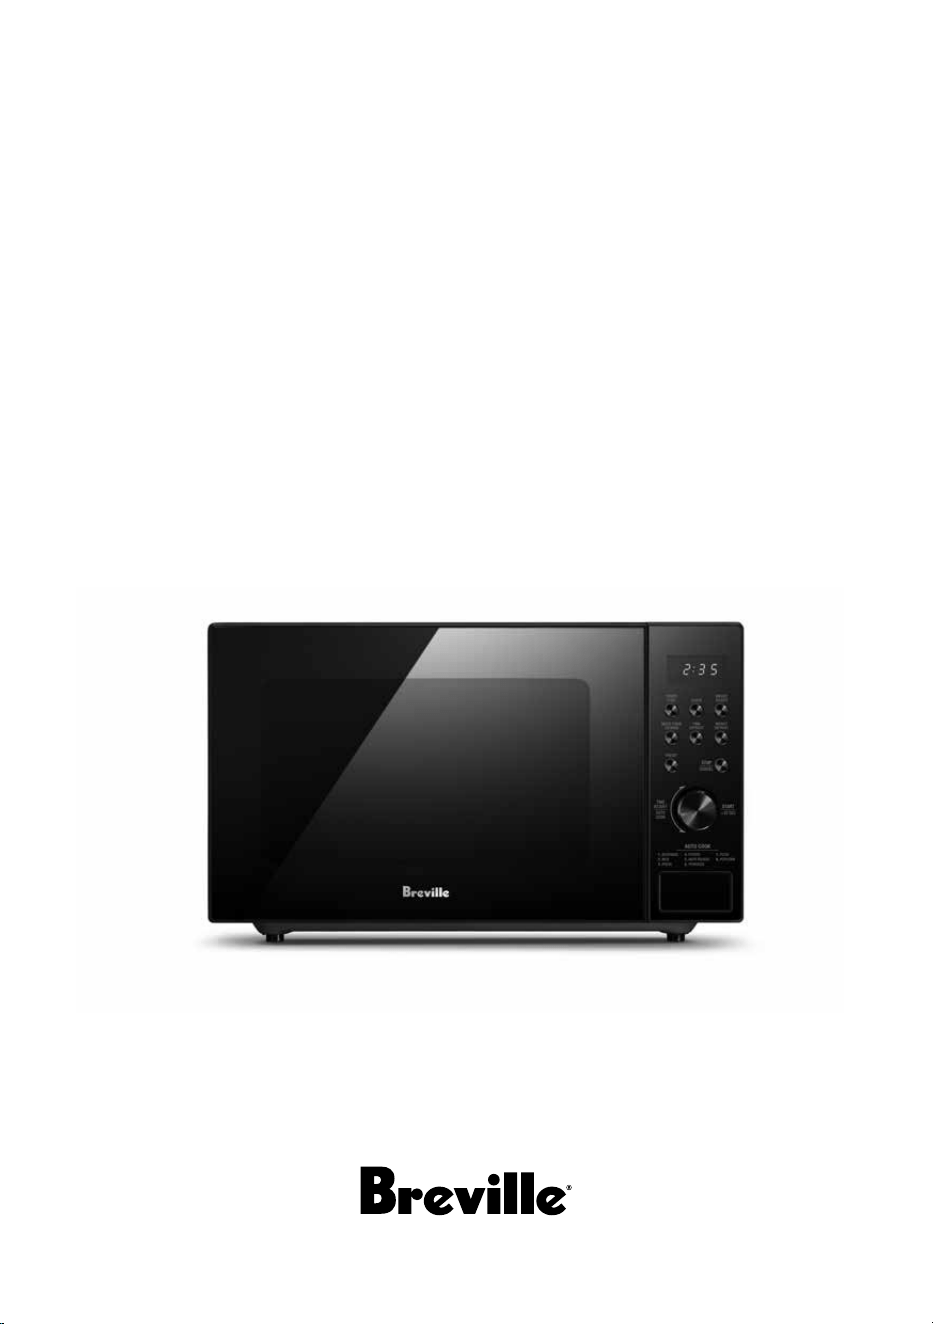
the Silhouette Flatbed
™
Compact
Instruction Book - LMO420

2
BREVILLE
RECOMMENDS
SAFETY FIRST
At Breville we are very safety
conscious. We design and
manufacture consumer
products with the safety of you,
our valued customer, foremost
in mind. In addition we ask
that you exercise a degree of
care when using any electrical
appliance and adhere to the
following precautions.
IMPORTANT
SAFEGUARDS
READ ALL
INSTRUCTIONS BEFORE
USE AND SAVE FOR
FUTURE REFERENCE
• Carefully read all
instructions before
operation and save for
future reference.
• Remove and safely
discard any packaging
material and promotional
labels before using the
Breville Microwave for the
first time.
• To eliminate a choking
hazard for young children,
remove and safely discard
the protective cover that is
fitted to the power plug of
the Breville Microwave.
• Do not place the
microwave oven near the
edge of a bench or table
during operation. Ensure
all surfaces are level, clean
and free of water or any
other substances.
2 Breville Recommends Safety First
12 Components
14 Functions
20 Tips
21 Care & Cleaning
22 Troubleshooting
Contents

3
• Do not place the
microwave oven on or
near a hot gas or electric
burner, or where it could
touch a heated microwave
oven.
• When using the
microwave oven, provide
adequate air space above
and on all sides for air
circulation (see page 14
TIPS ON SETTING UP
YOUR MICROWAVE).
• Always operate the
microwave oven on a
heat-resistant surface. Do
not use on a cloth-covered
surface, near curtains
or other flammable
materials.
• Do not use the microwave
oven on a metal surface,
for example, a sink drain
board.
• Always ensure the
microwave oven is
properly assembled before
connecting to the power
outlet and operating.
• The microwave oven
is not intended to be
operated by means of an
external timer or separate
remote control system.
• Never use the microwave
oven without food or
water in the microwave
oven cavity. Operating
the microwave oven
when empty could cause
damage to the appliance.
• Do not leave the
microwave oven
unattended when in use.
• Do not touch hot surfaces.
Allow the microwave oven
to cool before moving or
cleaning any parts.
• Do not place or store
anything on top of the
microwave oven.
• Always ensure the
microwave oven is turned
off at the power outlet and
the cord is unplugged
from the power outlet
before attempting to move
the appliance, when not

4
in use, if left unattended
and before disassembling,
cleaning or storing.
• Keep the appliance clean.
Follow the cleaning
instructions provided in
this book (page 21).
• Always turn the
microwave oven off by
pressing the STOP/
CANCEL button, switch
off at the power outlet and
unplug at the power outlet
when it is not in use.
• Before cleaning, always
press the STOP/CANCEL
button, switch off at the
power outlet and unplug
at the power outlet.
IMPORTANT
SAFEGUARDS
FOR ALL
ELECTRICAL
APPLIANCES
• Fully unwind the power
cord before use.
• Connect only to a 230V
or 240Vpower outlet.
• Do not let the power cord
hang over the edge of
a bench or table, touch
hot surfaces or become
knotted.
• To protect against electric
shock do not immerse the
power cord, power plug or
appliance in water or any
other liquid.
• The appliance is not
intended for use by persons
(including children) with
reduced physical, sensory
or mental capabilities,
or lack of experience
and knowledge, unless
they have been given
supervision or instruction
concerning use of the
appliance by a person
responsible for their safety.
• Before use always check
with your doctor if you
have a pacemaker. Modern
pacemakers are protected
against interference, but
some older ones may be
adversely affected when
in close proximity to a
microwave oven.

5
• Children should be
supervised to ensure that
they do not play with the
appliance.
• It is recommended to
regularly inspect the
appliance. To avoid a
hazard do not use the
appliance if the power
cord, power plug or
appliance becomes
damaged in any way.
Return the entire
appliance to the nearest
authorised Breville service
centre for examination
and/or repair.
• Any maintenance other
than cleaning should
be performed at an
authorised Breville service
centre.
• This appliance is for
household use only. Do
not use this appliance
for anything other than
its intended use. Do not
use in moving vehicles
or boats. Do not use
outdoors. Misuse may
cause injury.
• The installation of
a residual current
device (safety switch
is recommended to
provide additional safety
protection when using
electrical appliances.
It is advisable that a
safety switch with a rated
residual operating current
not exceeding 30mA be
installed in the electrical
circuit supplying the
appliance. See your
electrician for professional
advice.
• Always turn the appliance
to the OFF position,
switch off at the power
outlet and unplug at the
power outlet when the
appliance is not in use.
• Before cleaning, always
turn the appliance to the
OFF position, switch off at
the power outlet, unplug
at the power outlet and
remove the power cord,
if detachable, from the
appliance and allow all
parts to cool.

6
• Do not place this
appliance on or near a
heat source, such as hot
plate, microwave oven or
heaters.
• Position the appliance at
a minimum distance of
20cm away from walls,
curtains and other heat or
stream sensitive materials
and provide adequate
space above and on all
sides for air circulation.
WARNING
• Surfaces may be hot during and
after use.
WARNING
• Do not attempt to operate
the microwave oven with the
door open since the open-
door operation can result in
harmful exposure to microwave
energy. It is important not to
defeat or tamper with the safety
interlocks
WARNING
• Do not place any object
between the microwave oven
front face and the door or
allow soil or cleaner residue to
accumulate on sealing surfaces.
WARNING
• Do not put any foreign material
between the door and door jam
of the microwave oven as this
could cause excessive leakage
of microwave energy.
WARNING
• If the door or door seals are
damaged, the microwave oven
must not be operated until it
has been repaired by a Breville
Service Centre. It is particularly
important that the oven door
closes properly and that there is
no damage to the:
• (1) Door (bent), (2) hinges and
latches (broken or loosened),
(3) door seals and sealing
surfaces.

7
WARNING
• Liquids and other foods
must not be heated in sealed
containers since they are liable
to explode.
WARNING
• Only allow children to use
the microwave oven without
supervision when adequate
instructions have been given so
that the child is able to use the
microwave oven in a safe way
and understands the hazards of
improper use.
WARNING
• It is hazardous for anyone other
than a Breville Service Centre
to carry out any service or
repair operation that involves
the removal of the cover which
gives protection against
exposure to microwave energy.
WARNING
• When heating food in
microwave-safe or paper
containers, keep an eye on the
microwave oven due to the
possibility of ignition.
The appliance should not be
cleaned with a steam cleaner.
Microwave Oven specifications
Specification LMO420 BLKANZ
Power consumption 230-240V/50Hz, 1200W
Output 800W
Outside dimensions (mm) 271mm(H)×457mm(W)362mm(D)
Oven Cavity dimension (mm) 180mm(H)×315mm(W)×329mm(D)
Oven Capacity 20 Litres
Net Weight approx (kg) Approx. 9.5kg

8
SPECIAL SAFETY
INSTRUCTIONS
FOR YOUR
MICROWAVE
OVEN
• Wipe the microwave
oven cavity with a soft,
damp cloth after each
use. Leaving food residue,
grease or fat in the
cavity could cause the
microwave oven cavity to
overheat and may cause
the microwave oven to
smoke or catch fire.
• The microwave oven
should be cleaned
regularly and any food
splattering inside the
cavity should be removed.
Failure to maintain the
microwave oven in a
clean condition could
lead to deterioration of
the surface, adversely
affecting the life of the
microwave oven and
possibly resulting in a
hazardous situation.
• If the door seals or any
of the microwave oven is
damaged, the microwave
oven must not be
operated until it has been
inspected and/or repaired
at an authorised Breville
service centre.
• The microwave oven is
intended for heating food
and beverages. Drying
of food or clothing and
heating of warming pads,
slippers, sponges, damp
cloth and similar may lead
to risk of injury, ignition
or fire.
• Ensure all food containers
and/or plates are suitable
for use in the microwave
oven. This should be done
prior to preparing food
for heating or cooking
in the microwave oven.
Monitor foods and liquids
heating or cooking in
the microwave oven
at all times due to the
possibility of containers
igniting.

9
• Liquids or other foods
must not be heated in
sealed containers since
they are liable to explode.
• Some containers and/or
plates may appear suitable
for use in the microwave
oven but may be coated
in a glaze that will absorb
the microwave energy,
overheat and cause the
container to crack. The
glaze may also prevent
the food from heating/
cooking.
• Food and/or liquids should
not be heated or cooked
directly on the flatbed base
plate. Food and/or liquids
must be placed into a
suitable microwave proof
container before placing
onto the flatbed base plate
• Food and/or liquids should
not be heated or cooked in
plastic or paper containers
or bags, unless specified
as suitable for use by the
manufacturer, due to the
possibility of containers
exploding or igniting.
• Metal clips or twist ties
should be removed from
the packaging as these
could cause sparking and/
or fire.
• Do not use recycled paper
or kitchen paper towelling
when cooking. Recycled
paper may contain small
metal or other impurities
which could cause
sparking and/or fire.
• Do not use metal
containers or utensils
in the microwave oven
as these could cause
sparking and/or fire.
• Only use utensils that
are suitable for use in
microwave ovens.
• Food grade foil should not
be used in the microwave
oven as this could cause
sparking and/or fire.
• Ensure that lids and caps
covering containers are
removed prior to placing
liquids and/or foods into
the microwave oven.

10
• Feeding bottles and baby
food jars should have
lids and caps removed
before warming or
heating in the microwave
oven. To avoid burns or
scalding after heating,
the contents should be
stirred or shaken and the
temperature checked
before serving.
• Always ensure the
temperature of food or
drink which has been
heated or cooked in the
microwave oven has
been tested before eating,
drinking or serving to
others, especially children,
disabled or elderly people.
• The heating of liquids
and beverages in the
microwave oven can
result in delayed eruptive
boiling. Care must be
taken when handling any
containers containing hot
liquids or beverages.
• Do not heat popcorn
in the microwave oven
unless it has been
commercially packaged
for microwave use. There
may be a number of
un-popped kernels that
may overcook and burn
when popping popcorn.
Do not use oil unless
recommended by the
manufacturer. Do not
pop popcorn longer
than the manufacturer’s
instructions (popping
time should not exceed 3
minutes). Longer cooking
could cause scorching
or fire.
• Do not cook any
food surrounded by
a membrane (such as
potatoes, chicken liver,
egg yolks, oysters, etc)
without first piercing
the membrane several
times with a fork or
similar utensils.

11
• Fresh eggs in the shell and
whole hard-boiled eggs
should not be cooked or
heated in the microwave
oven as they may explode
during cooking, at the
end of cooking or after
removing from the
microwave oven.
• Do not heat oil or fat for
shallow or deep frying
in the microwave oven.
Doing so may cause the
microwave oven and/
or the oil to overheat
and/or ignite.
• If any smoke is observed,
switch off and unplug
the microwave oven at
the power outlet. Keep
the door closed to stifle
any flames.
• Do not attempt to operate
the microwave oven by
any method other than
those described in this
instruction book. Do not
disconnect the microwave
oven from the power
supply by pulling on the
cord to unplug from the
power outlet.
• When storing the
microwave oven loosely
wind the cord. Do not
wrap the cord around the
microwave oven.
• Only use the temperature
probe recommended or
supplied together with
this microwave oven. This
is only applicable if the
appliance has the facility
to use a temperature
sensing probe.
CAUTION
• Surfaces may be hot
during and after use.
If the product is not
maintained in a good
state of cleanliness, its
surface could be degraded
and affect the life span of
the product and lead to a
dangerous situation.
FOR HOUSEHOLD USE ONLY
SAVE THESE INSTRUCTIONS
12
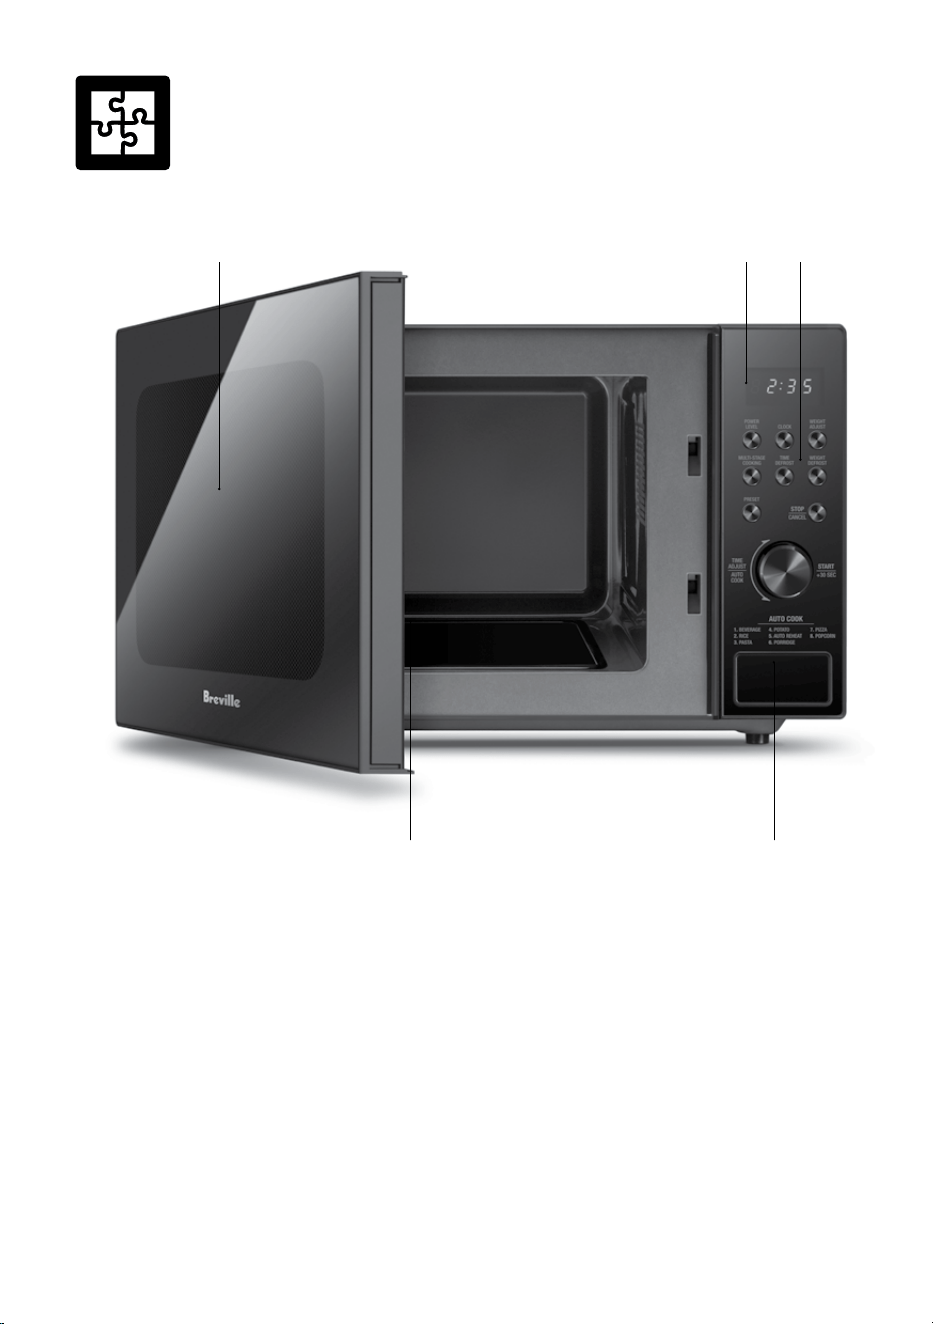
Components
A. Viewing window
B. LED display
C. Control panel, cooking functions & dial
D. Flatbed base plate
E. Push button door release
A B C
ED
13
POWER
LEVEL CLOCK
WEIGHT
ADJUST
MULTI-STAGE
COOKING
PRESET
TIME
DEFROST
WEIGHT
DEFROST
TIME
ADJUST
AUTO
COOK
AUTO COOK
1. BEVERAGE
2. RICE
3. PASTA
4. POTATO
5. AUTO REHEAT
6. PORRIDGE
7. PIZZA
8. POPCORN
START
+30 SEC
STOP
CANCEL
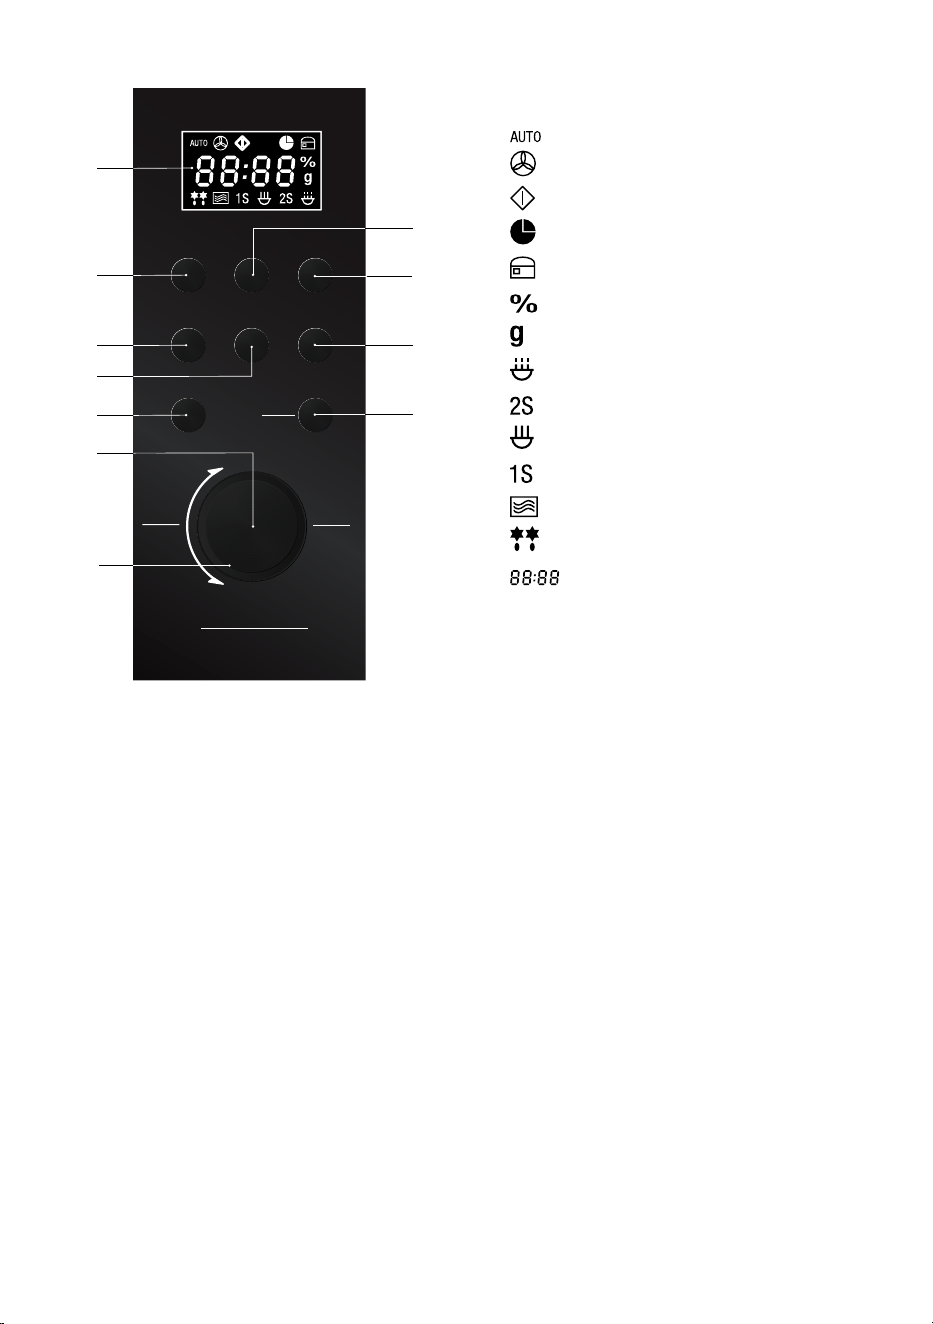
LED DIGITAL DISPLAY ICONS
Auto Cook
No Power - 0%
Pause
Clock
Safety Child Lock
Power Level
Unit Weight
Power – 10% – 70%
Second Cooking Program
Power – 80% – 100%
Current Cooking Program
Microwave/Start
Defrost
Numbers (Running Time/Clock)
1
2 4
5
8
6
10
7
9
11
3
7. WEIGHT DEFROST
Defrost by food category and weight; the
defrosting time and power level will be
automatically set.
8. PRESET
Pre-program a future start time.
9. STOP/CANCEL
Press once to pause cooking or twice to
cancel cooking. It is also used for setting
the Safety Child Lock.
10. START/+30SEC (Push Dial)
Push the dial in once for 30 second
instant cooking at 100% power, and each
additional push of the dial will add 30
seconds to the cooking time.
11. TIME ADJUST/AUTO COOK (Turn Dial)
Turn the dial clockwise to set cooking time.
Turn the dial anti-clockwise to select from
the Auto Cook menu.
1. LED digital display screen
Displays selected cooking progress, power
and digital clock.
2. POWER LEVEL
Press to select microwave power level
percentage - 100%, 80%, 60%, 40%, 20% or
00%.
3. DIGITAL CLOCK (24 HR)
Press to set the current time.
4. WEIGHT ADJUST
Use to select the weight or amount of food.
5. MULTI-STAGE COOKING
Use to set up to two cooking stages using
different power levels.
6. TIME DEFROST
Use to defrost by time. The defrosting power
level is automatically set once the defrosting
time is programmed.
14
Functions
INTRODUCTION TO MICROWAVE
COOKING
• Microwaves are invisible waves of
electromagnetic energy similar to radio
waves. Instead of being converted to
sound as in a radio or mobile phones, it is
converted into a heat source which heats
food from the inside.
• Microwaves cook because food molecules
of water, fat and sugar react to the energy
provided by the microwaves. That energy is
absorbed by the food causing the molecules
to vibrate quickly. This movement creates
friction which causes the food to heat up
and therefore cook.
• The energy in a microwave is distributed
evenly throughout the cavity.
• Microwave cooking is considered the 'cool'
cooking method as only the food gets hot
and surrounding air stays cool.
• Microwaves are safe and can be economical.
• Microwave ovens don't need preheating
therefore the kitchen stays cooler. Cooking
is cleaner with less odours and washing up
is reduced.
• Microwave ovens cook foods rapidly. Some
foods are better cooked in a microwave
oven as they retain more flavour, moisture,
texture and goodness, such plain fish fillets,
soft fruit, vegetables and fat free cakes.
• In a microwave the heat is produced
INSIDE the food. In all other conventional
cooking methods, heat is applied from
OUTSIDE through transference of heat by
convection or radiation.
• Microwave energy penetrates the food to
a depth of approximately 25mm. Small
foods under 5cm in diameter such as eggs
are penetrated to the centre, from all sides.
In larger foods, energy creates heat in the
outer layer; this then moves to the centre
by conduction, as it does with conventional
cooking.
BEFORE FIRST USE
• Before first use, remove all promotional
stickers and packaging material before
using the microwave oven for the first time.
• To eliminate a choking hazard for young
children, remove and safely discard the
protective cover fitted to the power plug of
this microwave oven.
• Carefully unpack the microwave oven and
keep all packing material until all the parts
of the microwave oven have been found and
the appliance has been assembled.
• To remove any dust that may have
accumulated during packing, wipe the
interior and exterior of the microwave oven
with a soft, damp cloth and dry thoroughly.
WARNING
Do not immerse any part of your microwave
oven in water or any other liquid
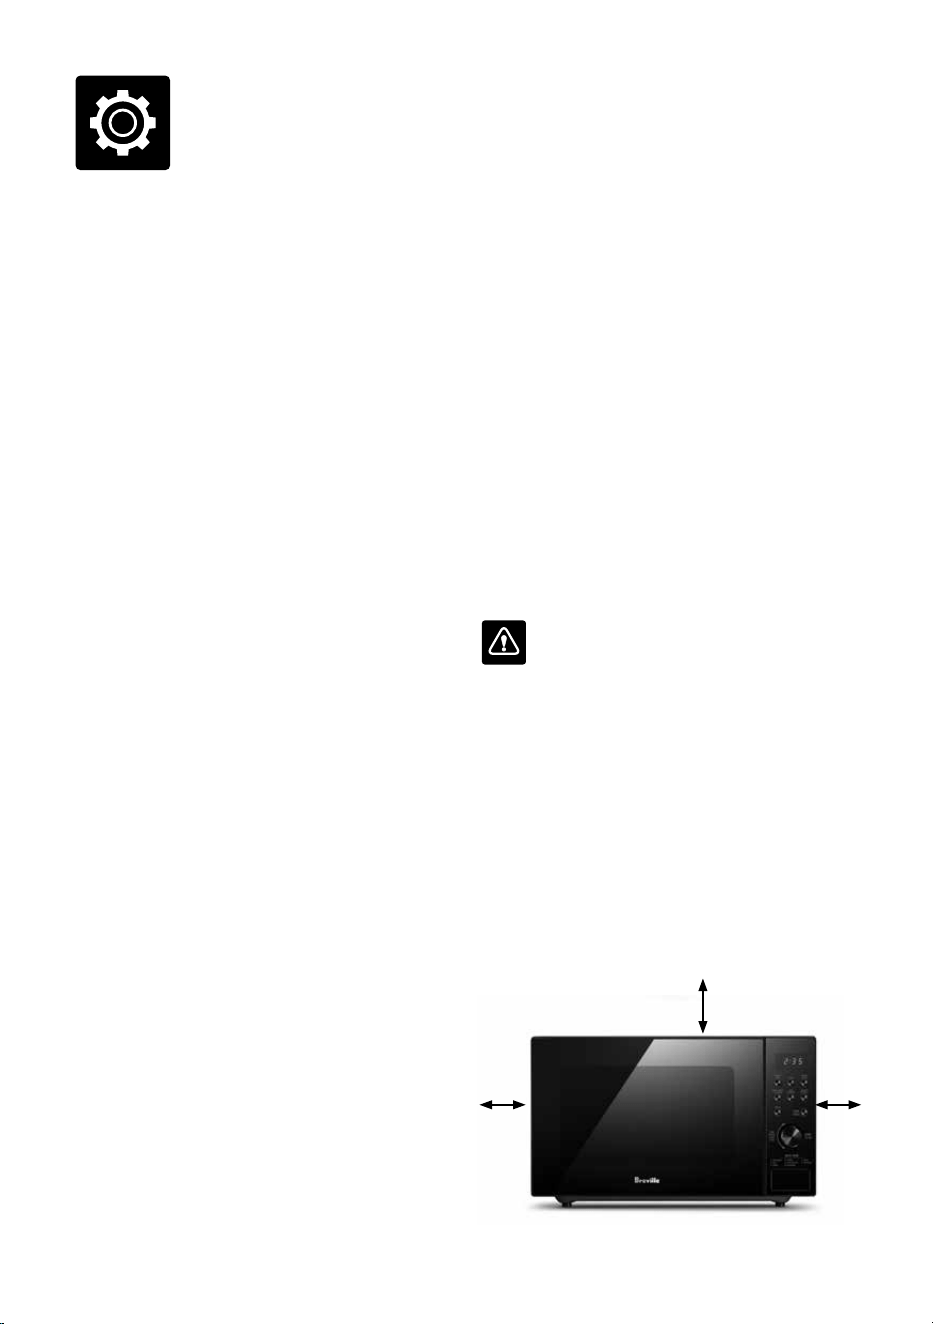
TIPS ON SETTING UP YOUR
MICROWAVE
• Select a level surface that provides enough
open space for the air intake and/or outlet
vents.
• A minimum clearance of 20cm on each
side and 30cm above the microwave is
required between the microwave oven and
any adjacent walls.
30cm
20cm 20cm
15
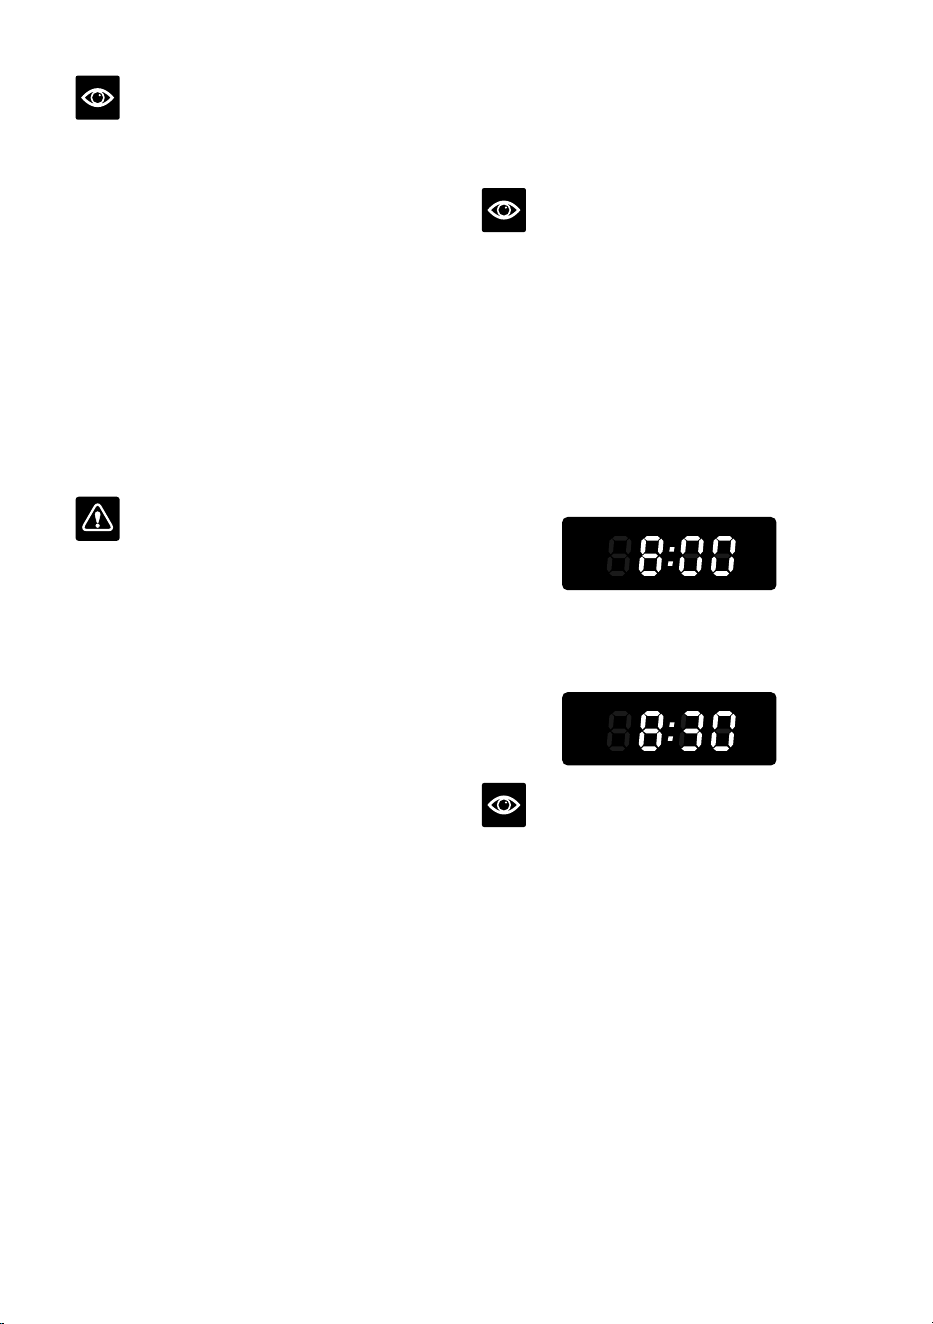
SETTING THE CLOCK
When the power is switched on, the LED will
display 1:00. Press the CLOCK button once to
set the digital clock in a 24 hour format.
NOTE
Before using PRESET, the clock must be
programmed to the correct time.
EXAMPLE: To set the clock time to 8:30:
1. Press the CLOCK button once and the
hours digits will flash.
2. Turn the TIME ADJUST/AUTO COOK
dial until 8 flashes on the LED display. Press
the CLOCK button to set this hour. The
minutes digits will begin to flash.
3. Turn the TIME ADJUST/AUTO COOK
dial until :30 is indicated. Press the CLOCK
button to set.
NOTE
Press the CLOCK button once to check clock
time during cooking.
NOTE
• Do not remove the feet from the bottom of
the microwave oven.
• Blocking the air intake and/or outlet
openings can damage the microwave oven.
• Do not install the microwave oven over
a range cooktop or other heat-producing
appliance.
• Place the microwave oven as far away from
radios and televisions as possible.
• The operation of a microwave oven
may cause interference to your radio or
television reception.
• The microwave must not be placed in a
cabinet.
WARNING
• Do not install the microwave oven over
a range cooktop or other heat-producing
appliance.
• If installed near or over a heat source, the
microwave oven could be damaged and the
warranty would be void.
• Check the microwave oven for any damage,
such as misaligned or bent door, damaged
door seals and sealing surface, broken or
loose door hinges and latches and dents
inside the cavity or on the door.
• If there is any damage, do not operate the
microwave oven and contact a Breville
service centre.
• Do not immerse the microwave oven, power
cord or plug in water or any other liquid.
OPERATING THE MICROWAVE OVEN
1. Plug the power cord into a 230V or 240V
power outlet and switch on the power outlet.
The microwave LED display will illuminate
indicating it is ready.

16
+30 SEC INSTANT START
The microwave oven is equipped with a
+30 second instant start.
1. Push the START/+30 SEC dial once to start
cooking for 30 seconds at 100% microwave
power. Each additional push of the dial will
increase the cooking time by 30 seconds
incrementally, to a maximum of 10 minutes
The microwave oven will start automatically
after the START/+30 SEC dial is pushed.
2. Press the STOP/CANCEL button once to
pause or twice to cancel.
IMPORTANT
+30 SEC will not operate if a cooking time has
been programmed.
PROGRAM TIME COOKING
1. To set a cooking time, FIRST turn the TIME
ADJUST/AUTO COOK dial clockwise
to display the time. Continue turning
clockwise to increase cooking time, or anti-
clockwise to decrease.
• The time increases in 10 second increments
up to 5 minutes, 30 seconds up to
10 minutes, then 1-minute increments up to
30 minutes, then 5-minute increments up
to 95 minutes. Cooking power is 100% high
on this function.
NOTE
FIRST turning the dial anti-clockwise will
activate the auto-cook settings, not the time.
If no action is taken after 20 seconds, the LED
display will revert back to the CLOCK time set,
and re-programming will be required.
2. Press the START/+30 SEC button to start.
NOTE
The +30 second instant start cannot be used to
add additional cooking time when using this
function.
3. Press the STOP/CANCEL button once to
pause or twice to cancel.
AUTO COOK MENUS
NOTE
The Auto Cook menu selections can only be
made by FIRST turning the TIME ADJUST/
AUTO COOK dial anti-clockwise.
• This microwave oven comes
pre-programmed with 8 Auto Cook menus.
• When using any of the Auto Cook menus,
only the quantity or weight of the item
needs to be selected as the power level and
cooking time is automatic.
• For Beverage and Potato, the display will
show the number of servings instead of
food weight when pressing the WEIGHT
ADJUST button.
• If no action is taken after 20 seconds
during programming, the LED display will
revert back to the CLOCK time set, and re-
programming will be required.
1. To select from the Auto Cook menu, rotate
the TIME ADJUST/AUTO COOK dial anti-
clockwise to the menu item desired. Press
the WEIGHT ADJUST to scroll through
the weight or quantity of the item to be
cooked.
2. Push the START/+30 SEC dial to start.
3. Press the STOP/CANCEL button once to
pause or twice to cancel.
EXAMPLE: To cook 150g of porridge.
1. Turn the TIME ADJUST/AUTO COOK
dial anti-clockwise until 06 is displayed.
2. Press the WEIGHT ADJUST button
repeatedly until 150g is indicated on the
LED display.
3. Push the START/+30 SEC dial to start.
NOTE
The result of auto cooking depends on factors
such as fluctuation of voltage, the shape and
size of food, your personal preference as to the
doneness of certain foods and even how well
you happen to place food in the microwave
oven.

17
AUTO COOK MENU GUIDE
Auto Auto Menu Weight/Portion Default
Time
1
Beverage 1 Portion/200ml 1.3
2 Portions/400ml 2.4
3 Portions/600ml 3.5
2
Rice 150g 18*
300g 18
450g 22
600g 24
3
Pasta 100g 13
200g 20
300g 24
4
Potato 1 Portion/230g 5
2 Portions/460g 8
3 Portions/690g 12
5
Auto Reheat 200g 2
300g 2.3
400g 3
500g 3.3
600g 4
700g 4.3
800g 5.3
6
Porridge 50g 2
100g 3.45
150g 5
7
Pizza 150g 1
300g 1.4
450g 2.2
8
Popcorn 100g 2.4
*When cooking 150g of rice add an extra ¼ cup water.
PRESET COOKING
• The PRESET button allows you to pre-
program a future cooking start time up
to 24 hours across the various microwave
functions; Auto Cook, Multi-Stage Cooking,
Weight or Time Defrost.
• The microwave function of choice must be
programmed prior to using the PRESET
button.
• If no action is taken after 20 seconds
during programming, the LED display will
revert back to the CLOCK time set, and re-
programming will be required.
Example: To preset the heating of
2 beverages at 5:00am, using the
PRESET function.
1. To preset the start time when using the
AUTO COOK menu selection, Beverage,
turn the TIME ADJUST/AUTO COOK dial
anti-clockwise to display 1 (for Beverage),
press the WEIGHT/ADJUST button and
turn the TIME ADJUST/AUTO COOK
dial to select 2 Beverages, then press the
PRESET button to set the time you require
the microwave oven to start.
2. The hour digits will flash on the display.
Turn the TIME ADJUST/AUTO COOK
dial to adjust the hours to display ‘5’. Press
the PRESET button again to change to
minutes. The minute digits will flash.
Turn the TIME ADJUST/AUTO COOK
dial to adjust the minutes to display ‘00’.
The preset button is now set to heat
2 beverages at 5:00am.
3. Push the START/+30 SEC dial to start.
The clock icon on the display will flash to
indicate that the preset has been set. The
microwave will start at the time set.
• To check the programmed start time, press
the PRESET button.
• To cancel Preset at any time, press the
PRESET button and when the programmed
start time is displayed, press the STOP/
CANCEL button. The clock icon will stop
flashing.

18
NOTE
• The PRESET button can only be set, to
begin within 24 hours of setting the preset
button – you cannot program to set on a
specific date.
• Once the preset function has been set - the
microwave cannot be used for any other
function, until the preset function has been
completed or cancelled.
WARNING
When using PRESET, use caution when
choosing food or liquid to cook at a later time
to ensure it adheres to food safety criteria
which will allow for it to stand uncooked over
that set period of time.
MULTI STAGE COOKING
• This microwave oven can be programmed
for up to 2 automatic cooking sequences.
This is handy if you want to reduce the
power level during cooking.
• If no action is taken after 20 seconds
during programming, the LED display will
revert back to the CLOCK time set, and re-
programming will be required.
EXAMPLE: To cook lasagne at 100% power
for 5 minutes and then 60% for the last
8 minutes
1. Press the POWER LEVEL button once to
display 100.
2. Turn the TIME ADJUST/AUTO COOK
dial to set the time for 5 minutes.
3. Press the MULTI-STAGE COOKING
button.
4. Press the POWER LEVEL button until 60%
is displayed.
5. Turn the TIME ADJUST/AUTO COOK
dial to set the time for 8 minutes.
6. Push the START/+30 SEC dial to start.
7. Press the STOP/CANCEL button once to
pause or twice to cancel.
NOTE
Time Defrost, Weight Defrost, +30 Sec and
Auto Cook cannot be programmed when using
the Multi-Stage cooking program.
POWER LEVEL ADJUST
You can adjust the cooking Power Level on the
microwave oven.
1. Press the POWER LEVEL button repeatedly
to scroll through the different power levels.
2. Push the START/+30 SEC dial to start.
3. Press the STOP/CANCEL button once to
pause or twice to cancel.
Press POWER LEVEL
Cooking power
Display
1 Time 100% 100
2 times 80% 80
3 times 60% 60
4 times 40% 40
5 times 20% 20
6 times 0% 00

19
DEFROST FUNCTIONS
• This microwave oven is handy for
defrosting frozen foods, such as meat,
poultry, or seafood. There are two defrost
options to select from.
• When using either of the defrosting
programs, the system will pause and sound
beeps to remind the user to turn food over.
• If no action is taken after 20 seconds
during programming, the LED display will
revert back to the CLOCK time set, and re-
programming will be required.
WEIGHT DEFROST
When using Weight Defrost, the time
and defrosting power level are adjusted
automatically once the weight is programmed.
The weight of the frozen food varies between
100g and 1800g.
1. Press the WEIGHT ADJUST button to
scroll through the weight options.
2. Push the START/+30 SEC dial to start.
3. The microwave will pause, and a beep
will sound indicating the need to turn the
food over. Once the food has been turned,
push the START/+30 SEC dial to resume
defrosting.
4. Press the STOP/CANCEL button once to
pause or twice to cancel.
TIME DEFROST
• The microwave oven can quickly defrost
food based on the time you program.
• The maximum defrosting time you can set
is 95 minutes.
1. Press the TIME DEFROST button once.
2. Turn the TIME ADJUST/AUTO COOK
dial to set the defrosting time.
3. Push the START/+30 SEC dial to start.
4. The microwave will pause, and a beep
will sound indicating the need to turn the
food over. Once the food has been turned,
push the START/+30 SEC dial to resume
defrosting.
5. Press the STOP/CANCEL button once to
pause or twice to cancel.
TIPS ON DEFROSTING
• The energy required for defrosting is much
lower than for cooking as the microwave
causes the ice formed in the food to melt,
rather than heat.
• Before defrosting meat in the microwave
oven, remove the freezer bag or wrapping
to prevent meat sitting in ‘drip’, which will
otherwise boil as the meat defrosts causing
meat to go grey and begin to stew.
• To remove frozen meat from freezer
wrappings, defrost for a few minutes so the
wrap is easy to remove.
• Remove meat from Styrofoam trays as they
are not microwave-safe.
• Place meat onto a microwave safe rack and
a drip tray to catch juices.
• Check the meat throughout the defrosting
time. As outer portions of meat thaw,
remove them. If the edges of meat feel
warm, stop microwaving and allow meat to
stand for a few minutes or until edges are
cold again.
• After defrosting the meat, it must be cooked
right away. Don’t leave it to stand for any
length of time at room temperature or in the
fridge.
SAFETY CHILD LOCK
• The Safety Child Lock can be activated
to prevent unsupervised operation of the
microwave oven by children.
• When activated, the microwave oven cannot
be operated and the SAFETY CHILD
LOCK icon will illuminate on the display.
1. To set the SAFETY CHILD LOCK, press
and hold the STOP/CANCEL button for
3 seconds until a beep sounds and the
SAFETY CHILD LOCK icon will illuminate
on the display.
2. To cancel the SAFETY CHILD LOCK, press
and hold the STOP/CANCEL button for
3 seconds until the SAFETY CHILD LOCK
icon is no longer displayed on the screen.

20
Tips
SOME IMPORTANT TIPS FOR
MICROWAVING COOKING
• To help equalize energy in the food so that
it cooks evenly follow these helpful tips.
• Arrange foods with varying size ends, such
as chicken drumsticks and broccoli with
the thicker or tougher part positioned to the
outside of the dish. This ensures the parts
that require more cooking will receive more
energy, so the food will cook evenly.
• Covering the dish during cooking holds in
the heat and steam to speed up the cooking
time. Use a microwave-safe lid that has been
vented, to allow the release excess steam.
• Choose cooking dishes that are shallow
dishes enable the food to cook faster.
• Use round shaped microwave dishes. Round
shapes cook more evenly than square or
rectangular dishes which absorb most of
the energy in the corners causing food to
overcook and toughen.
• Stir foods from the outside to centre of
the dish once or twice during cooking to
equalize heat and speed microwaving.
• Turn medium to large food items over once
during microwaving. This enables even
exposure to micro waves.
• Elevating some types of food such as cakes,
roast vegetables and dough products can
be advantageous. It allows more energy to
penetrate the food from all sides, base and
top. Use a microwave-safe plastic or ceramic
rack. Do not elevate any special browning
dishes, jugs of sauce or custard, small
quantities of food or mugs of beverages.
Internal temperatures of foods continue
to rise so that they continue cooking even
after they have been removed from the
microwave oven.
• It is better to underheat food slightly as it
will continue to cook once removed from
the microwave.
• MICROWAVE UTENSILS, containers,
plates, dishes, etc. used in the microwave
oven should always be microwave-safe.
Check if they are microwave-safe on the
underside of the utensil or contact the
manufacturer.
• Metal containers and utensils should not be
used in the microwave oven.

21
Care, Cleaning & Storage
• Remove odours from your microwave oven
by combining a cup of water with the juice
of one lemon in a deep microwave-safe
bowl, microwave on highest power level for
5 minutes. Wipe the microwave oven cavity
thoroughly and dry with a soft cloth.
• When it becomes necessary to replace the
oven light, please consult your Breville
service centre to have it replaced.
• If storing the microwave oven, press the
STOP/CANCEL button, switch off at the
power outlet then unplug the power cord.
Ensure the microwave oven is completely
cool, clean and dry. Do not place heavy
objects on top. Store the microwave oven
upright.
• Please do not dispose of this appliance with
domestic rubbish; it should be taken to the
appropriate disposal centre provided by
your local council municipalities.
BEFORE YOU CALL FOR SERVICE
• Check to ensure that the microwave oven is
plugged in securely. If it is not, remove the
plug from the power outlet, wait 10 seconds
and plug it in again securely.
• Check for a blown circuit fuse or a tripped
main circuit breaker. If these seem to be
operating properly, test the power outlet
with another appliance.
• Check to ensure that the control panel is
programmed correctly and the timer is set.
• Check to ensure that the door is securely
closed engaging the door safety lock
system. Otherwise, the microwave energy
will not flow into the microwave oven.
NOTE
If none of the above rectify the situation, then
contact your Breville service centre. Do NOT
try to adjust or repair the microwave oven
yourself.
• Switch off the microwave oven at the power
outlet and remove the plug from the power
outlet before cleaning.
• Keep the inside of the microwave oven
clean.
• When food splatters or spilled liquids
adhere to the microwave oven internal walls,
wipe with a damp cloth. Mild detergent may
be used if the cavity gets very dirty. Avoid
the use of spray and other harsh cleaners
as they may stain, streak or dull the door
surface.
• The outside surfaces should be cleaned with
a damp cloth. To prevent damage to the
operating parts inside the microwave oven
cavity, water should not be allowed to seep
into the ventilation openings.
• Wipe the door and window on both sides of
the door seals and adjacent parts frequently
with a damp cloth to remove any spills or
spatters. Do not use an abrasive cleaner.
• Do not allow the control panel to become
wet. Clean with a soft, damp cloth. When
cleaning the control panel, leave the
microwave oven door open to prevent it
from accidentally turning on.
• If steam accumulates inside or around the
outside of the oven door, wipe with a soft
dry cloth. This may occur when cooking
foods high in moisture or if the microwave
oven is operated under high humidity
conditions, this is normal.

22
Troubleshooting
PROBLEM POSSIBLE REASON EASY SOLUTION
Microwave oven
will not start
•
Power cord not plugged in properly or
switched on
•
Fuse blown or circuit breaker problem
•
Trouble with outlet
•
Ensure door is shut properly
•
Check to make sure there are no
obstructions or that the door is not
damaged in any way
Microwave oven
does not heat
•
Door not closed properly
•
Ensure door is shut properly
•
Check to make sure there is no
obstructions or that the door is not
damaged in any way
Microwave
oven interfering
with television
reception
•
Radio and TV reception may be
interfered with during operation.
This is similar to the interference
that is sometimes cause by vacuums,
blenders etc.
•
Interference should stop once microwave
is switched off
Dim microwave
oven light
•
When operating on low power
levels, the microwave oven light may
be dimmer.
•
This occurrence is normal
Steam
accumulating
and/or hot air
coming out from
vents
•
During operation, steam may be
produced. Most will exit through the
vents, however some may accumulate
around the microwave oven door.
•
Once microwave cooking is complete,
steam condensation maybe removed by
wiping over the affected area with
a dry cloth

23
Notes

Web: www.breville.comWeb: www.breville.com
Australian Customers
Phone:
1300 139 798
New Zealand Customers
Phone:
0800 273 845
Breville Customer Service Centre
Breville, the Breville logo, Master Every Moment and Silhouette Flatbed are trademarks of Breville Pty. Ltd.
A.B.N. 98 000 092 928. Copyright Breville Pty. Ltd. 2021. All other brand names may be trademarks of their respective owners.
Due to continued product improvement, the products illustrated/photographed in this booklet
may vary slightly from the actual product.
LMO420 ANZ G21