
DHEX83E
Dryer
User Manual
Asciugatrice
Manuale utente
2960313940_EN/ 19-02-24.(11:20)
Dear Customer,
Please read this guide prior to use this product!
Thank you for choosing Smeg product. We would like you to achieve the optimal efficiency from
this high quality product which has been manufactured with state of the art technology. Please
make sure you read and understand this guide and supplementary documentation fully before
use.
Observe all warnings and information herein. Therefore you can protect both yourself and your
product against potential damages.
Keep the manual. Include this guide with the unit if you hand it over to someone else.
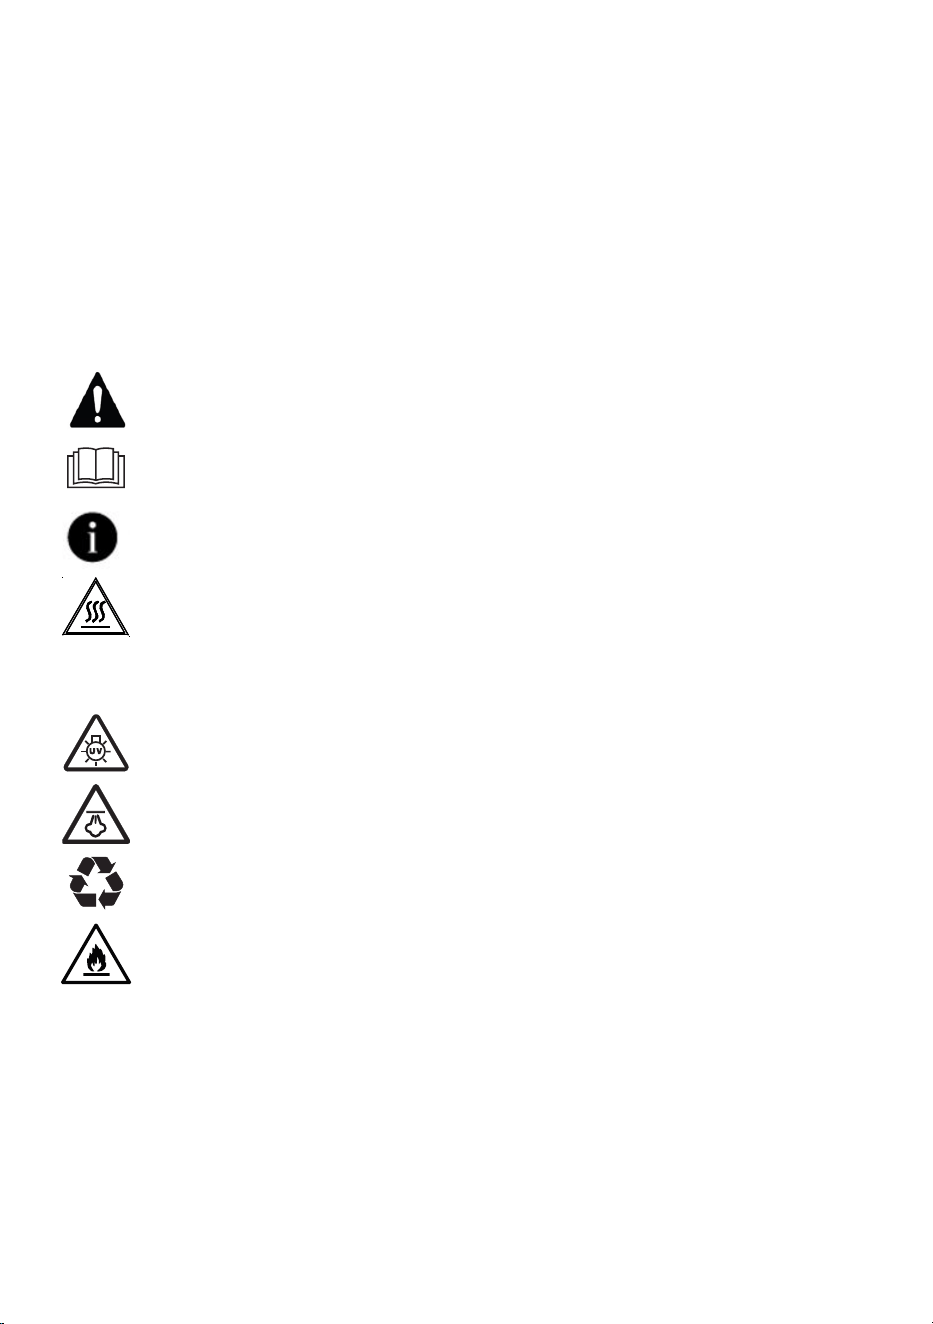
Symbols and Remarks
The following symbols are used in the user guide:
Danger that may cause death or injury
Read the manual
Important information or useful usage tips
Warning against hot surfaces
B
Warning against electric shock
Warning against UV Radiation hazard
Warning against scalding
The product's packaging is made of recyclable materials, in accordance with the
National Environment Legislation.
Warning against fire
NOTICE Danger that may cause material damage on the product or surrounding area

3
Dryer / User manual
Table Of Contents
1 Safety Instructions ............................................................................. 5
1.1 Intended use .....................................................................................................5
1.2 Safety of children, vulnerable persons and pets .................................................5
1.3 Electrical Safety .................................................................................................6
1.4 Transporting safety ............................................................................................7
1.5 Installing safety ..................................................................................................7
1.6 Usage safety .....................................................................................................9
1.7 Maintenance and cleaning safety .....................................................................10
1.8 Lighting safety .................................................................................................11
2 Environmental instructions................................................................. 12
2.1 Compliance with the WEEE Regulations and Waste Disposal ..........................12
2.2 Packaging information .....................................................................................12
2.3 Standard conformity and test information / EU declaration of conformity .........12
3 Your drying machine ........................................................................... 13
3.1 Technical specifications ...................................................................................13
3.2 General appearance ........................................................................................14
3.3 Scope of delivery .............................................................................................14
4 Installation .......................................................................................... 15
4.1 Right place for installation ................................................................................15
4.2 Removing the shipping safety group ................................................................15
4.3 Water connection ............................................................................................16
Connecting the water drainage hose .....................................................................16
4.5 Moving the drying machine .............................................................................. 16
4.6 Warning regarding the noise ............................................................................16
4.7 Replacing the lighting bulb ............................................................................... 16
5 Preparation ......................................................................................... 17
5.1 Laundry suitable for drying in drying machine ..................................................17
5.2 Laundry not suitable for drying in drying machine ............................................17
5.3 Preparing the laundry to be dried ..................................................................... 17
5.4 What to do for energy saving ...........................................................................17
5.5 Correct load capacity ......................................................................................18

4
Dryer / User manual
6 Running the product .......................................................................... 19
6.1 Control Panel ................................................................................................... 19
6.2 Symbols ..........................................................................................................19
6.3. Preparation of drying machine ........................................................................20
6.4 Program selection and consumption chart ....................................................... 21
6.5 Auxiliary functions ............................................................................................23
6.6 Warning indicators ........................................................................................... 23
6.7 Starting the program ........................................................................................24
6.8 Child Lock .......................................................................................................24
6.9 Changing the program after it is started ...........................................................24
6.10 Cancelling the program ..................................................................................25
6.11 End of program .............................................................................................25
6.12 Odour feature ................................................................................................25
7 Maintenance and cleaning ................................................................ 26
7.1 Loading Door Inner Surface .............................................................................26
7.2 Cleaning the sensor ........................................................................................ 27
7.3 Draining the water tank .................................................................................... 27
7.4 Cleaning the Condenser ..................................................................................27
8 Troubleshooting ................................................................................. 29
5
Dryer / User manual
1 Safety Instructions
This section includes the safety instructions necessary to prevent the
risk of personal injury or material damage.
• Our company shall not be held responsible for damages that may occur
if these instructions are not observed.
• Installation and repair operations shall always be performed by
Authorized Service.
• Use original spare parts and accessories only.
• Do not repair or replace any component of the product unless it is
clearly specified in the operation manual.
• Do not modify the product.
1.1 Intended use
• Product is designed only for household use. It is not intended for
commercial use.
• The product is not designed for outdoor use.
• Do not install or operate the product where freezing is a possibility and/
or vulnerable to external elements. Water frozen in the pump or the
hoses may cause damages
• Product can only be used to dry and ventilate laundry which are washed
with water and drying machine safe.
1.2 Safety of children, vulnerable persons and pets
• This product may be used by children aged 8 years and older and
persons with underdeveloped physical, sensory or mental capabilities or
lack of experience and knowledge if they have been given supervision
or instruction concerning use of the appliance in a the product safe way
and the hazards involved. Children should not tamper with the device.
Cleaning and maintenance should not be carried out by children unless
they are supervised.
• Children under 3 years old shall be kept away from the product unless
supervised.
6
Dryer / User manual
• Electrical products are dangerous for children and pets. Children and
pets shall not play with the product, climb on or get inside the product.
• Keep the product door closed even when not operated. Children or
pets could be locked inside the product and suffocate.
• Cleaning and user maintenance operations must not be performed by
children unless supervised.
• Keep the packaging materials away from children. Risk of injury and
suffocation.
• Keep all additives used with the product away from children.
• Before disposing of the product, cut the power cord and destroy the
loading door.
1.3 Electrical Safety
• The product must not be plugged in during installation, maintenance,
cleaning, repair and transporting operations.
• If the power the cord is damaged, it shall be replaced by authorized
service to avoid any risk that may occur.
• Do not tuck the power cord under the product or to the rear of the
product. Do not put heavy items on the power cord. Power cord shall
not be kinked, pinched and shall not come in contact with any heat
source.
• Do not use an extension cord, multi-plug or adaptor to operate your
product.
• The product shall not be powered via an external switch such as a timer
or shall not be connected to a circuit that is regularly opened and closed
with a tool.
• The plug shall be easily accessible. If this is not possible, a mechanism
that meets the electrical legislation and that disconnects all terminals
from the mains (fuse, switch, main switch, etc.) shall be available on the
electrical installation.
• Do not touch the plug with wet hands.
• When unplugging the appliance, don’t hold the power cord, but the
plug.
7
Dryer / User manual
1.4 Transporting safety
• Unplug the product prior to transport, empty the water tank and if any,
remove the water drain connections.
• This product is heavy, do not handle it by yourself.
• Take required precautions for the product against falling and tipping. Do
not crash or drop the product when transporting.
• Do not use the extruding parts of the product (such as the loading door)
to move the product.
• Move the product in upright position. If it cannot be moved upright,
transport via tilting to the right side when viewed from the front.
1.5 Installing safety
• To prepare the product ready for installation, ensure that the electrical
installation and water drain is proper by checking the information in the
user manual. If it is not suitable for installation, call a qualified electrician
and plumber to arrange the utilities as necessary. These operations shall
be undertaken by the customer.
• Check for any damage on the product before installing it. Do not have
the product installed if it is damaged.
• Do not remove the adjustable stand.
• Place the product on a level and hard surface and balance with the
adjustable legs.
• The gap between the product and the floor shall not be reduced via
materials such as rugs, pieces of wood and bands. The ventilation holes
under the base of the product shall not be clogged with a rug.
• The product shall be installed not to clog the ventilation holes.
• Install the product in an environment free of dust with good ventilation.
• Do not install the product in close proximity to flammable and explosive
materials and do not keep flammable and explosive materials near the
product when it is in operation.
• The product shall not be installed against a door, sliding door where the
product loading door cannot be completely opened, or behind a hinged
door where the product hinge is faced against the door’s hinges.

8
Dryer / User manual
• Install the product where periodic maintenance and cleaning can be
done with ease.
• Place the product with its back surface to the wall (for heater models).
• After placing the product, ensure that the back wall does not come in
contact with any extrusion (a water tap, electrical outlet etc.).
• Place the product with at least 1 cm space between the product and
the furniture edges.
• Follow the flue connection rules specified in the guide (for models with
flue).
• The exhaust air shall not be directed to flue which is used to exhaust the
smoke of devices that consume gas or other fuels (for models with flue).
• The ventilation hose shall not be connected to a heating stove or a
chimney flue (for models with flue).
• Plug the product to a grounded outlet protected with an appropriate
fuse in align with the specified type and current rates. Have an expert
electrician set grounding equipment. Do not use the product without a
grounding conforming with regional/national regulations.
• Plug the product in a grounded socket that conforms with the voltage,
current and frequency values specified in the type label.
• Do not plug the product to loose, broken, dirty, greasy sockets or
sockets that has come out their seats or sockets with a risk of water
contact.
• The new hose sets supplied with the product shall be used. Do not re-
use the old hose sets. Do not make attachments to the hoses.
• Place the power cord and hoses not cause a risk of tripping over.
• To use the product on top of a washing machine, a fixing aperture shall
be used between two products. Fixing aperture shall be mounted by the
authorised service.
• When the product is placed on the washing machine, their combined
weight when full could be around 180 kg. Place the products on a
sturdy floor that can carry adequate amount of load.
9
Dryer / User manual
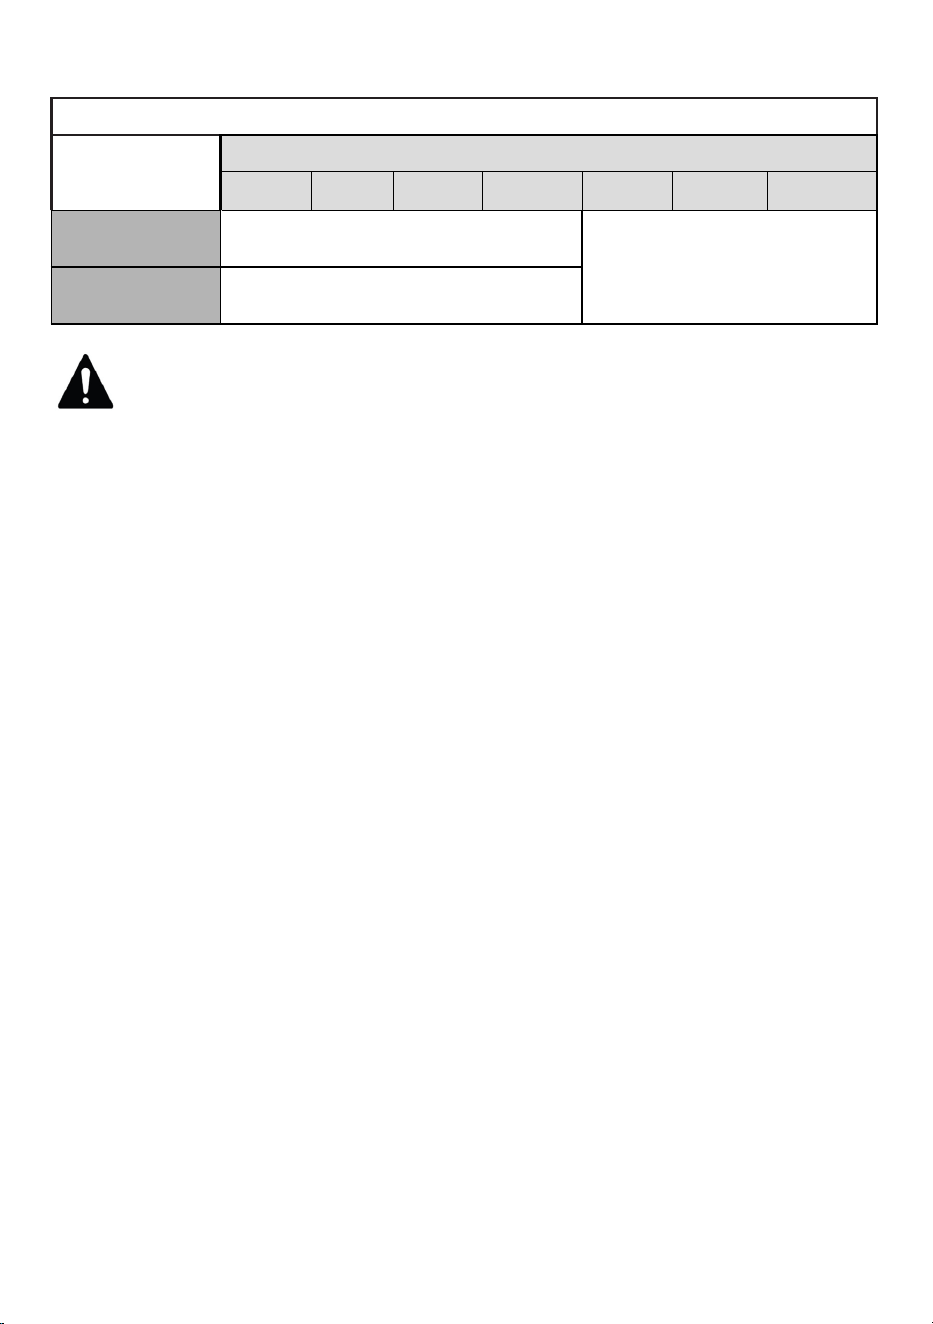
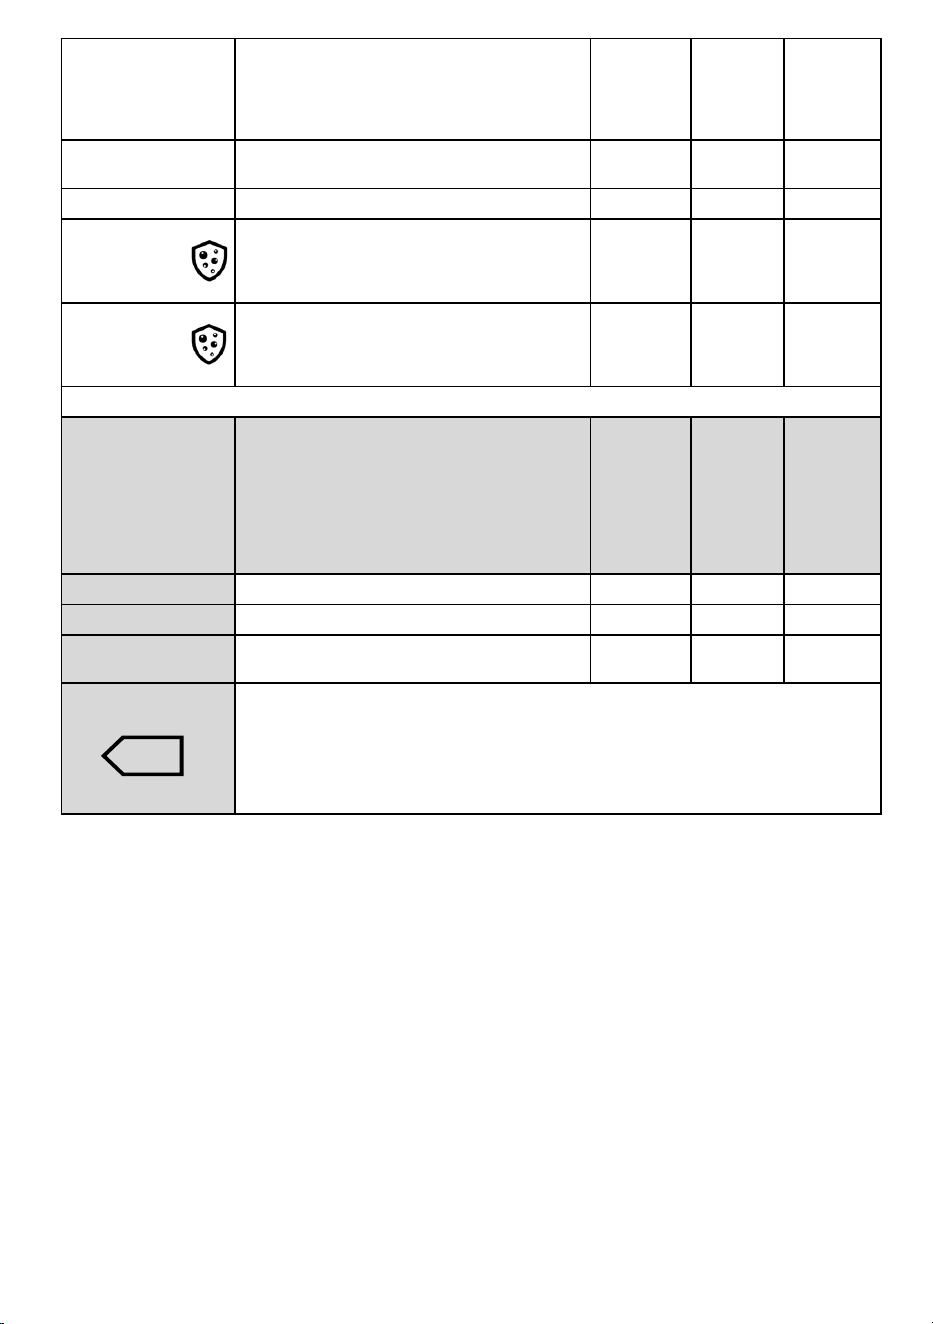
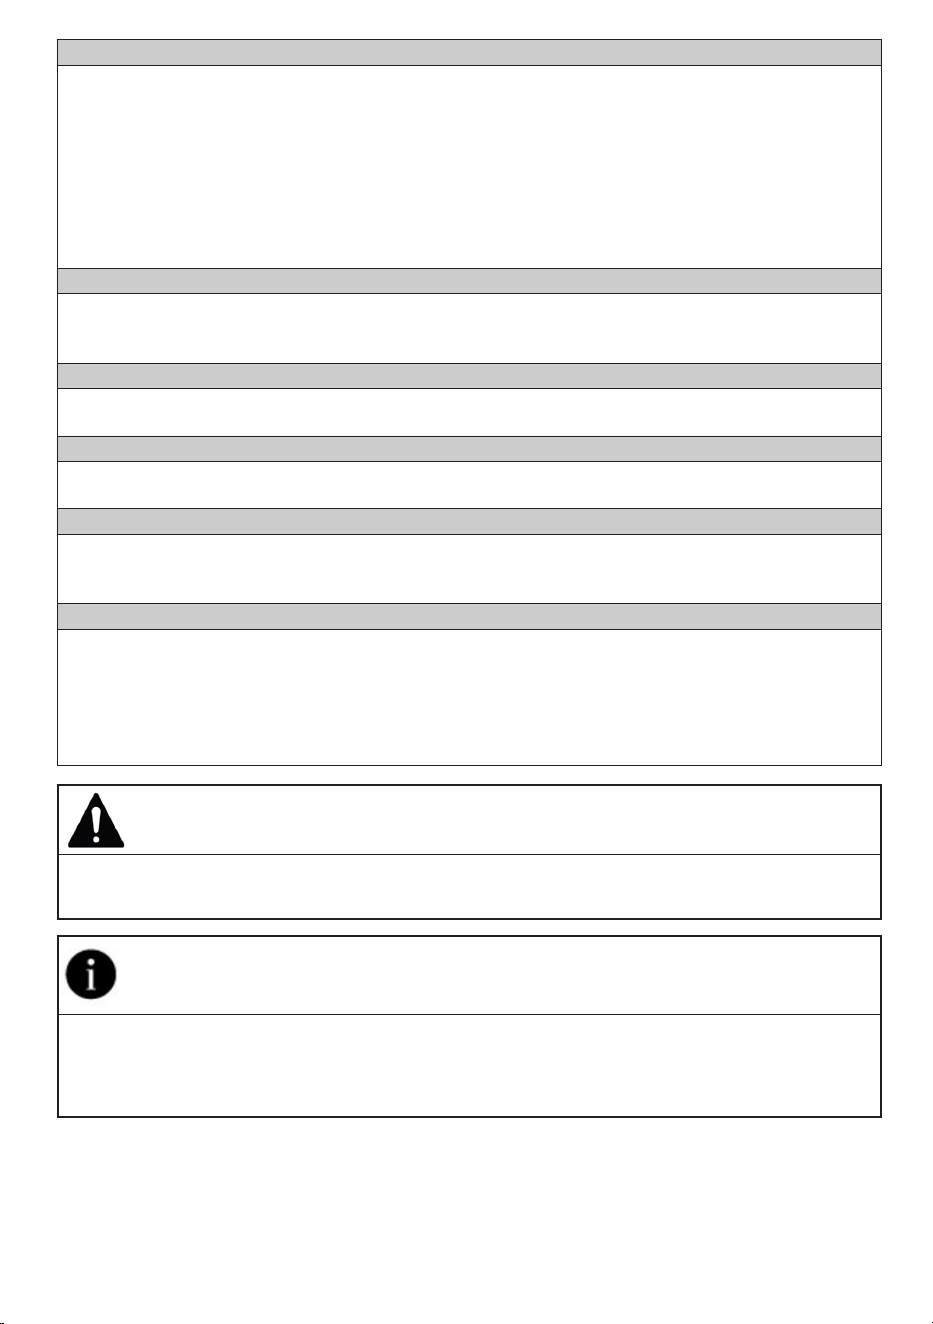
• Washing machine cannot be placed on top of the drying machine.
Installation Table for Washing Machine and Dryer
Dryer Depth
Washing Machine Depth
62 cm 60 cm 54 cm 50 cm 49 cm 45 cm 40 cm
54 cm
Can be installed
Cannot be installed
60 cm
Can be installed
1.6 Usage safety
• The maximum weight of dry laundry prior to washing is specified in
“Technical Specifications” section.
• Do not place the unwashed items in the drying machine.
• Items that are soiled with materials such as cooking oils, acetone,
alcohol, petrol, kerosene, stain removers, turpentine, wax or was
removers shall be washed in hot water with more amount of detergent
prior to drying with the drying machine.
• If chemicals are utilized for cleaning, the drying machine shall not be
used.
• Rubber foam (latex foam), shower bonnets, water resistant textiles,
rubber supported materials and clothes, pillows with rubber foam pads
shall not be dried in a drying machine.
• The items with hair spray, hair product residue or similar materials shall
not be dried in a drying machine.
• Empty the pockets of the clothes and remove items such as matches
and lighters.
• If all items cannot be removed rapidly and cannot be placed where
heat can dissipate, do not stop the drying machine before drying cycle
completed.
• The last part of the drying machine cycle is conducted without
heating (cooling cycle) in order to ensure that the items are kept at a
temperature that will not harm the items.

10
Dryer / User manual
• Laundry softeners or similar products shall be used in align with the
laundry softener instructions.
• Do not use the drying machine without the fibre filter.
• Do not allow fibre accumulation around the drying machine.
• To prevent back draft of gas in the room from the devices that consume
other fuels, including open fire, appropriate ventilation shall be provided
(for models with flue).
• Do not operate the product together with heaters such as gas heater
and a chimney. It may cause the flue to catch fire. (for models with flue)
• Do not lean or sit on the loading door when it is open, the product may
tip over.
• Do not get on the product.
• Do not place a source of flame (candles, cigarettes, etc.) on the product
or in the vicinity of it. Do not keep flammable/explosive materials.
• Do not touch the drum as it revolves.
• The back wall of the product will be hot during operation. Do not touch
the back side of the product during drying or after the drying process is
completed. (For models with heating)
• Do not touch the inner surface of the drum while adding or removing
clothes during a continuing program. The drum surface is hot.
• Do not press the buttons with sharp objects such as forks, knives, with
your nails etc.
• Do not operate the faulty or damaged product. Unplug the product (or
shut down the connected fuse) and call the authorized service.
• Unplug the product when not in use.
1.7 Maintenance and cleaning safety
• Do not wash the product by spraying or pouring water on it. Do not use
a pressure cleaner, steam cleaner, hose or pressurised gun to clean the
product.
• Do not use sharp or abrasive tools to clean the product.
11
Dryer / User manual
• Do not use materials such as household cleaning agents, soaps,
detergents, gas, gasoline, alcohol, wax, etc. to clean the product.
• The fibre filter shall be regularly cleaned. After each drying cycle, clean
the fibre filter and the inner surface of the loading door.
• Clean the fibre accumulation on the fins of the evaporator behind the
filter drawer with a vacuum cleaner. You can clean by hand, provided
you wear protective gloves. Do not try to clean with bare hands.
Evaporator fins may damage your hands. (For products with heat pump)
• Due to fire and explosion hazard, do not use solutions, cleaning
materials, steel wool or similar materials and tools to clean sensors.
• Clean the flue. (for models with flue)
• Do not drink the condensed water.
1.8 Lighting safety
• Contact an authorized service when you need to replace the LED/bulb
using for lighting (for products with lighting).
12
Dryer / User manual
2 Environmental instructions
2.1 Compliance with the WEEE Regulations and Waste Disposal
This product does not contain the dangerous and prohibited materials indicated in the
“Regulation on The Control of Waste Electrical and Electronic Equipment” published by
Ministry of Environment and Urbanisation of Republic of Turkey. Complies WEEE
Regulations. This product was manufactured from recyclable and reusable high quality
parts and materials. Therefore, do not dispose of this product with other domestic
wastes at the end of its life cycle. Take it to a collection point for electrical and electronic
equipment. You can ask your local administration about these collection points. You can help
protect the environment and natural resources by delivering the used products for recycling.
Also R290 is a flammable refrigerant. Therefore ensure that the system and pipes are
not damaged during operation and transportation.
Keep the product from heat sources, otherwise it may catch fire if damaged.
Do not dispose of the product by throwing it into fire.
2.2 Packaging information
The product’s packaging is made of recyclable materials, in accordance with the National
Legislation. Do not dispose the packaging waste with the household waste or other wastes,
dispose it to the packaging collection areas specified by local authorities.
2.3 Standard conformity and test information
/ EU declaration of conformity
The development, manufacturing and sales phases of this product is conducted in
conformity with the safety rules specified in all related instructions of the European
Union.
13
Dryer / User manual
3 Your drying machine
3.1 Technical specifications
* Min. height: Height with the adjustable stand closed.
Max. height: Height with the adjustable stand opened at maximum height.
** Weight of dry laundry before washing.
*** Data plate is under the door on the drying machine.
In order to increase the drying machine’s quality, the technical specifications may be
changed without prior notice.
Figures in this manual are schematic and may not exactly match the product.
The values provided with the drying machine or its accompanying documents are
laboratory readings in accordance with the respective standards. These values may
differ depending on the use and ambient conditions.
EN
Height (Min. / Max.) 84,6 cm / 86,6 cm*
Width 59,7 cm
Depth 60 cm
Capacity (max.) 8 kg**
Net weight (± %10) 44 kg
Voltage
See type label***Rated power input
Model code
14
Dryer / User manual
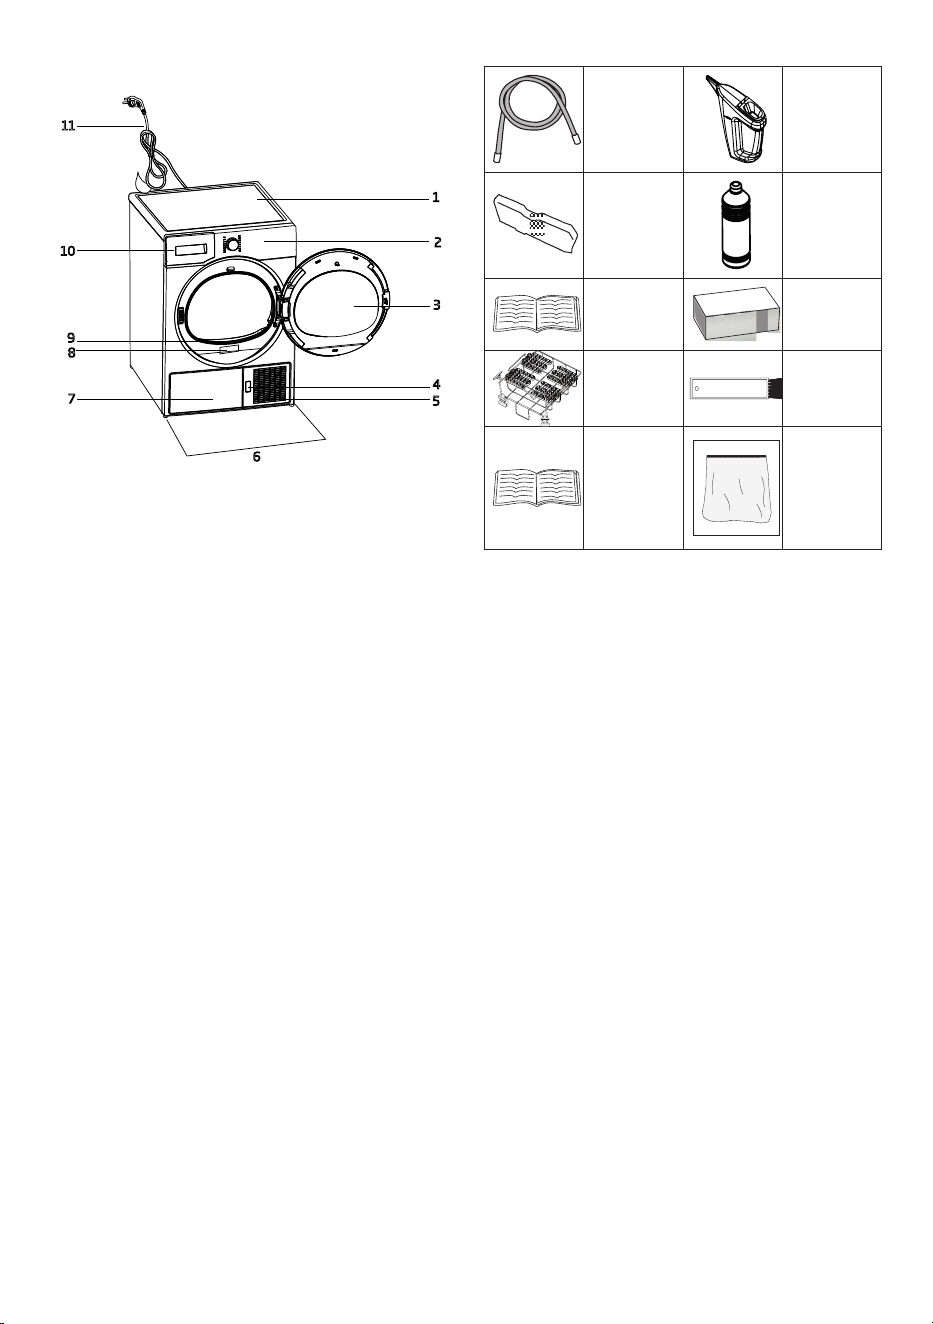
3.2 General appearance
11
10
1
2
3
4
5
6
7
8
9
1. Top panel
2. Control panel
3. Loading door
4. Kick plate opening button
5. Ventilation grids
6. Adjustable legs
7. In models where the tank is placed
below, the water tank is inside the toe board
8. Type label
9. Lint filter
10. Water tank drawer (in models where the
tank is placed above)
11. Power cord
3.3 Scope of delivery
1. Water
discharge
hose*
6. Water
filling cap*
2. Filter
drawer
spare
sponge*
7. Pure
Water*
3. User
Manual
8. Odour
Capsule
Group*
4. Drying
basket*
9. Brush*
5. Drying
basket user
manual*
10. Filter
cloth*
*Optional - may not be included, depends on
model.
15
Dryer / User manual
4 Installation
Read the “Safety Instructions” first!
Before consulting the nearest Authorized
Service for installing the drying machine, see
the information in the user guide and make sure
the electric and water utilities are as required. If
not, call an electrician and plumber to arrange
the utilities as necessary.
It is customer's responsibility to
prepare the location the drying
machine shall be placed on and
also have power and waste water
installation prepared.
Check for any damage on the
drying machine before installing it. If
drying machine is damaged, do not
get it installed. Damaged products
cause a risk for your safety.
Wait 12 hours prior to operating the
drying machine.
NOTICE
The product includes a cooling
agent and if the product is operated
right after its transported, it may
get damaged. After each time the
product is moved, it shall be left to
rest for 12 hours.
4.1 Right place for installation
• Install the drying machine on a flat and
stable surface.
• Dryer machine is heavy. Do not move it by
yourself.
• Operate the drying machine in an
environment free of dust with good
ventilation.
• The gap between the drying machine and
the floor shall not be reduced via materials
such as rugs, pieces of wood and bands.
• Do not block the ventilation grilles of the
drying machine.
• There shall not be doors that can be
locked, sliding doors or hinged doors near
the installation environment of the drying
machine that may block the loading door
to be opened.
• Once the drying machine is installed,
the connections must stay stable. After
placing the drying machine, ensure that
the back wall does not come in contact
with any extrusion (a water tap, electrical
outlet etc.).
• Place the drying machine with at least 1
cm space between the product and the
furniture edges.
• Your drying machine is suitable to be
operated between +5°C to +35°C. If
operated outside this temperature range,
your drying machine’s operation may be
compromised and get damaged.
• The drying machine shall not be placed
with the back side against a wall.
B
Do not place the drying machine on
its power cord.
* Ignore following warning if your
product’s system does not contains
R290.
Dryer contains R290 refrigerant.*
R290 is an environment-friendly, but
flammable refrigerant.*
Ensure that the air inlet of the dryer
is open and it is well-ventilated.*
Keep potential flame sources away
from the dryer.*
4.2 Removing the shipping
safety group
Remove the shipping
safety group prior to
first use the product.
NOTICE
Do not leave an accessory or any
parts of the shipping safety group
inside the drum.
16
Dryer / User manual
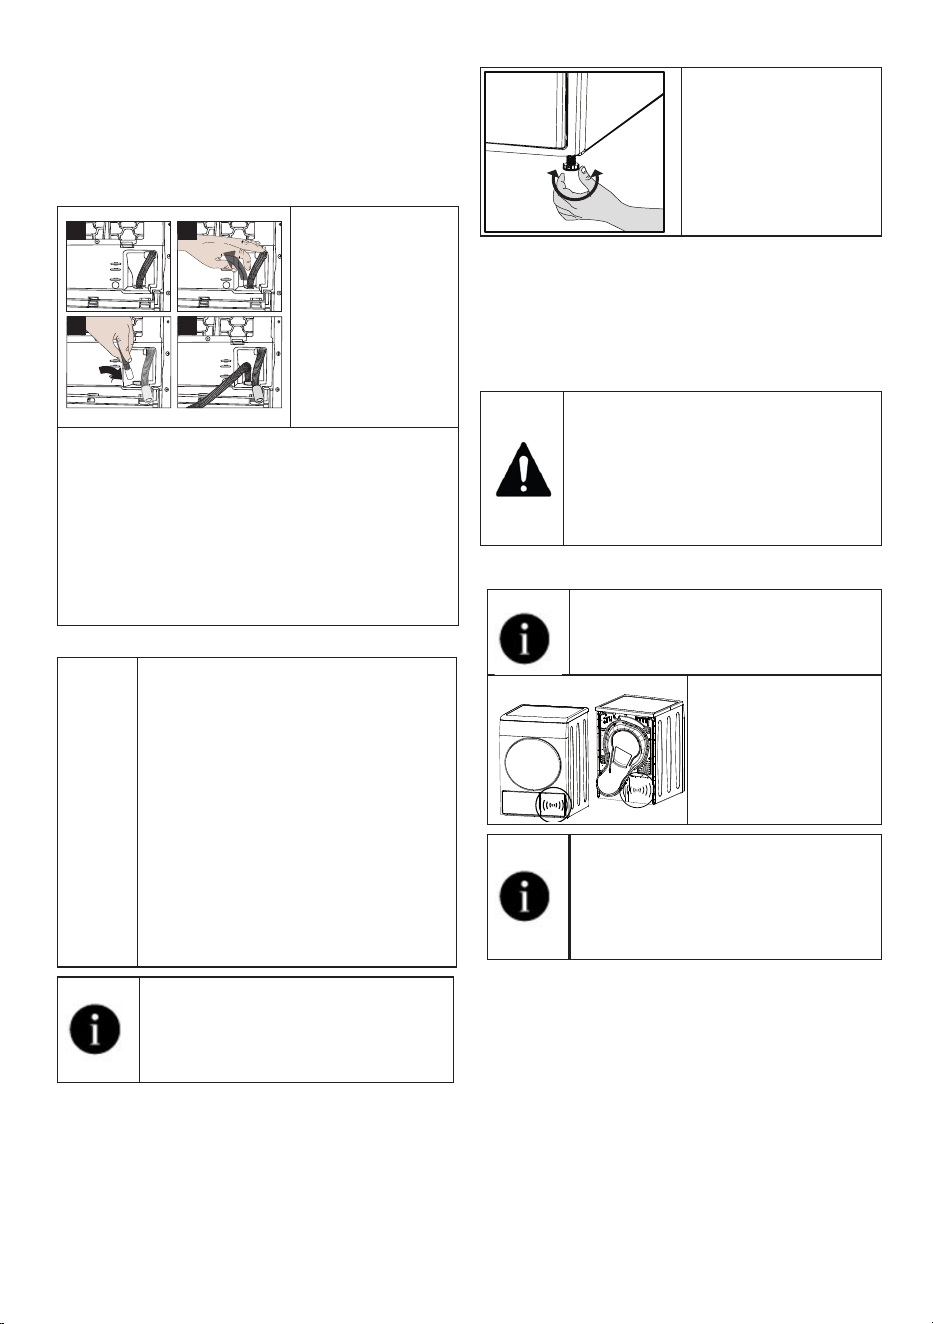
4.3 Water connection
Instead of periodically draining the water
accumulated in the water tank, you can
discharge via the water discharge hose
supplied with the drying machine.
Connecting the water drainage hose
1
3 4
2
1-2 Remove the
hose behind the
drying machine
by pulling it
manually from
where it is
attached. Do
not use a tool
to remove the
hose.
3 Insert one end of the water discharge hose
supplied with the drying machine to where
you have removed the hose on the drying
machine.
4 Fix the other end of the water discharge
hose to directly waste water drainage or a
sink.
NOTICE
The water discharge hose shall be
fixed at maximum 80 cm height.
Ensure that the water discharge
hose do not get kinked, collapsed
or pressed on between the
discharge and the drying machine.
Hose shall be connected not to
be disconnected from its location.
Leaked water may cause damage.
Do not extend the water drainage
hose.
Check whether the water runs at an
appropriate flow. The drainage line
shall not be closed or clogged.
If an accessory package is provided
with your product, check the
detailed instructions.
4.4 Adjusting the stands
Until the drying
machine stands level
and sturdy, adjust
the stands by turning
them left and right.
4.5 Moving the drying machine
• Drain the water in the drying machine
completely.
• If the product is connected via direct
discharge, remove the hose connections.
The drying machine is
recommended to be moved in
upright position. Otherwise, tilt it to
the right side when viewed from the
front and move the drying machine.
Wait 12 hours prior to operating the
drying machine.
4.6 Warning regarding the noise
As the product is
operated, metallic
noises may come
from the compressor
from time to time, it is
normal.
When the product is operated,
the accumulated water is pumped
to the water tank. It is normal to
hear pumping sounds from the
appliance during this operation.
4.7 Replacing the lighting bulb
If your drying machine has drum lighting lamp;
Consult the authorized service to replace the
bulb/LED used in lighting your drying machine.
The bulb in this product is not suitable for home
lighting. The intended use of this lamp is to
ensure safely loading the laundry to the drying
machine. The lamps used in this appliance is
resistant to heavy physical conditions such as
temperatures over 50°C.
17
Dryer / User manual
Read the “Safety Instructions” first!
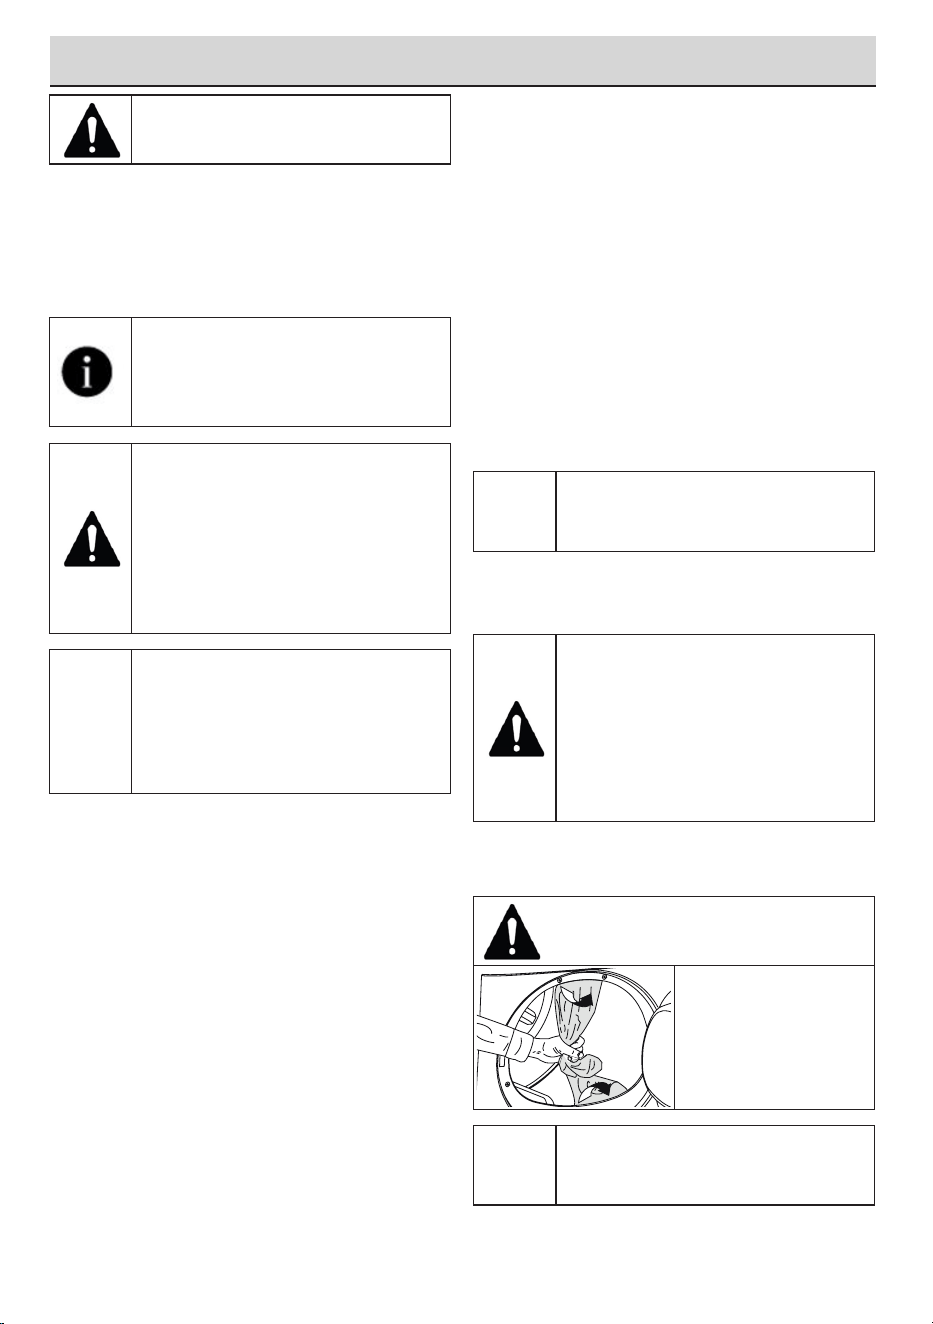
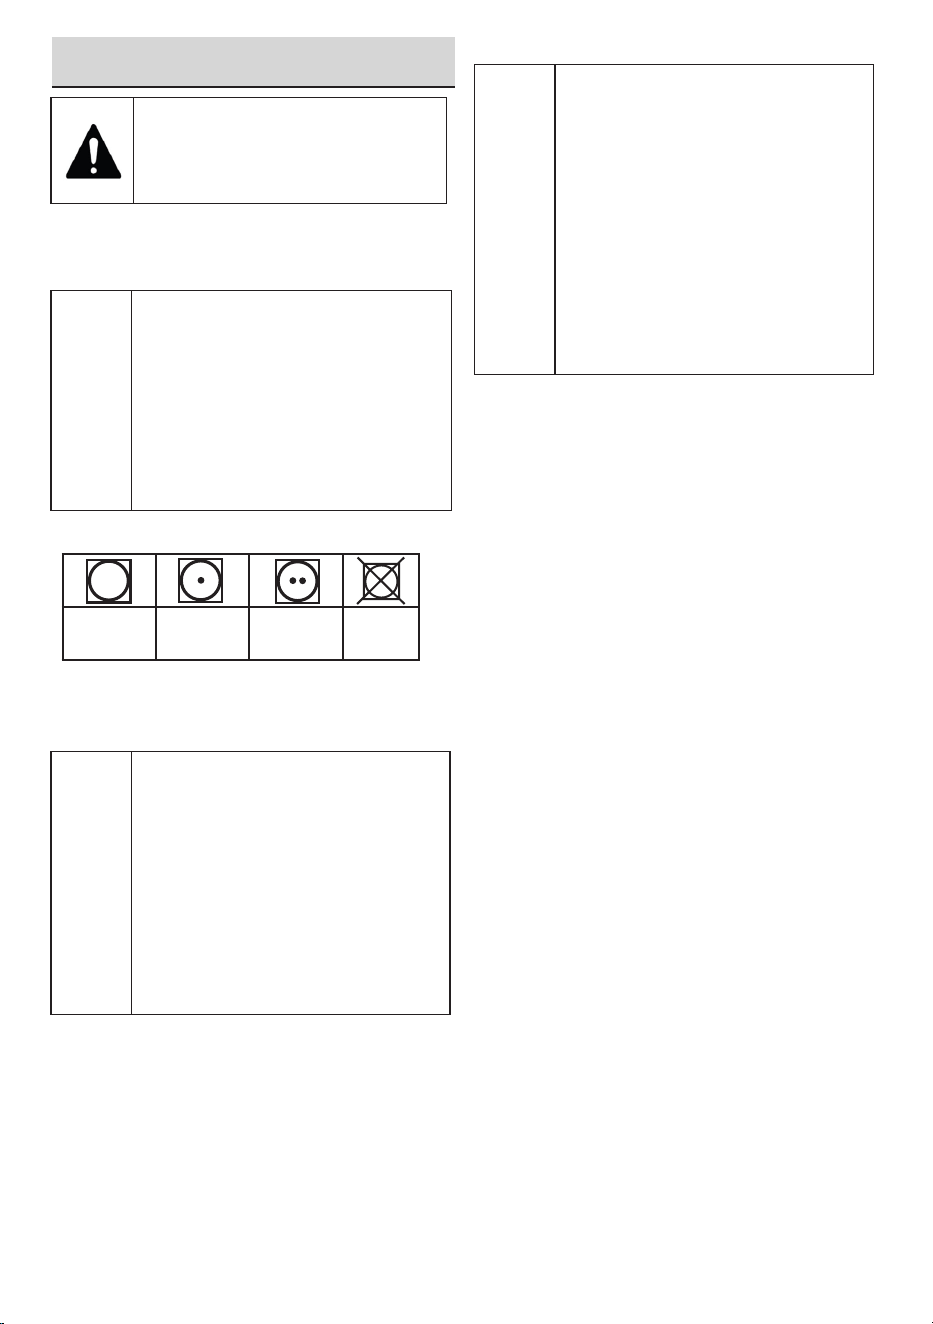
5.1 Laundry suitable for
drying in drying machine
NOTICE
Laundry that are not drying machine
safe may damage the appliance and
the laundry during drying. Follow
the instructions on the labels on the
laundry to be dried. Only dry the
laundry with “drying machine safe”
written on their labels.
Suitable for the dryer At low temperature At medium temperature Do not dry with
dryer
5.2 Laundry not suitable for
drying in drying machine
NOTICE
Undergarments with metal supports
shall not be dried in drying machine.
If these metal supports get loose
and ripped from the garment, it may
damage the machine.
Delicate embroidery textiles, cotton
and silk garments, garments
manufactured from delicate and
valuable textiles, non breathing
garments and tulle curtains shall not
be dried in drying machine.
5.3 Preparing the laundry to be dried
NOTICE
Items such as coins, metal parts,
needles, nails, screws, stones etc.
may damage the drum group of the
product or may cause functional
operation issues. Therefore check
all laundry that will be loaded to the
product.
Dry the laundry with metal
accessories such as zippers by
turning them inside out.
Close the zippers, hooks and
clasps, button up the covers’
buttons, tie textile belts and apron
belts.
5.4 What to do for energy saving
• Use the highest possible wringing option
as you wash the laundry. Therefore you
can reduce the drying period and reduce
energy consumption. Sort the laundry
based on their types and thickness.
Dry same types of laundry together. For
instance kitchen towels and table cloths
dry faster than bathroom towels.
• Follow the recommendations in the user
manual for program selection.
• During drying do not open the loading
door unless necessary. If you are required
to open the loading door, do not keep it
open for too long.
• Do not add wet laundry as the drying
machine operates.
• Clean the Fibre Filter before and after
each drying session.
• For condensation models, be sure to
clean the condenser at least once a
month or after each 30 drying sessions.
• Make sure the filters are clean. Refer to
maintenance and cleaning for details.
• For models with flue, follow the flue
connection rules specified in the guides
and clean the flue.
• During drying session, properly ventilate
the environment in which the drying
machine is in.
• On models with heat pump, check the
condenser at least every six months and
clean it if it is dirty.
5 Preparation
18
Dryer / User manual
• If you are using environment friendly filter,
you are not required to clean the filter
after every cycle. When the environment
friendly icon is lit on the screen, change
the filter cloth.
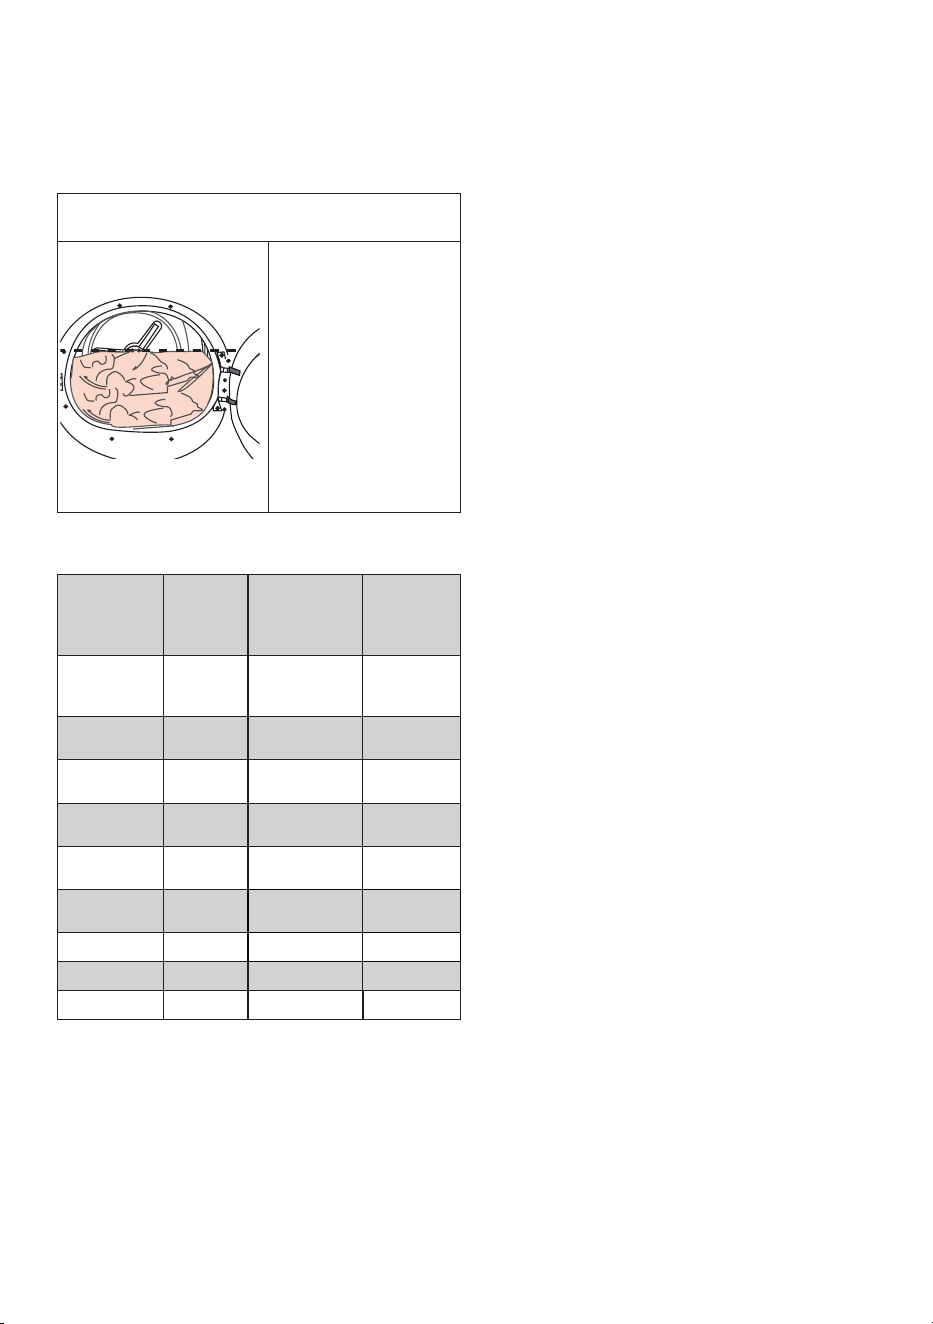
5.5 Correct load capacity
NOTICE
If the laundry in the
product exceed
maximum load
capacity, it may not
operate as intended
and may cause
material damage or
damage the product.
For each program,
follow the maximum
load capacity.
The weights below are provided as examples.
Laundry
Approx.
weight
(g)*
Laundry
Approx.
weight (g)*
Cotton
bedding
(double size)
1500 Cotton dress 500
Bedding
(single size)
1000 Dress 350
Bed sheet
(double size)
500 Denim 700
Bed sheet
(single size)
350
Handkerchief
(10 pcs)
100
Large table
cloth
700 T-Shirt 125
Small table
cloth
250 Blouse 150
Tea napkin 100 Cotton shirt 300
Bath towel 700 Shirt 200
Hand towel 350
*Weight of dry laundry before washing.
19
Dryer / User manual
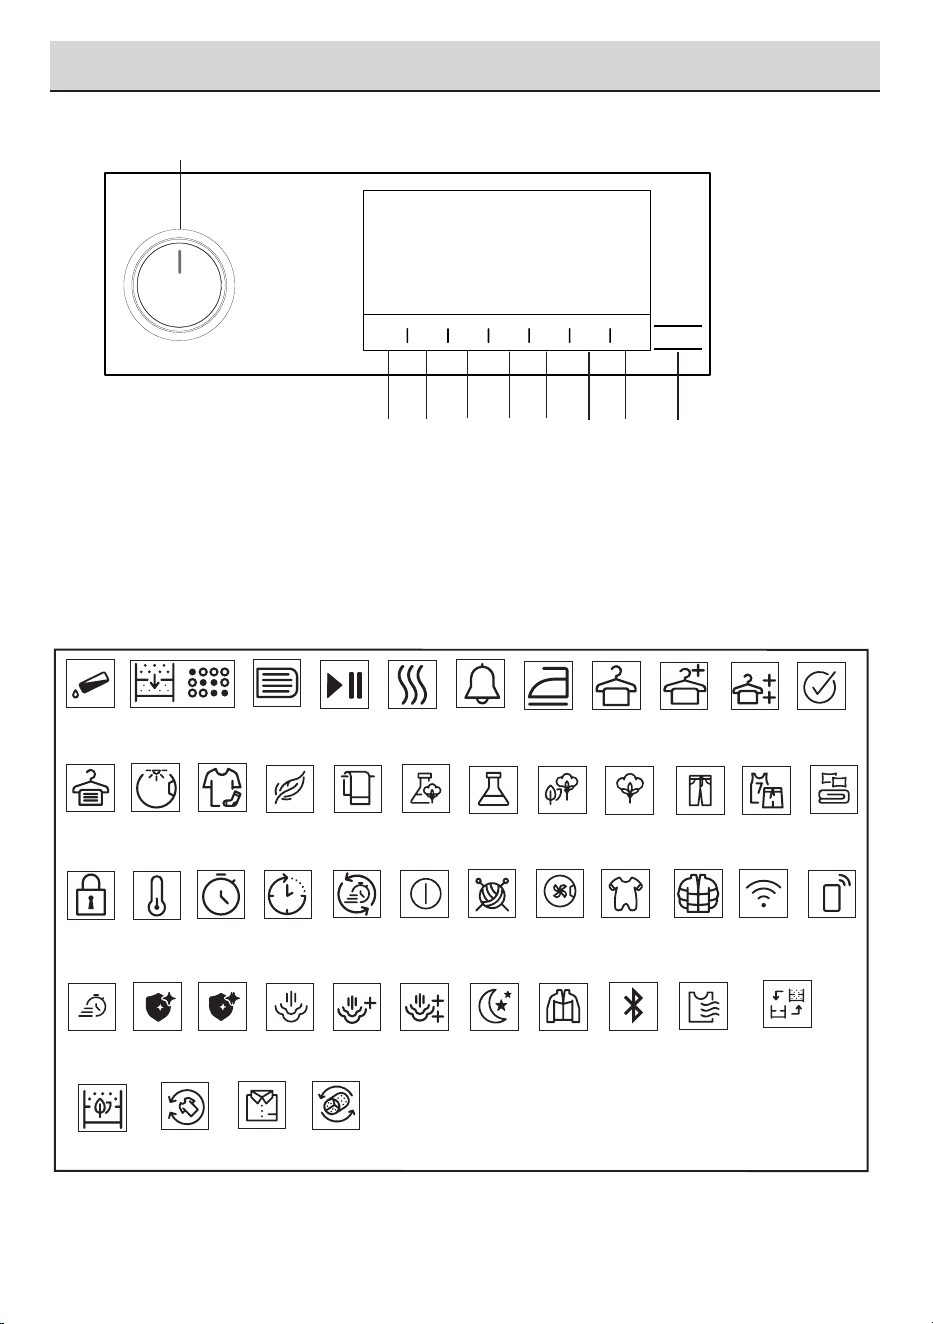
6.1 Control Panel
6 Running the product
1. On/Off/Program Selection button.
2. Start / Stand-by button.
3. Drum light button.
4. End time selection button.
5. Time program selection button.
6. Low temperature selection button.
7. Audible warning and child lock selection
button.
8. Wrinkle prevention selection button.
9. Dryness level selection button.
6.2 Symbols
Filter
Cleaning
Water tank
Filter drawer /
Heat exchanger
cleaning
Start
pause
cancel
Iron Dry
Drying Buzzer Cupboard
Dry
Cupboard
Dry +
Extra dry End
Anti-
creasing
Child-proof
lock
Low
temperature
TimeDry Ending In RapiDry
Drum
Light
Dryness
Level
Daily
Delicates
SyntheticsTowels Mix Cottons
Eco
Cottons Jeans Sport
Bedding/
Duvet
Shirts
Express Hygienic
Drying
Hygienic
Refresh
Steam Steam
Level 1
Steam
Level 2
On / Off Wool Protect
Night
Freshen
Up
Outdoor
Hygiene
(Baby Protect+)
Environmentally
friendly filter full
Environmentally
friendly filter
Downwear Wifi
Remote
Control
Bluetooth Gentle
Dry
Reverse
Drum
4
5
6
3
2
7
8
9
1
20
Dryer / User manual
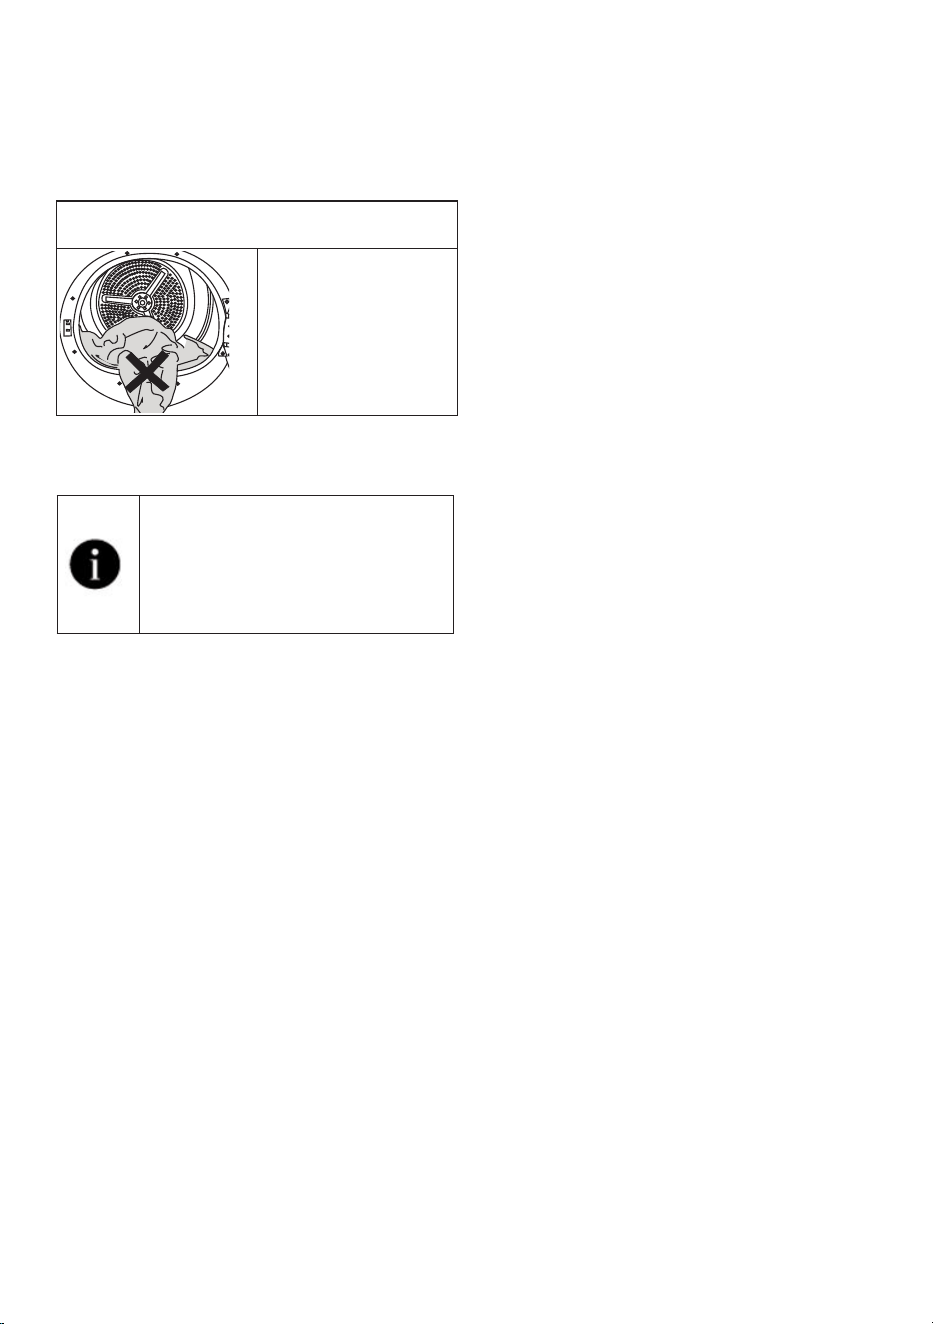
6.3. Preparation of drying machine
• Plug the drying machine.
• Open the loading door.
• Place the laundry to the drying machine
without jamming them.
• Push and close the loading door.
NOTICE
Ensure that no
laundry is jammed to
the loading door.
Do not close the
loading door with
force.
• Select the desired program by using
On/Off/Program Selection button, the
machine will turn on.
Selecting the program with the On/
Off/Program Selection button does
not mean that the program started.
Press Start / Stand-by button to
start the program.

21
Dryer / User manual
6.4 Program selection and consumption chart
EN
Programmes Programme Description
Capacity (kg)
Spin speed in washing
machine (rpm)
Drying Time (minutes)
Cottons
You can dry your heat-resistant cotton textiles
with this programme. A drying setting suitable for
the thickness of the products to be dried and the
desired level of dryness should be selected.
8 1000 184
Cottons Eco
It dries single layer, casual cotton textiles in the
most economical way.
8 1000 174
Cottons Iron dry
You may dry your cotton laundry to be ironed in
this program to have them slightly damp for ease
of ironing. (Shirt, T-shirt, tablecloth, etc.)
8 1000 139
Synthetics
You can dry all your synthetic textiles with this
programme. A drying setting suitable for the level
of dryness you desire should be selected.
4 800 70
Mix
Use this programme to dry non-pigmenting
synthetic and cotton laundry items together.
Sports and fitness clothes may be dried with this
program.
4 1000 115
Wool protect
Use this programme to dry woolen garments such
as jumpers that are washed according to the
instructions.It is recomended that garments would
be removed at the end of the programme.
1,5 600 148
Night (silent)
In this programme the level of noise emitted to the
environment will be the lowest.With this program
you can dry your cotton or synthetic blend clothes
silently.
8 1000 240
Delicates
You may dry your delicate laundry or laundry with
hand wash symbol (silk blouses, thin underwear,
etc.) at low temperature in this program.
2 1200 50
Drying Rack/ TimeDry
You may select from time programmes between
10 and 160 minutes to achieve the desired drying
level at low temperature. In this programme,
tumble drier’s operation lasts for the set time
independently from the dryness of laundry. This
product is available to be used with a drying
basket as option. For products that are sold
without a basket, you can obtain a basket from an
authorized service and use the drying programs
specified above. For details of use, see the drying
basket user guide.
- - -
Jeans
You may dry denim pants, skirts, shirts or jackets
in this program.
4 1200 117
Outdoor/Sports
(Goretex)
Use it to dry your clothes made of synthetics,
cotton or mixed fabrics or waterproof products
such as functional jacket, raincoat etc. Turn them
inside out prior to drying.
2 1000 135
22
Dryer / User manual
Duvet/Downwear
You can dry your feather or fibre filled textile that
bears can be dried in drier label as a single piece
of laundry. You can dry double duvet, pillow or
coats as single piece of laundry. Dry your cloths
such as coats and jackets turned inside out.
- 800 165
Shirts
It dries the shirts in a more sensitive manner, and
causes less creasing and easier ironing.
1,5 1200 50
Express Super Short Use this program to have 2 shirts ready for ironing. 0,5 1200 30
Hygienic Drying
It is the programme that you can dry your washed
products you want to provide with extra hygiene
(baby clothes, underwear, towels, etc.). It provides
high hygiene for your textiles via heat effect.
5 800 200
Hygienic Refresh
You can use this programme for your dry clothes
and laundry that you want to provide with hygiene
without washing them. It provides high hygiene for
your dry textiles via heat effect.
1,5 - 120
Energy consumption values
Programmes Capacity (kg)
Spin speed in
washing machine
(rpm)
Approximate
amount of
remaining humidity
Energy
consumption value
kWh
Cottons Eco * 8 1000 60% 1,44
Cottons Iron dry 8 1000 60% 1,10
Synthetics cupboard
dry
4 800 40% 0,55
“Cottons Eco programme” used at full and partial load is the standard drying programme to which the
information in the label and the fiche relates, that this programme is suitable for drying normal wet Cottons
laundry and that it is the most efficient programme in terms of energy consumption for Cottons.
* : Energy Label standard program EN 61121The values in the table are determined according to
the EN 61121 standard. Consumption values may vary from the valued in the chart depending on
laundry type, wringing speed, ambient conditions and voltage levels.
23
Dryer / User manual
6.5 Auxiliary functions
Dryness level
Dryness level button is used for adjusting to
desired dryness. Program time may change
depending on the selection.
You can activate this function only
prior to start of program.
Wrinkle prevention
You can turn on and off the wrinkle prevention
function by pressing the wrinkle prevention
selection button. If you will not take the
laundry out immediately after the program has
completed, you may use Wrinkle prevention
function to prevent wrinkling of your laundry.
Audible warning
Drying machine makes an audible warning
when the program is completed. Press the
“Audible Warning” button if you do not want
audible warning. When you press the audible
warning button, the light goes off and it does
not sound when the program is completed.
You can select this function before
the program starts or after the
program starts.
Low temperature
You can activate this function only prior to start
of a program. You can activate this function
if you want to dry your laundry at a lower
temperature. The program duration will be
longer after it becomes activated.
End time
You can delay the end time of the program up
to 24 hours with end time function.
1. Open the loading door and place the
laundry.
2. Select the drying program.
3. Press the End Time selection button and
set the delay time you wish. End time LED
turns on. (When pressed and hold the
button, End Time proceeds non-stop).
4. Press the Start / Stand-by button. End
Time countdown begins. The “:” sign in the
middle of displayed delay time flashes.
You can add or remove laundry
within end time. Displayed time is
the sum of normal drying time and
end time. End Time LED turns off at
the end of countdown, the drying
starts and the drying LED turns on.
Changing the end time
If you want to change the duration during the
countdown:
Pause the program and Turn the On/Off/
Program Selection button and cancel the
program. Select the desired program and
repeat the End Time selection.
Cancelling the end time function
If you want to cancel the end time countdown
and start the program immediately:
Pause the program and Turn the On/Off/
Program Selection button and cancel the
program. Select the desired program and press
the “Start/Pause” button.
Drum Light
You can turn on and off the drum light by
pressing this button. The light turns on when
the button is pressed and turns off after certain
time.
6.6 Warning indicators
Warning indicators may vary
depending on the model of your
drying machine.
Filter cleaning
When the program is completed, the warning
indicator for filter cleaning turns on.
Water tank
If the water tank fills up while the program
continues, the warning indicator starts flashing
and the machine goes into stand-by. In this
case, empty the water tank and start the
program by pressing the Start / Stand-by
button. Warning indicator turns off and program
resumes.
24
Dryer / User manual
Cleaning of filter drawer/
heat exchanger
Warning symbol flashes periodically to remind
that filter drawer must be cleaned.
6.7 Starting the program
Press the Start/Stand-by button to start the
program.
Start/Stand-by and Drying indicators turn on to
show that program started.
6.8 Child Lock
The drying machine has a child lock which
prevents the program flow from being
interrupted when the buttons are pressed
during a program. When the Child Lock is
activated, all buttons on the panel except
the On/Off/Program Selection button are
deactivated.
Press the Audible Warning button for 3
seconds in order to activate the child lock.
The child lock has to be deactivated to be
able to start a new program after the current
program is finished or to be able to interfere
with the program. To deactivate the child lock,
keep the same buttons pressed for 3 seconds.
When the child lock is activated,
the child lock warning indicator on
the screen turns on.
When the child lock is active:
The drying machine runs, or in stand-by state
the indicator symbols will not change upon
changing the position of the program selection
button.
When the drying machine is
operated and the child lock is
active, if the program selection
button is turned, a double beeping
noise will be heard. If the child lock
is deactivated before the program
selection button is turned to its
original place, the program will
be terminated since the program
selection button is displaced.
6.9 Changing the program
after it is started
You can change the program you selected to
dry your laundry with a different program after
the drying machine starts running.
• For example, Pause the program and turn
the On/Off/Program Selection button to
select the Extra Dry program in order to
select the Extra Dry program instead of
Ironing Dryness.
• Press the Start/Stand-by button to start
the program.
Adding and removing clothes during
stand-by
If you want to add or remove clothes to/from
the drying machine after the drying program
starts:
• Press the Start/Stand-by button to put
the drying machine in Stand-by state. The
drying operation stops.
• Open the loading door while in Stand-
by state, and close the door after you
remove or add laundry.
• Press the Start/Stand-by button to start
the program.
Adding laundry after the drying
operation starts may cause the
dried laundry inside the drying
machine to mix with wet laundry
and leave the laundry damp at the
end of operation.
Adding or removing laundry
during drying may be repeated as
many times as you wish. But this
operation continuously interrupts
the drying operation, and thus
increases program duration and
energy consumption. So, it is
recommended to add laundry
before the program starts.
If a new program is selected by
turning the program selection
button while the drying machine is
in stand-by, the running program
terminates.
25
Dryer / User manual
Do not touch the inner surface of
the drum while adding or removing
clothes during a continuing
program. The drum surface is hot.
6.10 Cancelling the program
If you want to cancel the program and
terminate the drying operation for any reason
after the drying machine starts running, Pause
the program and turn the On/Off/Program
Selection button; the program terminates.
The inside of the drying machine
shall be extremely hot when you
cancel the program during machine
operation, so run the refreshing
program to allow it to cool down.
6.11 End of program
When the program ends, the LED’s of End/
Wrinkle Prevention and Fibre Filter Cleaning
Warning on the program follow-up indicator
turn on. Loading door can be opened and
drying machine is ready for another operation.
Turn the On/Off/Program Selection button to
On/Off position in order to turn off the drying
machine.
If the Wrinkle Prevention mode
is active and the laundry is not
removed after the program is
completed, the wrinkle prevention
function activates for 2 hours to
prevent the laundry inside the
machine to get wrinkled. The
program tumbles the laundry with
10-minute intervals to prevent them
from wrinkling.
6.12 Odour feature
If your drying machine has odour feature, read
the ProScent manual to use this feature.
26
Dryer / User manual
7 Maintenance and cleaning
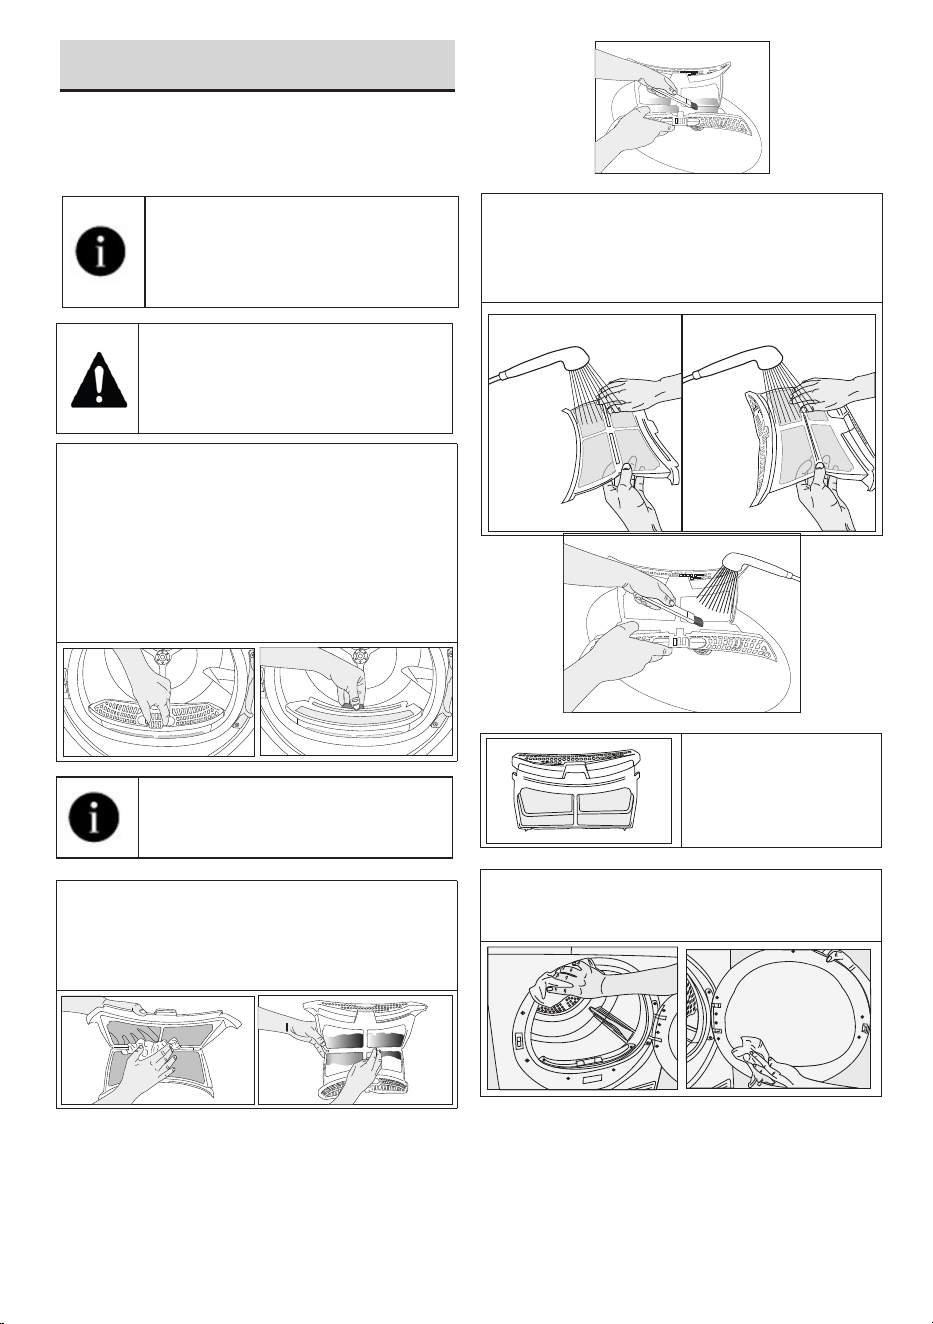
7.1 Loading Door Inner Surface
The hair and fibres that are separated from the
laundry during drying process is collected by
the Fibre Filter.
Fibres are formed during wearing
and washing clothes.
You can clean the filter slot with a
vacuum cleaner.
After each drying cycle, clean the
fibre filter and the inner surface of
the loading door.
To clean the fibre filter:
Open the loading door.
Hold the first part (inner filter) of the two part
fibre filter and remove it by pulling it upwards.
Collect the hair, fibres and cotton balls with
hand or with a soft cloth.
Remove the second part (outer filter) by
pulling it upwards.
Ensure that hair, fibre and cotton
balls do not fall into the slot where
the filters are installed.
Open both filters (top and bottom filters) and
to remove the lint with your hand, or use
cleaning brush at air routing cover. And if
necessary, use a vacuum cleaner to clean
filters.
Clean both filters under water running in
reverse direction of fibre accumulation or with
a soft brush. Dry the filter before placing it
back.
Insert the fibre filters
on one another and
place it back in its
place.
Clean the front door interior surface and its
gaskets with a soft damp cloth or with the
brush on air routing cover.
27
Dryer / User manual
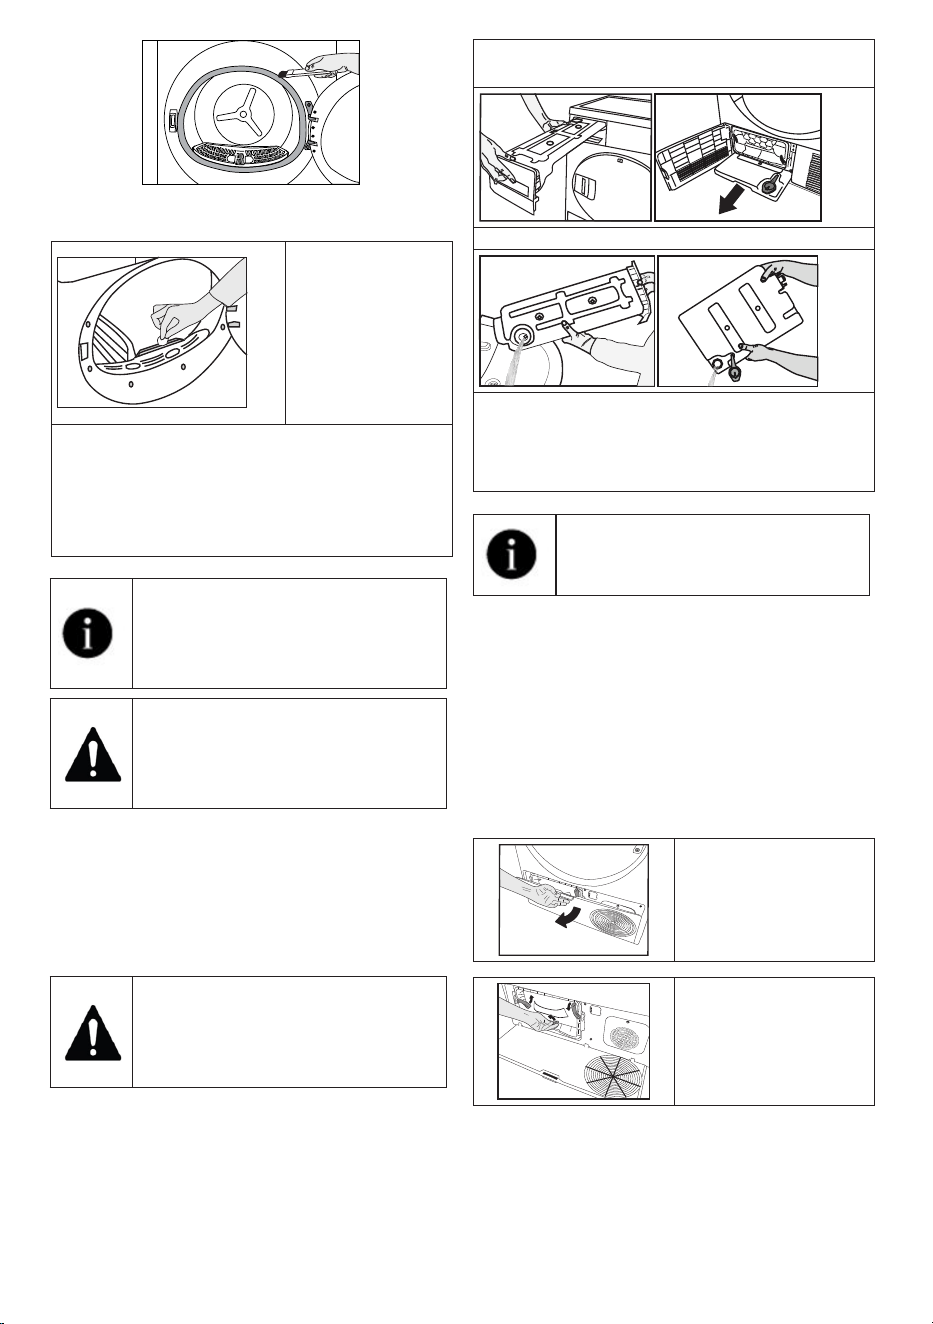
7.2 Cleaning the sensor
There are
dampness sensors
in the dryer that
detect whether
the laundry is dry
or not.
To clean the
sensors:
Open the loading door of the dryer.
Allow the machine to cool down if it is still hot
due to the drying process.
Wipe the metal surfaces of the sensor with
a soft cloth, dampened with vinegar and dry
them.
Clean metal surfaces of the sensors
4 times a year.
Do not use metal tools when
cleaning metal surfaces of the
sensors.
Never use solvents, cleaning
agents or similar substances for
cleaning due to the risk of fire and
explosion!
7.3 Draining the water tank
Dampness of the laundry is removed and
condensed during drying process and the water
that arise accumulates in the water tank. Drain
the water tank after each drying cycle.
Condensed water is not drinkable!
Never remove the water tank when
the program is running!
If you forget to drain the water tank, the
machine will stop during the subsequent drying
cycles when the water tank is full and the Water
Tank warning symbol will flash. If this is the
case, drain the water tank and press Start /
Pause button to resume the drying cycle.
To drain the water tank:
1. Remove the water tank in the drawer or
container carefully.
2. Drain the water in the tank.
If there is lint accumulation in the funnel of the
water tank, clean it under running water.
Place the water tank into its seat.
If the direct water draining is used
as an option, there is no need to
empty the water tank.
7.4 Cleaning the Condenser
The hair and the fibre that are not collected by
the fibre filter accumulates on the metal surface
of the condenser behind the air deflector. These
fibres shall be cleaned regularly.
If the condenser cleaning icon blinks, check
the metal surface. If there is any fibre, clean it. It
must be checked at least every 6 months.
Open the toe board
by pulling its button.
Move the latches to
open the air deflector
lid.
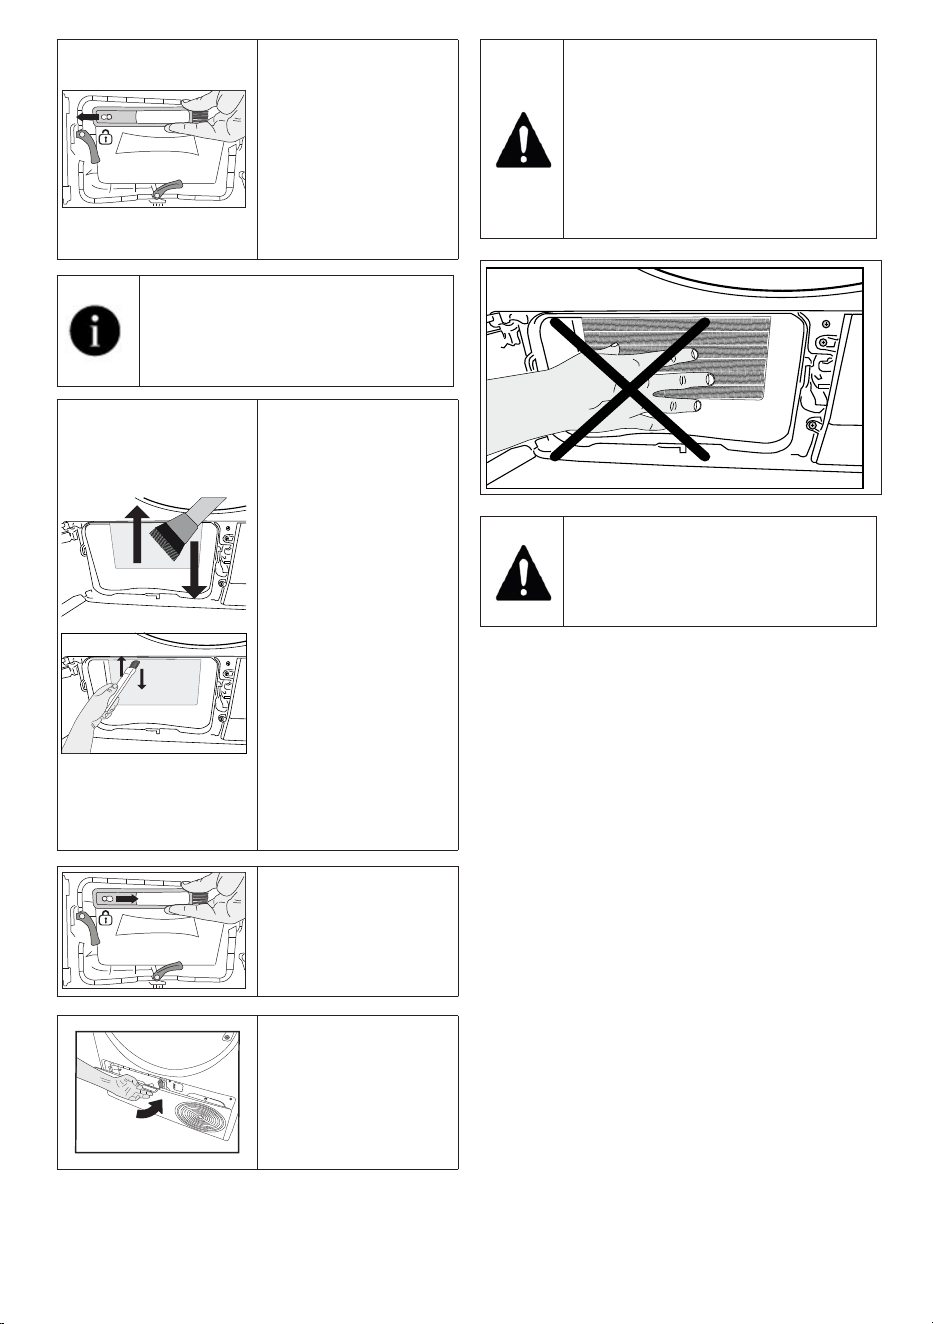
28
Dryer / User manual
Pull the brush to
the left side and
remove it. You can
use the cleaning
brush for removing
collected fluff on the
metal surface of the
condenser.
Brush is inside the printing
materials bag. You can place it in
its housing on the air routing cover
after the first usage.
Collected fluff on
condenser surface
should be removed
by a damp cloth or
rubbing the brush
placed on the air
routing cover up
and down on the
condenser.
Please do not clean
condenser fins in
right-left direction to
avoid damage.
You can also use a
vacuum cleaner with
a brush for cleaning.
Condenser cleaning
is not recommended
with a brushless
vacuum cleaner.
Insert the brush into
its slot pushing to the
right, after cleaning
condenser, front cover
and lint filter.
After the cleaning
process is completed,
place the air deflector
cover to its place,
move the latches to
close it and close the
toe board.
Condensed water is not drinkable!
You can clean by hand, provided
you wear protective gloves. Do
not try to clean with bare hands.
Condenser fins may damage your
hands. Cleaning by the left to right
movements may damage the
condenser fins. This may lead to
drying issues.
It is normal to see some water on
the plastic surface in front of the
condenser when you open the air
routing cover.
29
Dryer / User manual
8 Troubleshooting
The drying operation takes too long.
Fibre filter (interior and exterior filters) pores may be clogged. >>> Wash the fibre filters with warm water and dry them
The front side of the condenser may be clogged. >>> Clean the front side of the condenser.
The ventilation grills in front of the machine may be closed. >>> Remove any object in front of the ventilation grills that
blocks ventilation.
Ventilation may be insufficient due to the very small area where the machine is installed. >>> Open the door or
windows to prevent the room temperature from rising too much.
If there is a humidity sensor;
Limescale may have accumulated on the humidity sensor. >>> Clean the humidity sensor.
The machine may be overloaded with laundry. >>> Do not load the drying machine excessively.
The laundry may not have been spun enough.. >>> Spin at a higher speed in the washing machine.
The laundry comes out damp after drying.
The program suitable for the laundry type may not be used. >>> Check the care labels on the laundry and select a
program ideal for the kind of laundry or use additional time programs.
Fibre filter (interior and exterior filters) pores may be clogged. >>> Wash the filters with warm water and dry them
The front side of the condenser may be clogged. >>> Clean the front of the condenser.
The machine may be overloaded with laundry. >>> Do not load the drying machine excessively.
The laundry may not have been spun enough.. >>> Spin at a higher speed in the washing machine.
The dryer does not turn on, or the program cannot be started. The dryer does not turn on when set.
The power plug may not be plugged in. >>> Make sure the power plug is plugged in.
The loading door may be left open. >>> Make sure that the loading door is properly closed.
The program may not have been set or the Start / Pause button may not have been pressed. >>> Make sure that the
program is set and it is not in Standby position.
Child lock may be activated. >>> Turn off the child lock.
The program was interrupted for no reason.
Loading door might not be closed properly. >>> Make sure that the loading door is properly closed.
There might be a power outage. >>> Press the Start / Standby / Cancel button to start the program.
Water tank may be full. >>> Empty the water tank.
Laundry shrunk, matted or spoiled.
The program suitable for the type of laundry may not have been used. >>> Select a program suitable for the type of
laundry by checking the care labels on the laundry.
Water is flowing from the loading door.
Fibres might have gathered on the inner surfaces of the loading door and on the surfaces of the loading door gasket.
>>> Clean the inner surfaces of the loading door and the loading door gasket surfaces.
The loading door opens by itself.
The loading door might not be closed properly. >>> Push the loading door until the closing sound is heard.
The water tank warning symbol is on/flashing.
The water tank may be full. >>> Empty the water tank.
The water discharge hose might have folded. >>> If the product is connected directly to the water discharge check
the hose.
The lighting inside the drying machine does not turn on (in models with lamps).
The drying machine might not have been turned on by the On/Off button. >>> Check that the drying machine is
turned on.
Lamp might be broken. >>> Contact Authorized Service to replace the lamp.
Anti-Wrinkle icon or light is lit.
An anti-wrinkle program that prevents the laundry in the dryer from creasing may be activated. >>> Turn the dryer off
and remove the laundry.
30
Dryer / User manual
The fibre filter cleaning icon is lit.
Fibre filters (interior and exterior filters) may be unclean. >>> Wash the filters with warm water and dry them.
A layer may be formed in the fibre filter pores, leading to clogging. >>> Wash the filters with warm water and dry
them.
A layer may be formed in the fibre filter (internal and external filters) pores that leads to clogging.<<Wash the filters
with warm water and dry>>
Fibre filters may not be in place. >>> Insert the interior and exterior filters into their places.
Eco-friendly filter cloth may not be installed on the plastic part, and the front of the condenser may have
clogged.>>>Install the eco--friendly filter to the plastic part and place it on the filter housing.
Eco-friendly filters may not have been replaced, although the warning symbol is illuminated. “Replace your filter.”
An audible warning is heard from the machine
Fibre filters may not be in place. >>> Insert the interior and exterior filters into their places.
Filters of the machine may not have been installed.>>> Install the fibre filters (internal and external) or the
environmentally-friendly filter to their housing.
The condenser warning icon is flashing.
Condenser front may be clogged with fibres. >>> Clean the front of the condenser.
Fibre filters may not be place. >>> Insert the interior and exterior filters into their places.
The lighting inside the drying machine turns on (in models with lamps).
If the drying machine is plugged into the power outlet, the On/Off button is pressed, and the door is open; the light
turns on. >>> Unplug the dryer or turn the On/Off switch to the off position.
Wi-Fi icon flashes continuously. (HomeWhiz Function models)
>>> The product may not be connected to the wireless network. Follow the instructions to connect to the network.
The appliance which the product utilizes to connect to network may be faulty. Check it. The product may not be
connected to the network due to the proximity.
Check the steps below if you see "F L t" on the screen.
The filters may be dirty. >>> Clean the inner and outer filters or replace the eco-friendly filter.
In the cover area, if you are using the inner and outer dual filters. >>> Make sure that both filters are installed.
If you use the eco-friendly filter feature, make sure the filter cloth is attached to the plastic part. >>>Insert the filter
cloth into the plastic part if it is not inserted.
The front side of the condenser may be dirty. >>> Open and check the kick zone and make sure it is clean.
Check out the Maintenance and Cleaning section.
WARNING !
If the problem persists after following the instructions in this section, contact your vendor or an Authorized Service.
Never attempt to repair a malfunctioning product yourself.
NOTE!
• If you experience a problem with any part of your device, you can request a replacement by consulting
the nearest authorised service with the appliance model number.
• Operating the device with non-original parts may cause malfunction of the appliance.
• The manufacturer and distributor are not responsible for malfunctions caused by non-original parts.
31
Dryer / User manual
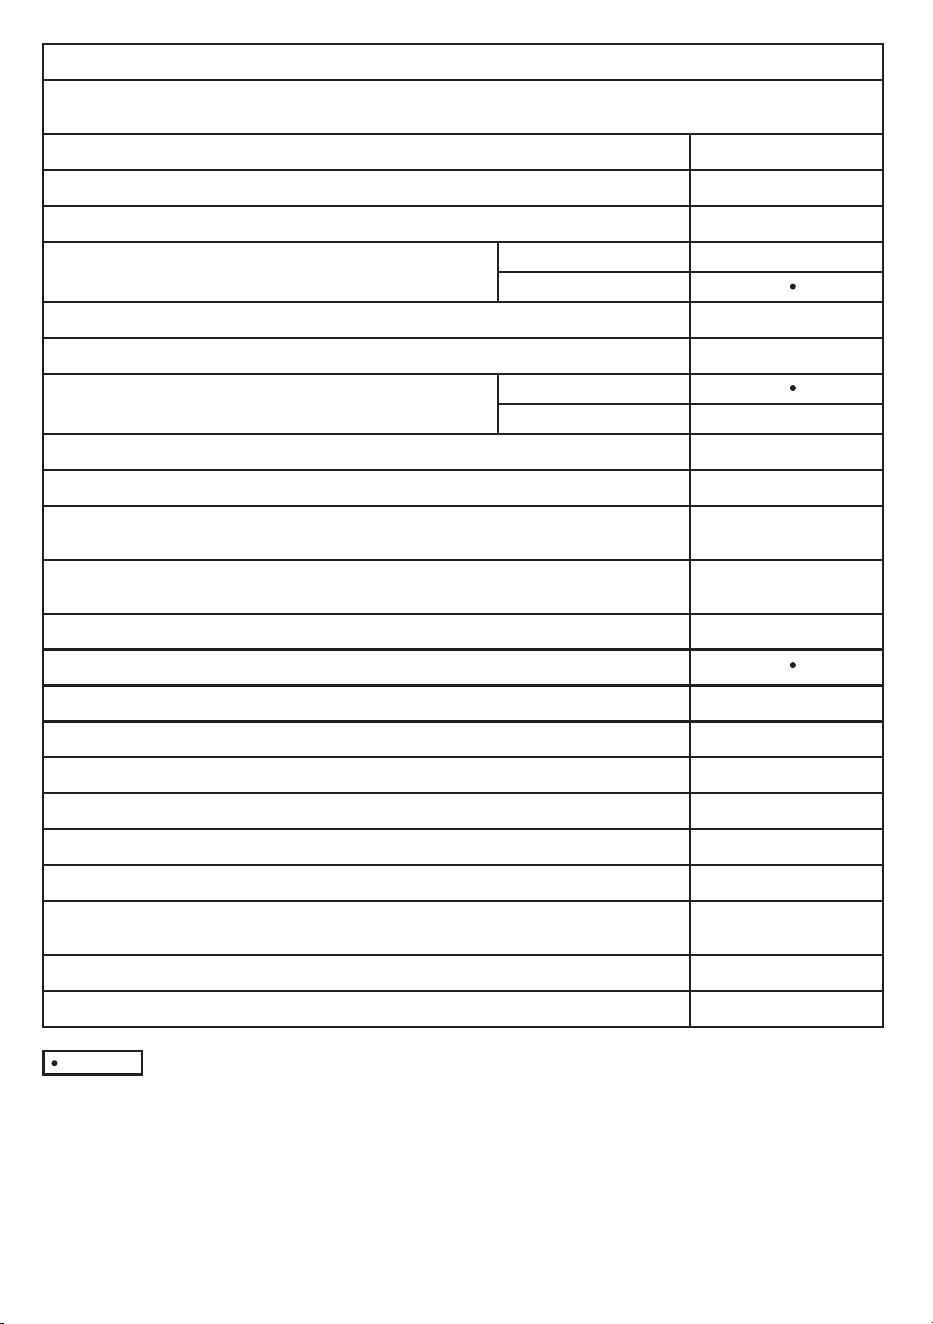
(4) Scale from G (lest efficient) to A (most efficient)
(5) Weighted average value — L
WA
expressed in dB(A) re 1 pW
(1) Scale from A+++ (most efficient) to D (least efficient)
(2) Energy consumption based on 160 drying cycles of the standard cotton programme at full and partial load, and the consumption of
the low-power modes. Actual energy consumption per cycle will depend on how the appliance is used.
(3) "Cotton cupboard dry programme" used at full and partial load is the standard drying programme to which the information in the
label and the fiche relates, that this programme is suitable for drying normal wet cotton laundry and that it is the most efficient
programme in terms of energy consumption for cotton
: Yes - : No
Supplier name or trademark
Model name
Rated capacity (kg)
Type of Tumble Dryer
Condenser
Air Vented
Energy efficiency class
(1)
Annual Energy Consumption (kWh)
(2)
Type of Control
Energy consumption of the standard cotton programme at full load (kWh)
Energy consumption of the standard cotton programme at partial load (kWh)
Power consumption of the off-mode for the standart cotton programme at full load, P
O
(W)
Power consumption of the left-on mode for the standart cotton programme at full load, P
L
(W)
The duration of the left on mode (min)
Standard cotton programme
(3)
Programme time of the standard cotton programme at full load, T
dry
(min)
Programme time of the standard cotton programme at partial load, T
dry1/2
(min)
Weighted programme time of the standard cotton programme at full and partial load (T
t
)
Condensation efficiency class
(4)
Average condensation efficiency of the standard cotton programme at full load, C
dry
Average condensation efficiency of the standard cotton programme at partial load, C
dry1/2
Weighted condensation efficiency of the standard cotton programme at full load and partial load, C
t
Sound power level for the standard cotton programme at full load
(5)
Built-in
PRODUCT FICHE
Complying Commission Delegated Regulation (EU) No 392/2012
Non-automatic
Automatic
A+++
176,8
-
1,44
0,81
0,47
1,00
30
174
136
A
91%
91%
91%
64
-
8.0
108
-
SMEG
DHEX83E