1. What's in the Box
2. Overview
3. Preparing Your S1
3.1 Remove Stickers and Foam Packaging
3.2 Install Side Brushes
3.3 Connect to Power Supply
3.4 Place the Station
3.5 Install Hard Floor Cleaner
3.6 Add Clean Water
3.7 Turn On the Robot
3.8 Download the App
3.9 Set Up the Wi-Fi Connection
3.10 Place the Robot
4. Using Your S1
4.1 Important Tips Before Use
4.2 Mapping
4.3 Start Cleaning
4.4 End a Cleaning Task
4.5 Enable Dust Collection
4.6 Dry the Mop
5. More Features
5.1 Multi-Floor Cleaning
5.2 Smart Speaker Connection
5.3 Firmware Update
6. Cleaning and Maintenance
6.1 Maintenance Frequency
6.2 Clean the Parts
6.2.1 Clean the Dirty Water Reservoir
6.2.2 Clean the Dust Bin and Filters
6.2.3 Replace the Rolling Mop
6.2.4 Clean the Swivel Wheel
6.2.5 Clean the Side Brushes
6.2.6 Clean the Rolling Brush
6.2.7 Clean the Sensors and Charging Contact Pins
6.2.8 Clean the Wheels
6.2.9 Clean the Dirty Water Tank
6.2.10 Clean the Filter Tray
6.2.11 Replace the Dust Bag
7. FAQs
8. Specs
9. Customer Service
1. What's in the Box
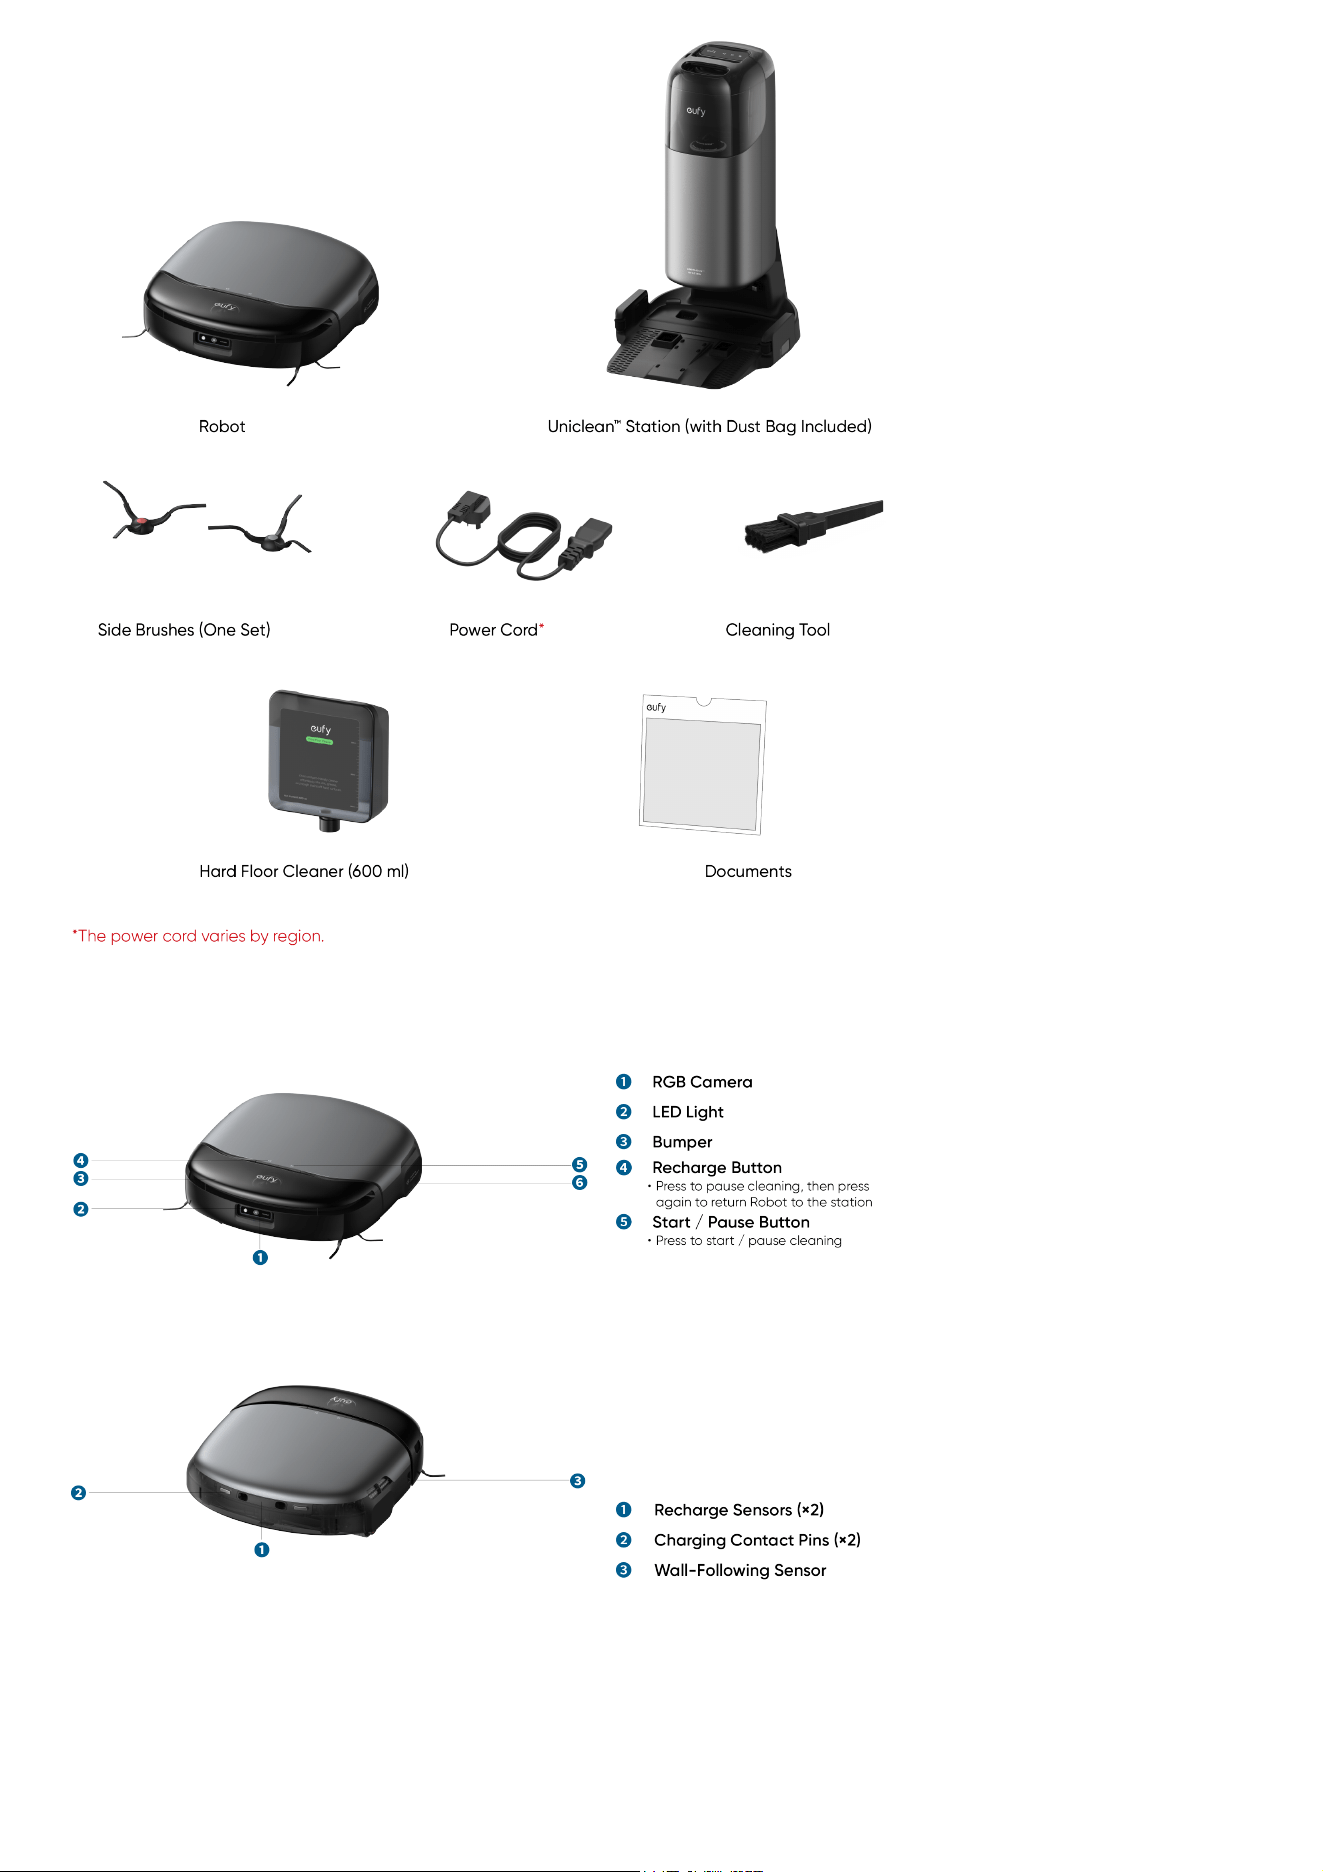
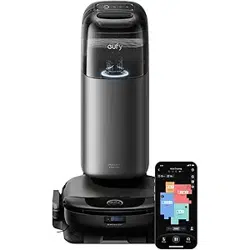
2. Overview
Exterior
Interior
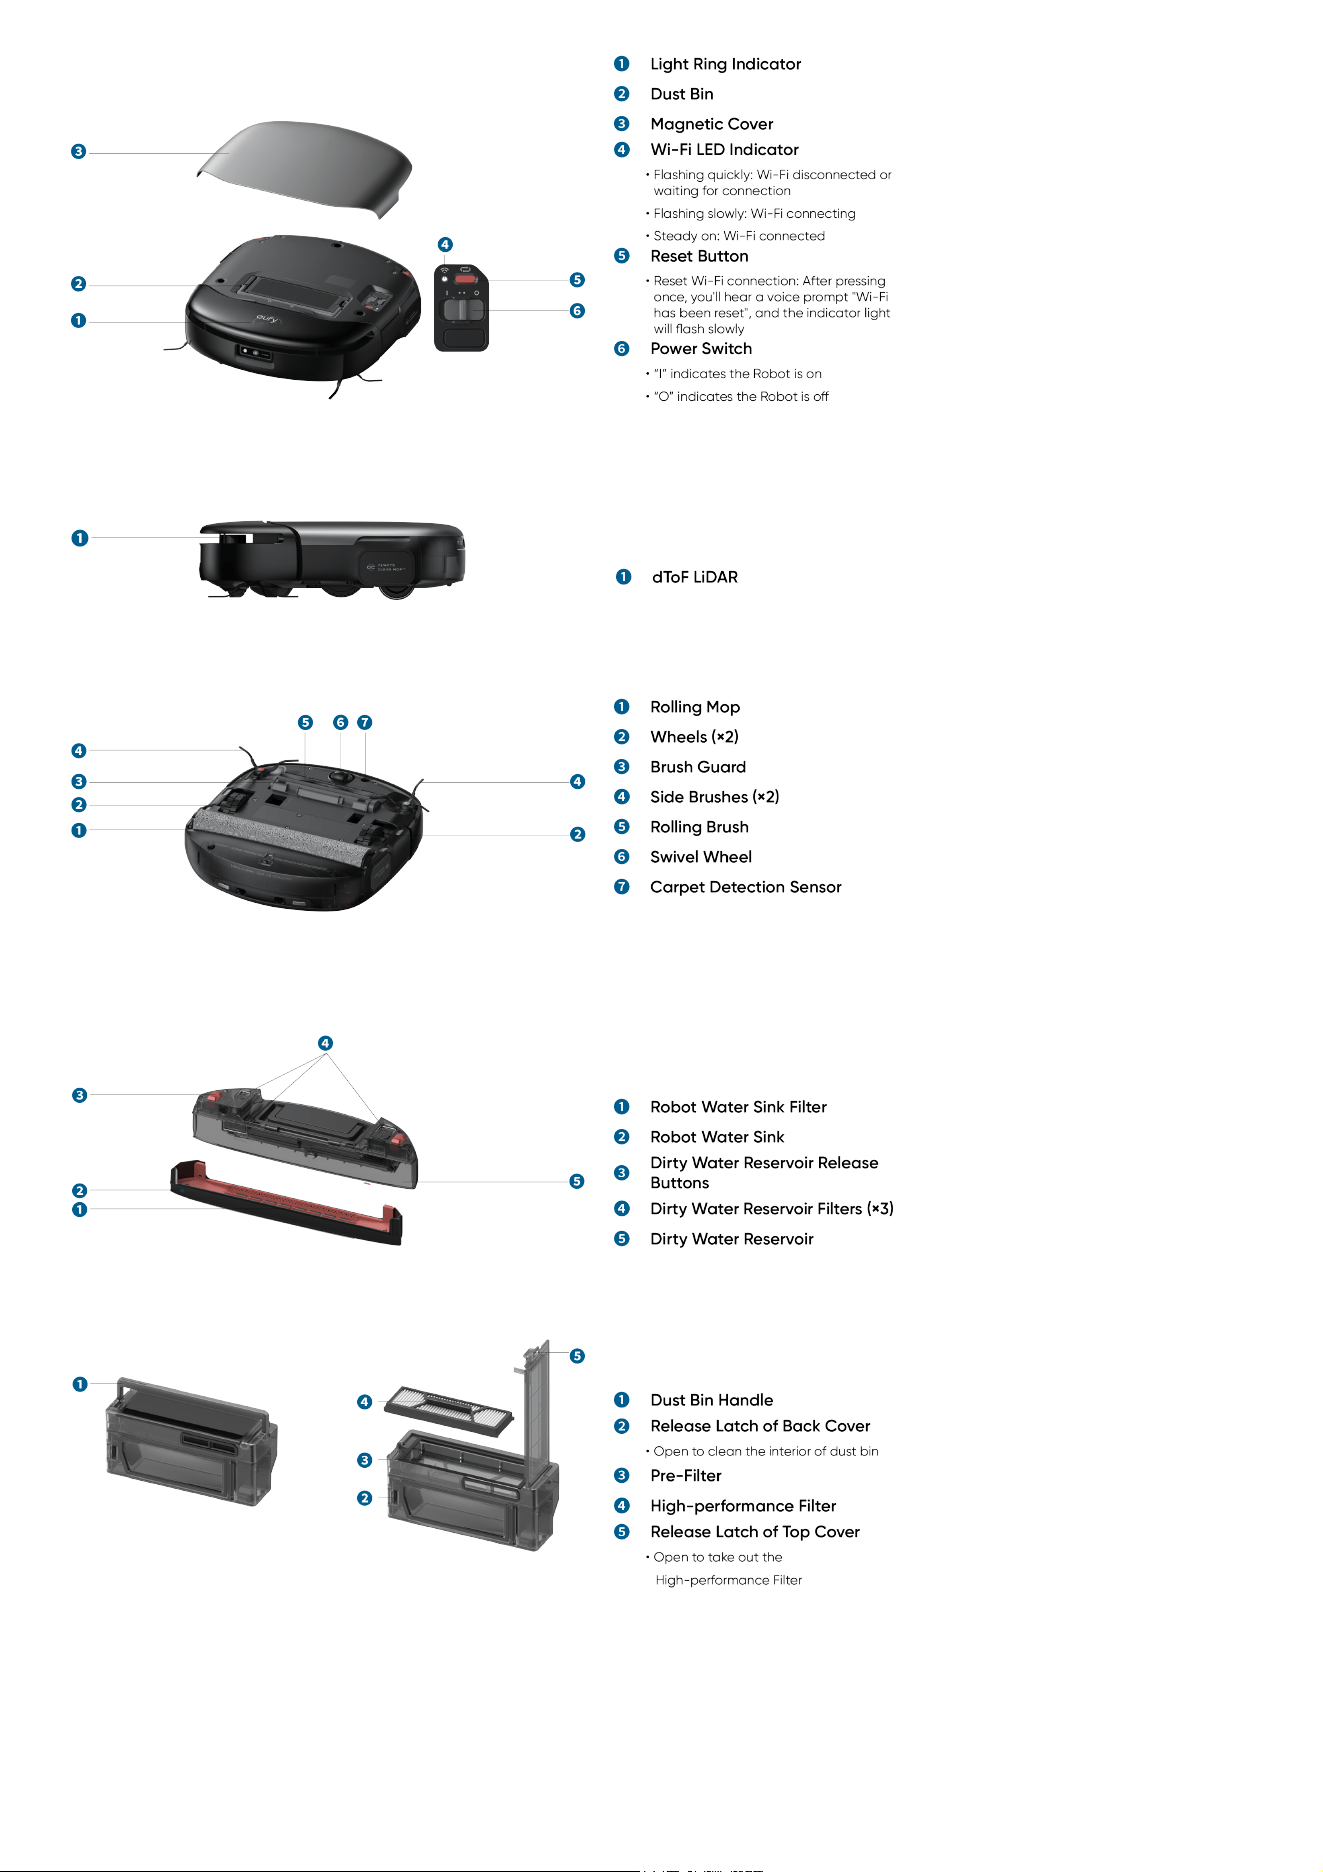
Bottom
Dirty Water Reservoir
Dust Bin
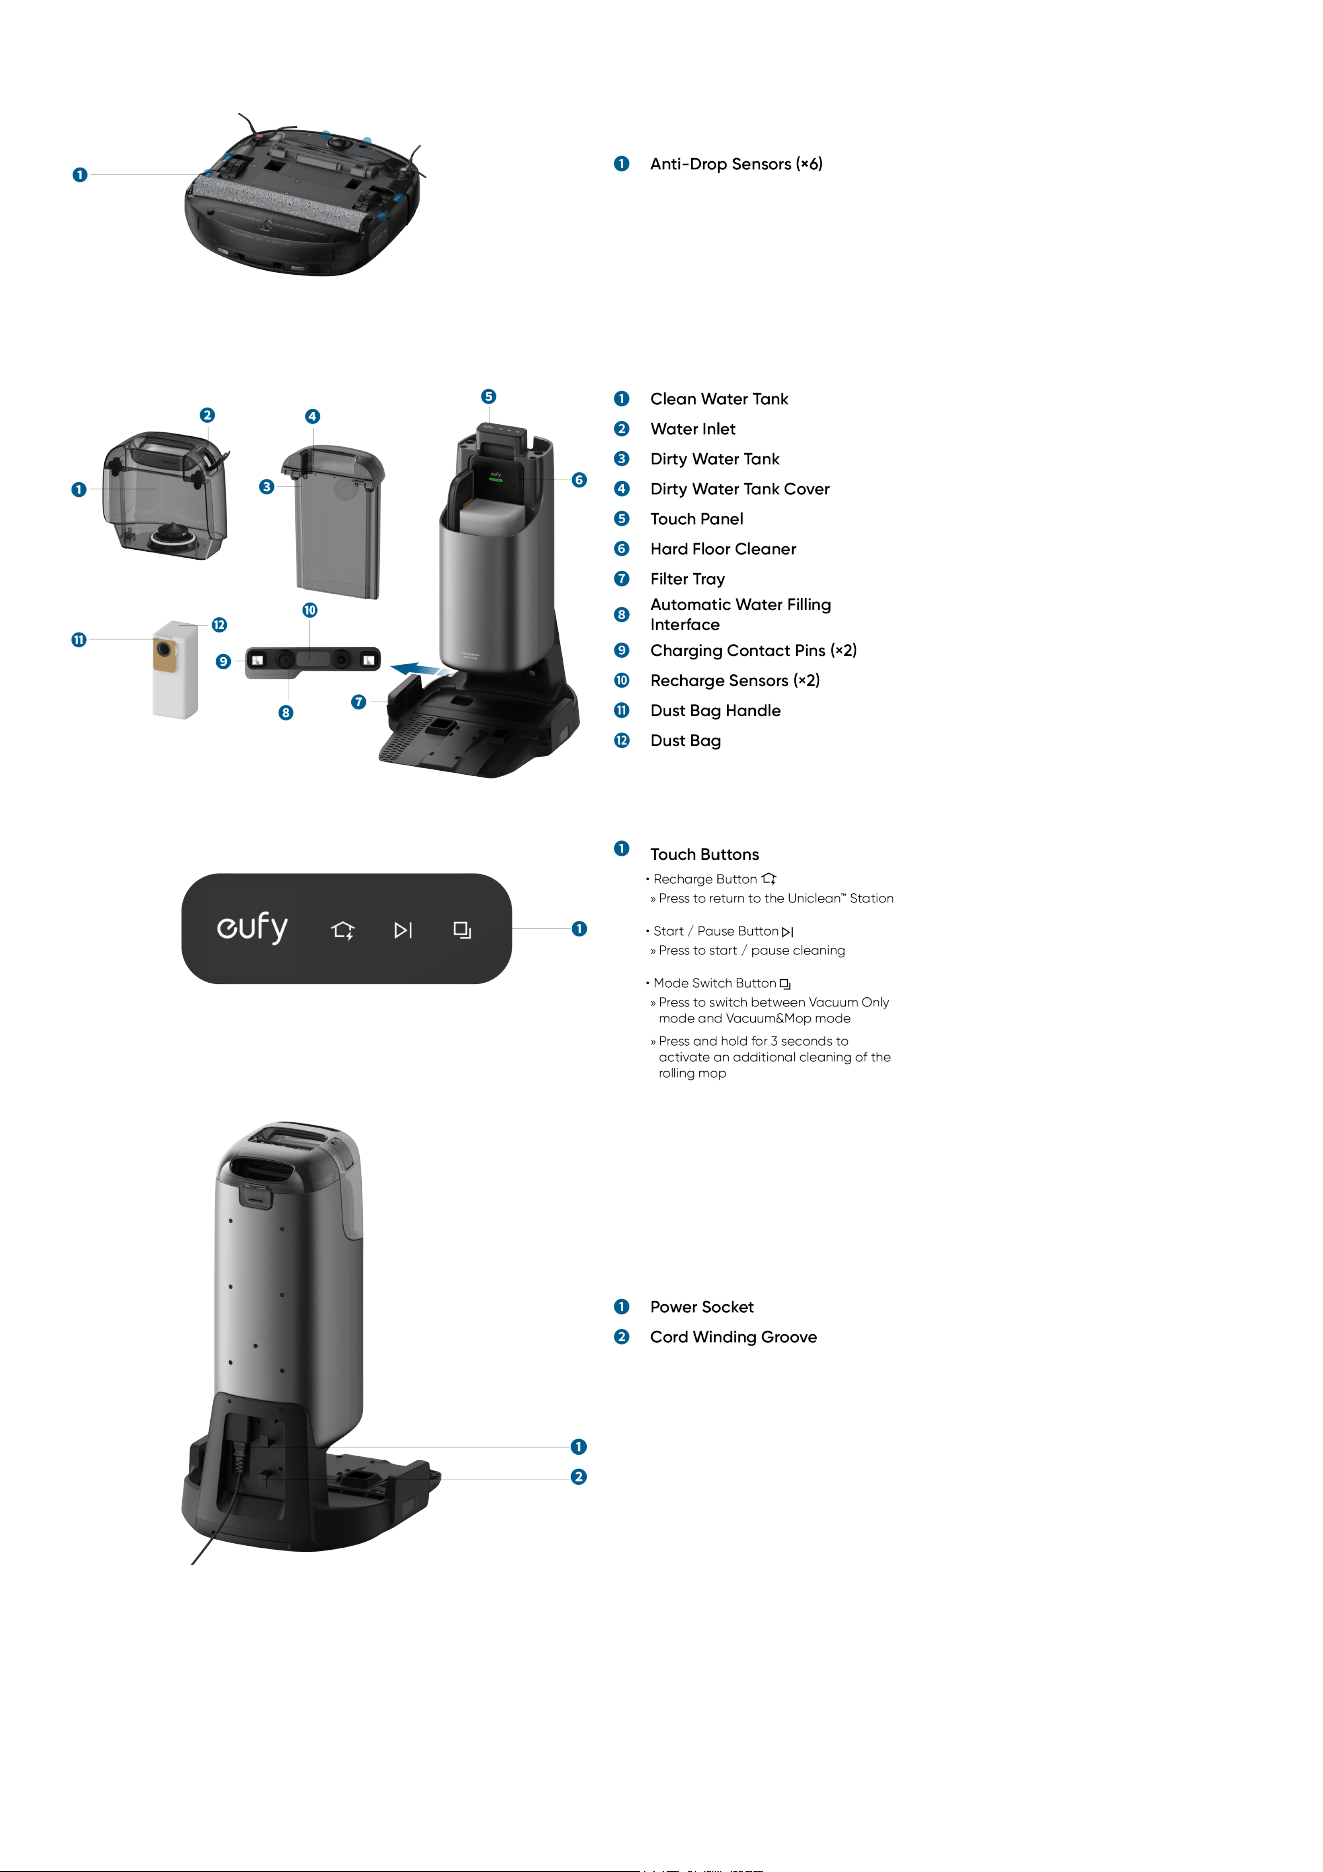
Uniclean™ Station
3. Preparing Your S1
3.1 Remove Stickers and Foam Packaging
Before using, remove the stickers, laser protection film, and foam packaging from the robot and Uniclean™ Station.
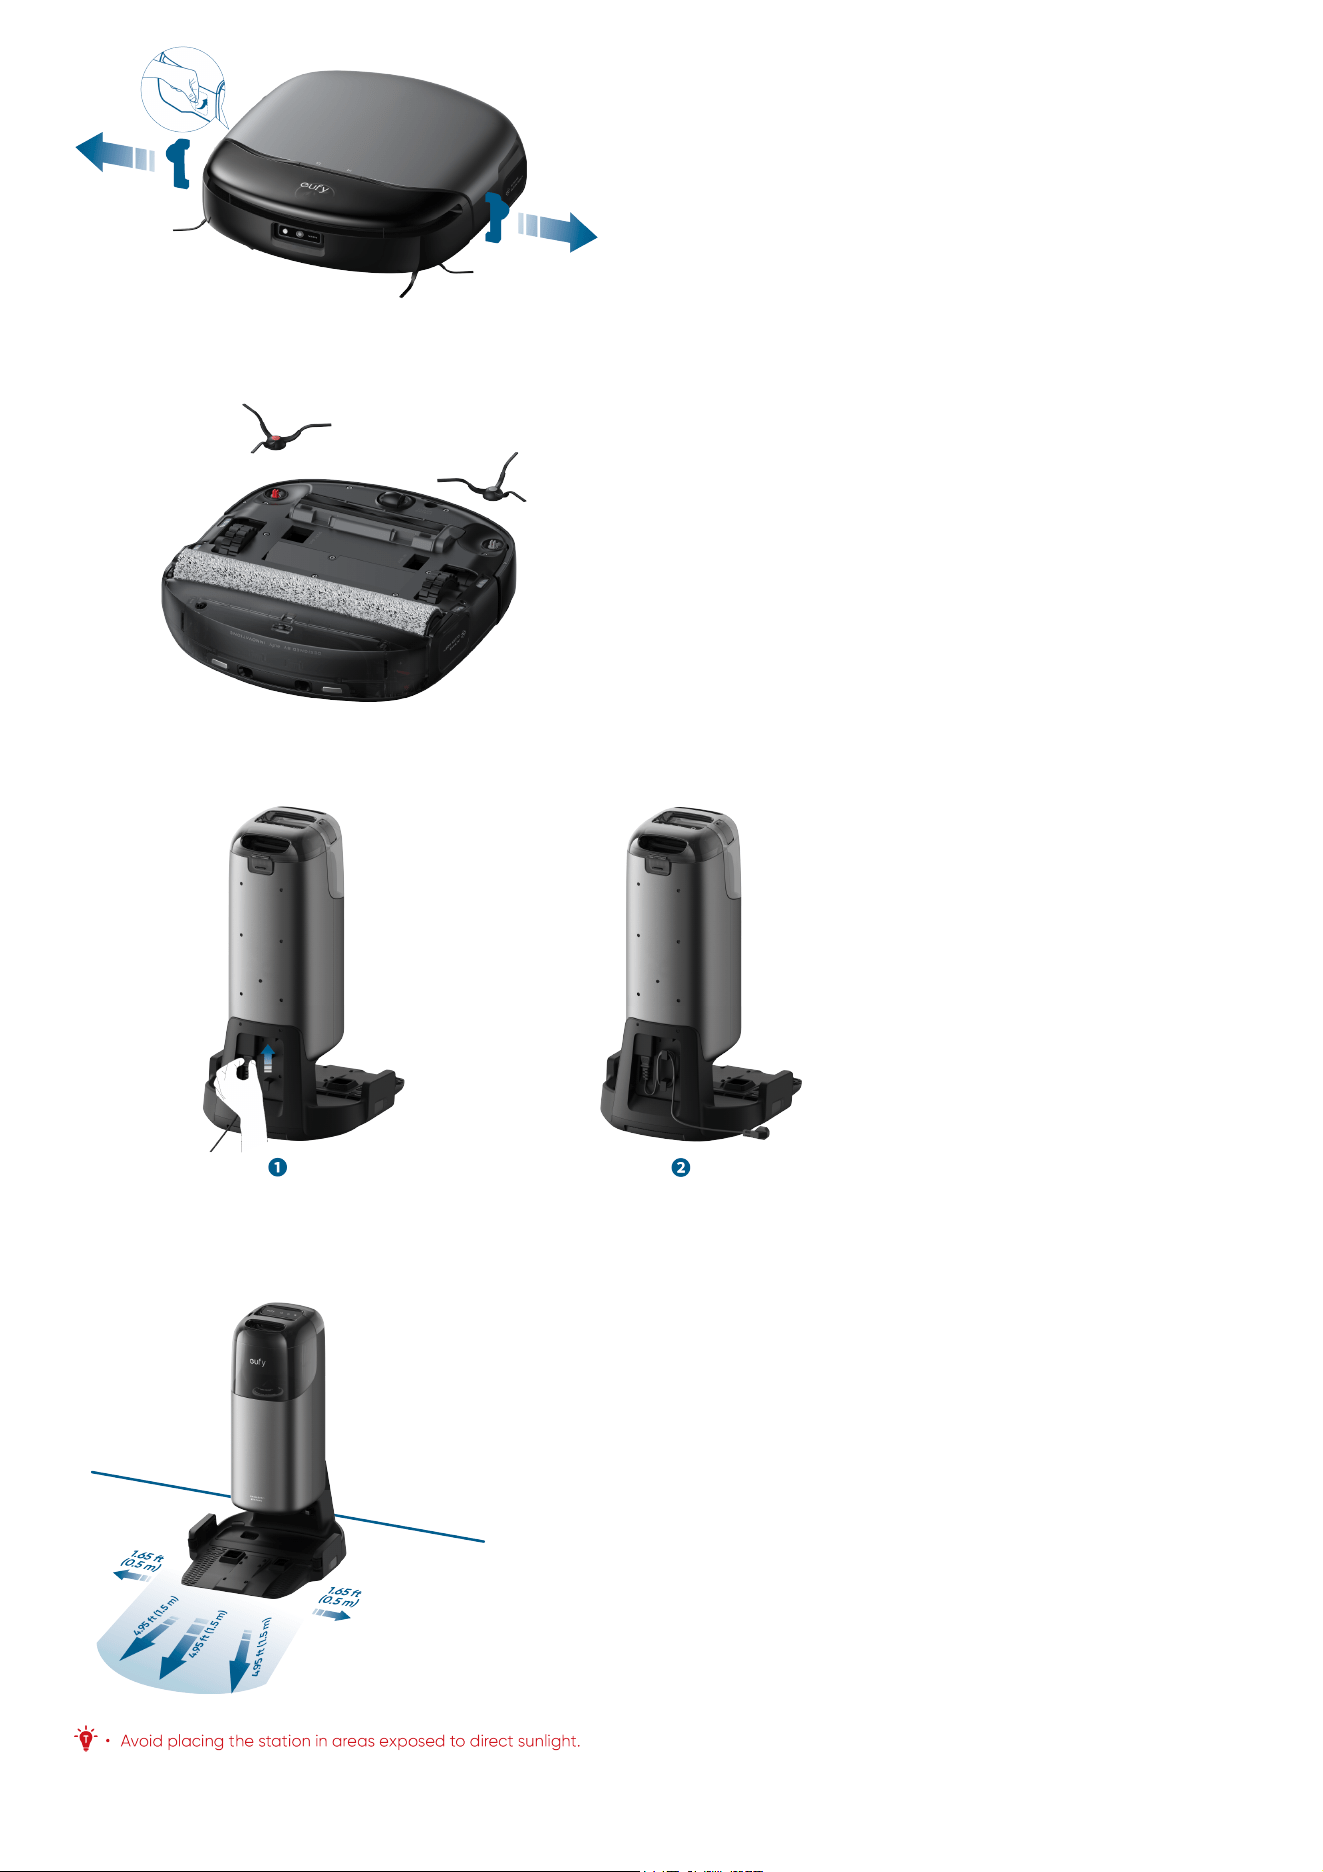
3.2 Install Side Brushes
Make sure the brushes marked 1 (red) and 2 (gray) are correctly installed based on the diagram below. You will hear a "click" when the side brushes are
in place.
3.3 Connect to Power Supply
Firmly insert the power cord as shown in the diagram. Tuck any excess cable into the winding groove.
Once the base station is connected to power, the Touch Panel and LED ring in the clean water tank will light up.
3.4 Place the Station
Place the station on a hard and level surface against a wall. Ensure a clearance of at least 4.95 ft (1.5 m) in front and 1.65 ft (0.5 m) at the sides. Place
the station in a location with a strong Wi-Fi signal (Frequency band: 2.4GHz).
3.5 Install Hard Floor Cleaner
Follow the diagram to remove the clean water tank. Peel off the sticker from the station, then insert the cartridge into the cleaner slot. You will hear a
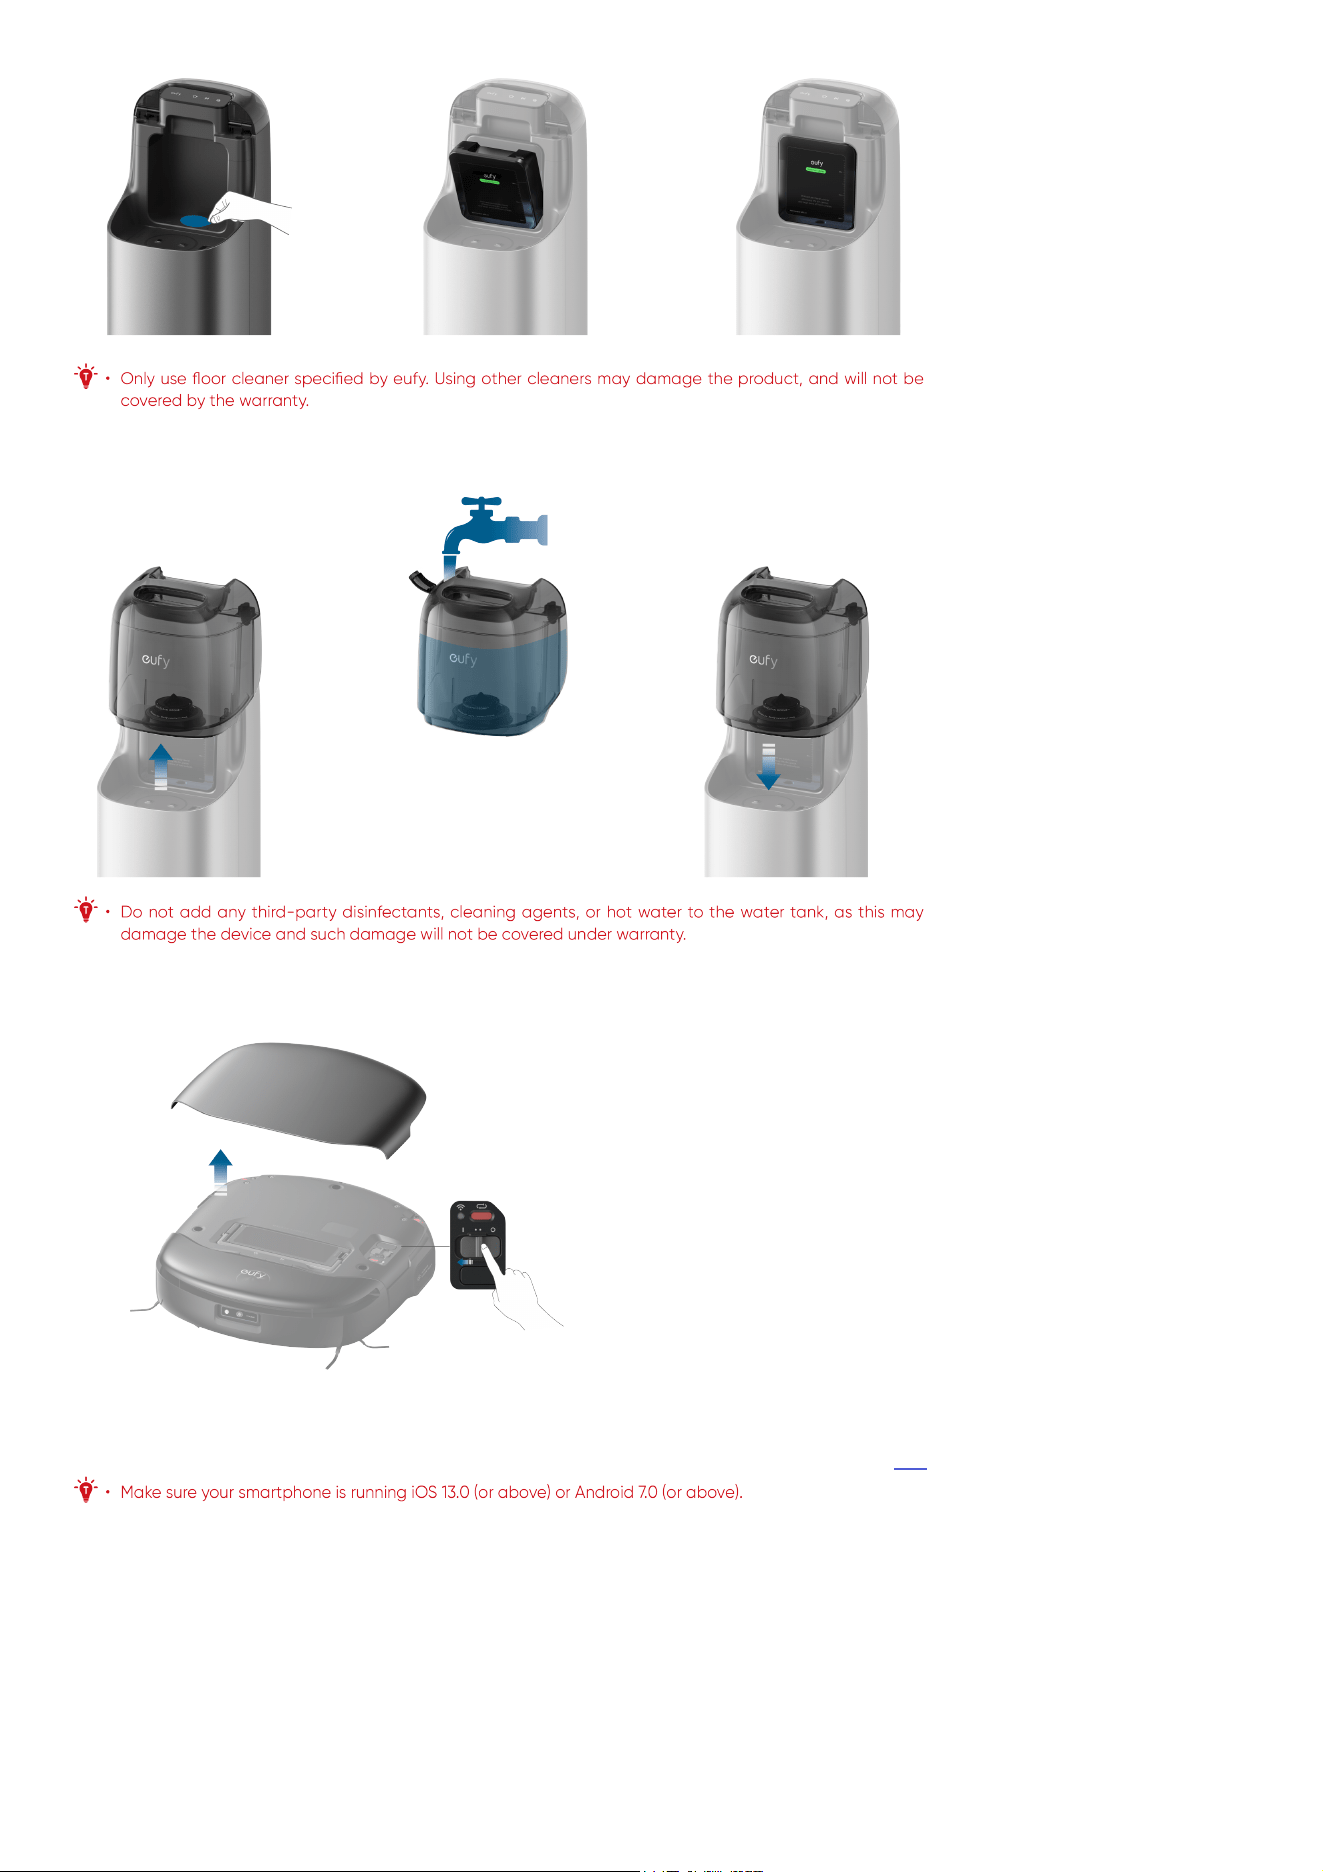
"click" when the floor cleaner is securely installed.
3.6 Add Clean Water
Remove the clean water tank from the station, add clean water until it reaches the MAX water line, and then reinsert the clean water tank.
3.7 Turn On the Robot
Open the magnetic cover of the robot and toggle the switch to "I" to power up the robot. Once powered on, the robot will play a voice prompt.
3.8 Download the App
To enjoy all the available features, it is recommended to control your robot via the app. You can try the following methods:
1. Download the app from the App Store (iOS devices) or Google Play (Android devices), or by clicking this link.
2. After opening the magnetic cover of the robot, scan the QR code on the main unit.
Once you've downloaded and finished installing the app, please register and log into your own eufy account.
3.9 Set Up the Wi-Fi Connection
Press the reset button once. When you hear the voice prompt, "Wi-Fi has been reset", follow the in-app instructions to add your robot and complete the
connection.
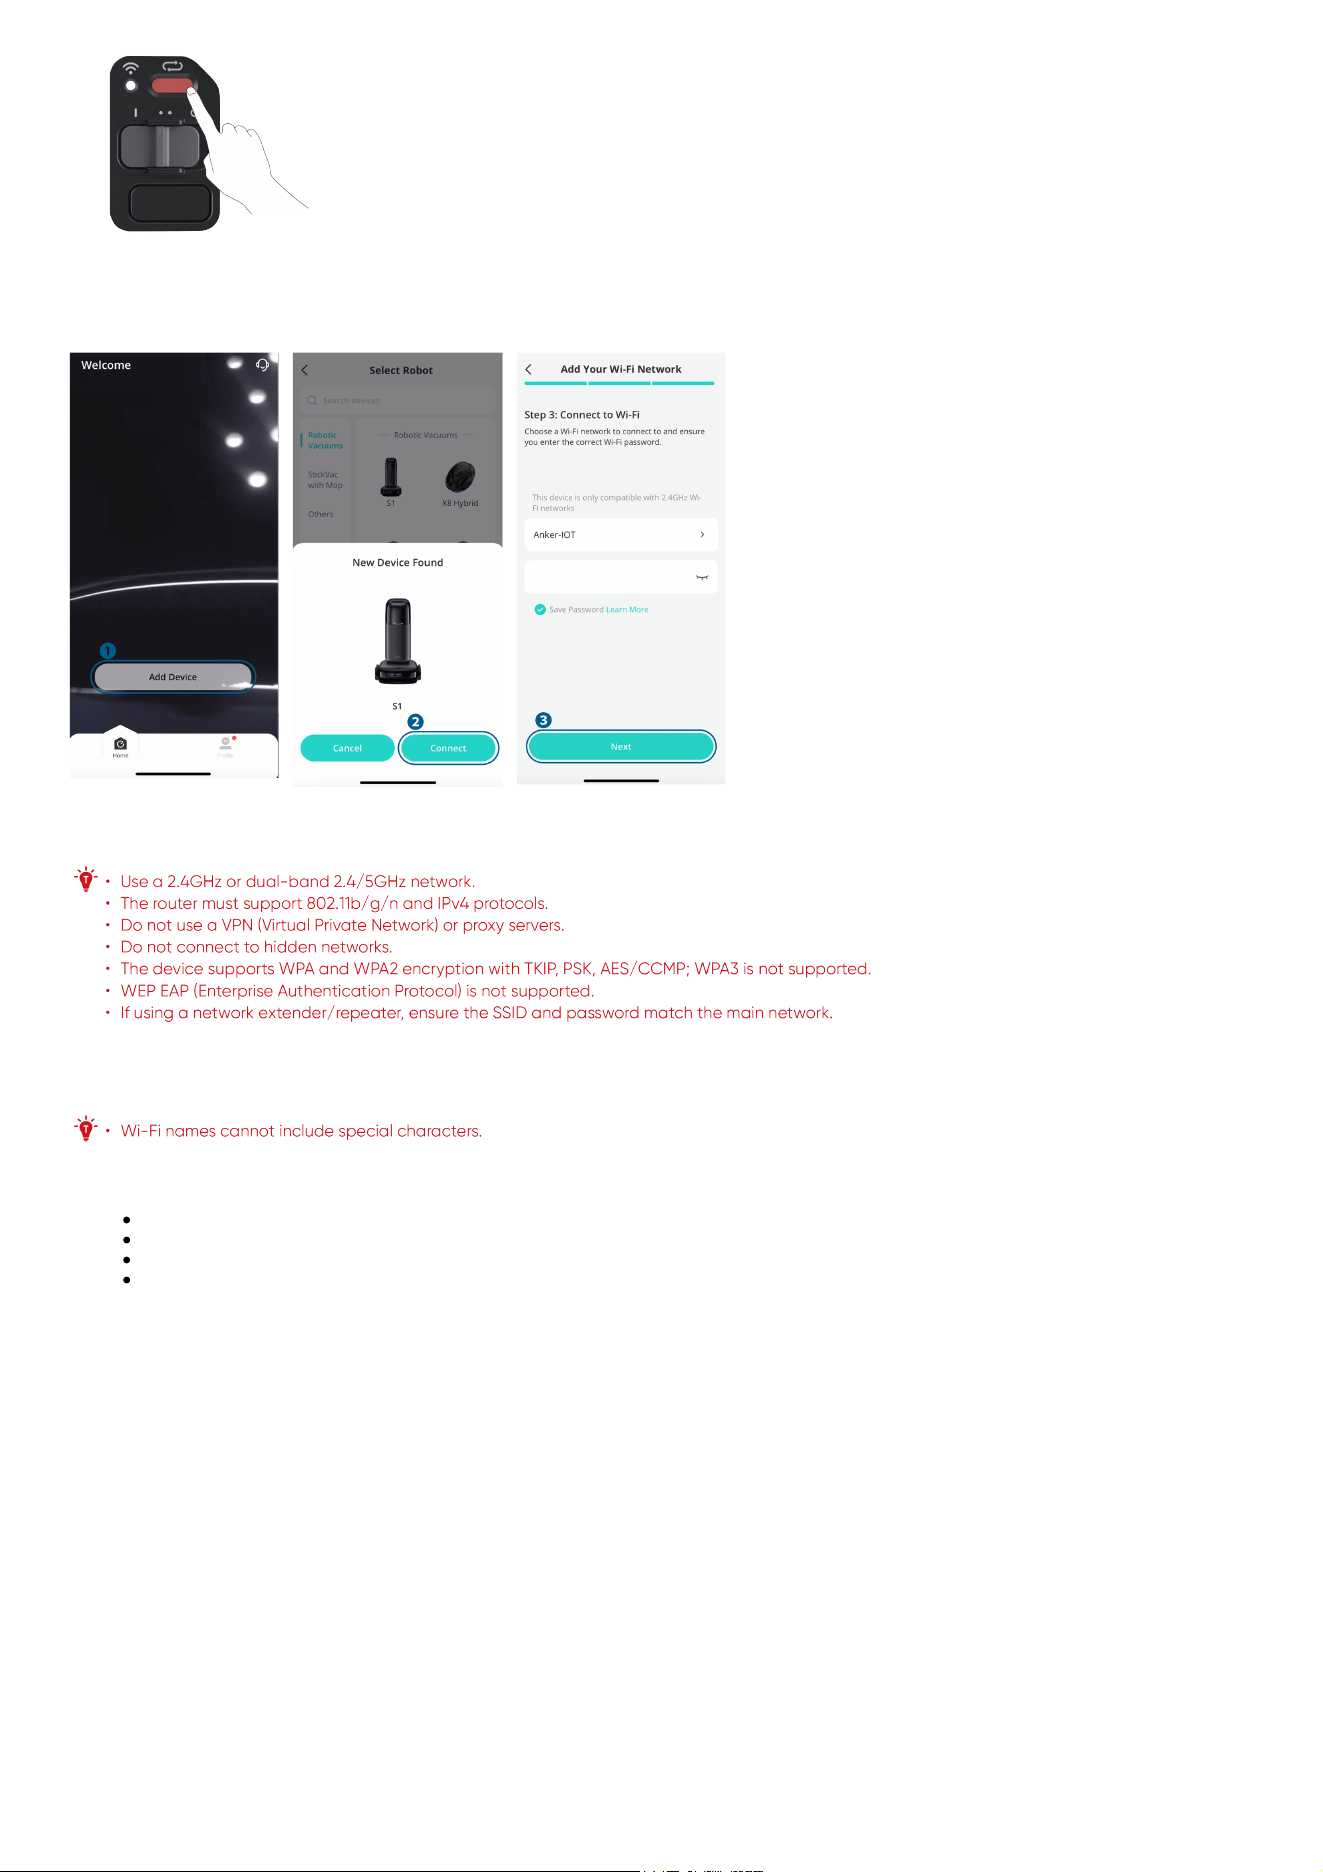
Enable Bluetooth on your mobile phone, tap "Add Device" on the main screen of the app, and select S1 from the device list. After the device appears on
the list, tap "Add" to start connecting to the robot.
Select the 2.4G Wi-Fi network at your home and enter the password, then tap "Next".
Note: The UI images are for illustration purposes only. Actual display contents may vary based on the software
version.
If the Wi-Fi name does not autofill, tap "Select Wi-Fi" next to the input field and choose your home network. Make sure your phone is connected to your
home Wi-Fi before adding the device in the app again. Upon successful connection, the robot will sound a voice prompt, and then you can name the
robot.
If the device fails to connect to the network:
Verify the accuracy of Wi-Fi name or password, including case sensitivity.
Check your router's internet connection and resolve any issues.
If your router has whitelist mode enabled, disable it temporarily.
If your router uses WPA3 encryption, switch to WPA2.
Upon successful connection, you can customize the robot's name, select cleaning modes, adjust settings, edit maps, and schedule cleanings.
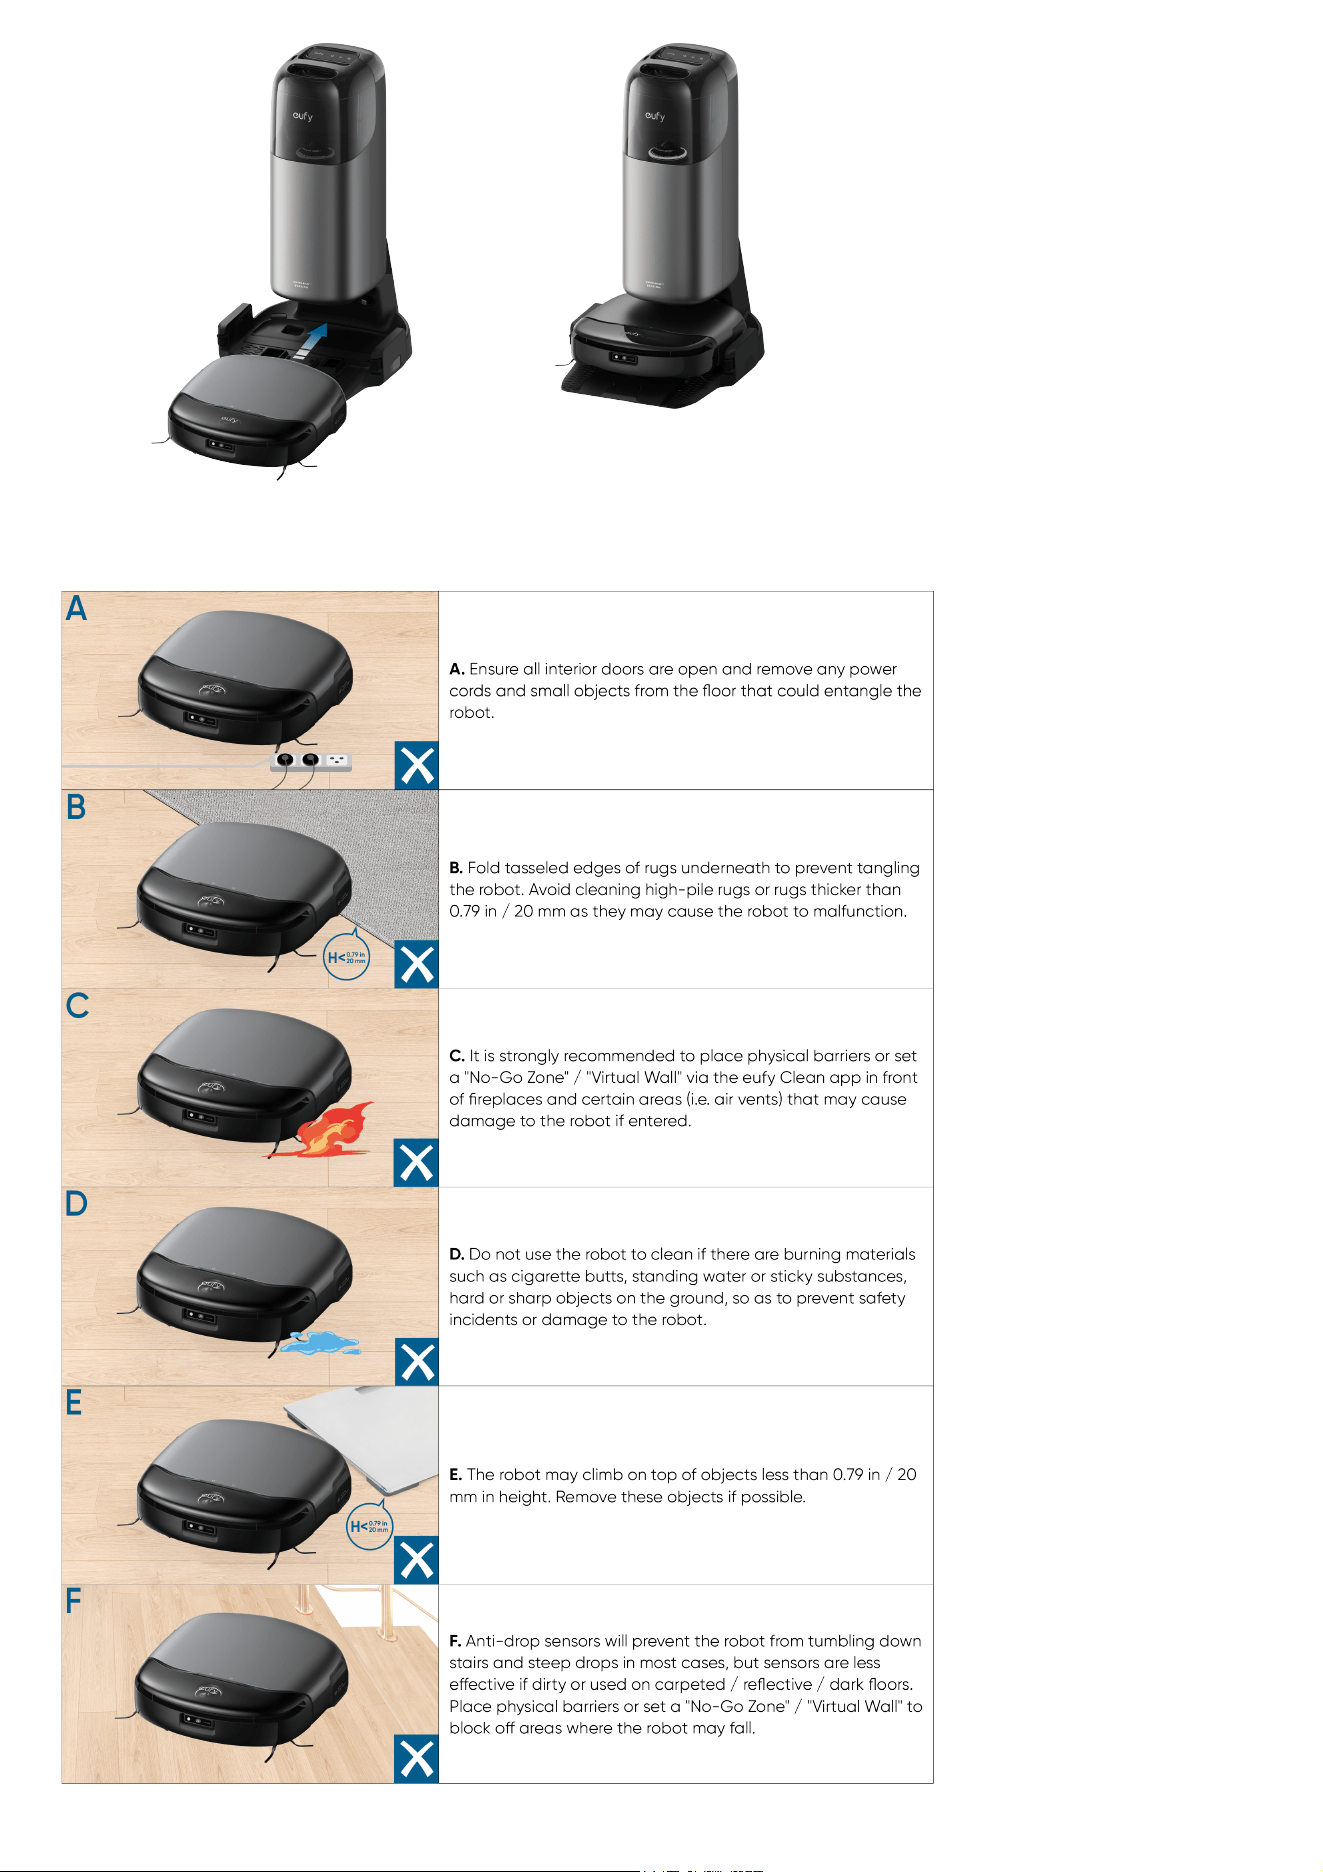
3.10 Place the Robot
Attach the robot to the by aligning the charging contact pins.
Once the robot successfully docks with the station, it will automatically start charging and sound a voice prompt.
4. Using Your S1
4.1 Important Tips Before Use
4.2 Mapping
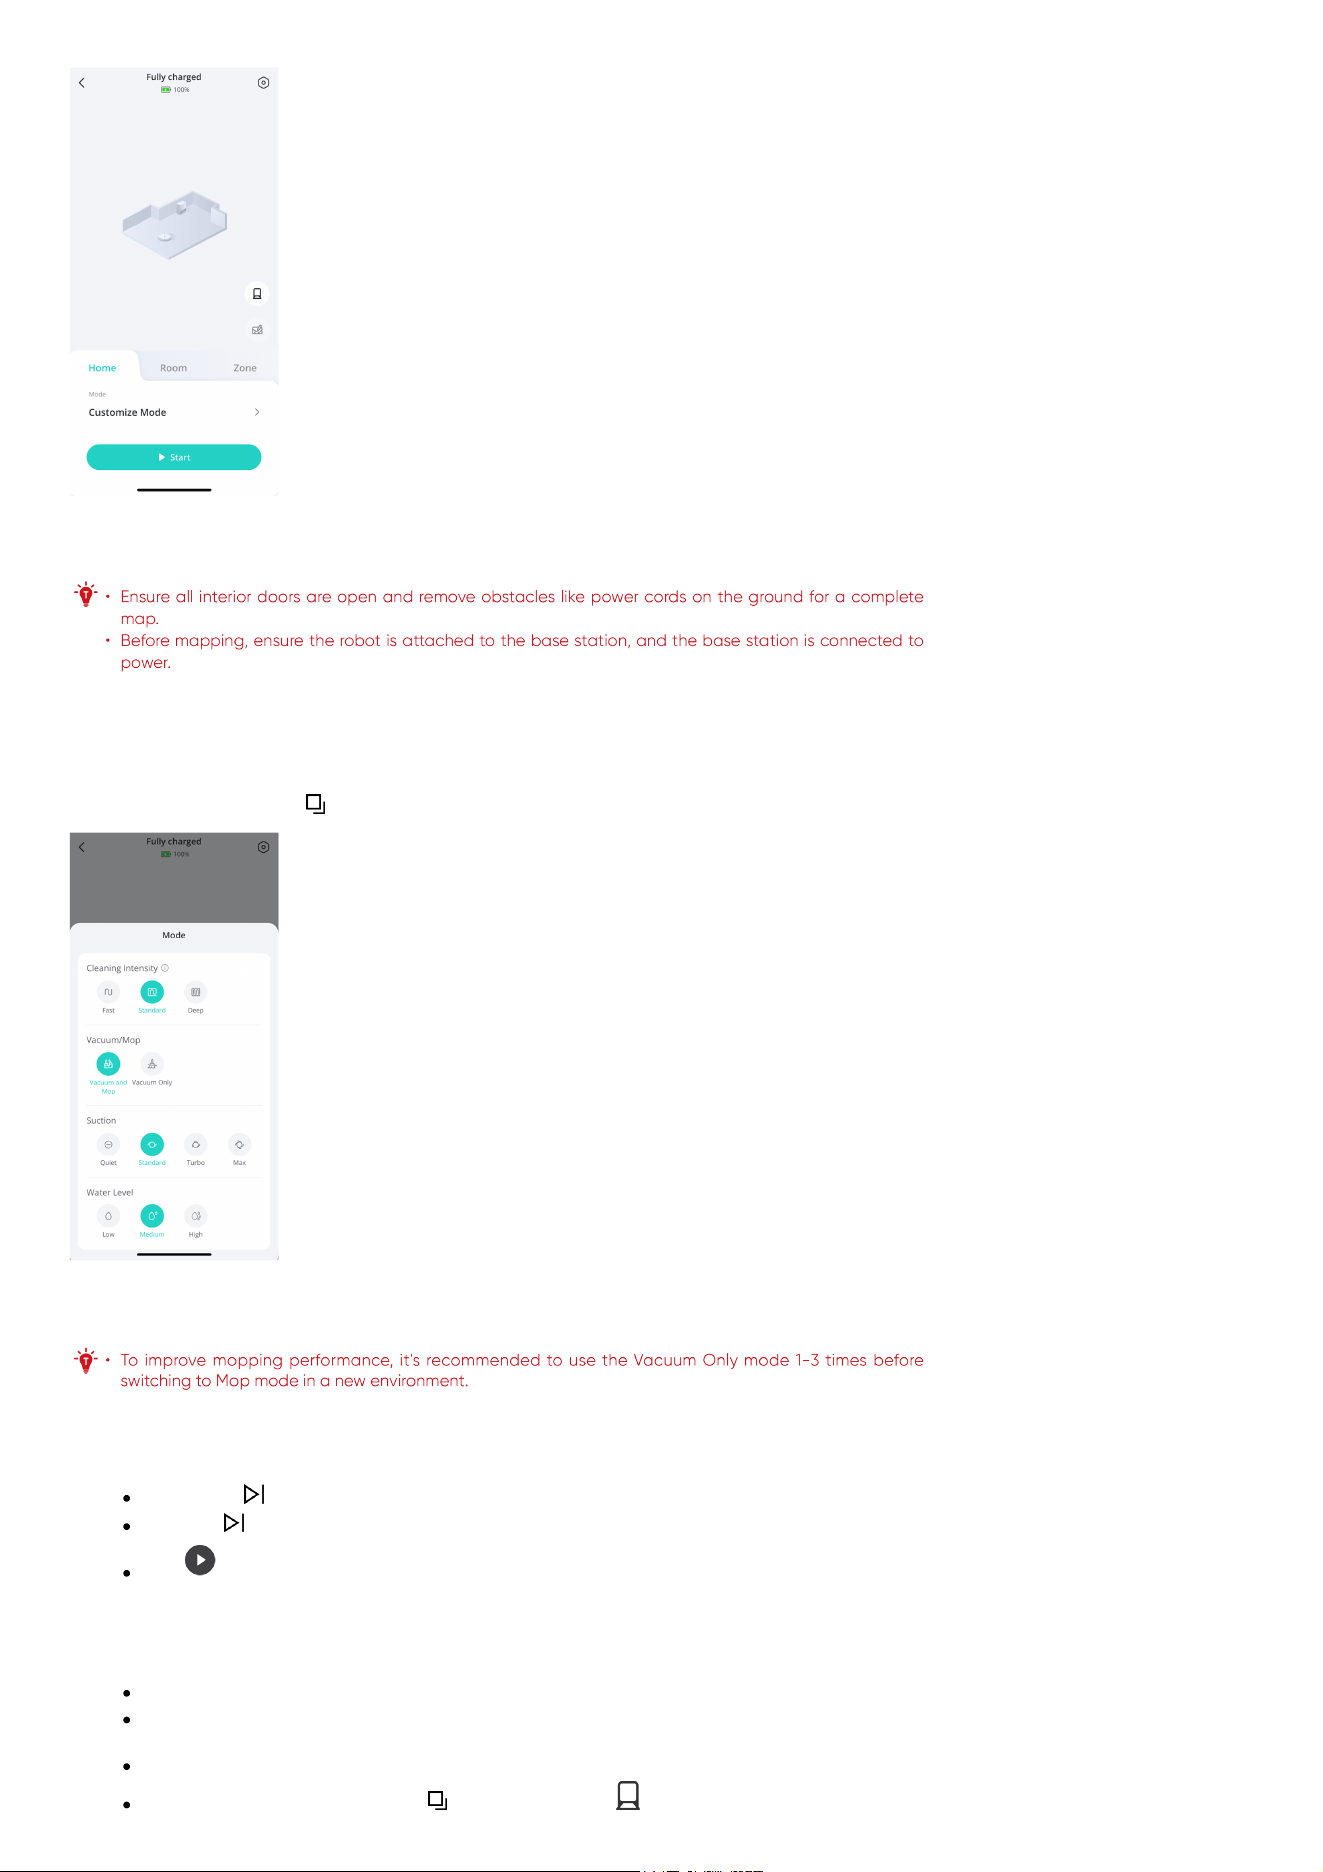
Before using your robot for the first time, create a map of the new environment to start cleaning tasks. To start mapping, tap "Start" in the app.
Note: The UI images are for illustration purposes only. Actual display contents may vary based on the software
version.
4.3 Start Cleaning
4.3.1 Select Cleaning Mode
The robot offers two modes: Vacuum Only and Vacuum&Mop. In Vacuum&Mop, it simultaneously vacuums and mops, automatically wetting and
scrubbing the rolling mop and collecting dirty water. When carpets are detected, it automatically lifts the mop to prevent wetting them. You can switch
cleaning modes by tapping the on the Touch panel or by tapping "Mode" in the app.
Note: The UI images are for illustration purposes only. Actual display contents may vary based on the software
version.
4.3.2 Start a Cleaning Task
You can start a cleaning task by:
Tapping the on the Touch panel of the base station.
Press the on the robot.
Tap in the app's main interface.
The robot will start cleaning based on the selected mode and settings.
4.3.3 Wash the Mop
Mop pre-moistening: The robot will dampen a dry mop at the base station before mopping begins.
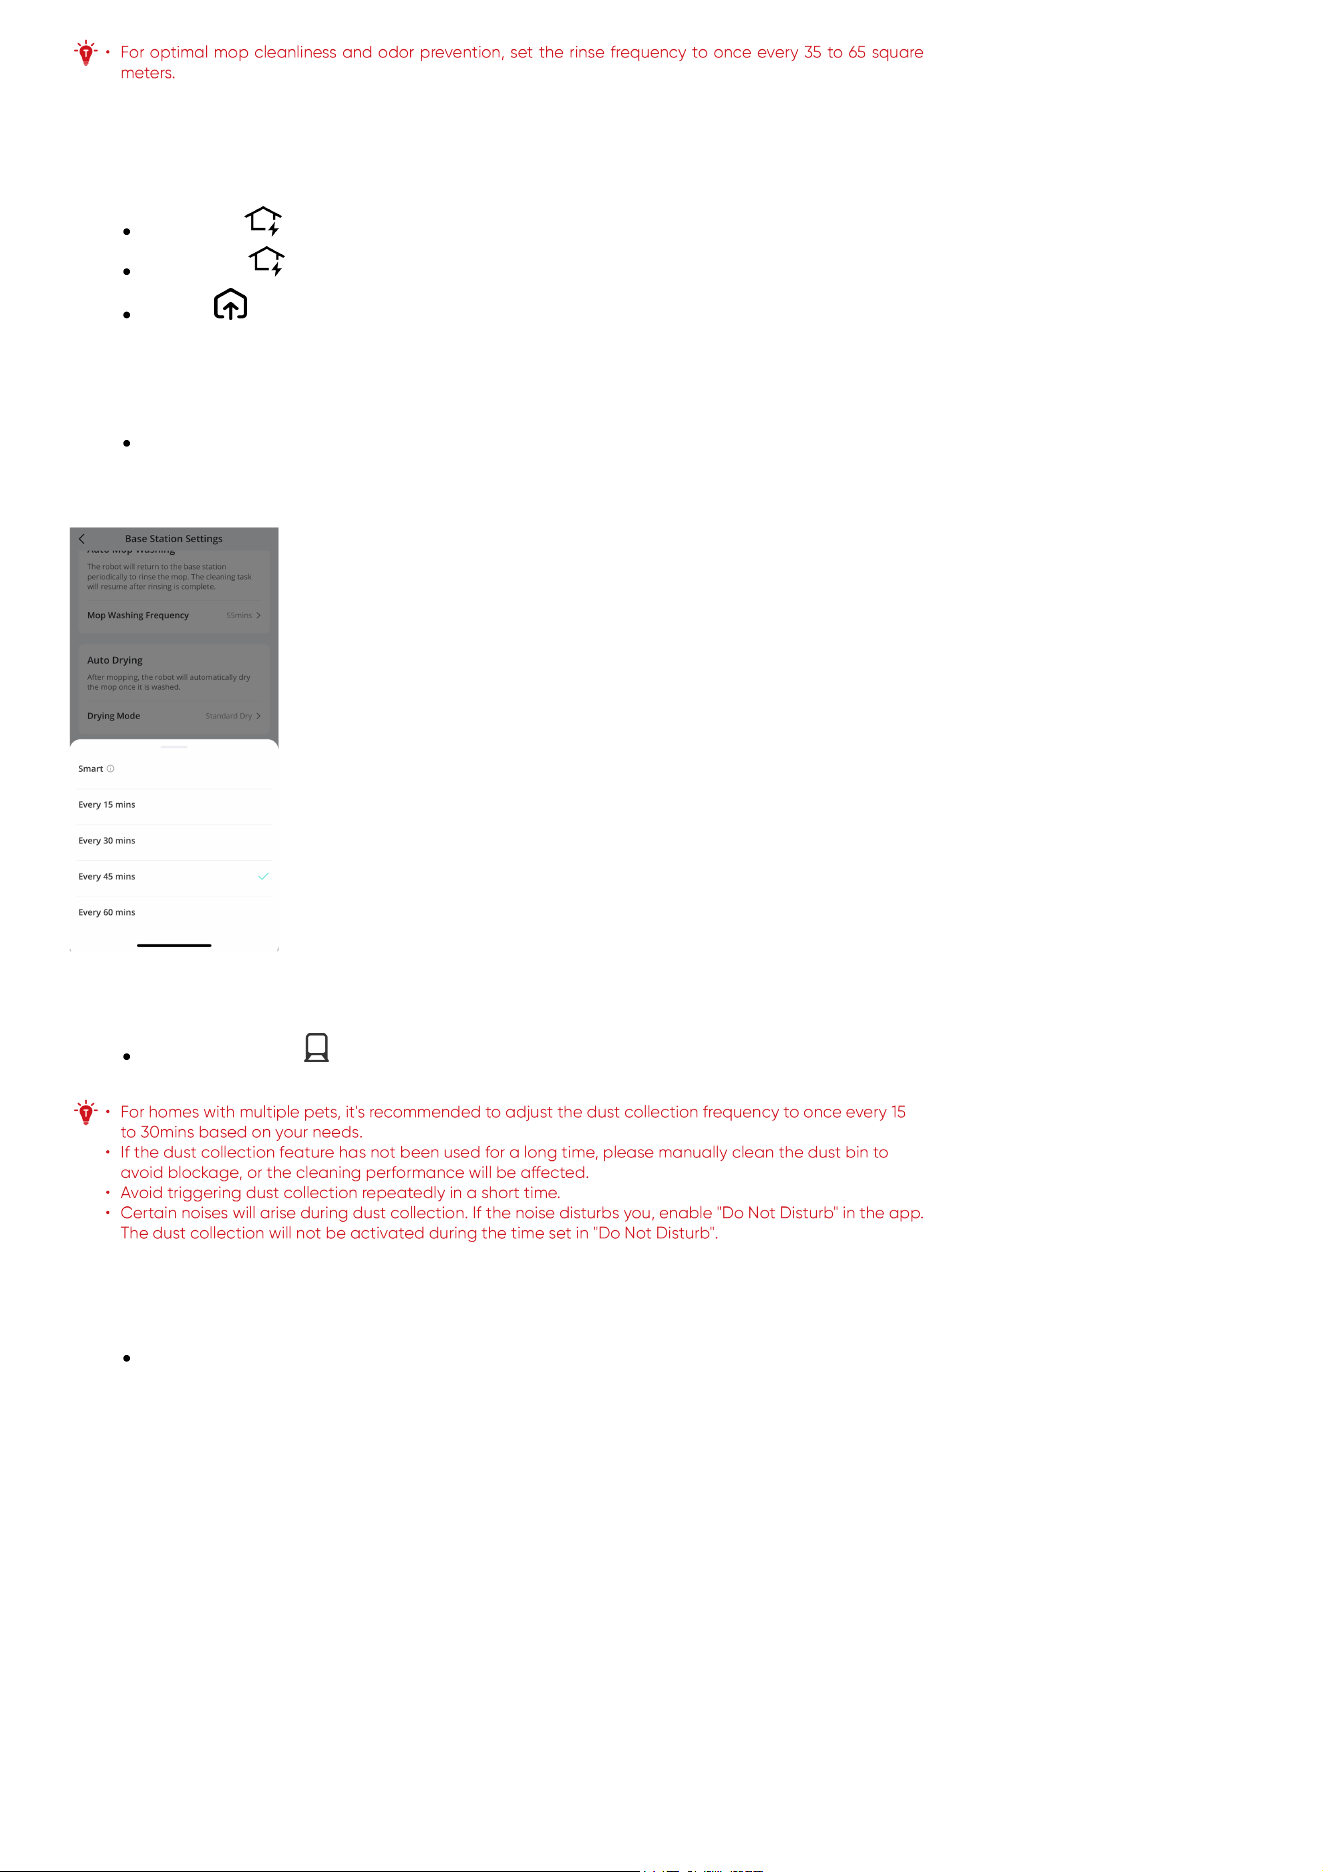
Mid-cleaning rinse: Activate this feature in the app's Base Station Settings to have the robot periodically rinse the mop at the station during
cleaning.
Deep cleaning: The robot will automatically determine if the mop requires washing and drying after the cleaning task.
Manual trigger: Touch and hold the for 3 seconds or tap in the app to manually start a mop wash. If the robot is outside of the base
station at that time, it will trigger a mid-cleaning rinse; if the robot is docked to the base station, it will trigger a wash and dry cycle.
4.4 End a Cleaning Task
After completing a task or when the battery falls below 10%, the robot will automatically return to the base station for dust collection, mop washing,
drying, and recharging. You can also manually end the task by:
Tapping the on the Touch panel of the station.
Pressing the on the robot once, and pressing it again.
Tapping in the app.
4.5 Enable Dust Collection
The robot will automatically initiate dust collection at the base station after cleaning for a specified period of time.
Mid-cleaning dust collection: You can pre-set the automatic dust collection frequency (15/30/45/60 minutes) in the app. In this case, the
robot will return to the station for dust collection at the pre-set frequency during the cleaning process, and then continue cleaning after dust
collection is complete.
Note: The UI images are for illustration purposes only. Actual display contents may vary based on the software
version.
Manual trigger: Tap in the bottom right corner of the app home screen to manually enable dust collection.
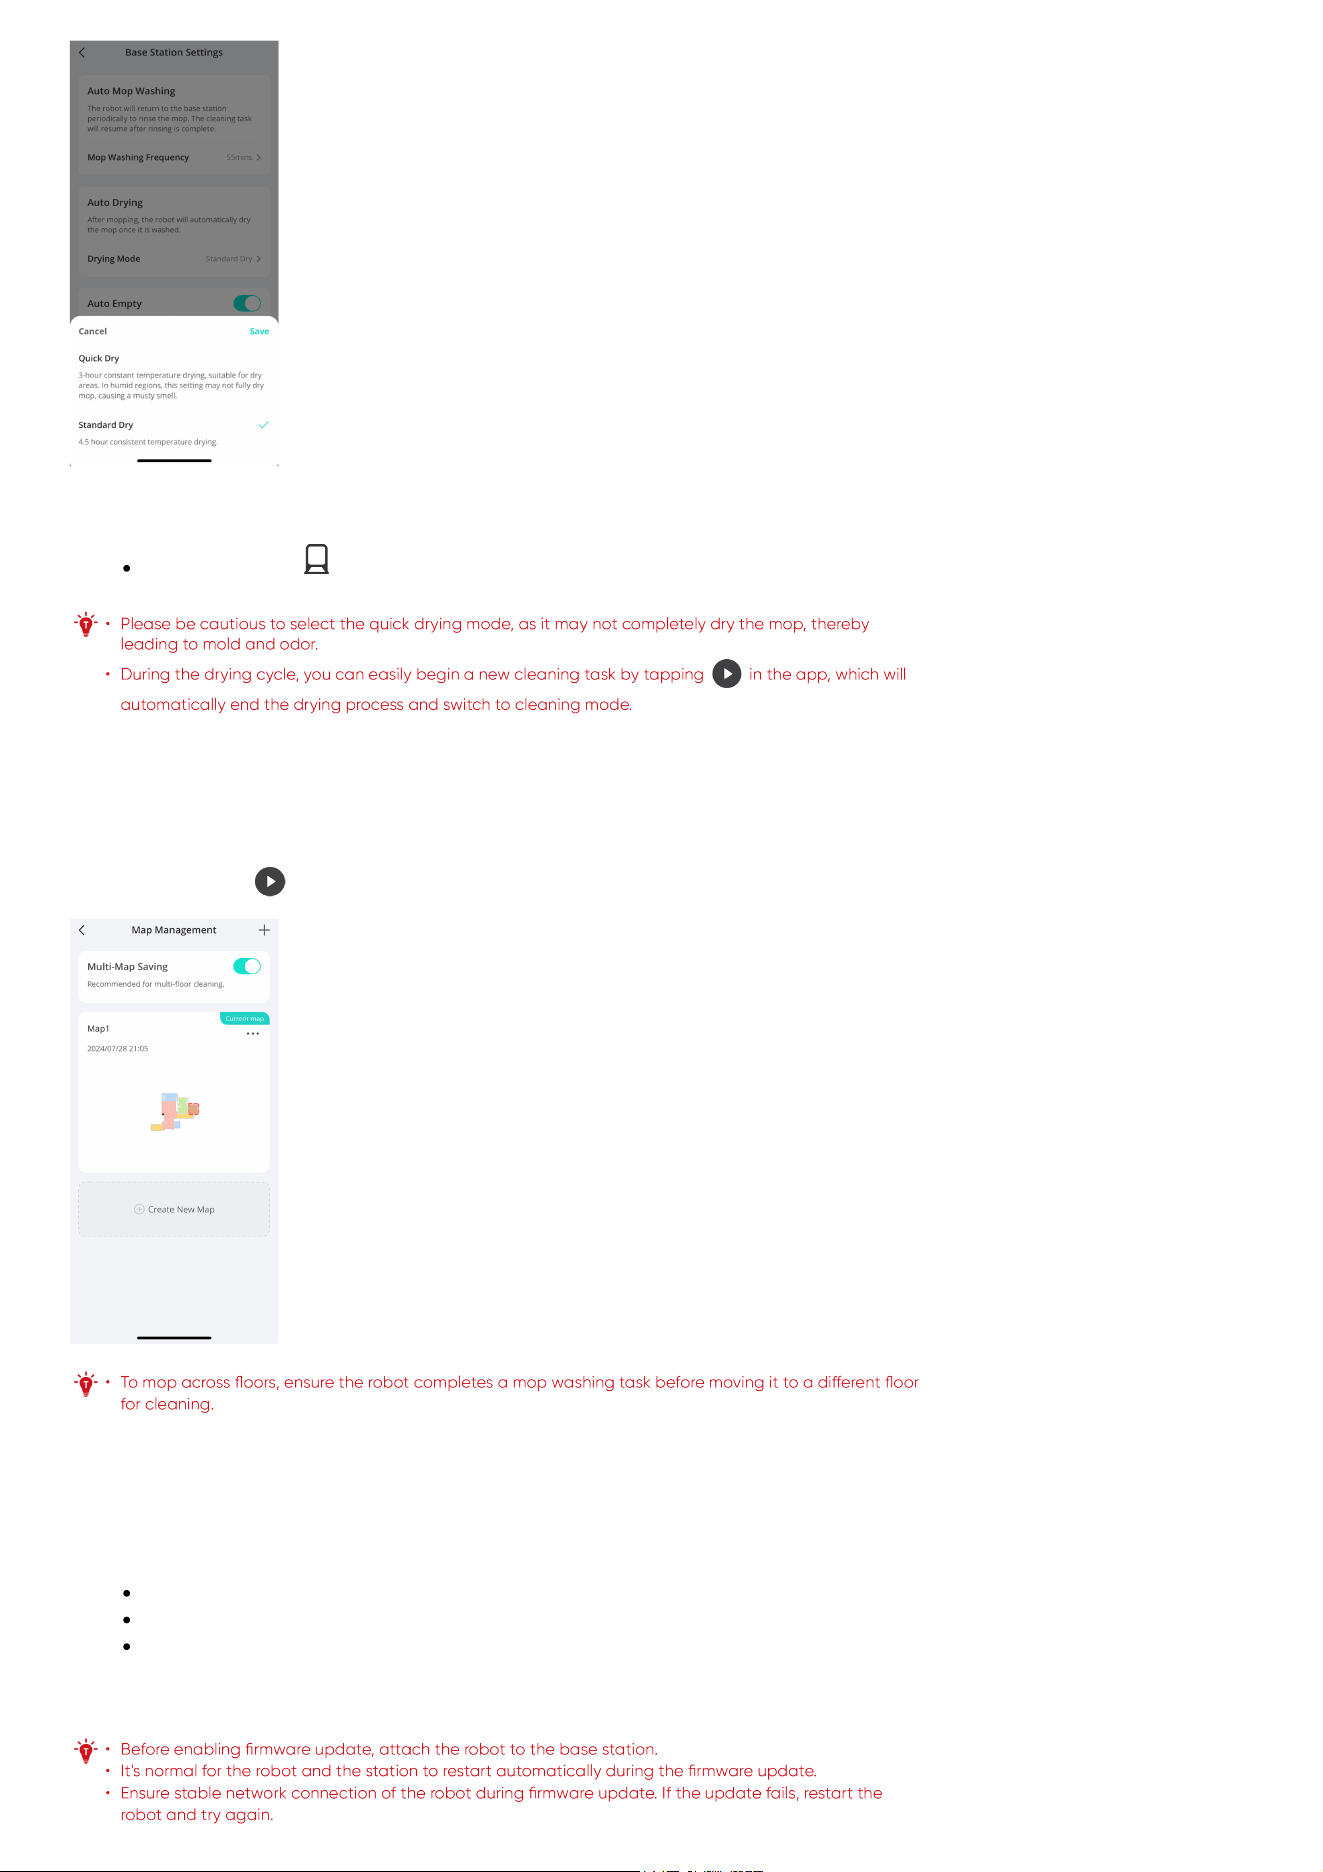
4.6 Dry the Mop
After mopping, the robot will automatically dry the mop.
Drying mode: You can switch the drying mode through the "Base Station Settings" in the app. Standard Dry is suitable for most households,
while Quick Dry is suitable for areas with a dry climate.
Note: The UI images are for illustration purposes only. Actual display contents may vary based on the software
version.
Manual trigger: Tap in the bottom right corner of the app home screen to manually trigger a drying cycle.
5. More Features
5.1 Multi-Floor Cleaning
To clean across multiple floors, move the robot to the desired floor, then navigate to "Settings" > "Manage Map" > "Create New Map" to create a map
for the new floor in the app. During the drying cycle, you can also easily begin a new cleaning task by pressing the start/pause button on the robot or
base station, or tapping in the app.
5.2 Smart Speaker Connection
S1 can connect to your home's smart speaker for voice-controlled cleaning tasks. It currently supports Amazon Alexa and Google Home Speaker.
5.3 Firmware Update
Whenever a new firmware is available, you can update in the following ways:
Tap the update icon in the app's device interface.
Tap the update notification on the app's home screen.
Go to "Firmware Update" in Settings.
After enabling firmware update, the robot will automatically download and install the new firmware. The update takes approximately 10-20 minutes;
ensure the robot and the station are powered on and connected to network.
6. Cleaning and Maintenance
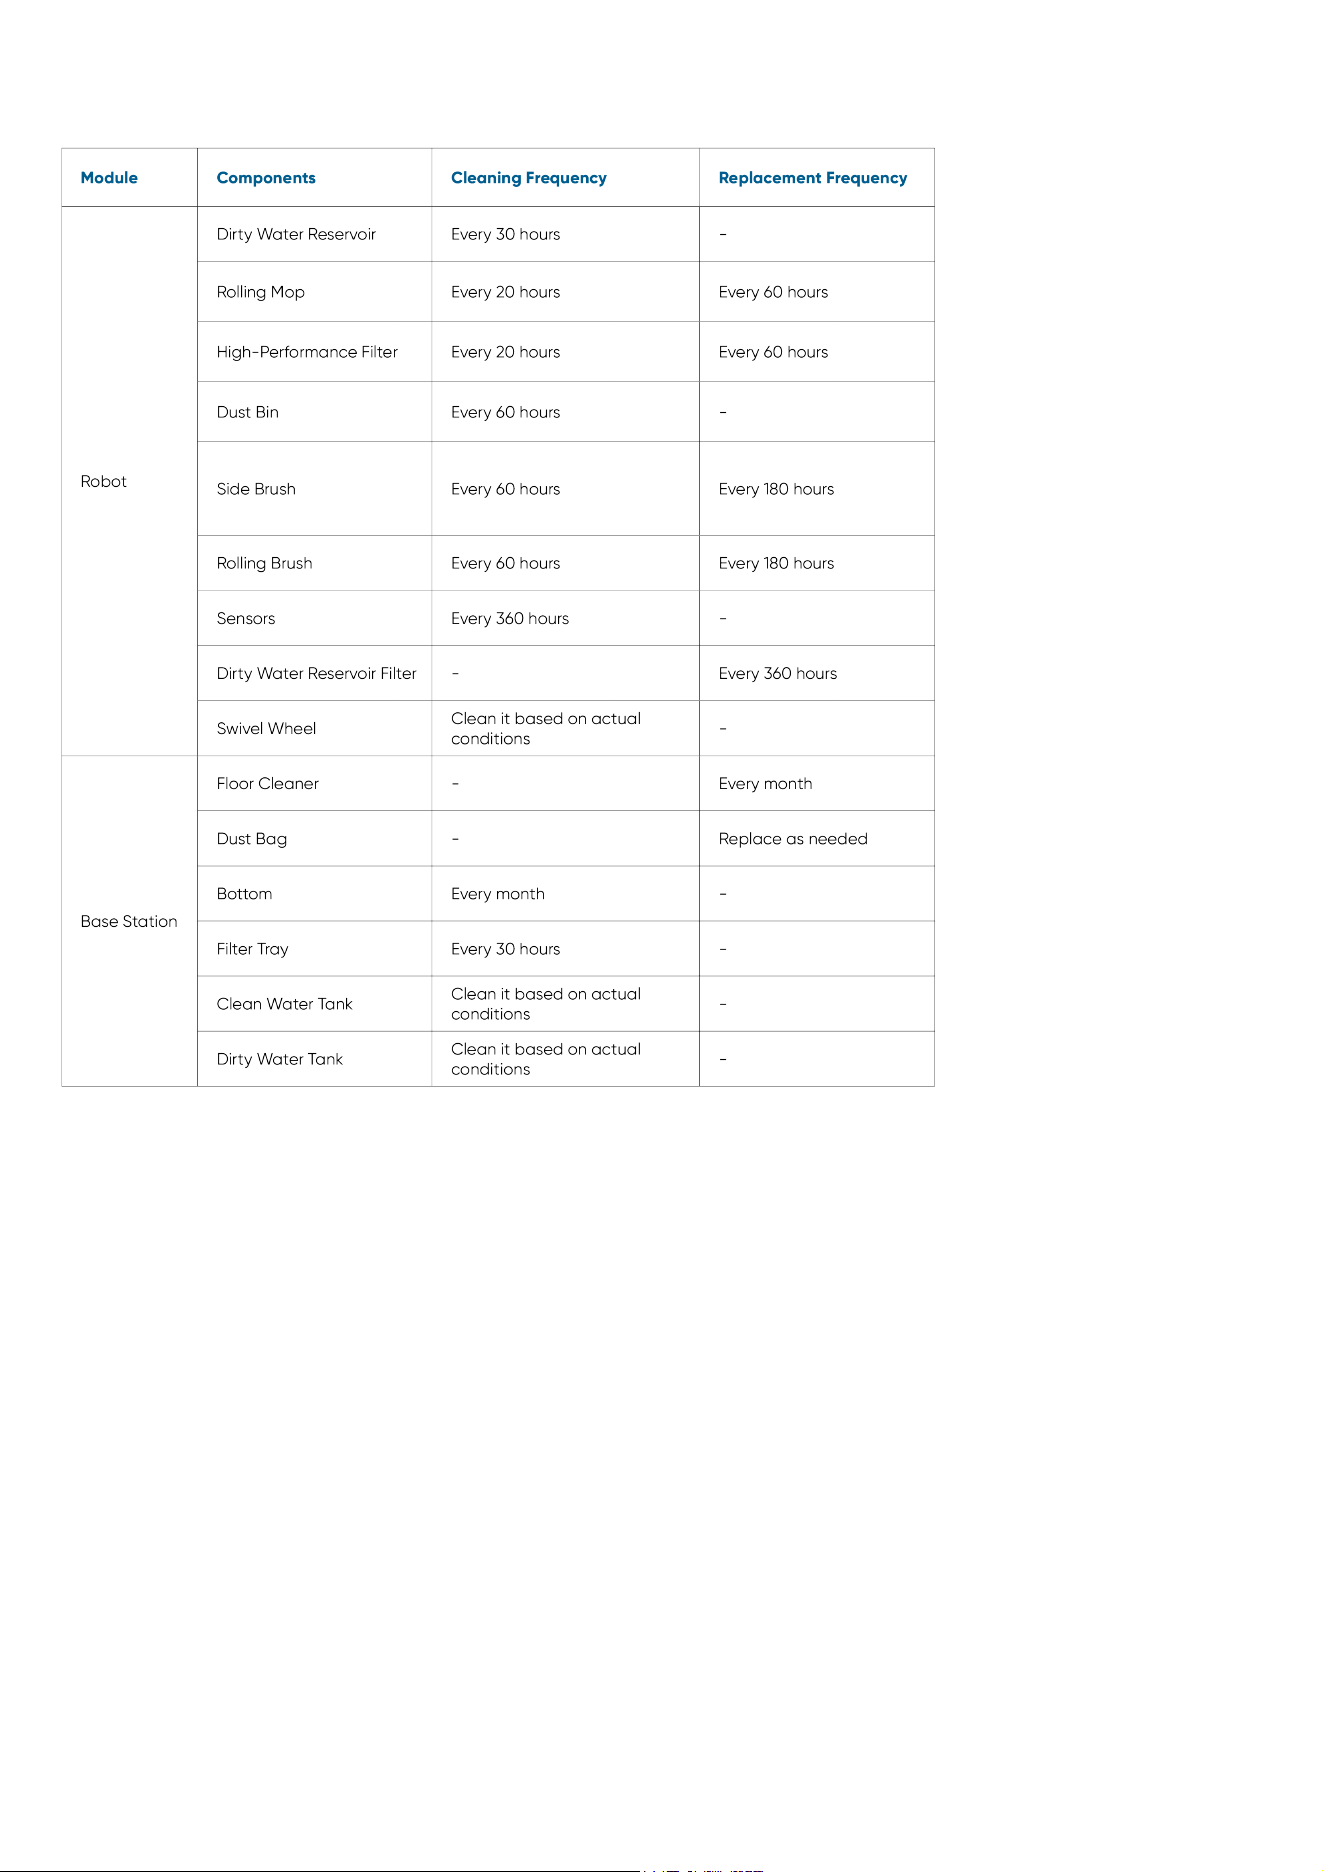
6.1 Maintenance Frequency
To ensure optimal performance of S1, we recommend regular maintenance of its components.
6.2 Clean the Parts
6.2.1 Clean the Dirty Water Reservoir
❶ Remove the robot's magnetic cover. Press the release buttons on both sides of the dirty water reservoir, and pull it out.
❷ Take out the water sink and sink filter.
❸ Use the cleaning tool to scrub the water sink and sink filter clean with running water.
❹ Air dry the water sink and sink filter.
❺ After air drying, reassemble the water sink and sink filter into the dirty water reservoir.
❻ Reinstall the dirty water reservoir into the robot properlly, and place the magnetic cover back.
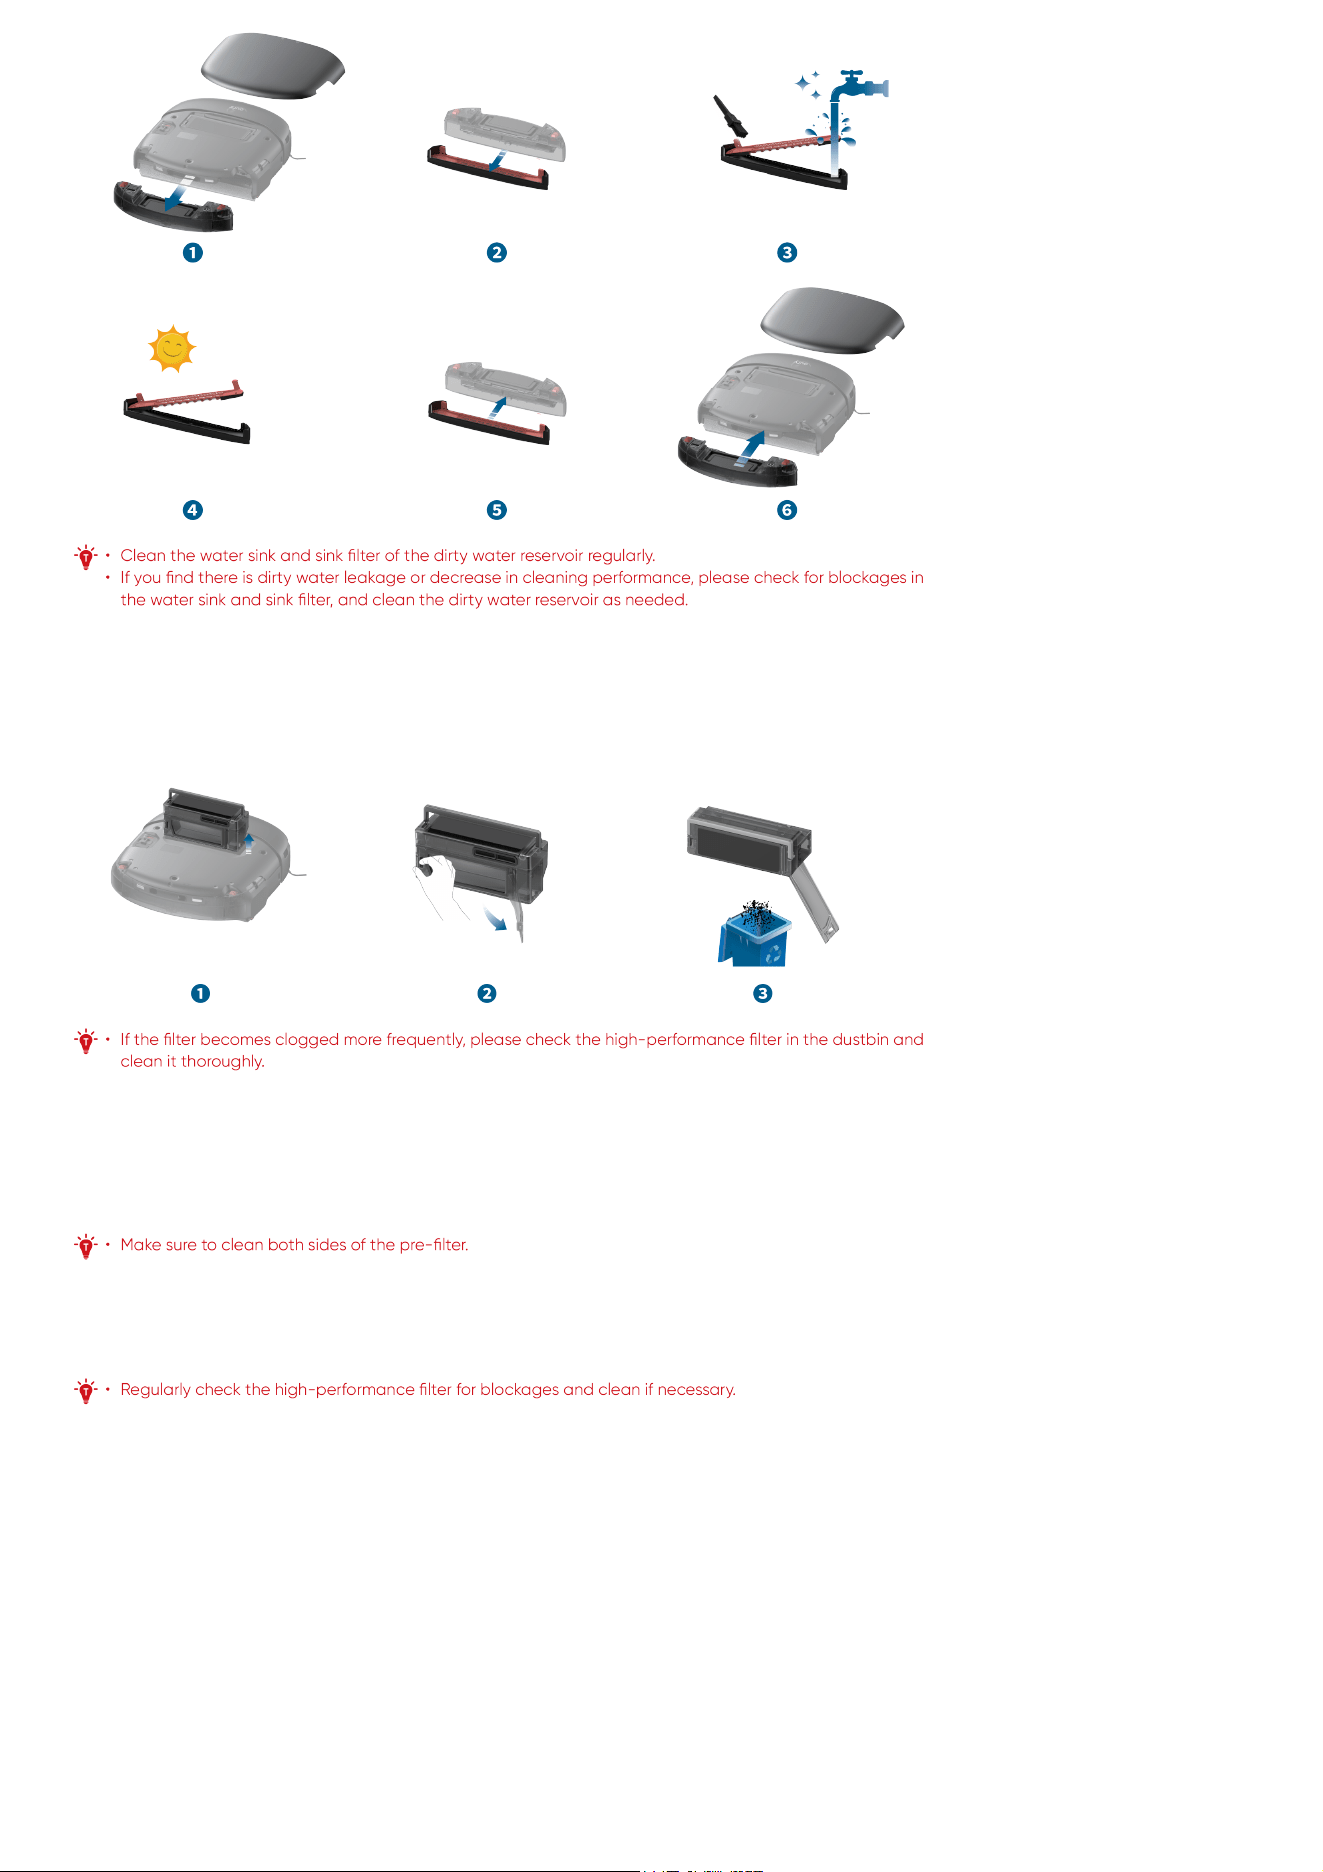
6.2.2 Clean the Dust Bin and Filters
6.2.2.1 Dust Bin
❶ Remove the robot's magnetic cover and lift the handle to take out the dust bin.
❷ Press the release latch to open the back cover.
❸ Empty the dust bin.
6.2.2.2 Filters
❶ Press the release latch to open the top cover of the dust bin.
❷ Take out the high-performance filter.
❸ Use the provided cleaning tool to clean the high-performance filter and the pre-filter. If the high-performance filter cannot be cleaned thoroughly,
replace it with a new one.
❹ After cleaning, air dry the high-performance filter and dust bin completely. Once they are dry, reinstall the filter into the dust bin.
❺ Once they are dry, reinstall the filter into the dust bin.
❻ Close the dust bin's top and back covers, and reinstall the dust bin into the robot.
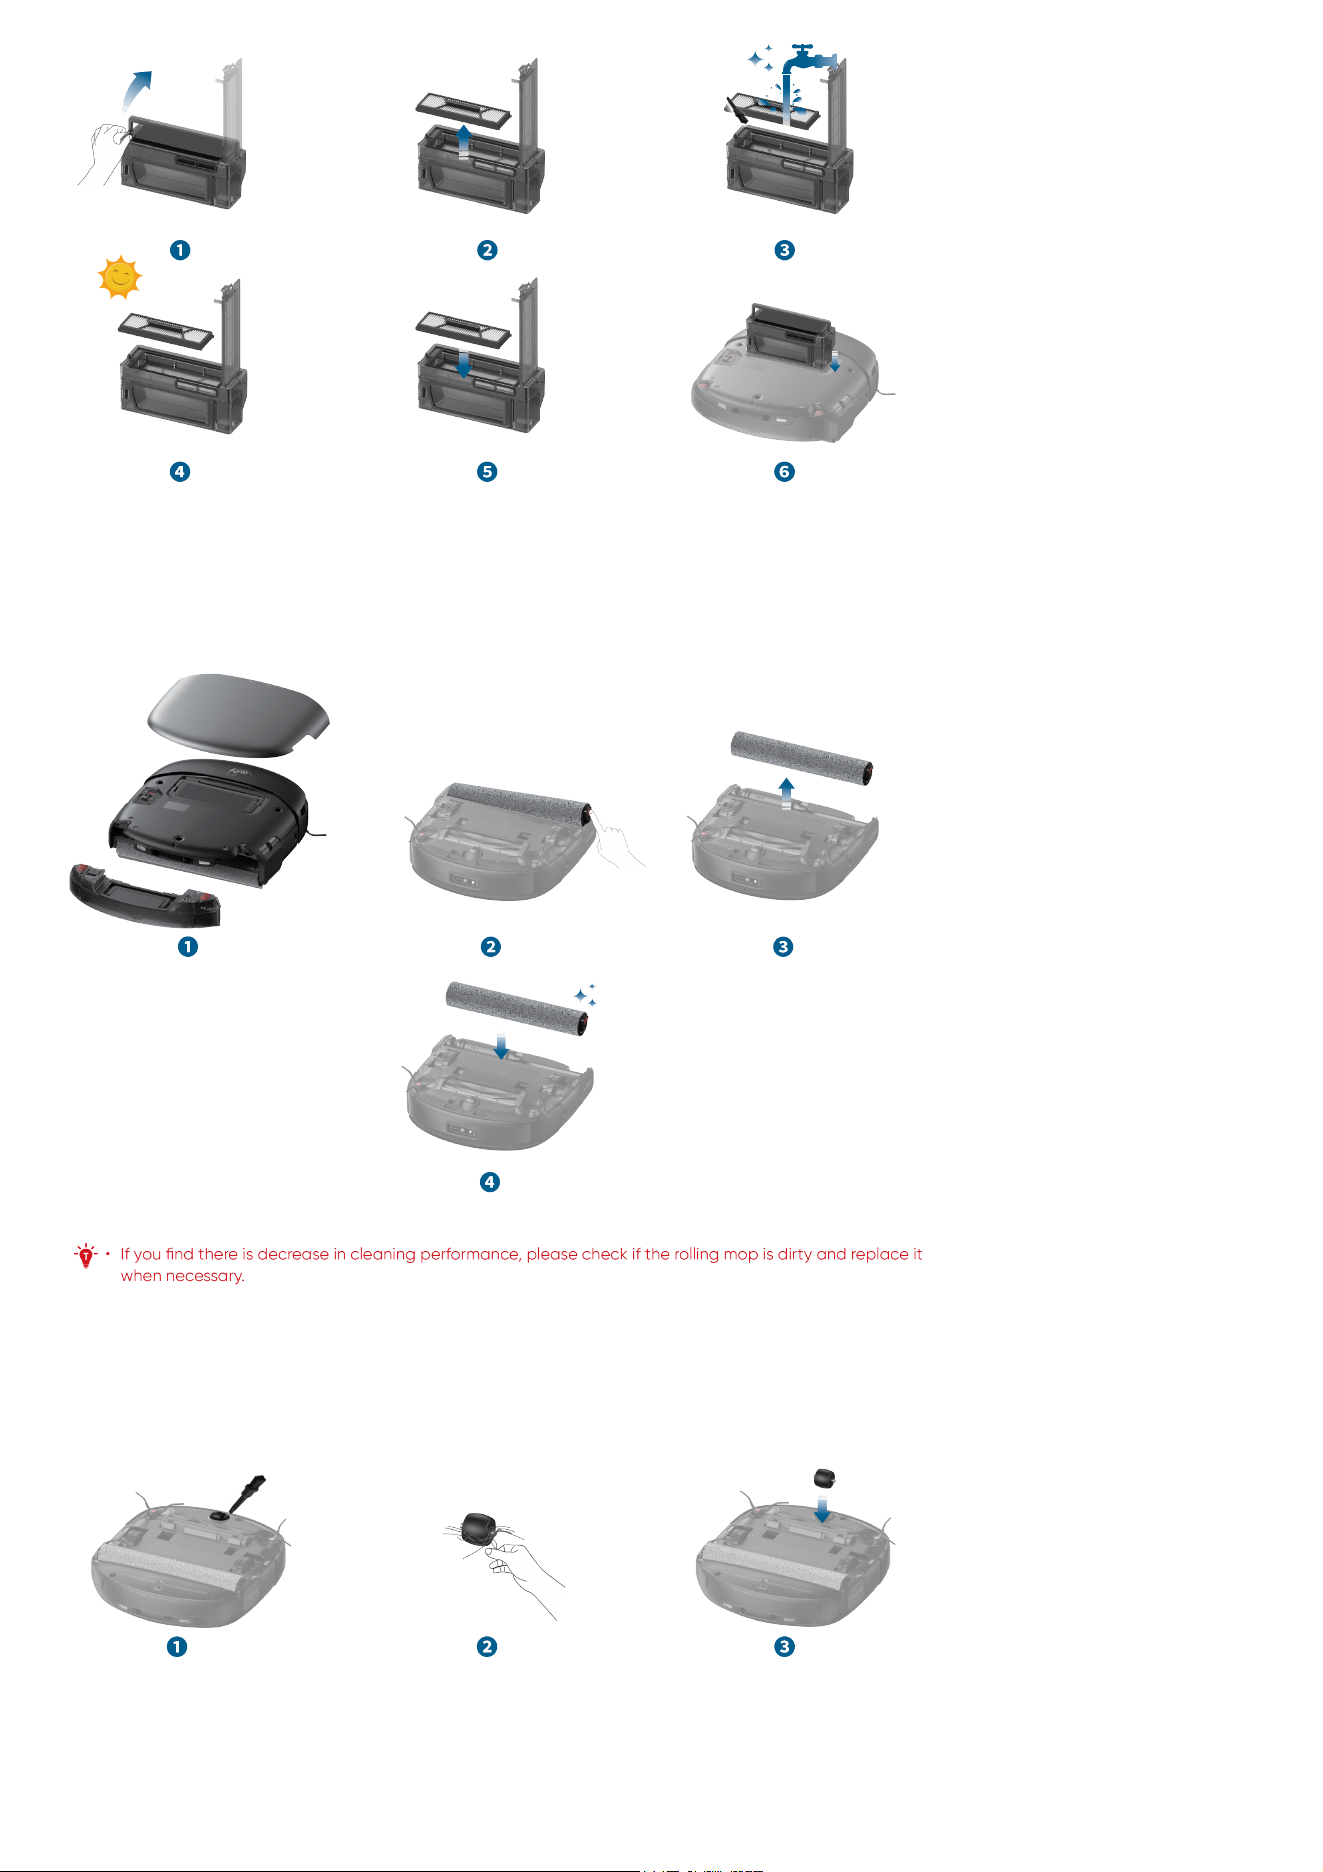
6.2.3 Replace the Rolling Mop
❶ With the robot powered on, remove the magnetic cover and take out the dirty water reservoir, then the rolling mop will automatically descend.
❷ Flip the robot over, press the rolling mop release button.
❸ Remove the rolling mop.
❹ Lift the roller drive motor and insert the new roller into the motor, adjust the motor until the rolling mop is properly in place. Press down on the roller
until you hear a click.
6.2.4 Clean the Swivel Wheel
❶ Use the provided cleaning tool to pry up the swivel wheel.
❷ Clean any hair and debris from its surface and cavity.
❸ Insert the wheel into the installation slot, and press down on the wheel until you hear a click.
6.2.5 Clean the Side Brushes
❶ Grap the side brushes with both hands and pull them out. If the brushes are entangled with hair, clean them manually.
❷ Reinstall the red side brush into the red slot, press it down until you hear a click. Reinstall the grey side brush in the same manner.
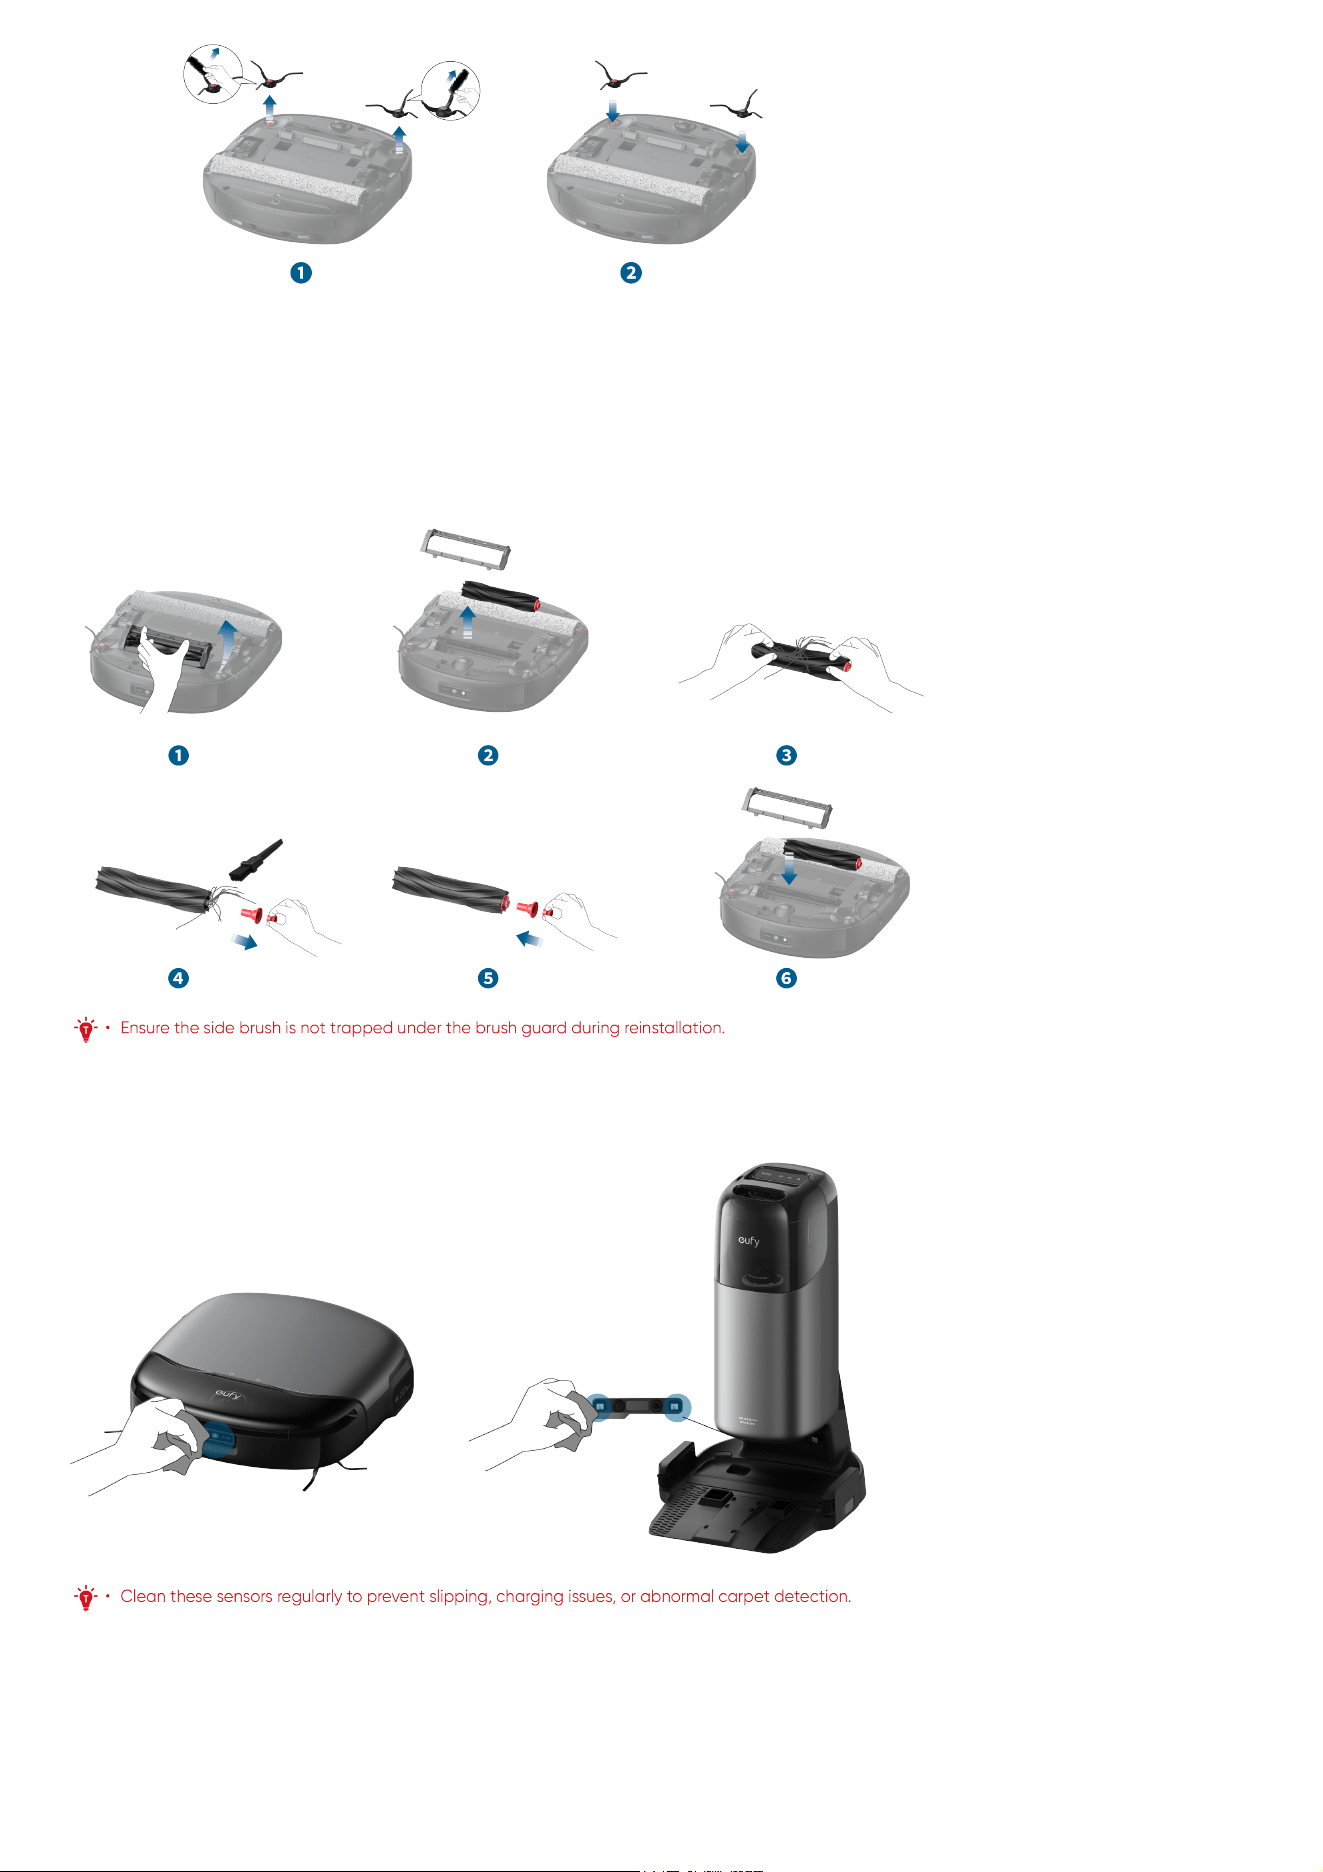
6.2.6 Clean the Rolling Brush
❶ Press the brush guard release button.
❷ Remove the brush guard and take out the rolling brush.
❸ Remove the hair entangled on the rolling brush.
❹ Pull out the red axle of the rolling brush and use the provided cleaning tool to remove the hair from both ends of the rolling brush.
❺ After cleaning, reinsert the red axle.
❻ Reinstall the rolling brush and brush guard.
6.2.7 Clean the Sensors and Charging Contact Pins
Wipe the RGB Camera, wall sensors, charging contact pins, cliff sensors, and carpet detection sensor with a damp cloth.
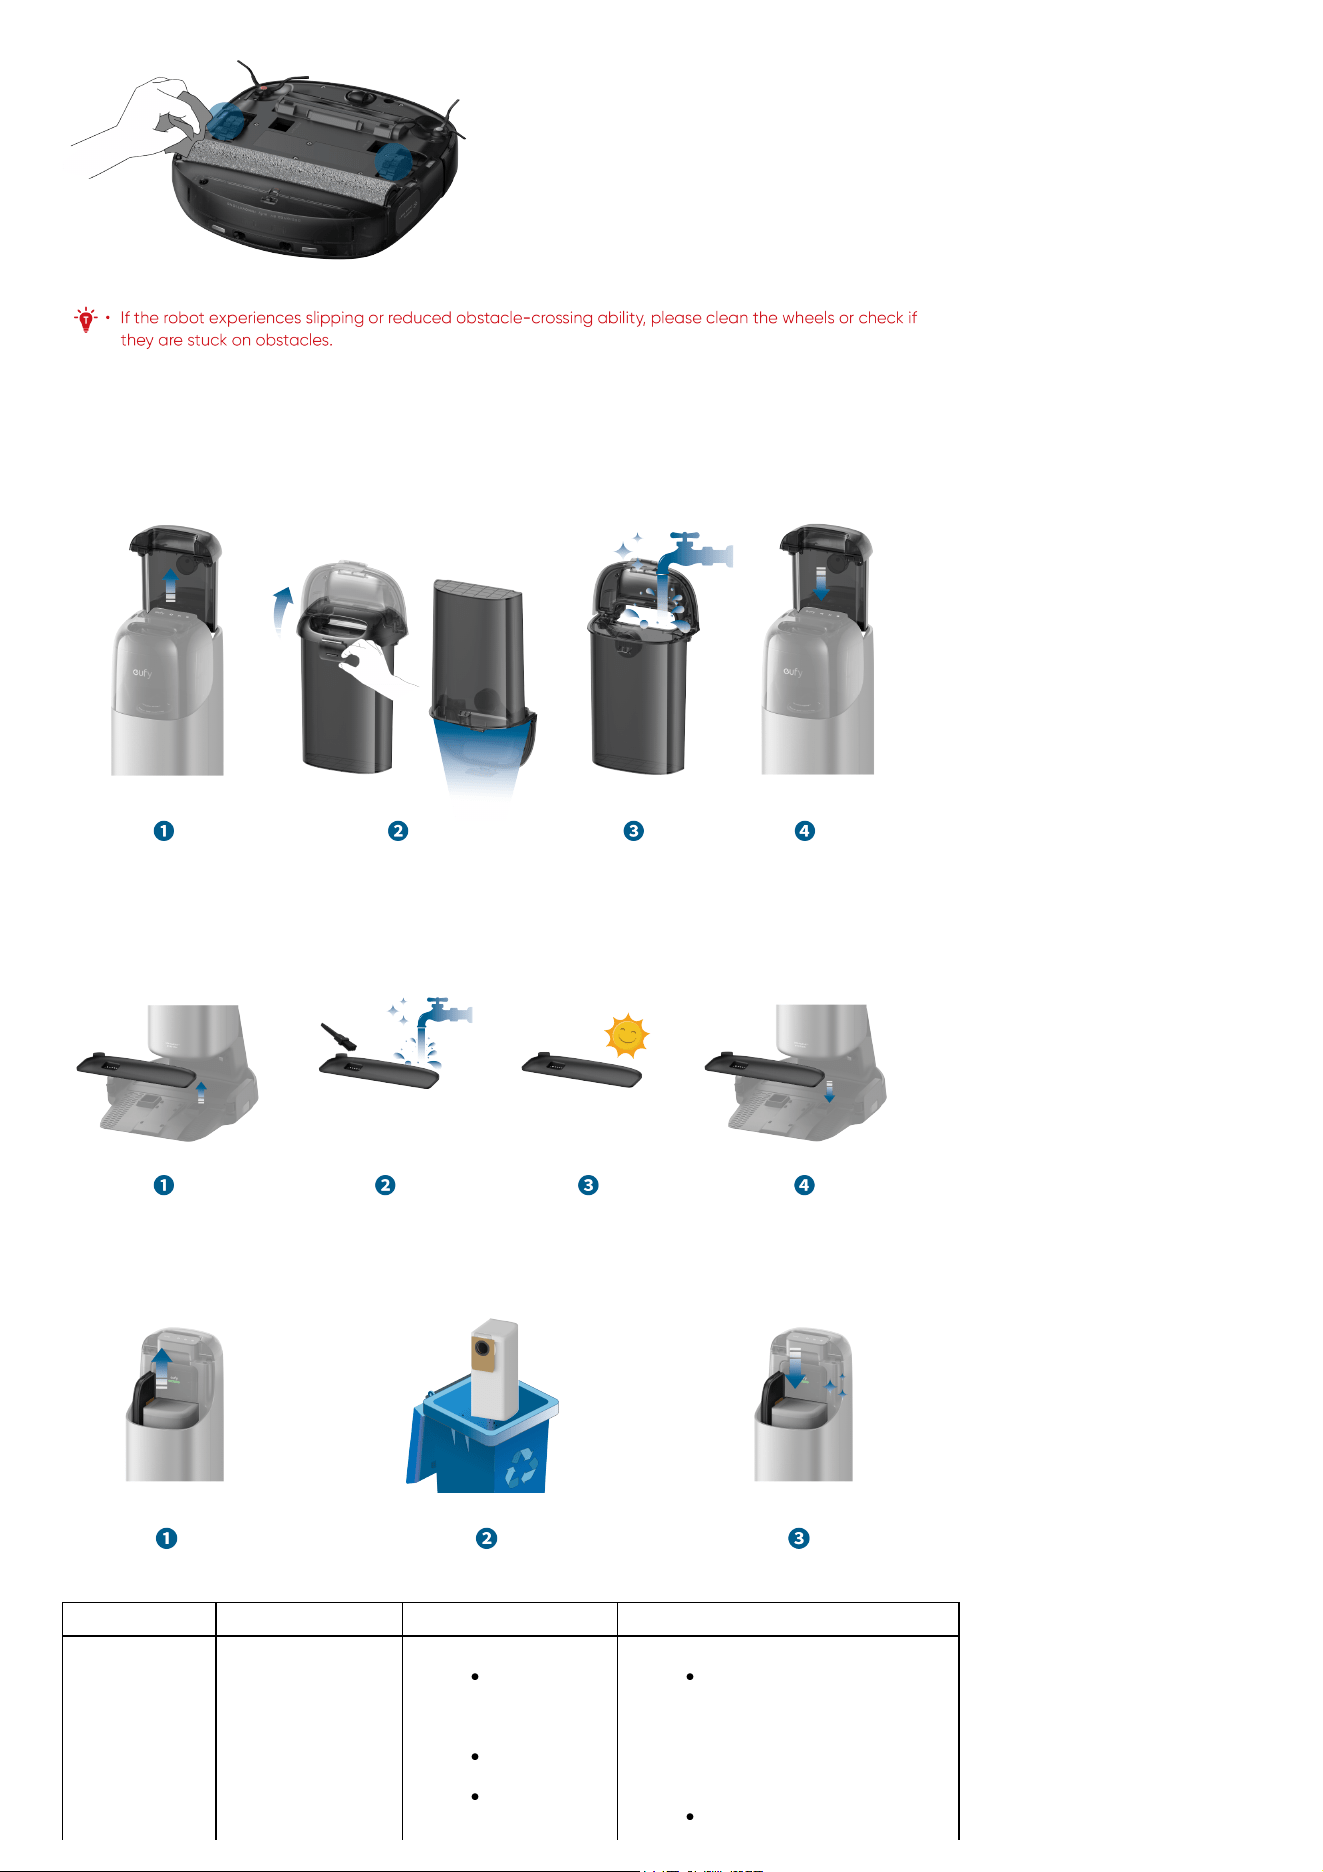
6.2.8 Clean the Wheels
Wipe the dirt off the robot's wheels with a damp cloth.
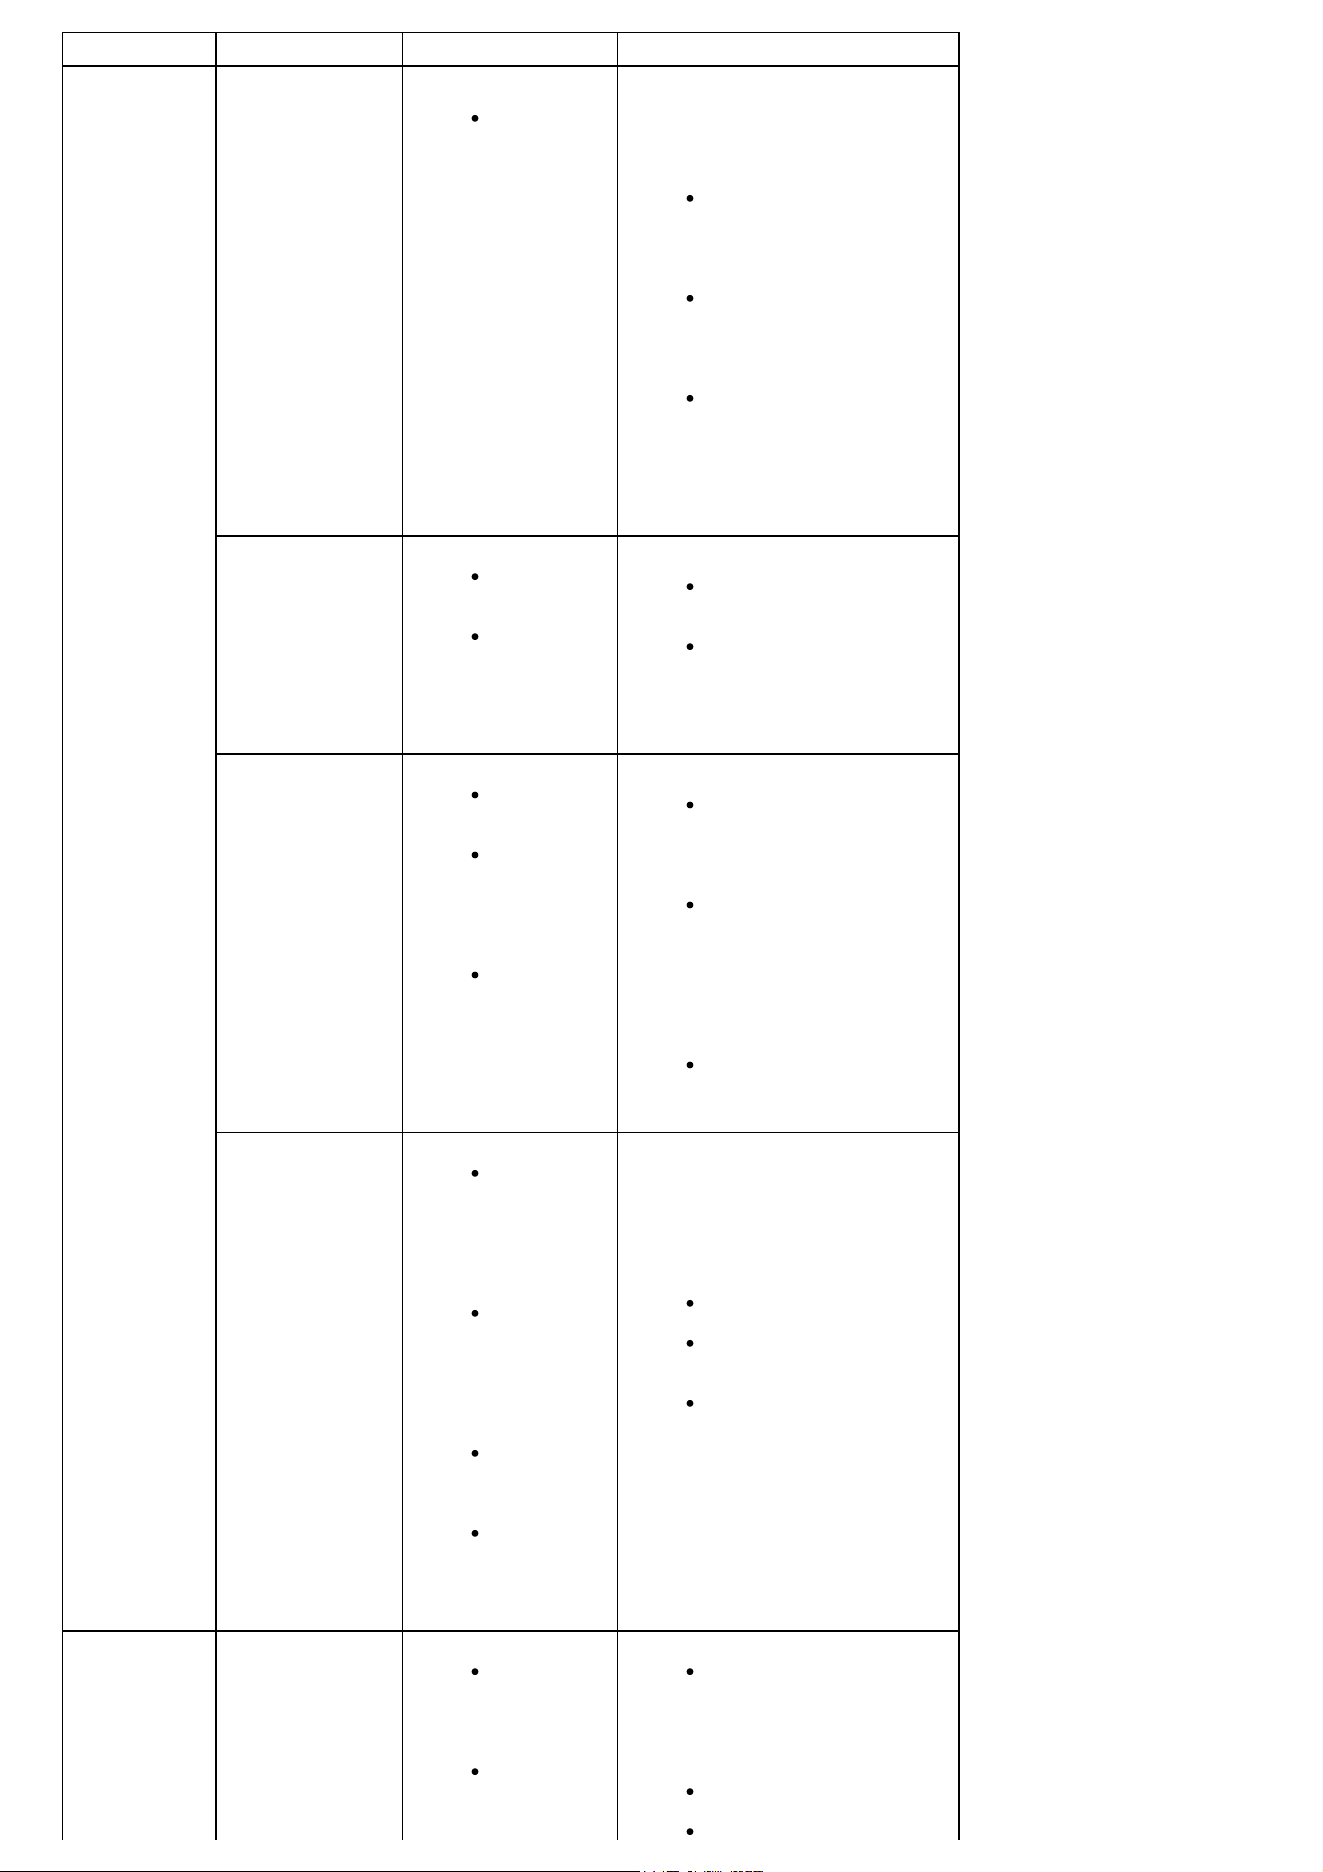
6.2.9 Clean the Dirty Water Tank
❶ Remove the dirty water tank.
❷ Open and empty the dirty water tank.
❸ Rinse the dirty water tank thoroughly with water.
❹ Reinstall the dirty water tank into the station.
6.2.10 Clean the Filter Tray
❶ Take out the filter tray from the base station.
❷ Use the provided cleaning tool to clean the trash from the tray.
❸ Air dry the filter tray.
❹ After drying, place it back into the station.
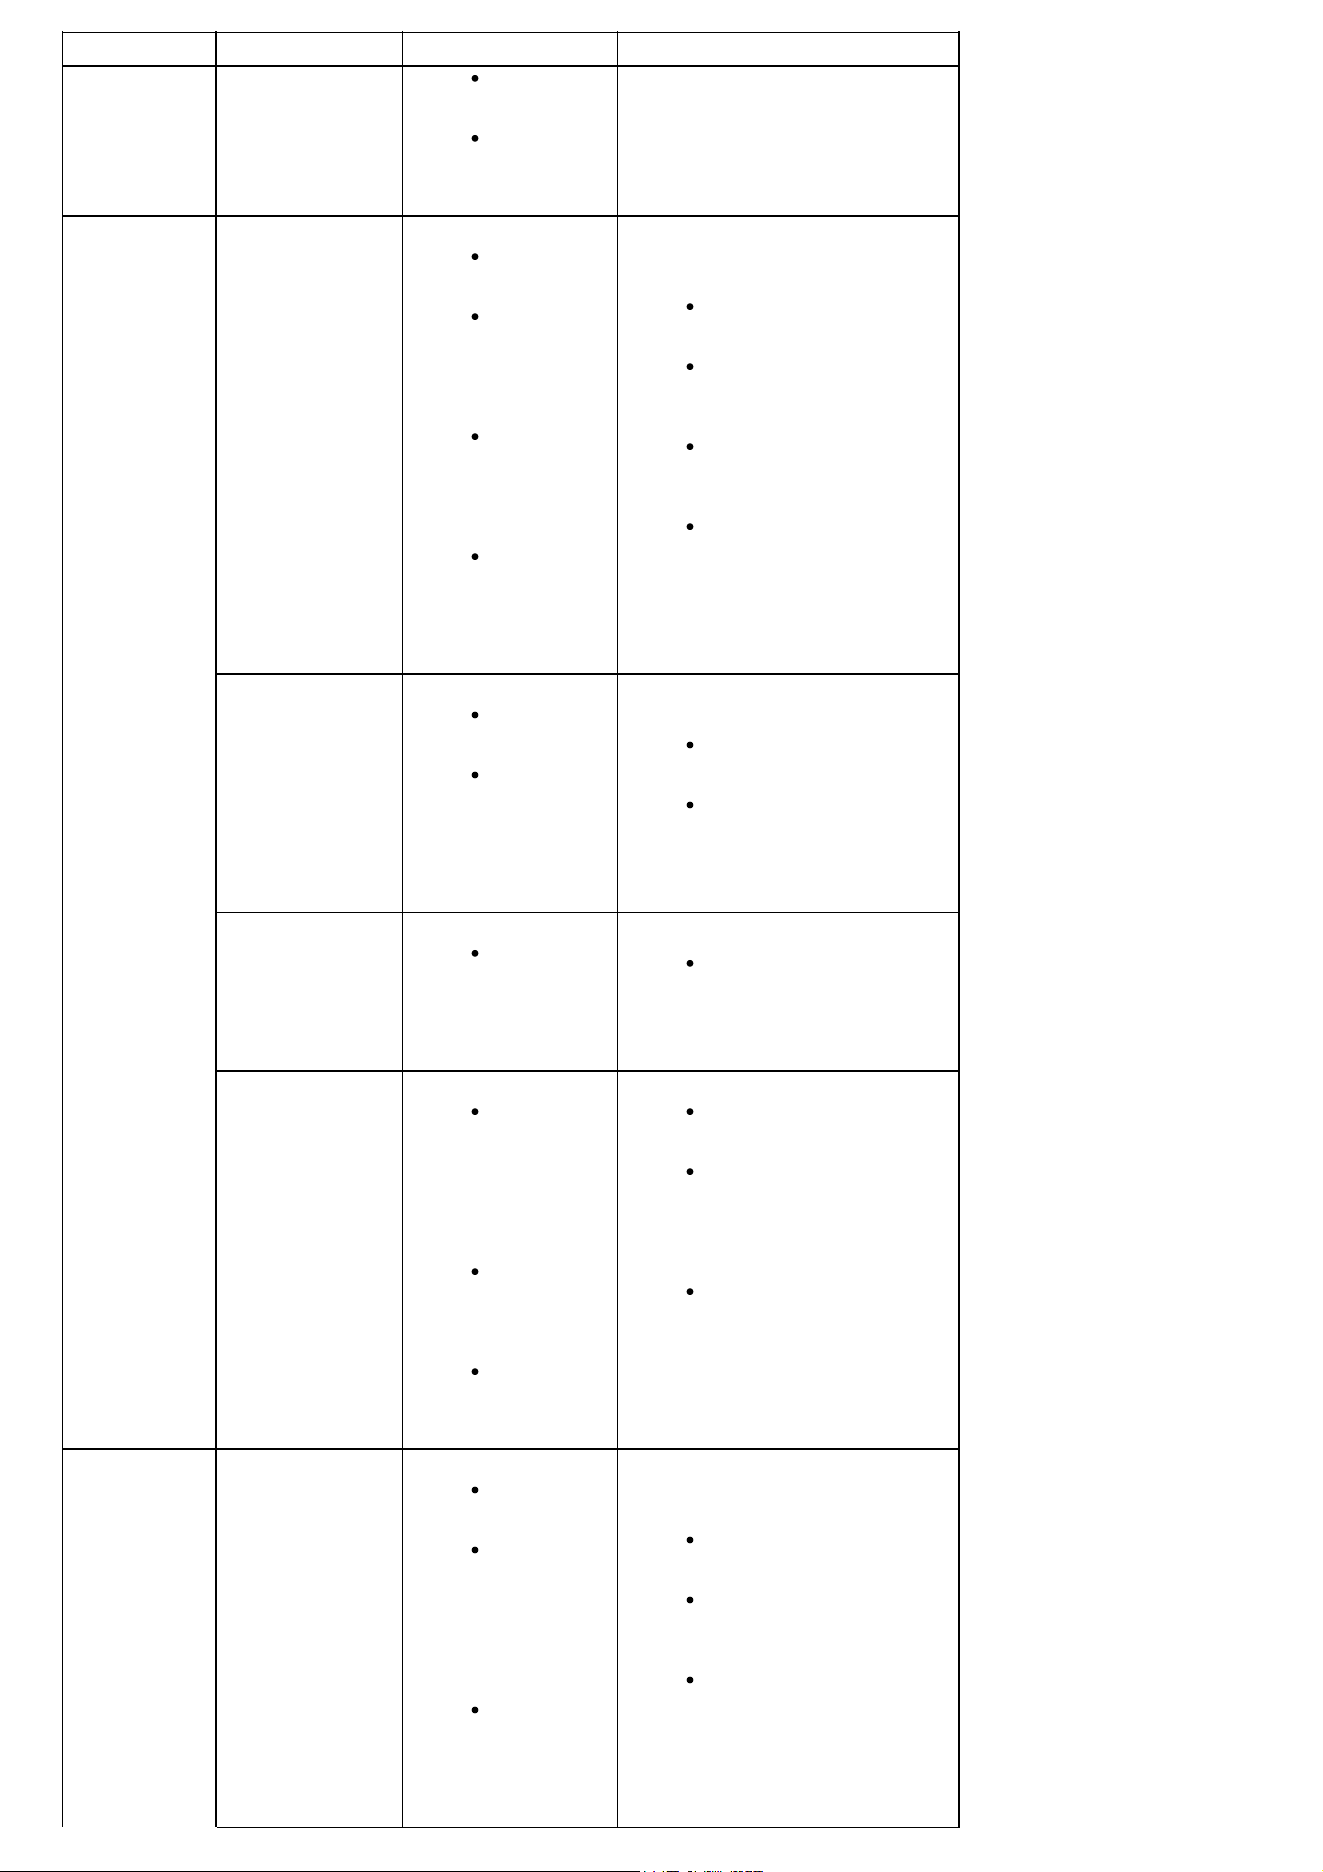
6.2.11 Replace the Dust Bag
❶ Remove the clean water tank, open the dust cover, and pull out the dust bag.
❷ Discard the used dust bag.
❸ Install a new dust bag and make sure it is properly in place, then close the dust cover.
7. FAQs
Module Problems Possible Causes Solutions
App App indicates that
the robot is offline.
Abnormal or
unstable Wi-
Fi
connection.
Robot is
powered off.
Robot
disconnected
Try refreshing the app by
scrolling down the screen. If
the robot remains offline,
remove the magnetic cover
to check the Wi-Fi indicator.
If it's flashing white, please
reset the Wi-Fi connection.
Connect a mobile device to
Module Problems Possible Causes Solutions
from the
station.
Robot not
connected to
network.
the same network as the
robot and open other apps to
check if the network is
stable. If the connection is
poor, switch to a more
reliable network.
Open the robot's magnetic
cover and check if the power
switch is in the "O" position.
If so, switch it to the "I"
position.
Re-seat the robot on its
base station to confirm
proper docking and charging.
Monitor for any offline
notifications.
Restart the robot. Remove
the magnetic cover, toggle
the power switch to the "O"
position, wait for 3 minutes,
and then switch it back to
the "I" position.
Map is lost in the
app.
Poor Wi-Fi
network
conditions.
The "Home
Mapping"
was not
completed
properly.
After restarting the robot, try
remapping to check if the
map loss issue persists.
Ensure that the mapping is
complete and the robot has
prompted the successful
saving of the map.
Firmware update
failed.
Poor Wi-Fi
network
conditions.
Robot is not
in the station
or
disconnected
from the
station.
The firmware
update
process is
stuck, the
app does not
synchronize
the process.
Check if the network is
stable; it is recommended to
switch to a new network
environment and try updating
again.
Check the robot's connection
with the Uniclean™ Station.
Remove the robot, switch the
power button to the "O"
position, wait for 3 minutes,
then turn it on and place it
back on the Uniclean™
Station to upgrade again.
Exit the app and re-enter to
see if it functions normally.
Robot unable to
connect to network.
Incorrect
Wi-Fi
password
entered
during
network
connection.
Robot is
connected to
a 5G
network
instead of a
2.4G
network.
Wi-Fi router
has whitelist
mode
enabled.
Wi-Fi router
encryption is
not set to
WPA2.
Retry with the correct Wi-Fi
password.
Reconnect the device after
disabling the router's
whitelist mode.
Switch the encryption
method to WPA2 through the
router's management
interface.
Robot Robot is stuck and
cannot move.
Robot is
entangled by
power cords
or other
objects.
Rolling brush
or side brush
is obstructed
by debris.
Check if the robot is trapped
or stuck on obstacles, and
inspect if the side brushes,
rolling brush, wheels, or
rolling mop are tangled with
other objects.
Check if the battery level is
too low.
If the problem persists, turn
Module Problems Possible Causes Solutions
Robot's
battery is
too low.
Robot is
stuck by
obstacles.
off the robot, wait for 5
seconds, and then restart it.
Robot
Robot makes
abnormal noise
during operation.
The swivel
wheel is
dirty.
Robot's dust
bin filter and
high-
performance
filter are
blocked.
The rolling
brush is
entangled
with debris,
causing
deformation.
The brush
guard's strip
is deformed
or severely
worn.
After removing the swivel
wheel, check if the wheel and
axle are dirty.
Remove the dust bin and
check if the dust bin, filter,
and the high-performance
filter are blocked.
Inspect the rolling brush for
any entanglement and
deformation caused by other
objects.
Check the brush guard strip
and the installation slot of
the rolling brush for any
deformation and wear.
Robot has no
suction or reduced
suction.
Robot's dust
bin is
clogged.
Robot's dust
bin filter and
high-
performance
filter are
blocked.
Remove the dust bin and
check if it is full or the
opening is obstructed.
Check if the dust bin filter
and high-performance filter
are blocked.
Robot reports
"Abnormal clean
water level".
There are
bubbles in
the Robot's
clean water
tank.
After flipping the robot
vertically for 360 degrees,
place it back on the base
station.
Robot cannot be
charged.
The charging
contact pins
between the
robot and
the station
are not
properly
aligned.
The charging
contact pins
on the robot
and station
are dirty.
The station
is not
powered on.
Ensure the charging pins on
the robot and the base
station are properly aligned.
Remove the robot and clean
the charging pins on both the
robot and the base station
with an alcohol wipe, then
place the robot back into the
station.
Make sure the Touch panel
of the station and the LED
ring in the clean water tank
light up normally; if it does
not, this indicates that the
power cord is not properly
plugged in.
Robot
Robot's cleaning
path is
disorganized, and
the cleaning
efficiency is low,
etc.
Swivel wheel
slipping due
to dirt.
There are
many
obstacles in
the robot's
cleaning
area such as
power cords
and slippers.
The robot's
radar
window and
wall sensors
are dirty.
Remove the swivel wheel,
clean it, and then reinstall it
onto the robot.
Before the robot starts
cleaning, please try to tidy up
the scattered items on the
floor.
Clean the dust on the radar
window bracket and wipe the
dirt off the surface of the
wall sensors.
Module Problems Possible Causes Solutions
Robot keeps moving
back and forth in
one place.
Bumper
sensor is not
rebounding
properly.
Tug gently forward and
backward to even out the
gap between the bumper and
the robot's head.
Robot leaks clean
water during
operation.
The robot
has operated
on a floor
with
standing
water.
The robot's
dirty water
reservoir is
not properly
installed.
There is
water at the
bottom of
the robot's
dirty water
reservoir.
The robot is
crossing a
threshold or
a door sill.
Ensure the robot's dirty
water reservoir is properly
installed, make sure it's
secure in place.
Clean any water from the
bottom of the dirty water
reservoir, and then check
again for any leakage during
operation.
It is normal for the robot to
drip clean water when
crossing thresholds or door
sills.
Robot leaks dirty
water during
operation.
Robot's
water sink is
blocked,
causing dirty
water
leakage.
Robot's dirty
water
reservoir is
not properly
installed.
There is
residual
water at the
bottom of
the robot.
There is
water within
the dust bin.
Remove the robot's dirty
water reservoir and use a
cleaning brush to clean the
water sink, sink filter, and the
bottom of the dirty water
reservoir.
Check if the robot's dirty
water reservoir is properly
installed, make sure it's
secure in place.
If the robot has mopped over
a wet surface, water may
have entered the dust bin.
Please wipe the water inside
the dust bin.
Robot drops debris
during operation.
There is
debris at the
bottom of
the robot.
Robot's
rolling mop
is dirty.
Clean the debris at the
bottom of the robot.
Clean the rolling mop and
debris of its cavity.
Robot
Robot unable to
move, spining in one
place.
Wheels
entangled
with debris
or hair.
The spring
of the
wheels
malfunctions.
Clean any foreign objects or
hair wrapped around the
wheels.
Disassemble the wheels to
check if the spring is secure
or broken. If broken, please
contact customer service for
repair.
Robot falls from
steps or drops over
the height of over
5cm.
Anti-drop
sensors are
dirty.
Clean the Anti-drop sensors.
Unpleasant odor
during robot's
operation.
There is
blockage in
the water
sink.
The rolling
mop is not
dried.
Remove the dirty water tank,
and use the provided
cleaning tool to clean the
scraper and filter.
Remove the rolling mop,
soak it in hot water, then
reattach it to the robot.
Module Problems Possible Causes Solutions
The high-
performance
filter in the
dustbin is
clogged,
causing dust
accumulation
and
unpleasant
odors.
Activate the robot's mop
wash. After cleaning, dry the
mop before next-time use.
Follow the instructions in the
APP's accessory service for
the high-performance filter
to clean the dustbin and
filter. Make they are
completely dry before next
use.
Uniclean™
Station
Dust bag leakage
from the station.
The dust bag
is not
properly in
place.
The dust bag
is full.
Check if the dust bag is
properly in place.
Remove any debris from the
dust bag installation slot,
then replace the dust bag.
Robot does not
enable auto dust
collection when it
has returned to the
base station.
The cleaning
area does
not exceed
the pre-set
automatic
dust
collection
area, or the
auto empty
feature is
not enabled.
The dust bag
is not
installed.
Check if the auto empty
feature is enabled and check
if the cleaned area meets the
pre-set dust collection area
requirement.
Ensure the dust bag is
properly installed.
Robot reports "Dirty
water tank is full".
Check if the
dirty water
tank at the
base station
is full or not
properly
installed.
The filter of
the tray is
clogged.
The robot's
water sink is
clogged.
Check if the dirty water tank
is full, and ensure the lid is
properly secured before
reinstalling the dirty water
tank.
Remove the tray and clean it
thoroughly.
Remove the robot's dirty
water reservoir, detach the
water sink and sink filter, and
clean them thoroughly.
If the problem persists after you've tried the recommended solutions, please contact our customer service staff.
8. Specs
Model: T2071
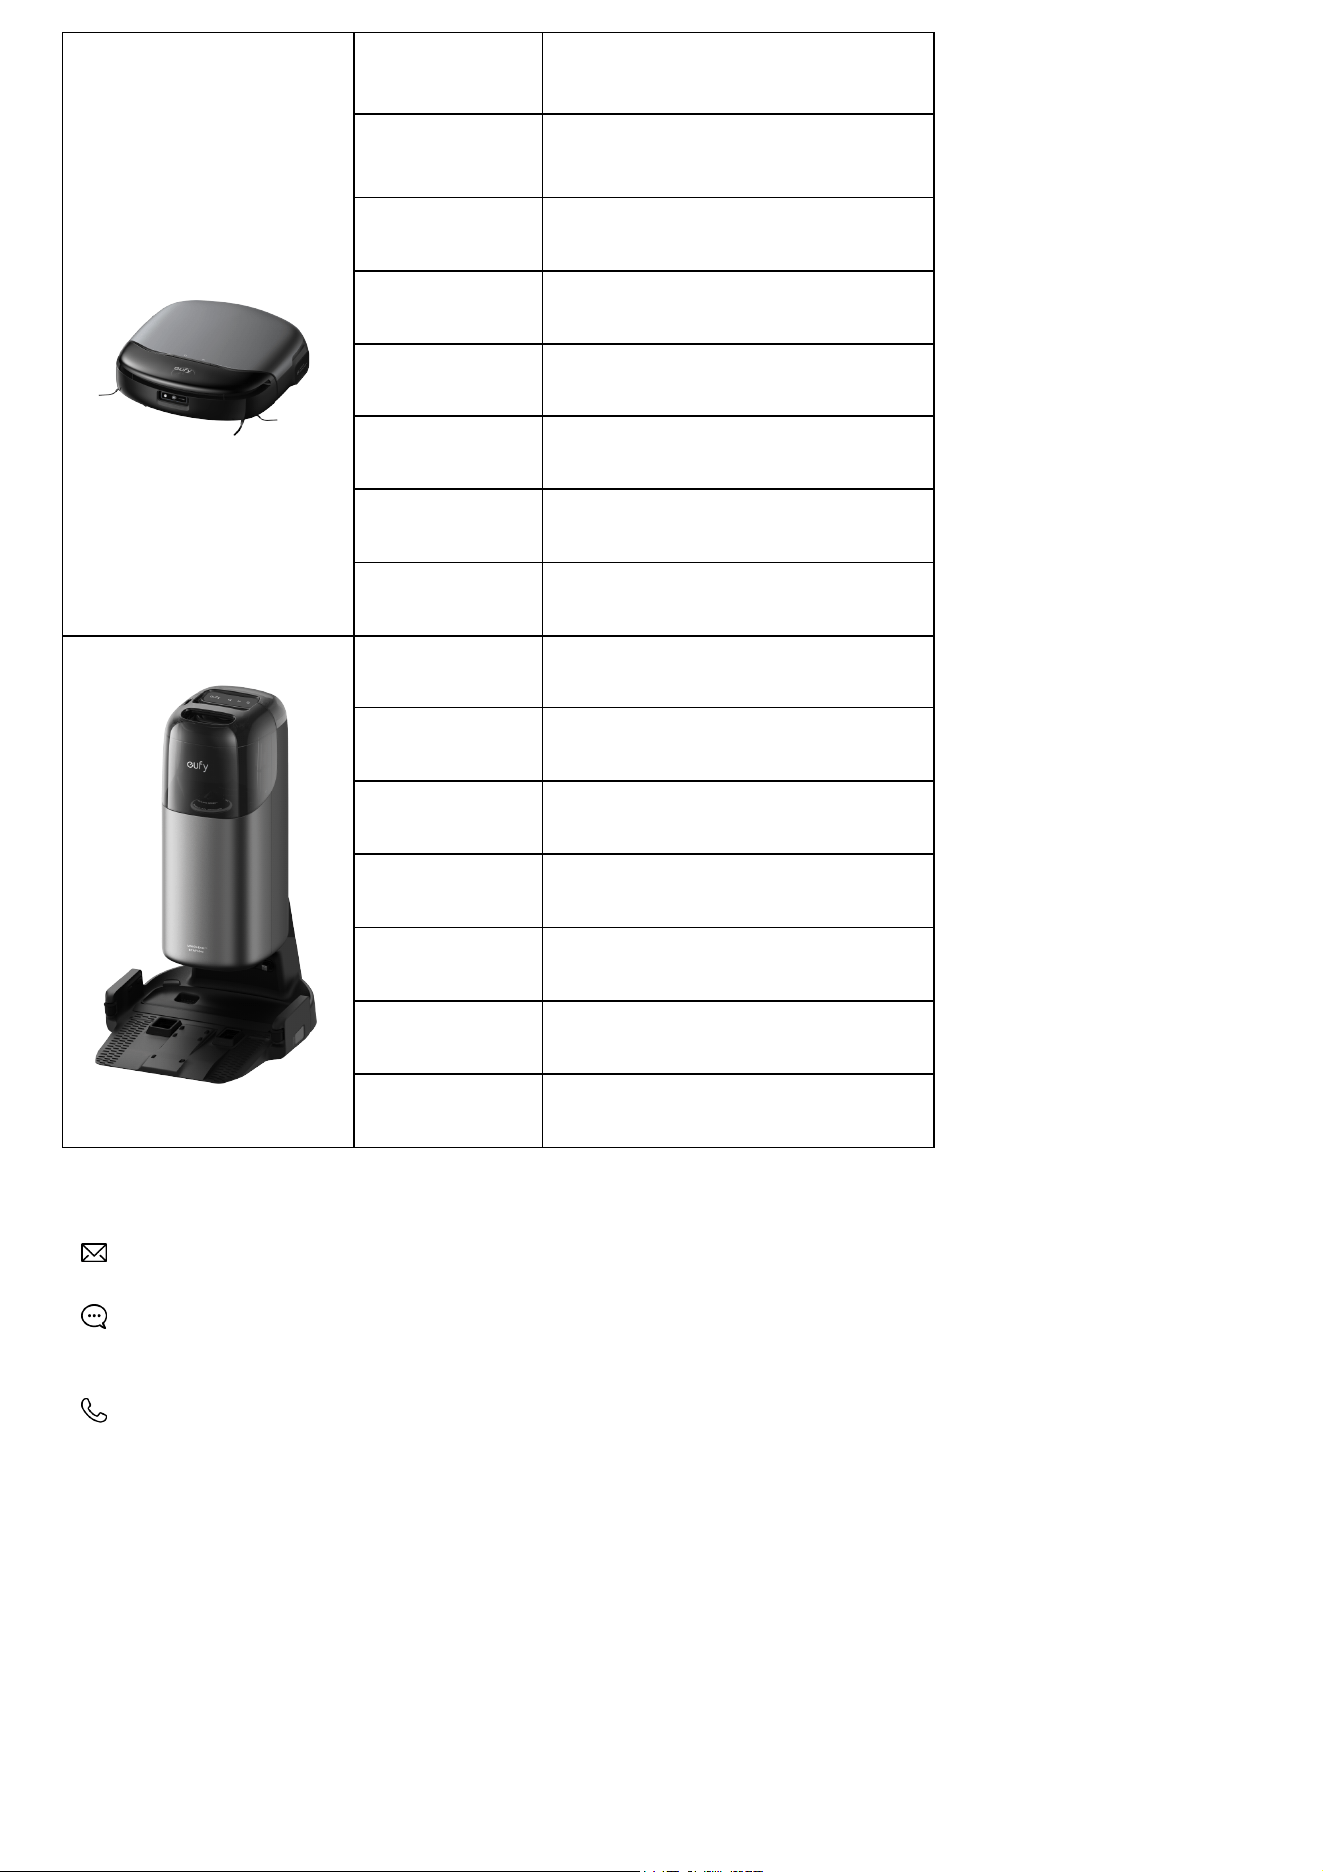
Dimensions 347*325*96mm
Weight 5.27kg
Battery 4600mAh,21.6v
Input Power 25V ⎓ 1.5A
Rated Power
Consumption
Max 61.7W
Cleaning Time
Vacuum-Only Mode: Up to 277 minutes
Vacuum and Mop Mode: Up to 184 minutes
Charging Time 3.6h (15%-100%)
Charging
Temperature
5-40℃
Dimensions 467*383*670mm
Weight 9.08kg
Rated Input 100~240V
Rated Output 25V ⎓ 1.5A
Clean Water Tank
Capacity
3.0L
Dirty Water Tank
Capacity
2.0L
Dust Bag Capacity 2.5L
9. Customer Service
Contact Us:
www.eufy.com
(US/CA) +1 (800)994 3056
(UK) +44 (0) 1604 936 200
(DE) +49 (0) 69 9579 7960
(JP) +81 03 4455 7823
(CN) +86 400 0550 036
For video tutorials, FAQs, warranty policies, and more information, please visit: https://support.eufy.com/
Hereby, Anker Innovations Limited declares that this device is in compliance with The Product Security and Telecommunications Infrastructure (Security
Requirements for Relevant Connectable Products) Regulations 2023. For the Statement of Compliance, visit the website: https://www.eufy.com/uk/psti-
related.