Loading ...
Loading ...
Loading ...

5
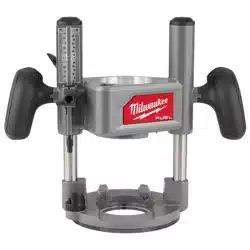
Accessory Plunge Base
1. Open the locking lever (1).
2
1
2. Insert the console (2)
into the base.
3. Close the locking lever.
4. To remove the base,
reverse the procedure.
Collets
The collet must be attached to the collet nut before
it is put into the collet shaft. Be sure that the size of
the collet matches the size of the bit shank being
used. If the wrong size bit shank is used, the collet
may break. For attaching or removing the collet to
the collet nut, see "Collet Assembly".
Changing Collet Nuts
The router can be tted with either a 1/4" or 1/2" collet
nut for dierent applications.
1. Remove battery pack.
2. Remove the console from the base.
3. Place the console upside down on a workbench.
4. Press and hold the spindle lock and use the 1-1/8"
wrench to loosen the collet nut counterclockwise.
5. Remove the collet nut.
6. Thread the new collet nut (either 1/4" or 1/2") onto
the spindle.
7. Hand-tighten the collet nut.
8. Press and hold the spindle lock and use the 1-1/8"
wrench to securely tighten the collet nut clockwise
(or use both 1-1/8" wrenches to tighten the collet
nut securely).
Installing/Removing Bits
WARNING
Never use bits larger than the
smallest of the openings in the
base or dust shroud. The use of larger bits can
result in loss of control and possible serious
personal injury.
Do not tighten the collet nut without inserting the
bit. The collet may break.
Never touch the bit during or immediately after
use. After use, the bit, collet, and collet nut may
be hot enough to burn bare skin.
1. Remove battery pack.
2. Remove the console from the base.
3. Place the console upside down on a workbench.
4. Press and hold the spindle lock and use the 1-1/8"
wrench to loosen the collet nut counterclockwise
5. Insert the bit shank into the collet as far as it will go.
6. Back the bit shank out slightly to avoid bottoming
out.
7. Be sure there is a
Minimum
1/16"
Bit
shank
Collet
Collet nut
minimum of 1/16"
between the bot-
tom of the collet
assembly and the
radius to the cut-
ting portion of the
bit.
8. Hand-tighten the collet nut.
9. Press and hold the spindle lock and use the 1-1/8"
wrench to securely tighten the collet nut clockwise.
WARNING
If the collet nut is not tightened
securely, the bit may come out
during use, causing serious personal injury.
During use, always keep the vacuum hose clear
of the path of the bit. If a rotating router bit con-
tacts the hose, the hose will break and ying
debris may cause injury.
Installing a Dust Shroud
WARNING
To reduce the risk of injury, do not
use the dust shroud when plunge
cutting if the bit is larger than the port opening
(1-3/8"). If a rotating router bit contacts the dust
shroud, the adapter will break and ying debris
may cause injury.
1. Remove the console and thumb screws from the
base.
2. Set the dust shroud onto the base.
3. Insert the U-rod into the base holes.
4. Tighten the thumb screws.
Thumb screws
U-rod
5. Connect a vacuum hose to the port and use with
an OSHA compliant dust extraction solution.
Installing the Edge Guide
1. Assemble the edge guide, as shown.
Loading ...
Loading ...
Loading ...