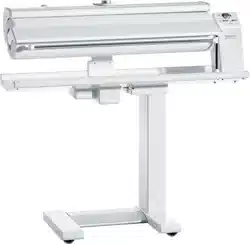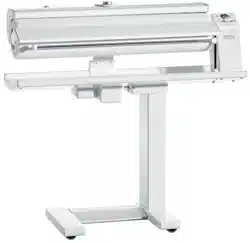
Operating Instructions
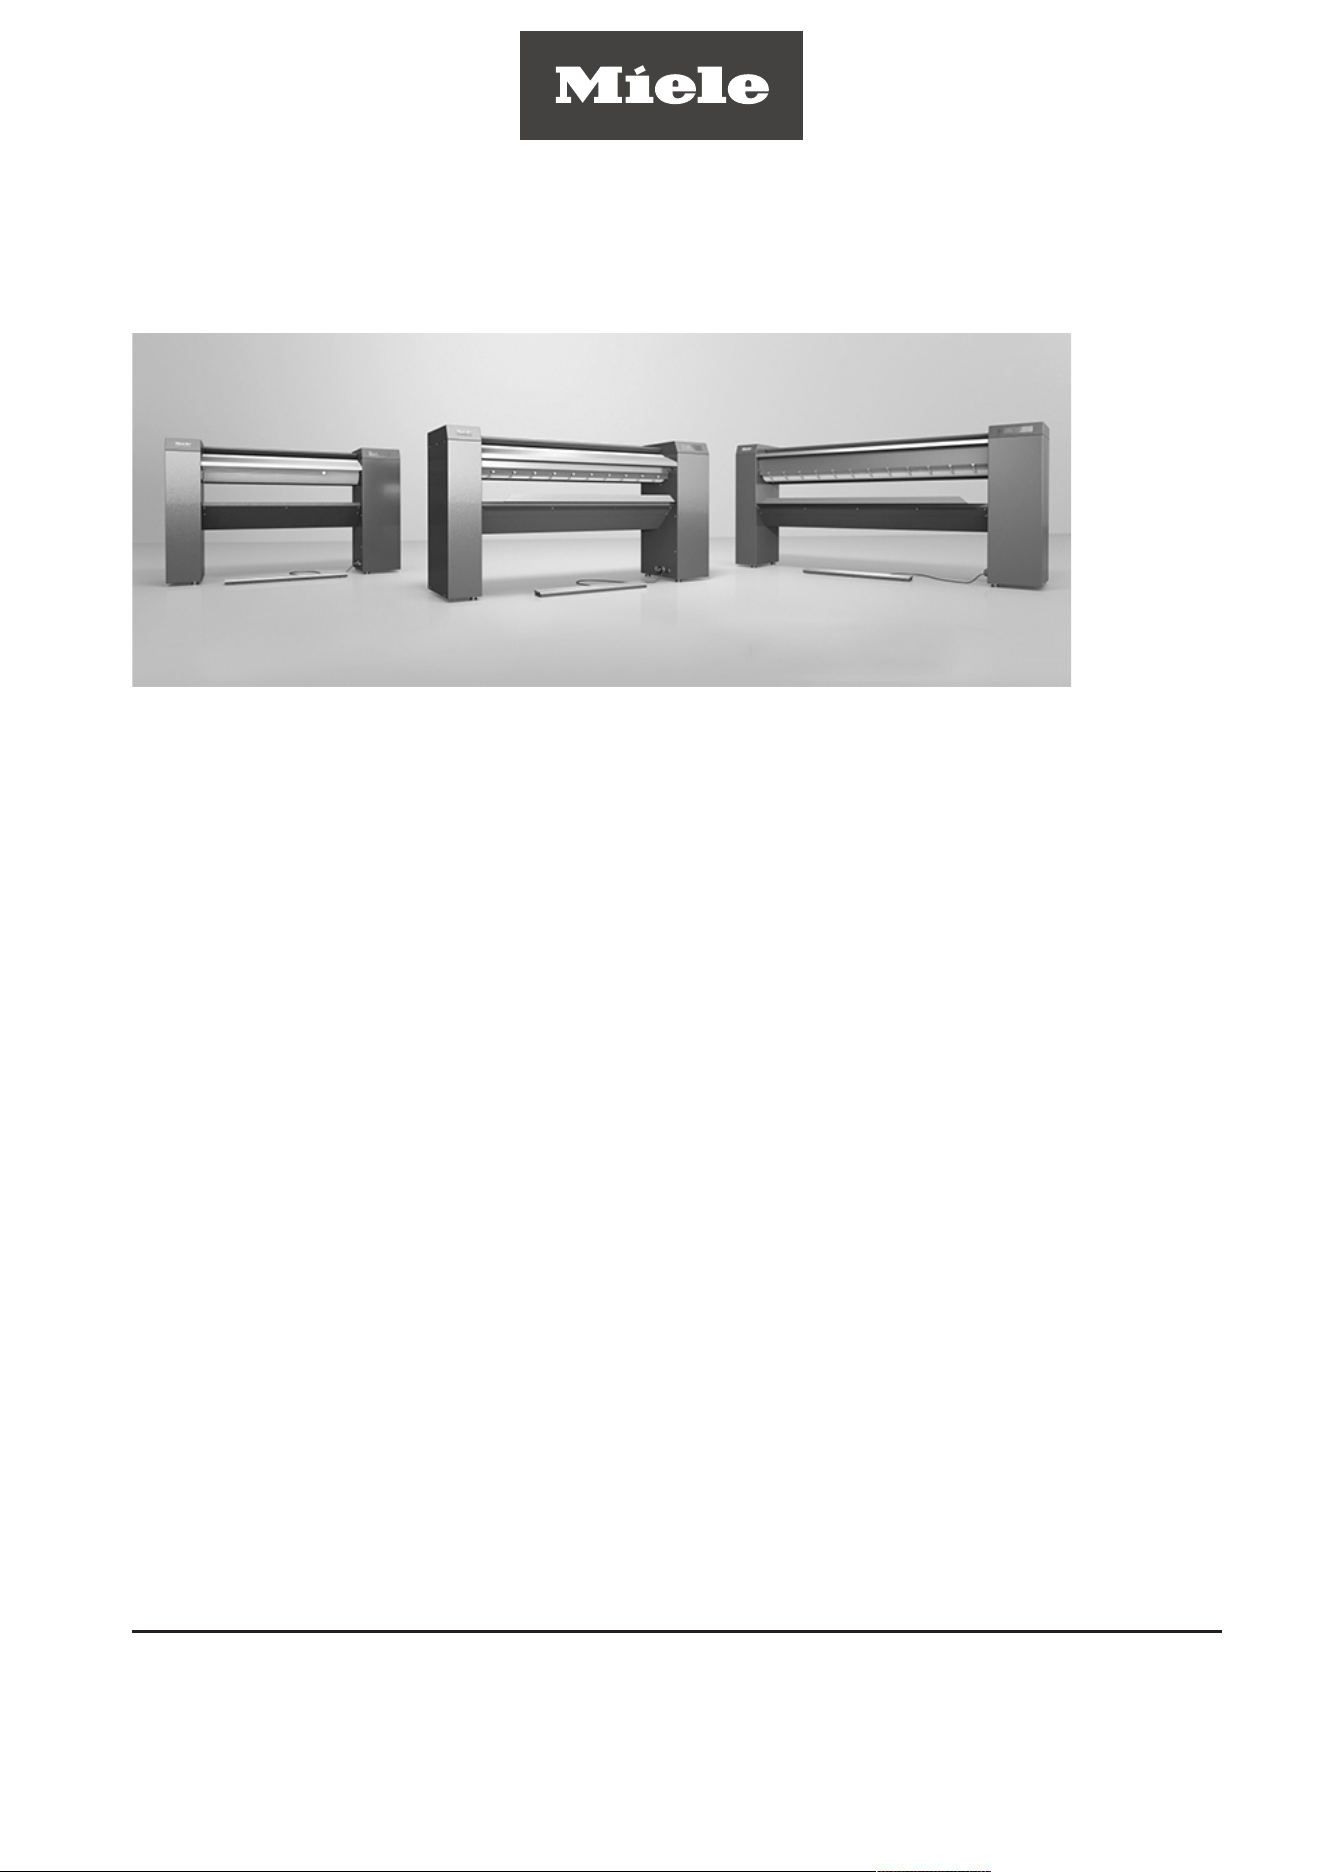
Commercial Rotary Iron
PRI210
PRI214
PRI217
To prevent accidents and machine damage,
read these instructions before installation or
use.
en-US, CA
M.-Nr. 11 942 090

Contents
2
Caring for the environment ............................................................................................ 4
IMPORTANT SAFETY INSTRUCTIONS .......................................................................... 5
Appropriate use................................................................................................................. 5
Technical and electrical safety ......................................................................................... 5
Use of the appliance ......................................................................................................... 6
Using accessories ............................................................................................................ 6
Notes on the use of this machine ..................................................................................... 7
Appliance overview ......................................................................................................... 8
Touch display .................................................................................................................... 9
Display symbols ................................................................................................................ 11
Finger guard ...................................................................................................................... 12
Swing out bar .................................................................................................................... 13
Flexible laundry feed for outfeed laundry removal ............................................................ 13
Before using for the first time ........................................................................................ 14
Cleaning and waxing before starting up for the first time ................................................. 14
Use.................................................................................................................................... 15
Preparing the laundry ........................................................................................................ 15
Residual moisture.......................................................................................................... 15
Sorting the laundry ........................................................................................................ 15
Preparing for use ............................................................................................................... 15
Ironing................................................................................................................................ 16
Ironing temperature ....................................................................................................... 16
Setting the ironing temperature..................................................................................... 16
Changing the value of a temperature selection button ................................................. 17
Ironing speed................................................................................................................. 17
Setting the iron speed ................................................................................................... 18
Changing the value of a spin speed selection button ................................................... 18
In-feed of laundry .......................................................................................................... 18
Removal of ironed laundry ............................................................................................ 19
Pausing ironing.............................................................................................................. 19
Standby mode............................................................................................................... 19
“FlexControl” footswitch ............................................................................................... 19
Stopping ironing ................................................................................................................ 20
Ironing with a coin-operated payment system.................................................................. 20
Notes for installer ............................................................................................................ 22
Installation ......................................................................................................................... 23
Setting up the rotary iron................................................................................................... 23
Electrical connection ......................................................................................................... 23
Duct for venting steam ...................................................................................................... 24
Substitute duct lengths ................................................................................................. 24
Maximum permissible total duct length ........................................................................ 26
Optional accessories......................................................................................................... 26
Mounting the base (optional)......................................................................................... 26
Notes ................................................................................................................................ 27
Changing the temperature unit.......................................................................................... 27
Saving and loading favorites ............................................................................................. 27
Preventing running while unloaded ................................................................................... 27
Continuing ironing after a power outage........................................................................... 27

Contents
3
Peak load/energy management......................................................................................... 27
Fault messages ................................................................................................................. 28
Cleaning and care ........................................................................................................... 29
Heater plate maintenance ................................................................................................. 29
Starting the cleaning program ....................................................................................... 29
Using the cleaning cloth................................................................................................ 30
Starting the waxing program ......................................................................................... 31
Using the waxing cloth and ironing wax ....................................................................... 31
Padding instructions.......................................................................................................... 33
Removing the ironing cloth ........................................................................................... 33
Fitting the ironing cloth (only for steel-wool roller covering) ......................................... 33
MieleTechnical Service ..................................................................................................... 34

Caring for the environment
4
Disposal of the packing material
The cardboard box and packing materials protect the appliance during shipping. They
have been designed to be biodegradable and recyclable.
Ensure that any plastic wrappings, bags, etc. are disposed of safely and kept out of the
reach of children. Danger of suffocation!
Disposal of your old appliance
Electrical and electronic appliances contain valuable materials. They also contain certain
substances, compounds and components which were essential for the proper functioning
and safe use of the equipment. Handling these materials improperly by disposing of them
in your household waste can be harmful to your health and the environment. Therefore,
please do not dispose of your old appliance with regular household waste and follow local
regulations on proper disposal.
Consult with local authorities, dealers or Miele in order to dispose of and recycle electrical
and electronic appliances. Miele assumes no responsibility for deleting any personal data
left on the appliance being disposed. Please ensure that your old appliance is kept away
from children until removal. Observe safety requirements for appliances that may tip over
or pose an entrapment hazard.

IMPORTANT SAFETY INSTRUCTIONS
5
Read the operating instructions carefully before using the rotary iron. They contain im-
portant information on safety, installation, use, and maintenance.
To avoid the risk of accidents or damage, it is essential to read the operating instructions
before using the rotary iron for the first time.
If other persons are being shown how to operate the rotary iron, they must be given
and/or informed of these important safety instructions.
Miele cannot be held liable for injury or damage caused by non-compliance with these
instructions.
Keep these operating instructions in a safe place and pass them on to any future user.
Appropriate use
This rotary iron must be used as described in these instructions and must be checked on a
regular basis to make sure it is functioning correctly. Maintenance must be carried out
when necessary.
This rotary iron is only intended for ironing clean fabrics that were washed in water.
Check fabric care labels to verify that the articles are suitable for machine ironing.
This rotary iron is intended for use in commercial settings. The rotary iron is not intended
for domestic use. If the rotary iron is used in a publicly accessible place, it is the supervi-
sor’s responsibility to ensure suitable measures are in place to protect users from any
source of risk or danger.
The rotary iron is not intended for outdoor use.
Technical and electrical safety
The rotary iron must not be operated in the same room as dry-cleaning equipment using
perchloroethylene or solvents containing CFCs.
The rotary iron may only be operated in a suitable dry room.
Only operate the rotary iron when all removable outer panels are in place so that it is im-
possible to touch an electrical component, moving part, or hot machine parts.
Do not damage, remove, or bypass the safety features or control elements of the rotary
iron.
Do not make any alterations to the rotary iron unless explicitly authorized to do so by
Miele.
If the control elements or the electrical cabling insulation has been damaged, the rotary
iron must not be used until such damage has been repaired.
Repairs should only be carried out by suitably qualified personnel. Incorrect repairs can
cause considerable danger to users.
Faulty components must only be replaced using genuine Miele parts. Miele can only
guarantee that the rotary iron fully complies with safety requirements if genuine Miele re-
placement parts are used.
The electrical safety of this rotary iron can only be guaranteed if it is correctly grounded.
It is essential that this standard safety requirement is observed and regularly tested. If in
any doubt, please have the electrical installation inspected by a qualified electrician. Miele
cannot be held liable for damages arising from an absent or faulty grounding connection.

IMPORTANT SAFETY INSTRUCTIONS
6
The rotary iron is only completely isolated from the electricity supply if switched off at
the circuit breaker.
Electrostatic charge can occasionally build up when using the rotary iron, depending on
the type of fabric and residual moisture.
Use of the appliance
The rotary iron must not be operated unsupervised.
People with reduced physical, sensory, or mental capabilities, or lack of experience and
knowledge, are only permitted to use the rotary iron under supervision or if they have been
shown how to use it in a safe way and can recognize and understand the dangers of such
use.
Children should be supervised in the vicinity of the rotary iron. Never allow children to
play with the rotary iron.
In the heated state and with the heater plate contacting the roller, there is a serious risk
of burning if you touch the edge of the heater plate on the laundry output side.
Do not set a higher ironing temperature than specified on the care label of the laundry.
The laundry could ignite if the ironing temperature is set too high.
When ironing double-layered laundry items, do not put your hands between the layers
when trying to stretch the item. There is a risk that you will not be able to move your hands
out of the way of the hot heater plate in time. This also applies to inserting your hands into
pockets whose open sides are facing the hot heater plate.
The flexible laundry feed mechanism for reverse laundry removal (optional) should only
be operated from the front.
Do not iron items with fringes, thin ties, straps, etc., on rotary irons with feed-in belts.
These could get tangled in the feed-in belts and cause a fault.
While using the rotary iron, keep your hands away from the areas between the side col-
umns and the roller. There is a danger of squashing your fingers in the rotating roller.
The room in which the rotary iron is being used should be sufficiently lit.
The rotary iron must be switched off when not in use.
Keep the work area around the rotary iron neat and tidy.
As a precaution fire suppression may be required. Check with local codes.
The installation and mounting of this rotary iron in non-stationary locations (for example,
on ships) should only be performed by specialized companies/specialists if they can guar-
antee the prerequisites for its safe use.
Country-specific safety regulations, standards, and safety requirements must be taken
into consideration.
Using accessories
Only approved genuine Miele accessories should be used with the rotary iron. Using
parts or accessories from other manufacturers will void the warranty, and Miele cannot ac-
cept liability.
IMPORTANT SAFETY INSTRUCTIONS
7
Coin-operated rotary irons must be anchored to the floor by the supporting feet to pre-
vent the risk of the machine tipping.
Notes on the use of this machine
At the laundry infeed table, only allow trained individuals to operate the iron.
Be aware of loose fitting or hanging clothing when using the rotary iron. Items such as
wide sleeves or apron strings could be wound in the roller.
Remove all jewelry and tie back long hair before ironing.
Always smooth out wrinkles as far away as possible from the pull-in point on the infeed
table. Feed pillow cases and duvet covers into the iron with the opening first. Do not hold
the corners from the inside and do not reach into the straps of shirts and aprons.
Check the function of the safety devices daily. The rotary iron may be operated only
with properly functioning safety devices. This guarantees that crushing injuries, burns, and
other severe injuries can be prevented.
Before switching to reverse, make sure that no one is endangered.
If other persons are being shown how to operate the rotary iron, they must be given or
informed of these IMPORTANT SAFETY INSTRUCTIONS.
Keep these instructions and pass them on to any future users / owners of the appliance.
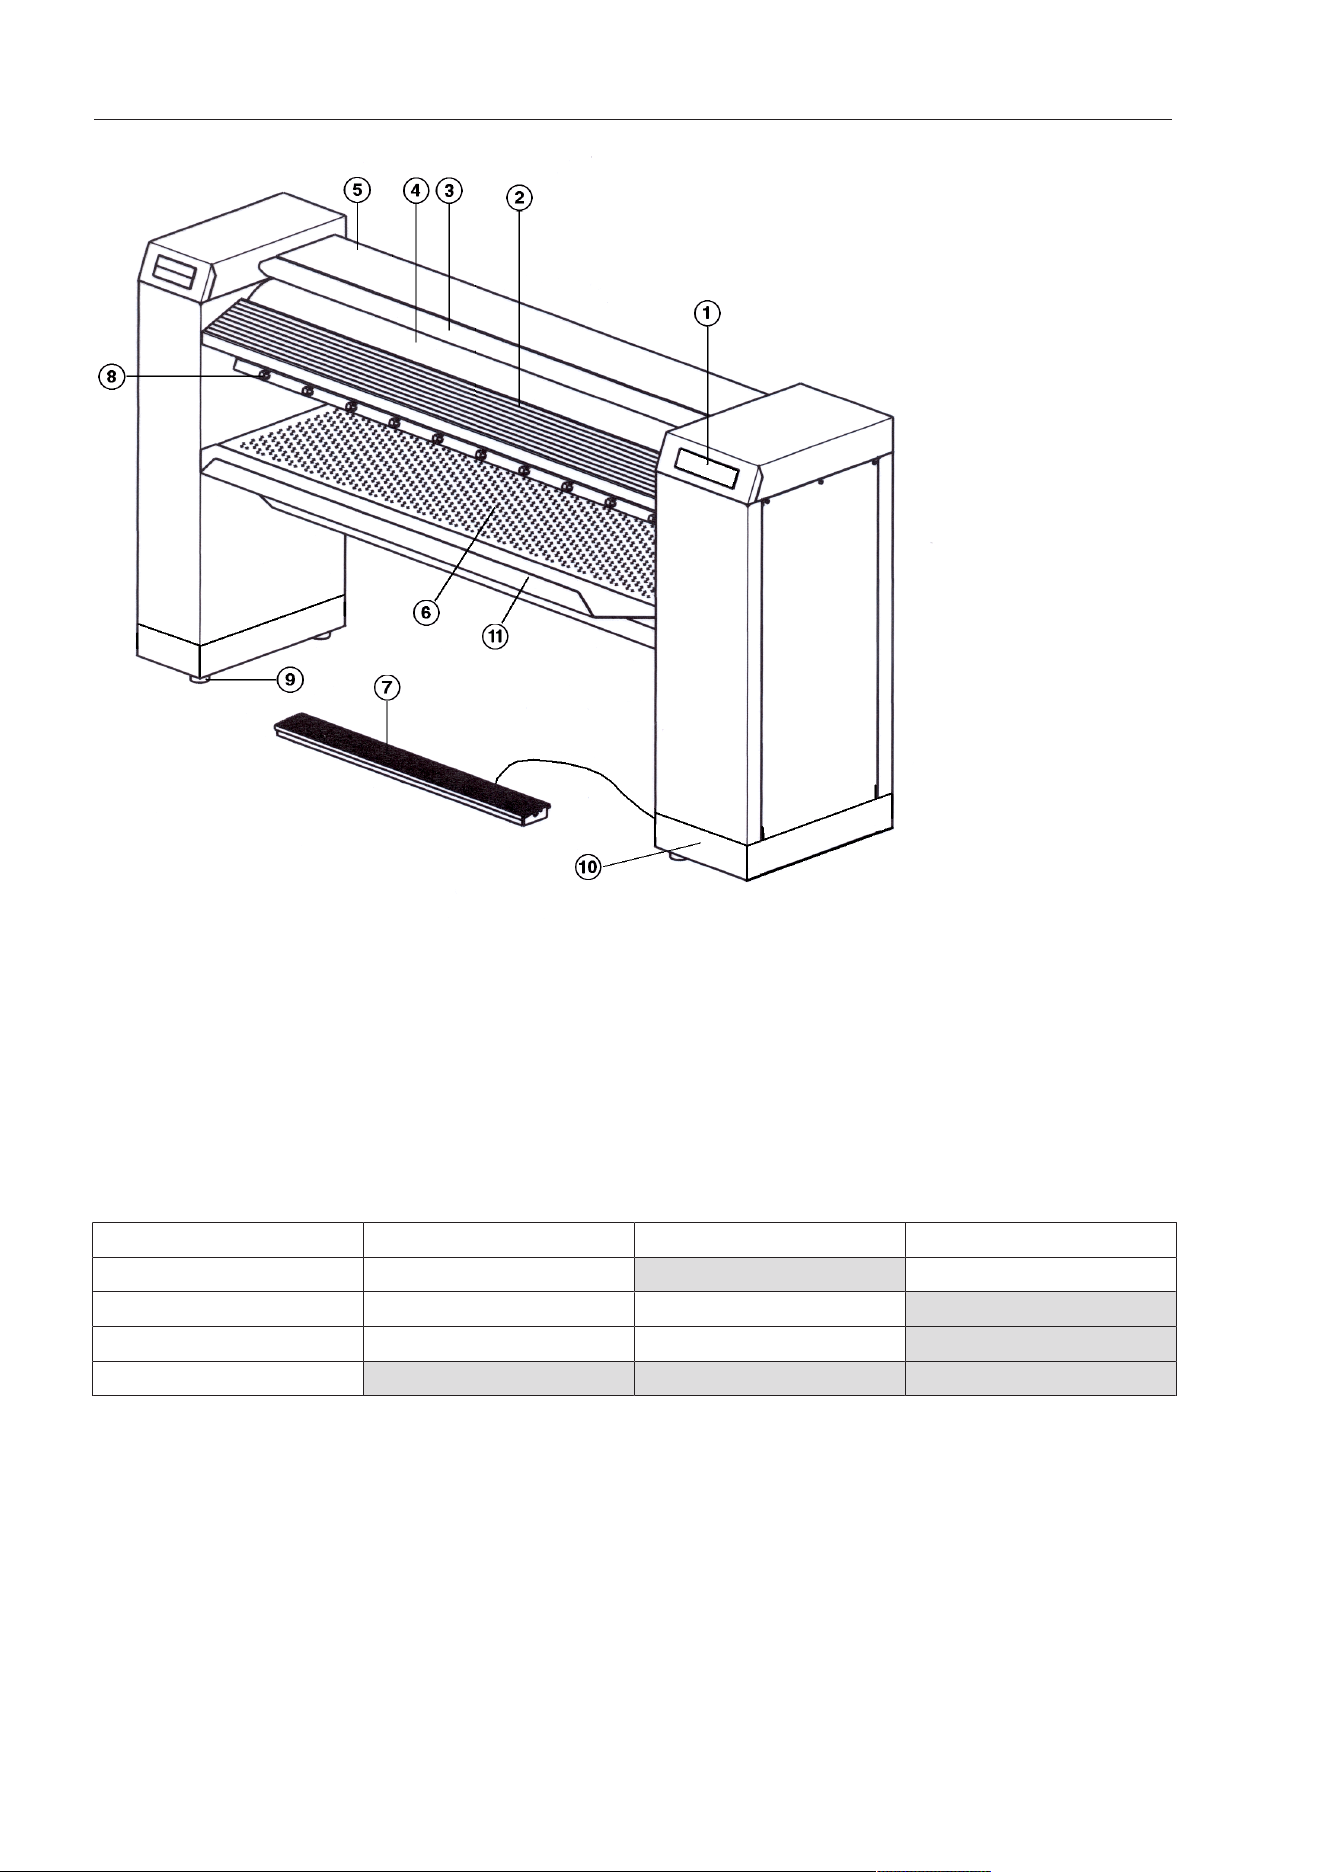
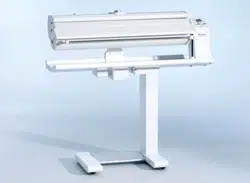
Appliance overview
8
a
Control panel (touch display)
b
Laundry infeed table
c
Finger guard
d
Roller
e
Heater plate with cover
f
Laundry outfeed table
g
“FlexControl” footswitch
h
Laundry pickers
i
Height-adjustable screw feet
j
Toe kick (optional)
k
Lint filter box
Option PRI210 PRI214 PRI217
Laundry rod - feature available -
Flexible laundry feed - - feature available
Leaf-spring padding - - feature available
Stand feature available feature available feature available

Appliance overview
9
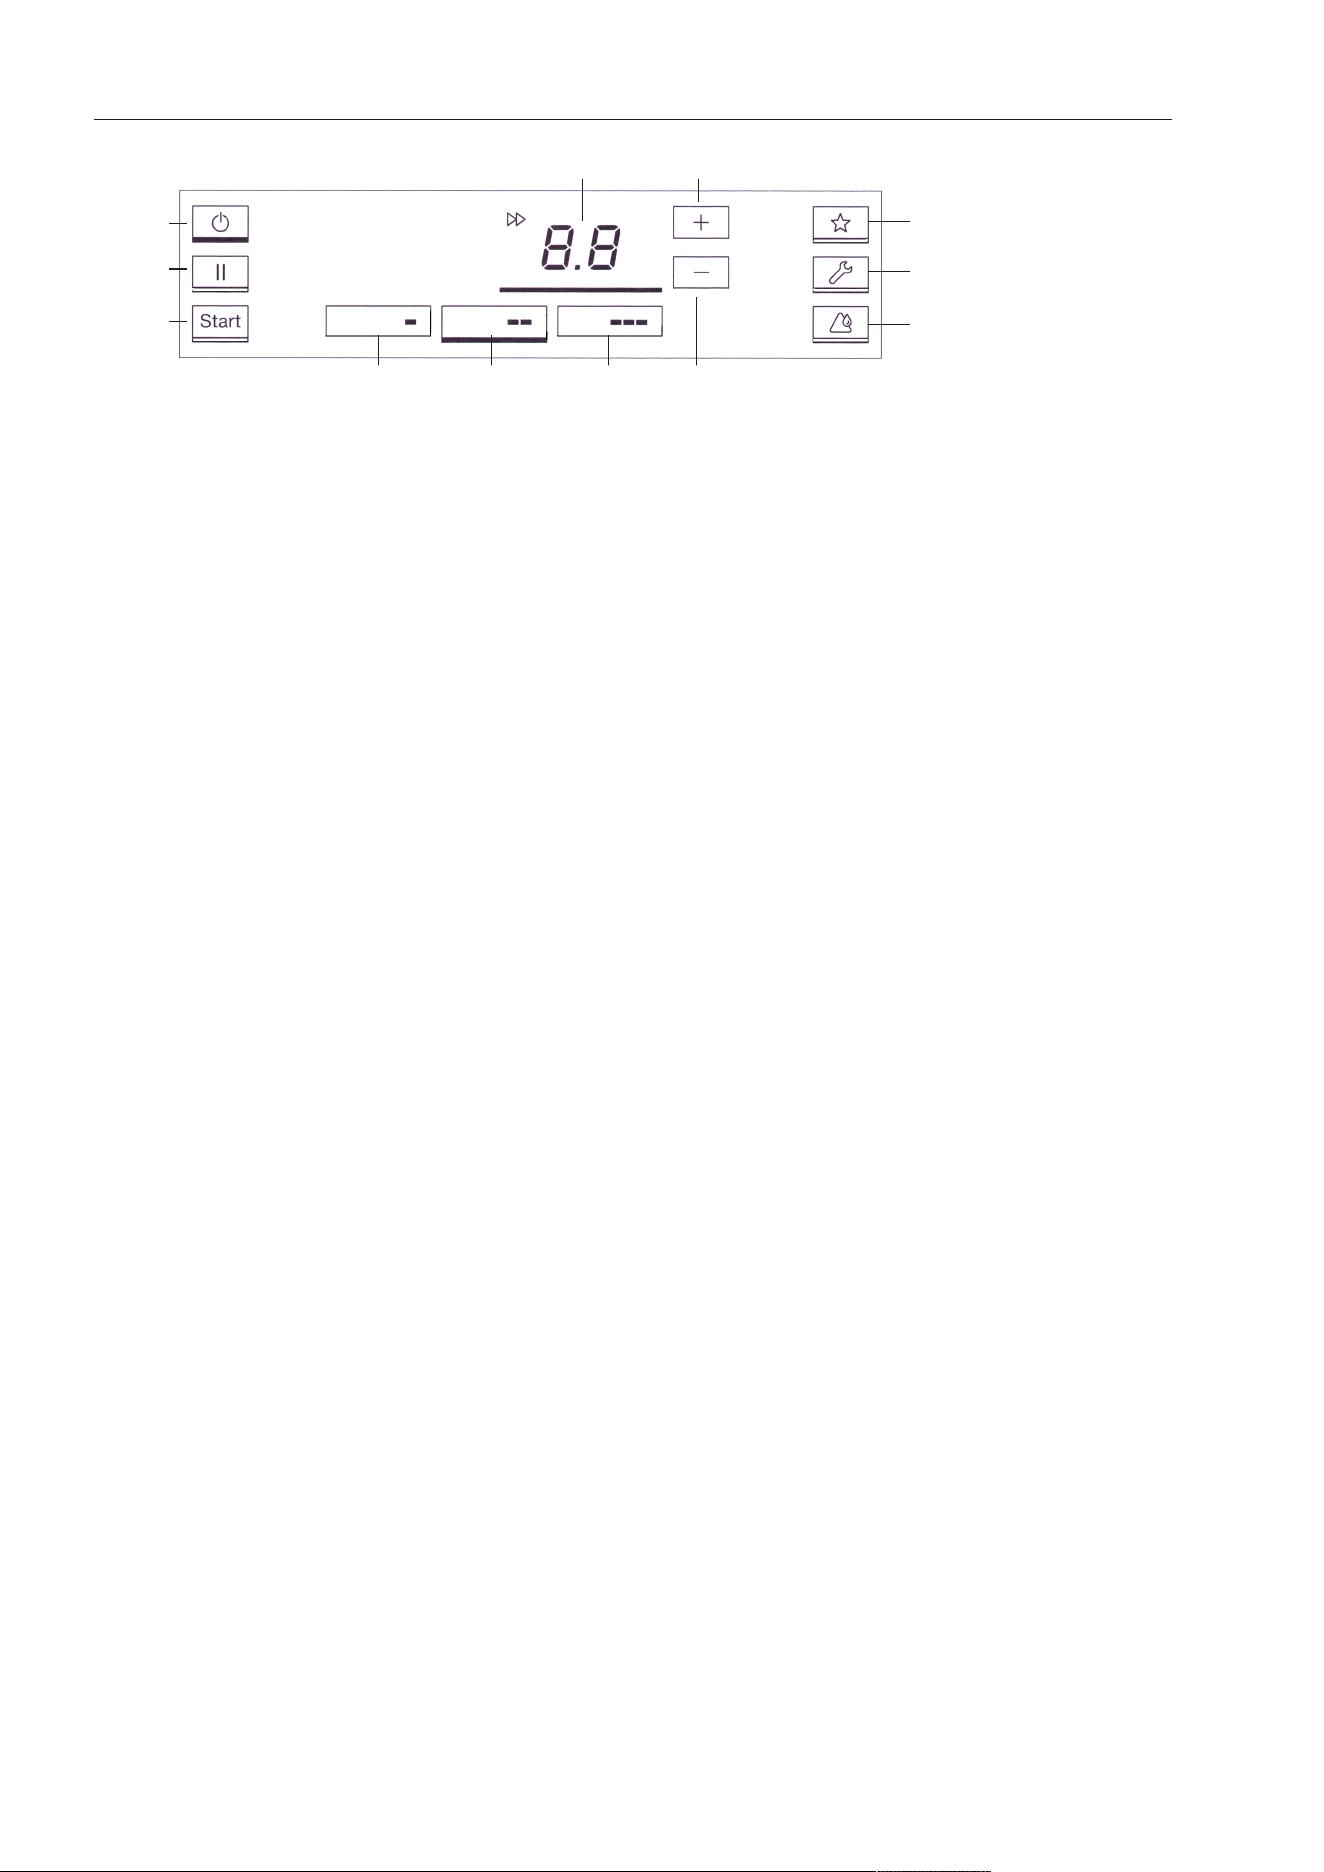
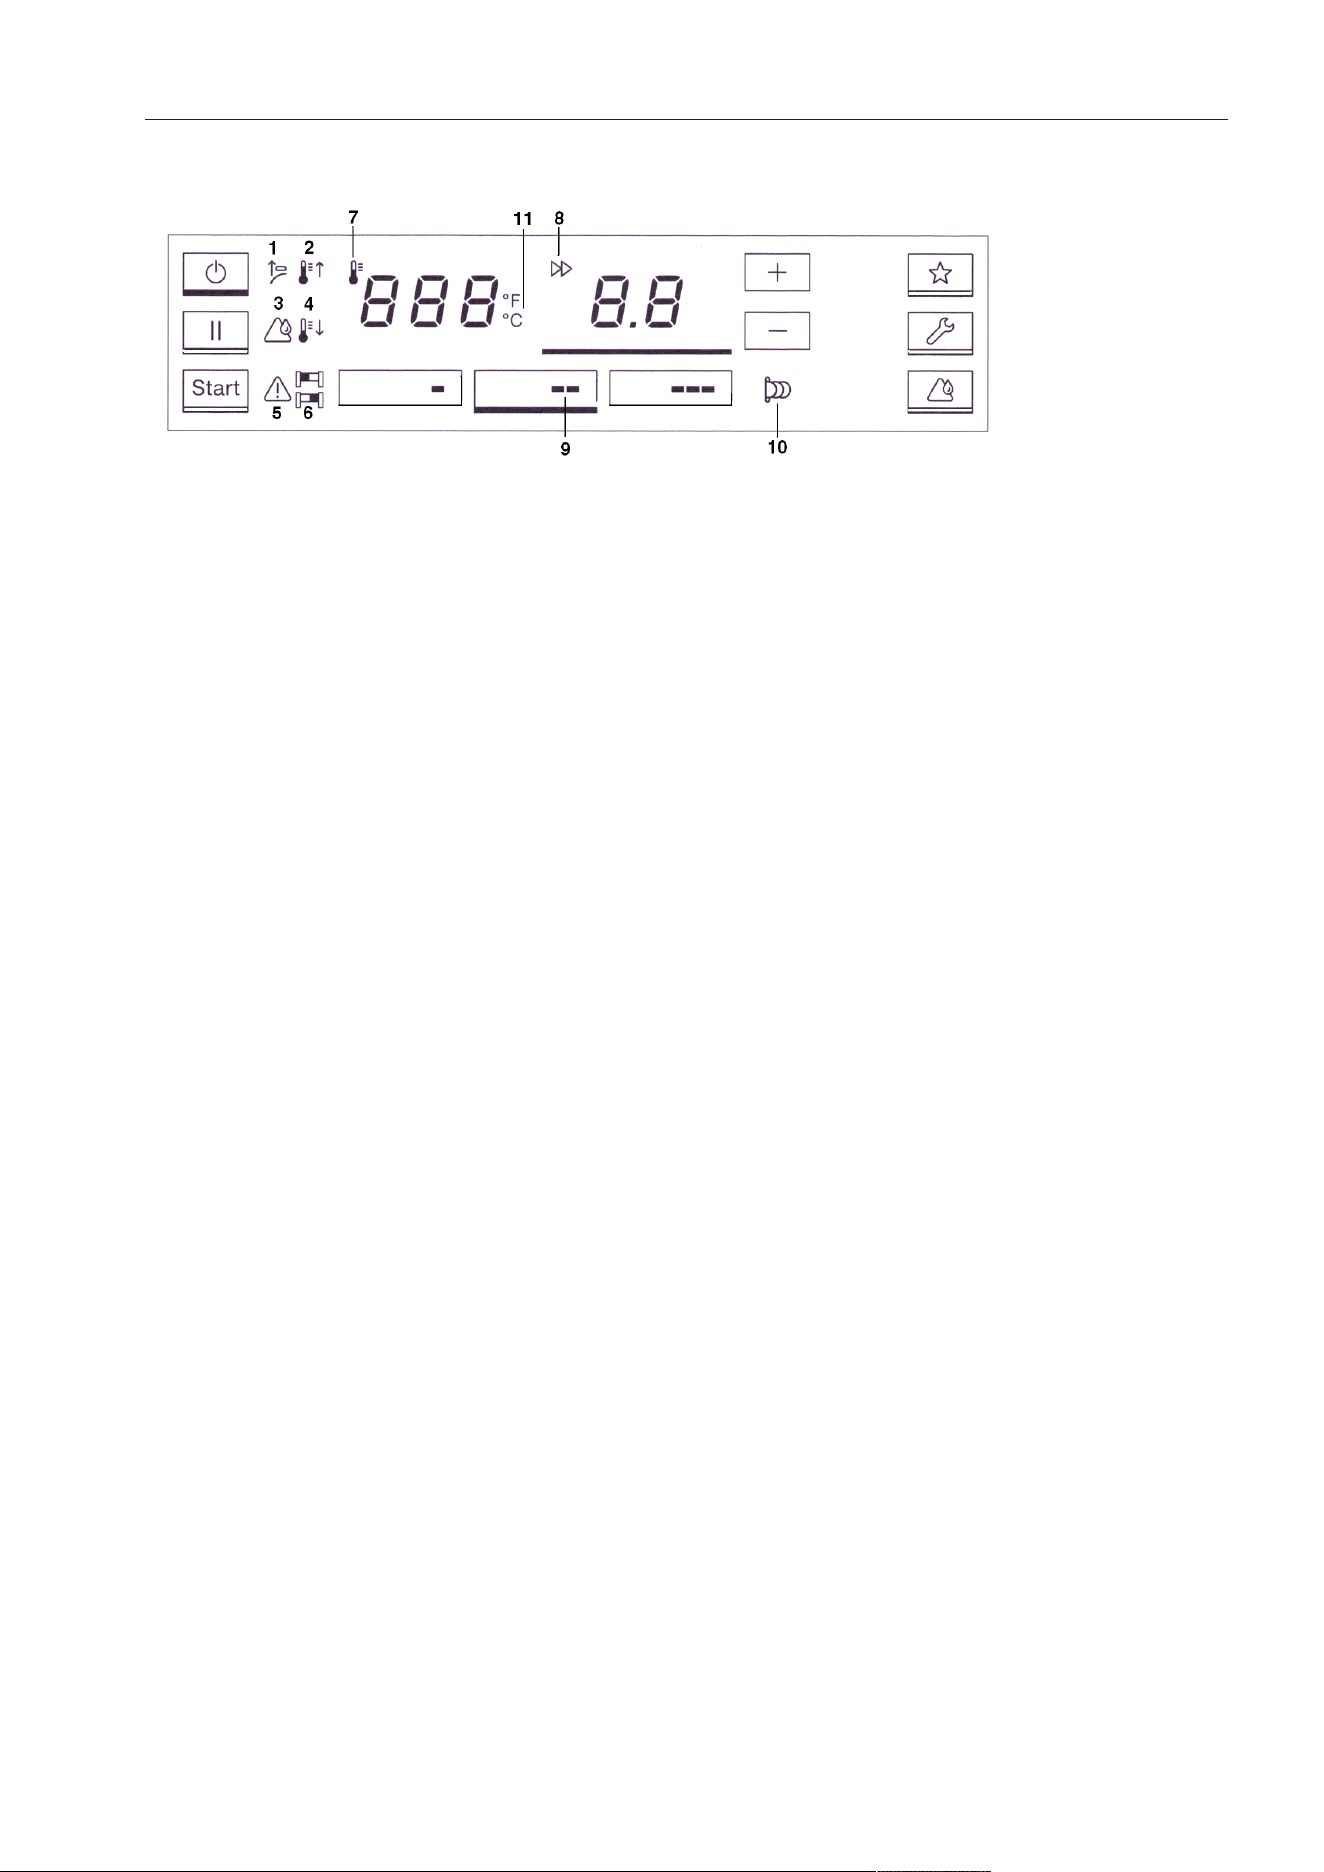
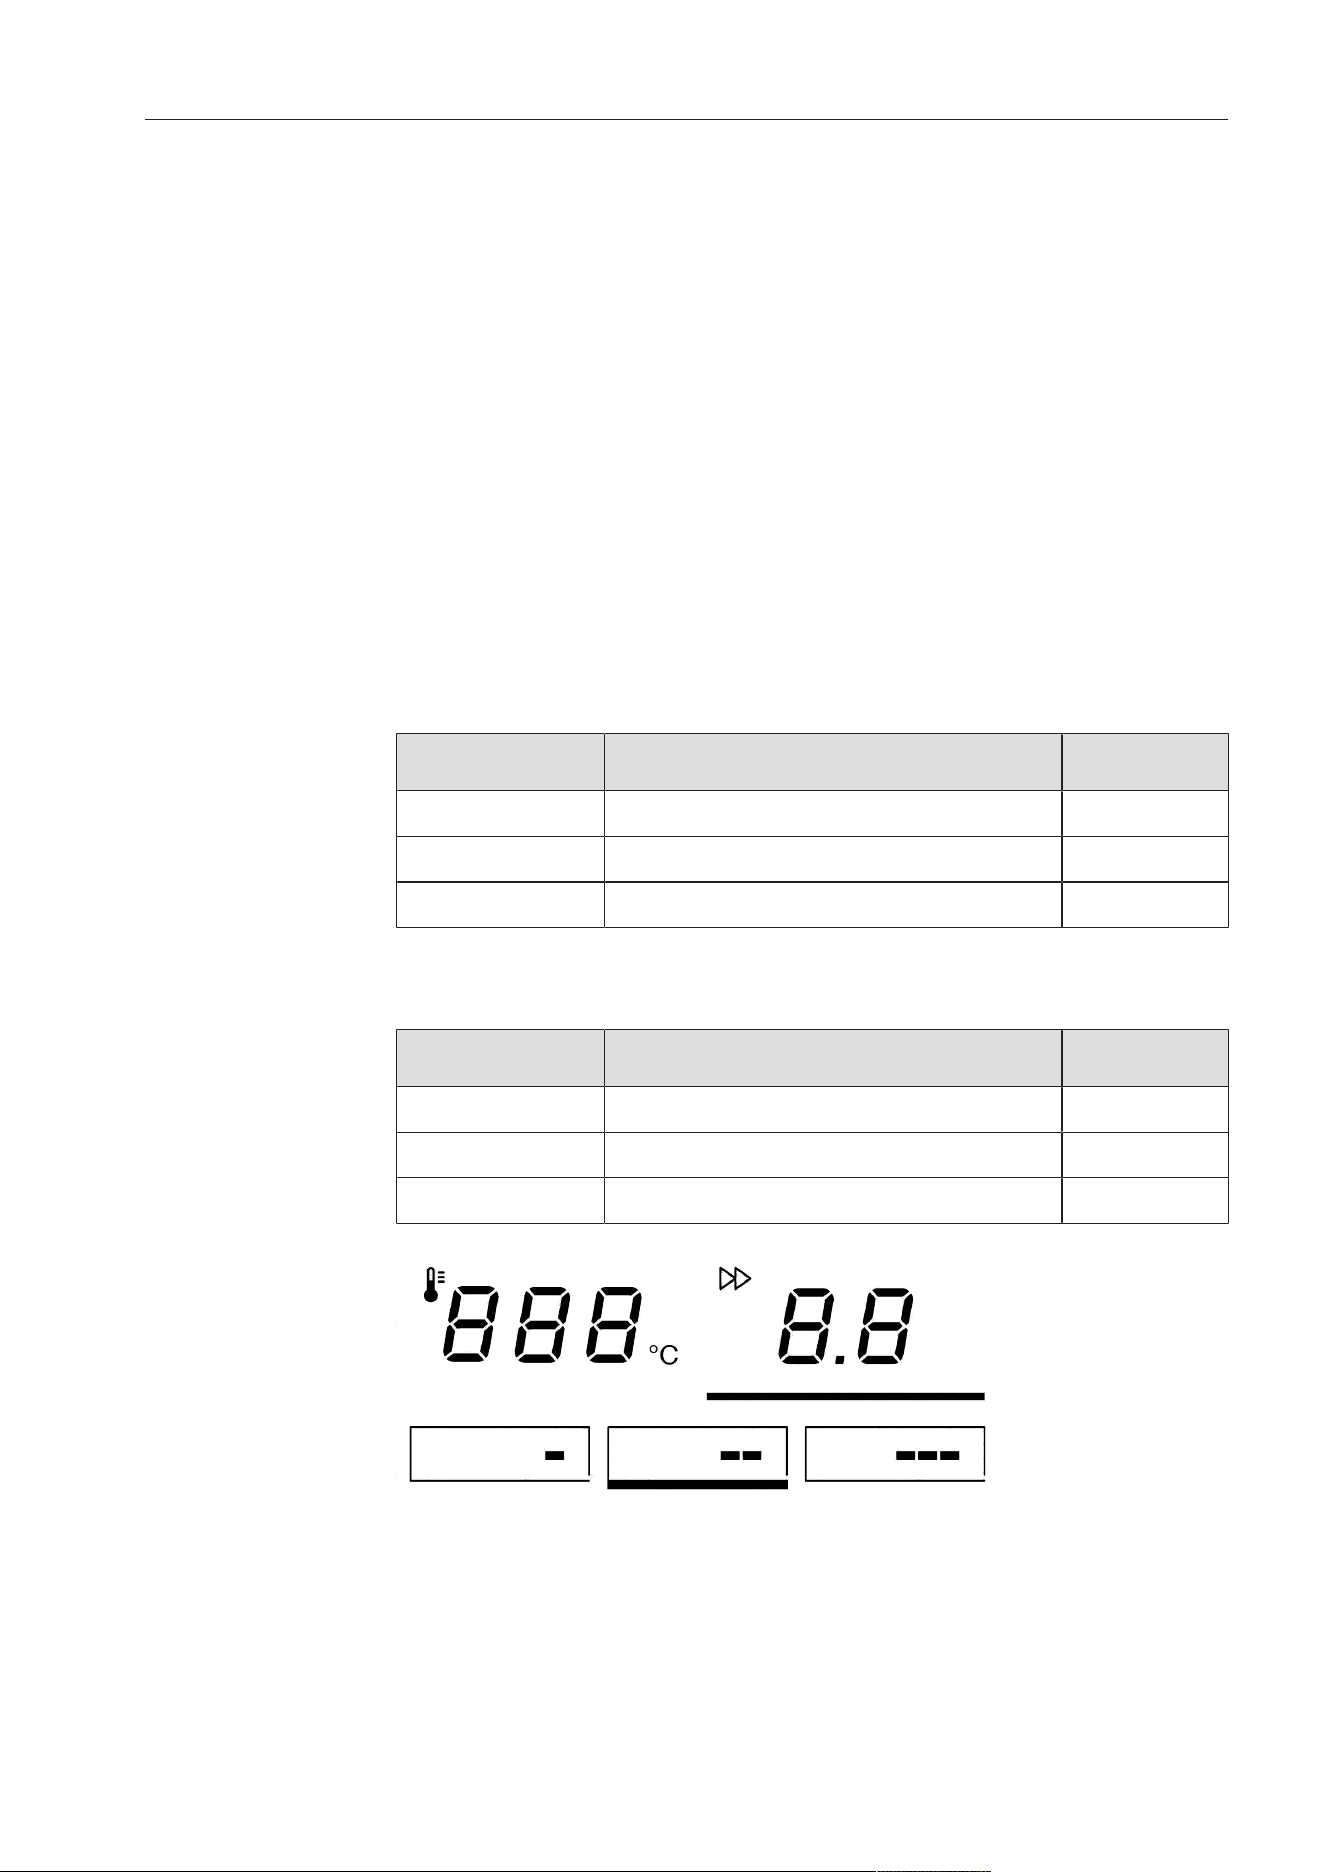
Touch display
The buttons on the touch display can be selected by pressing lightly. The button that is
currently selected will then be highlighted with a bar underneath.
Display in the ironing temperature selection mode
a
button
Switches the iron on and off.
b
button
Pauses the ironing operation.
c
button
Begins the ironing process once the set
ironing temperature is reached. The but-
ton flashes when the ironing process can
be started.
d
button
Ironing temperature selection mode.
e
Temperature selection button
For nylon and artificial silk.
f
Temperature selection button
For silk and woolens.
g
Temperature selection button
For cottons and linen.
h
button
Raises the ironing temperature.
i
button
Lowers the ironing temperature.
j
button
Favorites program
k
button*
Service position for carrying out mainte-
nance work. This button must be held
down for at least 3seconds in order to
activate or deactivate it.
*Depending on the model, this button is
displayed or hidden
l
button
Heater plate cleaning and waxing mode.
This button must be held down for at least
3seconds in order to activate or deacti-
vate it.
Appliance overview
10
Display in the roller speed selection mode
a
button
Switches the iron on and off.
b
button
Pauses the ironing process.
c
button
Begins the ironing process once the set
ironing temperature is reached. The but-
ton flashes when the ironing process can
be started.
d
.button
Switches to the roller speed selection
mode
e
Speed selection button
Low speed range
f
Speed selection button
Medium speed range
g
Speed selection button
High speed range
h
button
Increases the roller speed
i
button
Decreases the roller speed
j
button
Favorites program
k
button*
Service position for carrying out mainte-
nance work. This button must be held
down for at least 3seconds in order to
activate or deactivate it.
*Depending on the model, this button is
displayed or hidden
l
button
Heater plate cleaning and waxing mode.
This button must be held down for at least
3seconds in order to activate or deacti-
vate it.
Appliance overview
11
Display symbols
1
Activate finger guard
2
The current temperature of the heater
plate is lower than the setpoint tempera-
ture. The temperature of the heater plate
is raised.
3
Service display for cleaning and waxing
(see “Cleaning and care”)
4
The current temperature of the heater
plate is higher than the setpoint tempera-
ture. The temperature of the heater plate
is lowered.
5
Fault present
6
or
Continuous in-feed of laundry on the left
() or the right () side of the rotary iron
(see “Feeding in laundry”).
7
Pre-selection and display of temperature
in°F/°C
8
Pre-selection and display of roller speed
9
//
Roller speed range
10
Payment system mode (see “Ironing
with a payment system”)
11
°C/°F
Display of ironing temperature in °F or
°C . This can be altered by Miele Tech-
nical Service.
Appliance overview
12
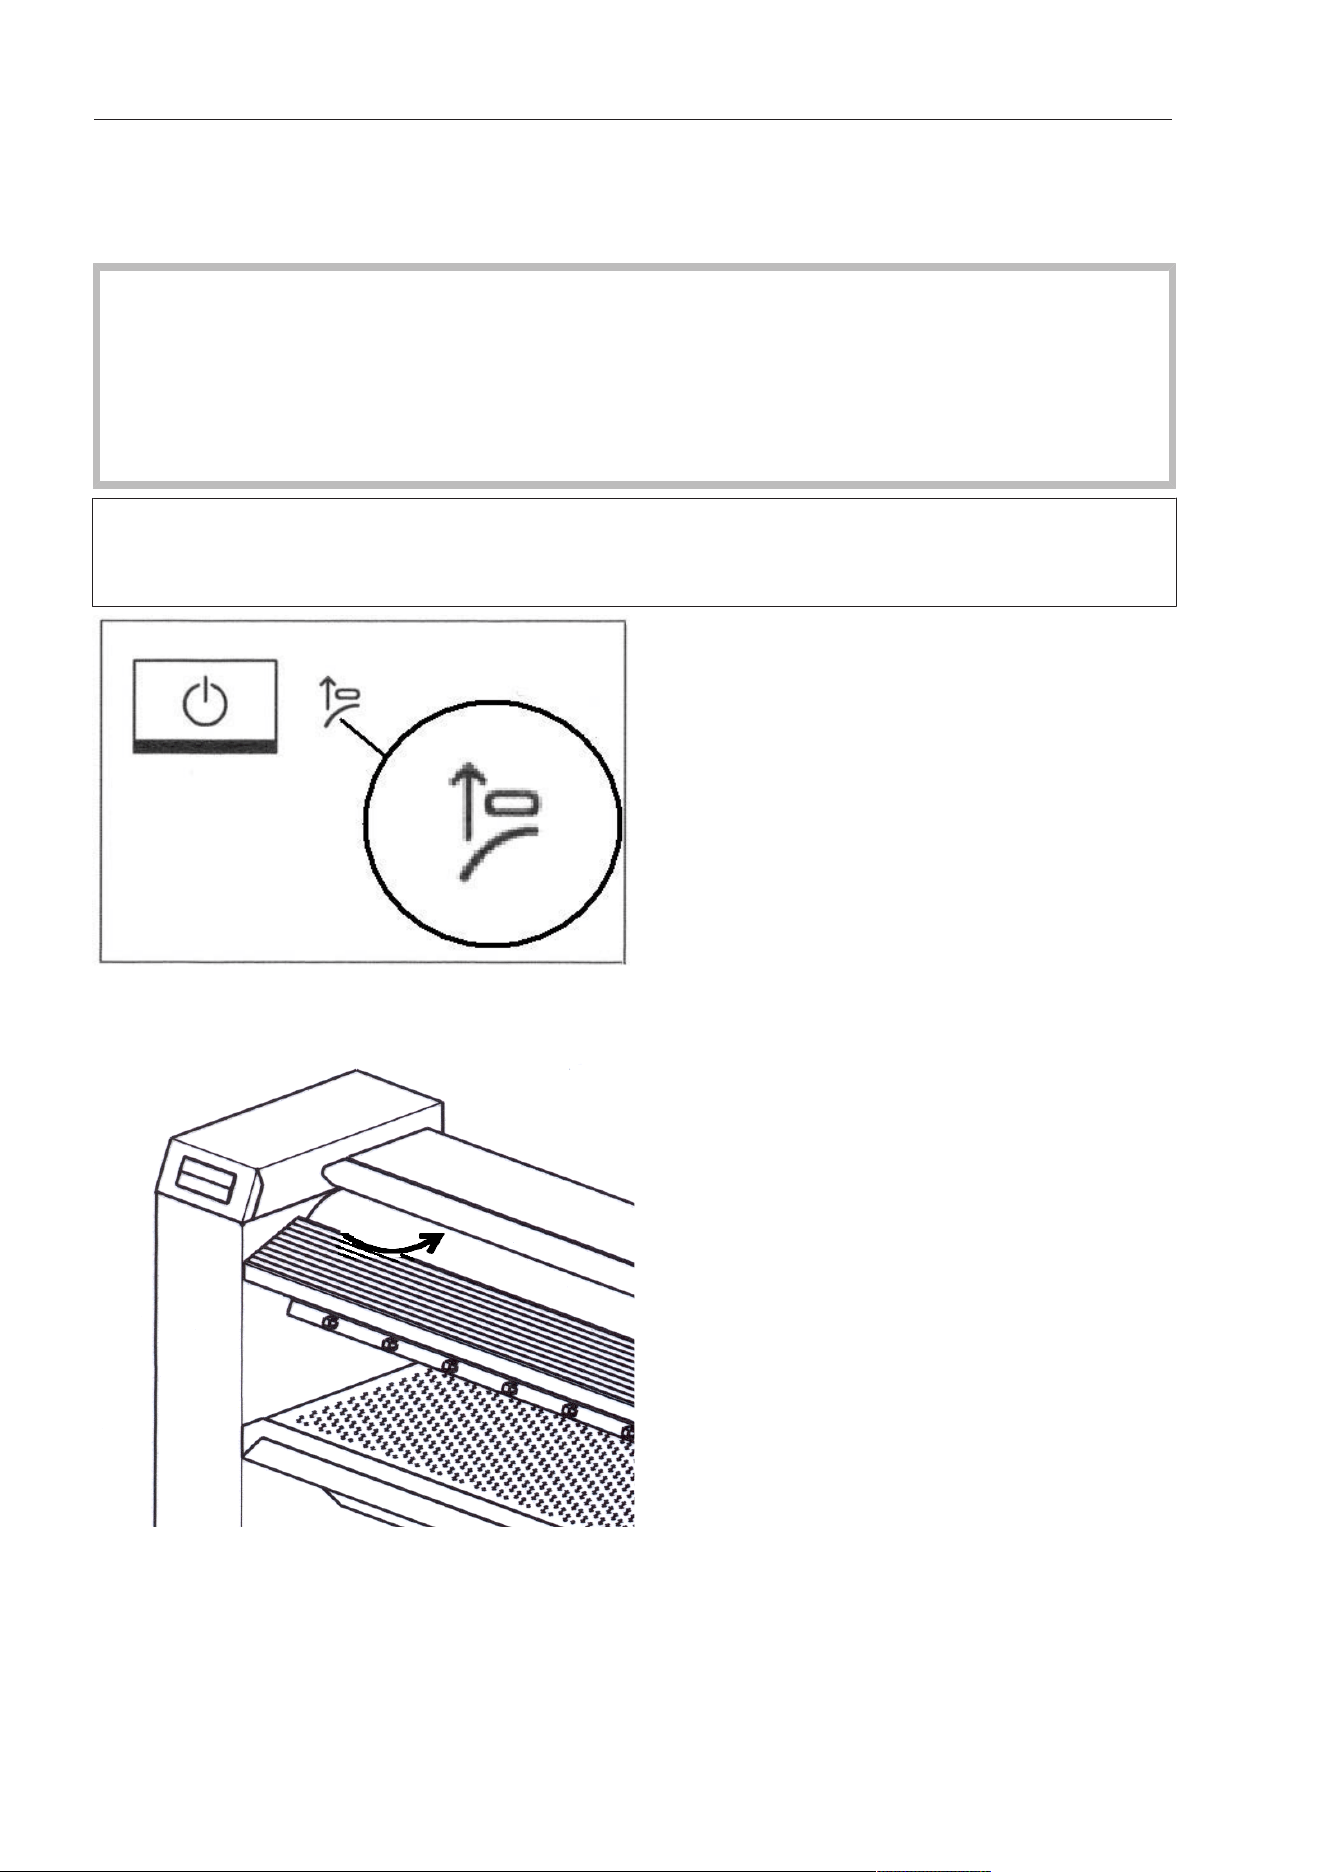
Finger guard
The finger guard is a safety feature that must be checked daily for proper functioning be-
fore startup.
Risk of injury due to lack of finger guard function.
A malfunctioning finger guard function can lead to serious injury.
Shut down the rotary iron immediately.
Contact Miele Technical Service immediately.
Ensure that the rotary iron is not operated by another person and advise others of the
potential hazard.
The rotary iron will only switch to normal operating mode if the finger guard has been
pulled up slightly after switching on the rotary iron. Otherwise, the rotary iron will switch
off again after a short period of time.
Pull the finger guard up slightly while the symbol is flashing.
If fingertips become trapped between the roller and the finger guard, the rotary iron will be
stopped immediately and the heater plate disengaged. At the same time, the symbol will
light up continuously. Press the button to switch the rotary iron back on.

Appliance overview
13
While the rotary iron is in operation, do not use the finger guard intentionally to interrupt
the ironing process.
Always interrupt the ironing process by pressing the button.
Swing out bar
(for PRI214 as an optional accessory)
Ironed laundry can be placed over the hinged laundry rod to avoid wrinkling.
Flexible laundry feed for outfeed laundry removal
(for PRI217 as an optional accessory)
The flexible laundry feed mechanism enables the ironed laundry to be fed through to the
back of the rotary iron for removal. The laundry return feed is particularly suitable for large
items of laundry like sheets/duvet covers or table cloths.
Risk of burns caused by using the flexible laundry feed backwards.
There is a danger of burning if the flexible laundry feed is operated backwards and you
touch the hot edge of the heater plate.
Do not touch the heater plate as this will be hot.
The flexible laundry feed mechanism must only only be operated from the front of the ro-
tary iron.

Before using for the first time
14
Cleaning and waxing before starting up for the first time
It is essential to clean and wax the heater plate before it is used for the first time (see
“Cleaning the heater plate” and “Waxing the heater plate” in “Cleaning and care”).
Clean the heater plate by passing the cleaning cloth offset through the rotary iron across
the entire width of the roller multiple times.
After cleaning the heater plate, wax it using the waxing cloth and suitable ironing wax.
Use the ironing wax sparingly to avoid the ironing cloth becoming too smooth.
Use
15
Preparing the laundry
Residual moisture
For an excellent finish and optimum ironing performance, the laundry
that is to be ironed should have the following levels of residual mois-
ture, depending on the type of ironing being carried out:
PRI214/217: 15–25% residual moisture
PRI210: 15% residual moisture
The ideal residual moisture level depends on the composition of the
fabric.
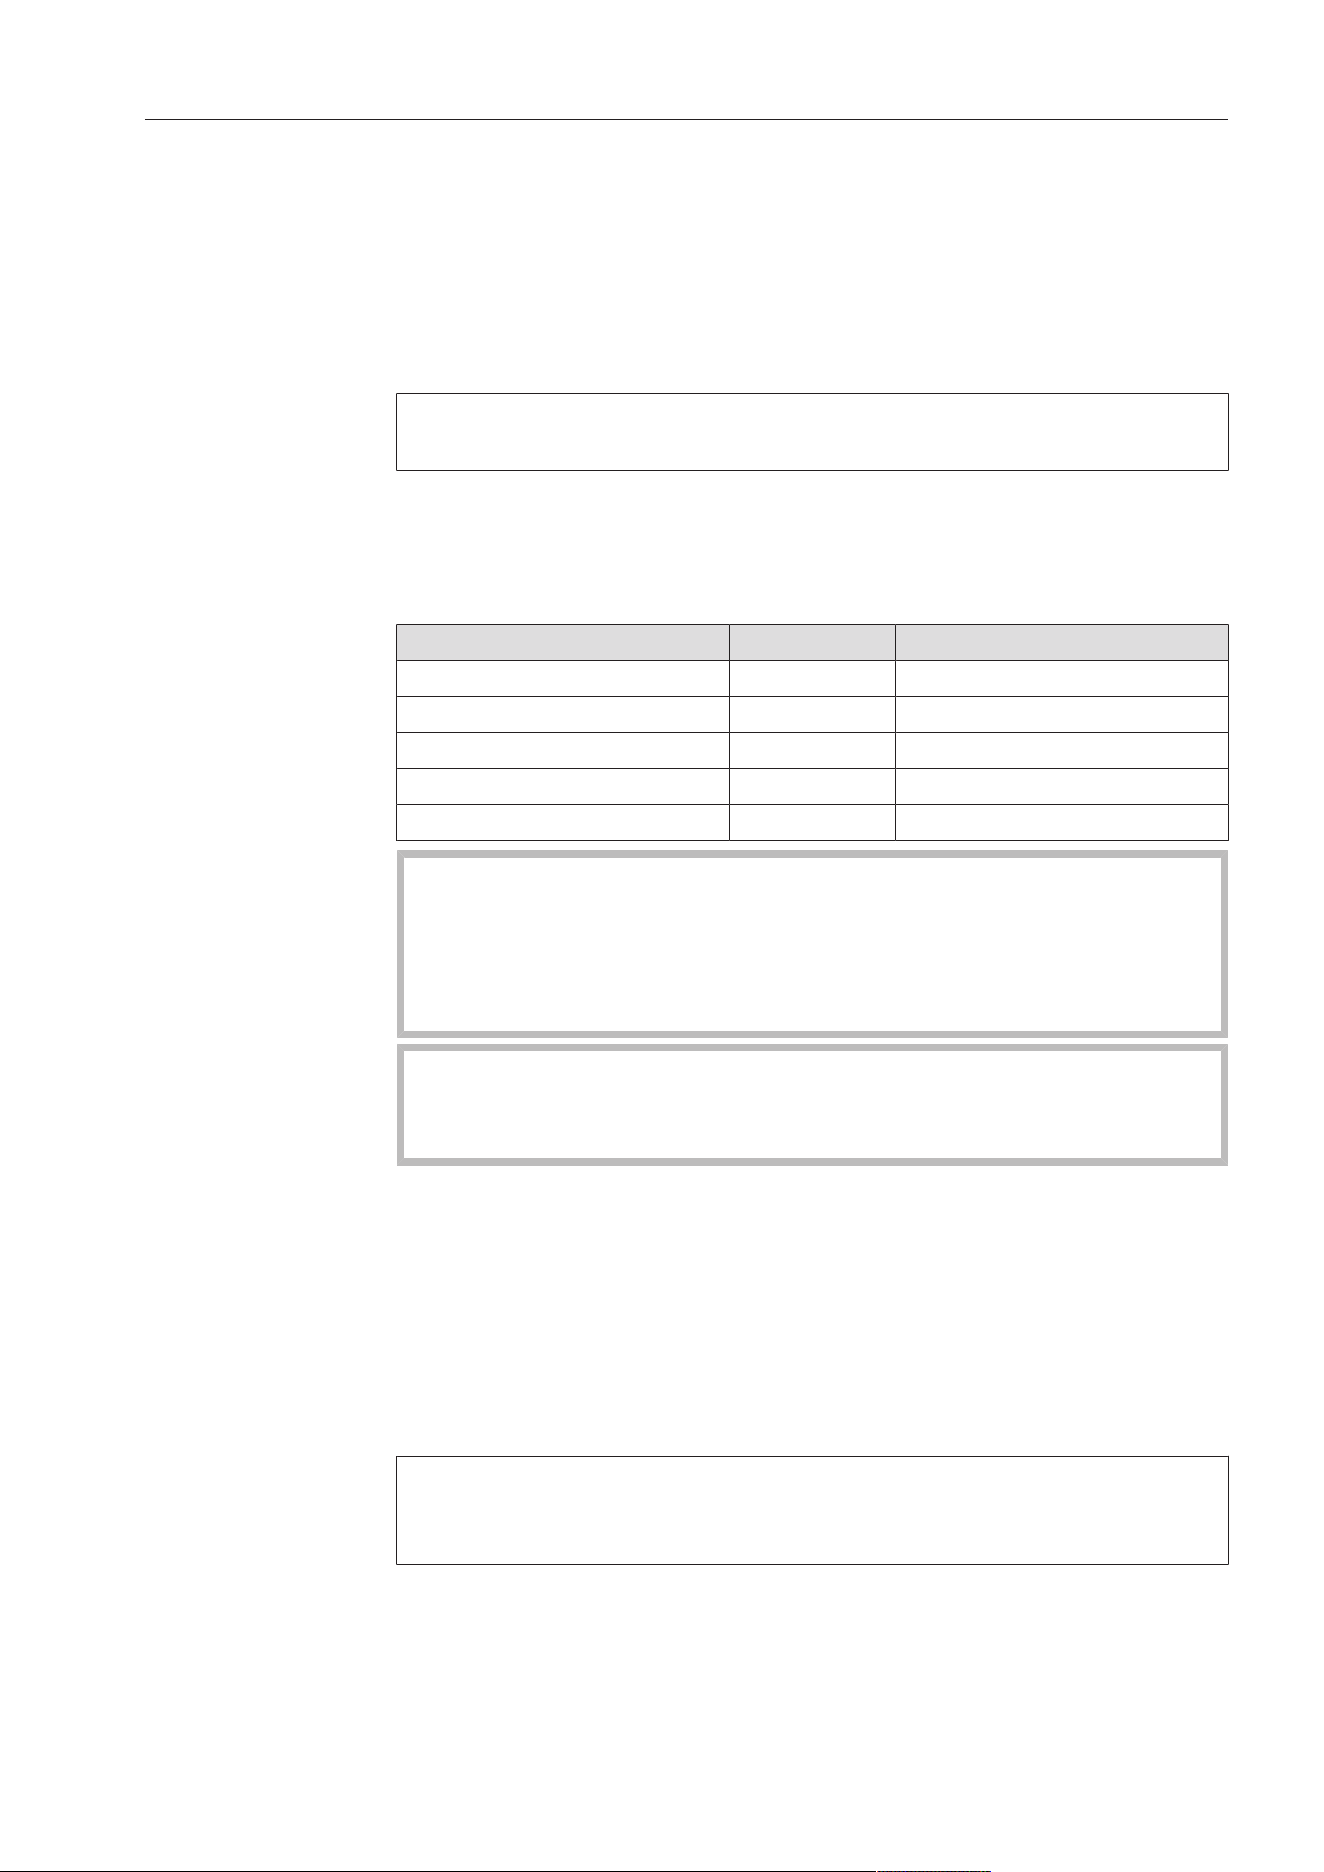
Sorting the laun-
dry
Sort the laundry according to type and fabric before starting to iron.
At the same time, please observe the instructions on the laundry
item’s care label. We recommend sorting the laundry in the following
order:
Type of material Symbol Temperature
Nylon, other synthetics 212-230°F (100–110°C)
then
Woolens, silk 231-302°F (111–150°C)
followed by
Cotton, linen 303-365°F (151–185°C)
The rotary iron must not be used for laundry containing more than
50% synthetic fibres (e.g., Dralon).
The high temperature of the rotary iron will cause the fabric to melt.
Laundry containing less than 50% synthetic fibers can be ironed at
low temperature (•range).
Starched laundry should always be ironed last.
Otherwise, any remaining starch residue on the heater plate may
have a negative effect when ironing other laundry items.
Preparing for use
Turn on the on-site power switch for the power supply.
Press the button to switch on the rotary iron.
The red display symbol flashes.
Now gently press the underside of the finger guard.
The rotary iron switches to normal operating mode.
The rotary iron is only ready to use if the finger guard has been acti-
vated properly. Otherwise, the rotary iron will switch off again after a
short period of time.
The red symbol will appear in the display and the heater plate will
heat up.
Use
16
Danger of burning on the hot edge of the heater plate.
When the rotary iron has heated up, there is a danger of burns on
the edge of the heater plate. Warning labels on the outer casing of
the heater plate indicate the danger of burns.
Avoiding touching the edges of the heater plate.
Wait until the selected temperature has been reached.
The button begins to flash as soon as the minimum temperature
has been reached.
The rotary iron is ready for operation when the set temperature is
reached and the symbol no longer appears in the display.
Now press the flashing button to start up the iron.
The rotary iron is now ready for use.
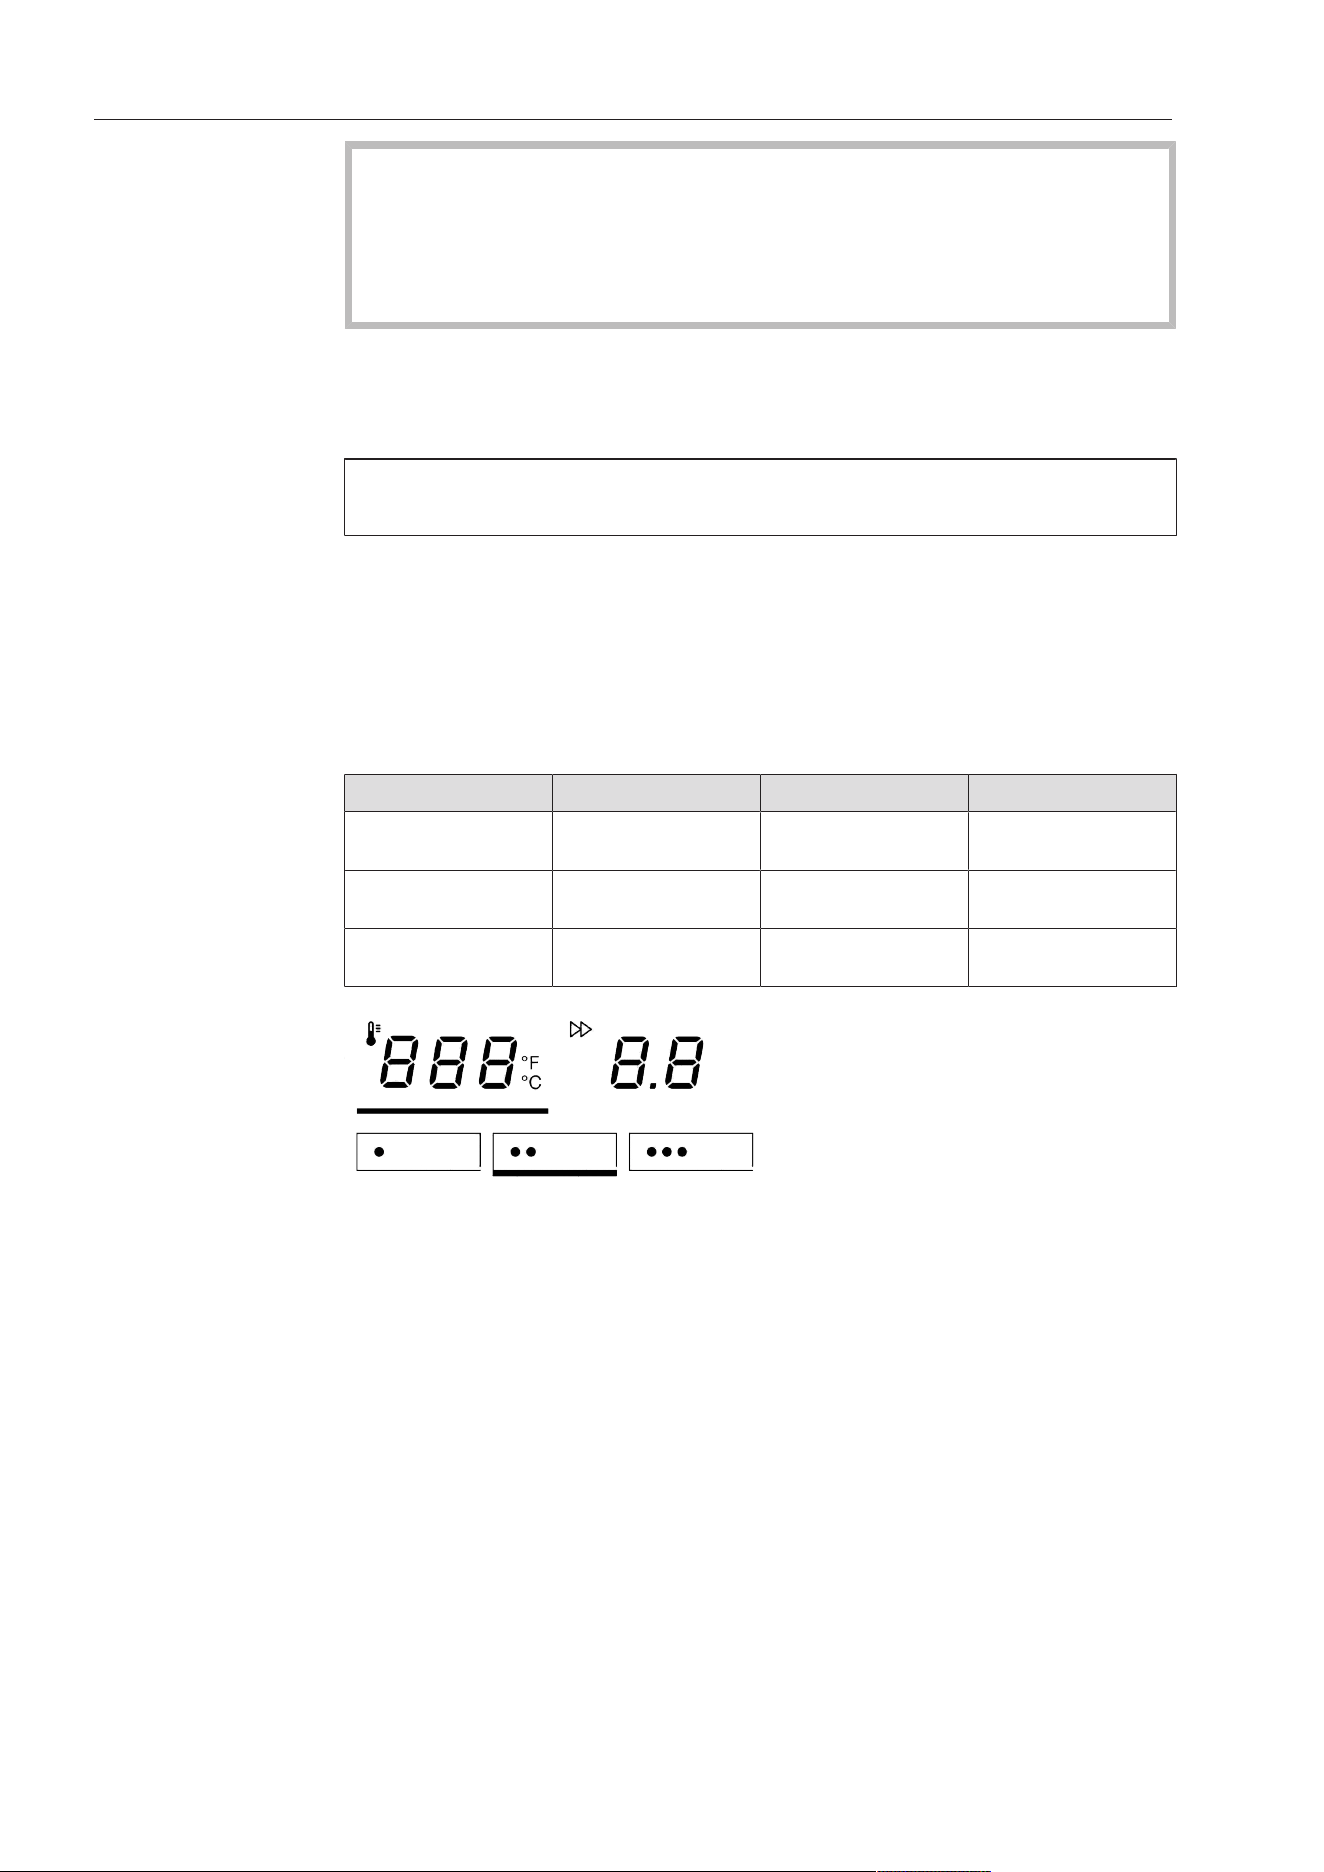
Ironing
Ironing tempera-
ture
The ironing temperature should be selected according to the type of
fabric being ironed.
Type of fabric Symbol Temperature Preset value
Nylon/artificial silk
212-230°F (100–
110°C)
230°F (110°C)
Woolens/silk
231-302°F (111–
150°C)
257°F (125°C)
Cotton/linen
303-365°F (151–
185°C)
180°F (356°C)
Temperature selection buttons
The temperature of the rotary iron can be set either via the tempera-
ture selection buttons (//) or alternatively via the or –but-
tons.
When adjusting the rotary iron from a higher ironing temperature to a
lower ironing temperature, the heater plate must cool down first. In
this case, the rotary iron’s heater element is switched off. The red
symbol indicates that the current temperature of the rotary iron is
still too high. When the symbol goes out, this indicates that the se-
lected temperature has been reached.
Setting the iron-
ing temperature
Press the button on the control panel to access the ironing
temperature selection mode.
The button will then be highlighted with a bar underneath.
Now press one of the threetemperature selection buttons.
Use
17
(For example, temperature selection button)
The selected temperature selection button will be highlighted with a
bar underneath and the heater plate heated / cooled to the appropri-
ate temperature.
Changing the
value of a temper-
ature selection
button
Press the temperature selection button you want to change the
value for.
Keep it pressed in. The bar will light up underneath it and the current
temperature value will appear in the display.
Press the or –button to set the temperature you want to save for
that button.
Then press and hold the temperature selection button highlighted
with a bar underneath until it flashes once.
The new temperature value is now saved for that temperature selec-
tion button.
Ironing speed
PRI210/214:
Symbol Speed range
m
/
min
Low speed range 1.5–2.2
Medium speed range 2.3–3.2
High speed range 3.3–4.0
PRI217:
Symbol Speed range
m
/
min
Low speed range 1.5–2.4
Medium speed range 2.5–3.4
High speed range 3.5–4.5
Speed selection buttons
The roller speed can be set either via the speed selection buttons (/
/) or alternatively via the and –buttons.
Use
18
Setting the iron
speed
Press the. button to access the roller speed selection mode.
The button will then be highlighted with a bar underneath.
Now press one of the three spin speed selection buttons.
(For example, button)
The selected spin speed selection button will be highlighted with a
bar underneath and the iron speed will be adopted as the button
value.
Changing the
value of a spin
speed selection
button
Press the spin speed selection button you want to change the value
for.
The bar will light up underneath it and the current spin speed value
will appear in the display.
Press the or– button to set the roller speed you want to save for
that button.
Press and hold the spin speed selection button until it flashes once.
The new roller speed is now saved for that button.
In-feed of laundry
Risk of damage as a result of incorrect in-feed of laundry.
If laundry items with buttons are incorrectly fed into the rotary iron,
they may be damaged or torn off when the item is passed into the
heater plate.
Laundry with buttons must be inserted into the rotary iron so that
the buttons are facing the roller and can be pressed into the roller’s
ironing cloth during ironing.
Place a cloth over zippers, metal buttons, and metal hooks before
ironing to protect the heater plate.
Never iron metal or plastic clasps of any kind, or raised buttons.
Press the button to start the ironing process.
The heater plate engages and the roller begins to rotate.
Align the laundry item parallel to the roller on the laundry infeed ta-
ble.
Smooth the item.
Feed the item evenly into the rotary iron for ironing.

Use
19
Do not feed small items into the iron on only one side.
If laundry is fed in on just one side, the heat will only be used on
one side and the load only exerted on the roller padding on one
side. If in-feed of laundry continues to be on one side only, this will
be indicated by an audible signal sounding and the red symbol
or symbol appearing in the display.
Use the entire roller width wherever possible and distribute small
items evenly on the laundry in-feed table.
Removal of ironed
laundry
The picker springs on the laundry picker band separate the ironed
laundry from the roller. The laundry can then be removed from the ro-
tary iron.
Risk of burning due to hot edges of the heater plate outfeed.
While the rotary iron is in use, the heater plate gets very hot. Ironed
laundry can be very hot when it comes out of the heater plate.
Always take care when removing ironed laundry.
Do not touch the edges of the heater plate outfeed.
If a picker spring comes loose from its position, the rotary iron must
be switched off. The picker spring then needs to be moved back to
the original position of the laundry picker band by hand.
Risk of fire due to laundry self-combustion.
Hot laundry can lead to a fire as a result of self-combustion.
It is important that you let ironed laundry cool down sufficiently be-
fore packing or stacking it.
Pausing ironing
Press the button to interrupt the ironing process and switch the
rotary iron to pause mode.
In Pause mode, the roller stops and the heater plate disengages. The
rotary iron’s heater will initially remain switched on. During pause
mode, the rotary iron remains ready for use.
Press the button to start ironing again.
Standby mode
After an adjustable period of non-use, the rotary iron can switch to
standby mode. In Standby mode, the roller comes to a standstill and
the heater plate is disengaged. During this process, the rotary iron’s
heater is switched off as well.
Press the button to switch the rotary iron back on.
Standby mode is deactivated by default. Standby mode can be acti-
vated at service level by MieleTechnical Service. The time at which
the rotary iron will switch to standby mode can be adjusted to a
value between 1 and 30minutes of non-use.
“FlexControl”
footswitch
Activating the moveable footswitch stops the roller. This makes it
easy to avoid mistakes when feeding in items.
Stopping the roller
During ironing, press down the footswitch with your foot.

Use
20
The roller stops moving. The heater plate remains engaged.
Remove your foot from the footswitch again to continue ironing.
The roller automatically begins to rotate again. The ironing process
continues.
Alternatively, the footswitch can be adjusted by MieleTechnical Ser-
vice in such a way that the heater plate exits Pause mode and the
roller begins to rotate when the footswitch is activated (domestic
setting).
Stopping ironing
After ironing, let the roller run for about 10minutes at the minimum
heating temperature and without feeding in any laundry to dry out
the padding completely.
Switch off the rotary iron by pressing the button.
The heater plate disengages and the fan runs for up to 10minutes to
cool down the rotary iron. The button flashes during this process.
Switch off the on-site power switch.
Ironing with a coin-operated payment system
Press the button to switch on the rotary iron.
The display symbol flashes.
Insert the coin or token into the coin-operated payment system.
The symbol will go out in the display.
Select the appropriate ironing temperature for the type of fabric.
Then select the desired roller speed.
When the indicator light goes out, the set target temperature
has been reached and the rotary iron is ready to start ironing. This
is indicated by an audible signal sounding.
The ironing time purchased starts when the audible signal sounds.
Press the button to start the ironing process.
If ironing commences before the target temperature is reached, the
timer starts counting down when the button is pressed.
The heater plate engages and the roller begins to rotate.
After the purchased ironing time has expired, the iron emits an audi-
ble signal to indicate that the follow-up time has started. The preset
default follow-up time is 1minute.
You can now finish ironing the item that has been fed in.

Use
21
If the ironing process is paused during the follow-up time, you must
purchase more ironing time to restart the iron.
Miele Technical Service can change the duration of the follow-up
time to a value between 0–5minutes.
At the end of the follow-up time, the heater plate disengages and the
roller comes to a standstill.
The display flashes. More ironing time can be purchased at any
time.

Notes for installer
22
The rotary iron should be installed by a Miele trained installer.
Storage of the
machine
The following conditions must be observed for transport and storage:
Temperature: minimum of 77°F (25°C) to maximum of 131°F (55°C)
Humidity: minimum of 5% to maximum of 75%, non-condensing
Maximum storage period: 2years
Operating condi-
tions
In general, the operating conditions of DIN60204 and EN60204-1
apply.
Temperature and
relative humidity
Temperature: 40°F (5°C) to maximum of 104°F (40°C)
Relative humidity: 10% to 85%
At 70°F (21°C) ambient temperature, the maximum permissible rela-
tive humidity is 70%.
Do not operate the machine in a room where cleaning machines
operate with solvents containing PERC or CFC.
Motor sparking may convert solvent vapors into hydrochloric acid
which can lead to consequential damage.

Notes for installer
23
Installation
The machine is transported to the installation site while still in the
packaging. Do not remove the packaging until right before installa-
tion.
The machine may be transported or lifted from the wooden frame
only with the lateral mounting flaps mounted.
First lift the machine at the installation site by the wooden frame. The
suspension points for lifting hooks/straps are located under the side
columns between the screw-on feet.
During installation, remember that the clearance next to and behind
the machine columns must amount to at least 23⅝" (600mm) so that
the side plates remain accessible.
The machine should be set up so that the light shines parallel to the
infeed table as much as possible.
The clearance in front of the machine must amount to at least
60“ (1.5m) to prevent a heating of foreign materials (furniture, walls).
There should be a clearance of at least 39” (1m) above the machine.
For anchoring requirements, local codes must be observed.
During the transport of the machine, pay attention to its stability.
The iron may not be transported without the wooden frame (e.g., in
case of a move). For a new transport, lift the iron onto the wooden
frame and fasten it there.
Setting up the rotary iron
Dismantle the mounting flaps on the left and right sides.
Check the roller and front and outside of the side columns using a
level.
Align the machine using the screw-on feet in such a way that the
side columns and roller are level with each other. In the process, the
feet may be unscrewed a maximum of 2 ⅜" (60mm).
Counter the screw-on feet according to the alignment using the
nuts (under the side columns).
Electrical connection
All electrical work must be performed by a qualified service techni-
cian in accordance with all applicable codes and standards.
- The electrical connection and wiring diagram are located behind the
mounting flap of the right side column.
- The values for the electrical connection and fuse rating can be
found on the data plate (see the “Technical data” chapter in this
document).

Notes for installer
24
- If the appliance is hard wired, a multiple-pole separator must be in-
stalled. Separators with a contact gap of more than ⅛" (3mm) are
valid as separators. All components have to bear CSA or UL ap-
proval.
- The plug connection or the disconnector must be accessible at all
times.
- You must be able to lock the disconnector or monitor the point of
disconnection at all times in case the appliance has to be discon-
nected from the power supply.
Duct for venting steam
Never connect an exhaust hood to an active chimney, dryer
vent, flue, or room venting ductwork It must also be laid separately
to any exhaust air duct used for a laundry dryer.
The moist warm exhaust air must be vented to the outdoors by the
shortest route possible. To ensure optimum air flow, the ducting
should contain as few bends as possible and airtight connections. Fil-
ters and louvers may not be installed into the exhaust duct.
Since the relative humidity can amount to up to 100%, suitable mea-
sures must be taken to prevent condensate from flowing back into
the machine. If the available pressure of the machine fan for over-
coming conductor resistance does not suffice, an according dimen-
sioned additional fan must be installed in the shaft or roof outlet on-
site. Ensure that there is sufficient ventilation in the room where the
ironer is installed
- The connection for the exhaust air duct for steam extraction is lo-
cated on the rear of the left side column and has a diameter of
2¾" (70mm).
- The exhaust air duct must have an internal diameter of
2¾" (70mm).
- To prevent the build-up of condensation in an upward sloping ex-
haust ducting, a ⅛“ to ¼” (3-5mm) diameter condensate trap
should be fitted at the lowest point.
- Ensure that there is sufficient ventilation in the room where the
ironer is installed
- The on-site ducting system and the exit point to the outside must
be checked on a regular basis for a build-up of lint and cleaned if
required.
- The air duct leading into the open should be protected against the
elements, e.g. using a suitable hood or grille or with a 90° bend.
Notes for installer
25
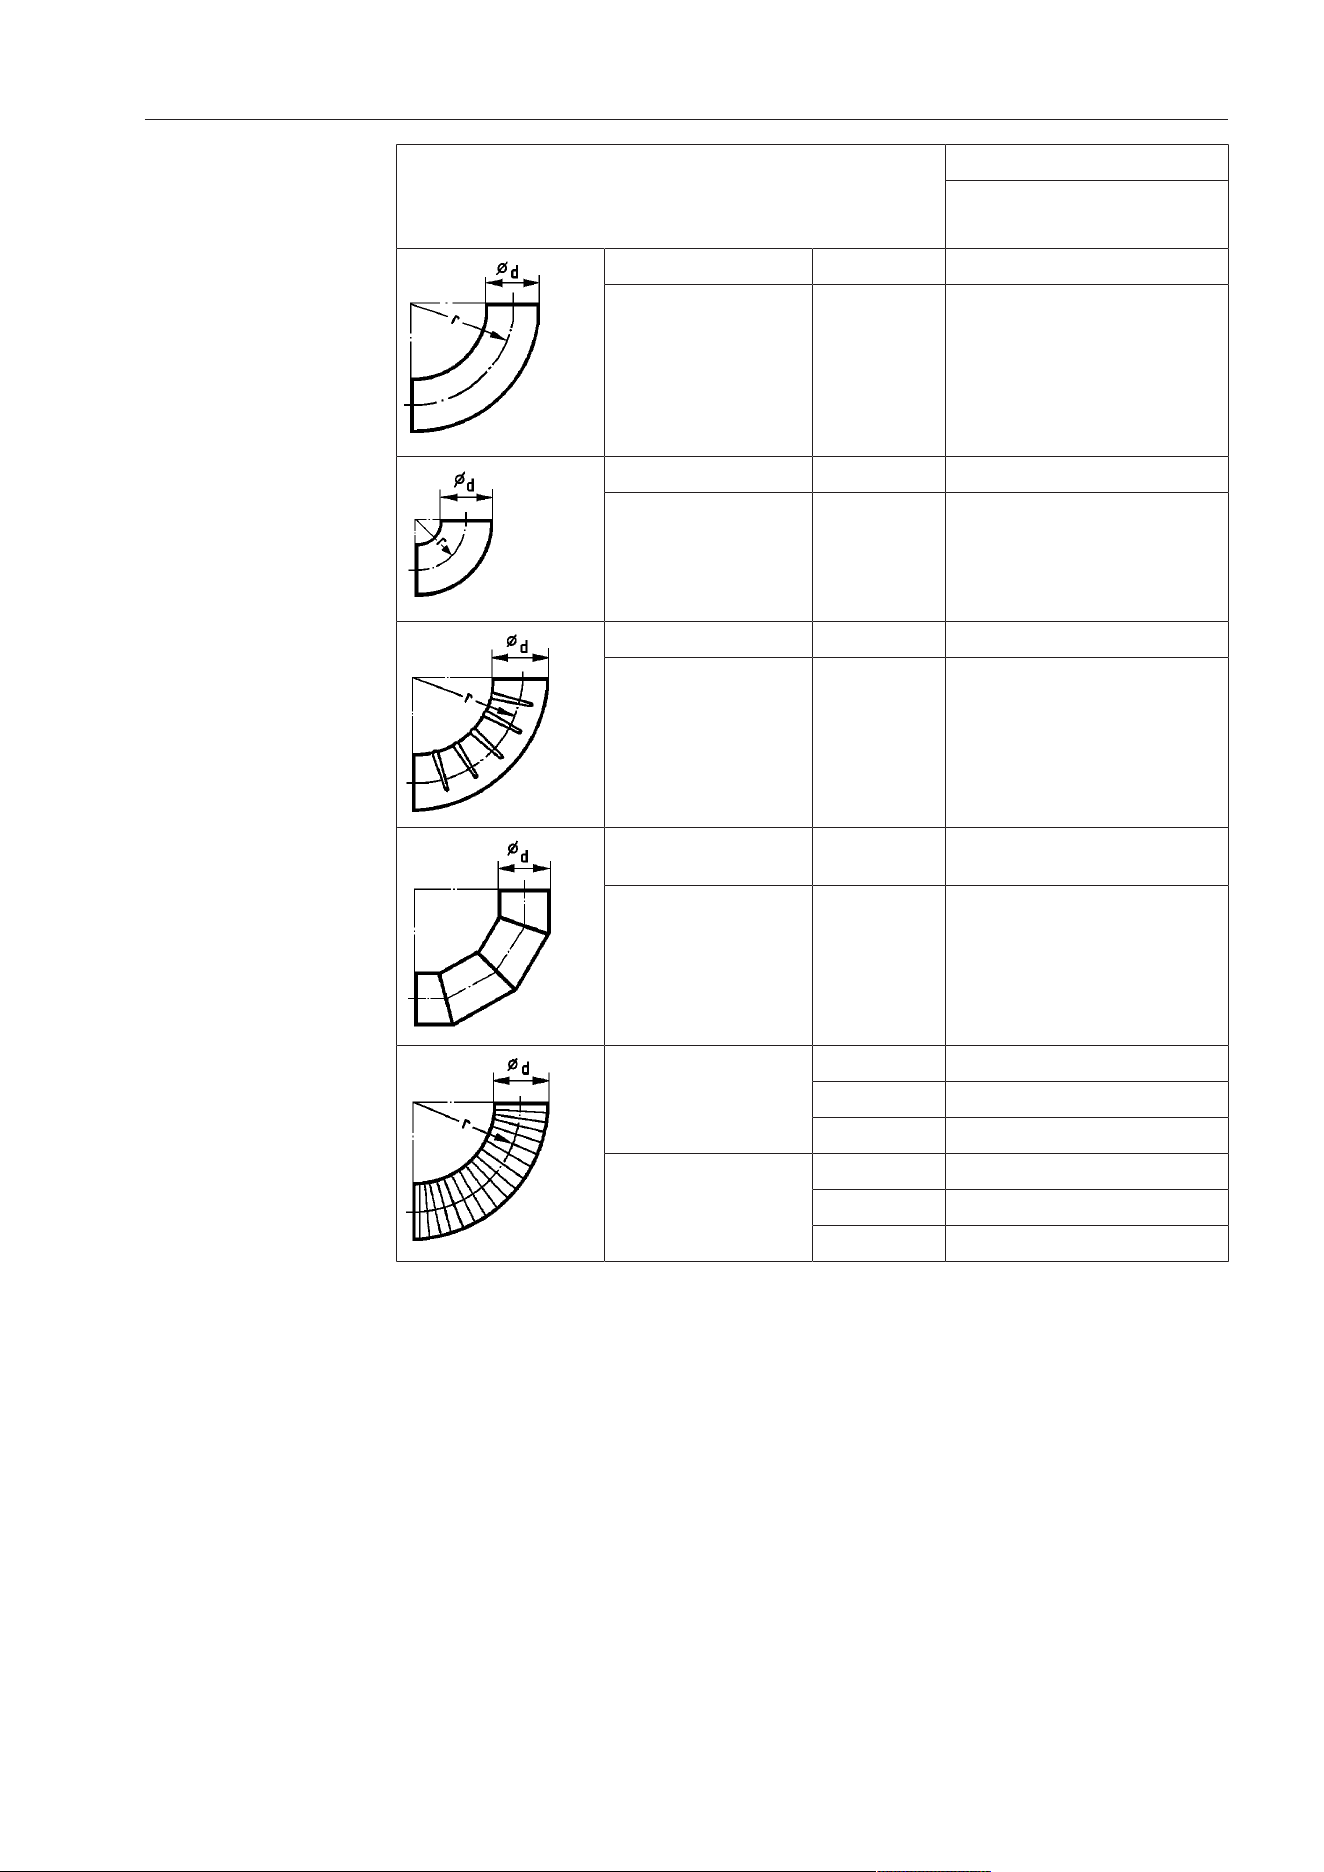
Substitute duct
lengths
Molded part Substitute duct length
PRI 214
PRI 217
90° bend r = 2d 10" (0.25m)
45° bend r = 2d 5⅞" (0.15m)
90° bend r = d 13¾" (0.35m)
45° bend r = d 10" (0.25m)
90° creased bend r = 2d 27½" (0.7m)
45° creased bend r = 2d 21⅝" (0.55m)
90° segmental bend (3
weld seams)
r = 2d 17¾" (0.45m)
45° segmental bend (3
weld seams)
r = 2d -
90° bend made of flex-
ible duct
r = d -
r = 2d 19¾" (0.5m)
r = 4d 13¾" (0.35m)
45° bend made of flex-
ible duct
r = d -
r = 2d 15¾" (0.4m)
r = 4d 11¾" (0.3m)
According to the number of bends, the substitute duct lengths must
be deducted from the maximum permissible duct length.

Notes for installer
26
Maximum permis-
sible total duct
length
Adequate room ventilation must be ensured during operation.
Minimum inside duct diam-
eter (sheet metal ducting)
Maximum permissible total duct
length
Exhaust air
PRI 214
PRI 217
2¾" (70mm) 16'4⅞" (5m)
3⅛" (80mm) 65'7⅜" (20m)
3½" (90mm) 104'11⅞" (32m)
4" (100mm) 131'2¾" (40m)
Once the machine has been successfully installed and con-
nected, replace all the external parts that were removed.
Optional accessories
Mounting the
base (optional)
Mounting the optionally available base can raise the machine by
4"(100mm).
Dismantle the mounting flaps on the left and right sides.
Unscrew the screw-on feet by the maximum amount
(>2⅜"(60mm)).
Hold the side columns with a suitable aid and remove the screw-on
feet.
Mount the screw-on feet into the base and push the base under the
column.
Screw the base to the base plate of the machine.

Notes
27
Changing the temperature unit
Miele Service can switch the temperature display from °C to °F.
Saving and loading favorites
The following steps describe how to save and load the most frequently used combinations
of ironing temperature and roller speed on the button.
Saving favorites
First set the desired ironing temperature and roller speed (see “Ironing” in “Using the ro-
tary iron”).
Then press and hold the button until it flashes once.
The set combination of ironing temperature and roller speed is then saved to the button.
Loading favorites
Tap the button to load a favorite.
The roller speed and ironing temperature of the rotary iron are then set to the combination
of values saved to the button.
Exiting favorites
Tap the button to exit a favorite setting.
The ironing temperature and roller speed set previously are loaded.
Preventing running while unloaded
If you interrupt the ironing process for a certain period of time, press the button to enter
Pause mode or alternatively press the button to switch off the iron. This prevents any
unnecessary running while unloaded (i.e., the iron operating without laundry) and means
that much less strain is exerted on the ironing cloth and the drive.
If the rotary iron is operated while unloaded over an extended period of time, this can re-
sult in a significantly shorter padding service life.
Continuing ironing after a power outage
After a power outage, press the button.
The rotary iron is switched back on.
Activate the finger guard.
Press the button.
Ironing can then be resumed.
Peak load/energy management
An option is available for connecting the rotary iron to a peak-load/energy management
system. If the peak-load/energy management system is active, the rotary iron’s heater ele-
ment switches off and either or .flashes in the display. The residual heat in the
heater plate means that ironing can continue until the iron goes into Pause mode().
Notes
28
Fault messages
When a fault occurs, ironing is interrupted, the button flashes, and a four-digit code ap-
pears in the display. Pressing the flashing button acknowledges the fault (the fault is
stored in the fault memory). The button flashes and the ironing process can be
restarted.
Fault code Fault
Heater fault
Electronic fault
Drive fault
Fan fault
Electronic fault
Appliance blocked
Drive voltage too low
General compressor fault
Low voltage
– Control system fault
If the fault message appears again, repeat the process or switch the iron off before switch-
ing it back on again. If the fault persists, contact Miele Technical Service.
In the event of a malfunction, contact MieleTechnical Service.

Cleaning and care
29
Heater plate maintenance
Regular heater plate maintenance is essential for protecting the roller drive and the pad-
ding. Refer to the instructions in the MieleIroningHandbook. Always wax the heater plate
after cleaning. Failure to exercise due care and attention can result in a significant reduc-
tion in the service life of the machine.
The heater plate for this rotary iron is made of aluminum.
Coarse-grained scouring agents or abrasive cleaning cloths must not be used for clean-
ing aluminum heater plates.
For optimum results, we recommend using the Mielecleaningset. The cleaning set con-
tains a cleaning cloth, a waxing cloth, and ironing wax. This set is available as an op-
tional accessory.
Residue (such as starch and detergent) can be left behind in the heater plate. For this rea-
son, clean the heater plate as appropriate for the degree of soiling before starting work.
When the red display symbol lights up, this signals that the heater plate requires
cleaning and waxing in cleaning mode.
Starting the cleaning program
Press and hold the button for more than 3seconds.
The rotary iron is now in the cleaning program. 176°F (80°C) is shown in the display.
If the current ironing temperature is above 176°F (80°C), the symbol is displayed and
the rotary iron is cooled down.
The cleaning process can be started when the button is flashing.
Press the flashing button to start the rotary iron in the cleaning program.
The rotary iron can then be cleaned using the cleaning cloth.
Cleaning and care
30
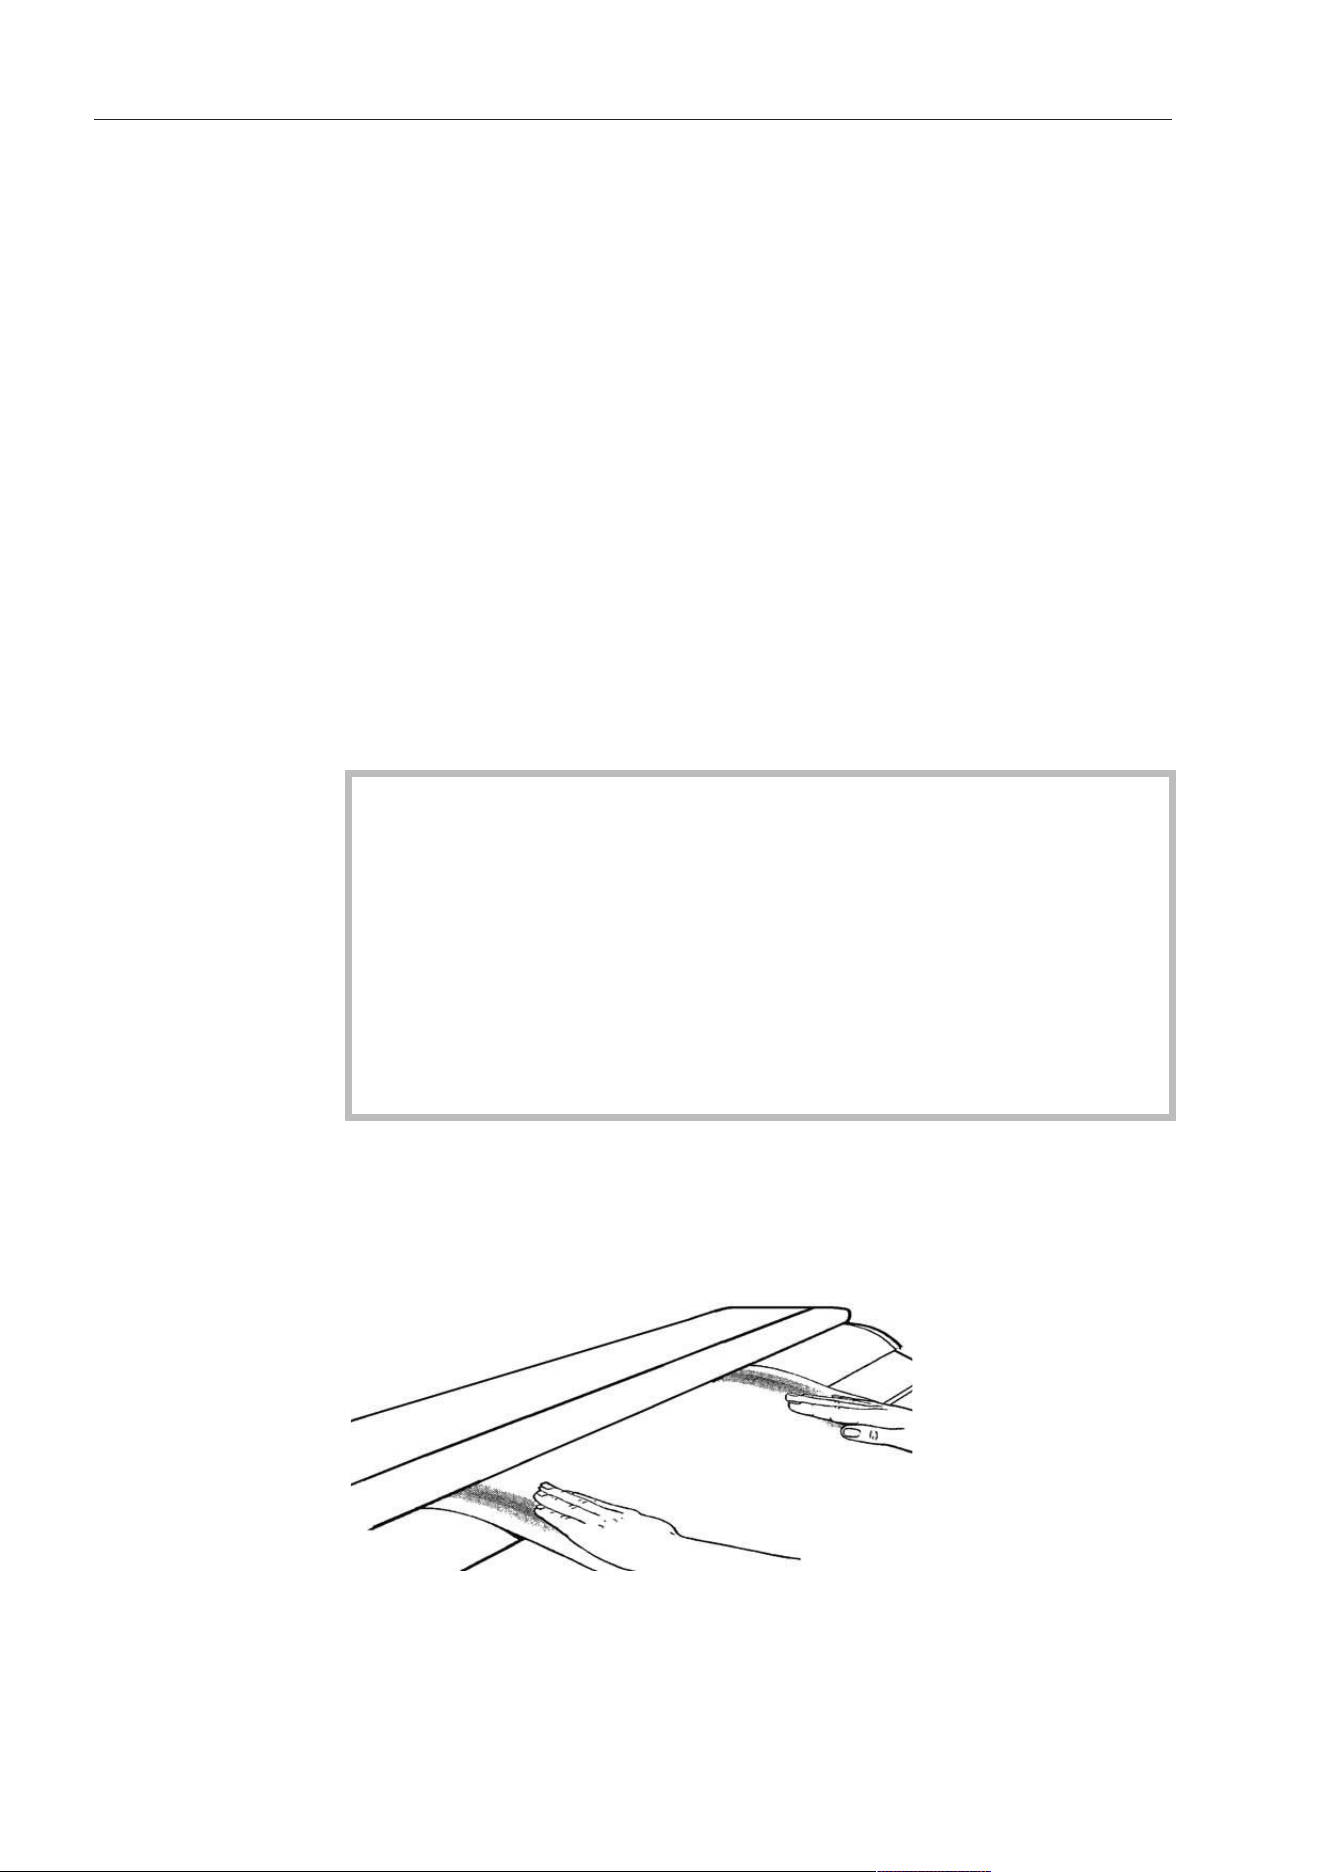
Using the cleaning cloth
Use the cleaning cloth for cleaning the heater plate.
Since the cleaning cloth is smaller than the heater plate, you cannot clean the entire
heater plate width by feeding the cloth through once. You need to feed the cloth through
the iron several times, and move it from side to side.
Tip: You can loosen incrustations such as starch residue by feeding a cloth soaked in luke-
warm water through the iron first.
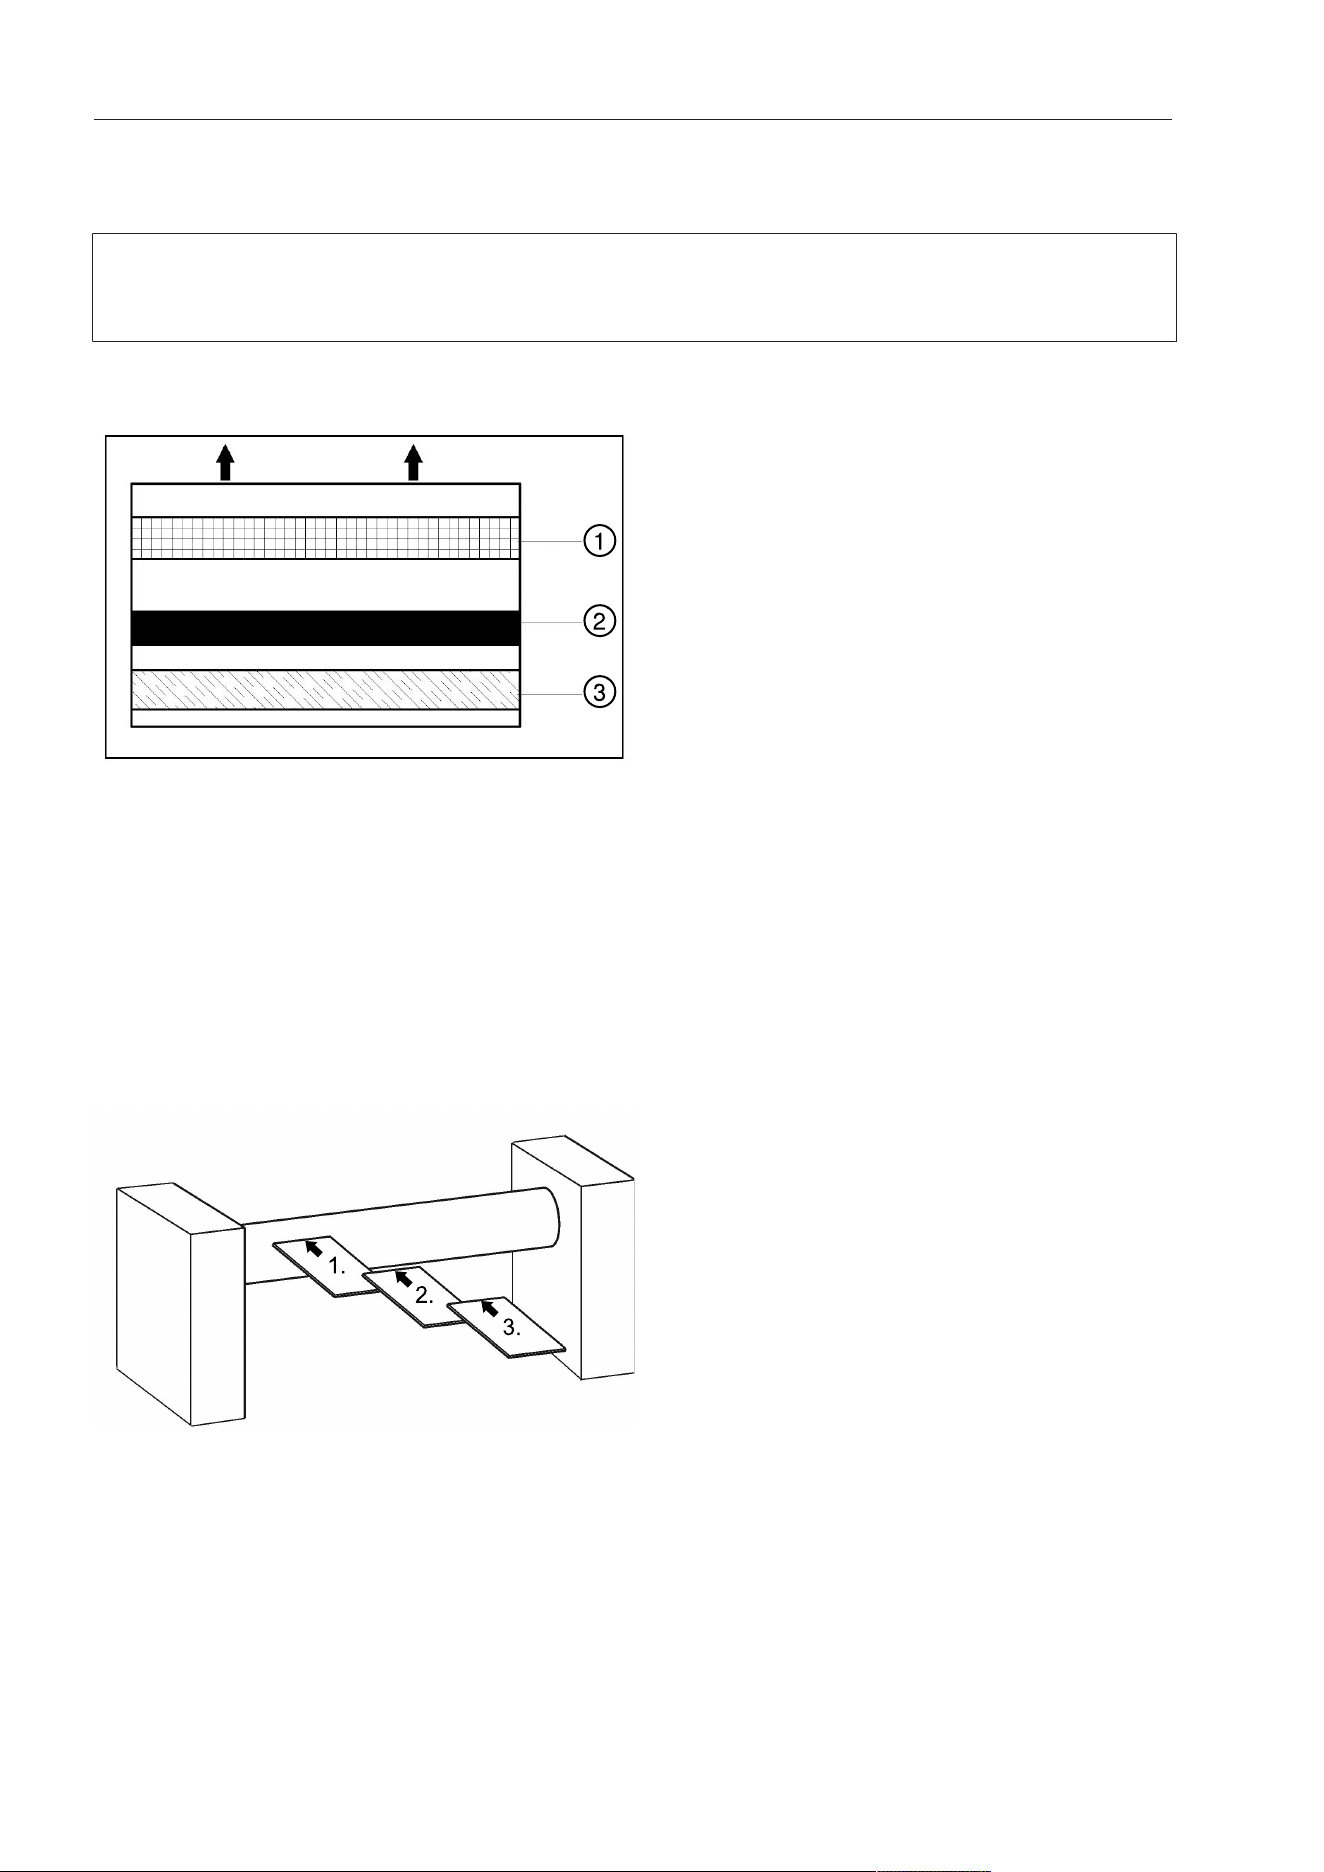
①
②
③
a
Pocket
b
Cleaning strip
c
Cotton strip
Lay the cleaning cloth on the left side of the infeed table with the cleaning strip facing the
heater plate.
Feed the cleaning cloth evenly and straight from the left side of the infeed table through
the iron until it comes all the way out on the other side.
The cleaning strip loosens the soiling. The softer cotton strip removes the soiling and pol-
ishes the heater plate.
1.
2.
3.
Feeding the cleaning cloth through the Rotary Iron from the left to the right side
Now lay the cleaning cloth back on the infeed table, but this time move it slightly to the
right. The cleaning strip must again face the heater plate.
Feed the cleaning cloth through the iron again.
Repeat the process until you reach the right side of the infeed table and the entire width
of the heater plate has been cleaned.
Press the button to end the cleaning program.
Cleaning and care
31
It is essential to wax the heater plate after cleaning.
You can switch directly to the waxing program by pressing the temperature selection but-
ton on the right or exit the cleaning program by pressing and holding the button for
at least 3seconds.
Starting the waxing program
Press and hold the button for at least 3seconds.
2temperature selection buttons which do not take the form of temperature dots (e.g.,)
are displayed.
To start the waxing program, press the temperature selection button on the right.
The Rotary Iron will switch to the waxing program. 176°F(80°C) is shown in the display.
To deactivate the waxing program, press the button and then keep the button
pressed for at least 3seconds.
When the Rotary Iron has reached a temperature of 176°F(80°C), the button begins to
flash. The waxing program is now ready to begin.
Press the flashing button to start the waxing program.
The heater plate can then be waxed using the waxing cloth.
Once waxing has been successfully carried out in the waxing program for a period lasting
at least 40seconds, the maintenance interval for prompting the cleaning and waxing of
the heater plate (= red display symbol) will be reset.
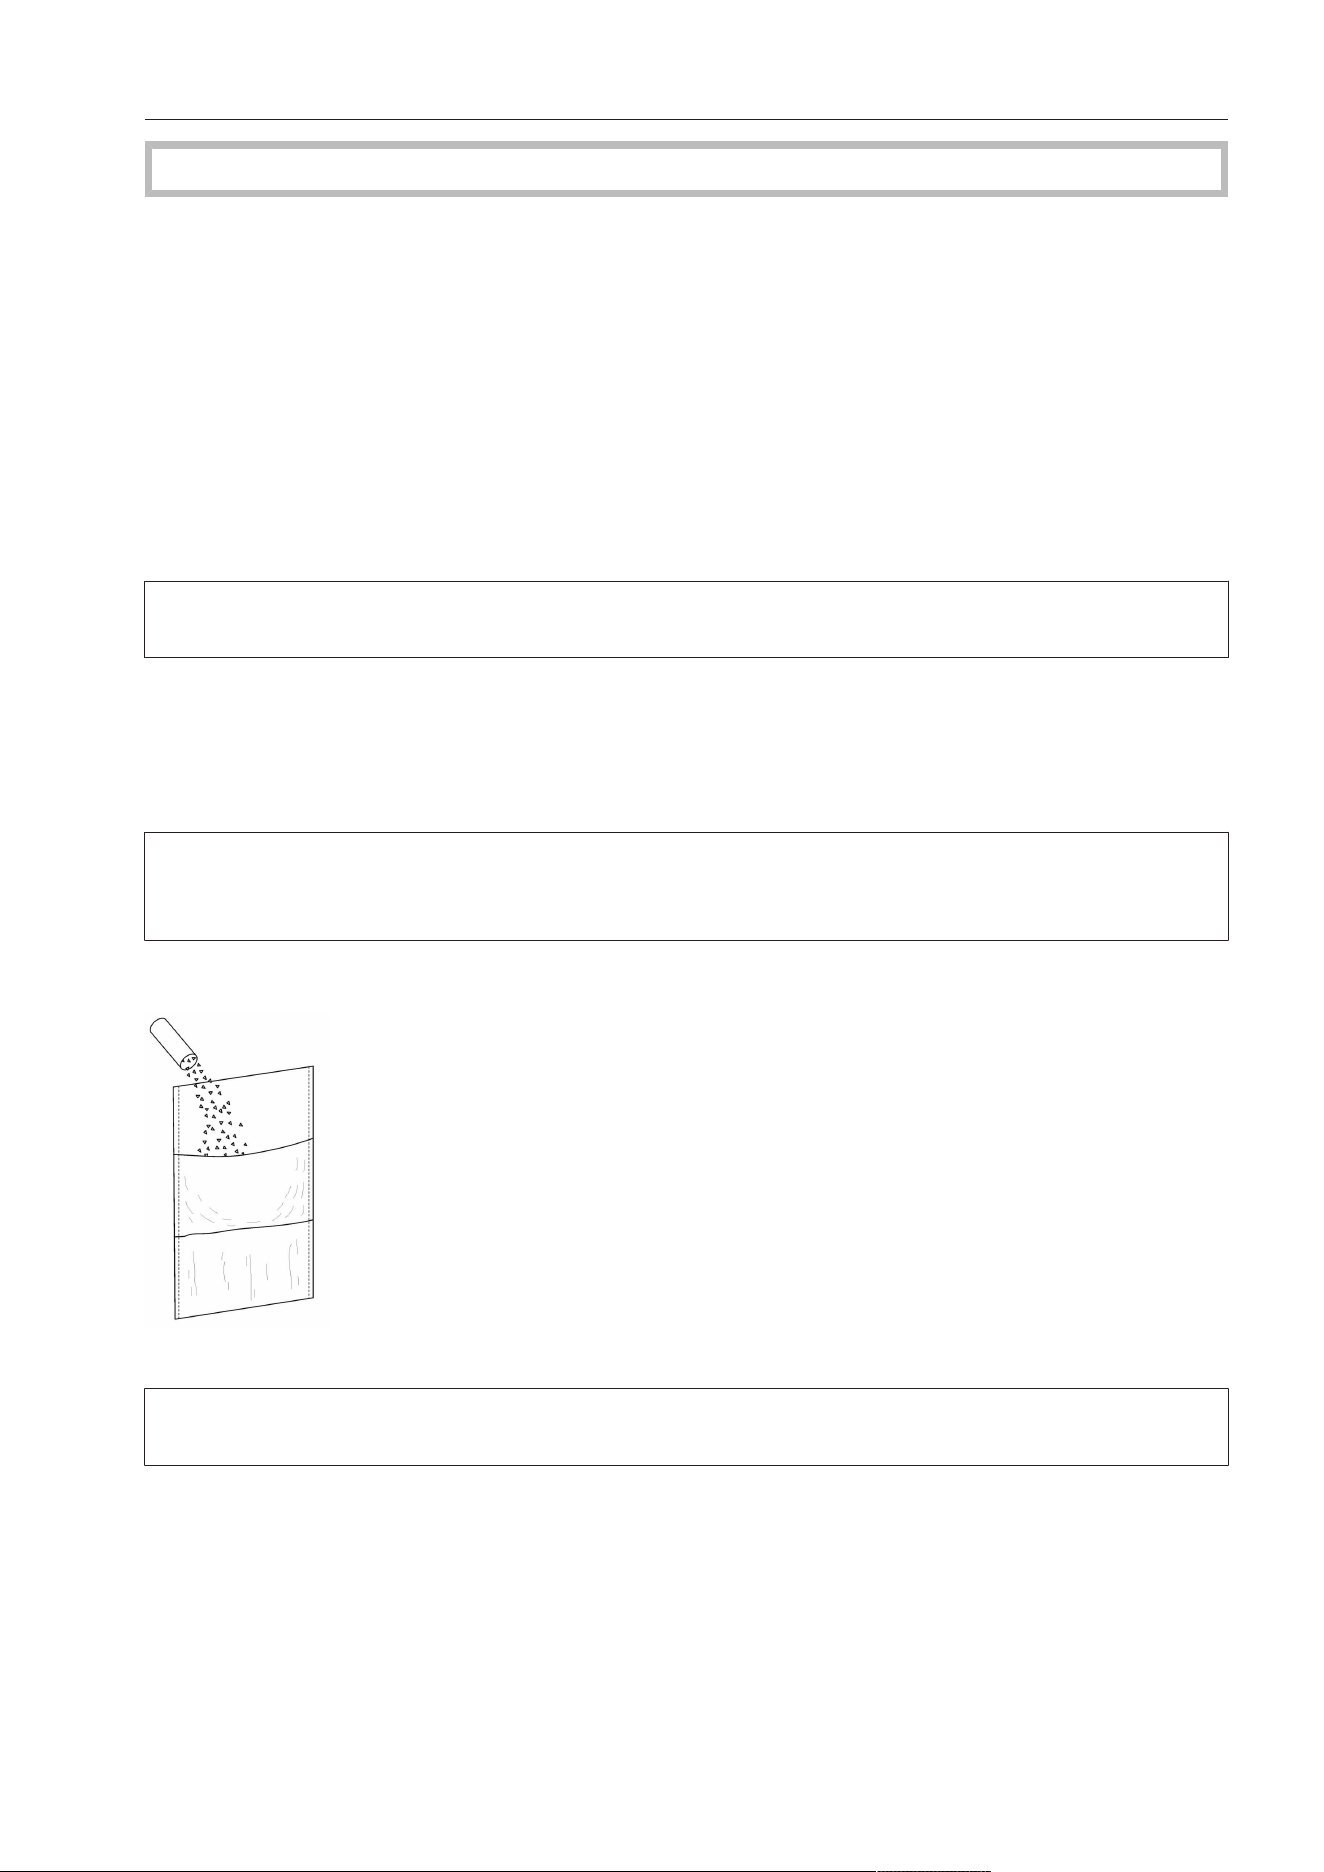
Using the waxing cloth and ironing wax
Sprinkle some ironing wax into the pocket of the waxing cloth.
Use the ironing wax sparingly to prevent the ironing cloth around the roller from becoming
too smooth.
Cleaning and care
32
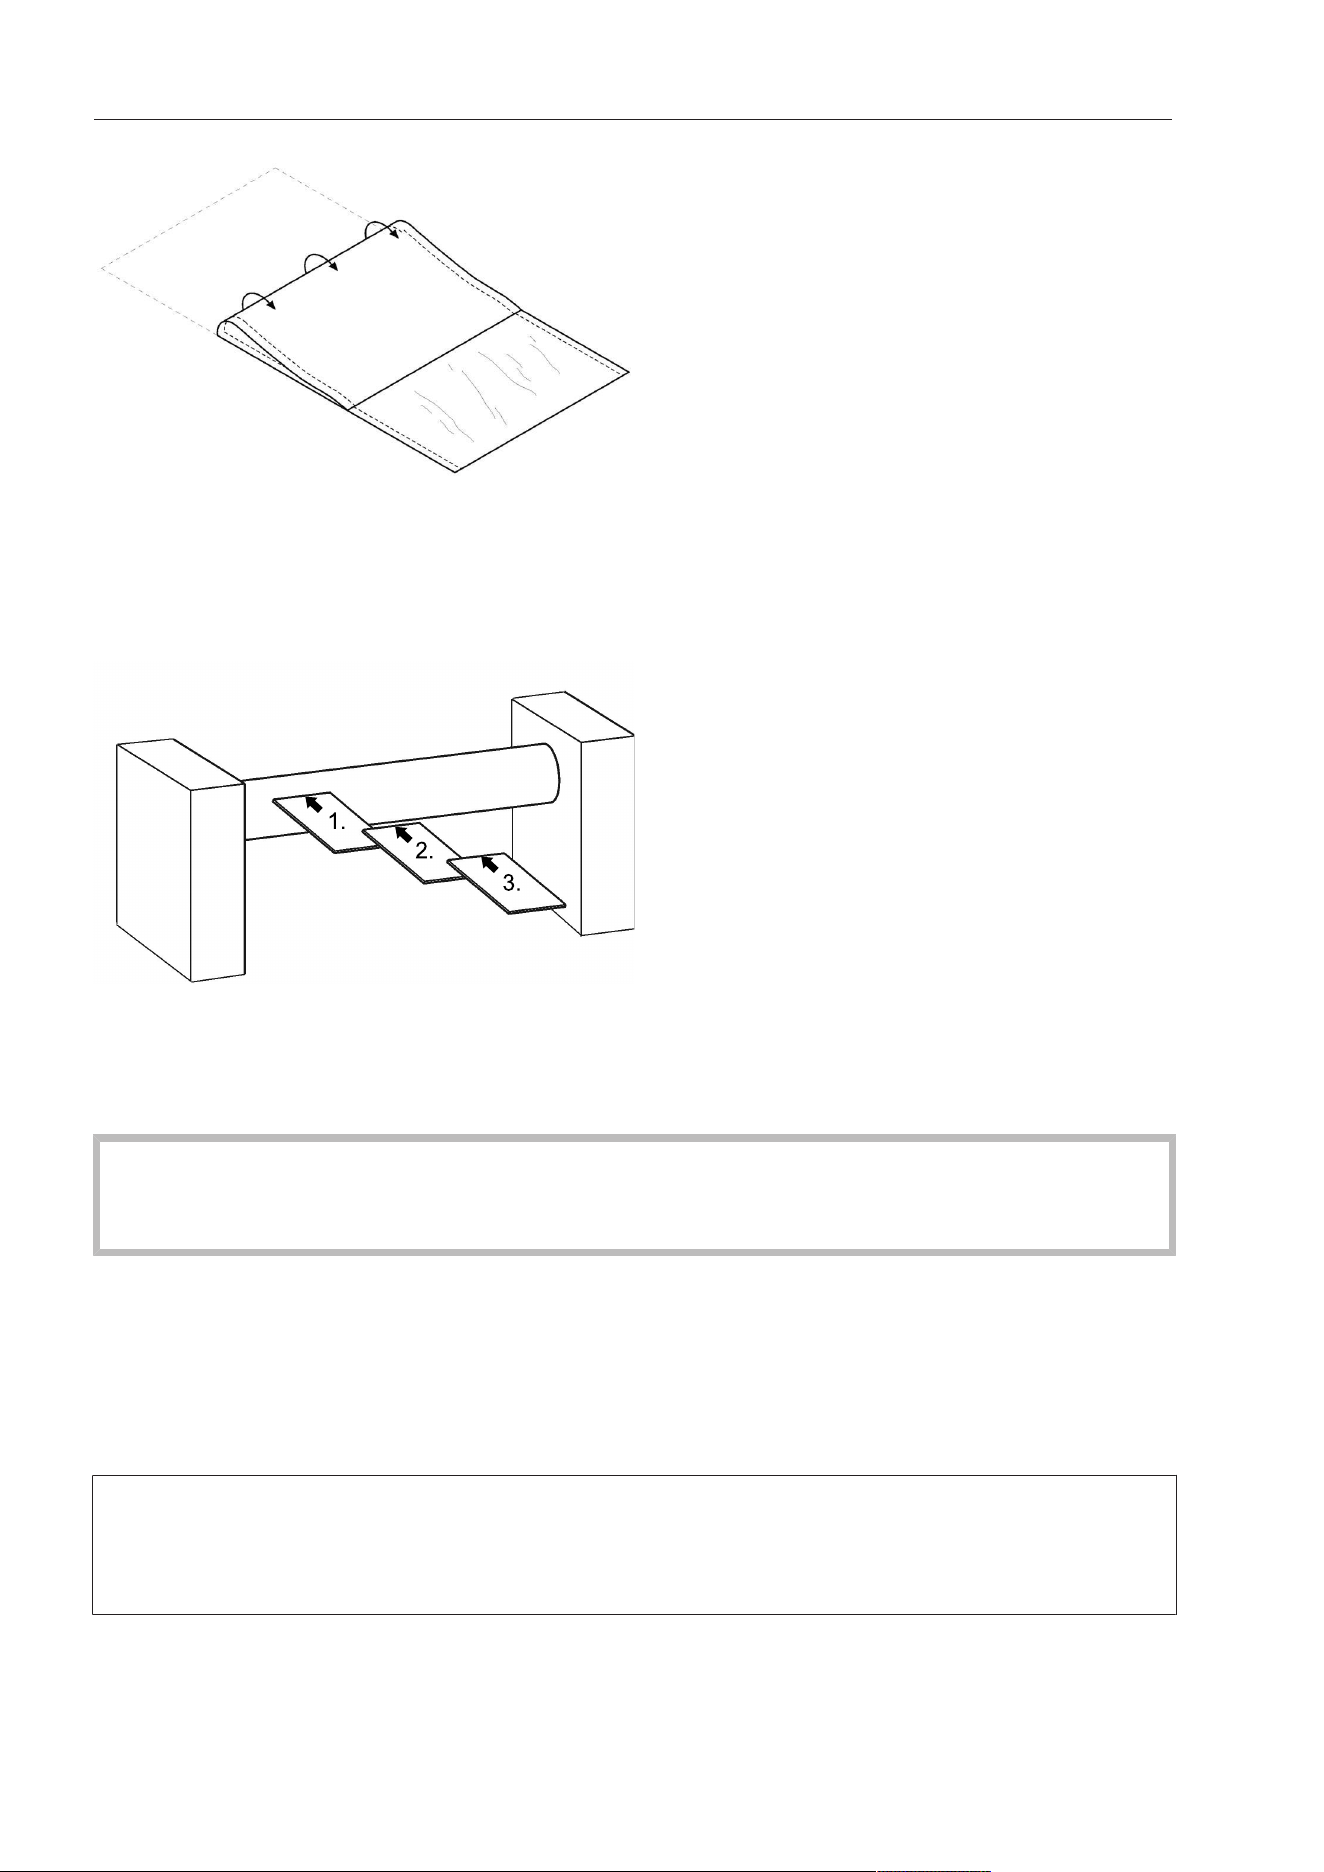
Fold up the waxing cloth.
Start the waxing program (see “Starting the waxing program” in “Waxing the heater
plate”).
Feed the waxing cloth into the rotary iron with the rubber-coated side facing the roller.
1.
2.
3.
Feed the waxing cloth into the rotary iron multiple times from the left or right side at the
necessary intervals across the entire working width of the iron. If no damp patches can
be seen on the waxing cloth after it has passed through the rotary iron, add additional
ironing wax.
On rotary irons with feed-in belts, ensure that no ironing wax comes into contact with
the belts.
Otherwise, the belts become too smooth and can no longer be driven properly.
Press and hold the button for at least 3seconds once waxing is complete.
Waxing mode is deactivated.
- After waxing, feed a cotton cloth through the rotary iron to remove wax residues.
- To maintain the smooth surface of the heater plate, it should be waxed after every work-
ing day.
Always carry out cleaning in the cleaning program and waxing in the waxing program,
otherwise the rotary iron’s maintenance interval will not be reset. The maintenance interval
is only reset once cleaning and waxing have been carried out in the corresponding mode
for at least 40seconds.

Cleaning and care
33
Padding instructions
Before the ironing cloth can be removed for the purpose of cleaning or replacing the
roller, the rotary iron must be switched off and the heater plate allowed to cool down.
Removing the ironing cloth
Before the ironing cloth can be removed from rollers with steel-wool padding, the laun-
dry pickers on the roller need to be fully retracted one after the other.
Switch on the rotary iron by pressing the button.
Pull the finger guard up slightly.
Press and hold the button for longer than 3seconds.
The heater plate disengages and is locked into this position.
Repeatedly press thebutton to reverse the roller incrementally (jog mode).
Take the end of the ironing cloth, and put it on the laundry infeed table.
With the roller in reverse, completely remove the ironing cloth.
After that, press and hold the button for longer than 3seconds to deactivate the main-
tenance position.
Wire wool residues may fall onto the laundry infeed table while the ironing cloth is being re-
moved or fitted. These residues must be removed.
Fitting the ironing cloth (only for steel-wool roller covering)
Switch on the rotary iron by pressing the button.
Pull the finger guard up slightly.
Select the lowest temperature () and the lowest roller speed ().
Lay the ironing cloth on the laundry infeed table parallel to the roller and feed it into the
rotary iron.
The padding needs to be changed if there is a visible gap on the lower edge of the
heater plate and roller (laundry outfeed).
The stainless wool padding on the roller may only be replaced by MieleTechnical Ser-
vice!
The diameter of a new or re-upholstered roller must not be less than the dimensions in-
dicated below (including the ironing cloth).
PRI210/214 PRI217
8 1/4"–8 7/16" (210–215mm) 9 13/16"–10 1/16" (250–255mm)
Within this range the roller should be wound cylindrically over its entire length.
During the replacement of the roller padding, MieleTechnical Service should check
whether the carbon brushes of the drive motor need to be replaced as well.

Cleaning and care
34
MieleTechnical Service
In the event of a malfunction, contact MieleTechnical Service. The MieleTechnical Service
department requires the model and serial number (SN) of the rotary iron.
You will find these on the data plate on the inside of the right-hand side column.
Position of the data plate

Please have the model and serial number
of your machine available when
contacting Technical Service.
U.S.A.
Miele, Inc.
National Headquarters
Importer
Miele Limited
Professional Division
Miele Professional
Technical Service
Phone: 1-888-325-3957
Canada
161 Four Valley Drive
Vaughan, ON L4K 4V8
Phone: 1-888-325-3957
www.mieleprofessional.ca
Manufacturer: Miele & Cie. KG
Carl-Miele-Straße 29, 33332 Gütersloh, Germany
9 Independence Way
Princeton, NJ 08540
Phone: 800-991-9380
www.mieleusa.com/professional
Technical Service & Support
Phone: 800-991-9380
Alteration rights reserved / Publication date: 36.21 M.-Nr. 11 942 090 / 00