30" OSCILLATING TOWER FAN
MODEL 1PAFT30
OWNER’S MANUAL

2
SAFETY & PRECAUTIONS
SAFETY INSTRUCTIONS
IMPORTANT SAFETY INSTRUCTIONS
CAUTION
Read Rules for Safe Operation and Instructions Carefully.
WARNING
1. Toreducetheriskofreorelectricalshock,donotusethis
fan with any solid state speed control device.
2. Ifthesupplycordisdamaged,itmustbereplacedbythe
manufactureroritsserviceagentorasimilarlyqualied
person in order to avoid a hazard.
3. Thisappliancehasapolarizedplug(onebladeiswiderthan
theother).Toreducetheriskofelectricshock,thisplugis
intendedtotinapolarizedoutletonlyoneway.Iftheplug
doesnottfullyintheoutlet,reversetheplug.Ifitstilldoes
nott,contactaqualiedelectrician.Donotattemptto
defeat this safety feature.
4. Do not leave the fan running unattended.
5. Do not run cord under carpeting. Do not cover cord with
throwrugs,runners,orsimilarcoverings.Arrangecordaway
fromtracareaandwhereitwillnotbetrippedover.
6. Thisproductemploysoverloadprotection(fuse).Ablown
fuse indicates an overload or short-circuit situation. If the
fuseblows,unplugtheproductfromtheoutlet.Replacethe
fuse as per the user servicing instructions (follow product
marking for proper fuse rating) and check the product. If the
replacementfuseblows,ashort-circuitmaybepresentand
theproductshouldbediscardedorreturnedtoanauthorized
service facility for examination and/or repair.
3
(Continued)
SAFETY INSTRUCTIONS
a) Do not operate any fan with a damaged cord or plug.
Discard fan or return to an authorized service facility for
examination and/or repair.
b) Donotruncordundercarpeting.Donotcovercordwith
throwrugs,runners,orsimilarcoverings.Donotroute
cord under furniture or appliances. Arrange cord away
fromtracareaandwhereitwillnotbetrippedover.
READ AND SAVE THESE INSTRUCTIONS
RULES FOR SAFE OPERATION
1. Neverinsertngers,pencils,oranyotherobjectsthrough
the fan housing when the tower fan is running. Unplug the fan
when moving it from one location to another.
2. Disconnectthefanbeforecleaning.
3. Toavoidoverturning,besurethefanisonastablesurface
when operating it.
4. Toreducetheriskofelectricshock,DONOTusethefanbya
window.
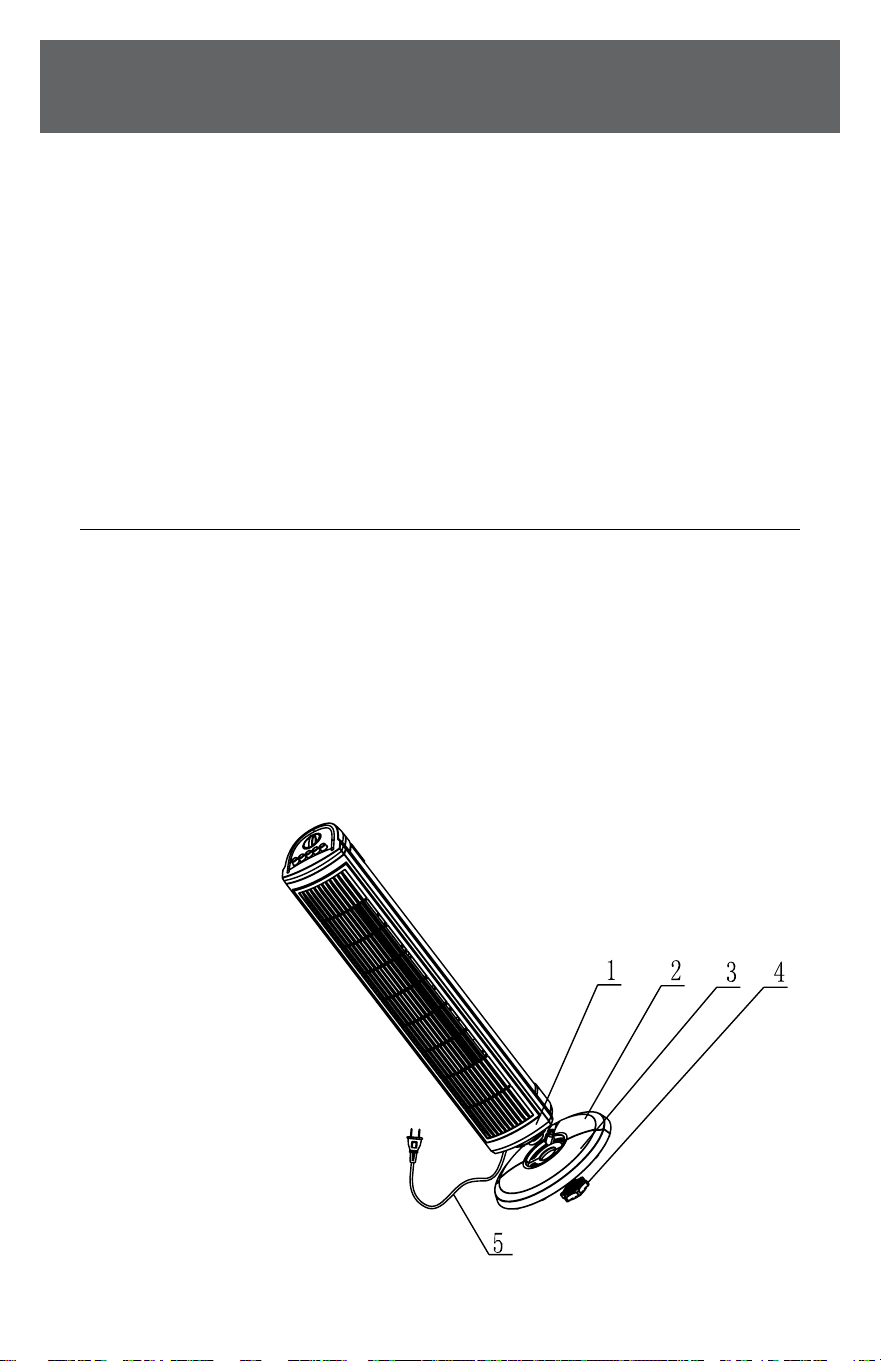
Parts Name
1. Body
2.Rearbase
3.Frontbase
4. Base clip
5. Power cord
4
SAFETY & PRECAUTIONS
PARTS / ASSEMBLY
PARTS ASSEMBLY
1. Pull power cord (5) out slightly. Disconnect the fan
beforecleaning.
2. Puttherearbase(2)onthebody(1)byinsertingthe
cylindersunderthebodytoblindholesonrearbase
as shown on diagram.
3. Putfrontbaseonrearbase(2)andxthebody,the
rearbaseandfrontbasebybaseclip(4)asshown.
OPERATING INSTRUCTIONS
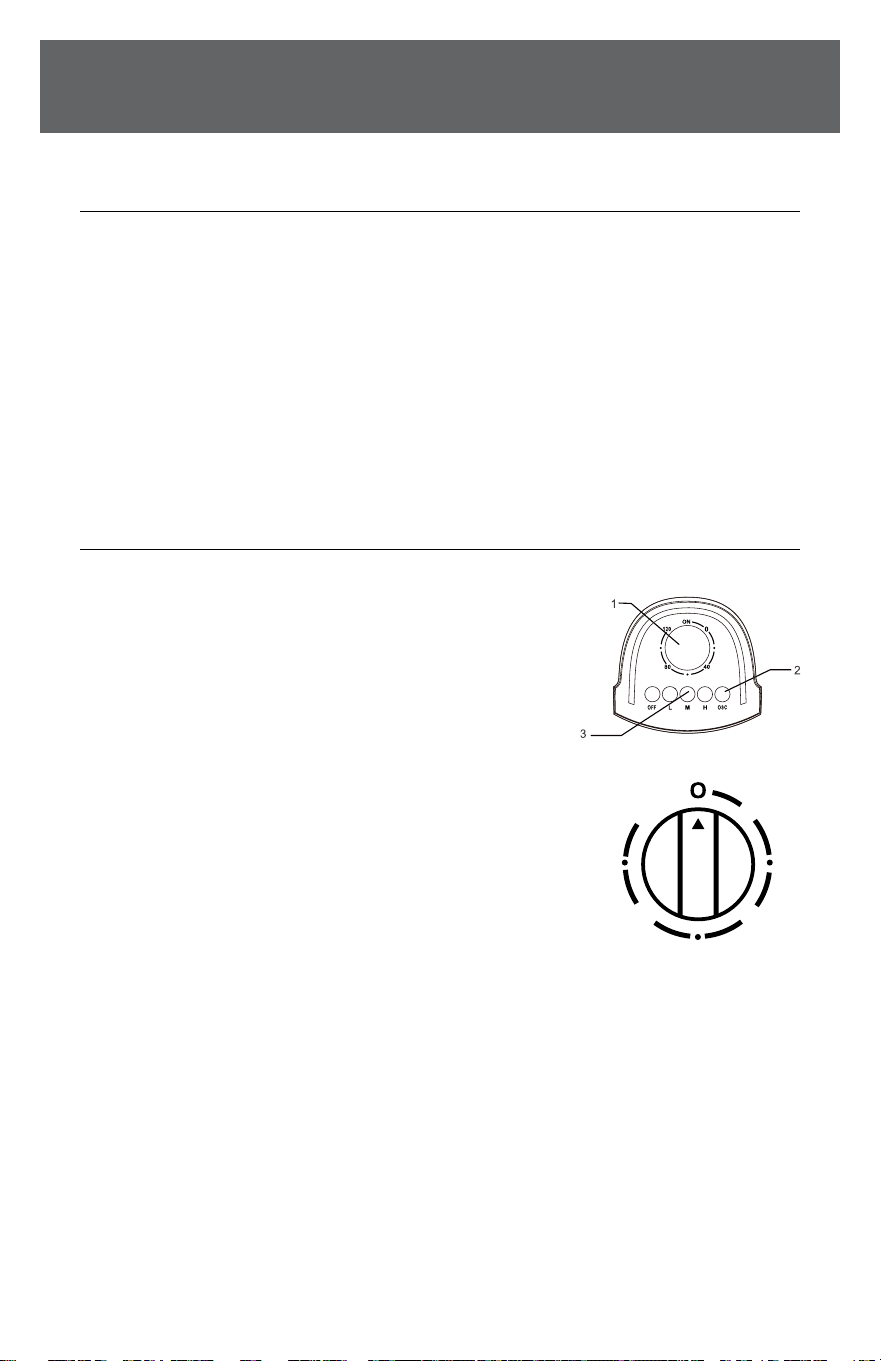
A. CONTROL PARTS DESCRIPTION
1. Timer
2. Body oscillating switch
3. Speed switch
B. INSTRUCTIONS
1. Plug the power cord into a wall outlet.
2. Theairowcanbeangledtotheleft
orrightbypushingthebuttonofbody
oscillating switch (2). If you want to
stopangling,pushitagain.
3. Automatic120-minutetimer.Turntheknobofthetimer(1)
tothedesiredtimeyouwant,thefanwillstopwhenthetime
is over. The longest timer setting is 120 minutes. If the timer
isnotinuse,setthetimerto“O“.
4. Speediscontrolledbypushingspeedswitch(3)
onthetopofthebody.Thereare4positions:
0—O;1—Low;2—Medium;3—High
0
4080
120

5
MAINTENANCE
MAINTENANCE INSTRUCTIONS
Thefanrequireslittlemaintenance.Donottrytoxitbyyourself.
Referittoqualiedservicepersonnelifserviceisneeded.
1. Beforecleaningandassembling,donotplugthepins
into the socket.
2. To ensure adequate air circulation to the motor. Keep vents
attherearofthemotorhousingfromdustandu.A
vacuumcleanercannotbeusedtocleantheseventsbefore
unplugging.Donotdisassemblethefantoremoveu.
3. Please wipe the exterior parts with a soft cloth soaked in
amilddetergent.Donotuseanyabrasivedetergentor
solvents to avoid scratching the surface. Do not use any of
thefollowingasacleaner:gasoline,thinner,bending.
4. Do not allow water or any other liquid into the motor
housing or interior parts.
CLEANING
1. Be sure to unplug from the electrical supply source
beforecleaning.
2. Plasticpartsshouldbecleanedwithmildsoapanddamp
clothorsponge.Thoroughlyremovesoaplmwithclean
water.
3. Be sure not to make water or other liquid enter the
inside of motor.
4. Dryallpartscompletelybeforereassemblingand
reconnecting to power source.

6
SAFETY & PRECAUTIONS
(Continued)
MAINTENANCE
USER SERVICING INSTRUCTIONS
a) Grasp plug and remove from the
receptacle or other outlet device.
Donotunplugbypullingoncord.
b) Openfusecover.Slideopenfuse
accesscoverontopofattachmentplugtowardsblades.
c) Remove fuse carefully. Insert the tip of your tool into fuse
slot(closewiththeterminal),thenprizethefusegradually
andslowly,butnotoverexert.Ifyoufeeltight,youcantryitat
severaltimesandprizethefuselittlebylittle.Whenoneside
ofthefusehasbeenprized,thenyoucangetthefuseout
entirely.
d) Riskofre.Replacefuseonlywith2.5Amp,125Voltfuse.
e) Close fuse cover. Slide closed the fuse access cover on top
of attachment plug.
f) Riskofre.Donotreplaceattachmentplug.Containsasafety
device(fuse)thatshouldnotberemoved.Discardproductif
the attachment plug is damaged.
NOTICE: When you replace the fuse, please don’t operate suddenly
or overexert, or else the product will be damaged or cause an accident.
If it feels hard to replace the fuse, please make sure you have it inserted
the right way.

7

844-4PA-AIRE | 844-472-2473 | support@perfectaire.us
CANADA SUPPORT 877-997-2473 | supportcanada@perfectaire.us
www.perfectaire.us
5401 Dansher Road
Countryside,IL60525
Printed in China | 0822_M989
Foryourrecords,stapleyoursalesreceipt
tothismanualandrecordthefollowing:
Date of Purchase: ____________________________________
Place of Purchase: ___________________________________
NOTE: Proof of purchase is required for all warranty claims.
THANK YOU FOR YOUR PURCHASE!
As a small business, reviews are everything!
We’dlovetohearhowyouareenjoyingyourPerfect
Aire product! Please take a minute to tell us (and others)
aboutyourexperience.
Thanks (again!)
SCAN CODE TO
LEAVE A REVIEW
NOTE:Asaresultofcontinualimprovements,thedesignand
specicationsoftheproductwithinmaydierslightlytothe
unit illustrated on the packaging.
