1 / 26
HiBy R3
User Manual

2 / 26
Thank you for purchasing the HiBy R3, an ultraportable touchscreen hi-res digital
audio player. To enjoy the R3 to its fullest, please read this user guide thoroughly.
Contents
1. Brief Introduction ................................................................................................ 4
1.1 Product Introduction ..................................................................................... 4
1.1 1.2 Buttons and ports ....................................................................................... 5
1.3 List of accessories ....................................................................................... 8
2. Basic Operations ................................................................................................ 9
2.1 Turning on ....................................................................................................... 9
2.2 Turning off ....................................................................................................... 9
2.3 Locking and unlocking the screen .................................................................... 9
2.4 Playback .......................................................................................................... 9
2.5 Pause and resume playback ............................................................................ 9
2.6 Last song and next song ................................................................................ 10
2.7 Adjusting volume ........................................................................................... 10
2.8 Adjusting backlight ......................................................................................... 10
2.9 Connecting to computer ................................................................................. 10
2.10 Restoring factory settings............................................................................. 10
2.11 Updating firmware ........................................................................................ 11
2.12 Viewing the information for R3 ..................................................................... 11
2.13 Standby function .......................................................................................... 11
2.14 Sleep timer .................................................................................................. 12
2.15 Idle timer ...................................................................................................... 12
3. Connection ....................................................................................................... 12
3.1 Connecting Wi-Fi ........................................................................................... 12
3.2 Connecting Bluetooth..................................................................................... 12
3.3 Connecting HiBy Link..................................................................................... 12

3 / 26
3.4 Connecting DLNA .......................................................................................... 15
3.5 Connecting Airplay ......................................................................................... 16
4. Files Transfer ................................................................................................... 18
4.1 Import music files via Wi-Fi ............................................................................ 18
4.2 Copy music files to micro SD card ................................................................. 18
5. Listen to Music on R3 ....................................................................................... 18
5.1 Earphone port (3.5mm) .................................................................................. 18
5.2 Balance port (2.5mm) .................................................................................... 18
5.3 SPDIF ............................................................................................................ 18
6. Driver Installation & USB DAC Function ........................................................... 19
6.1 Driver installation ........................................................................................... 19
6.2 USB DAC function. ........................................................................................ 23
7. FAQ..................................................................................................................... 24

4 / 26
1. Brief Introduction
1.1 Product Introduction
The HiBy R3
- Features the custom lightweight HiBy OS, passing audio bit-perfectly to the DAC
and allowing quick touchscreen operation.
- Features a ESS ES9028Q2M DAC for native decoding of hi-res audio formats, up to
384kHz PCM and DSD128.
- Includes MQA technology, which enables you to play back MQA audio files and
streams, delivering the sound of the original master recording.
- Supports a wide variety of music formats, including DSD, DXD, WAV, FLAC, ALAC,
APE, WMA, AIFF, AAC, MP3, MP2 and Ogg Vorbis, at up to 64bit/384kHz | DSD128.
- Comes with professional features such as .cue indexed playback, gapless playback,
auto-play through folders and a ten-band EQ.
Below we will introduce you to the use of the R3 as an audio player via an illustrated
guide.
5 / 26
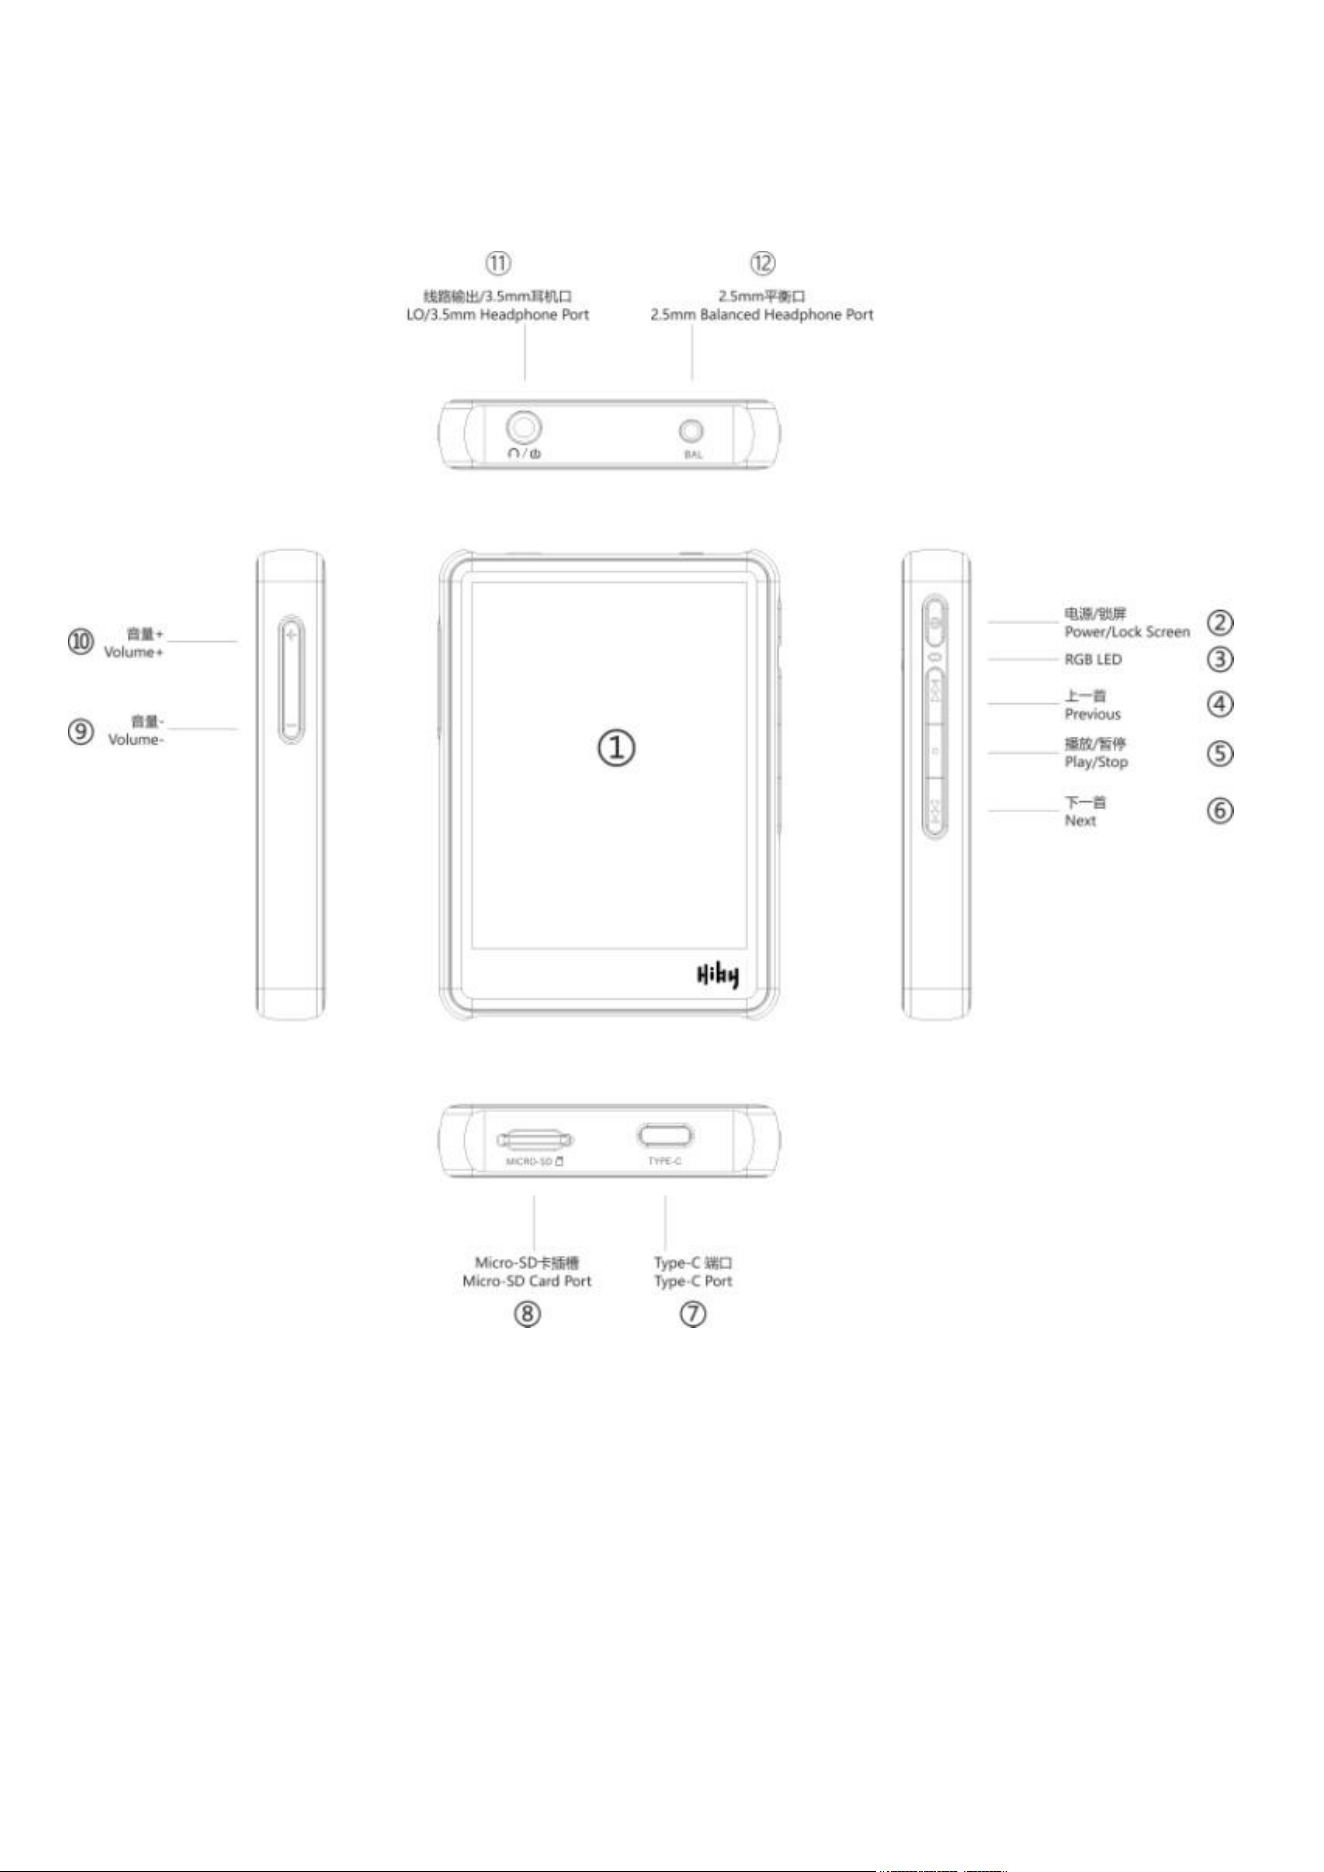
1.1 1.2 Buttons and ports

6 / 26
①Touchscreen: displays the R3’s graphical user interface and allows you to complete
all touch-based operations. The R3, after power on, will go straight to he intuitive
player screen, where tapping on the labelled and/or pictorial icons will produce
predictable results. Note that you can swipe left and right on the screen to bring up
extra menus.
②On / off switch: Hold down for two seconds to turn the R3 from off to on; hold down
the button while the R3 is on to show the power off / restart menu; press briefly while
powered on to turn the screen off / on; hold down for ten seconds to force restart.
③Multicolor LED: changes colors depending on what is playing in terms of sample
rate:
Not playing Pale blue
32kHz~48kHz Blue
88.2k~192kHz Green
352.8k~384kHz Orange
DSD White
④Previous button
⑤Play button
⑥Next button
These buttons can be used to skip to the previous track, toggle play / pause, and skip
to the next track respectively, even while the R3’s screen is off or the R3 is in your
pocket.
⑦USB-C port: It is recommended to keep your newly bought R3 powered off and
charge its battery using the provided USB data/power cable connected to a suitable
USB power source (preferably a Quick Charge 1.0/2.0/3.0 capable power adapter) for
two hours or until the R3 indicates it is full. The screen would light up for a few
seconds indicating the charge status / level; press the power button briefly to light up

7 / 26
the screen with this indication again at any time. After completing charging, hold the
power button to turn on the R3 and connect the USB cable from the R3 to your
computer to start importing songs.
⑧Micro SD card slot: the R3 carries an external micro SD card slot for music storage.
Insert a micro SD card face down (I.e. the metal contacts facing the same way as the
R3’s touchscreen) into the slot and press in until it stays in the slot to install a card;
press an installed card into the slot once more and it will be ejected. With the R3
connected to your computer via the provided USB cable, the card you installed in the
R3 will appear in your computer. To place music files in the card, simply drag and drop
them in. You should “safely eject” the card from your computer before disconnecting
the USB cable.
⑨Volume - button: while music is playing, press this button to reduce volume by one
step, hold down to reduce volume continuously down to silence.
⑩Volume + button: while music is playing, press this button tin increase volume by
one step, hold down to increase volume continuously up to maximum.
⑪3.5mm headphone port + line out output:
a) insert most earphone plugs into this port to play music, including earphones with
3.5mm plugs with two rings on the metal plug, and earphones with 3.5mm plugs with
three rings on the metal plug that carry a microphone and/or a remote button.* If your
headphones carry a large 1/4” plug, use a step-down cable to connect to this port.
b) the anolog line out can be accessed using any regular 3.5mm auxiliary cable.
* Do NOT connect balanced earphones (i.e. earphones with 3.5mm plugs with three
rings on the metal plug that do NOT carry a microphone nor remote button) to this port.
Instead, use an appropriate step-down cable to connect to the 2.5mm balanced
headphone port.

8 / 26
⑫2.5mm balanced headphone port: suitable for specially designed balanced
headphones with 2.5mm plugs with three rings on the plug. Please do not use
converter cables / adapters to connect regular earphones to this port.
1.3 List of accessories
- The R3 player proper
- USB data / charging cable
- This user guide
- Warranty card (attached to this user guide)
- QC certificate
- 3 screen protectors for the R3 touchscreen (one pre-applied on the screen)
- A plastic protect case

9 / 26
2. Basic Operations
2.1 Turning on
With the R3 off, press the power button for 1 second to turn it on.
2.2 Turning off
Software power off: With the R3 on, press the power button for 2 seconds to turn it off.
Hardware power off: Press the power button for 6 seconds to force shutdown.
2.3 Locking and unlocking the screen
With the screen on/off, press the power button to turn the screen off/on.
2.4 Playback
Store the music files in micro SD card -> Insert micro SD card to the card slot -> Click
“Scan” and wait for the list to be updated.
*Music formats support: mp3, mp2, wav, ape, flac, dsf, dff, iso, cue, wma, ogg, aac,
opus, aiff.
*Micro SD card format supported: FAT32, EXFAT, NTFS
Slide the interface to the left and the right to switch menus and interfaces.
Click the relevant icons in the playback interface to change music, pause and resume
playback, select the playback mode, view music information and select other
operations. Drag the progress bar to fast forward and rewind the music.
2.5 Pause and resume playback
Button press operation: Press the play button on the right side of the player to pause
playback while playing music. Press it again to resume playback.

10 / 26
Icon click operation: Click the pause icon (II) to pause the music while playing music.
Click play icon (►) to resume playback.
2.6 Last song and next song
Button press operation:
Short press the rewind button on the right side of the player to change to the last
song.
Short press the fast-forward button on the right side of the player to change to the next
song.
Long press the rewind button on the right side of the player to rewind the music.
Long press the fast-forward button on the right side of the player to fast forward the
music.
2.7 Adjusting volume
Press the up and down volume button on the left side of the player to increase and
decrease the volume.
2.8 Adjusting backlight
Click “System settings” -> “Brightness” and slide the bar to adjust the backlight
brightness.
2.9 Connecting to computer
Click “System settings” -> “USB mode”, select “Storage”, insert one end of the USB
Type C cable into the USB port of the player, and plug the other end into the USB port
of the computer.
2.10 Restoring factory settings
Click "System Settings" -> "Restore factory settings" and click "OK".

11 / 26
2.11 Updating firmware
Please do not power off during the update process, and ensure that the battery power
is no less than 30%.
OTA update: Click “Firmware update” -> “OTA update” -> Click “Yes” if the update
firmware is examined.
Update via micro SD card: Copy the firmware package “update.upt” in the root
directory in micro SD card. Insert micro SD card into the player. Click “System
settings” -> “Firmware update” -> “Update via micro SD card” -> click “OK”. Wait for
the update to be completed.
*The update firmware r3.upt will be released on HiBy Music Facebook Page.
2.12 Viewing the information for R3
Click "About" to view the related information of the player.
2.13 Standby function
Enter standby mode:
1) The screen is off.
2) The player is in the status of stop or pause playback.
3) The player is not in the status of HiByLink, DLNA, Airplay, USB connection, etc.
Under the above conditions, the player will enter standby mode by default after 1
minute.
Wake up from standby mode:
1) Short press the power button.
2) Insert USB.

12 / 26
After waking up, the player will restore to the condition before entering standby.
2.14 Sleep timer
Except connecting with USB, the player will power off directly when the appointed
sleep time comes.
2.15 Idle timer
The idle timer is calculated from the player stops any operation (e.g. play music,
adjust volume and button operation, etc.).
The player is connected with computer or in the interface of charging, the player will
not react to the idle timer.
If the standby option is enabled, the player will enter standby mode within 1 minute.
If the standby option is disabled, the player will power off directly when the appointed
idle time comes.
3. Connection
3.1 Connecting Wi-Fi
Enter “Wireless settings” -> Switch “Wi-Fi” On” -> Click “Scanning for networks” and
wait for the scanning -> Select a Wi-Fi in “Available Network” -> Enter password and
click “Connect” -> “Connected” is display.
3.2 Connecting Bluetooth
Enter “Wireless settings” -> Switch “Bluetooth” On -> Click “Search devices” and wait
for the scanning -> Select a Bluetooth in “Available Bluetooth” -> R3 automatically
connects with the other device via Bluetooth -> “Connected” is display.
3.3 Connecting HiBy Link
With HiBy Link connection, smart devices can control HiBy R3 to do related
13 / 26
operations. HiBy Link connection on HiBy R3 is supported via Bluetooth only.
1) Bluetooth connection. Refer to Point 3.2.
2) Enter “Wireless settings” -> Switch “Bluetooth” On -> Switch “HiBy Link” On.
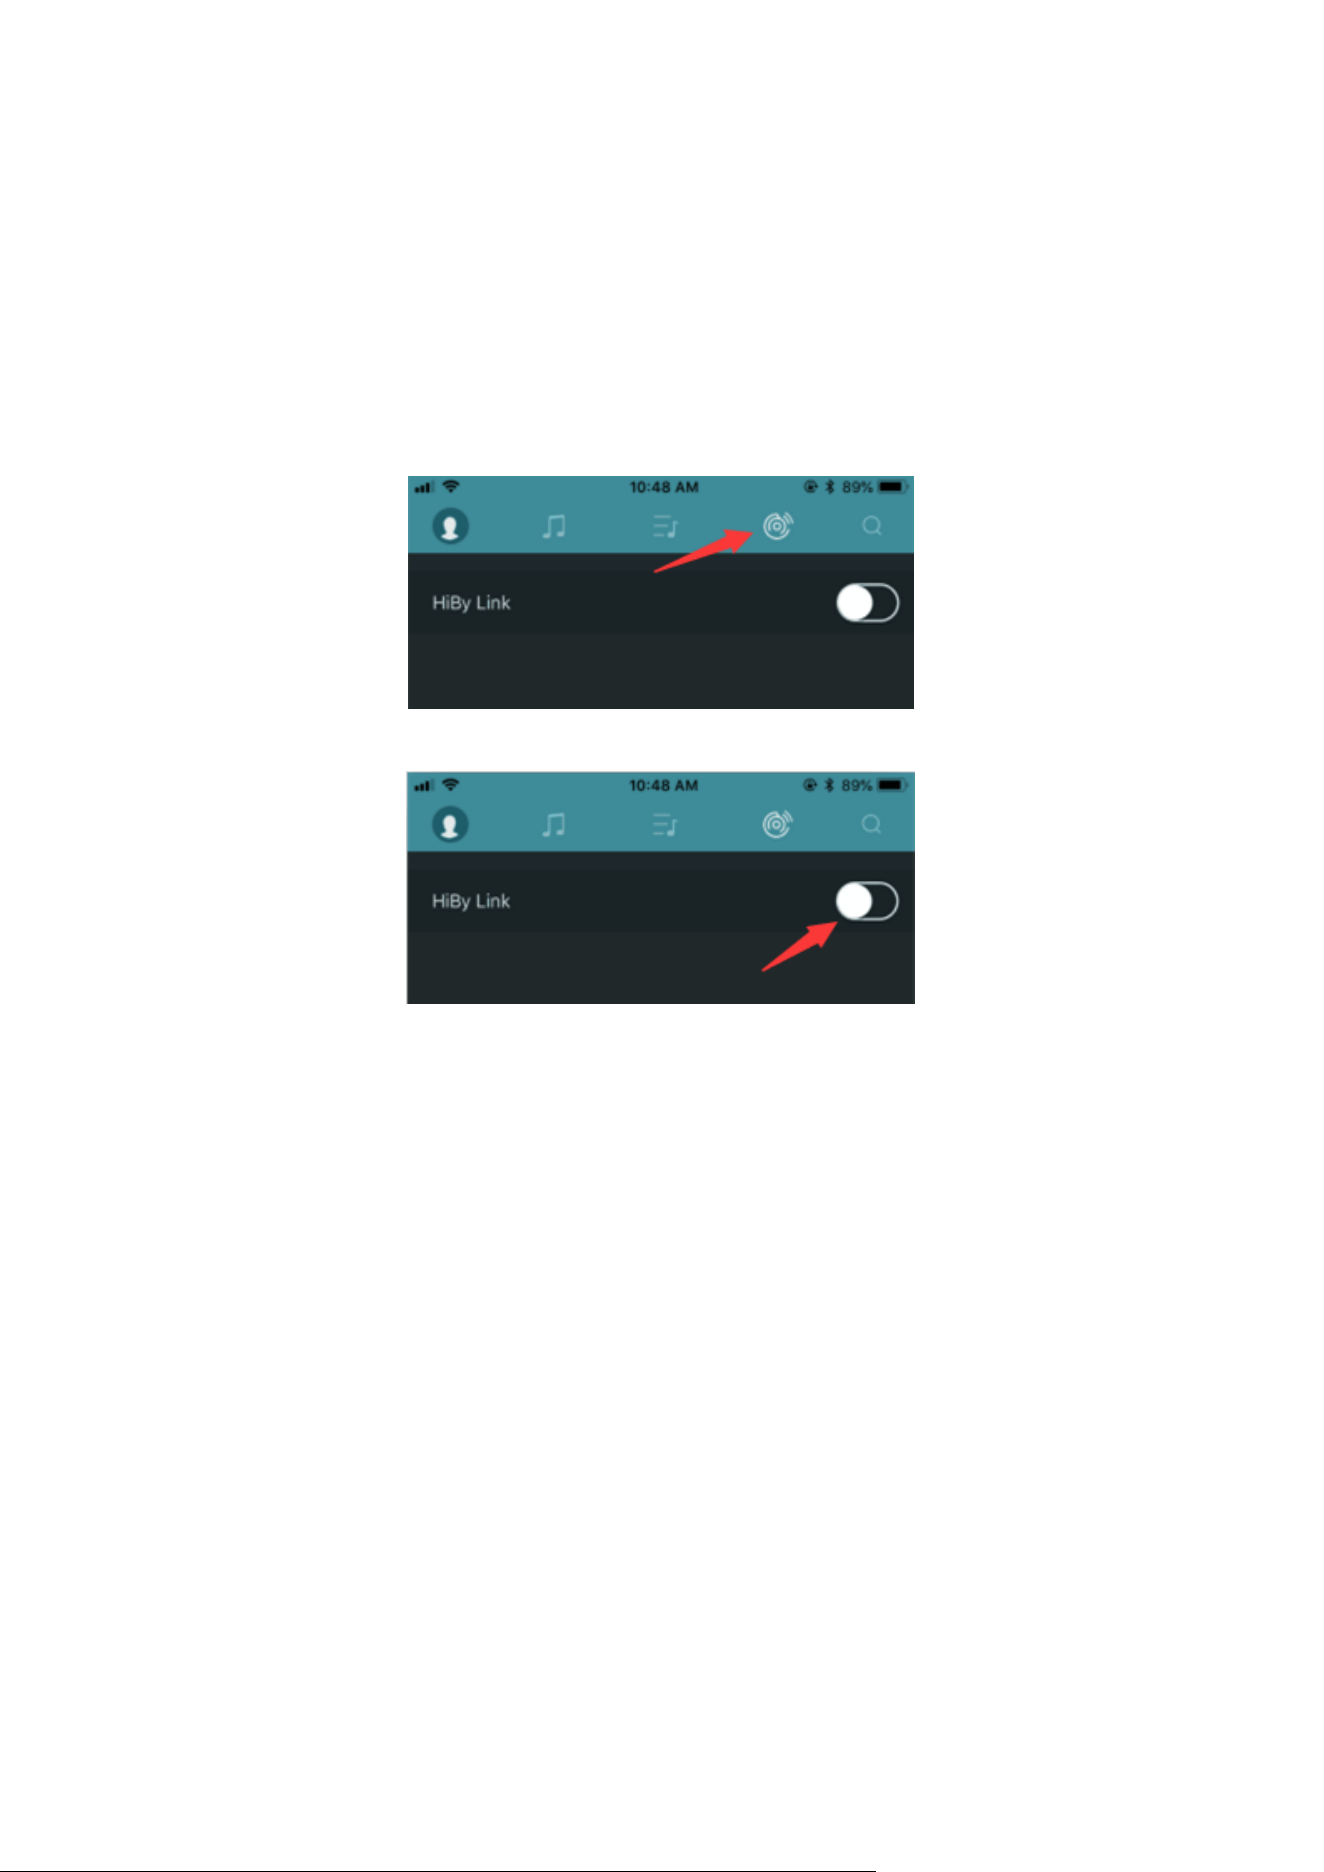
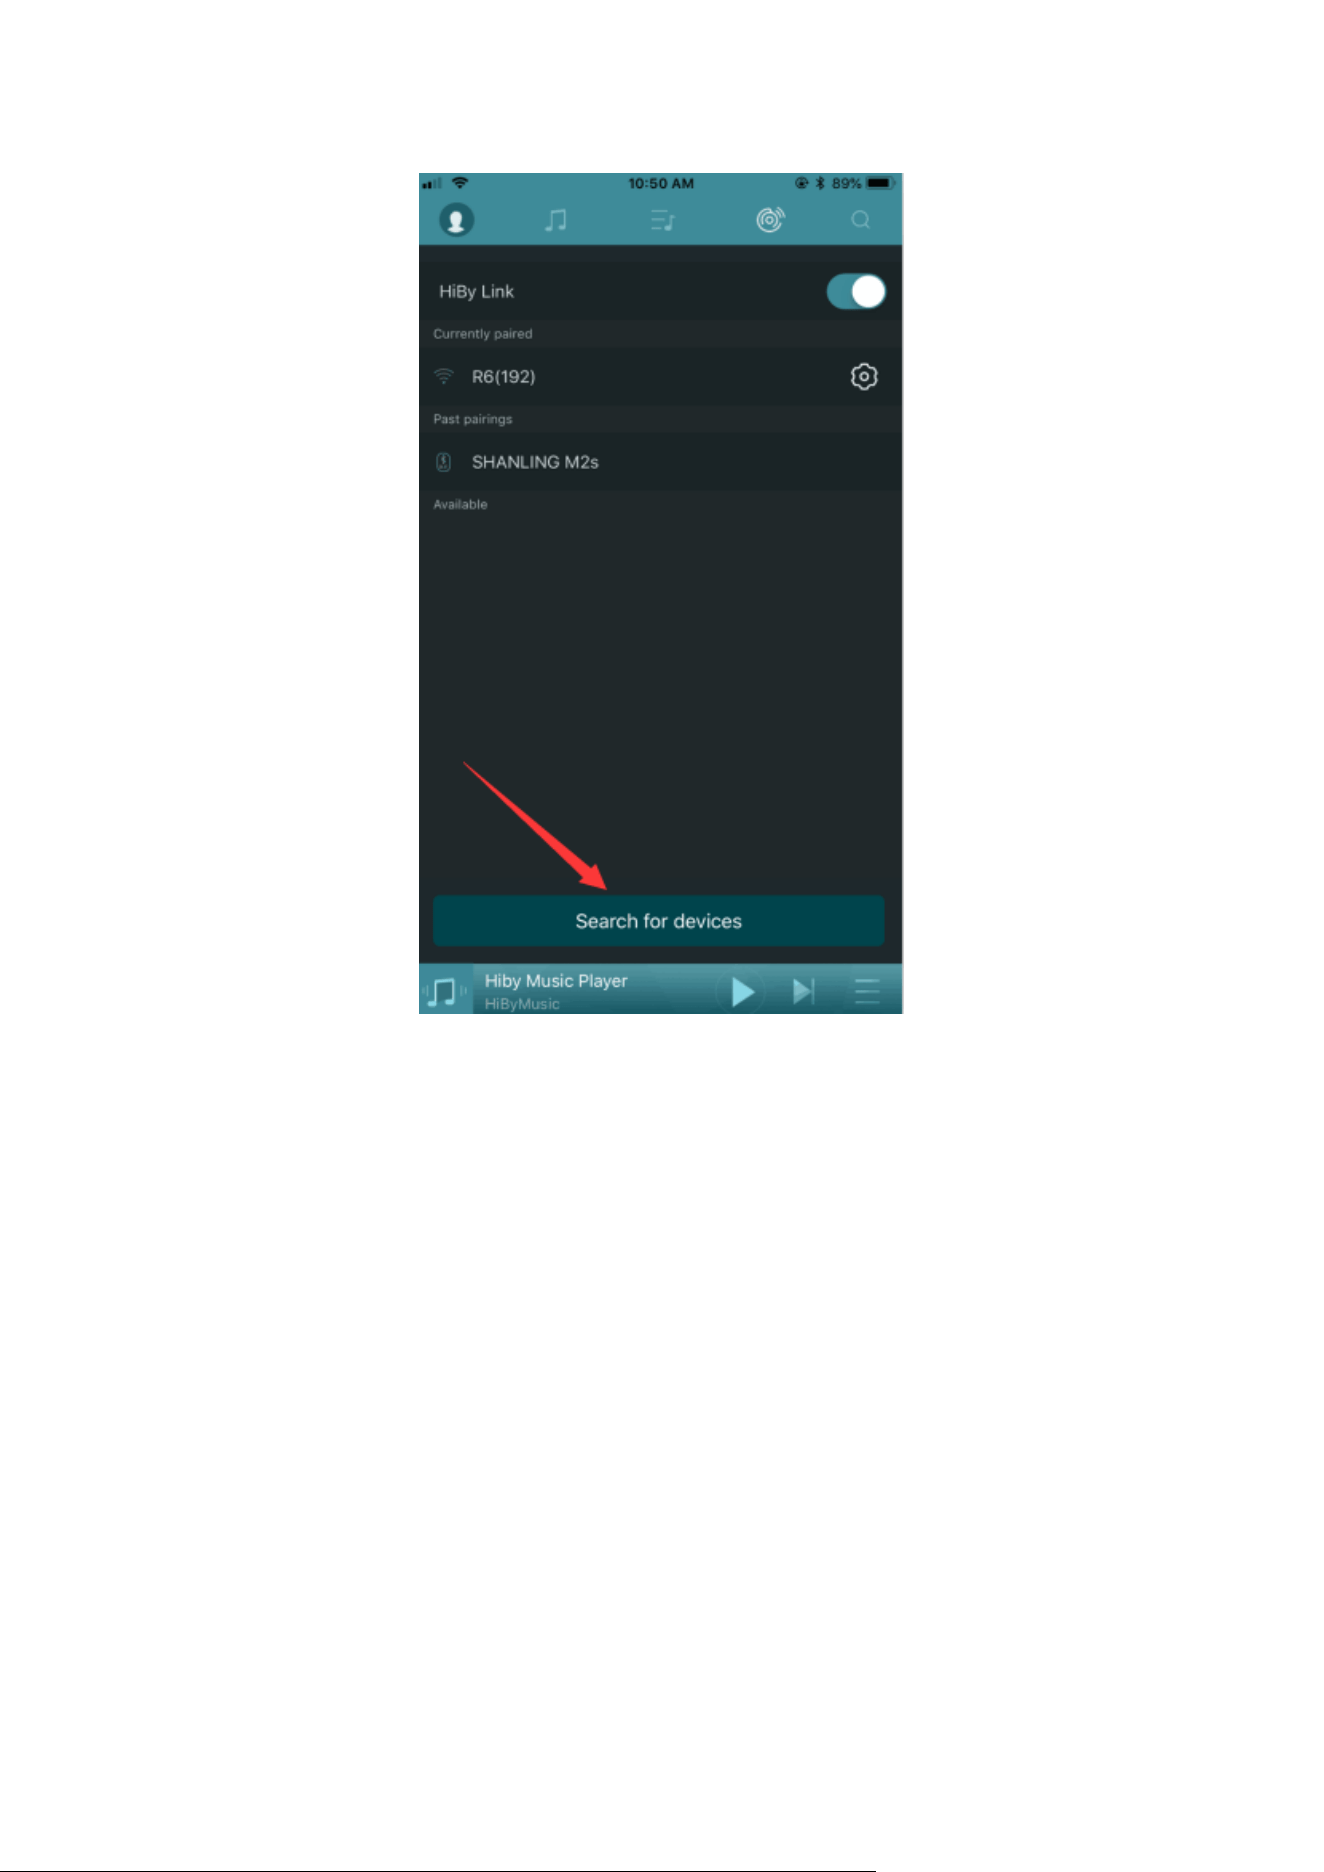
3) Turn on Bluetooth on phone (iOS/Andrioid) and launch “Hiby Music” app. Click
HiBy Link icon (Figure 3.3.1) -> Switch it On (Figure 3.3.2) -> Search devices (Figure
3.3.3) -> Select HiBy R3 (Figure 3.3.4).
(Figure 3.3.1)
(Figure 3.3.2)
14 / 26
(Figure 3.3.3)

15 / 26
(Figure 3.3.4)
4) With successful connection between R3 and phone, control the playback via Hiby
Music app on phone.
3.4 Connecting DLNA
1) Wi-Fi connection. Refer to Point 3.1.
2) Enter “Wireless settings” -> Switch “DLNA” On.
3) Turn on an Android device, connect the same Wi-Fi with R3.
4) Launch the apps that support DLNA (such as BubbleUPnP). Enter the setting
interface -> Switch "DLNA Connection" On -> Scan DLNA device -> Select HiBy R3.
* HiBy R3 is acting as a DLNA renderer - any DLNA controller on the same network
16 / 26
can "cast" to the R3 and make the R3 play music stored elsewhere. However, to do
this, something other than HiBy R3 has to take the initiative, i.e. HiBy R3 itself is not a
DLNA controller.
3.5 Connecting Airplay
1) Wi-Fi connection. Refer to Point 3.1.
2) Enter “Wireless settings” -> Switch “Airplay” On.
3) Turn on an Apple device, connect the same Wi-Fi with R3.
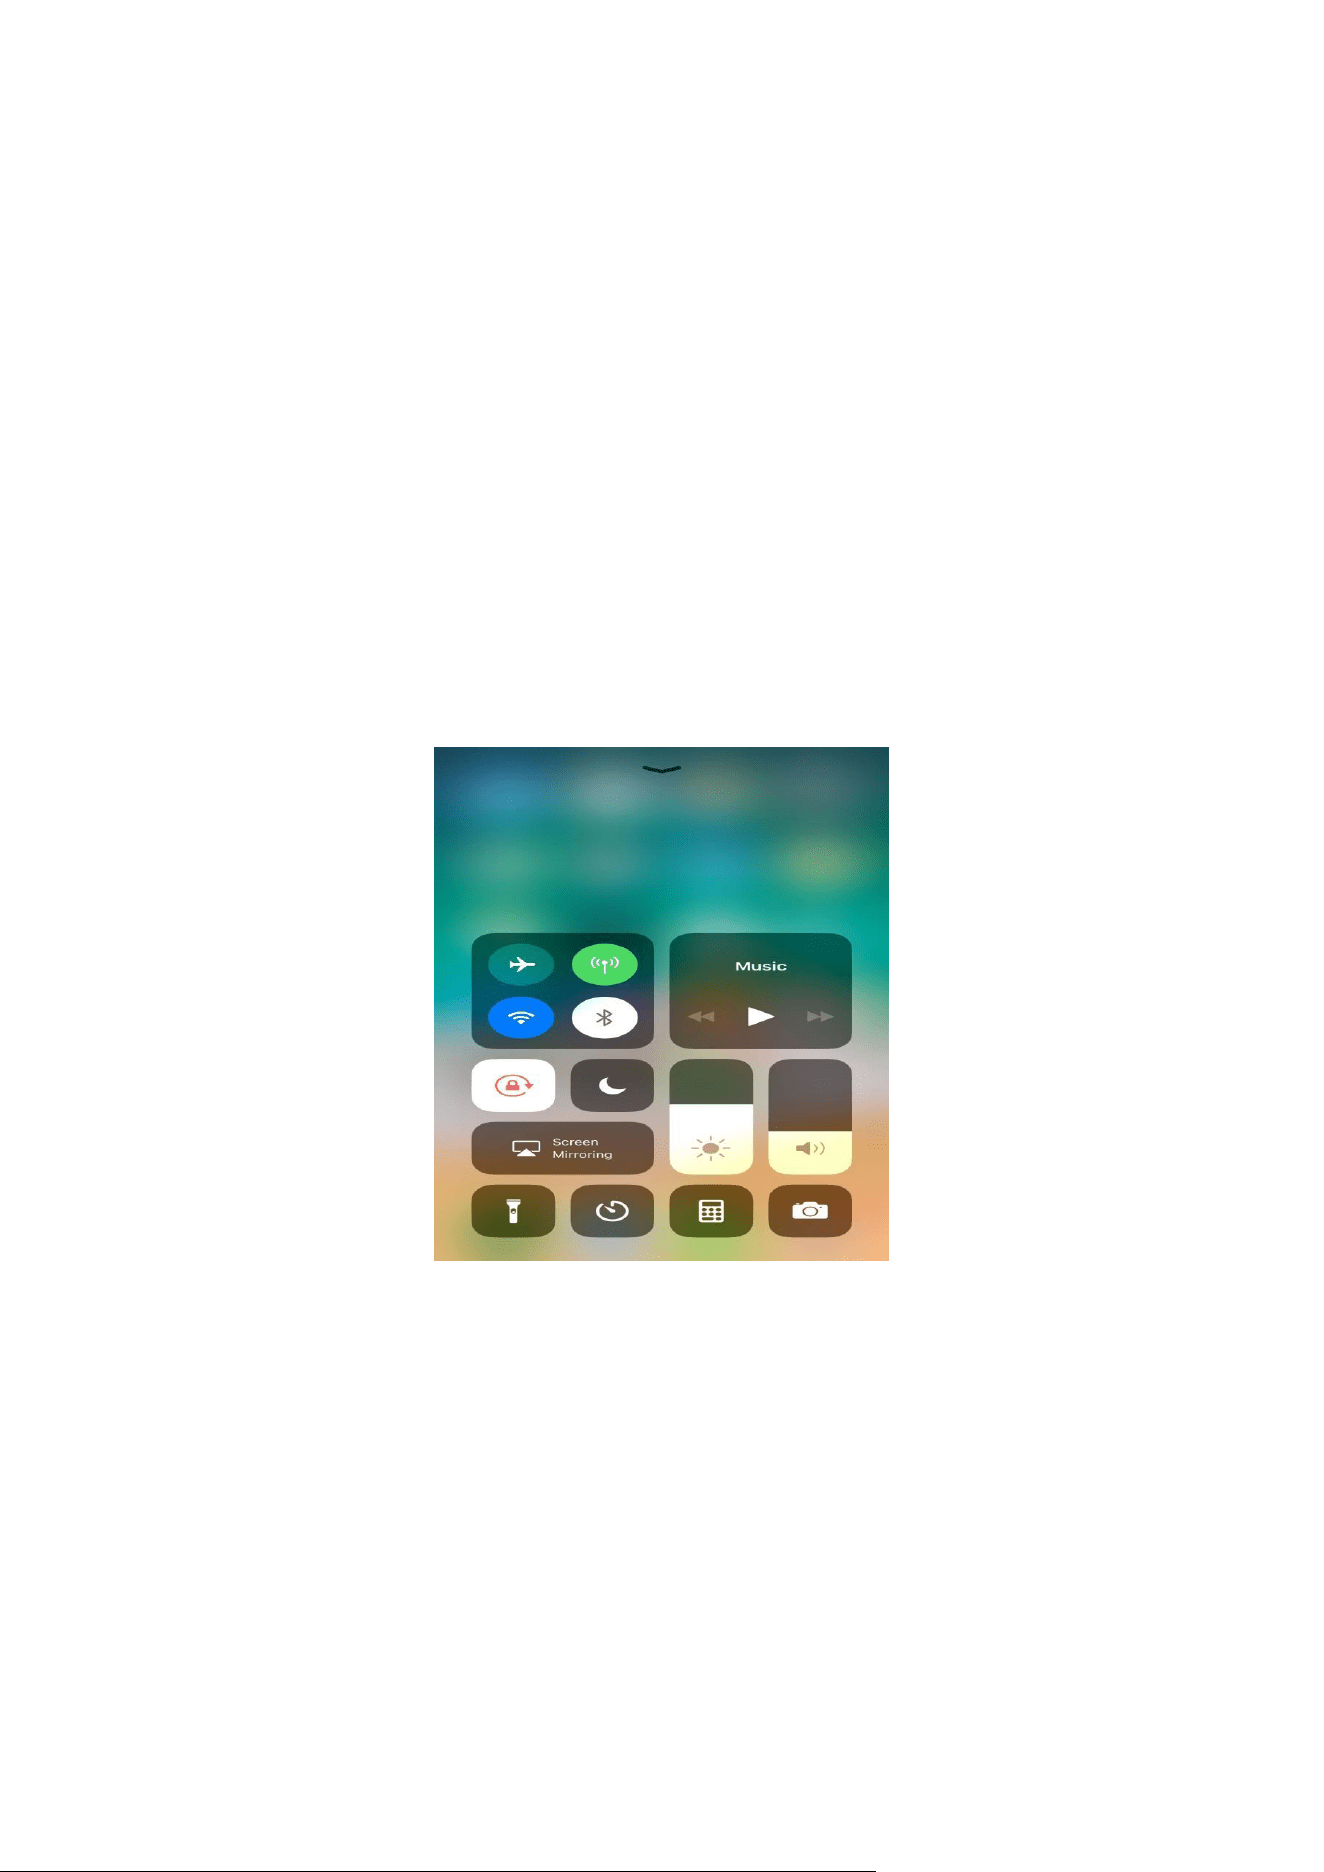
4) Connect R3 with Apple device. Take iPhone 6 with iOS 11.25 for example.
- Pull up from the bottom of the screen to call out the shortcut setting. Long press
music module (Figure 3.4.1).
(Figure 3.4.1).
- Click Airplay icon (Figure 3.4.2)..
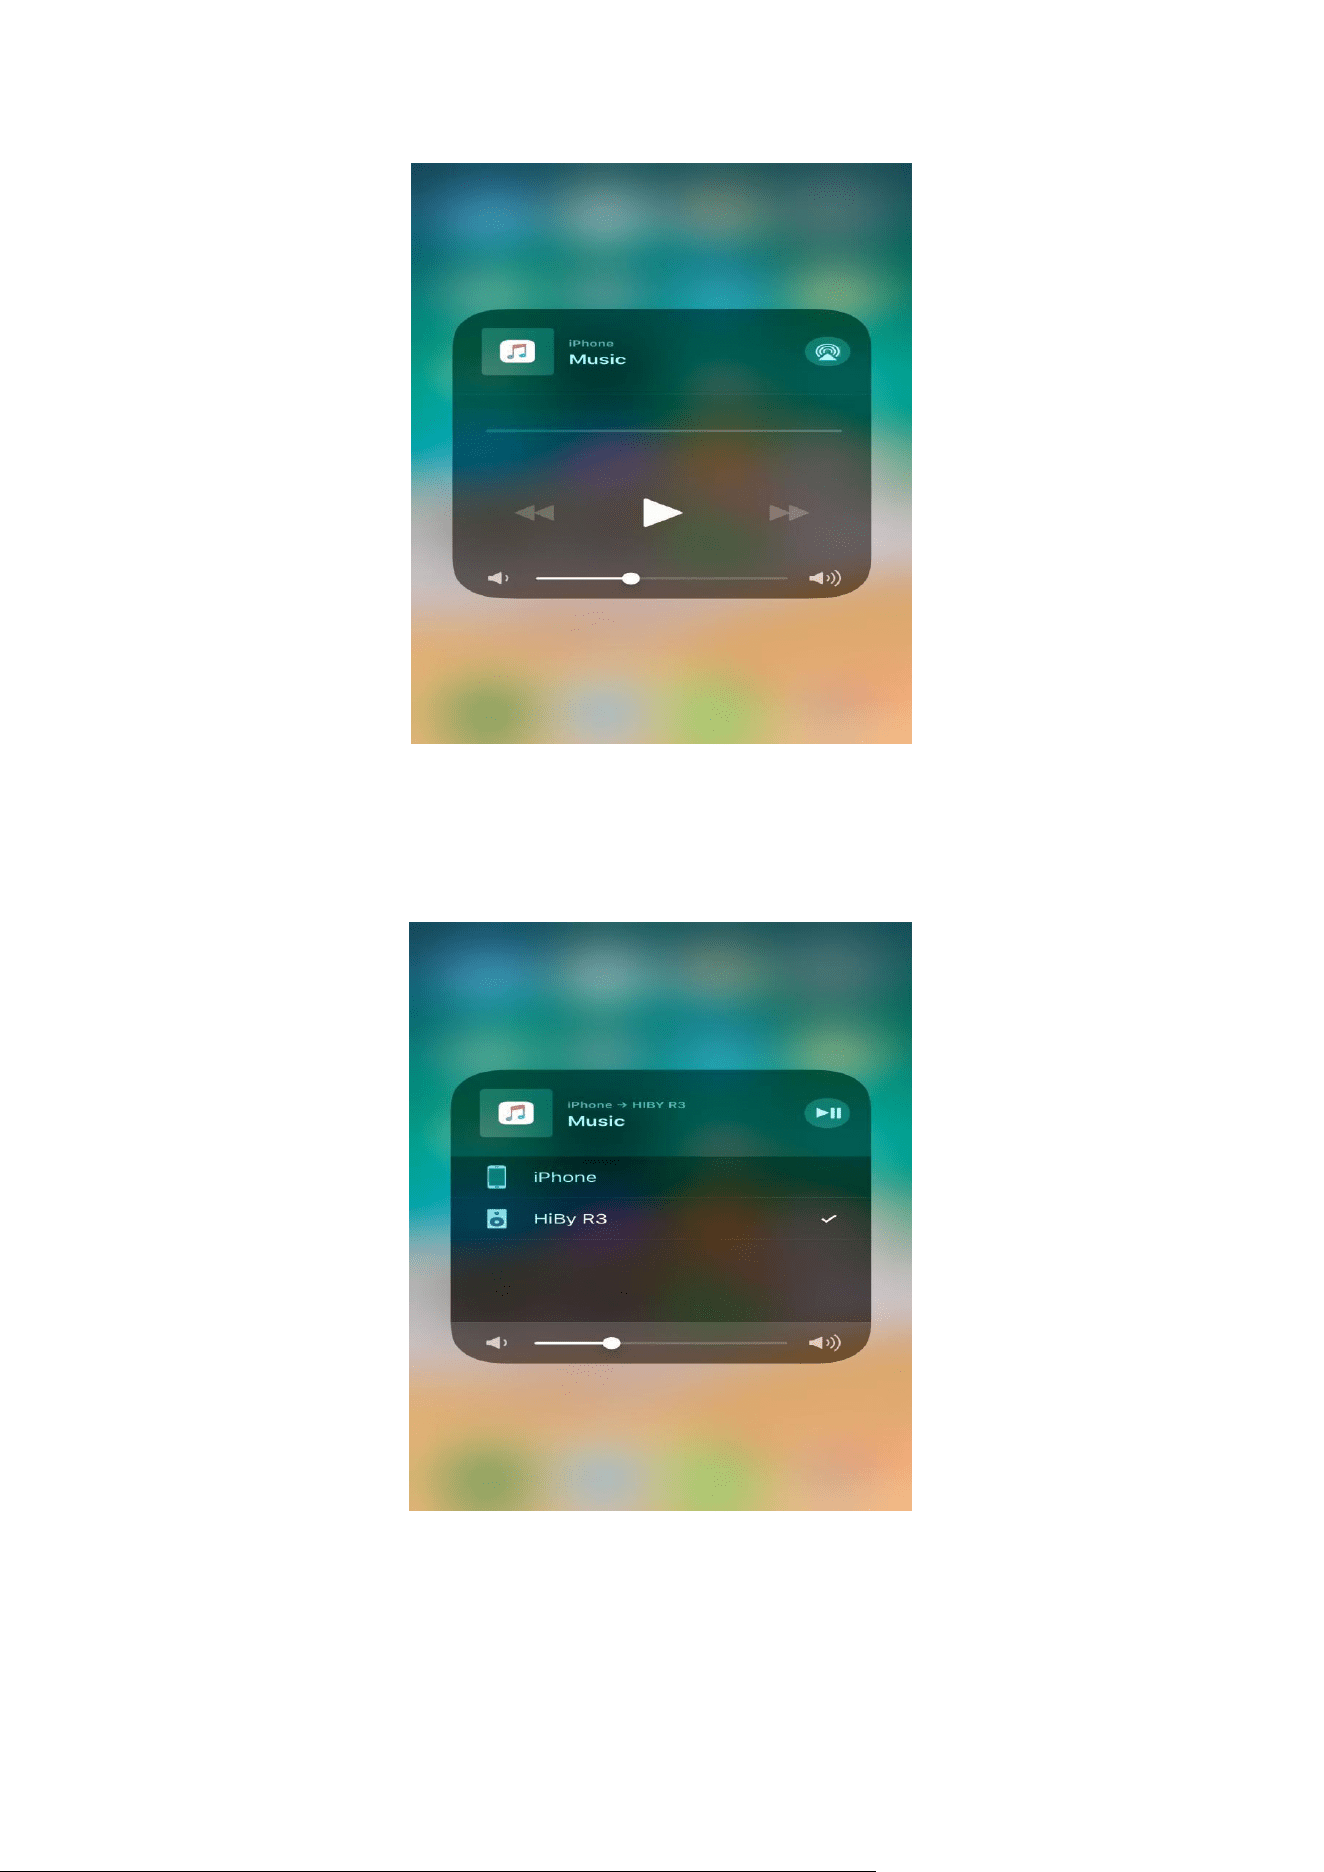
17 / 26
(Figure 3.4.2).
- Select HiBy R3 (Figure 3.4.3).
(Figure 3.4.3)
5) Launch the apps (such as Apple Music) on this Apple device to output music to R3.
18 / 26
4. Files Transfer
4.1 Import music files via Wi-Fi
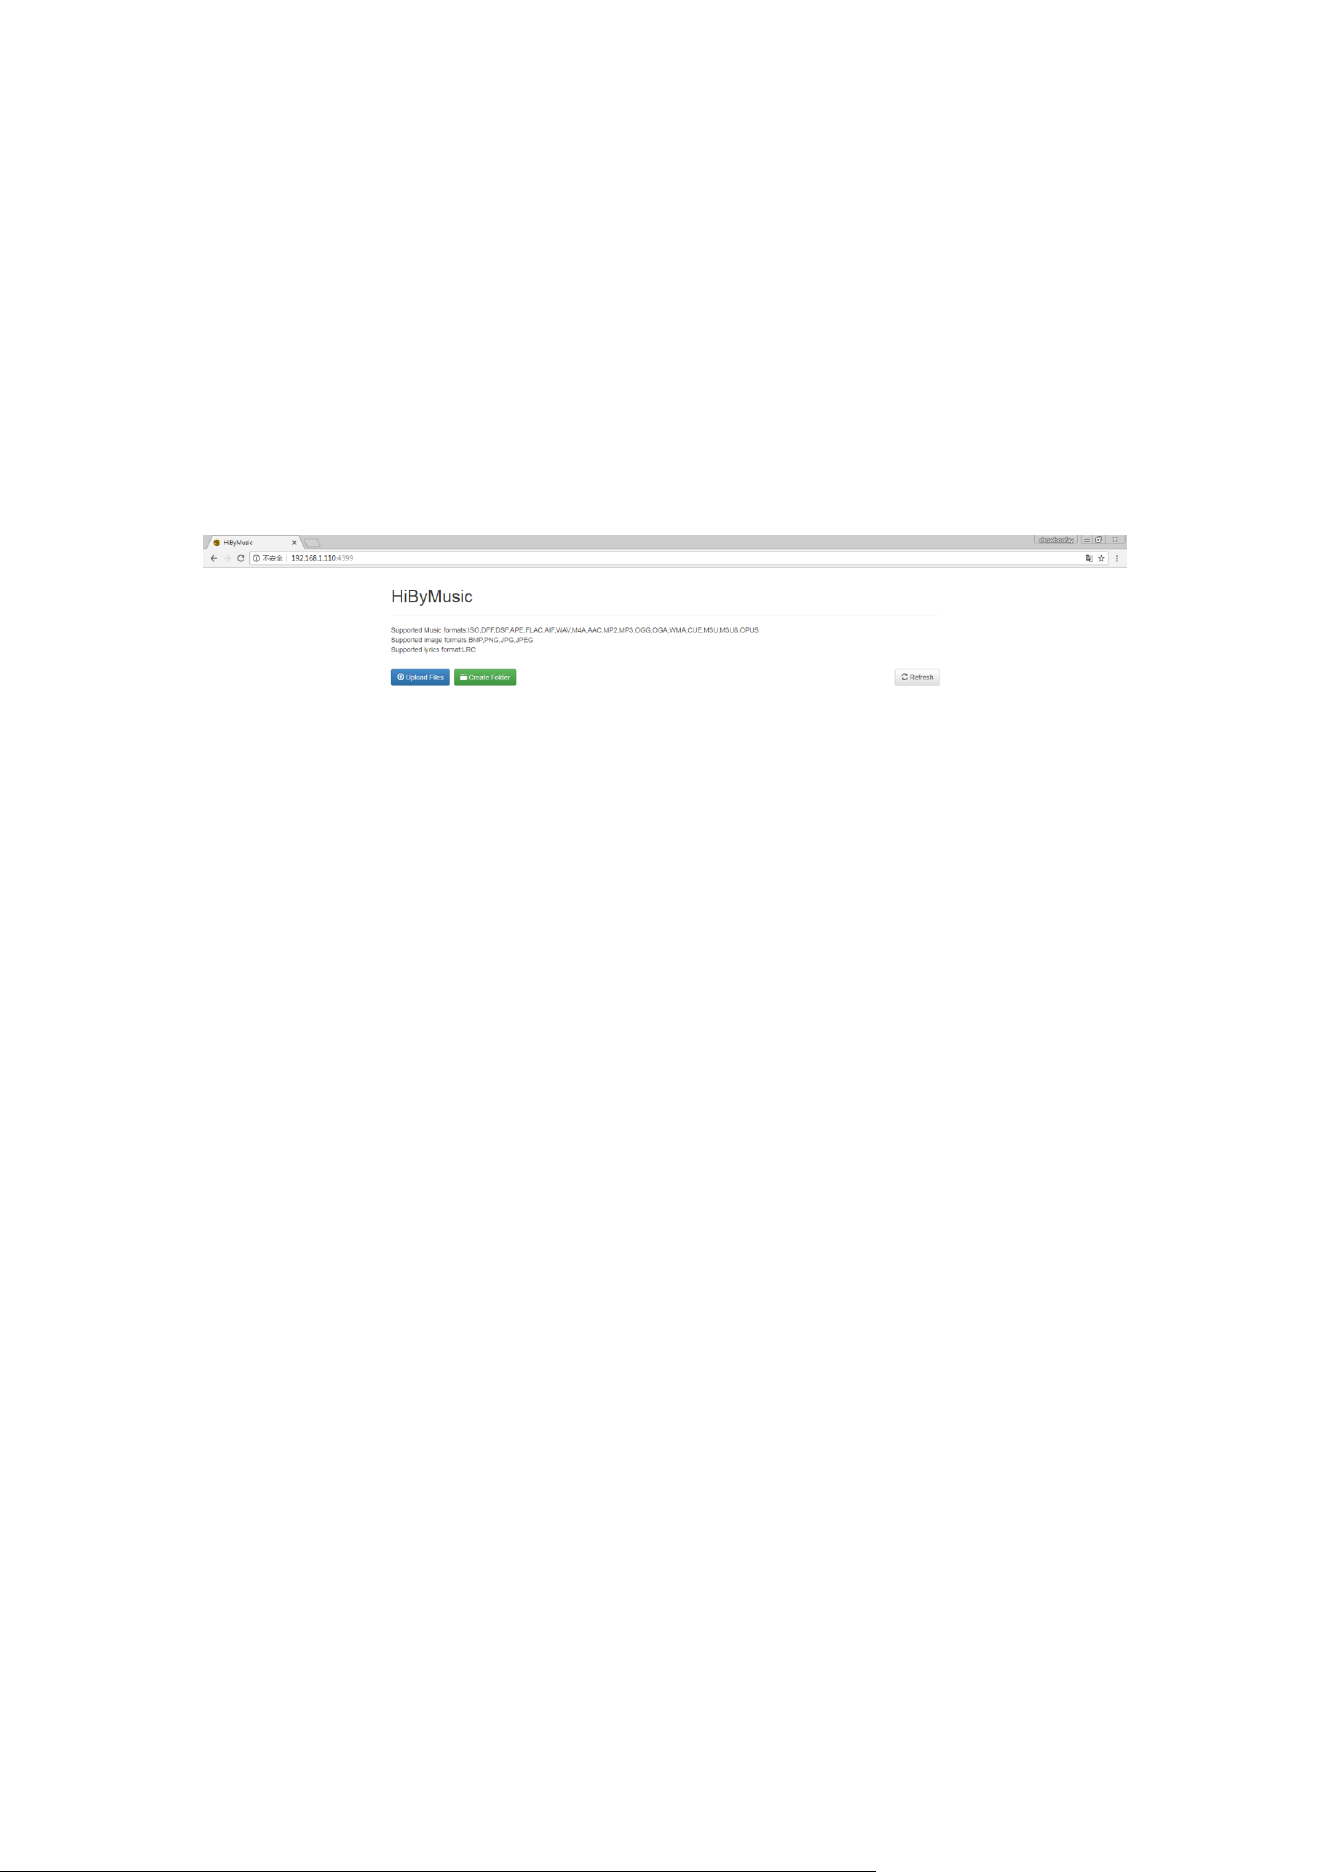
Connect WiFi -> Ensure R3 and computer are in the same WiFi -> Insert micro SD
card to R3 -> Enter the URL http://192.168.1.110:4399 in browser as shown on R3 ->
Upload files (Figure 4.1.1).
(Figure 4.1.1)
4.2 Copy music files to micro SD card
Way 1: Use card reader to copy music files from computer to micro SD card.
Way 2: Insert micro SD card to R3 -> Connect R3 with computer -> Copy music files
to micro SD card on R3
5. Listen to Music on R3
5.1 Earphone port (3.5mm)
Insert earphone to the left earphone port on R3.
5.2 Balance port (2.5mm)
Insert balanced earphone to the right earphone port on R3.
5.3 SPDIF
Enter “Play settings” -> “Output selection” -> Select “SPDIF” -> Connect R3 with other
audio devices with a SPDIF cable.

19 / 26
6. Driver Installation & USB DAC Function
6.1 Driver installation
Windows supports USB Audio 2.0 protocol, so drivers are required to installed on
Windows to use USB DAC function. The driver is not required on MacOS.
Please download the driver zip file through the link:
https://www.dropbox.com/s/2nt8l2vfgtvr67x/USB_AUDIO20_Windows_Driver.rar?dl=
0
System: Winxp/Win7/Win8/Win10 before V.1703.
Before installation:
- Disable driver signature on Win8/Win10.
- Connect R3 to computer -> Select “System settings” -> USB mode -> Audio.
- Download and install the driver software matching computer.
Way 1: Installation steps (Take Win7 for example):
1) Connect R3 to computer with a USB Type-C cable.
- Use a quality-reliable USB Type-C cable.
- If desktop computer, use the USB port in the rear face plate of the mainframe. The
USB port in the front end may face problems such as insufficient power supply and
impedance.
- To use a USB extension cord may influence the effect.
2) Open the driver software (setup.exe) provided by manufacturer.

20 / 26
- Check whether USB DAC device is connected successfully.
- There are the message if the device is not connected or the device is not supported.
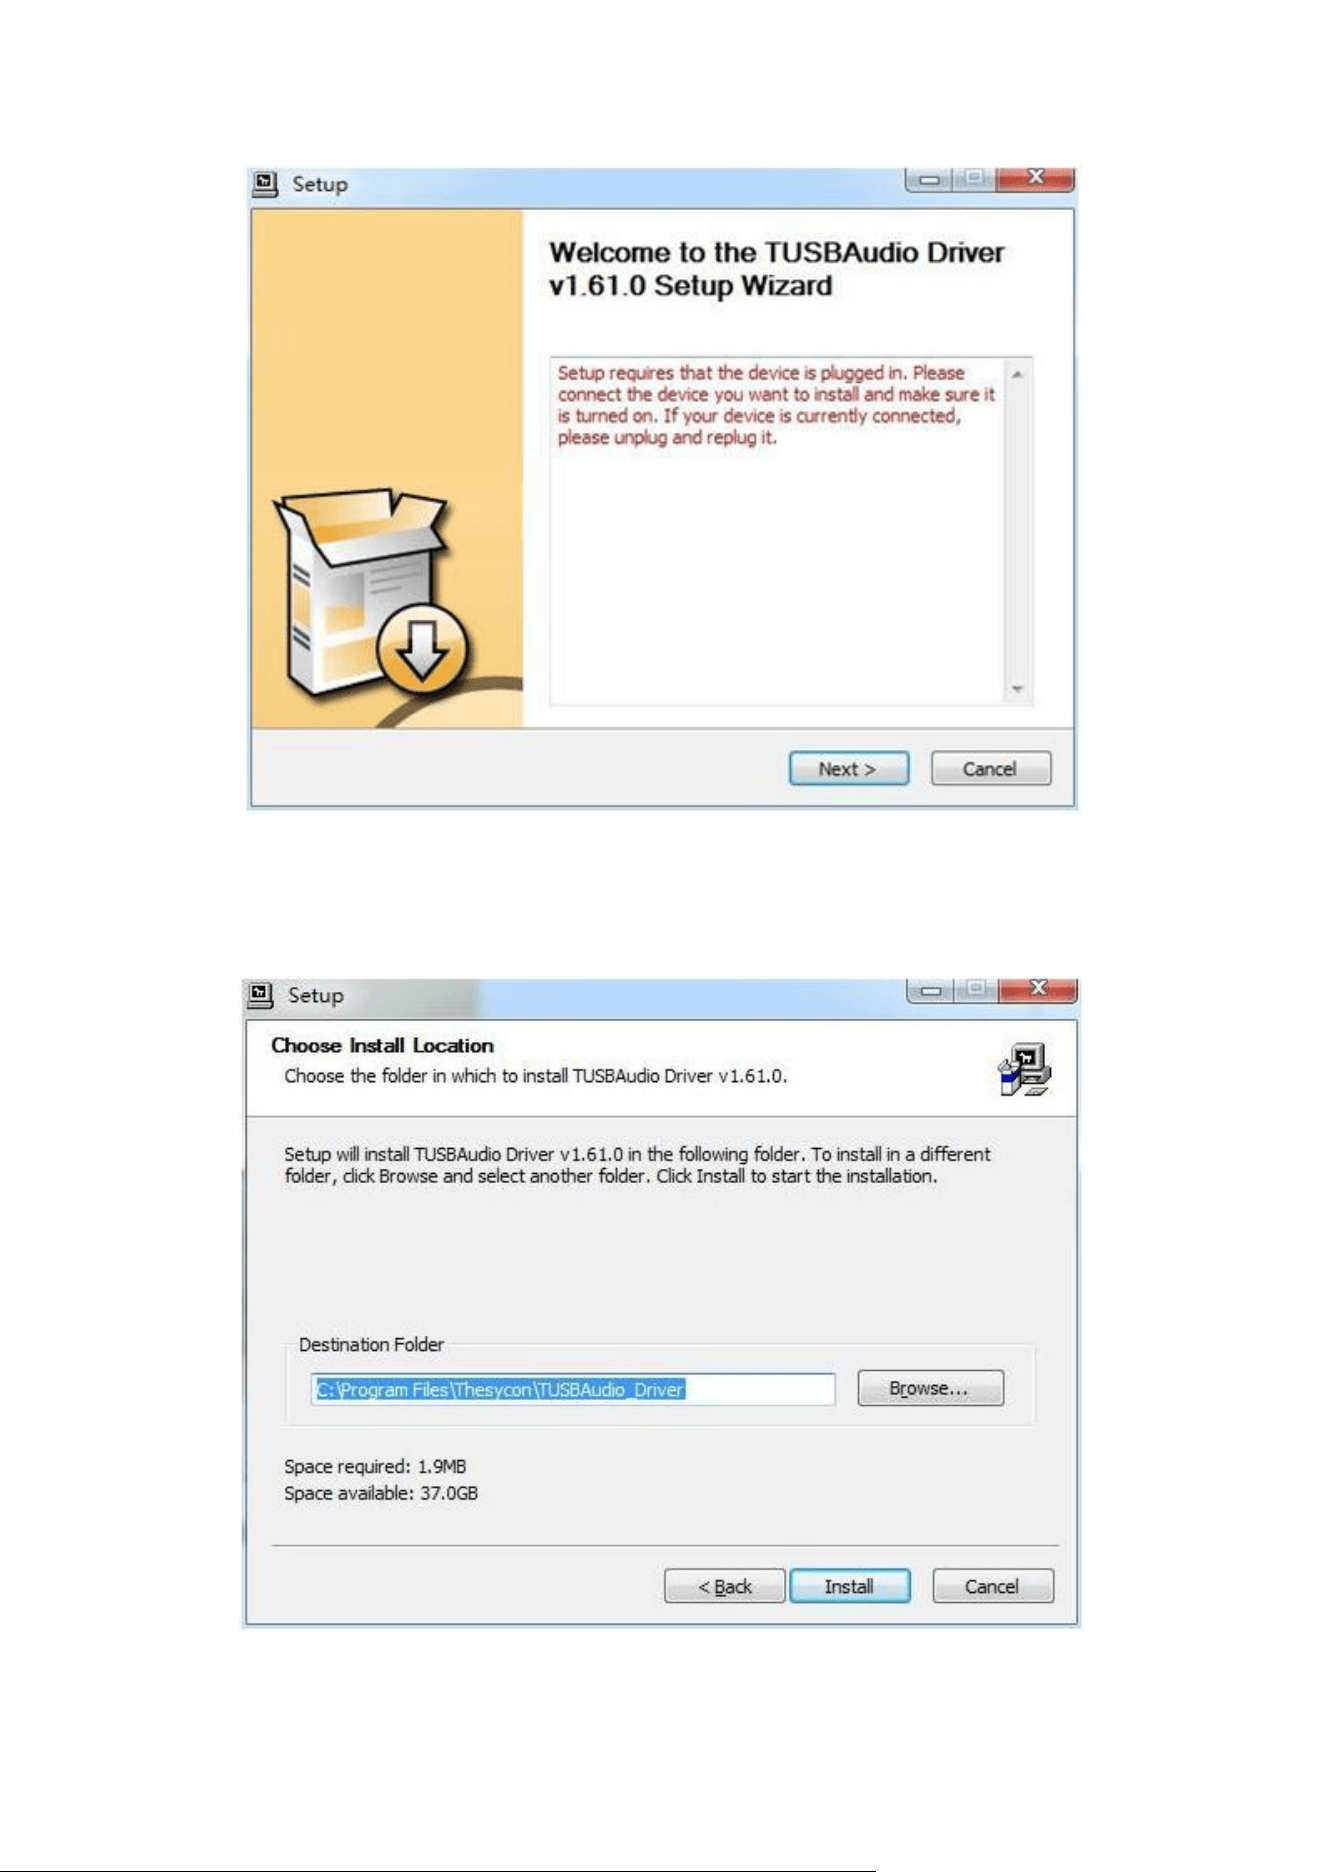
21 / 26
- The driver software find the device and recognize it.
22 / 26
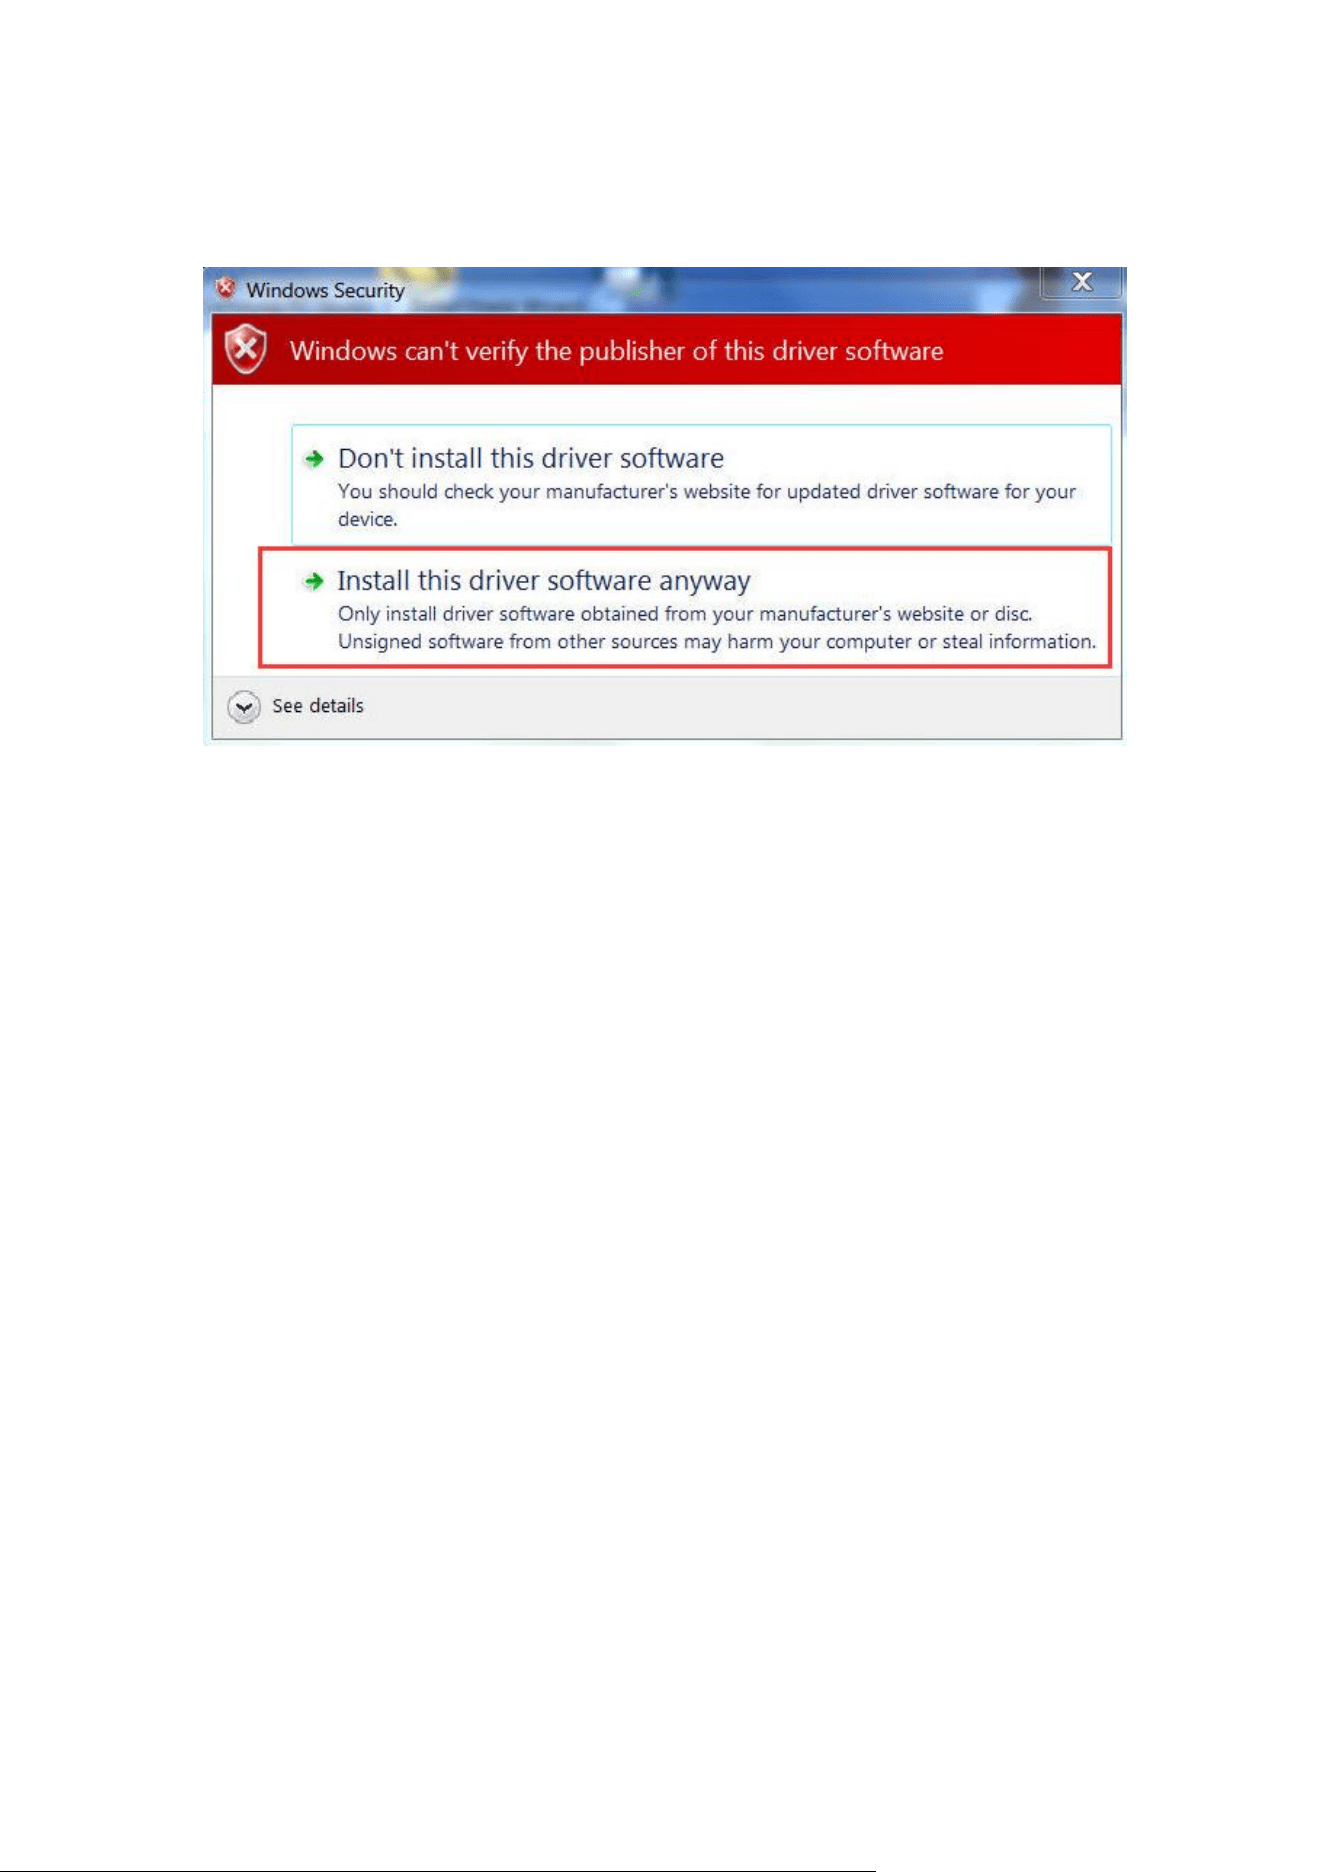
- There are security tips “Windows can't verify the publisher of this driver software”.
Click “Install this driver software anyway” twice.
3) Click the trumpet in the lower right of the screen: Right-click the trumpet icon ->
Sound -> Playback -> Speaker: HiBy R3.
Way 2: Solutions for failure installation (Take Win8 for example):
1) Connect R3 to computer.
2) Right-click the computer icon on desktop -> Properties -> Device Manager ->
Universal Serial Bus controllers -> USB Composite Device (with a yellow exclamation
mark).
3) Right-click USB Composite Device -> Update driver.
4) In the pop-up window, select “Browse my computer for driver software”.
5) Select the location the USB_AUDIO stores.

23 / 26
6) Select “Let me pick from a list of available drivers on my computer”.
7) Select “Have Disk”.
8) Select “Browse” and find the locations of the USB AUDIO -> Select tusbaudio.inf
There are security tips “Windows can't verify the publisher of this driver software”.
Click “Always allow”.
9) Following the above instructions to install another driver “tusbaudioks.inf”
6.2 USB DAC function.
Take Foobar2000 for example.
1) Download and install Foobar2000 latest version:
http://www.foobar2000.org/download
2) Download and install Foobar2000 ASIO plugins:
http://www.foobar2000.org/components/view/foo_out_asio
3) Foobar2000 menu -> Library -> Configure -> Playback: output -> Device-> Select
ASIO -> OK. Then you can play music files through USB DAC.
4) Download SDCD decoding plugin to support DSD:
http://sourceforge.net/projects/sacddecoder/files/
Select foo_input_sacd -> Select one of the versions to download -> Unzip the .zip file
-> Install ASIOProxyInstall-0.7.1.2.exe -> Install foo_input_sacd.fb2k-component (If
fails, please search on Internet on how to install Foobar2000 plugin).
After the installation is done, enter Foobar2000 menu -> Library -> Configure ->

24 / 26
Playback output ->Device -> Double click ASIO: foo_dsd_asio to pop up the following
window.
Select DSD if requiring DSD output.
Select PCM if DSD is not supported on the device, then DSD will transform into PCM
to output.
Click OK and play DSD through DoP.
Link reference:
http://www.exasound.com/Blog/tabid/74/articleType/ArticleView/articleld/61/Configuri
ng-Foobar2000-for-ASIO-DSD-DXD-Playback-with-exaSound-DACs.aspx
7. FAQ
What system does HiBy R3 run?
- HiBy OS.
How long does HiBy R3 take to charge from 0% to 100%?
- About 1 hour.
Does R3 supports wire control?
- HiBy R3 support American standard wire-control (Earphone with CTIA international
standard), which only allows pause / playback / last song / next song. Adjusting
volume is not allowed.
Does HiBy R3 support bidirectional Apt-X?
- No, HiBy R3 is not bidirectional Apt-X, which supports output only, and input is not
supported. Bidirectional Bluetooth 4.1 is supported on HiBy R3.
25 / 26
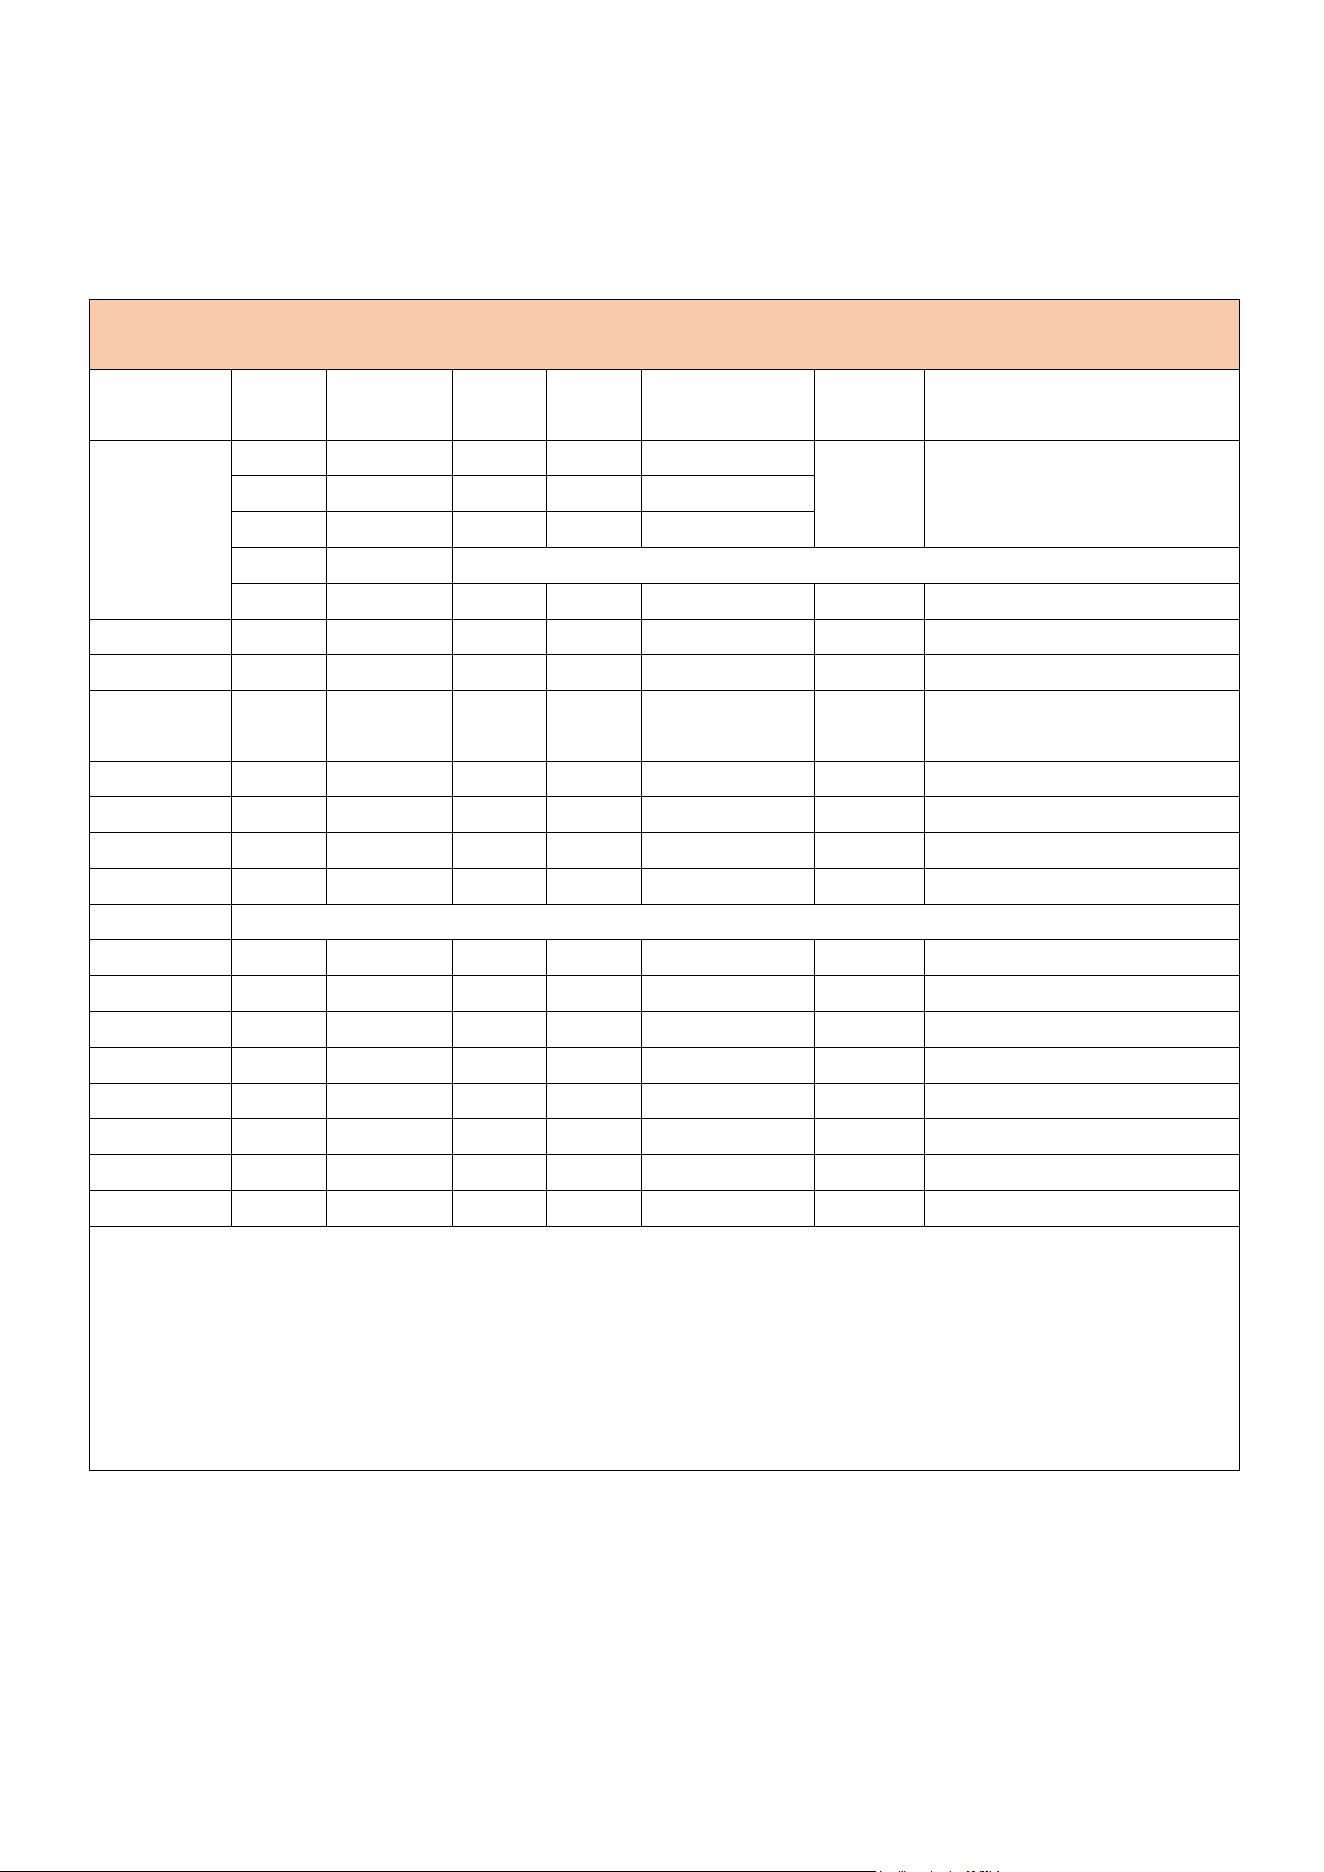
Is there any specified audio formats not supported on HiBy R3?
HiBy R3 Audio Formats Support List (V.1.0)
Last update: April 25, 2018.
Format
Suppor
t or not
Condition
Min
limit
Max
limit
Bit
CUE
Remarks
Ape
YES
Fast
32K
384K
16-24bit
YES
Switching interfaces not
smoothly while playing
352K/384K
YES
Normal
32K
384K
16-24bit
YES
High
32K
384K
16-24bit
Insane
NO
YES
Extra high
32K
96K
16-24bit
176 above not supported
WAV
YES
32K
384K
16-24bit-32bit
YES
WMA
YES
8K
96K
16-24bit
WMA
Lossless
YES
8K
96K
16-24bit
FLAC
YES
32K
192K
16-24bit
YES
DSD
YES
2.8M
11.2M
1bit
DFF
YES
2.8M
11.2M
1bit
ISO DSD
YES
2.8M
2.8M
1bit
ISO DST
NO
Aiff
YES
22K
384K
16-24bit-32bit
M4A
YES
32K
192K
16-24bit
MP2
YES
8K
48K
16bit
MP3
YES
8K
48K
16bit
YES
AAC
YES
32K
48K
16bit
OGG
YES
32K
48K
16bit
OPUS
YES
--
48K
--
YES
Remarks:
The report is based on the actual tests on the audio files available for manufacturer.
1.Filles of Ape Insane 32-192K are not supported. 352/384K are supported, but there is obvious nonfluency. (Advise to block)
2.Files of Ape Extra high 176K above are not supported.
3.Files of Ape Normal/High, 352K/384K, switching from playback interface to playlist arises instant pause.
4.Files of 64K are not supported.
5.Files of ISO DST are not supported.
Does HiBy R3 support Apple Bluetooth AAC?
- No.

26 / 26
Is there any track limit on HiBy R3?
- Here are the comparisons between the tracks limit on HiBy R6 and HiBy R3.
Model
Tracks
quantity limit
Playlist
quantity Limit
Files quantity limit
under playlist
My favorites
limit
Recents
limit
R6
No
No
No
No
No
R3
20000
No
No
No
50
What differences between the International firmware and Chinese firmware? Can they
be interchanged/inter-upgrade?
- The only difference is whether Tidal is integrated inside. With the firmware update,
Tidal is supported on both firmware versions from V.1.12. From V.1.12, there is no any
difference between the two firmware versions.
The international firmware and the Chinese one is not allowed to be interchanged. It
means that international firmware is not allowed to be updated from a Chinese
firmware.
How to do hard reset on HiBy R3?
- Long press power button to 30 seconds until HiBy R3 restarts.
Please try hard reset when your R3 meets the following situations:
1) Fail to charge via USB.
2) OTG function does not work.
3) System does not react at all.