Operator’s Manual
SAVE THESE INSTRUCTIONS
DO NOT RETURN THIS UNIT TO THE RETAILER. PROOF
OF PURCHASE WILL BE REQUIRED FOR WARRANTY
SERVICE.
For assistance regarding the assembly, operation or maintenance of
the unit, please call 1-844-786-7335 (in the United States) or contact
email box
Warranty service is available through an authorized service center.
To locate a service center in your area, please write us email or
call the number listed above. Service on this unit, both within and
after the warranty period, should only be performed by an
authorized and approved service center. When servicing, use only
identical replacement parts.
All information, illustrations, and specifications in this manual are
based on the latest product information available at the time of
printing. We reserve the right to make changes at any time without
notice.
The product may vary slightly from the illustrations contained in this
manual.
IMPORTANT: Read this manual thoroughly before using this product. Follow all instructions.
WBPMT26P
2023/02
SERVICE
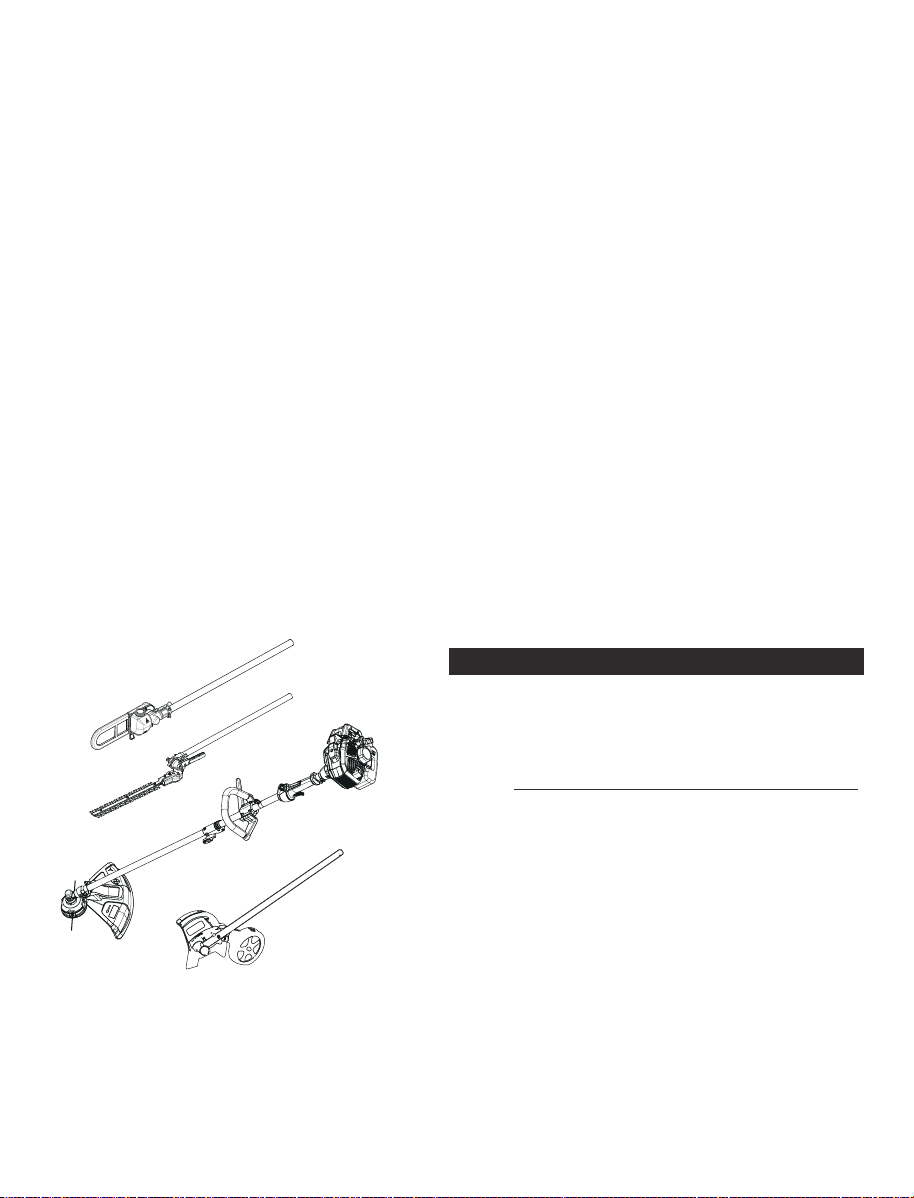
WBPMT26P
2-Cycle Multi-function Tool
WB26MTSE
The purpose of safety symbols is to attract your attention to
possible dangers. The safety symbols, and their explanations,
deserve your careful attention and understanding. The safety
warnings do not by themselves eliminate any danger. The
instructions or warnings they give are not substitutes for proper
accident prevention measures.
SYMBOL MEANING
NOTE: Advises you of information or instructions vital to the
operation or maintenance of the equipment.
Read the operator’s manual and follow all warnings and safety
instructions. Failure to do so can result in serious injury to the
operator and/or bystanders.
•
IMPORTANT SAFETY INSTRUCTIONS •
READ ALL INSTRUCTIONS BEFORE OPERATING
Be aware of risk of injury to the head, hands and feet.
Carefully inspect the area before starting the unit. Remove
rocks, broken glass, nails, wire, string and other objects that
may be thrown or become entangled with the unit.
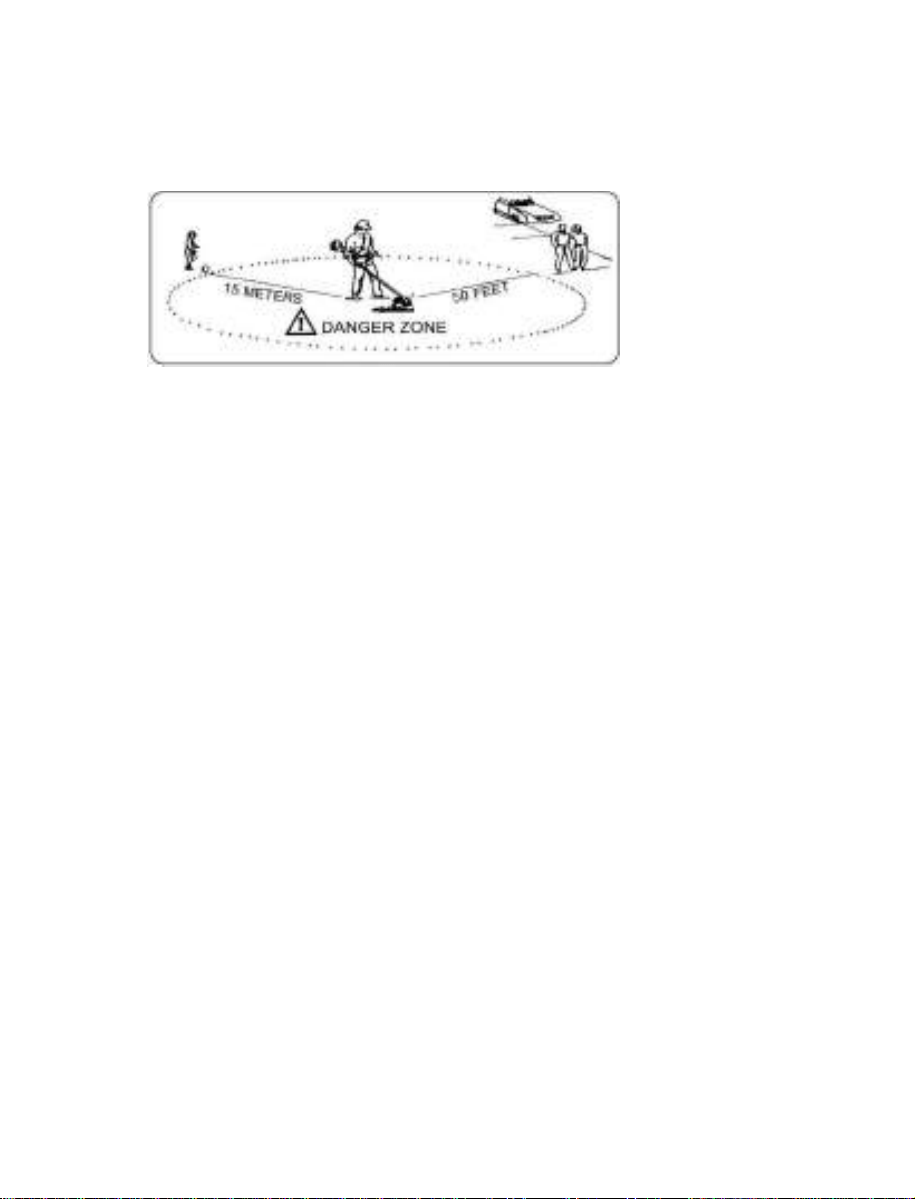
Clear the area of children, bystanders and pets; keep them
outside a 50-foot (15 m) radius, at a minimum. Even then, they
are still at risk from thrown objects. Encourage bystanders to
wear eye protection. If you are approached, stop the unit
immediately.
Squeeze the throttle control and check that it returns
automatically to the idle position. Make all adjustments or
repairs before using the unit.
Do not change the engine governor settings or overspeed the
engine.
This unit is intended for occasional, household use only.
Read the instructions carefully. Be familiar with the controls and
proper use of the unit.
Do not operate this unit when tired, ill or under the influence of
alcohol, drugs or medication.
Never allow children to operate the unit. Teens must be trained,
accompanied and supervised by an adult. Never allow adults to
operate the unit without proper instruction.
All guards and safety attachments must be installed properly
before operating the unit.
Inspect the unit before use. Replace damaged parts. Check for
fuel leaks. Make sure all fasteners are in place and secure.
Replace parts that are cracked, chipped, or damaged in any
way.
Do not operate the unit with loose or damaged parts.
Only use the trimming line described in the Specifications
section of this manual. Never use metal-reinforced line, wire,
chain or rope. These can break off and become dangerous
projectiles.
SAFETY
WARNING: When using the unit, all safety
instructions must be followed. Please read these
instructions before operating the unit in order to ensure the
safety of the operator and any bystanders. Please keep
these instructions for later use.
CAUTION:
Signals a MODERATE hazard.
Failure to obey a safety CAUTION symbol MAY result in
property damage or injury to yourself or to others.
CALIFORNIA PROPOSITION 65
WARNING:
This product contains a chemical
known to the state of California to cause cancer, birth
defects or other reproductive harm.
DANGER: Signals an EXTREME hazard.
Failure to obey a safety DANGER symbol WILL result in
serious injury or death to yourself or to others.
WARNING: Signals a SERIOUS hazard.
Failure to obeyasafety WARNING symbol CAN result in
serious injury to yourself or to others.
D
WBPMT26P incl. trimmer head,
blade, hedge trimmer and pruner;
WB26MTSE incl. trimmer head,
blade, hedge trimmer and edger,
this manual is for both model and
all attachment.
O NOT SELL TO CALIFORNIA
2

6$)(7< :$51,1*6 )25 *$6 81,76
%HIRUH VHWWLQJ WKH XQLW GRZQ DOZD\V PDNH VXUH WKH HQJLQH LV RII
DQG DOO PRYLQJ SDUWV KDYH VWRSSHG
,I \RX VWULNH RU EHFRPH HQWDQJOHG ZLWK D IRUHLJQ REMHFW VWRS WKH
XQLW LPPHGLDWHO\ DQG FKHFN IRU GDPDJH 'R QRW RSHUDWH WKH XQLW
EHIRUH UHSDLULQJ GDPDJH 'R QRW RSHUDWH WKH XQLW ZLWK ORRVH RU
GDPDJHG SDUWV
7XUQ WKH HQJLQH RII DQG GLVFRQQHFW WKH VSDUN SOXJ IRU
PDLQWHQDQFH RU UHSDLU
8VH RQO\ RULJLQDO HTXLSPHQW PDQXIDFWXUHU 2(0 UHSODFHPHQW
SDUWV DQG DFFHVVRULHV IRU WKLV XQLW 7KHVH DUH DYDLODEOH IURP \RXU
DXWKRUL]HG VHUYLFH GHDOHU 8VH RI DQ\ RWKHU SDUWV RU DFFHVVRULHV
FRXOG OHDG WR VHULRXV LQMXU\ WR WKH XVHU RU GDPDJH WR WKH XQLW
DQG YRLG WKH ZDUUDQW\
.HHS WKH XQLW FOHDQ &DUHIXOO\ UHPRYH YHJHWDWLRQ DQG RWKHU
GHEULV WKDW FRXOG EORFN PRYLQJ SDUWV
7R UHGXFH ILUH KD]DUG UHSODFH D IDXOW\ PXIIOHU DQG VSDUN DUUHVWRU
.HHS WKH HQJLQH DQG PXIIOHU IUHH IURP JUDVV OHDYHV H[FHVVLYH
JUHDVH RU FDUERQ EXLOG XS
,I WKH XQLW VWDUWV WR YLEUDWH DEQRUPDOO\ VWRS WKH XQLW LPPHGLDWHO\
,QVSHFW WKH XQLW IRU WKH FDXVH RI WKH YLEUDWLRQ 9LEUDWLRQ LV
JHQHUDOO\ DQ LQGLFDWRU RI WURXEOH
6WRUH IXHO RQO\ LQ FRQWDLQHUV VSHFLILFDOO\ GHVLJQHG DQG DSSURYHG
IRU WKH VWRUDJH RI VXFK PDWHULDOV
$OZD\V VWRS WKH HQJLQH DQG DOORZ LW WR FRRO EHIRUH ILOOLQJ WKH
WDQN 1HYHU UHPRYH WKH IXHO WDQN FDS RU DGG IXHO ZKHQ WKH
HQJLQH LV KRW $OZD\V ORRVHQ WKH IXHO WDQN FDS VORZO\ WR UHOLHYH
DQ\ SUHVVXUH LQ WKH WDQN EHIRUH IXHOLQJ
$OZD\V PL[ DQG DGG IXHO LQ D FOHDQ ZHOOYHQWLODWHG RXWGRRU DUHD
ZKHUH WKHUH DUH QR VSDUNV RU IODPHV '2 127 VPRNH
1HYHU RSHUDWH WKH XQLW ZLWKRXW WKH IXHO FDS VHFXUHO\ LQ SODFH
$YRLG FUHDWLQJ D VRXUFH RI LJQLWLRQ IRU VSLOOHG IXHO :LSH XS DQ\
VSLOOHG IXHO IURP WKH XQLW LPPHGLDWHO\ EHIRUH VWDUWLQJ WKH XQLW
0RYH WKH XQLW DW OHDVW IW P IURP WKH IXHOLQJ VRXUFH DQG
VLWH EHIRUH VWDUWLQJ WKH HQJLQH '2 127 VPRNH
1HYHU VWDUW RU UXQ WKH XQLW LQVLGH D FORVHG URRP RU EXLOGLQJ
%UHDWKLQJ H[KDXVW IXPHV FDQ NLOO 2SHUDWH WKLV XQLW RQO\ LQ D ZHOO
YHQWLODWHG RXWGRRU DUHD
27+(5 6$)(7< :$51,1*6
0DLQWDLQ WKH XQLW ZLWK FDUH
$OO VHUYLFH RWKHU WKDQ WKH PDLQWHQDQFH SURFHGXUHV GHVFULEHG LQ
WKLV PDQXDO VKRXOG EH SHUIRUPHG E\ DQ DXWKRUL]HG VHUYLFH
GHDOHU
1HYHU UHPRYH PRGLI\ RU PDNH LQRSHUDWLYH DQ\ VDIHW\ GHYLFH
IXUQLVKHG ZLWK WKH XQLW
%HIRUH LQVSHFWLQJ VHUYLFLQJ FOHDQLQJ VWRULQJ WUDQVSRUWLQJ RU
UHSODFLQJ DQ\ SDUWV RQ WKH XQLW
6WRS WKH XQLW
0DNH VXUH DOO PRYLQJ SDUWV KDYH VWRSSHG
$OORZ WKH XQLW WR FRRO
'LVFRQQHFW WKH VSDUN SOXJ ZLUH
6HFXUH WKH XQLW ZKLOH WUDQVSRUWLQJ
1HYHU VWRUH WKH XQLW ZLWK IXHO LQ WKH WDQN LQVLGH D EXLOGLQJ ZKHUH
IXPHV PD\ UHDFK DQ RSHQ IODPH SLORW OLJKWV HWF RU VSDUNV
VZLWFKHV HOHFWULFDO PRWRUV HWF
6WRUH WKH XQLW LQ D GU\ SODFH VHFXUHG RU DW D KHLJKW WR SUHYHQW
XQDXWKRUL]HG XVH RU GDPDJH .HHS WKH XQLW RXW RI WKH UHDFK RI
FKLOGUHQ
1HYHU GRXVH RU VTXLUW WKH XQLW ZLWK ZDWHU RU DQ\ RWKHU OLTXLG
.HHS KDQGOHV GU\ DQG FOHDQ IUHH IURP GHEULV RLO DQG JUHDVH
&OHDQ WKH XQLW DIWHU HDFK XVH 5HIHU WR &OHDQLQJ DQG 6WRUDJH 'R
QRW XVH VROYHQWV RU VWURQJ GHWHUJHQWV
.HHS WKHVH LQVWUXFWLRQV 5HIHU WR WKHP RIWHQ DQG XVH WKHP WR
LQVWUXFW RWKHU XVHUV ,I \RX ORDQ WKLV XQLW WR RWKHUV DOVR ORDQ
WKHP WKHVH LQVWUXFWLRQV
6$9( 7+(6( ,16758&7,216
:+,/( 23(5$7,1*
:HDU VDIHW\ JODVVHV RU JRJJOHV WKDW PHHW FXUUHQW $16, ,6($
= VWDQGDUGV DQG DUH PDUNHG DV VXFK :HDU HDUKHDULQJ
SURWHFWLRQ ZKHQ RSHUDWLQJ WKLV XQLW :HDU D IDFH PDVN RU GXVW
PDVN LI WKH RSHUDWLRQ LV GXVW\
:HDU KHDY\ ORQJ SDQWV ERRWV JORYHV DQG D ORQJ VOHHYH VKLUW 'R
QRW ZHDU ORRVH FORWKLQJ MHZHOU\ VKRUW SDQWV VDQGDOV RU JR
EDUHIRRW 6HFXUH KDLU DERYH VKRXOGHU OHYHO
7KH FXWWLQJ KHDG VKLHOG PXVW DOZD\V EH LQ SODFH ZKLOH RSHUDWLQJ
WKH XQLW 'R QRW RSHUDWH WKH XQLW ZLWKRXW ERWK WULPPLQJ OLQHV
H[WHQGHG DQG WKH SURSHU OLQH LQVWDOOHG 'R QRW H[WHQG WKH
WULPPLQJ OLQH EH\RQG WKH OHQJWK RI WKH VKLHOG
7KH FXWWLQJ KHDG VKRXOG UHPDLQ VWDWLRQDU\ ZKHQ WKH HQJLQH
LGOHV ,I LW GRHV QRW UHIHU WR $GMXVWLQJ WKH ,GOH 6SHHG
$GMXVW WKH KDQGOH WR SURYLGH WKH EHVW JULS LI DSSOLFDEOH
0DNH VXUH WKH FXWWLQJ KHDG LV QRW LQ FRQWDFW ZLWK DQ\WKLQJ
EHIRUH VWDUWLQJ WKH XQLW
8VH WKH XQLW RQO\ LQ GD\OLJKW RU JRRG DUWLILFLDO OLJKW
$YRLG DFFLGHQWDO VWDUWLQJ %H LQ WKH VWDUWLQJ SRVLWLRQ ZKHQHYHU
SXOOLQJ WKH VWDUWHU URSH 7KH RSHUDWRU DQG XQLW PXVW EH LQ D
VWDEOH SRVLWLRQ ZKLOH VWDUWLQJ 5HIHU WR 6WDUWLQJ DQG 6WRSSLQJ
8VH WKH ULJKW WRRO 2QO\ XVH WKLV WRRO IRU LWV LQWHQGHG SXUSRVH
$OZD\V KROG WKH XQLW ZLWK ERWK KDQGV ZKHQ RSHUDWLQJ .HHS D
ILUP JULS RQ ERWK KDQGOHV RU JULSV
'R QRW RYHUUHDFK $OZD\V NHHS SURSHU IRRWLQJ DQG EDODQFH 7DNH
H[WUD FDUH ZKHQ ZRUNLQJ RQ VWDLUV VWHHS VORSHV RU LQFOLQHV 7R
DYRLG VHULRXV LQMXU\ GR QRW RSHUDWH WKH XQLW ZKLOH RQ D ODGGHU RU
D URRI
.HHS KDQGV IDFH DQG IHHW DZD\ IURP DOO PRYLQJ SDUWV 'R QRW
WRXFK RU WU\ WR VWRS PRYLQJ SDUWV
'R QRW WRXFK WKH HQJLQH JHDU KRXVLQJ RU PXIIOHU 7KHVH SDUWV
JHW H[WUHPHO\ KRW IURP RSHUDWLRQ HYHQ DIWHU WKH XQLW LV WXUQHG
RII
'R QRW RSHUDWH WKH XQLW IDVWHU WKDQ WKH VSHHG QHHGHG WR GR WKH
MRE 'R QRW UXQ WKH XQLW DW KLJK VSHHG ZKHQ QRW LQ XVH
'R QRW IRUFH WKH XQLW ,W ZLOO GR D EHWWHU VDIHU MRE ZKHQ XVHG DW
WKH LQWHQGHG UDWH
$OZD\V VWRS WKH XQLW ZKHQ RSHUDWLRQ LV GHOD\HG RU ZKHQ ZDONLQJ
IURP RQH ORFDWLRQ WR DQRWKHU
:$51,1*
*DVROLQH LV KLJKO\ IODPPDEOH DQG
LWV YDSRUV FDQ H[SORGH LI LJQLWHG 7DNH WKH IROORZLQJ
SUHFDXWLRQV

• SAFETY & INTERNATIONAL SYMBOLS •
This operator's manual describes safety and international symbols and pictographsthat may appear on this product. Read the operator's
manual for complete safety, assembly, operating and maintenance andrepair information.
SYMBOL
MEANING
SYMBOL
MEANING
• ON/OFF STOP CONTROL
ON / START / RUN
• ON/OFF STOP CONTROL
OFF or STOP
• PRIMER BULB
Push primer bulb, fully and slowly, 7 times.
•THROWN OBJECTS CAN CAUSE SEVERE INJURY
WARNING:
Small objects can be
propelled at high speed,causing injury.
Min. 50
ft
15 m
•KEEPBYSTANDERS AWAY
WARNING:
Keep all bystanders,
especially children and pets, at least 50 feet (15 m)
from the operating area.
• HOT SURFACE
WARNING: Do nottouch a hot muffler
or cylinder. You may get burned.These parts get
extremely hot from operation.When turned off,they
remain hot for a short time.
•SHARP BLADE
WARNING: Thereisasharp blade on
the cutting head shield. To prevent serious injury, do
nottouch the line cutting blade.
• SAFETY ALERT SYMBOL
Indicates danger, warning or caution. May be used in
conjunction with other symbols or pictographs.
• READ OPERATOR'S MANUAL
WARNING:
Read the operator’s
manual(s) and follow all warnings and safety
instructions. Failure to do so can result in serious
injury to the operator and/or bystanders.
• WEAR EYE AND HEARING PROTECTION
WARNING:
Thrown objects and loud
noise can cause severe eye injury and hearing loss.
Wear eye protection meeting current ANSI/ISEA
Z87.1 standards and ear protection when operating
this unit. Useafull face shield when needed.
• WEAR FOOT PROTECTION
Always wear heavy-duty, non-slipfootwearwhen
operating this unit.
• WEAR HAND PROTECTION
Always wear heavy-duty, non-slip gloves when
handling this unit.
• HANDLE POSITION
Make sure the handle is positioned beyond the end of
the safety label.
• UNLEADED FUEL
Always use clean, fresh unleaded fuel.
• OIL
Refer to operator’s manual for the proper type of oil.
• DO NOT USE E85 FUEL IN THIS UNIT
WARNING: It has been proven thatfuel
containing greater than 10% ethanol will likely
damage this engine and void the warranty.
4
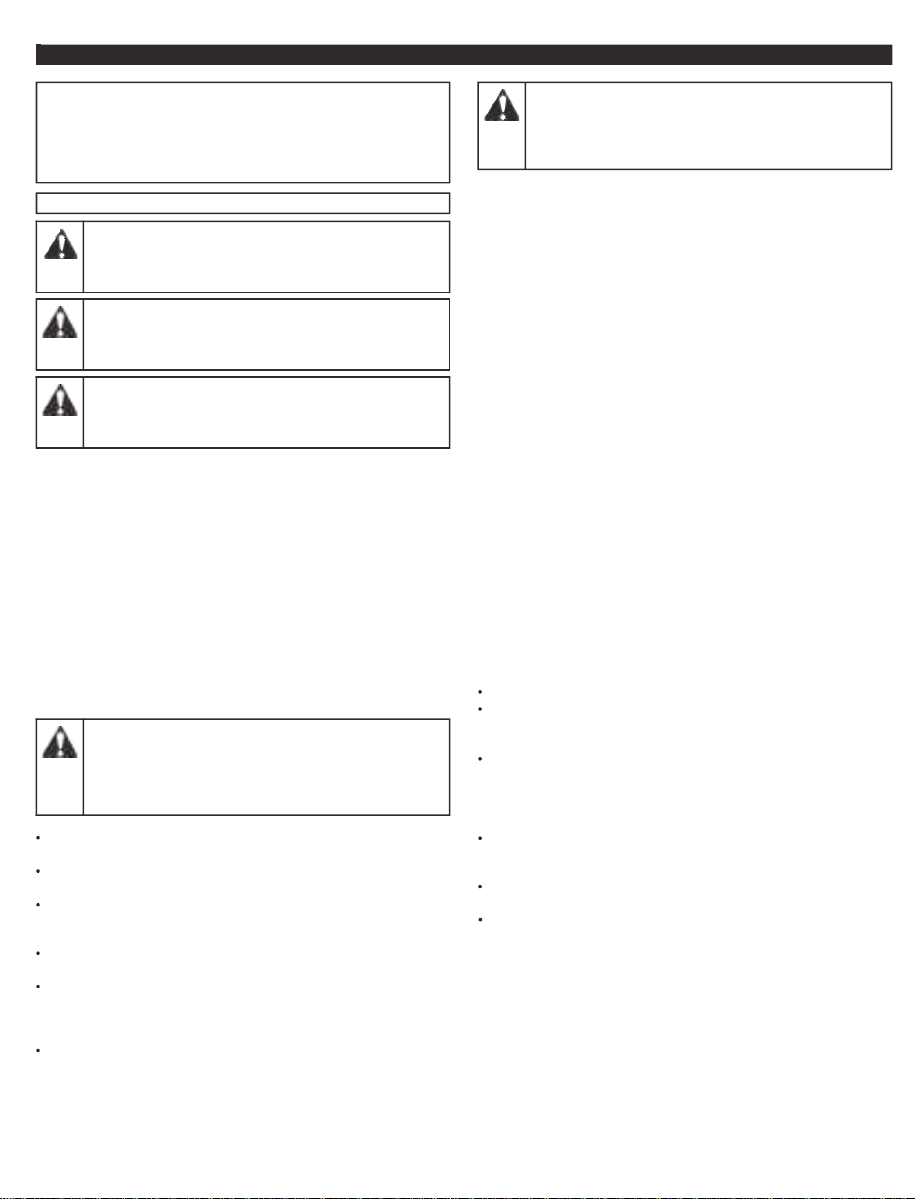
Edger Attachment Hedge Trimmer Pole Saw
KNOW YOUR UNIT
APPLICATIONS
As a trimmer /brush cutter:
•
•
•
Cutting grass and light weeds.
Edging
Decorative trimming around trees, fences, etc.
Cutting Head
Shaft Housing
Coupler
Cutting Head
Shield
Strap Hanger
On/Off Switch
Rear Handle
Air Filter
Cover
Handle
Throttle Lockout
Throttle
Control
Fuel Cap
Choke Lever
Primer Bulb
Starter Rope Grip
Other optional attachments may be used with this unit.
5

Cutting data hedge trimmer
Cutting circle diameter
0.95 in. (24mm)
Blade length
16 in. (430mm)
Cutting length
15.75 in. (400mm)
Max. cutting speed
1550/min max.
Cutting data pole saw
Blade length
10in.(254mm)
Cutting length
9.4in.(240mm)
Chain link thickness
0.05 in. (1.1mm)
Oil tank capicity
180 ml
Model name
WBPMT26P/WB26MTSE
Engine type
Air-Cooled, 2-Cycle
Engine displacement
25.4cc (1.52 cu. in.)
Rated motor power
0.7kw
Volumes of fuel tank
20 oz. (600ml)
Fuel/Oil ratio
50:1
Cutting diameter for nylon head for straight
shfat
16.9in. (430mm)
Trimmin
g line
0.095 in. (2.4mm)
Max. engine speed-trimmer
(with nylon head, no-load)
9000/min for straight shaft
Max. engine speed-brush cutter
(straight shaft with 3T blade, no-load)
10500/min
Cutting dia. With 3T blade (straight
shaft )
255mm
Cutter balde thickness
0.055 in. (1.4mm)
Cutting data edger
Cutting length
9 in. (226mm) for straight shaft edger
SPECIFICATIONS*
* All specifications are based on the latest product information available at the time of printing. We reserve the right to make changes at any
time without notice.
ASSEMBLY
When assembling this machine, please follow the instructions for assembly steps.
1. Mounting the rod: Push the pin(C) of shaft A into the coupler and make sure the pin insert into hole E, then tighten knob D
For attachments
except edger
For edger attachment
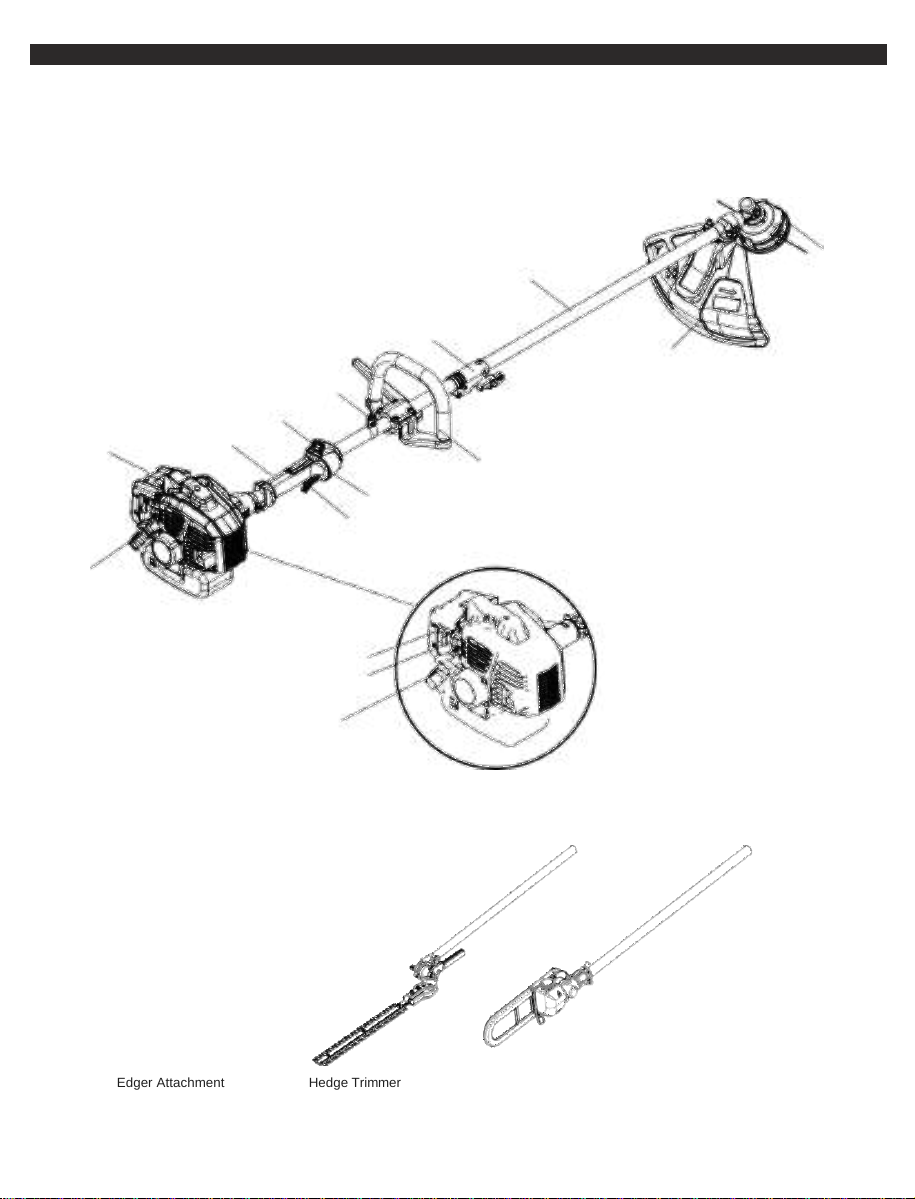
2. Assemble the handle on the machine.
-
Fit the sleeve (2) &lower part (3) with guard, placing the pin (3a) in one of the three holes on the drive tube.
-
Fit the front handgrip (4) by using the screws (5).
-
Before tightening the screw (4), align the handgrip correctly with respect to the drive tube.
-
Fully tighten the screw (5).
6
3.
Fitting the guard for straight shaft grass deflector
- Fix the transmission with hex key and wrench enclosed as standard
accessories for tightening
the nuts with the safe guard.
-The guard is fixed to the angle transmission by two screws
Warning! Use only original manufacturer's replacement parts, accessories and
attachments. Failure to do so can cause poor performance, possible injury and may void
your warranty. Never use the machine without the guard assembled!
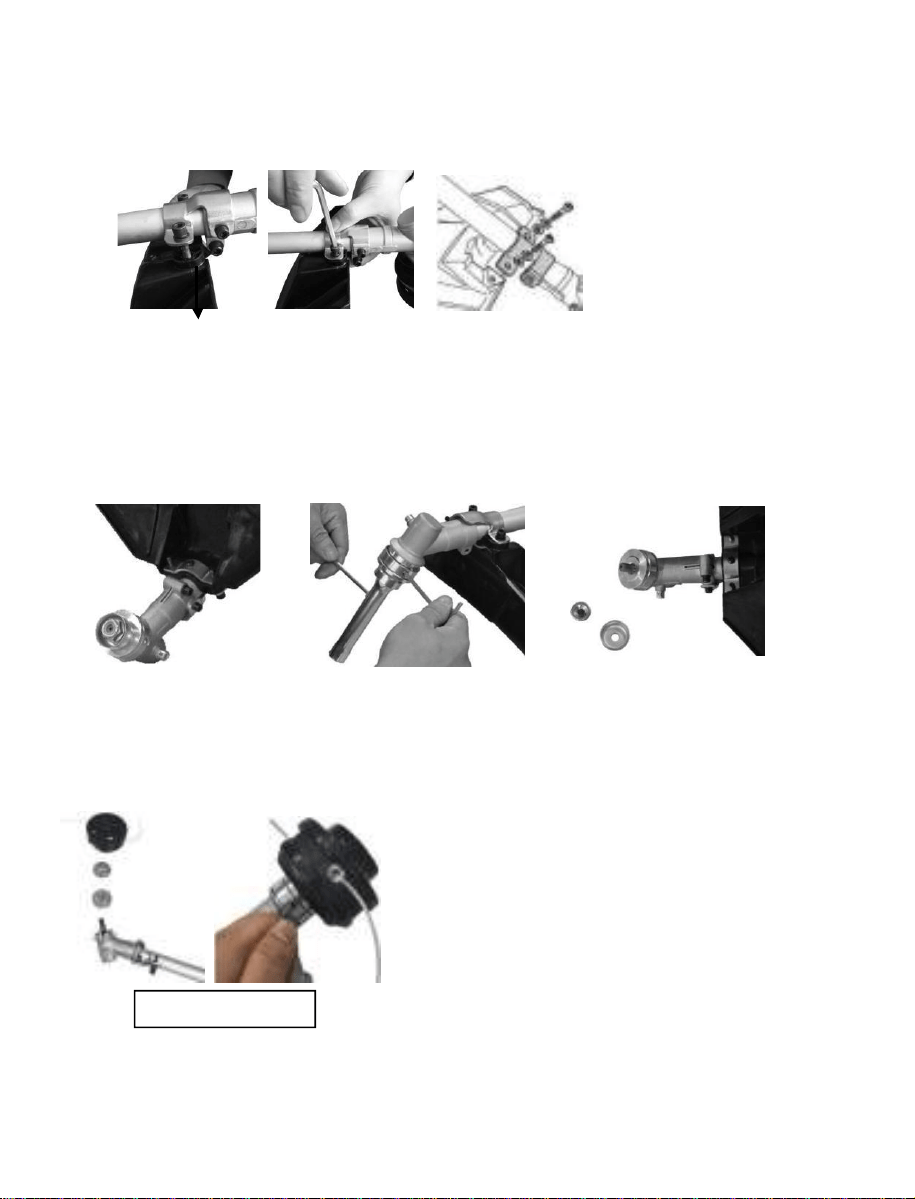
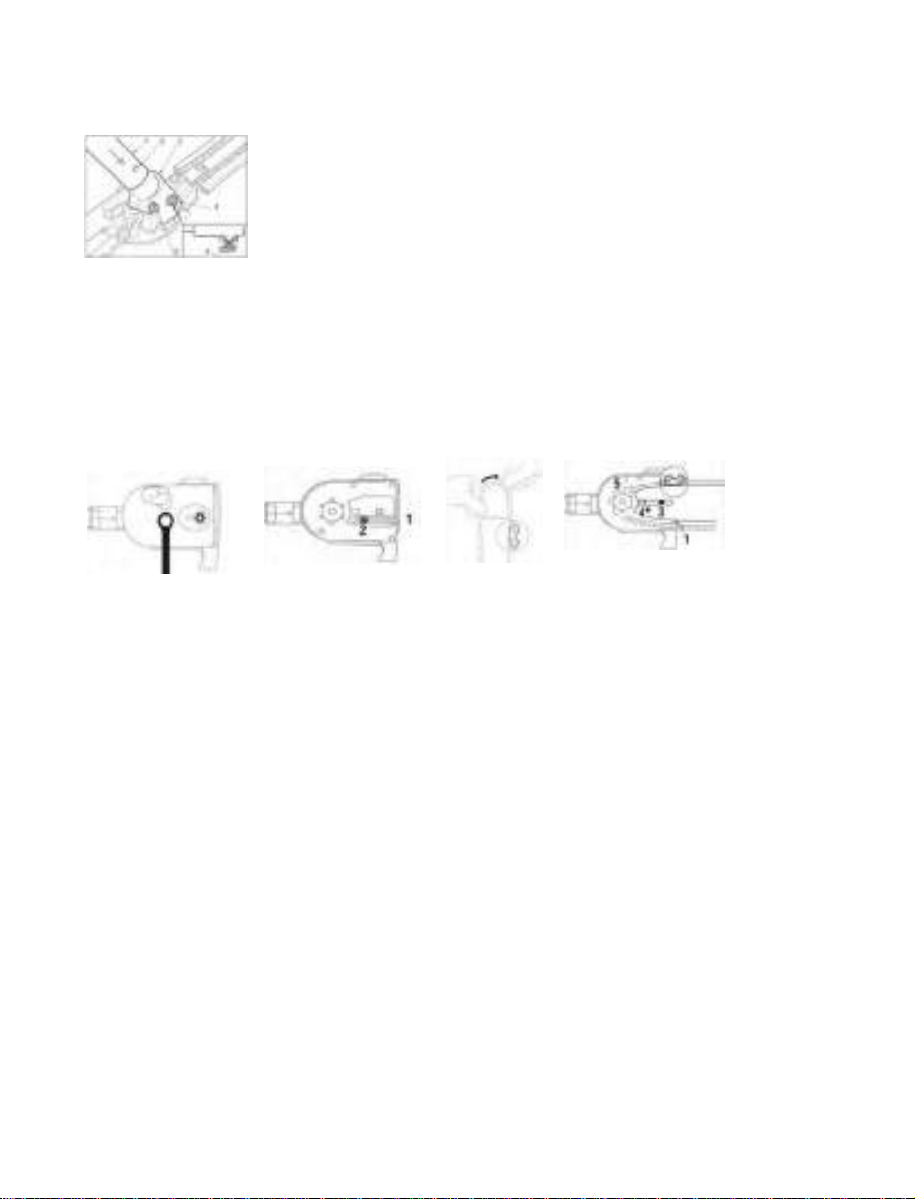
4. Assembly and disassembly of the cutting head
a) Release the nut. Line up the two holes of flange and shield, use one screw driver to hold the
flange as below and turn the socket wrench clockwise, the nut will be released.
b) Fit the Nylon cutting head.
Straight shaft: Remove another shield after release the nut. Still hold the flange, take the Nylon
cutting head on the shaft and rotate counter-clockwise, the Nylon cutting head is fitted
Straight shaft
7

c) Release the Nylon cutting head.
Straight shaft: Use screw driver to hold flange andthen rotate the Nylon cutting head clockwise,
it will be replaced.
d) Fit the blade (Only for straight shaft, forbidden used in curved shaft ). Take the outer flange
off after release the nut, then put the blade, outer flange, shield and nutaccording to priority as
below picture. Note the blade rotation direction needs be same as below picture. Use screw driver
to hold flange and tighten nut counter-clockwise, ensure the nut is tightened enough.
e) Release blade. Use screw driver to hold flange and release nut, the blade can be tookoff.
Warning!
Pleasemakesurethecutting head has been assembled correctly before use!
8
,QVWDOODWLRQ DQG DGMXVWPHQW SROH KHGJH WULPPHU
,QVWDOOLQJ WKH URG LI VXSSOLHG VHSDUDWHO\
,QVHUW WKH URG LQWR WKH VRFNHW VR WKH KROH OLQHV XS ZLWK WKH EROW
7LJKWHQ WKH WZR EROWV DQG 2QFH WKH\ DUH WLJKW
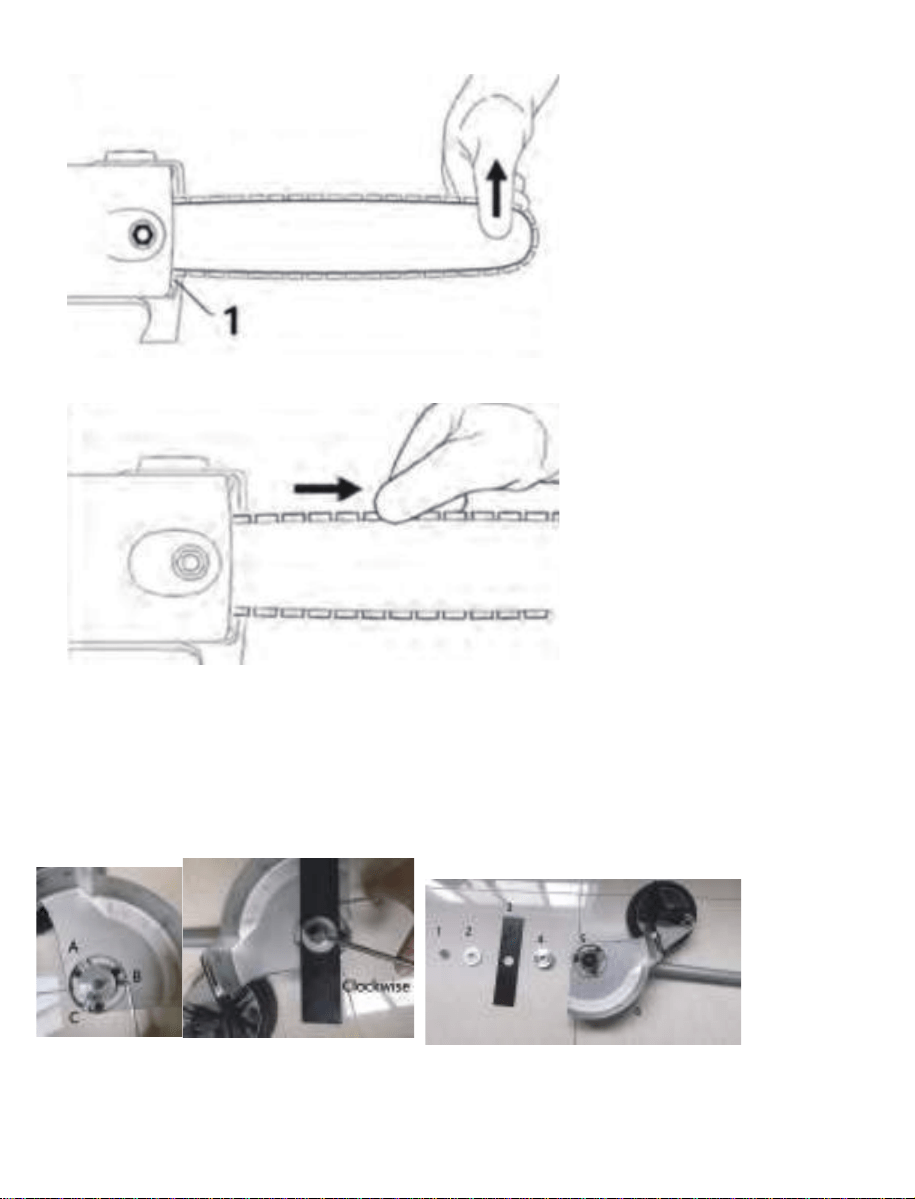
0RXQWLQJ WKH %DU DQG &KDLQ
8QVFUHZ QXW DQG WDNH RII WKH VSRUFNHW FRYHU EHORZ SLF
7XUQ WHQVLRQLQJ VFUHZ DQWLFORFNZLVH XQWLO WKH WHQVLRQLQJ QXW EXWWV DJDLQVW WKH OHIW
127( 7KH FKDLQ LV YHU\ VKDUS ± ZHDU ZRUN JORYHV WR SURWHFW KDQGV IURP FXWV SLF
)LW WKH FKDLQ ± VWDUW DW WKH EDU QRVH
)LW JXLGH EDU RYHU WKH VWXG (QJDJH SHJ RI WHQVLRQHU VOLGH LQ ORFDWLQJ KROH ± SODFH
WKH FKDLQ RYHU VSURFNHW DW WKH VDPH WLPH SLF
1RZ WXUQ WHQVLRQLQJ VFUHZ FORFNZLVH XQWLO WKHUH LV YHU\ OLWWOH FKDLQ VDJ RQ WKH
XQGHUVLGH RI WKH EDU ± DQG WKH GULYH OLQN WDQJV DUH ORFDWHG LQ WKH EDU JURRYH SLF
5HILW WKH VSURFNHW FRYHU DQG VFUHZ RQ WKH QXW RQO\ ILQJHUWLJKW
SLF
SLF
SLF
SLF
7HQVLRQLQJ WKH 6DZ &KDLQ SLF
5HWHQVLRQLQJ GXULQJ FXWWLQJ ZRUN
6KXW RII WKH HQJLQH DQG WKHQ VODFNHQ WKH QXW
+ROG WKH EDU QRVH XS
8VH VFUHZGULYHU WR WXUQ WKH WHQVLRQLQJ VFUHZ FORFNZLVH XQWLO FKDLQ ILWV VQXJO\ DJDLQVW WKH
XQGHUVLGH RI WKH EDU
7LJKWHQ GRZQ WKH QXW ILUPO\ $ QHZ FKDLQ KDV WR EH UHWHQVLRQHG PRUH RIWHQ WKDQ RQH WKDW KDV
EHHQ LQ XVH IRU VRPH WLPH ± FKHFN FKDLQ WHQVLRQ IUHTXHQWO\ ± VHH FKDSWHU ÄSHUDWLQJ ,QVWUXFWLRQV
'XULQJ 2SHUDWLRQ³
&KHFN FKDLQ WHQVLRQ
&KHFNLQJ &KDLQ 7HQVLRQ SLF
6KXW GRZQ WKH HQJLQH
:HDU ZRUN JORYHV WR SURWHFW KDQGV
&KDLQ PXVW ILW VQXJO\ DJDLQVW WKH XQGHUVLGH RI WKH EDU DQG LW PXVW VWLOO EH SRVVLEOH WR SXOO WKH
FKDLQ DORQJ WKH EDU E\ KDQG
,I QHFHVVDU\ UHWHQVLRQ WKH FKDLQ
&KDLQ /XEULFDQW
)RU DXWRPDWLF DQG UHOLDEOH OXEULFDWLRQ RI WKH FKDLQ DQG JXLGH EDU ± XVH RQO\ DQ HQYLURQPHQWDOO\
FRPSDWLEOH TXDOLW\ FKDLQ DQG EDU OXEULFDQW ZLWK QRQIOLQJ DGGLWLYH LV UHFRPPHQGHG
7KH VHUYLFH OLIH RI WKH FKDLQ DQG JXLGH EDU GHSHQGV RQ WKH TXDOLW\ RI WKH OXEULFDQW ,W LV WKHUHIRUH
HVVHQWLDO WR XVH RQO\ D VSHFLDOO\ IRUPXODWHG FKDLQ OXEULFDQW ,I VSHFLDO FKDLQ OXEULFDQW LV QRW
DYDLODEOH \RX PD\ ± LQ DQ HPHUJHQF\
± XVH DQ +' VLQJOH JUDGH RU PXOWLJUDGH HQJLQH RLO ZLWK D YLVFRVLW\ WKDW VXLWV WKH SUHYDLOLQJ RXWVLGH
WHPSHUDWXUH
'R QRW XVH ZDVWH RLO
0HGLFDO VWXGLHV KDYH VKRZQ WKDW UHQHZHG FRQWDFW ZLWK ZDVWH RLO FDQ FDXVH VNLQ FDQFHU 0RUHRYHU
ZDVWH LV HQYLURQPHQWDOO\ KDUPIXO :DVWH RLO GRHV QRW KDYH WKH QHFHVVDU\ OXEULFDWLQJ SURSHUWLHV
DQG LV XQVXLWDEOH IRU FKDLQ OXEULFDWLRQ
IRU DVVLVWDQFH LI QHFHVVDU\
10
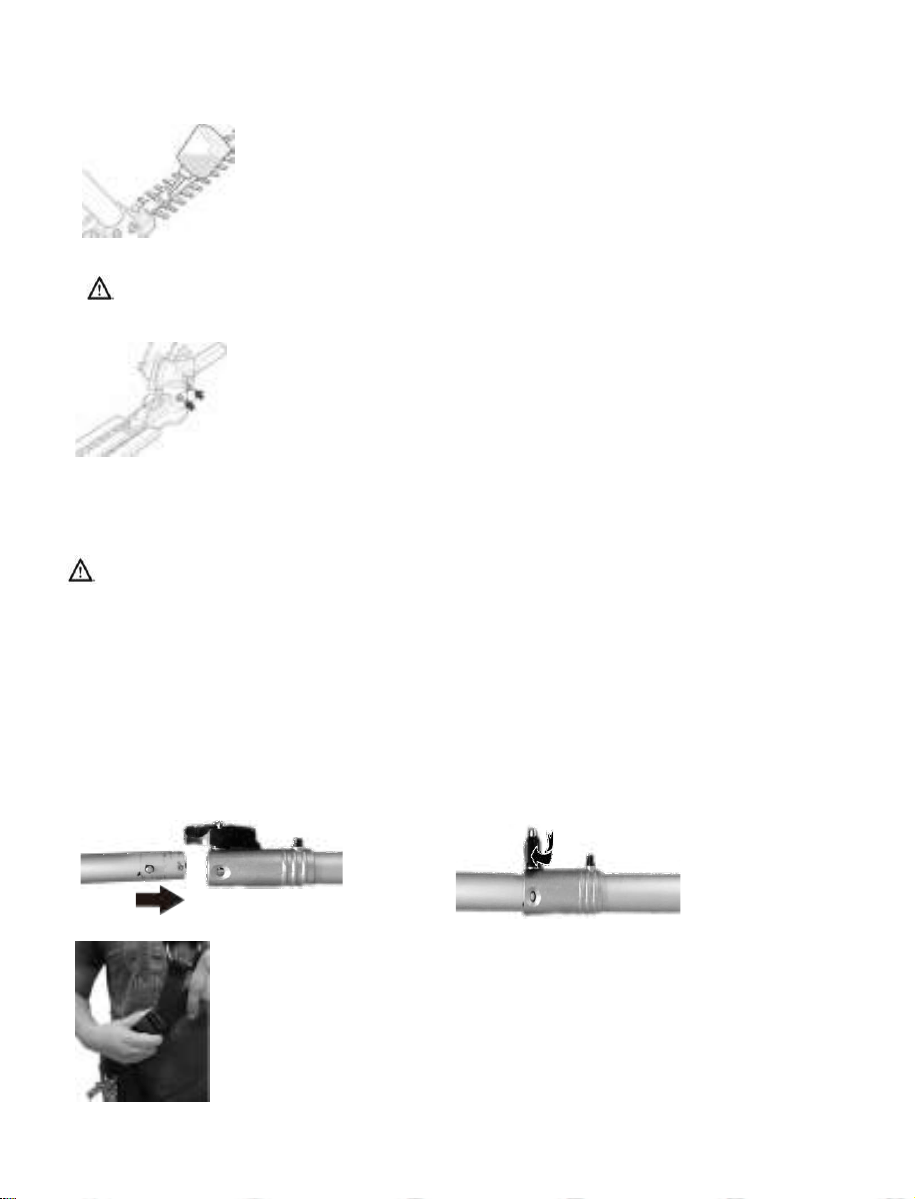
Assembling the Edger Attachment
Pull the protective caps off of the ends of the shaft and keep them in a safe place for later use
Connecting drive tube to gearbox ( Fig . 1 )
1 . There are 3 holes in the gear case, place the Allan key S4 into the gearcase holes B, and rotary the flange 4 ,
to let the allan key into the flange 4 holes. Loosen the 2 clamping screws ( 2 + 4 ) on the gearbox ( 5 ) of the edger
attachment by putting the socket wrench to catch the nut 1 and turn it by clockwise. Do not remove !
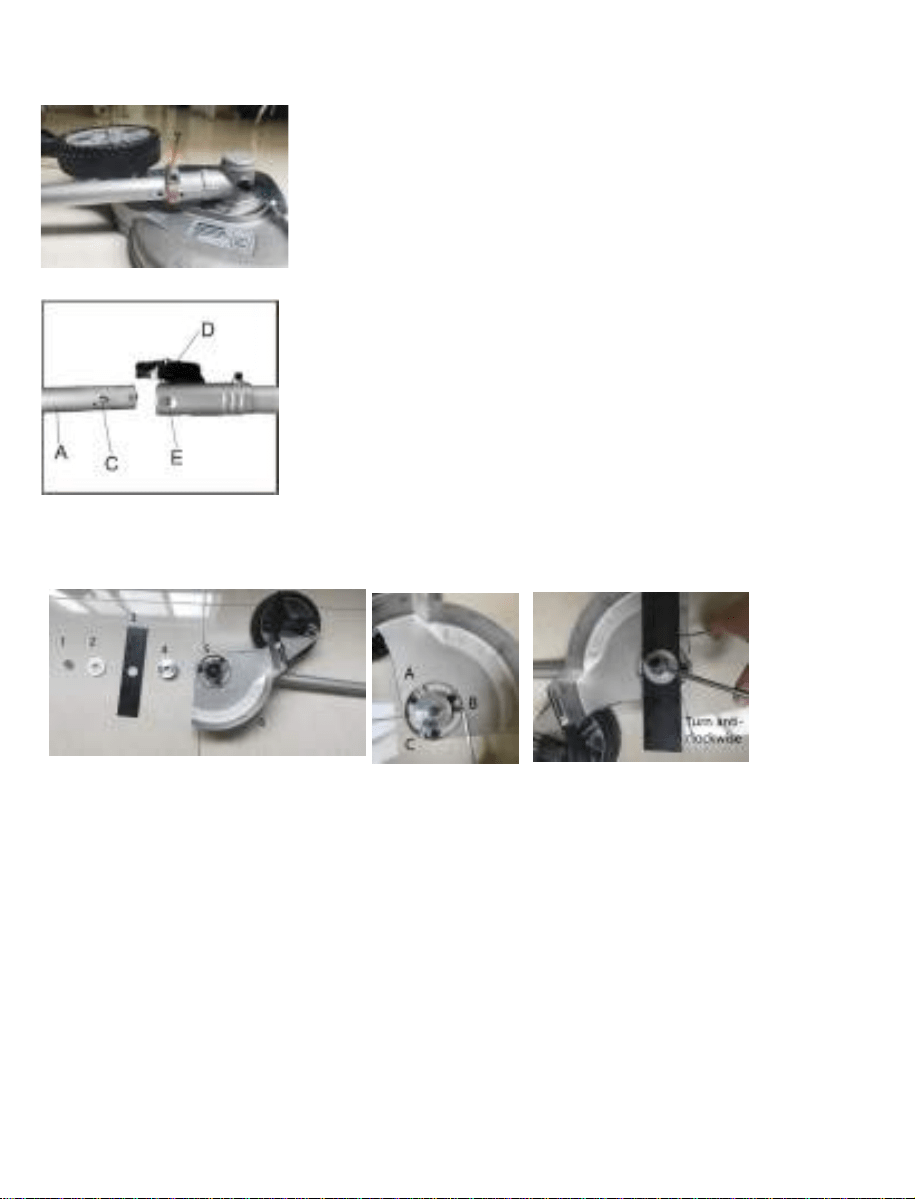
2 . Insert the tube in the gearbox with two holes alligned , screws two holes tightly, then tighten the gear box hole
7 with screw provided.
3 .Installing the attachment
-Aligh the pin (C) with the hole of the shaft connector hole (E), inset the shaft (A) to the shaft connector until the
pin get into the hole(E) and screw the knob (D)
4. Install the blade
There are 3 holes in the gearcase, place the Allan key S4 into the holes B, put the nut,f langes, and blades by
above sequence, rotary the flange 4 and until allan key S4 into the whole of flange 4, turn the nut(1) by
anti-clockwise tightly with a socket wrench. Release the allay key.
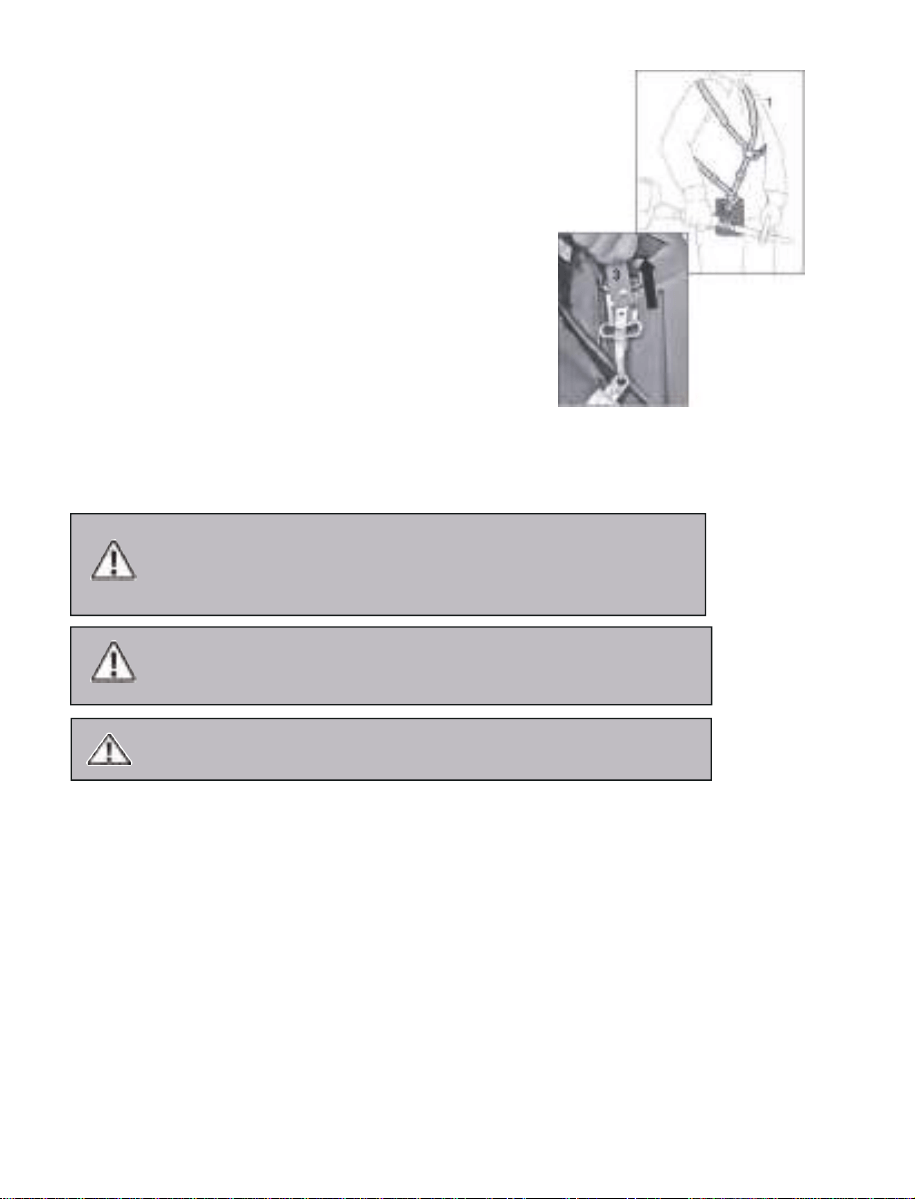
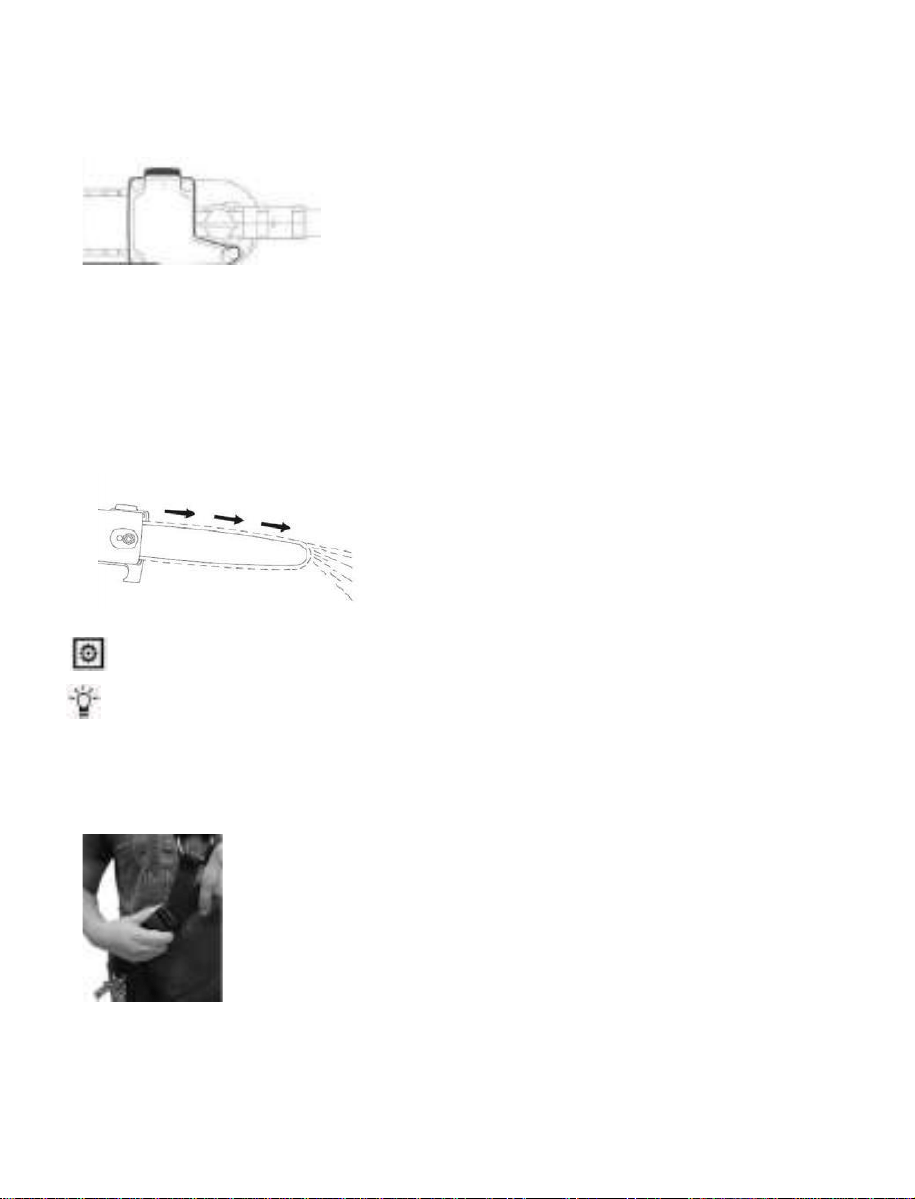
5. Fit and adjust the betl. The design and type of carry
strap may vary.(depends on if it is deliveried)
•
Put on the shoulder strap (1).
•
Adjust the length of the belt so that the spring hook(2)
is roughly a hand’s width below your right hip.
PLEASE NOTE: This carry strap has a safety
device allowing you to immediately disconnect the
strap from the machine in an emergency. To do so,
pull forcefully on the red pull tab (3) on the strap.
This disconnects the strap from the holding fixture
immed
iately.
NOTE: Ne
ver start the motor with the carry strap
attached to the machine!the belt well.
OPERATION
When operating this machine, please follow the instructions for operations steps.
1. Filling with fuel
Never use oil for 4-cycle engine use or water-cooled 2-cycle engine. If can cause spark
plug fouling exhaust port blocking or piston ring sticking.
Mixed fuels, which have been left unused for a period of one month or more may clog the
carburetor or result in the engine failing to operate pro
perly. Put remaining fuel int
o an
airtight container and keep it in the dark and cool room.
Mix a regular grade gasoline (leaded or unleaded, alcohol-free) and a quality-proven
motor oil (above 90 degree) for air-cooled 2 cycle engines.
RECOMMENDED MIXING RATIO
GASOLINE 50: OIL 1
WARNING! Take care of the emission of exhaust gases. Always shut off engine
before fueling. Never add fuel to a machine with a running or hot engine. Take care
of fire!
WARNING! Never smoke whilst refueling and avoid inhaling the petro
l fumes.
WARNING! Careful
ly open the tank top as pressure could have formed inside.
Risk of device damage!
The device is supplied without motor or gearbox oil.
Before operating, you must fill it with fuel.
Danger of injury!
Fuel is explosive!
-
Turn off and cool the motor down before filling the tank with fuel.
-
You must observe all safety instructions relating to handing fuel.
DO NOT SELL TO CALIFORNIA
12
%HIRUH UHIXHOOLQJ
6KDNH WKH IXHO PL[WXUH FRQWDLQHU ZHOO
3ODFH WKH PDFKLQH RQ D IODW VWDEOH VXUIDFH ZLWK WKH IXHO WDQN FDS IDFLQJ XSZDUGV
&OHDQ WKH IXHO WDQN FDS DQG WKH VXUURXQGLQJ DUHD WR DYRLG DQ\ GLUW IURP HQWHULQJ WKH WDQN
GXULQJ UHILOOLQJ
&DUHIXOO\ RSHQ WKH IXHO WDQN FDS WR DOORZ WKH SUHVVXUH LQVLGH WR GHFUHDVH JUDGXDOO\ 8VH
D IXQQHO WR UHILOO DQG DYRLG ILOOLQJ WKH WDQN WR WKH EULP
±
±
±
8QVFUHZ WKH WDQN FDS DQG UHPRYH LW
3RXU LQ WKH IXHO FDUHIXOO\ DYRLG VSLOOLQJ
6FUHZ WKH WDQN FDS RQ ILUPO\ E\ KDQG
67$57
581
'UDLQLQJ IXHO
±
+ROG D FROOHFWLRQ FRQWDLQHU EHQHDWK WKH IXHO GUDLQ EROW
±
8QVFUHZ WKH WDQN FDS DQG UHPRYH LW
$OORZ WKH IXHO WR UXQ RXWFRPSOHWHO\
6FUHZ WKH WDQN FDS RQ ILUPO\ E\ KDQG
:$51,1* $OZD\V FORVH WKH IXHO WDQN FDS ILUPO\
:$51,1* ,PPHGLDWHO\ FOHDQ DOO WUDFHV RI IXHO ZKLFK PD\ KDYH GULSSHG RQ WKH
PDFKLQH RU WKH JURXQG DQG GR QRW VWDUW WKH HQJLQH XQWLO WKH SHWURO IXPHV KDYH
GLVVLSDWHG
Start on the unit
Do not start the unit until it has been completely assembled. Before switching on the unit,
always check the oil.
Check before use!
Check the safe condition of the device:
– Check the device for leaks.
– Check the device for visual defects.
– Check that all parts of the device have been securely fitted.
-Check that all safety devices are in proper condition.
Once the machine has been set up properly, start the engine as follow:
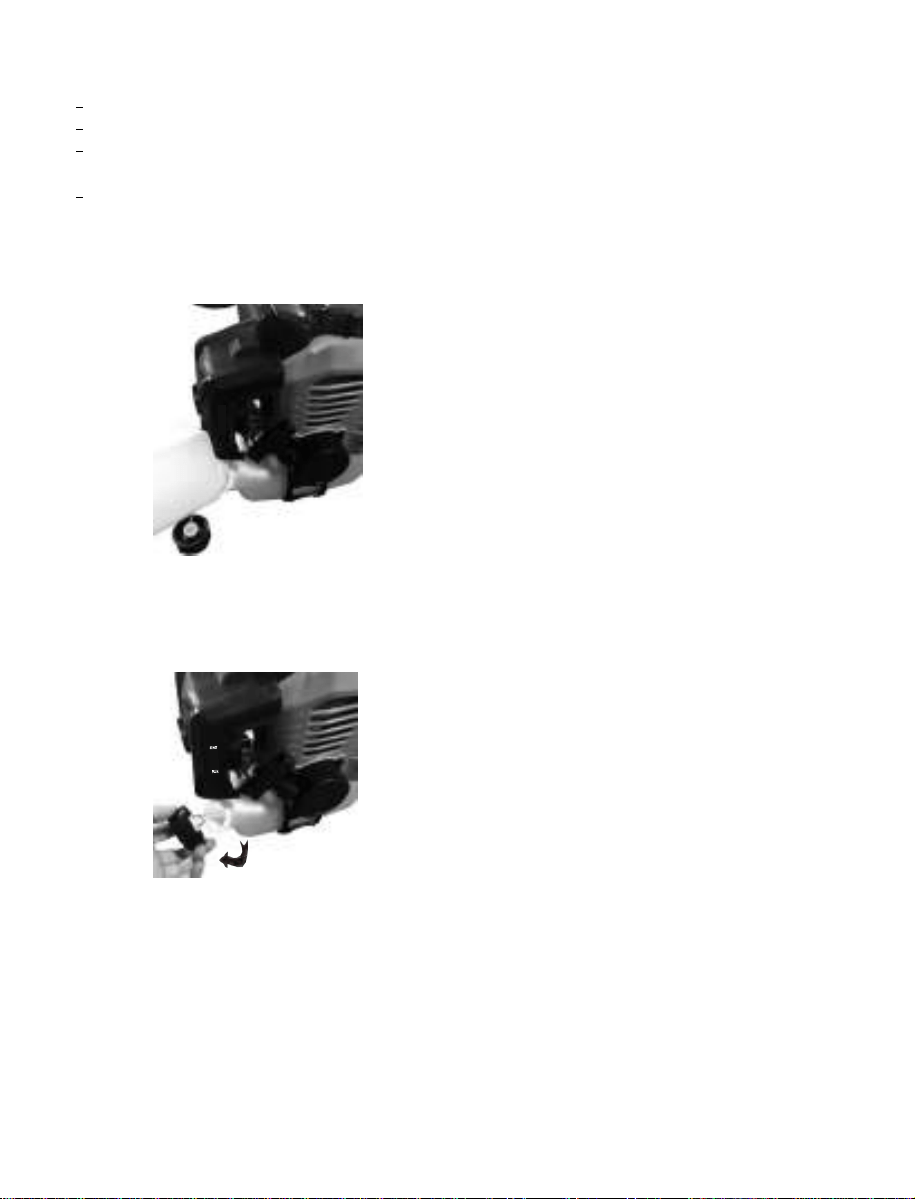
1.
Press the fuel pump more than 7 times.
2. Put the choke lever on the (START) position.
START
Danger of injury!
Before starting work, always check the ground and remove all objects
which could be thrown by the device.
Danger of injury!
Do not operate the device unless you did not find any faults. If a part has become
defective, make sure to replace it before you use the device again.
ATTENTION: The switch would always stays "ON" position,so no need to press it to "ON".
And once press it to "OFF" and release the switch, it returns to "OFF".
14

3XOO WKH UHFRLO VWDUWHU KDQGOH WLPHV WR VWDUW WKH HQJLQH +ROG WKH PDFKLQH ILUPO\ RQ WKH
JURXQG ZLWK RQH KDQG RQ WKH SRZHU XQLW LQ RUGHU QRW WR ORVH FRQWURO RI WKH PDFKLQH GXULQJ
VWDUWXS DV IROORZLQJ SLFWXUH
3XOO WKH VWDUWHU JULS VORZO\ IRU FP XQWLO \RX IHHO VRPH UHVLVWDQFH WKHQ WXJ LW D IHZ
WLPHV XQWLO \RX KHDU WKH HQJLQH WXUQ RYHU 7KHQ DGMXVW WKH FKRNH OHYHU WR 581 SRVLWLRQ
581
3XOO WKH VWDUWHU JULS DJDLQ XQWLO WKH HQJLQH VWDUWV DV QRUPDO
$WWHQWLRQ $OORZ WKH GHYLFH WR UXQQLQJ DW LGOLQJ IRU PLQXWHV WR ZDUP XS EHIRUH
VWDUW WR ZRUN
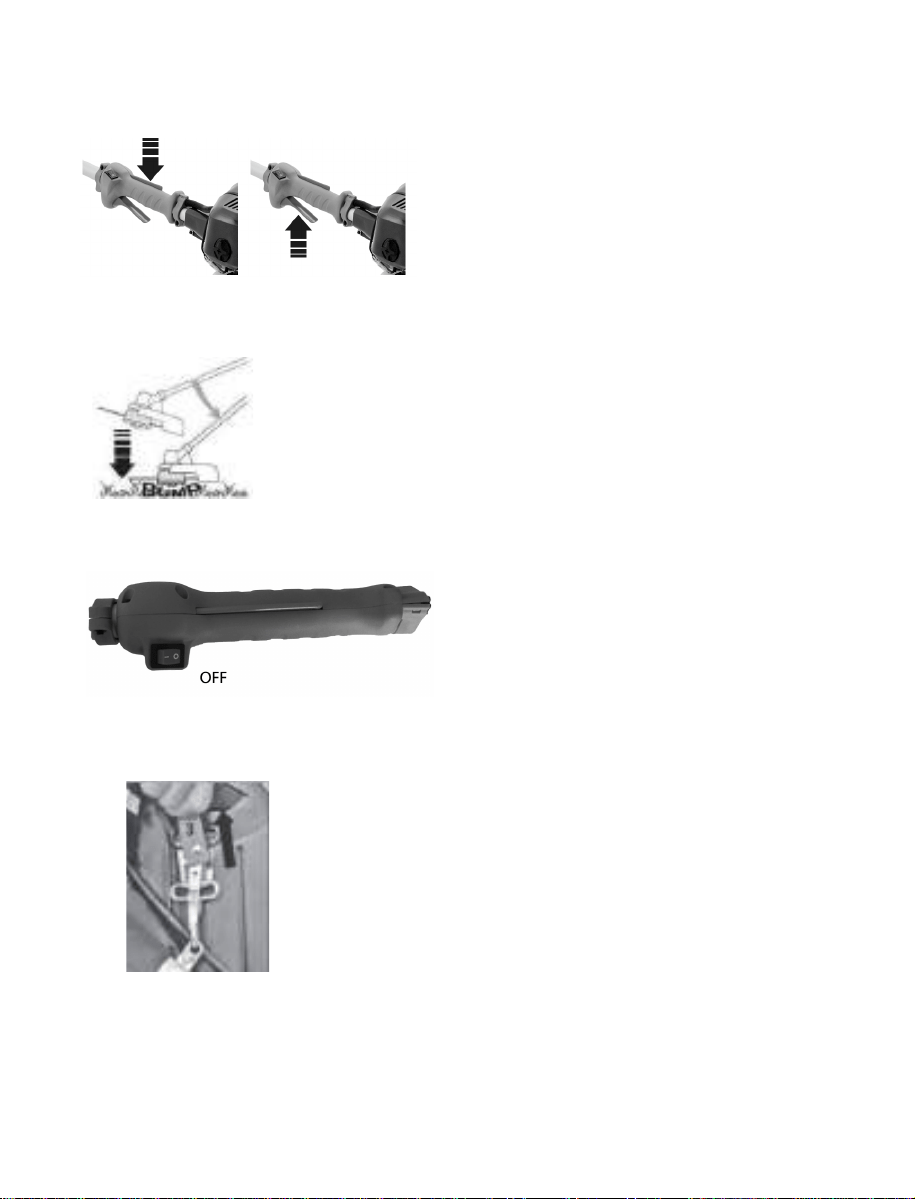
6. When the engine is running and idling, the throttle lever on handle is as below picture.
First press the lock off lever and then switch the throttle lever on, the machine will be
working.
7. Adjusting line length when working: This machine is fitted with a “Tap & Go”head.To
release more line, tap the cutting line head against the round with engine at top speed: the
line will be released automatically and the knife cut off the excesslength.
8. If any problem occurs, press the engine switch, the machine will stop running.
If you need stop cutting head working, release the throttle lever.
9. If any problem occurs, pull the pin of safety belt, then release the brush cutter immediately.
10. Hot start: If the machine is hot, the throttle level can be adjusted to ON position directly when
restart the machine.Then repeat step 1,3,5
ATTENTION: The switch would always stays "ON" position, once press it to "OFF"
and release the switch, it returns to "OFF"
:$51,1* 'R QRW XVH WKH PDFKLQH IRU VZHHSLQJ WLOWLQJ WKH FXWWLQJ OLQH KHDG 7KH
SRZHU RI WKH HQJLQH FRXOG WKURZ REMHFWV DQG VPDOO VWRQHV PHWUHV RU PRUH FDXVLQJ
GDPDJH RU LQMXULHV WR SHRSOH
1RWH
'R QRW VWDUW WKH PRWRU LQ WDOO JUDVV
:KLOH PRZLQJ OD\ WKH FRQQHFWLRQ FDEOH VDIHO\ RQ IRRWSDWKV DQG RQ DUHDV ZKLFK
KDYH DOUHDG\ EHHQ PRZQ
:KHQ WKH HQJLQH KDV EHHQ VZLWFKHG RII WKH FXWWHU FRQWLQXHV UXQQLQJ IRU VHYHUDO
VHFRQGV WKHUHIRUH GR QRW JHW FORVH WR WKH FXWWLQJ KHDG RI WKH EUXVK FXWWHU XQWLO WKH
FXWWHU KDV FRPH WR D VWDQGVWLOO

7KH GHVLJQ RI WKH SHWURO EUXVK FXWWHU DOORZV IRU RSHUDWLRQ RQO\ DW WKH ULJKW VLGH RI WKH XVHUV ERG\
.HHS WKH SHWURO EUXVK FXWWHU ILUPO\ ZLWK ERWK KDQGV RQ WKH KDQGOHV
$OZD\V WDNH FDUH WKDW WKH FXWWLQJ WRRO FRQWLQXHV WR URWDWH EULHIO\ DIWHU WKH WKURWWOH KDV EHHQ
UHOHDVHG
:KHQ VWULNH RQ D VWRQH RU D WUHH WXUQ RII WKH HQJLQH DQG UHPRYH WKH VSDUN SOXJ WKHQ H[DPLQH
WKH SHWURO EUXVK FXWWHU IRU GDPDJH
&DXWLRQ $OZD\V EH H[WUD FDUHIXO ZKHQ ZRUNLQJ LQ GLIILFXOW WHUUDLQ DQG VORSHV &XW WDOO JUDVV
JUDGXDOO\ VRDV QRW WR RYHUORDG WKH XQLW
$OZD\V ZHDU VDIHW\ JODVVHV DQG KHDULQJ SURWHFWLRQ DQG D VDIHW\ KHOPHW
0RZLQJ ZLWK JUDVV WULPPHU
&OHDU WKH ZRUN DUHD EHIRUH FXWWLQJ LQWHUIHULQJ EUDQFKHV DQG XQGHUJURZWK 7KHQ \RX FUHDWH D
UHWUHDW DUHD IDU IURP WKH VSRW ZKHUH WKH FXW EUDQFKHV IDOO RQ DQG UHPRYH DQ\ REVWDFOHV WKHUH
.HHS WKH ZRUN DUHD FOHDQ UHPRYH WKH FXW EUDQFKHV LPPHGLDWHO\ 3D\ DWWHQWLRQ WR \RXU SRLQW ZLQG
GLUHFWLRQ DQG WKH SRVVLEOH GLUHFWLRQ RI IDOO RI WKH EUDQFKHV %H SUHSDUHG WKDW IDOOHQ EUDQFKHV FDQ
VWULNH EDFN 3ODFH DOO RWKHU WRROV DQG HTXLSPHQW DW D VDIH GLVWDQFH IURP WKH EUDQFKHV WR EH FXW
EXW QRW LQ WKH UHWUHDW DUHD
8VH WKH SODVWLF OLQH FDVVHWWH IRU D FOHDQ FXW DOVR DWXQHYHQ HGJHV IHQFLQJ SRVWV DQG JUDVV
&DUHIXOO\ DGYDQFH WKH WULPPLQJ OLQH WR DQ REVWDFOH DQG XVH WKH WLS RI WKH OLQH WR FXW DURXQG WKH
REVWDFOH
:KHQ WKH WULPPLQJ OLQH FRPHV LQWR FRQWDFW ZLWK VWRQHV WUHHV DQG ZDOOV WKH OLQH ZHDUV RXW RU
EUHDNV RII DKHDG RI WLPH
6ZLQJ WKH SHWURO FXWWLQJ OLQH OLNH D QRUPDO VF\WKH KRUL]RQWDOO\ IURP ULJKW WR OHIW DQG EDFN DJDLQ
<RX GHILQH WKH FXWWLQJ KHLJKW GHSHQGLQJ RQ KRZ KLJK \RX DUH KROGLQJ WKH WRRO
1HYHU UHSODFH WKH Q\ORQ OLQH ZLWK D PHWDO ZLUH
5,6. 2) ,1-85,(6
$XWRPDWLF WKUHDG WULPPLQJ
7KH SURGXFW LV GHOLYHUHG ZLWK D ILOOHG Q\ORQ KHDG ZLWK OLQH7KLV OLQH ZLOO ZHDU RXW GXULQJ ZRUN 7R IHHG
QHZ OLQH IRUFHIXOO\ SUHVV WKH KHDG RI WKH OLQH FDVVHWWH RQWR WKH JURXQG ZKLOH WKH HQJLQH LV
UXQQLQJ DW ZRUNLQJ VSHHG 7KH OLQH LV DXWRPDWLFDOO\ IHG GXH WR FHQWULIXJDO IRUFH7KH NQLIH DW WKH
OLQH JXDUG ZLOO VKRUWHQ WKH WULPPLQJ OLQH WR WKH FRUUHFW OHQJWK 5XQ WKH WULP OLQH DSSURDFK
FDXWLRXVO\ WR DQ REVWDFOH DQG FXW ZLWK WKH WLS RI WKH OLQH DURXQG WKH REVWDFOH
0RZLQJ ZLWK EUXVK FXWWHU DQG KHGJH WULPPHU
8VH WKH 7 EODGH WR WUHDW ZLWK EUXVKZRRG UDQN JURZWK \RXQJ WUHH WUXQN GLDPHWHU RI
PD[LPXP FP DQG SROH KHGJH WULPPHU ZLWK KLJK EUDQFKHV
:KLOH XVLQJ PHWDO FXWWLQJ WRROV WKHUH LV JHQHUDOO\ D ULVN RI UHFRLO ZKHQ WKH WRRO KLWV D VROLG REVWDFOH
VWRQHV WUHHV EUDQFKHV HWF 7KHUHE\ WKH WRRO LV KXUOHG EDFNZDUGV DJDLQVW WKH URWDWLQJ GLUHFWLRQ
7R FXW UDQN JURZWK DQG EUXVKZRRG \RX ³LPPHUVH´ WKH FXWWLQJ EODGH IURP WKHWRS
&$87,21 %H HVSHFLDOO\ FDUHIXO ZKHQ XVLQJ WKLV ZRUNLQJ WHFKQLTXH EHFDXVH WKH IXUWKHU DZD\ WKH
FXWWLQJ WRRO LV IURP WKH JURXQG WKH KLJKHU LV WKH ULVN WKDW REMHFWV WR EH FXW DQG SDUWLFOHV ZLOO EH
KXUOHG VLGHZD\V
&$87,21 ,QFRUUHFW XVH DQG PLVXVH FDQ GDPDJH WKH EXVK FXWWHU DQG FDXVH VHYHUH LQMXULHV
EHFDXVH RI SLHFHV KXUOHG DZD\
7R PLQLPL]H WKH ULVN RI DFFLGHQWV E\ XVH RI WKH FXWWLQJ EODGH WDNH QRWH RI IROORZLQJ SRLQWV
1HYHU FXW VKUXEEHU\ RU ZRRG ZKRVH GLDPHWHU LV ODUJHU WKDQ FP
$YRLG FRQWDFW ZLWK PHWDO ERGLHV VWRQHV HWF
3HULRGLFDOO\ FKHFN WKH FXWWLQJ EODGH IRU GDPDJHV 1HYHU FRQWLQXH WR XVH D GDPDJHG FXWWLQJ EODGH
:KHQ WKH FXWWLQJ EODGH EHFRPHV DSSDUHQWO\ EOXQW LW PXVW EH VKDUSHQHG DFFRUGLQJ WR LQVWUXFWLRQV
:KHQ WKH FXWWLQJ EODGH LV DSSDUHQWO\ RXW RI EDODQFH LW PXVW EH UHSODFHG
Pole saw:
Filling Chain Oil Tank
A full chain oil tank is sufficient for only half a tankful of fuel. Check the oil level regularly during
cutting work. Never allow the oil tank to run dry!
Thoroughly clean the filler cap and area around it so that no dirt can fall into the tank.
Position the unit so that the filler cap faces up.
If the oil level in the tank does not go down, the reason may be a problem in the oil supply system:
Check chain lubrication, clean the oil ways, contact your servicing deal-er for assistance if
necessary.
Checking Chain Lubrication
The saw chain must always throw off a small amountofoil.
Always check chain lubrication and the oil level in the tank before starting work.
Never operate your pruner withoutchain lubrication. If the chain is run dry, the whole cutting
attachment will be irretrievably damaged within a very short time.
Every newchain has to be broken in for about2to3minutes. After breaking in the chain, check
chain tension and adjust if necessary – see chapter „Checking Chain Tension“.
Adjusting the carry strap
PLEASE NOTE:This carry strap has a safety device allowing you to immediately disconnect the
strap from the machine in an emergency. To do so, pull forcefully on the red pull tab on the strap.
This disconnects the strap from the holding fixture immediately.

NOTE:Never start the motor with the carry strap attached to the machine!
Starting / Stopping the Engine
To reduce the risk of fire and burn injuries, start the en-gine at least 10 feet (3 meters) from the
fueling spot, out-doors only.
Proper starting methods reduce the risk of injury.
Place the saw trimmer on firm ground or other solid sur-face in an open area or, in the alternative,
as shown in the above picture. Maintain good balance and secure footing.
Operating Instructions
During operation
Check chain tension frequently!
A newchain has to betens
ioned more often than onethat has been in use for some time.
Cold chain:
Tension is correct when the chain fits snugly against the underside of the bar and can still be pulled
along the bar by hand. Retension if necessary – see chapter “Tension-ing the Saw Chain”. Chain at
operating temperature: The chain stretches and begins to sag. The drive links on the underside of
the bar must not come out of the bar groove – the chain may otherwise jump off the bar.
Retension the chain – see chapter “Tensioning the Saw Chain”.
Always slacken off the chain again after finishing work. The cha
in contracts as it cools down. If it
is not slackened off, it may damage the gear shaft and bearings.
After finishing work
Slacken off the chain if you have retensioned it at op-erating temperature during cutting work.
The chain contracts as it cools down. If it is not slackened off, it may damage the gear shaft and
bearings.
Using the Pole Pruner
Preparations:
Wear suitable protective clothing and equipment.
Start the engine.
Put on the shoulder
strap.
Never throw cuttings into the household garbage can – they can be composted!
Never stand directly under the branch you are cutting – be ware of falling branches. Note thata
branch may spring back at you after it hits the ground!
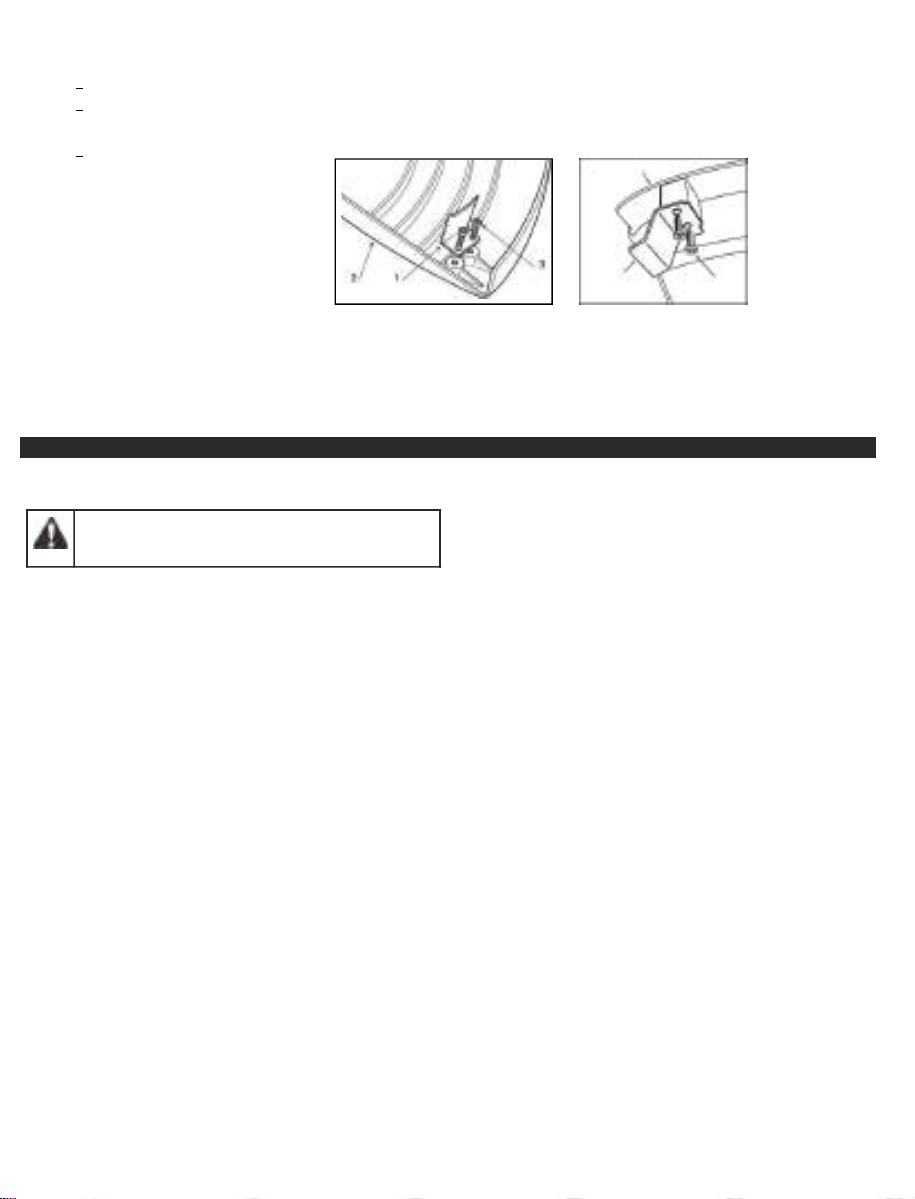
Adjusting the angle of the pole pruner
If required, you can set the cutting attachment of the pole pruner to 7 different positions.

Pull the sprung pin (1) out of the latch (2) and engage into different latches..
A
fter setting the desired position, release the sprung pin (1)again
.
Attention: The sprung pin (1) must engage firmly in the latch (2).
Cutting sequence
T
oallow branches a free fall,always cut the lower branches first. Prune heavy branches (larg
e
d
iameter) in several controllable pieces.
W
orking position
H
old the control handle with your right hand, and the drive tube with your left hand.Your left
arm
should be extended to the most comfortable position.
Theshaft should always be held at an angle of 60° or less!
Th
e most convenient working position is a tool angle of 60°, but any lesser angle may be use
d to
suit the situation concerned.
Cross-cutting
To avoid pinching the bar in the cut, position the cutting attachment with the hook against
t
he branch andthen perform the cross-cut from the top downwards.
Relieving cut
To avoid tearing the bark on thick branches, always start by performing a relieving cut (1) on the
underside of the branch.
To do this, apply the cutting attachment and pull it in an arc across the bottom of the branch
(see illustration).
Locate the hook against the branch andthen perform the cross-cut ( 2).
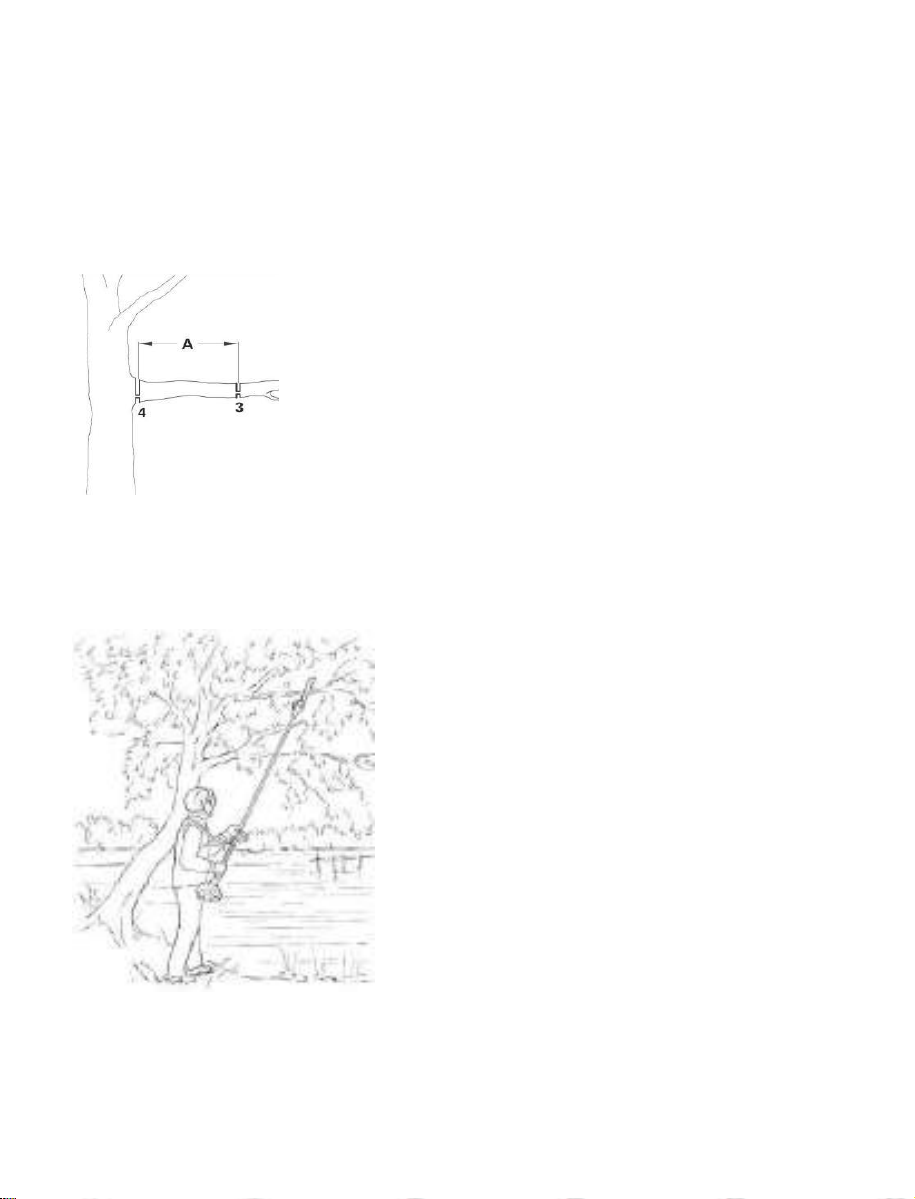
Flush-cutting thick branches
If branch diameter is more than 4“ (10 cm), first per-form undercut(3) andthen
cross-cut at a distance (A) of about 8“ (20cm) from the final cut.
Then carry out the flush-cut (4), starting with a reliev-ing cut and finishing with
a
cross-cut.
Cutting above obstacles
The unit‘s longreach makes it possible to prune branchesthat are overhanging obstacles, such as
rivers or lakes.Thetool angle in this case depends on the position of the branch.
Taking Care of Guide Bar
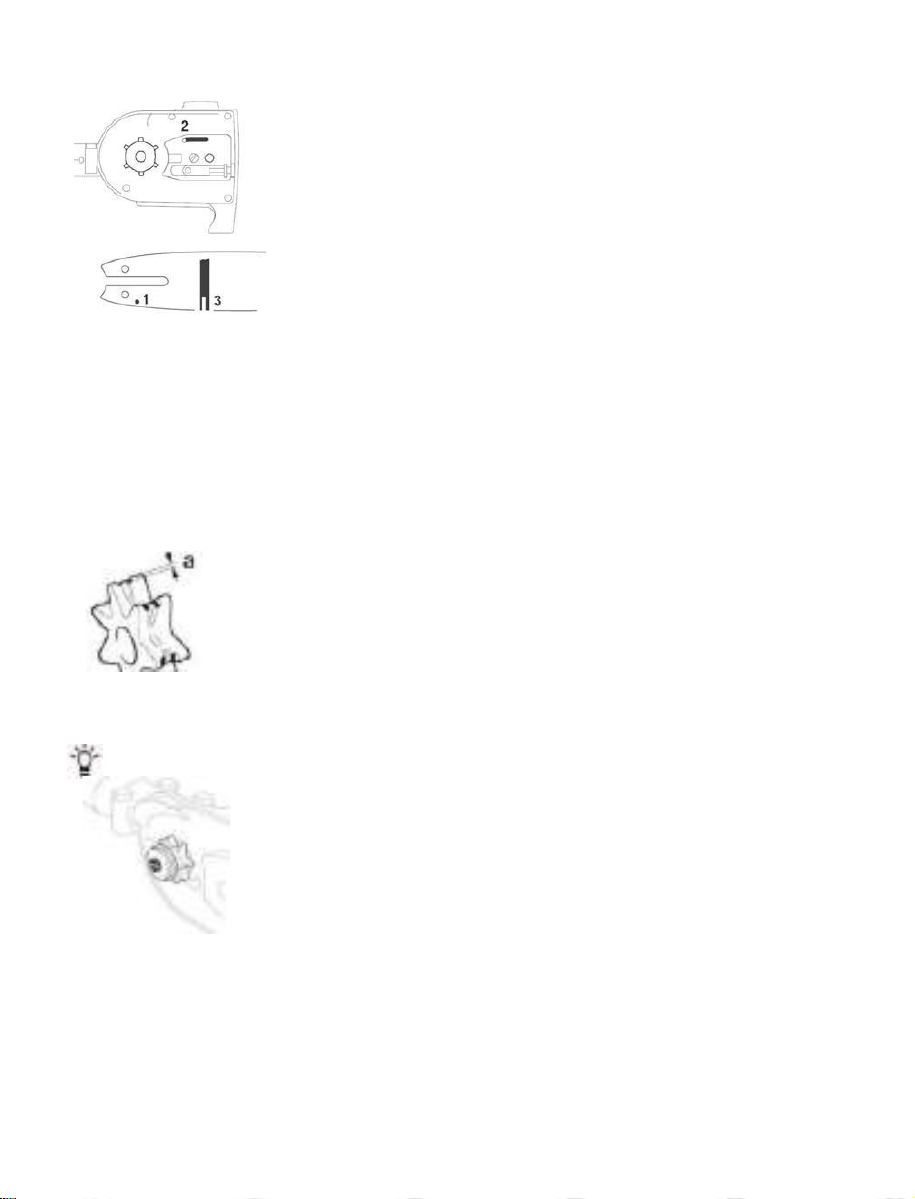
Turn the bar over –every time you sharpen the chain–and every time you replace the chain. This
avoids one-sidedwear, especiallly at nose and underside of the bar.
Regularly clean
1 = oil inlet hole
2 = oil passage
3=bar groove
Checking andReplacing the Chain Sprocket
Remove the chain sprocket cover, chain and guide bar.
Replace the chain sprocket:
after using two chains or sooner
if the wear marks (dimension deeperthan 0.02 in (0.5 mm) – the life of the a) on the spro
cket
are chain would otherwise be reduced.
The service life of the chain sprocket is prolonged if it is used with two chains in rotation.
Maintaining andSharpening Saw Chain
Correctly sharpened chain
A properly sharpenedchain slices throughwoodeffortlessly andrequires very little feed pressur
e.
Do not work with a dull or damaged saw chain as it will increase the physical effort required,cau
se
higher vibrations, produce unsatisfactory results and a higher rate of wear.
Clean the chain.
Check the chain for cracks in the links and damaged rivets.
Replace any damaged or worn parts of the chain and match the new parts to the s
hape and
size of the original partsbyfiling back as necessary.
It is necessary to comply with the angles and dimensionsspecified below. If the saw chain is
i
n-correctly sharpened if the depth gauges are too low – there is an increased risk of
kickback
an
d resulting injury!
Th
e pruner’s saw chain cannot be locked in place on the guide bar. Therefore, it i
s best to
r
emove the chain from the bar and resharpen it on a workshopsharpening tool.
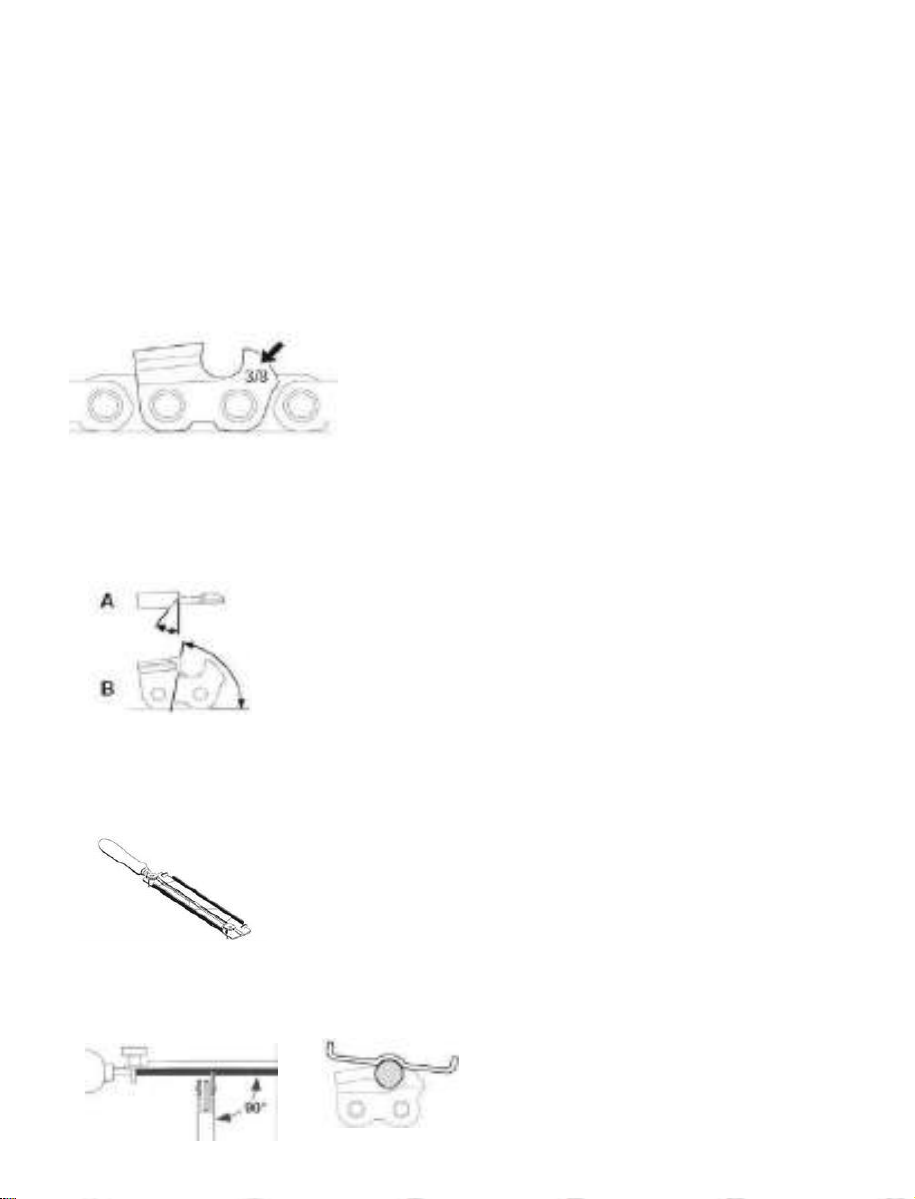
Select the appropriate sharpening tools for the chain pitch.
Thechain pitch (e.g. 3/8“) is marked on the depth gauge of each cutter.
Use only special saw chain files!
Otherfiles have the wrongshape and cut.
Select the file diameter according to the chain pitch.
You must also observe the following angles when re-sharpening the chain cutters.
A=Filing angle
B = Side plate angle
Furthermore, the angles must be the same on all cutters. If angles are uneven the chai
n will run
roughly, not in a straight line,wear quickly and break prematurely.
As these requirements can be met only after sufficient andconstant practice:
Useafile holder
Afile holder must be used for manual resharpening of saw chain. The correct filing angles are
marked on the file holder.

Hold the file guide bar) andfile according to the angles marked onhorizontally (at right angle
t
o side of the file holder. Rest the file holder on the top plate and depth gauge.
Always file from the inside to the outside of the cutter.
Thefile only sharpens on the forward stroke – lift the file off the cutter on the backstroke.
Avoid touching the tie straps and drive links with the file.
Rotate the file at regular intervals whilefiling to avoid one-sidedwear.
Useapiece of hardwood to remove burrs from cut-ting edge.
A
ll cutters must be the same length. If the cutters are not the same length, they will have differ
ent
heights. This makes the chain run roughly and increases the risk of breakage of the chain.
POLE HEDGE TRIMMER
Operation
I
mportant:You should also carefullyread through the operating instructions for the brush cutter o
n
w
hich the hedge cutter attachment is to be used.
B
efore commencing work, check that:
all screws and bolts on the machine and on the blades have been tightened
the blades are sharp and undamaged
the protective devices are fitted tightly and provide ad-equate protection
the hand grips are properly secured
Possible applications
The branches being cut must not be more than 5mm thick; using the hedge cutter attachment
t
ochop through thicker branchesmaycause irreparable damage to the attachment.
The cutting angle may ONLY be adjusted when the motor is switchedoff. The motor must al
so
b
e SWITCHED OFF before removing branches or foliage stuck in the attachment.
Always hold the cutting unit away from the body during operation.
When the unit is stopped,always fit the guard.
Adjusting the angle of the blade
Switch off the motor and wait until the blade comes to a stop.
Firmly hold the grip (1) andthen, holding the rod (3) with the other hand, push th
e
un
locking lever (2) and move the grip (1) to change the angle of the blade (4).
When the lever (2) is released again, the blade stays lockedinthedesired position.
Lubricating the blade during use
If the cutting unit gets too hot during operation, the internalfaces of the blademust be
lubricated using a specific oil.
Please note: This procedure may only be carried outwhen the motor is switche
d off and the
blade has come toastop.
Blade drive housing
Lubricate at intervals of 20 hours via the lubricating nipple.
Use lithium-based lubricating grease for high temperatures and pressure value
s to lubricate
your machine.
Maintaining and sharpening the blade
Please note:Check regularly to ensure that the blades are not warped or damaged
andthat the
blade bed is in goodcondition.
The bladespacing does not have to be set, this tolerance is preset in the factory.
If the blades are used in accordance with the instructions, no maintenance or sharpeni
ng is
required.
Re-sharpening is only necessary if the cutting performance deteriorates and branches
often
become entangled.
Important:Shoulditberequired, any work on the blade must be carried out by a specia
lized center,
which hasspecialized equipment at its disposal and is in a position to perform the nece
ssary work
without negatively affecting the safety of the machine.
1. Mounting the rod:
Adjusting the carry strap
The design and type of carry strap may vary.
PLEASE NOTE:This carry strap has a safety device allowing you to immediately disc
onnect
the strap from the machine in an emergency. To do so, pull forcefully on the red pull tab
(as
above pic. shows) on the strap. This disconnects the strap from the holding fixture immediat
ely.
N
OTE: Never start the motor with the carry strap attached to the machine!
Do not use your power scythe attachment during other people’s rest periods.
Preparations
A
lways wear a harness.
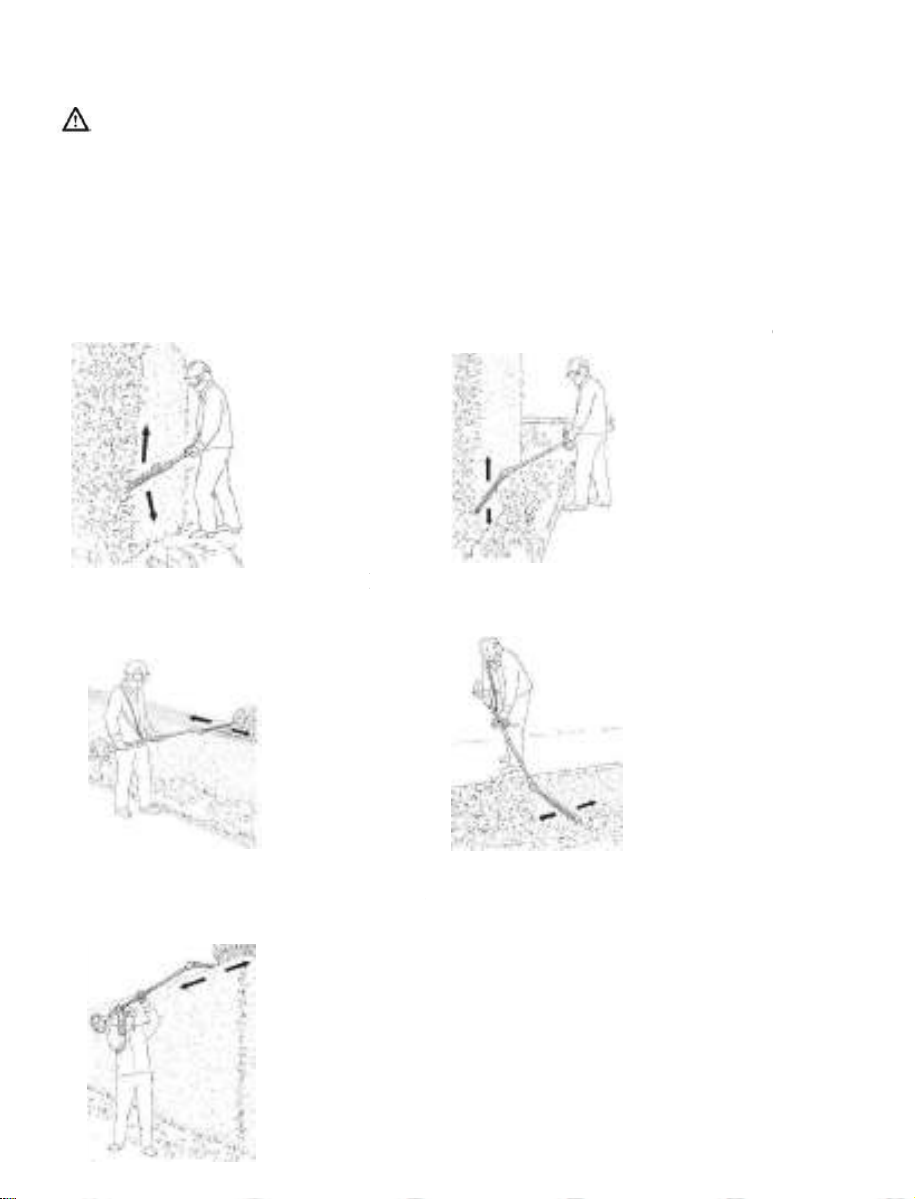
V
ertical cut (with straight cutter bar)
Large working radius even without additional aids
Vertical cut (with angled cutter bar)
Cutting without standing directly next to hedge
Horizontal cut (with straight cutter bar)
C
utting without standing directly in front
of
the hedge - large working radius
Horizontal cut (with angled cutter bar)
C
utting close to the ground from a standin
g
position, e.g. low shrubs
Overhead cut (with angled cutter bar)
H
old the hedge cutter above your head andswi
ng
it in an arc to make maximum use of its reach.
Do not throw cuttings in the rubbish bin
(garbagecan) -they can be composted
Any working position above head height is tiring.
To minimize the risk of accidents, work in such
positions for short periods only. Set angle of
adjustable cutter bar to maximum so that the unit
can be held in a lower, less tir-tir-ing position (wit
h
harness) while still providing adequate vertical
reach.

Working with straight shaft Edger Attachment
An arrow on the deflector shows the correct direction of rotation of the cutting blade. The arrow on the deflector
must always face away from you , so that cuttings and other debris will be diverted away from the machine and
your position.
Adjust carrying harness and grip to suit your size before starting work . The machine should be properly balanced
as specified in your instruction manual for proper control and less fatigue in operation . To be better prepared in
c
ase of an emergency , practise releasing the unit from the harness as quickly as possible
Adjust the depth of cut by above knob, when it goes up, the wheel heightwould be low, when it goes down, the
wheel heightwould high. Shut off the engine-risk of accident
Note: The guard board under the knob can help you to go along the edge, if don’t need it, you can move it up.
The depth of cut is influenced by uneven ground as well as height and working position of the operator . For this
reason
-Adjust the wheel so that the bl
ade barely touches the ground when the machine is held in a normal working
posture or penetrates the ground at most toadepth (B) of 5 mm
Tighten the knob clockwise
Standing in the normal working position , check the depth of cut again - correct it if necessary
ATTENTION : when working on flat ground , adjust the alignment guide board (3 ) to be short ,and when working
on road side with gap, adjust the alignment guide board ( E3 ) to be longer and fitable for the road gap.
Warning ! Do not adjust the deflecto
r
The deflector has been set by the manufacturer so that the arrow on the deflector and the open side point away
from the operator . This ensures that cuttings and other debris will be directed away from the machine and
operator
Edging
-Start the engine

-Start the cut at least half throttle and continue cutting at full throttle
-Hold and guide the unit so that the blade is vertical
-Cut steadily so that the engine speed does not decline to any major extent. Do not apply force
-Cut at a normal walking pace
-Do not push the blade into the ground
-Always walk forwards when cutting , do not pull the unit towards you
-Cut at a steady pace-this avoids having to make several passes
-Use the gunning sight ( 1 ) for the cutting blade to align the blade to the edge
Replacing
the cutting blade / Edger Attachment
Do not attempt to straighten or weldabent or cracked blade - it may break - it must be replaced
Replace the blade ( 1 ) if its length is no longer sufficient to maintain the necessary ground clearance and obtain
the required depth of cut.
ATTENTION : when replacing parts or doing maintenance , make sure switching off the engine until the cutting
parts stop rotary

5287,1( 0$,17(1$1&(
&RUUHFW PDLQWHQDQFH LV HVVHQWLDO WR PDLQWDLQ WKH RULJLQDO HIILFLHQF\ DQG VDIHW\ RI WKH PDFKLQH RYHU WLPH
%HIRUH SHUIRUPLQJ DQ\ PDLQWHQDQFH RU FOHDQLQJ ZRUN DOZD\V WXUQ RII WKH HQJLQH
'R QRW VSUD\ WKH XQLW ZLWK ZDWHU ,QJUHVV RI ZDWHU PD\ GDPDJH WKH HQJLQH DQG HOHFWULFDO
FRQQHFWLRQ
&OHDQ WKH XQLW ZLWK D FORWK KDQG EUXVK HWF
:$51,1* 'XULQJ PDLQWHQDQFH RSHUDWLRQV
±
5HPRYH WKH VSDUN SOXJ FDS
±
:DLW XQWLO WKH HQJLQH LV VXIILFLHQWO\ FROG
±
1HYHU GLVSRVH RI RLOV IXHO RU RWKHU SROOXWLQJ PDWHULDOV LQ XQDXWKRUL]HG SODFHV
([SHUW LQVSHFWLRQ LV UHTXLUHG
D
,I WKH JUDVV WULPPHU VWULNHV DQ REMHFW
E
,I WKH PRWRU VWRSV VXGGHQO\
F
,I WKH Q\ORQ FXWWHU LV GDPDJHG
G
,I WKH JHDUV DUH GDPDJHG
5HSODFLQJ DQG UHFOHDQLQJ WKH Q\ORQ VSRRO DW WKH HQG RI WKH WULPPLQJ VHDVRQ $OZD\V
UHFOHDQHG WKH Q\ORQ VSRRO RU LI UHTXLUHG UHSODFH WKH Q\ORQ VSRRO ZLWK D QHZ RQH $OZD\V
KDYH WKH Q\ORQ VSRRO UHFOHDQHG RU UHSODFHG E\ D FXVWRPHU VHUYLFH FHQWUH
6725$*(
$W WKH HQG RI HDFK ZRUNLQJ VHVVLRQ FDUHIXOO\ FOHDQ WKH PDFKLQH RI GXVW DQG GHEULV DQG
PDNH VXUH WKDW WKHUH DUH QR GDPDJHG SDUWV UHSODFLQJ DQ\ IDXOW\ SDUWV 7KH PDFKLQH PXVW
EH VWRUHG LQ D GU\ SODFH DZD\ IURP WKH HOHPHQWV DQG ZLWK WKH FRYHU FRUUHFWO\ ILWWHG
&/($1,1* 7+( (1*,1( $1' 7+( 6,/(1&(5
7R UHGXFH ILUH ULVNV SHULRGLFDOO\ FOHDQ WKH F\OLQGHU ILQV ZLWK FRPSUHVVHG DLU DQG FOHDU WKH
VLOHQFHU DUHD WR JHW ULG RI VDZGXVW EUDQFKHV OHDYHV RU RWKHU GHEULV
67$57,1* 81,7
7R DYRLG RYHUKHDWLQJ DQG GDPDJH WR WKH HQJLQH DOZD\V NHHS WKH FRROLQJ DLU YHQWV FOHDQ
DQG IUHH RI VDZGXVW DQG GHEULV ,I \RX QRWLFH VLJQV RI ZHDU RQ WKH VWDUWHU FDEOH FRQWDFW
\RXU 'HDOHU IRU D UHSODFHPHQW
1876 $1' 6&5(:6
3HULRGLFDOO\ FKHFN WKDW DOO WKH QXWV DQG VFUHZV DUH VHFXUHO\ WLJKWHQHG DQG WKH KDQGJULSV DUH
WLJKWO\ IDVWHQHG
0DLQWHQDQFH VFKHGXOH
KRXUV RI XVH KRXUV RI KRXUV RI
$LU ILOWHU
FOHDQ
FOHDQ
UHSODFH
6SDUN SOXJ
FKHFN
FOHDQ
UHSODFH
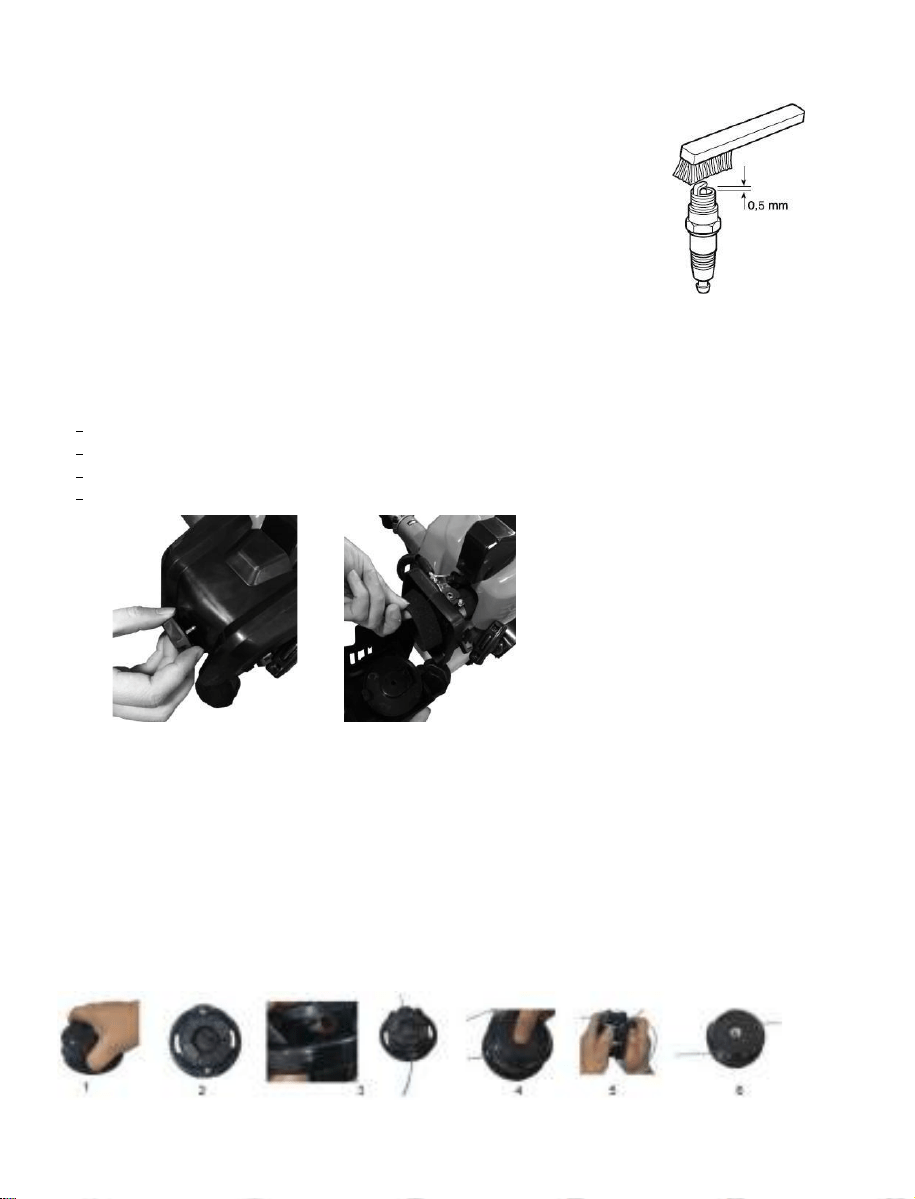
Change and clean the spark plug
-Periodically remove and clean the spark plug using a metal brush to get rid of any
deposits.
-Check and reset the correct distance between the electrodes.
-Replace the spark plug and fasten it firmly using the supplied wrench.
-The spark plug must be replaced with one with the same characteristics
whenever the electrodes have burnt or the insulation has worn, and in
any case every
100 working hours.
Clean the air filter
IMPORTANT Cleaning the air filter is essential to guarantee the efficiency and duration of
the machine. Do not work withadamaged filter or without a filter, as this could permanentl
y
damage the engine. It must be cleaned after every 12 working hours.
Clean the filter as follows:
Loosen the knob, remove the cover and the filter element
Washthefilter element with soap and water. Do not use petrol or other solvents.
Leavethefilter to dry in the open air.
Fit the filter element and the cover back on, tightening the knob again
.
Warning!
Never run the engine without the air filter element installed.
Head line replacement
1.Openthenylonhead lower housing by pressing the two clamps
2.Allignthespoolarrows to the upper housing hole
3. Insert the line from the hole of back side of the spool and the hole pf upperhousing,
stretch to the other side of the hole.
4. Refit the lower nylon headhousing
5. Turn the tips clockwise till the line is suitable
6+$53(1,1* 7+( /,1( &877,1* .1,)(
5HPRYH WKH OLQH FXWWLQJ NQLIH IURP WKH JXDUG E\ XQVFUHZLQJ WKH VFUHZV
)L[ WKH OLQH FXWWLQJ NQLIH LQ D YLFH DQG VKDUSHQ LW XVLQJ D IODW ILOH EHLQJ FDUHIXO WR UHWDLQ
WKH RULJLQDO FXWWLQJ DQJOH
5HILW WKH NQLIH RQ WKH JXDUG
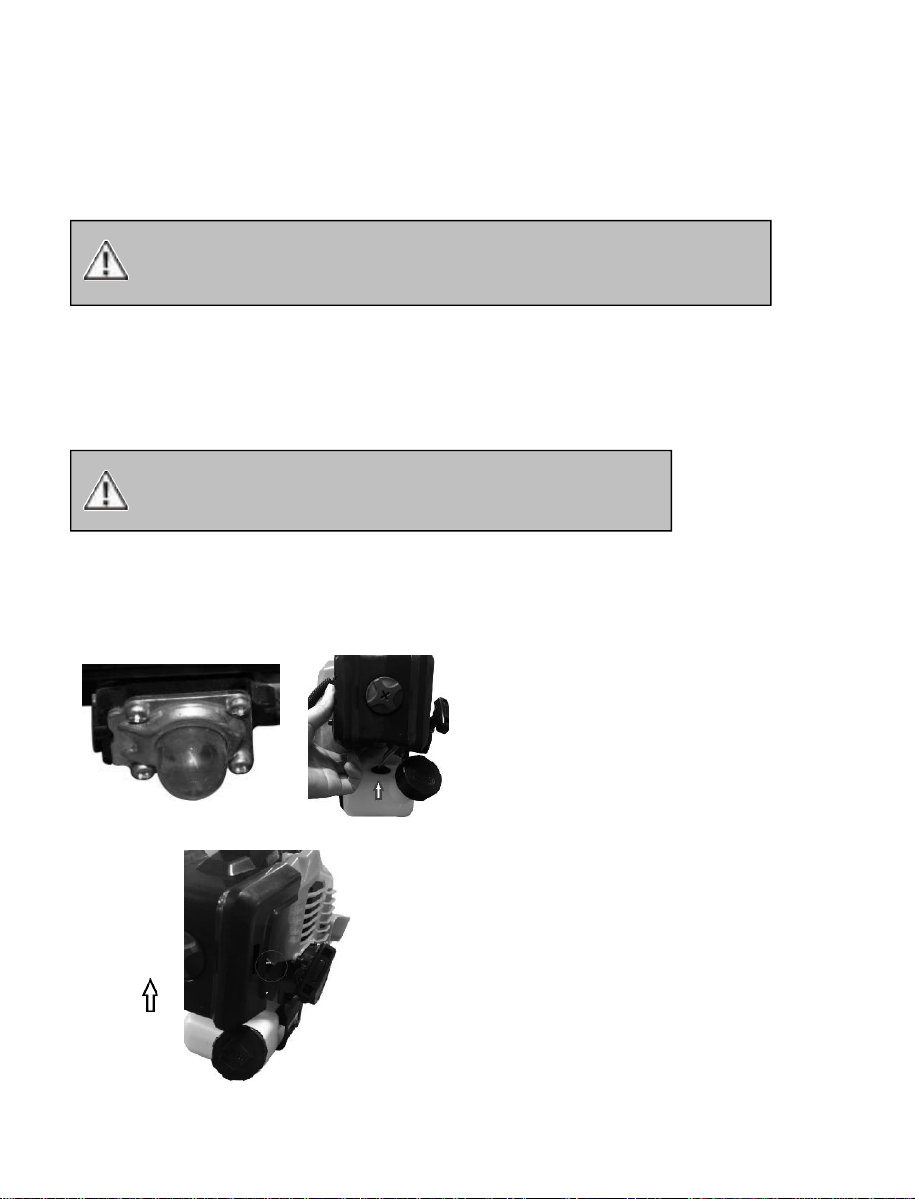
/XEULFDWH DQJOH WUDQVPLVVLRQ
/XEULFDWH ZLWK OLWKLXPEDVHG JUHDVH 5HPRYH WKH VFUHZ DQG SXW LQ WKH JUHDVH WXUQLQJ WKH VKDIW
PDQXDOO\ XQWLO JUHDVH HPHUJHV WKHQ UHSODFH WKH VFUHZ
&/($1,1* $1' 6725$*(
&/($1,1*
6KRUWWHUP 6WRUDJH ZHHNV
6WRUH WKH XQLW LQ D KRUL]RQWDO SRVLWLRQ ,I WKLV LV QRW SRVVLEOH VWRUH
WKH XQLW YHUWLFDOO\ ZLWK WKH HQJLQH DW WKH WRS
/RQJWHUP 6WRUDJH
5HPRYH WKH IXHO FDS WLS WKH XQLW DQG GUDLQ WKH IXHO LQWR DQ
DSSURYHG FRQWDLQHU 5HLQVWDOO WKH IXHO FDS
6WDUW WKH HQJLQH DQG DOORZ LW WR UXQ XQWLO LW VWDOOV 7KLV HQVXUHV
WKDW DOO IXHO KDV EHHQ GUDLQHG IURP WKH FDUEXUHWRU
$OORZ WKH HQJLQH WR FRRO 5HPRYH WKH VSDUN SOXJ DQG SXW
GURSV RI DQ\ KLJKTXDOLW\ PRWRU RLO RU F\FOH RLO LQWR WKH
F\OLQGHU 3XOO WKH VWDUWHU URSH VORZO\ WR GLVWULEXWH WKH RLO 5HLQVWDOO
WKH VSDUN SOXJ
7KRURXJKO\ FOHDQ WKH XQLW DQG LQVSHFW LW IRU DQ\ ORRVH RU
GDPDJHG SDUWV 5HSDLU RU UHSODFH GDPDJHG SDUWV DQG WLJKWHQ
ORRVH VFUHZV QXWV RU EROWV
8VH D VPDOO EUXVK WR FOHDQ WKH RXWVLGH RI WKH XQLW 'R QRW XVH VWURQJ
GHWHUJHQWV +RXVHKROG FOHDQHUV WKDW FRQWDLQ DURPDWLF RLOV VXFK DV
SLQH DQG OHPRQ DQG VROYHQWV VXFK DV NHURVHQH FDQ GDPDJH
SODVWLF :LSH RII DQ\ PRLVWXUH ZLWK D VRIW FORWK
6725$*(
1HYHU VWRUH D IXHOHG XQLW ZKHUH IXPHV PD\ UHDFK DQ RSHQ IODPH
RU VSDUN
$OORZ WKH HQJLQH WR FRRO EHIRUH VWRULQJ
/RFN XS WKH XQLW WR SUHYHQW XQDXWKRUL]HG XVH RU GDPDJH
6WRUH WKH XQLW LQ D GU\ ZHOOYHQWLODWHG DUHD
6WRUH WKH XQLW RXW RI WKH UHDFK RI FKLOGUHQ
7R VXVSHQG WKH DWWDFKPHQW IURP D KRRN LQVWDOO WKH KDQJHU FDS
RQWR WKH DWWDFKPHQW 0DNH VXUH WKH UHOHDVH EXWWRQ LV VHFXUHO\
ORFNHG LQWR RQH RI WKH KROHV RQ WKH KDQJHU FDS
3UHSDULQJ WKH 8QLW IRU 8VH DIWHU /RQJWHUP 6WRUDJH
5HPRYH WKH VSDUN SOXJ 7LS WKH XQLW DQG GUDLQ DOO RI WKH RLO IURP
WKH F\OLQGHU LQWR DQ DSSURYHG FRQWDLQHU 5HLQVWDOO WKH VSDUN SOXJ
127( 'R QRW XVH IXHO WKDW KDV EHHQ VWRUHG IRU PRUH WKDQ GD\V
'LVSRVH RI ROG IXHO DQG RLO DFFRUGLQJ WR IHGHUDO VWDWH DQG ORFDO
UHJXODWLRQV
:$51,1* 7R DYRLG VHULRXV SHUVRQDO LQMXU\ DOZD\V
VWRS WKH HQJLQH DQG DOORZ LW WR FRRO EHIRUH FOHDQLQJ RU
PDLQWDLQLQJ WKH XQLW

7528%/(6+227,1*
7KH WDEOH EHORZ FRQWDLQV D OLVW RI IDXOW V\PSWRPV DQG H[SODLQV ZKDW \RX FDQ GR WR UHPHG\ WKH SUREOHP LI \RXU HTXLSPHQ
IDLOV WR ZRUN SURSHUO\ ,I WKH SUREOHP VWLOO SHUVLVWV DIWHU ZRUNLQJ WKURXJK WKH OLVW SOHDVH FRQWDFW \RXU QHDUHVW VHUYLFH ZRUN
VKRS
,PSRUWDQW KLQW LQ FDVH RI VHQGLQJ WKH HTXLSPHQW WR D VHUYLFH VWDWLRQ
'XH WR VHFXULW\ UHDVRQV SOHDVH VHH WR LW WKDW WKH HTXLSPHQW LV VHQW EDFN IUHH RI RLO DQG JDV
,I IXUWKHU DVVLVWDQFH LV UHTXLUHG FRQWDFW DQ DXWKRUL]HG VHUYLFH GHDOHU
)DXOW 3RVVLEOH FDXVH 5HPHG\
0DFKLQH GRHV QRW VWDUW
/DFN RI IXHO VXSSO\
)DXOW LQ WKH IXHO OLQH
6WDUWLQJ GHYLFH LV IDXOW\
(QJLQH VWDOOHG
6SDUN SOXJ FDS QRW DWWDFKHG
1R VSDUN
(QJLQH IDXOW\
&DUEXUHWRU IDXOW\
5HIXHO
&KHFN WKH IXHO OLQH IRU NLQNV RUGDPDJH
&RQWDFW WKH VHUYLFH FHQWUH
5HPRYH WKH VSDUN SOXJ FOHDQ DQG GU\ LW WKHQ
SOXJ
&KHFN WKH FRUUHFW SRVLWLRQ RI WKH VSDUN SOXJ FDS
&OHDQ WKH VSDUN SOXJ RU UHSODFH LW LI DSSOLFDEOH
&KHFN WKH LJQLWLRQ FDEOH IRU GDPDJH
&RQWDFW WKH VHUYLFH FHQWUH
&RQWDFW WKH VHUYLFH FHQWUH
0DFKLQH VWDUWV EXW
VWRSV DJDLQ
:URQJ FDUEXUHWRU VHWWLQJ LGOHVSHHG
&RQWDFW WKH VHUYLFH FHQWUH
(QJLQH VWDUWV EXW WKH
FXWWLQJ WRRO VWRSV
&XWWLQJ WRRO EORFNHG
,QWHUQDO IDXOW GULYH VKDIW JHDUER[
&OXWFK IDXOW\
7XUQ RII HQJLQH DQG UHPRYH REMHFW
&RQWDFW WKH VHUYLFHFHQWUH
&RQWDFW WKH VHUYLFHFHQWUH
0DFKLQH ZRUNV
ZLWK LQWHUUXSWLRQV
VSXWWHULQJ
&DUEXUHWRU VHW XS LQFRUUHFWO\
6SDUN SOXJ LV VRRW\
2QRIIVZLWFKIDXOW\
&RQWDFW WKH VHUYLFH FHQWUH
&OHDQ WKH VSDUN SOXJ RU UHSODFH LW
&RQWDFW WKH VHUYLFH FHQWUH
6PRNH LV JHQHUDWHG
:URQJ IXHO PL[
&DUEXUHWRU VHW XS LQFRUUHFWO\
8VH WZRVWURNH PL[WXUH DW D UDWLR RI
&RQWDFW WKH VHUYLFH FHQWUH
0DFKLQH GRHV QRW ZRUN
DW IXOO SRZHU
0DFKLQH LV RYHUORDGHG
&DUEXUHWRU VHW XS LQFRUUHFWO\
6LOHQFHU LV EORFNHG
'R QRW XVH IRUFH GXULQJPRZLQJWULPPLQJ
&RQWDFW WKH VHUYLFH FHQWUH
&KHFN WKH H[KDXVW
%UXVK FXWWHU GRHV QRW
ZRUN DW IXOO SRZHU
%ODGHV DUH EOXQW RU GDPDJHG
&XW PDWHULDO LV WRR KLJK PDFKLQH RYHUORDG
6KDUSHQ RU UHSODFH EODGHV
&XW WKH JUDVV LQ SKDVHV
*UDVV WULPPHU GRHV QRW
ZRUN DW IXOO SRZHU
&XWWLQJ OLQH WRR VKRUW RU GDPDJHG
0DFKLQH LV RYHUORDGHG EHFDXVH WKH JUDVV LV
WRR KLJK
)HHG PRUH FXWWLQJ OLQH WKURXJK RU UHSODFH LW
&XW WKH JUDVV LQ SKDVHV
&XWWLQJ OLQH FDQQRW EH
IHG WKURXJK
6SRRO HPSW\
5HSODFH VSRRO
3ROH VDZ GRHV QRW VDZ
LW SOXFNV RU YLEUDWHV
&KDLQ WHQVLRQ WRR KLJK
&KDLQ EOXQW
&KDLQ DWWDFKHG LQFRUUHFWO\
&KDLQ ZRUQ
&KHFN DQG UHVHW FKDLQ WHQVLRQ
+DYH WKH FKDLQ VKDUSHQHG RU UHSODFH LW
5HDWWDFK WKH FKDLQ
5HSODFH WKH FKDLQ
6DZ FKDLQ EHFRPHV KRW
RU VDZ FKDLQ OXEULFDWLRQ
GRHV QRW ZRUN
1R RLO LQ WKH WDQN
2LO OLQH EORFNHG
&KDLQ WHQVLRQ WRR KLJK
&KDLQ EOXQW
&OHDQ WKH RLO OLQH
6HW WKH FKDLQ WHQVLRQ
+DYH WKH FKDLQ VKDUSHQHG RU UHSODFH LW

127(6

MANUFACTURER’S LIMITED WARRANTY
HOW TO OBTAIN SERVICE: Warranty service is available, WITH PROOF OF PURCHASE THROUGH YOUR
LOCAL AUTHORIZED SERVICE DEALER. To locate the dealer in your area, call 1-844-786-7335. No product
returned directly to the factory will be accepted unless prior written permission has been extended by the
Customer Service Department of Badger.
This limited warranty does not provide coverage in the following cases:
A. Tune-ups - Spark Plugs, Carburetor Adjustments, Filters
B. Wear items - B
ump Knobs, Outer Spools, Cutting Line, Inner Reels, Starter Pulley, Starter Ropes, Drive Belts,
Saw Chains, Guide Bars, Cultivator Tines, Blades.
C. Badger does not extend any warranty for products sold or exported outside of the United States of America,
its possessions and territories, except those sold through Badger’s authorized channels of export distribution.
Badger reserves the right to change or improve the design of any Badger Produ
ct without assuming any
obligation to modify any product previously manufactured.
No implied warranty, including any implied warranty of merchantability or fitness for a particular purpose,
applies after the applicable period of express written warranty above as to the parts as identified. No
other express warranty or guaranty, whether written or oral, except as mentioned above, given by any
person or entity, including a dealer or retailer, with respect to any product shall bind Badger. During
the pe
riod of the Warranty, the exclusive remedy is repair or replacement of the product as set forth
above. (Some states do not allow limitations on how long an implied warranty lasts, so the above limitation may
not apply to you.)
The provisions as set forth in this Warranty provide the sole and exclusive remedy arising from the sales.
Badger shall not be liable for incidental or consequential loss or damages including, without
limitation, expenses incurred for substitute or replacement lawn care services, for
transportation or for
related expenses, or for rental expenses to temporarily replaceawarranted product. (Some states do not
allow limitations on how long an implied warranty lasts, so the above limitation may not apply to you.)
In no event shall recovery of any kind be greater than the amount of the purchase price of the product sold.
Alteration of the safety features of the product shall voi
d this Warranty. You assume the risk and liability for loss,
damage, or injury to you and your property an
d/or to others and their property arising out of the use or misuse or
inability to use the product.
This limited warranty shall not extend to anyone other than the original purchaser, original lessee or the person
for whom it was purchased asagift.
How State Law Relates to this Warranty: This
warranty gives you specific legal rights, and you may also have
other rights which vary from state to state.
To locate your nea
rest service dealer, dial 1-844-786-7335 in the United States.
The limited warranty set forth below is given by Badger with respect to new merchandise purchased and used
in the United States, its possessions and territories .
Badger warrants this product against defects in material and workmanship for a period of three (3) years for home
use and one (1) years for commercial use commencing on the date of original purchase and will, at its option, repair
or replace, free of charge, any part found to be defective in material or workmanship. This limited warranty shall only
apply if this product has been operated and maintained in accordance with the Operator’s Manual furnished with the
product, and has not been subject to misuse, abuse, commercial use, neglect, accident, improper maintenance,
alteration, vandalism, theft, fire, water or damage because of other peril or natural disaster. Damage resulting from
the installation or use of any accessory or attachment not approved by Badger for use with the product(s) covered by
this manual will void your warranty as to any resulting damage. This warranty is limited to ninety (90) days from the
date of original retail purchase for any Badger product that is used for rental or commercial purposes, or any
other income-producing purpose.