NINJA® PRESTIGE SMART XL AIR FRYER
& COUNTERTOP OVEN
DT500 Series | Owner’s Guide
1 Read all instructions prior to using the oven and its accessories.
2 This appliance can be used by persons with reduced physical, sensory or mental capabilities or lack of experience and knowledge if they have
been given supervision or instruction concerning use of the appliance in a safe way and understand the hazards involved.
3 If food contents were to catch fire during cooking, DO NOT open the oven door. If you can safely do so, unplug the oven immediately. DO NOT
throw water onto the fire. Food contents may contain grease and water may cause fire growth. If fire were to emit from the oven door, call the
fire department immediately. DO NOT use the oven after it has experienced a fire, it may have been damaged and present a risk of fire
or shock.
4 To eliminate a choking hazard for young children, discard all packaging materials immediately upon unpacking.
5 To reduce the risk of fire, DO NOT place appliance on stovetops or hot surfaces or in a heated oven.
6 Take inventory of all contents to ensure you have all parts needed to properly and safely operate your oven.
7 DO NOT use an extension cord. A short power-supply cord is used to reduce the risk of children grabbing the cord or becoming entangled and to
reduce the risk of people tripping over a longer cord.
8 NEVER use outlet below counter level.
9 Keep the appliance and its cord out of reach of children. Do not allow the appliance to be used by children. Close supervision is necessary when
used near children.
10 DO NOT let cord hang over edges of tables or counters or touch hot surfaces, including stoves and other heating ovens.
11 NEVER leave the oven unattended while in use.
12 DO NOT place any object directly onto the heating elements and DO NOT cover crumb tray or any part of the oven with aluminum foil. This will
cause the oven to overheat or cause a fire.
13 DO NOT use the oven with crumb tray incorrectly installed. Crumb tray MUST be placed below lower heating elements.
14 To protect against electrical shock DO NOT immerse cord, plugs, or main unit housing in water or other liquid.
15 DO NOT use the oven with damage to the power cord or plug. Regularly inspect the oven and power cord. If the oven malfunctions or has been
damaged in any way, immediately stop use and call Customer Service.
16 DO NOT cover the air intake vents or air outlet vents while unit is operating. Doing so will prevent even cooking and may damage the unit or
cause it to overheat.
Read and review instructions to understand operation and use of product.
Indicates the presence of a hazard that can cause personal injury, death or substantial property damage if the
warning included with this symbol is ignored.
Avoid contact with hot surface. Always use hand protection to avoid burns.
For indoor and household use only
IMPORTANT SAFETY INSTRUCTIONS
INDOOR HOUSEHOLD USE ONLY. READ ALL INSTRUCTIONS BEFORE USE
WARNING
When using electrical appliances, basic safety precautions should always be followed, including the following:
SharkNinja Operating LLC
US: Needham, MA 02494
1-877-646-5288
ninjakitchen.com
Illustrations may dier from actual product. We are constantly striving to improve our products, therefore
the specifications contained herein are subject to change withoutnotice.
NINJA is a registered trademark of SharkNinja Operating LLC.
This product may be covered by one or more U.S. patents. For more information,
see sharkninja.com/uspatents.
© 2024 SharkNinja Operating LLC.
DT500Series_IB_REV_Mv1
THANK YOU
for purchasing the Ninja® Prestige Smart XL Air Fryer & Countertop Oven
TECHNICAL SPECIFICATIONS
Voltage: 120V~ 60Hz
Watts: 1800W
RECORD THIS INFORMATION
Model Number: _________________
Serial Number: __________________
Date of Purchase: ________________
(Keep receipt)
Store of Purchase: _______________
REGISTER YOUR PURCHASE
registeryourninja.com
Scan QR code using mobile device
@ninjakitchen
TIP: You can find the model and serial numbers on the QR code label on the
base of the unit.

3
ninjakitchen.com
17 DO NOT insert anything in the ventilation slots and do not obstruct them.
18 DO NOT place items on top of surface while unit is operating except for authorized recommended Ninja® accessories.
19 Before placing any accessories into the oven ensure they are clean and dry.
20 Intended for countertop use only. DO NOT place the oven near the edge of a countertop on or near a hot gas or electric burner. Ensure the
surface is level, clean and dry.
21 This oven is for household use only. DO NOT use this oven for anything other than its intended use. Misuse may cause injury.
22 DO NOT store any materials, other than supplied accessories, in this oven when not in use.
23 DO NOT use outdoors. DO NOT use in moving vehicles or boats.
24 DO NOT use accessory and attachments not recommended or sold by SharkNinja.
25 When using this oven, provide adequate space (at least 1 inch above and on all sides) for air circulation.
26 A fire may occur if the oven is covered or touching flammable material, including curtains, draperies, walls, or the like when in operation.
27 This oven has a tempered glass door and is more resistant to breakage. Avoid scratching door surface or nicking edges.
28 DO NOT place anything directly on heating elements and DO NOT use the oven without a wire rack or air fry basket installed.
29 DO NOT spray any type of aerosol spray or flavoring inside the oven while cooking.
30 Use caution when inserting and removing anything from the oven, especially when hot.
31 Outlet voltages can vary, affecting the performance of your product. To prevent possible illness, use a thermometer to check that your food is
cooked to the temperatures recommended.
32 Prevent food contact with heating elements. Excessive food loads may cause personal injury or property damage or affect the safe use
of the oven.
33 Oversize foods or metal utensils must not be inserted in the oven as they may create a fire or risk of electric shock.
34 With the exception of parchment paper, DO NOT place any of the following materials in the oven: paper, cardboard, plastic, roasting bags and
the like.
35 Extreme caution should be exercised when using containers constructed of any materials other than metal or glass.
36 DO NOT touch hot surfaces. Oven surfaces and glass door are hot during and after operation. To prevent burns or personal injury, ALWAYS use
protective hot pads or insulated oven mitts and use available handles.
37 Spilled food can cause serious burns. Extreme caution must be used when the oven contains hot food. Improper use may result in
personal injury.
38 Please refer to the Cleaning & Maintenance section for regular maintenance of the oven.
39 Cleaning and user maintenance shall not be done by children.
40 Allow to cool completely before cleaning and moving for storage.
41 When not in use, turn any control to ‘off’, then unplug. Grasp the plug by the body and pull from the outlet. Never unplug by grasping and
pulling flexible cord.
42 DO NOT clean with metal scouring pads. Pieces can break off the pad and touch electrical parts, causing a risk of electrical shock.
43 DO NOT use the oven as a source of heat or for drying.
44 This appliance has important markings on the plug blade. The entire supply cord is not suitable for replacement. If damaged, please contact
SharkNinja for service.
IMPORTANT SAFETY INSTRUCTIONS
INDOOR HOUSEHOLD USE ONLY. READ ALL INSTRUCTIONS BEFORE USE
SAVE THESE INSTRUCTIONS
WARNING
When using electrical appliances, basic safety precautions should always be followed, including the following:
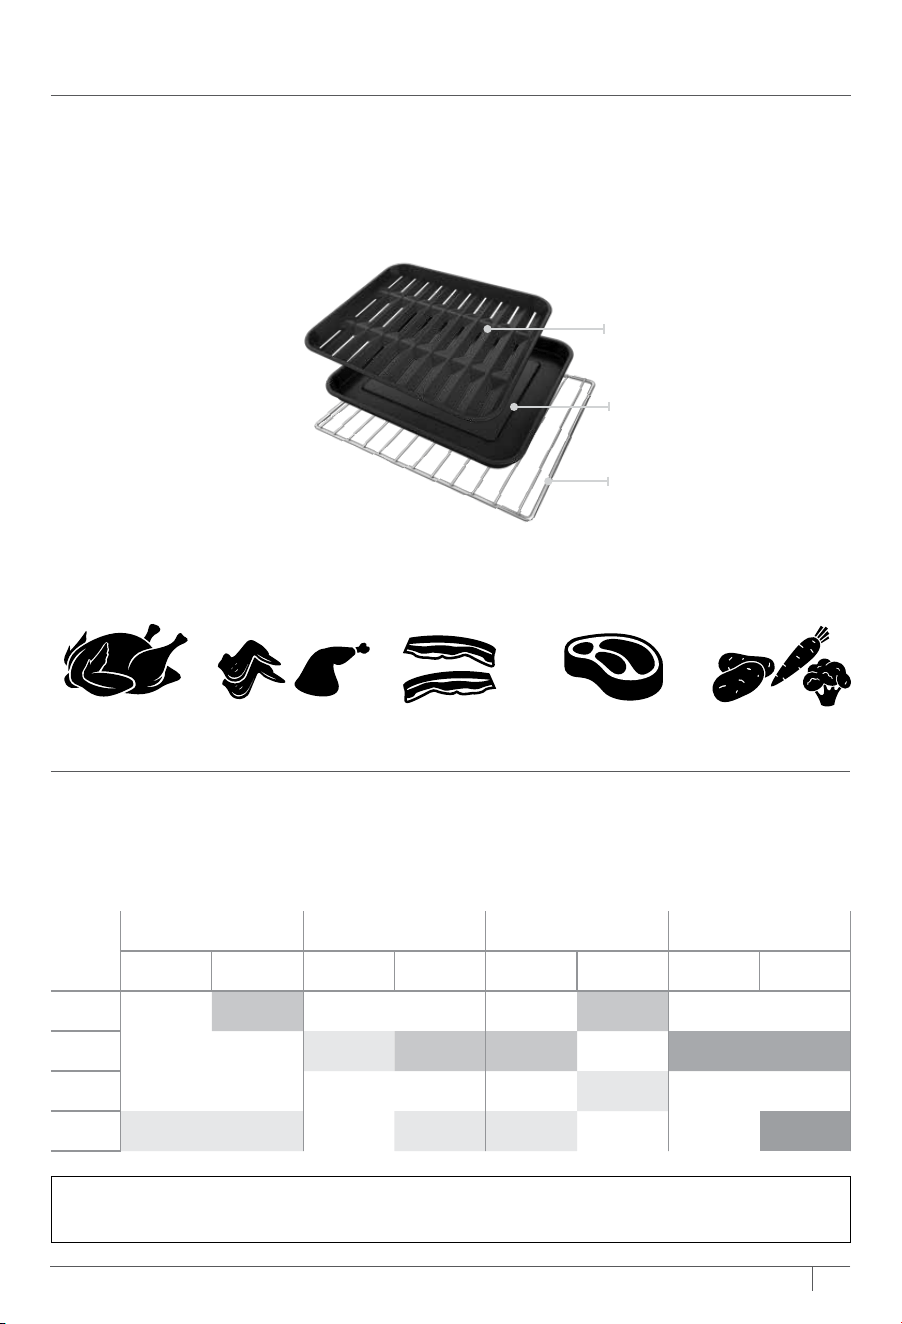
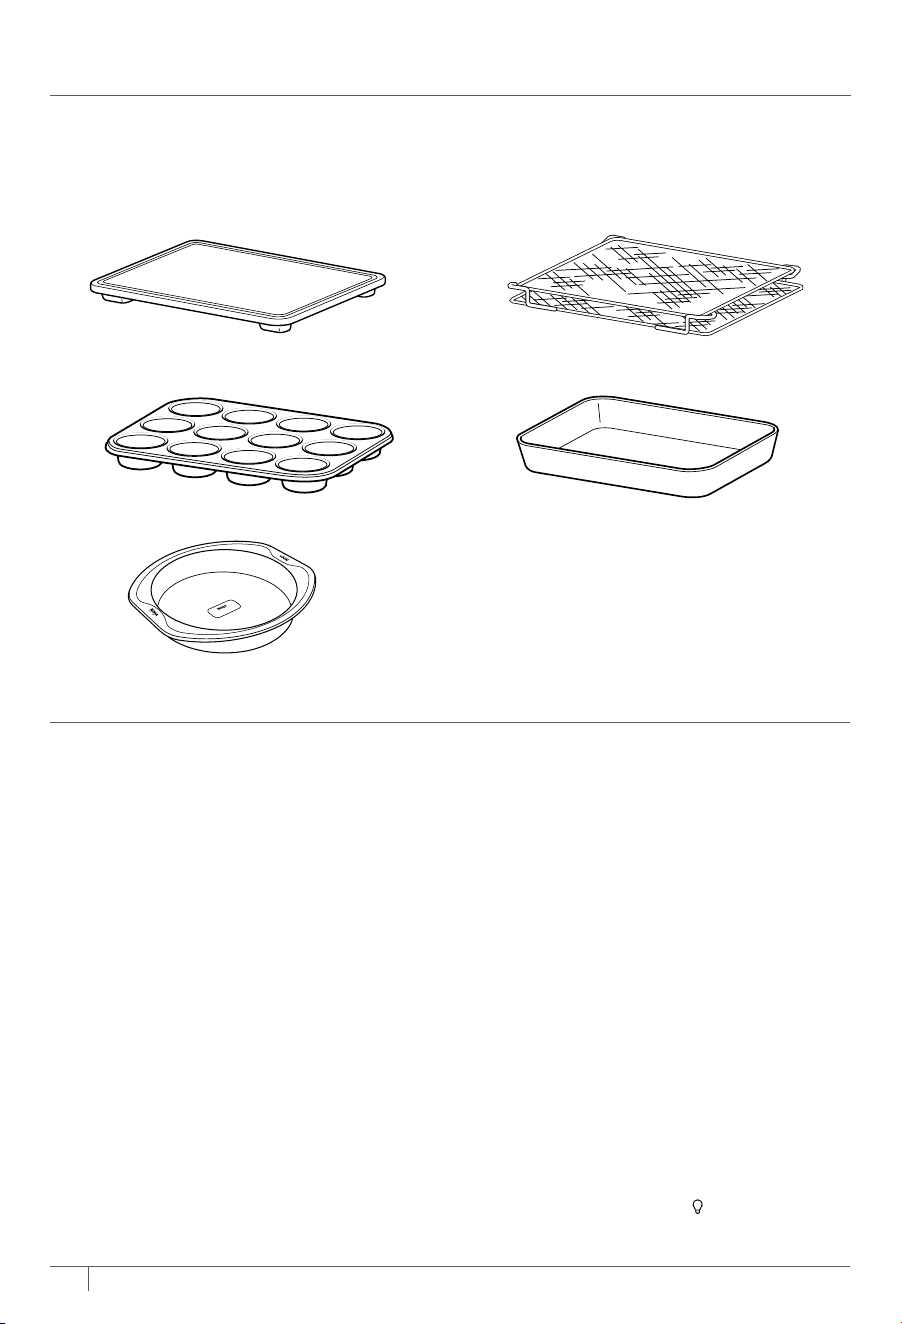
PARTS
A
Main Unit
(attached power cord
not shown)
F
Removable Crumb Tray
(already installed in unit)
Must remain installed when the
oven is in use. Hand-wash only.
E
2 Wire Racks
Use on its own or place the
sheet pan on top. Hand-wash
recommended.
D
Sheet Pan(s)
Place on top of the wire rack.
Hand-wash only.
Additional sheet pan is not available
on all models.
B
Air Fry Basket
Install when using the air
fry function. Hand-wash
recommended.
C
Roast Tray
Fits on top of the sheet pan
to catch grease below roasted
or air fried foods to reduce
smoke and grease splatter.
Hand-wash only.
IMPORTANT: Place crumb tray below lower heating elements. DO NOT slide into any
rack positions.
COMMON–SENSE PRACTICES/GOOD HABITS:
• DO NOT leave your oven unattended while making food. If possible, unplug the oven
while not in use to eliminate the possibility of accidents occurring.
• Have a fire extinguisher or fire containment blanket handy in a safe, known location. If you
don’t have a fire extinguisher, douse the flames with baking soda until they are put out.
• If a fire occurs and the food in the oven is not greasy, immediately unplug the unit and
douse the flames with water until the fire is extinguished. DO NOT use water if grease
is present, since it could make the fire worse. Use baking soda instead.
2
ninjakitchen.com

3
ninjakitchen.com
17 DO NOT insert anything in the ventilation slots and do not obstruct them.
18 DO NOT place items on top of surface while unit is operating except for authorized recommended Ninja® accessories.
19 Before placing any accessories into the oven ensure they are clean and dry.
20 Intended for countertop use only. DO NOT place the oven near the edge of a countertop on or near a hot gas or electric burner. Ensure the
surface is level, clean and dry.
21 This oven is for household use only. DO NOT use this oven for anything other than its intended use. Misuse may cause injury.
22 DO NOT store any materials, other than supplied accessories, in this oven when not in use.
23 DO NOT use outdoors. DO NOT use in moving vehicles or boats.
24 DO NOT use accessory and attachments not recommended or sold by SharkNinja.
25 When using this oven, provide adequate space (at least 1 inch above and on all sides) for air circulation.
26 A fire may occur if the oven is covered or touching flammable material, including curtains, draperies, walls, or the like when in operation.
27 This oven has a tempered glass door and is more resistant to breakage. Avoid scratching door surface or nicking edges.
28 DO NOT place anything directly on heating elements and DO NOT use the oven without a wire rack or air fry basket installed.
29 DO NOT spray any type of aerosol spray or flavoring inside the oven while cooking.
30 Use caution when inserting and removing anything from the oven, especially when hot.
31 Outlet voltages can vary, affecting the performance of your product. To prevent possible illness, use a thermometer to check that your food is
cooked to the temperatures recommended.
32 Prevent food contact with heating elements. Excessive food loads may cause personal injury or property damage or affect the safe use
of the oven.
33 Oversize foods or metal utensils must not be inserted in the oven as they may create a fire or risk of electric shock.
34 With the exception of parchment paper, DO NOT place any of the following materials in the oven: paper, cardboard, plastic, roasting bags and
the like.
35 Extreme caution should be exercised when using containers constructed of any materials other than metal or glass.
36 DO NOT touch hot surfaces. Oven surfaces and glass door are hot during and after operation. To prevent burns or personal injury, ALWAYS use
protective hot pads or insulated oven mitts and use available handles.
37 Spilled food can cause serious burns. Extreme caution must be used when the oven contains hot food. Improper use may result in
personal injury.
38 Please refer to the Cleaning & Maintenance section for regular maintenance of the oven.
39 Cleaning and user maintenance shall not be done by children.
40 Allow to cool completely before cleaning and moving for storage.
41 When not in use, turn any control to ‘off’, then unplug. Grasp the plug by the body and pull from the outlet. Never unplug by grasping and
pulling flexible cord.
42 DO NOT clean with metal scouring pads. Pieces can break off the pad and touch electrical parts, causing a risk of electrical shock.
43 DO NOT use the oven as a source of heat or for drying.
44 This appliance has important markings on the plug blade. The entire supply cord is not suitable for replacement. If damaged, please contact
SharkNinja for service.
IMPORTANT SAFETY INSTRUCTIONS
INDOOR HOUSEHOLD USE ONLY. READ ALL INSTRUCTIONS BEFORE USE
SAVE THESE INSTRUCTIONS
WARNING
When using electrical appliances, basic safety precautions should always be followed, including the following:
PARTS
A
Main Unit
(attached power cord
not shown)
F
Removable Crumb Tray
(already installed in unit)
Must remain installed when the
oven is in use. Hand-wash only.
E
2 Wire Racks
Use on its own or place the
sheet pan on top. Hand-wash
recommended.
D
Sheet Pan(s)
Place on top of the wire rack.
Hand-wash only.
Additional sheet pan is not available
on all models.
B
Air Fry Basket
Install when using the air
fry function. Hand-wash
recommended.
C
Roast Tray
Fits on top of the sheet pan
to catch grease below roasted
or air fried foods to reduce
smoke and grease splatter.
Hand-wash only.
IMPORTANT: Place crumb tray below lower heating elements. DO NOT slide into any
rack positions.
COMMON–SENSE PRACTICES/GOOD HABITS:
• DO NOT leave your oven unattended while making food. If possible, unplug the oven
while not in use to eliminate the possibility of accidents occurring.
• Have a fire extinguisher or fire containment blanket handy in a safe, known location. If you
don’t have a fire extinguisher, douse the flames with baking soda until they are put out.
• If a fire occurs and the food in the oven is not greasy, immediately unplug the unit and
douse the flames with water until the fire is extinguished. DO NOT use water if grease
is present, since it could make the fire worse. Use baking soda instead.
2
ninjakitchen.com
5
ninjakitchen.com
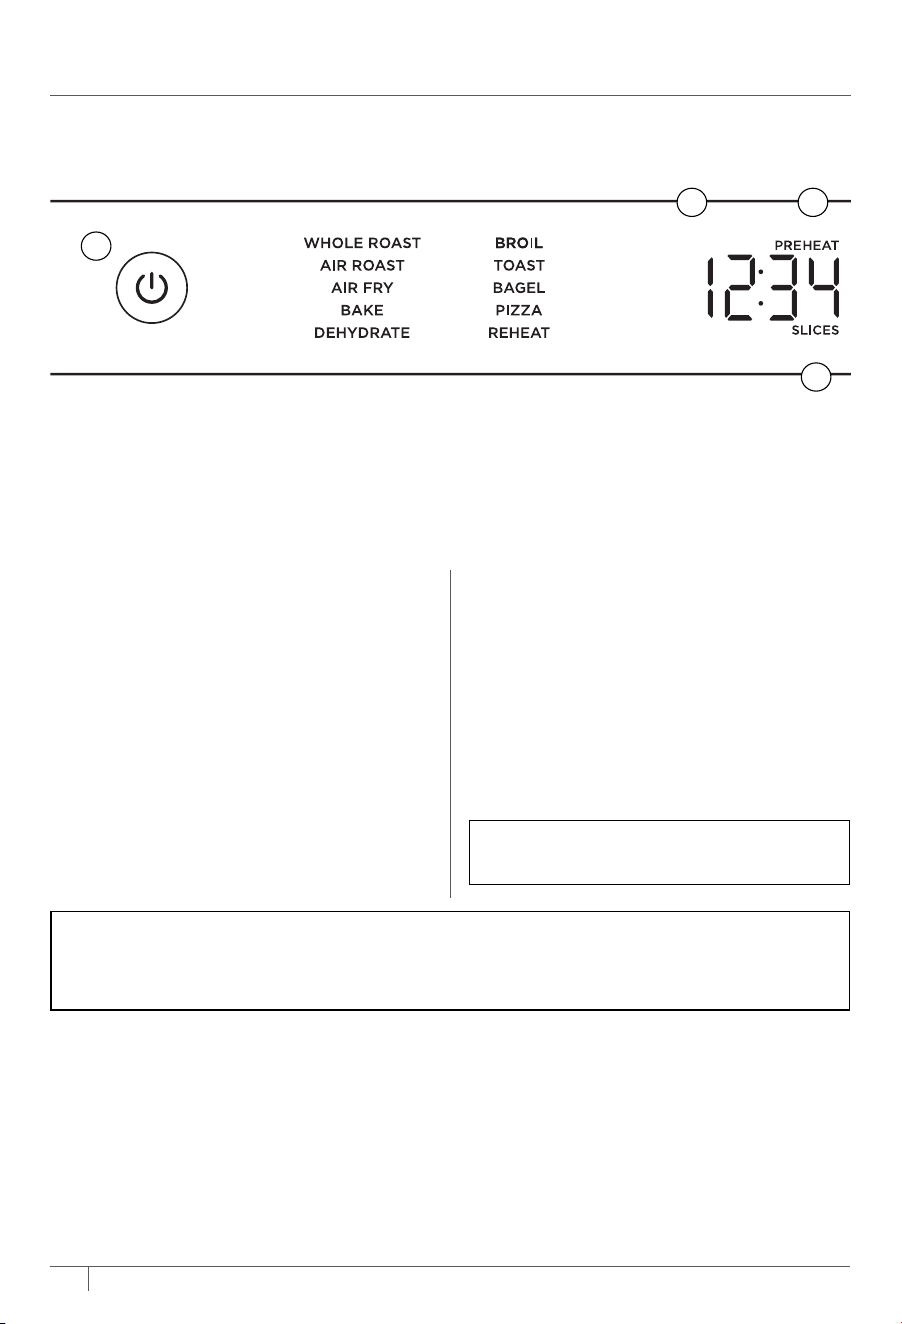
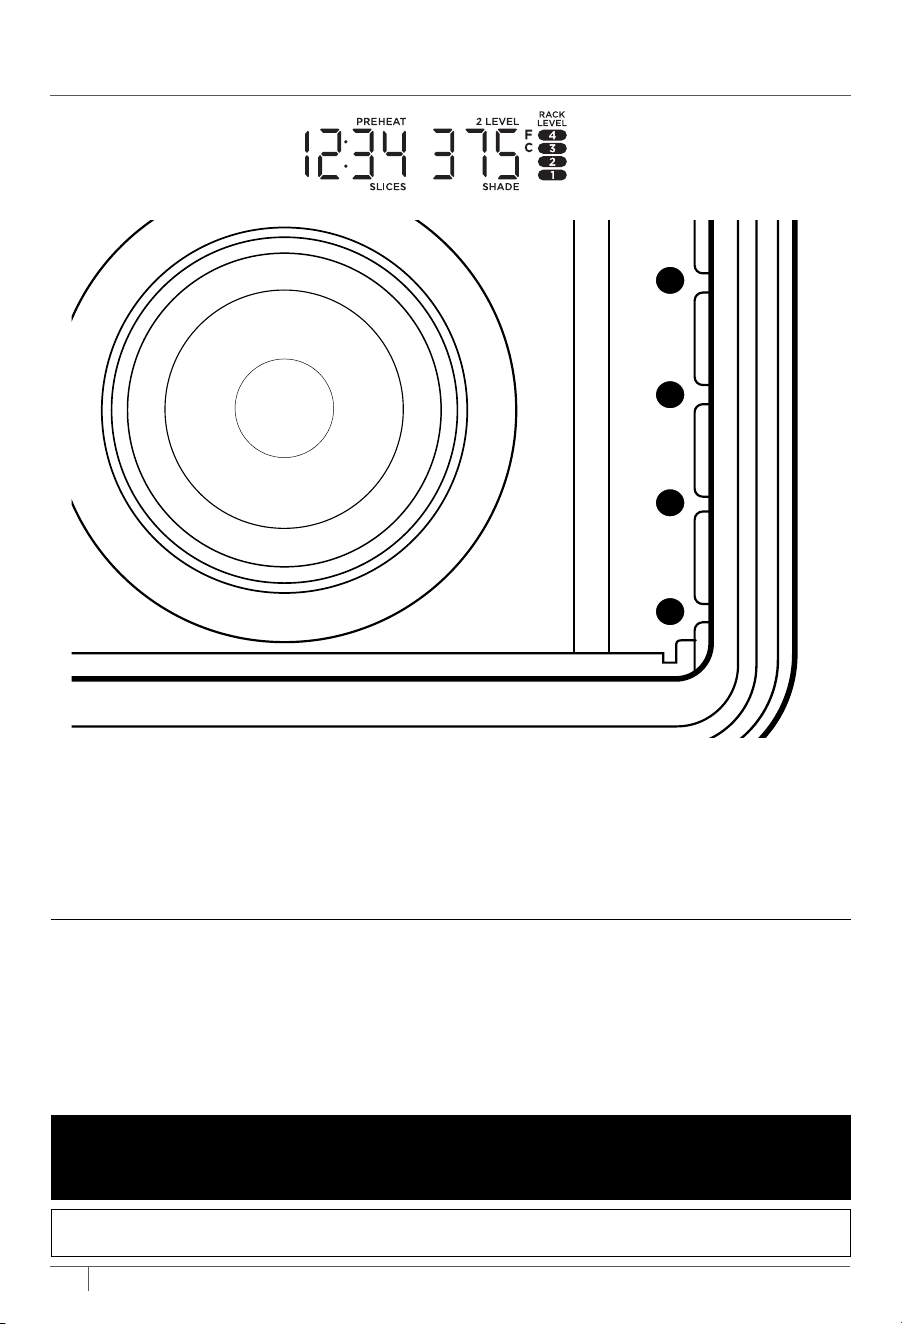
1 (Power) button: Press to turn the unit
on and o.
2 Time display: Shows the cook time.
The time will count down when cooking
is in progress.
3 PREHEAT: Flashes when the unit is
preheating. If the oven is already up to
temperature from using a previous cooking
function, the unit will skip preheating.
4 SLICES: Illuminates when using the
Toast or Bagel function to designate
number of slices.
5 Temperature display: Shows the
cook temperature.
6 RACK LEVEL: Depending on the
function you choose, the illuminated
rack level(s) will indicate where your
accessory should be placed in the unit.
7 2 LEVEL: For functions that allow you
to cook on 2 levels, press the button to
select 2-level cooking and rack levels
will update.
8 FUNCTION +/- buttons: To select a
cooking function, press the FUNCTION
+/- buttons.
4
ninjakitchen.com
USING THE CONTROL PANEL
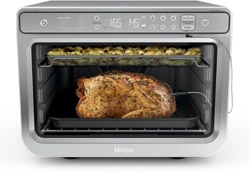
WHOLE ROAST: Simultaneously roast
larger proteins, like a 5-lb chicken, and
sides for a complete meal. Or cook a larger
protein, like a 12-lb turkey, on its own.
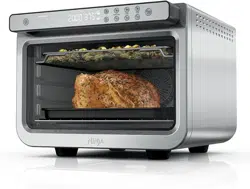
AIR ROAST: Achieve a crispy outside and
perfectly cooked inside for full-sized sheet pan
meals, thicker proteins, and roasted veggies.
AIR FRY: Cook foods that would
traditionally be fried—such as chicken
wings, French fries, and chicken nuggets—
with little to no added oil.
BAKE: Evenly bake everything from your
favorite cookies to cakes.
DEHYDRATE: Dehydrate meats, fruits,
and vegetables for healthy snacks.
9 TIME/SLICES +/- buttons: To select a
cook time, press the TIME +/- buttons.
When using the Toast or Bagel function,
these buttons will adjust the number of
slices/bagel halves instead of the time.
Time will increase in 1-minute increments
under 1 hour and 5-minute increments
over 1 hour. Hold the +/- buttons for 2
seconds to activate faster scrolling in
5-minute increments.
10 TEMP/SHADE +/- buttons: To adjust
temperature, press the TEMP +/- buttons.
When using the Toast or Bagel function,
these buttons will adjust the shade level
(1, lightest – 7, darkest) instead of the
temperature. Temperature will increase
in 5-degree increments. Hold the +/-
buttons for 2 seconds to activate faster
scrolling in 10-degree increments.
11 START/STOP button: Press to start or
stop cooking.
12 SHADE: Illuminates when using the
Toast or Bagel function to designate
desired shade.
13
(Light) button: Press to turn the
oven’s interior light on and o.
NOTE: The Dehydrate and Reheat
functions are not included on all models.
NOTE: The cook time and temperature
may be adjusted at any time during the
cooking cycle.
NOTE: The oven’s technology leads to faster cooking. Always monitor food to prevent
overcooking. Refer to cook charts in the Inspiration Guide for more guidance on cook times
and temperatures.
NOTE: Time and temperature will always
return to the settings used the last time
the oven was in operation.
2 5 763
4 12
11
9
10
13
1
BROIL: Evenly broil meats, fish and brown
the tops of casseroles.
TOAST: Toast up to 9 slices of bread to
your desired level of darkness.
BAGEL: Perfectly toast up to 9 bagel
halves when they’re placed cut-side up on
the wire rack.
PIZZA: Cook frozen or homemade
pizzas evenly.
REHEAT: Heat leftovers without over cooking.
CONTROL PANEL DISPLAY & OPERATING BUTTONS
8
FUNCTIONS
Once you’ve selected a function below, you can change temperature/shade and time/slices.
NOTE: As you move through functions,
you’ll notice the rack level recommendations
change for best results.
NOTE: The light will automatically turn on
when 1 minute of cook time remains and
when door is open while cooking.

5
ninjakitchen.com
1 (Power) button: Press to turn the unit
on and o.
2 Time display: Shows the cook time.
The time will count down when cooking
is in progress.
3 PREHEAT: Flashes when the unit is
preheating. If the oven is already up to
temperature from using a previous cooking
function, the unit will skip preheating.
4 SLICES: Illuminates when using the
Toast or Bagel function to designate
number of slices.
5 Temperature display: Shows the
cook temperature.
6 RACK LEVEL: Depending on the
function you choose, the illuminated
rack level(s) will indicate where your
accessory should be placed in the unit.
7 2 LEVEL: For functions that allow you
to cook on 2 levels, press the button to
select 2-level cooking and rack levels
will update.
8 FUNCTION +/- buttons: To select a
cooking function, press the FUNCTION
+/- buttons.
4
ninjakitchen.com
USING THE CONTROL PANEL
WHOLE ROAST: Simultaneously roast
larger proteins, like a 5-lb chicken, and
sides for a complete meal. Or cook a larger
protein, like a 12-lb turkey, on its own.
AIR ROAST: Achieve a crispy outside and
perfectly cooked inside for full-sized sheet pan
meals, thicker proteins, and roasted veggies.
AIR FRY: Cook foods that would
traditionally be fried—such as chicken
wings, French fries, and chicken nuggets—
with little to no added oil.
BAKE: Evenly bake everything from your
favorite cookies to cakes.
DEHYDRATE: Dehydrate meats, fruits,
and vegetables for healthy snacks.
9 TIME/SLICES +/- buttons: To select a
cook time, press the TIME +/- buttons.
When using the Toast or Bagel function,
these buttons will adjust the number of
slices/bagel halves instead of the time.
Time will increase in 1-minute increments
under 1 hour and 5-minute increments
over 1 hour. Hold the +/- buttons for 2
seconds to activate faster scrolling in
5-minute increments.
10 TEMP/SHADE +/- buttons: To adjust
temperature, press the TEMP +/- buttons.
When using the Toast or Bagel function,
these buttons will adjust the shade level
(1, lightest – 7, darkest) instead of the
temperature. Temperature will increase
in 5-degree increments. Hold the +/-
buttons for 2 seconds to activate faster
scrolling in 10-degree increments.
11 START/STOP button: Press to start or
stop cooking.
12 SHADE: Illuminates when using the
Toast or Bagel function to designate
desired shade.
13
(Light) button: Press to turn the
oven’s interior light on and o.
NOTE: The Dehydrate and Reheat
functions are not included on all models.
NOTE: The cook time and temperature
may be adjusted at any time during the
cooking cycle.
NOTE: The oven’s technology leads to faster cooking. Always monitor food to prevent
overcooking. Refer to cook charts in the Inspiration Guide for more guidance on cook times
and temperatures.
NOTE: Time and temperature will always
return to the settings used the last time
the oven was in operation.
2 5 763
4 12
11
9
10
13
1
BROIL: Evenly broil meats, fish and brown
the tops of casseroles.
TOAST: Toast up to 9 slices of bread to
your desired level of darkness.
BAGEL: Perfectly toast up to 9 bagel
halves when they’re placed cut-side up on
the wire rack.
PIZZA: Cook frozen or homemade
pizzas evenly.
REHEAT: Heat leftovers without over cooking.
CONTROL PANEL DISPLAY & OPERATING BUTTONS
8
FUNCTIONS
Once you’ve selected a function below, you can change temperature/shade and time/slices.
NOTE: As you move through functions,
you’ll notice the rack level recommendations
change for best results.
NOTE: The light will automatically turn on
when 1 minute of cook time remains and
when door is open while cooking.
6
ninjakitchen.com
7
ninjakitchen.com
BEFORE FIRST USE
1 Remove and discard any packaging material, promotional labels, and tape from the unit.
2 Remove all accessories from the package and read this manual carefully. Please pay
particular attention to operational instructions, warnings, and important safeguards to
avoid any injury or property damage.
3 Wash the air fry basket, sheet pan, wire rack, roast tray, and removable crumb tray in
warm, soapy water, then rinse and dry thoroughly. DO NOT put sheet pan, roast tray, or
removable crumb tray in the dishwasher. Finishes may degrade. NEVER submerse the
main unit in water.
4 We recommend placing all accessories inside the oven and running it on Air Roast at
450°F for 20 minutes without adding food. This removes any residues. This is completely
safe and not detrimental to the performance of the oven.
ACCESSORY PLACEMENT
3
NOTE: The accessories are hand-wash recommended.
1
4
2
The oven has 4 available rack positions where your accessories can slide into
the unit (see image above). When you select a function, the corresponding rack
number(s) will illuminate on the control panel. The numbers on the control panel
(see Fig. 1) will coincide with those on the interior of the unit. See the chart on
page 8 for further details.
Fig. 1
We recommend placing all accessories inside the oven and running it on Air Roast
at 450°F for 20 minutes without adding food. This removes any residues. This is
completely safe and not detrimental to the performance of the oven.
USING YOUR PRESTIGE SMART XL AIR OVEN
USING THE COOKING FUNCTIONS WITH RACK LEVELS
WHOLE ROAST AIR ROAST AIR FRY BAKE
1 Layer 2 Layers 1 Layer 2 Layers 1 Layer 2 Layers 1 Layer 2 Layers
LEVEL 4
Air Fry
Basket
Air Fry
Basket
LEVEL 3
Roast Tray
on Sheet Pan
Air Fry
Basket
Air Fry
Basket
Sheet Pan on
Wire Rack
Accessory on
Wire Rack
LEVEL 2
Roast Tray
on Sheet Pan
LEVEL 1
Roast Tray
on Sheet Pan
Roast Tray
on Sheet Pan
Roast Tray
on Sheet Pan
Roast Tray
on Sheet Pan
Accessory on
Wire Rack
When you select a cooking function, the control panel will illuminate the recommended
rack height(s). The chart below outlines these recommendations along with the suggested
accessories. For best results, use only the recommended accessories for a given function
and remove others from the oven.
WHEN TO USE THE ROAST TRAY
Use Roast Tray on Sheet Pan when cooking on convection functions (such as Whole Roast,
Air Roast, and Air Fry), or with greasy foods like: whole chicken, chicken wings, bacon,
marinated meats, or oiled vegetables.
NOTE: When cooking greasy, drippy foods on one level, place the Sheet Pan on the Wire
Rack below to catch the drippings. Alternatively, use the Roast Tray on top of the Sheet Pan.
Recommended for
Whole Chicken Chicken Wings
or Thighs
Bacon Marinated Meats Oiled Vegetables
Sheet Pan
Wire Rack
Roast Tray
8 9
ninjakitchen.com
ninjakitchen.com
8 9
ninjakitchen.com
ninjakitchen.com
USING YOUR PRESTIGE SMART XL AIR OVEN
DEHYDRATE BROIL TOAST BAGEL RE HEAT PIZZA
1 Layer 2 Layers 1 Layer 1 Layer 1 Layer 1 Layer 1 Layer 2 Layers
Air Fry
Basket
Air Fry
Basket
Roast Tray
on Sheet Pan
Wire Rack Wire Rack Wire Rack Wire Rack Wire Rack
Sheet Pan
Wire Rack
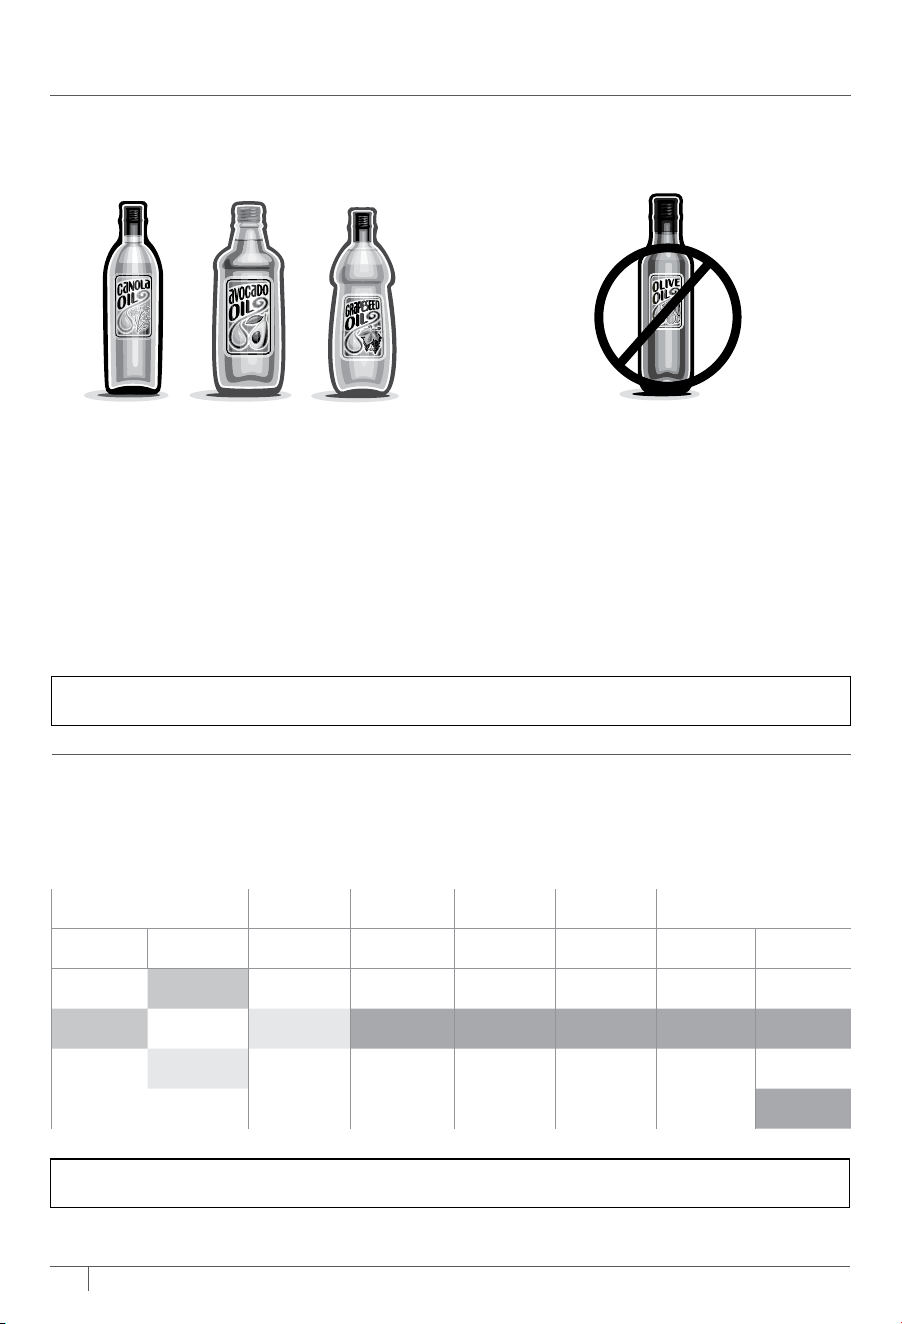
HOW TO REDUCE SMOKE
We recommend using canola, coconut, avocado, grapeseed, or vegetable oil instead of olive oil.
Recommended:
Canola
Refined coconut
Avocado
Vegetable
Grapeseed
Not recommended:
Olive oil
Butter
Margarine
The unit may produce smoke when cooking on a hotter setting than what is recommended.
NOTE: For more cooking charts, refer to your Inspiration Guide or visit ninjakitchen.com.
NOTE: Always place Sheet Pan on Wire Rack, DO NOT place directly on heating elements.
USING YOUR PRESTIGE SMART XL AIR OVEN – CONT.
Air Roast
1 To select the function, press the function
+/- buttons until AIR ROAST brightly
illuminates. The default time and
temperature settings will display.
When cooking 2 layers, select the
2 LEVEL button so that “2 LEVEL”
appears on the display.
2 Press the TIME/SLICES +/- buttons to
select a cook time up to 4 hours.
3 Press the TEMP/SHADE +/- buttons to
select a temperature between 250°F
and 450°F.
4 Press START/PAUSE to begin preheating.
5 Place ingredients on the sheet pan.
When the unit beeps to signify it has
preheated, immediately place the roast
tray on sheet pan on the wire rack on
Level 1. Close oven door. When cooking
on 2 levels, place the sheet pan on
Level 1 and use the air fry basket as
the second layer on Level 3.
6 When cook time is complete, the unit
will beep and “END” will appear on
the display.
USING THE COOKING FUNCTIONS
To turn on the unit, plug the power cord into
an outlet and press the button. The unit will
automatically shut o after 10 minutes
of inactivity.
Whole Roast
1 To select the function, press the
function +/- buttons until WHOLE
ROAST brightly illuminates. The default
time and temperature settings will
display. When cooking 2 layers, select
the 2 LEVEL button so that “2 LEVEL”
appears on the display.
2 Press the TIME/SLICES +/- buttons to
select a cook time up to 4 hours.
3 Press the TEMP/SHADE +/- buttons to
select a temperature between 250°F
and 450°F.
4 Press START/PAUSE to begin preheating.
5 Place ingredients on the roast tray or
directly on sheet pan. When the unit beeps
to signify it has preheated, immediately
place roast tray on the sheet pan on the
wire rack on Level 1. Close oven door.
When cooking on 2 levels, place the sheet
pan on Level 1 and use the air fry basket as
the second layer on Level 4.
6 When cook time is complete, the unit
will beep and “END” will appear on
the display.
NOTE: If cooking for 1 hour or less, the clock
will count down by minutes and seconds.
If cooking for more than 1 hour, the clock
will count down by hours and minutes.
NOTE: Food cooks faster when using
the Whole Roast function so refer to
cook charts in the Inspiration Guide
for more guidance on cook times and
temperatures.
NOTE: The timer will start counting
down as soon as the unit has preheated.
If ingredients are not ready to go into the
oven, simply press the TIME +/- buttons
to add more time.
NOTE: If cooking for 1 hour or less, the clock
will count down by minutes and seconds.
If cooking for more than 1 hour, the clock
will count down by hours and minutes.
NOTE: The timer will start counting
down as soon as the unit has preheated.
If ingredients are not ready to go into the
oven, simply press TIME +/- buttons to
add more time.
NOTE: Food cooks faster when using
the Air Roast function, so refer to
cook charts in the Inspiration Guide
for more guidance on cook times and
temperatures.

8 9
ninjakitchen.com
ninjakitchen.com
8 9
ninjakitchen.com
ninjakitchen.com
USING YOUR PRESTIGE SMART XL AIR OVEN
DEHYDRATE BROIL TOAST BAGEL RE HEAT PIZZA
1 Layer 2 Layers 1 Layer 1 Layer 1 Layer 1 Layer 1 Layer 2 Layers
Air Fry
Basket
Air Fry
Basket
Roast Tray
on Sheet Pan
Wire Rack Wire Rack Wire Rack Wire Rack Wire Rack
Sheet Pan
Wire Rack
HOW TO REDUCE SMOKE
We recommend using canola, coconut, avocado, grapeseed, or vegetable oil instead of olive oil.
Recommended:
Canola
Refined coconut
Avocado
Vegetable
Grapeseed
Not recommended:
Olive oil
Butter
Margarine
The unit may produce smoke when cooking on a hotter setting than what is recommended.
NOTE: For more cooking charts, refer to your Inspiration Guide or visit ninjakitchen.com.
NOTE: Always place Sheet Pan on Wire Rack, DO NOT place directly on heating elements.
USING YOUR PRESTIGE SMART XL AIR OVEN – CONT.
Air Roast
1 To select the function, press the function
+/- buttons until AIR ROAST brightly
illuminates. The default time and
temperature settings will display.
When cooking 2 layers, select the
2 LEVEL button so that “2 LEVEL”
appears on the display.
2 Press the TIME/SLICES +/- buttons to
select a cook time up to 4 hours.
3 Press the TEMP/SHADE +/- buttons to
select a temperature between 250°F
and 450°F.
4 Press START/PAUSE to begin preheating.
5 Place ingredients on the sheet pan.
When the unit beeps to signify it has
preheated, immediately place the roast
tray on sheet pan on the wire rack on
Level 1. Close oven door. When cooking
on 2 levels, place the sheet pan on
Level 1 and use the air fry basket as
the second layer on Level 3.
6 When cook time is complete, the unit
will beep and “END” will appear on
the display.
USING THE COOKING FUNCTIONS
To turn on the unit, plug the power cord into
an outlet and press the button. The unit will
automatically shut o after 10 minutes
of inactivity.
Whole Roast
1 To select the function, press the
function +/- buttons until WHOLE
ROAST brightly illuminates. The default
time and temperature settings will
display. When cooking 2 layers, select
the 2 LEVEL button so that “2 LEVEL”
appears on the display.
2 Press the TIME/SLICES +/- buttons to
select a cook time up to 4 hours.
3 Press the TEMP/SHADE +/- buttons to
select a temperature between 250°F
and 450°F.
4 Press START/PAUSE to begin preheating.
5 Place ingredients on the roast tray or
directly on sheet pan. When the unit beeps
to signify it has preheated, immediately
place roast tray on the sheet pan on the
wire rack on Level 1. Close oven door.
When cooking on 2 levels, place the sheet
pan on Level 1 and use the air fry basket as
the second layer on Level 4.
6 When cook time is complete, the unit
will beep and “END” will appear on
the display.
NOTE: If cooking for 1 hour or less, the clock
will count down by minutes and seconds.
If cooking for more than 1 hour, the clock
will count down by hours and minutes.
NOTE: Food cooks faster when using
the Whole Roast function so refer to
cook charts in the Inspiration Guide
for more guidance on cook times and
temperatures.
NOTE: The timer will start counting
down as soon as the unit has preheated.
If ingredients are not ready to go into the
oven, simply press the TIME +/- buttons
to add more time.
NOTE: If cooking for 1 hour or less, the clock
will count down by minutes and seconds.
If cooking for more than 1 hour, the clock
will count down by hours and minutes.
NOTE: The timer will start counting
down as soon as the unit has preheated.
If ingredients are not ready to go into the
oven, simply press TIME +/- buttons to
add more time.
NOTE: Food cooks faster when using
the Air Roast function, so refer to
cook charts in the Inspiration Guide
for more guidance on cook times and
temperatures.

10 11
ninjakitchen.com
ninjakitchen.com
USING YOUR PRESTIGE SMART XL AIR OVEN – CONT.
Bake
1 To select the function, press the
function +/- buttons until BAKE
brightly illuminates. The default time
and temperature settings will display.
When cooking 2 layers, select the
2 LEVEL button so that “2 LEVEL”
appears on the display.
2 Press the TIME/SLICES +/- buttons to
select a cook time up to 4 hours.
3 Press the TEMP/SHADE +/- buttons to
select a temperature between 180°F
and 450°F.
4 Press START/PAUSE to begin preheating.
5 Place ingredients on the sheet pan, air
fry basket, cake pan, or casserole dish.
When the unit beeps to signify it has
preheated, immediately place the sheet
pan on the wire rack. Close oven door.
6 During cooking, you can turn on the
light
to check on progress.
7 When cook time is complete, the unit
will beep and “END” will appear on
the display.
NOTE: If cooking for 1 hour or less, the clock
will count down by minutes and seconds.
If cooking for more than 1 hour, the clock
will count down by hours and minutes.
NOTE: The timer will start counting
down as soon as the unit has preheated.
If ingredients are not ready to go into
the oven, simply press the TIME +/-
buttons to add more time.
NOTE: For best results with baked
goods such as cookies, line the Ninja®
Sheet Pan with parchment paper.
Air Fry
1 To select the function, press the
function +/- buttons until AIR FRY
brightly illuminates. The default time
and temperature settings will display.
When cooking 2 layers, select the
2 LEVEL button so that “2 LEVEL”
appears on the display.
2 Press the TIME/SLICES +/- buttons to
select a cook time up to 4 hours.
3 Then press the TEMP/SHADE +/- buttons
to select a temperature between 250°F
and 450°F.
4 Press START/PAUSE to begin preheating.
5 Place ingredients in the air fry basket
and roast tray with sheet pan. If
ingredients are fatty, oily, or marinated,
place the basket on the sheet pan. Use
air fry basket for dry ingredients.
6 When the unit beeps to signify it has
preheated, immediately slide the basket
into the rack level(s) designated on
the control panel. If also using the
sheet pan, slide both into the oven at
the same time, with the basket in the
upper rack and the pan on the wire rack
beneath the basket. Close oven door.
7 When cook time is complete, the unit
will beep and “END” will appear on
the display.
NOTE: The timer will start counting
down as soon as the unit has preheated.
If ingredients are not ready to go into
the oven, simply press the TIME +/-
buttons to add more time.
NOTE: Food cooks faster when using
the Air Fry function. Refer to Air Fry
Chart in the Inspiration Guide for
more guidance on cook times and
temperatures.
Broil
1 To select the function, press the
function +/- buttons until BROIL
brightly illuminates. The default time
and temperature settings will display.
2 Press the TIME/SLICES +/- buttons to
select a cook time up to 30 minutes.
3 Press the TEMP/SHADE +/- buttons to
select either HI (450°F) or LO (400°F).
4 Place ingredients on the sheet pan. Place
the sheet pan on the wire rack and close
the oven door, press START/STOP to
start cooking.
5 When cook time is complete, the unit
will beep and “END” will appear on
the display.
Toast
1 To select the function, press the function
+/- buttons until TOAST brightly
illuminates. The default amount of
slices and darkness level will display.
2 Press the TIME/SLICES +/- buttons to
select the number of bread slices. You
may toast up to 9 slices at once.
3 Press the TEMP/SHADE +/- buttons to
select a darkness level.
4 Place bread slices on the wire
rack. Close oven door and press
START/PAUSE to begin cooking.
5 When cook time is complete, the unit will
beep and “END” will appear on the display.
NOTE: There is no temperature
adjustment available for the Toast
function, and the unit does not preheat
in Toast mode. It is very important to
select the exact number of slices to
avoid over- or under-toasting.
Dehydrate
1 To select the function, press the function
+/- buttons until DEHYDRATE brightly
illuminates. The default time and
temperature settings will display.
When dehydrating 2 layers, select the
2 LEVEL button so that “2 LEVEL”
appears on the display.
2 Press the TIME/SLICES +/- buttons to
select a dehydrate time up to 24 hours.
3 Press the TEMP/SHADE +/- buttons to
select a temperature between 85°F and
200°F.
4 Place ingredients in the air fry basket and
place basket in oven. Close oven door and
press START/PAUSE to begin cooking.
5 When cook time is complete, the unit
will beep and “END” will appear on
the display.
NOTE: Purchase additional dehydrate
accessory to dehydrate up to 4 levels
at one time.
NOTE: For best results, lay ingredients
flat on each layer; do not stack food.
NOTE: The unit does not preheat in
Dehydrate mode.
NOTE: The unit does not preheat in
Broil mode.
NOTE: The unit does not preheat in
Toast mode.
NOTE: You can also manually adjust the
time once cooking has started to better
choose your preferred shade.

12 13
ninjakitchen.com
ninjakitchen.com
USING YOUR PRESTIGE SMART XL AIR OVEN – CONT.
Reheat
1 To select the function, press the
function +/- buttons until REHEAT
brightly illuminates.
2 Press the TIME/SLICES +/- buttons to
select a reheat time up to 4 hours.
3 Press the TEMP/SHADE +/- buttons to
select a temperature between 100°F
and 450°F.
4 Place food on the sheet pan or in an
oven-safe container and place the pan
or container on the wire rack. Close
oven door and press START/PAUSE
to begin warming.
5 When cook time is complete, the unit
will beep and “END” will appear on
the display.
Bagel
1 To select the function, press the function
+/- buttons until BAGEL brightly
illuminates. The default number of
slices and darkness level will display.
2 Press the TIME/SLICES +/- buttons to
select the number of slices. You may
toast up to 9 bagel slices at once.
3 Press the TEMP +/- buttons to select a
darkness level.
4 Place bagel slices, cut-side up, in the
middle of the wire rack. Close oven door
and press START/PAUSE to begin cooking.
5 When cook time is complete, the unit
will beep and “END” will appear
on the display.
NOTE: You can also manually adjust the
time once cooking has started to better
choose your preferred shade.
Pizza
1 To select the function, press the
function +/- buttons until PIZZA
brightly illuminates. The default time
and temperature setting will display.
2 Press the TIME/SLICES +/- buttons to
select a cook time up to 4 hours.
3 Press the TEMP +/- buttons to select
a temperature between 180°F and
450°F.
4 Place pizza on the sheet pan or
directly on the wire rack. Close oven
door and press START/PAUSE to
begin cooking.
5 When cook time is complete, the unit
will beep and “END” will appear on
the display.
NOTE: The unit does not preheat in
Reheat mode.
NOTE: There is no temperature adjustment
available for the Bagel function, and the
unit does not preheat in Bagel mode. It is
very important to select the exact number
of slices to avoid over- or under-toasting.
NOTE: The unit does not preheat in
Bagel mode.
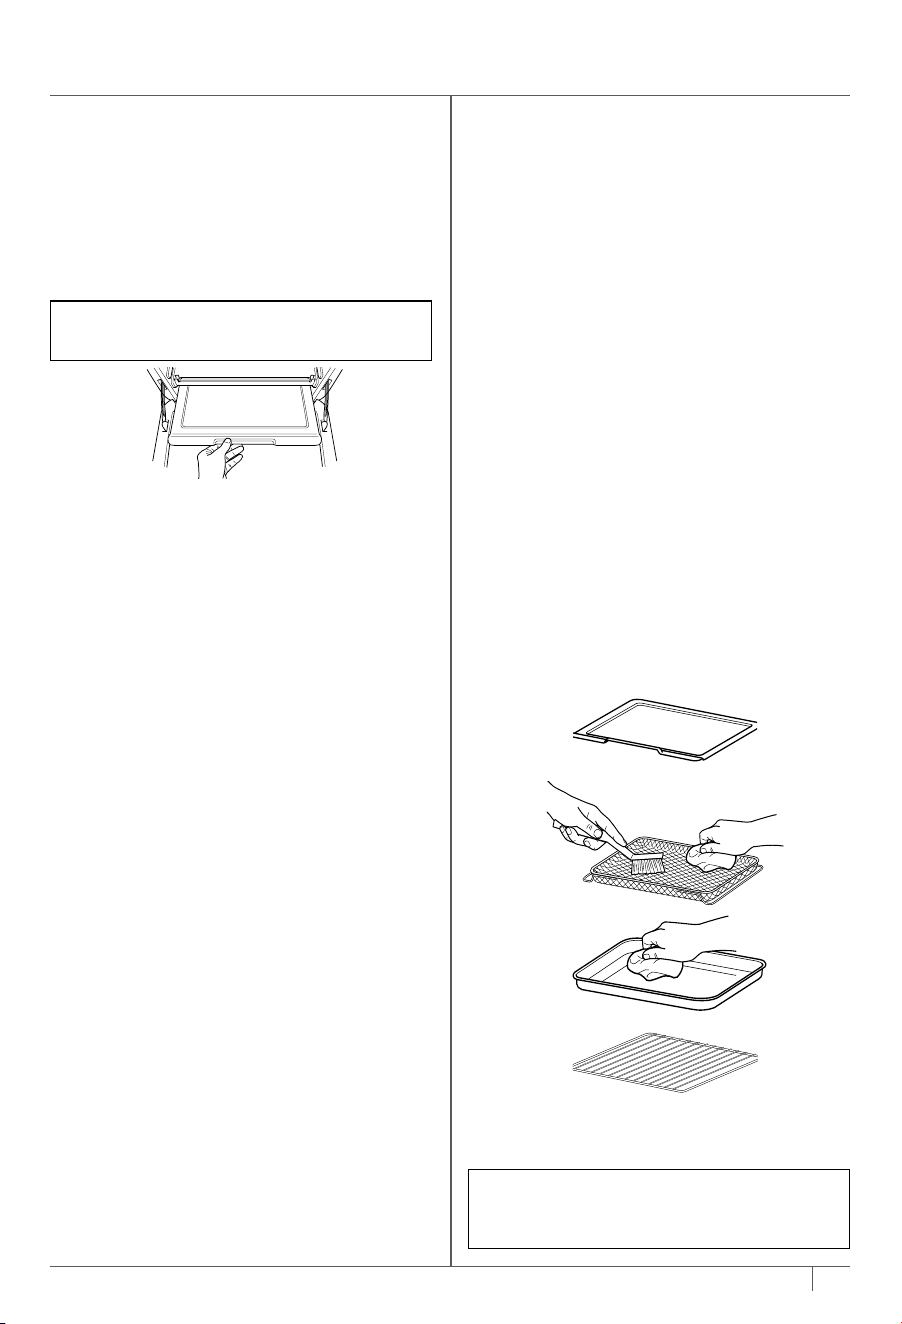
EVERYDAY CLEANING
The unit should be cleaned thoroughly
after every use.
1 Unplug the unit from the outlet and
allow it to cool down before cleaning.
2 Empty crumb tray by sliding it out of
the oven.
3 After every use, wipe away any food
splatter on the interior walls and glass
door of the unit with a soft, damp sponge.
4 To clean the exterior of the main unit
and the control panel, wipe them clean
with a damp cloth. A non-abrasive liquid
cleanser or mild spray solution may be
used. Apply the cleanser to the sponge,
not the oven surface, before cleaning.
5 When using accessories, we recommend
greasing them with recommended
cooking oil, or covering them with
parchment paper or aluminum foil
before placing food on top. DO NOT
cover roast tray holes with parchment
paper or aluminum foil.
DEEP CLEANING
1 Unplug the unit from the outlet and
allow it to cool down before cleaning.
2 Remove all accessories from the unit,
including the crumb tray, and wash
separately. Use a non-abrasive cleaning
brush to more thoroughly wash the air
fry basket. Accessories are hand-wash
recommended. DO NOT place roast tray,
sheet pan, or crumb tray in dishwasher.
3 Use warm, soapy water and a soft cloth
to wash the oven’s interior and glass
door, DO NOT use abrasive cleaners,
scrubbing brushes, or chemical cleaners,
as they will damage the oven.
CAUTION: NEVER put the main unit in
the dishwasher or immerse it in water
or any other liquid.
4 To remove tough grease, let sheet pan
and roast tray soak overnight in warm,
soapy water, then wash with a non-
abrasive sponge or brush.
5 Thoroughly dry all parts before placing
them back in the oven.
CLEANING & MAINTENANCE
NOTE: Empty crumb tray frequently.
Hand-wash when necessary.
IMPORTANT: Place crumb tray below
lower heating elements. DO NOT slide
into any rack positions.
12 13
ninjakitchen.com
ninjakitchen.com
USING YOUR PRESTIGE SMART XL AIR OVEN – CONT.
Reheat
1 To select the function, press the
function +/- buttons until REHEAT
brightly illuminates.
2 Press the TIME/SLICES +/- buttons to
select a reheat time up to 4 hours.
3 Press the TEMP/SHADE +/- buttons to
select a temperature between 100°F
and 450°F.
4 Place food on the sheet pan or in an
oven-safe container and place the pan
or container on the wire rack. Close
oven door and press START/PAUSE
to begin warming.
5 When cook time is complete, the unit
will beep and “END” will appear on
the display.
Bagel
1 To select the function, press the function
+/- buttons until BAGEL brightly
illuminates. The default number of
slices and darkness level will display.
2 Press the TIME/SLICES +/- buttons to
select the number of slices. You may
toast up to 9 bagel slices at once.
3 Press the TEMP +/- buttons to select a
darkness level.
4 Place bagel slices, cut-side up, in the
middle of the wire rack. Close oven door
and press START/PAUSE to begin cooking.
5 When cook time is complete, the unit
will beep and “END” will appear
on the display.
NOTE: You can also manually adjust the
time once cooking has started to better
choose your preferred shade.
Pizza
1 To select the function, press the
function +/- buttons until PIZZA
brightly illuminates. The default time
and temperature setting will display.
2 Press the TIME/SLICES +/- buttons to
select a cook time up to 4 hours.
3 Press the TEMP +/- buttons to select
a temperature between 180°F and
450°F.
4 Place pizza on the sheet pan or
directly on the wire rack. Close oven
door and press START/PAUSE to
begin cooking.
5 When cook time is complete, the unit
will beep and “END” will appear on
the display.
NOTE: The unit does not preheat in
Reheat mode.
NOTE: There is no temperature adjustment
available for the Bagel function, and the
unit does not preheat in Bagel mode. It is
very important to select the exact number
of slices to avoid over- or under-toasting.
NOTE: The unit does not preheat in
Bagel mode.
EVERYDAY CLEANING
The unit should be cleaned thoroughly
after every use.
1 Unplug the unit from the outlet and
allow it to cool down before cleaning.
2 Empty crumb tray by sliding it out of
the oven.
3 After every use, wipe away any food
splatter on the interior walls and glass
door of the unit with a soft, damp sponge.
4 To clean the exterior of the main unit
and the control panel, wipe them clean
with a damp cloth. A non-abrasive liquid
cleanser or mild spray solution may be
used. Apply the cleanser to the sponge,
not the oven surface, before cleaning.
5 When using accessories, we recommend
greasing them with recommended
cooking oil, or covering them with
parchment paper or aluminum foil
before placing food on top. DO NOT
cover roast tray holes with parchment
paper or aluminum foil.
DEEP CLEANING
1 Unplug the unit from the outlet and
allow it to cool down before cleaning.
2 Remove all accessories from the unit,
including the crumb tray, and wash
separately. Use a non-abrasive cleaning
brush to more thoroughly wash the air
fry basket. Accessories are hand-wash
recommended. DO NOT place roast tray,
sheet pan, or crumb tray in dishwasher.
3 Use warm, soapy water and a soft cloth
to wash the oven’s interior and glass
door, DO NOT use abrasive cleaners,
scrubbing brushes, or chemical cleaners,
as they will damage the oven.
CAUTION: NEVER put the main unit in
the dishwasher or immerse it in water
or any other liquid.
4 To remove tough grease, let sheet pan
and roast tray soak overnight in warm,
soapy water, then wash with a non-
abrasive sponge or brush.
5 Thoroughly dry all parts before placing
them back in the oven.
CLEANING & MAINTENANCE
NOTE: Empty crumb tray frequently.
Hand-wash when necessary.
IMPORTANT: Place crumb tray below
lower heating elements. DO NOT slide
into any rack positions.
14
ninjakitchen.com
• Cutting Board
• Mun Tray
• 9" Round Neverstick Bakeware
• Dehydrating Kit
• Casserole Dish (9 x 13)
15
ninjakitchen.com
We oer a suite of accessories custom made for your Ninja® Prestige Smart XL Air Fryer
& Countertop Oven. Visit ninjaaccessories.com to expand your capabilities and take your
cooking to the next level.
ACCESSORIES FOR PURCHASE
TROUBLESHOOTING & FAQ
ERROR MESSAGES
“CALL CUSt SrVC” followed by “Er0,” “Er1,” “Er2,” “Er3,” “Er4,” “Er5,” or “Er6”
Power o the unit and call Customer Service at 1-877-646-5288. So we may better assist
you, please register your product online at registeryourninja.com and have the product
on hand when you call.
FAQ
Why won’t the oven turn on?
• Make sure the power cord is securely plugged into the outlet.
• Insert the power cord into a dierent outlet.
• Reset the circuit breaker if necessary.
• Press the power button.
Can I use the sheet pan instead of the air fry basket with Air Fry function?
• Yes, but crispiness results may vary.
Do I need to adjust the cook times and temperatures of traditional oven recipes?
• For best results, keep an eye out on your food while cooking. Refer to cook charts in the
Inspiration Guide for more guidance on cook times and temperatures.
Can I restore the unit to its default settings?
• The oven will remember the last setting used for each function, even if you unplug it.
To restore the oven’s default settings for each function, press the Light
and 2 LEVEL
buttons simultaneously for 5 seconds.
TROUBLESHOOTING & FAQ - CONT.
To order additional parts and accessories, visit ninjaaccessories.com or contact
Customer Service at 1-877-646-5288.
So we may better assist you, please register your
product online at registeryourninja.com and have the product on hand when you call.
REPLACEMENT PARTS
Why do the heating elements appear to be turning on and o?
• This is normal. The oven is designed to control temperature precisely for every function
by adjusting the heating elements’ power levels.
Why does the oven have a dierent temperature reading with an external thermometer?
• Convection ovens circulate air dierently than traditional ovens, so when the door is
opened, more heat will escape. This may aect any external temperature reading of
the unit’s interior temperature.
• Since this is a convection oven, it can cook more quickly than a traditional oven.
Convection cooking includes a fan that helps speed up cook time by circulating hot air
and can aect temperatures within the cavity. The time it takes the unit to heat up to the
set temperature will vary based on the amount of food being cooked, the function being
used, and the cook temperature and time. The oven features an algorithm that ensures
temperature and time settings work with most traditional oven recipes. As a result, the
temperature inside the oven may dier from the set temperature. This does not impact
cooking quality. Refer to the Inspiration Guide to learn more about recommended cook
times and temperatures.
Why is my unit not fully preheated when the preheat cycle is completed?
• During preheating, the unit will not reach the intended cooking temperature, but
it will preheat to a level that will start cooking your ingredients. As the cook cycle
continues, the oven will continue to heat up and cook your food to doneness. It may
take up to 10 minutes for the unit to reach the intended cook temperature. This does
not aect the cooking quality of most recipes.
Why is steam coming out from the oven door?
• This is normal. Foods with a high moisture content may release steam around the door.
Why is water dripping onto the counter from under the door?
• This is normal. The condensation created by foods with a high moisture content
(such as frozen breads) may run down the inside of the door and drip onto the counter.
Why is the unit generating smoke?
• Ensure you are using the roast tray on the sheet pan when cooking all greasy foods, or
when using Air Fry, Air Roast, or Whole Roast functions.
• If problem persists, run a Toast cycle on shade 7 with accessories removed; this will burn
o any additional grease on the heating elements that are causing smoke.
How can I clean the sheet pan?
• For stuck-on food, let the sheet pan soak before cleaning.
• Line the sheet pan with aluminum foil or parchment paper when cooking to make clean-
up easier.
Why did a circuit breaker trip while using the unit?
• The unit uses 1800 watts of power, so it must be plugged into an outlet on a 15-amp
circuit breaker. It is also important that the unit be the only appliance plugged into an
outlet when in use. To avoid tripping a breaker, make sure the unit is the only appliance
plugged into an outlet on a 15-amp breaker.
Why does the unit sound like it is still running even though the power is o?
• The cooling fan may continue to run even after the unit has been turned o. This is a
normal function and should not be a source of concern. The cooling fan will stop after
the temperature of the unit reaches below 95°F (35°C).

16
ninjakitchen.com
17
ninjakitchen.com
The One (1) Year Limited Warranty applies to purchases made from authorized retailers of
SharkNinja Operating LLC. Warranty coverage applies to the original owner and to the original product
only and is not transferable.
SharkNinja warrants that the unit shall be free from defects in material and workmanship for a period
of one (1) year from the date of purchase when it is used under normal household conditions and
maintained according to the requirements outlined in the Owner’s Guide, subject to the following
conditions and exclusions:
What is covered by this warranty?
1. The original unit and/or non-wearable parts deemed defective, in SharkNinja’s sole discretion,
will be repaired or replaced up to one (1) year from the original purchase date.
2. In the event a replacement unit is issued, the warranty coverage ends six (6) months following the
receipt date of the replacement unit or the remainder of the existing warranty, whichever is later.
SharkNinja reserves the right to replace the unit with one of equal or greater value.
What is not covered by this warranty?
1. Normal wear and tear of wearable parts (such as blending vessels, lids, cups, blades, blender
bases, removable pots, racks, pans, etc.), which require regular maintenance and/or replacement
to ensure the proper functioning of your unit, are not covered by this warranty. Replacement parts
are available for purchase at ninjaaccessories.com.
2. Any unit that has been tampered with or used for commercial purposes.
3. Damage caused by misuse, abuse, negligent handling, failure to perform required maintenance
(e.g., failure to keep the well of the motor base clear of food spills and other debris), or damage
due to mishandling in transit.
4. Consequential and incidental damages.
5. Defects caused by repair persons not authorized by SharkNinja. These defects include damages
caused in the process of shipping, altering, or repairing the SharkNinja product (or any of its parts)
when the repair is performed by a repair person not authorized by SharkNinja.
6. Products purchased, used, or operated outside North America.
How to get service
If your appliance fails to operate properly while in use under normal household conditions within the
warranty period, visit ninjakitchen.com/support for product care and maintenance self-help. Our
Customer Service Specialists are also available at 1-877-646-5288 to assist with product support and
warranty service options, including the possibility of upgrading to our VIP warranty service options
for select product categories. So we may better assist you, please register your product online at
registeryourninja.com and have the product on hand when you call.
SharkNinja will cover the cost for the customer to send in the unit to us for repair or replacement. A fee
of $20.95 (subject to change) will be charged when SharkNinja ships the repaired or replacement unit.
How to initiate a warranty claim
You must call 1-877-646-5288 to initiate a warranty claim. You will need the receipt as proof of purchase.
We also ask that you register your product online at registeryourninja.com and have the product on
hand when you call, so we may better assist you. A Customer Service Specialist will provide you with
return and packing instruction information.
How state law applies
This warranty gives you specifi c legal rights, and you also may have other rights that vary from state
to state. Some states do not permit the exclusion or limitation of incidental or consequential damages,
so the above may not apply to you.
ONE (1) YEAR LIMITED WARRANTY
NJA_1_YR_IB_LMTD_WRNTY_US_ENG
NOTES

18 19
ninjakitchen.com
ninjakitchen.com
NOTES NOTES

18 19
ninjakitchen.com
ninjakitchen.com
NOTES NOTES

NINJA® PRESTIGE SMART XL AIR FRYER
& COUNTERTOP OVEN
DT500 Series | Owner’s Guide
1 Read all instructions prior to using the oven and its accessories.
2 This appliance can be used by persons with reduced physical, sensory or mental capabilities or lack of experience and knowledge if they have
been given supervision or instruction concerning use of the appliance in a safe way and understand the hazards involved.
3 If food contents were to catch fire during cooking, DO NOT open the oven door. If you can safely do so, unplug the oven immediately. DO NOT
throw water onto the fire. Food contents may contain grease and water may cause fire growth. If fire were to emit from the oven door, call the
fire department immediately. DO NOT use the oven after it has experienced a fire, it may have been damaged and present a risk of fire
or shock.
4 To eliminate a choking hazard for young children, discard all packaging materials immediately upon unpacking.
5 To reduce the risk of fire, DO NOT place appliance on stovetops or hot surfaces or in a heated oven.
6 Take inventory of all contents to ensure you have all parts needed to properly and safely operate your oven.
7 DO NOT use an extension cord. A short power-supply cord is used to reduce the risk of children grabbing the cord or becoming entangled and to
reduce the risk of people tripping over a longer cord.
8 NEVER use outlet below counter level.
9 Keep the appliance and its cord out of reach of children. Do not allow the appliance to be used by children. Close supervision is necessary when
used near children.
10 DO NOT let cord hang over edges of tables or counters or touch hot surfaces, including stoves and other heating ovens.
11 NEVER leave the oven unattended while in use.
12 DO NOT place any object directly onto the heating elements and DO NOT cover crumb tray or any part of the oven with aluminum foil. This will
cause the oven to overheat or cause a fire.
13 DO NOT use the oven with crumb tray incorrectly installed. Crumb tray MUST be placed below lower heating elements.
14 To protect against electrical shock DO NOT immerse cord, plugs, or main unit housing in water or other liquid.
15 DO NOT use the oven with damage to the power cord or plug. Regularly inspect the oven and power cord. If the oven malfunctions or has been
damaged in any way, immediately stop use and call Customer Service.
16 DO NOT cover the air intake vents or air outlet vents while unit is operating. Doing so will prevent even cooking and may damage the unit or
cause it to overheat.
Read and review instructions to understand operation and use of product.
Indicates the presence of a hazard that can cause personal injury, death or substantial property damage if the
warning included with this symbol is ignored.
Avoid contact with hot surface. Always use hand protection to avoid burns.
For indoor and household use only
IMPORTANT SAFETY INSTRUCTIONS
INDOOR HOUSEHOLD USE ONLY. READ ALL INSTRUCTIONS BEFORE USE
WARNING
When using electrical appliances, basic safety precautions should always be followed, including the following:
SharkNinja Operating LLC
US: Needham, MA 02494
1-877-646-5288
ninjakitchen.com
Illustrations may dier from actual product. We are constantly striving to improve our products, therefore
the specifications contained herein are subject to change withoutnotice.
NINJA is a registered trademark of SharkNinja Operating LLC.
This product may be covered by one or more U.S. patents. For more information,
see sharkninja.com/uspatents.
© 2024 SharkNinja Operating LLC.
DT500Series_IB_REV_Mv1
THANK YOU
for purchasing the Ninja® Prestige Smart XL Air Fryer & Countertop Oven
TECHNICAL SPECIFICATIONS
Voltage: 120V~ 60Hz
Watts: 1800W
RECORD THIS INFORMATION
Model Number: _________________
Serial Number: __________________
Date of Purchase: ________________
(Keep receipt)
Store of Purchase: _______________
REGISTER YOUR PURCHASE
registeryourninja.com
Scan QR code using mobile device
@ninjakitchen
TIP: You can find the model and serial numbers on the QR code label on the
base of the unit.