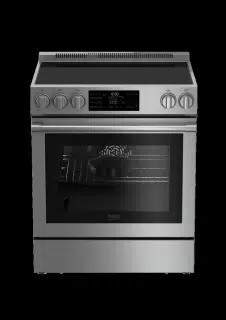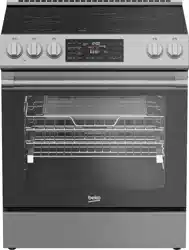

30" Slide-In Electric Range
Owner’s Manual
SLER 30524SS
285.6003.23 / R.AB/ 27.09.2023

CONGRATULATIONS ON THE PURCHASE OF YOUR
NEW BEKO SLIDE-IN RANGE
This stainless steel slide-in range has been manufactured in modern facilities with the
utmost care and meticulous quality controls. We are so confident in the quality of this
product that we back it with a two year parts and labor warranty. Please read this entire
owners manual before using your product to ensure you understand all of its features
and benefits and know how to operate it properly. This manual should be kept in an
easily accessible location and passed on to any future owners.
• Always observe the applicable safety instructions.
• Please read any other documents provided with the product.
Take a moment to complete the following information so it can be easily referenced
when contacting Customer Service:
Model
Serial No
Date of Purchase
Store / Dealer
City
State
Zip Code
If you have questions or comments, please contact your local authorized Beko dealer, or
call our Toll Free Customer Hotline number.
1-888-352 BEKO (2356)
BEKO.COM/US-EN
To register your product with Beko, please go to
BEKO.COM/US-EN/PRODUCT-REGISTRATION
(Located on bottom of control panel)

3
Premium Technology .....................................................................................................................4
Technical Information ....................................................................................................................5
Slide-In Range Overview ................................................................................................................6
Control Panel Overview ................................................................................................................. 8
Preparation ....................................................................................................................................10
Settings...........................................................................................................................................11
Operation ........................................................................................................................................ 13
Care and Maintenance ................................................................................................................26
Troubleshooting ............................................................................................................................29
Warranty and Service ...................................................................................................................30
CONTENTS
FURTHER INFORMATION
Browse the Beko website for helpful information on using your slide-in range,
care and maintenance, troubleshooting and more just visit http://www.beko.us
4
At Beko, we believe a truly revolutionary product is one that redefines what is possible in
terms of performance. Secondly, it must achieve that performance while using the least
amount of natural resources possible. And finally, it needs to be priced within reach of
everyone who wants to lead a healthy and sustainable life.
You don’t have to be a pro to cook like one.To make sure every healthy recipe meets your
standards of tasty perfection, Beko’s advanced features let you cook with confidence.
PREMIUM TECHNOLOGY
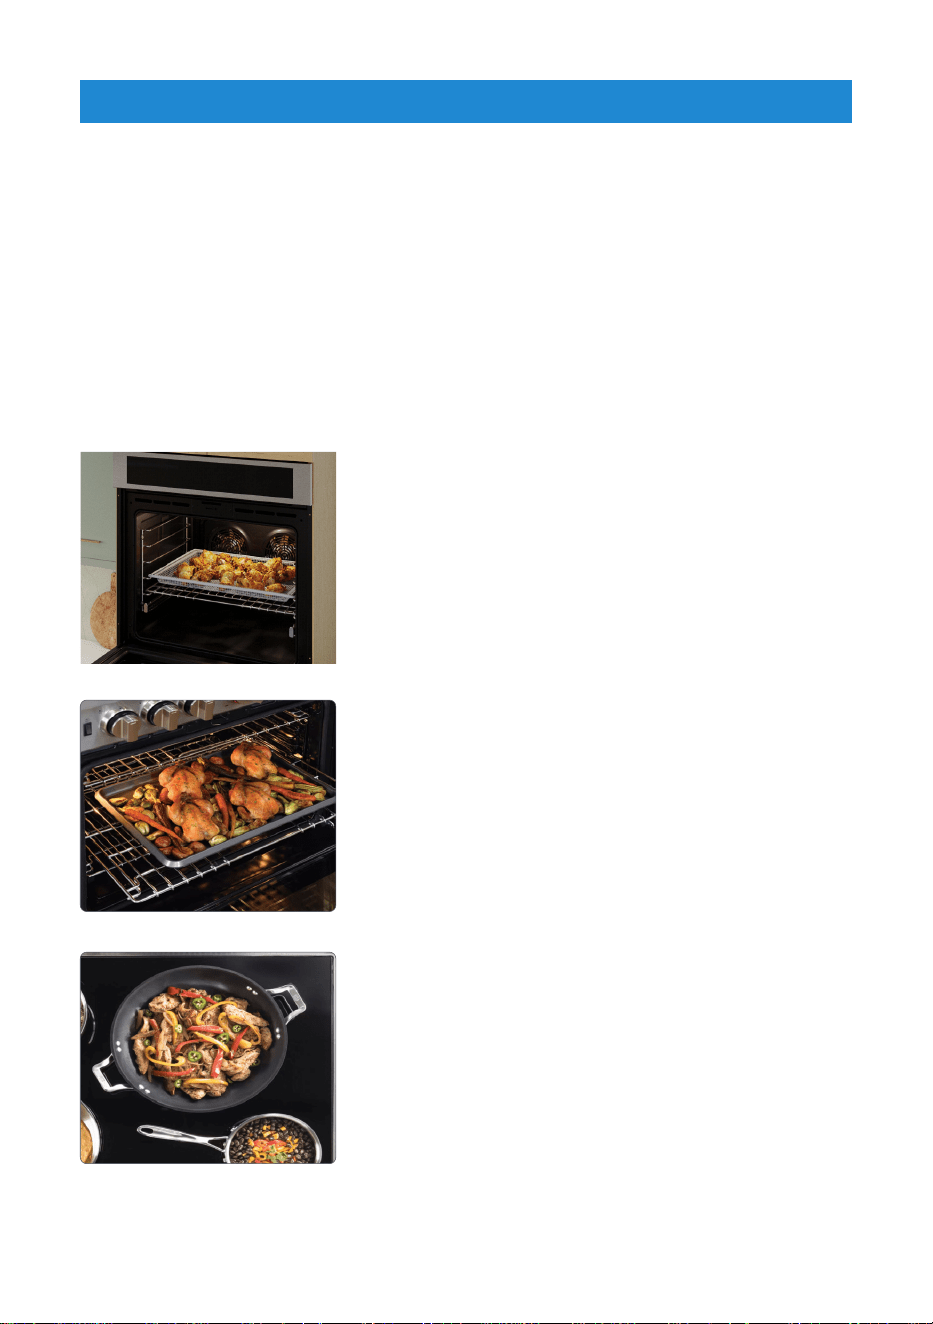
AirFry
A healthier alternative to frying
AirFry delivers crispy food without the use of cooking
oil, resulting in a healthy way to enjoy the taste of
fried foods without the frying. AirFry also requires no
pre-heat time. Faster and healthier cooking made easy.
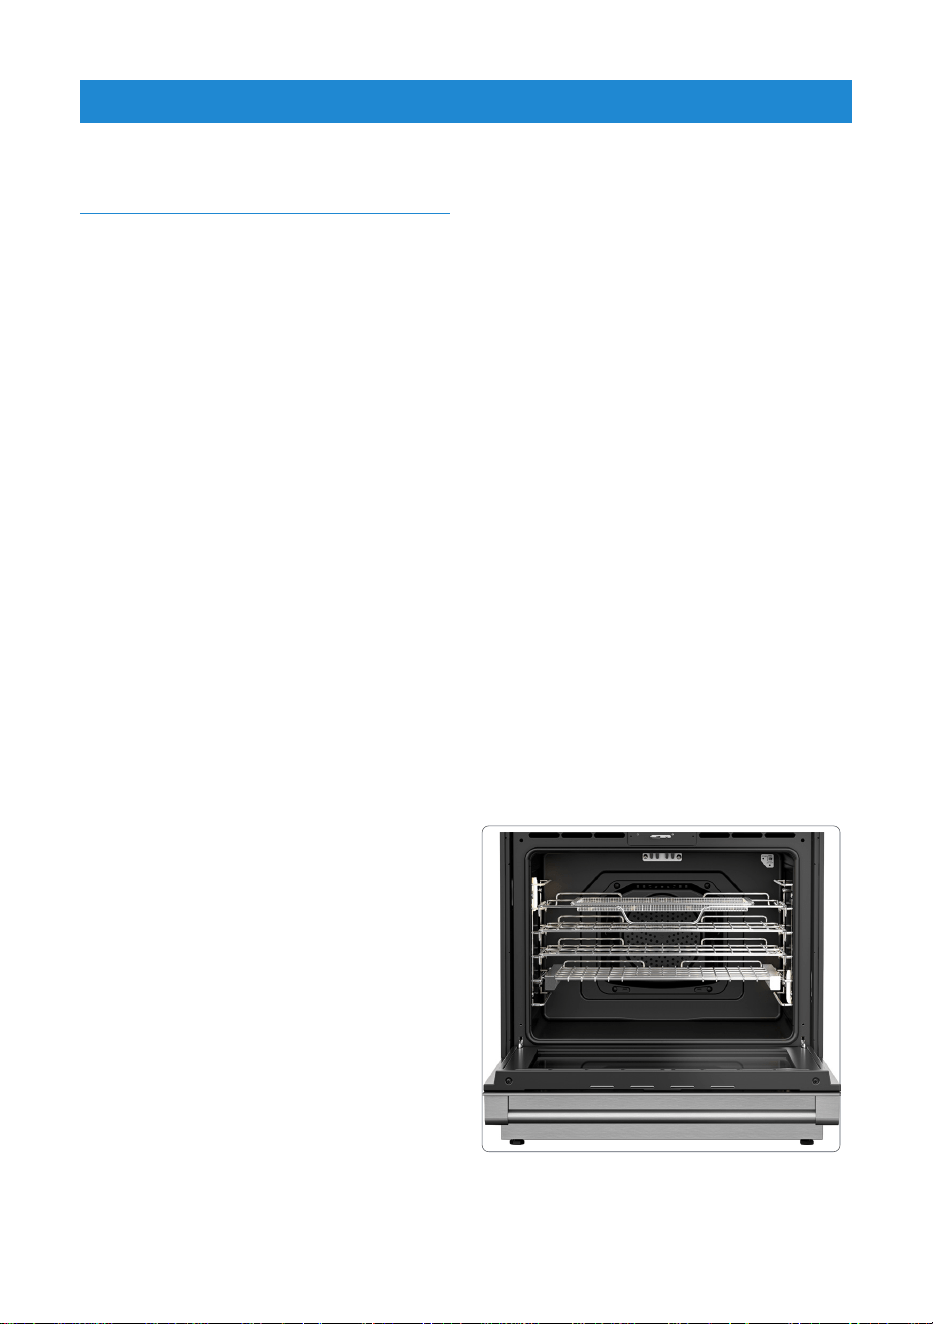
XL Interior Volume — 5.7 Cubic Feet
Industry-leading 5.7 cu. ft. interior volume
Beko’s oven interiors are the most spacious in their
class. With an industry-leading 5.7 cu. ft. interior
volume, you’ll have more than enough room for the
caramelized vegetables and tender roast at your next
dinner party.
12” XL Cooking Zone
Enjoy faster boiling and more efficient cooking
The ample space reduces the chance of burns while
sautéing vegetables, simmering sauces, and boiling
broth. Enjoy faster boiling and more efficient cooking in
any size pot, courtesy of our expansive surfaces.
5
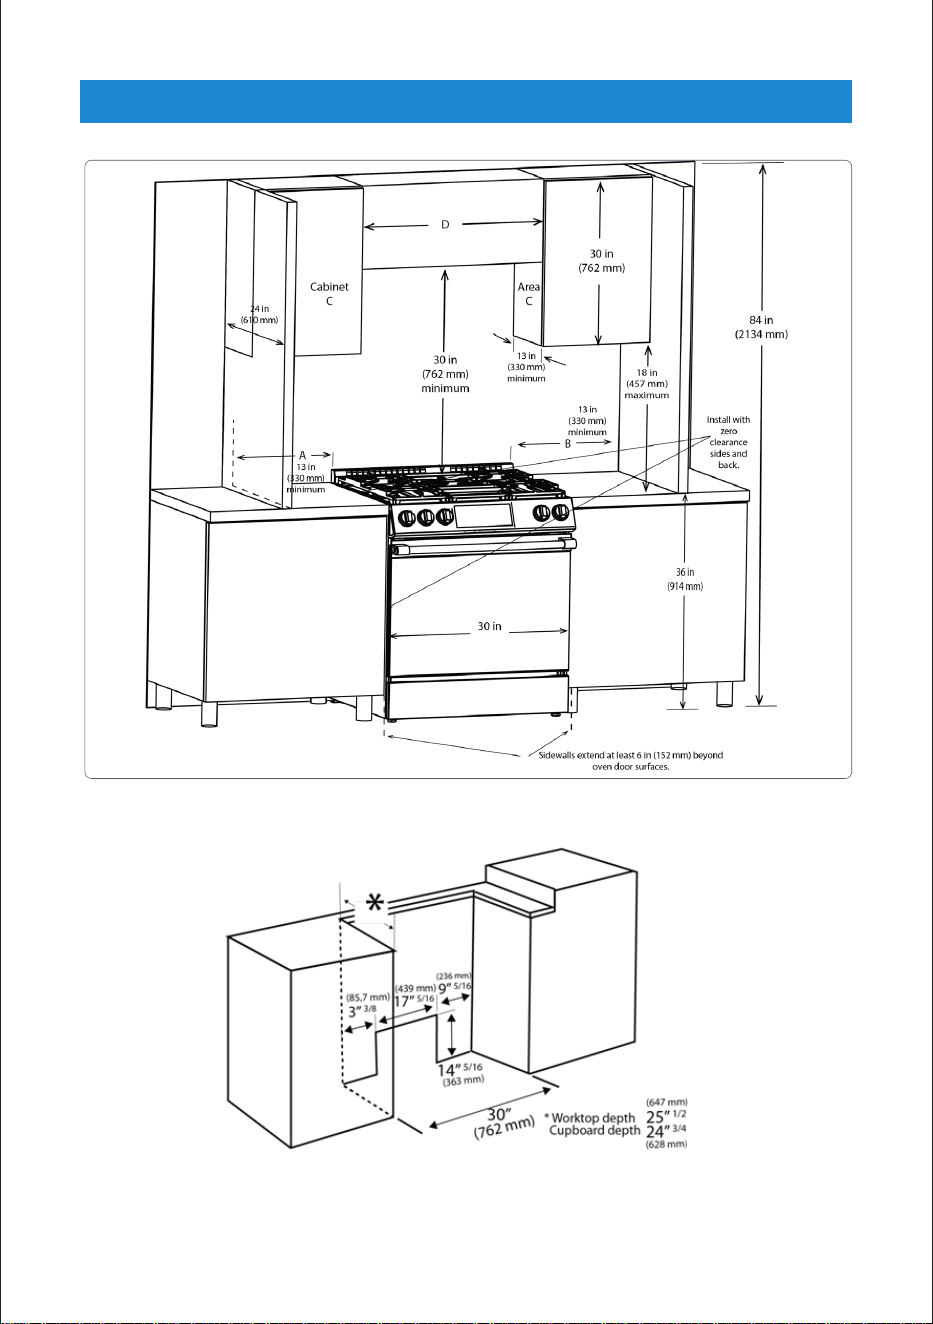
General
Overall Height 36" (914 mm)
Overall Width 29 - 13/16" (757 mm)
Overall Depth 26 - 3/4" (679 mm)
Total electric power 13kW
Electrical connection 120/240 V~;60 Hz 2AC~N
Cable type / Cross section / Fuse SRDT 10/3 + 12/1 AWG / min. 40 A
Cable length max. 6ft
Burners
Rear left Single-circuit cooking burner
Size 8 "
Power 2200 W
Front left Dual-circuit cooking burner
Size 5-8 "
Power 750-2200 W
Central Single-circuit cooking burner
Size 6 "
Power 100 W
Front right Dual-circuit cooking burner
Size 9-12 "
Power 1900-3000 W
Rear right Single-circuit cooking burner
Size 6 "
Power 1500 W
Main oven
Bake 2450 W
Broil 3550 W
Convection Roast 4000 W
Warming Drawer 380 W
This device corresponds to the following standarts: UL 858 Household Electric Ranges
directive.
TECHNICAL INFORMATION
6
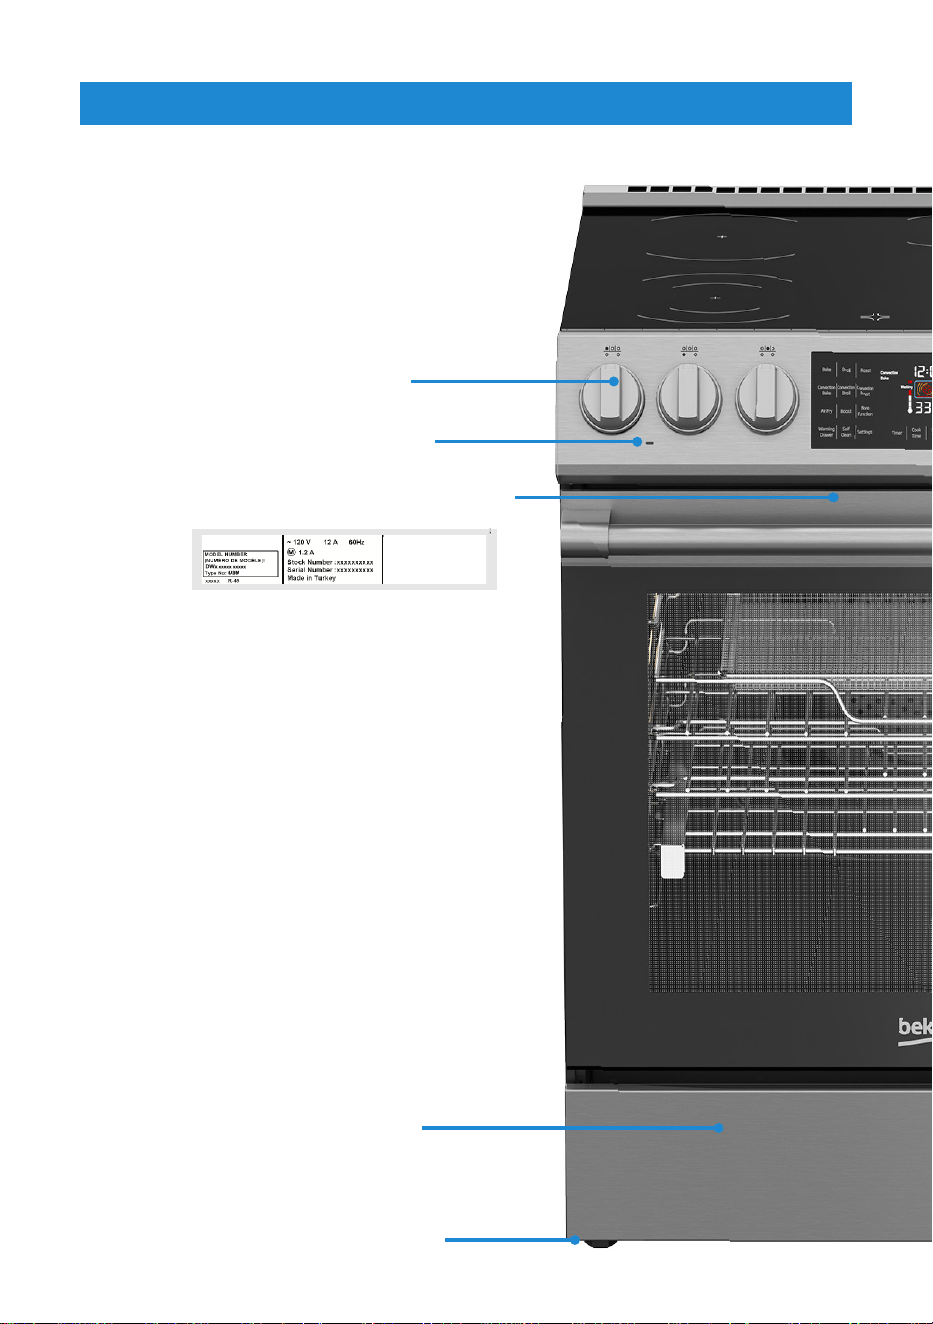
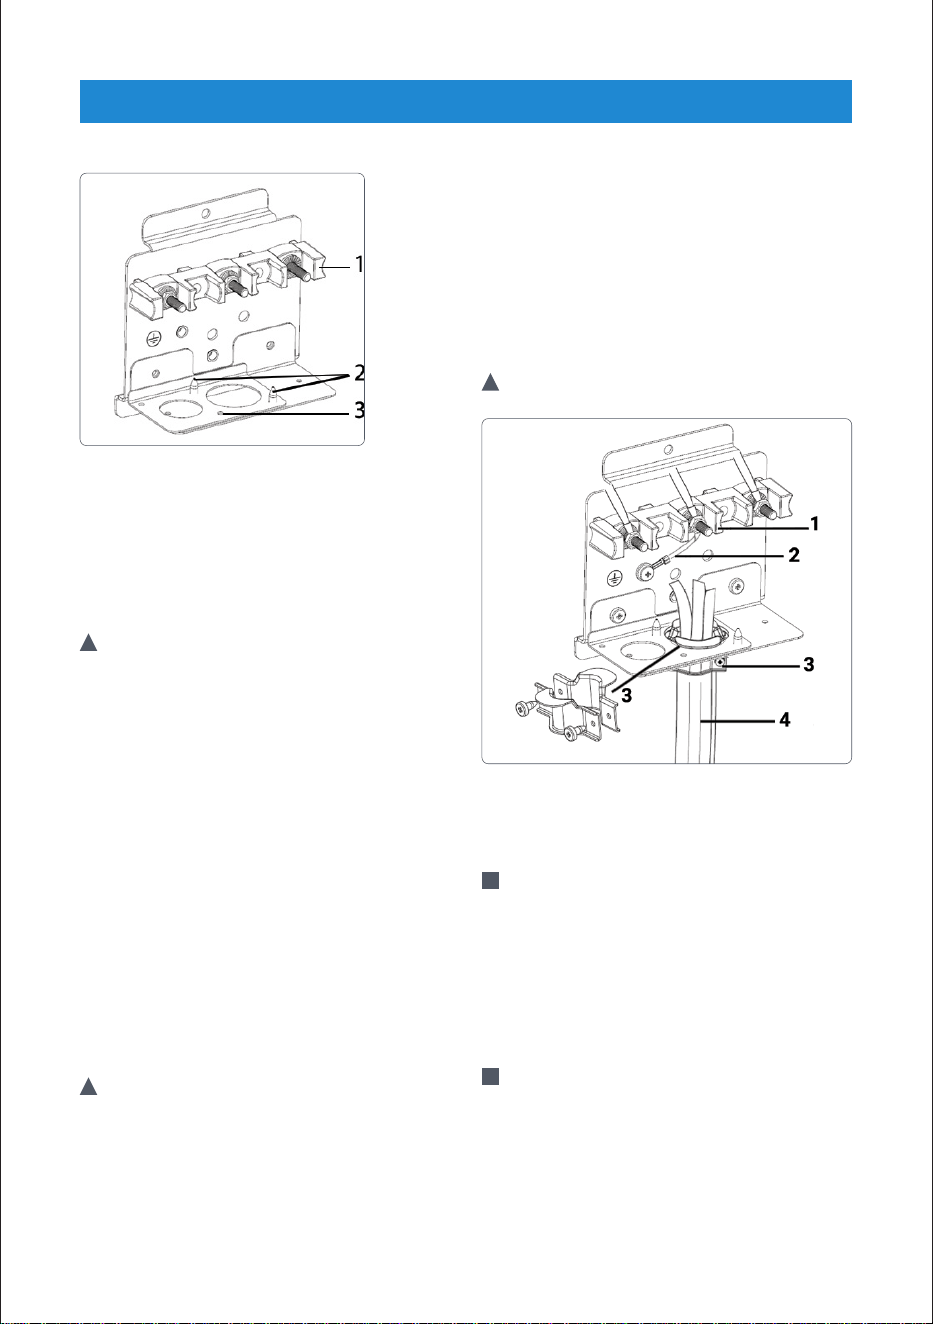
Model / Serial Tag / Rating Label
Control knobs
Foot
Warming Drawer
Burner indicator light
SLIDE-IN RANGE OVERVIEW
(Located on bottom of control panel)
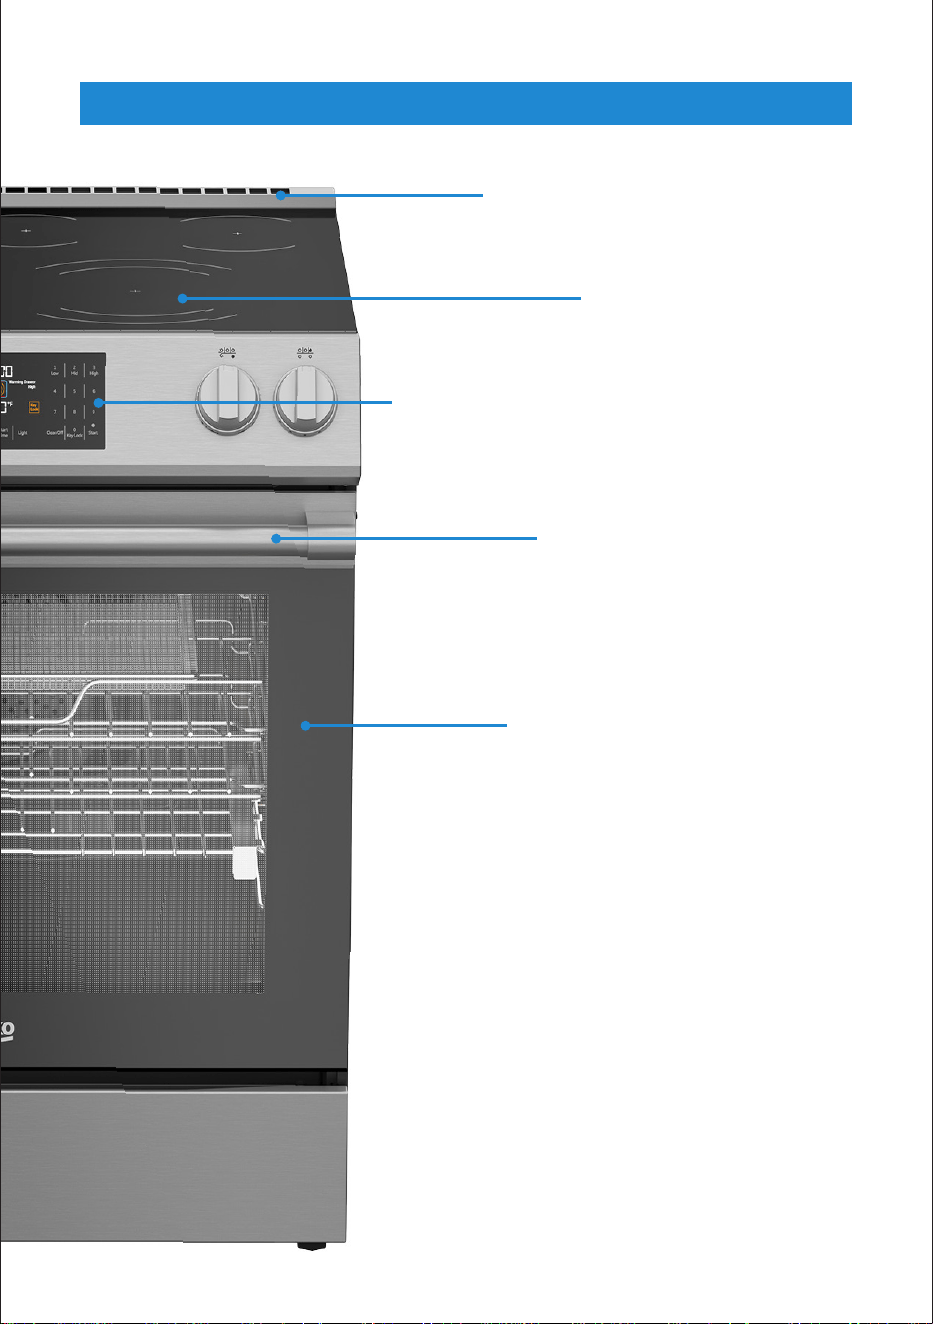
7
Front door
Splashback
Burners
Control panel
Handle
SLIDE-IN RANGE OVERVIEW
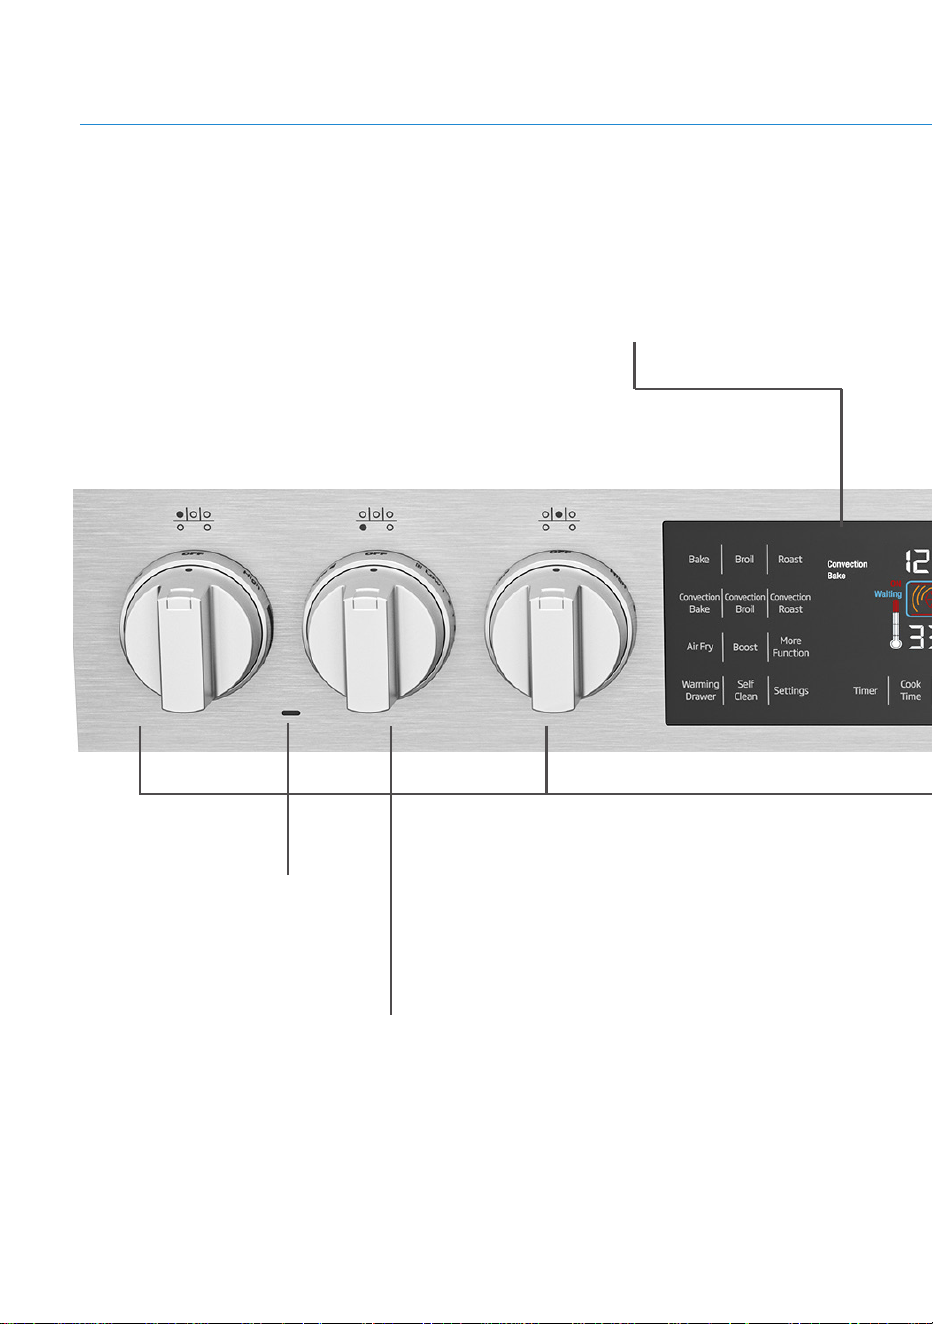
8
Burner Control Knobs
These knobs are used to turn on and
adjust burner temperatures.
Display
The selected functions are shown here
as well as the current oven operating
conditions.
CONTROL PANEL OVERVIEW
Burner Indicator Light
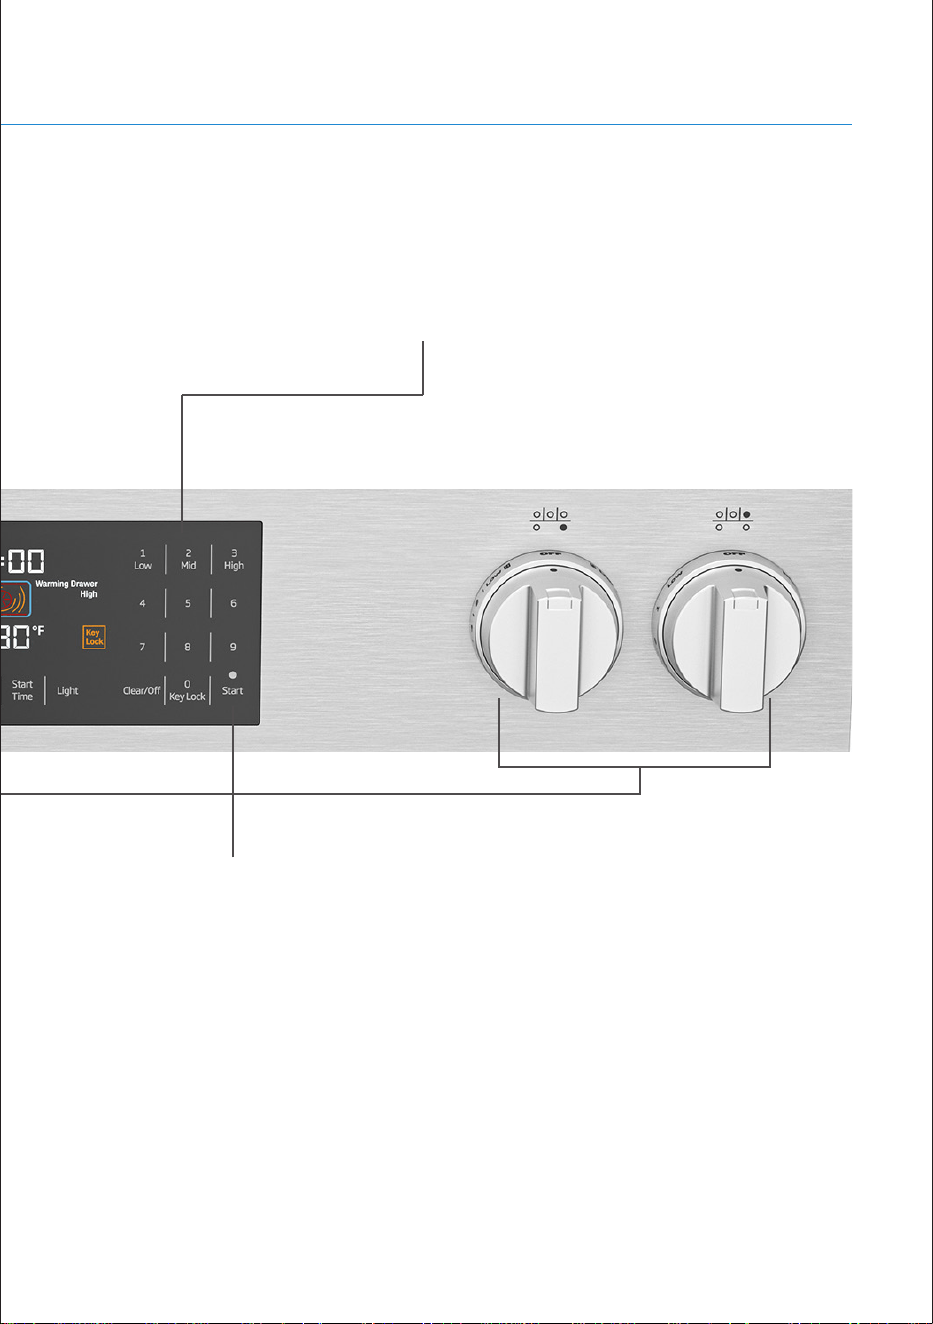
9
Numeric Keypad
This section is used to enter
temperature, time, start and stop
cooking modes.
CONTROL PANEL OVERVIEW
Start / Cancel Keys
These keys are used to start and
cancel cooking modes.

10
The following information will help you to
use your appliance in an ecological way,
and to save energy.
TIPS FOR SAVING ENERGY
• Use dark-colored or -enamel coated
cookware to improve heat transfer.
• Properly preheat the oven when cooking
instructions suggest to do so.
• Refrain from opening the oven door while
cooking.
• Cook multiple items at the same time or
one right after the other while the oven is
still hot.
• Defrost frozen meals prior to cooking.
• Turn oven off a few minutes before the
cooking time ends. Make sure to keep
the oven door closed to preserve the
heat necessary to finish cooking.
FIRST CLEANING OF THE
APPLIANCE
• Remove all packaging materials.
• Wipe the surfaces of the appliance with
a damp cloth or sponge and dry with a
cloth.
i
The surface might get damaged by
some detergents or cleaning materials.
i
Do not use aggressive detergents,
cleaning powders/creams or any sharp
objects during cleaning.
INITIAL HEATING
• Heat up the product for about 30
minutes and then switch it off. Thus,
any production residues or layers will be
burnt off and removed.
i
Smoke and smell may emit for a couple
of hours during the initial operation.This
is quite normal. Ensure that the room
is well ventilated to remove the smoke
and smell. Avoid directly inhaling the
smoke and the smell that emits.
!
Warning: Hot surfaces cause burns!
Product may be hot when it is in use.
Never touch the hot burners. Keep
children away.
PREPARATION
11
!
Warning: Before using the oven, the
clock must be set. If the clock is not
set, the oven some functions will not
work properly.
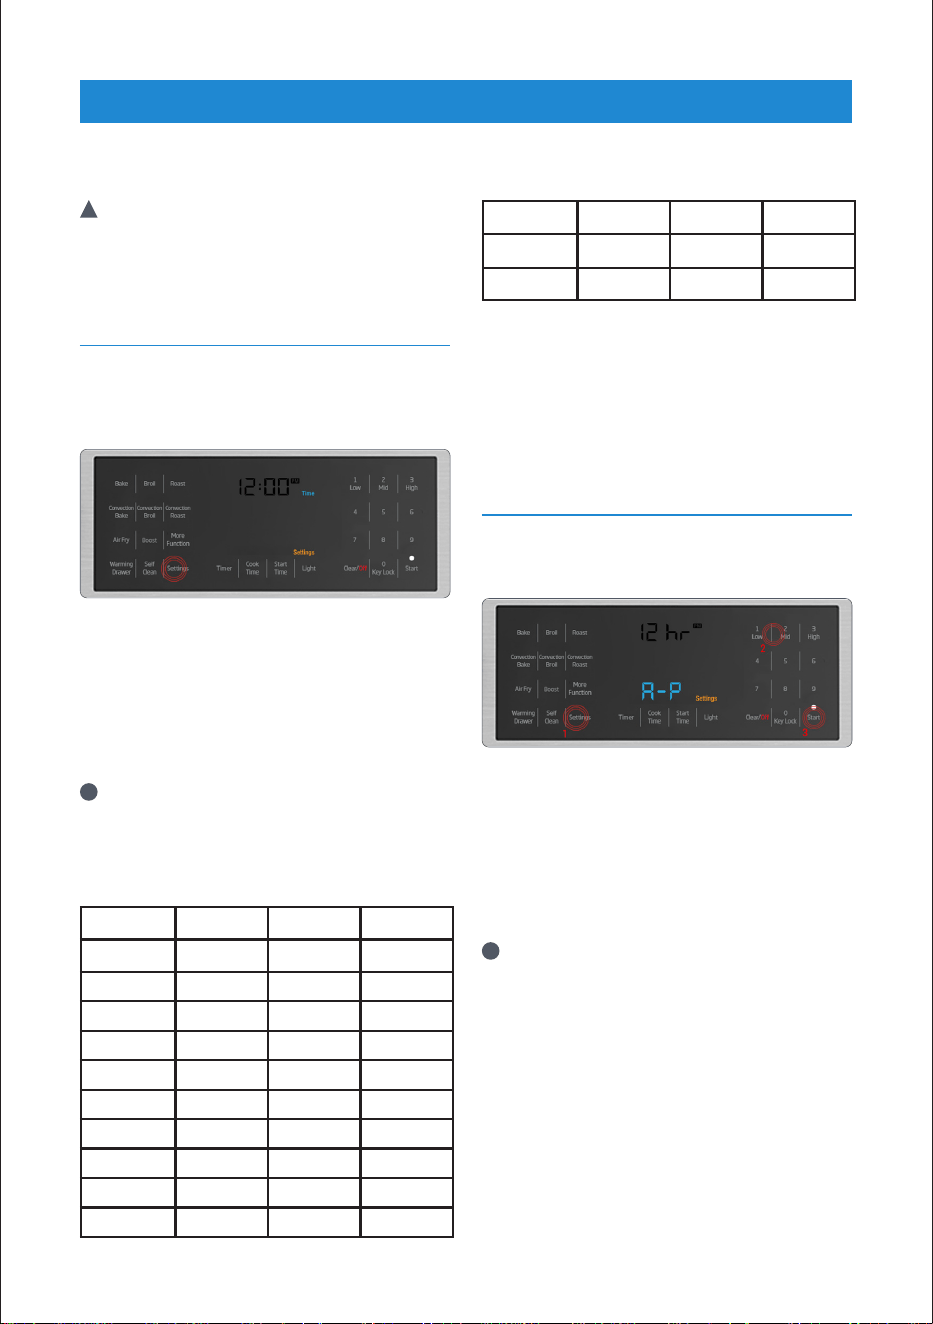
SETTING THE TIME
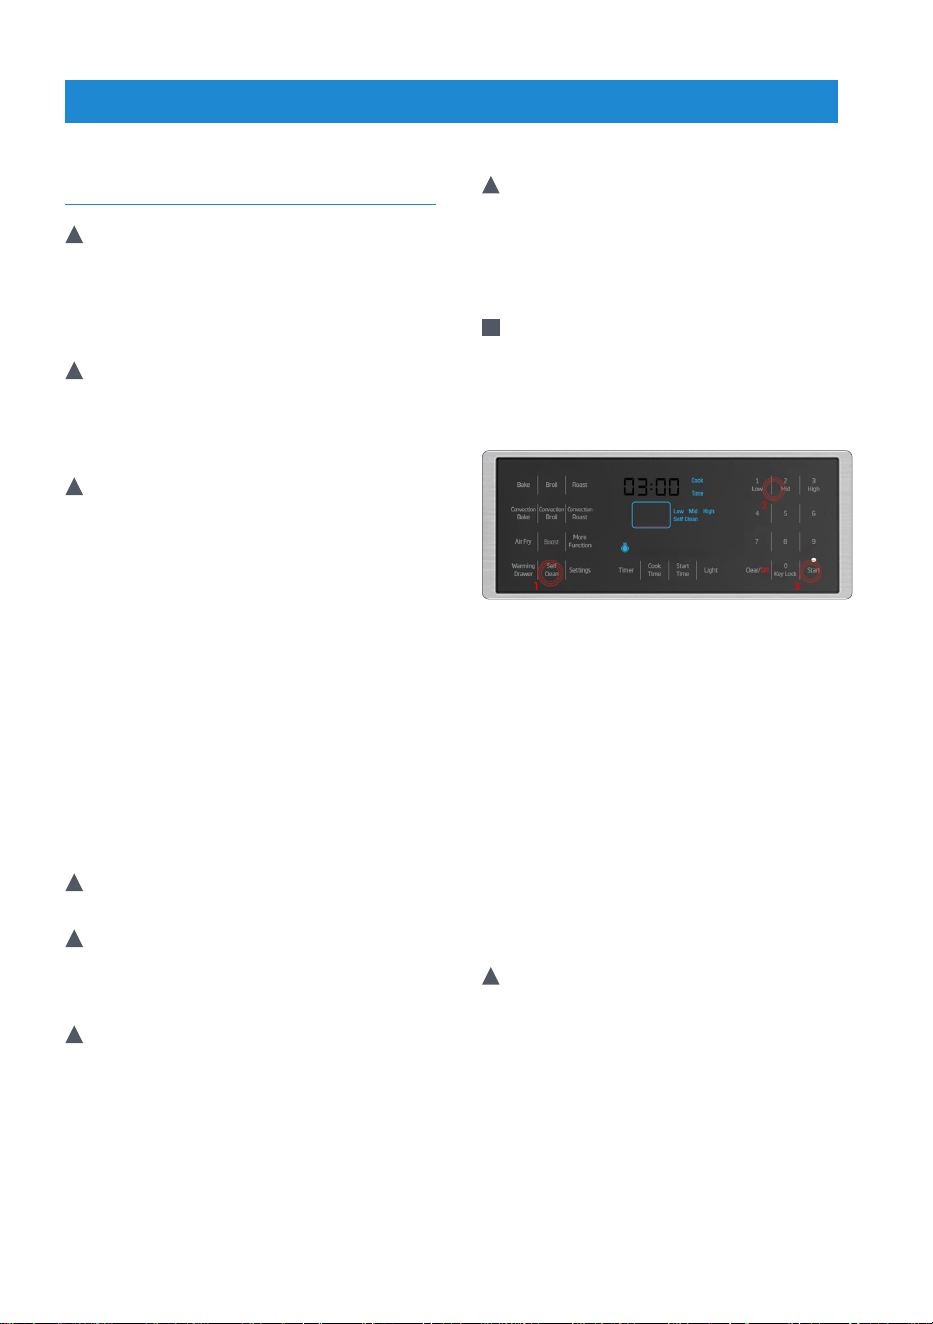
1. “Once the range is connected to power,
of he “Settings” key is pressed the time
will begin flashing in the display, along
with the words “clock” and “time.”
2. Using the keypad, begin entering the
time of day. For example, let’s assume
it’s 10:26 AM. Enter 1,0,2,6. As soon as
you begin entering the time, only the
time indicator will continue flashing.
After making 12 hours setting, you can
perform AM-PM selection by using
keypad number 8 than ''Start''.
i
If initial time setting is done in the 24
hour time scale (military time). See
chart below for 24/12 time conversion.
You can change the time scale to 12
hour mode after setting the time.
24 Hour 12 Hour 24 Hour 12 Hour
00:00 12:00 AM 12:00 12:00 PM
01:00 01:00 AM 13:00 01:00 PM
02:00 02:00 AM 14:00 02:00 PM
03:00 03:00 AM 15:00 03:00 PM
04:00 04:00 AM 16:00 04:00 PM
05:00 05:00 AM 17:00 05:00 PM
06:00 06:00 AM 18:00 06:00 PM
07:00 07:00 AM 19:00 07:00 PM
08:00 08:00 AM 20:00 08:00 PM
09:00 09:00 AM 21:00 09:00 PM
24 Hour 12 Hour 24 Hour 12 Hour
10:00 10:00 AM 22:00 10:00 PM
11:00 11:00 AM 23:00 11:00 PM
3. Once you’ve entered the correct time,
confirm the time by touching the
'' Start '' key on the touch pad, or wait
approximately 10 seconds.
SETTING (12HR/24HR) CLOCK
MODE
1. Press the Settings key until “12 / 24”
blinks in the display.
2. “Once “12/24” begins to flash in the
display, use the numeric touchpad and
press 1 (for 12 hr) or 2 (for 24) time
scale.
3. Confirm the selection by pressing
'' Start '' on the touchpad or wait
approximately 10 seconds.
i
If 12hr clock is set, PM indicator is
displayed. If 24hr clock is set, these
indicators are not displayed.
SETTINGS
12
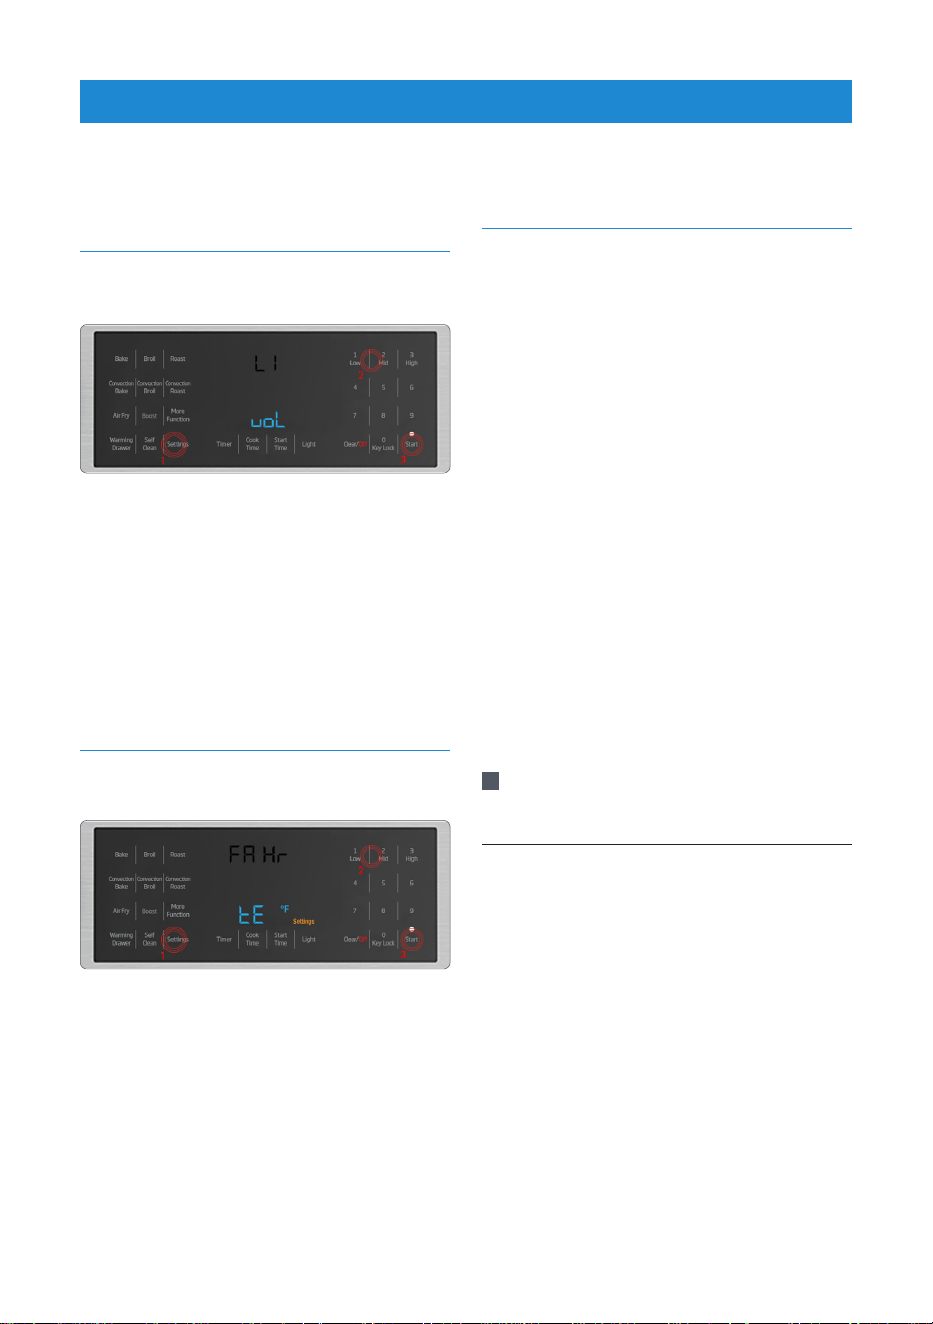
SETTING TIMER ALARM
VOLUME
1. Press the “Settings” key repeatedly until
“VOL” is displayed.
2. “Once “VOL” begins flashing in the
display, use the numeric touchpad to
choose the desired volume - 1 (low), 2
(med.), or 3 (high).
3. Confirm the selection by pressing '' Start ''
on the touchpad or wait approximately 10
seconds.
SETTING TEMPERATURE UNIT
(°F /°C)
1. Press the “Settings” key repeatedly until
“F/C” begins to flash in the display.
2. Once “F/C” begins to flash in the display,
use the numeric keypad to select the
desired temperature scale,
1 (ºF), or 2 (ºC).
3. Confirm the volume by pressing '' Start ''
on the touchpad or wait approximately 10
seconds.
TIPS
General information about cooking
• Do not place lids on the heating element.
• Always position pans centrally over the
heating element. When transferring pans
from one heating element to another
always lift the pans do not slide them.
• This appliance is equipped with one
or more surface units of different size.
Select utensils having flat bottoms large
enough to cover heating element. The
use of undersized pans will expose a
portion of the heating element to direct
contact and may result in ignition of
clothing. Using the proper pan size will
also improve cooking efficiency.
For equipment with a cooling fan
• The cooling fan cools both the built-in
cabinet and the front of the product.
!
Caution: The cooling fan continues to
operate for about 20-30 minutes after
the oven is switched off.
Tips for glass ceramic burner
• The glass ceramic surface is heat
resistant and insensitive to large
temperature deviations.
• Do not store objects on the glass
surface, or use it as a cutting board.
• Use pot and pans with smooth bottoms.
Sharp edges cause scratches on the
surface.
• Do not use aluminum pots and pans.
Aluminum damages the glass ceramic
surface.
SETTINGS
13
• For foods containing sugar in any form,
clean up all spills and soils as soon as
possible. Allow the cooktop to cool down
slightly. Then, while wearing oven mitts,
remove the spills while the surface is still
warm. If sugary spills are allowed to cool
down, they can adhere to the cooktop
and can cause pitting and permanent
marks.
• Splashes may damage the ceramic
surface and can cause fire. Do not
use pots that have concave or convex
bottoms.Use pot and pans with smooth
bottoms. They ensure a good heat
transfer.
• Ensure handles of pans cannot
accidentally be caught or knocked and
do not get hot by adjacent heating zones.
Avoid pans that are unstable and easily
tipped. Pans that are too heavy to move
easily when filled can also be a hazard.
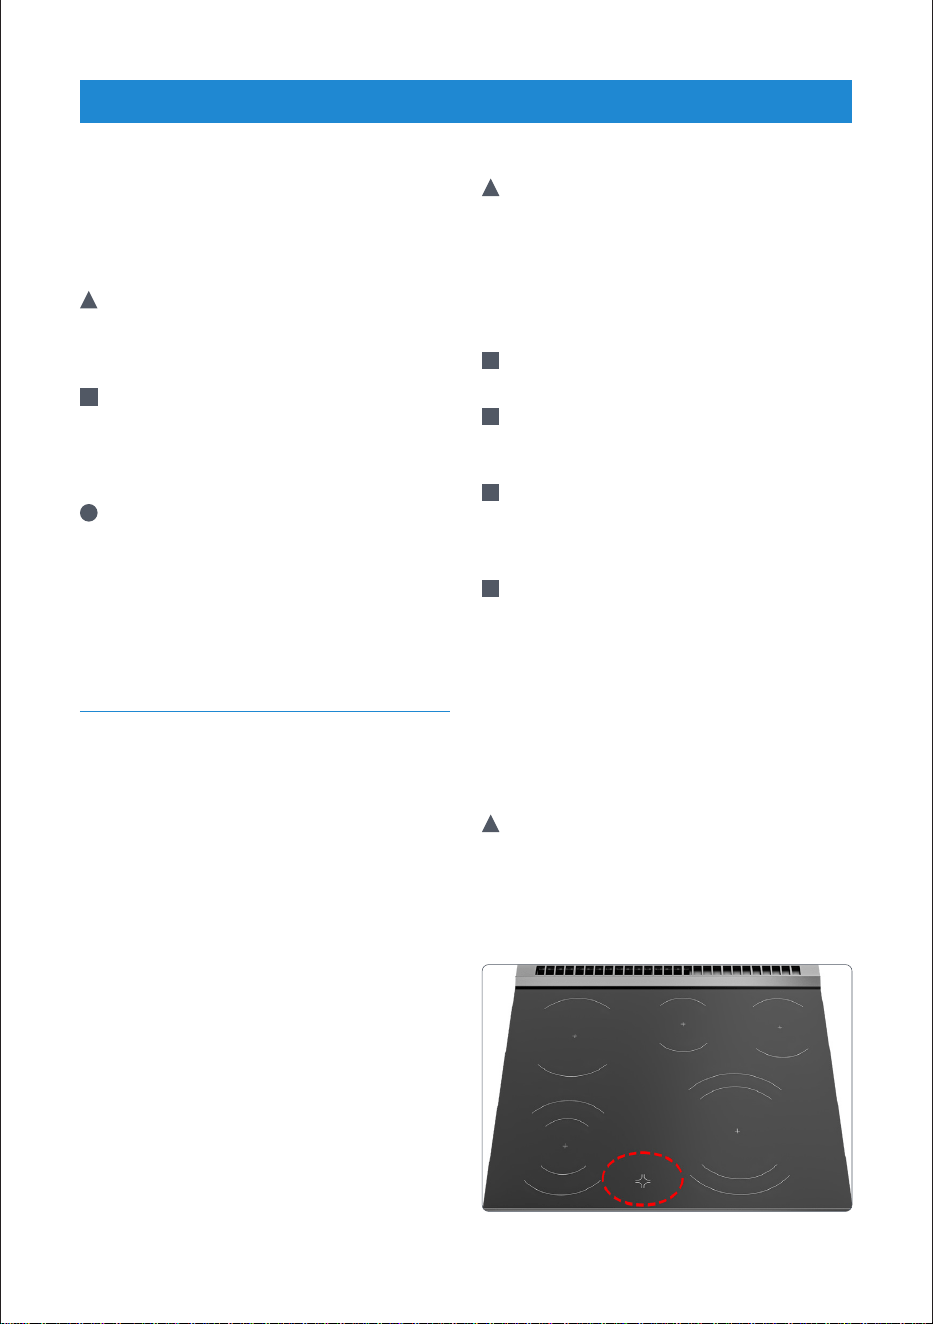
USING THE BURNERS
1. Dual-circuit burner 5-5
3 /4
/8-8
5 / 8
''
2. Dual-circuit burner 9-9
7/8
/12 -12
3 /4
''
3. Single-circuit burner 8 – 8
5/8
"
4. Middle-circuit burner 6 – 6
1/2
"
5. Single-circuit burner 6 – 6
1/2
"
Switching a burner off
• Turn control knob to off position (top).
How to operate on the multiple region
burners (model dependant)
• Hobs with multiple region are used for
different diameter of pans. By changing
the knob position in clockwise direction
or counter clockwise direction, the
diameter of active zone can be adjusted.
1. Single-circuit cooking burner (Rear Left)
2. Burner Indicator Light
3. Dual-circuit cooking burner (Front Left)
4. Central Single-circuit cooking burner
5. Control Panel
6. Dual-circuit cooking burner (Front Right)
7. Single-circuit cooking burner (Rear Right)
Using Multi-Region Burners
• Multi-Region burners (2 front burners)
can be operated using just the center
or using the center and outer ring. You
cannot use the outer ring by itself. All
other burners only have one heating
region.
Switch off dual zone burners
• In order to turn off the burners, set the
knob to "OFF" position by turning it.
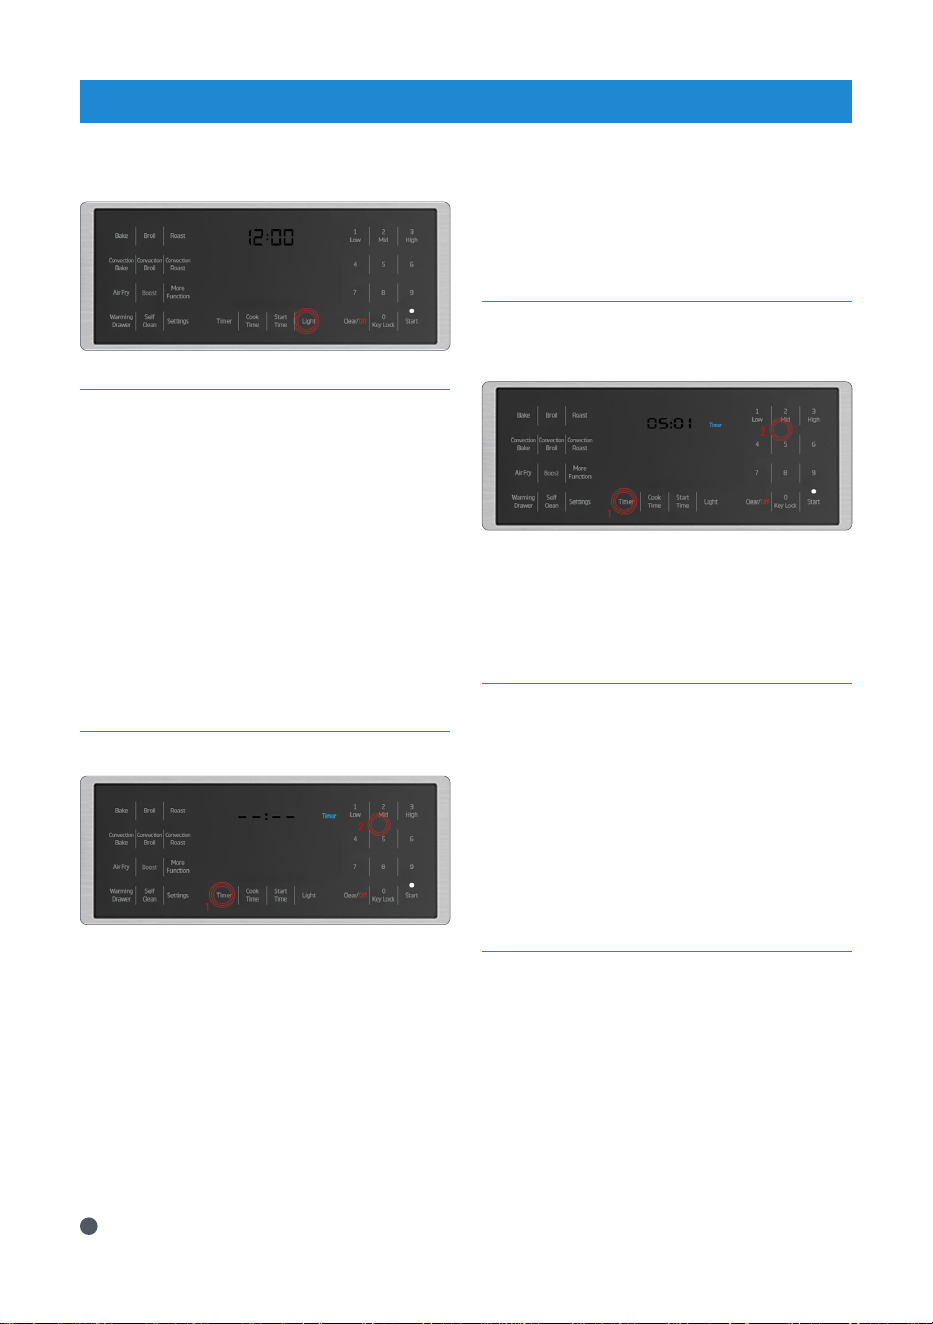
OVEN LIGHTS
• Press “Light” on the touchpad to turn the
oven lights on and off.
i
Oven light does not operate when the
oven is in self clean mode.
OPERATION
BURNERS
14
TIMER
• The oven timer can be used as a warning
or reminder and operates separately
from the oven functions. It can be used
for any purpose with the oven on or
in standby. The timer can be used in
conjunction with the oven functions and
will not interrupt or change the time set
by the function.
• It can be useful to set the timer as a
reminder to flip items in the oven at
certain time, without interrupting the
timed cycle of an oven function.
SETTING AN ALARM
1. Press '' Timer '' on the touchpad.
2. Using the numeric keypad, enter desired
time period.
3. Confirm selection and start the timer
by touching '' Start '' on the touchpad.
Selection will automatically confirm by
waiting approximately 10 seconds.
4. When the time period reaches “00:00”,
an alarm will sound and “Timer” and
“End” will start flashing in the display.
5. To stop the audible alarm, touch any
key on the touchpad.
i
Maximum alarm period is 5 hours and
59 minutes. If a value greater than 5:59
is set, the clock will return an error.
CANCEL AN ALARM
1. To cancel an alarm after it has been set,
press “Timer” on the touchpad.
2. Set the time to 00:00, the alarm will be
canceled about 10 seconds later and
'Timer' symbol on display will disappear.
STANDBY POSITION
• Stand-by mode is active when oven has
power. The display shows only time and
cooking function symbols when the
unit is not in use. Neither any indicators
nor any heater elements on the unit are
active at this position.If you wish to make
a programmed cooking operation in the
oven, please follow the steps to activate
the initial set time section.
COOKING TIME SELECTION
• In this operation mode you can adjust
cooking time.
•
Put your meal into the oven and close
the oven door.
1. Select the desired oven function. (for
example: Bake)
2. If you want to change the temperature
adjust the temperature using numbers
on the right side while °F or °C is
flashing.
OPERATION
OVEN
15
OPERATION
OVEN
3. For cooking time, press the 'Cook Time'
key once. Enter the cooking time using
numbers on the right keypad while Cook
and Time are flashing.
•
Once the cooking time is set, Cook and
Time symbols will appear on the display
continuously.
4. If cooking function, temperature and
time values are suitable, press Start to
begin cooking. Cooking starts and “ON”
appears on the display. The oven will
be heated up to the preset temperature
and will maintain this temperature
until the end of the cooking time you
selected.
i
After the cooking is completed, the
oven will give an audible warning.
i
To stop the alarm signal, just touch any
key.
DELAY COOKING TIME
SELECTION
•In this operation mode you can set delay
cooking time.
•
Put your meal into the oven and close
the oven door.
1. Select the desired oven function. (for
example: Bake) A default temperature
will also be displayed.
2. If you want to change the temperature
adjust the temperature using the
numbers on the right side while °F or °C
is flashing.
3. For setting the start time, press the
'Start Time' key once. Enter the time of
day you wish the program to start.
4. Press “Cook Time” key once to set the
cooking time. Enter how long you wish
program to last, using the numbers
on the right while Cook and Time are
flashing.
5. To start the delay time cooking program
press the ''Start'' key. Once you press the
start key the clock will display the start
time and the words ''Start Time'' for 5
seconds.Then it will display current time
with the word ''Waiting'' and the light
above the start key will be blinking.
i
If you want to cancel the program
simply press the “Clear/Off” key.
KEYLOCK (ACTIVATING)
•Key lock is activated by pressing 0-Key
Lock key amongst the numbers on the
right of display for approximately 3
seconds.
KEYLOCK (DEACTIVATING)
•Key Lock is deactivated by pressing
0-Key Lock key amongst the numbers on
the right of display for approximately 3
seconds.
•Oven keys are not functional when the
key lock function is activated. Key lock will
not be canceled in case of power failure.
16
COOKING TIPS
Baking
• Use dark-colored or -enamel coated
cookware to improve heat transfer.
• Use rack space efficiently.
• When cooking one item, place item in the
middle of the rack.
• Select the preferred rack position before
the oven starts heating. Do not change
rack position when oven is hot.
• DO NOT broil with the door open.
Roasting
• Seasoning with lemon juice and
black pepper will improve the cooking
performance when cooking a whole
chicken, turkey, or large piece of meat.
• Roasting meat with bones takes about
15 to 30 minutes longer than roasting
meat with bones removed.
• Estimate 4 to 5 minutes of cooking time
per centimeter height of meat.
• Fish should be cooked on the middle or
lower rack positions during roasting.
Broiling
• Broiling is ideal for cooking meat, fish
and poultry and will achieve a nice brown
surface without drying out. Flat pieces,
meat skewers, sausages, and vegetables
with high water content are particularly
suited for broiling.
• Distribute pieces directly on the wire
shelf. Place pan underneath to catch the
drippings. Add water to the drip pan for
easy cleaning.
Cooking Vegetables
• Cook vegetables in a pan with a lid to
keep them from running out of liquid
and drying out.
• Boil vegetables before cooking in the
oven to make sure they cook fully.
Rack Positions
• The oven racks can easily be removed
and/or rearranged to fit your cooking
needs. There are four rack positions, and
rack position 1 is the bottom most rack
position.
• For best results with conventional
baking, do not use more than one rack
at a time. If the use of two racks is
required during conventional baking, it is
recommended to leave one rack empty
in between the two racks in use.
• For optimal broiling coverage, it is
recommended to position the cooking
vessel closest to the oven door just out
of contact with the glass. Placing the
cooking vessel towards the rear of the
oven will reduce broiling coverage.
OPERATION
OVEN

17
Convection Bake
i
For best results, preheat oven when
using bake mode.
i
Heat radiates from the bake
element, situated at the bottom of
the oven cavity. while the convection
fan circulates the heat throughout
the oven. Convection bake mode
can be used to cook a variety of
food items, from cakes to breads.
i
Convection bake mode is also ideal
for sponge cakes, pastries, and
biscuits cooking. Position items
toward the rear of the top racks
and toward the front of lower racks.
Ensure 1 in. (25 mm) to 1.5 in. (38
mm) of space is between item and
oven walls.
i
Baking time will vary with the size,
shape, and material of the pan used.
• To use this mode, after placing food in
the oven in an appropriate cookware,
press the “Convection Bake” key,
enter the desired temperature with
the numeric touchpad, and press the
Start key. To cancel the cycle, press
the “Clear Off” key.
OPERATION
OVEN
OVEN FUNCTION MODES
Bake
i
For best results, preheat oven when
using bake mode.
i
Heat radiates from the bake
element, situated at the bottom of
the oven cavity. The bake mode can
be used for a variety of food items,
from cakes to casseroles.
i
Bake food on a single rack with
items positioned in the middle of
the rack. Ensure 1 in. (25 mm) to
1.5 in. (38 mm) of space is between
item and oven walls.
i
Baking time will vary with the size,
shape, and material of the pan
used.
• To use this mode, after placing
food in the oven in an appropriate
cookware, press the “Bake” key, enter
the desired temperature with the
numeric touchpad, and press the
Start key. To cancel the cycle, press
the “Clear/Off” key.
i
If you set the temperature below
500 F in Bake mode, the booster
will work automatically. If you want
to operate the Bake mode with a
temperature above 501 F, you need
to activate the booster manually.
18
OPERATION
OVEN
Broil
i
For best results, preheat oven for 5 to
6 minutes when using the broil mode.
Turn items once while cooking. Broiling
time will vary based on size, weight,
thickness, starting temperature, and
personal preference of doneness.
i
Heat radiates from the broil element,
situated at the top of the oven cavity.
Broil mode can be used to cook small
cuts and flat pieces of meat, poultry,
and fish. Broil mode can also be used
to brown breads and other foods.
i
Broil items on a single rack using a
broiler pan positioned under the broil
element.
i
The broil mode has three settings:
Low 350°F (175°C)
Mid 450°F (230°C)
High 550°F (290°C)
• To use this mode, after placing food in
the oven in an appropriate cookware,
press the “Broil” key, enter the desired
temperature with the numeric touchpad,
and press the Start key. To cancel the
cycle, press the “Clear Off” key.
Convection Broil
i
For best results, preheat oven for 5 to
6 minutes when using the convection
broil mode. Turn items once while
cooking. Broiling time will vary based
on size, weight, thickness, starting
temperature, and personal preference
of doneness.
i
Heat radiates from the broil element,
situated at the top of the oven cavity.
The convection fan circulates heat
throughout the oven. Convection broil
mode can be used to cook several
small cuts and flat pieces of meat,
poultry, and fish. Convection broil
mode can also be used to brown
breads and other foods.
• Broil items on a single rack using a
broiler pan positioned under the broil
element.
i
The convection broil mode has three
settings:
Low 350°F (175°C)
Mid 450°F (230°C)
High 550°F (290°C)
• To use this mode, after placing food in
the oven in an appropriate cookware,
press the “Convection Broil” key, enter
the desired temperature with the
numeric touchpad, and press the Start
key. To cancel the cycle, press the “Clear
Off” key.
Roast
i
For best results, preheat oven when
using roast mode.
i
Roast items on a single rack using
a roasting tray or broiler pan, and
position in the middle of the rack.
i
You can use a lid or roasting bags
in this mode. Follow manufacturer’s
directions for the roasting bag.
• To use this mode, after placing food in
the oven in an appropriate cookware,
press the “Roast” key, enter the desired
temperature with the numeric touchpad,
and press the Start key. To cancel the
cycle, press the “Clear Off” key.
Convection Roast
i
For best results, preheat oven when
using convection roast mode.
i
Heat radiates from the bake and
broil elements. The convection fan
circulates heat throughout the oven.
The roast mode can be used for
large cuts of meat and poultry or to
roast several items at the same time.
Convection roast mode can be used

19
OPERATION
OVEN
to reduce roast times while keeping the
item moist and tender. Roast items on
a single rack using a roasting tray or
broiler pan, and position in the middle
of the rack.
i
DO NOT cover meat or use roasting
bags in this mode.
• To use this mode, after placing food in
the oven in an appropriate cookware,
press the Convection Roast” key, enter
the desired temperature with the
numeric touchpad, and press the Start
key. To cancel the cycle, press the “Clear
Off” key.
Pizza
i
This oven function is available by
pressing “More Functions” on the
touchpad until the function illuminates
on the display.
i
For best results, preheat oven and
cook pizza on pizza pan or baking tray
positioned in the center of the rack.
Follow the manufacturer’s directions if
using a pizza stone.
i
You can use a lid or roasting bags
in this mode. Follow manufacturer’s
directions for the roasting bag.
i
Heat radiates from the bake element.
The convection fan circulates heat
throughout the oven. Pizza mode can
be used for fresh or frozen pizza. Follow
manufacturer’s directions for frozen
pizza.
Prime Turkey
i
This oven function is available by
pressing “More Functions” on the
touchpad until the function illuminates
on the display.
i
For best results, preheat oven when
using prime turkey mode.
i
Heat radiates from bake and broil
elements. The convection fan circulates
heat throughout the oven. The prime
turkey mode can be used to cook a
whole or partial turkey.
i
Cook turkey on roasting tray or broiler
pan positioned in the center of the
rack.
i
DO NOT cover meat or use roasting
bags in this mode.
Boost
i
Use the booster function (rapid
preheating) to bring the oven to the
desired temperature faster. After a
cooking function is set, press the
'' Boost '' touchpad to turn the booster
on or off. The “Boost” indicator will
illuminate when it is activated. The
indicator will turn dark when the
booster is not active.
i
Booster cannot be selected in Warm
Keep, Sabbath, Bread proof and Self
Clean.
i
If you set the temperature below 500
F in Bake mode, the booster will work
automatically. If you want to operate
the Bake mode with a temperature
above 501 F, you need to activate the
booster manually.
Sabbath
i
This oven function is available by
pressing “More Functions” on the
touchpad until the function illuminates
on the display.
i
Heat radiates from the bake element
only.
• Cook food on a single rack with items
positioned in the middle of the rack.
Ensure 1 in. (25 mm) to 1.5 in. (38 mm)
of space is between item and oven
walls.
• To use this mode, after placing food in
the oven in an appropriate cookware,
press the ''More Functions” key, until
the function illuminates on the display
enter the desired temperature with the
numeric keypad, and press the Start key.
To cancel the cycle, press the “Clear Off”
key.

20
OPERATION
OVEN
• Temperature must be between 125°F
(50°C) to 450°F (230°C).
• Oven temperature cannot be changed
after Sabbath mode starts. Oven lights
are disabled during Sabbath mode.
Audible alarms are disabled during
Sabbath mode.
• To turn off Sabbath mode, press “Clear/
Off” and “Light” simultaneously on the
touchpad for 2 seconds. Touching
“Clear/Off” on the touchpad will turn the
heating elements off, but will not change
the appearance of the display.
• Maximum time for Sabbath mode is 72
hours.
Bread Proof
i
Only bottom heat is on. The bread proof
mode can be used leavening of the
bread and pizza dough or other yeast
dough.
i
Use a bowl or a pan with lid or cover.
Proof dough on a single rack with bowl
or a pan is positioned in the middle of
the oven. No preheat is necessary.
Warm Keep
i
Always preheat oven and start with hot
food when using the warm keep mode.
i
Heat radiates from the bake element,
situated at the bottom of the oven
cavity. The warm keep mode will keep
hot foods at serving temperature.
Bacteria can grow rapidly in food
between 40°F (4,5°C) and 140°F (60°C).
For best results, do not warm food
longer than 1 hour. The warm keep
mode has three settings:
Low 150°F (65°C)
Mid 170°F (75°C)
High 200°F (95°C)
• Use the following table for
recommended warm keep settings:
Temperature
Setting
Food Type
Low Soft rolls, chips, empty
dinner burners
Mid Casseroles,
pizza,vegetables, eggs,
pastries, biscuits, hard
rolls, gravies
High Roasts,poultry,
hamburgers,bacon,
baked potatoes
Warming Drawer
!
Warning: The warming drawer will keep
hot, cooked foods at serving temperature.
Always start with hot food. Cold or room
temperature foods cannot be heated or
warmed in the warming drawer (except
crisping crackers, chips, dry cereal).
Bacteria will grow very rapidly in food that
in between 40 and 140°F. Always preheat
the warming drawer before warming
food. Do not heat food for more than 2
hours. The warming drawer has three
settings:
Low 150°F (65°C)
Mid 170°F (75°C)
High 200°F (95°C)
Use the following table for recommended
warm keep settings:
Temperature
Setting
Food Type
Low Soft rolls, chips, empty dinner
plates
Mid Casseroles, pizza,vegetables,
eggs, pastries, biscuits, hard
rolls, gravies
High Roasts,poultry,
hamburgers,bacon,
baked potatoes
!
Caution: Put the cooked food in heat-safe
serving dish on the rack in the warming
21
OPERATION
OVEN
drawer.Remove serving spoons etc.
before placing dishes in the warming
drawer.
!
Caution: Place the wire shelf that you
use for oven turning upside down, in the
warming drawer.
• Push 'Warming Drawer' ,then push Bake,
flashes 'Warming Drawer' on display
and will start in 'Low' level. Choose the
1(low), 2(Mid) or 3(High) on display.
!
Warning: Use care when opening the
drawer. Open the drawer a little and
let hot air or steam escape before
removing or replacing food. Hot air or
steam that escapes can cause burns to
hands, face and/or eyes.
!
Warning: Do not store any material in
the warming drawer/storage heavier
than 20 lb.
•
Slide open the drawer until it stops from
the middle of drawer shown above.
AirFry
!
Warning: Airfry accessories should
only be used with the airfry function.
When the Airfry accessory is used
with functions where the oven burners
work (bake, convection bake, roast,
convection roast, etc.), oil falling off the
accessory may cause smoke and fire
in the oven due to the heat.
i
The AirFry mode is designed to
produce foods with a crispier exterior
than traditional oven cooking.
i
The AirFry mode is intended for single
rack cooking only. Select AirFry, then
input the desired set temperature and
press Start. The temperature can be
set between 125°F and 550°F.
i
Rack position 3 is recommended most
foods. Use rack position 2 for thicker
foods.
i
Foods may cook faster than expected
if the oven is already hot when food is
placed in the oven.
i
If foods are browning too quickly, try a
lower rack position or lower oven set
temperature.
i
Rack position 3 is recommended most
foods. Use rack position 2 for thicker
foods.

22
OPERATION
OVEN
i
Place a proper size(larger than AirFry
tray) baking sheet or tray on the rack
below the AirFry tray to catch any
drippings from food. This will help to
reduce splatter and smoke.If you dont
use tray to catch oil, oil can causing a
fire hazard or poor oven performance.
!
Caution: Foods high in fat will smoke
when using the AirFry mode. For best
results, follow these recommendations
when air frying foods that are high
in fat, such as chicken wings, bacon,
sausage, hot dogs, turkey legs, lamb
chops, ribs, pork loin, duck, or some
plantbased proteins.
!
Caution: Never cover slots, holes, or
passages in the oven bottom or cover
entire racks with materials such as
aluminum foil.
Doing so blocks airflow through the
oven and can result in carbon monoxide
poisoning. Aluminum foil can also trap
heat, causing a fire hazard or poor oven
performance.
!
Caution:Turn on your exhaust hood
at a high fan setting before you start
AirFry and leave it on for 15 minutes
after you're done.
• Clean the grease filters on your
exhaust hood regularly.
• Keep the oven free from grease
buildup. Wipedown the interior of the
oven before and after airfrying.
!
Warning: Accessible parts may
become hot during use. Make sure it is
cold enough to clean.
AIRFRY COOK GUIDE
Food
Cooking
Mode
Oven Temp.
Rack
Position
Time
(min.)
Recommended amount
Homemade
potato*
AirFry
430°F (220°C)
4 35 … 45 200-1400 g
Frozen potato AirFry
430°F (220°C)
4 30 … 40 200-1400 g
Chicken leg/
wing
AirFry
430°F (220°C)
4 40 … 50 500-1500 g
Chicken breast AirFry
430°F (220°C)
4 30 … 40 200-700 g
Frozen nugget AirFry
430°F (220°C)
4 15 … 25 400-1000 g
Meatball AirFry
430°F (220°C)
3 20 … 30 20-25 pieces
Whole fish AirFry
430°F (220°C)
3 30 … 40 2-5 pieces
Frozen crunchy
fish
(fish fingers)
AirFry
430°F (220°C)
3 15 … 25 500-1500 g
Frozen pastry AirFry
430°F (220°C)
3 25 … 35 200-800 g (10-40 pieces)
Frozen pizza AirFry
430°F (220°C)
3 10 … 20 2-4 pieces
Sausage AirFry
430°F (220°C)
3 15 … 25 10-20 pieces
i
*Hold the potatoes in water for 30 minutes, dry and add ¼ to 1 tablespoon of oil.
i
Place a baking sheet or tray on the rack position 1 to catch any drippings from food.
This will help to reduce splatter and smoke.
i
For best results, preheat oven when using AirFry mode.

23
OPERATION
OVEN
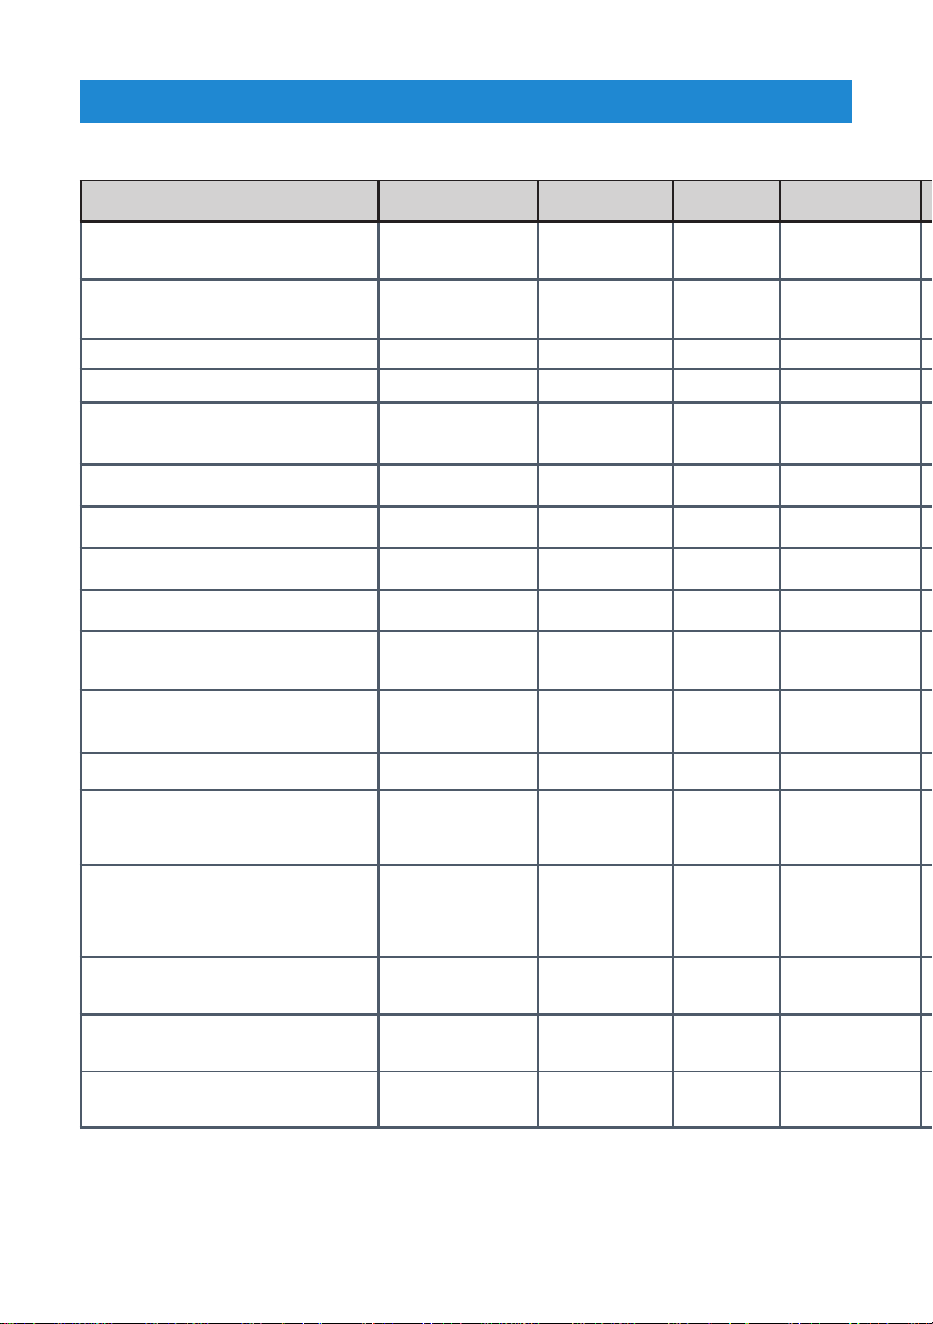
Oven Functions Table
Function
Temperature
Recommended Maximum Minimum
Bake 350°F (175°C) 550°F (290°C) 125°F (50°C)
Convection Bake 300°F (150°C) 550°F (290°C) 125°F (50°C)
Roast 375°F (190°C) 550°F (290°C) 125°F (50°C)
Convection Roast 375°F (190°C) 550°F (290°C) 125°F (50°C)
Broil 350°F (175°C) 550°F (290°C) 350°F (175°C)
Convection Broil 350°F (175°C) 550°F (290°C) 350°F (175°C)
Pizza 425°F (220°C) 550°F (290°C) 125°F (50°C)
Sabbath 350°F (175°C) 450°F (230°C) 125°F (50°C)
Warm Keep 150°F (65°C) 200°F (95°C) 150°F (65°C)
Prime Turkey 325°F (165°C) 550°F (290°C) 125°F (50°C)
Bread Proof 100°F (40°C) 125°F (50°C) 100°F (40°C)
AirFry 430°F (220°C) 550°F (290°C) 125°F (50°C)
Warming Drawer *150°F (65°C) LOW *200°F (95°C) HIGH *150°F (65°C) LOW
Self Clean 5 Hours 3 Hours
i
The warming drawer has only three options to set. (LOW-MID-HIGH)
24
OPERATION
SUGGESTED BAKE/ROAST TIMES CHART
Food Cooking Mode Oven Temp.
Number of
Racks
Rack Position Time(min.)
Pan Size and
Type
Explanation
Sponge cake Bake 350
°F (
175
°C)
Single 4 25 - 35
8" (200mm) or 9"
(230mm) round
The cakes are positioned in the middle of the oven. Bake foods with
1" (25 mm) - 1.5" (38 mm) space between pans and oven wall.
Sponge cake Convection Bake 300
°F (
150
°C)
Multiple 3 and 5 25 - 35
8" (200mm) or 9"
(230mm) round
The cakes are positioned with the top rack cakes toward the rear of the
oven and lower rack cakes towards front of the oven door. Bake foods
with 1" (25 mm) - 1.5" (38 mm) space between pans and oven wall.
Loaf (leavened) Bake 400
°F (
205
°C)
Single 4 40 - 50 Baking tray
Loaf (leavened) Convection Bake 400
°F (
205
°C)
Single 3 35 - 45 Baking tray
Puff pastry Convection Bake 375
°F (
190
°C)
Multiple 3 and 5 25 - 35 Cookie sheet
The sheets are positioned with the top rack sheet toward the rear of
the oven and lower rack sheet towards the oven door. Bake foods with
1" (25 mm) - 1.5" (38 mm) space between pans and oven wall.
Fresh pizza, thin Pizza 425
°F (
220
°C)
Single 2 8 - 15
Pizza pan or
baking tray
Fresh pizza, thick Pizza 425
°F (
220
°C)
Single 2 12 - 20
Pizza pan or
baking tray
Frozen pizza, thick Pizza 425
°F (
220
°C)
Single 2 10 - 15
Pizza pan or
baking tray
Chicken, whole (4-5 lb) Convection Roast 375
°F (
190
°C)
Single 3 80 - 120
Roasting pan or
broiler tray
Minimum internal temperature is 180°F (85°C) in thigh.
Turkey, whole, unstuffed (18-20 lb) Convection Roast 325
°F (
160
°C)
Single 1 200 - 240 Roasting pan
Minimum internal temperature is 180°F (85°C) in thigh. Foil the top
surface of turkey to prevent browning in last 30 minutes of cooking, if
necessary.
Sirloin, boneless (4-4.5 lb) Convection Roast 325
°F (
160
°C)
Single 3 55 - 70 Broiler tray
Internal temperature is 145°F (62°C) for medium-rare, 160°F (71°C) for
medium.
Toast bread Broil High Single 5 2 - 2:30 Broiler tray Place broiler tray centrally located under broil element.
Chicken thigh (2-2.5 lb) Broil High Single 4
Side 1:
16 - 20
Side 2: 8 - 12
Broiler tray
Place broiler tray centrally located under broil element. Minimum
internal
temperature is 180°F (82°C) in thigh.
Chicken thigh (2-2.5 lb) Broil Mid Single 4
Side 1:
20 - 24
Side 2:
14 - 16
Broiler tray
Place broiler tray centrally located under broil element. Minimum
internal
temperature is 180°F (82°C) in thigh.
Ground beef, (0.3" - 0.5" thick,
6 patties)
Broil High Single 4
Side 1: 5 - 7
Side 2: 3 - 5
Broiler tray Place broiler tray centrally located under broil element.
Hamburger, frozen
(0.3" - 0.5" thick, 6 patties)
Broil High Single 4
Side 1: 7 - 10
Side 2: 2 - 4
Broiler tray Place broiler tray centrally located under broil element.
Leavening Bread Proof 100/40 Single 3
30-40
Bowl or pan with
cover
25
OPERATION
SUGGESTED BAKE/ROAST TIMES CHART
Food Cooking Mode Oven Temp.
Number of
Racks
Rack Position Time(min.)
Pan Size and
Type
Explanation
Sponge cake Bake 350
°F (
175
°C)
Single 4 25 - 35
8" (200mm) or 9"
(230mm) round
The cakes are positioned in the middle of the oven. Bake foods with
1" (25 mm) - 1.5" (38 mm) space between pans and oven wall.
Sponge cake Convection Bake 300
°F (
150
°C)
Multiple 3 and 5 25 - 35
8" (200mm) or 9"
(230mm) round
The cakes are positioned with the top rack cakes toward the rear of the
oven and lower rack cakes towards front of the oven door. Bake foods
with 1" (25 mm) - 1.5" (38 mm) space between pans and oven wall.
Loaf (leavened) Bake 400
°F (
205
°C)
Single 4 40 - 50 Baking tray
Loaf (leavened) Convection Bake 400
°F (
205
°C)
Single 3 35 - 45 Baking tray
Puff pastry Convection Bake 375
°F (
190
°C)
Multiple 3 and 5 25 - 35 Cookie sheet
The sheets are positioned with the top rack sheet toward the rear of
the oven and lower rack sheet towards the oven door. Bake foods with
1" (25 mm) - 1.5" (38 mm) space between pans and oven wall.
Fresh pizza, thin Pizza 425
°F (
220
°C)
Single 2 8 - 15
Pizza pan or
baking tray
Fresh pizza, thick Pizza 425
°F (
220
°C)
Single 2 12 - 20
Pizza pan or
baking tray
Frozen pizza, thick Pizza 425
°F (
220
°C)
Single 2 10 - 15
Pizza pan or
baking tray
Chicken, whole (4-5 lb) Convection Roast 375
°F (
190
°C)
Single 3 80 - 120
Roasting pan or
broiler tray
Minimum internal temperature is 180°F (85°C) in thigh.
Turkey, whole, unstuffed (18-20 lb) Convection Roast 325
°F (
160
°C)
Single 1 200 - 240 Roasting pan
Minimum internal temperature is 180°F (85°C) in thigh. Foil the top
surface of turkey to prevent browning in last 30 minutes of cooking, if
necessary.
Sirloin, boneless (4-4.5 lb) Convection Roast 325
°F (
160
°C)
Single 3 55 - 70 Broiler tray
Internal temperature is 145°F (62°C) for medium-rare, 160°F (71°C) for
medium.
Toast bread Broil High Single 5 2 - 2:30 Broiler tray Place broiler tray centrally located under broil element.
Chicken thigh (2-2.5 lb) Broil High Single 4
Side 1:
16 - 20
Side 2: 8 - 12
Broiler tray
Place broiler tray centrally located under broil element. Minimum
internal
temperature is 180°F (82°C) in thigh.
Chicken thigh (2-2.5 lb) Broil Mid Single 4
Side 1:
20 - 24
Side 2:
14 - 16
Broiler tray
Place broiler tray centrally located under broil element. Minimum
internal
temperature is 180°F (82°C) in thigh.
Ground beef, (0.3" - 0.5" thick,
6 patties)
Broil High Single 4
Side 1: 5 - 7
Side 2: 3 - 5
Broiler tray Place broiler tray centrally located under broil element.
Hamburger, frozen
(0.3" - 0.5" thick, 6 patties)
Broil High Single 4
Side 1: 7 - 10
Side 2: 2 - 4
Broiler tray Place broiler tray centrally located under broil element.
Leavening Bread Proof 100/40 Single 3
30-40
Bowl or pan with
cover
26
SELF CLEANING FUNCTION
!
Warning: If the oven is hot, self cleaning
mode cannot be operated until the
oven is cold. If the self cleaning mod
malfunctions (power cut), turn the oven
off and disconnect the power supply,
and call the service.
!
Warning: Hot surfaces cause burns!
Do not touch the product during self
cleaning step and keep children away
from it. Keep at least 30 minutes before
removing the remnants.
!
Warning: The oven is equipped with
self-cleaning function. The oven is
heated to approx. 790 °F and existing
dirt is burned to ashes. A strong smoke
development may arise. Provide for
good ventilation.
• Clean the control panel and knobs with a
damp cloth and wipe them dry.
• The self-cleaning should be used after
approx. every 10th oven usage.The
self-cleaning has three levels. It can be
selected according to level of dirtiness.
1. Low level (Low): It takes 3 hours.
2. Medium Level (Mid): It takes 4 hours.
3. High Level (High): It takes 5 hours.
!
Warning: Remove all accessories from
the oven.
!
Warning: If the self-cleaning mode
malfunctions, turn the oven off and
disconnect the power supply. Have it
serviced by a qualified technician.
!
Warning: Before operating the self-
clean cycle, remove dirt from exterior
surfaces and oven interior with a damp
cloth, wipe grease and food soils from
the oven. Excessive amount of grease
may ignite, leading to smoke damage
to your home. Remove all accessories
from the oven.
!
Warning: Do not clean the door gasket.
Fiberglass gasket is highly sensitive
and can get damaged easily. In case
of a damage on the oven door gasket,
replace with the new one from the
authorized service.
!
Caution:
Before the self-cleaning cycle,
remove dirt from exterior surfaces and
oven interior with a damp cloth.
1. Press ''Self Clean'' on the touchpad.
2. Set the desired level by pressing the
keypad.
3. Confirm the by pressing '' Start '' on the
touchpad and it begins.
4. If there is a fire in the oven during self-
clean, turn the oven off and wait for
the fire to go out. Do not force the door
open. Introduction of fresh air at self-
clean temperatures may led to a burst
of flame from the oven. Failure to follow
this instruction may result in severe
burns.
!
Warning: The health of some birds and
pets is extremely sensitive to the fumes
given off during the Self-Cleaning cycle.
Always move birds and pets to another
closed and well ventilated room. Keep
the kitchen well-ventilated during the
Self-Cleaning cycle also for your health.
CARE AND MAINTENANCE
27
CARE AND MAINTENANCE
!
Caution: During the Self-Cleaning cycle,
the electrical flow to hob burners will
be cut. After turning the function and
thermostat knob to off position, the
door lock will be automatically opened.
When the oven gets cool , the electrical
flow to hob burners will be started.
i
During the Self-Cleaning cycle, the lamp
cannot be operated.
CLEANING OVEN DOOR
• To clean the oven door, use warm water
with washing liquid, a soft cloth or
sponge to clean the product and wipe it
with a dry cloth.
i
Don't use any harsh abrasive cleaners
or sharp metal scrapers for cleaning
the oven door. They could scratch the
surface and destroy the glass.
Removing the oven door
• When removing the oven door, make
sure oven is cool and power to the oven
has been turned off before removing the
door.
!
Warning: Failure to do so could result in
electrical shock or burns.
• The oven door is heavy and parts of it
are fragile. Use both hands to remove
the oven door. The door front is glass.
Handle carefully to avoid breakage.
• Grasp only the sides of the oven door. Do
notgrasp the handle as it may swing in
your hand and cause damage or injury.
!
Warning: Failure to grasp the oven
door firmly and properly could result in
personal injury or product damage.
• To avoid injury from hinge bracket
snapping closed, be sure that both levers
are securely in place before removing the
door. Also, do not
force door open or closed the hinge could
be damaged and injury could result.
• Do not lay removed door on sharp or
pointed objects as this could break the
glass. Lay on a flat, smooth surface,
positioned so that the door cannot fall
over.
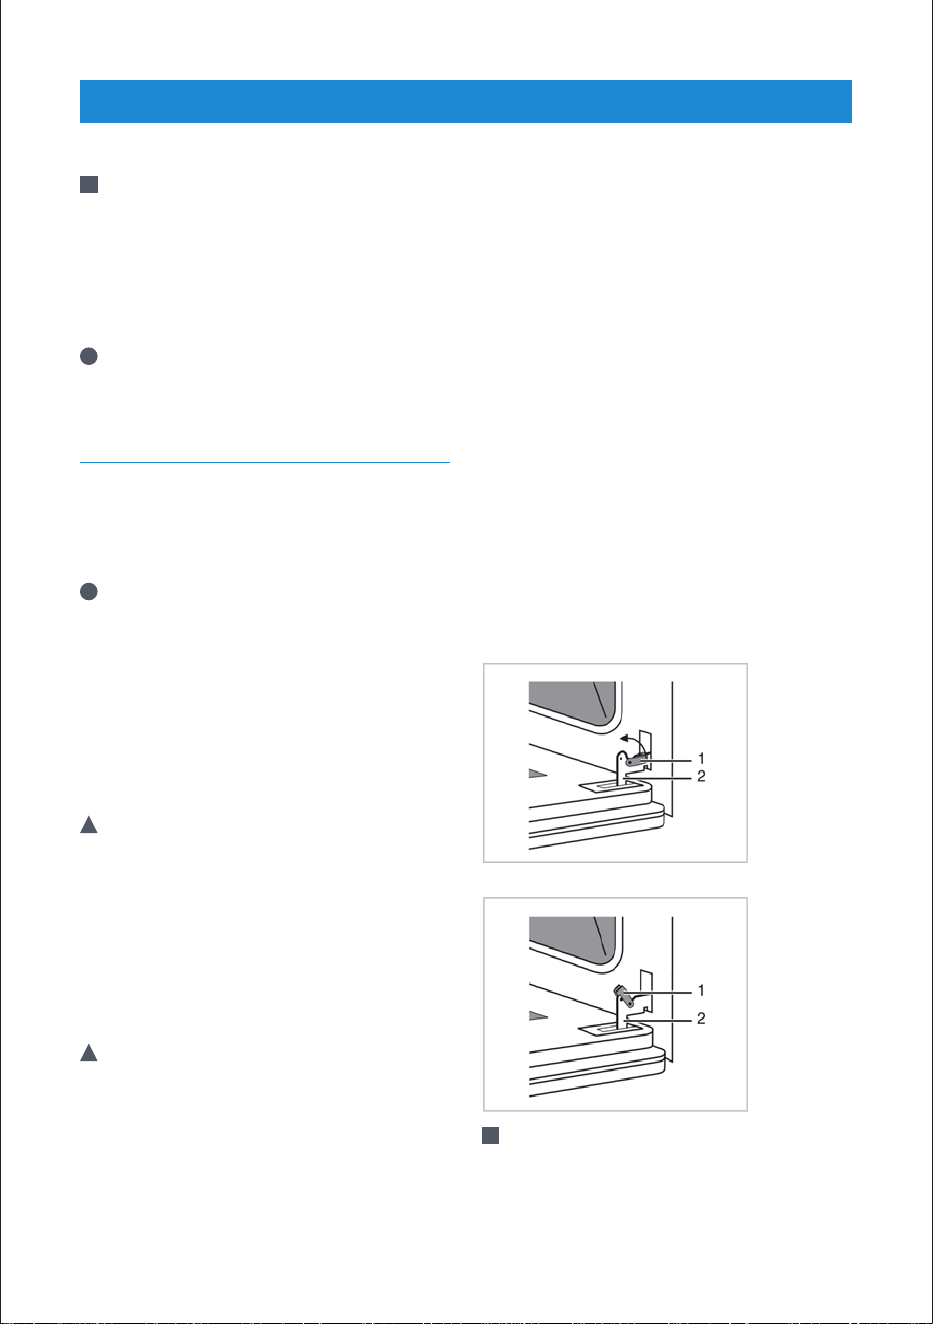
• Oven door can be removed in order to
clean the inside of oven easily.
1. Open the oven door completely.
2. Press the hinge clamps located at both
sides of the door backwards.
3. Move the oven door to a slightly inclined
position.
4. Raise the oven door forwards with your
two hands.
5. Once you complete cleaning, perform
the same procedure in reverse order to
reinstall the oven door.
1. Hinge Clamps 2. Hinge
!
Caution: Once you complete cleaning,
perform the same procedure in reverse
order to reinstall the oven door.

28
CARE AND MAINTENANCE
REPLACING THE OVEN LAMP
!
Warning: Hot surfaces cause burns!
Before replacing the oven lamp, make
sure that the product is disconnected
from mains and cooled down in order
to avoid the risk of an electrical shock.
!
Caution: The oven lamp is a special
electric light bulb that can resist up
to 300°C (573 °F). See Technical
specifications. for details. Oven lamps
can be obtained from Authorised
Service Agents or technician with
license.
!
Caution: Position of lamp might vary
from the figure.
• The oven lights can be illuminated with
lamp button. The lights are switched
on when the door is opened or when
the oven is in a cooking cycle. The oven
lights are not illuminated during self
clean. Each light assembly consist of a
removable lens, a light bulb as well as a
light socket housing that is fixed in place.
Light bulb replacement is considered to
be a routine maintenance item.
!
Caution: In this oven, an incandescent
lamp with a power of less than 40 W, a
height of less than 60 mm, a diameter
of less than 30 mm or a halogen lamp
with socket type G9, a power of less
than 60 W is used. The lamps are
suitable for operation at temperatures
above 300 °C. Oven lamps can be
obtained from Authorised Service
Agents or technician with licence.This
product contains a lamp of energy
class G.
!
Caution: The lamp used in this
appliance is not suitable for household
room illumination. The intended
purpose of this lamp is to assist the
user to see food stuffs.
1. Turn off power at the main power
supply (your fuse or breaker box)..
2. Turn the glass cover counter clockwise
to remove it. (See Cleaning the oven.)
3. Remove the protective glass cover with
a screwdriver
4. Pull out oven lamp and replace it with
new one.
5. Install the glass cover and then the wire
racks.

29
TROUBLESHOOTING
!
Warning: Consult your Authorized
Service Agent or the dealer where
you purchased the product if the
instruction above do not remedy
your issue. Never attempt to repair a
defective product yourself.
OVEN EMITS STEAM WHEN IN
USE
• Steam escaping during operation is
normal. >>>No corrective action needed.
METALLIC NOISES EMITTED
DURING HEATING AND
COOLING
• Metal parts expand during temperature
change. >>>No corrective action needed.
PRODUCT DOES NOT OPERATE
• Defective or tripped main fuse or circuit
breaker. >>>Reset fuse or breaker. If
defective, have an electrician replace the
circuit breaker.
• Key lock enabled. >>>Disable key lock,
see Operation.
OVEN LIGHTS DO NOT TURN
ON
• Defective oven light bulb. >>>Replace
bulb.
• Defective or tripped main fuse or circuit
breaker. >>>Reset fuse or breaker. If
defective, have an electrician replace the
circuit breaker.
OVEN DOES NOT HEAT
• Function and/or temperature not set.
>>>Set function and/or temperature.
• Time not set. >>>Set the time.
• Defective or tripped main fuse or circuit
breakerl. >>>Reset fuse or breaker. If
defective, have an electrician replace the
circuit breaker.
CLOCK DISPLAY BLINKING OR
CLOCK SYMBOL ON
• Power outage occurred. >>>Set oven
time, see Settings.

30
Full 2 year warranty from date of
first installation*
Beko will repair or replace at no cost to the
consumer any defective parts of the range if used
under normal household conditions. Cosmetic
defects must be reported within 10 business days
from installation.
Limited 2 year ++ warranty from
date of first installation* (parts
only)
Beko will repair or replace any parts at no cost to
the consumer if material defects or workmanship
have caused the damage or failure of these
components.
* Installation date shall refer to either purchase date or 5 business days after delivery of the product to the home,
whichever is later.
DISCLAIMERS OF WARRANTIES AND EXCLUSIONS
Warranty is void if the product is used commercially (e.g., bed + breakfast, nursing home
etc.).
Service must also be performed by an authorized Beko service agency. Warranty does
not cover service costs by an authorized service agent to correct installation, electrical
problems or educational instruction on the use of the range.
The warranty also does not cover defects or damage caused by an act of God (such as
storms, floods, fires, mudslides, etc.), damage cause by use of the for purposes other
than those for which it was designed, misuse, abuse, accident, alteration, improper
installation, maintenance, travel fees, service calls outside normal service hours, pick up
and delivery, any food loss due to product failure, unauthorized service work or work.
This product is fully tested and went through official quality assurance inspections
before leaving the original manufacturing site. Warranty terms for this Beko household
appliance is not valid if the product is altered, tampered, modified, additional parts
assembled, fixed and re-packed by an authorized distributor, servicer, a third party
The warranties provided by Beko in these statements only apply to Beko ranges sold
to the original purchaser or homeowner in the US and Canada. The warranty is not
transferable. To obtain warranty service, please contact our nearest distributor as
listed by state and province. You will need your range model number, serial number,
retailer name and address, where purchased and purchase date / installation date. This
warranty gives you specific legal rights, and you may also have other rights which vary
from state to state. Also, please make sure you register your product for warranty at
www.beko.us.
WARRANTY AND SERVICE

31
retailer, reseller or by any other unauthorized person(s).
TO THE EXTENT PERMITTED BY LAW, THIS WARRANTY IS IN LIEU OF ALL OTHER
EXPRESSED AND IMPLIED WARRANTIES, INCLUDING THE IMPLIED WARRANTIES OF
MERCHANTABILITY AND FITNESS FOR A PARTICULAR PURPOSE. BEKO UNDERTAKES
NO RESPONSIBILITY FOR THE QUALITY OF THIS PRODUCT EXCEPT AS OTHERWISE
PROVIDED IN THIS WARRANTY STATEMENT. BEKO ASSUMES NO RESPONSIBILITY
THAT THE PRODUCT WILL BE FIT FOR ANY PARTICULAR PURPOSE FOR WHICH
YOU MAY BE BUYING THIS PRODUCT, EXCEPT AS OTHERWISE PROVIDED IN THIS
WARRANTY STATEMENT.
Beko does not assume any responsibility for incidental or consequential damages.
Such damages include, but are not limited to, loss of profits, loss of savings or revenue,
loss of use of the range or any associated equipment, cost of capital, cost of any
substitute equipment, facilities or services, downtime, the claims of third parties, and
injury to property. Some states do not allow the exclusion or limitation of incidental or
consequential damages, so the above limitations or exclusion may not apply to you.
No Other Warranties. This Warranty Statement is the complete and exclusive warranty
from the manufacturer. No employee of Beko or any other party is authorized to make
any warranty statements in addition to those made in this Warranty Statement.
Please keep this warranty card, owners manual and your sales slip for future reference.
SERVICE
Please contact your local authorized Beko dealer, or call our Toll Free Customer Hotline
number at 1-888-352 BEKO (2356) for direction to an Authorized Beko Service Agent or
contact via http://www.beko.us. You can also look up for authorized dealer list at “Where
To Buy” section at the website for further reference.
WARRANTY AND SERVICE

1-888-352 BEKO (2356)
beko.com/us-en
©2022 Beko U.S., Inc. All rights reserved.