
Loading ...
Loading ...
Loading ...
8 WB26BCI STRAIGHT SHAFT TRIMMER & BRUSH CUTTER
SPECIFICATIONS
All specifi .gnitnirp fo emit eht ta elbaliava noitamrofni tcudorp tsetal eht no desab era snoitac
We reserve the right to make changes at any time without notice.
ASSEMBLY
When assembling this machine, please follow the instructions for assembly steps.
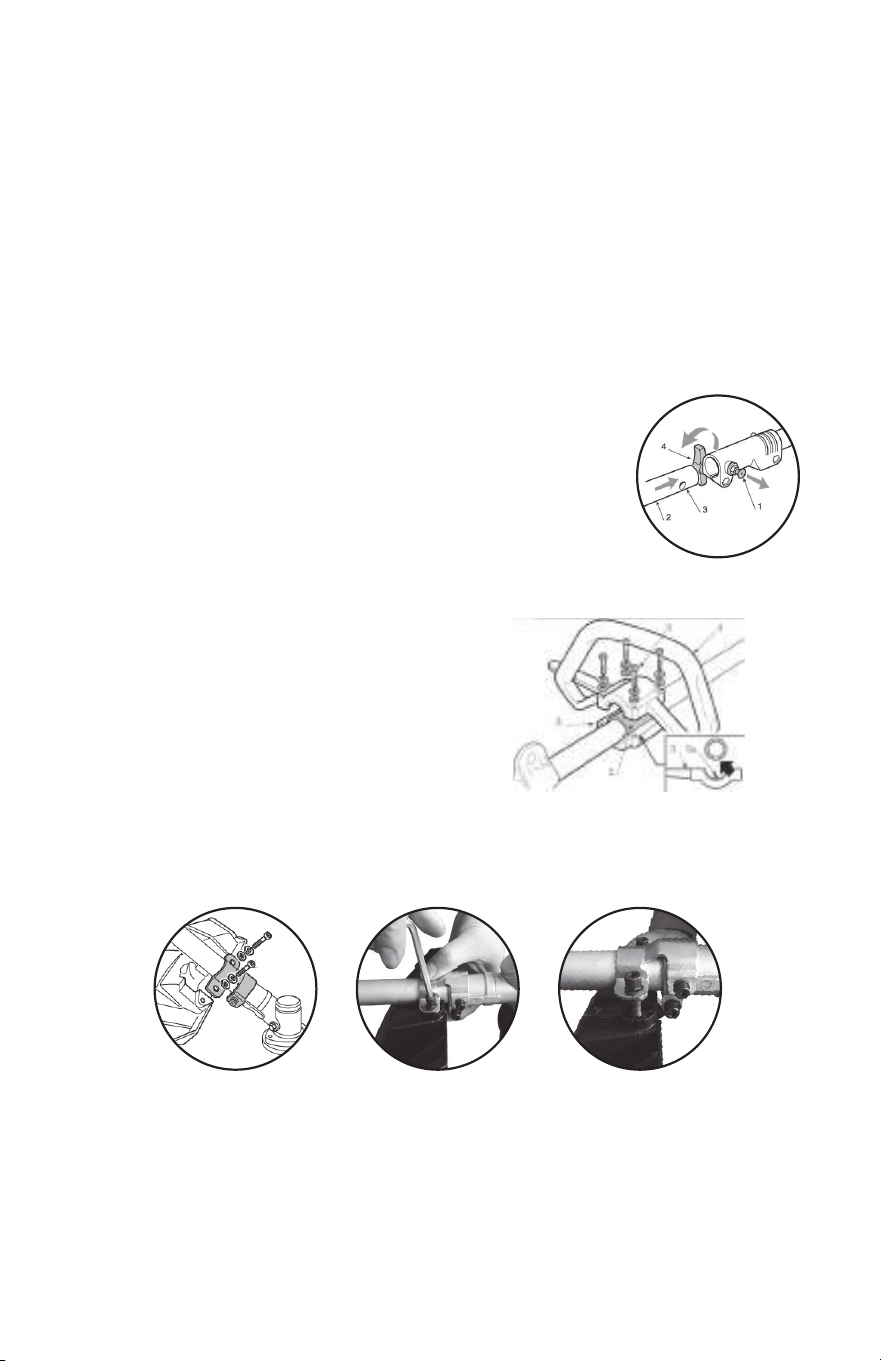
1. Connecting the upper and lower shafts:
Remove the rubber shaft plug and cap. Pull up the spring-loaded pin
(1) and push the lower shaft (2) into the aluminum coupler until the
spring loaded pin (1) clicks into the hole (3) of the aluminum coupler.
Once the spring-loaded pin is completely inserted, tighten the coupler
knob (4).
2. Attaching the handle:
3. Attaching the blade guard:
Attach the guard using the hex key included. The guard is attached to the lower shaft with two hex
screws facing the operator.
Warning! Use only original manufacturer’s replacement parts, accessories and attachments. Failure
to do so can cause poor performance, possible injury and may void your warranty. Never use the
trimmer without the guard securely attached!
Model name . . . . . . . . . . . . . . . .WB26BCI
Engine type. . . . . . . . . . Air-Cooled, 2-Cycle
Engine displacement . . . . . 25.4cc (1.52 cu. in.)
Rated motor power . . . . . . . . . . 0.7kw
Lubrication . . . . . . . . . . . . Fuel/Oil Mixture
Fuel/Oil ratio. . . . . . . . . . . . . . . . . . . 50:1
Volumes of fuel tank . . . . . . . . 20 oz. (600ml)
Trimmer mechanism . . . . . . . . . Bump Head
Cutting path diameter . . . . . . .16.9in (430mm)
Trimming line. . . . . . . . . . . 0.095 in. (2.4mm)
Max. engine speed (with cutting
attachment, no-load) . . . . . . . . . . 10500/min
- Fit the sleeve (2) and the lower part (3) with guard,
placing the pin (3a) in one of the three holes on the
drive tube.
- Fit the front handgrip (4) by using the screws (5).
- Before tightening the screw (4), align the handgrip
correctly with respect to the drive tube.
- Fully tighten the screw (5).
Loading ...
Loading ...
Loading ...