Loading ...
Loading ...
Loading ...

4
GB
Index
Welcome ...................................................................4
Important assembly information ..............................4
Before you start ������������������������������������������������������������������������������ 4
Description illustration A ���������������������������������������������������������������� 4
Use............................................................................4
Adjusting the Dip Horn ������������������������������������������������������������������4
Cleaning and maintenance ........................................4
Defects and malfunctions ���������������������������������������������������������������4
Additional information �������������������������������������������������������������������5
Disclaimer .................................................................5
Welcome
Welcome to the world of Tunturi!
Thank you for purchasing this piece of Tunturi equipment�
Tunturi offers a wide range of home fitness equipment, including
crosstrainers, treadmills, exercise bikes, rowers, strength benches and
multi stations� The Tunturi equipment is suitable for the entire family,
no matter what fitness level� For more information, please visit our
website www�tunturi�com
Important Safety Instructions
The RC20 Pro Power Rack - Dip Horn� is an accessory for the RC20
Cross Fit Rack-Base Rack and cannot be used as a stand-alone trainer
or station� We therefore refer to RC20 Cross Fit Rack-Base Rack
manual for safety and warranty information as you cannot find in this
assembly manual�
You can download the User manual for the RC20 Cross Fit Rack-Base
Rack from our website at all times�
The Owner’s Manual is an essential part of your training equipment:
reading all instructions in this manual before you start using this
appliance� The following precautions must always be followed:
Important assembly information
Before you start
We recommend to use two adjustable wrenches to assemble your
product� If you have metric sized wrenches in correct size this is fine
too�
‼ NOTE
• Suitable adjustable wrenches are “NOT” provided with the
product, neither included in the assembly kit�
• It is strongly recommended that this equipment is assembled by
two or more people to avoid possible injury�
- Ensure Carriage Bolts are inserted through the SQUARE holes on
components that need to be assembled� Attach washer only to end
of the Carriage Bolt�
- Use Allen Bolts or Hex Bolts inserted through the ROUND hole on
components that need to be assembled�
- Always wait until all bolts are assembled onto the bench before
tightening the bolts�
Description illustration A
The illustrations shows you in the correct following order how to
assembly your trainer best�
‼ NOTE
• Part numbers shown in the assembly steps are commencing
with the spare part drawing that can be found in the online full
version user manual�
⚠ WARNING
• Assemble the equipment in the given order�
Use
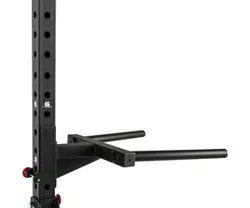
Adjusting the Dip Horn
Fig. Assembly step #1 & #2
The suitable height for the Dip Horn is at the height where you feel
comfortable doing your workout�
- Pull out the Magnetic pin and turn out the 2 plum bolts and take
them out�
- Pull the Dip Horn 90 degrees upwards and pull it out of the upright
tube�
- Place the Dip Horn in your required position on the upright tube,
and turn it back in a vertical position again�
- Fit the 2 plum bolt and fit the magnetic pin back again to secure
the fixture�
‼ NOTE
• It is recommended to locate the Dip Horn at a location where it
feels comfortable to use�
Cleaning and maintenance
- Inspect and tighten all parts before using the equipment�
- The equipment can be cleaned using a damp cloth and mild non-
abrasive detergent� DO NOT use solvents�
- Examine the equipment regularly for signs of damages or wear�
- Replace any defective components immediately and/or keep the
equipment out of use until repair�
- Failure to examine regularly may affect the safety level of the
equipment�
Defects and malfunctions
Despite continuous quality control, defects and malfunctions caused
by individual parts can occur in the equipment� In most cases, it will
be sufficient to replace the defective part�
- If the equipment does not function properly, immediately contact
the dealer�
- Provide the model number and the serial number of the equipment
to the dealer�
- State the nature of the problem, conditions of use and purchase
date�
Loading ...
Loading ...
Loading ...