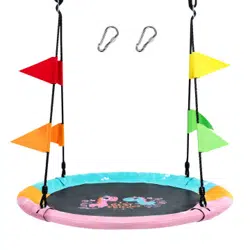

NP11173CL
THIS INSTRUCTION BOOKLET CONTAINS IMPORTANT SAFETY INFORMATION. PLEASE READ AND KEEP FOR FUTURE REFERENCE.
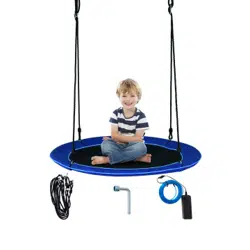
Saucer Swing with LED Light / Nestschaukel /
Balançoire Nid d’Oiseau /
Columpio de Platillo / Altalena a Piattino /
Huśtawka ogrodowa typu bocianie gniazdo
If you're having difficulty, our friendly
customer team is always here to help.
AUS:cs.au@costway.com
FRA:cs.fr@costway.com
DEU:cs.de@costway.com
I T A :cs.i t @costway.com ESP:cs.es@costway.com
POL:sklep@costway.com
GBR:cs.uk@costway.com
DEU office: FDS GmbH, Neuer Höltigbaum 36, 22143 Hamburg, Deutschland
ITA office: Milano
FRA office: Saint Vigor d'Ymonville
POL office: GdańskGBR office: IpswichAUS office: TruganinaUSA office: Fontana
02 03
The product must be installed and used under the supervision of an adult.
Read through each step carefully and follow the proper order.
Remove all packaging, separate and count all parts and hardware.
Please ensure that all parts are correctly installed, incorrect installation can lead to a
danger.
We recommend that, where possible, all items are assembled near the area in which
they will be placed in use, to avoid moving the product unnecessarily once assembled.
Ensure a secure surface during installation, and place the product always on a flat,
steady and stable surface.
Please check and maintain it regularly, and the most important part needs to be
suspended, fixed, or anchored to the ground.
Attention: For home use only.
Attention: Children should use this product under the parental supervision.
Danger: Keep all small parts and packaging materials for this product away from
babies and children, otherwise they may pose a choking hazard.
Danger: Lack of attachment may cause a risk of tipping or falling hazard.
Allgemeine Achtung
Before You Start Bevor Sie beginnen
Achtung! Nur für den Hausgebrauch.
Warnung: Kinder sollten diesen Artikel unter elterlicher Aufsicht benutzen.
Warnung: Halten Sie alle Kleinteile und Verpackungsmaterialien, die verschluckt werden
können, von Babys und Kindern fern.
Warnung: Unsachgemäße Montage kann zu Kippgefahr führen.
Bitte sorgfältig lesen und zum späteren Nachschlagen aufbewahren.Please read all instructions carefully and keep it for future reference.
EN DE
General Warnings
Warnings Achtung!
Der Artikel muss unter der Aufsicht eines Erwachsenen montiert und benutzt werden.
Lesen Sie jeden Schritt sorgfältig durch und befolgen Sie die richtige Reihenfolge.
Entfernen Sie alle Verpackungen, Überprüfen Sie, ob alle Teile und Zubehörteile
vorhanden sind.
Bitte stellen Sie sicher, dass alle Teile richtig montiert sind, eine falsche Montage kann zu
einer Gefahr führen.
Wir empfehlen, alle Teile möglichst in der Nähe des Aufstellungsortes zu montieren, um
unnötige Bewegungen nach der Montage zu vermeiden.
Achten Sie bei der Montage auf einen sicheren Untergrund und stellen Sie den Artikel
immer auf eine ebene, feste und stabile Fläche.
Bitte überprüfen und warten Sie regelmäßig die wichtigsten Teile zur Aufhängung,
Befestigung, Verankerung am Boden.

04 05
Atención: Solo para uso doméstico.
Atención: Los niños deben utilizar este producto bajo la supervisión de sus padres.
Peligro: Mantenga todas las piezas pequeñas y los materiales de embalaje de este producto
fuera del alcance de los bebés y los niños, ya que de lo contrario pueden suponer un peligro
de asfixia.
Peligro: La falta de fijación puede provocar un riesgo de vuelco o de caída.
Attention : Pour l'usage domestique seulement.
Attention : Les enfants doivent utiliser ce produit sous la surveillance de leurs parents.
Danger : Gardez toutes les petites pièces et les matériaux d'emballage de ce produit hors
de portée des bébés et des enfants pour éviter un risque d'étouffement.
Danger : La manque de la fixation pourrait entraîner un risque de basculement ou de chute.
Avant de Commencer
Veuillez lire attentivement toutes les instructions et les conserver pour la référence ultérieure.
Antes de Empezar
Lea atentamente todas las instrucciones y consérvelas para futuras consultas.
FR ES
Avertissements Généraux Advertencias Generales
Avertissements Advertencias
Le produit doit être installé et utilisé sous la surveillance d'un adulte.
Lisez attentivement chaque étape et suivez l'ordre correct.
Retirez tous les emballages, séparez et comptez toutes les pièces et le matériel.
Veuillez vous assurer que toutes les pièces soient correctement installées, une
installation incorrecte peut entraîner un danger.
Nous recommandons que, dans la mesure du possible, tous les articles soient
assemblés à proximité de la zone dans laquelle ils seront utilisés, afin d'éviter de
déplacer inutilement le produit une fois assemblé.
Assurez-vous que la surface soit solide pendant l'assemblage et placez toujours le
produit sur une surface plane et stable.
Veuillez vérifier et entretenir régulièrement les pièces les plus importantes pour la
suspension, la fixation, l'ancrage au sol.
El producto debe instalarse y usarse bajo la supervisión de un adulto.
Lea detenidamente cada paso y siga el orden correcto.
Quite todo el embalaje, separe y cuente todas las piezas y los accesorios.
Asegúrese de que todas las piezas estén instaladas correctamente, una instalación
incorrecta puede provocar un peligro.
Recomendamos que, siempre que sea posible, todos los elementos se monten cerca de
la zona en la que se van a utilizar, para evitar mover el producto innecesariamente una
vez montado.
Asegure una superficie segura durante el montaje, y coloque el producto siempre sobre
una superficie plana, firme y estable.
Por favor, revise y mantenga el producto regularmente, y las piezas más importantes
deben estar suspendidas, fijadas o ancladas bien al suelo.

06 07
Produkt musi być złożony i używany pod nadzorem osoby dorosłej.
Przeczytaj uważnie każdy krok i postępuj we właściwej kolejności.
Usuń opakowanie i upewnij się, że zestaw zawiera wszystkie części i elementy
montażowe.
Upewnij się, że wszystkie części są poprawnie połączone, nieprawidłowa instalacja
może prowadzić do wypadku.
Zalecamy, aby w miarę możliwości wszystkie elementy były montowane w pobliżu
miejsca, w którym będą używane, aby uniknąć niepotrzebnego przenoszenia produktu
po złożeniu.
Zapewnij bezpieczną przestrzeń roboczą podczas montażu i upewnij się, że produkt
znajduje się na płaskiej i stabilnej powierzchni.
Należy regularnie sprawdzać i konserwować najważniejsze części produktu takie jak
mocowania czy zakotwiczenie do podłoża.
Il prodotto deve essere installato e utilizzato sotto la supervisione di un adulto.
Leggere attentamente ogni passo e seguire l'ordine corretto.
Rimuovere tutti gli imballaggi, separare e contare tutte le parti e tutti gli accessori.
Si prega di assicurarsi che tutte le parti siano installate correttamente, un'installazione
errata può portare a un pericolo.
Si consiglia, ove possibile, di montare tutti gli articoli vicino alla zona in cui verranno posti
in uso, per evitare di spostare inutilmente il prodotto una volta assemblato.
Garantire una superficie sicura durante il montaggio e posizionare il prodotto sempre su
una superficie piana, stabile.
Si prega di controllare e manutenere regolarmente, le parti più importanti per la
sospensione, il fissaggio, l'ancoraggio a terra.
Attenzione: solo per uso domestico.
Attenzione: I bambini devono usare questo prodotto sotto la supervisione dei genitori.
Pericolo: Tenere tutte le piccole parti e i materiali di imballaggio di questo prodotto lontano
da neonati e bambini, altrimenti potrebbero rappresentare un rischio di soffocamento.
Pericolo: La mancanza di accessorio può causare un rischio di ribaltamento.
Prima di Iniziare Zanim Zaczniesz
Przeczytaj uważnie wszystkie instrukcje i zachowaj je na przyszłość.Si prega di leggere attentamente tutte le istruzioni e conservarle per riferimento futuro.
PLIT
Avvertenze Generali Ogólne ostrzeżenia
Uwaga: Produkt wyłącznie do użytku domowego
Uwaga: Dzieci moga używać tego produktu jedynie pod nadzorem dorosłych.
Niebezpieczeństwo: Trzymaj wszystkie małe części i opakowania tego produktu z dala od
niemowląt i dzieci - w przeciwnym razie mogą stwarzać ryzyko zadławienia.
Niebezpieczeństwo: Brak mocowania może spowodować ryzyko przewrócenia lub
upadku.
Avvertenza Uwaga

IMPORTANT
READ AND FOLLOW ALL SAFETY INFORMATION AND
INSTRUCTIONS, KEEP FOR FUTURE REFERENCE
ESSENTIAL INFORMATION
- Recommended for children 3+ years
- Do not leave child unattended while in use
- CAUTION: Use only under adult supervision
- Good safety practices should be followed at all times
- Read all instruction before using this product.
Intended solely for family and domestic use, not for a commercial
playground or daycare. Two adults needed for assembly.
Hanging hardware not included. Ideally, the swing body should be hung
over grass, sand, wood chips, or other soft surfaces. Under no
circumstances should it be hung over concrete, asphalt, or other hard
surfaces. Distance from ground should not exceed 40cm; the maximum
fall height should not be more than 46cm, Two S hooks are attached to
the rope to allow for adjustment of the rope length.
Please be sure to examine the ropes regularly to check for wear. Rope
will, in time, degrade. If the color of the rope has become pale, frays
easily, or gives off a powdery material when rubbed between the fingers,
we recommend you replace the rope.
Equipment should be hung in such a way that a distance of at least 2m is
clear on either side. Can be hung on an A-frame or swing set or on a tree
limb of a diameter of at least 25cm.
EN EN
WARNING! CHOKING HAZARD-SMALL PARTS, NOT FOR
CHILDREN UNDER 3 YEARS.
WARNING! DO NOT USE WITHOUT ADULT SUPERVISION!
WARNING! ADULT ASSEMBLING REQUIRED!
WARNING! NOT SUITABLE FOR CHILDREN UNDER 36
MONTHS OLD DUE TO LONG
CORDS. STRANGULATION HAZARD. DANGER OF FALLING.
WARNING! Small parts for assembly by an
adult.
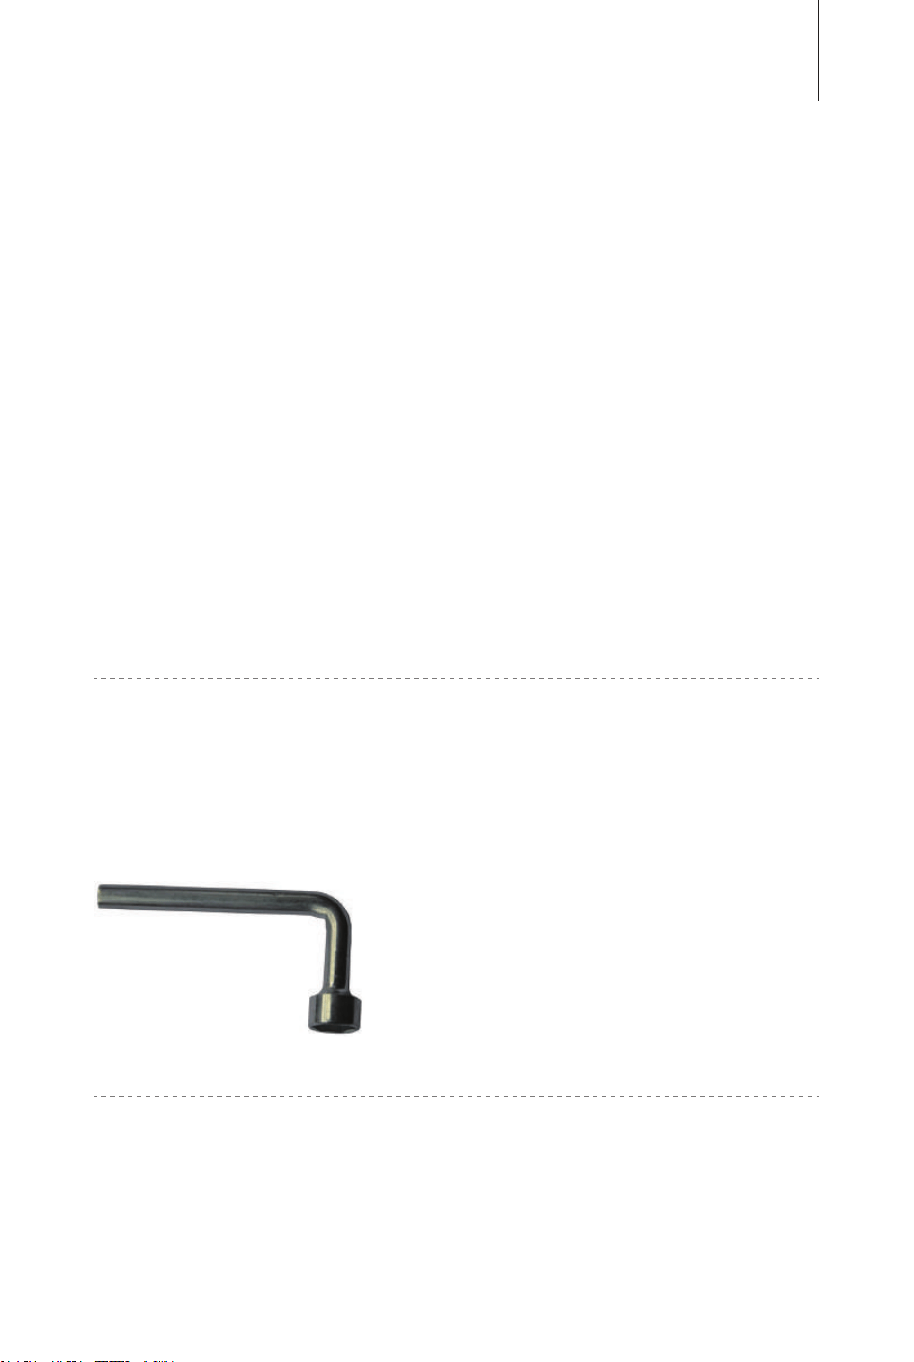
Tools Required (included in the packaging)
08 09
IMPORTANT
READ AND FOLLOW ALL SAFETY INFORMATION AND
INSTRUCTIONS, KEEP FOR FUTURE REFERENCE
ESSENTIAL INFORMATION
- Recommended for children 3+ years
- Do not leave child unattended while in use
- CAUTION: Use only under adult supervision
- Good safety practices should be followed at all times
- Read all instruction before using this product.
Intended solely for family and domestic use, not for a commercial
playground or daycare. Two adults needed for assembly.
Hanging hardware not included. Ideally, the swing body should be hung
over grass, sand, wood chips, or other soft surfaces. Under no
circumstances should it be hung over concrete, asphalt, or other hard
surfaces. Distance from ground should not exceed 40cm; the maximum
fall height should not be more than 46cm, Two S hooks are attached to
the rope to allow for adjustment of the rope length.
Please be sure to examine the ropes regularly to check for wear. Rope
will, in time, degrade. If the color of the rope has become pale, frays
easily, or gives off a powdery material when rubbed between the fingers,
we recommend you replace the rope.
Equipment should be hung in such a way that a distance of at least 2m is
clear on either side. Can be hung on an A-frame or swing set or on a tree
limb of a diameter of at least 25cm.
EN EN
WARNING! CHOKING HAZARD-SMALL PARTS, NOT FOR
CHILDREN UNDER 3 YEARS.
WARNING! DO NOT USE WITHOUT ADULT SUPERVISION!
WARNING! ADULT ASSEMBLING REQUIRED!
WARNING! NOT SUITABLE FOR CHILDREN UNDER 36
MONTHS OLD DUE TO LONG
CORDS. STRANGULATION HAZARD. DANGER OF FALLING.
WARNING! Small parts for assembly by an
adult.
Tools Required (included in the packaging)
08 09

EN EN
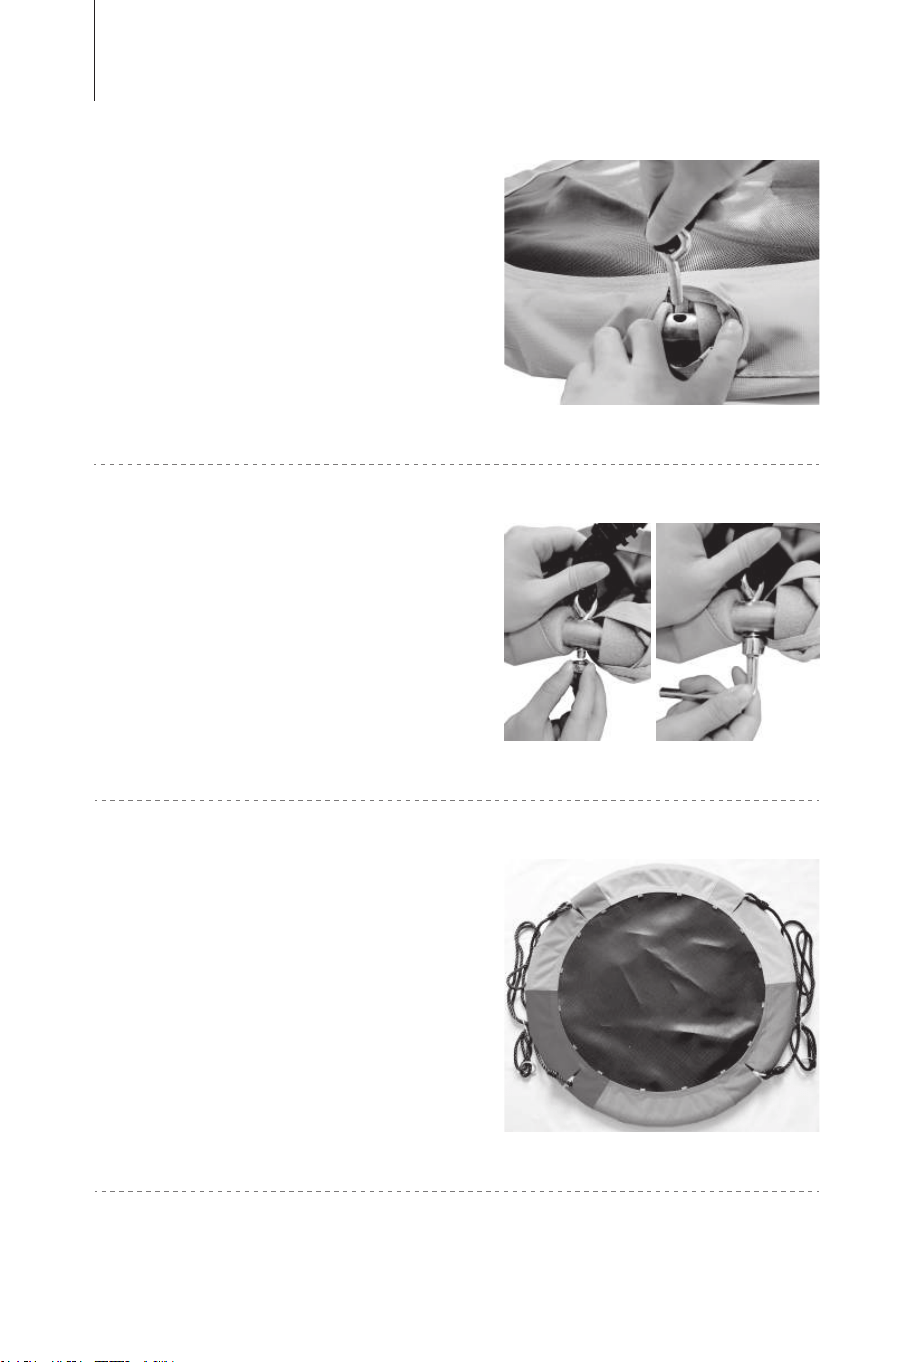
Swing Assembling
1.
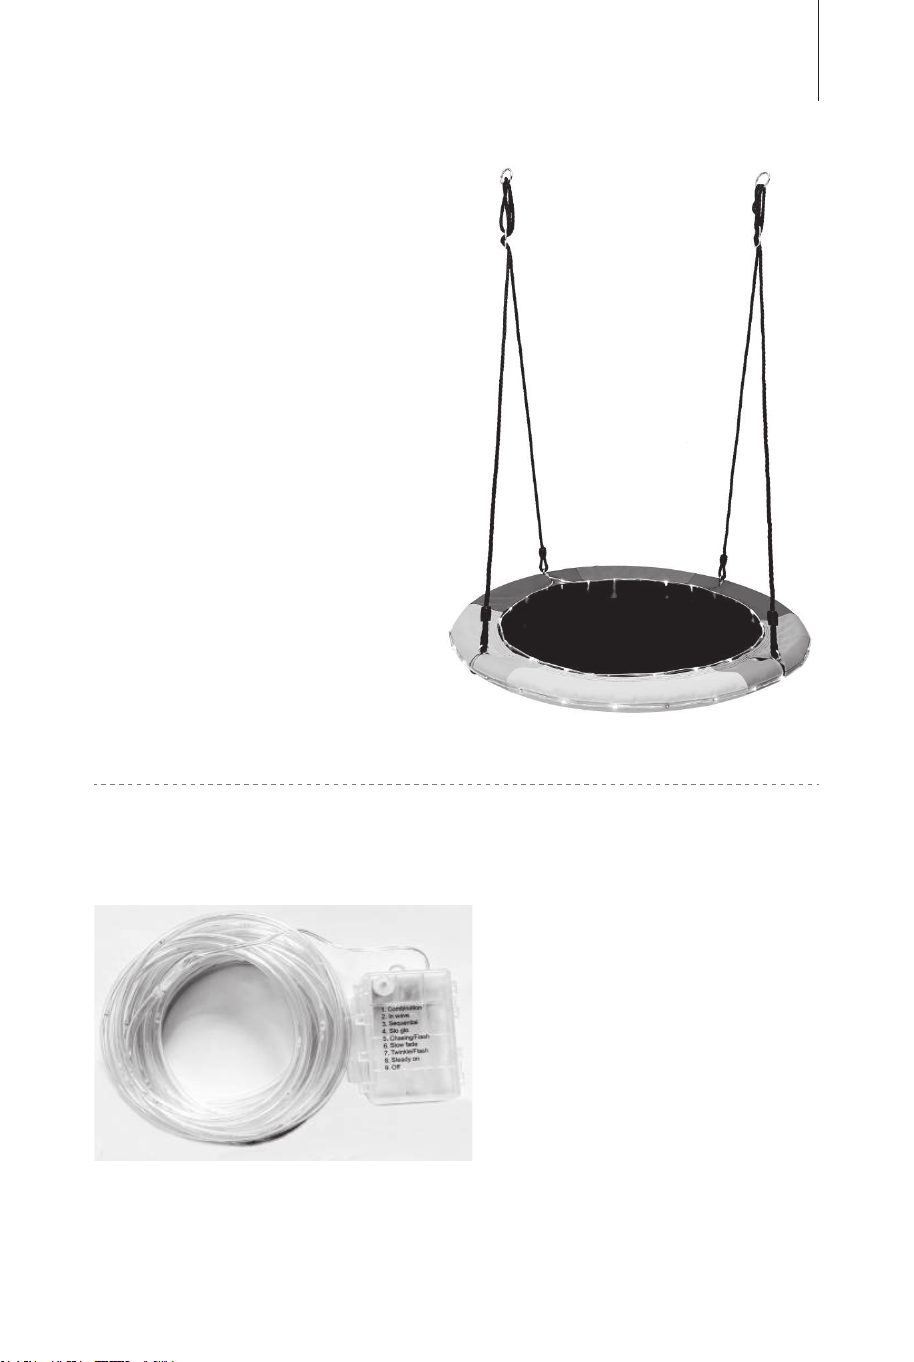
Swing arrives in 4pcs tubes,
2 hanging ropes, a string light,
and a swinging body for
assembly.
2. Insert the tube with foam into
the sleeve.
3. Insert the 2nd tube into the
sleeve; connect two tubes by
small socket to big socket.
Repeat it until all the tubes
connected to form a circle.
4. Insert the screw bolt into the
holes of frame tube. Make sure
the holes are aligned.
5. Fix it by washer and nut, use
wrench to tighten it.
6. Repeat above steps to
secure all the hanging ropes.
10 11

EN EN
Swing Assembling
1.
Swing arrives in 4pcs tubes,
2 hanging ropes, a string light,
and a swinging body for
assembly.
2. Insert the tube with foam into
the sleeve.
3. Insert the 2nd tube into the
sleeve; connect two tubes by
small socket to big socket.
Repeat it until all the tubes
connected to form a circle.
4. Insert the screw bolt into the
holes of frame tube. Make sure
the holes are aligned.
5. Fix it by washer and nut, use
wrench to tighten it.
6. Repeat above steps to
secure all the hanging ropes.
10 11

EN EN
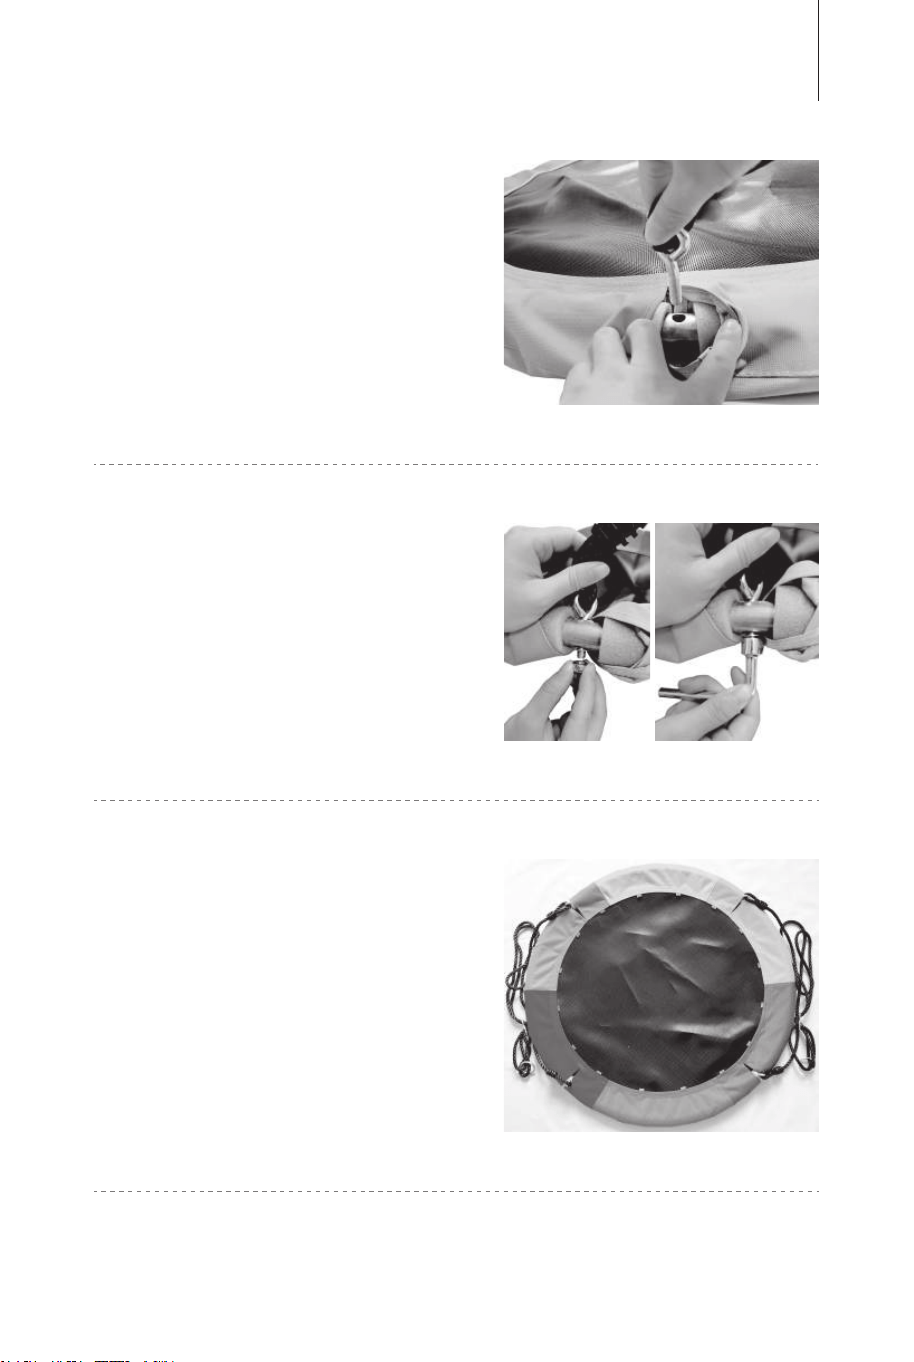
9. When the outer ring has
been threaded, pass the wire
through the gap between two
sleeves from bottom to top.
10. Now it begins to pull the
wire through inner ring.
11. When the inner ring has
been threaded, you can tuck the
extra wire into the sleeve.
8. Put the wire through the
hoses one by one which are
fixed onto the seating
mat.
Straighten the wire for easy
threading.
7. Find the bag underneath the seating mat, and put the battery box into
it, here is the starting point to pull the wire.
Thread through the OUTER ring before the INNER ring in clockwise
direction.
12 13

EN EN
9. When the outer ring has
been threaded, pass the wire
through the gap between two
sleeves from bottom to top.
10. Now it begins to pull the
wire through inner ring.
11. When the inner ring has
been threaded, you can tuck the
extra wire into the sleeve.
8. Put the wire through the
hoses one by one which are
fixed onto the seating
mat.
Straighten the wire for easy
threading.
7. Find the bag underneath the seating mat, and put the battery box into
it, here is the starting point to pull the wire.
Thread through the OUTER ring before the INNER ring in clockwise
direction.
12 13

12. Assembly finished.
You need insert 3pcs 1.5V AA
batteries.
Tips:
1) Keep batteries out of the reach of children.
2) Insert batteries of the same type only.
3) Check regularly that the batteries are not leaking.
4) Remove the batteries from the product if it is not in use for any length
of time.
5) Make sure that the polarity is correct when you insert the batteries.
EN EN
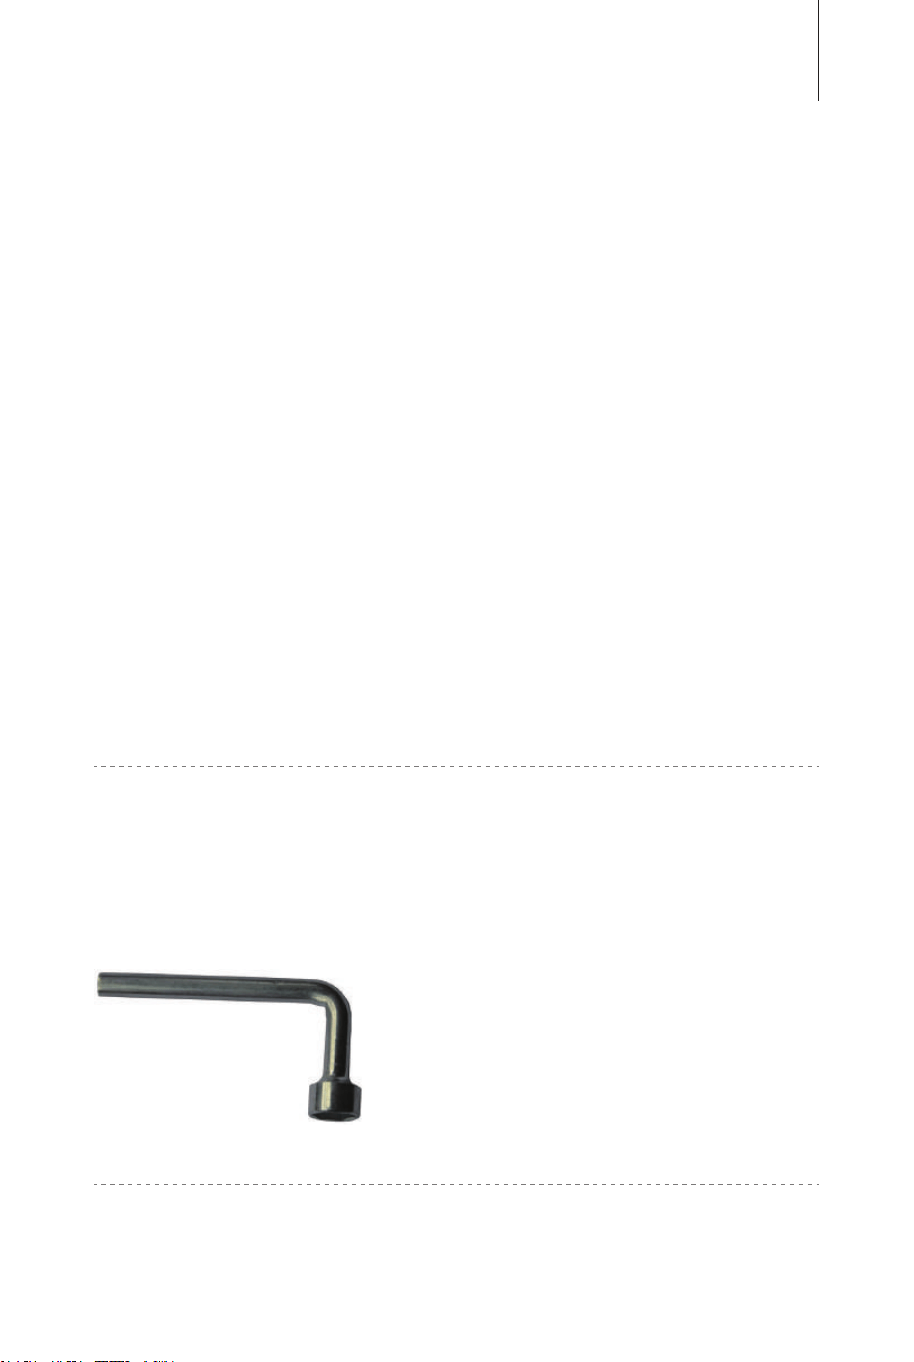
String Light (battery not included)
● The light is powered by 3pcs
1.5V AA batteries.
● Low heat emission and Safe
to touch.
● Switching 8 lighting modes.
Ensuring Safety of the Swing
Clearance distance should be 4m around the swing.
A fall onto a hard surface can result in serious injury to the equipment
user.
Do not use the equipment until properly installed.
This swing is not to be used in any other manner other than its intended
use. Adult supervision is required.
Adults should verify that the hanging ropes are secured and cannot be
looped back on the swing.
It is important for adults to instruct children to:
- Dress appropriately while using the swing (avoid ponchos, scarves, and
other loose-fitting clothing that is potentially hazardous)
- Sit in the center of the swing with full weight on the seat if swinging
alone
- Avoid swinging empty seats
14 15

12. Assembly finished.
You need insert 3pcs 1.5V AA
batteries.
Tips:
1) Keep batteries out of the reach of children.
2) Insert batteries of the same type only.
3) Check regularly that the batteries are not leaking.
4) Remove the batteries from the product if it is not in use for any length
of time.
5) Make sure that the polarity is correct when you insert the batteries.
EN EN
String Light (battery not included)
● The light is powered by 3pcs
1.5V AA batteries.
● Low heat emission and Safe
to touch.
● Switching 8 lighting modes.
Ensuring Safety of the Swing
Clearance distance should be 4m around the swing.
A fall onto a hard surface can result in serious injury to the equipment
user.
Do not use the equipment until properly installed.
This swing is not to be used in any other manner other than its intended
use. Adult supervision is required.
Adults should verify that the hanging ropes are secured and cannot be
looped back on the swing.
It is important for adults to instruct children to:
- Dress appropriately while using the swing (avoid ponchos, scarves, and
other loose-fitting clothing that is potentially hazardous)
- Sit in the center of the swing with full weight on the seat if swinging
alone
- Avoid swinging empty seats
14 15

WICHTIG
LESEN UND BEFOLGEN SIE ALLE SICHERHEITSINFORMATIONEN
UND ANWEISUNGEN, BEWAHREN SIE SIE FÜR SPÄTERES
NACHSCHLAGEN AUF
WICHTIGE INFORMATIONEN
- Empfohlen für Kinder ab 3 Jahren
- Lassen Sie das Kind während des Gebrauchs nicht unbeaufsichtigt
- ACHTUNG: Nur unter Aufsicht von Erwachsenen verwenden
- Gute Sicherheitspraktiken sollten jederzeit befolgt werden
- Lesen Sie alle Anweisungen, bevor Sie dieses Produkt verwenden.
Ausschließlich für den Familien- und Haushaltsgebrauch bestimmt, nicht
für einen kommerziellen Spielplatz oder eine Kindertagesstätte. Für den
Aufbau werden zwei Erwachsene benötigt.
ACHTUNG! ERSTICKUNGSGEFAHR-KLEINTEILE, NICHT FÜR
KINDER UNTER 3 JAHREN.
ACHTUNG! NICHT OHNE ERWACHSENE VERWENDEN!
ACHTUNG! MONTAGE VON ERWACHSENEN ERFORDERLICH!
ACHTUNG! NICHT GEEIGNET FÜR KINDER UNTER 36
MONATEN AUFGRUND LANGER SCHNÜRE.
STRANGULATIONSGEFAHR. STURZGEFAHR.
It is important for adults to instruct children NOT to
- Walk close to, in front of, behind, or between moving items
- Twist ropes or loop them over the top support bar since such action may
reduce the strength of the rope
- Get off the swing while it is in motion
- Climb on the swing when it is wet.
- Attach additional items to the swing that might cause a strangulation
hazard
- Wear a bicycle or sport helmet while on the swing
Maintaining the Swing
Inspection
At the beginning of the each play season, adults should:
- Tighten all hardware.
- Check all protective coverings on pipes, edges, and corners, Replace if
they are loose, cracked, or missing.
- Check all moving parts including swing seat, ropes for wear, rust, or
other deterioration, Replace as needed. The hardware used for this swing
(binding post, screw, M8 nut, S hook, lock washer, flat washer, and metal
ring) can be found at local hardware store.
Storing
- For the extended service life, it is better to take the swing set home and
store it in a clean and dry place.
EN DE
16 17

Hardware zum Aufhängen nicht enthalten. Idealerweise sollte der
Schaukelkörper über Gras, Sand, Holzspänen oder anderen weichen
Oberflächen aufgehängt werden. Unter keinen Umständen sollte es über
Beton, Asphalt oder anderen harten Oberflächen aufgehängt werden. Der
Abstand zum Boden sollte 40 cm nicht überschreiten; die maximale
Fallhöhe sollte nicht mehr als 46 cm betragen, Am Seil sind zwei
S-Haken angebracht, um die Seillänge anpassen zu können.
Bitte prüfen Sie die Seile regelmäßig auf Verschleiß. Das Seil wird sich
mit der Zeit verschlechtern. Wenn die Farbe des Seils blass geworden
ist, leicht ausfranst oder beim Reiben zwischen den Fingern ein pulvriges
Material abgibt, empfehlen wir, das Seil auszutauschen.
Geräte sollten so aufgehängt werden, dass auf beiden Seiten ein
Abstand von mindestens 2 m frei ist. Kann an einem A-Rahmen oder
einer Schaukel oder an einem Ast mit einem Durchmesser von
mindestens 25 cm aufgehängt werden.
ACHTUNG! Kleinteile zum Zusammenbauen
durch einen Erwachsenen.
Erforderliches Werkzeug (in der Verpackung enthalten)
Schaukelmontage
1.
Die Schaukel wird in 4
Rohren, 2 hängenden Seilen,
einer Lichterkette und einem
Schaukelkörper zur Montage
geliefert.
2. Stecken Sie die Rohre mit
Schaumstoff in die Hülse.
3. Setzen Sie das zweite Rohr
in die Hülse ein; Verbinden Sie
zwei Röhren durch eine kleine
Buchse mit einer großen
Buchse. Wiederholen Sie es, bis
alle Rohre verbunden sind, um
einen Kreis zu bilden.
DE DE
18 19

4. Setzen Sie die
Schraubenbolzen in die Löcher
des Rahmenrohrs ein. Stellen
Sie sicher, dass die Löcher
ausgerichtet sind.
5. Fixieren Sie es mit einer
Unterlegscheibe und einer
Mutter und ziehen Sie es mit
einem Schraubenschlüssel fest.
6. Wiederholen Sie die obigen
Schritte, um alle hängenden
Seile zu sichern.
8. Führen Sie den Draht
nacheinander durch die Rohre,
die an der Sitzmatte befestigt
sind.
Begradigen Sie den Draht für
einfaches Einfädeln.
7. Finden Sie die Tasche unter der Sitzmatte und legen Sie die
Batteriebox hinein, hier ist der Ausgangspunkt, um das Kabel zu ziehen.
Durch den ÄUSSEREN Ring vor dem INNEREN Ring im Uhrzeigersinn
fädeln.
DE DE
20 21

9. Wenn der Außenring
aufgefädelt ist, führen Sie den
Draht von unten nach oben
durch den Spalt zwischen zwei
Hülsen.
10. Jetzt beginnt es, den Draht
durch den Innenring zu ziehen.
11. Wenn der Innenring
eingefädelt ist, können Sie den
zusätzlichen Draht in die Hülse
stecken.
12. Montage abgeschlossen.
Sie müssen 3 Stück 1,5 V
AA-Batterien einlegen.
Lichterkette (Batterie nicht enthalten)
● Das Licht wird mit 3 Stück
1,5 V AA-Batterien betrieben.
● Geringe Wärmeabgabe und
berührungssicher.
● Umschalten von 8
Beleuchtungsmodi.
DE DE
22 23

Tipps:
1) Bewahren Sie Batterien außerhalb der Reichweite von Kindern auf.
2) Nur Batterien des gleichen Typs einlegen.
3) Kontrollieren Sie regelmäßig, dass die Batterien nicht auslaufen.
4) Entfernen Sie die Batterien aus dem Produkt, wenn es längere Zeit
nicht verwendet wird.
5) Achten Sie beim Einlegen der Batterien auf die richtige Polarität.
Gewährleistung der Sicherheit der
Schaukel
Der Sicherheitsabstand sollte 4 m um die Schaukel herum betragen.
Ein Sturz auf eine harte Oberfläche kann zu schweren Verletzungen des
Gerätebenutzers führen.
Verwenden Sie das Gerät erst, wenn es ordnungsgemäß installiert ist.
Diese Schaukel darf nicht zweckentfremdet verwendet werden. Aufsicht
durch Erwachsene ist erforderlich.
Erwachsene sollten sich vergewissern, dass die hängenden Seile
gesichert sind und nicht auf der Schaukel zurückgeschlauft werden
können.
Es ist wichtig, dass Erwachsene Kinder anweisen:
- Kleiden Sie sich angemessen, während Sie die Schaukel benutzen
(vermeiden Sie Ponchos, Schals und andere locker sitzende Kleidung,
die potenziell gefährlich ist)
- Setzen Sie sich in die Mitte der Schaukel mit vollem Gewicht auf dem
Sitz, wenn Sie alleine schaukeln
- Vermeiden Sie es, leere Sitze zu schwingen
Es ist wichtig, dass Erwachsene Kinder anweisen, dies NICHT zu tun
- Gehen Sie nah an, vor, hinter oder zwischen sich bewegenden
Gegenständen
- Seile verdrehen oder über die obere Stützstange legen, da dies die
Festigkeit des Seils verringern kann
- Steigen Sie von der Schaukel ab, während sie in Bewegung ist
- Klettere auf die Schaukel, wenn sie nass ist.
- Bringen Sie zusätzliche Gegenstände an der Schaukel an, die eine
Strangulationsgefahr darstellen könnten
- Tragen Sie auf der Schaukel einen Fahrrad- oder Sporthelm
Wartung der Schaukel
Inspektion
Zu Beginn jeder Spielsaison sollten Erwachsene:
- Alle Befestigungsteile festziehen.
- Überprüfen Sie alle Schutzabdeckungen an Rohren, Kanten und Ecken,
ersetzen Sie sie, wenn sie locker, rissig oder fehlend sind.
- Überprüfen Sie alle beweglichen Teile einschließlich Schaukelsitz, Seile
auf Verschleiß, Rost oder andere Beschädigungen und ersetzen Sie sie
bei Bedarf. Die für diese Schaukel verwendete Hardware (Klemme,
Schraube, M8-Mutter, S-Haken, Sicherungsscheibe, Unterlegscheibe und
Metallring) finden Sie im örtlichen Baumarkt.
Speicherung
- Für eine längere Lebensdauer ist es besser, die Schaukel mit nach
Hause zu nehmen und an einem sauberen und trockenen Ort zu lagern.
DE DE
24 25

AVERTISSEMENT! RISQUE D’ÉTOUFFEMENT - PETITES
PIÈCES, PAS POUR LES ENFANTS DE MOINS DE 3 ANS.
AVERTISSEMENT! NE PAS UTILISER SANS LA SURVEILLANCE
D’UN ADULTE!
AVERTISSEMENT! MONTAGE ADULTE REQUIS!
AVERTISSEMENT! NE CONVIENT PAS AUX ENFANTS DE
MOINS DE 36 MOIS EN RAISON DE LONGS CORDONS.
RISQUE D’ÉTRANGLEMENT. DANGER DE CHUTE.
IMPORTANT
LISEZ ET SUIVEZ TOUTES LES INFORMATIONS ET INSTRUCTIONS
DE SÉCURITÉ, CONSERVEZ-LES POUR RÉFÉRENCE ULTÉRIEURE
INFORMATIONS ESSENTIELLES
- Recommandé pour les enfants de 3+ ans
- Ne laissez pas l’enfant sans surveillance pendant l’utilisation
- ATTENTION : Utiliser uniquement sous la surveillance d’un adulte
- Les bonnes pratiques de sécurité doivent être suivies en tout temps
- Lisez toutes les instructions avant d’utiliser ce produit.
Destiné uniquement à un usage familial et domestique, et non à un
terrain de jeu commercial ou à une garderie. Deux adultes nécessaires
pour l’assemblage.
Le matériel de suspension n'est pas inclus. Idéalement, le corps de la
balançoire devrait être suspendu sur de l'herbe, du sable, des copeaux
de bois ou d'autres surfaces molles. Il ne doit en aucun cas être
suspendu sur du béton, de l'asphalte ou d'autres surfaces dures. La
distance par rapport au sol ne doit pas dépasser 40 cm ; la hauteur de
chute maximale ne doit pas dépasser 46 cm. Deux crochets en S sont
fixés à la corde pour permettre d'en ajuster la longueur.
Assurez-vous d’examiner régulièrement les cordes pour vérifier l’usure.
La corde se dégrade avec le temps. Si la couleur de la corde est
devenue pâle, si elle s'effiloche facilement ou si elle dégage une matière
poudreuse lorsqu'elle est frottée entre les doigts, nous vous
recommandons de remplacer la corde.
L'équipement doit être suspendu de manière à ce qu'une distance d'au
moins 2 m soit dégagée de chaque côté. Peut être accroché à un cadre
en A, à une balançoire ou à une branche d'arbre d'un diamètre d'au
moins 25 cm.
FR FR
AVERTISSEMENT ! Petites pièces pour
montage par un adulte.
Outils requis (inclus dans l’emballage)
26 27

Assemblage de la Balançoire
FR FR
1.
La balançoire est livrée avec
4 tubes, 2 cordes de
suspension, une guirlande
lumineuse et un corps de
balançoire pour l’assemblage.
2. Insérer le tube avec la
mousse dans le manchon.
3. Insérer le deuxième tube
dans le manchon ; relier les
deux tubes par une petite douille
à une grande douille. Répétez
l'opération jusqu'à ce que tous
les tubes soient connectés pour
former un cercle.
4. Insérez la vis dans les trous
du tube du cadre. Veillez à ce
que les trous soient alignés.
5. Fixez-le à l'aide d'une
rondelle et d'un écrou, et
serrez-le à l'aide d'une clé.
6. Répétez les étapes
ci-dessus pour fixer toutes les
cordes de suspension.
28 29

9. Lorsque l'anneau extérieur a
été enfilé, faites passer le fil
dans l'espace entre deux
manchons, de bas en haut.
10. Maintenant, on commence
à tirer le fil à travers l’anneau
intérieur.
11. Lorsque l'anneau intérieur
est enfilé, vous pouvez introduire
le fil supplémentaire dans le
manchon.
8. Faites passer le fil dans les
tuyaux un par un, qui sont fixés
sur le tapis de siège. Redressez
le fil pour faciliter l'enfilage.
7. Trouvez le sac sous le tapis de siège et mettez-y le boîtier de la
batterie, c'est le point de départ pour tirer le câble. Passer l'anneau
extérieur avant l'anneau intérieur dans le sens des aiguilles d'une montre.
FR FR
30 31

12. L'assemblage est terminé.
Vous devez insérer 3 piles AA de
1,5 V.
Conseils:
1) Gardez les piles hors de la portée des enfants.
2) Insérez uniquement des piles du même type.
3) Vérifiez régulièrement que les piles ne fuient pas.
4) Retirez les piles du produit s’il n’est pas utilisé pendant une certaine
durée.
5) Veillez à respecter la polarité lorsque vous insérez les piles.
Cordon Lumineux (pile non incluse)
● La lumière est alimentée par
3 piles AA de 1,5 V.
● Faible émission de chaleur
et sûr au toucher.
● Commutation de 8 modes
d’éclairage.
Garantie de la Sécurité de la Balançoire
La distance de dégagement doit être de 4 m autour de la balançoire.
Une chute sur une surface dure peut entraîner des blessures graves pour
l'utilisateur de l'équipement.
N'utilisez pas l'équipement tant qu'il n'est pas correctement installé.
Cette balançoire ne doit pas être utilisée à d'autres fins que celles pour
lesquelles elle a été conçue. La surveillance d'un adulte est nécessaire.
Les adultes doivent s'assurer que les cordes de suspension sont
sécurisées et qu'elles ne peuvent pas être enroulées sur la balançoire.
Il est important que les adultes enseignent aux enfants à :
- S'habiller de manière appropriée pour utiliser la balançoire (éviter les
ponchos, les écharpes et autres vêtements amples qui sont
potentiellement dangereux).
- de s'asseoir au centre de la balançoire et de peser de tout leur poids
sur le siège s'ils se balancent seuls
- Éviter de se balancer sur des sièges vides.
FR FR
32 33

Il est important que les adultes enseignent aux enfants de NE PAS
- Marcher près de, devant, derrière ou entre des objets en mouvement
- Tordre les cordes ou les faire passer par-dessus la barre de soutien
supérieure, car une telle action peut réduire la résistance de la corde.
- Descendre de la balançoire lorsqu'elle est en mouvement
- Monter sur la balançoire lorsqu'elle est mouillée.
- Attacher à la balançoire des objets supplémentaires susceptibles de
provoquer un risque d’étranglement.
- Portez un casque de vélo ou de sport lorsque vous êtes sur la
balançoire.
Maintien de la Balançoire
Inspection
Au début de chaque saison de jeu, les adultes doivent :
- Serrer toutes les accessoires.
- Vérifier toutes les protections sur les tuyaux, les bords et les coins, les
remplacer si elles sont lâches, fissurées ou manquantes.
- Vérifier que toutes les pièces mobiles, y compris le siège de la
balançoire et les cordes, ne sont pas usées, rouillées ou détériorées, et
les remplacer si nécessaire. Le matériel utilisé pour cette balançoire
(poteau de fixation, vis, écrou M8, crochet en S, rondelle de blocage,
rondelle plate et anneau métallique) peut être trouvé dans une
quincaillerie locale.
Stockage
- Pour prolonger la durée de vie de la balançoire, il est préférable de la
ramener à la maison et de la ranger dans un endroit propre et sec.
IMPORTANTE
LEA Y SIGA TODA LA INFORMACIÓN E INSTRUCCIONES DE
SEGURIDAD, CONSÉRVELAS PARA FUTURAS CONSULTAS
INFORMACIÓN ESENCIAL
- Recomendado para niños mayores de 3 años
- No deje al niño desatendido mientras se utiliza
- PRECAUCIÓN: Utilice solo bajo la supervisión de un adulto
- Las buenas prácticas de seguridad deben seguirse en todo momento
- Lea todas las instrucciones antes de utilizar este producto.
Destinado exclusivamente a uso familiar y doméstico, no a un parque
infantil comercial ni a una guardería. Se necesitan dos adultos para el
montaje.
¡ADVERTENCIA! PELIGRO DE ASFIXIA - PIEZAS PEQUEÑAS,
NO APTO PARA NIÑOS MENORES DE 3 AÑOS.
¡ADVERTENCIA! ¡NO UTILICE EL PRODUCTO SIN LA
SUPERVISIÓN DE UN ADULTO!
¡ADVERTENCIA! ¡MONTAJE POR UN ADULTO!
¡ADVERTENCIA! NO APTO PARA NIÑOS MENORES DE 36
MESES DEBIDO A LOS LARGOS CABLES. PELIGRO DE
ESTRANGULAMIENTO. PELIGRO DE CAÍDA.
ESFR
34 35

No se incluyen los accesorios para colgar. Lo ideal es colgar el columpio
sobre hierba, arena, virutas de madera u otras superficies blandas. En
ningún caso debe colgarse sobre hormigón, asfalto u otras superficies
duras. La distancia al suelo no debe ser superior a 40 cm; la altura
máxima de caída no debe ser superior a 46 cm. Dos ganchos en forma
de S están fijados a la cuerda para permitir el ajuste de la longitud de la
cuerda.
Asegúrese de examinar las cuerdas con regularidad para comprobar si
están desgastadas. Con el tiempo, la cuerda se degradará. Si el color de
la cuerda se ha vuelto pálido, se deshilacha con facilidad o desprende un
material pulverulento al frotarla entre los dedos, le recomendamos que
sustituya la cuerda.
El equipo debe colgarse de forma que quede libre una distancia de al
menos 2 m a cada lado. Puede colgarse en una estructura en A o en un
columpio, o en una rama de árbol de un diámetro mínimo de 25 cm.
¡ADVERTENCIA! Piezas pequeñas para
montaje por un adulto.
Herramientas Requeridas (incluidas en el embalaje)
Montaje del Columpio
1. El columpio viene con 4
tubos, 2 cuerdas para colgar,
una cuerda de luz y un cuerpo
de columpio para montar.
2. Inserte el tubo con espuma
en el manguito.
3. Inserte el segundo tubo en el
manguito; conecte los dos tubos
mediante un enchufe pequeño
con un grande. Repítalo hasta
que todos los tubos conectados
formen un círculo.
ES ES
36 37
4. Inserte los tornillos en los
orificios del tubo del armazón.
Asegúrese de que los agujeros
están alineados.
5. Fíjelo con arandela y tuerca,
utilice una llave para apretarlo.
6. Repita los pasos anteriores
para fijar todas las cuerdas
colgantes.
8. Pase el cable a través de las
mangueras, una por una, que
están fijadas a la alfombrilla del
asiento.
Enderece el cable para facilitar
el enhebrado.
7. Busque la bolsa debajo de la alfombrilla del asiento y coloque la caja
de batería en ella, este es el punto de partida para tirar del cable.
Pase el cable por el anillo EXTERIOR antes que por el INTERIOR en el
sentido de las agujas del reloj.
ES ES
38 39

9. Una vez enhebrado el anillo
exterior, pase el cable por el
hueco entre dos manguitos de
abajo hacia arriba.
10. Ahora comienza a tirar del
alambre a través del anillo
interior.
11. Cuando el anillo interior
haya sido enhebrado, puede
meter el cable sobrante en el
manguito.
12. Montaje terminado.
Necesita insertar 3 piezas de
pilas AA de 1,5 V.
Luz en Cadena (pilas no incluidas)
● La luz funciona con 3 pilas
AA de 1,5 V.
● Baja emisión de calor y
segura al tacto.
● Conmutación de 8 modos de
iluminación.
ES ES
40 41
Tipps:
1) Mantenga las pilas fuera del alcance de los niños.
2) Inserte solo pilas del mismo tipo.
3) Compruebe regularmente que las pilas no tienen fugas.
4) Retire las pilas del producto si no lo va a utilizar durante algún tiempo.
5) Asegúrese de que la polaridad es correcta al insertar las pilas.
Garantizar la Seguridad del Columpio
La distancia de seguridad debe ser de 4 m alrededor del columpio.
Una caída sobre una superficie dura puede provocar lesiones graves al
usuario del equipo.
No utilice el equipo hasta que esté correctamente instalado.
Este columpio no debe utilizarse de ninguna manera que no sea su uso
previsto.
Se requiere la supervisión de un adulto.
Los adultos deben verificar que las cuerdas para colgar estén
aseguradas y no puedan enrollarse en el columpio.
Es importante que los adultos enseñen a los niños a:
- Vistan adecuadamente mientras utilizan el columpio (eviten ponchos,
bufandas y otras prendas sueltas que sean potencialmente peligrosas).
- Se sienten en el centro del columpio con todo el peso sobre el asiento
si se columpian solos.
- Evite columpiarse en asientos vacíos
Es importante que los adultos enseñen a los niños a NO
- Caminen cerca, delante, detrás o entre objetos en movimiento.
- Tuerzan las cuerdas o las pasen por encima de la barra de soporte
superior, ya que esta acción puede reducir la resistencia de la cuerda.
- Baje del columpio cuando esté en movimiento.
- Suba al columpio cuando esté mojado.
- Coloque objetos adicionales en el columpio que puedan causar peligro
de estrangulamiento.
- Use un casco de bicicleta o deportivo mientras esté en el columpio.
Mantenimiento del Columpio
Inspección
Al principio de cada temporada de juego, los adultos deben:
- Aprieten todos los accesorios.
- Comprueben todos los revestimientos protectores de tubos, bordes y
esquinas, sustitúyalos si están sueltos, agrietados o faltan.
- Comprueben todas las piezas móviles, incluyendo el asiento del
columpio y las cuerdas, en caso de desgaste, óxido u otro deterioro;
cámbielas si es necesario. Los accesorios utilizados para este columpio
(poste de fijación, tornillo, tuerca M8, gancho en S, arandela de
seguridad, arandela plana y anillo metálico) se pueden encontrar en la
ferretería local.
Almacenamiento
- Para prolongar la vida útil, es mejor llevarse el columpio a casa y
guardarlo en un lugar limpio y seco.
ES ES
42 43
AVVERTENZA! RISCHIO DI SOFFOCAMENTO: PARTI PICCOLE,
NON ADATTO A BAMBINI DI ETÀ INFERIORE A 3 ANNI.
AVVERTENZA! NON UTILIZZARE SENZA LA SUPERVISIONE DI
UN ADULTO!
AVVERTENZA! È NECESSARIO L'ASSEMBLAGGIO DA PARTE
DI UN ADULTO!
AVVERTENZA! NON ADATTO A BAMBINI DI ETÀ INFERIORE A
36 MESI A CAUSA DEI LUNGHI CAVI. PERICOLO DI
STRANGOLAMENTO. PERICOLO DI CADUTA.
IMPORTANTE
LEGGERE E SEGUIRE TUTTE LE INFORMAZIONI E LE ISTRUZIONI
DI SICUREZZA, CONSERVANDOLE PER RIFERIMENTI FUTURI
INFORMAZIONI ESSENZIALI
- Consigliato per bambini 3+ anni
- Non lasciare il bambino incustodito durante l'utilizzo
- ATTENZIONE: Utilizzare solo sotto la supervisione di un adulto
- Seguire sempre le buone pratiche di sicurezza
- Leggere tutte le istruzioni prima di utilizzare questo prodotto.
Destinato esclusivamente all'uso familiare e domestico, non per un parco
giochi commerciale o un asilo nido. Per il montaggio sono necessari due
adulti.
La ferramenta per appendere non è inclusa. Idealmente, il corpo
dell'altalena dovrebbe essere appeso su erba, sabbia, trucioli di legno o
altre superfici morbide. In nessun caso deve essere appeso su cemento,
asfalto o altre superfici dure. La distanza da terra non deve superare i 40
cm; l'altezza massima di caduta non deve essere superiore a 46 cm, due
ganci a forma di S sono attaccati alla corda per consentire la regolazione
della lunghezza della corda.
Si prega di esaminare regolarmente le corde per verificarne l'usura. Le
corde, con il tempo, si degradano. Se il colore della corda è diventato
pallido, si sfilaccia facilmente o emette un materiale polveroso quando
viene strofinata tra le dita, si consiglia di sostituire la corda.
L'attrezzatura deve essere appesa in modo da lasciare una distanza di
almeno 2 m da entrambi i lati. Può essere appeso a un telaio a forma di A
o un'altalena o su un ramo di un albero di almeno 25 cm di diametro.
IT IT
AVVERTENZA! Le parti piccole devono
essere assemblate da un adulto.
Strumenti Necessari (inclusi nella confezione)
44 45

IT IT
Montaggio dell'Altalena
1.
L'altalena è composta da 4
tubi, 2 corde di sospensione,
una luce a corda e un corpo
oscillante da assemblare.
2. Inserire il tubo con schiuma
nel manicotto.
3. Inserire il secondo tubo nel
manicotto; collegare i due tubi
con una presa piccola e una
grande. Ripetere l'operazione
fino a quando tutti i tubi sono
collegati a formare un cerchio.
4. Inserire il bullone a vite nei
fori del tubo del telaio.
Assicurarsi che i fori siano
allineati.
5. Fissarlo con rondella e dado,
utilizzare la chiave per stringerlo.
6. Ripetere i passi precedenti
per fissare tutte le corde appese.
46 47

9. Una volta infilato l'anello
esterno, far passare il filo
attraverso lo spazio tra i due
manicotti dal basso verso l'alto.
10. Ora iniziare a tirare il filo
attraverso l'anello interno.
11. Una volta infilato l'anello
interno, è possibile infilare il filo
superfluo nel manicotto.
8. Inserire il filo attraverso i tubi
uno per uno che sono fissati sul
tappetino di seduta.
Raddrizzare il filo per una facile
filettatura.
7. Trovare il sacchetto sotto il tappetino dei sedili e metteteci dentro la
scatola della batteria: questo è il punto di partenza per tirare il filo.
Infilare l'anello ESTERNO prima dell'anello INTERNO in senso orario.
IT IT
48 49

12. Montaggio finito. È
necessario inserire 3 batterie AA
da 1,5 V.
Suggerimenti:
1) Tenere le batterie fuori dalla portata dei bambini.
2) Inserire solo batterie dello stesso tipo.
3) Controllare regolarmente che le batterie non presentino perdite.
4) Rimuovere le batterie dal prodotto se questo non viene utilizzato per
un certo periodo di tempo.
5) Assicurarsi che la polarità sia corretta quando si inseriscono le
batterie.
Stringa Luci a Filo (batteria non inclusa)
● La luce è alimentata da 3
batterie AA da 1,5V.
● Bassa emissione di calore e
sicurezza al tatto.
● Commutazione di 8 modalità
di illuminazione.
Garantire la Sicurezza dell'Altalena
La distanza di sicurezza deve essere di 4 m intorno all'altalena.
Una caduta su una superficie dura può causare gravi lesioni
all'utilizzatore dell'attrezzatura.
Non utilizzare l'attrezzatura finché non è stata installata correttamente.
L'altalena non deve essere utilizzata in modo diverso da quello previsto.
È necessaria la supervisione di un adulto.
Gli adulti devono verificare che le corde di sospensione siano fissate e
non possano essere riavvolte sull'altalena.
È importante che gli adulti istruiscano i bambini a:
- Vestirsi in modo appropriato durante l'utilizzo dell'altalena (evitare
poncho, sciarpe e altri indumenti larghi potenzialmente pericolosi).
- Sedersi al centro dell'altalena con tutto il peso sul sedile se si siede da
solo.
- Evitare di dondolare sui sedili vuoti
IT IT
50 51
È importante che gli adulti istruiscano i bambini a non
- Camminare vicino, davanti, dietro o tra gli oggetti in movimento.
- Attorcigliare le corde o avvolgerle sulla barra di supporto superiore,
poiché tale azione può ridurre la resistenza della corda.
- Scendere dall'altalena mentre è in movimento
- Salire sull'altalena quando è bagnata.
- Attaccare all'altalena altri oggetti che potrebbero causare un rischio di
strangolamento.
- Indossare un casco da bicicletta o sportivo quando si è sull'altalena.
Manutenzione dell'Altalena
Ispezione
All'inizio di ogni stagione di gioco, gli adulti devono:
- Stringere tutta la ferramenta.
- Controllare tutte le coperture protettive su tubi, bordi e angoli; sostituirle
se sono allentate, incrinate o mancanti.
- Controllare che tutte le parti mobili, compresi il sedile dell'altalena e le
corde, non siano usurate, arrugginite o deteriorate, e sostituirle se
necessario. La ferramenta utilizzata per questa altalena (paletto, vite,
dado M8, gancio a forma di S, rondella di sicurezza, rondella piatta e
anello metallico) può essere reperita presso il negozio di ferramenta
locale.
Conservazione
- Per prolungare la durata di vita dell'altalena, è meglio portarla a casa e
conservarla in un luogo pulito e asciutto.
UWAGA
ZAPOZNAJ SIĘ I POSTĘPUJ ZGODNIE Z INSTRUKCJĄ. ZACHOWAJ
INSTRUKCJĘ DO WYKORZYSTANIA W PRZYSZŁOŚCI.
PODSTAWOWE INFORMACJE
- Produkt jest przeznaczony dla dzieci powyżej 3 roku życia.
- Nie zostawiaj dziecka bez nadzoru podczas użytkowania huśtawki.
- UWAGA: Wymagany stały nadzór osoby dorosłej.
- Przestrzegaj zasad bezpiecznego użytkowania produktu.
- Przed użyciem produktu dokładnie zapoznaj się z instrukcją.
Produkt jest przeznaczony wyłącznie do użytku domowego. Nie używaj
produktu na placach zabaw ani w przedszkolach. Wymagany montaż
przez dwie osoby dorosłe.
OSTRZEŻENIE! RYZYKO ZADŁAWIENIA - MAŁE CZĘŚCI.
PRODUKT NIEODPOWIEDNI DLA DZIECI PONIŻEJ 3 ROKU
ŻYCIA.
OSTRZEŻENIE! WYMAGANY NADZÓR OSOBY DOROSŁEJ!
OSTRZEŻENIE! WYMAGANY MONTAŻ PRZEZ OSOBĘ
DOROSŁĄ!
OSTRZEŻENIE! PRODUKT NIEODPOWIEDNI DLA DZIECI
PONIŻEJ 3 ROKU ŻYCIA - RYZYKO UDUSZENIA ORAZ UPADKU.
PLIT
52 53
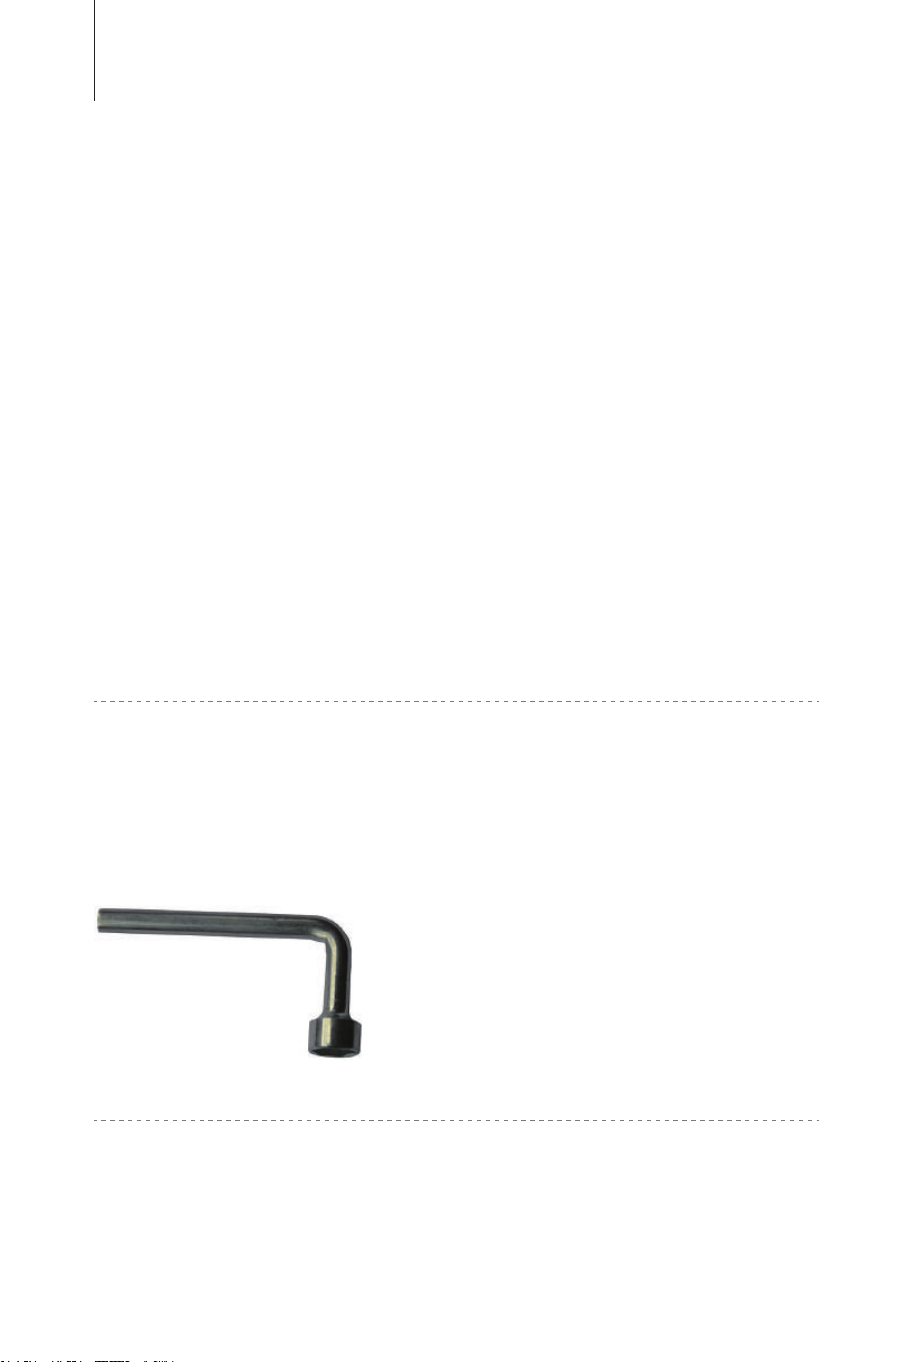
Sprzęt montażowy do zamocowania huśtawki nie jest dołączony do
zestawu. Huśtawka powinna zostać zamontowana nad miękką
nawierzchnią, taką jak trawa, kora lub piasek. W żadnym wypadku nie
należy mocować huśtawki nad twardą nawierzchnią, np. nad betonem.
Odległość od ziemi nie powinna przekraczać 40 cm, a maksymalna
wysokość upadku nie powinna przekraczać 46 cm. Dwa dołączone do
zestawu haki w kształcie litery S umożliwiają regulację długości lin.
Regularnie sprawdzaj liny pod kątem zużycia. Z czasem liny ulegną
uszkodzeniu. Bezzwłocznie wymień liny jeśli wyblakły, zaczynają pękać
lub wytwarzają pył po potarciu między palcami.
Huśtawka powinna zostać zamontowana w miejscu pozwalającym na
zachowanie 2 metrów wolnej przestrzeni wokół. Może zostać zawieszona
na ramie w kształcie litery A lub na gałęzi drzewa o średnicy minimum
25cm.
OSTRZEŻENIE! Małe części wymagające
montażu przez osobę dorosłą.
Potrzebne narzędzia (w zestawie)
Montaż huśtawki
1.
Huśtawka jest dostarczana w
następujących częściach: 4
rurki, 2 liny, przewód oświetlenia,
siedzisko huśtawki.
2. Przełóż piankową rurkę
przez materiałowy rękaw.
3. Przełóż drugą rurkę przez
materiałowy rękaw. Połącz obie
rurki, wkładając jedną rurkę w
drugą. Powtarzaj ten krok, aż
wszystkie rurki zostaną
zamocowane i utworzą okrąg.
PL PL
54 55
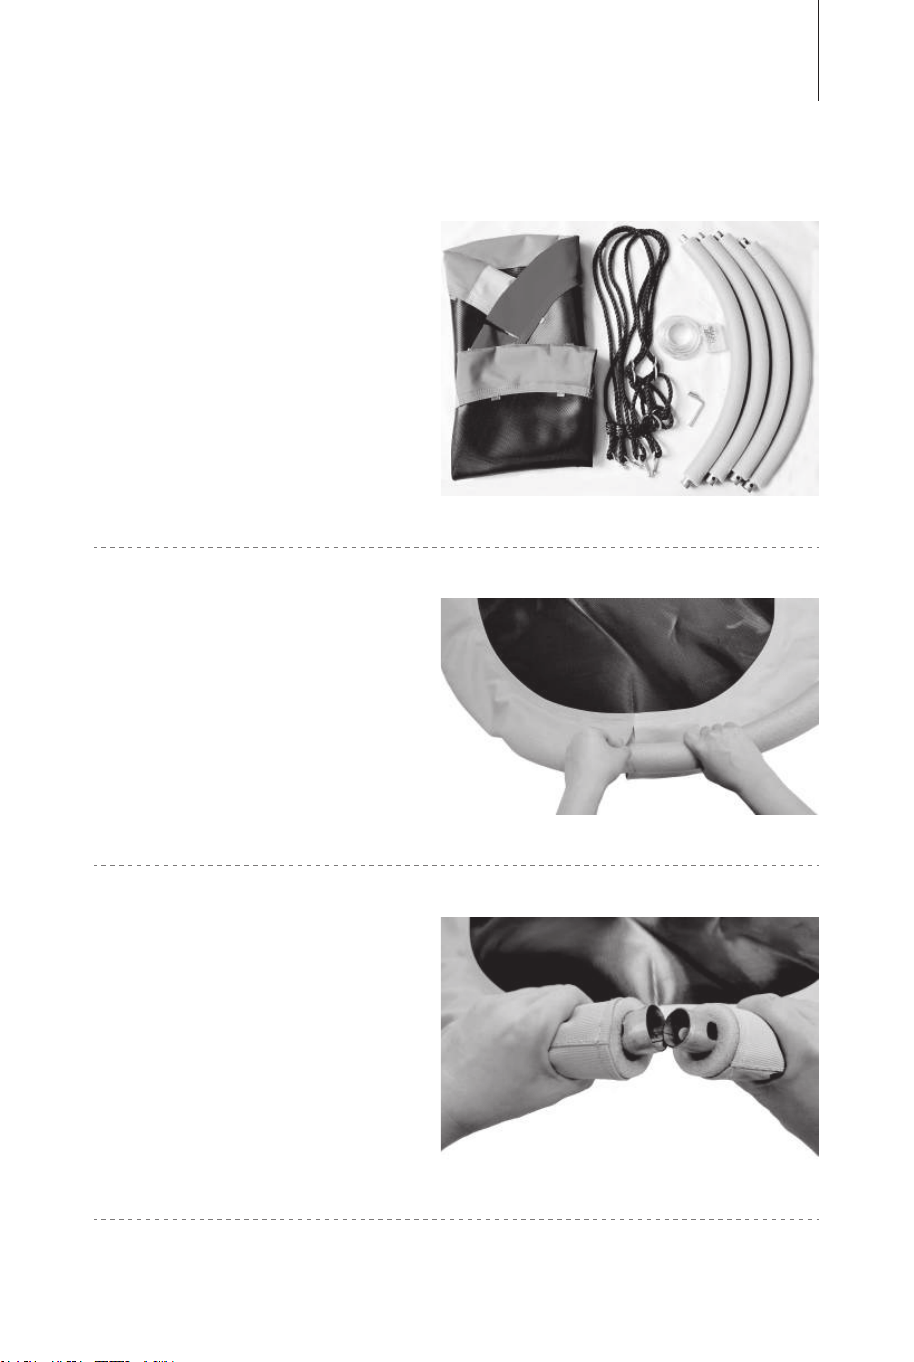

4. Umieść śruby w otworach w
rurkach ramy. Upewnij się, że
otwory w rurkach są wyrównane.
5. Zamocuj śrubę za pomocą
podkładki i nakrętki. Dokręć
nakrętkę za pomocą klucza.
6. Powtórz krok 5, aby
zamocować wszystkie śruby lin.
8. Zdejmij zaślepkę z końcówki
przewodu, a następnie
przewlecz go przez kolejne
zewnętrzne pierścienie na
siedzisku. Rozprostuj przewód
przed jego przewleczeniem.
7. Zlokalizuj kieszonkę na spodzie siedziska huśtawki. Umieść komorę
baterii w kieszonce. Kieszonka jest punktem początkowym przewodu
oświetlenia. Przewlecz przewód przez ZEWNĘTRZNE pierścienie na
krawędzi materiału, a następnie przez WEWNĘTRZNE pierścienie.
PL PL
56 57
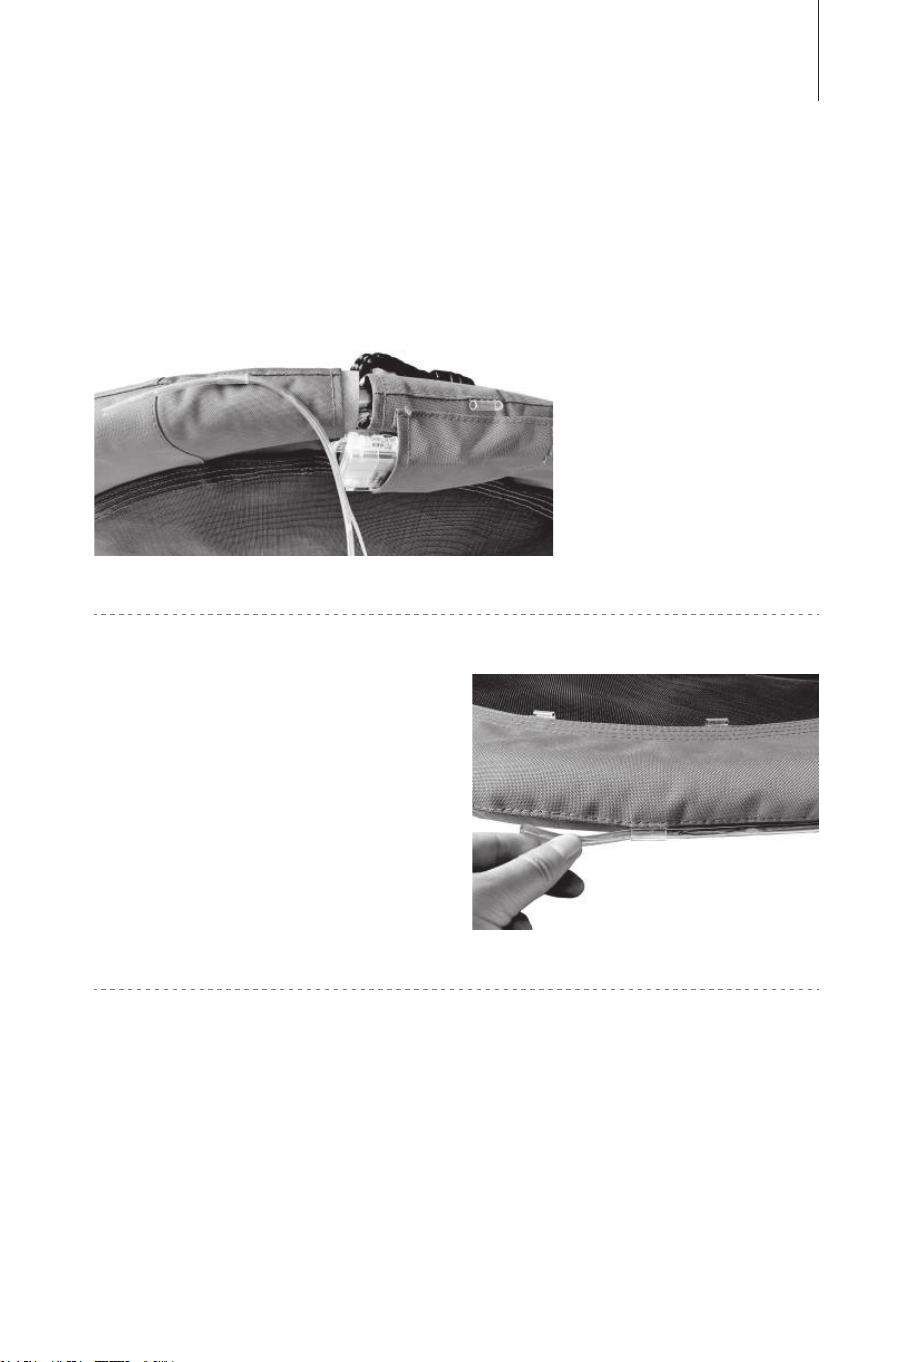
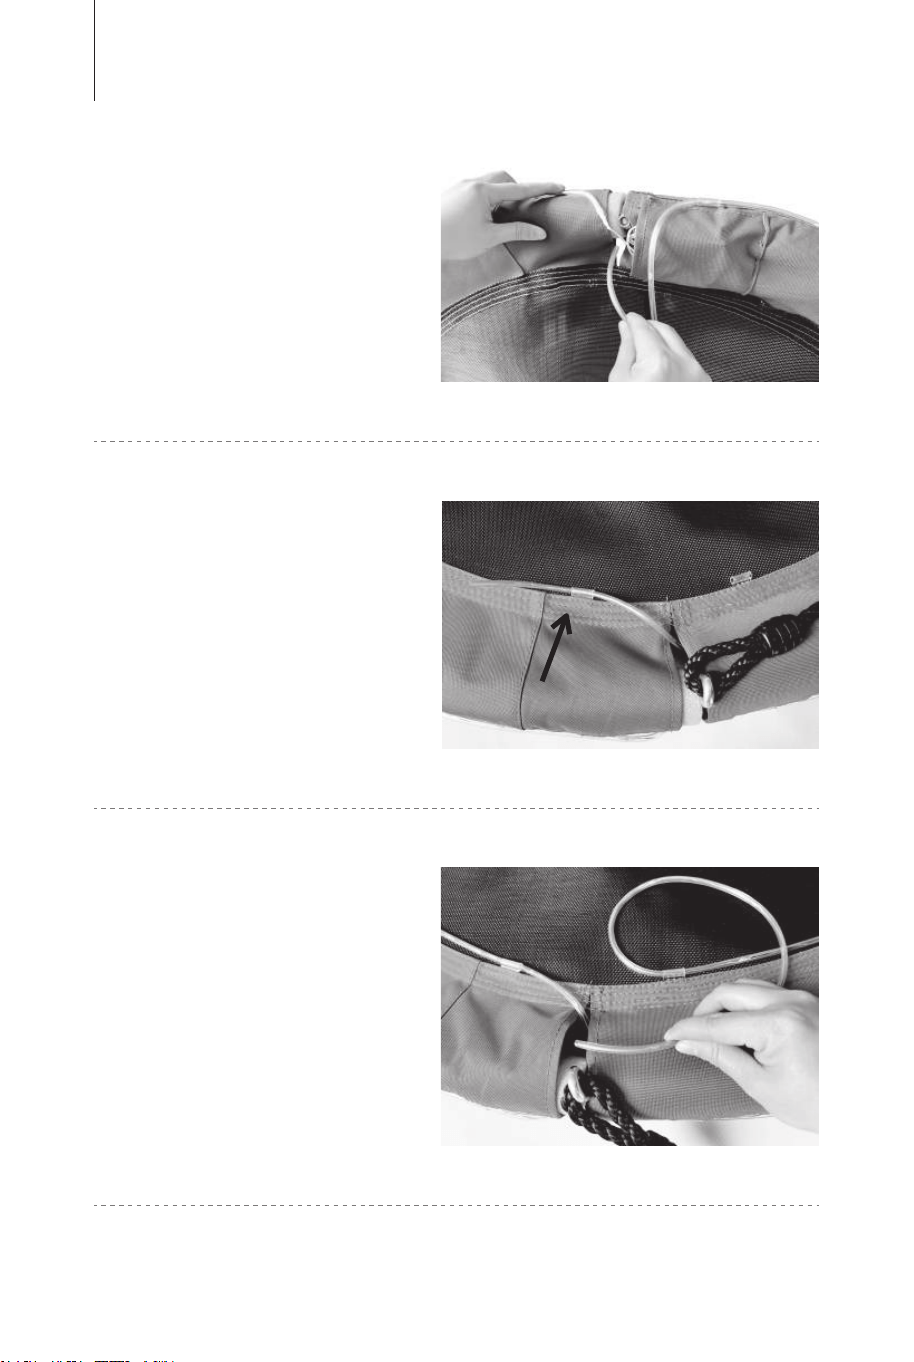
9. Po przewleczeniu przewodu
przez zewnętrzne pierścienie,
przeciągnij go od dołu do góry
przez szczelinę między dwoma
rękawami.
10. Następnie przewlecz
przewód przez wewnętrzne
pierścienie.
11. Po przewleczeniu
przewodu przez wewnętrzne
pierścienie, schowaj nadmiar
przewodu w materiałowym
rękawie.
12. Montaż został zakończony.
Włóż do komory 3 baterie AA
1,5V.
Przewód oświetlenia (brak baterii w
zestawie)
● Wymagane są 3 baterie AA
1,5V.
● Niska emisja ciepła -
bezpieczeństwo dla rąk.
● 8 trybów oświetlenia.
PL PL
58 59
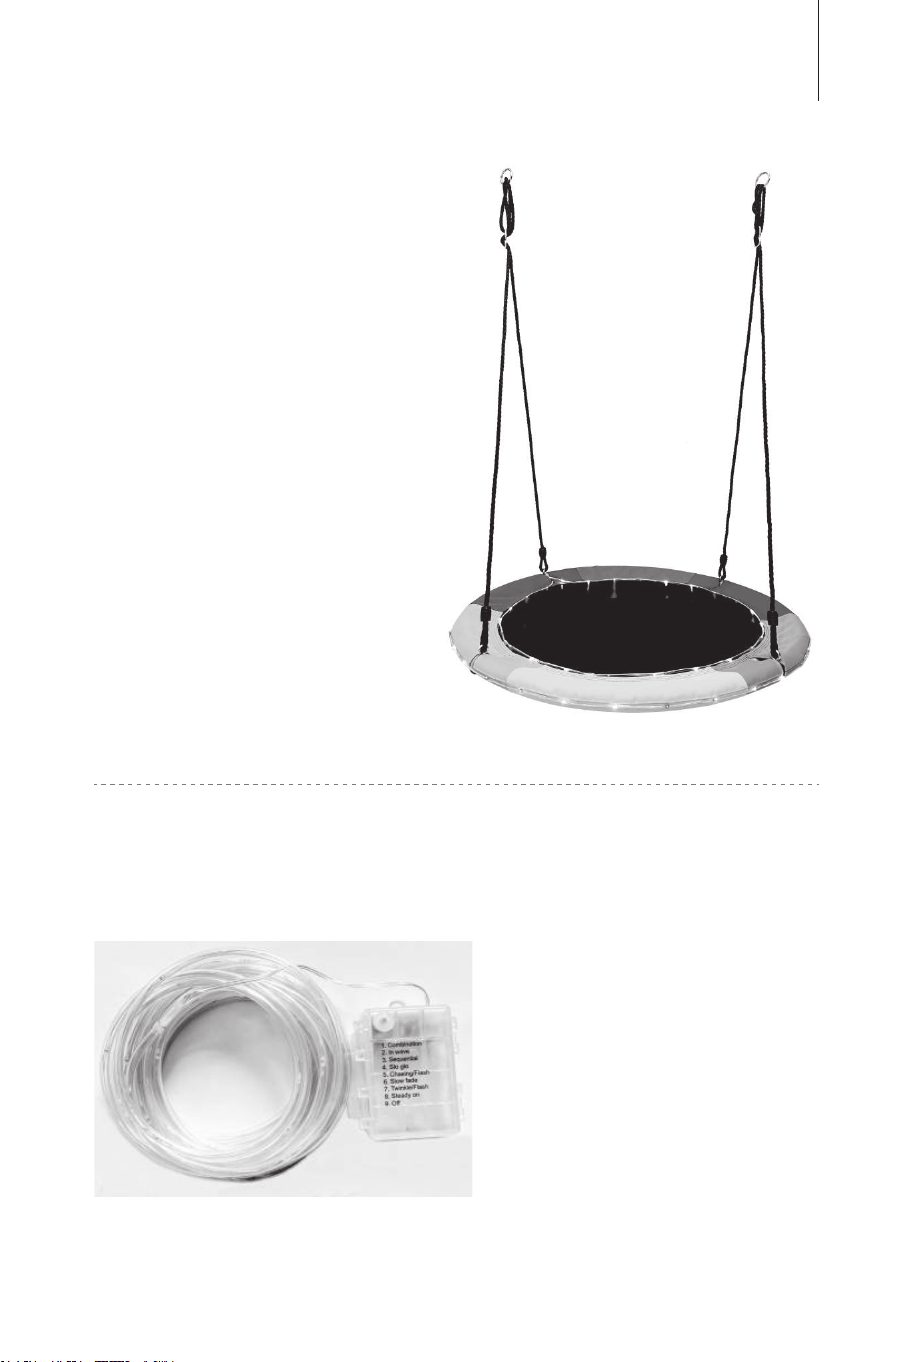
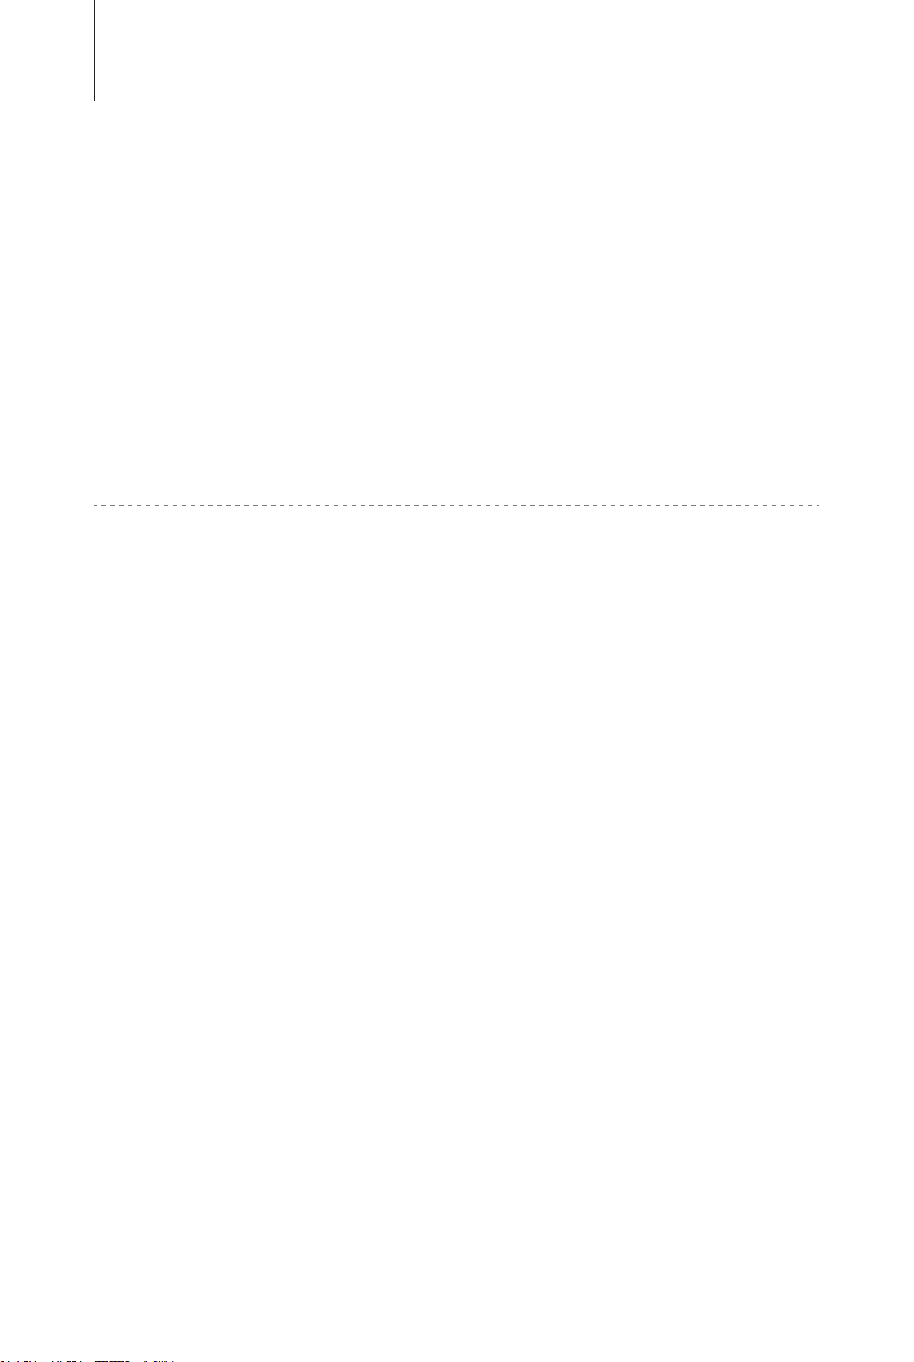
Uwagi:
1) Trzymaj baterie poza zasięgiem dzieci.
2) Używaj wyłącznie baterii tego samego rodzaju.
3) Regularnie sprawdzaj, czy baterie są w dobrym stanie.
4) Wyjmij baterie, jeśli produkt nie będzie używany przez dłuższy czas.
5) Podczas instalacji baterii upewnij się, że zachowana jest prawidłowa
polaryzacja.
Bezpieczeństwo użytkowania huśtawki
Wolna przestrzeń wokół huśtawki powinna wynosić 4 m.
Upadek na twardą nawierzchnię może spowodować poważne obrażenia
użytkownika.
Nie używaj huśtawki, dopóki nie zostanie prawidłowo zmontowana.
Huśtawka nie może być używana w żaden inny sposób, niż jest to
zgodne z jej przeznaczeniem.
Wymagany jest stały nadzór osoby dorosłej.
Osoba dorosła powinna regularnie sprawdzać czy liny są zamocowane
prawidłowo i nie doprowadzą do wypadku.
Obowiązkiem osoby dorosłej jest dopilnowanie, aby dziecko:
- Nosiło odpowiednie ubranie (powinno się unikać luźnych ubrań,
szalików itd., które mogą być niebezpieczne podczas użytkowania
huśtawki).
- Siadało na środku huśtawki z całym ciężarem ciała na siedzisku.
- Nie kołysało samego siedziska huśtawki.
Dziecku NIE wolno:
- Przebywać w pobliżu, przed, za lub między częściami huśtawki, które
znajdują się w ruchu.
- Skręcać lin lub zaplątywać lin na górnym pręcie, ponieważ takie
działanie może zmniejszyć wytrzymałość lin.
- Schodzić z huśtawki, gdy znajduje się ona w ruchu.
- Wspinać się na huśtawkę, gdy jej powierzchnia jest wilgotna.
- Mocować do huśtawki dodatkowych przedmiotów, które mogą
spowodować ryzyko uduszenia.
- Nosić kasku sportowego na huśtawce.
Konserwacja huśtawki
Konserwacja
Na początku każdego sezonu osoba dorosła powinna:
- Dokręcić wszystkie części montażowe.
- Sprawdzić wszystkie elementy ochronne na rurkach, krawędziach i
narożnikach. Wymień je, jeśli są obluzowane, pęknięte lub w przypadku
ich braku.
- Sprawdzić wszystkie ruchome części, w tym siedzisko huśtawki i liny
pod kątem zużycia, występowania rdzy lub innych uszkodzeń. Wymień
części w razie potrzeby. Wszystkie części montażowe można zakupić w
lokalnym sklepie z narzędziami (mocowania, śruby, haki, nakrętki M8,
przeciwnakrętki, płaskie podkładki, metalowe pierścienie itd.)
Przechowywanie
- Przechowuj huśtawkę w pomieszczeniu oraz w suchym i czystym
miejscu, aby przedłużyć jej żywotność.
PL PL
60 61
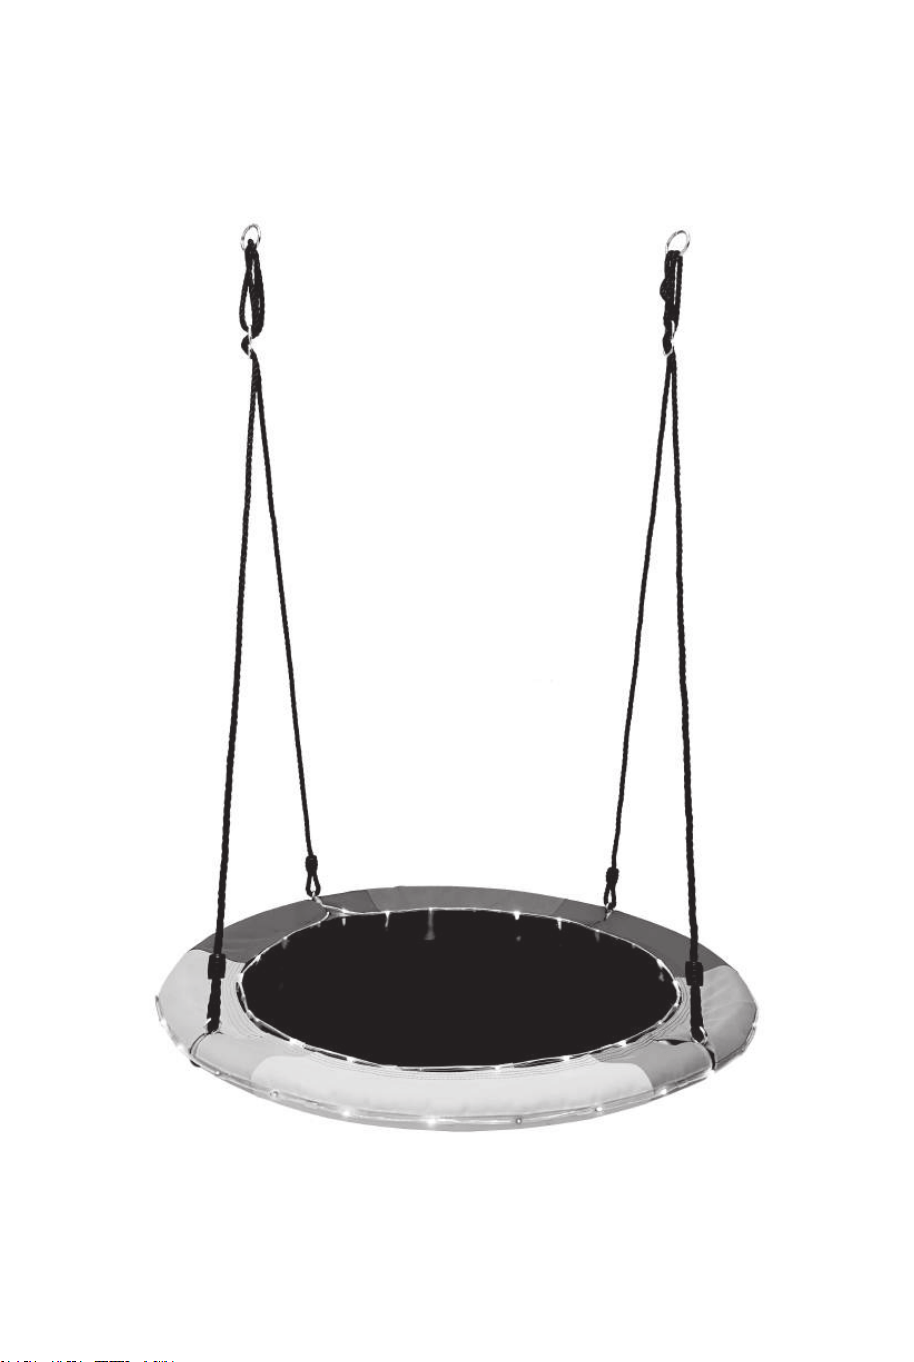
62 63
In case a return is required, the item must be returned in original box. Without this
your return will not be accepted.
DO NOT discard the box / original packaging.
Take a photo of the box markings.
Take a photo of the damaged part (if applicable).
Send us an email with the images requested.
A photo of the markings (text) on the side of the box is required in case a part is
needed for replacement. This helps our staff identify your product number to
ensure you receive the correct parts.
A photo of the damage is always required to file a claim and get your replacement
or refund processed quickly. Please make sure you have the box even if it is
damaged.
Email us directly from marketplace where your item was purchased with the
attached images and a description of your claim.
EN
Return / Damage Claim Instructions
Falls eine Rücksendung erforderlich ist, muss der Artikel in der
Originalverpackung zurückgeschickt werden. Andernfalls wird Ihre Rücksendung
nicht angenommen.
Werfen Sie den Karton / die Originalverpackung NICHT weg.
Machen Sie ein Foto von der Beschriftung des Kartons.
Machen Sie ein Foto des beschädigten Teils (falls zutreffend).
Schicken Sie uns eine E-Mail mit dem gewünschten Foto.
Für den Fall, dass ein Ersatzteil benötigt wird, benötigen wir ein Foto der
Beschriftung (Text) auf der Seite des Kartons. So können unsere Mitarbeiter Ihre
Artikelnummer identifizieren und sicherstellen, dass Sie die richtigen Teile
erhalten.
Ein Foto des beschädigten Teils ist immer erforderlich, um eine Reklamation
einzureichen und eine schnelle Bearbeitung Ihres Ersatzteils oder Ihrer
Rückerstattung zu gewährleisten. Bitte stellen Sie sicher, dass Sie den Karton
haben, auch wenn er beschädigt ist.
Schicken Sie uns eine E-Mail direkt vom Marktplatz, auf dem Sie den Artikel
gekauft haben, mit den angehängten Fotos und einer Beschreibung Ihrer
Reklamation.
DE
Rücksendung / Beschädigung Anweisungen
64 65
Instructions De Retour / Réclamation De Dommages
Dans le cas où un retour est requis, l'article doit être retourné dans sa boîte
d'origine. Sans cela, votre retour ne sera pas accepté.
NE PAS jeter la boîte/l'emballage d'origine.
Prenez une photo des marquages de la boîte.
Prenez une photo des dommages (le cas échéant).
Envoyez-nous un e-mail avec les images demandées.
Une photo des marquages (texte) sur le côté de la boîte est requise au cas où une
pièce serait nécessaire pour le remplacement. Cela aide notre personnel à
identifier votre numéro de produit pour s'assurer que vous recevez les bonnes
pièces.
Une photo des dommages est toujours requise pour déposer une réclamation et
obtenir rapidement votre remplacement ou votre remboursement. Assurez-vous
d'avoir la boîte même si elle est endommagée.
Envoyez-nous un e-mail directement depuis le marché où votre article a été
acheté avec les images ci-jointes et une description de votre réclamation.
FR
Instrucciones de Devolución / Reclamación de Daños
En caso de que se requiera una devolución, el artículo debe ser devuelto en la
caja original. Sin esto su devolución no será aceptada.
NO deseche la caja/embalaje original.
Tome una foto de las marcas de la caja.
Tome una foto de los daños (si procede).
Envíenos un correo electrónico con las imágenes solicitadas.
Se requiere una foto de las marcas (texto) en el lado de la caja en caso de que se
necesite una pieza para reemplazarla. Esto ayuda a nuestro personal a identificar
su número de producto para asegurarse de que recibe las piezas correctas.
Una foto de los daños es siempre necesaria para presentar una reclamación y
conseguir que su reemplazo o reembolso sea procesado rápidamente. Por favor,
asegúrese de tener la caja aunque esté dañada.
Envíenos un correo electrónico directamente desde el mercado donde se compró
su artículo con las imágenes adjuntas y una descripción de su reclamación.
ES
Nel caso in cui sia richiesto un reso, l'articolo deve essere restituito nella scatola
originale. Senza la scatola originale il tuo reso non sarà accettato.
NON scartare la scatola / confezione originale.
Fare una foto dei contrassegni sulla scatola.
Fare una foto di Danno (se è applicabile).
Inviarci una mail con le immagini richieste.
È necessaria una foto dei contrassegni (testo) sul lato della scatola nel caso in
cui la parte debba essere sostituita. Questo aiuta il nostro staff a identificare il
numero del tuo prodotto per assicurarti di ricevere le parti corrette.
Una foto del danno è sempre necessaria per presentare un reclamo e ottenere
rapidamente la sostituzione o il rimborso. Assicurati di avere la scatola anche se
è danneggiata.
Inviarci un'e-mail direttamente dal mercato in cui è stato acquistato il tuo articolo
con le immagini allegate e una descrizione del tuo reclamo.
IT
Istruzioni Per La Restituzione / Reclamo Per Danni
Jeśli chcesz zwrócić produkt, musi znajdować się on w oryginalnym opakowaniu.
Towar zwrócony w nieoryginalnym opakowaniu nie zostanie przyjęty.
Nie wyrzucaj oryginalnego opakowania.
Zrób zdjęcie oznaczeń na opakowaniu.
Zrób zdjęcie uszkodzonej części (jeśli dotyczy).
Skontaktuj się z nami.
Jeśli jakakolwiek część wymaga wymiany, zrób zdjęcie oznaczeń kodu produktu,
który znajduje się na opakowaniu. Pozwoli nam to zidentyfikować produkt i
dostarczyć ci właściwą część.
Jeśli chcesz złożyć reklamację, zrób zdjęcie uszkodzonej części. Pozwoli nam to
zatwierdzić reklamację i zlecić zwrot środków na twoje konto. Do złożenia
reklamacji potrzebne będzie oryginalne opakowanie.
Skontaktuj się z nami telefonicznie, mailowo lub poprzez formularz kontaktowy.
Załącz zdjęcia produktu i opis roszczenia.
PL
Zwroty i reklamacje

NP11173CL
THIS INSTRUCTION BOOKLET CONTAINS IMPORTANT SAFETY INFORMATION. PLEASE READ AND KEEP FOR FUTURE REFERENCE.
Saucer Swing with LED Light / Nestschaukel /
Balançoire Nid d’Oiseau /
Columpio de Platillo / Altalena a Piattino /
Huśtawka ogrodowa typu bocianie gniazdo
If you're having difficulty, our friendly
customer team is always here to help.
AUS:cs.au@costway.com
FRA:cs. f r@costway.com
DEU:cs.de@costway.com
I T A :cs.i t @costway.com ESP:cs.es@costway.com
POL:sklep@costway.com
GBR:cs.uk@costway.com
DEU office: FDS GmbH, Neuer Höltigbaum 36, 22143 Hamburg, Deutschland
ITA office: Milano
FRA office: Saint Vigor d'Ymonville
POL office: GdańskGBR office: IpswichAUS office: TruganinaUSA office: Fontana