
12/24V 200A STARTER/60A AUTOMATIC BATTERY
CHARGER
MODEL NO: SUPERSTART200D
Thank you for purchasing a Sealey product. Manufactured to a high standard, this product will, if used according to these instructions,
and properly maintained, give you years of trouble free performance.
IMPORTANT: PLEASE READ THESE INSTRUCTIONS CAREFULLY. NOTE THE SAFE OPERATIONAL REQUIREMENTS, WARNINGS & CAUTIONS. USE
THE PRODUCT CORRECTLY AND WITH CARE FOR THE PURPOSE FOR WHICH IT IS INTENDED. FAILURE TO DO SO MAY CAUSE DAMAGE AND/OR
PERSONAL INJURY AND WILL INVALIDATE THE WARRANTY. KEEP THESE INSTRUCTIONS SAFE FOR FUTURE USE.
1. SAFETY
1.1. ELECTRICAL SAFETY
WARNING! It is the user’s responsibility to check the following:
9 Check all electrical equipment and appliances to ensure that they are safe before using. Inspect power supply leads, plugs and all
electrical connections for wear and damage. Sealey recommend that an RCD (Residual Current Device) is used with all electrical
products.
Electrical safety information. It is important that the following information is read and understood:
9 Ensure that the insulation on all cables and on the appliance is safe before connecting it to the power supply.
9 Regularly inspect power supply cables and plugs for wear or damage and check all connections to ensure that they are secure.
Important: Ensure that the voltage rating on the appliance suits the power supply to be used and that the plug is tted with the correct fuse.
8 DO NOT pull or carry the appliance by the power cable.
8 DO NOT pull the plug from the socket by the cable.
8 DO NOT use worn or damaged cables, plugs or connectors. Ensure that any faulty item is repaired or is replaced immediately by a
qualied electrician.
9 If the cable or plug is damaged during use, switch off the electricity supply and remove from use.
9 If the supply cord is damaged, it must be replaced by the manufacturer, its service agent or similarly qualied persons in order to avoid
a hazard.
9 The battery charger must only be plugged into an earthed socket-outlet
Ensure that repairs are carried out by a qualied electrician.
9 Children from age 8 years and above, persons with reduced physical, sensory, or mental capabilities those with lack of experience and
knowledge can use the appliance, if they have been given supervision or instruction concerning use of the appliance in a safe way to
understand the hazards involved.
8 Children shall NOT play with the appliance
9 Always operate battery charger in a well ventilated area.
8 NEVER smoke or allow a spark or flame in the vicinity of the battery or engine.
8 Cleaning and user maintenance on the appliance shall not be made by children without supervision.
9 The appliance shall be disconnected from its power source during service and when replacing parts and, if that the removal of the plug
is foreseen, it shall be clearly indicated that the removal of the plug has to be such that an operator can check from any of the points to
which he has access that the plug remains removed.
1.2. GENERAL SAFETY
▲ DANGER! BE AWARE, LEAD-ACID BATTERIES GENERATE EXPLOSIVE GASES DURING NORMAL BATTERY OPERATION. FOR
THIS REASON, IT VERY IMPORTANT TO READ AND FOLLOW THESE INSTRUCTIONS CAREFULLY, EACH TIME YOU USE THE
CHARGING EQUIPMENT.
9 Follow these instructions and those published by the battery and vehicle manufacturers, and the maker of any equipment you intend to
use in the vicinity of the battery. Remember to review warning marks on all products and on engines.
WARNING! Modern vehicles contain extensive electronic systems.
You are required to check with the vehicle Manufacturer, for any specic instructions regarding the use of this type of equipment on
each vehicle.
9 No liability will be accepted for damage / injury, where this product is not used in accordance with all instructions.
1.3. PERSONAL PRECAUTIONS
9 Ensure there is another person within hearing range of your voice and close enough to come to your aid, should a problem arise when
working near a lead-acid battery.
9 Wear safety eye protection and protective clothing. Avoid touching eyes while working near battery.
9 Have fresh water and soap nearby in case battery acid contacts skin, clothing or eyes.
9 Wash immediately with soap and water if battery acid contacts skin or clothing. If acid enters eye, flush eye immediately with cool, clean
running water for at least 15 minutes and seek immediate medical attention.
9 Remove personal metallic items such as rings, bracelets, necklaces and watches. A lead-acid battery can produce a short-circuit current
which is high enough to weld a ring or the like to metal, which would cause severe burns.
9 Ensure hands, clothing (especially belts) are clear of fan blades and other moving or hot parts of engine, remove ties and contain long hair.
8 DO NOT smoke or allow a spark or flame in the vicinity of battery or engine.
WARNING! Wear complete eye protection and clothing protection, when working with lead-acid batteries.
9 Make sure someone is within range of your voice or close enough to come to your aid when you work with or near a lead-acid battery.
Refer to
instruction
manual
Wear eye
protection
SUPERSTART200D Issue 2 24/04/24
Original Language Version
© Jack Sealey Limited
Warning:
Explosive
Material
Warning:
Corrosive
substance
Wear
Protective
Gloves
Warning:
Electricity
Protect
From
Rain
Use in
Well
Ventilated
Areas
Keep away
from sources of
ignition:
Battery could
explode

9 Have soap and plenty of fresh water nearby for use if battery acid contacts skin,clothing or eyes. If battery acid contacts skin or clothing,
wash immediately with soap and water.
9 Avoid touching your eyes while working with a battery. Acid particles (corrosion) may get into your eyes! If acid enters your eye,
immediately rinse eye with running cold water for at least 10 minutes. Get medical attention immediately.
9 Remove personal metal items such as rings, bracelets, necklaces, and watches when working with a lead-acid battery. A lead-acid battery
can produce a short-circuit current high enough to weld a ring or the like to metal, causing a severe burn.
9 Take care not to drop a metal tool or other metal onto the battery. Metal may cause sparking or short circuit the battery or another
electrical devise. Sparking may cause an explosion.
1.4. SPECIFIC BATTERY CHARGING INSTRUCTIONS
9 Familiarise yourself with the application and limitations of the charger as well as the potential hazards. Also refer to the vehicle
manufacturer’s hand book. IF IN ANY DOUBT CONSULT A QUALIFIED ELECTRICIAN.
9 Ensure the charger is in good order and condition before use. If in any doubt do not use the unit, contact your Sealey Dealer.
9 Use the charger in the upright position only and ensure it is placed on a stable surface which will adequately support its weight.
9 Ensure the charger is disconnected from the mains supply before attaching/detaching the power clamps to/from the battery.
9 Keep tools and other items away from the engine and ensure you can see the battery and working parts of engine clearly.
9 Ensure the output of the charger is the same voltage as the battery.
9 Ensure that during charging, the charger is placed in a location where there is sufficient ventilation to prevent the build up of explosive
gases from a lead acid battery, and DO NOT cover or obstruct the charger ventilation louvres.
9 If battery has caps to access the battery fluid, remove the caps and check the fluid level before connecting the power clamps.
If necessary top-up the battery with distilled water by referring to the battery manufacturer’s instructions. (Apply personal safety
precautions described in 1.3).
9 If the charger receives a sharp knock or blow the unit must be checked by a qualified service agent before using.
9 If the battery terminals are corroded or dirty clean them before attaching the power clamps.
9 Keep children and unauthorised persons away from the working area.
8 DO NOT dis-assemble the charger for any reason. The charger must only be checked by qualified service personnel.
8 DO NOT try to charge a non-rechargeable battery.
8 DO NOT try to charge battery if battery fluid is frozen.
WARNING! To prevent the risk of sparking, short circuit and possible explosion DO NOT drop metal tools in the battery area, or allow
them to touch the battery terminals.
8 DO NOT allow power clamps to touch each other or to make contact with any metallic part of the vehicle.
8 DO NOT cross connect power leads from charger to battery. Ensure positive (+/RED) is to positive and negative (-/BLACK) is to negative.
8 DO NOT pull the cables or clamps from the battery terminals.
8 DO NOT use the charger outdoors, or in damp, or wet locations and DO NOT operate within the vicinity of flammable liquids or gases.
8 DO NOT use charger inside vehicle or inside engine compartment.
9 Ensure there is effective ventilation to prevent a build-up of explosive gases, and do not cover or obstruct charger ventilation louvres.
8 DO NOT use the charger for a task for which it is not designed.
WARNING! DO NOT simultaneously charge batteries of different capacities or discharge levels.
WARNING! If a fuse blows, ensure it is replaced with an identical fuse type and rating. Use only Sealey genuine parts.
9 When not in use, store the charger carefully in a safe, dry, childproof location.
WARNING! Life-threatening danger to infants and children! Never leave children unsupervised with the packing material as this can
cause suffocation. Do not allow children to play with cables – strangulation hazard! Do not allow children to play with the components or
fasteners, as they could be swallowed and result in suffocation.
WARNING! Explosive gases. When a battery is charged, it can produce hydrogen gas which is explosive. Charging should be carried out
in a well-ventilated area and away from sources of heat flames and sparks.
9 Store and use indoors only. Do not expose to rain or moisture.
8 DO NOT cover the charger. Allow air to the charger, as it will overheat.
9 Wear safety goggles and acid-proof safety gloves. Before charging maintenance type battery, the electrolyte (battery acid) must be filled to
the maximum marked levels. Never use tap water. Distilled water or electrolyte must be used.
9 Never attempt to charge non-rechargeable batteries.
9 Never attempt to charge a frozen battery as well as a damaged or distorted battery.
2. INTRODUCTION
Automatic battery charger and starter designed for charging and boosting a variety of AGM (stop/start), GEL, Lead Acid and Lithium
lifepo4 batteries up to 600ah. Intuitive digital display and 200A peak engine start function, makes this unit ideal for every workshop.
Features overcharge, short circuit, and reverse polarity protection. Dedicated charging programs for AGM, GEL, conventional Lead Acid
and Lithium batteries with fully automated charging algorithms. Three charging rates for both 12v and 24v systems makes this ideal for
whatever job comes through the workshop. Portable design with handle means you can easily manoeuvre the unit around the workshop.
3. SPECIFICATION
MODEL NO SUPERSTART200D
Battery Range 10Ah-600Ah Output Charge Peak 60A 12V, 30A 24V Twelve battery
cell max
Battery Support /DC Mode No Output Charge Rates 12V - 60A, 30A, 10A 24V - 30A,
15A, 5A 12V 10A, LiFePO4
Battery Type GEL, AGM, LEAD ACID,
LITHIUM (12V ONLY), LEISURE
Plug Type 3-Pin
Cable & Clamp Length 2m Power Supply Cable Length 1.9m
Charger Type Intelligent (HF) Start Peak 200A
Max Size Size Battery (AH) Full
Charge in 12hrs from Discharged
600Ah Supply Voltage / Current 230V / 13A
Original Language Version
© Jack Sealey Limited
SUPERSTART200D Issue 2 24/04/24
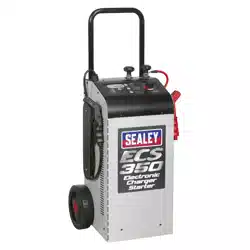
4. FEATURES
FIG.1
PART
NUMBER
NAME
1 Axle
2 Screws x 4
3 Circlip x 4
4 Hubcap x 2
5 Wheel x 2
6 Stand
7 Washer x 2
Red positive
clamp
Black negative
clamp
Control panel
Wheel
5. ASSEMBLY
5.1. HANDLE INSTALLATION (g.1)
5.1.1. Insert the handles into the two holes on both sides of the storage slot.
5.1.2. Find the four holes on two sides of the charger, tighten the screws, and make sure that the screws completely secure the handle.
FIG.2
FIG.3
5.2. WHEEL INSTALLATION (g.2 and g.3)
5.2.1. Pass the axle through the housing.
5.2.2. Snap the big circlips onto both sides of the axle near the housing.
NOTE: Make sure the circlips are properly positioned in the grooves.
5.2.3. Slide the wheels onto the axle.
5.2.4. Slide the backup rings onto both ends of the axle. Snap the small circlips onto the end of the axle on both sides.
5.2.5. Push the hubcaps into the center of the wheels.
5.2.6. Secure the foot stand using screws.
6. OPERATION
6.1. DISPLAY PANEL
FIG.4
© Jack Sealey Limited
SUPERSTART200D Issue 2 24/04/24
Original Language Version
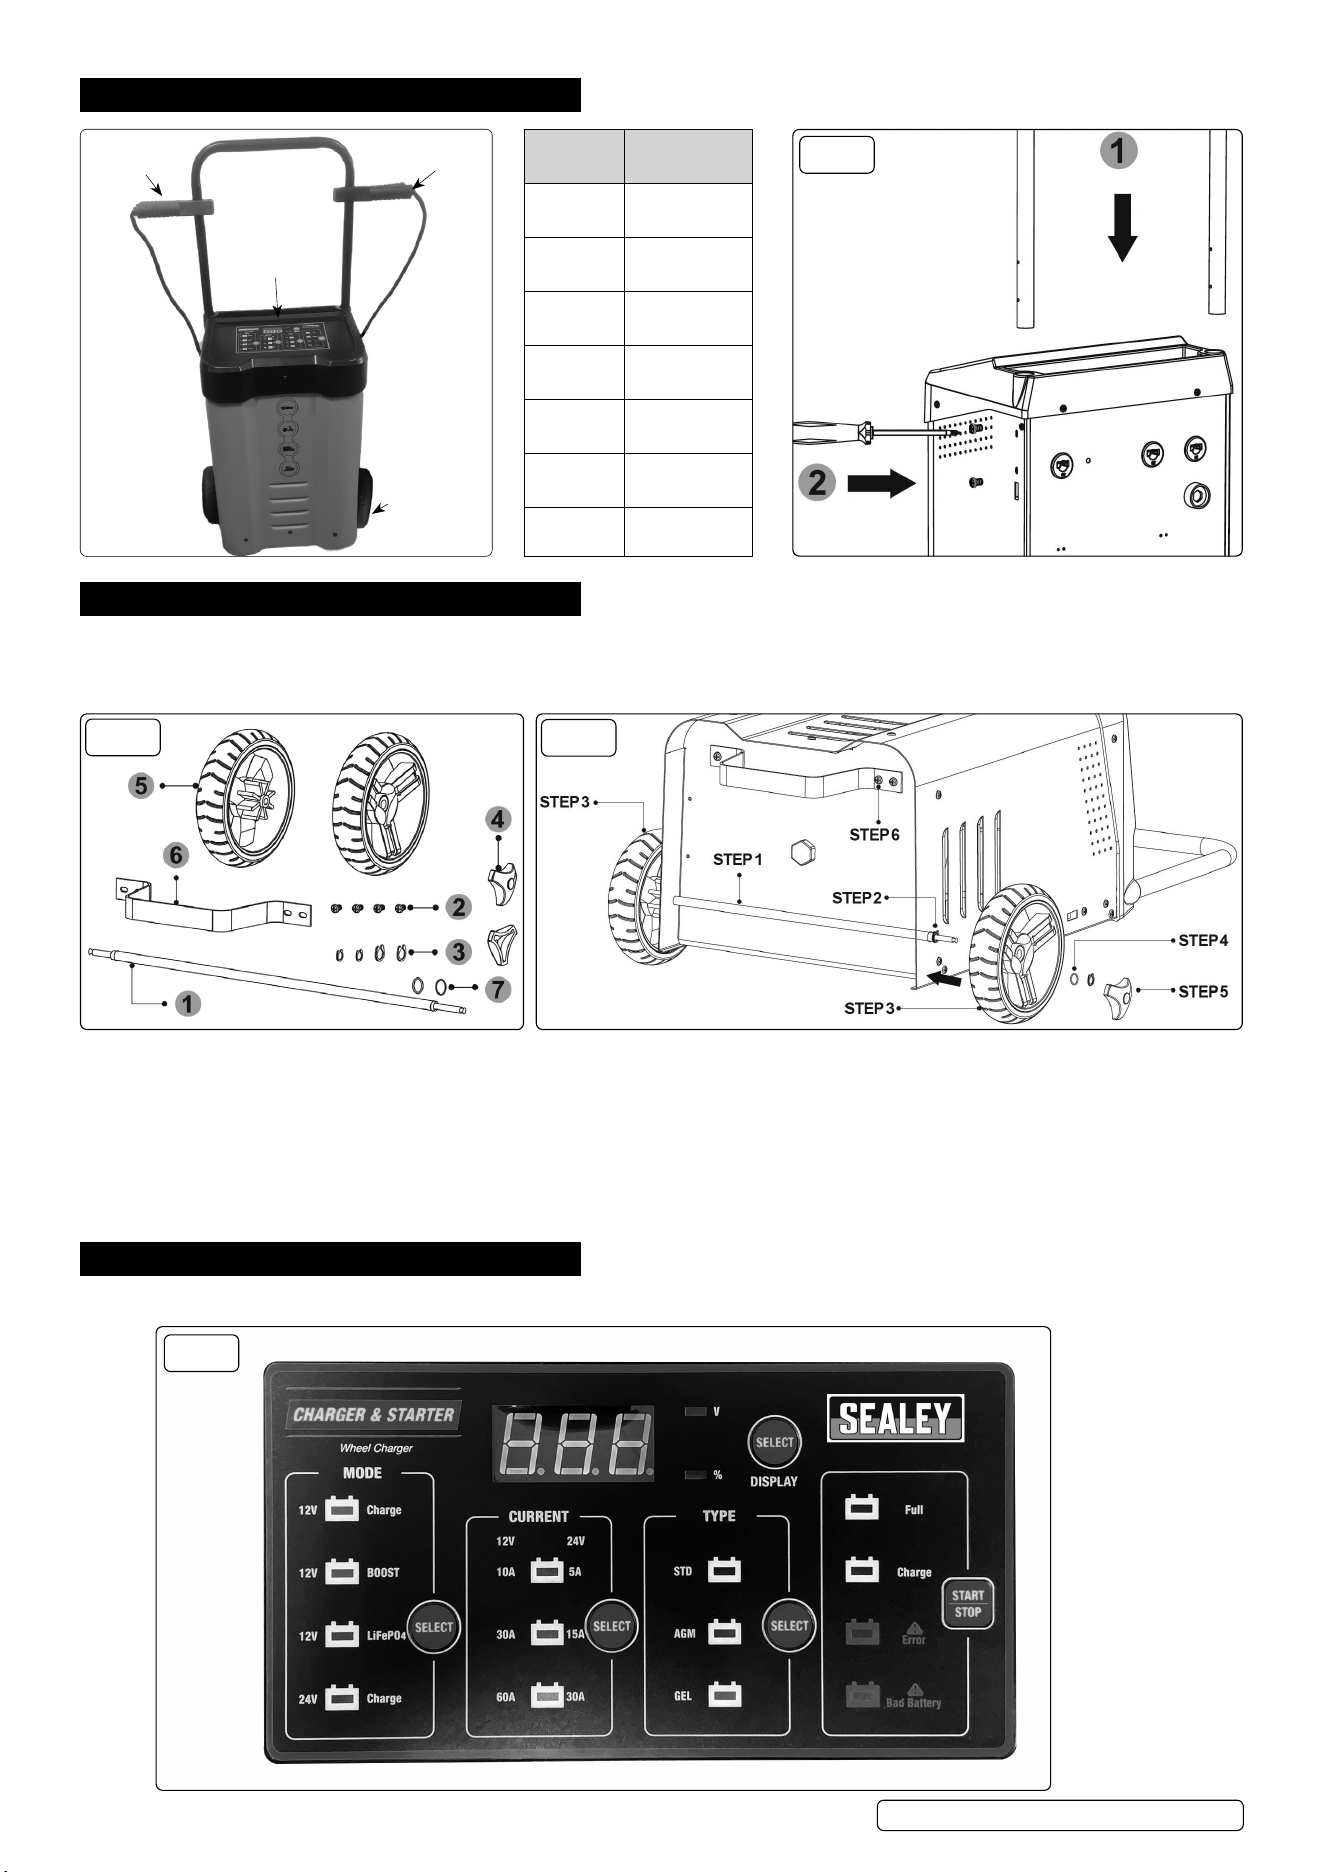
6.2. HOW TO CONNECT
6.2.1. The charger’s output leads have color-coded battery clips (RED-POSITIVE and BLACK- NEGATIVE). Determine which post of battery
is grounded (connected) to the chassis.
6.2.2. The battery terminal not connected to the chassis has to be connected rst. The other connection is to be made to the chassis, remote
from the battery and fuel line. The battery charger is then to be connected to the supply mains.
6.2.3. After charging, disconnect the battery charger from the mains supply. Then remove the chassis connection and then the battery
connection.
FIG.5
6.3. IF NEGATIVE POST IS GROUNDED TO CHASSIS
6.3.1. Connect the red clamp to the battery’s positive pole.
6.3.2. Connect the black clamp to the vehicle chassis remote from the fuel pipe and the battery.
6.3.3. Connect the charger to the wall socket.
6.4. IF POSITIVE POST IS GROUNDED TO THE CHASSIS
6.4.1. Connect the black clamp to the battery’s negative pole.
6.4.2. Connect the red clamp to the vehicle chassis remote from the fuel pipe and the battery.
6.4.3. Connect the charger to the wall socket.
9 When disconnecting charger, disconnect AC cord first, remove clamp from vehicle chassis, and then remove clamp from battery terminal.
8 DO NOT charge the battery while the engine is operating.
6.5. HOW TO CHARGE LEAD ACID BATTERIES
FIG.6
Connect the battery and AC power.
The display shows the battery’s
voltage.
FIG.7
Press the button to select charging
voltage (12V / 24V).
FIG.8
Press the button to select charging
current (12V 10A / 30A / 60A, 24V 5A /
15A / 30A).
FIG.9
Press the button to select battery type
(STD / AGM / GEL).
FIG.10
Press “START / STOP” button to start charging and the “Charge” light
will turn orange. When the battery is fully charged, the “Full” light will
turn green.
© Jack Sealey Limited
SUPERSTART200D Issue 2 24/04/24
Original Language Version
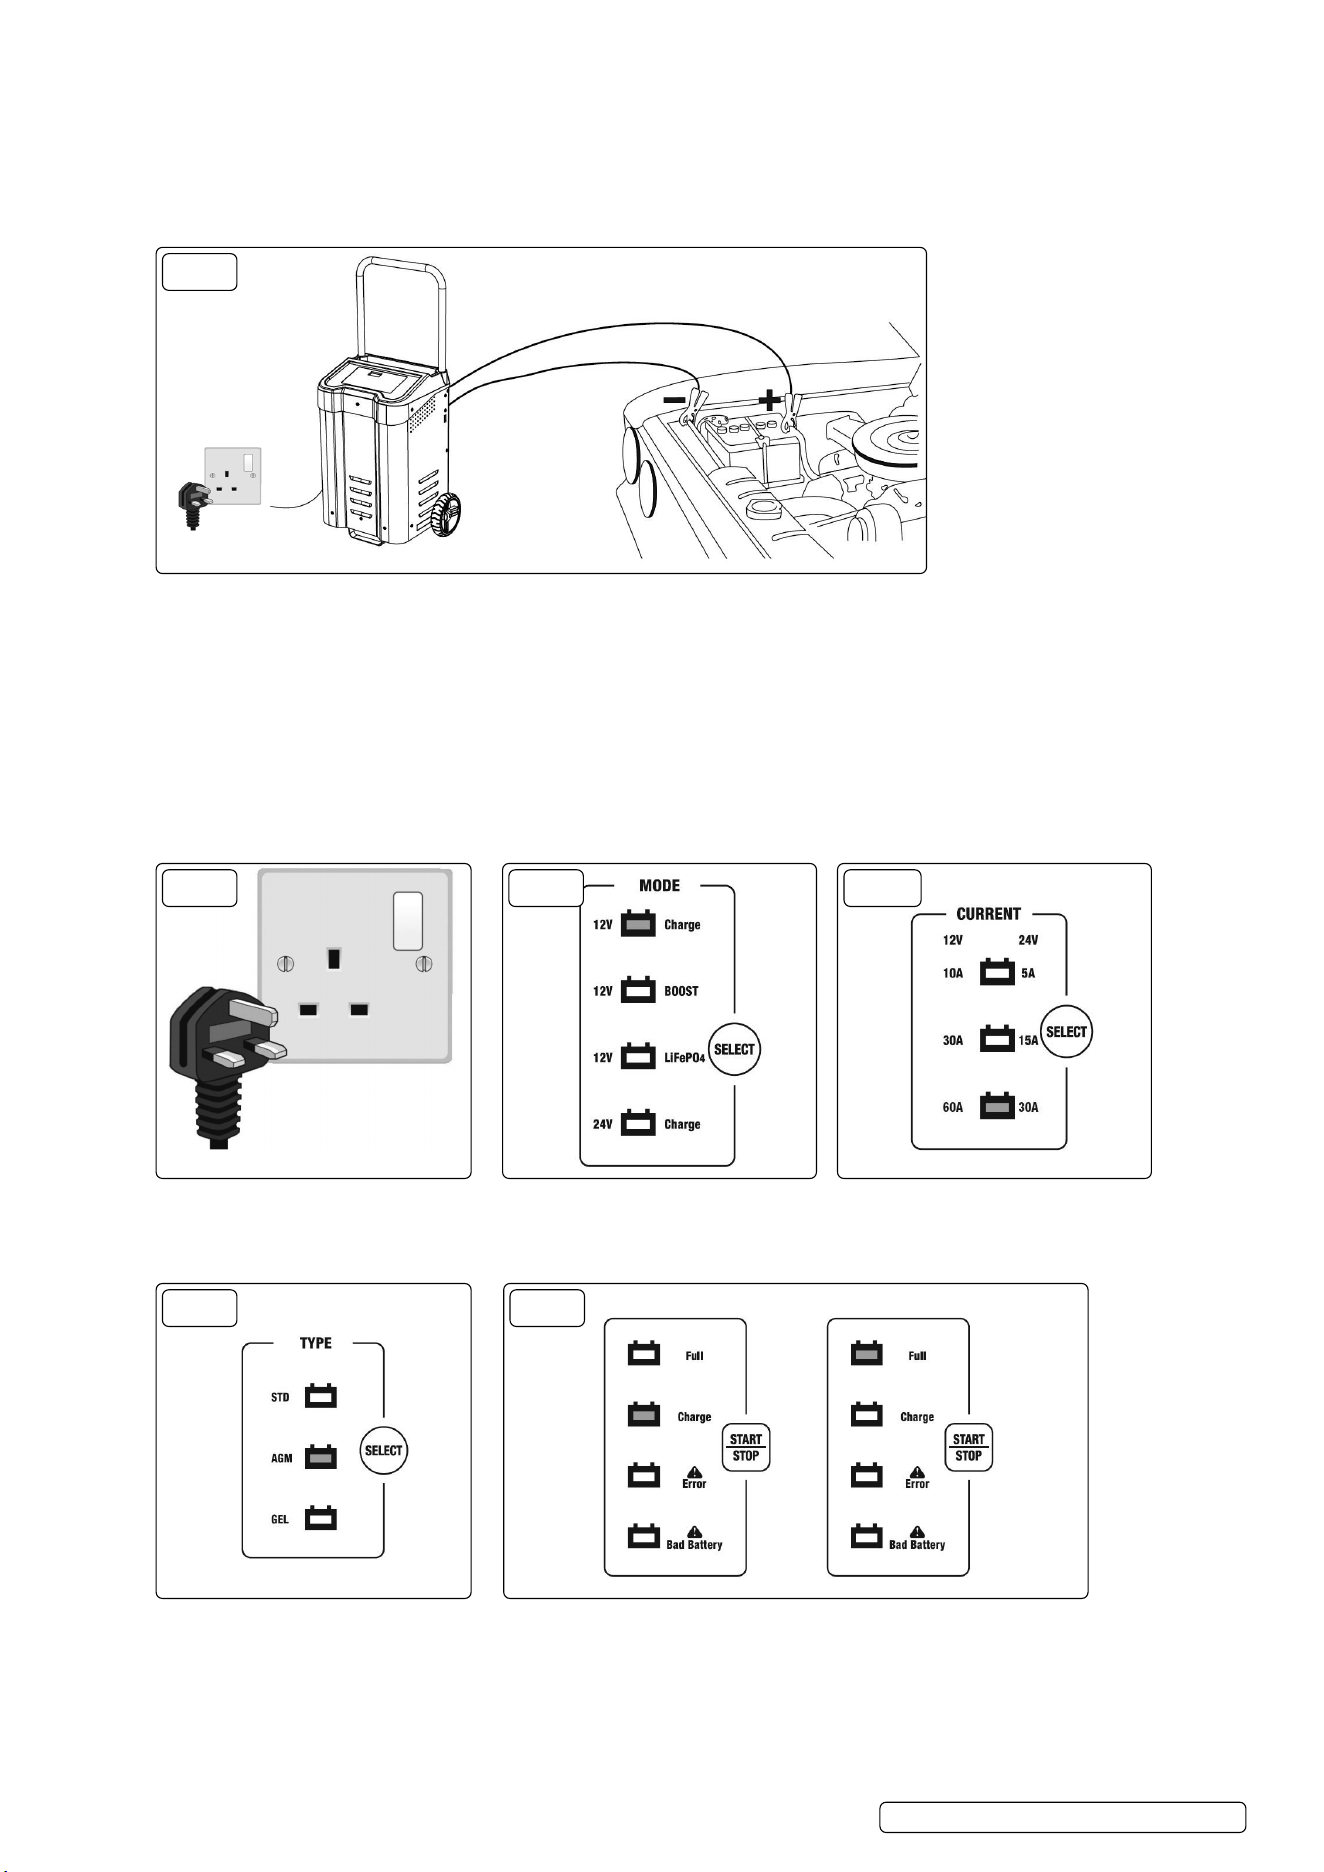
6.6. HOW TO CHARGE LIFEPO4 BATTERIES
Connect the battery and AC
power. The display shows the
battery’s voltage.
FIG.11
FIG.12 FIG.13
NOTE: Batteries with “Under Voltage Protection”
Some LiFePO4 batteries have on-board UVP (under voltage protection) which will disconnect the battery to prevent it becoming too
deeply discharged and dead. This protection will disable the charger from detecting whether there’s a battery connected. The lithium
charging function can’t work on LiFePO4 batteries if UVP is activated.
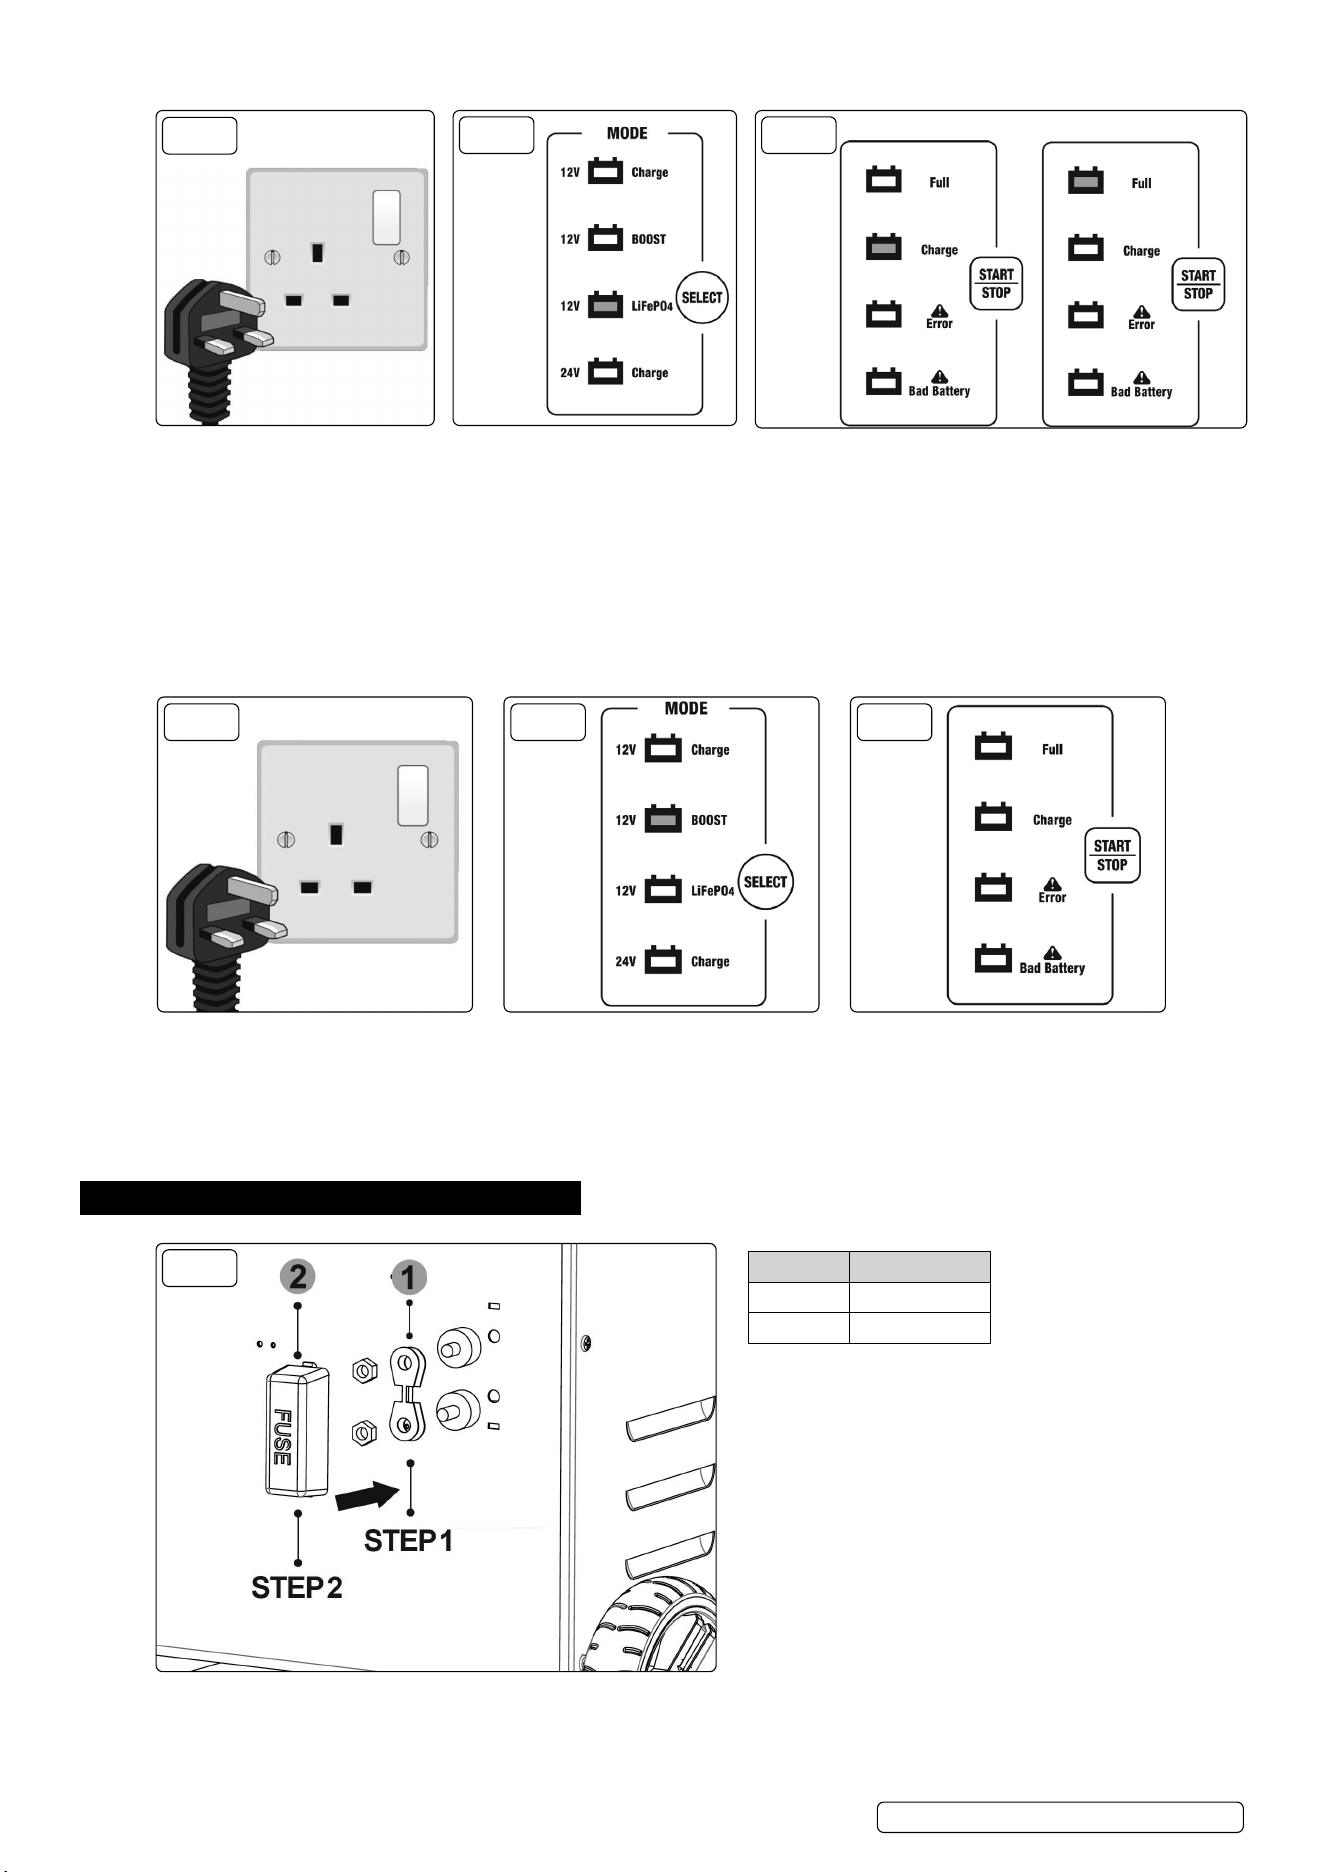
6.7. HOW TO BOOST
Connect the battery and AC power.
The display shows battery voltage.
Press the button to select 12V
BOOST. During boosting, other lights
go out, and functions are locked.
Press “START / STOP” button to boost
your car. The screen displays the
countdown time. The car needs to be
started within 90 seconds.
FIG.14 FIG.15 FIG.16
NOTE: The maximum of boosting time is 5 seconds and after each boost, it takes 180 seconds to cool down.
7. MAINTENANCE
PART NO NAME
1 Fuse (80A) x2
2 Plastic cover
FIG.17
7.1. FUSE REPLACEMENT (fig.17)
7.1.1. Replace the blown fuses, put 2 fuses on the two poles on the back of the charger, and screw them securely.
7.2. Put the plastic cover on the fuses for protection.
SUPERSTART200D Issue 2 24/04/24
Original Language Version
© Jack Sealey Limited
Press the button to select
LiFePO4 mode.
Press “START / STOP” button to start charging and the
“Charge” light will turn orange. When the battery is fully
charged, the “Full” light will turn green.
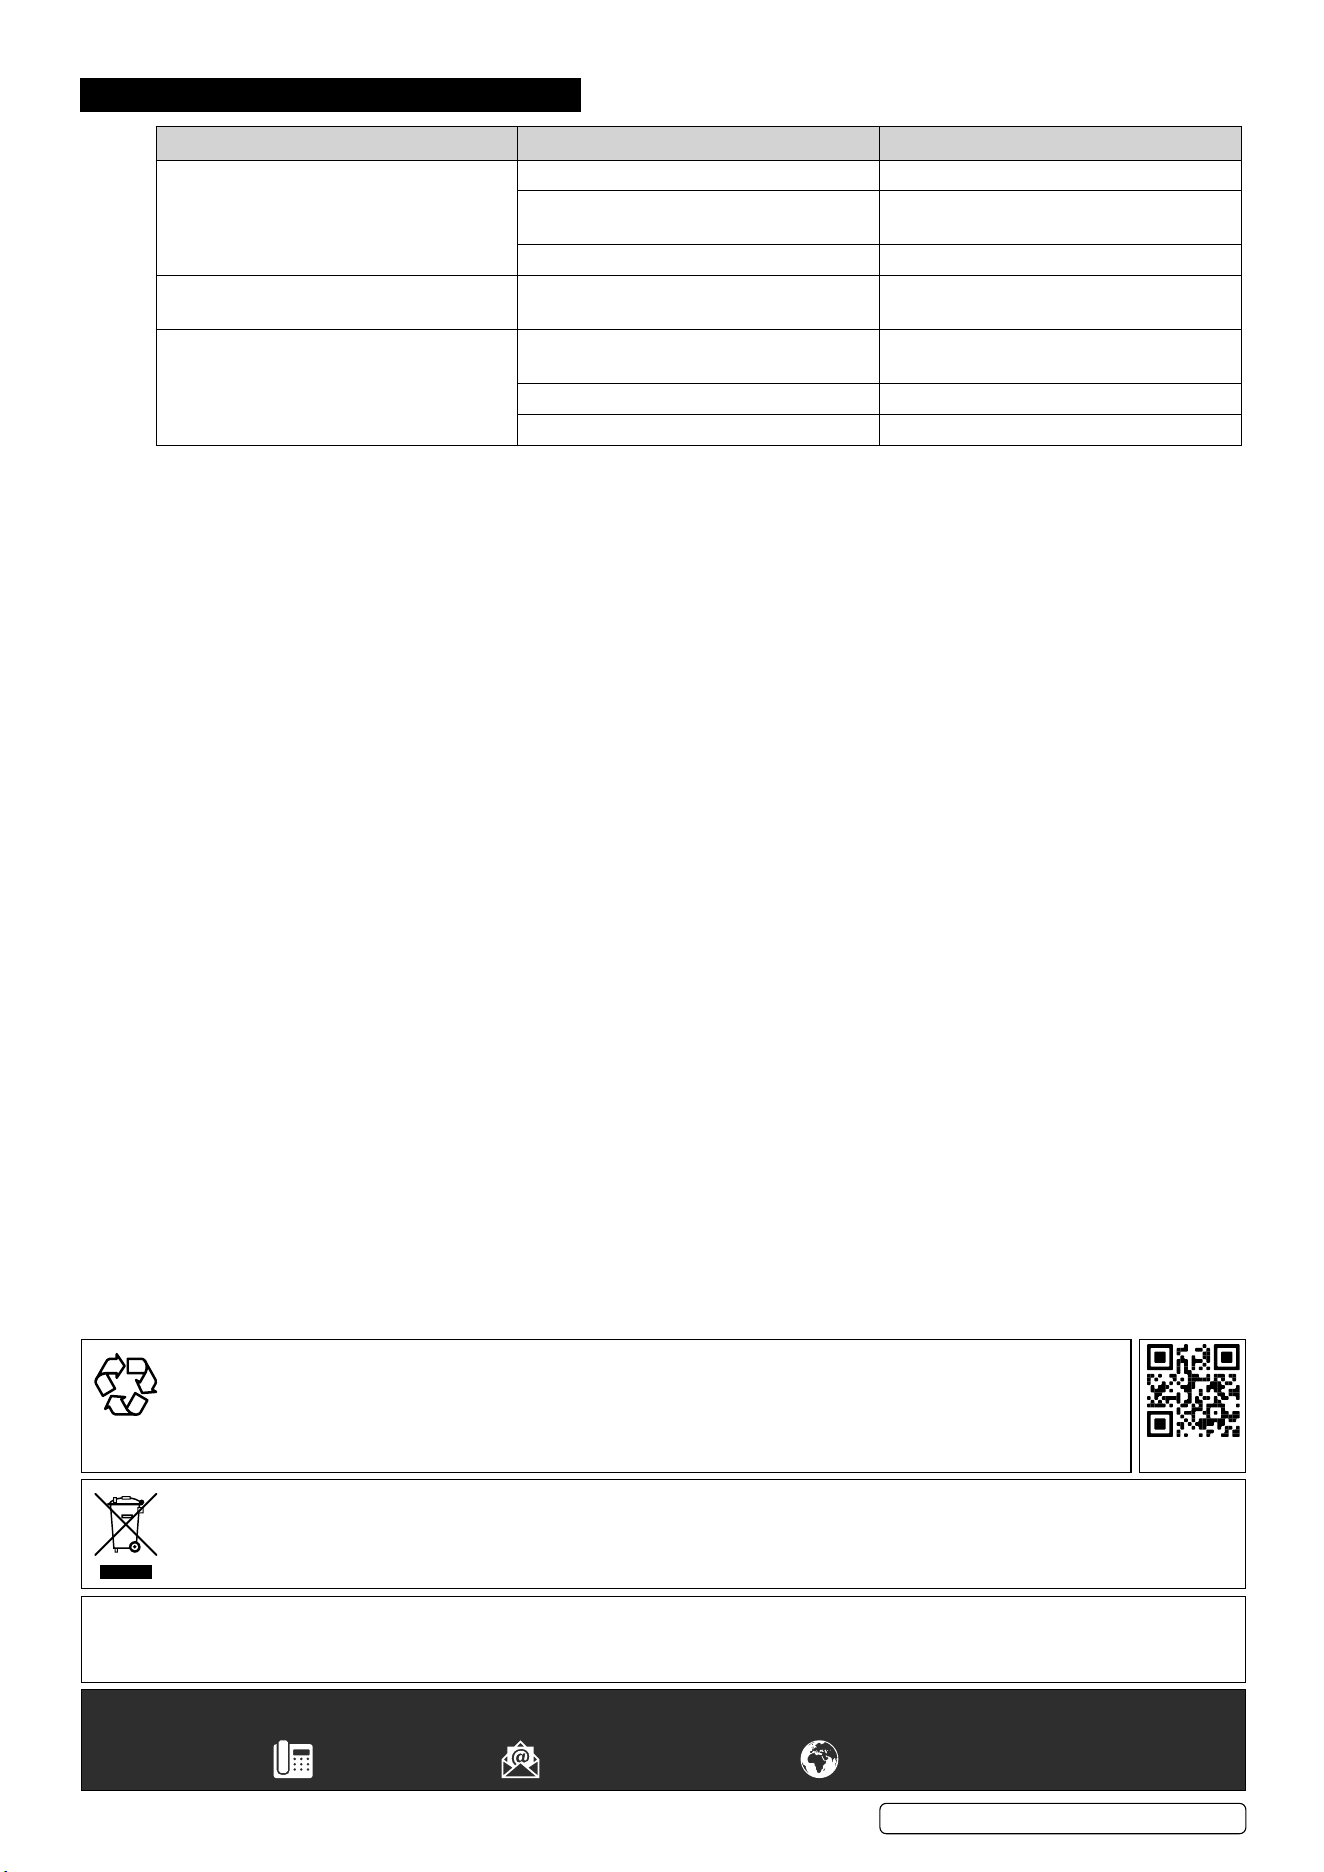
8. TROUBLESHOOTING.
PROBLEM POSSIBLE CAUSE SOLUTION
The “Error” light turns red and buzzer
sounds
The clamps are reversely connected Connect the clamps correctly
Battery voltage is below 1V Check whether clamps are connected or
replace battery
Select 12V mode to a 24V battery Change to 24V mode
The “Bad Battery” light turns red and
buzzer sounds
The connected battery voltage is between
1V to 4V
Replace battery
During the charging/starting process, the
display automatically returns to standby
condition and displays the battery voltage
The charger is over-temperature Switch off machine and allow charger to
cool
The clamp is loose Check the connections
The output is short circuit Connect the clamps correctly
Original Language Version
© Jack Sealey Limited
SUPERSTART200D Issue 2 24/04/24
Sealey Group, Kempson Way, Suffolk Business Park, Bury St Edmunds, Suffolk. IP32 7AR
01284 757500 sales@sealey.co.uk www.sealey.co.uk
WEEE REGULATIONS
Dispose of this product at the end of its working life in compliance with the EU Directive on Waste Electrical and Electronic
Equipment (WEEE). When the product is no longer required, it must be disposed of in an environmentally protective way. Contact
your local solid waste authority for recycling information.
Note: It is our policy to continually improve products and as such we reserve the right to alter data, specications and component parts without prior notice.
Important: No Liability is accepted for incorrect use of this product.
Warranty: Guarantee is 12 months from purchase date, proof of which is required for any claim.
ENVIRONMENT PROTECTION
Recycle unwanted materials instead of disposing of them as waste. All tools, accessories and packaging should be
sorted, taken to a recycling centre and disposed of in a manner which is compatible with the environment. When
the product becomes completely unserviceable and requires disposal, drain any uids (if applicable) into approved
containers and dispose of the product and uids according to local regulations.
REGISTER YOUR
PURCHASE HERE