SATISFRY BROOKLYN
5.7L AIR FRYER
RHAF57_IB&RB_FA_070623 Part no. T22-9003468
2 YEAR WARRANTY
RHAF57
INSTRUCTIONS & WARRANTY

2
IMPORTANT SAFEGUARDS
When using this appliance, basic safety precautions should always be followed, including the
following:
Read all instructions before, and follow whilst using this appliance.
1. To protect against electrical hazards, do not immerse the air fryer body in water or any
liquid.
2. Do not use it in a bathroom or near any source of water.
3. Do not use outdoors.
4. This appliance is not intended for use by persons (including children) with reduced
physical, sensory or mental capabilities, or lack of experience and knowledge, unless
they have been given supervision or instruction concerning use of the appliance by a
person responsible for their safety.
5. This appliance is NOT a toy. Children should be supervised to ensure they do NOT play
with this appliance.
6. Always follow the instructions when using this appliance.
7. The temperature of accessible surfaces/parts may become very hot when the appliance
is operating and may remain hot for some time after the appliance has been switched
off.
8. To avoid the possibility of scalding, keep clear of steam escaping around the door area.
9. CAUTION: Do not touch any internal surfaces until the air fryer has fully cooled.
10. CAUTION: Do not operate on an inclined plane. Place the air fryer on a stable, level,
heat-resistant surface and out of reach of children.
11. Route the power cord so it does not overhang, and cannot be caught accidentally.
12. Unplug the air fryer when not in use, before moving and before cleaning. Let it cool down
fully before cleaning and storing away.
13. There are no user serviceable parts. If the power cord is damaged, it must be replaced
by the manufacturer or similarly qualied person in order to avoid hazard.
14. Do not operate this appliance with a damaged cord/plug or after the appliance has
malfunctioned, or been dropped or damaged in any manner. Contact Customer Service
for examination, adjustment, repair or replacement.
15. To shut down, press and hold
for 3 seconds, turn off the wall power outlet then grasp
the plug and remove from wall power socket. Never pull by the cord.
16. Leave a clear space of at least 50mm around the air fryer when in use.
17. Do not cover the air fryer or put anything on top of it while in use.
18. Do not use the air fryer near or below curtains, overhead cupboards or or other
combustible materials.
19. Keep the power cord and the air fryer away from hotplates, cook-tops and burners.
20. Cook meat, poultry, and derivatives (mince, burgers, etc.) till the juices run clear. Cook
sh till the esh is opaque throughout.
21. Do not pour oil or any other liquid into the basket.
22. Do not use accessories or attachments other than those supplied as specically for use
with the air fryer.
23. Do not use the air fryer for any purpose other than that described in these instructions.

3
24. Do not connect this air fryer to an external timer or remote control system.
25. For added safety, electrical appliances should be connected to a power outlet that is
protected by a residual current device (RCD), also often referred to as a ‘Safety Switch’.
Your switchboard may already incorporate an RCD. If unsure, call an electrician for
verication and tting if necessary.
26. CAUTION: Benchtops, such as, but not limited to, engineered stone, marble, granite and
acrylic may not be tolerant of localised temperature rises. Therefore, any appliance that
radiates heat should be placed on a heat resistant pad or chopping board to prevent the
heat from affecting the benchtop.
This appliance is intended for use in households and similar applications such as:
- staff kitchen areas in shops, ofces and other working environments
- farm houses
- by clients in hotels, motels and other residential type environments
- bed and breakfast type environments
SAVE THESE INSTRUCTIONS
Legislation in some localities mandates that e-waste (anything with a plug, battery or cord)
is disposed of through controlled recycling facilities and must not be disposed of in general
household waste. For more information about recycling of electrical and battery operated
appliances, please contact your local council or your local household waste disposal service.
4
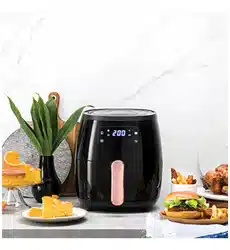
Congratulations on the purchase of your new Russell Hobbs Satisfry Brooklyn 5.7L Air Fryer.
Each unit is manufactured to ensure safety and reliability. Before using the air fryer for the
rst time, please read this instruction booklet carefully and keep it for future reference. Pass it
on if you pass on the air fryer.
When using this appliance, basic safety precautions should always be followed.
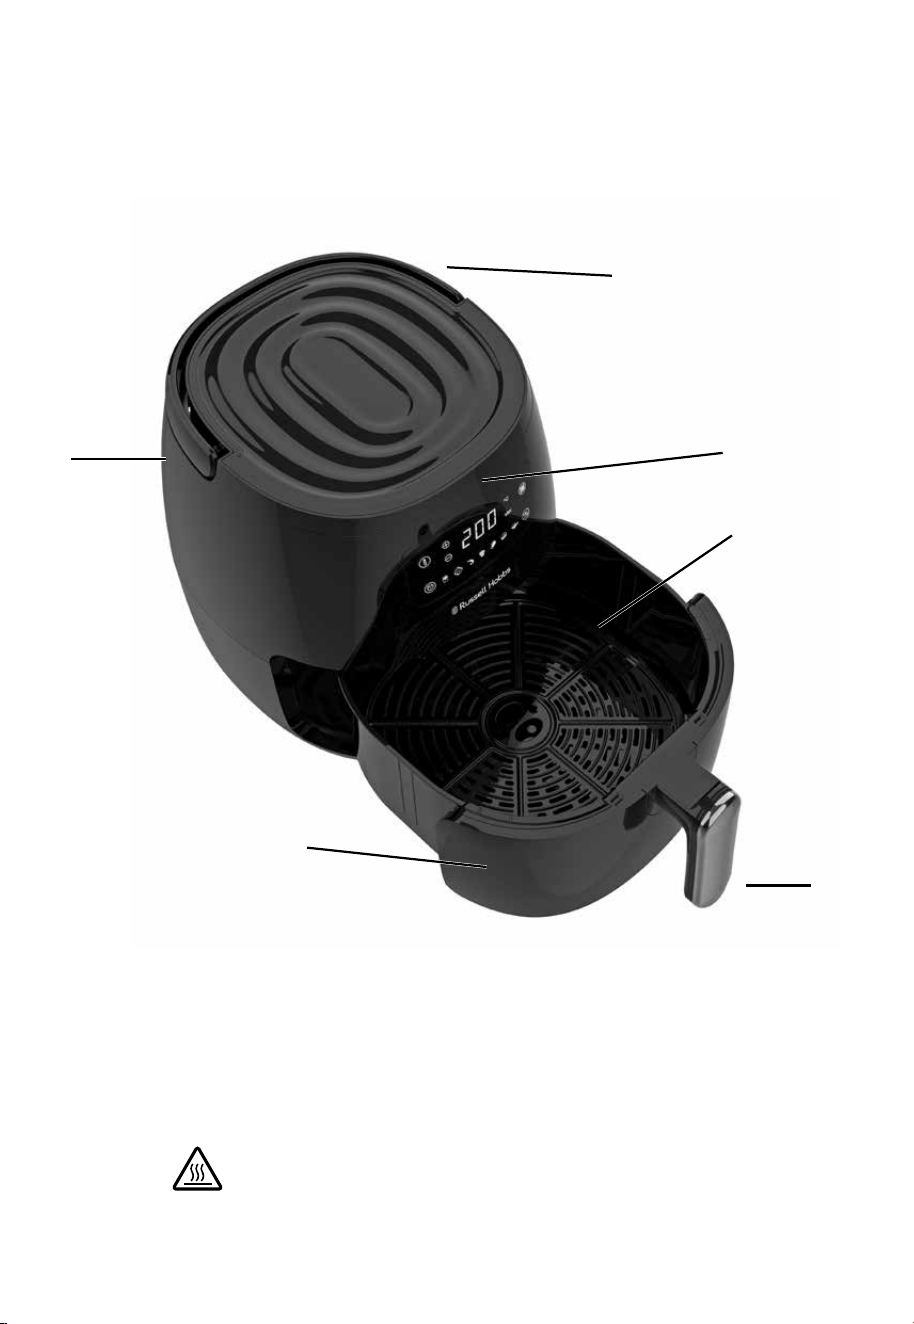
1. Air Fryer Body
2. Carry Handle
3. Digital Touchscreen
& Display
4. Basket Handle
5. Basket
6. Crisping Plate
6
3
4
1
5
Caution, hot surface(s)
2

5
BEFORE FIRST USE
• Remove all packing materials.
• Hand wash the removable parts.
• When using the fryer for the rst time, you may notice smoke or a slight odour for the rst
few minutes of cooking. This is normal. Ensure the room is well ventilated.
• Slide the basket into the machine until it clicks into place. The appliance will not work
unless the basket is properly inserted.
HOW IT WORKS
• The air fryer uses hot air and radiant heat for cooking.
• Little to no oil is required. If needed, add oil to the food as a coating, don’t pour oil into the
basket.
PREPARATION, BASKET & CRISPING PLATE
• Sit the appliance on a stable, level, heat-resistant surface.
• Leave a space of at least 50mm all-round the appliance.
• Have oven gloves (or a tea towel) on hand, use heat resistant plastic tongs and a
heat-resistant mat or dinner plate to rest the basket on.
Note: Do not use metal tongs as it may scratch the coating. We recommend using only
heat resistant plastic or silicon coated tongs.
• To remove the basket from the body:
1. Hold the top of the body.
2. Grip the basket handle with the other hand.
3. Slide the basket out of the body.
4. Rest the basket on a heat-resistant mat.
• To remove the crisping plate:
1. Remove food from the basket using heat-resistant plastic tongs.
2. Let the basket and crisping plate cool down.
3. Using oven gloves, grip the crisping plate from the center and slide up.
6
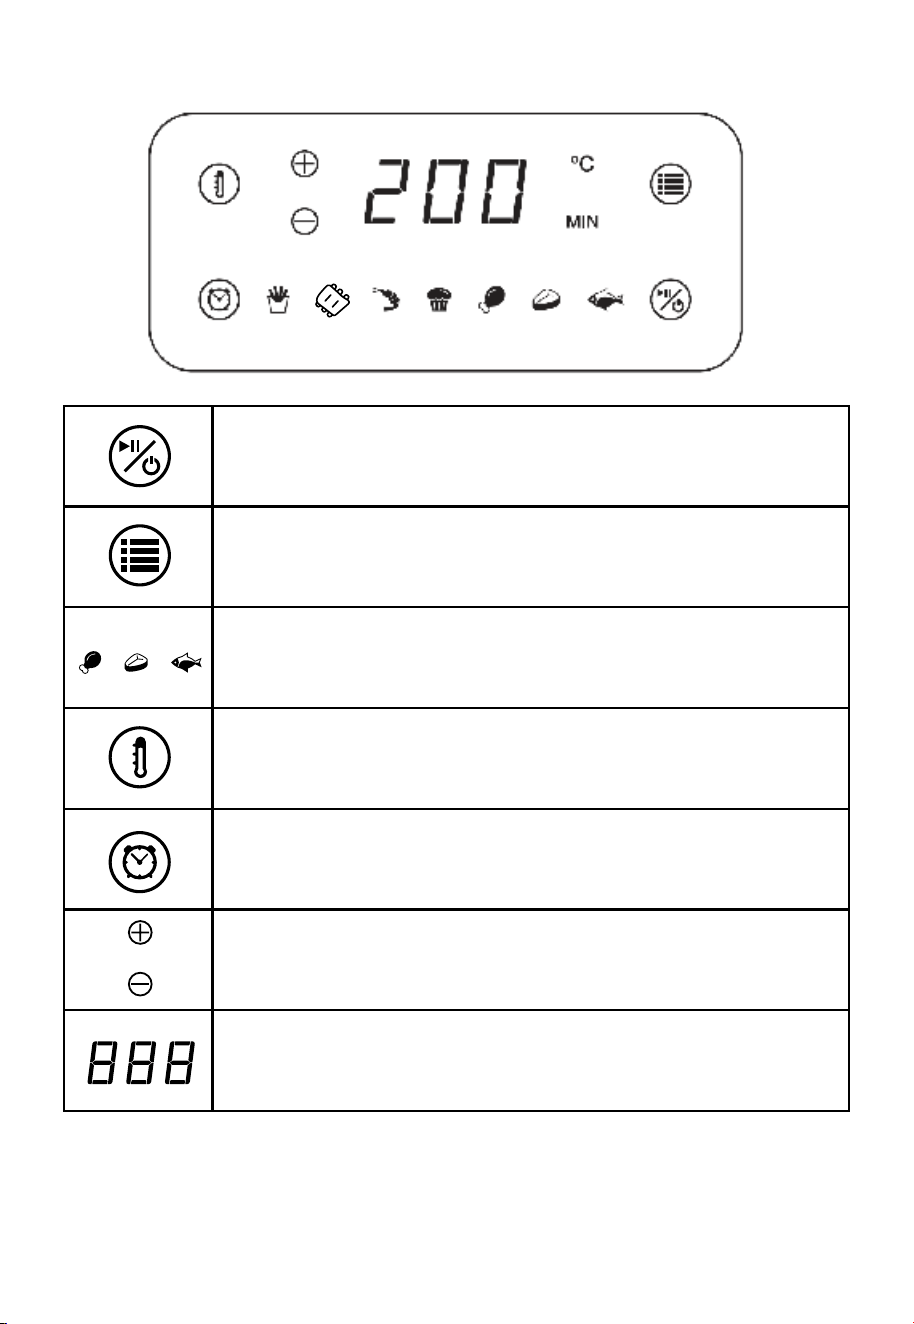
DIGITAL TOUCHSCREEN & SETTINGS
ON/OFF
Setup mode, start and shut off the appliance
COOKING MENU SELECTION
Select auto-cooking or manual mode by navigating through the different
8 setting options (7 auto-cooking + manual)
7 AUTO-COOKING SETTINGS
(1 displayed at a time)
Fries, Chops, Prawns, Bake, Chicken, Steak, Fish
COOKING TEMPERATURE
Press button and adjust Cooking Temperature Control
using the + or – buttons.
COOKING TIME
Press button and adjust Cooking Time Control using the + or – buttons.
+ / -
Increase/decrease cooking time and/or temperature.
DISPLAY SCREEN
Time/Temperature Display
7
DEFAULT COOKING TIMES AND TEMPERATURE:
The Air Fryer has 7 auto cooking functions with default cooking time/temperature, and
manual mode with adjustable cooking temperature/time settings.
Note: It is possible to adjust the cooking time and/or temperature on auto-cooking, if needed.
COOKING MODE DEFAULT COOKING TIME DEFAULT COOKING TEMP
Fries 25 minutes 200°C
Chops 22 minutes 180°C
Prawns 15 minutes 180°C
Bake 30 minutes 155°C
Chicken 20 minutes 180°C
Steak 12 minutes 200°C
Fish 15 minutes 175°C
Manual mode
15 minutes 200°C
GETTING STARTED: TURN ON THE AIR FRYER
• When rst connecting the appliance to a wall power outlet, the digital touchscreen icons
will all illuminate for several seconds. Following this, only the ON/OFF
touch button
will be illuminated.
• Press the
to turn on the air fryer. The display screen will show the default cooking
temperature/time settings on Manual mode: 200°C and 15 minutes.
• Select your cooking mode by either:
- Selecting one of 7 auto-cooking functions, with preset cooking temperature/time, or;
- Adjusting cooking time/temperature manually.
• To select an auto-cooking function, press the
button repeatedly to navigate through
the 7 different functions until the desired icon illuminates.
• If adjusting cooking time and temperature - whether on manual mode or on auto-cooking
mode - press the
or
button and then
.
• To shut down the appliance, press and hold
for 3 seconds. Once off, the
button
will remain illuminated indicating the unit is still connected to the mains power outlet.
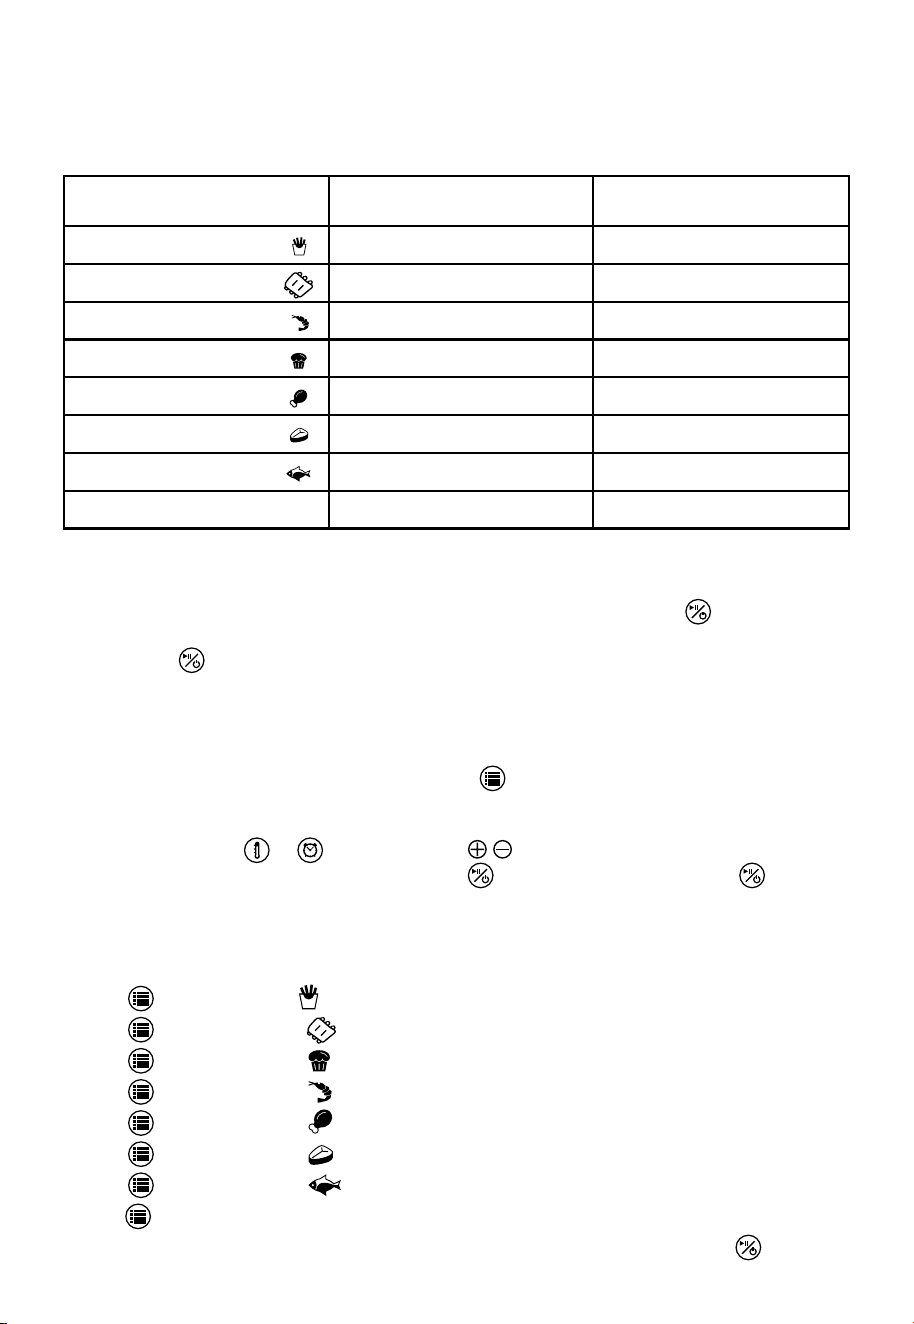
HOW TO NAVIGATE BETWEEN FUNCTIONS
- Manual mode is the default function when the air fryer is turned on
- Press
1 time to select
function.
- Press
2 times to select
function.
- Press
3 times to select
function.
- Press
4 times to select
function.
- Press
5 times to select
function.
- Press
6 times to select
function.
- Press
7 times to select
function.
- Press
8 times to return to manual cooking mode, select desired time/temperature if required
- Once the icon corresponding to your desired cooking mode illuminates, press
to begin
cooking.

8
PREHEAT - RECOMMENDED FOR MANUAL MODE
1. Insert the plug into a wall power outlet.
2. Adjust to the desired cooking temperature.
3. Adjust the cooking time to 5 minutes. The display screen will show 05 MIN.
4. Press
to start preheating the air fryer.
5. The cooking time and temperature will be displayed alternatively (respectively 3 and 7
seconds) during preheating/cooking cycle.
6. When the timer returns to zero, the air fryer beep 5 times and will switch off.
COOKING - IN USE
1. Place the crisping plate inside the basket making sure the arrows on the crisping plate
are aligned with the arrow on the bottom of the basket.
2. Place desired food into the cooking basket. Do not overfill the basket, to leave space for
the hot air to circulate between pieces of food.
3. Slide the basket back into the air fryer body, ensuring it clicks into place and sits flush
with the shape of the air fryer body.
4. Select cooking settings - via either auto-cooking mode or manual mode:
- Select one of the 7 auto cooking functions or;
- Manually adjust both cooking time and temperature by pressing the
or
refer to the
recipes & cook times in this booklet to determine the correct settings depending on the
food to be cooked.
5. Press
to begin cooking
- To stop the cooking cycle or reset the settings, press again.
6. Half way through cooking, remove the basket, shake it, and/or turn the food over, then
place the basket back into the body to resume the cooking cycle. This ensures the food
is evenly cooked and crispy all over.
7. Once the cooking time has elapsed, the timer will beep 5 times and the unit will switch
off.
8. Slide the basket out of the body and check that the food is cooked.
9. Place the basket on an insulated mat.
10. To remove food from the basket, we recommend using tongs. We do not recommend
tipping the basket upside down as oil residue will drip out.
11. Unplug the appliance, once all cooking is complete.
CAUTION: Hot oil from the ingredients may gather at the bottom of the basket. Be
careful when removing the crisping plate from the basket.
NOTES:
• The air fryer will switch off when you remove the basket.
• The air fryer will switch back on when you replace the basket in to the body and will
automatically resume the cooking cycle from where it stopped.
• During the last minute of the cooking cycle, ‘00’ will be flashing on the display
screen, indicating that there is less than 1 minute of cooking remaining.
NOTE: High fat foods (e.g. pork) may create smoke. This is normal as oil residue is
cooked at a high temperature.
Reducing temperature may decrease the effect of smoke.

9
CARE AND MAINTENANCE
This product contains no user serviceable parts. Refer service to qualied service personnel.
• IMPORTANT: Before cleaning any part, be sure the air fryer is off, unplugged, and cool. It
is important that you clean the entire appliance after each use to prevent accumulation of
grease and to avoid unpleasant odours.
• If the appliance isn’t cleaned thoroughly, it may produce smoke from the oil residue.
IMPORTANT: Do not immerse the appliance, power cord or plug in any liquid.
Basket & Crisping Plate
1. Once the air-fryer has cooled, grasp the basket handle and remove the basket from the
air-fryer body for cleaning.
2. Roughly wipe the interior of the body to remove any crumb or residue, but NOT the
heating elements at the top.
3. Remove the crisping plate from the basket.
4. Dispose of food residue and oils, and wipe both the crisping plate and basket with a damp
cloth before hand washing them in warm to hot soapy water. Dry thoroughly before placing
back in the air fryer body.
Exterior Surfaces
Clean the exterior with a damp cloth or sponge. Dry thoroughly.
NOTE: Do not use any abrasive material or sharp utensils to clean the air fryer or any of
its parts.
NOTE: Allow all parts and surfaces to dry thoroughly before using the appliance again.
COOKING TIMES & FOOD SAFETY
NOTE: These cooking times are intended as a guide only
• Cook meat, poultry, and derivatives (mince, burgers, etc.) until the juices run clear. Cook
sh till the esh is opaque throughout.
• When cooking pre-packed foods, refer to packaging instructions.
POTATOS & FRIES Temp°C Time
Shake/turn the food half way
through cooking
Frozen chips/potato chips 200°C 12-20 min
A single layer of chips – 12 minutes
Basket half full – 15 minutes
Basket full (loosely, not packed) – 20
minutes
Home-Made Potato Wedges 200°C 20 min
Rinse, towel dry, toss in salt, pepper, and
1 tsp oil
Jacket Potatoes 180°C 30-40 min For a crispy jacket, rub with oil
Roast Potatoes 180°C 25-35 min
Rinse, towel dry, toss in salt, pepper,
crushed rosemary (optional) and 1 tsp oil
MEAT & POULTRY Temp°C Time
Shake/turn the food half way
through cooking
Sausages 180°C 10 min
Chicken Breast 180°C 10-15 min
Cooking time depends on size of the
food
Chicken Thighs 180°C 25-30 min
Cooking time depends on size of the
food

10
Boneless Remove
Chicken Products (Frozen)
180°C 15 min
Schnitzel (Chicken/Veal/Pork) 180°C 15 min
Hammer meat flat, coat in egg, then in
seasoned crumb
Stir Fry 180°C 25-30 min
Toss in salt, pepper, and 1 tsp oil, add a
little sauce 5 minutes before the end
(chilli, sweet chilli, garlic, etc)
SNACKS & OTHERS Temp°C Time
Shake/turn the food half way
through cooking
Sausage Roll 200°C 13-15 min
Spring Rolls 200°C 8-10 min
Frozen Chicken Nuggets 200°C 6-10 min
Frozen Fish Fingers 200°C 6-10 min
Frozen Onion Rings 180°C 15 min
Frozen Fishcakes, Large 180°C 20-25 min
Frozen Fishcakes, Small 180°C 15-20 min
Fishcakes, Large 180°C 15-20 min
Fishcakes, Small 180°C 10 min
Frozen Scampi 180°C 10-15 min
Frozen Breadcrumbed
Cheese Snacks
180°C 8-10 min
Stuffed Vegetables 150°C 10 min
Frozen Samosas 180°C 20 min
Fresh Samosas 180°C 10-15 min
Tortillas 200°C 5-10 min For a crispy finish, rub with oil
BAKING Temp°C Time
Muffins 200°C 15-18 min

11
Spectrum Brands Australia Pty Ltd
Locked Bag 3004 Braeside
Victoria 3195 Australia
Customer Service in Australia
TollFree: 1800 623 118
Email: [email protected]
Website: www.spectrumbrands.com.au
Spectrum Brands New Zealand Ltd
PO Box 9817 Newmarket
Auckland 1149 New Zealand
Customer Service in New Zealand
TollFree: 0800 736 776
Email: [email protected]
Website: www.spectrumbrands.co.nz
Spectrum Brands Australia Pty Ltd and Spectrum Brands New Zealand Ltd
Warranty Against Defects
In this warranty:
Australian Consumer Law means the Australian consumer law set out in Schedule 2 to the
Competition and Consumer Act 2010;
CGA means the New Zealand Consumer Guarantees Act 1993;
Goods means the product or equipment which was accompanied by this warranty and
purchased in Australia or New Zealand, as the case may be;
Manufacturer, We or us means:
1. for Goods purchased in Australia, Spectrum Brands Australia Pty Ltd ABN, 78 007 070 573;
or
2. for Goods purchased in New Zealand, Spectrum Brands New Zealand Ltd, as the case
may be, contact details as set out at the end of this warranty;
Supplier means the authorised distributor or retailer of the Goods that sold you the Goods in
Australia or in New Zealand; and
You means you, the original end-user purchaser of the Goods.
1. Our goods come with guarantees that cannot be excluded under the Australian Consumer
Law, or the CGA. You are entitled to a replacement or refund for a major failure and
compensation for any other reasonably foreseeable loss or damage. You are also entitled
to have the goods repaired or replaced if the goods fail to be of acceptable quality and the
failure does not amount to a major failure.
2. The benefits provided by this Warranty are in addition to all other rights and remedies in
respect of the Goods which the consumer has under either the Australian Consumer Law
or the CGA. The original purchaser of the Goods is provided with the following Warranty
subject to the Warranty Conditions:
3. We warrant the Goods for all parts defective in workmanship or materials for
a (Warranty Period) period of 2 years from the date of purchase.
If the Goods prove defective within the Warranty Period by reason of improper workmanship
or material, we may, at our own discretion, repair or replace the Goods without charge.
Warranty Conditions
4. The Goods must be used in accordance with the manufacturer’s instructions. This
Warranty does not apply should the defect in or failure of the Goods be attributable
to misuse, abuse, accident or non-observance of manufacturer’s instructions on the
part of the user. As far as the law permits, the manufacturer does not accept liability
for any direct or consequential loss, damage or other expense caused by or arising
out of any failure to use the Goods in accordance with the manufacturer’s instructions.
5. Exhaustible components (such as batteries, filters and brushes) of the Goods are
included under this Warranty only where there is a defect in workmanship or materials
used.
6. The warranty granted under clause 3 is limited to repair or replacement only.
7. Any parts of the Goods replaced during repairs or any product replaced remain the
property of the manufacturer. In the event of the Goods being replaced during the
Warranty Period, the warranty on the replacement Goods will expire on the same
date as for the Warranty Period on the original Goods which are replaced.
8. In order to claim under the warranty granted under clause 3 you must:
(a) Retain this warranty with your receipt/proof of purchase; and
(b) Return the Goods to us at the relevant address or to the Supplier by prepaid
freight within the Warranty Period accompanied with (i) the legible and unmodified
original proof of purchase, which clearly indicates the name and address of the
Supplier, the date and place of purchase, the product name or other product serial
number and (ii) this warranty.
9. This warranty is immediately void if:
(a) Any serial number or appliance plate is removed or defaced;
(b) The Goods have been serviced or otherwise repaired by a person not authorised
to do so by us or where non approved replaced parts are used.
10. The Goods are designed for domestic use only. The Goods must be connected to the
electrical voltage requirements as specified in the ratings label located on the Goods.
11. This warranty does not cover the cost of claiming under the warranty or transport
of the Goods to and from the Supplier or us.
12. This warranty is only valid and enforceable in Australia against Spectrum Brands
Australia Pty Ltd and in New Zealand against Spectrum Brands New Zealand Ltd.
Contact us or the Supplier for further details.
Register your product online
If you live in Australia please visit: www.spectrumbrands.com.au/warranty
If you live in New Zealand Please visit: www.spectrumbrands.co.nz/warranty
Registration of your warranty is not compulsory, it gives us a record of your purchase
AND entitles you to receive these benefits: Product information; Hints and tips; Recipes
and news; Information on special price offers and promotions.
Any questions? Please contact Customer Service for advice.

12
Spectrum Brands Australia Pty Ltd
Locked Bag 3004 Braeside
Victoria 3195 Australia
Customer Service in Australia
TollFree: 1800 623 118
Email: [email protected]
Website: www.spectrumbrands.com.au
Spectrum Brands New Zealand Ltd
PO Box 9817 Newmarket
Auckland 1149 New Zealand
Customer Service in New Zealand
TollFree: 0800 736 776
Email: [email protected]
Website: www.spectrumbrands.co.nz
Spectrum Brands Australia Pty Ltd and Spectrum Brands New Zealand Ltd
Warranty Against Defects
In this warranty:
Australian Consumer Law means the Australian consumer law set out in Schedule 2 to the
Competition and Consumer Act 2010;
CGA means the New Zealand Consumer Guarantees Act 1993;
Goods means the product or equipment which was accompanied by this warranty and
purchased in Australia or New Zealand, as the case may be;
Manufacturer, We or us means:
1. for Goods purchased in Australia, Spectrum Brands Australia Pty Ltd ABN, 78 007 070 573;
or
2. for Goods purchased in New Zealand, Spectrum Brands New Zealand Ltd, as the case
may be, contact details as set out at the end of this warranty;
Supplier means the authorised distributor or retailer of the Goods that sold you the Goods in
Australia or in New Zealand; and
You means you, the original end-user purchaser of the Goods.
1. Our goods come with guarantees that cannot be excluded under the Australian Consumer
Law, or the CGA. You are entitled to a replacement or refund for a major failure and
compensation for any other reasonably foreseeable loss or damage. You are also entitled
to have the goods repaired or replaced if the goods fail to be of acceptable quality and the
failure does not amount to a major failure.
2. The benefits provided by this Warranty are in addition to all other rights and remedies in
respect of the Goods which the consumer has under either the Australian Consumer Law
or the CGA. The original purchaser of the Goods is provided with the following Warranty
subject to the Warranty Conditions:
3. We warrant the Goods for all parts defective in workmanship or materials for
a (Warranty Period) period of 2 years from the date of purchase.
If the Goods prove defective within the Warranty Period by reason of improper workmanship
or material, we may, at our own discretion, repair or replace the Goods without charge.
Warranty Conditions
4. The Goods must be used in accordance with the manufacturer’s instructions. This
Warranty does not apply should the defect in or failure of the Goods be attributable
to misuse, abuse, accident or non-observance of manufacturer’s instructions on the
part of the user. As far as the law permits, the manufacturer does not accept liability
for any direct or consequential loss, damage or other expense caused by or arising
out of any failure to use the Goods in accordance with the manufacturer’s instructions.
5. Exhaustible components (such as batteries, filters and brushes) of the Goods are
included under this Warranty only where there is a defect in workmanship or materials
used.
6. The warranty granted under clause 3 is limited to repair or replacement only.
7. Any parts of the Goods replaced during repairs or any product replaced remain the
property of the manufacturer. In the event of the Goods being replaced during the
Warranty Period, the warranty on the replacement Goods will expire on the same
date as for the Warranty Period on the original Goods which are replaced.
8. In order to claim under the warranty granted under clause 3 you must:
(a) Retain this warranty with your receipt/proof of purchase; and
(b) Return the Goods to us at the relevant address or to the Supplier by prepaid
freight within the Warranty Period accompanied with (i) the legible and unmodified
original proof of purchase, which clearly indicates the name and address of the
Supplier, the date and place of purchase, the product name or other product serial
number and (ii) this warranty.
9. This warranty is immediately void if:
(a) Any serial number or appliance plate is removed or defaced;
(b) The Goods have been serviced or otherwise repaired by a person not authorised
to do so by us or where non approved replaced parts are used.
10. The Goods are designed for domestic use only. The Goods must be connected to the
electrical voltage requirements as specified in the ratings label located on the Goods.
11. This warranty does not cover the cost of claiming under the warranty or transport
of the Goods to and from the Supplier or us.
12. This warranty is only valid and enforceable in Australia against Spectrum Brands
Australia Pty Ltd and in New Zealand against Spectrum Brands New Zealand Ltd.
Contact us or the Supplier for further details.
Register your product online
If you live in Australia please visit: www.spectrumbrands.com.au/warranty
If you live in New Zealand Please visit: www.spectrumbrands.co.nz/warranty
Registration of your warranty is not compulsory, it gives us a record of your purchase
AND entitles you to receive these benefits: Product information; Hints and tips; Recipes
and news; Information on special price offers and promotions.
Any questions? Please contact Customer Service for advice.

13
Spectrum Brands Australia Pty Ltd
Locked Bag 3004 Braeside
Victoria 3195 Australia
Customer Service in Australia
TollFree: 1800 623 118
Email: [email protected]
Website: www.spectrumbrands.com.au
Spectrum Brands New Zealand Ltd
PO Box 9817 Newmarket
Auckland 1149 New Zealand
Customer Service in New Zealand
TollFree: 0800 736 776
Email: [email protected]
Website: www.spectrumbrands.co.nz
Spectrum Brands Australia Pty Ltd and Spectrum Brands New Zealand Ltd
Warranty Against Defects
In this warranty:
Australian Consumer Law means the Australian consumer law set out in Schedule 2 to the
Competition and Consumer Act 2010;
CGA means the New Zealand Consumer Guarantees Act 1993;
Goods means the product or equipment which was accompanied by this warranty and
purchased in Australia or New Zealand, as the case may be;
Manufacturer, We or us means:
1. for Goods purchased in Australia, Spectrum Brands Australia Pty Ltd ABN, 78 007 070 573;
or
2. for Goods purchased in New Zealand, Spectrum Brands New Zealand Ltd, as the case
may be, contact details as set out at the end of this warranty;
Supplier means the authorised distributor or retailer of the Goods that sold you the Goods in
Australia or in New Zealand; and
You means you, the original end-user purchaser of the Goods.
1. Our goods come with guarantees that cannot be excluded under the Australian Consumer
Law, or the CGA. You are entitled to a replacement or refund for a major failure and
compensation for any other reasonably foreseeable loss or damage. You are also entitled
to have the goods repaired or replaced if the goods fail to be of acceptable quality and the
failure does not amount to a major failure.
2. The benefits provided by this Warranty are in addition to all other rights and remedies in
respect of the Goods which the consumer has under either the Australian Consumer Law
or the CGA. The original purchaser of the Goods is provided with the following Warranty
subject to the Warranty Conditions:
3. We warrant the Goods for all parts defective in workmanship or materials for
a (Warranty Period) period of 2 years from the date of purchase.
If the Goods prove defective within the Warranty Period by reason of improper workmanship
or material, we may, at our own discretion, repair or replace the Goods without charge.
Warranty Conditions
4. The Goods must be used in accordance with the manufacturer’s instructions. This
Warranty does not apply should the defect in or failure of the Goods be attributable
to misuse, abuse, accident or non-observance of manufacturer’s instructions on the
part of the user. As far as the law permits, the manufacturer does not accept liability
for any direct or consequential loss, damage or other expense caused by or arising
out of any failure to use the Goods in accordance with the manufacturer’s instructions.
5. Exhaustible components (such as batteries, filters and brushes) of the Goods are
included under this Warranty only where there is a defect in workmanship or materials
used.
6. The warranty granted under clause 3 is limited to repair or replacement only.
7. Any parts of the Goods replaced during repairs or any product replaced remain the
property of the manufacturer. In the event of the Goods being replaced during the
Warranty Period, the warranty on the replacement Goods will expire on the same
date as for the Warranty Period on the original Goods which are replaced.
8. In order to claim under the warranty granted under clause 3 you must:
(a) Retain this warranty with your receipt/proof of purchase; and
(b) Return the Goods to us at the relevant address or to the Supplier by prepaid
freight within the Warranty Period accompanied with (i) the legible and unmodified
original proof of purchase, which clearly indicates the name and address of the
Supplier, the date and place of purchase, the product name or other product serial
number and (ii) this warranty.
9. This warranty is immediately void if:
(a) Any serial number or appliance plate is removed or defaced;
(b) The Goods have been serviced or otherwise repaired by a person not authorised
to do so by us or where non approved replaced parts are used.
10. The Goods are designed for domestic use only. The Goods must be connected to the
electrical voltage requirements as specified in the ratings label located on the Goods.
11. This warranty does not cover the cost of claiming under the warranty or transport
of the Goods to and from the Supplier or us.
12. This warranty is only valid and enforceable in Australia against Spectrum Brands
Australia Pty Ltd and in New Zealand against Spectrum Brands New Zealand Ltd.
Contact us or the Supplier for further details.
Register your product online
If you live in Australia please visit: www.spectrumbrands.com.au/warranty
If you live in New Zealand Please visit: www.spectrumbrands.co.nz/warranty
Registration of your warranty is not compulsory, it gives us a record of your purchase
AND entitles you to receive these benefits: Product information; Hints and tips; Recipes
and news; Information on special price offers and promotions.
Any questions? Please contact Customer Service for advice.
NOTES

1
2 YEAR WARRANTY
SATI SFRY BROOKLYN
5.7L AIR FRYER
RHAF57
RECIPE BOOK

2
RUSSELL HOBBS and logo are Trade Marks of Spectrum Brands, Inc., or one of its subsidiaries.
Manufactured in China to Spectrum Brands specications. ©2021 Spectrum Brands, Inc.
Recipes are to be used in conjunction with the RHAF57 Satisfry Brooklyn 5.7L Air Fryer by Russell Hobbs.
All rights reserved. No part of this publication may be reproduced, stored in a retrieval system or transmitted in any form or by any means,
electronic, mechanical, photocopying, recording or otherwise, without prior permission of the copyright owner.
www.russellhobbs.com.au
www.russellhobbs.co.nz
HOMEMADE CAJUN CHIPS
Serves 4 (as a side)
Preparation Time: 15 minutes
Cooking Time: 25 minutes
Air Fryer Function: FRIES
Ingredients:
600g Sebago or Red Delight potatoes, peeled
1 tbsp Self Raising our
1 tsp Cajun spice mix
1 tsp salt akes
2 tsp canola oil
Method:
1. Cut the potatoes lengthways into 1.5cm thick slices, then into 1.5cm thick chips. Add to a
saucepan with cold water, bring to the boil and cook for 5 minutes. Drain potatoes and pat
dry.
2. Combine the our, Cajun spice and salt. Toss chips in the oil, then in the our mixture to
coat well. Add half the chips to the Air Fryer basket in one even layer.
3. Turn on your Russell Hobbs Air Fryer and select the FRIES function. Cook for 12-13
minutes, shaking the basket occasionally for even cooking. Repeat with remaining chips,
until golden and crisp.

3
WHOLE PERI-PERI CHICKEN
Serves 4
Preparation Time: 10 minutes
Cooking Time: 40 minutes
Air Fryer Function: CHICKEN
Ingredients:
Peri Peri Marinade
3 red banana chilies
1 clove garlic, peeled & chopped
1 Tbsp olive oil
1 tsp red wine vinegar
1 tsp salt akes
1 tsp smoked paprika
Cracked black pepper, to taste
1 - 1.5kg free-range chicken
Method:
1. Cut the chilies in half lengthways, and remove the seeds for a less spicy marinade. Add to
a blender, or mortar and pestle, with the remaining marinade ingredients. Blend to form a
smooth paste.
2. Clean the chicken, pat dry, and rub all over with the marinade. Place the marinated chicken
breast side up in your Russell Hobbs Air Fryer basket. Select the CHICKEN function and
cook for 20 minutes (preset).
3. Once the timer sounds, carefully turn the chicken over, breast side down. Select the
CHICKEN function again and cook a further 20 minutes.
TIP: Serve with buttered corncobs, cooked in your Russell Hobbs Air Fryer.

4
BUTTERMILK AIRFRIED CHICKEN
Serves 4
Preparation Time: 10 minutes
Cooking Time: 40 minutes
Air Fryer Function: CHICKEN
Ingredients:
1kg bone-in chicken pieces, such as thighs or drumsticks
1 ½ cups buttermilk
1 ½ cups Self Raising Flour
2 tsp salt akes
½ tsp cracked black pepper
Oil spray
Method:
1. Marinate the chicken in buttermilk for at least 2 hours, or overnight if possible.
2. Combine the our, salt and pepper. Add a little buttermilk so the our clumps together in
places. Add the chicken pieces and toss well to coat.
3. Spray the chicken pieces all over with oil spray and sprinkle with a little more salt. Arrange
in a single layer in your Russell Hobbs Air Fryer basket. You may need to cook the chicken
in two batches. Select the CHICKEN function and increase the cook time to 30 minutes.
Cook until crispy and golden brown all over.
Delicious served with Cajun chips.

5
SOY-GLAZED STEAK
WITH CRISPY SESAME BROCCOLI
Serves 2
Preparation Time: 15 minutes
Cooking Time:
Air Fryer Function: STEAK
Ingredients:
1 tbsp soy sauce
2 tsp canola oil
2 tsp honey
1 clove garlic, peeled & nely chopped
2 x 200g porterhouse (sirloin) steaks
200g broccoli, cut into owerets
2 tsp sesame oil
Method:
1. Combine the soy sauce, oil, honey and garlic in a shallow bowl. Add the steaks and
marinate 10 minutes.
2. Place the marinated steaks in the Russell Hobbs Air Fryer basket. Select the STEAK
function and cook at the preset 200°C. Stop at 10 minutes for medium rare steak, cook the
full 12 minutes for medium, or cook a further 2-3 minutes for medium to well done steaks.
3. Transfer the steaks to a plate to rest. Toss the broccoli in the sesame oil. Add to the Air
Fryer basket, and cook at 200°C for 2-3 minutes, until crispy all over.

6
TONKATSU PORK CHOPS
Serves 2
Preparation Time: 10 minutes
Cooking Time: 22 minutes
Air Fryer Function: CHOPS
Ingredients:
2 tbsp plain our
salt akes & pepper, to taste
2 x 300g pork loin chops
1 egg, lightly beaten
1 cup Japanese panko breadcrumbs
oil spray
tonkatsu sauce
Method:
1. Combine the our and seasoning. Dust both sides of the chops, then dip into the beaten
egg, then the breadcrumbs. Make sure the chops are completely coated.
2. Spray both sides of the chops with oil and place in the Russell Hobbs Air Fryer basket.
Select the CHOPS function and cook at the preset 180°C for 22 minutes, or until the
breadcrumbs are golden brown.
3. Serve with tonkatsu sauce, shredded cabbage salad and cooked rice, if desired.
TIP: for an extra crispy coating, toast the panko breadcrumbs in a frying pan with a little oil until
golden brown, then proceed with step 1 of the recipe.

7
JUICY FISH BURGERS
Serves 2
Preparation Time: 10 minutes
Cooking Time: 15 minutes
Air Fryer Function: FISH
Ingredients:
¼ cup plain our
Salt akes & pepper, to taste
400g rm white sh llets
1 egg, lightly beaten
1 cup breadcrumbs
Oil spray
TO SERVE
2 x burger buns, toasted
Tartare sauce & crisp lettuce leaves, to serve
Method:
1. Combine the our, salt and pepper. Coat the sh in the our, then dip into the beaten egg,
then the breadcrumbs. Press to ensure each llet is well coated.
2. Spray the crumbed sh llets all over with oil spray and transfer to the Air Fryer basket.
Select the FISH function on your Russell Hobbs Air Fryer and cook at the preset 175°C for
15 minutes, or until the breadcrumbs are golden and the sh is cooked through.
3. Serve the sh on toasted burger buns, with tartare sauce and crisp lettuce leaves.

8
THAI-STYLE CRISPY FISH
Serves 2
Preparation Time: 10 minutes
Cooking Time: 15 minutes
Air Fryer Function: FISH
Ingredients:
400g whole snapper, cleaned & scaled
2 tsp rice our
Oil spray
Dipping Sauce
2 tbsp sh sauce
2 tbsp lime juice
3 tsp sugar
1 red birdseye chili, nely chopped
½ clove garlic, nely chopped
Chopped spring onion, coriander leaves & peanuts, to serve
Coconut rice, to serve
Method:
1. Lightly dust the snapper all over with rice our. Spray both side with oil and transfer to the
Air Fryer basket. Select the FISH function on your Russell Hobbs Air Fryer and cook at the
preset 175°C for 15 minutes.
2. Meanwhile, combine the dipping sauce ingredients in a bowl and set aside.
3. Transfer the crispy sh to a plate. Top with chopped spring onion, coriander leaves and
peanuts, if desired. Serve with coconut rice and dipping sauce.
TIPS: For extra crispy sh, increase the temperate to 200°C. You could also try stufng the sh
cavity with aromatics such as chopped lemongrass, ginger or kafr lime leaves.

9
SICHUAN PEPPER PRAWNS
Serves 4
Preparation Time: 10 minutes
Cooking Time: 15 minutes
Air Fryer Function: PRAWNS
Ingredients:
500g peeled green prawns
¼ cup Chinese rice wine
¼ cup corn our
¼ cup plain our
1 tsp Sichuan salt & pepper
Oil spray
Chopped red chili & lime wedges, to serve
Method:
1. Marinate the prawns in the rice wine for 20 minutes. Meanwhile combine the ours, salt
and pepper in a bowl.
2. Select the PRAWN function on your Russell Hobbs Air Fryer, and preheat for 5 minutes.
Dust half the marinated prawns with our mixture. Transfer to the Air Fryer basket and
spray with oil spray. Cook for 10 minutes.
3. Remove prawns when light and crisp on the outside, and cooked through.
4. Repeat with remaining our and prawns. Serve with chili and lime, if desired.

10
HONEY & OAT MUESLI SLICE
Serves 8
Preparation Time: 10 minutes
Cooking Time: 30 minutes
Air Fryer Function: BAKE
Ingredients:
125g unsalted butter
1/3 cup honey
1 tsp vanilla extract
½ tsp bicarbonate of soda
1½ cups rolled oats
¾ cup plain our
2/3 cup dried fruit, chopped nuts & seeds *
1/3 cup desiccated coconut
1 large egg, lightly beaten
Preparation:
1. Line your Russell Hobbs Air Fryer basket with 2 layers of foil, laying one piece diagonally
across the other, allowing enough to extend up each side of the basket.
2. Melt the butter, honey and vanilla in a medium saucepan. Bring to the boil, then remove
from the heat and stir in the bicarbonate of soda. Continue stirring as the mixture foams,
then set aside to cool to room temperate.
3. Once cooled, add the remaining ingredients and stir to combine. Pour the slice mixture into
the lined Air Fryer basket, smoothing the top. Slide in the basket and set to BAKE function.
Cook at the preset 155°C for 30 minutes, or until deep golden brown on top and cooked
through to the center.
4. Allow the oat slice to cool completely in the Air Fryer basket before cutting into 8 even
pieces.
*Use dried fruit such as raisins, sultanas, dates or apricots; nuts like almonds, pecans,
macadamias and seeds including pepitas, sunower seeds, sesame and linseeds.

11
VEGETABLE SAMOSA
Makes 24
Preparation Time: 30 minutes
Cooking Time: 30 minutes
Manual cooking time/temperature settings
Ingredients:
2 tbsp ghee or vegetable oil
1 brown onion, peeled & diced
350g brushed potatoes, peeled & diced
2 tsp Indian curry powder
2 tsp cumin seeds
½ cup frozen peas
1/3 cup coriander leaves, chopped (optional)
3 sheets puff pastry
Mint yoghurt, to serve
Preparation:
1. Heat 1 tablespoon of oil in a frying pan. Add the onion and cook until soft; about 3 minutes.
Add the potatoes, curry powder and cumin seeds with a good splash of water. Cover and
cook 12-15 minutes, or until the potatoes are tender.
2. Remove from the heat and stir in the peas and coriander, if using. Mash the veggies slightly
to bring the lling mixture together. Set aside to cool.
3. To assemble the samosa, cut each pastry sheet into quarters, then cut each quarter in half
diagonally across the middle, to create 2 triangles. You should end up with 24 triangles of
pastry all together.
4. Add 1 tablespoon of veggie lling to the center of a pastry triangle. Brush the edges with
water and bring one corner a pastry over to meet the other corner. Use a fork to seal the
edges of the samosa together. Repeat with remaining pastry and lling.
5. Brush the samosas all over with the remaining oil. Set the air fryer to 200°C and set the
timer for 10 minutes. Cook the samosa in 3 batches, 8 samosas at a time, or until the
pastry is akey and golden brown all over.
MANUAL