
NODE NANO
WIRELESS MUSIC STREAMER
OWNER’S MANUAL
v. N030
2 3
Welcome to Bluesound
Thank you for purchasing your NODE NANO. The NODE NANO is designed with a truly high-
performance mindset, focusing on the absolute core functionality of a HiFi streamer.
BluOS
The BluOS multi-room music streaming platform, the world’s leading ecosystem for hi-res streaming
audio, is the backbone of Bluesound product performance. The NODE NANO has music services built
right in, so listening to your favorite artist or playlist is simple. Connect the NODE NANO to any audio
system by using its class-leading analog RCA output or pass the digital signals along with Coax, Optical
or USB. Using the BluOS Controller App, group your NODE NANO with other Bluesound players for
a whole home listening experience, or simply let it do all the work itself to add hi-res streaming to
your stereo. Either way, it’s easier than ever to enjoy the pleasures of hi-res listening – on any existing
amplifier or powered speakers– with the NODE NANO.
This Owner’s Manual will provide you with a more detailed overview of your NODE NANO and its
features. It also includes some troubleshooting tips and tricks and networking best practices. The Quick
Setup Guide included with your NODE NANO will help you get it on the network and ready to listen to
your music.
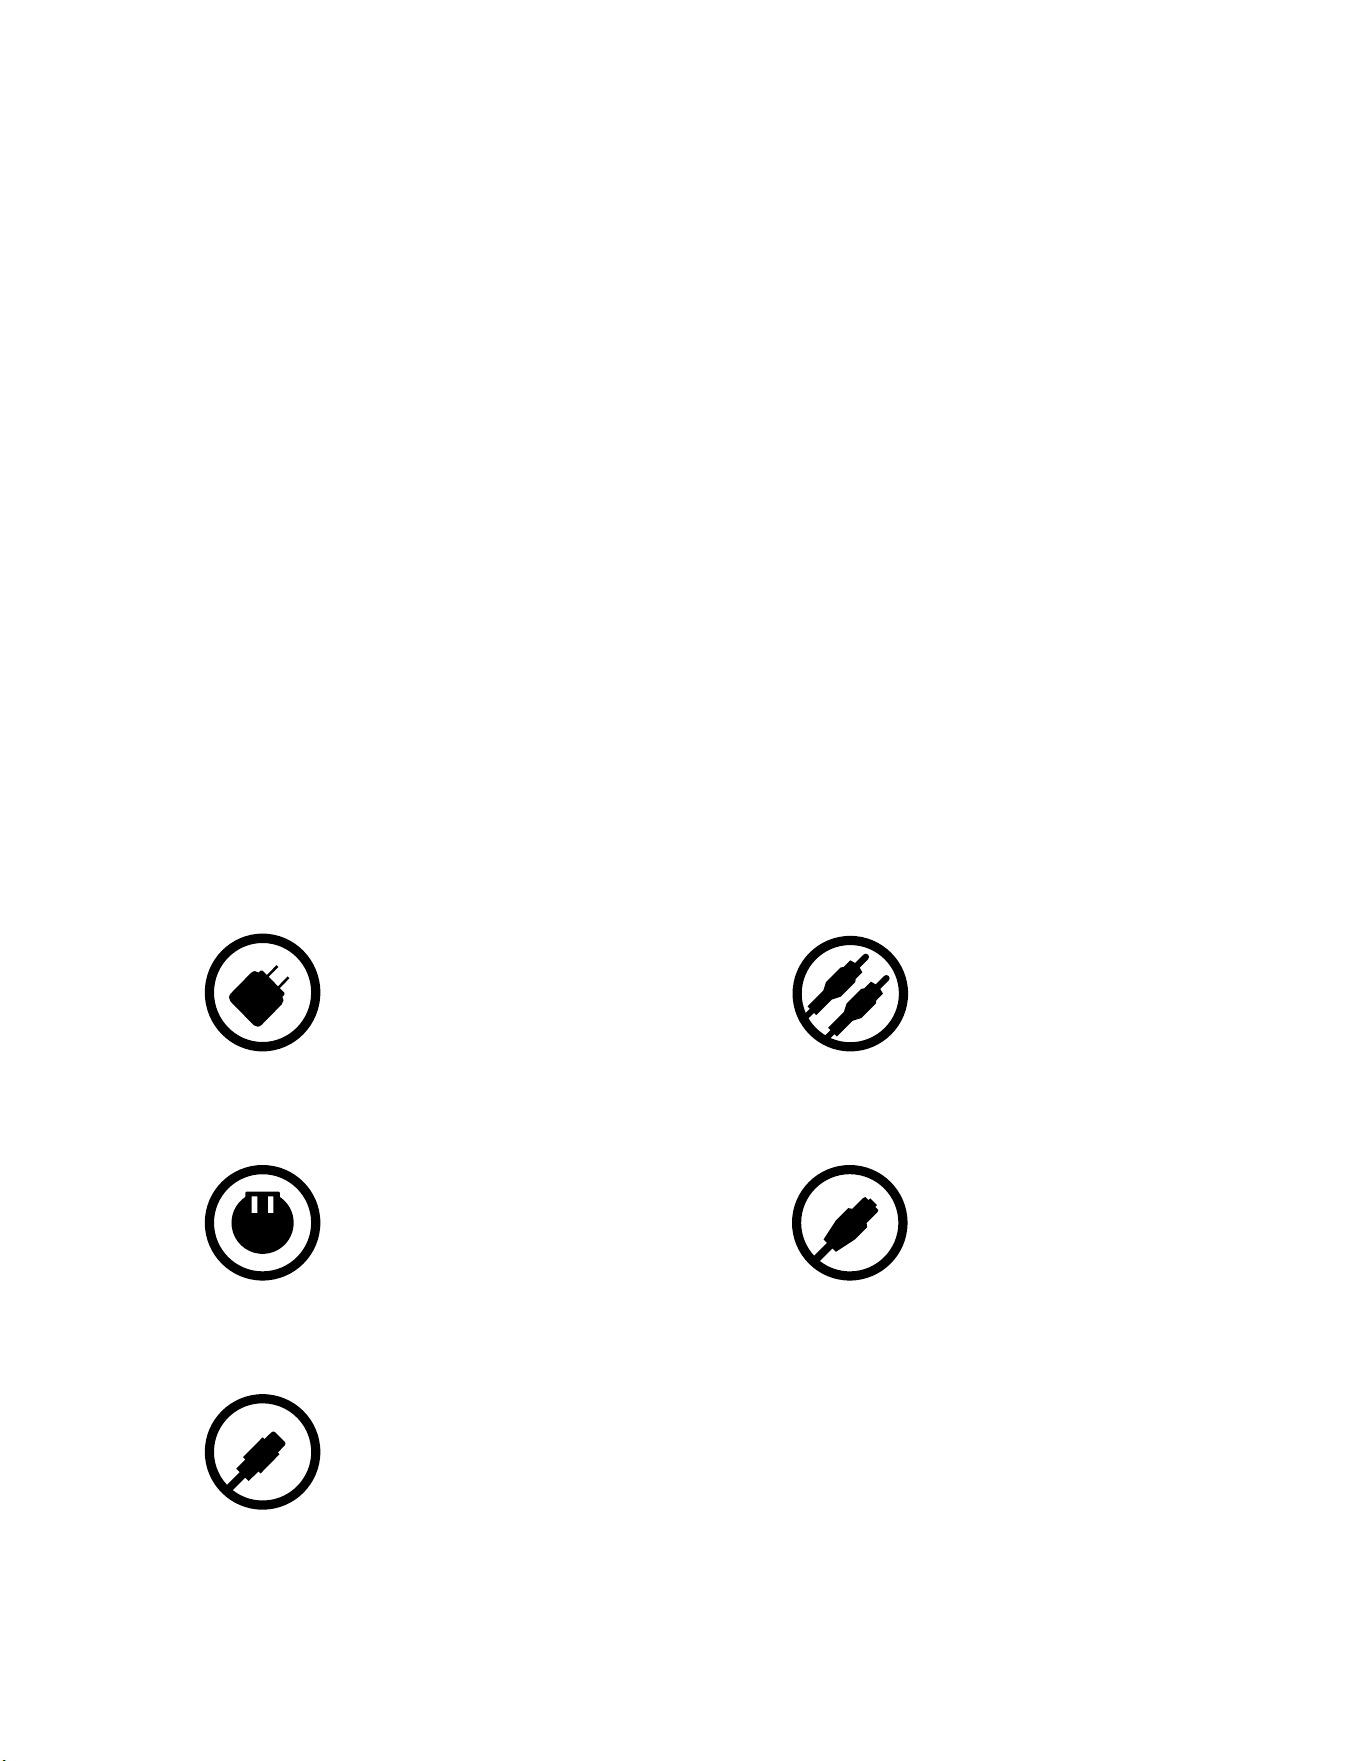
Included Accessories
Stereo RCA Connector
USB Power Adapter
International Plug Adapter
x4
USB-C Power Cable
Ethernet Cable
1
2
8
7
5
4
9
13
14
12
3
11
10
6
2 3
Welcome to Bluesound
Thank you for purchasing your NODE NANO. The NODE NANO is designed with a truly high-
performance mindset, focusing on the absolute core functionality of a HiFi streamer.
BluOS
The BluOS multi-room music streaming platform, the world’s leading ecosystem for hi-res streaming
audio, is the backbone of Bluesound product performance. The NODE NANO has music services built
right in, so listening to your favorite artist or playlist is simple. Connect the NODE NANO to any audio
system by using its class-leading analog RCA output or pass the digital signals along with Coax, Optical
or USB. Using the BluOS Controller App, group your NODE NANO with other Bluesound players for
a whole home listening experience, or simply let it do all the work itself to add hi-res streaming to
your stereo. Either way, it’s easier than ever to enjoy the pleasures of hi-res listening – on any existing
amplifier or powered speakers– with the NODE NANO.
This Owner’s Manual will provide you with a more detailed overview of your NODE NANO and its
features. It also includes some troubleshooting tips and tricks and networking best practices. The Quick
Setup Guide included with your NODE NANO will help you get it on the network and ready to listen to
your music.
Included Accessories
Stereo RCA Connector
USB Power Adapter
International Plug Adapter
x4
USB-C Power Cable
Ethernet Cable
1
2
8
7
5
4
9
13
14
12
3
11
10
6
4 5
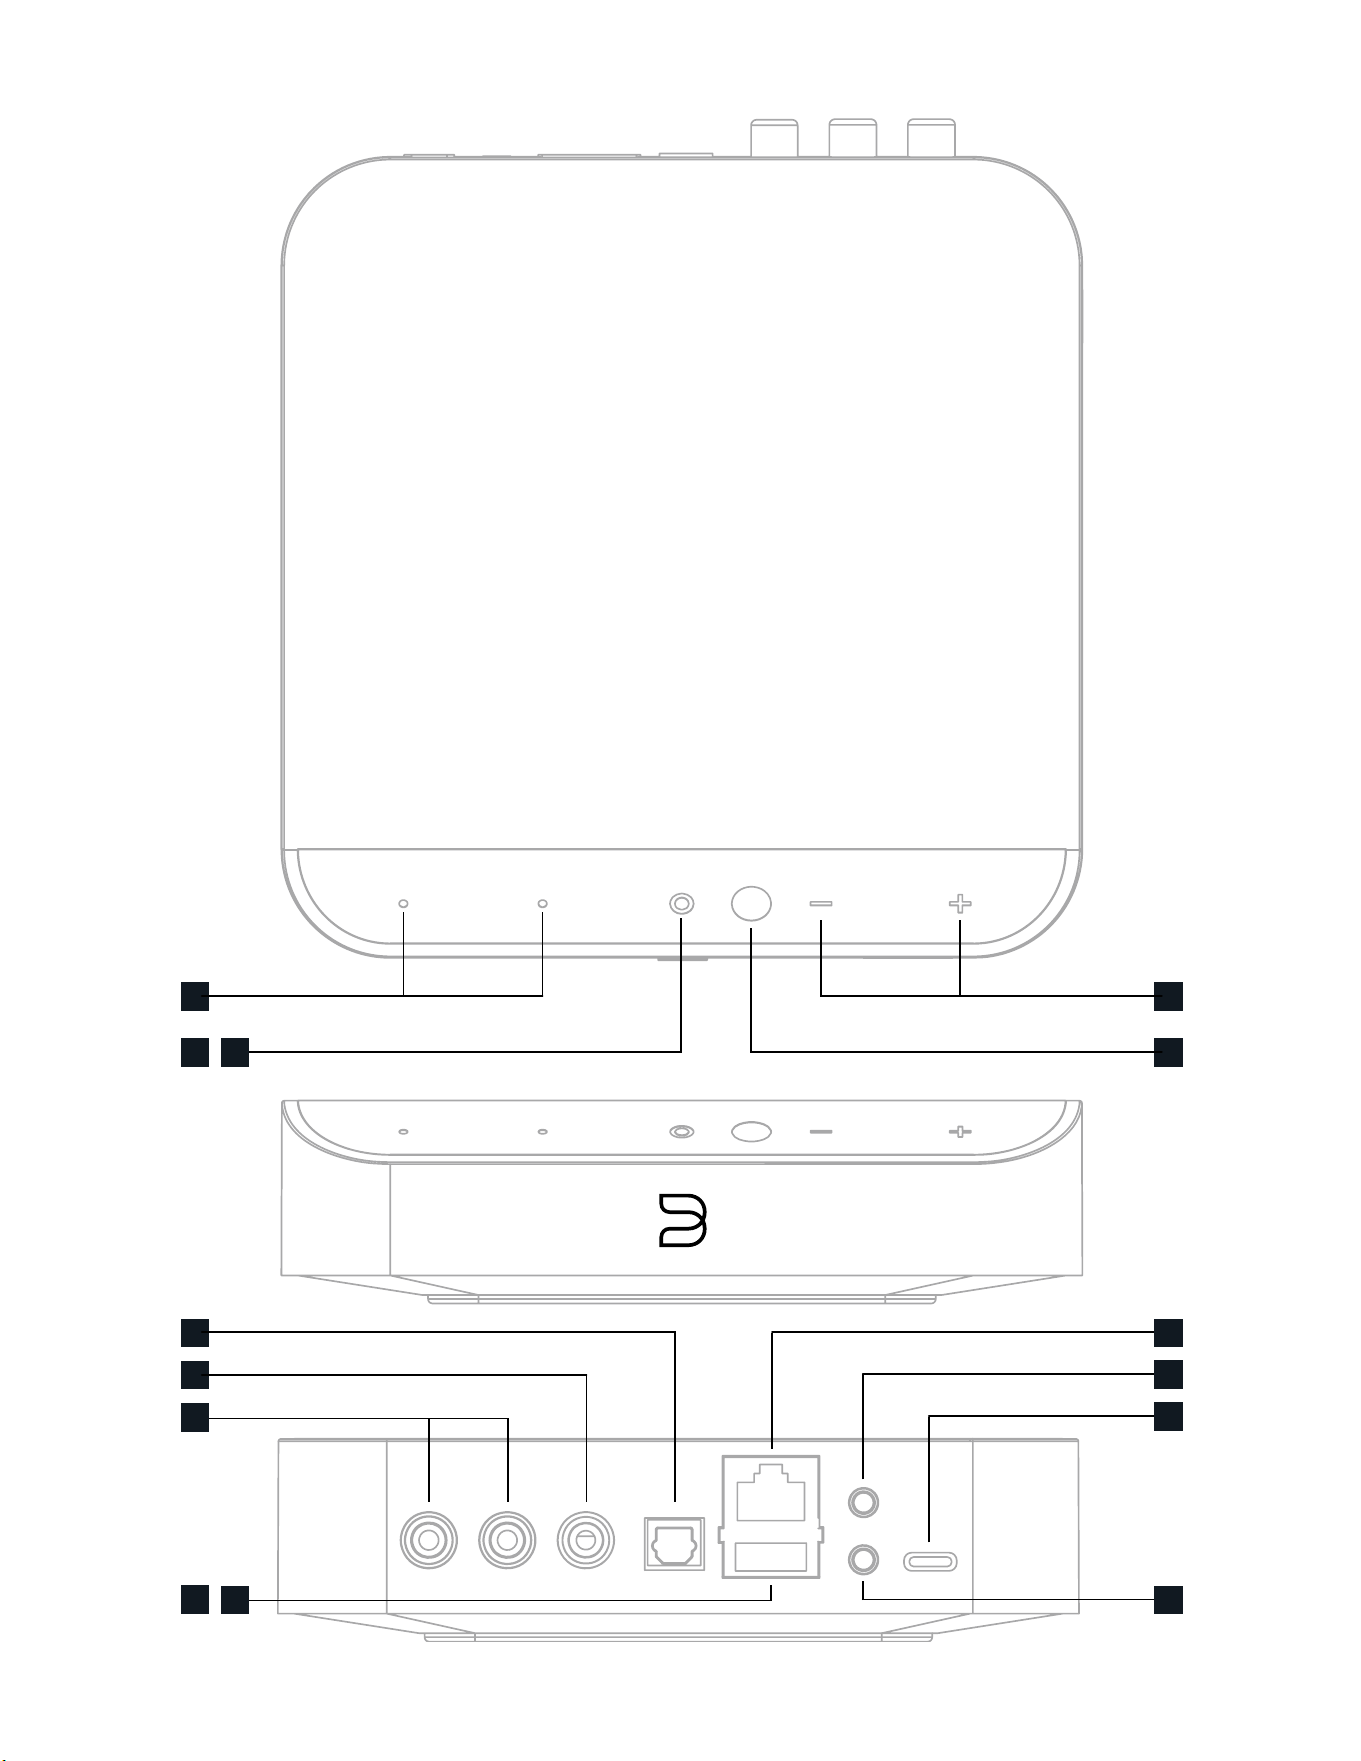
PRESETS The NODE NANO has 2 programmable preset buttons. These are configured using the Presets menu in the
BluOS App.
STATUS INDICATOR Below is a table of the LED blink codes and their corresponding descriptions.
LED BLINK CODE DESCRIPTION
Short blue flash, then red Powering up rebooting the unit
Solid green Hotspot Mode
Flashing green Connecting to Network
White pulse Software update available
Solid red Upgrade Mode
Alternate flashing red and green Upgrading
Flashing blue Mute Mode
Solid white Indexing
Solid blue Connected to Network - ready to use with BluOS App
Flashing red Factory Reset in process
Solid Purple Hotspot Mode timed out
PLAY/PAUSE BUTTON This button has multiple functions – a visual indicator of network connectivity and a PLAY/PAUSE
button. For a full listing of LED Blink Codes, please see #2 – Status Indicator. For an ungrouped Player, press the button to
Play or Pause the stream. If listening to an internet radio stream, the Pause- function will work for 30 seconds. At this point,
the buffer is full and the stream will Stop. When a Player is grouped, pressing the PLAY/PAUSE button will Mute the Player
while other Players continue the stream. The Player’s LED will flash blue when muted. This button is also used for Factory
Rest functions. See steps for Factory Reset later in the manual.
IR RECEIVER The IR receiver is hidden behind the glass.
VOLUME Use the “-“ and “+” buttons to adjust the volume level. Tapping the buttons will adjust the level by 1dB intervals.
AUDIO OUT Connect to the corresponding analog audio input of an amplifier, receiver, stereo system or active speakers.
Connecting via the AUDIO OUT will use the NODE NANO’s internal DAC.
COAX OUT Using a coax cable (not provided), connect one end to the COAX OUT of the NODE NANO and the other end
to the corresponding coax input of a compatible devices such as receivers, digital-to-analog converters or other digital
processors. Connecting via the COAX OUT will bypass the NODE NANO’S internal DAC.
OPTICAL OUT Using a digital optical cable (not provided), connect one end to the OPTICAL OUT of the NODE NANO and
the other end to the corresponding coax input of a compatible devices such as receivers, digital-to-analog converters or
other digital processors. Connecting via the OPTICAL OUT will bypass the NODE NANO’S internal DAC.
LAN PORT The LAN PORT connection can be used with the Ethernet cable provided. This is an optional connection since
the NODE NANO can be connected to the network through a Wi-Fi connection to your router. To setup the NODE NANO
using the LAN Port a Wired Ethernet connection is required. Connect one end of the Ethernet cable to the LAN port of your
wired Ethernet Broadband router and the other end to the NODE NANO’s LAN port.
USB INPUT (TYPE A) Connect a USB mass storage device to the USB input. Typical USB mass storage devices compatible
with the NODE NANO include portable flash memory devices and external hard drives (FAT32 formatted). [Read about
Server Mode in Settings]
USB OUTPUT (TYPE A) The NODE NANO can transfer digital audio (USB Audio 2.0) through to an external DAC via the
USB Type-A slot. Using a USB cable (not provided), connect one end to the USB output of the NODE NANO and the
other end to the corresponding USB input on a separate DAC device. Select your USB DAC from the NODE NANO’s Audio
settings page in the BluOS App to bypass the NODE NANO’s internal DAC via USB audio out. Note: when USB Output is
selected, all other outputs (Analog and Digital) are dormant.
1
2
3
4
5
6
7
8
9
10
11
NETWORK
The NODE NANO is a network audio player and relies on a well-implemented local area network to operate correctly. Internet
access is required for software updates and to use many of the player’s features, like cloud-based music streaming.
Visit the Bluesound Knowledge Base for more help, tips, and tricks to improve network setup.
https://support.bluos.net/hc/en-us/sections/360000042348-Networking-101
Once the NODE NANO is connected to your equipment and AC power, you need to add it to your network. Watch for the front
panel LED to turn Solid Green, indicating it is ready for network connection in ‘Hotspot’ mode. You can add your player to the
network via wired Ethernet, or wirelessly via Wi-Fi. If using Ethernet, simply plug in an Ethernet cable to the NODE NANO’s LAN
Port. The LED will turn Solid Blue, indicating network connection. If using Wi-Fi, open the BluOS App on a phone or tablet, and use
the ‘Add A Player’ wizard to guide you through the steps. Whether connecting via Ethernet or Wi-Fi, you must finalize setup by
initializing your NODE NANO within the BluOS App.
MOUNTING
On the bottom panel of the NODE NANO there is a rubber cover hiding two keyhole slots. Simply remove the cover to reveal these
slots. Use the cover as a guide for screw placement, by flipping it over and affixing it against the wall. Mounting screws are not
included.
PRESETS
You can set presets for your favorite radio stations, music streams or playlists using the BluOS Controller app. Presets can be
recalled from the two preset buttons on the NODE NANO or from an IR Remote, including the Bluesound RC1 remote (sold
separately).
Visit the Bluesound Knowledge Base for more help, tips, and tricks.
How to add or delete a Preset? – The BluOS Support Crew
TRIGGER OUT A 12V DC signal is available using the TRIGGER OUT. The 12V DC signal can be used to control or activate other
external devices equipped with a corresponding 12V trigger input using a 3.5mm mono audio cable.
IR IN An infrared extender can be connected to allow for programmable learning remotes to control volume and source selection
when a NODE NANO is stored in a way that the front panel IR sensor is not visible.
POWER Use the supplied USB-C cable and USB Power Adapter to power ON the NODE NANO.
12
13
14

4 5
PRESETS The NODE NANO has 2 programmable preset buttons. These are configured using the Presets menu in the
BluOS App.
STATUS INDICATOR Below is a table of the LED blink codes and their corresponding descriptions.
LED BLINK CODE DESCRIPTION
Short blue flash, then red Powering up rebooting the unit
Solid green Hotspot Mode
Flashing green Connecting to Network
White pulse Software update available
Solid red Upgrade Mode
Alternate flashing red and green Upgrading
Flashing blue Mute Mode
Solid white Indexing
Solid blue Connected to Network - ready to use with BluOS App
Flashing red Factory Reset in process
Solid Purple Hotspot Mode timed out
PLAY/PAUSE BUTTON This button has multiple functions – a visual indicator of network connectivity and a PLAY/PAUSE
button. For a full listing of LED Blink Codes, please see #2 – Status Indicator. For an ungrouped Player, press the button to
Play or Pause the stream. If listening to an internet radio stream, the Pause- function will work for 30 seconds. At this point,
the buffer is full and the stream will Stop. When a Player is grouped, pressing the PLAY/PAUSE button will Mute the Player
while other Players continue the stream. The Player’s LED will flash blue when muted. This button is also used for Factory
Rest functions. See steps for Factory Reset later in the manual.
IR RECEIVER The IR receiver is hidden behind the glass.
VOLUME Use the “-“ and “+” buttons to adjust the volume level. Tapping the buttons will adjust the level by 1dB intervals.
AUDIO OUT Connect to the corresponding analog audio input of an amplifier, receiver, stereo system or active speakers.
Connecting via the AUDIO OUT will use the NODE NANO’s internal DAC.
COAX OUT Using a coax cable (not provided), connect one end to the COAX OUT of the NODE NANO and the other end
to the corresponding coax input of a compatible devices such as receivers, digital-to-analog converters or other digital
processors. Connecting via the COAX OUT will bypass the NODE NANO’S internal DAC.
OPTICAL OUT Using a digital optical cable (not provided), connect one end to the OPTICAL OUT of the NODE NANO and
the other end to the corresponding coax input of a compatible devices such as receivers, digital-to-analog converters or
other digital processors. Connecting via the OPTICAL OUT will bypass the NODE NANO’S internal DAC.
LAN PORT The LAN PORT connection can be used with the Ethernet cable provided. This is an optional connection since
the NODE NANO can be connected to the network through a Wi-Fi connection to your router. To setup the NODE NANO
using the LAN Port a Wired Ethernet connection is required. Connect one end of the Ethernet cable to the LAN port of your
wired Ethernet Broadband router and the other end to the NODE NANO’s LAN port.
USB INPUT (TYPE A) Connect a USB mass storage device to the USB input. Typical USB mass storage devices compatible
with the NODE NANO include portable flash memory devices and external hard drives (FAT32 formatted). [Read about
Server Mode in Settings]
USB OUTPUT (TYPE A) The NODE NANO can transfer digital audio (USB Audio 2.0) through to an external DAC via the
USB Type-A slot. Using a USB cable (not provided), connect one end to the USB output of the NODE NANO and the
other end to the corresponding USB input on a separate DAC device. Select your USB DAC from the NODE NANO’s Audio
settings page in the BluOS App to bypass the NODE NANO’s internal DAC via USB audio out. Note: when USB Output is
selected, all other outputs (Analog and Digital) are dormant.
1
2
3
4
5
6
7
8
9
10
11
NETWORK
The NODE NANO is a network audio player and relies on a well-implemented local area network to operate correctly. Internet
access is required for software updates and to use many of the player’s features, like cloud-based music streaming.
Visit the Bluesound Knowledge Base for more help, tips, and tricks to improve network setup.
https://support.bluos.net/hc/en-us/sections/360000042348-Networking-101
Once the NODE NANO is connected to your equipment and AC power, you need to add it to your network. Watch for the front
panel LED to turn Solid Green, indicating it is ready for network connection in ‘Hotspot’ mode. You can add your player to the
network via wired Ethernet, or wirelessly via Wi-Fi. If using Ethernet, simply plug in an Ethernet cable to the NODE NANO’s LAN
Port. The LED will turn Solid Blue, indicating network connection. If using Wi-Fi, open the BluOS App on a phone or tablet, and use
the ‘Add A Player’ wizard to guide you through the steps. Whether connecting via Ethernet or Wi-Fi, you must finalize setup by
initializing your NODE NANO within the BluOS App.
MOUNTING
On the bottom panel of the NODE NANO there is a rubber cover hiding two keyhole slots. Simply remove the cover to reveal these
slots. Use the cover as a guide for screw placement, by flipping it over and affixing it against the wall. Mounting screws are not
included.
PRESETS
You can set presets for your favorite radio stations, music streams or playlists using the BluOS Controller app. Presets can be
recalled from the two preset buttons on the NODE NANO or from an IR Remote, including the Bluesound RC1 remote (sold
separately).
Visit the Bluesound Knowledge Base for more help, tips, and tricks.
How to add or delete a Preset? – The BluOS Support Crew
TRIGGER OUT A 12V DC signal is available using the TRIGGER OUT. The 12V DC signal can be used to control or activate other
external devices equipped with a corresponding 12V trigger input using a 3.5mm mono audio cable.
IR IN An infrared extender can be connected to allow for programmable learning remotes to control volume and source selection
when a NODE NANO is stored in a way that the front panel IR sensor is not visible.
POWER Use the supplied USB-C cable and USB Power Adapter to power ON the NODE NANO.
12
13
14

6 7
Audio Settings
TONE CONTROL: Enable to adjust your Player’s Treble and Bass output levels.
Note: When enabled, the total volume of your Player is reduced by 6dB to allow adjustment of the bass and treble outputs from
-6dB to 6dB. Tone Controls is disabled and not displayed when MQA external DAC is enabled.
REPLAY GAIN: Select any of the following to configure consistent volume levels between tracks in the play queue:
• Track gain – To use the track gain value from the song’s metadata to have the current track’s volume be more consistent with
other tracks.
• Album gain – To use the album gain value from the metadata to provide a consistent volume level between all audio tracks on
a particular album.
• Smart gain – To allow the BluOS to automatically choose between track gain and album gain values to provide the best replay
gain option for your current listening.
Note: BluOS uses the metadata of the selected audio track to configure consistent volume levels between tracks.
OUTPUT MODE: Select any of the following to configure the channel output on the BluOS Player:
• Left/Right – Outputs only the Left or Right audio channel.
• Mono – Outputs single-channel audio out.
• Stereo – Outputs both Left and Right audio channels.
MQA EXTERNAL DAC: Enable this option when you require an MQA-certified external DAC to handle MQA unfolding rather than
the BluOS Player.
Note: To enable MQA external DAC, you should enable the Output level fixed and disable – Tone Controls and Replay Gain. Learn
more.
OUTPUT LEVEL FIXED: Enable to set and fix the volume of the BluOS Player at the maximum level. This allows you to control
volume using the external device connected to the BluOS Player instead of the BluOS Controller App.
AUDIO CLOCK TRIM: Enable to reduce jitter and increase audio clock timing precision when using an external DAC.
Note: Not all DACs can handle this. If audible clippings or dropouts occur, disable Audio Clock Trim to avoid BluOS’s accuracy
setting from interfering with the external DAC’s firmware.
Settings
IR REMOTE: Setup an IR Remote, either by teaching your Bluesound Player to work with one of your old remotes or by using the
Bluesound RC1 remote which works out-of-box.
• BluOS Remote: Enable/Disable the Bluesound RC1 Remote if you have multiple Bluesound Players in the same room, and
only want the remote to control one of them. If you have multiple remotes, you can change the IR Channel for each Player.
Learn more
• IR Learning: Program your own remote to work with your Bluesound Player. Learn more
Indicator Light: Adjust the brightness of the light on your Bluesound Player
• Normal – Default brightness
• Dim – Lower the brightness
• Off – Turns off the light
BLUETOOTH: Settings for Bluetooth visibility and functionality.
• Manual – This mode allows you to manually switch between Bluetooth as a local source in the Inputs section of the Music Tab.
• Automatic – (Default mode) This mode automatically switches to the Bluetooth source when a Bluetooth-connected device
starts playing audio.
• Guest – This mode switches the Bluesound player to the Bluetooth source when your connected Bluetooth device starts
playing audio. However, switching sources disconnects the Bluetooth connection. The Bluetooth source is not displayed under
the Inputs section of the Music tab. This configuration is ideal for streaming audio from multiple Bluetooth-enabled devices.
• Disabled – This mode turns off the Bluetooth receiver on the player.
SERVER MODE: To make your USB library accessible in the BluOS Controller app, plug the USB drive (in NTFS or FAT32 file
format) into the USB port at the back of the BluOS Player and follow the onscreen prompts on the BluOS Controller app.
• [Yes] Server Mode enabled - USB drive is shared with other players on the network from the local Library.
• [No] Server Mode disabled - USB drive access is restricted to the USB-connected Player.
Note: After the connection, the player’s Status Indicator LED turns white, indicating that it is indexing the connected library.
Depending on the size of your music library, the indexing process may take some time to complete. The indexing process is
complete when the Status Indicator LED returns to solid Blue.
Visit the Bluesound Knowledge Base for more help, tips, and tricks.
USB Server Mode - How to connect external USB Library to the BluOS Players? – The BluOS Support Crew
8
WARNING!
THIS IS A FACTORY RESET OF YOUR PLAYER. ALL CUSTOMIZATION INCLUDING WI-FI
NETWORK CONFIGURATION, FILE SHARES AND SAVED PLAYLISTS WILL BE LOST. YOU WILL
HAVE TO RE- CREATE THESE ONCE COMPLETE. THIS PROCESS IS ONLY RECOMMENDED IF
YOUR PLAYER IS NOT FUNCTIONING AND AN INTERNET FIRMWARE UPGRADE HAS FAILED.
FOR ANY QUESTIONS OR CONCERNS CONTACT AN AUTHORISED BLUESOUND CUSTOMER
REPRESENTATIVE BEFORE PROCEEDING!
Steps to Factory Reset:
1. Disconnect the NODE NANO from electrical power.
2. Wait 30 seconds.
3. Reconnect the power.
4. Once the LED turns Red, press and hold the PLAY/PAUSE button. The LED will immediately
turn Green and then back to Red - continue to hold the button for 30 seconds.
5. After 30 seconds, the LED will begin to blink red – then release the button.
6. All customization to the NODE NANO will be removed and restored to factory settings.
IMPORTANT Removing your finger from the PLAY/PAUSE button at any time before the LED begins
flashing red will cancel the factory reset and leave the NODE NANO in Upgrade Mode. Just start the
steps again to factory reset it.
You will know the factory reset is successful if the NODE NANO returns to Hotspot mode (wireless
connection - the LED will turn solid green). If it is connected to your network through a wired Ethernet
connection, it will simply connect as if it was a new player (LED will turn solid blue).
© Bluesound International. Bluesound, the stylized wordmark “B” logotype, the phrase
“HiFi for a wireless generation”, NODE NANO and all other Bluesound product names
and taglines are trademarks or registered trademarks of Bluesound International, a
division of Lenbrook Industries Limited. All other logos and services are trademarks or
service marks of their respective owners.