AXLE STANDS (PAIR) 3TONNE CAPACITY
PER STAND
MODEL NO: AS3.V2 AS3G.V1 AS3O.V1 AS3R.V1
AS3Y.V1
Thank you for purchasing a Sealey product. Manufactured to a high standard, this product will, if used according to these
instructions, and properly maintained, give you years of trouble free performance.
IMPORTANT: PLEASE READ THESE INSTRUCTIONS CAREFULLY. NOTE THE SAFE OPERATIONAL REQUIREMENTS, WARNINGS & CAUTIONS. USE
THE PRODUCT CORRECTLY AND WITH CARE FOR THE PURPOSE FOR WHICH IT IS INTENDED. FAILURE TO DO SO MAY CAUSE DAMAGE AND/OR
PERSONAL INJURY AND WILL INVALIDATE THE WARRANTY. KEEP THESE INSTRUCTIONS SAFE FOR FUTURE USE.
1. SAFETY
WARNING!
DO NOT OVERLOAD AXLE STANDS BEYOND RATED CAPACITY. OVERLOADING CAN CAUSE DAMAGE TO, OR FAILURE
OF, THE AXLE STANDS. POSITION LOAD ON CENTRE OF CRUTCH/SADDLE ONLY. ALWAYS USE STANDS IN PAIRS ON
HARD LEVEL SURFACE CAPABLE OF SUSTAINING THE LOAD. USE OF STANDS ON OTHER THAN HARD LEVEL
SURFACES CAN RESULT IN LOAD INSTABILITY AND POSSIBLE LOSS OF LOAD. DO NOT USE ON TARMACADAM.
FAILURE TO FOLLOW THESE INSTRUCTIONS MAY RESULT IN DAMAGE TO AXLE STANDS, LOSS OF LOAD RESULTING
IN PROPERTY DAMAGE, SERIOUS PERSONAL INJURY OR LOSS OF LIFE.
▲ DANGER! Great care must be taken to ensure you lower the vehicle (or other load) slowly and carefully onto the centres of the crutch/
saddle of the axle stands.
9 Use only as specified by the manufacturer.
9 Ensure the load does not exceed the maximum capacity as marked on the axle stand, per pair.
9 Use no more than a single pair of stands either on the front, rear or one side of the vehicle. Use in pairs.
9 No alterations or modifications shall be made to this product.
9 Use on a hard, level surface, e.g. concrete. DO NOT use on uneven ground or tarmacadam.
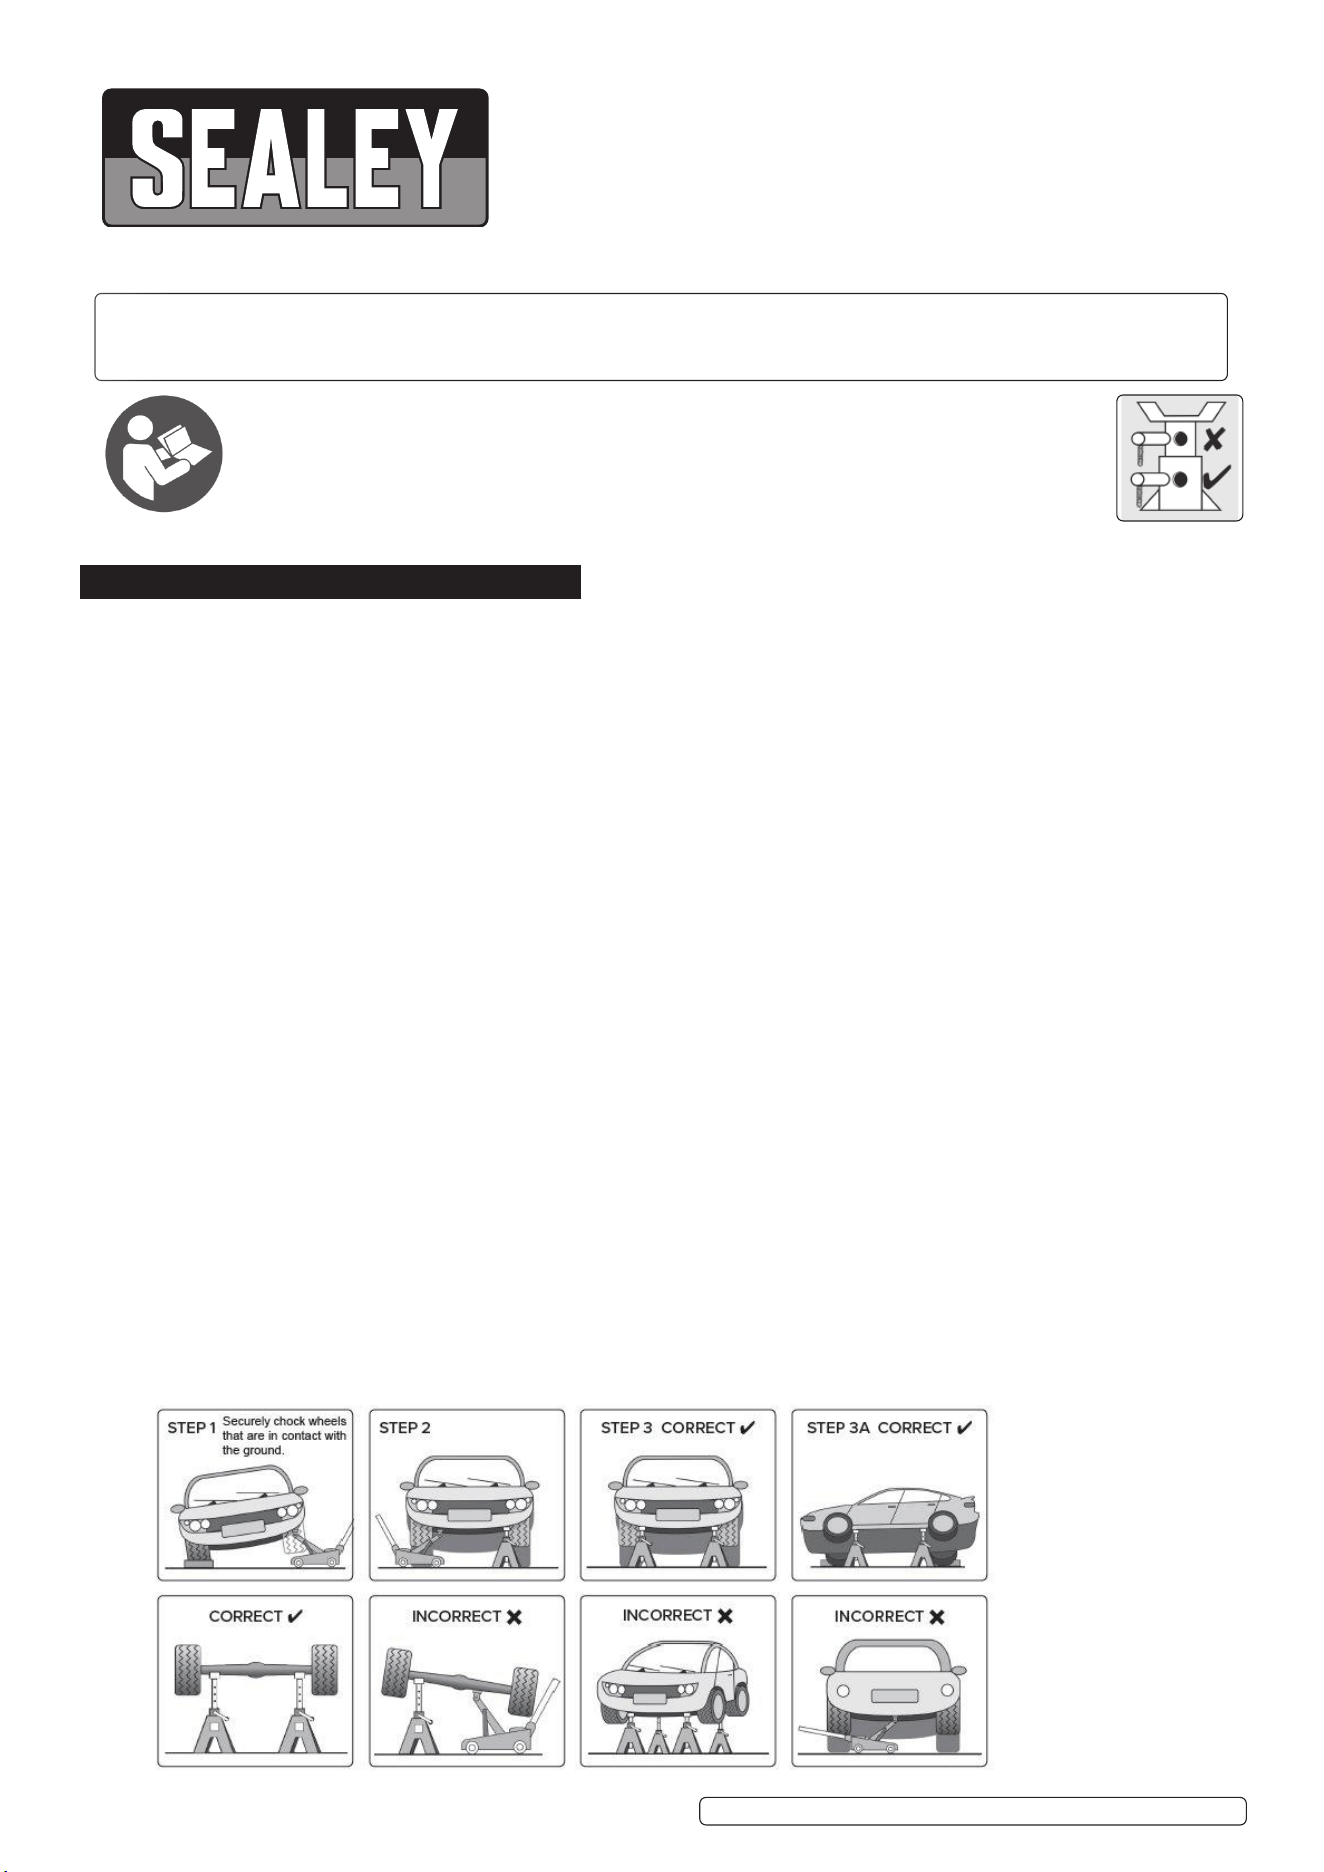
9 Securely chock wheels in contact with the ground. Before jacking and placing the stands, apply vehicle handbrake (put automatics in
‘Park’).
9 Make sure that each stand is securely located under a strong point on the vehicle; consult the vehicle manufacturer’s handbook for
guidance. Ensure that height adjust locking mechanism is fully located before applying any load to the axle stand.
9 Ensure that the load is located centrally on the saddle, and that the weight is directed through the vertical axis of the stand.
9 Exercise extra care when using with a three wheeled vehicle or a trailer. Refer to vehicle manufacturer’s instructions.
9 Once vehicle is supported, ensure that the vehicle and stands are stable before starting work. Ensure that it is not possible for the
vehicle to move before commencing any work.
9 Inspect stands before each use. DO NOT use if they show signs of damage. DO NOT use if it is suspected that they have been
overloaded.
9 Before commencing any work or going beneath the vehicle, undertake a risk assessment. Ensure that a responsible person is aware
of the work about to be undertaken.
9 Replace any labels on the axle stand should they become unreadable. This applies in particular to any warning or operation instruction
labels. If replacement labels are required, contact your Sealey stockist.
8 DO NOT use axle stands on the highway, or anywhere else if it is deemed to be unsafe.
8 DO NOT push or twist the vehicle/load whilst it is supported on stands.
8 DO NOT mix components between stands. Use only as supplied.
8 DO NOT allow children or animals in the vicinity of a vehicle supported on axle stands.
8 DO NOT leave a vehicle on axle stands in an area that could be considered a hazard to others or property.
9 Follow steps 1, 2 and 3 to correctly place vehicle/load onto axle stands.
Refer to
instructions
AS3.V2, AS3G.V1,AS3O.V1, AS3R.V1, AS3Y.V1 SERIES Issue:3 (H,3,F) 14/11/23
Original Language Version
© Jack Sealey Limited
Take care; you may know the total weight of the load you want to support but you cannot calculate the
exact weight distribution between support points. For this reason always allow a 40% margin for error. For
example: a load weighing 12 tonne could have a single point load of more than 6 tonne and two 6 tonne
supports would not be adequate.
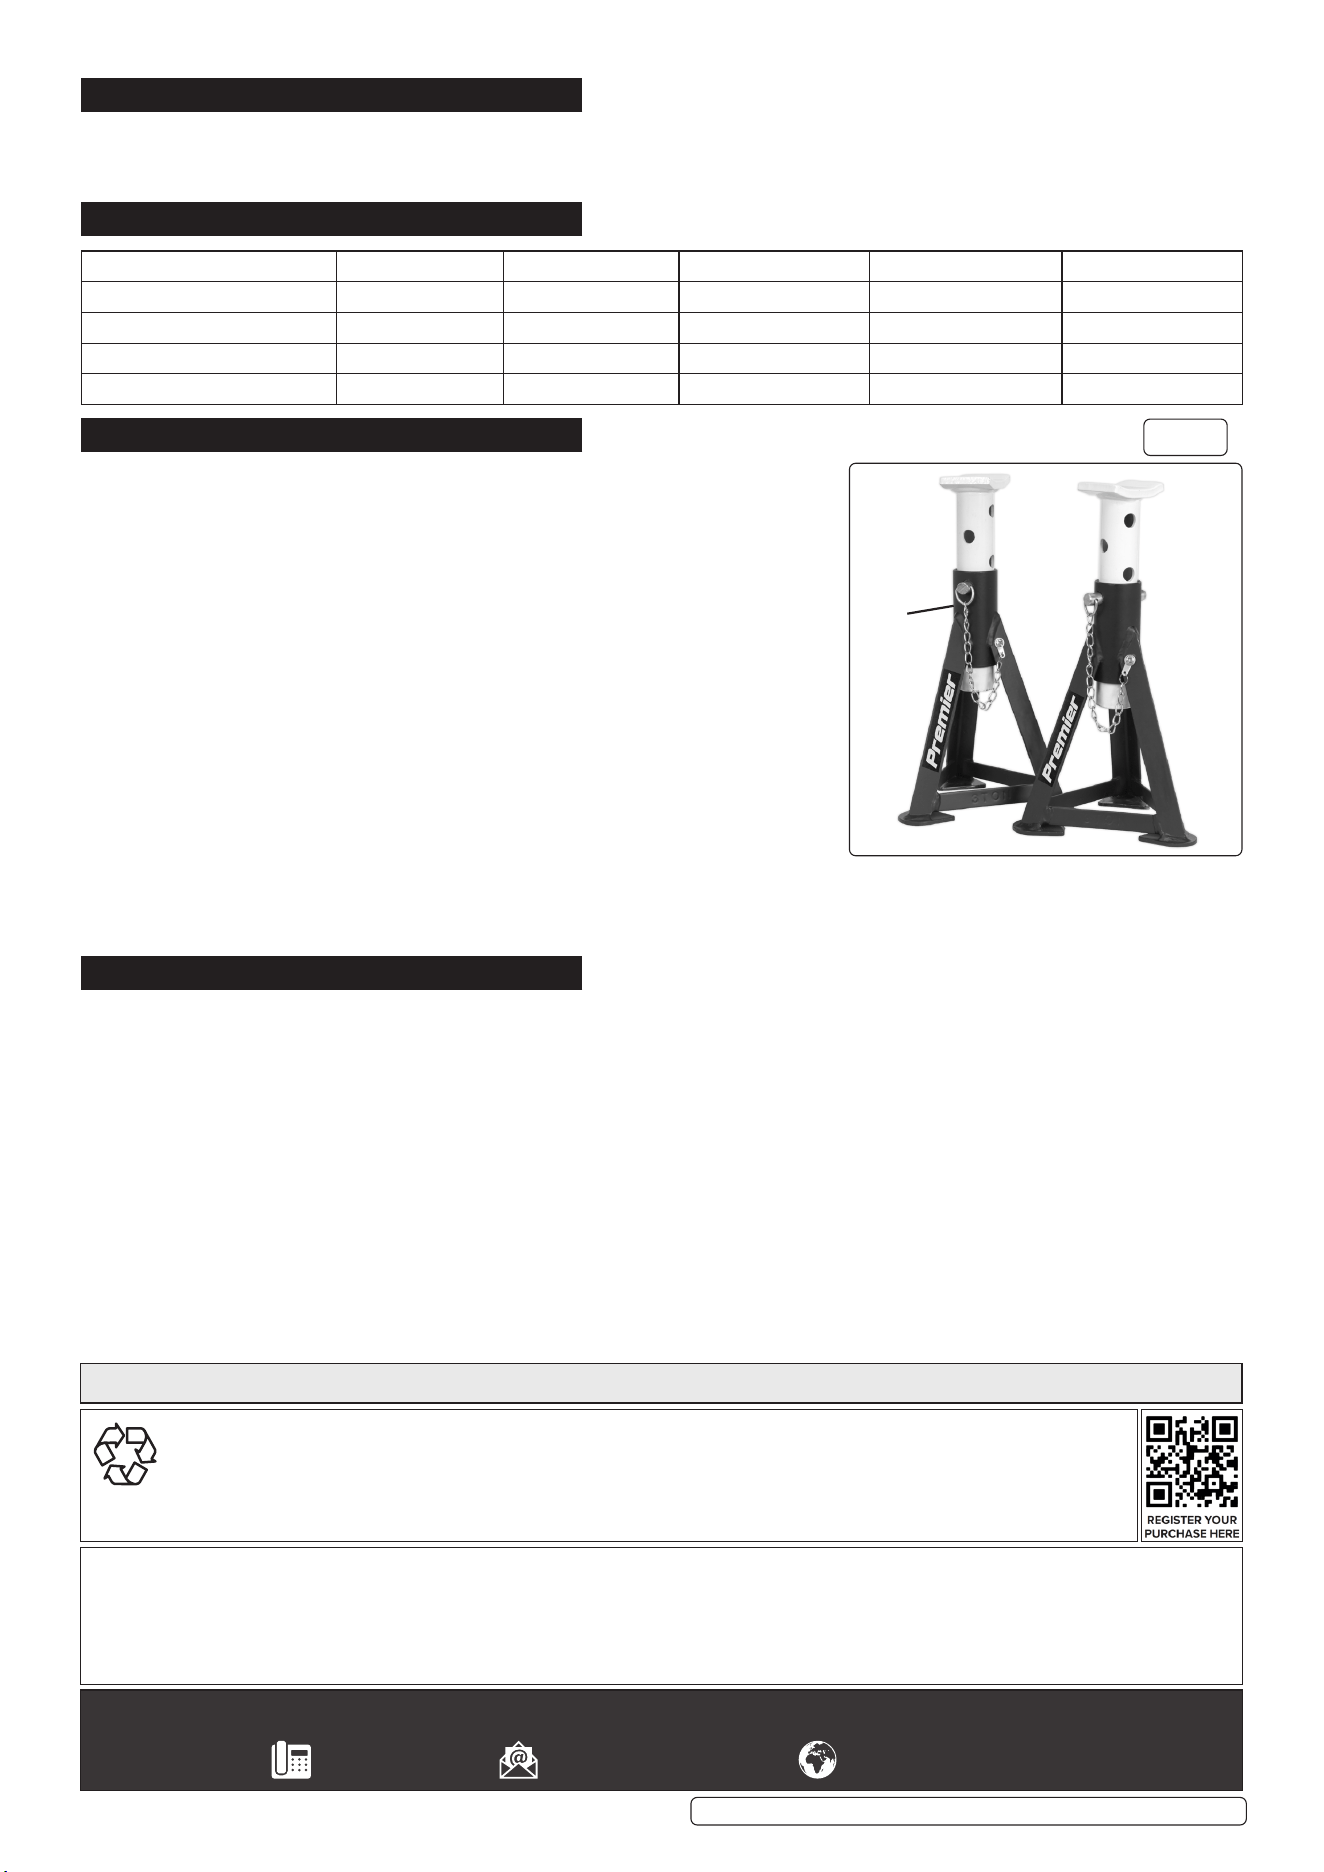
Fit pin through
both the stand
collar and the
centre tube
2. INTRODUCTION
Heavy-duty axle stands to safely support vehicles for extended periods of time. Large crutches for good load distribution. The heavy
gauge steel frame and welded construction gives superior strength and safety. All stands feature captive, multi-position pin load
support. Sold in pairs. Available in ve colours.
3. SPECIFICATION
4. OPERATION
4.1. Familiarise yourself with the product. Check that the stands are in good condition
and that no damage has been sustained during transit. Insert the centre column
(g.1.1) in the centre tube (g.1.2), adjust to height required and insert the locking pin
(g.1.3).
4.2. Ensure the maximum load does not exceed 6 tonnes per pair of axle stands, (3
tonnes for each stand).
4.3. Refer to vehicle manufacturer’s instructions for recommended support points. Check
that the points are in good condition.
4.4. Ensure the vehicle brake is on (or in park mode) and wheels are chocked.
4.5. Adjust height of stand to correspond with the raised vehicle.
4.6. Check that the locking pin is correctly pushed all the way through the stand collar,
centre column and out of the other side, insert safety pin, then position stands under
vehicle at points specied by vehicle manufacturer
4.7. Carefully and slowly lower the load onto stands. Ensure the load bearing points sit
in the center of the stand saddle and check that the stands are stable and not leaning.
Also ensure that there are no objects or persons that could impede the safe lowering
of the vehicle onto the stands.
4.8. To remove stands jack vehicle slightly so that stand can be removed.
4.9. After use, hold the centre column (g.1.1) rmly when removing the locking pin (g.1.3). Failure to do so will allow the center column to
fall freely through the main center tube which could be dangerous.
WARNING! Ensure you follow all instructions carefully. Failure to note these warnings may cause damage, serious injury or loss of life.
5. MAINTENANCE
5.1. Before each use check to ensure stands and stand welds are not cracked, and that there are no missing and/or damaged parts.
WARNING! Any stand that appears to be damaged in any way must be removed from service immediately.
5.2. Ensure the locking pins are in good order and condition.
5.3. Due to the potential hazards associated with these stands, do not misuse, or make any modication to the stands or components.
5.4. It is the responsibility of the stands owner to ensure the operator has read these instructions, and that the operator is familiar with the
stands use and limitations.
g.1
Original Language Version
© Jack Sealey Limited
Parts support is available for this product. To obtain a parts listing, please email sales@sealey.co.uk or telephone 01284 757500
AS3.V2, AS3G.V1,AS3O.V1, AS3R.V1, AS3Y.V1 SERIES Issue:3 (H,3,F) 14/11/23
Model No: AS3.V2 AS3G.V1 AS3O.V1 AS3R.V1 AS3Y.V1
Capacity Each: 3 Tonne 3 Tonne 3 Tonne 3 Tonne 3 Tonne
Capacity pair: 6 Tonne 6 Tonne 6 Tonne 6 Tonne 6 Tonne
Max Working Height: 435mm 435mm 435mm 435mm 435mm
Min Working Height: 290mm 290mm 290mm 290mm 290mm
Sealey Group, Kempson Way, Suffolk Business Park, Bury St Edmunds, Suffolk. IP32 7AR
01284 757500 sales@sealey.co.uk www.sealey.co.uk
ENVIRONMENT PROTECTION
Recycle unwanted materials instead of disposing of them as waste. All tools, accessories and packaging should be
sorted, taken to a recycling centre and disposed of in a manner which is compatible with the environment. When
the product becomes completely unserviceable and requires disposal, drain any uids (if applicable) into approved
containers and dispose of the product and uids according to local regulations.
Note: It is our policy to continually improve products and as such we reserve the right to alter data, specifications and component parts without prior
notice. Please note that other versions of this product are available. If you require documentation for alternative versions, please email or call
our technical team on technical@sealey.co.uk or 01284 757505.
Important: No Liability is accepted for incorrect use of this product.
Warranty: Guarantee is 36 months from purchase date, proof of which is required for any claim.
1
3
2