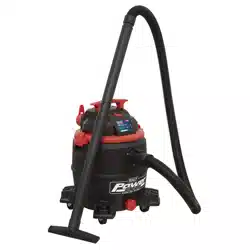

VACUUM CLEANER INDUSTRIAL DUST-FREE
WET & DRY 38L 1100W/110V STAINLESS STEEL
DRUM M CLASS FILTRATION
MODEL NO: PC380M110V
Thank you for purchasing a Sealey product. Manufactured to a high standard, this product will, if used according to these instructions,
and properly maintained, give you years of trouble free performance.
IMPORTANT: PLEASE READ THESE INSTRUCTIONS CAREFULLY. NOTE THE SAFE OPERATIONAL REQUIREMENTS, WARNINGS & CAUTIONS. USE
THE PRODUCT CORRECTLY AND WITH CARE FOR THE PURPOSE FOR WHICH IT IS INTENDED. FAILURE TO DO SO MAY CAUSE DAMAGE AND/OR
PERSONAL INJURY AND WILL INVALIDATE THE WARRANTY. KEEP THESE INSTRUCTIONS SAFE FOR FUTURE USE.
1. SAFETY
1.1. ELECTRICAL SAFETY
WARNING! It is the user’s responsibility to check the following:
9 Check all electrical equipment and appliances to ensure that they are safe before using. Inspect power supply leads, plugs and
all electrical connections for wear and damage. Sealey recommend that an RCD (Residual Current Device) is used with all electrical
products.
Electrical safety information. It is important that the following information is read and understood:
9 Ensure that the insulation on all cables and on the appliance is safe before connecting it to the power supply.
9 Regularly inspect power supply cables and plugs for wear or damage and check all connections to ensure that they are secure.
Important: Ensure that the voltage rating on the appliance suits the power supply to be used and that the plug is tted with the
correct fuse.
8 DO NOT pull or carry the appliance by the power cable.
8 DO NOT pull the plug from the socket by the cable.
8 DO NOT use worn or damaged cables, plugs or connectors. Ensure that any faulty item is repaired or is replaced immediately by a
qualied electrician.
If the cable or plug is damaged during use, switch o the electricity supply and remove from use.
Ensurethatrepairsarecarriedoutbyaqualiedelectrician.
1.2. GENERAL SAFETY
9 Safety precautions must be observed to avoid injuries and damage. Read the complete operating manual carefully. Keep this manual
in a safe place so that the information is always available to ANY users of the equipment.
9 Never leave the appliance switched on unattended. If the operator leaves the work area, switch the appliance o or unplug it from the
power supply.
8 DO NOT vacuum or use this vacuum cleaner near ammable liquids, gases or explosive vapours like gasoline or other fuels,
lighter uids, cleaners, oil-based paints, natural gas, hydrogen, or explosive dusts like coal dust, magnesium dust, grain dust or gun
power. Sparks inside the motor can ignite ammable vapours or dust.
9 This vacuum cleaner is not suitable for the vacuuming of asbestos or asbestos dust.
8 DO NOT vacuum anything that is burning or smoking, such as cigarettes, matches, or hot ashes.
9 Ensure the hose and connections are always pointed away from the users face, hair, ears and eyes during operation and never direct
the nozzle towards persons or animals.
9 Clear the working area of any items or possessions that do not need to be vacuumed before using equipment
9 Keep mains cable away from heated surfaces.
8 DO NOT expose to rain. Store indoors.
8 DO NOT unplug by pulling on the mains cable. To unplug, grasp the plug, not the cable.
8 DO NOT use with damaged cord, plug or other parts.
8 DO NOT pull or carry by cable, use cable as handle, close a door on the cable, or pull cable around sharp edges or corners.
9 If the supply cord is damaged, it must be replaced by the manufacturer, a qualied service agent or similarly qualied persons in order
to avoid a hazard.
8 DO NOT handle the plug or vacuum cleaner with wet hands.
9 Frequently check that the oat valve positioned underneath the motor is able to move freely.
8 DO NOT use this vacuum cleaner with a torn lter or without the lter installed.
8 DO NOT allow to be used as a toy. Close attention is necessary when used by or near children.
WARNING! To reduce the risk of injury from accidental starting, unplug power cord before changing or cleaning lter.
WARNING! Unplug from power supply when not in use and before carrying out maintenance.
8 DO NOT cover the ventilation openings. DO NOT vacuum with any ventilation openings blocked; keep free of dust, lint, hair or
anything that may reduce air ow.
9 Keep hair, loose clothing, ngers, all parts of body away from openings and moving parts.
9 This machine is not intended for use by persons (including children) with reduced physical, sensory or mental capabilities, or lack of
experience and knowledge. Children shall not play with the appliance. Cleaning and user maintenance shall not be made by children
without supervision. For additional protection: It is recommended that this vacuum cleaner can be used in conjunction with residual
Refer to
instruction
manual
Vacuum cleaners of dust category M
according to IEC/EN 60335-2-69 for
dry vacuuming of hazardous dusts
with an exposition limit value ≥0.1
mg/m3
.
Wear protective
clothing
Wear a P-2
respirator when
changing bags,
filter or
cartridges
PC380M110V Issue:2 (1,2) 24/10/23
Original Language Version
© Jack Sealey Limited

current device (RCD) with a rated residual current of 30mA or less.
9 Only use the socket outlet on the machine for purposes specied in the instructions.
9 If foam or liquid escapes from the machine, switch o immediately.
9 Check the oat valve regularly to ensure it is moving freely and examine it for signs of damage.
9 Precautions should be taken when changing attachments.
9 For user servicing, the machine must be dismantled, cleaned and serviced, as far as is reasonably practicable, without causing risk to
the maintenance sta and others. Suitable precautions include decontamination before dismantling.
9 Provision must be made for local ltered exhaust ventilation where the machine is dismantled, cleaning of the maintenance area and
suitable personal protection must be worn whilst carrying out these tasks.
9 Perform a technical inspection at least annually, consisting of, for example, inspection of lters for damage, air tightness of the
machine and proper function of the control mechanism.
9 Besides the operating instructions and the binding accident prevention regulations valid in the country of use, observe recognized
regulations for safety and proper use.
9 When dust removers are used, the rate at which air is exchanged in the room must be adequate if the exhaust air from the vacuum
cleaner is blown into the room (please observe regulations valid in the country of use).
9 Beforestartingwork,theoperatingstamustbeinformedon:
- use of the vacuum cleaner
- risks associated with the material to be picked up
- safe disposal of the picked up material
9 Before transporting the collection tank, close all the locks.
8 DO NOT tilt the cleaner if there is liquid in the collection tank.
8 DO NOT use a crane hook to lift the cleaner.
9 For class M machines, the outside of the machine should be decontaminated and wiped clean or treated with sealant before being
taken out of a hazardous area. All the machine parts shall be regarded as contaminated when removed from the hazardous area and
appropriate action taken to prevent dust dispersal.
If an extension reel is used it should be fully unwound before connection. A reel with an RCD fitted is preferred since any appliance
plugged into it will be protected. The cable core section is important and should be at least 1.5mm², but to be absolutely sure that the
capacity of the reel is suitable for this product and for others which may be used in the other output sockets, we recommend the use
of 2.5mm² section cable. If an extension reel is to be used outdoors, ensure it is marked for outdoor use.
2. INTRODUCTION
Automatic electric power tool dust extractor/vacuum cleaner. Wet and dry. M class ltration to 1 micron. Perfect for use as a regular
industrial vacuum cleaner as well as for automatic use with electric sanders and all power tools with dust extraction outlets. Variable
power tool adaptor to t most power tools with inlet diameter of 27mm, 32mm or 35mm included. Just insert power tool plug into socket
on vac for automatic use. Removes 99.95% of hazardous dust with particles greater than 0.1mg/m³. Excellent for workshop or building
site. Warning light shows when lter needs cleaning of hazardous dust. Filter self-cleaning system. Supplied with complete anti-static
tool kit including round brush, multi surface oor nozzle, power tool adaptor and 2.5m hose. 10m Power input cable with 2P+E BSI
approved 16A plug. Spare consumables: ve dust bags, ve tank liners and one foam lter for wet use all included.
3. SPECIFICATION
Model no .................................................. PC380M110V
Airow ...........................................................147.6m³/hr
Consumable parts
Foam lter (x3) ............................................. PC380MFF
Cartridge lter Class M .................................PC380MCF
Tank liner Class M (x5) ................................ PC380MTL
Dust bag class M (x5) ................................ PC380MDB
Drum size .................................................................38L
Max. vacuum pressure .........................................22Kpa
Motor power ........................................................ 1100W
Power tool capacity ....................................110V - 660W
Supply ............................................................. 110V-16A
Vacuum accessories diameter..............................35mm
Original Language Version
© Jack Sealey Limited
PC380M110V Issue:2 (1,2) 24/10/23
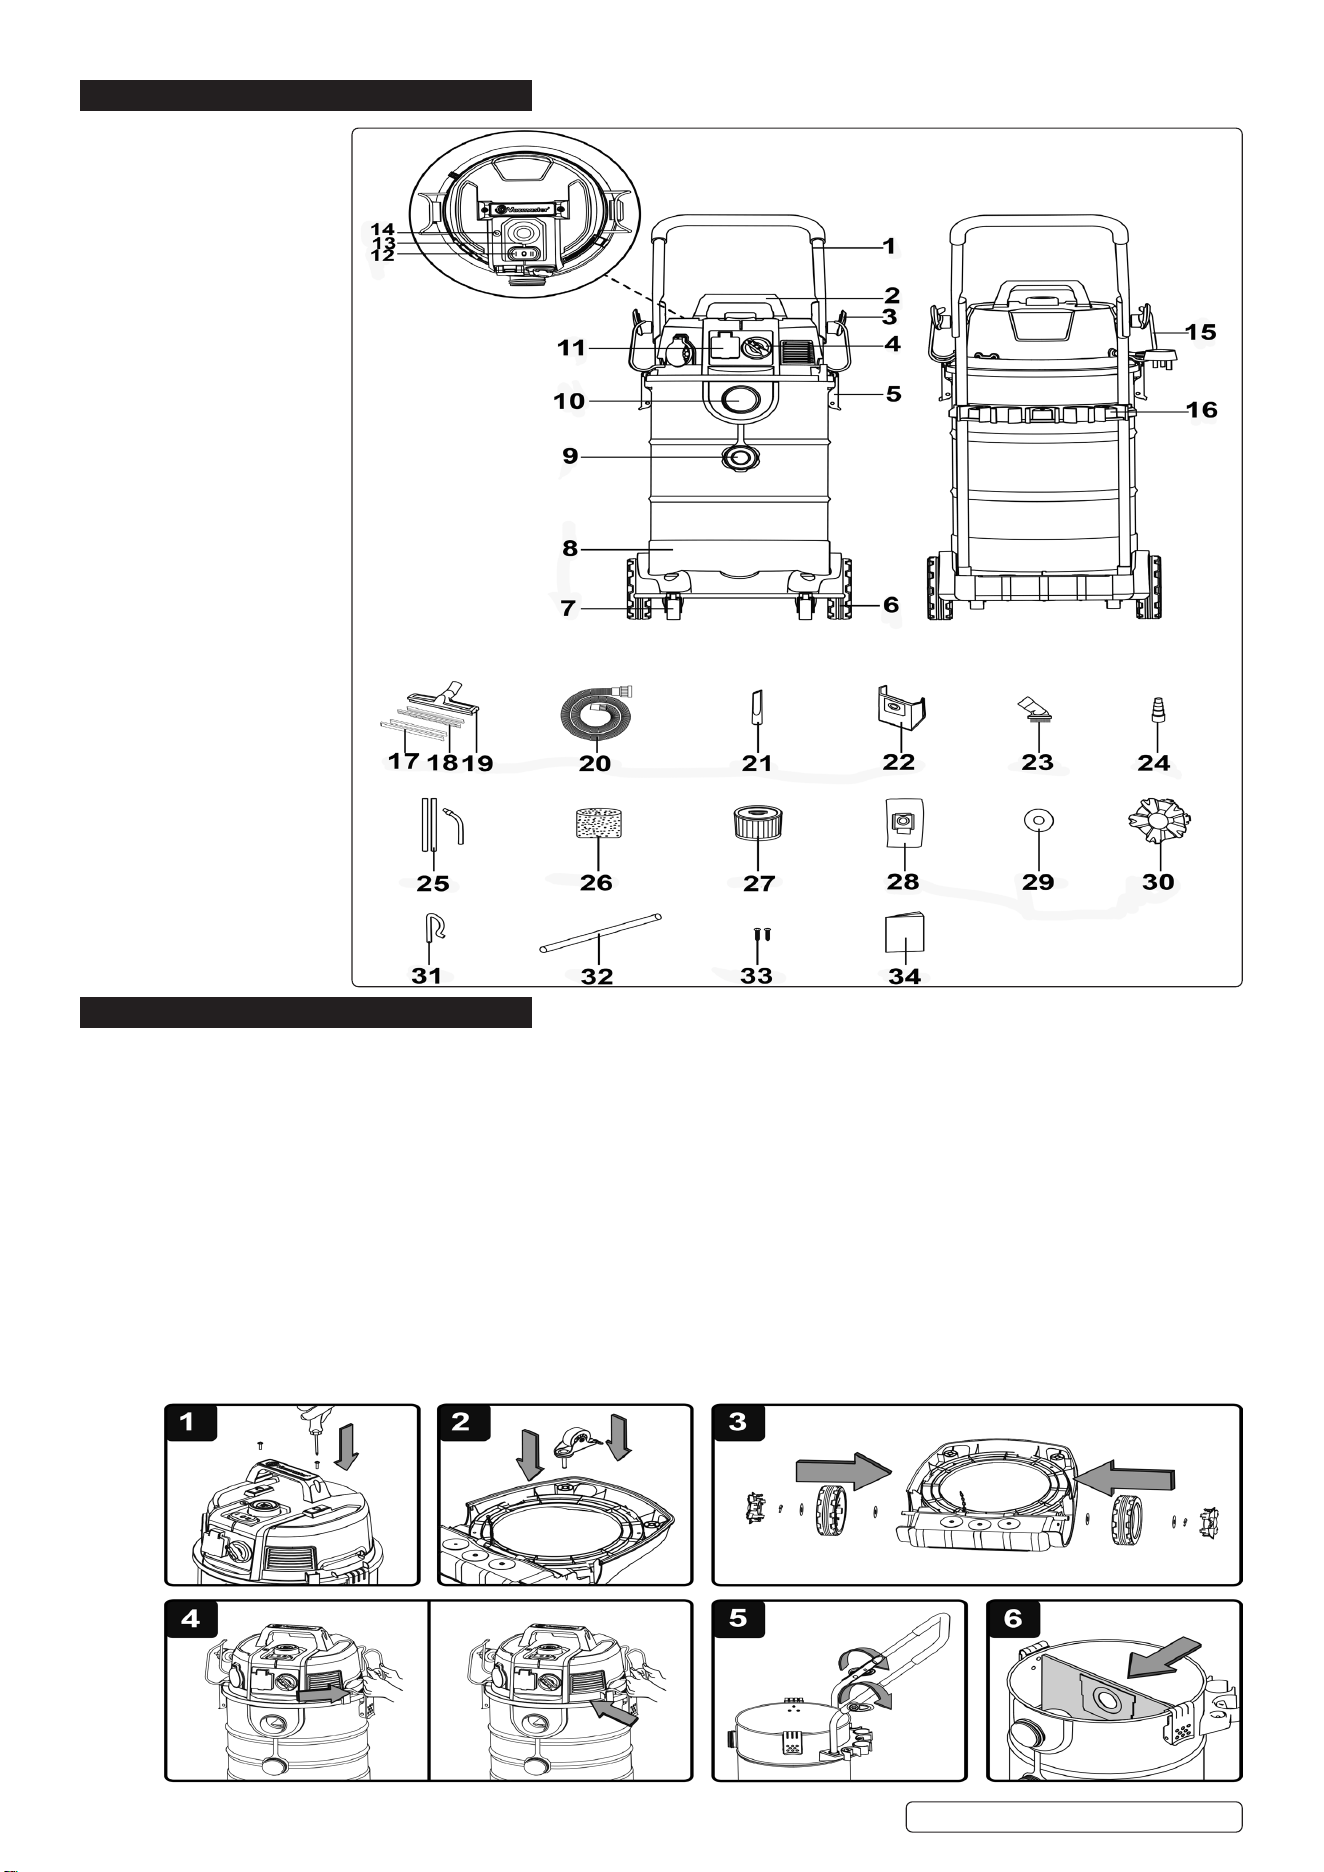
4. CONTENTS
1 Handle
2 Carry handle
3 Wing knob
4 Power regulator
5 Latch
6 Rear wheel
7 Front castor
8 Container
9 Cover gasket
10 Suction port
11 Power take o socket
12 On/o switch
13 Filter cleaning button
14 Air ow indicator
15 Hose storage rack
16 Accessory storage
17 Squeegee inserts
18 Brush inserts (pre-installed)
19 Floor nozzle
20 Suction hose
21 Crevice tool
22 Dust bag (x5)
23 Round dust brush
24 Power tool hose adaptor
25 Metal extension wand (x3)
26 Foam lter
27 Cartridge lter (pre-installed)
28 Disposable bag (x5)
29 Washer (x4)
30 Hub cap (x2)
31 Wheel retaining pin (x2)
32 Wheel axle
33 Screw (x2)
34 Manual
5. ASSEMBLY
5.1. Remove all the contents from inside of the vacuum cleaner container.
5.2. Attach the carry handle into the slots located on the top of the power head. Secure them with supplied screws (Fig.1).
5.3. Turn the container upside down and insert the front feet with casters into the slots and apply pressure until they click into place (Fig.2).
5.4. Insert the wheel axle into the rear wheel housing on the base. Insert a washer onto the axle followed by the rear wheel and another
washer. Insert the wheel retaining pin into the hole on the end of the axle to lock into place. Push t the hub cap onto the wheel.
Repeat the same steps on the other end of the axle (Fig.3).
5.5. To position the hose storage rack, insert one end into the channel on the side of the power head, making sure it is secured in place.
Apply inward pressure to the other side and insert it into the opposite channel (Fig.4).
5.6. Unfold the upper handle assembly into the upright position. The upper handle has two adjustable height positions. Secure in place by
tightening the knobs clockwise (Fig.5).
5.7. The vacuum cleaner comes ready for dry vacuum cleaning with the cartridge lter pre-installed. If the cartridge lter is not installed,
refer to section 6.6.
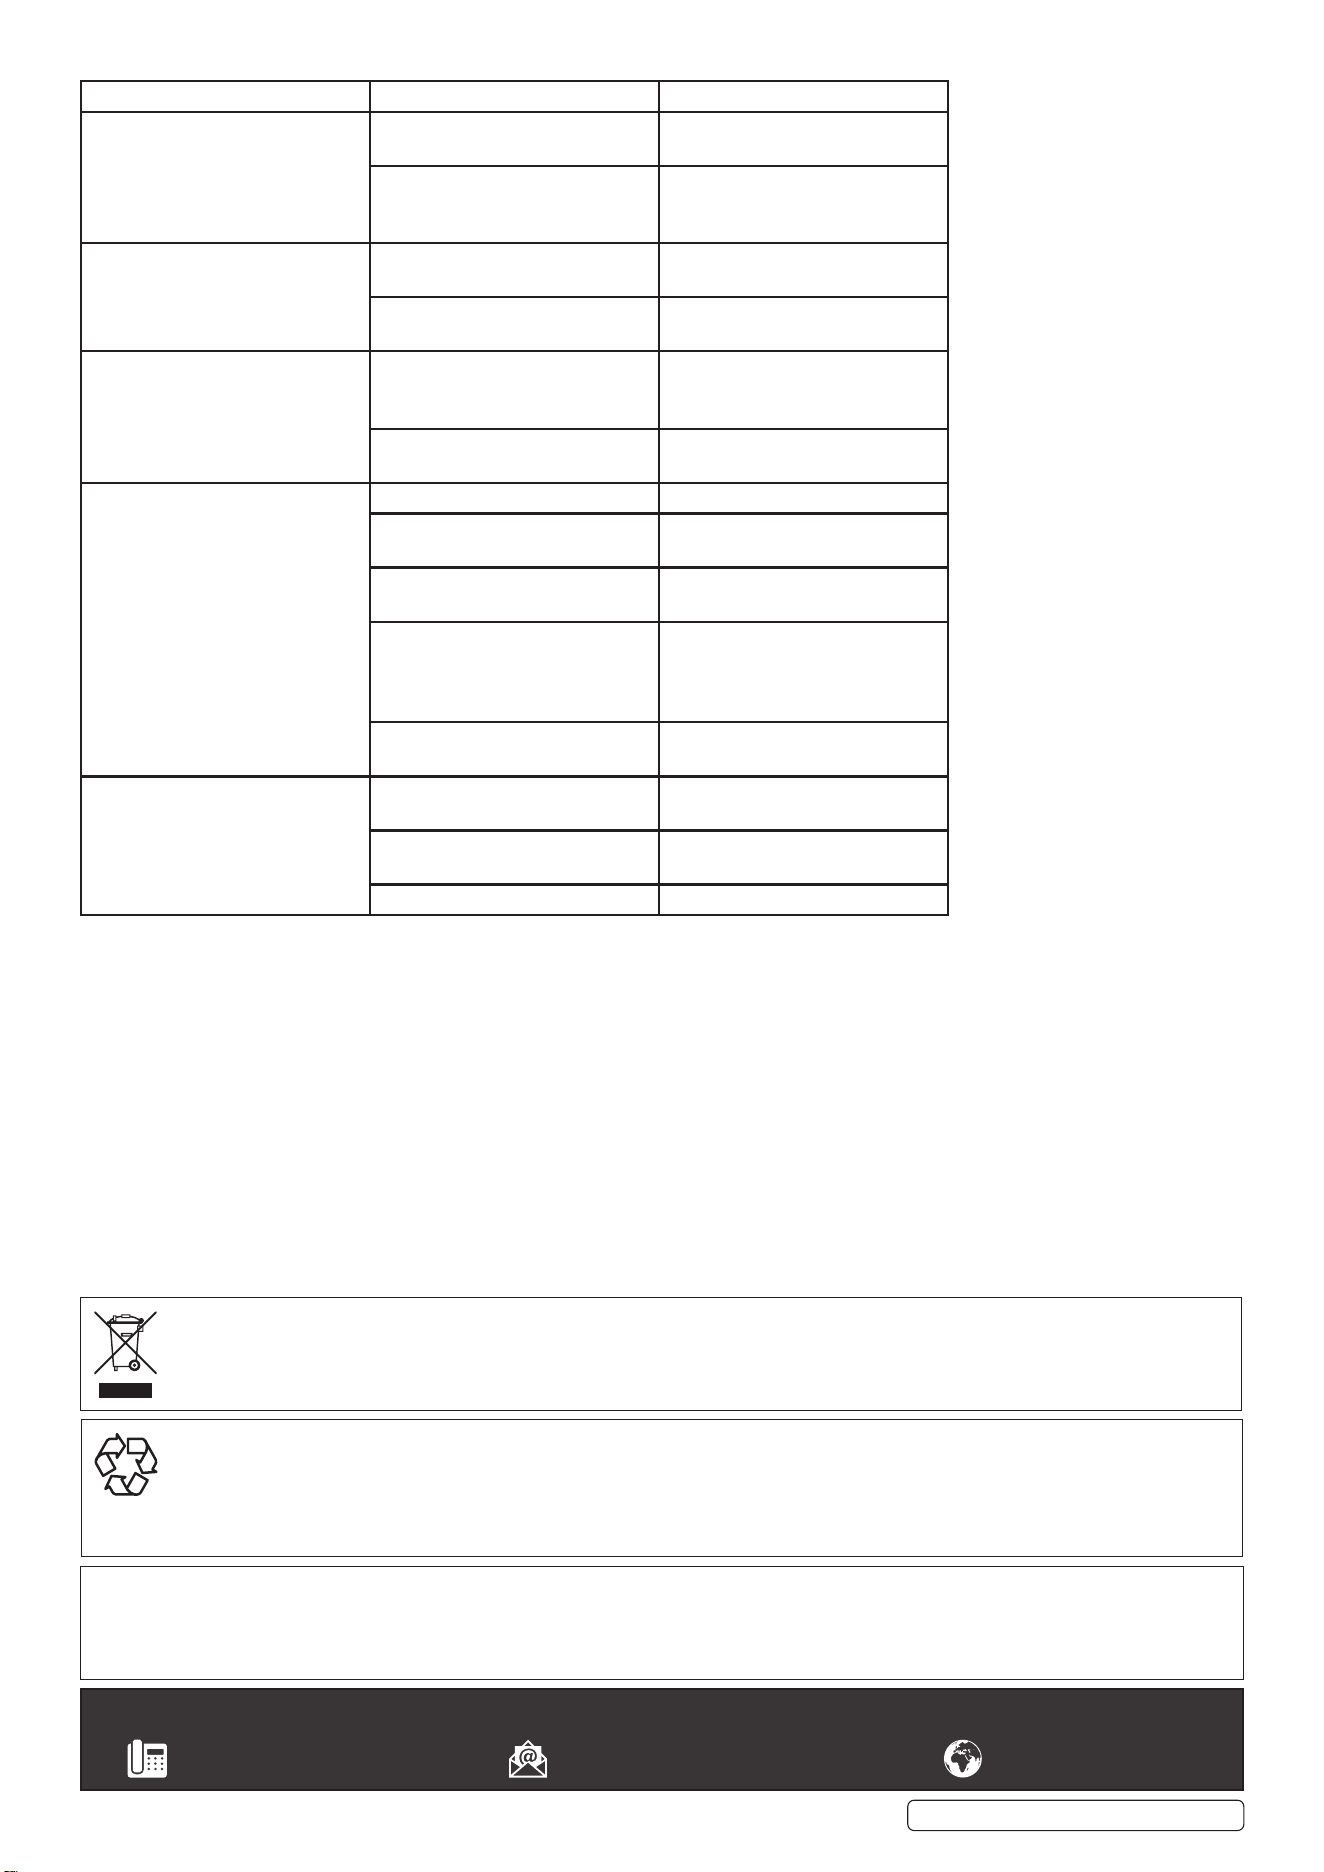
5.8. To maintain M-class certication this vacuum cleaner must be used with a means of disposable collection. By removing the dust bag
and disposable bag when collecting debris the user runs the risk of voiding vacuum cleaner certication.
5.9. To use a dust bag, fully t the dust bag ange onto the inlet stub (Fig.6).
Original Language Version
© Jack Sealey Limited
PC380M110V Issue:2 (1,2) 24/10/23

5.10. To use disposable bag, place the disposable bag into the container, and fully t the tank liner ange onto the inlet stub. Fold the top
edge of the tank liner over the rim of the container (Fig.7).
5.11. To use a disposable bag and a dust bag together, place the disposable bag into the container and fully t the disposable bag ange
onto the inlet stub, and fold the top edge of the disposable bag over the rim of the container, then fully t the dust bag ange onto the
inlet stub (Fig.8).
5.12. For wet vacuum cleaning, replace the cartridge lter with the foam lter supplied. DO NOT use a dust bag and/or a disposable bag
when wet vacuuming. If the foam lter is not installed, refer to section 6.7.
5.13. Secure the power head back on the container using the latches. Insert the locking end of the hose into the suction port of the container
and turn clockwise to lock into place (Fig. 9).
5.14. Choose the desired accessories and/or extension wands and push t onto the hose nozzle.
5.15. FLOOR NOZZLE ATTACHMENTS
5.15.1. The oor nozzle comes supplied with additional attachments to ensure correct suction across dierent oor surfaces and applications.
5.15.2. To remove the oor nozzle attachments, turn the oor tool holder upside down.
5.15.3. Using a athead screwdriver or other suitable tool, locate the holding clips on each outer edge.
5.15.4. Insert a at edged object directly next to the holding clip, between the insert and the oor tool holder. Pry the attachment up from
underneath (Fig.10 & 11).
5.15.5. Insert the new attachments into the holder applying downwards pressure (Fig.11).
5.15.6. The attachments can be used in three combinations (Fig.12):
Brush and Squeegee Combination: For use with mixture of wet or dry liquids.
Dual Brush Combination: For use with dry materials or carpeted oor surfaces.
Dual Squeegee Combination: For use on hard oor with wet liquids.
NOTE:The textured side of the rubber squeegee must be facing outwards.
6. OPERATION
6.1. SWITCHING ON/OFF
6.1.1. Connect the mains plug to a suitable power outlet.
6.2. POWER TOOL TAKE-OFF OPERATION (FIG.13)
WARNING! Always check the maximum wattage compatibility of the power tool take o socket against the desired power tool before
connecting to prevent overloading.
6.2.1. Connect the power cable of your power tool to the power take-o socket.
Original Language Version
© Jack Sealey Limited
PC380M110V Issue:2 (1,2) 24/10/23
6.2.2. If applicable, connect the vacuum suction hose to the dust extractor connector on your tool with the supplied adaptor.
6.2.3. Switch the vacuum cleaner to position II, as described in Switching ON/OFF. The moment you switch on the power tool, the vacuum
cleaner will also switch on. Once the electrical appliance has been switched o, the vacuum cleaner switches o following a time lapse
(around 5 seconds) to allow the suction tube to be emptied.
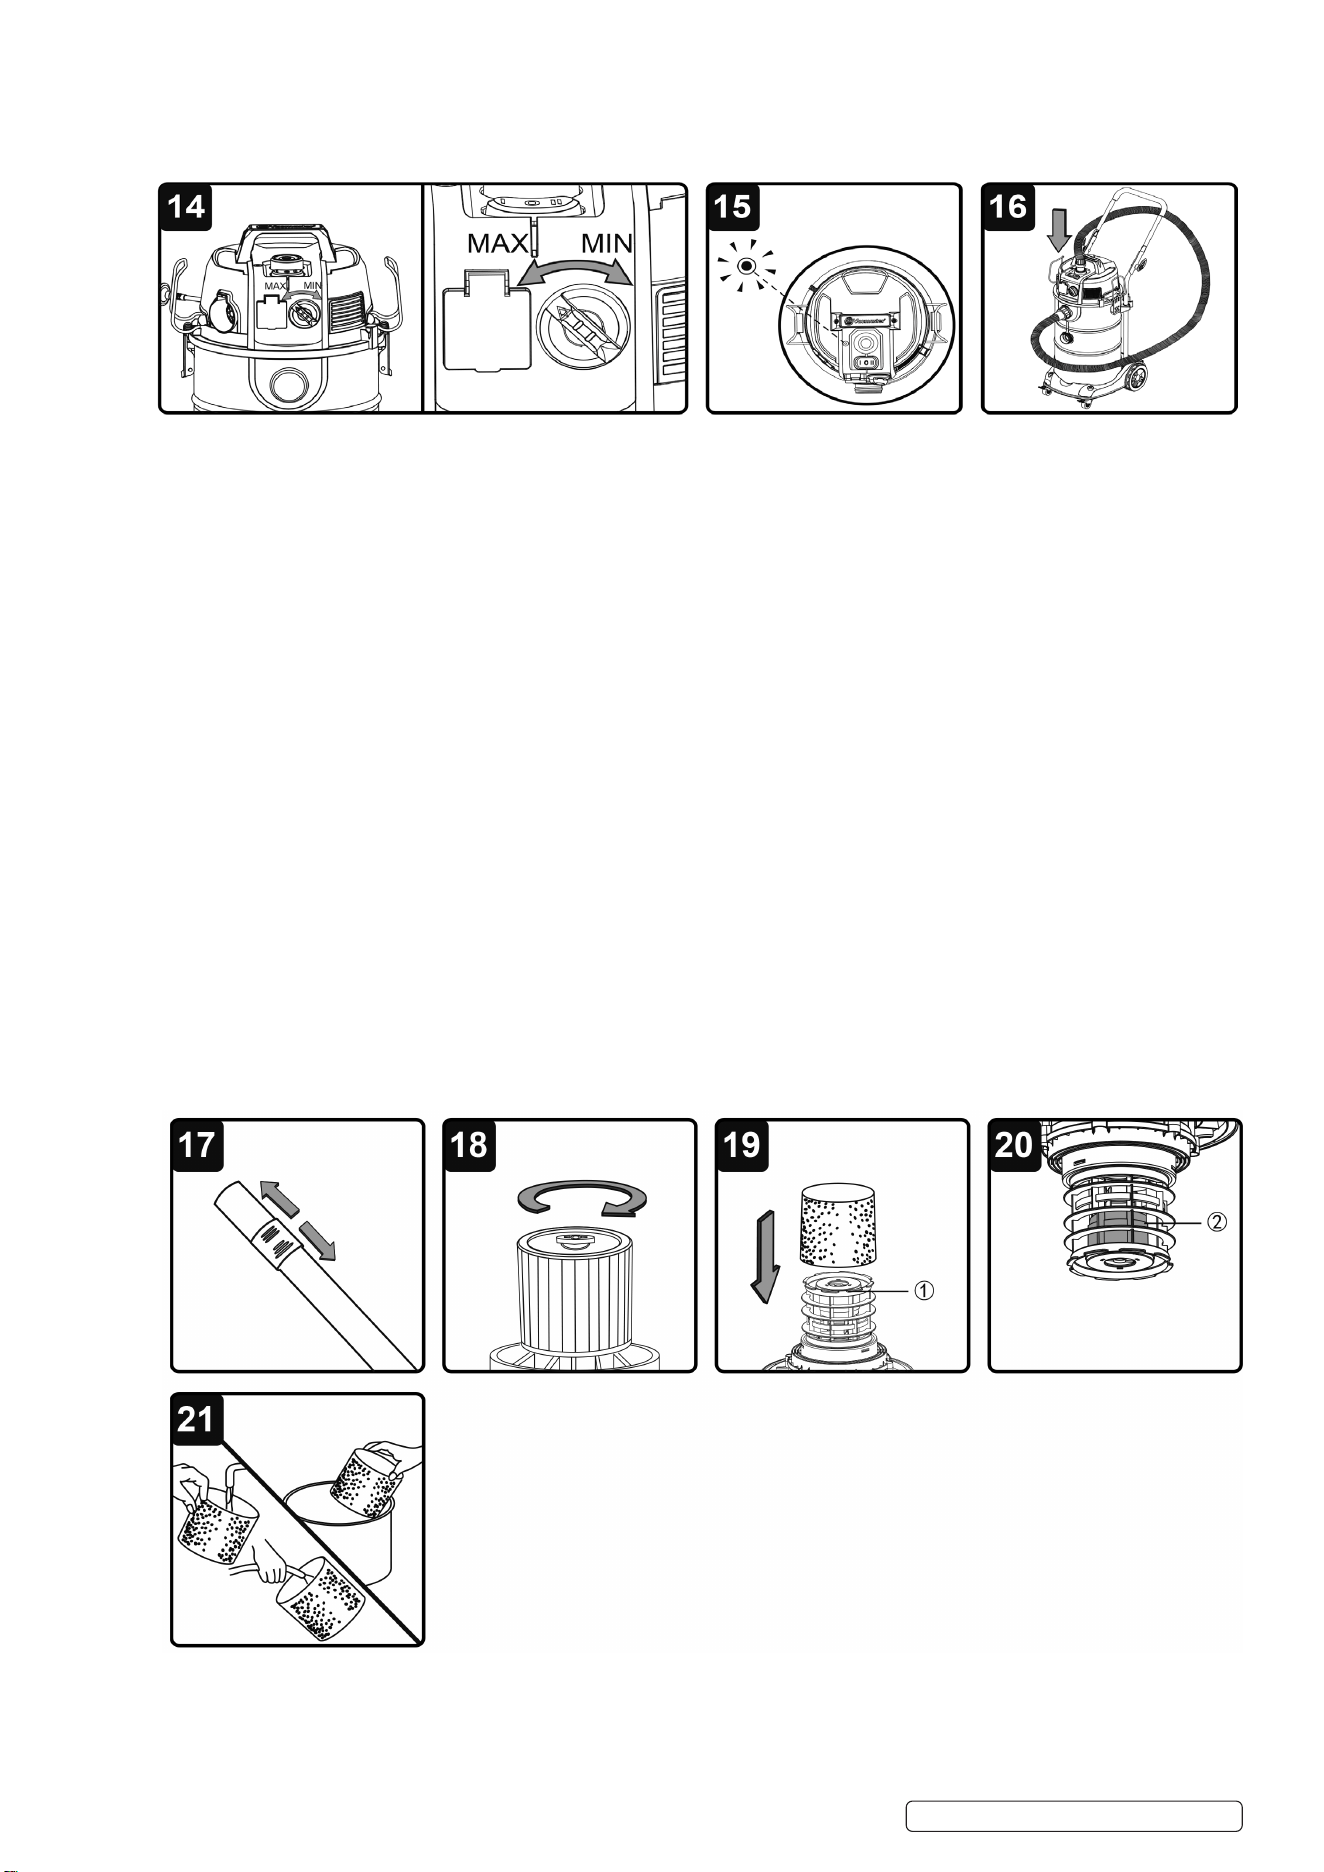
6.3. POWER REGULATOR
6.3.1. The airow can be continuously adjusted by turning the power regulator (Fig.14).
MIN:Reduced suction for applications which generate a low level of dust.
MAX: Maximum suction performance for use in applications which generate a high level of dust.
6.4. FILTER CLEANING OPERATION
IMPORTANT: Only perform the lter cleaning operation when the cartridge lter is installed.
6.4.1. After continuous dry vacuuming operation, air ow will decrease due to heavy accumulation of material and debris on the cartridge
lter. This vacuum is equipped with integrated lter cleaning to increase dust collection eciency.
6.4.2. When reduction of air ow (≤20m/s) has occurred during operation, the air ow indicator next to the lter cleaning button located on top
of the power head will admit a ashing red LED. If the suction performance diminishes, you can improve the suction power with the
help of the lter cleaning system (Fig.15).
6.4.3. Position the end of the suction hose nozzle into the channel located within the lter cleaner button.
6.4.4. Move the on/o switch to the “I” position.
6.4.5. Turn the power regulator to the MAX position.
6.4.6. Press the lter cleaning button down and hold it down for 3-4 seconds (Fig.16).
6.4.7. Repeat the process two more times.
6.5. WET AND DRY VACUUMING OPERATION
WARNING! ENSURE YOU READ, UNDERSTAND AND APPLY SECTION ENTITLED ‘SAFETY INFORMATION’.
WARNING! DO NOT VACUUM IN AREAS WITH FLAMMABLE GASES, VAPOURS, OR EXPLOSIVE DUSTS IN THE AIR.
FLAMMABLE GASES OR VAPOURS INCLUDE BUT ARE NOT LIMITED TO; LIGHTER FLUID, SOLVENT TYPE CLEANERS,
OIL-BASE PAINTS, GASOLINE, ALCOHOL OR AEROSOL SPRAYS. EXPLOSIVE DUSTS INCLUDE BUT ARE NOT LIMITED TO;
COAL, MAGNESIUM, GRAIN OR GUN POWDER.
6.5.1. Verify that the correct lter is installed and the container latches are secured.
6.5.2. Secure the locking end of the hose into the vacuum suction port.
6.5.3. Push the desired accessories onto the hose nozzle. The air ow regulation allows you to change vacuum cleaner suction. For best
cleaning results, fully close the air ow regulation (Fig.17).
6.5.4. Plug the power cord into a power outlet.
6.5.5. Turn on the motor by assigning the switch to the “I” ON position.
6.5.6. Once you have completed vacuuming, switch to the “O” OFF position and unplug the power cord from the power outlet.
6.6. DRY VACUUMING
WARNING! BEFORE INSTALLING, REMOVING OR CLEANING THE VACUUM CLEANER FILTER, ENSURE THAT THE POWER
CORD IS SWITCHED OFF AND UNPLUGGED.
WARNING! ALWAYS USE A P2-RESPIRATOR WHEN VACUUMING HAZARDOUS DUSTS.
Original Language Version
© Jack Sealey Limited
PC380M110V Issue:2 (1,2) 24/10/23
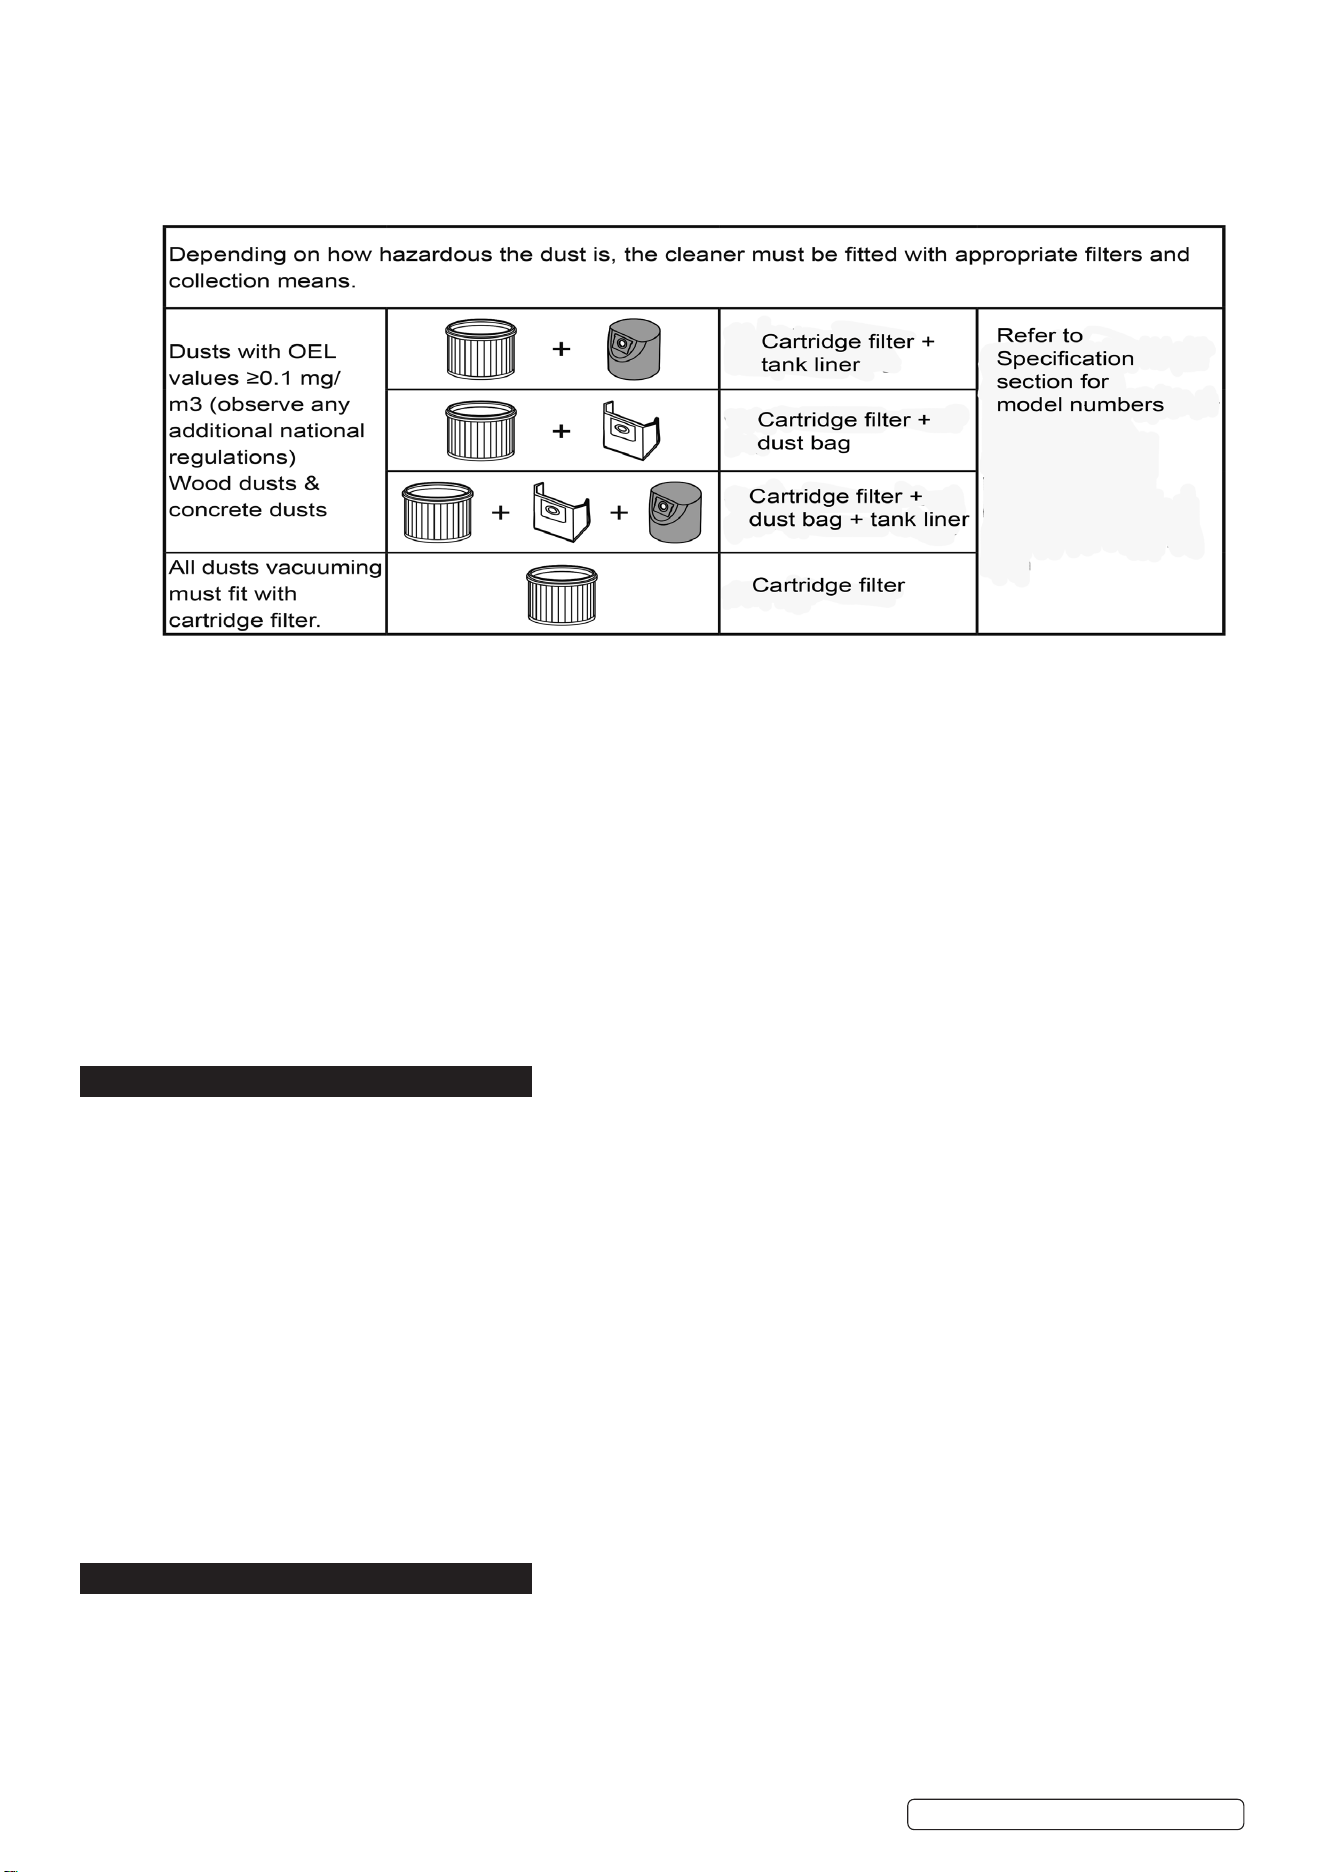
6.6.1. To prepare your vacuum cleaner for dry vacuuming, install the cartridge lter over the lter cage. Carefully push lter until it sits ush
forming a tight seal. Tighten the lter retainer lock clockwise to secure against the internal lter cage (Fig.18).
6.6.2. Install the dust bag and/or the disposable bag onto the suction port inlet. Refer to sections 5.9 & 5.10 for installation instructions.
IMPORTANT:Before picking up dust with occupational exposure limit values:
Check that all the lters are present and properly tted.
For safety reasons, a visual warning indicator will activate if the air ow in the suction hose drops to below 20 m/s.
IMPORTANT: Dispose of the dirt in accordance with legal regulations.
WARNING! Remove the electrical plug from the socket before emptying after dry pick-up. After removing the suction hose from the
machine, close the cover gasket.
NOTE:The requirements for the ingress degree (dust category M) have only been certied for dry vacuuming.
IMPORTANT: Check the lter regularly for optimal performance. An old or blocked lter will reduce suction performance.
WARNING! When using the tank liner, be careful not to vacuum heavy or sharp objects.
WARNING! When removing the tank liner, use a P2-respirator, and securly tie a knot in the disposable bag.
8 DO NOT make contact with any sharp objects and then carefully dispose of in accordance with local disposal regulations.
6.7. WETVACUUMING:
CAUTION! Never vacuum liquids without the water level limit system and foam lter in place.
NOTE:Empty the container before wet vacuuming.
6.7.1. To prepare your vacuum cleaner for wet vacuuming, release the retainer lock and remove the dry use cartridge lter.
6.7.2. Carefully install the supplied foam lter over the internal lter cage, making sure the whole cage is covered (Fig.19.1).
WARNING! DO NOT USE DUST COLLECTION BAGS FOR WET VACUUMING.
IMPORTANT! The vacuum cleaner is equipped with a oat valve which is operational during wet suction (Fig.20.2). The suction power
decreases when the maximum lling level is reached.
6.7.3. When this happens, switch the vacuum cleaner o immediately, and empty the container.
7. MAINTENANCE e
WARNING! REMOVE THE POWER CABLE FROM THE POWER SUPPLY BEFORE CARRYING OUT ANY MAINTENANCE.
WARNING! ALWAYS USE A P2-RESPIRATOR WHEN PERFORMING ANY MAINTENANCE AND/OR REMOVING THE CARTRIDGE
FILTER AFTER VACUUMING HAZARDOUS DUSTS.
7.1. Keep all safety devices, air vents and the motor housing free of dirt and dust. Use a soft, dry brush to clean the equipment regularly.
7.2. Clear all dirt or debris from the collection tank after each use. Allow to dry before replacing the power head.
7.3. Check the hose, attachments, and power cable to verify that they have not been damaged or any debris is trapped and blocking
airow.
7.4. CLEANING CARTRIDGE FILTER
IMPORTANT! After vacuuming hazardous dusts, it is recommended to dispose of the cartridge lter within a sealed bag and dispose
of in accordance with local disposal regulations.
IMPORTANT! When manually cleaning the cartridge lter, be careful not to damage the lter.
7.4.1. Remove the cartridge lter and clean by gently tapping or brushing dirt o. Ensure you always use a P2-respirator and only do so in a
well ventilated environment.
7.4.2. For optimal performance it is recommended to replace the old lter with a new lter regularly.
7.4.3. If necessary, use a mild soap and water solution to wash cartridge lter and rinse with clean water. Allow the lters to air dry before
re-installing.
7.5. CLEANING FOAM FILTER
7.5.1. Remove the foam lter and use a mild soap and water solution to wash and rinse with clean water (Fig.21). Allow lter to air dry
before installing and using again.
8. TROUBLESHOOTING.
WARNING! Remove from mains supply before Troubleshooting or performing any maintenance.
8.1. CLEANING PERFORMANCE
8.1.1. If your motor is operating, then the most likely cause for a loss in suction is a blockage or an opening in the vacuum. To maintain
a high cleaning performance from your machine, it is important to replace or clean cartridge lters as necessary.
8.1.2. Replace full dust collection bags to prevent performance drops. A performance drop with clean lters can only be caused by a
blockage in the tools or the hose.
Original Language Version
© Jack Sealey Limited
PC380M110V Issue:2 (1,2) 24/10/23
Sealey Group, Kempson Way, Suffolk Business Park, Bury St Edmunds, Suffolk. IP32 7AR
01284 757500 sales@sealey.co.uk www.sealey.co.uk
ENVIRONMENT PROTECTION
Recycle unwanted materials instead of disposing of them as waste. All tools, accessories and packaging should be sorted, taken to
a recycling centre and disposed of in a manner which is compatible with the environment. When the product becomes completely
unserviceable and requires disposal, drain any fluids (if applicable) into approved containers and dispose of the product and fluids
according to local regulations.
Note: It is our policy to continually improve products and as such we reserve the right to alter data, specifications and component parts without prior
notice.
Important: No Liability is accepted for incorrect use of this product.
Warranty: Guarantee is 12 months from purchase date, proof of which is required for any claim.
WEEE REGULATIONS
Dispose of this product at the end of its working life in compliance with the EU Directive on Waste Electrical and Electronic Equipment
(WEEE). When the product is no longer required, it must be disposed of in an environmentally protective way. Contact your local solid
waste authority for recycling information.
.
Problem Possible cause Solution
The appliance does not work No power Check the power supply and
fuse.
Functional fault in the mains
cable, switch or motor.
Have damaged part checked by
qualied personnel or contact
Sealey stockist.
Dust is escaping from the motor
cover.
The cartridge lter is missing or
damaged.
Fit cartridge lter or replace it.
Foam lter accidentally tted
when dry vacuuming.
Replace foam lter with the
cartridge lter.
Power tool take o socket does
not work.
Power tool wattage is not
compatible with the power tool
take o socket.
Check wattage is compatible with
the power tool take o socket.
Incorrect operating mode
selected.
Ensure the switch is moved into
position II.
Low suction power and high
operating noise/vibrations
Dust bag or disposable bag is full Replace dust or disposable bag.
Suction nozzle, hose, or tank
inlet is blocked.
Check the suction nozzle, hose
and tank inlet for obstructions.
Cartridge lter is blocked. Remove the cartridge lter and
clean.
Float valve has closed. Empty the container of any liquid
waste and ensure the oat valve
(located under the lter) is able to
move freely.
Power regulator switch is set to
minimum.
Adjust variable power regulator.
The air ow regulator is still
ashing red after completion of
lter cleaning operation.
Suction nozzle, hose or tank inlet
is blocked.
Check the suction nozzle, hose
and tank inlet for obstructions.
The cartridge lter is heavily
contaminated.
Remove and clean or replace
with a new lter.
The container is full. Empty the container.
Original Language Version
© Jack Sealey Limited
PC380M110V Issue:2 (1,2) 24/10/23