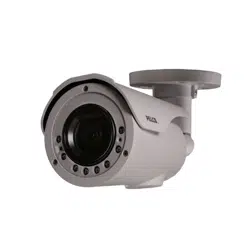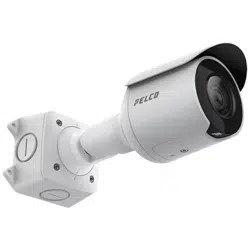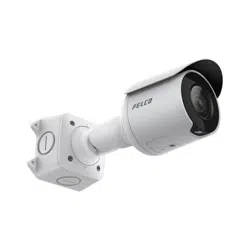


Sarix Professional 4 Bullet Camera Installation Manual
C6726M | 11/22
2
Legal Notices
©2022,PelcoCorporation.Allrightsreserved.PELCO,thePELCOlogo,PELCOaretrademarksof
PelcoCorporation.Othernamesorlogosmentionedhereinmaybethetrademarksoftheirrespective
owners.Theabsenceofthesymbols™and®inproximitytoeachtrademarkinthisdocumentoratallis
notadisclaimerofownershipoftherelatedtrademark.PelcoCorporationprotectsitsinnovationswith
patentsissuedintheUnitedStatesofAmericaandotherjurisdictionsworldwide(seewww.pelco.com).
Unlessstatedexplicitlyandinwriting,nolicenseisgrantedwithrespecttoanycopyright,industrial
design,trademark,patentorotherintellectualpropertyrightsofPelcoCorporationoritslicensors.
Disclaimer
Thisdocumenthasbeencompiledandpublishedusingproductdescriptionsandspecificationsavailable
atthetimeofpublication.Thecontentsofthisdocumentandthespecificationsoftheproductsdiscussed
hereinaresubjecttochangewithoutnotice.PelcoCorporationreservestherighttomakeanysuch
changeswithoutnotice.NeitherPelcoCorporationnoranyofitsaffiliatedcompanies:(1)guaranteesthe
completenessoraccuracyoftheinformationcontainedinthisdocument;or(2)isresponsibleforyour
useof,orrelianceon,theinformation.PelcoCorporationshallnotberesponsibleforanylossesor
damages(includingconsequentialdamages)causedbyrelianceontheinformationpresentedherein.
PelcoCorporation
www.pelco.com
C6726M
Revision:1-EN
20221117

Sarix Professional 4 Bullet Camera Installation Manual
C6726M | 11/22
3
Table of Contents
LegalNotices 2
Disclaimer 2
RegulatoryNotices 4
DisposalandRecyclingInformation 4
Overview 5
JunctionBoxView 5
FrontView 5
SideView 6
RearView 6
ConfigurationPanelView 7
Installation 8
CameraPackageContents 8
InstallationSteps 8
MountingtheBulletCamera 8
RemovingtheConfigurationPanelCover 11
InitializingaCameraUsernameandPassword 12
(Optional)UsingtheUSBWi-FiAdapter 12
AssigninganIPAddress 13
SettingtheIPAddressUsingtheARP/PingMethod 13
AccessingtheLiveVideoStream 13
AimingtheCamera 14
ZoomingandFocusingtheCamera 15
(Optional)ConfiguringmicroSDCardStorage 15
ConfiguringtheCamera 16
ConnectingtoPowerandExternalDevices 16
ConnectionStatusLEDIndicator 18
TroubleshootingNetworkConnectionsandLEDBehavior 18
ResettingtoFactoryDefaultSettings 19
ForMoreInformation 19
PelcoTroubleshootingContactInformation 19

Sarix Professional 4 Bullet Camera Installation Manual
C6726M | 11/22
4
Regulatory Notices
Thisdevicecomplieswithpart15oftheFCCRules.Operationissubjecttothefollowingtwoconditions:
(1)thisdevicemaynotcauseharmfulinterference,and(2)thisdevicemustacceptanyinterference
received,includinginterferencethatmaycauseundesiredoperation.
ThisClassBdigitalapparatuscomplieswithCanadianICES-003.
ThisequipmenthasbeentestedandfoundtocomplywiththelimitsforaClassBdigitaldevice,pursuant
toPart15oftheFCCrules.Theselimitsaredesignedtoprovidereasonableprotectionagainstharmful
interferenceinaresidentialinstallation.Thisequipmentgenerates,usesandcanradiateradiofrequency
energyand,ifnotinstalledandusedinaccordancewiththeinstructions,maycauseharmfulinterference
toradiocommunications.However,thereisnoguaranteethatinterferencewillnotoccurinaparticular
installation.Ifthisequipmentdoescauseharmfulinterferencetoradioortelevisionreception,whichcan
bedeterminedbyturningtheequipmentoffandon,theuserisencouragedtotrytocorrectthe
interferencebyoneormoreofthefollowingmeasures:
l
Reorientorrelocatethereceivingantenna.
l
Increasetheseparationbetweentheequipmentandthereceiver.
l
Connecttheequipmentintoanoutletonacircuitdifferentfromthattowhichthereceiveris
connected.
l
Consultthedealeroranexperiencedradio/TVtechnicianforhelp.
ChangesormodificationsmadetothisequipmentnotexpresslyapprovedbyPelcoCorporationor
partiesauthorizedbyPelcoCorporationcouldvoidtheuser’sauthoritytooperatethisequipment.
Disposal and Recycling Information
Whenthisproducthasreachedtheendofitsusefullife,pleasedisposeofitaccordingtoyourlocal
environmentallawsandguidelines.
Riskoffire,explosion,andburns.Donotdisassemble,crush,heatabove100°C(212°F),orincinerate.
European Union:
Thissymbolmeansthataccordingtolocallawsandregulationsyourproductshouldbedisposedof
separatelyfromhouseholdwaste.Whenthisproductreachesitsendoflife,takeittoacollectionpoint
designatedbylocalauthorities.Somecollectionpointsacceptproductsforfree.Theseparatecollection
andrecyclingofyourproductatthetimeofdisposalwillhelpconservenaturalresourcesandensurethat
itisrecycledinamannerthatprotectshumanhealthandtheenvironment.

Sarix Professional 4 Bullet Camera Installation Manual
C6726M | 11/22
5
Overview
Junction Box View
1. Camera mounts
Pointsforinstallingthecameratothejunctionbox.
2. Mounting hook slots
Pointstoholdthecameratothejunctionboxwhileconnectingtherequiredcables.
3. Mounting holes
Holesforsecuringthejunctionboxtothemountingsurface.
Front View
1. IR Illuminator
ProvidessceneilluminationintheIRspectrum.
2. Configuration panel cover
Coverstheconfigurationpanel.

Sarix Professional 4 Bullet Camera Installation Manual
C6726M | 11/22
6
Side View
1. Sun shroud
Anadjustablecovertohelpprotectthelensagainstglarefromthesun.
2. Mount arm
Adjustablemountarmforpositioningthecamera.
3. Adjustment screws
Providesalockingmechanismforthemountarm.
Rear View
1. Ethernet port
AcceptspowerandEthernetconnectiontothenetwork.Servercommunicationandimagedata
transmissionalsooccuroverthisconnection.
ThecameracaneitherbepoweredbyPoweroverEthernet(PoE)or12VDCAux.
2. Serial number tag
Deviceinformation,productserialnumberandpartnumberlabel.
3. Camera mounting screws
Screwsformountingthecameratothejunctionbox.
4. Mounting hooks
Hookstoattachthecameratothejunctionboxwhileconnectingtherequiredcables.
5. Power and I/O cables
CablesforconnectingthecameratoauxiliarypowerandI/Odevices.Formoreinformation,see
Connecting to Power and External Devices.

Sarix Professional 4 Bullet Camera Installation Manual
C6726M | 11/22
7
Configuration Panel View
1. microSD card slot
AcceptsamicroSDcardforonboardstorage.Formoreinformation,see (Optional) Configuring
microSD Card Storage.
2. Micro USB port
AcceptsamicroUSBtoUSBadapter.OnlyrequiredwhenusingtheUSBWi-FiAdapter.
3. Link LED indicator
AmberLEDindicatesifthereisanactiveconnectionintheEthernetport.
4. Connection status LED indicator
GreenLEDprovidesinformationaboutdeviceoperation.Formoreinformation,seeConnection
Status LED Indicator.
Sarix Professional 4 Bullet Camera Installation Manual
C6726M | 11/22
8
Installation
Camera Package Contents
l
PelcoSarixProfessional4BulletCamera
l
Junctionbox
l
Mountingtemplatesticker
l
4screwsandanchorsforsolidwalls
l
4screwsforattachmenttoelectricalbox
l
ProtectiverubberbootforEthernetport
l
Teflontape
Installation Steps
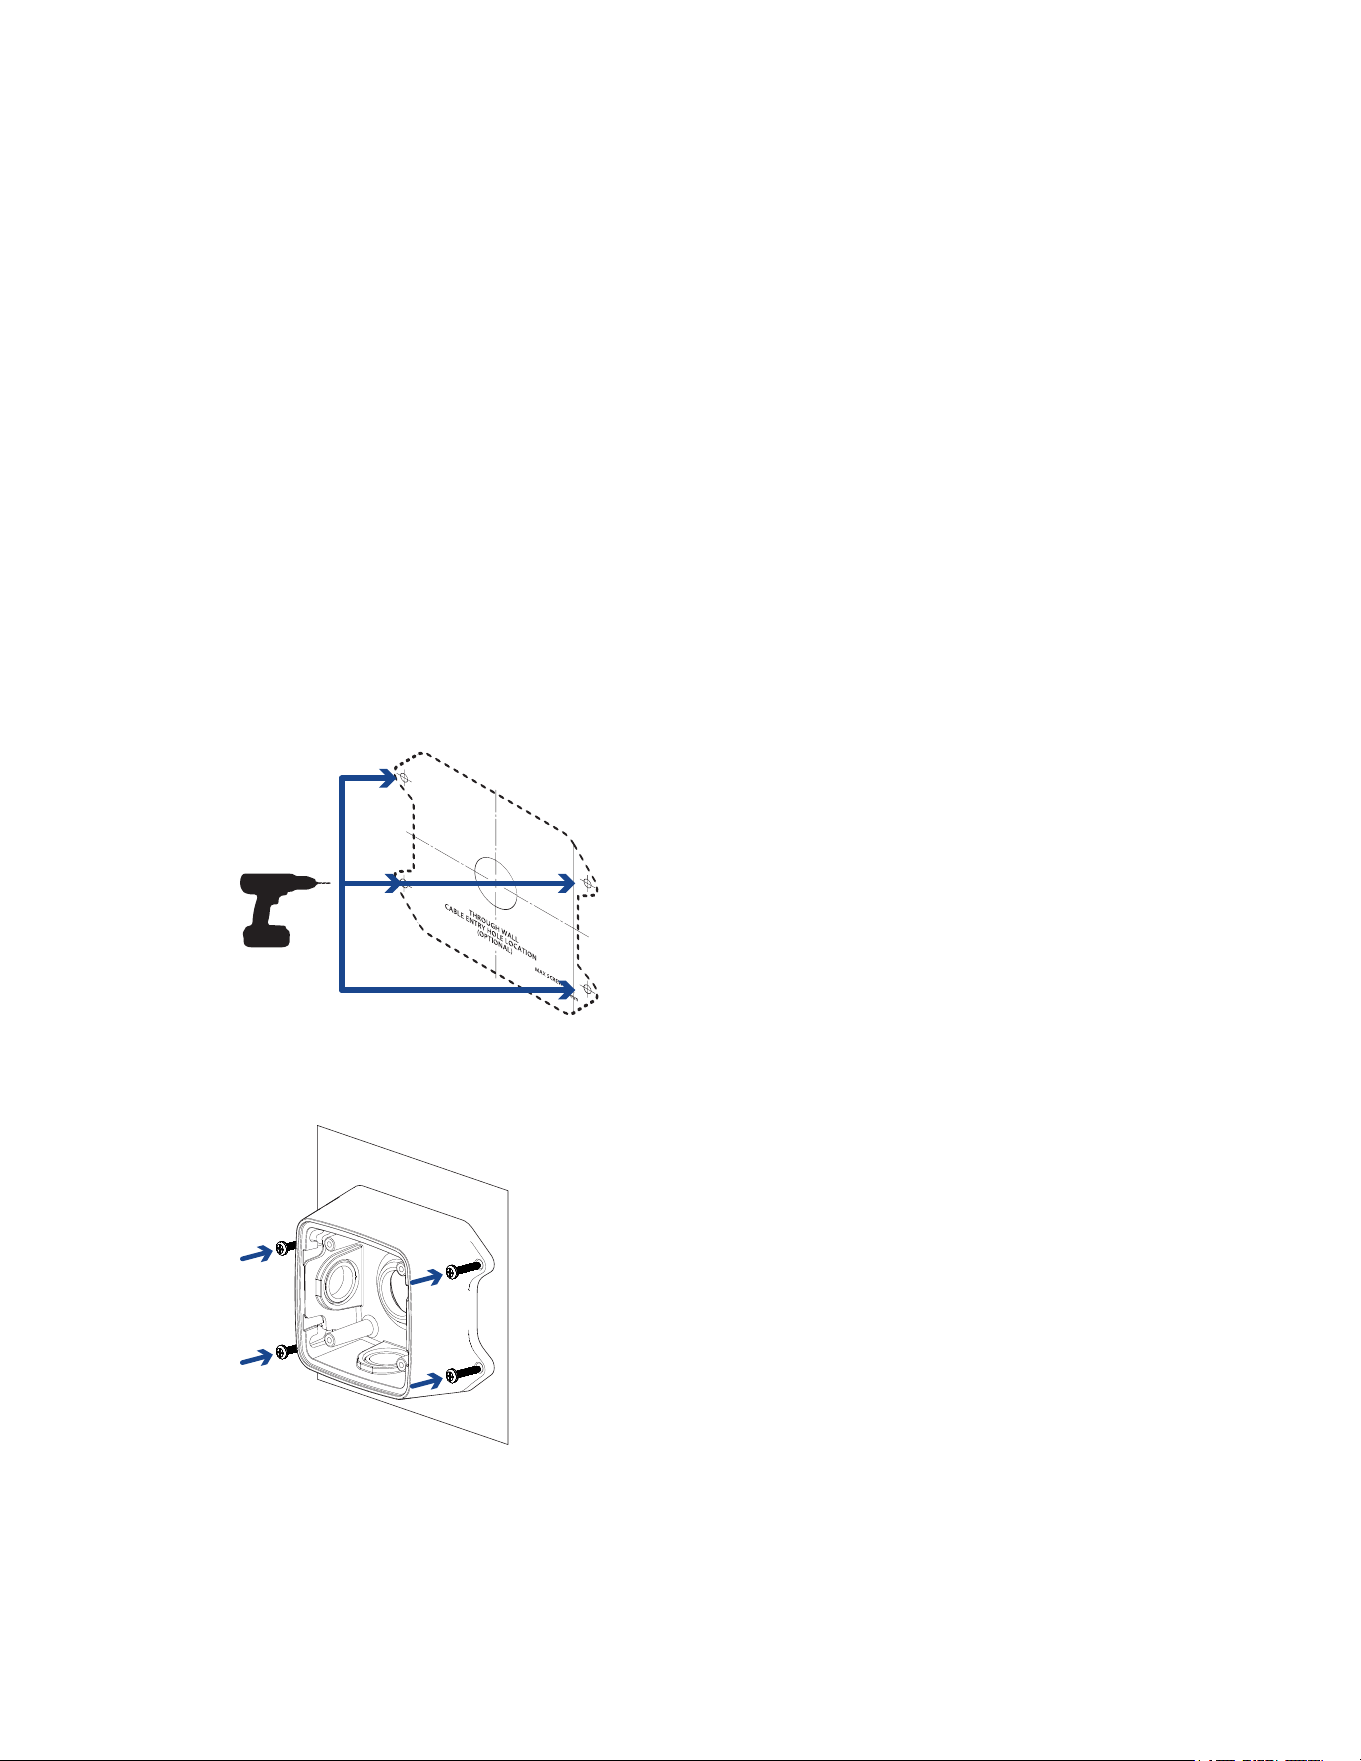
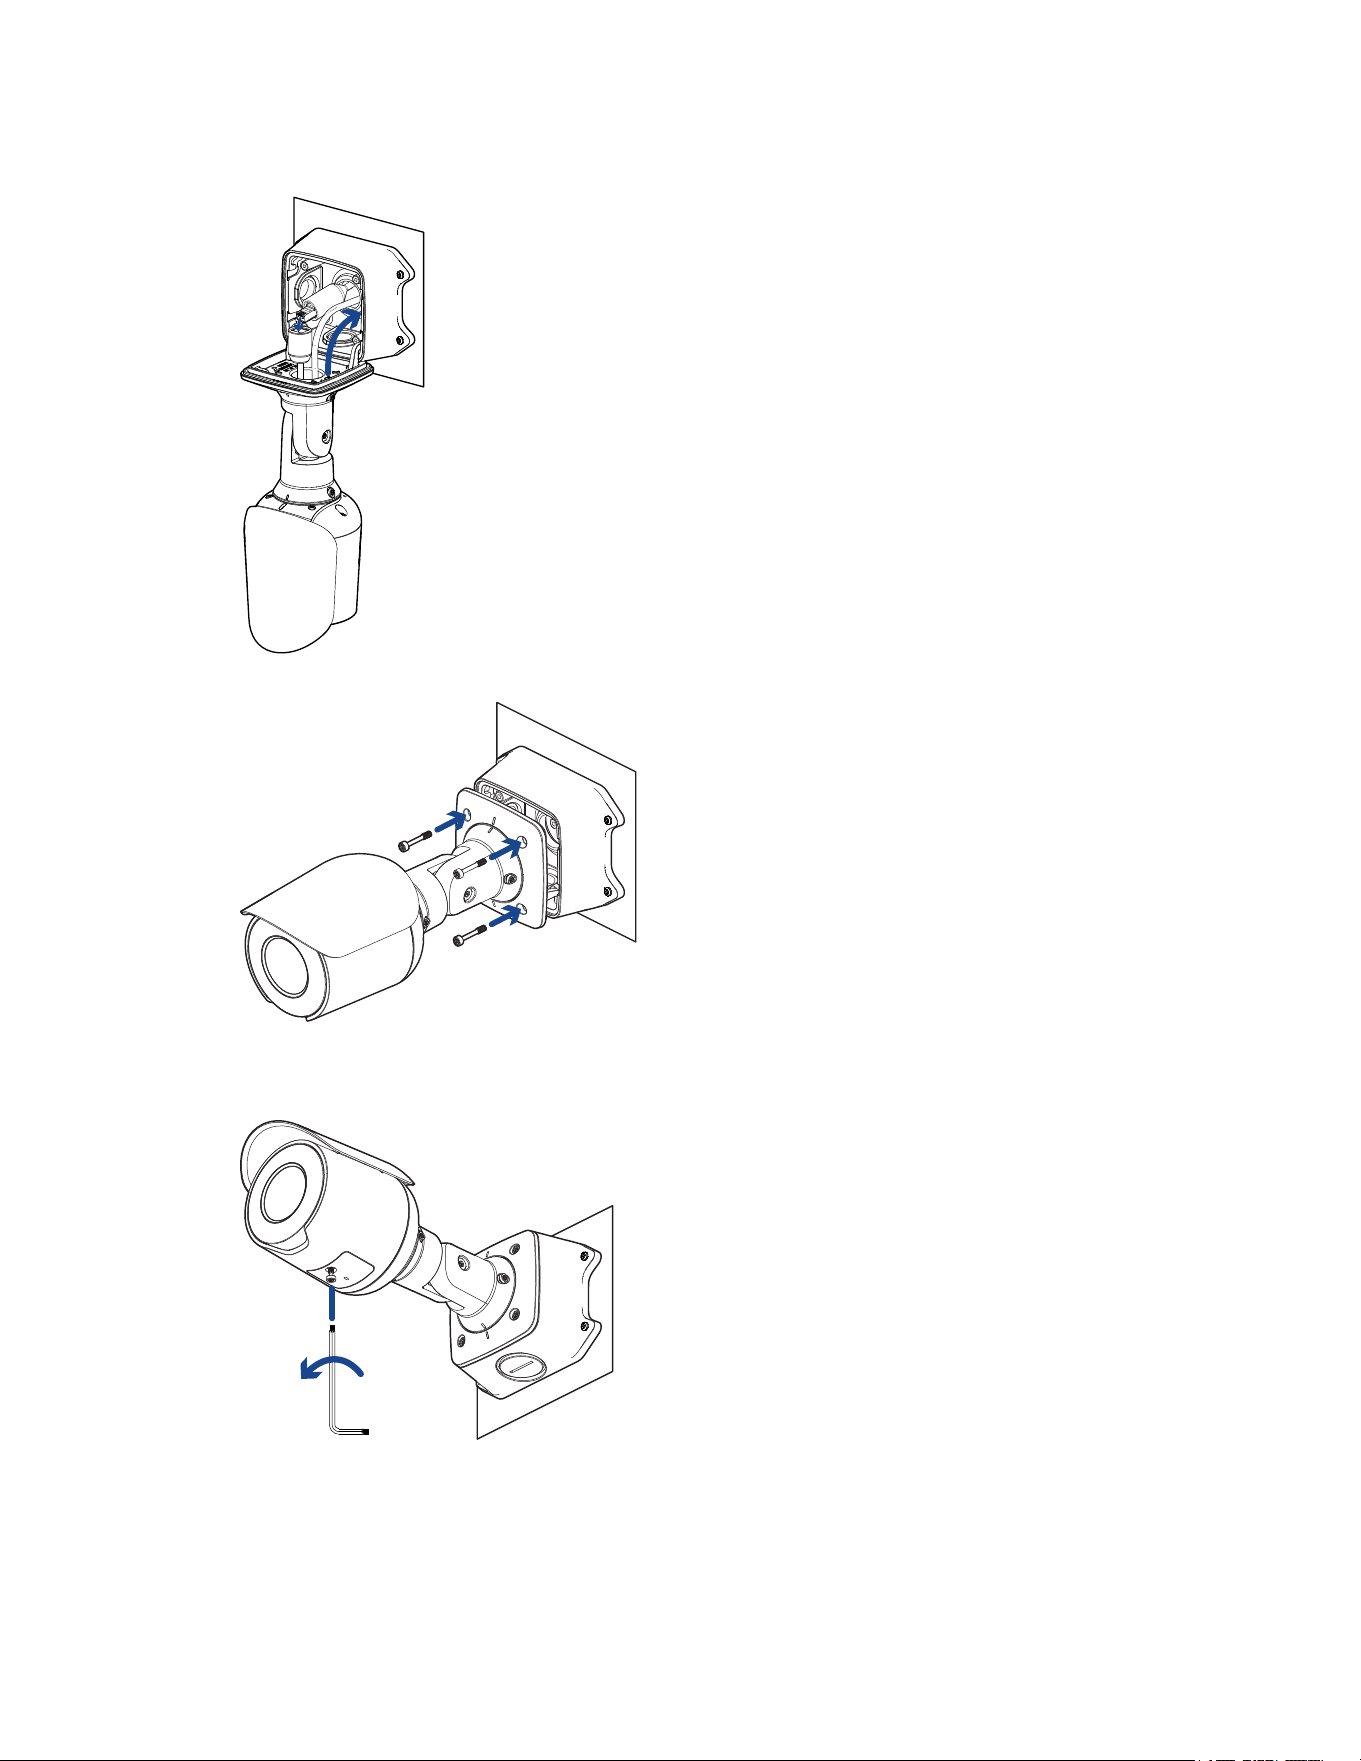
Mounting the Bullet Camera
Ifthecablesforthecamerawillnotbeprovidedfrominsidethemountingsurface,installthejunctionbox
first.Afteryouinstallthejunctionbox,youcanskipdirectlytostep3ofthisprocedure.
1. Usethemountingtemplatetodrillfourmountingholesintothemountingsurface.
2. DrillthecableentryholeintothemountingsurfacethenpulltherequiredEthernetcablethrough
thecableentryhole.
3. Fastenthejunctionboxtothemountingsurface.
Topreventmoisturefromenteringthejunctionbox,itisrecommendedtoapplyteflontapearound
thethreadedconduitpipeatthecableentrypointofthejunctionbox.Ensuretheothertwoconduit
plugsarefullytightened.

Sarix Professional 4 Bullet Camera Installation Manual
C6726M | 11/22
9
4. Insertthemountinghooksontherearofthecameraintothemountinghookslotsonthejunction
box,thenletthecamerahang.
Beforeconnectinganycables,ensurethatthecableconnectionsareproperlyprotectedfrom
moistureandcorrosion.MakesuretheprotectivecablebootisinstalledovertheEthernetportto
protecttheconnectionfromdustandmoisture.
IfPoEisnotavailable,thecameramaybepoweredthroughtheauxiliarypowercableusingeither
12VDC.Formoreinformation,seeConnecting to Power and External Devices.
5. Ifthereareexternalinputoroutputdevicesthatneedtobeconnectedtothecamera(forexample:
doorcontacts,relays,etc.),connectthedevicestothecamera'sdigitalI/Oconnectorcables.For
moreinformationseeConnecting to Power and External Devices.
ItisrecommendedthatsealtapebeappliedaroundtheexternalaudioandI/Oconnection,if
necessary,topreventmoisturefromentering.

Sarix Professional 4 Bullet Camera Installation Manual
C6726M | 11/22
10
6. Installtheprotectivecableboot.
a. ThreadoneendoftheEthernetcablethroughtheprovidedprotectivecableboot.
Ensuretheorientationofthecableandbootmatchestheoneshownintheimage.
b. CrimptheEthernetcableontothecord.
c. PlugtheEthernetcableintothecamera'sEthernetport.
d. Afteryouconnectthecabletothecamera,slidethebootovertheEthernetport.
7. Connectthenetworkcabletothecamera'sEthernetport.
8. Tucktheextralengthsofcablesintothecableentryholeorwithinthejunctionboxcompartment.
Sarix Professional 4 Bullet Camera Installation Manual
C6726M | 11/22
11
9. Raisethecamerauntilitcoversthejunctionbox.
10. Usethecameramountingscrewstofastenthecameratothejunctionbox.
Removing the Configuration Panel Cover
1. UseaT20Pin-Instar-shapeddrivertounscrewtheconfigurationpanelcover.
2. Removethecoverfromtheconfigurationpanel.

Sarix Professional 4 Bullet Camera Installation Manual
C6726M | 11/22
12
Initializing a Camera Username and Password
Youmustcreateauserwithadministratorprivilegesbeforethecameraisoperational.
Thenewusercanbecreatedusingthefollowingmethods:
l
Camera'swebinterface.Enterthecamera'sIPaddressinawebbrowsertoaccesstheweb
interface.Formoreinformation,seethePelcoSarixProfessional4BulletCameraOperations
Manual.Ifthecameraisinthefactorydefaultstate,youwillberedirectedtotheNewUserpageto
createanadministratoruser:
1. EnteranewUserNameorkeepthedefaultadministratorname.
2. EnteranewPasswordfortheuser.Itisrecommendedtouseasecureandcomplex
password.
3. Confirmthenewpassword.
4. Forthefirstuser,AdministratormustbeselectedintheSecurityGroupdrop-downmenu.
5. ClickApply.Aftercreatingtheuser,youwillbeaskedtologin.
l
CameraConfigurationTool:discoveredcamerasthatareidentifiedby willrequireafirstuserto
beset.SelecttheAdminUserstabtocreatethefirstuser.Formoreinformation,seetheCamera
Configuration Tool User Guide.
Note:Setupthefirstuserthroughthecamera'sWebInterfaceorCameraConfigurationTool
beforeyouconnectthecameratoaVMS.
(Optional) Using the USB Wi-Fi Adapter
IfyouhaveaUSBWi-FiAdapter(USB-AC56-**-MSI),attachittothecamera'smicroUSBporttoaccess
thecamera'smobilewebinterface.
AfteryouconnecttotheWi-Fisignalbroadcastbytheadapter,youcanaccessthemobilewebinterface
fromanymobiledeviceusingthefollowingaddress:
http://camera.lan
Formoreinformationaboutconfiguringthecamerafromthemobilewebinterfacesee USB Wi-Fi
Adapter System User Guide.

Sarix Professional 4 Bullet Camera Installation Manual
C6726M | 11/22
13
Thecamerawillreservethe10.11.22.32/28subnetforinternalusewhiletheUSBWi-FiAdapteris
pluggedin.
Assigning an IP Address
ThedeviceautomaticallyobtainsanIPaddresswhenitisconnectedtoanetwork.
IfthedevicecannotobtainanIPaddressfromaDHCPserver,itwilluseZeroConfigurationNetworking
(Zeroconf)tochooseanIPaddress.WhensetusingZeroconf,theIPaddressisinthe169.254.0.0/16
subnet.
TheIPaddresssettingscanbechangedusingoneofthefollowingmethods:
l
ThemobilewebinterfaceusingtheUSBWifiAdapter.Formoreinformation,see(Optional) Using
the USB Wi-Fi Adapter.
l
Device'swebbrowserinterface:http://<camera IP address>/.
l
NetworkVideoManagementsoftwareapplication.
l
ARP/Pingmethod.Formoreinformation,seeSetting the IP Address Using the ARP/Ping Method.
Setting the IP Address Using the ARP/Ping Method
CompletethefollowingstepstoconfigurethecameratouseaspecificIPaddress:
Note:TheARP/PingMethodwillnotworkiftheDisable setting static IP address through
ARP/Ping methodcheckboxisselectedinthecamera'swebbrowserinterface.Formore
information,seethePelcoSarixProfessional4BulletCameraOperationsManual.
1. LocateandmakenoteoftheMACAddress(MAC)listedontheSerialNumberTagforreference.
2. OpenaCommandPromptwindowandenterthefollowingcommands:
a. arp -s <New Camera IP Address> <Camera MAC Address>
Forexample:arp -s 192.168.1.10 00-18-85-12-45-78
b. ping -l 123 -t <New Camera IP Address>
Forexample:ping -l 123 -t 192.168.1.10
3. Rebootthecamera.
4. ClosetheCommandPromptwindowwhenyouseethefollowingmessage:
Reply from <New Camera IP Address>: ...
Accessing the Live Video Stream
Livevideostreamcanbeviewedusingoneofthefollowingmethods:
l
ThemobilewebinterfaceusingtheUSBWifiAdapter.Formoreinformation,see(Optional) Using
the USB Wi-Fi Adapter.
l
Webbrowserinterface:http://< camera IP address>/.
l
NetworkVideoManagementsoftwareapplication.

Sarix Professional 4 Bullet Camera Installation Manual
C6726M | 11/22
14
Aiming the Camera
Referencethecamera'slivestreamasyouaimthecamera.
1. Loosentheadjustmentscrewclosesttothejunctionboxtorotatethecameraarm.
2. Loosenthecenteradjustmentscrewtotiltthecamera.
3. Loosentheadjustmentscrewonthecameratoturnthecamerabody.

Sarix Professional 4 Bullet Camera Installation Manual
C6726M | 11/22
15
4. Ifthecameraisturnedsidewaystolookverticallyatascene,youcanremovethesunshroudthen
re-installittocoverthecamera'snewangleofview.
Zooming and Focusing the Camera
l
Inthecamerawebbrowserinterface,usethecamera’sImageandDisplaysettingstozoomand
focusthecamera.
a. Usethezoombuttonstozoomthecamerainorout.
b. ClickAuto Focustofocusthelens.
c. Usethefocusnearandfarbuttonstomanuallyadjustthefocus.
(Optional) Configuring microSD Card Storage
Tousethecamera'sSDcardstoragefeature,youmustinsertamicroSDcardintothecardslot.
ItisrecommendedthatthemicroSDcardhaveawritespeedofclass10orbetter.IfthemicroSDcard
doesnotmeettherecommendedwritespeed,therecordingperformancemaysufferandresultinthe
lossofframesorfootage.
1. InsertamicroSDcardintothecamera.DonotforcethemicroSDcardintothecameraoryoumay
damagethecardandthecamera.
2. Accessthecamera’swebinterfacetoenabletheonboardstoragefeature.Formoreinformation,
seethePelcoSarixProfessional4BulletCameraOperationsManual.

Sarix Professional 4 Bullet Camera Installation Manual
C6726M | 11/22
16
Configuring the Camera
Afterthecameraisinstalled,configureitusingtheinstructionsinthecurrentversionofthePelcoSarix
Professional4BulletCameraOperationsManual.
Connecting to Power and External Devices
IfPoEisnotavailable,thecameramaybepoweredthroughtheauxiliarypowercableusingeither
12VDC.Thepowerconsumptioninformationislistedintheproductspecifications.
Topowerthecamera,connectthetwopowerwirestotheauxiliarypowerwires.Theauxiliarypowerwire
isdistinguishedbyitsthickerwiregaugeandAUX PWRlabel.Theconnectioncanbemadewitheither
polarity.
ThisproductisintendedtobesuppliedbyaULListedPowerUnitmarked“Class2”or“LPS”or
“LimitedPowerSource”withoutputrated12VDC,13Wmin.orPoweroverEthernet(PoE),
rated48VDC,13Wmin.
Toavoiddamagingthecamera,doNOTconnectauxiliarypowertotheaudioorI/Oterminal
block,anddoNOTinstalltheMicrophoneaccessoryandanexternalaudioinputdevice
simultaneously.
PowersuppliesandexternaldevicesareconnectedtothecamerathroughthepowerandI/Owires.
ForthelocationsofthepowerandI/Oconnectorblocks,seeOverview.
ThepinoutfortheI/Oandpowerwiresisshowninthediagramonthefollowingpage.

Sarix Professional 4 Bullet Camera Installation Manual
C6726M | 11/22
17
Exampleapplication.
1. Brown—AudioInput(linelevel)
Anexternalpoweramplifiershouldbeusedwhenconnectingspeakersandmicrophones,as
showninthediagram.
2. Yellow—AudioGround
3. Green—AudioOutput(linelevel)
4. Grey—Ground
5. Red—DigitalInput
6. Pink—DigitalOutput
7. Purple—ReservedWire,donotconnect.
8. White—ReservedWire,donotconnect.
l
*—Relay
l
**—Switch
l
M—Microphone
l
S—Speaker
l
AUX1—AuxiliaryPowerWire,labeledAUX PWR
l
AUX2—AuxiliaryPowerWire

Sarix Professional 4 Bullet Camera Installation Manual
C6726M | 11/22
18
Connection Status LED Indicator
Onceconnectedtothenetwork,thegreenConnectionStatusLEDindicatorwilldisplaytheprogressin
connectingtotheNetworkVideoManagementsoftware.
ThefollowingtabledescribeswhattheLEDindicatorshows:
Connection State Connection
Status LED
Indicator
Description
Obtaining
IPAddress
Oneshortflash
everysecond
AttemptingtoobtainanIPaddress.
Discoverable Twoshortflashes
everysecond
ObtainedanIPaddressbutnotconnectedtothe
NetworkVideoManagementsoftware.
Upgrading
Firmware
Twoshortflashes
andonelongflash
everysecond
Updatingthefirmware.
Connected On ConnectedtotheNetworkVideoManagementsoftware.
ThedefaultconnectedsettingcanbechangedtoOffusing
thecamera'swebuserinterface.Formoreinformation,see
thePelcoSarixProfessional4BulletCameraOperations
Manual.
Troubleshooting Network Connections and LED Behavior
ForanyofthebelowLEDbehaviors,ensurethatthecameraisgettingpowerandisusingagood
networkcablebeforetryinganothersolution.
LED Behavior Suggested Solution
GreenLEDisoffandamberison Performafactoryresetofthecamerausingthephysical
firmwarerevertbutton.Resettingthroughthecamera'sweb
interfacewillnotproducethedesiredresult.
BothLEDsareoffandthecameraisnot
connectedorstreamingvideo
ChecktheGeneralsetuppageinthecamera'swebinterface
toensuretheLEDsarenotdisabled.
IftheLEDsarenotdisabled,performafactoryresetofthe
camerausingthephysicalfirmwarerevertbutton.Resetting
throughthecamera'swebinterfacewillnotproducethe
desiredresult.
BothLEDsareblinkingseveraltimesat
thesametime,thenpauseandrepeat
theblinking
Performafactoryresetofthecamerausingthephysical
firmwarerevertbutton.Resettingthroughthecamera'sweb
interfacewillnotproducethedesiredresult.
AdifferentLEDblinkingpatternthan
thosedescribedabove
Performafactoryresetofthecamerausingthephysical
firmwarerevertbutton.Resettingthroughthecamera'sweb
interfacewillnotproducethedesiredresult.

Sarix Professional 4 Bullet Camera Installation Manual
C6726M | 11/22
19
Resetting to Factory Default Settings
Ifthedevicenolongerfunctionsasexpected,youcanchoosetoresetthedevicetoitsfactorydefault
settings.
Usethefirmwarerevertbuttontoresetthedevice.Thefirmwarerevertbuttonisshowninthefollowing
diagram:
ThefirmwarerevertbuttonintheConfigurationPanel.
1. Ensurethedeviceispoweredon.
2. Usingastraightenedpapercliporsimilartool,gentlypressandholdthefirmwarerevertbutton.
3. Releasethebuttonafterthreeseconds.
Donotapplyexcessiveforce.Insertingthetooltoofarmaydamagethecamera.
For More Information
Additionalinformationaboutsettingupandusingthedeviceisavailableinthefollowingguides:
l
PelcoSarixProfessional4BulletCameraOperationsManualavailableonthePelcowebsite:
www.pelco.com.
l
Camera Configuration Tool User Guide
Pelco Troubleshooting Contact Information
Forfurtherassistance,contactPelcoProductSupportat1-800-289-9100(USAandCanada)or+1-559-
292-1981(international).
Donottrytorepairtheunityourself.Leavemaintenanceandrepairstoqualifiedtechnicalpersonnel
only.

Sarix Professional 4 Bullet Camera Installation Manual
M
Pelco, Inc.
625 W. Alluvial Ave., Fresno, California 93711 United States
(800) 289-9100 Tel
(800) 289-9150 Fax
+1 (559) 292-1981 International Tel
+1 (559) 348-1120 International Fax
www.pelco.com
Pelco, the Pelco logo, and other trademarks associated with Pelco products referred to in this publication are trademarks of Pelco,
Inc. or its affiliates. ONVIF and the ONVIF logo are trademarks of ONVIF Inc. All other product names and services are the property of
their respective companies. Product specifications and availability are subject to change without notice.
© Copyright 2022, Pelco, Inc. All rights reserved.