
0
Industry Dashcam
User Manual

Industry Dashcam • User Manual
I
Legal Information
©2023 Hangzhou Hikvision Digital Technology Co., Ltd. All rights reserved.
About this Manual
The Manual includes instructions for using and managing the Product. Pictures, charts, images and all other information
hereinafter are for description and explanation only. The information contained in the Manual is subject to change,
without notice, due to firmware updates or other reasons. Please find the latest version of this Manual at the Hikvision
website (
https://www.hikvision.com/).
Please use this Manual with the guidance and assistance of professionals trained in supporting the Product.
Trademarks
and other Hikvision’s trademarks and logos are the properties of Hikvision in various jurisdictions.
Other trademarks and logos mentioned are the properties of their respective owners.
Disclaimer
TO THE MAXIMUM EXTENT PERMITTED BY APPLICABLE LAW, THIS MANUAL AND THE PRODUCT DESCRIBED, WITH ITS
HARDWARE, SOFTWARE AND FIRMWARE, ARE PROVIDED “AS IS” AND “WITH ALL FAULTS AND ERRORS”. HIKVISION
MAKES NO WARRANTIES, EXPRESS OR IMPLIED, INCLUDING WITHOUT LIMITATION, MERCHANTABILITY, SATISFACTORY
QUALITY, OR FITNESS FOR A PARTICULAR PURPOSE. THE USE OF THE PRODUCT BY YOU IS AT YOUR OWN RISK. IN NO
EVENT WILL HIKVISION BE LIABLE TO YOU FOR ANY SPECIAL, CONSEQUENTIAL, INCIDENTAL, OR INDIRECT DAMAGES,
INCLUDING, AMONG OTHERS, DAMAGES FOR LOSS OF BUSINESS PROFITS, BUSINESS INTERRUPTION, OR LOSS OF DATA,
CORRUPTION OF SYSTEMS, OR LOSS OF DOCUMENTATION, WHETHER BASED ON BREACH OF CONTRACT, TORT
(INCLUDING NEGLIGENCE), PRODUCT LIABILITY, OR OTHERWISE, IN CONNECTION WITH THE USE OF THE PRODUCT,
EVEN IF HIKVISION HAS BEEN ADVISED OF THE POSSIBILITY OF SUCH DAMAGES OR LOSS.
YOU ACKNOWLEDGE THAT THE NATURE OF THE INTERNET PROVIDES FOR INHERENT SECURITY RISKS, AND HIKVISION
SHALL NOT TAKE ANY RESPONSIBILITIES FOR ABNORMAL OPERATION, PRIVACY LEAKAGE OR OTHER DAMAGES
RESULTING FROM CYBER-ATTACK, HACKER ATTACK, VIRUS INFECTION, OR OTHER INTERNET SECURITY RISKS; HOWEVER,
HIKVISION WILL PROVIDE TIMELY TECHNICAL SUPPORT IF REQUIRED.
YOU AGREE TO USE THIS PRODUCT IN COMPLIANCE WITH ALL APPLICABLE LAWS, AND YOU ARE SOLELY RESPONSIBLE
FOR ENSURING THAT YOUR USE CONFORMS TO THE APPLICABLE LAW. ESPECIALLY, YOU ARE RESPONSIBLE, FOR USING
THIS PRODUCT IN A MANNER THAT DOES NOT INFRINGE ON THE RIGHTS OF THIRD PARTIES, INCLUDING WITHOUT
LIMITATION, RIGHTS OF PUBLICITY, INTELLECTUAL PROPERTY RIGHTS, OR DATA PROTECTION AND OTHER PRIVACY
RIGHTS. YOU SHALL NOT USE THIS PRODUCT FOR ANY PROHIBITED END-USES, INCLUDING THE DEVELOPMENT OR
PRODUCTION OF WEAPONS OF MASS DESTRUCTION, THE DEVELOPMENT OR PRODUCTION OF CHEMICAL OR
BIOLOGICAL WEAPONS, ANY ACTIVITIES IN THE CONTEXT RELATED TO ANY NUCLEAR EXPLOSIVE OR UNSAFE NUCLEAR
FUEL-CYCLE, OR IN SUPPORT OF HUMAN RIGHTS ABUSES.
IN THE EVENT OF ANY CONFLICTS BETWEEN THIS MANUAL AND THE APPLICABLE LAW, THE LATTER PREVAILS.

Industry Dashcam • User Manual
II
Regulatory Information
EU Conformity Statement
This product and - if applicable - the supplied accessories too are marked with "CE" and
comply therefore with the applicable harmonized European standards listed under the RE
Directive 2014/53/EU, EMC Directive 2014/30/EU, the LVD Directive 2014/35/EU, the RoHS
Directive 2011/65/EU.
2012/19/EU (WEEE directive): Products marked with this symbol cannot be disposed of as
unsorted municipal waste in the European Union. For proper recycling, return this product
to your local supplier upon the purchase of equivalent new equipment, or dispose of it at
designated collection points. For more information see:
www.recyclethis.info
2006/66/EC (battery directive): This product contains a battery that cannot be disposed
of as unsorted municipal waste in the European Union. See the product documentation
for specific battery information. The battery is marked with this symbol, which may include
lettering to indicate cadmium (Cd), lead (Pb), or mercury (Hg). For proper recycling, return the
battery to your supplier or to a designated collection point. For more information see:
www.recyclethis.info
Industry Canada ICES-003 Compliance
This device meets the CAN ICES-3 (A)/NMB-3(A) standards requirements.
Industry Dashcam • User Manual
III
Symbol Conventions
The symbols that may be found in this document are defined as follows.
Safety Instructions
Proper configuration of all passwords and other security settings is the responsibility of the
installer and/or end-user.
In the use of the product, you must be in strict compliance with the electrical safety
regulations of the nation and region. Please refer to technical specifications for detailed
information.
Input voltage should meet limited power source or PS2 requirements according to the
IEC60950-1 or IEC 62368-1 standard. Please refer to technical specifications for detailed
information.
Do not connect several devices to one power adapter as adapter overload may cause over-
heating or a fire hazard.
Please make sure that the plug is firmly connected to the power socket.
If smoke, odor or noise rise from the device, turn off the power at once and unplug the power
cable, and then please contact the service center.
Symbol
Description
Provides additional information to emphasize or supplement
important points of the main text.
Indicates a potentially hazardous situation, which if not
avoided, could result in equipment damage, data loss,
performance degradation, or unexpected results.
Indicates a hazard with a high level of risk, which if not
avoided, will result in death or serious injury.

Industry Dashcam • User Manual
IV
TABLE OF CONTENTS
Chapter 1 Introduction ............................................................................................................... 1
Product Introduction ................................................................................................................ 1
Product Features ...................................................................................................................... 1
Chapter 2 Dashcam App Download ............................................................................................. 2
Chapter 3 Quick Configuration .................................................................................................... 4
Front Page ................................................................................................................................ 4
Quick Configurations ................................................................................................................ 5
Chapter 4 Dashcam Preview ....................................................................................................... 8
Snapshot ................................................................................................................................... 8
Video ...................................................................................................................................... 12
Chapter 5 Dashcam Configurations ........................................................................................... 18
ADAS Settings ......................................................................................................................... 18
5.1.2 ADAS Camera Settings ................................................................................................... 19
5.1.3 ADAS Alarm Parameter Settings ................................................................................... 20
DSM Settings .......................................................................................................................... 23
OSD Settings ........................................................................................................................... 30
Basic Parameters .................................................................................................................... 31
Network Parameters .............................................................................................................. 32
Image Parameters .................................................................................................................. 35
Storage parameters ................................................................................................................ 37
Device Parameters ................................................................................................................. 40
Platform Settings .................................................................................................................... 42
Chapter 6 HCP Platform Settings ............................................................................................... 45
ISUP5.0 Platform Settings ...................................................................................................... 45
Manage On-Board Devices ..................................................................................................... 45
6.2.1 Add On-Board Device by Device ID ............................................................................... 46
6.2.2 Add On-Board Devices by Device ID Segment .............................................................. 48
6.2.3 Add On-Board Devices in a Batch ................................................................................. 50
Settings .................................................................................................. 51
Alarm Settings ........................................................................................................................ 51
6.4.1 Set Alarm Types and Their Sources ............................................................................... 51
6.4.2 Choose the Recipients of the Alarm ............................................................................. 52
6.4.3 View Alarms/Events ...................................................................................................... 53
............................................................................................................. 56
....................................................................................................................... 56
........................................................................................................................ 58
............................................................................................................ 58
............................................................................................................. 58
........................................................................................................ 59
............................................................................................................... 60

Industry Dashcam • User Manual
V
....................................................................................................................... 61
........................................................................................................... 62
Chapter 7 FAQ .......................................................................................................................... 65
Dashcam Start Failure ............................................................................................................ 65
Video Recording Failure ......................................................................................................... 65
Position Failure ....................................................................................................................... 65
Blurry Video Image ................................................................................................................. 66

Industry Dashcam • User Manual
1
Chapter 1 Introduction
Product Introduction
This dashcam is a video and audio intelligent monitoring product for vehicle. With advanced image
acquisition technology and high-definition video recording technology, it records the front vision of
the vehicle. With high-fidelity sound recording technology, it synchronizes the video and audio in
the vehicle. With high-precision positioning technology, it offers excellent vehicle positioning service.
It uses intelligent AI algorithm for driving behavior monitoring, which ensures the service quality and
protects the legitimate rights and interests of drivers and passengers. The dashcam combines rich
functions with excellent performance, stability, compactness, low power consumption and easy
installation and maintenance. The product can be widely applied to vehicles such as ride-hailing cars,
taxis, official cars and other industries cars.
This product is subject to active development, which means that some functions might differ from
what is presented here. Please refer to the actual product for your reference.
Product Features
Up to 1080P resolution
Supports 3-ch video, 1-ch audio (CH 1)
Supports GPS and speed overlay on picture
Supports built-in Wi-Fi module, supports Wi-Fi AP
Supports 4G network
Supports dual-TF card storage and recording overwrite
Supports preview, playback and editing parameters by App
Supports built-in Gyroscope
Compatible with 2-ch 720P TVI extended camera
DSM alarm supports driving safety monitoring and so on.
Easy installation and operation
Low power consumption and high performance
Supports HCC and HCP Platforms
Industry Dashcam • User Manual
2
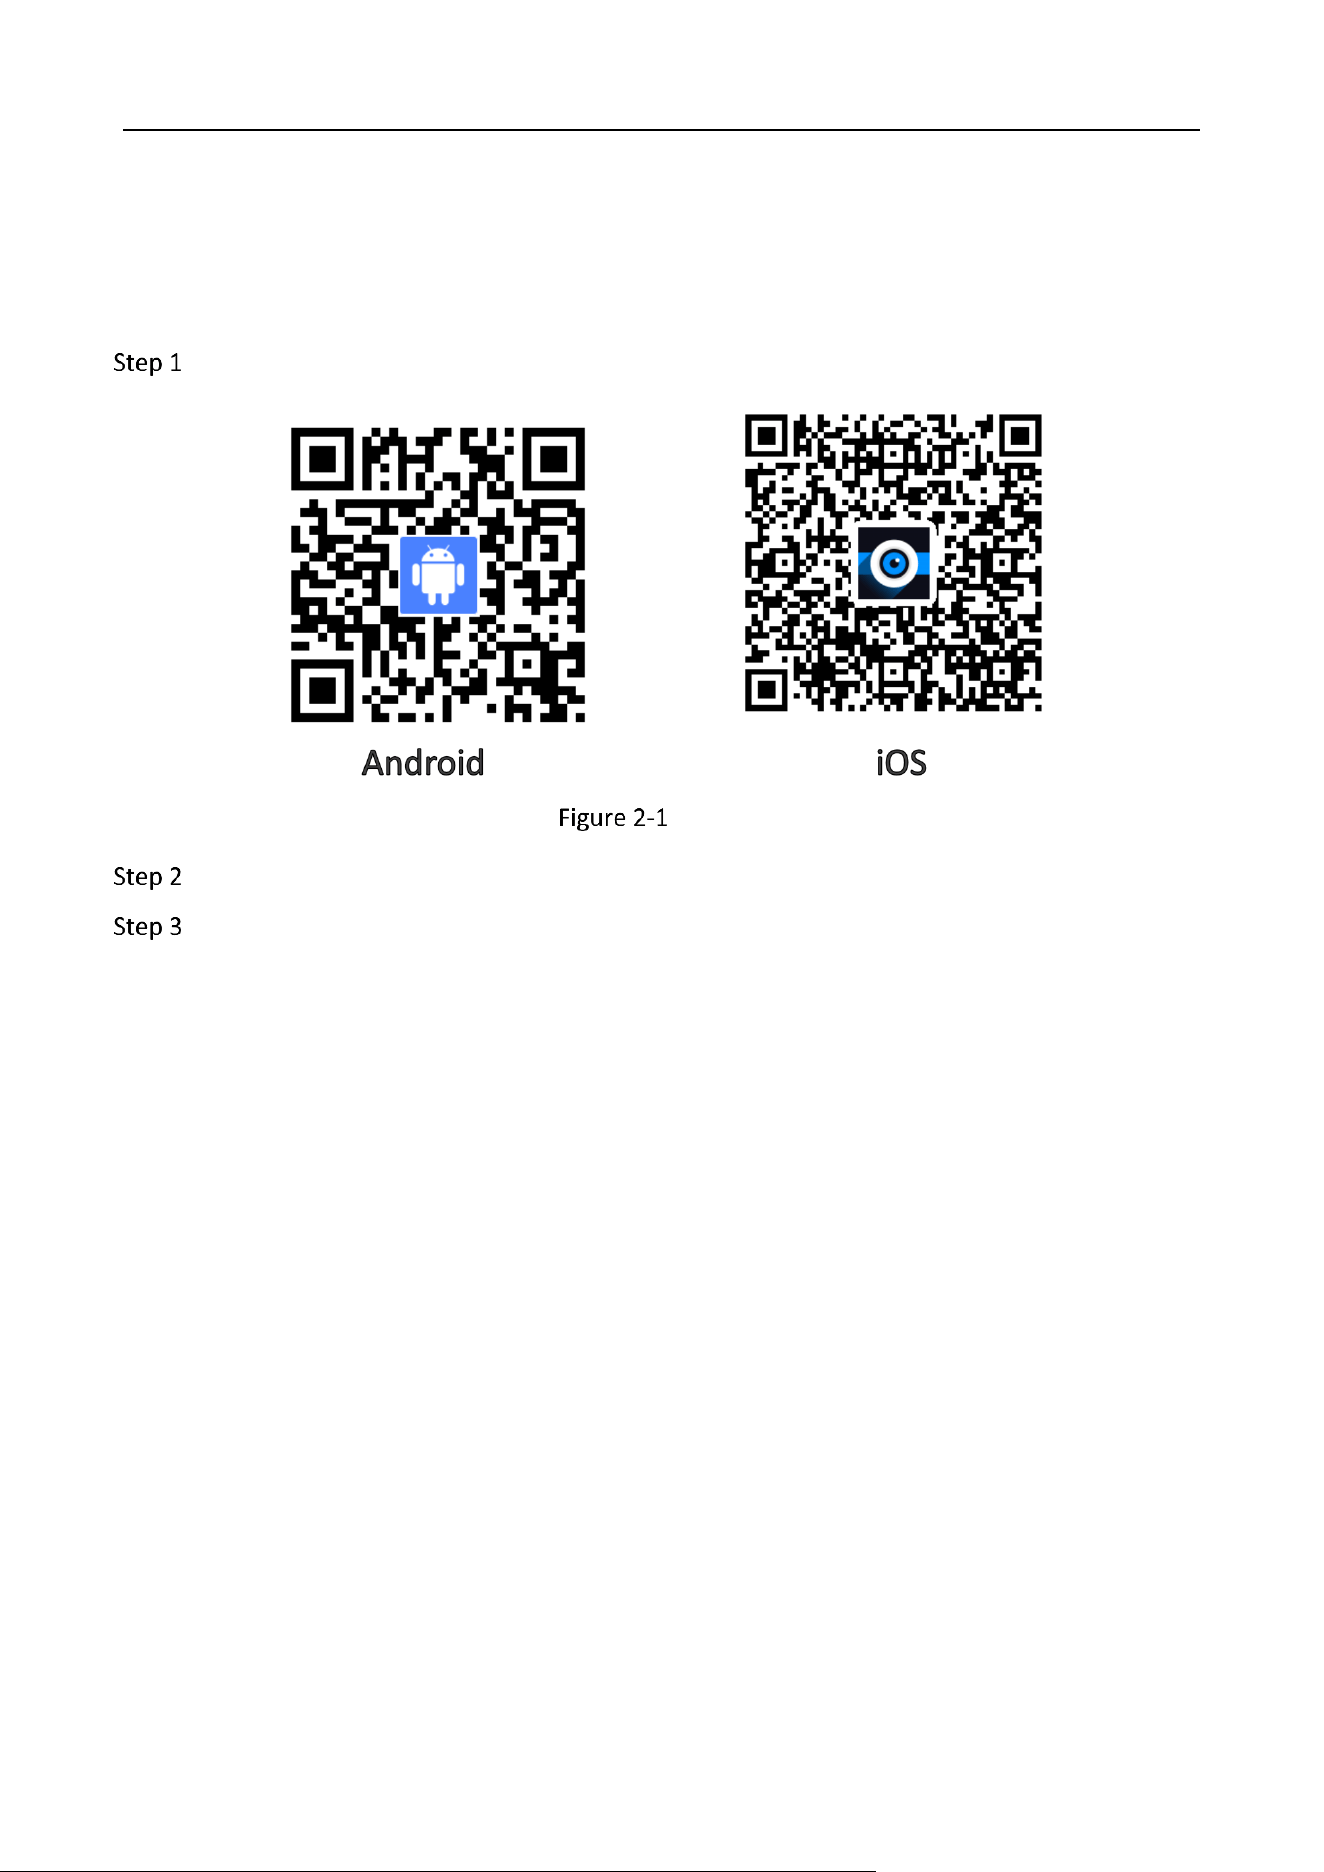
Chapter 2 Dashcam App Download
This dashcam requires HAT-Dashcam App for taking snapshots, recording videos and configuration.
Scan the QR code bellow according to your phone type and download the Dashcam App.
QR Code
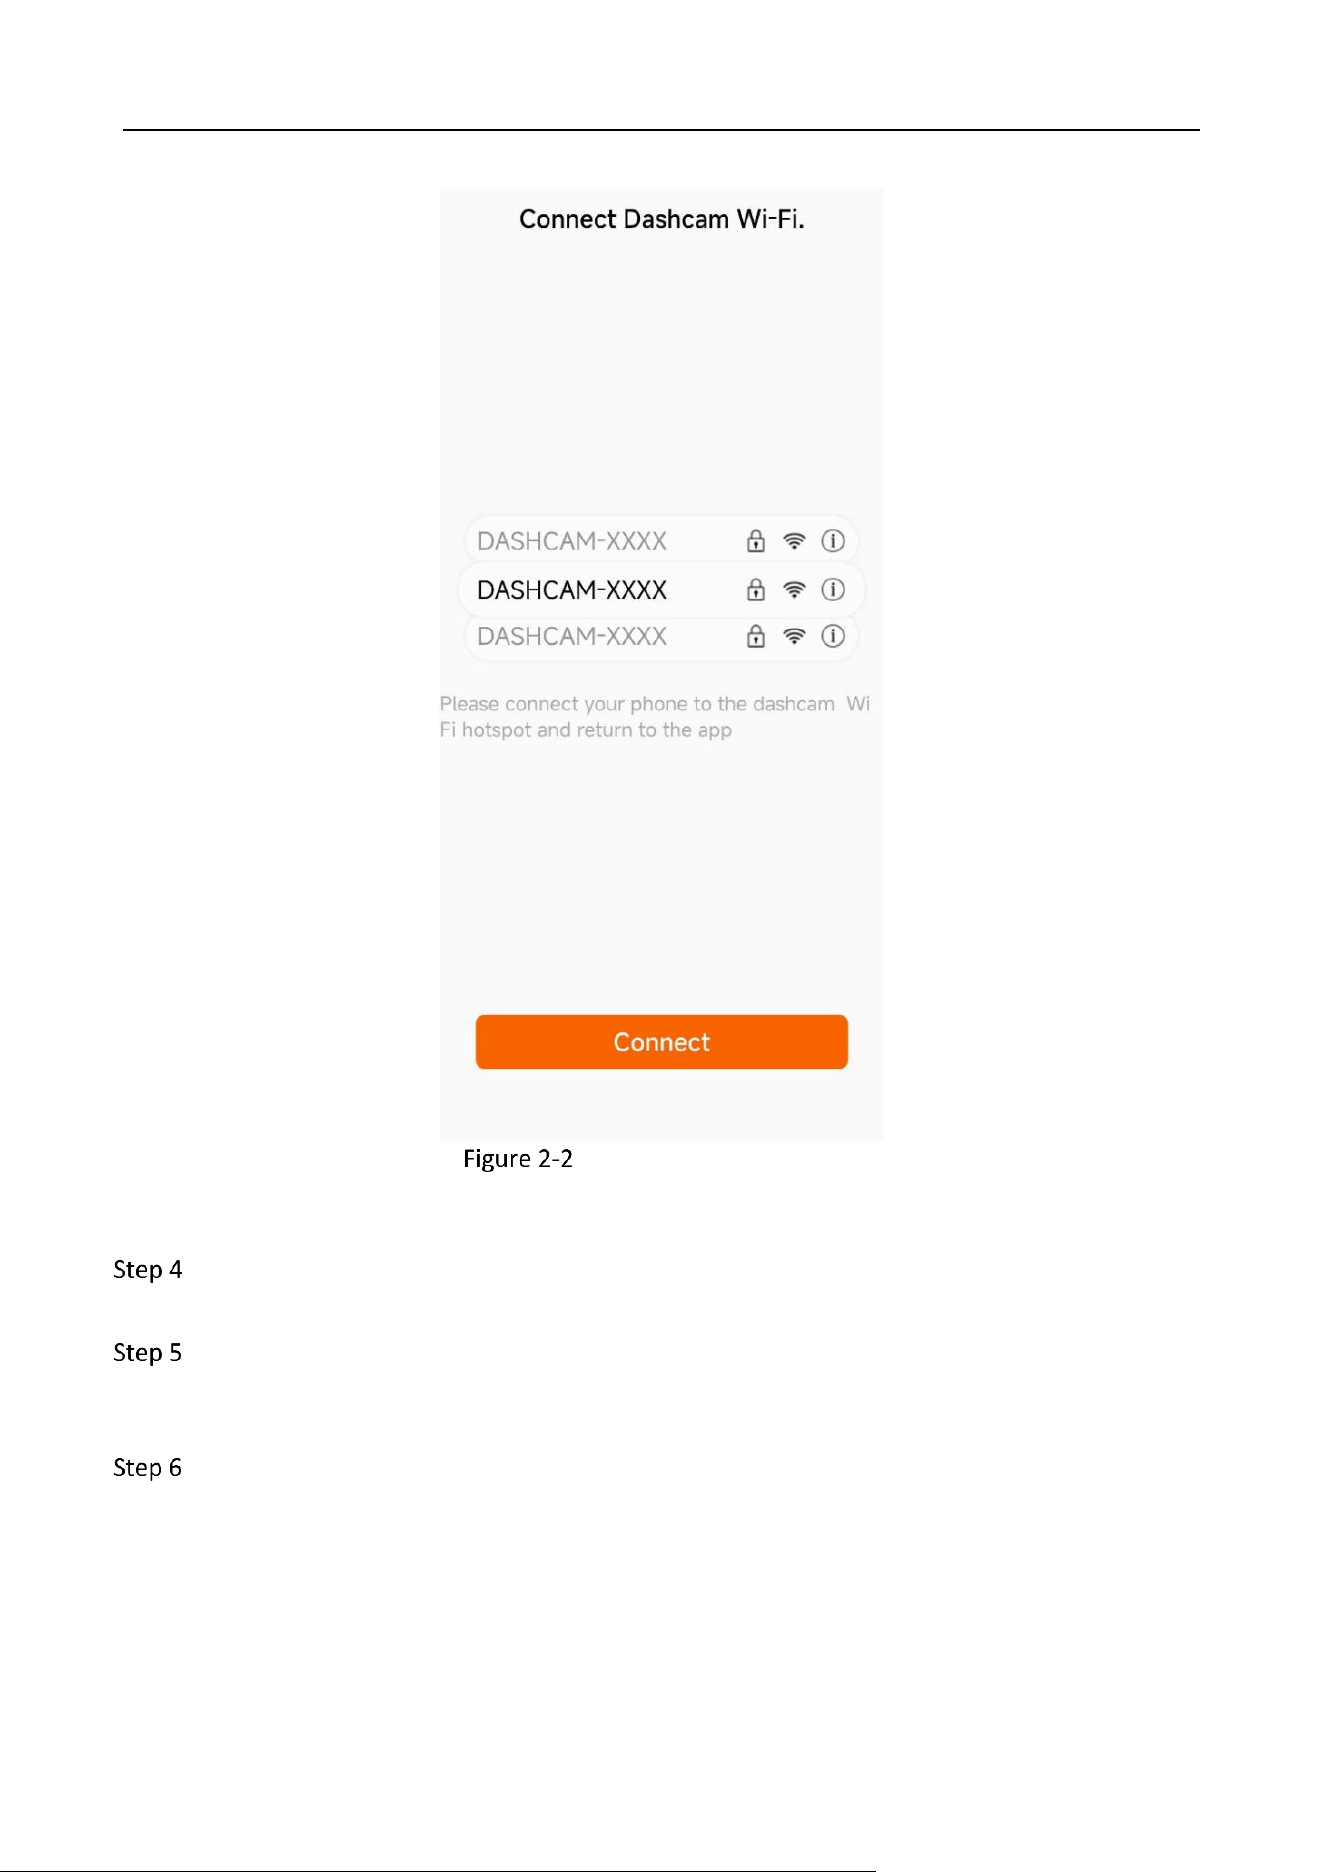
Turn on the Dashcam and press the Wi-Fi AP button to start the dashcam hotspot.
Open the Dashcam App and tap “Connect,” to pop up the Wi-Fi setting page of your phone.
Industry Dashcam • User Manual
3
Dashcam Wi-Fi Connection
Connect to the Wi-Fi hotspot named “DASHCAM-XXXX.” The string XXXX means the last four
characters of the verification code on the dashcam. The default password is Dash12345.
After connecting to the dashcam Wi-Fi, it is recommended to go to Config → Network
Parameters → Wi-Fi Settings to reset the password. The password should be more than 8
digits and contain digits, letters and symbols.
Connect to the dashcam Wi-Fi with the new password.
Industry Dashcam • User Manual
4
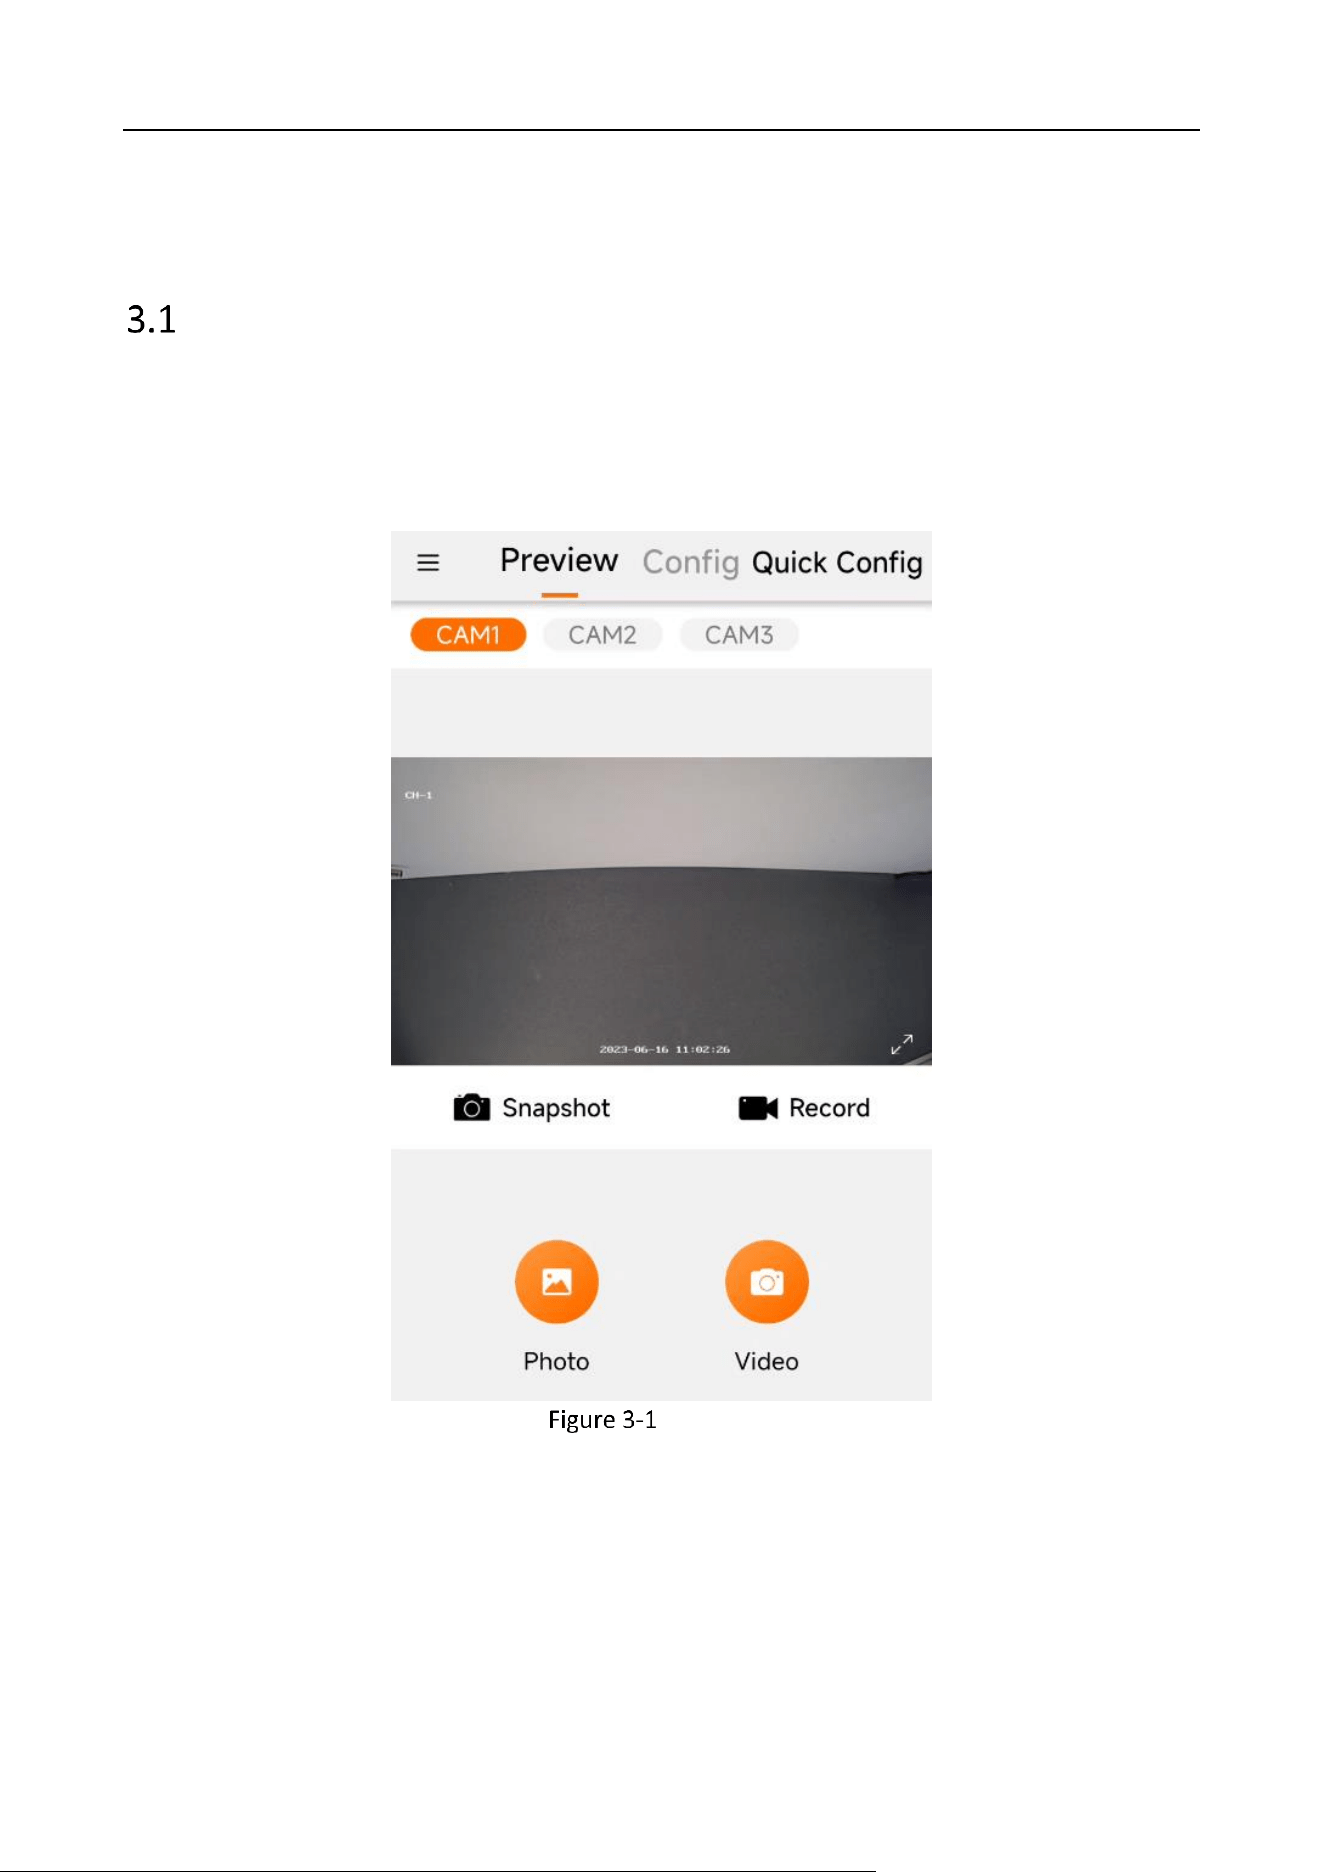
Chapter 3 Quick Configuration
Front Page
The front page of the HAT-Dashcam App is the “Preview” interface. You can preview the image of
the dashcam and configure its setup on the startup page. You can also open the menu on left to
disconnect the connection and open the configuration center.
Front Page
Industry Dashcam • User Manual
5
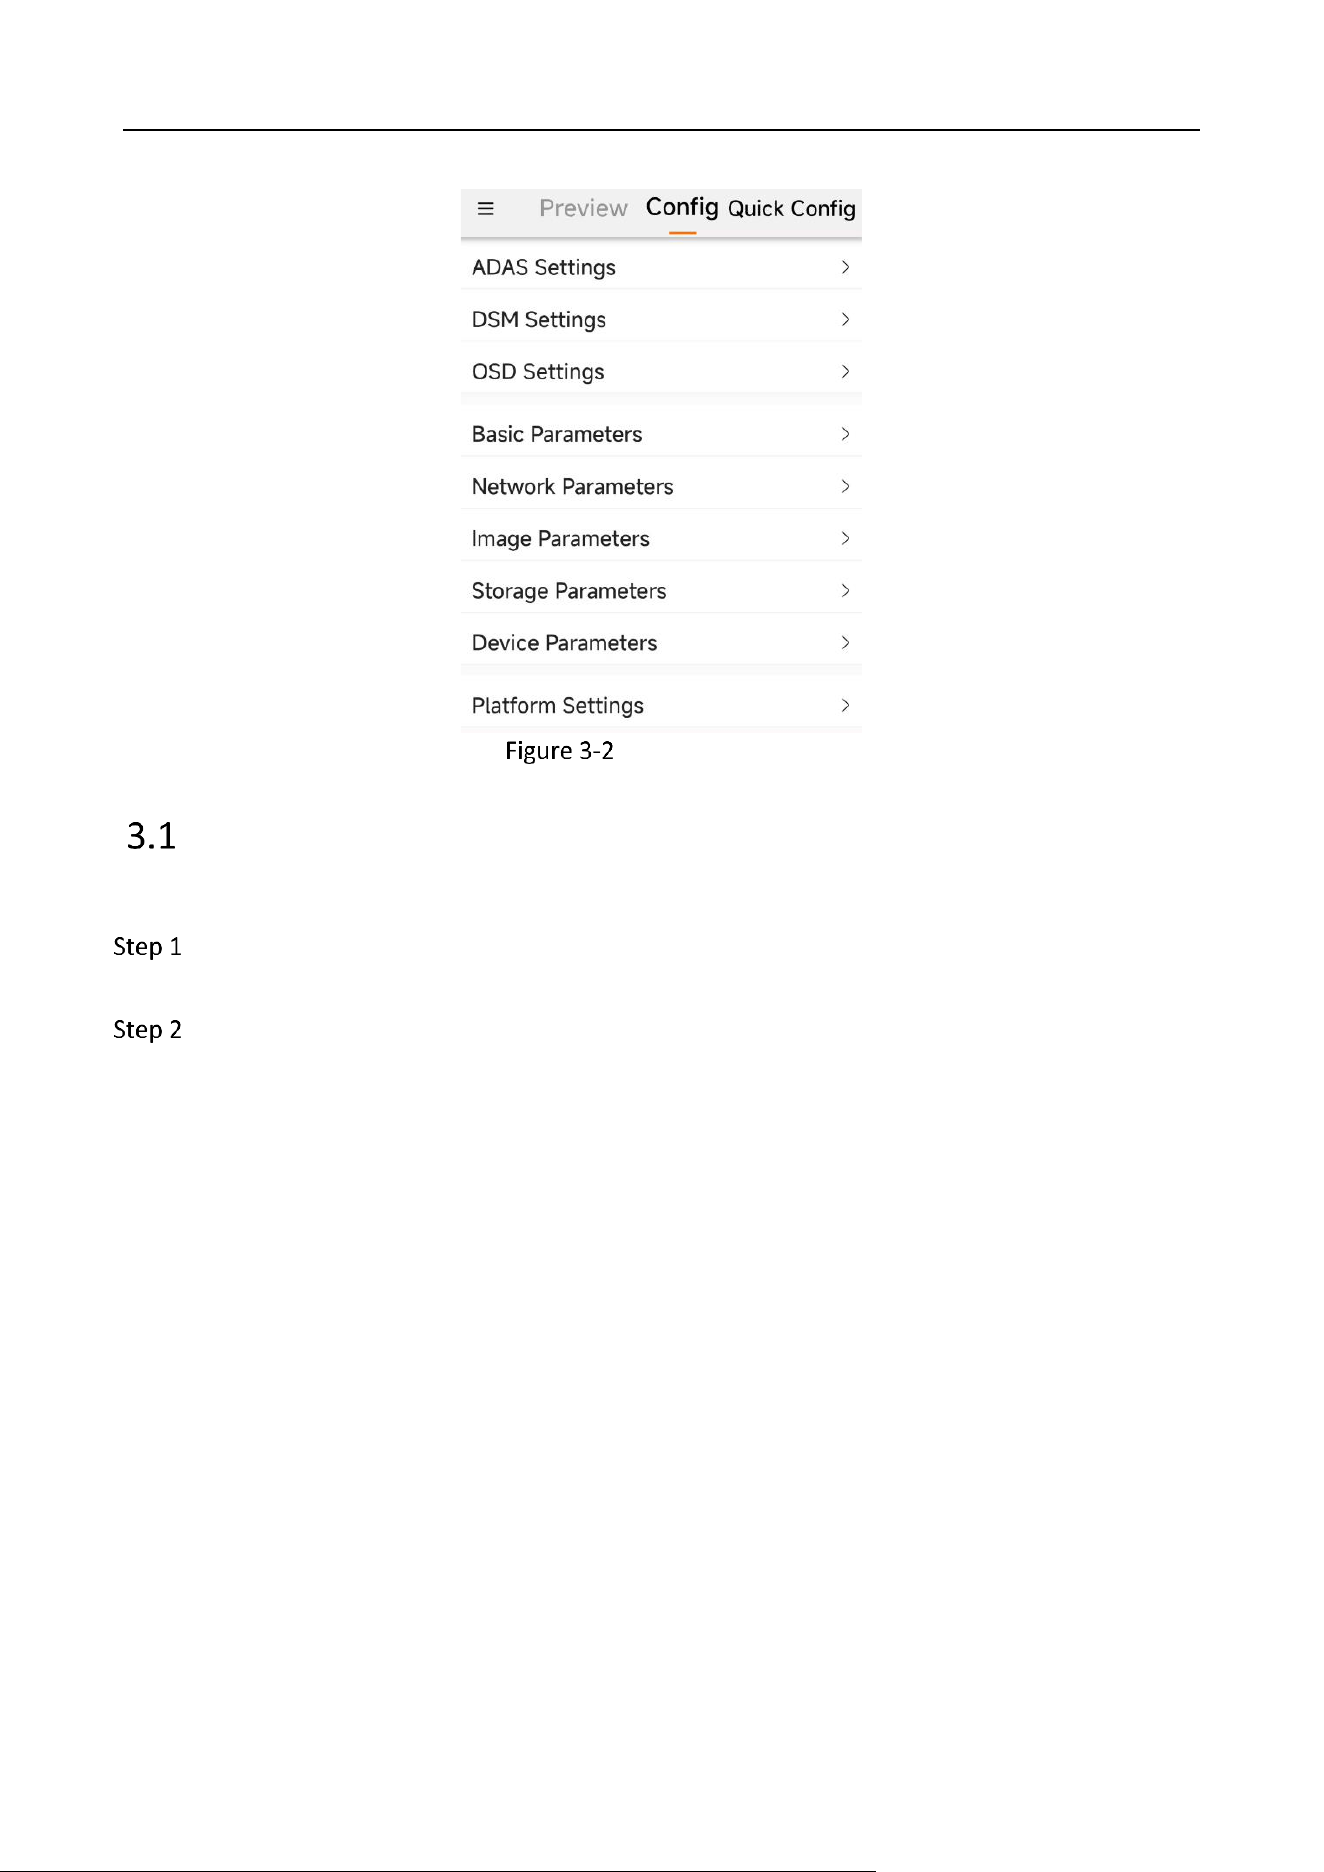
Configuration Page
Quick Configurations
You can set the plate number and color, and upload them to the platform.
Tap the quick Config button the front page. You can also go to Config → Basic Parameters to
enter the plate number and color.
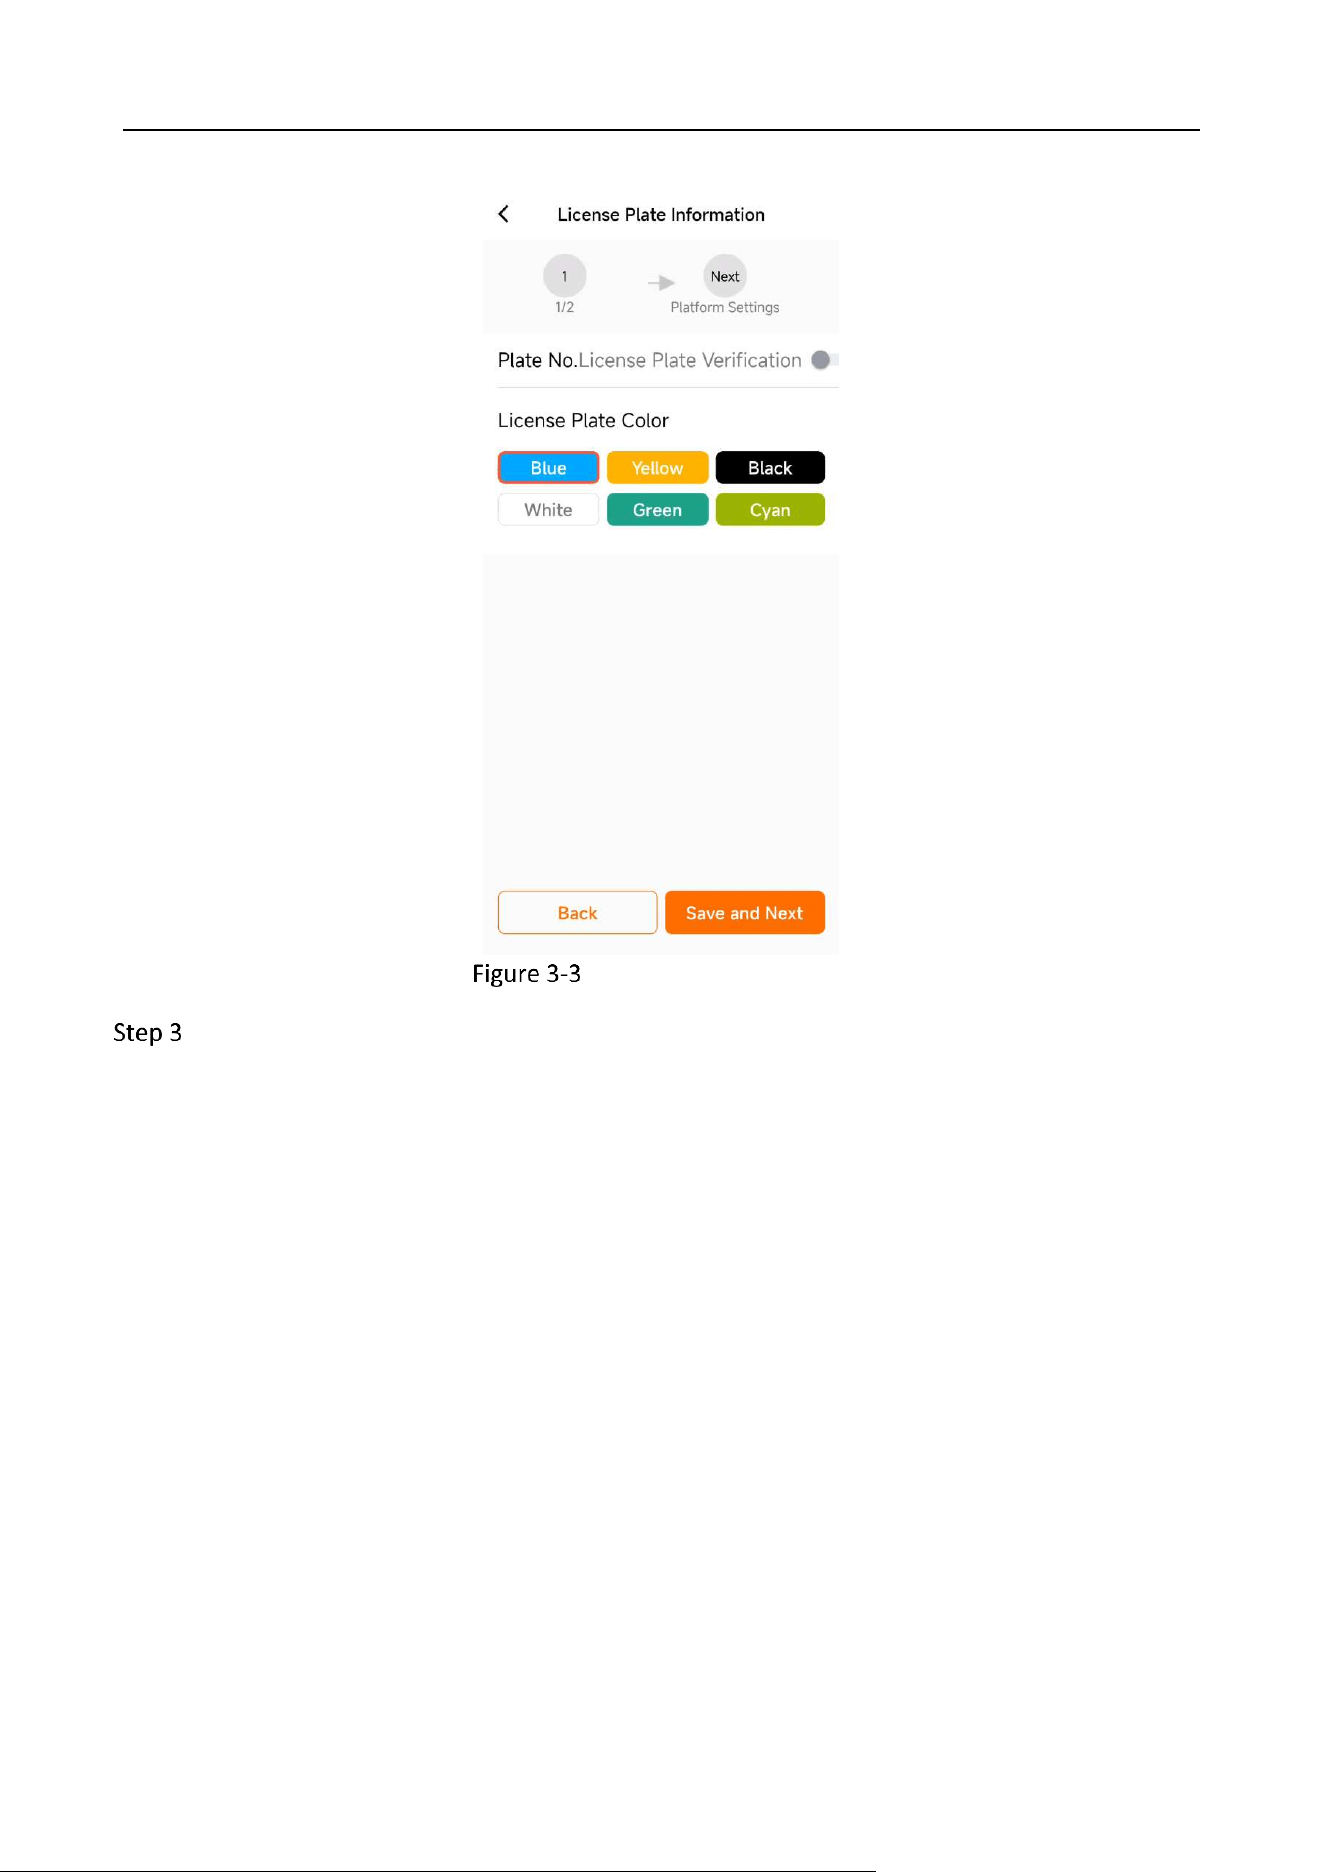
On the quick Config interface, enter the plate number and choose the plate color. Tap Save
and Next.
Industry Dashcam • User Manual
6
License Plate Information
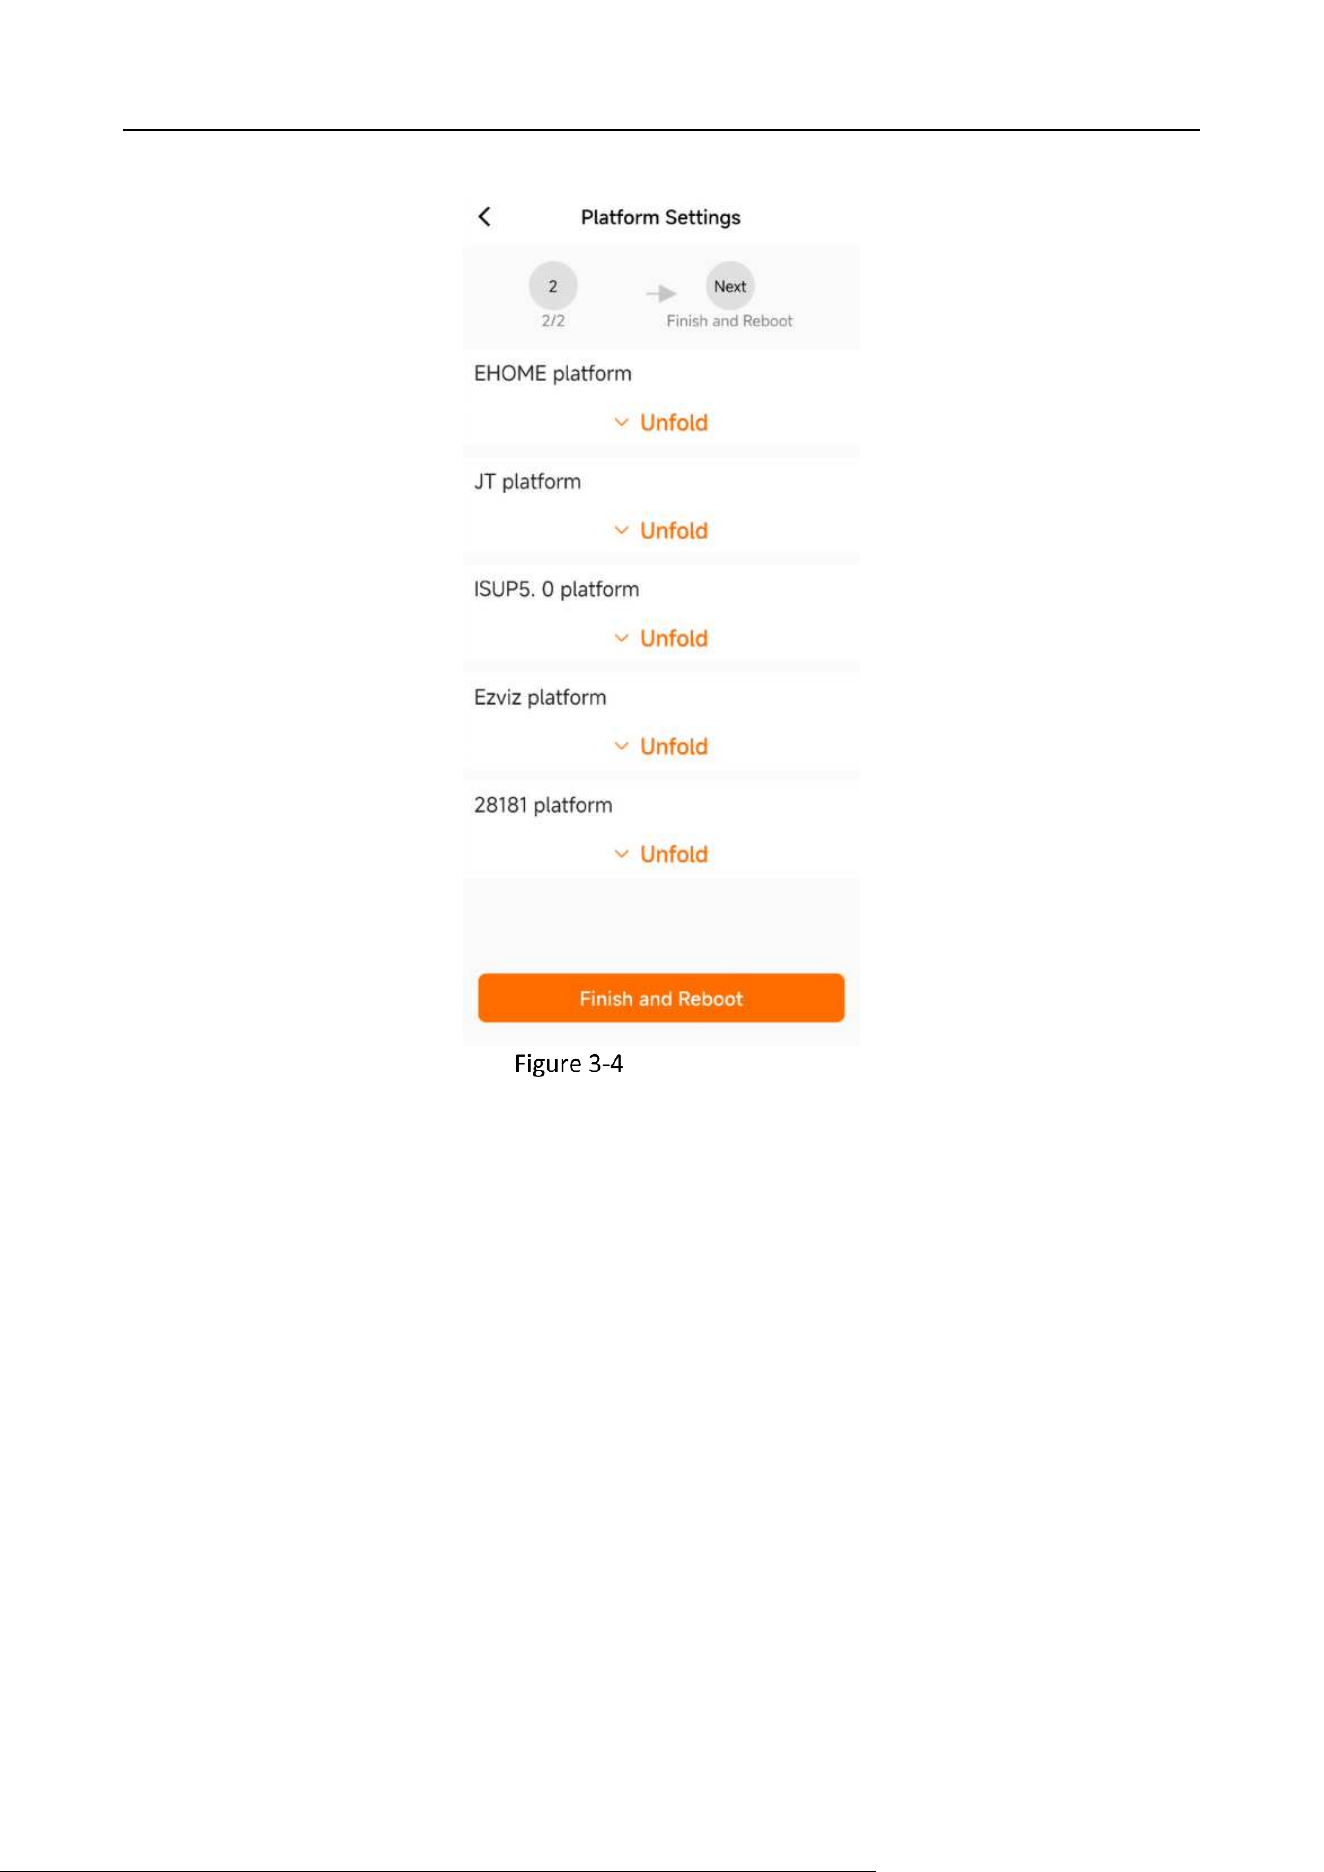
Enter the platform data according to your need. Tap “Finish and Reboot” to finish the plate
information quick configuration.
Industry Dashcam • User Manual
7
Platform Settings
Industry Dashcam • User Manual
8
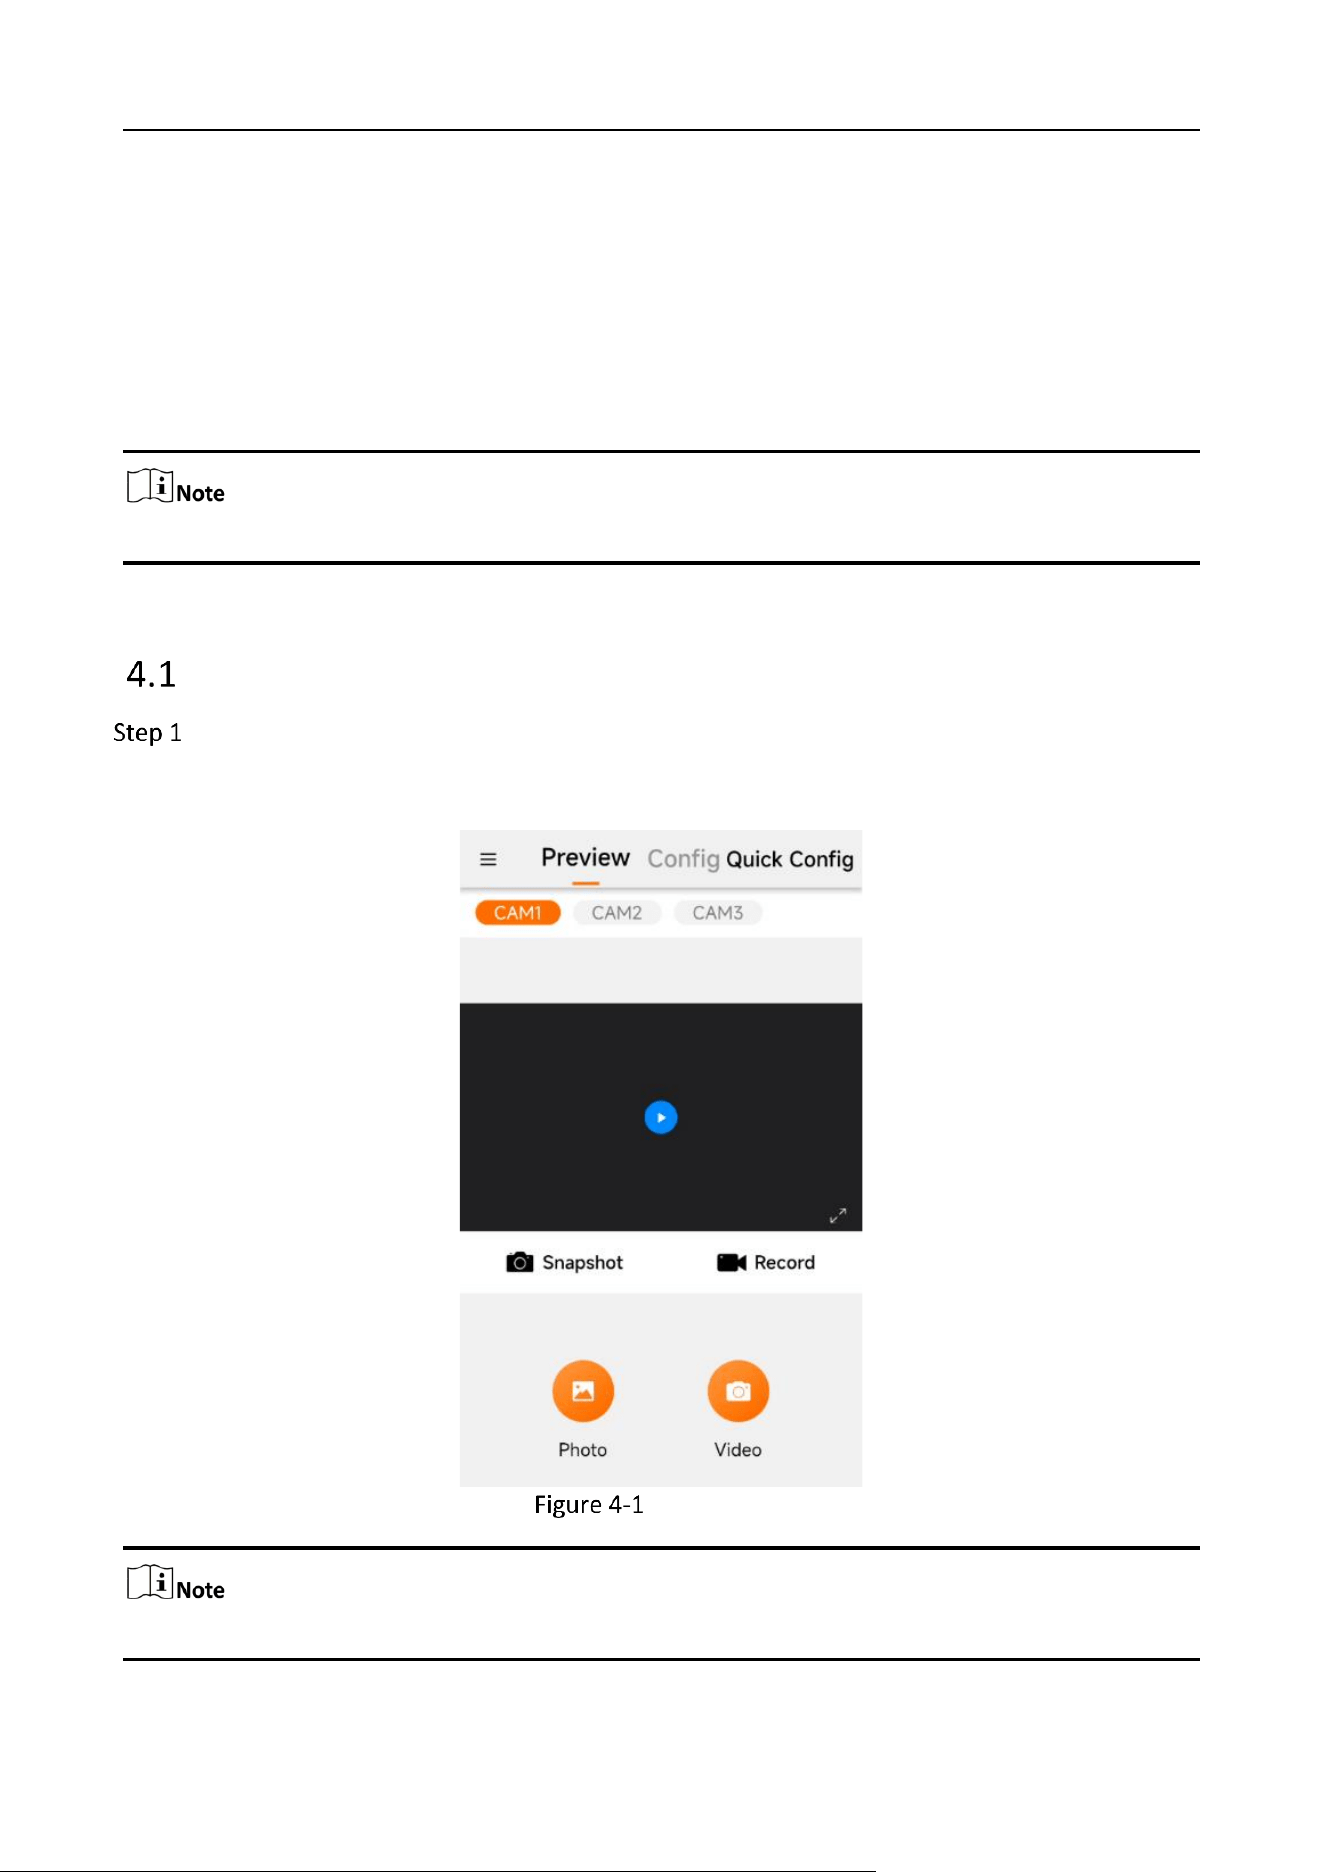
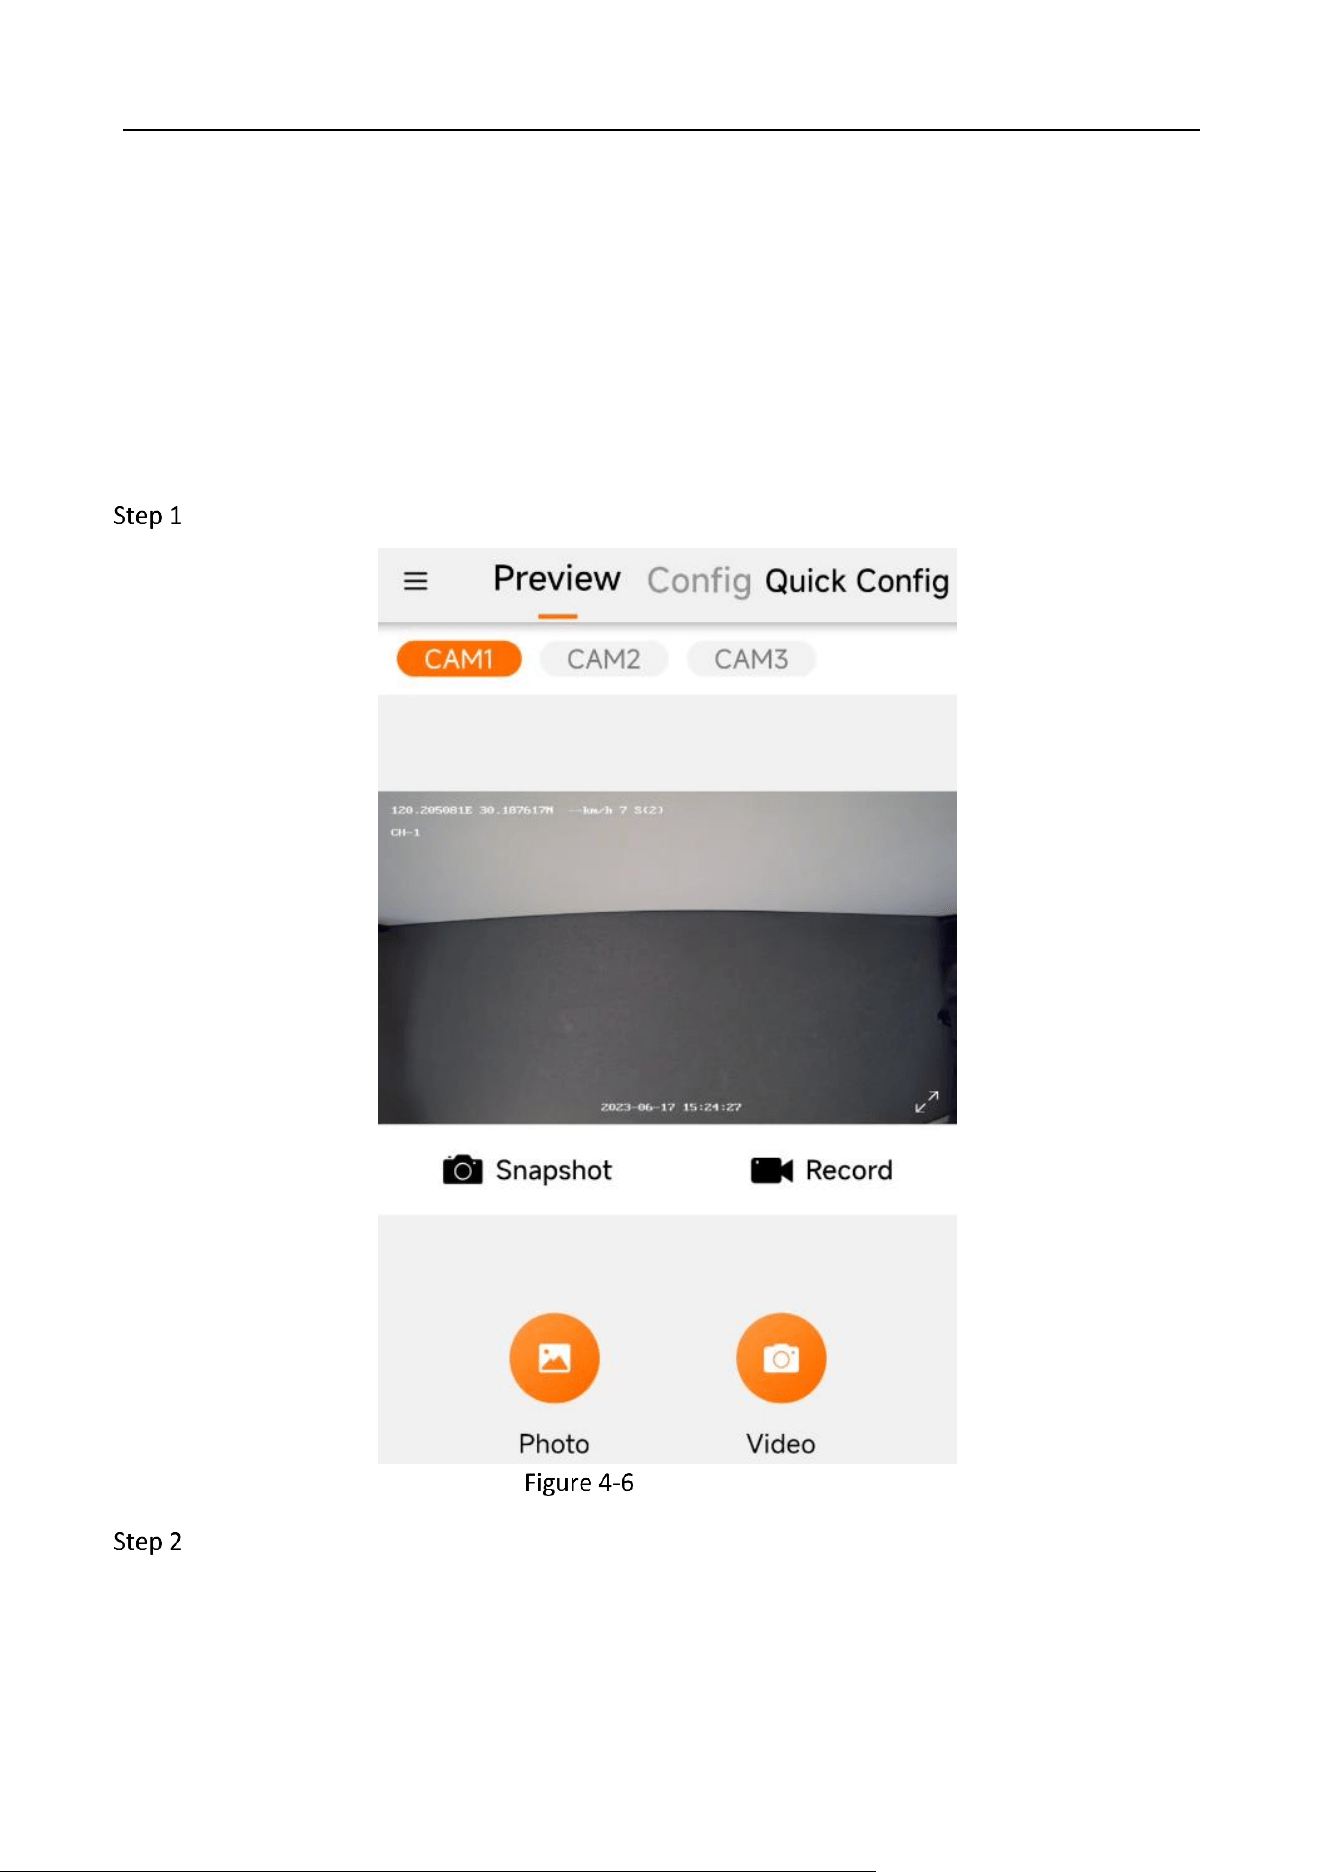
Chapter 4 Dashcam Preview
You can preview the image on the preview interface. Slide to choose the camera channel to take
snapshot or record a video. You can also save the snapshot to your phone. Open the side menu on
the left and open the management center to view the local pic and video.
For snapshot and recording, make sure that you have the TF card installed.
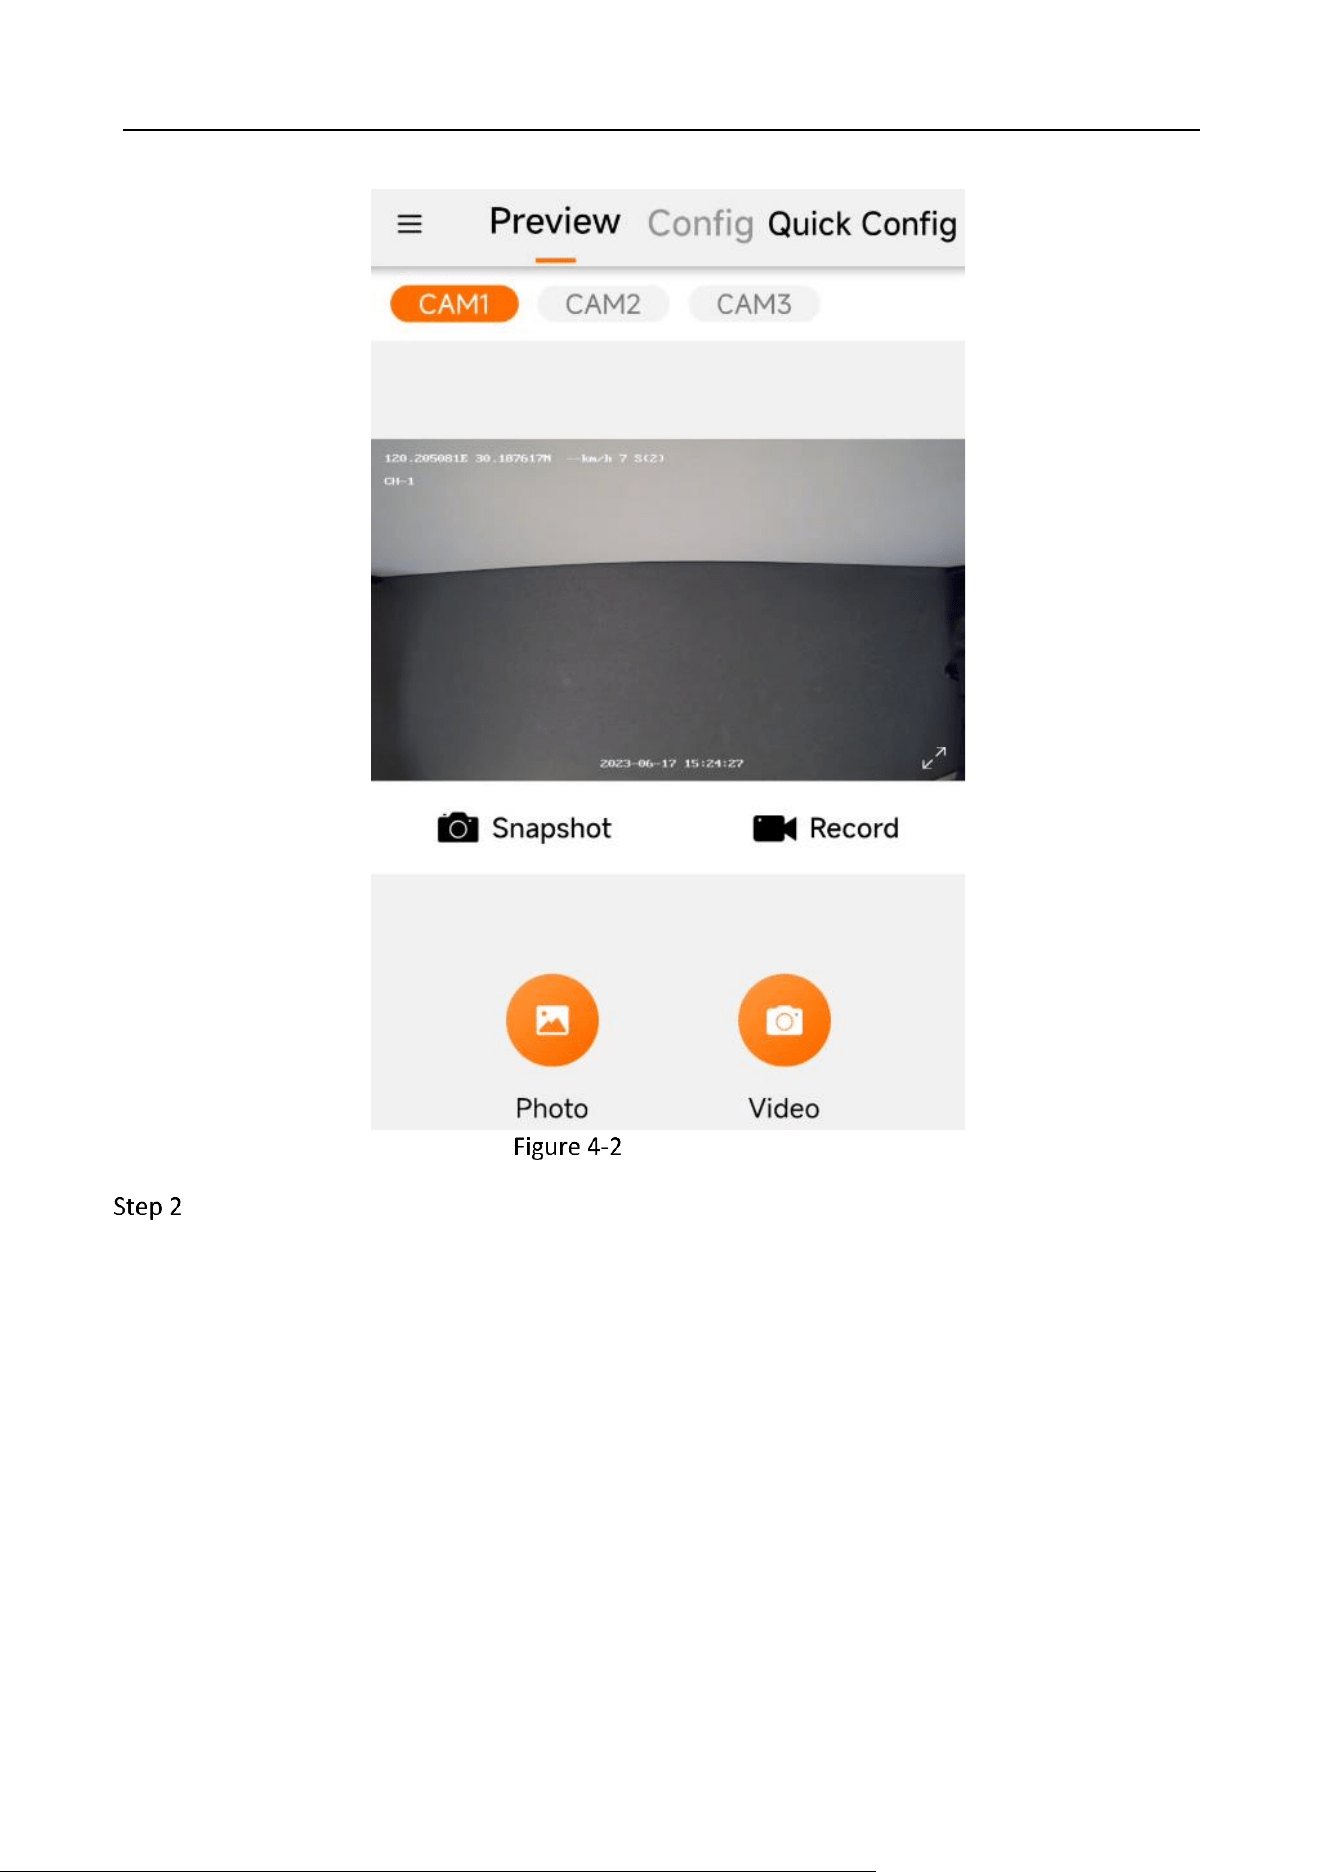
Snapshot
As the preview function is off by default, you can tap the blue button on the screen to start
the preview. The screen will display date and channel name on the upper left corner. For full
screen display, tap the full screen sign on the lower right corner.
Start Preview
Only channels that are connected to cameras can preview, take snapshot or record videos.
Industry Dashcam • User Manual
9
Preview Interface
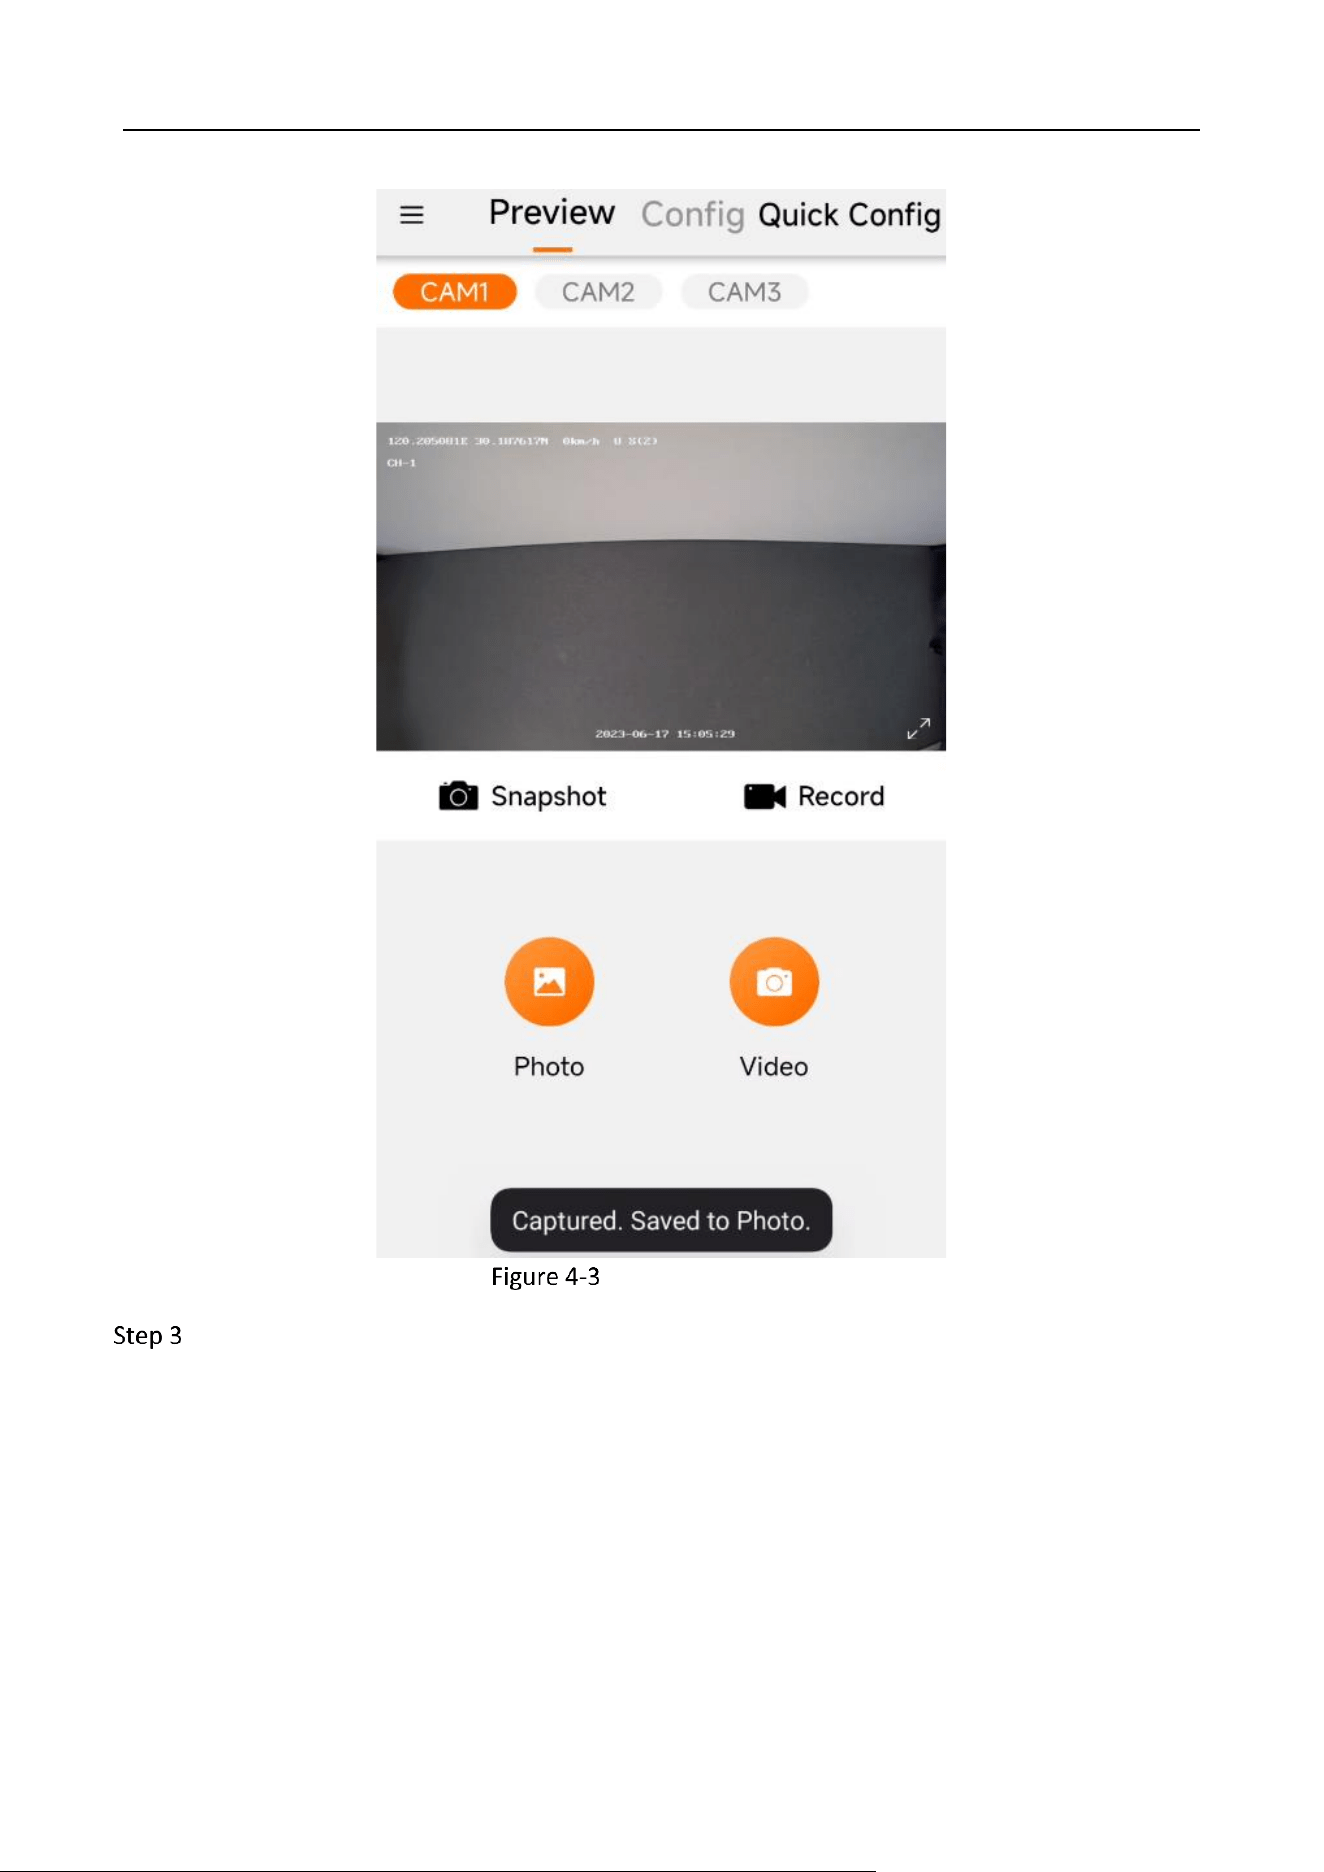
Tap the “Snapshot” button to capture the picture in the current preview screen, and the
interface prompts “Captured. Saved to Photo.”
Industry Dashcam • User Manual
10
Captured Successfully
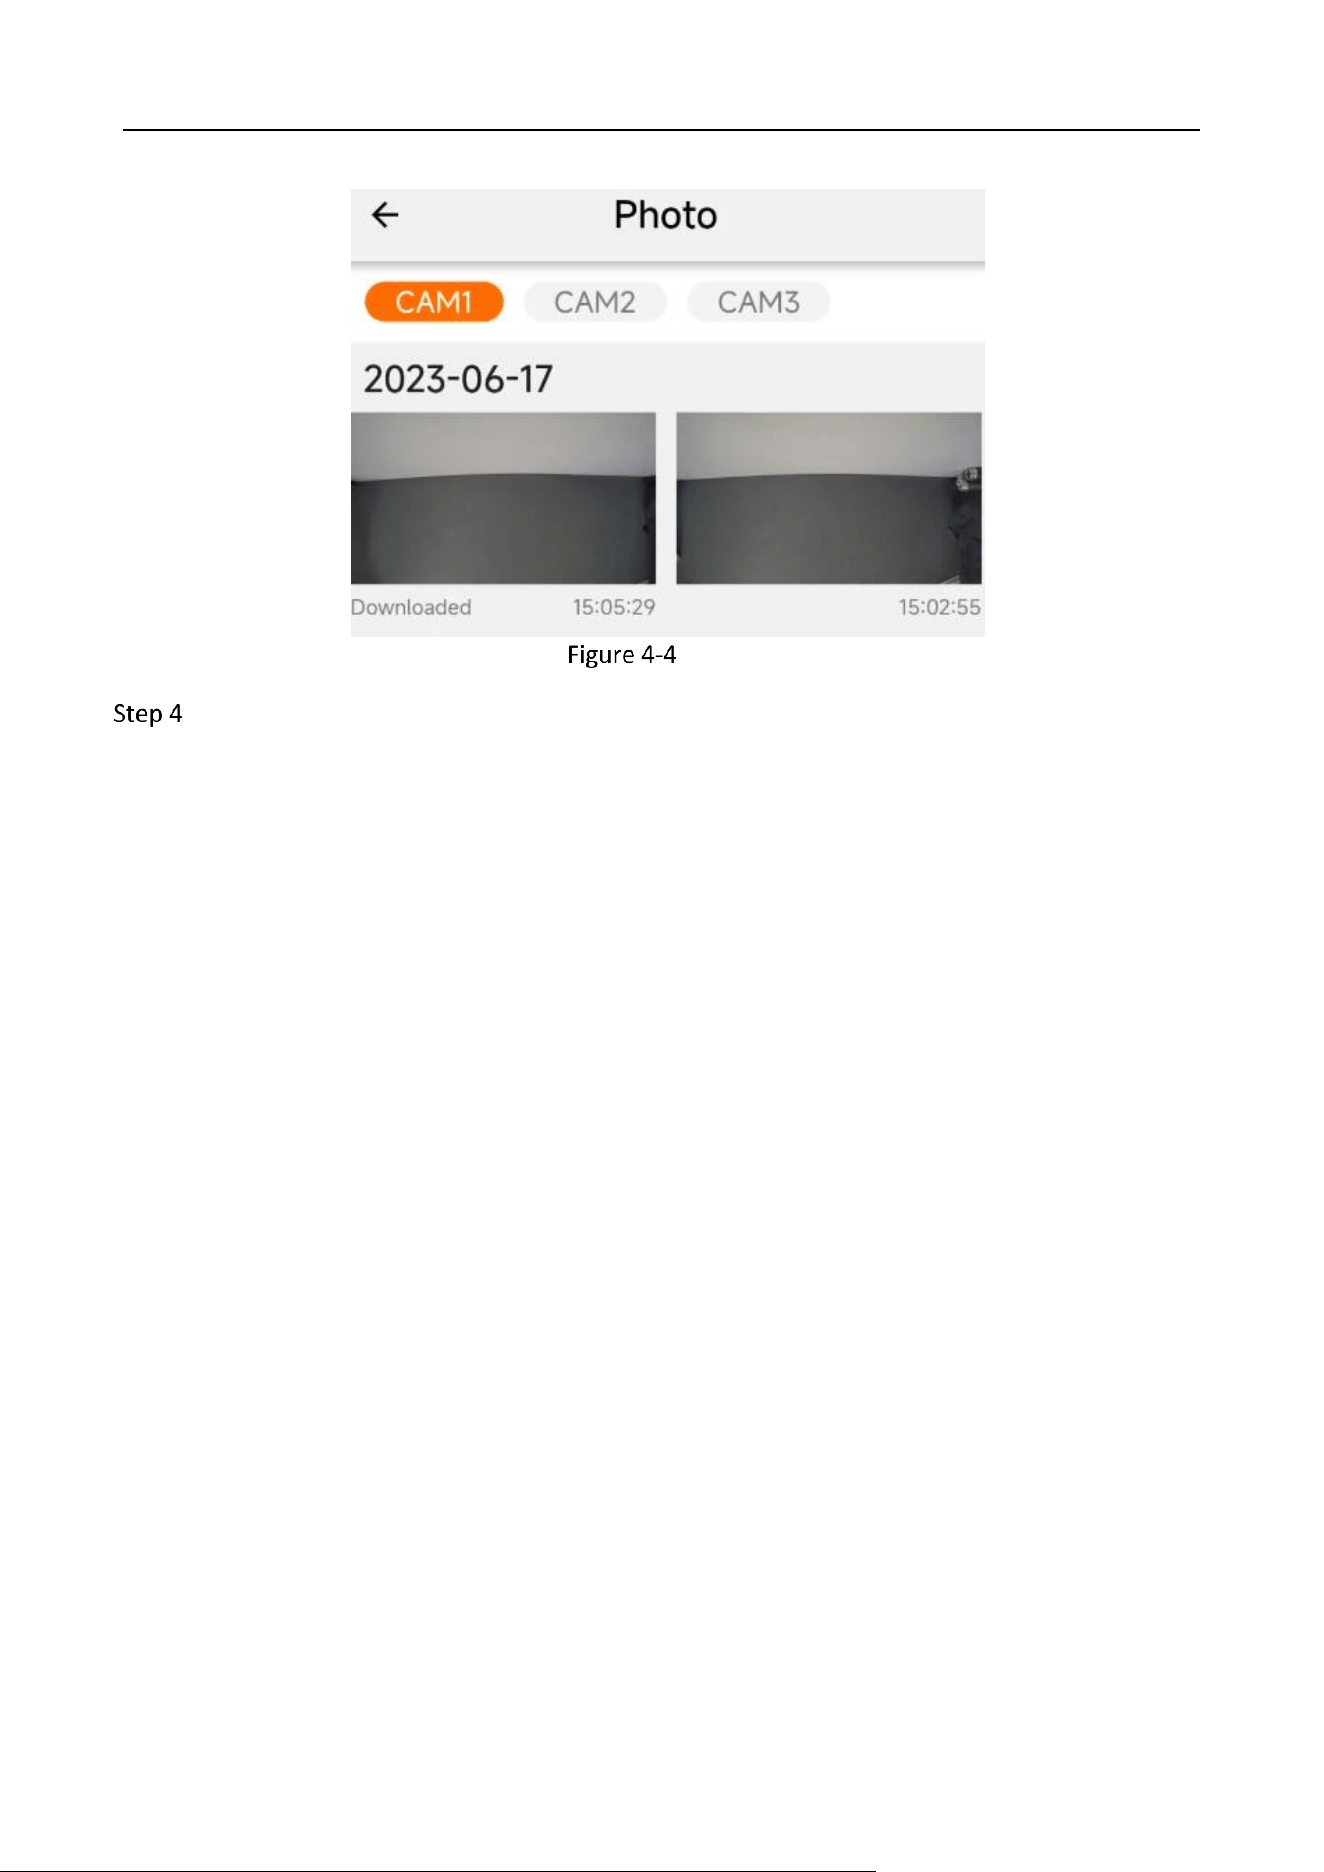
After completing the capture, you can enter the album to view the image.
Industry Dashcam • User Manual
11
Photos
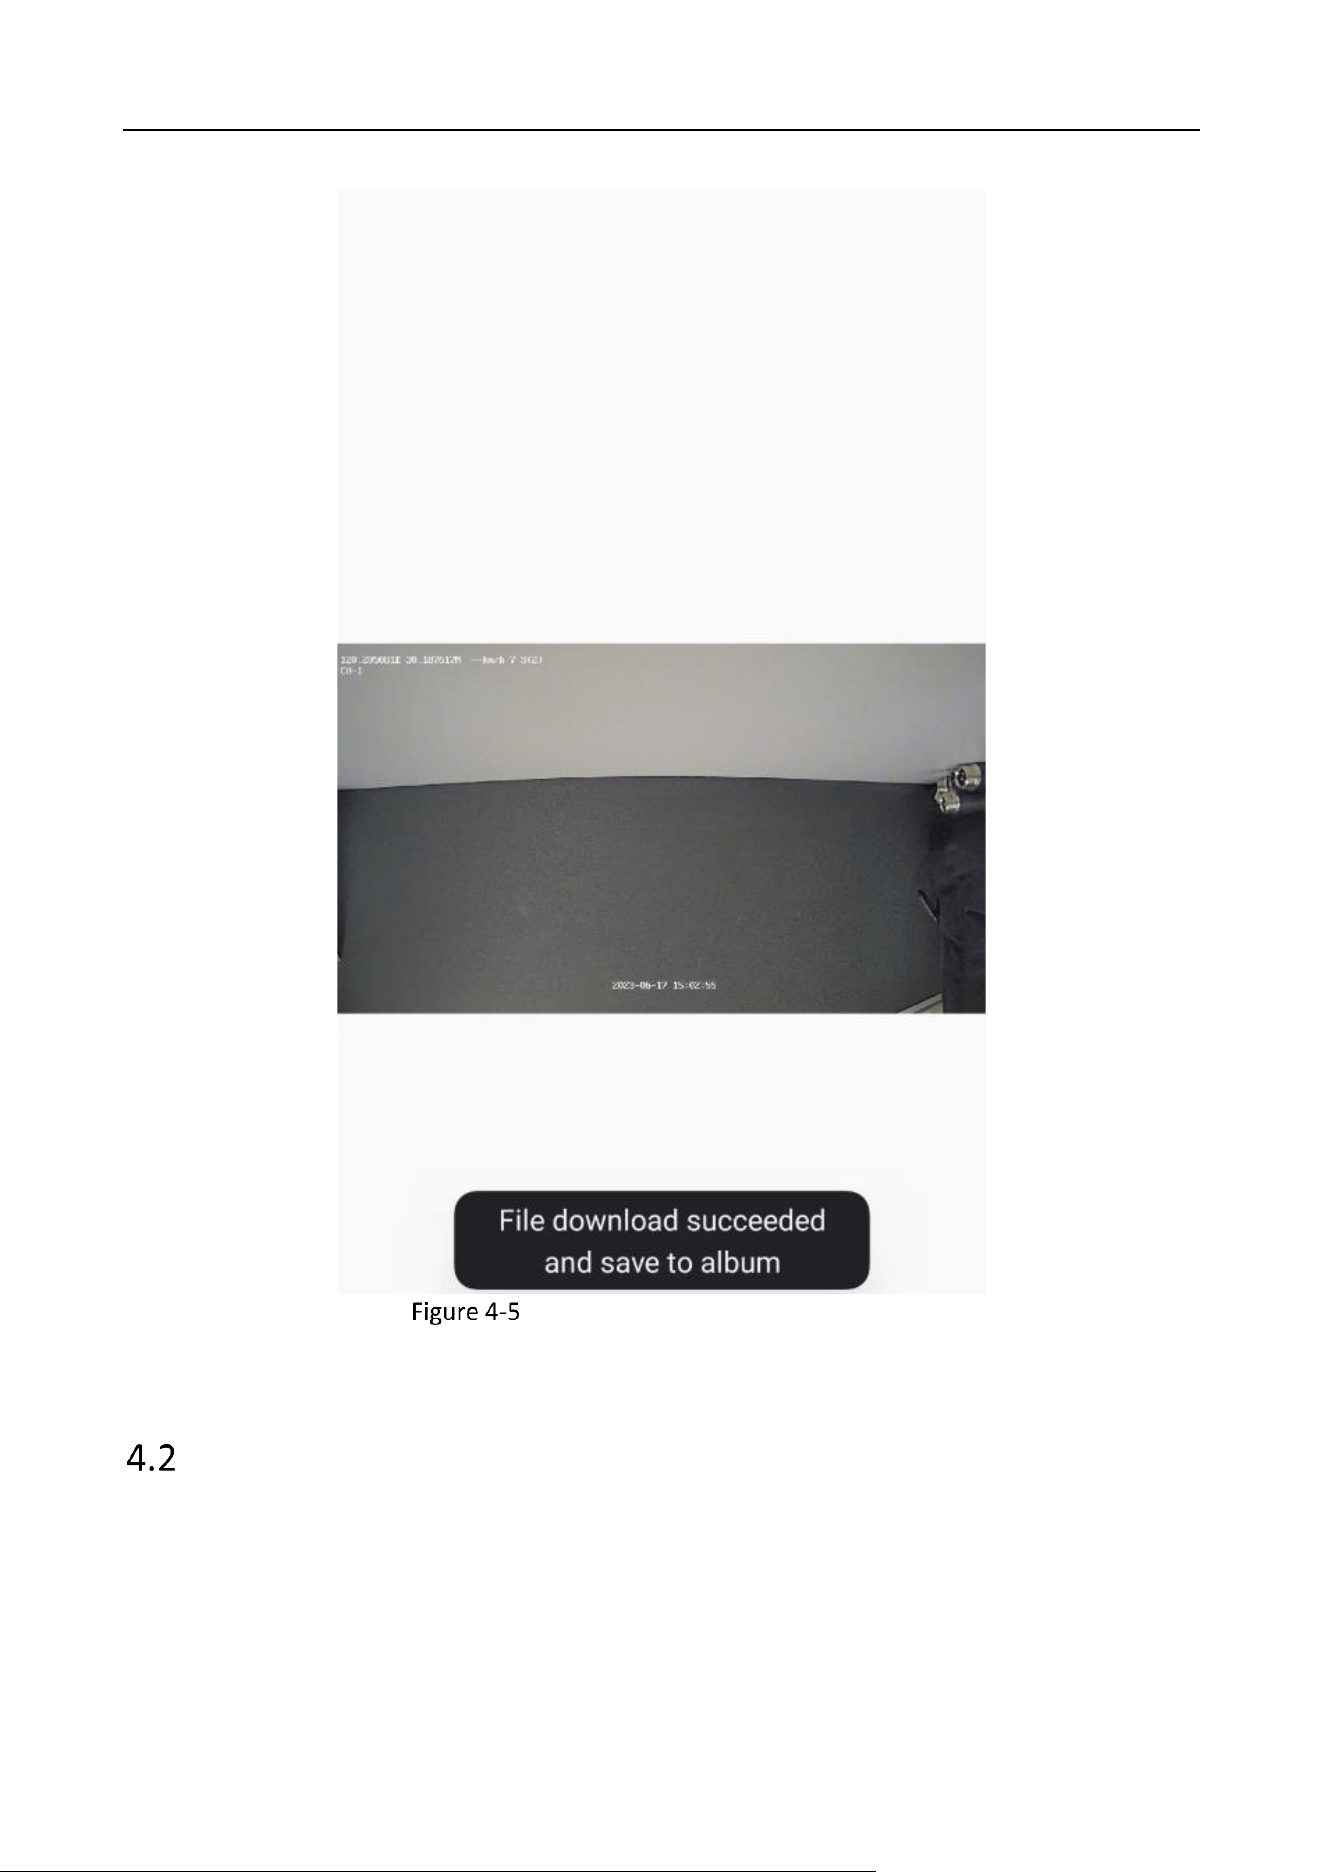
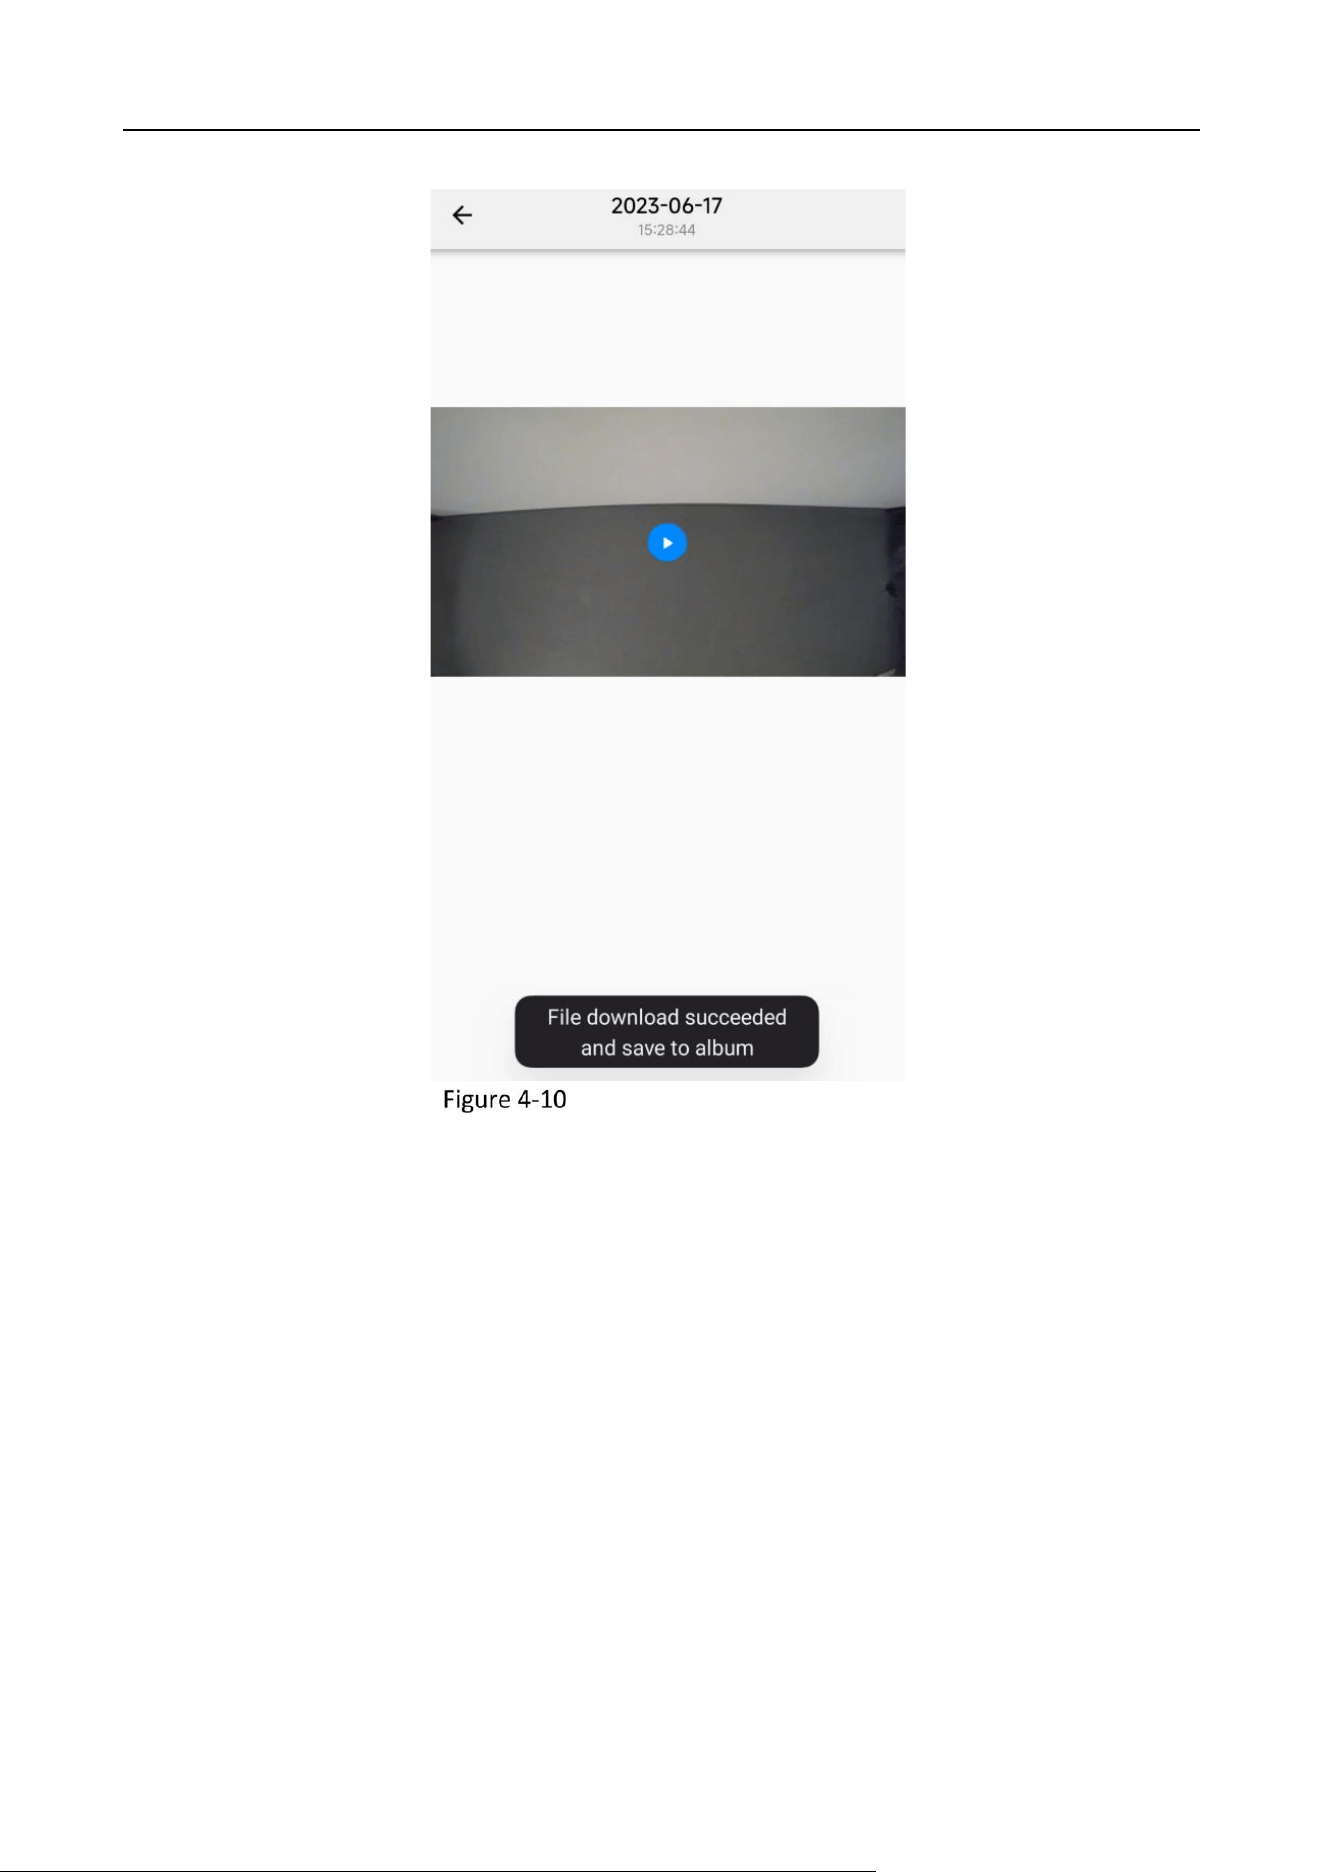
The image file is saved in the TF card of the device by default, if you need to save the capture
to the user's phone, you can tap the capture file in the album and tap the save button below.
If the saving is successful, the App prompts “File download succeeded and save to album.”
Industry Dashcam • User Manual
12
Save the Snapshot File to Your Phone
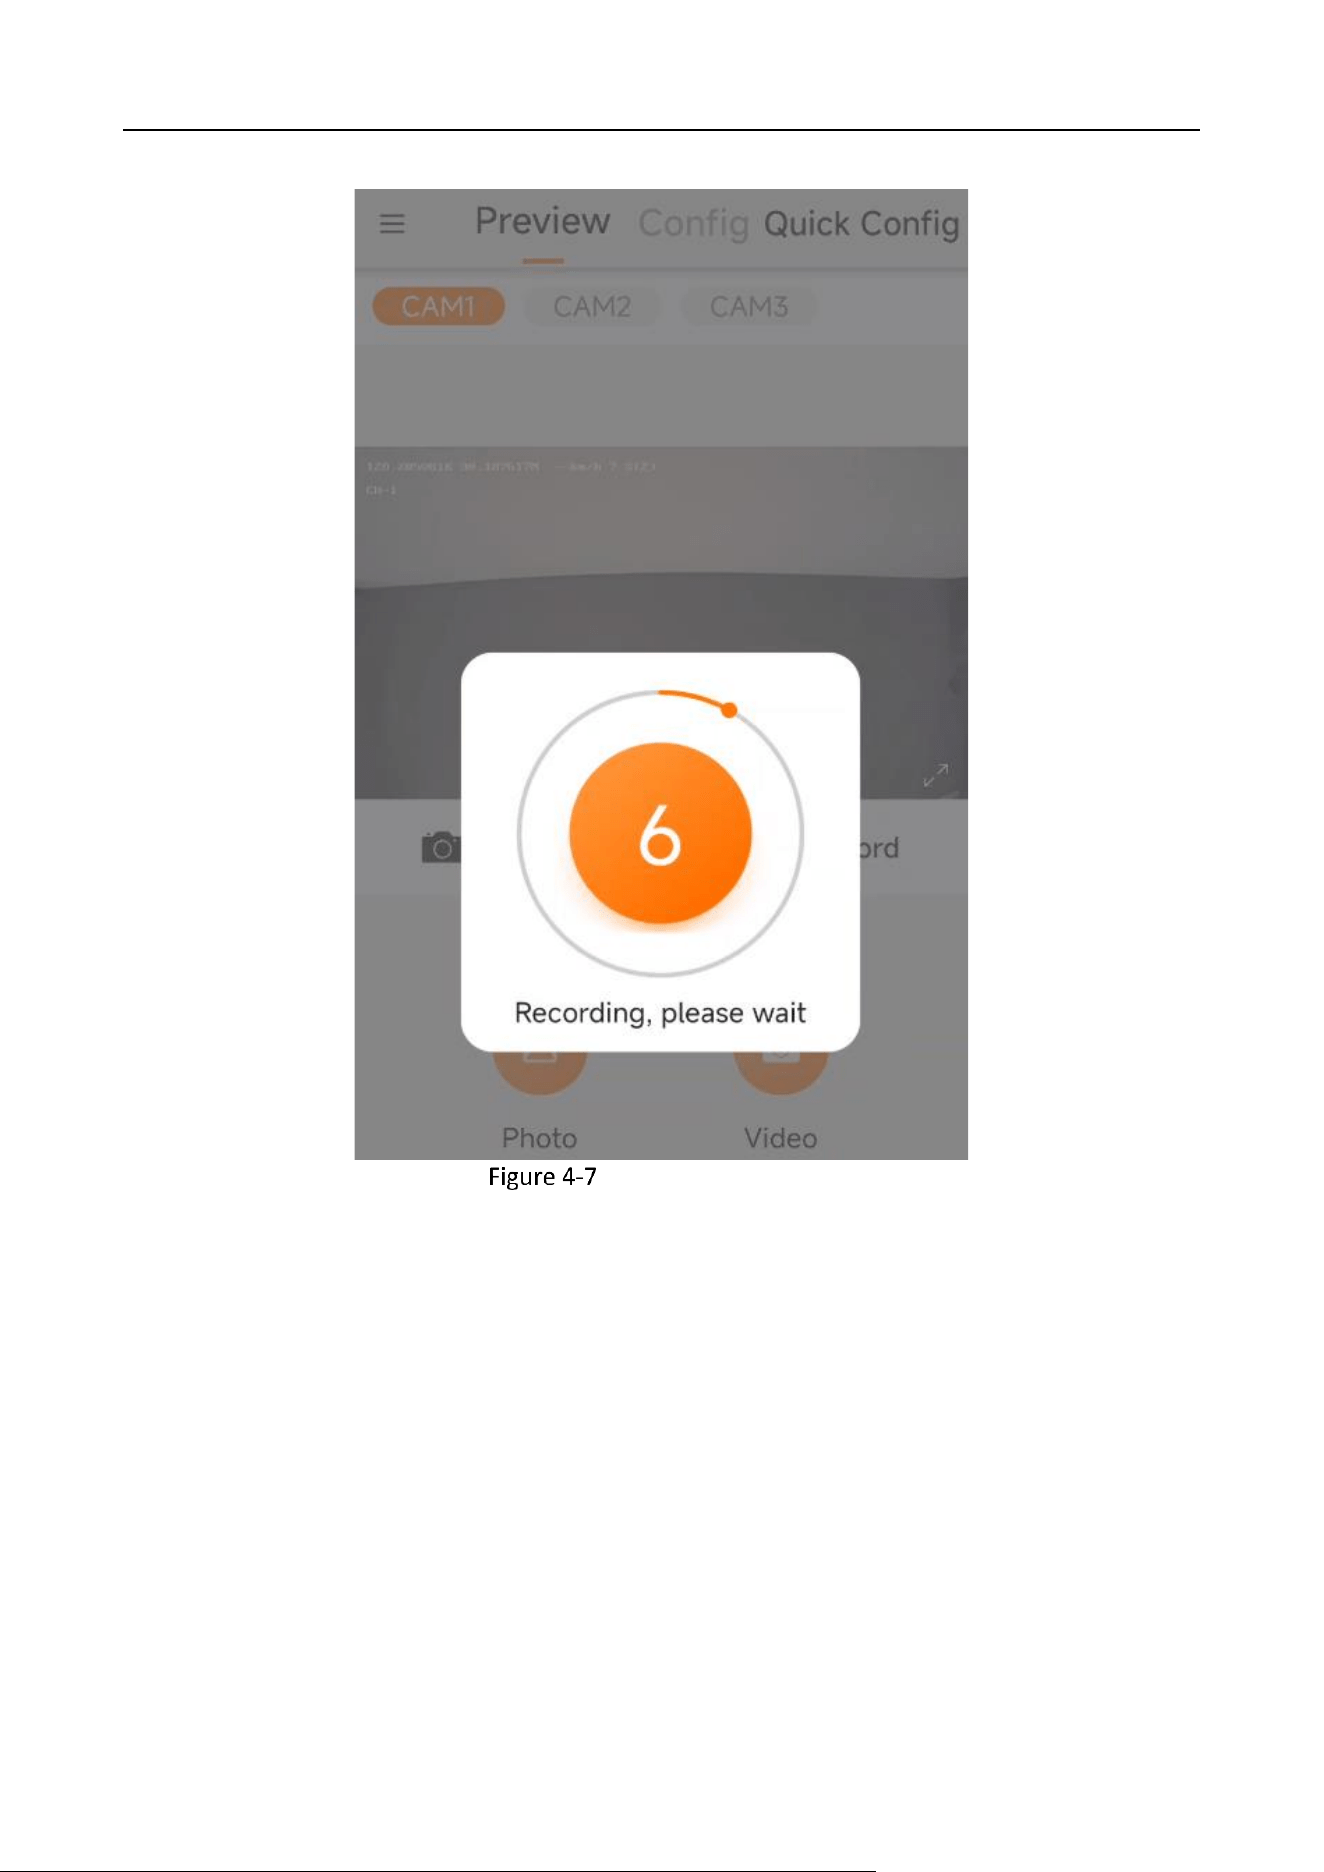
Video
The video recording of the dashcam is divided into “ordinary video” and “emergency video.”
Ordinary videos: the dashcam starts recording ordinary videos when powered on, and save them in
the TF card.
Emergency videos: the dashcam will record a video in case of collisions and alarms. This video is
Industry Dashcam • User Manual
13
generated by combining the ordinary video 6 s before the emergency ("pre-recording") and 6 s after
it.
The dashcam loops its video recording and prefers to cover the ordinary recordings first. However,
for long-term use, it is recommended to back up emergency recordings in time.
To start the preview, tap the “Play” button on the preview screen, and the screen supports full-
screen playback. To record an emergency video, tap the “Record” button during the playback, and
a recording countdown will be displayed on the interface. After the recording is completed, you can
save the recording file locally on the phone in the “Video” menu.
After starting the preview, tap the “Record” button.
Video Interface
During the emergency recording process, the interface displays a countdown of 6 seconds.
The total duration of the recording is 12 seconds (including 6 seconds of pre-recording).
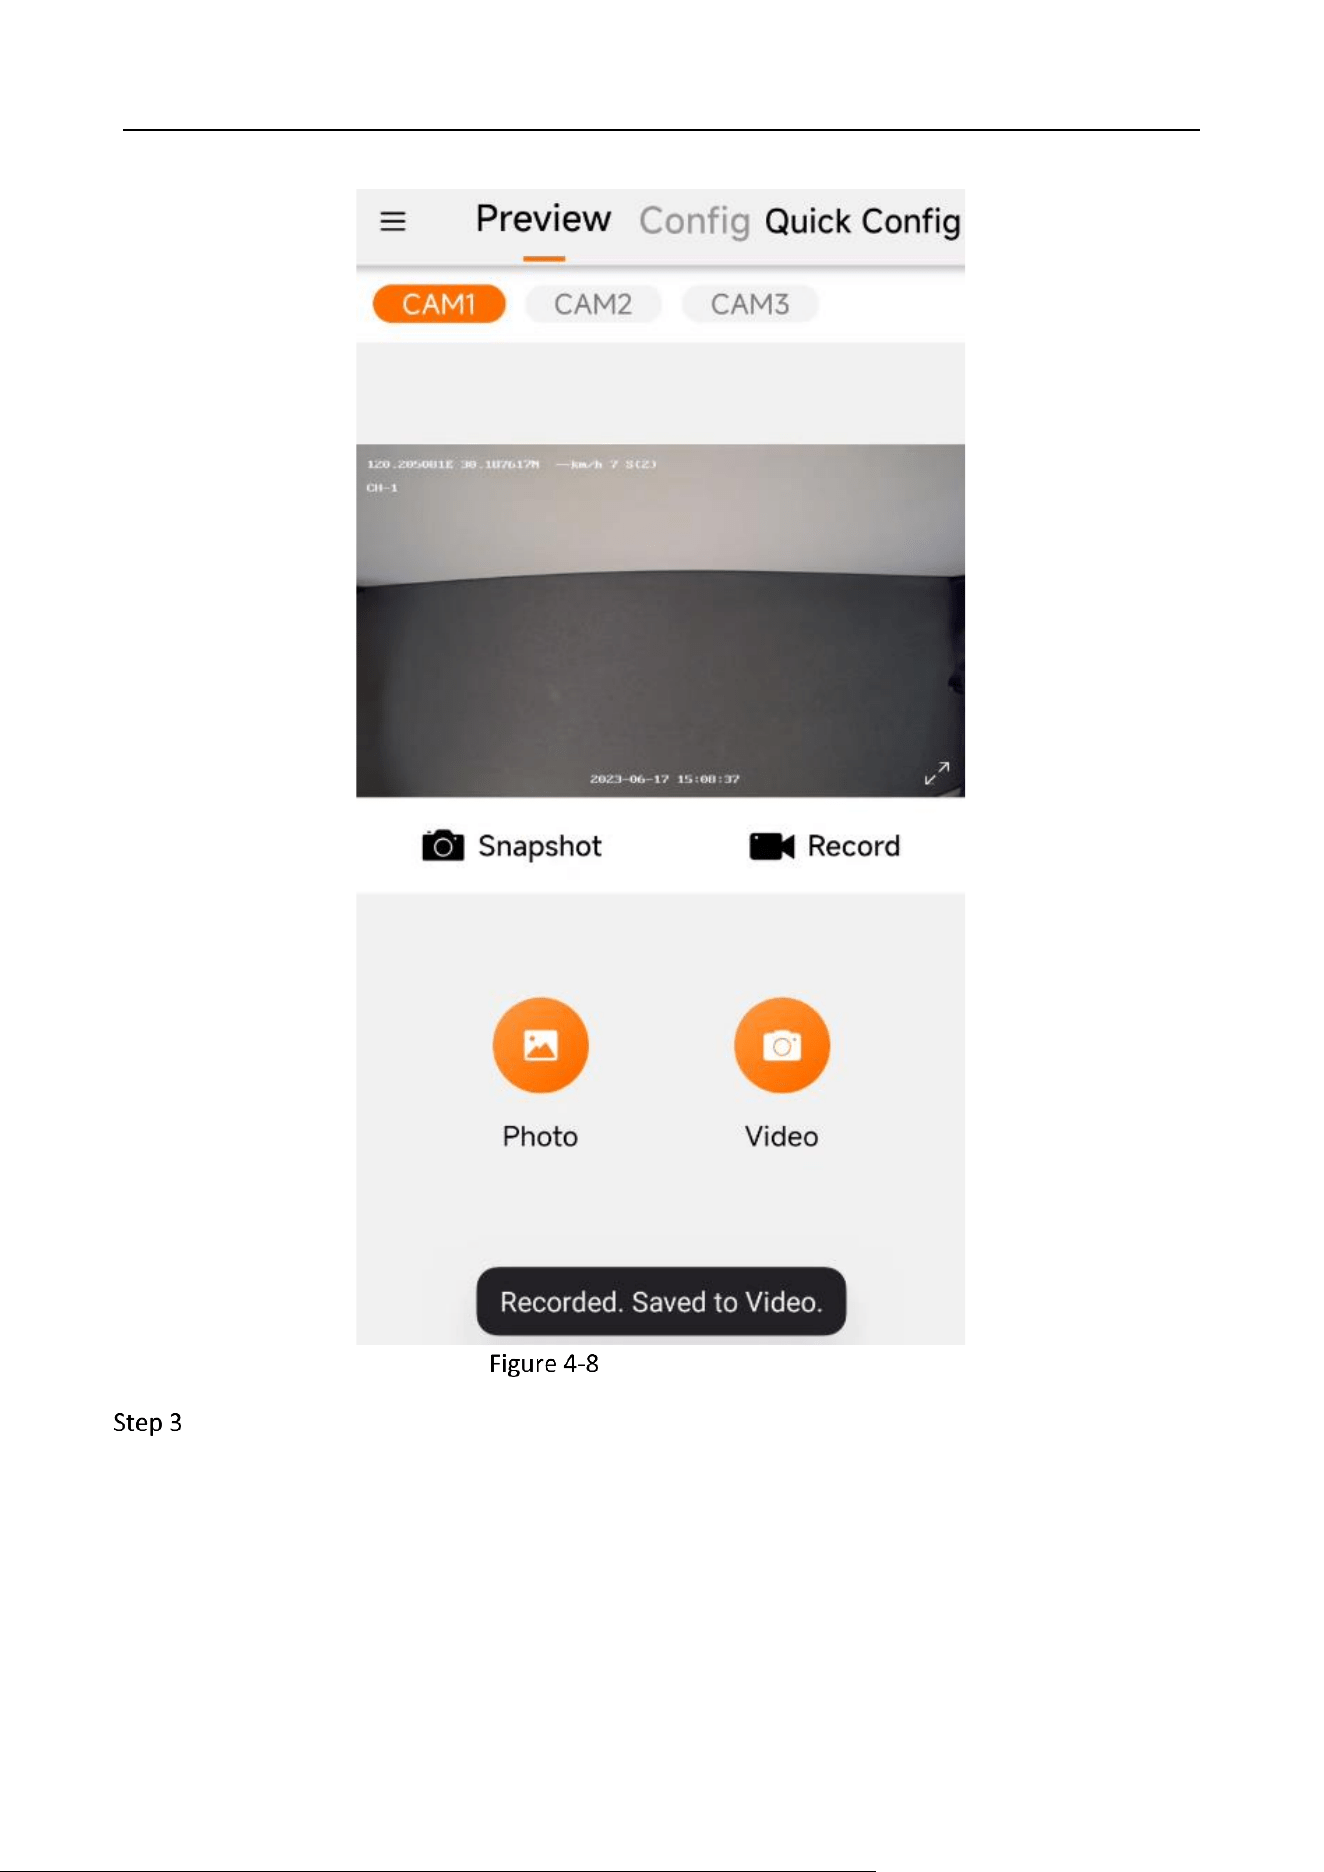
Industry Dashcam • User Manual
14
Recording Countdown
Industry Dashcam • User Manual
15
Recorded Successfully
After the recording is completed, you can enter the “Recording” menu to view the recording.
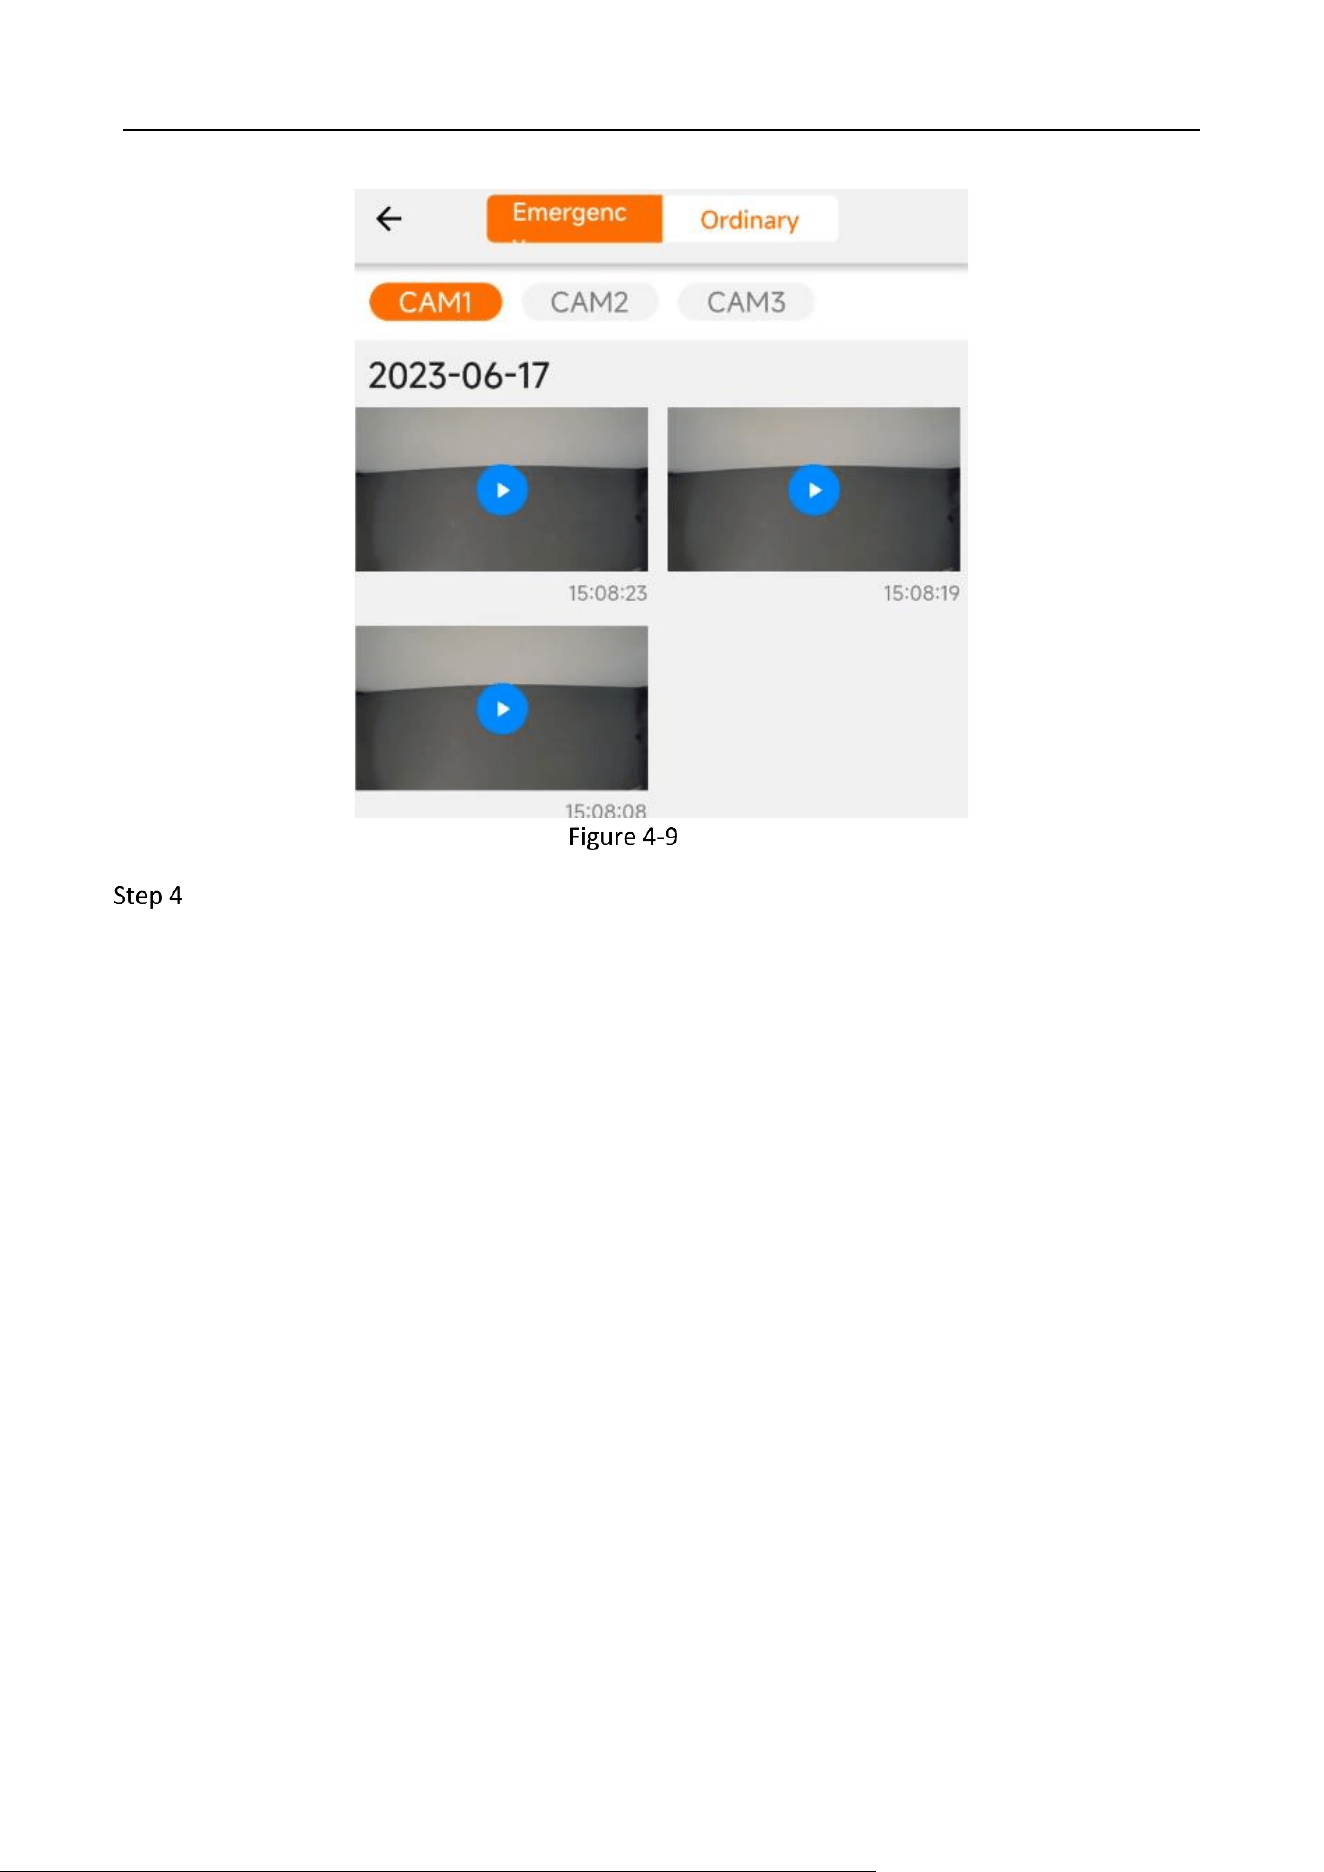
Industry Dashcam • User Manual
16
Videos
The recording file is saved in the TF card of the dashcam by default. To save the recording to
your phone, you can tap the recording file, tap “Save.” If the video is successfully saved, the
App prompts “File download succeeded and save to album.”
Industry Dashcam • User Manual
17
Save the Video to Your Phone
Industry Dashcam • User Manual
18
Chapter 5 Dashcam Configurations
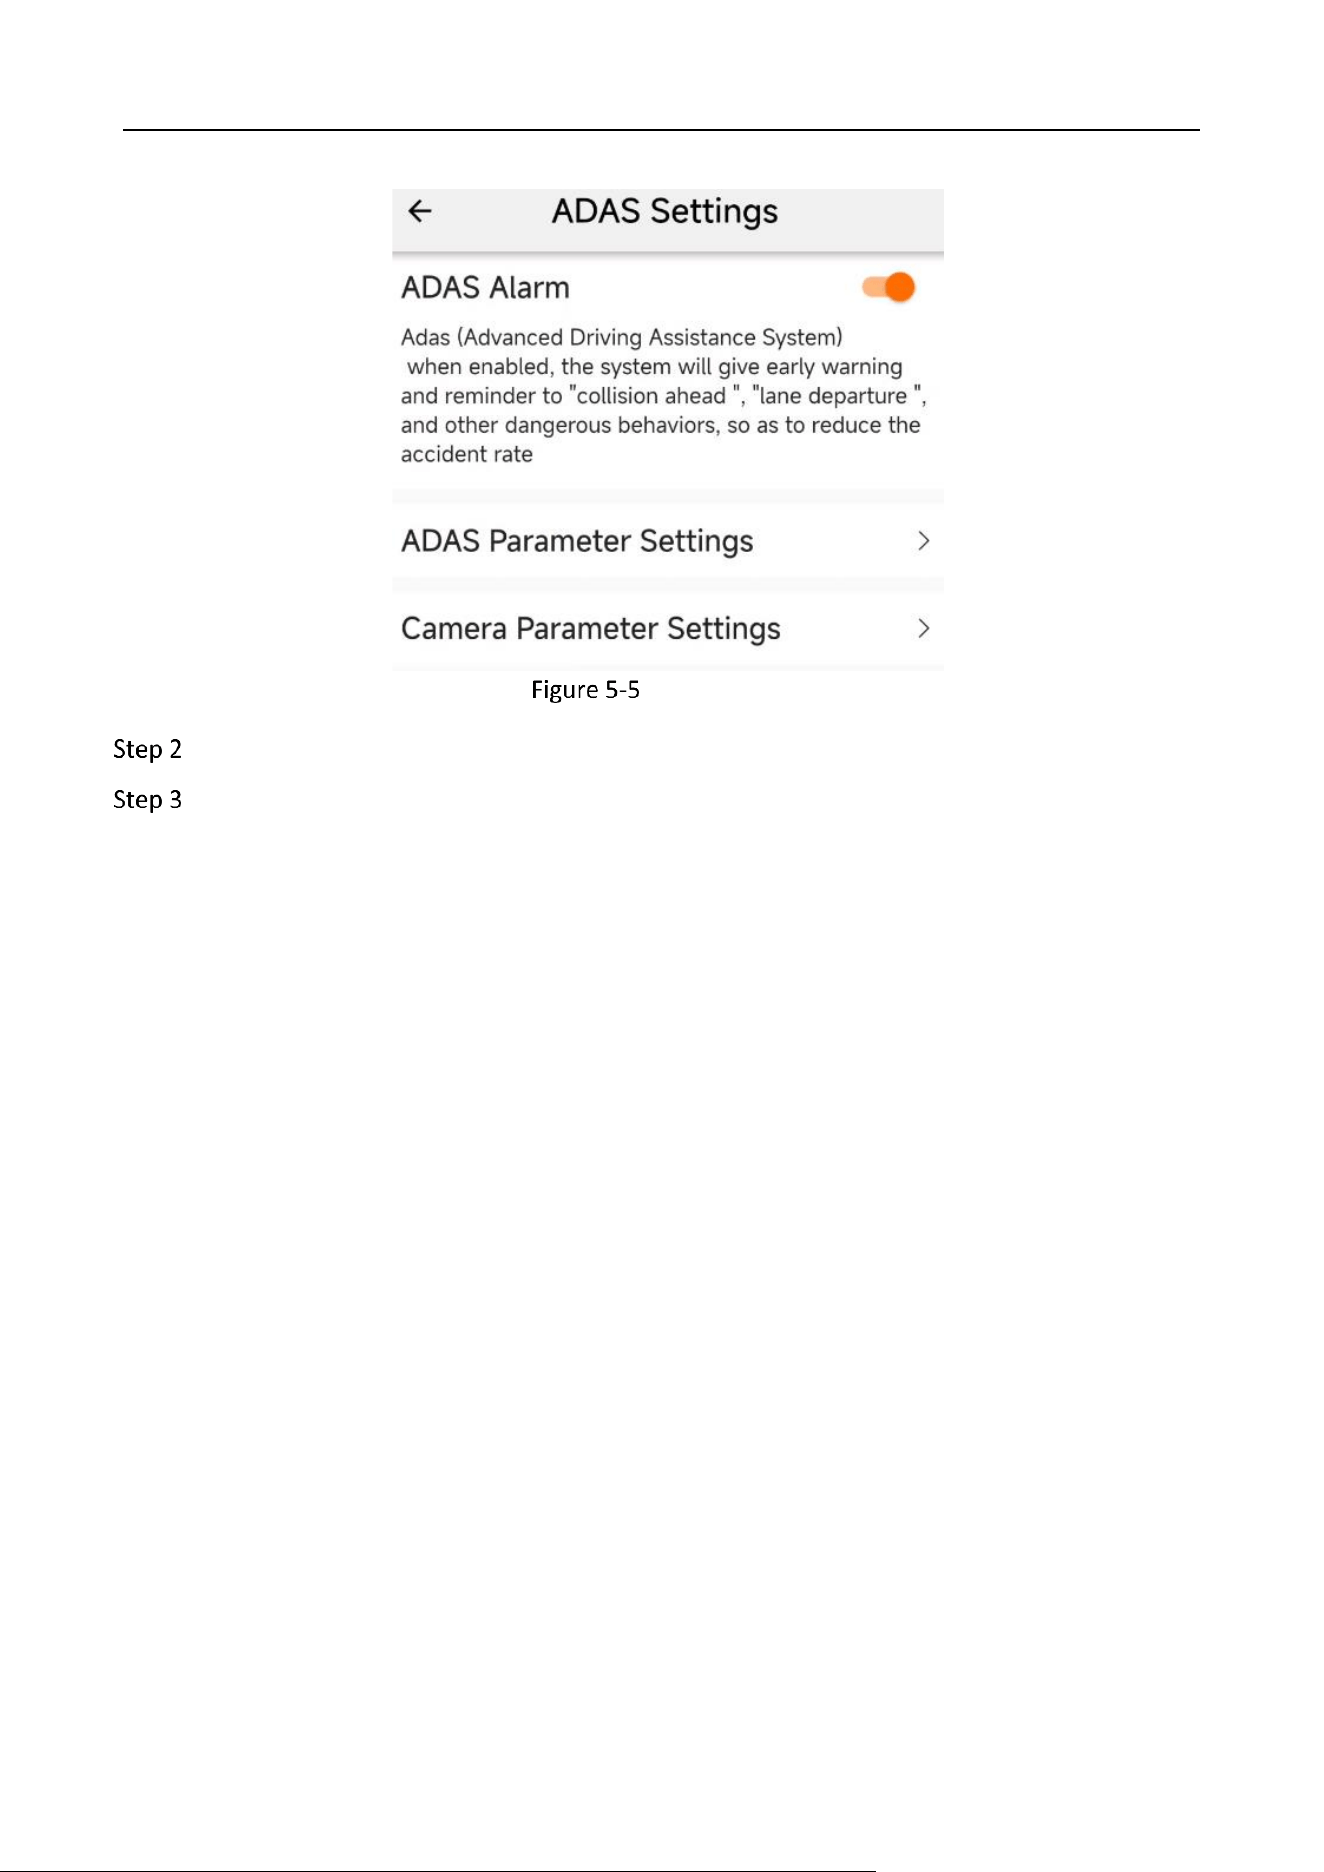
ADAS Settings
You can set ADAS alarm parameters to warn of driving risk factors and improve driving safety. Enable
ADAS alarm to use this function. To use ADAS functions, you need to configure the camera
parameters.
Config Interface
Industry Dashcam • User Manual
19
ADAS Settings
Enter ADAS Settings → Camera Parameter Settings, configure “Camera Parameters”, and
enter values such as the horizontal distance of the front of the car, the vertical height of the
camera, the horizontal distance of the left and right wheels, and the proportion of the front
of the car.
Camera Parameter Settings
Industry Dashcam • User Manual
20
Enter the “Blanking Line Position” setting. First adjust the focus of the field of view left and
right, and then adjust the horizon height up and down.
Horizon Settings
Tap “Save” to save the horizon settings.
Go to Config → ADAS Settings and enable ADAS alarms.
Industry Dashcam • User Manual
21
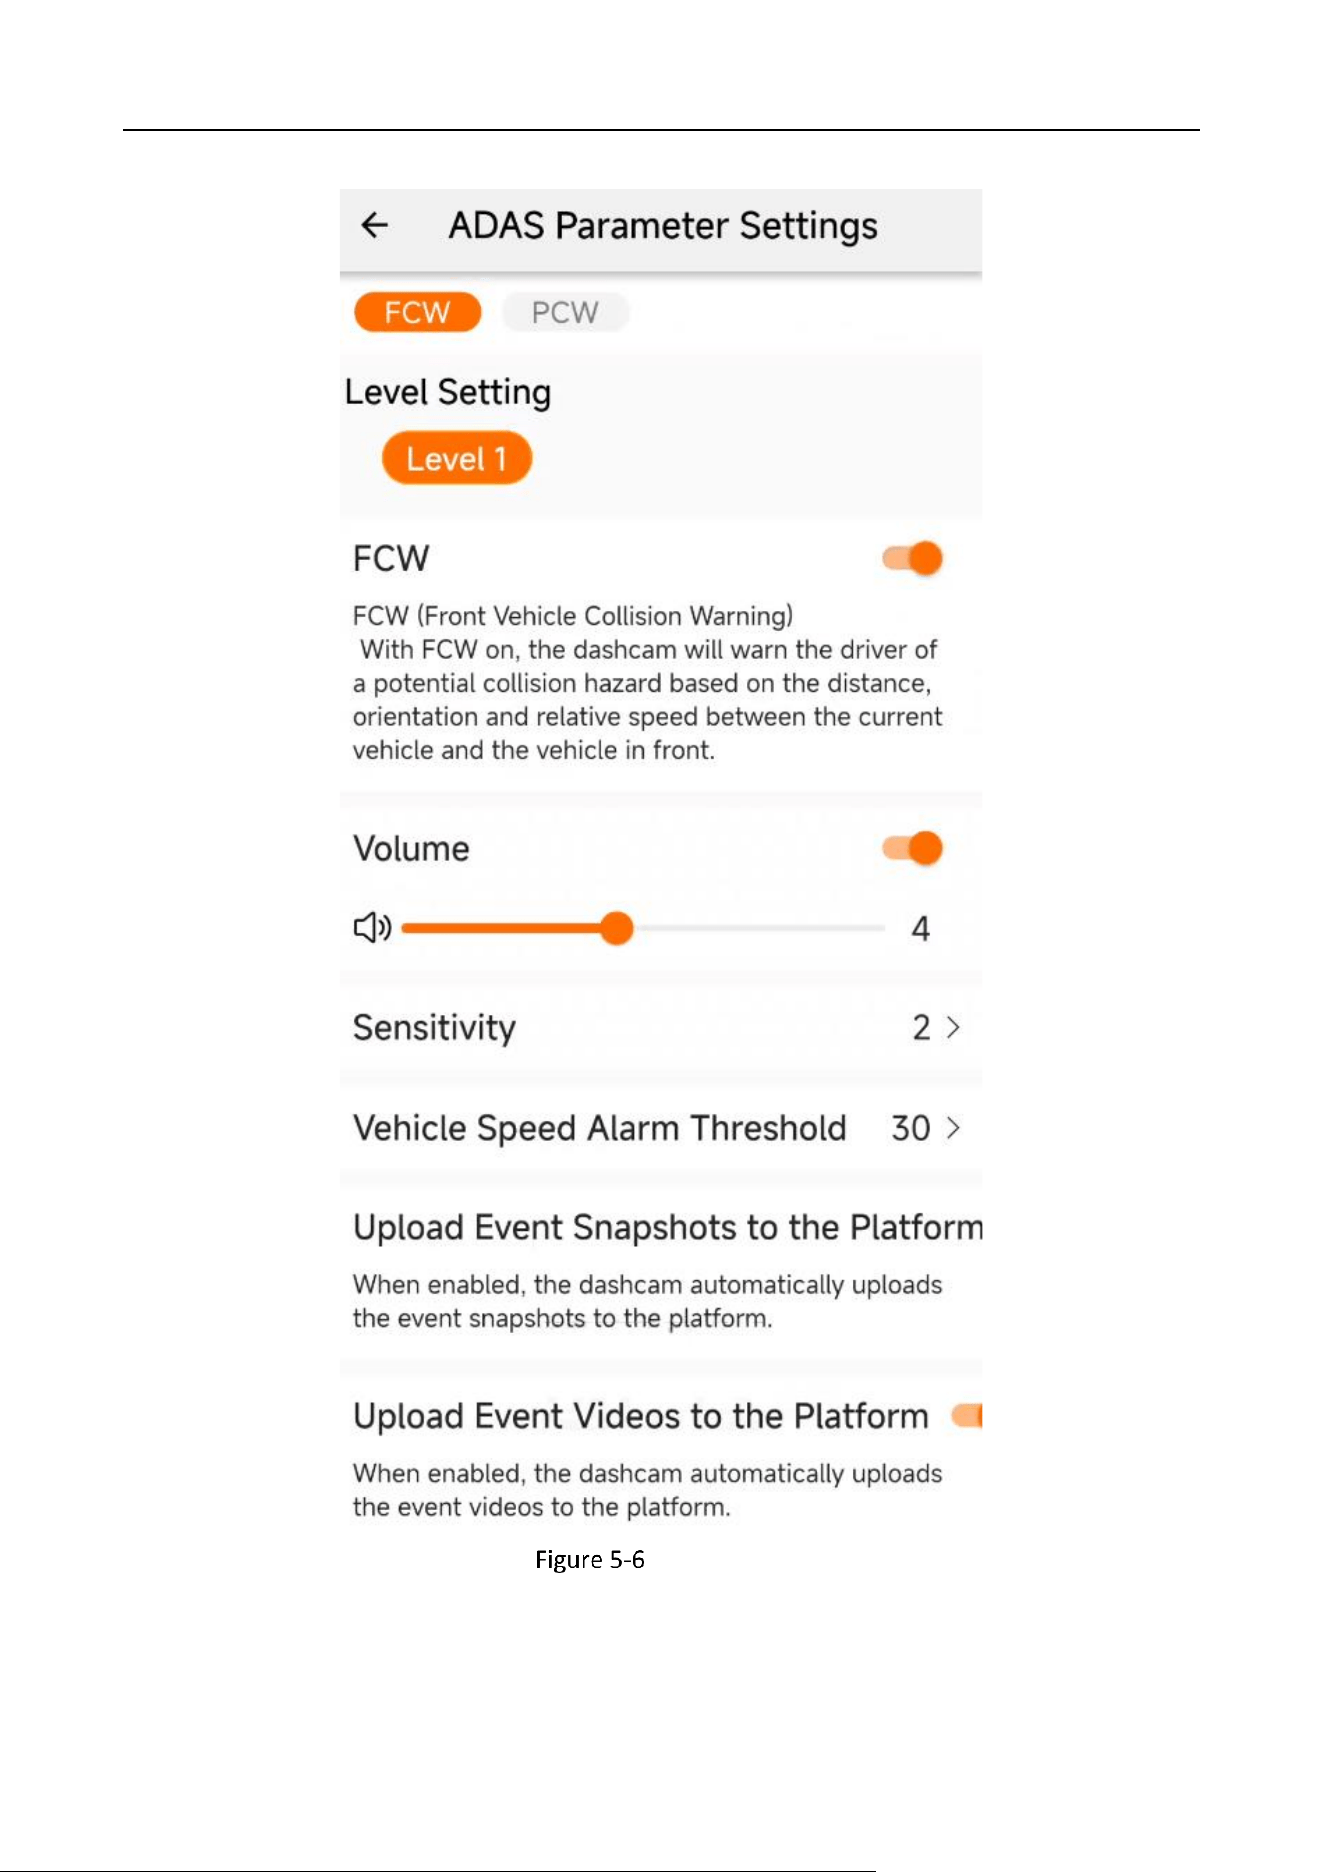
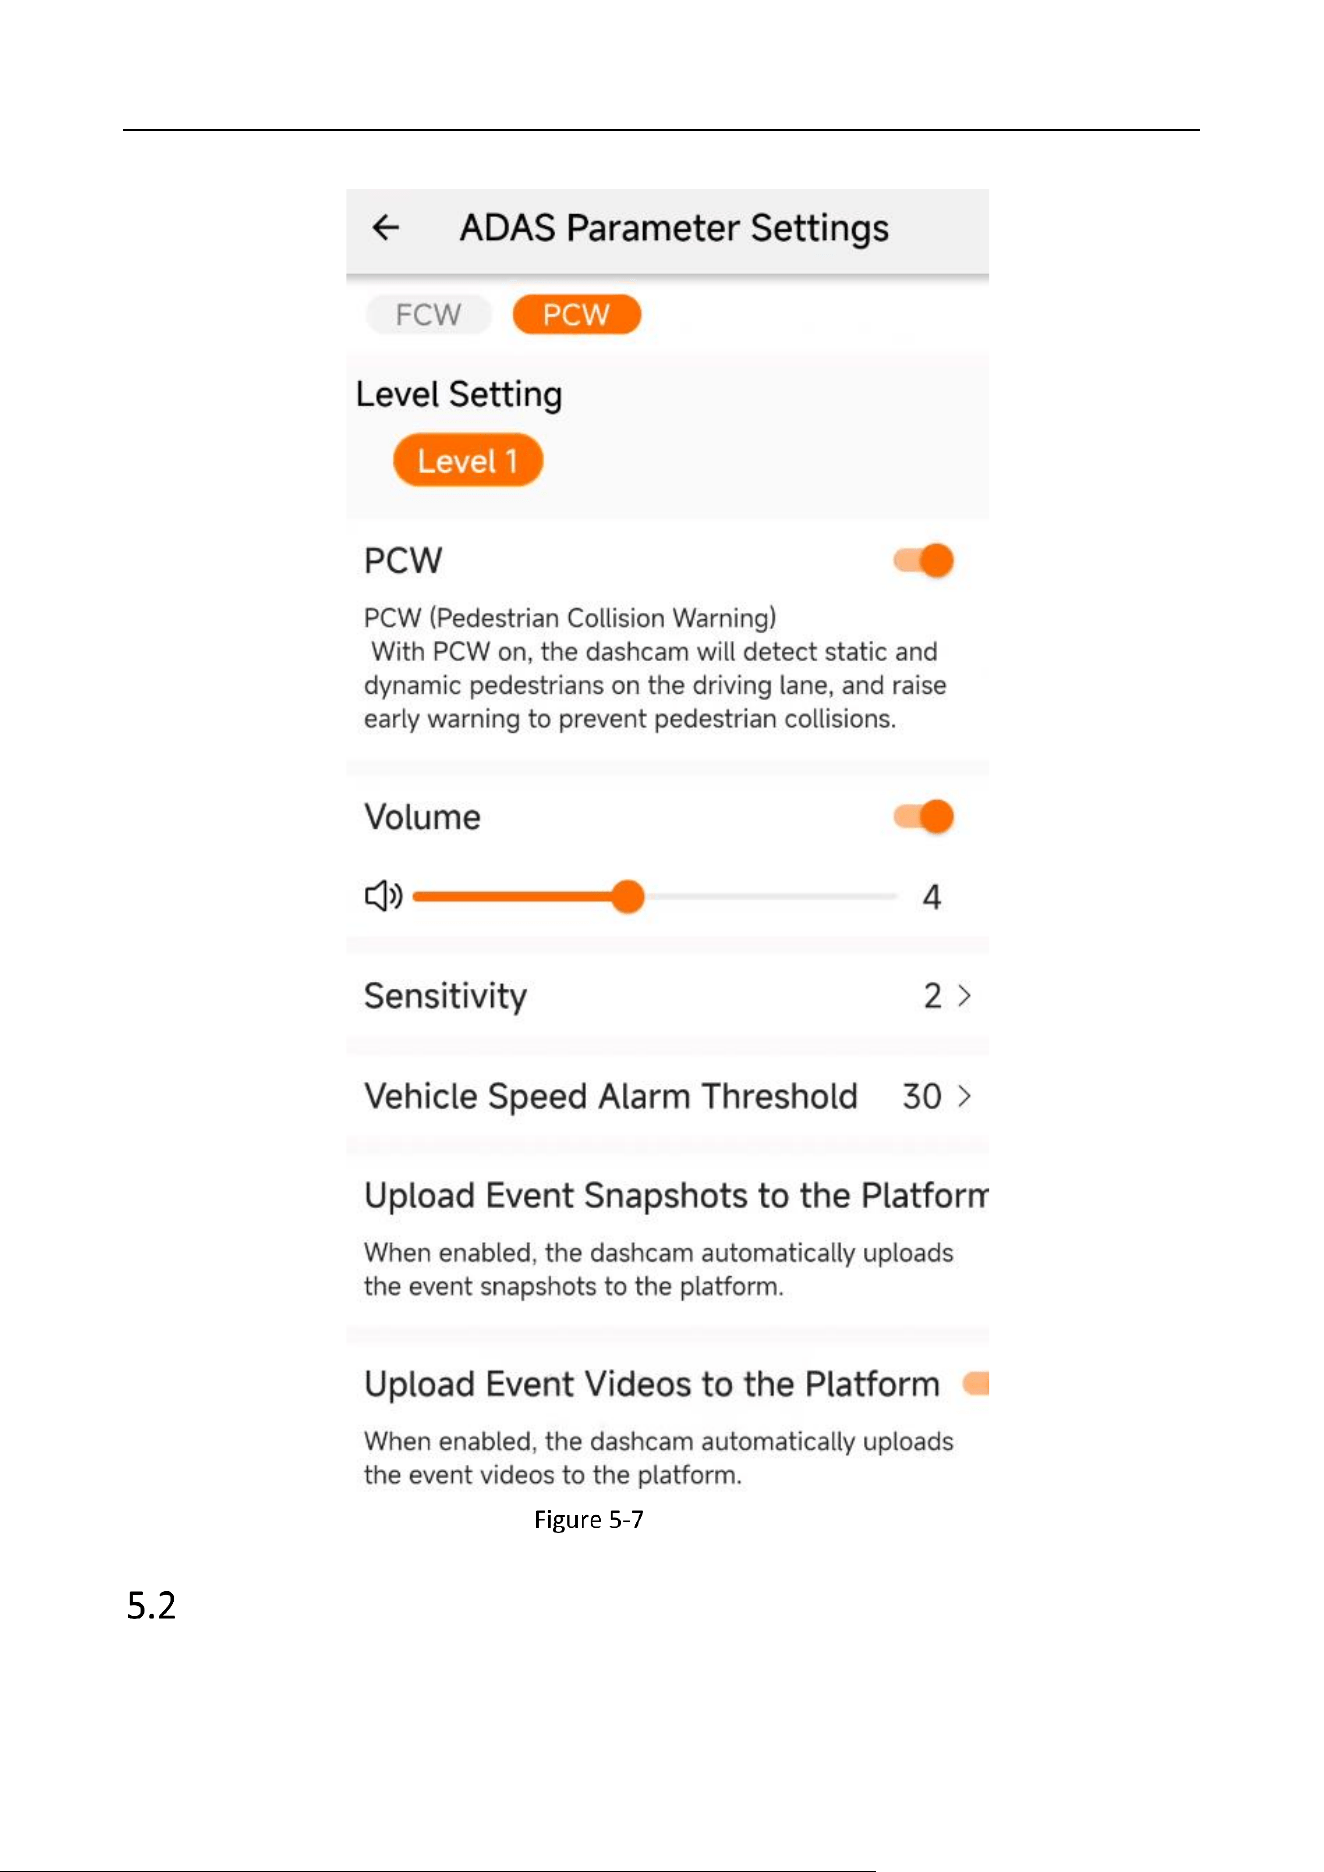
ADAS Settings
Enter ADAS Parameter Settings and set alarm items.
Select the relevant alarm item and select “Enable.” The alarm level is set to Level 1 by default.
Industry Dashcam • User Manual
22
FCW Settings
Industry Dashcam • User Manual
23
PCW Settings
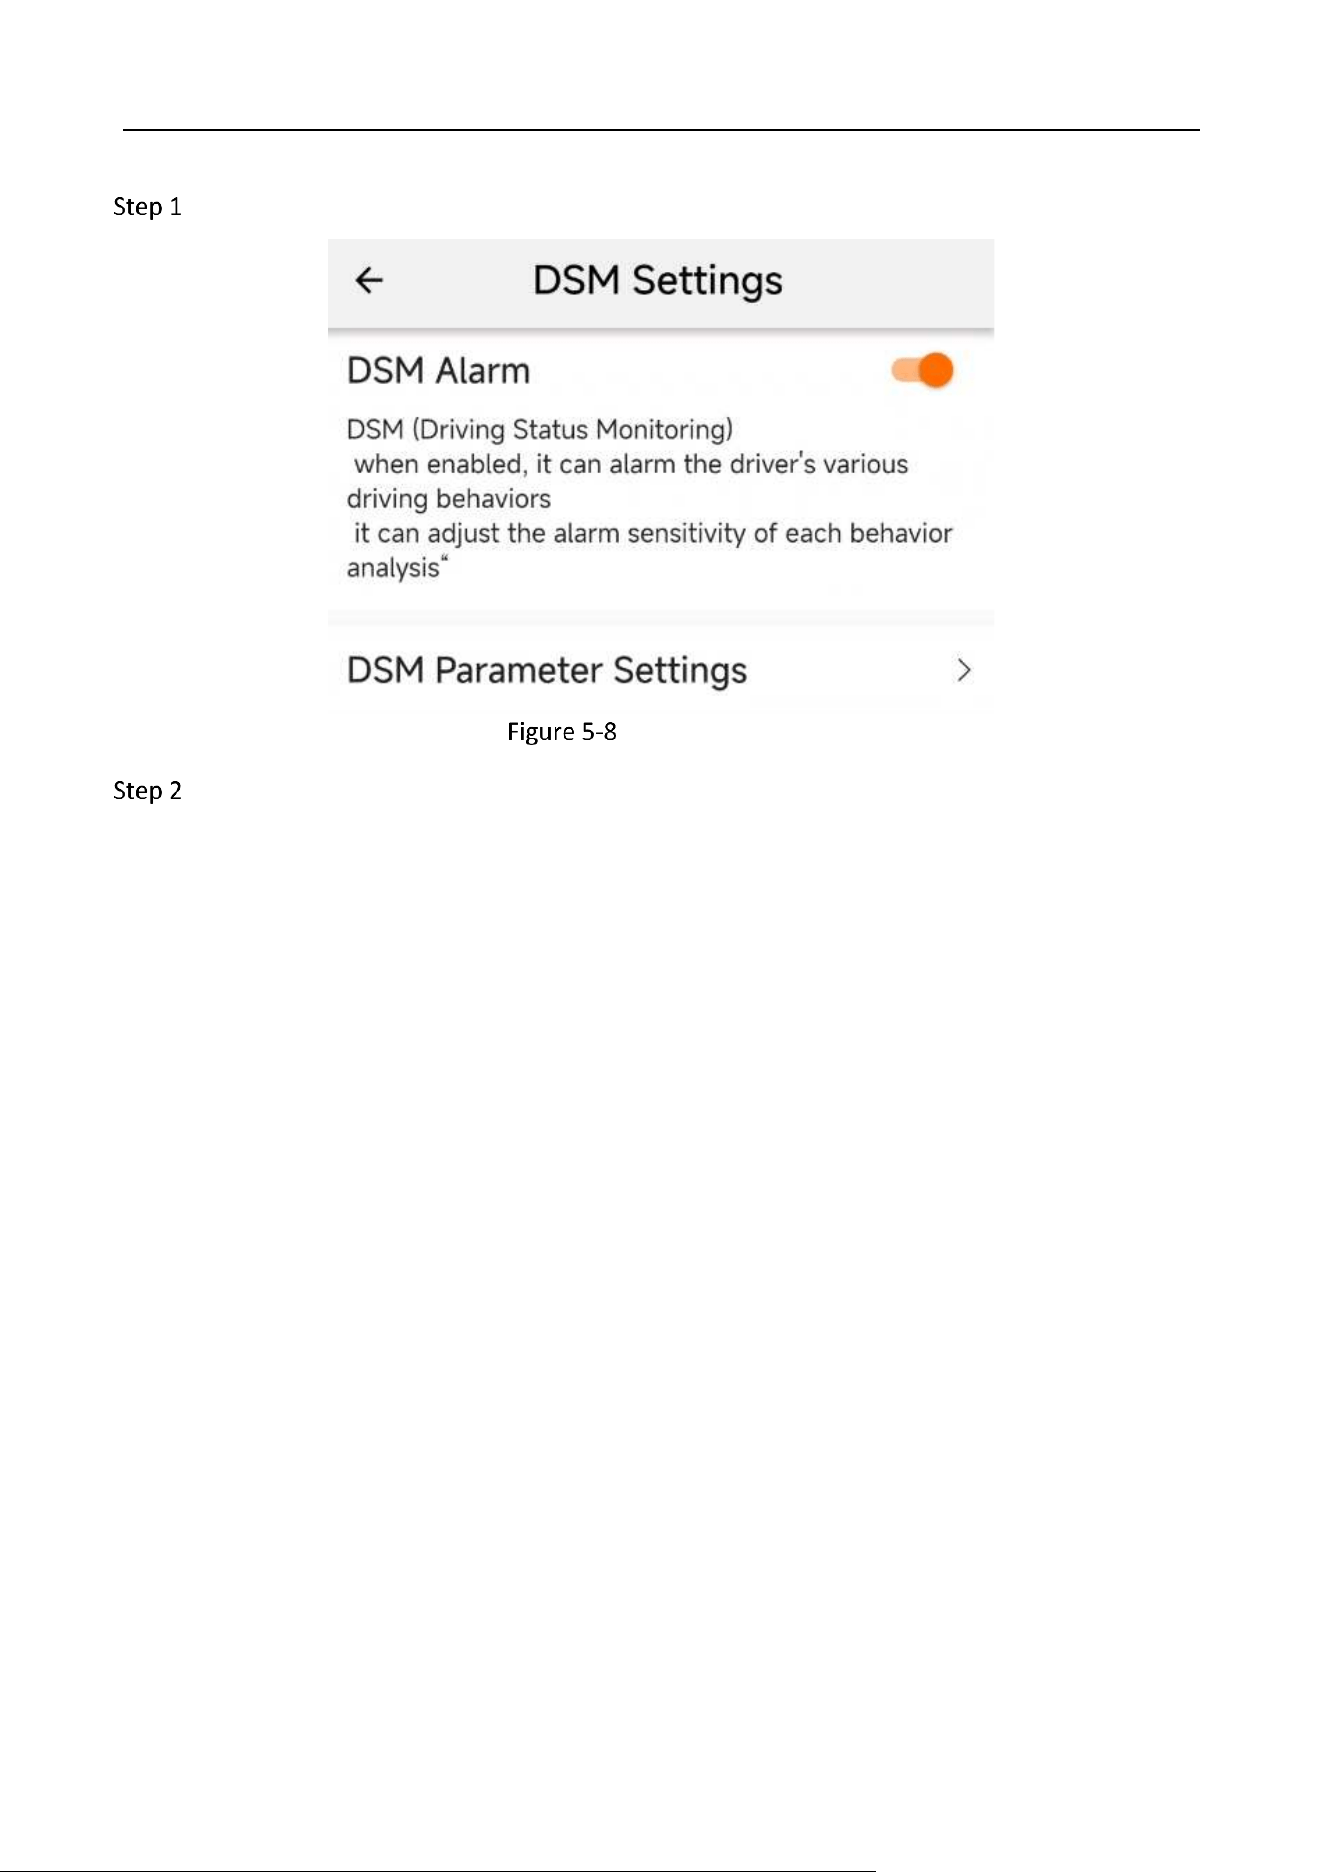
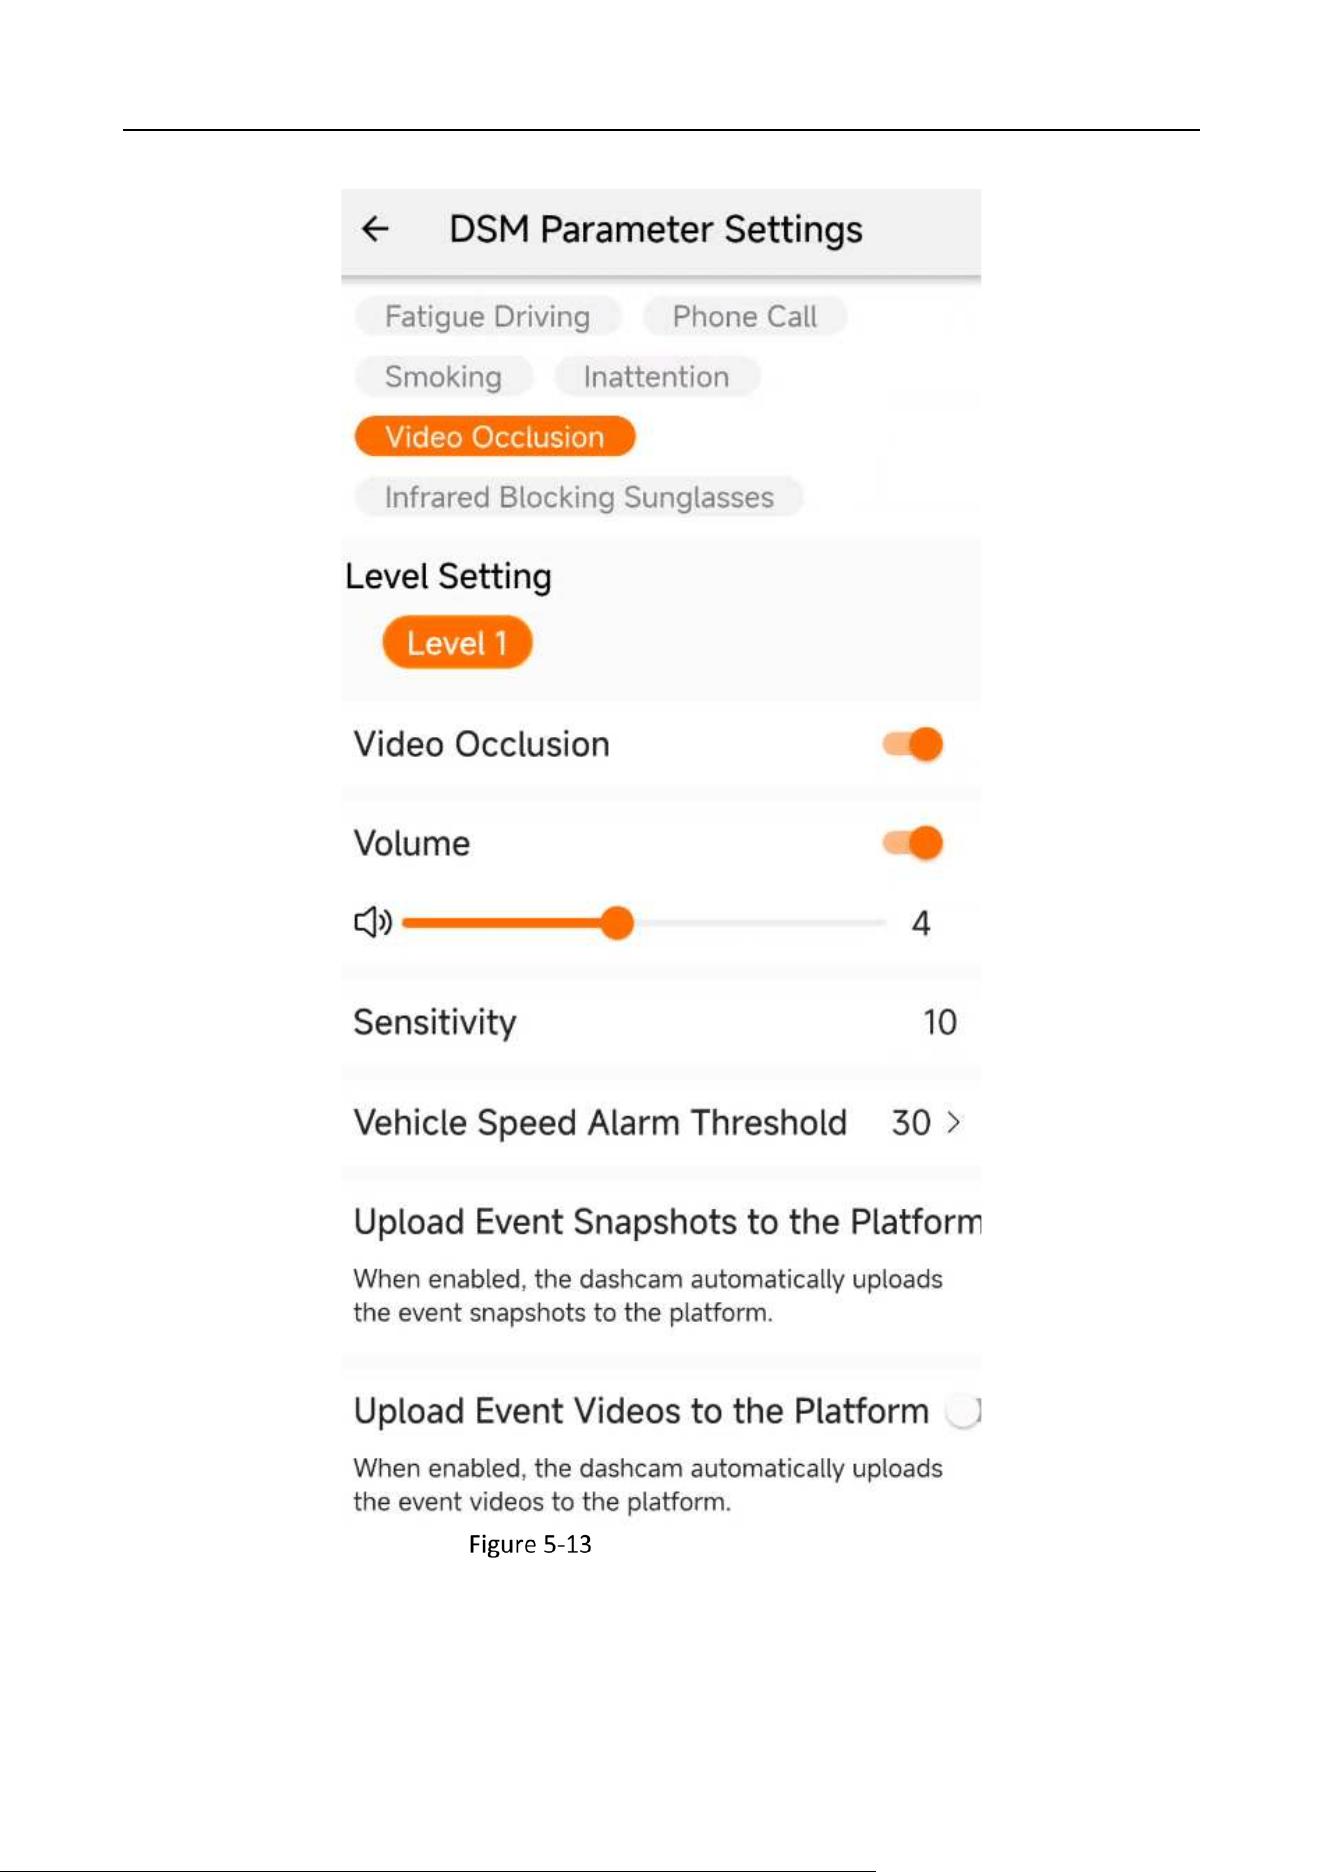
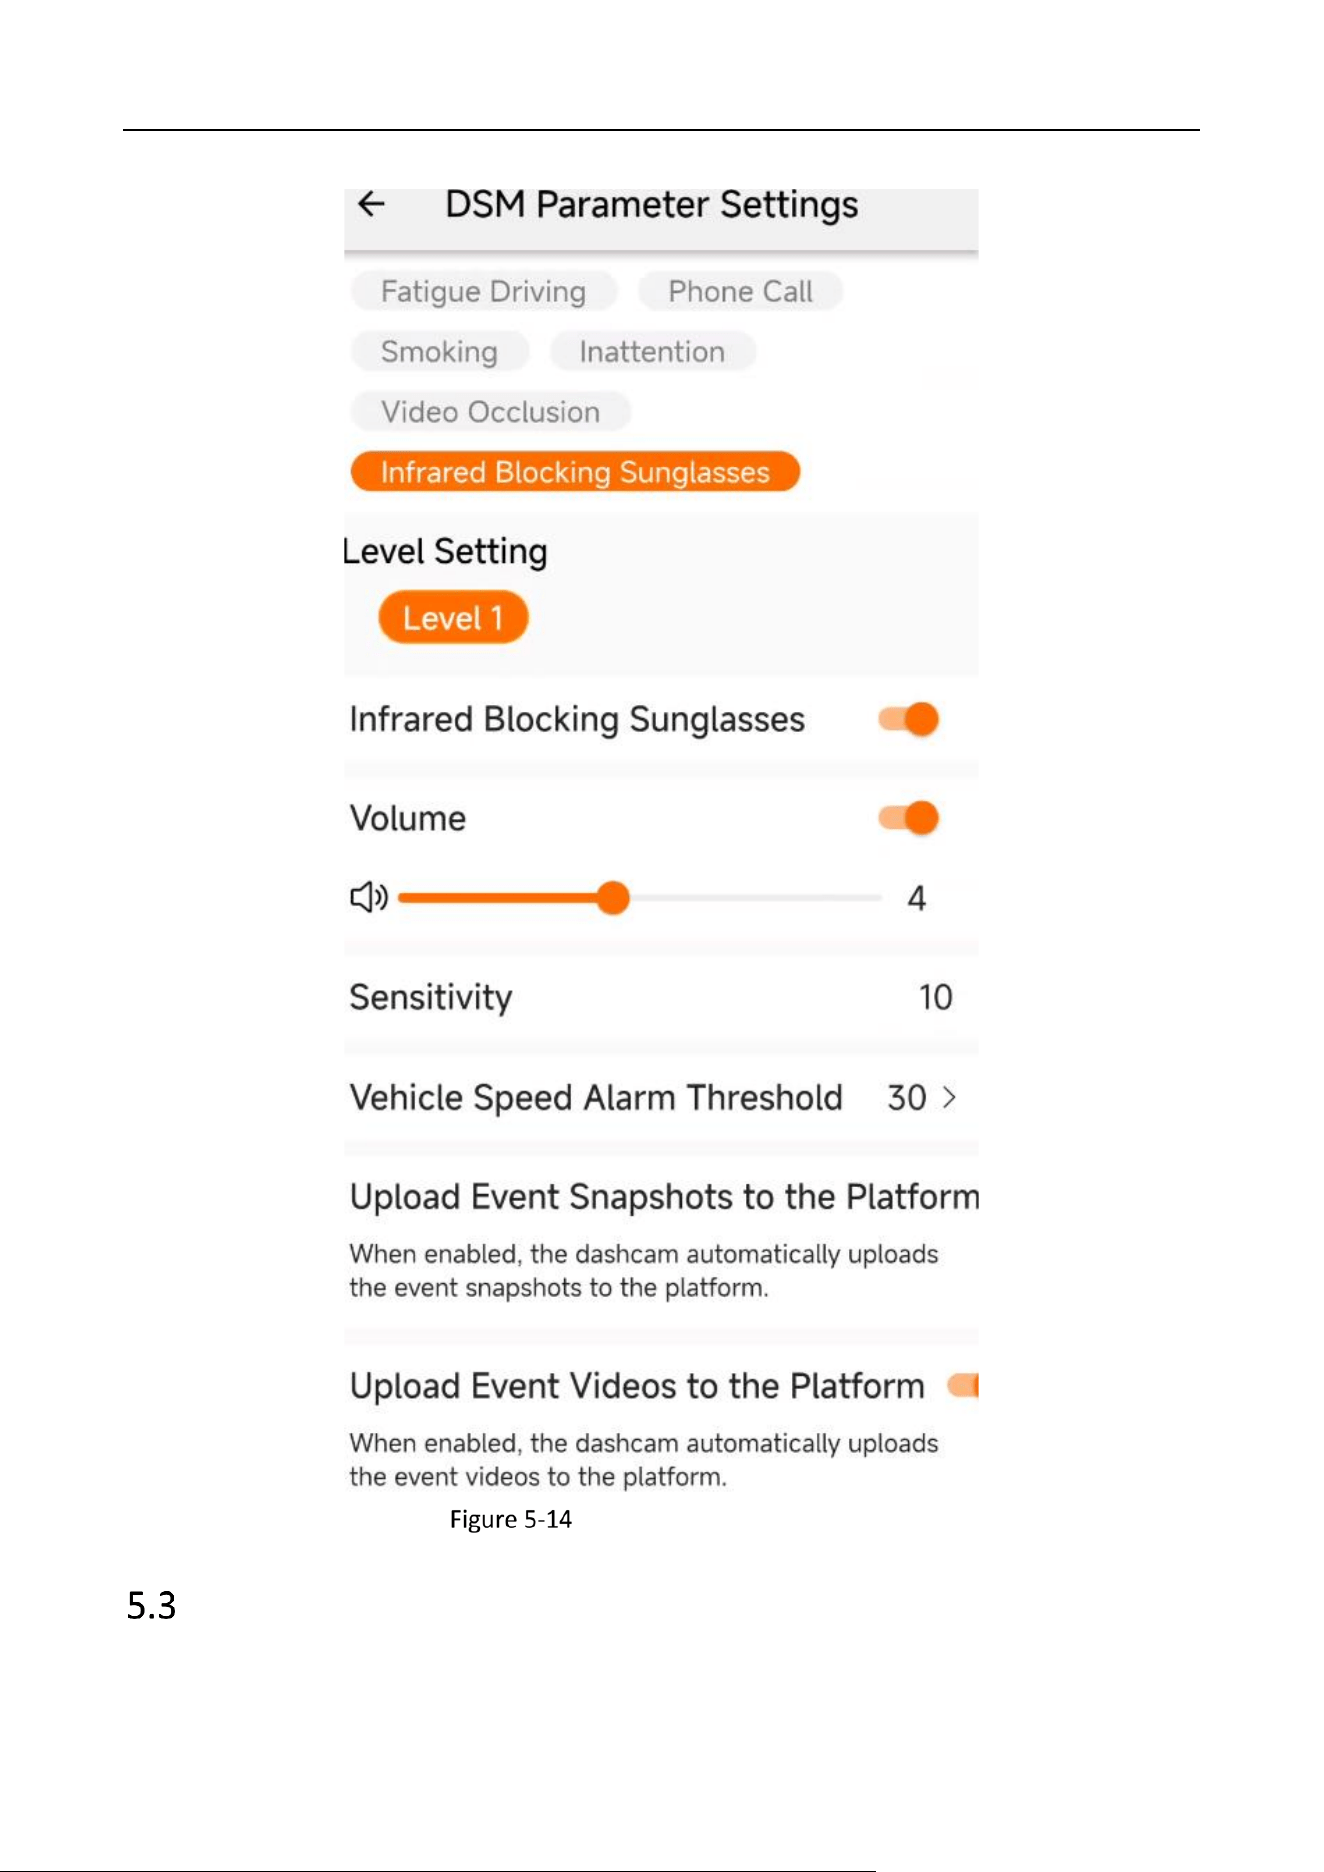
DSM Settings
You can set DSM alarms to remind dangerous driving behaviors and improve driving safety.
Industry Dashcam • User Manual
24
Go to Config → DSM Settings and enable DSM alarms
Enable DSM alarm
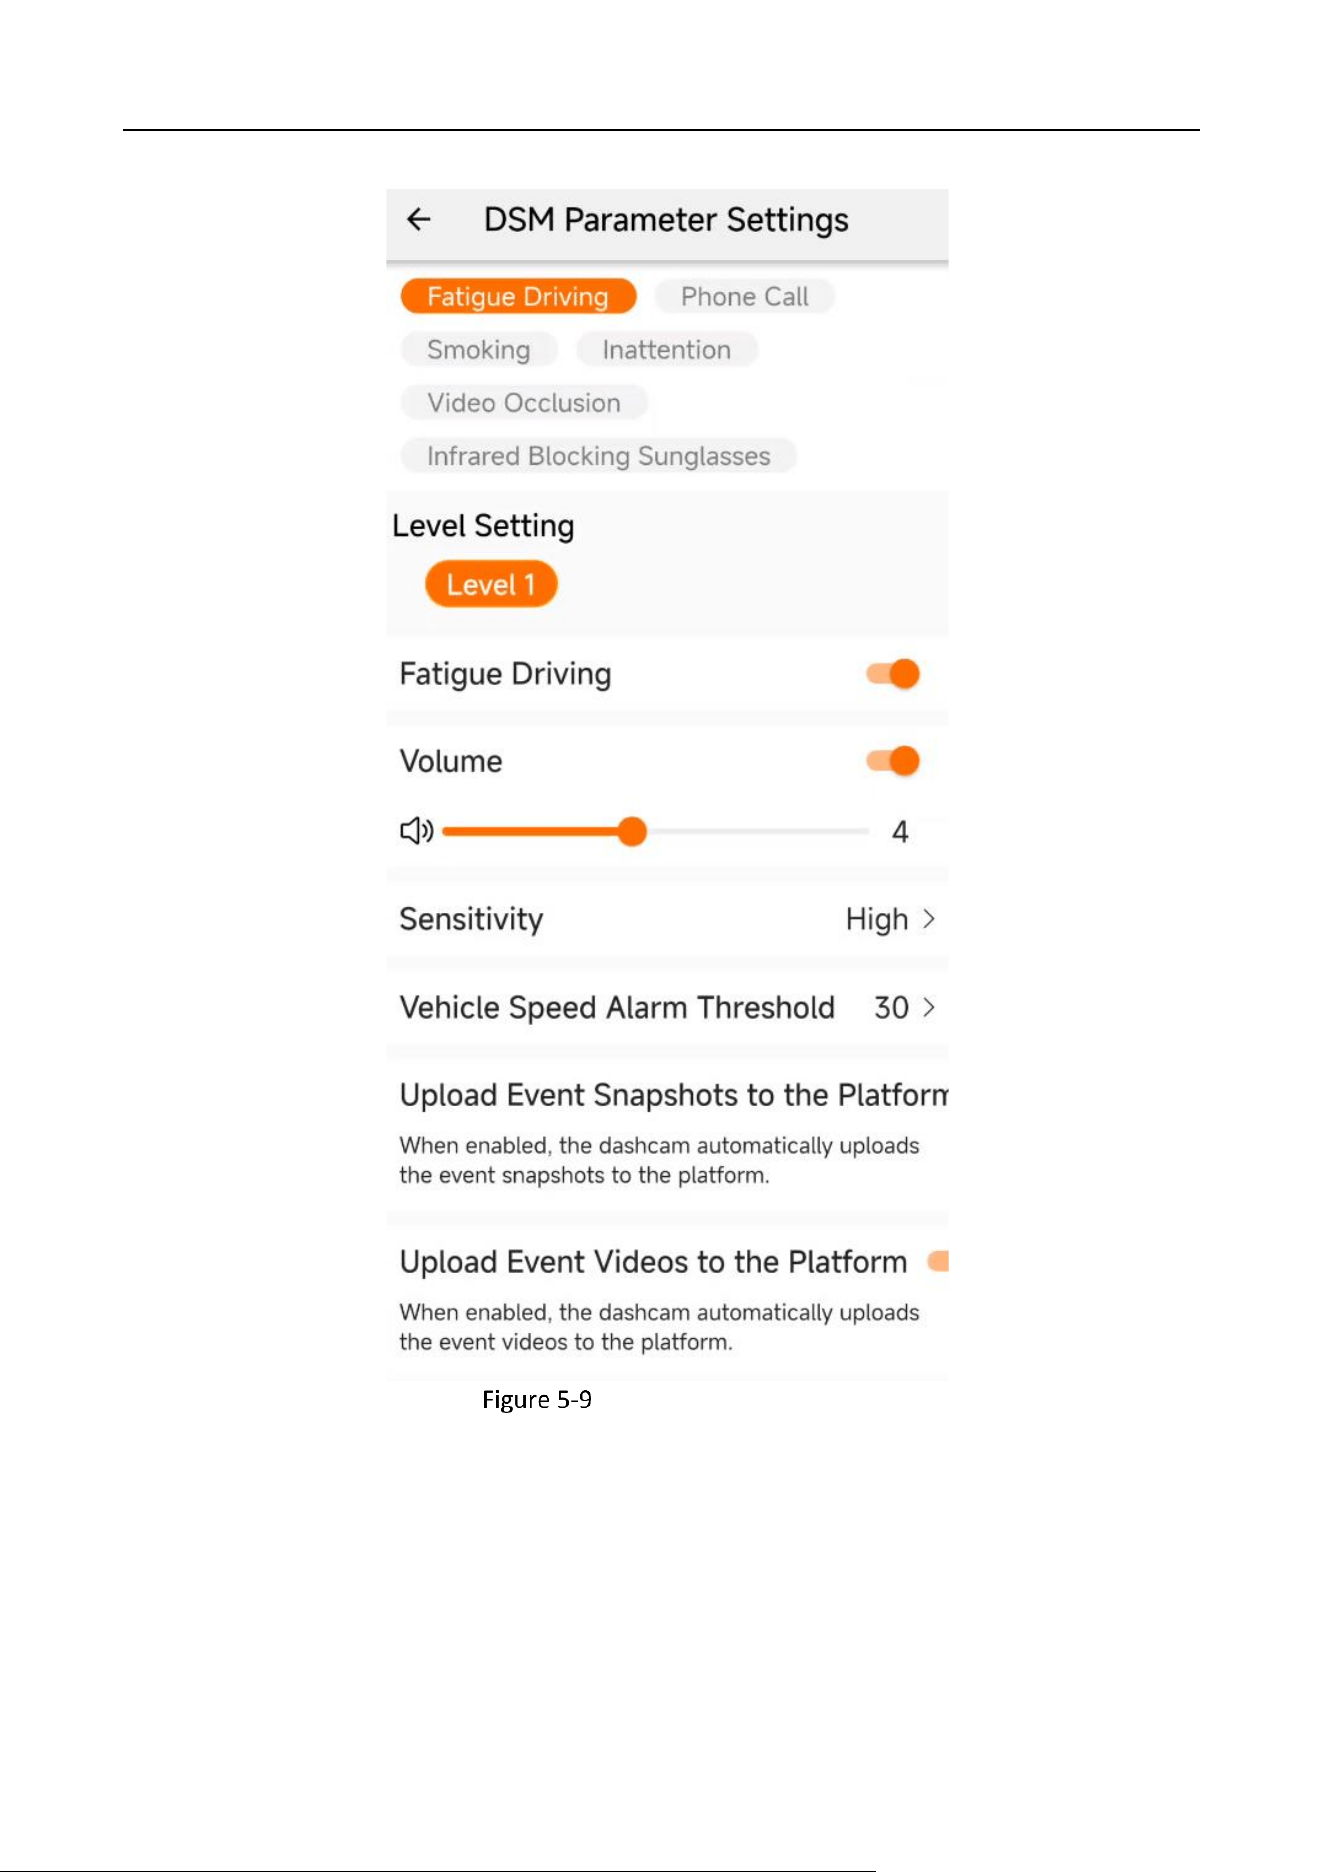
Go to “DSM Parameter Settings” and set the relevant alarm items. For example, for the
“fatigue driving” alarm, you can choose to turn on the alarm, turn on the beep tone and set
its volume, set the sensitivity and speed alarm thresholds, set the capture and upload video
to the platform, and other options. If you enable the “Upload Video to Platform”, the video of
3 s before and 3 s after the event will be automatically uploaded to the platform.
Industry Dashcam • User Manual
25
Fatigue Driving Settings
Industry Dashcam • User Manual
26
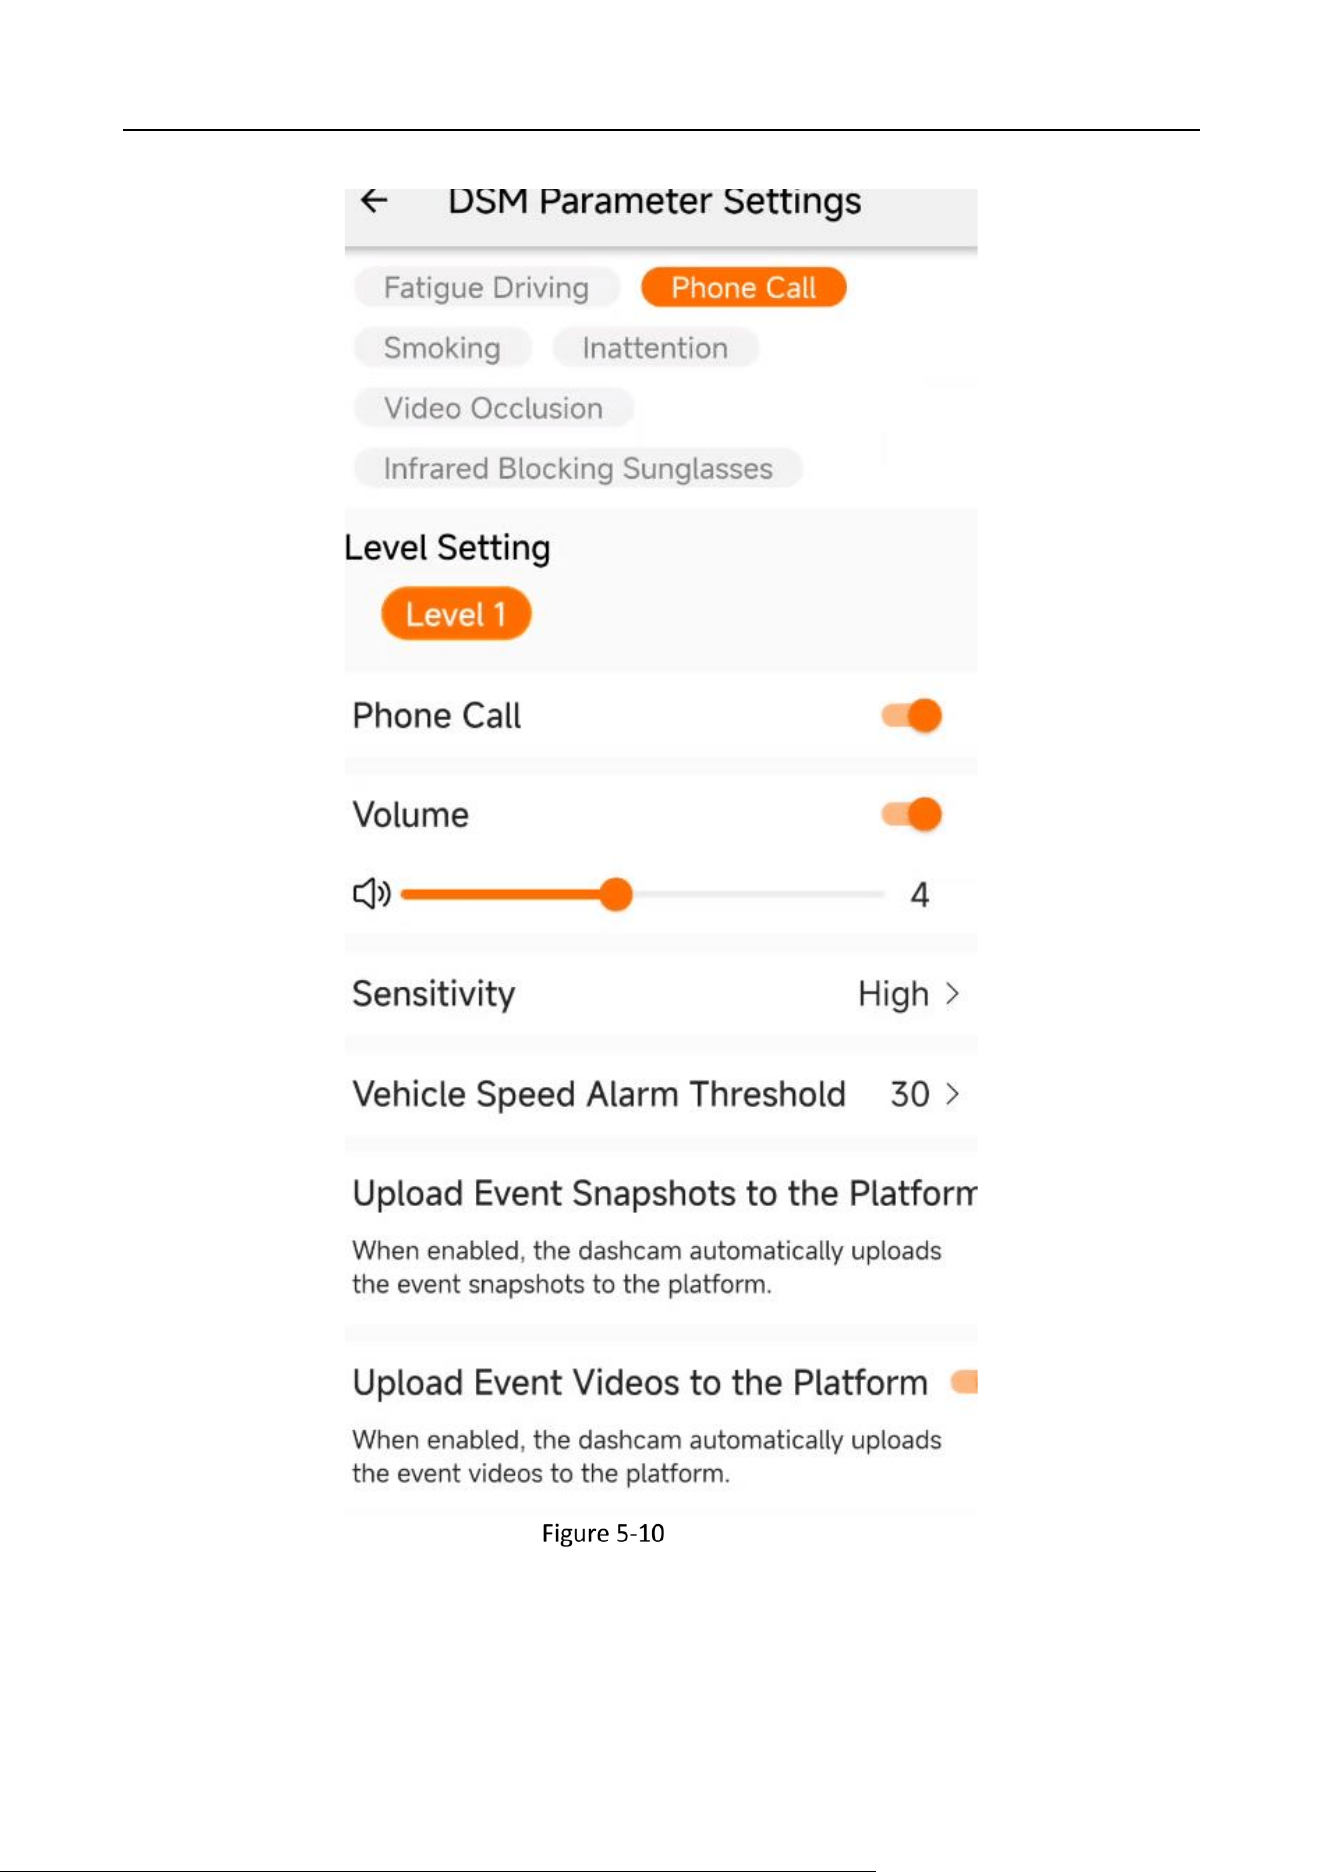
Phone Call
Industry Dashcam • User Manual
27
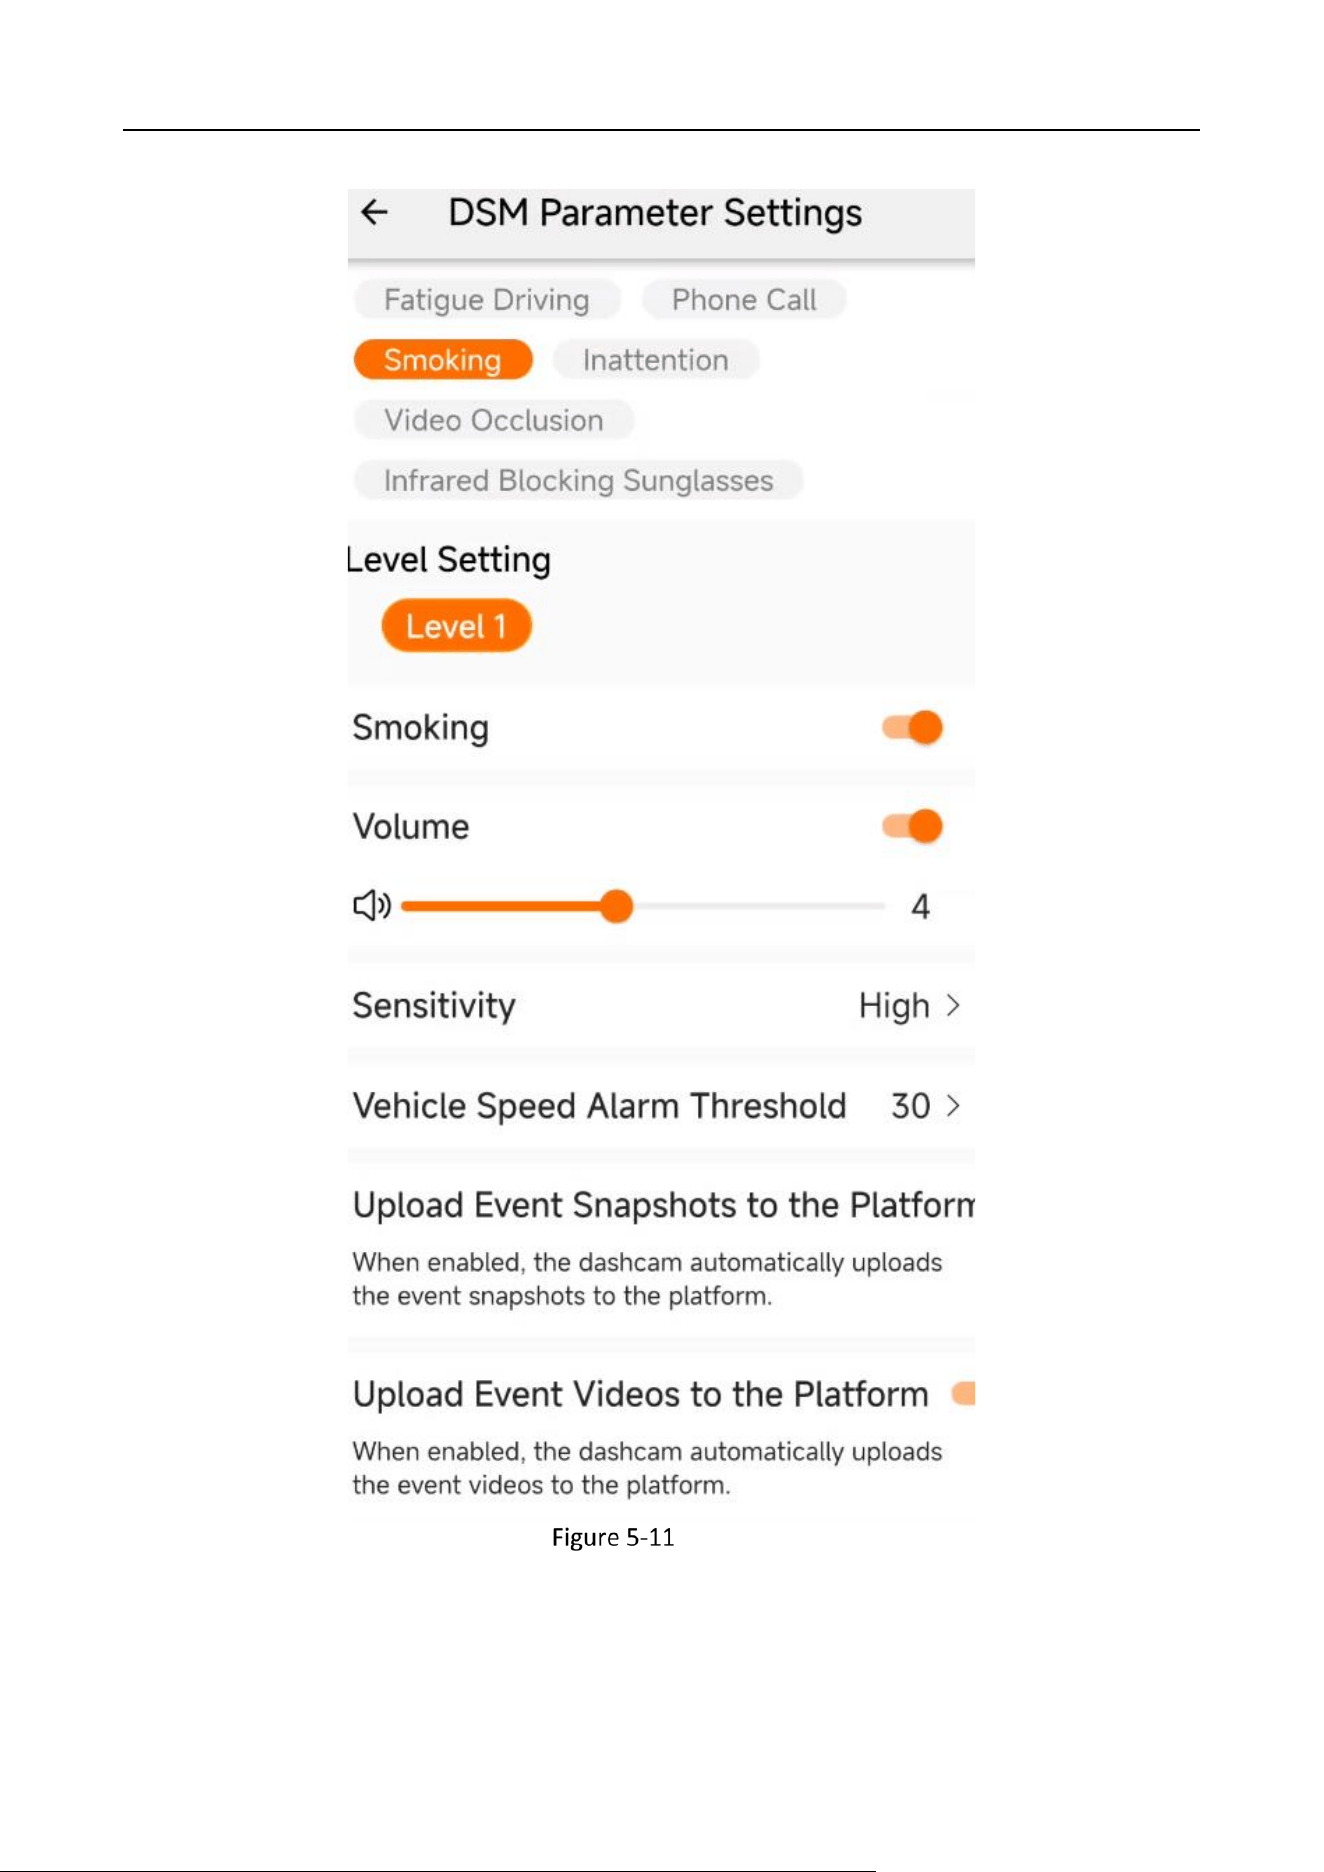
Smoking
Industry Dashcam • User Manual
28
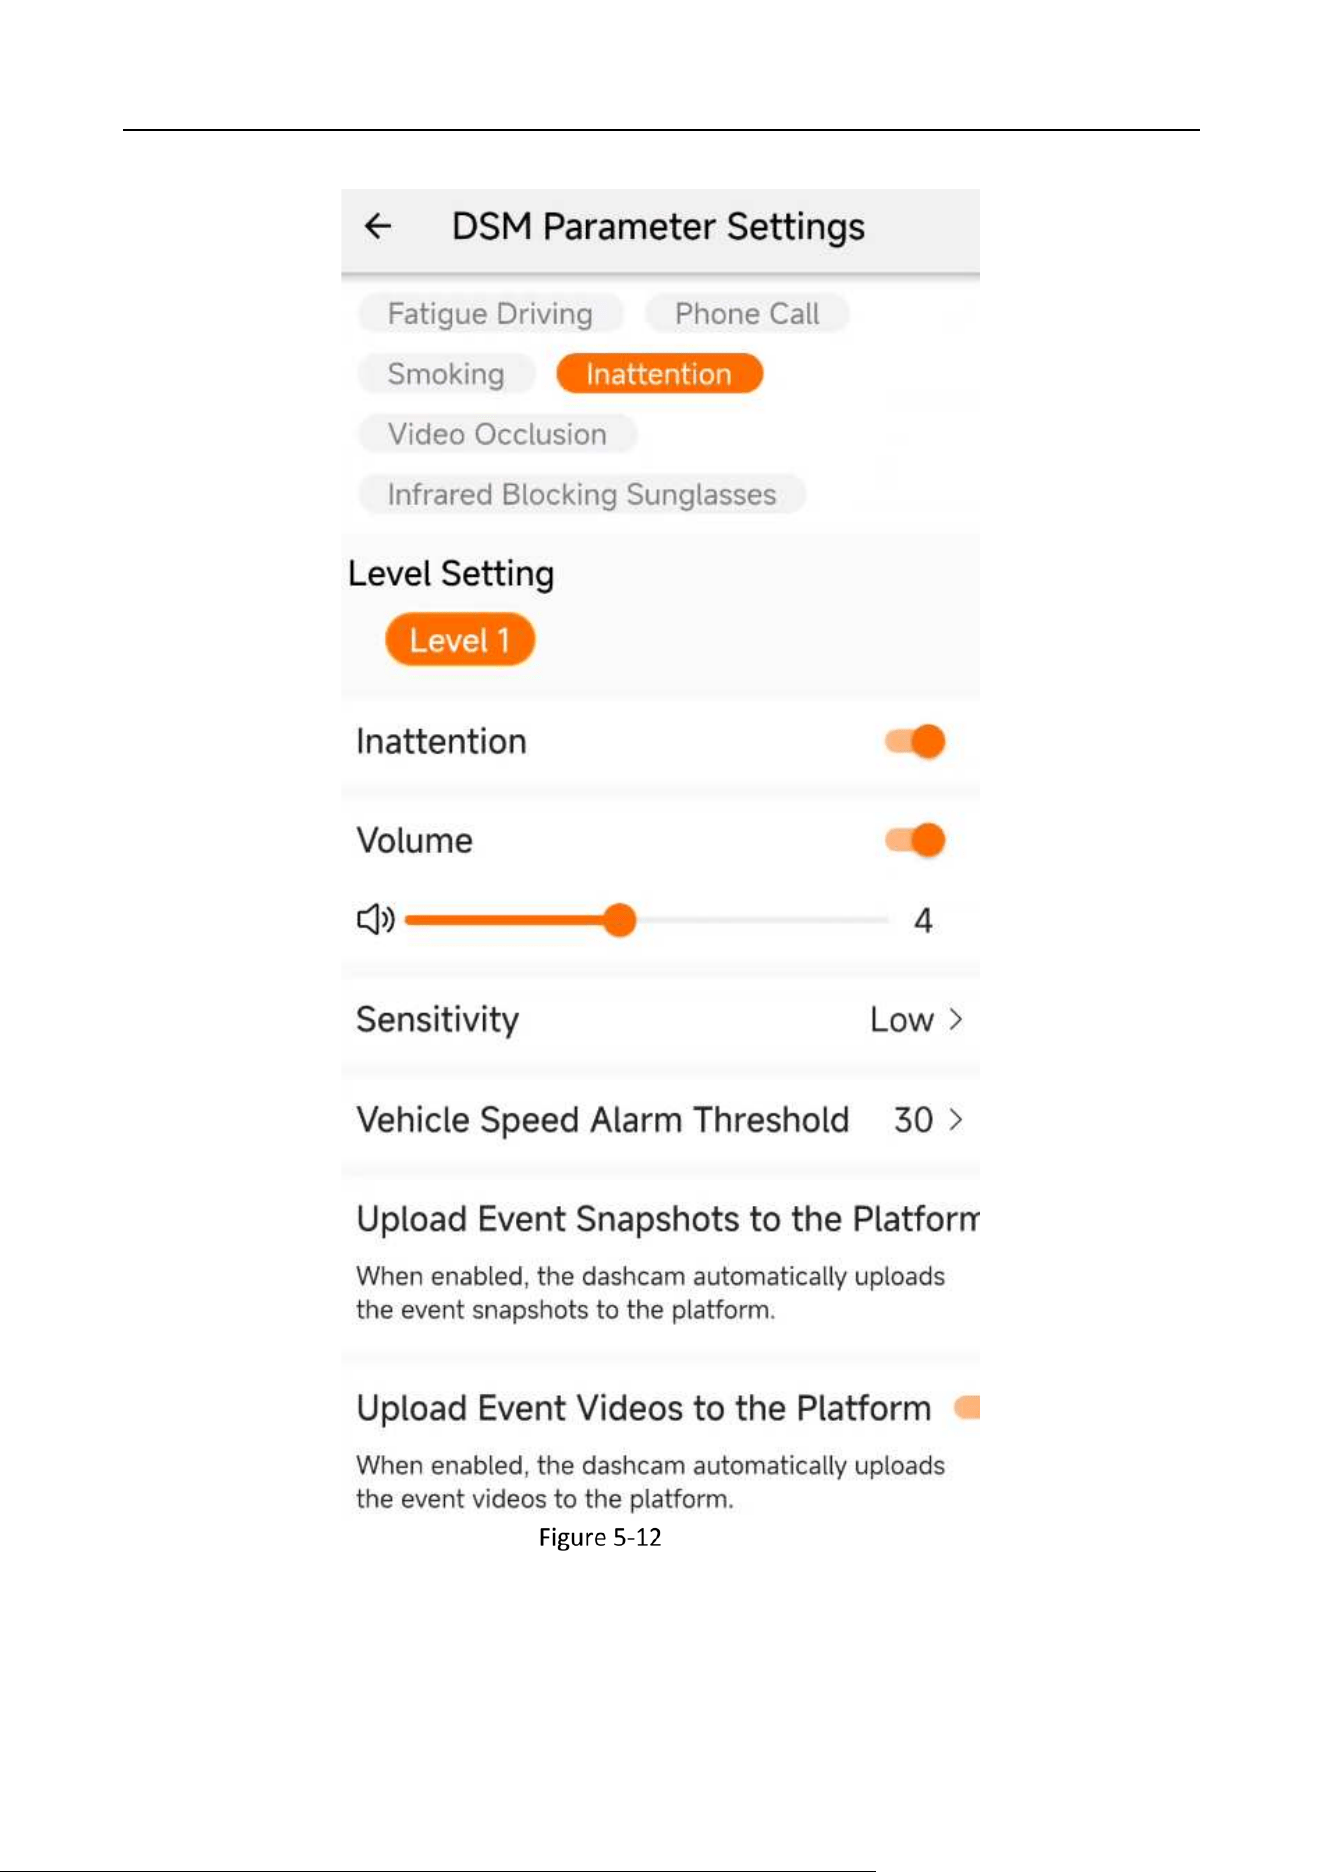
Inattention
Industry Dashcam • User Manual
29
Video Occlusion Settings
Industry Dashcam • User Manual
30
Infrared Blocking Sunglasses
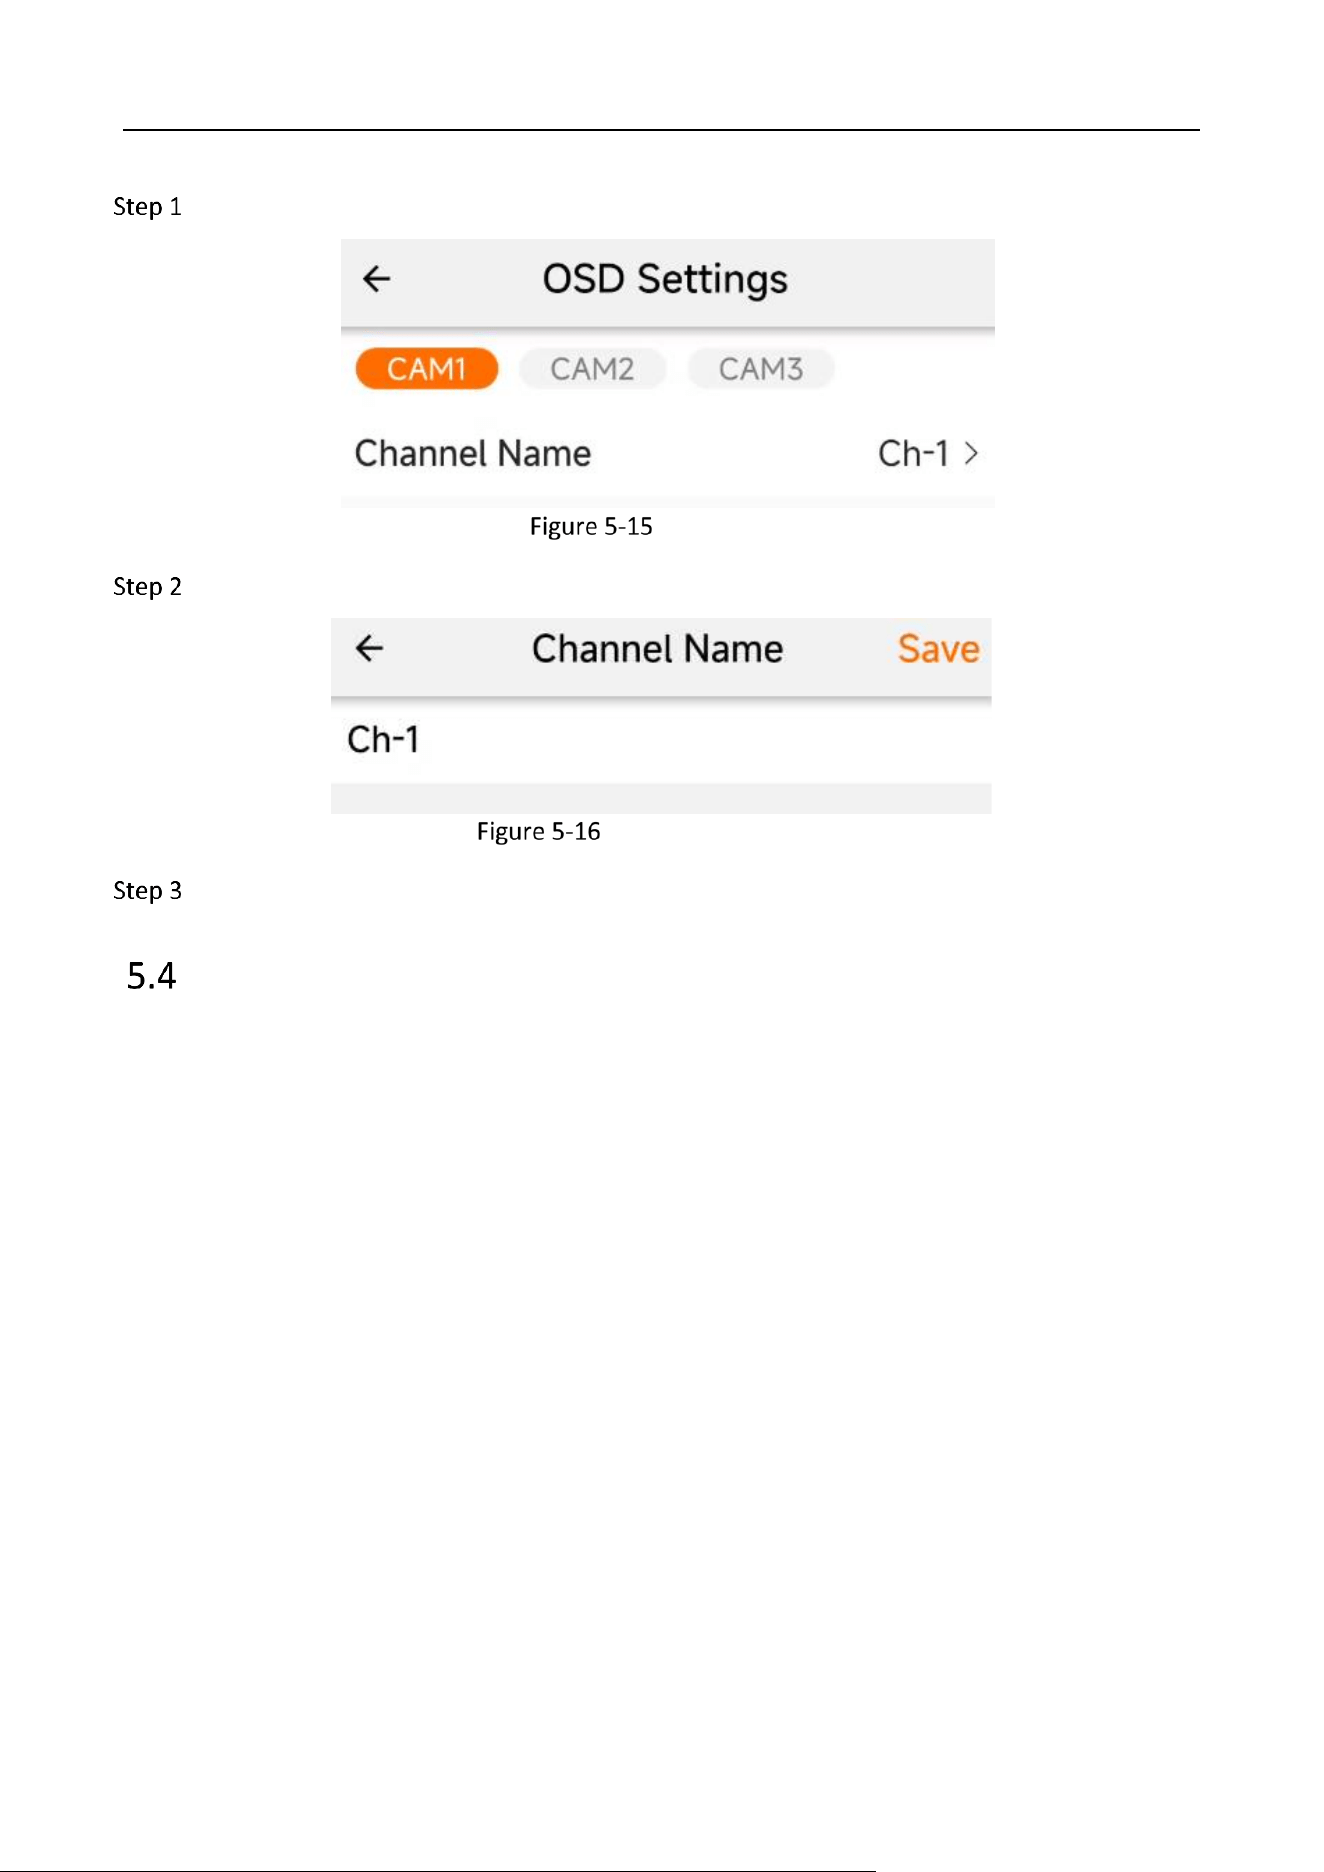
OSD Settings
You can configure the channel name displayed on the preview screen in OSD Settings.
Industry Dashcam • User Manual
31
Enter OSD Settings and select the camera to be configured.
OSD Settings
Tap the channel name to enter the setting interface.
Modify OSD characters
Tap “Save” to make changes take effect.
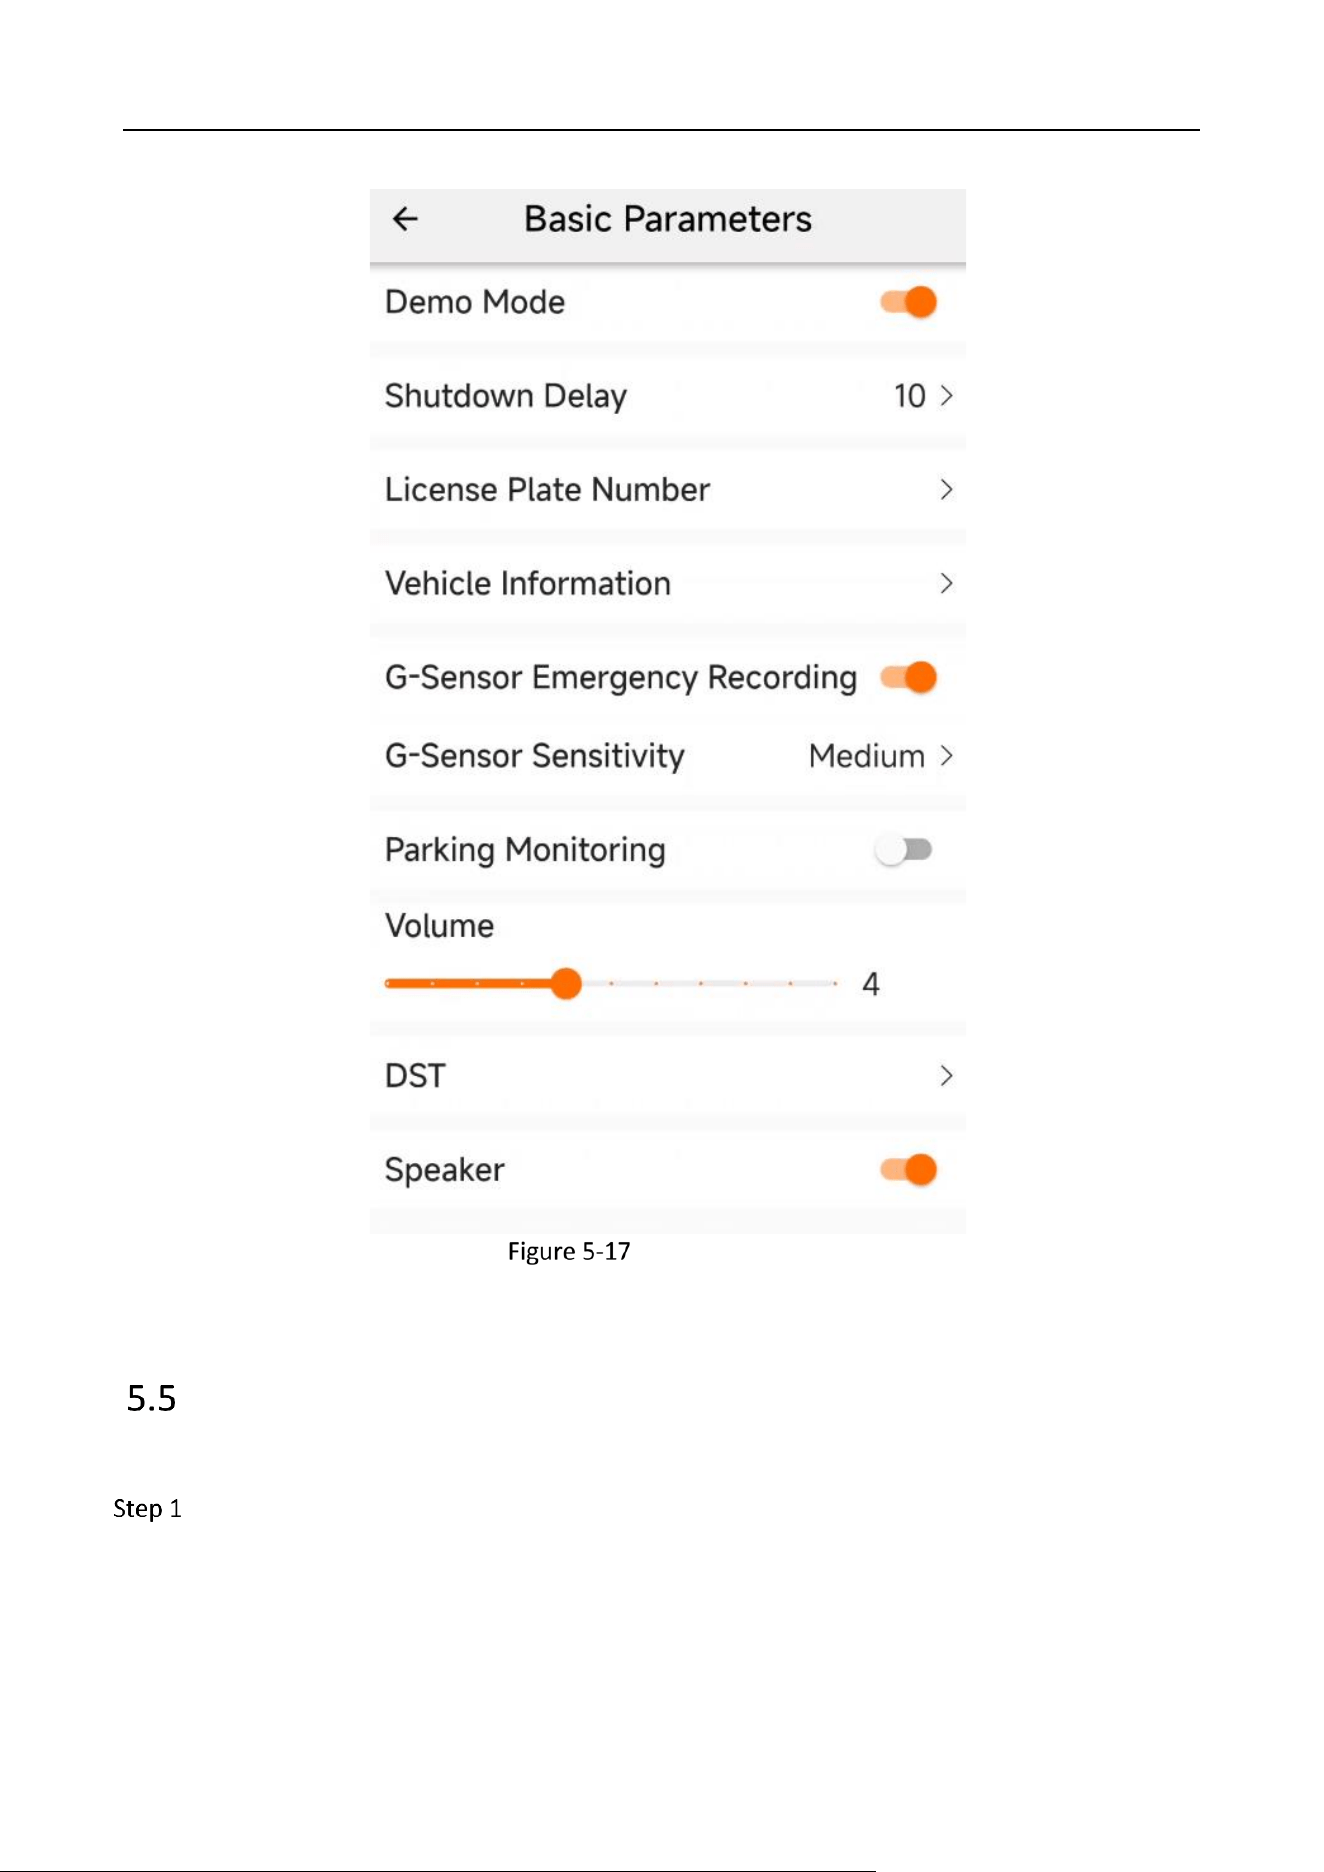
Basic Parameters
In “Basic Parameters,” you can set items such as delayed shutdown, license plate number, vehicle
information, G-sensor emergency recording, collision detection sensitivity, speaker switch and
volume. Demo mode is for testing the alarm algorithm in a non-driving (motionless) environment.
Industry Dashcam • User Manual
32
Basic Parameters
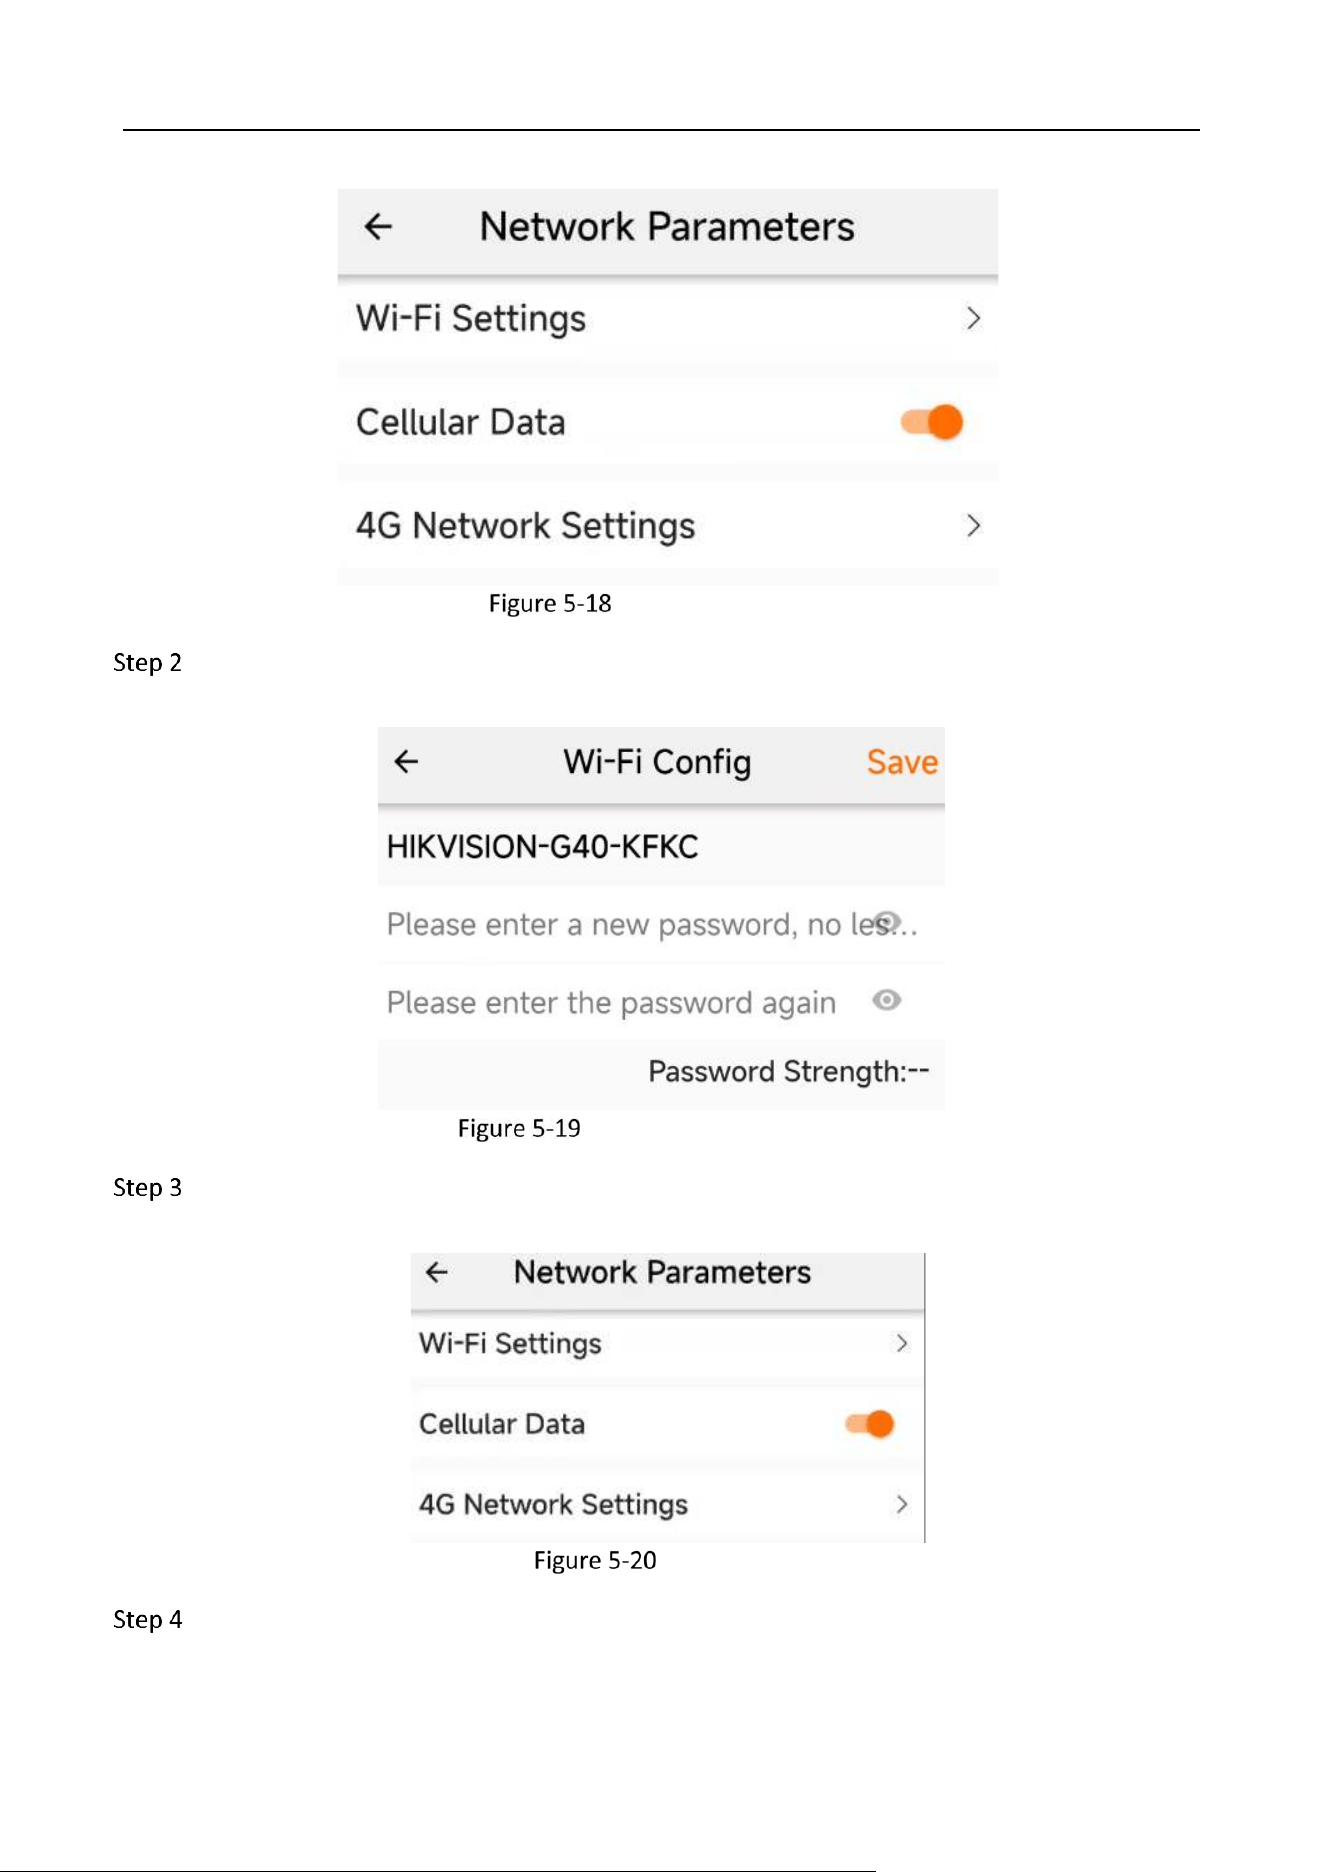
Network Parameters
You can set the data connection and Wi-Fi password in the Network Parameters.
Go to Config → Network Parameters.
Industry Dashcam • User Manual
33
Network Parameters
Go to Wi-Fi Config and reset the password, as shown in the following figure. The password
should be more than 8 digits and contain digits, letters and symbols.
Setting the Wi-Fi Password
Turn on Cellular Data on the Network Parameters interface and use install a SIM card to use
data connection.
Mobile data
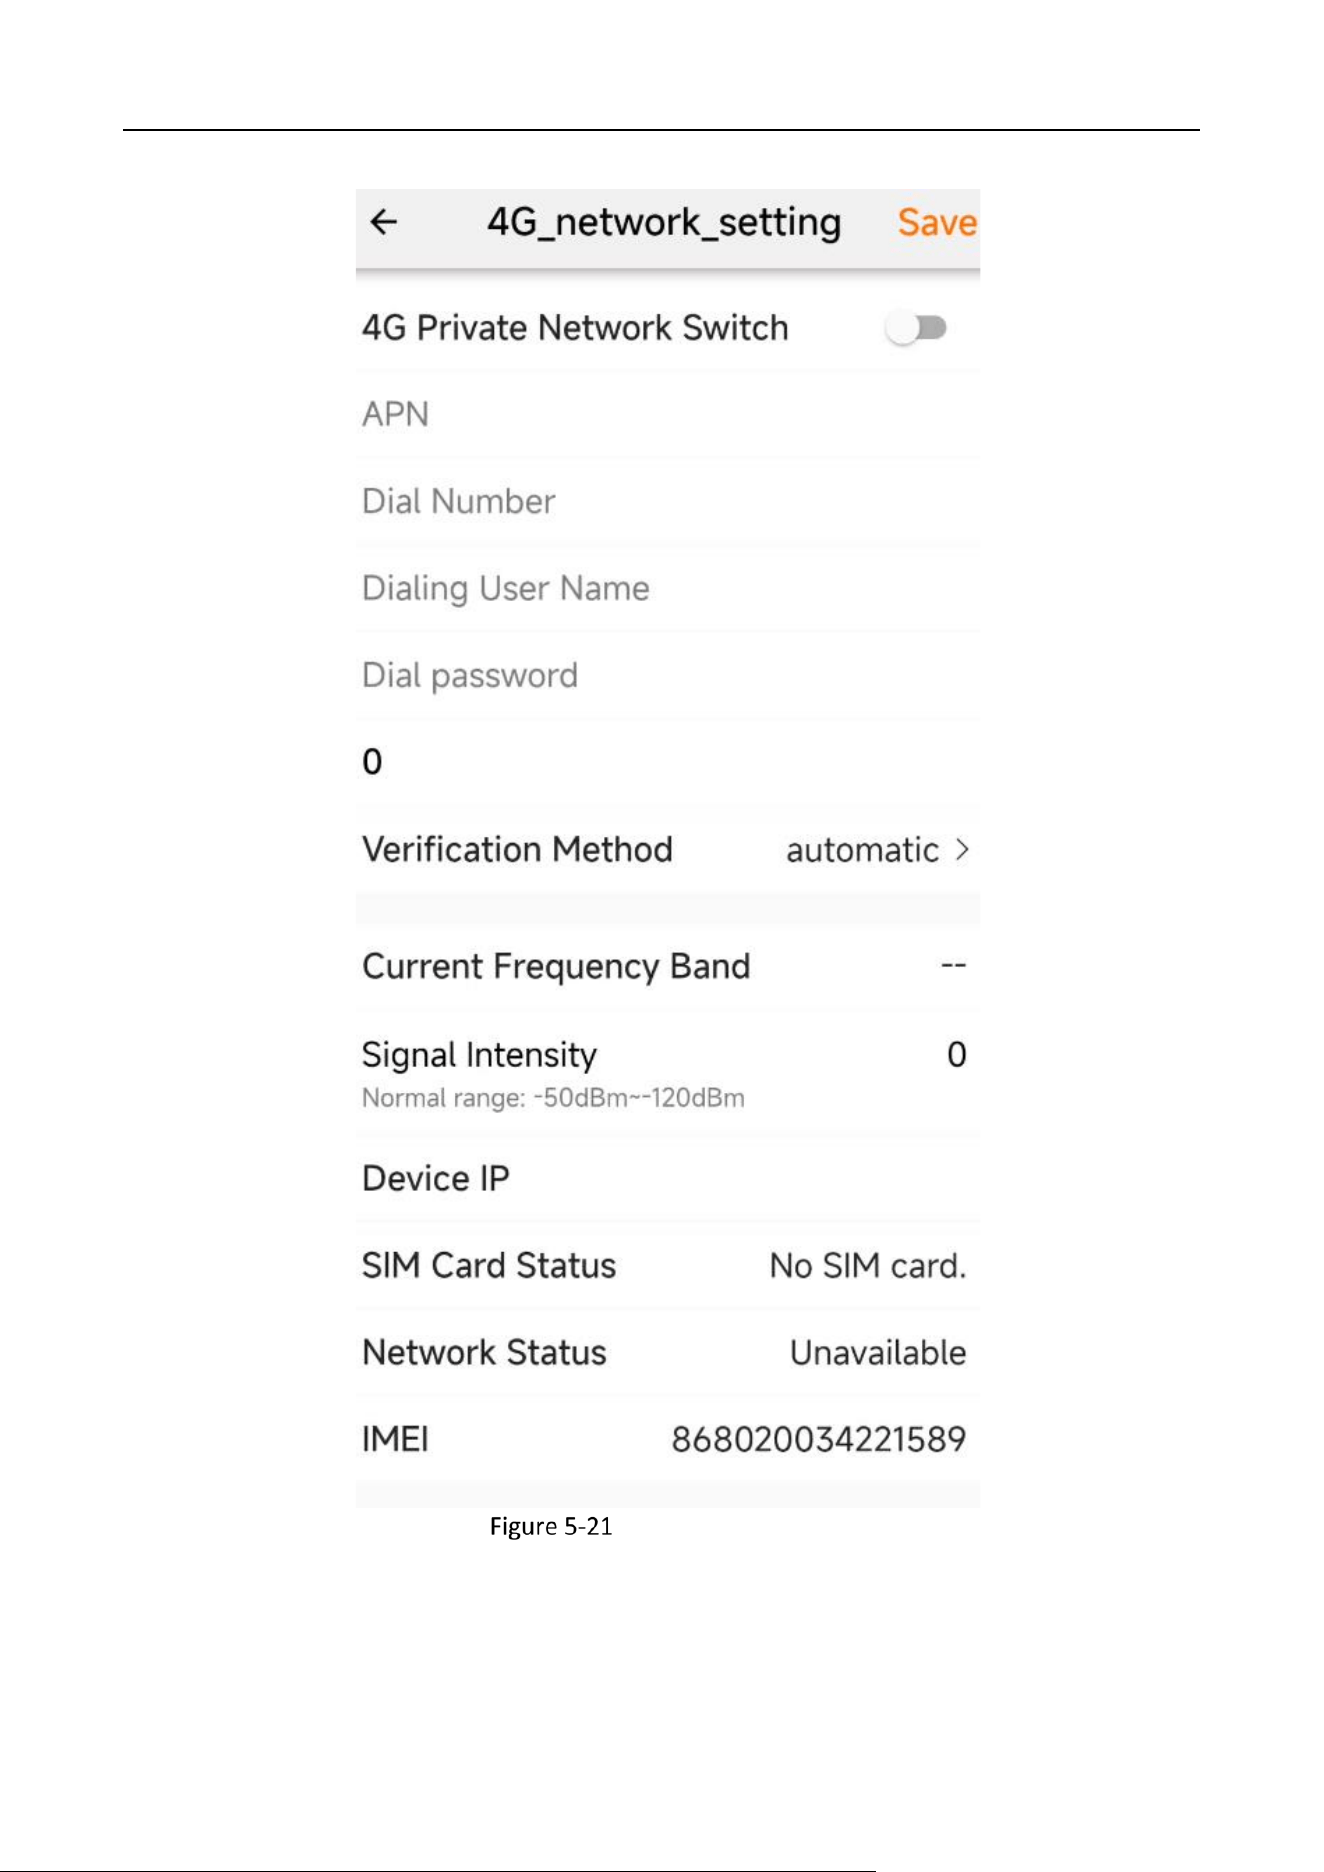
Go to “4G Network Settings” to set data connection parameters and view SIM card and signal
status: whether the SIM card is inserted, whether the network is normal, IMEI, etc.
Industry Dashcam • User Manual
34
4G Network Settings
Industry Dashcam • User Manual
35
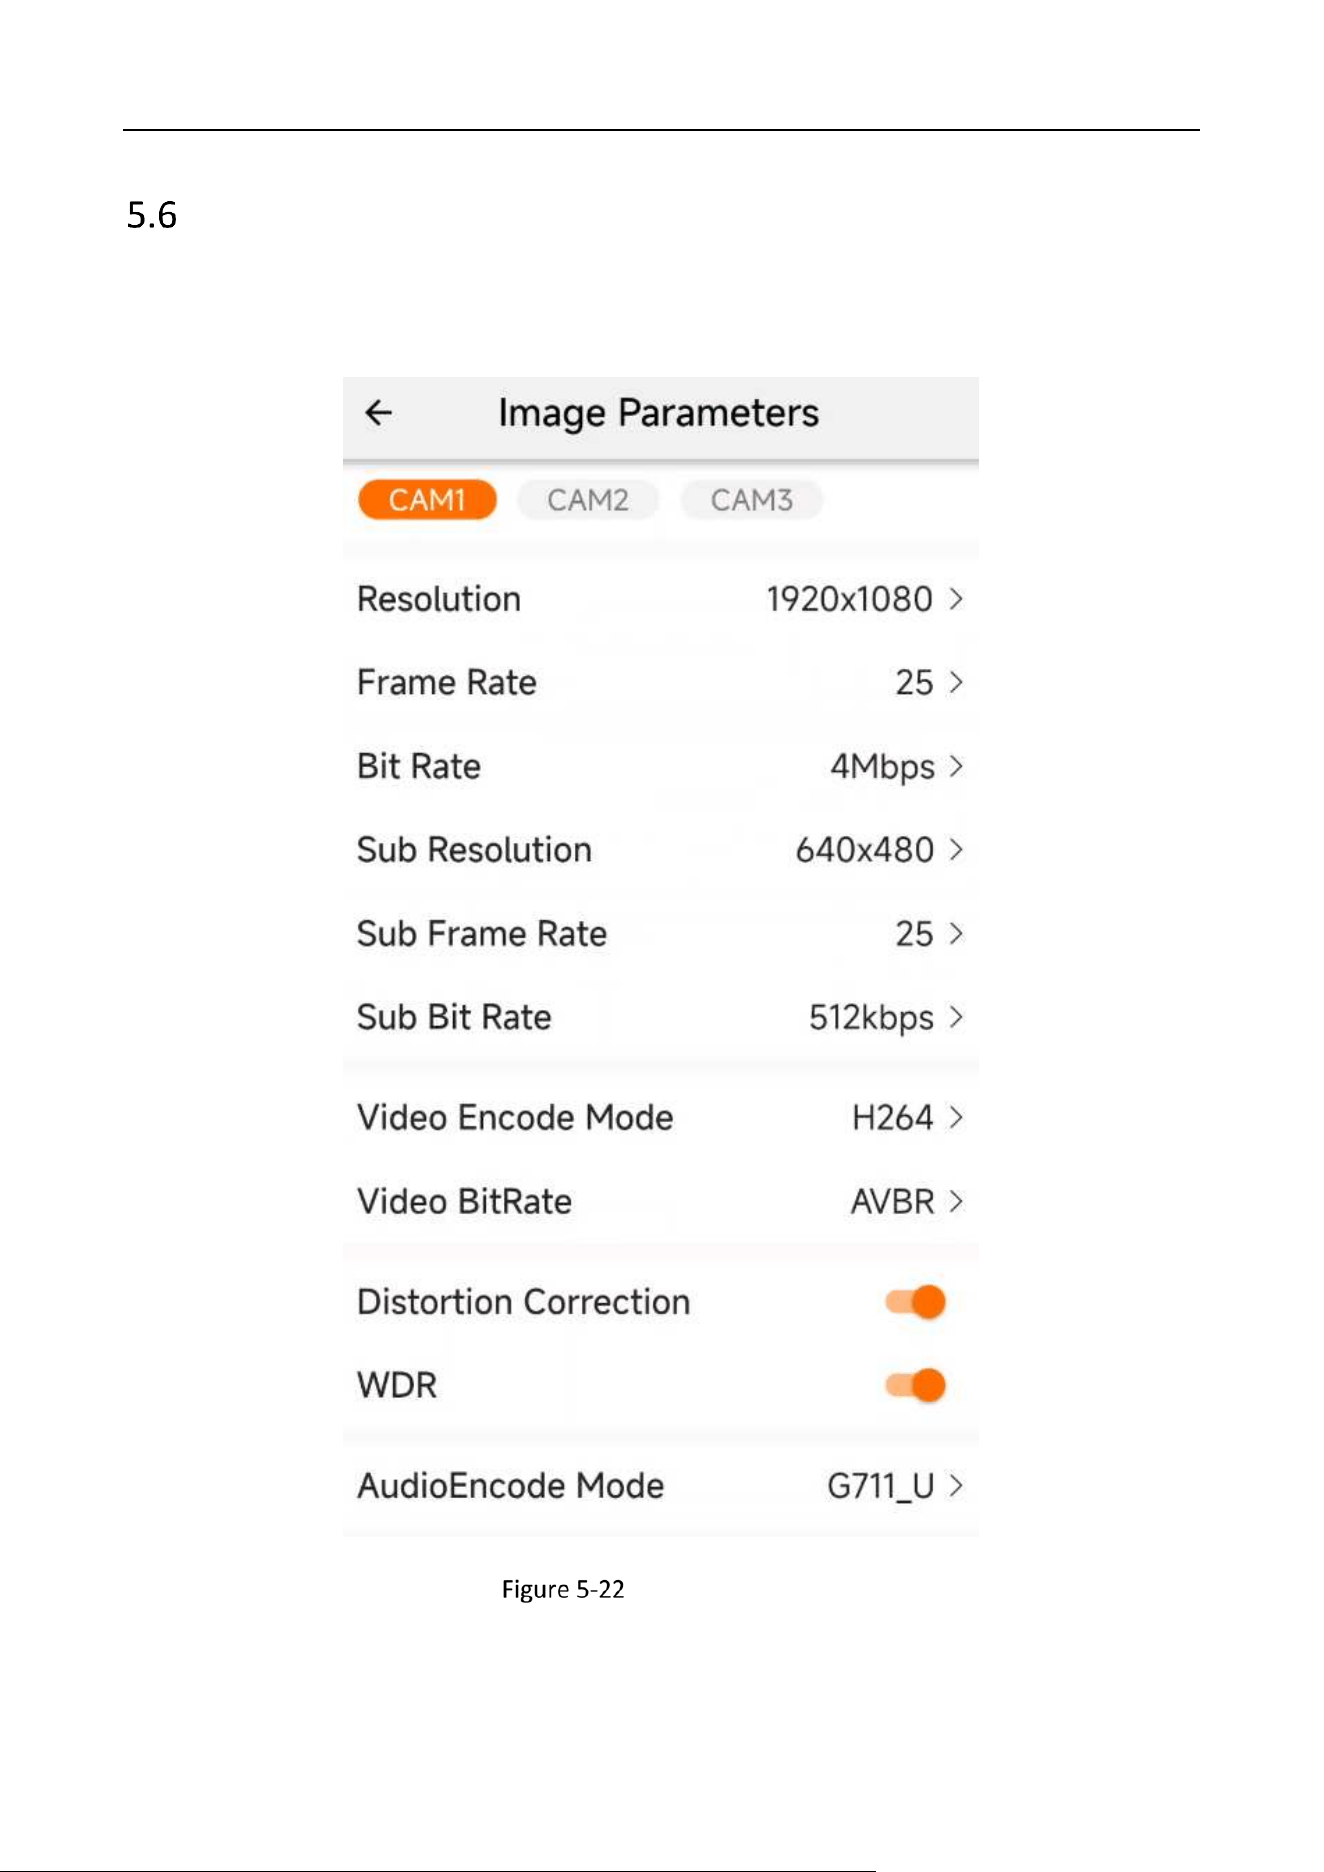
Image Parameters
You can set image resolution, bitrate, encoding format, distortion correction, and WDR items in
“Image Parameters.” Individual camera parameters can be set independently. The default
configuration is recommended.
Image Parameters
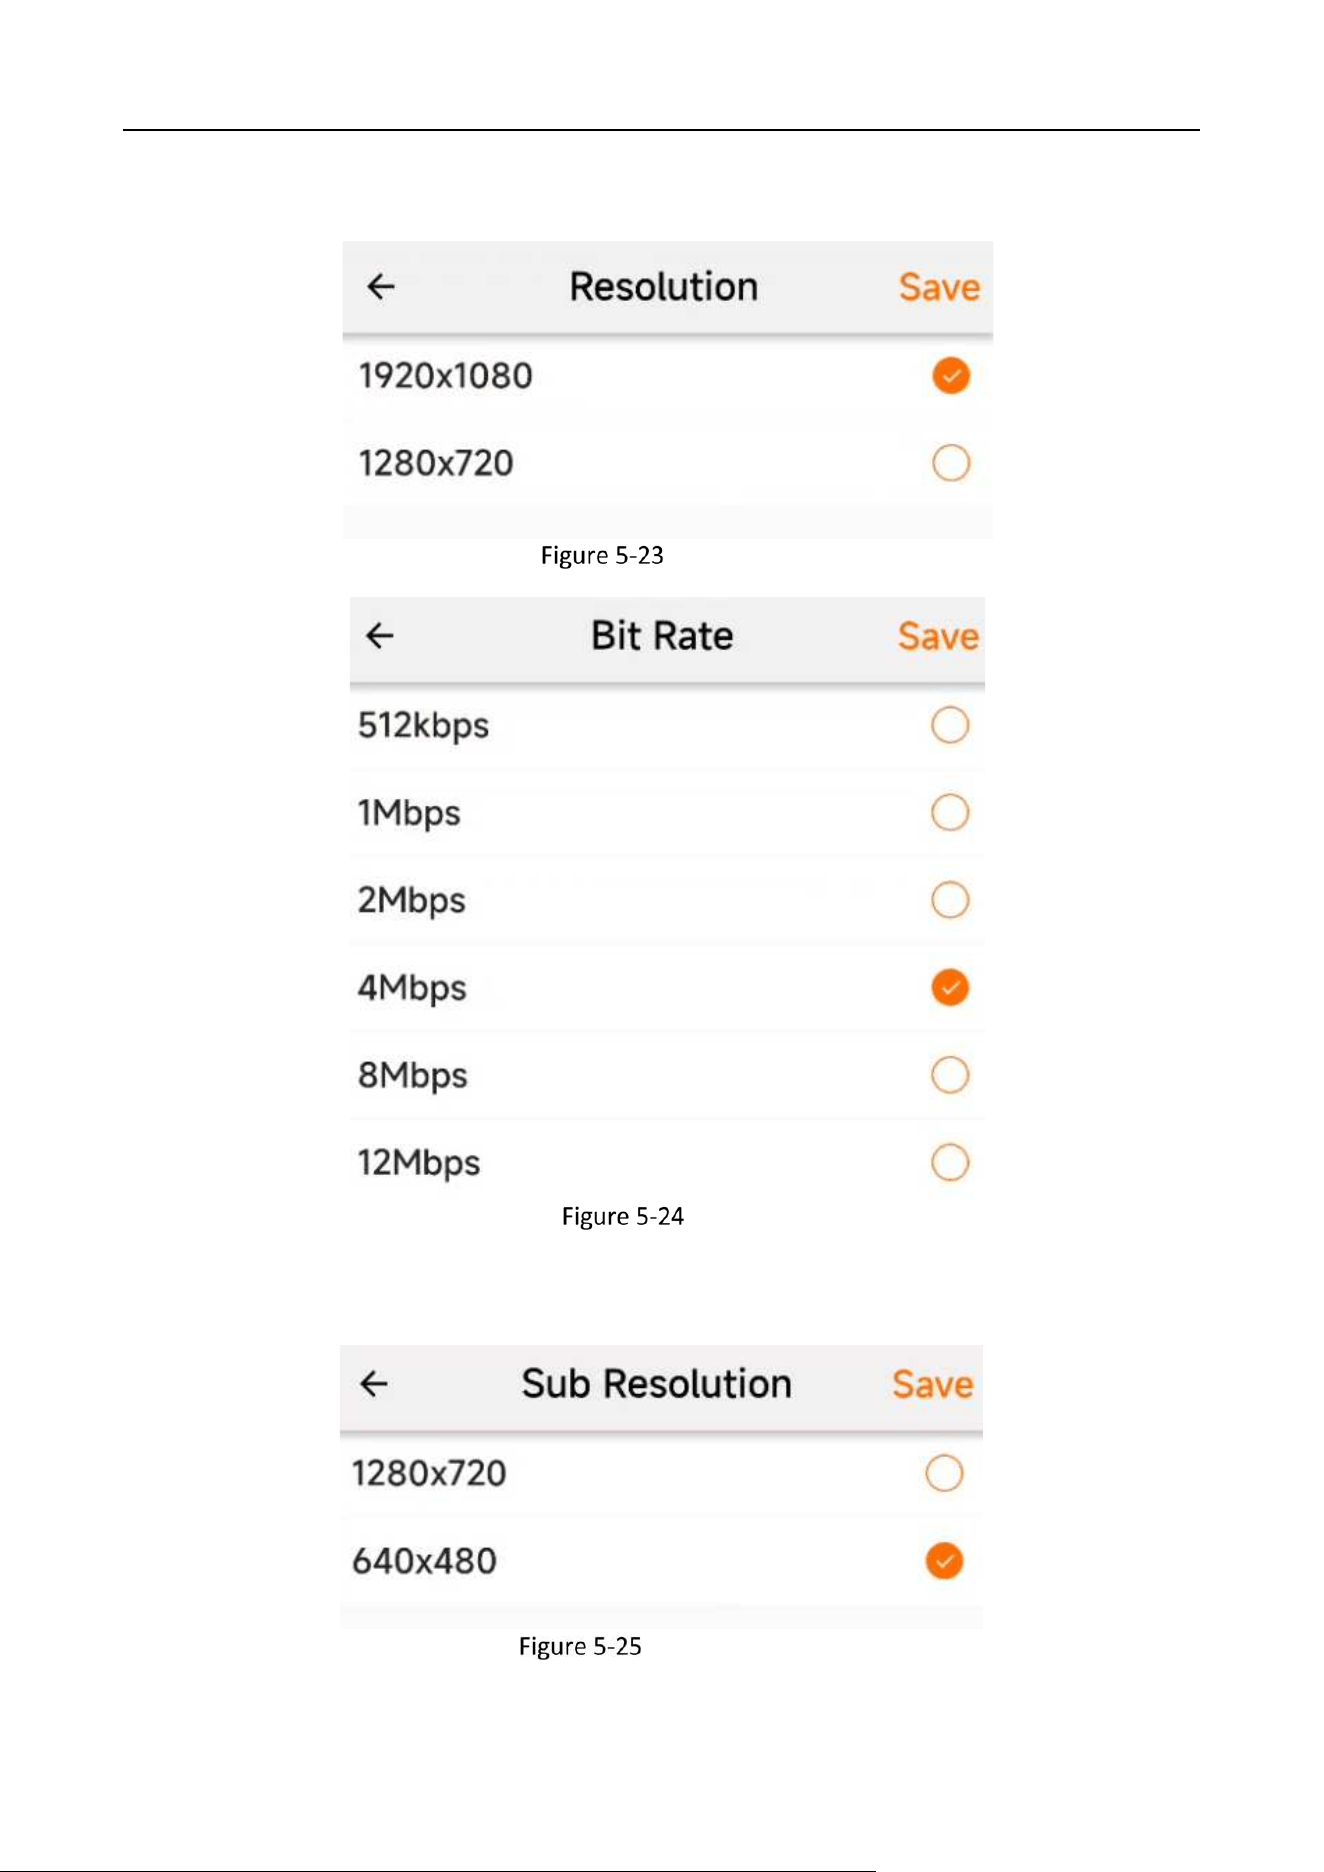
The higher the resolution or bitrate, the clearer it is, but the video file size will also get larger and
Industry Dashcam • User Manual
36
recording duration shorter.
Resolution
Bitrate
The higher the resolution and substream, the clearer the preview image, but the requirements for
network speed will also get higher.
Sub Resolution
Industry Dashcam • User Manual
37
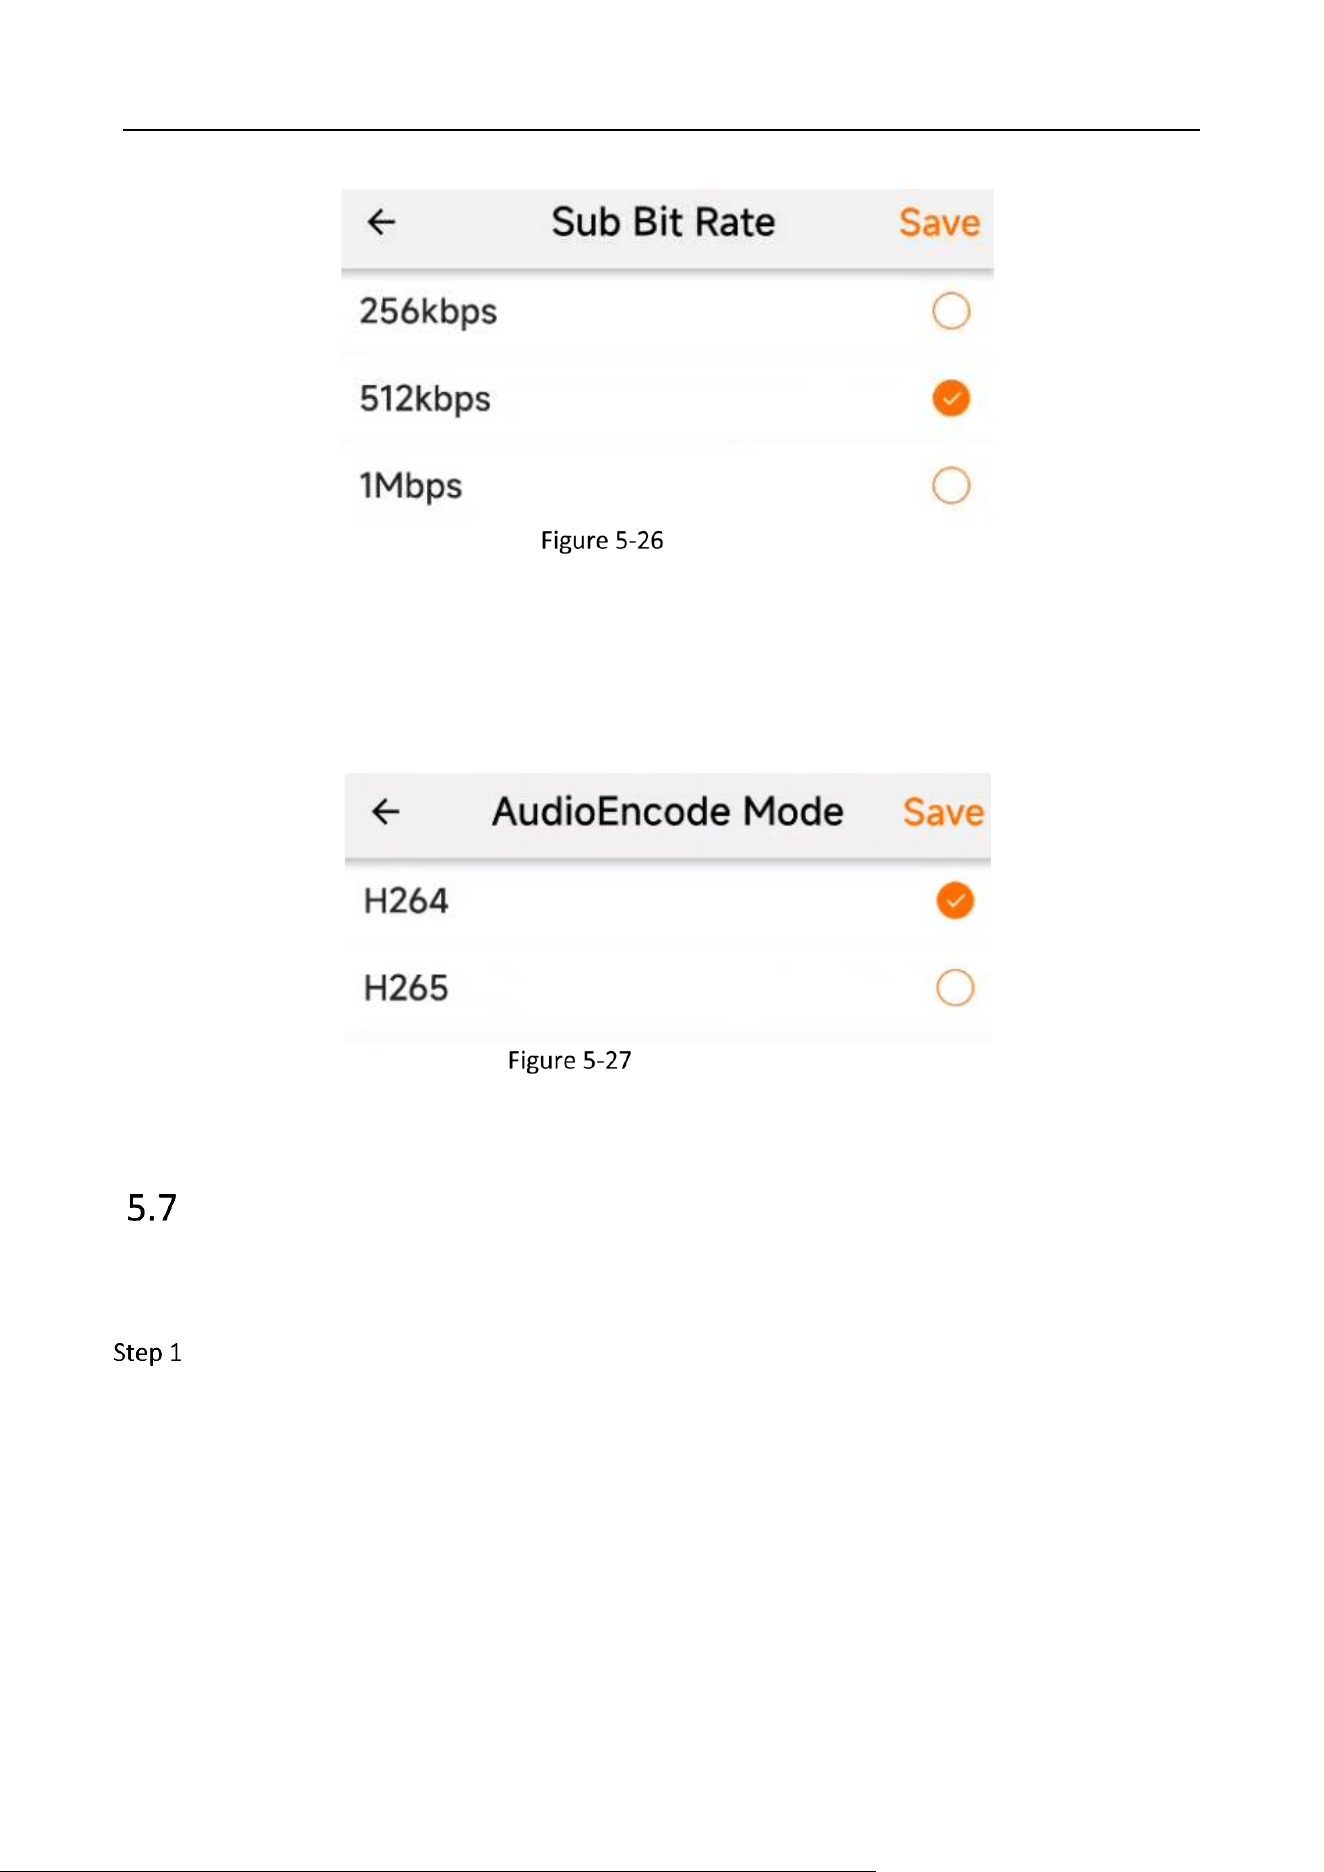
Substream
The H265 performs better than the H264 in terms of compressed storage, for H265 occupies less
space at the same quality. However, H265 encoding pressure is greater, and platform playback
compatibility is not inferior than H264, which may lead to playback failure. Therefore, it is
recommended that you select the default H264 encoding format.
Encoding Format
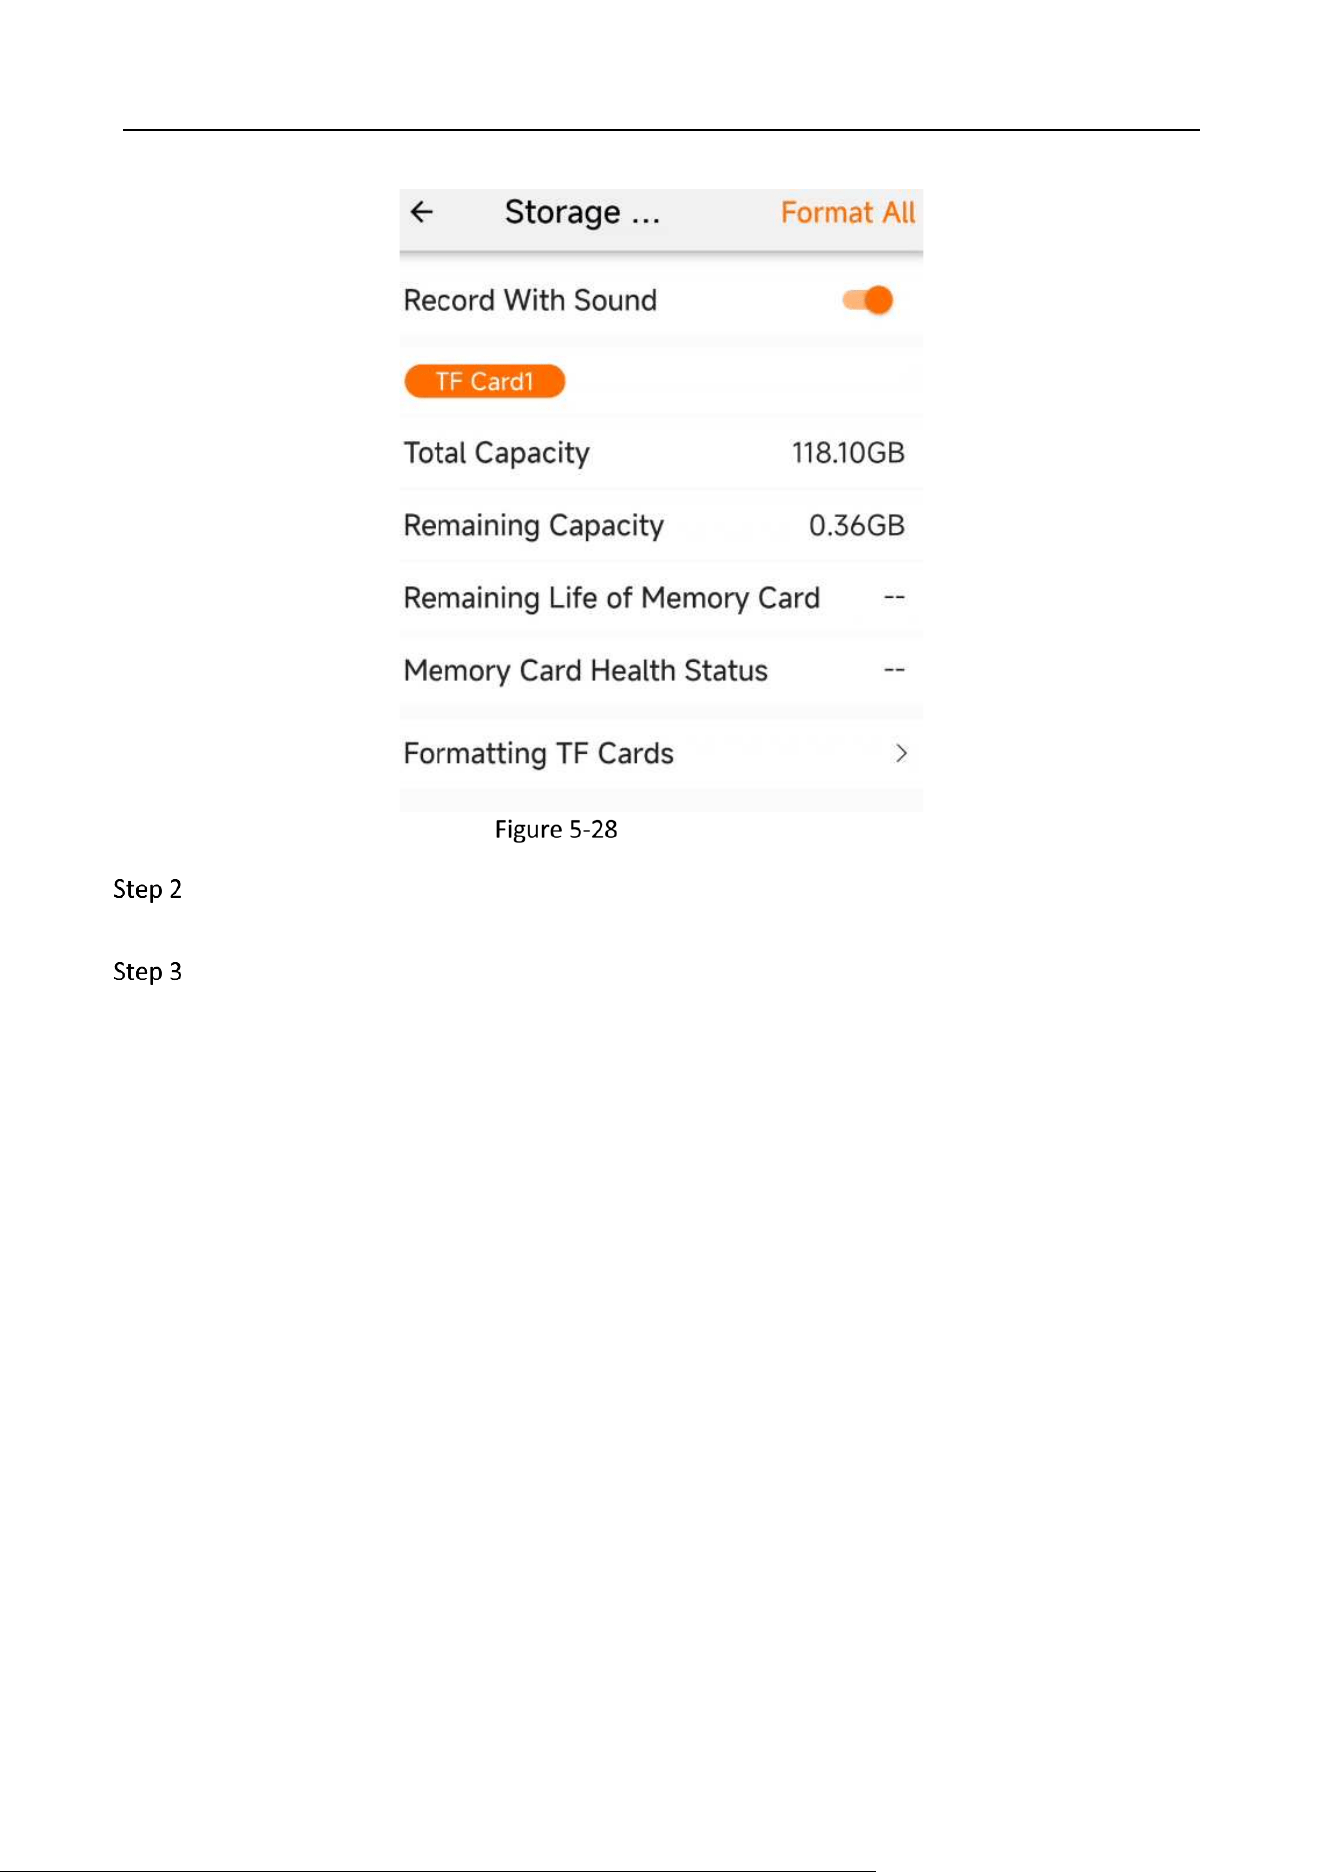
Storage parameters
The dashcam adopts loop recording, and the earlier recording will be overwritten after the TF card
storage space is exhausted. If there are important videos, please backup them in time.
Go to Config → Storage Parameters to view the storage status and set parameters.
Industry Dashcam • User Manual
38
Storage Parameters
To record sound, you can check “Record with sound.” However, this will also increase the file
size of the recording.
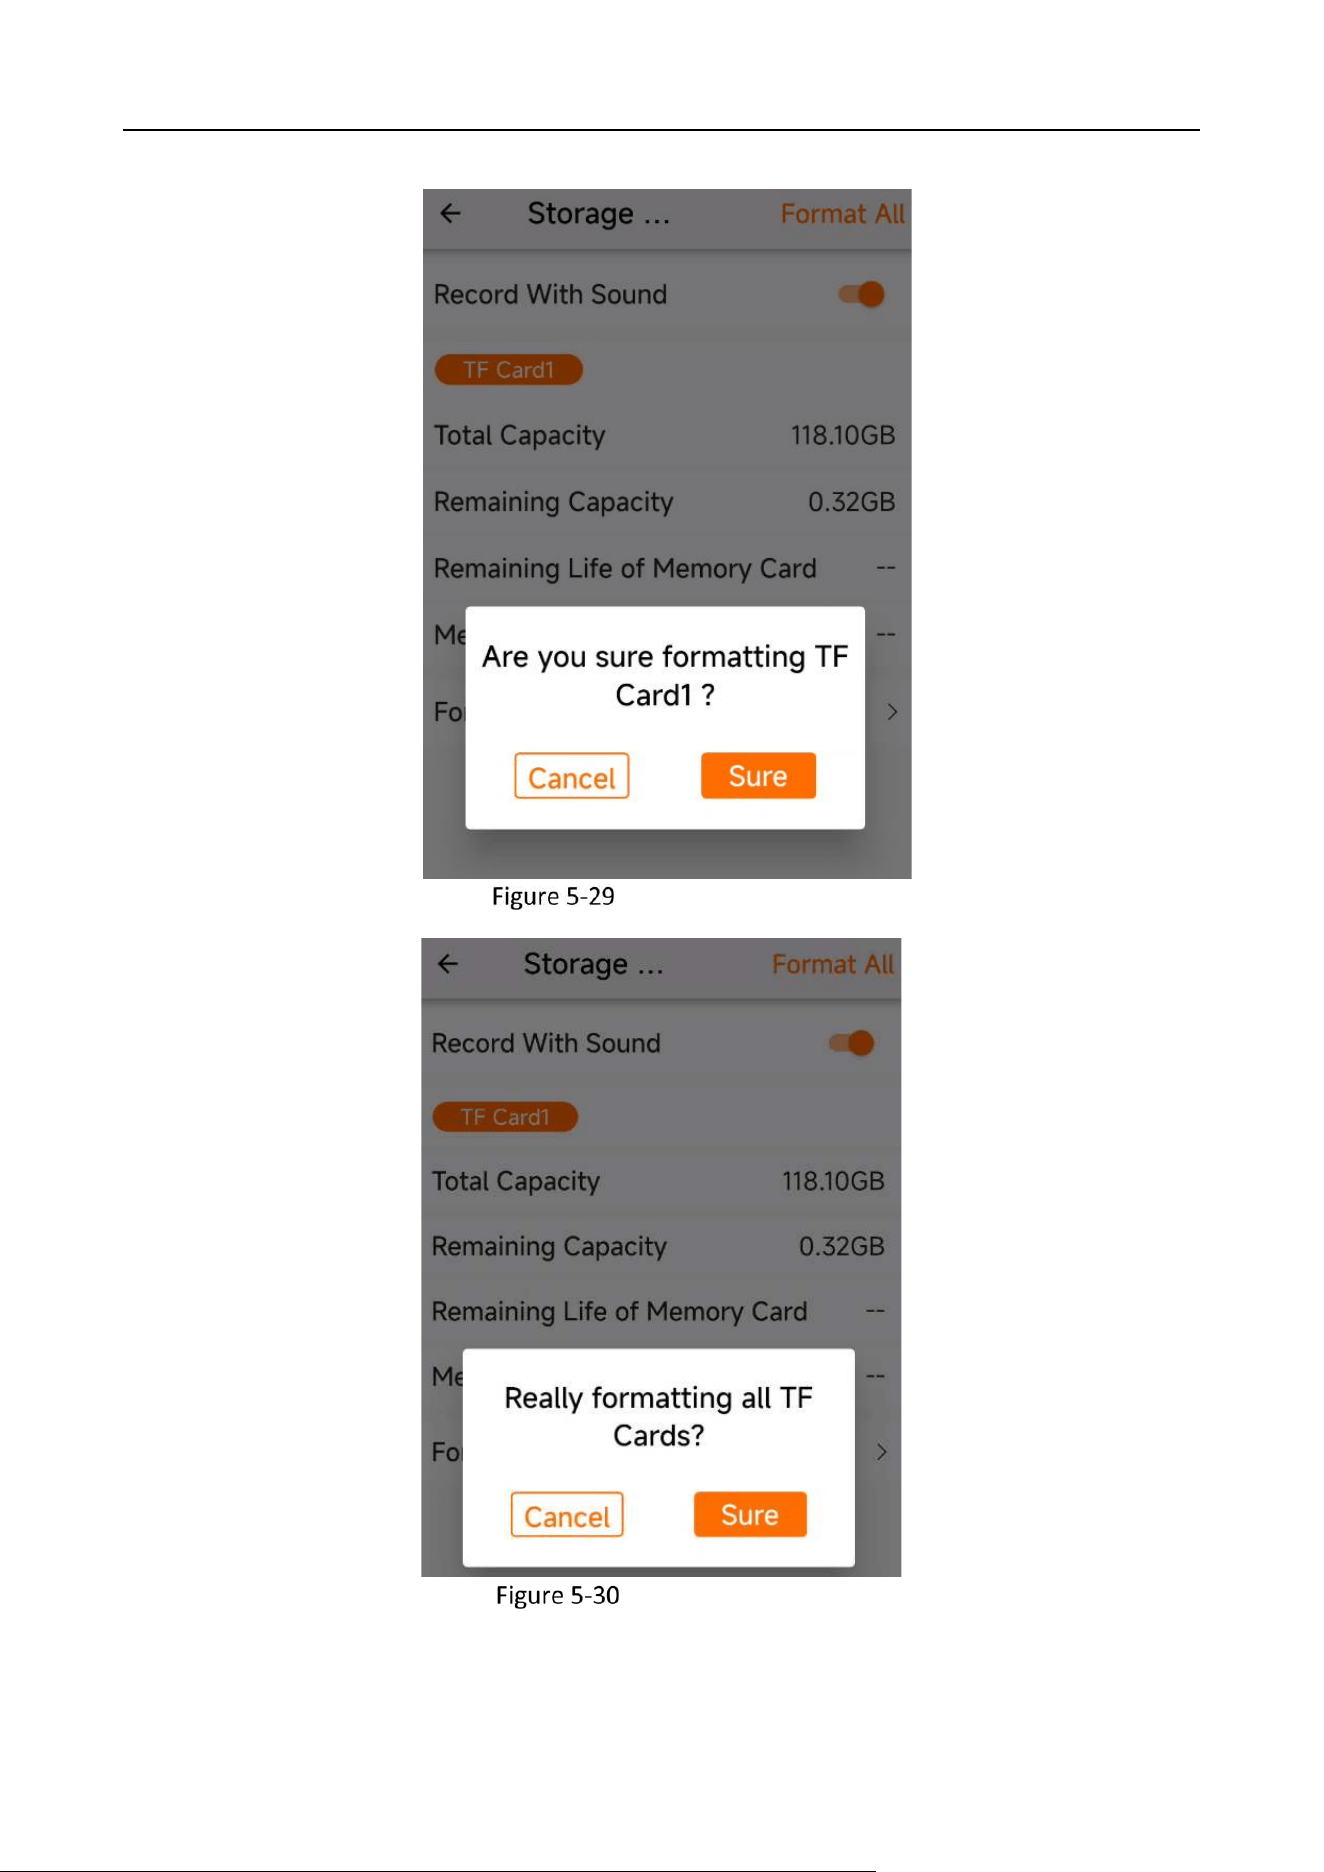
To format the TF card, tap “Formatting TF Cards” to pop up the confirmation interface. To
format all, tap “Format All.”
Industry Dashcam • User Manual
39
Formatting TF Cards
Format All TF Cards
Industry Dashcam • User Manual
40
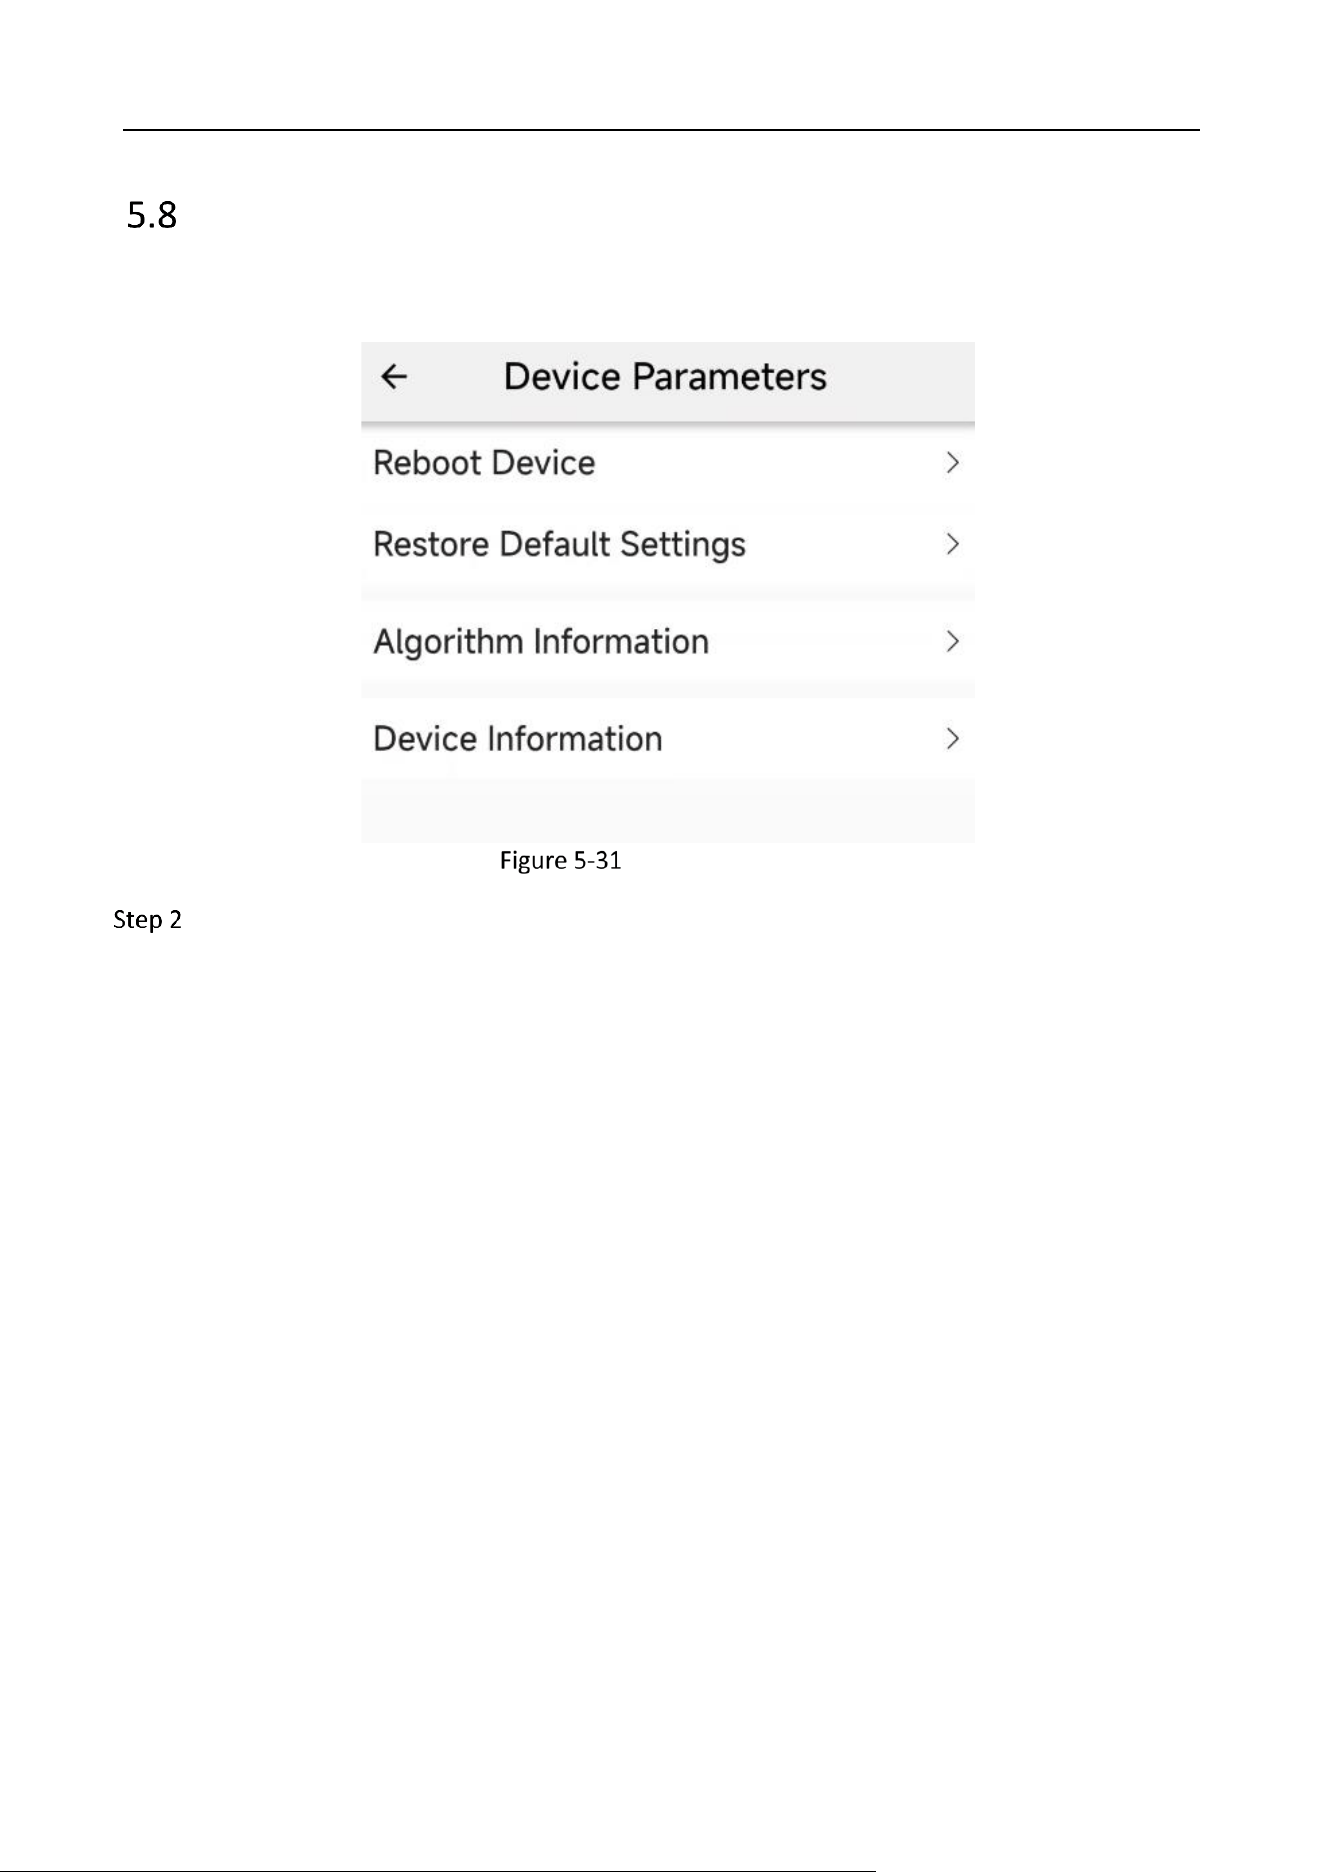
Device Parameters
In the device parameters interface, you can restart the device, restore the device default Settings,
and view the device and algorithm information.
Device Parameters
Tap Device Information to view the device model, firmware version, serial number, device
verification code and other information. The last four digits of the verification code are the
last four digits of the device's Wi-Fi name.

Industry Dashcam • User Manual
41
Device Information
Algorithm Information
Industry Dashcam • User Manual
42
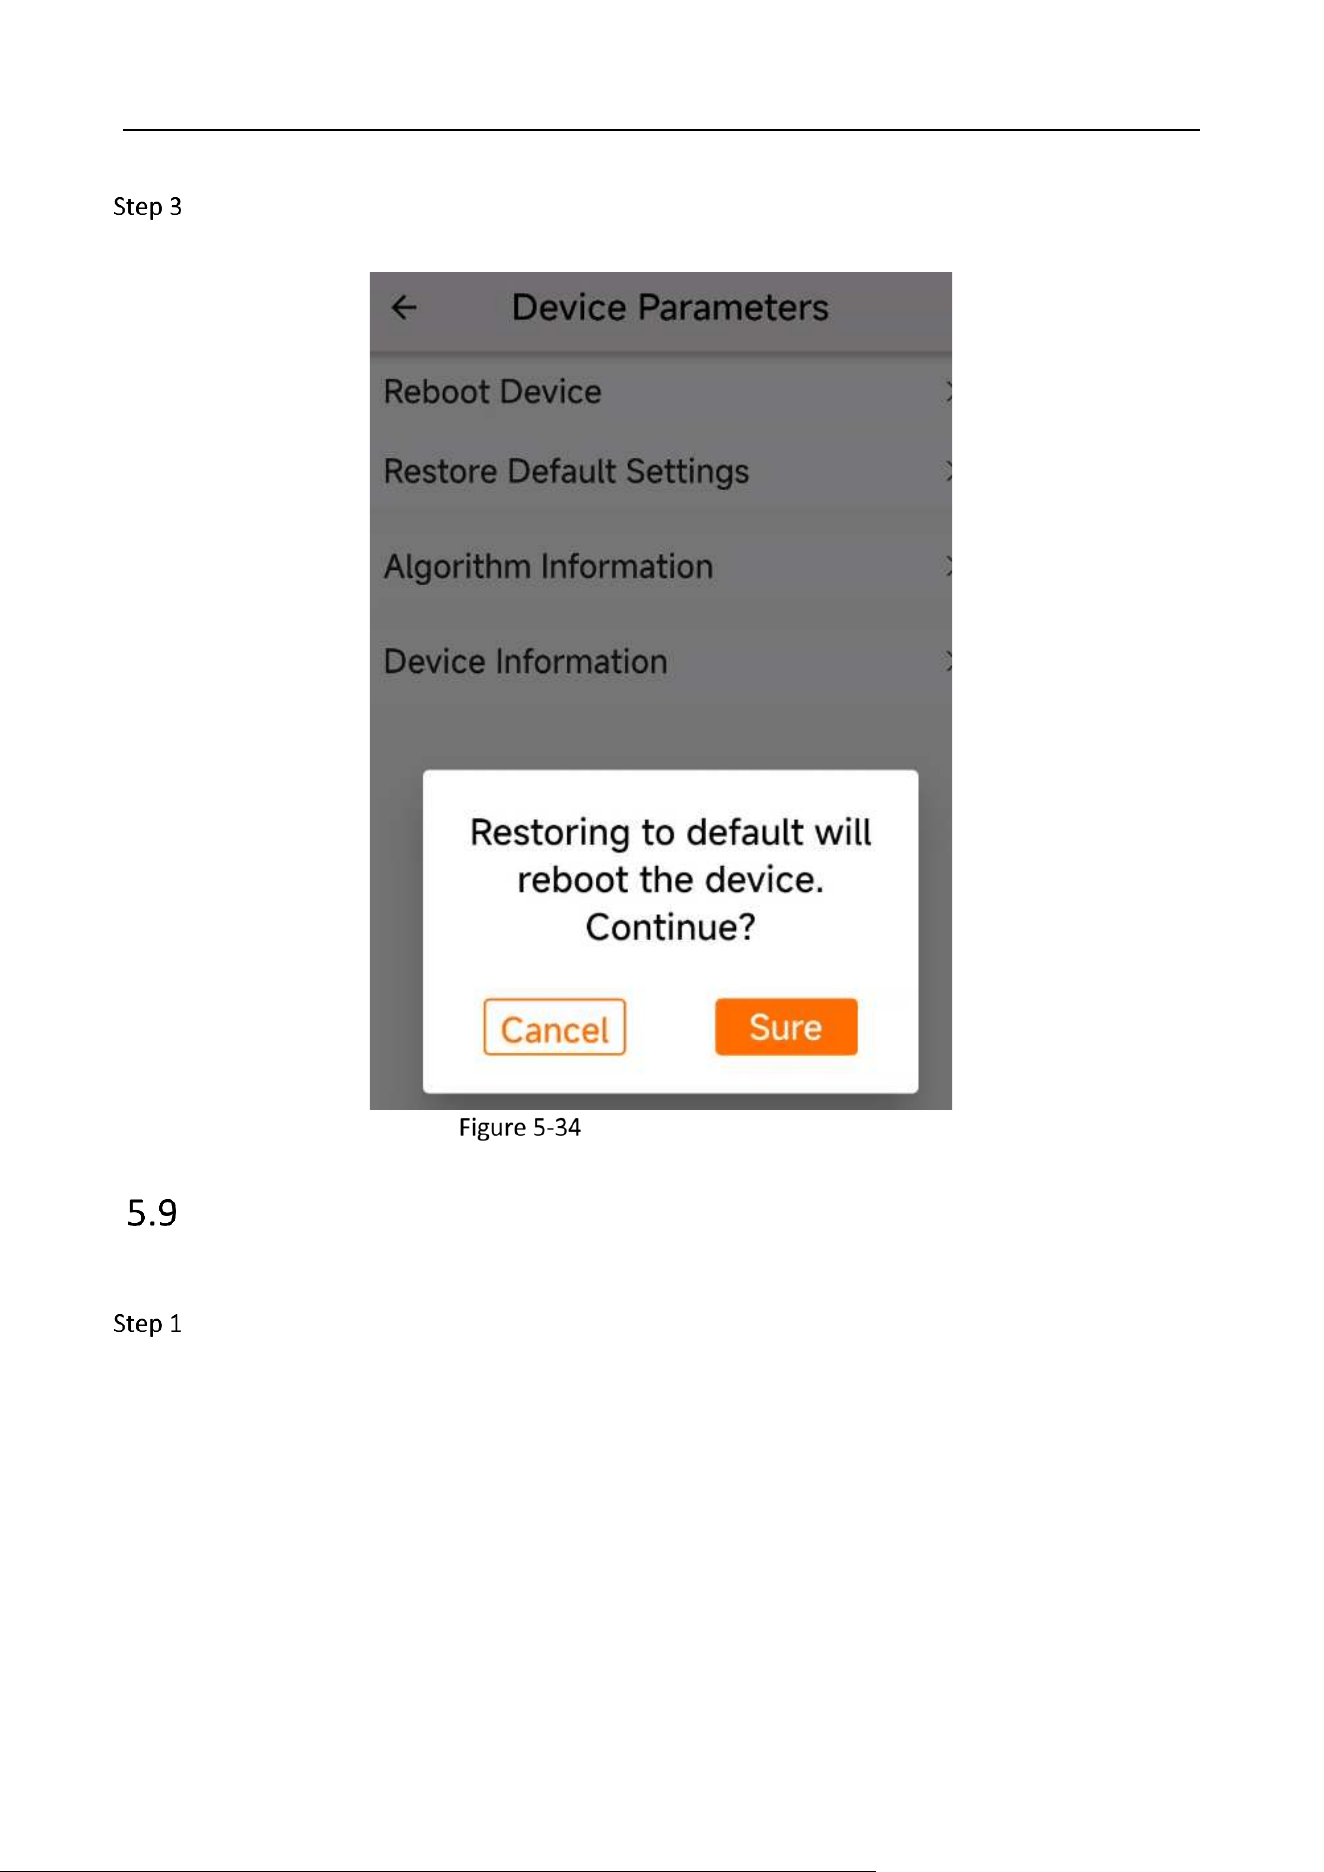
The restore device default settings function will restore the device to factory state, but the TF
card storage content will not be affected.
Restore to Default Settings
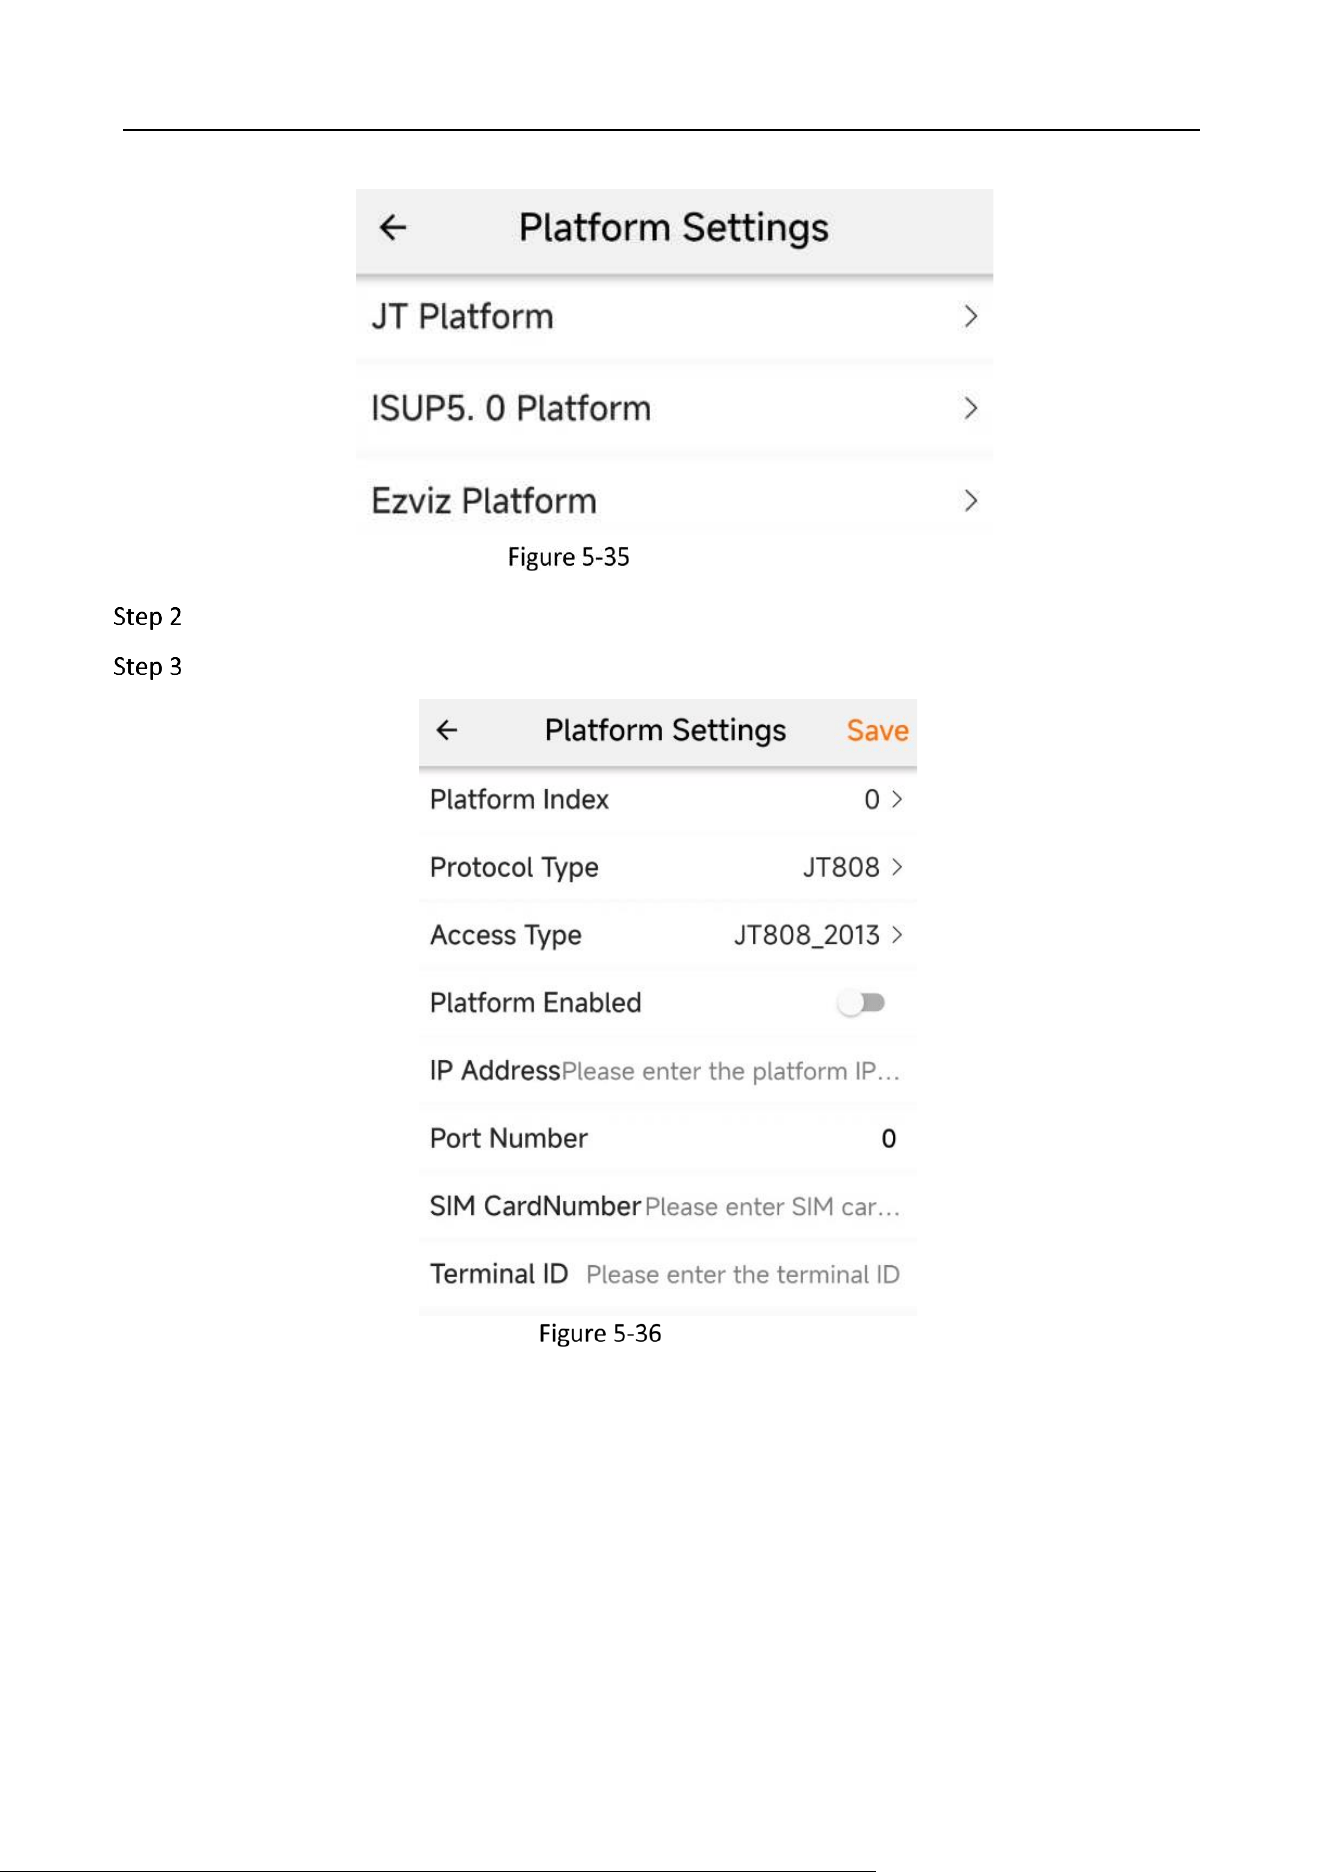
Platform Settings
You can configure platform-specific parameters in Platform Settings.
Go to Config → Platform Settings.
Industry Dashcam • User Manual
43
Platform Settings
Configure the relevant platform parameters according to your needs.
Tap “Save” to reboot to make the platform setting take effect.
JT Platform
Industry Dashcam • User Manual
44
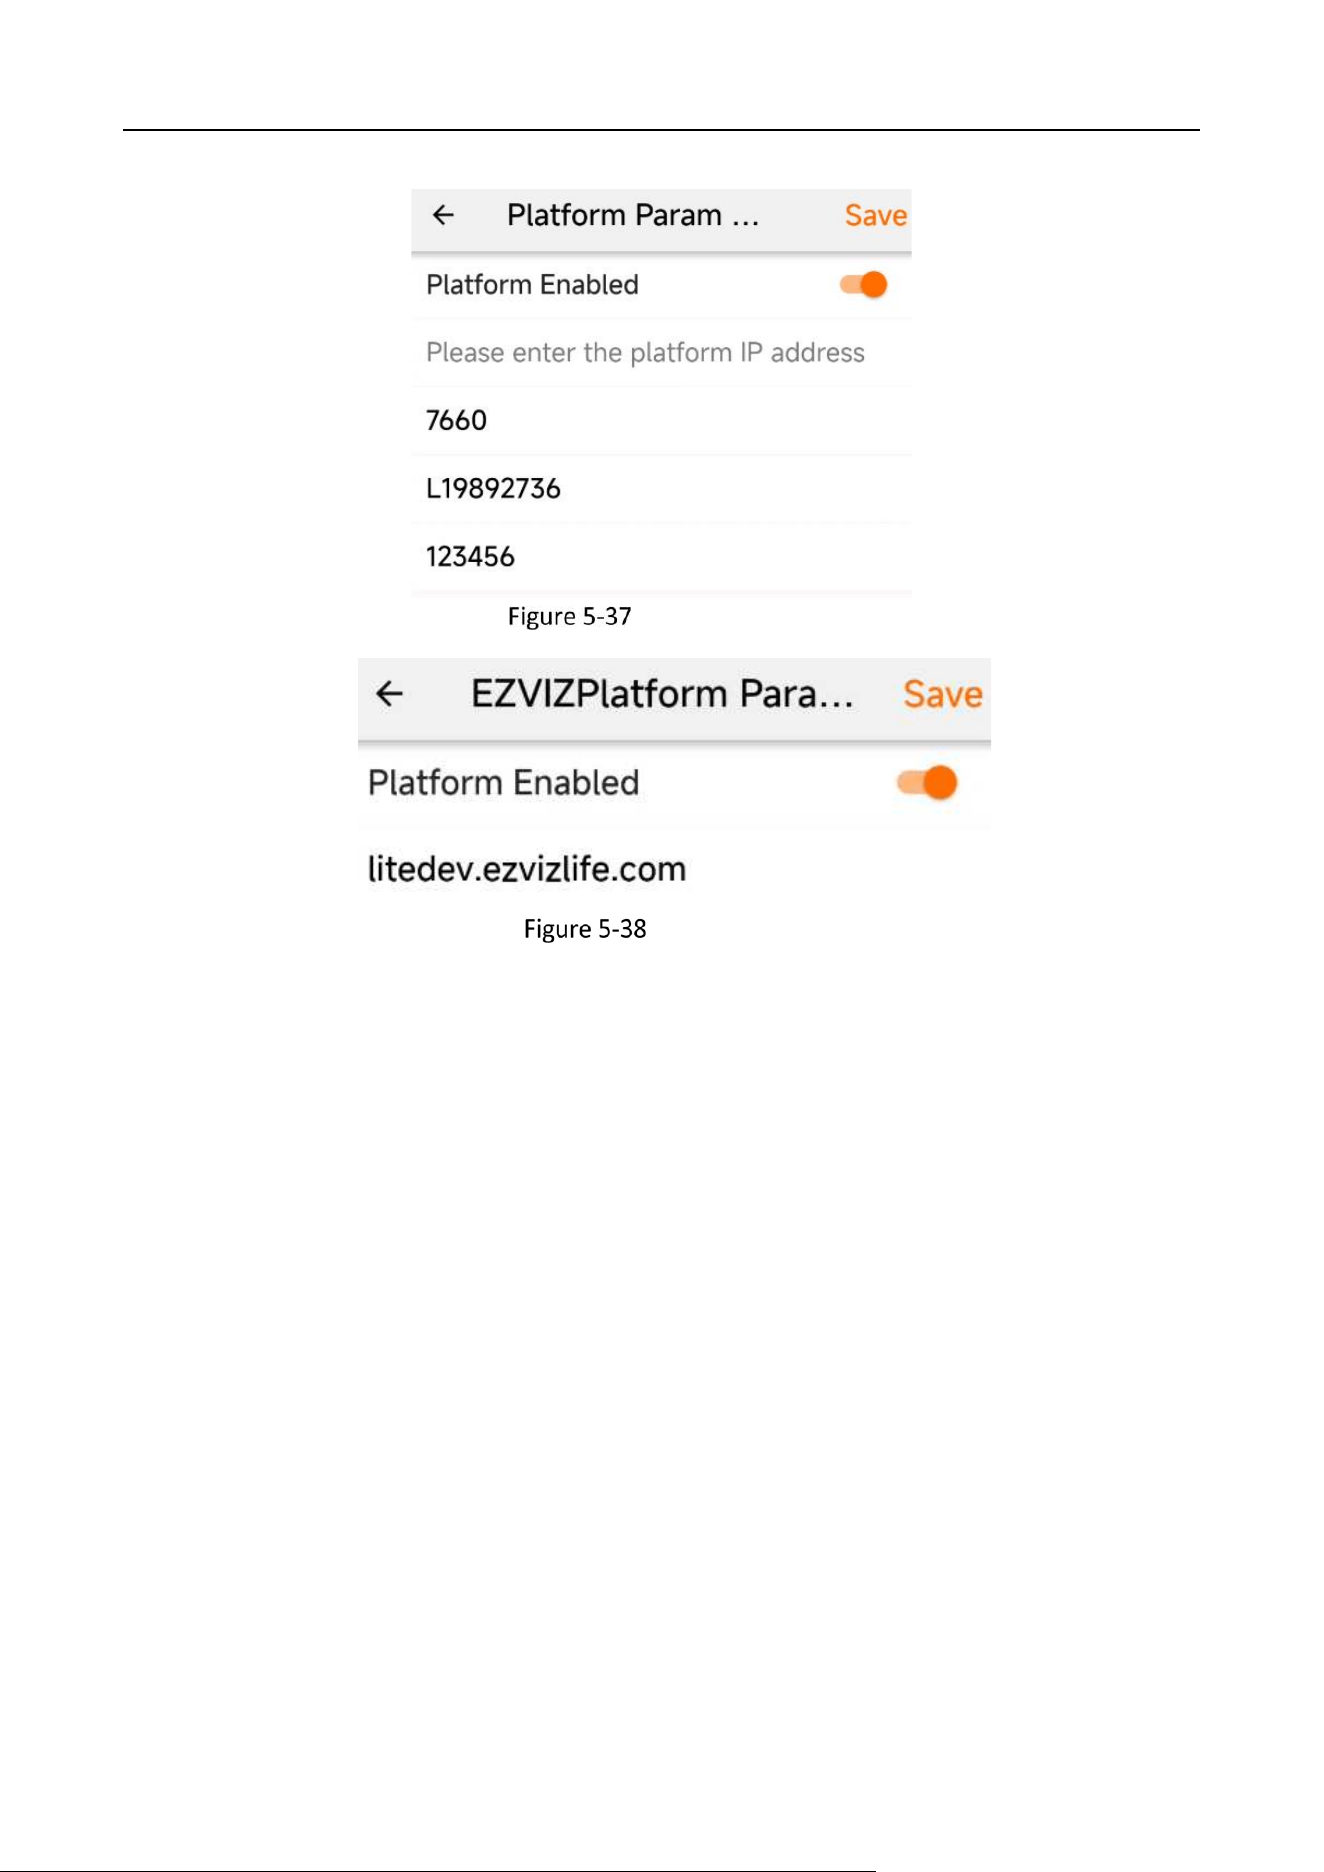
ISUP5.0 Platform
Ezviz Platform
Industry Dashcam • User Manual
45
Chapter 6 HCP Platform Settings
The HikCentral Professional (HCP) platform connects to the device with ISUP5.0. On the HCP
platform, you can test the registration of the device, preview, capture, playback/download videos,
view the track playback, view alarms, perform voice broadcast and two-way audio, audio monitoring
and firmware upgrade.
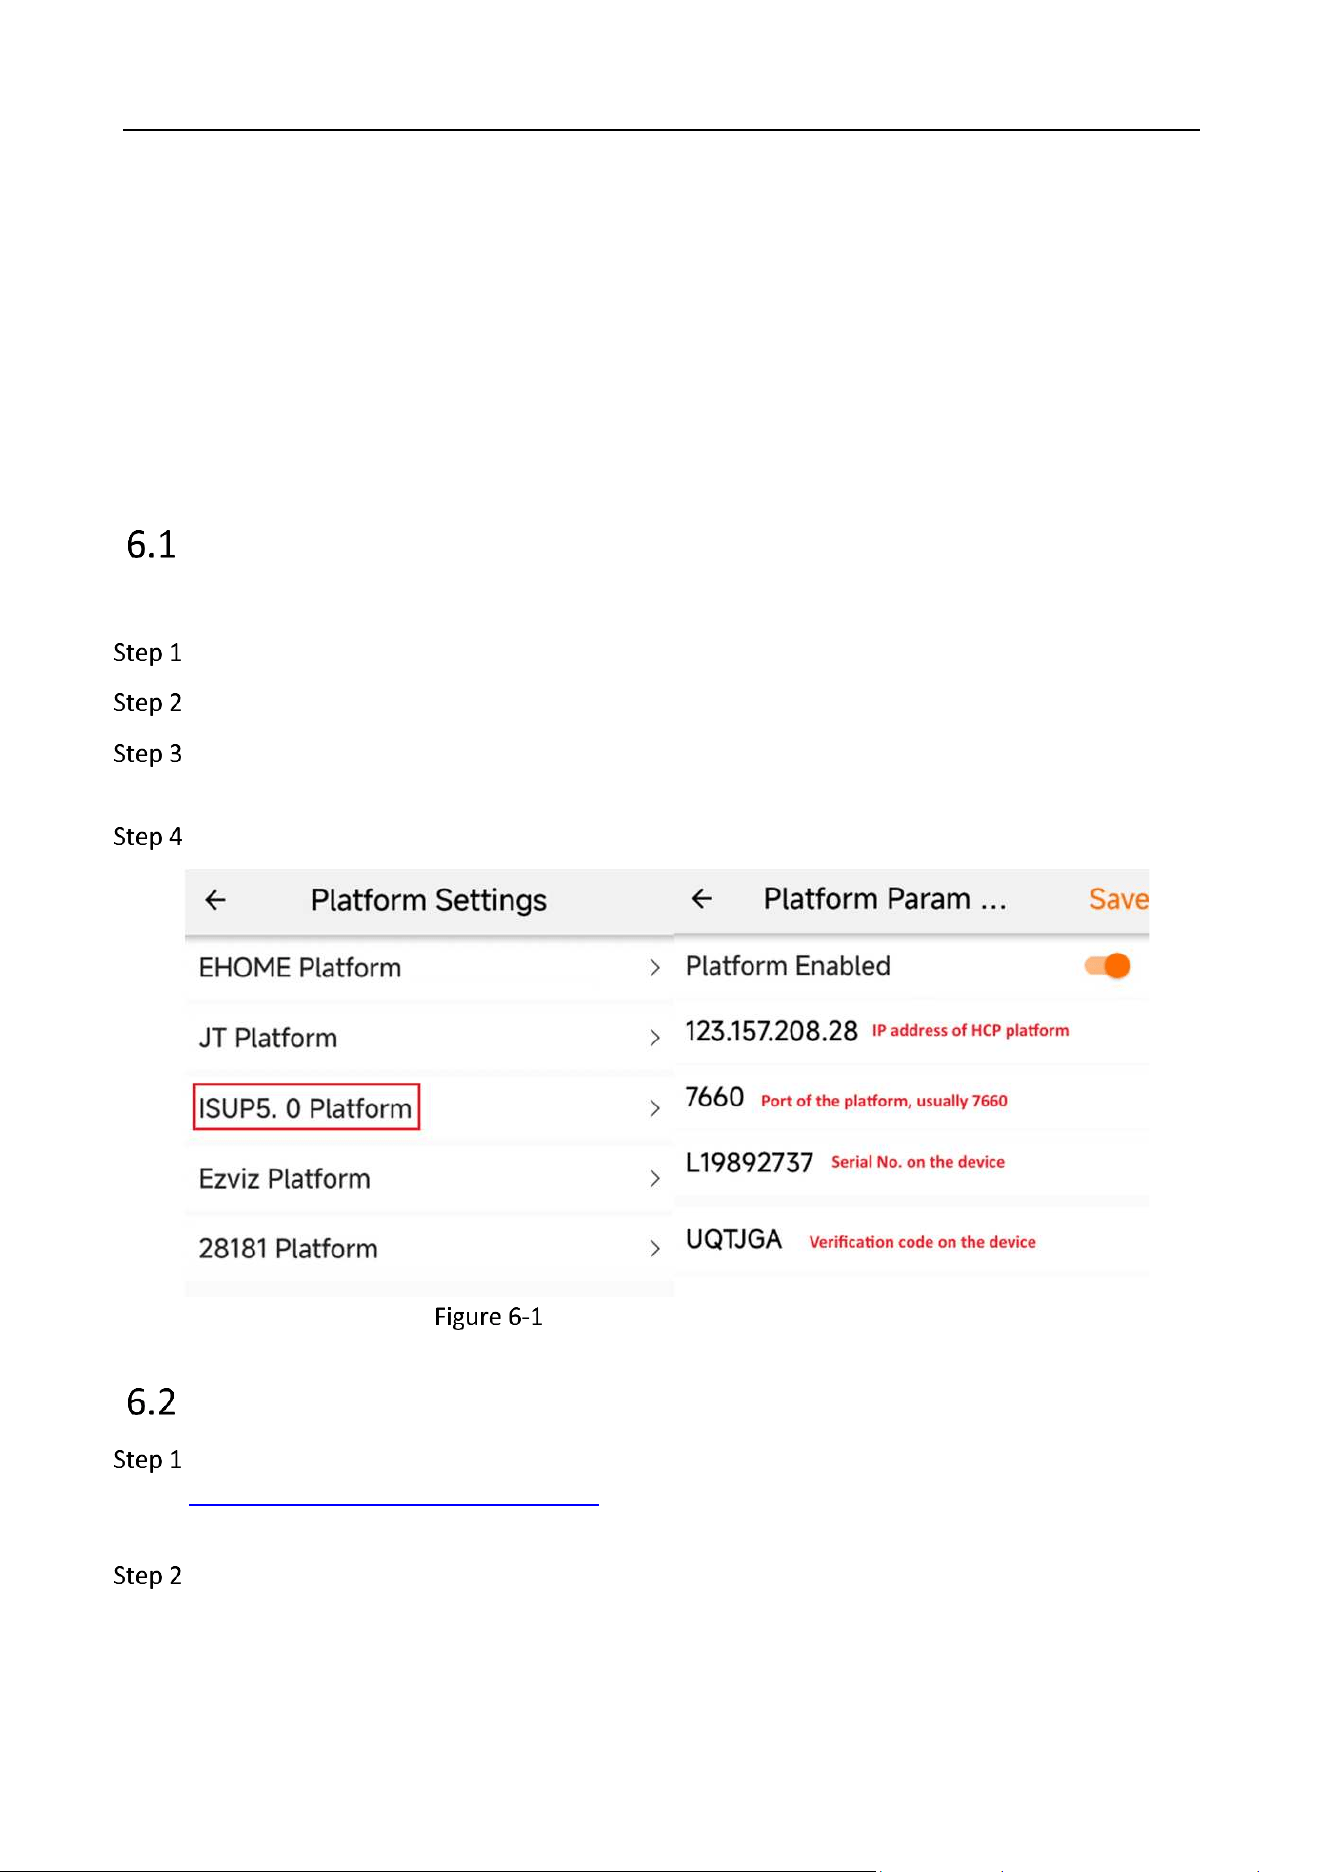
ISUP5.0 Platform Settings
Steps:
Connect the G40 device to the app and go to Config → Platform Settings → ISUP5.0.
Tap Platform Enabled to enable the platform.
Enter IP address and port of the HCP platform in order. You can find the serial number
printed on the device.
Tap Save and the G40 device will reboot to make settings take effect.
Set ISUP5.0 Platform Parameters
Manage On-Board Devices
Download and Install the Web Control Plugin at, for instance,
https://123.157.208.28:448/#/portal/. After installation, refresh to enable the show plugin
enabling interface and enable it.
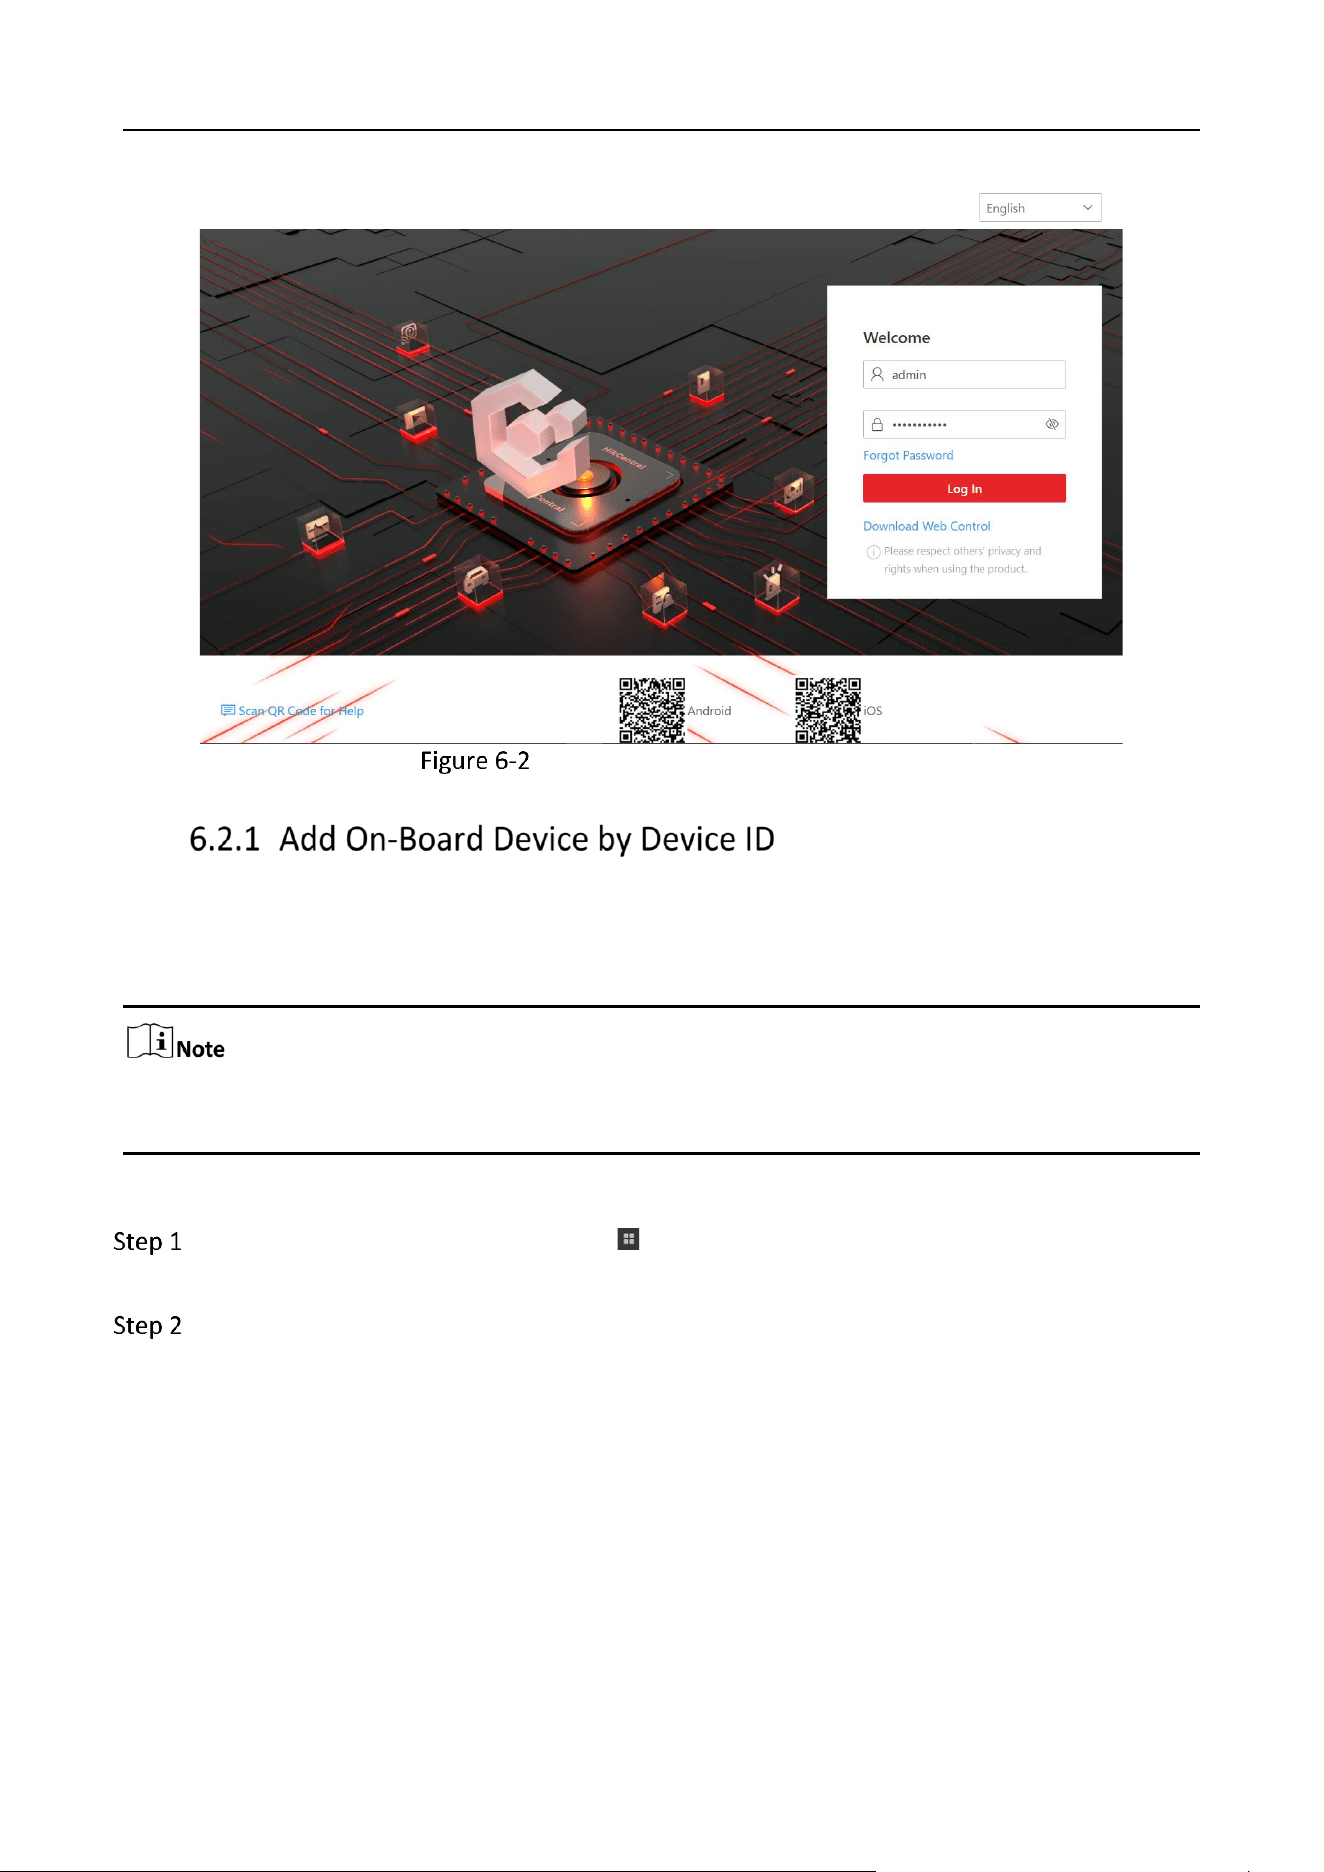
Log into the HCP platform with the username and password.
Industry Dashcam • User Manual
46
Login Interface of the HCP Platform
If an on-board device supports the ISUP protocol, you can add it to the platform by its device ID. This
way is cost-effective when you need to manage an on-board device on the public network without
a fixed IP address.
You should follow the instructions to install the web control properly and then the online device
detection function will be available.
Steps:
On the top left of the Web Client, click → Device → Device and Server → On-Board
Device.
Click Add.
Industry Dashcam • User Manual
47
Add On-Board Device
Set basic information.
1) Select Device ID as the adding mode.
2) Enter the Device ID, ISUP login password, and name of the on-board device. The device ID
means the serial number printed on the device. The ISUP login password means the
verification code on the device
Set vehicle information.
1) Enter the license plate number of the vehicle the on-board device is related to.
2) Add the vehicle to an existing area or click Add to add it to a newly-created area.
Optional: Set picture storage.
1) Switch on Picture Storage.
2) Select a storage location.
● If you select Local Storage, you need to click Configure to configure picture storage on the SYS
server.
● If you select Hybrid Storage Area Network, Cluster Storage, pStor, or Network Video Recorder,
you need to select a storage medium from the drop-down list.
Industry Dashcam • User Manual
48
Set device's time zone
Get Device's Time Zone
The time zone of the device will be automatically chosen according to the region of the device.
Manually Set Time Zone
You can select a time zone and the settings will be applied to the device automatically.
Set resource information.
1) Select a Streaming Server.
2) Optional: Check Wall Display via Streaming Server.
If the encoding device is not on the same network with cameras, it will get the stream for live view
and playback via the Streaming Server, if they are on the same network, the encoding device can get
stream directly from cameras.
3) Optional: Check Get Device's Recording Settings to get cameras' recording settings configured
on the on-board device.
Click Add to finish or click Add and Continue to add another on-board device.
Edit On-Board Device
On the device list, click the name of an on-
board device to edit it.
Configure On-Board Device Remotely
On the device list, click in the Operation
column to configure an on-board device
remotely.
Reset Device's Time Zone
On the device list, select one or multiple on-
board devices and click Time Zone to edit their
time zones.
Delete On-Board Device
Select one or multiple devices and click Delete
to delete them.
Search for On-Board Device(s)
Enter key words in the search box and click to
search for specified on-board device(s).
You can add on-board device(s) to the platform by device ID segment, and perform further
operations, such as editing device settings, configuring devices remotely, deleting devices.
Industry Dashcam • User Manual
49
On the top left of the Web Client, click → Device → Device and Server → On-Board
Device.
Click Add.
Select Device ID Segment as the adding mode.
Add On-Board Device by Device ID Segment
Configure the basic information of the device(s).
1) Enter the start device ID and end device ID.
If the start ID and end ID are the same, only one device will be added.
If the start ID is smaller than the end ID, multiple devices will be added with their IDs arranged in
ascending order. For example, if you set the start ID and end ID to 1 and 3 respectively, then devices
named 1, 2, and 3 will be added.
2) Optional: Enter the ISUP login password.
3) Optional: Enabled stream encryption, and switch on Verify Stream Encryption Key and enter
the stream encryption key on the device.

Industry Dashcam • User Manual
50
This function should be supported by the device.
For picture storage and time zone, refer to 6.2.1 .
Click Add to finish or click Add and Continue to add another on-board device.
You can fill in required information of to-be-added on-board devices in an Excel file and upload it
onto the platform to batch add them for management.
On the top left of the Web Client, click → Device → Device and Server → On-Board
Device.
Click Add.
Select Batch Import as the adding mode.
Batch Add On-Board Devices
Set basic information.
1) Select Batch Import as the adding mode.
Industry Dashcam • User Manual
51
2) Click Download Template to save the template file to your PC and fill in required information.
3) Click to select the file and upload it to the platform.
For picture storage and time zone, refer to 6.2.1 .
Click Add to finish or click Add and Continue to add another on-board device.
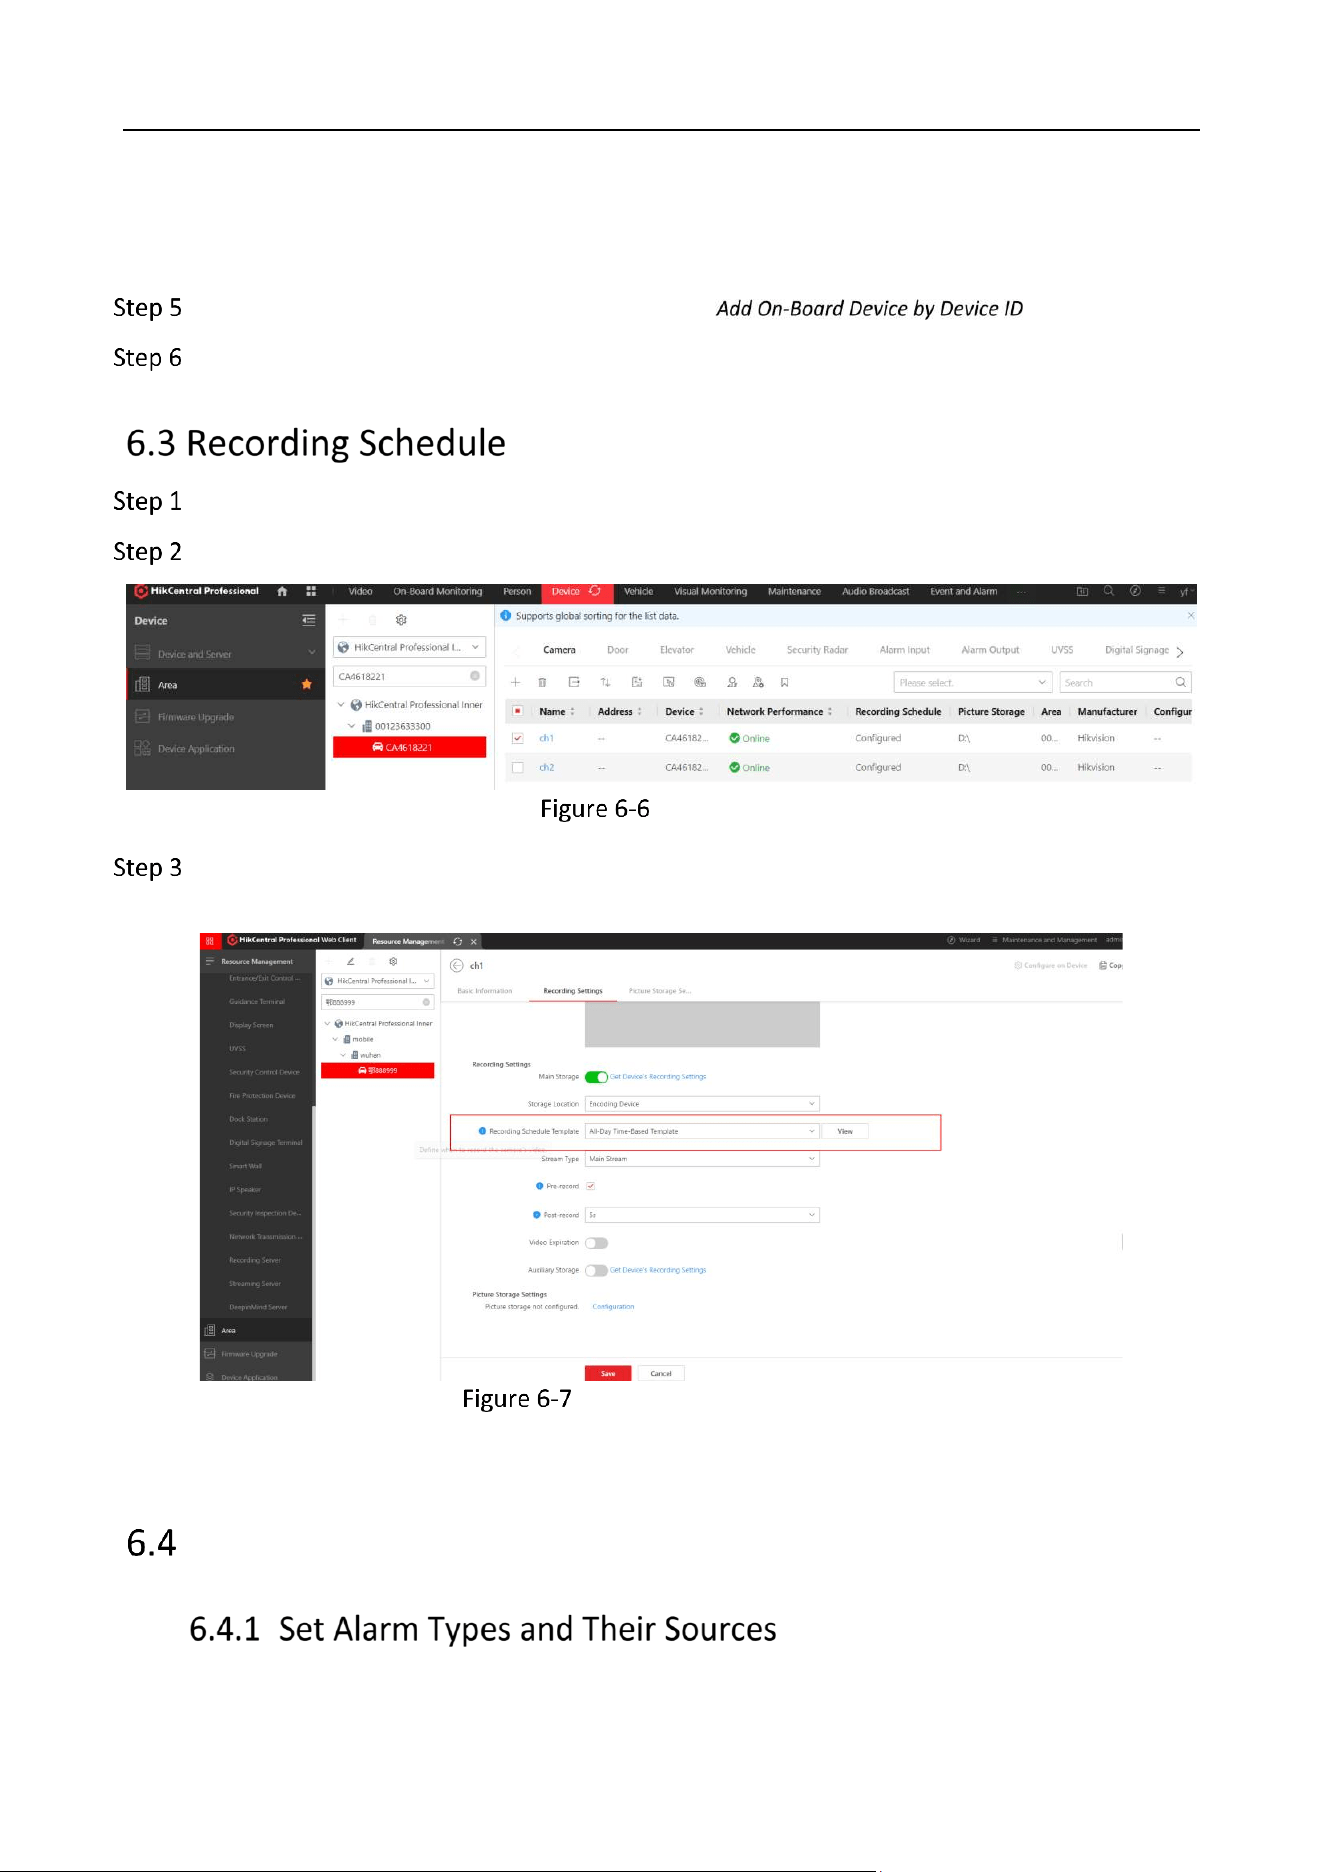
Settings
Click Area and search for the device added.
Click the device to show its camera.
Area Setting
Set the Recording Schedule Template as All-Day Time-Based Template to save all the video
recordings.
Recording Schedule Setting
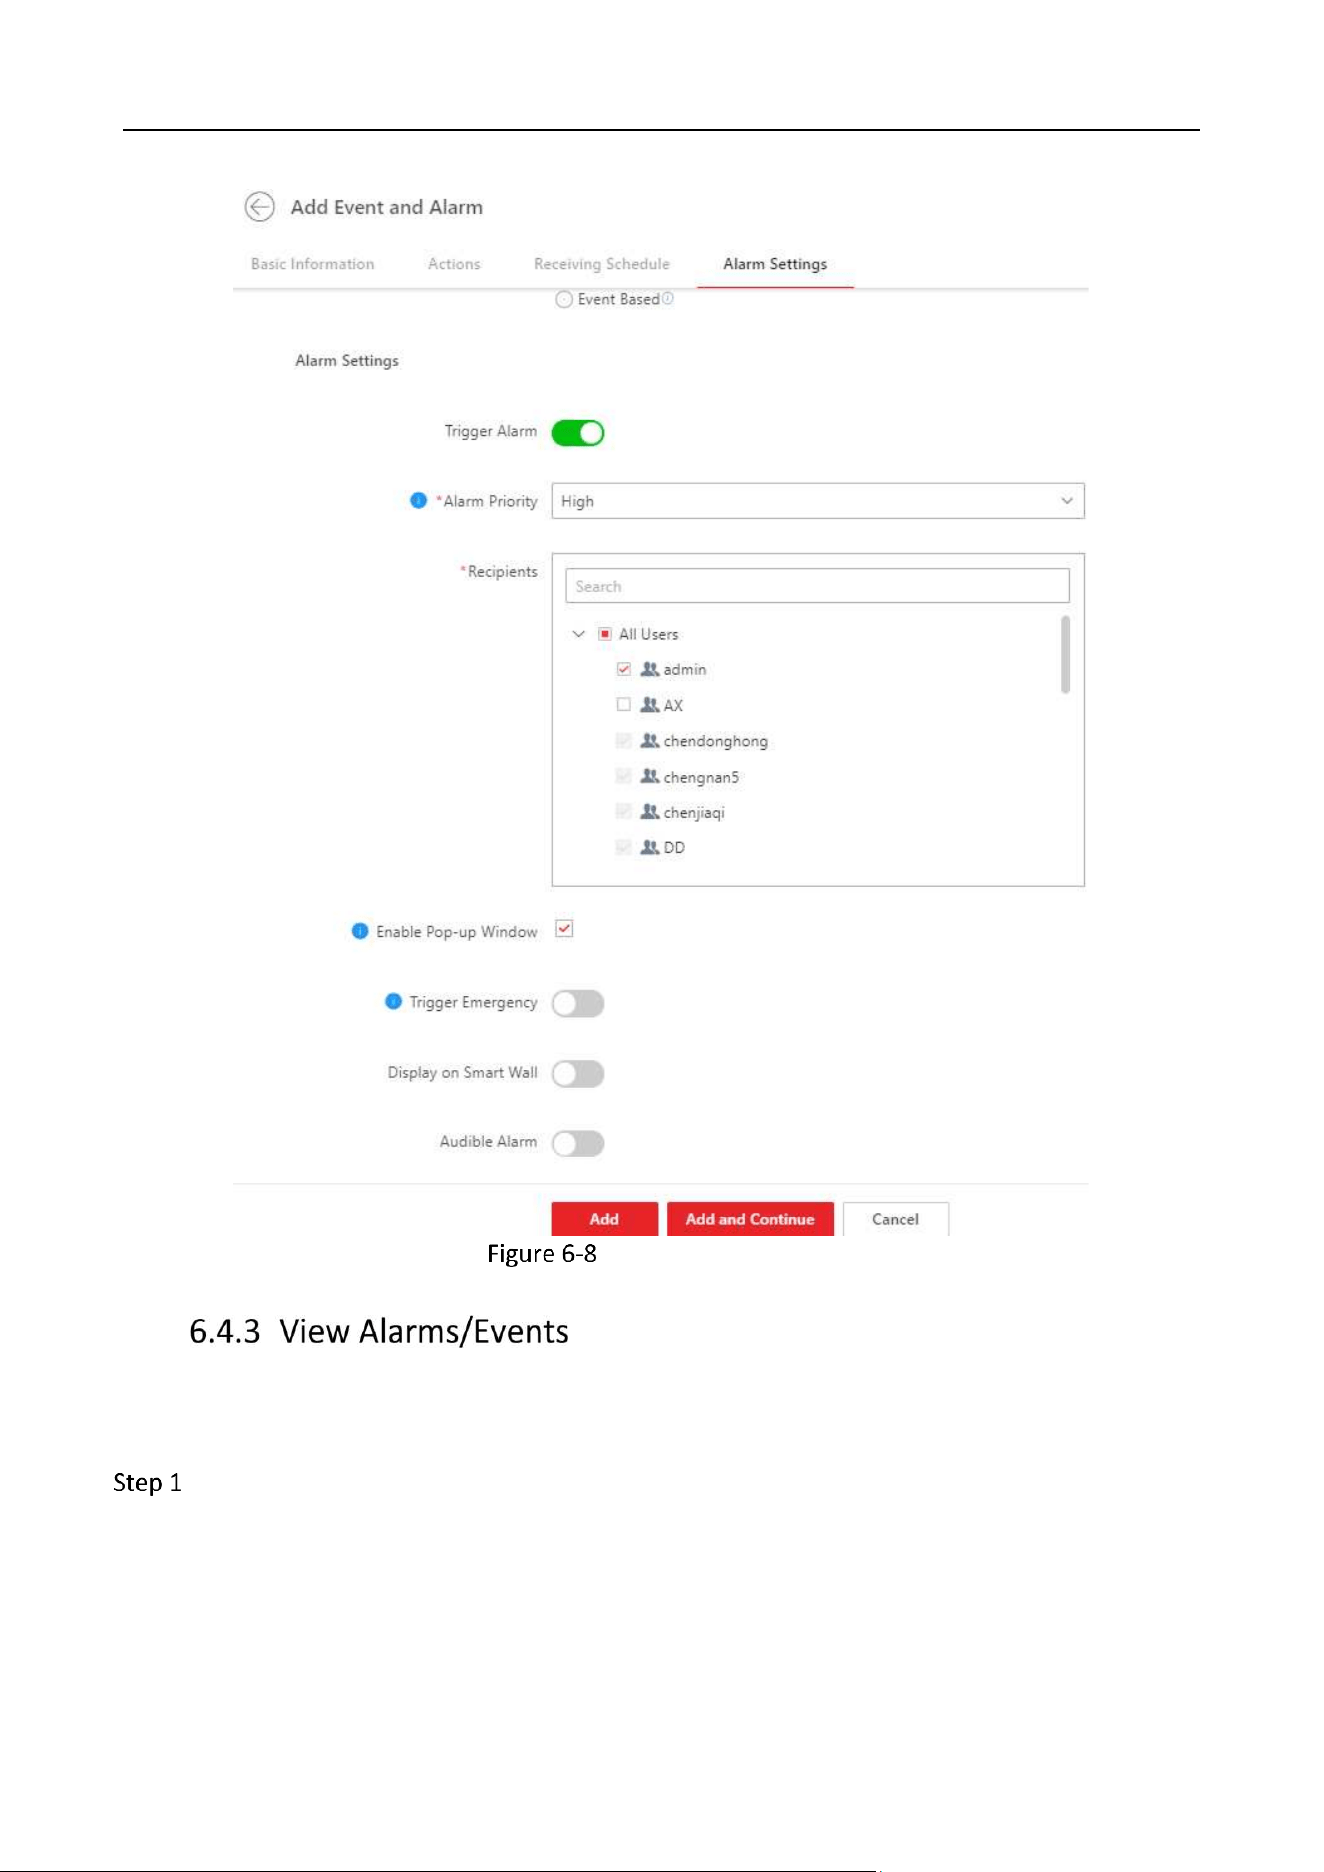
Alarm Settings

Industry Dashcam • User Manual
52
You can choose the alarm to be uploaded to the HCP platform and their sources, and recipients of
the alarm.
Go to Event and Alarm → Event and Alarm Configuration → Normal Event and Alarm.
Click Add.
Go to Driving Monitoring → Vehicle, and choose the ADAS and DSM alarms that you want to
upload.
Choose the source of the alarm, which can be either from areas or vehicles.
Go to Alarm Settings at the Add Event and Alarm.
Enable Trigger Alarm and Set its Priority.
Choose the Recipients of the Alarm.
Industry Dashcam • User Manual
53
Recipient of the Alarm
You can view the alarms/events by their types, the driver that triggered alarms/events, or by the
device.
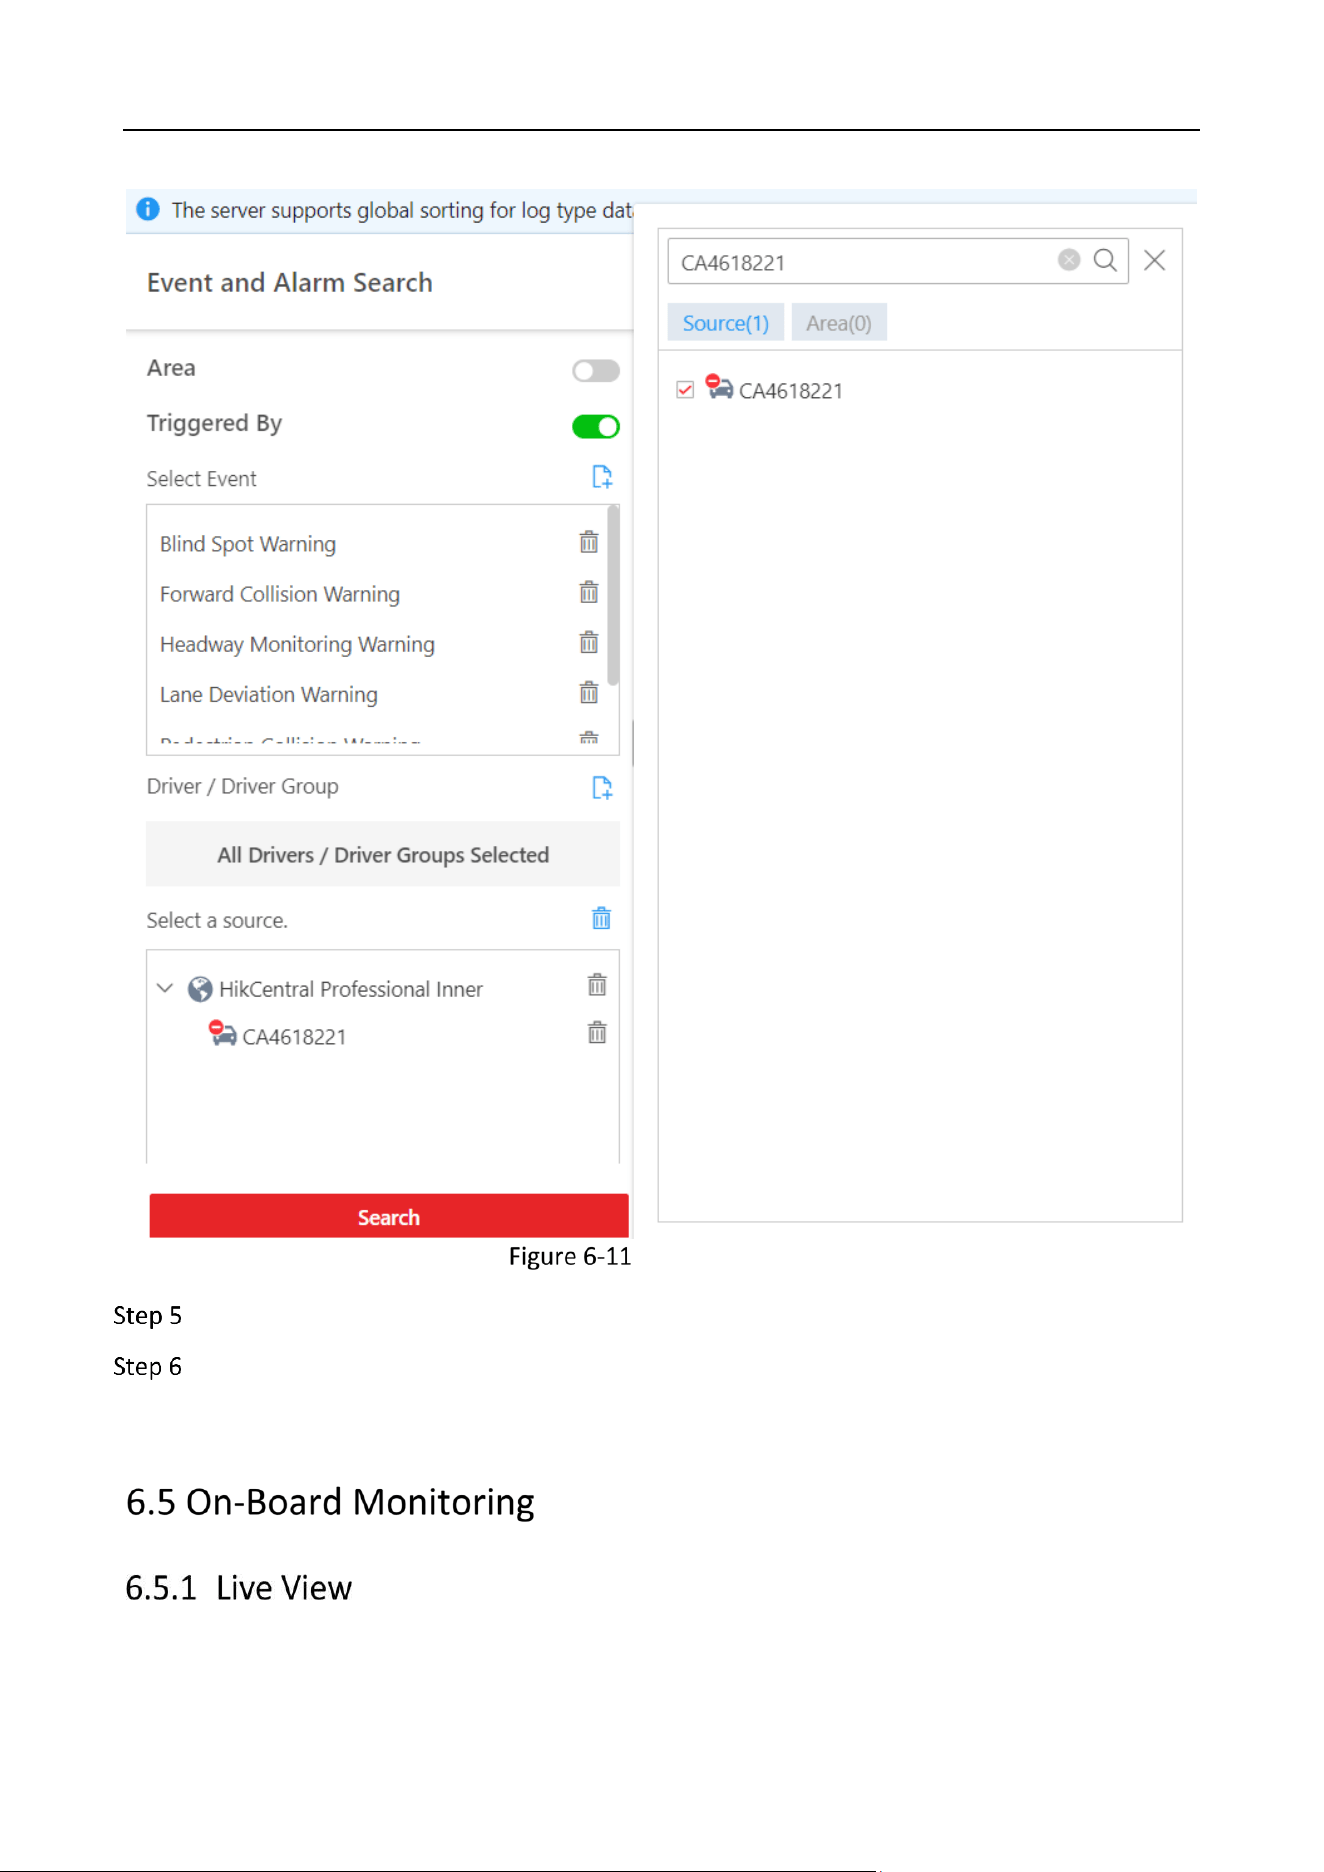
Go to Event and Alarm → Event and Alarm Search.
Industry Dashcam • User Manual
54
Event and Alarm Search
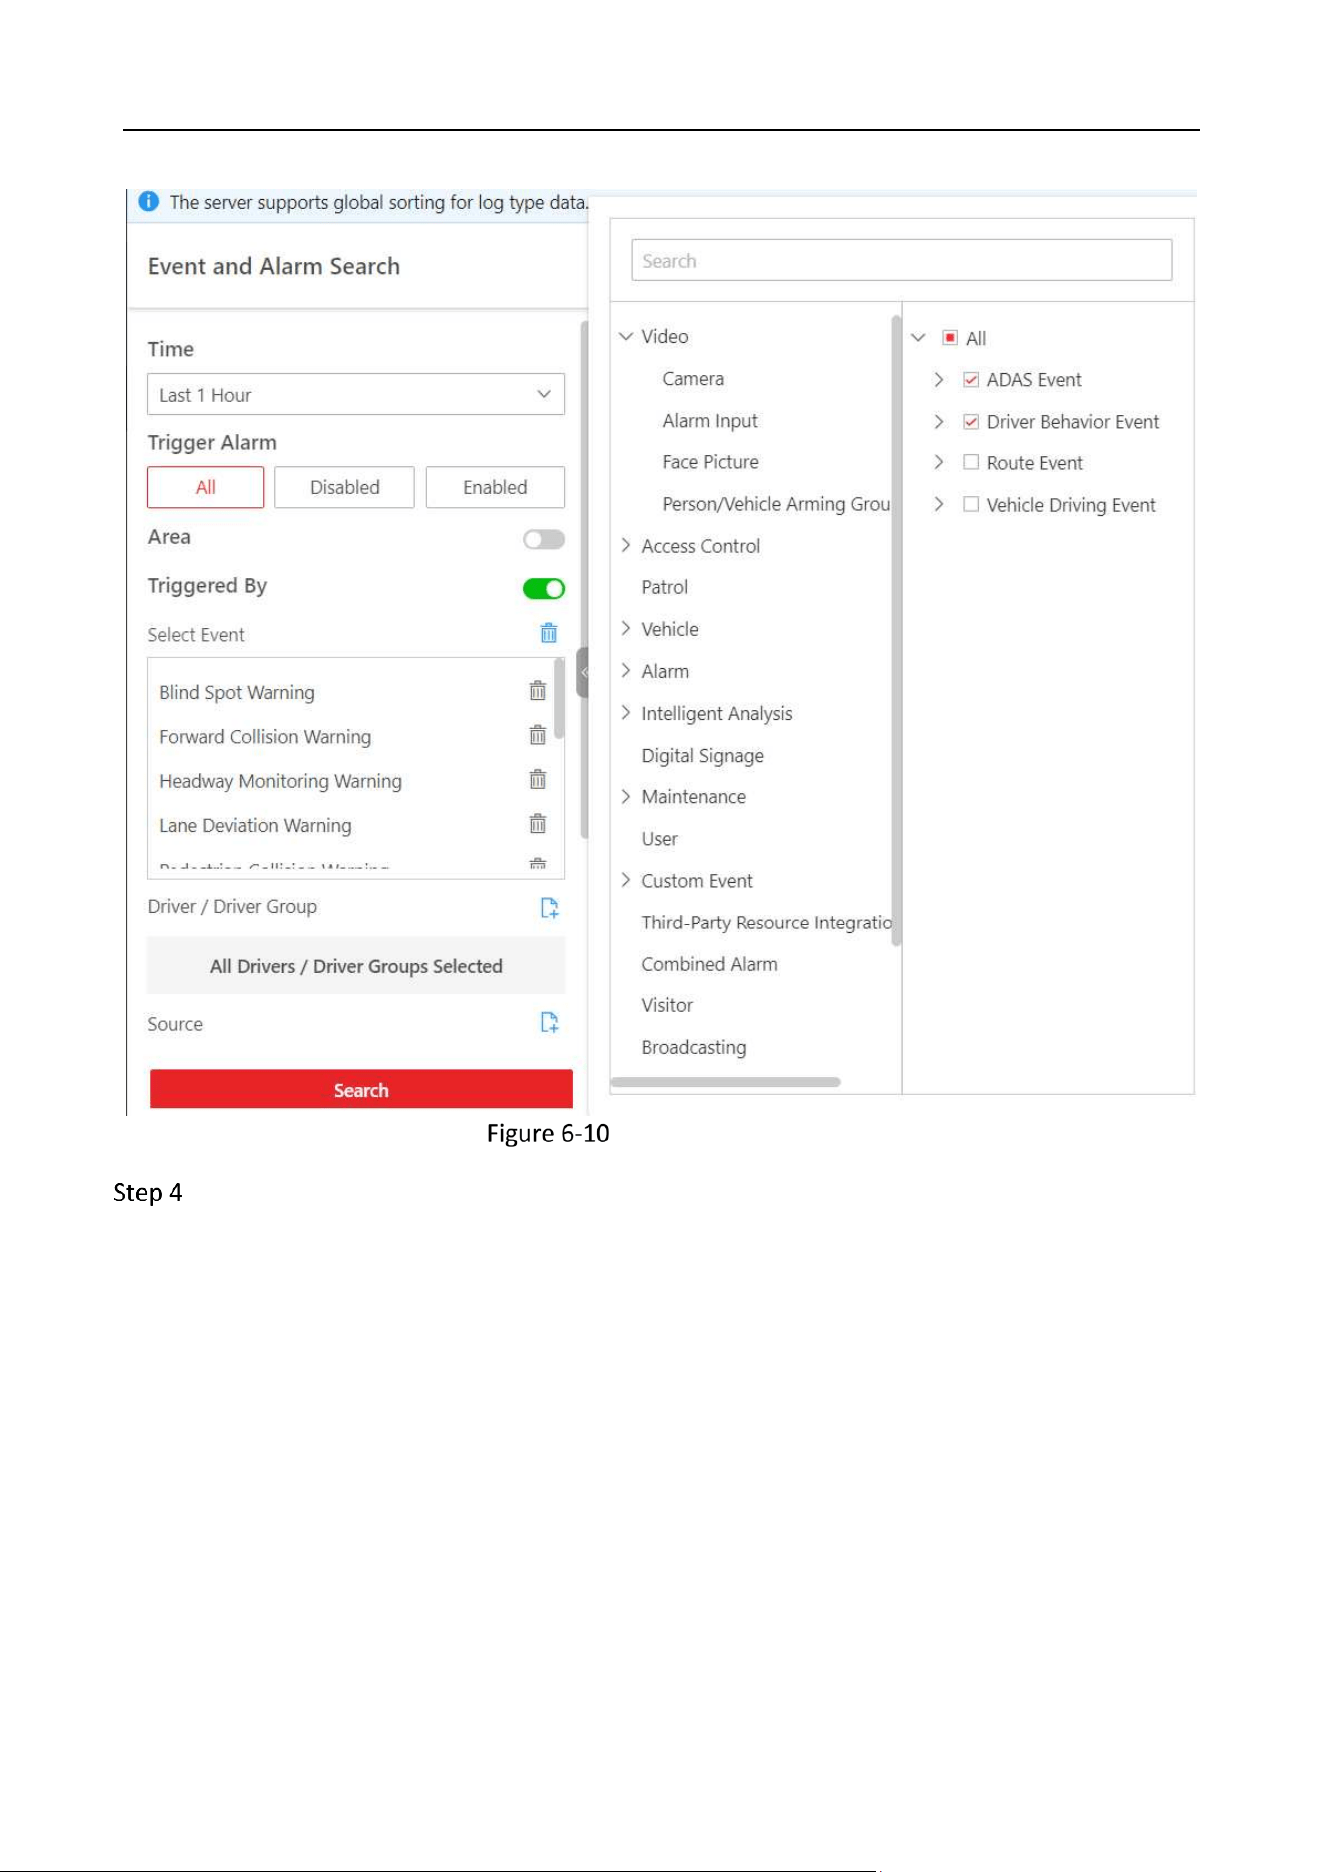
Select the time period or Enable Area, Trigger By or search by Event/Alarm Name.
Having enabled Triggered By, click Add at Select Event to prompt the selection interface.
Industry Dashcam • User Manual
55
Search by Event Type
You can also select by the source of the alarm/event by clicking Add at Select a source, and
search for the device at the interface prompted.
Industry Dashcam • User Manual
56
Search by Device
Click Search.
Optional: you can export the search result by clicking the Export as Excel or PDF.
Industry Dashcam • User Manual
57
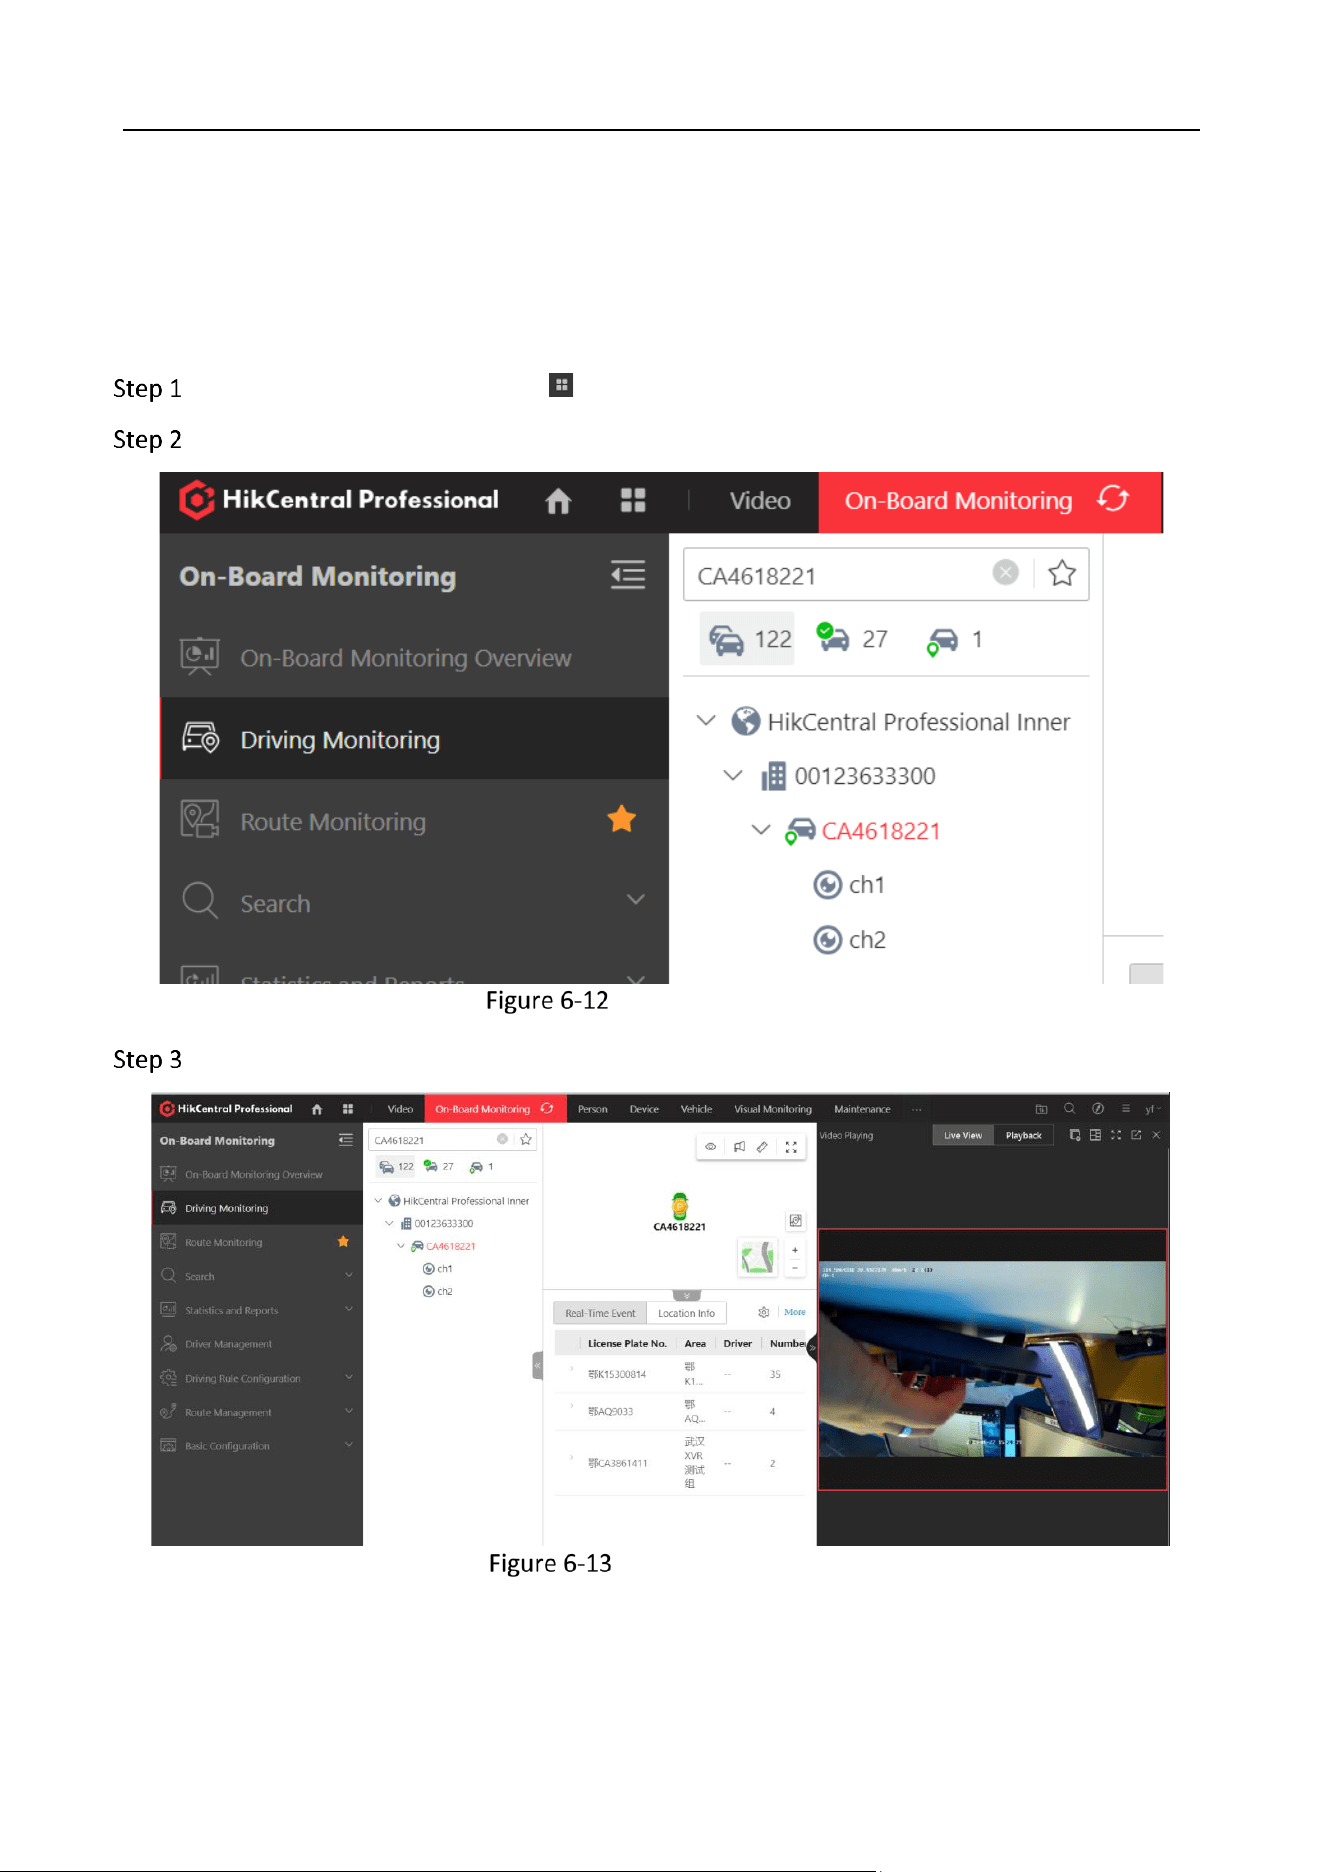
On the Driving Monitoring page, you can monitor driving vehicles to get their real-time
information such as locations, speeds, and events. You can also play the live videos streamed
from vehicle-mounted cameras, talk to drivers via two-way audio, track vehicles in real time,
play back the tracks vehicles have traveled along, and add vehicles to the Favorites list for
quick and easy management.
On the top navigation bar, go to → On-Board Monitoring → Driving Monitoring.
Search for the ID of the device.
Search for the Device
Click the channel which you want to preview.
Preview the Channel
Industry Dashcam • User Manual
58
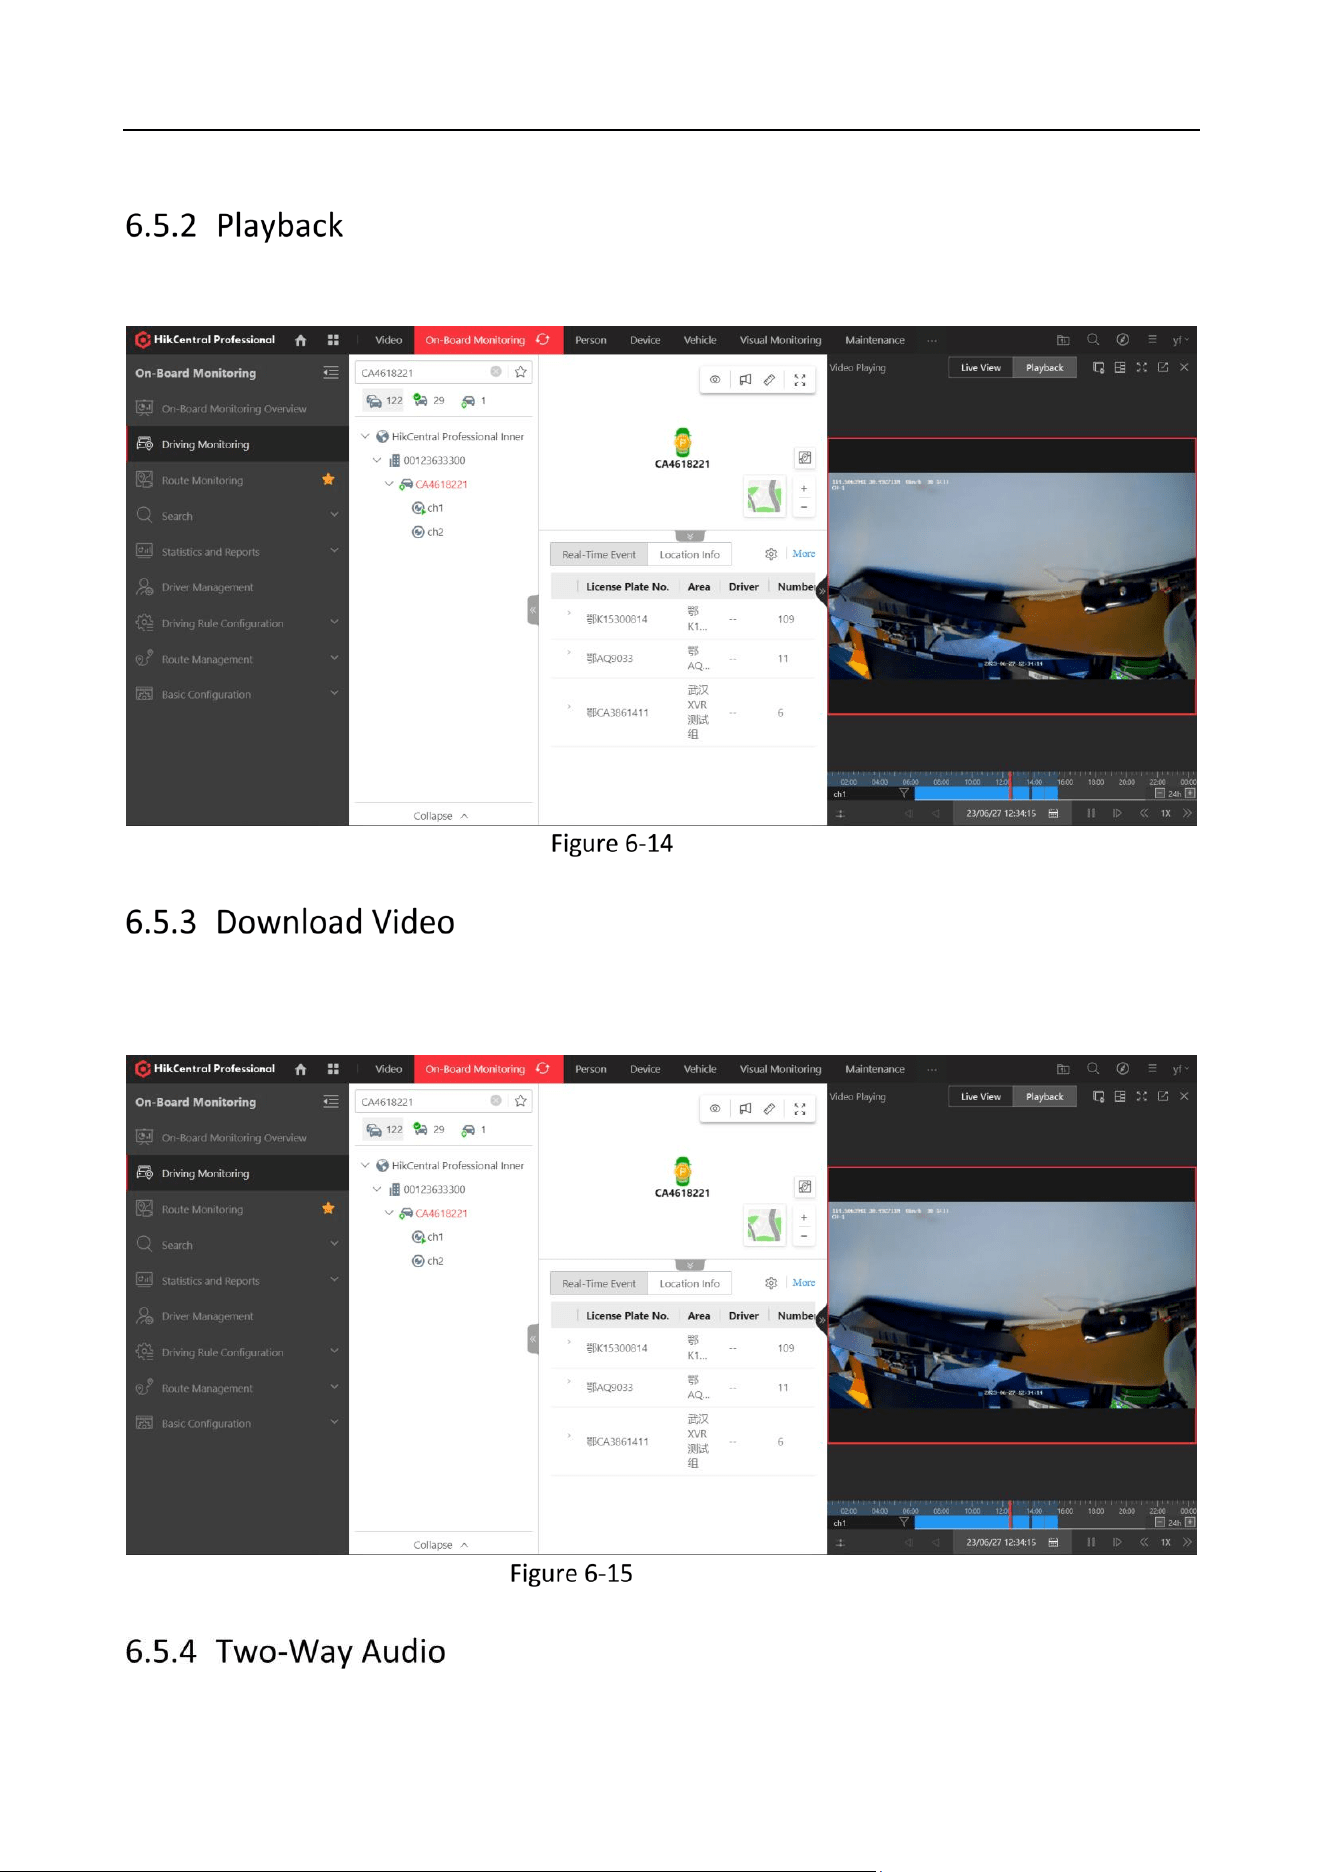
On the preview interface, click the “Playback” to play recordings.
Playback
On the playback interface, adjust the blue bar to the select the period of video you want to
download.
Download Video
Industry Dashcam • User Manual
59
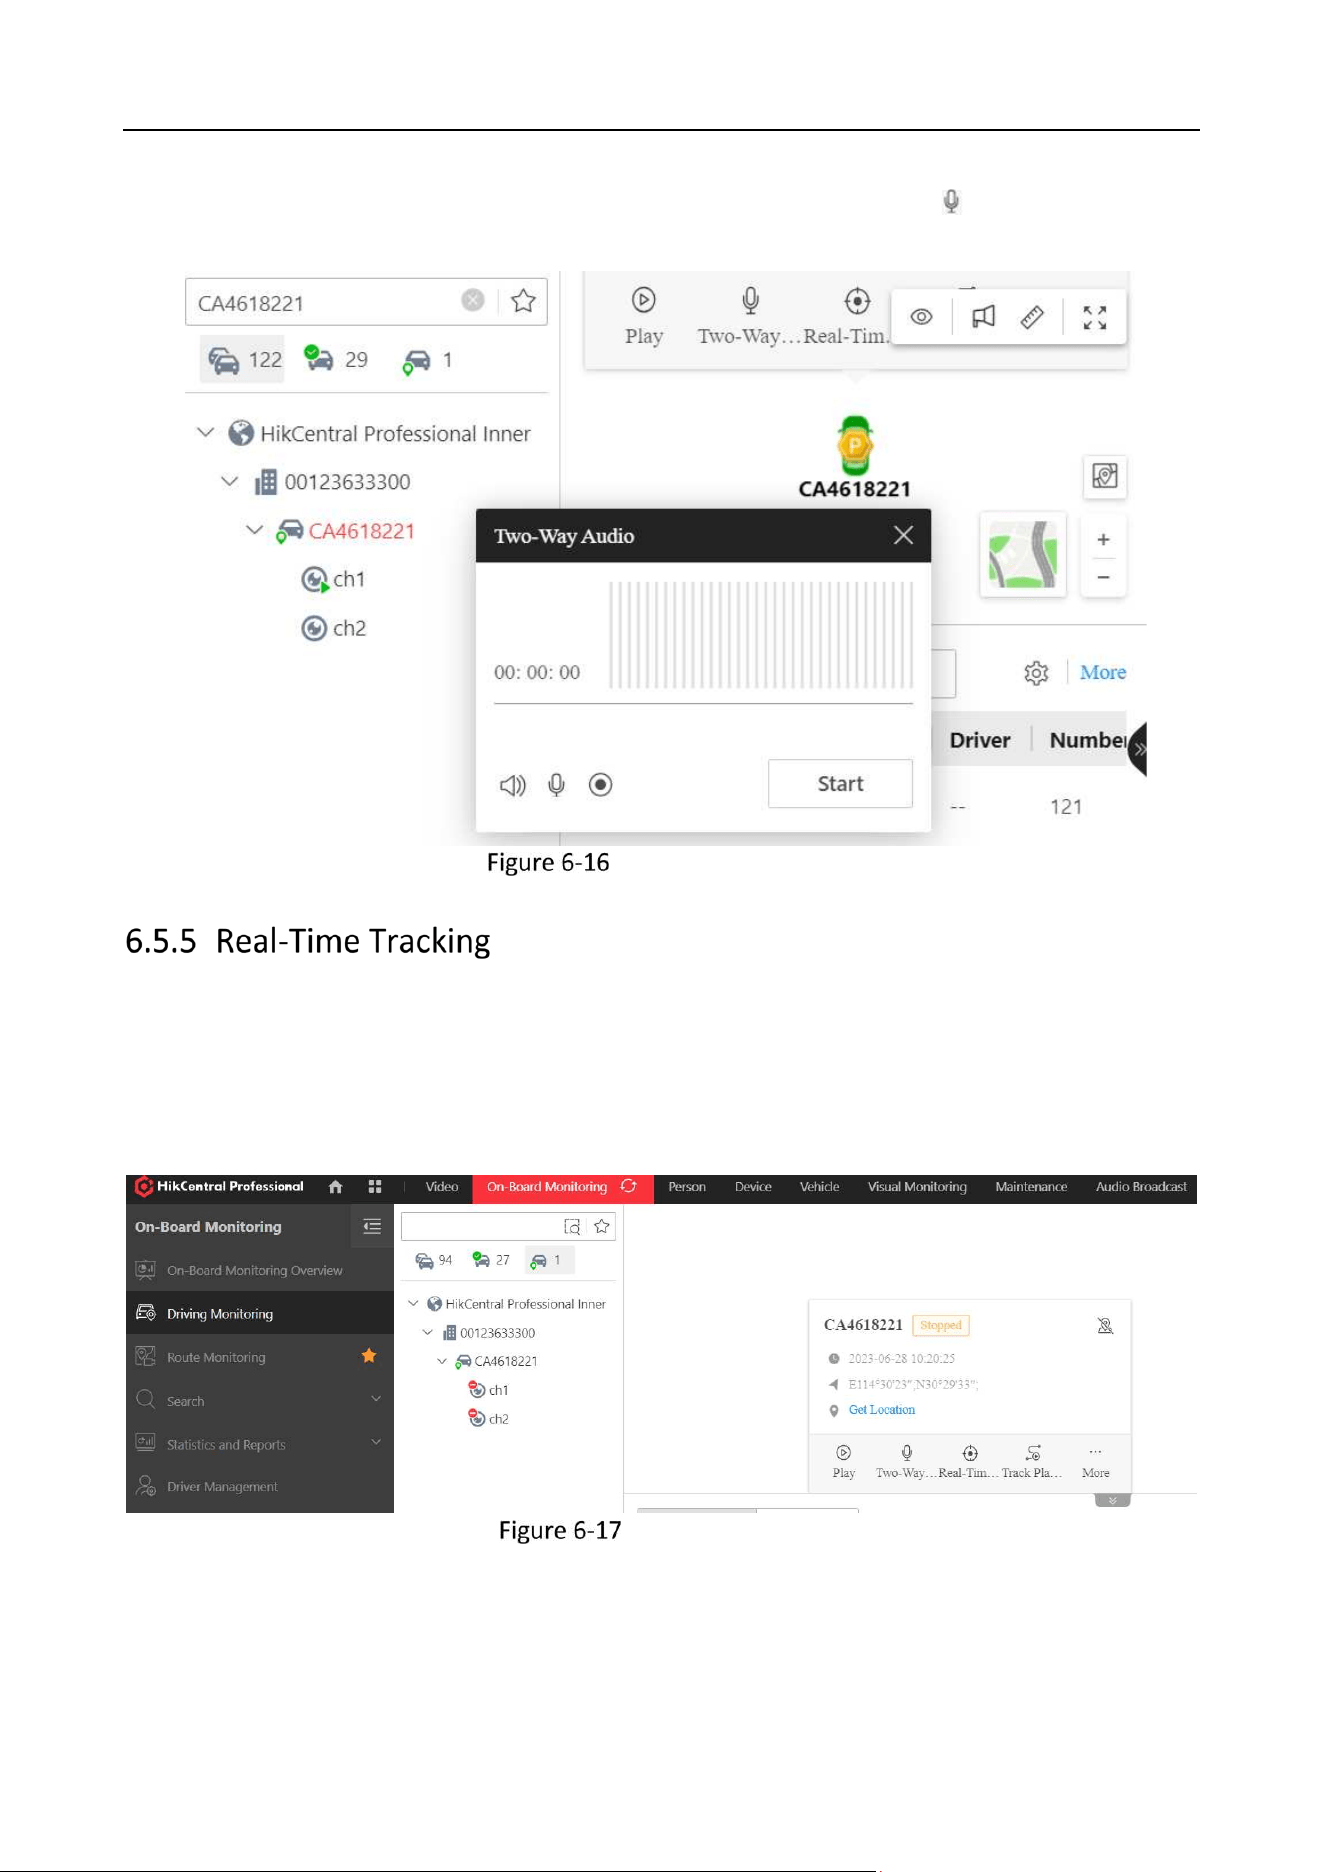
Go to the live view interface of the client and click the two-way audio icon to prompt the
interface.
Start Two-Way Audio
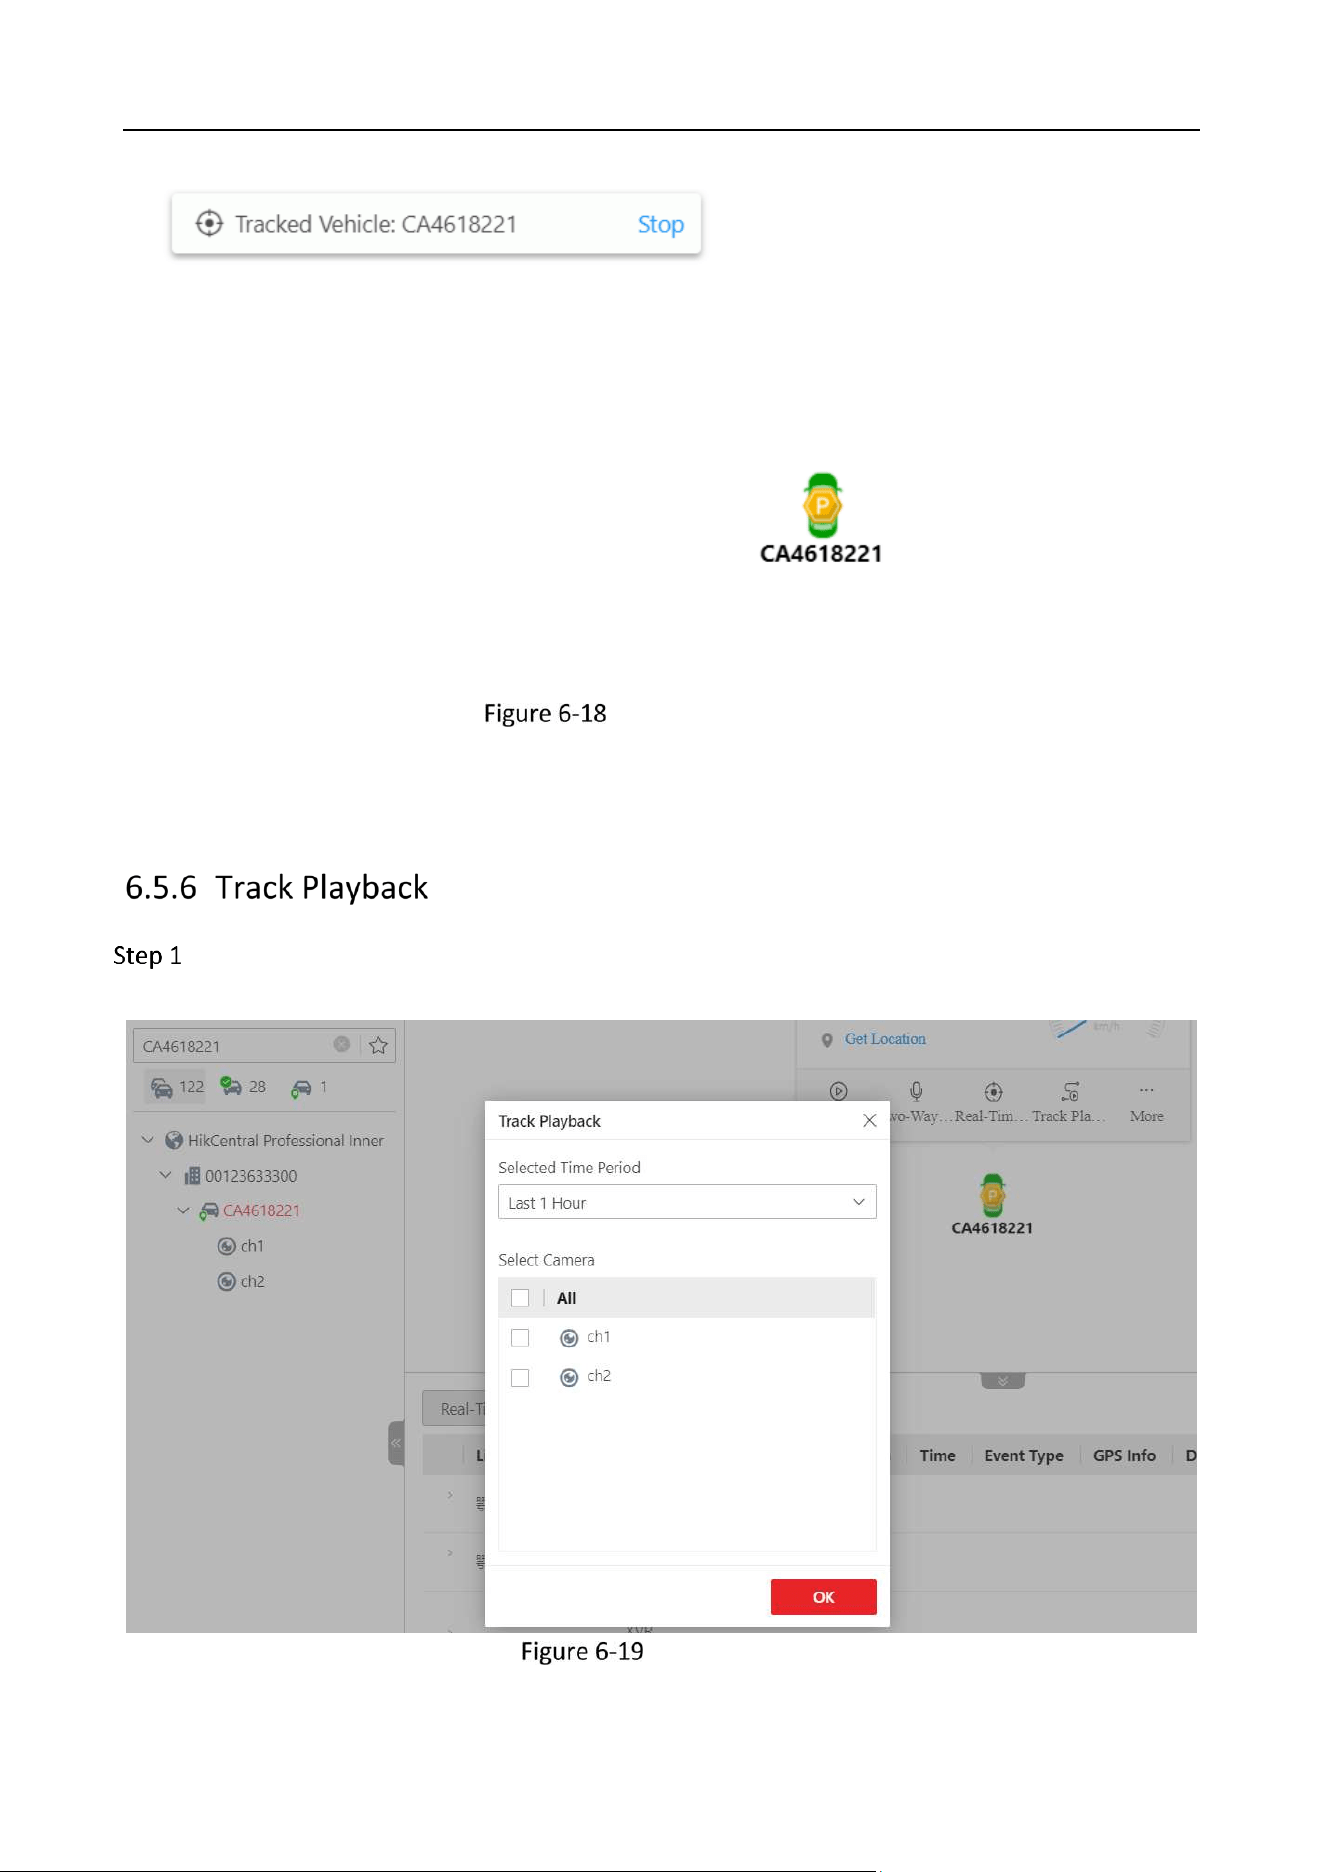
Click Real-Time Tracking to locate the G40 device. To get the GPS information, you can click Get
Location and the location information will be displayed after the positioning succeeds.
Real-Time Tracking
Industry Dashcam • User Manual
60
Position of the Device
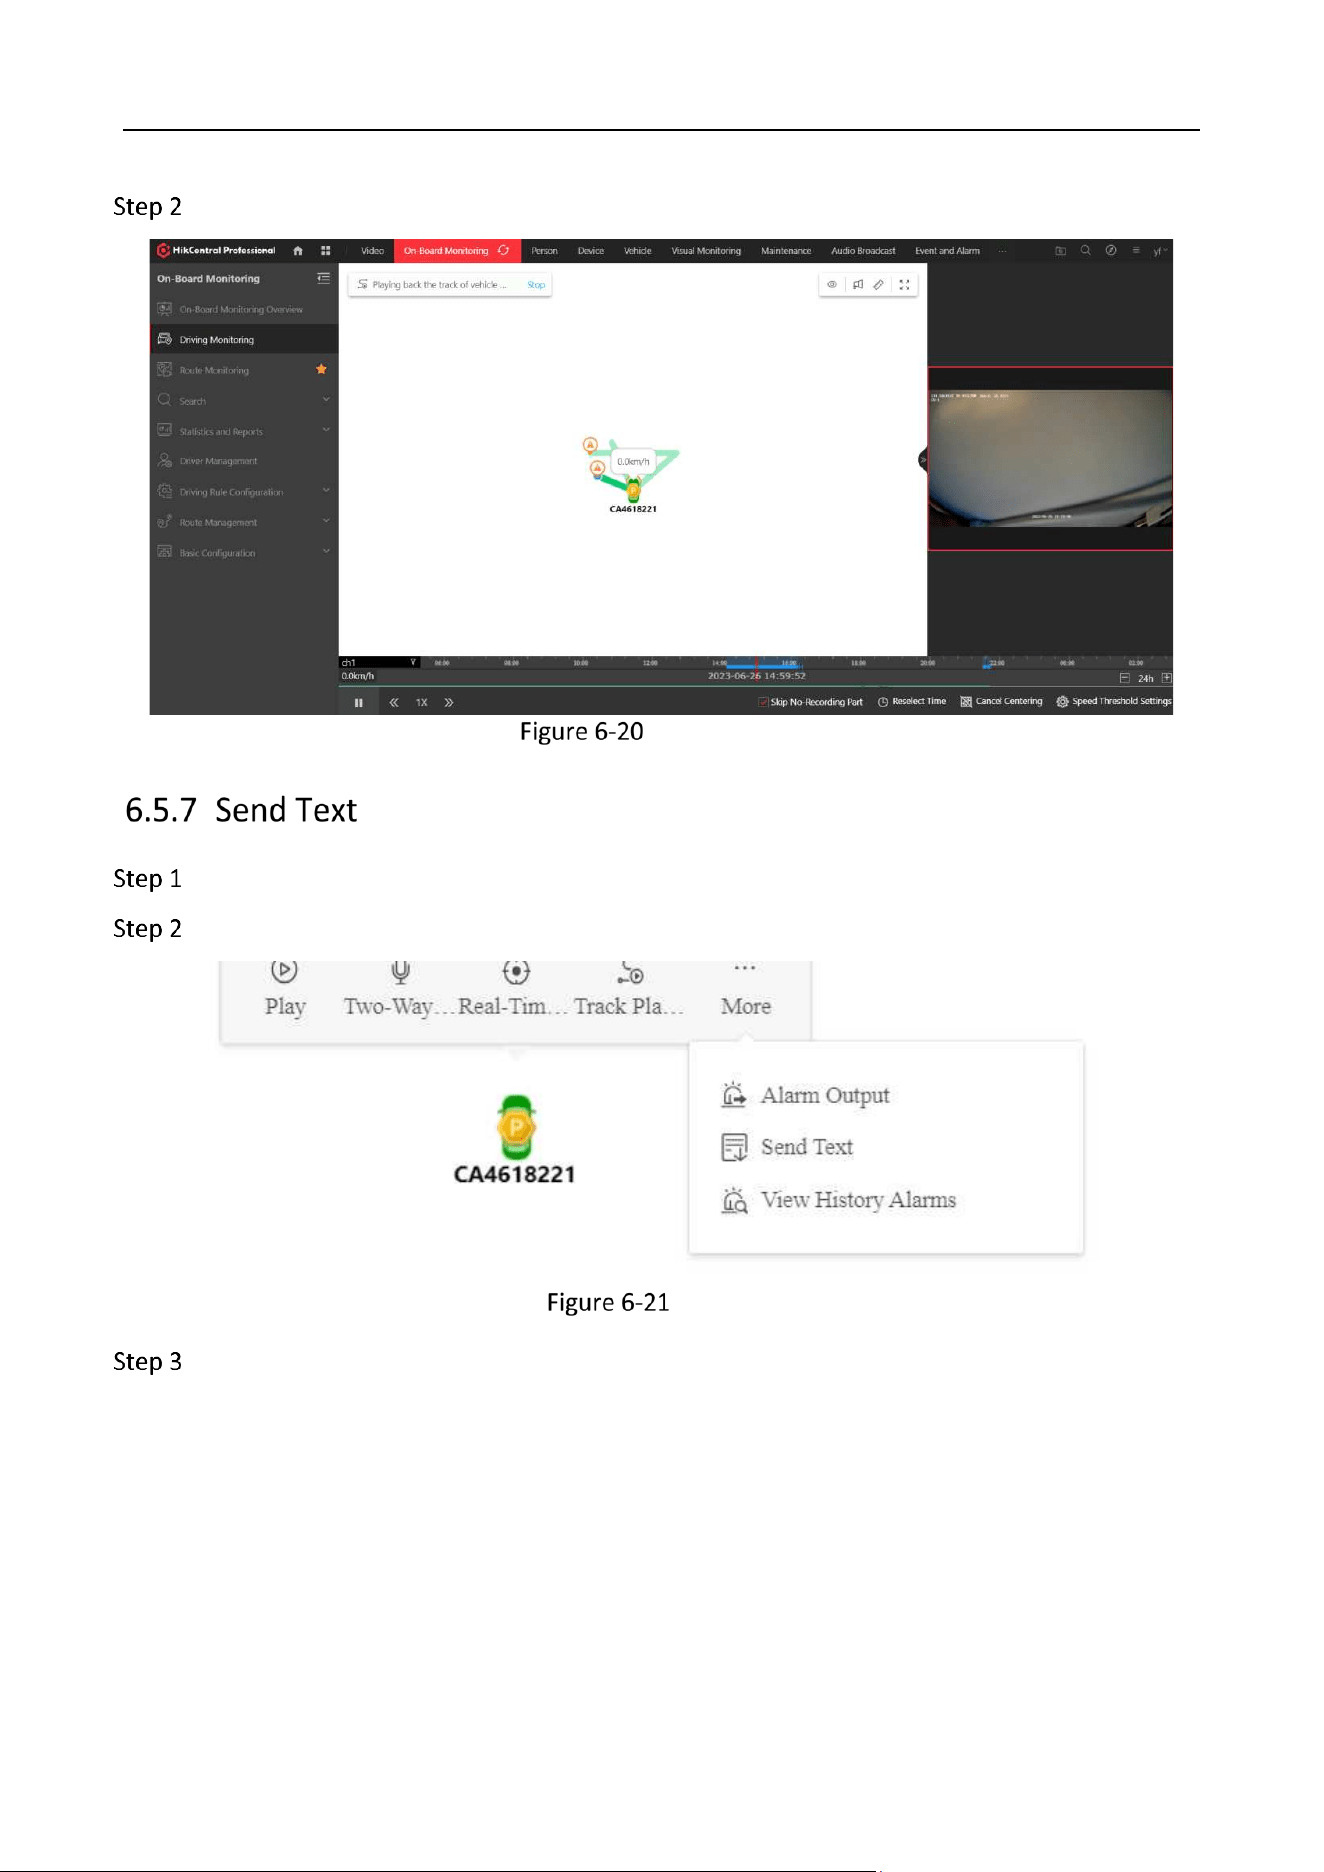
Go to the live view interface of the client and click Track to prompt the Track Playback
interface.
Track Playback
Industry Dashcam • User Manual
61
Select a time period and the camera channel for the play back.
Track Interface
Go to the live view interface.
Click More and select Send Text.
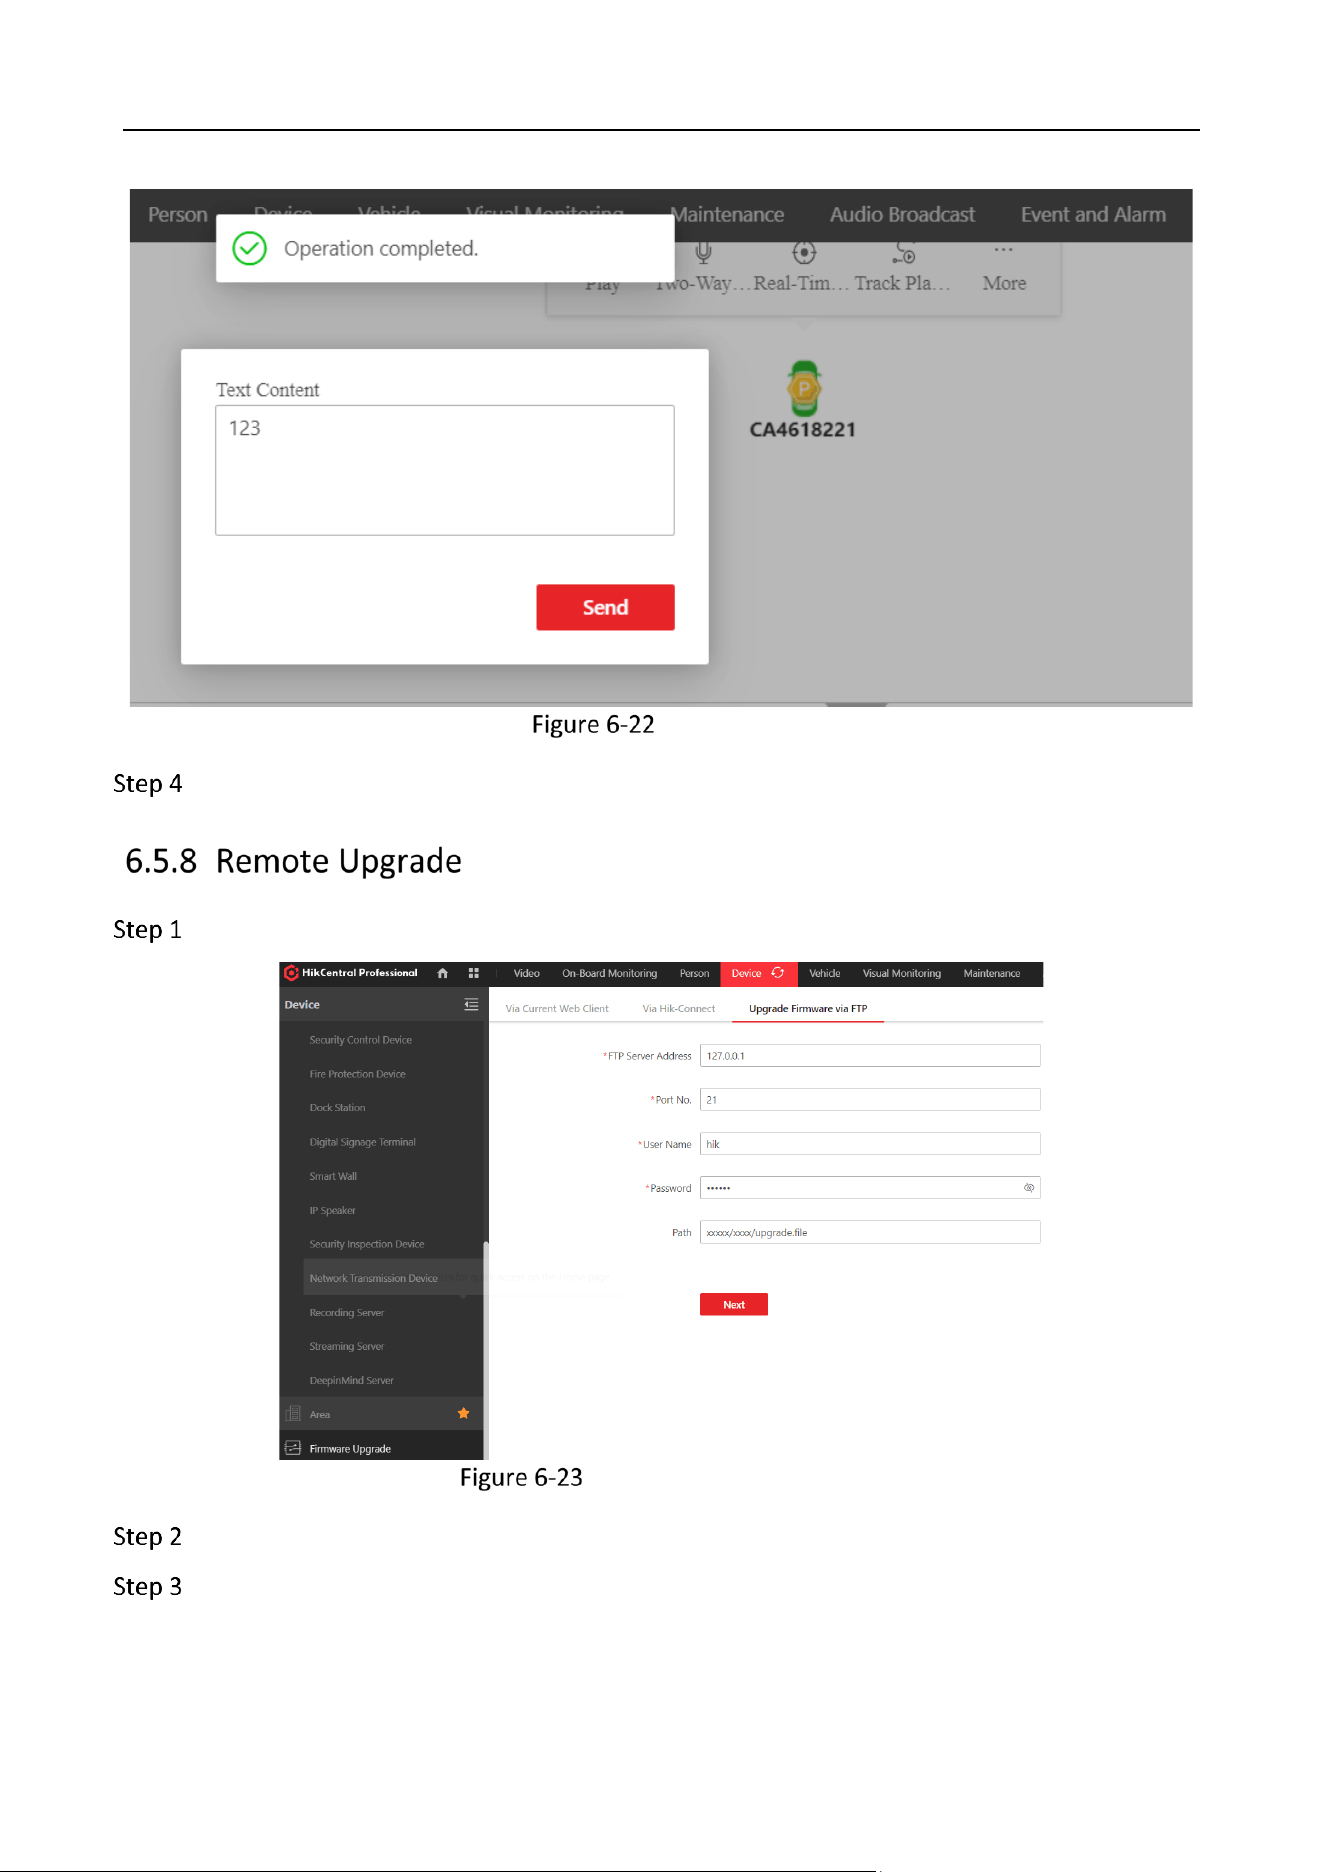
Send Text
Enter the text to send.
Industry Dashcam • User Manual
62
Edit the Text
Click Send.
Click Firmware Upgrade → Upgrade Firmware via FTP.
Upgrade Firmware via FTP
Enter the FTP Server Address on which the upgrade package has been uploaded.
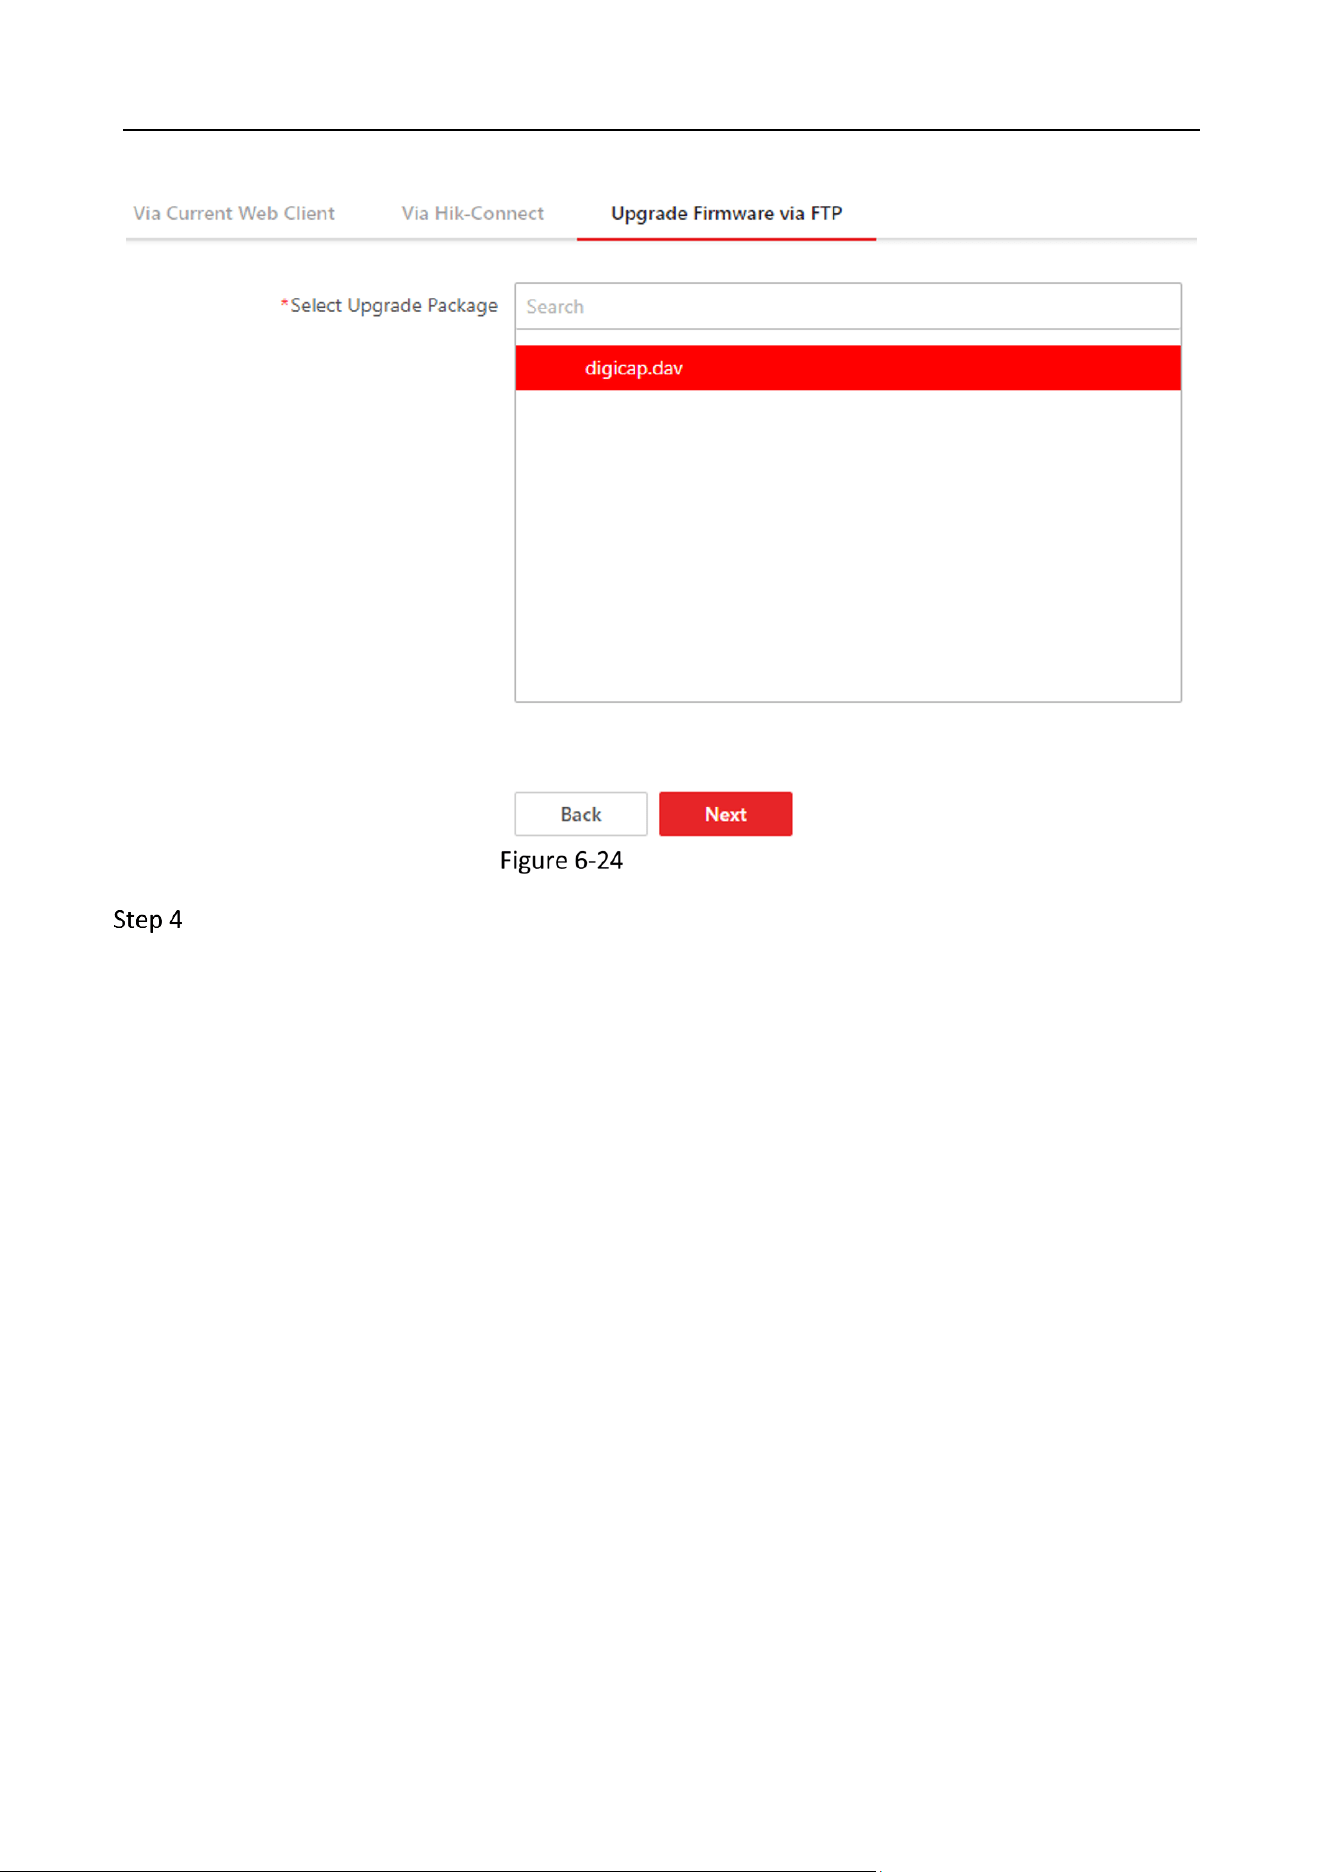
Click Next and select the upgrade package.
Industry Dashcam • User Manual
63
Select the Package
Select the device to upgrade and the schedule.
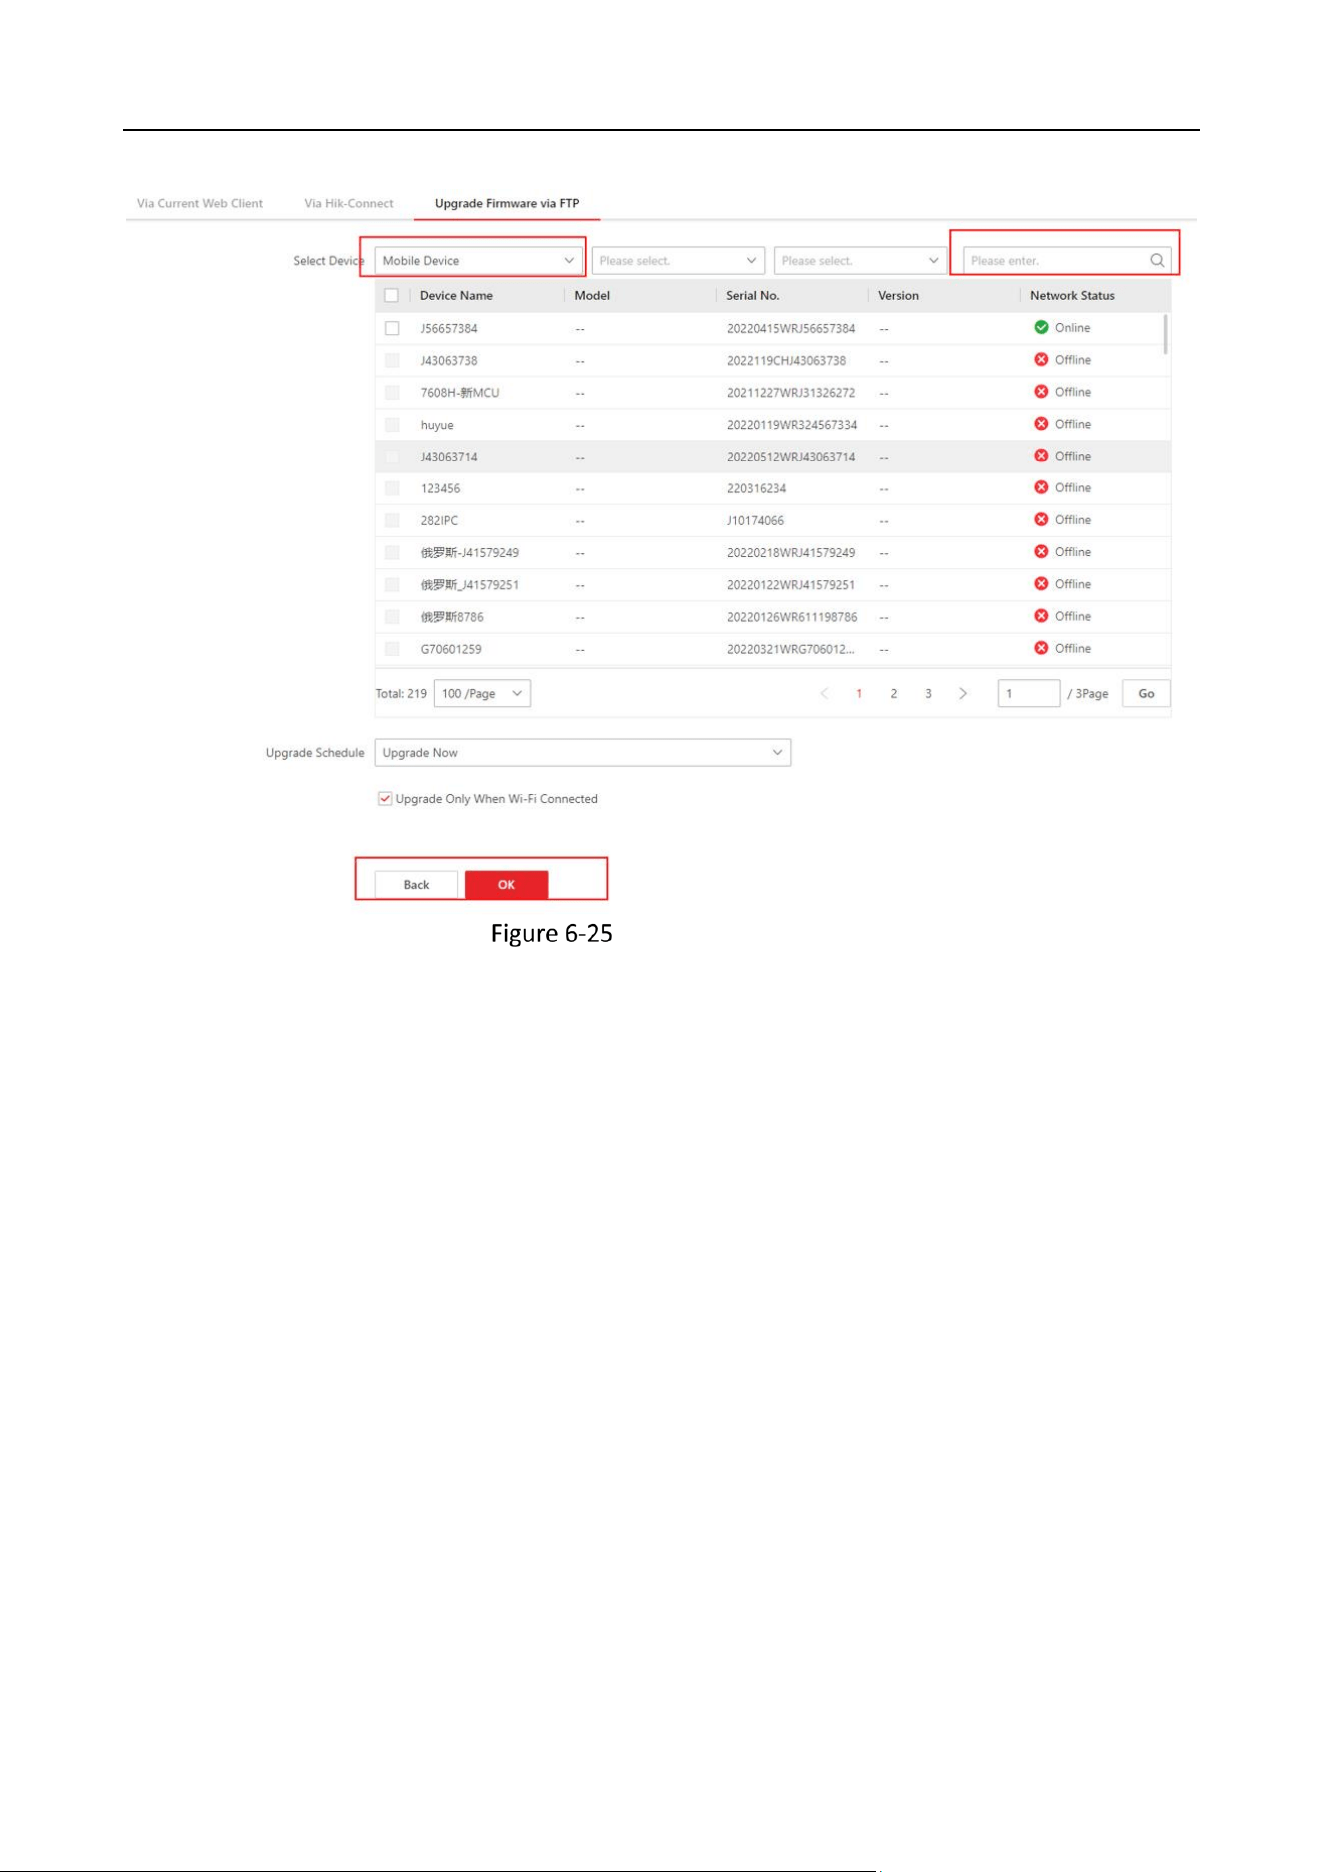
Industry Dashcam • User Manual
64
Upload Upgrade File

Industry Dashcam • User Manual
65
Chapter 7 FAQ
For a quick look into the status of the dashcam, check the following table.
Device Indicator Status
Indicator
Status
Description
Wi-Fi Status Indicator
Steady
Wi-Fi AP open, App connected
Flashing
Wi-Fi AP open, App connected
Off
Wi-Fi AP closed
4G Status Indicator
Steady
4G signal normal, platform connection normal
Flashing
4G signal normal, no platform connection
Off
No 4G signal
Positioning (GNSS) Status
Indicator
Steady
Positioning normally
Off
Positioning abnormally
Recording (REC) Status
Indicator
Steady
Recording normally
Off
Recording abnormally. Check your TF cards.
Dashcam Start Failure
• Check whether the power supply is consistent with the required parameters of the dashcam.
• Check that the power cord is connected.
• Check that the vehicle power supply is normal.
Video Recording Failure
• Please confirm that you have inserted a TF card.
• Please confirm if the TF card is damaged, and if it is damaged, replace the TF card.
• Please try formatting the TF card.
Position Failure
• Please check for obstruction around the vehicle, and drive the vehicle to an open road. If the GNSS
indicator is always on, this indicates that the dashcam is operating normally.
• Do not install the dashcam on the special car film. Some car film will affect the positioning signal,
you need to move the dashcam to a place without the car film covering.

Industry Dashcam • User Manual
66
Blurry Video Image
• Please check whether you have removed the lens protector.
• Whether the lens is dirty.

0