

EN
FR
DE
IT
ES
JA
ZH
English
France:Français
Deutschland:Deutsch
Italia:Italiano
España:Español
日本:日本語
中文:简体中文

Readthisrst
ReadthroughthisInstallationGuidecarefullybefore
installingtheproduct.KeeptheInstallationGuidefor
futurereference.
Legalconsiderations
Videoandaudiosurveillancecanberegulatedbylaws
thatvaryfromcountrytocountry.Checkthelaws
inyourlocalregionbeforeusingthisproductfor
surveillancepurposes.
Thisproductincludesthefollowinglicences:
•one(1)AACdecoderlicense
•one(1)H.264decoderlicense
•one(1)H.265decoderlicense
Topurchasefurtherlicenses,contactyourreseller.
Thisproductissubjecttoexportcontrolregulations.
Youshouldalwaysconsultandcomplywiththe
regulationsoftheappropriatelocalexportcontrol
authorities.
Liability
Everycarehasbeentakeninthepreparationofthis
document.PleaseinformyourlocalAxisofceof
anyinaccuraciesoromissions.AxisCommunications
ABcannotbeheldresponsibleforanytechnicalor
typographicalerrorsandreservestherighttomake
changestotheproductandmanualswithoutprior
notice.AxisCommunicationsABmakesnowarranty
ofanykindwithregardtothematerialcontained
withinthisdocument,including,butnotlimitedto,
theimpliedwarrantiesofmerchantabilityandtness
foraparticularpurpose.AxisCommunicationsAB
shallnotbeliablenorresponsibleforincidental
orconsequentialdamagesinconnectionwiththe
furnishing,performanceoruseofthismaterial.This
productisonlytobeusedforitsintendedpurpose.
Intellectualpropertyrights
AxisABhasintellectualpropertyrightsrelatingto
technologyembodiedintheproductdescribedinthis
document.Inparticular,andwithoutlimitation,these
intellectualpropertyrightsmayincludeoneormoreof
thepatentslistedataxis.com/patentandoneormore
additionalpatentsorpendingpatentapplicationsin
theUSandothercountries.
Thisproductcontainslicensedthird-partysoftware.
Seethemenuitem“About”intheproduct’suser
interfaceformoreinformation.
Thisproductcontainssourcecodecopyright
AppleComputer,Inc.,undertheterms
ofApplePublicSourceLicense2.0(see
opensource.apple.com/apsl).Thesourcecode
isavailablefromdeveloper.apple.com/bonjour/.
Equipmentmodications
Thisequipmentmustbeinstalledandusedin
strictaccordancewiththeinstructionsgivenin
theuserdocumentation.Thisequipmentcontains
nouser-serviceablecomponents.Unauthorized
equipmentchangesormodicationswillinvalidateall
applicableregulatorycerticationsandapprovals.
Trademarkacknowledgements
AXISCOMMUNICATIONS,AXISandVAPIXare
registeredtrademarksortrademarkapplicationsof
AxisABinvariousjurisdictions.Allothercompany
namesandproductsaretrademarksorregistered
trademarksoftheirrespectivecompanies.
Apple,Apache,Bonjour,Ethernet,InternetExplorer,
Linux,Microsoft,Mozilla,Real,SMPTE,QuickTime,
UNIX,Windows,andWWWareregisteredtrademarks
oftherespectiveholders.JavaandallJava-based
trademarksandlogosaretrademarksorregistered
trademarksofOracleand/oritsafliates.TheUPnP
WordMarkandUPnPLogoaretrademarksofOpen
ConnectivityFoundation,Inc.intheUnitedStatesor
othercountries.
microSD,microSDHC,and
microSDXCLogosaretrademarksofSD-3CLLC.
microSD,microSDHC,microSDXCaretrademarksor
registeredtrademarksofSD-3C,LLCintheUnited
States,othercountriesorboth.
Regulatoryinformation
Europe
ThisproductcomplieswiththeapplicableCEmarking
directivesandharmonizedstandards:
•ElectromagneticCompatibility(EMC)Directive
2014/30/EU.SeeElectromagneticcompatibility
(EMC)onpage4.
•LowVoltageDirective(LVD)2014/35/EU.See
Safetyonpage5.
•RestrictionofHazardousSubstances(RoHS)
Directive2011/65/EUand2015/863,including
anyamendments,updatesorreplacements.See
Disposalandrecyclingonpage5.
Acopyoftheoriginaldeclarationofconformity
maybeobtainedfromAxisCommunicationsAB.See
Contactinformationonpage6.
Electromagneticcompatibility(EMC)
Thisequipmenthasbeendesignedandtestedtofulll
applicablestandardsfor:
•Radiofrequencyemissionwheninstalled
accordingtotheinstructionsandusedinits
intendedenvironment.
•Immunitytoelectricalandelectromagnetic
phenomenawheninstalledaccordingtothe
instructionsandusedinitsintendedenvironment.
USA
Thisdevicecomplieswithpart15oftheFCCRules.
Operationissubjecttothefollowingtwoconditions:
1.Thisdevicemaynotcauseharmfulinterference,
and
2.thisdevicemustacceptanyinterferencereceived,
includinginterferencethatmaycauseundesired
operation.
Thisequipmenthasbeentestedusingashielded
networkcable(STP)andfoundtocomplywiththe
limitsforaClassAdigitaldevice,pursuanttopart15
oftheFCCRules.Theselimitsaredesignedtoprovide
reasonableprotectionagainstharmfulinterference
whentheequipmentisoperatedinacommercial
environment.Thisequipmentgenerates,uses,andcan
radiateradiofrequencyenergyand,ifnotinstalledand
usedinaccordancewiththeinstructionmanual,may
causeharmfulinterferencetoradiocommunications.
Operationofthisequipmentinaresidentialareais
likelytocauseharmfulinterferenceinwhichcasethe

userwillberequiredtocorrecttheinterferenceathis
ownexpense.Theproductshallbeconnectedusinga
shieldednetworkcable(STP)thatisproperlygrounded.
Contactinformation
AxisCommunicationsInc.
300ApolloDrive
Chelmsford,MA01824
UnitedStatesofAmerica
Tel:+19786142000
Canada
Thisdigitalapparatuscomplieswith
CANICES-3(ClassA).Theproductshallbe
connectedusingashieldednetworkcable(STP)that
isproperlygrounded.Cetappareilnumériqueest
conformeàlanormeCANNMB-3(classeA).Leproduit
doitêtreconnectéàl'aided'uncâbleréseaublindé
(STP)quiestcorrectementmisàlaterre.
Europe
ThisdigitalequipmentfulllstherequirementsforRF
emissionaccordingtotheClassAlimitofEN55032.
Theproductshallbeconnectedusingashielded
networkcable(STP)thatisproperlygrounded.Notice!
ThisisaClassAproduct.Inadomesticenvironment
thisproductmaycauseRFinterference,inwhichcase
theusermayberequiredtotakeadequatemeasures.
Australia/NewZealand
Thisdigitalequipmentfulllstherequirements
forRFemissionaccordingtotheClassAlimitof
AS/NZSCISPR32.Theproductshallbeconnected
usingashieldednetworkcable(STP)thatisproperly
grounded.Notice!ThisisaClassAproduct.Ina
domesticenvironmentthisproductmaycauseRF
interference,inwhichcasetheusermayberequired
totakeadequatemeasures.
Japan
この装置は、クラスA機器です。この装置を
住宅環境で使⽤すると電波妨害を引き起こす
ことがあります。この場合には使⽤者が適切
な対策を講ずるよう要求されることがありま
す。VCCI‒A
本製品は、シールドネットワークケーブル
(STP)を使⽤して接続してください。また適切
に接地してください。
本製品は電気通信事業者(移動通信会社、固
定通信会社、インターネットプロバイダ等)
の通信回線(公衆無線LANを含む)に直接接
続することができません。本製品をインター
ネットに接続する場合は、必ずルータ等を経
由し接続してください。
Korea
이기기는업무용환경에서사용할목적으로적
합성평가를받은기기로서가정용환경에서사
용하는경우전파간섭의우려가있습니다.적절
히접지된STP(shieldedtwistedpair)케이블을
사용하여제품을연결하십시오.
Safety
ThisproductcomplieswithIEC/EN/UL62368-1,
safetyofaudio/videoandITequipment,and
IEC/EN/UL60950-22,SafetyofInformation
TechnologyEquipment.
Theproductshallbegroundedusingboththe
protectivegroundingwireinthepowercableand
thegroundingbraid.Makesurebothendsofthe
protectivegroundingwireandthegroundingbraidare
incontactwiththeirrespectivegroundingsurfaces.
Thepowersupplyusedwiththisproductshallhave
aratedoutputvoltagewithinvoltagerangeof
20-28VAC/DC,andamaxcurrentratingof10.5A.
WerecommendtheuseofAxispowersupplyDINPS24
480W.
Disposalandrecycling
Whenthisproducthasreachedtheendofits
usefullife,disposeofitaccordingtolocallawsand
regulations.Forinformationaboutyournearest
designatedcollectionpoint,contactyourlocal
authorityresponsibleforwastedisposal.Inaccordance
withlocallegislation,penaltiesmaybeapplicablefor
incorrectdisposalofthiswaste.
Europe
Thissymbolmeansthattheproductshallnotbe
disposedoftogetherwithhouseholdorcommercial
waste.Directive2012/19/EUonwasteelectrical
andelectronicequipment(WEEE)isapplicablein
theEuropeanUnionmemberstates.Toprevent
potentialharmtohumanhealthandtheenvironment,
theproductmustbedisposedofinanapproved
andenvironmentallysaferecyclingprocess.For
informationaboutyournearestdesignatedcollection
point,contactyourlocalauthorityresponsiblefor
wastedisposal.Businessesshouldcontacttheproduct
supplierforinformationabouthowtodisposeofthis
productcorrectly.
Thisproductcomplieswiththerequirementsof
Directive2011/65/EUand2015/863ontherestriction
oftheuseofcertainhazardoussubstancesinelectrical
andelectronicequipment(RoHS).
China
Thisproductcomplieswiththerequirements
ofSJ/T11364-2014,Markingfortherestrictionof
hazardoussubstancesinelectricalandelectronic
products.
有毒有害物质或元素
部
件
名
称
铅
(Pb)
汞
(Hg)
镉
(Cd)
六
价
铬
(Cr-
(VI))
多
溴
联
苯
(PB-
B)
多
溴
二
苯
醚
(PB-
DE)
电
气
实
装
部
分
X
00000
0:表示该有毒有害物质在该部件均质材料
中的含量均在GB/T26572标准规定的限量要
求以下。
X:表示该有毒有害物质至少在该部件的某一
均质材料中的含量超出GB/T26572标准规定的
限量要求。

Contactinformation
AxisCommunicationsAB
Emdalavägen14
22369Lund
Sweden
Tel:+46462721800
Fax:+4646136130
axis.com
Warrantyinformation
ForinformationaboutAxis’productwarrantyand
theretorelatedinformation,gotoaxis.com/warranty.
Support
Shouldyourequireanytechnicalassistance,please
contactyourAxisreseller.Ifyourquestionscannotbe
answeredimmediately,yourresellerwillforwardyour
queriesthroughtheappropriatechannelstoensurea
rapidresponse.IfyouareconnectedtotheInternet,
youcan:
•downloaduserdocumentationandsoftware
updates
•ndanswerstoresolvedproblemsintheFAQ
database,searchbyproduct,category,orphrase
•reportproblemstoAxissupportstaffbylogging
intoyourprivatesupportarea
•chatwithAxissupportstaff
•visitAxisSupportataxis.com/support
Learnmore!
VisitAxislearningcenteraxis.com/academyforuseful
trainings,webinars,tutorialsandguides.

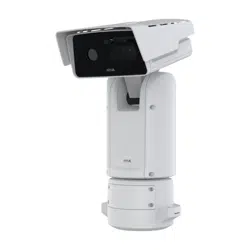
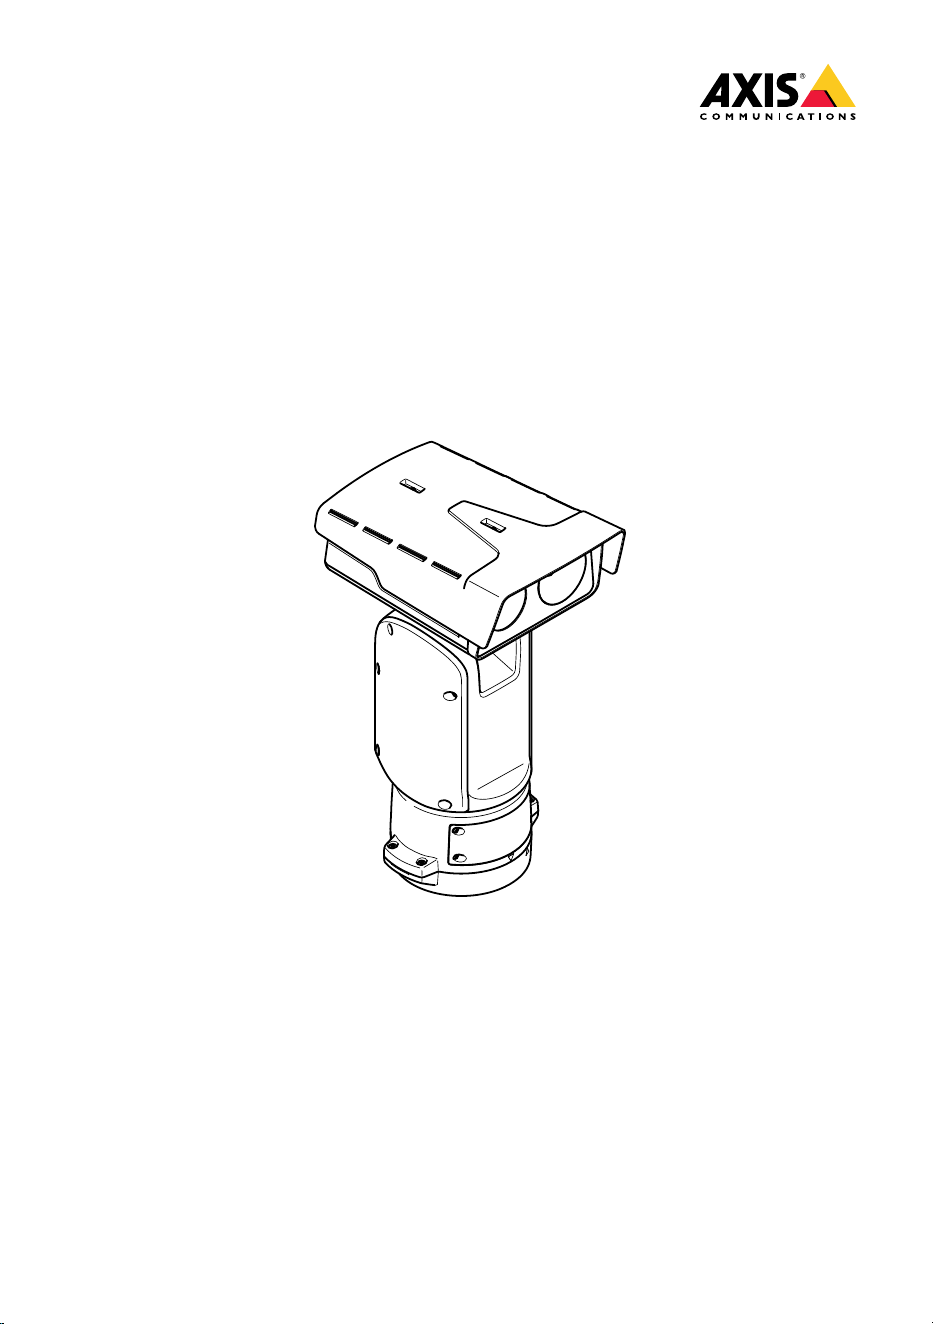
AXISQ8752-EBispectralPTZCamera
Packagecontents
7
EN

AXISQ8752-EBispectralPTZCamera
Productoverview
1
Weathershield
2
Topcover
3
Innercover
4
Positioningunit
5
Baseunitscrews
6
Baseunit
7
Wiper
8
Frontwithprotectivefoil
9
Visuallens
10
Thermallens
11
Lid
8

AXISQ8752-EBispectralPTZCamera
1
Topcoverconnector
2
RS485connector
3
Powerconnector
4
Controlbutton
5
RJ45connector
6
StatusLED
7
AudioIN3.5mmconnector
8
SDcardslot(microSD,cardnotincluded)
9
Inputpowerconnector
10
I/Oconnector
11
RJ45connector
12
SFPslotforSFPmodule(notincluded)
9
EN

AXISQ8752-EBispectralPTZCamera
Howtoinstalltheproduct
DANGER
Riskofelectricshock.Allcablesshallbede-energizedbeforeinstallingtheproduct.
CAUTION
Theelectricalconnectionsandconduitinstallationsshallbemadebyacertiedelectrician
andincompliancewithlocalregulations.
CAUTION
Riskofinjury.Movingparts.Keepyourbodypartsawayfromtheproductwhenin
operation.Disconnectfrompowersupplybeforeinstallingorperformingmaintenance
ontheproduct.
CAUTION
Riskofinjury.Hotsurface.Donottouchtheproductwheninoperation.Disconnect
frompowersupplyandallowthesurfacestocoolbeforeperformingmaintenanceon
theproduct.
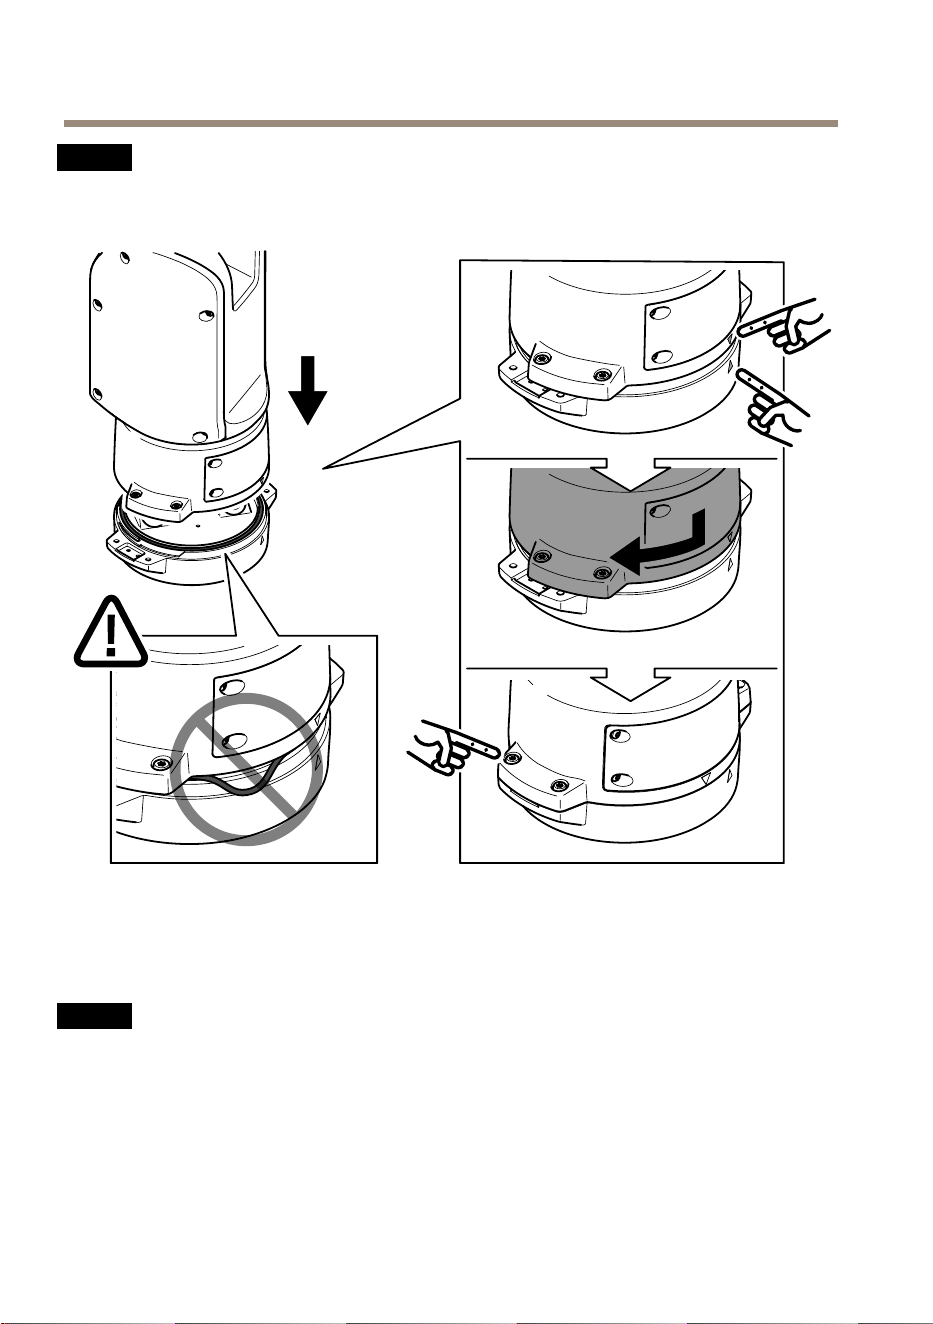
Mountthebaseunit
1
Baseunit
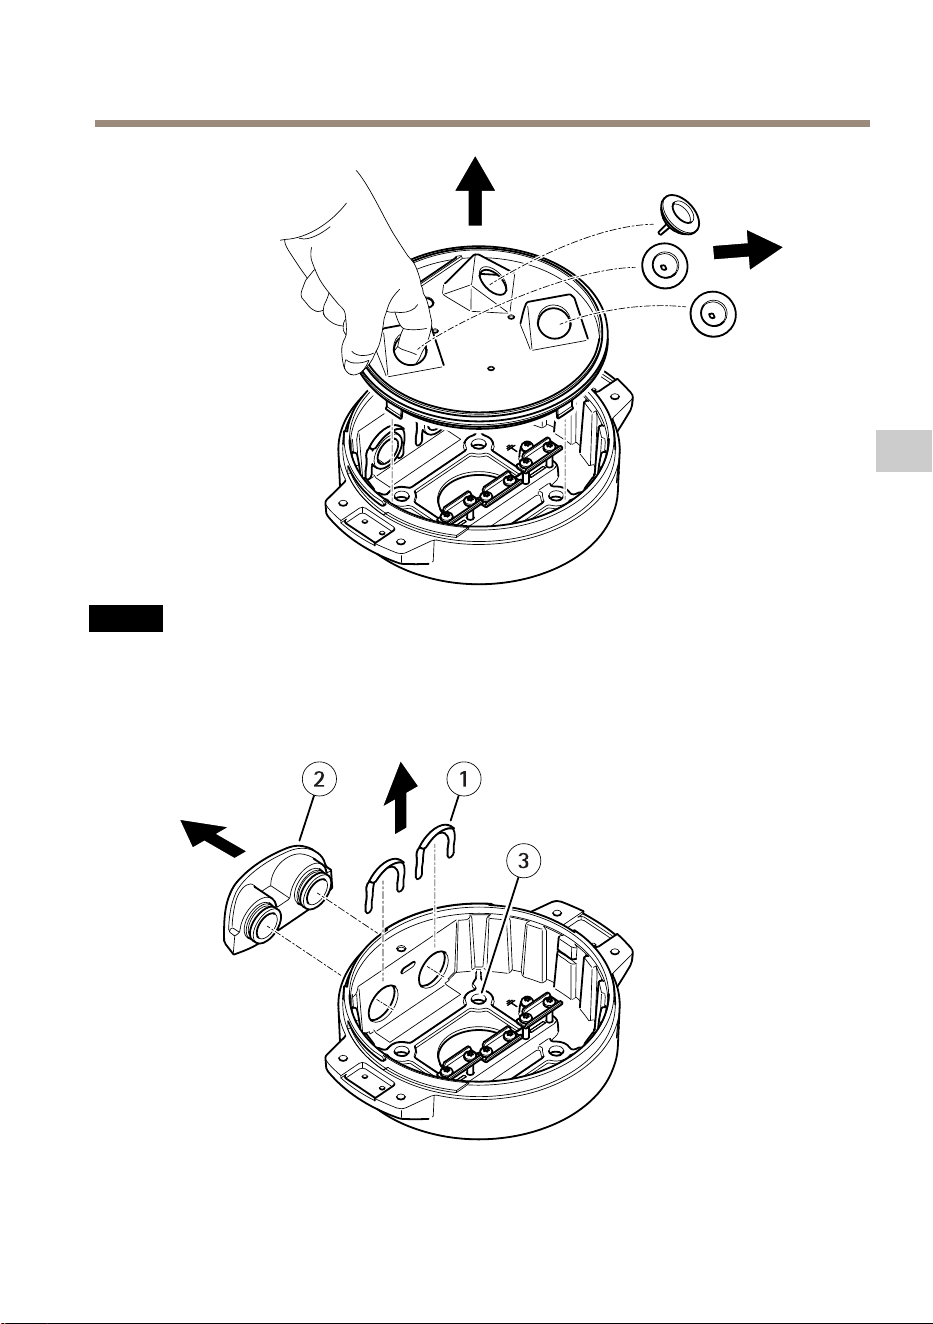
1.Removethefourbaseunitscrews(T30).
2.Simultaneouslypullandturnthebaseunitcounterclockwiseuntilthearrowsonthebase
unitandtherestofthepositioningunitalign.
3.Removethebaseunit.
10

AXISQ8752-EBispectralPTZCamera
NO NO
NO
TICE TICE
TICE
Donotusesharptoolswhenyouremovethetransparentbaseunitcover.
4.Removethetransparentbaseunitcover.
1
Conduitcoverclip
2
Conduitcover
11
EN

AXISQ8752-EBispectralPTZCamera
3
Screwhole(x4)
5.Forconduitinstallationsonly:removethetwoconduitcoverclipsfollowedbythe
conduitcover.
6.Attachthebaseunittothemountingsurfacewithappropriatefastenersinthefour
screwholes.
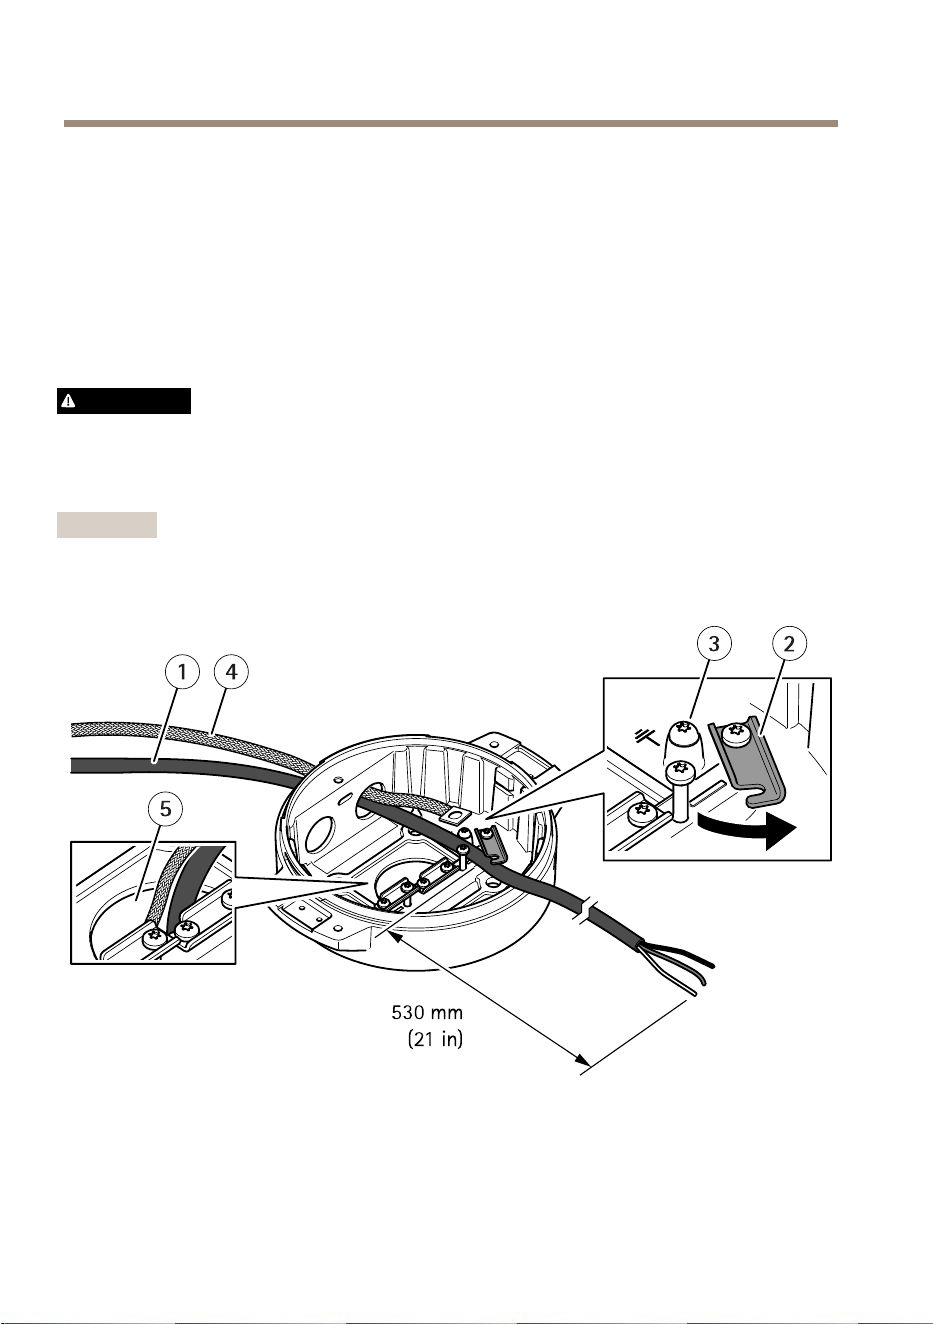
Routethecables
WARNING
Riskofelectricshock.Theproductshallbegroundedusingboththeprotectivegrounding
wireinthepowercableandthegroundingbraid.Makesurebothendsoftheprotective
groundingwireandthegroundingbraidareincontactwiththeirrespectivegrounding
surfaces.
Important
Useonlycablesthatcomplywiththespeciedcablearea.Formoreinformation,see
Cablethicknessonpage22.
1
Powercable(notincluded)
2
Strainrelief
3
Groundingscrew
4
Groundingbraid(notincluded)
5
Bottomcablehole
12

AXISQ8752-EBispectralPTZCamera
1.Installtheoptionalconduitadapters(notincluded).
2.Connectthegroundingbraidtothegroundingscrew.
3.Insertthepowercable,I/Ocableandnetworkcablethroughtheholeinthebaseunitas
shownintheillustrationabove.Alternativelyinsertthemthroughthebottomcablehole.
4.Insertthepowercablethroughthestrainreliefwithadistanceof530mm(21in)from
thestrainrelieftotheendofthecable.
1
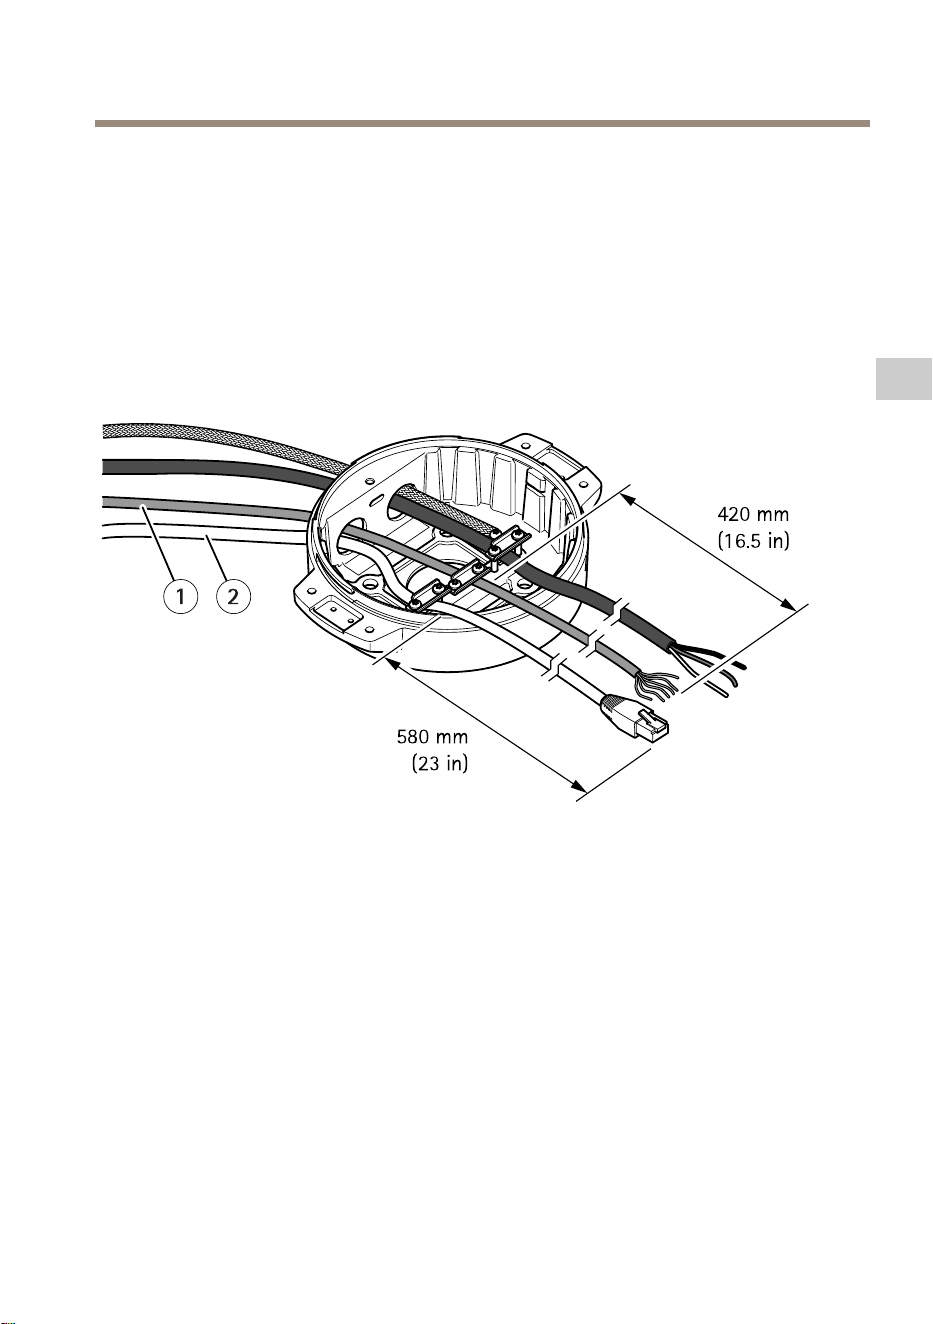
I/Ocable(optional,notincluded)
2
Networkcable(notincluded)
5.InserttheI/Ocable(optional)throughthestrainreliefwithadistanceof420mm(16.5
in)fromthestrainrelieftotheendofthecable.
6.Insertthenetworkcable(opticalbercableand/orRJ45cable)throughthestrainrelief
withadistanceof580mm(23in)fromthestrainrelieftotheendoftheconnector.
Formoreinformationondifferentnetworkconnectivityoptions,seeInstallthenetwork
linkonpage17.
7.Closeandtightenthethreestrainreliefs.
13
EN

AXISQ8752-EBispectralPTZCamera
1
Powercable(notincluded)
2
I/Ocable(optional,notincluded)
3
Networkcable(notincluded)
4
Cablegasket
5
Transparentbaseunitcover
8.Fitcablegasketsonthecables.SeeCablethicknessonpage22.
9.Insertthepower,I/Oandnetworkcablesincludingthecablegasketsthroughtheholesin
thetransparentbaseunitcoverandarrangethecablesasshownintheillustrationabove.
NO NO
NO
TICE TICE
TICE
IfyouusebothanopticalbrecableandanRJ45cablefornetworkconnectivity,routethe
opticalbrecablethroughthesamecablegasketastheI/Ocable.Applyasealantbetween
thecablesandthecablegaskettopreventleakage.Formoreinformationondifferent
networkconnectivityoptions,seeInstallthenetworklinkonpage17.
14
AXISQ8752-EBispectralPTZCamera
10.Placethetransparentbaseunitcoveronthebaseunitandtthecablegasketsinside
theholes.
1
I/Oconnector
2
Powerconnector
3
O-ring
NO NO
NO
TICE TICE
TICE
Tonotaccidentallydisconnecttheunitfrompowerifthecableispulled,lettheprotective
groundingwirebeabout10mm(0.4in)longerthantheothertwowires(inthepower
cable).
Note
Tomaketheinstallationaseasyaspossible,werecommendyoutostripapproximately90
mm(3.5in)ofthepowercablejacketand70mm(2.8in)oftheI/Ocablejacket.
11.InstallthepowerandI/Oconnectors.
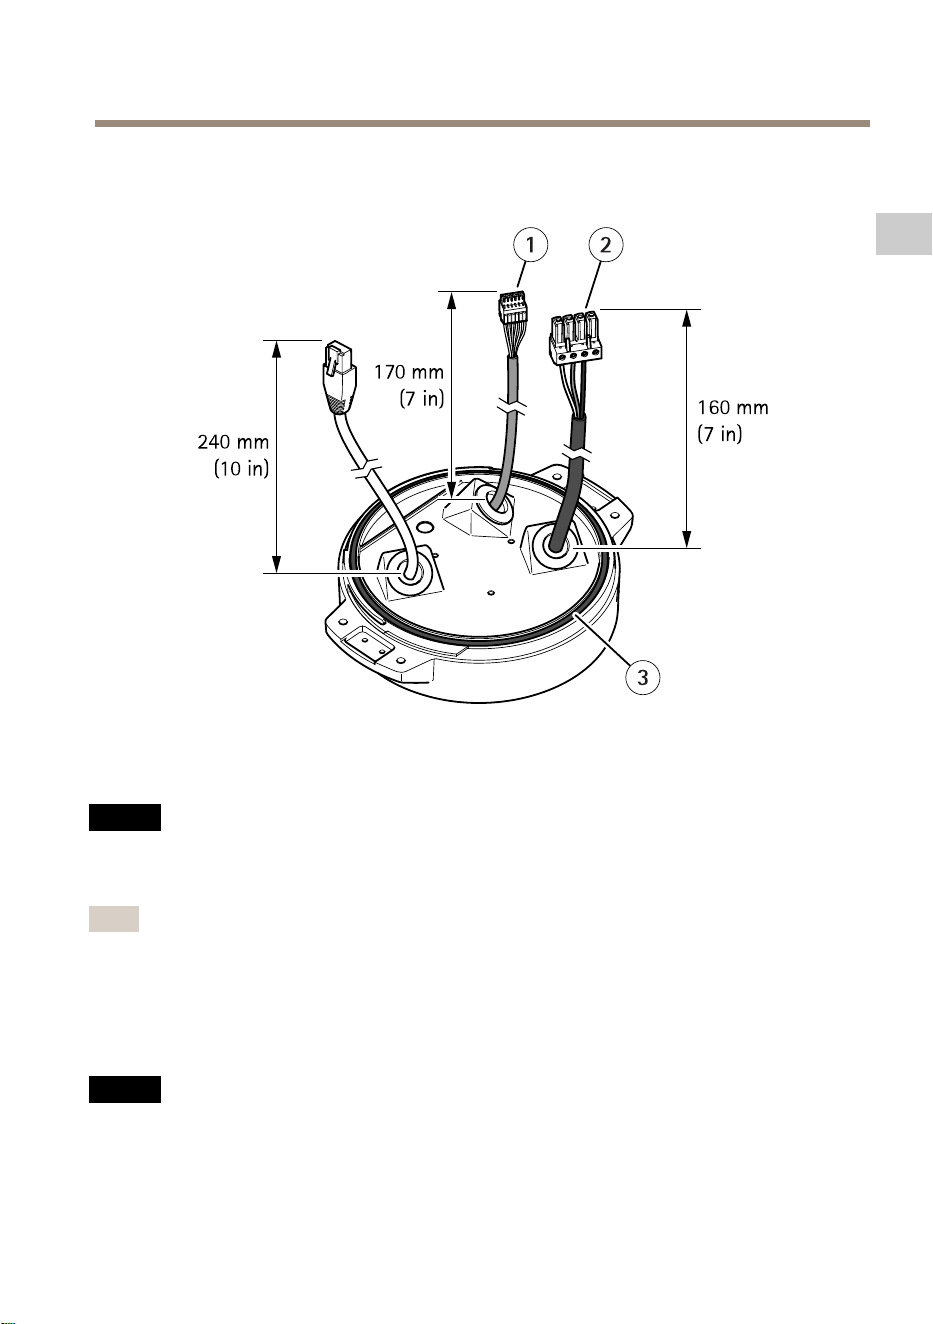
12.Adjustthenetwork,I/Oandpowercablessothatthedistancefromthecablegasketto
theendoftheconnectoris240mm(10in),170mm(7in),and160mm(7in)respectively.
NO NO
NO
TICE TICE
TICE
MakesurethattheO-ringisttedcorrectlyaroundthetransparentbaseunitcover.
15
EN

AXISQ8752-EBispectralPTZCamera
13.Placethepositioningunitonthebaseunit.Makesurethatthearrowsonthetwo
unitsarealigned.
14.Turnthepositioningunitclockwisebacktoitsoriginalpositionandtightenthefour
baseunitscrews(torque3.0Nm).
NO NO
NO
TICE TICE
TICE
Makesurethatthecablesdon’tgetpinchedwhenyouassemblethetwounits.
16

AXISQ8752-EBispectralPTZCamera
Installthenetworklink
Youcanchoosebetweendifferentoptionswhenyouinstallthenetworklink:
•A:viaanopticalberorRJ45cableconnectedtotheSFPmodule(witharespective
connector)intheSFPslot.
•B:viaanRJ45cableconnectedtothexedRJ45connector.
•C:viabothoftheabove,inwhichcasetheSFPmoduleconnectionfunctionsasthe
primarynetworklink,andthexedRJ45connectionfunctionsasthefail-overlink.
Formoreinformationonnetworkconnectorlocations,seeProductoverviewonpage8.
Note
•SFPmoduleisnotincluded.FormoreinformationonavailableSFPmodules,seeaxis.com
•IfyouinstallanetworklinkonlyviatheopticalbercableusingtherespectiveSFP
module,itworksasastand-alonesolutionforlongrangecablinginstallations.
17
EN

AXISQ8752-EBispectralPTZCamera
Connectthecables
1.Loosenthefourlidscrews(T20)andremovethelid.
1
Inputpowerconnector
2
I/Oconnector
3
RJ45connector
4
SFPslotforSFPmodule(SFPmodulenotincluded)
2.Connectthenetwork(opticalbreand/orRJ45),I/Oandpowercables.Formore
informationondifferentnetworkconnectivityoptions,seeInstallthenetworklinkon
page17.
3.Returnthelidtoitspositionandtightenthefourlidscrews(torque3.0Nm).
18

AXISQ8752-EBispectralPTZCamera
4.Removetheprotectivecover.
5.Applypowertotheproduct.
Removetopcover
CAUTION
Riskofinjury.Movingparts.Keepyourbodypartsawayfromtheproductwhenin
operation.Disconnectfrompowersupplybeforeinstallingorperformingmaintenance
ontheproduct.
CAUTION
Riskofinjury.Hotsurface.Donottouchtheproductwheninoperation.Disconnect
frompowersupplyandallowthesurfacestocoolbeforeperformingmaintenanceon
theproduct.
NO NO
NO
TICE TICE
TICE
Whenyouremovethetopcoveryouexposepartsofthevisualcamerathataresensitive
toimpact.Makesureyoudon’thittheunprotectedcamerawiththetopcoverwhen
youremoveit.
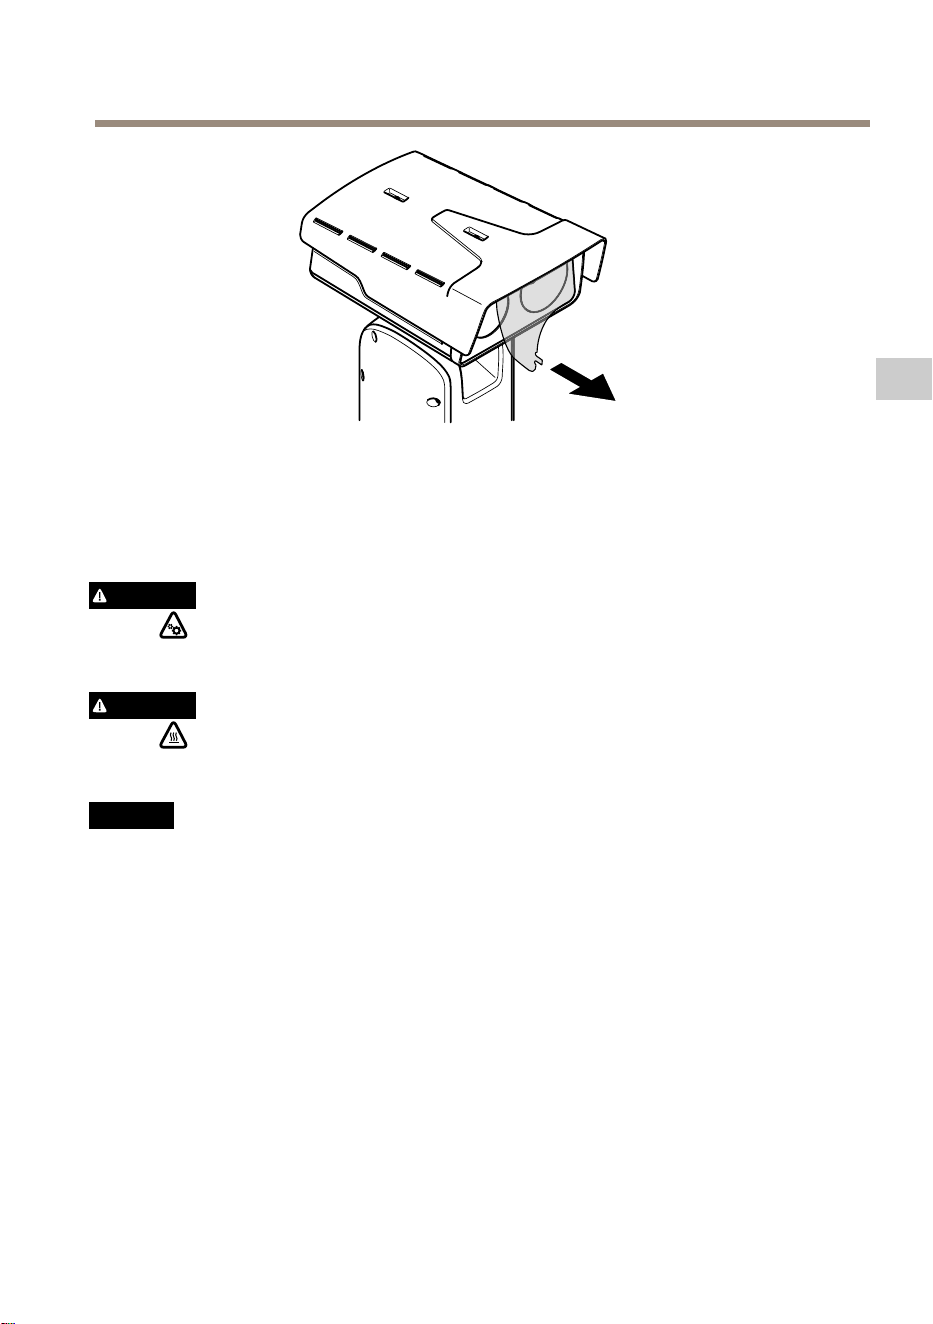
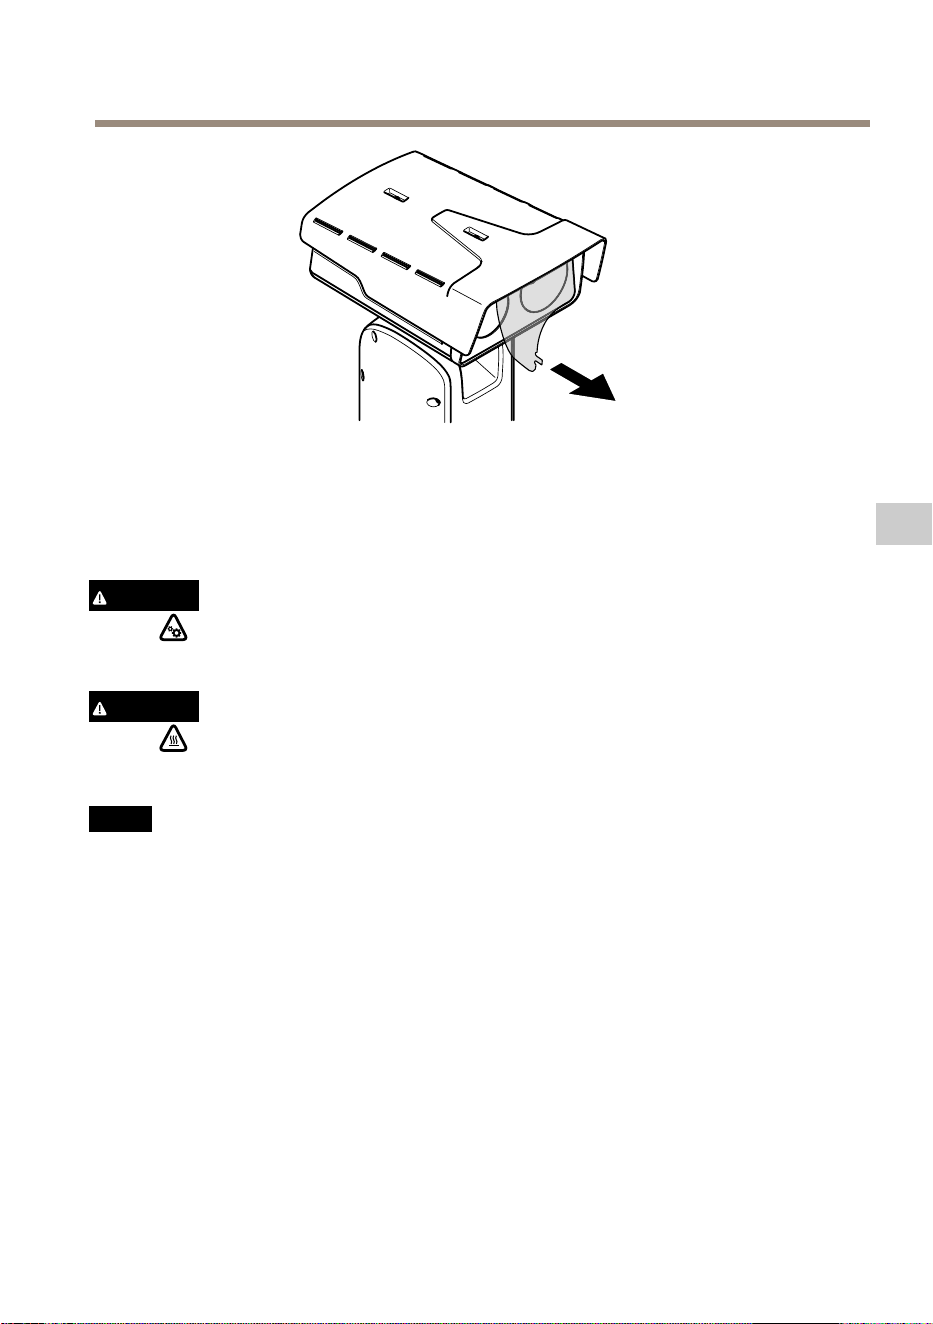
ToinsertanSDcardorresettofactorydefault,removethetopcover:
19
EN


AXISQ8752-EBispectralPTZCamera
2.Settheweathershieldinthepreferredposition.
3.Tightenthetwoweathershieldscrews(torque0.8Nm).
21
EN

AXISQ8752-EBispectralPTZCamera
Specifications
Tondthelatestversionoftheproduct’sdatasheet,gototheproductpageataxis.comand
locateSupport&Documentation.
Cablethickness
Thecablediameter,whenusingcablegasketsprovidedwiththeproduct,shouldbeintherangeof
5to11mm(0.2to0.4in).
NO NO
NO
TICE TICE
TICE
•Usecablesthatkeepwithinthespeciedcablearea
•Selectcablesincompliancewithyourlocalregulations
•Makesureallcableholesareproperlysealed
•Usecablegasketsorcableglandsthatmatchboththecableholeandthecablearea
Forinformationaboutaccessories,suchascablegasketsandcableglandsthatallowforother
cableareas,seewww.axis.com
22

Safetyinformation
Hazardlevels
DANGER
Indicatesahazardoussituationwhich,ifnot
avoided,willresultindeathorseriousinjury.
WARNING
Indicatesahazardoussituationwhich,if
notavoided,couldresultindeathorserious
injury.
CAUTION
Indicatesahazardoussituationwhich,ifnot
avoided,couldresultinminorormoderate
injury.
NO NO
NO
TICE TICE
TICE
Indicatesasituationwhich,ifnotavoided,
couldresultindamagetoproperty.
Othermessagelevels
Important
Indicatessignicantinformationwhichis
essentialfortheproducttofunctioncorrectly.
Note
Indicatesusefulinformationwhichhelpsin
gettingthemostoutoftheproduct.
Safetyinstructions
DANGER
Riskofelectricshock.Allcablesshallbe
de-energizedbeforeinstallingorperforming
maintenanceontheproduct.
WARNING
TheAxisproductshallbeinstalledbya
trainedprofessional,andincompliancewith
locallawsandregulations.
CAUTION
Riskofinjury.Movingparts.Keepyour
bodypartsawayfromtheproductwhenin
operation.Disconnectfrompowersupply
beforeinstallingorperformingmaintenance
ontheproduct.
CAUTION
Riskofinjury.Hotsurface.Donottouch
theproductwheninoperation.Disconnect
frompowersupplyandallowthesurfacesto
coolbeforeperformingmaintenanceonthe
product.
NO NO
NO
TICE TICE
TICE
•TheAxisproductshallbeusedincompliance
withlocallawsandregulations.
•StoretheAxisproductinadryand
ventilatedenvironment.
•AvoidexposingtheAxisproducttoshocks
orheavypressure.
•Donotinstalltheproductonunstablepoles,
brackets,surfacesorwalls.
•Useonlyapplicabletoolswheninstalling
theAxisproduct.Usingexcessiveforcewith
powertoolscouldcausedamagetothe
product.
•Donotusechemicals,causticagents,or
aerosolcleaners.
•Useacleanclothdampenedwithpurewater
forcleaning.
•Useonlyaccessoriesthatcomplywiththe
technicalspecicationofyourproduct.
ThesecanbeprovidedbyAxisorathird
party.AxisrecommendsusingAxispower
sourceequipmentcompatiblewithyour
product.
•Useonlysparepartsprovidedbyor
recommendedbyAxis.
•Donotattempttorepairtheproduct
yourself.ContactAxissupportoryourAxis
resellerforservicematters.
•Donotpointthecameralenstowardthesun
orotherhigh-intensityradiationsources
becausethiscouldcausedamagetothe
camera.
Transportation
NO NO
NO
TICE TICE
TICE
•WhentransportingtheAxisproduct,usethe
originalpackagingorequivalenttoprevent
damagetotheproduct.
Battery
TheAxisproductusesa3.0VBR2032lithiumbattery
asthepowersupplyforitsinternalreal-timeclock
(RTC).Undernormalconditionsthisbatterywilllast
foraminimumofveyears.
LowbatterypoweraffectstheoperationoftheRTC,
causingittoresetateverypower-up.Whenthe
batteryvoltageislow,alogmessagewillappearin
theproduct’sserverreport.
CAUTION
Donotreplacethebatteryyourself.Contact
Axissupportifthelogmessagerequestsa
batterychange.
Lithiumcoincell3.0Vbatteriescontain
1,2-dimethoxyethane;ethyleneglycoldimethylether
(EGDME),CASno.110-71-4.


AXISQ8752-EBispectralPTZCamera
Contenudel’emballage
25
FR

AXISQ8752-EBispectralPTZCamera
Vued'ensembleduproduit
1
Protectionétanche
2
Couverclesupérieur
3
Couvercleinterne
4
Unitédepositionnement
5
Visdel'unitédebase
6
Unitédebase
7
Essuyage
8
Avantavecfeuilledeprotection
9
Objectifvisuel
10
Objectifthermique
11
Opercule
26

AXISQ8752-EBispectralPTZCamera
1
Connecteurducouverclesupérieur
2
ConnecteurRS485
3
Connecteurd’alimentation
4
Boutondecommande
5
ConnecteurRJ45
6
LEDdestatut
7
Connecteurd'entréeaudio3,5mm
8
EmplacementpourcarteSD(microSD,cartenonfournie)
9
Connecteurd'alimentationd'entrée
10
Connecteurd'E/S
11
ConnecteurRJ45
12
EmplacementSFPpourmoduleSFP(nonfourni)
27
FR

AXISQ8752-EBispectralPTZCamera
Commentinstallerleproduit
DANGER
Risquedechocélectrique.Touslescâblesdoiventêtrehorstensionavantd'installer
leproduit.
ATTENTION
Lesconnexionsélectriquesetlesinstallationsdeconduitesdoiventêtreeffectuéesparun
électriciencertiéetconformémentauxréglementationslocales.
ATTENTION
Risquesdeblessures.Piècesmobiles.Restezàl'écartduproduitlorsqu'ilestencours
defonctionnement.Débranchezl'alimentationélectriqueavantd'installerleproduitou
d'effectuersonentretien.
ATTENTION
Risquesdeblessures.Surfaceschaudes.Netouchezpasleproduitlorsqu'ilesten
coursdefonctionnement.Débranchezl'alimentationélectriqueetlaissezlessurfaces
refroidiravantd'effectuerl'entretienduproduit.
Montagedel'unitédebase
1
Unitédebase
1.Déposerlesquatrevisdel'unité(T30).
2.Tirezettournezsimultanémentl'unitédebasedanslesensanti-horairejusqu'àceque
lesèchessurl'unitédebaseetlerestedel'unitédepositionnements'alignent.
3.Déposezl'unitédebase.
28

AXISQ8752-EBispectralPTZCamera
A A
A
VIS VIS
VIS
N'utilisezpasd'outilstranchantslorsquevousdéposezlecouvercletransparentdel'unité
debase.
4.Déposezlecouvercletransparentdel'unitédebase.
1
Clipducachedeconduit
29
FR

AXISQ8752-EBispectralPTZCamera
2
Cachedeconduit
3
Troudevis(x4)
5.Pourdesinstallationsdeconduituniquement:déposezlesdeuxclipsducachede
conduitsuivisparlecacheduconduit.
6.Fixezl'unitédebaseàlasurfacedemontageaveclesélémentsdexationappropriés
danslesquatretrousdevis.
Acheminementdescâbles
AVERTISSEMENT
Risquedechocélectrique.Leproduitdoitêtremisàlaterreàl'aideducâbledemiseà
laterredeprotectionducâbled'alimentationetdelatressedeterre.Assurez-vousque
lesdeuxextrémitésducâbledemiseàlaterredeprotectionetlatressedeterresonten
contactaveclessurfacesdemiseàlaterrecorrespondantes.
Important
Utilisezuniquementdescâblesconformesàlazonespéciée.Pourensavoirplus,consultez
Épaisseurducâblepage40.
1
Câbled’alimentation(nonfourni)
2
Réducteurdetension
3
visdemiseàlaterre
4
Tressedeterre(nonfournie)
30

AXISQ8752-EBispectralPTZCamera
5
passageducâbleinférieur
1.Installezlesadaptateursdeconduitenoption(nonfournis).
2.Reliezlatressedeterreàlavisdemiseàlaterre.
3.Insérezlecâbled'alimentation,lecâbled'E/Setlecâbleréseauàtraversl'oricede
l'unitédebasecommeillustréci-dessus.Vouspouvezaussilesinsérerdansl'orice
ducâbleinférieur.
4.Insérezlecâbled'alimentationàtraversleréducteurdetensionavecunedistancede
530mm(21po)depuisleréducteurdetensionjusqu'àl'extrémitéducâble.
1
CâbleE/S(enoption,nonfourni)
2
Câbleréseau(noninclus)
5.Insérezlecâbled'E/S(enoption)àtraversleréducteurdetensionavecunedistancede
420mm(16,5po)depuisleréducteurdetensionjusqu'àl'extrémitéducâble.
6.Insérezlecâbleréseau(câblebreoptiqueet/oucâbleRJ45)àtraversleréducteurde
tensionavecunedistancede580mm(23po)depuisleréducteurdetensionjusqu'à
l'extrémitéduconnecteur.Pourplusd'informationssurlesdifférentesoptionsde
connectivitéréseau,consultezInstallationdelaliaisonréseaupage35.
7.Fermezetserrezlestroisreliefsdetraction.
31
FR

AXISQ8752-EBispectralPTZCamera
1
Câbled'alimentation(noninclus)
2
CâbleE/S(enoption,nonfourni)
3
Câbleréseau(noninclus)
4
Jointdecâble
5
Couvercletransparentdel'unitédebase
8.Placezlesjointssurlescâbles.Cf.Épaisseurducâblepage40.
9.Insérezlescâblesd'alimentation,d'E/Setréseauycomprislesjointsàtraverslesorices
ducouvercletransparentdel'unitédebaseetdisposezlescâblescommeillustré
ci-dessus.
A A
A
VIS VIS
VIS
SivousutilisezuncâbleàbreoptiqueetuncâbleRJ45pourlaconnectivitéréseau,
acheminezlecâbleàbreoptiqueàtraverslemêmejointquelecâbled'E/S.Appliquez
unjointentrelescâblesetlejointdecâblepourempêchertoutefuite.Pourplus
32

AXISQ8752-EBispectralPTZCamera
d'informationssurlesdifférentesoptionsdeconnectivitéréseau,consultezInstallationde
laliaisonréseaupage35.
10.Placezlecouvercletransparentdel'unitédebasesurcelle-cietplacezlesjointsdans
lesorices.
1
Connecteurd'E/S
2
Connecteurd’alimentation
3
Jointtorique
A A
A
VIS VIS
VIS
Pournepasdébrancheraccidentellementl'unitédel'alimentationélectriquesilecâbleest
tiré,lecâbledemiseàlaterredeprotectiondoitêtrepluslongd'environ10mm(0,4po)
quelesdeuxautresls(danslecâbled'alimentation).
Note
Pourfaciliterl'installation,nousvousrecommandonsdedénuderenviron90mm(3,5po)de
lagaineducâbled'alimentationet70mm(2,8po)delagainedecâbled'E/S.
11.Installezlesconnecteursd'alimentationetd'E/S.
12.Réglezlescâblesréseau,d'E/Setd'alimentationdesortequeladistancedepuislejoint
ducâblejusqu'àl'extrémitéduconnecteursoitrespectivementde240mm(10po),
170mm(7po)et160mm(7po).
33
FR

AXISQ8752-EBispectralPTZCamera
A A
A
VIS VIS
VIS
Assurez-vousquelesjointstoriquessontcorrectementxésautourducouvercle
transparentdel'unitédebase.
13.Placezl'unitédepositionnementsurl'unitédebase.Assurez-vousquelesèchesdes
deuxunitéssontalignées.
14.Tournezl'unitédepositionnementdanslesensdesaiguillesd'unemontrejusqu'àsa
positiond'origineetserrezlesquatrevisdel'unitédebase(couplede3,0Nm).
A A
A
VIS VIS
VIS
Assurez-vousdenepaspincerlescâbleslorsdel'assemblagedesdeuxunités.
34

AXISQ8752-EBispectralPTZCamera
Installationdelaliaisonréseau
Vouspouvezchoisirentreplusieursoptionslorsquevousinstallezlaliaisonréseau:
•A:viauncâbleàbreoptiqueouuncâbleRJ45raccordéaumoduleSFP(avec
connecteurcorrespondant)surl'emplacementSFP.
•B:viauncâbleRJ45raccordéauconnecteurRJ45xe.
•C:vialesdeuxsolutionsci-dessus,auquelcaslaconnexiondumoduleSFPfonctionne
commelaliaisonréseauprimaireetlaconnexionRJ45xefonctionnecommelaliaison
desecours.
Pourplusd'informationssurlesemplacementsdesconnecteursréseau,voirVued'ensembledu
produitpage26.
Note
•LemoduleSFPn'estpasfourni.Pourplusd’informationssurlesmodulesSFP,consultezle
siteaxis.com
•Sivousinstallezuneliaisonréseauuniquementvialecâbleàbreoptiqueàl'aidedu
moduleSFPrespectif,ellefonctionnecommeunesolutionautonomepourlesinstallations
decâblagelonguedistance.
35
FR

AXISQ8752-EBispectralPTZCamera
Branchezlescâbles
1.Desserrezlesquatrevisducouvercle(T20)etretirezlecouvercle.
1
Connecteurd'alimentationd'entrée
2
ConnecteurE/S
3
ConnecteurRJ45
4
EmplacementSFPpourmoduleSFP(moduleSFPnoninclus)
2.Branchezlecâbleréseau(breoptiqueet/ouRJ45),E/Setd'alimentation.Pourplus
d'informationssurlesdifférentesoptionsdeconnectivitéréseau,consultezInstallation
delaliaisonréseaupage35.
3.Remettezlecouvercleenplaceetserrezlesquatrevisducouvercle(coupledeserrage
3,0Nm).
36

AXISQ8752-EBispectralPTZCamera
4.Retirezlecouvercledeprotection.
5.Mettezleproduitsoustension.
Retirerlecouverclesupérieur
ATTENTION
Risquesdeblessures.Piècesmobiles.Restezàl'écartduproduitlorsqu'ilestencours
defonctionnement.Débranchezl'alimentationélectriqueavantd'installerleproduitou
d'effectuersonentretien.
ATTENTION
Risquesdeblessures.Surfaceschaudes.Netouchezpasleproduitlorsqu'ilesten
coursdefonctionnement.Débranchezl'alimentationélectriqueetlaissezlessurfaces
refroidiravantd'effectuerl'entretienduproduit.
A A
A
VIS VIS
VIS
Lorsquevousdéposezlecouverclesupérieur,vousexposezdespartiesdelacaméravisuelle
sensiblesauxchocs.Assurez-vousdenepastoucherlacamérasansprotectionavecle
couverclesupérieurlorsquevousleretirez.
PourinsérerunecarteSDouréinitialiserauxvaleurspardéfaut,retirezlecouverclesupérieur:
37
FR


AXISQ8752-EBispectralPTZCamera
2.Placezlaprotectionétanchedanslapositiondevotrechoix.
3.Serrezlesdeuxvisdelaprotectionétanche(coupledeserrage0,8Nm).
39
FR

AXISQ8752-EBispectralPTZCamera
Caractéristiques
Pourobtenirladernièreversiondelachetechniqueduproduit,rendez-voussurlapageduproduit
surlesiteaxis.comettrouvezl'optionSupport&Documentation(Assistanceetdocumentation).
Épaisseurducâble
Lediamètreducâble,lorsdel'utilisationdejointsdecâblefournisavecleproduit,doitêtre
compriseentre5et11mm(0,2à0,4po).
A A
A
VIS VIS
VIS
•Utilisezdescâblesadaptésàlazonespéciée
•Sélectionnezdescâblesconformesàlalégislationlocale
•Assurez-vousquelespassgesdecâblessontcorrectementscellés
•Utilisezdesjointsdecâbleetdespresse-étoupesadaptésauxpassagesdecâbleset
àlazonedecâble
Pourplusd'informationssurlesaccessoires,telsquelesjointsdecâbleetlespresse-étoupes
adaptésàd'autreszonesdecâble,consultezwww.axis.com
40

Informationssurlasécurité
Niveauxderisques
DANGER
Indiqueunesituationdangereusequi,sielle
n'estpasévitée,entraîneraledécèsoudes
blessuresgraves.
AVERTISSEMENT
Indiqueunesituationdangereusequi,sielle
n'estpasévitée,pourraitentraînerledécès
oudesblessuresgraves.
ATTENTION
Indiqueunesituationdangereusequi,si
ellen'estpasévitée,pourraitentraînerdes
blessureslégèresoumodérées.
A A
A
VIS VIS
VIS
Indiqueunesituationqui,siellen'estpas
évitée,pourraitendommagerl'appareil.
Autresniveauxdemessage
Important
Indiquelesinformationsimportantes,
nécessairespourassurerlebon
fonctionnementdel’appareil.
Note
Indiquelesinformationsutilesqui
permettrontd’obtenirlefonctionnement
optimaldel’appareil.
Consignesdesécurité
DANGER
Risquedechocélectrique.Tousles
câblesdoiventêtremishorstension
avantl'installationouuneinterventionde
maintenancesurleproduit.
AVERTISSEMENT
LeproduitAxisdoitêtreinstalléparun
professionnelqualiéetconformémentaux
loisetrèglementationslocalesenvigueur.
ATTENTION
Risquesdeblessures.Piècesmobiles.
Restezàl'écartduproduitlorsqu'ilest
encoursdefonctionnement.Débranchez
l'alimentationélectriqueavantd'installerle
produitoud'effectuersonentretien.
ATTENTION
Risquesdeblessures.Surfaceschaudes.
Netouchezpasleproduitlorsqu'ilest
encoursdefonctionnement.Débranchez
l'alimentationélectriqueetlaissezles
surfacesrefroidiravantd'effectuerl'entretien
duproduit.
A A
A
VIS VIS
VIS
•LeproduitAxisdoitêtreutilisé
conformémentauxloisetrèglements
locaux.
•ConserverceproduitAxisdansun
environnementsecetventilé.
•NepasexposerceproduitAxisauxchocsou
auxfortespressions.
•Nepasinstallerceproduitsurdespoteaux,
supports,surfacesoumursinstables.
•Utiliseruniquementdesoutilsrecommandés
pourl'installationdel'appareilAxis.
L'applicationd'uneforceexcessivesur
l'appareilavecdesoutilspuissantspourrait
l'endommager.
•Nepasutiliserdeproduitschimiques,de
substancescaustiquesoudenettoyants
pressurisés.
•Utiliserunchiffonpropreimbibéd'eaupure
pourlenettoyage.
•Utiliseruniquementdesaccessoires
conformesauxcaractéristiquestechniques
devotreproduit.Ilspeuventêtrefournis
parAxisouuntiers.Axisrecommande
d'utiliserunéquipementd'alimentationAxis
compatibleavecvotreproduit.
•Utiliseruniquementlespiècesderechange
fourniesourecommandéesparAxis.
•Nepasessayerderéparervous-mêmece
produit.Contacterl'assistancetechnique
d'AxisouvotrerevendeurAxispourdes
problèmesliésàl'entretien.
•Évitezdepointerl’objectifdelacaméra
verslesoleiloutouteautresourcede
radiationdehauteintensité.Celarisque
d’endommagerlacaméra.
Transport
A A
A
VIS VIS
VIS
•LorsdutransportduproduitAxis,utilisez
l'emballaged'origineouunéquivalentpour
éviterd'endommagerleproduit.
Batterie
LeproduitAxisutiliseunebatterieaulithiumBR2032
3,0Vcommealimentationdesonhorlogeentemps
réelinterne(RTC).Dansdesconditionsnormales,cette
batterieauneduréedevieminimaledecinqans.
Silabatterieestfaible,lefonctionnementde
l'horlogeentempsréelpeutêtreaffectéetentraîner
saréinitialisationàchaquemisesoustension.Un
messageenregistréapparaîtdanslerapportdeserveur
duproduitlorsquelatensiondelabatterieestbasse.
ATTENTION
Neremplacezpaslabatterievous-même.
ContactezlesupportAxissilemessagedu
journaldemandeunchangementdebatterie.
Lespilesboutons3,0Vaulithiumcontiennentdu
1,2-diméthoxyéthane,éthylèneglycoldiméthyléther
(EGDME),CASn°110-71-4.


AXISQ8752-EBispectralPTZCamera
Lieferumfang
43
DE

AXISQ8752-EBispectralPTZCamera
Produktübersicht
1
Wetterschutz
2
ObereAbdeckung
3
InnereAbdeckung
4
Positionierungseinheit
5
SchraubenderBasiseinheit
6
Basiseinheit
7
Wischer
8
FrontmitSchutzfolie
9
Lichtbildobjektiv
10
Wärmebildobjektiv
11
Deckel
44

AXISQ8752-EBispectralPTZCamera
1
AnschlussobereAbdeckung
2
RS485-Steckverbinder
3
Stromanschluss
4
Steuertaste
5
RJ-45-Anschluss
6
LED-Statusanzeige
7
Audio-IN-3,5-mm-Stecker
8
SD-Kartensteckplatz(microSD,KartenichtimLieferumfangenthalten)
9
StromversorgungsanschlussEingang
10
E/A-Anschluss
11
RJ-45-Anschluss
12
SFP-EinschubfürSFP-Modul(nichtenthalten)
45
DE

AXISQ8752-EBispectralPTZCamera
InstallierendesProdukts
GEFAHR
StromschlaggefahrVorderInstallationoderWartungdesProduktsmüssenalleKabelvon
derStromversorgungabgeklemmtwerden.
VORSICHT
DieInstallationderelektrischenAnschlüsseundKabelkanäledarfnurvoneinem
zugelassenenElektrikerinÜbereinstimmungmitdengeltendenBestimmungen
vorgenommenwerden.
VORSICHT
VerletzungsgefahrGefahrdurchbeweglicheTeileKörperteilewährenddesBetriebs
vomProduktfernhalten.VorderInstallationoderWartungdesProduktsalleKabelvon
derStromversorgungabklemmen.
VORSICHT
VerletzungsgefahrHeißeOberächeDasProduktwährenddesBetriebsnichtberühren.
TrennenSievorWartungsarbeitendieStromversorgungundlassenSiedieOberächendes
Produktsabkühlen.
MontierenderGerätebasis
1
Basiseinheit
1.DievierSchrauben(T30)derGerätebasisentfernen.
2.DieGerätebasisgleichzeitigziehenundgegendenUhrzeigersinndrehen,bisdiePfeile
aufderGerätebasisunddemRestdesGerätsineinerLiniestehen.
3.DieGerätebasisentfernen.
46

AXISQ8752-EBispectralPTZCamera
HINWEIS HINWEIS
HINWEIS
BeimEntfernendertransparentenAbdeckungderGerätebasiskeinespitzenWerkzeuge
verwenden.
4.DietransparenteAbdeckungderGerätebasisentfernen.
1
KlammerderKabelführung
47
DE

AXISQ8752-EBispectralPTZCamera
2
AbdeckungderKabelführung
3
Schraubenbohrung(4x)
5.NurbeiInstallationenüberdieKabelführung:ZuerstdiebeidenKlammernder
KabelführungundanschließenddieAbdeckungderKabelführungentfernen.
6.DieGerätebasismitgeeignetenBefestigungselementenfürdievierSchraubenbohrungen
anderBefestigungsächeanbringen.
DieKabelverlegen
WARNUNG
Stromschlaggefahr.DasProduktmussgeerdetwerden.Dazumüssensowohlder
SchutzleiterimStromversorgungskabelalsauchdasErdungsbandverwendetwerden.
Sicherstellen,dassbeideEndendesSchutzleitersunddesErdungsbandesKontaktmit
denentsprechendenErdungsächenhaben.
Wichtig
NurKabelmitdemvorgegebenenKabelquerschnittverwenden.WeitereInformationen
ndenSieunterKabelstärkeaufSeite58.
1
Stromversorgungskabel(nichtimLieferumfangenthalten)
2
Zugentlastung
3
Masseschraube
4
Erdungsband(nichtimLieferumfangenthalten)
48
AXISQ8752-EBispectralPTZCamera
5
Kabelöffnungunten
1.DieoptionalenKabelführungsadapterinstallieren(nichtimLieferumfangenthalten).
2.DasErdungskabelmitderErdungsschraubebefestigen.
3.DieKabelfürStromversorgung,NetzwerkundE/Aeinschließlichder
KabelverschraubungenwieinderAbbildungobendurchdieÖffnungdesBasisgeräts
führen.AlternativdieKabeldurchdieuntereKabelöffnungeinführen.
4.DasStromversorgungskabeldurchdieZugentlastungführen.DabeieineLängevon530
mmzwischenZugentlastungundKabelendeeinhalten.
1
E/A-Kabel(optional,nichtimLieferumfangenthalten)
2
Netzwerk-Kabel(nichtimLieferumfangenthalten)
5.DasE/A-Kabel(optional)durchdieZugentlastungführen.DabeieineLängevon420mm
zwischenZugentlastungundKabelendeeinhalten.
6.DasNetzwerk-Kabel(GlasfaseroderKabeltypRJ-45)durchdieZugentlastungführen.
DabeieineLängevon580mmzwischenZugentlastungundAnschlussendeeinhalten.
WeitereInformationenzudenverschiedenenAnschlussoptionenandasNetzwerk,siehe
EinrichtenderNetzwerkverbindungaufSeite53.
7.DiedreiZugentlastungenschließenundanziehen.
49
DE

AXISQ8752-EBispectralPTZCamera
1
Stromversorgungskabel(nichtimLieferumfangenthalten)
2
E/A-Kabel(optional,nichtimLieferumfangenthalten)
3
Netzwerk-Kabel(nichtimLieferumfangenthalten)
4
Kabeldichtung
5
TransparenteAbdeckungderGerätebasis
8.DieKabeldichtungenaufdieKabelschieben.SieheKabelstärkeaufSeite58.
9.DieKabelfürStromversorgung,NetzwerkundE/AeinschließlichderKabeldichtungen
durchdieÖffnungendertransparentenAbdeckungderGerätebasisführenunddieKabel
wieinderAbbildungobendargestelltausrichten.
HINWEIS HINWEIS
HINWEIS
WirdsowohleinGlasfaserkabelalsaucheinKabeldesTypsRJ-45verwendet,das
GlasfaserkabeldurchdieselbeKabeldichtungführenwiedasE/A-Kabel.Gegendas
EindringenvonFeuchtigkeitzwischenKabelnundKabeldichtungeinDichtmittelverwenden.
50

AXISQ8752-EBispectralPTZCamera
WeitereInformationenzudenverschiedenenAnschlussoptionenandasNetzwerk,siehe
EinrichtenderNetzwerkverbindungaufSeite53.
10.DietransparenteAbdeckungderGerätebasisaufsetzenunddieKabeldichtungenindie
Öffnungenschieben.
1
E/A-Anschluss
2
Stromanschluss
3
O-Ring
HINWEIS HINWEIS
HINWEIS
UmdasGerätnichtversehentlichvonderStromversorgungzutrennen,wenndasKabel
gezogenwird,lassenSiedenSchutz-Erdungsdrahtum100,4mmlängeralsdiebeiden
anderenKabel(imStromversorgungskabel).
Beachten
UmdieInstallationsoeinfachwiemöglichzumachen,wirdempfohlen,ca.90mmder
Stromkabelhülleund70mmderE/A-Kabelhüllezuentfernen.
11.EinbauderStromversorgungs-undE/A-Anschlüsse
12.DieKabelfürNetzwerk,E/AundStromversorgungsoausrichten,dassdieLängezwischen
KabeldichtungundEndedesAnschlussesjeweils240mm,170mmund160mmbeträgt.
51
DE

AXISQ8752-EBispectralPTZCamera
HINWEIS HINWEIS
HINWEIS
Sicherstellen,dassderO-RingrichtigumdietransparenteAbdeckungderGerätebasis
herumeingepasstist.
13.PositionierenSiediePositionierungseinheitaufderBasiseinheit.StellenSiesicher,dass
diePfeileandenbeidenGerätenausgerichtetsind.
14.DiePositionierungseinheitimUhrzeigersinninihreAusgangsstellungdrehenunddievier
SchraubenderGrundeinheitanziehen(Drehmoment3,0Nm).
HINWEIS HINWEIS
HINWEIS
Sicherstellen,dassdieKabelbeimZusammenbauenderbeidenGerätenichtgequetscht
werden.
52

AXISQ8752-EBispectralPTZCamera
EinrichtenderNetzwerkverbindung
BeiderInstallationderNetzwerkverbindungstehenverschiedeneOptionenzurVerfügung:
•A:MithilfeeinesGlasfaserkabelsodereinesKabelsdesTypsRJ-45,das(miteinem
entsprechendenAnschluss)andasSFP-ModulimSFP-Einschubangeschlossenwird.
•B:MithilfeeinesAnschlussesdesTypsRJ-45andenfestenAnschlussdesTypsRJ-45.
•C:MithilfebeiderobenangeführtenMöglichkeiten.IndiesemFallagiertderAnschluss
überdasSFP-ModulalsdieprimäreNetzwerk-VerbindungunddieVerbindungüberden
festenAnschlussdesTypsRJ-45alsFail-Over-Anschluss.
WeitereInformationenzurLagederNetzwerk-Steckverbindungen,sieheProduktübersichtauf
Seite44.
Beachten
•SFP-ModulnichtimLieferumfangenthalten.WeitereInformationenzulieferbaren
SFP-Modulen,sieheaxis.com.
•DieInstallationeinerNetzwerk-VerbindungausschließlichüberdasGlasfaserkabelmittels
desentsprechendenSFP-ModulsdientalseigenständigeLösungfürKabelinstallationen
mitgroßerReichweite.
53
DE

AXISQ8752-EBispectralPTZCamera
AnschließenderKabel
1.DievierDeckelschrauben(T20)lösenunddenDeckelabnehmen.
1
StromversorgungsanschlussEingang
2
E/A-Anschluss
3
RJ-45-Anschluss
4
SFP-EinschubfürSFP-Module(SFP-Modulnichtenthalten)
2.DasNetzwerk(Glasfaserund/oderRJ-45),E/AunddieStromversorgunganschließen
WeitereInformationenzudenverschiedenenAnschlussoptionenandasNetzwerk,siehe
EinrichtenderNetzwerkverbindungaufSeite53.
3.BringenSiedenDeckelanseinePositionundziehenSiedievierDeckelschraubenan
(Drehmoment3,0Nm).
54
AXISQ8752-EBispectralPTZCamera
4.EntfernenSiedieSchutzabdeckung.
5.DasProduktandieStromversorgunganschließen.
ObereAbdeckungentfernen
VORSICHT
VerletzungsgefahrGefahrdurchbeweglicheTeileKörperteilewährenddesBetriebs
vomProduktfernhalten.VorderInstallationoderWartungdesProduktsalleKabelvon
derStromversorgungabklemmen.
VORSICHT
VerletzungsgefahrHeißeOberächeDasProduktwährenddesBetriebsnichtberühren.
TrennenSievorWartungsarbeitendieStromversorgungundlassenSiedieOberächendes
Produktsabkühlen.
HINWEIS HINWEIS
HINWEIS
WenndieobereAbdeckungentferntist,liegenstoßempndlicheTeilederLichtbildkamera
frei.StellenSiesicher,dassdieungeschützteKamerabeimEntfernennichtmitderoberen
Abdeckunggetroffenwird.
UmeineSD-KarteeinzusetzenoderaufdieWerkseinstellungenzurückzusetzen,dieobere
Abdeckungentfernen:
55
DE

AXISQ8752-EBispectralPTZCamera
WeitereInformationenzumEinsetzenderSD-KarteoderzumZurücksetzenaufdiewerksseitige
StandardeinstellungndenSieunterProduktübersichtaufSeite44.WeitereInformationenhierzu
ndenSieimBenutzerhandbuchunteraxis.com.
DenWetterschildeinstellen
1.DiebeidenSchraubendesWetterschildslösen.
56

AXISQ8752-EBispectralPTZCamera
2.DenWetterschildindiegewünschtePositionstellen.
3.DiebeidenSchraubendesWetterschildsanziehen(Drehmoment0,8Nm)
57
DE

AXISQ8752-EBispectralPTZCamera
TechnischeDaten
DieaktuelleVersiondestechnischenDatenblattsfürdasProduktndenSieaufaxis.comunter
SupportundDokumentation.
Kabelstärke
WenndiedemProduktbeiliegendenKabeldichtungenverwendetwerden,mussder
Kabeldurchmesserzwischen5und11mmliegen.
HINWEIS HINWEIS
HINWEIS
•Kabelverwenden,diederQuerschnittsvorgabeentsprechen.
•Kabelverwenden,diedenörtlichenVorschriftenentsprechen.
•Sicherstellen,dassalleKabeldurchführungenordnungsgemäßabgedichtetsind.
•KabeldichtungenoderKabelverschraubungenverwenden,diesowohlder
KabeldurchführungalsauchdemKabelquerschnittentsprechen.
FürInformationenzuZubehörwieKabeldichtungenundKabelverschraubungenfürandere
Kabelquerschnitte,siehe<1>www.axis.com.
58

Sicherheitsinformationen
Gefährdungsstufen
GEFAHR
WeistaufeinegefährlicheSituationhin,
welche,fallsnichtverhindert,zuTododer
schwerenVerletzungenführenkann.
WARNUNG
WeistaufeinegefährlicheSituationhin,
welche,fallsnichtverhindert,zuTododer
schwerenVerletzungenführenkann.
VORSICHT
WeistaufeinegefährlicheSituation
hin,welche,fallsnichtverhindert,zu
geringfügigerodermäßigerVerletzungführen
kann.
HINWEIS HINWEIS
HINWEIS
WeistaufeinegefährlicheSituationhin,
welche,fallsnichtverhindert,zuSachschäden
führenkann.
AndereMeldeebenen
Wichtig
WeistaufwichtigeInformationenhin,dieden
richtigenBetriebdesProduktsgewährleisten.
Beachten
WeistaufnützlicheInformationenhin,die
dieoptimaleVerwendungdesProdukts
unterstützen.
Sicherheitsanweisungen
GEFAHR
Stromschlaggefahr.VorderInstallationoder
WartungdesProduktsmusssichergestellt
werden,dassankeinemderKabelSpannung
anliegt.
WARNUNG
DasAxisProduktmussvonfachmännisch
geschultemPersonalundunterEinhaltungder
örtlichgeltendenBestimmungeninstalliert
werden.
VORSICHT
VerletzungsgefahrGefahrdurch
beweglicheTeileKörperteilewährenddes
BetriebsvomProduktfernhalten.Vorder
InstallationoderWartungdesProduktsalle
KabelvonderStromversorgungabklemmen.
VORSICHT
VerletzungsgefahrHeißeOberäche
DasProduktwährenddesBetriebsnicht
berühren.TrennenSievorWartungsarbeiten
dieStromversorgungundlassenSiedie
OberächendesProduktsabkühlen.
HINWEIS HINWEIS
HINWEIS
•DasAxis-ProduktmussunterBeachtung
dergeltendenGesetzeundBestimmungen
betriebenwerden.
•LagernSiedasAxisProduktineiner
trockenenundbelüftetenUmgebung.
•DasAxis-ProduktwederStößennoch
starkemDruckaussetzen.
•DasProduktnichtaninstabilenMasten,
Halterungen,OberächenoderWänden
anbringen.
•VerwendenSiebeiderInstallationdes
AxisProduktsausschließlichpassende
Werkzeuge.EinzugroßerKraftaufwandmit
elektrischenWerkzeugenkanndasProdukt
beschädigen.
•VerwendenSiekeinechemischen,ätzenden
oderaerosolhaltigenReinigungsmittel.
•VerwendenSiezumReinigeneinsauberes,
mitdestilliertemWasserangefeuchtetes
Tuch.
•VerwendenSienurZubehör,dasden
technischenVorgabenIhresProdukts
entspricht.DiesesistvonAxisoder
Drittanbieternerhältlich.Axisempehlt
diemitIhremProduktkompatible
StromversorgungvonAxis.
•VerwendenSieausschließlichErsatzteiledie
vonAxisangebotenoderempfohlenwerden.
•VersuchenSienicht,diesesProdukt
selbsttätigzureparieren.WendenSiesich
bezüglichReparaturundWartunganden
AxisSupportoderIhrenAxisHändler.
•RichtenSiedasKameraobjektivnicht
direktaufdieSonneoderanderestarke
Lichtquellen,umeineBeschädigungder
Kamerazuvermeiden.
Transport
HINWEIS HINWEIS
HINWEIS
•BeiBedarftransportierenSiedasAxis
ProduktinderOriginalverpackungoder
einerentsprechendenVerpackung,sodass
Schädenvermiedenwerden.
Batterie
DasAxisProduktistmiteiner3,0-V-BR2032-Lithium-
Batterieausgestattet,mitderdieinterneEchtzeituhr
(RTC)versorgtwird.UnternormalenBedingungenhat
dieBatterieeineLebensdauervonmindestensfünf
Jahren.
EinenichtausreichendgeladeneBatterie
beeinträchtigtdenBetriebderEchtzeituhr,diedann
beijedemSystemstartzurückgesetztwird.Sieerhalten
eineProtokollnachrichtimServerberichtdesProdukts,
wenndieBatteriespannungniedrigist.
VORSICHT
TauschenSiedieBatterienichtselbstaus.
WendenSiesichandenAxisSupport,wenn
dieProtokollnachrichteinenBatterietausch
anfordert.
Lithium-Knopfzellen(3,0V)enthalten
1,2-Dimethoxyethan;Ethylenglycoldimethylether
(EGDME),CAS-Nr.110-71-4.


AXISQ8752-EBispectralPTZCamera
Contenutodellaconfezione
61
IT

AXISQ8752-EBispectralPTZCamera
Panoramicadeldispositivo
1
Schermodiprotezionedagliagentiatmosferici
2
Coperturasuperiore
3
Coperturainterna
4
Unitàdiposizionamento
5
Vitidell'unitàbase
6
Unitàbase
7
Tergicristallo
8
Parteanterioreconlaminaprotettiva
9
Obiettivovisivo
10
Obiettivotermico
11
Coperchio
62

AXISQ8752-EBispectralPTZCamera
1
Connettorecoperturasuperiore
2
ConnettoreRS485
3
Connettoredialimentazione
4
Pulsantedicomando
5
ConnettoreRJ45
6
LEDdistato
7
Connettoreingressoaudioda3,5mm
8
SlotperschededimemoriaSD(microSD,schedanoninclusa)
9
Connettoreingressoalimentazione
10
ConnettoreI/O
11
ConnettoreRJ45
12
SlotSFPpermoduloSFP(nonincluso)
63
IT

AXISQ8752-EBispectralPTZCamera
Comeinstallareildispositivo
PERICOLO
Rischiodiscosseelettriche.Tuttiicavinonsarannosottotensioneprimadiinstallareil
dispositivo.
ATTENZIONE
Leconnessionielettricheel'installazionedeitubiprotettividevonoessereeffettuatedaun
elettricistacerticatoeinconformitàallenormativelocali.
ATTENZIONE
Rischiodilesioni.Partiinmovimento.Tenereilcorpoadistanzadaldispositivo
duranteilfunzionamento.Scollegaredall'alimentazioneprimadiinstallareoeseguire
lamanutenzionesuldispositivo.
ATTENZIONE
Rischiodilesioni.Superciecalda.Nontoccareildispositivoduranteilfunzionamento.
Scollegaredall'alimentazioneelasciarraffreddarelesuperciprimadieseguirela
manutenzionesuldispositivo.
Montaggiodell'unitàbase
1
Unitàbase
1.Rimuoverelequattroviti(T30)dell'unitàbase.
2.Estrarreeruotaresimultaneamentel'unitàbaseinsensoantiorarionchélefrecce
sull'unitàbaseesulrestodell'unitàdiposizionamentononsiallineano.
3.Rimuoverel'unitàbase.
64
AXISQ8752-EBispectralPTZCamera
A A
A
VVISO VVISO
VVISO
Nonutilizzarestrumentiappuntitiquandosirimuoveilcoperchiotrasparentedell'unità
base.
4.Rimuovereilcoperchiotrasparentedell'unitàbase.
1
Clipdelcoperchiodeltuboprotettivo
65
IT
AXISQ8752-EBispectralPTZCamera
2
Coperchiodeltuboprotettivo
3
Foropervite(x4)
5.Soloperleinstallazioniditubiprotettivi:rimuovereledueclipdelcoperchiodeltubo
protettivoepoiilcoperchiodeltuboprotettivostesso.
6.Fissarel'unitàbaseallasuperciedimontaggioconissaggiappropriatineiquattro
foridelleviti.
Installazionedeicavi
AVVERTENZA
Rischiodiscosseelettriche.Questodispositivodeveesserecollegatoaterrautilizzandoil
cavodimessaaterradiprotezionenelcavodialimentazioneelatrecciadimessaaterra.
Assicurarsicheentrambeleestremitàdelcavodimessaaterradiprotezioneedellatreccia
dimessaaterrasianoincontattoconlerispettivesupercidimessaaterra.
Importante
Utilizzaresolocaviconformiall'areadeicavispecicata.Perulterioriinformazioni,vedere
Spessoredelcavoallapagina76.
1
Cavodialimentazione(nonincluso)
2
Dispositivoantistrappo
3
Vitedimessaaterra
4
Trecciadimessaaterra(noninclusa)
66

AXISQ8752-EBispectralPTZCamera
5
Foropercavoinferiore
1.Installaregliadattatorideitubiprotettiviopzionali(noninclusi).
2.Collegarelatrecciadimessaaterraallavitedellamessaaterra.
3.Inserireilcavodialimentazione,ilcavodireteeilcavoI/Oattraversoilforonell'unità
basecomemostratonell'illustrazionesoprariportata.Inalternativa,inserirlinelforo
delcavoinferiore.
4.Inserireilcavodialimentazioneneldispositivoantistrappoconunadistanzadi530mm
traildispositivoantistrappoel'estremitàdelcavo.
1
CavoI/O(opzionale,nonincluso)
2
Cavodirete(nonincluso)
5.InserireilcavoI/O(opzionale)neldispositivoantistrappoconunadistanzadi420mmtra
ildispositivoantistrappoel'estremitàdelcavo.
6.Inserireilcavodirete(cavoinbraotticae/ocavoRJ45)neldispositivoantistrappoad
unadistanzadi580mmdaldispositivoantistrappoall'estremitàdelconnettore.Per
ulterioriinformazionisulledifferentiopzionidiconnettivitàdirete,vedereInstallazione
delcollegamentodireteallapagina71.
7.Chiudereeavvitareitredispositiviantistrappo.
67
IT

AXISQ8752-EBispectralPTZCamera
1
Cavodialimentazione(nonincluso)
2
CavoI/O(opzionale,nonincluso)
3
Cavodirete(nonincluso)
4
Guarnizionepercavi
5
Coperchiotrasparentedell'unitàbase
8.Inserireleguarnizionisuicavi.VedereSpessoredelcavoallapagina76.
9.Inserireilcavodialimentazione,direteeI/Ocompreseleguarnizioniattraversoiforinel
coperchiotrasparentedell'unitàbaseesistemareicavicomemostratonell'illustrazione
soprariportata.
A A
A
VVISO VVISO
VVISO
SesiutilizzanouncavoinbraotticaeuncavoRJ45perlaconnettivitàdirete,instradare
ilcavoinbraotticaattraversolastessaguarnizionedelcavoI/O.Applicareunsigillante
68

AXISQ8752-EBispectralPTZCamera
traicavielaguarnizioneperevitaredispersioni.Perulterioriinformazionisulledifferenti
opzionidiconnettivitàdirete,vedereInstallazionedelcollegamentodireteallapagina71.
10.Posizionareilcoperchiotrasparentesull'unitàbaseeinserireleguarnizionideicavi
neifori.
1
ConnettoreI/O
2
Connettoredialimentazione
3
Anelloditenuta
A A
A
VVISO VVISO
VVISO
Pernonscollegareaccidentalmentel'unitàdall'alimentazioneseilcavovienetirato,farein
modocheilcavodimessaaterradiprotezionesiapiùlungodeglialtriduecavi(nelcavodi
alimentazione)dicirca10mm.
Nota
Perrenderel'installazioneilpiùsemplicepossibile,siconsigliaditoglierecirca90mmdel
rivestimentodelcavodialimentazionee70mmdelrivestimentodelcavoI/O.
11.InstallareiconnettoridialimentazioneeI/O.
12.Regolareicavidirete,I/Oedialimentazioneinmodocheladistanzadallaguarnizione
delcavoall'estremitàdelconnettoresiarispettivamentedi240mm,170mme160mm.
69
IT
AXISQ8752-EBispectralPTZCamera
A A
A
VVISO VVISO
VVISO
Assicurarsichel'anelloditenutasiacorrettamentessatoalcoperchiotrasparente
dell'unitàbase.
13.Collocarel'unitàdiposizionamentosull'unitàbase.Assicurarsichelefreccesulledue
unitàsianoallineate.
14.Ruotarel'unitàdiposizionamentoinsensoorariofacendolatornareallaposizione
originaleeserrarelequattrovitidell'unitàbase(coppia3,0Nm).
A A
A
VVISO VVISO
VVISO
Accertarsicheicavinonvenganoschiacciatidurantel'assemblamentodelledueunità.
70

AXISQ8752-EBispectralPTZCamera
Installazionedelcollegamentodirete
Èpossibilesceglieretradiverseopzioniquandosiinstallailcollegamentodirete:
•A:tramiteuncavoinbraotticaouncavoRJ45collegatoalmoduloSFP(conun
rispettivoconnettore)nelloslotSFP.
•B:tramiteuncavoRJ45collegatoalconnettoreRJ45sso.
•C:tramiteentrambeleopzioniprecedenti.Intalcasolaconnessionetramiteilmodulo
SFPfungedaprimocollegamentodireteelaconnessionetramiteRJ45ssofunziona
comecollegamentodifailover.
Perulterioriinformazionisulleposizionideiconnettoridirete,vederePanoramicadeldispositivo
allapagina62.
Nota
•IlmoduloSFPnonèincluso.PerulterioriinformazionisuimoduliSFPdisponibili,vedere
axis.com
•Sesiinstallauncollegamentodiretesolotramitecavoinbraotticautilizzandoil
rispettivomoduloSFP,funzionacomesoluzioneindipendenteperleinstallazionidi
cablaggialungoraggio.
71
IT
AXISQ8752-EBispectralPTZCamera
Collegamentodeicavi
1.Allentarelequattroviti(T20)delcoperchioerimuoverlo.
1
Connettoreingressoalimentazione
2
ConnettoreI/O
3
ConnettoreRJ45
4
SlotSFPpermoduloSFP(moduloSFPnonincluso)
2.Collegarelarete(braotticae/oRJ45),I/Oeicavidialimentazione.Perulteriori
informazionisulledifferentiopzionidiconnettivitàdirete,vedereInstallazionedel
collegamentodireteallapagina71.
3.Riportareilcoperchioallasuaposizioneeserrarelequattrovitidelcoperchio(coppia3
Nm).
72

AXISQ8752-EBispectralPTZCamera
4.Rimuoverelacoperturaprotettiva.
5.Applicarel'alimentazionealdispositivo.
Rimuoverelacoperturasuperiore
ATTENZIONE
Rischiodilesioni.Partiinmovimento.Tenereilcorpoadistanzadaldispositivo
duranteilfunzionamento.Scollegaredall'alimentazioneprimadiinstallareoeseguire
lamanutenzionesuldispositivo.
ATTENZIONE
Rischiodilesioni.Superciecalda.Nontoccareildispositivoduranteilfunzionamento.
Scollegaredall'alimentazioneelasciarraffreddarelesuperciprimadieseguirela
manutenzionesuldispositivo.
A A
A
VVISO VVISO
VVISO
Quandosirimuovelacoperturasuperiore,vengonoespostelepartidellatelecameravisiva
sensibiliagliurti.Assicurarsidinoncolpirelatelecameranonprotettaconlacopertura
superiorequandolasirimuove.
Perinserireunaschedadimemoriaoripristinareleimpostazionipredenitedifabbrica,rimuovere
lacoperturasuperiore:
73
IT


AXISQ8752-EBispectralPTZCamera
1.Allentareleduevitidelloschermodiprotezionedagliagentiatmosferici.
2.Regolareloschermodiprotezionedagliagentiatmosfericinellaposizionedesiderata.
3.Serrareleduevitidelloschermodiprotezionedagliagentiatmosferici(serraggio0,8Nm).
75
IT

AXISQ8752-EBispectralPTZCamera
Specifiche
Perlaversionepiùaggiornatadellaschedatecnicadeldispositivo,visitareilsitoWebaxis.come
trovarelasezioneSupport&Documentation(Supportoedocumentazione).
Spessoredelcavo
Quandosiutilizzanoleguarnizionipercavoforniteconildispositivo,ildiametrodelcavodeve
esserecompresonell'intervallotra5e11mm.
A A
A
VVISO VVISO
VVISO
•Utilizzarecavidilunghezzaadeguataall'areaspecicata
•Selezionareicavinelrispettodellenormativelocali
•Vericarechetuttiiforideicavisianocorrettamentesigillati
•Utilizzareguarnizionipercaviopressacavicorrispondentialforoeall'areadeicavi
Perinformazionisugliaccessoridisponibili,comeadesempioguarnizionipercaviepressacavi
adattiperaltreareedeicavi,visitareilsitoWebwww.axis.com.
76

Informazionidisicurezza
Livellidipericolo
PERICOLO
Indicaunasituazionepericolosache,senon
evitata,provocamorteolesionigravi.
AVVERTENZA
Indicaunasituazionepericolosache,senon
evitata,potrebbeprovocarelamorteolesioni
gravi.
ATTENZIONE
Indicaunasituazionepericolosache,senon
evitata,potrebbeprovocarelesionimedieo
minori.
A A
A
VVISO VVISO
VVISO
Indicaunasituazioneche,senonevitata,
potrebbedanneggiarelaproprietà.
Altrilivellidimessaggio
Importante
Indicainformazioniimportanti,essenzialiper
ilcorrettofunzionamentodeldispositivo.
Nota
Indicainformazioniutilicheaiutanoa
ottenereilmassimodaldispositivo.
Informazionidisicurezza
PERICOLO
Rischiodiscosseelettriche.Tuttiicavi
devonoesserediseccitatiprimadiinstallareo
eseguirelamanutenzionesuldispositivo.
AVVERTENZA
IldispositivoAxisdeveessereinstallatodaun
professionistaqualicato,inconformitàalle
leggiealledisposizionilocali.
ATTENZIONE
Rischiodilesioni.Partiinmovimento.
Tenereilcorpoadistanzadaldispositivo
duranteilfunzionamento.Scollegare
dall'alimentazioneprimadiinstallareo
eseguirelamanutenzionesuldispositivo.
ATTENZIONE
Rischiodilesioni.Superciecalda.
Nontoccareildispositivoduranteil
funzionamento.Scollegaredall'alimentazione
eraffreddarelesuperciprimadieseguirela
manutenzionedeldispositivo.
A A
A
VVISO VVISO
VVISO
•IldispositivoAxisdeveessereutilizzatoin
conformitàalleleggieallenormativelocali.
•ConservareildispositivoAxisinunambiente
asciuttoeventilato.
•EvitarediesporreildispositivoAxisaurti
opressionieccessive.
•Noninstallareildispositivosusupporti,
superci,paretiopaliinstabili.
•Utilizzaresolostrumentiapplicabiliquando
siinstallaildispositivoAxis.Sesiutilizza
unaforzaeccessivaconstrumentinonadatti
èpossibilecausaredannialdispositivo.
•Nonutilizzaresostanzechimiche,agenti
causticiodetergentiaerosol.
•Utilizzareunpannopulitoinumiditoin
acquapuraperlapulizia.
•Utilizzaresoloaccessoricompatibilicon
lespecichetecnichedeldispositivo.
QuestipossonoesserefornitidaAxis
odaterzeparti.Axisconsiglial'uso
dell'apparecchiaturadialimentazioneAxis
compatibileconildispositivo.
•Utilizzaresolopartidiricambioforniteo
consigliatedaAxis.
•Nontentarediriparareildispositivodasoli.
Contattarel'assistenzaoilrivenditoreAxis
perquestionirelativeallamanutenzione.
•Nonrivolgerel'obiettivodellatelecamera
versoilsoleoaltresorgentidiradiazioni
moltointensepoichésipotrebbe
danneggiarelatelecamera.
Trasporto
A A
A
VVISO VVISO
VVISO
•Duranteiltrasportodeldispositivo
Axis,utilizzarel'imballaggiooriginaleo
equivalenteperevitaredannialdispositivo.
Batteria
IldispositivoAxisutilizzaunabatteriaallitioda
3VBR2032comealimentazioneperilsuoorologio
intemporeale(RTC)interno.Incondizioninormali
questabatteriaavràunadurataminimadicinqueanni.
Unabassacaricadellabatteriainuiscesul
funzionamentodell'orologiointemporeale,facendolo
resettareaogniaccensione.Quandolatensione
dellabatteriaèbassa,unmessaggiodiregistroviene
visualizzatonelreportdelserverdeldispositivo.
ATTENZIONE
Nonsostituirelabatteriadasoli.Contattare
l'assistenzadiAxisseilmessaggiodiregistro
richiedeunasostituzionedellabatteria.
Lebatterieabottoneallitioda3Vcontengono
1,2-dimetossietano;eteredimetilicodiglicoleetilenico
(EGDME),CASn.110-71-4.


AXISQ8752-EBispectralPTZCamera
Contenidodelpaquete
79
ES

AXISQ8752-EBispectralPTZCamera
Informacióngeneraldelproducto
1
Parasol
2
Cubiertasuperior
3
Cubiertainterna
4
Unidaddeposicionamiento
5
Tornillosdeunidadbase
6
Unidadbase
7
Escobillalimpiadora
8
Partedelanteraconcubiertaprotectora
9
Objetivoparacámaravisual
10
Objetivoparacámaratérmica
11
Tapa
80

AXISQ8752-EBispectralPTZCamera
1
Conectordecubiertasuperior
2
ConectorRS485
3
Conectordealimentación
4
Botóndecontrol
5
ConectorRJ45
6
LEDdeestado
7
Conectordeentradadeaudiode3,5mm
8
RanuraparatarjetasdememoriaSD(microSD,tarjetanoincluida)
9
Conectordeentradadecorriente
10
ConectordeE/S
11
ConectorRJ45
12
RanuraSFPparamóduloSFP(noincluido)
81
ES

AXISQ8752-EBispectralPTZCamera
Cómoinstalarelproducto
PELIGRO
Riesgodedescargaeléctrica.Todosloscablesdebenestarsinenergíaantesdeinstalarel
producto.
ATENCIÓN
Lasconexioneseléctricasylasinstalacionesdelosconductosdeberealizarlasunelectricista
cualicado,deconformidadconlanormativalocal.
ATENCIÓN
Riesgodelesiones.Piezasmóviles.Noacerqueningunapartedelcuerpoalproducto
mientrasestéfuncionando.Desconectelafuentedealimentaciónantesderealizartrabajos
deinstalaciónomantenimientoenelproducto.
ATENCIÓN
Riesgodelesiones.Superciecaliente.Notoqueelproductodurantesu
funcionamiento.Desconectelafuentedealimentaciónydejequeseenfríenlassupercies
antesderealizartrabajosdemantenimientoenelproducto.
Montajedelaunidadbase
1
Unidadbase
1.Quiteloscuatrotornillos(T30)delaunidadbase.
2.Tiredelabasealavezquelagiraensentidocontrarioalasagujasdelrelojhastaalinear
lasechasdelaunidadbaseconelrestodelaunidaddeposicionamiento.
3.Extraigalaunidadbase.
82

AXISQ8752-EBispectralPTZCamera
A A
A
VISO VISO
VISO
Noutiliceherramientasaladasalretirarlacubiertatransparentedelaunidadbase.
4.Extraigalacubiertatransparentedelaunidadbase.
1
Clipdecubiertadeconducto
2
Cubiertadeconducto
83
ES

AXISQ8752-EBispectralPTZCamera
3
Oricioparatornillo(4)
5.Parainstalacionesconconductosolo:retirelosdosclipsdecubiertadeconductoy,
acontinuación,lacubiertadeconducto.
6.Fijelaunidadbasealasuperciedemontajemediantelosjadoresadecuadosenlos
cuatrooriciosparatornillos.
Guíadeloscables
ADVERTENCIA
Riesgodedescargaeléctrica.Elproductodebeconectarseatierramedianteelcablede
tierraprotectorenelcabledealimentaciónyelcabletrenzadodetierra.Asegúresede
quelosdosextremosdelcabledetierraprotectoryelcabletrenzadodetierraesténen
contactoconsusrespectivassuperciesdetomadetierra.
Importante
Utilicesololoscablesquecumplanlosrequisitosdeláreadecableadoespecicada.Para
obtenermásinformación,consulteGrosordelcableenlapágina94.
1
Cabledealimentación(noincluido)
2
Descargadetracción
3
Tornillodetomadetierra
4
Cabletrenzadodetierra(noincluido)
5
Oricioinferiorparacable
84

AXISQ8752-EBispectralPTZCamera
1.Instalelosadaptadoresdeconductoopcionales(noincluidos).
2.Conecteelcabletrenzadodetierraaltornillodetierra.
3.Paseelcabledealimentación,elcabledeE/Syelcablederedatravésdeloriciode
launidadbasecomosemuestraenlailustraciónanterior.Tambiénpuedepasarlos
poreloriciodelcableinferior.
4.Paseelcabledealimentaciónporladescargadetracciónconunadistanciade530mm
entreestayelextremodelcable.
1
CabledeE/S(opcional,noincluido)
2
Cabledered(noincluido)
5.IntroduzcaelcabledeE/S(opcional)atravésdeladescargadetracciónconuna
distanciade420mmentreestayelextremodelcable.
6.Introduzcaelcabledered(cabledebraópticaocableRJ45)conunadistanciade
580mmentreladescargadetracciónyelextremodelconector.Paraobtenermás
informaciónsobrelasopcionesdeconectividaddelared,consulteInstalacióndelenlace
deredenlapágina89.
7.Cierreyaprietelastresdescargasdetracción.
85
ES

AXISQ8752-EBispectralPTZCamera
1
Cabledealimentación(noincluido)
2
CabledeE/S(opcional,noincluido)
3
Cabledered(noincluido)
4
Juntadecable
5
Cubiertatransparentedelaunidadbase
8.Pongajuntasenloscables.ConsulteGrosordelcableenlapágina94.
9.Paseloscablesdealimentación,E/Syredconlasjuntasporlosoriciosdelacubierta
transparentedelaunidadbaseydispóngaloscomosemuestraenlailustraciónanterior.
A A
A
VISO VISO
VISO
SiusauncabledebraópticayuncableRJ45paralaconexióndered,paseelcablede
braópticaporlamismajuntaqueelcabledeE/S.Apliqueunselladorentreloscablesyla
juntadecableparaquenohayafugas.Paraobtenermásinformaciónsobrelasopcionesde
conectividaddelared,consulteInstalacióndelenlacederedenlapágina89.
86

AXISQ8752-EBispectralPTZCamera
10.Coloquelacubiertatransparentedelaunidadbaseenlaunidadypongalasjuntas
decableenlosoricios.
1
ConectordeE/S
2
Conectordealimentación
3
Juntatórica
A A
A
VISO VISO
VISO
Andeevitardesconectaraccidentalmentelaunidaddelaalimentaciónsisetiradel
cable,dejeelcableprotectordetierraunos10mmmáslargoquelosotrosdoscables(en
elcabledealimentación).
Nota
Paraquelainstalaciónresultelomássencillaposible,lerecomendamosretirar
aproximadamente90mmdelacamisadelcabledealimentacióny70mmdelacamisa
delcabledeE/S.
11.InstalelosconectoresdealimentaciónyE/S.
12.Ajusteloscablesdered,E/Syalimentacióndeformaqueladistanciaentrelajuntade
cableyelextremodelconectorseade240mm,170mmy160mmrespectivamente.
A A
A
VISO VISO
VISO
Compruebequelajuntatóricaestábienpuestaentornoalacubiertatransparentede
launidadbase.
87
ES

AXISQ8752-EBispectralPTZCamera
13.Coloquelaunidaddeposicionamientoenlaunidadbase.Asegúresedequelasechasde
lasdosunidadesesténalineadas.
14.Girelaunidaddeposicionamientoensentidohorariohastasuposiciónoriginalyapriete
loscuatrotornillosdelabase(par3,0Nm).
A A
A
VISO VISO
VISO
Compruebequeloscablesnoquedanpresionadosalmontarlasdosunidades.
88

AXISQ8752-EBispectralPTZCamera
Instalacióndelenlacedered
Puedeelegirentrediferentesopcionesparainstalarelenlacedered:
•A:atravésdeuncabledebraópticaoRJ45conectadoalmóduloSFP(conel
correspondienteconector)enlaranuraSFP.
•B:conuncableRJ45unidoalconectorRJ45jado.
•C:mediantelasdosopcionesanteriores,encuyocasolaconexióndelmóduloSFP
funcionacomoenlacederedprincipalylaconexiónatravésdelconectorRJ45jado
funcionacomoenlaceparacasosdeerror.
Paraobtenermásinformaciónsobrelasubicacionesdelosconectoresdered,consulteInformación
generaldelproductoenlapágina80.
Nota
•ElmóduloSFPnoseincluye.ParaobtenerinformaciónsobrelosmódulosSFPdisponibles,
consulteaxis.com.
•Siinstalaunenlacederedúnicamenteconelcabledebraópticaatravésdel
correspondientemóduloSFP,funcionarácomosoluciónindependienteeninstalaciones
concablesdelargoalcance.
89
ES

AXISQ8752-EBispectralPTZCamera
Conexióndeloscables
1.Aojeloscuatrotornillos(T20)delatapadelabaseyretírela.
1
Conectordeentradadecorriente
2
ConectordeE/S
3
ConectorRJ45
4
RanuraSFPparamóduloSFP(móduloSFPnoincluido)
2.Conectelared(braópticaoRJ45),laE/Syloscablesdealimentación.Paraobtener
másinformaciónsobrelasopcionesdeconectividaddelared,consulteInstalación
delenlacederedenlapágina89.
3.Vuelvaacolocarlatapaensuposiciónyaprieteloscuatrotornillosdelatapa(par
3,0Nm).
90
AXISQ8752-EBispectralPTZCamera
4.Extraigalacubiertaprotectora.
5.Conectelaalimentacióndelproducto.
Retirarlacubiertasuperior
ATENCIÓN
Riesgodelesiones.Piezasmóviles.Noacerqueningunapartedelcuerpoalproducto
mientrasestéfuncionando.Desconectelafuentedealimentaciónantesderealizartrabajos
deinstalaciónomantenimientoenelproducto.
ATENCIÓN
Riesgodelesiones.Superciecaliente.Notoqueelproductodurantesu
funcionamiento.Desconectelafuentedealimentaciónydejequeseenfríenlassupercies
antesderealizartrabajosdemantenimientoenelproducto.
A A
A
VISO VISO
VISO
Alretirarlacubierta,seexpondránpiezasdelacámaravisualquesonsensiblesalos
impactos.Asegúresedenogolpearlacámaradesprotegidaconlacubiertasuperioral
extraerla.
ParainsertarunatarjetaSDopararestablecerlaconguraciónpredeterminadadefábrica,retire
lacubiertasuperior:
91
ES


AXISQ8752-EBispectralPTZCamera
1.Aojelosdostornillosdelparasol.
2.Coloqueelparasolenlaposiciónquepreera.
3.Aprietelosdostornillosdelparasol(par0,8Nm).
93
ES

AXISQ8752-EBispectralPTZCamera
Especificaciones
Paraaccederalaversiónmásrecientedelahojadedatosdelproducto,visitelapáginadelproducto
enaxis.comylocaliceSupport&Documentation(Soportetécnicoydocumentación).
Grosordelcable
Eldiámetrodelcable,siseusanlasjuntasparacablessuministradasconesteproducto,debeser
deentre5y11mm.
A A
A
VISO VISO
VISO
•Utilicecablesquepuedanpermanecerdentrodeláreadecableadoespecicada.
•Elijacablesquecumplanlanormativalocalaplicable.
•Asegúresedequetodoslosoriciosparacablesesténdebidamentesellados.
•Utilicejuntasdecableoprensaestopasqueseajustentantoaloricioparacablecomo
aláreadecableado.
Paraobtenerinformaciónacercadelosaccesorios,comojuntasdecableyprensaestopaspermitidos
paraotrasáreasdecableado,visitewww.axis.com.
94

Informacióndeseguridad
Nivelesdepeligro
PELIGRO
Indicaunasituaciónpeligrosaque,sinose
evita,provocarálesionesgravesolamuerte.
ADVERTENCIA
Indicaunasituaciónpeligrosaque,sinose
evita,puedeprovocarlesionesgravesola
muerte.
ATENCIÓN
Indicaunasituaciónpeligrosaque,sinose
evita,puedeprovocarlesionesmoderadaso
leves.
A A
A
VISO VISO
VISO
Indicaunasituaciónpeligrosaque,sinose
evita,puedeprovocardañosmateriales.
Otrosnivelesdemensaje
Importante
Indicainformaciónimportantequees
fundamentalparaqueelproductofuncione
correctamente.
Nota
Indicainformaciónútilqueayudaa
aprovecharelproductoalmáximo.
Instruccionesdeseguridad
PELIGRO
Riesgodedescargaeléctrica.Todosloscables
deberánestarsinenergíaantesderealizar
trabajosdeinstalaciónomantenimientoen
elproducto.
ADVERTENCIA
ElproductodeAxisdebeinstalarloun
profesionalformadoconformealasleyesy
normativaslocales.
ATENCIÓN
Riesgodelesiones.Piezasmóviles.No
acerqueningunapartedelcuerpoalproducto
mientrasestéfuncionando.Desconectela
fuentedealimentaciónantesderealizar
trabajosdeinstalaciónomantenimientoen
elproducto.
ATENCIÓN
Riesgodelesiones.Supercie
caliente.Notoqueelproductodurante
sufuncionamiento.Desconectelafuente
dealimentaciónydejequeseenfríenlas
superciesantesderealizartrabajosde
mantenimientoenelproducto.
A A
A
VISO VISO
VISO
•EsteproductodeAxisdebeutilizarsede
acuerdoconlasleyesynormativaslocales.
•AlmaceneelproductodeAxisenunentorno
secoyventilado.
•EvitelaexposicióndelproductodeAxisa
choquesoaunafuertepresión.
•Noinstaleelproductoenpostes,soportes,
superciesoparedesinestables.
•Utilicesololasherramientas
correspondientescuandoinstaleel
productodeAxis.Laaplicacióndeuna
fuerzaexcesivaconherramientaseléctricas
puedeprovocardañosenelproducto.
•Noutilicelimpiadoresenaerosol,agentes
cáusticosniproductosquímicos.
•Limpieconunpañolimpiohumedecidocon
aguapura.
•Utilicesoloaccesoriosquecumplanconlas
especicacionestécnicasdesuproducto.
EstosaccesorioslospuedeproporcionarAxis
ountercero.Axisrecomiendautilizarun
equipodesuministrodealimentaciónde
Axiscompatibleconsuproducto.
•Utilicesolopiezasderepuesto
proporcionadasorecomendadaspor
Axis.
•Nointenterepararelproductousted
mismo.Póngaseencontactoconelservicio
deasistenciatécnicadeAxisoconsu
distribuidordeAxisparatratarasuntosde
reparación.
•Nocoloqueelobjetivodelacámara
apuntandohaciaelsoluotrasfuentesde
radiacióndealtaintensidadyaquepodría
dañarlacámara.
Transporte
A A
A
VISO VISO
VISO
•CuandotransporteelproductodeAxis,
utiliceelembalajeoriginalounequivalente
paraevitardañosenelproducto.
Batería
EsteproductodeAxisutilizaunabateríadelitio
BR2032de3,0Vcomofuentedealimentacióndel
relojinternoentiemporeal.Encondicionesnormales,
estabateríaduraráunmínimodecincoaños.
Unnivelbajodebateríaafectaráalfuncionamiento
delrelojentiemporeal,loqueprovocaráel
restablecimientodeestecadavezqueseenciendael
producto.Cuandolatensióndelabateríaestébaja,
apareceráunmensajederegistroenelinformedel
servidordelproducto.
ATENCIÓN
Nosustituyalabateríaustedmismo.Póngase
encontactoconelserviciodeasistencia
técnicadeAxissielmensajederegistro
solicitauncambiodebatería.
Laspilasdebotóndelitiode3,0Vcontienen
1,2-dimetoxietano;éterdimetílicodeetilenglicol
(EGDME),n.ºCAS110-71-4.


AXISQ8752-EBispectralPTZCamera
パ パ
パ
ッ ッ
ッ
ケ ケ
ケ
ー ー
ー
ジ ジ
ジ
の の
の
内 内
内
容 容
容
97
JA

AXISQ8752-EBispectralPTZCamera
製 製
製
品 品
品
の の
の
概 概
概
要 要
要
1
ウ ェ ザ ー シ ー ル ド
2
ト ッ プ カ バ ー
3
内 部 カ バ ー
4
ポ ジ シ ョ ニ ン グ ユ ニ ッ ト
5
ベ ー ス ユ ニ ッ ト の ネ ジ
6
ベ ー ス ユ ニ ッ ト
7
ワ イ パ ー
8
保 護 フ ォ イ ル を 備 え た フ ロ ン ト
9
ビ ジ ュ ア ル レ ン ズ
10
サ ー マ ル レ ン ズ
98

AXISQ8752-EBispectralPTZCamera
11
蓋
1
ト ッ プ カ バ ー コ ネ ク タ
2
RS485 コ ネ ク タ
3
電 源 コ ネ ク タ
4
コ ン ト ロ ー ル ボ タ ン
5
RJ45 コ ネ ク タ
6
ス テ ー タ ス LED
7
⾳ 声 ⼊ ⼒ 3.5 mm コ ネ ク タ
8
SD カ ー ド ス ロ ッ ト (microSD 、 カ ー ド は 付 属 し て い ま せ ん )
9
⼊ ⼒ 電 ⼒ コ ネ ク タ
10
I/O コ ネ ク タ
11
RJ45 コ ネ ク タ
12
SFP モ ジ ュ ー ル ⽤ SFP モ ジ ュ ー ル ( ⾮ 付 属 品 )
99
JA

AXISQ8752-EBispectralPTZCamera
製 製
製
品 品
品
の の
の
取 取
取
り り
り
付 付
付
け け
け
⽅ ⽅
⽅
法 法
法
危険
感電の危険があります。製品を設置する前に、すべてのケーブルの通電
を切ってください。
注意
電気接続およびコンジットの取り付けは、必ず資格のある電気技師が地域
の規制に従って⾏ってください。
注意
損傷の危険があります。可動部分。動作中は、体を製品に近づけないで
ください。製品の設置やメンテナンスを⾏う前には電源を切ってください。
注意
損傷の危険があります。表⾯が熱くなります。動作中は、本製品に触れ
ないでください。製品のメンテナンスを⾏う前に、電源を切り、表⾯が冷
えるまで待ってください。
ベ ベ
ベ
ー ー
ー
ス ス
ス
ユ ユ
ユ
ニ ニ
ニ
ッ ッ
ッ
ト ト
ト
の の
の
取 取
取
り り
り
付 付
付
け け
け
1
ベ ー ス ユ ニ ッ ト
1.ベースユニットのネジ4本(T30)を外します。
2.ベースユニットと残りの位置決めユニットの⽮印が揃うまで、ベースユ
ニットを同時に反時計回りに引いて回します。
3.ベースユニットを取り外します。
100
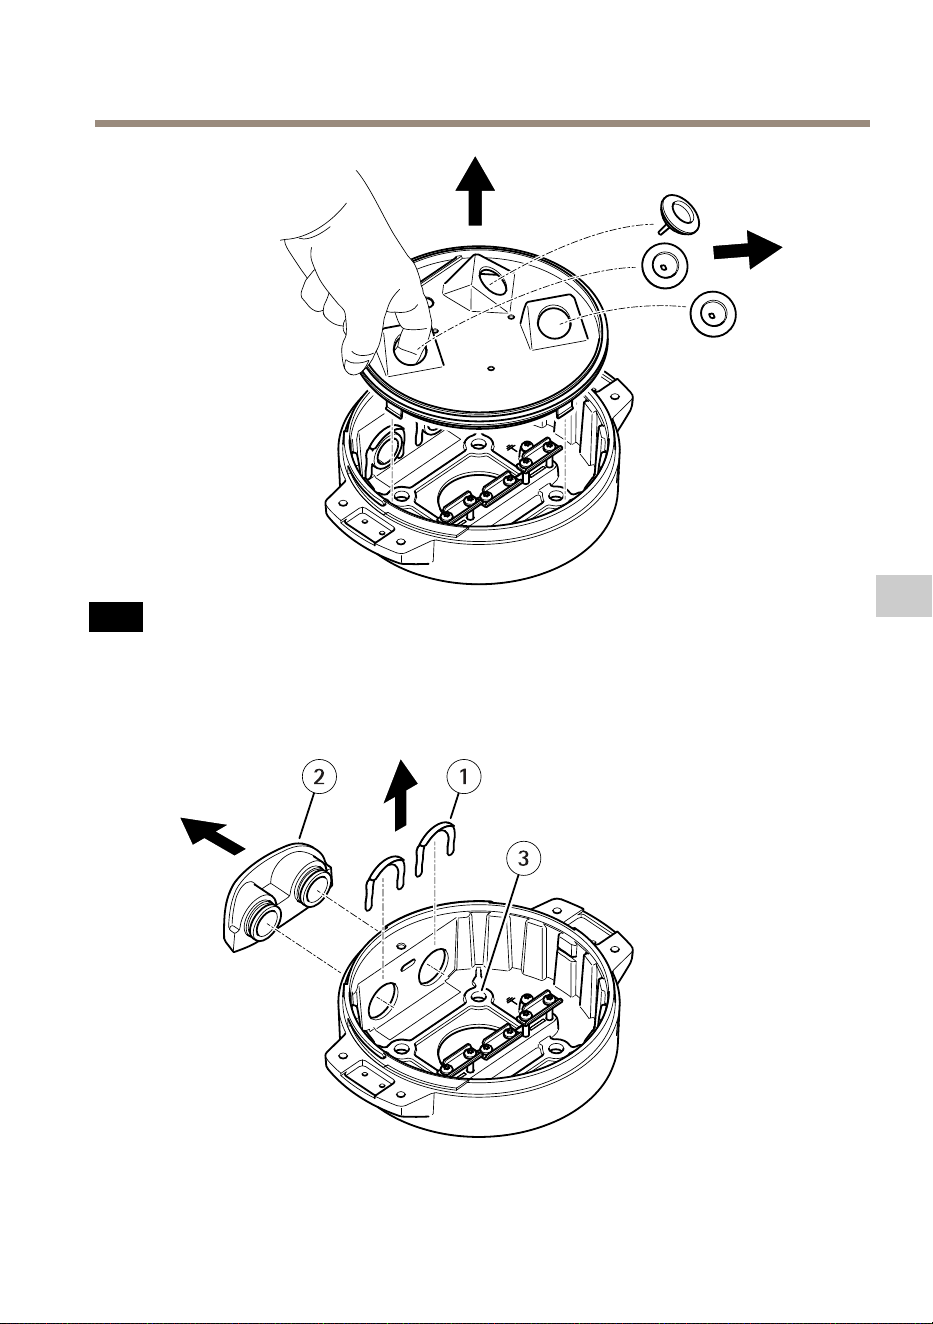
AXISQ8752-EBispectralPTZCamera
注 記
透明ベースユニットカバーの取り外しの際には、鋭利な⼯具を使⽤しな
いでください。
4.透明ベースユニットカバーを取り外します。
1
コ ン ジ ッ ト カ バ ー ク リ ッ プ
101
JA

AXISQ8752-EBispectralPTZCamera
2
コ ン ジ ッ ト カ バ ー
3
ネ ジ ⽳ (x4)
5.コンジットの取り付けの場合にのみ、2つのコンジットカバークリップを
取り外し、コンジットカバーを取り外します。
6.4つのネジ⽳に適したファスナーで、ベースユニットを取付⾯に取り付
けます。
ケ ケ
ケ
ー ー
ー
ブ ブ
ブ
ル ル
ル
の の
の
配 配
配
線 線
線
警告
感電の危険があります。本製品は、電源ケーブルおよび接地編組の両⽅に保
護アース線を使⽤して接地するものとします。保護アース線と接地編組のそ
れぞれの両端がいずれもアース⾯と接触していることを確認してください。
重要
指定のケーブルエリアでの仕様に準拠したケーブルのみ使⽤してください。
詳細については、
112 ペ ー ジ の 、 ケ ー ブ ル の 太 さ
を参照してください。
1
電 源 ケ ー ブ ル ( 付 属 し て い ま せ ん )
2
ス ト レ イ ン リ リ ー フ
3
ア ー ス 端 ⼦ ネ ジ
4
接 地 編 組 ( 付 属 し て い ま せ ん )
5
底 部 ケ ー ブ ル 孔
102

AXISQ8752-EBispectralPTZCamera
1.オプションのコンジットアダプター(付属していません)を取り付けます。
2.接地編組をアース端⼦ネジに接続します。
3.上図に⽰すように、ベースユニットの⽳から電源ケーブル、I/Oケーブ
ル、およびネットワークケーブルを挿⼊します。あるいは、それらを
底部ケーブル孔から挿⼊します。
4.ストレインリリーフからケーブルの先端までの距離が530mmになるよう
に、ストレインリリーフを通じて電源ケーブルを挿⼊します。
1
I/O ケ ー ブ ル ( オ プ シ ョ ン 、 付 属 し て い ま せ ん )
2
ネ ッ ト ワ ー ク ケ ー ブ ル ( 付 属 し て い ま せ ん )
5.ストレインリリーフからケーブルの先端までの距離が420mmになるよう
に、ストレインリリーフを通じてI/Oケーブル(オプション)を挿⼊します。
6.ストレインリリーフからコネクタの先端までの距離が580mmになるよう
に、ストレインリリーフを通じてネットワークケーブル(光ファイバー
ケーブルやRJ45ケーブル)を挿⼊します。さまざまなネットワーク接続オ
プションの詳細については、
107 ペ ー ジ の 、 ネ ッ ト ワ ー ク リ ン ク の イ ン ス
ト ー ル
を参照してください。
7.3つのストレインリリーフを閉じて締めます。
103
JA

AXISQ8752-EBispectralPTZCamera
1
電 源 ケ ー ブ ル ( 付 属 し て い ま せ ん )
2
I/O ケ ー ブ ル ( オ プ シ ョ ン 、 付 属 し て い ま せ ん )
3
ネ ッ ト ワ ー ク ケ ー ブ ル ( 付 属 し て い ま せ ん )
4
ケ ー ブ ル ガ ス ケ ッ ト
5
透 明 ベ ー ス ユ ニ ッ ト カ バ ー
8.ケーブルに合ったケーブルガスケットを取り付けます。
112 ペ ー ジ の 、 ケ ー
ブ ル の 太 さ
を参照してください。
9.上図に⽰すように、ケーブルガスケットを含めて、電源ケーブル、I/Oケー
ブル、ネットワークケーブルを透明ベースユニットのカバー孔から挿⼊
し、ケーブルの配置を調整します。
注 記
光ファイバーとRJ45ケーブルの両⽅をネットワーク接続に使⽤している場
合、光ケーブルはI/Oケーブルと同じケーブルガスケットを通します。漏電防
104

AXISQ8752-EBispectralPTZCamera
⽌のために、シーラントをケーブルとケーブルガスケットの間に貼り付けま
す。さまざまなネットワーク接続オプションの詳細については、
107 ペ ー ジ
の 、 ネ ッ ト ワ ー ク リ ン ク の イ ン ス ト ー ル
を参照してください。
10.ベースユニットの上に透明ベースユニットカバーを置き、⽳の内側にケー
ブルガスケットをはめ込みます。
1
I/O コ ネ ク タ
2
電 源 コ ネ ク タ
3
O - リ ン グ
注 記
ケーブルが引っ張られた場合に誤って装置を電源から切断しないように、保
護接地線は他の2本の線(電源ケーブル内)よりも約10mm⻑くしてください。
注意
設置をできるだけ簡単にするために、電源ケーブルジャケットの約90mmと
I/Oケーブルジャケットの70mmを取り除くことをお勧めします。
11.電源およびI/Oコネクタを取り付けます。
12.ネットワークケーブル、I/Oケーブル、および電源ケーブルのケーブルガ
スケットからコネクタの端までの距離が、それぞれ240mm、170mm、
160mmになるように調整します。
105
JA

AXISQ8752-EBispectralPTZCamera
注 記
O-リングが透明ベースユニットカバーに正しく取り付けられていること
を確認します。
13.ポジショニングユニットをベースユニットに配置します。2つのユニット上
の⽮印が⼀直線上になっていることを確認してください。
14.ポジショニングユニットを元の位置に戻るまで時計回りに回し、ベース
ユニットのネジ4本を締めます(トルク3.0Nm)。
注 記
2つのユニットを組み⽴てるときにケーブルが締め付けられないように注意
してください。
106

AXISQ8752-EBispectralPTZCamera
ネ ネ
ネ
ッ ッ
ッ
ト ト
ト
ワ ワ
ワ
ー ー
ー
ク ク
ク
リ リ
リ
ン ン
ン
ク ク
ク
の の
の
イ イ
イ
ン ン
ン
ス ス
ス
ト ト
ト
ー ー
ー
ル ル
ル
次のいずれかの⽅法で、ネットワークリンクをインストールすることができます:
•A:SFPポートで(それぞれのコネクタを使⽤して)SFPモジュールに接続され
た光ファイバーまたはRJ45ケーブルを介して接続。
•B:固定RJ45コネクタに接続されたRJ45ケーブルを介して接続。
•C:上記の両⽅を使⽤して接続。この場合、SFPモジュール接続はプライマリ
ネットワークリンクとして機能し、固定のRJ45接続はフェイルオーバー
リンクとして機能します。
ネットワークコネクタの位置の詳細については、
98 ペ ー ジ の 、 製 品 の 概 要
を参
照してください。
注意
•SFPモジュールは付属していません。利⽤可能なSFPモジュールについて
は、
axis.com
を参照してください。
•当該SFPモジュールを使⽤する光ファイバーケーブルのみを介してネット
ワークリンクをインストールする⽅法は、ケーブルを⻑距離に設置するスタ
ンドアロンのソリューションとして有効です。
107
JA

AXISQ8752-EBispectralPTZCamera
ケ ケ
ケ
ー ー
ー
ブ ブ
ブ
ル ル
ル
の の
の
接 接
接
続 続
続
1.4つの蓋⽌めネジ(T20)をゆるめ、蓋を取り外します。
1
⼊ ⼒ 電 ⼒ コ ネ ク タ
2
I/O コ ネ ク タ
3
RJ45 コ ネ ク タ
4
SFP モ ジ ュ ー ル ⽤ SFP ス ロ ッ ト (SFP モ ジ ュ ー ル は 付 属 し て い ま せ ん )
2.ネットワーク(光ファイバーまたはRJ45)に接続し、I/Oおよび電源ケーブル
を接続します。さまざまなネットワーク接続オプションの詳細については、
107 ペ ー ジ の 、 ネ ッ ト ワ ー ク リ ン ク の イ ン ス ト ー ル
を参照してください。
3.蓋を位置に戻し、4つの蓋ネジを締めます(トルク3.0Nm)。
108

AXISQ8752-EBispectralPTZCamera
4.保護カバーを取り外します。
5.製品の電源を⼊れます。
ト ト
ト
ッ ッ
ッ
プ プ
プ
カ カ
カ
バ バ
バ
ー ー
ー
を を
を
取 取
取
り り
り
外 外
外
し し
し
ま ま
ま
す す
す
注意
損傷の危険があります。可動部分。動作中は、体を製品に近づけないで
ください。製品の設置やメンテナンスを⾏う前には電源を切ってください。
注意
損傷の危険があります。表⾯が熱くなります。動作中は、本製品に触れ
ないでください。製品のメンテナンスを⾏う前に、電源を切り、表⾯が冷
えるまで待ってください。
注 記
トップカバーを取り外すと、ビジュアルカメラの衝撃に繊細な部分が現れ
ます。オフにした場合は、保護されていないカメラを、トップカバーを外
してから押してください。
SDカードを挿⼊または⼯場出荷時の設定にリセットするには、トップカバーを取
り外します。
109
JA


AXISQ8752-EBispectralPTZCamera
1.ウェザーシールドの2つのネジを緩めます。
2.希望の位置にウェザーシールドを取り付けます。
3.ウェザーシールドの2つのネジを締めます(トルク0.8Nm)。
111
JA

AXISQ8752-EBispectralPTZCamera
仕 仕
仕
様 様
様
最新バージョンの製品のデータシートについては、
axis.com
で本製品のページを開い
て「Support Support
Support
& &
&
Documentation Documentation
Documentation
( (
(
サ サ
サ
ポ ポ
ポ
ー ー
ー
ト ト
ト
と と
と
ド ド
ド
キ キ
キ
ュ ュ
ュ
メ メ
メ
ン ン
ン
ト ト
ト
) )
)
」へお進みください。
ケ ケ
ケ
ー ー
ー
ブ ブ
ブ
ル ル
ル
の の
の
太 太
太
さ さ
さ
本製品に付属のケーブルガスケットを使⽤する際、ケーブルは直径が5〜11mmのも
のを使⽤する必要があります。
注 記
•指定のケーブルエリアに収まるケーブルを使⽤してください
•地域の規制に適合したケーブルを選択してください
•すべてのケーブル孔が適切に密封されていることを確認してください
•ケーブル孔とケーブルエリアの両⽅に適合するケーブルガスケットまたは
ケーブルグランドを使⽤してください
他のケーブルエリアに対応するケーブルガスケット、ケーブルグランドなどのアク
セサリーについては、
www .axis.com
を参照してください。
112

安 安
安
全 全
全
情 情
情
報 報
報
危 危
危
険 険
険
レ レ
レ
ベ ベ
ベ
ル ル
ル
危険
回避しない場合、死亡または重傷につ
ながる危険な状態を⽰します。
警告
回避しない場合、死亡または重傷に
つながるおそれのある危険な状態を
⽰します。
注意
回避しない場合、軽傷または中程度の
怪我につながるおそれのある危険な
状態を⽰します。
注 記
回避しない場合、器物の破損につなが
るおそれのある状態を⽰します。
そ そ
そ
の の
の
他 他
他
の の
の
メ メ
メ
ッ ッ
ッ
セ セ
セ
ー ー
ー
ジ ジ
ジ
レ レ
レ
ベ ベ
ベ
ル ル
ル
重要
製品を正しく機能させるために不可⽋
な重要情報を⽰します。
注意
製品を最⼤限に活⽤するために役⽴つ
有⽤な情報を⽰します。
安 安
安
全 全
全
手 手
手
順 順
順
危険
感電の危険があります。製品の設置や
メンテナンスを⾏う前にすべてのケー
ブルの通電を切ってください。
警告
本製品の設置は、お使いになる地域の
法律や規制に準拠して、訓練を受けた
専⾨技術者が⾏ってください。
注意
損傷の危険があります。可動部
分。動作中は、体を製品に近づけな
いでください。製品の設置やメンテ
ナンスを⾏う前には電源を切ってく
ださい。
注意
損傷の危険があります。表⾯が熱
くなります。動作中は、本製品に触れ
ないでください。製品のメンテナンス
を実⾏する前には電源を切り、表⾯が
冷えるまで待ってください。
注 記
•本製品は、お使いになる地域の法律
や規制に準拠して使⽤してください。
•本製品は乾燥した換気のよい環境に
保管してください。
•本製品に衝撃または強い圧⼒を加え
ないでください。
•本製品を不安定なポール、ブラケッ
ト、表⾯、または壁に設置しないで
ください。
•本製品を設置する際には、適切な⼯
具のみを使⽤してください。電動⼯
具を使⽤して過剰な⼒をかけると、
製品が損傷することがあります。
•化学薬品、腐⾷剤、噴霧式クリーナー
は使⽤しないでください。
•清掃には、きれいな⽔に浸した清潔
な布を使⽤してください。
•製品の技術仕様に準拠したアクセサ
リーのみを使⽤してください。これ
らのアクセサリーは、Axisまたはサー
ドパーティから⼊⼿できます。Axis
は、ご使⽤の製品と互換性のあるAxis
給電ネットワークスイッチの使⽤を
推奨します。
•Axisが提供または推奨する交換部品の
みを使⽤してください。
•製品を⾃分で修理しないでください。
修理については、Axisサポートまたは
販売代理店にお問い合わせください。
•太陽などの⾼輝度の光源にはカメラ
のレンズを向けないでください。カ
メラが損傷することがあります。
輸 輸
輸
送 送
送
注 記
•本製品を運搬する際は、製品が損傷
しないよう、元の梱包か同等の梱包
を使⽤してください。
バ バ
バ
ッ ッ
ッ
テ テ
テ
リ リ
リ
ー ー
ー
本製品は、内部リアルタイムクロック(RTC)⽤
電源として、3.0VBR2032リチウムバッテリー
を使⽤します。このバッテリーは、通常条件
下で最低5年間使⽤できます。
バッテリーが低電⼒状態になると、RTCの動作
に影響し、電源を⼊れるたびにRTCがリセッ
トされます。バッテリーの電圧が低下する
と、製品のサーバーレポートにログメッセー
ジが表⽰されます。
注意
⾃分でバッテリーを交換しないでくだ
さい。ログメッセージがバッテリーの
交換を要求している場合は、アクシス
サポートに連絡してください。
リチウムコイン型3.0V電池は、1,2-ジメトキ
シエタン(エチレングリコールジメチルエーテ
ル(EGDME)、CAS番号110-71-4)を含有してい
ます。


AXISQ8752-EBispectralPTZCamera
包 包
包
装 装
装
内 内
内
容 容
容
115
ZH

AXISQ8752-EBispectralPTZCamera
产 产
产
品 品
品
概 概
概
述 述
述
1
耐 候 保 护 罩
2
顶 罩
3
内 罩
4
定 位 单 元
5
底 座 单 元 螺 丝
6
底 座 单 元
7
雨 刮 器
8
前 部 带 有 保 护 膜
9
视 觉 镜 头
10
热 透 镜
116
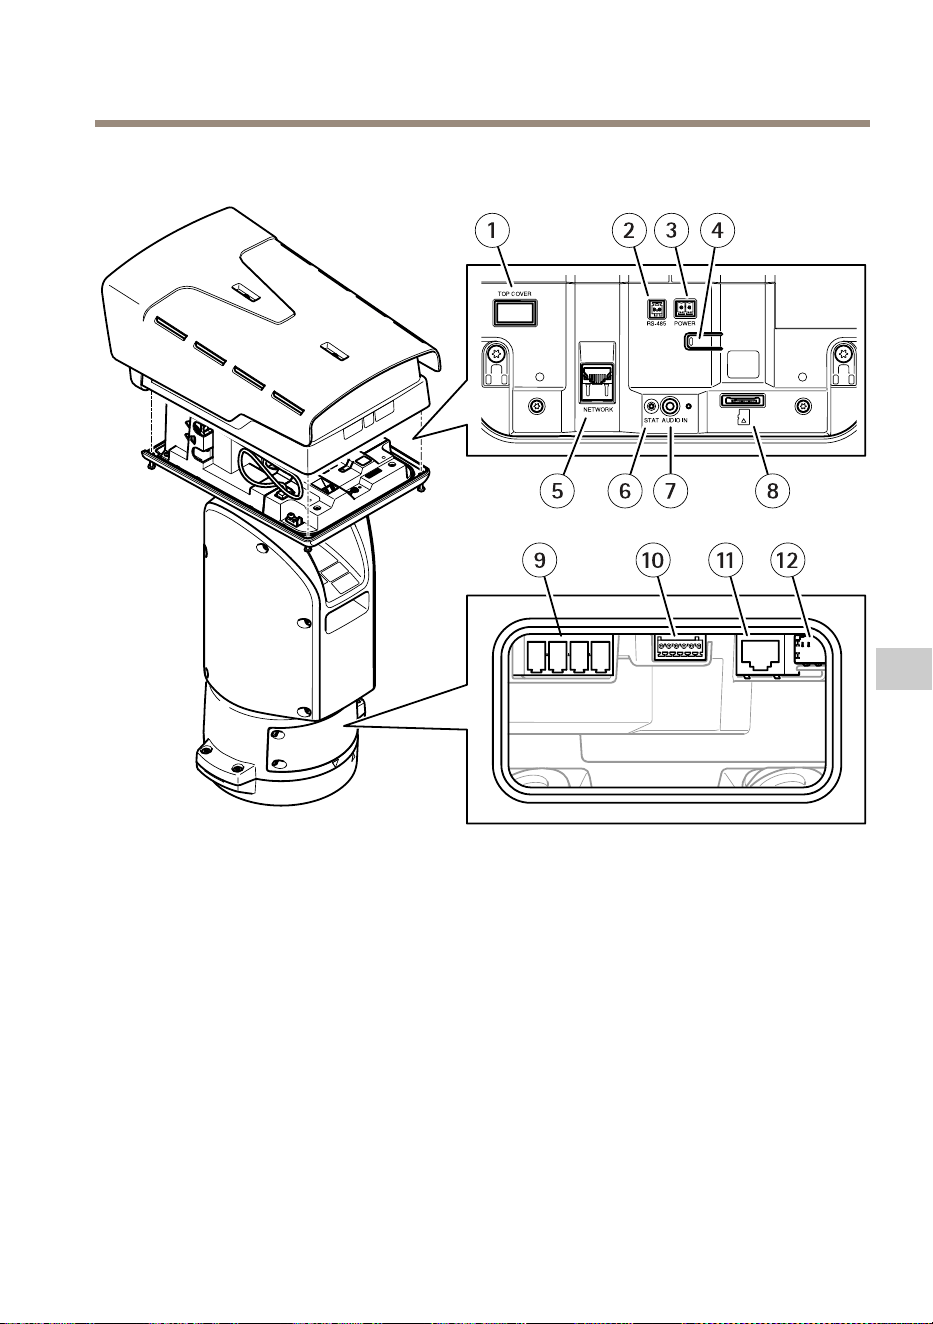
AXISQ8752-EBispectralPTZCamera
11
盖
1
顶 罩 连 接 器
2
RS485 连 接 器
3
电 源 连 接 器
4
控 制 按 钮
5
RJ45 连 接 器
6
LED 状 态 指 示 灯
7
音 频 输 入 3.5 毫 米 连 接 器
8
SD 卡 槽 ( microSD , 不 含 卡 )
9
输 入 电 源 连 接 器
10
I/O 连 接 器
11
RJ45 连 接 器
12
SFP 模 块 的 SFP 插 槽 ( 不 含 )
117
ZH

AXISQ8752-EBispectralPTZCamera
如 如
如
何 何
何
安 安
安
装 装
装
产 产
产
品 品
品
危险
电击风险。安装产品之前,电缆都应断电。
小心
电气连接和导线管安装应由经过认证的电工执行,并遵守当地法规。
小心
伤害风险。活动部件。操作期间,请保持身体部位远离产品。安装或
维护产品时,请断开电源。
小心
伤害风险。灼热的表面。请勿在操作期间触摸该产品。执行产品维护时,
请断开电源并让表面冷却。
安 安
安
装 装
装
底 底
底
座 座
座
单 单
单
元 元
元
1
底 座 单 元
1.移除四颗底座单元螺丝(T30)。
2.同时逆时针拉转底座单元,直到底座单元和定位单元其余部分的箭头对齐。
3.移除底座单元。
118

AXISQ8752-EBispectralPTZCamera
注 意
移除透明底座单元盖板时,请勿使用尖锐工具。
4.移除透明底座单元盖板。
1
导 线 管 盖 夹
2
导 线 管 盖
119
ZH

AXISQ8752-EBispectralPTZCamera
3
螺 丝 孔 ( 4 个 )
5.仅适用于导线管安装:取下两个导线管盖夹,然后取下导线管盖。
6.在四个螺丝孔中使用适当的紧固件将底座单元固定到安装表面。
布 布
布
线 线
线
警告
触点危险。本产品应同时使用电源线中的保护接地线和接地编织层进行接地。
确保保护接地线和接地编织层的两端与其各自的接地表面接触。
重要
仅使用符合指定电缆区域要求的电缆。有关详细信息,请参见
电 缆 厚 度 在
第 130 页
。
1
电 源 线 ( 不 包 括 )
2
应 力 消 除 器
3
接 地 螺 丝
4
接 地 编 织 层 ( 不 包 括 )
5
底 部 电 缆 孔
1.安装可选的导线管适配器(不包括)。
2.将接地编织层连接到接地螺丝。
120

AXISQ8752-EBispectralPTZCamera
3.将电源线、I/O电缆和网络电缆穿过底座单元上的孔(如上图所示)。或
者,将其穿过底部电缆孔。
4.将电源线穿过应力消除器,并保持应力消除器与电缆末端距离为530毫
米(21英寸)。
1
I/O 电 缆 ( 可 选 , 不 包 括 )
2
网 络 电 缆 ( 不 包 括 )
5.将I/O电缆(可选)穿过应变消除件,并使应变消除件至电缆端的距离为420
毫米(16.5英寸)。
6.将网络电缆(光纤电缆和/或RJ45电缆)穿过应力消除器,并保持应力消
除器与连接器末端的距离为580毫米(23英寸)。有关不同网络连接选项
的详细信息,请参见
安 装 网 络 链 路 在 第 125 页
。
7.合上并拧紧这三个应力消除器。
121
ZH

AXISQ8752-EBispectralPTZCamera
1
电 源 线 ( 不 包 括 )
2
I/O 电 缆 ( 可 选 , 不 包 括 )
3
网 络 电 缆 ( 不 包 括 )
4
电 缆 垫 片
5
透 明 底 座 单 元 盖 板
8.将电缆垫片安装到电缆上。请参见
电 缆 厚 度 在 第 130 页
。
9.将电源线、I/O电缆和网络电缆(包括电缆垫片)穿过透明底座单元盖板上的
孔,然后按照上图所示进行布线。
注 意
如果您同时使用光纤电缆和RJ45电缆进行网络连接,请将光纤电缆与I/O电缆
穿过同一电缆垫片。在电缆和电缆垫片之间涂抹密封剂以防电缆滑出。有关不
同网络连接选项的详细信息,请参见
安 装 网 络 链 路 在 第 125 页
。
122

AXISQ8752-EBispectralPTZCamera
10.将透明底座单元盖板放在底座单元上,并将线缆垫圈安装在孔内。
1
I/O 连 接 器
2
电 源 连 接 器
3
O 形 环
注 意
为避免电缆被拉扯时单元电源意外断开,保护接地线应该比他两条电线(电源
线内)长约10毫米(0.4英寸)。
备注
为了让安装尽可能简单,我们建议您将电源线护套剥去约90毫米(3.5英
寸),并将I/O电缆护套剥去70毫米(2.8英寸)。
11.安装电源连接器和I/O连接器。
12.调整网络、I/O和电源线,以使电缆垫片与连接器末端的距离分别为240毫米
(10英寸)、170毫米(7英寸)及160毫米(7英寸)。
注 意
确保O型环正确安装在透明底座单元盖板周围。
123
ZH
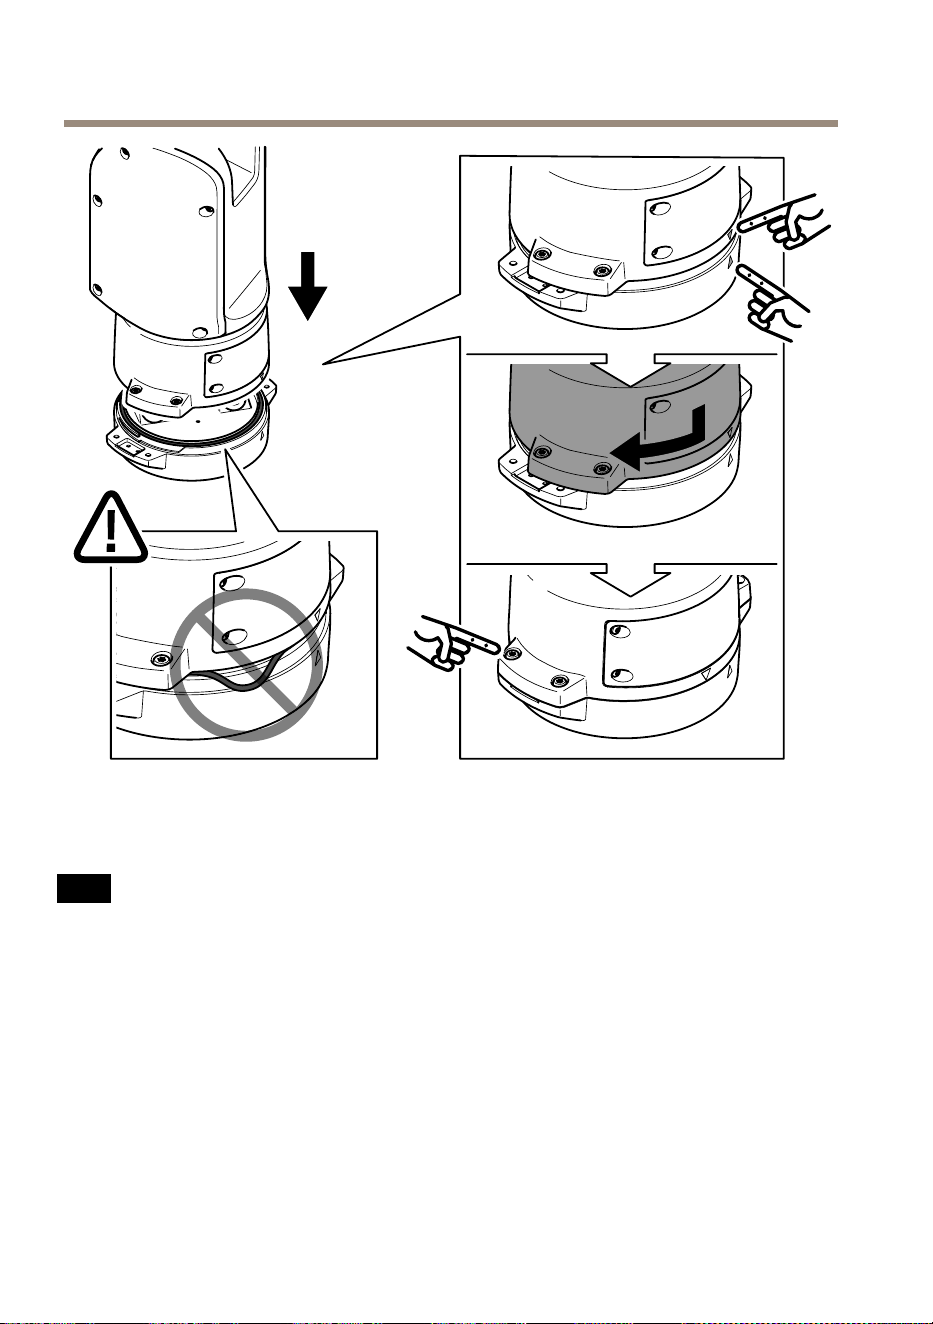
AXISQ8752-EBispectralPTZCamera
13.将定位单元放在底座单元上。确保两个单元上的箭头对齐。
14.按顺时针方向将定位单元转回至其初始位置并拧紧4个底座单元螺丝(扭
矩3.0牛米)。
注 意
在安装两个单元时,请确保电缆未被夹扁。
124

AXISQ8752-EBispectralPTZCamera
安 安
安
装 装
装
网 网
网
络 络
络
链 链
链
路 路
路
安装网络链路时,有几个选项可以选择:
•A:通过光纤电缆或与SFP插槽中的SFP模块(带有相应的连接器)连接
的RJ45电缆。
•B:通过与固定式RJ45连接器连接的RJ45电缆。
•C:同时连接上述两种电缆,在此情况下,SFP模块连接用作主网络链路,固
定的RJ45连接用作故障转移链路。
有关网络连接器位置的详细信息,请参见
产 品 概 述 在 第 116 页
。
备注
•不包括SFP模块。有关可用SFP模块的详细信息,请参见
axis.com
•如果您仅通过使用相应SFP模块的光纤电缆安装网络链路,它可以用作远程
布线安装的独立解决方案。
125
ZH


AXISQ8752-EBispectralPTZCamera
4.移除保护盖。
5.接通产品电源。
移 移
移
除 除
除
顶 顶
顶
罩 罩
罩
小心
受伤风险。活动部件。操作期间,请保持身体部位远离产品。安装或
维护产品时,请断开电源。
小心
受伤风险。灼热的表面。请勿在操作期间触摸该产品。执行产品维护时,
请断开电源并让表面冷却。
注 意
移除顶罩时,将显露易受碰撞影响的视觉摄像机部件。移除顶罩时,请确保
不要让顶罩碰撞无保护的摄像机。
要插入SD卡或重置为出厂默认设置,请移除顶罩:
127
ZH


AXISQ8752-EBispectralPTZCamera
2.将耐候保护罩设置在首选位置。
3.拧紧耐候保护罩的2个螺丝(扭矩0.8牛米)。
129
ZH


安 安
安
全 全
全
信 信
信
息 息
息
危 危
危
险 险
险
等 等
等
级 级
级
危险
表示如果不避免则会导致死亡或严重
伤害的危险情况。
警告
表示如果不避免则可能导致死亡或严重
伤害的危险情况。
小心
表示如果不避免则可能导致轻微或中度
伤害的危险情况。
注 意
表示如果不避免则可能导致财产损失
的情况。
其 其
其
他 他
他
消 消
消
息 息
息
等 等
等
级 级
级
重要
表示产品正常工作所必需的重要信息。
备注
表示有助于充分利用产品的有用信息。
安 安
安
全 全
全
说 说
说
明 明
明
危险
电击风险。在对产品进行安装或维护之
前,应断开所有电缆的电源。
警告
安讯士产品应由受过培训的专业人员进
行安装,并遵守当地法律和法规。
小心
伤害风险。活动部件。操作期间,
请保持身体部位远离产品。安装或维护
产品时,请断开电源。
小心
受伤风险。灼热的表面。请勿在操
作期间触摸该产品。执行产品维护时,
请断开电源并让表面冷却。
注 意
•使用安讯士产品时应遵守当地法律和
法规。
•在干燥通风的环境中存放安讯士产品。
•避免将安讯士产品暴露在冲击或高压
环境下。
•请勿将产品安装在不稳固的立杆、支
架、表面或墙壁上。
•安装安讯士产品时,仅使用适用的工
具。使用电动工具过度施力可能导致
产品损坏。
•请勿使用化学品、腐蚀剂或气雾剂。
•使用蘸纯净水的干净布进行清洁。
•仅使用符合产品技术规格的附件。这
些附件可由安讯士或第三方提供。安
讯士推荐使用与产品兼容的安讯士电
源设备。
•仅使用安讯士提供或推荐的备件。
•请勿尝试自行维修产品。有关服务事
项,请联系安讯士支持部门或安讯士
经销商。
•请勿将摄像机镜头对准太阳或其他高强
度辐射源,因为这可能会损坏摄像机。
运 运
运
输 输
输
注 意
•安讯士产品运输途中,应使用其原包
装或等效包装,以防对产品造成损坏。
电 电
电
池 池
池
安讯士产品使用3.0VBR2032锂电池作为其内
部实时时钟(RTC)的电源。在正常情况下,此
电池将持续至少五年。
蓄电池电量过低会影响实时时钟的运行,从而导
致实时时钟在每次上电时重置。当电池电压较低
时,产品的服务器报告中将显示一条日志消息。
小心
请勿自行更换电池。如果日志消息要求
更换电池,请联系安讯士支持部门。
3.0V纽扣锂电池内含1,2-二甲氧基乙烷;乙二
醇二甲醚(EGDME),CAS编号为110-71-4。

InstallationGuide
Ver.M1.2
AXISQ8752-EBispectralPTZCamera
Date:June2020
©AxisCommunicationsAB,2020
PartNo.2110784