

Este manual ha de considerarse como parte permanente del
vehículo y deberá permanecer con él si el usuario lo vende.
Esta publicación contiene la última información de producto
disponible en el momento de su impresión. Honda Motor Co., Ltd.
Se reserva el derecho a realizar cambios en cualquier momento sin
aviso previo sin incurrir en obligación alguna.
Está prohibida la publicación de cualquier parte de esta publicación
sin autorización por escrito.
Las imágenes del vehículo contenidas en el manual del propietario
pueden no coincidir con su vehículo real.
© 2022 Honda Motor Co., Ltd.
20220704173944_35K1ZR000_esm_BOOK Page 1 Monday, July 04 2022 17:43:45 JST
Bienvenido
¡Felicidades por la compra de su nuevo
vehículo Honda! Su elección de una Honda
le hace formar parte de la familia mundial de
clientes satisfechos que aprecian la
reputación de Honda por aportar calidad en
cada uno de sus productos.
Para asegurar su seguridad y su placer de
conducción:
● Lea con detenimiento este manual del
propietario.
● Siga todas las recomendaciones y
procedimientos incluidos en el mismo.
● Preste especial atención a los mensajes
de seguridad incluidos en el manual y en
el vehículo.
● Los siguientes códigos del presente
manual indican cada uno de los países.
● Las ilustraciones incluidas en esta
publicación corresponden al modelo
WW160A CO
.
Códigos de país
Código País
WW160A
AG Argentina
CO Colombia
*Las especificaciones pueden cambiar en
cada lugar.
20220704173944_35K1ZR000_esm_BOOK Page 2 Monday, July 04 2022 17:43:45 JST
Unas palabras sobre la seguridad
Su seguridad y la de terceros son muy
importantes. Es una responsabilidad importante
manejar este vehículo con seguridad.
Para ayudarle a tomar decisiones bien
fundadas en relación con la seguridad, hemos
incluido procedimientos de funcionamiento y
otra información en las etiquetas de seguridad
y en este manual. Esta información le advierte
sobre posibles peligros que podrían causarle
daños a usted o a otras personas.
Por supuesto, no resulta práctico ni posible
advertirle de todos los peligros asociados con
el manejo o el mantenimiento de un vehículo.
Por ello deberá emplear el sentido común.
Encontrará información de seguridad
importante en varias formas, incluyendo:
● Etiquetas de seguridad en el vehículo
●
Mensajes de seguridad precedidos por un
símbolo de alerta de seguridad y una de
las siguientes tres palabras de seguridad:
PELIGRO, ADVERTENCIA o PRECAUCIÓN.
Estas palabras de alerta significan:
3PELIGRO
Si no sigue las instrucciones PERDERÁ
LA VIDA o RESULTARÁ GRAVEMENTE
HERIDO.
3ADVERTENCIA
Si no sigue las instrucciones PUEDE
PERDER la VIDA o RESULTAR
GRAVEMENTE HERIDO.
3PRECAUCIÓN
Si no sigue las instrucciones PODRÁ
RESULTAR HERIDO.
Se incluyen también otras informaciones
importantes con los siguientes títulos:
AVISO
Información cuyo objetivo es
ayudarle a evitar que se produzcan
daños a su vehículo, a otras
propiedades o al medioambiente.
20220704173944_35K1ZR000_esm_BOOK Page 3 Monday, July 04 2022 17:43:45 JST

Directrices de seguridad .........................................P. 3
Pictogramas
..............................................................
..P.
6
Precauciones de seguridad
.....................................P. 8
Precauciones de conducción..................................P. 9
Accesorios y modificaciones................................P. 13
Carga de equipaje................................................... P. 14
20220704173944_35K1ZR000_esm_BOOK Page 5 Monday, July 04 2022 17:43:45 JST
Esta sección incluye información importante para una conducción segura de su vehículo.
Lea detenidamente esta sección.
Seguridad del vehículo

Directrices de seguridad
Para garantizar su seguridad siga estas directrices:
● Lleve a cabo todas las inspecciones habituales y
nor
males especificadas en el presente manual.
● Detenga el motor y manténgase alejado de
chispas y llamas antes de llenar el depósito de
combustible.
● No ponga en marcha el motor en un recinto
cerrado o parcialmente cerrado. El monóxido
de carbono de los gases de escape es tóxico y
puede matarle.
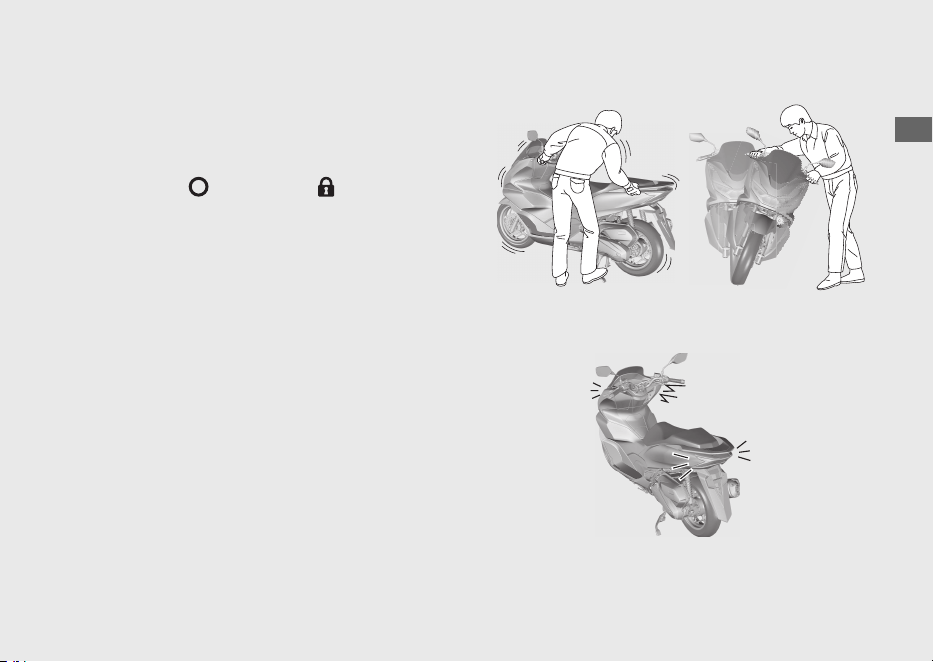
Conduzca siempre con el casco puesto
Se trata de un hecho probado: los cascos y
elementos de protección reducen de manera
importante el número y la gravedad de las lesiones
en la cabeza y otras zonas del cuerpo. Por ello,
utilice siempre cascos y elementos de protección
homologados. 2 P. 8
Antes de circular
Asegúrese de que se encuentra física y
mentalmente capacitado y de que no ha
consumido alcohol ni drogas. Compruebe que
tanto usted como su pasajero utilizan cascos y
elementos protectores debidamente
homologados. Indique al pasajero que se sujete en
el asidero
o su cintura, inclinándose con usted en
las curvas y manteniendo los pies en las estriberas,
incluso mientras el vehículo está parado.
Tómese el tiempo necesario para
aprender y practicar
Incluso aunque haya conducido otros vehículos,
practique la conducción en una zona segura para
familiarizarse con la forma de funcionar y el
manejo de este vehículo y acostúmbrese al peso y
tamaño del mismo.
Conduzca siempre alerta
Preste atención en todo momento en los vehículos
a su alrededor, y no dé por hecho que los otros
conductores han advertido su presencia. Esté listo
para detenerse rápidamente o realizar una
maniobra evasiva.
20220704173944_35K1ZR000_esm_BOOK Page 6 Monday, July 04 2022 17:43:45 JST
Directrices de seguridad
Seguridad del vehículo
3
Continuación

Hágase fácil de ver en carretera
Hágase fácil de ver, especialmente de noche, para
ello puede usar ropa reflectante brillante, puede
colocarse de tal forma que los demás conductores
le vean, realice las indicaciones pertinentes antes
de girar o cambiar de carril y utilice la bocina si
fuera necesario.
Circule dentro de sus limitaciones
Nunca conduzca más allá de su habilidad personal
o más rápido de lo permitido por las
circunstancias. La fatiga y la falta de atención
pueden disminuir su capacidad para actuar con
buen criterio y conducir con seguridad.
No consuma alcohol ni drogas si va a
conducir
Alcohol o drogas y conducción no son
compatibles. Incluso una sola copa puede reducir
la capacidad de respuesta en los continuos
cambios de condiciones, empeorándose el tiempo
de reacción con cada copa adicional. Esto mismo
sucede con el consumo de drogas. Por lo tanto, si
consume alcohol o drogas, no conduzca y
tampoco deje que sus amigos lo hagan.
Mantenga su Honda en condiciones de
seguridad
Es importante que dispense un mantenimiento
apropiado al vehículo y que lo mantenga en
buenas condiciones de funcionamiento.
Inspeccione el vehículo antes de cada uso y realice
todas las tareas de mantenimiento recomendadas.
Nunca exceda los límites de carga (2 P. 14), y no
modifique el vehículo ni instale accesorios que
hagan que resulte inseguro (2 P. 13).
Si se ve envuelto en un accidente
La seguridad personal es su prioridad. Si usted o
alguna otra persona han resultado heridos, juzgue
con serenidad la gravedad de las heridas y decida
si es seguro seguir conduciendo. Solicite asistencia
de emergencia si es necesario. Siga también las
normas y leyes aplicables si alguna otra persona u
otro vehículo se han visto involucrados en el
accidente.
20220704173944_35K1ZR000_esm_BOOK Page 7 Monday, July 04 2022 17:43:45 JST
Directrices de seguridad
Seguridad del vehículo
4
Si decide continuar conduciendo, primero gire el
interruptor de encendido a la posición
(Apagado) y evalúe el estado de su vehículo.
Compruebe si existen fugas de líquidos,
compruebe el apriete de las tuercas y pernos
críticos y verifique el manillar, las manetas de
control, los frenos y las ruedas. Conduzca despacio
y con precaución.
El vehículo podría haber sufrido daños, no
evidentes de inmediato. Haga que revisen a
conciencia su vehículo en un taller cualificado lo
antes posible.
Peligro por monóxido de carbono
Los gases de escape contienen monóxido de
carbono, un gas incoloro e inodoro que resulta
venenoso. Respirar monóxido de carbono puede
provocar la pérdida de la consciencia y puede ser
mortal.
Si pone en marcha el motor en un recinto cerrado
o parcialmente cerrado, el aire que respira podría
contener una cantidad peligrosa de monóxido de
carbono.
Jamás ponga en marcha el vehículo en un garaje u
otro recinto cerrado.
3ADVERTENCIA
Encender el motor de su vehículo en un
lugar cerrado o parcialmente cerrado
puede causar la rápida acumulación de
monóxido de carbono, un gas tóxico.
Respirar este gas incoloro e inodoro
puede causar la rápida pérdida de
consciencia y provocar la muerte.
Encienda solo su vehículo cuando se
encuentre en una zona exterior bien
ventilada.
20220704173944_35K1ZR000_esm_BOOK Page 8 Monday, July 04 2022 17:43:45 JST
Directrices de seguridad
Seguridad del vehículo
5
Pictogramas
En las siguientes páginas se describen los
significados de las etiquetas. Algunas etiquetas
le avisan sobre peligros potenciales que
pueden ocasionar heridas graves. Otras
ofrecen información importante sobre la
seguridad. Lea esta información
detenidamente y no retire las etiquetas.
Si una etiqueta se despega o se hace ilegible,
póngase en contacto con su distribuidor para
obtener una de sustitución.
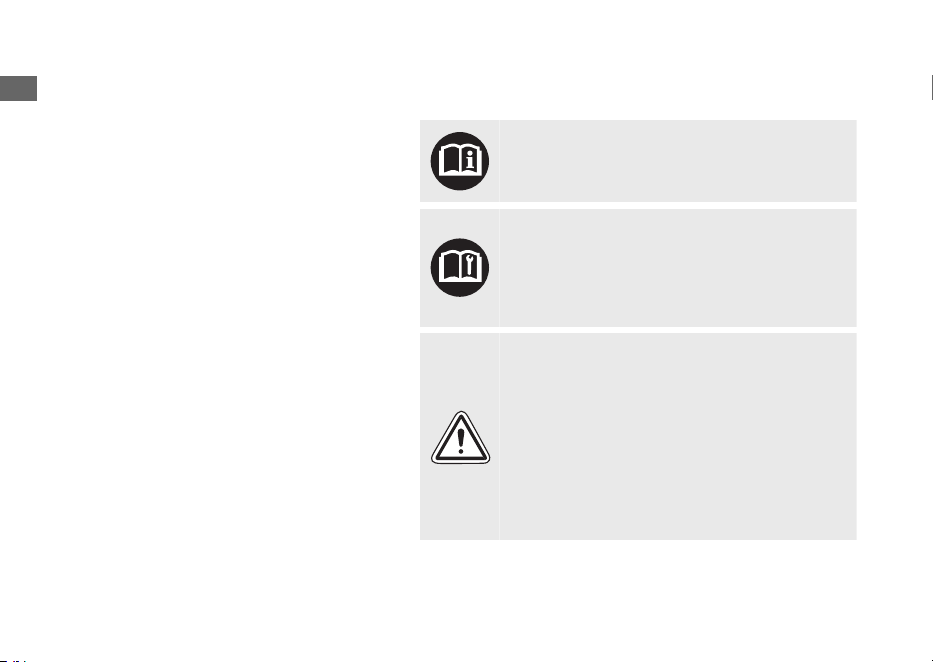
En cada etiqueta se encuentra un símbolo
específico.
Los significados de dichos símbolos son los
siguientes.
Lea con detenimiento las instrucciones
incluidas en el Manual del propietario.
Lea con detenimiento las instrucciones
incluidas en el Manual del taller. Por su
seguridad, lleve el vehículo solo a
concesionarios de su distribuidor para las
operaciones de servicio y mantenimiento.
PELIGRO (con fondo ROJO)
RESULTARÁ MUERTO o GRAVEMENTE
HERIDO si no sigue las instrucciones.
ADVERTENCIA (con fondo NARANJA)
PUEDE RESULTAR MUERTO o GRAVEMENTE
HERIDO si no sigue las instrucciones.
PRECAUCIÓN (con fondo AMARILLO)
PUEDE RESULTAR HERIDO si no sigue las
instrucciones.
20220704173944_35K1ZR000_esm_BOOK Page 9 Monday, July 04 2022 17:43:45 JST
Pictogramas
Seguridad del vehículo
6
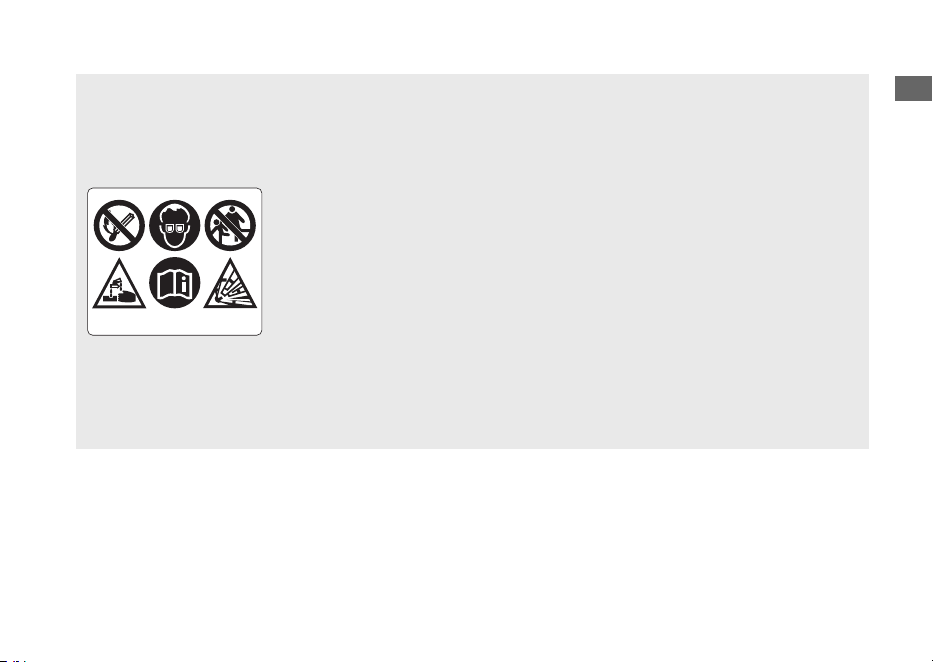
ETIQUETA DE LA BATERÍA
PELIGRO
• Mantenga las llamas y chispas alejadas de la batería. La batería produce
gases explosivos que podrían provocar una deflagración.
• Cuando manipule una batería utilice protección ocular y guantes de goma,
o podría quemarse o perder la vista debido al electrolito de la batería.
• No deje que los niños y otras personas toquen una batería a menos que
sepan cómo manipularla debidamente y conozcan los peligros que entraña
su manipulación.
• Manipule con extrema precaución el electrolito de la batería ya que
contiene ácido sulfúrico diluido. El contacto con la piel o los ojos puede
derivar en quemaduras o provocarle ceguera.
• Lea este manual con detenimiento antes de manipular la batería. Si no
respeta la instrucciones puede resultar herido o provocar daños al vehículo.
• No utilice una batería con el electrolito por debajo o justo en la marca de
nivel bajo de la misma. Puede explotar y producir lesiones graves.
20220704173944_35K1ZR000_esm_BOOK Page 10 Monday, July 04 2022 17:43:45 JST
Pictogramas
Seguridad del vehículo
7
Precauciones de seguridad
● Conduzca con cautela y mantenga las manos
en el manillar y los pies en la plataforma.
● Indique al pasajero que mantenga las manos
en el asidero
o en su cintura y los pies en las
estriberas mientras conduce.
● Tenga siempre en cuenta la seguridad del
pasajero, así como la del resto de conductores.
Elementos de protección
Asegúrese de que tanto usted como el pasajero
utilizan un casco homologado, así como
protección ocular y ropa protectora de alta
visibilidad. Evite el uso de prendas holgadas que
podrían quedar atrapadas en cualquier parte del
vehículo. Conduzca siempre alerta, adaptándose a
las condiciones climatológicas y de la carretera.
#
Casco
Homologado, de alta visibilidad y del tamaño
adecuado para su cabeza
● Debe adaptarse con comodidad pero con
seguridad, abrochado con la cinta de mentón
● Visera con campo de visión despejado u otra
protección ocular homologada
3ADVERTENCIA
No utilizar casco aumenta la posibilidad
de sufrir lesiones de gravedad o incluso
de perder la vida en caso de colisión.
Asegúrese de que tanto usted como el
pasajero utilizan siempre un casco
homologado y elementos de protección.
#
Guantes
Guantes de cuero enterizos con alta resistencia a la
abrasión
#
Botas o calzado de conducción
Botas resistentes con suelas antideslizantes y
protección para el tobillo
#
Chaqueta y pantalones
Chaqueta protectora de mangas largas, alta
visibilidad y pantalones resistentes de conducción
(o un mono de protección)
20220704173944_35K1ZR000_esm_BOOK Page 11 Monday, July 04 2022 17:43:45 JST
Precauciones de seguridad
Seguridad del vehículo
8

Precauciones de conducción
Periodo de rodaje
Durante los primeros 500 km, siga estas directrices
para garantizar la fiabilidad y prestaciones futuras
del vehículo.
● Evite arrancar con el acelerador a fondo y las
aceleraciones bruscas.
● Evite las frenadas bruscas.
● Sea comedido en la conducción.
Frenos
Observe las siguientes directrices:
● Evite las frenadas excesivamente bruscas.
u Una frenada repentina puede reducir la
estabilidad del vehículo.
u Siempre que sea posible, reduzca la
velocidad antes de tomar una curva, de lo
contrario corre el riesgo de patinar.
● Extreme las precauciones en superficies con
baja tracción.
u Las ruedas patinan con mayor facilidad en
dichas superficies, siendo mayores las
distancias de frenado.
● Evite las frenadas continuadas.
u Las frenadas repetidas, como por ejemplo
al bajar pendientes largas y pronunciadas,
pueden sobrecalentar bastante los frenos,
lo que reduce su eficacia.
● Para obtener la máxima eficacia de frenado,
utilice a la vez el freno trasero y el delantero.
#
Sistema de frenos antibloqueo (ABS) en la
rueda delantera
Este modelo está equipado con un sistema de
frenos antibloqueo (ABS) diseñado para impedir
que el freno delantero se bloquee en las frenadas
bruscas.
● No hay función ABS en la rueda trasera.
● El ABS no reduce la distancia de frenado. En
ciertas condiciones el ABS puede alargar la
distancia de frenado.
● El ABS no funciona a velocidades inferiores a
10 km/h.
20220704173944_35K1ZR000_esm_BOOK Page 12 Monday, July 04 2022 17:43:45 JST
Precauciones de conducción
Seguridad del vehículo
9
Continuación

● La maneta del freno delantero puede
retroceder levemente al accionar los frenos.
Esto es normal.
● Utilice siempre los neumáticos delanteros/
traseros recomendados para garantizar el
funcionamiento correcto del ABS.
#
Terreno mojado o lluvia
Cuando están mojadas, las superficies de la
carretera se vuelven resbaladizas y los frenos
mojados reducen aún más la eficacia de frenado.
Extreme las precauciones al frenar en mojado.
Si los frenos se mojan, aplique los frenos mientras
conduce a baja velocidad para ayudar a secarlos.
Estacionamiento
● Estacione en una superficie firme y nivelada.
● Si debe estacionar en una superficie
ligeramente inclinada o poco firme, hágalo de
forma que el vehículo no pueda moverse ni
volcar.
● Asegúrese de que las piezas que alcanzan
temperaturas elevadas no puedan entrar en
contacto con materiales inflamables.
● No toque el motor, el silenciador y los frenos,
así como otras piezas que alcanzan elevadas
temperaturas hasta que se hayan enfriado.
● Para reducir la probabilidad de robos, bloquee
siempre el manillar y el interruptor de
encendido (2 P. 43) y deje su vehículo
llevándose la Honda SMART Key con usted.
Desactive el sistema de la Honda SMART Key si
es necesario. 2 P. 38
También es recomendable el uso de algún
sistema antirrobo.
Active también el sistema de alarma antirrobo.
20220704173944_35K1ZR000_esm_BOOK Page 13 Monday, July 04 2022 17:43:45 JST
Precauciones de conducción
Seguridad del vehículo
10
#
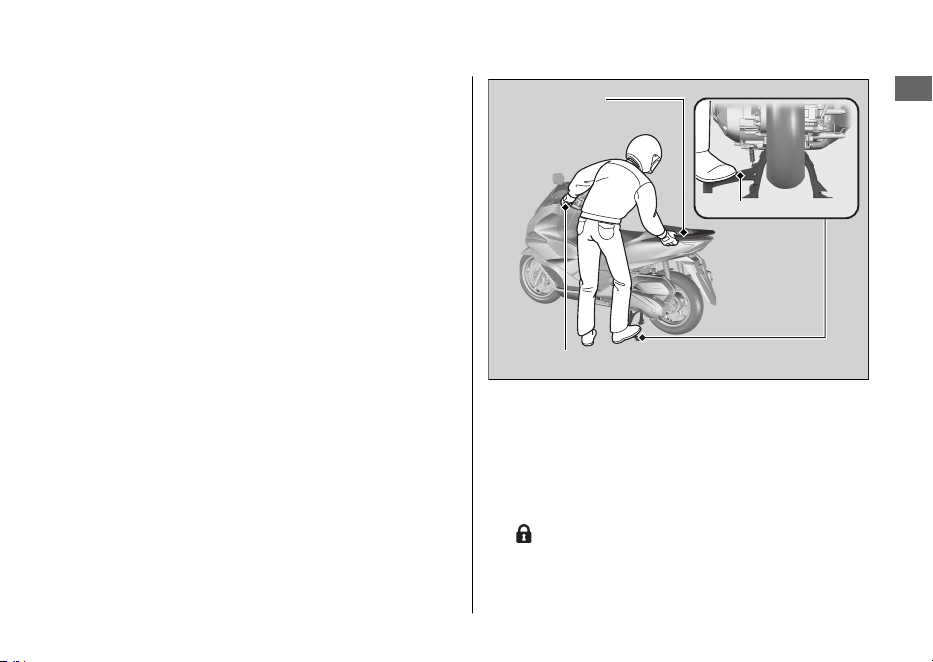
Estacionamiento con el caballete lateral o
central
1.
Pare el motor.
2.
Con el caballete lateral
Baje el caballete lateral.
Incline lentamente el vehículo hacia la
izquierda hasta que el peso descanse sobre el
caballete lateral.
Con el caballete central
Para bajar el caballete central, colóquese en el
lado izquierdo del vehículo.
Sujete la empuñadura izquierda del manillar y
el asidero.
Presione hacia abajo en la punta del caballete
central con el pie derecho y al mismo tiempo,
tire hacia arriba y hacia atrás.
3.
Gire el manillar completamente hacia la
izquierda.
u Si gira el manillar a la derecha reduce la
estabilidad y puede hacer que vuelque el
vehículo.
4.
Gire el interruptor de encendido a la posición
(Bloqueo) (2 P. 36
) para bloquearlo
(
2 P. 43).
5.
Active el sistema de alarma antirrobo. 2 P. 45
20220704173944_35K1ZR000_esm_BOOK Page 14 Monday, July 04 2022 17:43:45 JST
Precauciones de conducción
Seguridad del vehículo
11
Continuación
Puño izquierdo del manillar
Asidero
Caballete central
Repostaje y sugerencias sobre el
combustible
Siga estas indicaciones para proteger el motor, el
sistema de combustible y el catalizador:
● Utilice únicamente gasolina sin plomo.
● Esta debe ser del octanaje recomendado. Si
utiliza una gasolina con un octanaje menor, las
prestaciones del motor disminuirán.
● No utilice combustibles que contengan una
elevada concentración de alcohol. 2 P. 136
● No emplee gasolina pasada o sucia ni mezclas
de aceite/gasolina.
● Evite la entrada de suciedad o agua en el
depósito de combustible.
Control de par seleccionable de Honda
Cuando el control de par seleccionable de Honda
(control de par) detecta que la rueda trasera gira
durante la aceleración, el sistema limita la cantidad
de par aplicado a dicha rueda.
El control de par no funciona durante la
desaceleración y no evitará que la rueda trasera
patine debido al freno motor. No cierre el
acelerador repentinamente, en especial cuando
conduzca por superficies resbaladizas.
El control de par puede no compensar las
condiciones de una carretera en mal estado o el
funcionamiento rápido del acelerador. Tenga
siempre en cuenta las condiciones de la carretera y
meteorológicas, así como sus habilidades y estado,
cuando accione el acelerador.
Si el vehículo se queda atrapado en el barro, la
nieve o la arena, puede ser más sencillo sacarlo
apagando el control de par provisionalmente.
Apagar de forma provisional el control de par
también puede ayudarle a mantener el control y
equilibrio cuando circule por terrenos fuera de la
carretera.
Utilice siempre los neumáticos recomendados y las
piezas originales Honda para el sistema de
transmisión, como la correa de transmisión y los
rodillos del variador, para garantizar el correcto
funcionamiento del control de par.
20220704173944_35K1ZR000_esm_BOOK Page 15 Monday, July 04 2022 17:43:45 JST
Precauciones de conducción
Seguridad del vehículo
12

Accesorios y
modificaciones
Recomendamos encarecidamente que no añada
ningún accesorio que no haya sido diseñado
específicamente para su vehículo por Honda, y que
no realice modificaciones que afecten a su diseño
original. Hacerlo puede afectar a la seguridad de la
máquina.
Modificar el vehículo también puede anular la
garantía y hacer que resulte ilegal utilizarlo en vías
públicas. Antes de decidirse a instalar accesorios
en el vehículo asegúrese de que la modificación es
segura y legal.
3ADVERTENCIA
Los accesorios o las modificaciones
inapropiadas pueden ser causa de un
accidente en el que puede resultar
gravemente herido o muerto.
Siga todas las instrucciones de este
manual del propietario relacionadas
con los accesorios y modificaciones.
No tire de un remolque ni acople un sidecar al
vehículo. Este vehículo no ha sido diseñado para
llevar estos accesorios, y su uso puede perjudicar
seriamente al manejo del mismo.
20220704173944_35K1ZR000_esm_BOOK Page 16 Monday, July 04 2022 17:43:45 JST
Accesorios y modificaciones
Seguridad del vehículo
13
Carga de equipaje
● Transportar peso extra afecta al manejo,
frenado y estabilidad de su vehículo.
Conduzca siempre a una velocidad segura
para la carga que transporta.
● Evite transportar una carga excesiva y
manténgase siempre dentro de los límites de
carga.
Capacidad de peso máximo / Peso de
equipaje máximo 2 P. 138
● Sujete el equipaje con firmeza, equilibrado y
cerca del centro del vehículo.
● No coloque objetos cerca de las luces o del
silenciador.
3ADVERTENCIA
La sobrecarga o una carga inadecuada
pueden ser causa de un accidente en el
que puede resultar gravemente herido
o muerto.
Respete todos los límites de carga y
otras directrices incluidas en el presente
manual.
20220704173944_35K1ZR000_esm_BOOK Page 17 Monday, July 04 2022 17:43:45 JST
Carga de equipaje
Seguridad del vehículo
14

20220704173944_35K1ZR000_esm_BOOK Page 18 Monday, July 04 2022 17:43:45 JST
Seguridad del vehículo
15
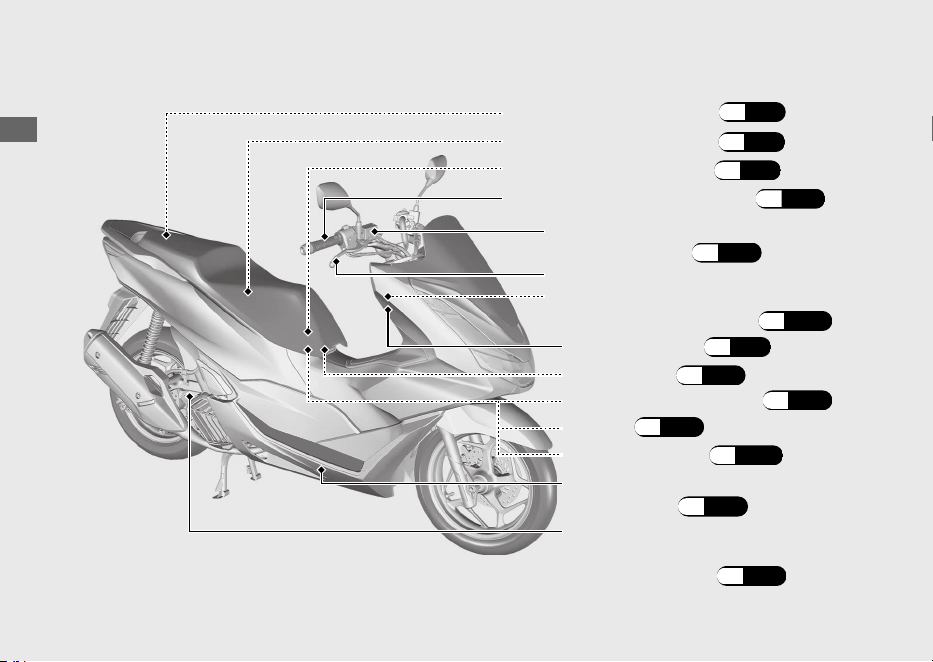
Situación de las piezas
20220704173944_35K1ZR000_esm_BOOK Page 19 Monday, July 04 2022 17:43:45 JST
Guía de funcionamiento
16
Empuñadura del acelerador
(P.99)
Bolsa para documentos (P.71)
Depósito del líquido del
freno delantero (P.96)
Juego de herramientas (P.71)
Maneta del freno delantero
Tapón de llenado/varilla de
comprobación del nivel de
aceite del motor (P.92)
Caja de fusibles (P.121)
Compartimento central (P.71)
Batería (P.89)
Cubierta de la batería (P.90)
Dispositivo de apertura de
emergencia del asiento (P.115)
Tapa delantera (P.91)
Depósito de expansión del
refrigerante (P.94)
Portacascos (P.70)
20220704173944_35K1ZR000_esm_BOOK Page 20 Monday, July 04 2022 17:43:45 JST
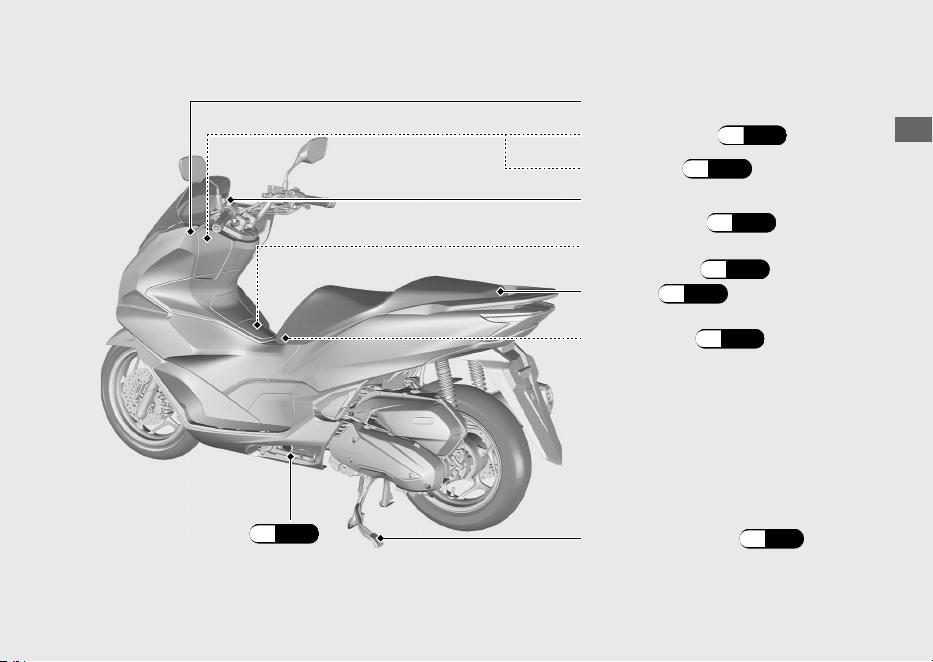
Guía de funcionamiento
17
Caballete lateral
(P.98)
Caja delantera (P.72)
Maneta del freno trasero
Depósito del líquido del
freno trasero (P.96)
Portacascos (P.70)
Caballete central (P.11)
Asiento (P.69)
Toma USB (P.68)
Tapón de llenado de
combustible (P.65)
Instrumentos
20220704173944_35K1ZR000_esm_BOOK Page 21 Monday, July 04 2022 17:43:45 JST
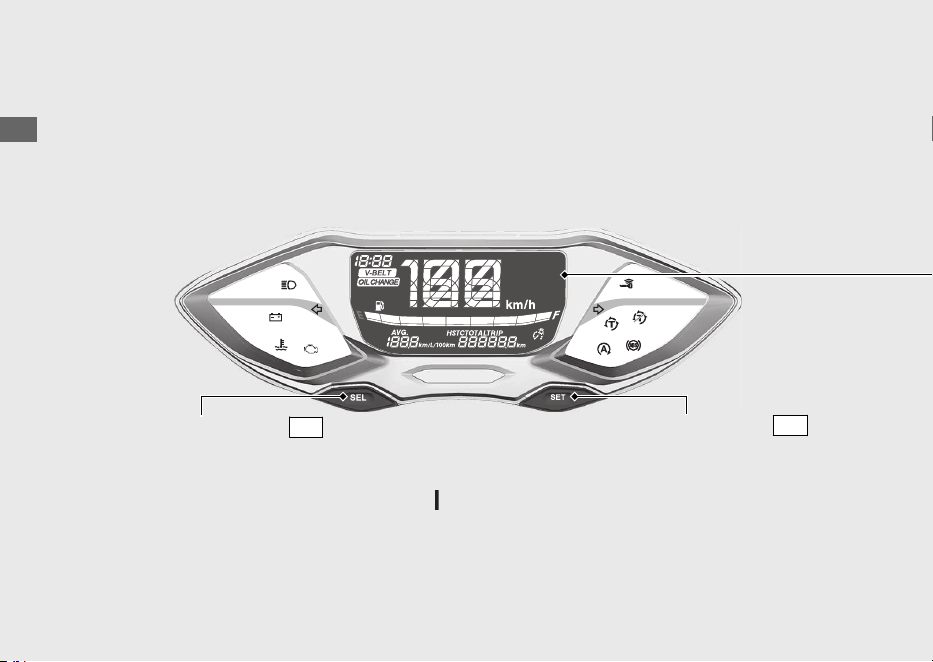
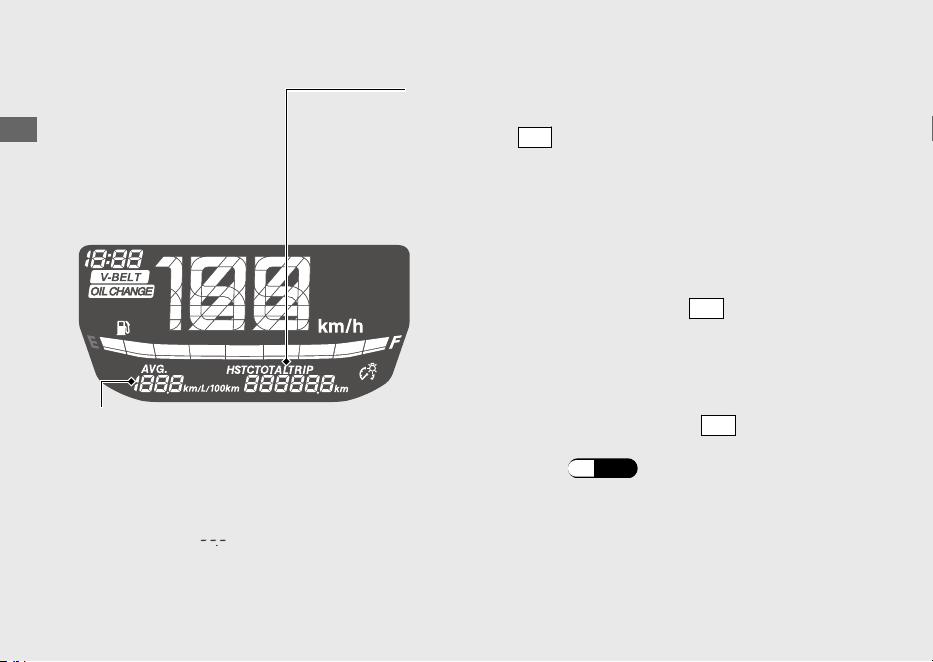
Guía de funcionamiento
18
Comprobación de la pantalla
Cuando el interruptor de encendido se gire a
(Encendido), se mostrará la
animación de inicio.
Interruptor
SEL
Si alguna parte de estos segmentos no se enciende cuando debiera, haga que su
concesionario busque los posibles problemas.
Interruptor
SET
20220704173944_35K1ZR000_esm_BOOK Page 22 Monday, July 04 2022 17:43:45 JST
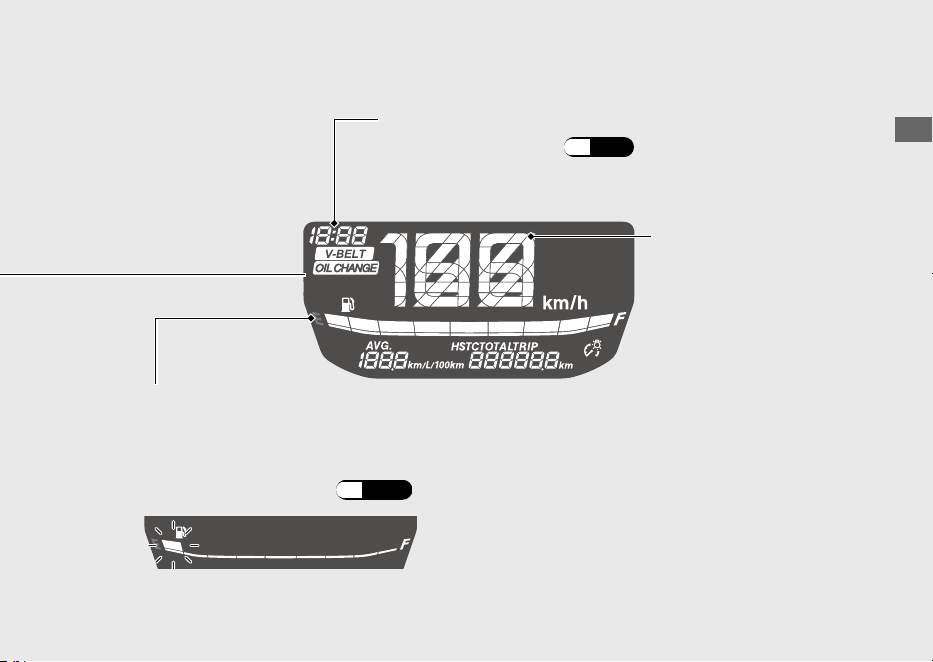
Guía de funcionamiento
19
Continuación
Si el indicador de combustible parpadea con un patrón
repetitivo o se apaga:
(P.109)
Combustible restante aproximado cuando comienza a parpadear
solo el primer segmento (E): 0,9 L
Indicador de combustible
Reloj (formato de 12 horas)
Para ajustar el reloj: (P.24)
Velocímetro
20220704173944_35K1ZR000_esm_BOOK Page 23 Monday, July 04 2022 17:43:45 JST
Guía de funcionamiento
20
Instrumentos (Continuación)
Cuentakilómetros total [TOTAL] , cuentakilómetros
parcial [TRIP] y control de par [HSTC]
El interruptor
SEL
selecciona entre el cuentakilómetros
total, el parcial y el control de par.
• Cuentakilómetros total:
• Cuentakilómetros parcial:
Distancia recorrida desde el reinicio del
cuentakilómetros parcial.
Para poner a cero el cuentakilómetros parcial,
mantenga pulsado el interruptor
SET
cuando se
visualiza el cuentakilómetros parcial.
Distancia total recorrida.
El consumo medio de combustible también se
pone a cero.
Indicador de consumo medio de
combustible [AVG]
El consumo medio de combustible se
basa en el cuentakilómetros parcial.
Consumo medio de combustible desde que
se puso a cero el cuentakilómetros parcial.
Si se visualiza “
” y no ha puesto a cero el
consumo medio de combustible, lleve la
motocicleta al concesionario para que la revisen.
• Control de par:
Si mantiene pulsado el interruptor
SET
mientras
se muestra el control de par, se enciende y apaga
el control de par.
(P.59)
20220704173944_35K1ZR000_esm_BOOK Page 24 Monday, July 04 2022 17:43:45 JST
Guía de funcionamiento
21
Continuación
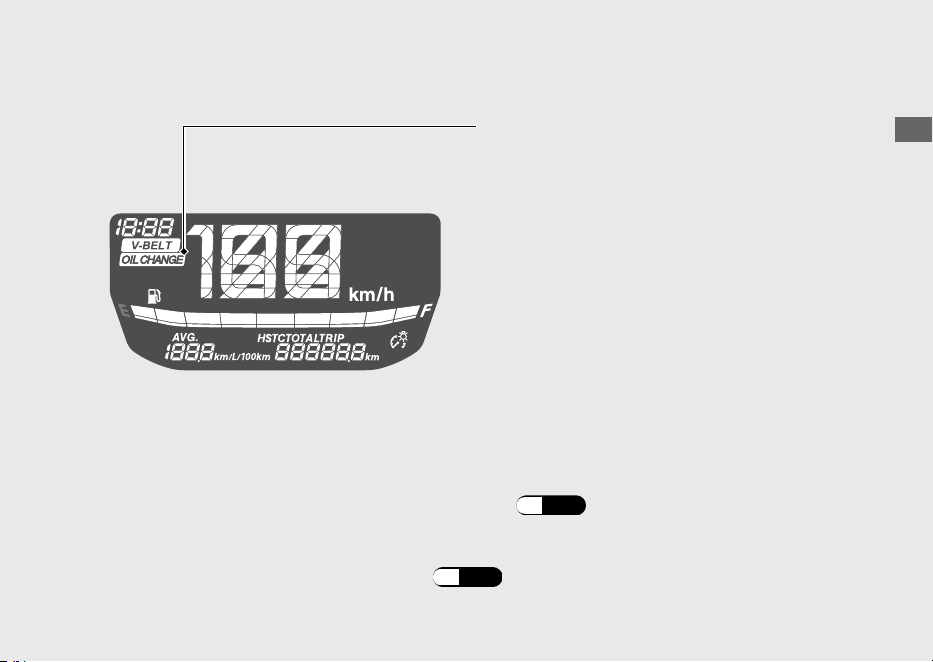
Indicador OIL CHANGE
También puede comprobar la distancia restante hasta el siguiente intervalo
del cambio de aceite.
Si se cambia el aceite después de que se ilumine el indicador de cambio de aceite, asegúrese
de ponerlo a cero.
Este indicador se activa siempre que la distancia
recorrida alcance el intervalo programado de
cambio de aceite.
Cuando aparezca el indicador de cambio de
a
c
e
ite, reinícielo tras cambiar el aceite del motor.
u El indicador no se apaga hasta que se reinicia.
u El indicador de cambio de aceite aparece por
primera vez cuando la distancia recorrida
alcanza 1.000 km.
u El indicador de cambio de aceite aparece cada
6.000 km de distancia recorrida, después de
que se reiniciara la primera indicación.
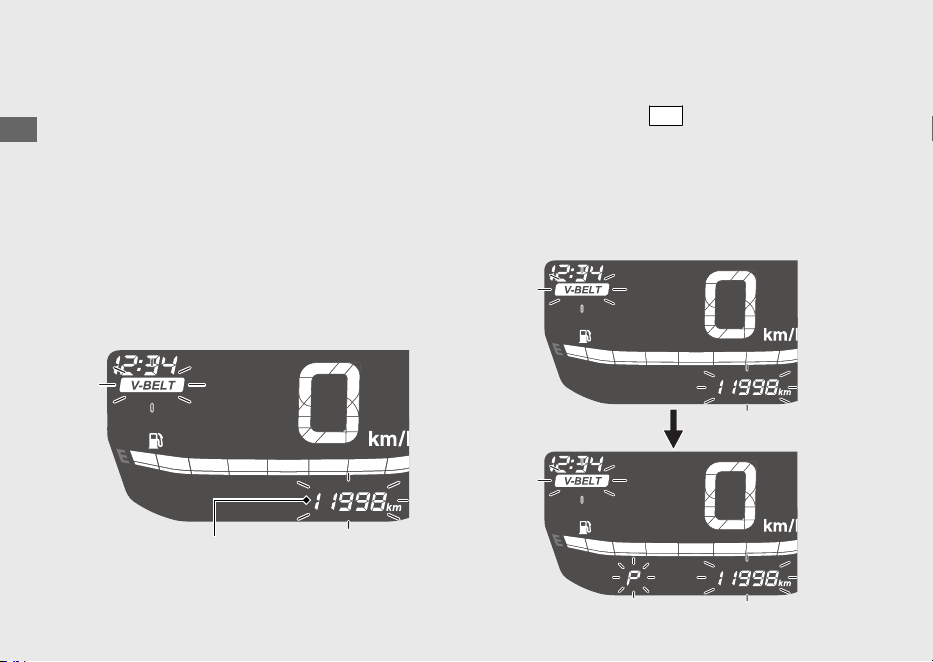
Para comprobar la distancia restante:
(P.26)
Para reiniciar el indicador de cambio de aceite: (P.26)
20220704173944_35K1ZR000_esm_BOOK Page 25 Monday, July 04 2022 17:43:45 JST
Guía de funcionamiento
22
Instrumentos (Continuación)
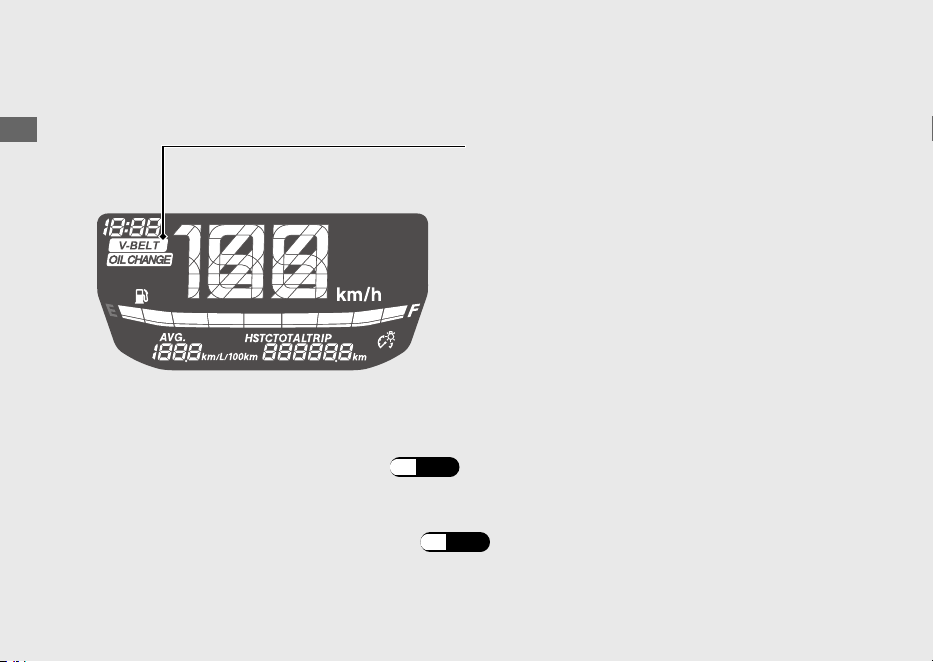
Indicador V-BELT
Cuando aparezca el indicador V-BELT, reinícielo
tras realizar el mantenimiento periódico.
También puede comprobar la distancia restante hasta el siguiente
intervalo de mantenimiento.
Para comprobar la distancia restante:
(P.28)
u El indicador de mantenimiento aparece cada
12.000 km de distancia recorrida.
Para reiniciar el indicador
V-BELT:
(P.28)
Este indicador se activa siempre que la distancia
recorrida alcance el intervalo programado de
mantenimiento.
Si se realiza el mantenimiento periódico antes de que el indicador V-BELT se encienda,
asegúrese de reiniciar el indicador V-BELT tras realizar el mantenimiento periódico.
u El indicador no se apaga hasta que se reinicia.
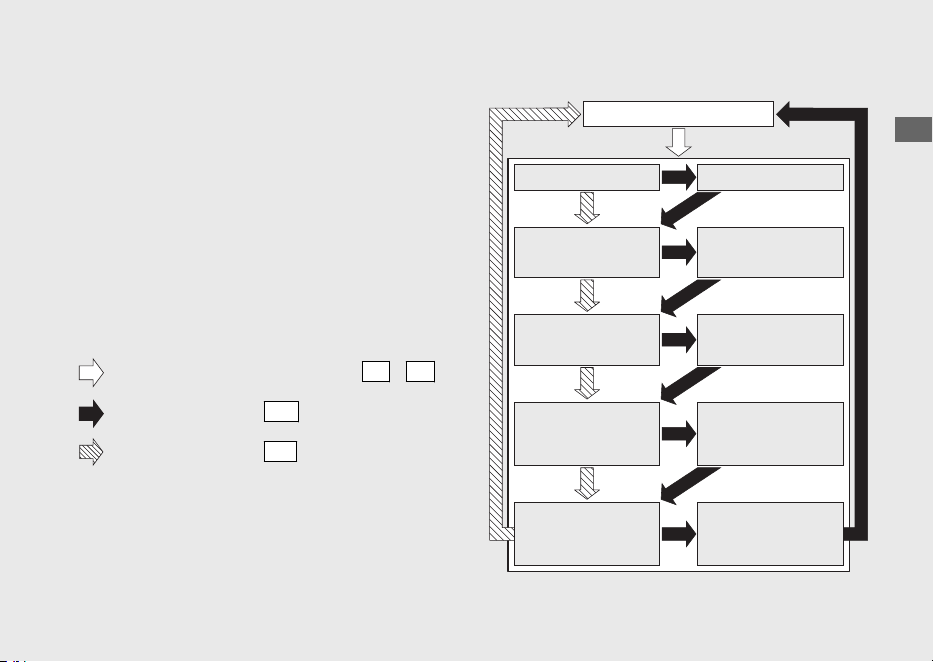
Configuración del visualizador
Los siguientes elementos pueden cambiarse en
orden.
• Ajuste del reloj
• Ajuste de la intensidad de la
retroiluminación
• Cambio de la unidad de kilometraje por
combustible
• Reinicio del indicador OIL CHANGE
• Reinicio del indicador V-BELT
20220704173944_35K1ZR000_esm_BOOK Page 26 Monday, July 04 2022 17:43:45 JST
Guía de funcionamiento
23
Continuación
Mantenga pulsados los interruptores
SEL
y
SET
Pulse el interruptor
SET
Pulse el interruptor
SEL
Visualización normal
Modo de ajuste del reloj
Modo de ajuste de
la intensidad de la
retroiluminación
Modo de cambio de la
unidad de kilometraje
por combustible
Ajuste del reloj
Ajuste de la intensidad
de la retroiluminación
Cambio de la unidad
de kilometraje por
combustible
Modo de visualización de
la distancia restante hasta
que el indicador OIL
CHANGE se encienda
Reinicio del
indicador OIL
CHANGE
Modo de visualización
de la distancia restante
hasta que el indicador
V-BELT se encienda
Reinicio del
indicador V-BELT
Lo siguiente cambia la visualización normal al
ajuste de visualización.
● El interruptor no se pulsa en aprox. 30
segundos
u Los elementos que se están ajustando se
eliminan y solo se reflejan aquellos cuyos
ajustes se han completado.
● Coloque el interruptor de encendido en la
posición (Apagado) y, a continuación, de
nuevo en la posición (Encendido)
u Se reflejan los elementos que se están
ajustando y aquellos cuyos ajustes se han
completado.
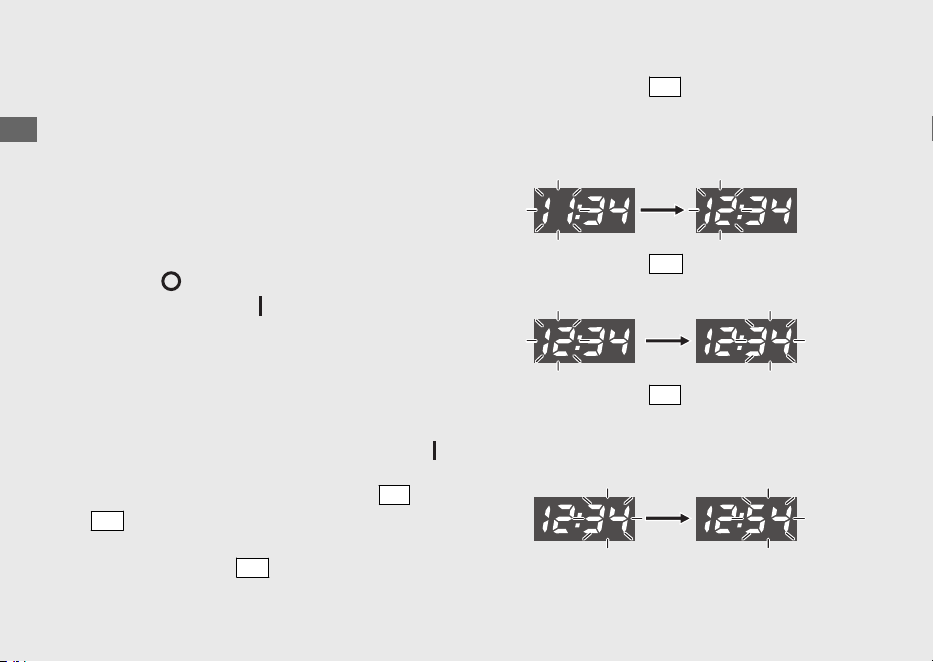
1 Ajuste del reloj:
a
Gire el interruptor de encendido a la posición
(Encendido).
b
Si mantiene pulsados los interruptores
SEL
y
SET
la visualización de la hora y los minutos
comienza a parpadear.
c
Pulse el interruptor
SET
y empiezan a
parpadear los dígitos de la hora.
d
Pulse el interruptor
SEL
hasta que se muestre
la hora que desee.
u Mantenga presionado para avanzar la hora
rápidamente.
e
Pulse el interruptor
SET
. Los dígitos de los
minutos comienzan a parpadear.
f
Pulse el interruptor
SEL
hasta que se muestre
el minuto que desee.
u Mantenga el botón presionado para
avanzar los minutos rápidamente.
20220704173944_35K1ZR000_esm_BOOK Page 27 Monday, July 04 2022 17:43:45 JST
Guía de funcionamiento
24
Instrumentos (Continuación)
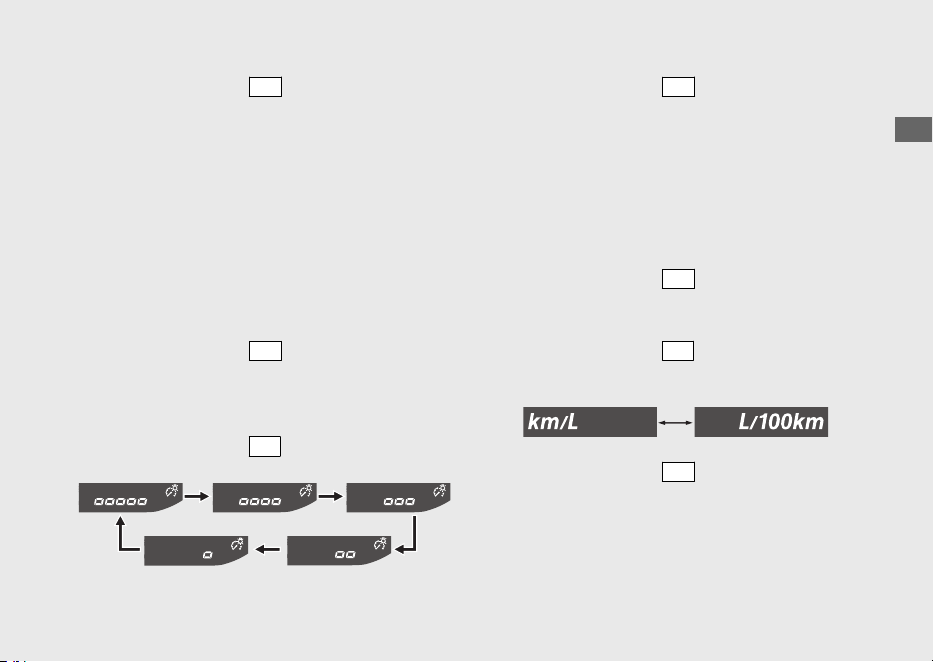
g
Pulse el interruptor
SET
. El reloj ya se ha
ajustado; a continuación, el visualizador cambia
al ajuste de la intensidad de la retroiluminación.
(Los segmentos del indicador de intensidad de
la retroiluminación y de ajuste de intensidad de
la retroiluminación comienzan a parpadear).
2 Ajuste de la intensidad de la
retroiluminación:
La intensidad se puede ajustar de uno a cinco
niveles.
a
Pulse el interruptor
SET
y los segmentos del
indicador de intensidad de la retroiluminación
y de ajuste de intensidad de la retroiluminación
parpadearán más rápido.
b
Pulse el interruptor
SEL
. La intensidad cambia.
c
Pulse el interruptor
SET
. La retroiluminación ya
se ha ajustado; a continuación, el visualizador
pasa al cambio de la unidad de kilometraje por
combustible. (La unidad de kilometraje por
combustible comienzan a parpadear).
3 Cambio de la unidad de kilometraje por
combustible:
a
Pulse el interruptor
SET
y empezará a
parpadear rápidamente la unidad de
kilometraje por combustible.
b
Pulse el interruptor
SEL
para seleccionar
“km/L” o “L/100 km”.
c
Pulse el interruptor
SET
. La unidad del
medidor de kilometraje por combustible ya se
ha configurado; a continuación, el visualizador
pasa a la distancia restante hasta que el
indicador OIL CHANGE se encienda. (El
indicador OIL CHANGE empieza a parpadear).
20220704173944_35K1ZR000_esm_BOOK Page 28 Monday, July 04 2022 17:43:45 JST
Guía de funcionamiento
25
Continuación
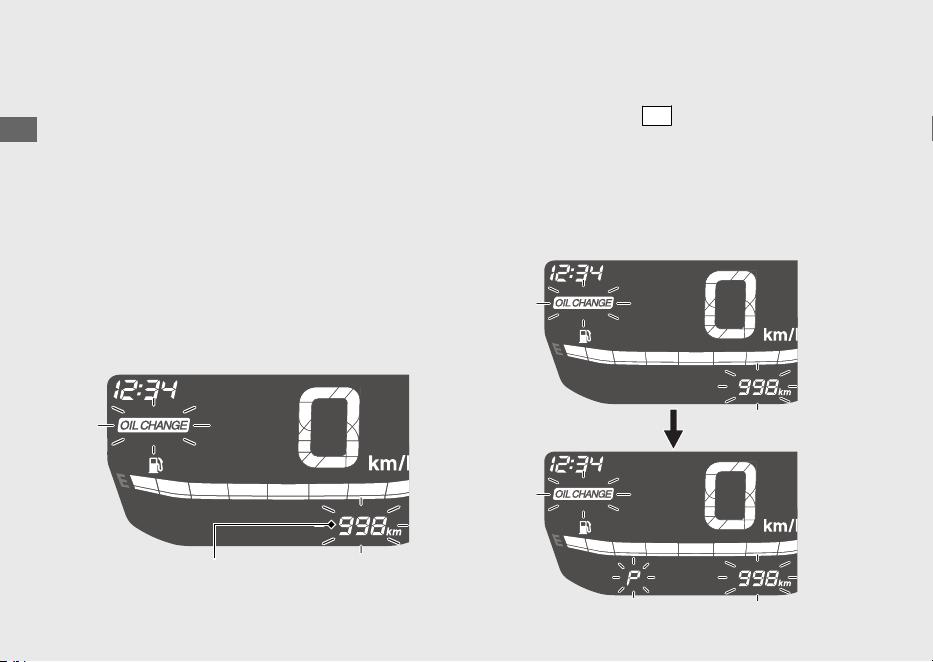
4 Visualización de la distancia restante
hasta que el indicador OIL CHANGE se
encienda:
Puede confirmar la distancia restante hasta que el
indicador OIL CHANGE se encienda y, a
continuación, reiniciar el indicador OIL CHANGE.
#
Confirmación de la distancia restante
hasta que el indicador OIL CHANGE se
encienda
Muestra la distancia restante hasta que el
indicador OIL CHANGE se encienda.
#
Reinicio del indicador OIL CHANGE
a
Pulse el interruptor
SET
. El indicador OIL
CHANGE y la distancia restante hasta que el
indicador OIL CHANGE se encienda parpadean.
u “P” parpadea cuando se visualiza la
distancia restante hasta que el indicador
OIL CHANGE se encienda.
20220704173944_35K1ZR000_esm_BOOK Page 29 Monday, July 04 2022 17:43:45 JST
Guía de funcionamiento
26
Instrumentos (Continuación)
Distancia restante hasta que el indicador
OIL CHANGE se encienda
b
Pulse el interruptor
SEL
para seleccionar el
intervalo de cambio de aceite.
u “P” se apaga cuando se visualiza el
intervalo de cambio de aceite.
u Cuando se visualiza la distancia restante
hasta que el indicador
OIL CHANGE se
encienda, el indicador OIL CHANGE
no se
reinicia aunque se pulse el interruptor
SET
.
c
Al pulsar el interruptor
SET
se reinicia el
indicador OIL CHANGE. Cuando se reinicia, la
visualización cambia a la distancia restante
hasta que el indicador V-BELT se encienda. (El
indicador V-BELT empieza a parpadear).
20220704173944_35K1ZR000_esm_BOOK Page 30 Monday, July 04 2022 17:43:45 JST
Guía de funcionamiento
27
Continuación
5 Visualización de la distancia restante
hasta que el indicador V-BELT se encienda:
Puede confirmar la distancia restante hasta que
el indicador V-BELT se encienda y, a
continuación, reiniciar el indicador
V-BELT.
#
Confirmación de la distancia restante
hasta que el indicador V-BELT se
encienda
Muestra la distancia restante hasta que el
indicador V-BELT se encienda.
#
Reinicio del indicador V-BELT
a
Pulse el interruptor
SET
. El indicador V-BELT y
la distancia restante hasta que el indicador V-
BELT se encienda parpadean.
u “P” parpadea cuando se visualiza la
distancia restante hasta que el indicador V-
BELT se encienda.
20220704173944_35K1ZR000_esm_BOOK Page 31 Monday, July 04 2022 17:43:45 JST
Guía de funcionamiento
28
Instrumentos (Continuación)
Distancia restante hasta que el indicador
V-BELT se encienda

b
Pulse el interruptor
SEL
para seleccionar el
intervalo de mantenimiento.
u “P” se apaga cuando se visualiza el
intervalo de mantenimiento.
u Cuando se visualiza la distancia restante
hasta que el indicador
V-BELT se encienda,
el indicador V-BELT no se reinicia aunque
se pulse el interruptor
SET
.
c
Al pulsar el interruptor
SET
se reinicia el
indicador V-BELT. Cuando se reinicia, la
visualización cambia al estado normal.
20220704173944_35K1ZR000_esm_BOOK Page 32 Monday, July 04 2022 17:43:45 JST
Guía de funcionamiento
29
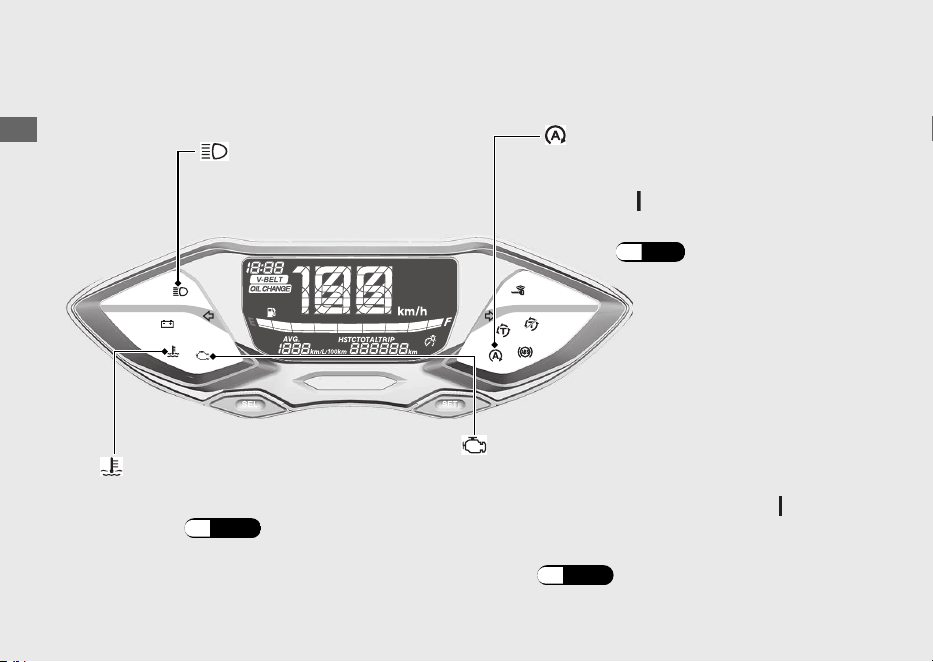
Indicadores
20220704173944_35K1ZR000_esm_BOOK Page 33 Monday, July 04 2022 17:43:45 JST
Guía de funcionamiento
30
Testigo de avería (MIL) de la PGM-FI
(Inyección programada de combustible)
Se enciende brevemente cuando se coloca el
interruptor de encendido en la posición
(Encendido).
Si se enciende mientras el motor está en
marcha: (P.105)
Si se enciende mientras
conduce: (P.104)
Indicador de alta temperatura
del refrigerante
Si uno de estos indicadores no se enciende cuando debiera, solicite a su concesionario que
busque la causa del problema.
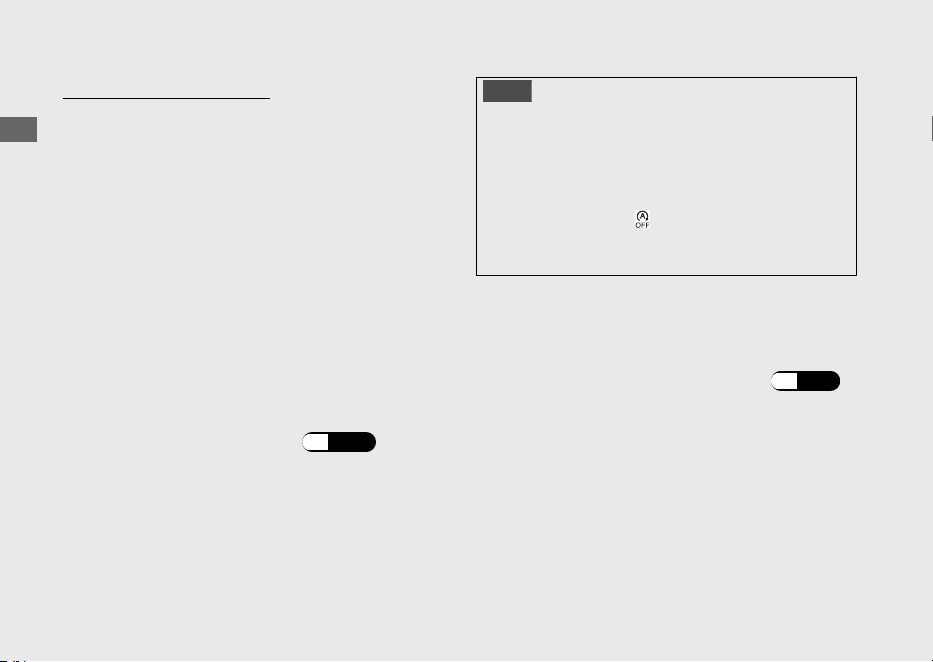
Sistema de parada al
ralentí:
(P.56)
Se enciende brevemente cuando se
coloca el interruptor de encendido en
la posición (Encendido).
Indicador de parada al ralentí
Indicador de luz
de carretera
20220704173944_35K1ZR000_esm_BOOK Page 34 Monday, July 04 2022 17:43:45 JST
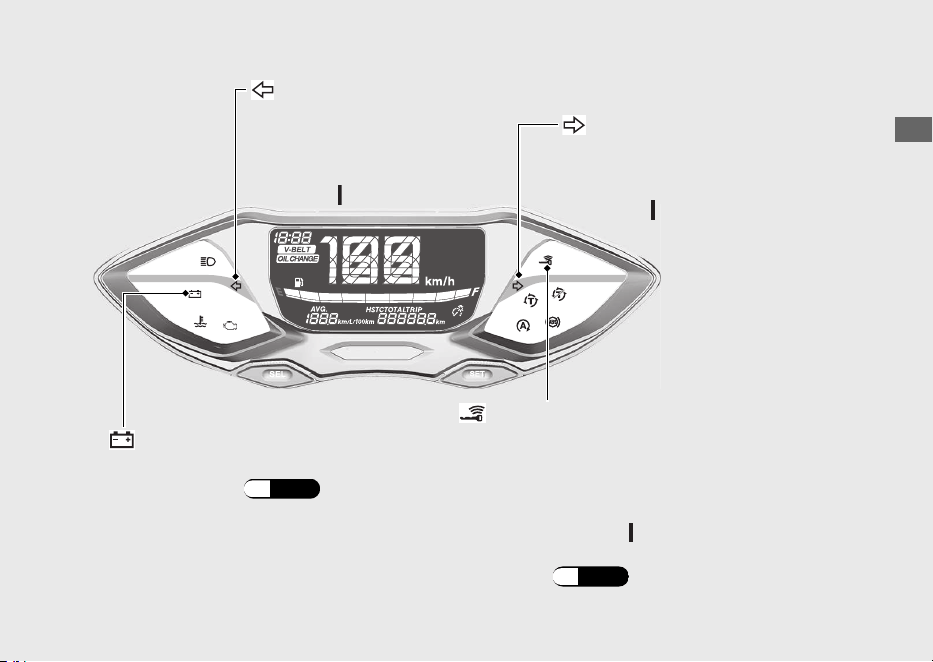
Guía de funcionamiento
31
Continuación
Indicador del intermitente
izquierdo
Indicador del intermitente
derecho
Se enciende brevemente
cuando se coloca el
interruptor de encendido en
la posición (Encendido).
Se enciende brevemente cuando se
coloca el interruptor de encendido en
la posición (Encendido).
Se apaga cuando el interruptor de encendido se
coloca en la posición (Encendido).
Cuando el indicador de la Honda SMART Key
parpadea: (P.108)
Se enciende cuando finaliza la verificación del
vehículo y de la Honda SMART Key, y puede
accionarse el interruptor de encendido.
Indicador de la Honda SMART Key
Indicador del estado de carga
de la batería
Si se enciende: (P.105)
20220704173944_35K1ZR000_esm_BOOK Page 35 Monday, July 04 2022 17:43:45 JST
Guía de funcionamiento
32
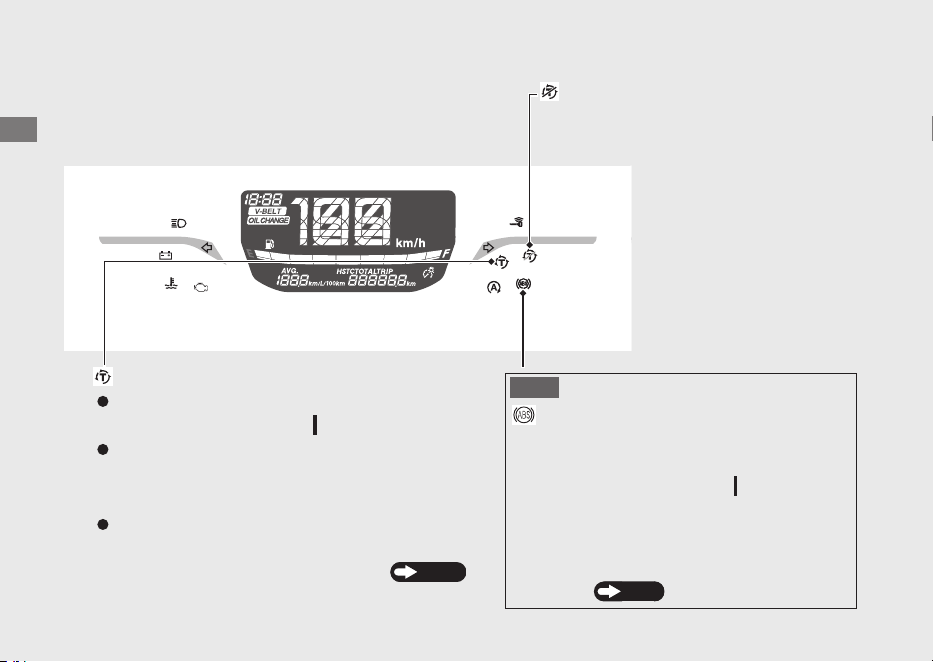
Indicadores (Continuación)
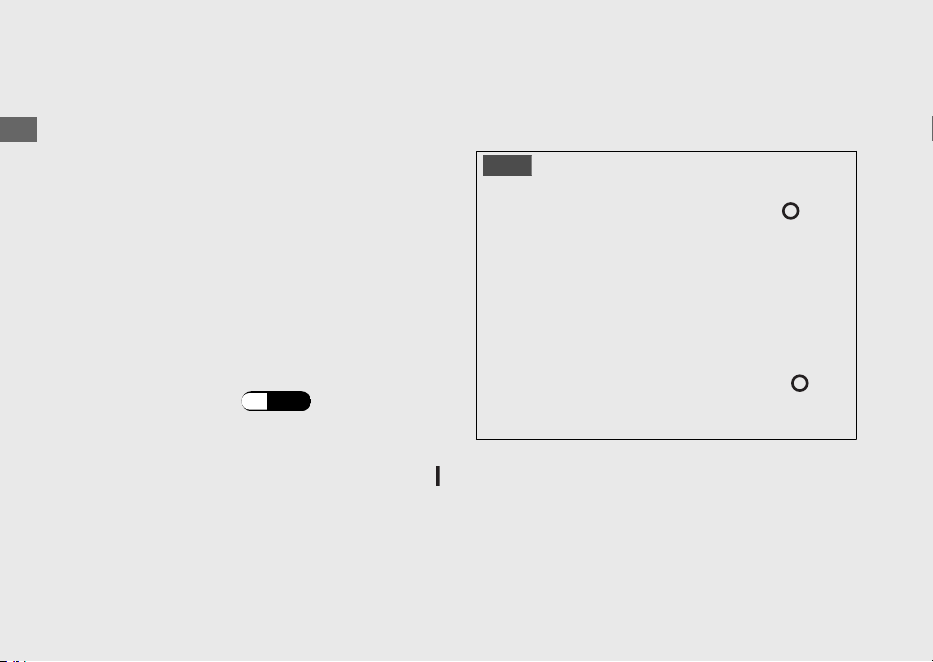
Indicador del control de par
Indicador de desactivación
del control de par
Se enciende cuando se coloca el interruptor de
encendido en la posición
(Encendido).
Se activa al apagar el control de par.
Se apaga cuando la velocidad alcanza unos
3 km/h para indicar que el control de par
está listo para funcionar.
Parpadea cuando el control de par está en
funcionamiento.
Si se enciende mientras conduce: P.107
Indicador del ABS
(Sistema de frenos antibloqueo)
Se enciende cuando se coloca el interruptor
de encendido en la posición (Encendido).
Si se enciende mientras
conduce:
Se apaga cuando la velocidad alcanza unos
10 km/h.
P.106
AVISO

20220704173944_35K1ZR000_esm_BOOK Page 36 Monday, July 04 2022 17:43:45 JST
Guía de funcionamiento
33
Interruptores
20220704173944_35K1ZR000_esm_BOOK Page 37 Monday, July 04 2022 17:43:45 JST
Guía de funcionamiento
34
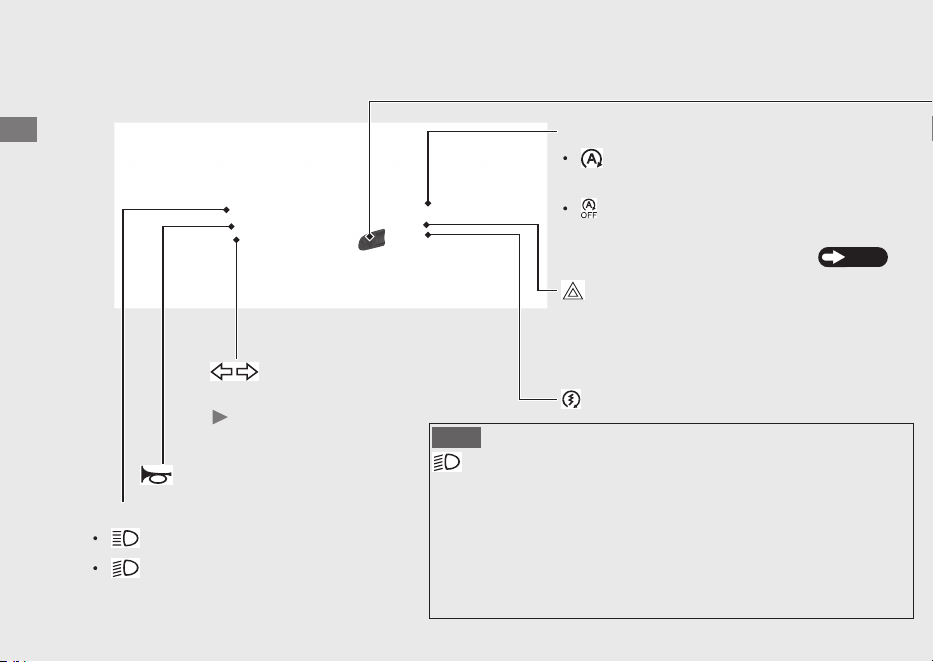
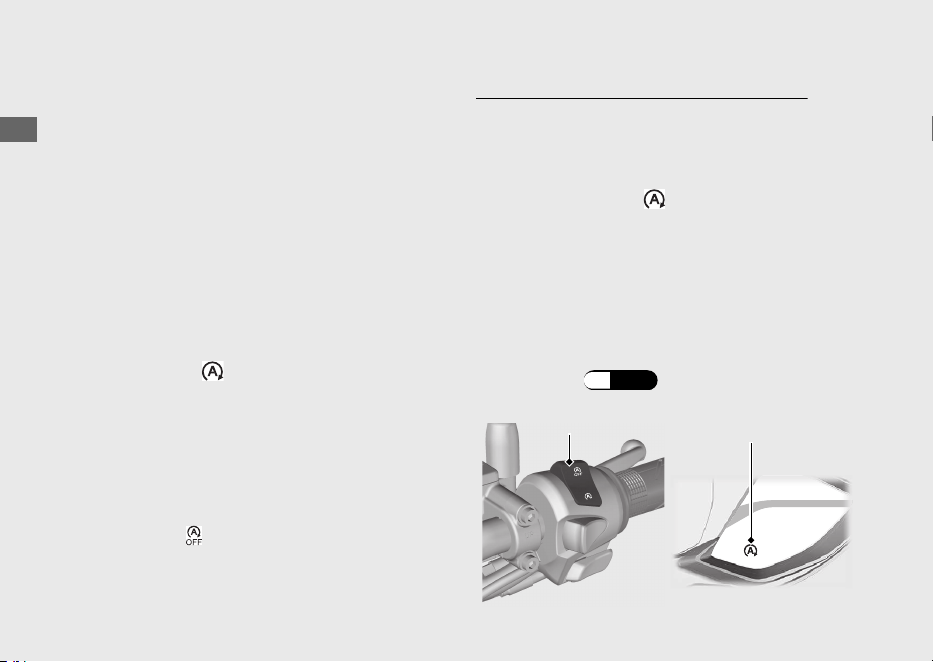
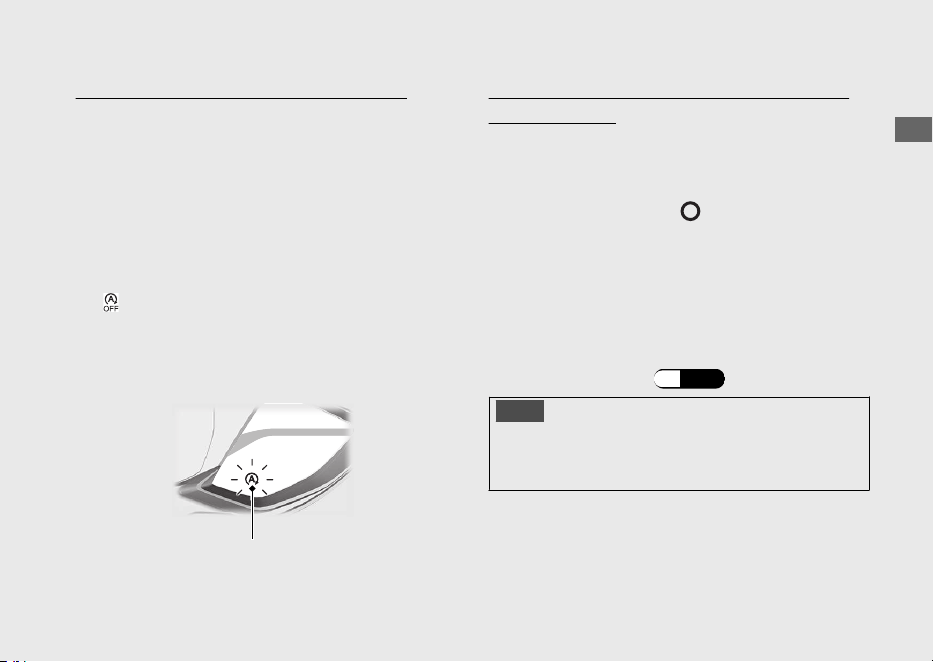
Interruptor de parada al ralentí
Interruptor de intensidad del faro
: Luz de carretera
: Luz de cruce
Botón de arranque
Interruptor de
intermitentes
Al pulsar el interruptor se
apaga el intermitente.
Botón de la bocina
:
:
Sistema de parada al ralentí:
Interruptor de emergencia
La señal de las luces de emergencia está
encendida. Disponible cuando el interruptor
de encendido está conectado.
El sistema de parada al
ralentí está activado.
El sistema de parada al
ralentí está apagado.
P.56
AVISO
Sistema de encendido automático de luces
Esto significa que laluz delantera se encederá tan pronto active
el interruptor de encendido.
No hay uninterruptorparaapagarla luz delantera mientras
conduce. El sistema de encendidoautomático de luces de su
vehículo ayuda a otros a reconecer la posición de su motocicleta
en condiciones ambientales nubladas o polvorientes.
20220704173944_35K1ZR000_esm_BOOK Page 38 Monday, July 04 2022 17:43:45 JST
Guía de funcionamiento
35
Continuación
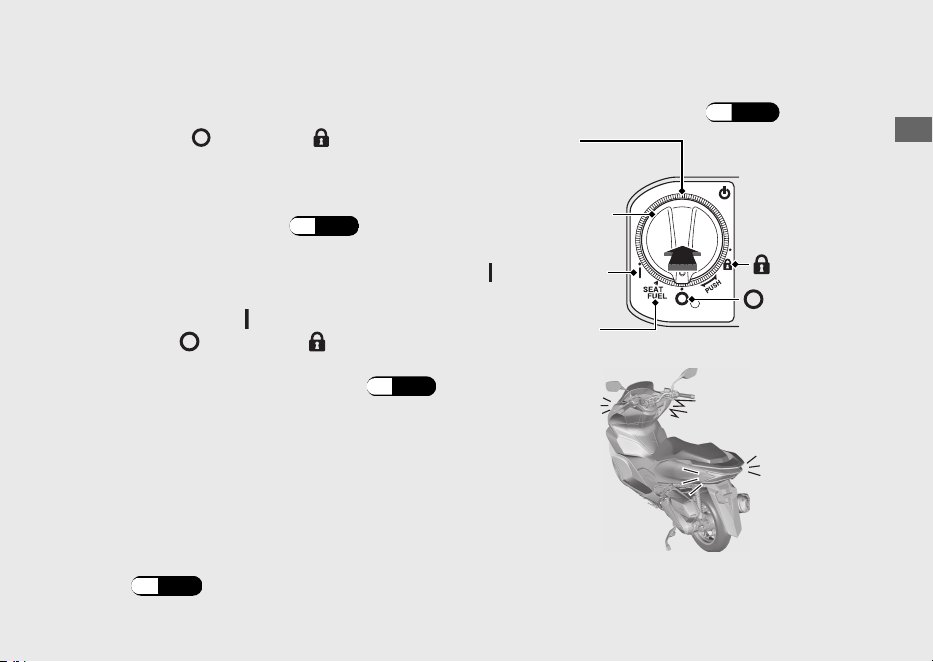
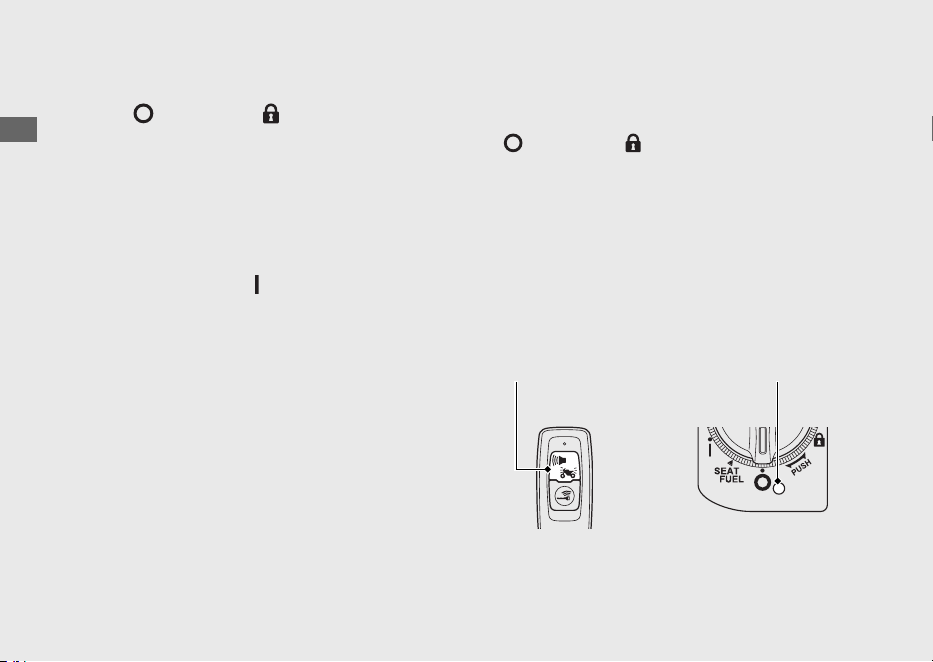
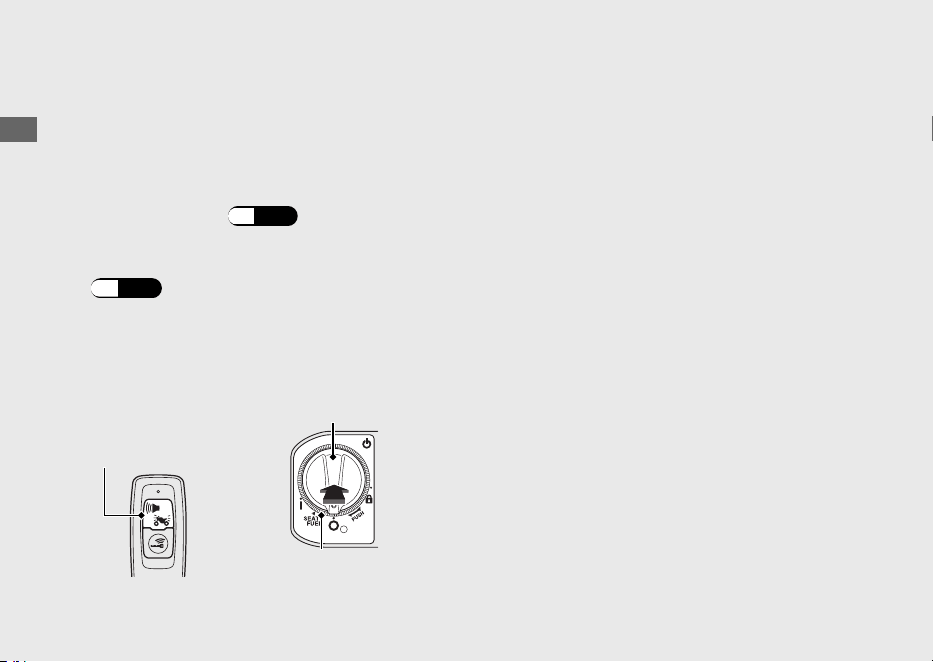
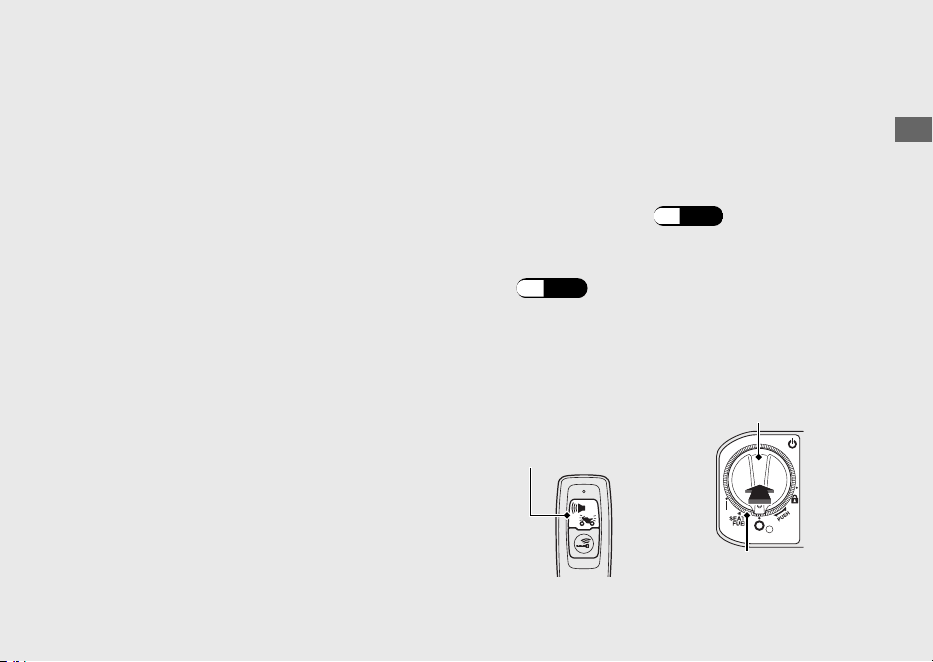
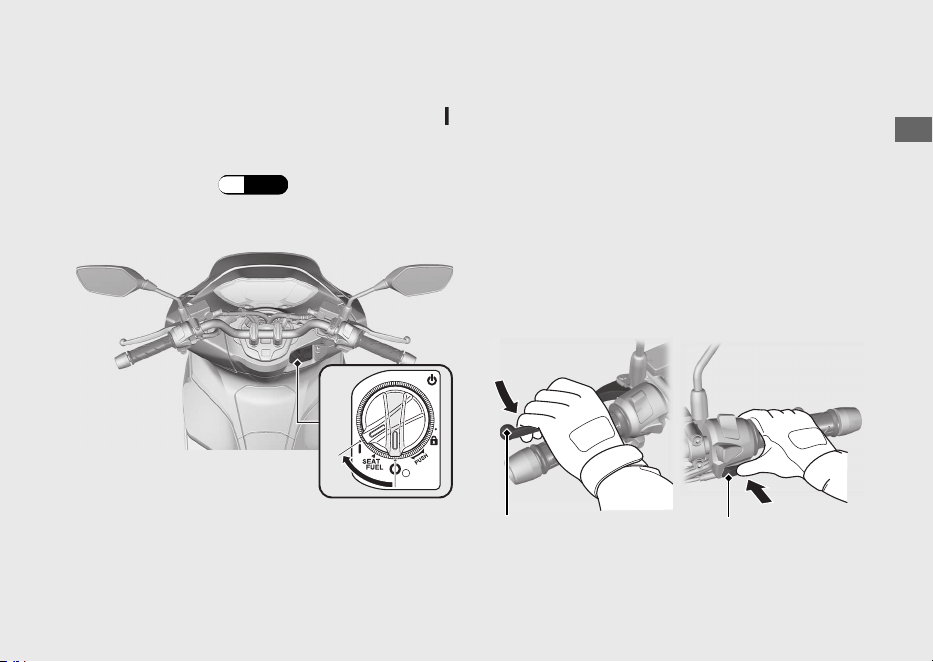
Interruptor de encendido
Conecta y desconecta el sistema
eléctrico, bloquea la dirección y acciona
el interruptor de apertura de la tapa del
combustible y del asiento.
Para desbloquear el interruptor de
encendido: (P.42)
(Encendido)
Activa el sistema eléctrico para el
arranque/la conducción.
SEAT FUEL
Acciona el interruptor de
apertura de la tapa del
combustible y del asiento.
(Bloqueo)
Bloquea la dirección.
(Apagado)
Apaga el motor.
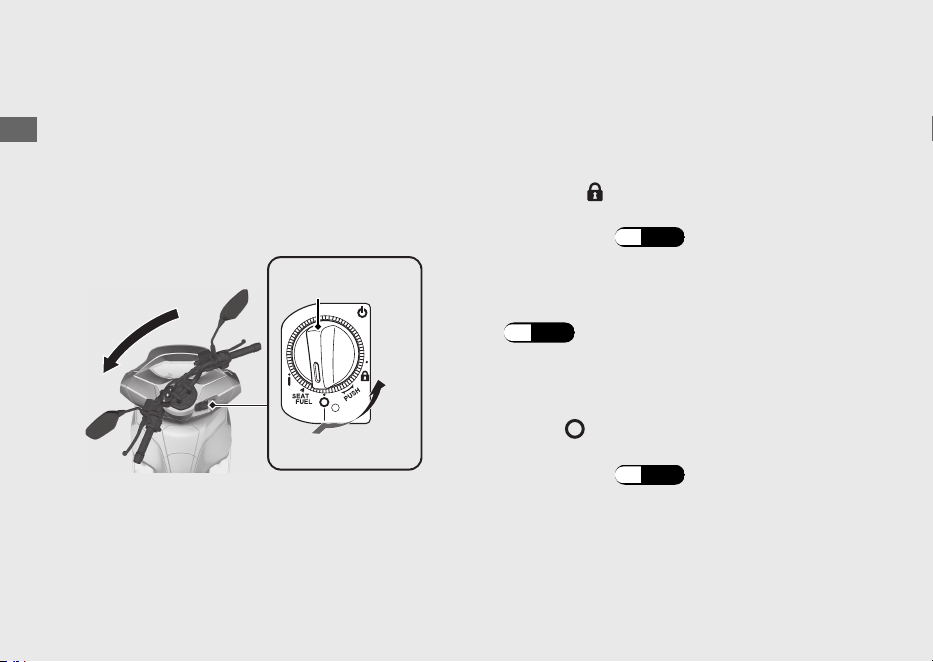
Bloqueo de la dirección
Bloquee la dirección al estacionar para evitar
posibles robos del vehículo.
También se recomienda el uso de un candado
en forma de U para la rueda o de un dispositivo
similar.
#
Bloqueo
a
Gire el manillar completamente hacia la
izquierda o hacia la derecha.
b
Presione el interruptor de encendido y gírelo a
la posición
(Bloqueo).
u Para desbloquear el interruptor de
encendido (P.42)
u Mueva un poco el manillar si resulta algo
difícil aplicar el bloqueo.
c
Bloquee el interruptor de encendido.
(P.43)
#
Desbloqueo
Presione el interruptor de encendido y gírelo a
la posición
(Apagado).
u Para desbloquear el interruptor de
encendido
(P.42)
20220704173944_35K1ZR000_esm_BOOK Page 39 Monday, July 04 2022 17:43:45 JST
Guía de funcionamiento
36
Interruptores (Continuación)
a
b
Interruptor de
encendido
Presionar
Girar

Sistema Honda SMART Key
El sistema Honda SMART Key le permite
accionar el interruptor de encendido sin
introducir una llave en la cerradura.
El sistema ejecuta una autenticación
bidireccional entre el vehículo y la llave Honda
SMART Key para verificar que se trata de una
Honda SMART Key registrada.
El sistema Honda SMART Key utiliza ondas de
radio de baja intensidad. Pueden afectar a
dispositivos médicos tales como los marcapasos
cardíacos.
20220704173944_35K1ZR000_esm_BOOK Page 40 Monday, July 04 2022 17:43:45 JST
Guía de funcionamiento
37
Continuación
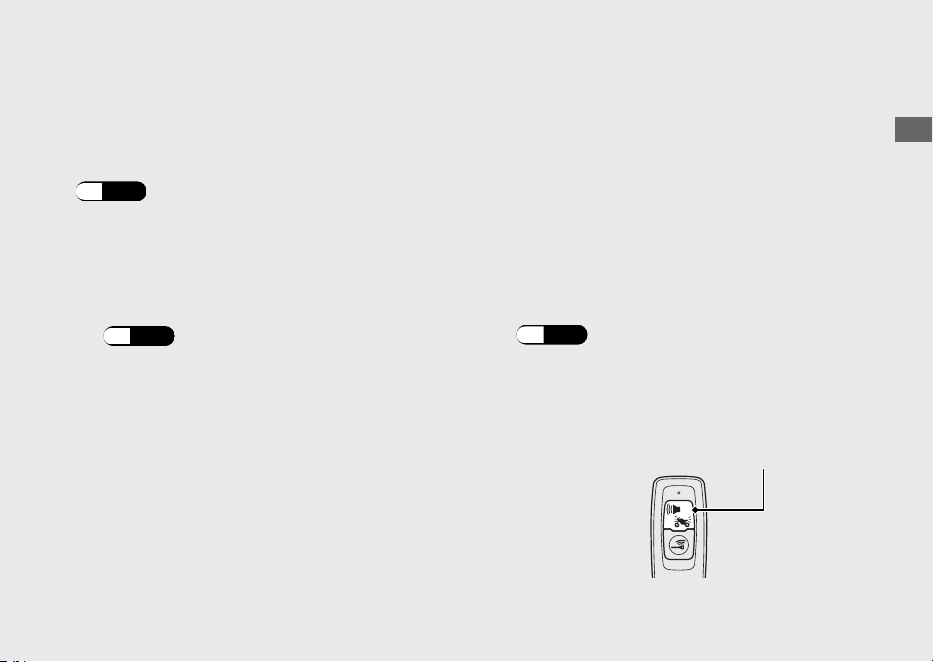
Encendido del sistema Honda SMART Key
#
Ajuste del sistema Honda SMART Key
en activación o desactivación
Pulse el botón encendido/apagado hasta que el
LED Honda SMART Key cambie de color.
#
Comprobación del estado del sistema
Honda SMART Key
Pulse ligeramente el botón encendido/
apagado. El LED de la Honda SMART Key
mostrará el estado.
Cuando el LED de la Honda SMART Key se
ilumina de color:
Verde:
(activo)
Puede realizarse la
autenticación del sistema
Honda SMART Key.
Rojo:
(inactivo)
No puede realizarse la
autenticación del sistema
Honda SMART Key.
20220704173944_35K1ZR000_esm_BOOK Page 41 Monday, July 04 2022 17:43:45 JST
Guía de funcionamiento
38
Sistema Honda SMART Key (Continuación)
Botón encendido/apagado
LED
Distancia de operación
La distancia de operación varía cuando el
interruptor de encendido está bloqueado o
desbloqueado.
El sistema Honda SMART Key utiliza ondas de
radio de baja intensidad. Por tanto, la distancia
de operación puede ser mayor o menor, o el
sistema de Honda SMART Key puede no
funcionar adecuadamente en las siguientes
situaciones:
● Cuando la batería de Honda SMART Key no
tiene carga.
● Cuando hay instalaciones cercanas que
generan ondas de radio potentes o ruido,
como torres de TV, centrales eléctricas,
emisoras de radio o aeropuertos.
● Cuando transporta la Honda SMART Key
con un ordenador portátil o un dispositivo
de comunicación inalámbrica, como una
radio o un teléfono móvil.
● Cuando la Honda SMART Key entra en
contacto con objetos metálicos o está
cubierta por ellos.
#
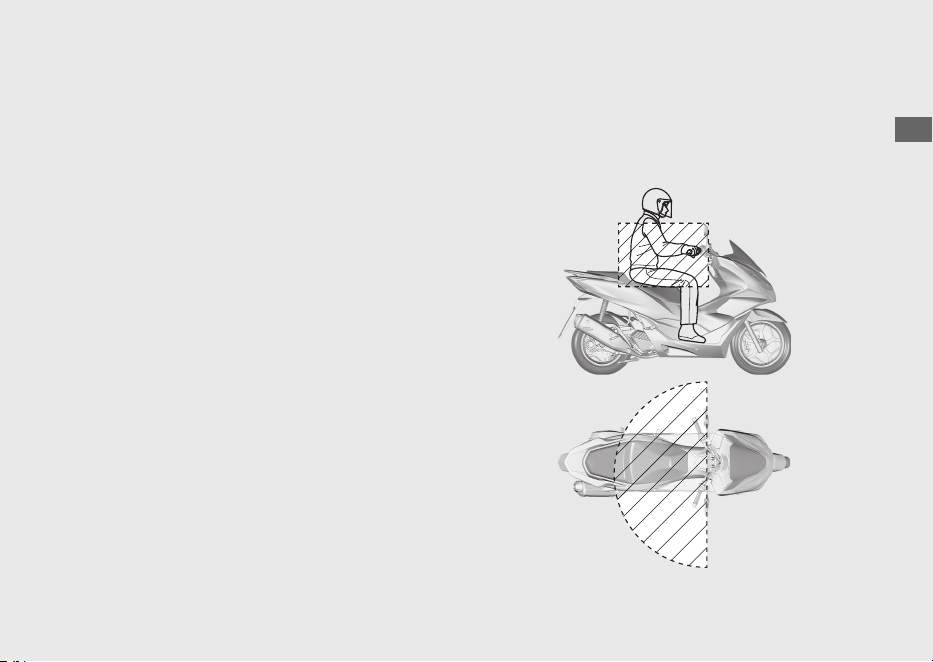
Cuando el interruptor de encendido
está desbloqueado:
El sistema puede operarse dentro de la zona
sombreada mostrada en la ilustración.
20220704173944_35K1ZR000_esm_BOOK Page 42 Monday, July 04 2022 17:43:45 JST
Guía de funcionamiento
39
Continuación
#
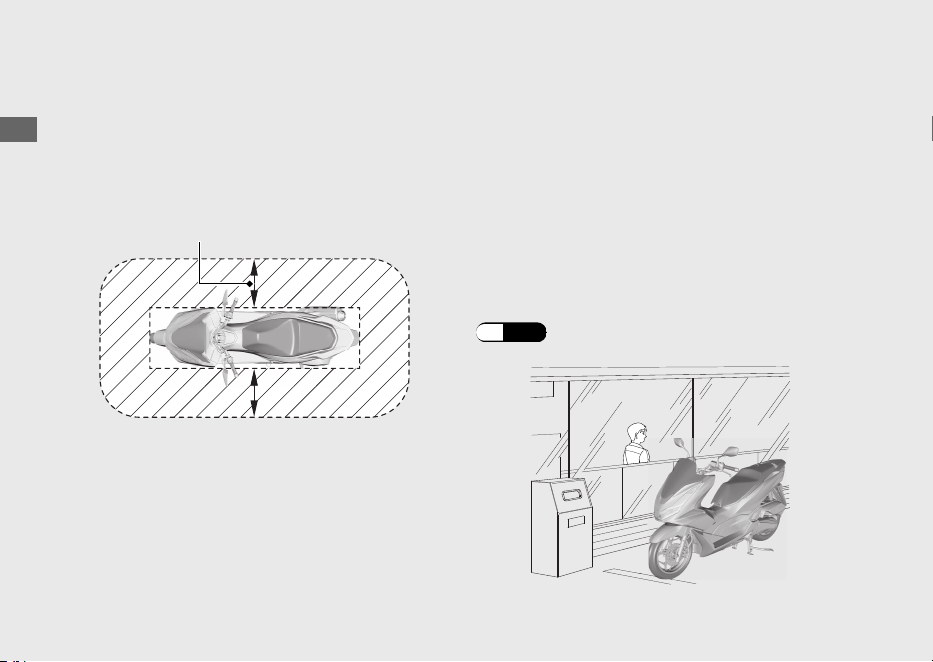
Cuando el interruptor de encendido es
bloqueado:
El sistema puede operarse dentro de la zona
sombreada mostrada en la ilustración.
Cualquiera podrá desbloquear el interruptor de
encendido y poner en marcha el motor si su
Honda SMART Key está dentro de la distancia
de operación del vehículo, aunque usted esté
en el otro lado de una pared o de una ventana.
Si no está junto a su vehículo pero su
Honda
SMART Key está todavía en su distancia de
operación, desactive el sistema Honda SMART
Key.
Encendido del sistema
Honda SMART Key
(P.38)
20220704173944_35K1ZR000_esm_BOOK Page 43 Monday, July 04 2022 17:43:45 JST
Guía de funcionamiento
40
Sistema Honda SMART Key (Continuación)
Alrededor de 2 m
Cualquiera que esté en posesión de Honda
SMART Key puede realizar las siguientes
operaciones si la Honda SMART Key está a una
distancia de operación:
● Arranque del motor
● Desbloqueo del interruptor de encendido
● Liberar la cerradura del asiento
● Apertura de la tapa del depósito de
combustible
● Desbloqueo de la dirección
Debe siempre llevar Honda SMART Key con
usted después de subir o bajar de su vehículo o
mientras conduce.
No guarde la Honda SMART Key en ningún
compartimento.
Si el interruptor de encendido está en la
posición (Encendido), el vehículo podrá ser
utilizado incluso por alguien que no tenga una
Honda SMART Key verificada.
Siempre que abandone su vehículo, bloquee la
dirección y el interruptor de encendido.
(P.43)
Asegúrese de que el anillo del interruptor de
encendido se apaga y que todos los
intermitentes parpadean una vez en este
momento.
20220704173944_35K1ZR000_esm_BOOK Page 44 Monday, July 04 2022 17:43:45 JST
Guía de funcionamiento
41
Continuación

Activación y desactivación del interruptor
de encendido
#
Para desbloquear el interruptor de encendido
a
Asegúrese de que el sistema de Honda SMART
Key está activado.
(P.38)
b
Para autenticar el sistema Honda SMART Key,
pulse el interruptor de encendido.
u
Una vez correctamente autenticado y con el
interruptor de encendido desbloqueado, se
encienden el indicador de la Honda SMART
Key y el anillo del interruptor de encendido.
El zumbador también suena 2 veces en
este momento.
u El sonido del zumbador puede cancelarse.
(P.44)
c
Gire el interruptor de encendido a la posición
(Encendido) mientras se enciende el indicador
de Honda SMART Key.
u Si no coloca el interruptor de encendido en
la
posición
(Encendido) en los 20 segundos
sig
uientes a pulsar el interruptor de
encendido, el indicador de Honda SMART
Key y el anillo del interruptor de encendido
se apagarán, los intermitentes parpadearán
1 vez, el zumbador suena 1 vez y el
interruptor de encendido se bloqueará.
Cuando el sistema Honda SMART Key no
funciona correctamente
(P.113)
Si alguien que no tiene la Honda SMART Key
intenta girar el interruptor de encendido, el
interruptor de encendido girará sin
impedimentos. Si usted nota que el interruptor
de encendido está en una posición distinta, gire
el interruptor de encendido a la posición
original (
(Apagado) o (Bloqueo)).
20220704173944_35K1ZR000_esm_BOOK Page 45 Monday, July 04 2022 17:43:45 JST
Guía de funcionamiento
42
Sistema Honda SMART Key (Continuación)
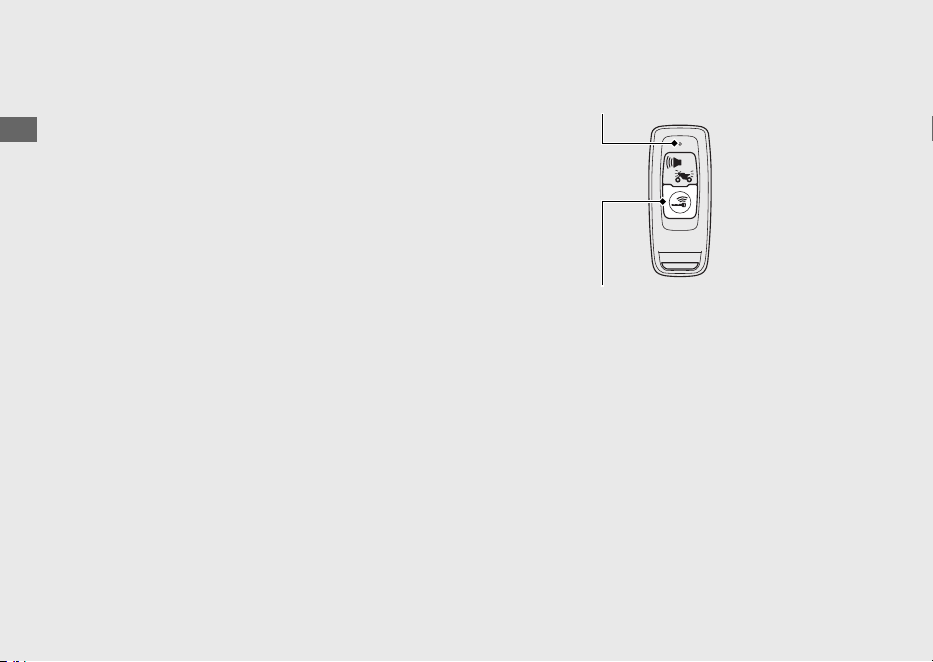
Honda
SMART Key
Indicador de
la Honda
SMART Key
Anillo del
interruptor de
encendido
Interruptor de
encendido
#
Para bloquear el interruptor de encendido
a
Gire el interruptor de encendido a la posición
SEAT FUEL,
(Apagado) o (Bloqueo).
b
Bloquee el interruptor de encendido realizando
una de las acciones siguientes:
● Salga de la distancia de operación con la
Honda SMART Key. (P.39)
● Presione el interruptor de encendido.
● Espere aproximadamente 20 segundos
después de girar el interruptor de
encendido de (Encendido) a SEAT
FUEL, (Apagado) o (Bloqueo).
● Coloque el sistema Honda SMART Key
en posición de desactivación.
(P.
38)
c
Asegúrese de que se apaguen el indicador de
la Honda SMART Key y el anillo del interruptor
de encendido, y de que los intermitentes
parpadeen una vez. Esto indica que el
interruptor de encendido está bloqueado.
El zumbador también suena 1 vez en este
momento.
u El sonido del zumbador puede cancelarse.
(P.44)
Cuando el sistema Honda SMART Key no
funciona correctamente (P.113)
20220704173944_35K1ZR000_esm_BOOK Page 46 Monday, July 04 2022 17:43:45 JST
Guía de funcionamiento
43
Continuación
Anillo del
interruptor de
encendido
Interruptor de
encendido
(Encendido)
SEAT FUEL
(Bloqueo)
(Apagado)
Asegúrese de que el interruptor de encendido
se encuentra en las posiciones (Apagado) o
(Bloqueo) cuando abandone su vehículo.
Cuando el interruptor de encendido está
bloqueado en la posición SEAT FUEL, el
interruptor de encendido puede colocarse en la
posición (Apagado) solamente una vez.
Cuando el interruptor de encendido está
bloqueado en la posición (Apagado), la
dirección no puede bloquearse. Para bloquear
la dirección, desbloquee el interruptor de
encendido.
#
Activación del sonido del zumbador
cuando el interruptor de encendido se
bloquea/desbloquea
Activar
a
Desactive el sistema Honda SMART Key.
(P.
38)
b
Pulse ligeramente el botón encendido/apagado.
Se enciende el LED rojo de la Honda SMART Key.
c
Mientras el LED rojo está encendido, pulse el
botón de alarma/respuesta.
u El LED rojo comienza a parpadear cuando
el sonido del zumbador se activa
adecuadamente.
Desactivar
a
Desactive el sistema Honda SMART Key.
(P.38)
b
Pulse ligeramente el botón encendido/apagado.
El LED rojo de la Honda SMART Key parpadea.
c
Mientras el LED rojo está parpadeando, pulse
el botón de alarma/respuesta.
u
El LED rojo deja de parpadear pero
permanece encendido cuando el sonido del
zumbador se desactiva adecuadamente.
20220704173944_35K1ZR000_esm_BOOK Page 47 Monday, July 04 2022 17:43:45 JST
Guía de funcionamiento
44
Sistema Honda SMART Key (Continuación)
Sistema de alarma antirrobo
El sistema de alarma antirrobo es un dispositivo
diseñado para reducir las posibilidades de robo.
Cuando el sensor detecta vibraciones o
movimiento con el interruptor de encendido en
las posiciones (Apagado) o (Bloqueo) y el
sistema está activo, se activa la alarma.
El zumbador suena y los intermitentes
parpadean durante unos 10 segundos cuando
el sistema de alarma antirrobo detecta
vibraciones causadas por contacto o
movimiento.
El zumbador suena y los intermitentes
parpadean durante unos 60 segundos cuando
el sistema de alarma antirrobo detecta un
cambio importante en la posición del vehículo.
Después de que el zumbador suene durante 60
segundos, el sistema de alarma antirrobo se
reiniciará en esa postura.
20220704173944_35K1ZR000_esm_BOOK Page 48 Monday, July 04 2022 17:43:45 JST
Guía de funcionamiento
45
Continuación
Si se deja el interruptor de encendido en la
posición (Apagado) o (Bloqueo) durante
más de 10 días, el sistema de alarma antirrobo
dejará de estar activo. Cuando el sistema esté
activo y el vehículo reciba una señal pulsando el
botón de alarma/respuesta, la activación del
sistema se ampliará 10 días.
Para reiniciar el sistema, gire el interruptor de
encendido a la posición (Encendido) una vez.
El sistema de alarma antirrobo utiliza ondas de
radio de baja intensidad. Pueden afectar a
dispositivos médicos tales como los marcapasos
cardíacos.
Cuando la batería del vehículo esté baja, el
sistema de alarma antirrobo no funcionará.
#
Ajuste del sistema de alarma antirrobo
a
Gire el interruptor de encendido a la posición
(Apagado) o (Bloqueo).
b
Pulse el botón de alarma/respuesta. En un
segundo, el intermitente parpadea y el
zumbador suena 1 vez. Después de 2,5
segundos, el zumbador suena 1 vez. El sistema
de alarma antirrobo está activado.
El indicador de la alarma parpadea mientras
el sistema de alarma antirrobo está activado.
20220704173944_35K1ZR000_esm_BOOK Page 49 Monday, July 04 2022 17:43:45 JST
Guía de funcionamiento
46
Sistema de alarma antirrobo (Continuación)
Botón de alarma/
respuesta
Indicador
de alarma
#
Cancelación del sistema de alarma
antirrobo
Para cancelar el sistema de alarma antirrobo,
desbloquee el interruptor de encendido.
(P.42)
Cuando se desbloquea el interruptor de
encendido, el zumbador suena 2 veces y el
indicador de alarma se apaga.
u El sonido del zumbador puede cancelarse.
(P.44)
#
Detención de la activación de la alarma
antirrobo
Para detener la activación de la alarma
antirrobo realice una de estas acciones:
● Pulse el botón de alarma/respuesta de la
Honda SMART Key.
u Después de detener la activación de la
alarma antirrobo, el sistema de la alarma
antirrobo se reiniciará.
● Desbloquee el interruptor de encendido.
(P.42)
u Después de detener la activación de la
alarma antirrobo, el sistema de la alarma
antirrobo se cancelará.
20220704173944_35K1ZR000_esm_BOOK Page 50 Monday, July 04 2022 17:43:45 JST
Guía de funcionamiento
47
Continuación
Botón de alarma/
respuesta
#
Ajuste de la sensibilidad del sistema de
alarma antirrobo
Puede elegir entre 3 niveles de sensibilidad para
el sistema de alarma antirrobo.
a
Asegúrese de que el sistema de Honda SMART
Key está activado.
(P.38)
b
Pulse el interruptor de encendido para
autenticar el sistema Honda SMART Key.
(P.42)
c
Mantenga pulsado el interruptor de encendido
durante más de 4 segundos.
u El indicador Honda SMART Key
y el anillo
del interruptor de encendido parpadean.
d
Pulse el interruptor de encendido 1 vez
mientras el indicador de la Honda SMART Key
y el anillo del interruptor de encendido
parpadean.
u El indicador de la Honda SMART Key
y el
anillo del interruptor de encendido se
encienden, y el zumbador suena.
e
Repita lo siguiente 3 veces:
Pulse el botón de alarma/respuesta de la
Honda SMART Key 4 veces y el interruptor
de encendido 1 vez.
u Cuando se pulsa el interruptor de
encendido, el indicador de la Honda
SMART Key y el anillo del interruptor de
encendido se apagan, y el zumbador
suena. Cuando se vuelvan a encender,
realice el siguiente paso.
u Cuando se pulsa el botón de alarma/
respuesta, el LED de la Honda SMART Key
se enciende. Asegúrese de que el LED se
apaga antes de volver a pulsar el botón.
20220704173944_35K1ZR000_esm_BOOK Page 51 Monday, July 04 2022 17:43:45 JST
Guía de funcionamiento
48
Sistema de alarma antirrobo (Continuación)
Botón de
alarma/
respuesta
Interruptor de encendido
Anillo del interruptor
de encendido

u Cuando no se pulsa el botón de alarma/
respuesta o el interruptor de encendido
durante 1 minuto, el indicador de la
Honda
SMART Key y el anillo del interruptor de
encendido parpadean 3 veces y, a
continuación, el zumbador suena y se
cancela el modo. Vuelva al paso a
y
vuelva a realizar el procedimiento.
u Si pulsa el botón de alarma/respuesta un
número incorrecto de veces antes de que
repita el procedimiento 3 veces, vuelva a
repetir el procedimiento otras 3 veces.
f
Pulse el botón de alarma/respuesta para
seleccionar entre 3 niveles de sensibilidad.
3 sonidos de alarma: alta sensibilidad
2 sonidos de alarma: sensibilidad media
1 sonido de alarma: baja sensibilidad
El indicador Honda SMART Key
y el anillo
del interruptor de encendido se apagan
durante el ajuste.
g
Mantenga pulsado el interruptor de encendido
durante más de 2 segundos. El nivel de
sensibilidad está ajustado.
u El indicador de la Honda SMART Key
y el
anillo del interruptor de encendido se
apagan, y el zumbador suena una vez.
u
Cuando no se pulsa el botón de alarma/
respuesta durante 10 segundos, el indicador
de la Honda SMART Key y el anillo del
interruptor de encendido parpadean 3 veces
y, a continuación, el zumbador suena y se
establece el nivel de sensibilidad.
#
Si el sistema de alarma antirrobo no
funciona correctamente
Si se produce cualquiera de las situaciones
siguientes, la batería (
(P.
89) ) del vehículo
podría estar descargada o el sistema tiene un
problema. Extraiga la batería y consulte a su
concesionario.
● La alarma no suena.
●
La alarma suena pero el sonido se desvanece.
● El sistema de alarma no se detiene.
20220704173944_35K1ZR000_esm_BOOK Page 52 Monday, July 04 2022 17:43:45 JST
Guía de funcionamiento
49

Sistema de Respuesta
El sistema de respuesta es un dispositivo para
encontrar la ubicación de su vehículo e
informarle de que se ha activado la función de
inmovilización del sistema Honda SMART Key.
Cuando pulse el botón de alarma/respuesta en
la Honda SMART Key con el interruptor de
encendido en la posición (Apagado) o
(Bloqueo) y el sistema de la alarma antirrobo
está encendido, los intermitentes y el anillo del
interruptor de encendido se encienden y el
zumbador suena, para informarle de la
ubicación de su vehículo y de la activación de la
función del inmovilizador.
El anillo del interruptor de encendido se
iluminará durante alrededor de 1 minuto.
El sistema de respuesta utiliza ondas de radio
de baja intensidad. Pueden afectar a
dispositivos médicos tales como los marcapasos
cardíacos.
20220704173944_35K1ZR000_esm_BOOK Page 53 Monday, July 04 2022 17:43:45 JST
Guía de funcionamiento
50
Anillo del
interruptor de
encendido
Botón de
alarma/
respuesta

#
Funcionamiento
Pulse el botón de alarma/respuesta de la
Honda SMART Key.
u El sistema de respuesta no funcionará cuando
el interruptor de encendido esté en la posición
(Encendido).
Si se deja el interruptor de encendido en la
posición (Apagado) o (Bloqueo) durante
más de 10 días, el sistema de respuesta dejará
de estar activo. Cuando el sistema esté activo y
el vehículo reciba una señal pulsando el botón
de alarma/respuesta, la activación del sistema
se ampliará 10 días.
Para reiniciar el sistema, gire el interruptor de
encendido a la posición (Encendido) una vez.
u Para desbloquear el interruptor de encendido
(P.42)
Cuando la batería del vehículo esté baja, el
sistema de respuesta no funcionará.
#
Ajuste del nivel de volumen de sonido
del zumbador de respuesta
Puede elegir entre 3 niveles de volumen de
sonido del zumbador.
a
Asegúrese de que el sistema de Honda SMART
Key está activado.
(P.38)
b
Pulse el interruptor de encendido para
autenticar el sistema Honda SMART Key.
(P.42)
c
Mantenga pulsado el interruptor de encendido
durante más de 4 segundos.
u El indicador Honda SMART Key y el anillo
del interruptor de encendido parpadean.
20220704173944_35K1ZR000_esm_BOOK Page 54 Monday, July 04 2022 17:43:45 JST
Guía de funcionamiento
51
Continuación
Botón de
alarma/
respuesta
Interruptor de encendido
Anillo del interruptor
de encendido

d
Pulse el interruptor de encendido 1 vez
mientras el indicador de la Honda SMART Key
y el anillo del interruptor de encendido
parpadean.
u El indicador de la Honda SMART Key y el
anillo del interruptor de encendido se
encienden, y el zumbador suena.
e
Repita lo siguiente 3 veces:
Pulse el botón de alarma/respuesta de la
Honda SMART Key 2 veces y el interruptor
de encendido 1 vez.
u Cuando se pulsa el interruptor de
encendido, el indicador de la Honda
SMART Key y el anillo del interruptor de
encendido se apagan, y el zumbador
suena. Cuando se vuelvan a encender,
realice el siguiente paso.
u Cuando se pulsa el botón de alarma/
respuesta, el LED de la Honda SMART Key
se enciende. Asegúrese de que el LED se
apaga antes de volver a pulsar el botón.
u Cuando no se pulsa el botón de alarma/
respuesta o el interruptor de encendido
durante 1 minuto, el indicador de la
Honda
SMART Key y el anillo del interruptor de
encendido parpadean 3 veces y, a
continuación, el zumbador suena y se
cancela el modo. Vuelva al paso a
y
vuelva a realizar el procedimiento.
u Si pulsa el botón de alarma/respuesta un
número incorrecto de veces antes de que
repita el procedimiento 3 veces, vuelva a
repetir el procedimiento otras 3 veces.
f
Pulse el botón de alarma/respuesta para
seleccionar entre 3 niveles de volumen de
sonido. El indicador
Honda SMART Key y el
anillo del interruptor de encendido se apagan
durante el ajuste.
20220704173944_35K1ZR000_esm_BOOK
Page 55 Monday, July 04 2022 17:43:45 JST
Guía de funcionamiento
52
Sistema de Respuesta (Continuación)
g
Mantenga pulsado el interruptor de encendido
durante más de 2 segundos. El nivel de
volumen del sonido está ajustado.
u El indicador de la Honda SMART Key y el
anillo del interruptor de encendido se
apagan, y el zumbador suena una vez.
u Cuando no se pulsa el botón de alarma/
respuesta durante 10 segundos, el
indicador de la Honda SMART Key y el
anillo del interruptor de encendido
parpadean 3 veces y, a continuación, el
zumbador suena y se establece el nivel de
volumen.
#
Cambio del patrón de sonido del
zumbador de respuesta
Puede elegir entre 3 patrones de sonido del
zumbador.
a
Asegúrese de que el sistema de Honda SMART
Key está activado.
(P.38)
b
Pulse el interruptor de encendido para
autenticar el sistema Honda SMART Key.
(P.42)
c
Mantenga pulsado el interruptor de encendido
durante más de 4 segundos.
u El indicador Honda SMART Key y el anillo
del interruptor de encendido parpadean.
20220704173944_35K1ZR000_esm_BOOK
Page 56 Monday, July 04 2022 17:43:45 JST
Guía de funcionamiento
53
Continuación
Botón de
alarma/
respuesta
Interruptor de encendido
Anillo del interruptor
de encendido

d
Pulse el interruptor de encendido 1 vez
mientras el indicador de la Honda SMART Key
y el anillo del interruptor de encendido
parpadean.
u El indicador de la Honda SMART Key y el
anillo del interruptor de encendido se
encienden, y el zumbador suena.
e
Repita lo siguiente 3 veces:
Pulse el botón de alarma/respuesta de la
Honda SMART Key 3 veces y el interruptor
de encendido 1 vez.
u Cuando se pulsa el interruptor de
encendido, el indicador de la Honda
SMART Key y el anillo del interruptor de
encendido se apagan, y el zumbador
suena. Cuando se vuelvan a encender,
realice el siguiente paso.
u Cuando se pulsa el botón de alarma/
respuesta, el LED de la Honda SMART Key
se enciende. Asegúrese de que el LED se
apaga antes de volver a pulsar el botón.
u Cuando no se pulsa el botón de alarma/
respuesta o el interruptor de encendido
durante 1 minuto, el indicador de la
Honda
SMART Key y el anillo del interruptor de
encendido parpadean 3 veces y, a
continuación, el zumbador suena y se
cancela el modo. Vuelva al paso a
y
vuelva a realizar el procedimiento.
u Si pulsa el botón de alarma/respuesta un
número incorrecto de veces antes de que
repita el procedimiento 3 veces, vuelva a
repetir el procedimiento otras 3 veces.
f
Pulse el botón de alarma/respuesta para
seleccionar entre 3 patrones de sonido del
zumbador. El indicador
Honda SMART Key y el
anillo del interruptor de encendido se apagan
durante el ajuste.
20220704173944_35K1ZR000_esm_BOOK Page 57 Monday, July 04 2022 17:43:45 JST
Guía de funcionamiento
54
Sistema de Respuesta (Continuación)

g
Mantenga pulsado el interruptor de encendido
durante más de 2 segundos. El patrón de
sonido está ajustado.
u El indicador de la Honda SMART Key y el
anillo del interruptor de encendido se
apagan, y el zumbador suena una vez.
u Cuando no se pulsa el botón de alarma/
respuesta durante 10 segundos, el
indicador de la Honda SMART Key y el
anillo del interruptor de encendido
parpadean 3 veces y, a continuación, el
zumbador suena y se establece el patrón
de sonido.
#
Modo de silencio temporal
El modo de silencio temporal es la forma
inmediata de apagar el sonido del zumbador
del sistema de respuesta.
Activar:
Mantenga pulsado el botón de alarma/
respuesta unos 2 segundos, el LED de la Honda
SMART Key cambia a rojo.
Desactivar:
Mantenga pulsado de nuevo el botón de
alarma/respuesta unos 2 segundos, el LED de la
Honda SMART Key cambia a verde.
20220704173944_35K1ZR000_esm_BOOK Page 58 Monday, July 04 2022 17:43:45 JST
Guía de funcionamiento
55
Sistema de parada al ralentí
El sistema de parada al ralentí está diseñado
para ayudar a reducir el consumo de
combustible y el ruido; se para al ralentí cuando
el scooter está detenido, por ejemplo mientras
espera en una intersección.
#
Activación y desactivación del sistema
de parada al ralentí
Activa o desactiva el sistema de parada al
ralentí utilizando el interruptor de parada de
ralentí.
● ENCENDIDO:
(Idling Stop)
u
El indicador de parada al ralentí se enciende
cuando el sistema de parada al ralentí está
preparado para detener el motor durante la
conducción. El indicador de parada al ralentí
parpadea cuando el sistema de parada al
ralentí detiene el motor.
● APAGADO:
(Idling)
u El indicador de parada al ralentí no se
enciende cuando el sistema de parada al
ralentí está apagado.
Activación del sistema de parada al ralentí
El sistema de parada al ralentí está preparado
para detener el motor y el indicador de parada
al ralentí se enciende cuando se cumplen estas
condiciones con el interruptor de parada al
ralentí en la posición (Idling Stop):
● el caballete lateral está levantado
● arranque el motor con el botón de arranque
● caliente el motor lo suficiente
● conduzca el vehículo a una velocidad
superior a 10 km/h
#
El indicador de parada al ralentí no se
enciende:
(P.110)
20220704173944_35K1ZR000_esm_BOOK Page 59
Monday, July 04 2022 17:43:45 JST
Guía de funcionamiento
56
Interruptor de
parada al ralentí
Indicador de
parada al ralentí
Detención del sistema de parada al ralentí
El motor se detiene y el indicador de parada al
ralentí comienza a parpadear después de cerrar
completamente el acelerador y de detener el
vehículo mientras el indicador de parada al
ralentí está encendido.
u Mientras que el motor está detenido por el
sistema de parada al ralentí, si se coloca el
interruptor de parada al ralentí en la posición
(Idling), el sistema de parada al ralentí se
cancelará. El motor no se volverá a poner en
funcionamiento aunque abra el acelerador.
Precauciones de seguridad para el sistema de
parada al ralentí
No deje el vehículo mientras el indicador de
parada al ralentí esté parpadeando. Cuando
deje el vehículo, gire siempre el interruptor de
encendido a la posición (Apagado).
u Puede que el motor arranque de forma
inesperada si el acelerador está abierto.
#
El motor NO está detenido por el
sistema de Parada al ralentí mientras
que el indicador de parada al ralentí
esta encendido:
(P.111)
AVISO
Si utiliza el sistema de parada al ralentí durante un
periodo de tiempo prolongado, puede que se
descargue la batería.
20220704173944_35K1ZR000_esm_BOOK Page 60 Monday, July 04 2022 17:43:45 JST
Guía de funcionamiento
57
Continuación
Indicador de
parada al ralentí
Volver a arrancar el motor
Compruebe que el indicador de Parada al
ralentí está parpadeando y, a continuación,
abra el acelerador.
u Si no parpadea, no puede volver a arrancar el
motor con el sistema de parada al ralentí,
incluso si abre el acelerador.
u Cuando el sistema de Parada al ralentí detiene
el motor, si acciona el caballete lateral, el
indicador de Parada al ralentí que parpadea se
detiene y permanece encendido. El motor no
se pondrá en funcionamiento aunque abra el
acelerador.
#
El motor no arranca incluso si el
acelerador está abierto:
(P.112)
AVISO
El faro permanece encendido cuando el sistema de
parada al ralentí detiene el motor. Puede que se
descargue la batería y que no pueda volver a
arrancar el motor.
Cuando la batería esté baja, cambie el interruptor
de parada al ralentí a (Idling) y no use el sistema
de parada al ralentí. Vaya al concesionario para
comprobar la batería.
Vaya al concesionario para que se compruebe
la batería según las especificaciones del
programa de mantenimiento.
#
Programa de mantenimiento:
(P.76)
20220704173944_35K1ZR000_esm_BOOK Page 61
Monday, July 04 2022 17:43:45 JST
Guía de funcionamiento
58
Sistema de parada al ralentí (Continuación)

Control de par seleccionable de Honda
El control de par (control de la potencia del
motor) puede encenderse/apagarse.
u Primero detenga el vehículo y encienda o
apague el control de par.
u El control de par no puede apagarse cuando el
sistema está activado (el indicador de control
de par parpadea).
u Cada vez que el interruptor de encendido se
gira a la posición
(Encendido), el control de
par se activa automáticamente.
Encendido y apagado del control de par
Pulse el interruptor
SEL
para visualizar el
control de par [HSTC]. Si mantiene pulsado el
interruptor
SET
mientras se muestra el control
de par [HSTC], se enciende y apaga el control
de par.
20220704173944_35K1ZR000_esm_BOOK Page 62 Monday, July 04 2022 17:43:45 JST
Guía de funcionamiento
59
Indicador de desactivación
del control de par
Indicador del
control de par
Interruptor
SET
Control de par [HSTC]
Arranque del motor
Encienda el motor utilizando el procedimiento
siguiente, independientemente de si el motor
está frío o caliente.
Este vehículo está equipado con un sistema de
corte del encendido en el caballete lateral.
u El motor no podrá ponerse en marcha si el
caballete lateral está bajado.
u Si baja el caballete lateral con el motor en
marcha, se detendrá automáticamente.
Este vehículo está equipado con un sistema de
Honda SMART Key. Mantenga siempre el
Honda SMART Key encendido cuando
conduzca su vehículo. (P.39)
Si se detiene el motor de este vehículo mientras
el interruptor de encendido está en la posición
(Encendido), la autenticación se desactivará
después de cierto tiempo o si abandona la
distancia de autenticación. Vuelva a poner en
marcha el motor realizando los pasos c y d
del procedimiento de arranque.
u Si el sistema de parada al ralentí detiene el
motor de este vehículo, la autenticación no se
desactivará.
AVISO
• Si el motor no arranca en 5 segundos, gire el
interruptor de encendido a la posición
(Apagado) y espere 10 segundos antes de
intentar arrancarlo de nuevo para que la
tensión de la batería se recupere.
• Un periodo prolongado al ralentí rápido y una
subida de revoluciones puede dañar el motor y
el sistema de escape.
• Si el vehículo vuelca, en primer lugar ponga el
interruptor de encendido en la posición
(Apagado) y, a continuación, inspeccione el
vehículo detenidamente.
20220704173944_35K1ZR000_esm_BOOK Page 63 Monday, July 04 2022 17:43:45 JST
Guía de funcionamiento
60
a
Apoye el vehículo en su caballete central.
b
Gire el interruptor de encendido a la posición
(Encendido).
u Para desbloquear el interruptor de
encendido. (P.42)
c
Apriete la maneta del freno trasero.
u El motor de arranque solamente funcionará
cuando se haya apretado la maneta del
freno trasero y el caballete lateral esté
levantado.
d
Pulse el botón de arranque con el acelerador
completamente cerrado. Suelte el botón de
arranque cuando se ponga en marcha el
motor.
20220704173944_35K1ZR000_esm_BOOK Page 64 Monday, July 04 2022 17:43:45 JST
Guía de funcionamiento
61
Continuación
b
dc
Si no se puede arrancar el motor:
a
Coloque el vehículo en el caballete central y
presione la maneta del freno trasero.
b
Presione el botón de arranque con el
acelerador un poco abierto (aproximadamente
3 mm, sin juego libre).
Si el motor no arranca:
a
Abra el acelerador totalmente y pulse el botón
de arranque durante 5 segundos.
b
Repita el procedimiento de arranque normal.
c
Si el motor arranca pero el ralentí resulta
inestable, abra ligeramente el acelerador.
d
Si el motor no arranca, espere 10 segundos
antes de intentar de nuevo los pasos a y b.
#
Si el motor no arranca
(P.103)
20220704173944_35K1ZR000_esm_BOOK Page 65 Monday, July 04 2022 17:43:45 JST
Guía de funcionamiento
62
Arranque del motor (Continuación)
Aproximadamente 3
mm, sin juego libre

Conducir
Arranque del vehículo
a
Empuje el vehículo hacia adelante para retirar
el caballete central.
u Apriete la maneta del freno trasero.
u Mantenga el acelerador cerrado.
Asegúrese que el caballete lateral y el central
están arriba.
b
Suba al vehículo.
u Móntese en el vehículo por el lado
izquierdo, manteniendo al menos un pie en
el suelo.
c
Suelte la maneta del freno.
d
Aceleración y desaceleración
Para acelerar: Abra lentamente el acelerador.
Para desacelerar: Cierre el acelerador.
20220704173944_35K1ZR000_esm_BOOK Page 66 Monday, July 04 2022 17:43:45 JST
Guía de funcionamiento
63
Continuación
Cerrar (desacelerar)
Abrir (acelerar)
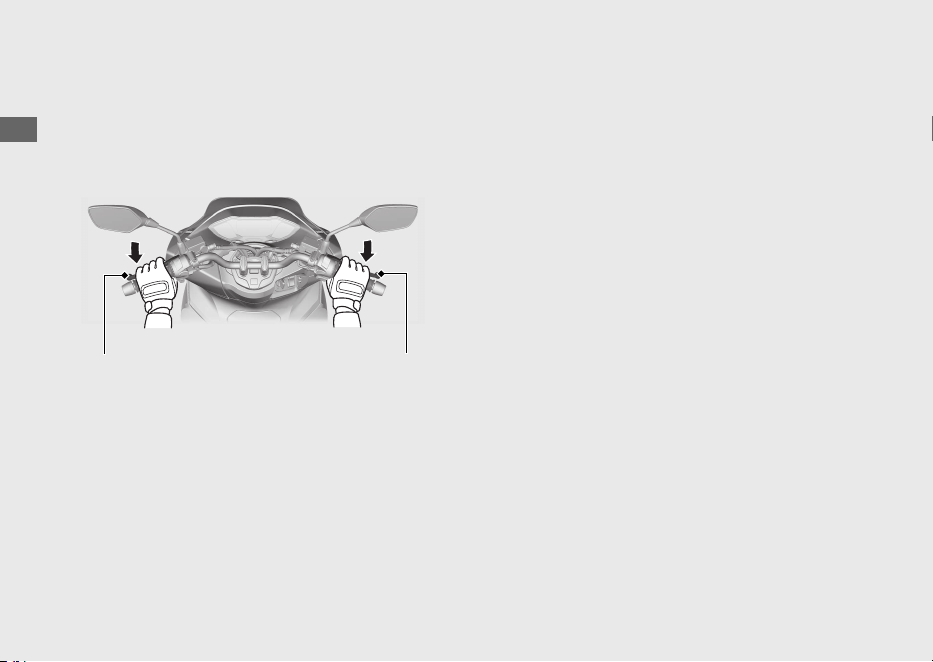
Frenado
Cierre el acelerador y aplique a la vez las
manetas de los frenos delantero y trasero.
20220704173944_35K1ZR000_esm_BOOK Page 67 Monday, July 04 2022 17:43:45 JST
Guía de funcionamiento
64
Conducir (Continuación)
Maneta del freno
trasero
Maneta del freno
delantero
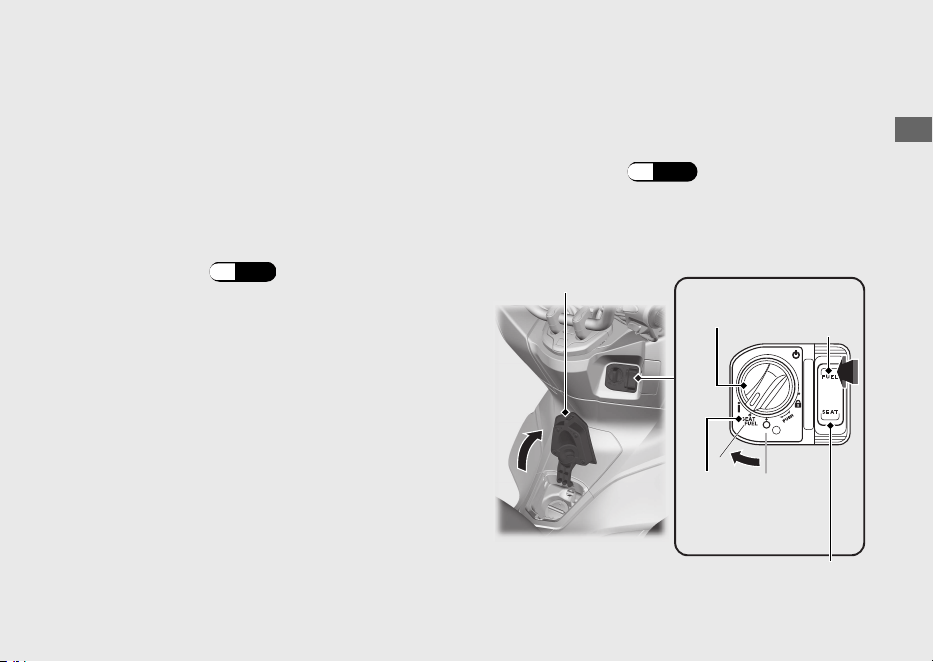
Repostaje
Tipo de combustible: Solo gasolina sin plomo
Índice de octanaje: Su vehículo está diseñado
para usar combustible con un índice de
octanaje (RON) de 91 o superior.
Capacidad del depósito: 8,0 L
#
Repostaje y sugerencias sobre el
combustible
(P.12)
Apertura del tapón de llenado de combustible
a
Gire el interruptor de encendido a la posición
SEAT FUEL .
u Para desbloquear el interruptor de
encendido
(P.42)
b
Pulse el lado FUEL del interruptor de apertura
de la tapa del combustible y del asiento.
u Se abre la tapa del combustible.
20220704173944_35K1ZR000_esm_BOOK Page 68 Monday, July 04 2022 17:43:45 JST
Guía de funcionamiento
65
Continuación
Interruptor de
encendido
Tapa del
combustible
FUEL
SEAT FUEL
Interruptor de apertura de la tapa
del combustible y del asiento
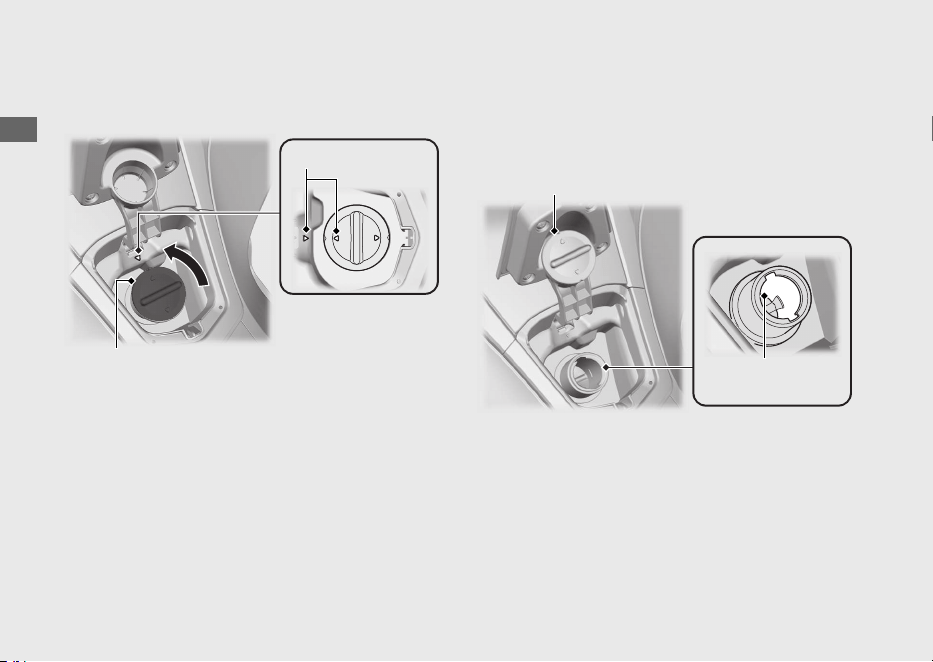
c
Gire el tapón de llenado de combustible hacia
la izquierda y retire el tapón.
d
Coloque el tapón de llenado de combustible
que ha extraído en la zona de apoyo para el
tapón de llenado de combustible.
No llenar con combustible por encima del
borde inferior del cuello de llenado.
20220704173944_35K1ZR000_esm_BOOK Page 69 Monday, July 04 2022 17:43:45 JST
Guía de funcionamiento
66
Repostaje (Continuación)
Marcas de flechas
Tapón de llenado
de combustible
Zona de apoyo para el tapón
de llenado de combustible
Borde inferior del
cuello de llenado
Cierre del tapón de llenado de combustible
a
Instale y apriete el tapón de llenado de
combustible con firmeza, para ello gírelo hacia
la derecha.
u
Asegúrese de que las marcas de las flechas del
tapón de llenado de combustible estén
alineadas con las del depósito de combustible.
b
Cierre la tapa del combustible hasta que haga
tope.
u Asegúrese de que la tapa del combustible
esté correctamente cerrada.
3ADVERTENCIA
La gasolina es muy inflamable y
explosiva. Manejando el combustible se
podrá quemar o lesionar gravemente.
• Pare el motor y mantenga el
vehículo alejado de fuentes de calor,
chispas y llamas.
• Manipule el combustible
únicamente en exteriores.
• Limpie inmediatamente el
combustible derramado.
20220704173944_35K1ZR000_esm_BOOK Page 70 Monday, July 04 2022 17:43:45 JST
Guía de funcionamiento
67

Toma USB
La toma USB está situada en la caja delantera.
(P.72)
Emplee los dispositivos USB bajo su cuenta y
riesgo. En ningún caso será Honda responsable
por posibles daños a su dispositivo USB
mientras esté en uso.
Abra la tapa para acceder a la toma USB.
Pueden utilizarse conectores USB tipo A.
La capacidad nominal es de
10,5 W (5 V, 2,1 A).
u La toma USB solo sirve para cargar.
u Para evitar que la batería se debilite (o se
agote), mantenga el motor en marcha mientras
circula corriente desde la toma USB.
u Para evitar que entren sustancias extrañas en la
toma USB, asegúrese de cerrar la tapa cuando
la toma USB no esté en uso.
u Asegure con cuidado todos los dispositivos
conectados, ya que las vibraciones pueden
dañarlos o podrían desplazarse
inesperadamente.
AVISO
● El uso de cualquier dispositivo USB generador
de calor o dispositivo USB con capacidad
errónea puede dañar la toma USB.
● No use la toma USB con humedad o mientras
esté lavando el vehículo o en cualesquiera
condiciones con humedad, ya que esto puede
dañar la toma USB.
● No deje que el mazo de cables del USB quede
pinzado o atrapado.
● No deje que el mazo de cables del USB
interfiera con la dirección o los mandos.
20220704173944_35K1ZR000_esm_BOOK Page 71 Monday, July 04 2022 17:43:45 JST
Guía de funcionamiento
68
Tapa
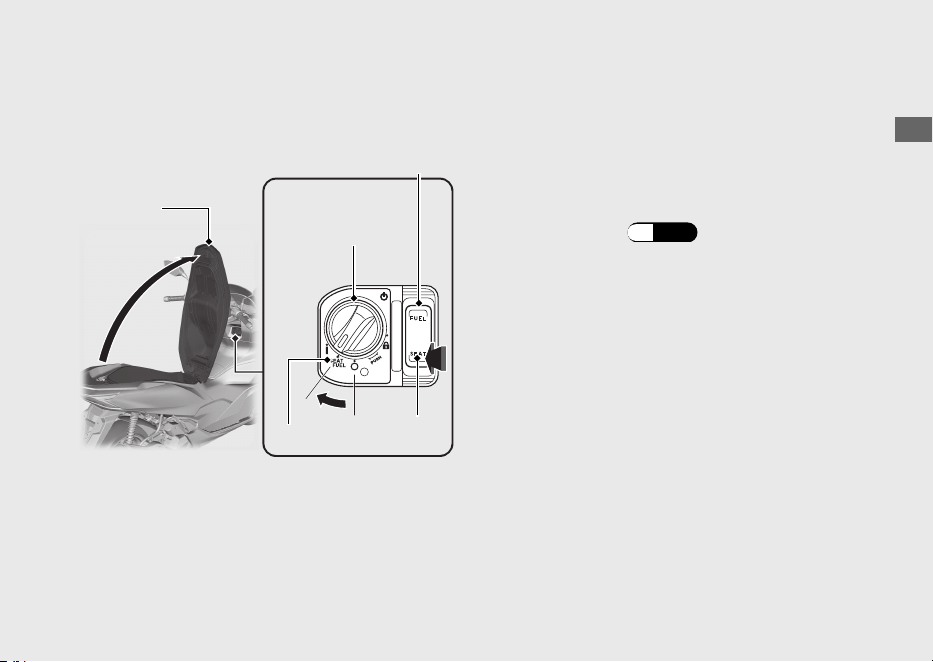
Equipo de almacenaje
Asiento Abrir el asiento
a
Gire el manillar para ponerlo apuntando hacia
adelante.
b
Gire el interruptor de encendido a la posición
SEAT FUEL .
u Para desbloquear el interruptor de
encendido (P.42)
c
Pulse el lado SEAT
del interruptor de apertura
de la tapa del combustible y del asiento.
d
Abra el asiento.
Cerrar el asiento
Cierre y presione en la parte trasera del asiento
hasta que quede bloqueado. Asegúrese de que
el asiento queda bloqueado con firmeza, para
ello tire hacia arriba ligeramente del mismo.
Tenga cuidado de no dejarse la llave en el
compartimento de debajo del asiento.
20220704173944_35K1ZR000_esm_BOOK Page 72 Monday, July 04 2022 17:43:45 JST
Guía de funcionamiento
69
Continuación
SEAT FUEL
Asiento
Interruptor de apertura de la
tapa del combustible y del
asiento
Interruptor de
encendido
SEAT
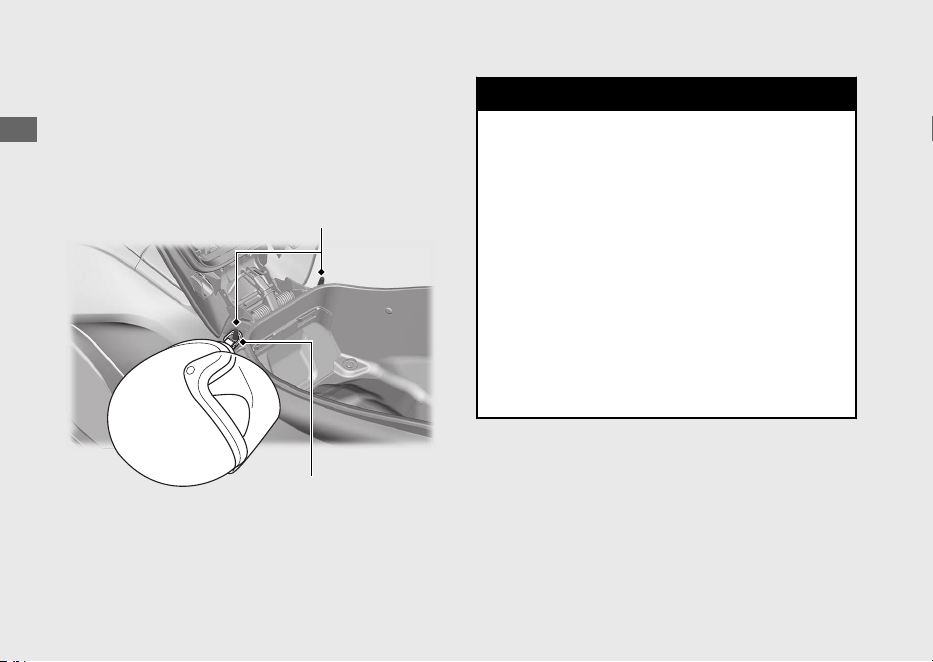
Portacascos
Los portacascos se encuentran debajo del
asiento.
u Utilice los portacascos solamente mientras esté
estacionado.
3ADVERTENCIA
Si conduce con un casco sujeto en el
portacascos, el casco podría interferir
con su habilidad para conducir el
vehículo de forma segura y provocar un
accidente en el que podría tener
lesiones de gravedad o incluso perder
la vida.
Utilice el portacascos solamente
mientras esté estacionado. No
conduzca con un casco en el
portacascos.
20220704173944_35K1ZR000_esm_BOOK Page 73 Monday, July 04 2022 17:43:45 JST
Guía de funcionamiento
70
Equipo de almacenaje (Continuación)
Portacascos
Anillo en D del casco
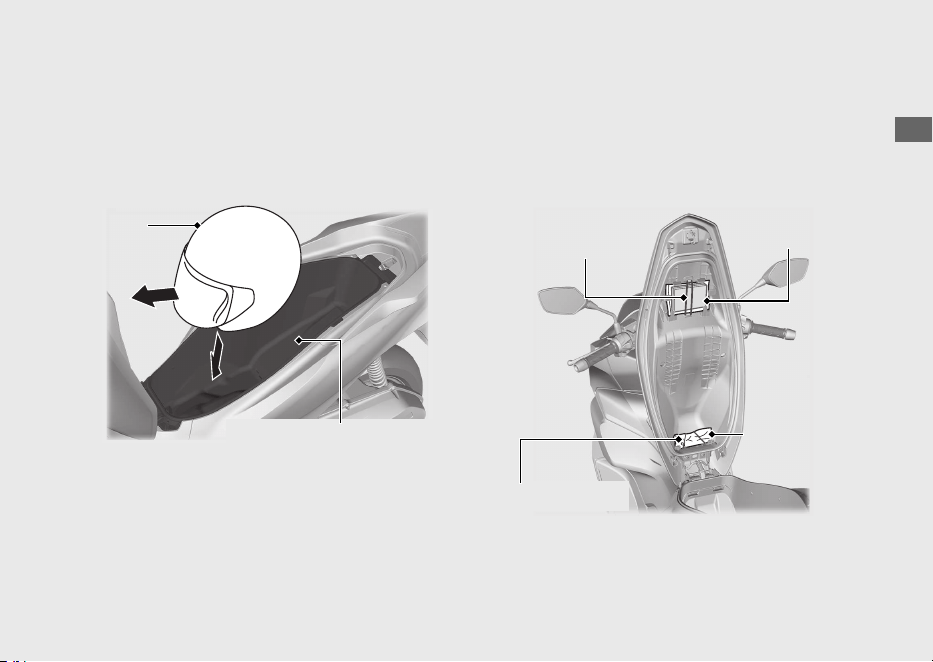
En el compartimento central se puede guardar
un casco.
Coloque el frontal del casco hacia adelante.
u Es posible que algunos cascos no encajen en el
compartimento debido a su tamaño o diseño.
Compartimento central
No exceda nunca el límite del peso máximo.
Peso máximo: 10 kg
u No almacene ningún objeto que sea inflamable
o que se pueda dañar por el calor.
u No guarde objetos de valor ni artículos frágiles.
Juego de herramientas/Bolsa para
documentos
Hay un juego de herramientas y una bolsa para
documentos bajo el asiento, junto a la cinta de
goma.
20220704173944_35K1ZR000_esm_BOOK Page 74 Monday, July 04 2022 17:43:45 JST
Guía de funcionamiento
71
Continuación
Casco
Compartimento central
Cinta de goma
Juego de
herramientas
Bolsa para
documentos
Cinta de goma
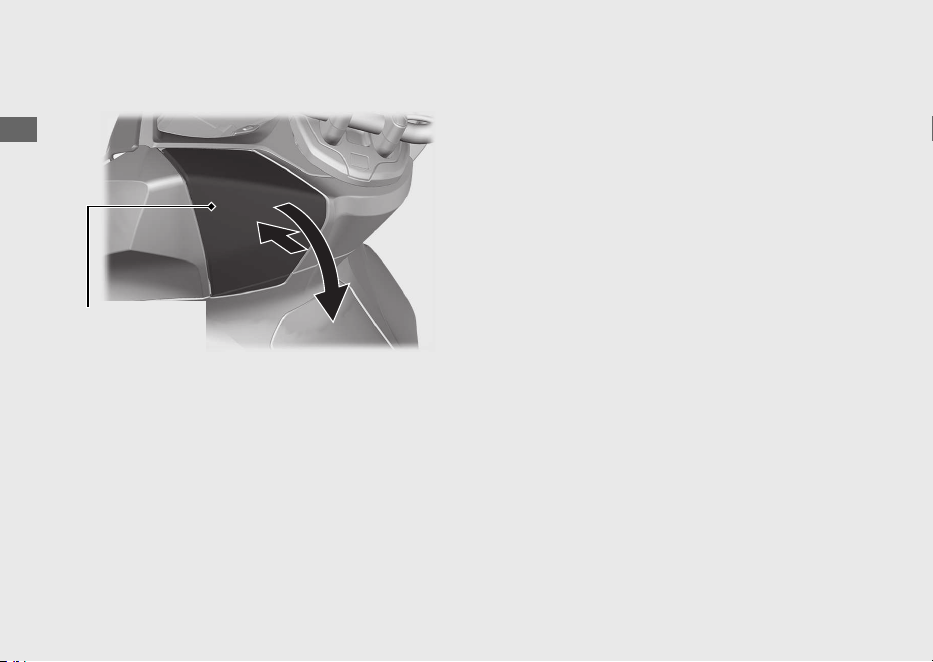
Caja delantera
#
Abrir
Presione la tapa de la caja delantera para
abrirla.
#
Cerrar
Cierre la tapa de la caja delantera haciendo
presión sobre ella.
La carga máxima permitida en la caja delantera
no deberá superar
1,0 kg.
Asegúrese de que la tapa de la caja delantera
esté correctamente cerrada.
u No guarde objetos de valor ni artículos frágiles.
20220704173944_35K1ZR000_esm_BOOK Page 75 Monday, July 04 2022 17:43:45 JST
Guía de funcionamiento
72
Equipo de almacenaje (Continuación)
Tapa de la caja
delantera
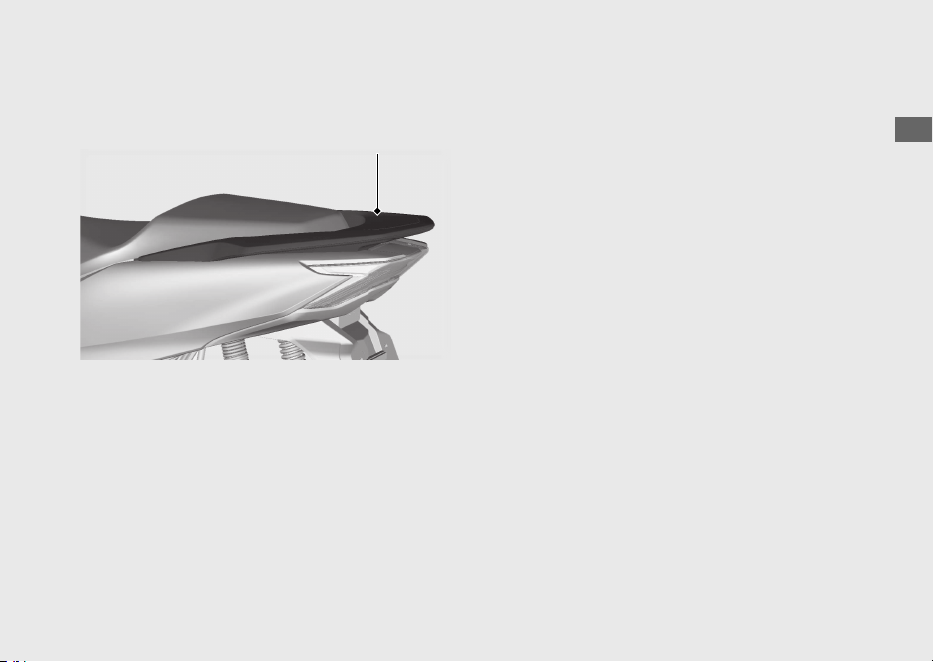
Portabultos trasero
No exceda nunca el límite del peso máximo.
Peso máximo: 5 kg
20220704173944_35K1ZR000_esm_BOOK Page 76 Monday, July 04 2022 17:43:45 JST
Guía de funcionamiento
73
Portabultos trasero

Importancia del mantenimiento.........................P.
75
Programa de mantenimiento
............................
..P. 76
Fundamentos del mantenimiento......................P. 79
Herramientas ...........................................................P. 88
Desmontaje e instalación de los componentes del
carenado ................................................................. P. 89
Batería.......................................................................... P. 89
Cubierta de la batería..............................................P. 90
Tapa delantera .......................................................... P. 91
Aceite del motor ..................................................... P. 92
Refrigerante .............................................................P. 94
Frenos........................................................................ P. 96
Caballete lateral ...................................................... P. 98
Acelerador ................................................................ P. 99
Otras sustituciones...............................................P. 100
Sustitución de la batería de la Honda SMART
Key...........................................................................P. 100
20220704173944_35K1ZR000_esm_BOOK Page 77 Monday, July 04 2022 17:43:45 JST
Por favor lea cuidadosamente las secciones “Importancia del mantenimiento” y
“Fundamentos del mantenimiento” antes de intentar llevar a cabo alguna de las tareas de
mantenimiento. Consulte “Especificaciones” para conocer los datos de servicio.
Mantenimiento
Importancia del mantenimiento
Importancia del mantenimiento
Llevar un buen mantenimiento del vehículo es
absolutamente esencial para su seguridad y para
proteger su inversión, obtener las máximas
prestaciones, evitar averías y reducir la
contaminación. El mantenimiento es
responsabilidad del propietario. Asegúrese de
inspeccionar el vehículo antes de cada conducción y
realice las comprobaciones periódicas especificadas
en el Programa de mantenimiento. 2 P. 76
3ADVERTENCIA
Si no dispensa un mantenimiento
apropiado al vehículo o si no corrige un
problema antes de conducir puede
tener un accidente en el que puede
sufrir lesiones de gravedad o incluso
perder la vida.
Siga siempre las recomendaciones de
inspección y mantenimiento y los
programas de este manual del propietario.
Seguridad del mantenimiento
Lea siempre todas las instrucciones de
mantenimiento antes de iniciar la tarea y
asegúrese de que dispone de las herramientas y
piezas adecuadas y que tiene las capacidades
técnicas requeridas.
Nos resulta imposible alertarle de todos los riesgos
concebibles que puedan surgir al realizar el
mantenimiento. Solamente usted podrá decidir si
deberá o no realizar una tarea.
Siga estas indicaciones al realizar el mantenimiento.
● Detenga el motor y coloque el interruptor de
encendido en la posición
(Apagado).
● Coloque el vehículo en una superficie firme y
nivelada con el caballete lateral, caballete
central o un soporte de mantenimiento que le
permita apoyarlo.
● Deje que se enfríe el motor, el silenciador, los
frenos y otros elementos calientes antes de
realizar el servicio, de lo contrario podría
quemarse.
● Ponga en marcha el motor sólo cuando se le
i
nd
ique y hágalo en una zona bien ventilada.
20220704173944_35K1ZR000_esm_BOOK Page 78 Monday, July 04 2022 17:43:45 JST
Mantenimiento
75

Programa de mantenimiento
El Programa de mantenimiento especifica los
requisitos de mantenimiento necesarios para
garantizar un rendimiento seguro y fiable así como
un control apropiado de las emisiones.
El trabajo de mantenimiento debe realizarse de
acuerdo con las normas y especificaciones de
Honda y siempre por técnicos cualificados y
debidamente formados. Su concesionario cumple
todos estos requisitos. Mantenga un registro
preciso del mantenimiento para asegurarse de que
el vehículo recibe el mantenimiento apropiado.
Asegúrese de la persona que realice el
mantenimiento cumplimente este registro.
Cualquier mantenimiento programado se
considera un coste operativo normal del
propietario y le será cobrado por el concesionario.
Conserve todos los justificantes. Si vende el
vehículo, estos justificantes deben transferirse junto
con el mismo a su nuevo propietario.
Honda recomienda que su concesionario realice
una prueba en carretera tras cada mantenimiento
periódico.
20220704173944_35K1ZR000_esm_BOOK Page 79 Monday, July 04 2022 17:43:45 JST
Mantenimiento
76
Elementos
Comprobación
previa al uso
2 P. 79
Periodicidad
*1
Comprobación
anual
Sustitución
normal
Consultar
la página
× 1.000 km 1 6 12 18 24 30 36
× 1.000 mi 0,6 4 8 12 16 20 24
Tubería del combustible
–
Nivel de combustible 65
Funcionamiento del
acelerador
99
Filtro de aire
*2
–
Respiradero del cárter
*3
–
Bujía –
Holgura de las válvulas –
Aceite del motor –
Filtro tamiz del aceite del
motor
–
Velocidad de ralentí del
motor
–
Refrigerante del radiador
*4
3 años 94
Sistema de refrigeración –
Correa de transmisión –
Aceite del grupo final
*4
2 años –
Nivel de mantenimiento Leyenda de mantenimiento
:
Intermedio. Recomendamos que el servicio lo realice su
concesionario, a menos que cuente con las herramientas
necesarias y que tenga las capacidades técnicas requeridas.
Los procedimientos están incluidos en un Manual de
taller Honda oficial.
:
:
:
Inspeccionar (limpiar, ajustar, lubricar o reemplazar si fuera necesario)
Reemplazar
Limpiar
:
Técnico. En interés de seguridad, haga que el servicio
de su vehículo se realice en su concesionario.
20220704173944_35K1ZR000_esm_BOOK Page 80 Monday, July 04 2022 17:43:45 JST
Programa de mantenimiento
Mantenimiento
77
Continuación
Elementos
Comprobación
previa al uso
2 P. 79
Periodicidad
*1
Comprobación
anual
Sustitución
normal
Consultar
la página
× 1.000 km 1 6 12 18 24 30 36
× 1.000 mi 0,6 4 8 12 16 20 24
Batería
89
Líquido de frenos
*4
2 años 96
Desgaste de las pastillas
de freno
97
Sistema de frenos 79
Reglaje del faro –
Luces/Bocina –
Desgaste de las zapatas
del embrague
–
Caballete lateral 98
Suspensión –
Tuercas, pernos y
elementos de sujeción
–
Ruedas/Neumáticos 85
Cojinetes del cabezal de la
dirección
–
Notas:
*
1 :
A mayores lecturas del cuentakilómetros, repita el trabajo de mantenimiento al cumplirse los intervalos aquí indicados.
*
2 : Efectúe las labores de mantenimiento con más frecuencia cuando se circule por zonas húmedas o polvorientas.
*
3 : Realice el mantenimiento con mayor frecuencia al conducir con lluvia o a máxima apertura del acelerador.
*
4 : El trabajo de sustitución exige conocimientos de mecánica.
20220704173944_35K1ZR000_esm_BOOK Page 81 Monday, July 04 2022 17:43:45 JST
Programa de mantenimiento
Mantenimiento
78

Fundamentos del mantenimiento
Inspección previa al uso
Para garantizar su seguridad, es responsabilidad
del usuario realizar una inspección previa al uso y
asegurarse que se resuelve cualquier problema
que pudiera encontrarse. La inspección previa al
uso es imprescindible, no solo por razones de
seguridad, sino porque cualquier avería, aunque
solo sea un neumático pinchado, puede ocasionar
grandes inconveniencias.
Compruebe los elementos siguientes antes de
montarse en el vehículo:
● Nivel de combustible: llene el depósito cuando
sea necesario 2 P. 65
● Acelerador: compruebe si se abre suavemente
y si se cierra por completo en todas las
posiciones que se ponga el manillar 2 P. 99
● Nivel de aceite del motor: añada aceite del
motor si fuese necesario. Compruebe si hay
fugas 2 P. 92
● Nivel de refrigerante: añada refrigerante si
fuese necesario. Compruebe si hay fugas
2 P. 94
● Frenos: compruebe el funcionamiento;
Delantero y trasero: compruebe el nivel del
líquido de frenos y el desgaste de las pastillas
2 P. 96, 2 P. 97
● Luces y bocina: compruebe que las luces, los
indicadores y la bocina funcionan
correctamente
● Sistema de desconexión del encendido en el
caballete lateral: compruebe si el sistema
funciona correctamente 2 P. 98
● Ruedas y neumáticos: compruebe el estado y
la presión de inflado y ajústela si es necesario
2 P. 85
20220704173944_35K1ZR000_esm_BOOK Page 82 Monday, July 04 2022 17:43:45 JST
Mantenimiento
79
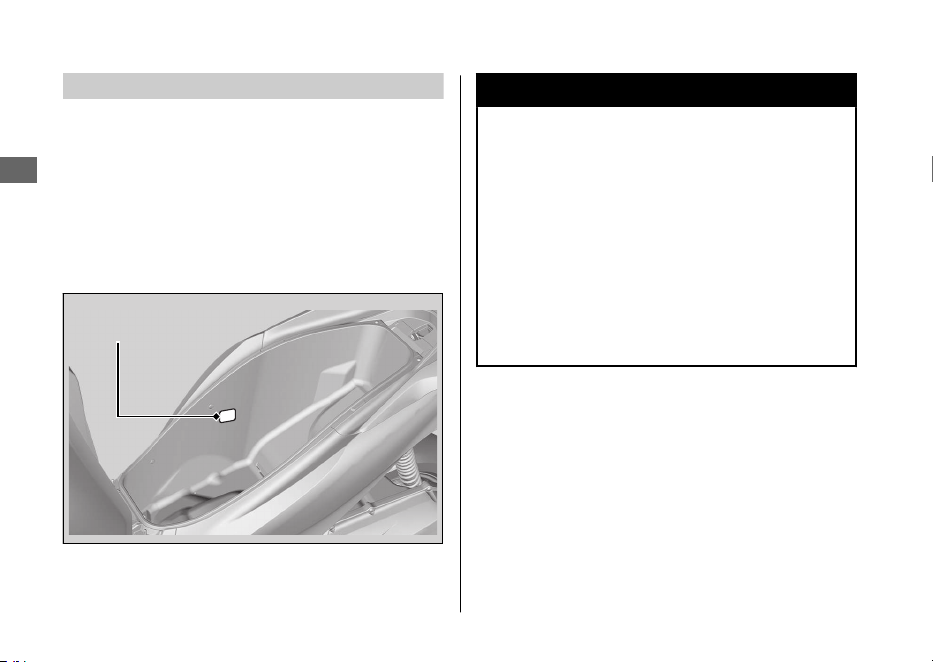
Sustitución de las piezas
Utilice siempre Piezas originales Honda o sus
equivalentes para garantizar la fiabilidad y
seguridad del vehículo.
Cuando realice pedidos de componentes con
color, especifique el nombre del modelo, el color y
el código mencionado en la etiqueta del color.
La etiqueta de color se encuentra colocada en el
compartimento central. 2 P. 71
3ADVERTENCIA
La instalación de piezas ajenas a Honda
puede hacer que su vehículo resulte
inseguro y provoque un accidente en el
que puede resultar gravemente herido,
o incluso perder la vida.
Utilice siempre Piezas originales Honda
o equivalentes que hayan sido
diseñadas y homologadas para su
vehículo.
20220704173944_35K1ZR000_esm_BOOK Page 83 Monday, July 04 2022 17:43:45 JST
Fundamentos del mantenimiento
Mantenimiento
80
Etiqueta de color
Batería
Este vehículo tiene un tipo de batería que está
exenta de mantenimiento. No tiene que
comprobar el nivel del electrolito de la batería ni
añadir agua destilada. Limpie los terminales de la
batería si se ensucian o se corroen.
No retire las juntas de los tapones de la batería.
No tiene que retirar el tapón al cargar la batería.
AVISO
Su batería es de las del tipo que no necesita
mantenimiento y podrá dañarse de forma
permanente si se quita la ristra de tapones.
AVISO
La eliminación inadecuada de la batería puede ser
perjudicial para el medioambiente y la salud pública.
Para conocer las instrucciones para desechar
correctamente la batería, siga siempre la normativa
local.
#
Qué hacer en caso de emergencia
Si se presenta alguna de las siguientes situaciones,
acuda al médico inmediatamente.
● Salpicadura de electrolito en los ojos:
u Lávese los ojos repetidamente con agua
fría durante un mínimo de 15 minutos. El
uso de agua a presión podría dañarle los
ojos.
● Salpicadura de electrolito en la piel:
u Quítese la ropa salpicada y lave bien la piel
con agua.
● Salpicadura de electrolito en la boca:
u Enjuáguese bien la boca con agua, pero no
se la trague.
3ADVERTENCIA
Durante el uso normal, la batería
desprende gas de hidrógeno explosivo.
Una chispa o llama puede hacer que la
batería explote con fuerza suficiente como
para causarle la muerte o lesiones graves.
Utilice ropa protectora y una mascarilla, o
bien haga que un mecánico cualificado
realice el mantenimiento de la batería.
20220704173944_35K1ZR000_esm_BOOK Page 84 Monday, July 04 2022 17:43:45 JST
Fundamentos del mantenimiento
Mantenimiento
81
Continuación
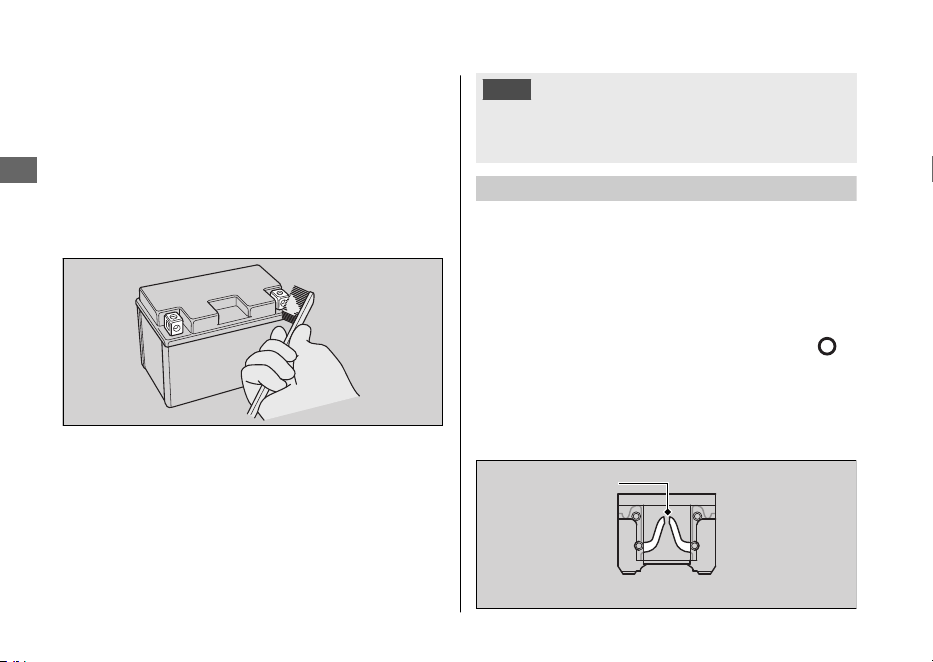
#
Limpieza de los terminales de la batería
1.
Extraiga la batería. 2 P. 89
2.
Si los terminales comienzan a oxidarse y están
recubiertos de una sustancia blanca, lávelos
con agua caliente y límpielos.
3.
Si los terminales están muy oxidados, limpie y
pula los terminales con un cepillo de alambre o
papel de lija. Utilice gafas de seguridad.
4.
Tras la limpieza, vuelva a instalar la batería.
La batería dispone de una vida útil limitada.
Consulte con su concesionario el momento de
sustituir la batería. Sustituya siempre la batería por
otra batería sin mantenimiento del mismo tipo.
AVISO
La instalación de accesorios eléctricos de marcas ajenas
a Honda puede sobrecargar el sistema eléctrico,
descargar la batería y posiblemente dañar el sistema.
Fusibles
Los fusibles protegen los circuitos eléctricos de su
vehículo. Si algún elemento de su vehículo deja de
funcionar, compruebe y sustituya cualquier fusible
que esté fundido. 2 P. 121
#
Inspección y sustitución de fusibles
Gire el interruptor de encendido a la posición
(Apagado) para retirar e inspeccionar los fusibles.
Si un fusible está fundido, sustitúyalo por un fusible
de las mismas características. Para conocer las
características de los fusibles, consulte
“Especificaciones”. 2 P. 140
20220704173944_35K1ZR000_esm_BOOK Page 85 Monday, July 04 2022 17:43:45 JST
Fundamentos del mantenimiento
Mantenimiento
82
Fusible fundido
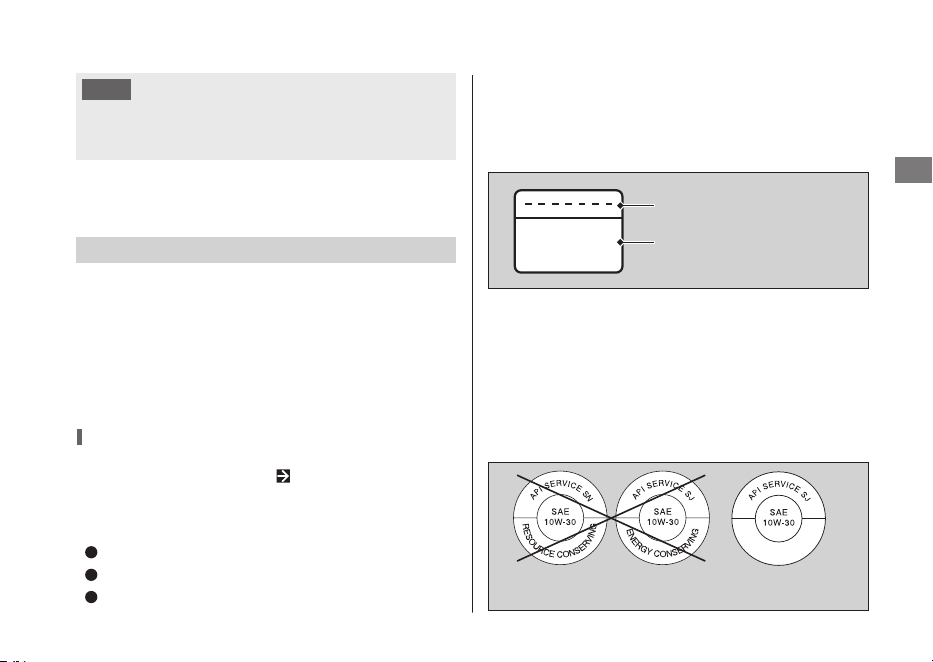
MB
Si reemplaza un fusible por otro de mayor
amperaje, aumentarán las posibilidades de
ocasionarse daños en el sistema eléctrico.
Si un fusible falla repetidas veces, es posible que
exista un problema eléctrico. Haga inspeccionar el
vehículo en su concesionario.
Aceite del motor
El consumo de aceite del motor y la calidad del
mismo se deteriora en función de las condiciones
de conducción y del tiempo transcurrido.
Compruebe el nivel del aceite del motor con
regularidad y rellene si fuera necesario con el
aceite recomendado. El aceite sucio o viejo debe
cambiarse lo antes posible.
Selección del aceite del motor
Para conocer el aceite del motor recomendado,
consulte “Especificaciones”. P. 139
Si utiliza aceite del motor de marcas diferentes a
Honda, compruebe la etiqueta para asegurarse de
que el aceite satisface todas las normas siguientes:
Norma JASO T 903
*1 *2
: MB
Norma SAE
*3
: 10W-30
Clasificación API
*4
: SJ o superior
*1.
La norma JASO T 903 es una referencia para aceites
de motor para motores de motocicletas de 4
tiempos. Existen dos clases: MA y MB. Por ejemplo,
la etiqueta siguiente muestra la clasificación MB.
*3.
La norma SAE clasifica los aceites porsuviscosidad.
*2.
Para el mercado de Colombia use la clase de aceite MA.
*4.
La clasificación API especifica la calidad y
rendimiento de los aceites del motor. Utilice
aceites de grado SJ o superior, excepto los aceites
marcados como “Energy Conserving” o “Resource
Conserving” en el símbolo de servicio API circular.
20220704173944_35K1ZR000_esm_BOOK Page 86 Monday, July 04 2022 17:43:45 JST
Fundamentos del mantenimiento
Mantenimiento
83
Código del aceite
Clasificación del aceite
No recomendado Recomendado
AVISO
Líquido de frenos
No añada ni reemplace líquido de frenos a menos
que sea un caso de emergencia. Emplee sólo
líquido de frenos nuevo de un recipiente sellado. Si
añade líquido, haga que revisen en su
concesionario lo antes posible el sistema de frenos.
AVISO
El líquido de frenos puede dañar las superficies de
plástico y las pintadas.
Limpie inmediatamente cualquier derrame y lave a
conciencia la zona afectada.
Líquido de frenos recomendado:
Líquido de frenos Honda DOT 3 o DOT
4 o equivalente
Refrigerante recomendado
El refrigerante Pro Honda HP es una solución
premezclada de anticongelante y agua destilada.
Concentración:
50% de anticongelante y 50% de agua
destilada
Una concentración de anticongelante por debajo
del 40% no proporcionará una protección
adecuada contra la corrosión y las bajas
temperaturas.
Una concentración de hasta el 60% proporcionará
una mejor protección en climas fríos.
AVISO
El uso de refrigerantes no especificados para
motores de aluminio o agua del grifo/mineral
pueden provocar corrosión.
20220704173944_35K1ZR000_esm_BOOK Page 87 Monday, July 04 2022 17:43:45 JST
Fundamentos del mantenimiento
Mantenimiento
84
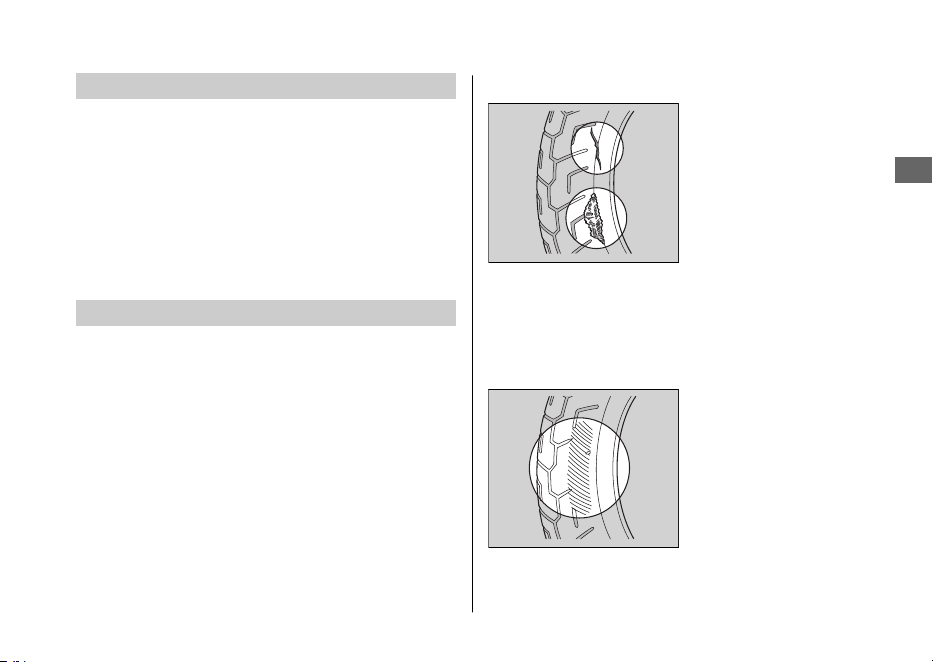
Respiradero del cárter
Haga un servicio más frecuente cuando conduzca
bajo la lluvia, con el acelerador a tope, o después
de lavar o volcarse el vehículo. Hágale el servicio si
los sedimentos acumulados pueden verse en la
sección transparente del tubo de drenaje.
Si el tubo de drenaje rebosa, el filtro de aire puede
contaminarse con el aceite del motor, lo que
podría causar un rendimiento del motor deficiente.
Neumáticos (inspección/sustitución)
#
Comprobación de la presión de los
neumáticos
Inspeccione visualmente los neumáticos y utilice un
manómetro para medir la presión al menos una
vez al mes o siempre que piense que los
neumáticos están algo deshinchados. Compruebe
siempre la presión de los neumáticos cuando estén
fríos.
#
Inspección de daños
Compruebe la existencia
de cortes, rajas o grietas
que expongan la tela o
los cordajes, o posibles
clavos u otros objetos
extraños incrustados en
el lateral del neumático
o en su banda de
rodadura. Inspeccione también posibles bultos o
protuberancias en las paredes laterales de los
neumáticos.
#
Comprobación de desgaste anómalo
Inspeccione los
neumáticos en busca de
signos de desgaste
anómalo en la superficie
de contacto.
20220704173944_35K1ZR000_esm_BOOK Page 88 Monday, July 04 2022 17:43:45 JST
Fundamentos del mantenimiento
Mantenimiento
85
Continuación
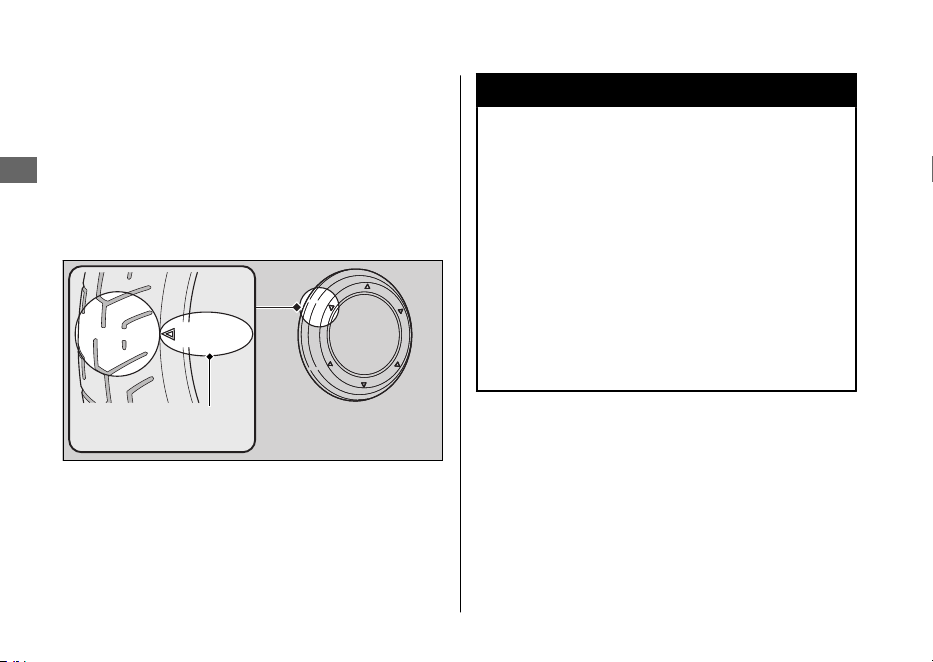
#
Inspección de la profundidad de la banda
de rodadura
Inspeccione los indicadores de desgaste de la
banda de rodadura. Si pueden verse, sustituya
inmediatamente los neumáticos.
Para una conducción segura, debería sustituir los
neumáticos cuando se alcance la profundidad
mínima de la banda de rodadura.
3ADVERTENCIA
Conducir con neumáticos
excesivamente gastados o
incorrectamente inflados podrá dar
lugar a un accidente en el que podrá
sufrir lesiones de gravedad o incluso
perder la vida.
Siga todas las instrucciones de este
manual del propietario relacionadas
con el inflado y el mantenimiento de
los neumáticos.
20220704173944_35K1ZR000_esm_BOOK Page 89 Monday, July 04 2022 17:43:45 JST
Fundamentos del mantenimiento
Mantenimiento
86
Marca de ubicación del
indicador de desgaste
o TWI

Sustituya los neumáticos en su concesionario.
Para conocer los neumáticos recomendados, la
presión de aire y la profundidad mínima de la
banda de rodadura, consulte “Especificaciones”.
2 P. 139
Siga estas indicaciones siempre que cambie los
neumáticos:
● Utilice los neumáticos recomendados o
equivalentes del mismo tamaño, construcción,
índice de velocidad y capacidad de carga.
● No instale una cámara en un neumático sin
cámara en este vehículo. La acumulación
excesiva de calor puede hacer que la cámara
explote.
● Utilice únicamente neumáticos sin cámara en
este vehículo.
Las llantas están diseñadas para neumáticos sin
cámara, y durante la aceleración rápida o el
frenado, los neumáticos con cámara pueden
deslizarse sobre la llanta y hacer que el
neumático se desinfle rápidamente.
3ADVERTENCIA
La instalación de neumáticos
inadecuados en su vehículo puede
afectar la conducción y la estabilidad
del mismo, lo que podría dar lugar a un
accidente que le podría ocasionar
lesiones graves o incluso la muerte.
Emplee siempre los neumáticos del
tamaño y tipo recomendado en este
manual del propietario.
20220704173944_35K1ZR000_esm_BOOK Page 90 Monday, July 04 2022 17:43:45 JST
Fundamentos del mantenimiento
Mantenimiento
87

Herramientas
El juego de herramientas está guardado debajo
del asiento. 2 P. 71
Con las herramientas proporcionadas puede
realizar algunas reparaciones y ajustes menores,
así como sustituciones de piezas.
● Llave fija de 14 × 17 mm
20220704173944_35K1ZR000_esm_BOOK Page 91 Monday, July 04 2022 17:43:45 JST
Mantenimiento
88

Desmontaje e instalación de los componentes del carenado
Batería
#
Extracción
Asegúrese de que el interruptor de encendido
se encuentre en la posición
(apagado).
1.
Extraiga la cubierta de la batería. 2 P. 90
2.
Desenganche la cinta de goma.
3.
Desconecte el terminal negativo - de la
batería.
4.
Desconecte el terminal positivo + de la batería.
5.
Extraiga la batería con cuidado de que no
caigan las tuercas de los terminales.
#
Instalación
Instale las piezas en el orden inverso al de la
extracción. Conecte siempre el terminal
positivo + en primer lugar. Asegúrese de
que los pernos y las tuercas estén apretados.
Después de volver a conectar la batería,
compruebe que la información del reloj es
correcta. 2 P. 24
El sistema de alarma antirrobo se desactivará si
se desconecta la batería. El sistema permanecerá
apagado cuando vuelva a conectarse la batería.
Para activar el sistema, gire el interruptor de
encendido a la posición
(Encendido) una vez.
Para saber cómo manipular adecuadamente
la batería, consulte “Fundamentos del
mantenimiento”. 2 P. 81
“La batería se agota”. 2 P. 120
20220704173944_35K1ZR000_esm_BOOK Page 92 Monday, July 04 2022 17:43:45 JST
Mantenimiento
89
Terminal positivo Cinta de goma
Batería
Terminal negativo
Cubierta de la batería
#
Extracción
1.
Abra el asiento. 2 P. 69
2.
Presione las orejetas y desmonte la tapa
de la batería.
#
Instalación
Instale las piezas en el orden inverso al de la
extracción.
20220704173944_35K1ZR000_esm_BOOK Page 93 Monday, July 04 2022 17:43:45 JST
Desmontaje e instalación de los componentes del carenado u Cubierta de la batería
Mantenimiento
90
Pestañas
Cubierta de la batería

Tapa delantera
#
Extracción
Tire hacia atrás de la tapa delantera mientras
presiona su lateral.
#
Instalación
Instale las piezas en el orden inverso al de
extracción.
Asegúrese de que todas las pestañas se
colocan con seguridad.
20220704173944_35K1ZR000_esm_BOOK Page 94 Monday, July 04 2022 17:43:45 JST
Desmontaje e instalación de los componentes del carenado u Tapa delantera
Mantenimiento
91
Tapa delantera
Tapa delantera
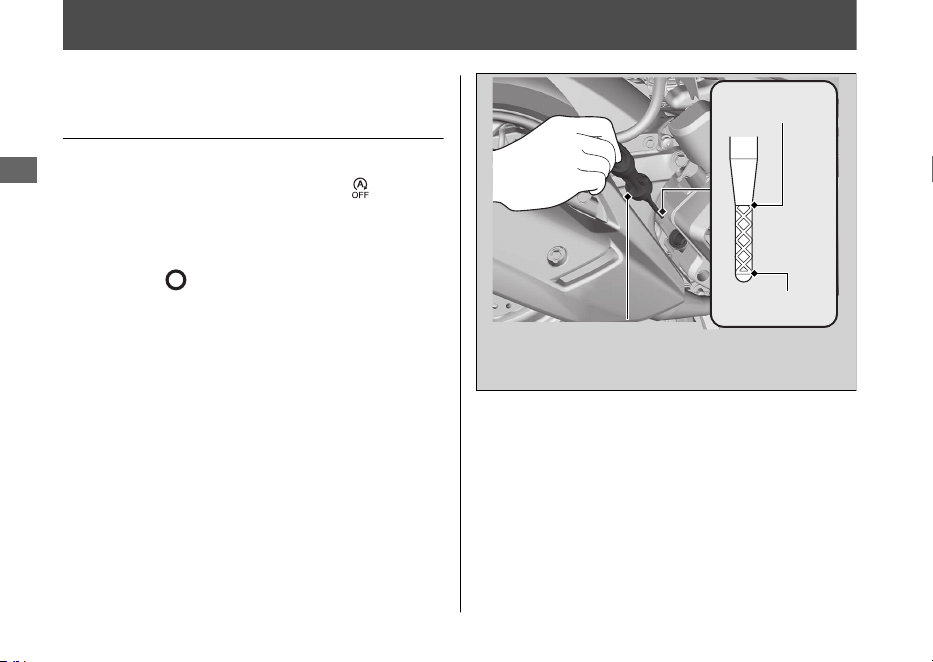
Aceite del motor
Comprobación del aceite del
motor
Compruebe el aceite del motor con el
interruptor de parada al ralentí en
(ralentí).
1.
Si el motor está frío, deje el motor al
ralentí entre 3 y 5 minutos.
2.
Coloque el interruptor de encendido en la
posición
(Apagado) y espere entre 2 y
3 minutos.
3.
Coloque el vehículo sobre el caballete
central en una superficie firme y nivelada.
4.
Extraiga el tapón de llenado/varilla de
comprobación del nivel de aceite y límpielo.
5.
Inserte el tapón de llenado/varilla de
comprobación del nivel de aceite hasta
que se asiente, pero no lo enrosque.
6.
Compruebe que el nivel del aceite queda
entre las marcas de nivel superior e
inferior del tapón de llenado/varilla de
comprobación del nivel de aceite.
7.
Coloque correctamente el tapón de llenado/
varilla de comprobación del nivel de aceite.
20220704173944_35K1ZR000_esm_BOOK Page 95 Monday, July 04 2022 17:43:45 JST
Mantenimiento
92
Nivel superior
Nivel inferior
Tapón de llenado/varilla
de comprobación del
nivel de aceite
Adición de aceite del motor
Si el aceite del motor queda por debajo o cerca
de la marca de nivel inferior, añada el aceite del
motor recomendado. 2 P. 83, 2 P. 139
1.
Extraiga el tapón de llenado/varilla de
comprobación del nivel de aceite. Añada
el aceite recomendado hasta que alcance
la marca de nivel superior.
u
Coloque el vehículo sobre su caballete
central en una superficie firme y
nivelada al comprobar el nivel de aceite.
u No llene por encima de la marca de
nivel superior.
u Asegúrese de que no penetran
cuerpos extraños en la abertura de
llenado del aceite.
u Limpie de inmediato cualquier posible
derrame.
2.
Vuelva a colocar correctamente el tapón
de llenado/varilla de comprobación del
nivel de aceite.
AVISO
El funcionamiento con una cantidad excesiva o
insuficiente de aceite puede producir daños al
motor. No mezcle diferentes marcas ni grados de
aceite.
Para conocer el aceite recomendado y las
indicaciones de selección del aceite, consulte
“Fundamentos del mantenimiento”. 2 P. 83
20220704173944_35K1ZR000_esm_BOOK Page 96 Monday, July 04 2022 17:43:45 JST
Aceite del motor u Adición de aceite del motor
Mantenimiento
93
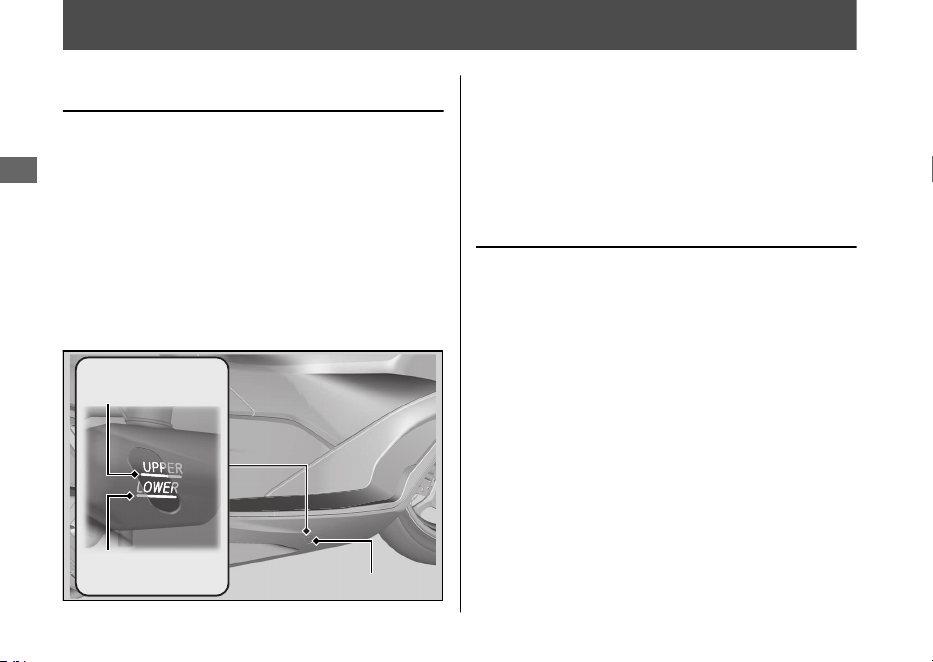
Refrigerante
Comprobación del refrigerante
Compruebe el nivel del refrigerante en el
depósito de expansión mientras el motor
está frío.
1.
Coloque el vehículo sobre el caballete
central en una superficie firme y nivelada.
2.
Compruebe que el nivel de refrigerante se
encuentra entre las marcas de nivel UPPER
y LOWER en el depósito de expansión.
Si el nivel del refrigerante cae de forma
evidente o el depósito de expansión está
vacío, es probable que tenga una fuga grave.
Haga inspeccionar el vehículo en su
concesionario.
Adición de refrigerante
Si el nivel del refrigerante está por debajo de
la marca de nivel LOWER, añada el
refrigerante recomendado (2 P. 84) hasta
que el nivel alcance la marca de nivel UPPER.
Añada líquido sólo por el tapón del depósito
de expansión y no retire el tapón del
radiador.
1.
Retire la alfombrilla.
2.
Abra la tapa del depósito de expansión
insertando un destornillador plano
cubierto con un paño protector en la
ranura del suelo.
20220704173944_35K1ZR000_esm_BOOK Page 97 Monday, July 04 2022 17:43:45 JST
Mantenimiento
94
Marca de
nivel UPPER
Marca de
nivel LOWER
Depósito de expansión
3.
Retire el tapón del depósito de expansión
y añada líquido mientras monitoriza el
nivel del refrigerante.
u No llene en exceso por encima de la
marca de nivel UPPER.
u Asegúrese de que no penetran
cuerpos extraños en la abertura del
depósito de expansión.
4.
Vuelva a instalar el tapón del depósito de
expansión.
5.
Monte la tapa del depósito de expansión
y la alfombrilla.
3ADVERTENCIA
La retirada del tapón del radiador con
el motor caliente puede producir
salpicaduras de refrigerante y causarle
quemaduras.
Deje siempre que se enfríen el motor y
el radiador antes de retirar el tapón del
radiador.
20220704173944_35K1ZR000_esm_BOOK Page 98 Monday, July 04 2022 17:43:45 JST
Refrigerante u Adición de refrigerante
Mantenimiento
95
Tapón del depósito
de expansión
Tapa del depósito
de expansión
Alfombrilla
Ranura
Paño protector
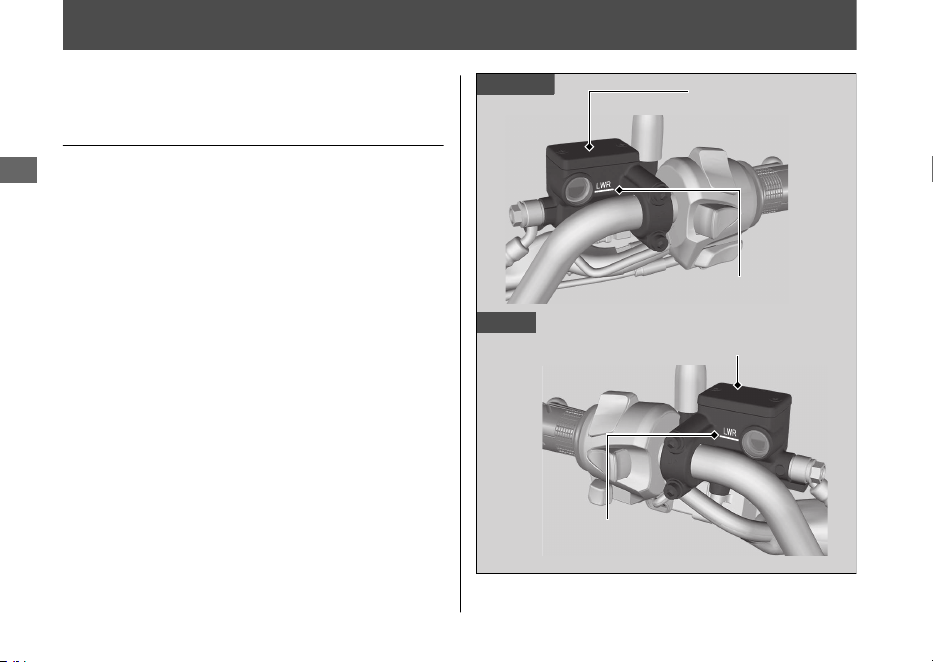
Frenos
Comprobación del líquido de
frenos
1.
Coloque el vehículo en posición vertical
sobre una superficie firme y nivelada.
2.
Compruebe que el depósito del líquido
de frenos está en posición horizontal y
que el nivel del líquido queda por encima
de la marca LWR.
Si el nivel del líquido de frenos del depósito
queda por debajo de la marca LWR o el
juego libre en la maneta del freno llega a ser
excesivo, inspeccione el desgaste de las
pastillas de freno.
Si las pastillas de freno no se encuentran
desgastadas, es probable que exista una
fuga. Haga inspeccionar el vehículo en su
concesionario.
20220704173944_35K1ZR000_esm_BOOK Page 99 Monday, July 04 2022 17:43:45 JST
Mantenimiento
96
Delantero
Trasero
Depósito del
líquido del freno
delantero
Marca LWR
Marca LWR
Depósito del líquido
del freno trasero
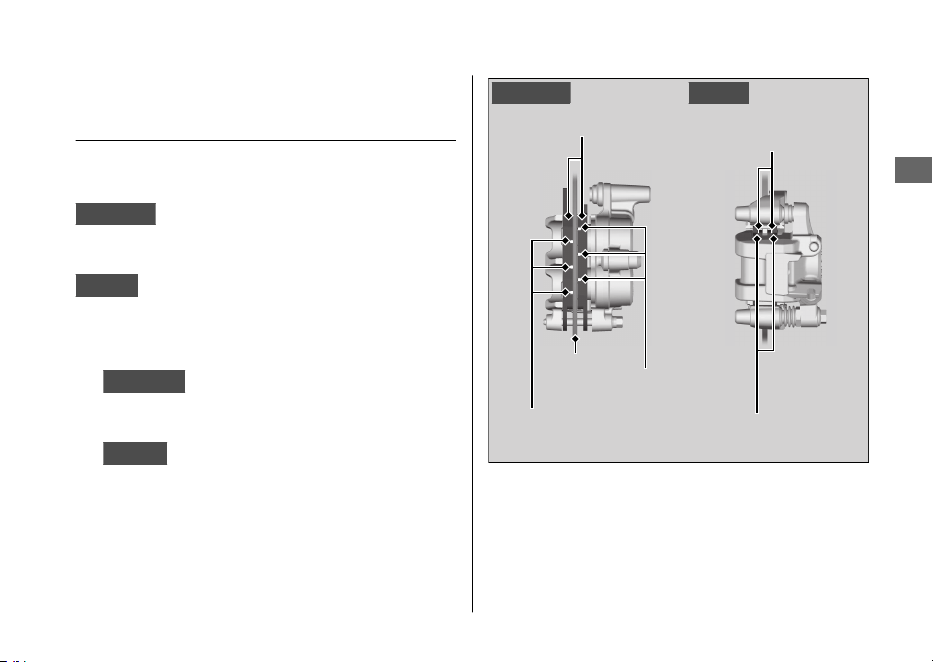
Inspección de las pastillas de
freno
Compruebe el estado de los indicadores de
desgaste de la pastilla del freno.
Delantera
Las pastillas deben ser sustituidas si
una de las pastillas de freno está desgastada
hasta la parte inferior del indicador.
Trasera
Las pastillas deben ser sustituidas si
una de las pastillas de freno está desgastada
hasta el indicador.
1.
Delantera
Inspeccione las pastillas de
freno desde la parte frontal de la pinza de
freno.
2.
Trasero
Inspeccione las pastillas de freno
desde el lado posterior derecho del
vehículo.
Si fuera necesario, haga que sustituyan las
pastillas de freno en su concesionario.
Sustituya siempre las pastillas de freno
izquierda y derecha simultáneamente.
20220704173944_35K1ZR000_esm_BOOK Page 100 Monday, July 04 2022 17:43:45 JST
Frenos u Inspección de las pastillas de freno
Mantenimiento
97
Pastillas de freno
Indicadores
de desgaste
Disco
Indicadores
de desgaste
TraseroDelantero
Pastillas de freno
Indicadores
de desgaste
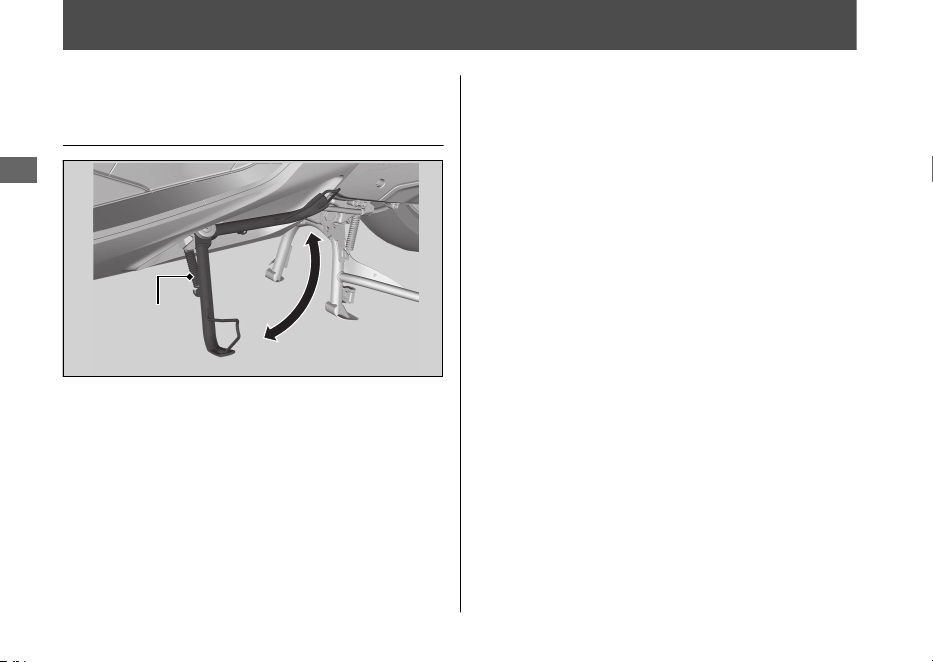
Caballete lateral
Comprobación del caballete
lateral
1.
Coloque el vehículo sobre el caballete
central en una superficie firme y nivelada.
2.
Compruebe que el caballete lateral
funciona debidamente. Si el caballete
lateral resulta difícil de colocar o chirría,
limpie la zona de giro y lubrique el perno
de giro con grasa limpia.
3.
Compruebe posibles daños o falta de
tensión del muelle.
4.
Siéntese en el vehículo y levante el
caballete lateral.
5.
Arranque el motor.
6.
Baje por completo el caballete lateral. El
motor deberá pararse cuando baje el
caballete lateral. Si no lo hace, haga que
se inspeccione el vehículo en su
concesionario.
20220704173944_35K1ZR000_esm_BOOK Page 101 Monday, July 04 2022 17:43:45 JST
Mantenimiento
98
Muelle del
caballete
lateral
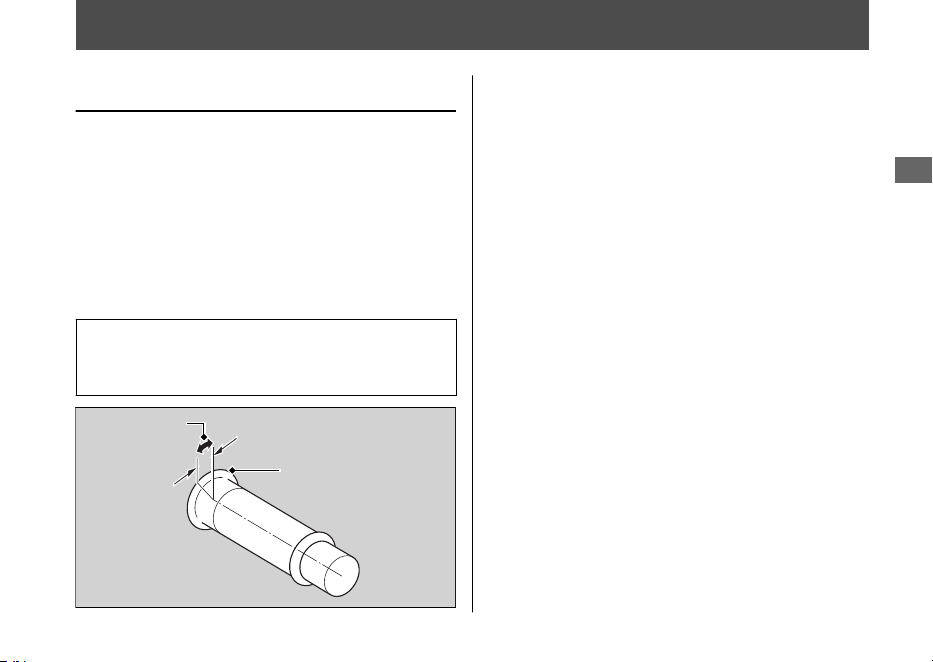
Acelerador
Comprobación del acelerador
Con el motor apagado, compruebe que el
acelerador gira con suavidad desde la posición de
cierre total a abertura completa en todas las
posiciones de la dirección y que el juego libre del
acelerador es el correcto. Si el acelerador no se
mueve con suavidad, no se cierra
automáticamente o si el cable está dañado, haga
que inspeccionen el vehículo en su concesionario.
Juego libre en la brida de la
empuñadura del acelerador:
2 - 6 mm
20220704173944_35K1ZR000_esm_BOOK Page 102 Monday, July 04 2022 17:43:45 JST
Mantenimiento
99
Juego libre
Brida
Otras sustituciones
Sustitución de la batería de la
Honda SMART Key
Si el indicador Honda SMART Key parpadea
5 veces cuando el interruptor de encendido
se coloca en la posición
(Encendido), o si la
distancia de operación es inestable, sustituya
la batería lo antes posible.
Para ello, recomendamos que visite su
concesionario.
Tipo de pila: CR2032 / CR2032H
1.
Extraiga la carcasa superior insertando en
la ranura una moneda o un destornillador
de punta plana cubierto con un paño
protector.
u Cubra la moneda o el destornillador
con un paño protector para evitar
arañar la Honda SMART Key.
u No toque el circuito ni el terminal.
Podrían producirse problemas.
u Tenga cuidado y evite rayar la cubierta
impermeable y no permita la entrada
de polvo.
u No efectúe el desmontaje de la Honda
SMART Key a la fuerza.
20220704173944_35K1ZR000_esm_BOOK Page 103 Monday, July 04 2022 17:43:45 JST
Mantenimiento
100
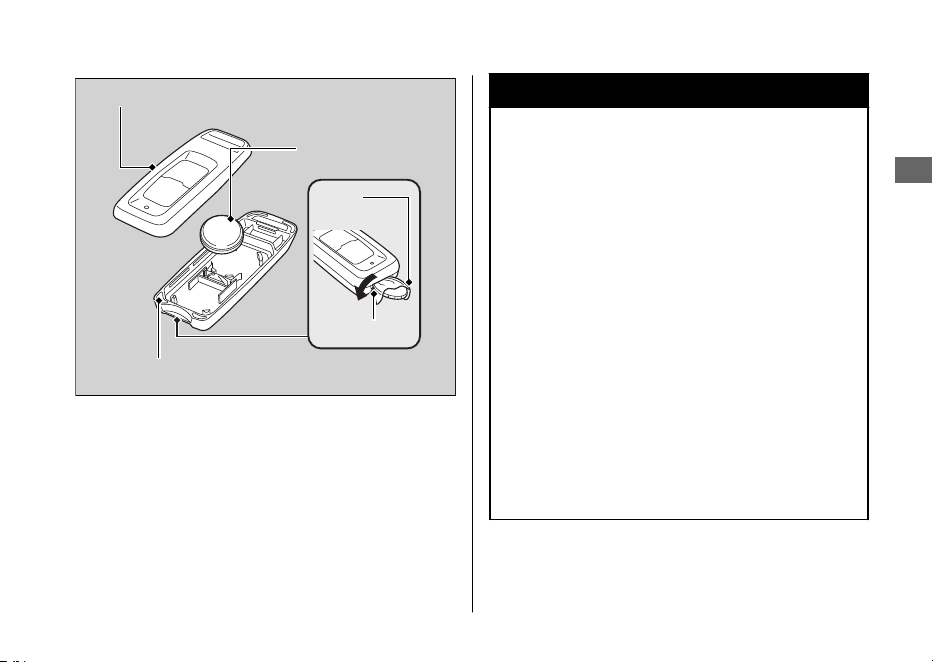
2.
Reemplace la batería gastada por una
batería nueva con el lado negativo -
arriba.
3.
Acople las dos mitades de la Honda
SMART Key para unirlas.
u Asegúrese de que las carcasas
superior e inferior están colocadas en
la posición correcta.
3ADVERTENCIA
Peligro de quemaduras químicas: no
se trague la pila.
De lo contrario, la pila puede provocar
graves quemaduras internas e incluso la
muerte.
• Mantenga la pila lejos del alcance de
los niños y el compartimento de la
pila firmemente cerrado.
• Si el compartimento de la pila no se
cierra bien, deje de usar el producto
y manténgalo lejos del alcance de
los niños.
• Busque atención médica de
inmediato si cree que un niño se ha
tragado la pila.
20220704173944_35K1ZR000_esm_BOOK Page 104 Monday, July 04 2022 17:43:45 JST
Otras sustituciones u Sustitución de la batería de la Honda SMART Key
Mantenimiento
101
Carcasa superior
Batería
Carcasa inferior
Ranura
Paño
protector

El motor no arranca
.......................................................
P. 103
Sobrecalentamiento (El indicador de alta temperatura del
refrigerante está encendido)
........................................
P. 104
Indicadores de advertencia encendidos o intermitentes
..
P. 105
Testigo de avería (MIL) de la PGM-FI (Inyección programada de
combustible)
.................................................................
P. 105
Indicador del estado de carga de la batería
......................
P. 105
Indicador del ABS (Sistema de frenos antibloqueo)
...........
P. 106
Indicador del control de par
.............................................
P. 107
Indicador de la Honda SMART Key
...................................
P. 108
Otras indicaciones de advertencia
..................................
P. 109
Indicación de fallo del indicador de combustible
...............
P. 109
Si el sistema de parada al ralentí no funciona
adecuadamente
..........................................................
P. 110
El Indicador de Parada al ralentí no se enciende
...............
P. 110
El motor NO está detenido por el sistema de Parada al ralentí
mientras el indicador de parada al ralentí está
encendido
.....................................................................
P. 111
El motor no arranca incluso si el acelerador está abierto
...
P. 112
Si el sistema de Honda SMART Key no funciona
adecuadamente
..........................................................
P. 113
Desbloqueo del asiento en caso de emergencia
..............
P. 115
Desbloqueo del interruptor de encendido en un caso de
emergencia
.................................................................
P. 116
Pinchazo del neumático
.................................................
P. 119
Problema eléctrico
........................................................
P. 120
La batería se agota
..........................................................
P. 120
Bombilla fundida
.............................................................
P. 120
Fusible fundido
................................................................
P. 121
Funcionamiento inestable del motor de forma
intermitente
................................................................
P. 122
20220704173944_35K1ZR000_esm_BOOK Page 105 Monday, July 04 2022 17:43:45 JST
Localización de averías

El motor no arranca
El motor de arranque funciona
pero el motor no arranca
Compruebe los puntos siguientes:
● Compruebe la secuencia correcta de
arranque del motor. 2 P. 60
● Compruebe que tiene gasolina en el
depósito de combustible.
● Compruebe si el testigo de avería (MIL)
de la PGM-FI está encendido.
u Si el indicador está encendido,
póngase en contacto con su
concesionario lo antes posible.
El motor de arranque no
funciona
Compruebe los puntos siguientes:
● Compruebe la secuencia correcta de
arranque del motor. 2 P. 60
● Compruebe si hay un fusible fundido.
2 P. 121
● Compruebe si está suelta la conexión de
la batería (2 P. 89) o si existe corrosión en
sus terminales (2 P. 81).
● Compruebe el estado de la batería.
2 P. 120
Si el problema continúa, haga que
inspeccionen el vehículo en su concesionario.
20220704173944_35K1ZR000_esm_BOOK Page 106 Monday, July 04 2022 17:43:45 JST
Localización de averías
103
Sobrecalentamiento (El indicador de alta temperatura del refrigerante está encendido)
El motor se sobrecalienta cuando ocurre lo
siguiente:
● El indicador de alta temperatura del
refrigerante se enciende.
● La aceleración se ralentiza.
Si esto ocurre, colóquese a un lado en
cuanto lo permitan las circunstancias del
tráfico y realice las siguientes
comprobaciones.
Un ralentí rápido prolongado puede hacer
que el indicador de alta temperatura del
refrigerante se encienda.
AVISO
La conducción continuada con un motor
recalentado puede provocar daños graves al motor.
1.
Detenga el motor con el interruptor de
encendido.
2.
Deje que el motor se enfríe con el
interruptor de encendido en la posición
(Apagado).
3.
Cuando se haya enfriado el motor,
inspeccione la manguera del radiador y
compruebe si existe una fuga. 2 P. 94
Si existe una fuga:
No ponga en marcha el motor.
Transporte el vehículo a su concesionario.
4.
Compruebe el nivel del refrigerante del
depósito de expansión. 2 P. 94
u Añada refrigerante si es necesario.
5.
Si los pasos 1 a 4 son normales, puede
continuar conduciendo, pero vigile con
frecuencia el indicador de alta
temperatura del refrigerante.
20220704173944_35K1ZR000_esm_BOOK Page 107 Monday, July 04 2022 17:43:45 JST
Localización de averías
104

Indicadores de advertencia encendidos o intermitentes
Testigo de avería (MIL) de la
PGM-FI (Inyección programada
de combustible)
Si el indicador se enciende mientras conduce,
puede tener un problema grave con el
sistema PGM-FI. Reduzca la velocidad y haga
inspeccionar el vehículo en su concesionario
lo antes posible.
Indicador del estado de carga
de la batería
Si el indicador se enciende mientras conduce,
puede que la tensión de la batería sea baja o
haya una degradación del rendimiento de la
batería. Haga inspeccionar el vehículo en su
concesionario.
u Si la batería no tiene suficiente tensión
para accionar el sistema de indicadores, el
indicador podría no encenderse.
20220704173944_35K1ZR000_esm_BOOK Page 108 Monday, July 04 2022 17:43:45 JST
Localización de averías
105

Indicador del ABS (Sistema de
frenos antibloqueo)
Si el indicador funciona de alguna de estas
formas, es posible que haya un problema
grave en el ABS. Reduzca la velocidad y haga
inspeccionar el vehículo en su concesionario
lo antes posible.
● El indicador se enciende o comienza a
parpadear mientras conduce.
● El indicador no se enciende cuando el
interruptor de encendido se gira a la
posición
(Encendido).
● El indicador no se apaga a velocidades
superiores a 10 km/h.
Si el indicador del ABS permanece
encendido, los frenos continuarán
funcionando como un sistema convencional,
pero sin la función antibloqueo.
El indicador del ABS puede parpadear si gira
la rueda trasera mientras esta no esté
tocando el suelo. En este caso, coloque el
interruptor de encendido en la posición
(Apagado) y, a continuación, de nuevo en la
posición (Encendido). El indicador ABS se
apagará después de que la velocidad alcance
30 km/h.
20220704173944_35K1ZR000_esm_BOOK Page 109 Monday, July 04 2022 17:43:45 JST
Indicadores de advertencia encendidos o intermitentes u Indicador del ABS (Sistema de frenos antibloqueo)
Localización de averías
106

Indicador del control de par
Si el indicador funciona de alguna de estas
formas, es posible que haya un problema
grave en el control de par. Reduzca la
velocidad y haga inspeccionar el vehículo en
su concesionario lo antes posible.
● El indicador se enciende y permanece
encendido (sólido) mientras conduce.
● El indicador no se enciende cuando el
interruptor de encendido se gira a la
posición
(Encendido).
● El indicador no se apaga a velocidades
superiores a 3 km/h.
Aunque el indicador del control de par esté
encendido, podrá conducir el vehículo con
normalidad sin la función de control de par.
u Si el indicador se enciende mientras el
control de par está en funcionamiento,
tendrá que cerrar por completo el
acelerador para recuperar la capacidad
de conducción normal.
El indicador del control de par puede
encenderse si gira la rueda trasera mientras
el vehículo está levantado del suelo. En este
caso, coloque el interruptor de encendido en
la posición (Apagado) y, a continuación,
de nuevo en la posición (Encendido). El
indicador del control de par se apagará
después de que la velocidad alcance 3 km/h.
20220704173944_35K1ZR000_esm_BOOK Page 110
Monday, July 04 2022 17:43:45 JST
Indicadores de advertencia encendidos o intermitentes u Indicador del control de par
Localización de averías
107
Indicador de la Honda SMART Key
#
Cuando el indicador de la Honda
SMART Key parpadea 5 veces
Sustitución de la batería de la Honda
SMART Key 2 P. 100
#
Cuando el indicador de Honda
SMART Key parpadea mientras el
interruptor de encendido está en la
posición (Encendido)
El indicador de Honda SMART Key parpadea
cuando la comunicación entre su vehículo y
Honda SMART Key se detiene después de
colocar el interruptor de encendido en la
posición
(Encendido).
Las causas posibles son las siguientes:
● Ondas de radio o ruido potentes están
afectando al sistema
● Perdió la Honda SMART Key mientras
conducía
Sin embargo, esto no afecta al funcionamiento
de su vehículo hasta que detenga el motor,
excepto cuando se detiene al ralentí.
Si coloca el interruptor de encendido en la
posición SEAT FUEL, (Apagado) o (Bloqueo)
mientras el indicador de la Honda SMART Key
está parpadeando, el anillo del interruptor de
encendido y el indicador de la Honda SMART Key
parpadearán más rápidamente durante unos 20
segundos, se apagarán automáticamente y el
interruptor de encendido se bloqueará.
El zumbador también suena en este momento.
u Los intermitentes parpadean al principio y
al final de esta función.
Para detener las luces y el sonido, mantenga
pulsado el interruptor de encendido durante
más de 2 segundos. Una vez que se detienen
las luces y el sonido, el interruptor de
encendido está bloqueado.
Si no tiene la Honda SMART Key, el
interruptor de encendido puede
desbloquearse de otra forma. 2 P. 116
20220704173944_35K1ZR000_esm_BOOK Page 111 Monday, July 04 2022 17:43:45 JST
Indicadores de advertencia encendidos o intermitentes u Indicador de la Honda SMART Key
Localización de averías
108

Otras indicaciones de advertencia
Indicación de fallo del
indicador de combustible
Si el sistema de combustible detecta un error, los
indicadores de nivel de combustible se comportarán
tal y como se muestra en las ilustraciones.
Si esto sucede, consulte con su concesionario
lo antes posible.
20220704173944_35K1ZR000_esm_BOOK Page 112 Monday, July 04 2022 17:43:45 JST
Localización de averías
109
Si el sistema de parada al ralentí no funciona adecuadamente
El Indicador de Parada al
ralentí no se enciende
Si el indicador de parada al ralentí no se
enciende, realice lo siguiente.
Si el interruptor de parada al ralentí está
en
(Idling):
Coloque el interruptor de parada al ralentí en
(Idling Stop).
Si el motor está frío:
Caliente el motor.
El sistema de parada al ralentí no funciona
cuando el motor está frío.
Si no ha conducido el vehículo tras arrancar el
motor:
Conduzca el vehículo a una velocidad superior
a 10 km/h. El sistema de parada al ralentí no
funciona hasta que conduce una vez.
Si se enciende el testigo de avería de la PGM-FI
(MIL):
Cuando se enciende el testigo de avería
(MIL) de la PGM-FI, el sistema de parada al
ralentí no funciona para proteger el motor.
Consulte con su concesionario.
Si la tensión de la batería es baja:
Conduzca el vehículo durante un tiempo,
después pare el motor y vuelva a encenderlo
con el botón de arranque consultando el
procedimiento de arranque (2 P. 60) para el
encendido estándar del motor. El sistema de
parada al ralentí puede no funcionar si la
tensión de la batería es baja.
Si esto ocurre frecuentemente, póngase en
contacto con su concesionario.
20220704173944_35K1ZR000_esm_BOOK Page 113 Monday, July 04 2022 17:43:45 JST
Localización de averías
110

El motor NO está detenido por
el sistema de Parada al ralentí
mientras el indicador de parada
al ralentí está encendido
Si el sistema de parada al ralentí no detiene
el motor cuando el indicador de parada al
ralentí está encendido, realice lo siguiente.
Si el vehículo no se detiene totalmente:
Detenga totalmente el vehículo. El sistema de
parada al ralentí funciona únicamente si la
velocidad es inferior a 0 km/h.
Si el acelerador no está totalmente cerrado:
Cierre el acelerador totalmente.
20220704173944_35K1ZR000_esm_BOOK Page 114 Monday, July 04 2022 17:43:45 JST
Si el sistema de parada al ralentí no funciona adecuadamente u El motor NO está detenido por el sistema de Parada al ralentí mientras el indicador de
parada al ralentí está encendido
Localización de averías
111
El motor no arranca incluso si
el acelerador está abierto
Si el motor no arranca incluso si el acelerador
está abierto, haga lo siguiente.
Si el caballete lateral está bajado:
Cuando el sistema de parada al ralentí
detiene el motor, si acciona el caballete
lateral, el indicador de parada al ralentí que
parpadea se apaga o se detiene y
permanece encendido y el sistema de parada
al ralentí se cancela. Vuelva a encender el
motor con el botón de arranque,
consultando el procedimiento de arranque
(2 P. 60) para el encendido estándar del
motor.
Si el interruptor de parada al ralentí está
en
(Idling):
Mientras que el motor está detenido por el
sistema de parada al ralentí, si se coloca el
interruptor de parada al ralentí en la posición
(Idling), el sistema de parada al ralentí se
cancelará. Vuelva a encender el motor con el
botón de arranque, consultando el
procedimiento de arranque (2 P. 60) para el
encendido estándar del motor.
Si el indicador de parada al ralentí parpadea
(el interruptor de parada al ralentí está en la
posición (Idling Stop)), pero el motor no
arranca incluso si el acelerador está abierto;
haga lo siguiente.
La batería está baja (o descargada), o el cable
de la batería está suelto:
Compruebe la batería y los terminales de la
batería. Si la batería esté baja, póngase en
contacto con su concesionario.
20220704173944_35K1ZR000_esm_BOOK Page 115 Monday, July 04 2022 17:43:45 JST
Si el sistema de parada al ralentí no funciona adecuadamente u El motor no arranca incluso si el acelerador está abierto
Localización de averías
112

Si el sistema de Honda SMART Key no funciona adecuadamente
Si el sistema de Honda SMART Key no
funciona adecuadamente, realice lo
siguiente.
● Asegúrese de que el sistema de Honda
SMART Key
está activado.
Pulse ligeramente el botón encendido/
apagado de la Honda SMART Key.
Si el LED de la Honda SMART Key se
enciende de color rojo, active el sistema
de la Honda SMART Key
. 2 P. 38
Si el LED de la no responde Honda
SMART Key sustituya la batería.
● Compruebe que no existe un fallo de
comunicación en el sistema de Honda
SMART Key. El sistema Honda SMART Key
utiliza ondas de radio de baja intensidad.
El sistema de Honda SMART Key puede
no funcionar correctamente en las
siguientes condiciones:
u Cuando hay instalaciones cercanas
que generan ondas de radio potentes
o ruido, como torres de TV, centrales
eléctricas, emisoras de radio o
aeropuertos.
u Cuando transporta la Honda SMART
Key con un ordenador portátil o un
dispositivo de comunicación
inalámbrica, como una radio o un
teléfono móvil.
u Cuando la Honda SMART Key entra en
contacto con objetos metálicos o está
cubierta por ellos.
20220704173944_35K1ZR000_esm_BOOK Page 116 Monday, July 04 2022 17:43:45 JST
Localización de averías
113
Continuación

● Compruebe que utiliza una Honda
SMART Key registrada.
Use una Honda SMART Key registrada.
El sistema de Honda SMART Key
no
puede activarse sin una Honda SMART
Key registrada.
● Asegúrese de que no utiliza una Honda
SMART Key rota.
Si utiliza una Honda SMART Key rota, el
sistema de Honda SMART Key no puede
activarse. Lleve la llave de emergencia y la
etiqueta de ID a su concesionario.
● Compruebe el estado de la batería y el
cable de esta de su vehículo.
Compruebe la batería y los terminales de
la batería. Si la batería esté baja, póngase
en contacto con su concesionario.
Si el sistema de Honda SMART Key no puede
activarse debido a otras causas, póngase en
contacto con su concesionario.
20220704173944_35K1ZR000_esm_BOOK Page 117 Monday, July 04 2022 17:43:45 JST
Si el sistema de Honda SMART Key no funciona adecuadamente
Localización de averías
114
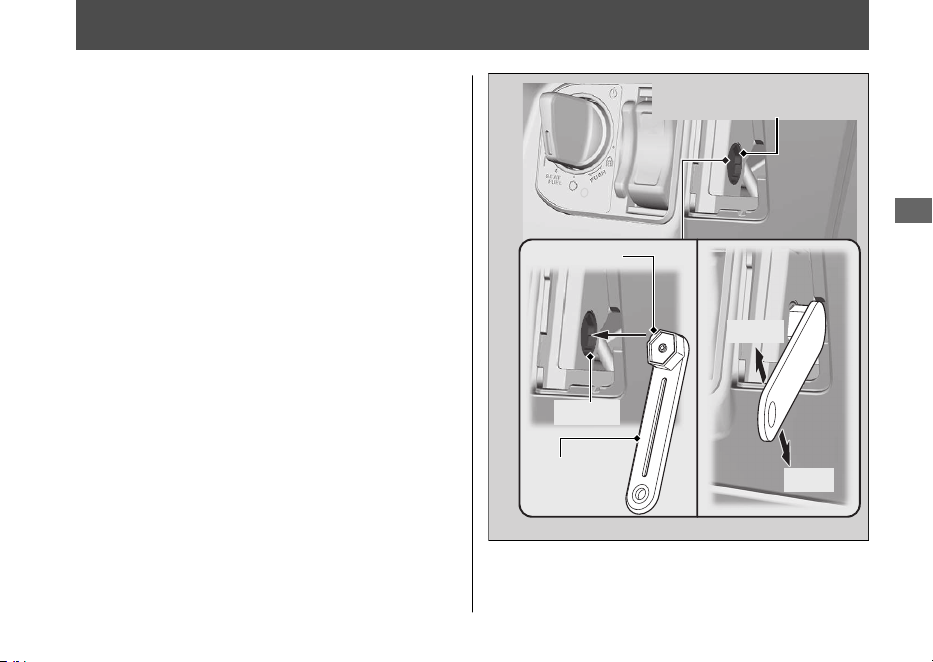
Desbloqueo del asiento en caso de emergencia
La cerradura del asiento puede desbloquearse
u
ti
lizando la llave de emergencia.
#
Abrir
1.
Desmonte la tapa delantera. 2 P. 91
2.
Alinee el saliente de la llave de emergencia
con la ranura del dispositivo de apertura
de emergencia del asiento, y gire la llave
de emergencia hacia la izquierda.
3.
Abra el asiento y gire la llave de
emergencia hacia la derecha.
#
Cerrar
1.
Cierre y presione en la parte trasera del
asiento hasta que quede bloqueado.
Asegúrese de que el asiento queda
bloqueado con firmeza, para ello tire
hacia arriba ligeramente del mismo. Si el
asiento no está bloqueado, gire la llave
de emergencia hacia la derecha para
bloquear el cerrojo del asiento.
2.
Instale la tapa delantera.
20220704173944_35K1ZR000_esm_BOOK Page 118 Monday, July 04 2022 17:43:45 JST
Localización de averías
115
Llave de
emergencia
Abrir
Cerrar
Dispositivo de apertura de
emergencia del asiento
Saliente
Ranura
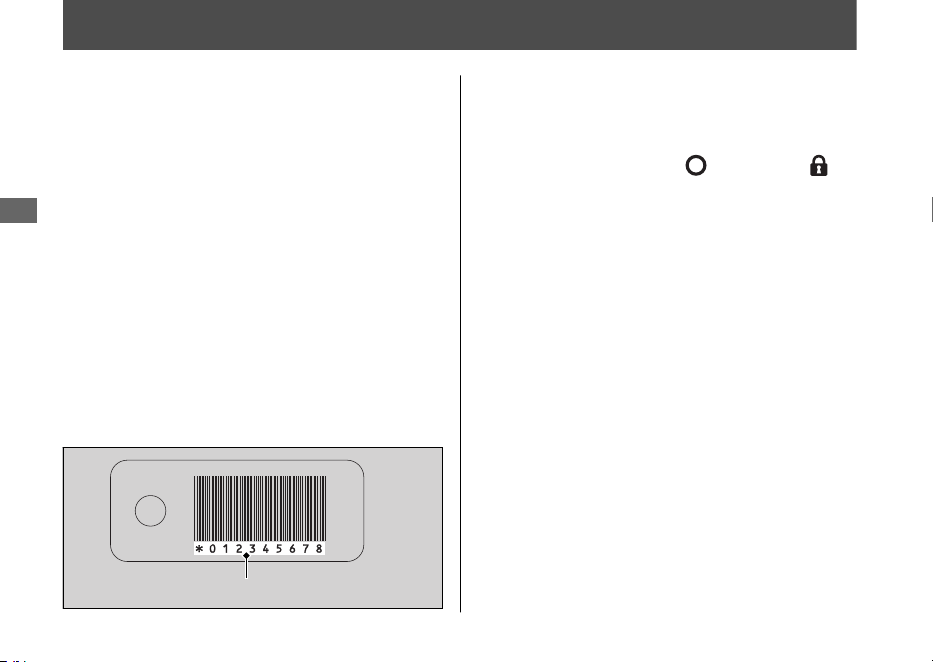
Desbloqueo del interruptor de encendido en un caso de emergencia
#
Acceda al modo de introducción del
número de ID
1.
Compruebe el número de ID de la tarjeta
de ID.
2.
Mantenga pulsado el interruptor de
encendido durante más de 4 segundos.
u El anillo del interruptor de encendido y
el indicador de la Honda SMART Key
parpadean.
3.
Pulse el interruptor de encendido mientras el
anillo del interruptor de encendido y el
indicador de la Honda SMART Key parpadean.
u
El anillo del interruptor de encendido y
el indicador de la Honda SMART Key
permanecen encendidos, y el modo de
introducción del número de ID se activa.
#
Introduzca el número de ID
Puede introducir su número de ID pulsando
el interruptor de encendido cuando este se
encuentra en la posición
(Apagado),
(Bloqueo) o SEAT FUEL. Introduzca el
número de ID de la tarjeta de ID en orden
comenzando desde la izquierda pulsando el
interruptor de encendido.
El número de ID se autentica según el número de
veces que se pulsa el interruptor de encendido.
Pulse el interruptor de encendido el número
de veces necesario en un plazo de 5
segundos cuando su anillo se enciende.
Después de 5 segundos, el anillo del
interruptor de encendido se apaga y vuelve a
encenderse. Esto significa que el número
introducido se ha fijado y puede introducir el
número siguiente.
u Si el anillo del interruptor de encendido
no se enciende en azul, es posible que la
batería tenga poca carga.
Póngase en contacto con su concesionario.
20220704173944_35K1ZR000_esm_BOOK Page 119 Monday, July 04 2022 17:43:45 JST
Localización de averías
116
Número de ID
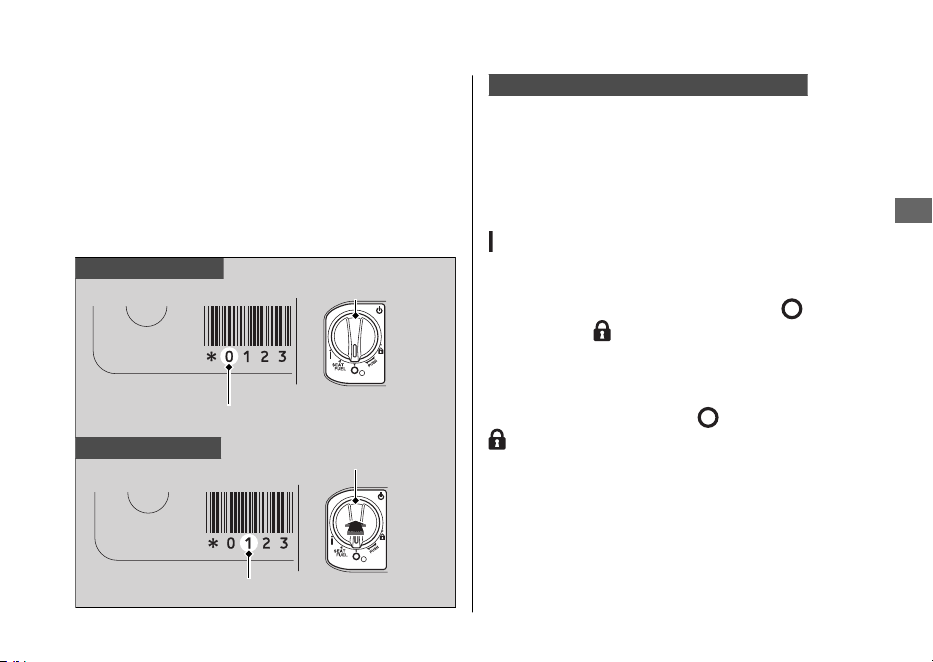
Ejemplo:
● Para introducir “0” espere 5 segundos sin
pulsar el interruptor de encendido
cuando su anillo se enciende.
● Para introducir “1”, pulse una vez el
interruptor de encendido en un plazo de
5 segundos desde que se enciende el
anillo del interruptor de encendido.
Introducción correcta del número de ID
Después de introducir el último número de
ID, el anillo del interruptor de encendido y el
indicador de la Honda SMART Key se
apagan, y cuando se vuelven a encender se
desbloquea el interruptor de encendido.
Gire el interruptor de encendido a la posición
(Encendido) en un plazo de 6 minutos.
Podrá arrancar el motor.
Para bloquear el interruptor de encendido,
colóquelo en la posición SEAT FUEL,
(Apagado) o (Bloqueo), y mantenga pulsado
el interruptor de encendido durante 2
segundos. El interruptor de encendido también
se bloquea automáticamente cuando ha estado
en la posición SEAT FUEL, (Apagado) o
(Bloqueo) durante unos 6 minutos después
de introducir correctamente el número de ID.
El zumbador también suena en este momento.
Cuando el interruptor de encendido está
bloqueado, su anillo se apaga.
Para volver a desbloquear el interruptor de
encendido, repita el procedimiento de
desbloqueo del mismo.
20220704173944_35K1ZR000_esm_BOOK Page 120 Monday, July 04 2022 17:43:45 JST
Desbloqueo del interruptor de encendido en un caso de emergencia
Localización de averías
117
Continuación
Para introducir “0”
Para introducir “1”
Número de ID
Interruptor de
encendido
Sin pulsación
Interruptor de
encendido
Número de ID
Pulse una vez

Fallo en la introducción del número de ID
Después de introducir el último número de
ID, el anillo del interruptor de encendido y el
indicador de la Honda SMART Key
parpadean a intervalos de 1 segundo y, a
continuación, se apagan.
El zumbador también suena en este
momento.
El interruptor de encendido no se
desbloquea.
Vuelva a realizar el procedimiento
“Desbloqueo del interruptor de encendido en
un caso de emergencia”. 2 P. 116
Cancelación de la introducción del número de ID
Si se equivoca al introducir su ID, haga una
de las siguientes cosas:
• Mantenga pulsado el interruptor de
encendido hasta que el zumbador suene
una vez, el anillo del interruptor de
encendido y el indicador de la Honda
SMART Key se apagarán.
• No pulse el interruptor de encendido,
espere a que el anillo del interruptor de
encendido y el indicador de la Honda
SMART Key se apaguen.
Vuelva a realizar el procedimiento
“Desbloqueo del interruptor de encendido en
un caso de emergencia”. 2 P. 116
20220704173944_35K1ZR000_esm_BOOK Page 121 Monday, July 04 2022 17:43:45 JST
Desbloqueo del interruptor de encendido en un caso de emergencia
Localización de averías
118
Pinchazo del neumático
La reparación de un pinchazo o el cambio de
una rueda requiere de herramientas especiales y
experiencia técnica. Le recomendamos que este
tipo de servicio se realice en su concesionario.
Tras una reparación de emergencia, haga
que inspeccionen el neumático/rueda en su
concesionario.
Reparación de emergencia con un
kit de reparación de neumáticos
Si el neumático tiene un pinchazo de poca
importancia, puede realizar una reparación
de emergencia con un kit de reparación de
neumáticos sin cámara.
Siga las instrucciones facilitadas en el kit de
reparación de neumáticos.
Conducir el vehículo con un neumático
reparado temporalmente es muy arriesgado.
No superar los 50 km/h. Haga que sustituyan
cuanto antes el neumático en su concesionario.
3ADVERTENCIA
Conducir el vehículo con un neumático
reparado temporalmente puede ser
arriesgado. Si la reparación temporal
falla, puede tener un accidente y
resultar gravemente herido o incluso
perder la vida.
Si debe conducir con un neumático
reparado temporalmente, hágalo
despacio y con cuidado de no superar
una velocidad de 50 km/h hasta que
sustituya el neumático.
20220704173944_35K1ZR000_esm_BOOK Page 122 Monday, July 04 2022 17:43:45 JST
Localización de averías
119

Problema eléctrico
La batería se agota
Cargue la batería con un cargador para
baterías de motocicletas.
Retire la batería del vehículo antes de
cargarla.
No utilice un cargador de baterías de
automóvil ya que estos pueden
sobrecalentar la batería de una motocicleta y
provocar daños permanentes. Si la batería no
se recupera tras la recarga, consulte a su
concesionario.
AVISO
Si realiza un arranque con cable puente con una
batería de automóvil puede dañar el sistema
eléctrico del vehículo, por lo que no se recomienda.
Bombilla fundida
Todas las bombillas del vehículo son de LED.
Si alguno de los LED no se enciende, haga
que su concesionario los revise.
20220704173944_35K1ZR000_esm_BOOK Page 123 Monday, July 04 2022 17:43:45 JST
Localización de averías
120
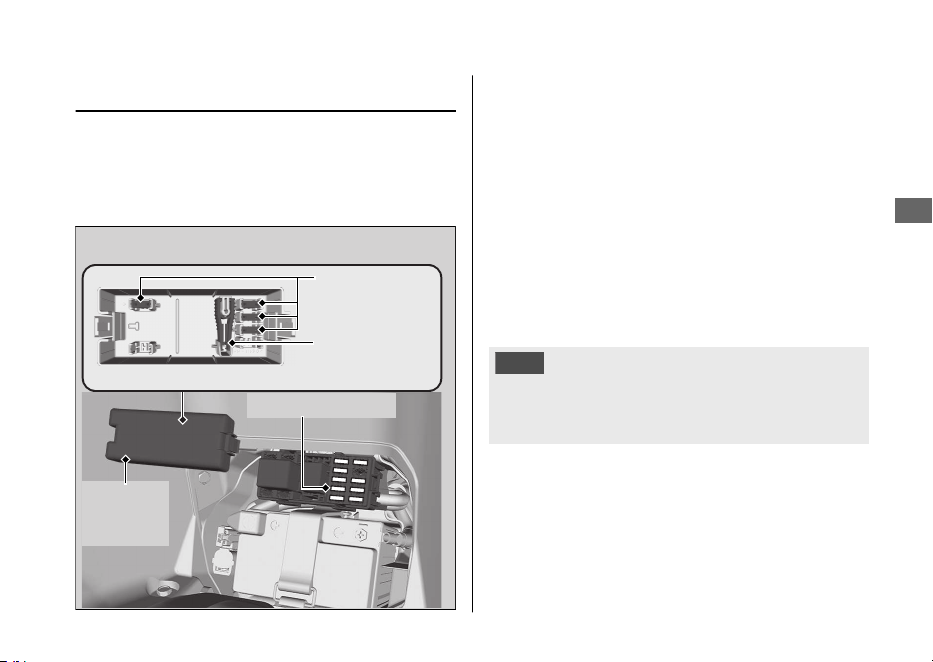
Fusible fundido
Antes de manipular los fusibles, consulte
“Inspección y sustitución de fusibles”. 2 P. 82
#
Fusibles de la caja de fusibles
1.
Extraiga la cubierta de la batería. 2 P. 90
2.
Extraiga la tapa de la caja de fusibles.
3.
Extraiga uno a uno el fusible principal y el
resto de fusibles con el extractor de
fusibles situado dentro de la caja de
fusibles. Compruebe si hay un fusible
fundido. Sustituya siempre un fusible
fundido por uno de repuesto del mismo
valor nominal.
4.
Instale la tapa de la caja de fusibles.
5.
Instale la cubierta de la batería.
AVISO
Si un fusible falla repetidas veces, es posible que
exista un problema eléctrico. Haga inspeccionar el
vehículo en su concesionario.
20220704173944_35K1ZR000_esm_BOOK Page 124 Monday, July 04 2022 17:43:45 JST
Problema eléctrico u Fusible fundido
Localización de averías
121
Tapa de
la caja de
fusibles
Extractor de
fusibles
Fusibles de
repuesto
Fusible principal

Funcionamiento inestable del motor de forma intermitente
Si el filtro de la bomba de combustible está
obstruido, durante el funcionamiento, el
régimen del motor será inestable de forma
intermitente.
Aunque se produzca este síntoma, puede
continuar utilizando su vehículo.
Si se produce inestabilidad en el régimen del
motor incluso si dispone de suficiente
combustible, haga que inspeccionen el
vehículo en su concesionario lo antes posible.
20220704173944_35K1ZR000_esm_BOOK Page 125 Monday, July 04 2022 17:43:45 JST
Localización de averías
122

Llaves....................................................................... P. 124
Instrumentos, controles y otras
características
....................................................
..P.
127
Cuidados de su vehículo..................................... P. 128
Almacenaje de su vehículo................................. P. 132
Transporte de su vehículo..................................P. 133
Usted y el medioambiente.................................P. 134
Números de serie ................................................. P. 135
Combustibles que contienen alcohol..............P. 136
Catalizador ............................................................. P. 137
20220704173944_35K1ZR000_esm_BOOK Page 126 Monday, July 04 2022 17:43:45 JST
Información
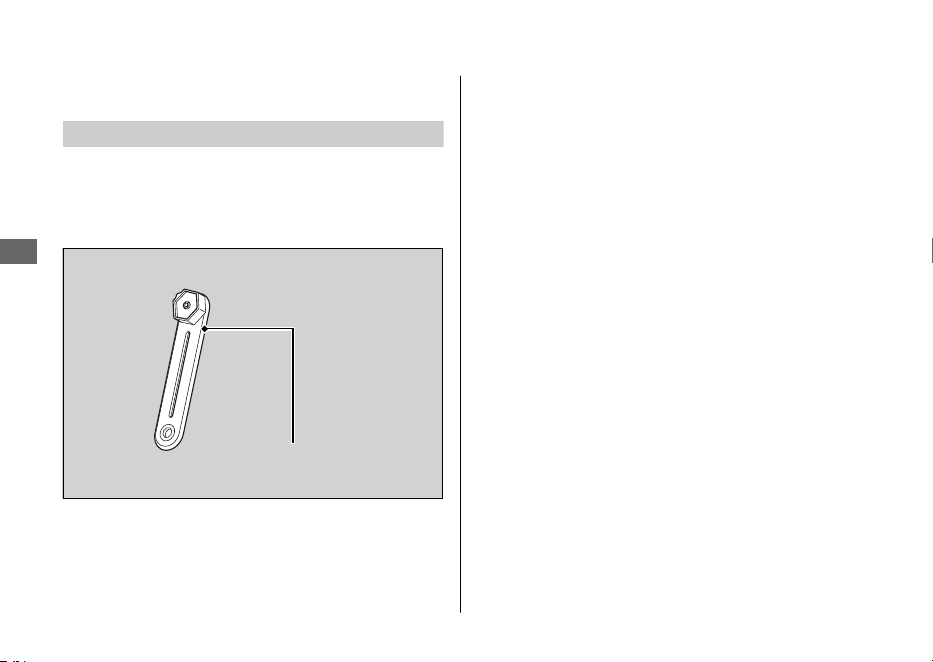

Honda SMART Key
Disponer de la Honda SMART Key le permite
realizar las operaciones siguientes:
● Bloquear y desbloquear el interruptor de
encendido
● Liberar la cerradura del asiento
● Apertura de la tapa del depósito de
combustible
● Bloquear o desbloquear la dirección
El número de ID de la Honda SMART Key está en
la etiqueta de ID. También podrá desbloquear el
interruptor de encendido introduciendo el número
de ID.
Lleve siempre consigo la llave de emergencia y la
etiqueta de ID, pero guárdelas en lugares distintos
de la Honda SMART Key para que no pueda
perderlas al mismo tiempo.
Guarde también una copia del número de ID en
un lugar seguro que no sea en su vehículo.
La Honda SMART Key contiene circuitos
electrónicos. Si se dañan los circuitos, la Honda
SMART Key no le permitirá realizar ninguna de las
operaciones.
● No deje caer las Honda SMART Key ni ponga
objetos pesados encima de ellas.
● Proteja la Honda SMART Key contra la luz
directa del sol, las altas temperaturas, y la
humedad elevada.
● No la raye ni la pinche.
● No la guarde cerca de artículos magnetizados
como puedan ser una cadena de llavero
magnetizada.
● Guarde siempre la Honda SMART Key
apartada
de aparatos eléctricos tales como televisores,
radios, ordenadores o dispositivos de masaje
de baja frecuencia.
● Mantenga la Honda SMART Key alejada de los
líquidos. Si se moja, séquela inmediatamente
con un paño suave.
● Mantenga la Honda SMART Key alejada del
vehículo mientras lo lava.
● No la queme.
● No la lave con limpiadores ultrasónicos.
20220704173944_35K1ZR000_esm_BOOK Page 128 Monday, July 04 2022 17:43:45 JST
Llaves
Información
125
Continuación
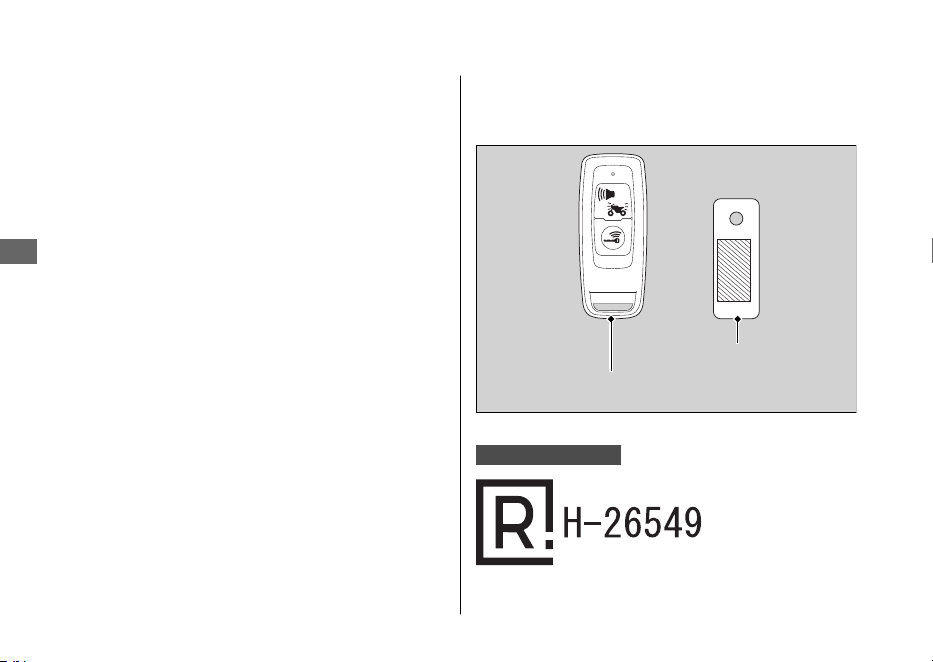
● Si se adhieren combustible, cera, o grasa a la
Honda SMART Key, frótela inmediatamente
para que no se agriete o deforme.
● No desmonte la Honda SMART Key si no es
para cambiar la batería. Sólo puede
desmontarse la cubierta de la Honda SMART
Key
. No desmonte las otras partes.
● No pierda su Honda SMART Key
. Si la pierde,
deberá registrar una
Honda SMART Key nueva.
Para su registro, visite su concesionario con su
llave de emergencia y su etiqueta de ID.
La batería del sistema Honda SMART Key
normalmente dura unos 2 años.
No guarde teléfonos móviles ni otros dispositivos
transmisores de radio en ningún compartimento.
La radiofrecuencia de los dispositivos interferirá
con el sistema Honda SMART Key.
Para obtener una Honda SMART Key adicional,
lleve la Honda SMART Key y el vehículo a su
concesionario.
Solo para Argentina
20220704173944_35K1ZR000_esm_BOOK Page 129 Monday, July 04 2022 17:43:45 JST
Llaves
Información
126
Etiqueta de ID
Honda SMART Key

Instrumentos, controles y
otras características
Interruptor de encendido
Si deja el interruptor de encendido en la posición
(Encendido) con el motor detenido, se descargará
la batería.
No gire el interruptor de encendido mientras
conduce.
Cuentakilómetros total
El visualizador se mantiene en 999.999 cuando el
cuentakilómetros total supera 999.999.
Cuentakilómetros parcial
El cuentakilómetros parcial vuelve a 0,0 cuando el
kilometraje parcial supera 9.999,9.
Bolsa para documentos
El manual del propietario, así como la información
de registro y del seguro pueden guardarse en la
bolsa de plástico para documentos situada debajo
del asiento.
20220704173944_35K1ZR000_esm_BOOK Page 130 Monday, July 04 2022 17:43:45 JST
Instrumentos, controles y otras características
Información
127

Cuidados de su vehículo
Una limpieza y un pulido frecuente resultan
importantes para garantizar una larga vida útil de
su Honda. Un vehículo limpio hace más fácil
detectar posibles problemas.
En particular, el agua de mar y la sal utilizados
para evitar la acumulación de hielo en las
carreteras favorecen la formación de corrosión.
Lave siempre el vehículo a conciencia después de
circular por carreteras de costa o tratadas.
Lavado
Deje que se enfríe el motor, el silenciador, los frenos
y otros elementos calientes antes del lavado.
1.
Aclare bien el vehículo con una manguera de
jardín de baja presión para eliminar la suciedad
suelta.
2.
Si fuera necesario, utilice una esponja o paño
suave con limpiador para eliminar la suciedad
de la carretera.
u Limpie la cúpula, las lentes del faro, los
paneles y otros elementos de plástico con
cuidado de no arañarlos.
Evite la aplicación directa del agua sobre el
filtro de aire, el silenciador y los elementos
eléctricos.
3.
Enjuague el vehículo con abundante agua y
séquelo con un paño limpio y suave.
4.
Después de que el vehículo se haya secado,
lubrique las piezas móviles.
u Asegúrese de que no se derrama
lubricante sobre los frenos o los
neumáticos. Los discos, pastillas, tambor o
zapatas de freno contaminados con aceite
sufren una enorme reducción de su
capacidad de frenado y pueden provocar
un accidente.
5.
Aplique una capa de cera para evitar la
corrosión.
u Evite los productos que contengan
detergentes agresivos o disolventes
químicos. Estos productos pueden dañar
las piezas metálicas, así como la pintura y
los plásticos de su vehículo.
Mantenga la cera alejada de los
neumáticos y de los frenos.
u Si el vehículo tiene piezas con pintura mate,
no aplique cera a las superficies con pintura
mate.
20220704173944_35K1ZR000_esm_BOOK Page 131 Monday, July 04 2022 17:43:45 JST
Cuidados de su vehículo
Información
128

#
Precauciones durante la limpieza
Durante la limpieza siga estas indicaciones:
● No utilice máquinas de lavado a alta presión:
u Los limpiadores de agua a alta presión
pueden dañar las piezas móviles y las
eléctricas, haciéndolas inservibles.
u El agua de la admisión de aire podría
introducirse en el cuerpo del acelerador
y/o entrar en el filtro de aire.
● No dirija el agua directamente al silenciador:
u El agua en el silenciador puede impedir el
arranque y provocar la oxidación del
propio silenciador.
● Seque los frenos:
u El agua afecta negativamente a la
efectividad de frenado. Tras el lavado,
aplique los frenos intermitentemente a baja
velocidad para ayudar a secarlos.
● No dirija el chorro de agua hacia la zona de
debajo del asiento:
u Si entrase agua en el compartimento de
debajo del asiento podría dañar los
documentos y otras pertenencias.
● No dirija el agua al filtro de aire:
u El agua en el filtro de aire puede impedir
que arranque el motor.
● No dirija el agua debajo del faro delantero:
u La lente interna del faro puede empañarse
de forma temporal tras el lavado o al
conducir bajo la lluvia. Esto no afecta al
funcionamiento del faro.
Sin embargo, si observa que se acumula
una gran cantidad de agua o hielo en el
interior de la(s) lente(s), haga que
inspeccionen el vehículo en su
concesionario.
● No utilice ceras ni compuestos para abrillantar
en las superficies pintadas de acabado mate:
u Utilice un paño suave o una esponja,
abundante agua y un detergente suave
para limpiar las superficies pintadas de
acabado mate. Séquelas con un paño
suave y limpio.
20220704173944_35K1ZR000_esm_BOOK Page 132 Monday, July 04 2022 17:43:45 JST
Cuidados de su vehículo
Información
129
Continuación

Componentes de aluminio
El aluminio se corroe cuando entra en contacto
con la suciedad, barro, o con la sal de la carretera.
Limpie las piezas de aluminio con regularidad y
siga estas indicaciones para evitar arañazos:
● No utilice cepillos duros, lana de acero o
limpiadores que contengan componentes
abrasivos.
● Evite rozarse o pegarse demasiado a los
bordillos.
Paneles
Siga estas indicaciones para evitar arañazos y
manchas:
● Lave con cuidado con una esponja suave y
abundante agua.
● Para eliminar las manchas persistentes, utilice
jabón diluido y enjuague con abundante agua.
● Evite el contacto de la gasolina, el líquido de
frenos o el detergente en los instrumentos, los
paneles o el faro delantero.
20220704173944_35K1ZR000_esm_BOOK Page 133 Monday, July 04 2022 17:43:45 JST
Cuidados de su vehículo
Información
130
Cúpula
Utilizando agua en abundancia, limpie el
parabrisas con un paño suave o una esponja. (No
emplee detergentes ni ningún tipo de limpiadores
químicos en el parabrisas.) Séquela con un paño
suave y limpio.
AVISO
Para evitar rayadas y otros posibles daños, emplee
solamente agua y un paño suave o una esponja
para limpiar el parabrisas.
Cuando el parabrisas esté muy sucio, emplee un
detergente neutro diluido y una esponja con
abundante agua.
Asegúrese de aclarar por completo todo el
detergente. (Los residuos de detergente pueden
ocasionar grietas en el parabrisas.)
Reemplace el parabrisas si las rayadas no pueden
eliminarse y obstruyen la visión despejada.
Evite que el electrolito de la batería, el líquido de
frenos u otros disolventes químicos entren en
contacto con el parabrisas y con la guarnición del
parabrisas. Dañarían el plástico.
Tubo de escape y silenciador
Si pinta el tubo de escape y el silenciador, no
utilice un compuesto de limpieza para cocinas
abrasivo de uso comercial. Utilice un detergente
neutro para limpiar la superficie pintada en el tubo
de escape y el silenciador. Si no está seguro de si
el tubo de escape y el silenciador están pintados,
póngase en contacto con su concesionario.
20220704173944_35K1ZR000_esm_BOOK Page 134 Monday, July 04 2022 17:43:45 JST
Cuidados de su vehículo
Información
131

Almacenaje de su vehículo
Si guarda el vehículo en exterior, quizás debería
considerar el uso de una funda completa.
Si no va a conducir la motocicleta durante un
periodo prolongado de tiempo, siga estas
indicaciones:
● Lave el vehículo y encere todas las superficies
pintadas (excepto las superficies con pintura
mate). Aplique aceite antióxido a las piezas
cromadas.
● Apoye el vehículo sobre el caballete central y
coloque un calzo de forma que ambos
neumáticos queden separados del suelo.
● Después de llover, desmonte el carenado y
deje que se seque el vehículo.
● Retire la batería (2 P. 89) para evitar que se
descargue. Cargue completamente la batería y,
a continuación, colóquela en una zona a la
sombra y bien ventilada.
u Si deja la batería en la motocicleta,
desconecte el terminal negativo - para
evitar que se descargue.
Tras sacar el vehículo del lugar en el que estuviera
guardado, inspeccione todos los elementos de
mantenimiento incluidos en el Programa de
mantenimiento.
20220704173944_35K1ZR000_esm_BOOK Page 135 Monday, July 04 2022 17:43:45 JST
Almacenaje de su vehículo
Información
132

Transporte de su vehículo
Si necesita transportar el vehículo, debería hacerlo
en un remolque para motocicletas o en un camión
o remolque de plataforma que disponga de rampa
de carga o plataforma de elevación, además de
cintas de sujeción adecuadas. Jamás intente
remolcar el vehículo con una rueda o las ruedas en
el suelo.
AVISO
Remolcar el vehículo con una rueda o las ruedas en
el suelo puede provocarle graves daños a la
transmisión.
20220704173944_35K1ZR000_esm_BOOK Page 136 Monday, July 04 2022 17:43:45 JST
Transporte de su vehículo
Información
133

Usted y el medioambiente
Ser el propietario y conducir un vehículo puede ser
una experiencia espléndida, pero tiene su cuota de
responsabilidad en la protección del
medioambiente.
Elija limpiadores suaves
Emplee detergentes biodegradables cuando lave
el vehículo. Evite los limpiadores de aerosol que
contengan clorofluorocarbonos (CFC) que pueden
causar daños en la capa de ozono protectora de la
atmósfera.
Recicle los residuos
Ponga el aceite y el resto de residuos tóxicos en
recipientes homologados y llévelos a un centro de
reciclaje. Llame a su ayuntamiento o al servicio de
medioambiente para que le digan dónde está el
centro de reciclaje de su localidad y para saber
cómo eliminar los residuos que no pueden
reciclarse. No deposite el aceite del motor usado
en la basura doméstica, ni lo vierta por las cañerías
ni en la tierra. El aceite, la gasolina, el refrigerante,
y los disolventes de limpieza usados contienen
substancias venenosas que pueden causar daños a
los trabajadores del servicio de recogida de
residuos urbanos y contaminar el agua que
bebemos, los lagos, los ríos y el mar.
20220704173944_35K1ZR000_esm_BOOK Page 137 Monday, July 04 2022 17:43:45 JST
Usted y el medioambiente
Información
134
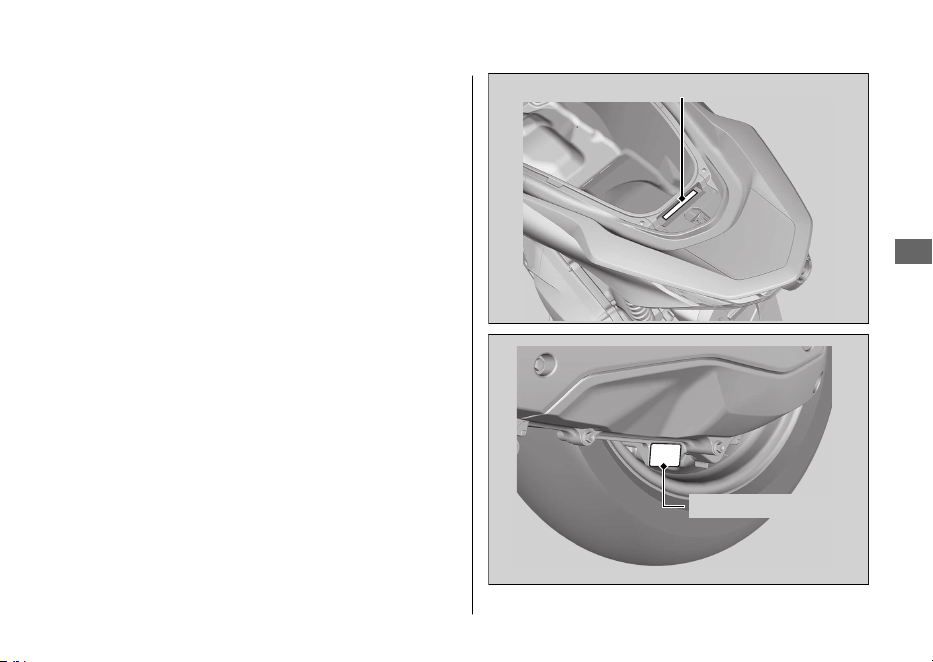
Números de serie
Los números de serie del bastidor y el motor
identifican de forma exclusiva su vehículo y son
necesarios para registrarlo. También pueden ser
necesarios al solicitar piezas de repuesto.
Para comprobar el número de bastidor, abra el
asiento. 2 P. 69
Debería anotar estos números y conservarlos en
un lugar seguro.
20220704173944_35K1ZR000_esm_BOOK Page 138 Monday, July 04 2022 17:43:45 JST
Números de serie
Información
135
Número del bastidor
Número del motor
Combustibles que
contienen alcohol
En algunos países están disponibles algunos
combustibles convencionales mezclados con
alcohol que ayudan a reducir las emisiones y
cumplir con las normativas medioambientales. Si
tiene pensado utilizar combustible mezclado,
compruebe que es sin plomo y que cumple los
requisitos de octanaje mínimos.
Las siguientes mezclas de combustible pueden
usarse en este vehículo:
● Etanol (alcohol etílico) hasta el 10 % por
volumen.
u La gasolina que contiene etanol puede
comercializarse bajo el nombre de
Gasohol.
El uso de gasolina con un contenido superior al
10% de etanol puede:
● Dañar la pintura del depósito de combustible.
● Dañar los tubos de goma de la tubería del
combustible.
● Causar corrosión del depósito de combustible.
● Causar una marcha deficiente.
AVISO
El uso de combustibles mezclados que contienen
porcentajes superiores a los homologados pueden
dañar los elementos metálicos, de goma y plásticos
del sistema de combustible.
Si advierte algún síntoma de funcionamiento no
deseado o problemas de rendimiento, intente usar
una marca diferente de combustible.
20220704173944_35K1ZR000_esm_BOOK Page 139 Monday, July 04 2022 17:43:45 JST
Combustibles que contienen alcohol
Información
136

Catalizador
Este vehículo está equipado con dos convertidores
catalíticos de tres vías. Cada convertidor catalítico
contiene metales preciosos que sirven como
catalizadores en las reacciones químicas a altas
temperaturas que convierten los hidrocarburos
(HC), el monóxido de carbono (CO) y los óxidos de
nitrógeno (NOx) de los gases del escape en
compuestos seguros.
Un catalizador defectuoso contribuye a la
contaminación del aire y puede afectar
negativamente al rendimiento del motor. La
unidad de repuesto debe ser una pieza original de
Honda o su equivalente.
Siga estos consejos para proteger los
convertidores catalíticos de su vehículo:
● Emplee siempre gasolina sin plomo. La
gasolina con plomo dañará los
convertidores
catalíticos
.
● Mantenga el motor en buen estado de
funcionamiento.
● Si observa que el motor de su vehículo
produce fallos de encendido, petardeos, se
cala o no funciona correctamente, deténgase,
apague el motor y haga que revisen el
vehículo.
20220704173944_35K1ZR000_esm_BOOK
Page 140 Monday, July 04 2022 17:43:45 JST
Catalizador
Información
137
Especificaciones
■ Componentes principales
Longitud total 1.935 mm
Anchura total 742 mm
Altura total 1.108 mm
Distancia entre ejes 1.313 mm
Distancia mínima al
suelo
134 mm
Ángulo de avance 26º 30’
Rodadura 79 mm
Peso neto del vehículo 132 kg
Capacidad de peso
máximo
*1
180 kg
Peso de equipaje
máximo
*2
Compartimento
central
10 kg
Caja delantera 1,0 kg
Portabultos trasero 5 kg
*1 : Incluido el piloto, el pasajero, todo el equipaje y los accesorios.
*2 : Incluye el peso del equipaje y los accesorios añadidos.
Capacidad de pasajeros Piloto y 1 pasajero
Radio de giro mínimo 1,90 m
Cilindrada
156,9 cm
3
Diámetro x carrera 60,000 x 55,502 mm
Relación de compresión 12,0:1
Combustible
Gasolina sin plomo
Recomendado: RON 91 o superior
Combustibles que
contienen alcohol
ETANOL hasta el 10 % por volumen
Capacidad del depósito 8,0 L
Batería
DTZ6
12 V-5 Ah (10 HR)
Reducción primaria V-Matic (2,52:1-0,81:1)
Reducción final 9,589
20220704173944_35K1ZR000_esm_BOOK Page 141 Monday, July 04 2022 17:43:45 JST
Especificaciones
138
■ Datos de servicio
Medidas de los
neumáticos
Delantero
110/70-14M/C 50P
Trasero
130/70-13M/C 63P REINF
Tipo de
neumático
Capas sesgadas, sin cámara
Neumáticos
recomendados
Delantero
PIRELLI
DIABLO ROSSO SCOOTER
Trasero
PIRELLI
DIABLO ROSSO SCOOTER
Presión de aire de
los neumáticos
(Solo piloto)
Delantero 200 kPa (2,00 kgf/cm
2
)
Trasero 225 kPa (2,25 kgf/cm
2
)
Presión de aire de
los neumáticos
(Piloto y pasajero)
Delantero 200 kPa (2,00 kgf/cm
2
)
Trasero 250 kPa (2,50 kgf/cm
2
)
Profundidad
mínima de la
banda de
rodadura
Delantero 1,5 mm
Trasero 2,0 mm
Bujía (estándar) LMAR8L-9 (NGK)
Separación de
electrodos de la
bujía
0,8 - 0,9 mm
Velocidad de
ralentí
1.700 ± 100 rpm
Aceite del motor
recomendado
Aceite para motocicleta Honda de 4
tiempos, clasificación de servicio API SJ o
superior, excluidos los aceites marcados con
“Energy Conserving” o “Resource
Conserving”, SAE 10W-
30, JASO T 903
norma MB
Capacidad de
aceite del motor
Después del
drenaje
0,8 L
Después del
desmontaje
0,9 L
Capacidad de
aceite de la
transmisión
Después del
drenaje
0,12 L
Después del
desmontaje
0,14 L
Líquido de frenos
recomendado
Líquido de frenos Honda DOT 3 o DOT 4
Capacidad del
sistema de
refrigeración
0,50 L
Refrigerante
recomendado
Refrigerante Pro Honda HP
20220704173944_35K1ZR000_esm_BOOK Page 142 Monday, July 04 2022 17:43:45 JST
Especificaciones
Especificaciones
139
*1
*1.
Para el mercado de Colombia use la clase de aceite MA.

■ Bombillas
Faro LED
Luz de freno/piloto trasero LED
Intermitente delantero LED
Intermitente trasero LED
Luz de la placa de la matrícula LED
Luz de posición LED
■ Fusibles
Fusible principal 30 A
Otro fusible 15 A, 10 A, 7,5 A
20220704173944_35K1ZR000_esm_BOOK Page 143 Monday, July 04 2022 17:43:45 JST
Especificaciones
Especificaciones
140


This manual should be considered a permanent part of the vehicle
and should remain with the vehicle when it is resold.
This publication includes the latest production information available
before printing. Honda Motor Co., Ltd. reserves the right to make
changes at any time without notice and without incurring any
obligation.
No part of this publication may be reproduced without written
permission.
The vehicle pictured in this owner’s manual may not match your
actual vehicle.
© 2022 Honda Motor Co., Ltd.
20220603164939_32K1ZR000_eng_BOOK Page 1 Friday, June 03 2022 16:52:56 JST
Welcome
Congratulations on your purchase of a new
Honda vehicle. Your selection of a Honda
makes you part of a worldwide family of
satisfied customers who appreciate Honda's
reputation for building quality into every
product.
To ensure your safety and riding pleasure:
● Read this owner's manual carefully.
● Follow all recommendations and
procedures contained in this manual.
● Pay close attention to safety messages
contained in this manual and on the
vehicle.
● The following codes in this manual
indicate each country.
● The illustrations here in are based on the
WW160A CO
type.
Country Codes
Code
Country
WW160A
AG Argentina
CO Colombia
*The specifications may vary with each locale.
20220603164939_32K1ZR000_eng_BOOK Page 2 Friday, June 03 2022 16:52:56 JST
A Few Words About Safety
Your safety, and the safety of others, is very
important. Operating this vehicle safely is an
important responsibility.
To help you make informed decisions about
safety, we have provided operating
procedures and other information on safety
labels and in this manual. This information
alerts you to potential hazards that could
hurt you or others.
Of course, it is not practical or possible to
warn you about all hazards associated with
operating or maintaining a vehicle. You must
use your own good judgement.
You will find important safety information in a
variety of forms, including:
● Safety labels on the vehicle
●
Safety Messages preceded by a safety alert
symbol and one of three signal words:
DANGER, WARNING, or CAUTION.
These signal words mean:
3DANGER
You WILL be KILLED or SERIOUSLY
HURT if you don’t follow instructions.
3WARNING
You CAN be KILLED or SERIOUSLY
HURT if you don’t follow instructions.
3CAUTION
You CAN be HURT if you don’t follow
instructions.
Other important information is
provided under the following titles:
NOTICE
Information to help you avoid
damage to your vehicle, other
property, or the environment.
20220603164939_32K1ZR000_eng_BOOK Page 3 Friday, June 03 2022 16:52:56 JST


Safety Guidelines................................................. P. 3
Image Labels.........................................................P.
6
Safety Precautions...............................................P. 8
Riding Precautions ..............................................P. 9
Accessories & Modifications........................... P. 13
Loading ................................................................ P. 14
20220603164939_32K1ZR000_eng_BOOK Page 5 Friday, June 03 2022 16:52:56 JST
This section contains important information for safe riding of your vehicle.
Please read this section carefully.
Vehicle Safety

Safety Guidelines
Follow these guidelines to enhance your safety:
● Perform all routine and regular inspections
specified in this manual.
● Stop the engine and keep sparks and flames
away before filling the fuel tank.
● Do not run the engine in enclosed or partly
enclosed areas. Carbon monoxide in
exhaust gases is toxic and can kill you.
Always Wear a Helmet
It's a proven fact: helmets and protective
apparel significantly reduce the number and
severity of head and other injuries. So always
wear an approved helmet and protective
apparel. 2 P. 8
Before Riding
Make sure that you are physically fit, mentally
focused, and free of alcohol and drugs. Check
that you and your passenger are both wearing
an approved helmet and protective apparel.
Instruct your passenger on holding onto the
grab rail or your waist, leaning with you in turns,
and keeping their feet on the footpegs, even
when the vehicle is stopped.
Take Time to Learn & Practice
Even if you have ridden other vehicles, practice
riding in a safe area to become familiar with
how this vehicle works and handles, and to
become accustomed to the vehicle's size and
weight.
Ride Defensively
Always pay attention to other vehicles around
you, and do not assume that other drivers see
you. Be prepared to stop quickly or perform an
evasive maneuver.
20220603164939_32K1ZR000_eng_BOOK Page 6 Friday, June 03 2022 16:52:56 JST
Safety Guidelines
Vehicle Safety
3
Continued

Make Yourself Easy to See
Make yourself more visible, especially at night,
by wearing bright reflective clothing, positioning
yourself so other drivers can see you, signaling
before turning or changing lanes, and using
your horn when necessary.
Ride within Your Limits
Never ride beyond your personal abilities or
faster than conditions warrant. Fatigue and
inattention can impair your ability to use good
judgement and ride safely.
Don't Drink or Use Drugs and Ride
Alcohol or drugs and riding don't mix. Even one
alcoholic drink can reduce your ability to
respond to changing conditions, and your
reaction time gets worse with every additional
drink. The same is true for drug use. Don't drink
or use and ride, and don't let your friends do it
either.
Keep Your Honda in Safe Condition
It's important to keep your vehicle properly
maintained and in safe riding condition.
Inspect your vehicle before every ride and
perform all recommended maintenance. Never
exceed load limits (2 P. 14), and do not modify
your vehicle or install accessories that would
make your vehicle unsafe (2 P. 13).
If You are Involved in a Crash
Personal safety is your first priority. If you or
anyone else has been injured, take time to
assess the severity of the injuries and whether it
is safe to continue riding. Call for emergency
assistance if needed. Also follow applicable laws
and regulations if another person or vehicle is
involved in the crash.
20220603164939_32K1ZR000_eng_BOOK Page 7 Friday, June 03 2022 16:52:56 JST
Safety Guidelines
Vehicle Safety
4
If you decide to continue riding, first turn the
ignition switch to the (Off) position, and
evaluate the condition of your vehicle. Inspect
for fluid leaks, check the tightness of critical nuts
and bolts, and check the handlebar, control
levers, brakes, and wheels. Ride slowly and
cautiously.
Your vehicle may have suffered damage that is
not immediately apparent. Have your vehicle
thoroughly checked at a qualified service facility
as soon as possible.
Carbon Monoxide Hazard
Exhaust contains poisonous carbon monoxide, a
colourless, odorless gas. Breathing carbon
monoxide can cause loss of consciousness and
may lead to death.
If you run the engine in a confined or even
partly enclosed area, the air you breathe could
contain a dangerous amount of carbon
monoxide.
Never run your vehicle inside a garage or other
enclosure.
3WARNING
Running the engine of your vehicle
while in an enclosed or even partially
enclosed area can cause a rapid build-
up of toxic carbon monoxide gas.
Breathing this colourless, odorless gas
can quickly cause unconsciousness and
lead to death.
Only run your vehicle's engine when it
is located in a well ventilated area
outdoors.
20220603164939_32K1ZR000_eng_BOOK Page 8 Friday, June 03 2022 16:52:56 JST
Safety Guidelines
Vehicle Safety
5
Image Labels
The following pages describe the label
meanings. Some labels warn you of
potential hazards that could cause serious
injury. Others provide important safety
information. Read this information carefully
and don't remove the labels.
If a label comes off or becomes hard to
read, contact your dealer for a replacement.
There is a specific symbol on each label.
The meanings of each symbol and label are
as follows.
Read instructions contained in Owner's
Manual carefully.
Read instructions contained in Shop Manual
carefully. In the interest of safety, take the
vehicle to be serviced only by your dealer.
DANGER (with RED background)
You WILL be KILLED or SERIOUSLY HURT if
you don't follow instructions.
WARNING (with ORANGE background)
You CAN be KILLED or SERIOUSLY HURT if
you don't follow instructions.
CAUTION (with YELLOW background)
You CAN be HURT if you don't follow
instructions.
20220603164939_32K1ZR000_eng_BOOK Page 9 Friday, June 03 2022 16:52:56 JST
Image Labels
Vehicle Safety
6
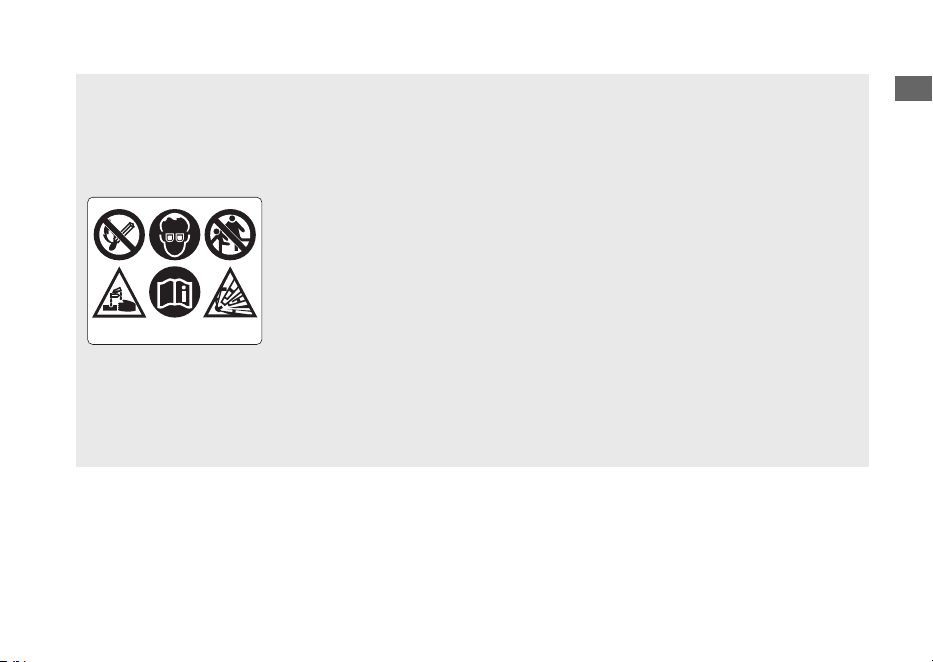
BATTERY LABEL
DANGER
• Keep flame and spark away from the battery. Battery produce
explosive gas that can cause explosion.
• Wear the eye protection and rubber gloves when handling the battery,
or you can get burned or lose your eyesight by the battery electrolyte.
• Do not allow children and other people to touch a battery unless they
understand proper handling and hazards of the battery very well.
• Handle the battery electrolyte with extreme care as it contains dilute
sulfuric acid. Contact with your skin or eyes can burn you or cause loss
of your eyesight.
• Read this manual carefully and understand it before handling the
battery. Neglect of the instructions can cause personal injury and
damage to the vehicle.
• Do not use a battery with the electrolyte at or below the lower level
mark. It can explode causing serious injury.
20220603164939_32K1ZR000_eng_BOOK Page 10 Friday, June 03 2022 16:52:56 JST
Image Labels
Vehicle Safety
7
Safety Precautions
● Ride cautiously and keep your hands on the
handlebar and feet on the step board.
● Instruct your passenger to keep their hands
on the grab rail or your waist and their feet
on the footpegs while riding.
● Always consider the safety of your
passenger, as well as other drivers and
riders.
Protective Apparel
Make sure that you and any passenger are
wearing an approved helmet, eye protection,
and high-visibility protective clothing. Avoid
wearing loose clothes that could get caught on
any part of the vehicle. Ride defensively in
response to weather and road conditions.
#
Helmet
Safety-standard certified, high-visibility, correct
size for your head
● Must fit comfortably but securely, with the
chin strap fastened
● Face shield with unobstructed field of vision
or other approved eye protection
3WARNING
Not wearing a helmet increases the
chance of serious injury or death in a
crash.
Make sure that you and any passenger
always wear an approved helmet and
protective apparel.
#
Gloves
Full-finger leather gloves with high abrasion
resistance
#
Boots or Riding Shoes
Sturdy boots with non-slip soles and ankle
protection
#
Jacket and Trousers
Protective, highly visible, long-sleeved jacket
and durable trousers for riding (or a protective
suit)
20220603164939_32K1ZR000_eng_BOOK Page 11 Friday, June 03 2022 16:52:56 JST
Safety Precautions
Vehicle Safety
8

Riding Precautions
Running-in Period
During the first 500 km (300 miles) of running,
follow these guidelines to ensure your vehicle's
future reliability and performance.
● Avoid full-throttle starts and rapid
acceleration.
● Avoid hard braking.
● Ride conservatively.
Brakes
Observe the following guidelines:
● Avoid excessively hard braking.
uSudden braking can reduce the vehicle's
stability.
uWhere possible, reduce speed before
turning; otherwise you risk sliding out.
● Exercise caution on low traction surfaces.
uThe tyres slip more easily on such
surfaces and braking distances are
longer.
● Avoid continuous braking.
uRepeated braking, such as when
descending long, steep slopes can
seriously overheat the brakes, reducing
their effectiveness.
● For full braking effectiveness, operate both
the front and rear brakes together.
#
Anti-lock Brake System (ABS) on Front
Wheel
This model equipped with an Anti-lock Brake
System (ABS) designed to help prevent the front
brake from locking up during hard braking.
● There is no ABS function to the rear wheel.
● ABS does not reduce braking distance. In
certain circumstances, ABS may result in a
longer stopping distance.
● ABS does not function at speeds below
10 km/h (6 mph).
20220603164939_32K1ZR000_eng_BOOK Page 12 Friday, June 03 2022 16:52:56 JST
Riding Precautions
Vehicle Safety
9
Continued

● The front brake lever may recoil slightly
when applying the brakes. This is normal.
● Always use the recommended front/rear
tyres to ensure correct ABS operation.
#
Wet or Rainy Conditions
Road surfaces are slippery when wet, and wet
brakes further reduce braking efficiency.
Exercise extra caution when braking in wet
conditions.
If the brakes get wet, apply the brakes while
riding at low speed to help them dry.
Parking
● Park on a firm, level surface.
● If you must park on a slight incline or loose
surface, park so that the vehicle cannot
move or fall over.
● Make sure that high-temperature parts
cannot come into contact with flammable
materials.
● Do not touch the engine, muffler, brakes
and other high-temperature parts until they
cool down.
● To reduce the likelihood of theft, always lock
the handlebar, lock the ignition switch
(2 P. 43) and leave your vehicle while taking
the Honda SMART Key with you. Deactivate
the Honda SMART Key system if necessary.
2 P. 38
Use of an anti-theft device is also
recommended.
Also set the anti-theft alarm system.
20220603164939_32K1ZR000_eng_BOOK Page 13 Friday, June 03 2022 16:52:56 JST
Riding Precautions
Vehicle Safety
10
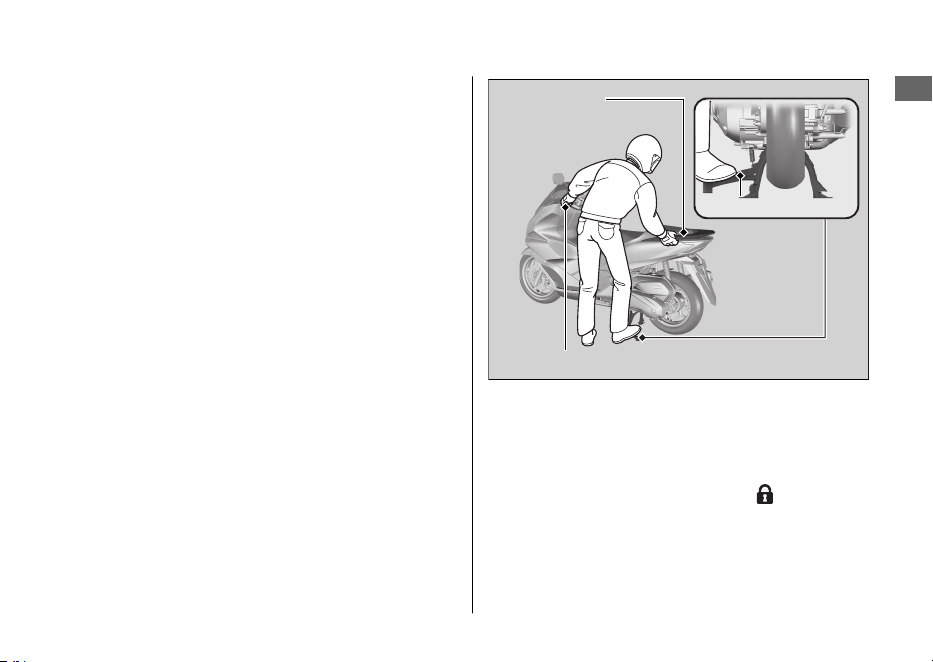
#
Parking with the Side Stand or Centre
Stand
1.
Stop the engine.
2.
Using the side stand
Push the side stand down.
Slowly lean the vehicle to the left until its
weight rests on the side stand.
Using the centre stand
To lower the centre stand, stand on the left
side of the vehicle.
Hold the left handle grip and the grab rail.
Press down on the tip of the centre stand with
your right foot and, simultaneously, pull up and
back.
3.
Turn the handlebar fully to the left.
uTurning the handlebar to the right
reduces stability and may cause the
vehicle to fall.
4.
Turn the ignition switch to the
(Lock)
position (2 P. 36) and lock the ignition
switch (2 P. 43).
5.
Set the anti-theft alarm system. 2 P. 45
20220603164939_32K1ZR000_eng_BOOK Page 14 Friday, June 03 2022 16:52:56 JST
Riding Precautions
Vehicle Safety
11
Continued
Left handle grip
Grab rail
Centre stand

Refuelling and Fuel Guidelines
Follow these guidelines to protect the engine,
fuel system and catalytic converter:
● Use only unleaded petrol.
● Use the recommended octane number.
Using lower octane petrol will result in
decreased engine performance.
● Do not use fuels containing a high
concentration of alcohol. 2 P. 136
● Do not use stale or contaminated petrol or
an oil/petrol mixture.
● Avoid getting dirt or water in the fuel tank.
Honda Selectable Torque Control
When the Honda selectable torque control
(Torque Control) detects rear wheel spin during
acceleration, the system will limit the amount of
torque applied to the rear wheel.
Torque Control does not work during
deceleration and will not prevent the rear wheel
from skidding due to engine braking. Do not
close the throttle suddenly, especially when
riding on slippery surfaces.
Torque Control may not compensate for rough
road conditions or rapid throttle operation.
Always consider road and weather conditions,
as well as your skills and condition, when
applying throttle.
If your vehicle gets stuck in mud, snow, or sand,
it may be easier to free it by turning off the
Torque Control temporarily.
Temporarily turning off Torque Control also
may help you maintain control and balance
when riding on off-road terrain.
Always use the recommended tyres and the
Honda Genuine Parts for drive system such as
the drive belt and weight rollers, to ensure
correct Torque Control operation.
20220603164939_32K1ZR000_eng_BOOK Page 15 Friday, June 03 2022 16:52:56 JST
Riding Precautions
Vehicle Safety
12
Accessories &
Modifications
We strongly advise that you do not add any
accessories that were not specifically designed
for your vehicle by Honda or make
modifications to your vehicle from its original
design. Doing so can make it unsafe.
Modifying your vehicle may also void your
warranty and make your vehicle illegal to
operate on public roads. Before deciding to
install accessories on your vehicle, be certain
the modification is safe and legal.
3WARNING
Improper accessories or modifications
can cause a crash in which you can be
seriously hurt or killed.
Follow all instructions in this owner's
manual regarding accessories and
modifications.
Do not pull a trailer with, or attach a sidecar to,
your vehicle. Your vehicle was not designed for
these attachments, and their use can seriously
impair your vehicle's handling.
20220603164939_32K1ZR000_eng_BOOK Page 16 Friday, June 03 2022 16:52:56 JST
Accessories & Modifications
Vehicle Safety
13

Loading
● Carrying extra weight affects your vehicle's
handling, braking and stability.
Always ride at a safe speed for the load you
are carrying.
● Avoid carrying an excessive load and keep
within specified load limits.
Maximum weight capacity / Maximum
luggage weight 2 P. 138
● Tie all luggage securely, evenly balanced,
and close to the centre of the vehicle.
● Do not place objects near the lights or the
muffler.
3WARNING
Overloading or improper loading can
cause a crash and you can be seriously
hurt or killed.
Follow all load limits and other loading
guidelines in this manual.
20220603164939_32K1ZR000_eng_BOOK Page 17 Friday, June 03 2022 16:52:56 JST
Loading
Vehicle Safety
14

20220603164939_32K1ZR000_eng_BOOK Page 18 Friday, June 03 2022 16:52:56 JST
Vehicle Safety
15
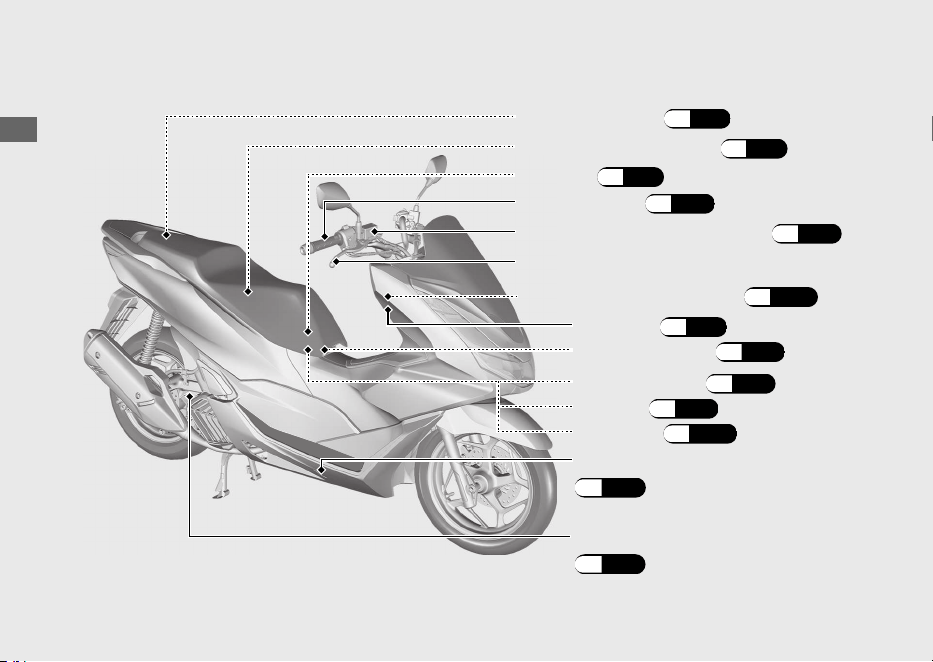
Parts Location
20220603164939_32K1ZR000_eng_BOOK Page 19 Friday, June 03 2022 16:52:56 JST
Operation Guide
16
Throttle grip
(P.99)
Document bag (P.71)
Front brake fluid reservoir (P.96)
Tool kit (P.71)
Front brake lever
Engine oil fill cap/dipstick
(P.92)
Fuse box (P.121)
Centre compartment (P.71)
Battery (P.89)
Battery cover (P.90)
Emergency seat opener (P.115)
Front lid (P.91)
Coolant reserve tank
(P.94)
Helmet holder (P.70)
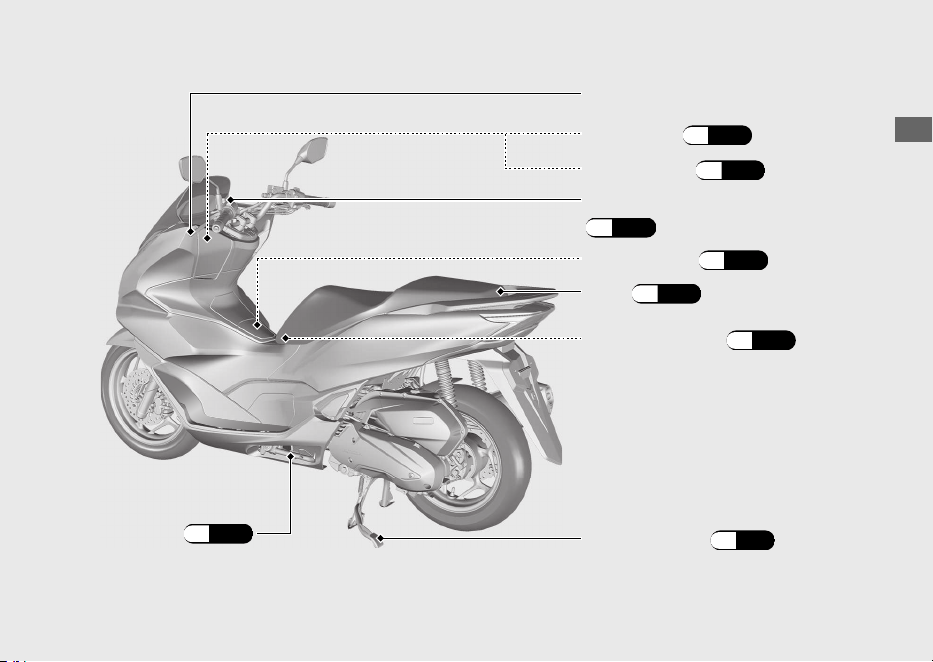
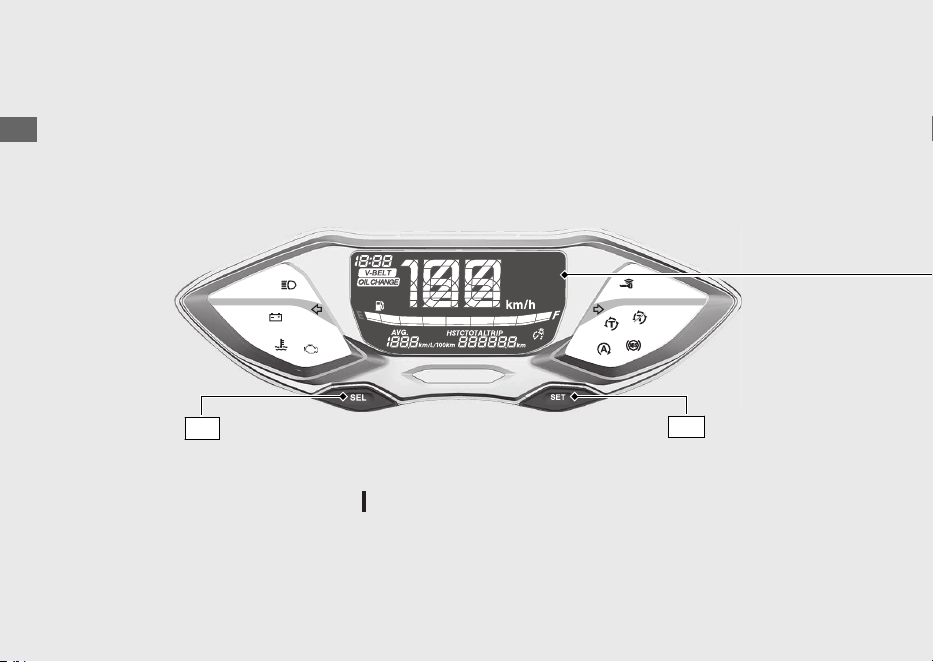
Instruments
20220603164939_32K1ZR000_eng_BOOK Page 21 Friday, June 03 2022 16:52:56 JST
Operation Guide
18
Display Check
When the ignition switch is turned
(On), initial animation will show.
SEL
switch
If any part of these displays does not come on when it should, have your dealer check for
problems.
SET
switch
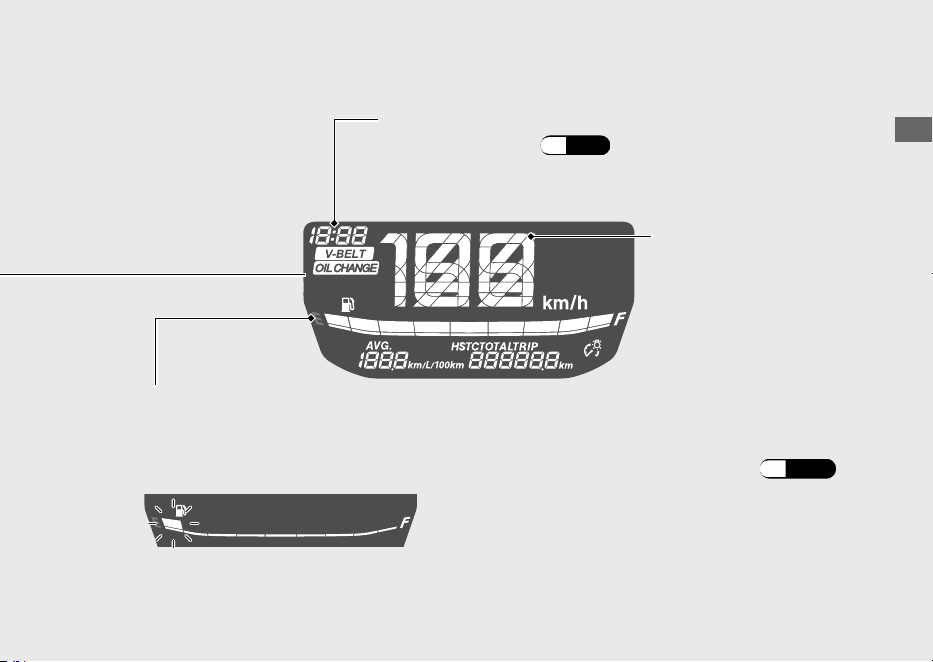
20220603164939_32K1ZR000_eng_BOOK Page 22 Friday, June 03 2022 16:52:56 JST
Operation Guide
19
Continued
If the fuel gauge indicator flashes in a repeat pattern or turns off:
(P.109)
Remaining fuel when only 1st (E) segment starts flashing
approximately: 0.9 L (0.24 US gal, 0.20 Imp gal)
Fuel gauge
Clock (12-hour display)
To set the clock: (P.24)
Speedometer
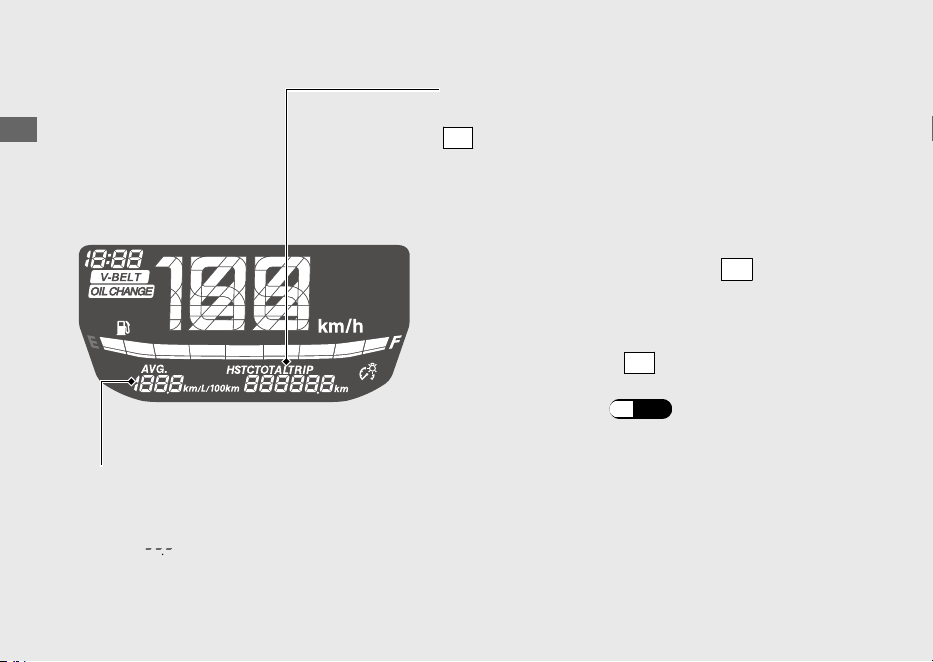
20220603164939_32K1ZR000_eng_BOOK Page 23 Friday, June 03 2022 16:52:56 JST
Operation Guide
20
Instruments (Continued)
Odometer [TOTAL] , Tripmeter [TRIP] &
Torque Control [HSTC]
SEL
switch selects the odometer, tripmeter and
Torque Control.
•
Odometer:
•
Tripmeter:
Distance ridden since tripmeter was reset.
To reset tripmeter, press and hold
SET
switch
with tripmeter displayed.
Total distance ridden.
The average fuel mileage is also reset.
Average fuel mileage meter [AVG]
The average fuel mileage will be based on tripmeter.
Average fuel mileage since tripmeter was reset.
When “
” is displayed except after the average fuel
mileage has been reset, go to your dealer for service.
•
Torque Control:
Pressing and holding
SET
switch while
Torque Control is displayed turns Torque
Control on and off.
(P.59)
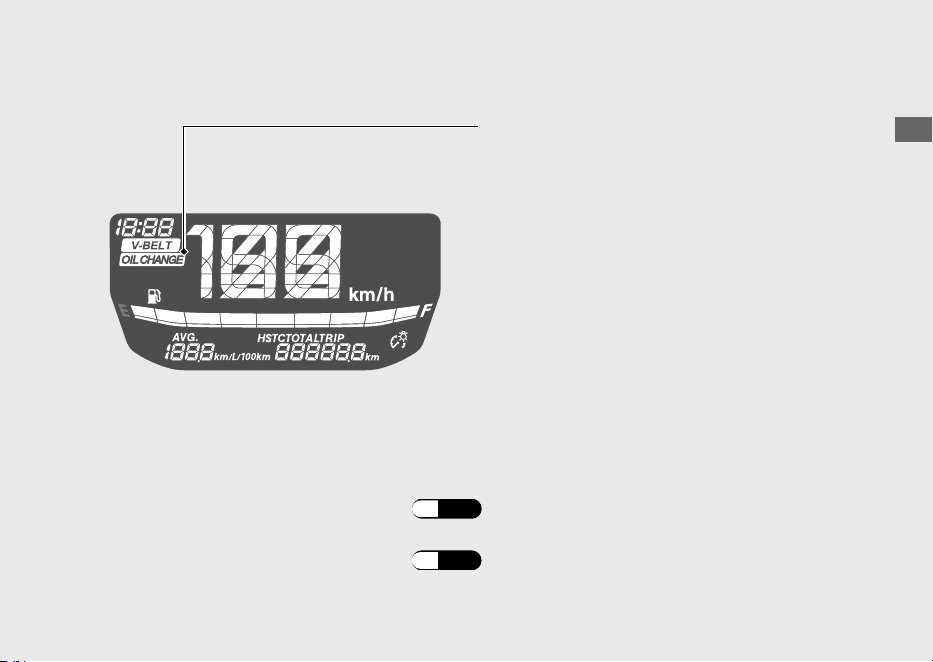
20220603164939_32K1ZR000_eng_BOOK Page 24 Friday, June 03 2022 16:52:56 JST
Operation Guide
21
Continued
OIL CHANGE indicator
You can also check the remaining distance to next interval of the oil change.
If the oil is changed before the oil change indicator comes on, be sure to reset the oil
change indicator after changing the oil.
The indicator is turned on whenever the
running distance reaches the programmed oil
change interval.
When the oil change indicator is appeared, reset
the indicator after changing the engine oil.
u
The indicator does not go off until it is reset.
u
The oil change indicator is appeared for the
first time when the running distance reaches
1,000 km (600 miles).
u
The oil change indicator is appeared when
the running distance reaches every
6,000 km (4,000 miles) after first indication
was reset.
To check the remaining distance:
(P.26)
To reset the oil change indicator: (P.26)

20220603164939_32K1ZR000_eng_BOOK Page 25 Friday, June 03 2022 16:52:56 JST
Operation Guide
22
Instruments (Continued)
V-BELT indicator
When the V-BELT indicator is appeared, reset
the indicator after performing the periodic
maintenance.
You can also check the remaining distance to next interval of the maintenance.
To check the remaining distance:
(P.28)
u
The maintenance indicator is appeared when
the running distance reaches every
12,000 km (8,000 miles).
To reset the V-BELT indicator:
(P.28)
The indicator is turned on whenever the
running distance reaches the programmed
maintenance interval.
If the periodic maintenance is performed before the V-BELT indicator comes on, be sure
to reset the V-BELT indicator after performing the periodic maintenance.
u
The indicator does not go off until it is reset.

Display Setting
Following items can be changed sequentially.
• Clock setting
• Backlight brightness adjustment
• Changing of fuel mileage meter unit
• Resetting OIL CHANGE indicator
• Resetting V-BELT indicator
20220603164939_32K1ZR000_eng_BOOK Page 26 Friday, June 03 2022 16:52:56 JST
Operation Guide
23
Continued
Press and hold
SEL
switch and
SET
switch
Press
SET
switch
Press
SEL
switch
Ordinary display
Clock setting mode
Backlight brightness
adjustment mode
Changing of fuel mileage
meter unit mode
Clock setting
Backlight brightness
adjustment
Changing of fuel
mileage meter unit
Remaining distance until
OIL CHANGE indicator
lights display mode
Resetting OIL
CHANGE indicator
Remaining distance
until V-BELT indicator
lights display mode
Resetting V-BELT
indicator

The following moves the ordinary display at
display setting.
● The switch is not pressed for about 30
seconds
uThe items that are being set are deleted,
and only the items whose settings have
been completed are reflected.
● Turn the ignition switch to the (Off)
position and then to the (On) position
uThe items that are being set and the
items whose settings have been
completed are reflected.
1 Clock setting:
a
Turn the ignition switch to the (On)
position.
b
Pressing and holding
SEL
switch and
SET
switch makes the hour and minute displays
start flashing.
c
Press
SET
switch, the hour digits start
flashing.
d
Press
SEL
switch until the desired hour is
displayed.
uPress and hold to advance the hour fast.
e
Press
SET
switch. The minute digits start
flashing.
f
Press
SEL
switch until the desired minute is
displayed.
uPress and hold to advance the minute
fast.
20220603164939_32K1ZR000_eng_BOOK Page 27 Friday, June 03 2022 16:52:56 JST
Operation Guide
24
Instruments (Continued)
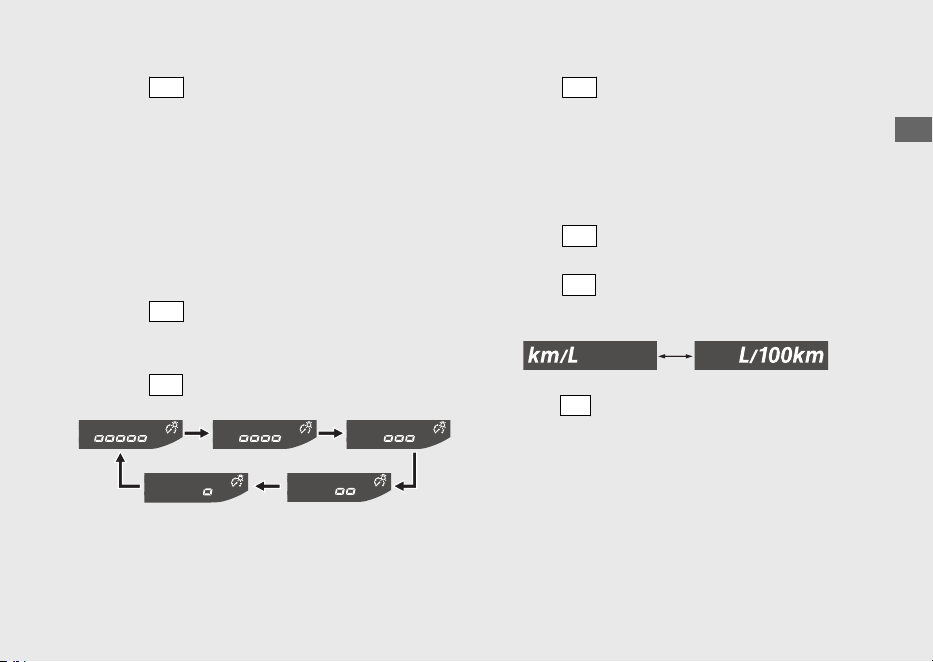
g
Press
SET
switch. The clock is set, and then
the display moves to the backlight
brightness adjustment. (Backlight brightness
indicator and backlight brightness
adjustment segments start flashing.)
2 Backlight brightness adjustment:
You can adjust the brightness to one of five
levels.
a
Press
SET
switch, the backlight brightness
indicator and backlight brightness
adjustment segments flash faster.
b
Press
SEL
switch. The brightness is switched.
c
Press
SET
switch. The backlight is set, and
then the display moves to the changing of
the fuel mileage meter unit. (Fuel mileage
meter unit start flashing.)
3 Changing the fuel mileage meter unit:
a
Press
SET
switch, the fuel mileage meter
unit start flashing fast.
b
Press
SEL
switch to select “km/L” or “L/100
km”.
c
Press
SET
switch. The fuel mileage meter unit
is set, and then the display moves to remaining
distance until OIL CHANGE indicator lights.
(OIL CHANGE indicator starts flashing.)
20220603164939_32K1ZR000_eng_BOOK Page 28 Friday, June 03 2022 16:52:56 JST
Operation Guide
25
Continued
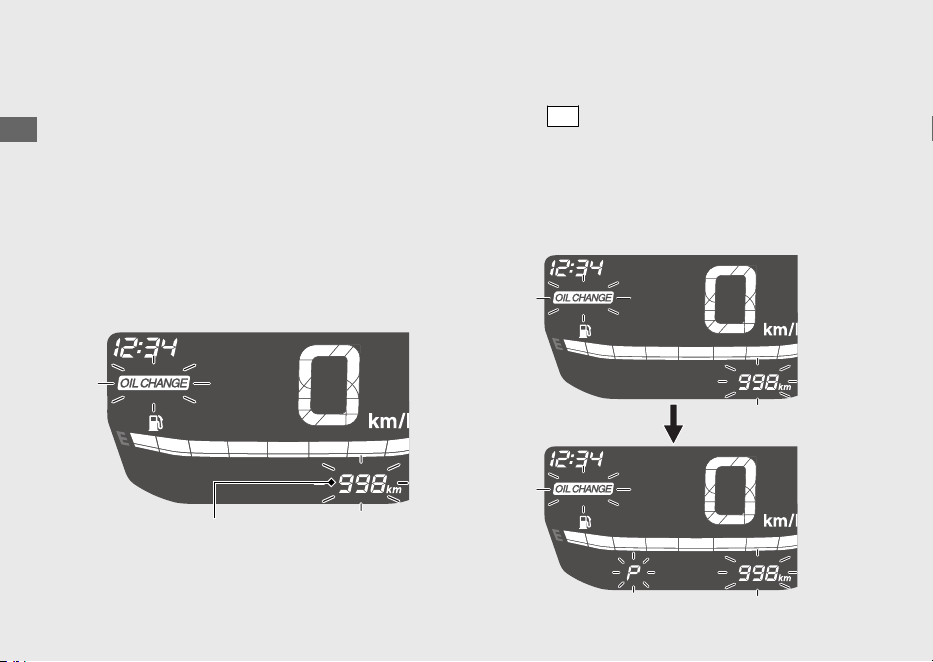
4 Remaining distance until OIL CHANGE
indicator lights display:
You can confirm the remaining distance until
the OIL CHANGE indicator lights, and then
reset the OIL CHANGE indicator.
#
Confirming the remaining distance
until OIL CHANGE indicator lights
Display the remaining distance until the OIL
CHANGE indicator lights.
#
Resetting OIL CHANGE indicator
a
Press
SET
switch. The OIL CHANGE indicator
and the remaining distance until the OIL
CHANGE indicator lights flash.
u“P” flashes when the remaining distance
until the OIL CHANGE indicator lights is
displayed.
20220603164939_32K1ZR000_eng_BOOK Page 29 Friday, June 03 2022 16:52:56 JST
Operation Guide
26
Instruments (Continued)
Remaining distance until
OIL CHANGE indicator lights

b
Press
SEL
switch to select oil change interval.
u“P” turns off when the oil change interval
is displayed.
uWhen the remaining distance until the
OIL CHANGE indicator lights is displayed,
the OIL CHANGE indicator does not
reset even if
SET
switch is pressed.
c
Pressing the
SET
switch resets the OIL
CHANGE indicator. When this is reset, the
display changes to the remaining distance
until V-BELT indicator lights. (V-BELT
indicator starts flashing.)
20220603164939_32K1ZR000_eng_BOOK Page 30 Friday, June 03 2022 16:52:56 JST
Operation Guide
27
Continued
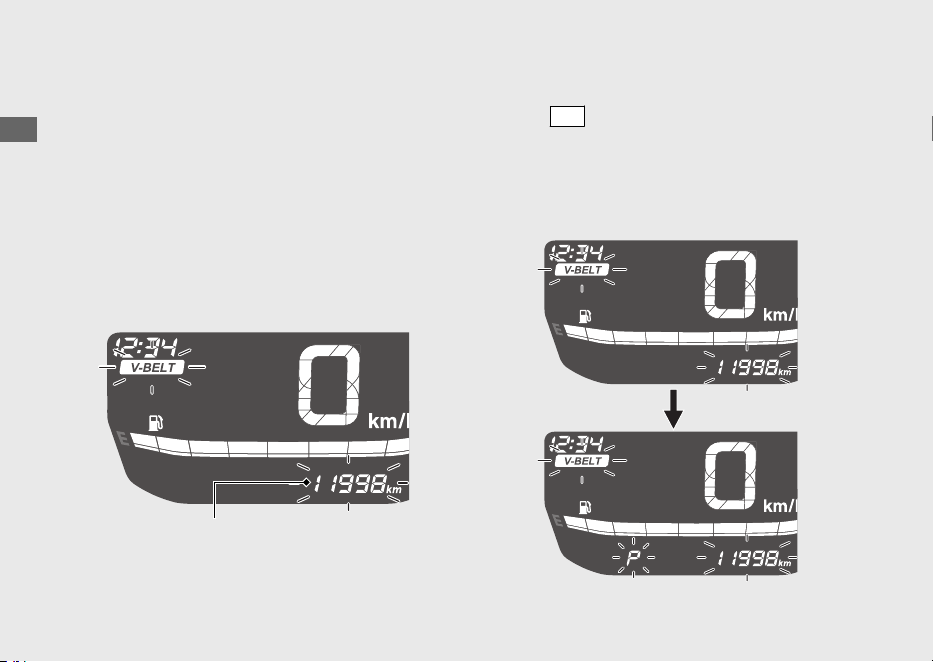
5 Remaining distance until V-BELT
indicator lights display:
You can confirm the remaining distance until
the V-BELT indicator lights, and then reset
the V-BELT indicator.
#
Confirming the remaining distance
until V-BELT indicator lights
Display the remaining distance until the V-
BELT indicator lights.
#
Resetting V-BELT indicator
a
Press
SET
switch. The V-BELT indicator and
the remaining distance until the V-BELT
indicator lights flash.
u“P” flashes when the remaining distance
until V-BELT indicator lights is displayed.
20220603164939_32K1ZR000_eng_BOOK Page 31 Friday, June 03 2022 16:52:56 JST
Operation Guide
28
Instruments (Continued)
Remaining distance until
V-BELT indicator lights
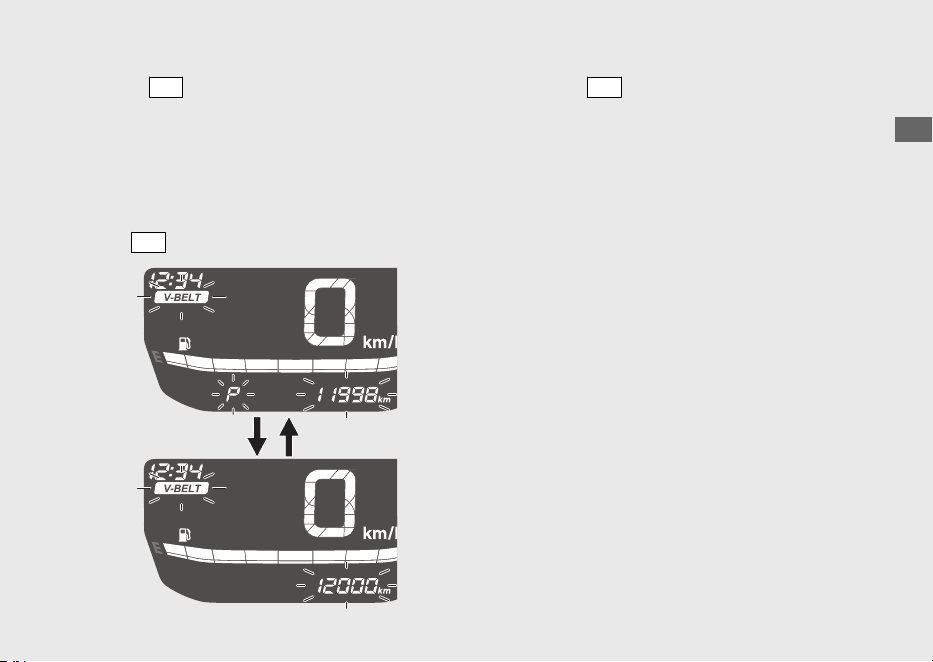
b
Press
SEL
switch to select maintenance
interval.
u“P” turns off when the maintenance
interval is displayed.
uWhen the remaining distance until the
V-BELT indicator lights is displayed, the
V-BELT indicator does not reset even if
SET
switch is pressed.
c
Pressing
SET
switch resets the V-BELT
indicator. When this is reset, the display
changes to normal.
20220603164939_32K1ZR000_eng_BOOK Page 32 Friday, June 03 2022 16:52:56 JST
Operation Guide
29
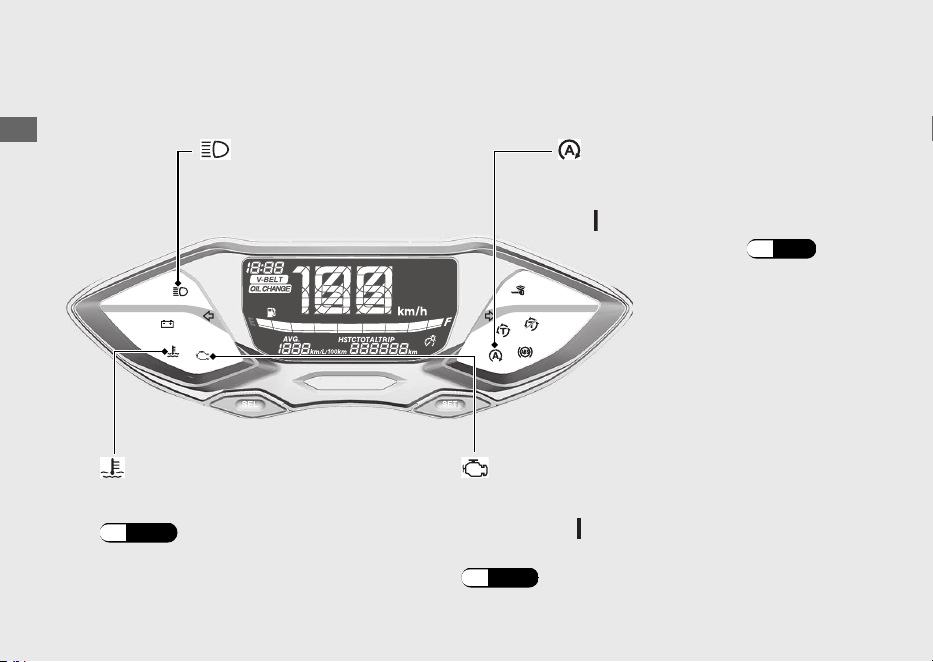
Indicators
20220603164939_32K1ZR000_eng_BOOK Page 33 Friday, June 03 2022 16:52:56 JST
Operation Guide
30
PGM-FI (Programmed Fuel Injection)
malfunction indicator lamp (MIL)
Comes on briefly when the ignition switch is
turned to the
(On) position.
If it comes on while engine is running:
(P.105)
If it comes on while riding:
(P.104)
High coolant temperature
indicator
If one of these indicators does not come on when it should, have your dealer check
for problems.
Idling Stop system: (P.56)
Comes on briefly when the
ignition switch is turned to
the (On) position.
Idling Stop indicator
High beam indicator
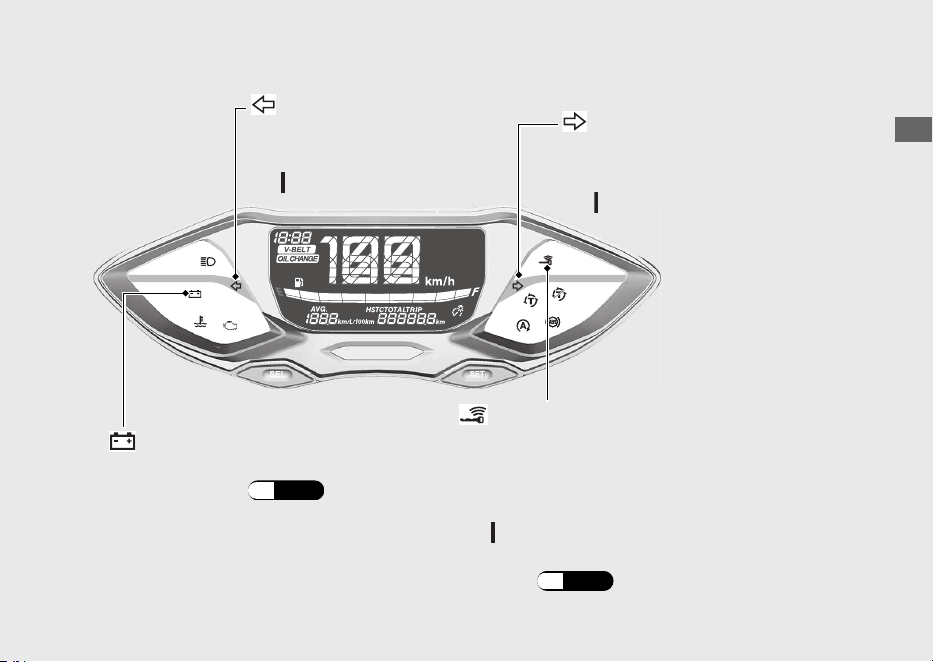
20220603164939_32K1ZR000_eng_BOOK Page 34 Friday, June 03 2022 16:52:56 JST
Operation Guide
31
Continued
Left turn signal indicator
Right turn signal indicator
Comes on briefly when the
ignition switch is turned to
the (On) position.
Comes on briefly when the
ignition switch is turned to
the (On) position.
Goes off when the ignition switch is turned to
the (On) position.
When the Honda SMART Key Indicator
Flashes: (P.108)
Comes on when vehicle and Honda SMART
Key verification is complete, and the ignition
switch can be operated.
Honda SMART Key Indicator
Battery Charging Condition
indicator
If it comes on: (P.105)
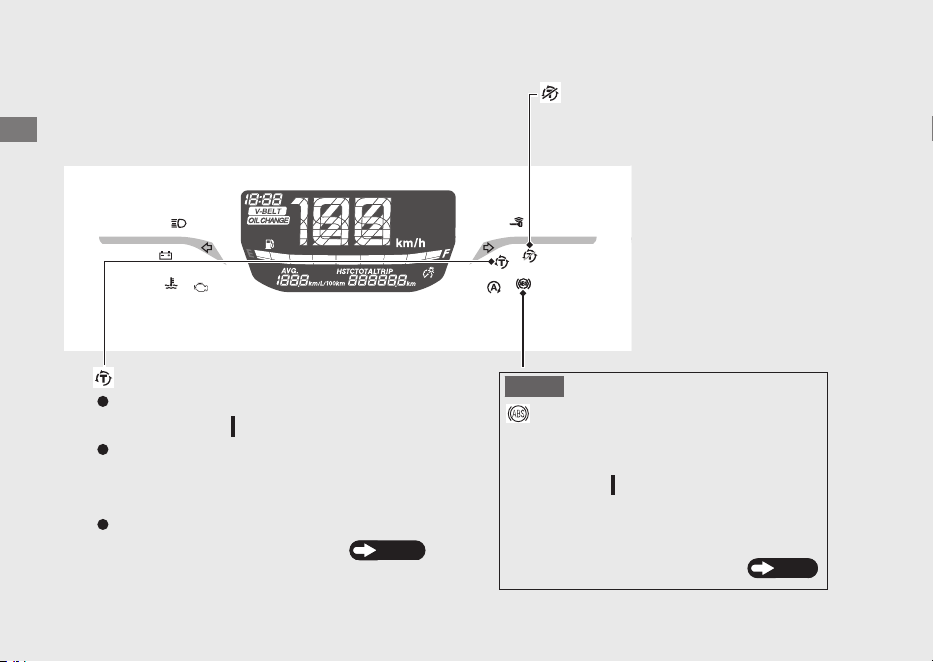
20220603164939_32K1ZR000_eng_BOOK Page 35 Friday, June 03 2022 16:52:56 JST
Operation Guide
32
Indicators (Continued)
Torque Control indicator
Torque Control OFF indicator
Comes on when the ignition switch is
turned to the
(On) position.
Comes on when the Torque
Control is turned to off.
Goes off when your speed reaches
approximately 3 km/h (2 mph) to indicate
Torque Control is ready to work.
Blinks when Torque Control is operating.
If it comes on while riding:
P.107
ABS (Anti-lock Brake System)
indicator
Comes on when the ignition switch is
turned to the (On) position.
If it comes on while riding:
Goes off when your speed reaches
approximately 10 km/h (6 mph)
P.106
NOTICE

20220603164939_32K1ZR000_eng_BOOK Page 36 Friday, June 03 2022 16:52:56 JST
Operation Guide
33
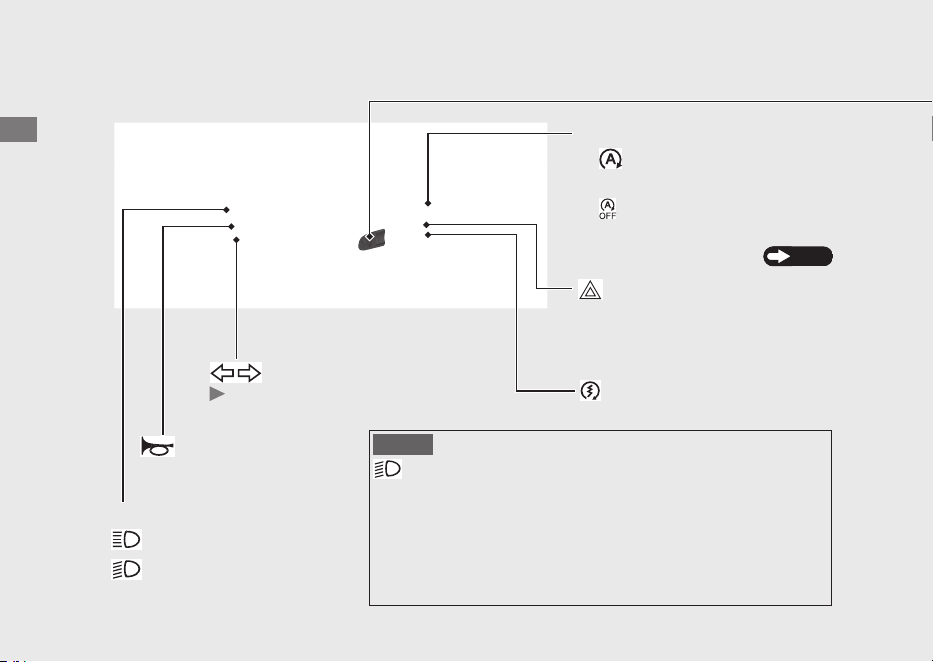
Switches
20220603164939_32K1ZR000_eng_BOOK Page 37 Friday, June 03 2022 16:52:56 JST
Operation Guide
34
Idling stop switch
Headlight dimmer switch
•
: High beam
• : Low beam
Start button
Turn signal switch
Pressing the switch turns the
turn signal off.
Horn button
• :
• :
Idling Stop system:
P.56
Hazard switch
The hazard signal is on.
Switchable when the ignition
switch is on.
The Idling Stop system
is on.
The Idling Stop system
is off.
NOTICE
Automatic lighting system
This means that the headlight will turn on when ignition switch
actives.
There is no switch to turn off the headlight while driving. The
vehicle automatic lighting system helps other drivers to notice
the motorcycle position in poor weather condition.
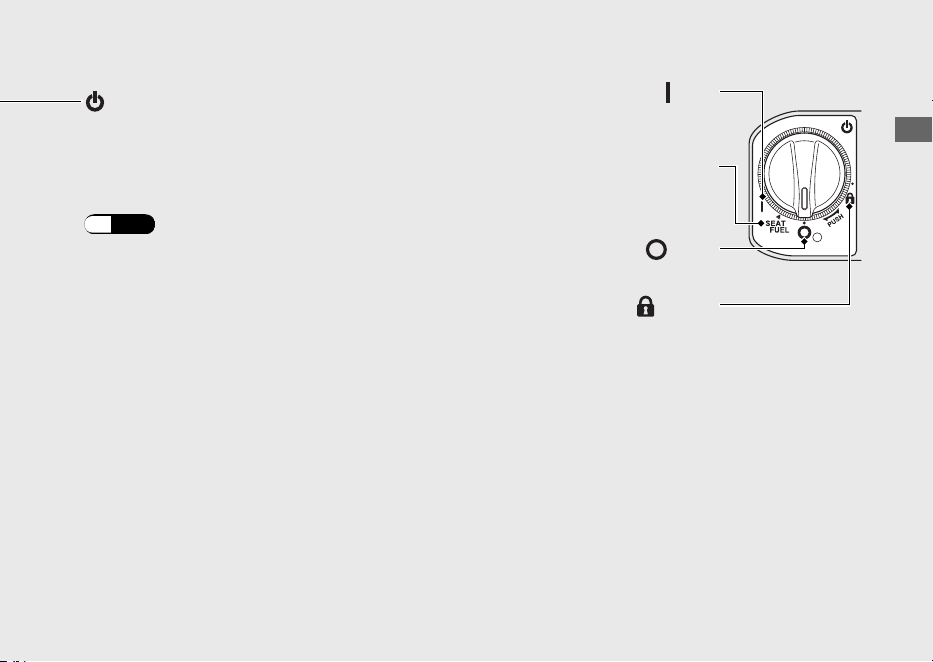
20220603164939_32K1ZR000_eng_BOOK Page 38 Friday, June 03 2022 16:52:56 JST
Operation Guide
35
Continued
Ignition switch
Switches the electrical system on/off,
locks the steering, and operates the
fuel lid and seat opener switch.
To unlock the ignition switch:
(P.42)
(On)
Turns electrical system on for
starting/riding.
SEAT FUEL
Operates the fuel lid and seat
opener switch.
(Lock)
Locks steering.
(Off)
Turns engine off.
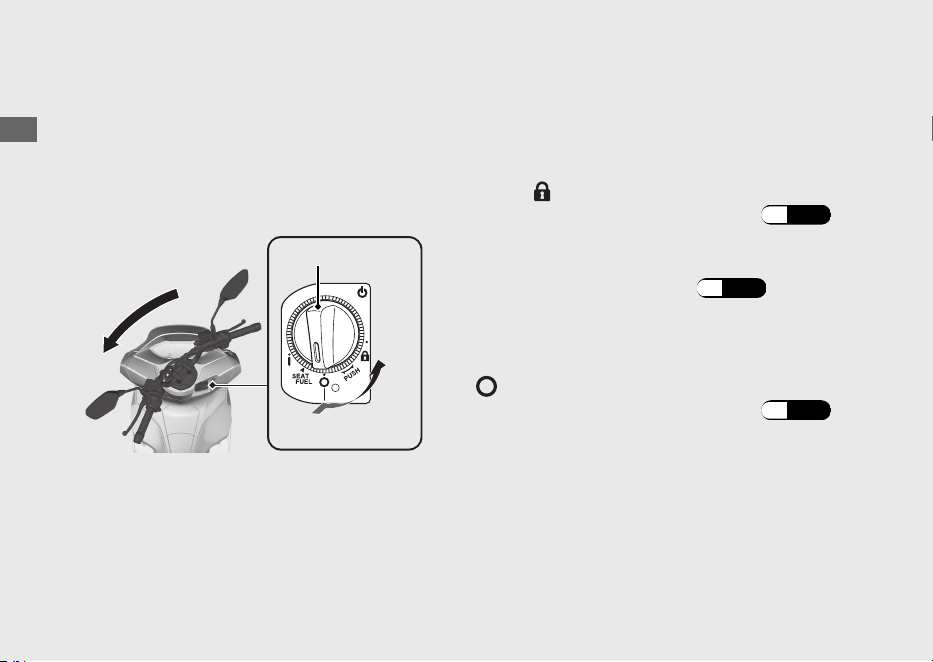
Steering Lock
Lock the steering when parking to help
prevent theft.
A U-shaped wheel lock or similar device is
also recommended.
#
Locking
a
Turn the handlebar all the way to the left or
right.
b
Push the ignition switch down, and turn it to
the
(Lock) position.
uTo unlock the ignition switch (P.42)
uJiggle the handlebar if the lock is difficult
to engage.
c
Lock the ignition switch. (P.43)
#
Unlocking
Push the ignition switch in, and turn it to the
(Off) position.
uTo unlock the ignition switch (P.42)
20220603164939_32K1ZR000_eng_BOOK Page 39 Friday, June 03 2022 16:52:56 JST
Operation Guide
36
Switches (Continued)
a
b
Ignition switch
Push
Turn

Honda SMART Key System
The Honda SMART Key system allows you to
operate the ignition switch without inserting
a key into a keyhole.
The system runs a two-way authentication
between the vehicle and the Honda SMART
Key to verify if it is the registered Honda
SMART Key.
The Honda SMART Key system uses low-
intensity radio waves. It may affect medical
equipment such as a cardiac pacemaker.
20220603164939_32K1ZR000_eng_BOOK
Page 40 Friday, June 03 2022 16:52:56 JST
Operation Guide
37
Continued
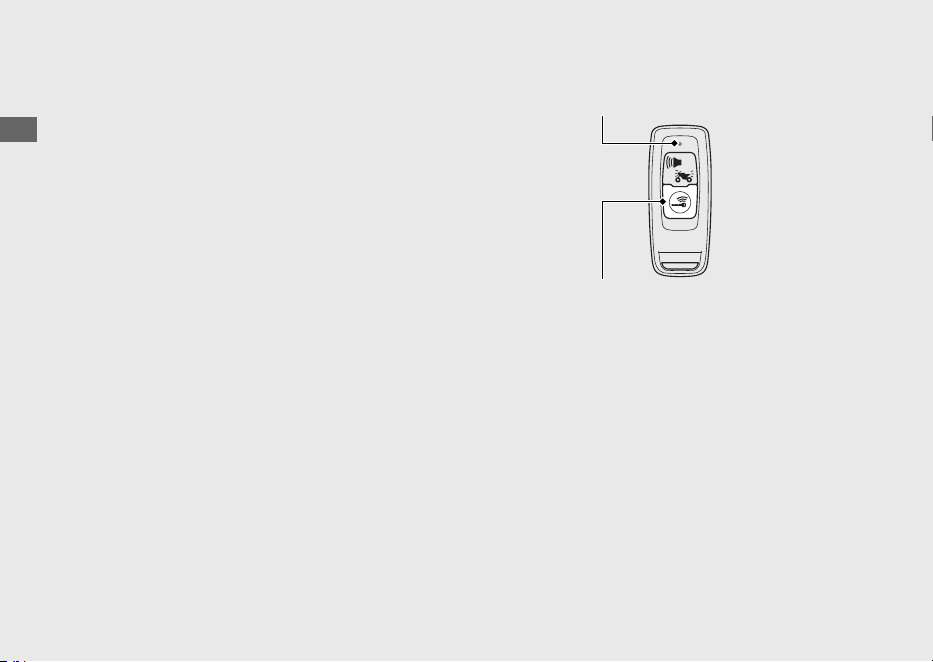
Switching the Honda SMART Key
System
#
To switch the Honda SMART Key
system to activation or deactivation
Press the ON/OFF button until the Honda
SMART Key LED changes colour.
#
To check the Honda SMART Key
system status
Lightly press the ON/OFF button. The Honda
SMART Key LED will show the status.
When the Honda SMART Key LED is:
Green:
(active)
Honda SMART Key system
authentication can be
performed.
Red:
(inactive)
Honda SMART Key system
authentication cannot be
performed.
20220603164939_32K1ZR000_eng_BOOK Page 41 Friday, June 03 2022 16:52:56 JST
Operation Guide
38
Honda SMART Key System (Continued)
ON/OFF button
LED

Operating Range
The operating range varies when the ignition
switch is locked or unlocked.
The Honda SMART Key system uses low-
intensity radio waves. Therefore, the
operating range may be wider or narrower,
or the Honda SMART Key system may not
work properly in the following situations:
● When the Honda SMART Key battery is
depleted.
● When there are facilities nearby that
generate strong radio waves or noise,
such as TV towers, power stations, radio
stations, or airports.
● When you carry the Honda SMART Key
with a laptop or wireless communication
device such as a radio or mobile phone.
● When the Honda SMART Key comes into
contact with or is covered by metal
objects.
#
When the ignition switch is unlocked:
The system can be operated within the
shaded area shown in the illustration.
20220603164939_32K1ZR000_eng_BOOK Page 42 Friday, June 03 2022 16:52:56 JST
Operation Guide
39
Continued
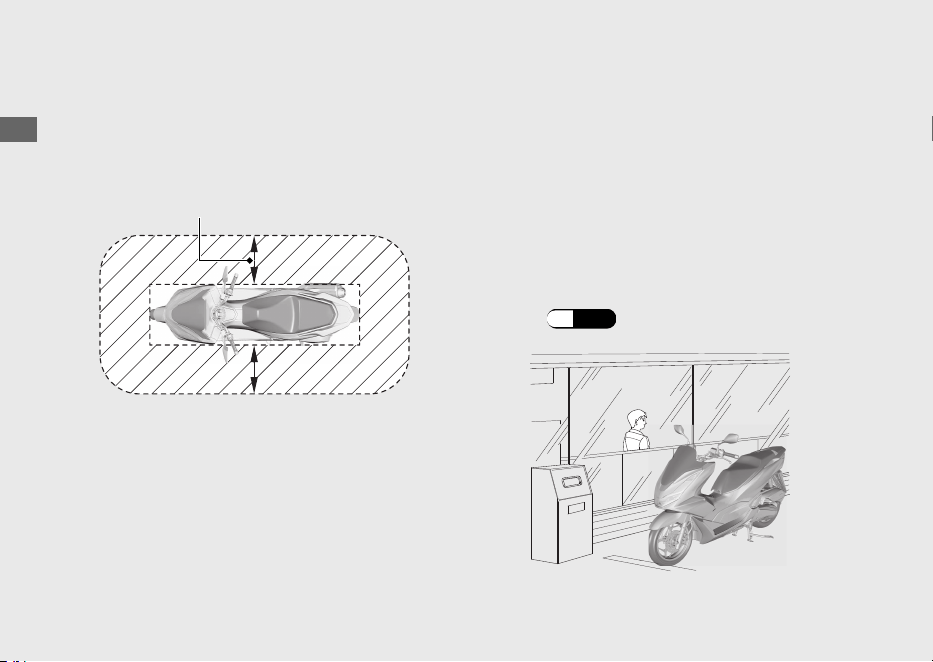
#
When the ignition switch is locked:
The system can be operated within the
shaded area shown in the illustration.
Anyone can unlock the ignition switch and
start the engine if your Honda SMART Key is
within operating range of your vehicle, even
if you are on the other side of a wall or
window. If you are away from your vehicle
but your Honda SMART Key is still within
operating range, deactivate the Honda
SMART Key system.
To switching the Honda SMART Key
system
(P.38)
20220603164939_32K1ZR000_eng_BOOK Page 43 Friday, June 03 2022 16:52:56 JST
Operation Guide
40
Honda SMART Key System (Continued)
About 2 m (6.6 ft)
Anyone in possession of the Honda SMART
Key can perform the following operations if
the Honda SMART Key is within operating
range:
● Starting the engine
● Unlocking the ignition switch
● Releasing the seat lock
● Opening the fuel lid
● Unlocking the steering lock
You should always keep the Honda SMART
Key on your person after you get on and off
the vehicle or while riding.
Do not store the Honda SMART Key in any
compartment.
If the ignition switch is in the (On) position,
the vehicle can be operated even by a
person who does not have a verified Honda
SMART Key.
Whenever you leave your vehicle, lock the
steering and lock the ignition switch.
(P.43)
Make sure the ignition switch ring goes off
and all turn signals flash once at this time.
20220603164939_32K1ZR000_eng_BOOK Page 44 Friday, June 03 2022 16:52:56 JST
Operation Guide
41
Continued
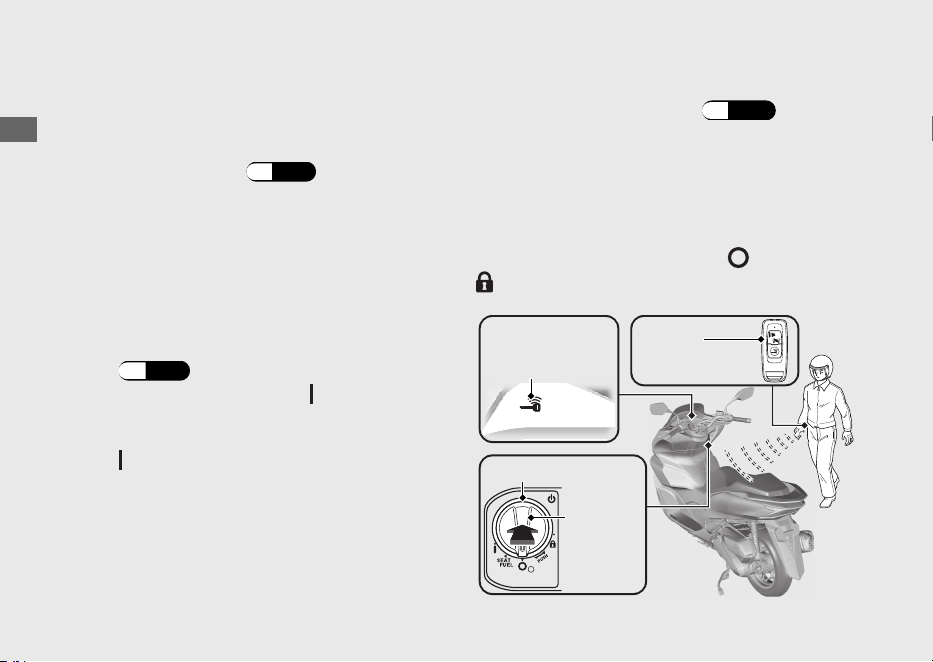
Switching the ignition switch
#
To Unlock the Ignition Switch
a
Make sure that the Honda SMART Key
system is activated.
(P.38)
b
To authenticate the Honda SMART Key
system, push the ignition switch.
u
When properly authenticated and the
ignition switch is unlocked, the Honda
SMART Key indicator and ignition switch
ring come on.
The buzzer also rings 2 times at this time.
uThe buzzer sound can be cancelled.
(P.
44)
c
Turn the ignition switch to the (On) position
while the Honda SMART Key indicator comes on.
u
If you do not turn the ignition switch to the
(On) position within 20 seconds after
pushing in the ignition switch in, the Honda
SMART Key indicator and ignition switch
ring will go off, the turn signals flash 1 time,
buzzer rings 1 time, and then the ignition
switch will be locked.
When the Honda SMART Key system
does not work properly
(P.113)
If someone without the Honda SMART Key
tries to turn the ignition switch, the ignition
switch rotates freely. If you notice the ignition
switch is in a different position, turn the
ignition switch to the original ( (Off) or
(Lock)) position.
20220603164939_32K1ZR000_eng_BOOK Page 45 Friday, June 03 2022 16:52:56 JST
Operation Guide
42
Honda SMART Key System (Continued)
Honda
SMART Key
Honda
SMART Key
indicator
Ignition switch ring
Ignition
switch
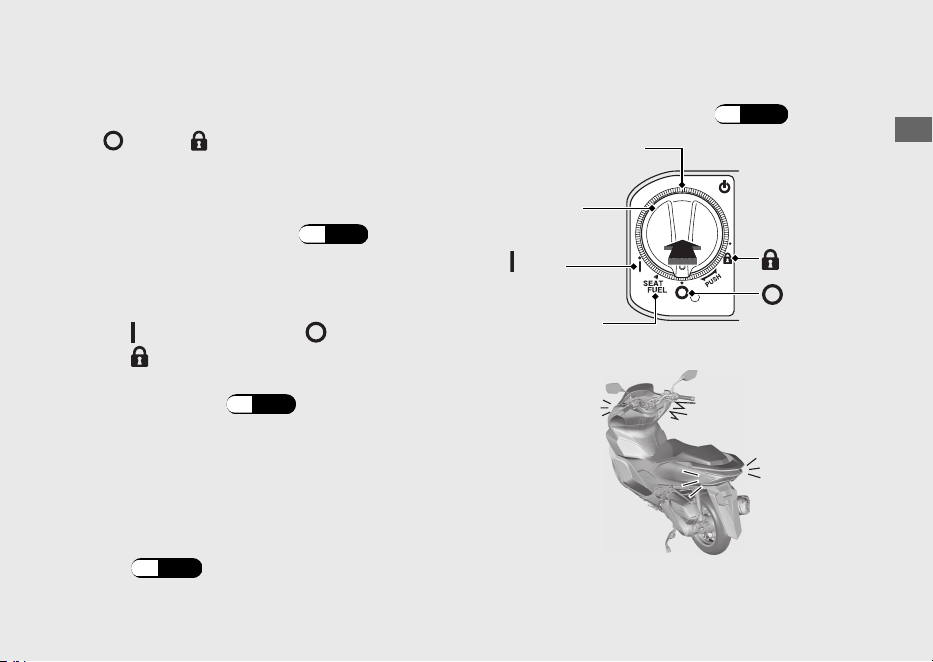
#
To Lock the Ignition Switch
a
Turn the ignition switch to the SEAT FUEL,
(Off) or (Lock) position.
b
Lock the ignition switch by doing one of the
following:
● Leave the operating range with the
Honda SMART Key. (P.39)
● Push the ignition switch.
● Wait for approximately 20 seconds
after turning the ignition switch from
(On) to SEAT FUEL, (Off) or
(Lock) position.
● Switch the Honda SMART Key system
to inactive. (P.38)
c
Make sure that the Honda SMART Key
indicator and ignition switch ring go off and
the turn signals flash once. This indicates
that the ignition switch is locked.
The buzzer also rings 1 time at this time.
uThe buzzer sound can be cancelled.
(P.44)
When the Honda SMART Key system
does not work properly
(P.113)
20220603164939_32K1ZR000_eng_BOOK Page 46 Friday, June 03 2022 16:52:56 JST
Operation Guide
43
Continued
Ignition switch
ring
Ignition
switch
(On)
SEAT FUEL
(Lock)
(Off)
Always make sure the ignition switch position
is in the (Off) or (Lock) position when
you leave your vehicle.
When the ignition switch is locked in the
SEAT FUEL position, the ignition switch can
be turned (Off) position only once.
When the ignition switch is locked in the
(Off) position, the steering cannot be
locked. To lock the steering, unlock the
ignition switch.
#
Switch the Buzzer Sound When the
Ignition Switch is Locked/Unlocked
Enable
a
Deactivate the Honda SMART Key system.
(P.38)
b
Lightly press the ON/OFF button. The red
Honda SMART Key LED comes on.
c
While the red LED is on, press the answer
back/alarm button.
uThe red LED starts blinking when the
buzzer sound is properly enabled.
Disable
a
Deactivate the Honda SMART Key system.
(P.
38)
b
Lightly press the ON/OFF button. The red
Honda SMART Key LED blinks.
c
While the red LED is blinking, press the
answer back/alarm button.
uThe red LED stops blinking but stays on
when the buzzer sound is properly
disabled.
20220603164939_32K1ZR000_eng_BOOK
Page 47 Friday, June 03 2022 16:52:56 JST
Operation Guide
44
Honda SMART Key System (Continued)

Anti-theft Alarm System
The anti-theft alarm system is a device to
reduce the likelihood of theft. When the
sensor detects vibration or movement with
the ignition switch in the (Off) or (Lock)
position and the system is set, the alarm is
activated.
The buzzer rings and the turn signals blink
for about 10 seconds when the anti-theft
alarm system detects vibration caused by
contact or movement.
The buzzer rings and the turn signals blink
for about 60 seconds when the anti-theft
alarm system detects a substantial change in
the vehicle posture. After the buzzer rings for
60 seconds, the anti-theft alarm system will
be reset in that posture.
20220603164939_32K1ZR000_eng_BOOK Page 48 Friday, June 03 2022 16:52:56 JST
Operation Guide
45
Continued
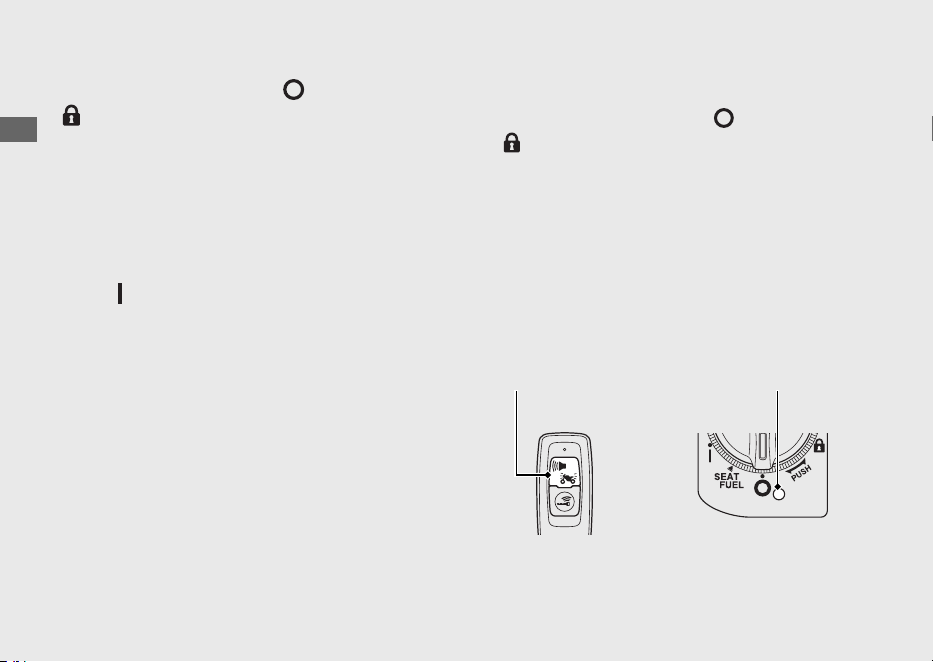
If the ignition switch is left (Off) or
(Lock) position for more than 10 days, the
anti-theft alarm system will no longer
operate. When the system is active and the
vehicle receives a signal from pressing the
answer back/alarm button, system activation
will be extended for 10 days.
To reset the system, turn the ignition switch
to the (On) position once.
The anti-theft alarm system uses low-
intensity radio waves. It may affect medical
equipment such as a cardiac pacemaker.
When the battery in the vehicle is weak, the
anti-theft alarm system may not function.
#
Setting the Anti-theft Alarm System
a
Turn the ignition switch to
(Off) or
(Lock) position.
b
Press the answer back/alarm button. Within
a second, the turn signal blinks and the
buzzer rings 1 time. After 2.5 seconds, the
buzzer rings 1 time. The anti-theft alarm
system is activated.
The alarm indicator flashes while the anti-
theft alarm system is activated.
20220603164939_32K1ZR000_eng_BOOK Page 49 Friday, June 03 2022 16:52:56 JST
Operation Guide
46
Anti-theft Alarm System (Continued)
Answer back/
alarm button
Alarm indicator
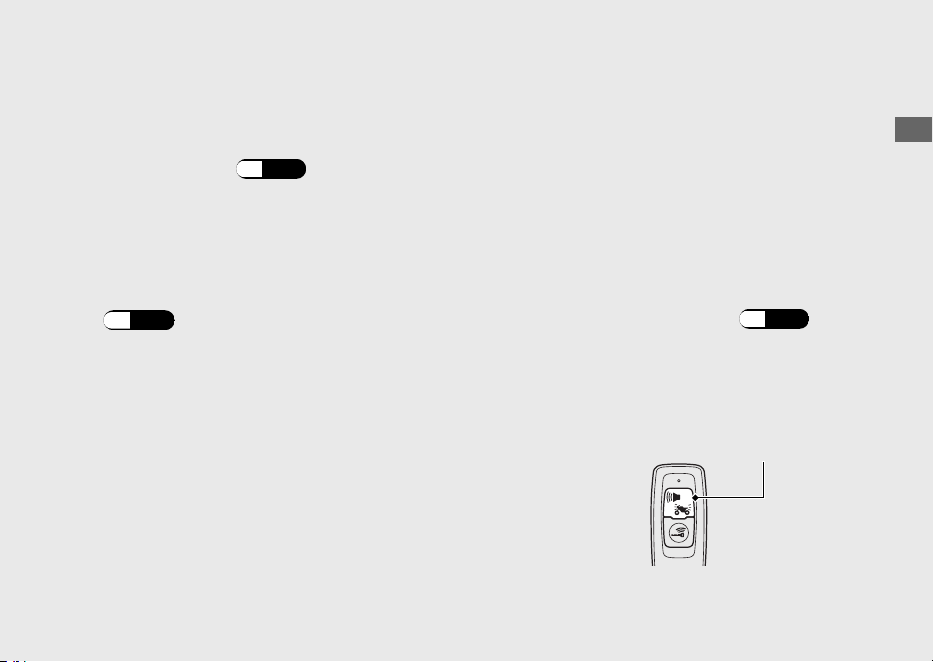
#
Cancelling the Anti-theft Alarm
System
To cancel the anti-theft alarm system, unlock
the ignition switch.
(P.42)
When the ignition switch is unlocked, the
buzzer rings 2 times and the alarm indicator
goes off.
u The buzzer sound can be cancelled.
(P.44)
#
Stopping the Anti-theft Alarm
Activation
To stop the anti-theft alarm activation, do
one of the following:
● Press the answer back/alarm button on
the Honda SMART Key.
uAfter stopping the anti-theft alarm
activation, the anti-theft alarm system
will be reset.
● Unlock the ignition switch.
(P.42)
uAfter stopping the anti-theft alarm
activation, the anti-theft alarm system
will be cancelled.
20220603164939_32K1ZR000_eng_BOOK Page 50 Friday, June 03 2022 16:52:56 JST
Operation Guide
47
Continued
Answer back/
alarm button
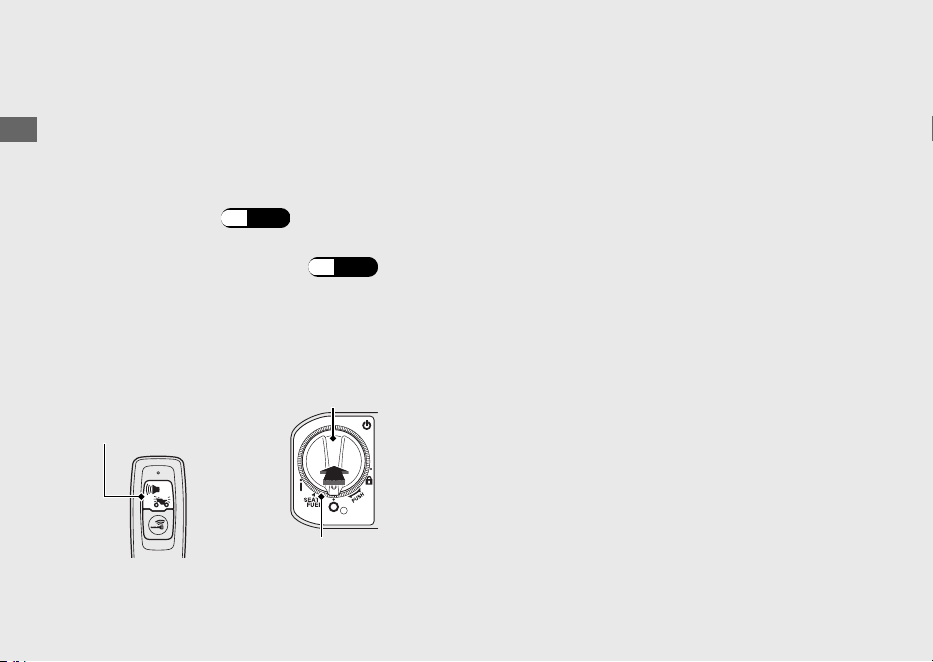
#
Adjusting the Sensitivity of Anti-theft
Alarm System
You can select from 3 sensitivity levels for the
anti-theft alarm system.
a
Make sure that the Honda SMART Key
system is active.
(P.38)
b
Push the ignition switch to authenticate the
Honda SMART Key system. (P.42)
c
Press and hold the ignition switch for more
than 4 seconds.
uThe Honda SMART Key indicator and
ignition switch ring flash.
d
Press the ignition switch 1 time while the
Honda SMART Key indicator and ignition
switch ring are flashing.
uThe Honda SMART Key indicator and
ignition switch ring come on, and a
buzzer sounds.
e
Repeat the following 3 times:
Press the answer back/alarm button on
the Honda SMART Key 4 times and the
ignition switch 1 time.
uWhen the ignition switch is pressed, the
Honda SMART Key indicator and ignition
switch ring go off, and the buzzer
sounds. When they light again, do the
next input.
uWhen the answer back/alarm button is
pressed, the Honda SMART Key LED
comes on. Make sure the LED goes off
before pressing the button again.
20220603164939_32K1ZR000_eng_BOOK Page 51
Friday, June 03 2022 16:52:56 JST
Operation Guide
48
Anti-theft Alarm System (Continued)
Answer back/
alarm button
Ignition switch
Ignition switch ring
uWhen the answer back/alarm button or
ignition switch is not pressed for 1
minute, the Honda SMART Key indicator
and ignition switch ring flash 3 times,
and then the buzzer sounds and the
mode is cancelled. Return to a and do
the procedure again.
uIf you press the answer back/alarm
button the wrong number of times
before you repeat the procedure 3
times, then repeat the procedure 3 times
again.
f
Press the answer back/alarm button to
select from 3 sensitivity levels.
3 alarm rings: high sensitivity
2 alarm rings: medium sensitivity
1 alarm ring: low sensitivity
The Honda SMART Key indicator and
ignition switch ring come on while setting.
g
Press and hold the ignition switch for more
than 2 seconds. The sensitivity level is set.
uThe Honda SMART Key indicator and
ignition switch ring turn off, and a buzzer
sounds once.
uWhen the answer back/alarm button is
not pressed for 10 seconds, the Honda
SMART Key indicator and ignition switch
ring flash 3 times, and then the buzzer
sounds, and the sensitivity level is set.
#
If the Anti-Theft Alarm System Does
Not Operate Properly
If any of the following situations arise, the
battery (
(P.89) ) in the vehicle may be
discharged or there is a system problem.
Remove the battery and see your dealer.
● The alarm does not ring.
● The alarm rings but fades out.
● The alarm system does not stop.
20220603164939_32K1ZR000_eng_BOOK Page 52
Friday, June 03 2022 16:52:56 JST
Operation Guide
49

Answer Back System
The answer back system is a device to find
the location of your vehicle and to inform
you that the immobilizer function of the
Honda SMART Key system is activated.
When you press the answer back/alarm
button on the Honda SMART Key with the
ignition switch is in the (Off) or (Lock)
position and the anti-theft alarm system is
set, the turn signals light, the ignition switch
ring lights, and the buzzer rings, informing
you of your vehicle's location and activation
of the immobilizer function.
The ignition switch ring will light for about 1
minute.
The answer back system uses low-intensity
radio waves. It may affect medical equipment
such as a cardiac pacemaker.
20220603164939_32K1ZR000_eng_BOOK Page 53 Friday, June 03 2022 16:52:56 JST
Operation Guide
50
Ignition
switch ring
Answer back/
alarm button
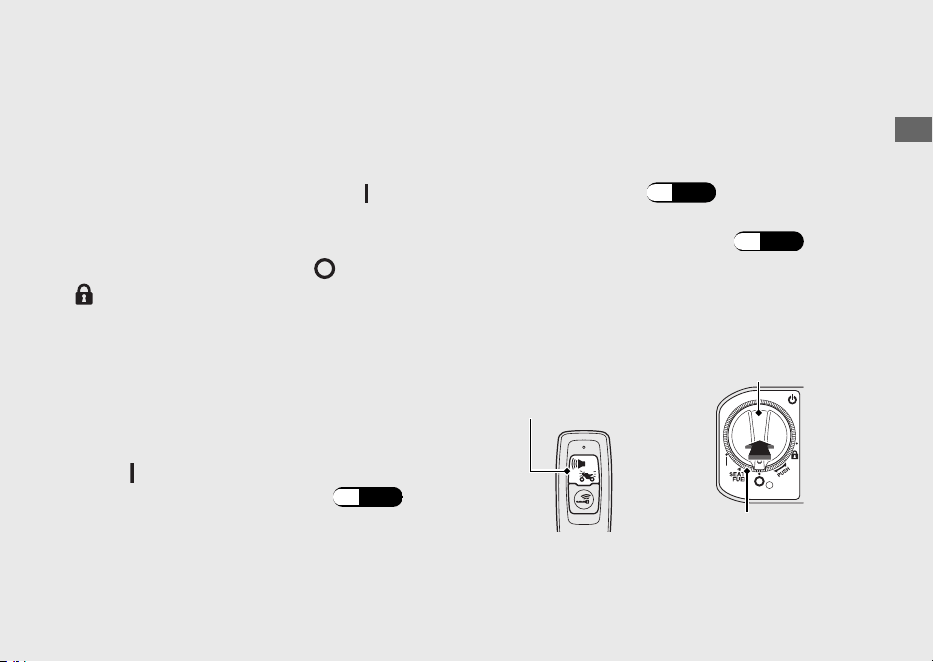
#
Operation
Press the answer back/alarm button on the
Honda SMART Key.
u The answer back system will not function
when the ignition switch is in the
(On)
position.
If
the ignition switch is left the
(Off) or
(Lock) position for more than 10 days, the
ans
wer back system will no longer operate.
When the system is active and the vehicle
receives a signal from pressing the answer
back/alarm button, system activation will be
extended for 10 days.
To reset the system, turn the ignition switch
to the
(On) position once.
u To unlock the ignition switch
(P.42)
When the battery in the vehicle is weak, the
answer back system may not function.
#
Adjusting the Answer Back Buzzer
Sound Volume Level
You can select 3 buzzer sound volume levels.
a
Make sure that the Honda SMART Key
system is active.
(P.38)
b
Push the ignition switch to authenticate the
Honda SMART Key system. (P.42)
c
Press and hold the ignition switch for more
than 4 seconds.
uThe Honda SMART Key indicator and
ignition switch ring flash.
20220603164939_32K1ZR000_eng_BOOK
Page 54 Friday, June 03 2022 16:52:56 JST
Operation Guide
51
Continued
Answer back/
alarm button
Ignition switch
Ignition switch ring

d
Press the ignition switch 1 time while the
Honda SMART Key indicator and ignition
switch ring are flashing.
uThe Honda SMART Key indicator and
ignition switch ring come on, and a
buzzer sounds.
e
Repeat the following 3 times:
Press the answer back/alarm button on
the Honda SMART Key 2 times and the
ignition switch 1 time.
uWhen the ignition switch is pressed, the
Honda SMART Key indicator and ignition
switch ring go off, and the buzzer
sounds. When they light again, do the
next input.
uWhen the answer back/alarm button is
pressed, the Honda SMART Key LED
comes on. Make sure the LED goes off
before pressing the button again.
uWhen the answer back/alarm button or
ignition switch is not pressed for 1
minute, the Honda SMART Key indicator
and ignition switch ring flash 3 times,
and then the buzzer sounds and the
mode is cancelled. Return to a
and do
the procedure again.
uIf you press the answer back/alarm
button the wrong number of times
before you repeat the procedure 3
times, then repeat the procedure 3 times
again.
f
Press the answer back/alarm button to
select from 3 levels for the sound volume.
The Honda SMART Key indicator and
ignition switch ring come on while setting.
20220603164939_32K1ZR000_eng_BOOK Page 55 Friday, June 03 2022 16:52:56 JST
Operation Guide
52
Answer Back System (Continued)
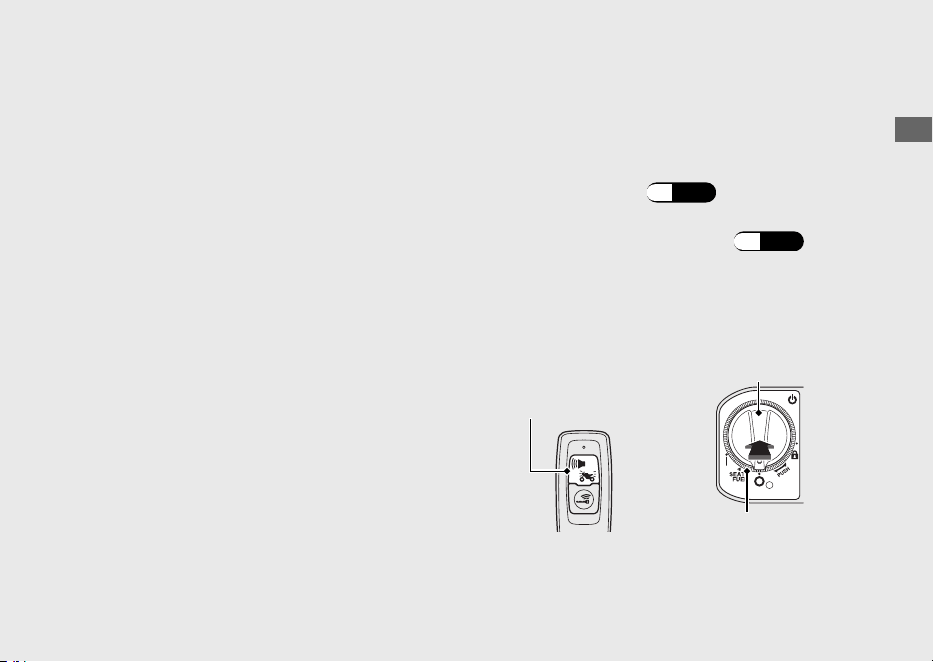
g
Press and hold the ignition switch for more
than 2 seconds. The sound volume level is
set.
uThe Honda SMART Key indicator and
ignition switch ring turn off, and a buzzer
sounds once.
uWhen the answer back/alarm button is
not pressed for 10 seconds, the Honda
SMART Key indicator and ignition switch
ring flash 3 times, and then the buzzer
sounds, and the sound volume level is
set.
#
Changing the Answer Back Buzzer
Sound Pattern
You can select 3 buzzer sound patterns.
a
Make sure that the Honda SMART Key
system is active.
(P.38)
b
Push the ignition switch to authenticate the
Honda SMART Key system. (P.42)
c
Press and hold the ignition switch for more
than 4 seconds.
uThe Honda SMART Key indicator and
ignition switch ring flash.
20220603164939_32K1ZR000_eng_BOOK Page 56
Friday, June 03 2022 16:52:56 JST
Operation Guide
53
Continued
Answer back/
alarm button
Ignition switch
Ignition switch ring

d
Press the ignition switch 1 time while the
Honda SMART Key indicator and ignition
switch ring are flashing.
uThe Honda SMART Key indicator and
ignition switch ring come on, and a
buzzer sounds.
e
Repeat the following 3 times:
Press the answer back/alarm button on
the Honda SMART Key 3 times and the
ignition switch 1 time.
uWhen the ignition switch is pressed, the
Honda SMART Key indicator and ignition
switch ring go off, and the buzzer
sounds. When they light again, do the
next input.
uWhen the answer back/alarm button is
pressed, the Honda SMART Key LED
comes on. Make sure the LED goes off
before pressing the button again.
uWhen the answer back/alarm button or
ignition switch is not pressed for 1
minute, the Honda SMART Key indicator
and ignition switch ring flash 3 times,
and then the buzzer sounds and the
mode is cancelled. Return to a
and do
the procedure again.
uIf you press the answer back/alarm
button the wrong number of times
before you repeat the procedure 3
times, then repeat the procedure 3 times
again.
f
Press the answer back/alarm button to
select from 3 buzzer sound patterns. The
Honda SMART Key indicator and ignition
switch ring come on while setting.
20220603164939_32K1ZR000_eng_BOOK Page 57 Friday, June 03 2022 16:52:56 JST
Operation Guide
54
Answer Back System (Continued)

g
Press and hold the ignition switch for more
than 2 seconds. The sound pattern is set.
uThe Honda SMART Key indicator and
ignition switch ring turn off, and a buzzer
sounds once.
uWhen the answer back/alarm button is
not pressed for 10 seconds, the Honda
SMART Key indicator and ignition switch
ring flash 3 times, and then the buzzer
sounds, and the sound pattern is set.
#
Temporary Silence Mode
Temporary silence mode is the immediate
way to turn off the answer back system
buzzer sound.
Enable:
Press and hold the answer back/alarm button
for about 2 seconds, the Honda SMART Key
LED changes to red.
Disable:
Re-press and hold the answer back/alarm
button for about 2 seconds, the Honda
SMART Key LED changes to green.
20220603164939_32K1ZR000_eng_BOOK Page 58 Friday, June 03 2022 16:52:56 JST
Operation Guide
55
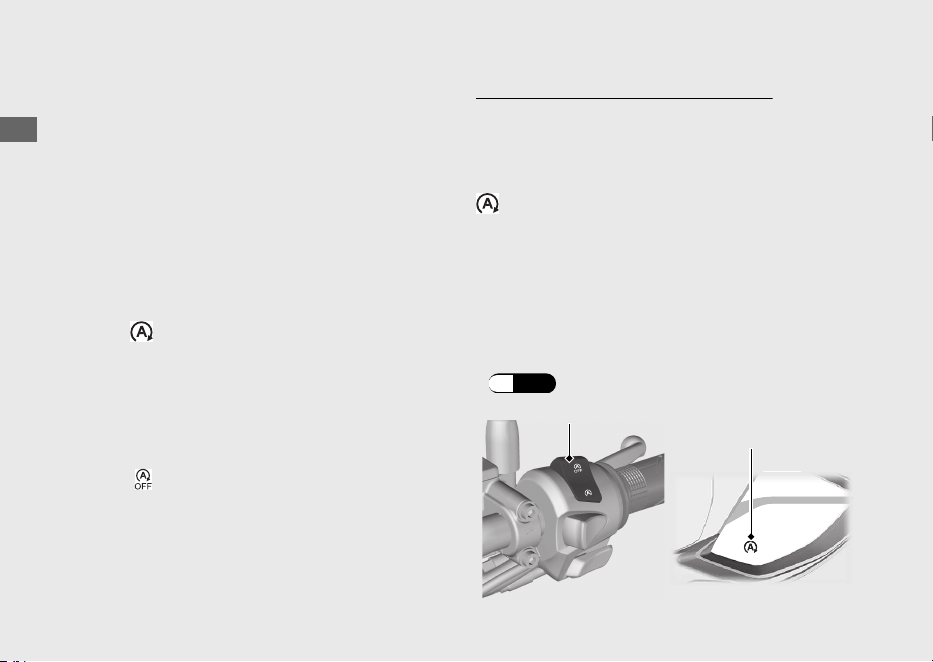
Idling Stop System
Idling Stop system is designed to help reduce
the fuel consumption and noise, by idling
stop while making a stop such as waiting at
an intersection.
#
Switching the Idling Stop System On
or Off
Switches the Idling Stop system on or off
using the Idling Stop switch.
● ON:
(Idling Stop)
uIdling Stop indicator comes on when the
Idling Stop system becomes ready to
stop the engine while riding. Idling Stop
indicator flashes when the engine is
stopped by the Idling Stop system.
● OFF: (Idling)
uIdling Stop indicator does not come on
when the Idling Stop system is off.
Activation of the Idling Stop System
The Idling Stop system becomes ready to
stop the engine and Idling Stop indicator
comes on when the following requirements
are satisfied with the Idling Stop switch in the
(Idling Stop) position:
● side stand is up
●
start the engine by pressing the start button
● warm up the engine enough
● ride the vehicle at speeds over 10 km/h (6
mph)
#
Idling Stop Indicator Does Not Come On:
(P.110)
20220603164939_32K1ZR000_eng_BOOK Page 59 Friday, June 03 2022 16:52:56 JST
Operation Guide
56
Idling Stop switch
Idling Stop
indicator
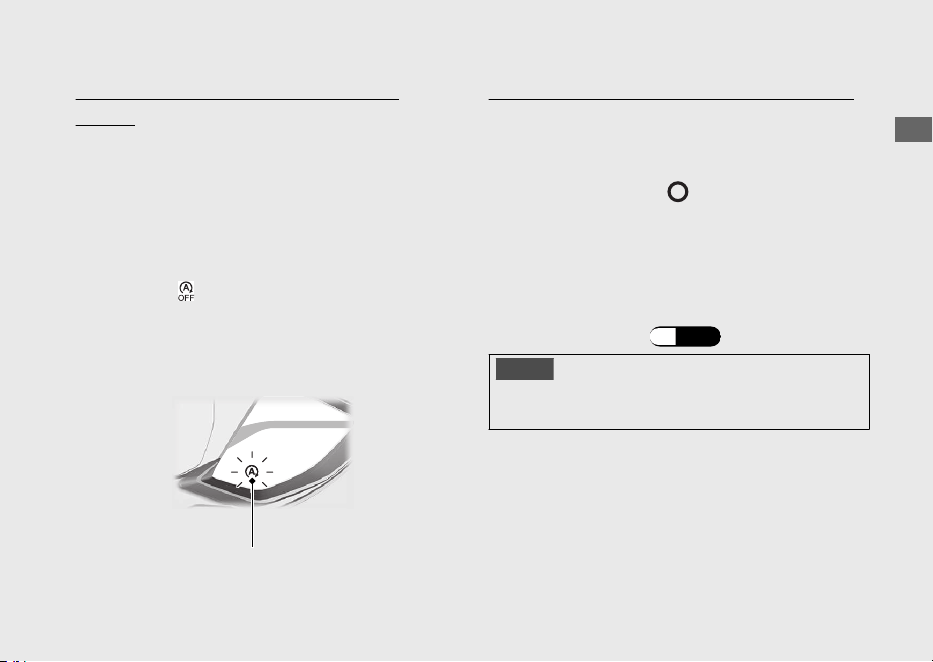
Stopping the engine by the Idling Stop
System
The engine stops and Idling Stop indicator
changes to flash after you close the throttle
completely and stop the vehicle while the
Idling Stop indicator is on.
u While the engine is stopped by the Idling
Stop system, if you press the Idling Stop
switch to (Idling), the Idling Stop system
will be cancelled. The engine will not restart
even when you open the throttle.
Safety Precaution for the Idling Stop System
Do not go away from the vehicle while the
Idling Stop indicator is flashing. When you go
away from the vehicle, always turn the
ignition switch to the (Off) position.
u The engine may start unexpectedly if the
throttle is opened.
#
Engine is Not Stopped by the Idling
Stop System While the Idling Stop
Indicator is On:
(P.111)
NOTICE
Stopping by the Idling Stop system for a long
time may cause battery discharge.
20220603164939_32K1ZR000_eng_BOOK Page 60 Friday, June 03 2022 16:52:56 JST
Operation Guide
57
Continued
Idling Stop indicator

Restarting the Engine
Check that the Idling Stop indicator is
flashing, and then open the throttle.
u If it is not flashing, you can't restart the
engine with the Idling Stop system, even if
you open the throttle.
u While the engine is stopped by the Idling
Stop system, if you operate the side stand,
the flashing Idling Stop indicator turns off or
stops flashing and stays on, then the engine
will not restart even when you open the
throttle.
#
Engine Does Not Start Even If the
Throttle is Opened:
(P.112)
NOTICE
Headlight stays on after the engine is stopped by
the Idling Stop system. The battery may
discharge and you may not be able to restart
engine.
When the battery is weak, switch the Idling Stop
switch to (Idling) and do not to use the Idling
Stop system. See your dealer to check the
battery.
See your dealer for checking the battery as
specified in the maintenance schedule.
#
Maintenance Schedule:
(P.76)
20220603164939_32K1ZR000_eng_BOOK Page 61
Friday, June 03 2022 16:52:56 JST
Operation Guide
58
Idling Stop System (Continued)
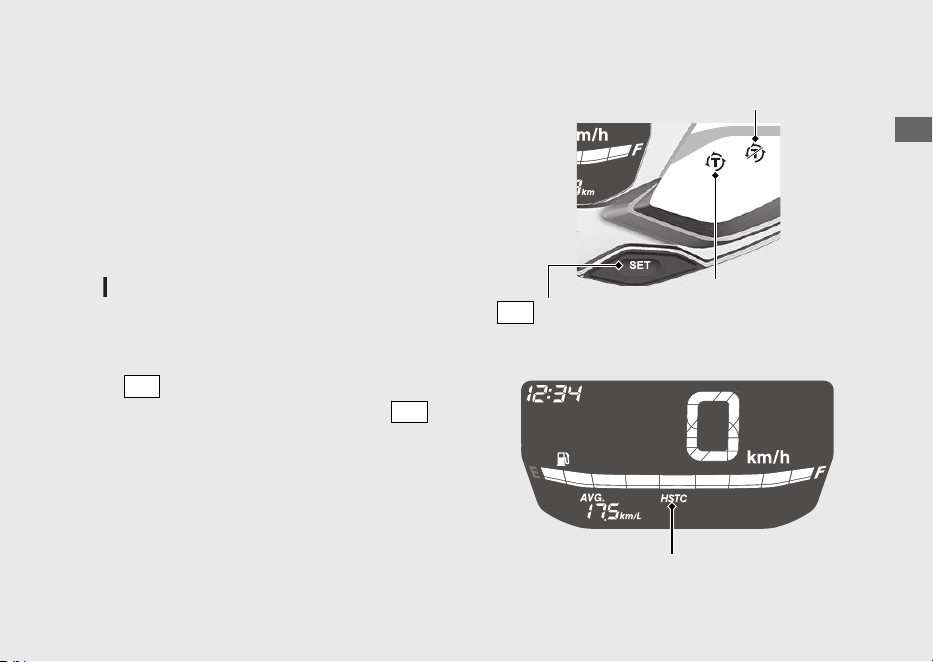
Honda Selectable Torque Control
Torque Control (engine power control) can
be turned on/off.
u Stop the vehicle first, turn the Torque
Control off or on.
u The Torque Control cannot be turned off
when the system is activated (Torque
Control indicator blinking).
u Each time the ignition switch is turned to the
(On) position, the Torque Control will
automatically be set to on.
Torque Control on and off
Press
SEL
switch to display the Torque
Control [HSTC]. Pressing and holding
SET
switch while Torque Control [HSTC] is
displayed switches between on and off.
20220603164939_32K1ZR000_eng_BOOK Page 62 Friday, June 03 2022 16:52:56 JST
Operation Guide
59
Torque Control OFF indicator
Torque Control
indicator
SET
switch
Torque Control [HSTC]
Starting the Engine
Start your engine using the following procedure,
regardless of whether the engine is cold or warm.
This vehicle is equipped with a side stand
ignition cut-off system.
u If the side stand is down, the engine cannot
be started.
u If you lower the side stand with the engine
running, it will automatically shut off.
This vehicle is equipped with a Honda SMART
Key system. Always keep Honda SMART Key on
you when you ride the vehicle. (P.39)
If the engine of this vehicle is stopped while
the ignition switch is in the
(On) position,
authentication will be disabled after a certain
amount of time or if you leave the
authentication range. Restart the engine by
performing step c & d
under the starting
procedure.
u If the engine of this vehicle is stopped by the
Idling Stop System, authentication will not
be disabled.
NOTICE
• If the engine does not start within 5 seconds,
turn the ignition switch to the
(Off)
position and wait 10 seconds before trying to
start the engine again to recover battery
voltage.
• Extended fast idling and revving the engine
can damage the engine and the exhaust
system.
• If the vehicle is over-turned, you must first
turn the ignition switch to the (Off)
position and then inspect the vehicle
carefully.
20220603164939_32K1ZR000_eng_BOOK Page 63 Friday, June 03 2022 16:52:56 JST
Operation Guide
60
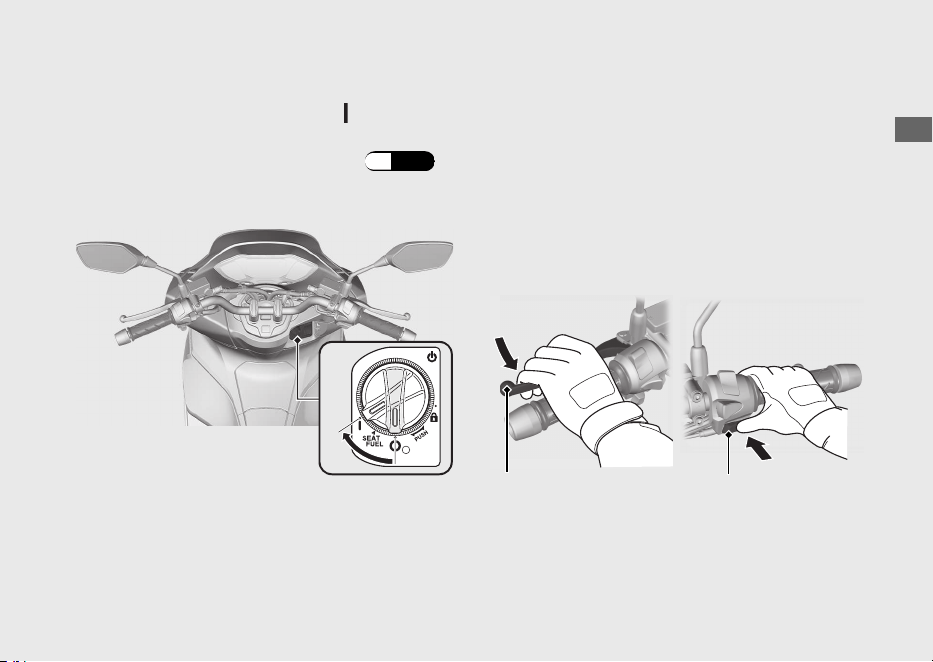
a
Place the vehicle on its centre stand.
b
Turn the ignition switch to the (On)
position.
uTo unlock the ignition switch. (P.42)
c
Squeeze the rear brake lever.
uThe starter motor will only work when
the rear brake lever is squeezed and the
side stand is up.
d
Press the start button with the throttle
completely closed. Release the start button
as soon as the engine starts.
20220603164939_32K1ZR000_eng_BOOK Page 64 Friday, June 03 2022 16:52:56 JST
Operation Guide
61
Continued
b
dc
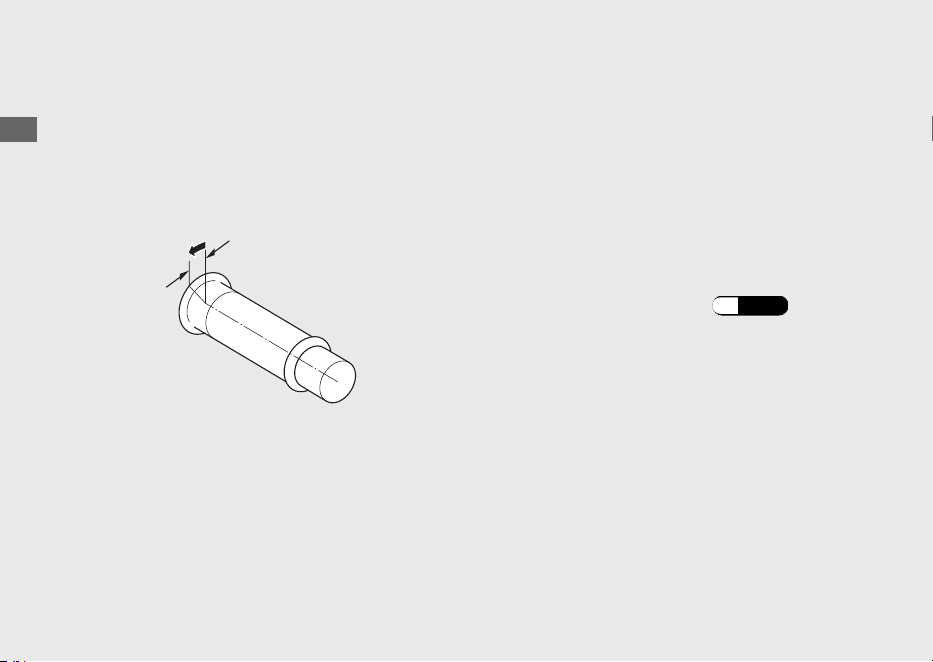
If you cannot start the engine:
a
Place the vehicle on its centre stand and
squeeze the rear brake lever.
b
With the throttle slightly open (about 3 mm,
without freeplay), press the start button.
If the engine does not start:
a
Open the throttle fully and press the start
button for 5 seconds.
b
Repeat the normal starting procedure.
c
If the engine starts, open the throttle slightly
if idling is unstable.
d
If the engine does not start, wait 10 seconds
before trying steps a & b again.
#
If Engine Will Not Start
(P.103)
20220603164939_32K1ZR000_eng_BOOK Page
65 Friday, June 03 2022 16:52:56 JST
Operation Guide
62
Starting the Engine (Continued)
About 3 mm, without freeplay
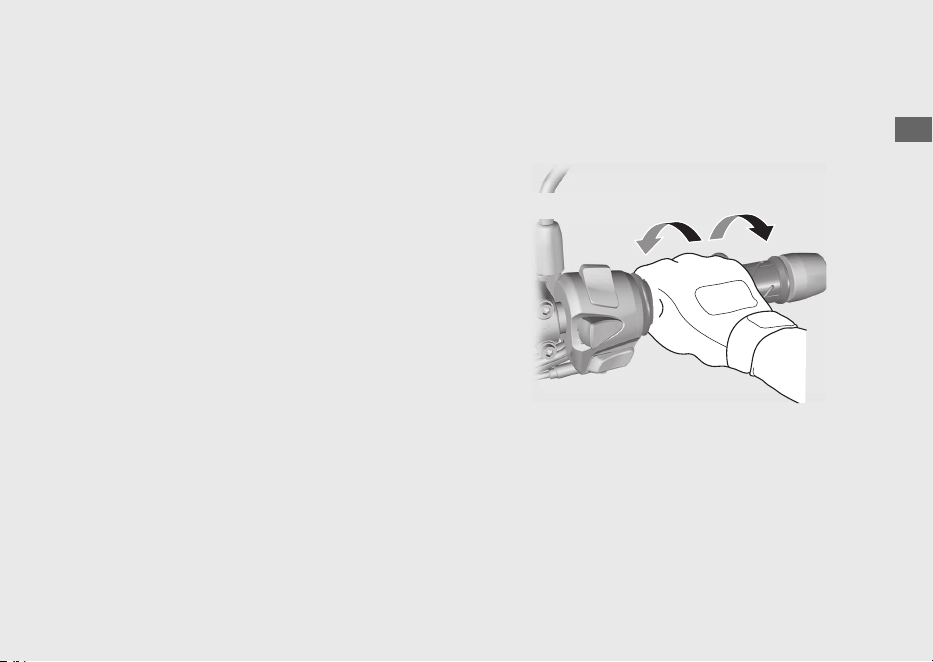
Riding
Starting the Vehicle
a
Push the vehicle forward off the centre
stand.
uSqueeze the rear brake lever.
uKeep throttle closed.
Make sure the side stand and centre stand
are up.
b
Get on the vehicle.
uMount the vehicle from the left side,
keeping at least one foot on the ground.
c
Release the brake lever.
d
Acceleration and deceleration
To accelerate: Open the throttle slowly.
To decelerate: Close the throttle.
20220603164939_32K1ZR000_eng_BOOK Page 66 Friday, June 03 2022 16:52:56 JST
Operation Guide
63
Continued
Close (Decelerate)
Open (Accelerate)
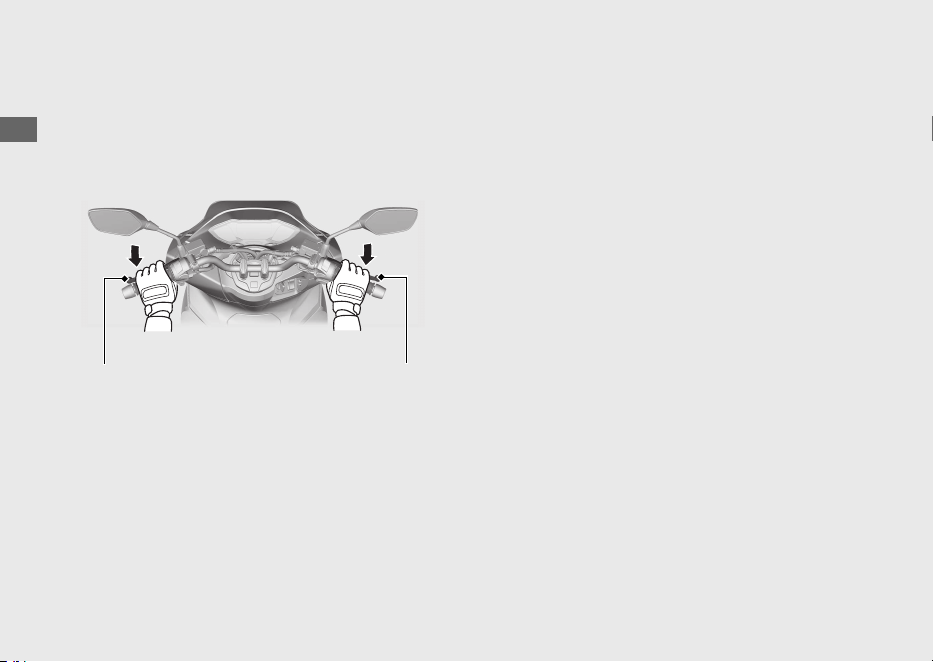
Braking
Close the throttle and apply the front and
rear brake levers together.
20220603164939_32K1ZR000_eng_BOOK Page 67 Friday, June 03 2022 16:52:56 JST
Operation Guide
64
Riding (Continued)
Rear brake lever Front brake lever
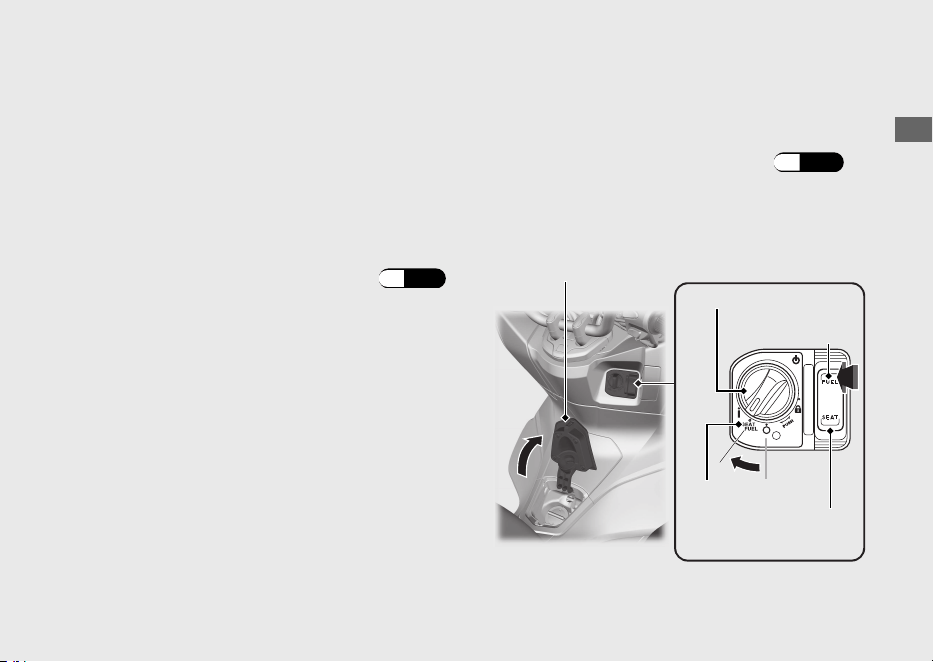
Refuelling
Fuel type: Unleaded petrol only
Fuel octane number: Your vehicle is
designed to use Research Octane Number
(RON) 91 or higher.
Tank capacity: 8.0 L (2.11 US gal, 1.76 Imp
gal)
#
Refuelling and Fuel Guidelines
(P.12)
Opening the Fuel Fill Cap
a
Turn the ignition switch to the SEAT FUEL
position.
uTo unlock the ignition switch
(P.42)
b
Push the FUEL side of the fuel lid and seat
opener switch.
uThe fuel lid opens.
20220603164939_32K1ZR000_eng_BOOK Page 68 Friday, June 03 2022 16:52:56 JST
Operation Guide
65
Continued
Ignition switch
Fuel lid
FUEL
SEAT FUEL
Fuel lid and seat
opener switch
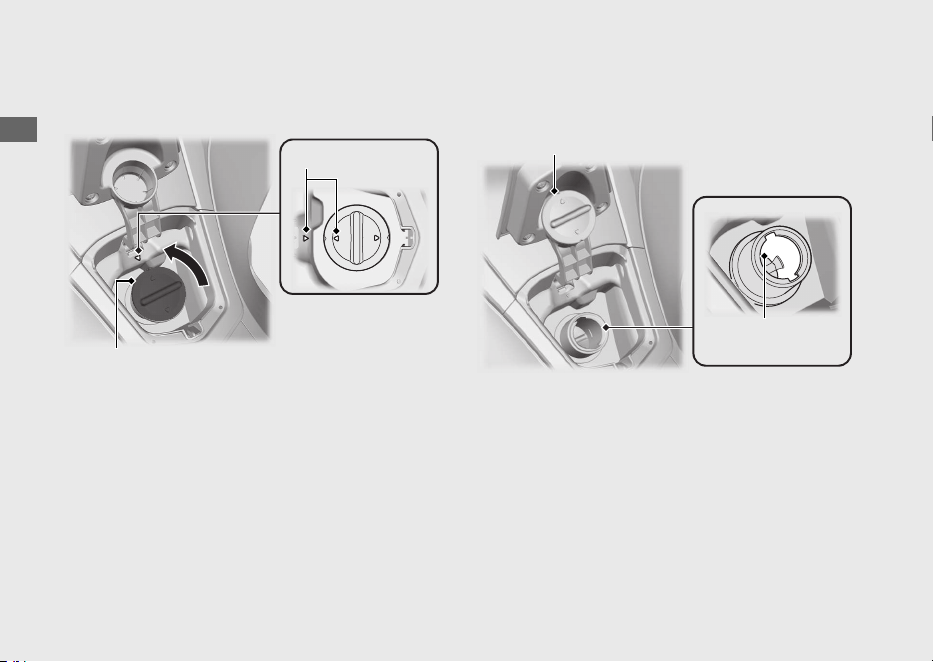
c
Turn the fuel fill cap counterclockwise and
remove the fuel fill cap.
d
Put the removed fuel fill cap on the fuel fill
cap resting place.
Do not fill with fuel above the lower edge of
the filler neck.
20220603164939_32K1ZR000_eng_BOOK Page 69 Friday, June 03 2022 16:52:56 JST
Operation Guide
66
Refuelling (Continued)
Arrow marks
Fuel fill cap
Fuel fill cap resting place
Lower edge of
filler neck
Closing the Fuel Fill Cap
a
Install and tighten the fuel fill cap firmly by
turning it clockwise.
uMake sure that the arrow marks on the
fuel fill cap and fuel tank are aligned.
b
Close the fuel lid until it locks.
uMake sure that the fuel lid is closed
securely.
3WARNING
Petrol is highly flammable and
explosive. You can be burned or
seriously injured when handling fuel.
• Stop the engine, and keep heat,
sparks, and flames away.
• Only handle fuel outdoors.
• Wipe up spills immediately.
20220603164939_32K1ZR000_eng_BOOK Page 70 Friday, June 03 2022 16:52:56 JST
Operation Guide
67
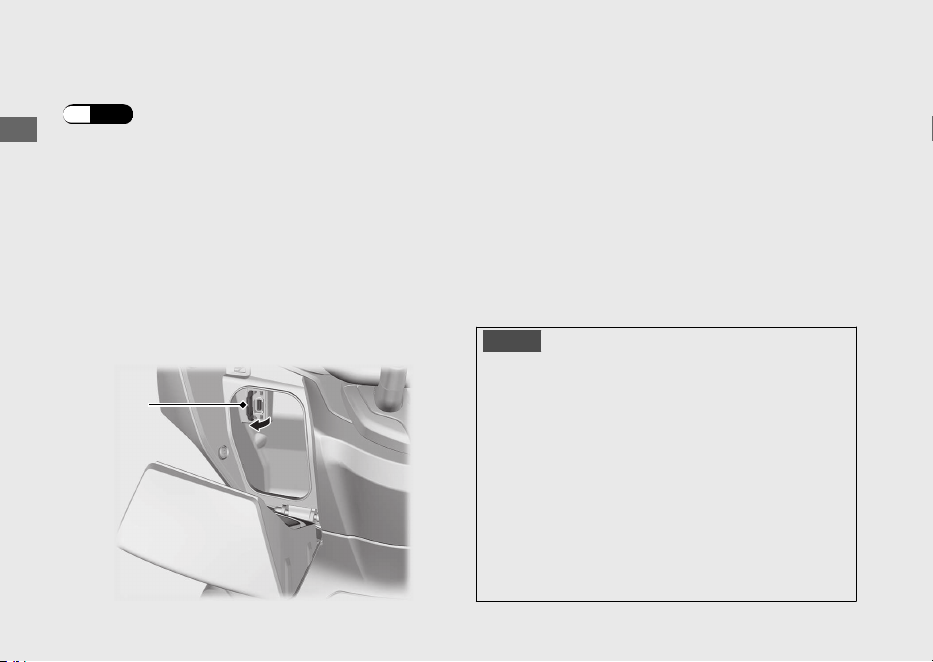
USB Socket
The USB socket is located in the front box.
(P.72)
Use USB devices at your own risk. In no event
shall Honda be liable for any damage to your
USB device when in use.
Open the cover to access the USB socket.
USB type-A connectors can be used.
Rated capacity is
10.5 W (5 V, 2.1 A).
u The USB socket is for charging only.
u To prevent the battery from becoming weak
(or dead), keep the engine running while
drawing current from the USB socket.
u To prevent entry of foreign matter into the
USB socket, be sure to close the cover when
the USB socket is not used.
u Carefully secure all connected devices, as
vibration may cause damage to them or
they could shift unexpectedly.
NOTICE
● Using any heat-generating USB devices or
improperly rated USB devices can damage
the USB socket.
● Do not use the USB socket in wet conditions,
when or while washing or any other wet
conditions as these will damage the USB
socket.
● Do not allow the USB's harness to become
pinched or trapped.
● Do not allow the USB's harness to interfere
with the steering or controls.
20220603164939_32K1ZR000_eng_BOOK Page 71 Friday, June 03 2022 16:52:56 JST
Operation Guide
68
Cover
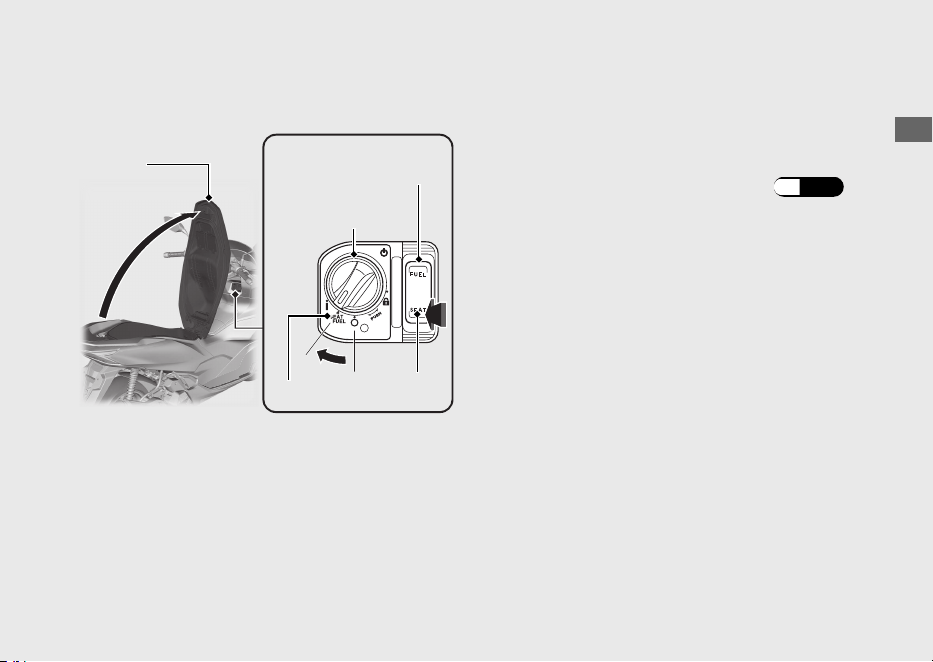
Storage Equipment
Seat Seat Open
a
Turn the handlebar pointed straight ahead.
b
Turn the ignition switch to the SEAT FUEL
position.
uTo unlock the ignition switch (P.42)
c
Push the SEAT side of the fuel lid and seat
opener switch.
d
Open the seat.
Seat Close
Close and push down on the rear of the seat
until it locks. Make sure that the seat is locked
securely by pulling it up lightly.
Take care not to lock your key in the
compartment under the seat.
20220603164939_32K1ZR000_eng_BOOK
Page 72 Friday, June 03 2022 16:52:56 JST
Operation Guide
69
Continued
SEAT FUEL
Seat
Fuel lid and seat
opener switch
Ignition switch
SEAT
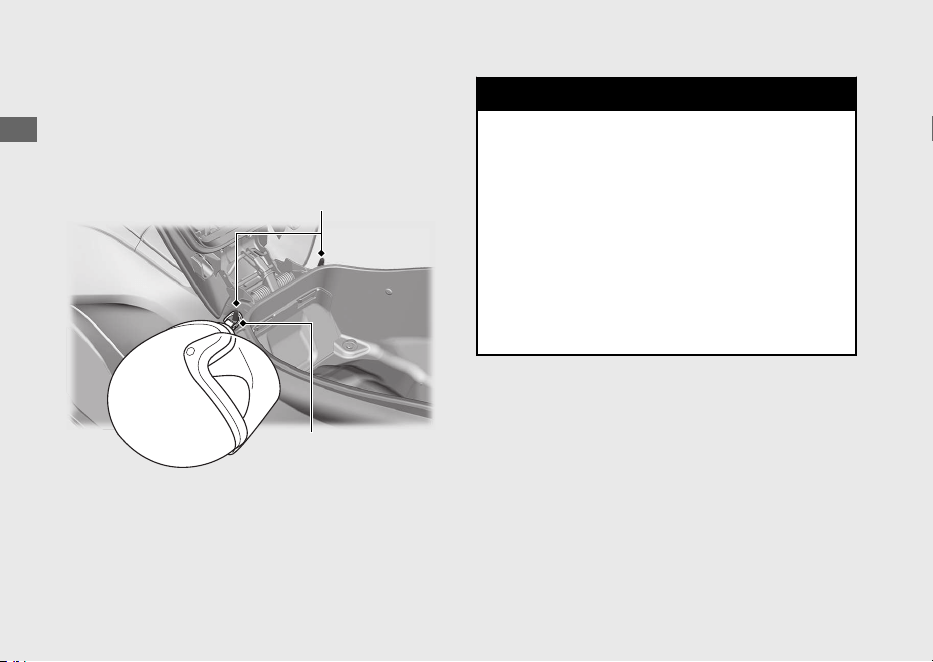
Helmet Holders
The helmet holders are located under the
seat.
u Use the helmet holders only when parked.
3WARNING
Riding with a helmet attached to the
holder can interfere with your ability to
safely operate the vehicle and could
lead to a crash in which you can be
seriously hurt or killed.
Use the helmet holder only while
parked. Do not ride with a helmet
secured by the holder.
20220603164939_32K1ZR000_eng_BOOK Page 73 Friday, June 03 2022 16:52:56 JST
Operation Guide
70
Storage Equipment (Continued)
Helmet holders
Helmet D-ring
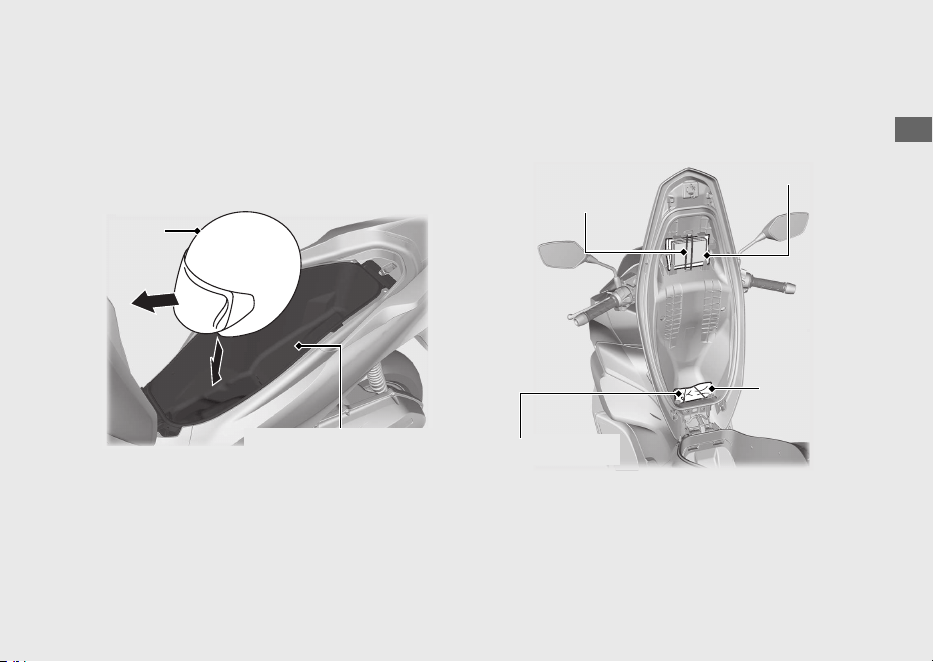
A helmet can be stored in the centre
compartment.
Set in the front of the helmet forward.
u Some helmets may not fit in the
compartment due to their size or design.
Centre compartment
Never exceed the maximum weight limit.
Maximum Weight: 10 kg (22 lb)
u Do not store any items that are flammable
or susceptible to heat damage.
u Do not store valuables or fragile articles.
Tool Kit/Document Bag
The tool kit and document bag are located
underside of the seat by the rubber strap.
20220603164939_32K1ZR000_eng_BOOK Page 74 Friday, June 03 2022 16:52:56 JST
Operation Guide
71
Continued
Helmet
Centre compartment
Rubber strap
Tool kit
Document bag
Rubber strap
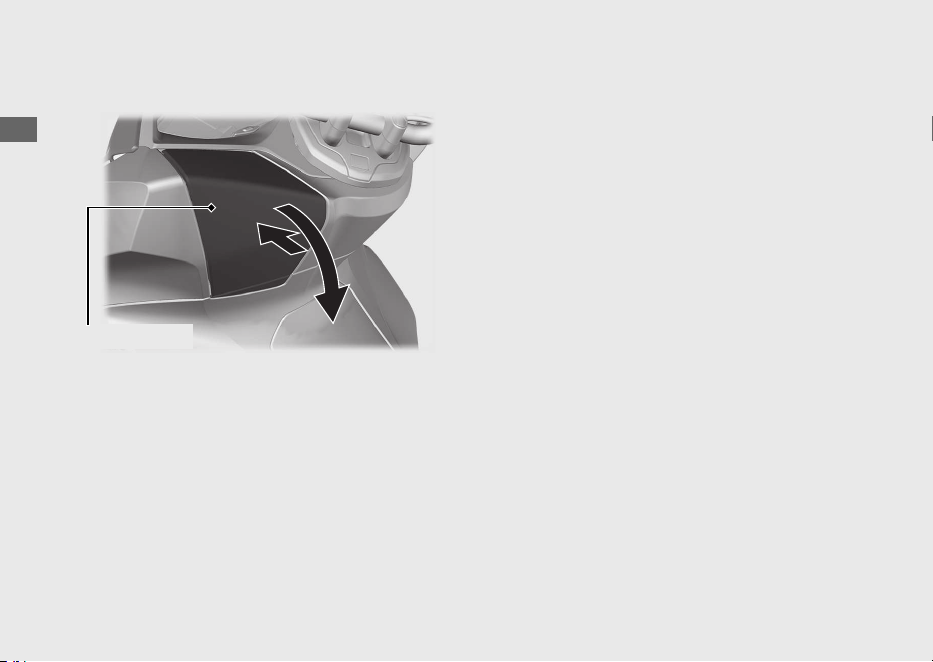
Front Box
#
Open
Push the front box lid, then open the front
box lid.
#
Close
Close the front box lid by pressing the front
box lid.
The maximum allowable load in the front box
shall be no more than
1.0 kg (2.2 lb).
Make sure that the front box lid is closed
securely.
u Do not store valuables or fragile articles.
20220603164939_32K1ZR000_eng_BOOK Page 75 Friday, June 03 2022 16:52:56 JST
Operation Guide
72
Storage Equipment (Continued)
Front box lid
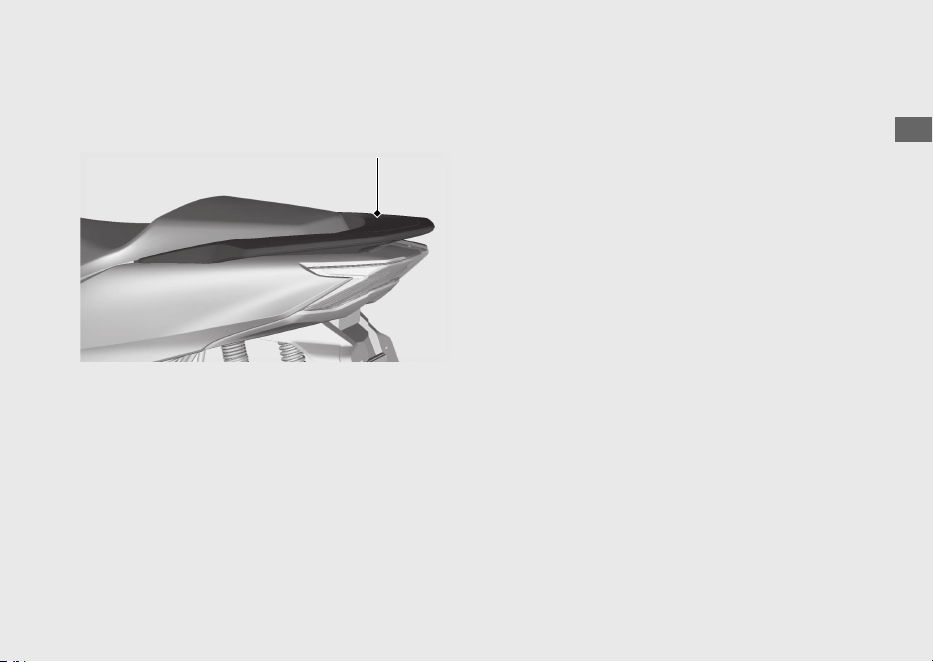
Rear Carrier
Never exceed the maximum weight limit.
Maximum Weight: 5 kg (11 lb)
20220603164939_32K1ZR000_eng_BOOK Page 76 Friday, June 03 2022 16:52:56 JST
Operation Guide
73
Rear carrier

Importance of Maintenance ........................... P. 75
Maintenance Schedule.....................................P.
76
Maintenance Fundamentals ...........................P. 79
Tools .....................................................................P. 88
Removing & Installing Body Components..P. 89
Battery....................................................................P. 89
Battery Cover........................................................P. 90
Front Lid.................................................................P. 91
Engine Oil............................................................P. 92
Coolant.................................................................P. 94
Brakes...................................................................P. 96
Side Stand ........................................................... P. 98
Throttle ................................................................P. 99
Other Replacement.........................................P. 100
Replacing the Honda SMART Key Battery .. P. 100
20220603164939_32K1ZR000_eng_BOOK Page 77 Friday, June 03 2022 16:52:56 JST
Please read “Importance of Maintenance” and “Maintenance Fundamentals” carefully
before attempting any maintenance. Refer to “Specifications” for service data.
Maintenance

Importance of Maintenance
Importance of Maintenance
Keeping your vehicle well-maintained is
absolutely essential to your safety and to
protect your investment, obtain maximum
performance, avoid breakdowns, and reduce air
pollution. Maintenance is the owner's
responsibility. Be sure to inspect your vehicle
before each ride and perform the periodic
checks specified in the Maintenance Schedule.
2 P. 76
3WARNING
Improperly maintaining your vehicle or
failing to correct a problem before you
ride can cause a crash in which you can
be seriously hurt or killed.
Always follow the inspection and
maintenance recommendations and
schedules in this owner's manual.
Maintenance Safety
Always read the maintenance instructions
before you begin each task and make sure that
you have the tools, parts, and skills required.
We cannot warn you of every conceivable
hazard that can arise in performing
maintenance. Only you can decide whether or
not you should perform a given task.
Follow these guidelines when performing
maintenance.
● Stop the engine and turn the ignition switch
to the
(Off) position.
● Place your vehicle on a firm, level surface
using the side stand, centre stand or a
maintenance stand to provide support.
● Allow the engine, muffler, brakes, and other
high-temperature parts to cool before
servicing as you can get burned.
● Run the engine only when instructed, and
do so in a well-ventilated area.
20220603164939_32K1ZR000_eng_BOOK Page 78 Friday, June 03 2022 16:52:56 JST
Maintenance
75

Maintenance Schedule
The maintenance schedule specifies the
maintenance requirements necessary to ensure
safe, dependable performance, and proper
emission control.
Maintenance work should be performed in
accordance with Honda's standards and
specifications by properly trained and equipped
technicians. Your dealer meets all of these
requirements. Keep an accurate record of
maintenance to help ensure that your vehicle is
properly maintained.
Make sure that whomever performs the
maintenance completes this record.
All scheduled maintenance is considered a
normal owner operating cost and will be
charged to you by your dealer. Retain all
receipts. If you sell the vehicle, these receipts
should be transferred with the vehicle to the
new owner.
Honda recommends that your dealer should
road test your vehicle after each periodic
maintenance is carried out.
20220603164939_32K1ZR000_eng_BOOK Page 79 Friday, June 03 2022 16:52:56 JST
Maintenance
76
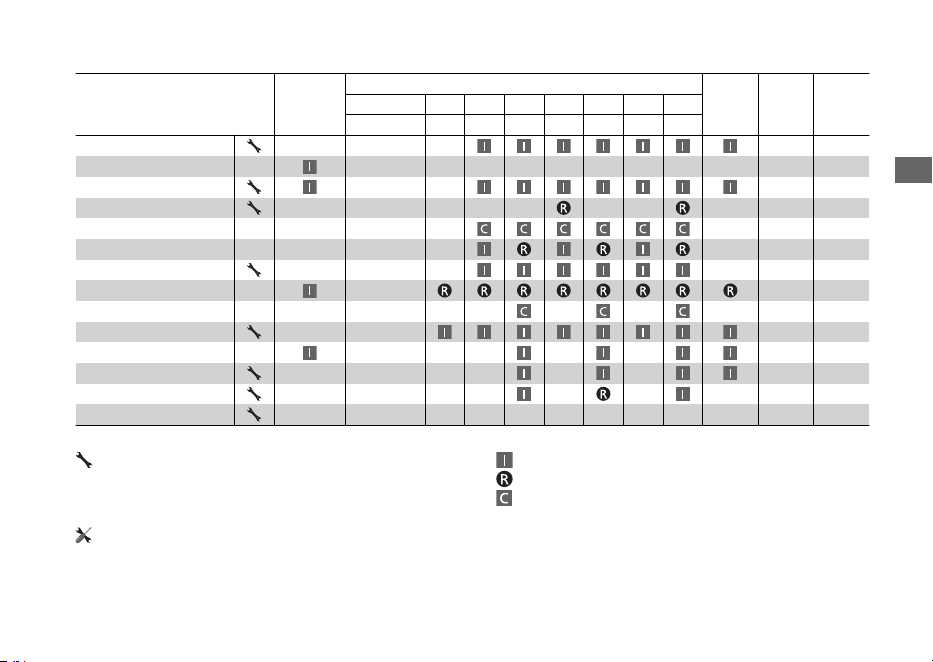
Items
Pre-ride
Check
2 P. 79
Frequency
*1
Annual
Check
Regular
Replace
Refer to
page
× 1,000 km 1 6 12 18 24 30 36
× 1,000 mi 0.6 4 8 12 16 20 24
Fuel Line –
Fuel Level 65
Throttle Operation 99
Air Cleaner
*2
–
Crankcase Breather
*3
–
Spark Plug –
Valve Clearance –
Engine Oil –
Engine Oil Strainer Screen
–
Engine Idle Speed –
Radiator Coolant
*4
3 Years 94
Cooling System –
Drive Belt –
Final Drive Oil
*4
2 Years –
Maintenance Level Maintenance Legend
:
Intermediate. We recommend service by your
dealer, unless you have the necessary tools and are
mechanically skilled.
Procedures are provided in an official Honda Shop Manual.
:
:
:
Inspect (clean, adjust, lubricate, or replace, if necessary)
Replace
Clean
:
Technical. In the interest of safety, have your vehicle
serviced by your dealer.
20220603164939_32K1ZR000_eng_BOOK Page 80 Friday, June 03 2022 16:52:56 JST
Maintenance Schedule
Maintenance
77
Continued
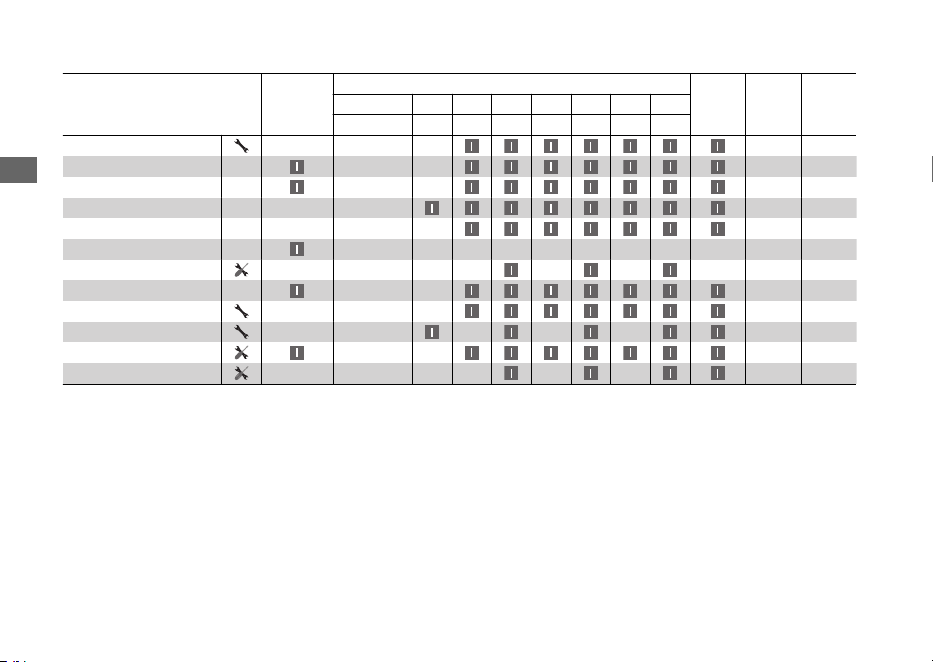
Items
Pre-ride
Check
2 P. 79
Frequency
*1
Annual
Check
Regular
Replace
Refer to
page
× 1,000 km 1 6 12 18 24 30 36
× 1,000 mi 0.6 4 8 12 16 20 24
Battery 89
Brake Fluid
*4
2 Years 96
Brake Pads Wear 97
Brake System 79
Headlight Aim –
Lights/Horn –
Clutch Shoes Wear –
Side Stand 98
Suspension –
Nuts, Bolts, Fasteners –
Wheels/Tyres 85
Steering Head Bearings –
Notes:
*
1 : At higher odometer reading, repeat at the frequency interval established here.
*
2 : Service more frequently when riding in unusually wet or dusty areas.
*
3 : Service more frequently when riding in rain or at full throttle.
*
4 : Replacement requires mechanical skill.
20220603164939_32K1ZR000_eng_BOOK Page 81 Friday, June 03 2022 16:52:56 JST
Maintenance Schedule
Maintenance
78

Maintenance Fundamentals
Pre-ride Inspection
To ensure safety, it is your responsibility to
perform a pre-ride inspection and make sure
that any problem you find is corrected. A pre-
ride inspection is a must, not only for safety, but
because having a breakdown, or even a flat
tyre, can be a major inconvenience.
Check the following items before you get on
your vehicle:
● Fuel level - Fill fuel tank when necessary
2 P. 65
● Throttle - Check for smooth opening and
full closing in all steering positions 2 P. 99
● Engine oil level - Add engine oil if necessary.
Check for leaks 2 P. 92
● Coolant level - Add coolant if required.
Check for leaks 2 P. 94
● Brakes - Check operation;
Front and Rear: check brake fluid level and
pads wear 2 P. 96, 2 P. 97
● Lights and horn - Check that lights,
indicators and horn function properly
● Side stand ignition cut-off system - Check
for proper function 2 P. 98
● Wheels and tyres - Check condition, air
pressure and adjust if necessary 2 P. 85
20220603164939_32K1ZR000_eng_BOOK Page 82 Friday, June 03 2022 16:52:56 JST
Maintenance
79
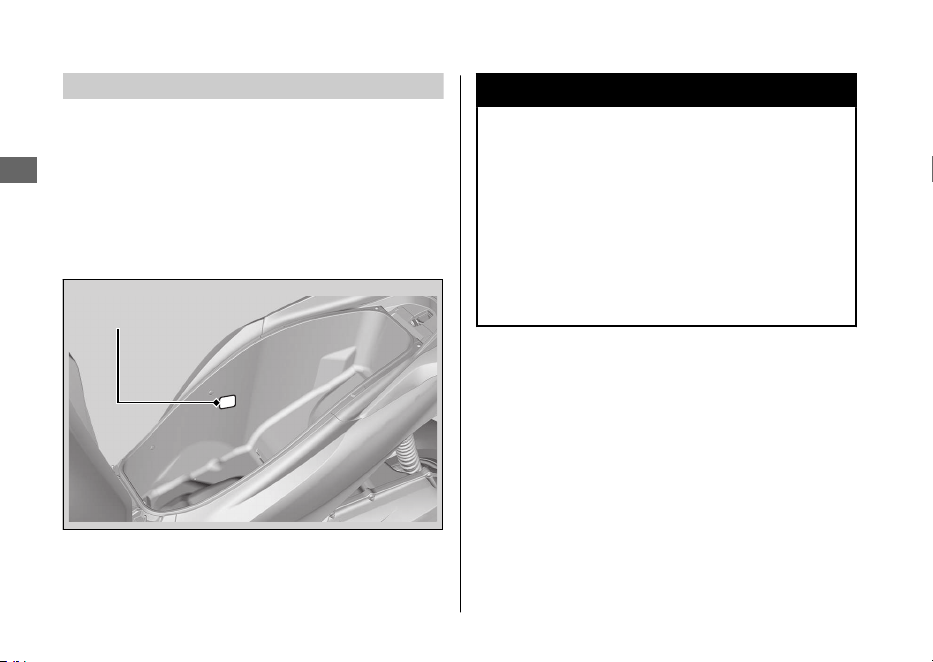
Replacing Parts
Always use Honda Genuine Parts or their
equivalents to ensure reliability and safety.
When ordering coloured components, specify
the model name, colour, and code mentioned
on the colour label.
The colour label is attached to the centre
compartment. 2 P. 71
3WARNING
Installing non-Honda parts may make
your vehicle unsafe and cause a crash in
which you can be seriously hurt or
killed.
Always use Honda Genuine Parts or
equivalents that have been designed
and approved for your vehicle.
20220603164939_32K1ZR000_eng_BOOK Page 83 Friday, June 03 2022 16:52:56 JST
Maintenance Fundamentals
Maintenance
80
Colour label
Battery
Your vehicle has a maintenance-free type
battery. You do not have to check the battery
electrolyte level or add distilled water. Clean the
battery terminals if they become dirty or
corroded.
Do not remove the battery cap seals. There is
no need to remove the cap when charging.
NOTICE
Your battery is a maintenance-free type and can be
permanently damaged if the cap strip is removed.
NOTICE
An improperly disposed of battery can be
harmful to the environment and human health.
Always confirm local regulations for proper
battery disposal instruction.
#
What to do in an emergency
If any of the following occur, immediately see
your doctor.
● Electrolyte splashes into your eyes:
uWash your eyes repeatedly with cool
water for at least 15 minutes. Using water
under pressure can damage your eyes.
● Electrolyte splashes onto your skin:
uRemove affected clothing and wash your
skin thoroughly using water.
● Electrolyte splashes into your mouth:
uRinse mouth thoroughly with water, and
do not swallow.
3WARNING
The battery gives off explosive
hydrogen gas during normal operation.
A spark or flame can cause the battery
to explode with enough force to kill or
seriously hurt you.
Wear protective clothing and a face
shield, or have a skilled mechanic do
the battery servicing.
20220603164939_32K1ZR000_eng_BOOK Page 84 Friday, June 03 2022 16:52:56 JST
Maintenance Fundamentals
Maintenance
81
Continued

#
Cleaning the Battery Terminals
1.
Remove the battery. 2 P. 89
2.
If the terminals are starting to corrode and
are coated with a white substance, wash
with warm water and wipe clean.
3.
If the terminals are heavily corroded, clean
and polish the terminals with a wire brush or
sandpaper. Wear safety glasses.
4.
After cleaning, reinstall the battery.
The battery has a limited life span. Consult your
dealer about when you should replace the
battery. Always replace the battery with another
maintenance-free battery of the same type.
NOTICE
Installing non-Honda electrical accessories can
overload the electrical system, discharging the
battery and possibly damaging the system.
Fuses
Fuses protect the electrical circuits on your
vehicle. If something electrical on your vehicle
stops working, check for and replace any blown
fuses. 2 P. 121
#
Inspecting and Replacing Fuses
Turn the ignition switch to the
(Off) position
to remove and inspect fuses. If a fuse is blown,
replace with a fuse of the same rating. For fuse
ratings, see “Specifications.” 2 P. 140
20220603164939_32K1ZR000_eng_BOOK Page 85 Friday, June 03 2022 16:52:56 JST
Maintenance Fundamentals
Maintenance
82
Blown fuse
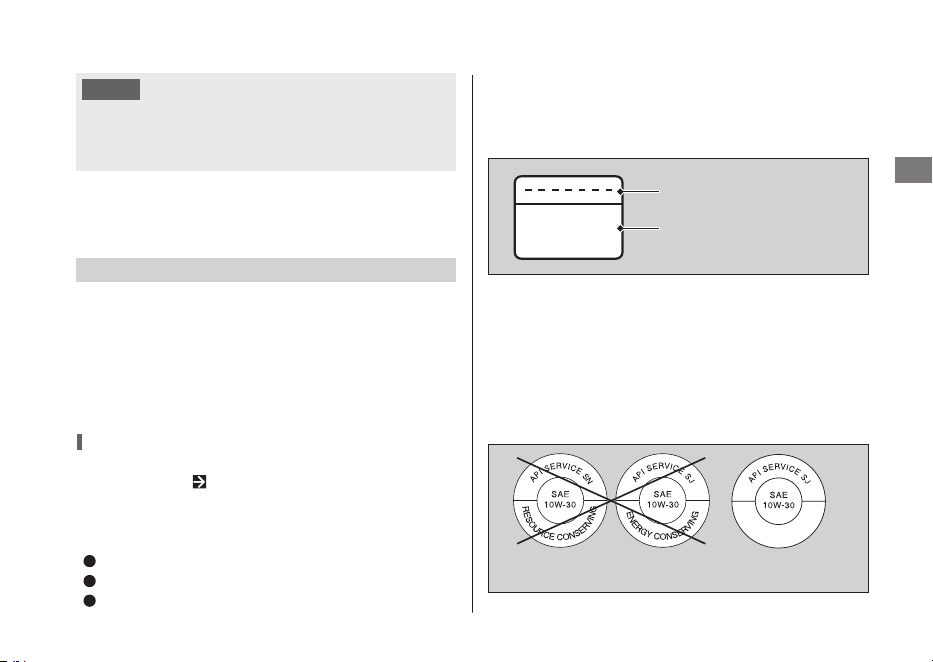
MB
NOTICE
Replacing a fuse with one that has a higher
rating greatly increases the chance of damage to
the electrical system.
If a fuse fails repeatedly, you likely have an
electrical fault. Have your vehicle inspected by
your dealer.
Engine Oil
Engine oil consumption varies and oil quality
deteriorates according to riding conditions and
time elapsed.
Check the engine oil level regularly, and add the
recommended engine oil if necessary. Dirty oil or
old oil should be changed as soon as possible.
Selecting the Engine Oil
For recommended engine oil, see
“Specifications.” P. 139
If you use non-Honda engine oil, check the label
to make sure that the oil satisfies all of the
following standards:
JASO T 903 standard
*1 *2
: MB
SAE standard
*3
: 10W-30
API classification
*4
: SJ or higher
*1.
The JASO T 903 standard is an index for engine oils
for 4-stroke motorcycle engines. There are two
classes: MA and MB. For example, the following label
shows the MB classification.
*3.
The SAE standard grades oils by their viscosity.
*2.
For Colombia market use MA oil class.
*4.
The API classification specifies the quality and
performance rating of engine oils. Use SJ or higher
oils, excluding oils marked as “Energy Conserving”
or “Resource Conserving” on the circular API
service symbol.
20220603164939_32K1ZR000_eng_BOOK Page 86 Friday, June 03 2022 16:52:56 JST
Maintenance Fundamentals
Maintenance
83
Oil code
Oil classification
Not recommended Recommended
Brake Fluid
Do not add or replace brake fluid, except in an
emergency. Use only fresh brake fluid from a
sealed container. If you do add fluid, have the
brake system serviced by your dealer as soon as
possible.
NOTICE
Brake fluid can damage plastic and painted
surfaces.
Wipe up spills immediately and wash thoroughly.
Recommended brake fluid:
Honda DOT 3 or DOT 4 Brake Fluid
or
equivalent
Recommended Coolant
Pro Honda HP Coolant is a pre-mixed solution
of antifreeze and distilled water.
Concentration:
50% antifreeze and 50% distilled water
A concentration of antifreeze below 40% will
not provide proper corrosion and cold
temperature protection.
A concentration of up to 60% will provide better
protection in colder climates.
NOTICE
Using coolant not specified for aluminium engines
or tap/mineral water can cause corrosion.
20220603164939_32K1ZR000_eng_BOOK Page 87 Friday, June 03 2022 16:52:56 JST
Maintenance Fundamentals
Maintenance
84

Crankcase Breather
Service more frequently when riding in rain, at
full throttle, or after the vehicle is washed or
overturned. Service if the deposit level can be
seen in the transparent section of the drain
tube.
If the drain tube overflows, the air filter may
become contaminated with engine oil, causing
poor engine performance.
Tyres (Inspecting/Replacing)
#
Checking the Air Pressure
Visually inspect your tyres and use an air
pressure gauge to measure the air pressure at
least once a month or any time you think the
tyres look low. Always check air pressure when
your tyres are cold.
#
Inspecting for Damage
Inspect the tyres for
cuts, slits, or cracks that
expose fabric or cords,
or nails or other
foreign objects
embedded in the side
of the tyre or the tread.
Also inspect for any unusual bumps or bulges in
the side walls of the tyres.
#
Inspecting for Abnormal Wear
Inspect the tyres for
signs of abnormal wear
on the contact surface.
20220603164939_32K1ZR000_eng_BOOK Page 88 Friday, June 03 2022 16:52:56 JST
Maintenance Fundamentals
Maintenance
85
Continued
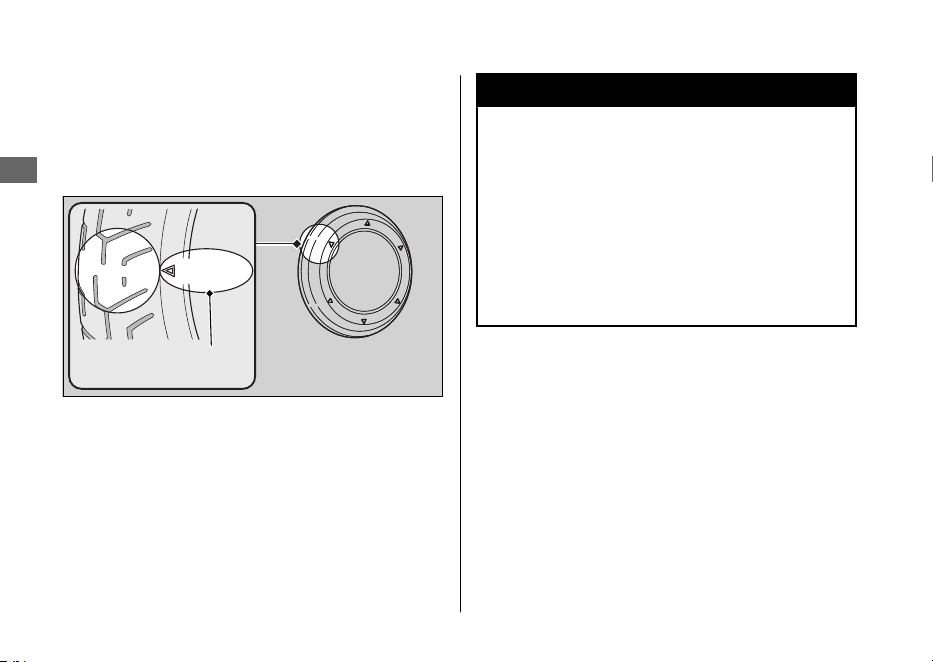
#
Inspecting Tread Depth
Inspect the tread wear indicators. If they
become visible, replace the tyres immediately.
For safe riding, you should replace the tyres
when the minimum tread depth is reached.
3WARNING
Riding on tyres that are excessively
worn or improperly inflated can cause a
crash in which you can be seriously hurt
or killed.
Follow all instructions in this owner's
manual regarding tyre inflation and
maintenance.
20220603164939_32K1ZR000_eng_BOOK Page 89 Friday, June 03 2022 16:52:56 JST
Maintenance Fundamentals
Maintenance
86
Wear indicator
location mark
or TWI
Have your tyres replaced by your dealer.
For recommended tyres, air pressure, and
minimum tread depth, see “Specifications.”
2 P. 139
Follow these guidelines whenever you replace
tyres:
● Use the recommended tyres or their
equivalents of the same size, construction,
speed rating, and load range.
● Do not install a tube inside a tubeless tyre
on this vehicle. Excessive heat build-up can
cause the tube to burst.
● Use only tubeless tyres on this vehicle.
The rims are designed for tubeless tyres,
and during hard acceleration or braking, a
tube-type tyre could slip on the rim and
cause the tyre to rapidly deflate.
3WARNING
Installing improper tyres on your
vehicle can adversely affect handling
and stability, and can cause a crash in
which you can be seriously hurt or
killed.
Always use the size and type of tyres
recommended in this owner's manual.
20220603164939_32K1ZR000_eng_BOOK Page 90 Friday, June 03 2022 16:52:56 JST
Maintenance Fundamentals
Maintenance
87

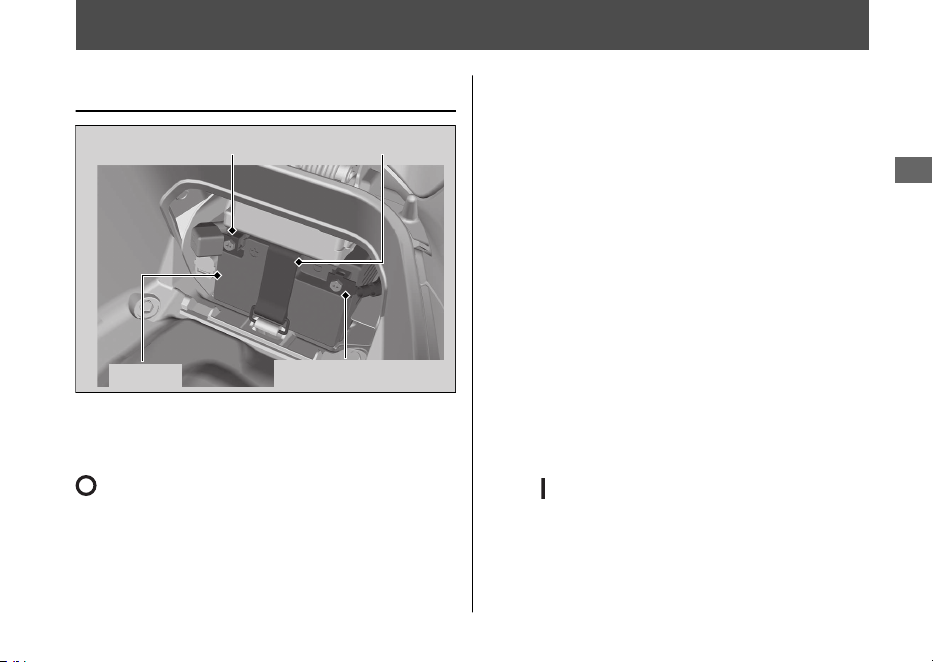
Removing & Installing Body Components
Battery
#
Removal
Make sure the ignition switch is in the
(Off) position.
1.
Remove the battery cover. 2 P. 90
2.
Unhook the rubber strap.
3.
Disconnect the negative - terminal from
the battery.
4.
Disconnect the positive + terminal from
the battery.
5.
Remove the battery, taking care not to
drop the terminal nuts.
#
Installation
Install the parts in the reverse order of removal.
Always connect the positive + terminal first.
Make sure bolts and nuts are tight.
Make sure the clock information is correct after
the battery is reconnected. 2 P. 24
The anti-theft alarm system will be deactivated
if the battery is disconnected. The system will
remain off when the battery is reconnected.
To activate the system, turn the ignition switch
to the (On) position once.
For proper handling of the battery, see
“Maintenance Fundamentals.” 2 P. 81
“Battery Goes Dead.” 2 P. 120
20220603164939_32K1ZR000_eng_BOOK Page 92 Friday, June 03 2022 16:52:56 JST
Maintenance
89
Positive terminal Rubber strap
Battery
Negative terminal

Battery Cover
#
Removal
1.
Open the seat. 2 P. 69
2.
Press the tabs and remove the battery
cover.
#
Installation
Install the parts in the reverse order of
removal.
20220603164939_32K1ZR000_eng_BOOK Page 93 Friday, June 03 2022 16:52:56 JST
Removing & Installing Body Components u Battery Cover
Maintenance
90
Tabs
Battery cover
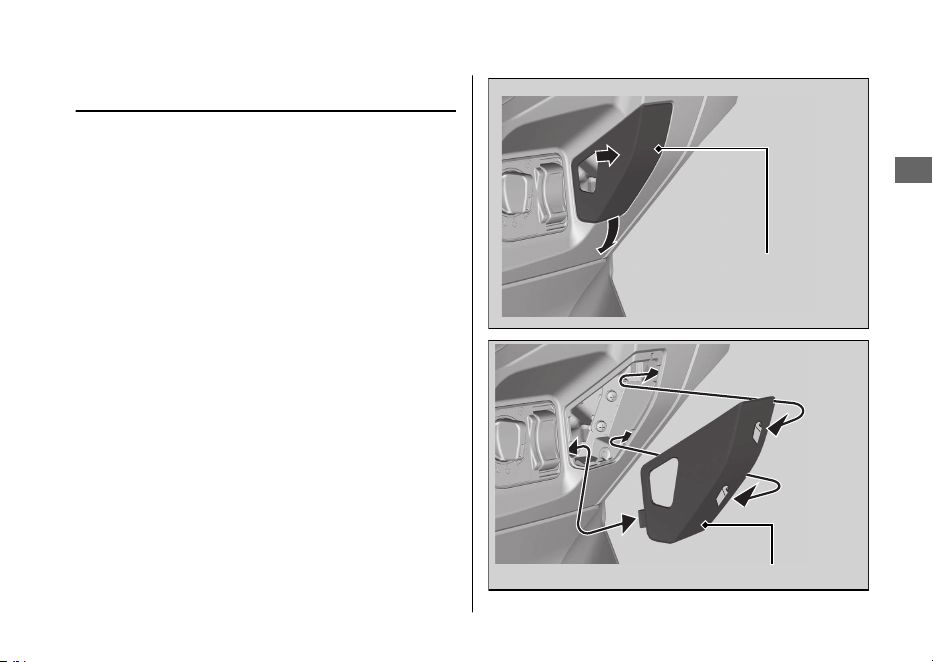
Front Lid
#
Removal
Pull out the front lid backward while pushing
the side of the front lid.
#
Installation
Install the part in the reverse order of
removal.
Make sure that all tabs are installed securely
in position.
20220603164939_32K1ZR000_eng_BOOK Page 94 Friday, June 03 2022 16:52:56 JST
Removing & Installing Body Components u Front Lid
Maintenance
91
Front lid
Front lid
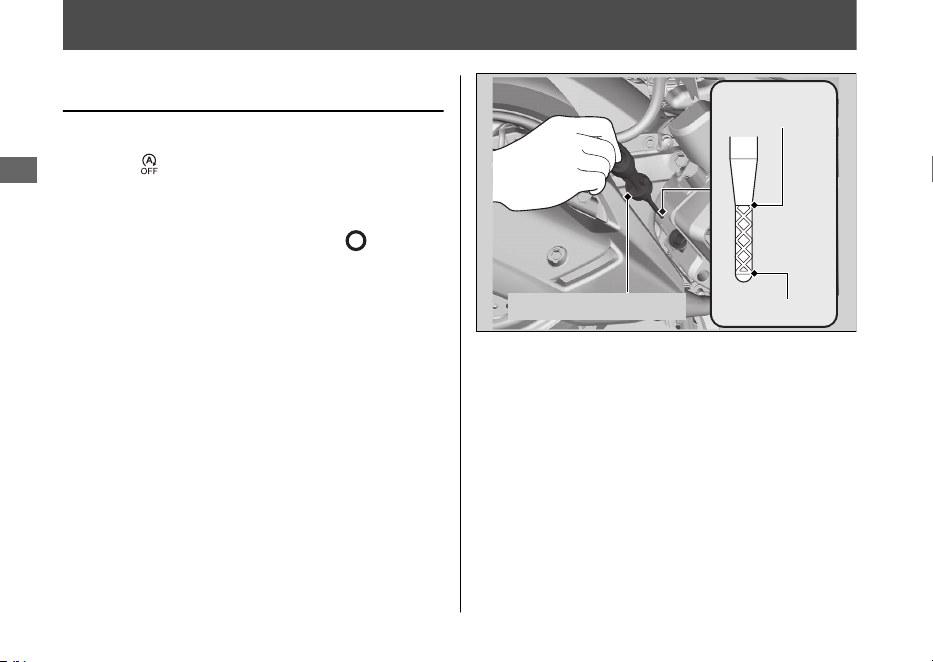
Engine Oil
Checking the Engine Oil
Check the engine oil with the Idling Stop
switch at
(Idling).
1.
If the engine is cold, idle the engine for 3
to 5 minutes.
2.
Turn the ignition switch to the
(Off)
position and wait for 2 to 3 minutes.
3.
Place your vehicle on its centre stand on a
firm, level surface.
4.
Remove the oil fill cap/dipstick and wipe it
clean.
5.
Insert the oil fill cap/dipstick until it seats,
but don't screw it in.
6.
Check that the oil level is between the
upper level and lower level marks on the
oil fill cap/dipstick.
7.
Securely install the oil fill cap/dipstick.
20220603164939_32K1ZR000_eng_BOOK Page 95 Friday, June 03 2022 16:52:56 JST
Maintenance
92
Upper level
Lower level
Oil fill cap/dipstick
Adding Engine Oil
If the engine oil is below or near the lower
level mark, add the recommended engine oil.
2 P. 83, 2 P. 139
1.
Remove the oil fill cap/dipstick. Add the
recommended oil until it reaches the
upper level mark.
u Place your vehicle on its centre stand
on a firm, level surface when checking
the oil level.
u Do not overfill above the upper level
mark.
u Make sure no foreign objects enter the
oil filler opening.
u Wipe up any spills immediately.
2.
Securely reinstall the oil fill cap/dipstick.
NOTICE
Overfilling with oil or operating with insufficient
oil can cause damage to your engine. Do not mix
different brands and grades of oil.
For the recommended oil and oil selection
guidelines, see “Maintenance Fundamentals.”
2 P. 83
20220603164939_32K1ZR000_eng_BOOK Page 96 Friday, June 03 2022 16:52:56 JST
Engine Oil u Adding Engine Oil
Maintenance
93
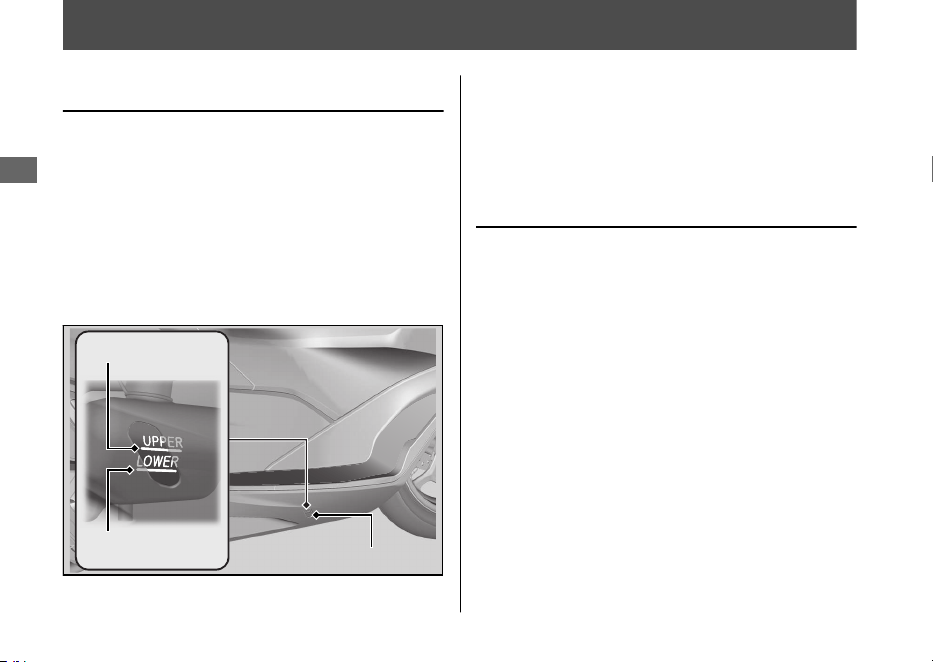
Coolant
Checking the Coolant
Check the coolant level in the reserve tank
while the engine is cold.
1.
Place your vehicle on its centre stand on a
firm, level surface.
2.
Check that the coolant level is between
the UPPER level and LOWER level marks
on the reserve tank.
If the coolant level is dropping noticeably or
the reserve tank is empty, you likely have a
serious leak. Have your vehicle inspected by
your dealer.
Adding Coolant
If the coolant level is below the LOWER level
mark, add the recommended coolant
(2 P. 84) until the level reaches the UPPER
level mark.
Add fluid only from the reserve tank cap and
do not remove the radiator cap.
1.
Pull the floor mat off.
2.
Remove the reserve tank lid by inserting a
flat head screwdriver covered with a
protective cloth into the slit on the right
side floor.
20220603164939_32K1ZR000_eng_BOOK Page 97 Friday, June 03 2022 16:52:56 JST
Maintenance
94
UPPER level mark
LOWER level mark
Reserve tank
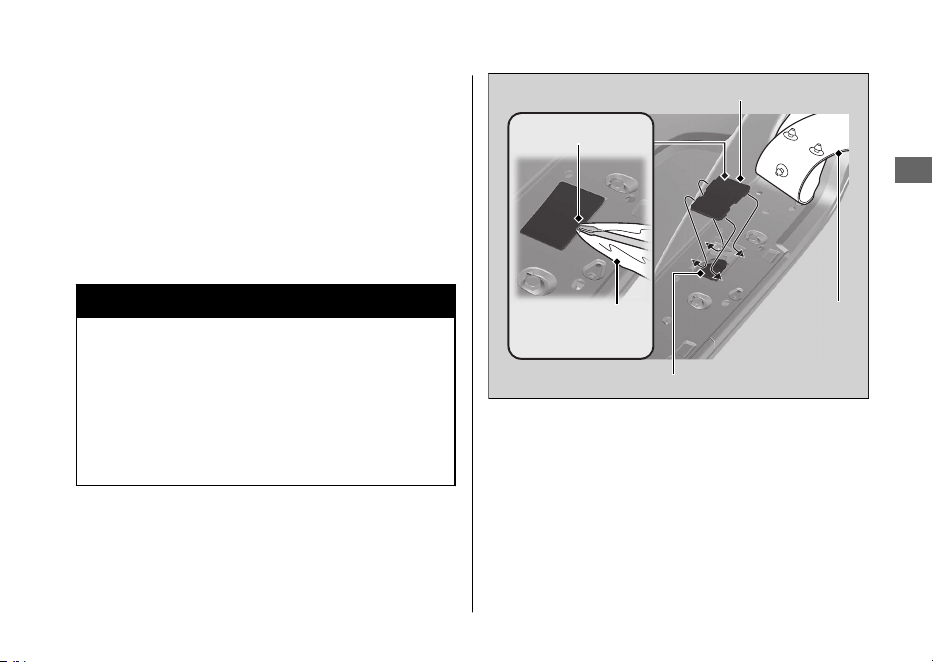
3.
Remove the reserve tank cap and add
fluid while monitoring the coolant level.
u Do not overfill above the UPPER level
mark.
u Make sure no foreign objects enter the
reserve tank opening.
4.
Securely reinstall the reserve tank cap.
5.
Install the reserve tank lid and floor mat.
3WARNING
Removing the radiator cap while the
engine is hot can cause the coolant to
spray out, potentially scalding you.
Always let the engine and radiator cool
down before removing the radiator cap.
20220603164939_32K1ZR000_eng_BOOK Page 98 Friday, June 03 2022 16:52:56 JST
Coolant u Adding Coolant
Maintenance
95
Reserve tank cap
Reserve tank lid
Floor mat
Slit
Protective
cloth

Brakes
Checking Brake Fluid
1.
Place your vehicle in an upright position
on a firm, level surface.
2.
Check that the brake fluid reservoir is
horizontal and that the fluid level is above
the LWR mark.
If the brake fluid level in the reservoir is
below the LWR mark or the brake lever
freeplay becomes excessive, inspect the
brake pads for wear.
If the brake pads are not worn, you most
likely have a leak. Have your vehicle
inspected by your dealer.
20220603164939_32K1ZR000_eng_BOOK Page 99 Friday, June 03 2022 16:52:56 JST
Maintenance
96
Front
Rear
Front brake fluid
reservoir
LWR mark
LWR mark
Rear brake fluid
reservoir
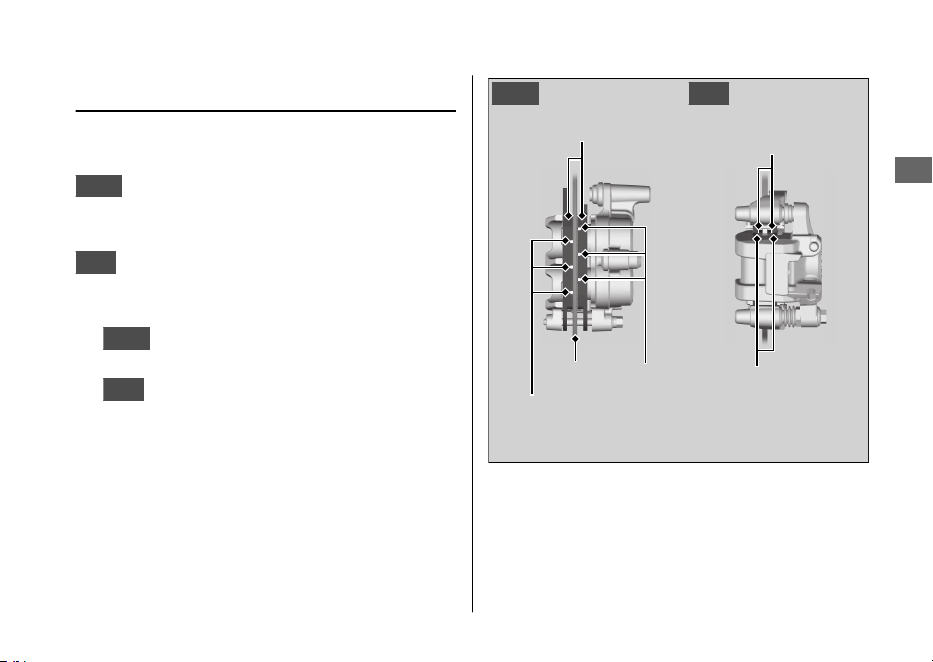
Inspecting the Brake Pads
Check the condition of the brake pad wear
indicators.
Front
The pads need to be replaced if a
brake pad is worn to the bottom of the
indicator.
Rear
The pads need to be replaced if a brake
pad is worn to the indicator.
1.
Front
Inspect the brake pads from in front
of the brake caliper.
2.
Rear
Inspect the brake pads from the rear
right of the vehicle.
If necessary, have the pads replaced by your
dealer.
Always replace both left and right brake pads
at the same time.
20220603164939_32K1ZR000_eng_BOOK Page 100 Friday, June 03 2022 16:52:56 JST
Brakes u Inspecting the Brake Pads
Maintenance
97
Brake pads
Wear
indicators
Disc
Wear
indicators
RearFront
Brake pads
Wear
indicators
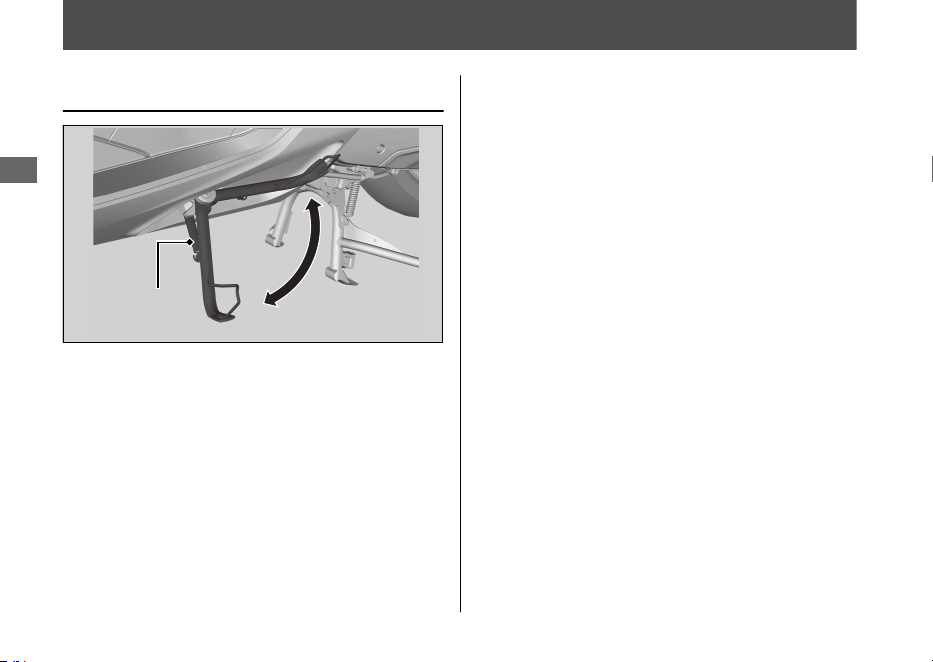
Side Stand
Checking the Side Stand
1.
Place your vehicle on its centre stand on a
firm, level surface.
2.
Check that the side stand operates
smoothly. If the side stand is stiff or
squeaky, clean the pivot area and
lubricate the pivot bolt with clean grease.
3.
Check the spring for damage or loss of
tension.
4.
Sit on the vehicle and raise the side stand.
5.
Start the engine.
6.
Lower the side stand all the way. The
engine should stop as you lower the side
stand. If the engine doesn't stop, have
your vehicle inspected by your dealer.
20220603164939_32K1ZR000_eng_BOOK Page 101 Friday, June 03 2022 16:52:56 JST
Maintenance
98
Side stand
spring
Throttle
Checking the Throttle
With the engine off, check that the throttle
rotates smoothly from fully closed to fully
open in all steering positions and throttle
freeplay is correct. If the throttle does not
move smoothly or close automatically, or if
the cable is damaged, have the vehicle
inspected by your dealer.
Freeplay at the throttle grip flange:
2 - 6 mm (0.1 - 0.2 in)
20220603164939_32K1ZR000_eng_BOOK Page 102 Friday, June 03 2022 16:52:56 JST
Maintenance
99
Freeplay
Flange
Other Replacement
Replacing the
Honda SMART Key Battery
If the Honda SMART Key indicator flashes 5
times when the ignition switch is turned
(On), or the operating range becomes
unstable, replace the battery as soon as
possible.
We recommend to see your dealer for this
service.
Battery type: CR2032 / CR2032H
1.
Remove the upper case by inserting a
coin or a flat head screwdriver covered
with a protective cloth into the slit.
u Wrap a coin or a screwdriver with a
protective cloth to prevent scratching
the Honda SMART Key.
u Do not touch the circuit or terminal.
This may cause problems.
u Be careful to avoid scratching the
waterproof covering or allowing dust
to enter.
u Do not forcibly dismantle the Honda
SMART Key body.
20220603164939_32K1ZR000_eng_BOOK Page 103 Friday, June 03 2022 16:52:56 JST
Maintenance
100

2.
Replace the old battery with a new
battery with the negative - side facing
up.
3.
Snap the two halves of the Honda SMART
Key back together.
u Make sure that upper and lower cases
are set in the right position.
3WARNING
Chemical Burn Hazard: do not
swallow battery.
If swallowed, the battery can cause
severe internal burns and even death.
• Keep battery away from children and
battery compartment securely
closed.
• If the battery compartment does not
close securely, stop using the
product and keep it away from
children.
• Immediately seek medical attention
if a child may have swallowed
battery.
20220603164939_32K1ZR000_eng_BOOK Page 104 Friday, June 03 2022 16:52:56 JST
Other Replacement u Replacing the Honda SMART Key Battery
Maintenance
101
Upper case
Battery
Lower case
Slit
Protective
cloth

Engine Will Not Start......................................P. 103
Overheating (High coolant temperature
indicator is on)............................................... P.
104
Warning Indicators On or Flashing............. P. 105
PGM-FI (Programmed Fuel Injection)
Malfunction Indicator Lamp (MIL)............... P. 105
Battery Charging Condition indicator .......... P. 105
ABS (Anti-lock Brake System) Indicator.......P. 106
Torque Control Indicator................................. P. 107
Honda SMART Key Indicator..........................P. 108
Other Warning Indications ...........................P. 109
Fuel Gauge Failure Indication.........................P. 109
When the Idling Stop System Does Not
Operate Properly...........................................P. 110
Idling Stop Indicator Does Not Come On ..P. 110
Engine is Not Stopped by the Idling Stop System
While the Idling Stop Indicator is On.........P. 111
Engine Does Not Start Even If the Throttle is
Opened ............................................................. P. 112
When the Honda SMART Key System Does Not
Operate Properly...........................................P. 113
Unlock the Seat in an Emergency ...............P. 115
Unlock the Ignition Switch in an
Emergency ......................................................P. 116
Tyre Puncture...................................................P. 119
Electrical Trouble.............................................P. 120
Battery Goes Dead............................................P. 120
Burned-out Light Bulb .....................................P. 120
Blown Fuse..........................................................P. 121
Unstable Engine Operation Occurs
Intermittently .................................................P. 122
20220603164939_32K1ZR000_eng_BOOK Page 105 Friday, June 03 2022 16:52:56 JST
Troubleshooting

Engine Will Not Start
Starter Motor Operates But
Engine Does Not Start
Check the following items:
● Check the correct engine starting
sequence. 2 P. 60
● Check that there is petrol in the fuel tank.
● Check if the PGM-FI malfunction indicator
lamp (MIL) is on.
u If the indicator lamp is on, contact
your dealer as soon as possible.
Starter Motor Does Not
Operate
Check the following items:
● Check the correct engine starting
sequence. 2 P. 60
● Check for a blown fuse. 2 P. 121
● Check for a loose battery connection
(2 P. 89) or battery terminal corrosion
(2 P. 81).
● Check the condition of the battery.
2 P. 120
If the problem continues, have your vehicle
inspected by your dealer.
20220603164939_32K1ZR000_eng_BOOK Page 106 Friday, June 03 2022 16:52:56 JST
Troubleshooting
103
Overheating (High coolant temperature indicator is on)
The engine is overheating when the following
occurs:
● High coolant temperature indicator
comes on.
● Acceleration becomes sluggish.
If this occurs, pull safely to the side of the
road and perform the following procedure.
Extended fast idling may cause the high
coolant temperature indicator to come on.
NOTICE
Continuing to ride with an overheated engine
can cause serious damage to the engine.
1.
Stop the engine using the ignition switch.
2.
Allow the engine to cool with the ignition
switch in the
(Off) position.
3.
After the engine has cooled, inspect the
radiator hose and check if there is a leak.
2 P. 94
If there is a leak:
Do not start the engine. Transport your
vehicle to your dealer.
4.
Check the coolant level in the reserve
tank. 2 P. 94
u Add coolant as necessary.
5.
If 1-4 check normal, you may continue
riding, but closely monitor the high
coolant temperature indicator.
20220603164939_32K1ZR000_eng_BOOK Page 107 Friday, June 03 2022 16:52:56 JST
Troubleshooting
104

Warning Indicators On or Flashing
PGM-FI (Programmed Fuel
Injection) Malfunction
Indicator Lamp (MIL)
If the indicator comes on while riding, you
may have a serious problem with the PGM-FI
system. Reduce speed and have your vehicle
inspected by your dealer as soon as possible.
Battery Charging Condition
indicator
If the indicator comes on while riding, you
may have a condition of low battery voltage
or battery performance degradation. Have
your vehicle inspected by your dealer.
u If the battery does not have enough
voltage to drive the indicator system, the
indicator may not come on.
20220603164939_32K1ZR000_eng_BOOK Page 108 Friday, June 03 2022 16:52:56 JST
Troubleshooting
105
ABS (Anti-lock Brake System)
Indicator
If the indicator operates in one of the
following ways, you may have a serious
problem with the ABS. Reduce your speed
and have your vehicle inspected by your
dealer as soon as possible.
● Indicator comes on or starts flashing while
riding.
● Indicator does not come on when the
ignition switch is turned to the
(On)
position.
● Indicator does not go off at speeds above
10 km/h (6 mph)
.
If the
ABS indicator stays on, your brakes will
continue to work as a conventional system,
but without the anti-locking function.
The ABS indicator may flash if you turn the
rear wheel while the rear wheel is lifted off
the ground. In this case, turn the ignition
switch to the (Off) position, and then to
the (On) position again. The ABS indicator
will go off after your speed reaches
30 km/h (19 mph).
20220603164939_32K1ZR000_eng_BOOK
Page 109 Friday, June 03 2022 16:52:56 JST
Warning Indicators On or Flashing u ABS (Anti-lock Brake System) Indicator
Troubleshooting
106

Torque Control Indicator
If the indicator operates in one of the
following ways, you may have a serious
problem with the Torque Control. Reduce
your speed and have your vehicle inspected
by your dealer as soon as possible.
● Indicator comes and stays on (solid) while
riding.
● Indicator does not come on when the
ignition switch is turned to the
(On)
position.
● Indicator does not go off at speeds above
3 km/h (2 mph).
Even when the Torque Control indicator is
on, your vehicle will have normal riding ability
without Torque Control function.
u When the indicator comes on while the
Torque Control is in operation, you will
have to completely close the throttle to
regain normal riding ability.
The Torque Control indicator may come on if
you rotate the rear wheel while your vehicle
is lifted off the ground. In this case, turn the
ignition switch to the (Off) position, and
then to the (On) position again. The Torque
Control indicator will go off after your speed
reaches 3 km/h (2 mph).
20220603164939_32K1ZR000_eng_BOOK Page 110 Friday, June 03 2022 16:52:56 JST
Warning Indicators On or Flashing u Torque Control Indicator
Troubleshooting
107
Honda SMART Key Indicator
#
When the Honda SMART Key
indicator flashes 5 times
Replacing the Honda SMART Key
Battery 2 P. 100
#
When the Honda SMART Key
indicator is flashing while the
ignition switch is in the (On)
position
The Honda SMART Key indicator flashes
when communication between your vehicle
and Honda SMART Key stops after turning
the ignition switch to the
(On) position.
It is probably caused by the following:
● Strong radio waves or noise are affecting
the system
● You lose the Honda SMART Key while
riding
However, this does not affect the operation
of your vehicle until stop the engine except
the idling stop.
If you turn the ignition switch to the SEAT
FUEL, (Off) or (Lock) position while the
Honda SMART Key indicator is flashing, the
ignition switch ring and the Honda SMART
Key indicator will flash faster for about 20
seconds, automatically go off, and then the
ignition switch will lock.
The buzzer also rings at this time.
u Turn signals blink at the beginning and
end of this function.
To stop this flashing and ringing, press and
hold the ignition switch for more than 2
seconds. After the flashing and ringing stop,
the ignition switch is locked.
If you do not have the Honda SMART Key,
the ignition switch can be unlocked in
another way. 2 P. 116
20220603164939_32K1ZR000_eng_BOOK Page 111
Friday, June 03 2022 16:52:56 JST
Warning Indicators On or Flashing u Honda SMART Key Indicator
Troubleshooting
108
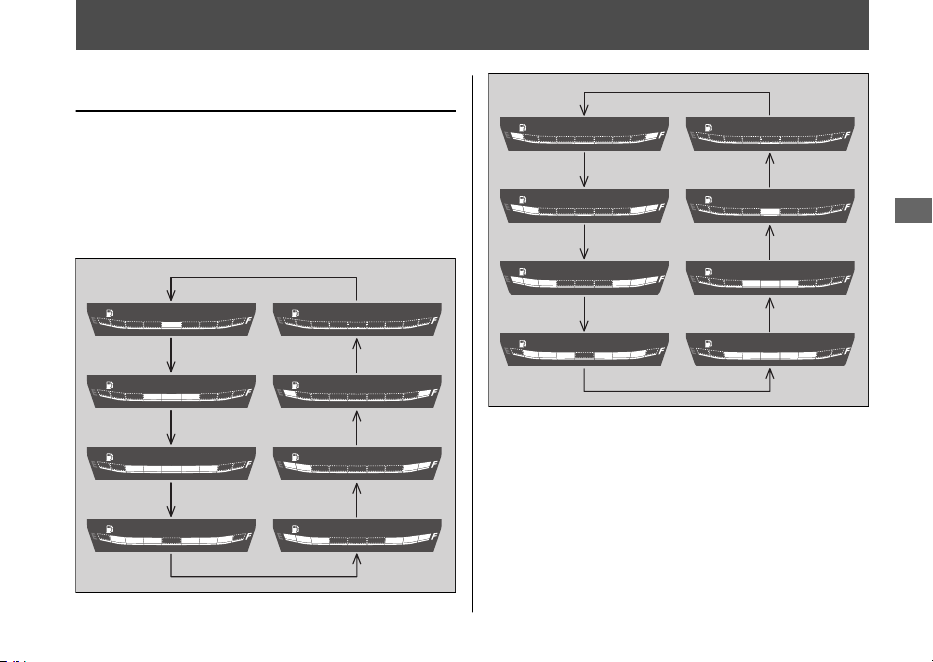
Other Warning Indications
Fuel Gauge Failure Indication
If the fuel system has an error, the fuel gauge
indicators will be displayed as shown in the
illustrations.
If this occurs, see your dealer as soon as
possible.
20220603164939_32K1ZR000_eng_BOOK Page 112 Friday, June 03 2022 16:52:56 JST
Troubleshooting
109
When the Idling Stop System Does Not Operate Properly
Idling Stop Indicator Does Not
Come On
When the Idling Stop indicator does not
come on, perform the followings.
If the Idling Stop switch is at (Idling):
Press the Idling Stop switch to
(Idling
Stop).
If the engine is cold:
Warm up the engine.
The Idling Stop system does not operate
when the engine is cold.
If you did not ride the vehicle after engine
starts:
Ride the vehicle at speeds of over 10 km/h (6
mph). The Idling Stop system does not
operate until you ride once.
If PGM-FI malfunction indicator lamp (MIL)
lights:
When the PGM-FI malfunction indicator lamp
(MIL) lights, the Idling Stop system does not
operate for protection of the engine. See
your dealer.
If the battery voltage is low:
Ride the vehicle awhile, then stop the engine
and then restart the engine with start button
referring to the starting procedure (2 P. 60)
for standard engine starting. The Idling Stop
system may not operate if the battery voltage
is low.
If this occurs frequently, contact your dealer.
20220603164939_32K1ZR000_eng_BOOK Page 113 Friday, June 03 2022 16:52:56 JST
Troubleshooting
110

Engine is Not Stopped by the
Idling Stop System While the
Idling Stop Indicator is On
When the engine is not stopped by the Idling
Stop system while the Idling Stop indicator is
on, perform the followings.
If the vehicle does not stop completely:
Stop the vehicle completely. The Idling Stop
system operates if the speed is only at 0
km/h (0 mph).
If the throttle is not closed completely:
Close the throttle completely.
20220603164939_32K1ZR000_eng_BOOK Page 114 Friday, June 03 2022 16:52:56 JST
When the Idling Stop System Does Not Operate Properly u Engine is Not Stopped by the Idling Stop System While the Idling Stop Indicator is On
Troubleshooting
111
Engine Does Not Start Even If
the Throttle is Opened
Engine does not start even if the throttle is
opened, perform the followings.
If the side stand is down:
While the engine is stopped by the Idling
Stop system, if you operate the side stand,
the flashing Idling Stop indicator turns off or
stops flashing and stays on, and the Idling
Stop system is cancelled. Restart the engine
with start button referring to the starting
procedure (2 P. 60) for standard engine
starting.
If the Idling Stop switch is at (Idling):
While the engine is stopping by the Idling
Stop system, if you press the Idling Stop
switch to
(Idling), the Idling Stop system
will be cancelled. Restart the engine with start
button referring to the starting procedure
(2 P. 60) for standard engine starting.
If the Idling Stop indicator flashes (the Idling
Stop switch is at (Idling Stop) position),
but engine does not start even if the throttle
is opened, perform the followings.
Low (or dead) battery or battery lead is loose:
Check the battery and battery terminals. If
the battery is weak, contact your dealer.
20220603164939_32K1ZR000_eng_BOOK Page 115 Friday, June 03 2022 16:52:56 JST
When the Idling Stop System Does Not Operate Properly u Engine Does Not Start Even If the Throttle is Opened
Troubleshooting
112

When the Honda SMART Key System Does Not Operate Properly
When the Honda SMART Key system does
not work properly, perform the following.
● Check that the Honda SMART Key system
is activated.
Lightly push the ON/OFF button on the
Honda SMART Key.
If the Honda SMART Key LED is red,
activate the Honda SMART Key system.
2 P. 38
If the Honda SMART Key LED does not
respond, replace the battery.
● Check that there is no communication
failure in the Honda SMART Key system.
The Honda SMART Key system uses low-
intensity radio waves. The Honda SMART
Key system may not work properly in the
following conditions:
u When there are facilities nearby that
generate strong radio waves or noise
such as TV towers, power stations,
radio stations, or airports.
u When you carry the Honda SMART
Key with a laptop or wireless
communication device such as a radio
or mobile phone.
u When the Honda SMART Key comes
into contact with or is covered by
metal objects.
20220603164939_32K1ZR000_eng_BOOK Page 116 Friday, June 03 2022 16:52:56 JST
Troubleshooting
113
Continued

● Check that a registered Honda SMART
Key is used.
Use a registered Honda SMART Key.
The Honda SMART Key system cannot be
activated without a registered Honda
SMART Key
.
● Make sure that you do not use a broken
Honda SMART Key.
If you use a broken Honda SMART Key,
the Honda SMART Key system cannot be
activated. Bring the emergency key and
ID tag to your dealer.
● Check the battery condition and battery
lead in your vehicle.
Check the battery and battery terminals. If
the battery is weak, contact your dealer.
If the Honda SMART Key system cannot be
activated due to other causes, contact your
dealer.
20220603164939_32K1ZR000_eng_BOOK Page 117 Friday, June 03 2022 16:52:56 JST
When the Honda SMART Key System Does Not Operate Properly
Troubleshooting
114
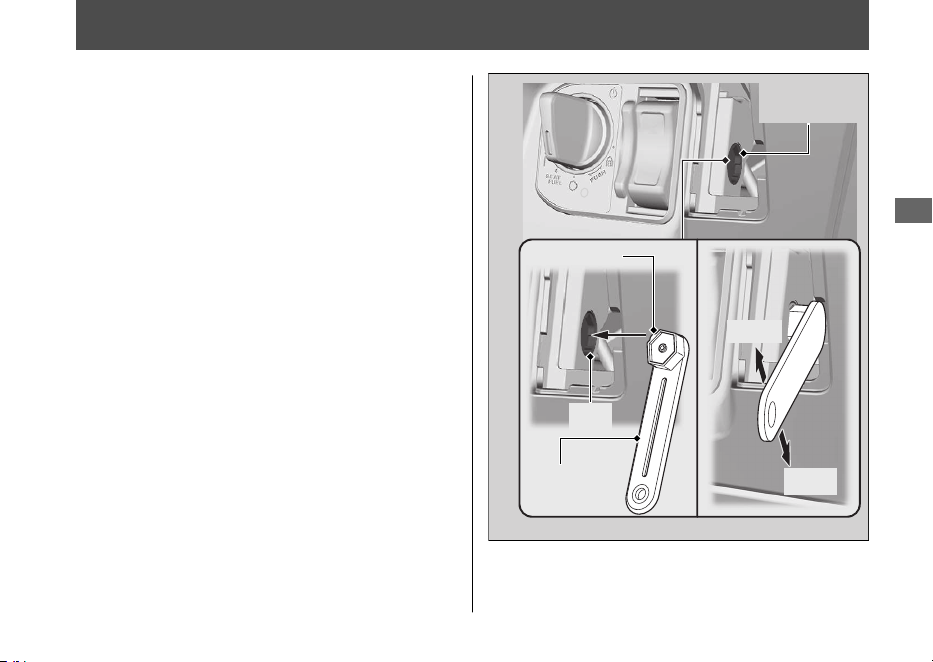
Unlock the Seat in an Emergency
The seat lock can be unlocked by using the
emergency key.
#
Open
1.
Remove the front lid. 2 P. 91
2.
Align the projection of the emergency key
with the slot of the emergency seat
opener, and turn the emergency key
counterclockwise.
3.
Open the seat and turn the emergency
key clockwise.
#
Close
1.
Close and push down on the rear of the
seat until it locks. Make sure that the seat
is locked securely by pulling it up lightly. If
the seat is not locked, turn the emergency
key clockwise to lock the seat catch.
2.
Install the front lid.
20220603164939_32K1ZR000_eng_BOOK Page 118 Friday, June 03 2022 16:52:56 JST
Troubleshooting
115
Emergency
key
Open
Close
Emergency
seat opener
Projection
Slot
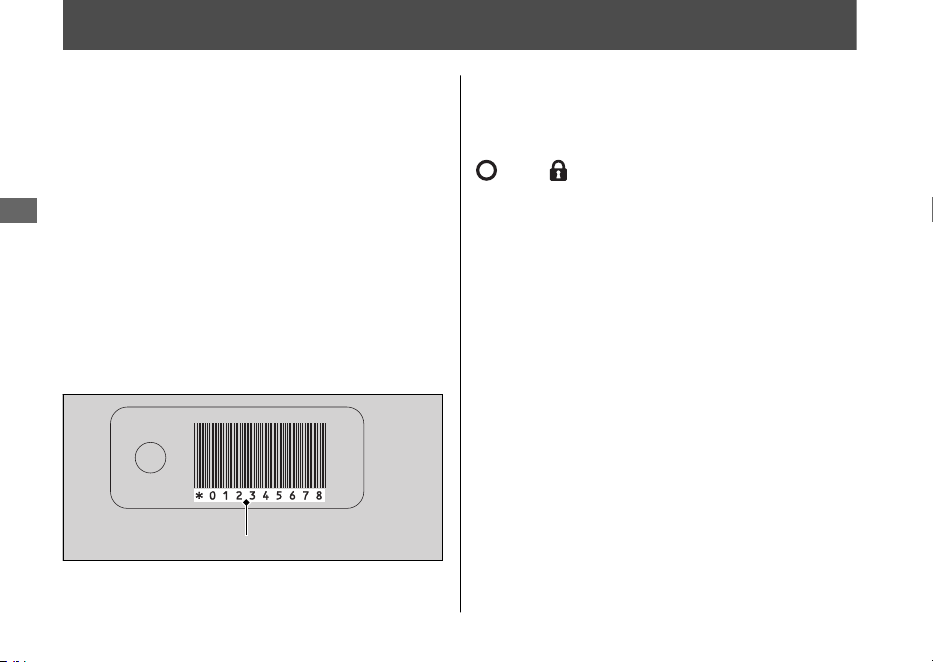
Unlock the Ignition Switch in an Emergency
#
Set up to ID number input mode
1.
Check the ID number on the ID tag.
2.
Press and hold the ignition switch for
more than 4 seconds.
u The ignition switch ring and the Honda
SMART Key indicator flash.
3.
Press the ignition switch while the ignition
switch ring and the Honda SMART Key
indicator are flashing.
u The ignition switch ring and the Honda
SMART Key indicator stay lit, and the
ID number input mode turns on.
#
ID number input
You can input your ID number by pressing
the ignition switch when the ignition switch is
(Off), (Lock) or SEAT FUEL position.
Input the ID number on the ID tag in order
from the left in turn by pressing the ignition
switch.
The ID number is authenticated according to
the number of times the ignition switch is
pushed.
Push the ignition switch the desired number
of times within 5 seconds when the ignition
switch ring comes on. After 5 seconds, the
ignition switch ring goes off and comes on
again. This means that the inputted number
is fixed, and you can input the next number.
u If the ignition switch ring does not come
on in blue, the battery may be low.
Contact your dealer.
20220603164939_32K1ZR000_eng_BOOK Page 119 Friday, June 03 2022 16:52:56 JST
Troubleshooting
116
ID number
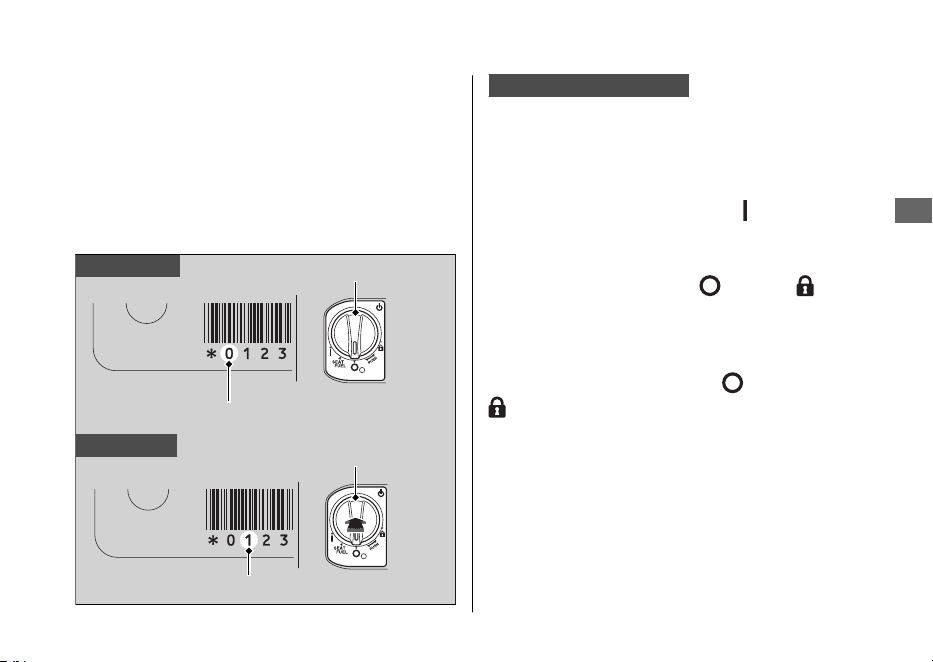
Example:
● To input “0”, wait for 5 seconds without
pushing the ignition switch when the
ignition switch ring comes on.
● To input “1”, push the ignition switch once
within 5 seconds when the ignition switch
ring comes on.
ID number input success
After the last ID number is input, the ignition
switch ring and the Honda SMART Key
indicator go off, and when they come on
again the ignition switch is unlocked.
Turn the ignition switch to the
(On) position
within 6 minutes. You can start the engine.
To lock the ignition switch, turn the ignition
switch to the SEAT FUEL, (Off), or (Lock)
position, and press and hold the ignition
switch for 2 seconds. The ignition switch also
locks automatically when the ignition switch
has been in the SEAT FUEL, (Off), or
(Lock) position for about 6 minutes after
the ID number is successfully inputted.
The buzzer also rings at this time.
When the ignition switch is locked, the
ignition switch ring goes off.
To unlock the ignition switch again, repeat
the procedure for unlocking the ignition
switch.
20220603164939_32K1ZR000_eng_BOOK Page 120 Friday, June 03 2022 16:52:56 JST
Unlock the Ignition Switch in an Emergency
Troubleshooting
117
Continued
To input “0”
To input “1”
ID number
Ignition switch
No push
Ignition switch
ID number
Push one time

ID number input failure
After the last ID number is input, the ignition
switch ring and the Honda SMART Key
indicator flash at 1 second intervals, and then
go off.
The buzzer also rings at this time.
The ignition switch does not unlock.
Redo the “Unlock the Ignition Switch in an
Emergency” procedure. 2 P. 116
ID number input cancel
If you make a mistake while inputting your ID,
do one of the following:
• Press and hold the ignition switch until the
buzzer rings once, the ignition switch ring
and the Honda SMART Key indicator to
turn off.
• Do not press the ignition switch, just wait
for the ignition switch ring and the Honda
SMART Key indicator to turn off.
Redo the “Unlock the Ignition Switch in an
Emergency” procedure. 2 P. 116
20220603164939_32K1ZR000_eng_BOOK
Page 121 Friday, June 03 2022 16:52:56 JST
Unlock the Ignition Switch in an Emergency
Troubleshooting
118

Tyre Puncture
Repairing a puncture or removing a wheel
requires special tools and technical expertise.
We recommend you have this type of service
performed by your dealer.
After an emergency repair, always have the
tyre inspected/replaced by your dealer.
Emergency Repair Using a Tyre
Repair Kit
If your tyre has a minor puncture, you can
make an emergency repair using a tubeless
tyre repair kit.
Follow the instructions provided with the
emergency tyre repair kit.
Riding your vehicle with a temporary tyre
repair is very risky. Do not exceed 50 km/h
(30 mph). Have the tyre replaced by your
dealer as soon as possible.
3WARNING
Riding your vehicle with a temporary
tyre repair can be risky. If the temporary
repair fails, you can crash and be
seriously injured or killed.
If you must ride with a temporary tyre
repair, ride slowly and carefully and do
not exceed 50 km/h (30 mph) until the
tyre is replaced.
20220603164939_32K1ZR000_eng_BOOK Page 122 Friday, June 03 2022 16:52:56 JST
Troubleshooting
119
Electrical Trouble
Battery Goes Dead
Charge the battery using a motorcycle
battery charger.
Remove the battery from the vehicle before
charging.
Do not use an automobile-type battery
charger, as these can overheat a motorcycle
battery and cause permanent damage. If the
battery does not recover after recharging,
contact your dealer.
NOTICE
Jump starting using an automobile battery can
damage your vehicle's electrical system and is
not recommended.
Burned-out Light Bulb
All light bulbs on the vehicle are LEDs. If
there is an LED which is not turned on, see
your dealer for servicing.
20220603164939_32K1ZR000_eng_BOOK Page 123 Friday, June 03 2022 16:52:56 JST
Troubleshooting
120
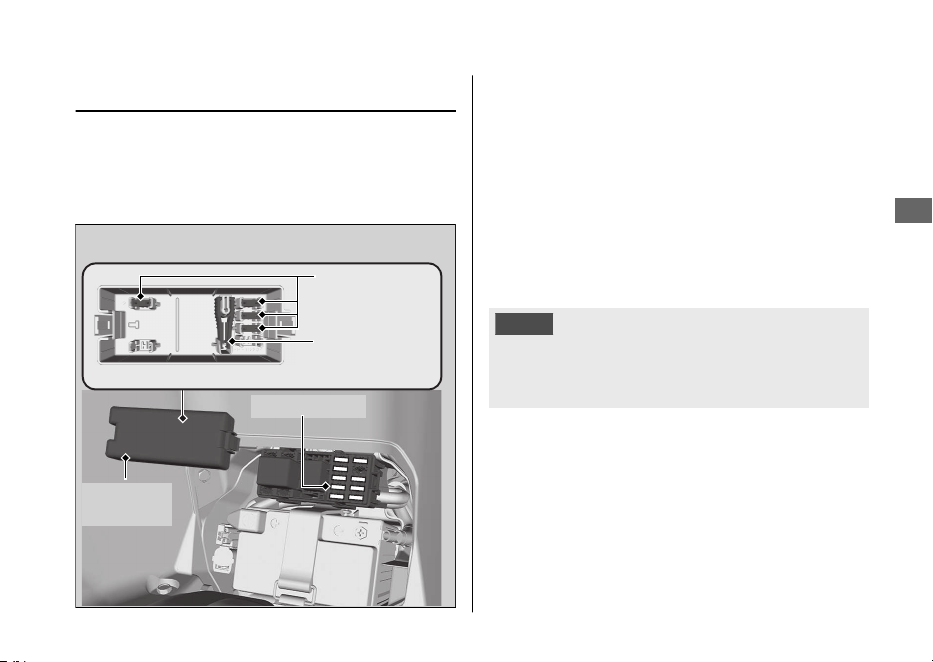
Blown Fuse
Before handling fuses, see “Inspecting and
Replacing Fuses.” 2 P. 82
#
Fuse Box Fuses
1.
Remove the battery cover. 2 P. 90
2.
Remove the fuse box cover.
3.
Pull the main fuse and other fuses out
one by one with the fuse puller located
inside of the fuse box cover. Check for a
blown fuse. Always replace a blown fuse
with a spare fuse of the same rating.
4.
Install the fuse box cover.
5.
Install the battery cover.
NOTICE
If a fuse fails repeatedly, you likely have an
electrical problem. Have your vehicle inspected
by your dealer.
20220603164939_32K1ZR000_eng_BOOK Page 124 Friday, June 03 2022 16:52:56 JST
Electrical Trouble u Blown Fuse
Troubleshooting
121
Fuse box
cover
Fuse puller
Spare fuses
Main fuse

Unstable Engine Operation Occurs Intermittently
If the fuel pump filter is clogged, unstable
engine operation will occur intermittently
while riding.
Even if this symptom occurs, you can
continue to ride your vehicle.
If unstable engine operation occurs even if
sufficient fuel is available, have your vehicle
inspected by your dealer as soon as possible.
20220603164939_32K1ZR000_eng_BOOK Page 125 Friday, June 03 2022 16:52:56 JST
Troubleshooting
122

Keys.....................................................................P. 124
Instruments, Controls, & Other Features...P. 127
Caring for Your Vehicle
..................................P. 128
Storing Your Vehicle.......................................P. 132
Transporting Your Vehicle ............................P. 133
You & the Environment .................................P. 134
Serial Numbers ................................................P. 135
Fuels Containing Alcohol ..............................P. 136
Catalytic Converter .........................................P. 137
20220603164939_32K1ZR000_eng_BOOK Page 126 Friday, June 03 2022 16:52:56 JST
Information


Honda SMART Key
Carrying the Honda SMART Key allows you to
perform the following operations:
● Locking or unlocking the ignition switch
● Releasing the seat lock
● Opening the fuel lid
● Locking or unlocking the steering
The ID number of the Honda SMART Key is on
the ID tag. You can also unlock the ignition
switch by inputting the ID number.
Always carry both the emergency key and ID
tag, but separate from the Honda SMART Key,
to avoid losing all of them at the same time.
Also store a copy of your ID number in a safe
place other than your vehicle.
The Honda SMART Key contains electronic
circuits. If the circuits are damaged, the Honda
SMART Key will not allow you to perform any
operations.
● Do not drop the Honda SMART Key or set
heavy objects on them.
● Protect the Honda SMART Key from direct
sunlight, high temperature, and high
humidity.
● Do not scratch or puncture.
● Do not store near any magnetized products
such as a magnetized key chain.
● Always keep the Honda SMART Key away
from electric appliances such as a TV, radio,
PC or low-frequency massage device.
● Keep the Honda SMART Key away from
liquids. If it gets wet, dry it immediately with
a soft cloth.
● Keep the Honda SMART Key away from the
vehicle while washing the vehicle.
● Do not burn.
● Do not wash in an ultrasonic cleaner.
20220603164939_32K1ZR000_eng_BOOK Page 128 Friday, June 03 2022 16:52:56 JST
Keys
Information
125
Continued
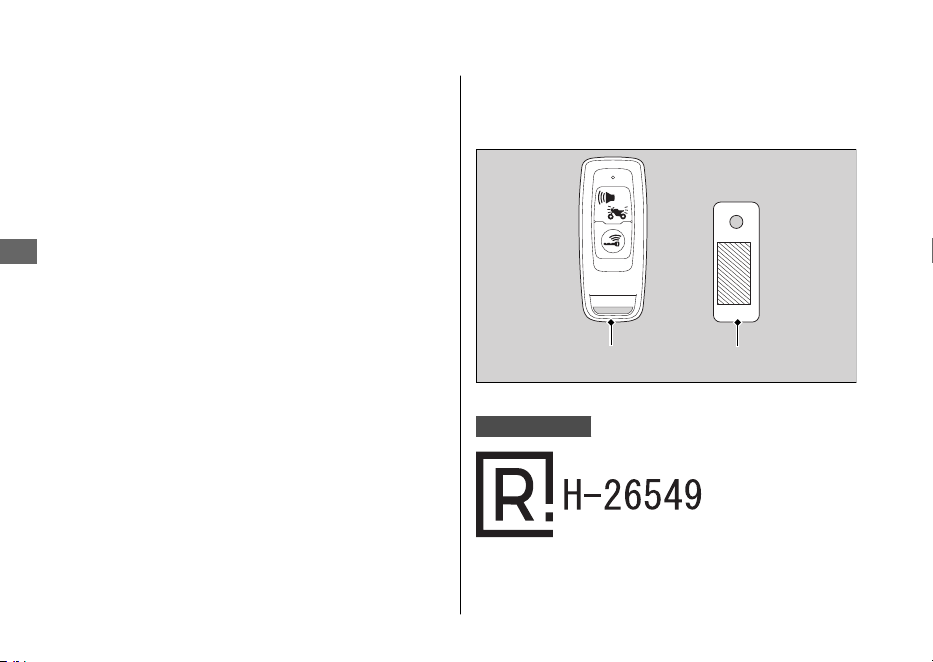
● If fuel, wax, or grease adhere to the Honda
SMART Key, wipe it off immediately to avoid
cracking or warping.
● Do not disassemble the Honda SMART Key
other than when changing a battery. Only
the cover of the Honda SMART Key can be
disassembled. Do not disassemble other
parts.
● Do not lose your
Honda SMART Key. If you
lose it, you will need to register a new
Honda SMART Key. See your dealer with
your emergency key and ID tag for
registration.
The battery in the Honda SMART Key system
normally lasts about 2 years.
Do not keep mobile phones or other radio
transmitting devices in any compartment. The
radio frequency from the devices will interrupt
the Honda SMART Key system.
To get an additional Honda SMART Key, take
the Honda SMART Key and the vehicle to your
dealer.
Argentina only
20220603164939_32K1ZR000_eng_BOOK Page 129 Friday, June 03 2022 16:52:56 JST
Keys
Information
126
ID tagHonda SMART Key
Instruments, Controls, &
Other Features
Ignition Switch
Leaving the ignition switch in the
(On) position
with the engine stopped will drain the battery.
Do not turn the ignition switch while riding.
Odometer
The display remains at 999,999 when the
odometer exceeds 999,999.
Tripmeter
The tripmeter resets to 0.0 when the trip
mileage exceeds 9,999.9.
Document Bag
The owner’s manual, registration, and insurance
information can be stored in the plastic
document bag located underside of the seat.
20220603164939_32K1ZR000_eng_BOOK Page 130 Friday, June 03 2022 16:52:56 JST
Instruments, Controls, & Other Features
Information
127

Caring for Your Vehicle
Frequent cleaning and polishing is important to
ensure the life of your Honda. A clean vehicle
makes it easier to spot potential problems.
In particular, seawater and salts used to prevent
ice on roads promote the formation of
corrosion. Always wash your vehicle thoroughly
after riding on coastal or treated roads.
Washing
Allow the engine, muffler, brakes, and other
high-temperature parts to cool before washing.
1.
Rinse your vehicle thoroughly using a low
pressure garden hose to remove loose dirt.
2.
If necessary, use a sponge or a soft towel
with mild cleaner to remove road grime.
uClean the windscreen, headlight lens,
panels, and other plastic components
with extra care to avoid scratching them.
Avoid directing water into the air cleaner,
muffler, and electrical parts.
3.
Thoroughly rinse your vehicle with plenty of
clean water and dry with a soft, clean cloth.
4.
After the vehicle dries, lubricate any moving
parts.
uMake sure that no lubricant spills onto
the brakes or tyres. Brake discs, pads,
drum or shoes contaminated with oil will
suffer greatly reduced braking
effectiveness and can lead to a crash.
5.
Apply a coat of wax to prevent corrosion.
uAvoid products that contain harsh
detergents or chemical solvents. These
can damage the metal, paint, and plastic
on your vehicle.
Keep the wax clear of the tyres and brakes.
uIf your vehicle has any mat painted parts,
do not apply a coat of wax to the mat
painted surface.
20220603164939_32K1ZR000_eng_BOOK Page 131 Friday, June 03 2022 16:52:56 JST
Caring for Your Vehicle
Information
128

#
Washing Precautions
Follow these guidelines when washing:
● Do not use high-pressure washers:
uHigh-pressure water cleaners can
damage moving parts and electrical
parts, rendering them inoperable.
uWater in the air intake can be drawn into
the throttle body and/or enter the air
cleaner.
● Do not direct water at the muffler:
uWater in the muffler can prevent starting
and causes rust in the muffler.
● Dry the brakes:
uWater adversely affects braking
effectiveness. After washing, apply the
brakes intermittently at low speed to
help dry them.
● Do not direct water under the seat:
uWater in the under seat compartment
can damage your documents and other
belongings.
● Do not direct water at the air cleaner:
uWater in the air cleaner can prevent the
engine from starting.
● Do not direct water near the headlight:
uThe headlight's inside lens may fog
temporarily after washing or while riding
in the rain. This does not impact the
headlight function.
However, if you see a large amount of
water or ice accumulated inside the
lens(es), have your vehicle inspected by
your dealer.
● Do not use wax or polishing compounds on
mat painted surfaces:
uUse a soft cloth or sponge, plenty of
water, and a mild detergent to clean mat
painted surfaces. Dry with a soft clean
cloth.
20220603164939_32K1ZR000_eng_BOOK Page 132 Friday, June 03 2022 16:52:56 JST
Caring for Your Vehicle
Information
129
Continued

Aluminium Components
Aluminium will corrode from contact with dirt,
mud, or road salt. Clean aluminium parts
regularly and follow these guidelines to avoid
scratches:
● Do not use stiff brushes, steel wool, or
cleaners containing abrasives.
● Avoid riding over or scraping against curbs.
Panels
Follow these guidelines to prevent scratches
and blemishes:
● Wash gently using a soft sponge and plenty
of water.
● To remove stubborn stains, use diluted
detergent and rinse thoroughly with plenty
of water.
● Avoid getting petrol, brake fluid, or
detergents on the instruments, panels, or
headlight.
20220603164939_32K1ZR000_eng_BOOK Page 133 Friday, June 03 2022 16:52:56 JST
Caring for Your Vehicle
Information
130

Windscreen
Using plenty of water, clean the windscreen with
a soft cloth or sponge. (Avoid using detergents
or any kind of chemical cleaner on the
windscreen.) Dry with a soft, clean cloth.
NOTICE
To avoid possible scratching or other damage,
use only water and a soft cloth or sponge to
clean the windscreen.
For a dirtier windscreen, use a diluted neutral
detergent with a sponge and plenty of water.
Make sure to wash off all the detergent.
(Detergent residue may cause windscreen
cracks.)
Replace the windscreen if scratches cannot be
removed and they obstruct clear vision.
Take care to keep battery electrolyte, brake
fluid, or other chemical solvents off the
windscreen and screen garnish. They will
damage the plastic.
Exhaust Pipe and Muffler
If the exhaust pipe and muffler are painted, do
not use a commercially available abrasive
kitchen cleaning compound. Use a neutral
detergent to clean the painted surface on the
exhaust pipe and muffler. If you are not sure if
your exhaust pipe and muffler are painted,
contact your dealer.
20220603164939_32K1ZR000_eng_BOOK Page 134 Friday, June 03 2022 16:52:56 JST
Caring for Your Vehicle
Information
131

Storing Your Vehicle
If you store your vehicle outdoors, you should
consider using a full-body cover.
If you won't be riding for an extended period,
follow these guidelines:
● Wash your vehicle and wax all painted
surfaces (except mat painted surfaces). Coat
chrome pieces with rust-inhibiting oil.
● Place your vehicle on its centre stand and
position a block so that both tyres are off
the ground.
● After rain, remove the body cover and allow
the vehicle to dry.
● Remove the battery (2 P. 89) to prevent
discharge. Fully charge the battery and then
place it in a shaded, well-ventilated area.
uIf you leave the battery in place,
disconnect the negative - terminal to
prevent discharge.
After removing your vehicle from storage,
inspect all maintenance items required by the
Maintenance Schedule.
20220603164939_32K1ZR000_eng_BOOK Page 135 Friday, June 03 2022 16:52:56 JST
Storing Your Vehicle
Information
132

Transporting Your Vehicle
If your vehicle needs to be transported, it
should be carried on a motorcycle trailer or a
flatbed truck or trailer that has a loading ramp
or lifting platform and motorcycle tie-down
straps. Never try to tow your vehicle with a
wheel or wheels on the ground.
NOTICE
Towing your vehicle with a wheel or wheels on
the ground can cause serious damage to the
transmission.
20220603164939_32K1ZR000_eng_BOOK Page 136 Friday, June 03 2022 16:52:56 JST
Transporting Your Vehicle
Information
133

You & the Environment
Owning and riding a vehicle can be enjoyable,
but you must do your part to protect the
environment.
Choose Sensible Cleaners
Use a biodegradable detergent when you wash
your vehicle. Avoid aerosol spray cleaners that
contain chlorofluorocarbons (CFCs) which
damage the atmosphere's protective ozone
layer.
Recycle Wastes
Put oil and other toxic wastes in approved
containers and take them to a recycling centre.
Call your local or state office of public works or
environmental services to find a recycling centre
in your area and to get instructions on how to
dispose of non-recyclable wastes. Do not place
used engine oil in the trash or pour it down a
drain or on the ground. Used oil, petrol,
coolant, and cleaning solvents contain poisons
that can hurt refuse workers and contaminate
drinking water, lakes, rivers, and oceans.
20220603164939_32K1ZR000_eng_BOOK Page 137 Friday, June 03 2022 16:52:56 JST
You & the Environment
Information
134
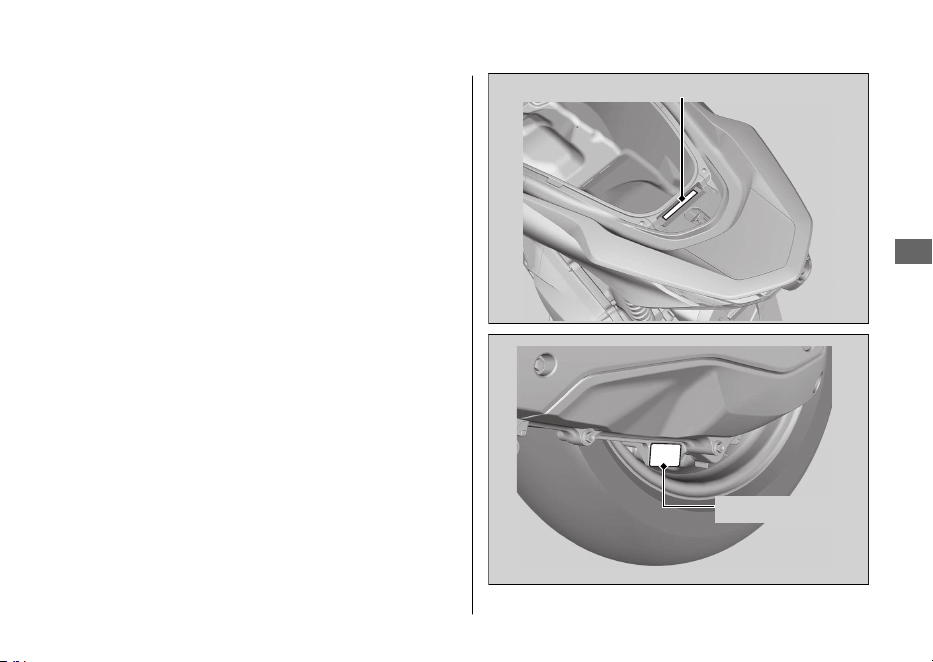
Serial Numbers
The frame and engine serial numbers uniquely
identify your vehicle and are required in order
to register your vehicle. They may also be
required when ordering replacement parts.
To check the frame number, open the seat.
2 P. 69
You should record these numbers and keep
them in a safe place.
20220603164939_32K1ZR000_eng_BOOK Page 138 Friday, June 03 2022 16:52:56 JST
Serial Numbers
Information
135
Frame number
Engine number
Fuels Containing Alcohol
Some conventional fuels blended with alcohol
are available in some locales to help reduce
emissions to meet clean air standards. If you
plan to use blended fuel, check that it is
unleaded and meets the minimum octane
rating requirement.
The following fuel blends can be used in your
vehicle:
● Ethanol (ethyl alcohol) up to 10% by volume.
uPetrol containing ethanol may be
marketed under the name Gasohol.
The use of petrol containing more than 10%
ethanol may:
● Damage the painting of the fuel tank.
● Damage the rubber tubes of the fuel line.
● Cause corrosion of the fuel tank.
● Cause poor drivability.
NOTICE
Use of blended fuels containing higher than
approved percentages can damage metal,
rubber, plastic parts of your fuel system.
If you notice any undesirable operating
symptoms or performance problems, try a
different brand of petrol.
20220603164939_32K1ZR000_eng_BOOK Page 139 Friday, June 03 2022 16:52:56 JST
Fuels Containing Alcohol
Information
136

Catalytic Converter
This vehicle is equipped with two three-way
catalytic converters. Each catalytic converter
contains precious metals that serve as catalysts
in high temperature chemical reactions that
convert hydrocarbons (HC), carbon monoxide
(CO), and oxides of nitrogen (NOx) in the
exhaust gases into safe compounds.
A defective catalytic converter contributes to air
pollution and can impair your engine's
performance. A replacement unit must be an
original Honda part or equivalent.
Follow these guidelines to protect your vehicle's
catalytic converters:
● Always use unleaded petrol. Leaded petrol
will damage the catalytic converters.
● Keep the engine in good running condition.
● Have your vehicle serviced if your engine is
misfiring, backfiring, stalling, or otherwise
not running properly, stop riding and turn
off the engine.
20220603164939_32K1ZR000_eng_BOOK Page 140
Friday, June 03 2022 16:52:56 JST
Catalytic Converter
Information
137
Specifications
■ Main Components
Overall length 1,935 mm (76.2 in)
Overall width 742 mm (29.2 in)
Overall height 1,108 mm (43.6 in)
Wheelbase 1,313 mm (51.7 in)
Minimum ground
clearance
134 mm (5.3 in)
Caster angle 26º 30’
Trail 79 mm (3.1 in)
Curb weight 132 kg (291 lb)
Maximum weight
capacity
*1
180 kg (397 lb)
Maximum luggage
weight
*2
Centre compartment 10 kg (22 lb)
Front box 1.0 kg (2.2 lb)
Rear carrier 5 kg (11 lb)
*1 : Including rider, passenger, all luggage, and accessories.
*2 : Includes the weight of the luggage and added accessories.
Passenger capacity Rider and 1 passenger
Minimum turning radius 1.90 m (6.2 ft)
Displacement
156.9 cm
3
(9.573 cu-in)
Bore x stroke
60.000 x 55.502 mm (2.3622 x 2.1851
in)
Compression ratio 12.0:1
Fuel
Unleaded petrol
Recommended: 91 RON or higher
Fuels containing alcohol ETHANOL up to 10 % by volume
Tank capacity 8.0 L (2.11
US gal, 1.76 Imp gal)
Battery
DTZ6
12 V-5 Ah (10 HR)
Primary reduction V-Matic (2.52:1-0.81:1)
Final reduction 9.589
20220603164939_32K1ZR000_eng_BOOK Page 141 Friday, June 03 2022 16:52:56 JST
Specifications
138
■ Service Data
Tyre size
Front
110/70-14M/C 50P
Rear
130/70-13M/C 63P REINF
Tyre type Bias-ply, tubeless
Recommended
Tyre
Front
PIRELLI
DIABLO ROSSO SCOOTER
Rear
PIRELLI
DIABLO ROSSO SCOOTER
Tyre air
pressure
(Drivers only)
Front 200 kPa (2.00 kgf/cm
2
, 29 psi)
Rear 225 kPa (2.25 kgf/cm
2
, 33 psi)
Tyre air
pressure
(Driver and
passenger)
Front 200 kPa (2.00 kgf/cm
2
, 29 psi)
Rear 250 kPa (2.50 kgf/cm
2
, 36 psi)
Minimum
tread depth
Front 1.5 mm (0.06 in
)
Rear 2.0 mm (0.08 in)
Spark plug (standard) LMAR8L-9 (NGK)
Spark plug
gap
0.8 - 0.9 mm (0.03 - 0.04 in)
Idle speed 1,700 ± 100 rpm
Recommended
engine oil
Honda 4-stroke motorcycle oil API Service
Classification SJ or higher, excluding oils
marked as “Energy Conserving” or “Resource
Conserving, ”SAE 10W-30, JASO T 903 standard
MB
Engine oil
capacity
After draining
0.8 L (0.8 US qt, 0.7 Imp qt)
After
disassembly
0.9 L (1.0 US qt, 0.8 Imp qt)
Transmission
oil capacity
After draining 0.12 L (0.13 US qt, 0.11 Imp qt)
After
disassembly
0.14 L (0.15 US qt, 0.12 Imp qt)
Recommended
brake fluid
Honda DOT 3 or DOT 4 Brake Fluid
Cooling system
capacity
0.50 L (0.53 US qt, 0.44 Imp qt)
Recommended
coolant
Pro Honda HP Coolant
20220603164939_32K1ZR000_eng_BOOK Page 142 Friday, June 03 2022 16:52:56 JST
Specifications
Specifications
139
*1.
For Colombia market use MA oil class.
*1
■ Bulbs
Headlight LED
Brakelight/Taillight LED
Front turn signal LED
Rear turn signal LED
License plate light LED
Position light LED
■ Fuses
Main fuse 30 A
Other fuse 15 A, 10 A, 7.5 A
20220603164939_32K1ZR000_eng_BOOK Page 143 Friday, June 03 2022 16:52:56 JST
Specifications
Specifications
140


Printed in Brazil
Axxxxx
2208
PCX 160