INSTRUCTION MANUAL
MANUAL DE INSTRUCCIONES
Thank you for choosing BLACK+DECKER!
¡Gracias por elegir BLACK+DECKER!
PLEASE READ BEFORE RETURNING THIS PRODUCT FOR ANY
REASON.
POR FAVOR, LEA ESTE MANUAL ANTES DE DEVOLVER ESTE
PRODUCTO POR CUALQUIER MOTIVO.
If you have a question or experience a problem with your BLACK+DECKER purchase, go
to www.blackanddecker.com/instantanswers
If you can’t find the answer or do not have access to the Internet, call
844-299-0879 from 10:30 a.m. to 6:30 p.m. EST Mon. - Fri. to speak with an agent.
Please have the catalog number available when you call.
Si tiene alguna pregunta o tiene algún problema con su producto de BLACK+DECKER
vaya a www.blackanddecker.com/instantanswers.
Si no puede encontrar la respuesta a su pregunta o no tiene acceso a Internet, llame al
844-299-0879 de 10:30 a 18:30 EST de lunes a viernes para hablar con un agente. Por
favor, tenga el número de catálogo a mano cuando llame.
SAVE THIS MANUAL FOR FUTURE REFERENCE.
GUARDE ESTE MANUAL PARA SU REFERENCIA EN EL FUTURO.
CATALOG NUMBER
NÚMERO DE CATÁLOGO
BUHD055
BUHDR055
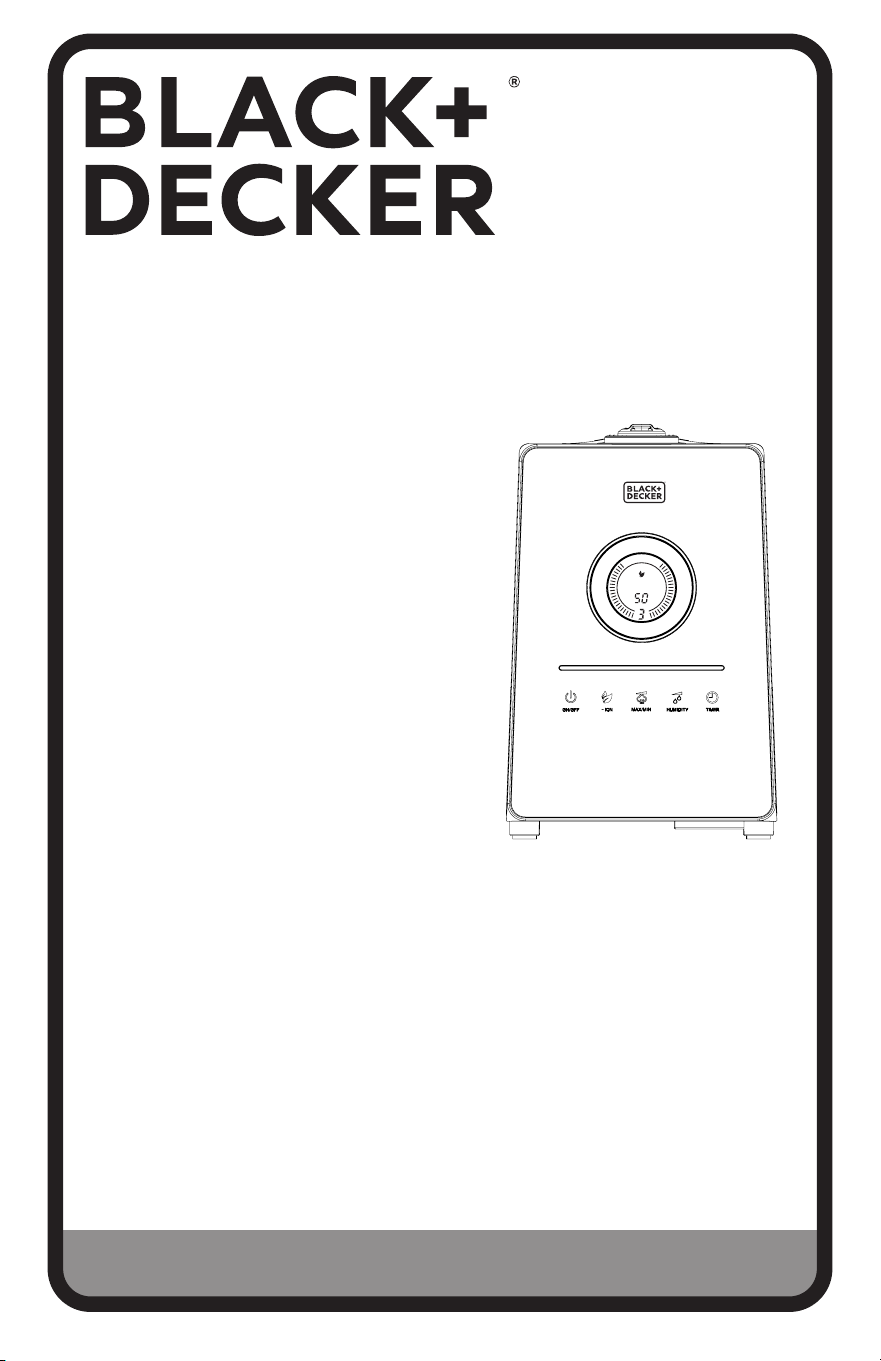
1.45 GALLON ULTRASONIC HUMIDIFIER
HUMIDIFICADOR ULTRASÓNICO DE 1,45
GALONES (5,5 LITROS)
Timer Auto
%RH

Page 2
ENGLISH
Thank you for purchasing our
BLACK+DECKER product. This
easy-to-use manual will guide you
in getting the best use of your
humidifier.
Remember to record the model and
serial numbers. They are on a label
on the rear.
Staple your receipt to your manual.
You will need it to obtain warranty service.
Model number
Serial number
Date of purchase
PRODUCT REGISTRATION
CONTENTS
SAFETY INFORMATION
Important Safety Instructions ..........................................................................................................................................3-5
Electrical Requirements ..........................................................................................................................................................5
SET UP & USE
Parts & Features .........................................................................................................................................................................6
Operating Instructions ....................................................................................................................................................... 6-11
Cleaning & Maintenance .......................................................................................................................................................12
TROUBLESHOOTING & WARRANTY
Troubleshooting.........................................................................................................................................................................13
Limited Warranty ......................................................................................................................................................................15
Page 3
ENGLISH
SAFETY INFORMATION
1. READ ALL INSTRUCTIONS BEFORE USE
2. To avoid fire or shock hazard, plug the appliance directly into a 120V AC
electrical outlet.
3. Close supervision is necessary when any appliance is used by or near
children.
4. Avoid exposure to direct sunlight and always keep it at least 4 inches
away from walls. Make sure the mist outlet does not directly face a wall.
Do not place near heat sources such as stoves, radiators, etc.
5. Place humidifier on a firm, flat, level surface. A waterproof mat or pad
is recommended for use underneath the humidifier. Do not place on a
rug, carpet or on a finished floor that may be damaged by exposure to
water or moisture.
6. Do not insert or remove the electric plug on the appliance with wet
hands. Unplug when not in use
7. Do not operate any humidifier with a damaged cord or plug. Discard
humidifier or return to an authorized service facility for examination
and/or repair.
8. To reduce the risk of electric shock, do not remove screws. The
unit does not contain any user serviceable parts. Please leave all
maintenance work to qualified personnel.
9. Fill the tank with fresh, distilled or demineralized water. Do not switch
on the appliance when there is no water in the tank.
10. Do not shake the appliance as this might cause the water spill over into
the base of the unit.
WARNING
When using electrical appliances, basic safety precautions
should be followed, including the following:
DANGER
DANGER - Immediate hazards
which WILL result in severe
personal injury or death
WARNING
WARNING - Hazards or unsafe
practices which COULD result in
severe personal injury or death
CAUTION
CAUTION - Hazards or unsafe
practices which COULD result in
minor personal injury
IMPORTANT SAFETY INSTRUCTIONS

Page 4
ENGLISH
11. Never touch the water or components while the unit is in operation.
12. Do not pour hot water into the tank, i.e. at a temperature in excess of
100°F.
13. Unplug the appliance before cleaning it or removing the tank.
14. Do not immerse the appliance or the power cord in water or other
liquids.
15. Never scrape the transducer with a hard tool. The humidifier must be
cleaned regularly. To do this, refer to the cleaning instructions in this
manual.
16. Do not use any detergents, glass or household cleaner, furniture
polish, gasoline, paint thinner or other solvent to clean any part of the
humidifier.
17. If you spill any liquid into the unit, it can cause serious damage. Switch it
o and unplug immediately.
18. Do not let cord touch any hot surface and make sure that it does not
hang over a table edge or counter.
19. Never use this appliance in a room where aerosol products (sprays) are
used or in a room or where oxygen is being administered.
20. Do not put items of clothing or towels on top of the appliance. If the
nozzle is obstructed, this may cause the appliance to malfunction.
21. When moving the appliance, lift it by the base unit and not by the water
tank.
22. The ideal relative humidity level for human comfort is between 45% and
60%. Excess humidity shows up in the form of condensation on cold
surfaces or cold walls in the room. To measure the room’s humidity, use
a hygrometer available at your local hardware store.
23. Do not use outdoors.
24. Do not place humidifier in an area where it is accessible to children.
Do not use humidifier in a closed room, particularly where a child may
be sleeping, resting, or playing (a closed room may result in excessive
humidity).
25. Do not attempt to refill humidifier without first unplugging the unit from
its electrical outlet. Failure to heed this warning may cause personal
injury. Be sure to unplug the unit by pulling on the plug and not the
cord.
26. This humidifier requires maintenance to operate appropriately. Refer to
cleaning and maintenance procedures. Use only cleaners and additives
recommended by the manufacturer.
SAFETY INFORMATION

Page 5
ENGLISH
SAFETY INFORMATION
SAVE THESE INSTRUCTIONS
HOUSEHOLD USE ONLY
ELECTRICAL REQUIREMENTS
POLARIZED PLUGS
This appliance has a polarized plug (one blade is wider than the other). To reduce the
risk of electric shock, this plug is intended to fit into a polarized outlet only one way.
If the plug does not fit into the outlet, reverse the plug. If it still does not fit, contact a
qualified electrician.
DOUBLE INSULATION
Double insulated appliances are constructed throughout with two separate layers
of electrical insulation or one single layer of reinforced insulation between the user
and the appliances electrical system. Products built with this insulation system are
not intended to be grounded. As a result, this appliance is equipped with a two-
prong plug which permits it to be used without concern for maintaining a ground
connection.
NOTE: Double insulation does not take the place of normal safety precautions when
operating this appliance. The secondary insulation system is for protection
against injury resulting from a possible failure of the primary insulation within
the product.
CAUTION: WHEN SERVICING USE ONLY IDENTICAL REPLACEMENT PARTS.
Repair or replace damaged cords.
WARNING: Do not attempt to modify the plug in any way.
WARNING: If the plug does not t fully in the outlet, reverse the plug. If
it still does not t, contact a qualied electrician to install the
proper outlet”
POWER CORD SUPPLY
1. If the power supply cord is too short, do not use an extension cord. Have a
qualified electrician or serviceman to install an outlet near the appliance.
NOTE: Neither BLACK+DECKER nor the dealer can accept any liability for damage to
the product or personal injury resulting from failure to observe the electrical
connection procedures.
Page 6
ENGLISH
Timer Auto
%RH
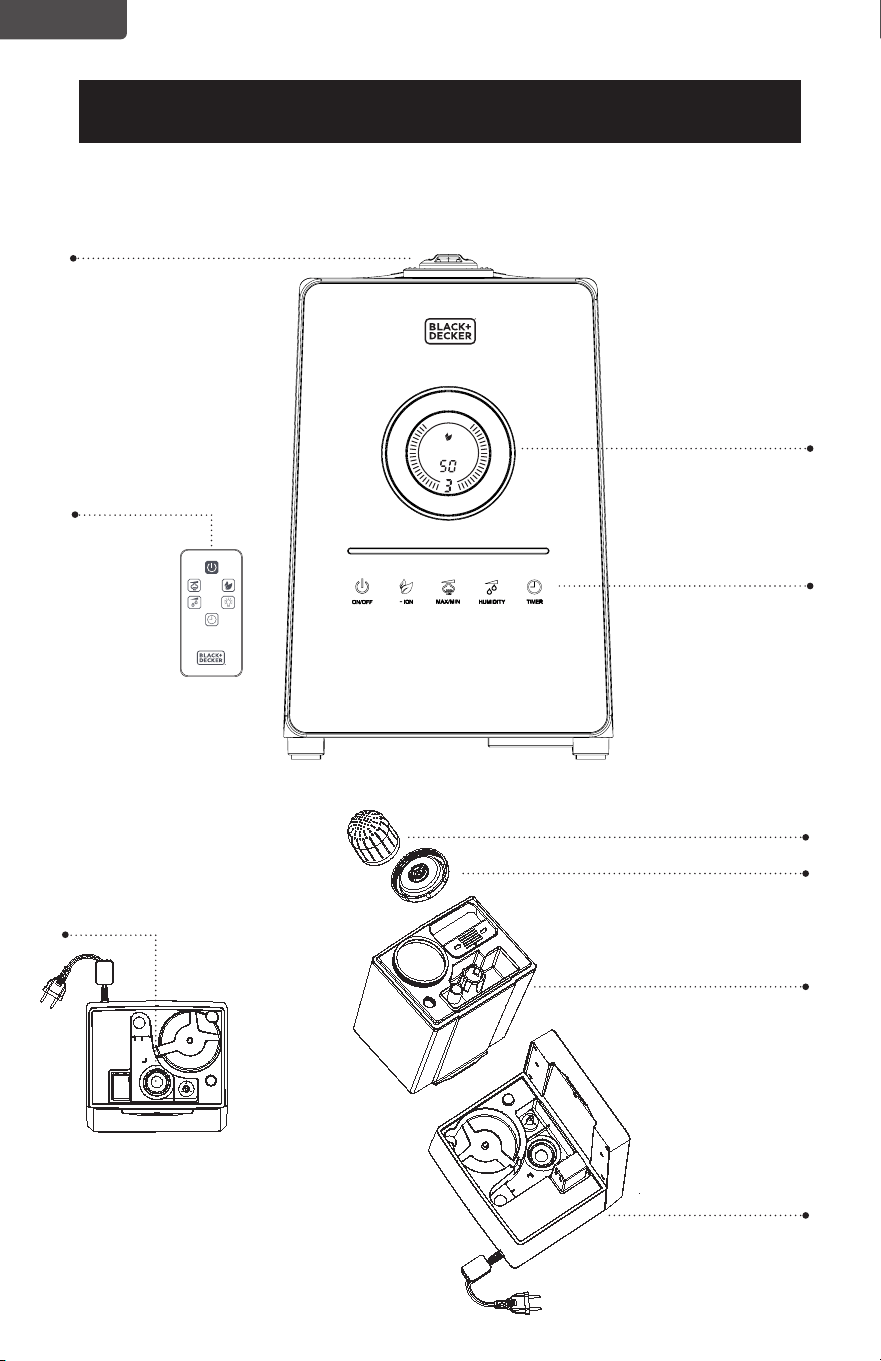
PARTS & FEATURES
Mist outlet
SET UP & USE
Control Panel
LCD Screen
Cap
Base
Tank
Ceramic Infused Filter Cartridge
(Replacement Part Model Number: HF2)
Transducer
Remote (model
BUHDR055 only)

Page 7
ENGLISH
SET UP & USE
OPERATING INSTRUCTIONS
Remove the humidifier from the packing carton and place it upright on an level
surface.
NOTE: Only operate humidifier in upright position. Always make sure the water tank
is clean. Fill with cool water.
1. Remove the water tank from the humidifier base. Remove the cap by turning it
counterclockwise. Fill the entire tank with clean, cool water. After filling with fresh,
distilled, or demineralized water make sure the cap is tightened and water tank is
securely in place over the base of the unit.
Please note the mist outlet might fall out of its position and it should be replaced
prior to operating the humidifier.
CAUTION: Do not move the humidier after the humidier has been lled with water.
This can cause too much water to spill into the humidier base.
Only add water to the tank through the opening with the cap. Do not
add directly to the base or the mist outlet.
2. Connect the power plug. The LCD screen will display the current RH% (relative
humidity) in the air.
3. ON/OFF: Turn the humidifier ON by pressing the ON/OFF button The humidifier
will begin to operate. You can then select from other options on the control panel.
Turn the humidifier OFF at any time by pressing the ON/OFF button again.
NOTE: When the tank is empty the humidifier will shut o automatically. Once the
tank is refilled with water turn the humidifier ON by pressing the ON/OFF
button.
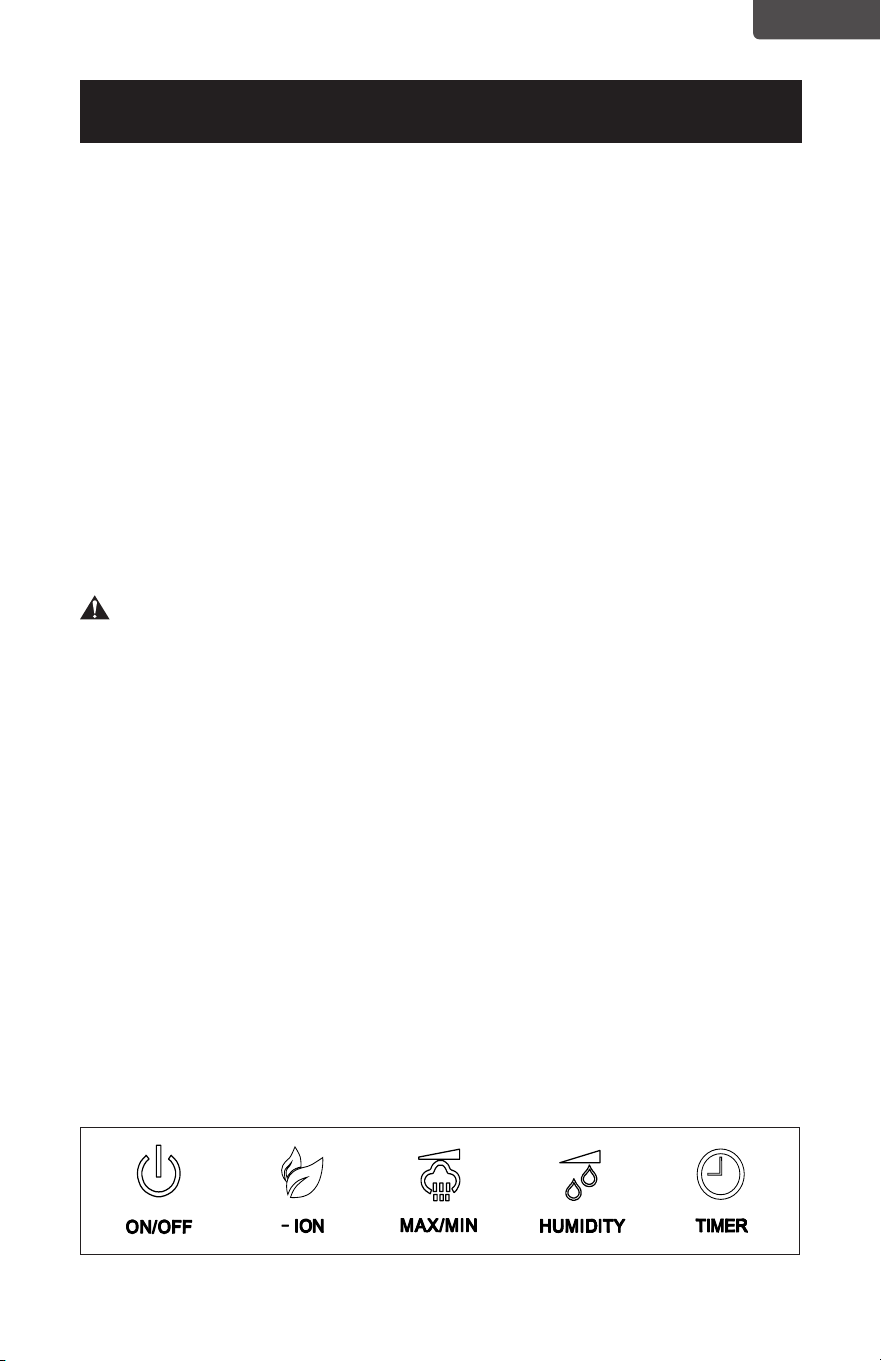
CONTROL PANEL
Page 8
ENGLISH
SET UP & USE
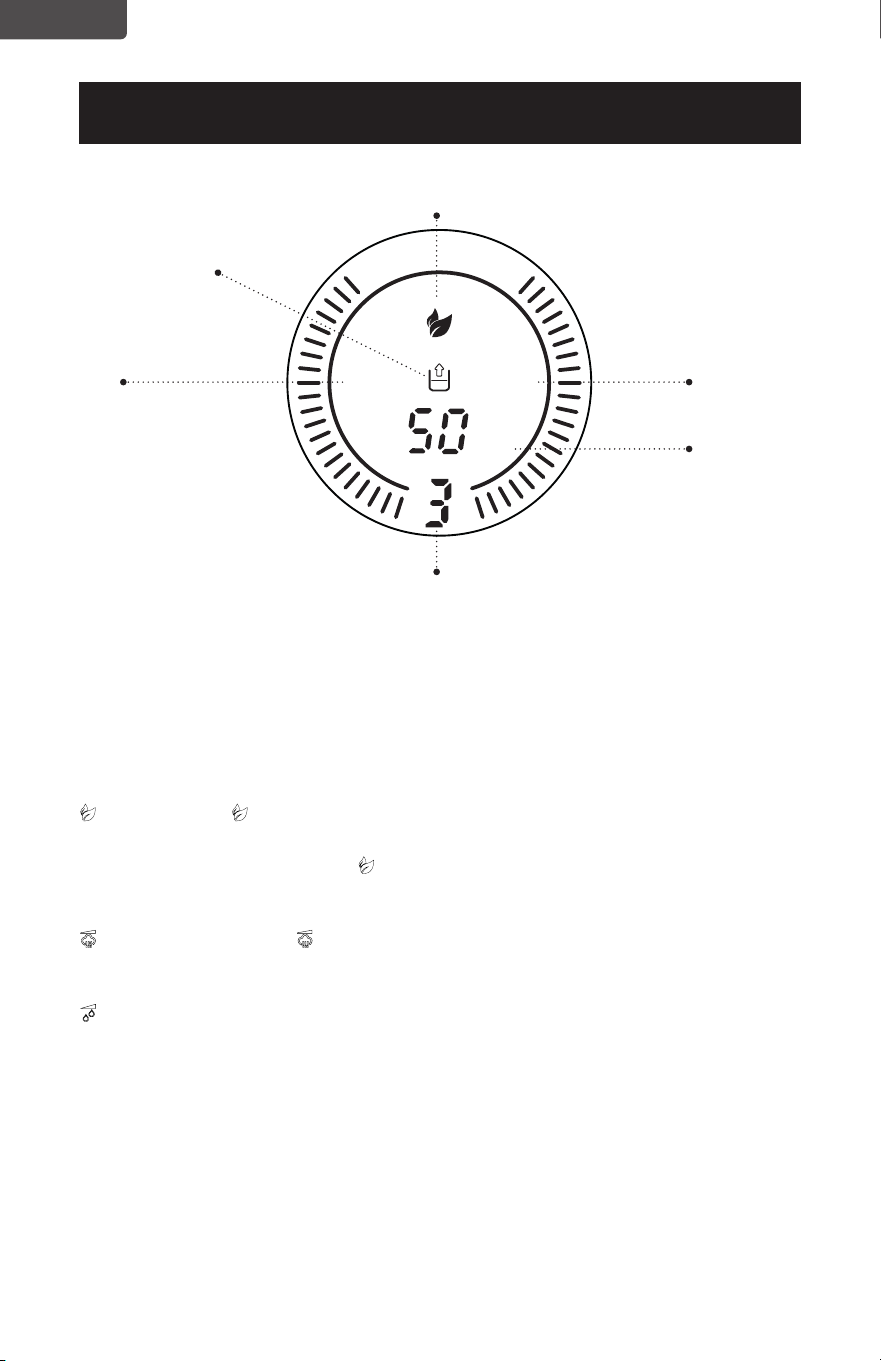
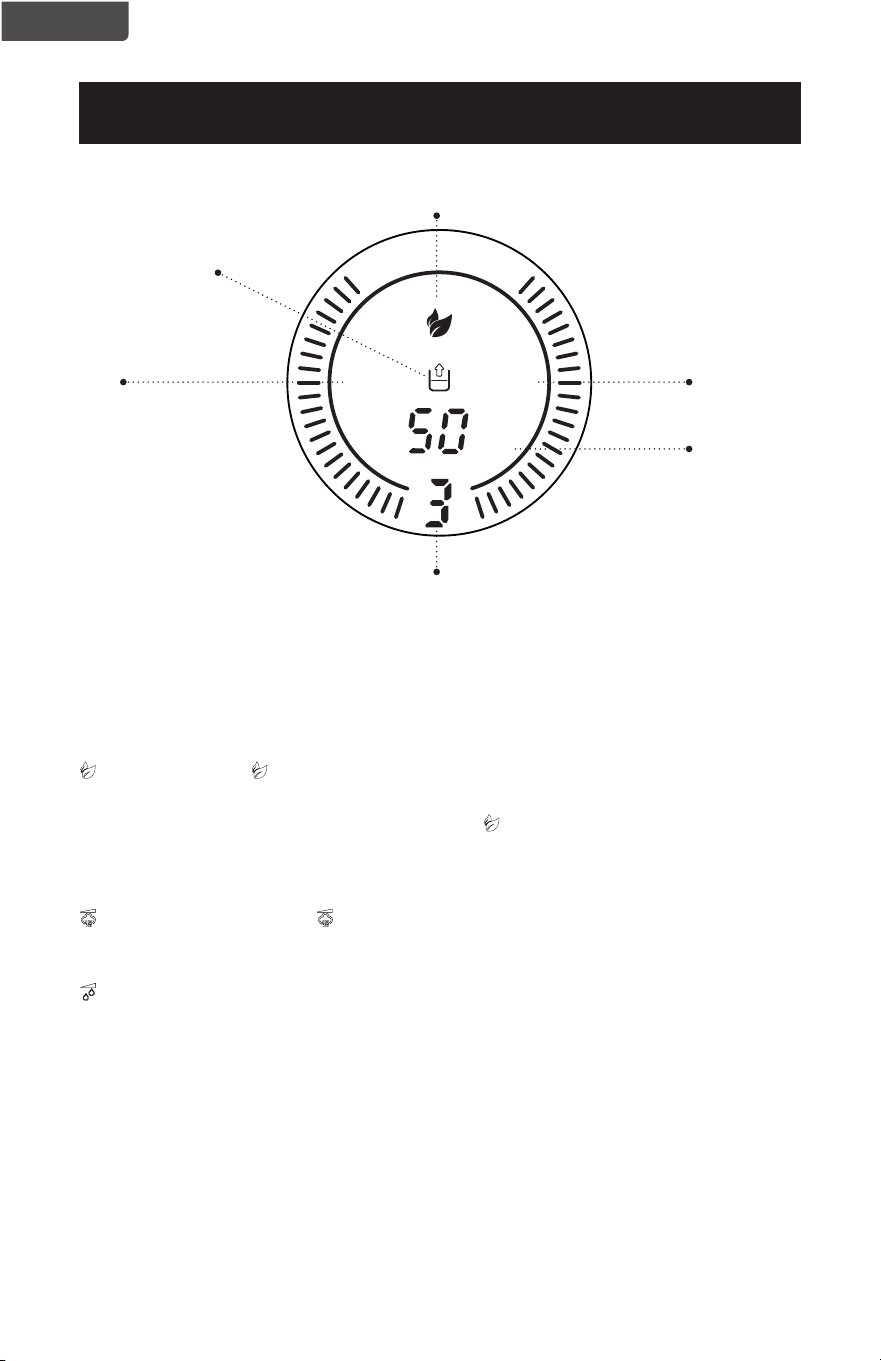
LCD IMAGE
Auto
Speed
Empty Tank
Timer
Indicator
- Ion
Relative
Humidity
NOTE: If the humidier stops producing mist when AUTO is shown on the LCD screen,
it has reached the set RH%. The humidier will produce mist again automatically
to maintain the RH%. If you would like the humidier to continue to produce
mist, either increase the RH% or continue to press the HUMIDITY button until
Co ashes on the LCD screen and AUTO is no longer indicated. You can adjust
mist using the MAX/MIN button.
-ION: Press the -ION button to generate negative ions. Press the button again to
deactivate. The -ion symbol will illuminate on the LCD screen.
NOTE: If you press and hold the -ION button for 2 seconds it will turn o the blue
lights in the circles surrounding the LCD screen. Pressing and holding for
another 2 seconds will turn these lights back on again.
MAX/MIN: Pressing the MAX/MIN button will select between 1 (LOW), 2 (MEDIUM)
and 3 (HIGH) speeds. The selected number will show on the bottom of
the LCD screen.
HUMIDITY: When this button is pressed it allows you to select a target humidity
level from 45% RH to 90% RH. Continue to press the button to add 5%
RH every time you press it until you reach a maximum of 90% RH. If you
press this button again you will reach Co% (Continue Operation). You
will then need to continue to scroll starting at 45% RH again until you
reach the RH% you would like to set.
The AUTO light will blink as you scroll through the target RH%
selections. A steady AUTO light indicates the actual RH% in the room.
The humidifier will stop producing mist when the target RH% is
achieved and resume automatically to maintain the selected RH%.
Timer Auto
%RH
Page 9
ENGLISH
TIMER: The humidifier is equipped with a timer that allows you to set its length of
operation up to 12 hours. Each time you press it will add 1 hour increment
until you reach the selected shut-o time. The selected number of hours
will illuminate on the LCD screen with the word TIMER flashing to show the
selection and then will change to the RH% in the room. TIMER will remain
as a steady light while it is activated and the LCD screen will display the
current RH% and fluctuate to display the remaining time until the humidifier
reaches the selected number of hours to shut o.
EMPTY TANK: The empty tank indicator light will illuminate to alert you to refill the
water tank.
NOTE: Never operate the humidifier when there is no water in the tank.
When the tank is empty the humidifier will shut o automatically. Once the
tank is refilled with water turn the humidifier ON by pressing the ON/OFF
button.
SET UP & USE
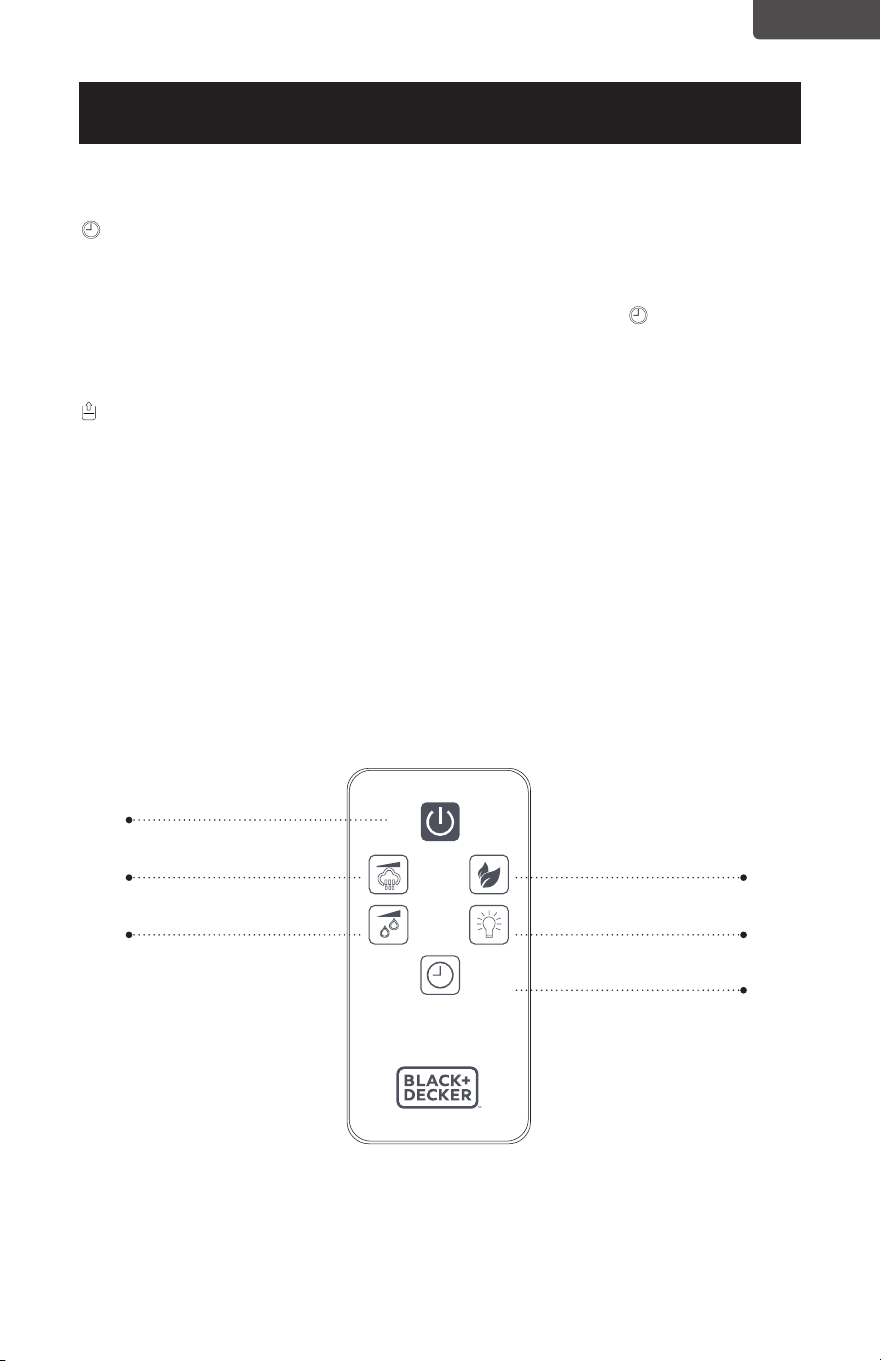
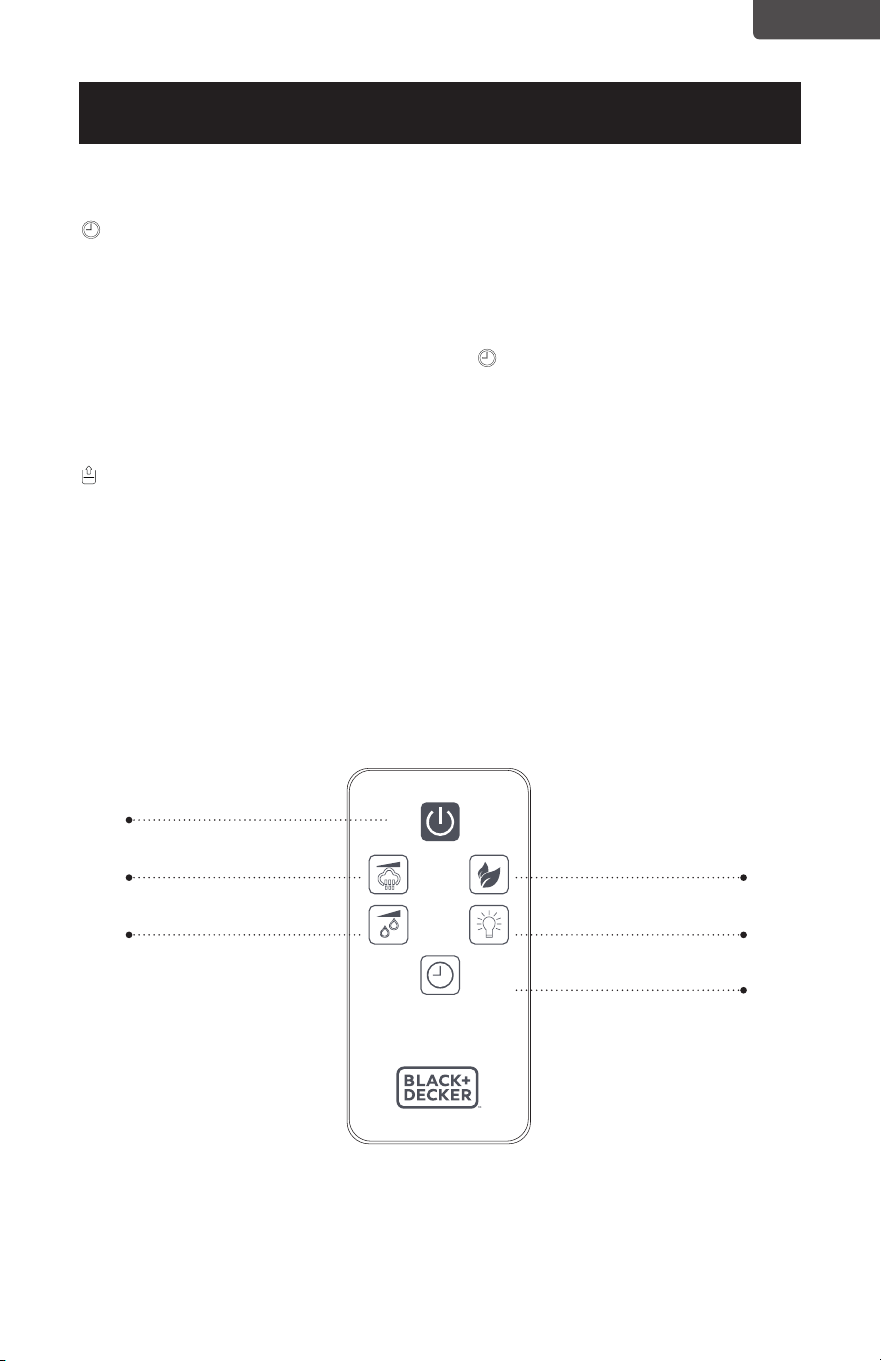
REMOTE CONTROL (MODEL BUHDR055 ONLY)
Model BUHRD055 comes with a remote. If you have purchased this model the
humidifier can be operated using the remote in addition to the controls on the front
of the unit.
- ION
LIGHT CONTROLHUMIDITY
MAX/MIN
ON/OFF
TIMER
Page 10
ENGLISH
SET UP & USE
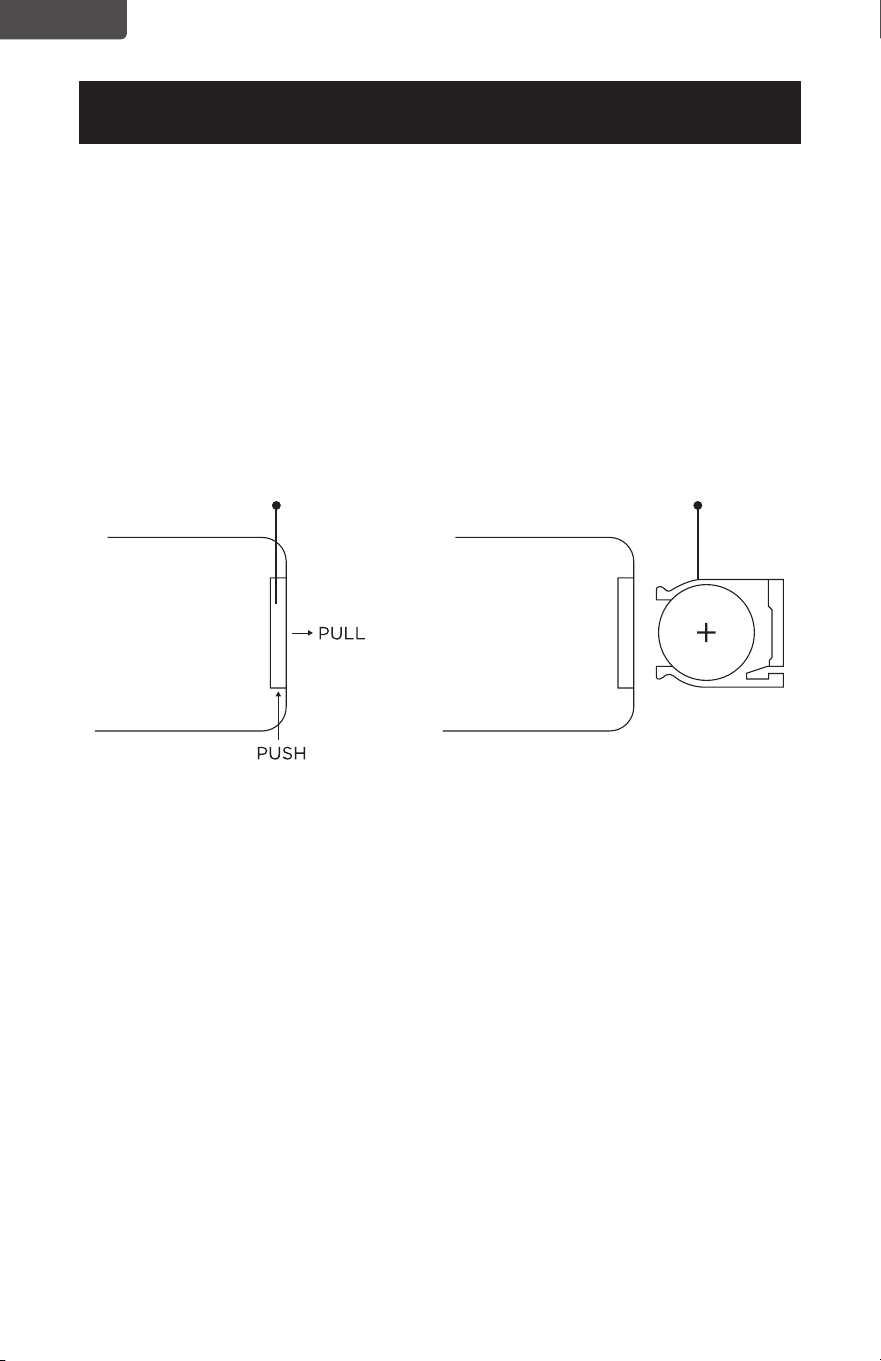
BATTERY INSTRUCTIONS (BATTERIES NOT INCLUDED)
The remote control requires a CR2025 Lithium Battery to operate. Battery is not
included.
1. Push the button at the base of the battery cover to release the cover. Pull out the
battery cover as shown in the diagram.
2. Insert the battery making sure the “+” side is facing up.
3. Once battery is installed, push battery cover closed.
CR2025
Battery
Remote Control
Battery Cover

Page 11
ENGLISH
BATTERY INFORMATION (MODEL BUHDR055)
WARNING-
• KEEP OUT OF REACH OF CHILDREN.
Swallowing may lead to serious injury or death. Severe burns can occur within 2
hours of ingestion. Immediately see a doctor and have the doctor phone (202)
625- 3333 collect. Keep in original package until ready to use. Dispose of used
batteries immediately. Risk of injury due to fire, explosion or leakage. Do not
disassemble, charge, crush or expose to fire or high temperatures.
• LITHIUM COIN CELL SAFETY NOTICE:
Keep lithium coin batteries out of the reach of small children; coin cell batteries
can be accidentally ingested. If ingested, these batteries may leak harmful
contents causing chemical burns, perforation of soft tissue, and in severe cases
may cause death. Lithium coin batteries must be removed immediately if
swallowed. Seek medical attention immediately. If you or your doctor suspects
that a battery has been ingested for assistance in the US call the NATIONAL
BATTERY INGESTION HOTLINE any time at (202) 625-3333: in Canada call 416-
813-5900.
• In order to prevent unnecessary battery drain, do not store anything on the
remote.
• Do not dispose of batteries in re. Batteries may explode or leak.
• Remove the battery if the remote is not used for a long period of time.
• Danger of explosion if battery is incorrectly replaced. When replacing battery,
replace it with the same or equivalent type CR2025. Observe correct polarity
(+ and –) when replacing batteries. Do not store or carry batteries so that metal
objects can contact exposed battery terminals.
• DO NOT INGEST BATTERY; CHEMICAL BURN HAZARD. This product contains
a coin/button cell battery. If the coin/button cell battery is swallowed, it can
cause severe internal burns in just 2 hours and can lead to death.
• Keep new and used batteries away from children. If the battery compartment
does not close securely, stop using the product and keep it away from children.
• If you think batteries might have been swallowed or placed inside any part of
the body, seek immediate medical attention.
SET UP & USE
Page 12
ENGLISH
WATER
WATER
CLEANING AND MAINTENANCE
WARNING: Be sure to unplug from the electrical supply source before cleaning.
Do not submerge humidfier base in water.
Do not attempt to disassemble the humidifier base for cleaning.
• Clean the transducer, water tank and interior of the base every week.
• Film or scale may form on the transducer or the interior of the base. To clean the
transducer, soak with undiluted vinegar for approximately 20 minutes. Gently
wipe with a soft cloth. Rinse with warm clean water.
• Plastic parts of the humidifier should be cleaned with mild soap and a damp
cloth or sponge. Rinse with clean water to remove any soapy film residue.
FILTER INSTALLATION
Your humidifier comes with a ceramic infused filter cartridge to soften water and
reduce calcium build up. It should be replaced approximately every 6 months. It can
be replaced sooner if you see an increase of calcium build-up in the water.
NOTE: You do not need the filter cartridge in order to operate the humidifier.
SET UP & USE
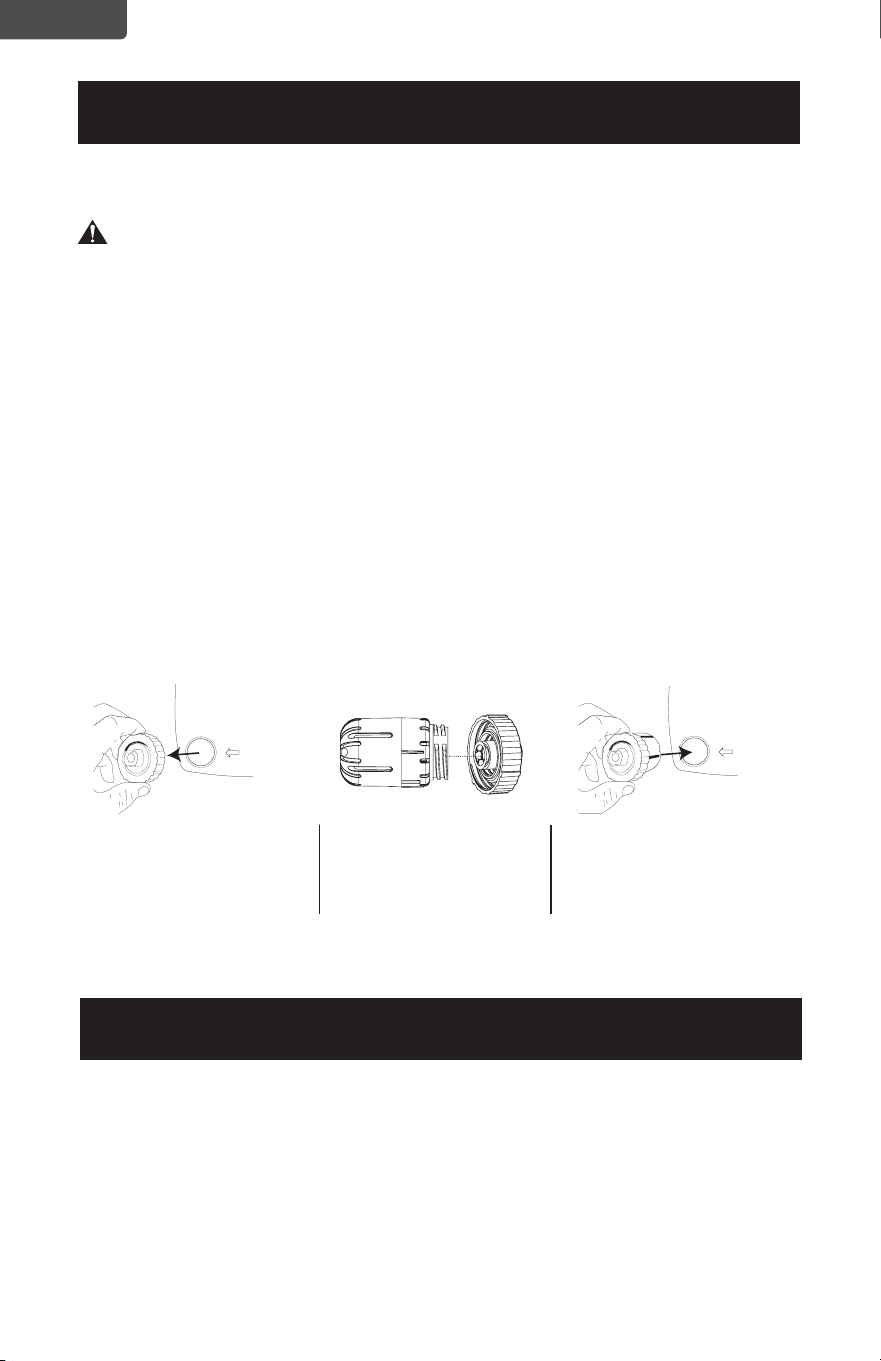
To install the filter cartridge,
remove the cap to the
water tank by turning it
counterclockwise (left).
It is recommended that you rinse the filter with warm water every time you add water
to the tank.
Use Replacement Filter Model HF2. To purchase a replacement filter, it is
recommended that you check with the retailer where you purchased your humidifier
or online retailers. You can also contact the Black + Decker Customer Satisfaction
Center at 844-299-0879 or service@equitybrands.com.
STORAGE
If you are not going to use the humidifier for a long time make sure all water is
removed and the humidifier is clean and dry. Store in a cool dry place.
Insert the end of the filter
into the center of the cap
and secure it by turning
clockwise (right).
Replace the cap of the water
tank with the filter installed
by turning it clockwise.
REPLACEMENT FILTER
ENGLISH
Page 13
TROUBLESHOOTING & WARRANTY
SPECIFICATIONS
Voltage: 120V, 60Hz
Unit Dimensions (WxDxH): 9.84’’ x 7.28’’ x 14’’
Net Weight: Approx. 5.3 lbs
TROUBLE POSSIBLE CAUSE POSSIBLE REMEDY
Appliance does not
turn on
Appliance is not plugged in Check that the appliance is plugged into a
working outlet
LCD Screen is illuminated
with AUTO indicated,
but no mist is being
produced
The humidifier has reached the
set RH% so it will stop producing
mist
The humidifier will produce mist again
automatically to maintain the RH%. If you
would like the humidifier to continue to
produce mist, either increase the RH% or
continue to press the HUMIDITY button
until Co flashes on the LCD screen and
AUTO is no longer indicated. You can
adjust mist using the MAX/MIN button
Humidifier shuts o No water is in water tank When the tank is empty the humidifier
will shut o automatically. Refill the water
tank with water. Turn the humidifier ON
by pressing the ON/OFF button.
Power on light is on but
humidifier is not operating
Too much water is in water tank Remove water from the water tank
The mist has an odor
The unit is new Remove water tank and open cover. Let it
sit in cool environment for 12 hours
The water may not be clean or
has become stagnant from sitting
too long
Clean the water tank/transducer and fill
with clean water.
*Refer to CLEANING AND MAINTENANCE
section of this manual.
The volume of mist is low
There is mineral scale in the water Clean the water tank/transducer and fill
with clean water
*Refer to CLEANING AND MAINTENANCE
section of this manual.
The water may not be clean or
has become stagnant from sitting
too long
Clean the water tank/transducer and fill
with clean water
*Refer to CLEANING AND MAINTENANCE
section of this manual.
Humidifier is noisy
There is a vibrating sound coming
from the water tank because the
water level is too low
Fill the water tank with more water
The humidifier is not on a flat
surface
Move the humidifier to a stable flat surface
Humidifier produces white
dust
Hard Water/Minerals in the water
Some white dust is normal. It is caused
by the mineral content in the water which
creates white dust when released into
the air. To reduce white dust you can use
distilled water.
Film or scale in water tank Hard Water/Minerals in the water Clean the water tank/transducer and fill
with clean water
*Refer to CLEANING AND MAINTENANCE
section of this manual.
Troubleshoot your problem by using the chart below. If the dehumidier still does
not work properly, contact BLACK+DECKER customer service center or the nearest
authorized service center.
WARNING: Users must never troubleshoot internal components.

ENGLISH
Page 14
TROUBLESHOOTING & WARRANTY
BEFORE YOU CALL FOR SERVICE
IF THE APPLIANCE FAILS TO OPERATE:
A) Check to make sure that the humidifier is plugged in securely. If it is not,
remove the plug from the outlet, wait 10 seconds and plug it in again securely.
B) Check for a blown circuit fuse or a tripped main circuit breaker. If these seem
to be operating properly, test the outlet with another appliance.
IF NONE OF THE ABOVE SOLVES THE PROBLEM, CONTACT A QUALIFIED
TECHNICIAN.
WARNING: USER SHOULD NOT TRY TO ADJUST OR REPAIR THIS
APPLIANCE. THERE ARE NO USER SERVICEABLE PARTS INSIDE.
IMPORTANT
DO NOT RETURN THIS PRODUCT TO THE STORE
If you have a problem with this product, please contact the
BLACK+DECKER Customer Satisfaction Center at
844-299-0879 or service@equitybrands.com
DATED PROOF OF PURCHASE, MODEL # AND SERIAL #
REQUIRED FOR WARRANTY SERVICE

ENGLISH
Any repair, replacement, or warranty service,
and all questions about this product should be
directed to BLACK+DECKER at 844-299-0879
from the USA or Puerto Rico.
BLACK+DECKER warrants to the original purchaser
that the product will be free from defects in material,
parts and workmanship for the period designated for
this product. The warranty commences the day the
product is purchased and covers up to a period of 1
year (12 months) for labor/1 year (12 months) for parts
(manufacturing defects only).
BLACK+DECKER agrees that it will, at its option,
replace the defective product with either a new
or remanufactured unit equivalent to your original
purchase during the warranty period.
Exclusions: This warranty does not apply to the
below:
1. If the appearance or exterior of
the product has been damaged or
defaced, altered or modified in design or
construction.
2. If the product original serial number
has been altered or removed or cannot
be readily determined.
3. If there is damaged due to power line
surge, user damage to the AC power
cord or connection to improper voltage
source.
4. If damage is due to general misuse,
accidents or acts of God.
5. If repair attempts are done by
unauthorized service agents, use of
parts other than genuine parts or parts
obtained from persons other than
authorized service companies.
6. On units that have been transferred
from the original owner.
7. On products that have been purchased
as refurbished, like new, second-hand, in
a “As-Is” or “Final Sale” terms.
8. To products used in a commercial or
rental setting.
9. To products used in settings other than
ordinary household use or used other
than in accordance with the provided
instructions.
10. To damages for service calls for
improper installations.
11. Transportation and shipping costs
associated with the replacement of the
unit.
12. Service calls to instruct you how to use
your product.
13. Service calls to repair or replace the
house fuse, reset the circuit breaker or
correct the wiring in the house.
REPAIR OR REPLACEMENT AS PROVIDED UNDER
THIS WARRANTY IS THE EXCLUSIVE REMEDY OF
THE CUSTOMER; BLACK+DECKER. SHALL NOT BE
LIABLE FOR ANY INCIDENTAL OR CONSEQUENTIAL
DAMAGES FOR BREACH OF ANY EXPRESS OR
IMPLIED WARRANTY ON THIS PRODUCT, EXCEPT
TO THE EXTENT PROHIBITED BY APPLICABLE LAW.
ANY IMPLIED WARRANTY OF MERCHANTABILITY
OF FITNESS FOR A PARTICULAR PURPOSE ON THIS
PRODUCT IS LIMITED TO THE DURATION OF THE
WARRANTY.
Some states do not allow the exclusion or limitations
of incidental or consequential damages, or limitations
on how long the warranty lasts. In these cases the
above exclusions or limitations may not apply to you.
This warranty gives you specific legal rights and you
may also have other rights which vary from state to
state.
Obtaining Service: To obtain service, product
literature, supplies or accessories please call
844-299-0879 to create a ticket for exchange/repair.
Please make sure to provide the date of purchase,
model number and a brief description of the problem.
Our customer service representative
will contact you or send detailed return instructions.
BLACK+DECKER does not warrant that the appliance will work
properly in all environmental conditions, and makes no warranty
and representation, either implied or expressed, with respect
to the quality, performance, merchantability, or fitness for a
particular purpose other than the purpose identified within this
user’s manual. BLACK+DECKER has made every eort to ensure
that this user’s manual is accurate and disclaims liability for any
inaccuracies or omissions that may have occurred. Information in
this user’s manual is subject to change without notice and does
not represent a commitment on the part of BLACK+DECKER.
BLACK+DECKER reserves the right to make improvements to
this user’s manual and/or to the products described in this user’s
manual at any time without notice. If you find information in this
manual that is incorrect, misleading, or incomplete, please contact
us at 844-299-0879.
W Appliance Co.
1356 Broadway
New York, NY 10018
TROUBLESHOOTING & WARRANTY
LIMITED WARRANTY
Page 15

Página 16
ESPAÑOL
¡Gracias por comprar nuestro
producto BLACK+DECKER! Este
manual fácil de usar le guiará
para darle el mejor uso a su
humidificador.
Recuerde anotar el número de
modelo y el número de serie. Están
en una etiqueta en la parte trasera.
Grape o adjunte su recibo a su manual.
Lo necesitará para acceder el servicio de
garantía.
Nº de modelo
Nº de serie
Fecha de compra
REGISTRO DEL PRODUCTO
CONTENIDO
INFORMACIÓN DE SEGURIDAD
Instrucciones importantes de seguridad ...................................................................................................................3-5
Requisitos eléctricos ................................................................................................................................................................ 5
CONFIGURACIÓN Y USO
Partes y características ...........................................................................................................................................................6
Instrucciones de uso ............................................................................................................................................................ 6-11
Limpieza y mantenimiento .................................................................................................................................................12
SOLUCIÓN DE PROBLEMAS Y GARANTÍA
Solución de problemas ..........................................................................................................................................................13
Garantía limitada .......................................................................................................................................................................15

Página 17
ESPAÑOL
INFORMACIÓN DE SEGURIDAD
1. LEA TODAS LAS INSTRUCCIONES ANTES DEL USO
2. Para evitar incendios o descargas eléctricas, enchufe el aparato
directamente a una toma de corriente de 120V de corriente alterna.
3. Es necesario ejercer supervisión estricta cuando cualquier aparato sea
utilizado por o cerca de niños.
4. Evite la exposición a la luz solar directa y manténgase a al menos a 4
pulgadas de las paredes. Asegúrese de que la salida del vaporizador no
esté directamente frente a una pared. No lo coloque cerca de fuentes
de calor como estufas, radiadores, etc.
5. Coloque el humidificador sobre una superficie firme, plana y
nivelada. Se recomienda usar una alfombrilla impermeable debajo del
humidificador. No lo coloque sobre una alfombra, moqueta, o en un
piso con un acabado que pueda dañarse por la exposición al agua o la
humedad.
6. No inserte ni retire el enchufe eléctrico del aparato con las manos
mojadas. Desenchúfelo cuando no esté en uso.
7. No opere ningún humidificador con el cable o enchufe dañados.
Descarte el humidificador o devuélvalo a un centro de servicio
autorizado para su examinación y/o reparación.
8. Para reducir el riesgo de descarga eléctrica, no quite los tornillos. La
unidad no contiene piezas reparables por el usuario. Por favor, deje
todo tipo de trabajos de mantenimiento a personal calificado.
9. Llene el tanque con agua fresca, destilada o desmineralizada. No
encienda el aparato con el tanque de agua vacío.
10. No agite el aparato ya que podría derramarse agua en la base de la
unidad.
11. Nunca toque el agua o los componentes mientras la unidad esté en
funcionamiento.
ADVERTENCIA
Cuando se usen aparatos eléctricos, se deben tomar precauciones
de seguridad básicas, incluidas las siguientes:
PELIGRO
PELIGRO - Amenazas inmediatas
que resultarán en lesiones
personales graves o la muerte
ADVERTENCIA
ADVERTENCIA - Peligros o
prácticas inseguras que pueden
resultar en lesiones personales
graves o la muerte
PRECAUCIÓN
PRECAUCIÓN - Peligros o prácticas
inseguras que podrían resultar en
lesiones personales menores
INSTRUCCIONES IMPORTANTES DE
SEGURIDAD

Página 18
ESPAÑOL
12. No vierta agua caliente en el tanque, es decir, a una temperatura
superior a 100°F (38°C).
13. Desenchufe el aparato antes de limpiarlo o retirar el tanque.
14. No sumerja el aparato o el cable de alimentación en agua u otros
líquidos.
15. Nunca raspe el transductor con una herramienta dura. El humidificador
debe ser limpiado regularmente. Para hacerlo, consulte las instrucciones
de limpieza en este manual.
16. No utilice detergentes, limpia vidrios o limpiadores domésticos, cera
para muebles, gasolina, diluyente de pintura u otro solvente para limpiar
cualquier parte del humidificador.
17. Si derrama algún líquido sobre la unidad, puede causar daños graves.
Apáguelo y desenchúfelo inmediatamente.
18. No permita que el cable toque ninguna superficie caliente y asegúrese
de que no cuelgue sobre el borde de una mesa o mesada.
19. Nunca use este aparato en una habitación donde se estén usando
productos en aerosol (sprays) o en una habitación o donde se
administre oxígeno.
20. No coloque prendas de vestir o toallas encima del aparato. Si la boquilla
se obstruye puede causar un mal funcionamiento del aparato.
21. Al mover el aparato, levántelo por la unidad base y no por el tanque de
agua.
22. El nivel ideal de humedad relativa para que resulte cómodo para las
personas es de entre 45% y 60%. El exceso de humedad se manifiesta
en forma de condensación en las superficies o paredes frías de
la habitación. Para medir la humedad de la habitación, utilice un
higrómetro (disponible en su ferretería local).
23. No utilice este aparato al aire libre.
24. No coloque el humidificador en un área donde sea accesible para
los niños. No utilice el humidificador en una habitación cerrada,
especialmente donde un niño pueda estar durmiendo, descansando o
jugando (una habitación cerrada puede resultar en humedida excesiva).
25. No intente rellenar el humidificador sin antes desenchufar la unidad de
de la toma de corriente. El incumplimiento de esta advertencia puede
causar lesiones personales. Asegúrese de desenchufar la unidad tirando
del enchufe y no del cable.
26. Este humidificador requiere mantenimiento para funcionar
correctamente. Consulte los procedimientos de limpieza y
mantenimiento. Use solo limpiadores y aditivos recomendados por el
fabricante.
INFORMACIÓN DE SEGURIDAD

Página 19
ESPAÑOL
INFORMACIÓN DE SEGURIDAD
CONSERVE ESTAS INSTRUCCIONES
SOLO PARA USO DOMÉSTICO
REQUISITOS ELÉCTRICOS
ENCHUFES POLARIZADOS
Este aparato cuenta con un enchufe polarizado (una clavija es más ancha que la otra).
Para reducir el riesgo de descarga eléctrica, este enchufe fue diseñado para encajar
en una toma polarizada de una sola manera. Si no puede introducir el enchufe,
inviértalo. Si aún no encaja, póngase en contacto con un electricista calificado.
AISLAMIENTO DOBLE
Los electrodomésticos con aislamiento doble están construidos con dos capas
separadas de aislamiento eléctrico o una sola capa de aislamiento reforzado entre
el usuario y el sistema eléctrico de los electrodomésticos. Los productos fabricados
con este sistema de aislamiento no están diseñados para conectarse a tierra. Como
resultado, este aparato está equipado con un enchufe de dos clavijas que permite su
uso sin preocuparse por mantener una conexión a tierra.
NOTA: El aislamiento doble no reemplaza las precauciones de seguridad normales
cuando se utiliza este aparato. El sistema de aislamiento secundario es para
la protección contra lesiones resultantes de una posible falla del aislamiento
primario dentro del producto.
PRECAUCIÓN: AL REPARAR ESTE APARATO UTILICE ÚNICAMENTE PIEZAS
DE REPUESTO IDÉNTICAS.
Repare o reemplace los cables dañados.
ADVERTENCIA: No intente modificar el enchufe de forma alguna.
ADVERTENCIA: Si el enchufe no encaja completamente en la toma
de corriente, invierta el enchufe. Si aún así no encaja,
comuníquese con un electricista calificado para que instale
una toma de corriente adecuada.
CABLE DE ALIMENTACIÓN
1. Si el cable de suministro de energía es demasiado corto, no use un cable de
extensión. Pida a un electricista o técnico calicado que instale una toma de
corriente cerca del electrodoméstico.
NOTA: Ni BLACK+DECKER ni el distribuidor pueden aceptar ninguna responsabilidad
por daños al producto o daños personales que resulten de no respetar
procedimientos de conexión los procedimientos de conexión eléctrica.

Página 20
ESPAÑOL
Timer Auto
%RH
PARTES Y CARACTERÍSTICAS
Salida del vaporizador
CONFIGURACIÓN Y USO
Panel de control
Pantalla LCD
Tapa
Base
Tanque de agua
Cartucho de filtro con infusión de cerámica
(Número de modelo de pieza de repuesto: HF2)
Transductor
Control remoto
(solo en el modelo
BUHDR055)
Página 21
ESPAÑOL
CONFIGURACIÓN Y USO
INSTRUCCIONES DE USO
Retire el humidificador del embalaje y colóquelo en posición vertical en una superficie
nivelada.
NOTA: Utilice el humidificador únicamente en posición vertical. Siempre asegúrese de
que el tanque de agua esté limpio. Rellenar con agua fría.
1. Retire el tanque de agua de la base del humidificador. Retire el tapón girándolo
en sentido anti-horario. Llene el tanque con agua limpia y fría. Después de llenarlo
con agua fresca, agua destilada o desmineralizada, asegúrese de que la tapa esté
apretada y que el tanque de agua esté firmemente en su lugar sobre la base de la
unidad.
Tenga en cuenta que la salida de niebla podría salirse y debe ser colocada
nuevamente en su lugar antes de operar el humidificador.
PRECAUCIÓN: No mueva el humidificador después de que se haya
llenado con agua. Esto puede hacer que se derrame
demasiada agua en la base del humidificador.
Solo agregue agua al tanque a través de la abertura con la tapa.
No agregue directamente a la base ni a la salida de niebla.
2. Conecte el enchufe de alimentación. La pantalla LCD mostrará el %HR actual
(humedad relativa) del aire.
3. ON/OFF: Encienda el humidificador presionando el botón ON/OFF. El
humidificador comenzará a operar. Luego puede seleccionar entre otras
opciones en el panel de control. Apague el humidificador en cualquier momento
presionando el botón ON/OFF nuevamente.
NOTA: Cuando el tanque está vacío, el humidificador se apagará automáticamente.
Una vez que el tanque se haya llenado de agua, encienda el humidificador
presionando el botón ON / OFF.
PANEL DE CONTROL
Página 22
ESPAÑOL
CONFIGURACIÓN Y USO
IMAGEN LCD
Auto
Velocidad
Tanque vacío
Indicador de
temporizador
- Ion
Humedad
relativa
NOTA: Si el humidicador deja de producir niebla cuando se muestra AUTO en la
pantalla LCD, es porque ha alcanzado el %HR congurado. El humidicador
volverá a producir niebla automáticamente para mantener el %HR. Si desea
que el humidicador continúe produciendo niebla, aumente el %HR o continúe
presionando el botón HUMIDITY hasta que Co parpadee la pantalla LCD y deje
de indicar AUTO. Puedes ajustar el nivel de niebla usando el botón MAX/MIN.
-ION: Presione el botón -ION para generar iones negativos. Presione el botón
nuevamente para desactivar. El símbolo -Ion se iluminará en la pantalla LCD.
NOTA: Si presiona y mantiene presionado el botón -ION durante 2 segundos,
se apagarán las luces azules en los círculos que rodean la pantalla LCD. Al
presionar y mantener presionado por otros 2 segundos se volverán a encender
estas luces.
MAX/MIN: Al presionar el botón MAX/MIN se seleccionará entre las velocidades 1
(BAJAO), 2 (MEDIA), y 3 (ALTA). El número seleccionado se mostrará en
la parte inferior de la pantalla LCD.
HUMIDITY: Presionar este botón le permite seleccionar un nivel humedad objetivo
de entre 45%HR a 90%HR. Continúe presionando el botón para agregar
5%HR cada vez que lo presione hasta que alcance un máximo de
90%HR. Si presiona este botón nuevamente llegará a CO% (Operación
Continua). Deberá entonces continuar desplazándose comenzando
en 45%HR nuevamente hasta que alcance el %HR que le gustaría
establecer.
La luz AUTO parpadeará mientras se desplaza por las opciones de %HR
objetivo. Una luz AUTO fija indica el %HR real en la habitación.
El humidificador dejará de producir niebla cuando el %HR objetivo
sea alcanzada y reanudará el funcionamiento automáticamente para
mantener el %HR seleccionado.
Timer Auto
%RH
Página 23
ESPAÑOL
TEMPORIZADOR: El humidificador está equipado con un temporizador que le
permite configurar el tiempo de funcionamiento hasta 12 horas.
Cada vez que lo presione agregará un incremento de 1 hora
hasta llegar a la hora de apagado seleccionada. El número de
horas seleccionado se iluminará en la pantalla LCD con la palabra
TIMER parpadeando para mostrar la selección y luego cambiará
al %HR de la habitación. TIMER permanecerá como una luz
fija mientras está activado y la pantalla LCD mostrará el %HR
actual y alternará para mostrar el tiempo restante hasta que el
temporizador alcance el número de horas seleccionado para
apagarse.
EMPTY TANK: La luz indicadora de tanque vacío se iluminará para avisarle que debe
volver a llenar el tanque de agua.
NOTA: Nunca opere el humidificador cuando no haya agua en el tanque.
Cuando el tanque está vacío, el humidificador se apagará automáticamente.
Una vez que el tanque se haya llenado de agua, encienda el humidificador
presionando el botón ON / OFF.
CONFIGURACIÓN Y USO
CONTROL REMOTO (SOLO EN EL MODELO BUHDR055)
El modelo BUHRD055 viene con un control remoto. Si ha comprado este modelo el
humidificador puede ser operado usando el control remoto además de los controles
en el frente de la unidad.
- ION
LIGHT CONTROLHUMIDITY
MAX/MIN
ON/OFF
TIMER

Página 24
ESPAÑOL
CONFIGURACIÓN Y USO
INSTRUCCIONES DE LAS BATERÍAS (BATERÍAS NO INCLUIDAS)
El control remoto requiere una batería de litio CR2025 para operar. La batería no se
incluye.
1. Presione el botón de la base de la tapa de la batería para liberarla. Quite la tapa de
la batería como se muestra en el diagrama.
2. Inserte la batería asegurándose de que el lado “+” esté hacia arriba.
3. Una vez que la batería esté instalada, empuje la tapa de la batería para cerrarla.
Batería CR2025
Tapa de las batería del
control remoto
TIRAR
EMPUJAR

Página 25
ESPAÑOL
INFORMACIÓN DE LA BATERÍA (MODELO
BUHDR055)
ADVERTENCIA-
• MANTÉNGASE FUERA DEL ALCANCE DE LOS NIÑOS.
La ingestión puede resultar en lesiones serias o la muerte. Pueden ocurrir
quemaduras severas dentro de las 2 horas de la ingestión. Consulte a un doctor
inmediatamente y haga que el doctor llame por cobrar al (202) 625 - 333.
Manténgase en el empaque original hasta que esté listo para usarse. Deseche las
baterías usadas inmediatamente. Riesgo de lesiones por incendio, explosión o
fuga. No desmontar, cargar, triturar, o exponer al fuego o altas temperaturas.
• AVISO SOBRE BATERÍAS DE BOTÓN DE LITIO:
Mantenga las baterías de botón de litio lejos del alcance de los niños; las
baterías de botón pueden ser ingeridas accidentalmente. De ser ingeridas, estas
baterías pueden verter sus contenidos nocivos causando quemaduras químicas,
perforación de tejidos blandos y, en casos severos, la muerte. Las baterías de
botón de litio deben ser extraídas inmediatamente en caso de ingestión. Busque
atención médica de inmediato. Si usted o su médico sospechan que se ha
ingerido una batería, por asistencia en los EE.UU., llame a la LÍNEA NACIONAL
DE INGESTIÓN DE BATERÍAS a cualquier hora al (202) 625-3333; en Canadá
llame al 416-813-5900.
• Para prevenir el desgaste innecesario de la batería, no guarde nada en el control
remoto.
• No arroje las baterías al fuego. Pueden explotar o verter sus contenidos.
• Quite las baterías si el control remoto no será utilizado por un largo período de
tiempo.
• Existe riesgo de explosión si la batería se sustituye de forma incorrecta.
Cuando reemplace la batería, reemplácela con el mismo tipo (CR2032) o uno
equivalente. Verique la polaridad correcta (+ y -) al reemplazar las baterías. No
almacene ni transporte baterías de manera que objetos metálicos puedan entrar
en contacto con los terminales expuestos de la batería.
• NO INGIERA LA BATERÍA; PELIGRO DE QUEMADURAS QUÍMICAS. Este
producto contiene una batería de tipo moneda/botón. Si se traga la pila de
moneda/botón, puede causar quemaduras internas graves en solo 2 horas y
puede provocar la muerte.
• Mantenga las pilas nuevas y usadas fuera del alcance de los niños. Si el
compartimento de la batería no cierre de forma segura, deje de usar el producto
y manténgalo alejado de los niños.
• Si piensa que las baterías pueden haber sido tragadas o introducidas en alguna
parte del cuerpo, busque atención médica de inmediato.
CONFIGURACIÓN Y USO
Página 26
ESPAÑOL
WATER
WATER
LIMPIEZA Y MANTENIMIENTO
ADVERTENCIA: Asegúrese de desenchufar el aparado antes de la limpieza.
No sumerja la base del humidificador en agua.
No intente desmontar la base del humidificador para limpiarla.
• Limpie el transductor, el tanque de agua y el interior de la base todas las semanas.
• Se puede acumular una película de residuos en el transductor o en el interior
de la base. Para limpiar el transductor, remoje con vinagre sin diluir durante
aproximadamente 20 minutos. Seque suavemente con un paño suave. Enjuague con
agua tibia y limpia.
• Las partes de plástico del humidificador deben limpiarse con un jabón suave y un
paño húmedo o una esponja. Enjuague con agua para eliminar cualquier resto de
jabón.
INSTALACIÓN DEL FILTRO
Su humidificador viene con un cartucho de filtro con infusión de cerámica para
ablandar el agua y reducir la acumulación de calcio. Debe reemplazarse cada 6 meses
aproximadamente. Puede ser reemplazado antes si observa un aumento de la acumulación
de calcio en el agua.
NOTA: No necesita el cartucho de filtro para usar el humidificador.
CONFIGURACIÓN Y USO
Para instalar el cartucho de
filtro, quite la tapa del tanque
de agua girándola en sentido
antihorario (izquierda).
Se recomienda que enjuague el filtro con agua tibia cada vez que agregue agua al tanque.
Utilice el filtro de repuesto modelo HF2. Para comprar un filtro de repuesto, se recomienda
que consulte con el minorista donde compró su humidificador o en minoristas en línea.
También puede contactar al Servicio de Atención al Cliente de BLACK+DECKER al 844-
299-0879 o a través de [email protected]om.
ALMACENAMIENTO
Si no va a utilizar el humidificador durante mucho tiempo, asegúrese de que no quede
agua en el tanque y que el humidificador esté limpio y seco. Guardar en lugar fresco y seco.
Inserte el filtro en el centro
de la tapa y asegúrelo
girando en sentido horario
(derecha).
Coloque la tapa del tanque
de agua con el filtro instalado
girándolo en el sentido
horario.
RECAMBIO DE FILTRO
Página 27
ESPAÑOL
SOLUCIÓN DE PROBLEMAS Y GARANTÍA
ESPECIFICACIONES
Voltaje: 120V, 60Hz
Dimensiones de la unidad (AnxProfxAl): 9.84’’ x 7.28’’ x 14’’(25 cm x 18.5 cm x 36 cm)
Peso neto: aprox. 5.3 lb (2.4 kg)
PROBLEMA CAUSA POSIBLE SOLUCIÓN POSIBLE
El aparato no enciende El aparato no está enchufado Asegúrese de que el aparato esté enchufado a
una toma que funcione
La pantalla LCD está
tiene el indicador AUTO
iluminado pero no hay se
produce niebla
El humidificador ha
alcanzado el %HR
establecido, por lo que
dejará de producir niebla
El humidificador producirá niebla de nuevo
automáticamente para mantener el %HR.
Si desea que el humidificador continúe
produciendo niebla, aumente el %HR o
continúe presionando el botón HUMIDITY hasta
que CO parpadee en la pantalla LCD y AUTO
ya no esté iluminado. Puede ajustar el nivel de
niebla usando el botón MAX/MIN.
La pantalla LCD está
encendida pero no se está
produciendo niebla
No hay agua en el tanque
de agua
Llene el tanque de agua con agua
El humidificador se apaga Demasiada agua en el
tanque de agua
Cuando el tanque está vacío, el humidificador
se apagará automáticamente. Vuelva a llenar
el tanque de agua con agua. Encienda el
humidificador presionando el botón ON / OFF.
La niebla tiene olor
La unidad es nueva Retire el tanque de agua y abra la tapa Déjelo
reposar en un ambiente fresco durante 12 horas
Es posible que el agua
no esté limpia o se haya
estancado por estar sin uso
por demasiado tiempo
Limpie el tanque de agua/transductor y llene el
tanque de agua con agua limpia.
*Consulte los procedimientos de LIMPIEZA Y
MANTENIMIENTO de este manual.
El volumen de niebla es
bajo
Hay residuos minerales en
el agua
Limpie el tanque de agua/transductor y llene el
tanque de agua con agua limpia
*Consulte los procedimientos de LIMPIEZA Y
MANTENIMIENTO de este manual.
Es posible que el agua no esté
limpia o se haya estancado
por estar sin uso por
demasiado tiempo
Limpie el tanque de agua/transductor y llene el
tanque de agua con agua limpia
*Consulte los procedimientos de LIMPIEZA Y
MANTENIMIENTO de este manual.
El humidificador hace
ruido
Hay un sonido vibratorio
proveniente del tanque de
agua porque el nivel del agua
es demasiado bajo
Llene el tanque de agua con más agua
El humidificador no está sobre
una superficie nivelada
Mueva el humidificador a una superficie
nivelada y estable
El humidificador produce
polvo blanco
Agua dura o residuos
minerales en el agua
Algo de polvo blanco es normal Es causado
por el contenido de minerales en el agua que
crea un polvo blanco cuando se libera en el aire
Para reducir el polvo blanco puede utilizar agua
destilada.
Película de residuos
minerales en el tanque
de agua
Agua dura o residuos
minerales en el agua
Limpie el tanque de agua/transductor y llene el
tanque de agua con agua limpia
*Consulte los procedimientos de LIMPIEZA Y
MANTENIMIENTO de este manual.
Solucione su problema utilizando el cuadro a continuación. Si el humidicador aun
no funciona correctamente, comuníquese con el centro de atención al cliente BLACK+DECKER o
el centro de servicio autorizado más cercano.
ADVERTENCIA: Los usuarios nunca deben solucionar problemas de componentes internos.

Página 28
ESPAÑOL
Page 28
SOLUCIÓN DE PROBLEMAS Y GARANTÍA
ANTES DE LLAMAR AL SERVICIO TÉCNICO
SI EL APARATO NO FUNCIONA:
A) Verifique para asegurarse que el humidificador esté bien enchufado. Si no lo
está, quite el enchufe de la toma de corriente, espere 10 segundos y conéctelo
nuevamente de forma segura.
B) Compruebe si hay un fusible quemado o un disyuntor principal disparado. Si
éstos parecen estar operando como es debido, pruebe el enchufe con otro
aparato.
SI NINGUNO DE LOS PASOS ANTERIORES RESUELVE EL PROBLEMA,
CONTACTE A UN TÉCNICO CALIFICADO.
ADVERTENCIA: EL USUARIO NO DEBE INTENTAR AJUSTAR O REPARAR
ESTE ELECTRODOMÉSTICO. NO HAY PIEZAS EN EL
DISPOSITIVO QUE EL USUARIO PUEDA REPARAR.
IMPORTANTE
NO DEVUELVA ESTE PRODUCTO A LA TIENDA
Si tiene problemas con este producto, por favor, contacte al
Centro da Satisfacción del Cliente de BLACK+DECKER a través
del 844-299-0879 o a service@equitybrands.com
UN COMPROBANTE DE COMPRA CON FECHA, No. DE MODELO
Y No. DE SERIE ES REQUERIDO PARA EL SERVICIO DE
GARANTÍA

Página 29
ESPAÑOL
SOLUCIÓN DE PROBLEMAS Y GARANTÍA
Page 29
GARANTÍA LIMITADA
Cualquier reparación, recambio, o servicio
de garantía, y todas las preguntas sobre este
producto deben ser dirigidas BLACK+DECKER
al 844-299-0879 desde EE.UU. o Puerto Rico.
BLACK+DECKER garantiza al comprador original que
el producto estará libre de defectos de materiales,
partes y mano de obra por el período designado para
este producto. La garantía comienza el día en que se
compra el producto y cubre hasta un período de 1 año
(12 meses) por mano de obra / 1 año (12 meses) por
piezas (solo defectos de fabricación).
BLACK+DECKER acepta que, de acuerdo con su
criterio, remplazará el producto defectuoso por
uno nuevo o uno remanufacturado equivalente a su
compra original durante el período de garantía.
Exclusiones: Esta garantía no se aplica a lo siguiente:
1. Si la apariencia o el exterior de el
producto ha sido dañado o cambiado,
alterado o modificado en diseño o
construcción.
2. Si el número de serie original del
producto ha sido alterado o eliminado
o no puede ser fácilmente determinado.
3. Si está dañado debido a una
sobrecarga de la línea eléctrica, daño al
cable de alimentación de CA por parte
del usuario o conexión a una fuente de
voltaje incorrecta.
4. Si el daño se debe a un mal uso
general, accidentes o actos de Dios.
5. Si los intentos de reparación son
realizados por agentes de servicio
no autorizados, el uso de piezas que
no sean piezas originales o piezas
obtenidas de personas que no sean
empresas de servicios autorizadas.
6. En unidades que han sido transferidas
del propietario original.
7. En productos que han sido comprados
como reacondicionados, como nuevos,
de segunda mano, en términos de “tal
como es” o “venta final”.
8. A los productos utilizados en un
entorno comercial o de alquiler.
9. A productos utilizados en condiciones
distintas a las ordinarias de uso
doméstico normal o usado de otra
manera que no sea de acuerdo con las
instrucciones provistas.
10. A los daños por las llamadas al servicio
por instalaciones inadecuadas.
11. A costos de transporte y envío
asociados con el reemplazo de la
unidad.
12. A llamadas de servicio para instruirlo
sobre cómo usar su producto.
13. Llamadas de servicio para reparar
o reemplazar el fusible de la casa,
reiniciar el disyuntor o corregir el
cableado de la casa.
LA REPARACIÓN O EL REMPLAZO COMO SE
ESTABLECE EN ESTA GARANTÍA SON LA SOLUCIÓN
EXCLUSIVA DEL CLIENTE; BLACK+DECKER NO SERÁ
RESPONSABLE POR NINGÚN DAÑO INCIDENTAL
O EN CONSECUENCIA POR INCUMPLIMIENTO DE
CUALQUIER GARANTÍA EXPRESA O IMPLÍCITA DE
ESTE PRODUCTO, EXCEPTO EN LA MEDIDA EN
QUE LO PROHÍBA LA LEY APLICABLE. CUALQUIER
GARANTÍA IMPLÍCITA DE COMERCIABILIDAD O
IDONEIDAD PARA UN PROPÓSITO PARTICULAR
SOBRE ESTE PRODUCTO TIENE UNA DURACIÓN
LIMITADA A LA DURACIÓN DE ESTA GARANTÍA.
Algunos estados no permiten la exclusión o
limitaciones de daños incidentales o consecuentes,
o limitaciones en la duración de la garantía. En estos
casos, las exclusiones o limitaciones anteriores pueden
no aplicarse en su caso. Esta garantía le otorga
derechos legales específicos, y también puede tener
otros derechos que varían de estado a estado.
Obtención de servicio: Para obtener servicio,
documentación del producto, suministros o
accesorios, llame al 844-299-0879 para crear un ticket
de cambio/reparación. Asegúrese de proporcionar la
fecha de compra, el número de modelo y una breve
descripción del problema. Nuestros representantes de
servicio al cliente se comunicarán con usted o enviarán
instrucciones detalladas de devolución.
BLACK+DECKER no garantiza que el aparato funcionará
adecuadamente en todas las condiciones ambientales, y no
otorga garantía alguna ni defensa, ya sea implícita o expresada,
con respecto a la calidad, desempeño, comerciabilidad, o aptitud
para un propósito particular más allá del propósito identificado
en este manual de usuario. BLACK+DECKER ha realizado todos
los esfuerzos para asegurarse de que este manual es preciso
y renuncia a la responsabilidad sobre cualquier imprecisión
u omisión que pueda haber ocurrido. La información en este
manual de usuario está sujeta a cambiar sin aviso previo y no
representa un compromiso por parte de BLACK+DECKER.
BLACK+DECKER se reserva el derecho de hacer mejoras a este
manual de usuario y/o al producto descrito en este manual de
usuario en cualquier momento sin aviso previo. Si encuentra
información en este manual que es incorrecta, engañosa o
incompleta, comuníquese con nosotros al 844-299-0879.
W Appliance Co.
1356 Broadway
New York, NY 10018

This device complies with Part 15 of the FCC rules. Operation is subject to the
following two conditions:(1) this device may not cause harmful interference, and (2)
this device must accept any interference received including interference that may
cause undesired operation.
Warning: Changes or modications to this unit not expressly approved by the party
responsible for compliance could void the user’s authority to operate the
equipment.
NOTE: This equipment has been tested and found to comply with the limits for a
Class B digital device, pursuant to Part 15 of the FCC rules. These limits are
designed to provide reasonable protection against harmful interference in
a residential installation. This equipment generates, uses and can radiate
radio frequency energy and, if not installed and used in accordance with
the instructions, may cause harmful interference to radio communications.
However there is no guarantee that interference will not occur in a particular
installation. If this equipment does cause harmful interference to radio or
television reception, which can be determined by turning the equipment off
and on, the use is encouraged to try to correct the interference by one or
more of the following measures:
- Reorient or relocate the receiving antenna.
- Increase the separation between the equipment and receiver.
- Connect the equipment into an outlet on a circuit different from that to
which the receiver is connected.
- Consult the dealer or an experienced radio/ TV technician for help.
Este dispositivo cumple con el apartado 15 de las normas de la FCC. El
funcionamiento está sujeto a las siguientes dos condiciones: (1) este dispositivo
no puede causar interferencias, y (2) este dispositivo debe aceptar cualquier
interferencia recibida, incluyendo interferencia que pueda causar un funcionamiento
no deseado.
Advertencia: Los cambios o modicaciones a esta unidad no aprobados
expresamente por la parte responsable del cumplimiento podrían anular
la autoridad del usuario para operar el equipo.
NOTA: Este equipo ha sido probado y cumple con los límites de un dispositivo
digital Clase B de acuerdo con el apartado 15 de las reglas de la FCC. Estos
límites están diseñados para proporcionar una protección razonable contra
interferencias perjudiciales en una instalación residencial. Este equipo genera,
usa y puede irradiar energía de radiofrecuencia y, si no está instalado y
es utilizado de acuerdo con las instrucciones, puede causar interferencias
dañinas a las comunicaciones por radio. Sin embargo, no se puede garantizar
que dicha interferencia no ocurrirá en una instalación en particular. Si este
equipo causare interferencia dañina que afecte la recepción de radio o
televisión, que se puede determinar encendiendo y apagando el equipo, se
alienta al asuario a que intente corregir la interferencia mediante una o más
de las siguientes medidas:
- Reorientar o reubicar la antena receptora.
- Aumentar la separación entre el equipo y el receptor.
- Conectar el equipo a una toma de corriente en un circuito diferente al que
está conectado el recepto.
- Consultar con el distribuidor o solicitar la ayuda de un técnico
experimentado en radio/TV.


BLACK & DECKER, BLACK+DECKER, the BLACK & DECKER and
BLACK+DECKER logos and product names and the orange and black color
scheme are trademarks of The Black & Decker Corporation, used under license.
All rights reserved.
BLACK & DECKER, BLACK+DECKER, y los logos y nombres de productos
de BLACK & DECKER y el esquema de color naranja y negro son marcas
registradas de The Black & Decker Corporation, usados bajo licencia. Todos los
derechos reservados.
Product in this box may differ slightly from that pictured. Does not affect
function. Not all accessories shown in photography are included in this
package.
El producto en esta caja puede diferir levemente de la imagen. No afecta
su función. No todos los accesorios que se muestran en la fotografía están
incluidos en este paquete.
Imported by W Appliance, Inc., 1356 Broadway, New York, NY 10018
Importado por W Appliance, Inc., 1356 Broadway, Nueva York, NY 10018
February 2021 Printed in China / Impreso en China