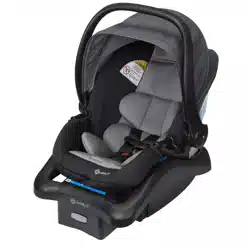
onBoard 35 LT
Infant Car Seat
™
To see installation videos, scan the QR Code
or visit www.safety1st.com
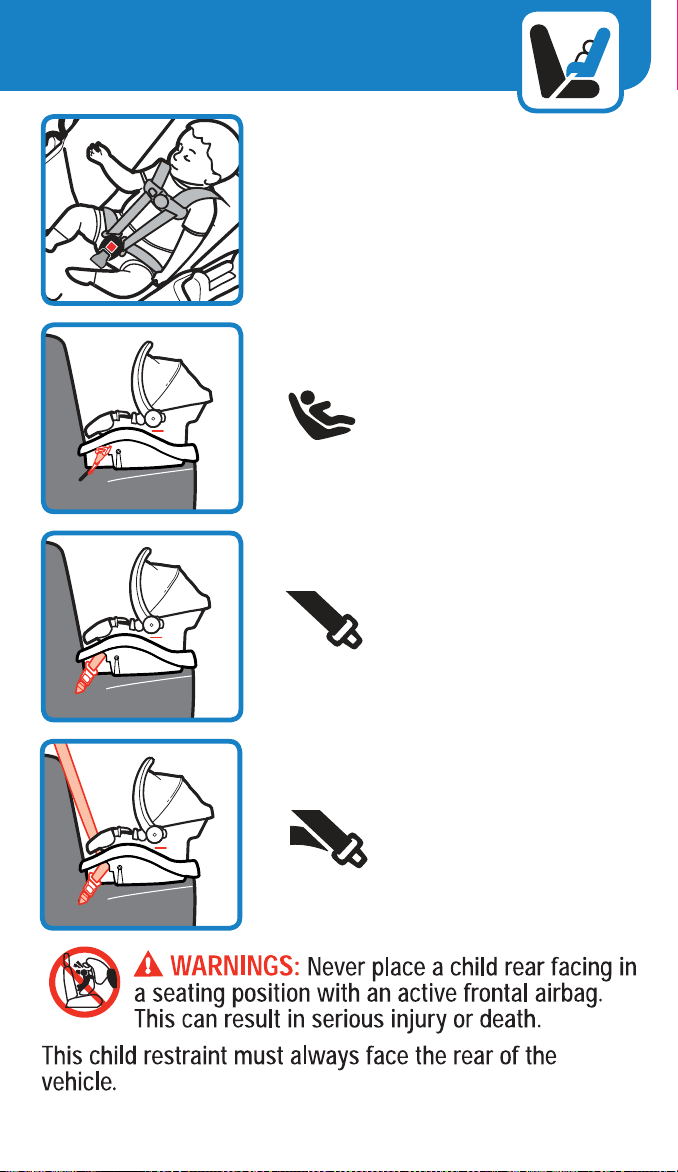
REAR FACING
REAR FACING
Table of Contents
Getting Started..................................... 1
General Use ........................................... 16
Safety Information ............................... 30
Vehicle Information ............................. 32
Rear Facing with Base ........................ 38
Rear Facing without Base .................. 47
Important Information ........................ 51
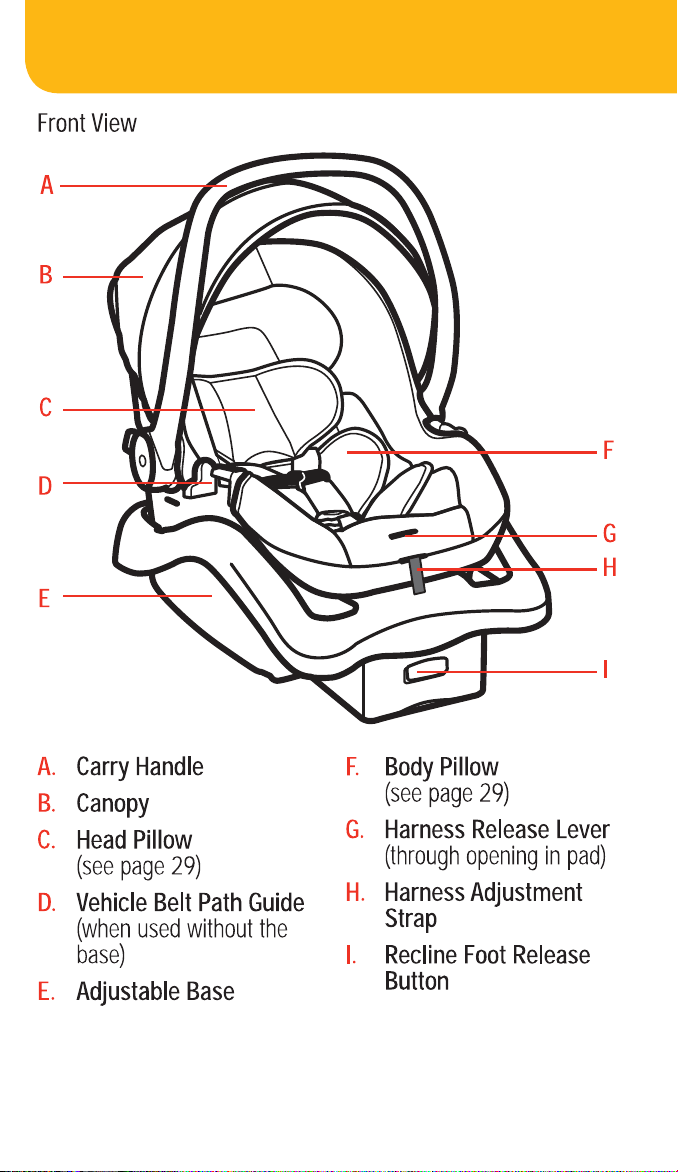
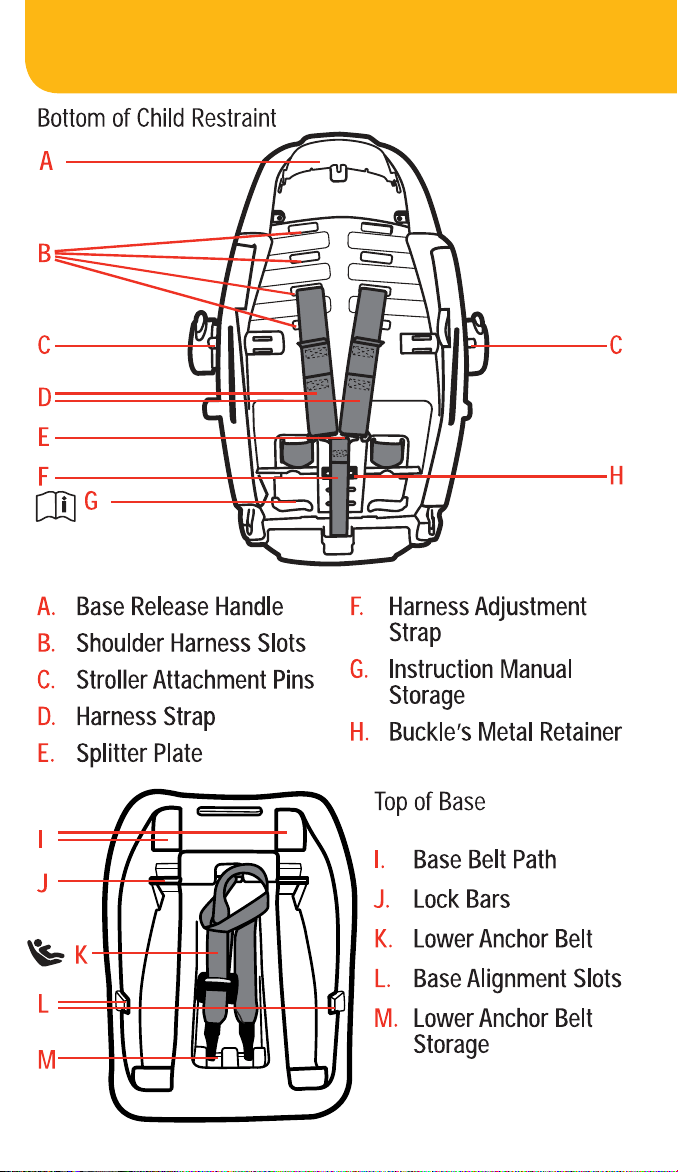
Parts of the Child Restraint
1 2
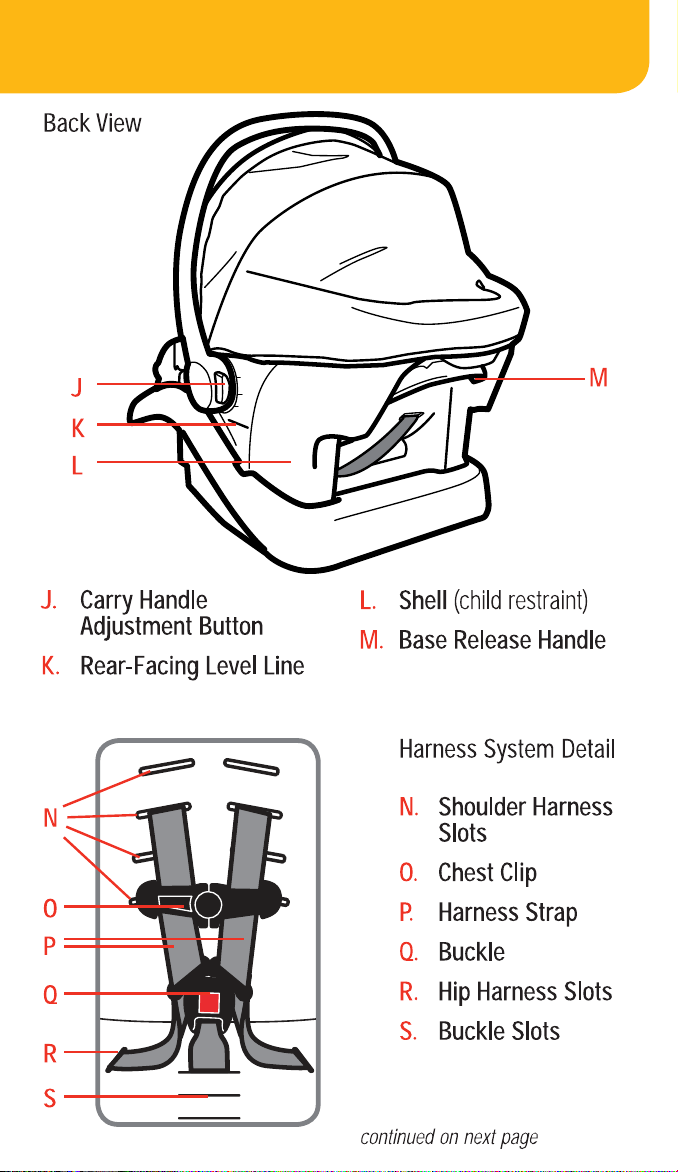
Parts of the Child Restraint
1 2
4
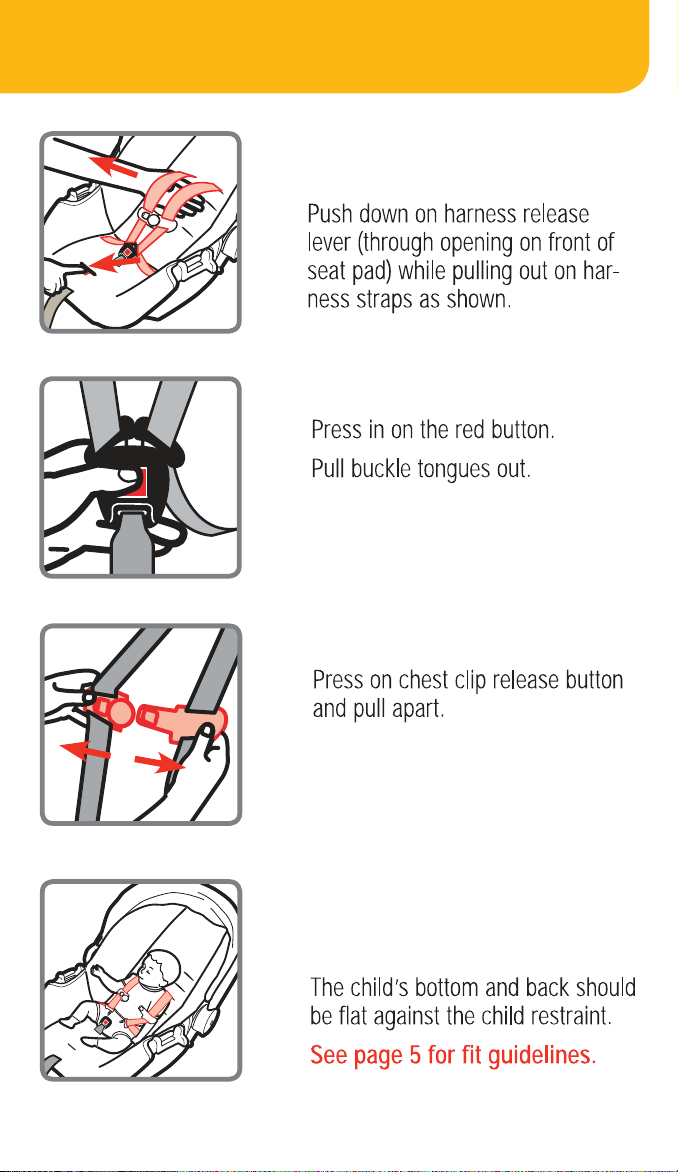
Prepare Child Restraint to Fit Your Child
3
1. Fully Loosen Harness
Straps
3. Release Chest Clip
2. Unbuckle Harness
4. Place Child in Child
Restraint to Determine
Proper Harness Fit
4
Prepare Child Restraint to Fit Your Child
3
1. Fully Loosen Harness
Straps
3. Release Chest Clip
2. Unbuckle Harness
4. Place Child in Child
Restraint to Determine
Proper Harness Fit
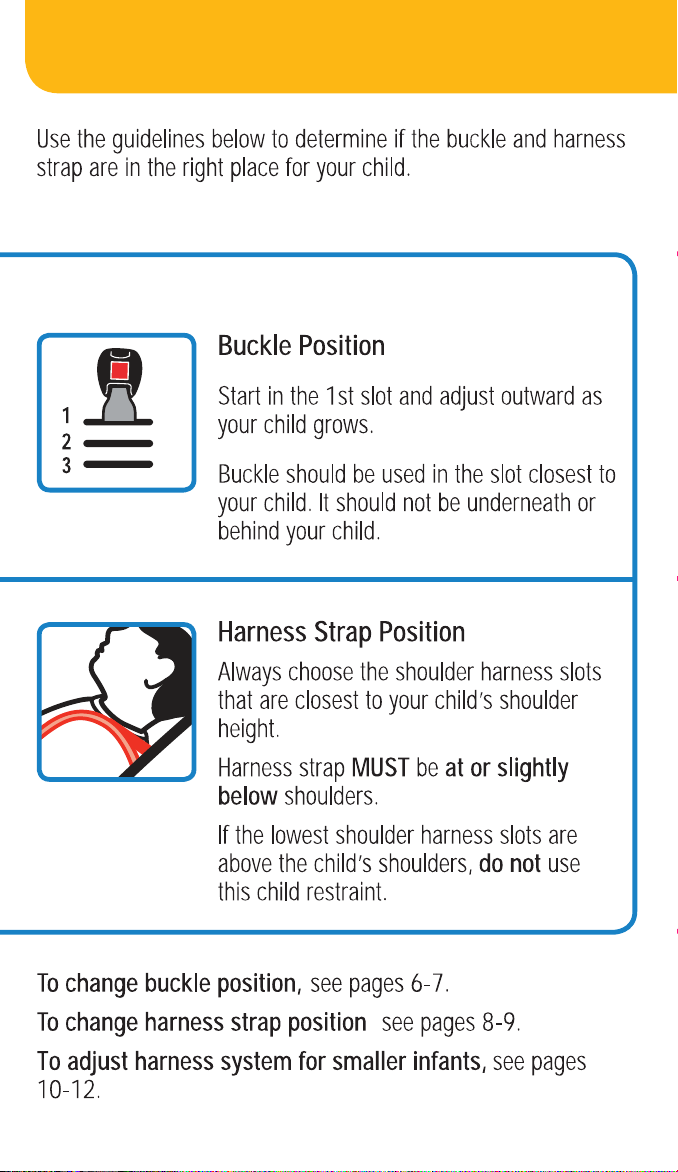
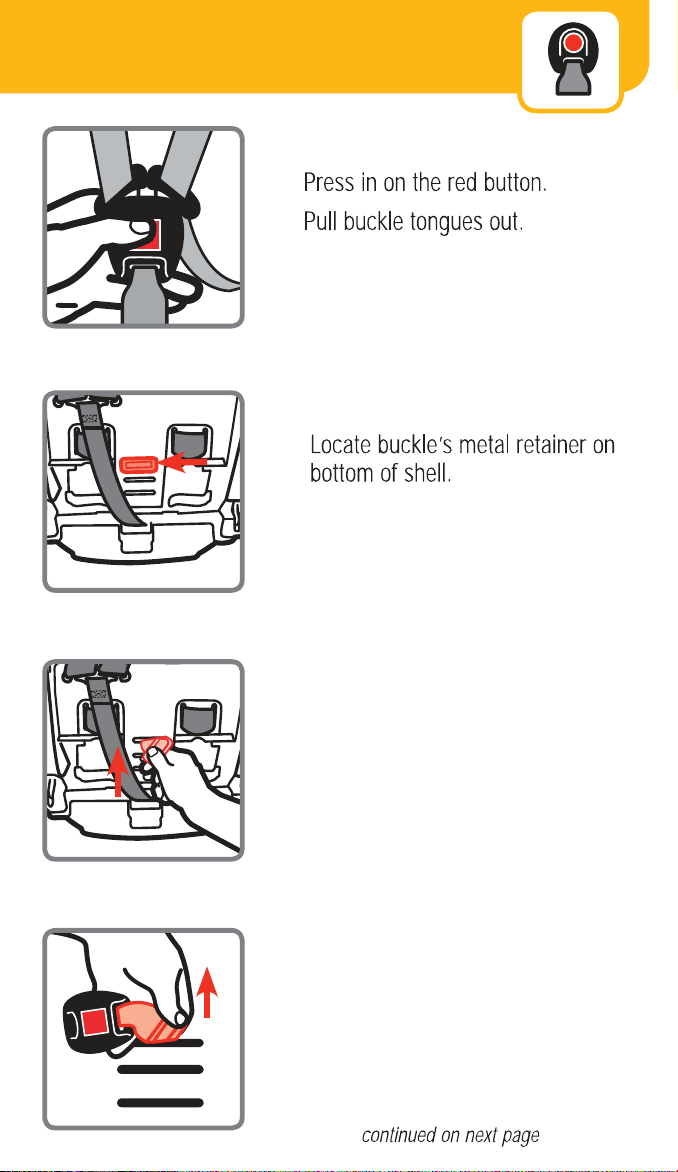
How Does Your Child Fit? Changing Position of Buckle
65
1. Unbuckle Harness
2. Turn Seat Over
3. Rotate Metal Retainer
and Push It Up Through
Shell and Pad
REAR FACING
,
4. From Top of Seat,
Pull Buckle Out of Shell
and Pad
How Does Your Child Fit? Changing Position of Buckle
65
1. Unbuckle Harness
2. Turn Seat Over
3. Rotate Metal Retainer
and Push It Up Through
Shell and Pad
REAR FACING
,
4. From Top of Seat,
Pull Buckle Out of Shell
and Pad
7 8
Changing Position of Shoulder
Harness Strap
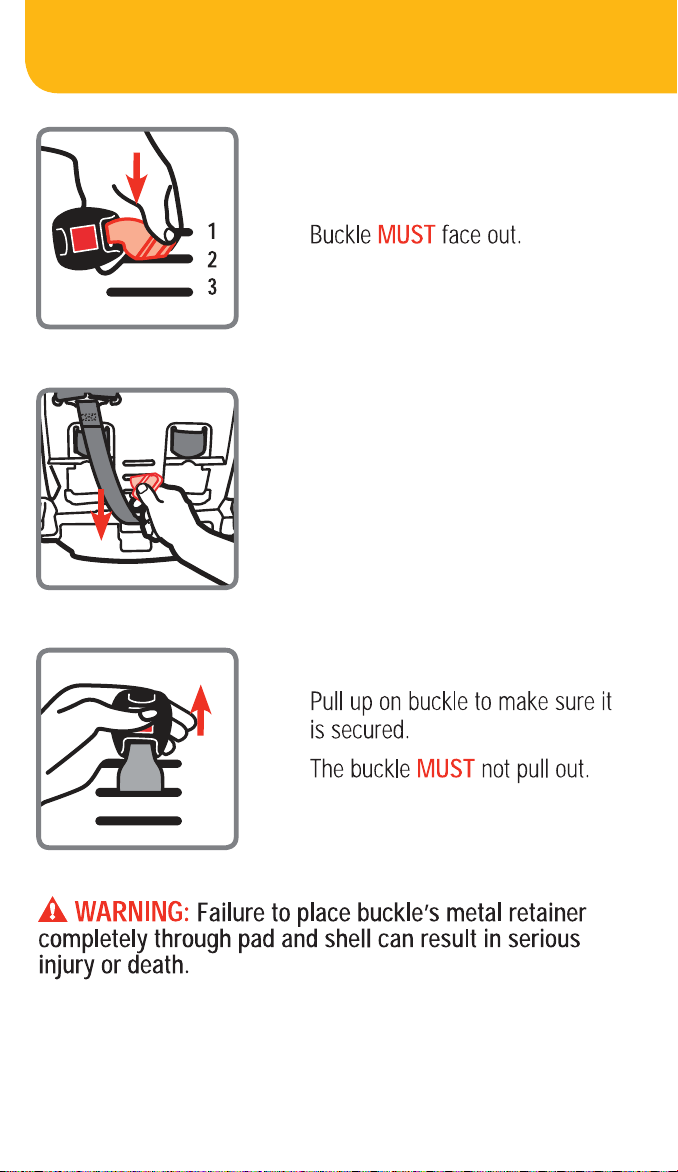
5. Insert Buckle’s Metal
Retainer into Slot
Closest to Child
6. Pull Metal Retainer
Completely Through
Pad and Shell
7. Check Buckle
1. Fully Loosen Harness
Straps
2. From Back of Seat,
Remove Harness
Strap Loops From
Splitter Plate
3. Pull Harness Strap Out of
Shoulder Harness Slots
4. Rethread Harness Strap
Into Correct Shoulder
Harness Slots For Your
Child
7 8
Changing Position of Shoulder
Harness Strap
5. Insert Buckle’s Metal
Retainer into Slot
Closest to Child
6. Pull Metal Retainer
Completely Through
Pad and Shell
7. Check Buckle
1. Fully Loosen Harness
Straps
2. From Back of Seat,
Remove Harness
Strap Loops From
Splitter Plate
3. Pull Harness Strap Out of
Shoulder Harness Slots
4. Rethread Harness Strap
Into Correct Shoulder
Harness Slots For Your
Child
9 10
Harness System Adjustments for
Smaller Infants
4. Replace Pad and
Check Buckle
2. From Bottom of Seat,
Pull Metal Retainer
Towards You and Push
It Up into 2nd Slot As
Shown
3. From Top of Seat,
Lift Pad Up and Lay
the Metal Retainer Flat
Against the Shell As
Shown
1. With Buckle in the
1st Slot As Shown,
Turn the Seat Over
5. Attach 1st Harness Strap
Loops to Splitter Plate
1211
5. Fully Loosen Harness
Strap
6. From Back of Seat,
Remove Harness
Strap Loops From
Splitter Plate
7. Pull Harness Strap Out of
Shoulder Harness Slots
8. Rethread Harness Strap
Into Correct Shoulder
Harness Slots For Your
Child
9. Attach 2nd Harness Strap
Loops to Splitter Plate

1211
5. Fully Loosen Harness
Strap
6. From Back of Seat,
Remove Harness
Strap Loops From
Splitter Plate
7. Pull Harness Strap Out of
Shoulder Harness Slots
8. Rethread Harness Strap
Into Correct Shoulder
Harness Slots For Your
Child
9. Attach 2nd Harness Strap
Loops to Splitter Plate
13 14
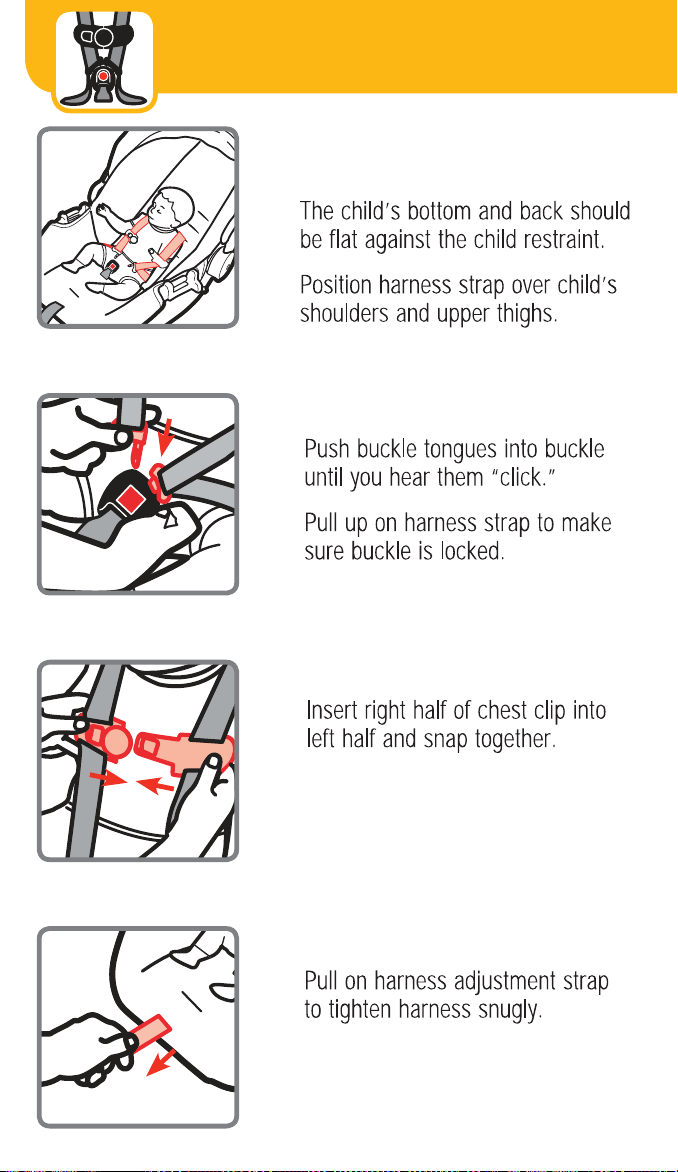
Securing Child in Child Restraint
1. Place Child in Child
Restraint
3. Close Chest Clip
2. Buckle Harness
4. Tighten Harness
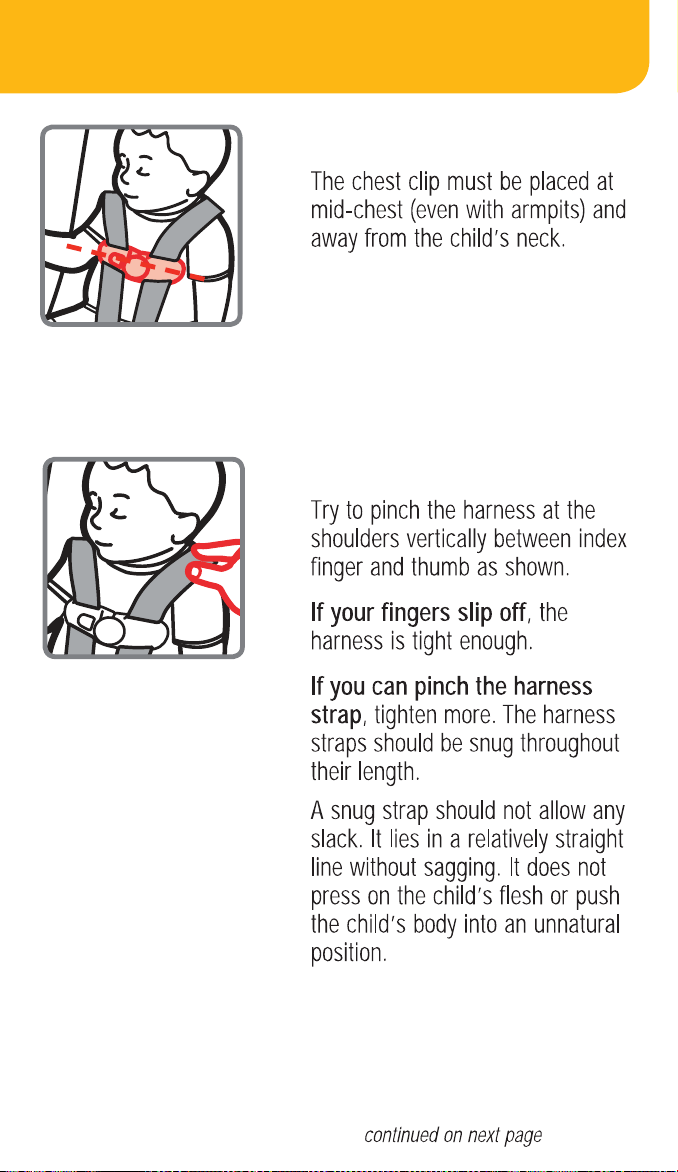
5. Position Chest Clip
6. Check Harness Tightness
13 14
Securing Child in Child Restraint
1. Place Child in Child
Restraint
3. Close Chest Clip
2. Buckle Harness
4. Tighten Harness
5. Position Chest Clip
6. Check Harness Tightness
15 16
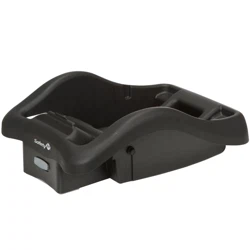
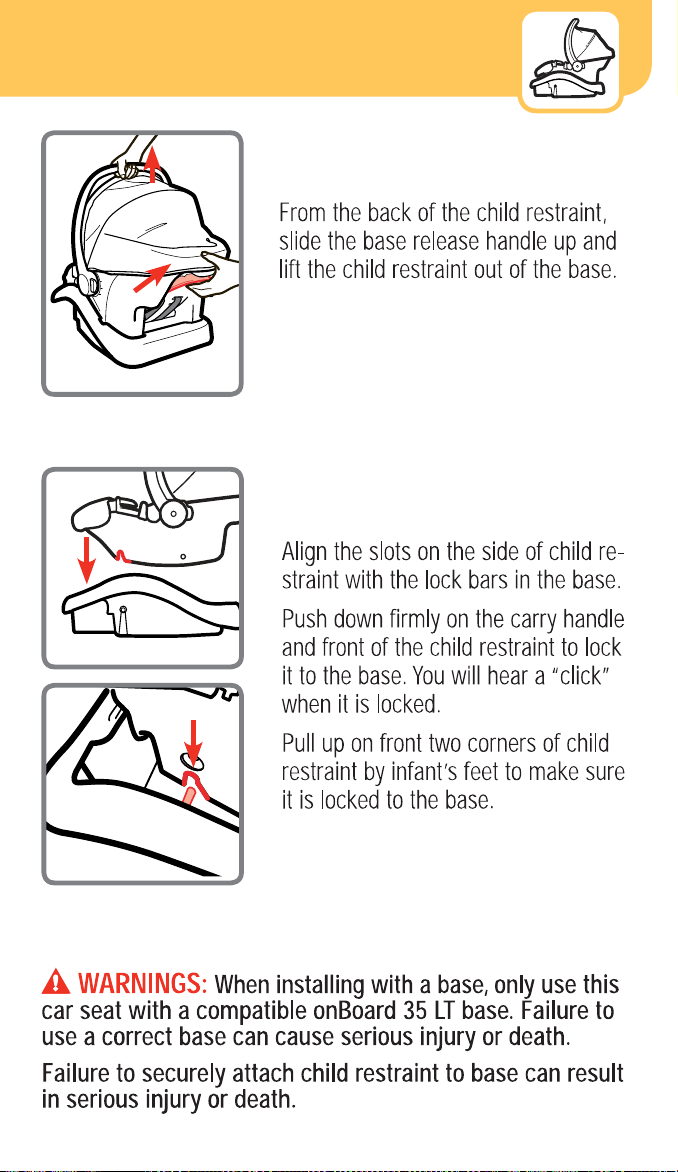
Removing and Installing Child
Restraint to Base
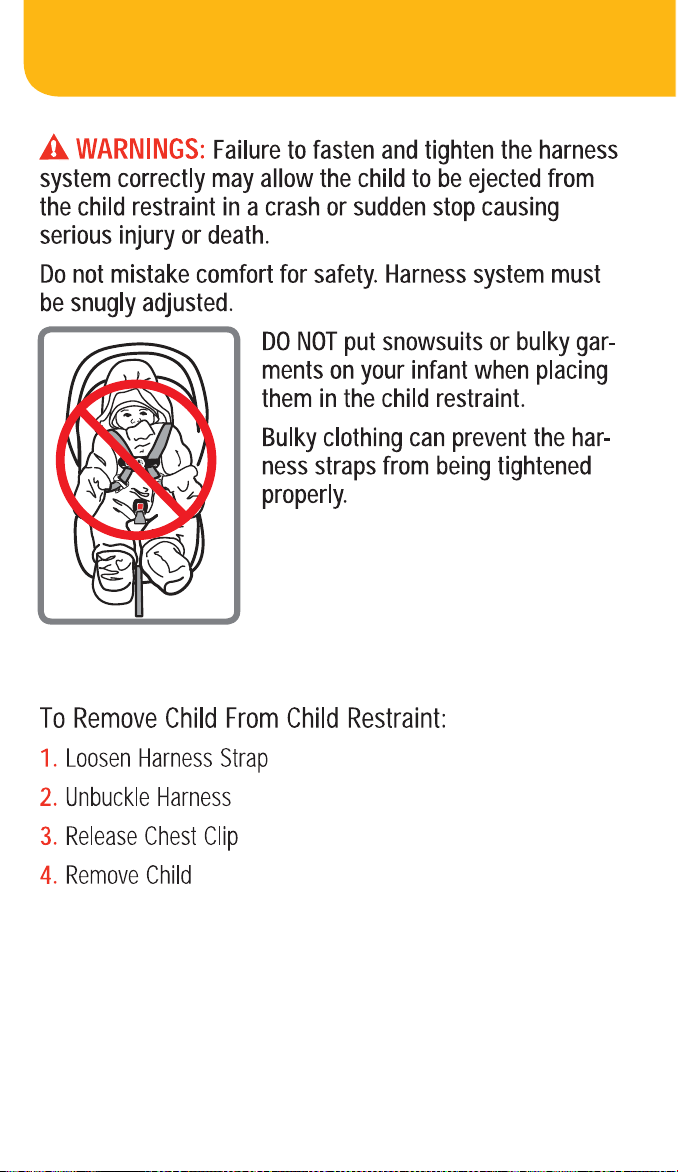
To Remove Child
Restraint from Base
To Attach Child Restraint
to Base
15 16
Removing and Installing Child
Restraint to Base
To Remove Child
Restraint from Base
To Attach Child Restraint
to Base
17 18
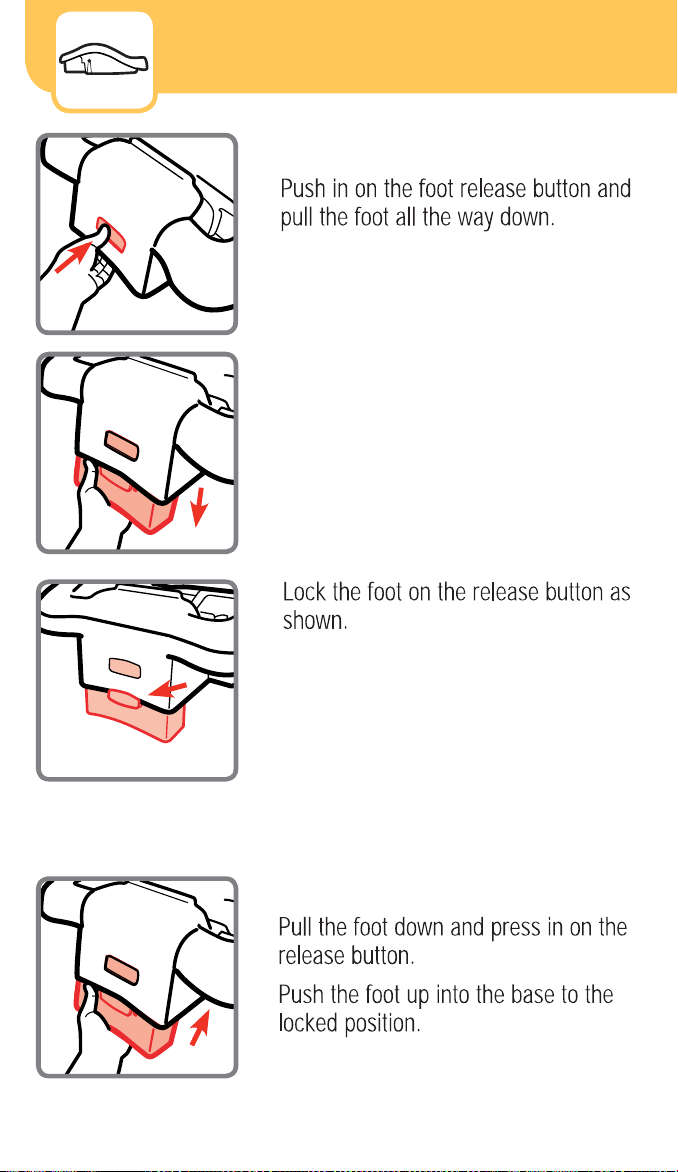
Adjusting the Base Carrier Use
To Lower the Base Foot
To Store Base Foot
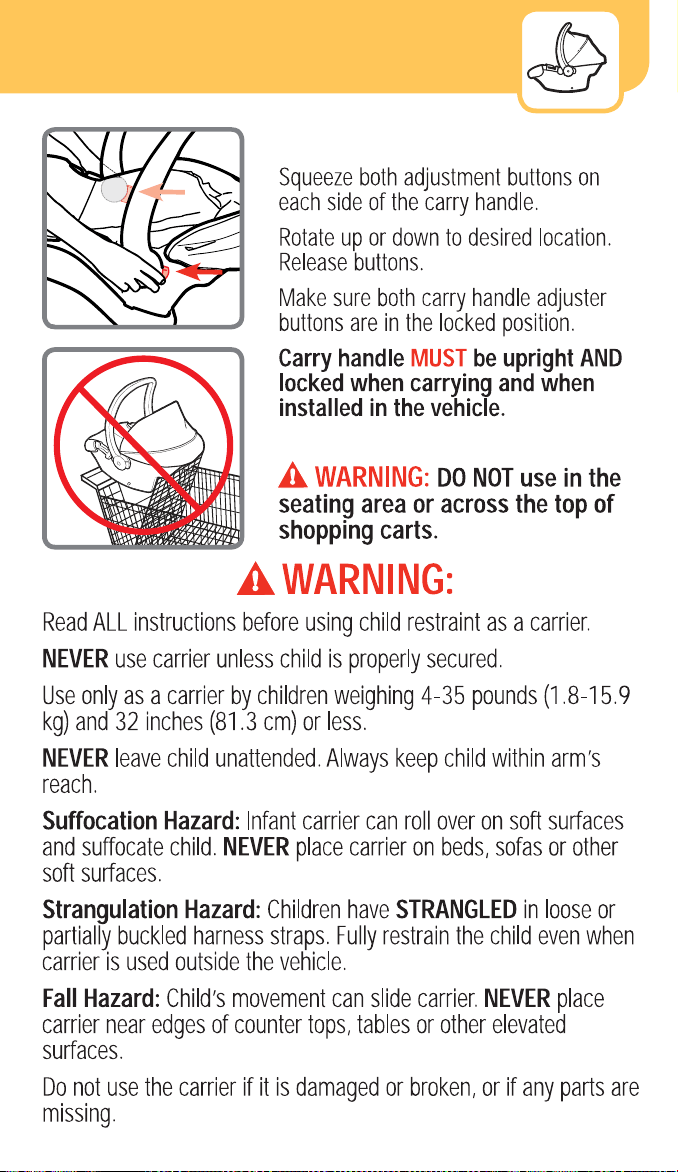
To Adjust Carry Handle
17 18
Adjusting the Base Carrier Use
To Lower the Base Foot
To Store Base Foot
To Adjust Carry Handle
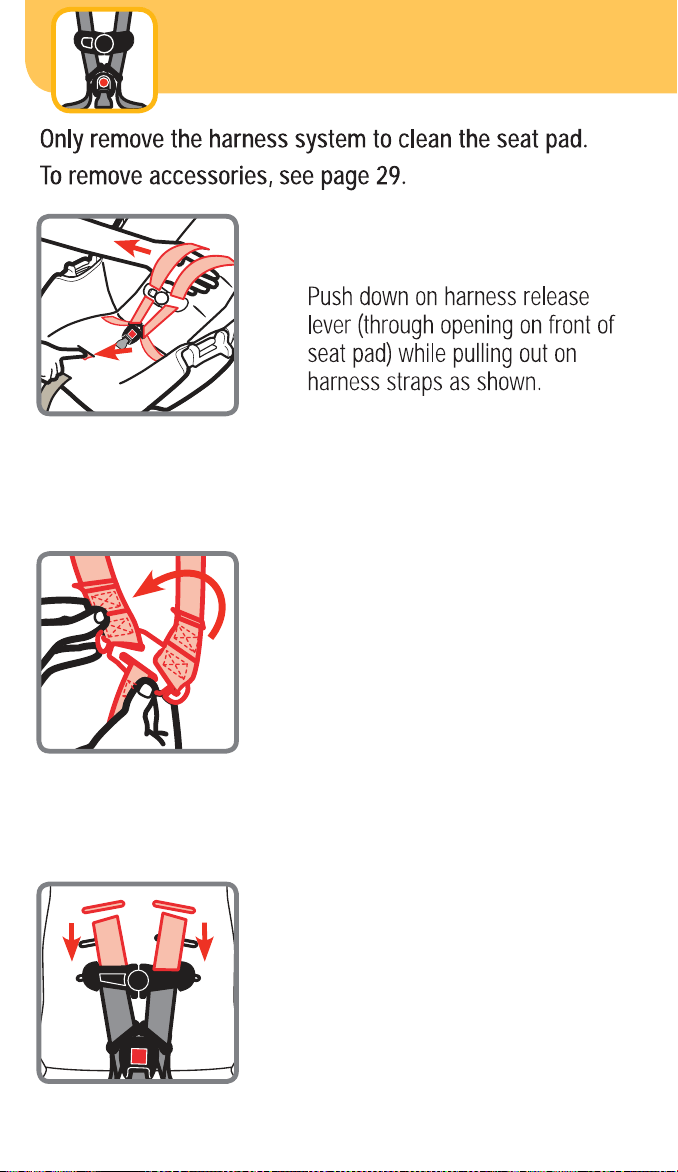
Removing Harness System
19 20
1. Fully Loosen Harness
Strap
2. From Back of Seat,
Remove Harness
Strap Loops From
Splitter Plate
4. Unthread Chest Clip
5. Unthread Buckle
6. Pull Harness Strap Out
of Seat
7. Turn Seat Over
3. Pull Harness Strap Out
of Shoulder Harness
Slots
Removing Harness System
19 20
1. Fully Loosen Harness
Strap
2. From Back of Seat,
Remove Harness
Strap Loops From
Splitter Plate
4. Unthread Chest Clip
5. Unthread Buckle
6. Pull Harness Strap Out
of Seat
7. Turn Seat Over
3. Pull Harness Strap Out
of Shoulder Harness
Slots
21 22
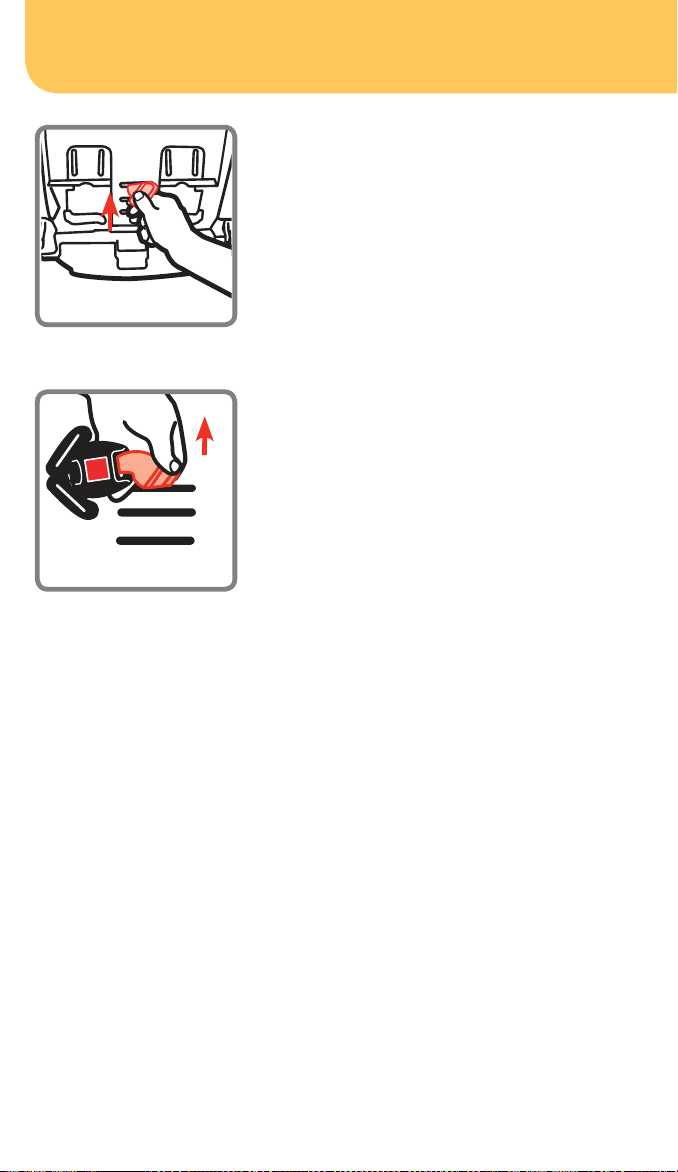
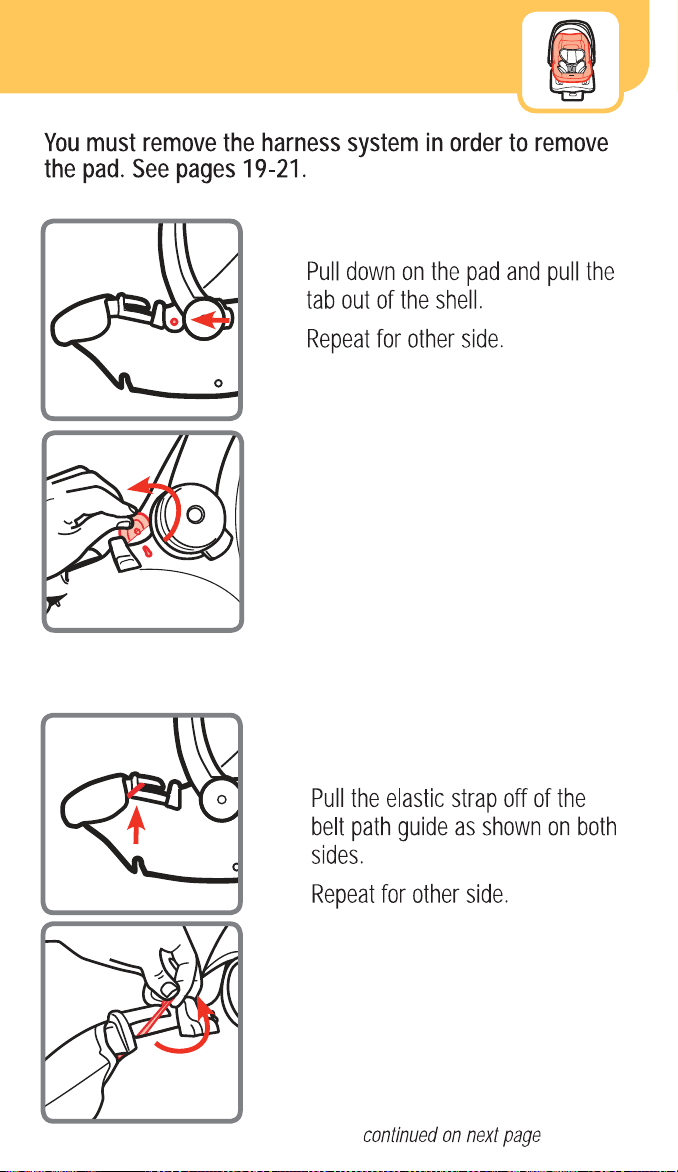
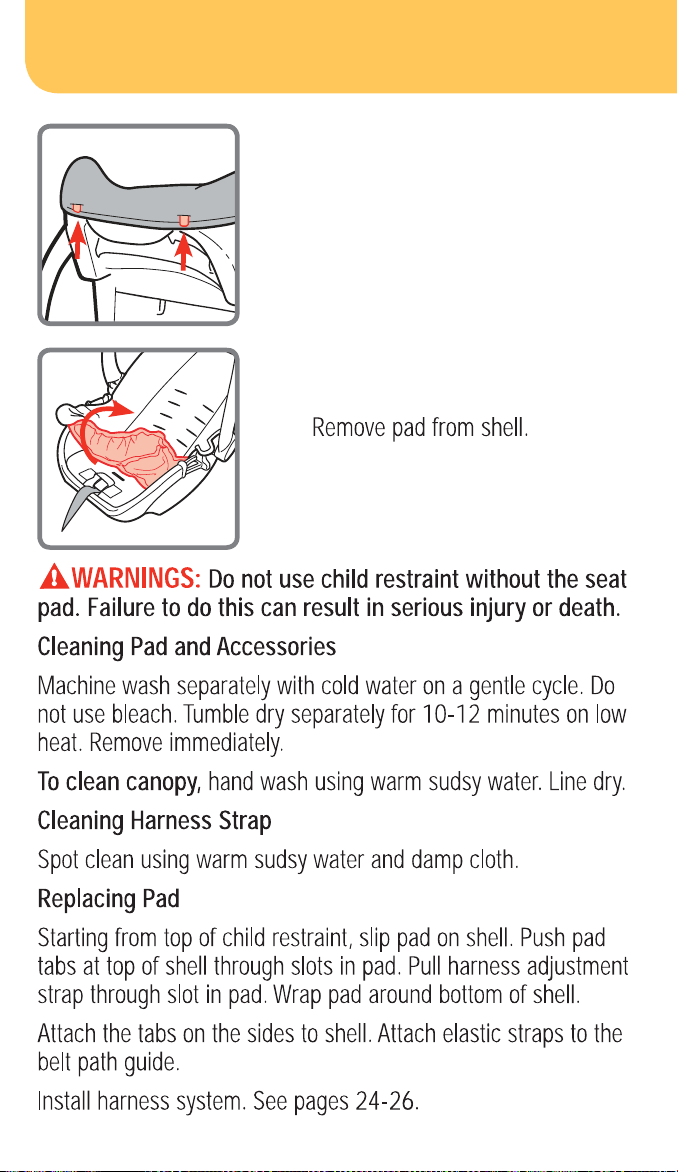
Removing Seat Pad for Cleaning
1. Release the Pad Tabs
2. Remove the Elastic
Straps
8. Rotate Metal Retainer
and Push It Up Through
Shell and Pad
9. From Front of Seat,
Pull Buckle Out of Shell
and Pad
21 22
Removing Seat Pad for Cleaning
1. Release the Pad Tabs
2. Remove the Elastic
Straps
8. Rotate Metal Retainer
and Push It Up Through
Shell and Pad
9. From Front of Seat,
Pull Buckle Out of Shell
and Pad
23 24
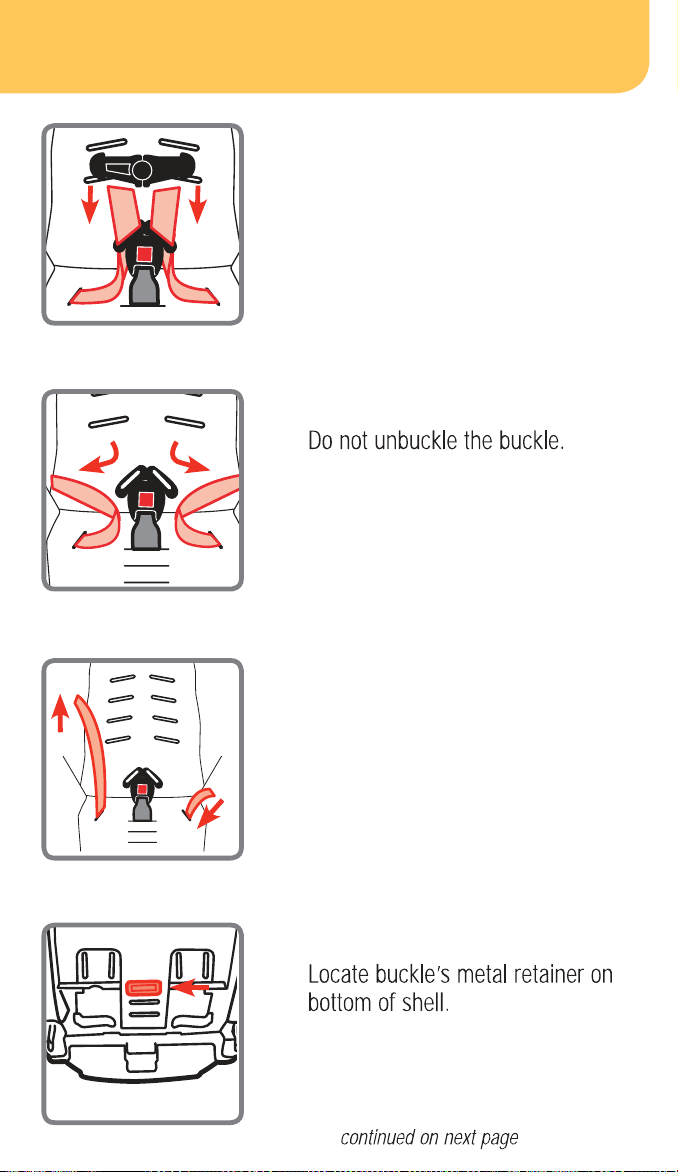
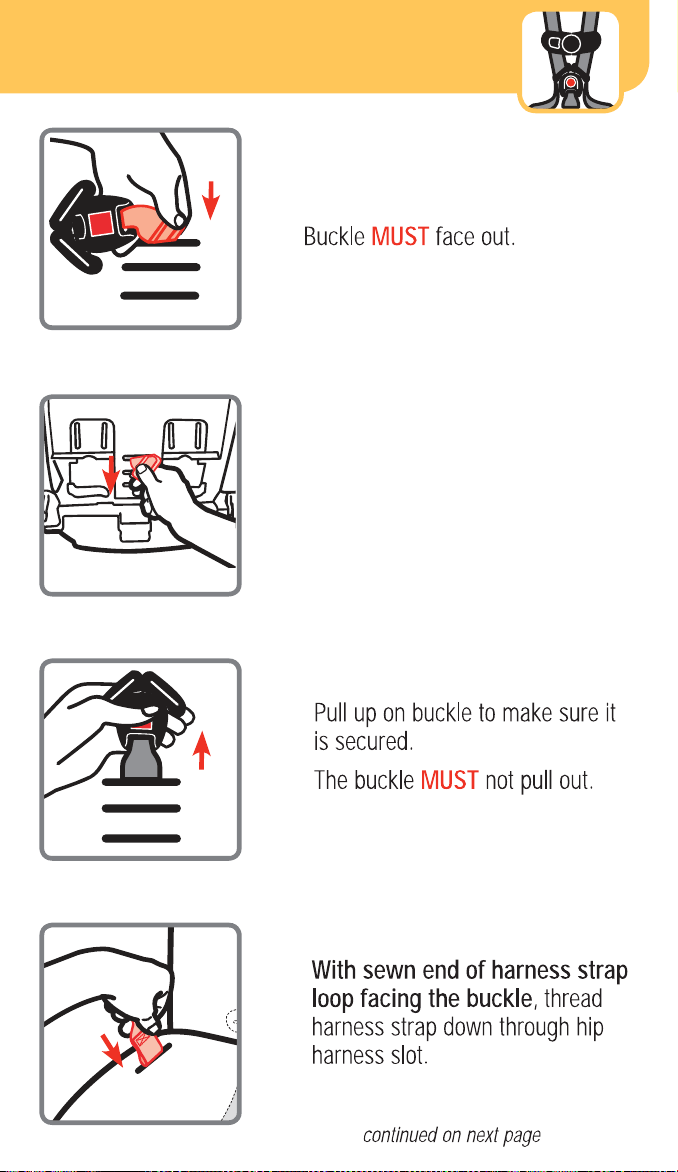
Installing Harness System
3. Pull Pad o Tabs from
Top of Shell
4. Remove Pad from the
Bottom of Shell
1. Insert Buckle’s Metal
Retainer into Slot
Closest to Child
2. Pull Metal Retainer
Completely Through
Pad and Shell
3. Check Buckle
4. Rethread Harness Strap
23 24
Installing Harness System
3. Pull Pad o Tabs from
Top of Shell
4. Remove Pad from the
Bottom of Shell
1. Insert Buckle’s Metal
Retainer into Slot
Closest to Child
2. Pull Metal Retainer
Completely Through
Pad and Shell
3. Check Buckle
4. Rethread Harness Strap
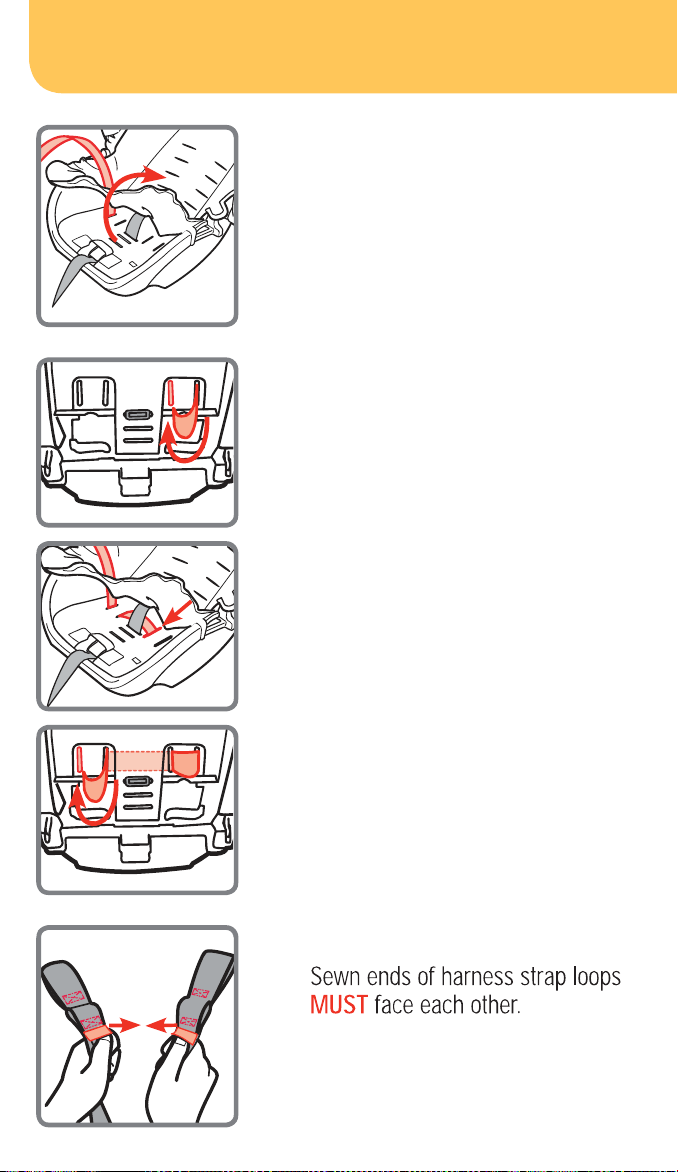
6. Weave Harness Strap
In and Out of Shell As
Shown
5. Pull Up Front of Seat
Pad
25 26
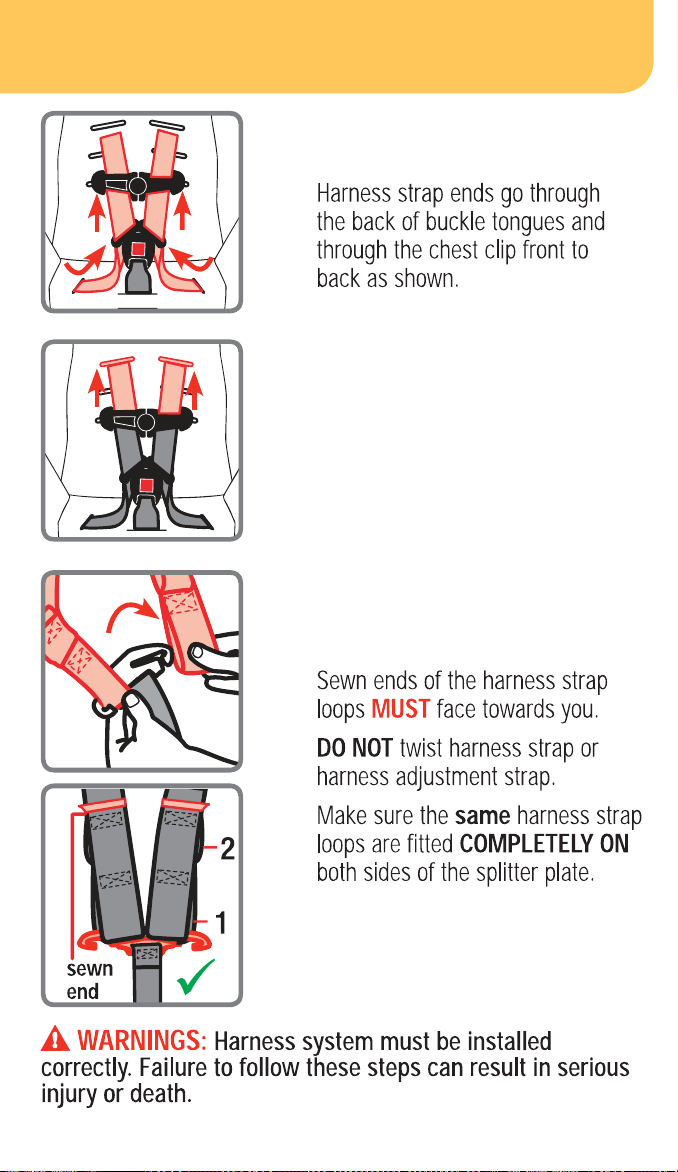
9. Thread Harness Strap
into Correct Shoulder
Harness Slots For Your
Child
7. Make Harness Strap Even
8. Thread Buckle and
Chest Clip
10. Attach 1st Harness
Strap Loops to Splitter
Plate
6. Weave Harness Strap
In and Out of Shell As
Shown
5. Pull Up Front of Seat
Pad
25 26
9. Thread Harness Strap
into Correct Shoulder
Harness Slots For Your
Child
7. Make Harness Strap Even
8. Thread Buckle and
Chest Clip
10. Attach 1st Harness
Strap Loops to Splitter
Plate
27 28
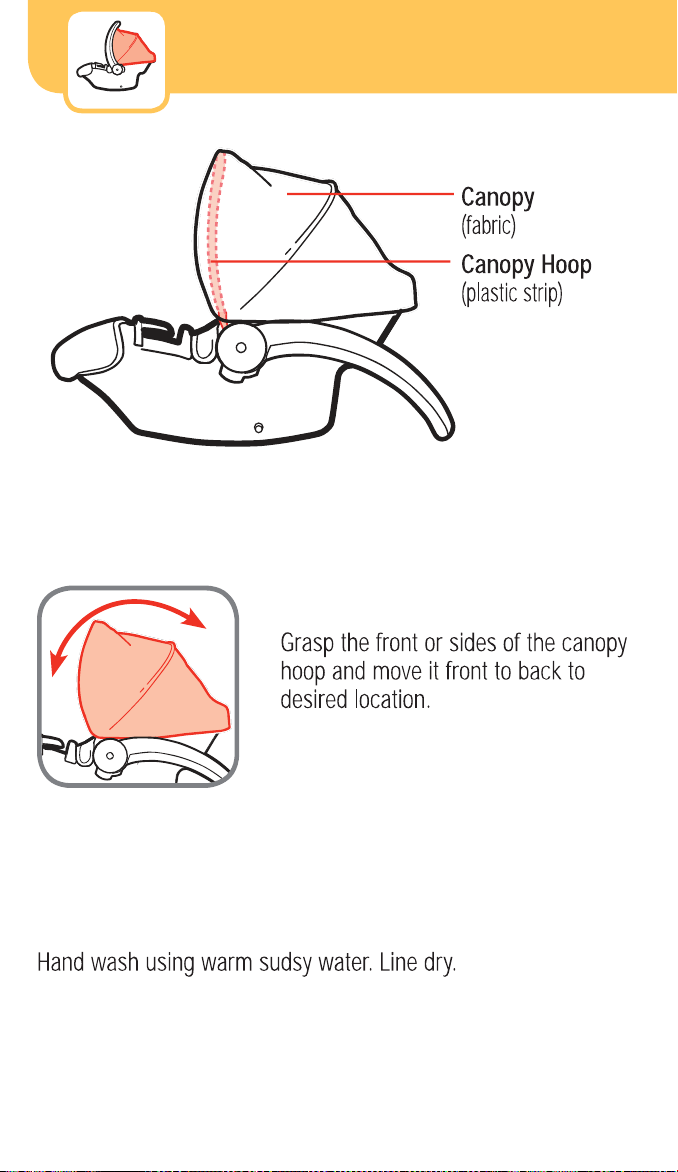
XXXXXCanopy Use and Removal
To Remove Canopy
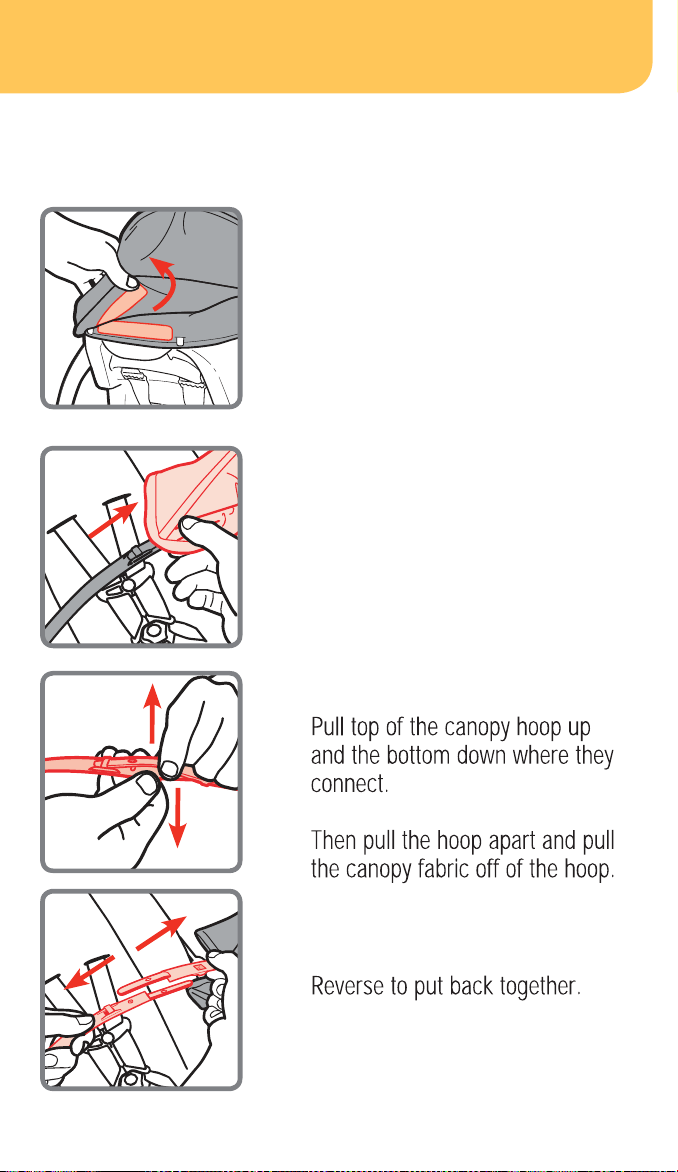
1. Undo Fastening Strip
on the Back of the Shell
2. Expose Canopy Hoop
Connection in the
Middle of the Hoop
by Sliding Canopy
Fabric to One Side of
the Shell
3. Undo Canopy Hoop
To Adjust Canopy
To Clean Canopy
27 28
XXXXXCanopy Use and Removal
To Remove Canopy
1. Undo Fastening Strip
on the Back of the Shell
2. Expose Canopy Hoop
Connection in the
Middle of the Hoop
by Sliding Canopy
Fabric to One Side of
the Shell
3. Undo Canopy Hoop
To Adjust Canopy
To Clean Canopy
30
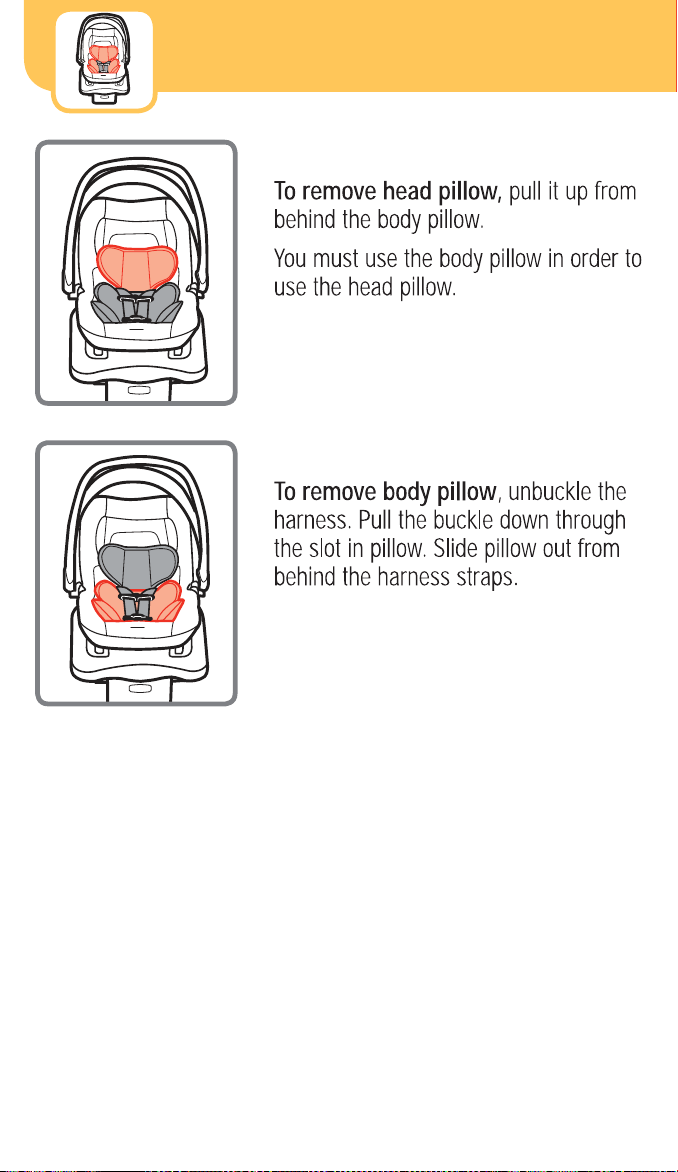
Accessories on Select Models
Body Pillow
Head Pillow
Child Restraint Use
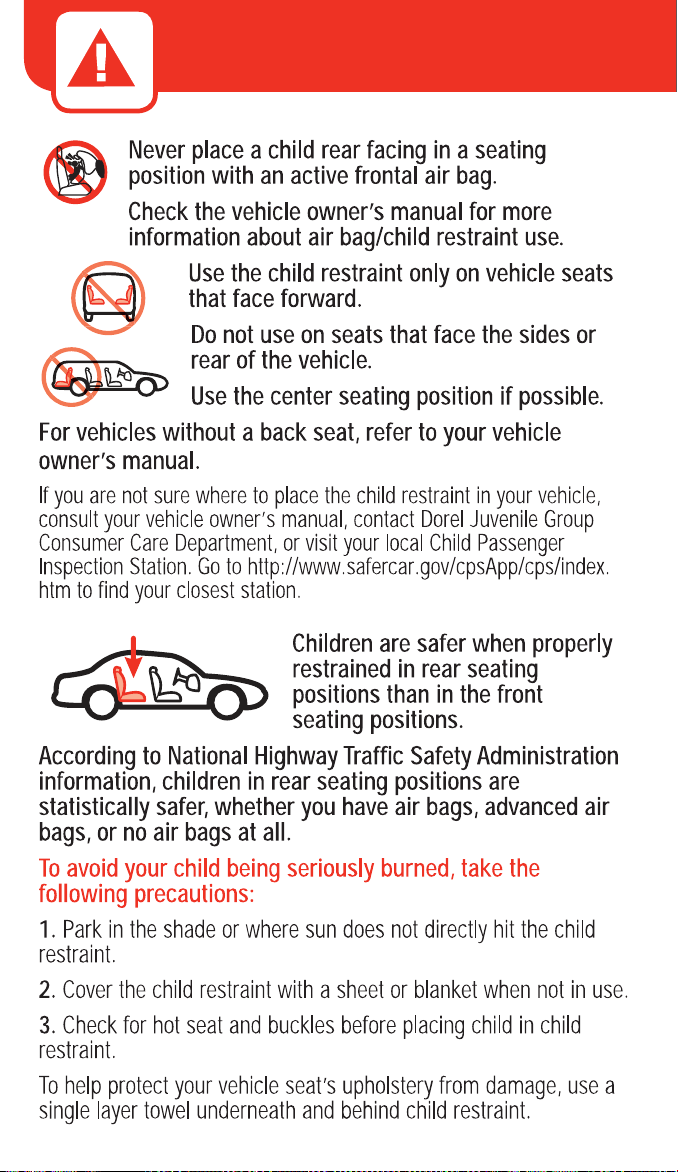
Installation in Vehicle
29
30
Accessories on Select Models
Body Pillow
Head Pillow
Child Restraint Use
Installation in Vehicle
29
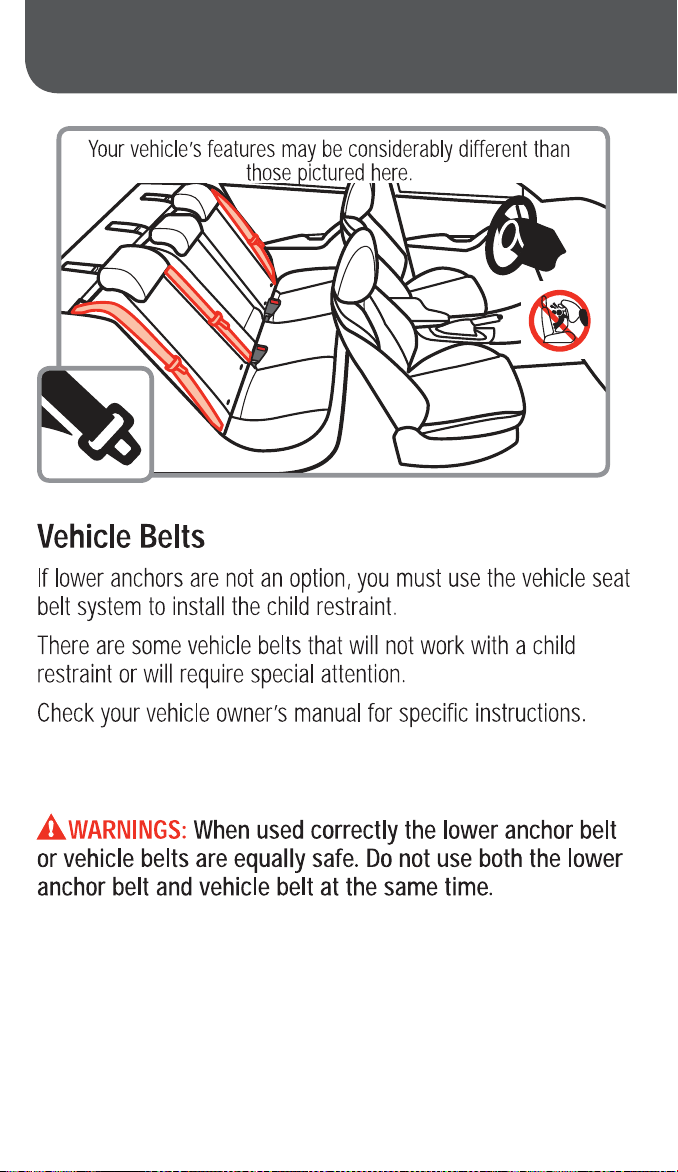
Vehicle Seating Position
3231
Choosing Lower Anchor Belt or
Vehicle Belts
Vehicle Seating Position
3231
Choosing Lower Anchor Belt or
Vehicle Belts
33 34
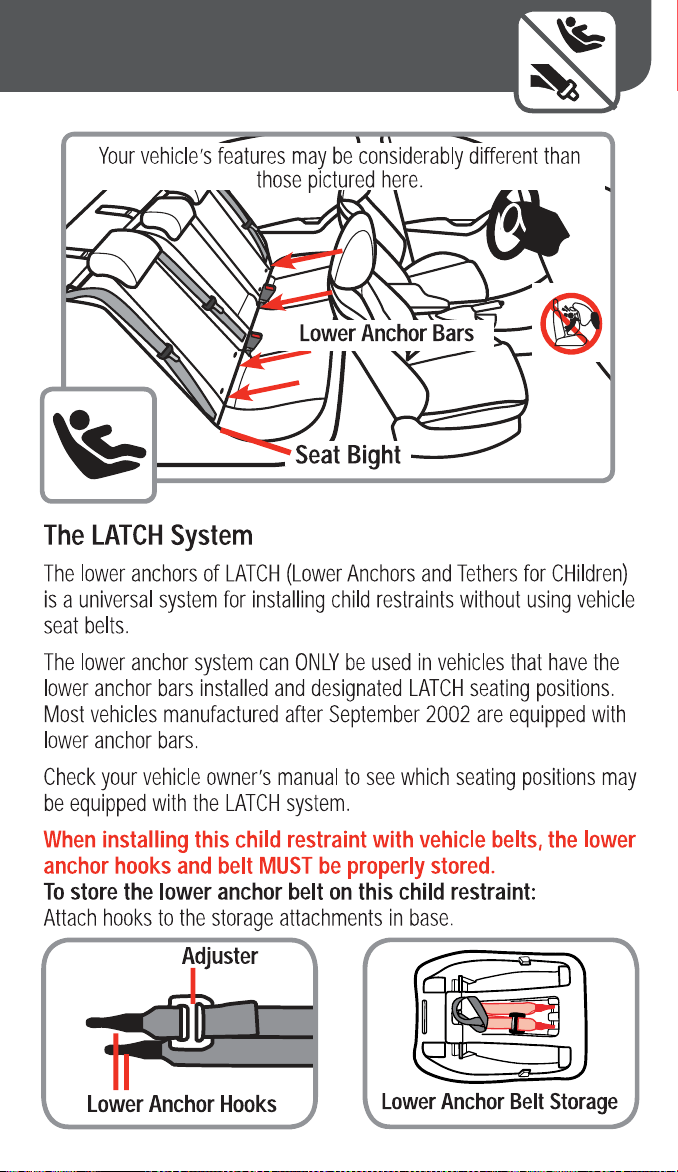
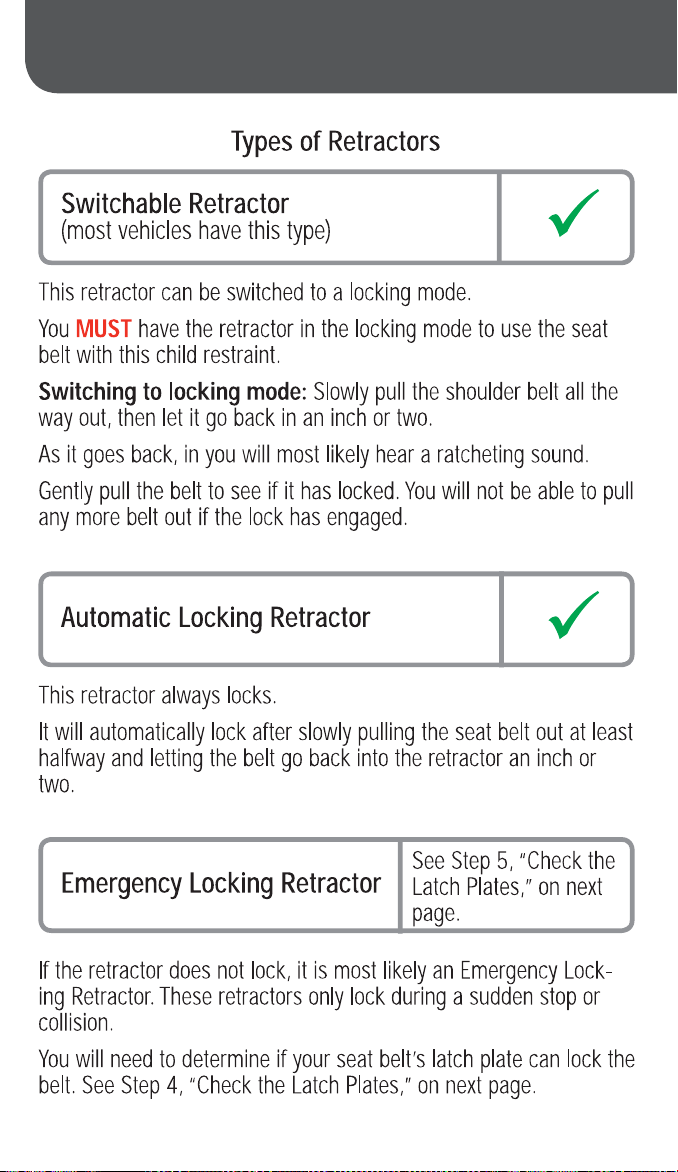
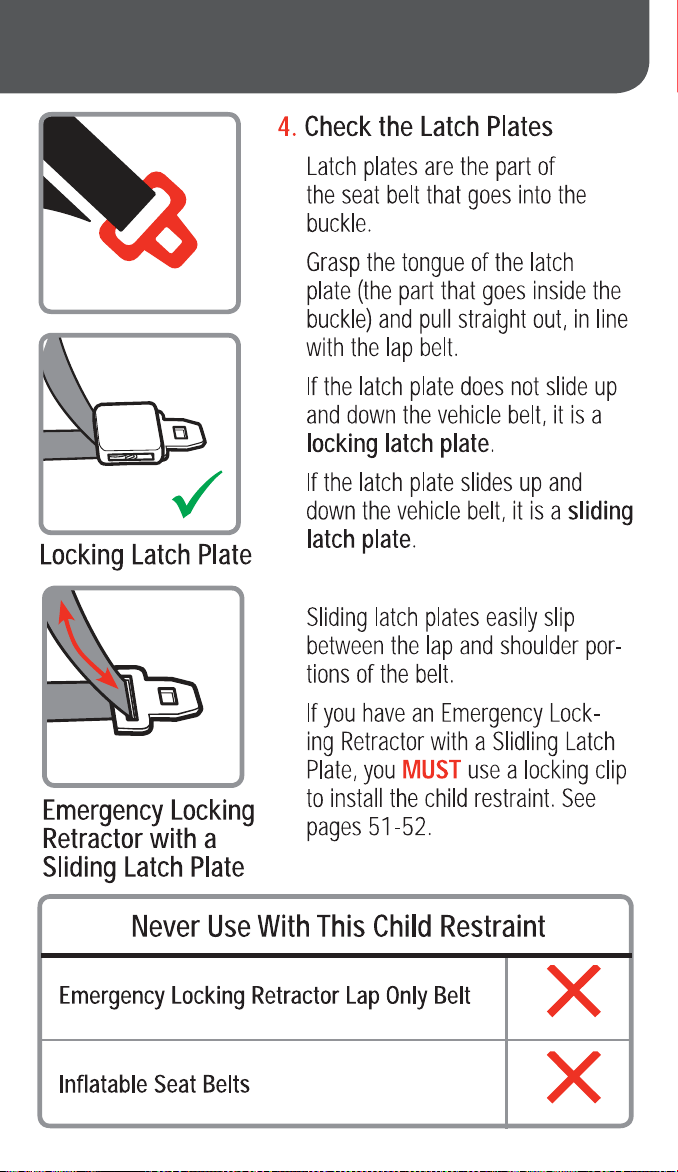
Knowing Your Vehicle Belts
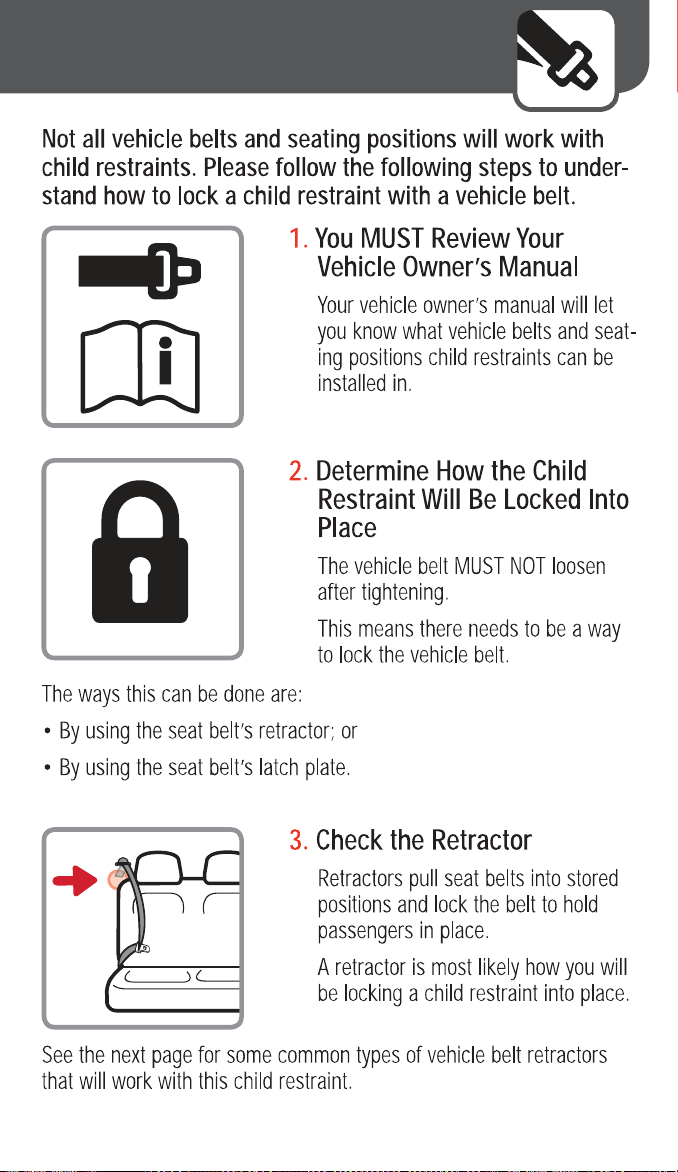
33 34
Knowing Your Vehicle Belts
35 36
35 36
37 38
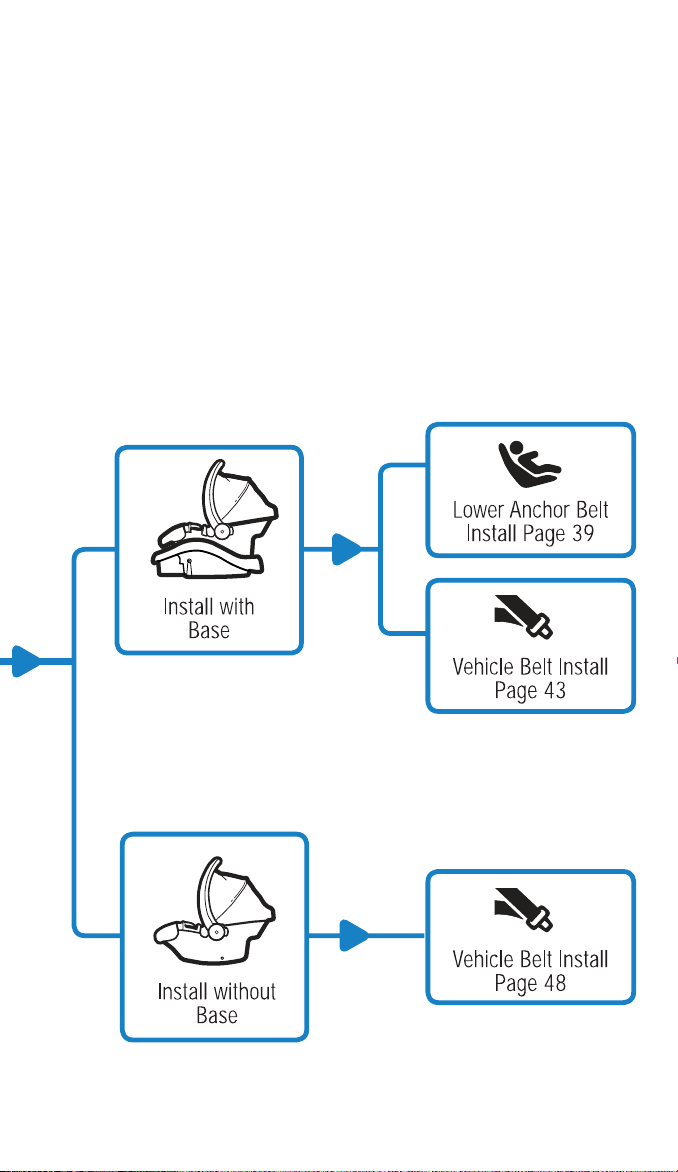
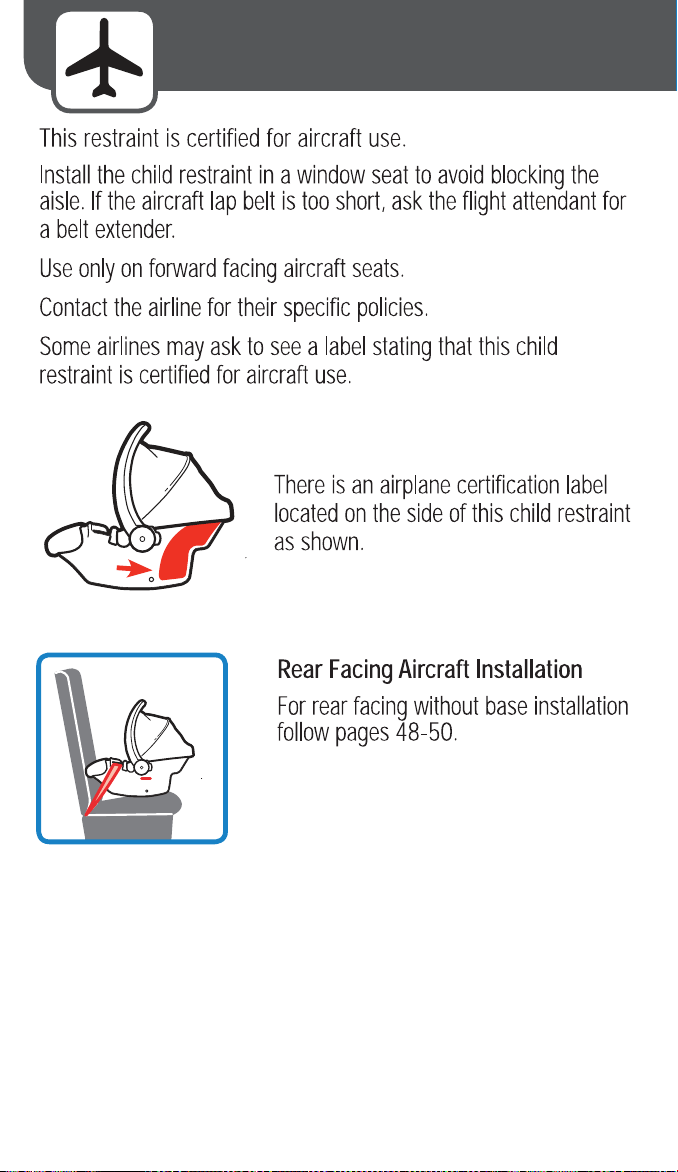
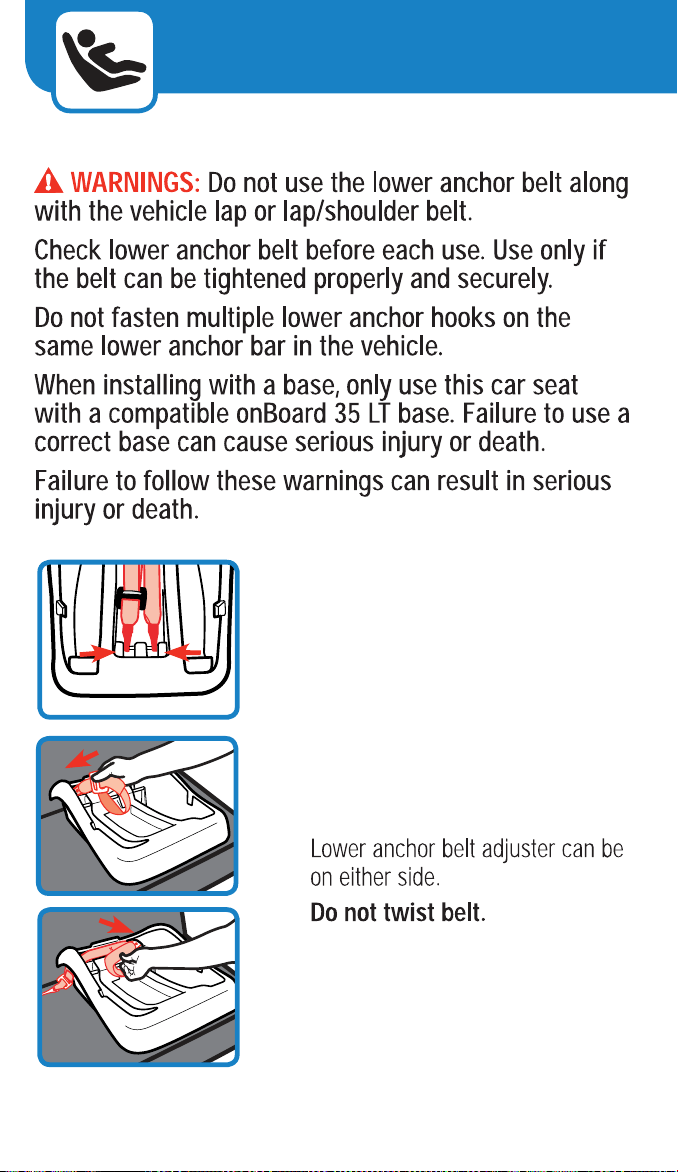
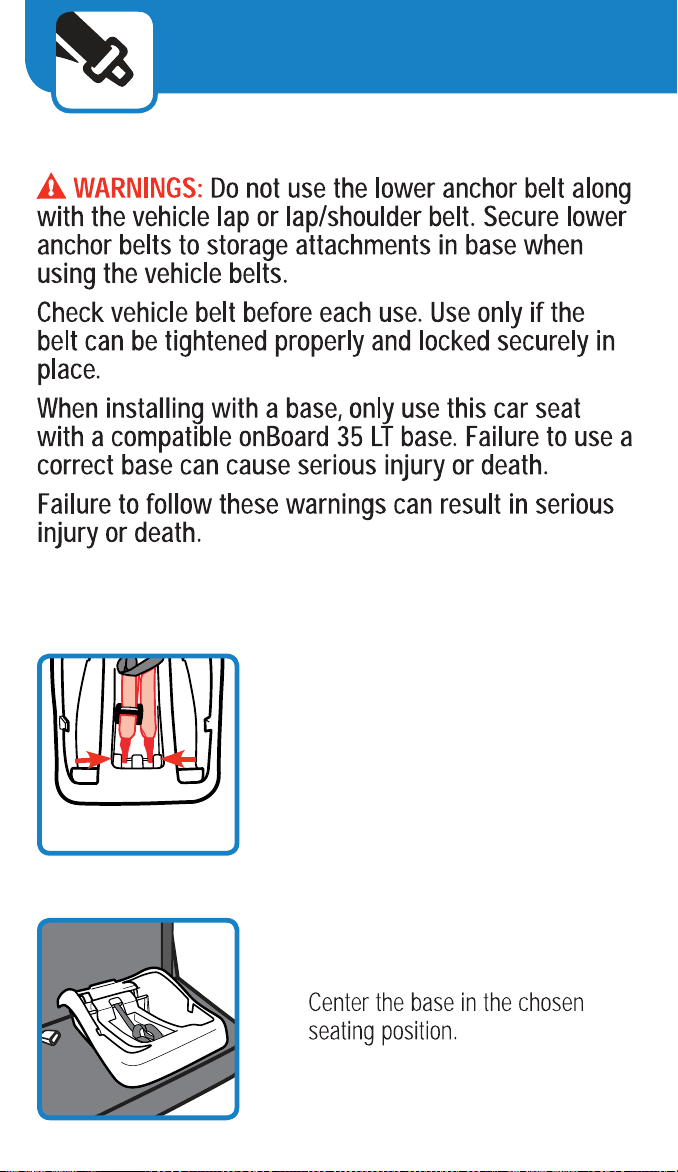
Aircraft Information Rear Facing with Base
Lower Anchor Belt
Lap/Shoulder Belt
Lap Belt
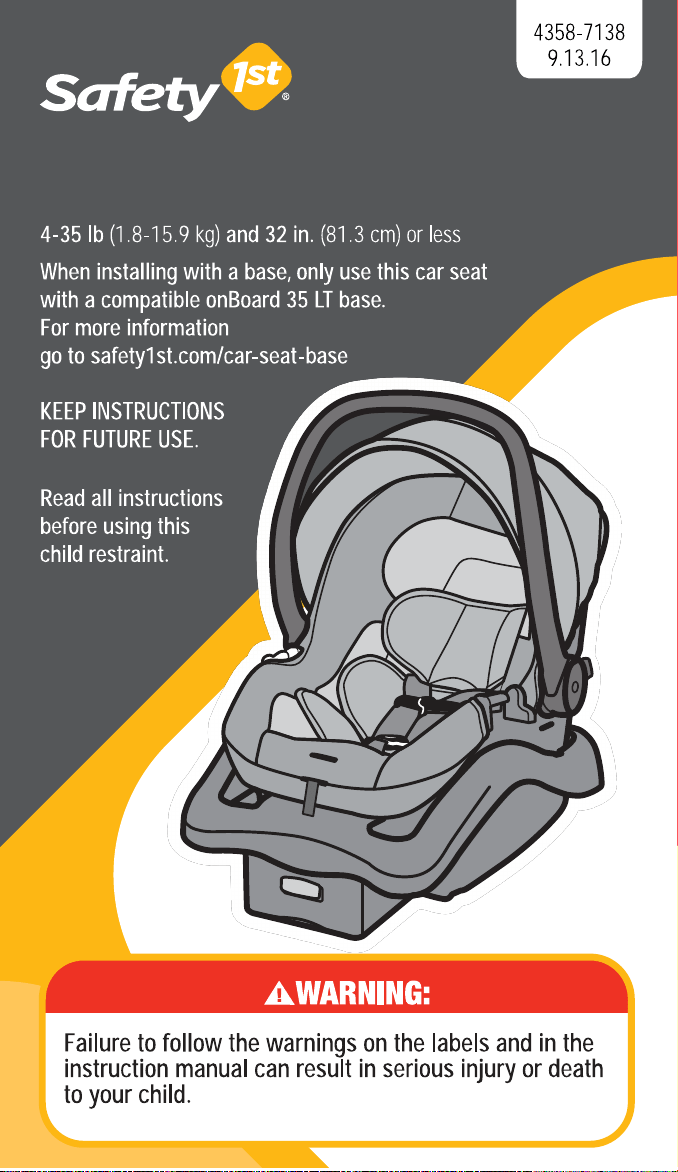
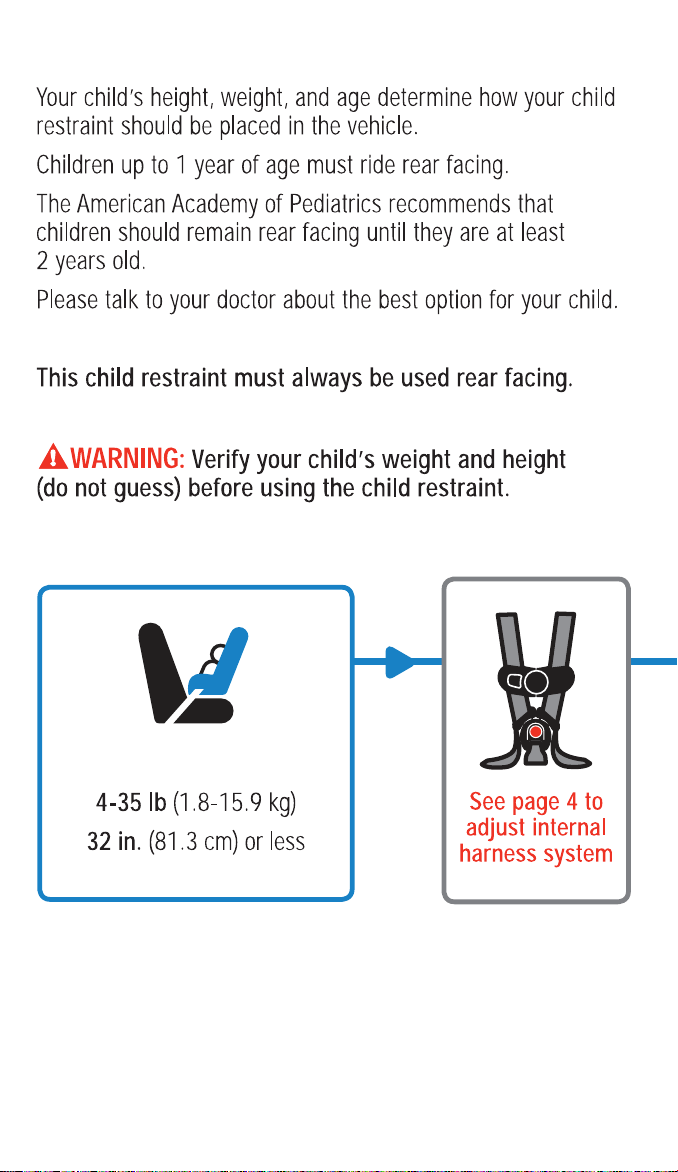
4-35 lb (1.8-15.9 kg)
32 in. (81.3 cm) or less
37 38
Aircraft Information Rear Facing with Base
Lower Anchor Belt
Lap/Shoulder Belt
Lap Belt
4-35 lb (1.8-15.9 kg)
32 in. (81.3 cm) or less
39 40
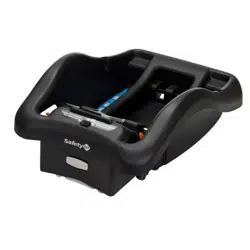
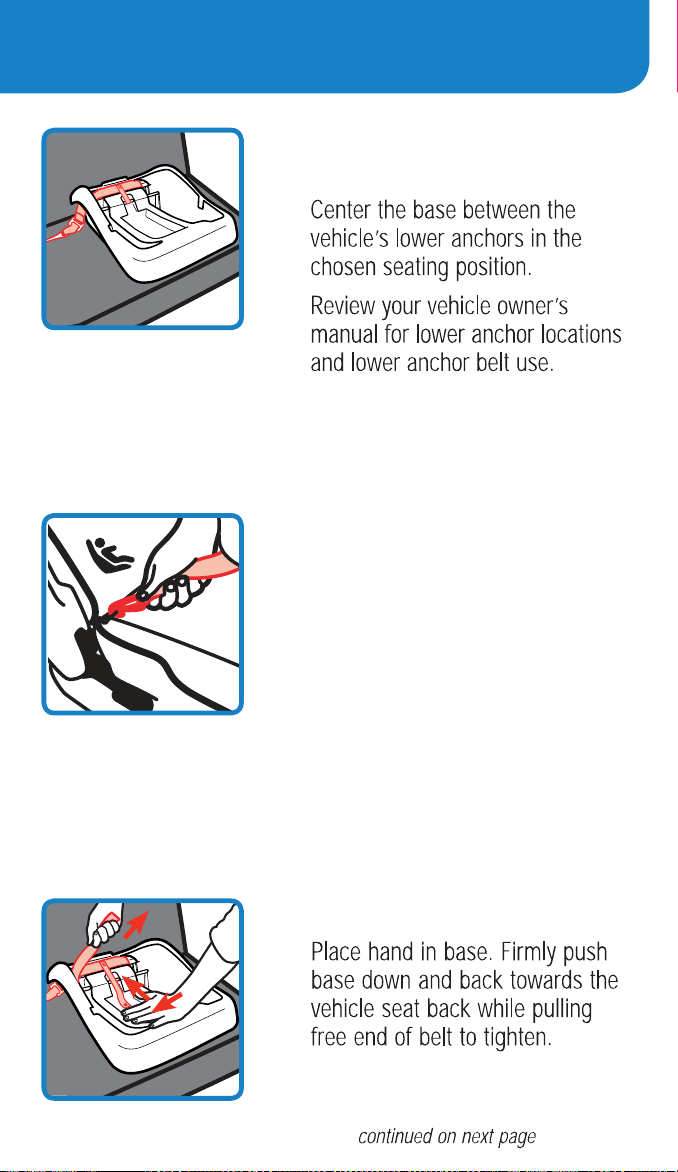
Lower Anchor Belt Installation
with Base
1. Remove Lower Anchor
Belt from Storage
Location
2. Route Lower Anchor
Belt Through Base Belt
Path
5. Tighten Belt
4. Attach Lower Anchor
Hooks to Vehicle’s
Lower Anchors
3. Place Base in Vehicle
Rear Facing
39 40
Lower Anchor Belt Installation
with Base
1. Remove Lower Anchor
Belt from Storage
Location
2. Route Lower Anchor
Belt Through Base Belt
Path
5. Tighten Belt
4. Attach Lower Anchor
Hooks to Vehicle’s
Lower Anchors
3. Place Base in Vehicle
Rear Facing

41 42
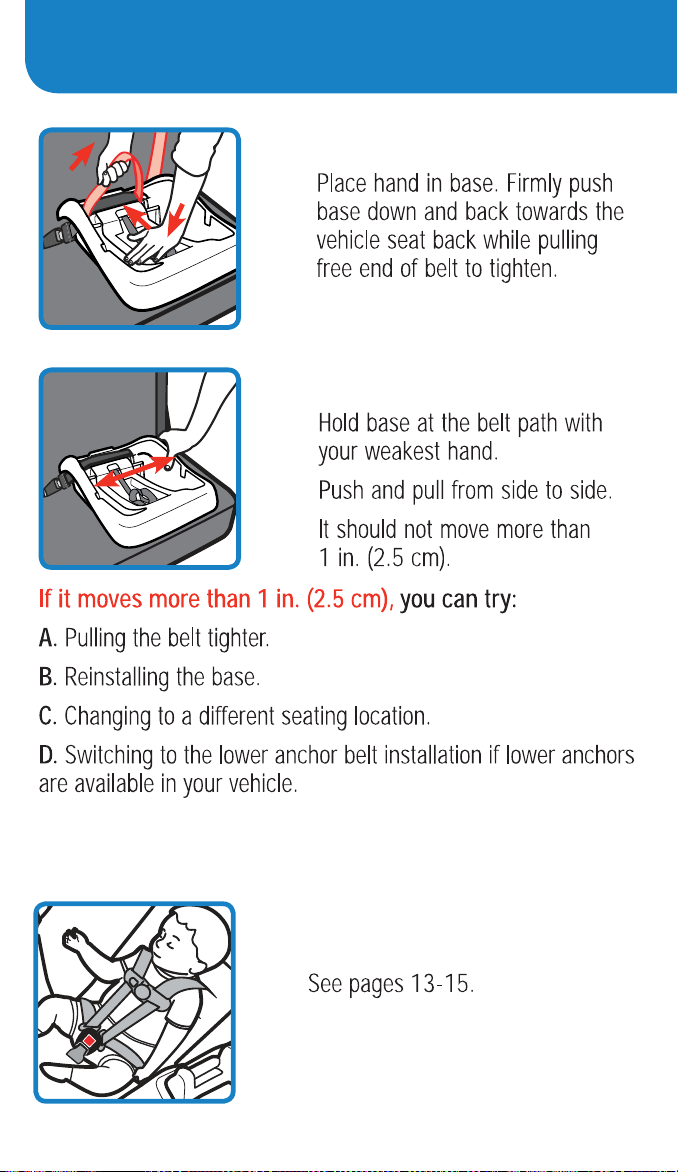
6. Check Belt Tightness
7. Secure Child in Child
Restraint
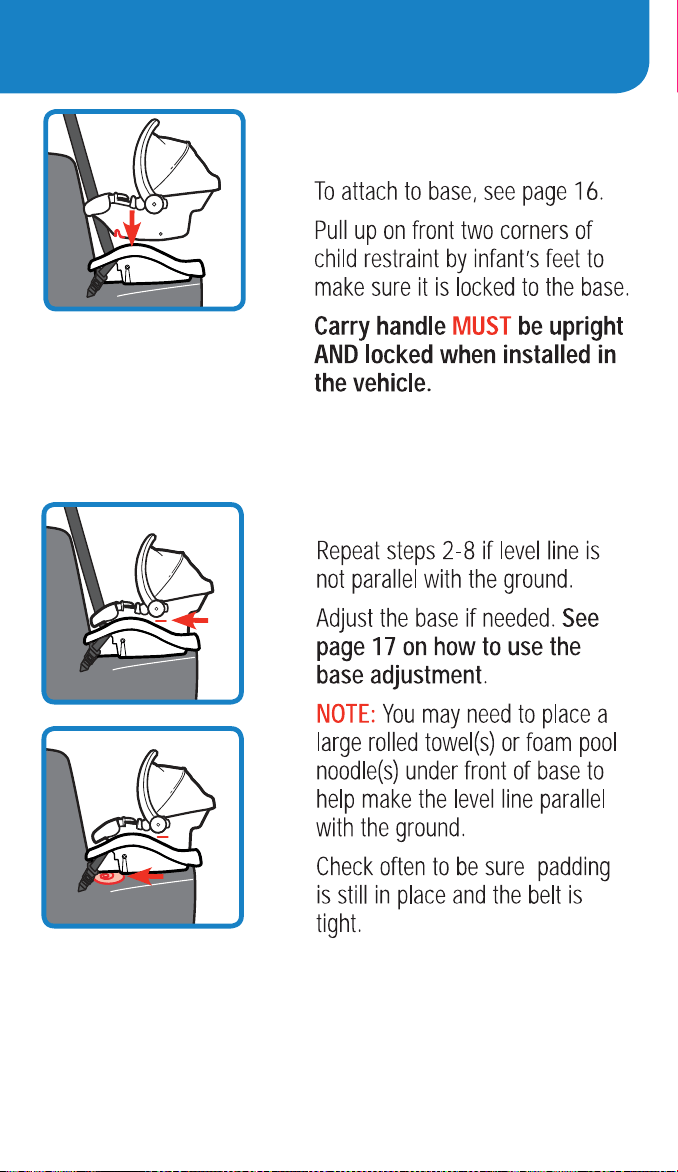
8. Attach Child Restraint
to Base
To Release Lower Anchor
Belt
9. Check Level Line

41 42
6. Check Belt Tightness
7. Secure Child in Child
Restraint
8. Attach Child Restraint
to Base
To Release Lower Anchor
Belt
9. Check Level Line
43 44
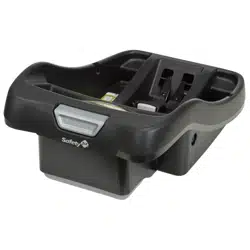
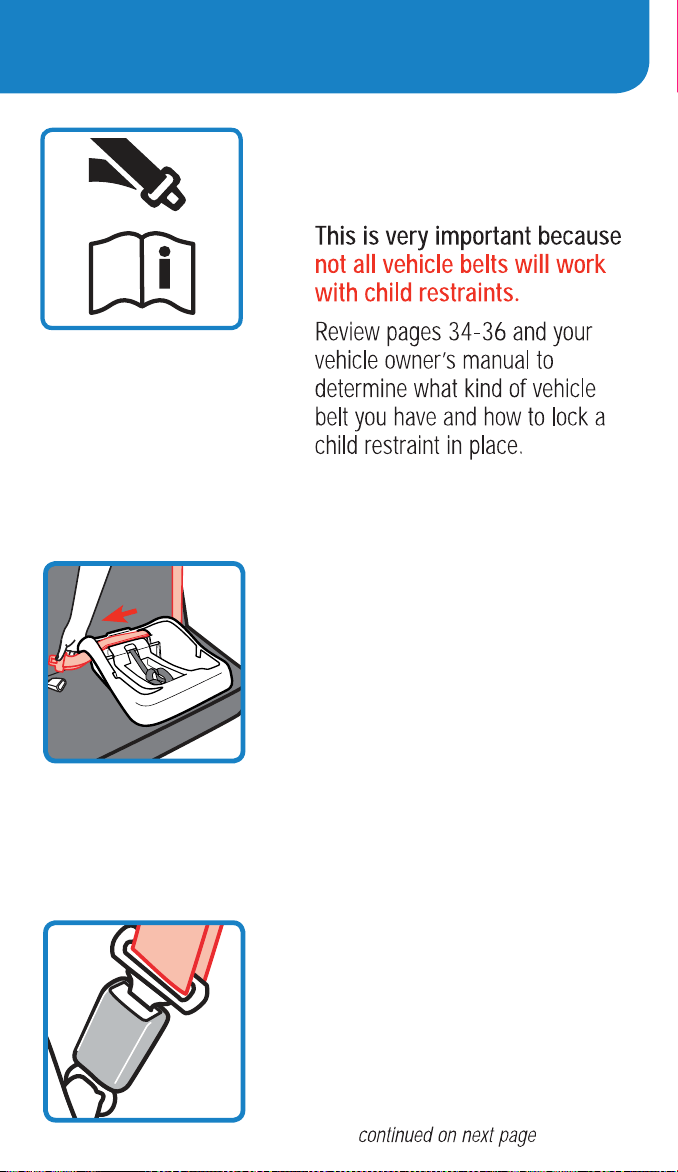
Vehicle Belt Installation with Base
1. Store Lower Anchor
Belt
2. Place Base in Vehicle
Rear Facing
4. Route Vehicle Lap or
Lap/Shoulder Belt
Through Base Belt Path
5. Buckle Vehicle Belt
3. Check if Your Vehicle
Belts Will Work With
This Child Restraint
43 44
Vehicle Belt Installation with Base
1. Store Lower Anchor
Belt
2. Place Base in Vehicle
Rear Facing
4. Route Vehicle Lap or
Lap/Shoulder Belt
Through Base Belt Path
5. Buckle Vehicle Belt
3. Check if Your Vehicle
Belts Will Work With
This Child Restraint
45 46
7. Check Belt Tightness
9. Attach Child Restraint
to Base
8. Secure Child in Child
Restraint
10. Check Level Line
6. Tighten Belt
45 46
7. Check Belt Tightness
9. Attach Child Restraint
to Base
8. Secure Child in Child
Restraint
10. Check Level Line
6. Tighten Belt
47 48
Rear Facing without Base Vehicle Belt Installation without Base
Lap/Shoulder Belt
Lap Belt
4-35 lb (1.8-15.9 kg)
32 in. (81.3 cm) or less
1. Secure Child in Child
Restraint
2. Place Child Restraint in
Vehicle Rear Facing
3. Check if Your Vehicle
Belts Will Work With
This Child Restraint
47 48
Rear Facing without Base Vehicle Belt Installation without Base
Lap/Shoulder Belt
Lap Belt
4-35 lb (1.8-15.9 kg)
32 in. (81.3 cm) or less
1. Secure Child in Child
Restraint
2. Place Child Restraint in
Vehicle Rear Facing
3. Check if Your Vehicle
Belts Will Work With
This Child Restraint
49 50
7. Check Belt Tightness
6. Tighten Vehicle Belt
8. Recheck Level Line
5. Buckle Vehicle Belt
4. Route Vehicle Lap or
Lap Portion of the Lap/
Shoulder Belt Through
Shell Belt Path As Shown
49 50
7. Check Belt Tightness
6. Tighten Vehicle Belt
8. Recheck Level Line
5. Buckle Vehicle Belt
4. Route Vehicle Lap or
Lap Portion of the Lap/
Shoulder Belt Through
Shell Belt Path As Shown
52
Using a Locking Clip
51

52
Using a Locking Clip
51
54
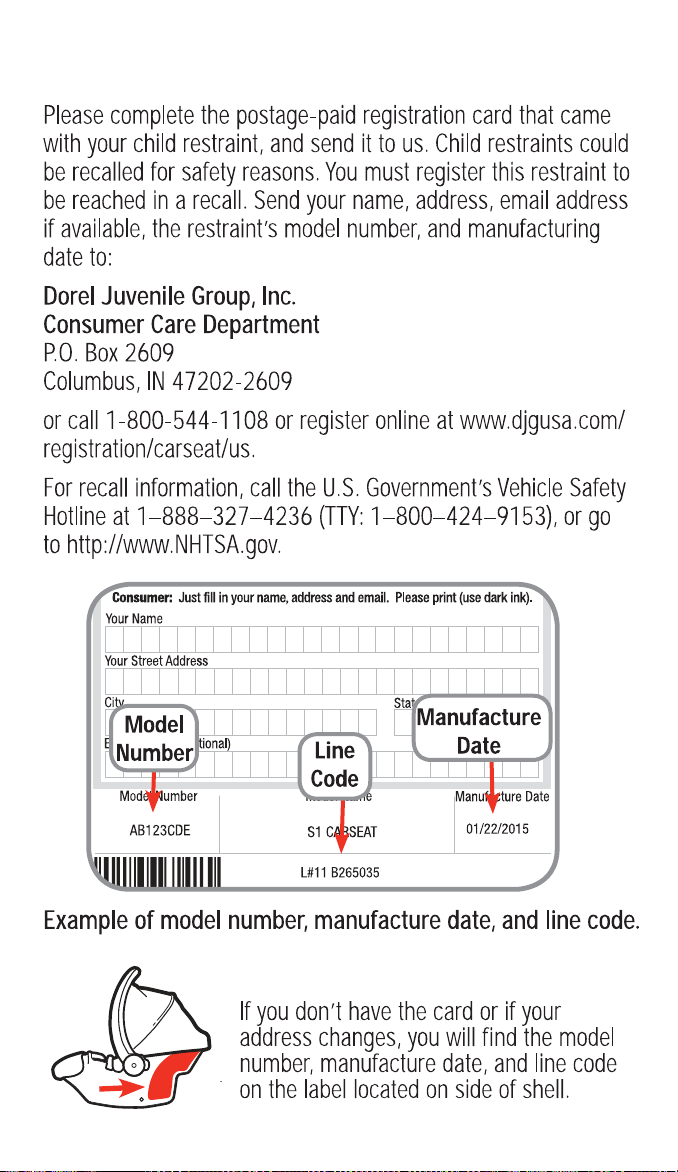
Registration and Safety Notices
53
Dorel Juvenile Group Information
54
Registration and Safety Notices
53
Dorel Juvenile Group Information
5655
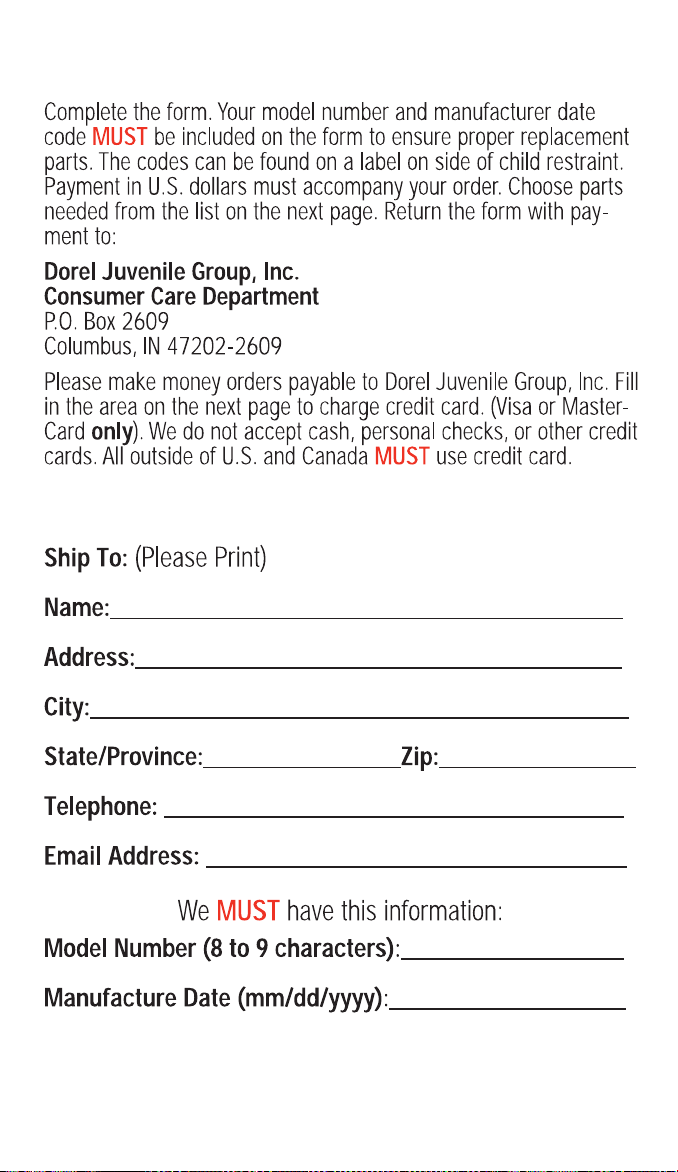
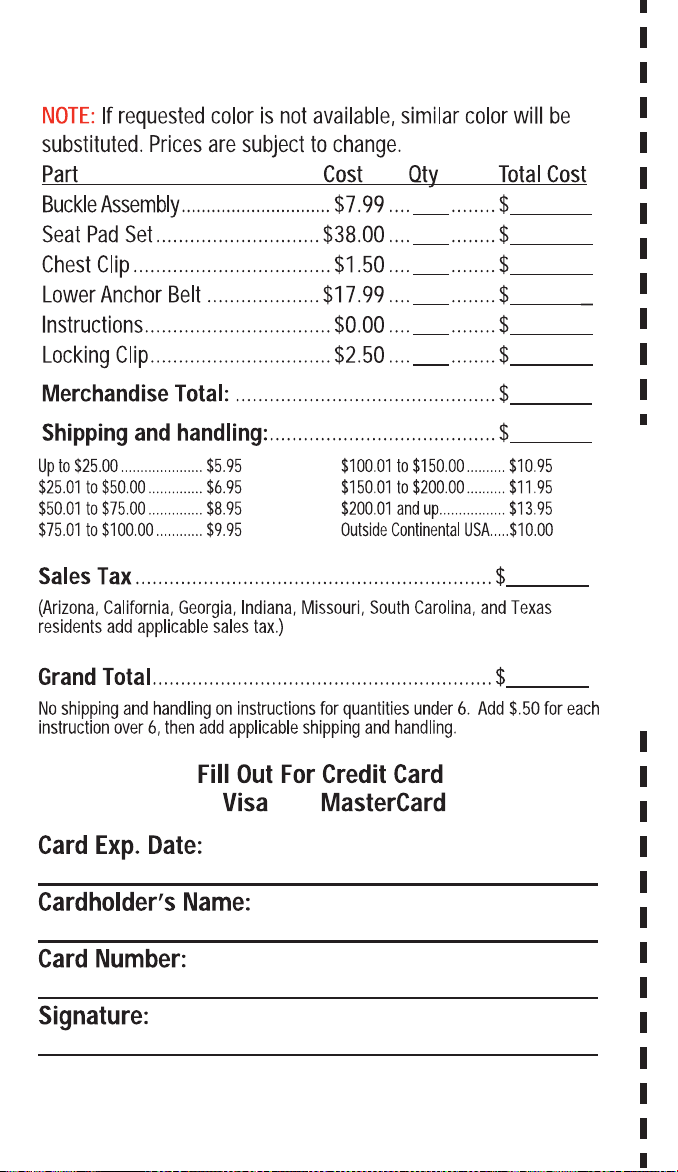
Replacement Parts Order Form
Troubleshooting
.
5655
Replacement Parts Order Form
Troubleshooting
.
5857
CUT ON DOTTED LINE
Replacement Parts List
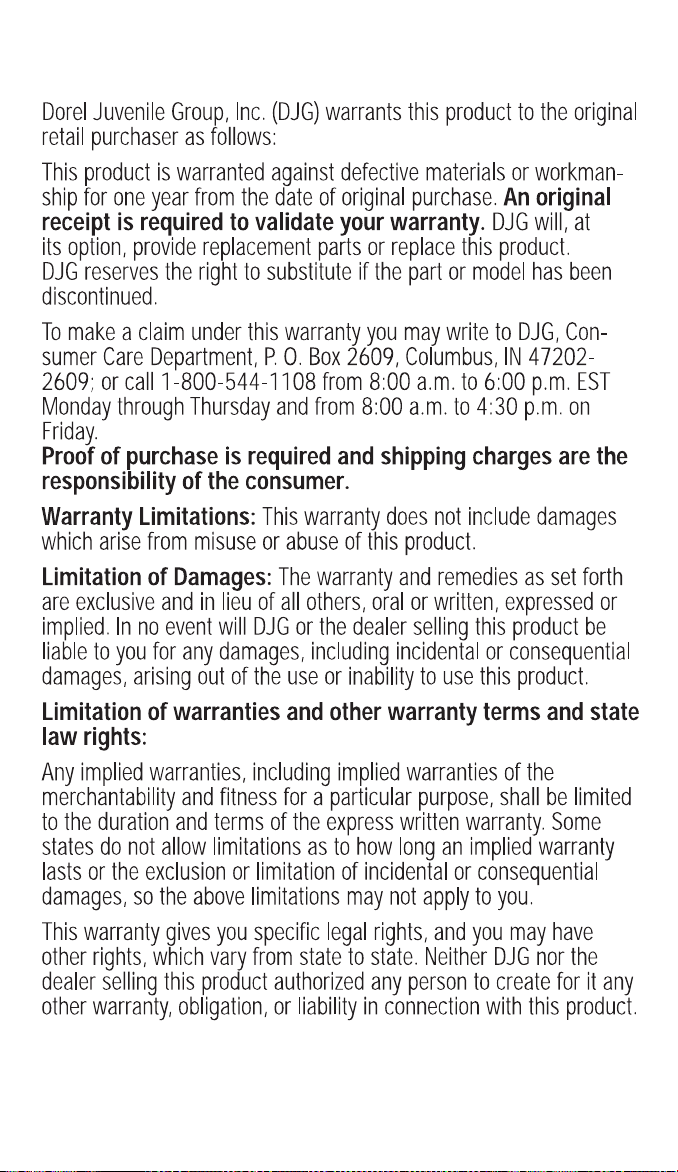
Warranty
5857
CUT ON DOTTED LINE
Replacement Parts List
Warranty
onBoard 35 LT
Infant Car Seat
™
To see installation videos, scan the QR Code
or visit www.safety1st.com