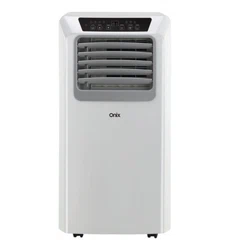
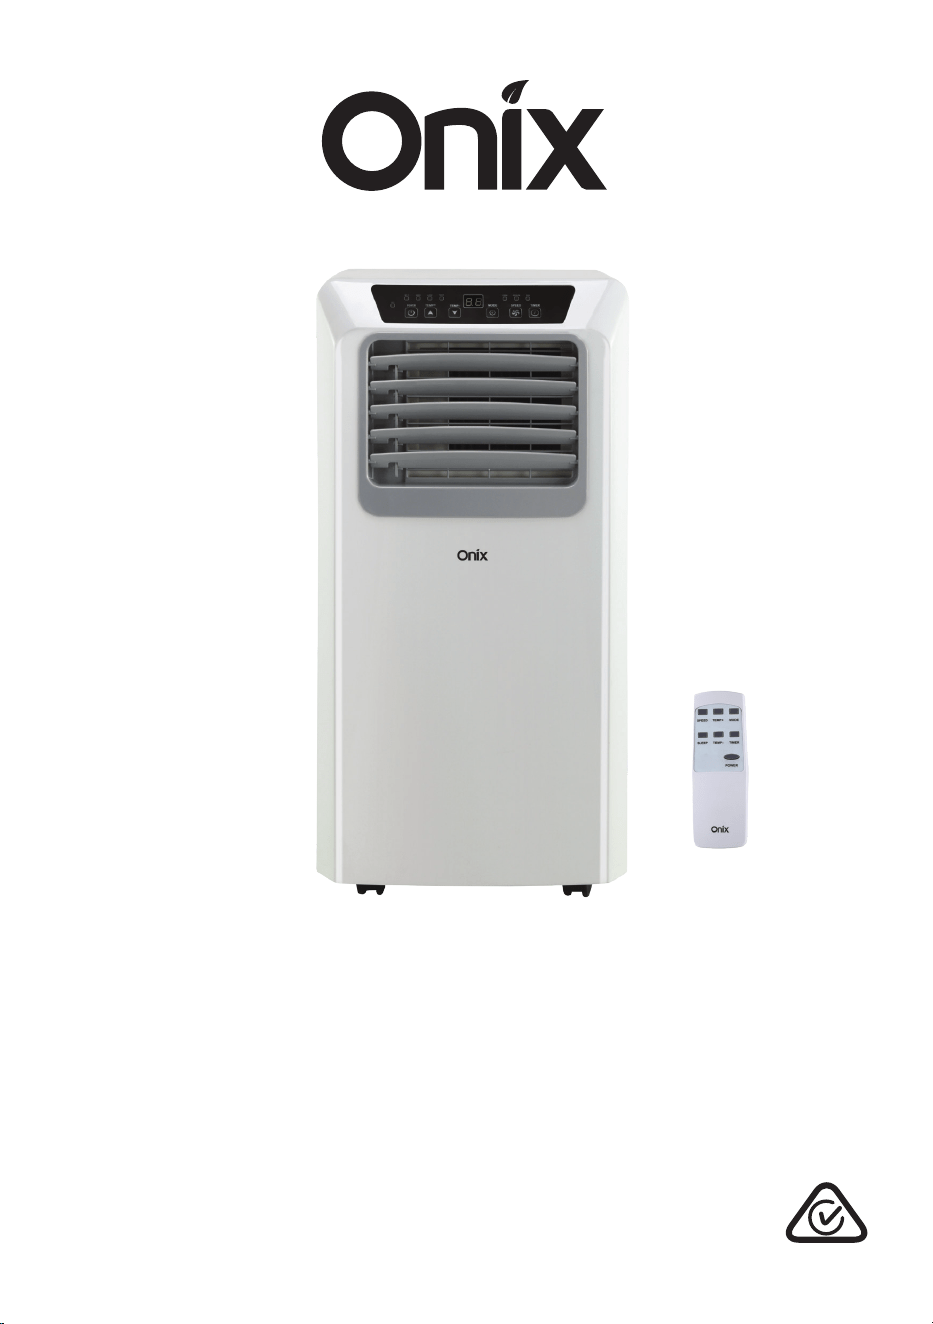
Wi-Fi Portable Air Conditioner
(2.7 kW Cooling)
Model Number ON-27KWP3
USER MANUAL

After Sales Support
1300 886 649 | info@tempo.org
2
Contents
03 Important Safety Instructions
07 R290-Specific Safety Advice
09 Getting Started
10 Product Overview
12 Installation
14 Instructions
17 Wi-Fi Control
24 FAQs & Troubleshooting Guide
25 Other Useful Information

After Sales Support
1300 886 649 | info@tempo.org
3
READ CAREFULLY AND KEEP FOR FUTURE REFERENCE
Read this manual thoroughly before first use, even if you are familiar with
this type of product. The safety precautions enclosed herein reduce the risk
of fire, electric shock and injury when correctly adhered to. Make sure you
understand all instructions and warnings. Keep the manual in a safe place for
future reference, along with any warranty information, your purchase receipt
and the original packaging. If you sell or transfer ownership of this product,
pass on these instructions to the new owner.
Always follow basic safety precautions and accident prevention
measures when using an electrical appliance, including the following:
Electrical safety and cord handling
• Electrical connection: The unit comes with a plug ready for connection to
your mains power outlet.
• Voltage: Before turning on the air conditioner, ensure the electrical voltage
and circuit frequency correspond to those indicated on the appliance.
• Socket: Ensure your electrical outlet is properly installed and earthed and
complies with your local electrical safety requirements.
• Moisture: To reduce the risk of electrocution, never operate the appliance
with wet hands; never submerge it in water or spill liquids into it. Do not use
it in a bathroom or laundry, or where it can be splashed with water.
• Power supply cord: Do not kink or damage the cord. Do not pull the cord
or place it near a heat source. Always unwind the cord completely to avoid
overheating. Run the cord in such a way so that no one will trip over it.
• Extension cord/adaptor: Do not use this appliance with an extension cord
or power adaptor.
• Damage: If the supply cord (or any other part of the appliance) is damaged,
do not use the appliance. A damaged power supply cord must be replaced
by the manufacturer or its service agent or a similarly qualified person in
order to avoid a hazard. Contact our after sales support centre.
• WARNING: Do not use when damaged! In case of damage, switch o the
appliance, unplug it and contact our after sales support centre. Do not pick
up or operate a damaged appliance, or after it malfunctions or has been
dropped or damaged in any manner.
• Switching on/off: Do not use the mains plug to start and stop the unit;
always use the POWER button to start and stop the unit.
• Disconnect: Turn off the unit first and then unplug it when it is not in use
and before maintenance or cleaning, but do not unplug it when it is in
operation, as this could create a spark and cause a fire. Grip by the plug,
do not pull by the cord when disconnecting.
Important Safety Instructions

After Sales Support
1300 886 649 | info@tempo.org
4
• RCD: The installation of a residual current device (safety switch) is
recommended to provide additional safety protection when using electrical
appliances. It is advisable that a safety switch with a rated residual
operating current not exceeding 30 mA be installed in the electrical circuit
supplying the appliance. See your electrician for professional advice.
Usage conditions and restrictions
• Intended use: This appliance is intended for air conditioning domestic
environments. It is not suitable for commercial, industrial or trade use. Do
not use it for any other purpose (such as drying clothes, cooling food, etc.),
and only use it as described in this manual.
• Common sense: These instructions are not intended to cover every
possible condition and situation. As with any electrical appliance, common
sense and caution are therefore always recommended when installing,
operating and maintaining the unit.
• No outdoor use: Do not use the unit outdoors. It is for indoor use only.
• Usage restriction: This appliance is not intended for use by persons
(including children) with reduced physical, sensory or mental capabilities,
or lack of experience and knowledge, unless they have been given
supervision or instruction concerning use of the appliance in a safe way
and understand the hazards involved.
• No external timer: This appliance is not intended to be used with an
external timer or a separate remote control system.
• WARNING: Do not cover! Do not cover the air conditioner or obstruct any
air inlet or outlet grilles. Obstructing these openings causes a fire hazard,
reduces the operating efficiency and may lead to malfunction or damage.
• Air outlets: Do not insert any objects, or your fingers, into the air outlet,
and make sure to warn children of the dangers.
• Children: Supervise children to ensure they do not play with the appliance.
Close supervision is necessary when any appliance is used by or near
children. Cleaning and user maintenance shall not be made by children
without supervision.
• Unattended: Do not leave the appliance unattended when in use.
• Attachments: The use of attachments not recommended or sold by the
manufacturer may cause fire, electric shock or injury.
• Start-up settings: Set the unit to maximum cooling and high speed
ventilation for the initial startup, then adjust the unit down to a more
comfortable setting as required.
Important Safety Instructions (Cont.)

After Sales Support
1300 886 649 | info@tempo.org
5
Installation
• Proper installation: Install the appliance according to the instructions in
this manual and national wiring regulations. Improper installation may result
in the risk of fire, electric shock and/or injury.
• WARNING: Electric shock hazard! Before installation or servicing, ensure
the unit is switched off and disconnected from the power outlet to prevent
possible injury.
• The location: When deciding on an installation place, keep in mind that
the area must be flat, the air outlets must not be covered up, and there
must be a properly earthed 220–240 V~ 50 Hz power outlet nearby.
• Airflow: Do not direct the airflow onto plants or animals, as long and direct
exposure to cold air from the air conditioner could adversely affect them.
• Cold air exposure: Never remain directly exposed to the flow of cold air
for a long time, as direct and prolonged exposure to cold air from the air
conditioner could be dangerous for your health. Take particular care in
rooms where there are children, frail, or sick people.
• Moving the appliance: When moving the air conditioner, always turn it off
first and disconnect the power supply, and move it slowly. Keep the unit
upward during transport and storage.
Cleaning and maintenance
• Disconnect: Make sure the appliance is disconnected from the power
supply when it will not be used for a long time and before carrying out any
cleaning or maintenance.
• Air filter: Keep the air filter clean. Do not use the unit without the air filter
fitted. Using it without air filter could cause an excessive accumulation of
dust or waste on the inner parts of the device with possible subsequent
failures.
• Service and repair: The air conditioner has no user-serviceable parts
contained inside. Do not attempt to disassemble, modify or conduct
repairs on this unit. It has been built in accordance with relevant safety and
performance standards. An electrical specialist must carry out all repairs.
Contact our after sales support centre for advice on service.
• Unplug the appliance immediately if you notice any smoke, odour or
strange sounds coming from the unit. Call for a service.
• Risk of fire: This appliance contains a flammable refrigerant. Do not open
the appliance. In case of damage or malfunction, turn off the appliance,
disconnect the power supply and call our after sales support centre for a
service.
Important Safety Instructions (Cont.)
After Sales Support
1300 886 649 | info@tempo.org
6
• Do NOT install/use the appliance in the following areas:
– outdoors or where water is likely to splash
– near a bath, shower, laundry basin or swimming pool
– in an area where oil is likely to splash
– near a hot gas or electric burner, or sources of fire
– near sources of heat, or exposed to direct sunlight
– in an area where furniture or other objects can obstruct the airflow
– in the presence of flammable substances or vapour such as alcohol,
insecticides, petrol, etc.
– at a dry cleaner’s premises.
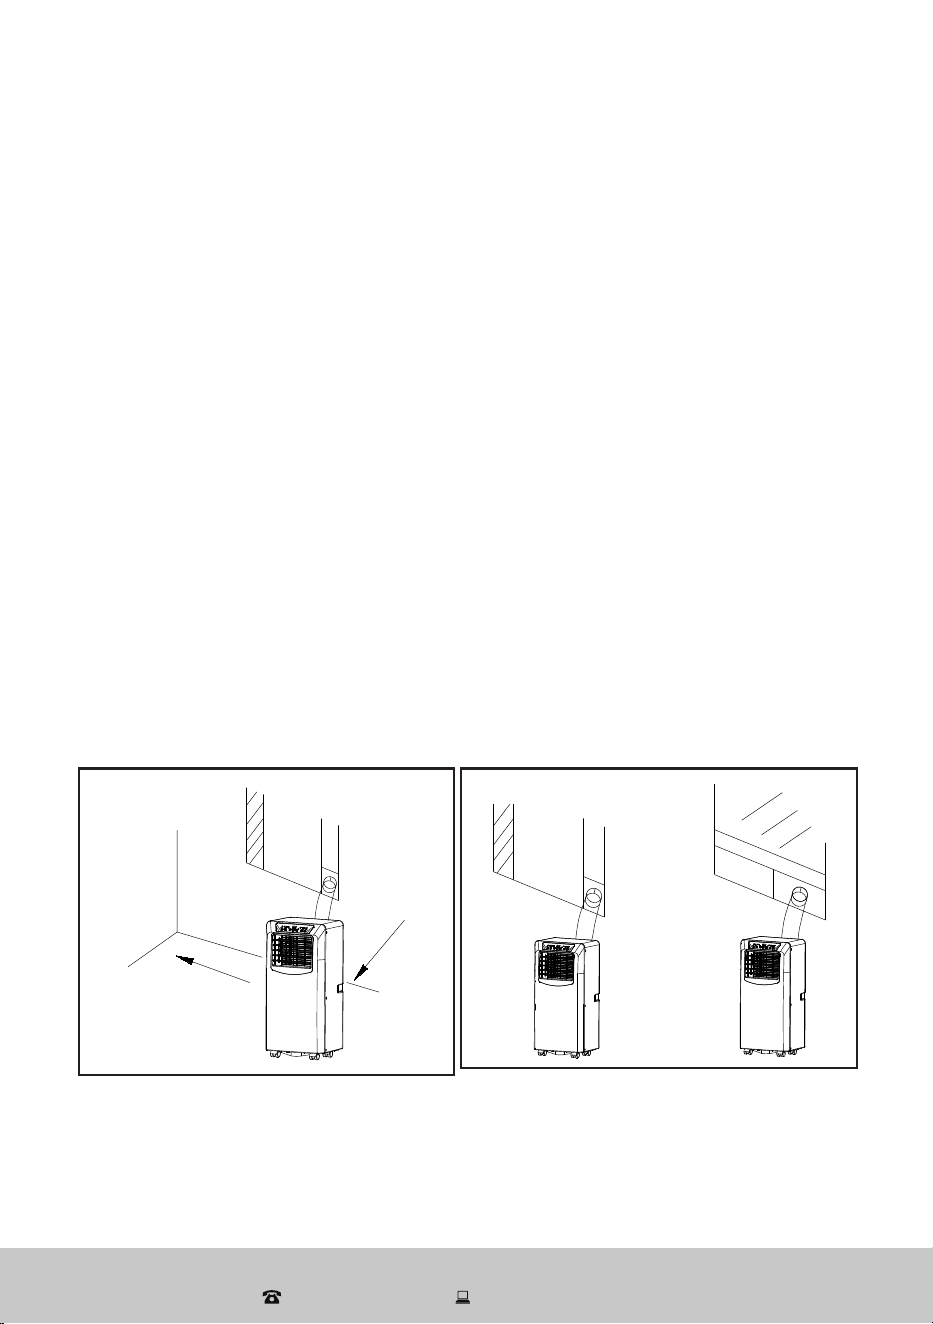
• Clearances: There must be a clearance of at least 30cm between the
appliance and any walls, furniture, curtains or any other obstacles (refer to
Fig. 1, below). Maintaining this minimum 30cm clearance is essential; failure
to keep that distance can result in the unit malfunctioning or causing injury.
• Window application: The air exhaust can be installed in a vertical or
horizontal sliding window (refer to Fig. 2, below).
• Air exhaust installation instructions follow on pages 12–13. Keep the length
of the air exhaust hose to the minimum length necessary during operation.
• Upright position: Place the unit on a flat surface to reduce the risk of it tipping
over. Do not tilt the unit, always keep it upright during installation and use.
• Misuse: We accept no responsibility for any eventual injuries or damages
caused by improper installation, faulty use or failure to follow the instructions.
Pressure specifications:
Permissible excessive operating pressure: discharge 2.6 MPa, suction 1.0 MPa.
Maximum allowable pressure: discharge 3.2 MPa, suction 1.2 MPa.
30CM
30CM
Fig. 1
Fig.2aFig.2
Fig. 2
Important Safety Instructions (Cont.)
After Sales Support
1300 886 649 | info@tempo.org
7
Important safety precautions concerning refrigerant R290
WARNING: Combustible & Dangerous
This symbol alerts you to take care as the appliance contains
a flammable refrigerant: R290 (propane). Take extra care when
installing the unit and when carrying out maintenance. R290 is
a colourless and odourless hydrocarbon gas. It is an ecient
refrigerant with a low Global Warming Potential (GWP) and no
potential for ozone depletion.
WARNING!
• The room in which this air conditioner is installed must have a minimum area
of more than 12 m
2
. (This unit is designed for use in a room of approximately
15–20 m
2
size.)
• The appliance shall be stored in a well-ventilated area without continuously
operating ignition sources, such as open flames, an operating ignition gas
appliance or an operating electric heater. Do not expose the appliance to
high heat, sparks and open flames.
• Do not pierce or burn the appliance.
• Do not use means to accelerate the defrosting process or to clean, other
than those recommended by the manufacturer.
• Be aware that refrigerants may not contain an odour.
• The ratings of the fuse installed in the built-in control unit are T, 2 AL, 250 V~.
• This air conditioner has been fully charged with refrigerant at the factory.
Should a recharge become necessary, it may only be recharged by a
professional installer.
• Maintenance must only be carried out by properly qualified, authorised
personnel. If the appliance requires maintenance or service, contact our after
sales support centre.
• The service technician must strictly comply with:
– all safety instructions in the manual provided with the appliance
– all relevant provisions of gas-related local laws and regulations.
While R290 is highly ammable, there will be no risk of burning and explosion if
the appliance is properly installed and maintained following all instructions and
safety advice in the supplied manuals.
R290-SpecicSafetyAdvice
After Sales Support
1300 886 649 | info@tempo.org
8
R290-SpecicSafetyAdvice(Cont.)
• After servicing the appliance, the service technician must:
– check that air cannot enter the refrigerant system
– check for refrigerant leaks when moving the air conditioner
– carry out a test cycle under controlled conditions after installing the unit and
record the operating data.
Packaging materials are recyclable. Please dispose of them
responsibly for recycling.
Responsible disposal
This air conditioner contains a flammable refrigerant, which must be removed
before disposal. Contact your municipal authorities for any codes or
regulations concerning the disposal of such materials.
At the end of its working life, make the appliance
unserviceable by unplugging it from the power outlet and
cutting the power cord. Do not throw this appliance out with
your household waste. Electrical and electronic products
contain substances that can have a detrimental eect on the
environment and human health if disposed of inappropriately.
Observe any local regulations regarding the disposal of
electrical consumer goods and dispose of it appropriately for
recycling.
Contact your local authorities for advice on recycling facilities
in your area. Or nd recycling scheme services listed on
Planet Ark’s website recyclingnearyou.com.au, or call Planet
Ark on 1300 733 712.
After Sales Support
1300 886 649 | info@tempo.org
9
Before you start
• Unpacking: This product has been packaged to protect it against
transportation damage. Unpack the appliance and keep the original
packaging materials in a safe place. It will help prevent any damage if the
product needs to be transported in the future, and you can use it to store
the appliance when it is not in use. In the event that the packaging is to be
disposed of, please recycle it where possible.
• Safe packaging disposal: Plastic wrapping can be a suffocation hazard for
babies and young children, so ensure all packaging materials are kept out of
their reach and disposed of safely.
• Inspection: Unwind the cord fully and inspect it for damage. Do not use if
any part of the appliance is damaged. In case of damage, contact our after
sales support centre for advice.
• Documentation: Read the manual to familiarise yourself with all parts and
operating principles of the portable air conditioner. Pay particular attention to
the safety instructions on the previous pages.
Electric shock hazard!
Before installation, cleaning or servicing, ensure the unit is switched off and
disconnected from the power outlet to prevent possible injury.
Getting Started
After Sales Support
1300 886 649 | info@tempo.org
10
NOTE: Due to continued
product improvement,
images and illustrations
in this manual may vary
slightly from the product
purchased. All images
in this manual are for
reference purposes only.
Parts are not necessarily
pictured to scale.
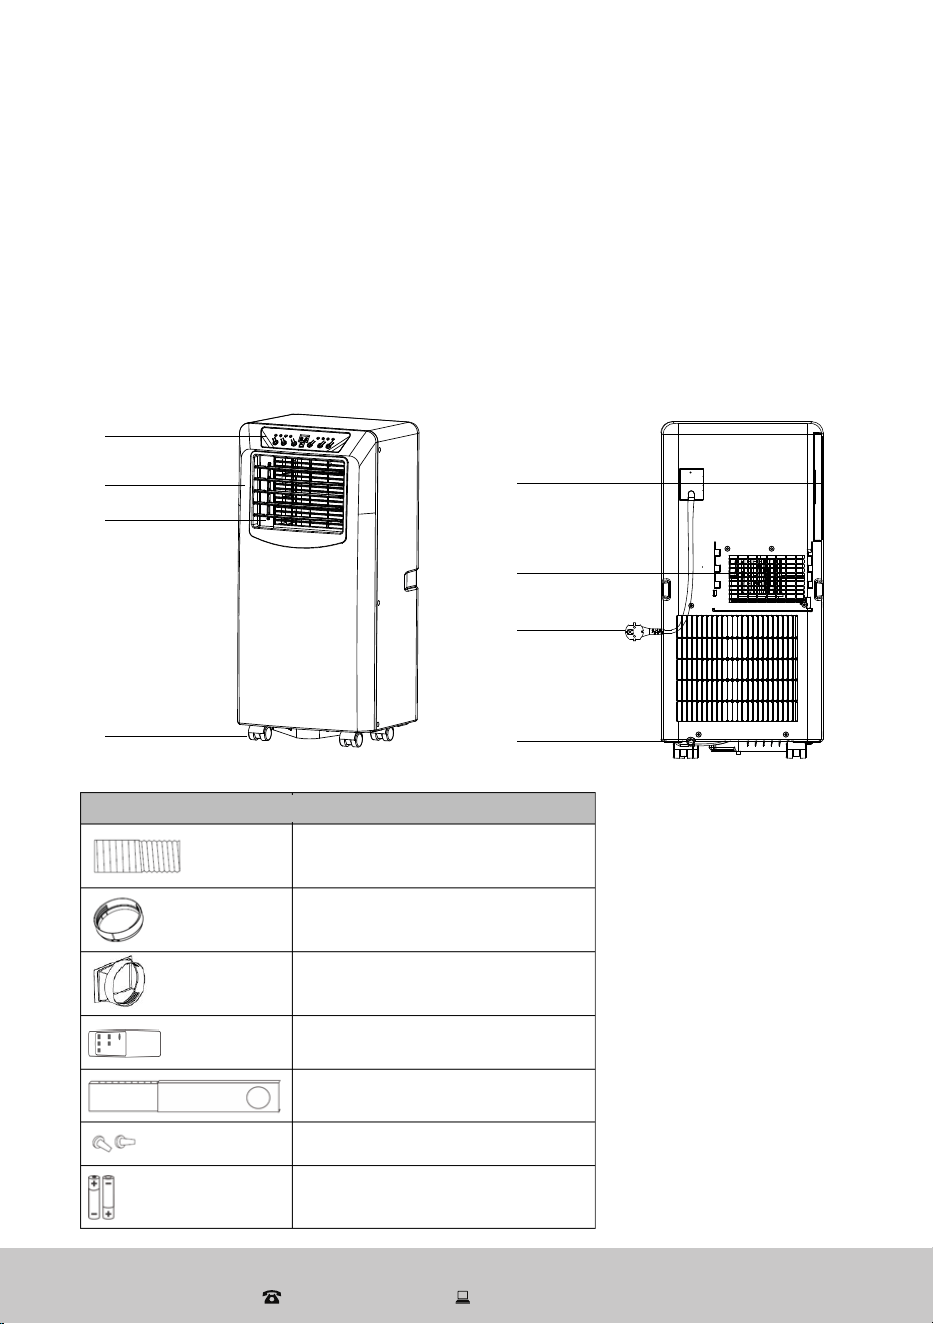
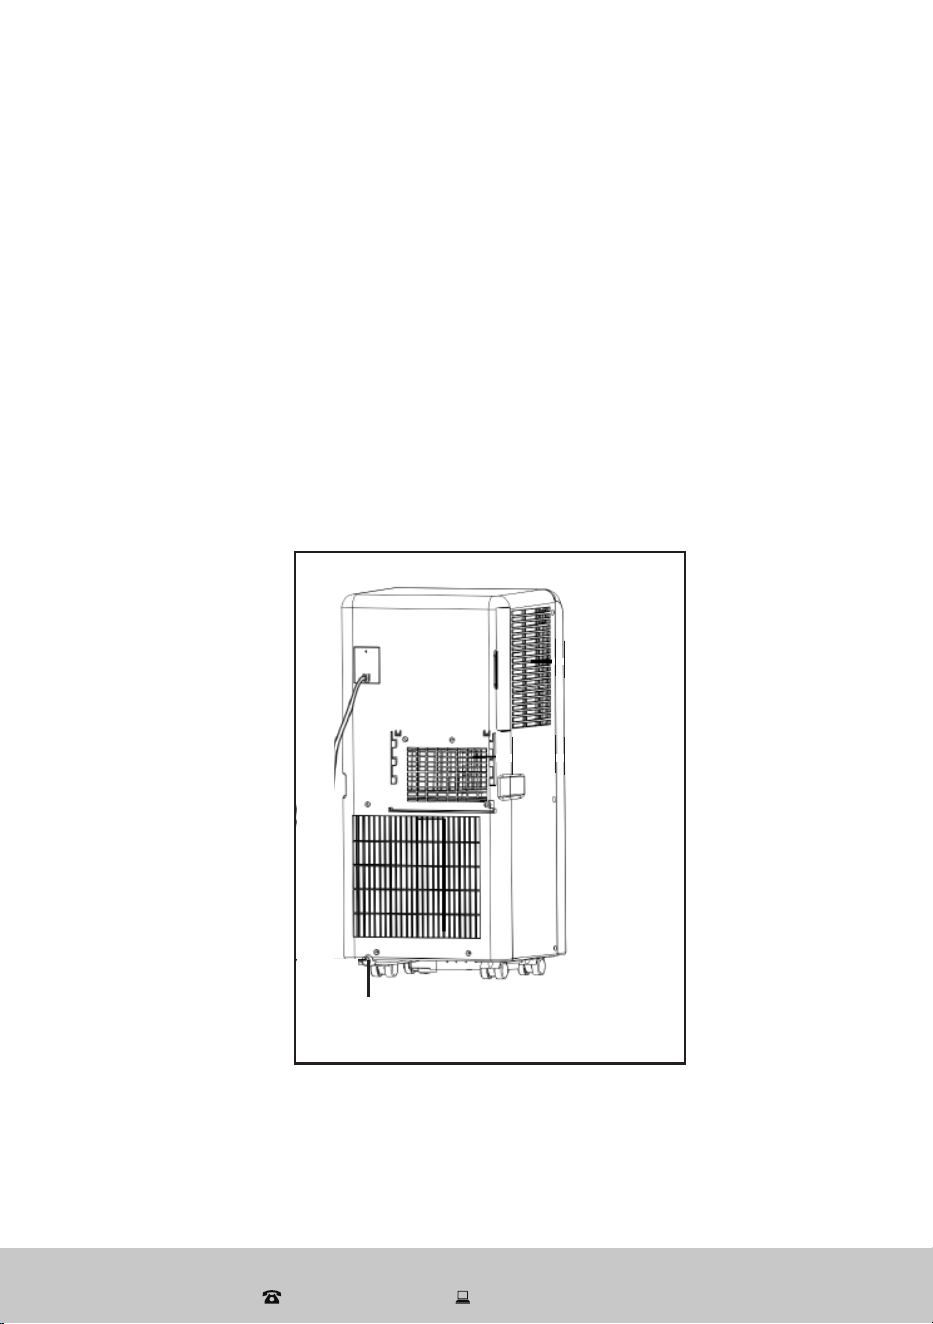
ProductOverview
Scopeofdelivery
A Portable air conditioner
1 Control panel (see page 11) 5 Power cord and plug
2 Front panel 6 Drainage outlet with plug
3 Cold air outlet with louvre 7 Air intake grille with filter
4 Castor wheels (4) 8 Exhaust air outlet
Front & right side view (Fig. 3) Rear view (Fig. 4)
Flexible air exhaust hose
Exhaust hose connector
(window end)
Adjustable window slider (for
67.5 cm – 123 cm windows)
Remote control
Exhaust hose connector (hous-
ing adaptor) (air conditioner end)
2 Dowels
2 AAA-size batteries
(packaged separately)
B Accessory parts (Fig. 5)
1
2
3
4
Power line
Rear view
7
8
5
6
After Sales Support
1300 886 649 | info@tempo.org
11
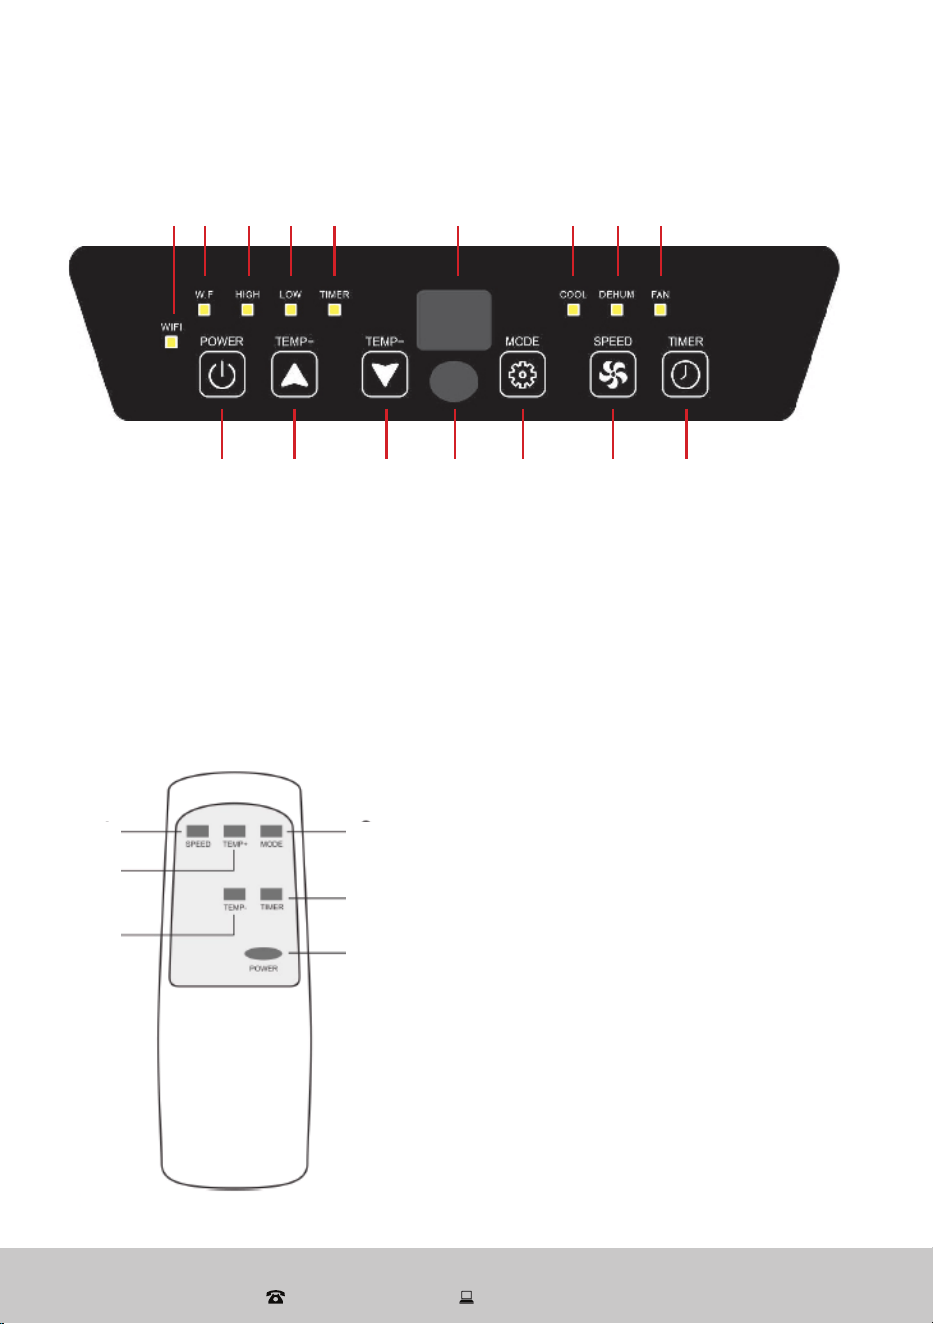
C Control panel (Fig. 6)
ProductOverview(Cont.)
D Remote control (Fig. 7)
NOTE:
Do not drop the remote control.
Do not place the remote control in a
location exposed to direct sunlight.
Remote control buttons
1 Fan speed button
2 Temperature up button
3 Temperature down button
4 Mode button
5 Timer button
6 Power button
Control panel buttons and indicators
1 Wi-Fi indicator
2 Water full (W.F) indicator
3 Fan speed indicators
4 Timer indicator
5 Temperature/timer display
6 Mode indicators
A Power button
B Temperature up button
C Temperature down button
D Operation mode button
E Fan speed button
F Timer button
G Signal receiver
1 2 3 3 4 5 6 6 6
A B C G D E F
1
2
3
4
5
6
E Documentation (not shown)
Instruction manual
Service manual
Warranty certicate
After Sales Support
1300 886 649 | info@tempo.org
12
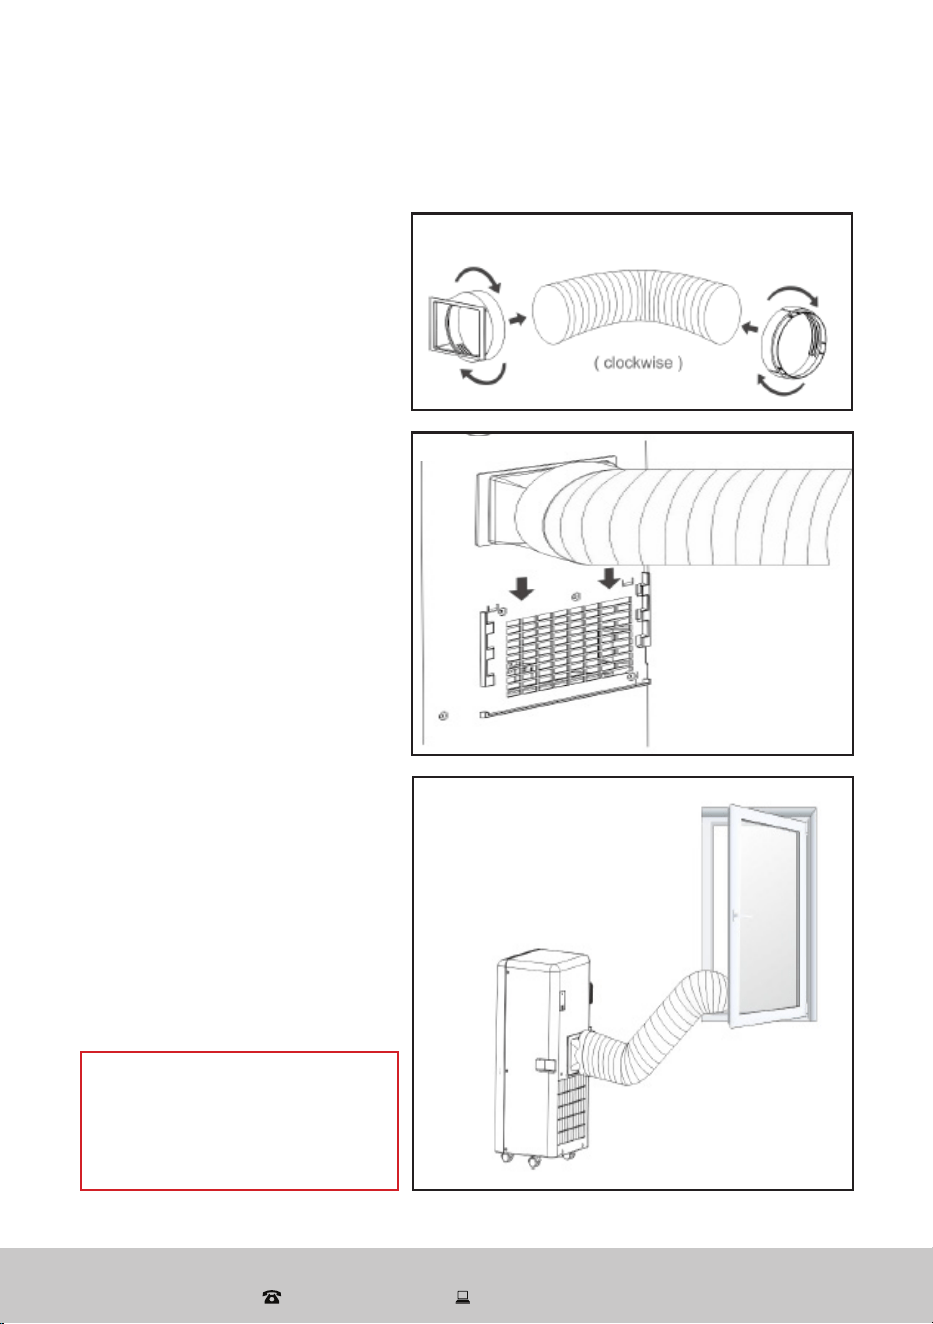
Installation
Installing the air exhaust hose
IMPORTANT!
For best performance, keep the
length of the air exhaust hose to
the minimum length necessary
during operation.
Fig. 9
Fig. 10
• Insert the fixing clip of the
housing connector into the
openings at the back of the
air conditioner (Fig. 9).
• Fit the exhaust hose and
housing connectors to
the ends of the flexible air
exhaust hose, twisting them
into place (Fig. 8).
• For temporary installation
(in fan mode only), lead the
exhaust hose connector
(window end) out of an open
window (Fig. 10).
NOTE: Ambient air will still
be able to enter the room
this way. To cool the room
effectively,thewindowkit
must be properly installed.
Fig. 8
After Sales Support
1300 886 649 | info@tempo.org
13
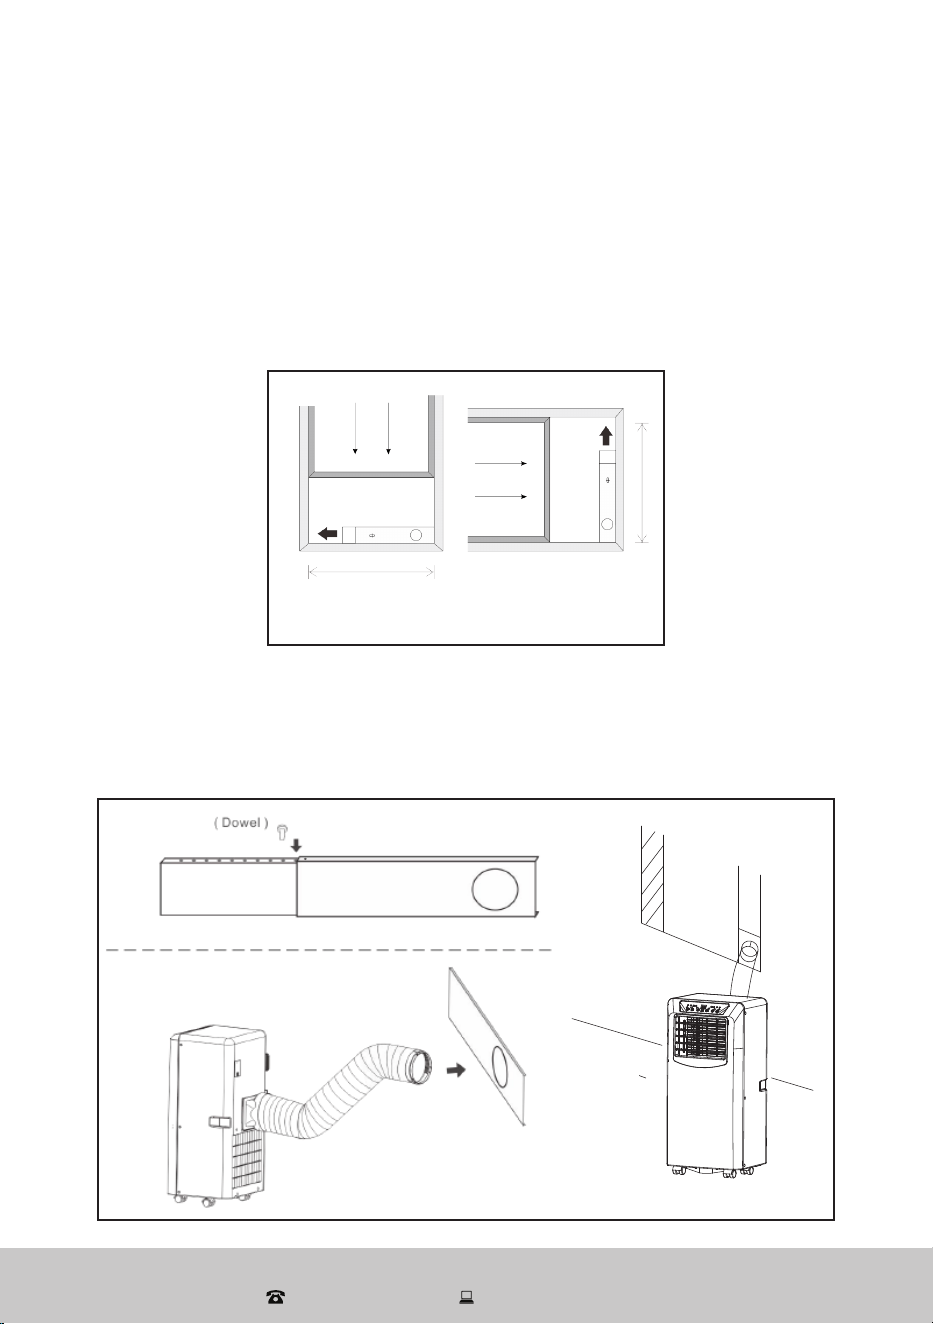
30CM
30CM
Installing the window kit
Your window kit has been designed to fit most standard ‘horizontal’ and
‘vertical’ window applications, but for certain types of windows it may be
necessary for you to improvise/modify some aspects of the installation
procedure.
Installation (Cont.)
• Adjust the window slider to the length of a horizontally (or height of a
vertically) opening window (Fig. 11) and fix it with a dowel (Fig. 12).
Fig. 11
• Fit the slider to the bottom of the window sill (or to the side of the window, if
it opens vertically), then close the window.
• Fit the exhaust hose connector (window end) through the opening to the
outside (Fig. 13).
Fig. 12
Fig. 13
Window width Window height
min. 67.5 cm min. 67.5 cm
max. 123 cm max. 123 cm
After Sales Support
1300 886 649 | info@tempo.org
14
Instructions
Using the portable air conditioner
• Before switching the unit on for the first time, make sure you have properly
installed the exhaust hose and window kit (see pages 5–6 and 12–13) and
inserted two AAA size batteries into the remote control (see page 26).
• Find a place for the air conditioner where there is a power outlet nearby.
• Install the exhaust hose through
the window kit so that the hot air is
expelled to the outside (Fig. 14).
• Ensure the rubber stopper at the
back of the appliance is properly in
place to block the drainage outlet.
• Plug the portable air conditioner
into a properly earthed 220–240 V~
50 Hz mains socket and switch on
power to the outlet.
NOTE: Do not connect it to a multiple socket outlet that is also being used
for other electrical appliances. Do not connect it to an extension cord.
• Press the POWER button and the unit will start operation.
IMPORTANT INFORMATION
• Room size: It is important to use the right size air conditioner in the
room you want to cool. (This appliance is suitable for cooling rooms of
15 m
2
– 20 m
2
size.)
• Exhaust hose: This MUST BE CONNECTED and hot air expelled to the
outside for the appliance to work properly. Keep the hose as short as
possible.
• Noise: As the compressor is inside the room, a portable air conditioner
makes more noise than a split system, where the compressor is outside.
• Forbestcoolingefficiency,keepblindsandcurtainsclosedduring the
sunniest part of the day. Close off any fireplace damper, floor and/or wall
register so cool air does not escape through the chimney or duct work.
• Switchingon/o:After switching on, allow 30 seconds for cool air to
ow through the louvres. Avoid starting the air conditioner soon after
switching o, and avoid switching it o immediately after switching on.
Allow at least 3 minutes in between switching the unit on and then o,
or vice versa.
• Movingtheappliance: Take care when moving the appliance as conden-
sation water may spill out. Ensure the drip tray is empty before moving it.
Fig.2aFig.2
Fig. 14

After Sales Support
1300 886 649 | info@tempo.org
15
Instructions (Cont.)
Cooling mode
• Press the MODE button until the cooling mode indicator illuminates.
• Press the TEMP– or TEMP+ button repeatedly to set the desired room
temperature between 16 °C and 31 °C.
• Press the SPEED button to select the fan speed: high or low.
NOTE: For best cooling efficiency, make sure that:
* Curtains/blinds are closed if your room is directly exposed to the sun.
* The air conditioner is located away from any heat source.
Dehumidifying mode
• Press the MODE button until the dehumidifying mode indicator illuminates.
• The unit will automatically set the fan motor to low speed and maintain the
room temperature at 2°C lower than the current room temperature (within
the 16 °C to 31 °C range).
Fan mode
• Press the MODE button until the fan mode indicator illuminates.
• Press the SPEED button to select the fan speed: high or low.
Timer operation
The air conditioner has a 24 hour timer, which you can set to start the unit at
a later time, or to switch off the unit automatically.
On-Timer setting
• With the unit switched off (but power supplied), press the TIMER button
and then use the UP and DOWN buttons to select the number of hours after
which you want the unit to turn on. The selected number of hours will be
shown on the display.
Off-Timer setting
• Use the same procedure as above, but while the unit is switched on, to set
an auto-off time. The selected number of hours will be shown on the display.
After Sales Support
1300 886 649 | info@tempo.org
16
Instructions (Cont.)
Water full alarm
Condensation water that forms during cooling will drop into an in-built drip
tray. When the water level in the drip tray is getting too full, an automatic
water level sensor illuminates the water full (W.F) indicator on the control
panel to alert you that the drip tray needs to be emptied.
Should the water full (W.F) indicator light up during operation, proceed as
follows:
• Unplug the unit from the power supply.
• Place a pan under the water drainage outlet at the bottom of the unit.
• Remove the rubber stopper and drain all water out of the tray.
• Alternatively, attach a water drain hose (not supplied) to the drainage outlet
(Fig. 15) and lead the hose to the outside or into a tub or drain for water
drainage.
Drainage
outlet
Fig. 15
After Sales Support
1300 886 649 | info@tempo.org
17
Wi-Fi Control
This portable air conditioner features Wi-Fi technology, which enables you to
control the appliance remotely from wherever you are — at work, at play or on
the go — so that on your arrival your home is comfortably cool. The portable
air conditioner works in conjunction with your mobile device, using your home
Wi-Fi network router to communicate with the air conditioner.
Controlling the air conditioner remotely is very easy. You will need:
• an Android smartphone or Apple iPhone
• an internet connection at your home
• a Wi-Fi network router set up at home
• You must also have our ONIX App installed or updated on your smart-
phone. This app is available from Google Play Store or Apple App Store.
Initial set-up
Upon installation of your new portable air conditioner, or when you have
changed your mobile device or wireless router, you will have to set up the
communication channel between the devices. In order to do this, make sure
you have the ONIX App installed or updated on your mobile device, your Wi-Fi
router is switched on and your mobile device connected to your home Wi-Fi
network.
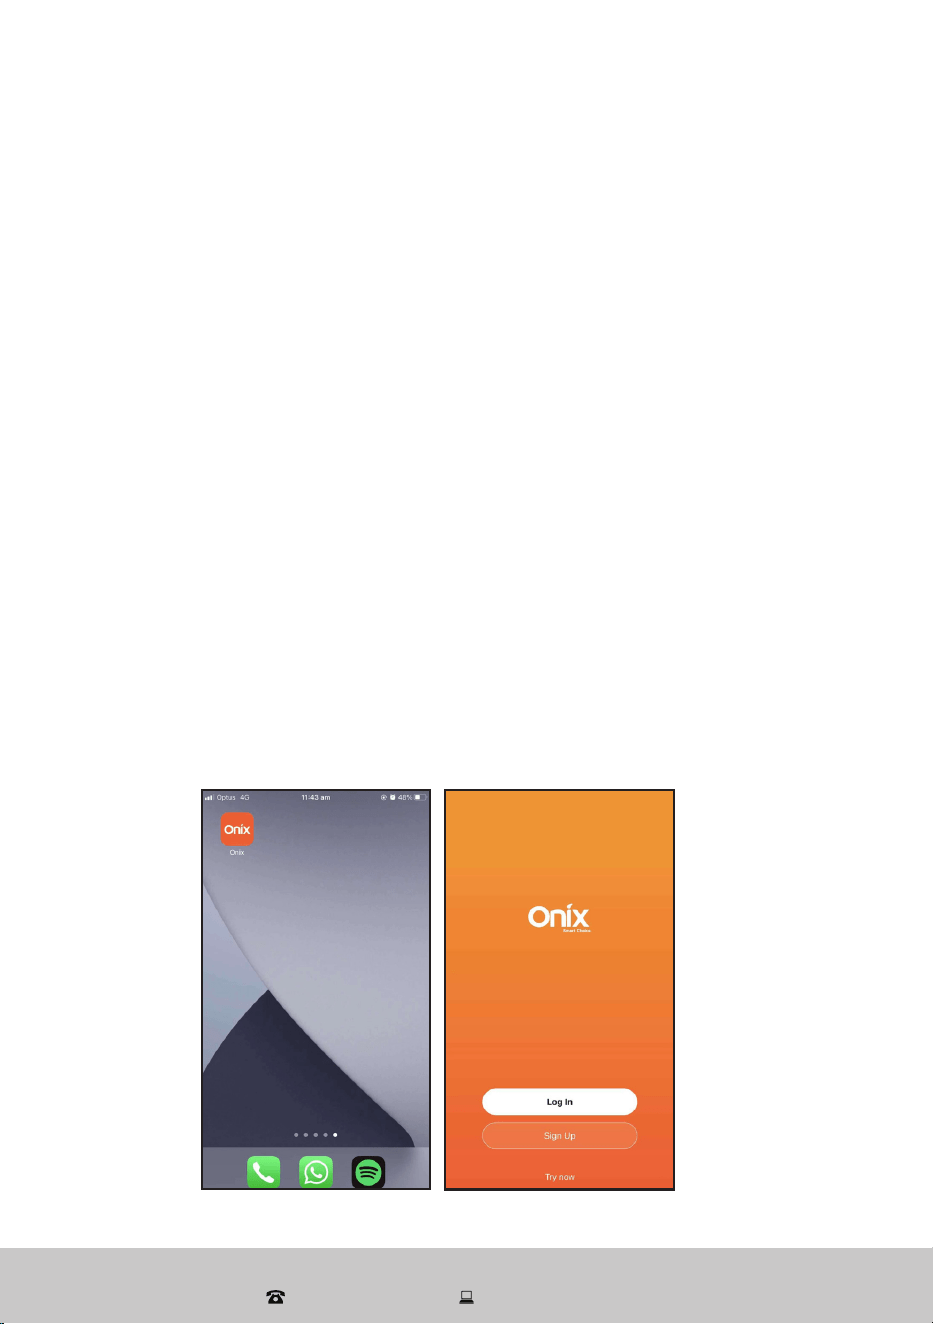
• On your mobile device, tap on the [ ONIX ] app (Fig. WF1). It will open
and take you to the Login Page (Fig. WF2).
Fig. WF1 Fig. WF2
After Sales Support
1300 886 649 | info@tempo.org
18
Wi-Fi Control (Cont.)
Fig. WF4
Fig. WF3
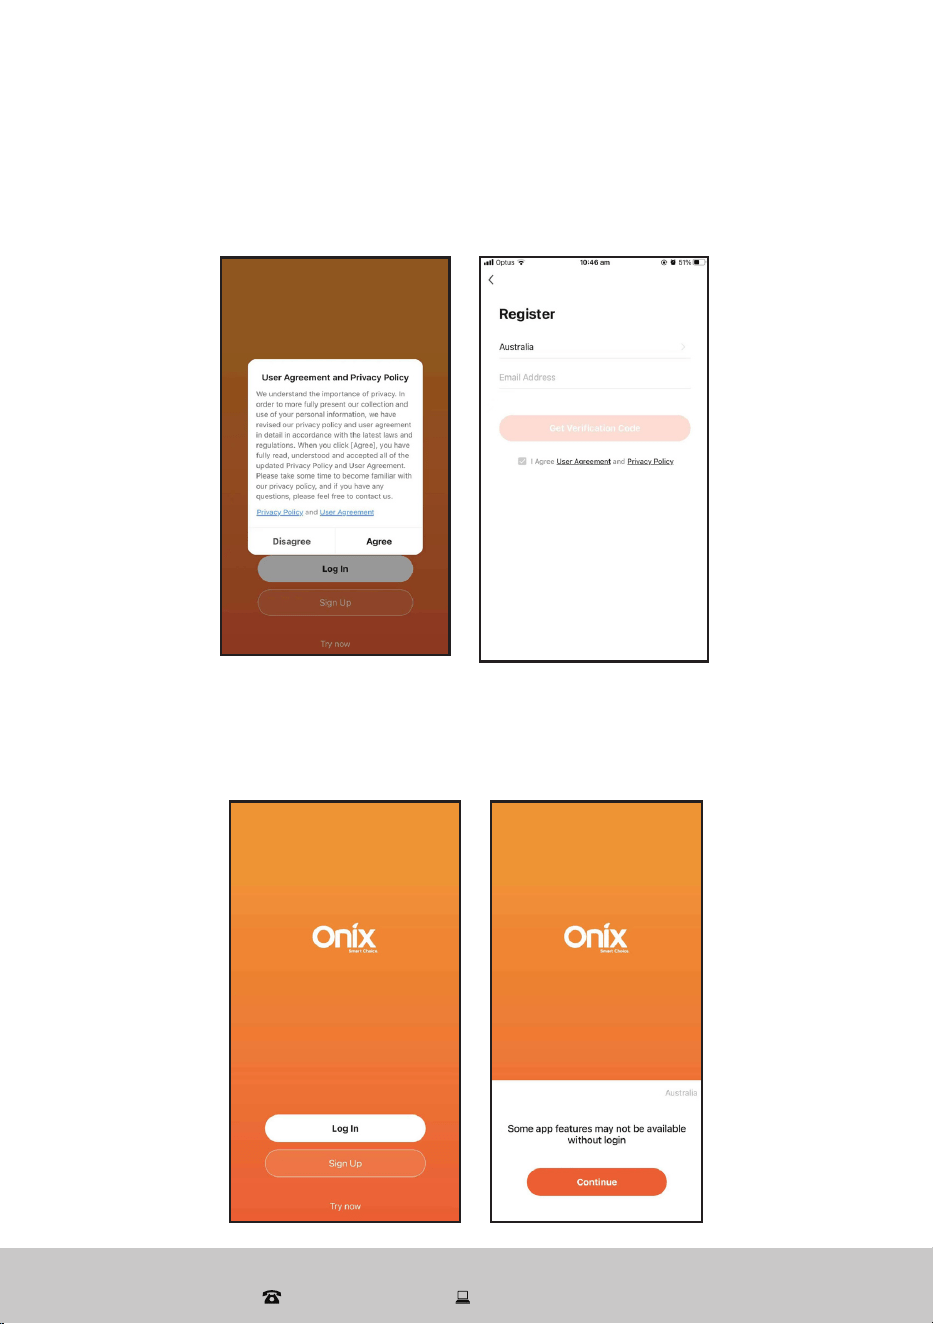
• Before you log in, please tap [ Register ] and register your account using
your email account (Fig. WF3, WF4).
• NOTE: If you do not want to create an account, you may also continue as a
guest. To log in as a guest, tap [ Try now ] (Fig. WF5), then tap [ Continue ]
(WF6). (Some app features may not be available without log in.)
Fig. WF5 Fig. WF6
After Sales Support
1300 886 649 | info@tempo.org
19
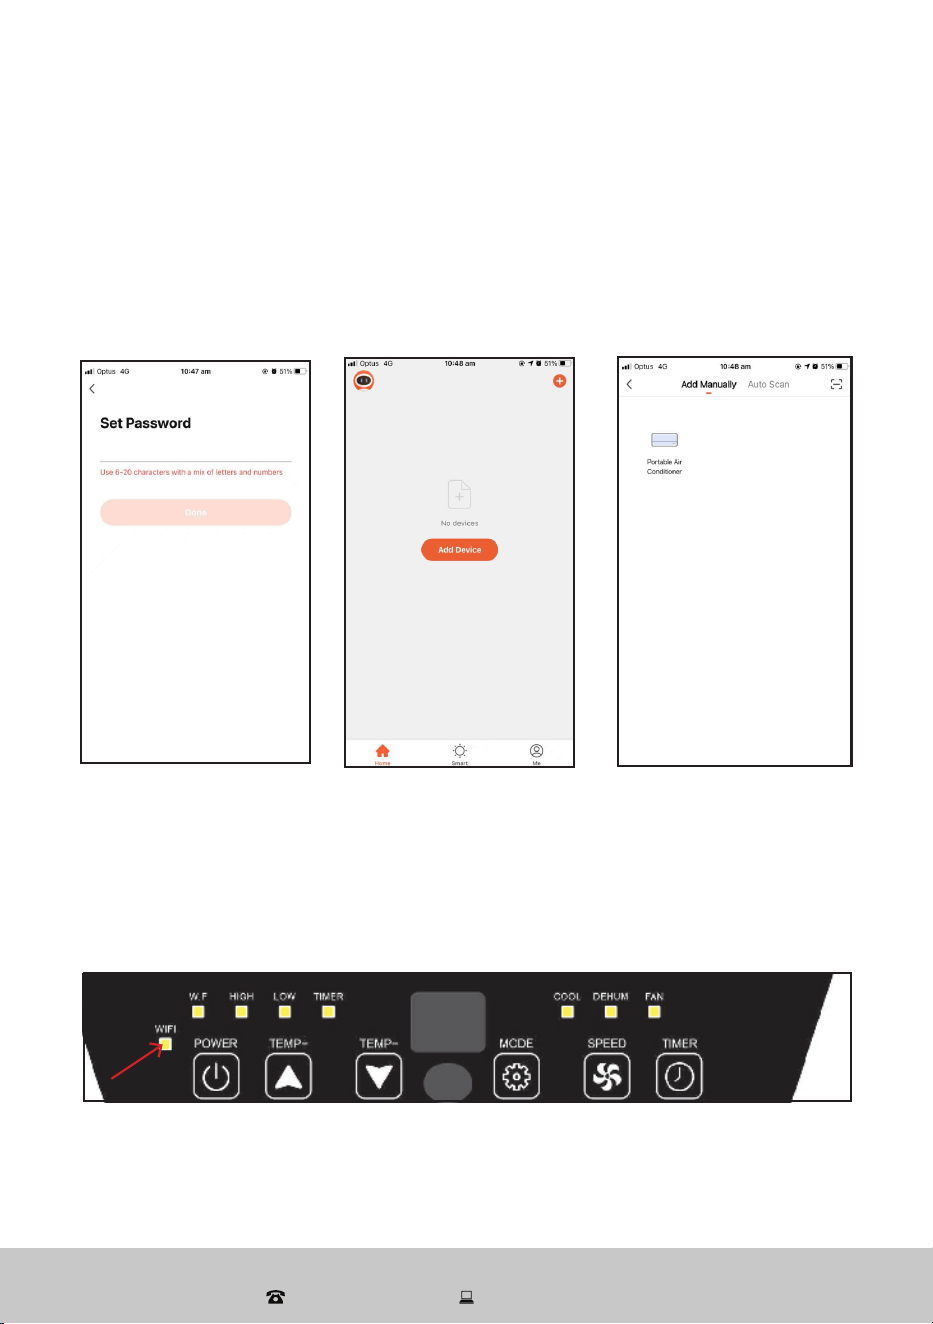
• Once you have registered and entered your email address, tap [ Get
Verification Code ] and an email will be sent directly to the email account
that you entered when registering. Enter this verification code.
• Now you have to enter your password and tap [ Done ] (Fig. WF7).
• You will now enter the main device list (Fig. WF8). Tap [ + ] or [ Add
Device]and add your device from the product list (Fig. WF9).
Wi-Fi Control (Cont.)
Fig. WF8
Fig. WF7
Fig. WF9
• On the air conditioner’s remote control (or control panel), press and
hold the SPEED button for 5 seconds to reset the Wi-Fi module.
• When the Wi-Fi indicator on the control panel is blinking rapidly (WF10),
the Wi-Fi module is ready for configuration with your mobile phone.
Fig. WF10
After Sales Support
1300 886 649 | info@tempo.org
20
Wi-Fi Control (Cont.)
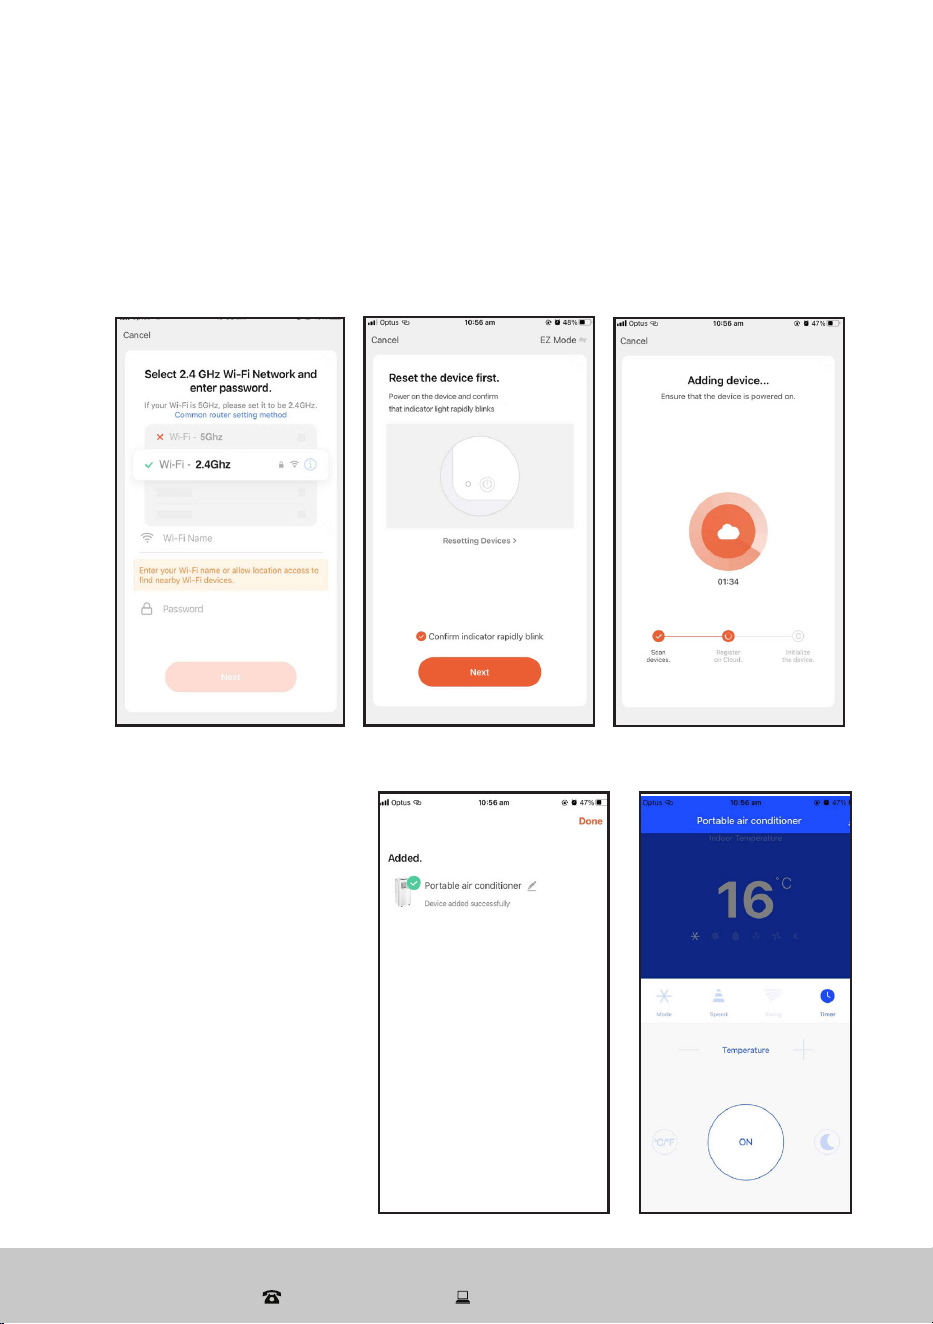
• Onyourmobiledevice, enter your Wi-Fi name and password, then
tap [ Next ] (WF11). Tap [ Confirm indicator rapidly blinks ], then tap
[ Next ] (WF12). The message “Adding device” will appear on the screen
(Fig. WF13).
• On completion, you
can name your device.
Tap [ Done ].
• You will return to the
Devicelistand your
device will be shown
(Fig. WF14).
• Click on the device
name and it will take
you to the main control
page (Fig. WF15).
Fig. WF14
Fig. WF11 Fig. WF12 Fig. WF13
Fig. WF15
After Sales Support
1300 886 649 | info@tempo.org
21
Wi-Fi Control (Cont.)
Device sharing
• The device only recognises ONE registered user. You can share access to
the device with other members of your household if they have the ONIX
App installed and updated on their phone. To share the device, proceed as
follows:
Fig. WF18Fig. WF16 Fig. WF17
Fig. WF19
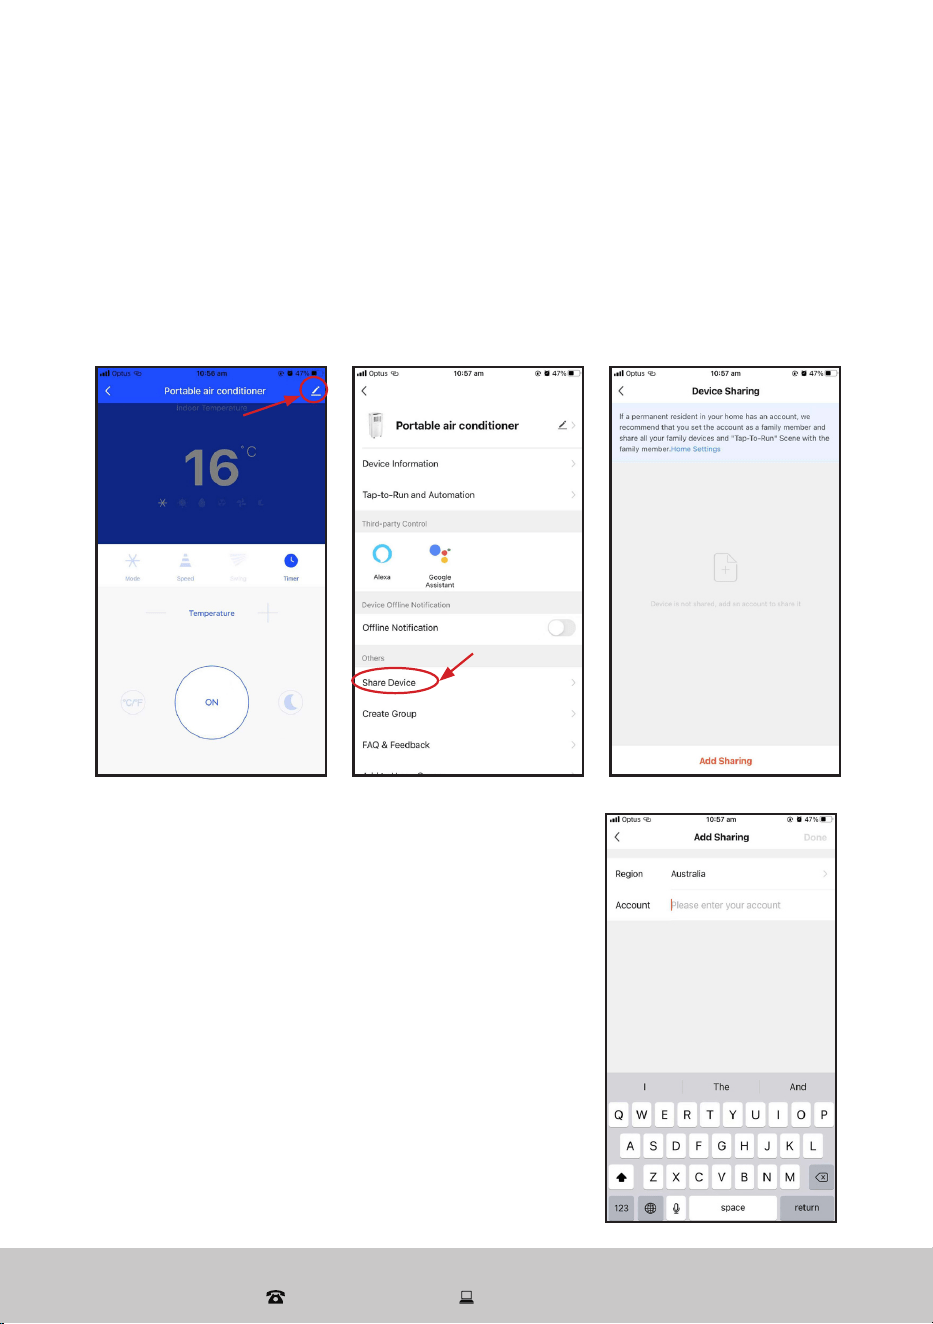
• On the device’s main control page, click the edit
icon in the top right corner (WF16). Then select
[ShareDevice] (WF17) and follow the prompts
(WF18, WF19).
• Your account is your email address.
After Sales Support
1300 886 649 | info@tempo.org
22
Adding the ONIX App to your Google Home app *
• Open your Google Home app.
(Before you can link your ONIX App to your Google Home app you will
have to have a Google Home account set up.)
• From the home screen of the Google Home app, tap [ Add ].
• Tap [Setupdevice], then tap [Havesomethingalreadysetup?] under
the “Works with Google” banner.
• Using the magnifying glass icon, search for Onix.
• Tap the [ Onix ] app and enter your Onix account details and password,
then tap [ Sign in ].
Adding the ONIX App to your Alexa account *
• Before you can link your ONIX App to your Alexa account you will have to
have an Alexa account set up.
• From the home screen of the Alexa app, tap the three bars in the top left
hand corner. Tap Skills & Games, then use the magnifying glass icon to
search for Onix.
• Select the ONIX App. Ensure you have followed the steps listed, then
select [ Confirmed ] and tap [ Next ]. Enter your Onix account details and
password, then tap [ Sign in ].
* These instructions for adding the ONIX App are of a general nature only.
Detailed steps or specific messages from your Google Home or Alexa
account may vary depending on the version.
Smartphone and Wi-Fi specification requirements
Minimum smartphone specifications
Android 5.0 version or later
IOS 9.0 version or later
Wireless network requirements of the Wi-Fi module
Frequency band 2.412 GHz to 2.484 GHz
Wi-Fi standard IEEE 802.11 b/g/n (channels 1 to 14)
Data transmission rate 802.11b: 1, 2, 5.5 or 11 (Mbits/s)
802.11g: 6, 9, 12, 18, 24, 36, 48 or 54 (Mbits/s)
802.11n: HT20 MCS0 to MCS7
Antenna type PCB antenna with a gain of 2.0 dBi
Wi-Fi Control (Cont.)
After Sales Support
1300 886 649 | info@tempo.org
23
Wi-Fi troubleshooting
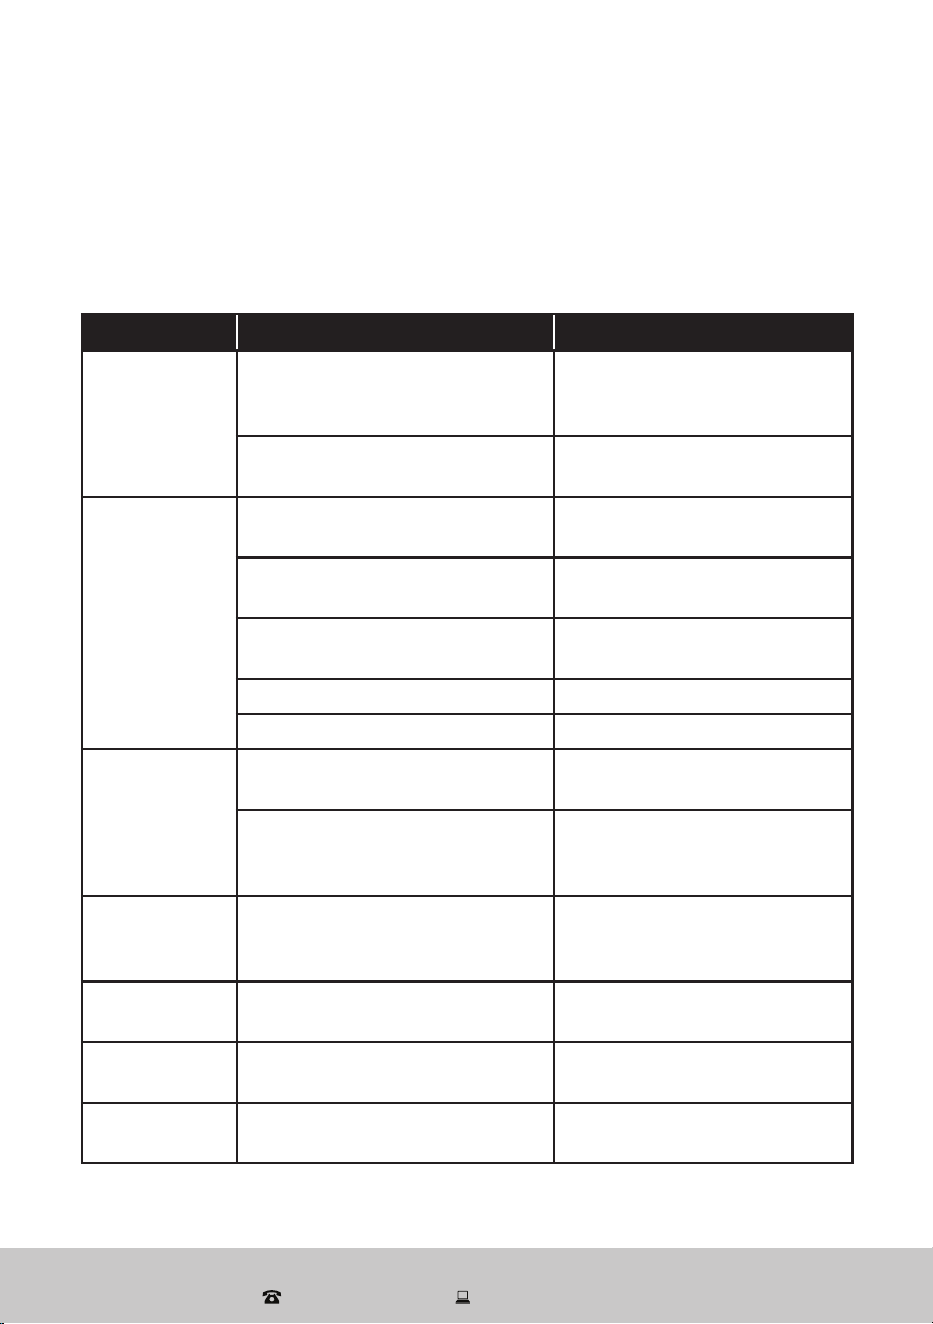
Problem Possible cause and solution
During the set-up,
the portable air
conditioner cannot
be configured
successfully.
Check and ensure you have internet reception
and your mobile phone and the air conditioner are
connected to the same Wi-Fi network.
Check and ensure your Wi-Fi password is correct.
Check and ensure that no firewalls or other
restrictions are set.
Check and ensure that the router works normally —
check the network requirements.
Ensure that the portable air conditioner, router and
mobile are all on the same Wi-Fi network and within
the signal range.
I cannot control the
air conditioner with
my mobile.
If a message is displayed to alert you to an
identification failure, the portable air conditioner
has been reset and the mobile phone lost control
permission. You need to reconnect the phone to
the portable air conditioner, following the set-up
instructions in this manual.
If after these steps you still cannot control the
portable air conditioner with your mobile, please
delete the portable air conditioner from your device
list and reconnect again.
My mobile phone
cannot find the air
conditioner.
If a message is displayed to alert you that the
device is offline, please check and ensure that your
portable air conditioner is connected to your mains
supply and power is switched on at the outlet.
Also ensure that your router is connected to the
mains supply and that the router and your mobile
phone are properly connected to your Wi-Fi
network.
Wi-Fi Control (Cont.)
After Sales Support
1300 886 649 | info@tempo.org
24
Problem Possible Causes Solution
Unit does not
start when
pressing
the POWER
button.
The water full (W.F) indicator
blinks, indicating that the drip
tray is full.
Drain the condensation water
manually.
The room temperature is lower
than the set temperature.
Reset the temperature.
Low cooling
performance.
Doors or windows to the
room are open.
Ensure all windows and
doors to the room are closed.
There are heat sources inside
the room.
Remove the heat sources, if
possible.
The exhaust air hose is not
connected, or blocked.
Connect or clean the
exhaust air hose.
The set temperature is too high. Reset the temperature.
The air inlet is blocked. Clean the air inlet.
Noisy
The ground is not level or not
flat enough.
Make sure to place the unit
on a flat, level ground.
The sound comes from the
refrigerant flowing inside the
air conditioner.
This is normal and no cause
for concern.
E0 Code
The room temperature sensor
failed.
Call for service to replace
the part (the unit can also
work without replacement).
E1 Code
Condenser temperature
sensor failed.
Call for service to replace
the part.
E2 Code Water drip tray is full.
Drain the water manually
out of the drip tray.
E3 Code
Evaporator temperature
sensor failed.
Call for service to replace
the part.
If you experience problems with your portable air conditioner, or it appears
not to be operating correctly, check the information below for solutions
to common problems. If none of the solutions offered help you solve your
problem, please contact our after sales support centre for advice.
Do not attempt to repair the appliance yourself!
FAQs & Troubleshooting Guide
After Sales Support
1300 886 649 | info@tempo.org
25
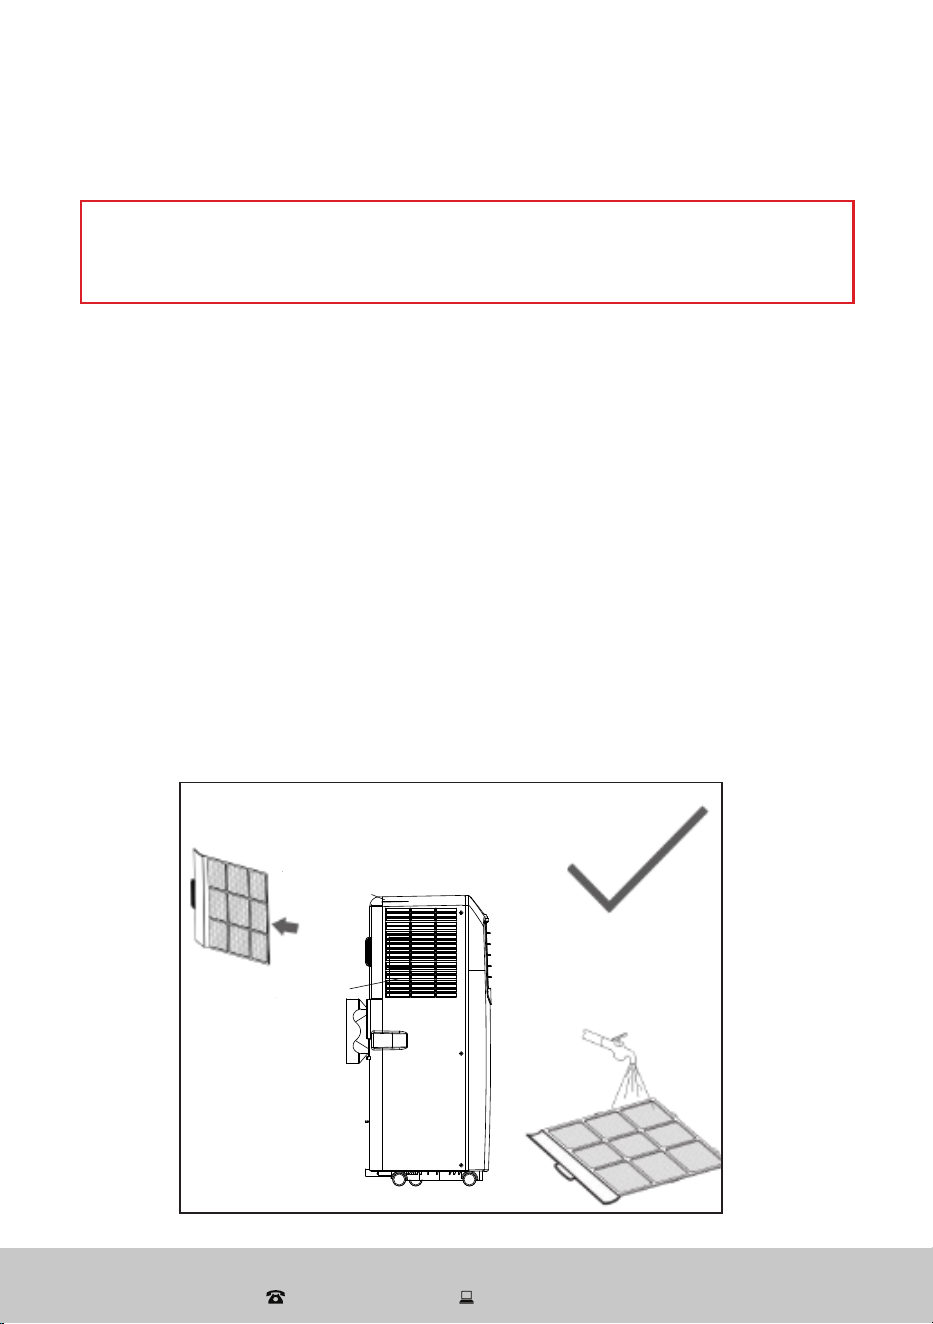
Cleaning the air lter
This unit has an air intake filter at the side of the unit. If the air filter clogs up
with dust, the airflow volume will be reduced. We recommend cleaning the filter
once every two weeks.
To remove the filter, proceed as follows (Fig. 16):
• Open the air inlet grille and take off the air filter.
• Clean the air filter with a mild detergent in lukewarm water (max. 40 °C).
Rinse thoroughly.
• Let all parts dry completely in the shade before reinstallation.
Other Useful Information
Care and cleaning
Electric shock hazard!
Before cleaning and servicing, ensure the unit is switched off and
disconnected from the power outlet to prevent possible injury.
Cleaning the air conditioner
Wipe the housing with a damp cloth, moistened with water and a little mild
detergent. Dry with a soft, dry cloth.
CAUTION: Do not wash the unit directly. Do not use any solvent or alcohol-
based cleaning agent on any surface. Using such harsh cleansers will scratch
or damage the surface, or can even lead to deformation of the housing.
Fig. 16
Air inlet
Side view
Front cover
Castor
Rear cover

After Sales Support
1300 886 649 | info@tempo.org
26
Other Useful Information (Cont.)
Before storage
At the end of the summer season, follow the simple steps below before
disconnecting and storing the appliance.
• Place a pan under a water drainage outlet and remove the rubber stopper
(see Fig. 15 on page 16). Alternatively, connect a drain hose (not supplied) to
the outlet and lead the hose to the outside. Any condensation water that has
accumulated will drain out.
• Operate the unit in fan mode for a few hours to let the drainage pipe dry.
• Switch off the unit and disconnect the plug from the power supply.
• Disconnect the drain hose (if installed) and keep the hose and stopper with
the portable air conditioner during storage.
• Store the appliance in the original packaging, or wrap it with a plastic bag or
piece of material and keep it in a dry, cool place, out of children’s reach.
Battery replacement
The remote control is powered by 2x AAA size batteries, packaged separately.
To install them, or to replace them when required, proceed as follows:
• Open the cover to the battery compartment at the back of the remote
control and insert 2 AAA batteries, making sure to match the polarity
markings (+/-) on the batteries with those inside the compartment.
• Close the battery compartment.
Battery precautions
Only use fresh batteries of the required size and type.
Do not mix old and new, or different types of batteries.
To prevent a risk of explosion, normal batteries must not be charged, heated or
disposed of by burning.
Never throw batteries into a re or subject them to high temperatures.
Do not open the batteries or short-circuit them.
If battery acid has leaked, avoid contact with skin, eyes and mucous
membranes to prevent injury.
In the event of contact with the acid, rinse the aected areas immediately with
plenty of clean water and contact a doctor at once.
After Sales Support
1300 886 649 | info@tempo.org
27
Service,repairandspareparts
If you look after your portable air conditioner it should give you years of good
service. Should you experience problems with the appliance that you cannot
solve yourself using the advice given in this manual, then please contact our
after sales support centre for advice. Do not attempt to open the appliance!
Our after sales support centre stocks the spare parts listed below for the
portable air conditioner. To purchase a part, call the centre on 1300 886 649
or email us at [email protected]g.
Adjustable window slider Air filter Exhaust hose
Remote control Water stopper Window connector
Other Useful Information (Cont.)
Technical specifications
Model ON-27KWP3
Cooling capacity 2.7 kW
Refrigerant, quantity R290, 160 g
Permissible excessive operating pressure
Discharge 2.6 MPa
Suction 1.0 MPa
Max. allowable pressure
Discharge 3.2 MPa
Suction 1.2 MPa
Weight (approx.) 25 kg (with accessories)
Rated voltage 220–240 V~
Rated frequency 50 Hz
Rated current 4.9 A
Rated input 1000 W
Sound power level 67 dB(A)
Ingress protection IP20
Dimensions (approx.) 335(W) x 695(H) x 295(D) mm
Compliance
This appliance has been fully tested and meets all requirements as set out by
standards AS/NZS 60335.1 and AS/NZS 60335.2.40.
The RCM Mark (Regulatory Compliance Mark) indicates that the product
complies with the relevant guidelines of the ACMA as well as corresponding
government requirements for the safety of electrical devices.

After Sales Support
1300 886 649 | info@tempo.org
Warranty returns
Should you for any reason need to return this product for
a warranty claim, make sure to include all accessories with
the product.
Productdoesnotwork?
If you encounter problems with this product, or if it fails to
perform to your expectations, make sure to contact our
After Sales Support Centre on (AU) 1300 886 649 or
(NZ) 0800 836 761 for advice.
Distributed by Tempo (Aust) Pty Ltd ABN 70 106 100 252
PO BOX 132, Frenchs Forest NSW 1640, Australia
Customer Helpline:
(AU) 1300 886 649 (NZ) 0800 836 761
Email: [email protected]
For an electronic copy of this manual, please contact our after sales support centre.
IM Version No: V2.0 Issue: May 2023