JBLCELEBRITY150
FR
EN
ZH-TW
ES
Owner's Manual
Mode d’emploi
Manual del propietario
Manuale utente
Handleiding
使用者手册
IT
NL
CA_JBL Celebrity 150_OM_GLOBAL_CR_V14.indd 1CA_JBL Celebrity 150_OM_GLOBAL_CR_V14.indd 1 6/27/2024 2:29:04 PM6/27/2024 2:29:04 PM
JBLCELEBRITY150
I. BEFORE YOU START
Congratulations on your purchase of the JBL Celebrity 150 in-car
head unit! For correct installation and connection, as well as the
correct use of functions during operation, we recommend that you
read this manual first. Save it, it will be useful to you in the future.
The JBL Celebrity 150 head unit has a standard installation size of
1DIN and contains:
• AM/FM tuner,
• Player for audio files from USB flash drives,
• Player for audio files from SD memory cards,
• Bluetooth module that allows the head unit to work in hands
free mode and play music from the connected device through
the car audio system (BT Audio mode)
• AUX input for connecting any audio sources with headphone
output (players, smartphones, tablets, etc.)
II. INSTALLATION AND CONNECTION
OF THE HEAD UNIT
Choosing a place to install
• The head unit is intended for use inside the car.
• To mount it, choose a regular place in the panel, provided by
the car manufacturer.
• If the dimension of footprint is not in 1-DIN format, select a
suitable adapter frame to accommodate a standard 1-DIN
footprint.
• If the design of the panel does not provide for a regular place
for the installation of the head unit, choose the mounting
location where the unit will not interfere with the normal driving
function of the driver.
• Avoid installing the unit where it would be subject to high
temperature, such as from direct sunlight, or from hot air,
form the heater, or where it would be subject to dust, dirt, or
excessive vibration.
Choosing an installation method
• Use only the parts included with the unit to ensure proper
installation. To use of unauthorized parts can cause
malfunctions.
• Consult with your nearest dealer if installation requires the
drilling of holes or other modifications of the vehicle.
• Install the unit where it does not get in the driver's way and
cannot injure the passenger if there is a sudden stop. Like an
emergency stop.
• To avoid short circuits, disconnect the battery from the vehicle
electrical system (if possible). After making connections,
connect the positive terminal of the battery first, then the
negative one.
• Before final assembly of the unit, make sure all connections are
correct and the system is working properly.
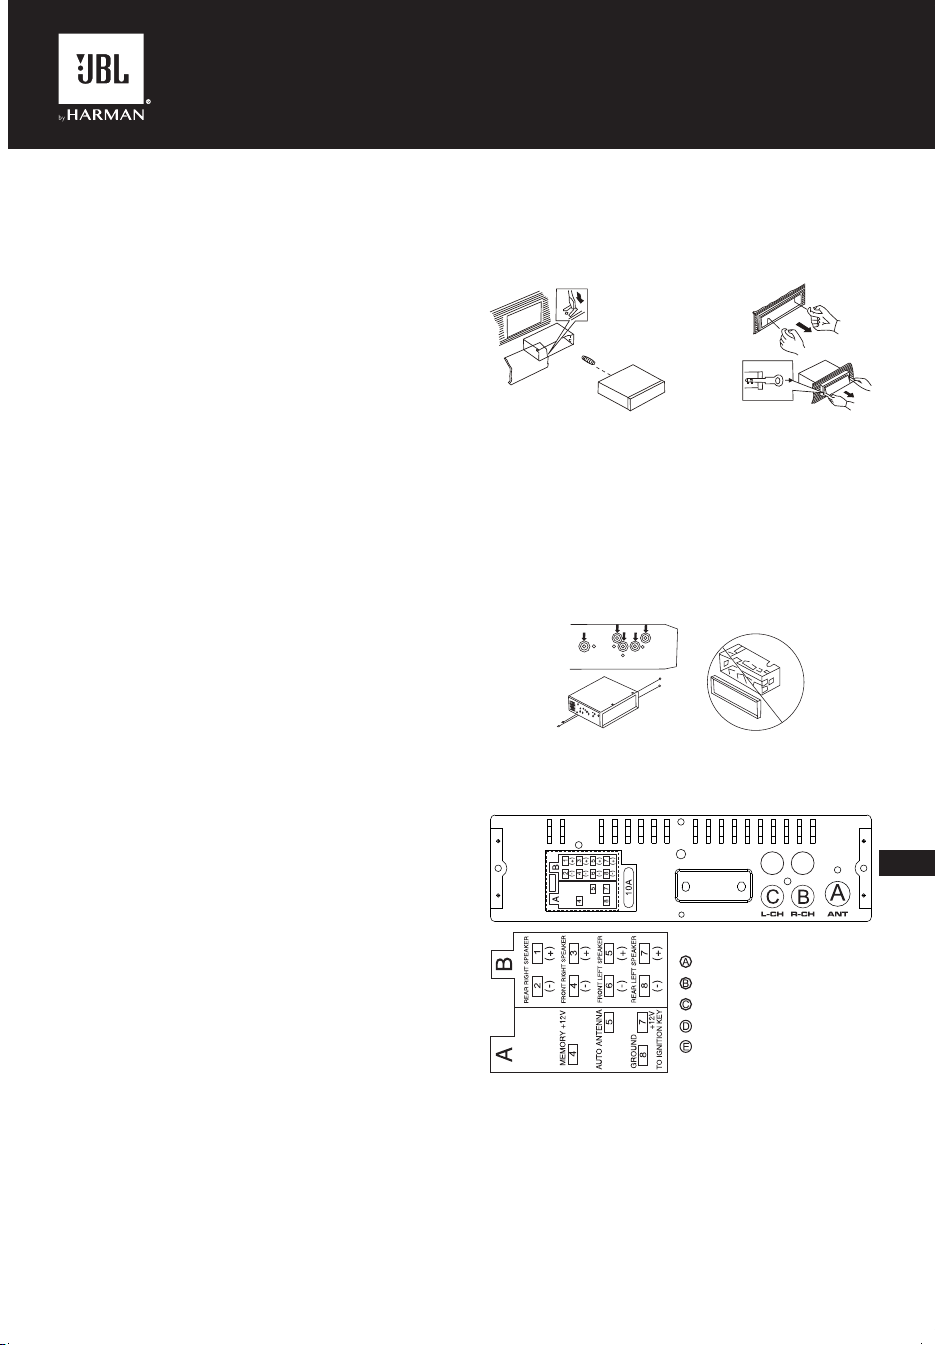
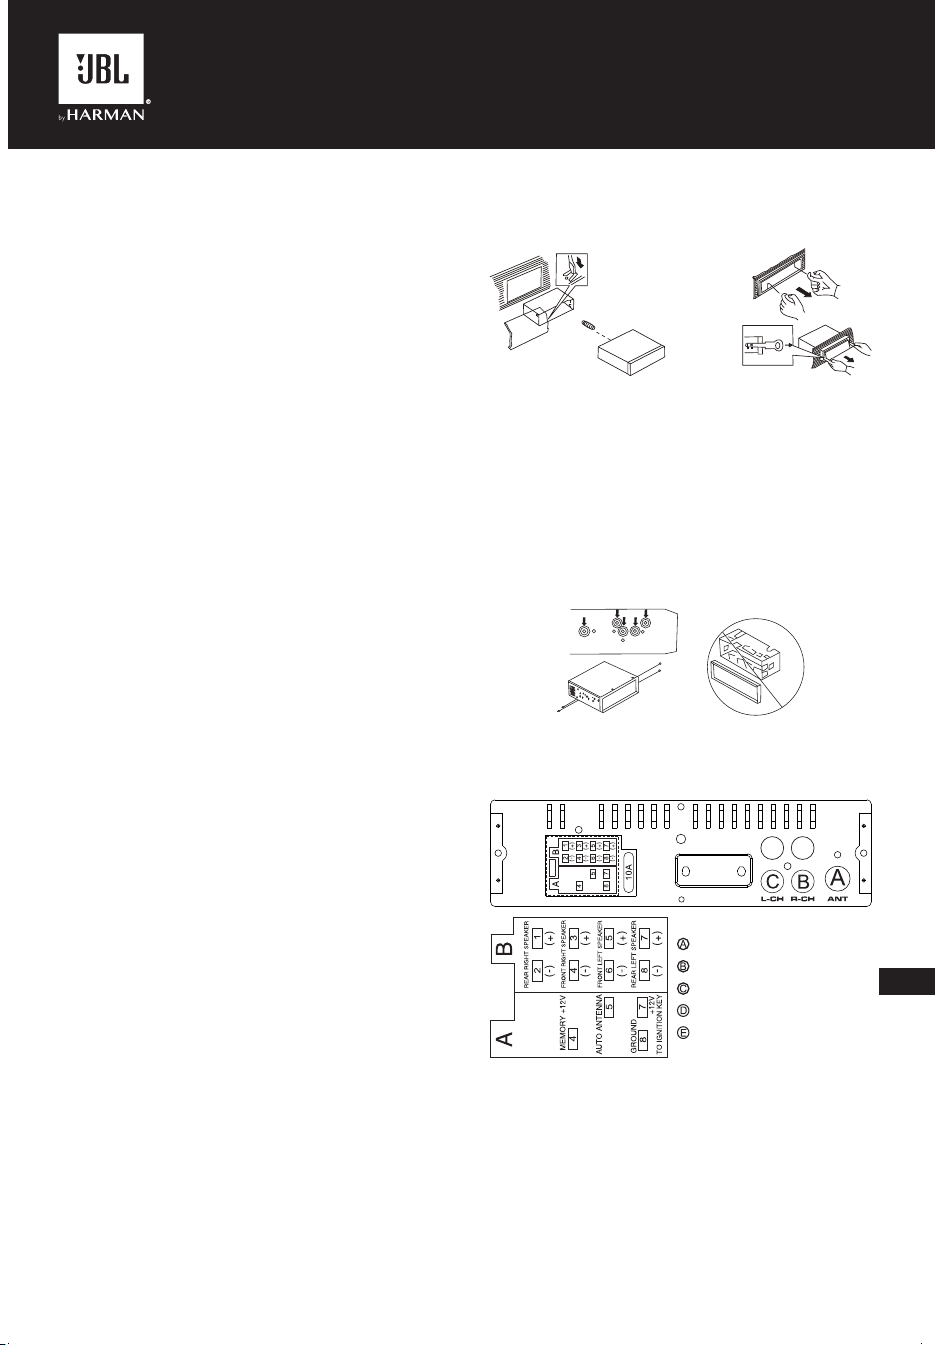
Installation option with the mounting frame
1. Insert the mounting frame into the car dashboard.
2. Select the appropriate tab according to the thickness of the
dashboard material and bend them inwards to secure the
frame in the panel.
3. Make all the necessary connections and insert the unit into
the mounting frame.
4. Attach the decorative frame to the front of the unit.
5. If there is need to remove the head unit, use the remove tools
included in the kit.
Installation option without the mounting frame,
but using the factory head unit bracket in the
car dashboard
1. Select a position where the screw holes of the bracket and
the screw holes of the main unit become aligned (are fitted).
2. Attach the head unit to the brackets on both sides of the
unit in at least two places. To do this, use the fixing screws
supplied with the head unit. Do not use screws with longer
lengths or other thread sizes, as this may damage the device.
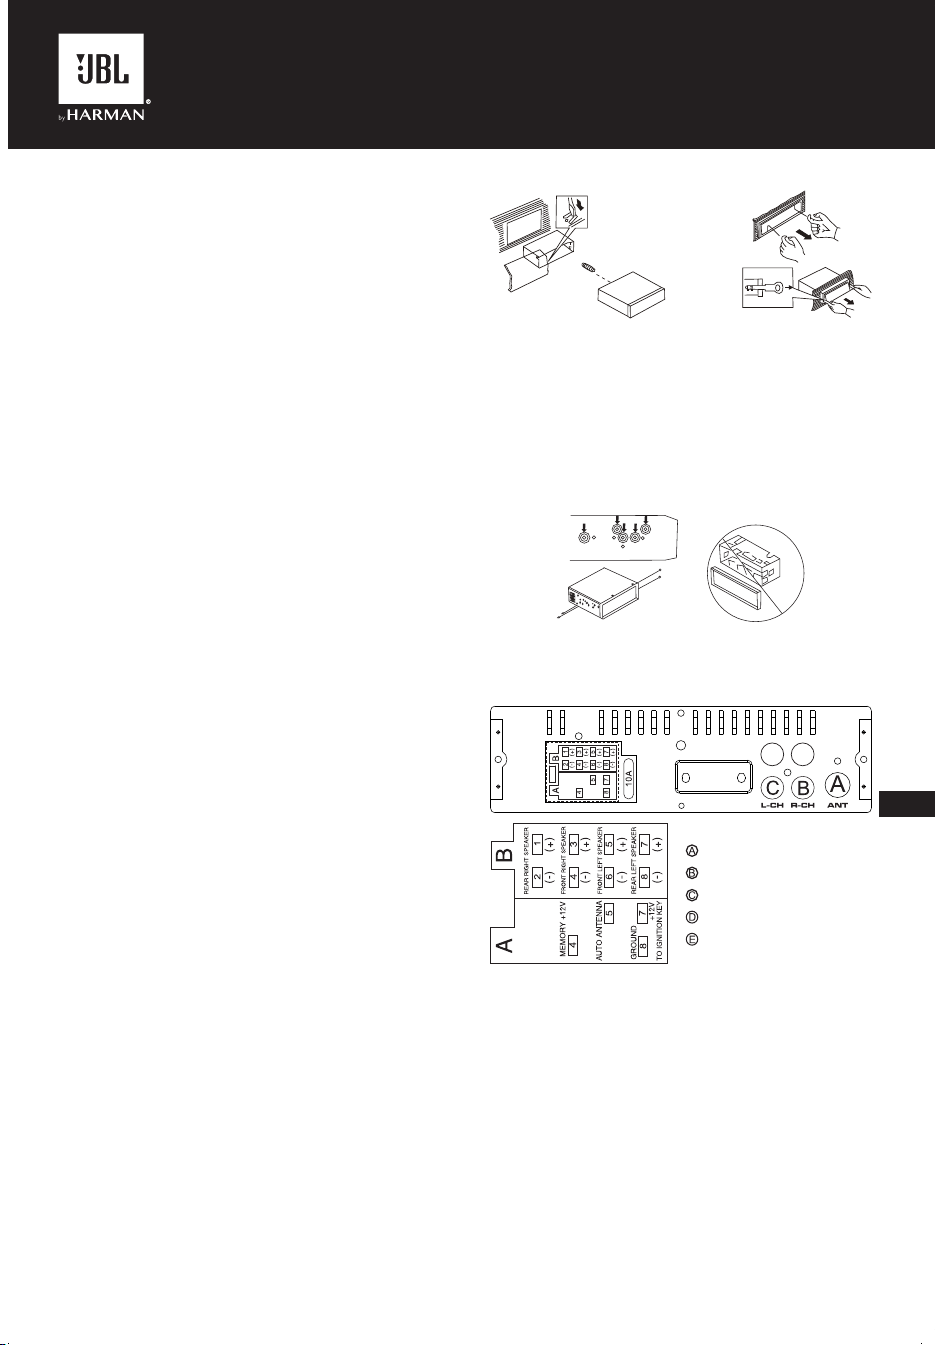
Connecting to the head unit
Location of the connectors on the back of the head unit:
D
E
DE
FR ON T
RE AR
D
E
DE
FR ON T
RE AR
Note1:
The red wire of the unit can only be connected to the ignition
circuit (ACC). Connecting it together with the yellow wire to a
permanent B+can lead to a discharge of the car's battery during
prolonged parking.
Note2:
In some vehicles, the locaon of the red and yellow wires in the ISO
connector may be reversed. If the settings are reset every time
when the car ignition is turned off, swap the red and yellow wires
in the connector.
• Be careful when connecting the head unit. Incorrect
connection can lead to its breakdown and void the right to
warranty service.
• When connecting the speakers, do not short-circuit the wires to
the vehicle ground, to the +12 V power wire, or to each other.
-------ANTENNA
-------REAR Rch LINE OUT
-------REAR Lch LINE OUT
-------FRONT Rch LINE OUT
-------FRONT Lch LINE OUT
EN
CA_JBL Celebrity 150_OM_GLOBAL_CR_V14.indd 3CA_JBL Celebrity 150_OM_GLOBAL_CR_V14.indd 3 6/27/2024 2:29:05 PM6/27/2024 2:29:05 PM
• The yellow wire must be connected to a wire that has a
constant voltage of +12 Volts even with the ignition off. If you
do not find such a wire, connect to the positive terminal of the
battery after the fuse box.
• The black wire of the unit can be connected to a grounded
metal part of the vehicle. If you cannot find a suitable bolt or
screw, contact your nearest vehicle dealer for assistance. To
ensure reliable contact, remove paint and dirt from the areas of
the surface that the wire is in contact with.
• The blue wire is used to power the active antenna or control
the switching on of the connected amplifier (remote control
signal).
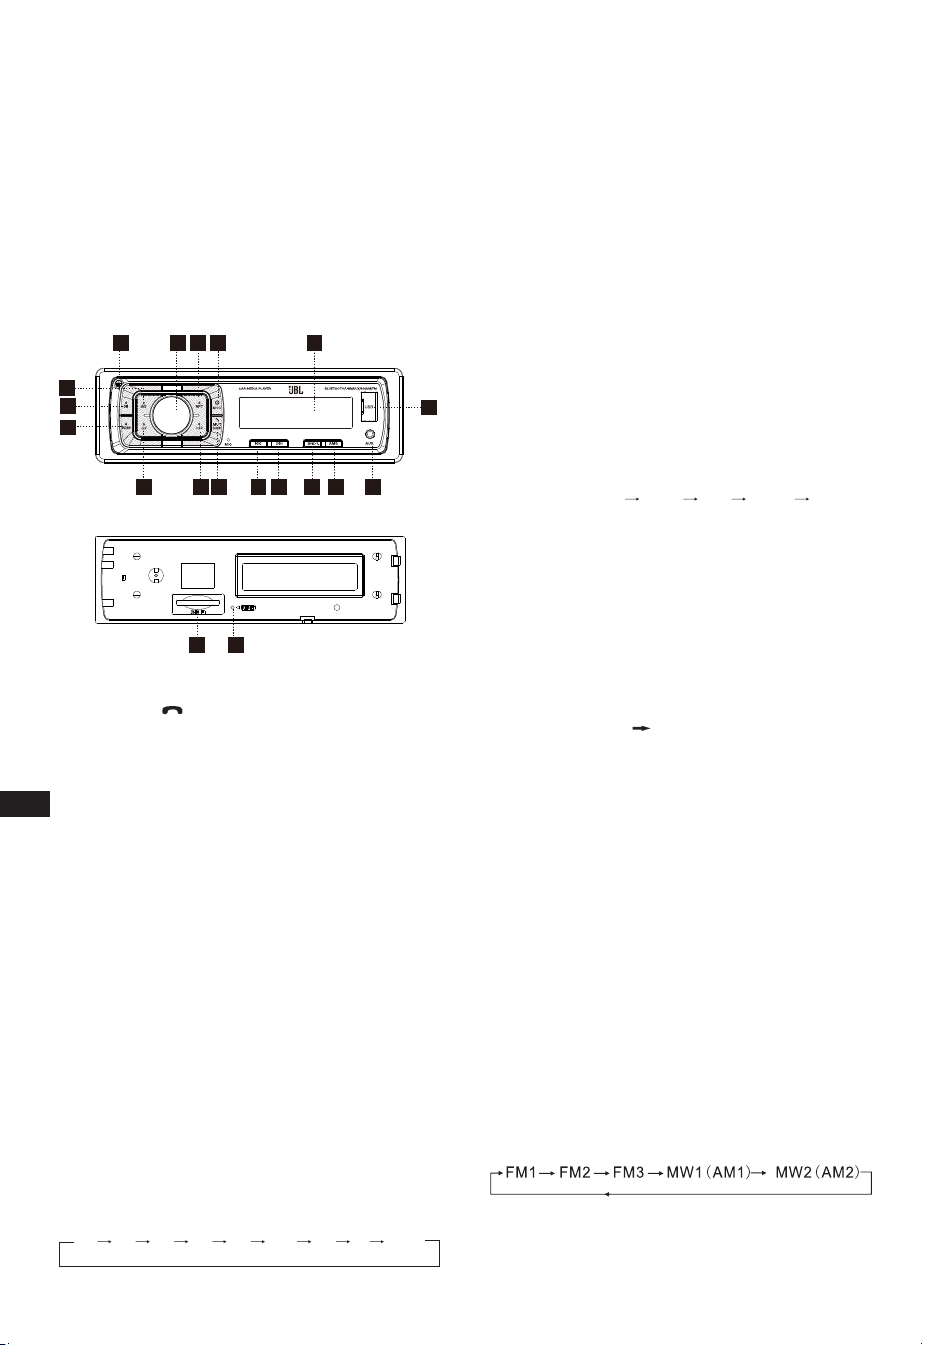
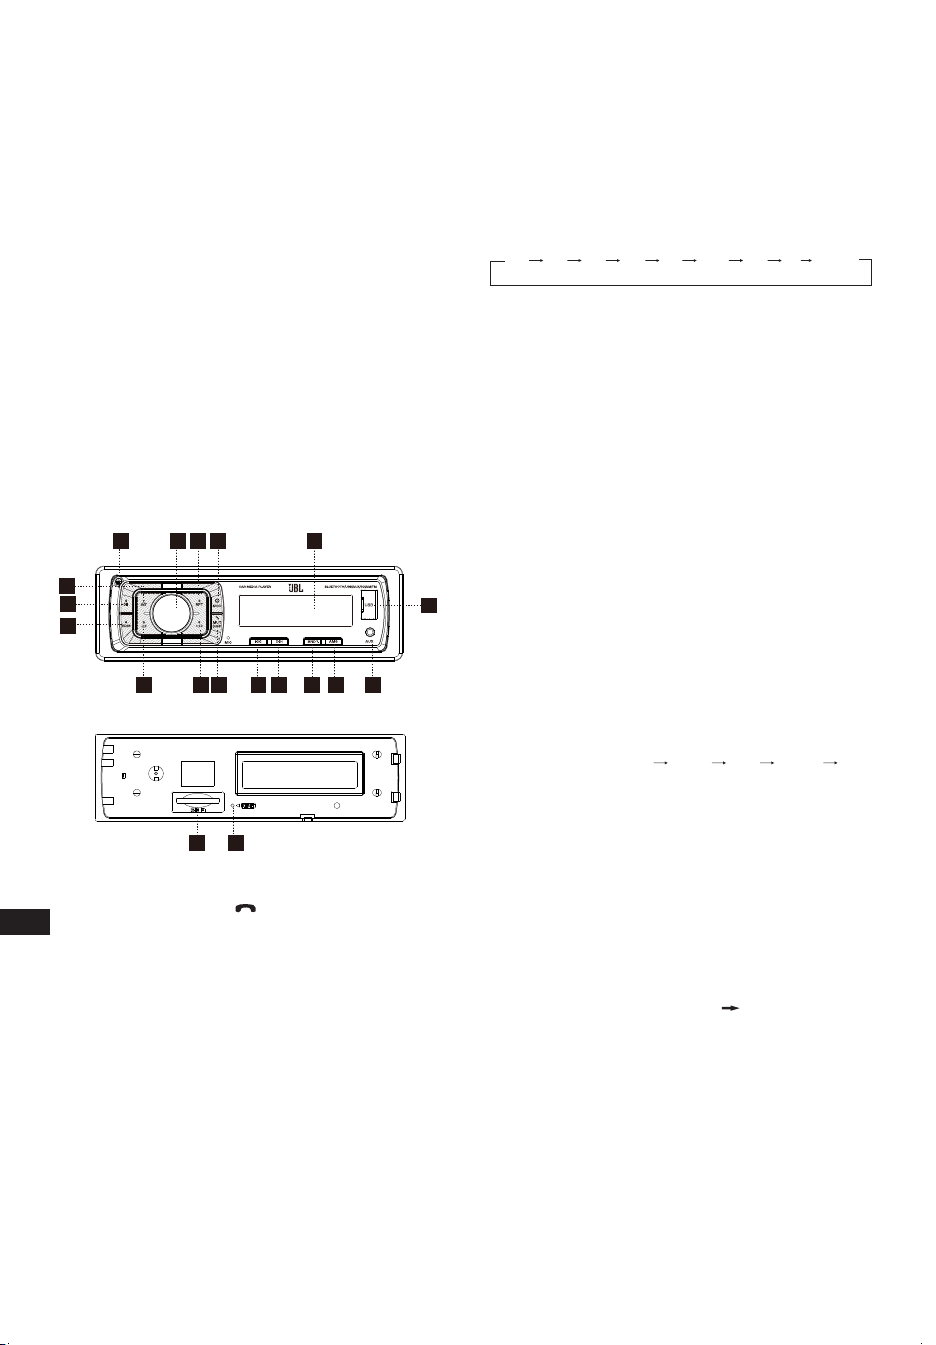
III. FRONT PANEL LAYOUT AND
CONTROLS
17
3
5
12
3
4
15 8
9
10
11
12
13
14
18
16
6
19
7
1. Power/MOD Button
2. Volume/Sel Button
3. Display/Mute/ Button
4. LCD Display
5. Reset Button
6. Band switch/ID3 select
7. Tune Seek & Track forward Button
8. Tune Seek & Track reverse Button
9. Automatically memory storing
10. Play/pause & Preset Button 1
11. Intro & Preset Button 2
12. Repeat & Preset Button 3
13. Random & Preset Button 4
14. Preset Button 5
15. Preset Button 6
16. Release Button
17. AUX IN JACK
18. USB connecter
19. SD/MMC slot
General settings
POWER /MOD conversion
Under power off status, short press is power on,
Under power on status, short press is switching mode, long press
is power off.
SOUND ADJUSTMENT
Turn on (2) can adjust the desired volume quality.
Press SEL button (2) will change in the following order.
Option:
VOL
(Volume)
BAS
(Bass)
TRE
(Treble)
BAL
(Balance)
FAD
(Fader)
LOUD DSP DX STEREO
VOLUME
Adjust volume level by using VOL/SEL (2) knob. Turn the
VOL knob to left to decrease the sound level, turn the VOL knob
to right to increase the sound level.
Note: The unit is initially set to volume mode.
BASS
Press VOL/SEL button(2) one time. Adjust bass level by using
VOL/SEL(2) Knob.
TREBLE
Press VOL/SEL button(2) two times. Adjust treble level by using
VOL/SEL(2) Knob.
BALANCE
Press VOL/SEL button(2) three times. Adjust sound balance
between left and right speakers by using VOL/SEL(2) Knob.
FADER (optional)
Press SEL button(2) four times. Adjust sound balance between
front and rear speakers by using VOL/SEL(2) Knob.
LOUD ON/OFF MODE
In loud on mode the bass and treble response will be boosted.
DSP OFF/ON
Select “DSP ON” FLAT ROCK POP CLASS DSP OFF
menu male.
LOCAL/DX
“LOCAL” position in areas with strong signals to let radio stop at
only strong stations during manual turning select distant position
in areas with weak signals to listen to all stations.
STEREO/ MONO
When FM station are weak and are disturbed.listening can be
improve by selecting MONO.
AREA SETUP
In Radio mode. Press SEL button for several seconds. LCD will
be show from BEEP ON AREA USA/EUR. At AREA USA/EUR.
You can use VOL +/- to select the AREA frequency.
Note: *On Remote Control
Short press “MUT/DISP” button to turn on the mute, Press “MUT/
DISP” again to turn off the mute.
Long press “MUT/DISP”, LCD screen shows clock “00:00”. Short
press “MUT/DISP”, the hour flashes, rotate “VOL +/-” to adjust
hour. Press “SEL” button, minute flashes, rotate “VOL +/-” to
adjust the minute. If there is no operation within 5 seconds, the
unit will memorize the current time and return to current mode.
RESET
RESET button (5) is placed on the housing and must be activated
with either a ball point pen or thin metal object. (Do not use sharp
object to avoid damaging the unit.) The RESET button (5) is to be
activated for the following reasons:
- Initial installation of the unit when all wiring is completed.
- All the function buttons do not operate.
- Error symbol on the display.
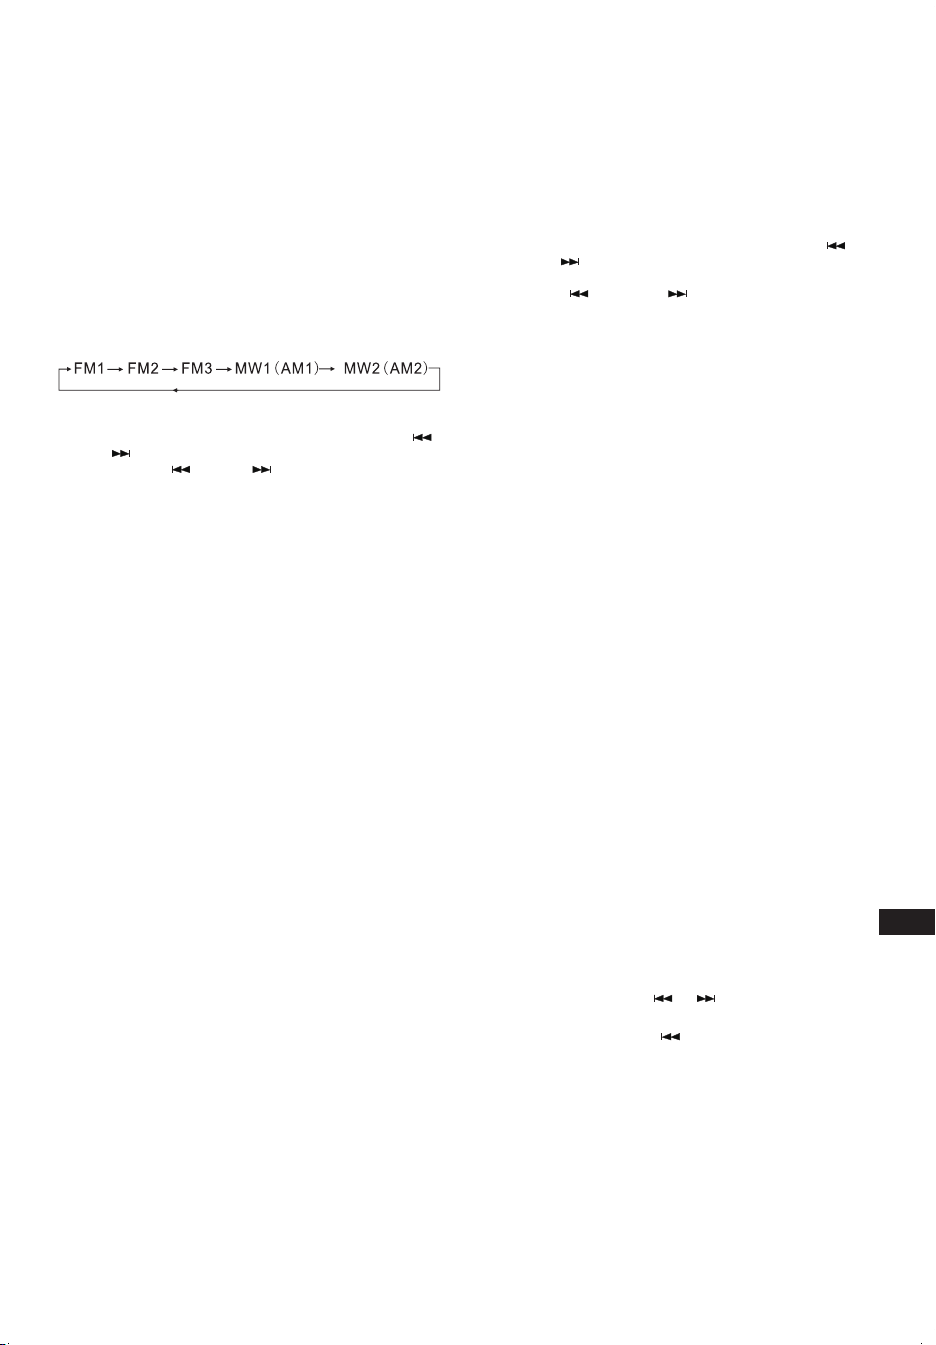
Radio tuner mode
BAND SELECTION
At tuner mode, press BAND button (6) to select the desired band.
The reception band will change in the following order:
EN
CA_JBL Celebrity 150_OM_GLOBAL_CR_V14.indd 4CA_JBL Celebrity 150_OM_GLOBAL_CR_V14.indd 4 6/27/2024 2:29:05 PM6/27/2024 2:29:05 PM

EN
STATION SELECTION
During radio mode, Press “SEEK ” or “SEEK ” buttons
shortly to automatically search a station, Press “SEEK ” or
“SEEK ” buttons more than 1 second is operated as manual
turning mode.
AUTOMATICALLY MEMORY STORING & PROGRAM
SCANNING
- Automatically Memory Storing
Press AMS(MP3) button (9) for several seconds, the radio
searches from the current frequency and checks the signal
strength until one cycle search is finished.
And then 6 strongest stations are stored into the corresponding
preset number button.
- Program Scanning
Press AMS(MP3) button (9) shortly to scan preset station. When
the AMS mode is carry out, “INT” appear on LCD display, the unit
scan each stored station for 5 seconds,you also can press the
corresponding number button or AMS button. Your desired station
will start playing.
STATION STORING
Press preset button (10~15)
RADIO MODE.
M1 ~ M6
- PRESET MEMORY is loaded when key is pressed for less than
1 second.
- PRESET MEMORY is saved when key is pressed for longer than
1 sec.
Playback from USB ash drives and SD memory
cards
Supported USB ash drives and SD memory cards
The head unit works with USB flash drives and memory cards
formatted only in the FAT32 file system.
PLAY / PAUSE
Press button (10) pause function is activated. Music track play
time INDICATOR flashes. Press it again to resum palying, press it
more than 1 second is TOP function.
INT
Press button (11): During INTRO ON, INT indicator comes on and
begins playing the first 10sec of each song, until the last song is
played. It begins playing the entire track from where INT started.
RPT
Press preset button (12): Flash play mode: REPEAT ON / OFF is
activated. When REPEAT ON, RPT INDICATOR comes on and
repeats the current music track.
RDM
Press preset button (13): During RANDOM ON, RDM INDICATOR
is turned on and each track of disc is played in ramdom instead
of normal order.
SELECT TRACKS
During USB/SD operation, press SEEK " " (8) button or SEEK
" " (7) button to move to the previous track or the following
track, Track number shows on display. During USB/SD, hold
SEEK " " (8) button or SEEK " " (7) to fast reverse or fast
forward. Music play starts from when you release the button.
Press preset button (14-15):
- MP3 MODE: 10 TRACK UP / DOWN is activated.
When the total track is 10 or less, KEY is inactivated.
Bluetooth mode
1. Pairing connect.
Turn on car unit, put your mobile near the unit, activate your
mobile bluetooth function. Soon the phone will find the new
bluetooth device "CAR AUDIO". Input the pairing password “8888”
and clik OK. The phone will prompt the matching successful.
When the pairing connect is successful, on the LCD, it shows
BT ON, and the bluetooth logo will stop blinking. Then you may
perform the bluetooth operation.
REMARK: depend on bluetooth mobile, the bluetooth system
support “HSP” “HFP” “A2DP” and AVRCP bluetooth profile.
2. Handsfree phone service
If your mobile phone have matched with the unit. You can dial calls
out through your mobile phone. It will turn to unit automatically
when calling come in and the calling phone number will indicat on
the LCD screen.
- Press the “BAND” button shortly to accept the call. Then you
can talk with the other party through the mic on the panel.
- Press “MUTE” button shortly to reject the call when calling come in.
- Press “MUTE” button shortly to hang up after you finish the talk.
3. Advance Audio distributing prole(A2DP) playing.
Through mobile and unit A2DP connected, press “MODE” and
turn to A2DP mode at the same time, the music playing in mobile
can turn to the unit audio system play. “A2DP” will display on LCD.
Press button in the panel can select the music track.
- Press button shortly to pause the music playing.
- Press “BAND” (mode) longly to temporarily discommect the
bluetooth.
- Press “BAND” (mode) button longly again to reconnect the
bluetooth.
4. Phone number book.
This bluetooth system can automatically store incoming call
numbers, up to 10 phone numbers.
- Press “MUTE”(mode) button longly to enter the phone number
book and press VOL button to look up the phone number.
- Press “BAND” button once can call out you desired phone
number.
5. Interrupt bluetooth connection/reconnection.
Pressing the “BAND” button shortly to interrupt the bluetooth
connection when your are talking a call and the voice can turn to
mobile speaker.
Press “BAND” button again to reconnection.
NOTE: Different mobile phone have different responses. We do
not guarantee all the operation of connectable devices.
6. How to delete stored phone number?
You just can store ten number of missed, rejected and ANS under
separately, and the first number will auto deleted when the 11th
number calling.
7. How to use “RECEIVED” “MISSED” “REJECTED”
“MANU ANS/AUTO ANS” Functions.
Press “MUTE” for 3 seconds to enter into “RECEIVED” “MISSED”
“REJECTED” “MANU ANS/AUTO ANS”. Turn VOL button for
choosing the telephone number.
AUX IN mode
You can connect any third-party audio source (player, smartphone,
tablet, etc.) with a headphone output to the head unit. To do this,
use a mini-jack 3.5mm adapter (purchased separately) by inserting
it into the AUX input on the front panel.
To listen to music from an external source through the car audio
system, press the MODE button (1) until the head unit enters the
AUX mode.
CA_JBL Celebrity 150_OM_GLOBAL_CR_V14.indd 5CA_JBL Celebrity 150_OM_GLOBAL_CR_V14.indd 5 6/27/2024 2:29:05 PM6/27/2024 2:29:05 PM

EN
Note:
Adjust the volume of the connected source so that the overall
volume of the audio system in AUX mode roughly matches the
volume of other sources, such as a USB flash driveor radio tuner.
To quickly adjust the volume, use the knob (2) on the head unit.
Specications
General:
Power supply: 12 V DC on-board network
Type of on-board network: with a negative terminal on the body
("mass")
Supply voltage range: 11.0 - 14.4 V
Recommended speaker impedance: 4 ohms
Rated Output Power: 4 x 50 W peak
Installation dimensions (W x H x D): 178 x 50 x 87 mm
Fuse rating: 10 A
Tone Controls:
Bass (at 100 Hz): -10 dB / +10 dB
Treble (at 10K): -10 dB / +10 dB
USB/SD:
Signal to noise ratio: no less than 70 dB
Channel separation: no less than 70 dB
Frequency response: 20 Hz - 20 kHz
FM Radio:
Frequency coverage: 87.5 - 108 MHz (Europe)
65.0 - 74.0 MHz (OIRT)
87.5 - 108 MHz (S.America)
87.5 - 107.9 MHz (N.America)
Sensitivity (S/N -30 dB): ≤15 dBu
Channel Separation: >30 dB
AM Radio:
Frequency coverage: 522 - 1620 KHz (Europe/OIRT)
520 - 1620 KHz (S.America)
530 - 1710 KHz (N.America)
Sensitivity (S/N -20 dB): <42 dBu
Bluetooth:
Bluetooth version: 5.0
Bluetooth profile: AVCTP, AVDTP, GAVDP, RFCOMM, SPP, A2DP,
AVRCP, HFP, HID
Bluetooth transmitter frequency range: 2.402 G~2.48 G
Bluetooth transmitter power: 4dBmax
Bluetooth transmitter modulation: GFSK(1 Mbps), π/4-DQPSK
(2 Mbps), 8-DPSK (3 Mbps)
The maximum operation temperature is 70 °C
No naked flame sources, such as lighted candles, should be
placed on the apparatus.
CA_JBL Celebrity 150_OM_GLOBAL_CR_V14.indd 6CA_JBL Celebrity 150_OM_GLOBAL_CR_V14.indd 6 6/27/2024 2:29:05 PM6/27/2024 2:29:05 PM
JBLCELEBRITY150
FR
I. AVANT DE COMMENCER
Félicitations pour votre achat de l'autoradio JBL Celebrity 150 !
Pour réaliser une installation et des connexions correctes, et pour
une utilisation adéquate des fonctions, nous vous recommandons
de lire d'abord ce manuel. Conservez-le, il vous sera utile
ultérieurement.
L'autoradio JBL Celebrity 150 a les dimensions standard d’une
installation 1DIN et contient :
• Un tuner AM/FM.
• Un lecteur de fichiers audio sur clés USB.
• Un lecteur de fichiers audio sur cartes mémoire SD.
• Un module Bluetooth qui lui permet de fonctionner en mode
mains libres et de lire de la musique depuis un appareil
connecté sur le système audio du véhicule (mode BT Audio).
• Une entrée AUX pour connecter toutes les sources audio avec
sortie casque (lecteurs, smartphones, tablettes, etc.).
II. INSTALLATION ET
RACCORDEMENT DE
L'AUTORADIO
Choix d'un emplacement d'installation
• L'autoradio est destiné à être utilisé à l'intérieur de la voiture.
• Pour son montage, choisissez un emplacement standard du
tableau de bord, prévu par le constructeur automobile.
• Si l'emplacement n'est pas aux dimensions 1-DIN,
sélectionnez un cadre adaptateur approprié capable de
recevoir un format 1-DIN standard.
• Si la conception du tableau de bord ne prévoit pas
d'emplacement standard pour l'installation de l'autoradio,
choisissez un emplacement de montage où l'appareil ne
gênera pas la conduite.
• Évitez d'installer l'appareil à un endroit où il serait soumis à une
température élevée, par exemple sous la lumière directe du
soleil ou par de l'air chaud, par le chauffage ou à un endroit où
il serait soumis à la poussière, à la saleté ou à des vibrations
excessives.
Choix d'une méthode d'installation
• Utilisez uniquement les pièces incluses avec l'appareil pour
assurer une installation correcte. L'utilisation de pièces non
autorisées peut provoquer des dysfonctionnements.
• Consultez votre concessionnaire le plus proche si l'installation
nécessite le perçage de trous ou d'autres modifications du
véhicule.
• Installez l'appareil à un endroit où il ne gêne pas le conducteur
et ne peut pas blesser le passager en cas d'arrêt soudain. Par
exemple lors d’un arrêt d'urgence.
• Pour éviter les courts-circuits, débranchez la batterie du
véhicule (si possible). Après avoir réalisé les connexions,
connectez d'abord la borne positive de la batterie, puis la
borne négative.
• Avant l'assemblage final de l'unité, assurez-vous que toutes
les connexions sont correctes et que le système fonctionne
normalement.
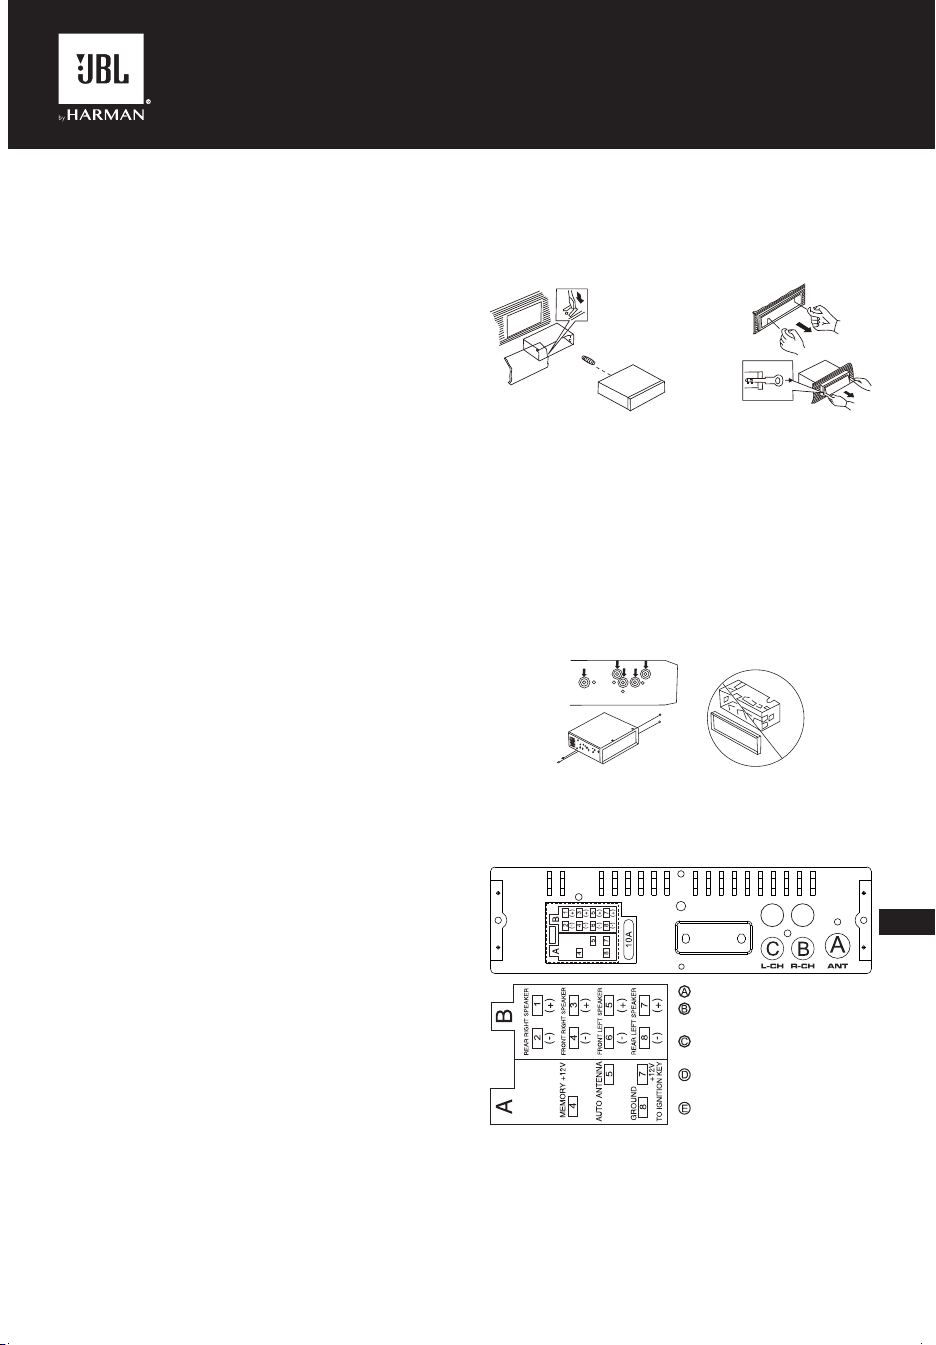
Option d'installation avec le cadre de montage
1. Insérez le cadre de montage dans le tableau de bord du véhicule.
2. Sélectionnez les languettes appropriées en fonction de
l'épaisseur du matériau du tableau de bord et pliez-les vers
l'intérieur pour fixer le cadre dans le panneau.
3. Faites toutes les connexions nécessaires et insérez l'unité
dans le cadre de montage.
4. Fixez le cadre de finition sur l'avant de l'appareil.
5. Utilisez les outils de dépose inclus dans le kit si vous devez
retirer l'autoradio.
Option d'installation sans le cadre de montage,
mais avec le support de l'autoradio d'usine
dans le tableau de bord du véhicule
1. Sélectionnez une position où les trous de vis du support et les
trous de vis de l'autoradio sont alignés (correspondent).
2. Fixez l'autoradio sur le support, sur ses deux côtés et à au
moins deux endroits. Utilisez les vis de fixation fournies avec
l'autoradio pour le faire. N'utilisez pas de vis plus longues
ou des filetages différents, car cela pourrait endommager
l'appareil.
Connexion à l'autoradio
Emplacement des connecteurs à l'arrière de l'autoradio :
D
E
DE
FR ON T
RE AR
D
E
DE
FR ON T
RE AR
Remarque 1 :
Le fil rouge de l'unité ne peut être connecté qu'au circuit d'allumage
(ACC). Le connecter avec le fil jaune à un B+ permanent peut
décharger la batterie du véhicule lors d'un stationnement prolongé.
Remarque 2 :
Dans certains véhicules, l'emplacement des fils rouges et jaunes
peut être inversé dans le connecteur ISO. Si les réglages sont
réinitialisés à chaque coupure du contact du véhicule, inversez les
fils rouge et jaune du connecteur.
--- ANTENNE
--- Sortie ligne canal arrière droit
--- Sortie ligne canal arrière gauche
--- Sortie ligne canal avant droit
--- Sortie ligne canal avant gauche
CA_JBL Celebrity 150_OM_GLOBAL_CR_V14.indd 7CA_JBL Celebrity 150_OM_GLOBAL_CR_V14.indd 7 6/27/2024 2:29:06 PM6/27/2024 2:29:06 PM
FR
• Soyez prudent lorsque vous branchez l'autoradio. Une
connexion incorrecte peut l’endommager et annuler le droit au
service de garantie.
• Lors de la connexion des haut-parleurs, ne court-circuitez pas
les fils à la masse du véhicule, au fil d'alimentation +12 V ou
entre eux.
• Le fil jaune doit être connecté à un fil sous une tension
constante de +12 volts même lorsque le contact est coupé. Si
vous ne trouvez pas un tel fil, connectez-le à la borne positive
de la batterie après la boîte à fusibles.
• Le fil noir de l'unité peut être connecté à une partie métallique
faisant partie de la masse du véhicule. Si vous ne trouvez pas
une vis ou un boulon adéquat, demandez assistance à votre
concessionnaire automobile le plus proche. Pour assurer un
contact fiable, retirez la peinture et la saleté des zones de
contact du fil.
• Le fil bleu sert à alimenter l'antenne active ou à commander
l’allumage d’un amplificateur connecté (signal de télécommande).
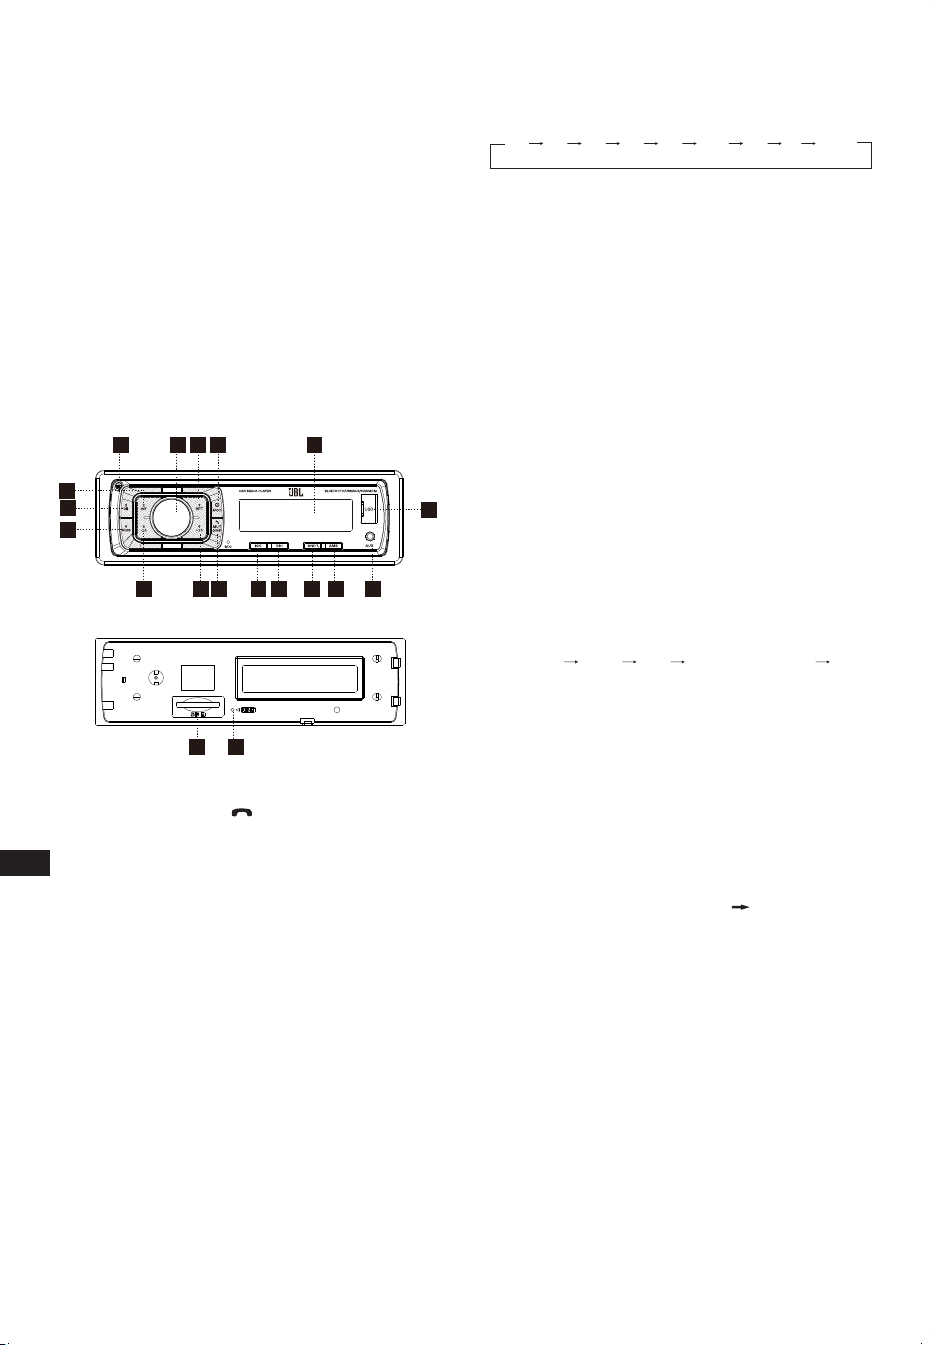
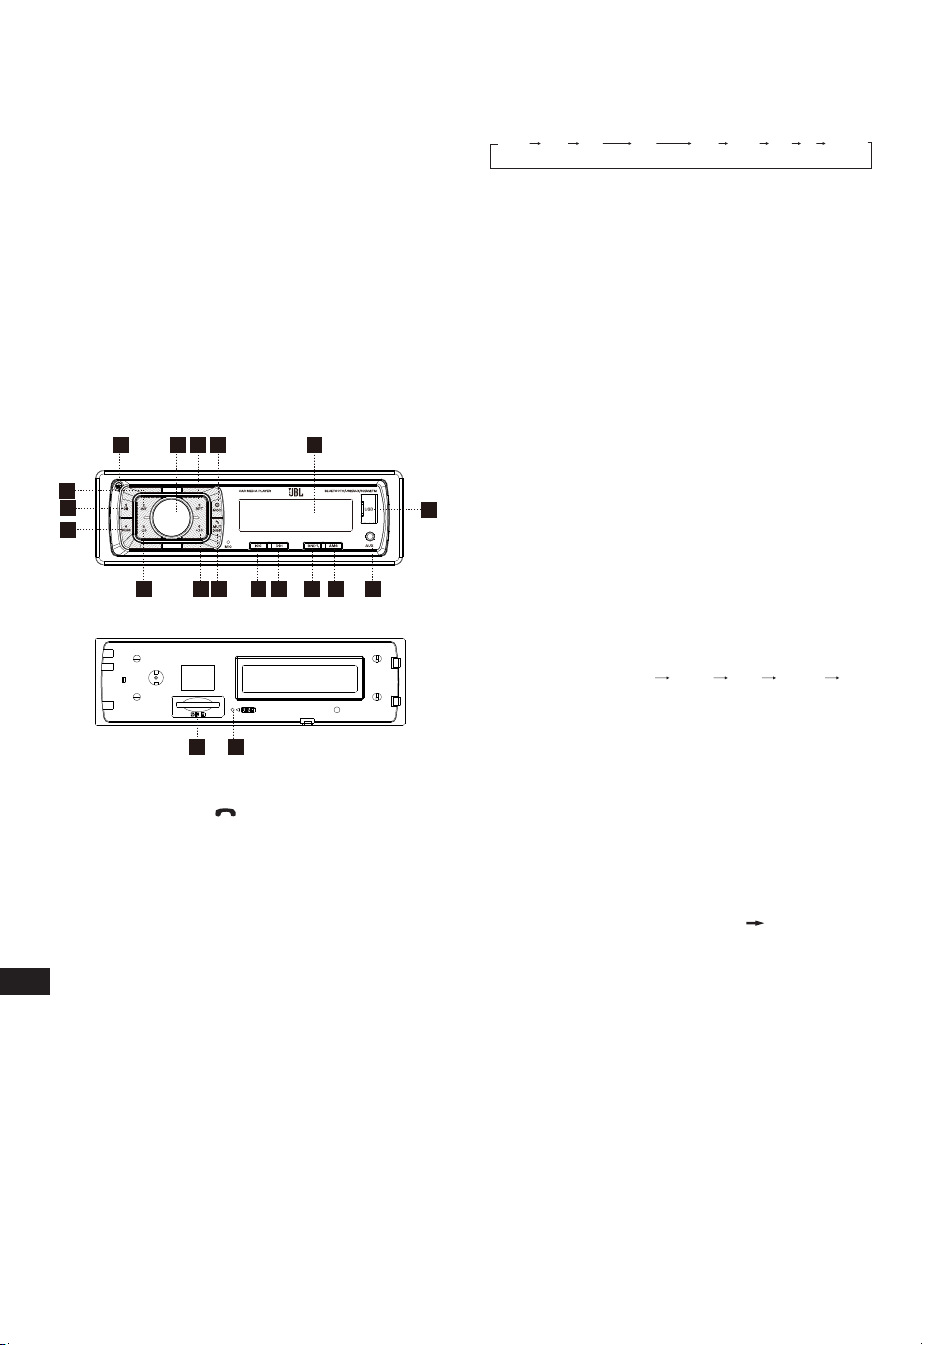
III. DISPOSITION ET COMMANDES
DE LA FAÇADE
17
3
5
12
3
4
15 8
9
10
11
12
13
14
18
16
6
19
7
1. Bouton d'alimentation/MOD
2. Bouton Volume/Sélection
3. Bouton Affichage/Silence/
4. Affichage à LCD
5. Bouton Réinitialiser
6. Sélection de bande/ID3
7. Bouton de recherche et d’avance de piste
8. Bouton de recherche et de recul de piste
9. Stockage automatique en mémoire
10. Bouton Lecture/Pause et Préréglage 1
11. Bouton Introduction et Préréglage 2
12. Bouton Répétition et Préréglage 3
13. Bouton Aléatoire et Préréglage 4
14. Bouton Préréglage 5
15. Bouton Préréglage 6
16. Bouton de déverrouillage
17. PRISE jack AUX IN
18. Connecteur USB
19. Logement SD/MMC
Réglages généraux
Conversion ALIMENTATION/MOD
L’appareil éteint, une pression courte l’allume.
L’appareil allumé, une pression courte commute le mode, une
pression longue l’éteint.
RÉGLAGE AUDIO
Le volume peut se régler en tournant (2).
Appuyez sur le bouton SEL (2) pour changer selon l'ordre suivant.
Option :
VOL
(Volume)
BAS
(Graves)
TRE
(Aigus)
BAL
(Équilibre)
FAD
(Gradateur)
LOUD
(Fort)
DSP DX STÉRÉO
VOLUME
Réglez le niveau de volume avec le bouton VOL/SEL (2). Tournez
le bouton VOL vers la gauche pour diminuer le niveau sonore,
tournez le bouton VOL vers la droite l’augmenter.
Remarque : L'appareil est réglé par défaut sur le mode du volume.
GRAVES
Appuyez une fois sur le bouton VOL/SEL (2). Réglez le niveau des
graves avec le bouton VOL/SEL (2).
AIGUS
Appuyez deux fois sur le bouton VOL/SEL (2). Réglez le niveau
des aigus avec le bouton VOL/SEL (2).
ÉQUILIBRE
Appuyez trois fois sur le bouton VOL/SEL (2). Réglez l'équilibre du son
entre les haut-parleurs gauche et droit avec le bouton VOL/SEL (2).
GRADATEUR (option)
Appuyez quatre fois sur le bouton SEL (2). Réglez l'équilibre du sono
entre les haut-parleurs avant et arrière avec le bouton VOL/SEL (2).
MARCHE/ARRÊT DU MODE FORT
La réponse des graves et des aigus est renforcée losrque le mode
fort est activé.
DSP DÉSACTIVÉ/ACTIVÉ
Sélectionnez un option de menu parmi « DSP ON » (DSP ACTIVÉ)
FLAT (PLAT) ROCK POP CLASS (CLASSIQUE) DSP
OFF (DSP DÉSACTIVÉ).
LOCAL/DX
La position « LOCAL » dans les zones aux signaux forts indique
à la radio de ne sélectionner que les stations fortes, en réglage
manuel, sélectionnez la position distante dans les zones aux
signaux faibles pour écouter toutes les stations.
STÉRÉO/MONO
La sélection de MONO peut améliorer l’écoute lorsque les stations
FM sont faibles et perturbées.
CONFIGURATION DE LA ZONE
En mode radio Appuyez plusieurs secondes sur le bouton SEL.
L'écran LCD affiche BEEP ON (bip activé) AREA USA/EUR
(zone USA/EUR). Sur AREA USA/EUR, Vous pouvez utiliser VOL
+/- pour sélectionner les fréquences de la ZONE.
Remarque : * Sur la télécommande :
Appuyez brièvement sur le bouton « MUT / DISP » (silence/
affichage) pour couper le son, appuyez à nouveau sur « MUT /
DISP » pour rétablir le son.
Appuyez longuement sur « MUT / DISP » pour que l'écran LCD
affiche l'horloge « 00:00 ». Appuyez brièvement sur « MUT / DISP »,
l'heure clignote, tournez « VOL +/- » pour régler l'heure. Appuyez
sur le bouton « SEL », les minutes clignotent, tournez « VOL +/- »
pour régler les minutes. Sans action pendant 5 secondes, l'appareil
mémorise l'heure actuelle et revient au mode en cours.
RESET
Le bouton RESET (5) est sur le boîtier et doit être activé avec un
stylo à bille ou un objet métallique mince. (N'utilisez pas d'objet
pointu pour éviter d'endommager l'appareil.) Le bouton RESET (5)
doit être activé dans les cas suivants :
- Installation initiale de l'unité lorsque tout le câblage est terminé.
- Les boutons des fonctions sont sans effet.
- Symbole d'erreur affiché.
CA_JBL Celebrity 150_OM_GLOBAL_CR_V14.indd 8CA_JBL Celebrity 150_OM_GLOBAL_CR_V14.indd 8 6/27/2024 2:29:06 PM6/27/2024 2:29:06 PM

FR
Mode tuner radio
SÉLECTION DE BANDE
En mode tuner, appuyez sur le bouton BAND (6) pour sélectionner
la bande souhaitée. La bande de réception change dans l'ordre
suivant :
SÉLECTION DES STATIONS
En mode radio, appuyez brièvement sur les boutons « SEEK »
(recherche arrière) ou « SEEK » (recherche avant) pour
rechercher automatiquement une station, appuyez pendant plus
d’une seconde sur les boutons « SEEK » ou « SEEK » pour
effectuer une recherche manuelle.
STOCKAGE AUTOMATIQUE EN MÉMOIRE ET
RECHERCHE DES PROGRAMMES
- Stockage automatique en mémoire
Appuyez sur le bouton AMS (MP3) (9) pendant plusieurs
secondes, la radio recherche depuis la fréquence actuelle et vérifie
la force du signal jusqu'à la fin du cycle de recherche.
Et puis 6 stations les plus fortes sont mémorisées dans les
boutons numérotés des préréglages correspondants.
- Recherche des programmes
Appuyez brièvement sur le bouton AMS (MP3) (9) pour analyser
la station préréglée. En mode AMS, « INT » (intro) apparaît sur
l'écran LCD, l'unité analyse chaque station stockée pendant
5 secondes, vous pouvez également appuyer sur le bouton
numéroté correspondant ou sur le bouton AMS. L’écoute de la
station choisie démarre.
MÉMORISATION DES STATIONS
Bouton de préréglage (10-15)
MODE RADIO.
M1 - M6
- La PRESET MEMORY (mémoire de préréglage) est chargée lors
d’une pression de moins de 1 seconde sur le bouton.
- La PRESET MEMORY est enregistrée lors d’une pression
supérieure à 1 seconde sur le bouton.
Lecture depuis des clés USB et des cartes
mémoire SD
Clés USB et cartes mémoire SD reconnues
L'autoradio fonctionne avec des clés USB et des cartes mémoire
formatées uniquement selon le système de fichiers FAT32.
LECTURE/PAUSE
Appuyez sur le bouton (10) pour suspendre la lecture. L’indication
du temps de lecture de la piste musicale clignote. Appuyez à
nouveau sur ce bouton pour reprendre la lecture, appuyez dessus
plus de 1 seconde pour la fonction TOP.
INT
Appuyez sur le bouton (11) : Si l'introduction est activée (INTRO
ON), le témoin INT s'allume et les 10 premières secondes de
chaque chanson sont lues, jusqu'à ce que la dernière chanson. La
piste du point de départ de INT est lue entièrement.
RPT
Appuyez sur le bouton de préréglage (12) : Lecture de mémoire :
REPEAT ON/OFF (répétition active/inactive) est activée. Avec
REPEAT ON (répétition activée), le témoin RPT s’allume et la piste
musicale en cours est répétée.
RDM
Appuyez sur le bouton de préréglage (13) : Avec RANDOM ON
(aléatoire activé), le témoin RDM s’allume et chaque piste de
l’album est lue aléatoirement au lieu de l'ordre normal.
SÉLECTION DES PISTES
Pendant la lecture depuis USB / SD, appuyez sur le bouton SEEK
« » (recherche arrière, 8) ou SEEK « » (recherche avant, 7)
pour passer à la piste précédente ou à la piste suivante, le numéro
de piste s'affiche à l'écran. Pendant la lecture depuis USB/SD,
appuyez longeuement sur le bouton SEEK « » (recherche
arrière, 8) ou SEEK « » (recherche arrière, 7) pour un recul ou
une avance rapides. La lecture de la musique démarre lorsque
vous relâchez le bouton.
Appuyez sur un bouton de préréglage (14-15) :
- MODE MP3 : 10 TRACK UP / DOWN (pistes suivantes/
précédentes) est activée.
Si le nombre total des pistes est inférieur ou égal à 10, le bouton
est désactivé.
Mode Bluetooth
1. Appairage.
Allumez l'autoradio, placez votre mobile près de l'appareil, activez
le Bluetooth de votre mobile. Le téléphone doit trouver le nouvel
appareil Bluetooth « CAR AUDIO ». Entrez le mot de passe
d'appairage « 8888 » puis appuyez sur OK. Le téléphone signalera
la réussite de la connexion. Lorsque l’appairage est réussi, l'écran
LCD affiche BT ON (Bluetooth actif), et le logo Bluetooth cesse de
clignoter. Vous pouvez alors effectuer les opérations par Bluetooth.
REMARQUE : le système Bluetooth peut prendre en charge les
profils Bluetooth « HSP » « HFP » « A2DP » et AVRCP selon le
Bluetooth du mobile.
2. Service téléphonique mains libres
Si votre téléphone mobile est appairé avec l'appareil. Vous pouvez
composer des appels sur votre téléphone mobile. Le transfert est
automatiquement fait vers l’appareil une fois l'appel entrant établi et
le numéro de téléphone du correspondant apparaît sur l'écran LCD.
- Appuyez brièvement sur le bouton « BAND » pour accepter
l'appel. Vous pouvez parler avec votre correspondant via le
micro du panneau.
- Appuyez brièvement sur le bouton « MUTE » (silence) pour
rejeter un appel entrant.
- Appuyez brièvement sur le bouton « MUTE » (silence) pour
raccrocher en fin de conversation.
3. Lecture du prol de distribution audio avancé (A2DP).
Lorsqu’un mobile et l'unité A2DP sont connectés, appuyez sur
« MODE » et activez simultanément le mode A2DP, la musique
jouée par le mobile peut être diffusée par le système audio de
l'unité. « A2DP » s'affiche sur l'écran LCD. Appuyez sur les boutons
« » et « » du panneau pour sélectionner la piste musicale.
- Appuyez brièvement sur le bouton « » pour suspendre la
lecture de la musique.
- Appuyez longuement sur « BAND » (mode) pour déconnecter le
Bluetooth temporairement.
- Appuyez à nouveau longuement sur le bouton « BAND » (mode)
pour reconnecter le Bluetooth.
4. Répertoire téléphonique.
Ce système Bluetooth peut stocker automatiquement jusqu'à 10
numéros d'appels entrants.
- Appuyez longuement sur le bouton « MUTE » (mode) pour entrer
dans le répertoire téléphonique et appuyez sur le bouton VOL
pour le parcourir.
- Appuyez une fois sur le bouton « BAND » pour appeler le
numéro de téléphone sélectionné.
5. Connexion/reconnexion en cas d’interruption du
Bluetooth.
Appuyez brièvement sur le bouton « BAND » pour interrompre la
connexion Bluetooth pendant un appel et diffuser la voix sur le
haut-parleur du mobile.
Appuyez à nouveau sur « BAND » pour la reconnexion.
CA_JBL Celebrity 150_OM_GLOBAL_CR_V14.indd 9CA_JBL Celebrity 150_OM_GLOBAL_CR_V14.indd 9 6/27/2024 2:29:06 PM6/27/2024 2:29:06 PM

FR
REMARQUE : le fonctionnement varie selon les téléphones
mobiles. Nous ne garantissons pas toutes les fonctions des
appareils connectables.
6. Comment supprimer un numéro de téléphone
mémorisé ?
Vous pouvez simplement stocker dix numéros d’appels manqués,
rejetés et répondus, le premier numéro sera automatiquement
supprimé lors d’un appel du 11ème numéro.
7. Utilisation des fonctions « RECEIVED » (reçu),
« MISSED » (manqué), « REJECTED » (rejeté),
« MANU ANS/AUTO ANS » (réponse manuelle/
réponse automatique).
Appuyez sur « MUTE » pendant 3 secondes pour appeler
les options « RECEIVED » (reçu), « MISSED » (manqué),
« REJECTED » (rejeté), « MANU ANS/AUTO ANS » (réponse
manuelle/réponse automatique). Tournez le bouton VOL pour
choisir le numéro de téléphone.
Mode AUX IN
Vous pouvez connecter à l'autoradio toute source audio tierce
(lecteur, smartphone, tablette, etc.) disposant d’une sortie casque.
Pour ce faire, utilisez un adaptateur mini-jack 3,5 mm (acheté
séparément) en l'insérant dans l'entrée AUX de la façade.
Pour écouter de la musique depuis une source externe dans
le système audio du véhicule, appuyez sur le bouton MODE (1)
jusqu'à ce que l'autoradio passe en mode AUX.
Remarque :
Réglez le volume de la source connectée de telle façon que le
volume global du système audio en mode AUX corresponde à
peu près au volume des autres sources, telles qu'une clé USB
ou un tuner radio. Utilisez le bouton (2) de l'autoradio pour régler
rapidement le volume.
Spécications
Généralités :
Alimentation électrique : Réseau embarqué 12 V CC
Type de réseau embarqué : avec une borne négative sur la
carrosserie (« masse »).
Plage de tension d’alimentation : 11,0 - 14,4 V
Impédance de haut-parleurs recommandée : 4 ohms
Puissance de sortie nominale : 4 x 50 W peak
Dimensions de l’installation (L x H x P) : 178 x 50 x 87 mm
Calibre du fusible : 10 A
Réglages de tonalité :
Graves (à 100 Hz) : -10 dB / +10 dB
Aigus (à 10 kHz) : -10 dB / +10 dB
USB/SD :
Rapport signal sur bruit : pas moins de 70 dB
Séparation des canaux : pas moins de 70 dB
Réponse en fréquence : 20 Hz - 20 kHz
Radio FM :
Couverture des fréquences : 87,5 - 108 MHz (Europe)
65,0 - 74,0 MHz (OIRT)
87,5 - 108 MHz (Amérique du Sud)
87,5 - 107,9 MHz (Amérique du
Nord)
Sensibilité (S/N -30 dB) : ≤ 15 dBu
Séparation des canaux : > 30 dB
Radio AM :
Couverture des fréquences : 522 - 1620 kHz (Europe/OIRT)
520 - 1620 kHz (Amérique du Sud)
530 - 1710 kHz (Amérique du Nord)
Sensibilité (S/N -20 dB) : < 42 dBu
Bluetooth :
Version Bluetooth : 5.0
Profils Bluetooth : AVCTP, AVDTP, GAVDP, RFCOMM, SPP, A2DP,
AVRCP, HFP, HID
Bande de fréquences de l'émetteur Bluetooth : 2.402 G~2.48 G
Puissance de l'émetteur Bluetooth : 4dBmax
Modulation de l'émetteur Bluetooth : GFSK(1 Mbps), π/4-DQPSK
(2 Mbps), 8-DPSK (3 Mbps)
La température maximale de fonctionnement est 70 °C.
Aucune source de flamme nue, telle que des bougies allumées, ne
doit être placée sur l'appareil.
CA_JBL Celebrity 150_OM_GLOBAL_CR_V14.indd 10CA_JBL Celebrity 150_OM_GLOBAL_CR_V14.indd 10 6/27/2024 2:29:06 PM6/27/2024 2:29:06 PM
JBLCELEBRITY150
ES
I. ANTES DE EMPEZAR
Felicidades por la compra de la unidad principal para automóvil
JBL Celebrity 150. Para una correcta instalación y conexión,
así como para el uso correcto de las funciones durante el
funcionamiento, recomendamos que primero lea este manual.
Guárdelo, le será útil en el futuro.
La unidad principal JBL Celebrity 150 tiene un tamaño de
instalación estándar de 1DIN y tiene:
• Sintonizador de AM/FM,
• Reproductor de archivos de audio desde memorias USB,
• Reproductor de archivos de audio desde tarjetas de memoria SD,
• Módulo Bluetooth que permite que la unidad principal funcione
en modo manos libres y reproduzca música del dispositivo
conectado a través del sistema de audio del automóvil (modo
de Audio Bluetooth).
• Entrada AUX para conectar cualquier fuente de audio con salida
de auriculares (reproductores, teléfonos inteligentes, tabletas, etc.)
II. INSTALACIÓN Y CONEXIÓN DE
LA UNIDAD PRINCIPAL
Elección del lugar de instalación
• La unidad principal está pensada para su uso en el interior del
automóvil.
• Para montarla, elija un lugar habitual en el panel, el
proporcionado por el fabricante del automóvil.
• Si la dimensión de la huella no tiene el formato 1-DIN,
seleccione un bastidor-adaptador adecuado para acomodar
una huella estándar del tipo 1-DIN.
• Si el diseño del panel no proporciona un lugar para la
instalación de la unidad principal, elija el lugar de montaje
donde la unidad no interfiera con la función de conducción
normal del conductor.
• Evite instalar la unidad en lugares donde pueda estar expuesta
a temperaturas altas, como la luz solar directa o el aire
caliente del calefactor, o donde pueda estar expuesta a polvo,
suciedad o vibraciones excesivas.
Elección del método de instalación
• Use únicamente las piezas incluidas con la unidad para
garantizar una instalación correcta. El uso de piezas no
autorizadas puede causar fallas.
• Consulte con su distribuidor más cercano si la instalación requiere
que se realicen orificios u otras modificaciones al vehículo.
• Instale la unidad donde no moleste al conductor y no pueda
lesionar al pasajero si se produce una parada repentina. Como
una parada de emergencia.
• Para evitar cortocircuitos, desconecte la batería del sistema
eléctrico del vehículo (si es posible). Después de realizar las
conexiones, conecte primero el borne positivo de la batería y
después el negativo.
• Antes del montaje final de la unidad, asegúrese de que se
hayan hecho correctamente todas las conexiones y de que el
sistema funcione correctamente.
Opción de instalación con el bastidor de montaje
1. Inserte el bastidor de montaje en el tablero de instrumentos
del automóvil.
2. Seleccione la lengüeta adecuada según el grosor del material
del tablero de instrumentos y dóblelas hacia dentro para fijar
el bastidor en el panel.
3. Realice todas las conexiones necesarias e inserte la unidad
en el bastidor de montaje.
4. Fije el bastidor decorativo a la parte delantera de la unidad.
5. Si es necesario retirar la unidad central, use las herramientas
de desmontaje incluidas en el kit.
Opción de instalación sin el bastidor de
montaje, pero con el soporte de fábrica de la
unidad principal en el tablero de instrumentos
del automóvil.
1. Seleccione una posición en la que los orificios para los
tornillos del soporte y los orificios para los tornillos de la
unidad principal queden alineados (estén colocados).
2. Fije la unidad principal a los soportes de ambos lados de la
unidad en al menos dos lugares. Para ello, use los tornillos de
fijación suministrados con la unidad principal. No use tornillos
de mayor longitud u otros tamaños de rosca, porque podría
dañar el dispositivo.
Conexión a la unidad principal
Ubicación de los conectores en la parte trasera de la unidad
principal:
D
E
DE
FR ON T
RE AR
D
E
DE
FR ON T
RE AR
Nota 1:
El cable rojo de la unidad solo se puede conectar al circuito de
encendido (ACC). Si se conecta el cable amarillo junto a una
B+ permanente se puede provocar la descarga de la batería del
vehículo durante un estacionamiento prolongado.
---ANTENA
---
SALIDA TRASERA Rch
(canal derecho)
---
SALIDA TRASERA Lch
(canal izquierdo)
---
SALIDA FRONTAL Rch
(canal derecho)
---
SALIDA FRONTAL Lch
(canal izquierdo)
CA_JBL Celebrity 150_OM_GLOBAL_CR_V14.indd 11CA_JBL Celebrity 150_OM_GLOBAL_CR_V14.indd 11 6/27/2024 2:29:06 PM6/27/2024 2:29:06 PM
ES
Nota 2:
En algunos vehículos, es posible que la ubicación del cable rojo
y del amarillo en el conector ISO esté invertida. Si los ajustes se
reinician cada vez que se desconecta el encendido del vehículo,
intercambie el cable rojo y el amarillo en el conector.
• Tenga cuidado al conectar la unidad principal. Una conexión
incorrecta podría averiarla y anular el derecho al servicio de
garantía.
• Al conectar los altavoces, no cortocircuite los cables a la masa
del vehículo, al cable de alimentación de +12 V ni entre sí.
• Se debe conectar el cable amarillo a un cable que tenga una
tensión constante de +12 voltios, incluso con el encendido
desconectado. Si no encuentra dicho cable, conéctelo al
borne positivo de la batería después de la caja de fusibles.
• El cable negro de la unidad se puede conectar a una pieza
metálica del vehículo con toma de tierra. Si no puede encontrar
un perno o tornillo adecuado, contacte al concesionario de
vehículos más cercano para obtener ayuda. Para garantizar un
contacto fiable, elimine la pintura y la suciedad de las zonas de
la superficie con las que está en contacto el cable.
• El cable azul se usa para alimentar la antena activa o controlar
el encendido del amplificador conectado (señal de control
remoto).
III. DIAGRAMA DEL PANEL FRONTAL
Y LOS CONTROLES
17
3
5
12
3
4
15 8
9
10
11
12
13
14
18
16
6
19
7
1. Botón de encendido/MOD
2. Botón de volumen/sel
3. Botón de pantalla/silencio/
4. Visor LCD
5. Botón para resetear
6. Selección de cambio de banda/ID3
7. Botón para buscar sintonización y pista siguiente
8. Botón para buscar sintonización y pista anterior
9. Almacenamiento automático en memoria
10. Botón Reproducción/Pausa y presintonía 1
11. Botón Intro y presintonía 2
12. Botón repetir y presintonía 3
13. Botón aleatorio y presintonía 4
14. Botón Presintonía 5
15. Botón Presintonía 6
16. Botón de liberación
17. ENTRADA AUX
18. Conector USB
19. Ranura SD/MMC
Conguración general
Conversión de ALIMENTACIÓN/MOD
Si está apagado, pulse brevemente para encenderlo,
Cuando esté encendido, pulse brevemente para cambiar de
modo, mantenga pulsado para apagar.
AJUSTE DE SONIDO
Encienda (2) se puede ajustar al nivel de volumen deseada.
Pulse el botón SEL (2) para cambiar en el siguiente orden.
Opción:
VOL
(Volumen)
BAS
(Bajos)
TRE
(Agudos)
BAL
(Balance)
FAD
(Atenuador)
LOUD
(ALTO)
DSP DX ESTÉREO
VOLUMEN
Ajuste el nivel de volumen con el dial VOL/SEL (2). Gire el dial VOL
hacia la izquierda para disminuir el nivel de sonido, gire el dial VOL
hacia la derecha para aumentar el nivel de sonido.
Nota: La unidad se ajusta inicialmente al modo de volumen.
BAJOS
Pulse el botón VOL/SEL(2) una vez. Ajuste el nivel de bajos con el
dial VOL/SEL(2).
AGUDOS
Pulse el botón VOL/SEL(2) dos veces. Ajuste el nivel de agudos
con el dial VOL/SEL(2).
BALANCE
Pulse el botón VOL/SEL(2) tres veces. Ajuste el balance de sonido
entre los altavoces izquierdo y derecho con el dial VOL/SEL(2).
ATENUADOR (opcional)
Pulse el botón SEL(2) cuatro veces. Ajuste el balance de sonido
entre los altavoces delanteros y traseros con el dial VOL/SEL(2).
MODO LOUD ACTIVADO/DESACTIVADO
En el modo «Loud» activado, se verá reforzada la respuesta de
graves y agudos.
DSP OFF/ON (DESACTIVADO/ACTIVADO)
Seleccione «DSP ON» FLAT ROCK POP CLASS DSP
OFF en el menú macho.
LOCAL/DX
«LOCAL» posición en áreas con señales fuertes para dejar que la
radio se detenga solo en las estaciones fuertes durante la posición
de selección de giro manual en áreas con señales débiles para
escuchar todas las estaciones.
ESTÉREO/MONO
Cuando las emisoras FM son débiles y molestan, se puede
mejorar la escucha al seleccionar MONO.
CONFIGURACIÓN DEL ÁREA
En modo Radio. Pulse el botón SEL por varios segundos. La
pantalla LCD mostrará desde BEEP ON
AREA DE EE. UU./
EUR. En AREA DE EE. UU./EUR. Puede usar VOL +/- para
seleccionar la frecuencia de AREA.
Nota: *En el control remoto
Pulse brevemente el botón «MUT/DISP» para activar el modo
silencio, pulse «MUT/DISP» nuevamente para desactivar el modo
silencio.
Mantenga pulsado «MUT/DISP», la pantalla LCD muestra el reloj
«00:00». Pulse brevemente «MUT/DISP», la hora parpadea, gire
«VOL +/-» para ajustar la hora. Pulse el botón «SEL», los minutos
parpadean, gire «VOL +/-» para ajustar los minutos. Si no se
realiza ninguna operación en 5 segundos, la unidad memorizará la
hora actual y volverá al modo actual.
CA_JBL Celebrity 150_OM_GLOBAL_CR_V14.indd 12CA_JBL Celebrity 150_OM_GLOBAL_CR_V14.indd 12 6/27/2024 2:29:07 PM6/27/2024 2:29:07 PM
ES
REINICIO
El botón RESET (5) está situado en la carcasa y se debe activar
con un bolígrafo o un objeto metálico fino. (No use objetos
afilados para evitar dañar la unidad). El botón RESET (5) se debe
activar por las siguientes razones:
- Instalación inicial de la unidad después de haber completado
todo el cableado.
- Todos los botones de función no funcionan.
- Símbolo de error en la pantalla.
Modo sintonizador de radio
SELECCIÓN DE BANDA
En el modo sintonizador, pulse el botón «BAND» (6) para
seleccionar la banda deseada. La banda de recepción cambiará
en el siguiente orden:
SELECCIÓN DE EMISORA
Durante el modo radio, pulse brevemente los botones «SEEK »
o «SEEK
» para buscar automáticamente una emisora, pulse
los botones «SEEK » o «SEEK » más de 1 segundo para
funcionar como modo de giro manual.
ALMACENAMIENTO AUTOMÁTICO EN MEMORIA Y
BÚSQUEDA DE PROGRAMAS
- Almacenamiento automático en memoria
Pulse el botón AMS (MP3) (9) por varios segundos, la radio busca
a partir de la frecuencia actual y comprueba la intensidad de la
señal hasta que finaliza un ciclo de búsqueda.
A continuación, las 6 emisoras más fuertes se almacenan en el
botón del número de presintonía correspondiente.
- Exploración de programas
Pulse brevemente el botón AMS (MP3) (9) para buscar emisoras
presintonizadas. Cuando se activa el modo AMS, aparece «INT»
en la pantalla LCD, la unidad escanea cada emisora almacenada
durante 5 segundos, también puede pulsar el botón numérico
correspondiente o el botón AMS. Se comenzará a reproducir la
emisora deseada.
ALMACENAMIENTO DE EMISORAS
Pulse el botón de presintonía (10-15)
MODO RADIO.
M1 ~ M6
- Cuando se pulsa la tecla durante menos de 1 segundo, se carga
la MEMORIA DE PRESINTONÍAS.
- Cuando se pulsa la tecla durante más de 1 segundo, se guarda
la MEMORIA DE PRESINTONÍAS.
Reproducción desde unidades ash USB y
tarjetas de memoria SD
Unidades ash USB y tarjetas de memoria SD
compatibles
La unidad principal funciona con unidades flash USB y tarjetas de
memoria formateadas únicamente en el sistema de archivos FAT32.
REPRODUCCIÓN/PAUSA
Pulse el botón (10) se activa la función de pausa. Parpadea el
INDICADOR de tiempo de reproducción de la pista musical.
Vuelva a pulsar para reanudar la reproducción, pulse más de 1
segundo para activar la función TOP.
INT
Pulse el botón (11): Durante INTRO ON, el indicador INT se
enciende y comienza a reproducir los primeros 10 segundos de
cada canción, hasta que se reproduce la última canción. Comienza
a reproducir la pista completa desde donde comenzó INT.
RPT
Pulse el botón de presintonía (12): Modo de reproducción flash:
REPEAT ON/OFF está activado. Con REPEAT ON, se enciende el
INDICADOR RPT y repite la pista de música actual.
RDM
Pulse el botón de presintonía (13): Durante RANDOM ON, se
enciende el INDICADOR RDM y se reproduce cada pista del disco
de manera aleatoria en lugar del orden normal.
SELECCIÓN DE PISTAS
Durante el funcionamiento USB/SD, pulse el botón SEEK « »
(8) o SEEK «
» (7) para pasar a la pista anterior o a la siguiente.
Durante el funcionamiento con USB/SD, mantenga pulsado el
botón SEEK «
» (8) o SEEK « » (7) para avanzar o retroceder
rápidamente. La reproducción de música comienza cuando suelta
el botón.
Pulse el botón de presintonía (14-15):
- Modo MP3: Se activa 10 TRACK UP/DOWN.
Cuando el total de pistas es 10 o menos, se desactiva KEY.
Modo Bluetooth
1. Conexión de emparejamiento.
Encienda la unidad del automóvil, ponga su teléfono móvil cerca
de la unidad, active la función bluetooth de su teléfono móvil.
Pronto el teléfono encontrará el nuevo dispositivo bluetooth «CAR
AUDIO». Ingrese la contraseña de emparejamiento «8888» y
pulse OK. El teléfono le indicará que se realizó el emparejamiento
correctamente. Cuando el emparejamiento se haya realizado
correctamente, en la pantalla LCD aparecerá BT ON y el logotipo
de Bluetooth dejará de parpadear. Entonces podrá realizar la
operación bluetooth.
NOTA: dependiendo del teléfono móvil Bluetooth, el sistema
Bluetooth admite los perfiles Bluetooth «HSP», «HFP», «A2DP» y
AVRCP.
2. Servicio de manos libres
Si su teléfono móvil se emparejó con la unidad. Puede realizar
llamadas a través de su teléfono móvil. Cuando reciba una
llamada, la unidad se activará automáticamente y el número de
teléfono de la llamada aparecerá en la pantalla LCD.
- Pulse brevemente el botón «BAND» para aceptar la llamada.
Entonces podrá hablar con la otra persona a través del
micrófono en el panel.
- Pulse brevemente el botón «MUTE» para rechazar la llamada.
- Pulse brevemente el botón «MUTE» para colgar cuando termine
de hablar.
3. Reproducción con perl de distribución de audio
avanzado (A2DP).
A través del teléfono móvil y la unidad A2DP conectados, pulse
«MODE» y cambie al modo A2DP al mismo tiempo, la música
que se reproduce en el teléfono móvil se pasa a reproducir en
el sistema de audio de la unidad. En la pantalla LCD aparecerá
«A2DP». Pulse los botones «
» y « » del panel para
seleccionar la pista de música.
- Pulse brevemente el botón « » para pausar la reproducción
de música.
- Pulse prolongadamente «BAND» (modo) para desactivar
temporalmente el Bluetooth.
- Vuelva a mantener pulsado el botón «BAND» (modo) para volver
a conectar el Bluetooth.
4. Lista de contactos.
Este sistema Bluetooth puede almacenar automáticamente
los números de las llamadas entrantes, hasta 10 números de
teléfono.
- Mantenga pulsado el botón «MUTE» (modo) para acceder a
la libreta de teléfonos y pulse el botón «VOL» para buscar el
número de teléfono.
CA_JBL Celebrity 150_OM_GLOBAL_CR_V14.indd 13CA_JBL Celebrity 150_OM_GLOBAL_CR_V14.indd 13 6/27/2024 2:29:07 PM6/27/2024 2:29:07 PM

ES
- Pulse el botón «BAND» una vez para llamar al número de
teléfono que desee.
5. Interrumpe la conexión/reconexión Bluetooth.
Al pulsar el botón «BAND» brevemente, se interrumpirá la
conexión Bluetooth cuando hable en una llamada y la voz se
dirigirá al altavoz del teléfono móvil.
Vuelva a pulsar el botón «BAND» para reanudarla.
NOTA: diferentes teléfonos móviles tienen respuestas diferentes.
No garantizamos que funcionen todos los dispositivos que se
puedan conectar.
6. ¿Cómo se borra un número de teléfono
almacenado?
Puede almacenar diez números de llamadas perdidas,
rechazadas y ANS por separado, y el primer número se borrará
automáticamente cuando llame el undécimo número.
7. Uso de las funciones «RECEIVED» (recibida)
«MISSED» (perdida) «REJECTED» (rechazada)
«MANU ANS/AUTO ANS» (respuesta manual/auto).
Pulse «MUTE» por 3 segundos para ingresar a «RECEIVED»
«MISSED» «REJECTED» «MANU ANS/AUTO ANS». Use el botón
«VOL» para elegir el número de teléfono.
Modo AUX IN
Puede conectar cualquier fuente de audio de terceros
(reproductor, teléfono inteligente, tableta, etc.) con salida de
auriculares a la unidad principal. Para ello, use un adaptador mini
conector de 3,5 mm (se adquiere por separado) e insértelo en la
entrada AUX del panel frontal.
Para escuchar música desde una fuente externa por medio del
sistema de audio del automóvil, pulse el botón MODE (1) hasta
que la unidad central ingrese al modo AUX.
Nota:
Ajuste el volumen de la fuente conectada de modo que el
volumen general del sistema de audio en modo AUX coincida
aproximadamente con el volumen de otras fuentes, como una
memoria USB o un sintonizador de radio. Para un ajuste rápido
del volumen, use el mando (2) de la unidad principal.
Especicaciones
General:
Alimentación: Red de a bordo de 12 V CC
Tipo de red a bordo: con un terminal negativo en el cuerpo («masa»)
Rango de la tensión: 11,0 - 14,4 V
Impedancia recomendada del altavoz: 4 Ohm
Potencia nominal de salida: 4 x 50 W peak
Dimensiones de la instalación (An. x Al. x Prof.): 178 x 50 x 87 mm
Valor nominal del fusible: 10 A
Controles de sonido:
Bajos (a 100 Hz): -10 dB/+10 dB
Agudos (a 10 K): -10 dB/+10 dB
USB/SD:
Relación señal/ruido: no menor a 70 dB
Separación de canales: no menor a 70 dB
Intervalo de frecuencias: 20 Hz - 20 kHz
Radio FM:
Cobertura de frecuencias: 87,5 - 108 MHz (Europa)
65,0 - 74,0 MHz (OIRT)
87,5 - 108 MHz (América del Sur)
87,5 - 107,9 MHz (América del Norte)
Sensibilidad (S/N -30 dB): ≤15 dBu
Separación de canales: >30 dB
Radio AM:
Cobertura de frecuencias: 522 - 1 620 KHz (Europa/OIRT)
520 - 1 620 KHz (América del Sur)
530 - 1 710 KHz (América del Norte)
Sensibilidad (S/N -20 dB): <42 dBu
Bluetooth:
Versión Bluetooth: 5.0
Perfil de Bluetooth: AVCTP, AVDTP, GAVDP, RFCOMM, SPP,
A2DP, AVRCP, HFP, HID
Intervalo de frecuencias del transmisor Bluetooth: 2.402 G~2.48 G
Potencia del transmisor Bluetooth: 4dBmax
Modulación del transmisor Bluetooth: GFSK(1 Mbps), π/4-DQPSK
(2 Mbps), 8-DPSK (3 Mbps)
La temperatura máxima de funcionamiento es de 70 °C
No se deben colocar fuentes de llama descubierta, como velas
encendidas, encima del aparato.
CA_JBL Celebrity 150_OM_GLOBAL_CR_V14.indd 14CA_JBL Celebrity 150_OM_GLOBAL_CR_V14.indd 14 6/27/2024 2:29:07 PM6/27/2024 2:29:07 PM
JBLCELEBRITY150
IT
I. PRIMA DI INIZIARE
Congratulazioni per l’acquisto dell’autoradio JBL Celebrity 150!
Per una corretta installazione e collegamento, nonché per l'uso
corretto delle funzioni durante il funzionamento, si consiglia di
leggere prima questo manuale. Salvalo, ti sarà utile in futuro.
L'autoradio JBL Celebrity 150 ha una dimensione di installazione
standard di 1 DIN e contiene:
• Sintonizzatore AM/FM,
• Lettore per file audio da unità flash USB,
• Lettore per file audio da schede di memoria SD,
• Modulo Bluetooth che consente all'autoradio di funzionare in
modalità a mani libere e di riprodurre musica dal dispositivo
collegato tramite il sistema audio dell'auto (modalità audio BT)
• Ingresso AUX per il collegamento di qualsiasi sorgente audio
con uscita cuffie (lettori, smartphone, tablet, ecc.)
II. INSTALLAZIONE E
COLLEGAMENTO
DELL'AUTORADIO
Scelta del punto di installazione
• L'autoradio è destinata all'uso all'interno dell'auto.
• Per il montaggio, utilizzare l’alloggiamento nel pannello
solitamente fornito dal produttore dell'auto.
• Se la dimensione del vano predisposto non è in formato 1-DIN,
selezionare un telaio-adattatore utile per ospitare un dispositivo
con ingombro standard 1-DIN.
• Se il design del pannello non consente di installare l'autoradio
in modo consono, scegliere una posizione di montaggio in
cui l'unità non interferisca con la normale attività di guida del
conducente.
• Evitare di installare l'unità in luoghi in cui potrebbe essere
soggetta a temperature elevate, dovute ad esempio alla luce
diretta del sole o all'aria calda proveniente dal riscaldamento
o in cui potrebbe essere soggetta a polvere, sporcizia o
vibrazioni eccessive.
Scelta del metodo di installazione
• Utilizzare solo le parti incluse con l'unità per garantire
un'installazione corretta. L'uso di parti non autorizzate può
causare malfunzionamenti.
• Rivolgersi al concessionario più vicino se l'installazione richiede
la realizzazione di fori o altre modifiche del veicolo.
• Installare l’unità in un punto in cui non intralci il conducente e
non possa ferire il passeggero in caso di frenata improvvisa.
Come nel caso di un arresto di emergenza.
• Per evitare cortocircuiti, scollegare la batteria dall'impianto
elettrico del veicolo (se possibile). Dopo aver effettuato i
collegamenti, collegare prima il terminale positivo della batteria,
quindi quello negativo.
• Prima del montaggio finale dell'unità, assicurarsi che
tutti i collegamenti siano corretti e che il sistema funzioni
correttamente.
Opzione di installazione con il telaio di montaggio
1. Inserire il telaio per il montaggio nel cruscotto della vettura.
2. Selezionare la linguetta appropriata in base allo spessore del
materiale del cruscotto e piegarla verso l'interno per fissare il
telaio al pannello.
3. Effettuare tutti i collegamenti necessari e inserire l'unità nel
telaio di montaggio.
4. Fissare la cornice decorativa alla parte anteriore dell'unità.
5. Se fosse necessario rimuovere l'autoradio, utilizzare gli attrezzi
per la rimozione inclusi nel kit.
Opzione di installazione senza il telaio
di montaggio, ma utilizzando la staffa
dell'autoradio montata di serie nel cruscotto
della vettura
1. Selezionare una posizione in cui i fori delle viti della staffa e i
fori delle viti dell'autoradio si allineano (combaciano).
2. Fissare l'autoradio alle staffe su entrambi i lati dell'unità in
almeno due punti. A tale scopo, utilizzare le viti di fissaggio
fornite con l'autoradio. Non utilizzare viti con lunghezze
superiori o filettature diverse per evitare di danneggiare il
dispositivo.
Collegamento all'autoradio
Posizione dei connettori sul retro dell'autoradio:
D
E
DE
FR ON T
RE AR
D
E
DE
FR ON T
RE AR
Nota 1:
Il filo rosso dell'unità può essere collegato solo al circuito
di accensione (ACC). Collegandolo con il filo giallo a un B+
permanente può portare a scaricare la batteria dell'auto durante i
parcheggi prolungati.
Nota 2:
In alcuni veicoli, la posizione dei fili rosso e giallo nel connettore
ISO potrebbe essere invertita. Se le impostazioni vengono
ripristinate ogni volta che l'accensione della vettura viene
disinserita, scambiare i fili rosso e giallo nel connettore.
----ANTENNA
---- LINE OUT Rch POSTERIORE
---- LINE OUT Lch POSTERIORE
----LINE OUT Rch ANTERIORE
----LINE OUT Lch ANTERIORE
CA_JBL Celebrity 150_OM_GLOBAL_CR_V14.indd 15CA_JBL Celebrity 150_OM_GLOBAL_CR_V14.indd 15 6/27/2024 2:29:07 PM6/27/2024 2:29:07 PM
IT
• Prestare attenzione quando si collega l'autoradio. Un
collegamento errato può causarne la rottura ed annullare il
diritto all'assistenza in garanzia.
• Quando si collegano gli speaker, non cortocircuitare i fili con la
massa del veicolo, con il filo dell’alimentazione +12 V o tra loro.
• Il filo giallo deve essere collegato a un filo con una tensione
costante di +12 V anche con l'accensione disinserita. Se non si
trova un filo di questo tipo, collegarlo al terminale positivo della
batteria dopo la scatola dei fusibili.
• Il filo nero dell'unità può essere collegato a una parte metallica
del veicolo dotata di messa a terra. Se non si riesce a trovare
un bullone o una vite adatti, rivolgersi al concessionario di zona
per assistenza. Per garantire un contatto affidabile, rimuovere
la vernice e lo sporco dalle aree della superficie con cui il filo è
a contatto.
• Il filo blu viene utilizzato per alimentare l'antenna attiva o
controllare l'accensione dell'amplificatore collegato (segnale del
controllo remoto).
III. DISPOSIZIONE DEL PANNELLO
ANTERIORE E COMANDI
17
3
5
12
3
4
15 8
9
10
11
12
13
14
18
16
6
19
7
1. Pulsante Accensione/MOD
2. Pulsante volume/selezione
3. Pulsante Display/Mute/
4. Display LCD
5. Pulsante Reset
6. Interruttore banda/selezione ID3
7. Pulsante ricerca sintonia & traccia successiva
8. Pulsante ricerca sintonia & traccia precedente
9. Memorizzazione automatica
10. Pulsante Riproduci/pausa & Preset 1
11. Pulsante Intro & Preset 2
12. Pulsante Ripeti & Preset 3
13. Pulsante Random & Preset 4
14. Pulsante Preset 5
15. Pulsante Preset 6
16. Pulsante di sblocco
17. JACK AUX IN
18. Connettore USB
19. Slot SD/MMC
Impostazioni generali
Conversione ACCENSIONE/MOD
In stato di spegnimento, una breve pressione corrisponde
all'accensione,
Nello stato di accensione, una breve pressione consente di
passare alla modalità di commutazione, una pressione lunga è lo
spegnimento.
REGOLAZIONE DEL SUONO
Da acceso (2) consente di regolare la qualità del volume desiderata.
Premere il pulsante SEL (2) per cambiare nell'ordine seguente.
Opzione:
VOL
(Volume)
BAS
(Bassi)
TRE
(Alti)
BAL
(Bilanciamento)
FAD
(Fader)
LOUD DSP DX STEREO
VOLUME
Regolare il livello del volume utilizzando la manopola VOL/SEL (2).
Ruotare la manopola VOL verso sinistra per diminuire il livello del
suono, ruotare la manopola VOL verso destra per aumentare il
livello del suono.
Nota: L'unità viene inizialmente impostata sulla modalità volume.
BASSI
Premere una volta il pulsante VOL/SEL (2). Regolare il livello dei
bassi utilizzando la manopola VOL/SEL (2).
ALTI
Premere due volte il pulsante VOL/SEL (2). Regolare il livello degli
alti utilizzando la manopola VOL/SEL (2).
BILANCIAMENTO
Premere tre volte il pulsante VOL/SEL (2). Regolare il
bilanciamento del suono tra gli altoparlanti sinistro e destro
utilizzando la manopola VOL/SEL (2).
FADER (opzionale)
Premere quattro volte il pulsante SEL (2). Regolare il bilanciamento
del suono tra gli altoparlanti anteriori e posteriori utilizzando la
manopola VOL/SEL (2).
MODALITÀ LOUD ACCESA/SPENTA
In modalità loud, la risposta dei bassi e degli alti viene potenziata.
DSP OFF/ON
Selezionare "DSP ON" FLAT ROCK POP CLASS DSP
OFF menu male.
LOCAL/DX
Posizione "LOCAL" nelle aree con segnali forti per consentire
l'arresto della radio solo alle stazioni forti durante la sintonizzazione
manuale, selezionare la posizione distante nelle aree con segnali
deboli per ascoltare tutte le stazioni.
STEREO/MONO
Quando le stazioni FM sono deboli e disturbate.l'ascolto può
essere migliorato selezionando MONO.
IMPOSTAZIONE AREA
In modalità radio. Premere il pulsante SEL per alcuni secondi.
Sul display LCD viene visualizzato BEEP ON AREA USA/
EUR. NELL’AREA USA/EUR. È possibile utilizzare VOL +/- per
selezionare la frequenza DELL'AREA.
Nota: *Sul telecomando
Premere brevemente il pulsante "MUT/DISP" per attivare il mute,
premere nuovamente "MUT/DISP" per disattivare il mute.
Premere a lungo "MUT/DISP"; sullo schermo LCD viene visualizzato
l'orologio "00:00". Premere brevemente "MUT/DISP", l'ora
lampeggia, ruotare "VOL +/-" per regolare l'ora. Premere il pulsante
"SEL", i minuti lampeggiano, ruotare "VOL +/-" per regolare i minuti.
Se non viene eseguita alcuna operazione entro 5 secondi, l'unità
memorizza l'ora corrente e torna alla modalità corrente.
RESET
Il pulsante RESET (5) si trova sull'alloggiamento e deve essere
attivato con una penna a sfera o con un oggetto metallico sottile.
(Non utilizzare oggetti appuntiti per evitare di danneggiare l'unità.) Il
pulsante RESET (5) deve essere attivato per i seguenti motivi:
- Installazione iniziale dell'unità al termine di tutti i cablaggi.
- Tutti i pulsanti funzione non funzionano.
- Simbolo di errore sul display.
CA_JBL Celebrity 150_OM_GLOBAL_CR_V14.indd 16CA_JBL Celebrity 150_OM_GLOBAL_CR_V14.indd 16 6/27/2024 2:29:07 PM6/27/2024 2:29:07 PM

IT
Modalità sintonizzatore radio
SELEZIONE DELLA BANDA
In modalità sintonizzatore, premere il pulsante BND (6) per
selezionare la banda desiderata. La banda di ricezione cambia nel
seguente ordine:
SELEZIONE DELLA STAZIONE
In modalità radio, premere brevemente i pulsanti "SEEK " o
"SEEK " per cercare automaticamente una stazione, premere
i pulsanti "SEEK
" o "SEEK " per più di 1 secondo per
utilizzare la modalità di sintonizzazione manuale.
MEMORIZZAZIONE AUTOMATICA E SCANSIONE DEI
PROGRAMMI
- Memorizzazione automatica
Premere il pulsante AMS(MP3) (9) per alcuni secondi, la radio
esegue la ricerca dalla frequenza corrente e controlla la forza del
segnale fino al termine di un ciclo di ricerca.
Quindi, vengono memorizzate le 6 stazioni con il segnale più forte
nel pulsante numerico di preselezione corrispondente.
- Scansione dei programmi
Premere brevemente il pulsante AMS(MP3) (9) per eseguire la
scansione delle stazioni memorizzate. Quando la modalità AMS
è attiva, sul display LCD viene visualizzato "INT", l'unità esegue
la scansione di ciascuna stazione memorizzata per 5 secondi.
È inoltre possibile premere il pulsante numerico corrispondente
o il pulsante AMS. Verrà avviata la riproduzione della stazione
desiderata.
MEMORIZZAZIONE DELLA STAZIONE
Premere il pulsante memoria (10 - 15)
MODALITÀ RADIO.
M1 - M6
- LA MEMORIA viene caricata quando il tasto viene premuto per
meno di 1 secondo.
- LA MEMORIA viene salvata quando il tasto viene premuto per
più di 1 secondo.
Riproduzione da unità ash USB e schede di
memoria SD
Unità ash USB e schede di memoria SD supportate
L'autoradio funziona con unità flash USB e schede di memoria
formattate solo nel file system FAT32.
Riproduci/Pausa
Premere il pulsante (10) per attivare la funzione di pausa. LA SPIA
del tempo di riproduzione del brano musicale lampeggia. Premerlo
di nuovo per riprendere la riproduzione, premerlo per più di
1 secondo per INTERROMPERE la funzione.
INT
Premere il pulsante (11): Durante INTRO ON, la spia INT si
accende e l’autoradio inizia a riprodurre i primi 10 secondi di ogni
brano, fino a quando non viene riprodotto l'ultimo brano. Inizia a
riprodurre l'intero brano da dove è iniziato INT.
RPT
Premere il pulsante memoria (12): Modalità di riproduzione flash:
La funzione REPEAT ON/OFF è attivata. Quando REPEAT è attiva,
la spia RPT si accende e ripete il brano musicale corrente.
RDM
Premere il pulsante memoria (13): Durante RANDOM ON, la
spia RDM si accende e ogni traccia del disco viene riprodotta in
ramdom invece che in ordine normale.
SELEZIONE DEI BRANI
Durante il funzionamento USB/SD, premere il pulsante SEEK " "
(8) o il pulsante SEEK " " (7) per passare al brano precedente
o al brano successivo; sul display viene visualizzato il numero
del brano. Durante la modalità USB/SD, tenere premuto il
pulsante SEEK " " (8) o SEEK " " (7) per l'indietro veloce o
l'avanzamento veloce. La riproduzione musicale inizia quando si
rilascia il pulsante.
Premere il pulsante memoria (14-15):
- MODALITÀ MP3: 10 TRACK UP/DOWN attivata.
Quando il numero totale di tracce è 10 o inferiore, il TASTO è
disattivato.
Modalità Bluetooth
1. Abbinamento connessione.
Accendere l'autoradio, posizionare il telefono cellulare vicino
all'unità, attivare la funzione bluetooth del telefono cellulare. In
poco tempo il telefono troverà il nuovo dispositivo bluetooth "CAR
AUDIO". Inserire la password per l’abbinamento "8888" e fare
clic su OK. Il telefono informerà che l’abbinamento è avvenuto
correttamente. Una volta stabilita correttamente il collegamento
di abbinamento, sul display LCD viene visualizzato BT ON e il
logo bluetooth smette di lampeggiare. A questo punto è possibile
eseguire il funzionamento bluetooth.
NOTA: a seconda del telefono bluetooth, il sistema bluetooth
supporta i profili "HSP" "HFP" "A2DP" e AVRCP.
2. Servizio telefonico vivavoce
Se il telefono cellulare è abbinato all'unità. È possibile comporre
le chiamate tramite il telefono cellulare. Passerà automaticamente
all’unità quando arriva una chiamata e il numero di telefono
chiamante viene indicato sullo schermo LCD.
- Premere brevemente il pulsante "BND" per accettare la
chiamata. Quindi è possibile parlare con l'interlocutore tramite il
microfono sul pannello.
- Premere brevemente il pulsante "MUT" per rifiutare la chiamata
in entrata.
- Premere brevemente il pulsante "MUT" per riagganciare una
volta terminata la conversazione.
3. Riproduzione del prolo A2DP (Advance Audio
Distributing Prole).
Tramite il cellulare e l'unità collegati con A2DP, premere "MOD"
e passare contemporaneamente alla modalità A2DP; la musica
riprodotta sul cellulare può passare alla riproduzione del sistema
audio dell'unità. Sul display LCD viene visualizzato "A2DP".
Premere il pulsante sul pannello per selezionare il brano musicale.
- Premere brevemente il pulsante per mettere in pausa la
riproduzione musicale.
- Premere a lungo "BND" (modalità) per interrompere
temporaneamente il bluetooth.
- Premere a lungo il pulsante "BND" (modalità) per ricollegare il
bluetooth.
4. Rubrica telefonica.
Questo sistema bluetooth è in grado di memorizzare
automaticamente i numeri delle chiamate in arrivo, fino a
10 numeri di telefono.
- Premere a lungo il pulsante "MUT" (modalità) per accedere
alla rubrica e premere il pulsante VOL per cercare il numero di
telefono.
- Premere il pulsante "BND" una volta per chiamare il numero di
telefono desiderato.
5. Interrompere la connessione/riconnessione bluetooth.
Premere brevemente il pulsante "BND" per interrompere la
connessione bluetooth quando si sta parlando e la voce può così
passare allo speaker del telefono.
Premere nuovamente il pulsante "BND" per riconnettere.
CA_JBL Celebrity 150_OM_GLOBAL_CR_V14.indd 17CA_JBL Celebrity 150_OM_GLOBAL_CR_V14.indd 17 6/27/2024 2:29:07 PM6/27/2024 2:29:07 PM

IT
NOTA: I diversi telefoni cellulari hanno risposte diverse. Non
garantiamo il funzionamento completo dei dispositivi collegabili.
6. Come si elimina un numero di telefono memorizzato?
È possibile memorizzare separatamente dieci numeri di chiamate
perse, rifiutate e ANS e il primo numero verrà automaticamente
eliminato quando l'11° numero chiamerà.
7. Come utilizzare le funzioni "RECEIVED" "MISSED"
"REJECTED" "MANU ANS/AUTO ANS".
Premere "MUT" per 3 secondi per entrare in "RECEIVED"
"MISSED" "REJECTED" "MANU ANS/AUTO ANS". Ruotare il
pulsante VOL per scegliere il numero di telefono.
Modalità AUX IN
È possibile collegare all'autoradio qualsiasi sorgente audio di
terze parti (lettore, smartphone, tablet, ecc.) con un'uscita per
cuffie. A tale scopo, utilizzare un adattatore mini-jack da 3,5 mm
(da acquistare separatamente) inserendolo nell'ingresso AUX sul
pannello anteriore.
Per ascoltare musica da una sorgente esterna attraverso
l'impianto audio della vettura, premere il pulsante MOD (1) fino a
quando l’autoradio non entra in modalità AUX.
Nota:
Regolare il volume della sorgente collegata in modo che il volume
complessivo del sistema audio in modalità AUX corrisponda
approssimativamente al volume di altre sorgenti, come un'unità
flash USB o un sintonizzatore radio. Per regolare rapidamente il
volume, utilizzare la manopola (2) sull'autoradio.
Speciche
Informazioni generali:
Alimentazione: Rete a bordo del veicolo da 12 V CC
Tipo di rete a bordo del veicolo: Con terminale negativo sul corpo
("massa")
Gamma di tensione di alimentazione: 11,0 - 14,4 V
Impedenza consigliata dello speaker: 4 ohm
Potenza nominale in uscita: 4 x 50 W picco
Dimensioni per l’installazione (L x A x P): 178 x 50 x 87 mm
Fusibile: 10 A
Controllo Toni:
Bassi (a 100 Hz): -10 dB / +10 dB
Alti (a 10K): -10 dB / +10 dB
USB/SD:
Rapporto segnale/rumore: non inferiore a 70 dB
Separazione dei canali: non inferiore a 70 dB
Risposta in frequenza: 20 Hz - 20 kHz
Radio FM:
Copertura della frequenza: 87.5 - 108 MHz (Europa)
65.0 - 74.0 MHz (OIRT)
87.5 - 108 MHz (S.America)
87.5 - 107.9 MHz (N.America)
Sensibilità (S/N -30 dB): ≤15 dBu
Separazione dei canali: >30 dB
Radio AM:
Copertura della frequenza: 522 - 1620 kHz (Europa/OIRT)
520 - 1620 kHz (S.America)
530 - 1710 kHz (N.America)
Sensibilità (S/N -20 dB): <42 dBu
Bluetooth:
Versione Bluetooth: 5.0
Profilo Bluetooth: AVCTP, AVDTP, GAVDP, RFCOMM, SPP, A2DP,
AVRCP, HFP, HID
Intervallo di frequenza del trasmettitore Bluetooth: 2,402 G - 2,48 G
Potenza del trasmettitore Bluetooth: 4 dB max
Modulazione del trasmettitore Bluetooth: GFSK(1 Mbps),
π/4-DQPSK (2 Mbps), 8-DPSK (3 Mbps)
La temperatura di esercizio massima è di 70 °C
Nessuna fiamma libera - come le candele accese - deve essere
posizionata sul dispositivo.
Trova la Guida
rapida in italiano qui.
CA_JBL Celebrity 150_OM_GLOBAL_CR_V14.indd 18CA_JBL Celebrity 150_OM_GLOBAL_CR_V14.indd 18 6/27/2024 2:29:07 PM6/27/2024 2:29:07 PM
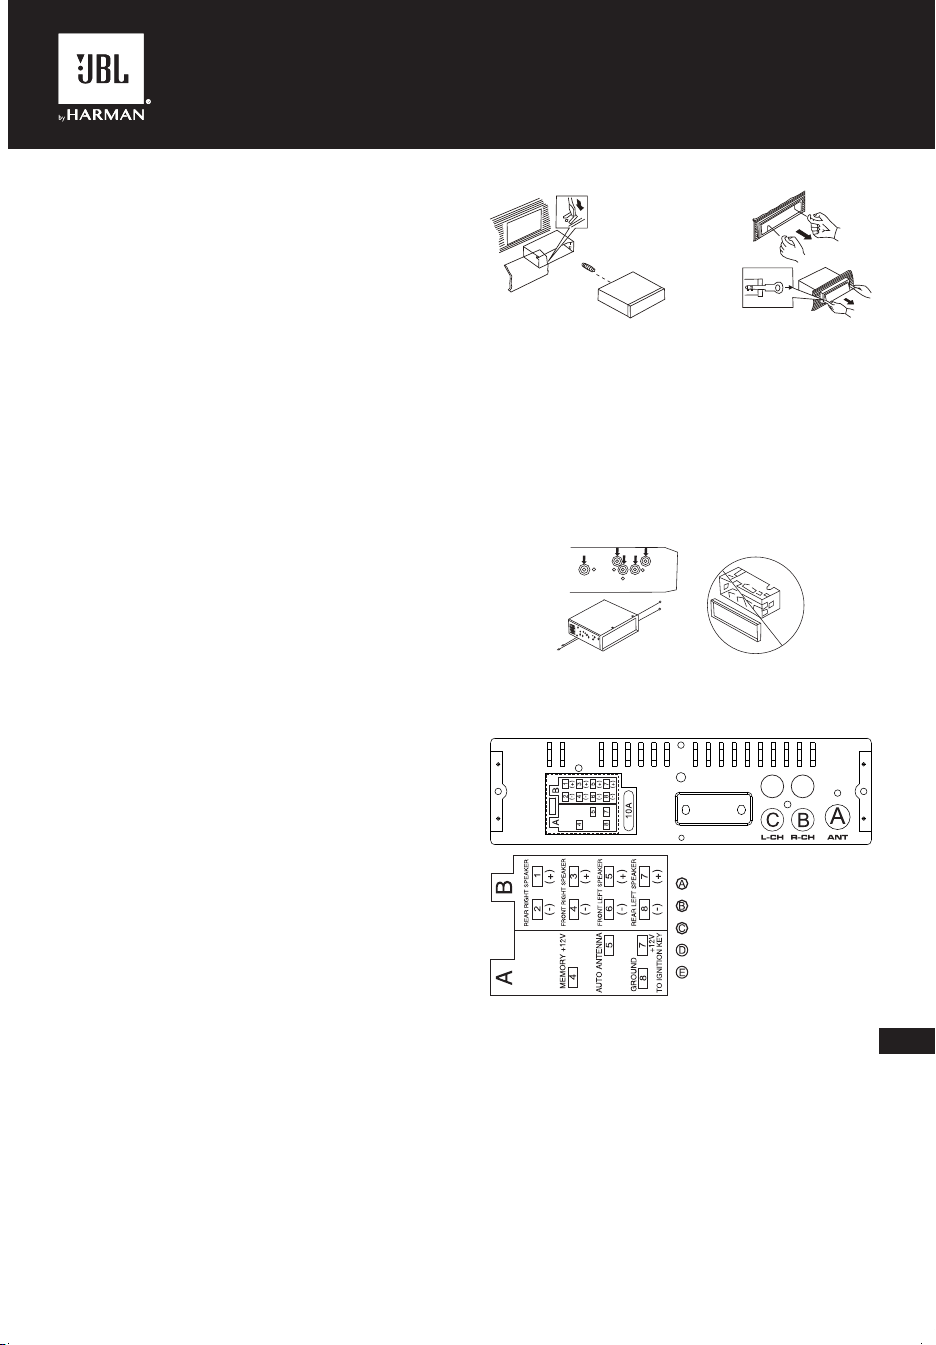
JBLCELEBRITY150
NL
I. VOORDAT JE BEGINT
Dank voor je de aankoop van de JBL Celebrity 150 autoradio! Voor
een juiste installatie en aansluiting, evenals de correcte bediening
van de functies, raden wij je aan eerst deze handleiding te lezen.
Bewaar de handleiding om deze later te kunnen raadplegen.
De JBL Celebrity 150 audioradio heeft een standaard inbouwmaat
van 1DIN en bevat:
• AM/FM-tuner,
• speler voor audiobestanden van USB-sticks,
• speler voor audiobestanden van SD-geheugenkaarten,
• Bluetooth-module waarmee de autoradio in de handsfree
modus kan werken en muziek van het aangesloten apparaat
kan afspelen via het autoradiosysteem (BT Audio-modus)
• AUX-ingang voor het aansluiten van audiobronnen met
hoofdtelefoonuitgang (spelers, smartphones, tablets, enz.)
II. INSTALLATIE EN AANSLUITING
VAN DE AUTORADIO
Een montageplaats kiezen
• De autoradio is bedoeld voor gebruik in de auto.
• Om het toestel te monteren kies je een vaste plaats in het
paneel, voorzien door de autofabrikant.
• Als de afmetingen niet het 1-DIN-formaat hebben, selecteer dan
een geschikt adapterframe voor een standaard 1-DIN-footprint.
• Als het ontwerp van het paneel niet voorziet in een vaste
plaats voor de installatie van de autoradio, kies dan een
montagelocatie waar het toestel de normale rijfunctie van de
bestuurder niet hindert.
• Installeer het apparaat niet op een plek waar het wordt
blootgesteld aan hoge temperaturen, zoals direct zonlicht of
hete lucht van de verwarming, of waar het wordt blootgesteld
aan stof, vuil of overmatige trillingen.
Een installatiemethode kiezen
• Gebruik alleen de onderdelen die bij het apparaat zijn geleverd
om correcte installatie te garanderen. Gebruik van niet-
goedgekeurde onderdelen kan storingen veroorzaken.
• Raadpleeg je dealer als voor de installatie gaten moeten
worden geboord of andere wijzigingen aan het voertuig moeten
worden aangebracht.
• Installeer het toestel op een plaats waar deze de bestuurder
niet in de weg zit en de passagier niet kan verwonden bij een
plotselinge stop. Zoals een noodstop.
• Koppel de accu los van het elektrische systeem van het
voertuig (indien mogelijk) om kortsluiting te voorkomen. Sluit na
het maken van de aansluitingen eerst de positieve pool van de
accu aan en daarna de negatieve.
• Controleer vóór de definitieve montage van het toestel of alle
aansluitingen correct zijn gemaakt en of het systeem goed werkt.
Installatie-opties met het montageframe
1. Plaats het montageframe in het autodashboard.
2. Selecteer het juiste lipje op basis van de dikte van het
dashboardmateriaal en buig deze naar binnen om het frame in
het paneel vast te zetten.
3. Breng alle benodigde aansluitingen tot stand en plaats het
toestel in het montageframe.
4. Monteer het decoratieve frame aan de voorkant van het toestel.
5. Als het nodig is om het toestel te verwijderen, gebruik dan het
meegeleverde verwijdergereedschap.
Installatiemogelijkheid zonder montageframe,
maar met behulp van de fabrieksinbouwbeugel
in het autodashboard
1. Kies een positie waar de schroefgaten van de beugel en de
schroefgaten van het hoofdapparaat op één lijn liggen (zijn
gemonteerd).
2. Bevestig het toestel op minimaal twee plaatsen aan de
beugels aan beide zijden van het toestel. Gebruik hiervoor
de bevestigingsschroeven die bij het toestel zijn geleverd.
Gebruik geen schroeven met langere lengtes of andere
schroefdraadmaten, omdat dit het apparaat kan beschadigen.
Aansluiten op het toestel
Locatie van de connectoren aan de achterkant van het toestel:
D
E
DE
FR ON T
RE AR
D
E
DE
FR ON T
RE AR
Opmerking 1:
De rode draad van het toestel kan alleen worden aangesloten op
het ontstekingscircuit (ACC). Als je deze samen met de gele draad
aansluit op een permanente B+, kan dit leiden tot ontlading van de
accu van de auto tijdens langdurig parkeren.
Opmerking 2:
Bij sommige voertuigen kan de locatie van de rode en gele
draden in de ISO-connector omgekeerd zijn. Als de instellingen
telkens worden gereset wanneer het contact van de auto wordt
uitgeschakeld, verwissel dan de rode en gele draden in de
connector.
• Wees voorzichtig bij het aansluiten van het toestel. Een
onjuiste aansluiting kan tot defecten leiden en het recht op
garantieservice ongeldig maken.
----ANTENNE
----ACHTER Rch LIJNUITGANG
----ACHTER Lch LIJNUITGANG
----VOOR Rch LIJNUITGANG
----VOOR Lch LIJNUITGANG
CA_JBL Celebrity 150_OM_GLOBAL_CR_V14.indd 19CA_JBL Celebrity 150_OM_GLOBAL_CR_V14.indd 19 6/27/2024 2:29:08 PM6/27/2024 2:29:08 PM
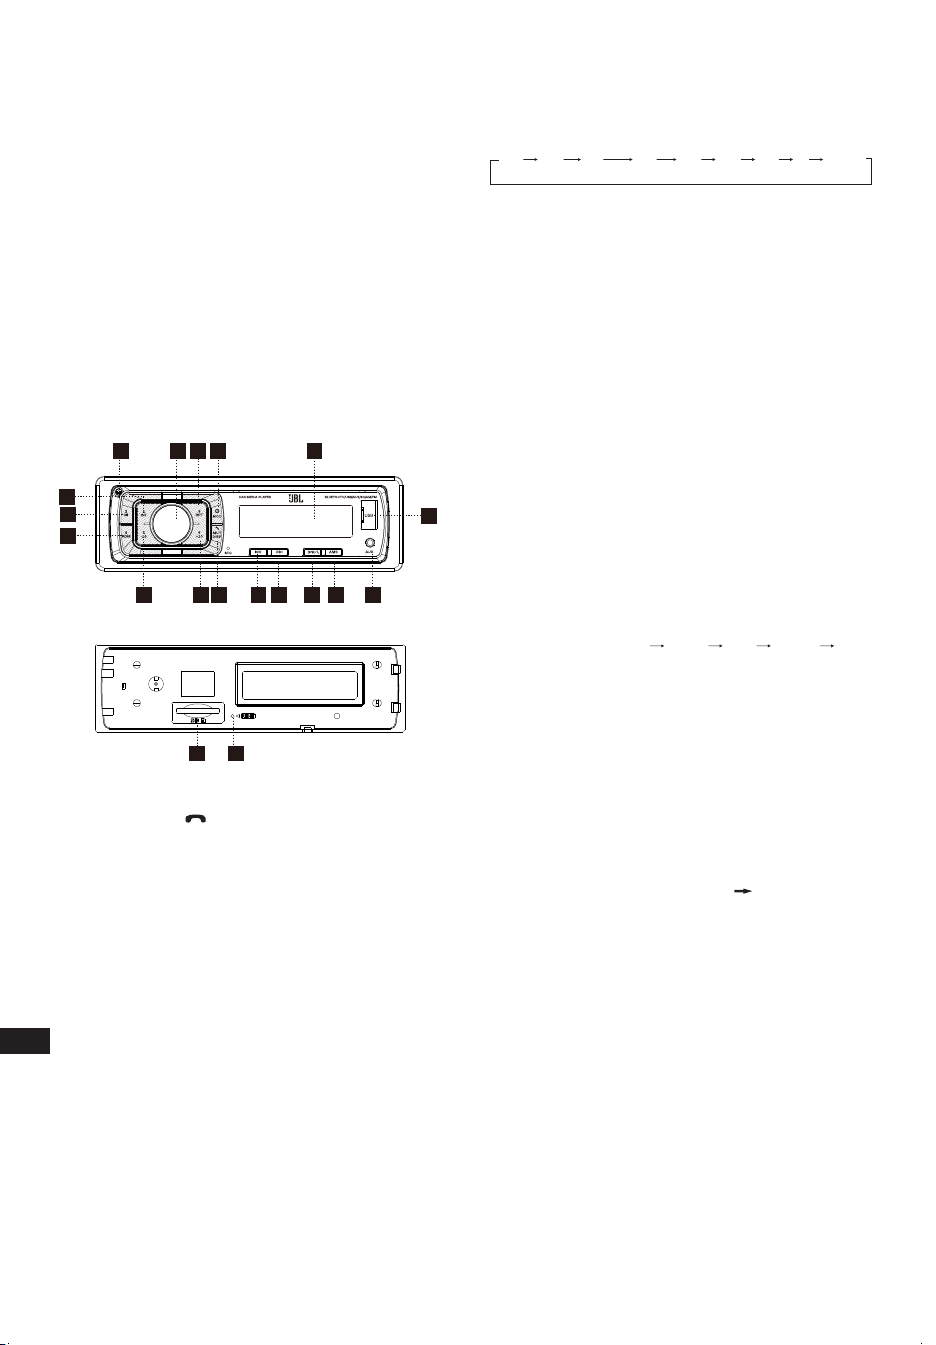
NL
• Wanneer je de luidsprekers aansluit, mag je de draden niet
kortsluiten met de massa van het voertuig, met de +12 V
voedingskabel of met elkaar.
• De gele draad moet worden aangesloten op een draad die een
constante spanning van +12 volt heeft, zelfs als het contact
is uitgeschakeld. Als je een dergelijke draad niet kunt vinden,
sluit deze dan aan op de positieve pool van de accu, na de
zekeringkast.
• De zwarte draad van het toestel kan worden aangesloten
op een geaard metalen deel van het voertuig. Als je geen
geschikte bout of schroef kunt vinden, neem dan contact op
met je autodealer voor hulp. Om goed contact te garanderen,
verwijder je verf en vuil van de delen van het oppervlak
waarmee de draad in contact komt.
• De blauwe draad wordt gebruikt om de actieve antenne van
stroom te voorzien of om het inschakelen van de aangesloten
versterker te regelen (signaal van de afstandsbediening).
III. INDELING EN
BEDIENINGSELEMENTEN OP HET
VOORPANEEL
17
3
5
12
3
4
15 8
9
10
11
12
13
14
18
16
6
19
7
1. Aan-uit/MODUS-knop
2. Volume/Keuze-knop
3. Scherm/Dempen/ -knop
4. LCD-scherm
5. Reset-knop
6. Golfbandschakelaar/ID3 selecteren
7. Zender zoeken & Volgende zender-knop
8. Zender zoeken & Vorige zender-knop
9. Automatische geheugenopslag
10. Afspelen/pauzeren en Voorkeuze-knop 1
11. Intro/Voorkeuze-knop 2
12. Herhaal/Voorkeuze-knop 3
13. Willekeurige/Voorkeuze-knop 4
14. Voorkeuze-knop 5
15. Voorkeuze-knop 6
16. Vrijgave-knop
17. AUX-IN POORT
18. USB-connector
19. SD/MMC-sleuf
Algemene instellingen
AAN-UIT/MODUS-conversie
Wanneer uitgeschakeld, kort indrukken om in te schakelen.
Wanneer ingeschakeld, kort indrukken om de modus te
schakelen, lang indrukken om uit te schakelen.
GELUIDSINSTELLING
Schakel (2) in om het gewenste volume aan te passen.
Als je op de SEL-knop (2) drukt, verandert de stand in
onderstaande volgorde.
Keuze:
VOL
(Volume)
BAS
(Bas)
TRE
(Hoge tonen)
BAL
(Balans)
FAD
(Fader)
LUID DSP DX STEREO
VOLUME
Pas het volumeniveau aan met de VOL/SEL-knop (2). Draai de
VOL-knop naar links om het volume te verlagen, draai de VOL-
knop naar rechts om het volume te verhogen.
Opmerking: Het apparaat staat standaard in de volumemodus.
BAS
Druk één keer op de VOL/SEL(2)-knop. Pas het basniveau aan
met de VOL/SEL(2)-knop.
HOGE TONEN
Druk tweemaal op de VOL/SEL(2)-knop. Pas het niveau van de
hoge tonen aan met de VOL/SEL(2)-knop.
BALANS
Druk drie keer op de VOL/SEL(2)-knop. Pas de geluidsbalans tussen
de linker- en rechterluidsprekers aan met de VOL/SEL(2)-knop.
FADER (optioneel)
Druk vier keer op de SEL-knop (2). Pas de geluidsbalans tussen
de voor- en achterluidsprekers aan met de VOL/SEL(2)-knop.
LUID AAN/UIT-MODUS
In de Luid aan-modus worden de lage en hoge tonen versterkt.
DSP UIT/AAN
Selecteer "DSP AAN" FLAT ROCK POP CLASS DSP
UIT menu.
LOKAAL/DX
Selecteer "LOKAAL" in gebieden met sterke signalen om bij
handmatig afstemmen de radio alleen op sterke stations te laten
stoppen. Selecteer "DX" in gebieden met zwakke signalen om
naar alle stations te luisteren.
STEREO/MONO
Als de FM-zender zwak en gestoord is, kun je het geluid
verbeteren door MONO te selecteren.
GEBIED INSTELLEN
In Radiomodus. Houd de SEL-knop enkele seconden ingedrukt.
Het LCD-scherm verandert van PIEP AAN in GEBIED VS/EUR.
Bij GEBIED VS/EUR. Je kunt VOL +/- gebruiken om de GEBIED-
frequentie te selecteren.
Opmerking: *Op afstandsbediening
Druk kort op de "MUT/DISP"-knop om het geluid te dempen. Druk
nogmaals op de "MUT/DISP"-knop om het dempen op te heffen.
Druk lang op "MUT/DISP", het LCD-scherm toont de klok met
aanduiding "00:00". Druk kort op "MUT/DISP". Het uur knippert, draai
aan "VOL +/-" om het uur aan te passen. Druk op de "SEL"-knop. De
minuten knipperen, draai aan "VOL +/-" om de minuten aan te passen.
Als er binnen 5 seconden geen handeling plaatsvindt, onthoudt het
apparaat de huidige tijd en keert terug naar de huidige modus.
RESETTEN
De RESET-knop (5) bevindt zich op de behuizing en moet worden
geactiveerd met een balpen of een dun metalen voorwerp.
(Gebruik geen scherpe voorwerpen om schade aan het apparaat
te voorkomen.) De RESET-knop (5) moet in de volgende gevallen
worden geactiveerd:
- Eerste installatie van het toestel wanneer alle bedrading is voltooid.
- De functieknoppen werken niet.
- Foutsymbool op het display.
CA_JBL Celebrity 150_OM_GLOBAL_CR_V14.indd 20CA_JBL Celebrity 150_OM_GLOBAL_CR_V14.indd 20 6/27/2024 2:29:08 PM6/27/2024 2:29:08 PM

NL
Radiotunermodus
GOLFBANDKEUZE
Druk in de tunermodus op de BND-knop (6) om de gewenste
golfband te selecteren. De ontvangen golfband verandert in
onderstaande:
ZENDERKEUZE
Druk in de radiomodus kort op "ZOEKEN " of "ZOEKEN "
om automatisch naar een zender te zoeken. Druk langer dan
1 seconde op "ZOEKEN " of "ZOEKEN " bij handmatig
afstemmen.
AUTOMATISCH GEHEUGENOPSLAG EN PROGRAMMA
SCANNEN
- Automatisch geheugenopslag
Druk enkele seconden op de AMS(MP3)-knop (9). De radio zoekt
vanaf de huidige frequentie en controleert de signaalsterkte totdat
een zoekcyclus is voltooid.
De 6 sterkste zenders worden opgeslagen onder de
overeenkomstige voorkeuzenummertoets.
- Programma scannen
Druk kort op de AMS(MP3)-knop (9) om naar voorkeurzenders
te zoeken. Wanneer de AMS-modus wordt uitgevoerd,
verschijnt "INT" op het LCD-scherm. Het apparaat scant elk
opgeslagen station gedurende 5 seconden. Je kunt ook op de
overeenkomstige cijfertoets of AMS-knop drukken. Je gewenste
zender begint te spelen.
ZENDER OPSLAAN
Druk op de voorkeurzenderknop (10 - 15)
RADIOMODUS.
M1 - M6
- VOORKEURZENDER GEHEUGEN wordt geladen wanneer de
toets korter dan 1 seconde wordt ingedrukt.
- VOORKEURZENDER GEHEUGEN wordt opgeslagen als de
toets langer dan 1 seconde wordt ingedrukt.
Afspelen vanaf USB-ashstations en SD-
geheugenkaarten
Ondersteunde USB-ashstations en SD-geheugenkaarten
Het toestel werkt alleen met USB-flashstations en
geheugenkaarten die in het FAT32-bestandssysteem zijn
geformatteerd.
AFSPELEN/PAUZE
Druk op knop (10) om de pauzefunctie in te schakelen. De
INDICATOR van de speelduur knippert. Nogmaals indrukken om
het afspelen te hervatten; langer dan 1 seconde ingedrukt houden
voor de TOP-functie.
INT
Druk op knop (11): Tijdens INTRO AAN gaat de INT-indicator branden
en begint de eerste 10 seconden van elk nummer te spelen, totdat
het laatste nummer wordt gespeeld. Het apparaat begint het hele
nummer af te spelen vanaf het punt waarop INT begon.
RPT
Druk op de voorkeuzeknop (12): Flash-afspeelmodus: HERHAAL
AAN/UIT is ingeschakeld. Wanneer HERHALEN AAN brandt, gaat
de RPT INDICATOR branden en wordt het huidige muzieknummer
herhaald.
RDM
Druk op de voorkeuzeknop (13): Tijdens WILLEKEURIG AAN
wordt de RDM INDICATOR ingeschakeld en wordt elk nummer
van de schijf in willekeurige volgorde afgespeeld in plaats van in de
normale volgorde.
SELECTEER NUMMERS
Druk tijdens gebruik van USB/SD op de ZOEKEN " " knop (8)
knop of zoeken " " knop (7) om naar het vorige of volgende
nummer te gaan. Het tracknummer wordt op het display
weergegeven. Houd tijdens USB/SD de ZOEKEN " " knop (8)
of ZOEKEN " " knop (7) ingedrukt om snel achteruit of vooruit te
spoelen. Het afspelen van muziek begint vanaf het moment dat je
de knop loslaat.
Druk op de voorkeuzeknop (14-15):
- MP3-MODUS: 10 TRACK HOGER/LAGER is geactiveerd.
Wanneer het totale aantal tracks 10 of minder is, wordt SLEUTEL
geïnactiveerd.
Bluetooth-modus
1. Verbinden maken.
Zet de autoradio aan, plaats je mobiele telefoon dichtbij het
apparaat, en activeer de Bluetooth-functie van je mobiele
apparaat. De telefoon zoekt naar het nieuwe Bluetooth-apparaat
"CAR AUDIO". Voer het koppelingswachtwoord "8888" in en
klik op OK. De telefoon geeft aan dat de koppeling is gelukt.
Wanneer het koppelen is gelukt, wordt op het LCD-scherm BT
AAN weergegeven en stopt het Bluetooth-logo met knipperen.
Vervolgens kun je de Bluetooth-functie uitvoeren.
OPMERKING: afhankelijk van Bluetooth-mobiel, ondersteunt het
Bluetooth-systeem "HSP" "HFP" "A2DP" en AVRCP Bluetooth-
profiel.
2. Handsfree telefoongebruik
Wanneer je mobiele telefoon met het apparaat is gekoppeld.
Je kunt via je mobiele telefoon bellen. Het apparaat schakelt
automatisch in wanneer gebeld wordt en het bellende
telefoonnummer wordt op het LCD-scherm weergegeven.
- Druk kort op de "BND"-knop om de oproep aan te nemen.
Vervolgens kun je via de microfoon op het paneel met de andere
partij praten.
- Druk kort op de "MUT"-knop om de oproep te weigeren
wanneer er een andere oproep binnenkomt.
- Druk kort op de "MUT"-knop om op te hangen aan het einde van
het gesprek.
3. Geavanceerd audiodistributieproel (A2DP) afspelen.
Met mobiel en unit A2DP aangesloten, druk je op "MOD" en draai
tegelijkertijd naar de A2DP-modus. De muziek die op mobiel wordt
afgespeeld, kan worden overgeschakeld naar het audiosysteem
van het apparaat. "A2DP" wordt weergegeven op het LCD-scherm.
Druk op de knop in het paneel om het muzieknummer te selecteren.
- Druk kort op de knop om het afspelen van muziek te pauzeren.
- Druk lang op "BND" (modus) om Bluetooth tijdelijk te verbreken.
- Druk nogmaals lang op de knop "BND"-modus om opnieuw
verbinding te maken met Bluetooth.
4. Telefoonnummerboek.
Dit Bluetooth-systeem kan inkomende oproepnummers
automatisch opslaan, tot maximaal 10 telefoonnummers.
- Druk lang op de knop "MUT"-(modus) om het
telefoonnummerboek te openen en druk op de VOL-knop om
het telefoonnummer op te zoeken.
- Druk één keer op de "BND"-knop om het gewenste
telefoonnummer te bellen.
5. Onderbreek de Bluetooth-verbinding/hervat de
verbinding.
Druk kort op de "BND"-knop om de Bluetooth-verbinding te
onderbreken terwijl je aan het bellen bent. De spraak kan worden
doorgestuurd naar de mobiele luidspreker.
Druk nogmaals op de "BND"-knop om opnieuw verbinding te maken.
OPMERKING: Verschillende mobiele telefoons hebben
verschillende reacties. Wij garanderen niet de volledige werking
van aansluitbare apparaten.
CA_JBL Celebrity 150_OM_GLOBAL_CR_V14.indd 21CA_JBL Celebrity 150_OM_GLOBAL_CR_V14.indd 21 6/27/2024 2:29:08 PM6/27/2024 2:29:08 PM

NL
6. Hoe kan ik een opgeslagen telefoonnummer
verwijderen?
Je kunt tien gemiste, afgewezen en ANS-nummers afzonderlijk
opslaan, en het eerste nummer wordt automatisch verwijderd
wanneer het 11e nummer belt.
7. Gebruik van de functies "RECEIVED" (ONTVANGEN)
"MISSED" (GEMIST) "REJECTED" (GEWEIGERD)
"MANU ANS/AUTO ANS" (HANDMATIG EN/AUTO
BEANTWOORDEN).
Druk 3 seconden op "MUT" (DEMPING) voor "RECEIVED"
(ONTVANGEN) "MISSED" (GEMIST) "REJECTED"
(GEWEIGERD) "MANU ANS/AUTO ANS" (HANDMATIG EN/
AUTO BEANTWOORDEN). Draai aan de VOL-knop om het
telefoonnummer te kiezen.
AUX IN-modus
Je kunt elke externe audiobron (speler, smartphone, tablet, enz.)
met een hoofdtelefoonuitgang op het apparaat aansluiten. Gebruik
hiervoor een mini-jack 3,5 mm-adapter (apart verkrijgbaar) en sluit
aan op de AUX-ingang op het voorpaneel.
Om via het autoradiosysteem naar muziek van een externe bron
te luisteren, druk je op de MOD-knop (1) totdat het toestel naar de
AUX-modus gaat.
Opmerking:
Pas het volume van de aangesloten bron zo aan dat het algehele
volume van het audiosysteem in de AUX-modus ongeveer
overeenkomt met het volume van andere bronnen, zoals een
USB-stick of radiotuner. Om het volume snel aan te passen,
gebruik je de knop (2) op het apparaat.
Specicaties
Algemeen:
Voeding: 12 V DC on-board netwerk
Type on-board netwerk: met negatieve pool op de carrosserie
("massa")
Voedingsspanningsbereik: 11,0 - 14,4 V
Aanbevolen luidsprekerimpedantie: 4 ohm
Nominaal uitgangsvermogen: 4 x 50 W piek
Installatieafmetingen (B x H x D): 178 x 50 x 87 mm
Zekeringwaarde: 10 A
Toonregeling:
Bas (bij 100 Hz): -10 dB / +10 dB
Hoge tonen (bij 10 K): -10 dB / +10 dB
USB/SD:
Signaal-ruisverhouding: niet minder dan 70 dB
Kanaalscheiding: niet minder dan 70 dB
Frequentierespons: 20 Hz - 20 kHz
FM-radio:
Frequentiedekking: 87,5 - 108 MHz (Europa)
65,0 - 74,0 MHz (OIRT)
87,5 - 108 MHz (Z.Amerika)
87,5 - 107,9 MHz (N.Amerika)
Gevoeligheid (S/N -30 dB): ≤15 dBu
Kanaalscheiding: >30 dB
AM-radio:
Frequentiedekking: 522 - 1,620 kHz (Europa/OIRT)
520 - 1,620 kHz (Z.Amerika)
530 - 1,710 kHz (N.Amerika)
Gevoeligheid (S/N -20 dB): <42 dBu
Bluetooth:
Bluetooth-versie: 5.0
Bluetooth-profiel: AVCTP, AVDTP, GAVDP, RFCOMM, SPP, A2DP,
AVRCP, HFP, HID
Frequentiebereik Bluetooth-zender: 2,402 G - 2,48 G
Vermogen Bluetooth-zender: 4 dBmax
Modulatie Bluetooth-zender: GFSK(1 Mbps), π/4-DQPSK
(2 Mbps), 8-DPSK (3 Mbps)
De maximale bedrijfstemperatuur bedraagt 70°C
Er mogen geen bronnen van open vuur, zoals brandende kaarsen,
op het apparaat worden geplaatst.
CA_JBL Celebrity 150_OM_GLOBAL_CR_V14.indd 22CA_JBL Celebrity 150_OM_GLOBAL_CR_V14.indd 22 6/27/2024 2:29:08 PM6/27/2024 2:29:08 PM
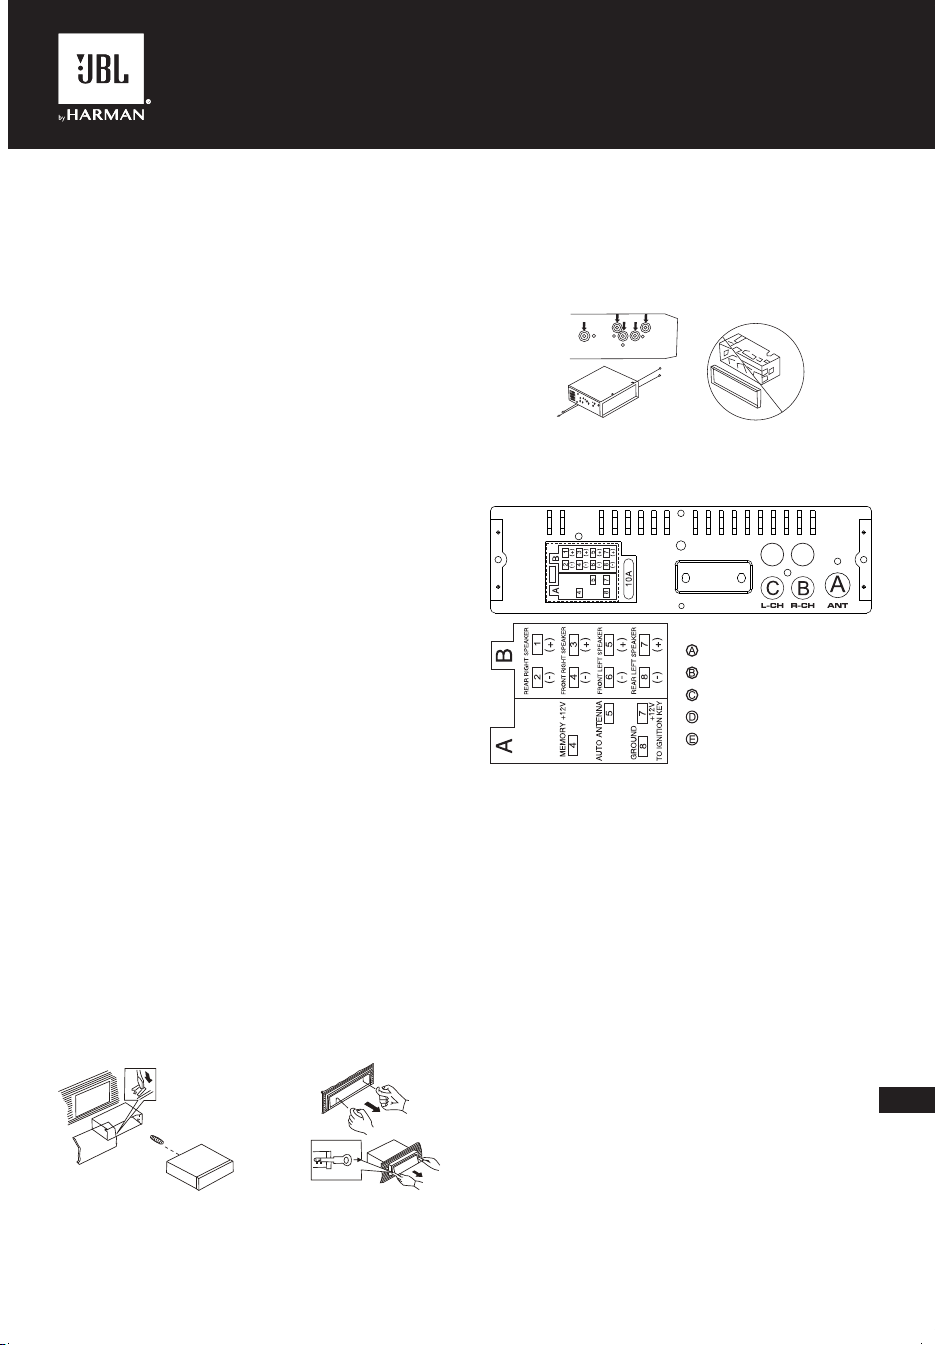
JBLCELEBRITY150
ZH-TW
I. 在開始之前
恭喜您購買 JBL Celebrity 150 車內主機!為了正確安裝和連接以
及操作期間正確使用相關功能,建議您先閱讀本手冊。請妥善保
存,以備將來使用。
JBL Celebrity 150 主機具有 1DIN 的標準安裝尺寸,並包含:
• AM/FM 調諧器,
• 用於播放 USB 快閃磁碟機上的音訊檔案的播放器,
• 用於播放 SD 記憶卡上的音訊檔案的播放器,
• 允許主機在免持模式下工作並透過汽車音響系統(藍牙音訊模
式)播放所連裝置上的音樂的藍牙模組
• 用於將任何音訊來源與耳機輸出(播放器、智慧型手機、平板
電腦等)連接的 AUX 輸入
II. 主機的安裝和連接
選擇安裝位置
• 主機適合在車內使用。
• 要安裝主機,請在汽車製造商提供的面板內選擇一個固定的
位置。
• 若佔地空間尺寸不是 1-DIN 格式,則選擇一個合適的適配器框
架來適應標準 1-DIN 佔地空間。
• 若面板設計沒有為安裝主機提供一個固定位置,則選擇主機不
會干擾駕駛者正常駕駛的安裝位置。
• 避免將主機安裝在易受高溫(如陽光直射,或加熱器熱氣)影
響的位置,或易受灰塵、污垢或過度振動的位置。
選擇安裝方法
• 僅使用主機隨附的零件,以確保正確安裝。使用非授權零件
可能引發故障。
• 若安裝需要鑽孔,或者需要對車輛進行其他改動,請洽詢附
近的經銷商。
• 將主機安裝在不會阻擋駕駛者路線也不會在突然停車(如緊急
停車)時傷害乘員的位置。
• 為避免短路,請斷開電池與車輛電氣系統之間的連接(若可
能)。完成連接後,先連接電池的正極端子,然後連接負極。
• 最終組裝主機前,確保所有連接正確無誤,並且系統正常工作。
使用安裝架的安裝選項
1. 將安裝架插入汽車儀表板。
2. 根據儀表板材料的厚度選擇適當的卡舌,然後將卡舌向內彎
摺,將安裝架固定到面板中。
3. 完成所有必要的連接,然後將主機插入安裝架。
4. 將裝飾架安裝到主機正面。
5. 若有必要拆除主機,請使用套件隨附的工具。
不使用安裝架的安裝選項,但使用汽車儀表板內的
原廠主機支架
1. 選擇一個支架螺孔與主機螺孔對齊(安裝)的位置。
2. 在至少兩個位置將主機安裝到主機兩側的支架上。為此,請
使用主機隨附的固定螺釘。不要使用較長或其他螺紋規格的
螺釘,因為這樣做可能會損壞裝置。
連接到主機
主機背面接口的位置:
D
E
DE
FR ON T
RE AR
D
E
DE
FR ON T
RE AR
註 1:
主機的紅線僅可連接到點火電路 (ACC)。將此紅線與黃線一起連
接到永久 B+,可能導致汽車在長期停放期間電池發生放電。
註 2:
在某些車型中,ISO 連接器的紅線和黃線位置可能顛倒。若每次關
閉汽車點火裝置時都重設設定,請交換連接器中的紅線和黃線。
• 連接主機時要小心。連接不正確可能引發故障並喪失保固服
務的權利。
• 連接喇叭時,不要將電線與車輛接地、+12 V 電源線或彼此
短路。
• 即使點火開關關閉,黃線也必須連接至具有 +12 V 恆定電壓的
電線。若沒找到此電線,請連接到保險絲盒後電池的正極端子。
• 主機的黑線可以連接到車輛的接地金屬部分。若您找不到合適
的螺栓或螺釘,請聯絡附近的車輛經銷商以尋求協助。為確保
可靠的接觸,請清除電線接觸表面區域的油漆和污垢。
• 藍線用於為有源天線供電或控制所連接的功放(遙控訊號)
的開關。
-------ANTENNA(天線)
-------後右聲道線路輸出
-------後左聲道線路輸出
-------前右聲道線路輸出
-------前左聲道線路輸出
CA_JBL Celebrity 150_OM_GLOBAL_CR_V14.indd 23CA_JBL Celebrity 150_OM_GLOBAL_CR_V14.indd 23 6/27/2024 2:29:08 PM6/27/2024 2:29:08 PM
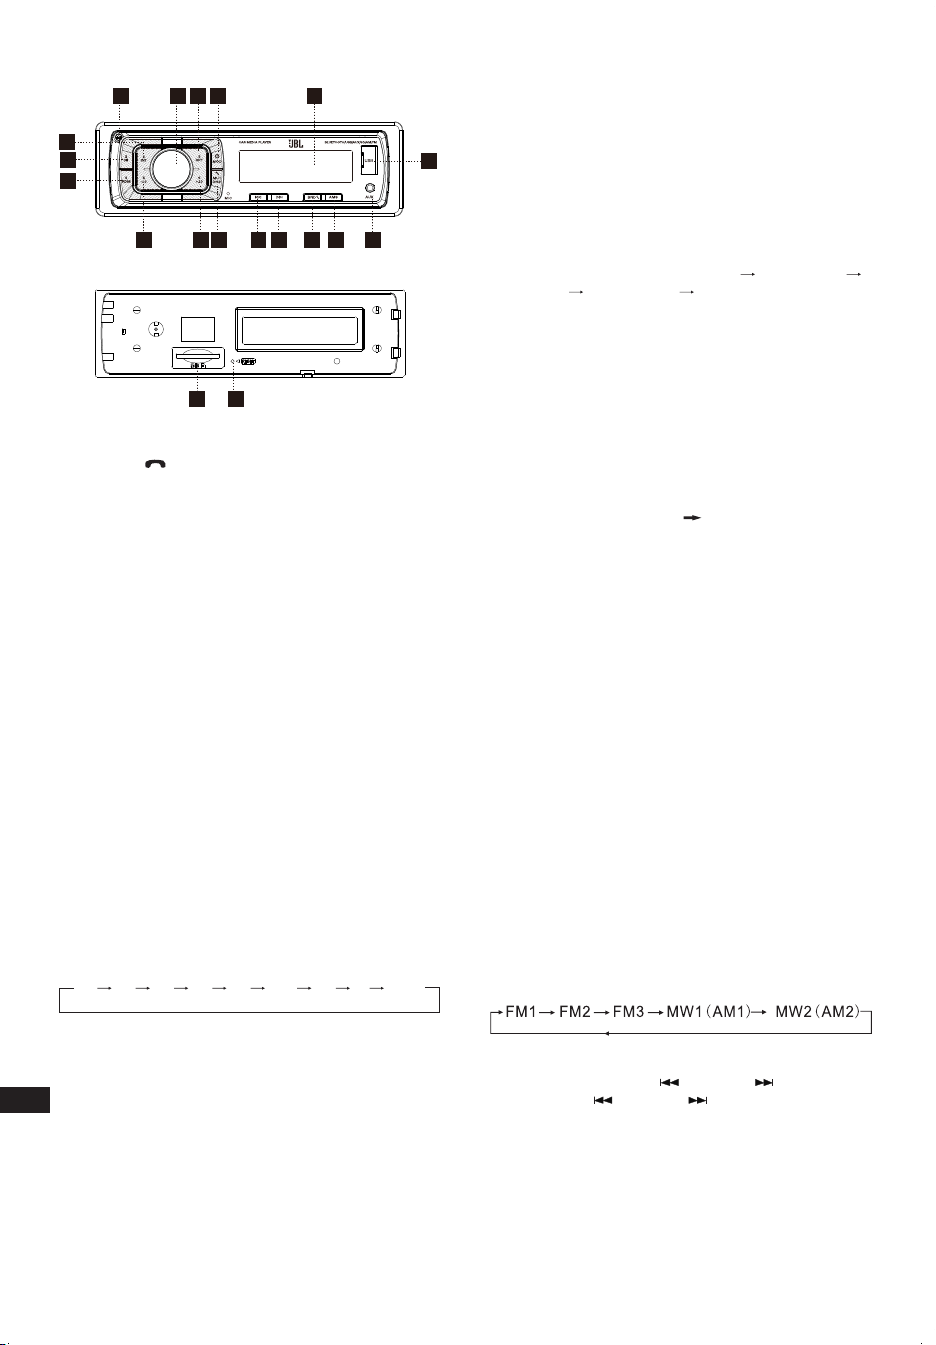
ZH-TW
III. 前面板佈局和控制鈕
17
3
5
12
3
4
15 8
9
10
11
12
13
14
18
16
6
19
7
1. 電源/模式按鈕
2. 音量/選擇按鈕
3. 顯示/靜音/
按鈕
4. LCD 顯示螢幕
5. 重設按鈕
6. 頻段開關/ID3 選擇
7. 調諧搜尋及曲目前進按鈕
8. 調諧搜尋及曲目後退按鈕
9. 自動記憶儲存
10. 播放/暫停和預設按鈕 1
11. 序曲和預設按鈕 2
12. 重複和預設按鈕 3
13. 隨機和預設按鈕 4
14. 預設按鈕 5
15. 預設按鈕 6
16. 鬆開按鈕
17. AUX 輸入插孔
18. USB 接口
19. SD/MMC 插槽
一般設定
POWER /MOD(電源/模式)轉換
在關機狀態下,短按可開機,
在開機狀態下,短按可切換模式,長按可關機。
聲音調節
開啟 (2) 可調節所需的音質。
按 SEL(選擇)按鈕 (2) 將按以下順序變化。
選項:
VOL
(音量)
BAS
(低音)
TRE
(高音)
BAL
(平衡)
FAD
(衰減器)
LOUD
(響度)
DSP DX
(遠距)
STEREO
(立體聲)
VOLUME(音量)
使用 VOL/SEL(音量/選擇)(2) 旋鈕調節音量。向左轉動 VOL(音
量)旋鈕減小音量,向右轉動 VOL(音量)旋鈕增大音量。
註:主機最初設為音量模式。
BASS(低音)
按 VOL/SEL(音量/選擇)按鈕 (2) 一次。使用 VOL/SEL(音量/
選擇)(2) 旋鈕調節低音電平。
TREBLE(高音)
按 VOL/SEL(音量/選擇)按鈕 (2) 兩次。使用 VOL/SEL(音量/
選擇)(2) 旋鈕調節高音電平。
BALANCE(平衡)
按 VOL/SEL(音量/選擇)按鈕 (2) 三次。使用 VOL/SEL(音量/
選擇)(2) 旋鈕調節左右喇叭的聲音平衡。
FADER(前後衰減)(可選)
按 SEL(選擇)按鈕 (2) 四次。使用 VOL/SEL(音量/選擇)(2) 旋
鈕調節前後喇叭的聲音平衡。
LOUD ON/OFF MODE(響度開/關模式)
在響度開模式下,將提升低音和高音回應。
DSP OFF/ON(DSP 關/開)
選擇「DSP ON」(DSP 開)FLAT(平直) ROCK(搖滾)
POP(流行)
CLASS(古典) DSP OFF(DSP 關)功能表。
LOCAL/DX(本地/遠距)
在訊號強的區域選擇「LOCAL」(本地)位置,讓廣播在手動調
諧期間僅停在訊號強的電台;在訊號弱的區域選擇遙遠位置,以
收聽所有電台。
STEREO/ MONO(立體聲/單聲道)
當調頻電台訊號弱並受到干擾時,可選擇 MONO(單聲道)來改
善聆聽效果。
AREA SETUP(區域設定)
在 Radio(廣播)模式下,按住 SEL(選擇)按鈕幾秒,LCD 將
顯示為從 BEEP ON(提示音開)
AREA USA/EUR(區域美國/
歐洲)。在 AREA USA/EUR(區域美國/歐洲),您可使用 VOL
+/-(音量 +/-)選擇區域頻率。
註:*在遙控器上,
短按「MUT/DISP」(靜音/顯示)按鈕開啟靜音,再次按「MUT/
DISP」(靜音/顯示)關閉靜音。
長按「MUT/DISP」(靜音/顯示),LCD 螢幕將顯示時鐘
「00:00」。短按「MUT/DISP」(靜音/顯示),小時將閃爍,
轉動「VOL +/-」(音量 +/-)以調節小時。按「SEL」(選擇)
按鈕,分鐘將閃爍,轉動「VOL +/-」(音量 +/-)以調節分鐘。
若在 5 分鐘內無操作,主機將記住目前的時間,然後回到目前
模式。
重設
RESET(重設)按鈕 (5) 位於外殼上,必須以圓珠筆或細金屬物
件啟動。(不要使用尖銳物件,以避免損傷主機。)RESET(重
設)按鈕 (5) 必須出於以下原因啟動:
- 完成所有接線後,開始安裝主機。
- 所有功能按鈕不起作用。
- 顯示螢幕上的錯誤符號。
廣播調諧器模式
頻段選擇
在調諧器模式下,按 BAND(頻段)按鈕 (6) 選擇所需的頻段。接
收頻段將按以下順序變化:
電台選擇
在廣播模式下,短按「SEEK 」或「SEEK 」按鈕自動搜尋
電台,按「SEEK
」或「SEEK 」按鈕一秒以上則按手動調
諧模式操作。
自動記憶儲存和節目掃描
- 自動記憶儲存
按住 AMS(MP3) 按鈕 (9) 幾秒,廣播將從目前的頻率中搜尋,並
在完成一個週期搜尋前檢查訊號強度。
然後會將 6 個訊號最強的電台儲存到對應的預設數字按鈕中。
CA_JBL Celebrity 150_OM_GLOBAL_CR_V14.indd 24CA_JBL Celebrity 150_OM_GLOBAL_CR_V14.indd 24 6/27/2024 2:29:09 PM6/27/2024 2:29:09 PM

ZH-TW
- 節目掃描
短按 AMS(MP3) 按鈕 (9),以掃描預設電台。當執行 AMS 模式
時,LCD 顯示螢幕上將會顯示「INT」,主機會連續掃描所儲存
的每個電台 5 秒,您也可按對應的數字按鈕或 AMS 按鈕。您所
需的電台將開始播放。
電台儲存
按預設按鈕 (10~15)
廣播模式。
M1 ~ M6
- 預設記憶在按鍵不到
1 秒時載入。
- 預設記憶在按鍵超過
1 秒時儲存。
從 USB 快閃磁碟機和 SD 記憶卡播放
受支援的 USB 快閃磁碟機和 SD 記憶卡
主機與僅以 FAT32 檔案系統格式化的 USB 快閃磁碟機和記憶卡
結合使用。
PLAY/PAUSE(播放/暫停)
按按鈕 (10),啟動暫停功能。音樂曲目播放時間指示燈將會閃爍。
再次按此按鈕繼續播放,按此按鈕 1 秒以上即停止。
INT(序曲)
按按鈕 (11):在選擇 INTRO ON(序曲開)期間,INT(序曲)指
示燈將會亮起,開始播放每首歌的前 10 秒,直到播放最後一首
歌曲。然後從 INT(序曲)開始處開始播放整首曲目。
RPT(重複)
按預設按鈕 (12):閃光播放模式:REPEAT ON / OFF(重複開/關)
將啟動。當選擇 REPEAT ON(重複開)時,RPT(重複)指示燈
將會亮起,並重複目前的音樂曲目。
RDM(隨機)
按預設按鈕 (13):在選擇 RANDOM ON(隨機開)期間,RDM(隨
機)指示燈將會亮起,並隨機(而不是按正常順序)播放光碟的
每首曲目。
SELECT TRACKS(選擇曲目)
在 USB/SD 操作期間,按 SEEK「 」(8) 按鈕或 SEEK「 」
(7) 按鈕移至上一首曲目或下一首曲目,同時顯示螢幕上會顯示
曲目編號。在 USB/SD 操作期間,按住 SEEK 「
」 (8) 按鈕或
SEEK「
」(7) 快退或快進。從您鬆開按鈕時開始播放音樂。
按預設按鈕 (14-15):
- MP3 模式:10 TRACK UP / DOWN(前/後曲目選擇)將啟動。
總曲目數為 10 或以下時,將停用按鍵。
藍牙模式
1. 配對連接
開啟車內主機,將手機靠近主機,啟動手機的藍牙功能。手
機很快會找到新的藍牙裝置「CAR AUDIO」。輸入配對密碼
「8888」,然後按 OK(確定)。手機將提示配對成功。配對連
接成功後,LCD 上會顯示 BT ON(藍牙開),藍牙標誌將會停止
閃爍。然後您可執行藍牙操作。
備註:根據手機上的藍牙,藍牙系統支援「HSP」、「HFP」、
「A2DP」和 AVRCP 藍牙設定檔。
2.免持手機服務
若您的手機已與主機配對,您可以透過手機撥出電話。當有來電
時,手機將自動轉至主機,LCD 螢幕上將顯示通話號碼。
- 短按「
BAND」(頻段)按鈕以接聽來電。然後您可以透過面板
上的麥克風與另一方交談。
- 短按「
MUTE」(靜音)按鈕可拒絕來電。
- 談話結束後,短按「MUTE」(靜音)按鈕掛斷電話。
3. 藍牙立體聲音訊傳輸規範 (A2DP) 播放。
透過所連接的手機和主機 A2DP,按「MODE」(模式),同時轉
至 A2DP 模式,手機中的音樂播放可轉至主機音訊系統播放。
LCD 上將顯示「A2DP」。按面板上的按鈕「 」和「 」,可
以選擇音樂曲目。
- 短按「
」按鈕可暫停音樂播放。
- 長按「
BAND」(頻段)模式,暫時斷開藍牙。
- 再次長按「
BAND」(頻段)模式,重新連接藍牙。
4. 電話號碼簿。
此藍牙系統可自動儲存多達 10 個來電號碼。
- 長按「
MUTE」(靜音)(模式)按鈕進入電話號碼簿,按
VOL(音量)按鈕查找電話號碼。
- 按「
BAND」(頻段)按鈕一次呼出所需的電話號碼。
5. 中斷藍牙連接/重新連接。
當您正在通話時,短按「BAND」(頻段)按鈕中斷藍牙連接,
語音將轉至手機喇叭。
再按「BAND」(頻段)按鈕重新連接。
註:不同的手機具有不同的回應。我們不保證可連接的裝置的
所有操作。
6. 如何刪除所儲存的電話號碼?
您僅可單獨儲存十個未接、已拒絕和應答號碼,在呼叫第 11 個
號碼時,將自動刪除第一個號碼。
7. 如何使用「RECEIVED」(已接聽)、「MISSED」(未
接)、「REJECTED」(已拒絕)、「MANU ANS/
AUTO ANS」(手動應答/自動應答)功能。
按住「MUTE」(靜音)3 秒,進入「RECEIVED」(已接聽)、
「MISSED」(未接)、「REJECTED」(已拒絕)、「MANU
ANS/AUTO ANS」(手動應答/自動應答)。轉動 VOL(音量)
按鈕選擇電話號碼。
AUX 輸入模式
您可將任何第三方音訊來源(播放器、智慧型手機、平板電腦
等)與主機的耳機輸出連接。為此,請使用迷你插孔 3.5mm 轉
接器(單獨購買),方法是將其插入前面板上的 AUX 輸入。
要透過汽車音響系統聆聽外部來源的音樂,請按 MODE(模式)
按鈕 (1) 直到主機進入 AUX 模式。
註:
調節所連接的來源的音量,使 AUX 模式下音訊系統的總體音量與
其他來源(如 USB 快閃磁碟機或廣播調諧器)的音量大致相符。
要快速調節音量,請使用主機上的旋鈕 (2)。
規格
一般:
電源:12 V DC 車載網路
車載網路類型:主體(「質量」)上的負極端子
電源電壓範圍:11.0 - 14.4 V
建議的喇叭阻抗:4 歐姆
額定輸出功率:4 x 50 W peak
安裝尺寸(寬 x 高 x 深):178 x 50 x 87 mm
保險絲額定電流:10 A
音調控制:
低音(在 100 Hz 時):-10 dB / +10 dB
高音(在 10K 時):-10 dB / +10 dB
USB/SD:
雜訊比:不小於 70 dB
聲道分離:不小於 70 dB
頻率回應:20 Hz - 20 kHz
CA_JBL Celebrity 150_OM_GLOBAL_CR_V14.indd 25CA_JBL Celebrity 150_OM_GLOBAL_CR_V14.indd 25 6/27/2024 2:29:09 PM6/27/2024 2:29:09 PM

ZH-TW
調頻廣播:
頻率覆蓋範圍: 87.5 - 108 MHz(歐洲)
65.0 - 74.0 MHz(OIRT 頻段)
87.5 - 108 MHz(南美洲)
87.5 - 107.9 MHz(北美洲)
靈敏度(訊噪比 -30 dB):≤15 dBu
聲道分離:>30 dB
AM 廣播:
頻率覆蓋範圍: 522 - 1620 KHz(歐洲/OIRT 頻段)
520 - 1620 KHz(南美洲)
530 - 1710 KHz(北美洲)
靈敏度(訊噪比 -20 dB):<42 dBu
藍牙:
藍牙版本:5.0
藍牙設定檔:AVCTP, AVDTP, GAVDP, RFCOMM, SPP, A2DP,
AVRCP, HFP, HID
藍牙發射機頻率範圍:2.402 G~2.48 G
藍牙發射機功率:4dBmax
藍牙發射機調變:GFSK(1 Mbps), π/4-DQPSK (2 Mbps), 8-DPSK
(3 Mbps)
最大工作溫度為 70
°
C
為避免火災,切勿在設備上放置點燃的蠟燭等明火源。
CA_JBL Celebrity 150_OM_GLOBAL_CR_V14.indd 26CA_JBL Celebrity 150_OM_GLOBAL_CR_V14.indd 26 6/27/2024 2:29:09 PM6/27/2024 2:29:09 PM

CA_JBL Celebrity 150_OM_GLOBAL_CR_V14.indd 27CA_JBL Celebrity 150_OM_GLOBAL_CR_V14.indd 27 6/27/2024 2:29:09 PM6/27/2024 2:29:09 PM

CA_JBL Celebrity 150_OM_GLOBAL_CR_V14
HARMAN International Industries,
Incorporated 8500 Balboa Boulevard,
Northridge, CA 91329 USA
www.jbl.com
© 2023 HARMAN International Industries, Incorporated. All rights reserved.
JBL is a trademark of HARMAN International Industries, Incorporated,
registered in the United States and/or other countries. Features, specifications
and appearance are subject to change without notice.
The Bluetooth
®
word mark and logos are registered trademarks owned by Bluetooth SIG, Inc.
and any use of such marks by HARMAN International Industries, Incorporated is under license.
Other trademarks and trade names are those of their respective owners.
CA_JBL Celebrity 150_OM_GLOBAL_CR_V14.indd 28CA_JBL Celebrity 150_OM_GLOBAL_CR_V14.indd 28 6/27/2024 2:29:09 PM6/27/2024 2:29:09 PM