
USER’S OPERATION MANUAL
Before operating this unit, please read this manual
thoroughly, and retain for future reference.
HDFS10HP HDFS10HPB HDFS10HP*
English
EN

TABLE OF CONTENTS
4 SAFETY INFORMATION
INTRODUCTION
14 PRODUCT DESCRIPTION
15 Technical information
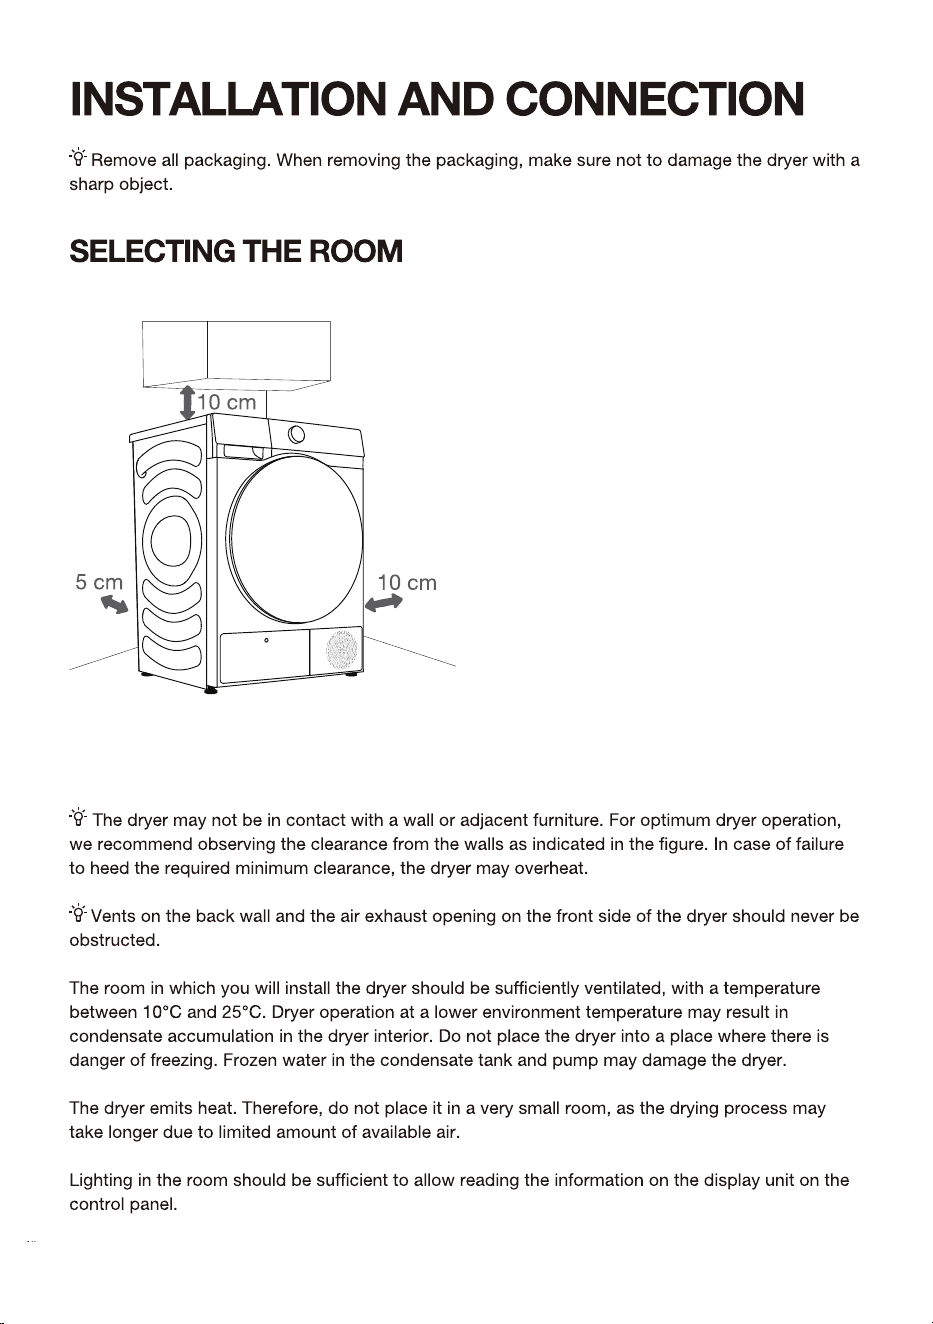
16 INSTALLATION AND CONNECTION
16 Selecting the room
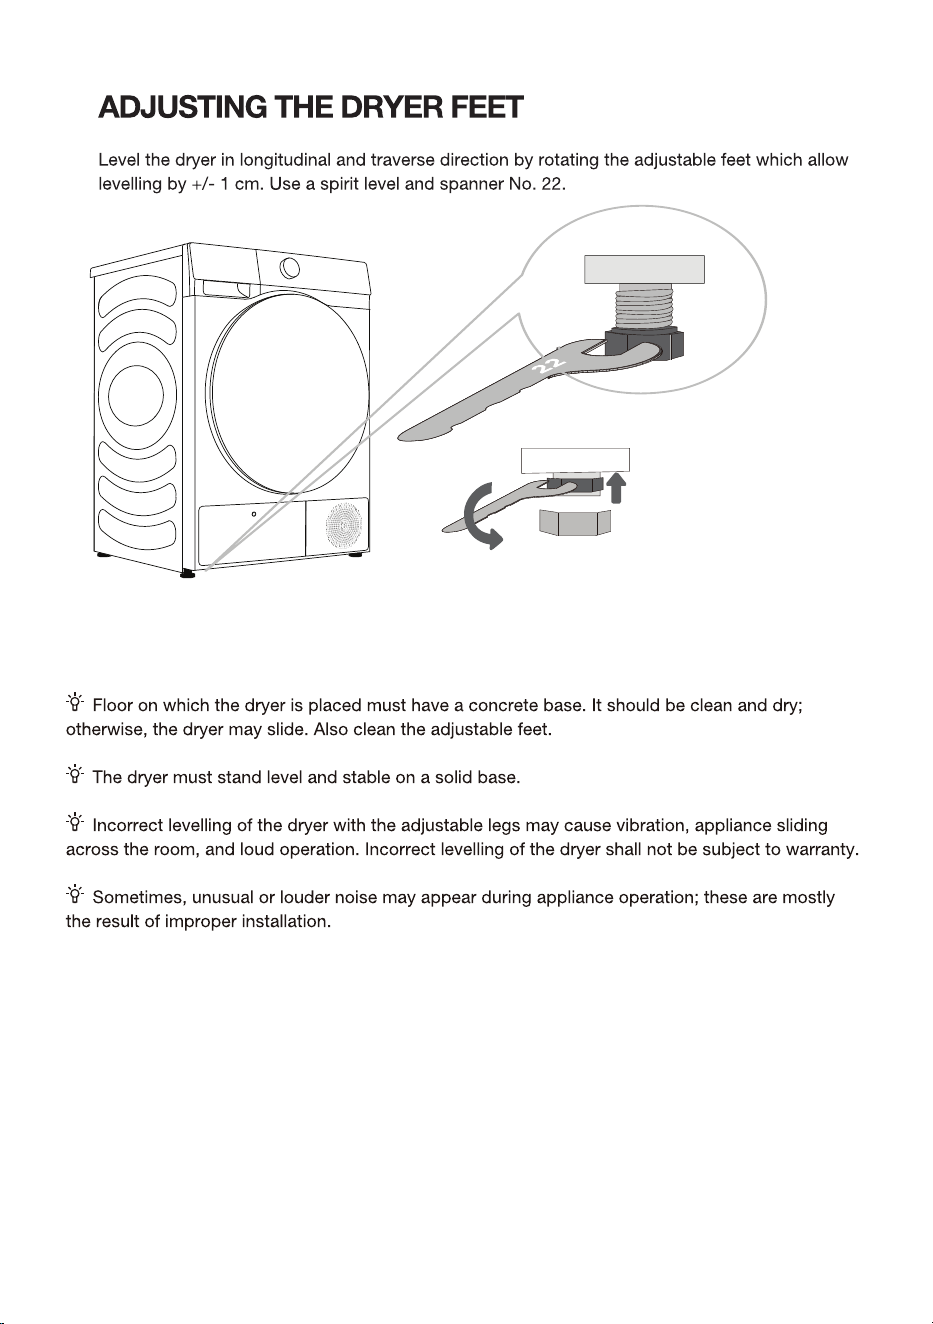
20 Adjusting the dryer feet
21 Changing the door opening direction
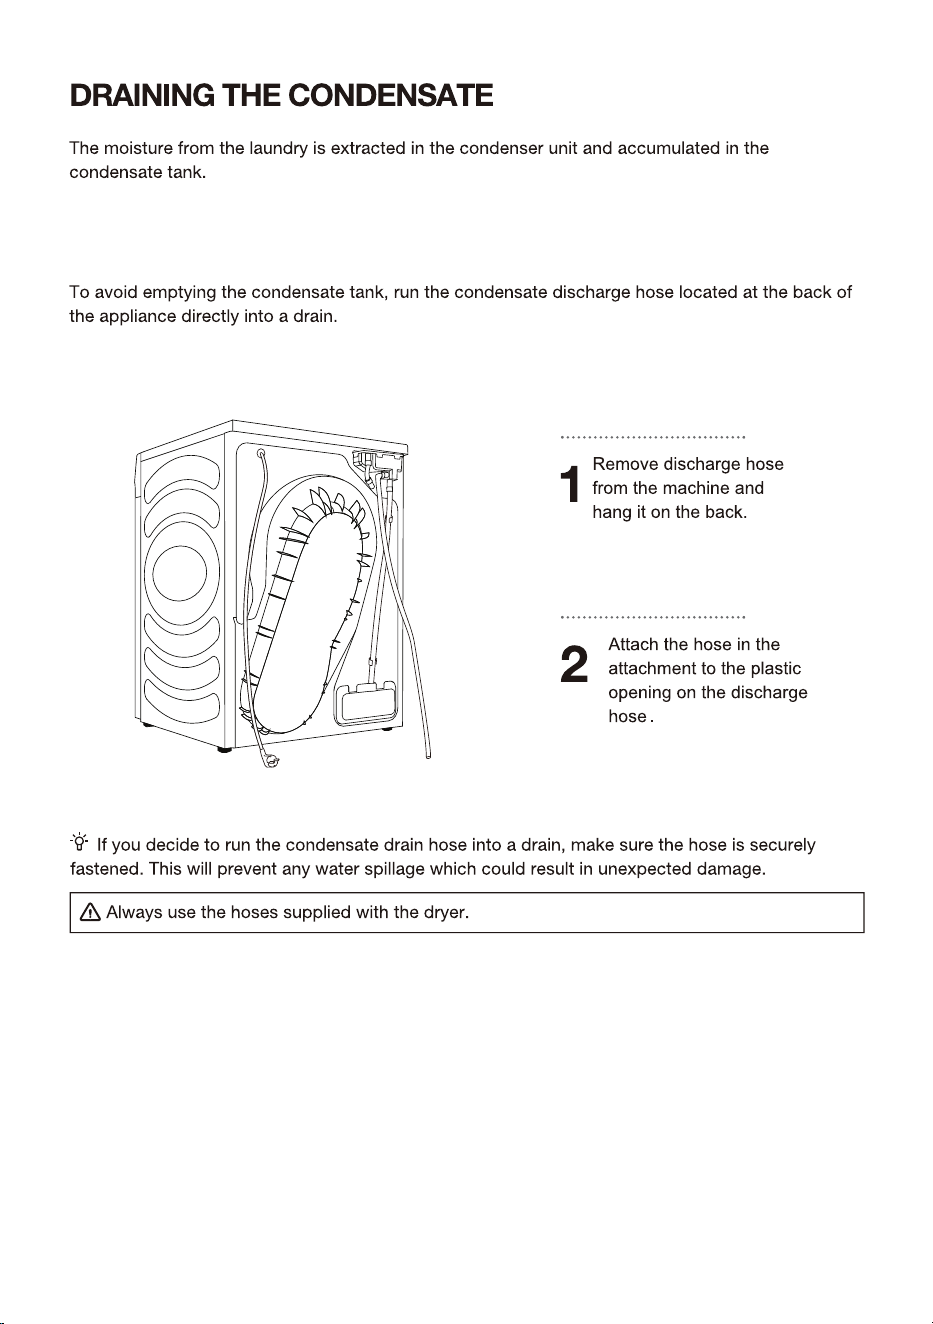
23 Draining the condensate
24 Connecting to the power mains
25 Moving and transport after installation
PREPARING THE
DRYER BEFORE
FIRST USE
26 BEFORE USING THE APPLIANCE FOR THE FIRST TIME
27 DRYING PROCESS, STEP BY STEP (1 -
)
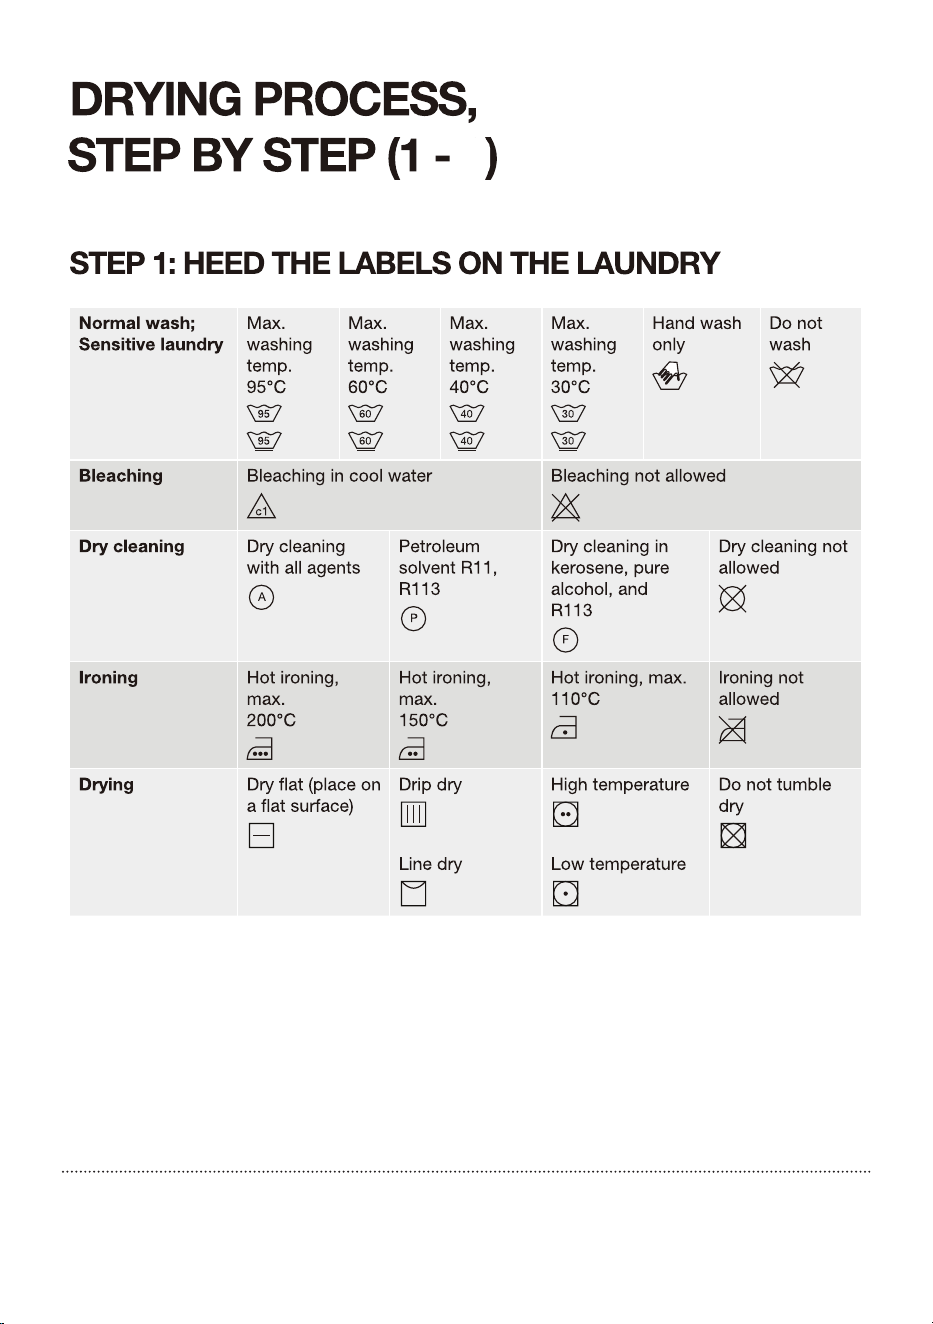
27 Step 1: Heed the labels on the laundry
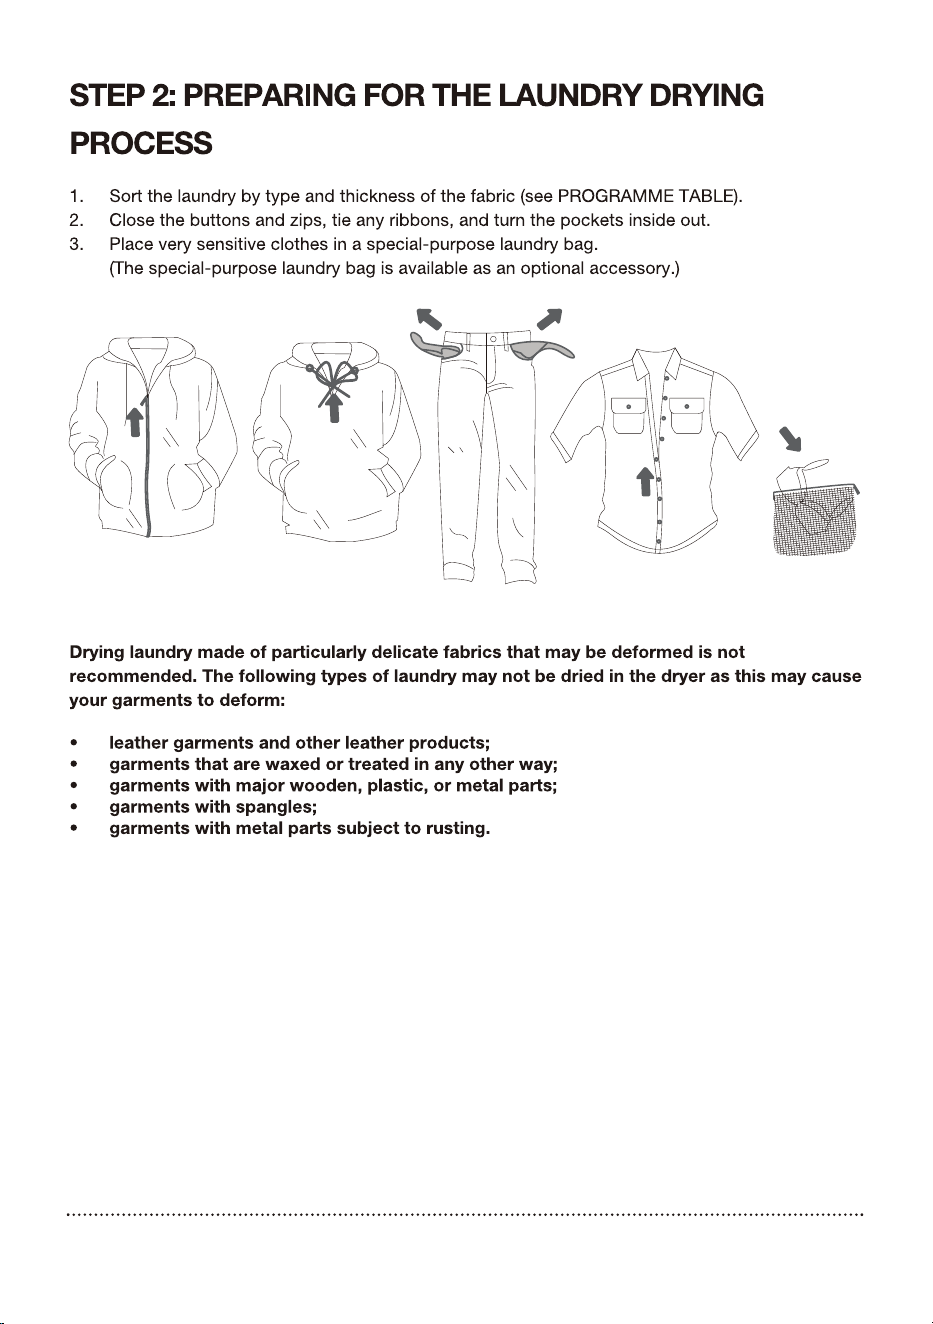
28 Step 2: Preparing for the laundry drying process
33 Step 3: Choosing the drying programme
35 Step 4: Selecting additional settings and functions
41 Step 5: Program display and end
DRYING PROCESS,
STEP BY STEP
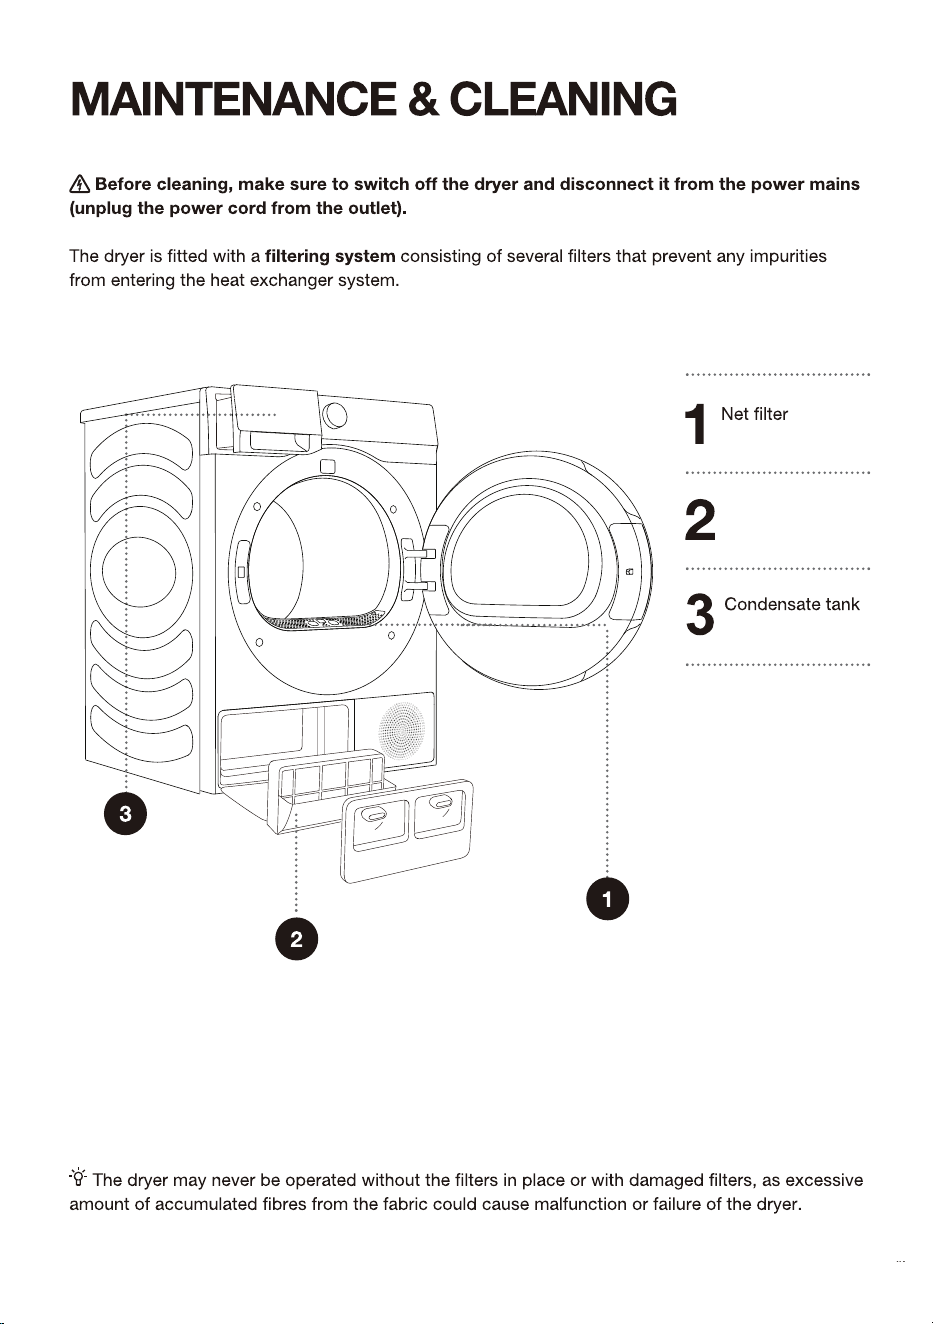
42 MAINTENANCE & CLEANING
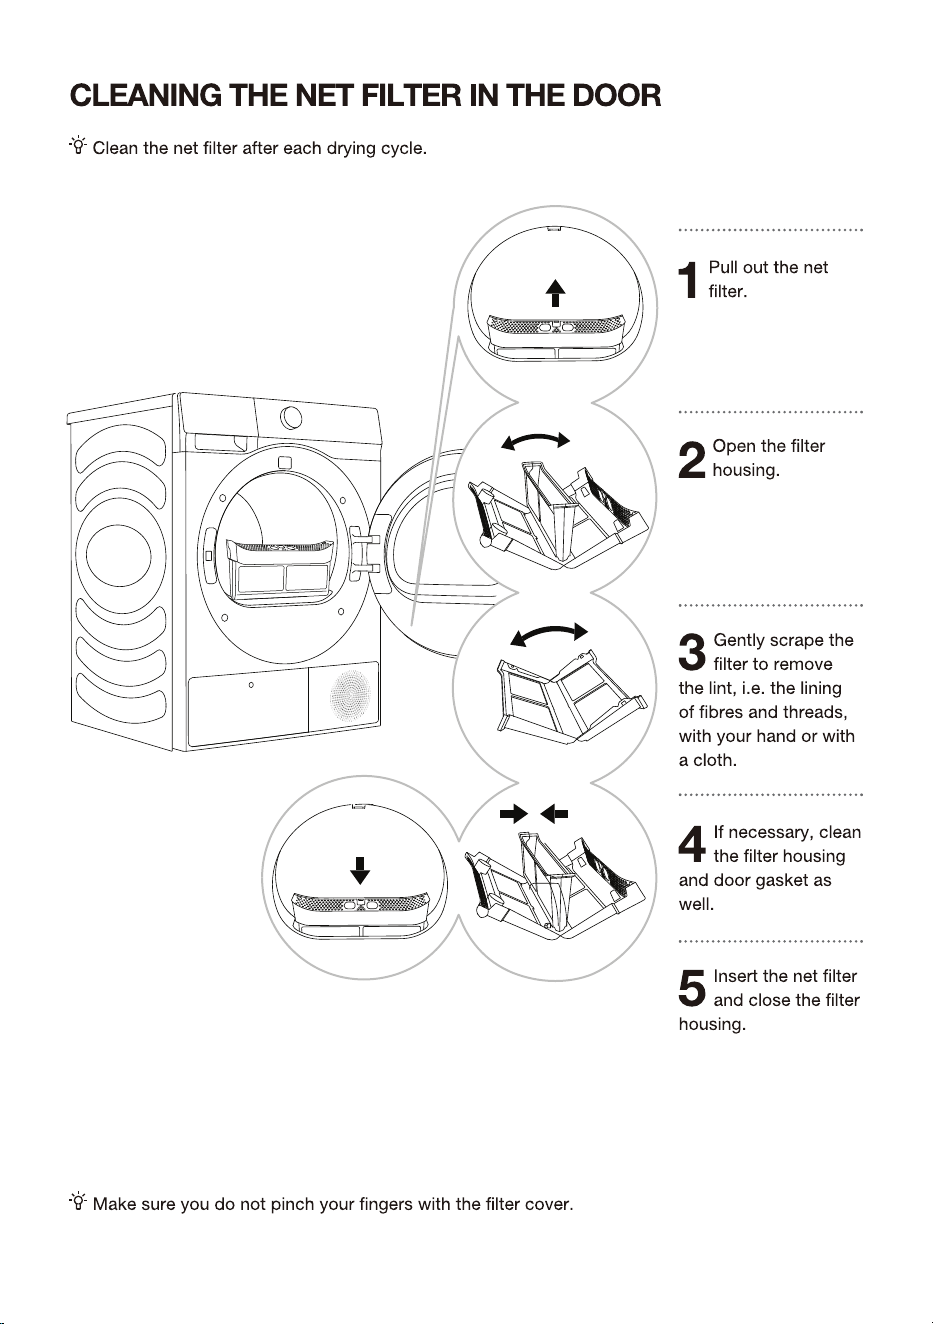
43 Cleaning the net filter in the door
44 Cleaning the heat exchanger filter
45 Cleaning of the heat exchanger
46 Emptying the condensate tank
48 Cleaning the dryer
DRYER CLEANING
AND MAINTENANCE
49 TROUBLESHOOTING
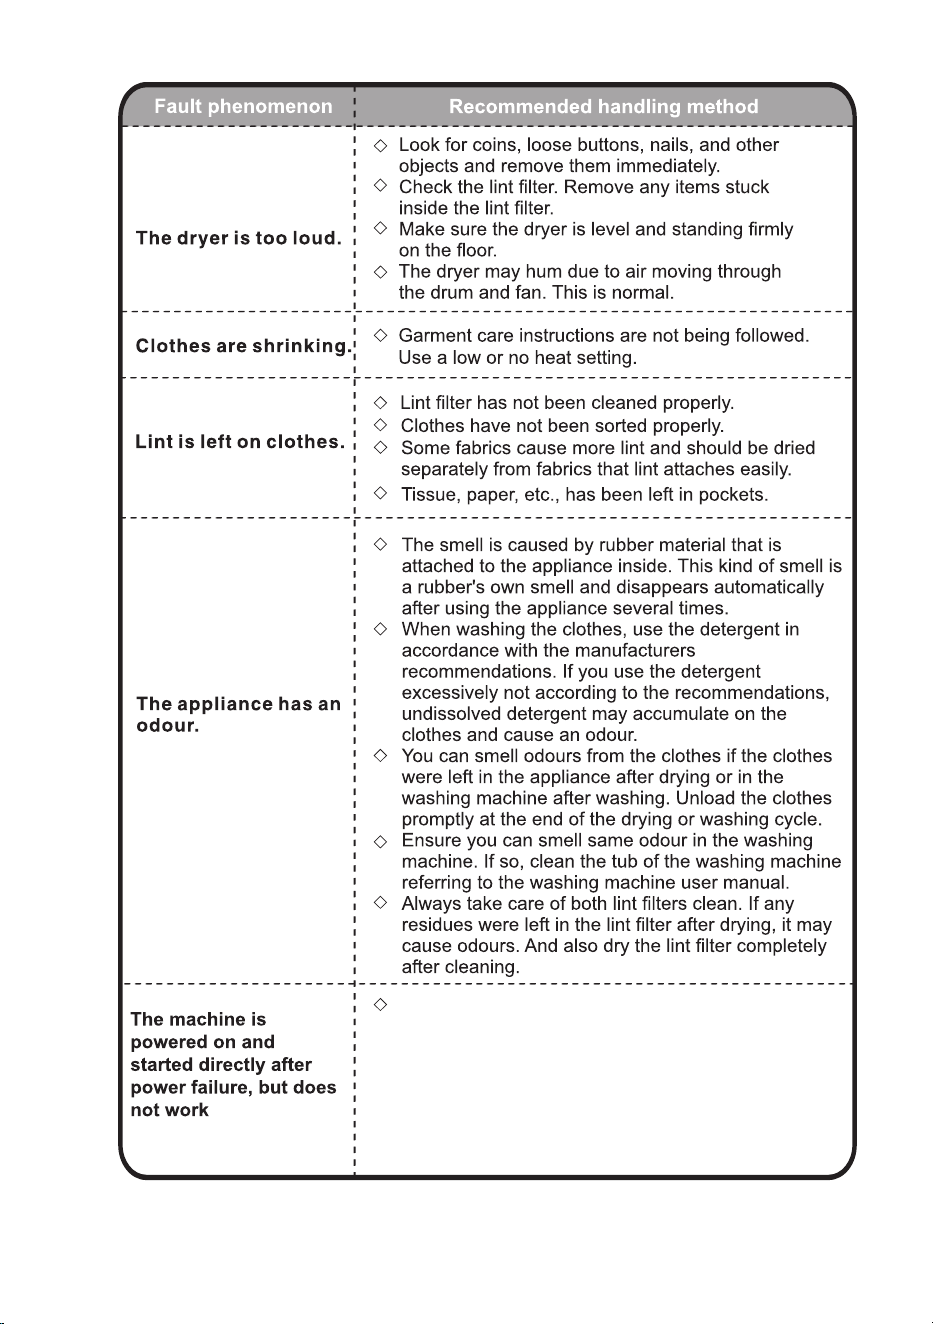
49 What to do …?
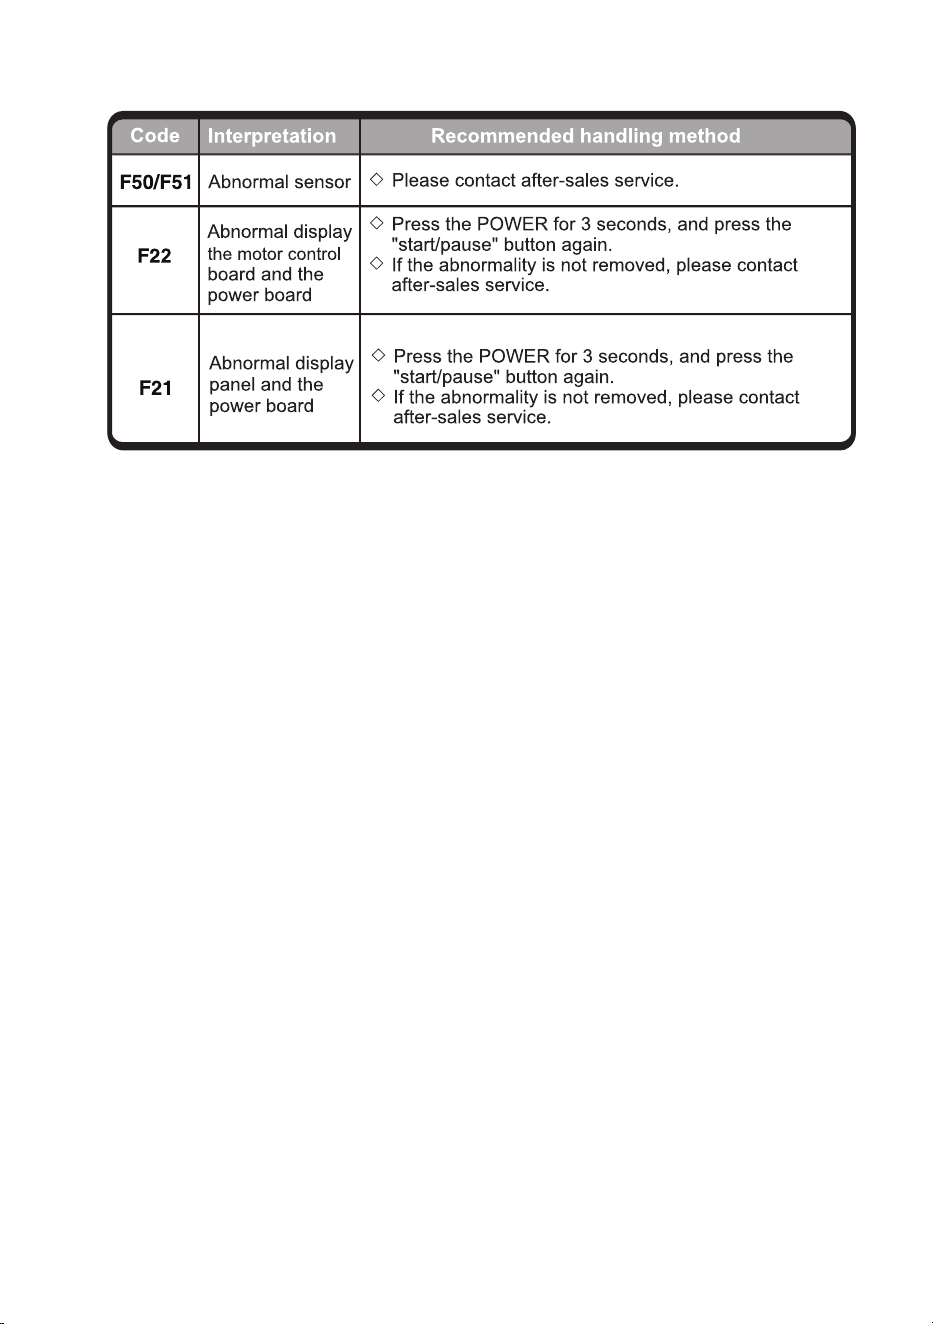
53 Servicing
TROUBLESHOOTING
55 TIPS FOR DRYING AND ECONOMIC USE YOUR DRYER
56 DISPOSAL
57 Connecting your appliance to the application ConnectLife
MISCELLANEOUS
3
ELECTRICAL SAFETY
+')6+3
NJ
Queensland Service Notes:In Queensland,the Authorized Service Person
Musthold a Gas Work Authorization for hydrocarbon refrigerants to carry
out servicingor repairs which involve removal of covers.
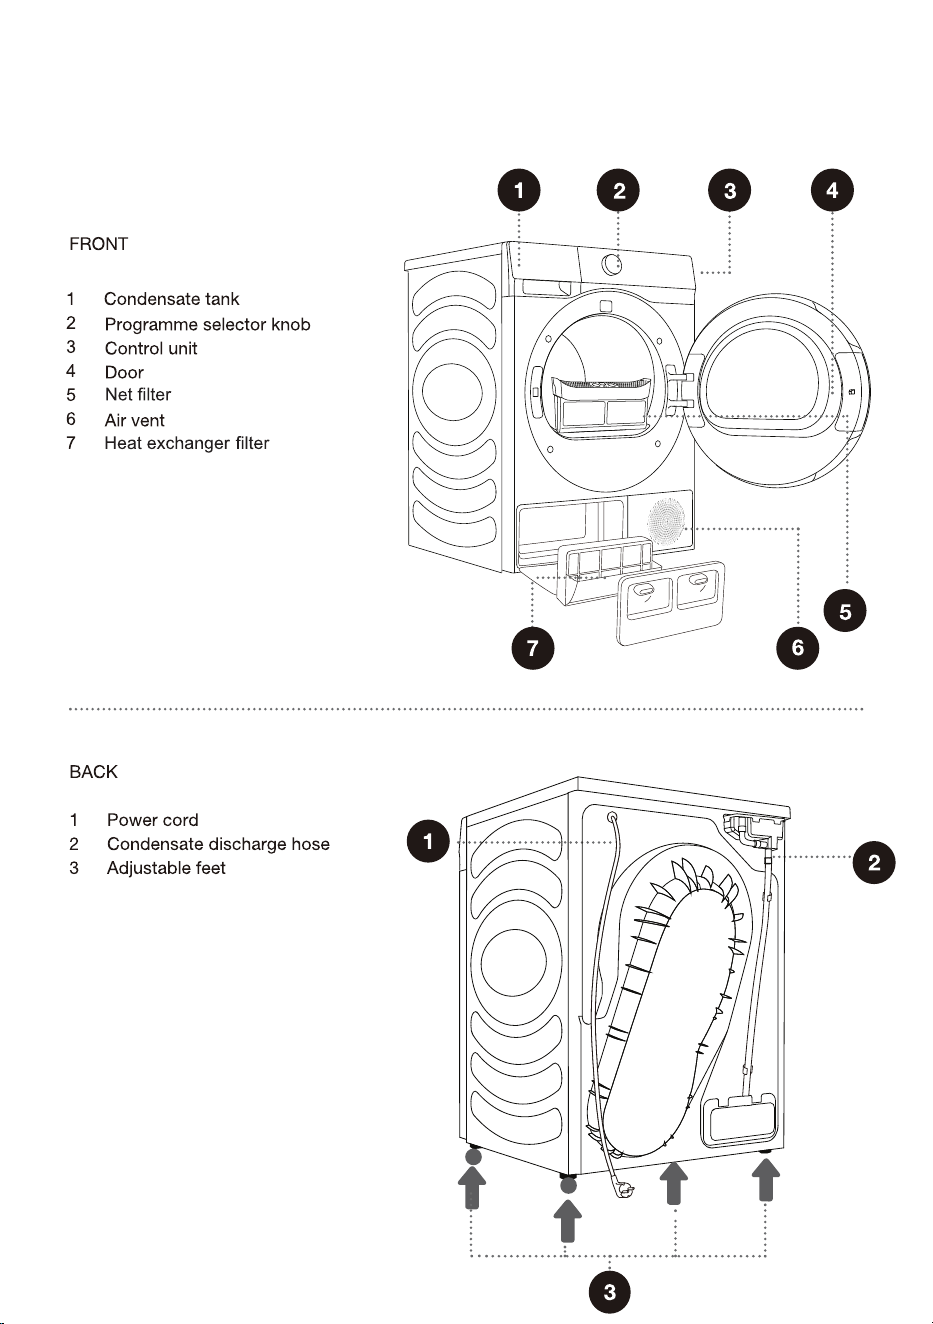
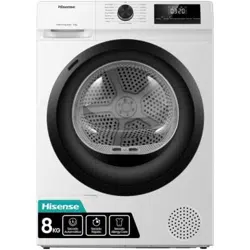
PRODUCT DESCRIPTION
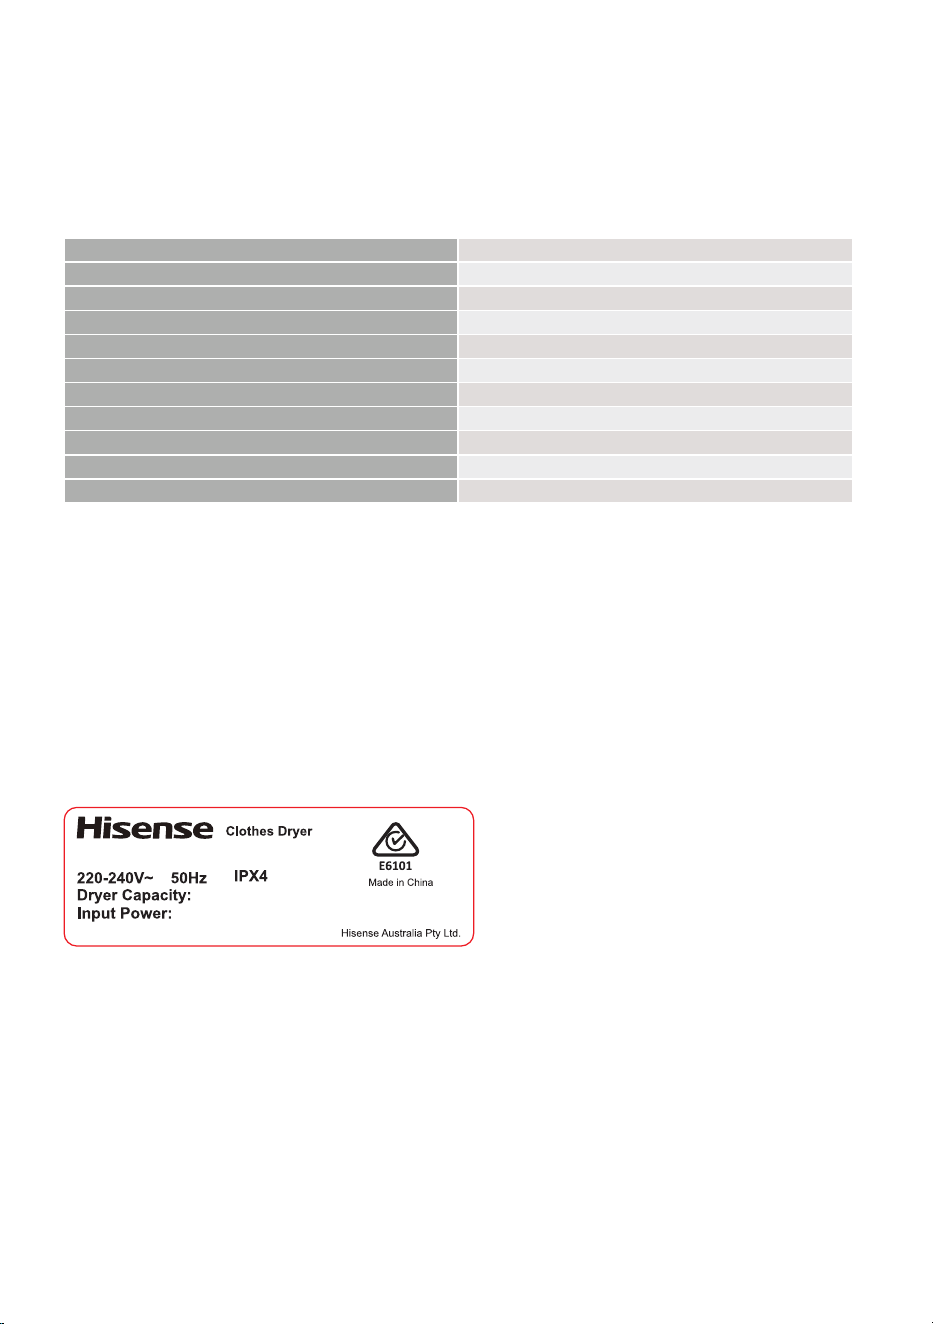
TECHNICAL INFORMATION
(DEPENDING ON THE MODEL)
Rating plate with basic information about the dryer is ftted on the front wall of the dryer door opening
(see chapter
>>
DESCRIPTION OF THE DRYER
<<
).
Width 595 mm
Height 845mm
Dryer depth (a) 640 mm
Depth with door closed 670 mm
Depth with door open (b) 1150 mm
Weight 54 kg
Rated voltage See rating plate
Nominal power See rating plate
Amount of refrigerant See rating plate
Refrigerant type R290
Maximum load See rating plate
Rating plate
$33529$/12
6*6($
+')6+3
NJ
:
5HIULJHUDQW5J
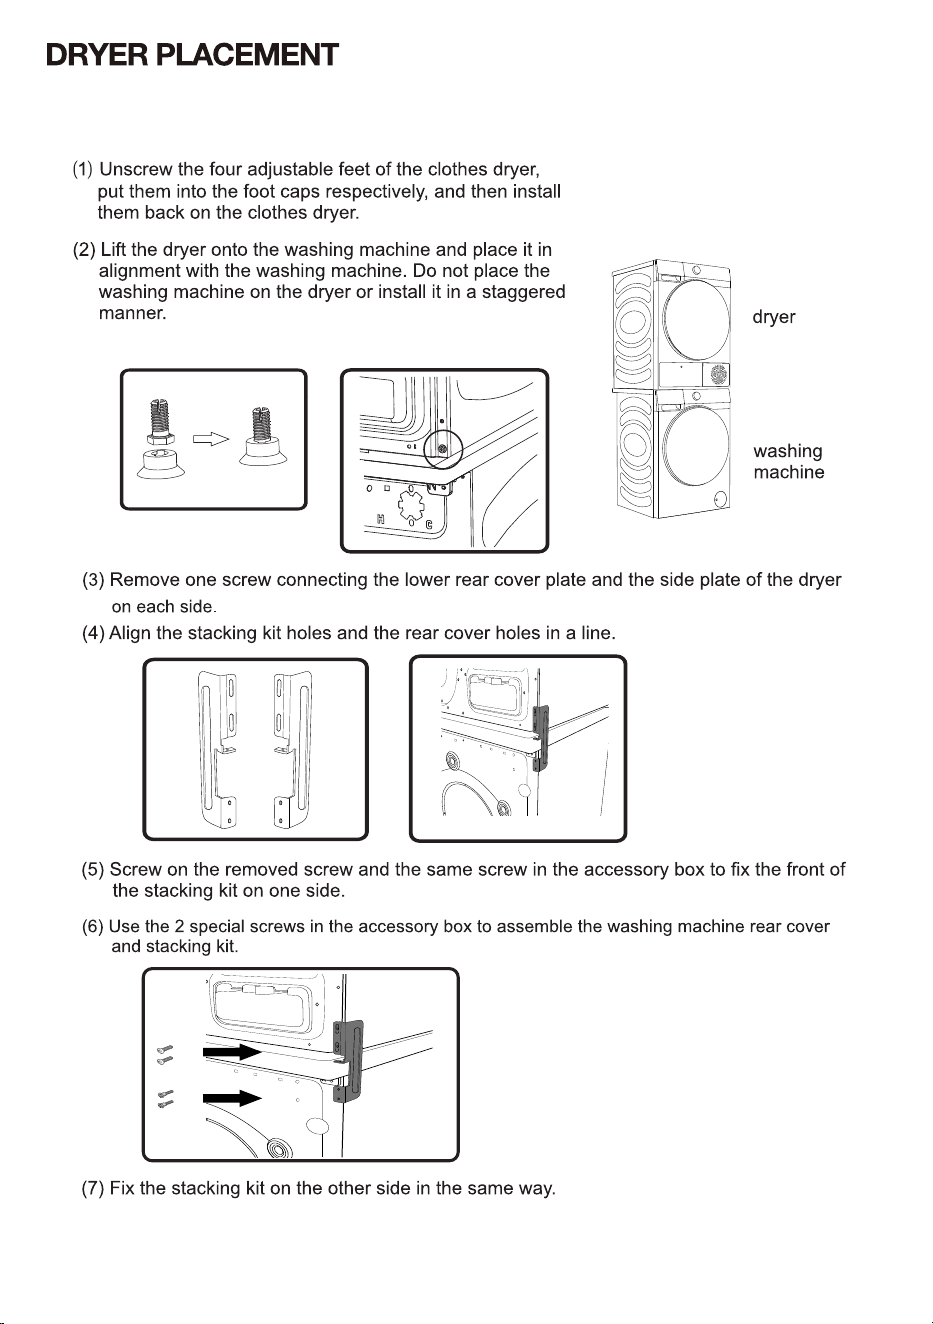
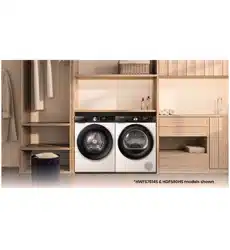
,I\RXKDYHD+LVHQVHZDVKLQJPDFKLQHZLWKPPWKH+LVHQVHGU\HUFDQEHSODFHGRQ
WKHWRSRILW.,QWKLVFDVHWKHVWDFNLQJNLWPXVWEHXVHG%HORZDUHWKHVWHSVIRULQVWDOODWLRQ

$OVR\RXFDQXVHWKHGU\HUVWDFNLQJEUDFNHWILJXUHDWRVWDFNHGZLWKD+LVHQVHZDVKLQJ
PDFKLQHZLWKPP VLGHSODWHRIWKHER[ILJXUH$OWHUQDWLYHO\WKHGU\HUFDQEHSODFHG
QH[WWRWKHZDVKLQJPDFKLQHILJXUH<RXFDQFRQWDFWDIWHUVDOHVIRUSXUFKDVHILJXUHDDQG
LQVWDOOLWDFFRUGLQJWRXVHUPDQXDO

During drying, the screen will display a prompt indicating the condensate water tank is full and should
be emptied.


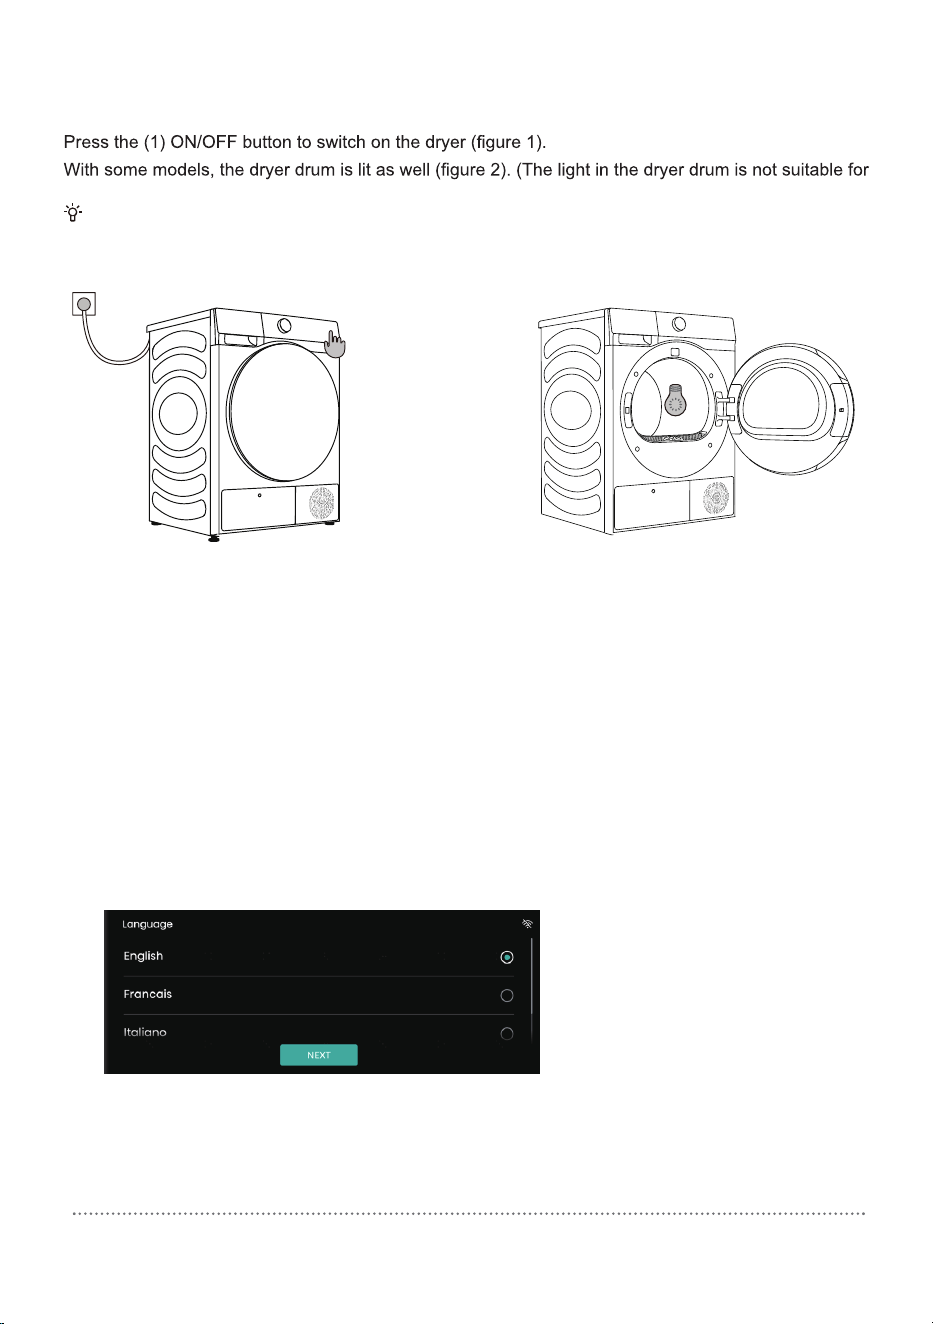
SWITCHING ON THE DRYER
Connect the dryer to the power mains by plugging in the power cord.
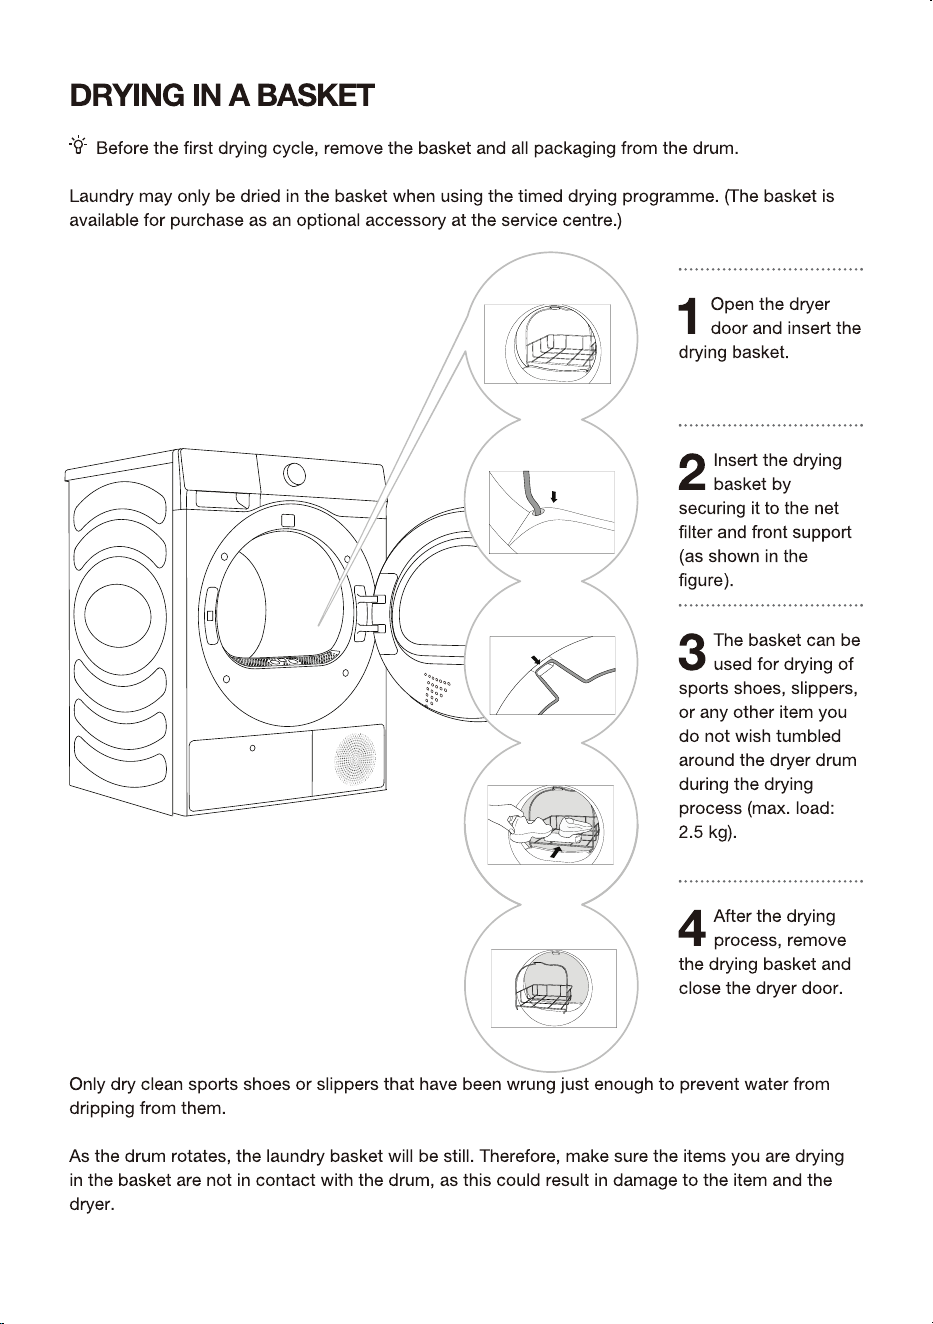
any other use.)
The light in the dryer drum may only be replaced by the manufacturer, a service technician or an
authorized person.
1 2
Before first use, configure the preferences of Language, Country and Region, Time
Zone and User agreement according to the boot navigation and user’s actual needs.
(The energy efficiency requirement varies with the country and region. If the country/
region selected is inconsistent with reality, the energy efficiency grade and data will be
different.)
1. Configure the language
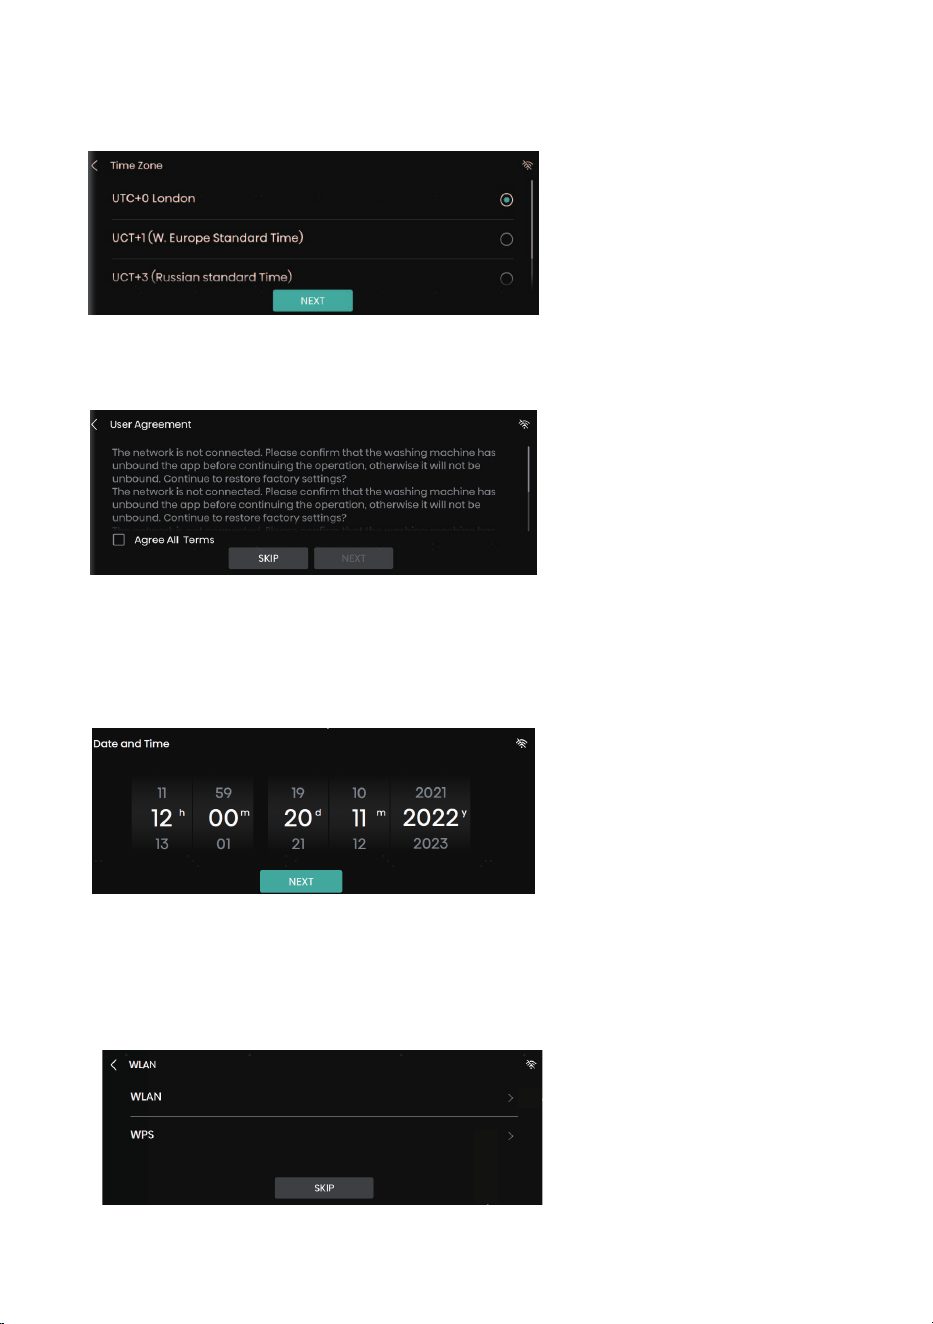
2. Select the time zone
3. Confirm whether network configuration is necessary
3.1 Skip network configuration, and set system date and time
Note: After skipping network configuration, you can subsequently set the network again
under System Settings
3.2 If network configuration is not skipped, the network can be connected as prompted
on the screen.
Note: For detailed steps of network connection, see “WLAN”.
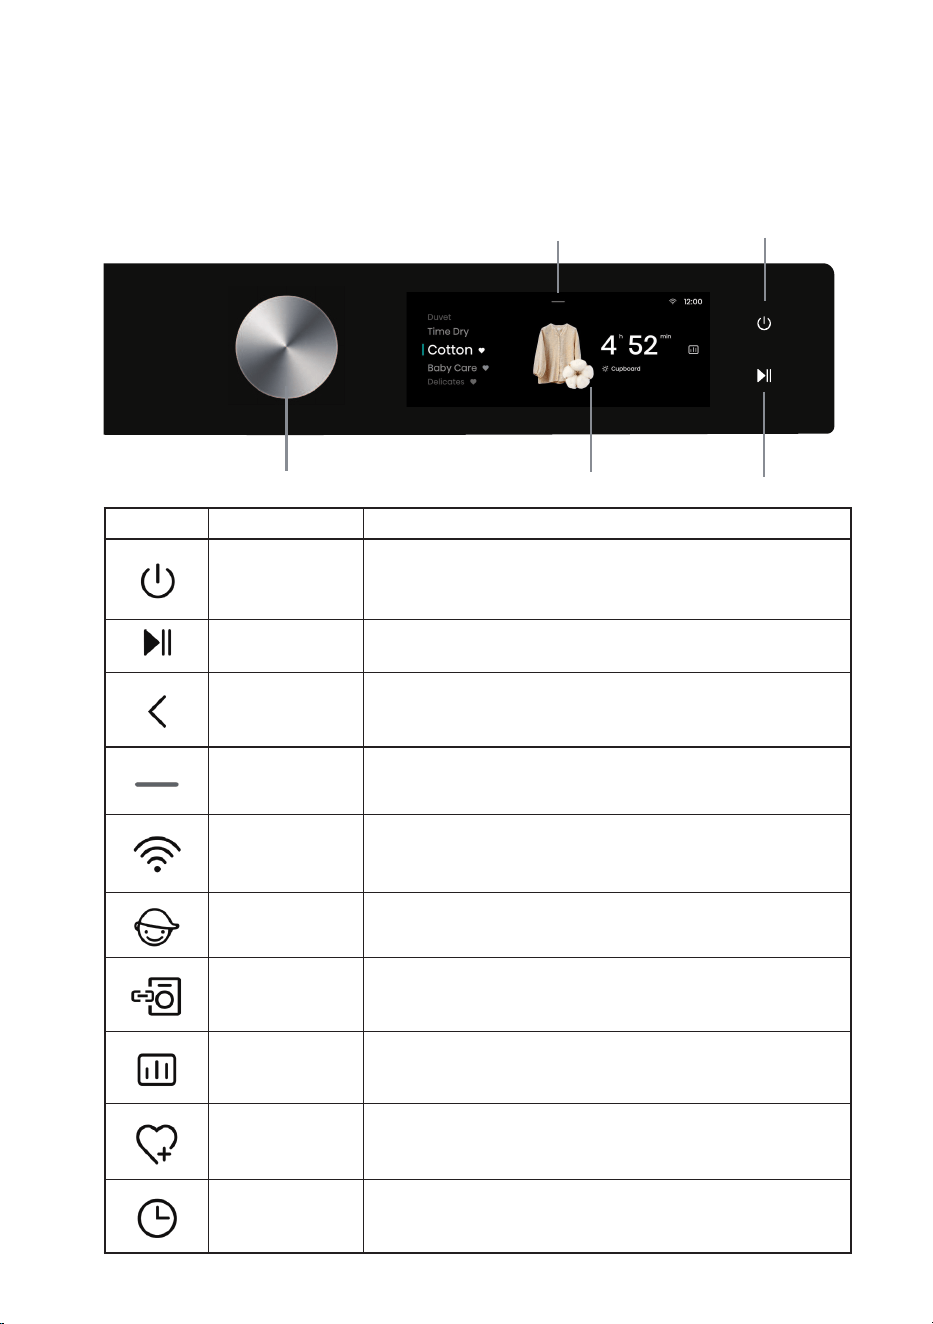
This device is controlled by a touchscreen + a rotary knob; program selection can be
realized by touching the touchscreen or rotating the knob; the Power and Start/Pause
buttons can be pressed by touching the touchscreen.
Icon Name Description
Power button For powering on/off the washing machine.
Start/Pause button For starting/suspending a program.
Back Go back to the previous interface.
Settings
Enter Setting Options to set WLAN, Drum Light, Mute,
Settings, etc.
WLAN WLAN icon of the washing machine.
Child Lock icon
After a program is started, all operations except the Power
button will be locked if the child lock is turned on.
Wash & Dry icon
For combined control of the washing machine and the dryer
in the same home network.
Intelligent Report
Touch this icon to show the local weather, total power
consumption and other data.
Favorites icon Touch this icon to add the current program to your favorites.
Reserve icon Touch this icon to enter the Reserve interface.
Touch screen
Setting Options
Power
Start/Pause
Knob
32
CONTROL PANEL
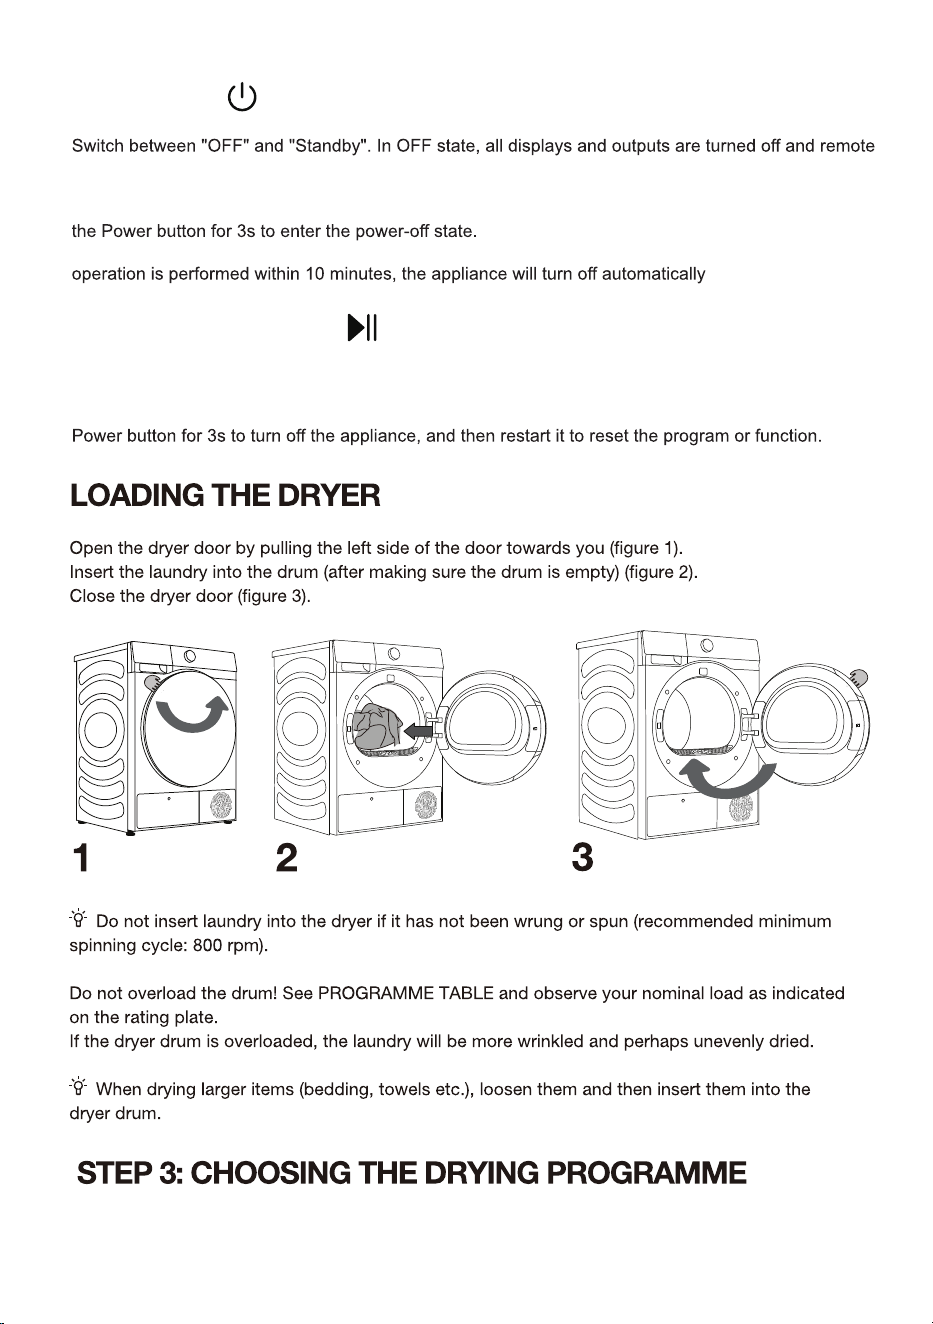
Choose the program by rotating the program selector knob or touching the touchscreen
(depending on the type of laundry and dry level desired). See Program Table.
POWER
startup is not supported. Press the Power button; the screen will turn on and the dryer will enter
standby mode.
When the dryer is in standby mode, or after the screen displays the program end interface, long press
In standby mode, or in the program end interface or Wash & Dry retry reminder interface, if no
.
START/PAUSE
Press this key to start/pause the program.
When the program is paused, the settings cannot be changed. To change the program or function
during operation, press the Back button to go back and end the current program; or long press the
8VHWKHSURJUDPPHIRUODUJHULWHPV!:KHQWKHSURJUDPPHLV
FRPSOHWHLWZLOOEHGU\$GMXVWHGGUXPURWDWLRQSUHYHQWV
WKHODXQGU\IURPWDQJOLQJ
'+6%
'+6%
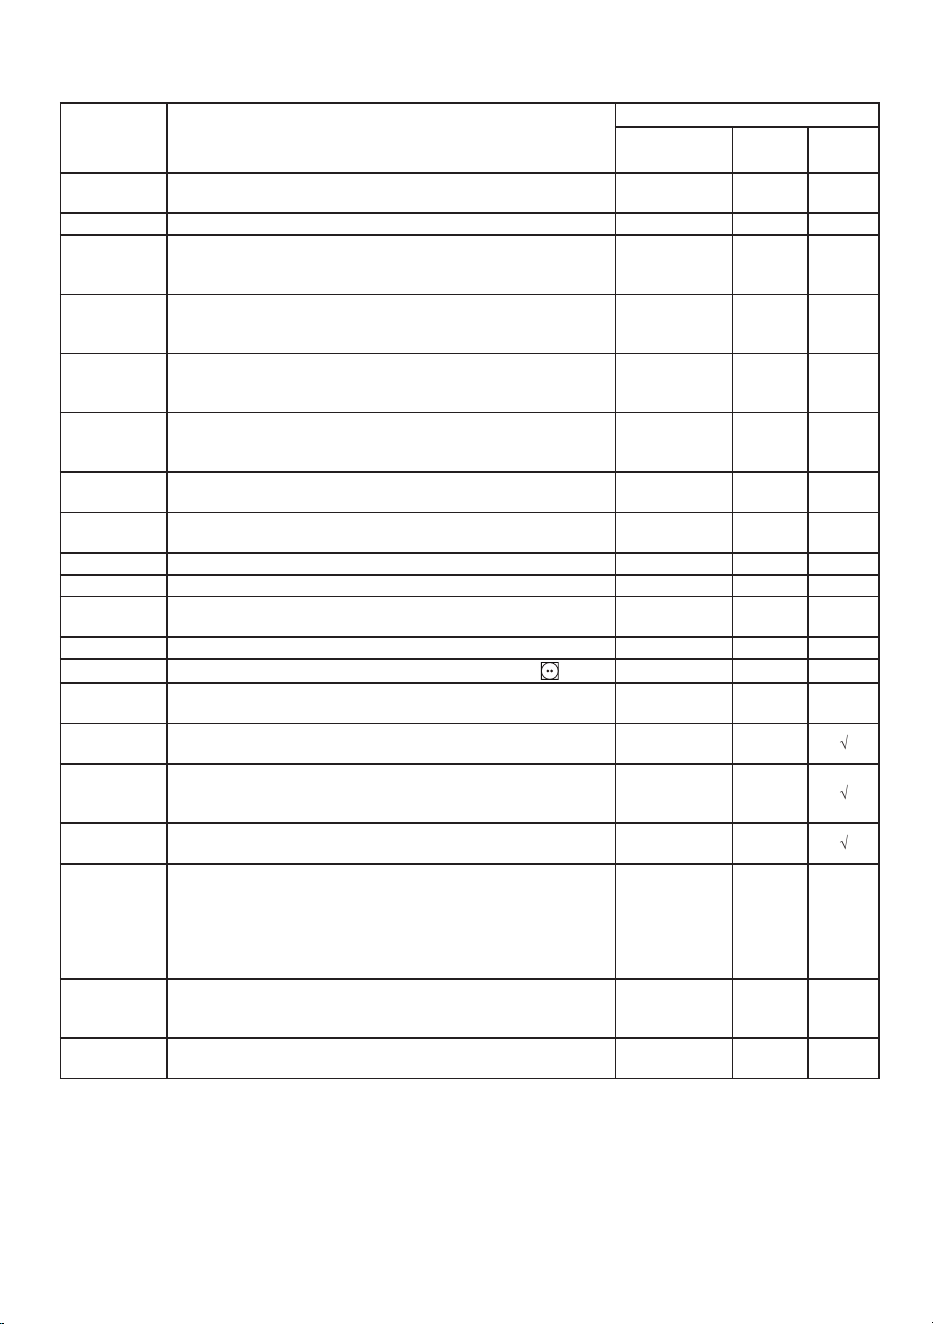
Program Table
Program Type of laundry
End mode
Rated Capacity
(kg)
Just in
Time
Manual
Dry
Cotton
This program is suitable for thicker, non-sensitive cotton laundry.
It will be completely dry after the drying program ends.
10 ¥
Synthetics This program is suitable for synthetics. 5 ¥
Delicates
This program is suitable for highly delicate laundry made of
V\QWKHWLF¿EHUZKLFKPD\EHVOLJKWO\PRLVWDIWHUWKHGU\LQJ
program ends. A special-purpose laundry bag is recommended.
1 ¥
Towels
This program is suitable for non-sensitive items (towels, kitchen
clothes...). After the drying program ends, it will be dry and
ready to be stored in the cupboard.
4 ¥
Bedding
This program is suitable for larger items. After the program ends,
it will be completely dry. Adjusted drum rotation would prevent
the laundry from tangling.
2.5 ¥
Duvet
7KLVSURJUDPLVVXLWDEOHIRUWH[WLOHVVWXႇHGRUSDGGHGZLWKGRZQ
feather (pillows, duvets, jackets, etc.). Please dry larger items
separately, and use the Extra Dry or Time Dry if necessary.
2 ¥
SportVwear
7KLVSURJUDPLVVXLWDEOHIRUFORWKHVZLWK¿OPVDQGVSRUWVZHDU
made of mixed materials and breathable fabrics.
2 ¥
Baby Care
This program is suitable for baby clothes. The clothes will be
completely dry.
2 ¥
Allergy Care This program is used for removing allergens such as mites. 2 ¥
Quick 30’ This program is used for quick drying of lightweight clothes. 0.5 ¥
Shirts
This program is suitable for shirts and tops. Adjusted drum
rotation would prevent the laundry from creasing.
2 ¥
Denim This program is suitable for denim and clothes that fade easily. 3 ¥
Power 6SHHG 79'
This program is suitable for drying cotton clothes with
label. ¥
AI Dry
This program is suitable for drying clothes mixing cotton clothes
and non-iron clothes.
5 ¥
Ion Refresh
:KHQWKLVSURJUDPLVHQDEOHGWKHKHDWHUZLOOEHWXUQHGRႇ7KLV
program is suitable for refreshing clothes by adding ions.
/ ¥
Wool
7KLVSURJUDPLVVXLWDEOHIRUVRIWHQLQJRUÀXႈQJZRRODQG
silk clothes, which must be dried thoroughly according to the
manufacturer's instructions.
/ ¥
Rack Dry
7RXVHWKLVSURJUDPSOHDVHSODFHODXQGU\VXFKDVVPDOOVWXႇHG
toys, sneakers, etc.) on the rack for drying.
/ ¥
Time Dry
This program is suitable for non-sensitive laundry that is slightly
moist and must be thoroughly dried. In this program, remaining
moisture is not detected automatically. If the laundry is still
GDPSDIWHUWKHSURJUDPHQGVSOHDVHUHSHDWWKHSURJUDPLIWKH
laundry is too dry and therefore creased and rough to touch, it
indicates that the drying time selected is too long.
/ ¥
Warm Dry
This program is suitable for drying daily items that can be dried,
such as bath towels, bathrobes, towels, small articles and wet
clothes.
/ ¥
Cool Air
This program is suitable for fabrics that need to be refreshed by
FRRODLUWKHGU\HUGUXPZLOOQRWKHDW
/ ¥
* (QHUJ\HIILFLHQF\WHVWSURJUDP:&RWWRQ&XSERDUG'U\
* These programs have reversing function specially for big load
.
If your laundry is not dried to the desired dryness level, use extra functions or use a more suitable
programme.
STEP 4: SELECTING ADDITIONAL SETTINGS AND FUNCTIONS
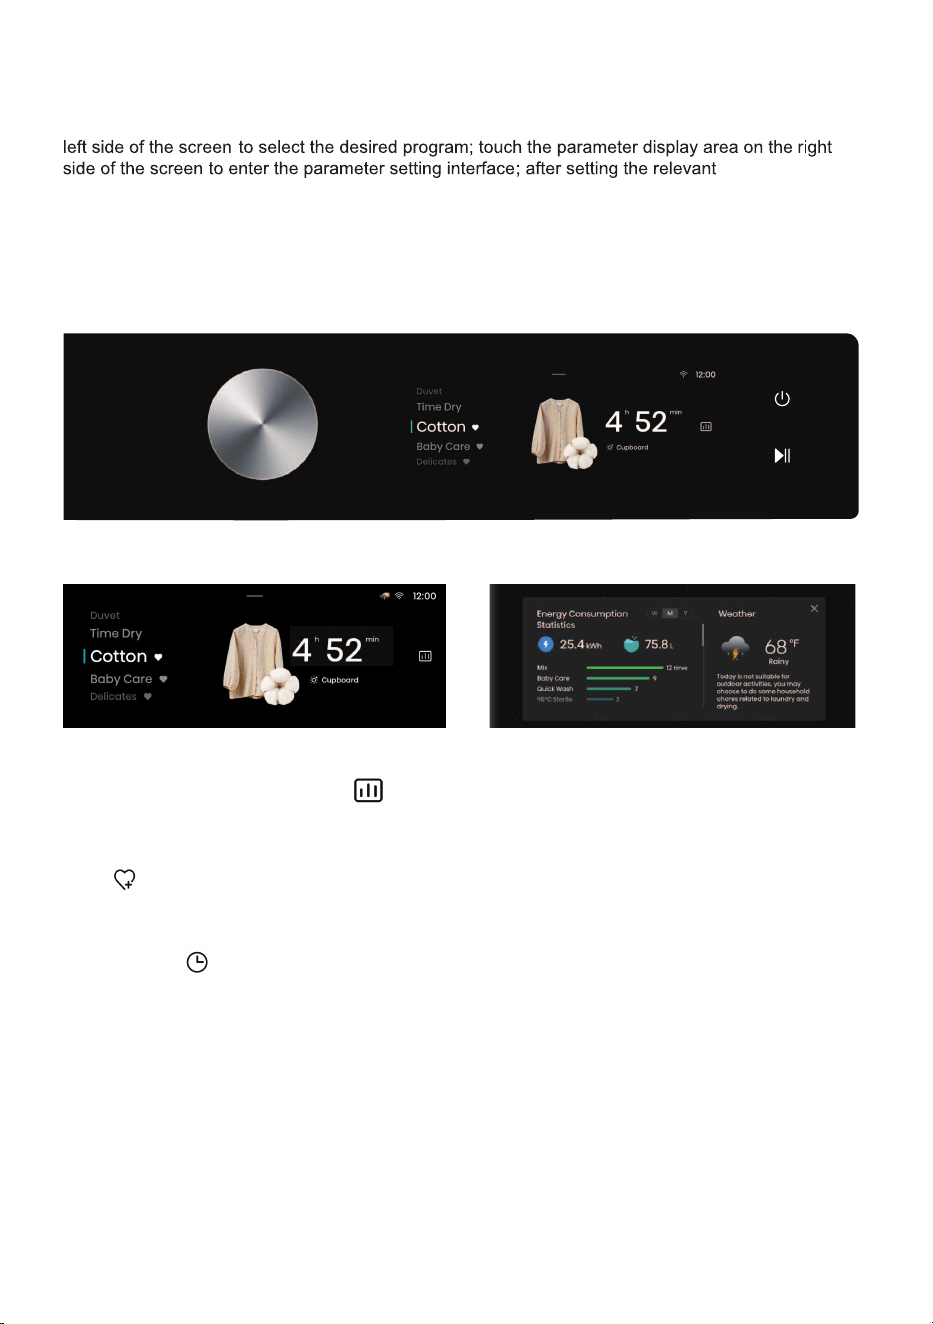
The settings of most programs are adjustable: Slide up or down in the program display area on the
press Start key to start running the selected program.
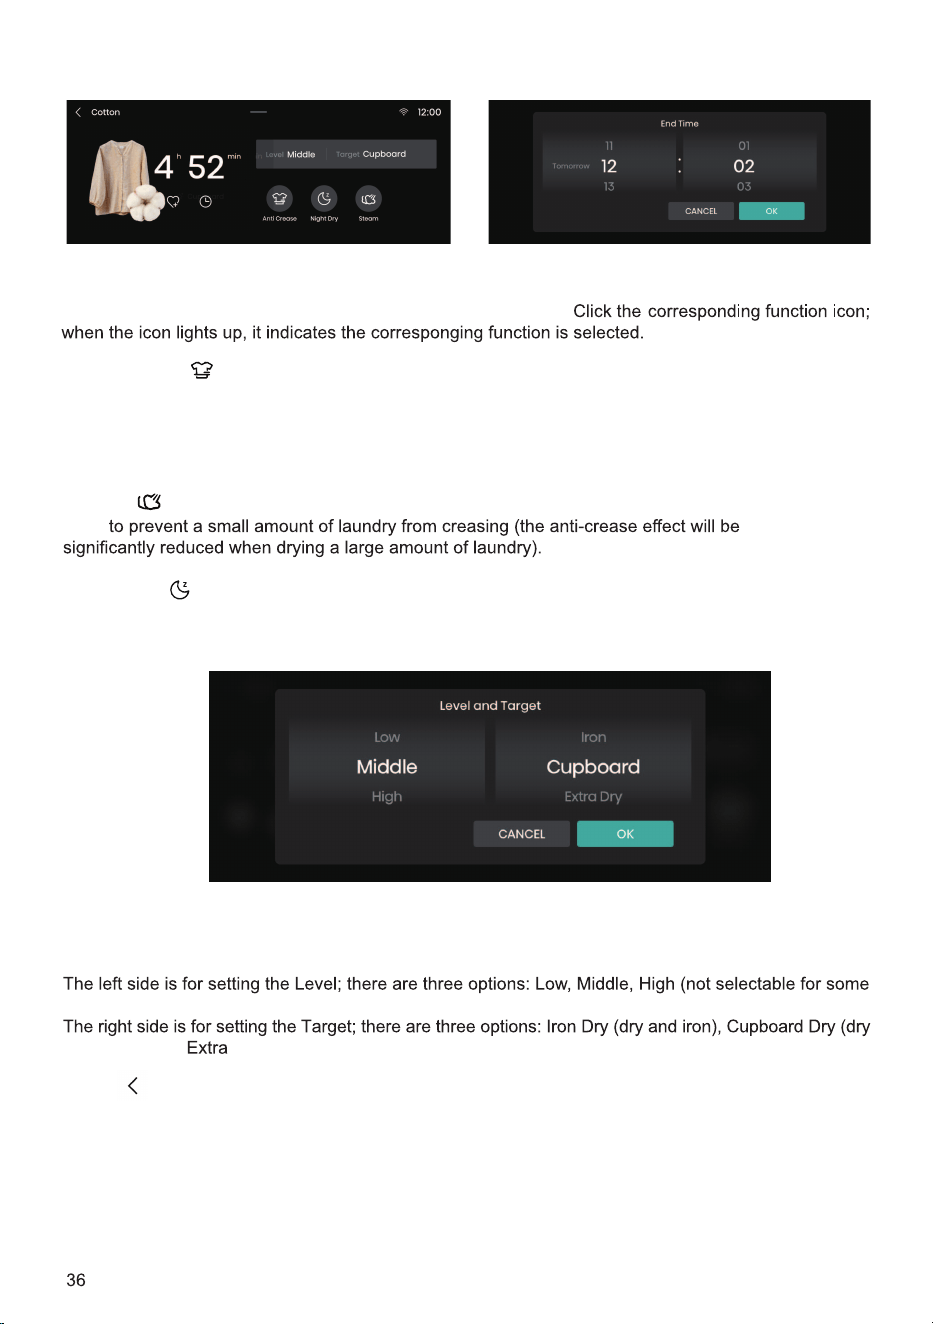
Touch the selected program time to change the Level and Target settings, and to set additional
functions such as the Anti Crease, Night Dry and Steam. Additional functions that can be selected
vary with the program.
Press this icon to add the current program to Favorites, and favorited programs will be listed at
the top of the program list
.
parameters,
Fav.
Delay End:
35
1. The reserved time is the end time, which can be set when the machine is in standby;
2. After reservation, if user switches the program or sets parameters or functions, the reservation
will be canceled automatically;
3. When the reservation is in progress, the screen will display “Delaying” and the End Time; after
the washing program starts, the remaining time will be displayed;
4. The reserved time must be longer than the program running time, and the maximum time
should not exceed 24h.
Intelligent Laundry Report
When network is connected, touch this icon to enter the Intelligent Laundry Report interface,
where information such as energy consumption and weather is displayed.
Press this button to return to the Program Selection interface. This button can be used if you
want to abandon setting relevant parameters and end the current program.
Touch the parameter display area to enter the Parameter Settings interface.
programs). Users can select a proper drying level according to the quantity and material of clothes
.
and wear), and Dry (dry and put away).
.dehcnual si margorp a erofeb dedda eb nac taht snoitcnuf fo tsiL
Additional functions
Drying Level and Target
Back
If the laundry cannot be timely taken out after drying, the "Anti Crease" function can be
selected. The drum will rotate intermittently to prevent crease of clothes. Press any button or open
the machine door to exit the Anti Crease mode. If no operation is performed, the program will end
automatically after the default maximum duration of 12 h.
Anti Crease
Steam
Used
Used to reduce drying noise and suitable for drying during nighttime.
Night Dry
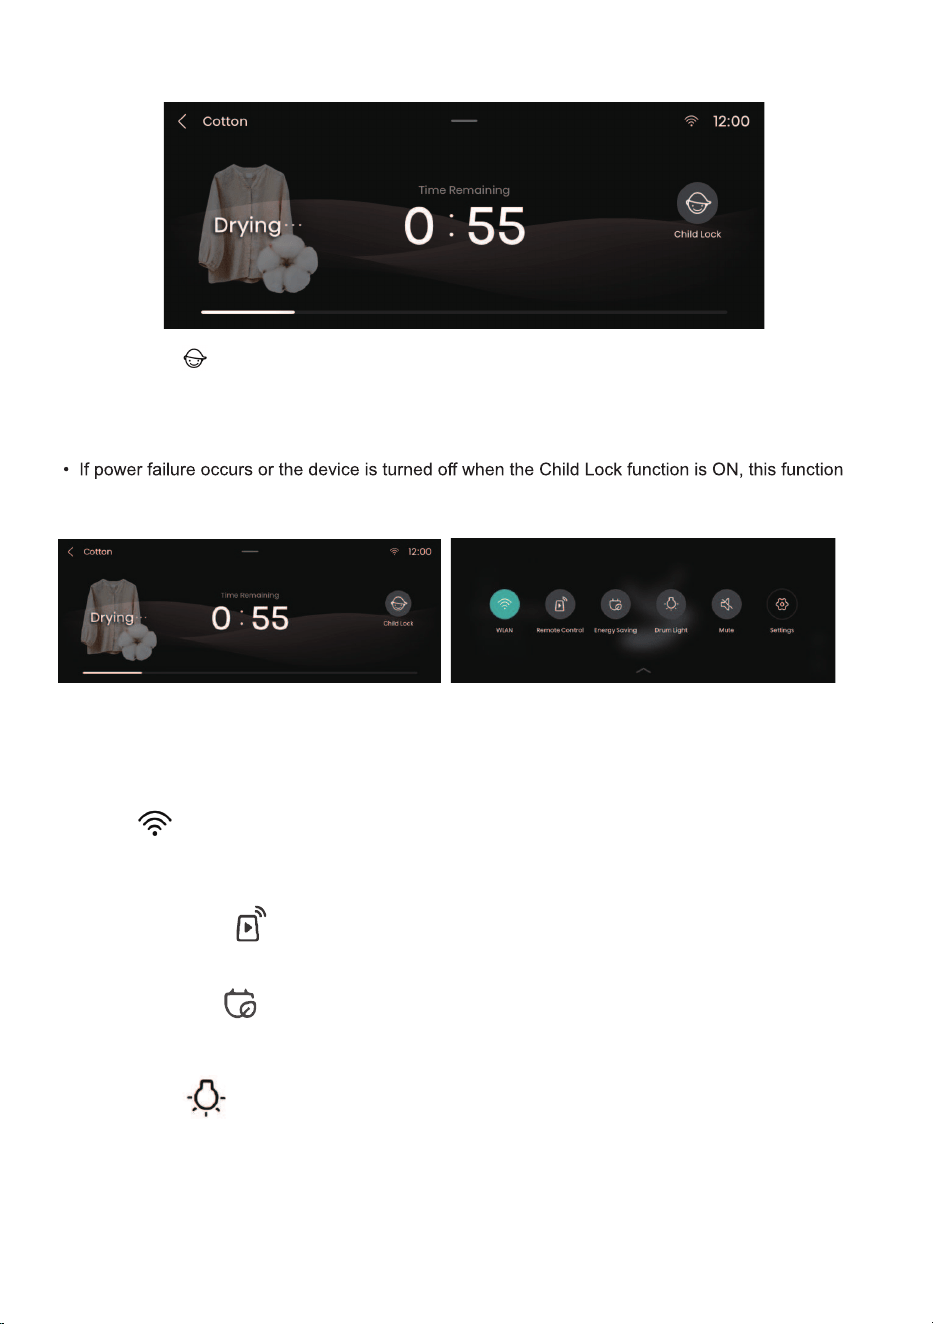
This is a safety feature. To enable this function, press the Child Lock icon. When the
icon lights up, it indicates the Child Lock function is enabled. Press the Child Lock icon for 3s to unlock
this function.
• When Child Lock is set, all function buttons except the Power button are disabled.
will be deactivated. Child Lock will unlock automatically after the program is completed.
Child Lock
37
Setting Options:
After touching the Settings icon, a drop-down list of setting options will appear, for setting WLAN,
Remote Control, Energy Saving, Drum Light, Mute, Wash & Dry, Settings, Detergent and Softener.
WLAN
This function can be used to turn on/off WLAN. After the washing machine is successfully
connected to WLAN, it can be controlled via the app on your mobile phone.
Remote Control
This function can be used to remotely control the machine via the app.
Energy Saving
This function can be used to set the time for the screen to enter the Energy Saving mode, and the
duration during which the drum light stays on.
Drum Light
This function can be used to manually turn on/off the Drum Light.
When the machine is in standby, when a program is suspended, or when laundry is ended, the
drum light will turn on automatically.
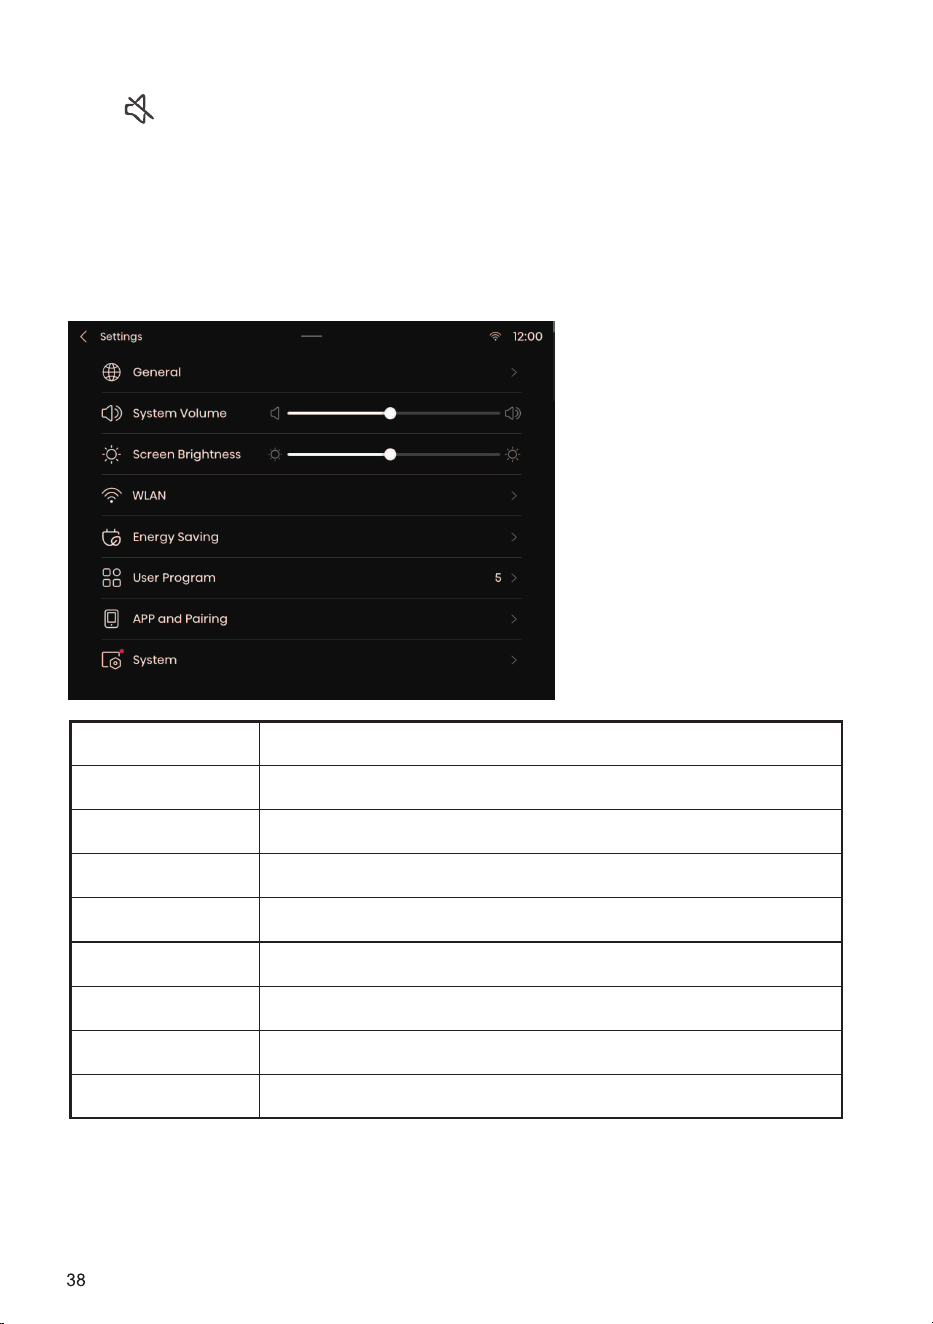
Mute
This option can be used to turn on/off the prompt tone of the machine. When it is turned off, all
sounds of the machine except the alarm tone will be disabled.
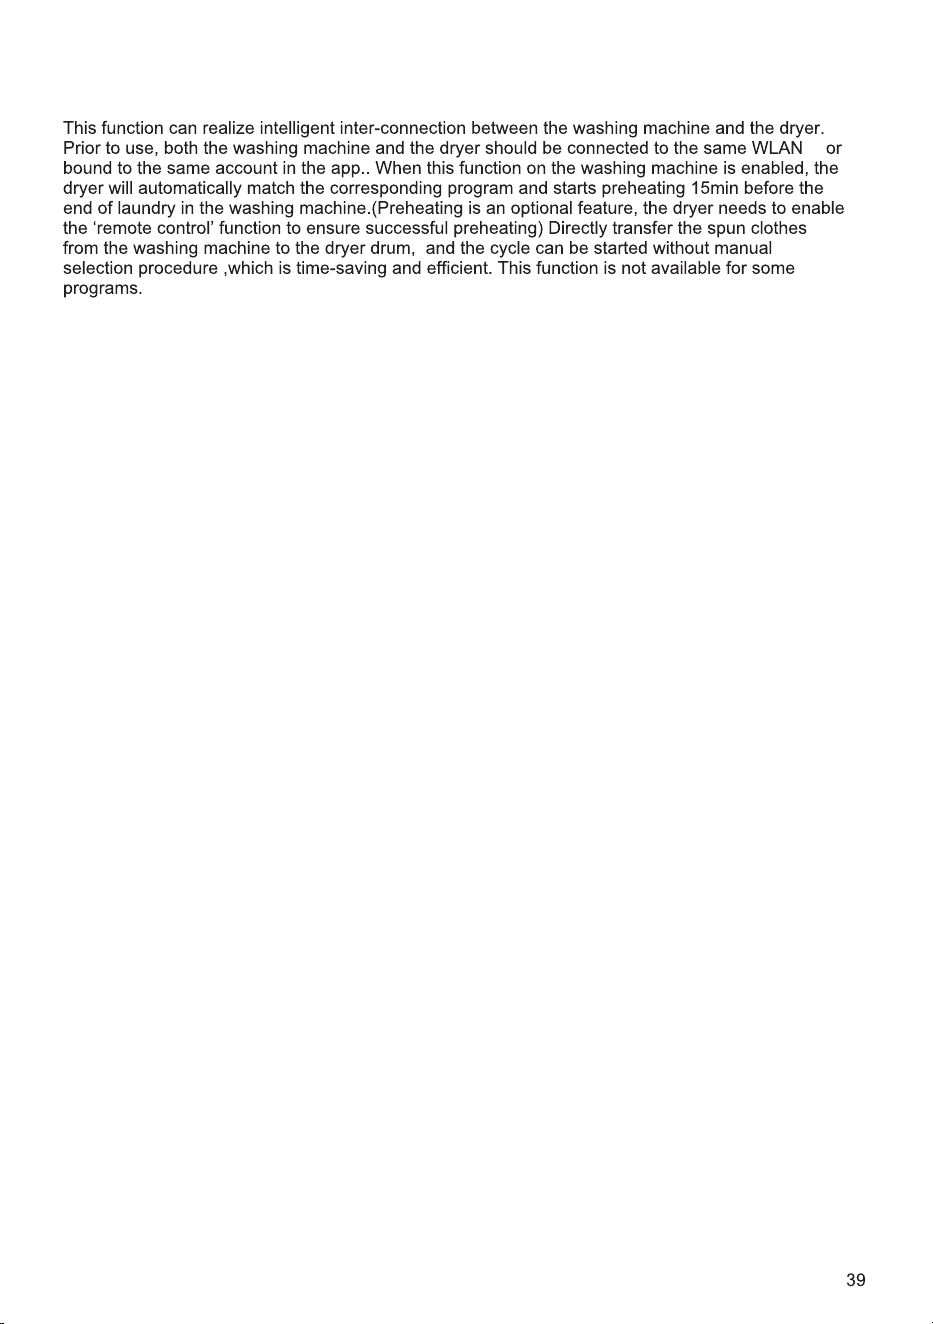
Name Function Description
General Set the language, date and temperature unit.
System Volume Set the system volume.
Screen Brightness Set the screen brightness.
WLAN Configure network connection.
Energy Saving Turn on Energy Saving.
User Program Users can set the number of programs shown on the home page.
APP and Pairing View the QR code for App downloading and binding.
System Turn on system upgrade and restore factory settings.
Settings
press this icon to enter the Settings interface, where you can set General, System Volume, Screen
Brightness, WLAN, Energy Saving, User Program,APP and
Pairing, System Upgrade, etc.
WASH & DRY DESCRIPTION
,
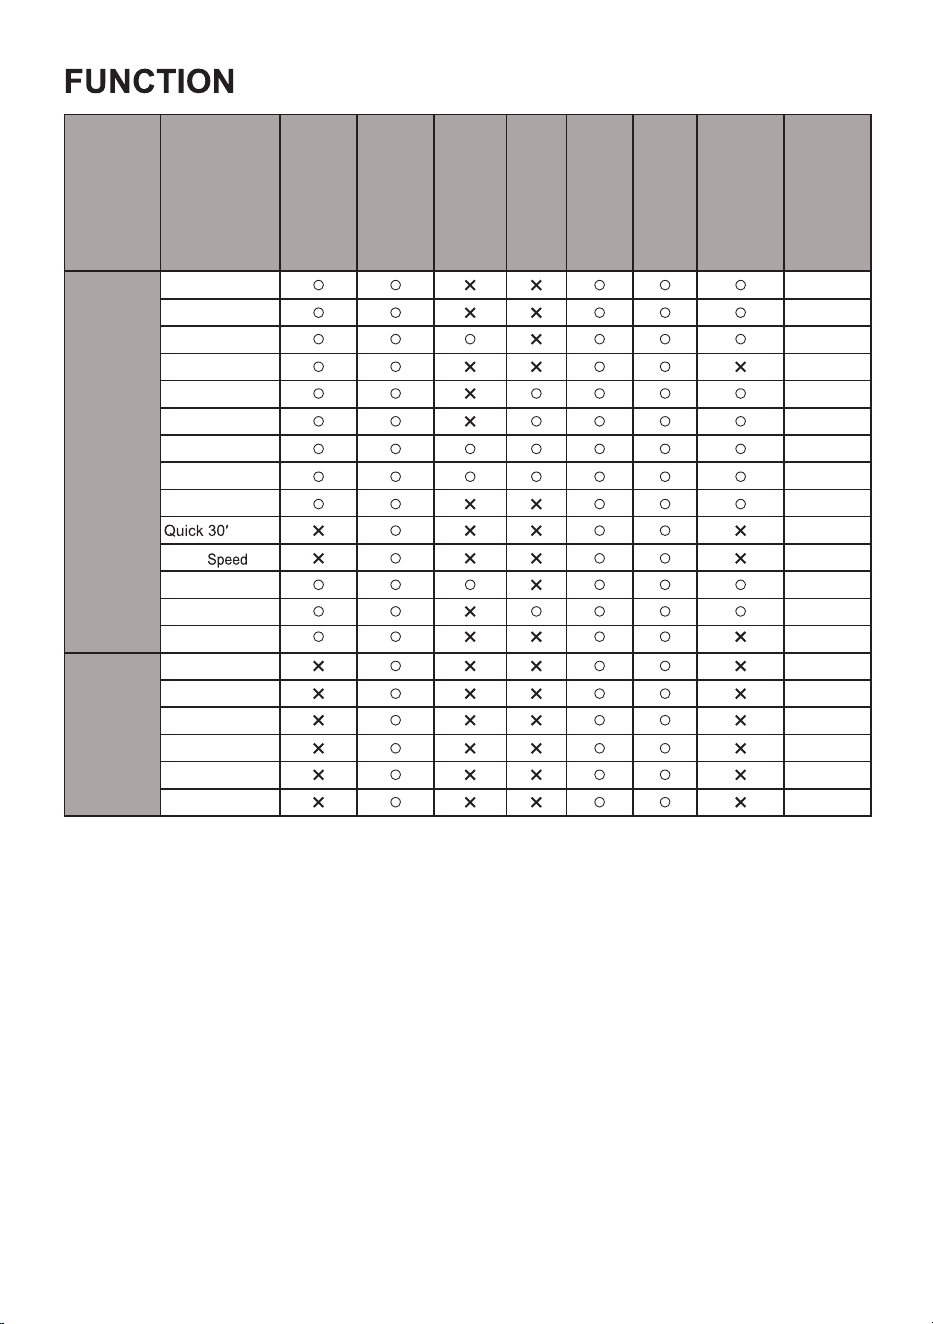
Program
DRYING TARGET
ANTI CREASE
NIGHT DRY
STEAM
DRUM LIGHT
DELAY END
SETTING
DRYING LEVEL
DEFAULT
DRYING LEVEL
SMART
END
AI Dry
LOW
Allergy Care
LOW
Bedding
LOW
Baby Care
HIGH
Shirts
LOW
Cotton
LOW
Synthetics
LOW
Delicates
LOW
TIME DRY
Ion Refresh
-
Rack Dry
-
Wool
-
Time Dry
-
Warm Dry
-
Cool Air
-
Note: When the Steam function is added, the maximum rated capacity changes to 3 shirts under the
Shirts program, and to 1 Kg under other programs.
TABLE
Sport
swear
LOW
LOW
Towels
LOW
Denim
LOW
Duvet
HIGH
Power 79'
LOW
STEP 5: PROGRAM DISPLAY AND END
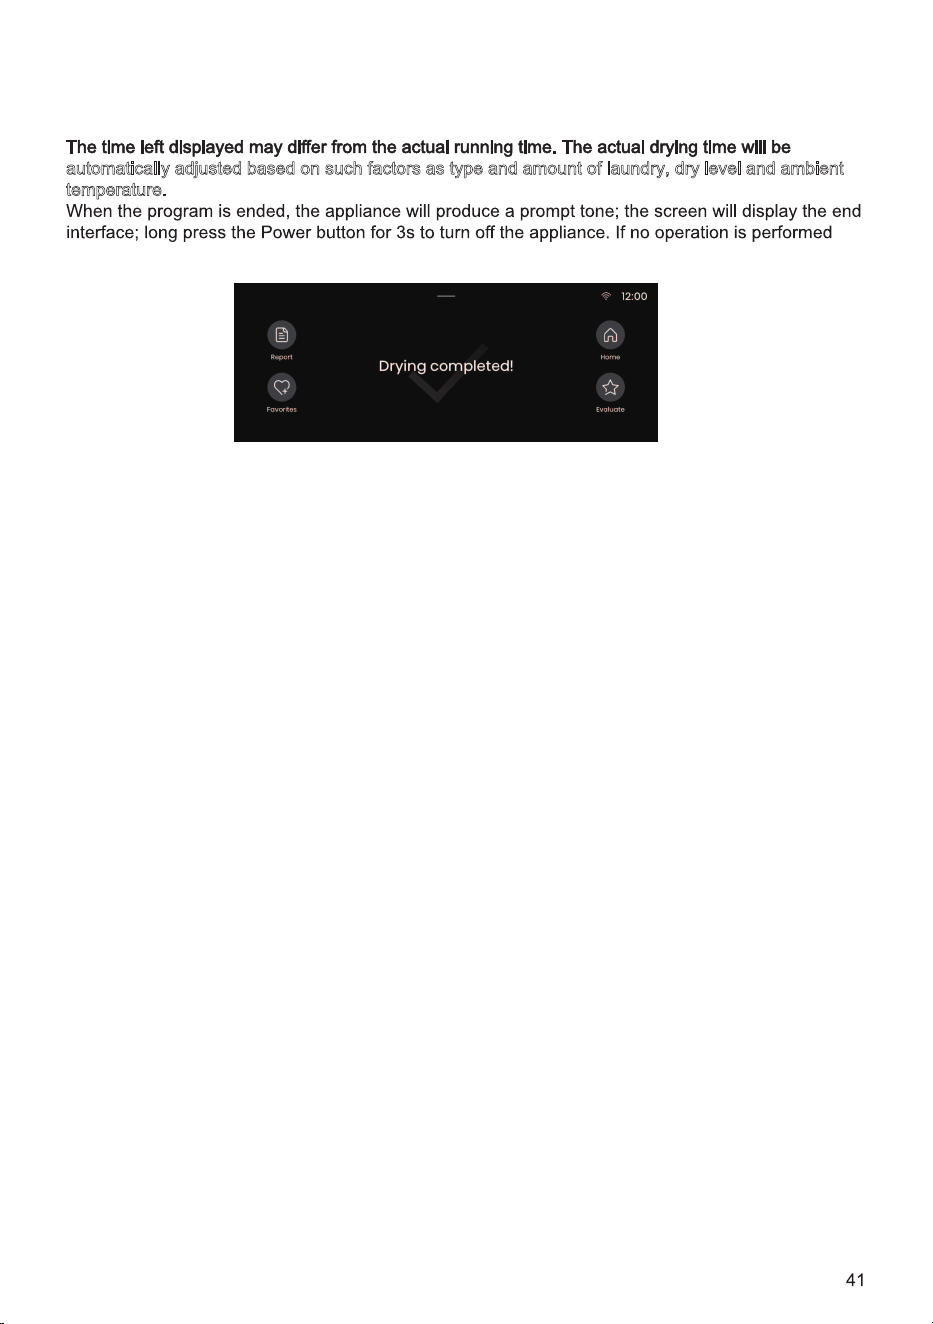
During program operation, the display screen will show information such as time left.
automatically adjusted based on such factors as type and amount of laundry, dry level and ambient
t
emperature.
within 10min, the dryer will shut down automatically.
Report:
Click it to view the energy consumption and time used of this drying.
Favorites:
Click it to add the program and settings of function parameters of this drying to your favorites. The
added program will appear at the top of the program list so that it can be selected with priority
during next use.
HOME:
Click it to go back to the home page.
Evaluate:
Users can evaluate the star level of this drying to help us in continuous improvement.
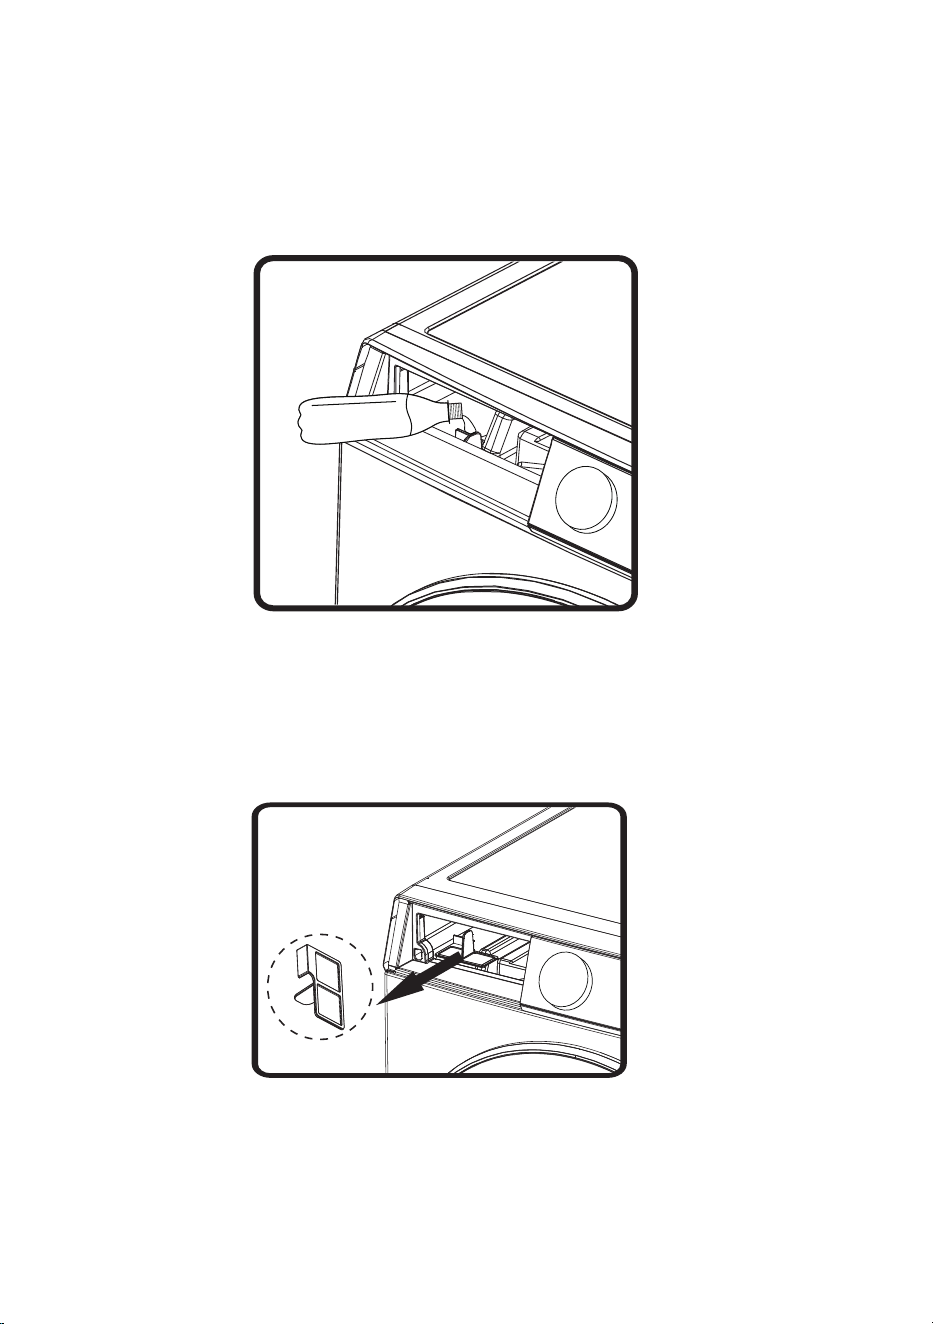
+HDWH[FKDQJHUILOWHU
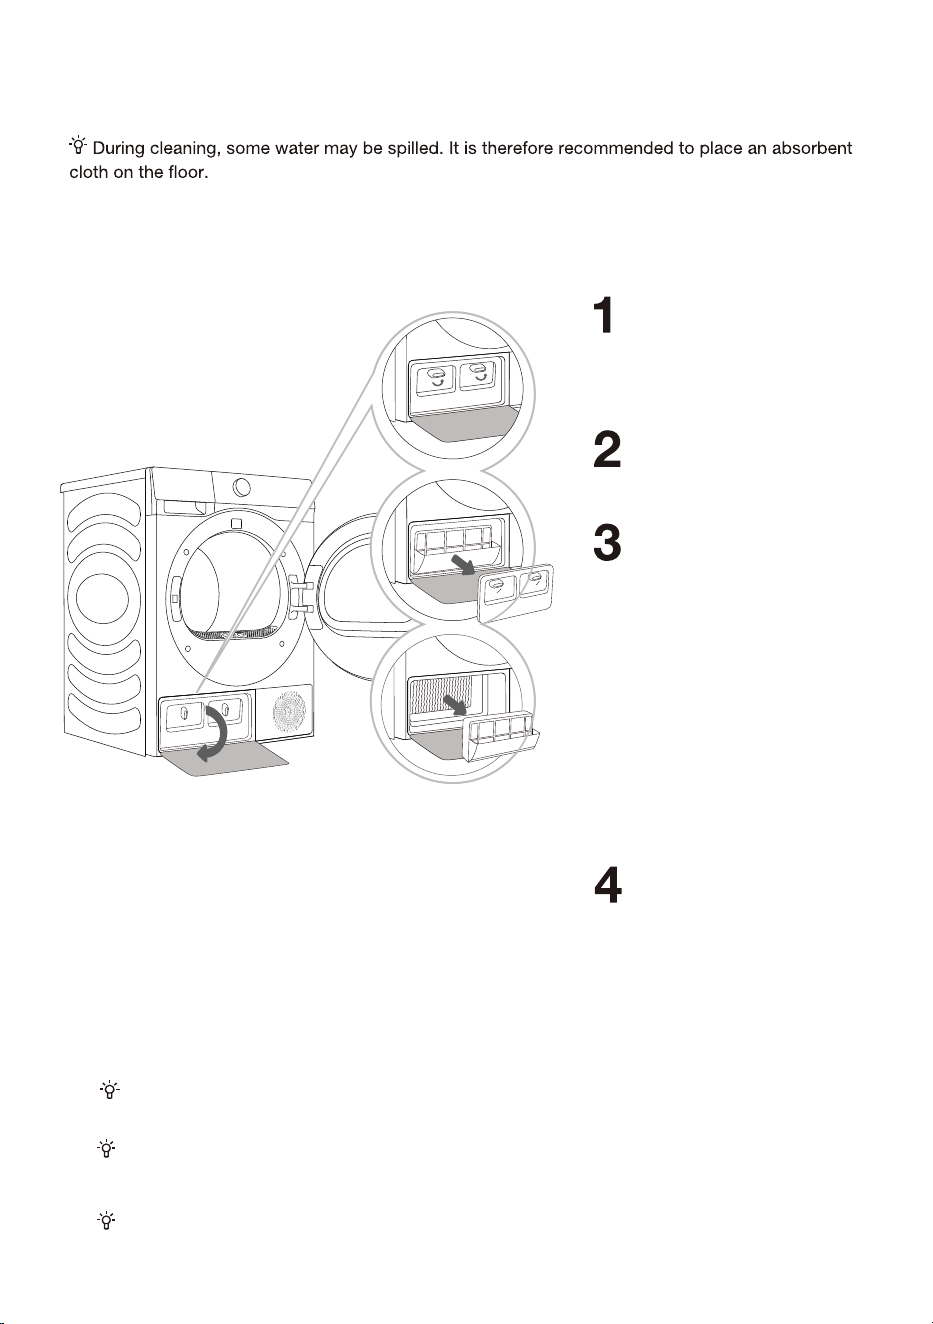
5HPRYHWKHFOHDQFRYHU
DQGWDNHRXWWKHKHDW
H[FKDQJHUIOLWHU$IWHU
VHYHUDOWLPHVRIXVHFOHDQ
WKHGXVWRQWKHKHDW
H[FKDQJHUIOLWHUZLWKDZHW
FORWKRUIORZLQJZDWHU$IWHU
XVLQJIRUDSHULRGRIWLPHLI
WKHUHLVGXVWRQWKHKHDW
H[FKDQJHUSOHDVHUHPRYH
WKHGXVWZLWKWRROV'RQRW
WRXFKWKHKHDWH[FKDQJHU
GLUHFWO\ZLWK\RXUKDQGVWR
DYRLGLQMXU\
,QVWDOOWKHKHDWH[FKDQJHU
ILOWHUDQGWKHFOHDQFRYHU
EDFNWRWKHRULJLQDO
SRVLWLRQVORFNWKHNQRE
DQGFORVHWKHFOHDQGRRU
FRYHU
3UHVVWKHEXFNOHRIWKHFOHDQ
GRRUFRYHUDWWKHORZHUOHIWWR
RSHQWKHFOHDQGRRUFRYHU
7XUQWKHORFNLQJNQRERIWKH
FOHDQFRYHUWRXQORFNSRVLWLRQ
,QVHUWWKHKHDWH[FKDQJHUILOWHULQWRWKHKRXVLQJDQGFORVHWKHFOHDQFRYHUSXVKLW
WRZDUGWKHPDFKLQHDQGWXUQWKHORFNLQJNQREXQWLOLWODWFKHVLQWRSODFH
&OHDQWKHKHDWH[FKDQJHUILOWHUDWOHDVWDIWHUHYHU\ILYHGU\LQJF\FOHV
7KHKHDWH[FKDQJHUILOWHUKDVWREHFRUUHFWOHLQVHUWHGLQWRLWVVORW2WKHUZLVHWKHKHDW
H[FKDQJHULQVWDQOOHGLQVLGHWKHGU\HUPD\EHFORJJHGRUGDPDJHG
&/($1,1*7+(+($7(;&+$1*),/7(5
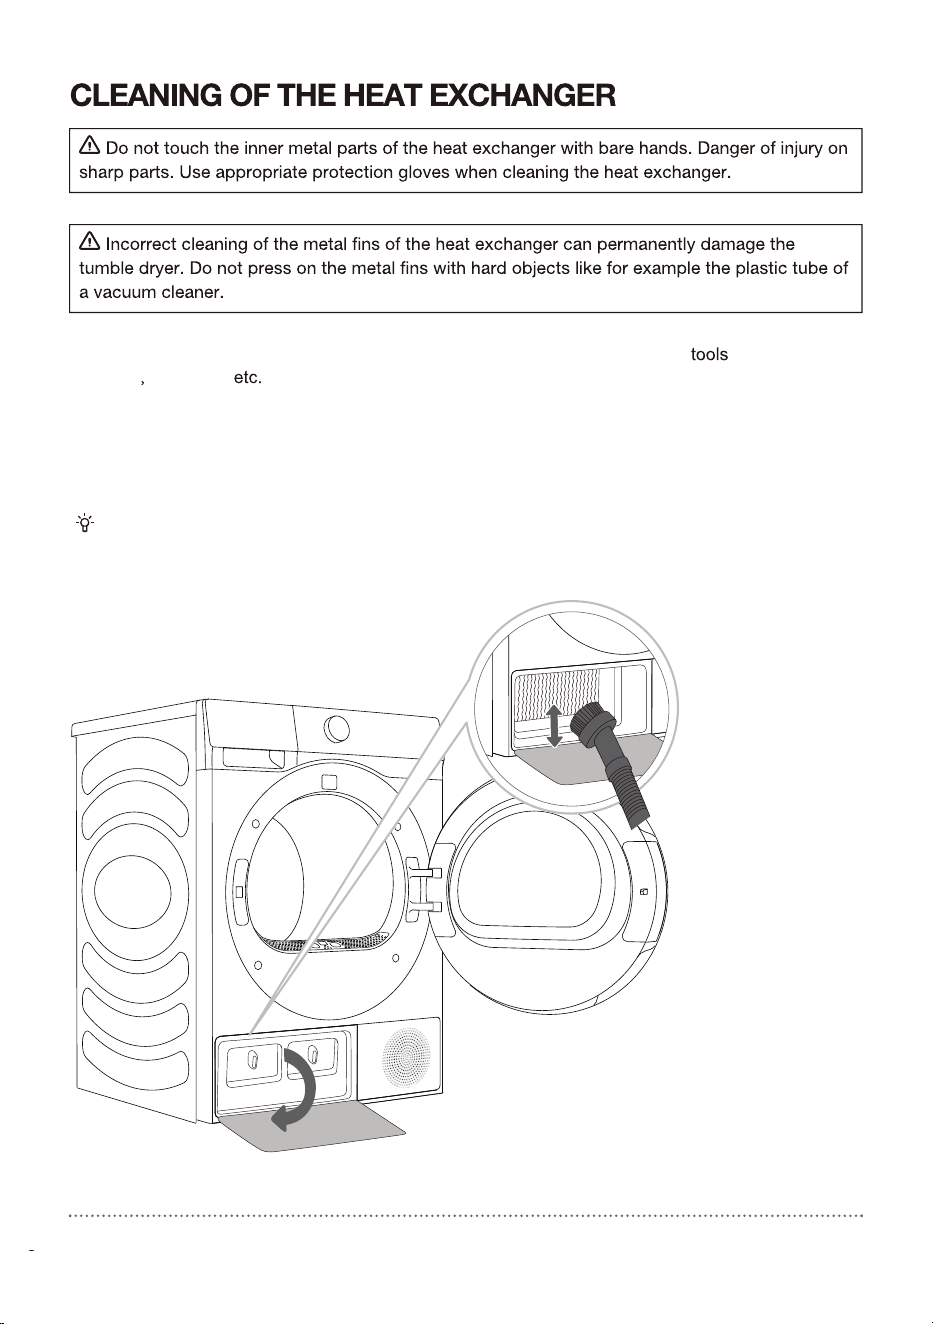
The dust and dirt in the metal fins of the heat exchanger can be cleaned with vacuum
cleaner
soft brush .
Access to the heat exchanger is possible, when the heat pump filter is removed as is described in
the chapter »Cleaning the heat pump filter«.
Without pressing, gently move the brush attachment only in the direction of the metal fins from top
to bottom. Too much pressure can damage or bend the metal fins of the heat exchanger.
We recommend you clean the heat exchanger at least every t .
We recommend you clean the heat exchanger once after every twenty drying cycles.
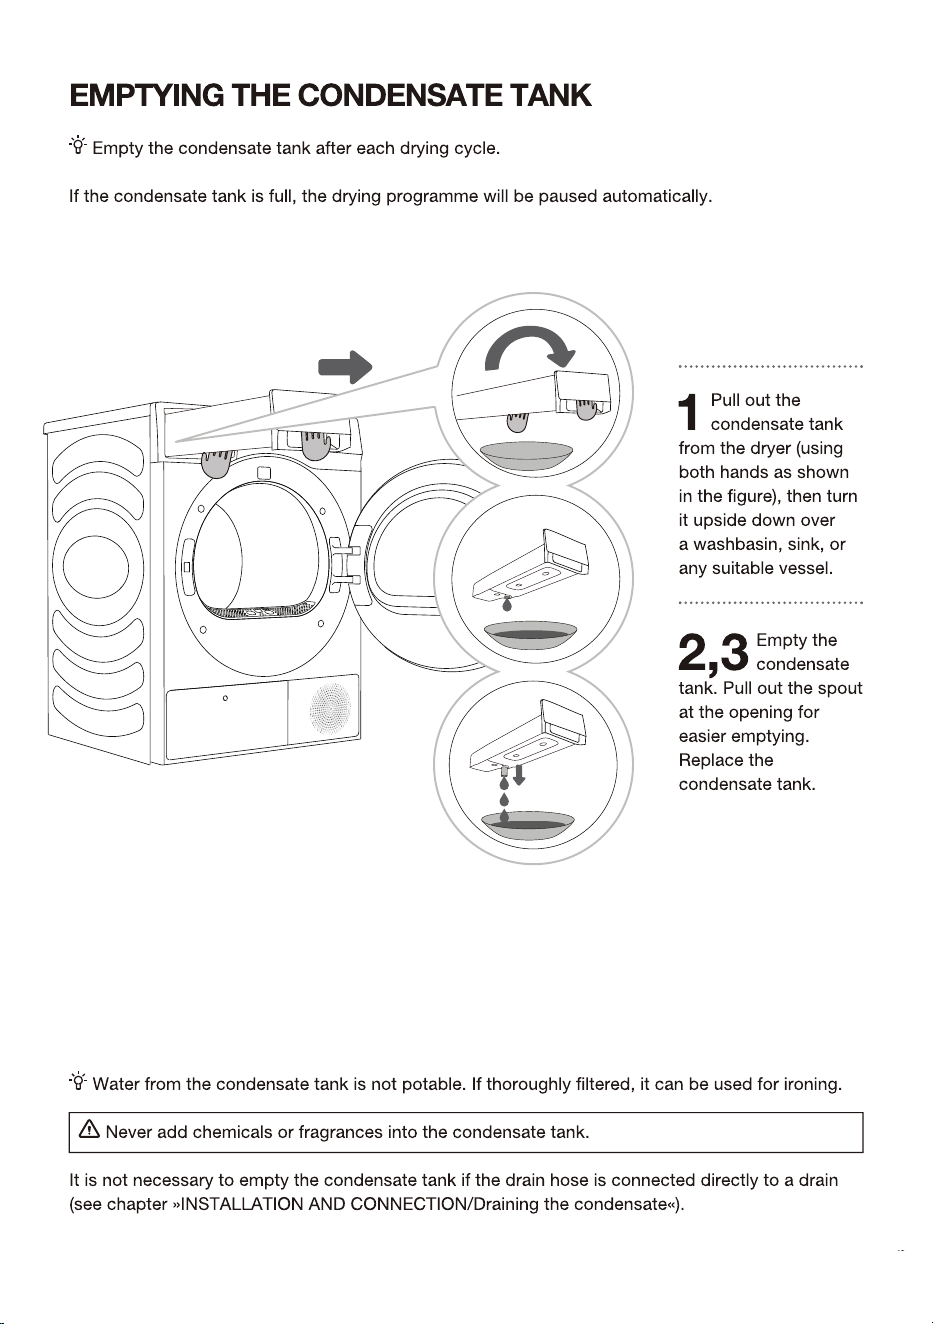
The screen will display a prompt indicating the condensate water tank is full and should be emptied.
ADD WATER FOR THE STEAM FUNCTION AND CLEAN THE FILTER
MESH
The Steam function can be selected under some programs. It is needed to guarantee that water in the
ZDWHUWDQNLVDGHTXDWHHQRXJKWRIRUPVWHDP)RU¿UVWXVHSOHDVHDGGSXUL¿HGZDWHUDERXW0/If
the screen displays a prompt indicating a lack of water during use, please use a container
WRDGGSXUL¿HGZDWHUDERXW0/DFFRUGLQJWRWKHRSHUDWLRQVWHSVEHORZ
7KHZDWHUWDQN¿OWHUPHVKFRXOGEHEORFNHGE\LPSXULWLHVDIWHUORQJXVHLWLVVXJJHVWHGWRFOHDQLW
RQDPRQWKO\EDVLV+ROGRXW\RXU¿QJHUVWRSLQFKDQGWDNHRXWWKHORZHUZDWHUWDQN¿OWHUPHVKDIWHU
ZDVKLQJWKH¿OWHUPHVKUHLQVWDOOLWSURSHUO\


The dryer do not
operate
7#%#6
-!,IWKHSURJUDPRUIXQFWLRQQHHGV
WREHFKDQJHGGXULQJRSHUDWLRQRUWKHSRZHULVRII
GXULQJRSHUDWLRQDQGWKHSRZHUQHHGVWREHSRZHUHG
RQDJDLQVHOHFWWKHUHTXLUUHGSURJUDPDQGIXQFWLRQ
DQGILQDOO\VWDUWLW
:KHQ\RXFRQWDFWDVHUYLFHFHQWUHSOHDVHVWDWH\RXUGU\HUW\SH
7\SHFRGH,'PRGHODQGVHULDOQXPEHUDUHLQGLFDWHGRQWKHEDFNRIWKHGU\HU
'+6%
'+6%
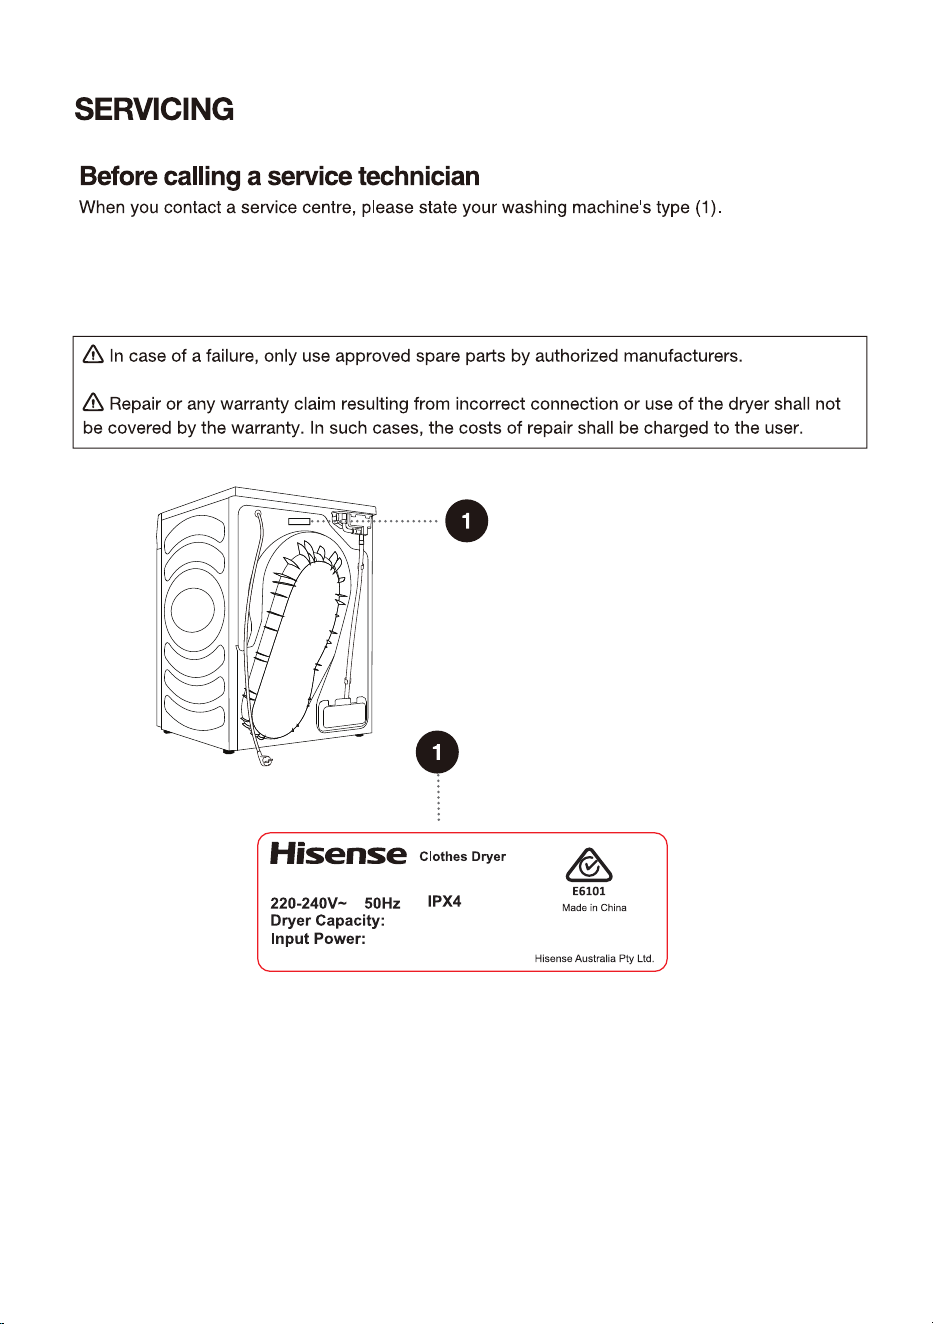
When you contact a service centre, please state your dryer type (1).
Type, code/ID, model, and serial number are indicated on the back of the dryer.
$33529$/12
6*6($
+')6+3
NJ
:
5HIULJHUDQW5J
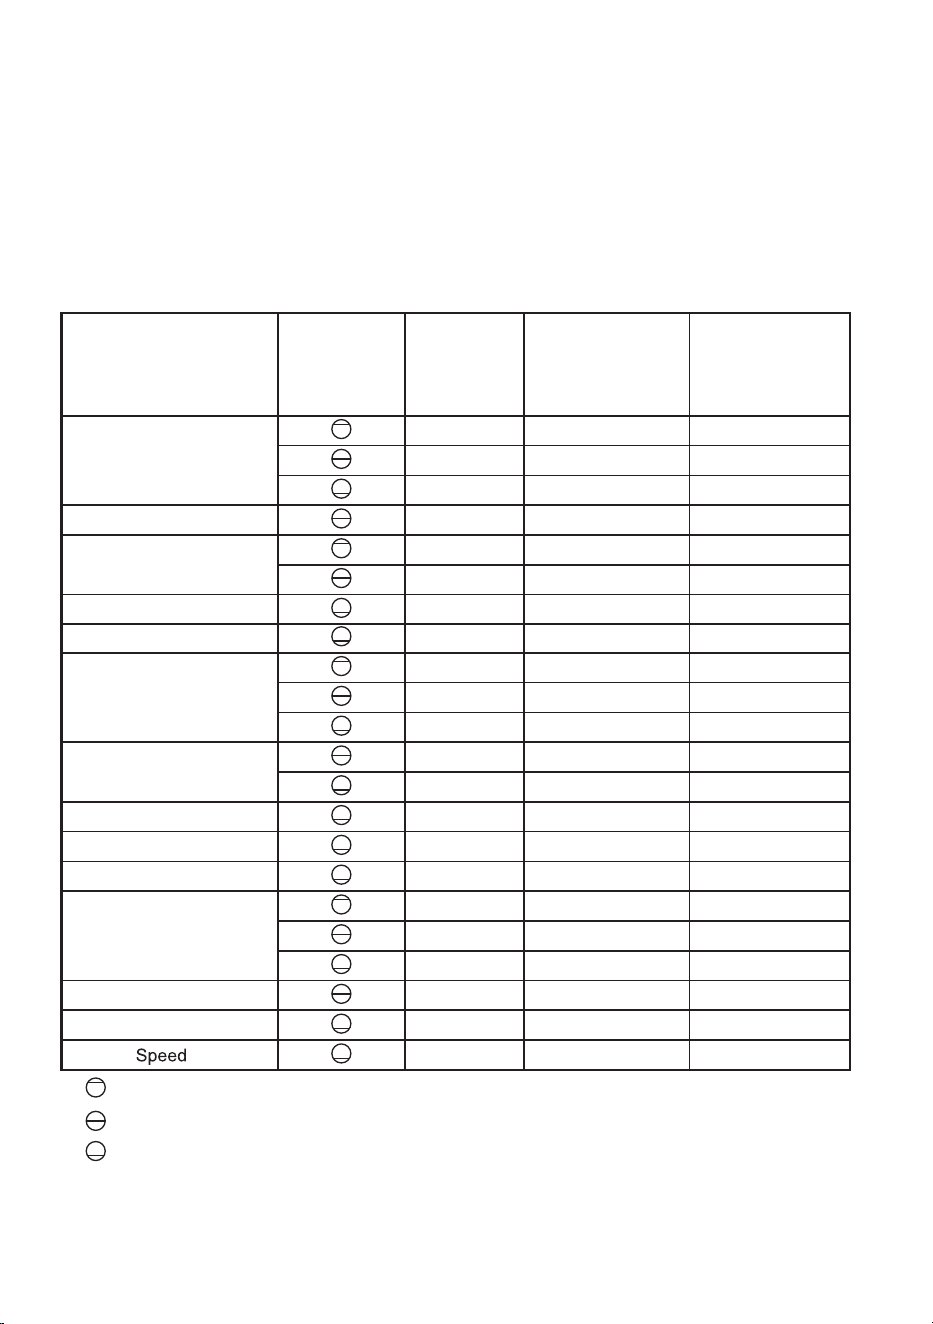
The table indicates the power consumption and duration for drying of a test batch of laundry with
various loads that go through spinning at various speeds, in compliance with EN 61121.
The following requirements apply to the programs specified below.
Inlet air temperature Room temperature
Inlet air humidity 50-60%
Drying temperature Normal
Program Amount Spinning
Program
consumption,
approximately
(kWh)*
Program
duration,
approximately
(h:min)*
AI Dry
1000 1.05 2:20
1400 0.78 1:50
1400 0.51 1:10
Allergy Care
1200 0.96 2:02
Bedding
1400 1.02 2:05
1400 0.58 1:20
Baby Care
1000 0.72 1:48
Shirts
1000 0.34 0:50
Cotton
1000 1.78 3:48
1200 0.98 2:10
1200 0.70 1:45
Synthetics
1000 0.65 1:45
1000 0.46 1:10
Delicates
1000 0.48 1:15
Quick 30'
1400 0.15 0:30
Sportswear
1000 0.64 1:35
Towels
1000 1.15 2:25
1400 0.70 1:45
1400 0.51 1:10
Denim
1400 0.79 1:55
Duvet
1400 1.68 1:40
Power
79’
1200 0.58 1:19
Full load
Partial load
Small load
* Due to deviations in terms of type and amount of laundry, spinning, power supply, temperature and humidity, the program duration
and power consumption measured at the end may differ from the ones stated in the table.
PROGRAM TABLE
Connecting your appliance to the application
ConnectLife is a smart home platform that connects people, devices, and services. The ConnectLife
application includes advanced digital services and carefree solutions that allow users to monitor and
control appliances, receive notifications from a smartphone, and update software (supported features
vary depending on your appliance and your region/country).
2. WLAN
2.1 Enabling Wi-Fi on the appliance
Click on the "WLAN" button in the top right corner of the dropdown menu to enable or disable the
Wi-Fi Function.
2.2 Connection setup
For first start up: follow the boot to complete device Settings and App account binding
。
If you have reject to finish the WiFi setting and binding ,you can start like below:
1) Click on the "Settings" button in the top right corner of the dropdown menu to enter the "Settings",
2) Or Long press on the "WLAN" button in the top right corner of the dropdown menu to enter the
"WLAN" directly .
2.3 Pairing
Click on the "Settings" button in the top right corner of the dropdown menu to enter the "Settings"
page.
1) Click on "App and Pairing" to enter the pairing page.
2) Click on "Bind A New Account" to start the pairing process for a new user.
3) Click "Next" and the dedicated QR code will be shown up for device pairing.
ConnectLife
To connect your smart device, you need a home Wi-Fi network and a smartphone with the application
ConnectLife.
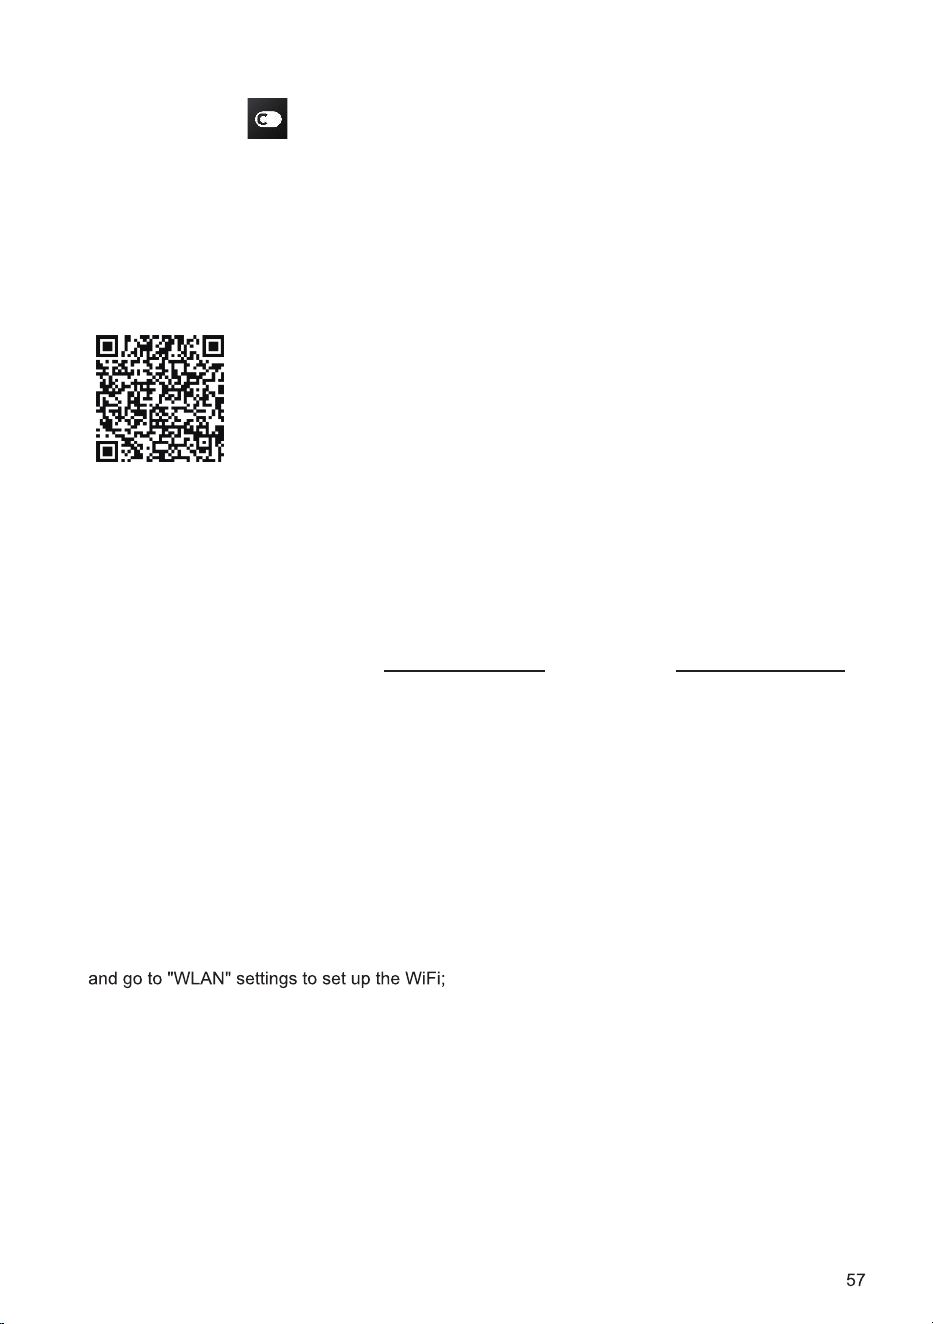
To download the ConnectLife application, scan the QR code or search
for ConnectLife in your favorite app store.
1. Install the ConnectLife application and create an account.
2. In the ConnectLife application, go to the "+" menu and select the appropriate type of device. Then
scan the QR/SN code (it can be found on the rating plate of the appliance; you can also enter the
AUID/SN code manual
ly).
3. The application then guides you through the entire process of connecting the appliance to your
smartphone.
4. After a successful connection, the appliance can be operated remotely via the mobile application.
Do you have more questions? Visit us at www.connectlife.io or contact us at hello@connectlife.io.
1.ConnectLife

2.4 Unpairing
1) On the appliance side:
A. Click on the "Settings" button in the top right corner of the dropdown menu to enter the "Settings"
page.
B. Click on "App and Pairing" to enter the pairing page.
C. Click on "Unbind" to unbind the connected account.
D. Tick the accounts that you want to unbind and click "Unbind" to disconnect.
2) On the smartphone side:
A. Select and click the device you want to unbind in "Devices" page.
B. Click "Settings" to enter the Settings page.
C. Click "Remove Device" to unbind the device on the ConnectLife app.
2.5 Remote start
Click on "Remote Control" button in the top right corner of the dropdown menu to enable or disable
this function.
2.6 System Upgrade
Click on the "Settings" button in the top right corner of the dropdown menu to enter the "Settings"
page. Then click to open "System" page. Chose "System Upgrade", then you can check whether new
version have been released or not.

58
;B