AGA MERCURY
36” & 48” INDUCTION RANGETOP
USER &
INSTALLATION GUIDE
08-000006-03


1. Important safety information 1
Important Safety Notice & Warning 1
In Case of Fire 1
To Prevent Fire or Smoke Damage 1
Wear Suitable Clothing 2
Use Only Dry Potholders or Oven Gloves 2
Pan Performance Check 3
Use the Right Size Pan 3
General safety instructions 4
2. Rangetop overview 5
The Rangetop 5
Overheat function 6
Rangetop control indications & warnings 6
Pan detector, 6
Residual heat indicator 6
Automatic heat-up 7
Child lock 7
Low temperature/simmer setting 8
Power boost setting 8
The Bridging-Zone Function
(36” only) 9
3. Cleaning your Rangetop 10
4. Troubleshooting 11
5. Installation Instructions 12
6. Service and parts 13
7. Installation safety instructions 14
8. Installation 15
Positioning the Rangetop 15
Fitting the side panel for 36" 18
Fitting the side panels for 48" 19
Install and secure the Rangetop 20
9. Electrical connection 21
10. Circuit diagram 23
11. Technical data 24
Contents

1
To Prevent Fire or Smoke Damage
Before using the Rangetop make sure all the packing
materials have been removed.
Always keep the area around the Rangetop free from
combustible materials, gasoline, and other ammable vapors
and liquids.
n
NEVER leave any items on the cooktop. The hot air
from a rear vent may ignite ammable items and
may increase pressure in closed containers, which
may cause them to burst. Many aerosol-type spray
cans are EXPLOSIVE when exposed to heat and may
be highly ammable. Avoid their use or storage near
an appliance.
Many plastics will burn, and most are damaged by heat. DO
NOT leave plastic items on the cooktop as they may burn,
melt or soften if left too close to a vent or an energized
surface element.
Storage should not be installed directly above a Rangetop.
To eliminate the risk of burns or re by reaching over heated
surface units, cabinet storage space located above the
surface units should be avoided. If cabinet storage is to be
provided, the risk can be reduced by installing a range hood
that projects horizontally a minimum of 5 inches beyond the
bottom of the cabinets.
Destroy the carton and plastic bags after unpacking the
Rangetop. NEVER allow children to play with packaging
material.
n
It is recommended that this appliance is serviced
annually by a qualied service engineer.
n
DO NOT repair or replace any part of the appliance
unless specically recommended in this Owner’s
Guide. Always consult a qualied service engineer.
All other servicing should be done only by an authorized
servicing technician, this may reduce the risk of personal
injury and damage to the Rangetop.
NEVER modify or alter the construction of a Rangetop by
removing panels, wire covers, screws, or any other part of the
product.
n
DO NOT leave children alone.
Babies, toddlers and young children should not be allowed
near the Rangetop at any time. They should NEVER be
allowed to sit or stand on any part of the appliance.
DO NOT allow children to climb or play around the Rangetop.
Teach them not to play with controls or any other part of the
Rangetop.
CAUTION: NEVER store items of interest to children in
the cabinets above a Rangetop or on the backguard of a
n
NEVER use this appliance as a space heater to heat
or warm the room.
Have your appliance properly installed and grounded by a
qualied installer. The installation must conform with local
codes or, in the absence of local codes, in accordance with
the National Electrical Code ANSI/NFPA 70 or the Canadian
Electric Code, CSA C22.1.
READ THESE INSTRUCTIONS FULLY BEFORE USE SAVE
THESE INSTRUCTIONS FOR FUTURE REFERENCE.
ALL PICTURES SHOWN ARE FOR ILLUSTRATION PURPOSES
ONLY. ACTUAL PRODUCTS AND COMPONENTS MAY VARY
DUE TO PRODUCT ENHANCEMENT.
Install only as described in the installation section of this book.
Ask your dealer to recommend a qualied installer and an
authorized repair service. Know how to disconnect the power
to the Rangetop at the circuit breaker or fuse box in case of
an emergency.
Important Safety Notice & Warning
• IMPORTANT INFORMATION - If you are wearing a
medical device (such as a pacemaker), consult your
doctor. The operation of the appliance may affect a
medical device.
• Prior to connecting, the cable should be inspected for
any damage. In the event of damage please consult
your electrical installer.
• You must provide adequate clearance between the
Rangetop and adjacent combustible surfaces. Refer to
Installation Instructions.
• Save the installation instructions for the local electrical
inspector’s use.
In Case of Fire
n
DO NOT use water on grease res. NEVER pick
up a aming pan. Turn the controls o. Smother
a aming pan on a cooktop zone by covering the
pan completely with a well-tting lid or baking
tray. Isolate the power source, where it is safe to
do so, either at the control or isolator. If available,
use a multipurpose dry chemical or foam-type re
extinguisher.
Open doors and windows or if a hood is installed turn it on to
remove smoke and odor.
1. Important safety information

2
Rangetop; children climbing on the Rangetop to reach them
could be seriously injured.
This instruction is based on safety considerations.
Flammable materials should not be stored near the cooktop
zones. This includes paper, plastic and cloth items, such as
cookbooks, plasticware and towels, as well as ammable
liquids. DO NOT store explosives, such as aerosol cans, on or
near the appliance.
Flammable materials may explode and result in re or
property damage.
n
To avoid risk of electrical shock, personal injury, or
death, make sure your Rangetop has been properly
grounded and always disconnect it from main power
supply before servicing.
DO NOT touch the cooktop areas.
The marked areas on the cooktop may be hot even if they
have been o for some time. Areas near the cooking area
may become hot enough to cause burns. During and after
use, DO NOT touch, or let clothing touch or other ammable
materials contact the cooktop or areas near the cooking area
until they have had enough time to cool. These areas include
the Rangetop and rear vent.
Wear Suitable Clothing
NEVER wear loose-tting or hanging clothes while using
the cooktop. Be careful when reaching for items stored in
cabinets over the cooktop. Flammable material could be
ignited if brought into contact with a hot surface and may
cause severe burns.
Use Only Dry Potholders or Oven
Gloves
Moist or damp potholders on hot surfaces may result in
burns from steam. NEVER let a potholder touch hot heating
elements.
DO NOT use a towel or other bulky cloth in place of a glove.
They might catch re if they touch a hot surface.
Use dry oven gloves when applicable – using damp gloves
might result in steam burns when you touch a hot surface.
NEVER operate the Rangetop with wet hands.
DO NOT place metallic objects such as knives, forks, spoons
and lids on the cooktop surface since they can get hot.
Induction care
Important information for pacemaker and implanted insulin
pump users: The functions of this Rangetop comply with the
applicable standards on electromagnetic interference. If you
are tted with a pacemaker or implanted insulin pump and
are concerned, please consult your doctor for medical advice.
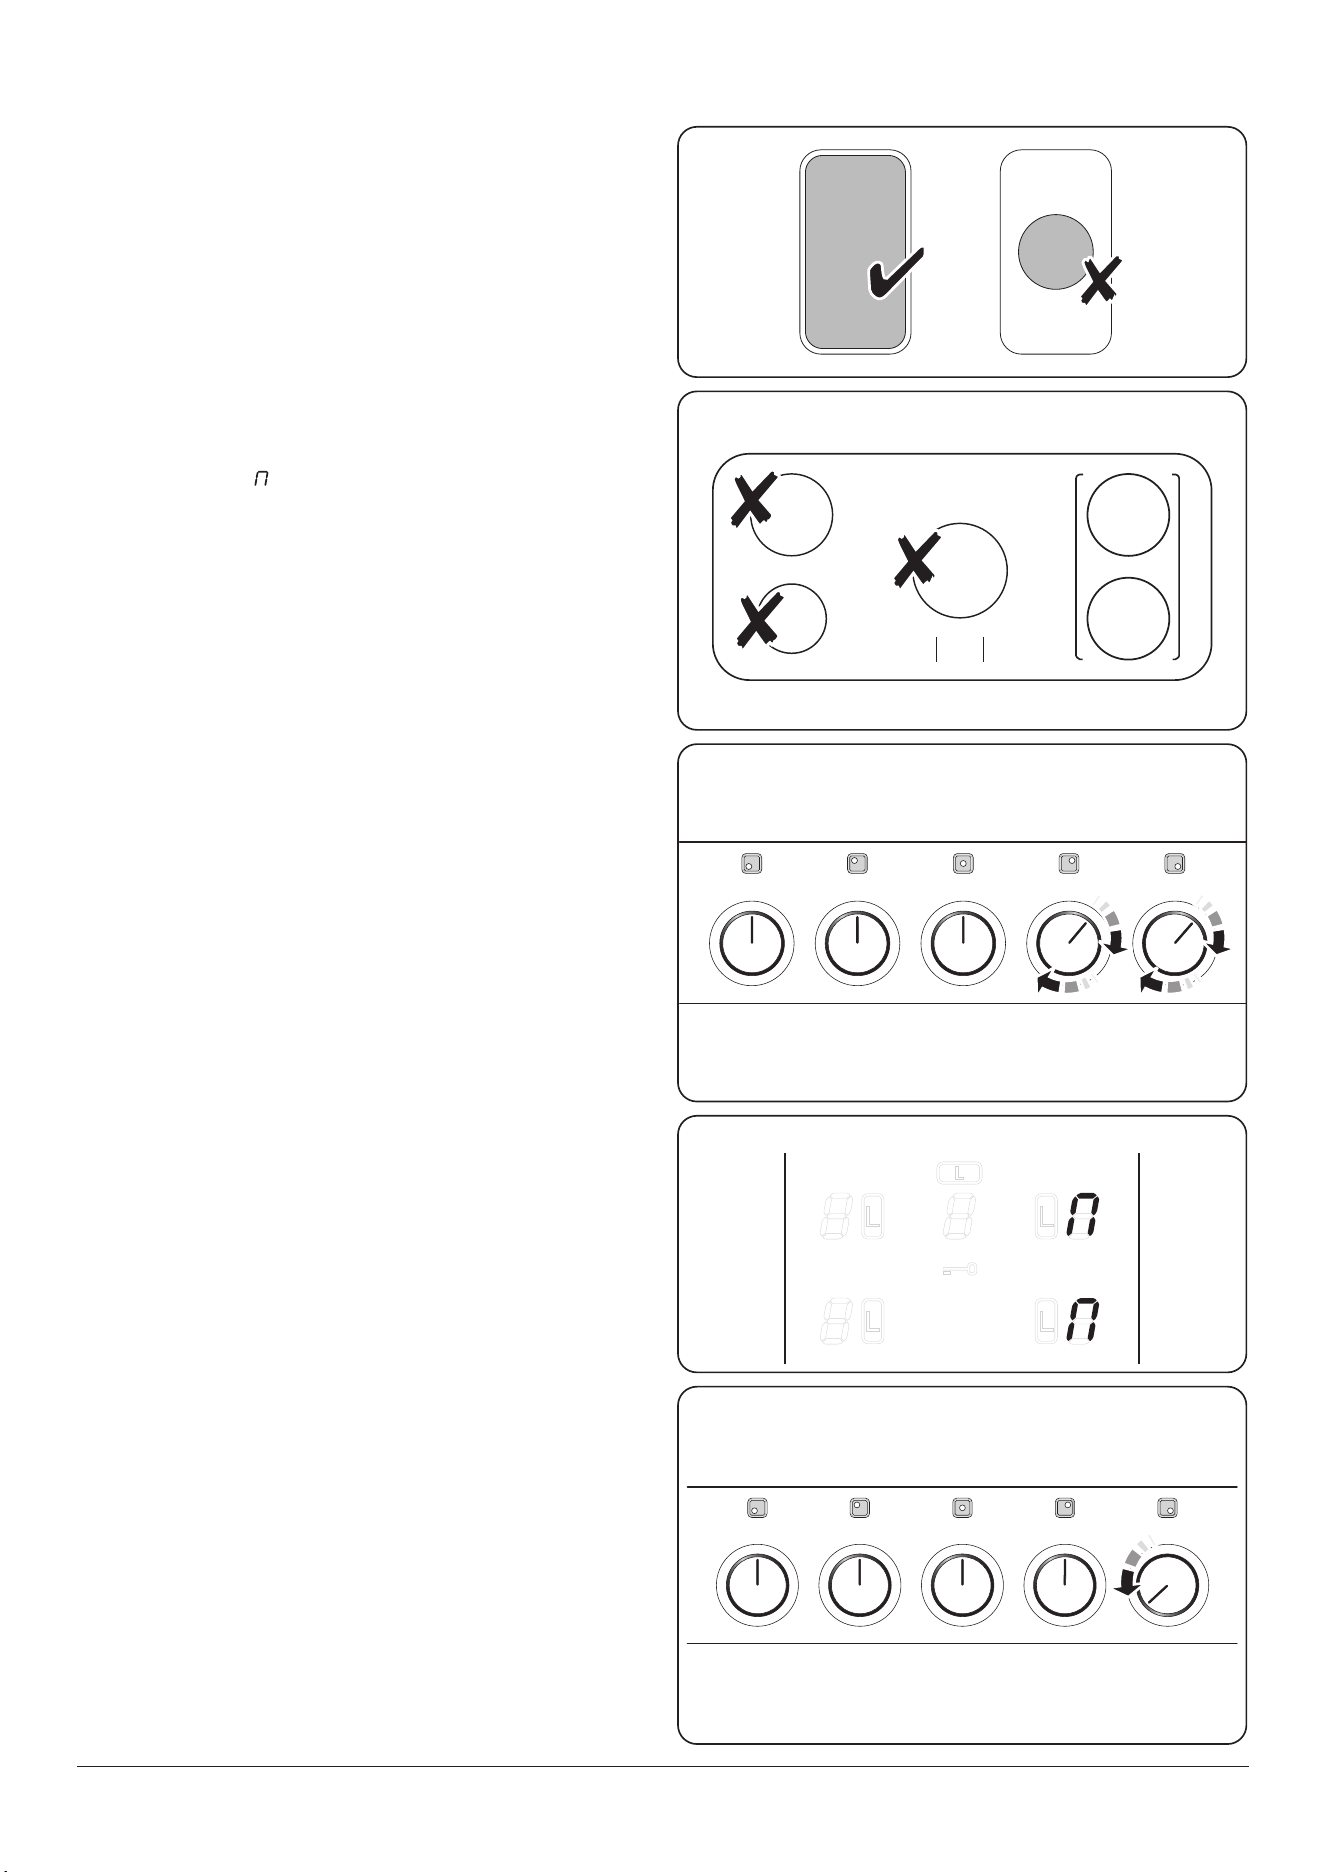
To fully utilize the power of your induction Rangetop and to
ensure longevity of performance, we recommend the use
of AGA approved Induction Pots and Pans. If you decide to
purchase an alternative set of pans for use on your induction
Rangetop, we would strongly recommend that composite
aluminum pans with steel inserts, example shown.
Fig. 1.1, are avoided. This type of pan construction can
signicantly reduce the lifetime and performance of your
induction Rangetop.
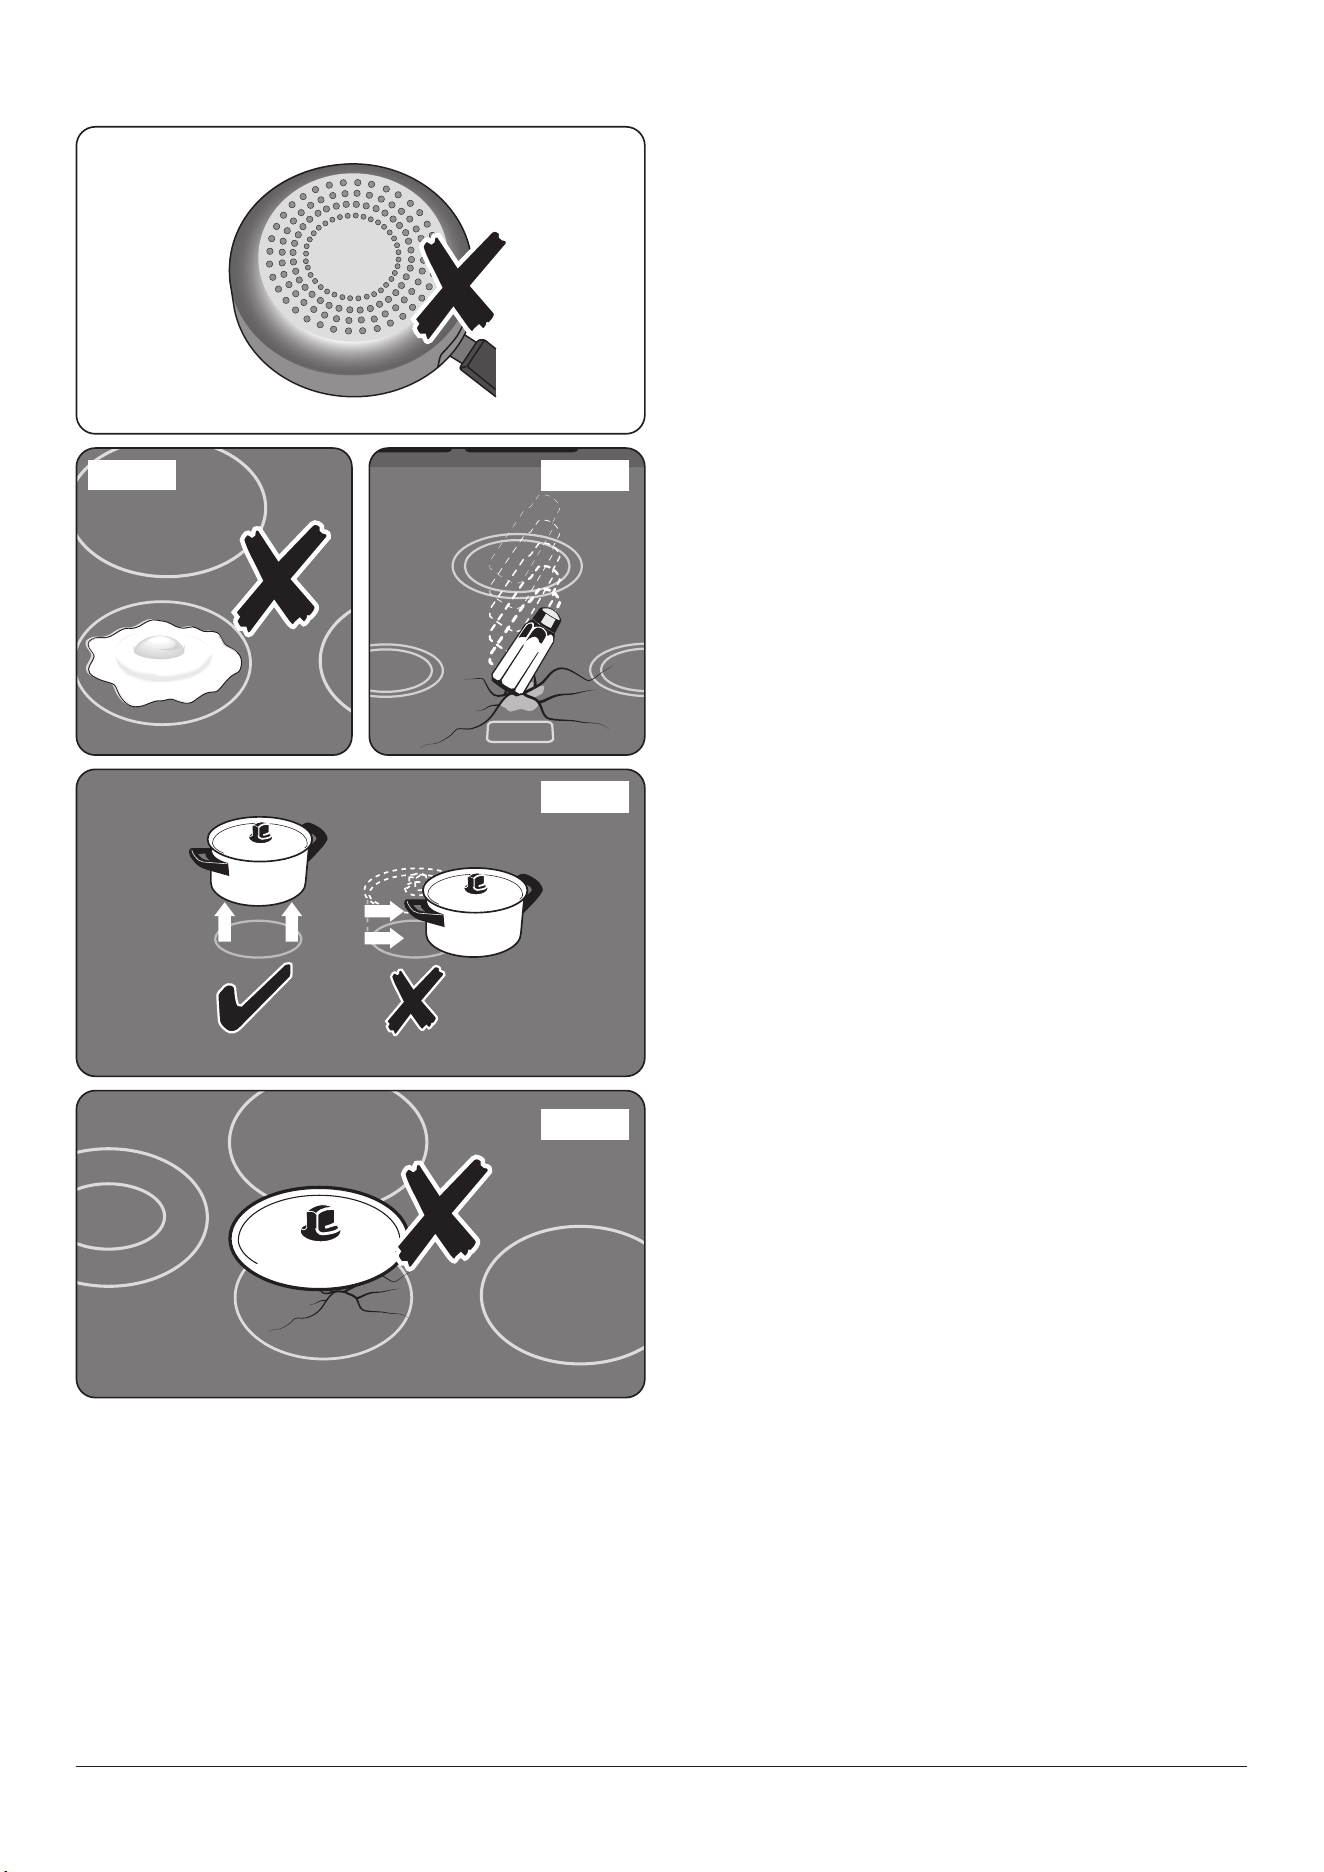
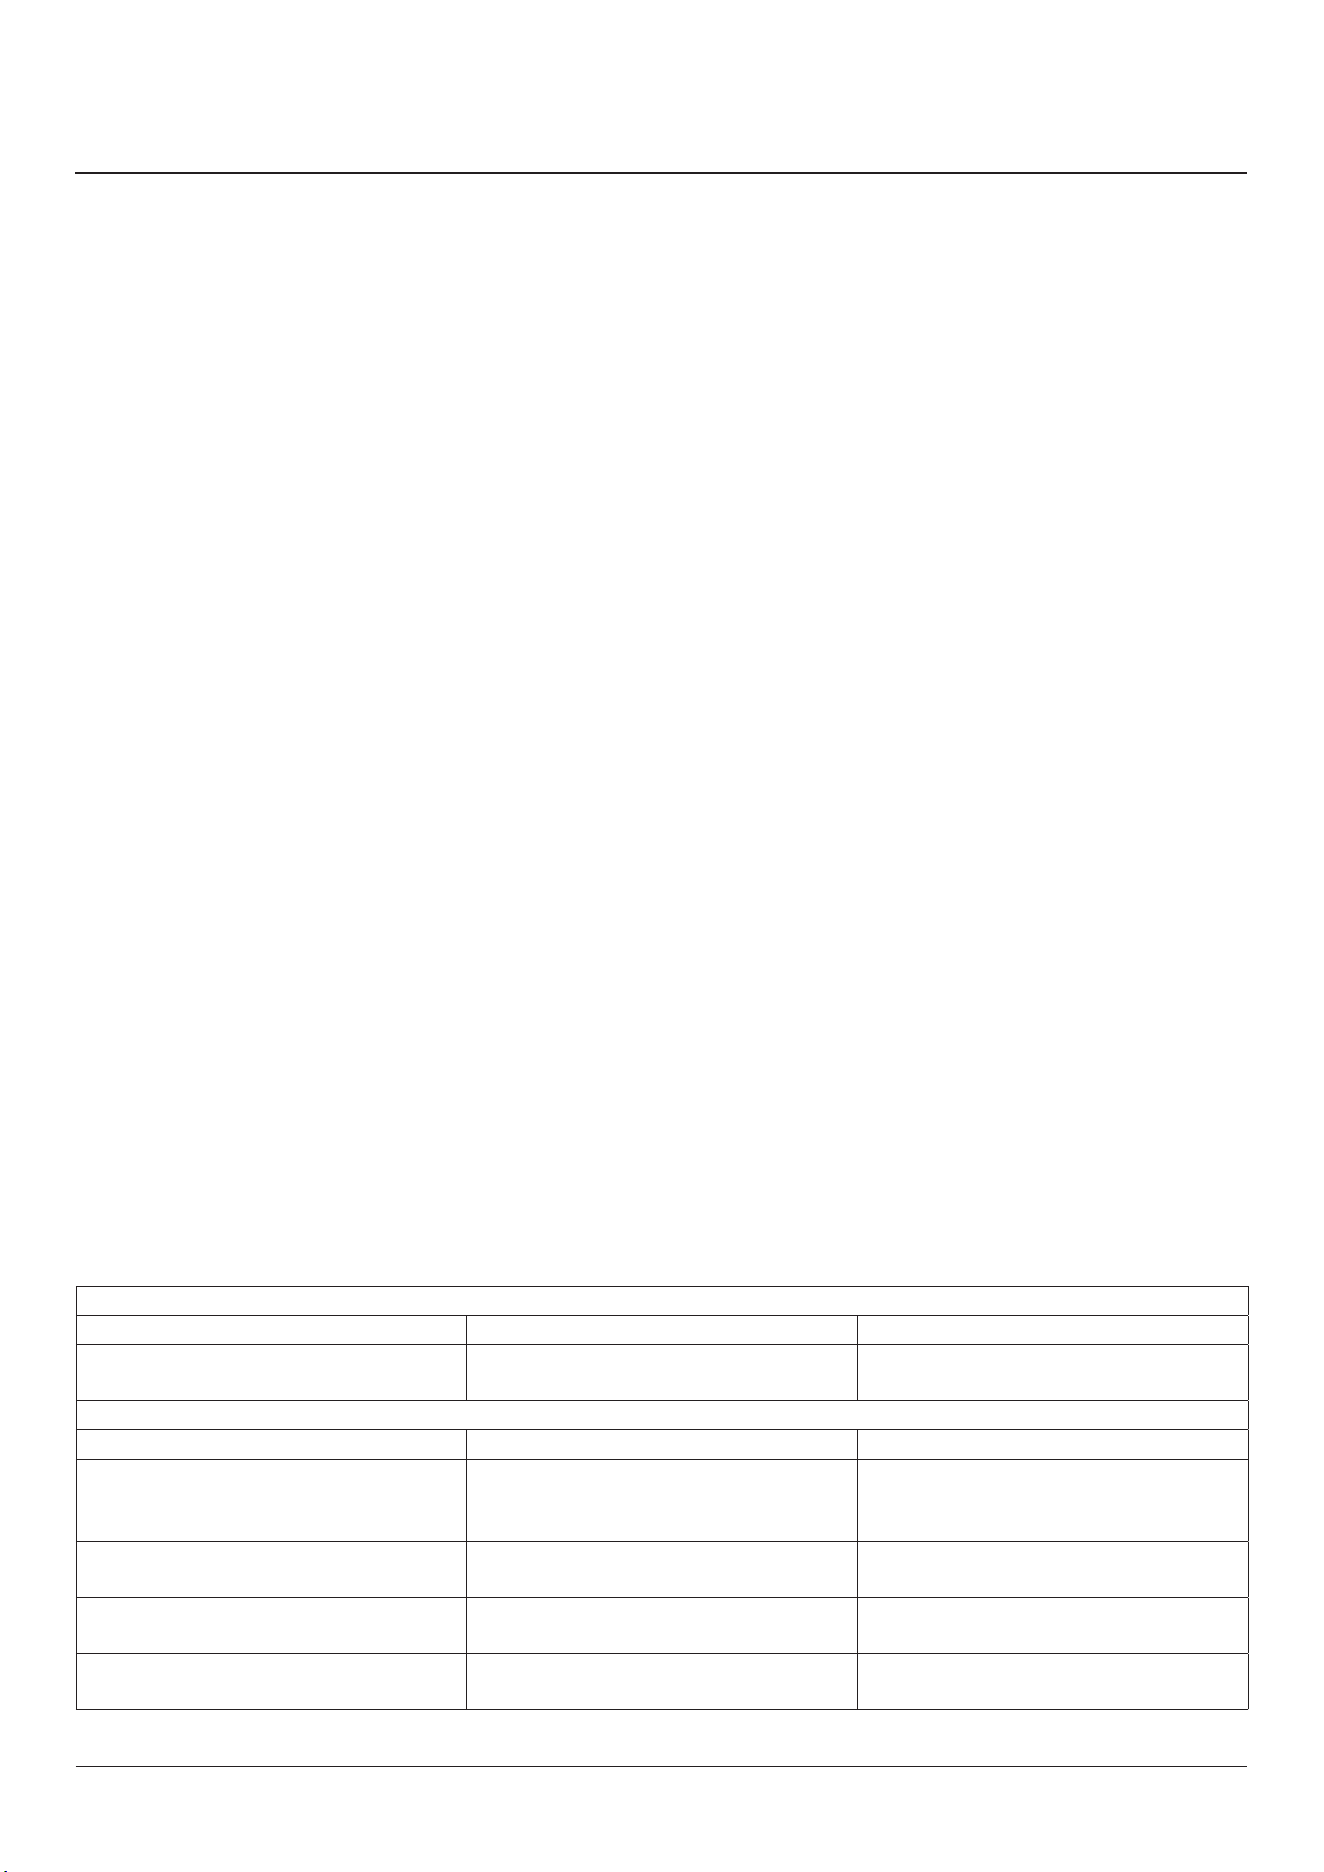
NEVER cook directly on the cooktop surface (Fig. 1.2).
n
DO NOT cook on a broken cooktop. If the cooktop
should break, cleaning solutions and spillovers
may penetrate the broken cooktop and cause a
risk of electric shock. Contact a qualied installer
immediately (Fig. 1.3).
n
Should a crack appear in the surface, disconnect the
Rangetop immediately from the supply and arrange
for its repair.
n
NEVER leave surface units unattended at high heat
settings - boilover may cause residue that may ignite.
n
ALWAYS LIFT pans o the cooktop. Sliding pans may
cause marks and scratches (Fig. 1.4).
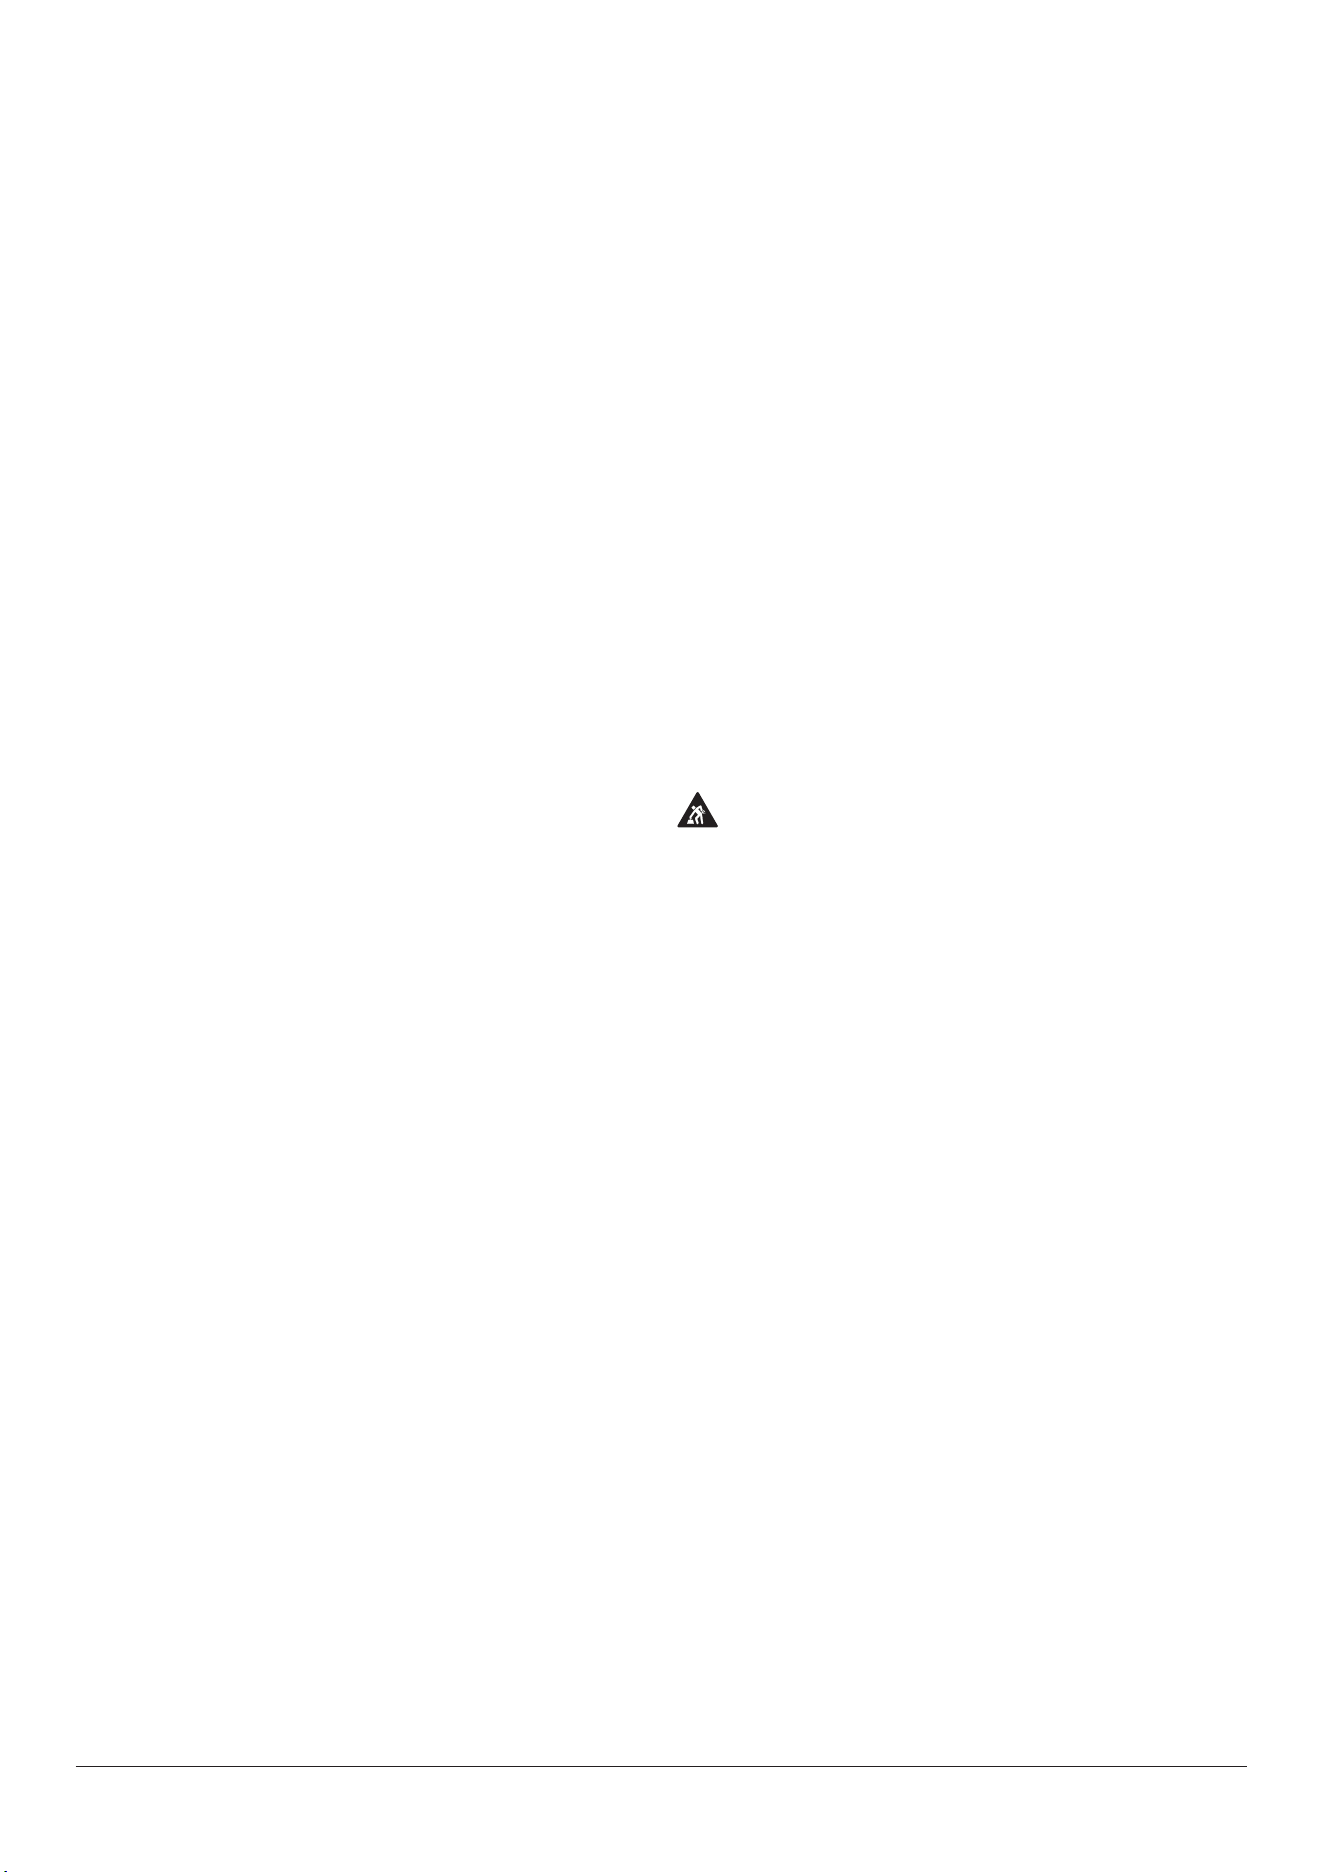
n
Take care NOT TO PLACE HOT LIDS onto the cooktop
surface (Fig. 1.5). Lids that have been used to cover
a hot pan can “stick” or create a “vacuum” eect to
the glass top. Should this occur, DO NOT attempt to
lift the lid o the glass surface, this may damage the
glass. Instead slide the lid to the edge of the cooktop
and remove, taking care not to scratch the cooktop
surface. Alternatively wait until the lid has cooled to
room temperature, the vacuum has been released,
then remove the lid by lifting it from the cooktop.
3
Pan Performance Check
Method:
Use a 1.85 Kw zone (refer for ratings of each zone Fig. 2.4).
• Fill an unlidded pan with 1/2 liter of room temperature
water (the diameter of pan should not be greater than
the outer circle of the zone).
• Operate the zone at power level 9.
• The water should boil within 3 ½ minutes.
Boiling times outside this duration would suggest that the
pan construction is not ideal to provide best performance
and can result in premature component failure.
Use the Right Size Pan
This appliance is equipped with cooktop zones of dierent
sizes. Use utensils with at bottoms. DO NOT use unstable
pans and position the handles away from the edge of the
cooktop.
The proper relationship of pan location to zones will improve
eciency.
n
NEVER leave cooktop zones unattended at high
settings. Pans boiling over can cause smoking and
greasy spills may catch on re.
n
DO NOT use hotplate protectors, foil or hotplate
covers of any description. These may aect the
safe use of your hotplate zones and are potentially
hazardous to health.
n
Only certain types of stainless steel, enameled steel
pans or cast iron pans with enameled bases are
suitable for induction cooktop cooking.
n
The handle of a utensil should be positioned so
that it is turned inward to reduce the risk of burns,
ignition of ammable materials, and spillage due to
unintentional contact with the utensil.
ArtNo.312-0001 Not cooking surface
ArtNo.312-0003 Moving pans
ArtNo.312-0001 Not cooking surface
Fig. 1.1
Fig. 1.2
Fig. 1.3
Fig. 1.4
Fig. 1.5
4
General safety instructions
This appliance must be installed by a qualied installer in
accordance with the installation instructions. The installation
must comply with the relevant regulations and also the local
electricity supply company requirements.
This appliance is designed for domestic cooking only. Use for
any other purpose could invalidate any warranty or liability
claim.
The Rangetop should be serviced by an authorized service
technician and only approved parts used. Have the installer
show you the location of the Rangetop circuit breaker. Mark
it for easy reference. Always allow the Rangetop to cool
and then switch o at the circuit breaker before cleaning
or carrying out any maintenance work, unless specied
otherwise in this guide.
n
All parts of the Rangetop become hot with use
and will retain heat even after you have stopped
cooking.
n
Take care when touching Rangetop, to minimize
the possibility of burns, always be certain that the
controls are in the OFF position and that it is cool
before attempting to clean the Rangetop.
n
Clean with caution. If a wet sponge or cloth is used
to wipe spills on a hot surface, be careful to avoid
steam burns. Some cleaners can produce noxious
fumes if applied to a hot surface.
Clean only parts listed in this guide.
In the interests of hygiene and safety, the Rangetop should
be kept clean at all times as a build up in fats and other food
particles could result in a re.
Always keep combustible wall coverings or curtains etc. a safe
distance away from your Rangetop.
n
DO NOT spray aerosols in the vicinity of the
Rangetop while it is in use.
DO NOT store or use combustible materials, or ammable
liquids in the vicinity of this appliance.
Take great care when heating fats and oils, as they will ignite
if they get too hot.
Use a deep fat thermometer whenever possible to prevent
overheating fat beyond the smoking point.
n
NEVER leave a deep fry pan unattended. Always
heat fat slowly and watch as it heats. Deep fry pans
should be only a maximum of one third full of fat.
Filling the pan too full of fat can cause spill over
when food is added. If you use a combination of oils
or fats in frying, stir them together before heating,
or as the fats melt.
Foods for frying should be as dry as possible. Frost on frozen
foods or moisture on fresh foods can cause hot fat to bubble
up and over the sides of the pan. Carefully watch for spills or
overheating of foods when frying at high or medium high
temperatures. NEVER try to move a pan of hot fat, especially
a deep fry pan. Wait until the fat is cool.
When using an electrical appliance near the cooktop, be sure
that the cable of the appliance does not come into contact
with the cooktop.
Take care that no water seeps into the appliance.
Make sure that your kitchen is well ventilated at all times. Use
extractor fans or hoods when installed.
The Rangetop is designed for cooking foods only and must
not be used for any other purpose.
The specication of this Rangetop should not be altered.
n
This appliance is heavy, take care when moving it.
When the Rangetop is not in use ensure that the control
knobs are in the o position.
5
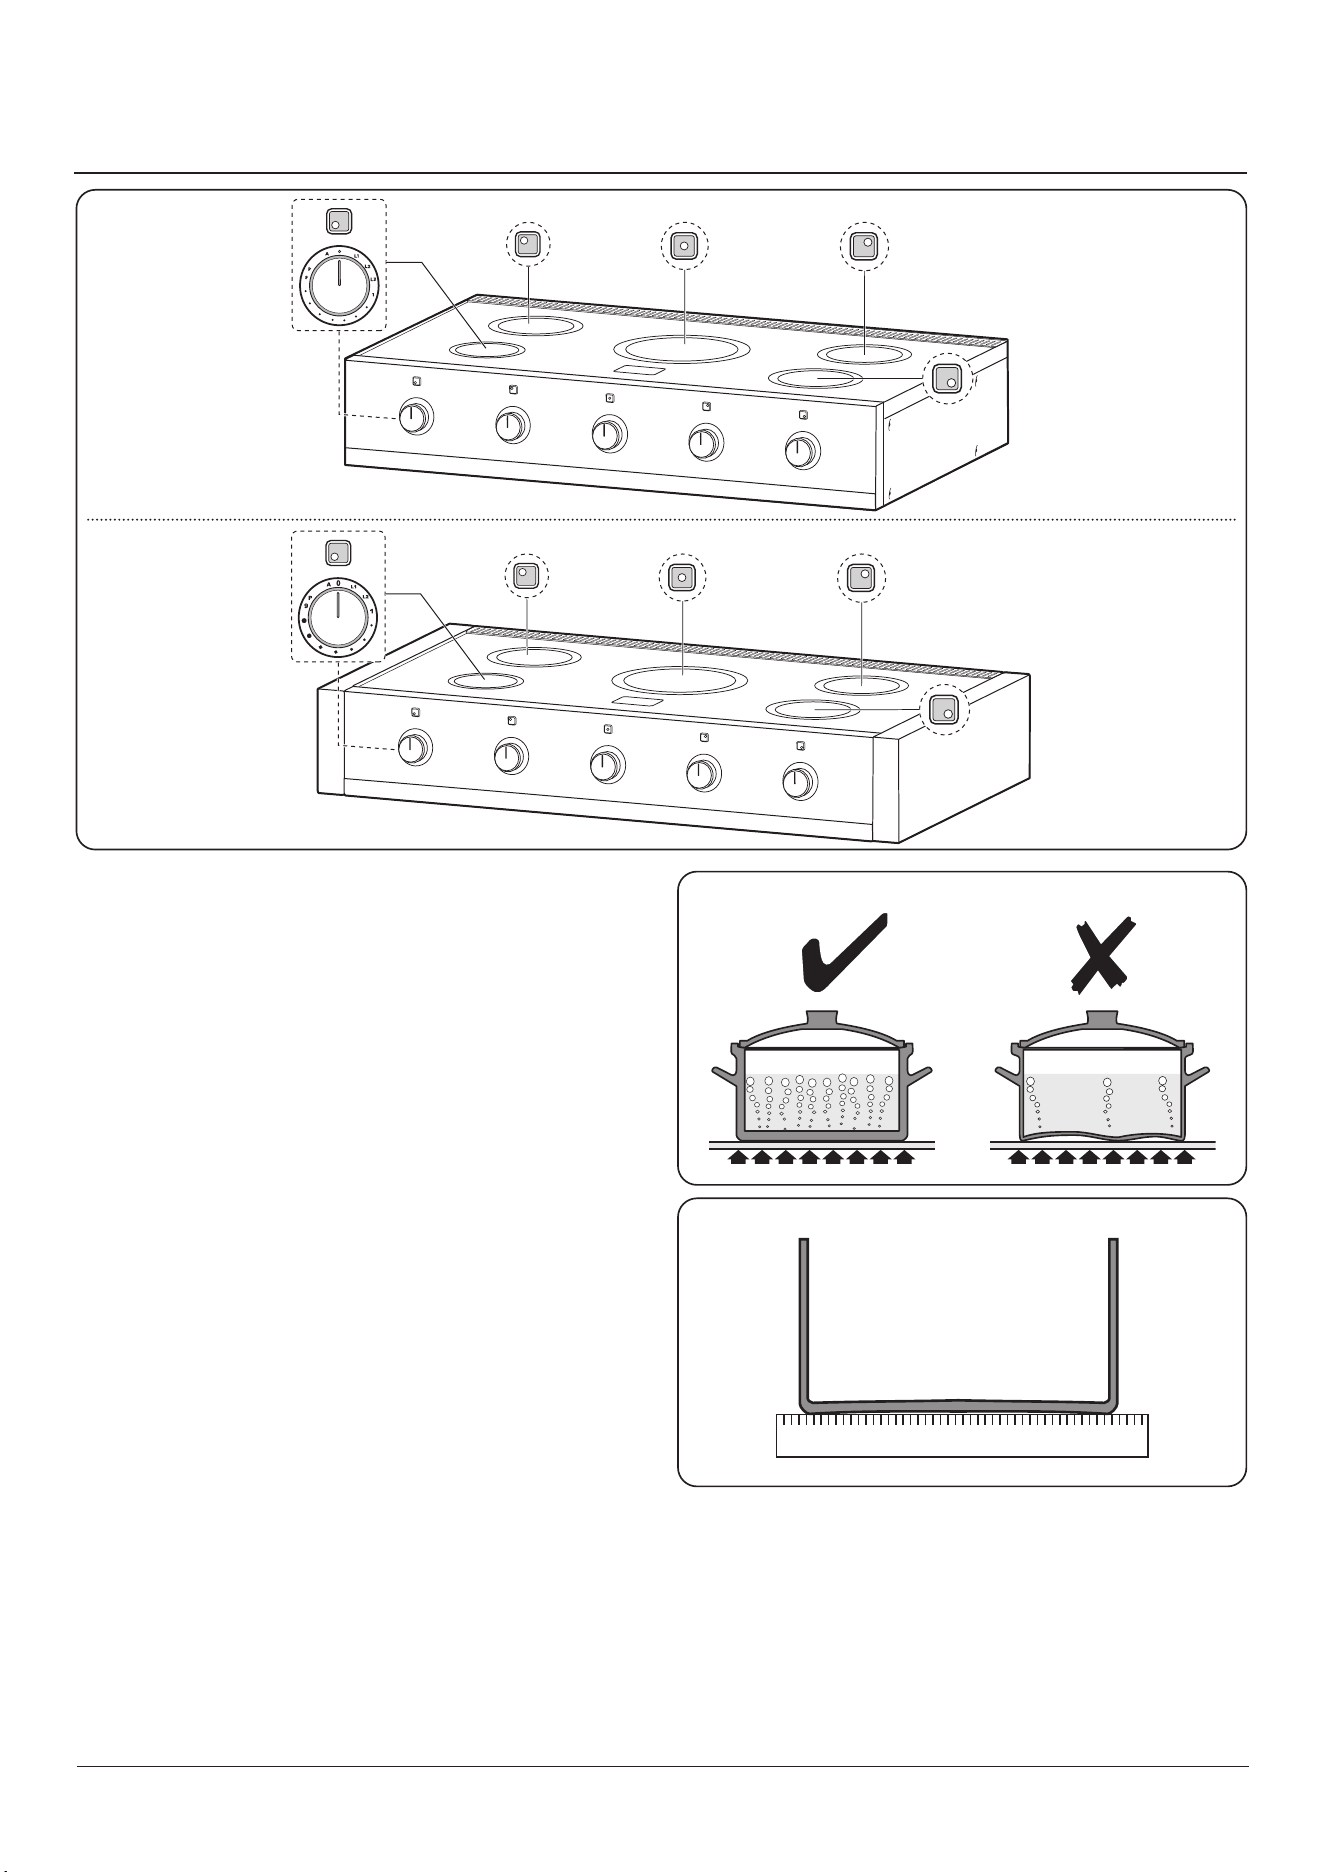
Fig. 2.1
Fig. 2.2
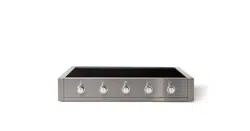
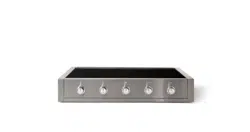
The Rangetop
Use only pans that are suitable for induction Rangetops. We
recommend stainless steel, enamel steel pans or cast-iron
pans with enamel bases. Note that some stainless-steel pans
are not suitable for use with an induction Rangetop so please
check carefully before purchasing any cookware.
The controls for the induction zones are shown in Fig. 2.1.
Pans made of copper, aluminum or ceramic are not suitable
for use on an induction Rangetop. The kind of pan you use,
and the quantity of food aects the setting required. Higher
settings are required for larger quantities of food.
Pots and pans should have thick, smooth, at bottoms
(Fig. 2.2). This allows the maximum heat transfer from the
Rangetop to the pan, making cooking quick and energy
ecient. Never use a round-bottomed wok, even with a
stand.
The very best pans have bases that are very slightly curved
up when cold (Fig. 2.3). If you hold a ruler across the bottom
you will see a small gap in the middle. When they heat up the
metal expands and lies at on the cooking surface.
Make sure that the base of the pan is clean and dry to prevent
any residue burning onto the Rangetop panel. This also helps
prevent scratches and deposits.
Use pans that are the similar size as (or slightly larger than)
the areas marked on the cooktop. Using a lid will help the
contents boil more quickly.
n
Always take care before touching the surface, even
when the Rangetop is turned o. It may be hotter
than you think!
2. Rangetop overview
Fig. 2.3
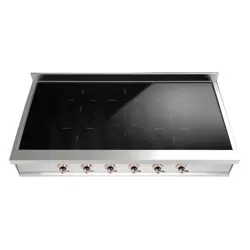
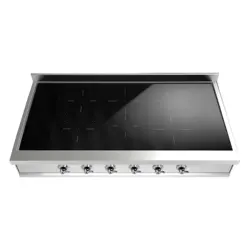
48”
36”
6
Max: 1.85 kW
Boost: 3.0 kW
Max: 1.85 kW
Boost: 3.0 kW
Max: 2.3 kW
Boost: 3.7 kW
Max: 1.85 kW
Boost: 3.0 kW
Max: 1.4 kW
Boost: 2.2 kW
Zone 1
Zone 2
Zone 3
Zone 4
Zone 5
HE-2
Cooking zone
Minimum Pan Diameter
(Pan base) inches (mm)
Front left
4 ¾” (120)
Rear left
5 ½” (140)
Center
8 ¼” (160)
Rear right
5 ½” (140)
Front right
5 ½” (140)
Fig. 2.4
Fig. 2.5
Overheat function
This function identies when the temperature of the pan rises
rapidly and works to maintain a safe level of pan temperature.
It should not interfere with normal cooking.
Cookware with bases that become distorted (Fig. 2.2) when
heated may interfere with the operation of the Overheat
Function. This may result in damage to your cookware or
Induction Glass Rangetop.
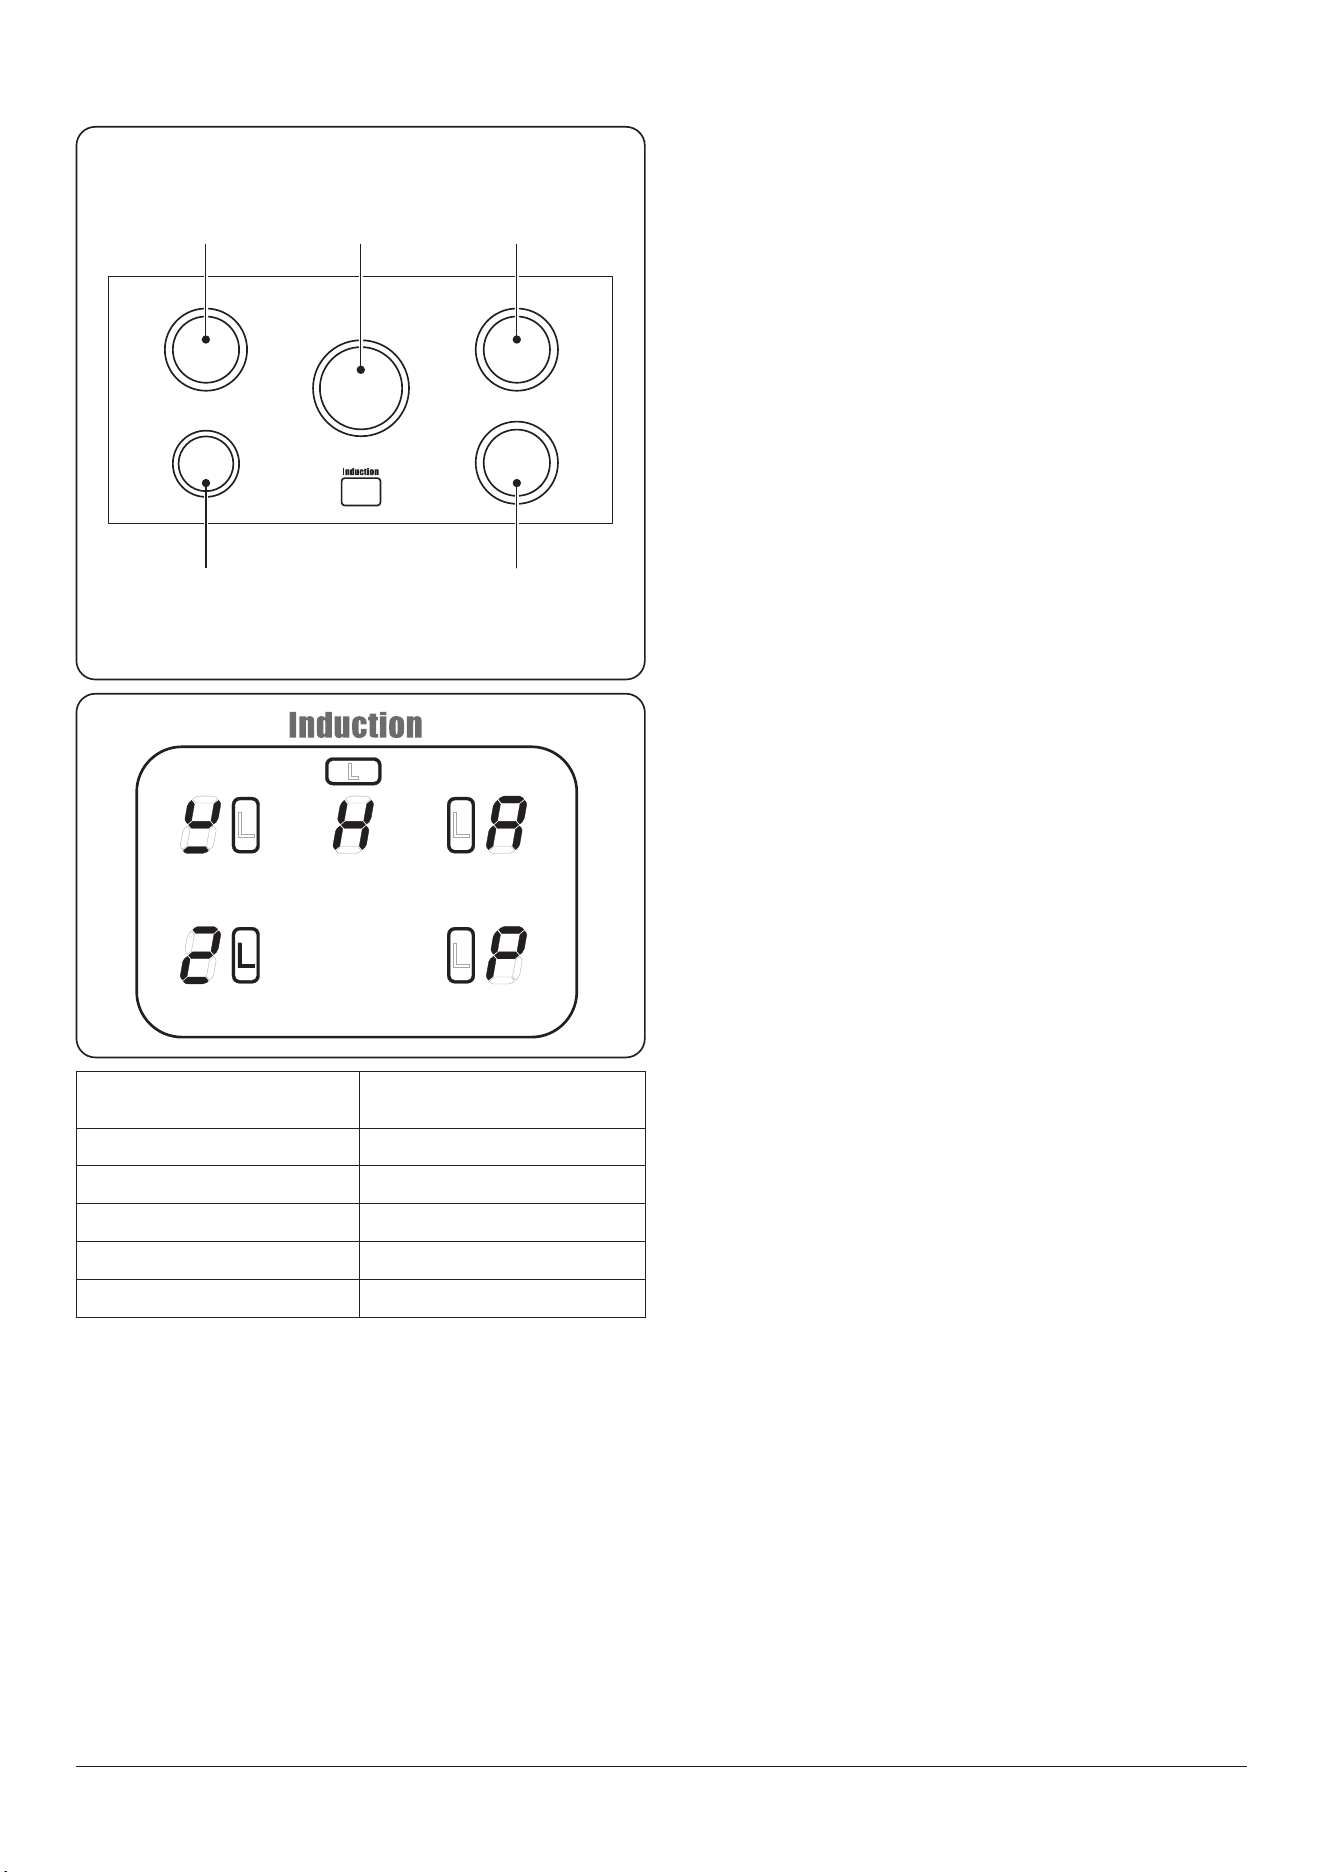
Rangetop control indications &
warnings
The induction Rangetop comprises of ve cooking zones
containing induction elements with dierent ratings and
diameters (Fig. 2.4) each with a pan detector and residual
heat indicator, and a Rangetop control display.
The Rangetop control display (Fig. 2.5) informs you of the
following induction Rangetop functions:
• Pan Detector
• H Residual Heat Indicator
• A Automatic Heat-up
• L Child Lock
• Low Temperature/Simmer Setting
• 36” - L1/L2/L3
• 48” - L1/L2
• P Power Boost Setting
• ON Advises user one or more zones are active
Pan detector,
n
IMPORTANT: After use, switch o the Rangetop
element by its control and DO NOT RELY on the pan
detector.
If a cooking area is switched on and there is no pan in
place or if the pan is too small for the cooking area, then no
heat will be generated. The symbol [ ]will appear on the
Rangetop control display; this is the “pan-missing symbol”.
Place a pan of the correct size on the cooking area and the
[ ] will disappear and cooking can begin. After 10 minutes
without detecting a pan the cooking zone will switch o
automatically.
Table 2.1 shows the minimum pan sizes recommended for
each cooking zone.
NOTE: Using pans with a base diameter smaller than those
recommended will result in a power reduction.
Residual heat indicator
After use, a cooking zone will remain hot for a period of time
as heat dissipates. When a cooking zone is switched o the
residual heat indicator symbol [ H ], will appear in the display.
This shows that the cooking zone temperature is above 140 °F
(60 °C) and may still cause burns. Once the temperature has
dropped to below 140 °F (60 °C) the [ H ] will go out.
Table 2.1
7
Table 2.2
Power level
Automatic Heat-up Time at
100% (min:sec)
1 0:48
2 2:24
3 3:50
4 5:12
5 6:48
6 2:00
7 2:48
8 3:36
48”
36”
Automatic heat-up
This function is available on all of the cooking zones. It
allows rapid heating to bring the selected cooking zone up
to temperature. The zone will maintain 100 % power (level
9) for the specied time and then automatically reduce
power to the preset level. The function is selected by turning
the control knob to the ‘A’ position. This can be selected by
turning the control knob momentarily counter-clockwise
from the zero position until the symbol [ A ] is shown on the
Rangetop control display.
Once the [ A ] is displayed, turn the control knob to the level
of your choice (1 to 9). The pan will heat up at 100% power
for a specied time before the power is reduced to the level
selected.
When the Automatic Heat-up function is activated, the
Rangetop control display will ash alternately between the
[ A ] setting and the chosen power level.
Once the Automatic Heat-up time has ended the Rangetop
display will stop ashing and will show the chosen power
level.
The Automatic Heat-up function can be stopped by either
turning the control knob back to the “0” power setting or
turning the control knob to the “9” power setting.
For your guidance Table 2.2 shows the time available at
100% power depending on the power level selected in the
Automatic Heat-up mode.
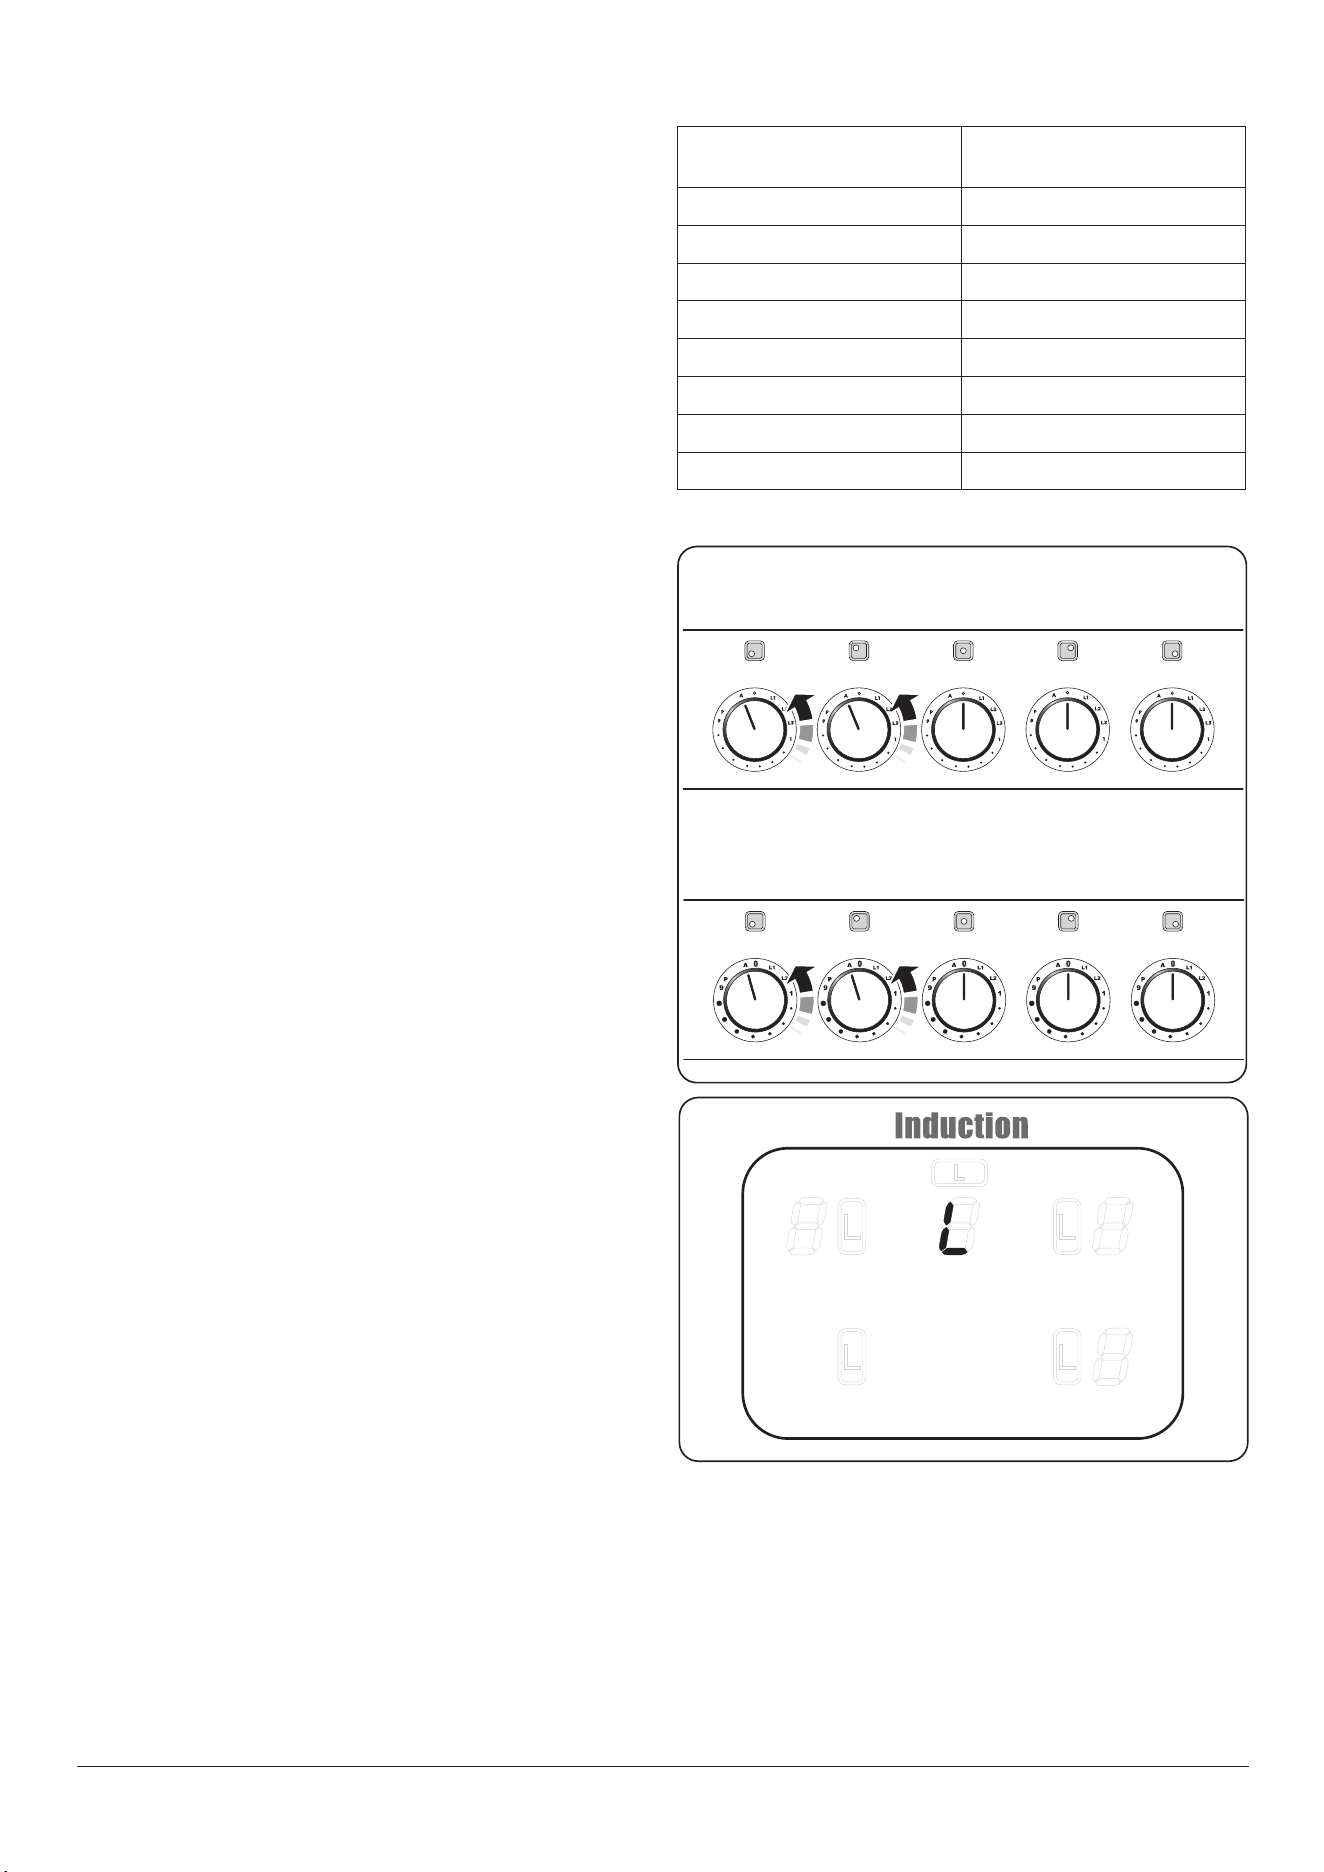
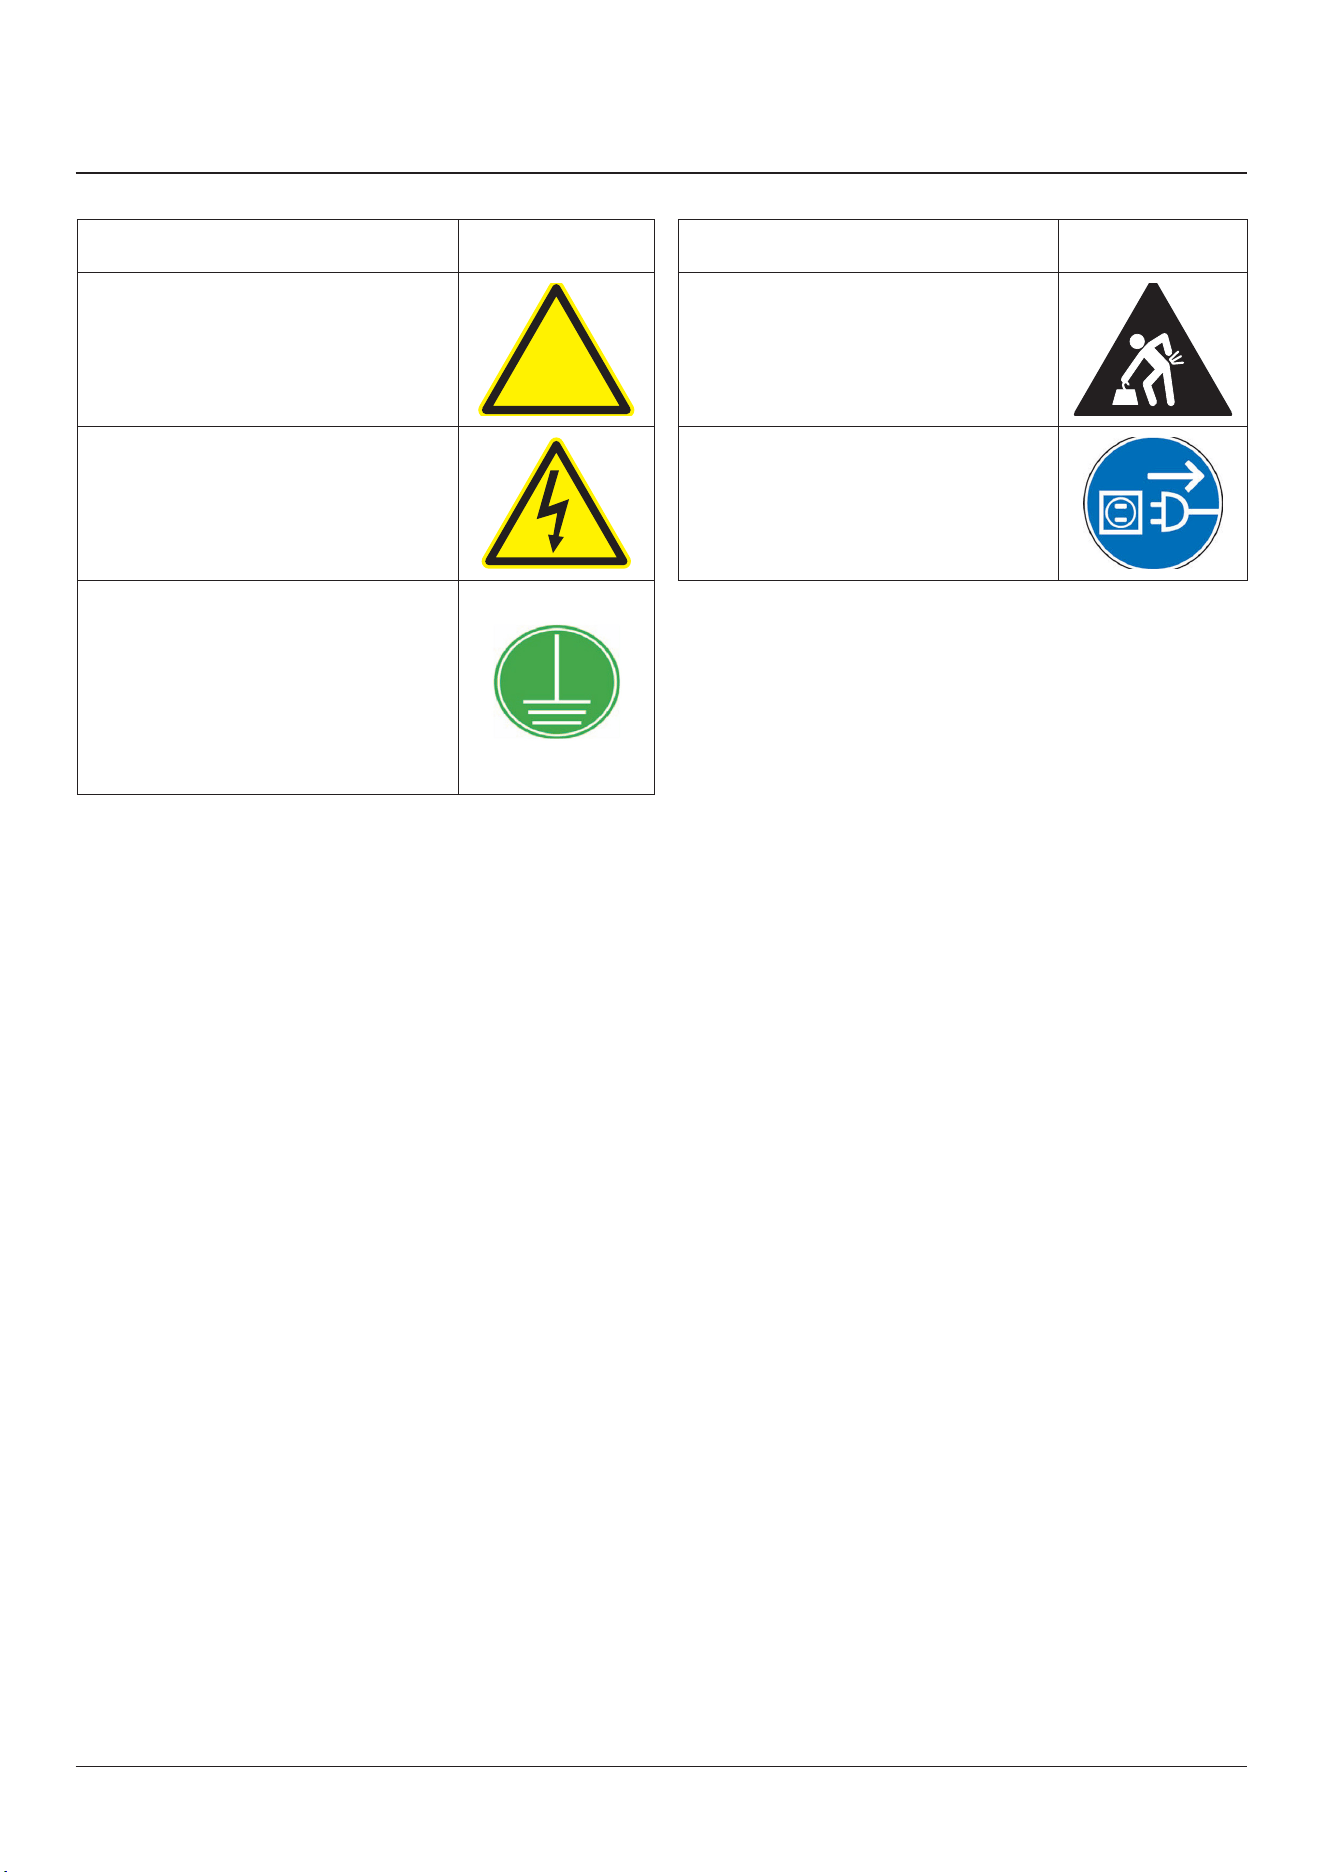
Child lock
To prevent unwanted use by children, the Rangetop can be
locked.
n
IMPORTANT: This can only be activated when all the
cooking zones are switched o.
To lock the Rangetop, simultaneously turn the two left-hand
controls counter-clockwise (Fig. 2.6) and hold until the L
symbol appears in the center of the Rangetop control display
(Fig. 2.7).
NOTE: [ A ] will ash when locking the Rangetop – this is
normal.
To unlock the Rangetop, simultaneously turn the two left-
hand controls counter-clockwise and hold until the L symbol
disappears from the center of the Rangetop control display.
Fig. 2.6
Fig. 2.7
8
Table 2.3
Low temperature/simmer setting
n
This function should only be used when heating
from cold.
Each cooking zone is equipped with 3 low temperature
settings for 36” and 2 settings for 48”:
• L1 will maintain a temperature of about 104 °F (40 °C) –
ideal for gently melting butter or chocolate.
• L2 will maintain a temperature of about 194 °F (90 °C) –
ideal for simmering (bring the pan to the boil and then
select L2 to keep soups, sauces, stews, etc. at an optimal
simmer).
• L3 will maintain a temperature of about 201.2 °F (94 °C) –
ideal for simmering (bring the pan to the boil and then
select L3 to keep soups, sauces, stews, etc at an optimal
simmer).
The maximum time this setting can be used is 2 hours, after
which the Rangetop will switch o automatically. If required,
you can immediately restart the Low Temperature function
by reactivating L1 , L2 or L3. To increase the heat, just turn the
control knob to the required level.
The maximum times for all other power levels are shown in
Table 2.3.
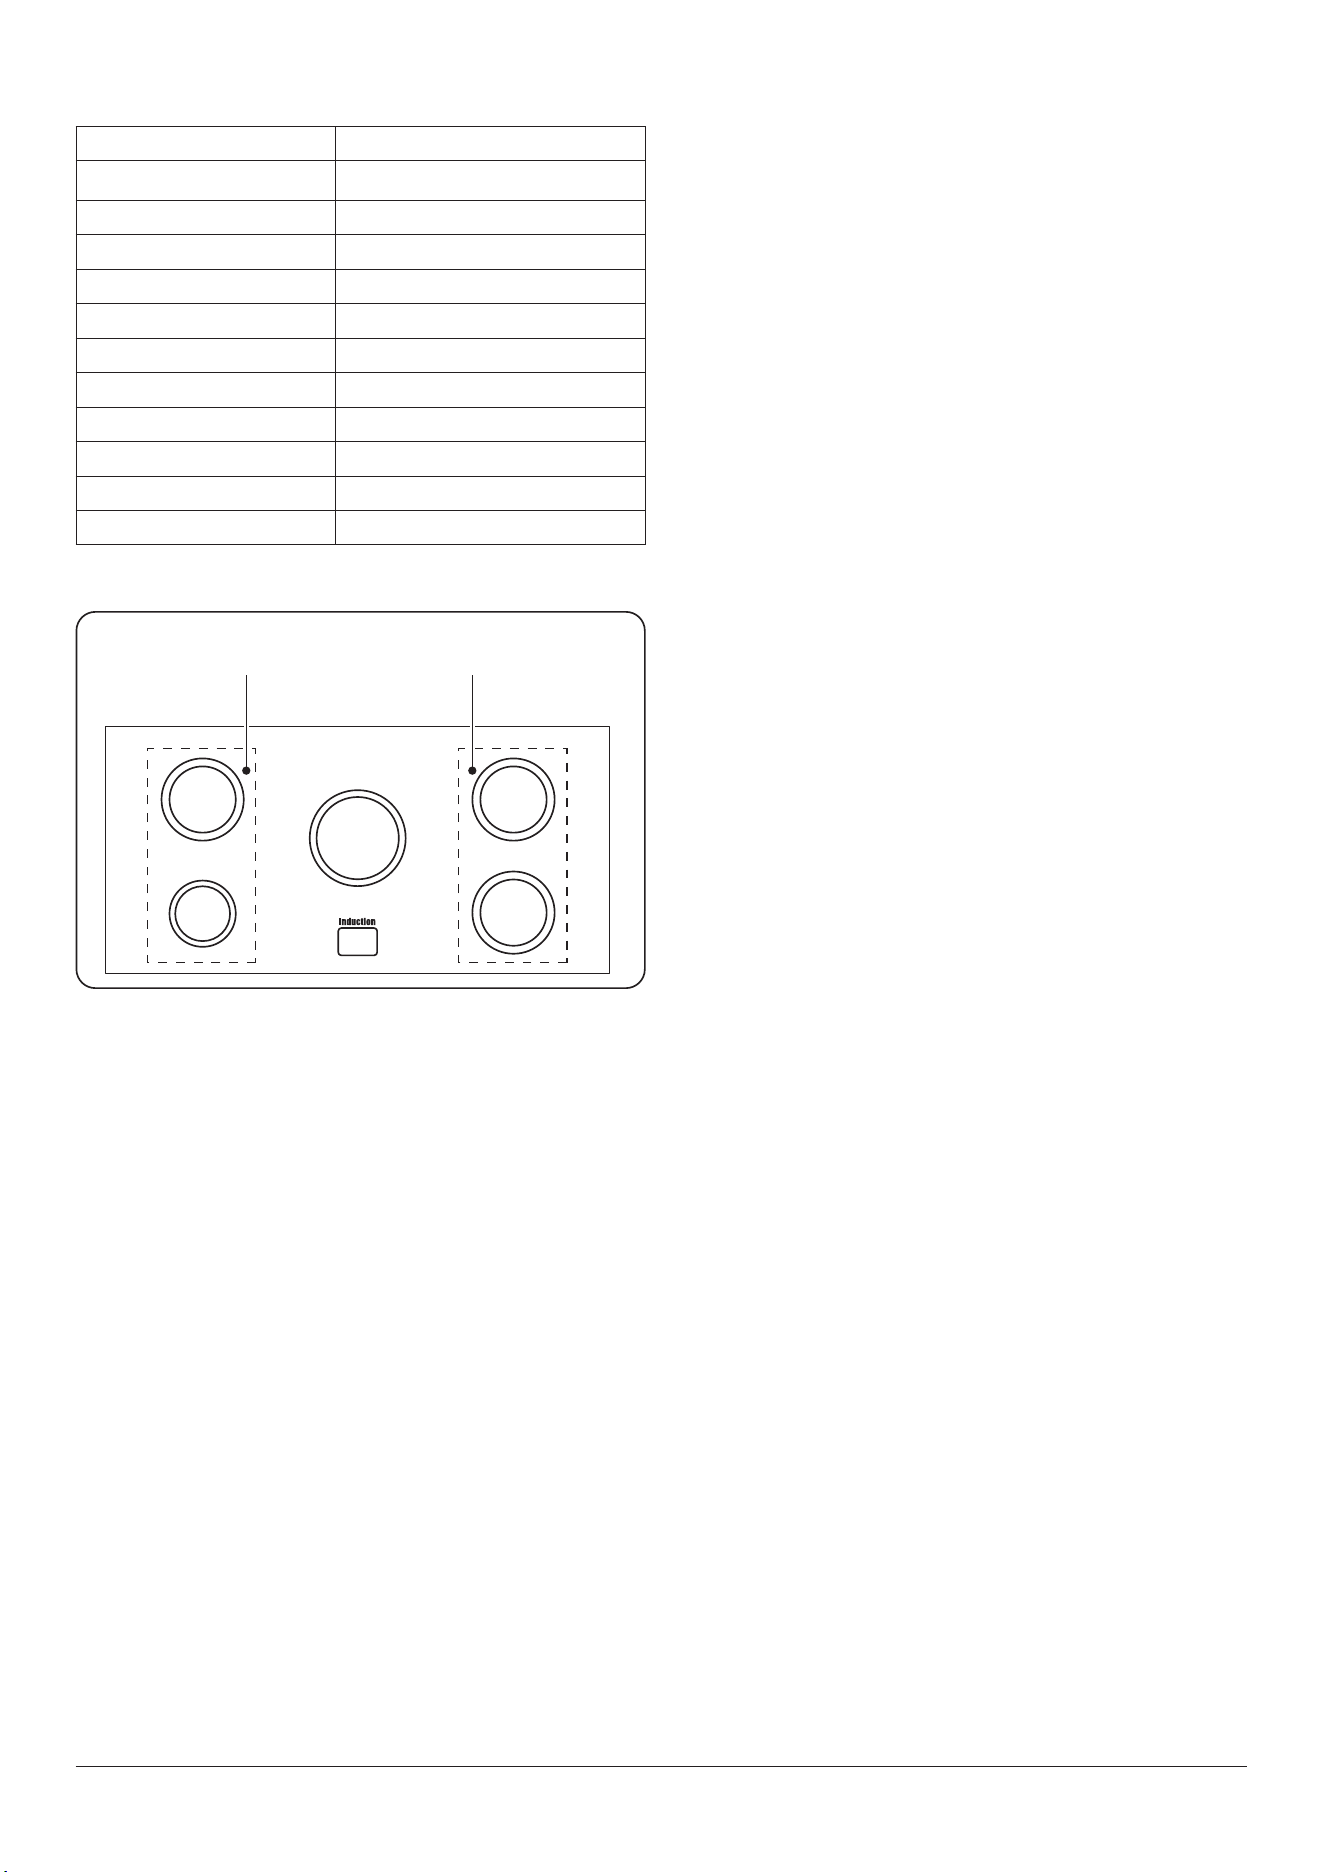
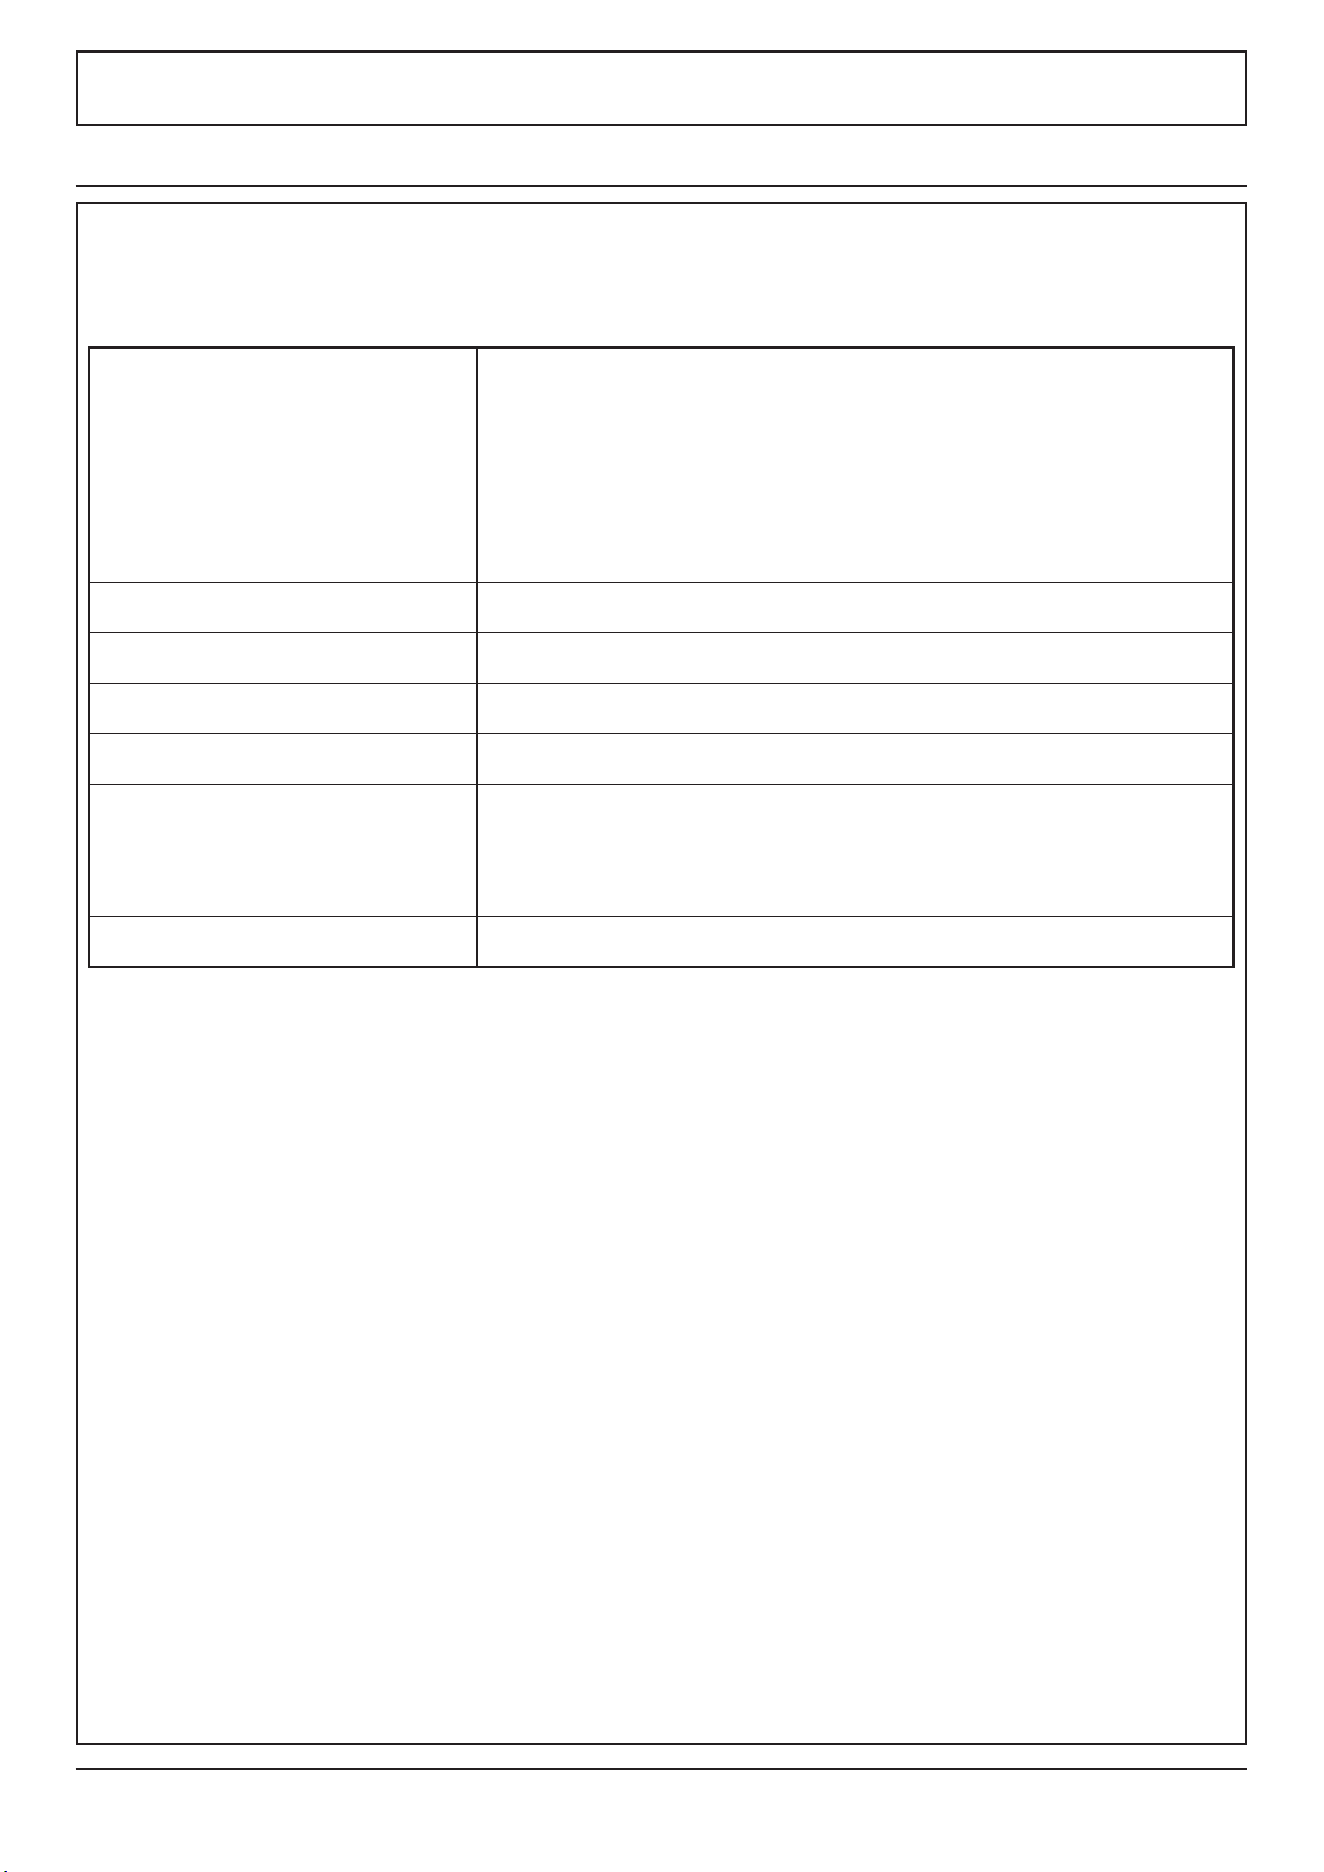
Power boost setting
All of the induction cooking zones have Power Boost
available, activated by turning the control knob clockwise
until [ P ] is shown on the Rangetop control display.
Power Boost allows additional power to be made available for
each of the cooking zones. This is useful to bring a large pan
of water to the boil quickly.
The Power Boost function operates for a maximum
of 10minutes on each zone, after which the power is
automatically reduced to setting 9.
When using the Power Boost function, the cooking zones are
linked.
Fig. 2.8 shows the Rangetop layout. Zones A and B are linked
together as are zones D and E.
This means that when using zone A on Power Boost and then
switching zone B to Power Boost, the power to zone A will
reduce slightly. The last zone switched to Power Boost always
takes priority. Zones D and E work in the same way. Zone C is
not shared.
n
This is a built-in safety device.
Deactivate the Power Boost function by turning the control
knob to a lower setting.
n
Please remember not to leave the Rangetop
unattended. Care should be taken to not allow your
cookware to boil dry. Damage to your cookware and
Induction Glass Rangetop may result.
Please read and follow the manufacturers’ instructions
carefully before using cookware on your induction Rangetop.
A D
B
E
C
A & B linked D & E linked
Fig. 2.8
Power Level Maximum Operating Time
L1, L2 and L3
2 hours
1 6 hours
2 6 hours
3 5 hours
4 5 hours
5 4 hours
6 1.5 hours
7 1.5 hours
8 1.5 hours
9 1.5 hours
Power Boost 10 minutes
9
The Bridging-Zone Function
(36” only)
Zones D and E can be bridged, creating an area, ideal for use
with an induction griddle (not supplied).
Note: The griddle should comprise of an induction friendly,
at bottom, large enough to cover zones D and E of the
hotplate heating area (Fig. 2.10).
DO NOT use zones A, B or C to heat the griddle (Fig. 2.10).
To activate the bridging-zone function, simultaneously turn
the two right-hand controls completely clockwise (Fig. 2.11)
and hold until the [ ] symbols appear in the centre of the
cooktop control display (Fig. 2.12). The temperature can then
be adjusted using the right-hand knob (Fig. 2.13).
Turn both knobs counter-clockwise to cancel the dualzone
function and return to normal operation.
n
DO NOT turn the two right-hand knobs individually
to heat the griddle. This can cause excessive
temperatures and damage the coating on the
griddle.
A
B
C
E
D
Fig. 2.9
Fig. 2.10
Fig. 2.11
Fig. 2.12
Fig. 2.13
10
Essential information
n
Before thorough cleaning, turn o the circuit
breaker. Allow the Rangetop to cool.
n
After cleaning remember to switch on the circuit
breaker before using the Rangetop.
n
NEVER use paint solvents, caustic cleaners,
biological powders, bleach, chlorine based bleach
cleaners, coarse abrasives or salt.
n
DO NOT mix dierent cleaning products – they may
react together with hazardous results.
n
A steam cleaner is NOT to be used.
Recommended cleaning materials are shown in Table 3.1
Rangetop
Daily care
First of all, make sure that all heat indicator lights are o and
that the cooking surface is cool. Clean the surface with hot
soapy water or a non-abrasive cleaner if necessary. As a nal
step, wipe the cooking surface with a clean, dry paper towel.
3. Cleaning your Rangetop
Cleaning spills
For spills and boil-overs that occur while cooking, turn the
unit o and wipe the area surrounding the hot zone with a
clean paper towel. If a spill (other than a sugary substance) is
on the hot zone, do not clean until the unit has completely
cooled down, and then follow the instructions below
(‘Cleaning Burned-on Spills’).
If you accidentally melt anything on the surface, or if you spill
foods with a high sugar content (preserves, tomato sauce,
fruit juice, etc.), remove the spill IMMEDIATELY with a razor
scraper, while the unit is still hot.
n
IMPORTANT: Use an oven glove to protect your hand
from potential burns.
Scrape the major spill or melted material from the cooking
zone and push into a cold area. Then, turn the unit ‘OFF’ and
allow it to cool before cleaning further. After the cooking
surface cools down and the heat indicator lights go o, follow
the ‘Daily Care’ procedure outlined above.
Cleaning burned-on spills
Make sure that the heat indicator lights are o and that the
Rangetop is cool. Remove the excess burned-on substance
with a single-edged razor scraper. Hold the scraper at an
angle of about 30° to the surface and then scrape o the
burned-on matter.
AGA care and cleaning
Supplies can be found at www.aga-ranges.com and
purchased by calling AGA Kitchen Concierge on
(800) 525 - 5601.
Cleaning table
Cleaners listed (Table 3.1) are available from supermarkets or
online.
For enamel surfaces use a cleaner that is approved for use on
vitreous enamel.
Regular cleaning is recommended. For easier cleaning, wipe
up any spillages immediately.
Rangetop
Part Finish Recommended Cleaning Method
Rangetop surface High temperature glass
Hot soapy water, non-abrasive cleaner if
necessary.
Outside of Rangetop
Part Finish Recommended Cleaning Method
Sides and trim Stainless steel surface
Hot soapy water, soft cloth. Enamel
cleaner or chrome & steel cleaner
respectively, if necessary.
Rear trim stainless Stainless steel
Hot soapy water, soft cloth. Cream
cleaner, with care, if necessary.
Control panel Enamel or stainless steel
Warm soapy water. Do not use abrasive
cleaners on lettering.
Control knobs Mercury knobs are aluminum
Warm soapy water, soft cloth. Chrome &
steel cleaner if necessary.
Table 3.1

11
n
All servicing and repairs must be carried out by an
authorized service technician.
NOTE: The induction Rangetop is able to self-diagnose a
number of problems and can show this information to the
user via the Rangetop control display. Error codes may be
displayed if your Rangetop has developed a fault.
If your appliance reports an error or is not working, you may
be able to correct the fault by consulting the following.
Error code E2 is displayed
The electronic unit is too hot. Please check the installation of
the Rangetop, making sure that there is sucient ventilation.
In extreme cases, if a cooking utensil has been allowed to boil
dry this error code may also be displayed. If in doubt, please
contact your qualied installer or an authorized service
technician.
No display operation
Over voltage or loss of supply voltage to the Rangetop. If in
doubt, please contact your qualied installer or an authorized
service technician.
Error code U400 is displayed
The Rangetop has been incorrectly connected. The control
will switch o after approximately 1 second and the error
code will be permanently displayed.
Consult your qualied installer or an authorized service
technician.
Error code Er followed by a number is displayed
The appliance has developed an internal technical fault that
cannot be rectied by the user.
Consult your qualied installer or an authorized service
technician.
The fuse blows or the RCD trips regularly
Consult your qualied installer or an authorized service
technician.
The Rangetop will not switch on
Has the wiring system in the house blown a fuse or tripped an
earth leakage circuit breaker?
Has the Rangetop been correctly connected to the mains
supply?
The induction Rangetop is noisy
When using the induction Rangetop there may be some
‘noise’ emitted from the pan. This is normal and may be most
noticeable when cooking on high power settings or if 5 pans
are used simultaneously. This type of pan may also contribute
to induction ‘noise’.
4. Troubleshooting
What cleaning materials are recommended for the
Rangetop?
See the ‘Cleaning’ section for a full list of recommended
cleaning materials.
n
We DO NOT recommend corrosive or caustic
cleaners as these may damage your Rangetop.
If there is an installation problem and I don’t get my
original installer to come back to x it who pays?
You do. Service organizations will charge for their call outs if
they are correcting work carried out by your original installer.
It is in your interest to track down your original installer.
12
5. Installation Instructions
READ THESE INSTRUCTIONS FULLY BEFORE USE
SAVE THESE INSTRUCTIONS FOR FUTURE REFERENCE SAVE THE INSTALLATION
INSTRUCTIONS FOR THE LOCAL ELECTRICAL INSPECTOR’S USE
Meaning / Description Symbol
WARNING / CAUTION
An appropriate safety instruction
should be followed or caution to a
potential hazard exists.
!
DANGEROUS VOLTAGE
To indicate hazards arising from
dangerous voltages.
PROTECTIVE EARTH (GROUND)
To identify any terminal which is
intended for connection to an external
conductor for protection against
electric shock in case of a fault, or the
terminal of a protective earth (ground)
electrode.
Meaning / Description Symbol
HEAVY
This product is heavy and reference
should be made to the safety
instructions for provisions of lifting and
moving.
DISCONNECT MAINS SUPPLY
Disconnect incoming supply before
inspection or maintenance.
The following symbols are related to Safety and are used on the product and throughout this manual.
INSTALLATION
Check the appliance is electrically safe when you have nished.
13
Firstly, please complete the appliance details below and keep them safe for future reference – this information will enable us
to accurately identify the particular appliance and help us to help you. Filling this in now will save time and inconvenience
if you later have a problem with the appliance. It may also be of benet to keep your purchase receipt with this leaet. You
may be required to produce the receipt to validate a warranty eld visit.
* This information is on the appliance data badge.
If you have a problem
In the unlikely event that you have a problem with your appliance, please refer to the rest of this booklet, especially the
problem solving section, rst to check that you are using the appliance correctly.
If you are still having diculty, please contact Tech Support at 800.914.4799 or email [email protected]om .
Please note
For warranty information or to register your AGA Rangetop, email customersupport@middlebyresidential.com. You may
also refer to the warranty document provided with the appliance or contact 888.845.4641 Option 3 .
Out of warranty
We recommend that our appliances are serviced regularly throughout their life to maintain the best performance and
eciency. The frequency of service will depend on usage – for normal usage once a year should suce. Service work should
only be carried out by an authorized service technician.
Spare parts
To maintain optimum and safe performance, we recommend that only genuine spare parts are used. DO NOT use re-
conditioned or unauthorized controls. Contact 888.845.4641 Option 1 or email parts@middlebyresidential.com .
Dealer’s Name and Address
Name of Appliance
Appliance Serial Number*
Fuel Type
Date of Purchase
Installer’s Name, Address and
Telephone No.
Date of Installation
6. Service and parts
INSTALLATION
Check the appliance is electrically safe when you have nished.
14
Regulations
n
Installation of this Rangetop must conform with
local codes.
n
This Rangetop has been designed and certied to
the requirements of UL 858 & CSA C22.2 E60335-2-6.
n
This appliance is to be installed in accordance with
National, regional and electrical codes by a qualied
person.
n
The Rangetop must be electrically grounded in
accordance with local codes or, in the absence
of local codes, in accordance with the National
Electrical Code (NFPA 70, latest edition). In Canada,
electrical grounding must be in accordance with the
current CSA C22.1 Canadian Electrical Code Part 1
and/or local codes.
IMPORTANT!
n
Observe all governing codes and ordinances.
n
Save these instructions for the local electrical
inspector’s use.
For your safety
n
DO NOT store or use combustible materials, gasoline
or other ammable vapors and liquids in the vicinity
of this or any other appliance.
n
This appliance must be grounded.
Isolate electrical supply before installation.
This appliance is heavy. Ensure you have the correct
facilities to complete the move. To nd the weight of
the appliance refer to the "Technical data".
n
Ensure all clearances are followed. Refer to
"Positioning the Rangetop".
n
Improper installation, adjustment, alteration,
service or maintenance can cause injury or property
damage. Refer to this manual. For assistance
or additional information, consult a qualied,
appointed AGA Service Agent.
IMPORTANT!
n
Remove all packing material and literature before
connecting the electrical supply to Rangetop.
n
Have your Rangetop installed by a qualied installer.
n
Your Rangetop must be electrically grounded in
accordance with local codes or, in the absence
of local codes, in accordance with the National
Electrical Code (NFPA 70, latest edition).
n
DO NOT install your Rangetop on a substrate that
cannot withstand 180 °F (82 °C).
n
Make sure the wall coverings around the Rangetop
can withstand heat generated by the Rangetop up to
200 °F (93 °C).
n
Avoid placing cabinets above the Rangetop. There
must be a gap of at least 30" (762 mm) between the
top of the Rangetop and any combustible surface
above it.
n
If a ventilation hood is installed above the Rangetop
follow the installation instructions supplied with the
hood.
n
Items of interest to children should not be stored
above a Rangetop – children climbing on the
Rangetop to reach items could be seriously injured.
n
To eliminate the risk of burns or re by reaching over
heated surface units, cabinet storage space located
above the surface units should be avoided.
Location of the Rangetop
The Rangetop may be installed in a kitchen/kitchen dining
area but NOT in a room containing a bath or shower.
n
IMPORTANT - Make sure the wall coverings around
your Rangetop can withstand the heat generated
(up to 200°F) by the Rangetop. (See the Installation
Safety Instructions section).
7. Installation safety instructions
INSTALLATION
Check the appliance is electrically safe when you have nished.
15
You will need the following equipment to complete the
Rangetop installation satisfactorily:
• Multimeter (for electrical checks).
You will also need the following tools:
1. Steel tape measure
2. Screwdriver
3. Level
4. Jigsaw
Positioning the Rangetop
n
Do not position the Rangetop above a built-in
appliance.
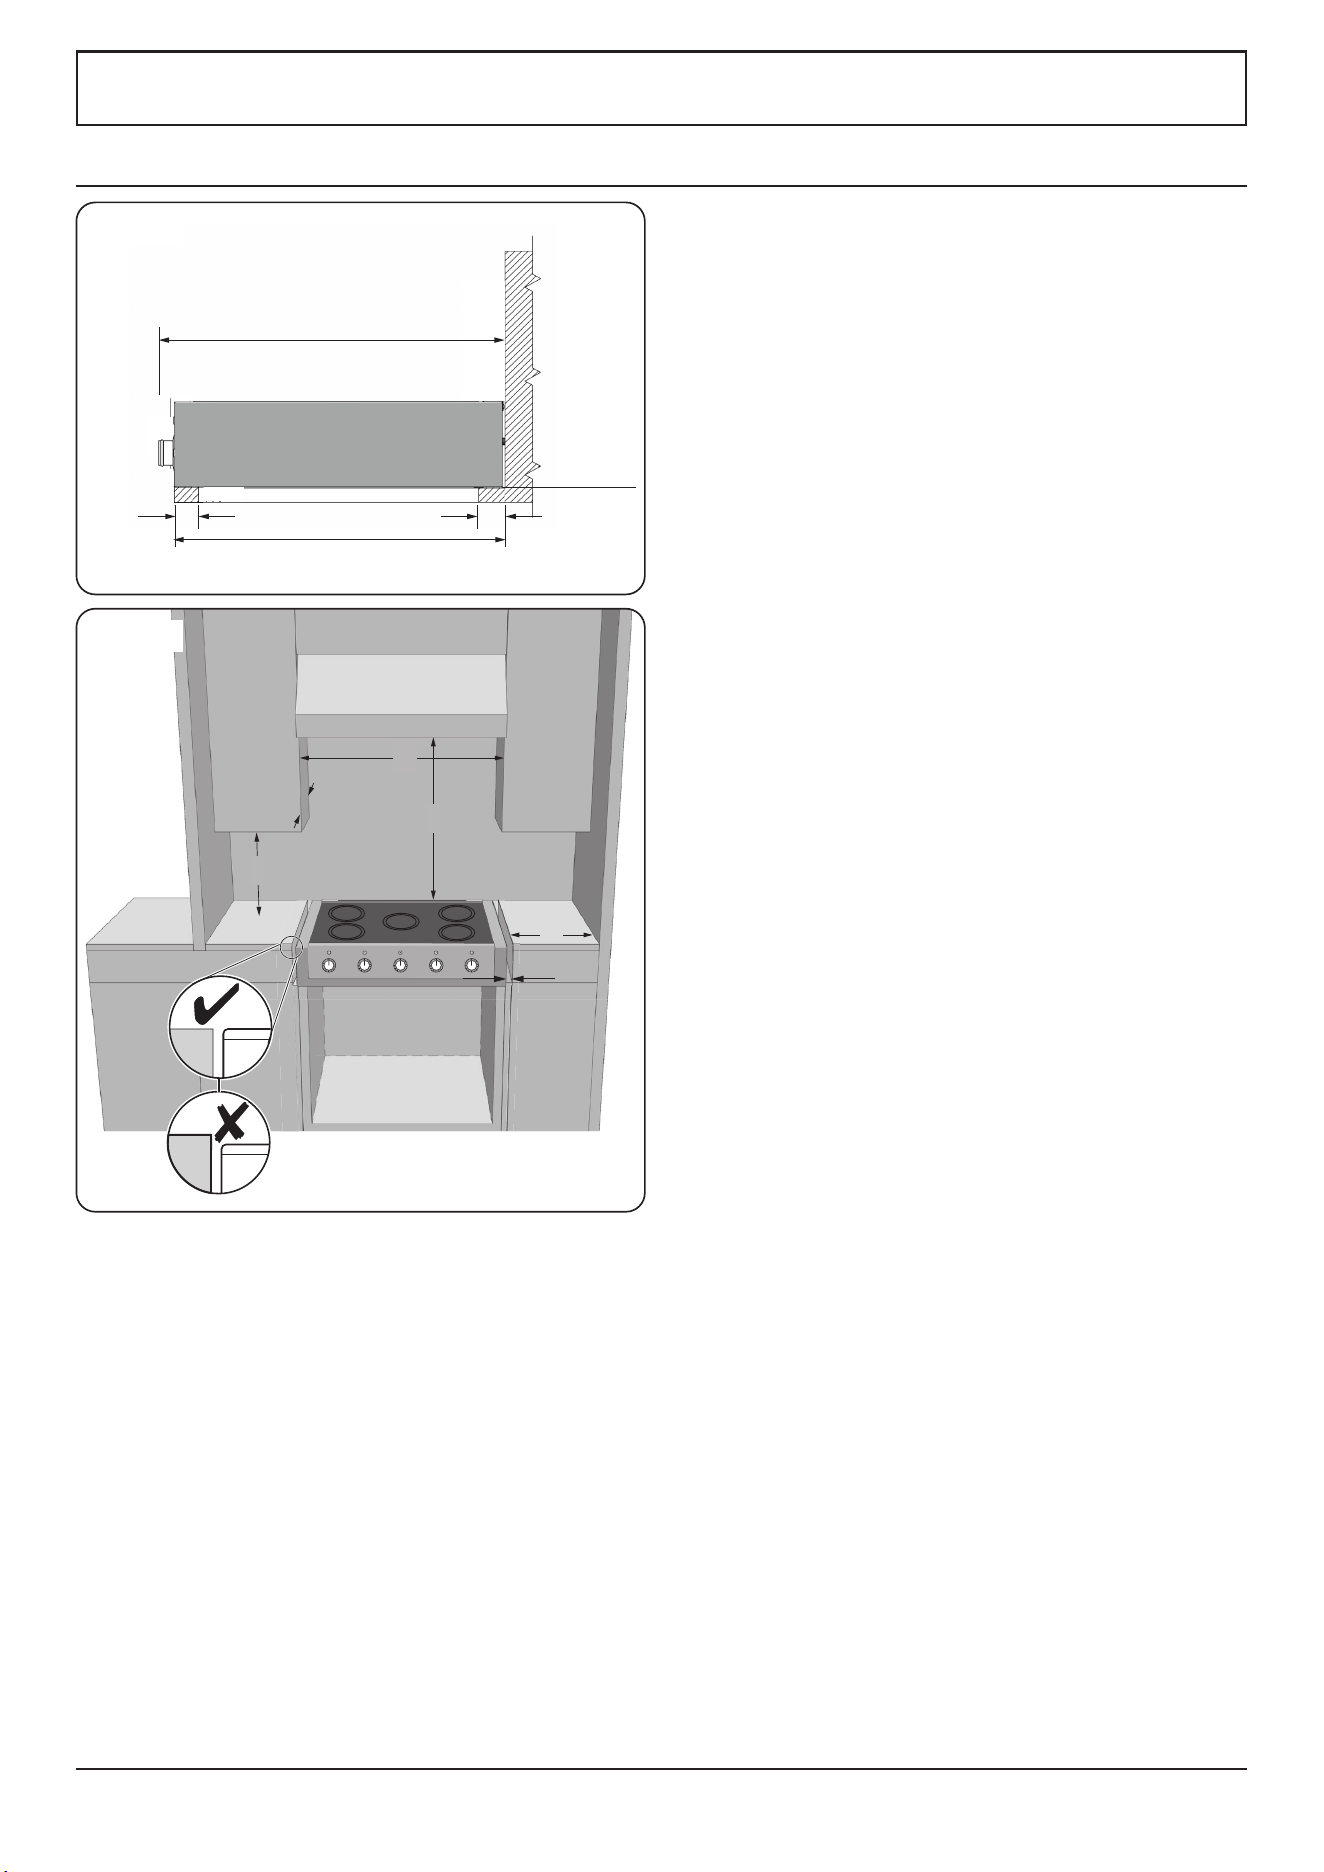
Fig. 8.1 to Fig. 8.48 show the minimum recommended
distance from the Rangetop to nearby combustible surfaces
(see Table 8.1).
We recommend a gap of no more than 3/16” (5 mm)
(see Table 8.1) either side of the appliance for moving the
Rangetop. It must be possible to move the Rangetop in and
out for cleaning and servicing.
Rangetop should be level with, or above, any adjacent
countertop (Fig. 8.1).
*Any rangehood should be installed in accordance with the
hood manufacturer’s instructions.
**Any splashback must be tted in accordance with the
manufacturer’s instructions. Allowance should be made for
the additional height of the ue trim, which is tted to the
Rangetop.
Surfaces of furniture and walls at the sides and rear of the
appliance should be heat, splash and steam resistant. Certain
types of vinyl or laminate kitchen furniture are particularly
prone to heat damage and discoloration.
We cannot accept responsibility for damage caused by
normal use of the Rangetop to any material that de-laminates
or discolors at temperatures less than 149°F/65°C above room
temperature.
8. Installation
17 18/25” (450 mm)
25 3/5” (650 mm)
4” (100 mm)
4” (100 mm)
26 7/10” (678 mm)
D
B
F
C
E
A
17 18/25” (450 mm)
25 3/5” (650 mm)
4” (100 mm)
4” (100 mm)
26 7/10” (678 mm)
D
B
F
C
E
A
Fig. 8.1
Fig. 8.2
INSTALLATION
Check the appliance is electrically safe when you have nished.
16
Dimension Description
36" 48"
USA Canada USA Canada
A
Gap between side of appliance and adjacent vertical
surface ABOVE Rangetop level
1 3/16" (30 mm) 1 1 3/16" (30 mm) 1 1 3/16" (30 mm) 1 1 3/16" (30 mm) 1
B
Gap between side of appliance and adjacent vertical
surface BELOW Rangetop level
3/16" (5 mm) ½" (12 mm) 3/16" (5 mm) ½" (12 mm)
C
Gap between Rangetop level and any horizontal
combustible surface
31 ½"
(800 mm) 2
31 ½"
(800 mm) 2
31 ½"
(800 mm) 2
31 ½"
(800 mm) 2
D
Maximum depth of cabinets installed above the top
surface cooking sections
13" (330 mm) 13" (330 mm) 13" (330 mm) 13" (330 mm)
E
Minimum distance between horizontal surfaces less
than dimension C
35 ½"
(901.7 mm)
35 ½"
(901.7 mm)
47 ⁷/16"
(1208 mm)
47 ⁷/16"
(1208 mm)
F
Minimum distance between horizontal cabinets and
worktop surfaces adjacent to Rangetop
16 ⁵/32"
(410 mm)
16 ⁵/32" (410 mm)
16 ⁵/32"
(410 mm)
16 ⁵/32"
(410 mm)
1 For non-combustible surfaces (such as unpainted metal or ceramic tiles) this gap is not required
2 This dimension can be reduced to 24" (610 mm) if the bottom of the wooden or painted metal cabinet is preserved with a non-combustible material; when
bottom of wood or metal cabinet is protected by not less than 1/4-inch-thick ame-retardant millboard covered with not less than No. 28 MSG sheet steel,
0.015-inchthick stainless steel, 0.024-inch-thick aluminum, or 0.020-inch-thick copper
Table 8.1
Clearances to combustibles
min 24” (610 mm)
max 25 1/2” (650 mm)
(914 mm)
36“
min 24” (610 mm)
max 25 1/2” (650 mm)
(915 mm)
36“
max 25 1/2” (650 mm)
min 24” (610 mm)
EMPTY SPACE
3“
(75 mm)
4”
(100 mm)
3”
(75 mm)
4“
(100 mm)
(914 mm)
36“
(1220 mm)
48“
20” (510 mm)
5”
(125 mm)
max 25 1/2” (650 mm)
min 24” (610 mm)
20” (510 mm)
6” (150mm)
CUTOUT FOR FIXING BRAKETS
4” (100mm)
10 21/64”
(275mm)
CUTOUT FOR DATA PLATE
3” (75 mm)
6” (150mm)
4” (100mm)
(914 mm)
36“
min 24” (610 mm)
max 25 1/2” (650 mm)
(914 mm)
36“
min 24” (610 mm)
max 25 1/2” (650 mm)
(915 mm)
36“
max 25 1/2” (650 mm)
min 24” (610 mm)
EMPTY SPACE
3“
(75 mm)
4”
(100 mm)
3”
(75 mm)
4“
(100 mm)
(914 mm)
36“
(1220 mm)
48“
20” (510 mm)
5”
(125 mm)
max 25 1/2” (650 mm)
min 24” (610 mm)
20” (510 mm)
6” (150mm)
CUTOUT FOR FIXING BRAKETS
4” (100mm)
10 21/64”
(275mm)
CUTOUT FOR DATA PLATE
3” (75 mm)
6” (150mm)
4” (100mm)
(914 mm)
36“
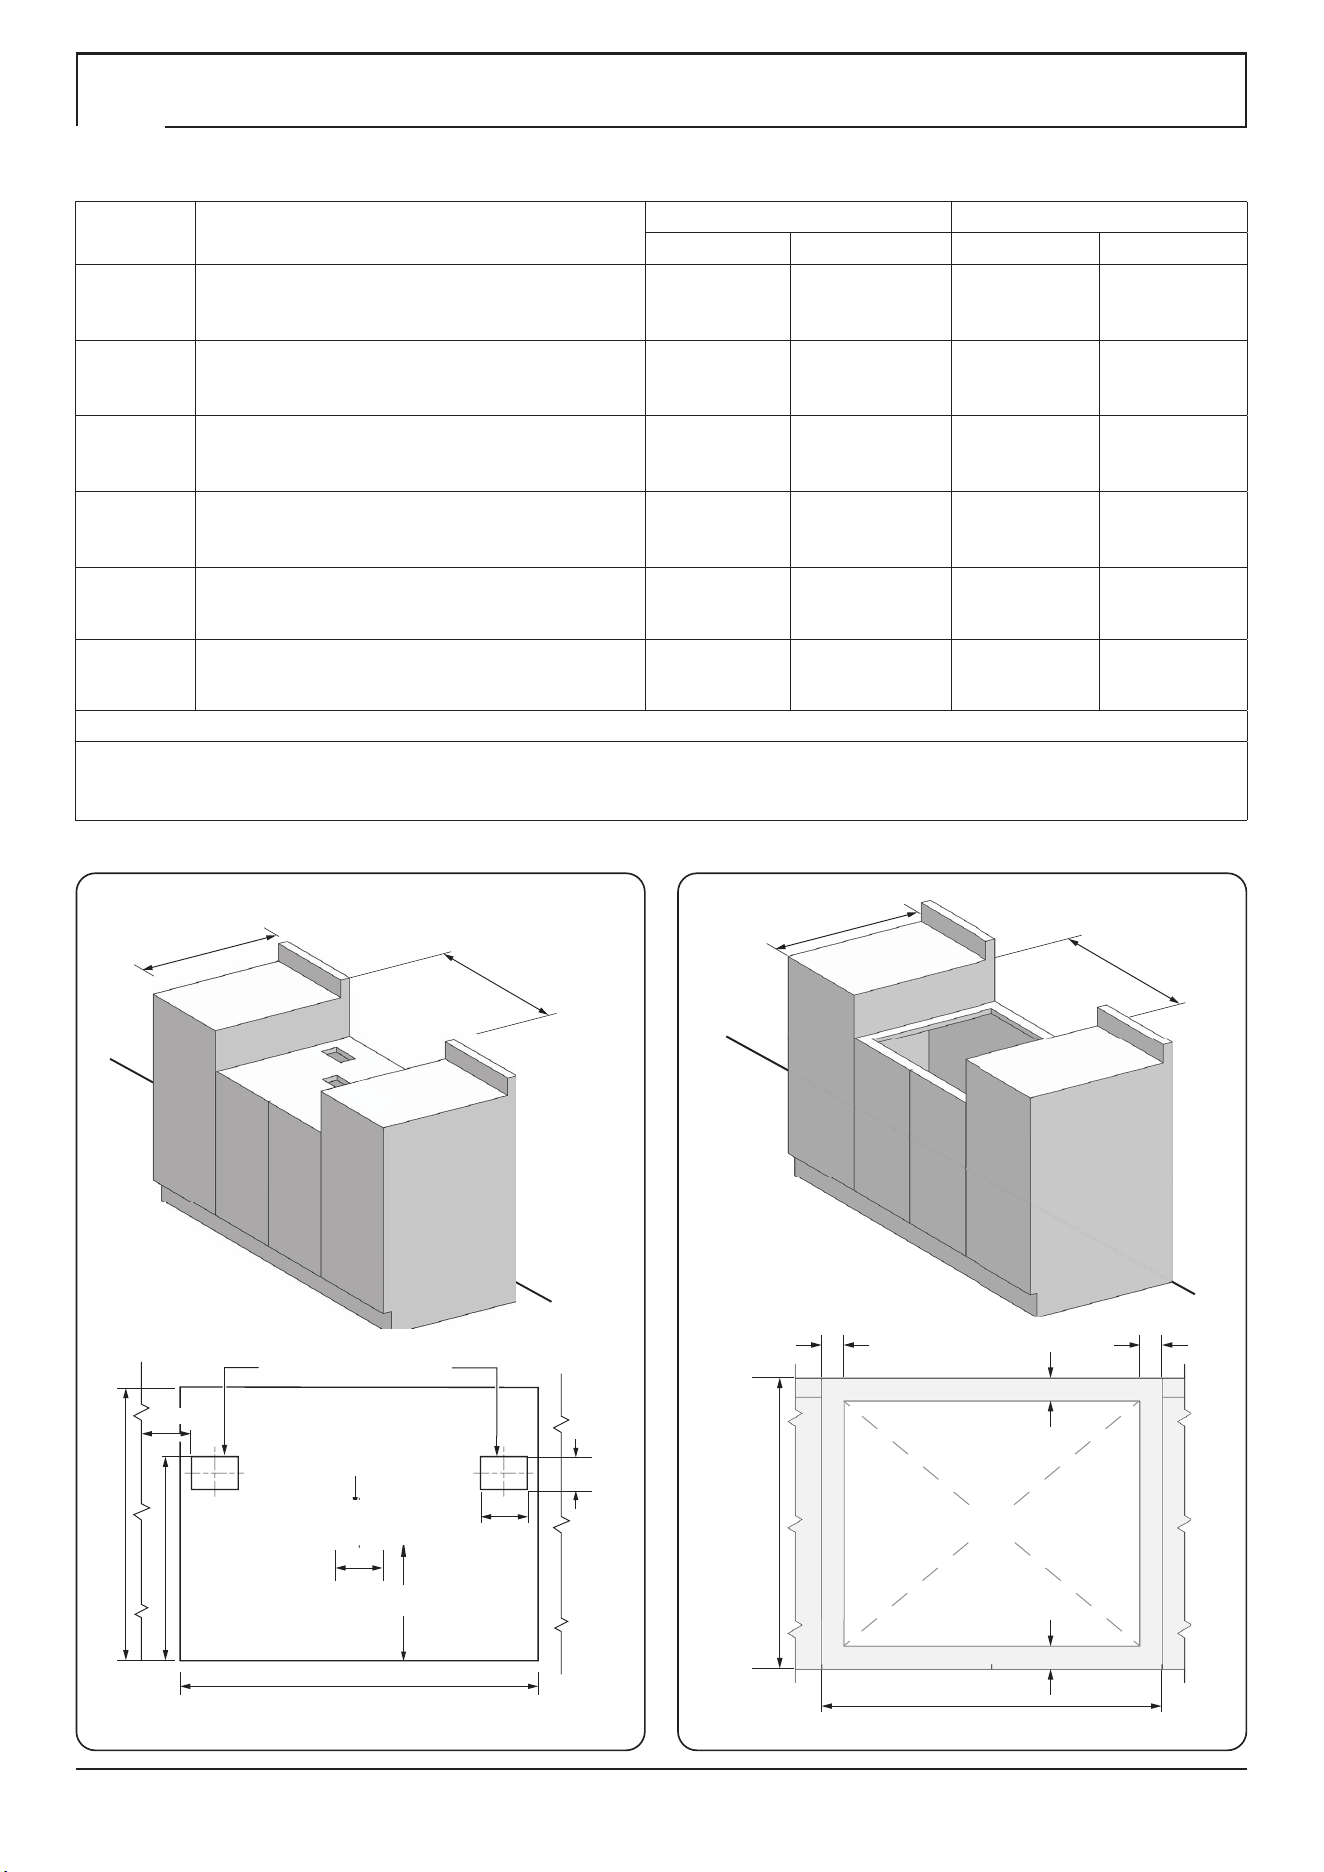
Fig. 8.3 Fig. 8.4
CUTOUT FOR FIXING
BRACKETS
CUTOUT FOR DATA
PLATE
Countertop cutout dimensions for 36" rangetop
INSTALLATION
Check the appliance is electrically safe when you have nished.
17
min 24” (610 mm)
max 25 1/2” (650 mm)
(1220 mm)
48“
min 24” (6
10 mm)
max 25 1/2” (650 mm)
(1220 mm)
48“
max 25 1/2” (650 mm)
min 24” (610 mm)
EMPTY SPACE
5“
(125 mm)
4”
(100 mm)
5”
(125 mm)
4“
(100 mm)
(1220 mm)
48“
(1220 mm)
48“
20” (510 mm)
5”
(125 mm)
max 25 1/2” (650 mm)
min 24” (610 mm)
20” (510 mm)
48” (1220 mm)
6” (150mm)
CUTOUT FOR FIXING BRAKETS
4” (100mm)
10 21/64”
(275mm)
CUTOUT FOR DATA PLATE
5” (125 mm)
6” (150mm)
4” (100mm)
min 24” (610 mm)
max 25 1/2” (650 mm)
(1220 mm)
48“
min 24” (610 mm)
max 25 1/2” (650 mm)
(1220 mm)
48“
max 25 1/2” (650 mm)
min 24” (610 mm)
EMPTY SPACE
5“
(125 mm)
4”
(100 mm)
5”
(125 mm)
4“
(100 mm)
(1220 mm)
48“
(1220 mm)
48“
20” (510 mm)
5”
(125 mm)
max 25 1/2” (650 mm)
min 24” (610 mm)
20” (510 mm)
48” (1220 mm)
6” (150mm)
CUTOUT FOR FIXING BRAKETS
4” (100mm)
10 21/64”
(275mm)
CUTOUT FOR DATA PLATE
5” (125 mm)
6” (150mm)
4” (100mm)
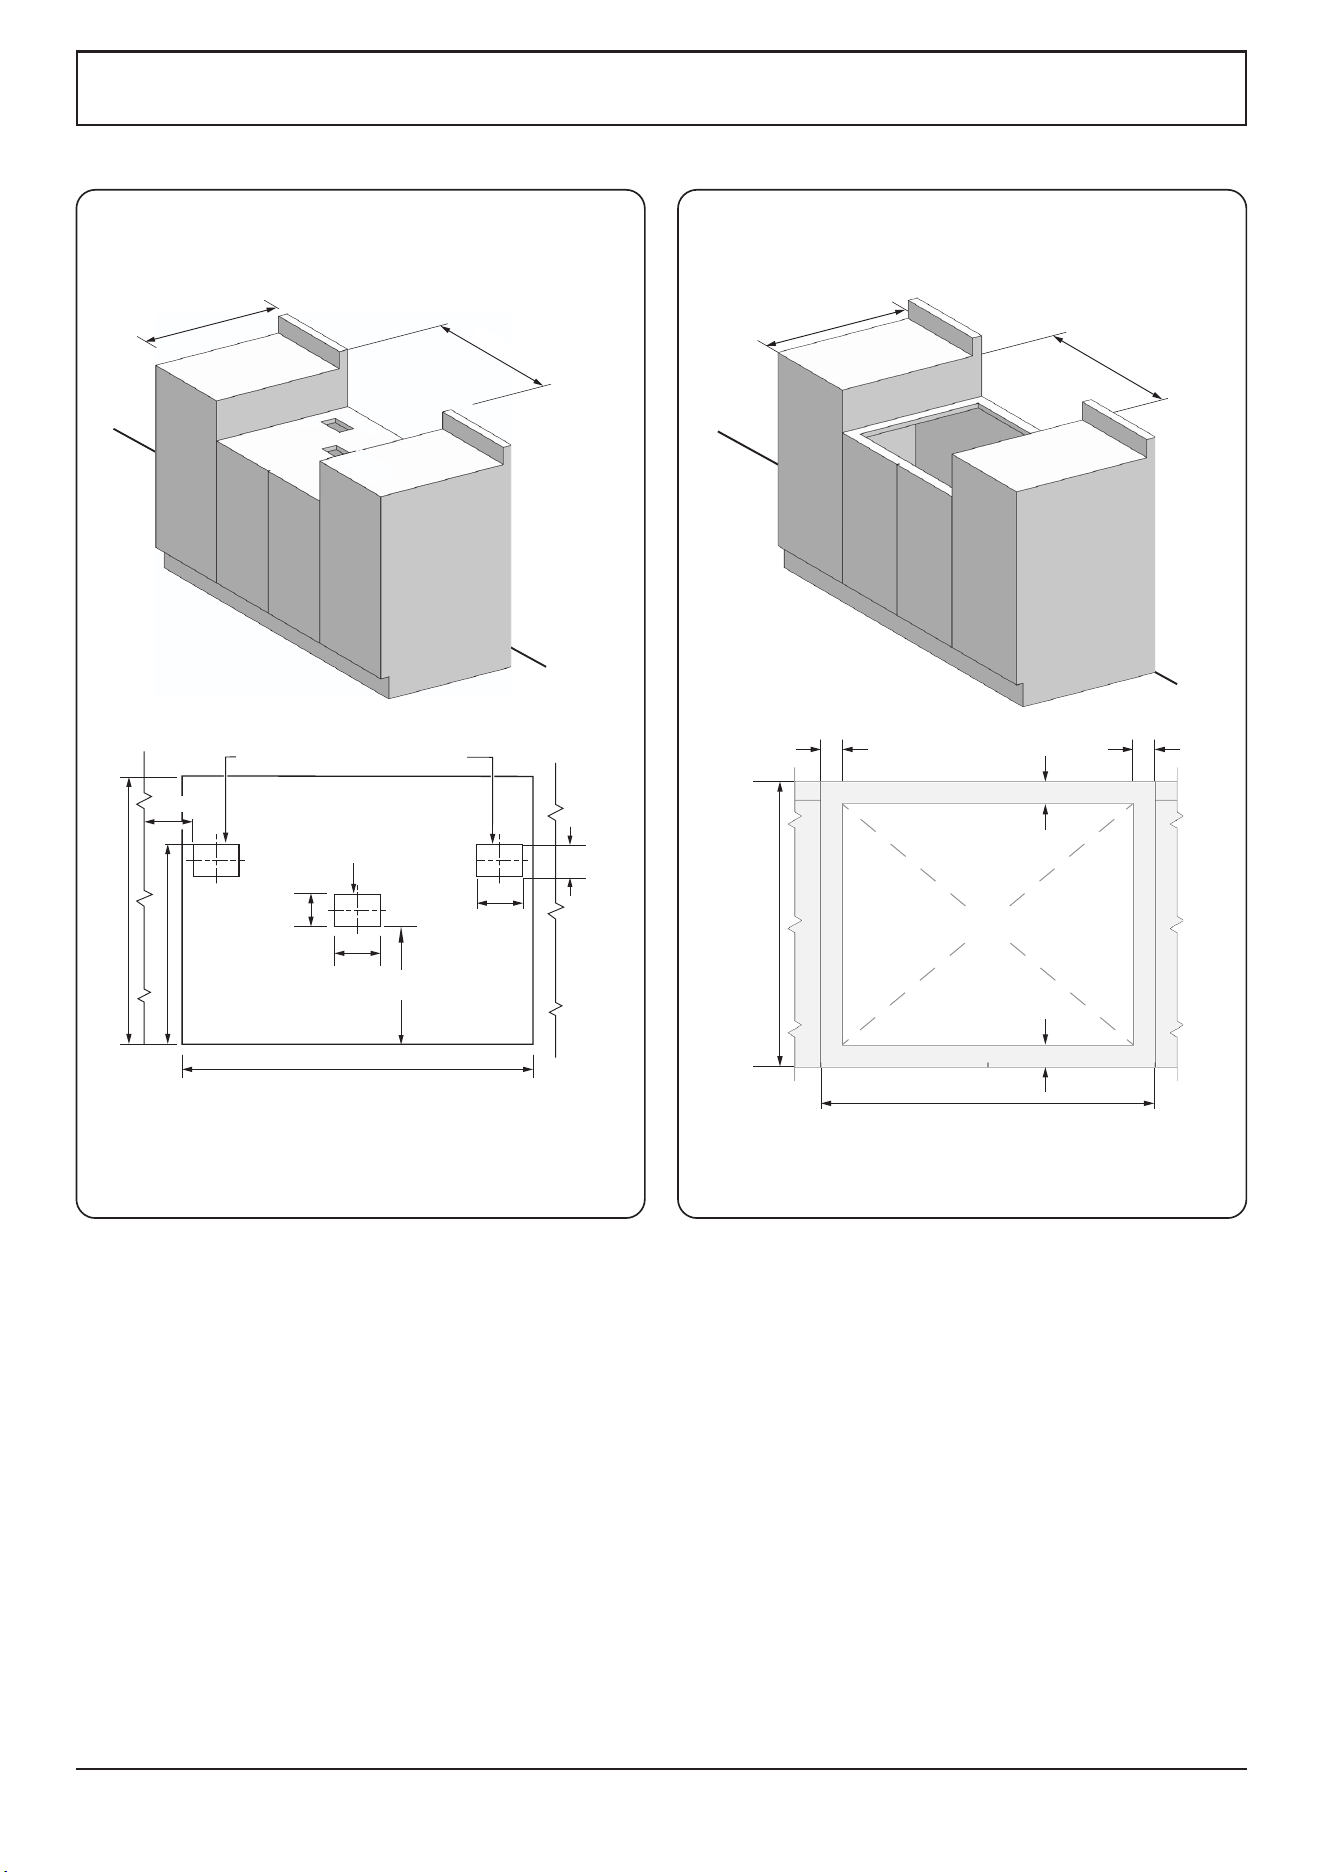
Fig. 8.5 Fig. 8.6
CUTOUT FOR FIXING
BRACKETS
CUTOUT FOR DATA
PLATE
Countertop cutout dimensions for 48" rangetop

INSTALLATION
Check the appliance is electrically safe when you have nished.
18
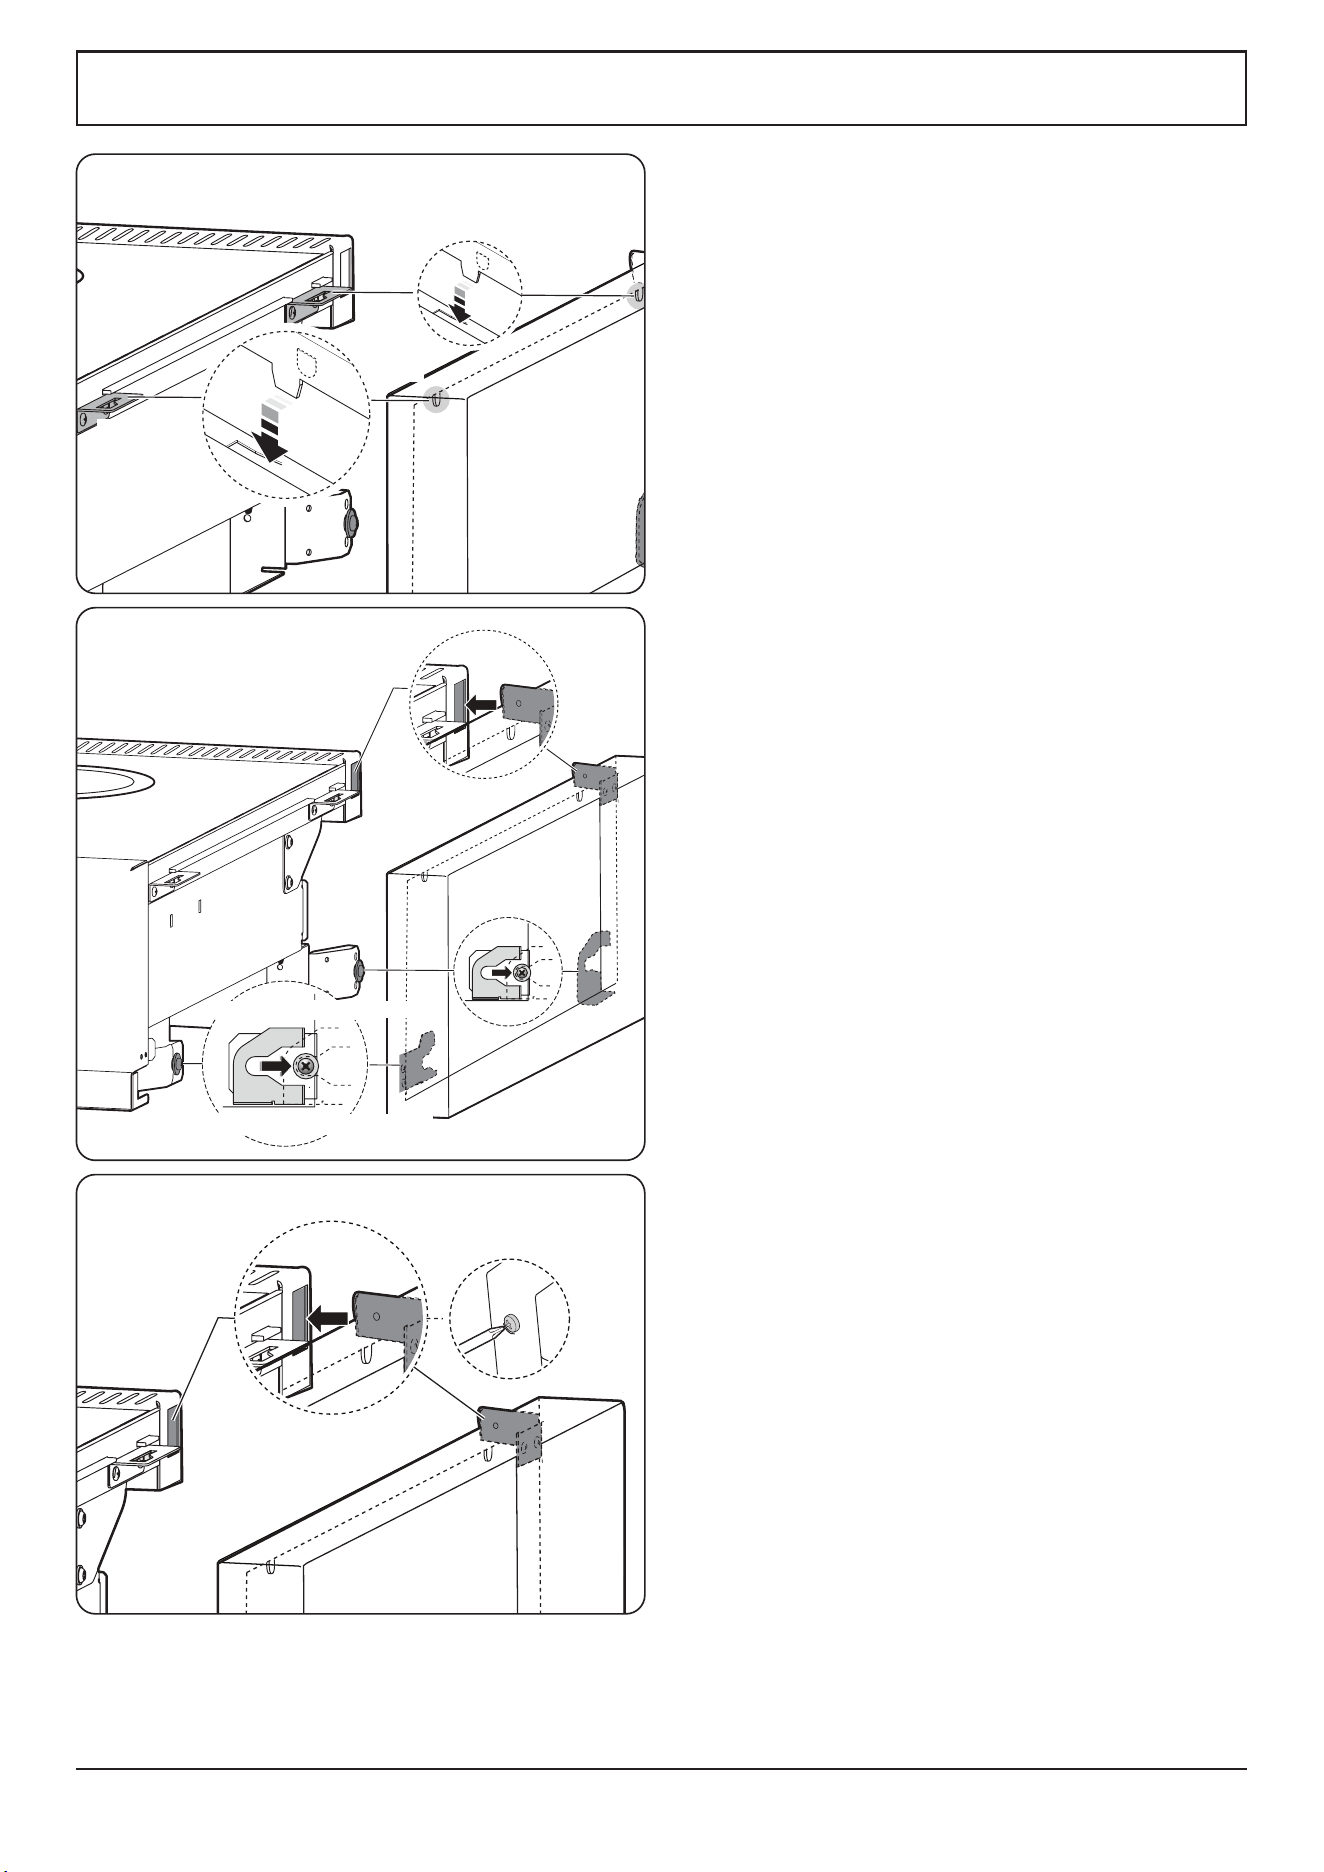
Fitting the side panel for 36"
1. Inside the top of the side panel top are two tabs. Attach
the self-adhesive gaskets to each tab and connect these
tabs into the cut-outs in the top edge of the Rangetop
(Fig. 8.7).
2. Align and insert the slotted tab at the top rear and slide
the side panel so that the side panel bracket in the
base connects to the rear retaining washer (Fig. 8.8).
3. Check everything is rmly connected and tighten the
screw at the rear side of the side panel to secure in
position (Fig. 8.9).
NOTE: The bottom front of the side panels will be loose.
These are secured once the bottom panel (toe kick) is tted.
NOTE: If a side panel is loose, t one of the extra gaskets to
the inner face of the front bracket locating tabs and ret.
INSTALLATION
Check the appliance is electrically safe when you have nished.
19
Gasket
Connect tab
into front of
slot
Nylon Retaining washer
Side panel bracket
Rear
side
Fig. 8.7
Fig. 8.8
Fig. 8.9
Connect
tab into
front of
slot
Gasket
Nylon retaining washer
Side panel bracket
Rear
side
Fitting the side panels for 48"
1. Inside the top of the side panel top are two tabs. Attach
the self-adhesive gaskets to each tab and connect these
tabs into the cut-outs in the top edge of the Rangetop
(Fig. 8.7).
2. Align and insert the slotted tab at the top rear and slide
the side panel so that the side panel bracket in the
base connects to the rear retaining washer (Fig. 8.8).
3. Check everything is rmly connected and tighten the
screw at the rear side of the side panel to secure in
position (Fig. 8.9).
NOTE: The bottom front of the side panels will be loose.
These are secured once the bottom panel (toe kick) is tted.
NOTE: If a side panel is loose, t one of the extra gaskets to
the inner face of the front bracket locating tabs and ret.
INSTALLATION
Check the appliance is electrically safe when you have nished.
20
Fig. 8.12
Fig. 8.13
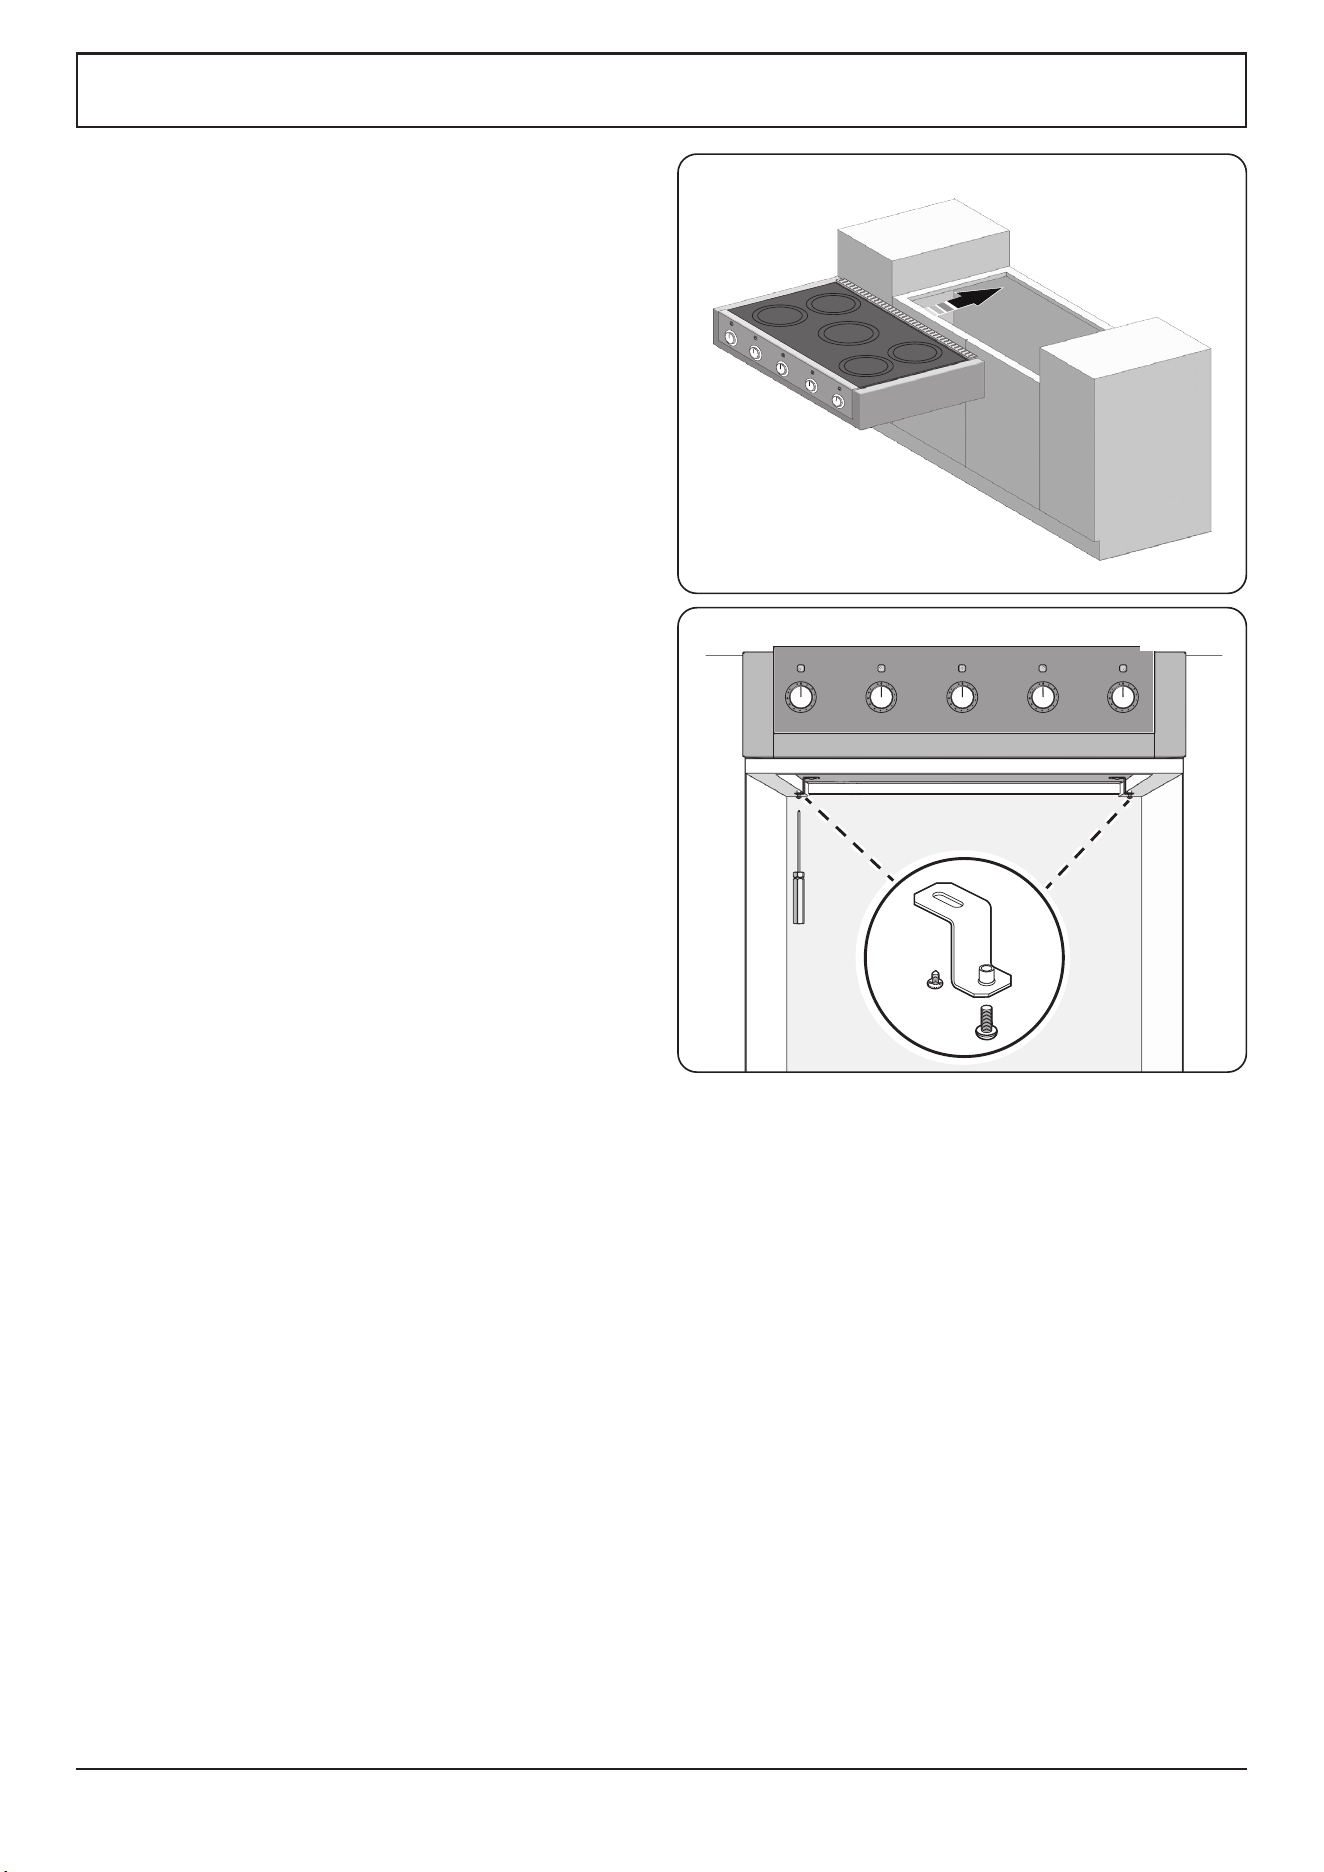
Install and secure the Rangetop
1. Slide the Rangetop into place (Fig. 8.12).
2. Inserting the clamping screw into the two clamp
brackets.
3. Attach the brackets by using the attachment screws on
the selected location of the buner box. Then, tighten
the screws to securely hold brackets in place (Fig. 8.13).
4. Position brackets so that they are in contact with the
Rangetop bottom.
5. Tighten attachment screws.
6. Check the front edge of the Rangetop is in parallel to
the front edge of the countertop before nally tighten
up the screw.
NOTE: Do not over tighten.

21
INSTALLATION
Check the appliance is electrically safe when you have nished.
Electrical requirements
n
For personal safety, DO NOT use an extension cord
with this appliance. Remove the house fuse or open
the circuit breaker before beginning installation.
n
WARNING Electrical Grounding Instructions.
This rangetop does not require a neutral connection.
Your rangetop must be connected to the proper
electrical voltage and frequency as specied in the
”Technical data” on page 24
n
Prior to connection inspect the cable for any damage
that may have occurred. In the event of damage
please consult your electrical installer.
n
Ensure that the cable is routed so that it cannot
become damaged during the installation.
n
WARNING: Product is not suitable for a plug
attachment connection.
Have your appliance properly installed and grounded by a
qualied installer. The installation must conform with local
codes or, in the absence of local codes, in accordance with
the National Electrical Code ANSI/NFPA 70 or the Canadian
Electric Code, CSA C22.1.
This appliance must be supplied with the proper voltage
and frequency, and connected to an individual, properly
grounded branch circuit, protected by a circuit breaker or
time-delay fuse, as noted on the rating plate.
Wiring must conform to National Electric Codes. If the electric
service provided does not meet the above specications have
a licensed electrician install the product.
Because Rangetop terminals are not accessible after
Rangetop is in position, exible service conduit or cable must
be used.
Provide proper electrical supply
This Rangetop must be supplied with 240 V 60 Hz, and
connected to an individual, properly grounded branch circuit
protected supply. If the electrical service provided does not
meet the above specications, it is recommended that a
qualied electrician install an approved outlet.
This should be connected to an appropriate Branch Circuit
protected supply. NOTE - load diversity factor has been
applied in accordance with NFPA 70 article 220.
9. Electrical connection
22
INSTALLATION
Check the appliance is electrically safe when you have nished.
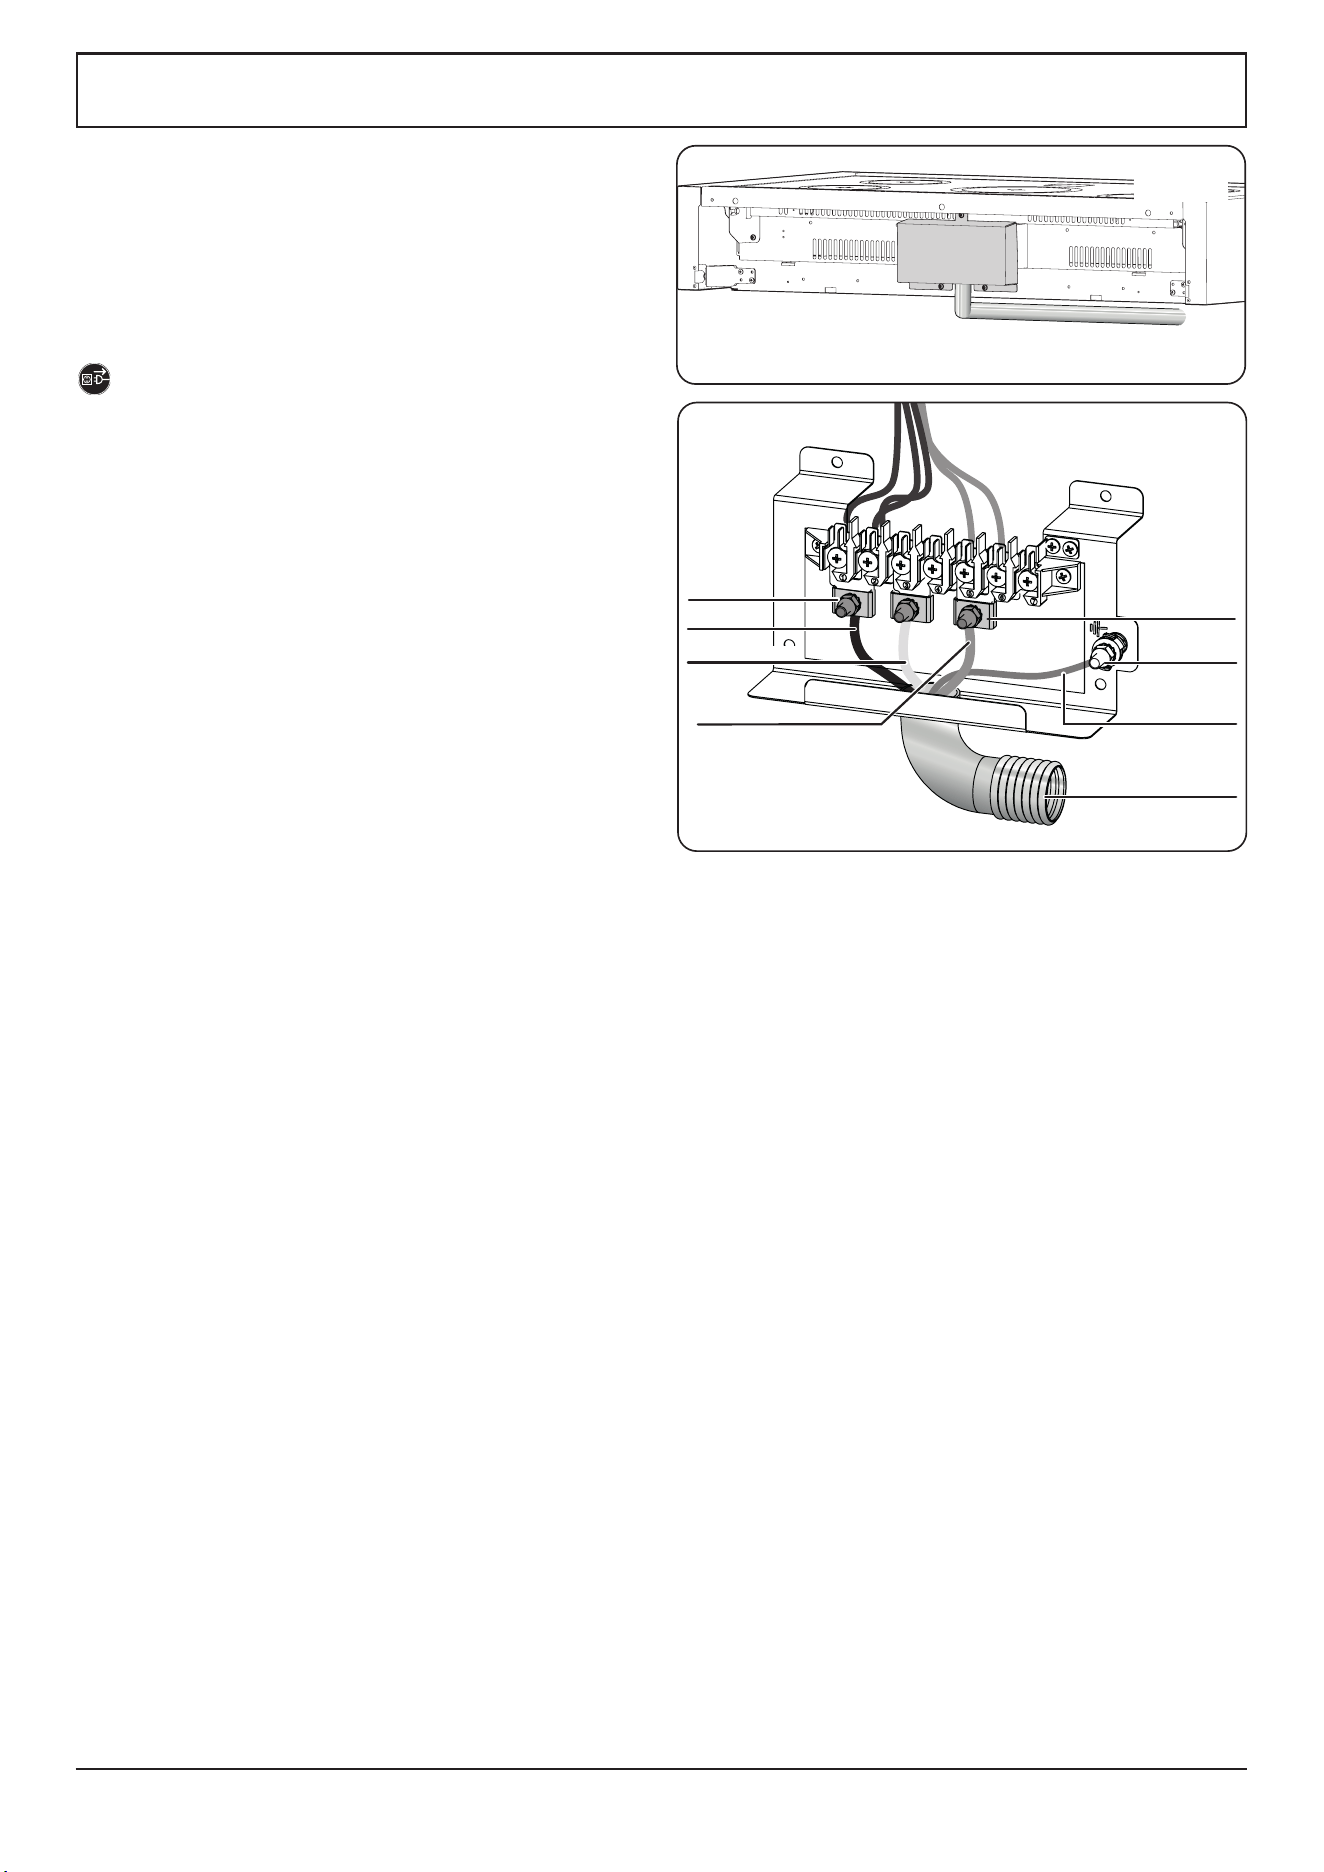
Ground post
Ground: earth
Red: live
Black: live
Conduit
Outside
terminal
Outside
terminal
Connecting using the supplied
cable and conduit
Your Rangetop is shipped with a cable and conduit, 2 metres
in length, to be connected to your branch circuit.
n
The product should only be installed by a qualied
installer.
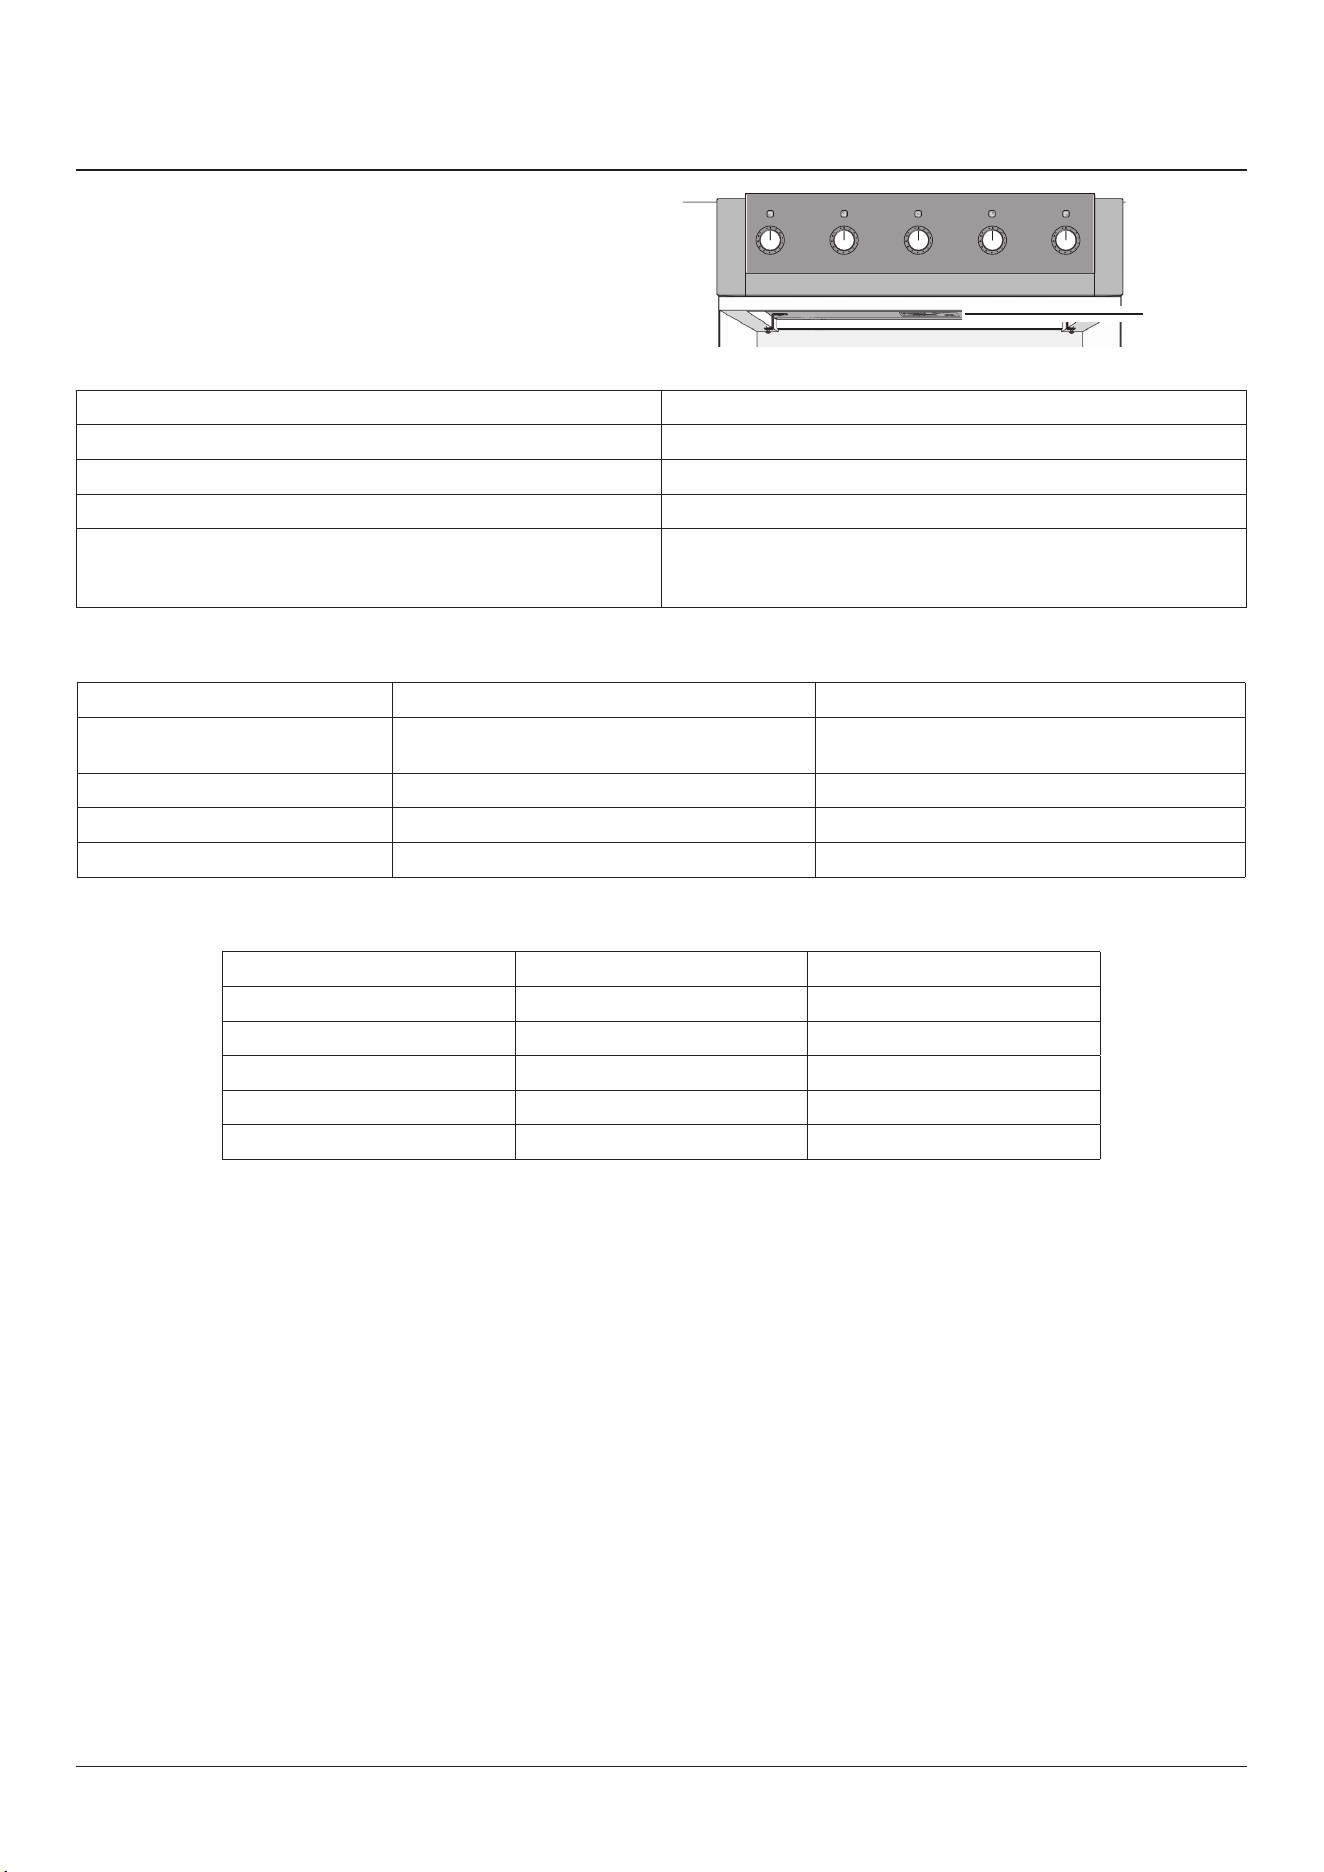
DISCONNECT THE ELECTRICAL SUPPLY.
To access the electrical connections, undo the screws and
remove the electrical cover (Fig. 9.1).
The conduit comes with a push to t connection terminal
on both ends for strain relief. Please ensure both ends are
pushed in and secure before use.
4 wire cable connection
Connect the new power leads as per the Fig. 9.2, they should
be connected to the outside terminals. Ensure the clamp is
tight and the connection is secure before use.
Fig. 9.1
Fig. 9.2
White: neutral
23
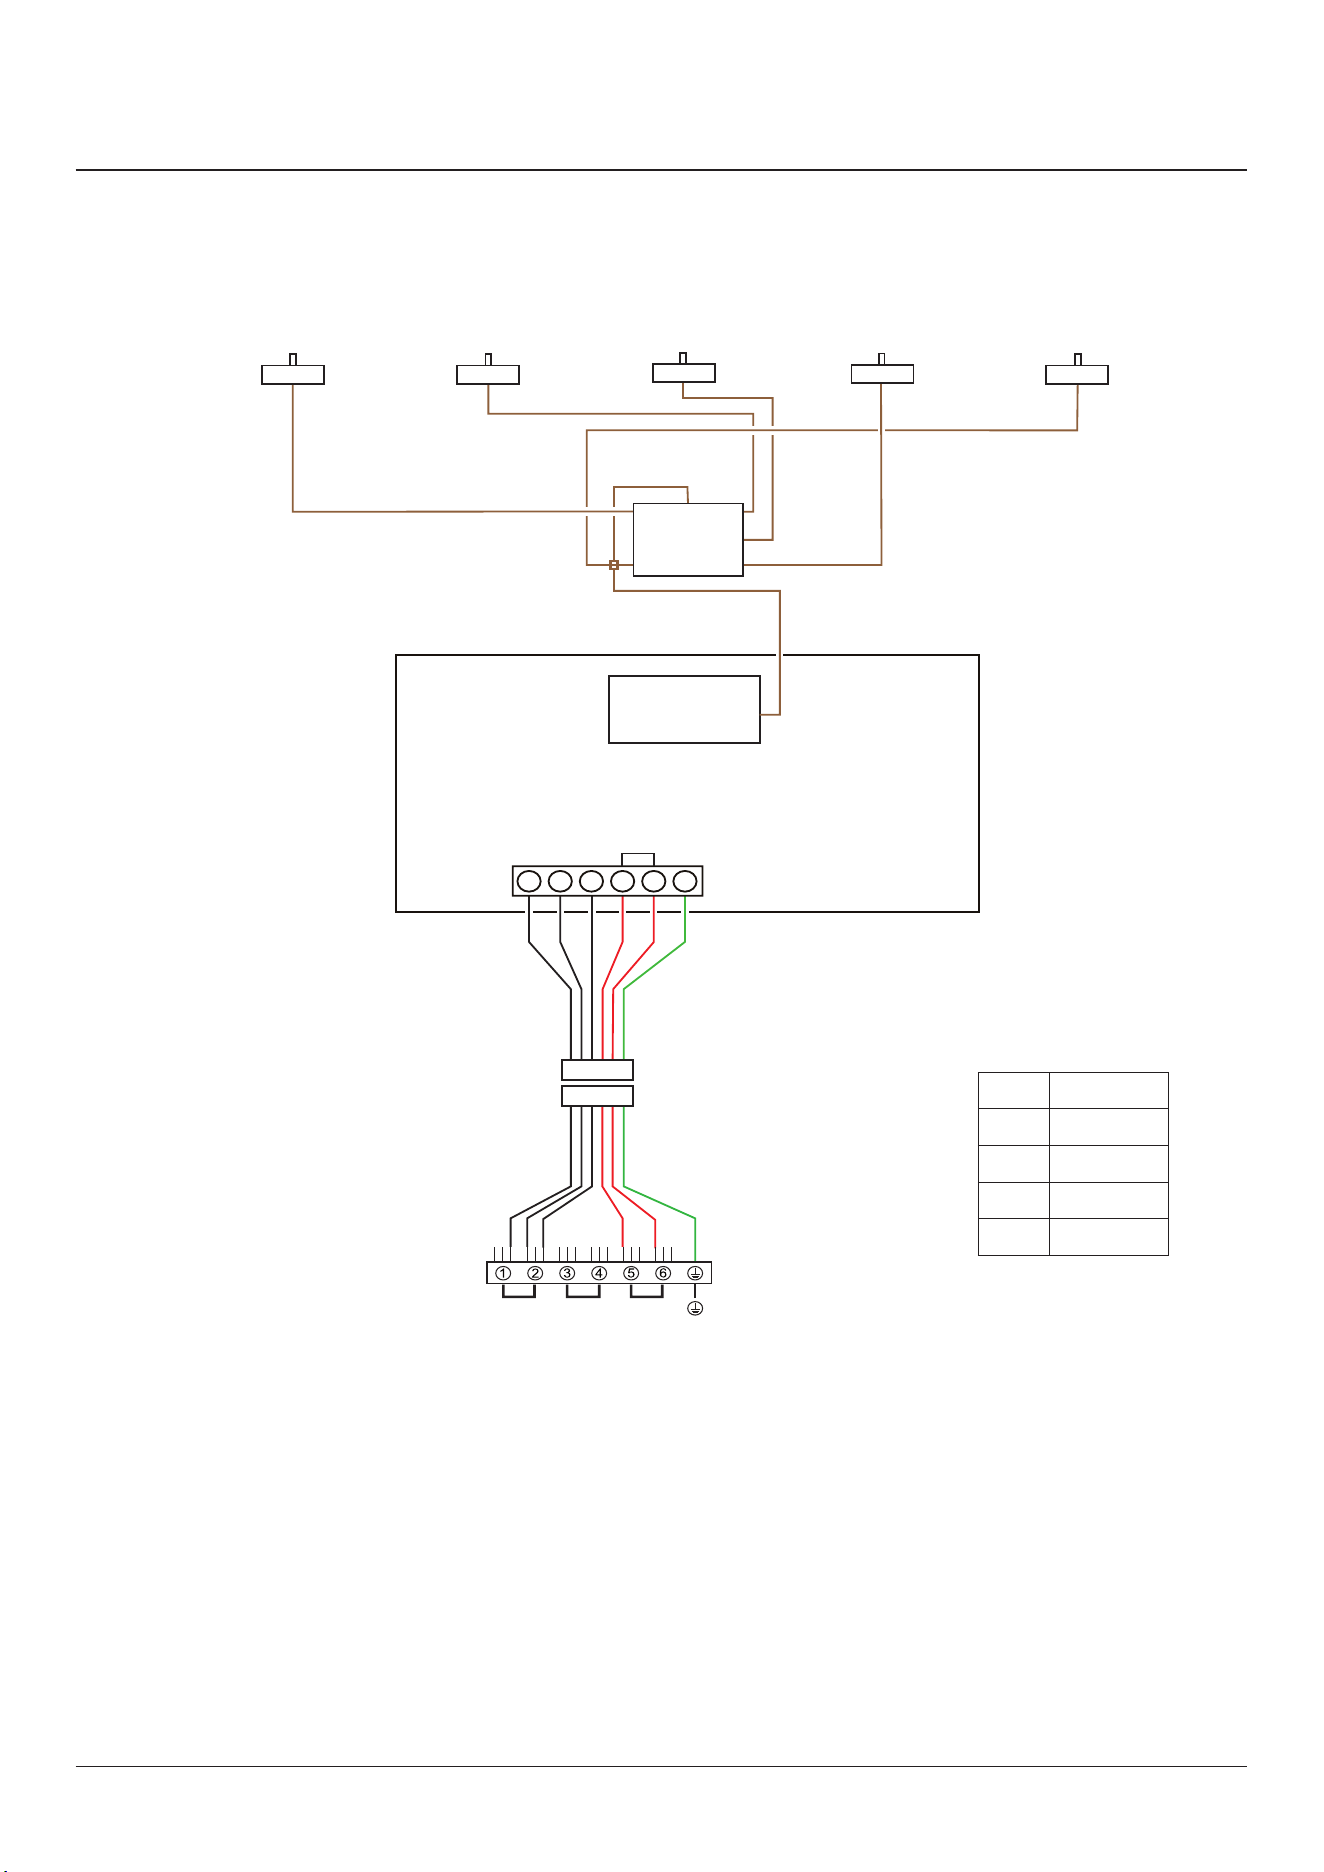
10. Circuit diagram
Ground
L1 N L2
Hob Display
Induction unit
Left Front
1
Left Rear
2
Centre
5
Right Rear
3
Right Front
4
6 way connector
6 way connector
br
br
br br
br
br
bk
br
grrbkbk
Interface
board
x1
x5
x3x4
x2
x6
54312 E
Cooktop Display
Induction unit
6 way connector
6 way connector
Ground
Interface
board
CenterLeft Front Right FrontLeft Rear Right Rear
Code Color
br
Brown
bk
Black
r
Red
g
Green
24
11. Technical data
INSTALLER: Please leave these instructions with the owner.
DATA BADGE LOCATION: At the bottom of the unit.
COUNTRY OF DESTINATION: USA, Canada, Mexico.
Connections
Electric Supply 240 V 60 Hz
Electric Rating 240V (2 Wire + Grd), 60Hz, 11.4 kW *
Branch Circuit Protection 50 A *
Connection Type NEMA 14-50 P
Maximum total electric load 240 V
* Load demand diversity calculation according to NFPA 70 article 220.
11.4 kW*
Dimensions
48” Induction Rangetop 36” Induction Rangetop
Overall width
47 9/16” (1208 mm);
see ‘Positioning of Rangetop’.
35 ½” (900mm);
see ‘Positioning of Rangetop’.
Overall depth 26 7/10” (678 mm) 26 7/10” (678 mm)
Minimum space for Rangetop 48 ” (1220 mm) 31 ½” (800mm)
Weight (unpacked) 132 LBS (60 Kg) 90 LBS (40 Kg)
Rangetop ratings
Rangetop Zone Max Boost
Front Left 1.40 kW 2.20 kW
Rear Left 1.85 kW 3.00 kW
Center 2.30 kW 3.70 kW
Front Right 1.85 kW 3.00 kW
Rear Right 1.85 kW 3.00 kW
Data plate
25
CONSUMER WARRANTY
ENTIRE PRODUCT – LIMITED TWO-YEAR WARRANTY
Any cosmetic faults must be reported within 7 days of installation.
AGA warrants the replacement or repair of all parts of this product which prove to be defective in material or
workmanship, with the exception of the painted or porcelain enamel nish or plated surfaces, for two-year from
the date of original purchase. Such parts will be repaired or replaced at the option of AGA without charge, subject
to the terms and conditions set out below.
The warranty period against defects in the painted or porcelain enamel nish, or plated surfaces, is 90 days from
the date of original purchase.
TERMS AND CONDITIONS
1. This warranty applies only for single family domestic use when the range has been properly installed
according to the instructions supplied by AGA and is connected to an adequate and proper utility service.
Damage due to faulty installation, improper usage and care, abuse, accident, re, ood, acts of God, commercial,
business or rental use, and alteration, or the removal or defacing of the serial plate, cancels all obligations of this
warranty. Service during this warranty must be performed by a factory Authorized Service Technician.
2. The warranty applies to product only in the country in which it was purchased.
3. AGA is not liable for any claims or damages resulting from any failure of the range or from service delays
beyond their reasonable control.
4. To obtain warranty service, the original purchaser must present the original Bill of Sale, Model and Serial
number. Components repaired or replaced are warranted through the remainder of the original warranty
period only.
5. The warranty does not cover expenses involved in making this appliance readily accessible for servicing.
6. This warranty gives you specic legal rights. Additional warranty rights may be provided by law in some areas.
7. Adjustments such as calibrations, leveling, tightening of fasteners, or utility connections normally associated
with original installation are the responsibility of the dealer or installer and not that of the Company.
TO ENSURE PROMPT WARRANTY SERVICE, SEND IN YOUR WARRANTY CARD WITHIN 10 DAYS OF PURCHASE.
If further help is needed concerning this warranty, contact:
PLACE OF PURCHASE ________________________________
DATE OF PURCHASE _________________________________
SERIAL NUMBER ____________________________________
MODEL NUMBER ___________________________________
Middleby Residential
4960 Golden Pkwy
BLDG 3
Buford, GA 30518
Business 770.932.7282
Fax 770.932.7292
Toll Free Telephone 800.241.9152

26
NOTE


www.aga-ranges.com
Middleby Residential
4960 Golden Pkwy
BLDG 3
Buford, GA 30518
Business 770.932.7282
Fax 770.932.7292
Toll Free Telephone 800.241.9152