

FLEXIDOME multi 7000i IR Table of contents | en 3
Bosch Security Systems B.V.
Installation manual
2023-02 | 02 |
Table of contents
1
Safety5
1.1Safety message explanation5
1.2Safety precautions5
1.3Important safety instructions5
1.4Notices6
2
Short information8
3
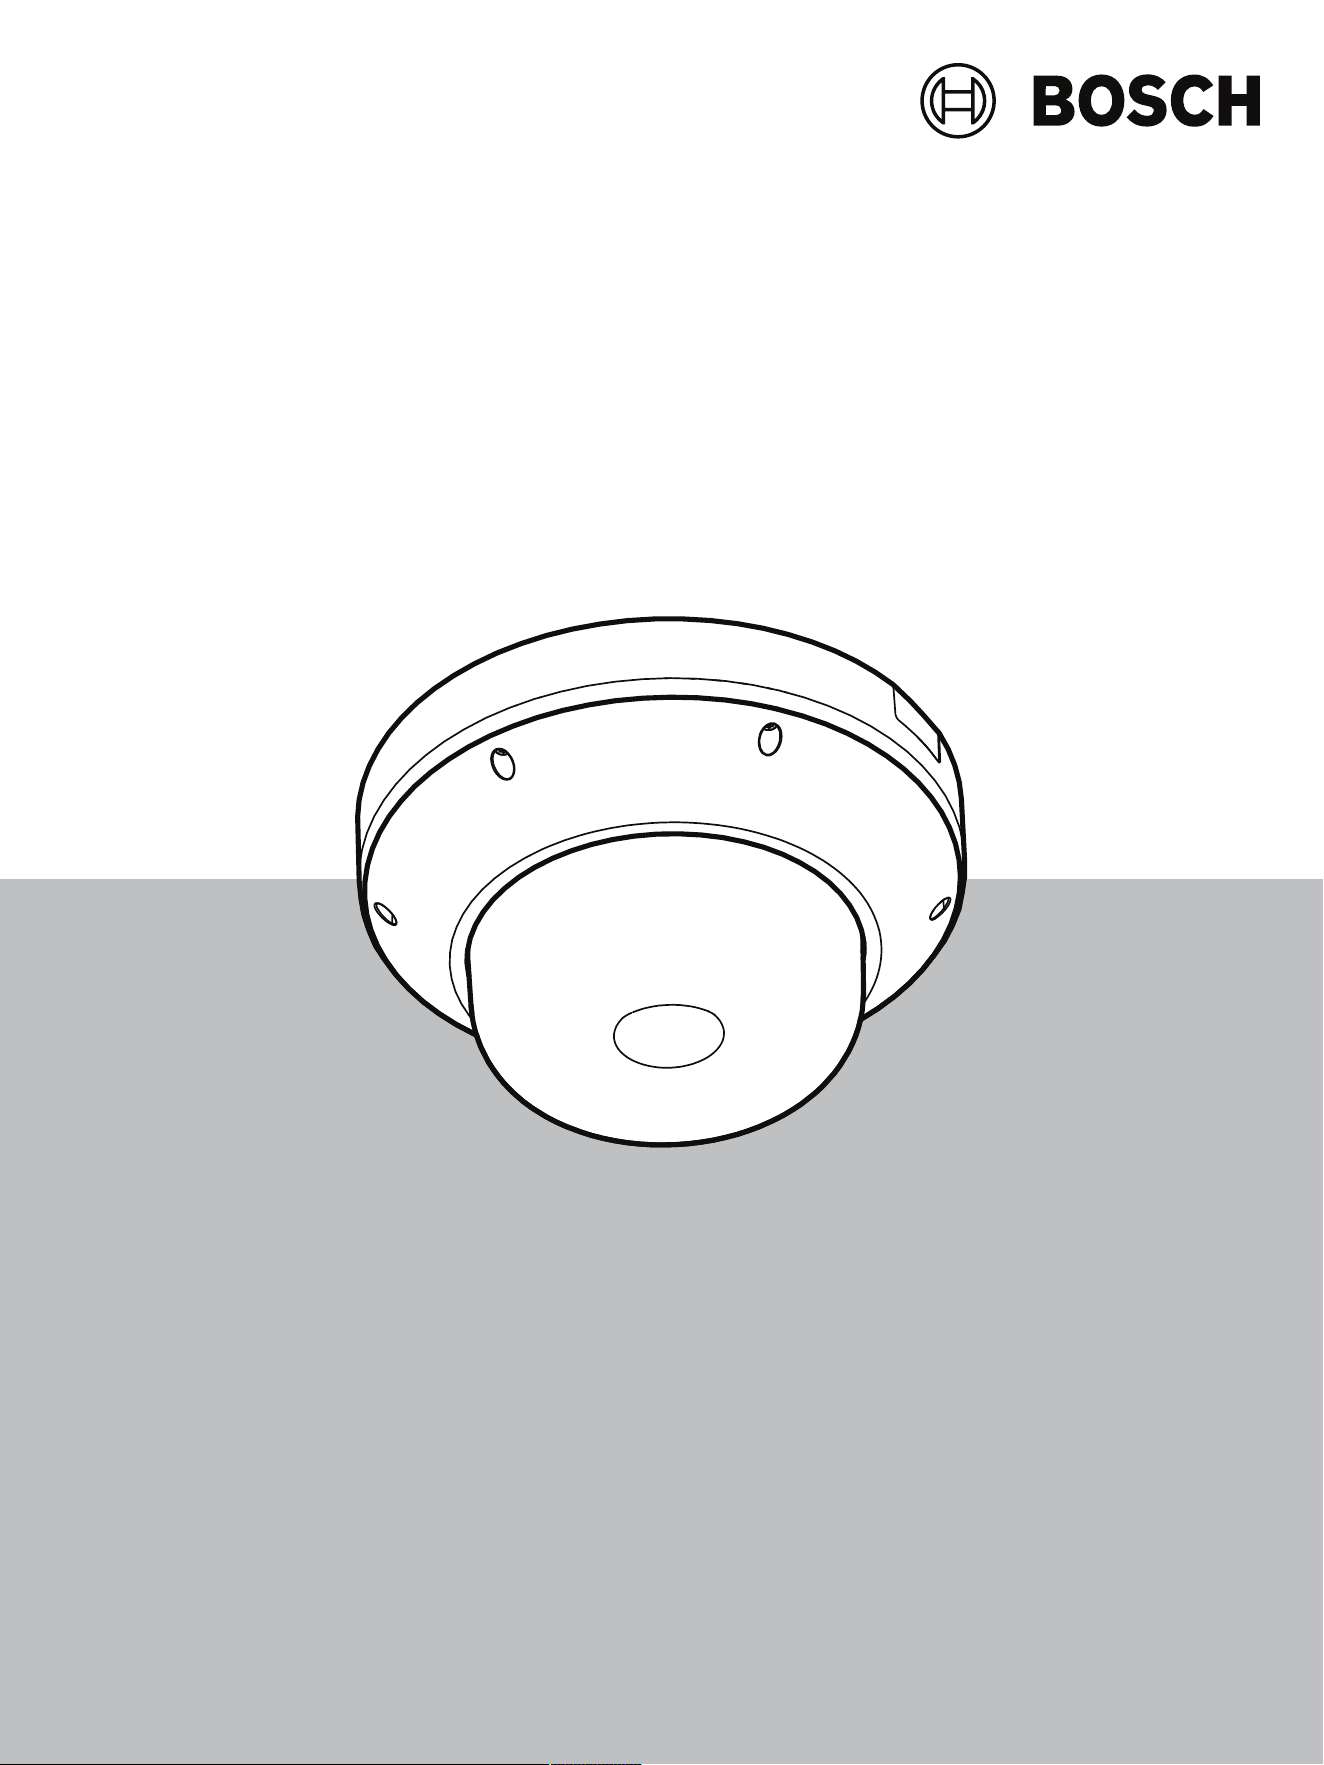
System overview9
3.1Product description9
3.2Intended use10
3.3Using the camera10
3.4Operation with external systems10
4
Planning information12
4.1Unpacking12
4.2Parts included12
4.3Preparation13
4.4Network and PoE++13
5
Installation14
5.1Installing the mounting plate14
5.1.1Installing the mounting plate without conduit15
5.1.2Installing the mounting plate with conduit (NDA-7051-CA)15
5.2Installing the camera base17
5.2.1Before the installation17
5.2.2Installation steps18
5.2.3Wiring the camera base22
5.2.4Connecting a wireless USB dongle24
5.3Setting the position of the multi-imager lenses25
5.3.1Panning each of the four lenses over the ring25
5.3.2Tilting each of the four lenses26
5.3.3Rotating each of the four lenses26
5.3.4Rolling each of the four lenses27
5.4Installing the camera dome cover28
5.5Optional mounting accessories28
6
Configuration32
6.1Bosch Project Assistant32
6.2Browser connection32
6.2.1Establishing the network32
6.2.2Protected network32
6.3Bosch Video Client32
6.4Video Security Client33
7
Troubleshooting34
7.1Resolving problems34
7.2Testing the network34
7.3Customer service35
8
Maintenance36
8.1Cleaning36
8.2Repair36
8.3Reset36
9
Decommissioning38

FLEXIDOME multi 7000i IR Safety | en 5
Bosch Security Systems B.V.
Installation manual
2023-02 | 02 |
1 Safety
Read, follow, and retain for future reference all of the following safety instructions. Follow all
warnings before operating the device.
1.1 Safety message explanation
In this manual, the following symbols and notations are used to draw attention to special
situations:
Danger!
Indicates a hazardous situation which, if not avoided, will result in death or serious injury.
!
Warning!
Indicates a hazardous situation which, if not avoided, could result in death or serious injury.
!
Caution!
Indicates a hazardous situation which, if not avoided, could result in minor or moderate
injury.
i
Notice!
Indicates a situation which, if not avoided, could result in damage to the equipment or
environment, or data loss.
1.2 Safety precautions
!
Caution!
Installation should only be performed by qualified service personnel in accordance with the
National Electrical Code (NEC800 CECSection60) or applicable local codes.
1.3 Important safety instructions
– To clean the device, do not use liquid cleaners or aerosol cleaners.
– Do not install the device near any heat sources such as radiators, heaters, stoves, or
other equipment (including amplifiers) that produce heat.
– Do not spill liquids on the device before installation is completed.
– Take precautions to protect the device from power and lightning surges. Refer to NFPA
780, Class 1 & 2, UL96A, or the equivalent code appropriate for your country/region, and
to local building codes.
– If powered by a power adapter, the adapter should be properly grounded. The power
cord must be connected to a socket or outlet with a ground connection.
– Use green/yellow (green with yellow stripe) ground wires.
– Adjust only those controls specified in the operating instructions.
– Operate the device only from the type of power source indicated on the label.
– Unless qualified, do not attempt to service a damaged device yourself. Refer all servicing
to qualified service personnel.

6 en | Safety FLEXIDOME multi 7000i IR
2023-02 | 02 |
Installation manual
Bosch Security Systems B.V.
– Install in accordance with the manufacturer's instructions in accordance with applicable
local codes.
– Use only attachments/accessories specified by the manufacturer.
– Protect all connection cables from possible damage, particularly at connection points.
– The camera should be installed at least 10cm away from the eave of a building.
– Please contact Bosch certified dealers for suitable power adapters.
– The Low Voltage power supply unit must comply with EN62368-1. The power supply
must be: SELV-LPS unit and ClassII for 24VAC.
– Routing of external wiring must be done through a permanently earthed metal conduit.
1.4 Notices
UL Disclaimer
Underwriter Laboratories Inc. ("UL") has not tested the performance or reliability of the
security or signaling aspects of this product. UL has only tested fire, shock and/or casualty
hazards as outlined in Standard(s) for Safety for Information Technology Equipment, UL
60950-1, UL 62368-1, UL 60950-22. UL Certification does not cover the performance or
reliability of the security or signaling aspects of this product.
UL MAKES NO REPRESENTATIONS, WARRANTIES, OR CERTIFICATIONS WHATSOEVER
REGARDING THE PERFORMANCE OR RELIABILITY OF ANY SECURITY OR SIGNALING-RELATED
FUNCTIONS OF THIS PRODUCT.
FCC statement (USA)
1. This device complies with Part 15 of the FCC Rules. Operation is subject to the following
two conditions:
– This device may not cause harmful interference.
– This device must accept any interference received, including interference that may
cause undesired operation.
2. Changes or modifications not expressly approved by the party responsible for compliance
could void the user's authority to operate the equipment.
Note: This equipment has been tested and found to comply with the limits for a Class B digital
device, pursuant to Part 15 of the FCC Rules. These limits are designed to provide reasonable
protection against harmful interference in a residential installation. This equipment generates
uses and can radiate radio frequency energy and, if not installed and used in accordance with
the instructions, may cause harmful interference to radio communications. However, there is
no guarantee that interference will not occur in a particular installation. If this equipment does
cause harmful interference to radio or television reception, which can be determined by
turning the equipment off and on, the user is encouraged to try to correct the interference by
one or more of the following measures:
– Reorient or relocate the receiving antenna.
– Increase the separation between the equipment and receiver.
– Connect the equipment into an outlet on a circuit different from that to which the
receiver is connected.
– Consult the dealer or an experienced radio/TV technician for help.
FCC suppliers Declaration of Conformity
FLEXIDOME multi 7000i IR: NDM-7702-AL, NDM-7703-AL
Responsible party
Bosch Security Systems Inc
130 Perinton Parkway
14450 Fairport, NY, USA
www.boschsecurity.us

FLEXIDOME multi 7000i IR Safety | en 7
Bosch Security Systems B.V.
Installation manual
2023-02 | 02 |
IC statement (Canada)
This device complies with Industry Canada licence-exempt RSS standard(s). Operation is
subject to the following two conditions: (1) this device may not cause harmful interference,
and (2) this device must accept any interference received, including interference that may
cause undesired operation.
Use latest software
Before operating the device for the first time, make sure that you install the latest applicable
release of your software version. For consistent functionality, compatibility, performance, and
security, regularly update the software throughout the operational life of the device. Follow
the instructions in the product documentation regarding software updates.
The following links provide more information:
– General information:
https://www.boschsecurity.com/xc/en/support/product-security/
– Security advisories, that is a list of identified vulnerabilities and proposed solutions:
https://www.boschsecurity.com/xc/en/support/product-security/security-advisories.html
Bosch assumes no liability whatsoever for any damage caused by operating its products with
outdated software components.

8 en | Short information FLEXIDOME multi 7000i IR
2023-02 | 02 |
Installation manual
Bosch Security Systems B.V.
2 Short information
This manual has been compiled with great care and the information it contains has been
thoroughly verified. The text was correct at the time of publication, however, the content can
change without notice. Bosch Security Systems accepts no liability for damage resulting
directly or indirectly from faults, incompleteness or discrepancies between this manual and
the product described.
Copyright
This manual is the intellectual property of Bosch Security Systems and is protected by
copyright.
All rights reserved.
Trademarks
All hardware and software product names used in this document are likely to be registered
trademarks and must be treated accordingly.
More information
For more information please contact the nearest Bosch Security Systems location or visit
www.boschsecurity.com
.
https://www.boschsecurity.com/xc/en/product-catalog/

FLEXIDOME multi 7000i IR System overview | en 9
Bosch Security Systems B.V.
Installation manual
2023-02 | 02 |
3 System overview
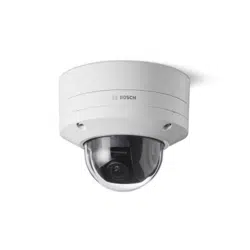
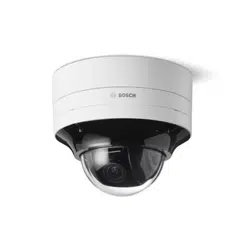
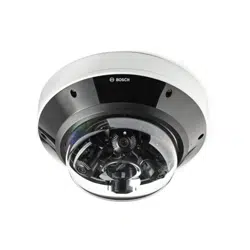
3.1 Product description
The FLEXIDOME multi 7000i IR camera is built for high-quality performance, featuring four
independent imagers with motorized zoom/focus lenses. It helps to simplify installation and
lower costs while maintaining flexibility in coverage. With four scenes simultaneously in a
single camera, it is perfect for wide area coverage, traffic intersections and building corners.
With its integrated 360⁰IR lighting, the camera can capture crisp images in extremely low light
conditions, such as at night-time or dusk. When the lenses are tilted at the right angle, the
camera can even cover an area up to full 360°. Additionally, the zoom capability allows the
camera to obtain detailed coverage for more distant areas.
Product overview
1
11
10
8
7
6
9
3
2
4
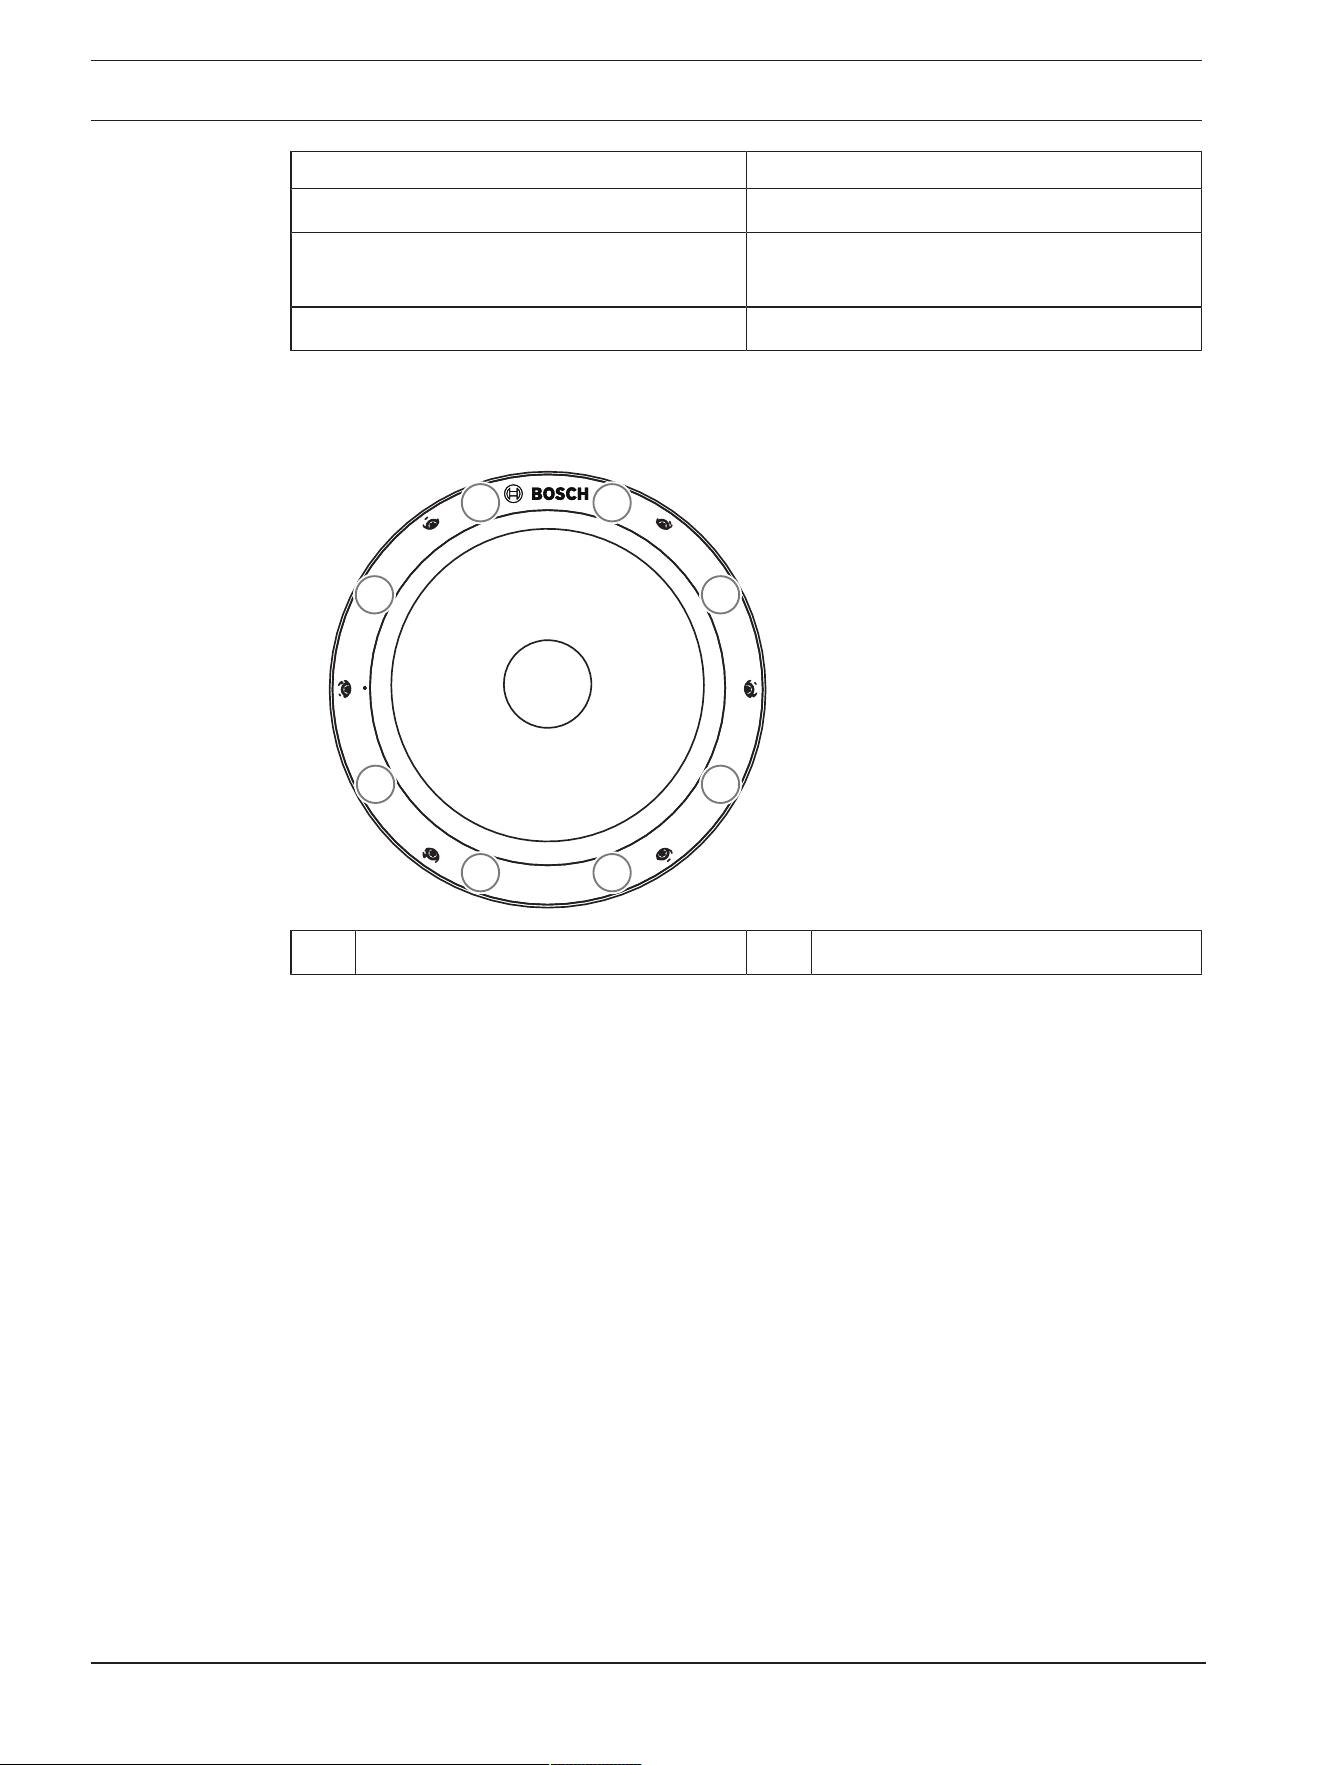
5
1 Mount plate 2 Conduit door
3 Reset button 4 LED
5 microSD card slot 6 USB-C port
7 24VAC power input connector 8 8-pin Audio and I/O connector
9 RJ45 port for PoE++ 10 Microphone
11 Camera dome cover
LED behavior description
LED behavior Description
Red LED lights up Startup is in progress.
Red LED flashes The unit is faulty, for example following failed
firmware upload.
10 en | System overview FLEXIDOME multi 7000i IR
2023-02 | 02 |
Installation manual
Bosch Security Systems B.V.
LED behavior Description
Refer to
Resolving problems, page 34
.
Green LED lights up The unit is switched on and startup is
completed.
Green LED flashes Video connection is active.
IR LED location
The camera has 8 IR LEDs. The 8 IR LEDs can be controlled individually in the configuration of
the camera.
1
2 7
63
8
4 5
1-8 Location of the IR LEDs 1-8
3.2 Intended use
The camera is designed to be integrated in professional IP video surveillance solutions as a
surveillance camera. Installation, commissioning and operation of the camera shall be carried
out by trained professionals only.
The use of surveillance cameras is restricted by national laws and regulations. Use the camera
accordingly.
3.3 Using the camera
To access the features of the camera, use a web browser. The browser provides live viewing of
the camera streams in the interface window, and also allows you to access and change the
extensive list of settings and parameters for camera configuration. Refer to the software
manual for more information on the browser interface.
The camera recording and storage functions include local alarm recording and recording to
iSCSI-based systems. The camera can also use the BoschVideoRecordingManager (VRM) to
control recording and storage. Integration with the many Bosch recording solutions is
seamless.
3.4 Operation with external systems
The web browser is the most direct way of using the camera, however, the Bosch download
store provides several other free applications (listed below) for viewing and controlling the
camera.

FLEXIDOME multi 7000i IR System overview | en 11
Bosch Security Systems B.V.
Installation manual
2023-02 | 02 |
Download store
Download the latest applications and firmware from:
http://downloadstore.boschsecurity.com/
Configuration Manager
Use the Configuration Manager application to configure general VideoClient settings like the
default path for workstation recording or the use of an IntuiKey keyboard.
If you decide to work with a pre-configured monitoring system, use the Configuration Manager
application to set up your monitoring system:
– Easily configure basic system settings with the integrated configuration wizard
– Manage user groups and rights
– Add devices to your system and arrange them in groups
VideoSecurityClient
The VideoSecurityClient is a free, easy-to-use video-surveillance application provided by
Bosch for local and remote monitoring of IP cameras and appliances. The software supports
up to 16 cameras.
The VideoSecurityClient has extensive dewarping capabilities and can be used for client-side
dewarping as well as for viewing the available modes.
BoschVideoClient
The BoschVideoClient is a free Windows application to view, operate, control, and administer
surveillance cameras and installations at remote locations. It offers a user-friendly interface for
easy live viewing of multiple cameras, playback, forensic search and export.
12 en | Planning information FLEXIDOME multi 7000i IR
2023-02 | 02 |
Installation manual
Bosch Security Systems B.V.
4 Planning information
4.1 Unpacking
This equipment should be unpacked and handled with care. If an item appears to have been
damaged in shipment, notify the shipper immediately.
Verify that all parts are included. If any items are missing, notify your Bosch Security Systems
sales or customer service representative.
The original packaging is the safest container in which to transport the unit and can be used if
returning the unit for service.
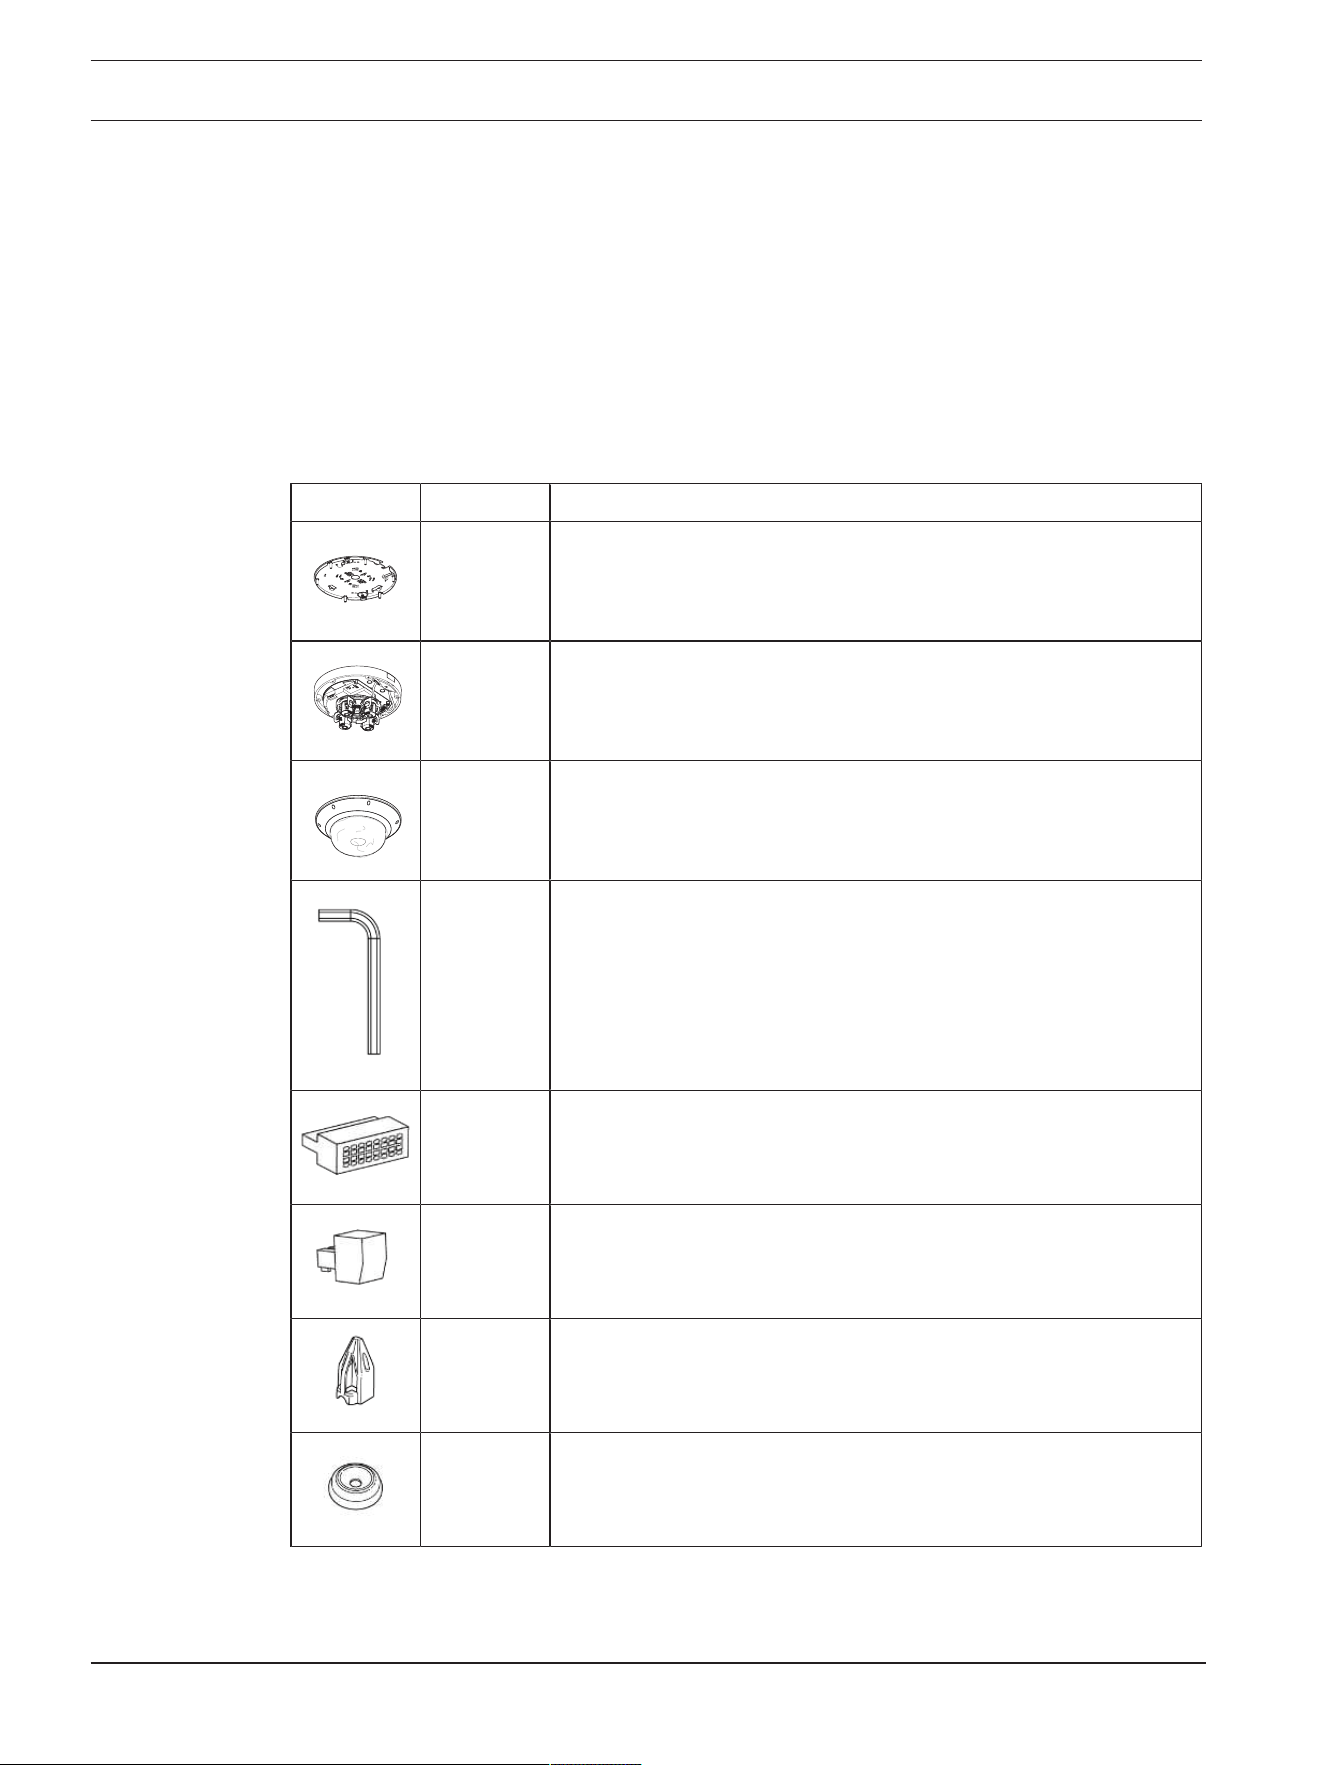
4.2 Parts included
Quantity Component
1 Mount plate
1 Camera base
1 Camera dome cover
1 TR20 Allen key
1 8-pin Audio and I/O connector
1 2-pin power connector
1 RJ-45 punch-through aid
2 M20 rubber grommets (attached to the camera)
FLEXIDOME multi 7000i IR Planning information | en 13
Bosch Security Systems B.V.
Installation manual
2023-02 | 02 |
Quantity Component
1 Quick installation guide
1 Safety information
3 Installer UX labels
4.3 Preparation
Before installation, prepare and plan the installation process and materials needed.
Pre-requisites
– Remove the components from the box. Make sure that all parts are included and are not
damaged.
– The necessary material and equipment:
– 4 screws M4 or M5 and mounting plugs M4 or M5 are necessary. For installation with
conduit (NDA-7051-CA), 5 screws M4 or M5 and mounting plugs M4 or M5 are
necessary.
– Appropriate size power drill.
– Screwdriver and bit holder for TR20 bit, or use the provided TR20 Allen key.
– microSD card (optional)
Note: Bosch recommends the use of industrial microSD cards with health
monitoring.
– Wireless USB dongle (NCA-WLAN) for wireless commissioning (optional) - available
2022.
4.4 Network and PoE++
i
Notice!
Camera supports PoE++ and PoE+
PoE802.3bt Type 3 Class 5 with operating temperature -50°C to +55°C / -58°F to +131°F)
PoE802.3at Type 2 Class 4 with operating temperature -20°C to +55°C / -4°F to +131°F)
Power-over-Ethernet Plus Plus (PoE++) can be connected at the same time as a 24VAC power
supply. If auxiliary power (24VAC) and PoE++ is applied simultaneously, the camera draws its
power from PoE++ by default, and seamlessly switches to auxiliary input if PoE++ fails.
When PoE++ returns, the camera seamlessly switches back to PoE++ as its default power
source.
The camera has an integrated heater. The heater works only when PoE802.3bt Type 3 Class 5
is used. In this case, the camera functions in lower temperature (-50°C / -58°F).
Cables
For cable requirements, refer to
Wiring the camera base, page 22
.
14 en | Installation FLEXIDOME multi 7000i IR
2023-02 | 02 |
Installation manual
Bosch Security Systems B.V.
5 Installation
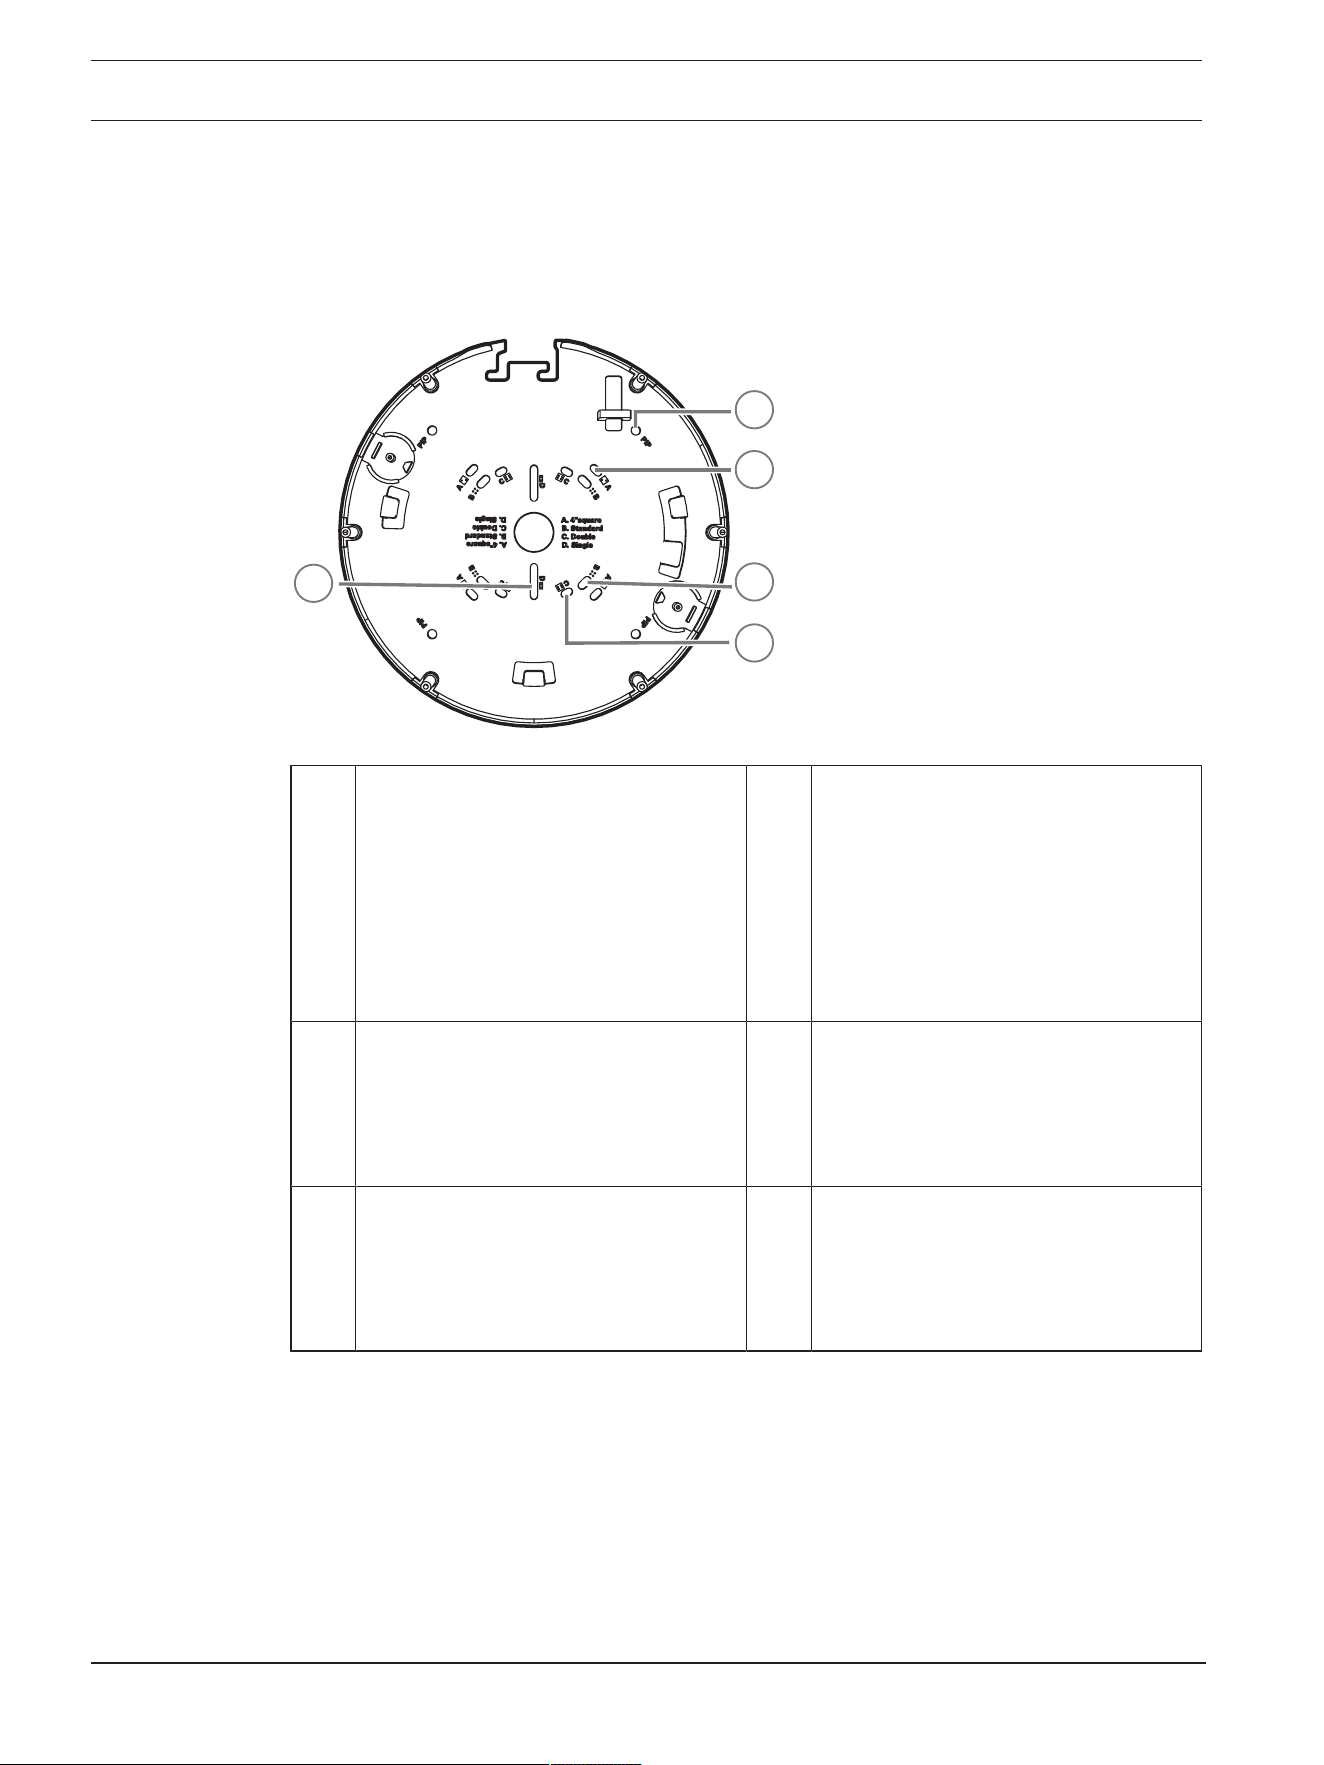
5.1 Installing the mounting plate
The mounting plate is used to fix the camera to a flat surface. It offers different holes and
slots for a variety of fixing options.
2
3
4
5
1
1 PIP
Mounting holes for installation with
NDA-7050-PIPW. Required screws are
provided with NDA-7050-PIPW.
2 A
Mounting holes for 4inch or 4S
electrical box installation. There are
four mounting holes available on the
mounting plate, but you need only two
for the installation. You can install the
mounting plate in different
orientations.
3 B
Mounting holes for standard wall or
ceiling installation. Use four screws. If
required, use plugs (for concrete
walls/ceilings).
4 C
Mounting holes for double gang box
installation. Align the mounting plate
with the four screw holes in the
electrical gang box.
5 D
Mounting holes for single gang box.
Align the two slotted holes on the
mounting plate with the two screw
holes in the electrical gang box.
Installation options
The camera has two configurations for surface mounting:
– Refer to
Installing the mounting plate without conduit, page 15
, if the wires are not on
the outside of the surface.
– Refer to
Installing the mounting plate with conduit (NDA-7051-CA), page 15
, if the wires
are on the outside of the surface.
Additionally, the camera can cover various mounting options when combined with the
available accessories. Refer to
Optional mounting accessories, page 28
for the available
accessories.

FLEXIDOME multi 7000i IR Installation | en 15
Bosch Security Systems B.V.
Installation manual
2023-02 | 02 |
i
Notice!
The plugs and screws for surface mounting are not supplied with the camera.
5.1.1 Installing the mounting plate without conduit
1. Remove the mounting plate from the box.
2. Position the mounting plate with the center hole on top of the cable exit on the surface,
and mark the positions of the screw holes on the surface.
For standard installation, use the mounting holes marked with a B on the mounting plate.
For a different installation, for example for an installation on an electrical box, use
different mounting holes. For more information, refer to
Installing the mounting plate,
page 14
.
3. Use 4 screws that are suitable for the surface and the type of installation. If needed for
the surface, drill 4 holes to fit plugs. Make sure that the plugs fit tightly. Use the
appropriate diameter drill to support 5-6mm (0.2inch).
4. Put the cable through the center hole of the mounting plate.
5. Attach the mounting plate to the surface with 4 screws.
5.1.2 Installing the mounting plate with conduit (NDA-7051-CA)
For installation with conduit, use the NDA-7051-CA Conduit adapter M25 (sold separately).
NDA-7051-CA contains 5 conduit adapters. Use one conduit adapter per camera.
1. Remove one conduit adapter from the box.
2. Mark the position of the hole on the surface.
3. Use a screw that is suitable for the surface and the type of installation. If needed for the
surface, drill a hole to fit a plug. Make sure that the plug fits tightly. Use the appropriate
diameter drill.
16 en | Installation FLEXIDOME multi 7000i IR
2023-02 | 02 |
Installation manual
Bosch Security Systems B.V.
4. Put the cable through the hole of the conduit plate.
5. Attach the conduit plate with the conduit plate adapter to the surface with a 5-6mm
(0.2inch) screw.
6. Remove the mounting plate from the box.
7. Mark the positions of the holes on the surface. The mounting plate has only one side
available for the conduit. Make sure to position it accordingly.
For standard installation, use the mounting holes marked with a B on the mounting plate.
For a different installation, for example for an installation on an electrical box, use
different mounting holes. For more information, refer to
Installing the mounting plate,
page 14
.
8. Use 4 screws that are suitable for the surface and the type of installation. If needed for
the surface, drill 4 holes to fit plugs. Make sure that the plugs fit tightly. Use the
appropriate diameter drill to support 5-6mm (0.2inch).
9. Attach the mounting plate to the surface with 4 screws.
10. Install the conduit cover on the conduit plate with the bolt. Tighten the screw between
1.4 and 2Nm (1lbfft and 1.5lbfft) with the TR20 Allen key.
FLEXIDOME multi 7000i IR Installation | en 17
Bosch Security Systems B.V.
Installation manual
2023-02 | 02 |
5.2 Installing the camera base
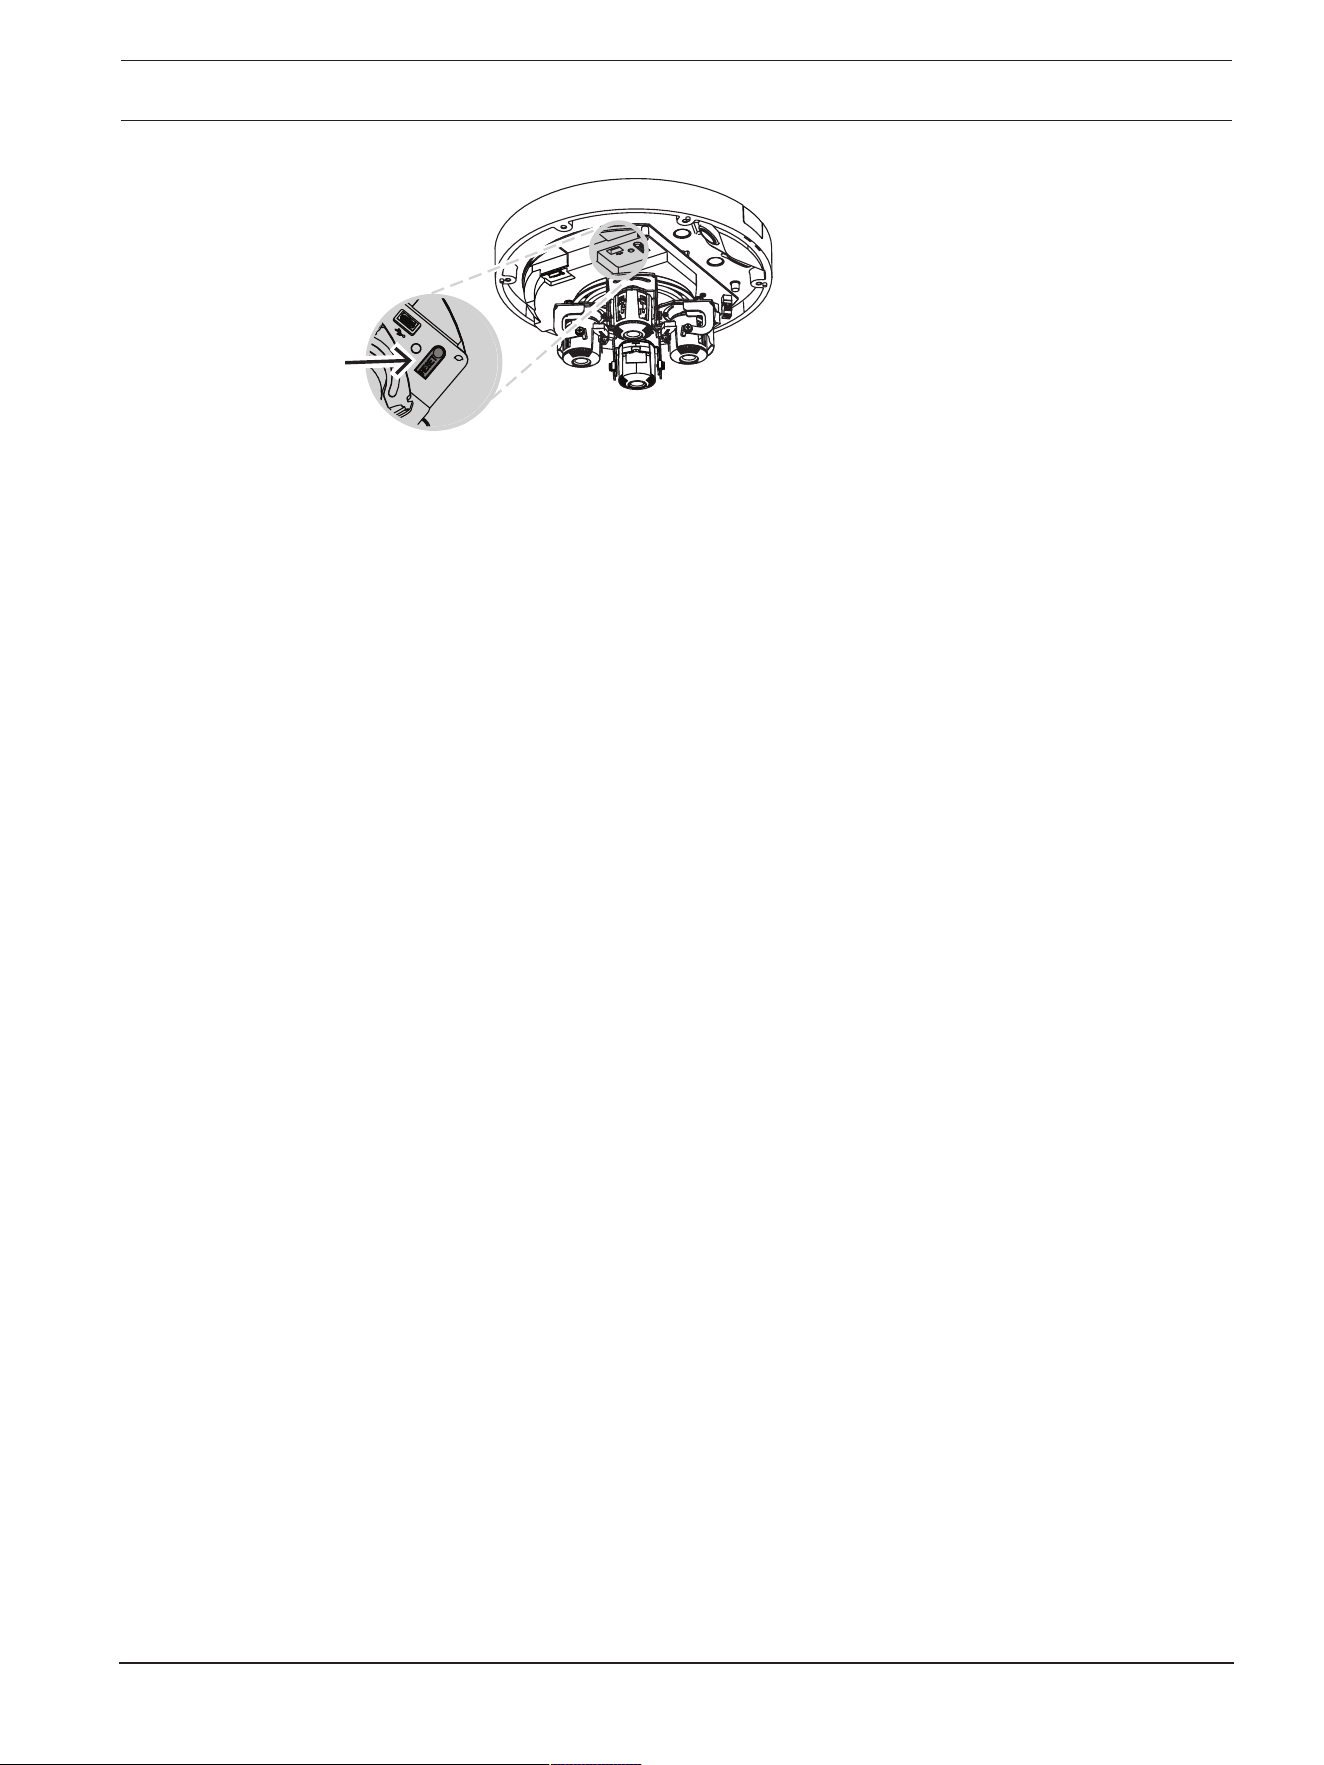
5.2.1 Before the installation
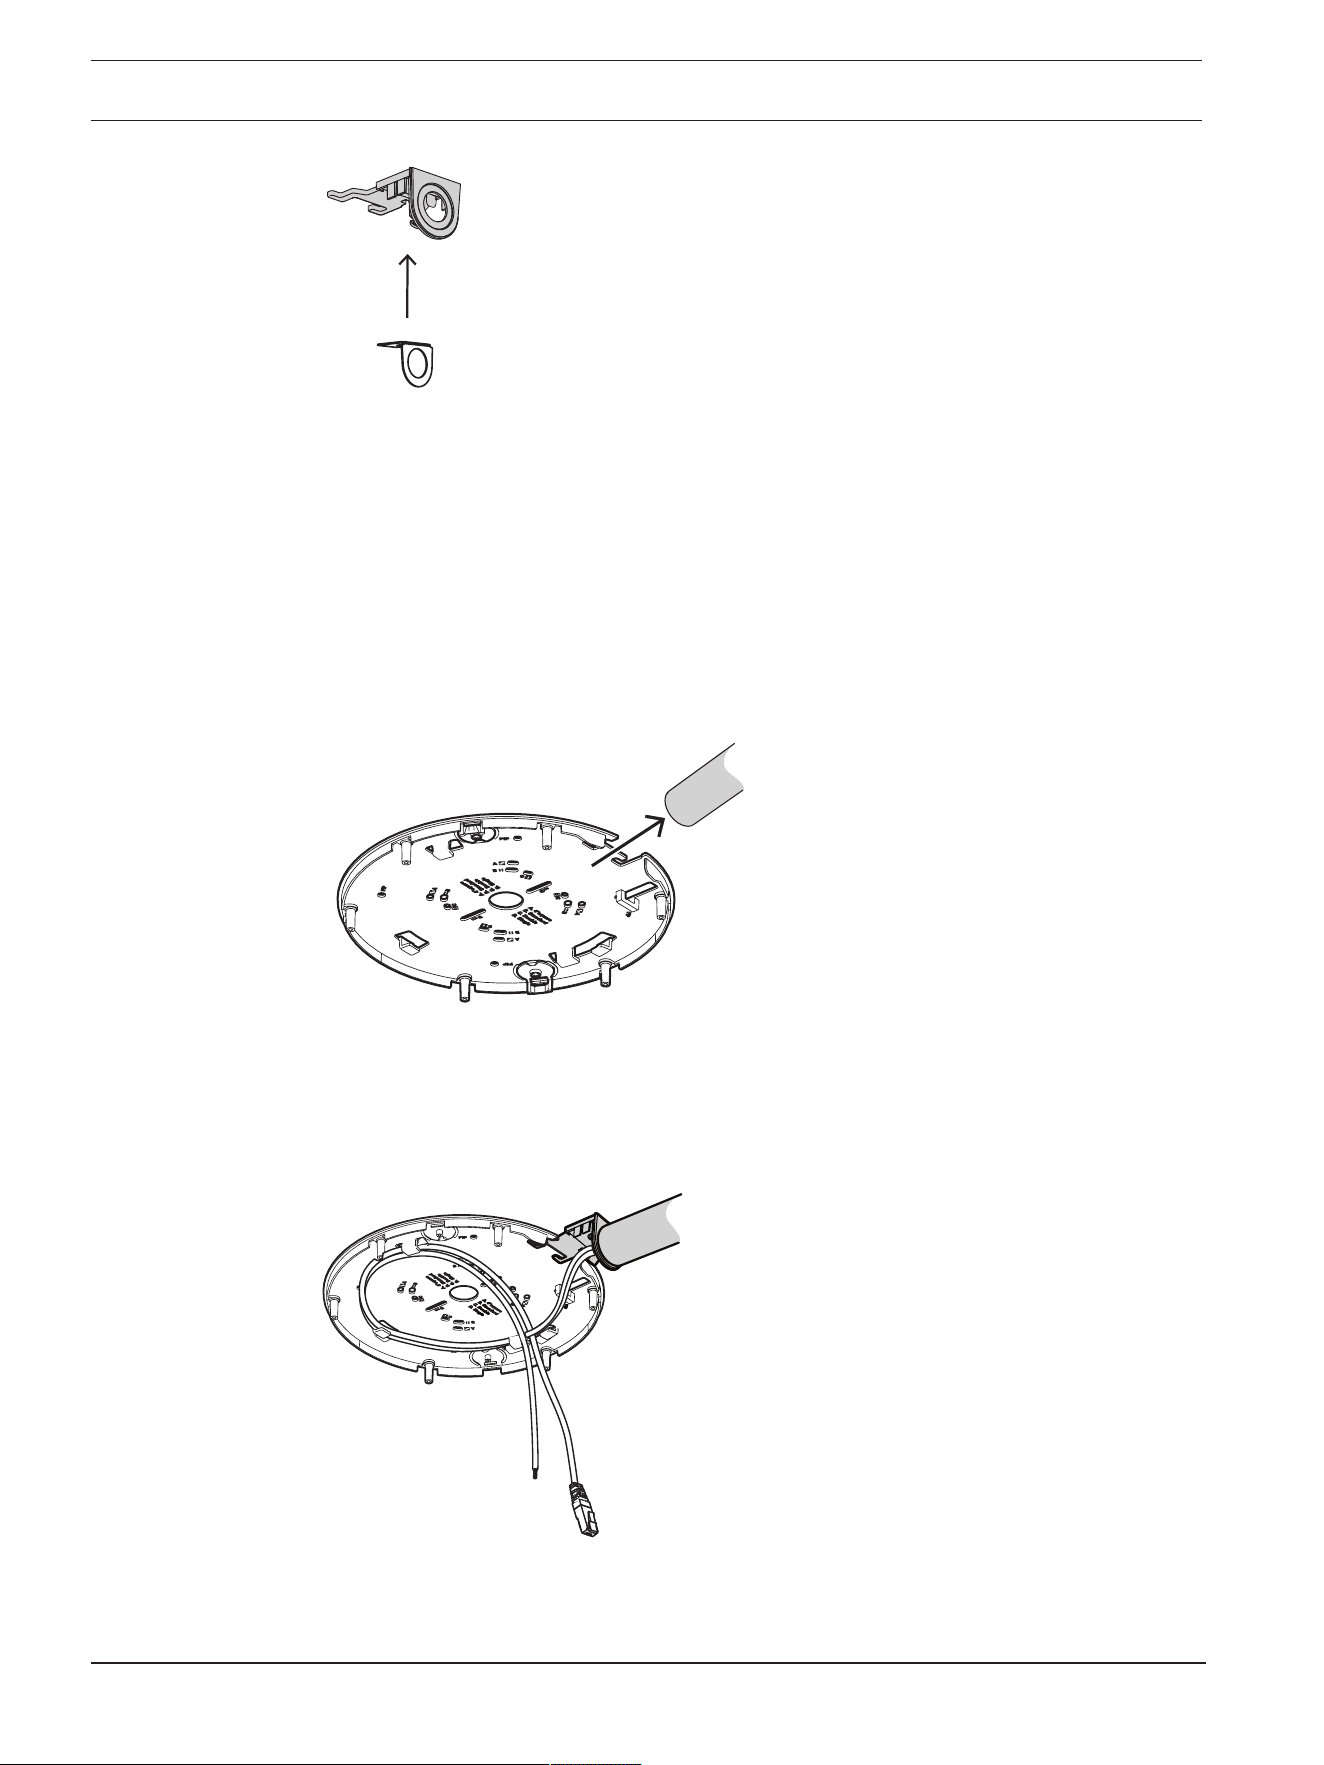
1. Remove the camera base from the box.
2. If the installation of the mounting plate was done with the conduit, remove the door on
the camera base as shown in the image. Keep the screw and lid.
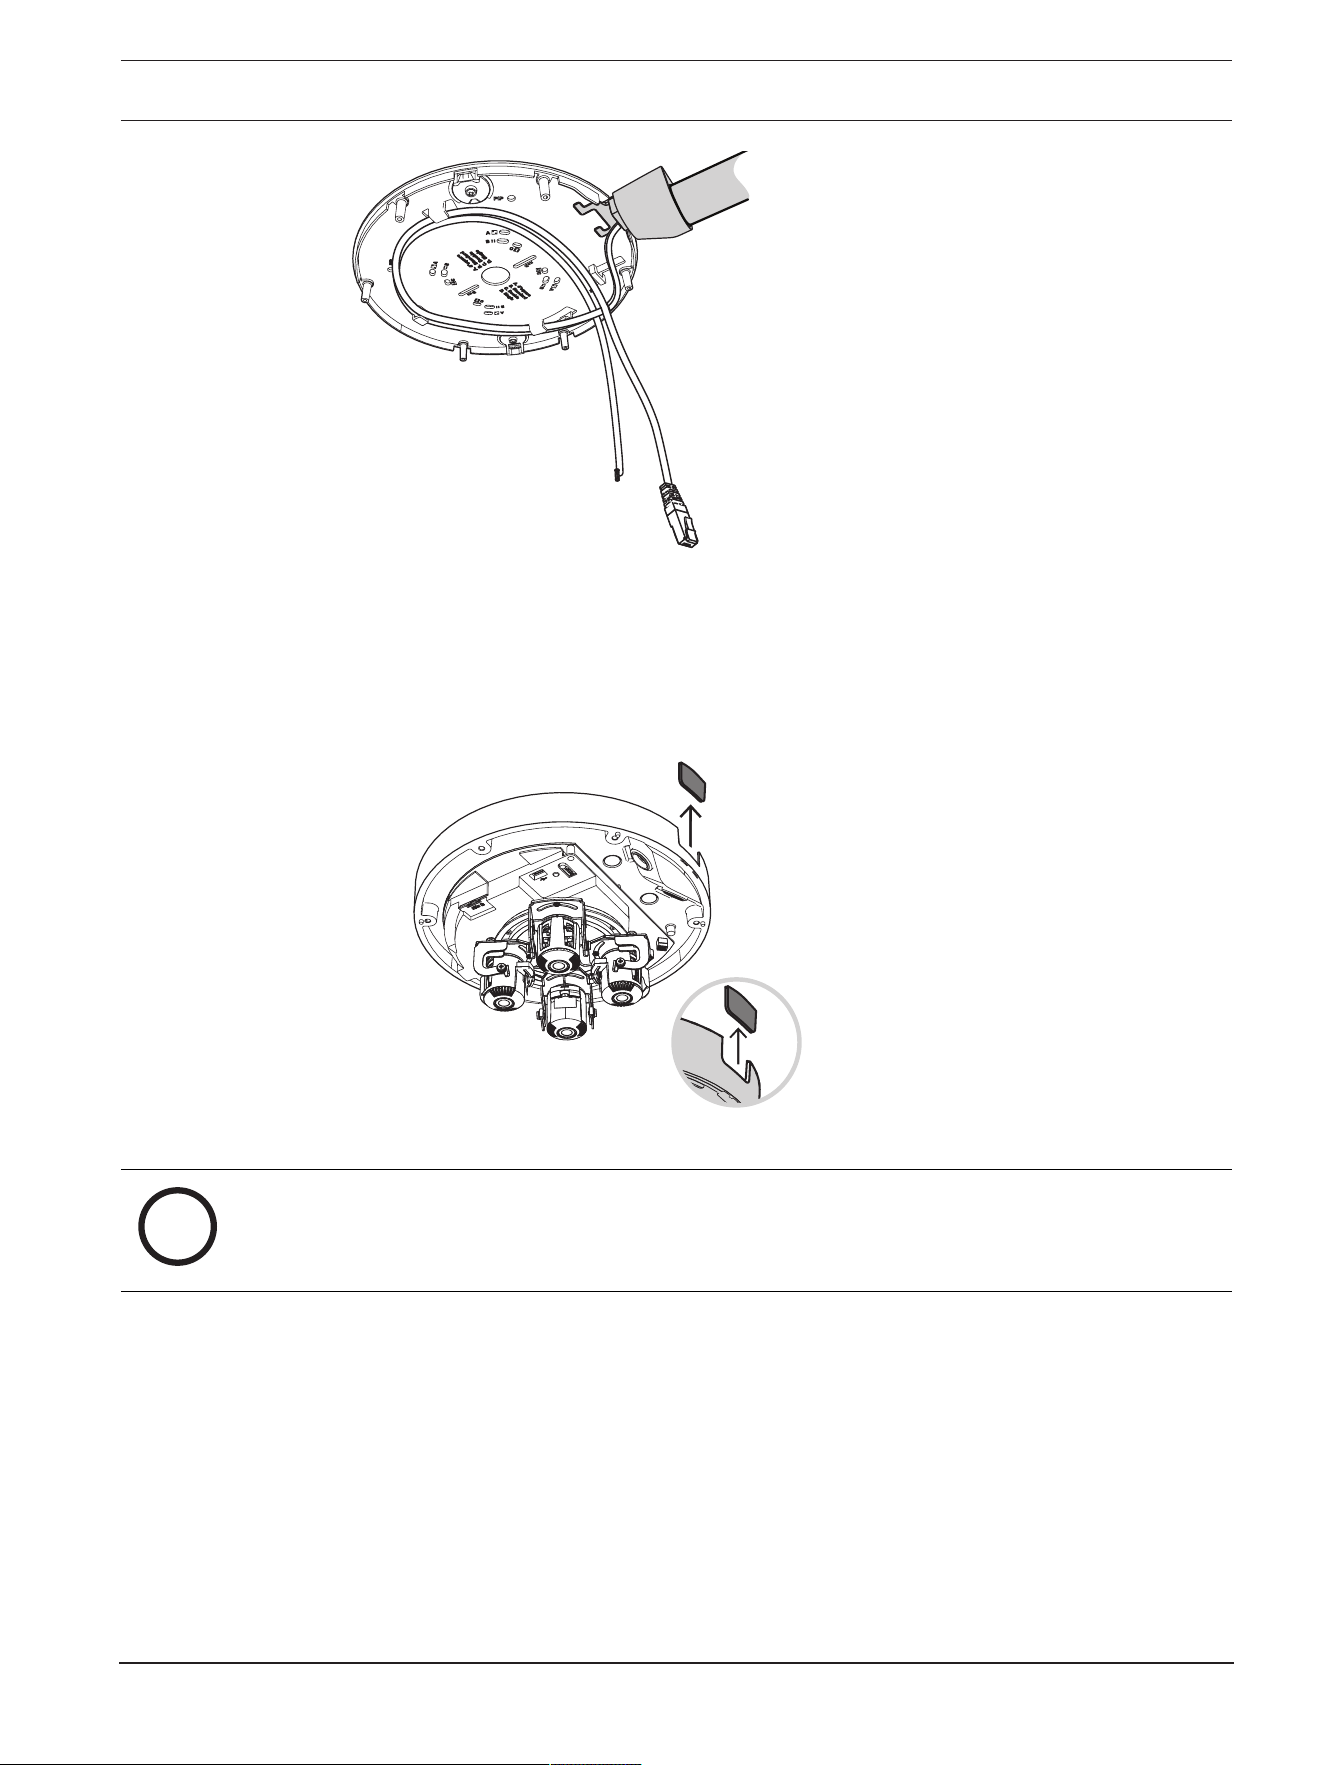
Local storage
i
Notice!
Bosch recommends the use of industrial micro SD cards with health monitoring.
1. If necessary, install a micro SD card in the micro SD slot.
2. Press the micro SD card firmly until it latches into place in the slot.
3. To remove the card, press it into the slot until it unlatches again. Then, remove it from the
SD slot.

18 en | Installation FLEXIDOME multi 7000i IR
2023-02 | 02 |
Installation manual
Bosch Security Systems B.V.
Grounding
!
Warning!
Trained electricians only!
Work at electric appliances must only be carried out by qualified technicians.
To ground the camera:
1. Remove the screw from the bottom of the camera base.
2. Install the ring terminal (not supplied with the camera) on the screw.
3. Hold the camera base and attach the screw with the grounding cable.
>18AWG
5.2.2 Installation steps
1. Put the cord of the camera base through the hook on the mounting plate to secure the
camera base during installation.
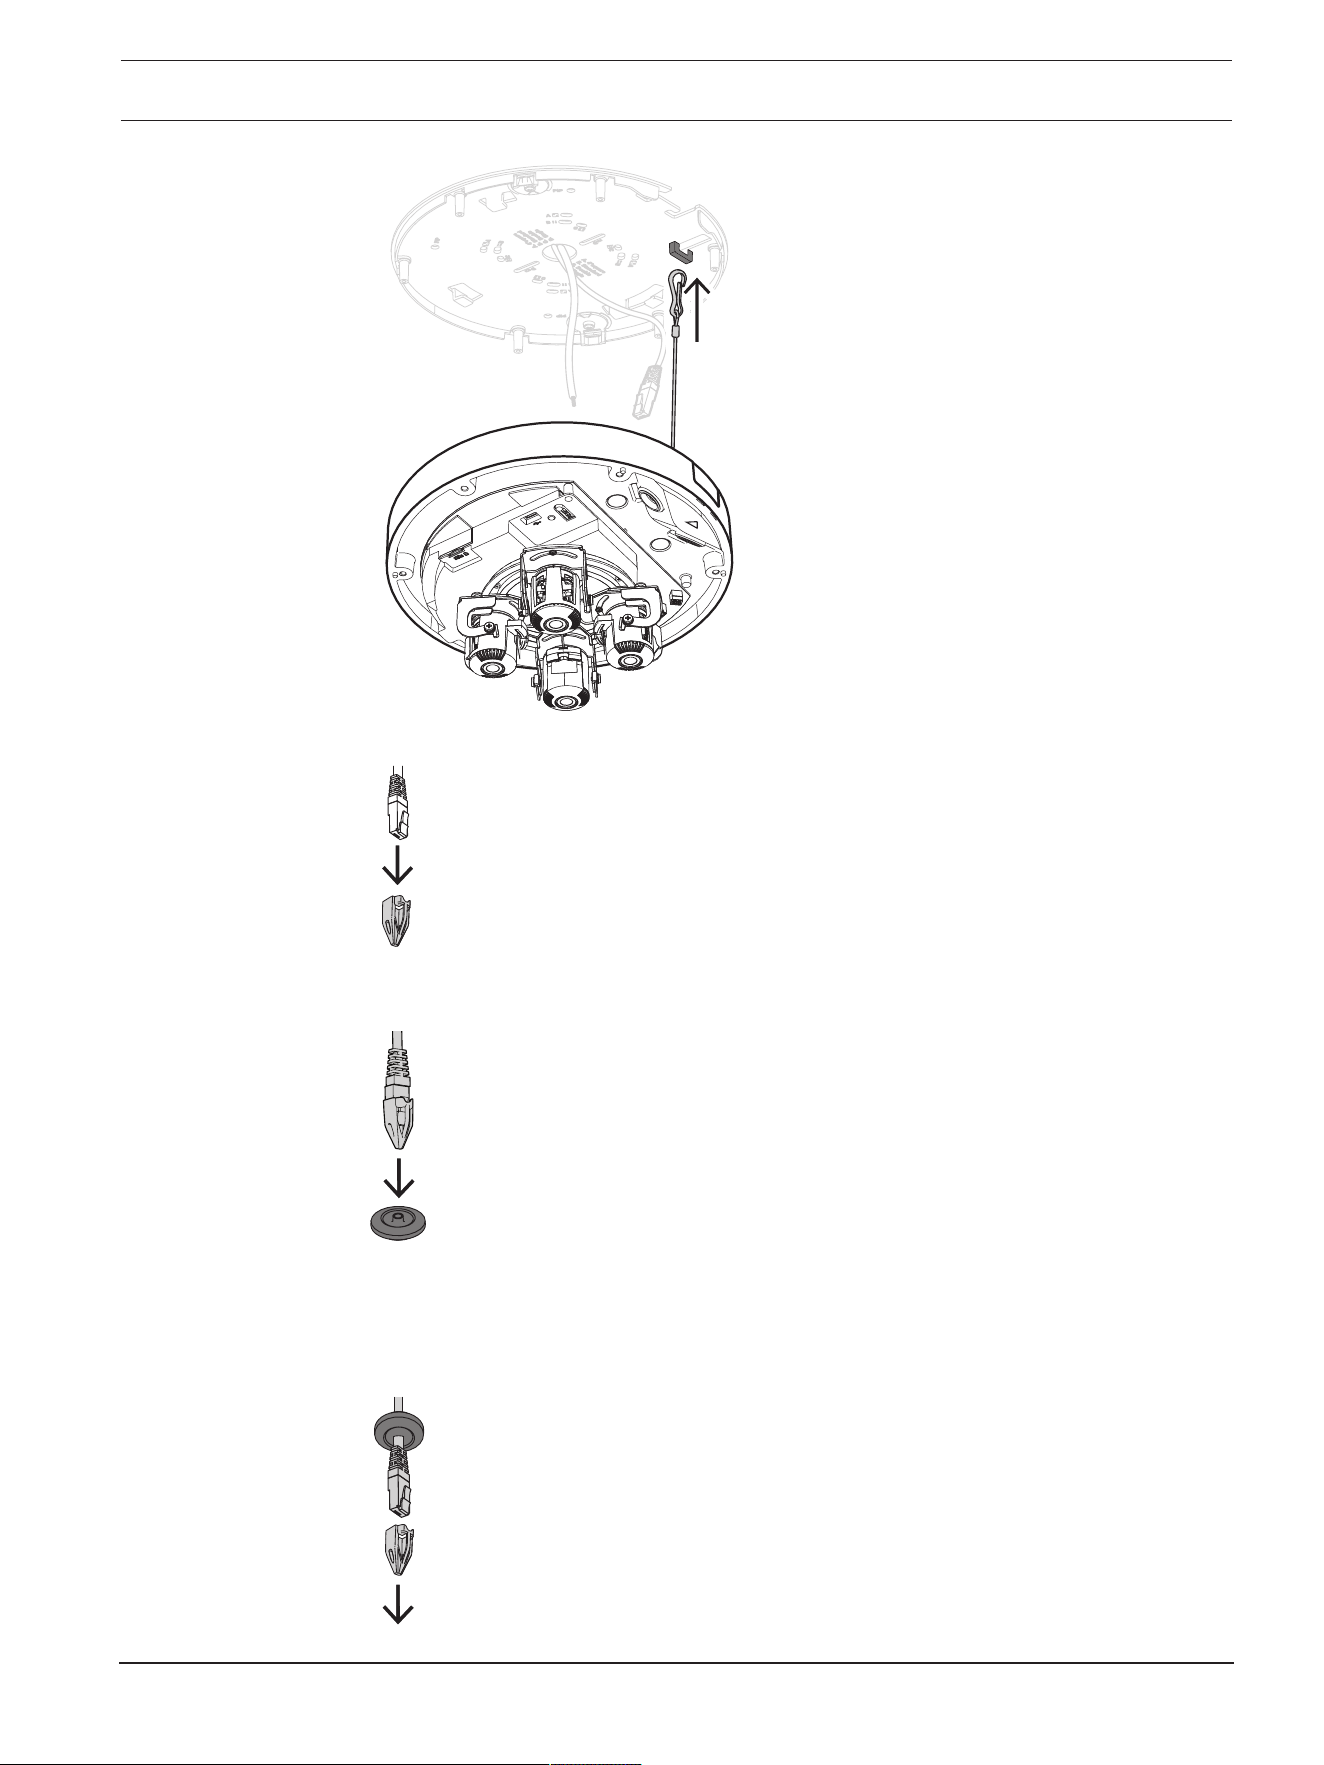
FLEXIDOME multi 7000i IR Installation | en 19
Bosch Security Systems B.V.
Installation manual
2023-02 | 02 |
2. Put the RJ-45 punch-through aid on the network cable.
3. Remove the tubes from the M20 rubber grommets.
4. Put one M20 rubber grommet on the edge of the RJ-45 punch-through aid.
5. Pull the RJ-45 punch-through aid together with the network cable connector through the
M20 rubber grommet. Leave about 13cm (5inch) between grommet and end of the
cable.
6. Remove the RJ-45 punch-through aid.
20 en | Installation FLEXIDOME multi 7000i IR
2023-02 | 02 |
Installation manual
Bosch Security Systems B.V.
7. Put the other M20 rubber grommet on the edge of the auxiliary connections cable. Leave
at least 5cm (2inch) between grommet and end of the cable.
8. Slightly pull back the M20 rubber grommets on both cables to make sure that the
grommet sleeve faces the source of the cables.
9. Put the network cable through the network cable inlet.
10. Put the auxiliary connections cable through the other cable inlet.
11. Fix the M20 rubber grommets in both cable inlets to make sure that the cable inlets are
firmly closed.
FLEXIDOME multi 7000i IR Installation | en 21
Bosch Security Systems B.V.
Installation manual
2023-02 | 02 |
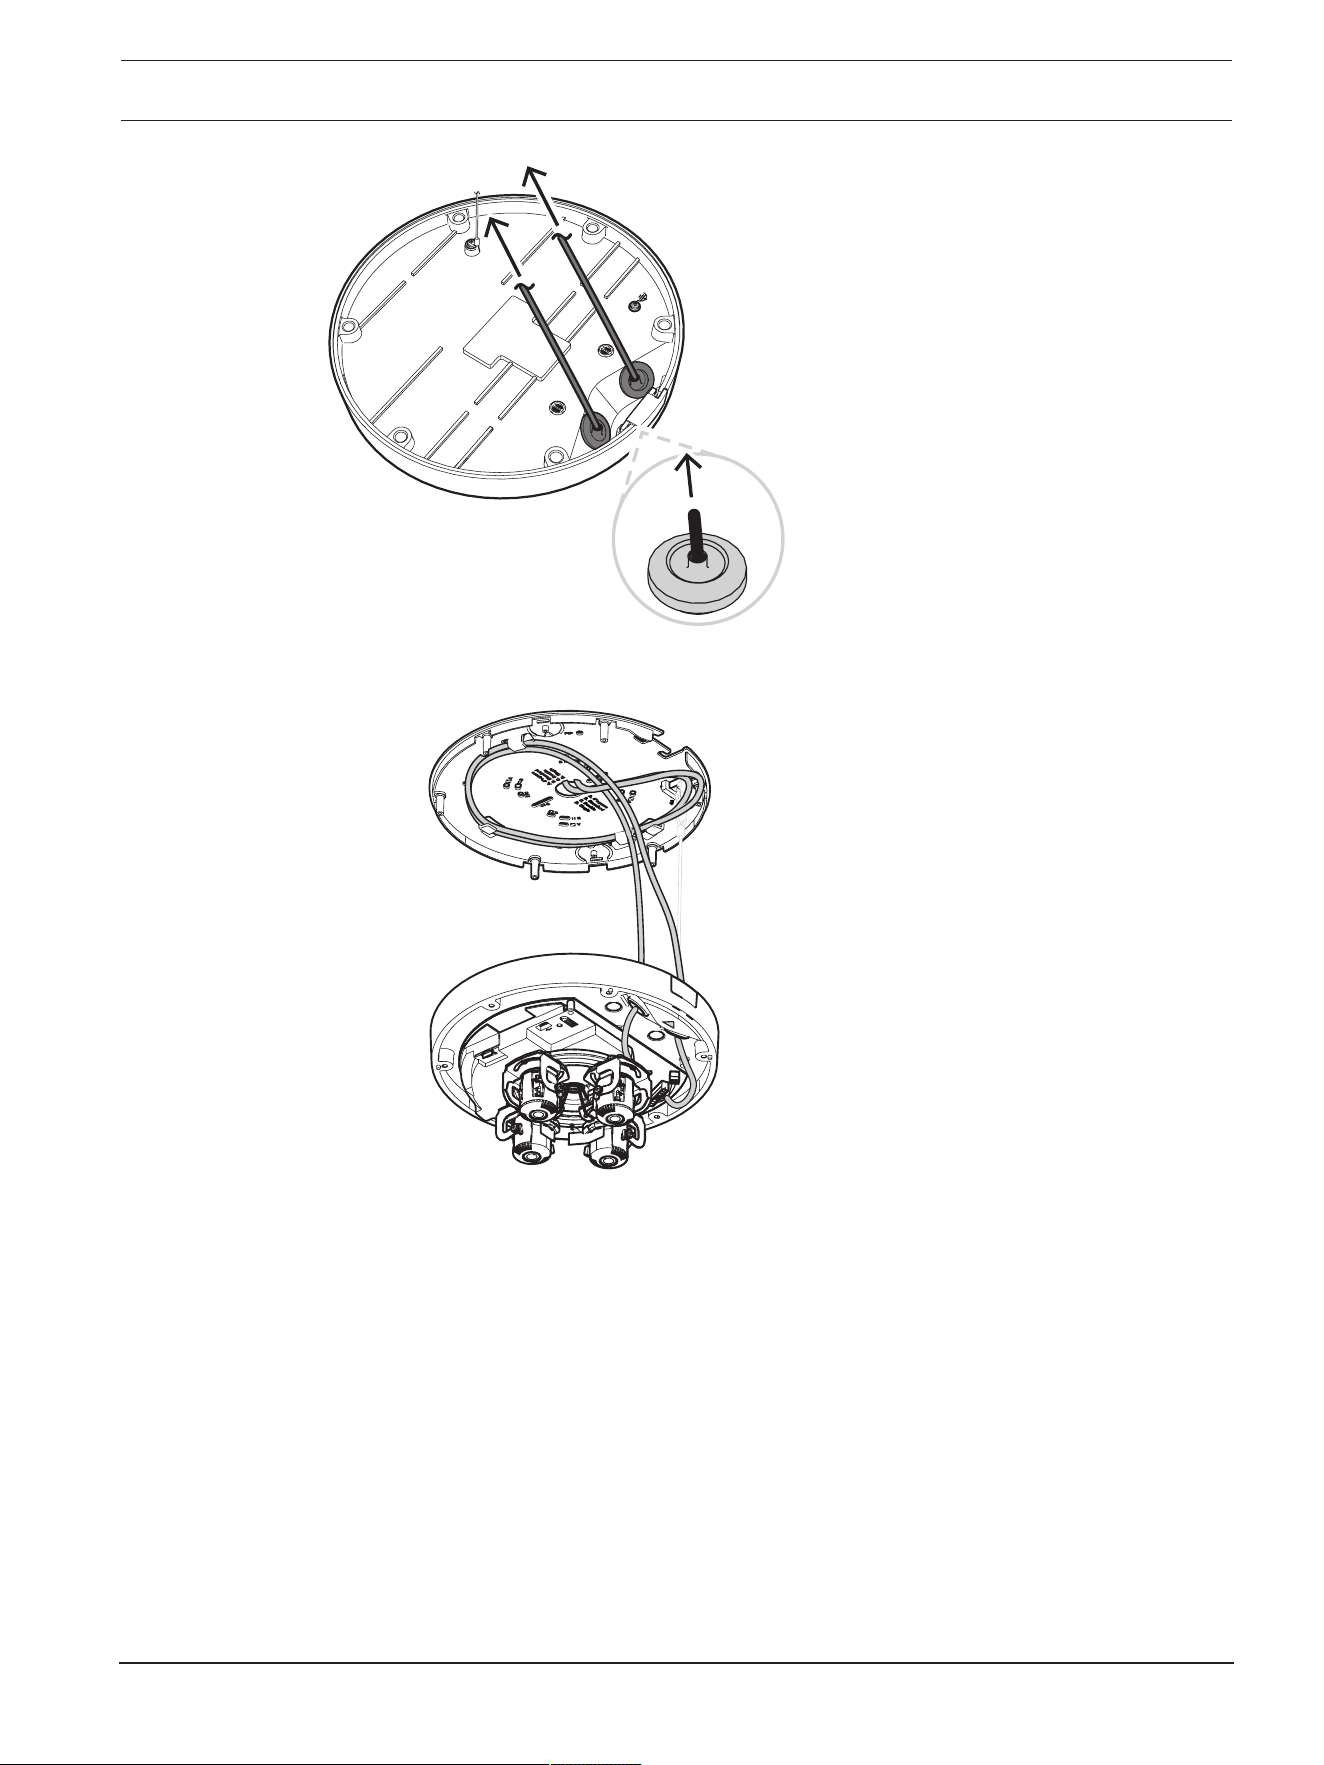
x2
12. If required, do a loop with the cable on the hooks of the mounting plate.
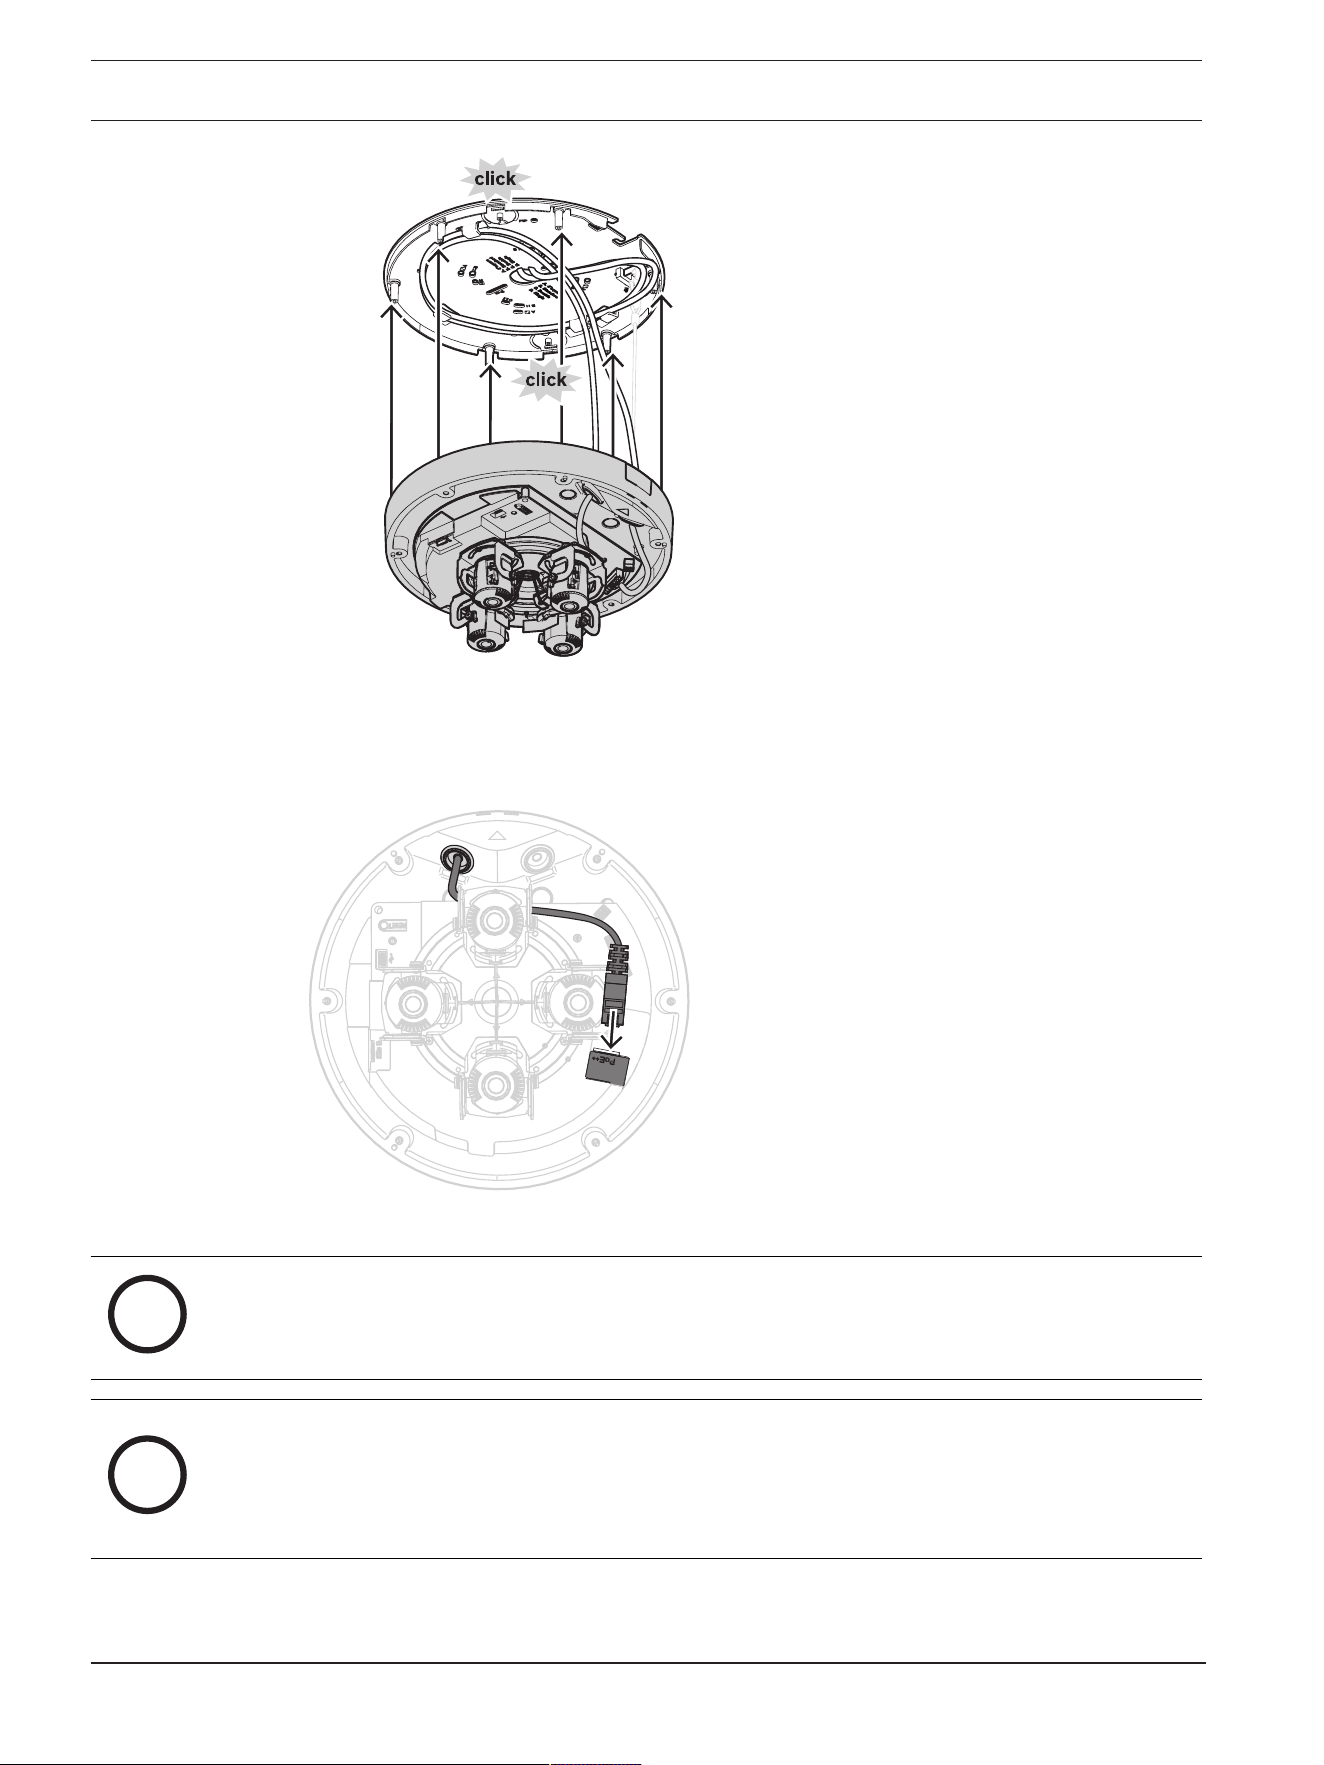
13. Position the camera base on the mounting plate, so that the screw holes of camera base
and mounting plate match. Slightly press the camera base onto the mounting plate until
you hear/feel a click. Make sure that the camera base is secured.
22 en | Installation FLEXIDOME multi 7000i IR
2023-02 | 02 |
Installation manual
Bosch Security Systems B.V.
5.2.3 Wiring the camera base
Network connection
1. Connect the network cable to the network connector.
Auxiliary connections - power connection
i
Notice!
IP66 water/dust protection
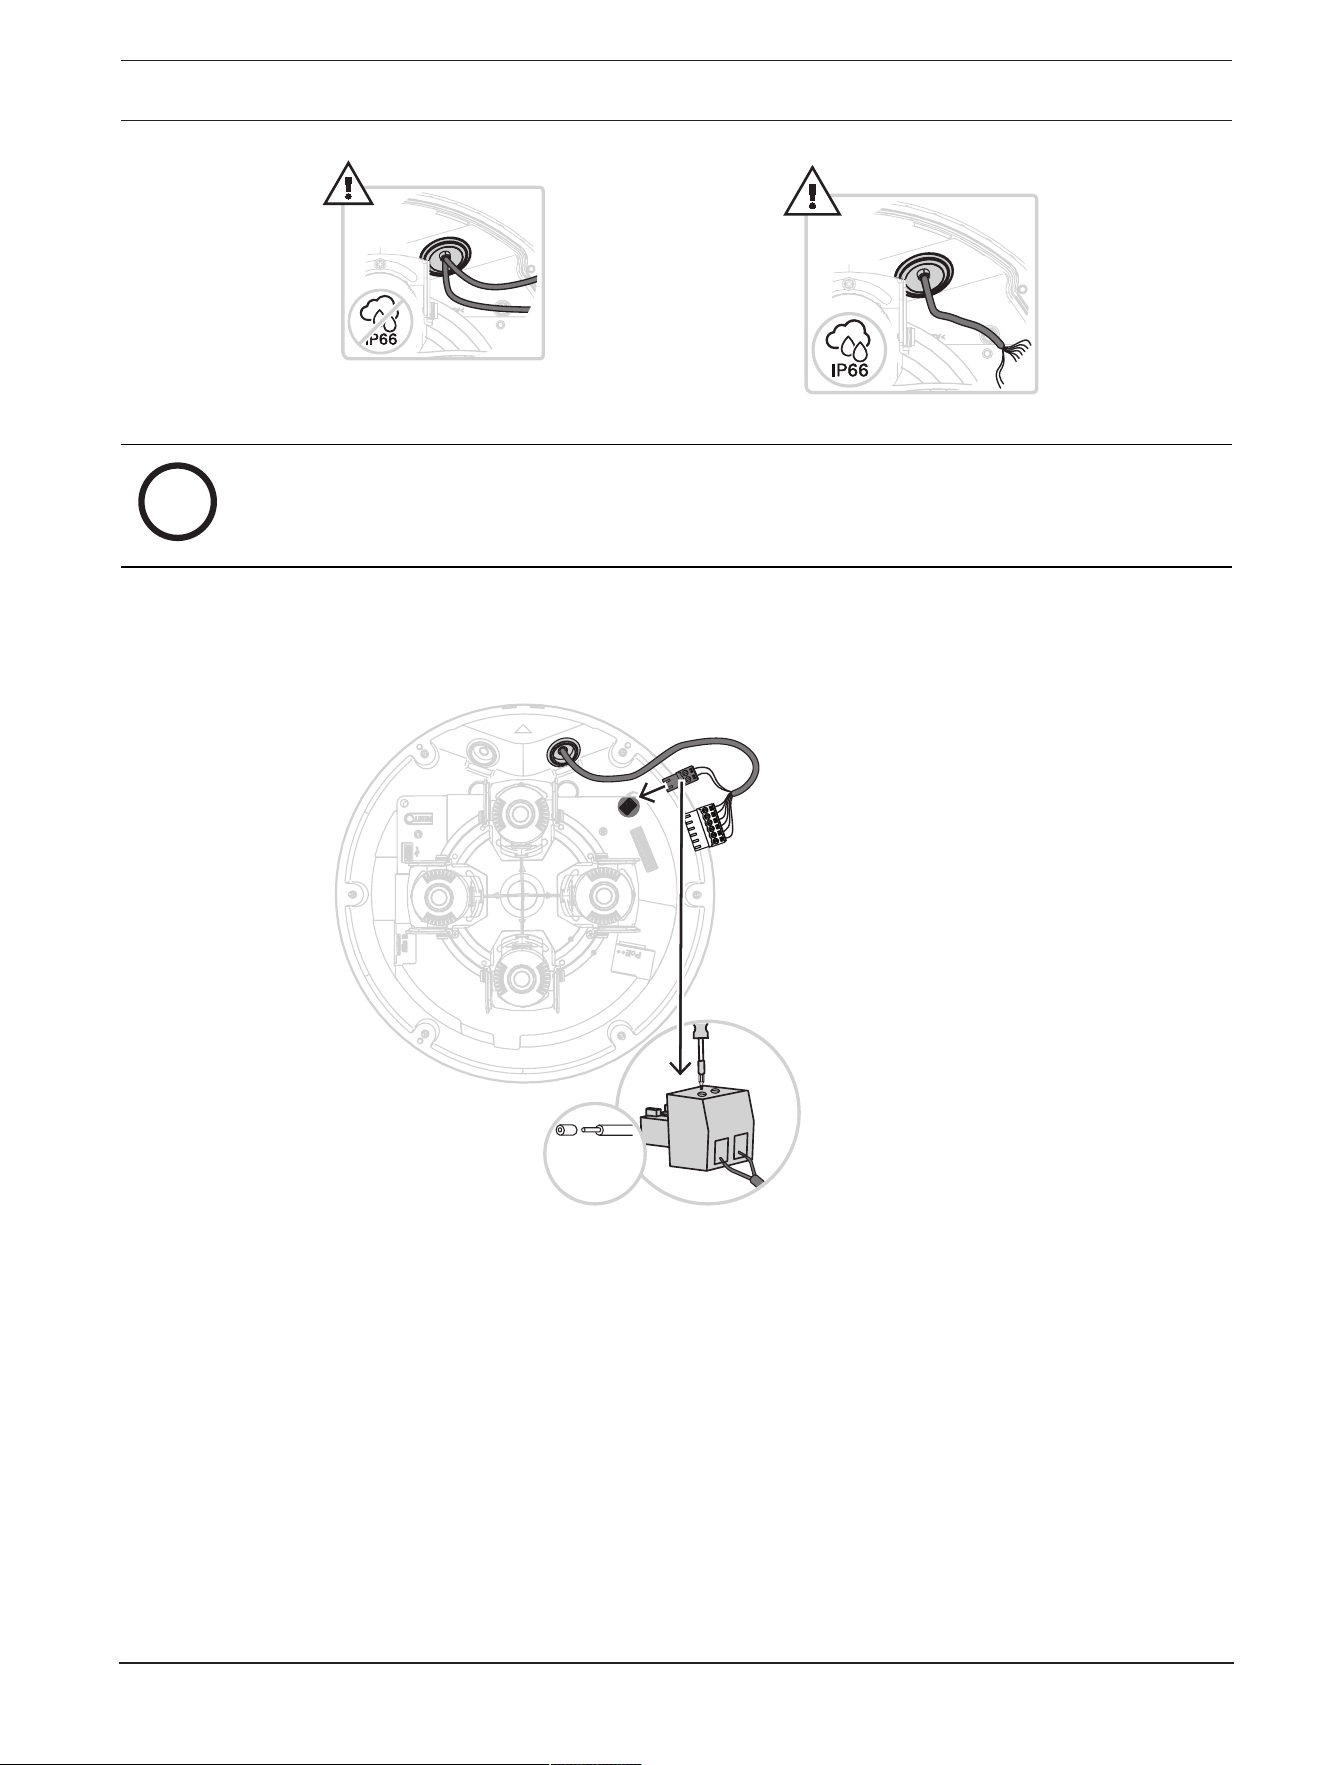
For IP66 water/dust protection, use cables with a diameter of at least 5mm.
i
Notice!
IP66 water/dust protection
If you split up the auxiliary connections into two cables before routing them through the M20
rubber grommet, the camera loses the IP66 water/dust protection. Route only one cable
through the M20 rubber grommet to keep the IP66 water/dust protection.
FLEXIDOME multi 7000i IR Installation | en 23
Bosch Security Systems B.V.
Installation manual
2023-02 | 02 |
i
Notice!
If PoE++ or PoE+ is not available, use a 24VAC power supply.
1. Remove 8mm (0.3inch) of the power wires insulation.
2. Connect the power wires to the 2-pin power connector.
3. Connect the 2-pin power connector to the power connector of the camera base.
24 VAC
8 mm
(0.3”)
Auxiliary connections - audio and alarm connection
1. Remove 7mm (0.28inch) of the audio and alarm wires insulation.
2. Connect the audio and alarm wires to the 8-pin Audio and I/O connector.

24 en | Installation FLEXIDOME multi 7000i IR
2023-02 | 02 |
Installation manual
Bosch Security Systems B.V.
Alarm
OUTOUT
IN
GND
Audio
IN GND OUT GND
7 mm
(0.28”)
Audio Alarm
IN GND OUT GND IN GND OUT OUT
5.2.4 Connecting a wireless USB dongle
The camera is equipped with a USB-C port for a wireless USB dongle (sold separately,
available 2022), so that you can easily perform the initial configuration wirelessly. Using a
mobile device with the Bosch Project Assistant app, you can do initial set-up and lens zoom-
focus to find the right scene.
1. Connect the wireless USB dongle with a cable to the USB-C port on the camera base.
USB-C
For more information on Bosch Project Assistant, refer to
Bosch Project Assistant, page 32
.
FLEXIDOME multi 7000i IR Installation | en 25
Bosch Security Systems B.V.
Installation manual
2023-02 | 02 |
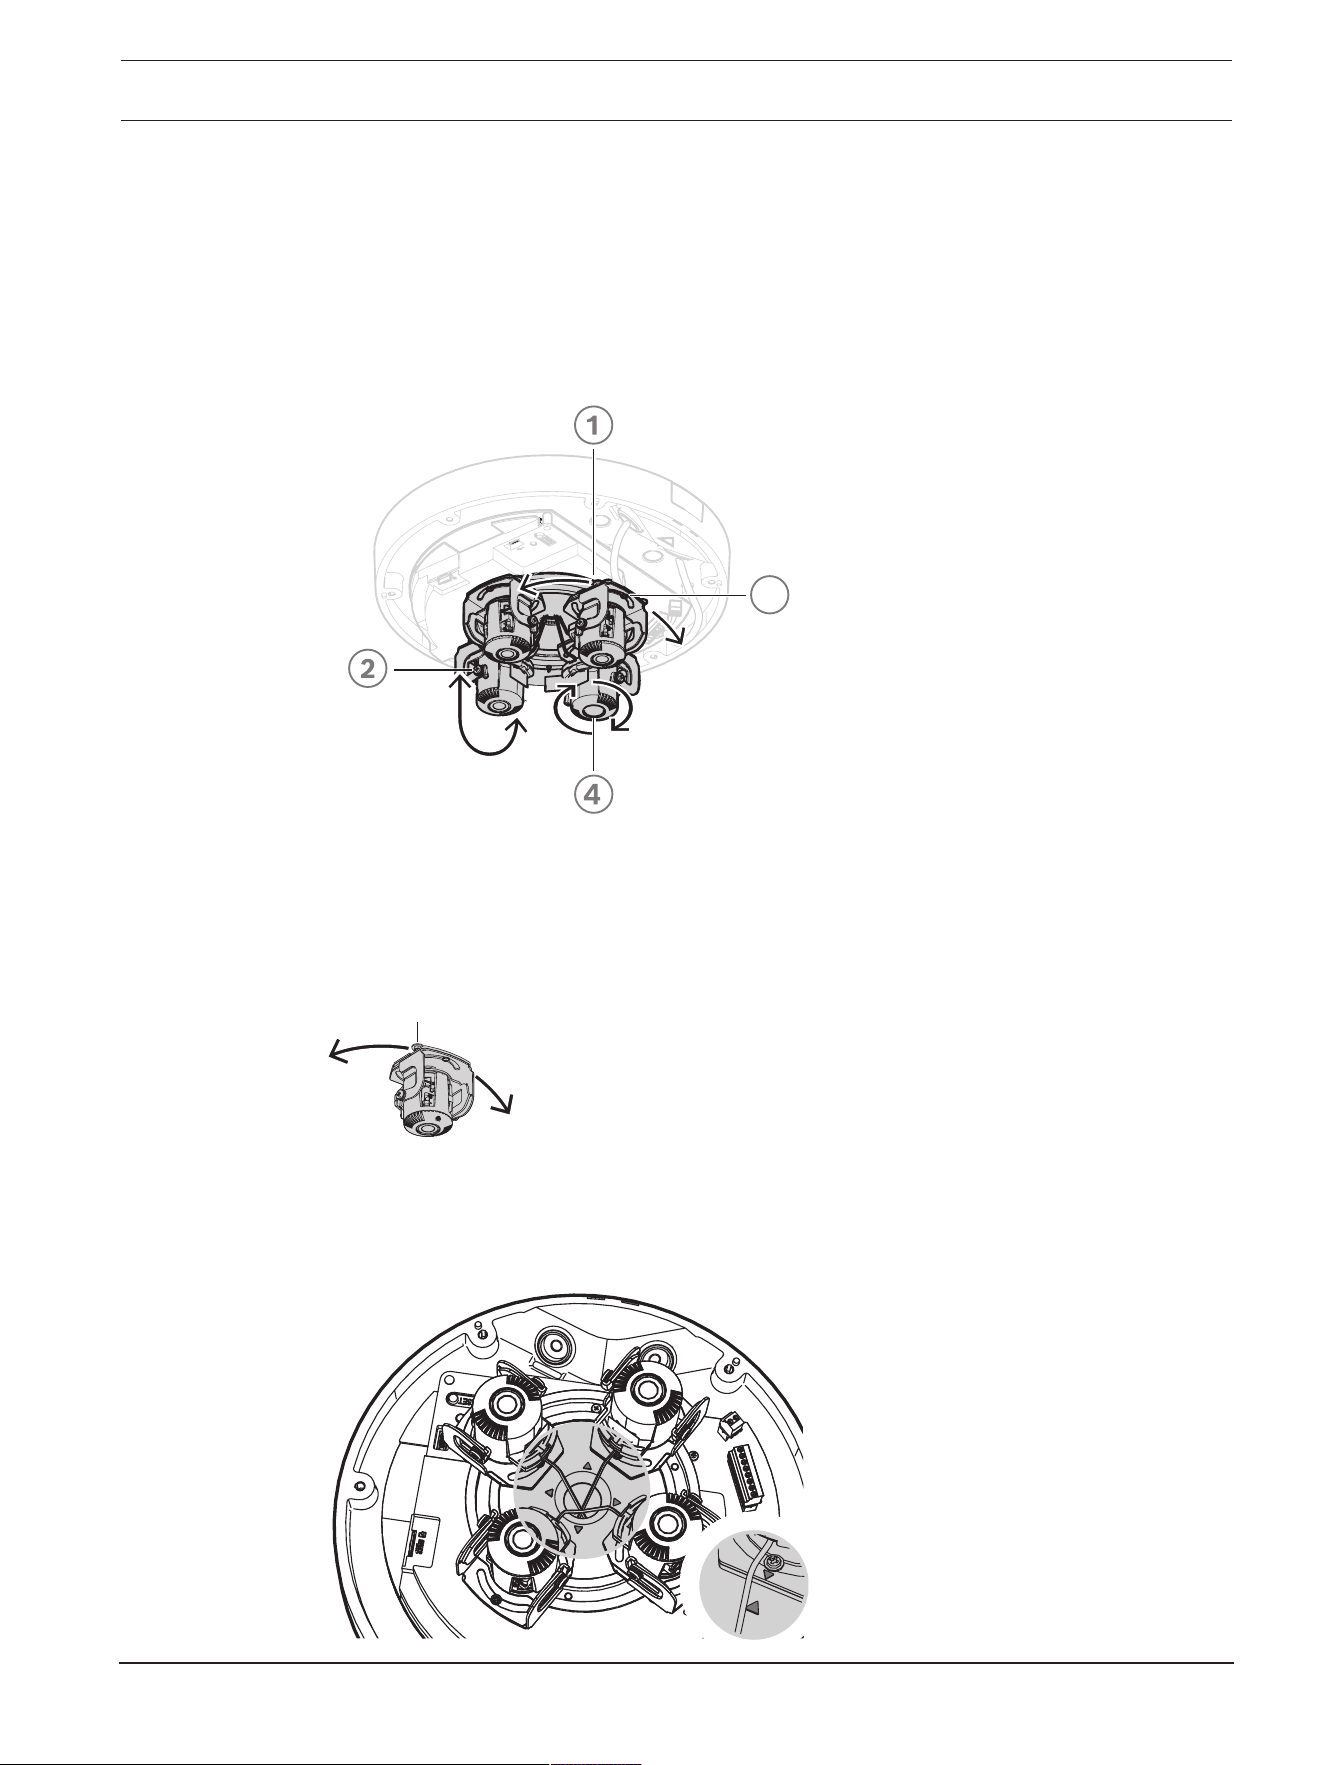
5.3 Setting the position of the multi-imager lenses
You can set the position of each multi-imager lens individually to achieve maximum flexibility.
You can do the following 4-axis lens adjustments:
1.
Panning each of the four lenses over the ring, page 25
: 0º to 360º
2.
Tilting each of the four lenses, page 26
: 0º to 105º
3.
Rotating each of the four lenses, page 26
: -20º to 20º
4.
Rolling each of the four lenses, page 27
: -90º to 90º
3
5.3.1 Panning each of the four lenses over the ring
1. Pan each of the four lenses to set the position that you need. You can pan 0° to 360° over
the integrated transportation ring in the camera.
360º
2. To set the camera in an optimal 360° overview position, pan each of the four lenses so
that the grey triangle icons match the screws. For an optimal 360° overview position, you
also need to tilt the lenses at least 20° to have overlapping images. Refer to
Tilting each
of the four lenses, page 26
.
26 en | Installation FLEXIDOME multi 7000i IR
2023-02 | 02 |
Installation manual
Bosch Security Systems B.V.
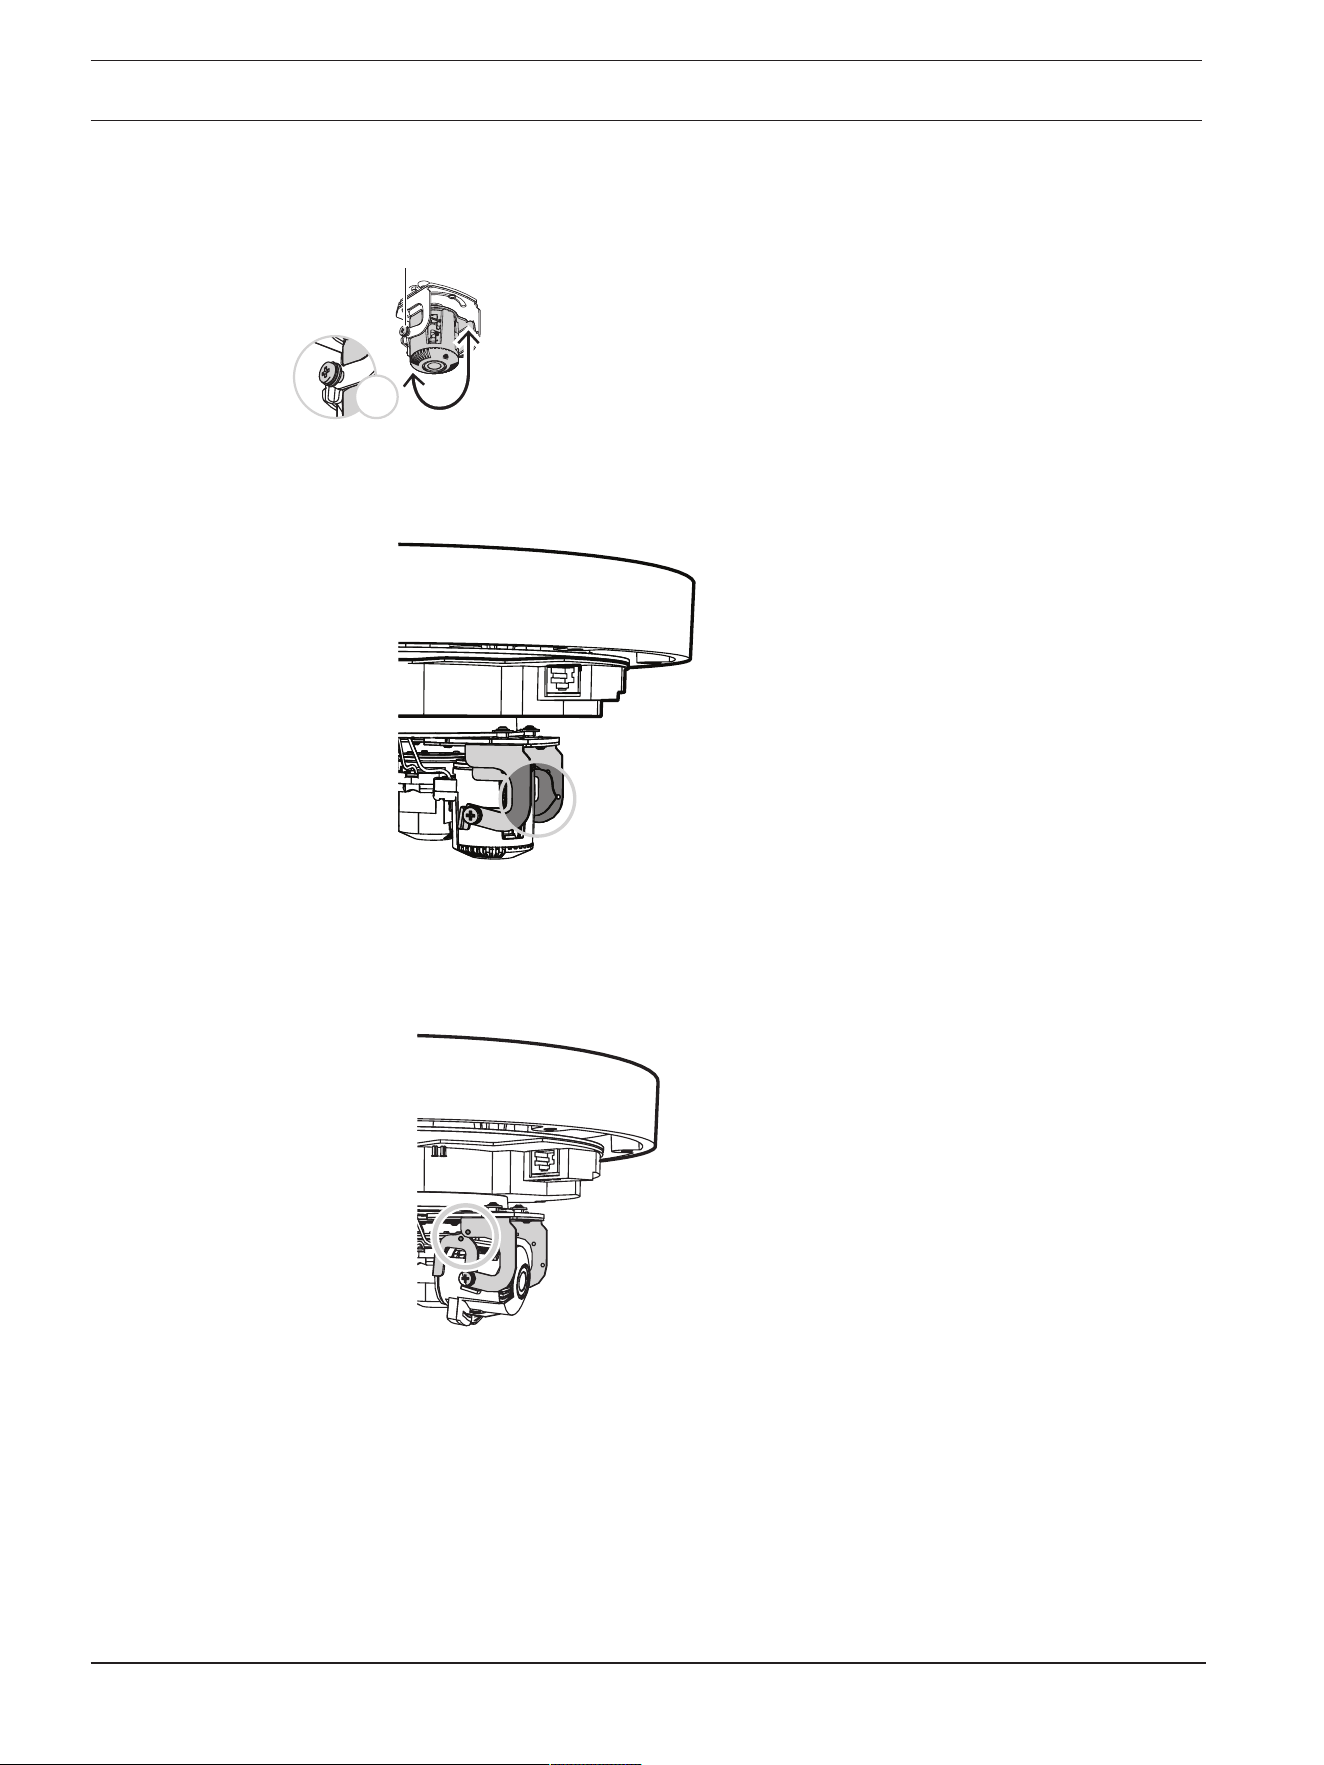
5.3.2 Tilting each of the four lenses
1. Tilt the each of the four lenses to set the position that you need. You can tilt 0° to 105°.
0º ~ 105°
x2
2. To set each of the four lenses at 90° tilt, to let the lens face straight down in ceiling
installations, make sure that the white dot in the middle of the larger lens holder meets
the edge of the smaller lens holder.
3. Do not tilt each of the four lenses any further than until the white dot on the edge of the
lens holder meets the white triangle. If you tilt any further, you might see a partly blurry
image. Use this position only in specific use cases or when you need the lens to fully
zoom in.
4. To obtain 360° overlapping images, make sure to have a tilt angle from the ceiling of at
least 20° up to 62°:
– 20°: bottom half of the images shows overlap
– 62°: full 360° overview with side by side overlap and without blind spots
5.3.3 Rotating each of the four lenses
1. Rotate each of the four lenses on the camera base to set the position that you need. You
can rotate -20º to 20º.
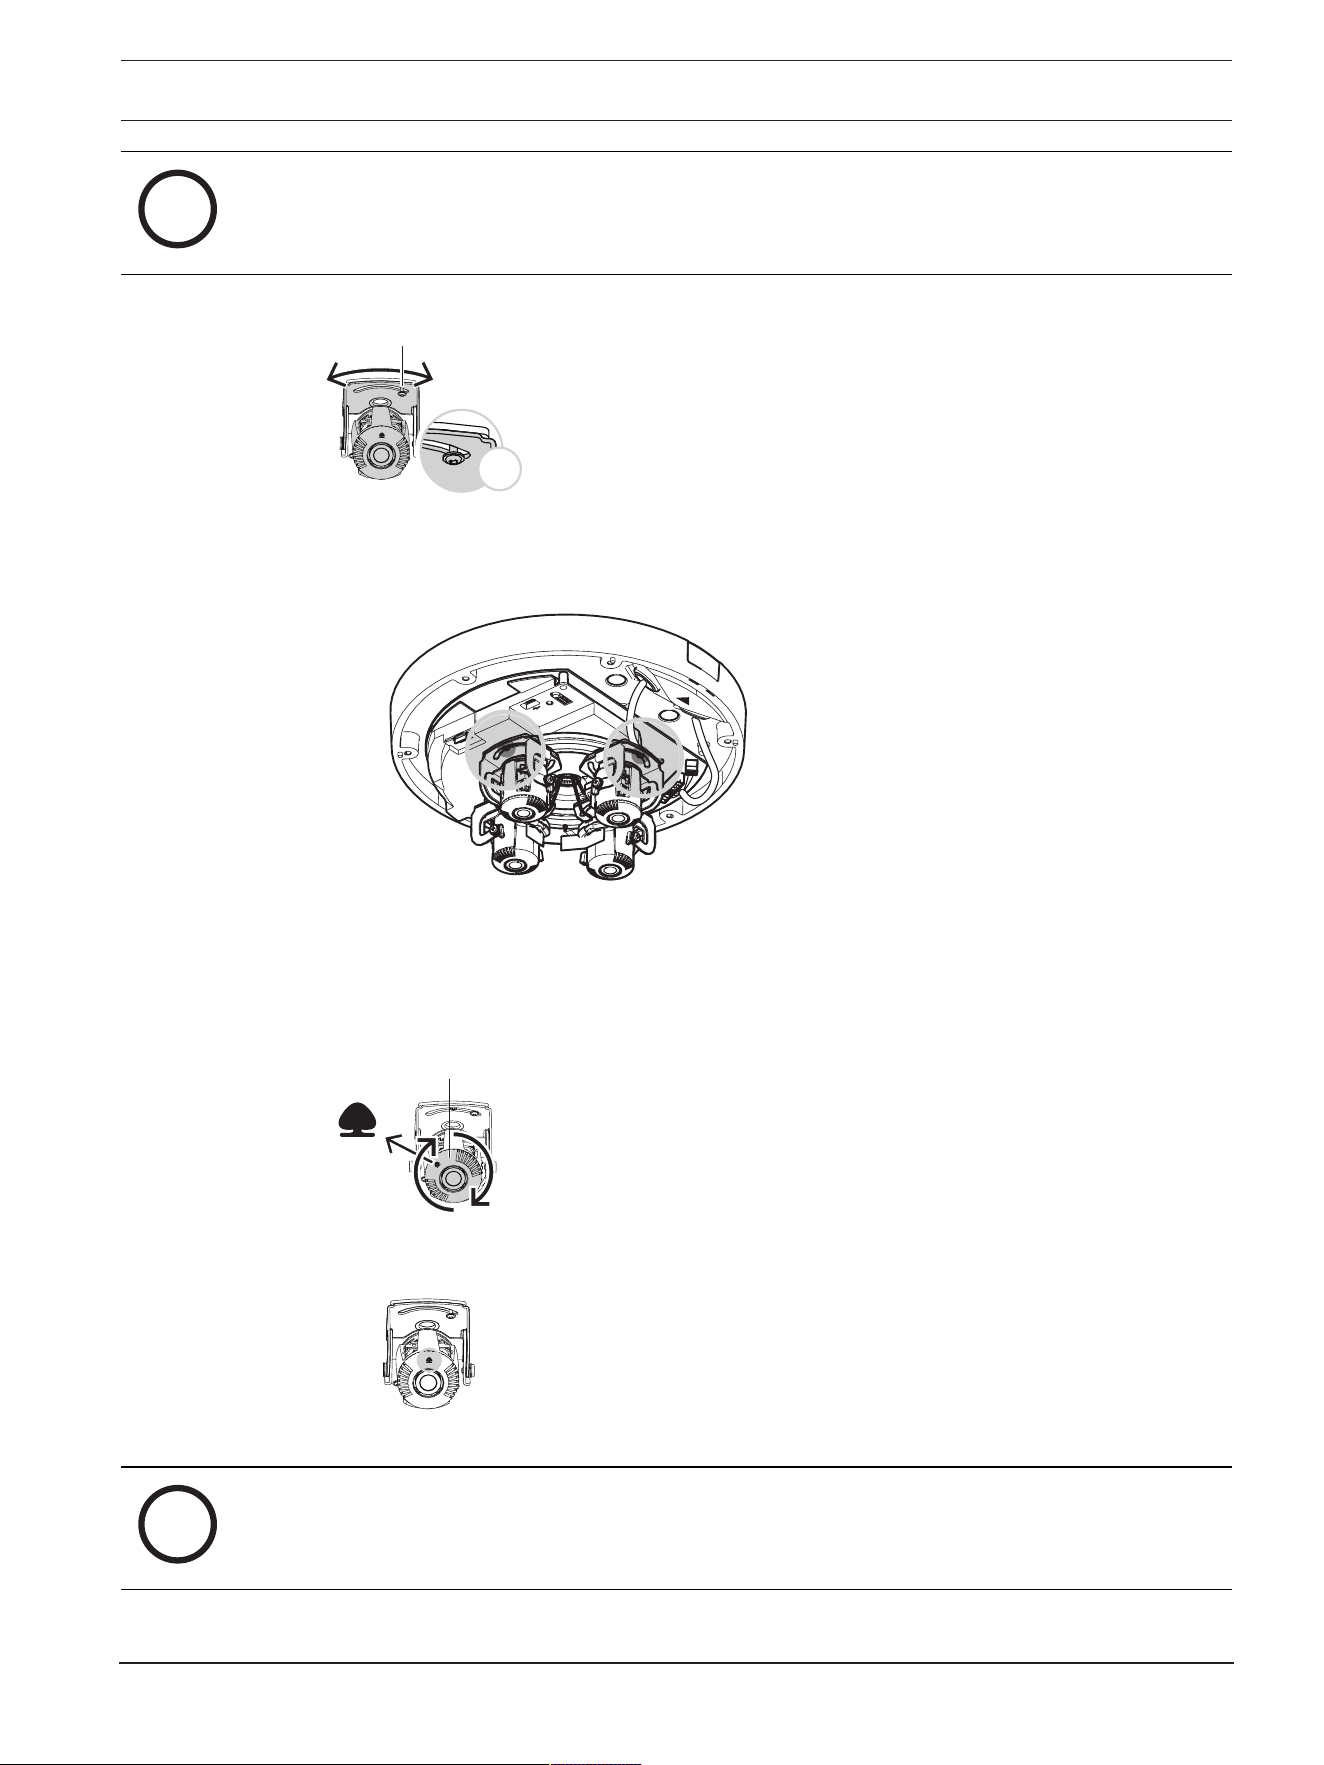
FLEXIDOME multi 7000i IR Installation | en 27
Bosch Security Systems B.V.
Installation manual
2023-02 | 02 |
i
Notice!
Mechanically, each of the four lenses rotates -45º to 45º, but doing so will prevent you from
closing the camera dome cover. Do not rotate more than -20º to 20º.
-20º ~ 20°
x2
2. To set the camera in an optimal 360º overview position, rotate each of the four lenses so
that the white triangle icons match.
5.3.4 Rolling each of the four lenses
1. Roll each of the four lenses to set the position that you need. You can roll -90º to 90º.
-90º ~ 90º
TOP
2. To set the image straight, make sure that the tree icon on the lens is leveled horizontally.
i
Notice!
Do not roll the lens more than 90º. To prevent damage, do not push it beyond the lens stop.

28 en | Installation FLEXIDOME multi 7000i IR
2023-02 | 02 |
Installation manual
Bosch Security Systems B.V.
5.4 Installing the camera dome cover
1. Position the camera dome cover on the camera base, so that the triangle icons on the
camera base and on the camera dome cover match.
2. Tighten the 6 captive screws of the screw holes in the camera dome cover between 1 and
2Nm.
TR20
3. Remove the protective cover from the bubble.
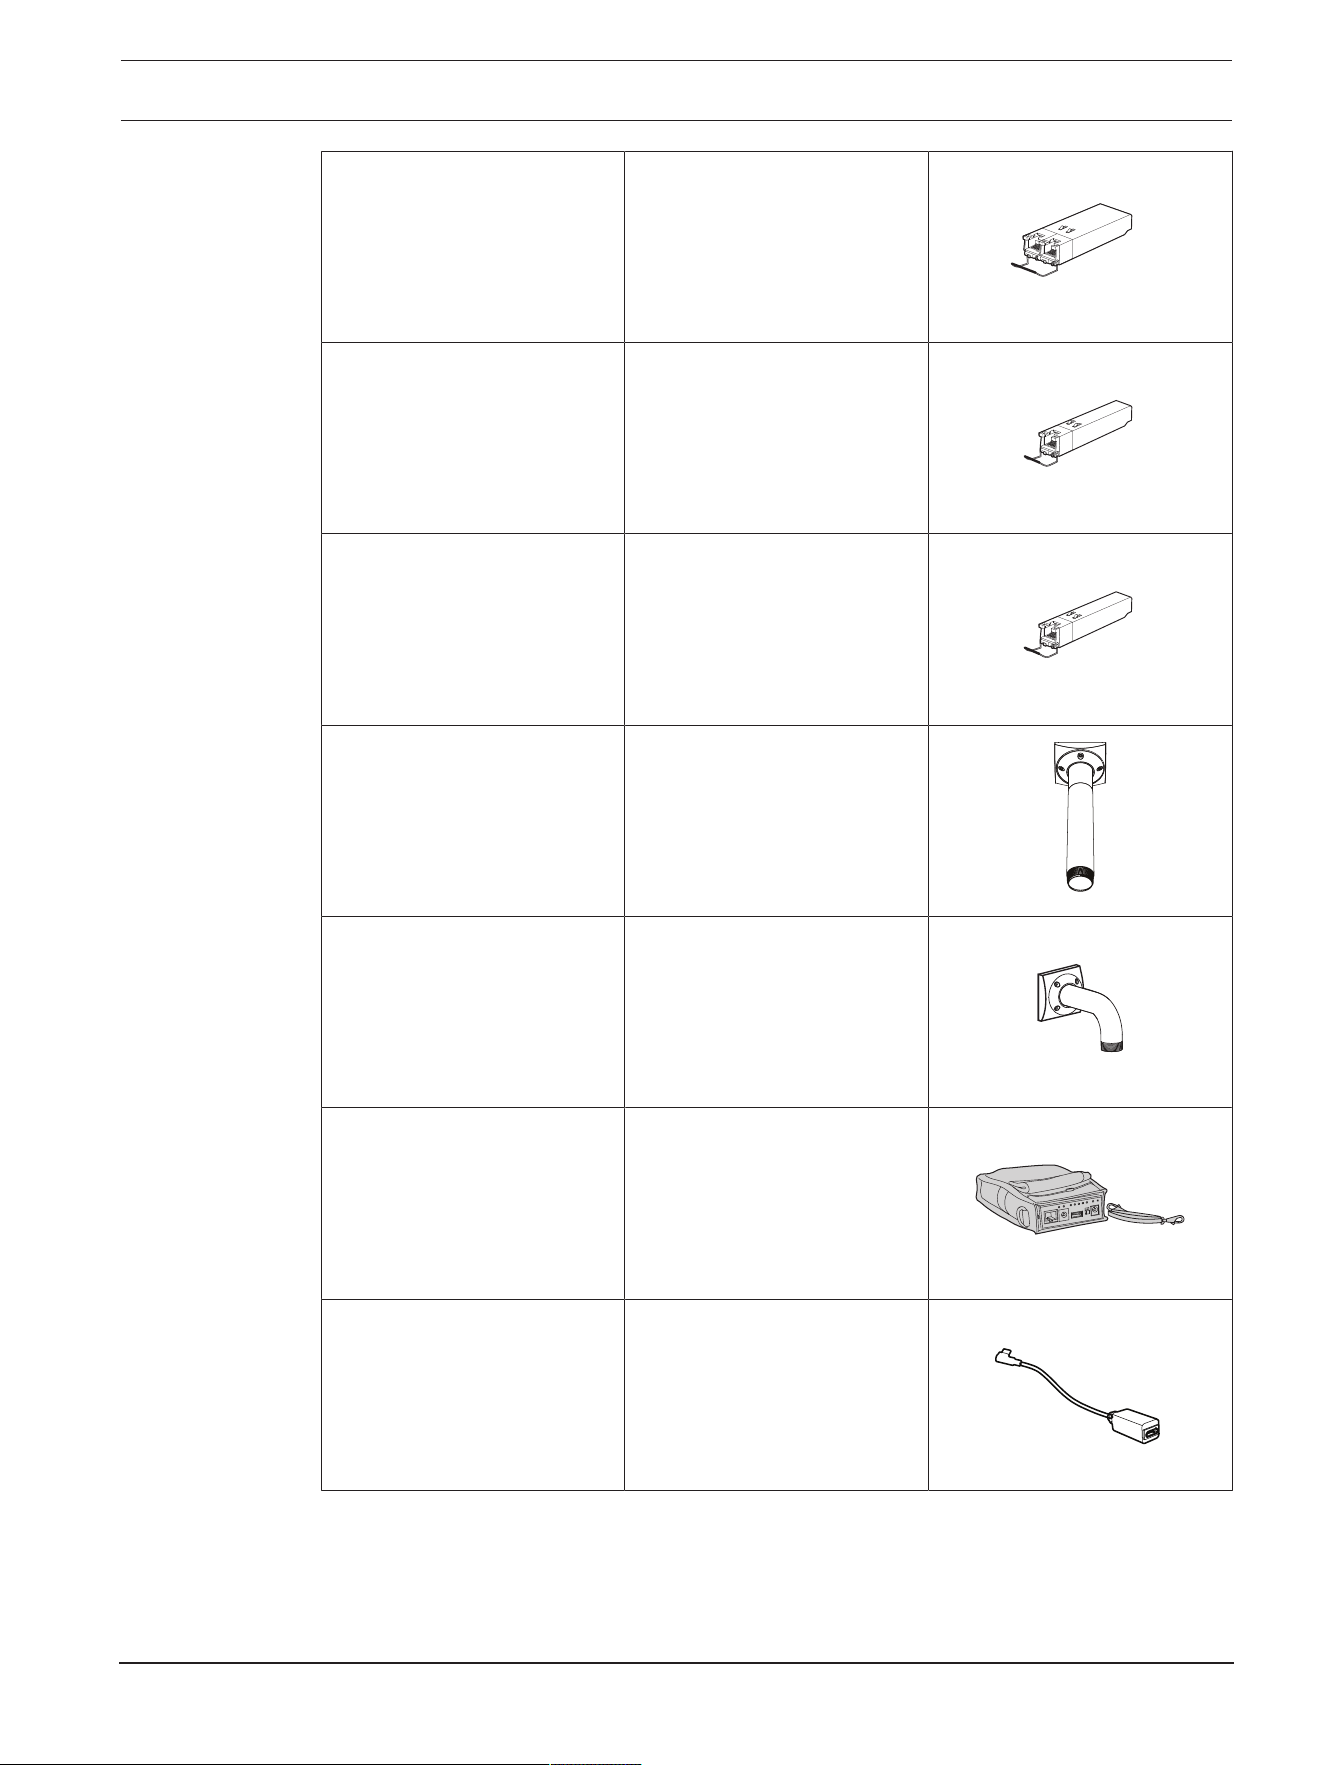
5.5 Optional mounting accessories
NDA-7050-PIPW Pendant interface plate.
NDA-7051-CA Conduit adapter M25 (5
pieces).

FLEXIDOME multi 7000i IR Installation | en 29
Bosch Security Systems B.V.
Installation manual
2023-02 | 02 |
NDA-U-WMT Universal wall mount for
dome cameras, white.
NDA-U-WMP Back plate for universal wall
mount, corner mount and
pole mount, white, IP66.
NDA-U-PMT Universal pipe mount for
dome cameras, 31 cm, white.
NDA-U-PMTE Extension for universal pipe
mount, 50 cm, white.
NDA-U-PMTS Universal pendant pipe mount
for dome cameras, 11cm
(4"), white.
NDA-U-PSMB Surface mount box (SMB) for
wall mount or pipe mount.
NDA-U-PMAS Universal pole mount adapter,
white; small.

30 en | Installation FLEXIDOME multi 7000i IR
2023-02 | 02 |
Installation manual
Bosch Security Systems B.V.
NDA-U-PMAL Universal pole mount adapter,
white; large.
NDA-U-RMT Universal roof mount for
dome cameras, white.
NDA-U-PA0 Surveillance cabinet, 24VAC
input, 24VAC output, IP66.
NDA-U-PA1 Surveillance cabinet, 100 -
120VAC 50/60Hz input,
24VAC output, IP66.
NDA-U-PA2 Surveillance cabinet, 230VAC
input, 24VAC output, IP66.
VG4-SFPSCKT Ethernet media converter
video transmitter/data
receiver fiber optic kit.
SFP-2 SFP Fiber Optic Module, 2km
(1.2miles), 2LC connectors.
Multi-mode. 1310 mm.
FLEXIDOME multi 7000i IR Installation | en 31
Bosch Security Systems B.V.
Installation manual
2023-02 | 02 |
SFP-3 SFP Fiber Optic Module,
20km (12.4miles), 2LC
connectors. Single-mode.
1310nm.
SFP-25 SFP Fiber Optic Module, 2km
(1.2miles), 1SC connector.
Multi-mode. 1310/1550nm.
SFP-26 SFP Fiber Optic Module, 2km
(1.2miles), 1SC connector.
Multi-mode. 1550/1310nm.
NDA-U-PMTG Universal pipe mount,
compatible with gang box
installation for fixed dome
cameras only, white.
NDA-U-WMTG Universal wall mount,
compatible with gang box
installation for fixed dome
cameras only, white.
NPD-3001-WAP Bosch camera portable and
wireless installation tool.
Provides PoE only.
NCA-WLAN (available 2022) Wireless USB dongle for
wireless commissioning with
USB-C cable.
32 en | Configuration FLEXIDOME multi 7000i IR
2023-02 | 02 |
Installation manual
Bosch Security Systems B.V.
6 Configuration
6.1 Bosch Project Assistant
If you have connected a wireless USB dongle, you can use the Bosch Project Assistant app on
a mobile device (iOS, Windows, or Android) to perform the initial configuration wirelessly.
1. Download the Project Assistant app.
2. Do the necessary steps to configure the device. Use the step-by-step instructional video
for help.
For more information on connecting a wireless USB dongle, refer to
Connecting a wireless
USB dongle, page 24
.
6.2 Browser connection
A computer with a web browser (Google Chrome, Microsoft Edge, or Mozilla Firefox) is used
to receive live images, control the unit, and replay stored sequences. The unit is configured
over the network using the browser.
6.2.1 Establishing the network
The unit must have a valid IP address to operate on your network and a compatible subnet
mask.
By default, DHCP is pre-set at the factory to On plus Link-Local so a DHCP server assigns an
IP address or, if no DHCP server is available, a link-local address (auto-IP) is assigned within
the range 169.254.1.0 to 169.254.254.255.
You can use the Configuration Manager to find the IP address. Download the software from
http://downloadstore.boschsecurity.com
.
1. Start the Web browser.
2. Enter the IP address of the unit as the URL.
3. During initial installation, confirm any security questions that appear.
6.2.2 Protected network
If a RADIUS server is used for network access control (802.1x authentication), the unit must
be configured first. To configure the unit, connect it directly to a computer using a network
cable and configure the two parameters, Identity and Password. Only after these have been
configured can communication with the unit via the network occur.
6.3 Bosch Video Client
The BoschVideoClient is a free Windows application to view, operate, control, and administer
surveillance cameras. It can be downloaded from:

FLEXIDOME multi 7000i IR Configuration | en 33
Bosch Security Systems B.V.
Installation manual
2023-02 | 02 |
http://downloadstore.boschsecurity.com/
The Configuration Manager, which is part of the VideoClient, is a useful tool for locating the IP
addresses of cameras in your network. Refer to the relevant Operation Manual for more
information.
6.4 Video Security Client
VideoSecurityClient
The VideoSecurityClient is a free, easy-to-use video-surveillance application provided by
Bosch for local and remote monitoring of IP cameras and appliances. The software supports
up to 16 cameras.
The VideoSecurityClient has extensive dewarping capabilities and can be used for client-side
dewarping as well as for viewing the available modes.

34 en | Troubleshooting FLEXIDOME multi 7000i IR
2023-02 | 02 |
Installation manual
Bosch Security Systems B.V.
7 Troubleshooting
7.1 Resolving problems
The following table is intended to help identify the causes of malfunctions and correct them
where possible.
Malfunction Possible causes Solution
Unit does not operate. Power failure. Check power supply. Check if
PoE+ or 24V auxiliary input is
used.
Faulty cable connections. Check all cables, plugs,
contacts and connections.
No connection
established, no image
transmission.
Incorrect unit configuration. Check all configuration
parameters (reset to factory
default if necessary).
Faulty installation. Check all cables, plugs,
contacts and connections.
Wrong IP address. Check the IP addresses (ping).
Faulty data transmission within
the LAN.
Check the data transmission
with ping.
The maximum number of
connections has been reached.
Wait until there is a free
connection and call the
transmitter again.
The unit is not
operational after a
firmware upload.
Power failure during
programming by firmware file.
Have the unit checked by
Customer Service and replace if
necessary.
Incorrect firmware file. Enter the IP address of the unit
followed by /main.htm in your
Web browser and repeat the
upload.
Only use CPP14 firmware files.
Web browser contains
empty fields.
Active proxy server in network. Create a rule in the local
computer's proxy settings to
exclude local IP addresses.
7.2 Testing the network
The ping command can be used to check the connection between two IP addresses. This
allows testing whether a device is active in the network.
1. Open the DOS command prompt.
2. Type ping followed by the IP address of the device.
If the device is found, the response appears as "Reply from ... ", followed by the number of
bytes sent and the transmission time in milliseconds. Otherwise, the device cannot be
accessed via the network. This might be because:

FLEXIDOME multi 7000i IR Troubleshooting | en 35
Bosch Security Systems B.V.
Installation manual
2023-02 | 02 |
– The device is not properly connected to the network. Check the cable connections in this
case.
– The device is not correctly integrated into the network. Check the IP address, subnet
mask, and gateway address.
7.3 Customer service
If a fault cannot be resolved, please contact your supplier or system integrator, or go directly
to BoschSecuritySystems Customer Service.
The version numbers of the internal firmware can be viewed on a service page. Please note
this information before contacting Customer Service.
1. In the address bar of your browser, after the unit IP address, enter: /version
for example: 192.168.0.80/version
2. Write down the information or print out the page.

36 en | Maintenance FLEXIDOME multi 7000i IR
2023-02 | 02 |
Installation manual
Bosch Security Systems B.V.
8 Maintenance
8.1 Cleaning
Bubble Cleaning
If cleaning the bubble is required, use the following procedures and comply with all the
warnings listed below.
Cleaning the Bubble Interior
The extremely soft interior surface should not be cleaned by rubbing or dusting with a cloth.
Use clean dry compressed air, preferably from a spray can, to remove any dust from the
interior surface.
!
Warning!
Do not use alcohol-based solutions to clean the bubble. This will cause the surface to cloud
and, over time, cause stress aging, which makes the bubble brittle.
Cleaning the Bubble Exterior
The exterior of the bubble is hard-coated for extra protection. If cleaning becomes necessary,
only use cleaning solutions and cloths suitable for cleaning safety glass lenses. Dry the bubble
thoroughly with a dry nonabrasive cloth to prevent water spots. Never scrub the bubble with
any abrasive material or cleaners.
Bosch recommends cleaning the exterior of the bubble with NOVUS “No. 1” Plastic Clean &
Shine (or equivalent), according to manufacturer’s instructions. Refer to
www.novuspolish.com to order or to find a local distributor.
Cautions
– Do not clean bubbles in the hot sun or on very hot days.
– Do not use abrasive or highly alkaline cleaners on the bubble.
– Do not scrape the bubble with razor blades or other sharp instruments.
– Do not use Benzene, Gasoline, Acetone, or Carbon Tetrachloride on the bubble.
Lens cleaning
It is important to keep the lens clean to ensure optimum performance. Dust, grease, or
fingerprints should be removed from the lens surface. When cleaning the lens, take extra care
not to damage the special coating used to reduce light reflections.
– Remove dust with a blower-brush or grease-free soft brush.
– Wipe water drops off the lens with a clean soft lint-free cloth and dry the lens surface.
– Use special lens cleaning paper or cloth treated with lens cleaning fluid to gently wipe off
any remaining dirt (wipe spirally from the lens center towards the edge).
8.2 Repair
The unit does not contain any user-serviceable parts. Refer all repairs to suitable qualified
specialists.
8.3 Reset
To reset the camera to factory settings:
1. Remove the camera dome cover from the camera base.
2. Press the reset button on the camera base.
FLEXIDOME multi 7000i IR Maintenance | en 37
Bosch Security Systems B.V.
Installation manual
2023-02 | 02 |
3. Re-attach the camera dome cover onto the camera base.
38 en | Decommissioning FLEXIDOME multi 7000i IR
2023-02 | 02 |
Installation manual
Bosch Security Systems B.V.
9 Decommissioning
9.1 Transfer
The device should only be passed on together with this Installation manual.
9.2 Disposal
Old electrical and electronic equipment
This product and/or battery must be disposed of separately from household waste.
Dispose such equipment according to local laws and regulations, to allow their reuse
and/or recycling. This will help in conserving resources, and in protecting human
health and the environment.

FLEXIDOME multi 7000i IR Technical data | en 39
Bosch Security Systems B.V.
Installation manual
2023-02 | 02 |
10 Technical data
10.1 Dimensions
274mm (10.8)
1
75.3 (6.9)
134 (5.3)
7
8.4 (3.1)
32
(1.3)
Dimensions in mm (inch)
10.2 Specifications
Power
Input voltage 45W (PoE 802.3bt Type 3 Class 5 with operating
temperature -50°C to +55°C (-58°F to +131°F)
30W (PoE 802.3at Type 2 Class 4 with operating
temperature -20°C to +55°C (-4°F to +131°F)
24VAC ±10%
PoE and auxiliary power can be connected simultaneously for
redundant operation
Note: Compatible with NPD-6001C.

40 en | Technical data FLEXIDOME multi 7000i IR
2023-02 | 02 |
Installation manual
Bosch Security Systems B.V.
Power
Power Consumption
(typical / maximum)
PoE++: 10.6W / 42.3W
PoE+: 10.6W / 21.8W (without heater)
Sensor
Sensor type 4x 1/2.7‑inch CMOS
Sensitivity
Measured according to IEC 62676 Part 5 (1/25, F1.9)
Color 0.091lx
Mono 0.012lx
With IR 0lx
Dynamic range
High Dynamic Range 120dB WDR
HDR Measured according to
IEC 62676 Part 5
101 dB WDR
Night vision
Distance 30m (98ft)
LED 360⁰LED high efficiency array, 850nm
IR intensity Adjustable
Optical
Lens 3.7-7.7mm
F1.9
Adjustment Motorized zoom/focus
Day/Night Switchable IR-cut filter
Viewing angle Wide: 85.1º x 62º (H x V)
Tele: 38.7º x 29.0º (H x V)
Viewing angle (maximum
combined)
Up to 360º coverage (depending on lens position and tilt)
Platform
Common product platform CPP14
Video streaming
Video compression H.265; H.264; M- JPEG
Streaming Multiple configurable streams in H.264, H.265 and M-JPEG,
configurable frame rate and bandwidth.
Regions of Interest (ROI)
Camera latency 120ms

FLEXIDOME multi 7000i IR Technical data | en 41
Bosch Security Systems B.V.
Installation manual
2023-02 | 02 |
Video streaming
GOP structure IP
Frame rate 1-30fps
Signal-to-Noise Ratio (SNR) >55dB
Video resolution (H x V)
Max. resolution (12MP
variant)
4x 2048 x 1536 (4:3) @30 fps
4x 1920 x 1080 (16:9) @30 fps
Max. resolution corridor mode
(12MP variant)
4x 1536 x 2048 (3:4) @30 fps
4x 1080 x 1920 (9:16) @30 fps
Max. resolution (20MP
variant)
4x 2592x1944 (4:3) @30 fps
4x 2560 x 1440 (16:9) @30 fps
Max. resolution corridor mode
(20MP variant)
4x 1944 x 2592 (3:4) @25 fps
4x 1440 x 2560 (9:16) @25 fps
Multiple lower resolutions available in 4:3 and 16:9 format individually selectable per stream
and imager
Image setup
Mirror image On / Off
Rotate image 0° / 90° / 180° / 270°
Positioning Coordinates / Mounting height
Video functions
White Balance 2300 to 10000K, 3 automatic modes (Basic, Standard,
Sodium vapor), Manual mode and Hold mode
Shutter Automatic Electronic Shutter (AES);
Fixed shutter (1/25[30] to 1/15000) selectable;
Default shutter
Day/Night Auto (adjustable switch point), Color, Monochrome
Noise reduction Dynamic noise reduction with 3 levels: Low, Medium and
High
Scene modes Standard, Sodium lighting, Sensitivity boost, Backlight,
Vibrant, Color only
Privacy Masking Eight independent areas per imager, fully programmable
Display stamping Name; Logo; Time; Alarm message; fully programmable per
imager
Additional functions Contrast, Saturation level and control, Brightness,
Sharpness, ALC level, Defog
Video content analysis
Analysis type Intelligent Video Analytics, Camera Trainer

42 en | Technical data FLEXIDOME multi 7000i IR
2023-02 | 02 |
Installation manual
Bosch Security Systems B.V.
Video content analysis
Alarm rules (combinable) Any object, Object in field, Line crossing, Enter / leave field,
Loitering, Follow route, Idle / removed object, Counting,
Occupancy, Crowd density estimation, Condition change,
Similarity search, Flow / counter flow
Number of rules
(simultaneously)
16 per imager
Object filters Duration, Size, Aspect ratio, Speed, Direction, Color, Object
classes (4)
Tracking modes Standard (2D) tracking, 3D tracking, 3D people tracking,
Ship tracking, Museum mode
Object classes Person, car, bike, truck
Calibration / Geolocation Automatic, based on gyro sensor, focal length and camera
height
Additional functions Tamper detection
Local storage
Internal RAM 5s pre-alarm recording
Memory card slot Micro SDXC / SDHC / SD card
Industrial SD cards Extreme lifetime and health monitoring support (if supported
by the SD card) that provides early service indication.
Health monitoring will be available with a future firmware
version.
Input/output
Audio line in 0.6 Vrms, 40 kOhm
Audio line out 1.0 Vrms, 10 kOhm
Microphone 1 integrated microphone (can be disabled)
Alarm input 1 input
Alarm input activation Short or DC 5V activation
Alarm output 1 output
Alarm output voltage 30 VDC, max. load 0.5 A
Ethernet RJ-45
USB USB 2.0 Type C, for use with wireless USB dongle for setup
and commissioning (sold separately, available 2022)
Fiber optics (sold separately) The Fiber Optic Ethernet Media Converter kit (VG4-
SFPSCKT) installed inside a Surveillance Cabinet (NDA-U-
PA0, NDA-U-PA1 or NDA-U-PA2) provides the fiber optic
interface to the mounted camera.

FLEXIDOME multi 7000i IR Technical data | en 43
Bosch Security Systems B.V.
Installation manual
2023-02 | 02 |
Audio streaming
Standard G.711, 8kHz sampling rate
L16, 16kHz sampling rate
AAC-LC, 48Kbit/s at 16kHz sampling rate
AAC-LC, 80Kbit/s at 16kHz sampling rate
Signal-to-Noise Ratio >50dB
Audio Streaming Full-duplex / half duplex
Network
IP One IP address for all four imagers
Protocols IPv4, IPv6, UDP, TCP, HTTP, HTTPS, RTP/RTCP, IGMP V2/V3,
ICMP, ICMPv6, RTSP, FTP, ARP, DHCP, APIPA (Auto-IP, link
local address), NTP (SNTP), SNMP (V1, V3, MIB-II), DNS,
DNSv6, DDNS (DynDNS.org, selfHOST.de, no-ip.com), SMTP,
iSCSI, UPnP (SSDP), DiffServ (QoS), LLDP, SOAP, CHAP,
digest authentication
Ethernet 10/100/1000 Base-T
Interoperability ONVIF ProfileS; ONVIF Profile G; ONVIF ProfileM; ONVIF
Profile T
Data security
Secure Element (“TPM”) RSA 4096 bit (with future firmware update), AES/CBC 256
bit
PKI X.509 certificates
Encryption Full end-to-end encryption with supported VMS
Network: TLS1.0/1.1/1.2/1.3, AES128, AES256
Local storage: XTS-AES
Video authentication checksum, MD5, SHA-1, SHA-256
Firmware protection Signed firmware, secure boot
Mechanical
Dimensions (DxH) 275x137mm (10.8x5.4in)
Weight 3.38kg (7.45lbs)
Color White (RAL9003)
Gyrosensor Yes, 1 per imager
4-axis lens adjustment Pan: 0º to 360º
Rotate: -20º to 20º
Tilt: 0º to 105º
Roll: -90º to 90º
Dome bubble Polycarbonate, clear with UV blocking anti-scratch coating
Housing Aluminum with dehumidifying membrane and waterproof
connection area

44 en | Technical data FLEXIDOME multi 7000i IR
2023-02 | 02 |
Installation manual
Bosch Security Systems B.V.
Mechanical
Mounting Mounting plate included for surface mount, 4-inch square
junction box, single and double gang box
Conduit 3/4-inch NPT (M25) conduit side entry (sold separately)
Environmental
Operating temperature PoE++ (with heater): -50°C to +55°C (-58°F to +131°F)
PoE+ (without heater): -20°C to +55°C (-4°F to +131°F)
-34°C to +74°C (-30°F to +165°F) according to NEMA TS
2-2003 (R2008), para. 2.1.5.1. using fig. 2.1 test profile
Storage temperature -40°C to 70°C (-40°F to 158°F)
Cold start temperature -20°C (-4°F)
Operating humidity 5% to 93% RH non condensing
100% RH condensing
Storage humidity Up to 98% RH
Impact protection IK10
Water/dust protection IP66 and NEMA Type 4X
Support
Access our support services at
www.boschsecurity.com/xc/en/support/
.
Bosch Security and Safety Systems offers support in these areas:
– Apps & Tools
– Building Information Modeling
– Warranty
– Troubleshooting
– Repair & Exchange
– Product Security
Bosch Building Technologies Academy
Visit the Bosch Building Technologies Academy website and have access to training courses,
video tutorials and documents:
www.boschsecurity.com/xc/en/support/training/

FLEXIDOME multi 7000i IR Technical data | 45
Bosch Security Systems B.V.
Installation manual
2023-02 | 02 |

46 | Technical data FLEXIDOME multi 7000i IR
2023-02 | 02 |
Installation manual
Bosch Security Systems B.V.


Bosch Security Systems B.V.
Torenallee 49
5617 BA Eindhoven
Netherlands
www.boschsecurity.com
© Bosch Security Systems B.V., 2023
202302231532
Building solutions for a better life.