KOGAN SMARTERHOME™ G50
SMART ROBOT VACUUM CLEANER
WITH MOPPING FUNCTION
KAVACRBG50A, KAVACRBG50B

2
Safety & Warnings 3
Components List 5
Overview 6
Installation 9
Charging 10
Connect to SmarterHome™ App 11
Operation 14
Cleaning & Care 18
Google Home Control 27
Amazon Alexa Control 30
Specifications 33
Troubleshooting 34
Notes 35

3
• Before using this product, please read the following safety instructions and follow
all the safety precautions.
• Any operation inconsistent with this instruction manual may cause damage to this
product.
Note:
• Only authorised technicians can disassemble this product. Users are not
recommended to disassemble this product by themselves.
• Please use the original power adapter only. Other adapters may cause damage to
this product.
• Do not touch wires, sockets or power adapters when your hands are wet.
• Do not place this product near cigarette butts, lighters and other smouldering fires.
• Please clean the product after charging.
• Do not bend wires excessively or place heavy objects or sharp objects on the
machine.
• This product is an indoor household product. Do not use it outdoors.
• Do not sit on the product.
• Do not use this product in wet environment. (e.g. bathroom)
• Before using this product, please remove all vulnerable or fragile items (e.g. glasses,
lamps, etc.) from the floor, as well as the items that may entangle and block the
side brushes and air suction passages (e.g. wires, paper sheets, curtains).
• Do not put this product in a place from where it can fall easily. (e.g. on desks and
chairs)
• Please check carefully whether the power adapter is connected to the socket
before use, otherwise the battery may get damaged.
• To prevent tripping, please inform other members of the house when this product is
in use.
• Please empty the dust box before using this product, if the dust box is full.
• The ambient operating temperature for this product is 0°C to 40°C.
• Do not use this product in an environment higher or lower than the above
temperature.
• Please remove the battery from the machine before the product is scrapped.
SAFETY & WARNINGS
4
• Please make sure that this product is not powered on when removing the battery.
• Please recycle the discarded batteries safely.
Warning:
• Use only the original rechargeable battery and charging station specially equipped
by the manufacturer. Non-rechargeable batteries are strictly prohibited; please refer
to "product parameters" for battery specification information.
• Do not use the vacuum in environments with open flames or fragile objects.
• Do not use the vacuum in extremely hot (above 40 °C) or cold (below 0 °C)
weather.
• Do not allow human hair, clothes, fingers and other parts to approach the opening
and operating parts of the product.
• Do not use the vacuum on wet or stagnant ground.
• Do not allow the vacuum to suction any particles such as stones and wastepaper
that may clog the product.
• Do not allow the vacuum to suction any inflammable substances, such as petrol,
toner for printers or photocopiers. It is also prohibited to use the product in clean
areas with flammable items.
• Do not allow the vacuum to suction any burning particles, such as cigarettes,
matches, ashes and other particles that may cause fire.
• Do not block the suction port. Do not use the product when the suction port is
blocked. Clean the dust, cotton wool, hair etc. from the suction port to ensure
smooth air circulation at the suction port.
• Use the power cord carefully to avoid damage. Do not use the power cord to drag
or pull the vacuum and the charging station. Do not use the power cord as a
handle. Be careful not to clamp the power cord in the crack of a door. Do not pull
the power cord against sharp wall or table corners as it bends and damages the
cord. Do not allow the power cord to be near heat sources.
• Do not use damaged charging station.
• Even if the vacuum has been severely damaged, burning of the vacuum is
prohibited, which may lead to explosion of the battery of the product.
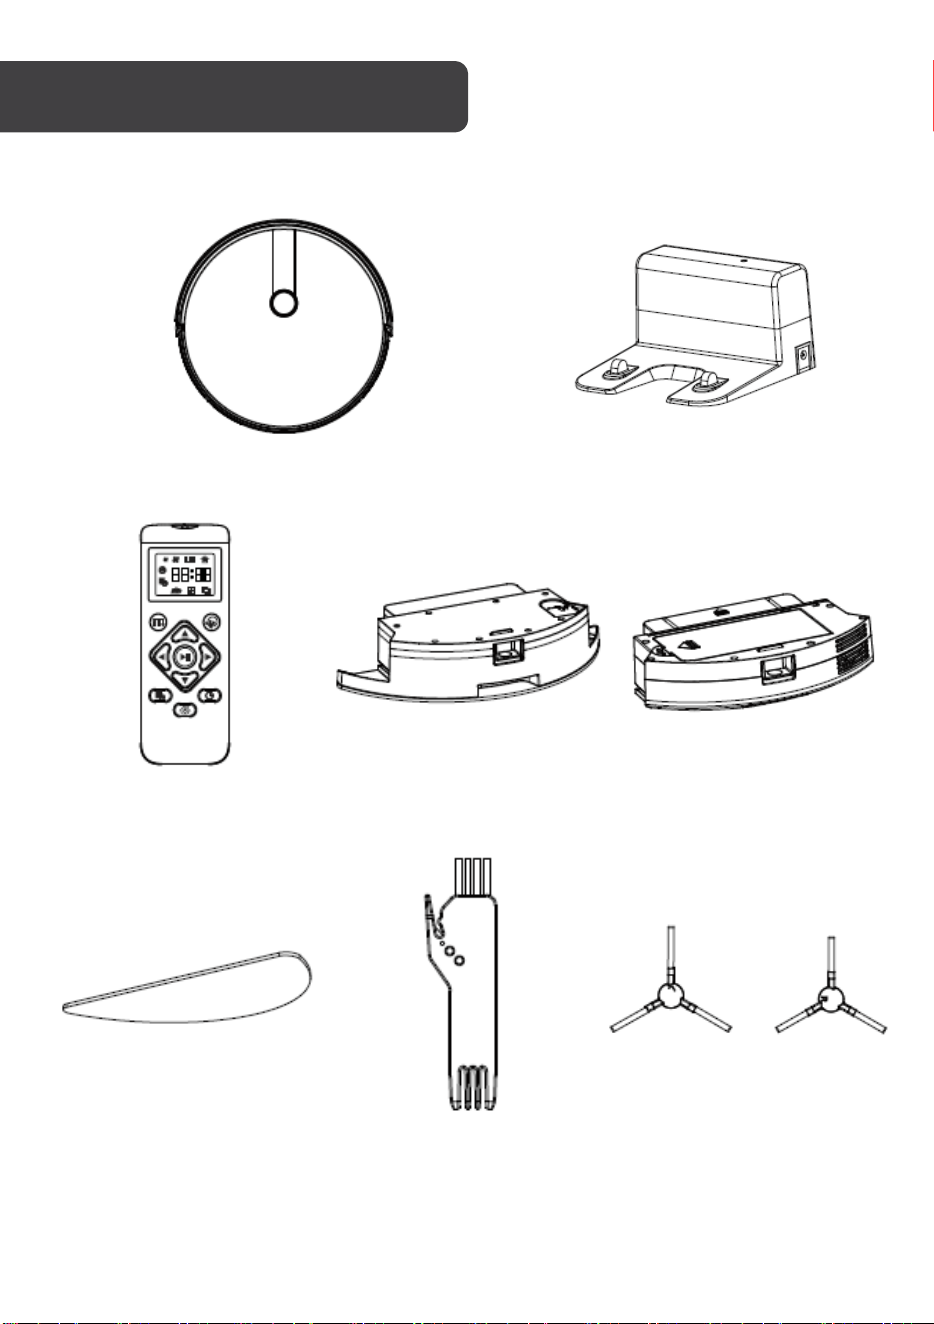
5
G50 Smart Robot Vacuum Cleaner Charging Station
Remote Control Water Tank Dust Box
Mop Cleaning Brush Side Brushes (x2)
COMPONENTS LIST
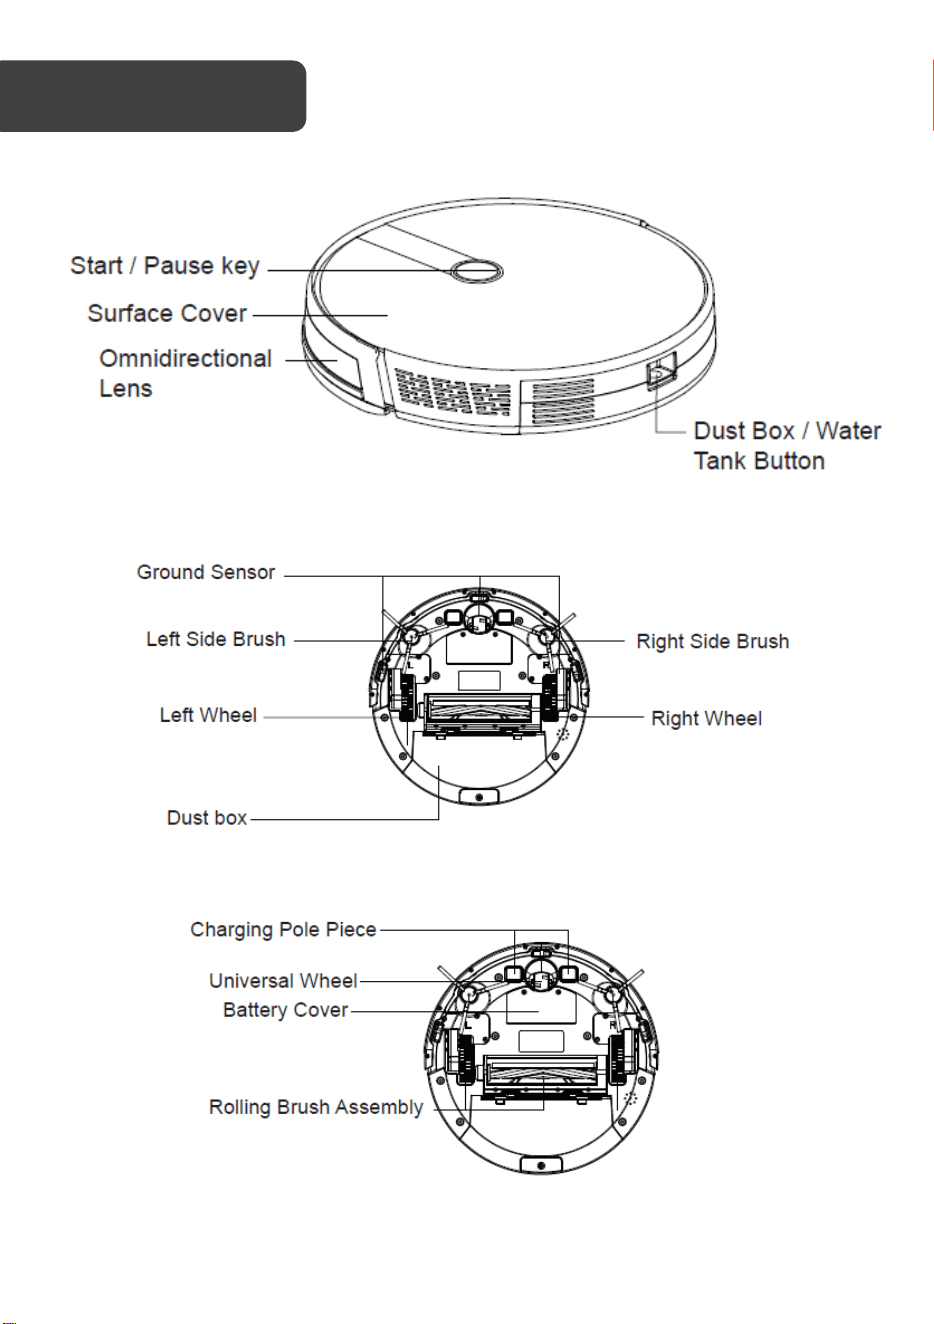
6
Top
Bottom
OVERVIEW
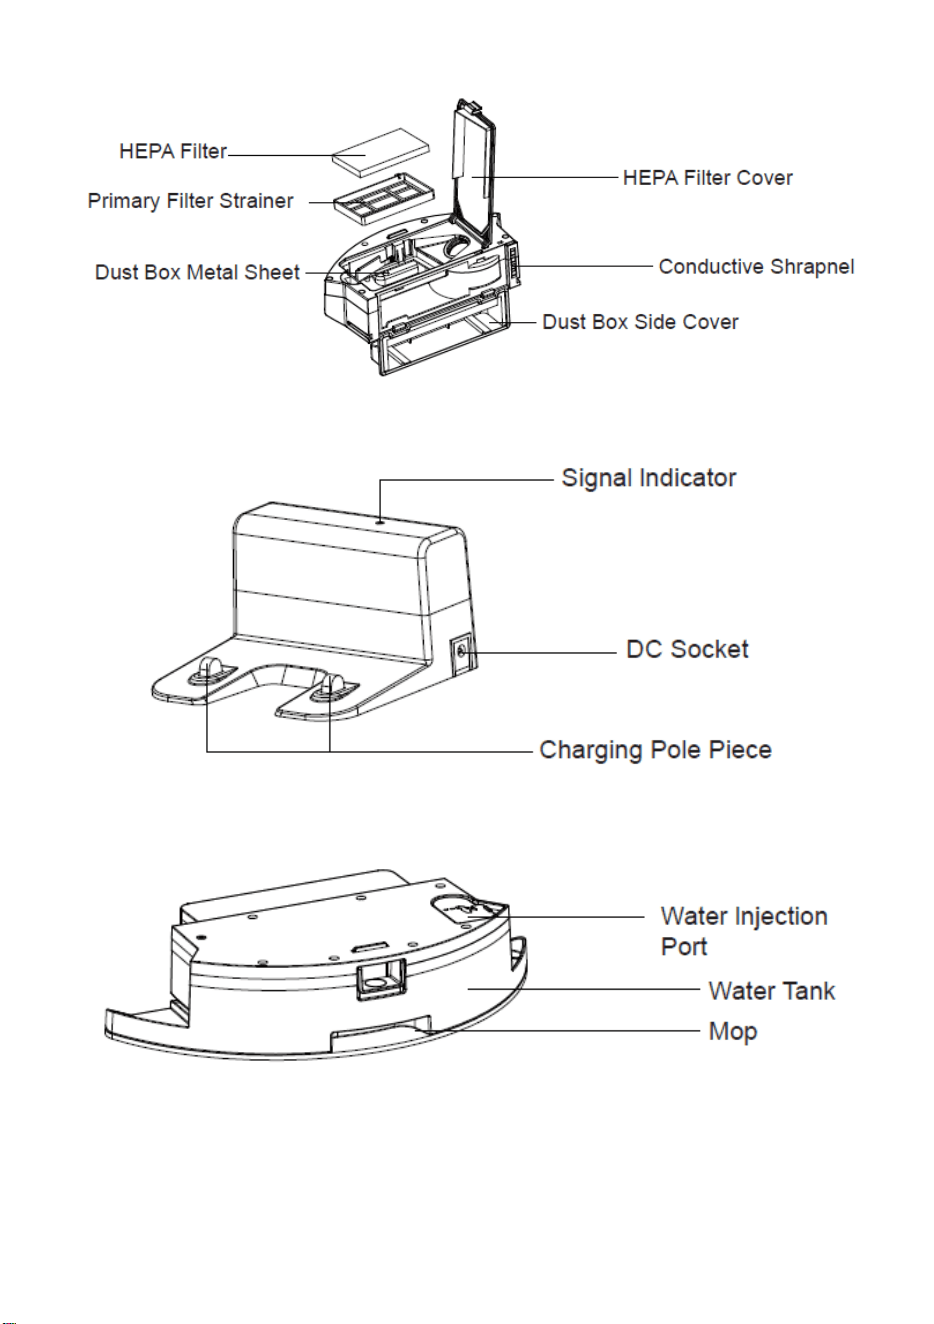
7
Dust Box
Charging Station
Water Tank and Mop Assembly
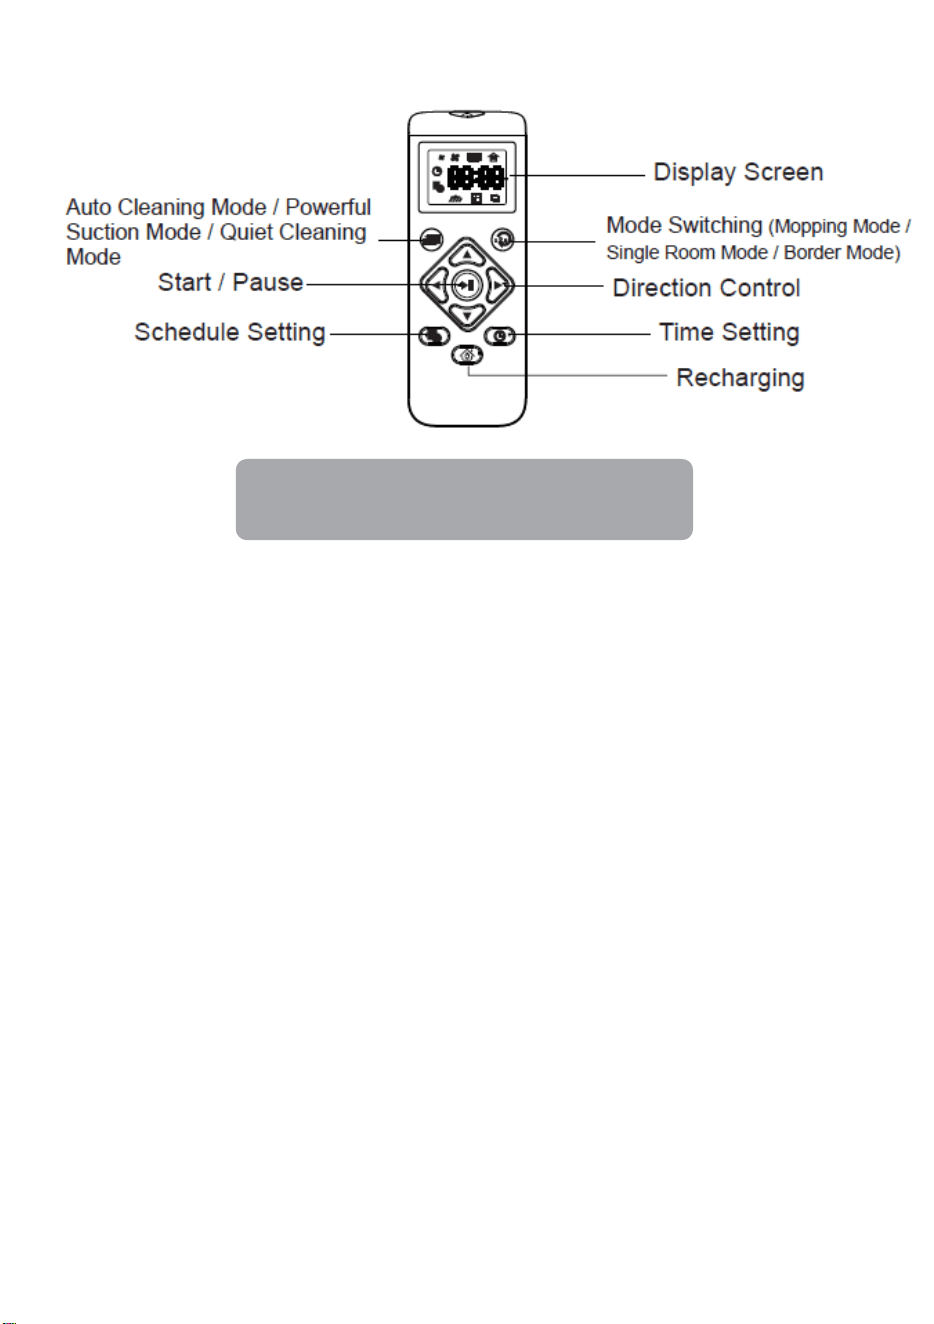
8
Remote Control
Note:
Images in this user guide are for reference only.

9
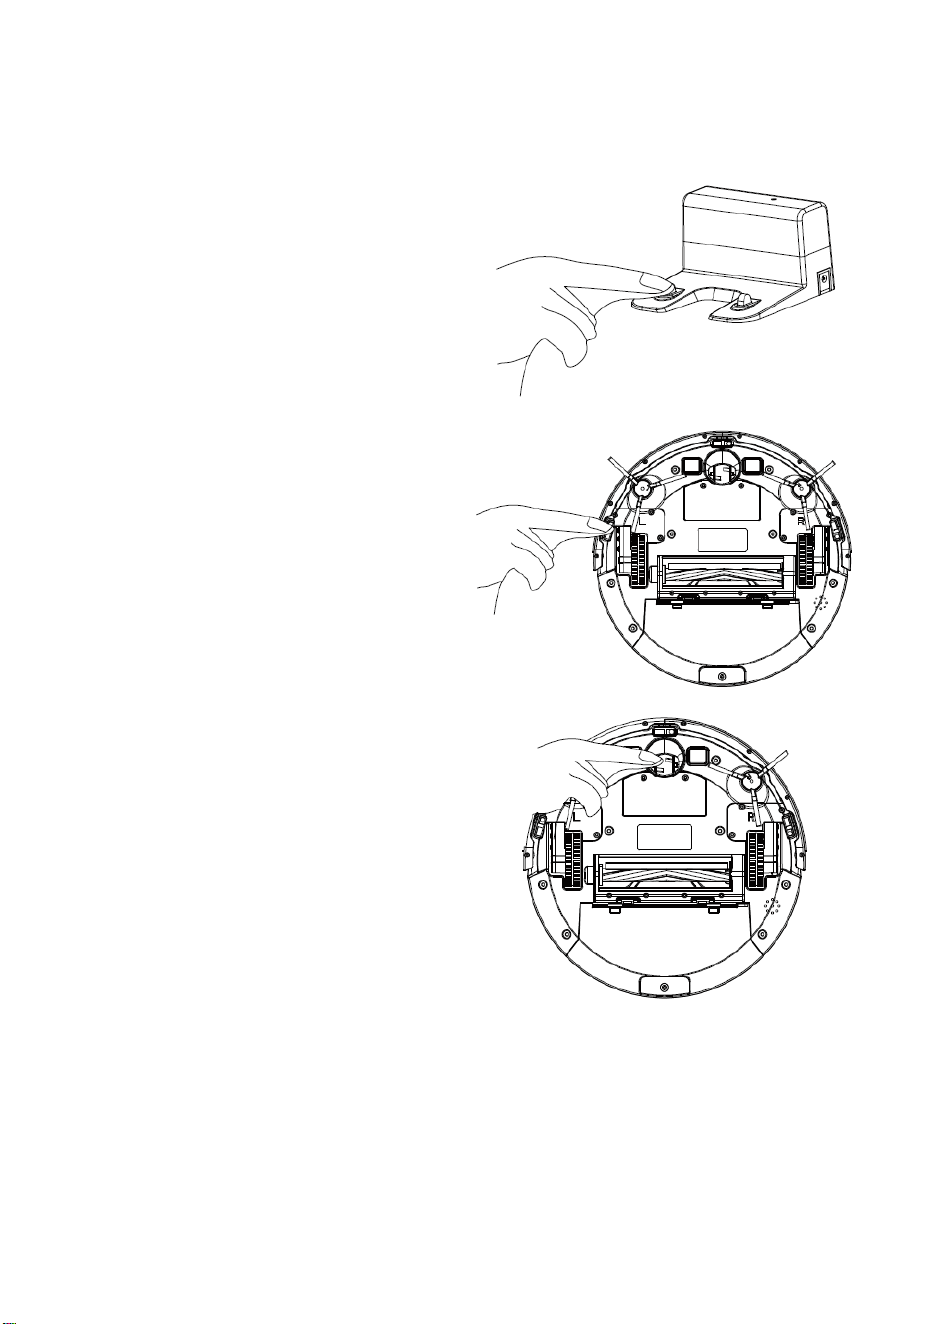
Remove Protection
Before using the vacuum, remove the protective strip on the unit and the protective film on
the charging station.
Remove the protective strip Remove the protective film
1. Placing and charging: Fix the charging station against the wall while placed on a
flat floor. Do not place objects within the range of 0.5m on either side and 1.5m in
front of the unit.
2. Connect the power supply.
3. Installing side brush: Install the side brush to the left
and right accordingly (L/R).
INSTALLATION
10
Charging
1. Place the robot vacuum on the charging station for charging.
During charging, the indicator light blinks; if charging is over, the light is
always on. The charging time is approximately 5 hours.
2. The charging station cannot be used in environments with strong reflections such
as direct sunlight or nearby mirrors. If there are any objects with strong reflections,
please cover it as it affects the sensors in the unit.
3. In order to ensure normal working hours of the vacuum, please fully charge it before
use. The charging time is approximately 5 hours.
4. When charging, do not assemble the water tank to the robot vacuum to avoid
electrocution and fire risk, and to avoid spills.
5. During the cleaning process, the vacuum can sense that its power is insufficient
and automatically starts recharging mode to return to the charging station to
recharge. You can also command the robot vacuum to start recharging mode by
pressing the recharge button on the remote controller.
CHARGING
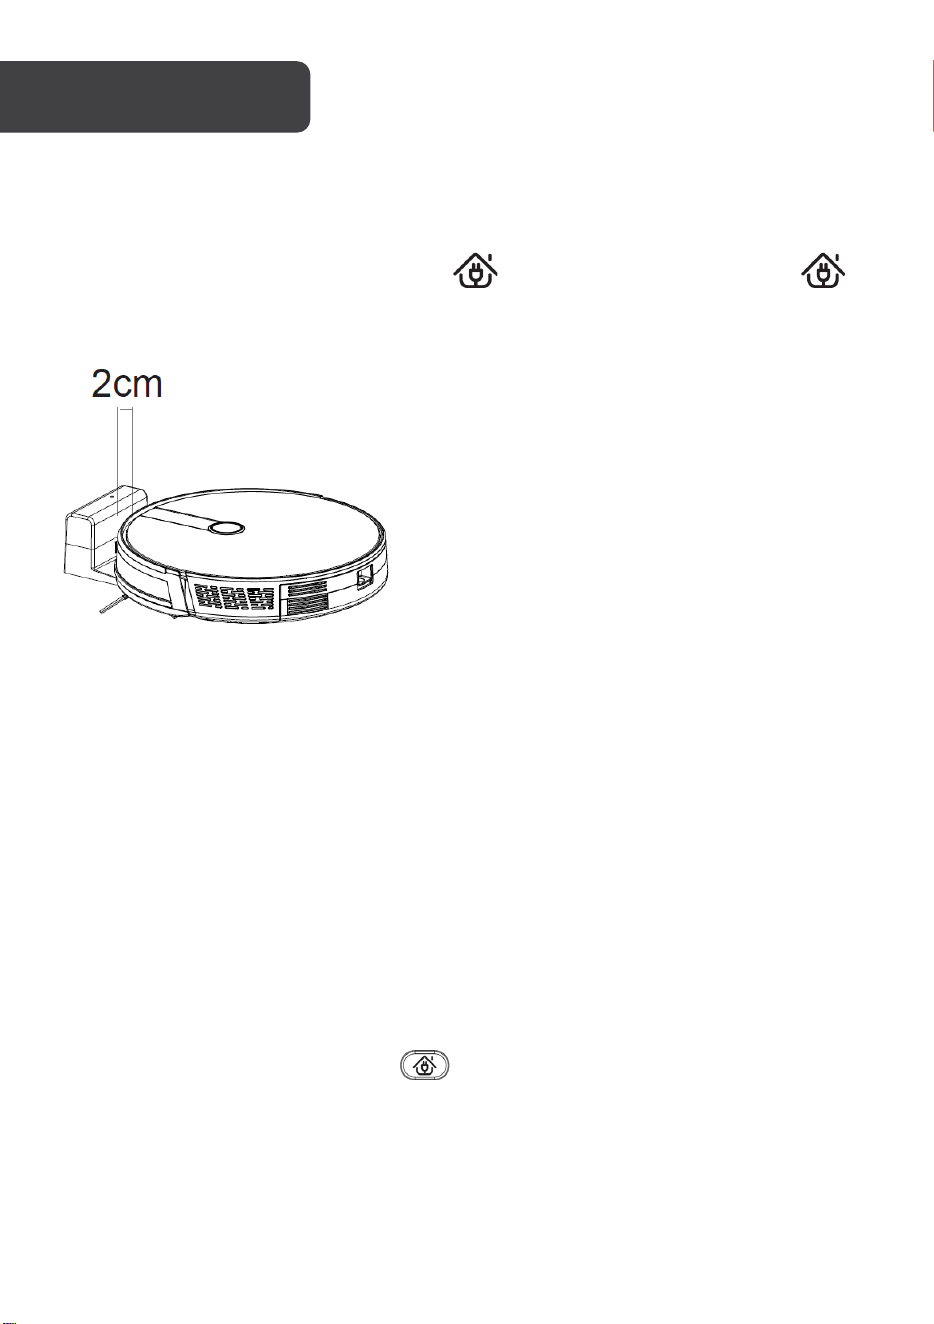
Attention: When manual charging,
please keep the front bumper of the
robot 2cm away from the charging
station to ensure the metal contacts
connect well for successful charging.
11
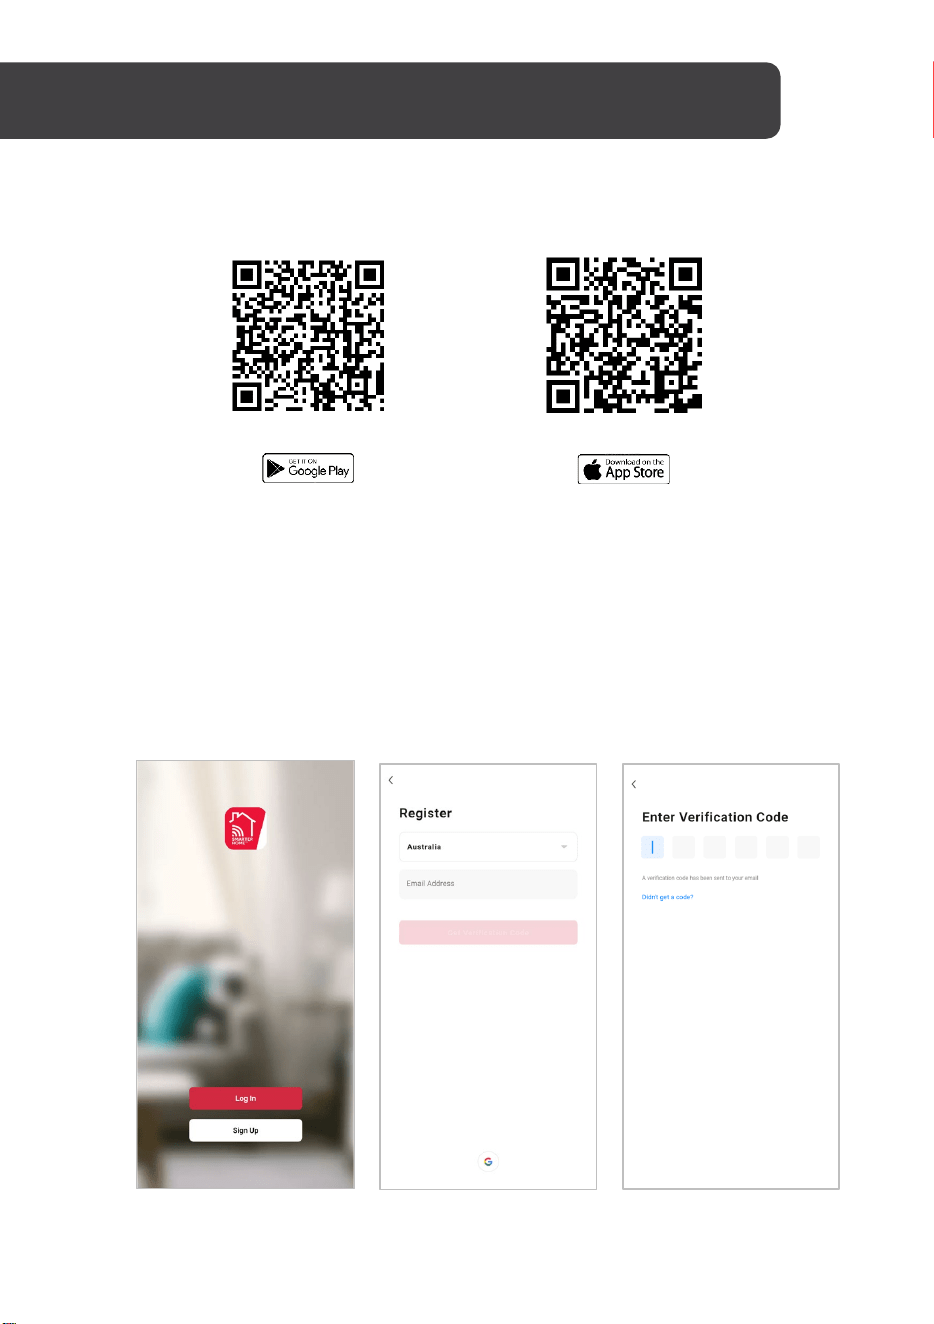
Install App
Download the “Kogan SmarterHome” app from the Play Store (Android) or App Store (iOS).
Play Store (Android)
App Store (iOS)
To register:
1. If you already have a SmarterHome account, select ‘Log In’. To register a new
account, select ‘Sign Up’.
2. The system will automatically recognise your country. If needed, you can manually
select your country from the drop-down box. Enter your email address and tap ‘Get
Verification Code’ to continue.
3. A 6-digit code will be sent to the submitted email address. Enter this code before
the one-minute timer expires.
4. Continue to the next page and complete your SmarterHome profile.
CONNECT TO SMARTERHOME™ APP
12
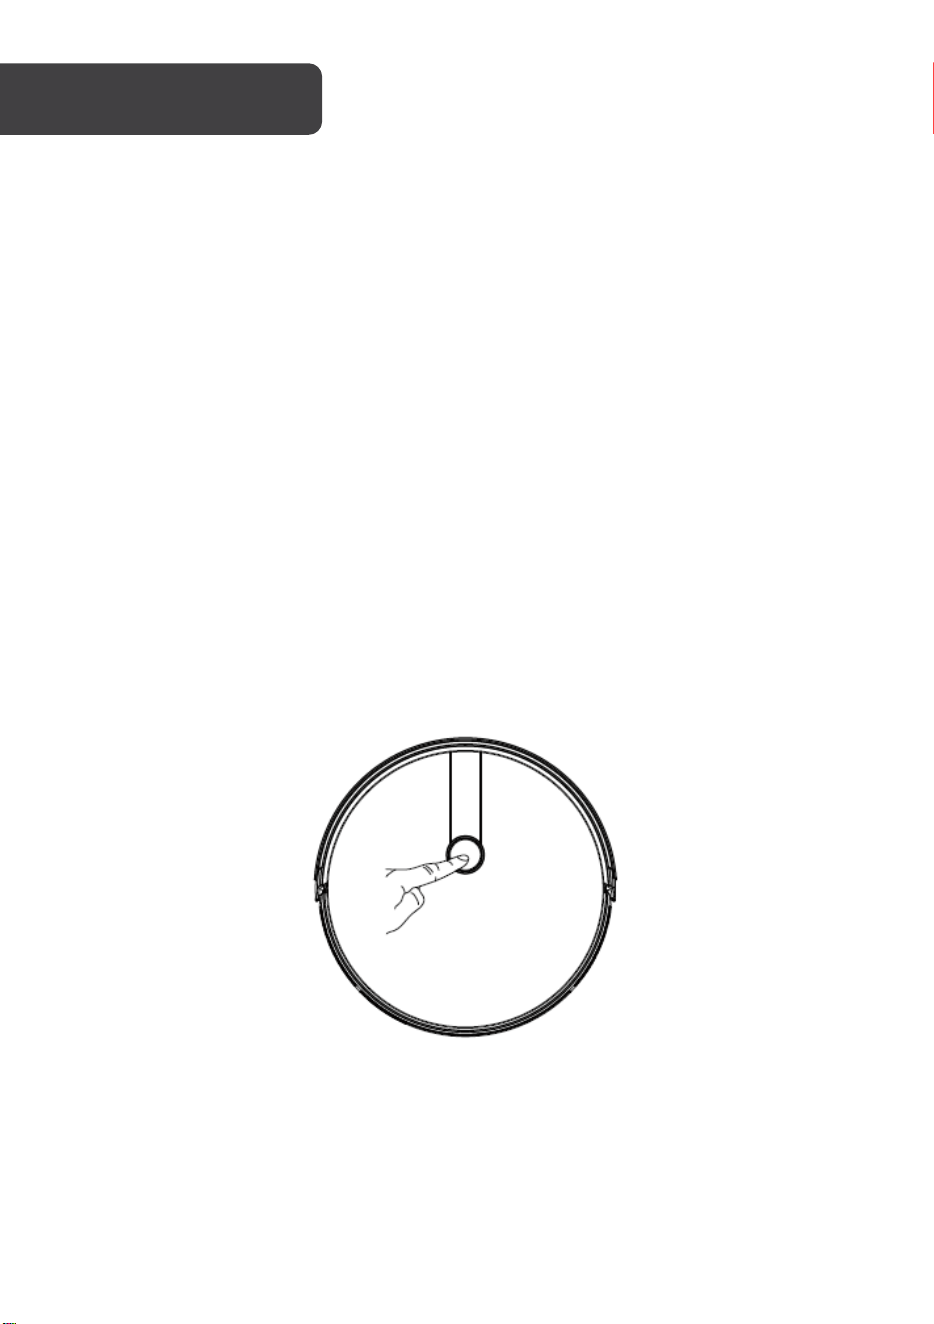
Set device in pairing mode
When the device is first turned on, it may automatically enter pairing mode (the light will be
flashing rapidly).
If not automatically in pairing mode when powered on, you can manually set the device in
pairing mode by double pressing the Start/Pause button until the light starts flashing
rapidly.
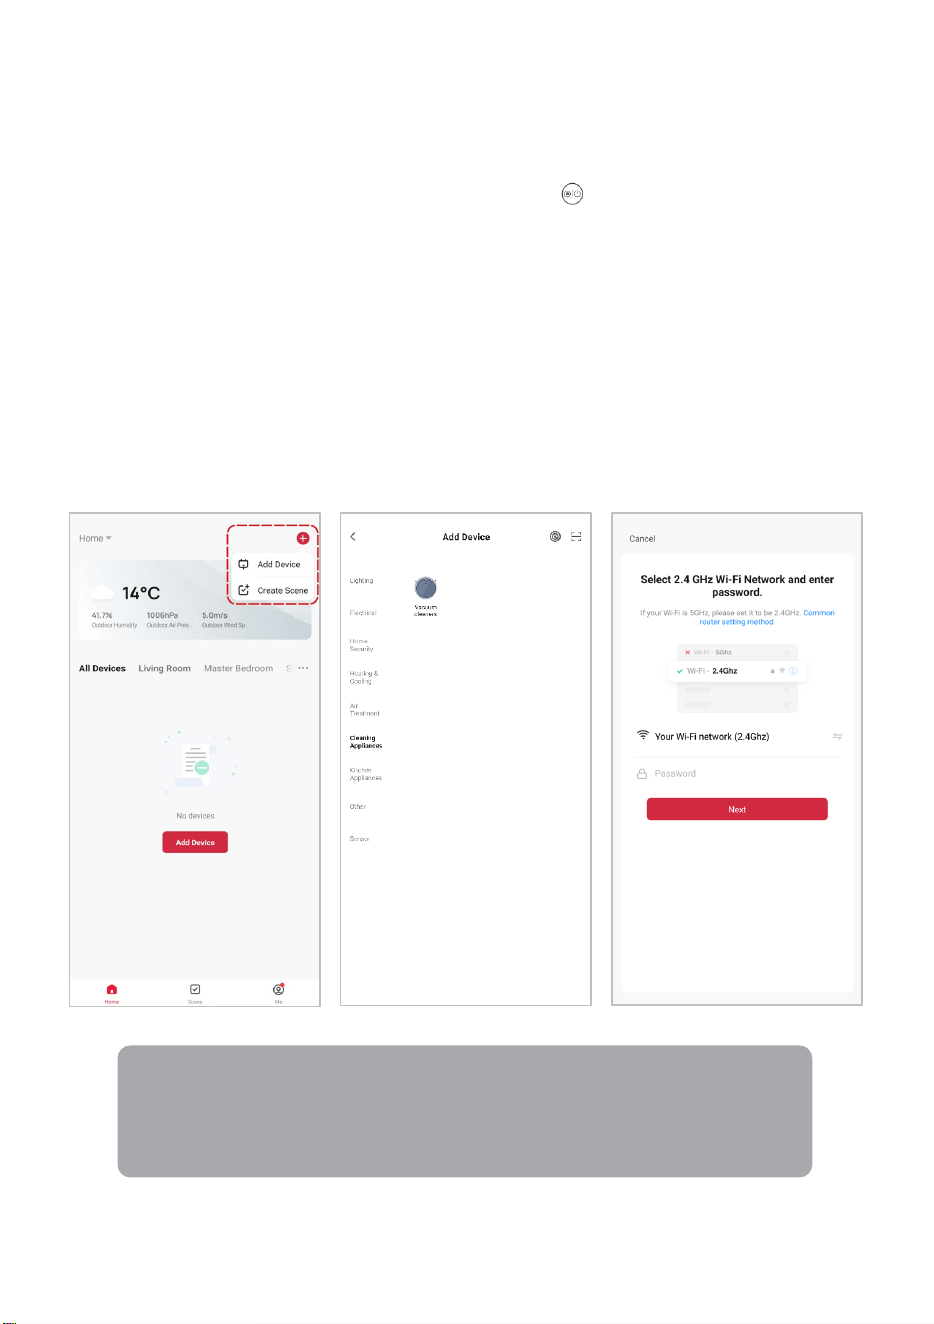
Add device through network
1. Once registered, tap “Add Device” on the app’s home page, or the “+” in the upper
right corner, to add a new device through the network.
2. Select the product type from the list of options in the app (Cleaning Appliances >
Vacuum Cleaners).
3. Enter your Wi-Fi details. It is important that your SmarterHome™ device and the
app are connected to the same Wi-Fi network during setup.
Notes:
•
The device and the app have to use the same Wi-Fi network.
• The device is only compatible with 2.4Ghz networks.
• Depending on the product, Steps 3 and 4 may be in opposite order.

13
4. Ensure that the device is in pairing mode, with the light flashing rapidly, and tap
“Confirm light is rapidly flashing”.
5. The device will commence the pairing process and connect to the app. Ensure your
Wi-Fi router, mobile phone, and the SmarterHome™ device are kept close until
connection is complete.
6. After successfully being added, you will have the option to rename the device and
assign it to a location. It will now be listed on the app’s home page. Tap the device
listing to enter its control page.
Note:
Once connected, you can select Create Scene from the “+” in the upper right
corner (or from the Scene tab) to group connected SmarterHome™ products
and automate their functions.
14
Start Cleaning
According to different cleaning needs, the product has a variety of cleaning modes to
choose from. You can start various cleaning modes via the vacuum, remote control or app.
Automatic Cleaning:
While shutdown, press the Start/Pause button on the robot vacuum for a few seconds.
When the indicator light of the vacuum is on, it indicates that the vacuum is powered on.
When the Start/Pause button on the robot vacuum is pressed for a short time or the
automatic cleaning button on the remote controller is pressed, the robot vacuum starts
automatic cleaning.
If the dustbin instead of the water tank is installed in the robot vacuum in standby mode or
other working modes, press the automatic cleaning button on the remote controller and the
robot vacuum starts automatic cleaning.
While cleaning, press the automatic cleaning button again to switch to powerful suction
mode.
Press the automatic cleaning button once more and the vacuum will switch to quiet
cleaning mode.
Pressing the automatic cleaning button after this will switch the unit between powerful and
quiet modes.
If the water tank is installed in the vacuum in standby or other working modes, pressing the
automatic cleaning button will always make the vacuum enter mopping mode.
OPERATION

15
Mopping mode:
Applicable scenario: Used to do wet & dry mopping.
Install the water tank in the vacuum and press the start button on the vacuum or the
automatic cleaning button or ( ) buttons on the remote controller to start
mopping mode.
Note: If the water tank is not installed and the button is selected on the remote
controller, the vacuum will prompt that the water tank is not installed, and the robot vacuum
will not work.
Press the button ( ) and the vacuum will switch to single room cleaning mode.
Press the button ( ) and the vacuum will switch to border cleaning mode.
Single room cleaning:
Applicable scenario: Used to clean a single room.
Click the mode switch button ( ) on the remote control to select the single room
cleaning mode and to start single room cleaning.
Note: When it is necessary to clean a single room, please close the door and the vacuum
will do centralised cleaning in the room.
If this room does not have a charging station, the vacuum will return to the original point
after finishing the cleaning.
Border cleaning:
Applicable scenario: For indoor border cleaning, the vacuum cleans along the perimeter of
fixed objects (such as walls) and returns to the charging station after the border cleaning is
finished.
Setting method: Click the mode switch button ( ) on the remote control to select
the border cleaning mode and to start the border cleaning.
Manual control:
Applicable scenario: Suitable for manual control cleaning.
Setting method: Click on the buttons on the remote controller to move forward, turn 180°
and to turn right or left.
16
Pause, Wake Up and Shut Down:
Pause: During operation, press the vacuum button or the pause button on the
remote controller or app to pause the vacuum.
Wake up: If the vacuum is idle for more than ten minutes, it will automatically enter sleep
mode (all the lights will turn off). You can wake up the vacuum by pressing the vacuum
button , any button on the remote controller or the button on the app.
Shut down: After the vacuum finishes cleaning, press the button for a few seconds and
all the vacuum lights will turn off to indicate that the vacuum has been shut down.
Schedule Settings:
Press the schedule setting button on remote control to set the vacuum scheduled
cleaning time. First press the button , then press the buttons to set the hour and
minute. Press the button again to save the settings.
The vacuum will automatically start to clean at the scheduled time every day.
Note: Before the schedule setting, you need to press the button to set the current time
first. Press the button and then press the buttons to set the hour and minute. Press
the button again to save the settings.
17
Water tank use:
Do not use the floor mopping function on carpets.
After mopping the floor, please empty the water tank and remove the mop.
Add water Install the water tank assembly
Install mop Start mopping floor
18
Clean Side Brush
Use a cleaning brush to clean the rubbish on the sides. If you have more hair on the side, use
scissors to carefully cut the hair.
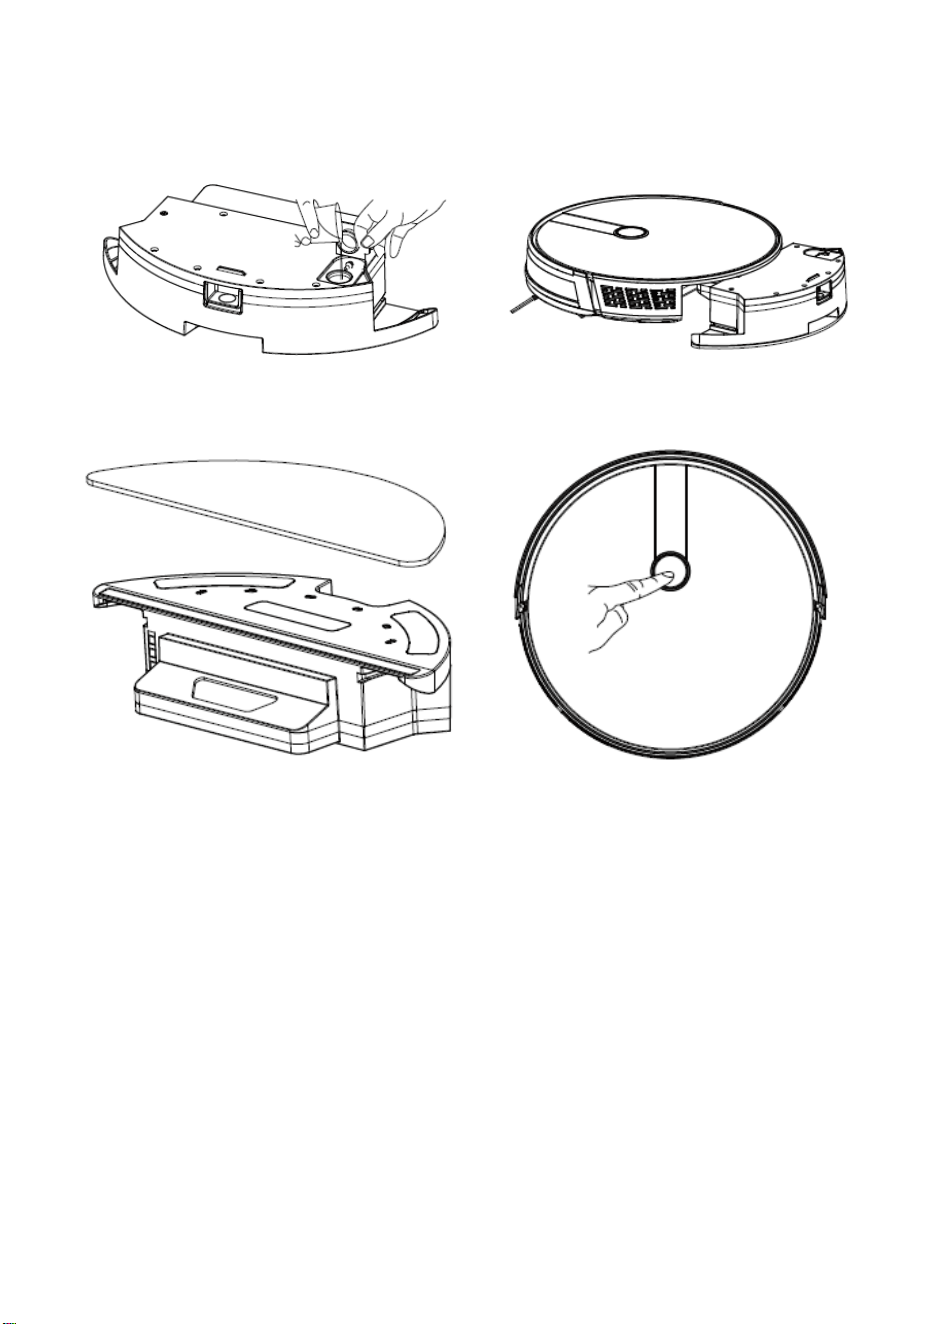
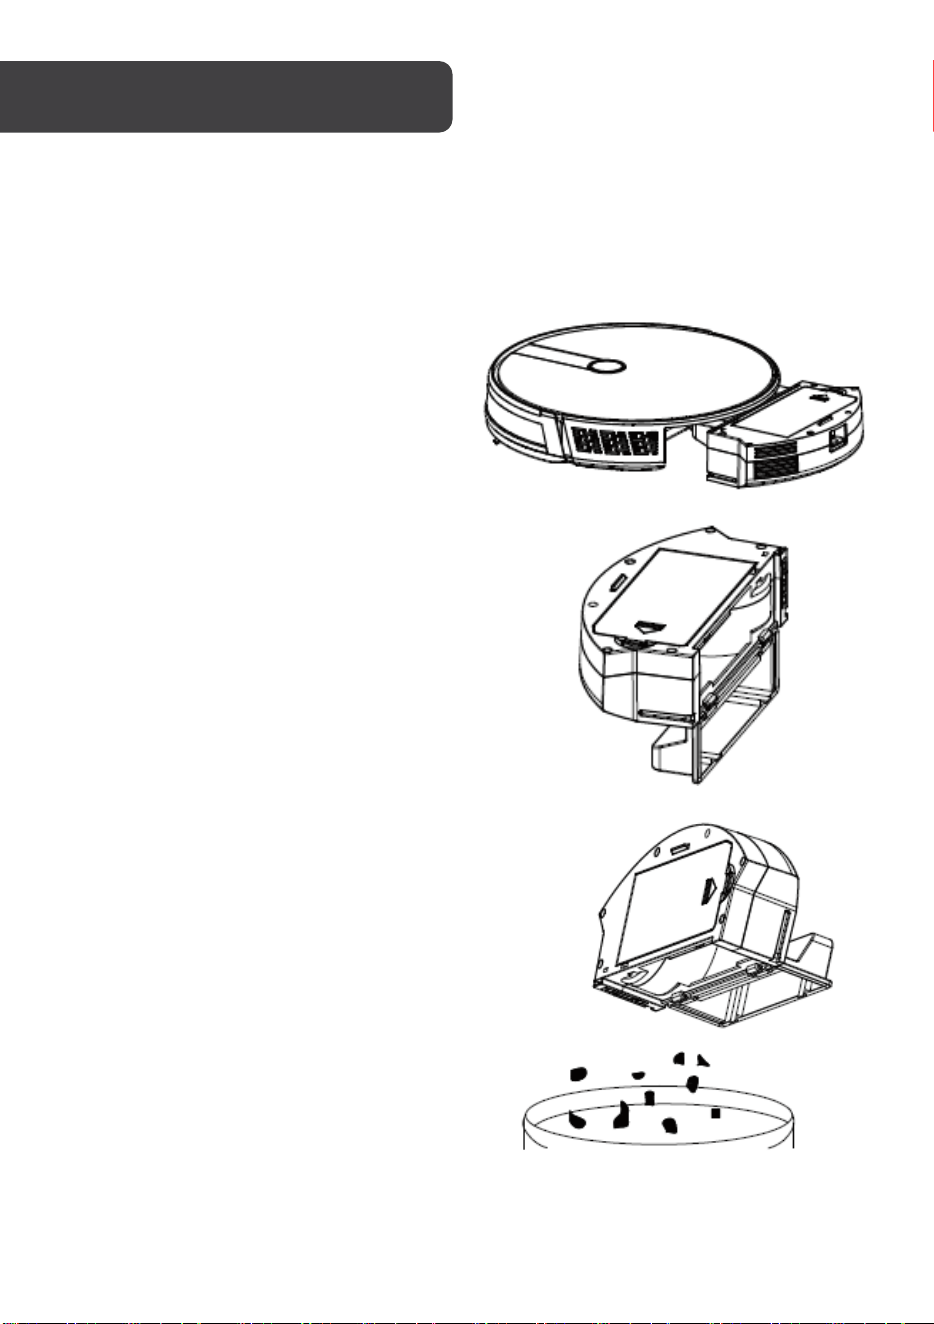
Dust Box
1. Press the dust box button to take
out the dust box.
2. Open the dust box side cover.
3. Dump the rubbish.
CLEANING & CARE
19
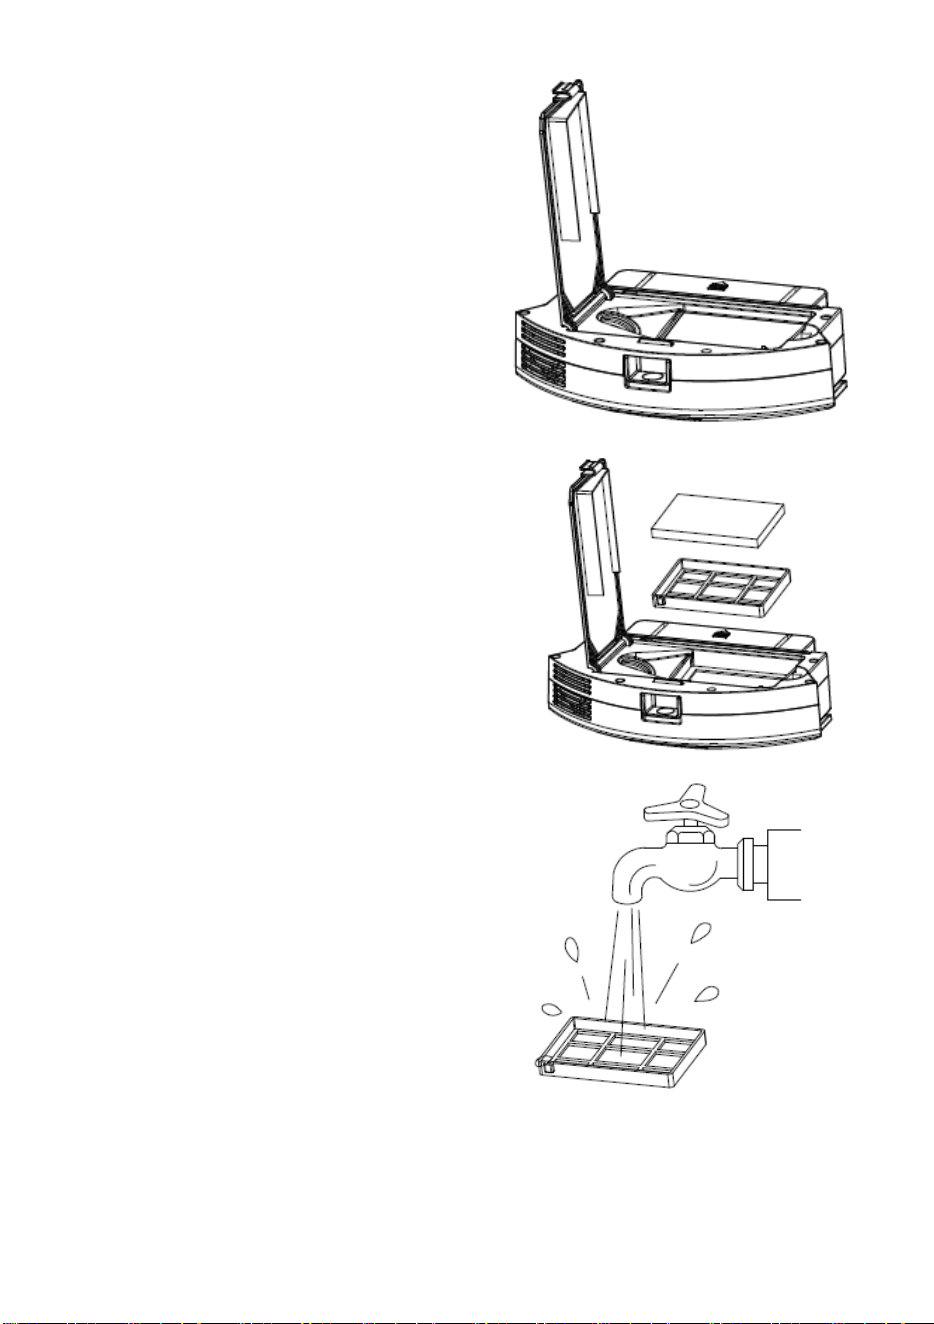
4. Open the HEPA Filter cover.
5. Take out the HEPA filter and the
primary filter. It is not recommended
to wash the HEPA filter with water.
Tap gently to remove the dust.
6. Rinse the primary filter.
20
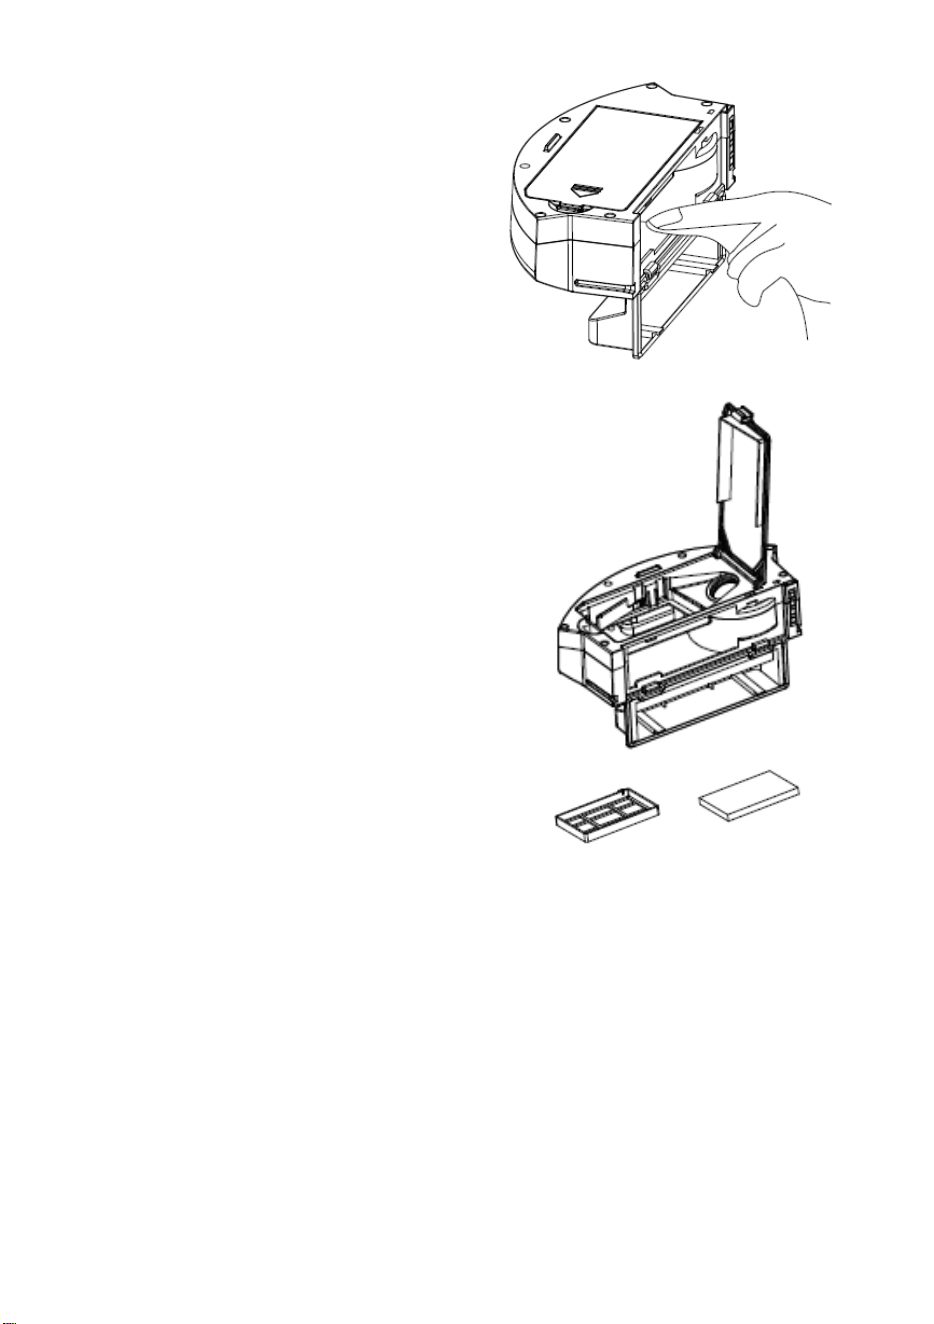
7. The dust box should be scrubbed or
wiped.
8. Dry the dust box and filter assembly
and keep it dry to ensure its service
life.
21
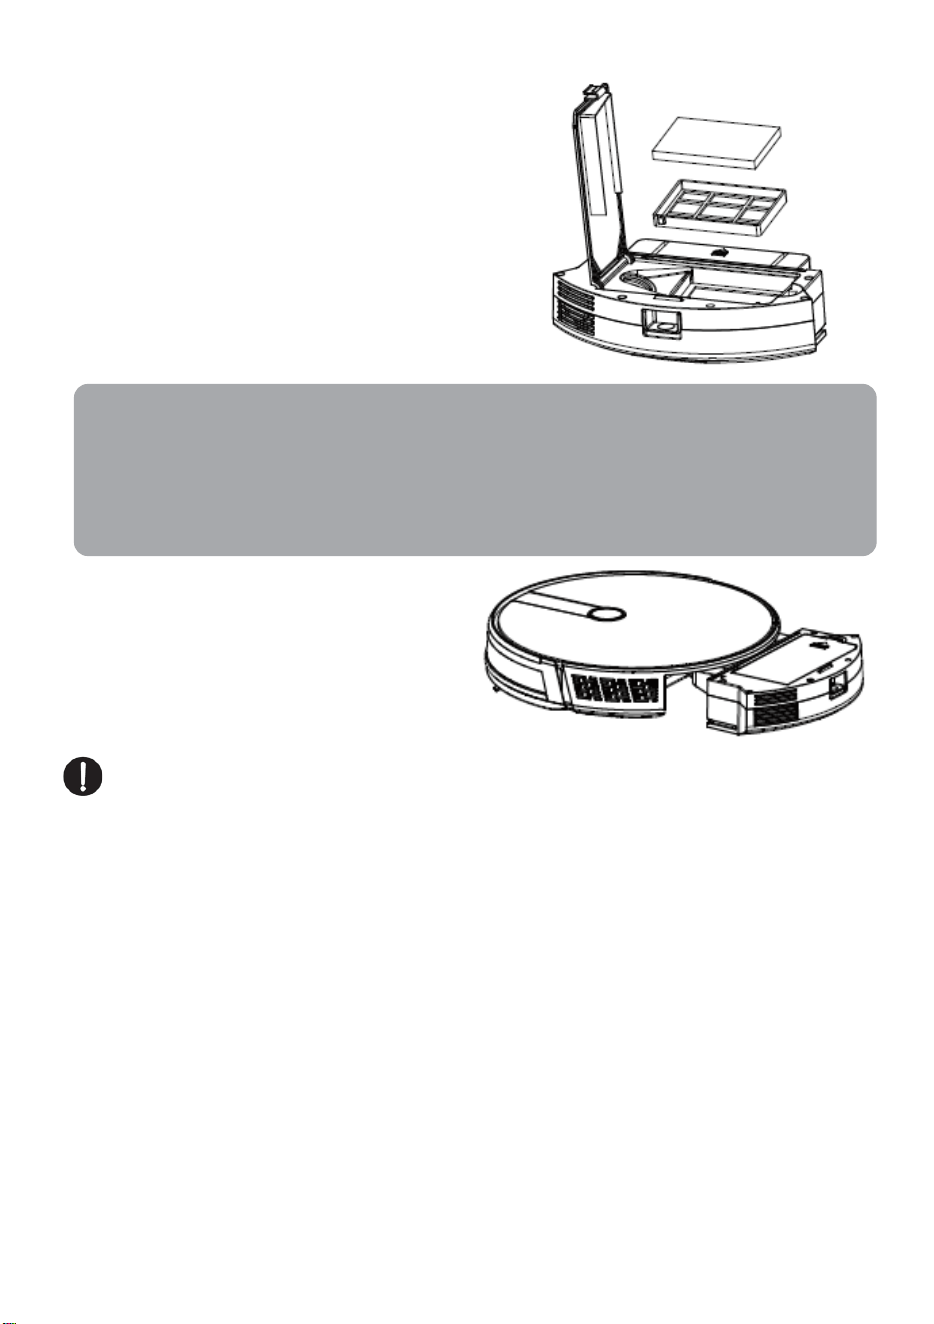
9. Replace the primary filter and the
HEPA filter into the dust box.
10. Close the dust box cover and install
the dust box into the vacuum.
Note: Do not allow water to seep into the fan port when cleaning.
Notes:
• Before installing the filters, please ensure that the HEPA filter and the primary filter
are dry.
• Do not expose the HEPA filter and primary filter to the sun. Air dry in a shaded
place.
22
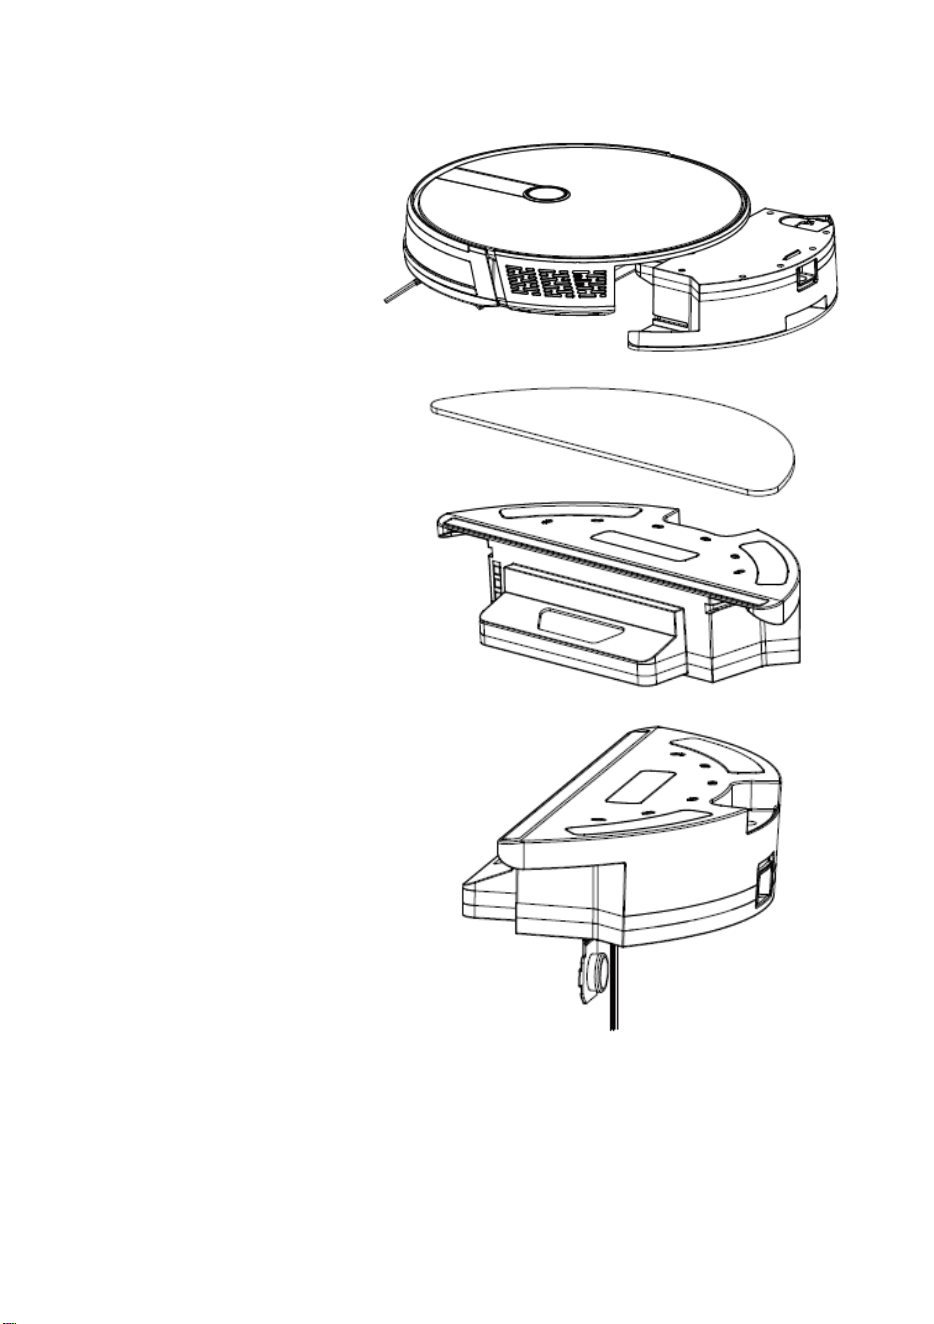
Water Tank and Mop
1. Take out the water tank
assembly.
2. Remove the mop.
3. Empty the water tank.
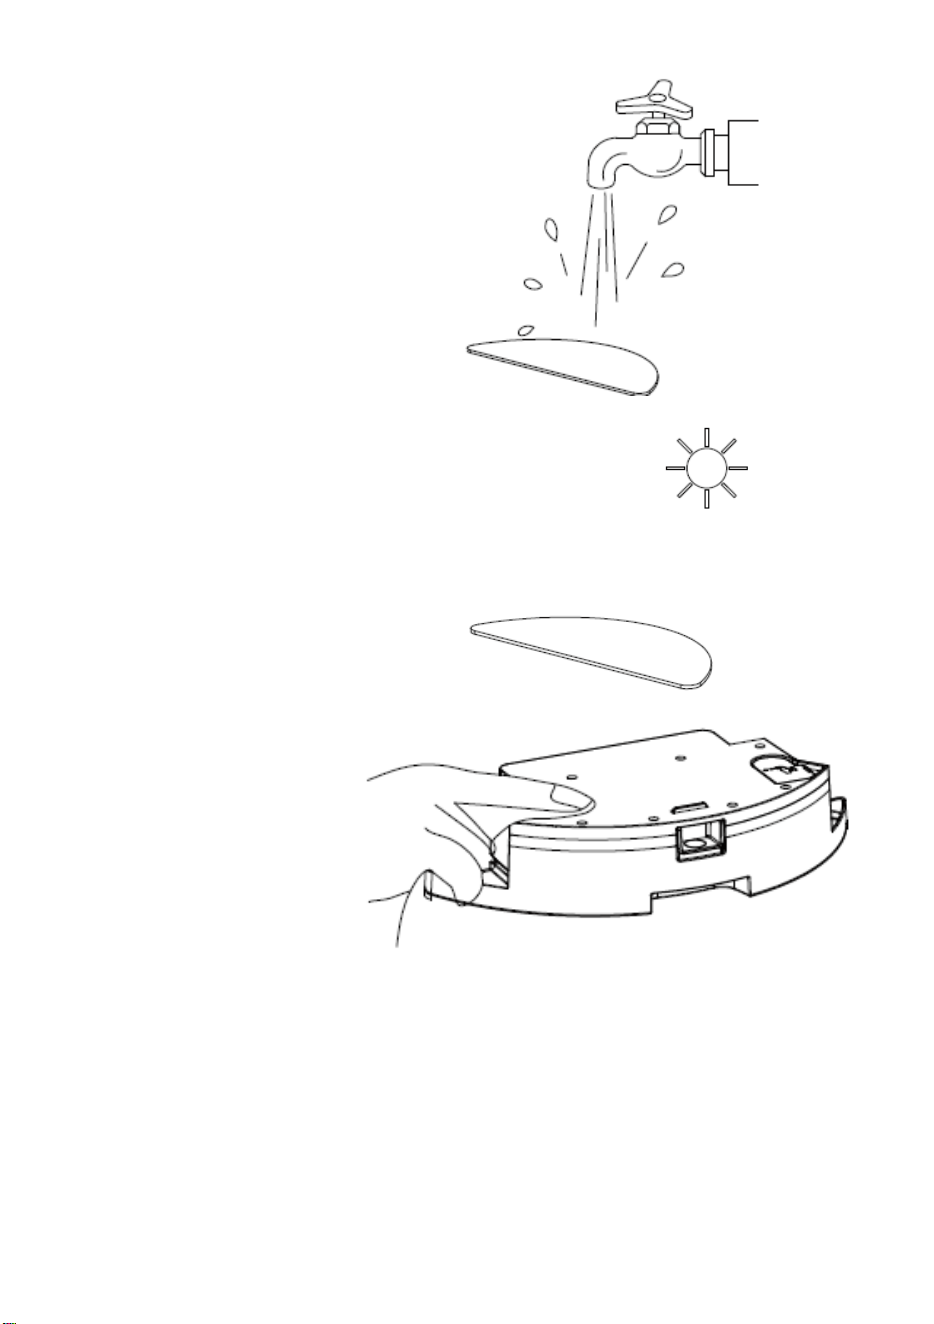
23
4. Wash the mop.
5. Air dry the mop.
6. Dry the water tank.
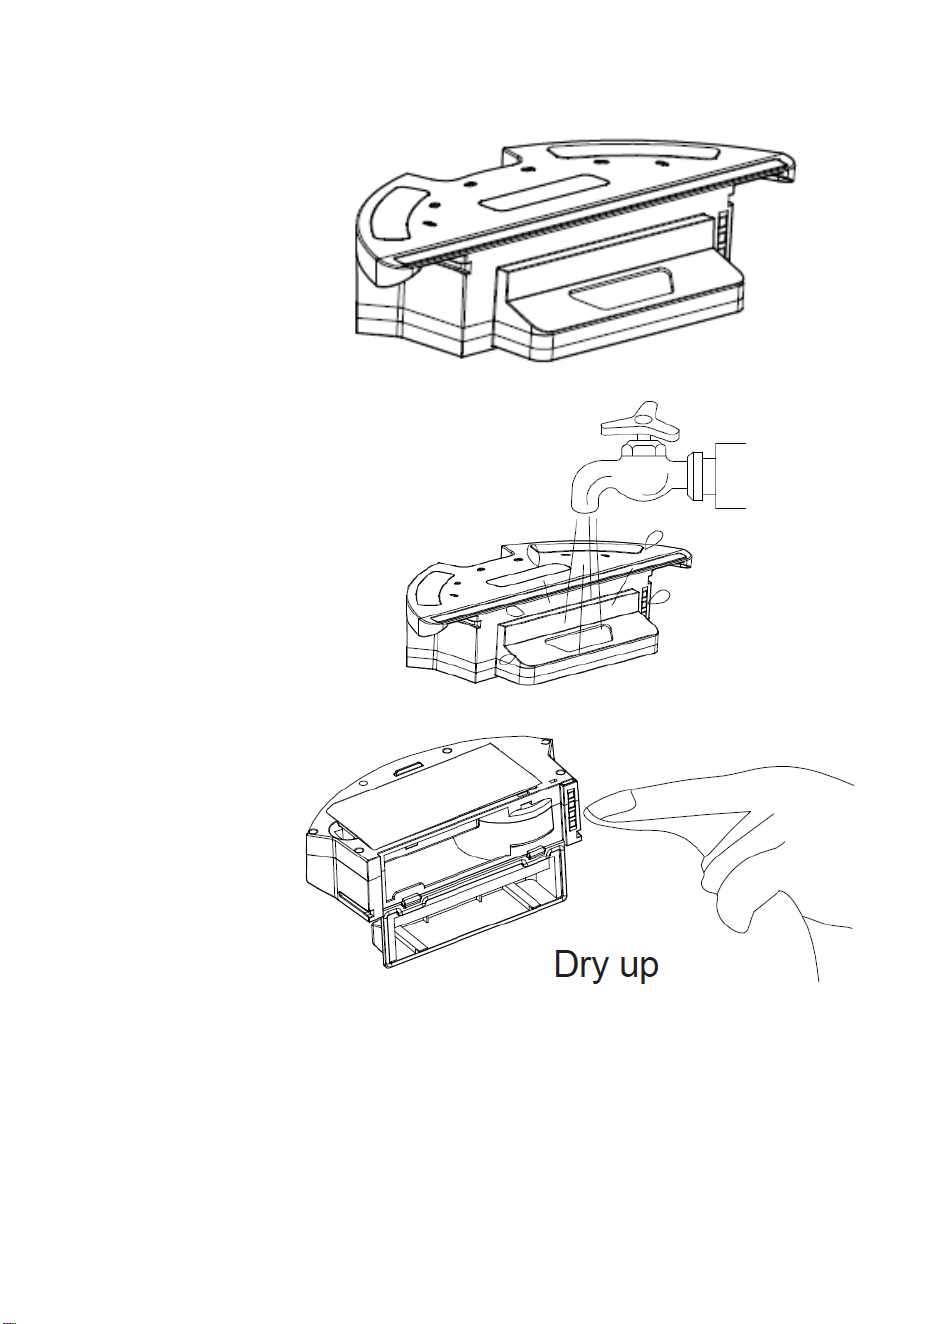
24
Water Tank Dustbin
1. Put the water
tank
horizontally with
the dustbin port
upside.
2. Clean the
rubbish in the
dustbin of the
water tank with
running water.
3. Ensure the
contacts are
dry.
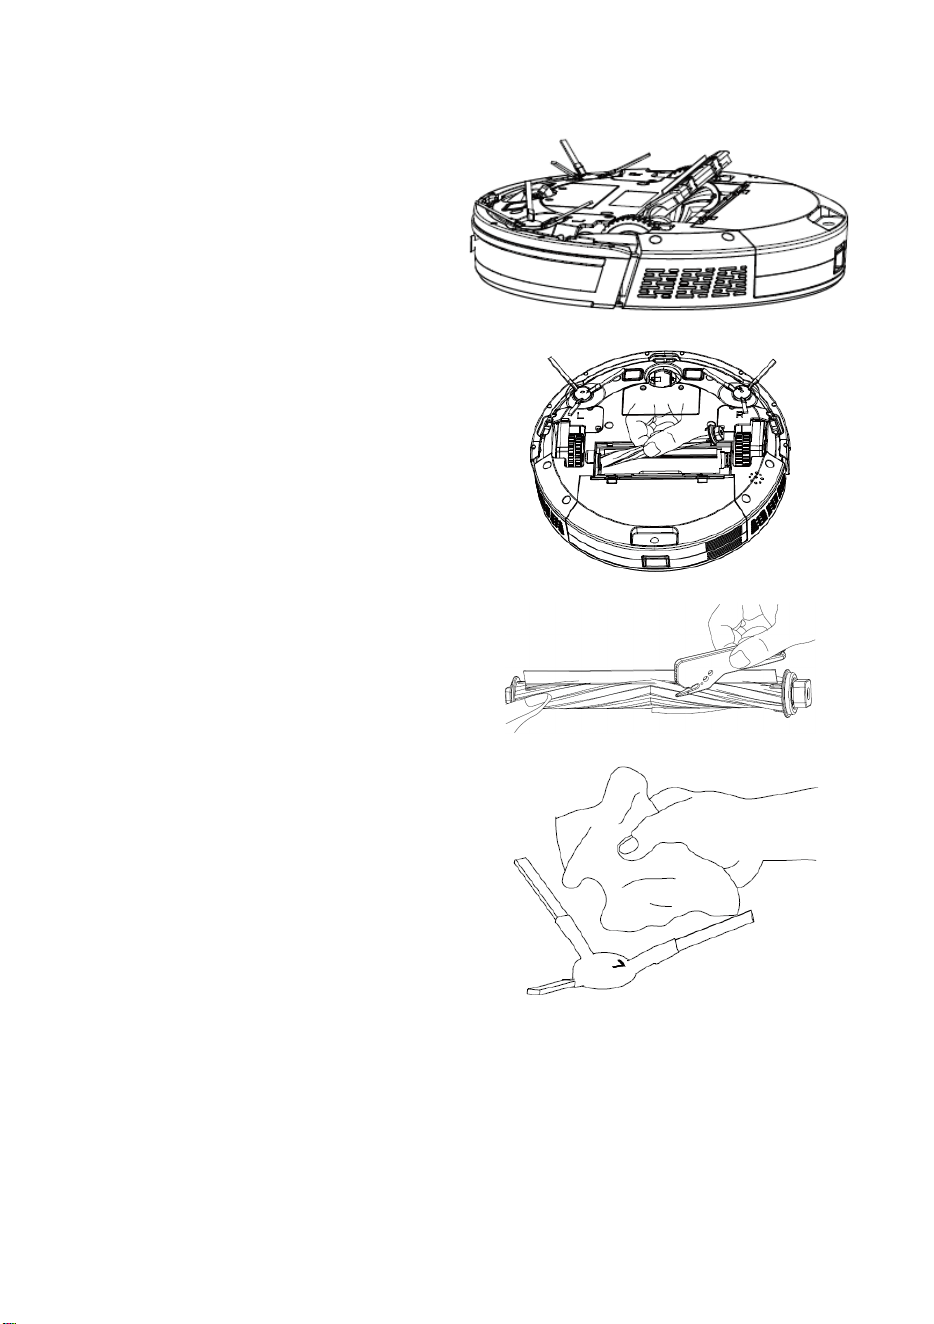
25
Roller Brush and Side Brush
1. Open the roller brush cover
assembly.
2. Take out the roller brush shaft.
3. Use the cleaning brush to cut off
any hair or fibres tangled on the
roller brush.
4. Clean the side brush.
26
Charging Station, Ground Sensors, Drive Wheels and Universal Wheel
Note: The interior of the charging station, the ground sensors and the front bumper all
contain sensitive electronic components. Please use a cloth to clean the above parts and do
not use moisture or water to prevent damage caused by water inflow.
1. Clean the charging station docking
pieces
2. Clean the ground sensors
3. Clean the drive wheels and the
universal wheel
If you do not use the product for a long time, please fully charge it before storing. Turn off the
vacuum and keep charging every 3 months to prevent the battery from over discharge.
If the battery is over discharged or not used for a long time, the product may lose ability to
charge entirely. Please contact Kogan.com for any support. Do not disassemble it by
yourself.
27
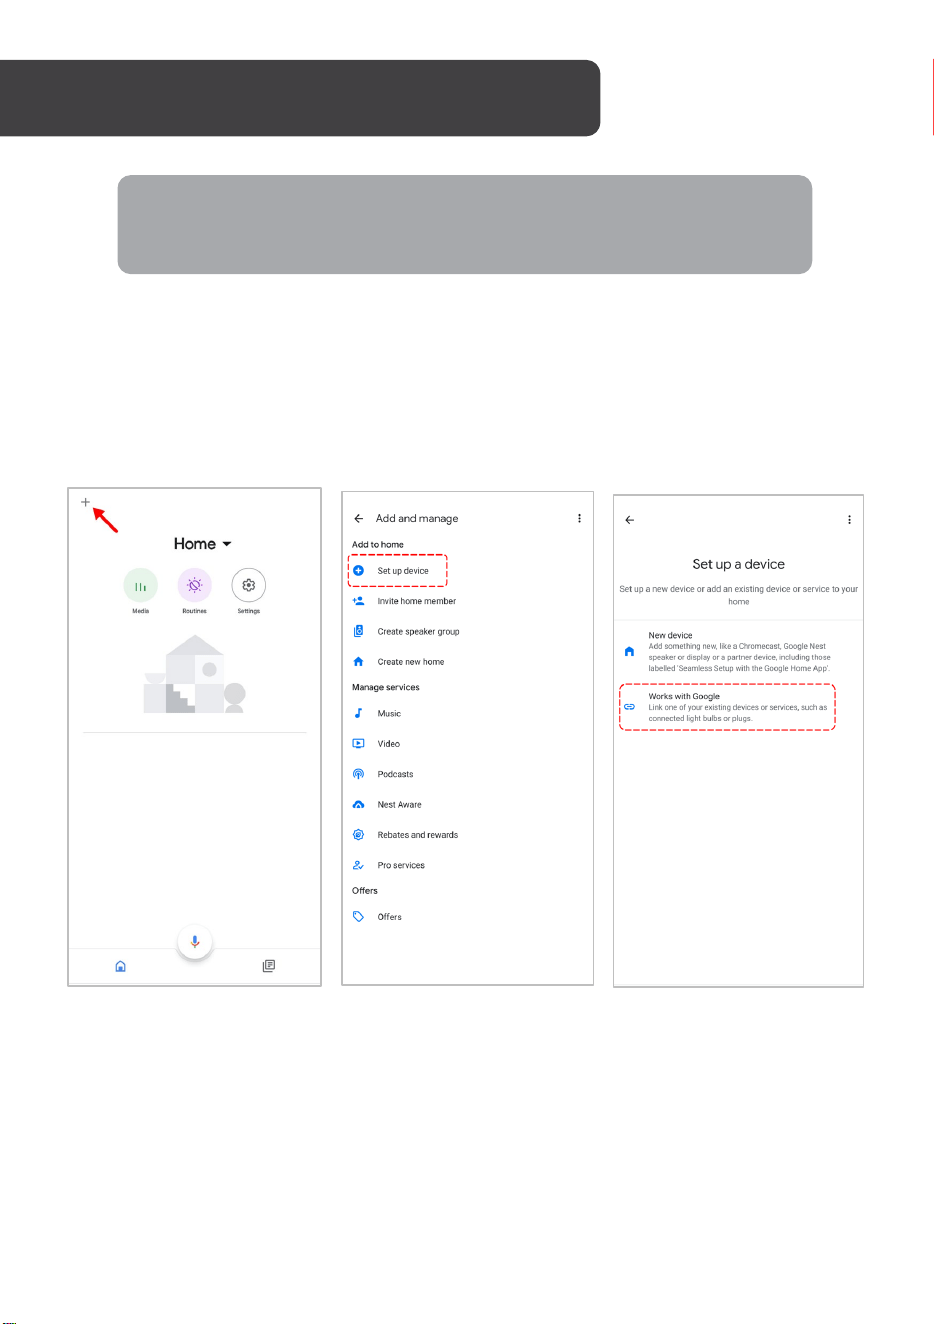
Adding “SmarterHome” to the Google Home app
1. From the home page of the Google Home app, select the “+” icon (top left corner,
see arrow in the below screenshot) to access the ‘Add and manage’ page.
2. Select ‘Set up device’, then select the ‘Works with Google’ option.
GOOGLE HOME CONTROL
Note:
You will need to have set up a Google Home account prior to linking your
Kogan SmarterHome™ device.
28
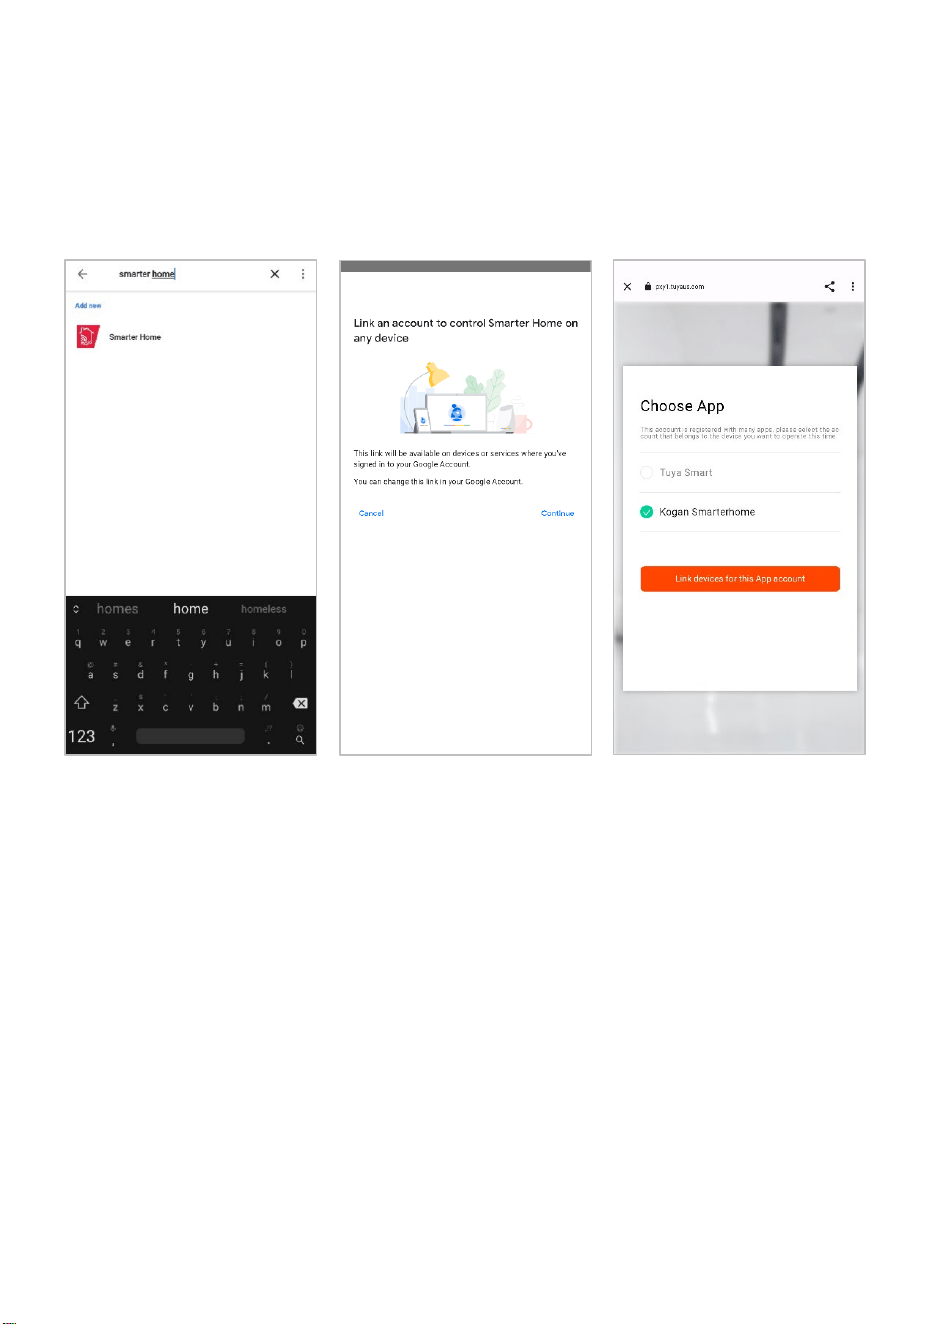
3. Select the search bar and type ‘Smarter Home’ to locate the Kogan
SmarterHome™ service.
4. From here, you will be prompted to sign into your SmarterHome™ account using
either your email or mobile phone number, depending on which method you used
to register your account.
5. Select “Kogan SmarterHome™” from the app options.

29
6. Tap ‘Authorise’ to grant Google permission to access the SmarterHome™ app and
your devices.
7. Once connected, the app will display any compatible devices linked to your
SmarterHome™ account. From here you can assign them to rooms and set up any
routines. Tap on any of the devices to view a list of available commands.
Note:
Please note that Google Home can only control the base/core functions of any
compatible SmarterHome™ devices. To make full use of this product’s smart
functionality, please use the Kogan SmarterHome™ app.
30
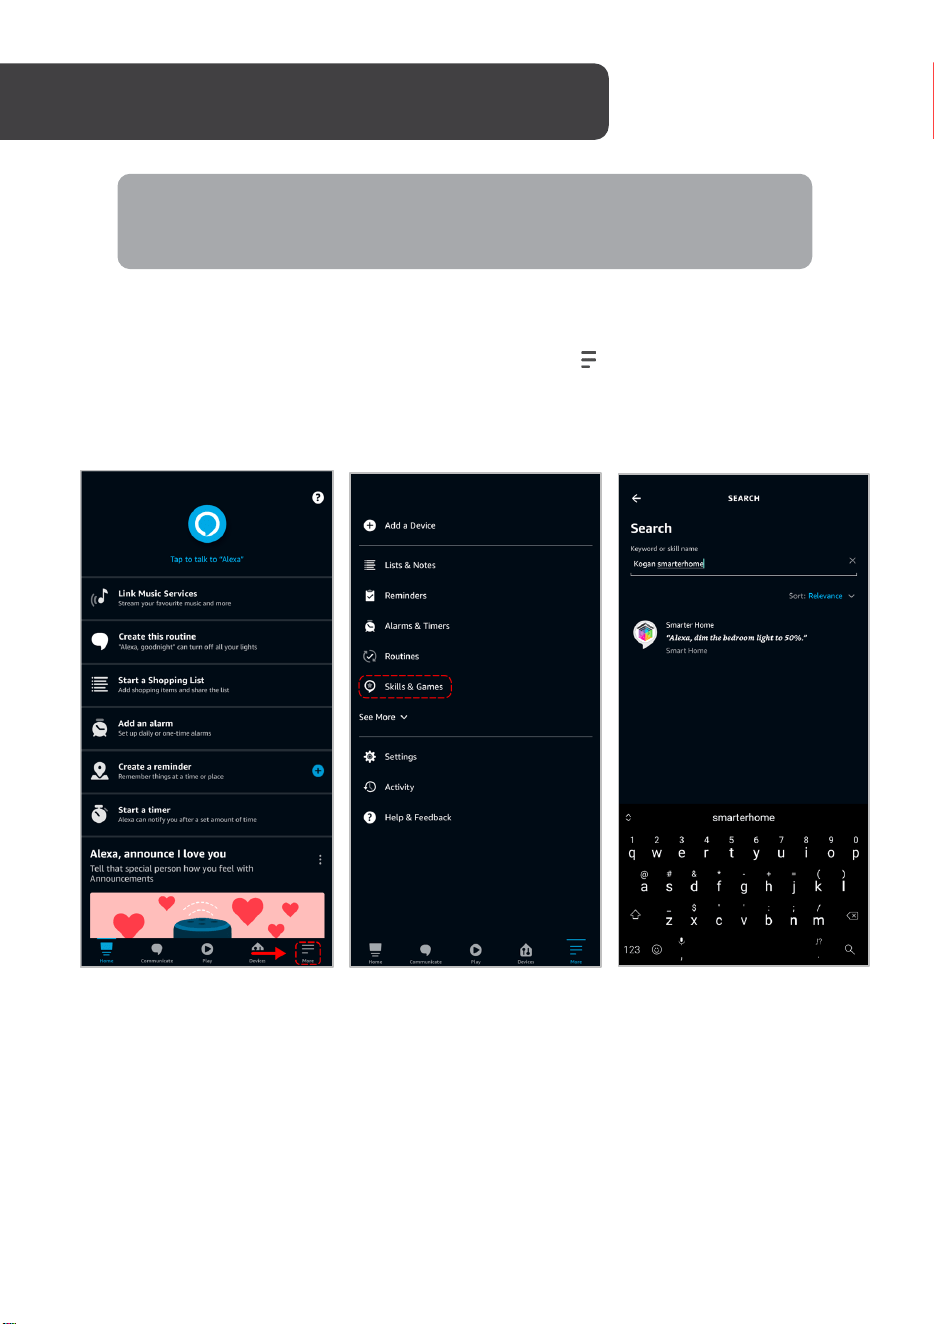
Adding “SmarterHome” to the Alexa app
1. From the home page of the Alexa app, select the “ ” icon in the bottom-right and
select “Skills & Games” from the sidebar.
2. Select the search bar and type ‘Smarter Home’ to locate the Kogan
SmarterHome™ skill.
AMAZON ALEXA CONTROL
Note:
You will need to have set up an Alexa account prior to linking your Kogan
SmarterHome™ device.
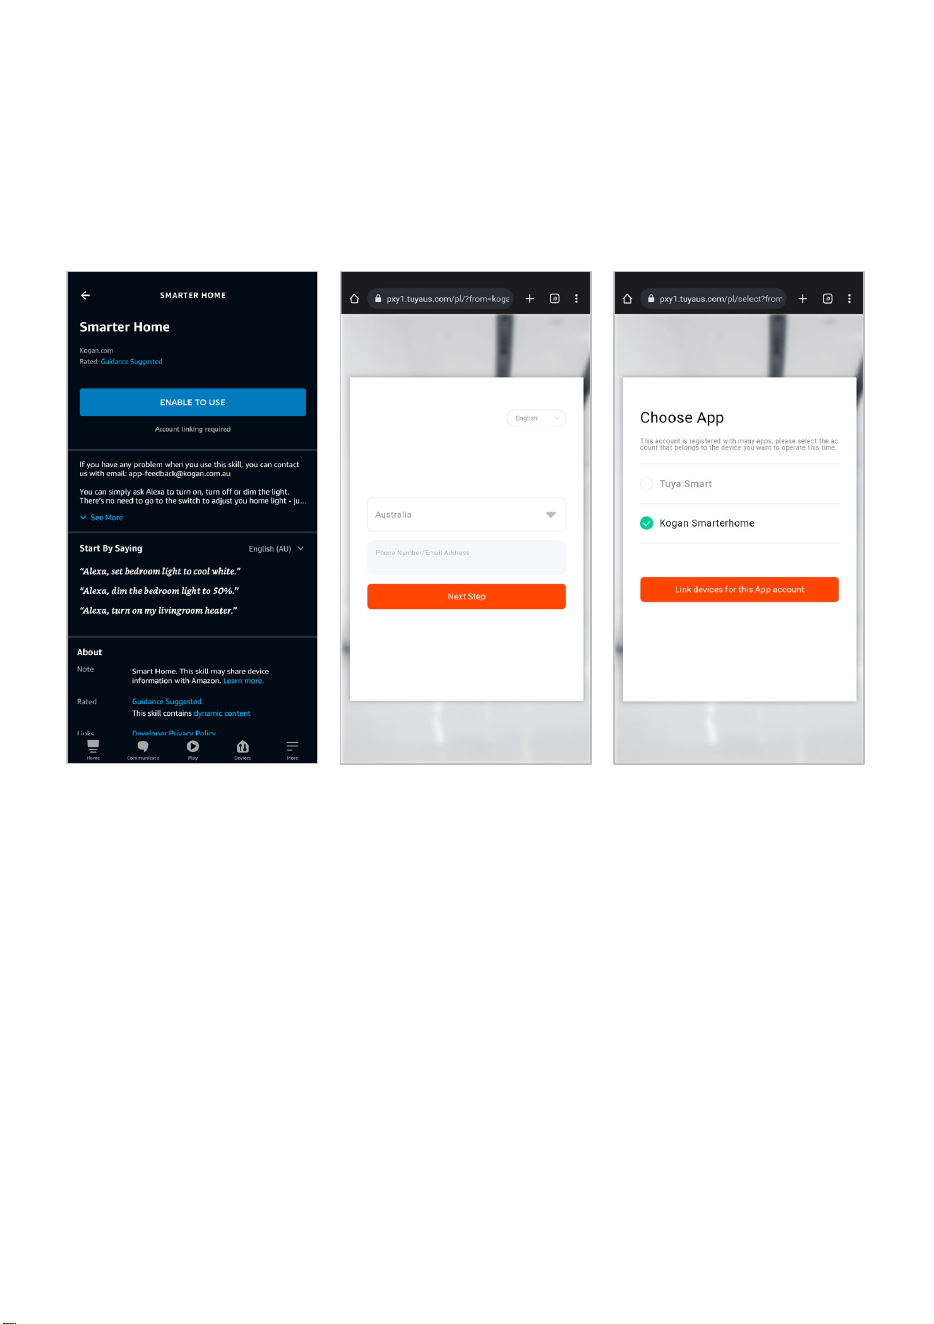
31
3. Tap ‘Enable to Use’ to add the Kogan SmarterHome™ skill to Alexa.
4. From here, you will be prompted to sign into your SmarterHome™ account using
either your email or mobile phone number, depending on which method you used
to register your account.
5. Select “Kogan SmarterHome™” from the app options.

32
6. Tap ‘Authorise’ to grant Alexa permission to access the SmarterHome™ app and
your devices.
7. Once connected, the app will perform a search and display the devices linked to
your SmarterHome™ account. When your devices have successfully connected to
the Alexa app, you will be able to control your Kogan SmarterHome™ devices via
Alexa’s voice commands.
Note:
Please note that Alexa can only control the base/core functions of any compatible
SmarterHome™ devices. To make full use of this product’s smart functionality,
please use the Kogan SmarterHome™ app.
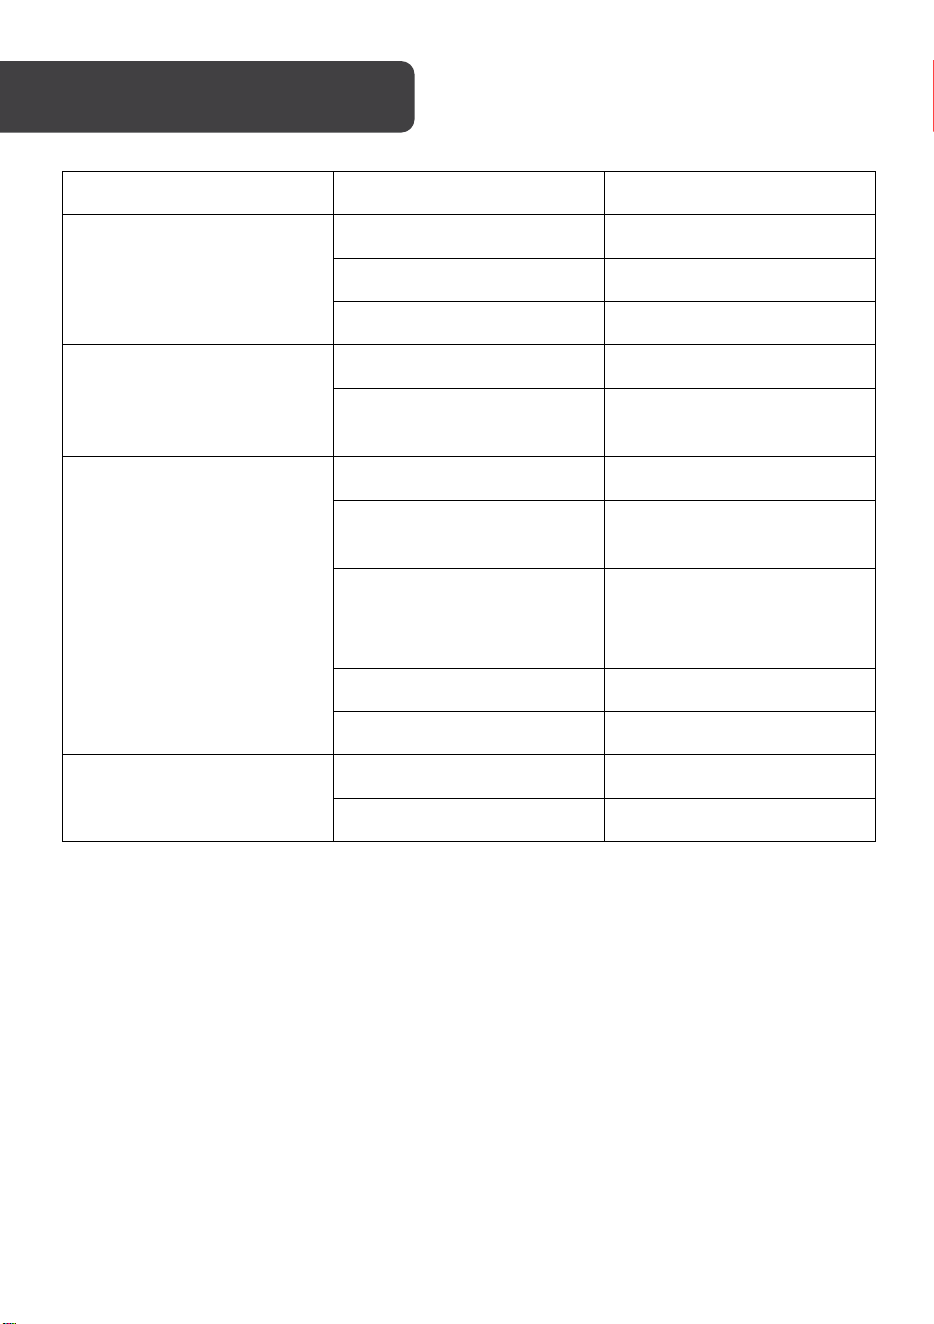
33
Classification Item Parameter
Structural class
Diameter 330mm
Height 74mm
Net weight 2.7kg
Battery
Voltage 14.4 volts
Battery
2500mAh rechargeable
lithium battery pack
Sweeping parameter
Bin capacity 600 ml
Charging type
Automatic charging /
manual charging
Cleaning mode
Auto/ Schedule/ Single
room/ Fixed point/ Border/
Mop floor
Charging Time About 300 minutes
Cleaning Time About 100 minutes
Vacuum
Rated power(W) 28
Operating voltage (V) 14.4
SPECIFICATIONS
34
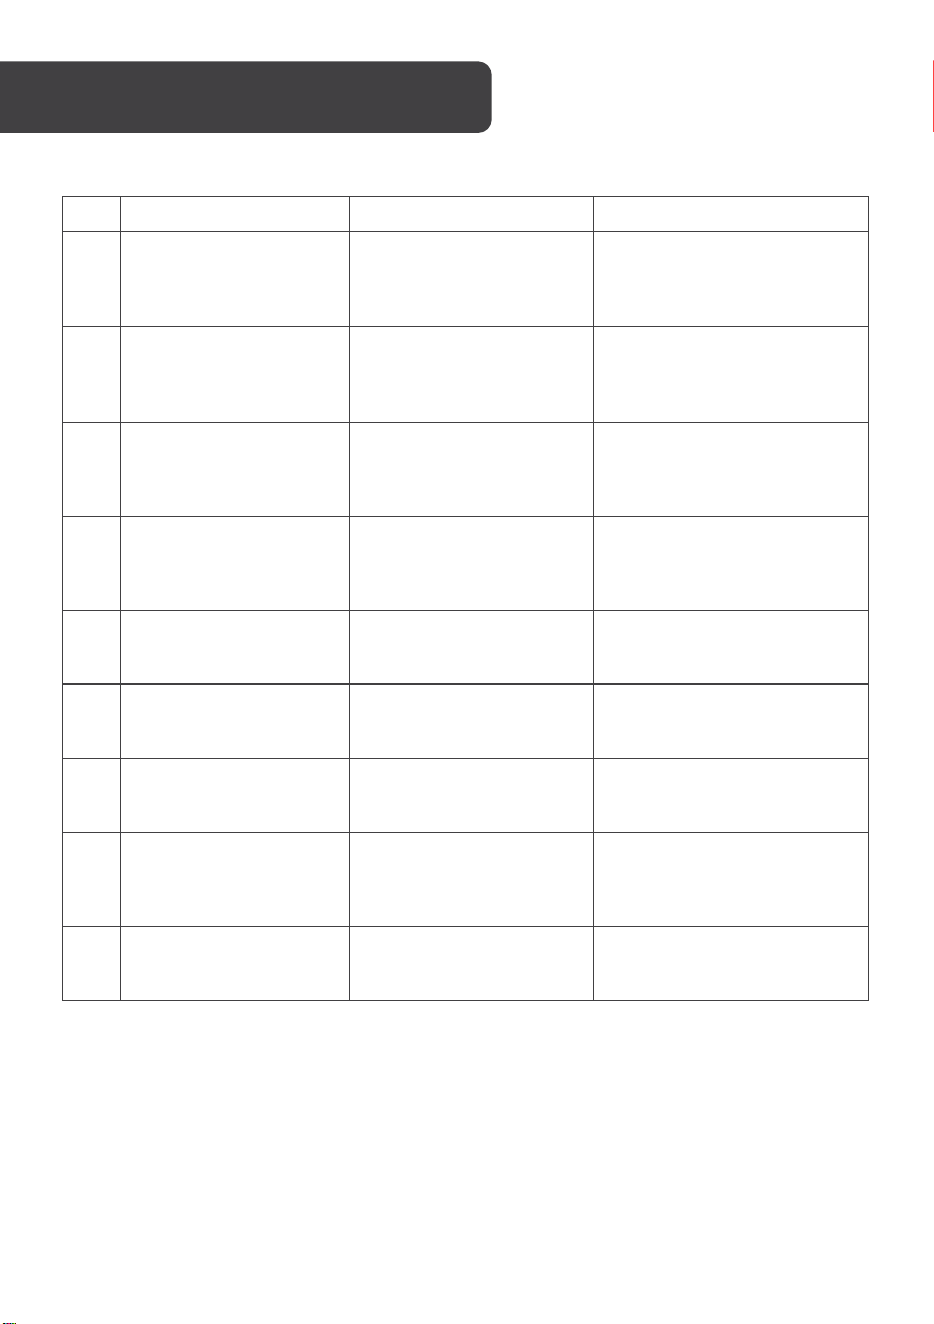
N
Failure mode
Failure reminding
Troubleshooting
1 Wheels off the ground Vacuum suspended
Please put the vacuum back
to the ground and press the
cleaning button again.
2 Dust box not installed
Dust box removed and
not installed
Replace the dustbin to the
vacuum and press the
cleaning button again.
3 Battery failure
Abnormal battery
charging
Contact Kogan.com to test
the battery.
4
Please check if the
wheel is stuck
Wheel jammed
Check whether the wheel is
entangled with foreign
objects and clean the
entangled objects.
5
Please check if the front
bumper is stuck
Front bumper bracket
stuck
Check whether the front
bumper can be bounced
normally.
6 Robot connection failed
Machine failed to connect
to server
Check whether the wireless
network connected can
connect to the internet.
7
The battery is low,
please charge the
machine.
Battery power is less than
20%
The vacuum automatically
switches to recharging mode.
8
Please check whether
the side brush is tangled
or jammed
Abnormal side brush.
Check whether the side brush
is entangled with foreign
objects and clean the
entangled objects.
9
Please move the
machine to open area
The machine failed to get
out of trouble
Please move the vacuum to
an open place and press the
cleaning key again.
Tips: If you can't rule out the corresponding faults by referring to the above methods, please
contact customer Kogan.com for support.
TROUBLESHOOTING
35
NOTES

36
Need more information?
We hope that this user guide has given you
the assistance needed for a simple set-up.
For the most up-to-date guide for your product,
as well as any additional assistance you may require,
head online to help.kogan.com