Loading ...
Loading ...
Loading ...
16 SECTION 4 — PRODUCT CARE
Note: This Operator’s Manual covers several models.
Tractor features may vary by model. Not all features
in this manual are applicable to all tractor models and
the tractor depicted may differ from yours.
Warning! Before performing any
maintenance or repairs, disengage
the PTO, set the parking brake, stop
the engine and remove the key to
prevent unintended starting.
Troubleshooting
Excessive Vibration
1. Cutting blade loose.
• Tighten cutting blade and deck
spindle.
2. Cutting blade damaged, unbalanced or bent.
• Replace the cutting blade.
Uneven Cut
1. Deck not properly leveled.
• Perform side-to-side deck
adjustment.
2. Cutting blade dull or damaged.
• Sharpen or replace cutting blade.
3. Uneven tire pressure.
• Check and correct tire pressure in all
four tires.
Engine
Refer to the Engine Operator’s Manual for all
engine issues and questions.
Note : Maintenance, repair, or replacement of the
emission control devices and systems which are
being done at owner’s expense may be performed
by any engine repair establishment or individual.
Warranty repairs must be performed by an
authorized dealer.
Maintenance
Battery
WARNING
California PROPOSITION 65: Battery posts, terminals,
and related accessories contain lead and lead compounds,
chemicals known to the State of California to cause cancer
and reproductive harm. Wash hands after handling.
The battery is sealed and is maintenance-free.
Acid levels cannot be checked and fluid can not
be added.
• Always keep the battery cables and terminals
clean and free of corrosive build-up.
• After cleaning the battery and terminals,
apply a light coat of petroleum jelly or
grease to both terminals.
CAUTION
If removing the battery for cleaning, disconnect the NEGATIVE
(Black) wire from it’s terminal first, followed by the POSITIVE
(Red) wire. When re-installing the battery, always connect
the POSITIVE (Red) wire its terminal first, followed by the
NEGATIVE (Black) wire. Be certain that the wires are connected
to the correct terminals; reversing them could result in serious
damage to your engine’s alternating system.
Jump Starting
WARNING
Never jump start a damaged or frozen battery. Be certain
the vehicles do not touch, and ignitions are off. Do not
allow cable clamps to touch.
1. Connect positive (+) cable to positive (+)
post of your tractor’s discharged battery.
2. Connect the other end of the cable to the
positive (+) post of the jumper battery.
3. Connect the second cable negative (–) to
the other post of the jumper battery.
4. Make the final connection on the engine
block of the tractor, away from the battery.
Attach to an unpainted part to assure a
good connection.
CAUTION
If the jumper battery is installed on a vehicle (i.e. car,
truck), do NOT start the vehicle’s engine when jump starting
your tractor.
5. Start the tractor (as instructed in the
Operation section of this manual).
6. Remove the jumper cables in reverse order of
connection.
Charging
WARNING
Batteries give off an explosive gas while charging. Charge
the battery in a well ventilated area and keep away from an
open flame or pilot light as on a water heater, space heater,
furnace, clothes dryer or other gas appliances.
CAUTION
When charging your tractor’s battery, use only a charger
designed for 12V lead-acid batteries. Read your battery
charger’s Owner’s Manual prior to charging your tractor’s
battery. Always follow its instructions and heed its warnings.
If your tractor has not been put into use for an
extended period of time, charge the battery as follows:
1. Set your battery charger to deliver a max of
10 amperes.
2. If your battery charger is automatic, charge the
battery until the charger indicates that charging
is complete. If the charger is not automatic,
charge for no fewer than eight hours.
Fuse
WARNING
Before servicing, repairing, or inspecting, always disengage
PTO, set parking brake, stop engine and remove ignition key
to prevent unintended starting.
A 20 AMP fuse is installed in your tractor’s wiring
harness to protect the tractor’s electrical system
from damage caused by excessive amperage.
If the electrical system does not function, or your
tractor’s engine will not crank, check to be certain
that the fuse has not blown. It is located under the
seat, attached to the POSITIVE (Red) wire leading
to the battery.
CAUTION
Always use a replacement fuse with the same amperage
capacity as the blown fuse.
Relays & Switches
There are several safety switches in the electrical
system. If a function of the safety interlock system
described earlier is not functioning properly, have
the electrical system checked by your authorized
service dealer.
Engine
Refer to the Engine Operator’s Manual for all
engine maintenance procedures and instructions.
Note: If the “LOW OIL” text appears immediately after
the engine is started the oil pressure may be low. This
is normal. If the low oil indication persists stop the
tractor immediately and check the engine oil level as
instructed in the Engine Operator’s Manual.
Note: The “Low Oil” function only works if the
engine is equipped with an oil pressure switch.
Changing the Engine Oil
WARNING
If the engine has been recently run, the engine, muffler and
surrounding metal surfaces will be hot and can cause burns
to the skin. Exercise caution to avoid burns.
Note: The oil filter should be changed at every
oil change interval. To complete an oil change,
proceed as follows:
To complete an oil change, proceed as follows:
1. Run the engine for a short time to warm
the engine oil. The oil will flow more freely
and carry away more impurities. Use care to
avoid burns from hot oil.
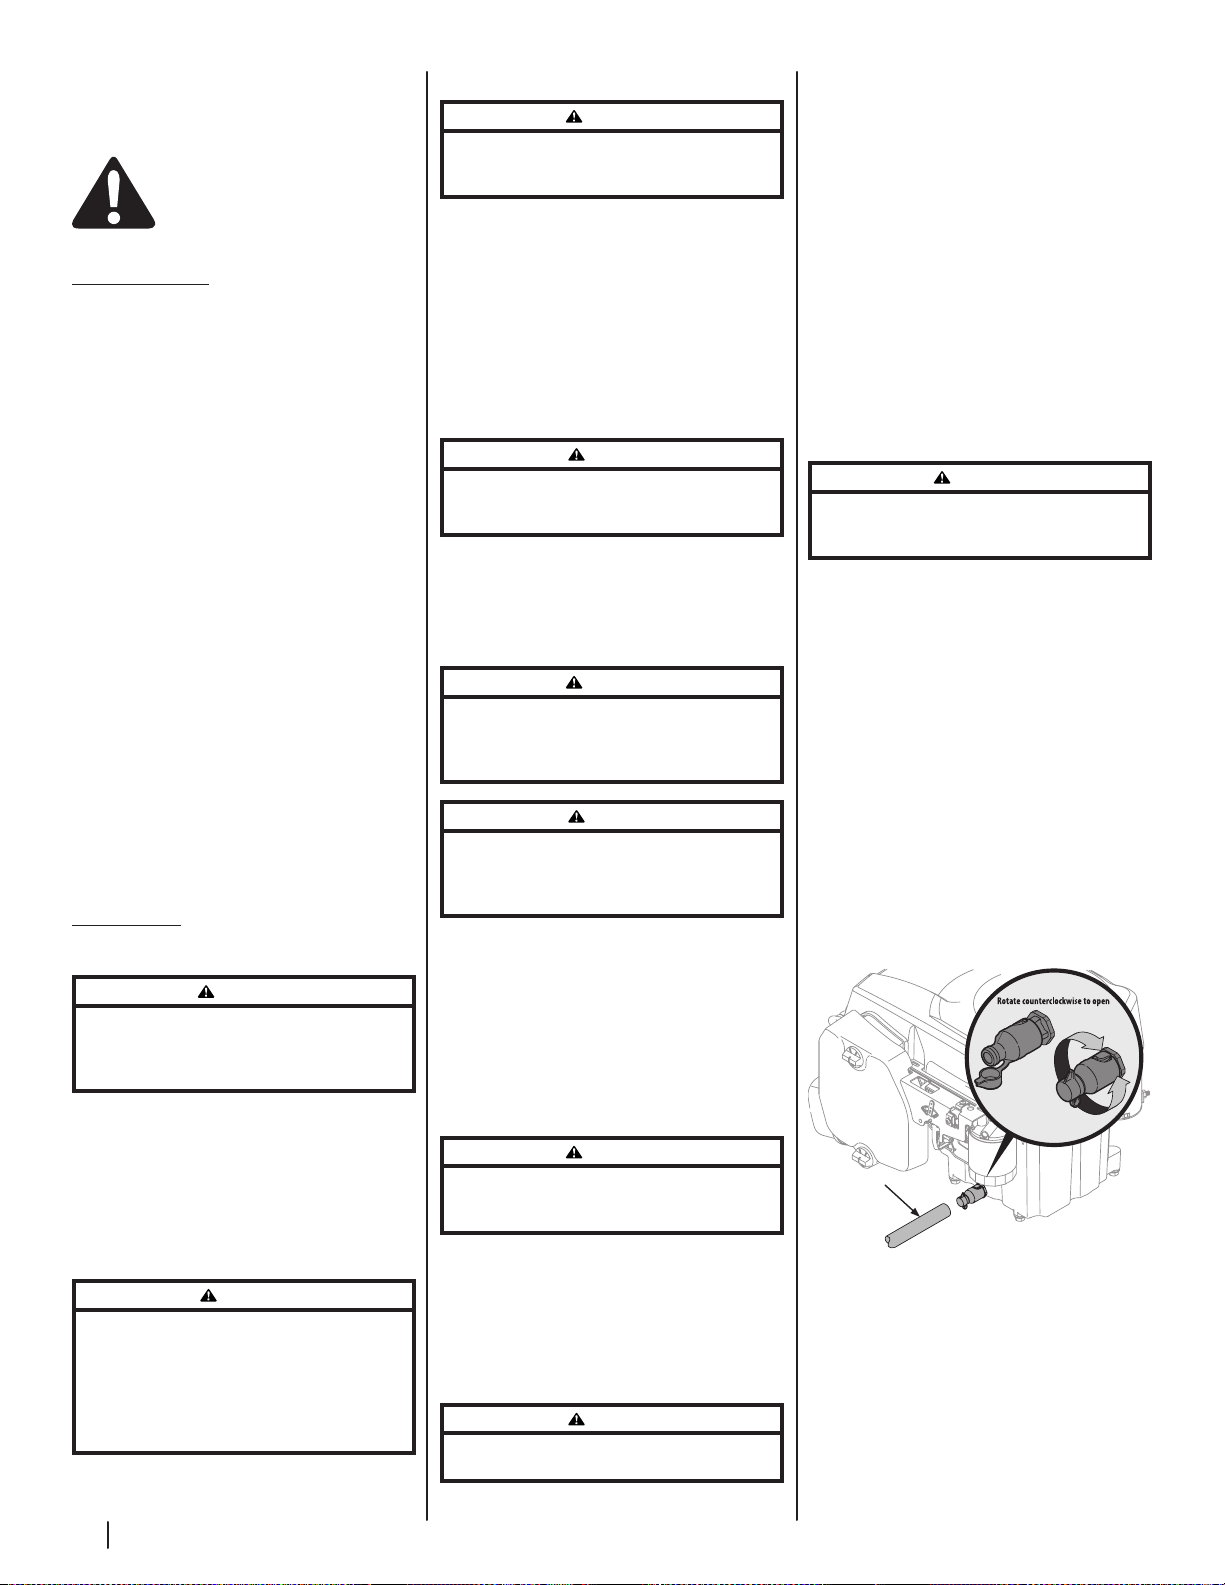
2. Open the tractor’s hood and locate the oil
drain port on the side of the engine.
3. Place an appropriate oil collection container
with at least a 2.5 quart capacity below the
opening of the oil drain tube, to collect the
used oil. Remove the oil fill cap/dipstick
from the oil fill tube.
4. Pop open the protective cap on the end of
the oil drain valve to expose the drain port.
See Figure 4-1.
OPENED
CLOSED
Clear Oil Drain Tube
Figure 4-1
5. Remove the oil fill cap/dipstick from the oil
fill tube.
6. Push the clear oil drain tube (packed with this
manual) onto the oil drain port. Route the
opposite end of the tube into an appropriate
oil collection container with at least a 2.5
quart capacity to collect the used oil.
Loading ...
Loading ...
Loading ...