Loading ...
Loading ...
Loading ...
9
bl e n d I n g I n cu p S a n d bow l S (8 oz . a n d 20 oz .)
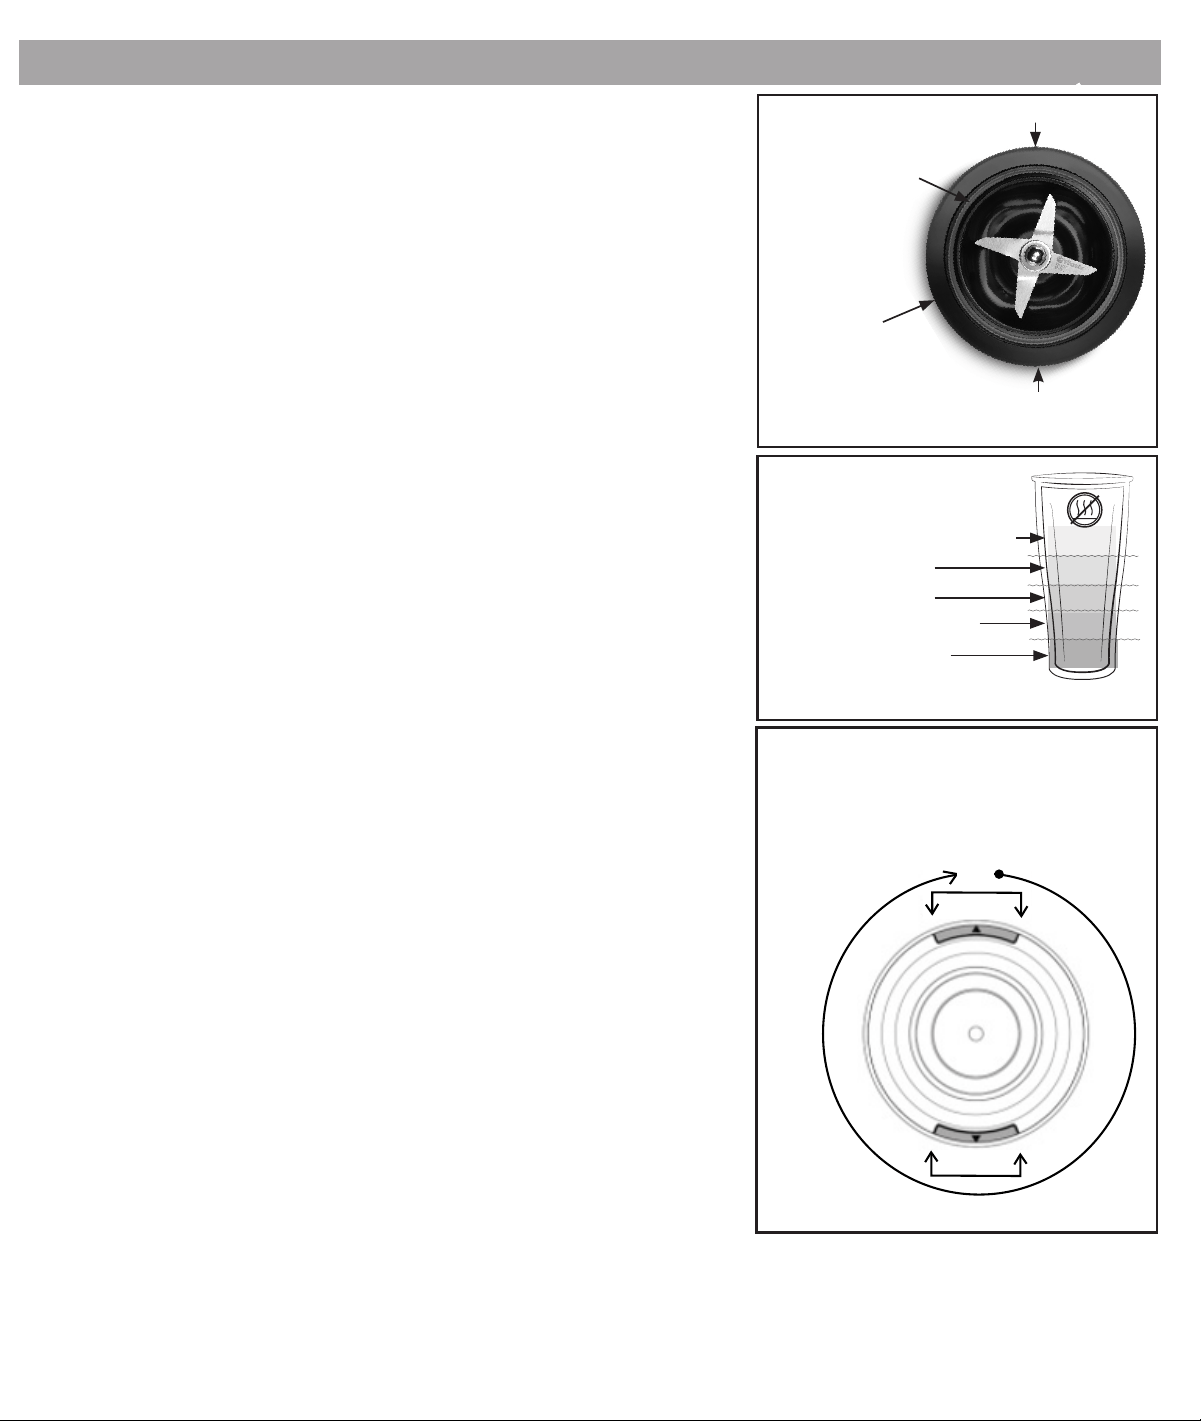
1. Locate the two arrows on the blade base. The arrows are opposite of each other on the
blade base (see Figure A).
2.
Put a clean, dry seal onto the bottom thread of the blade base (see Figure A). The seal
should fit snugly and evenly around the thread.
Note: Do not blend hot liquids in the 20 oz. (0.6 L) cup or 8 oz. (225 ml) bowl. Do not fill
the cup beyond the maximum capacity with solids or liquids. “MAXIMUM CAPACITY"
is marked on the 20 oz cup. The maximum capacity of the bowl is the 8oz (225 ml) fill
line.
3.
L
oad the cup or bowl (see Figure B for ingredient loading order).
4. Put the blade base onto the cup or bowl.
5. Rotate the blade base clockwise at least two complete turns from your starting point
until the arrows are within the ranges marked on the cup or bowl. If necessary, continue
to rotate clockwise until the arrows are within the ranges below (see Figure C).
6. Put the cup or bowl and blade base onto the blender motor base.
If the blender motor base does not recognize the cup or bowl, tighten the blade base
clockwise onto the cup or bowl and place it back onto the blender motor base. If the problem
is not corrected, contact Vitamix Customer Service for support.
7. Blend the recipe according to the instructions in the recipe.
8. If the mixture stops circulating:
Press the On/O switch to stop the motor. Wait until the blades stop rotating.
Remove the cup or bowl and blade base from the blender motor base. Turn the cup
over. Unthread the blade base from the cup by rotating counter-clockwise. Stir the
ingredients. Add liquid if necessary. Place a clean and dry seal on the blade base. Wipe
clean the threads on the blade base and cup or bowl. Reattach the blade base according
to STEP 5, place on blender base and continue blending.
9. After blending, wait until the blades completely stop before removing the cup or bowl
from the blender base.
10. If necessary, use a Vitamix Blade Scraper or spatula to remove salsa, jelly, jam, peanut
butter, and other thick ingredients from under the blades only after the blender has
been turned o and the container has been removed from the motor base.
Liquids
DO NOT blend hot liquids!
Dry Goods
Leafy Greens
Fruits & Veggies
Ice & Frozen
Ingredients
Figure B
Arrow #1
Arrow #2
Figure A
Seal
(removable,
color not shown)
Blade Base
Range
Figure C
To tighten: rotate the blade base
clockwise at least two complete turns
from your starting point until the arrows
are withing the ranges marked on the
cup or bowl. If necessary, continue to
rotate clockwise until the arrows are
within the ranges below.
x2
Range
Loading ...
Loading ...
Loading ...