
43C350KP/43E350KP
50C350KP/50E350KP
55C350KP/55E350KP
65C350KP/65E350KP
Owner's Record
You will find the model number and serial
number on the back of the TV. Record these
numbers in the spaces provided below. Refer
to them whenever you call upon your Toshiba
dealer regarding this product.
Model number:
Serial number:
ES-A211305-1

1
Contents
Apps ...................................................................................................................................21
Media .................................................................................................................................22
Troubleshooting ....................................................................................23
Picture Problem .............................................................................................................23
Sound Problem ..............................................................................................................23
Picture and Sound Problem.......................................................................................23
Internet Problem ...........................................................................................................23
My File Won’t Play ..........................................................................................................24
Recording/Timeshift Function Isn’t Working .......................................................24
Other Issues .....................................................................................................................24
Other Information .................................................................................25
Specifications ..................................................................................................................25
Media Format List ..........................................................................................................26
License Information ......................................................................................................28
Disclaimer:
Images throughout this document are for illustrative purposes only and
may differ from the actual product.
Designs and specifications are subject to change without notice.
Welcome to Toshiba
• Thank you for purchasing this Toshiba LED TV. This manual will help
you use the exciting features of your new TV.
• Instructions in this manual are based on using the remote control.
• Please read all safety and operating instructions in this manual
carefully, and keep this manual for future reference.
• LED TV is LCD Panel with LED Backlight.
Contents
Contents .................................................................................................. 1
Important Safety Precautions ............................................................... 2
Getting started ....................................................................................... 5
Accessories List ................................................................................................................5
Installing the Stand or Wall Mount Bracket ...........................................................5
TV Front ...............................................................................................................................6
TV Rear ................................................................................................................................6
Terminals ............................................................................................................................8
Wired Setup ....................................................................................................................... 9
Wireless Setup ..................................................................................................................9
Connecting with an HDMI (ARC) Cable ................................................................... 9
Connecting with an HDMI Cable ............................................................................... 9
Connecting with an USB Cable ..................................................................................9
Remote Control ..................................................................................... 10
Buttons on the Remote Control ...............................................................................10
Installing Batteries in the Remote Control ...........................................................12
Pairing the Remote Control .......................................................................................12
Remote Control Operation Range ...........................................................................12
General Operation ................................................................................ 13
Turn on/off your TV .......................................................................................................13
Selecting the Input Source ........................................................................................13
Using the Live TV ...........................................................................................................13
EPG (GUIDE) .....................................................................................................................13
PVR/T.Shift ........................................................................................................................14
Menu ...................................................................................................... 15
Using the Menu ..............................................................................................................15
Settings ................................................................................................. 18
Using the Settings .........................................................................................................18
Advanced Features ............................................................................... 21
Getting Familiar with the Home Screen ................................................................21

2
Important Safety Precautions
Be sure to observe the following instructions and precautions to ensure
safe use of this TV.
Installation
1. WARNING: To prevent injury, this apparatus must be securely
attached to a stable surface/wall in accordance with the
installation instructions.
Install the TV in a horizontal, stable location.
• If the TV is not installed securely, it may lean or fall over and cause
an injury.
• To prevent injury, use the exclusive optional stand or wall-hanging
bracket to install this TV on a stable surface or wall securely in
accordance with a qualified technician.
• To secure the TV, use a sturdy strap from the
hook(s) on the rear of the TV to a wall stud,
pillar, or other immovable structure. Make sure
the strap is tight, secure, and parallel to the
floor.
2. Never place the TV in an unstabilized location such as on a shaky
table, incline or location subject to vibration.
• Only use cabinets or stands recommended by the TV manufacturer.
• Only use furniture that can safely support the TV.
• Ensure that the TV is not hanging over the edge of the supporting
furniture.
• Never place the TV on tall furniture (for example, cupboards or
bookcases) without anchoring both the furniture and the TV to a
suitable support.
• Never stand the TV on cloth or other material placed between the
TV and supporting furniture.
The TV may drop or fall off, which may cause an injury or damage.
3. Never stand or climb on the TV.
• Educate children about the dangers of climbing on furniture to
reach the TV or its controls.
Be especially careful in households with children to prevent them
through climbing on top of the TV. It may move, fall over, break,
become damaged or cause an injury.
4. Always connect the power plug to an appropriate electrical outlet
equipped with 100-240V AC, 50/60Hz.
Never use the TV outside the specified voltage range. It may cause a
fire or an electric shock.
About the fuse
In a three pin earthing-type, the fuse fitted in this plug is approved by
ASTA or BSI to BS1362. It should only be replaced by a correctly rated
and approved type and the fuse cover must be refitted.
About the use
• Make sure to insert the plugs firmly, when plugging the AC power
cord into the TV set end and wall outlet end.
• Make sure to hold the plug, when unplugging the AC power cord.
• Never use other cord except for supplied AC power cord, and never
use the supplied power cord for any other purpose.
5. Never insert or remove the power plug with wet hands.
This may cause an electric shock.
6. Never block or cover the slots and openings in the cabinet.
• Never place the TV so that it is facing upward or on its side.
• Never place the TV in a closet, bookcase or other similar area where
the ventilation is poor.
• Never drape a newspaper, tablecloth or curtain on the TV.
• When installing the TV against a wall, always keep the TV at least
10cm away from the wall.
• Never place the TV on a soft unstable surface, such as a carpet, or a
cushion.
The inside of this TV will overheat if the ventilation holes are covered,
blocked or sealed, which may result in a fire.
7. Never place the TV near a heater or in direct sunlight.
The surface of the cabinet or power cord may melt and result in a fire
or an electric shock.
8. Never place the TV in an area exposed to high humidity levels,
such as in a bathroom or close to a humidifier.
This may cause a fire or an electric shock.
9. Never place the TV next to a stove where it will be exposed to oil,
smoke, or steam, or in a location where there is a large quantity of
dust.
This may cause a fire or an electric shock.
10. Precautions for moving the TV.
• When moving the TV, be sure to remove the plug from the wall
outlet and disconnect the aerial cable and audio/video cables, any
steady ties and mounting screw. A fire or an electric shock may
result if the power cord is damaged.
• When carrying the TV, at least two people are needed. Be sure to
carry it upright.
• Never carry the TV with the screen facing up or down.
11. Precautions for installing on outdoor aerial.
An outside aerial system should not be located in the vicinity of
overhead power lines, or other electric light or power circuits.
If the aerial falls down or drops, it may cause an injury or an electric
shock.
Use
1. Never place hot objects or open flame sources, such as lighted
candles or nightlights, on or close to the TV.
High temperatures can melt plastic and lead to fires.
2. The apparatus shall not be exposed to dripping or splashing and
that no objects filled with liquids, such as vases, shall be placed
on the apparatus.
When liquids are spilled or small items are dropped inside the TV, this
may cause a fire or an electric shock.
If small objects drop inside the TV, turn off the TV and remove the
power plug from the outlet immediately and contact a service
technician.
3. Never insert objects (metal or paper) or pour water inside the TV
through ventilation holes and other openings.
These items may cause a fire or an electric shock. If these objects are
inserted inside the TV, turn off the TV and remove the power plug
from the outlet immediately and contact a service technician. Be
especially careful that children do not insert objects in the TV.
4. When the TV will not be used for a long period of time, such as
during vacation or travel, remove the power plug from the wall
outlet for safety.
The TV is not completely disconnected from the power supply line, as
minute current is consumed even when the Power switch is turned off.
The Mains plug or an appliance coupler is used as the disconnect
device, therefore the disconnect device shall remain readily operable.
Only for the model with P-clip

3
Important Safety Precautions
5. Never pull on the power cord when removing the plug from the
wall outlet.
Always hold the plug firmly when removing it. If the power cord is
yanked, the cord may become damaged and a fire or an electric shock
may occur.
6. Never cut, break, modify, twist, bunch up or bent the cord or apply
excessive force or tension to it.
Never place heavy objects on the cord or allow it to overheat as
this may cause damage, a fire or an electric shock. Contact a service
technician if the power cord is damaged.
7. If there is thunder or lightning, never touch the aerial cable or
other connected cables.
You may suffer an electric shock.
8. Turn off the TV before unplugging the power cord.
Failure to do so, may cause a malfunction.
9. Listening to music at high volume levels and for extended
durations can damage one’s hearing.
In order to reduce the risk of damage to hearing, one should lower the
volume to a safe, comfortable level, and reduce the amount of time
listening at high levels.
10. In dry environment due to static electricity, the product may be
restart and return to the main OSD interface, USB player interface
or the previous source mode.
You can continue to use the TV when appear this phenomenon.
Service
1. Never repair, modify or disassemble the TV by yourself.
It may cause a fire or an electric shock.
Consult a service technician for inspection and repairs.
2. When a malfunction occurs, or if smoke or an unusual odor comes
from the TV, turn off the TV and remove the power plug from the
outlet immediately.
Make sure that the smoke or smell has stopped, then contact a service
technician. If the TV is still used in this condition, it may cause a fire or
an electric shock.
3. If the TV is dropped or the cabinet is broken, turn off the TV and
remove the power plug from the outlet immediately.
If the TV has power in this condition, it may cause a fire or an electric
shock. If the cabinet is broken, be careful when handling the TV to
prevent an injury.
Contact a service technician for inspection and repair.
4. When the TV reaches the end of its useful life, ask a qualified
service technician to properly dispose of the TV.
Cleaning
CAUTION: Avoid using chemicals (such as air refreshers, cleaning
agents, etc.) on or near the TV pedestal. Studies indicate that plastics
may weaken and crack over time from the combination effects
of chemical agents and mechanical stress (such as weight of TV).
Failure to follow these instructions could result in serious injury and/
or permanent damage to TV and TV pedestal.
1. Remove the power plug before cleaning.
Never use solvents such as benzine or thinner to clean the TV.
• These solvents may distort the cabinet or damage its finish.
• If rubber or vinyl products remain in contact with the TV for a long
time, a stain may result.
If the cabinet becomes dirty, clean it with a soft, dry cloth.
When cleaning the surface of the LED display, wipe the panel surface
gently with a soft, dry cloth.
2. Periodically disconnect the power plug from the outlet and check
it.
If dust has collected on the power plug connectors, clean off the
dust with a dry cloth.
This dust may cause a fire due to reduced insulation on the plug.
Important information
1. About LCD screen
• If you have the LCD screen facing to the sun, the LCD screen will
be damaged. Be aware of locating the TV close to a window or
outdoors.
• Never press the LCD screen strongly or scratch it, and never put
anything on it. These actions will damage the LCD screen.
2.
About cabinet and LCD screen
Never spray volatile compounds such as insecticide on the cabinet
and LCD screen. This may cause a discoloration or damage the cabinet
and LCD screen.
3. About afterimage
If a still picture is displayed, an afterimage may remain on the screen,
however it will disappear. This is not a sign of malfunction.
4. Some pixels of the screen do not light up
The LCD display panel is manufactured using an extremely high level
of precision technology, however sometimes some pixels of the screen
may be missing picture elements or have luminous spots. This is not
sign of malfunction.
5. About Interference
The LCD display may cause interference in image, sound, etc. of other
electronic equipment that receives electromagnetic waves (e.g. AM
radios and video equipment).
6. About using under the low temperature places
If you use the TV in the room of 0°C or less, the picture brightness may
vary until the LCD monitor warms up. This is not a sign of malfunction.
7. When disposing of or transferring ownership of the TV
Before disposing of or transferring ownership of the TV, perform
“Resetting the TV”.

4
Important Safety Precautions
Recording using an USB storage device
• Be sure to select the correct country/region for use.
Use of the recording function may not be possible depending on the
selected country/region.
Use with incorrect settings may violate certain laws or other
regulations, and may result in criminal punishment.
In such cases, TOSHIBA CORPORATION and the Toshiba Group shall
bear no responsibility whatsoever.
• The recording function has been designed for private use and
entertainment in your home environment.
Please note that any commercial use of the recording function could
lead to copyright infringement of authors’ rights. Toshiba asks you to
respect the intellectual property rights of third parties.
• Before recording to a device connected to the TV, make a test
recording and check the recording performance.
• Toshiba shall not be liable for compensation or incidental damages
of any kind whatsoever resulting from content that was not properly
recorded on the recording device or that was modified or lost.
• Toshiba shall not be liable for damages of any kind whatsoever
(breakdown of the recording device, modification or loss of the
recorded content, etc.) resulting from malfunction, operating failure or
incorrect operation due to combining with another connected device.
• Do not turn off the power supply to the USB storage device or
disconnect the connecting cable while the USB storage device
is operating. Doing so may result in loss of the recorded data or
malfunction of the USB storage device.
• The recording function is not available in all countries/regions.
• Please note that recording on the USB storage device is no longer
playable after the TV’s main-board is exchanged during service.
• If the time information is incorrect, programed recording may not be
performed properly.
Furthermore, if the time information differs according to the currently
viewed channel, programed recording may not be performed properly
depending on tuning operations.
Exemptions
• Toshiba is not liable for any damage caused by fires, natural disaster
(such as thunder, earthquake, etc.), acts by third parties, accidents,
owner’s misuse, or uses in other improper conditions.
• Toshiba is not liable for incidental damaged (such as profit loss or
interruption in business, modification or erasure of record data, etc.)
caused by use or inability to use of product.
• Toshiba is not liable for any damage caused by neglect of the
instructions described in the owner’s manual.
• Toshiba is not liable for any damage caused by misuse or malfunction
through simultaneous use of this product and the connected
equipment
.
When using a wireless network
CAUTION:
• Bluetooth
TM
and Wireless LAN devices operate within the same
radio frequency range and may interfere with one another. If you
use Bluetooth
TM
and Wireless LAN devices simultaneously, you may
occasionally experience a less than optimal network performance or
even lose your network connection.
• If you should experience any such problem, immediately turn off
either your Bluetooth
TM
or Wireless LAN device.
• Actual performance can vary, including lower wireless network
capacity, data throughput rate, range and coverage.
• Performance depends on many factors, conditions and variables,
including distance from the access point, volume of network traffic,
building materials and construction, operating system used, mix of
wireless products used, interference and other adverse conditions.
Wireless LAN and your Health
Wireless LAN products, like other radio devices, emit radio frequency
electromagnetic energy. The level of energy emitted by Wireless LAN
devices, however, is far less than the electromagnetic energy emitted by
wireless devices such as mobile phones.
Because Wireless LAN products operate within the guidelines found
in radio frequency safety standards and recommendations, TOSHIBA
believes Wireless LAN is sage for use by consumers. These standards and
recommendation reflect the consensus of the scientific community and
result from deliberations of panels and committees of scientists who
continually review and interpret the extensive research literature.
In some situation or environments, the use of Wireless LAN may be
restricted by the proprietor of the building or responsible representatives
of the organization. Such restrictions may apply in environments where
the risk of interference to other devices or services is perceived or
identified as harmful.
If you are uncertain of the policy that applies to the use of wireless
devices in a specific organization or environment, you are encouraged to
ask for authorization to use the Wireless LAN device prior to turning on
the equipment.
- This lightning flash with arrowhead symbol within an equilateral
triangle is intended to alert the user to the presence of non-insulated
“dangerous voltage” within the product’s enclosure that may be of
sufficient magnitude to constitute a risk of electric shock.
- Warning: To reduce the risk of electric shock, do not remove cover (or
back) as there are no user serviceable parts inside. Refer servicing to
qualified personnel.
- The exclamation point within an equilateral triangle is intended to alert
the user to the presence of important operating and maintenance
instructions in the literature accompanying the appliance.
AC voltage: This symbol indicates that the rated voltage
marked with the symbol is AC
voltage.
This equipment is a Class II or double insulated electrical
appliance. It has been designed in such a way that it does not
require a safety connection to electrical earth.
CAUTION
RISK OF E LECTRIC
SHOCK. DO NOT OPEN.

5
Getting started
Installing the Stand or Wall Mount Bracket
Accessories List
Installing the Wall Mount Bracket
CAUTION
• Be sure to disconnect the AC power cord before installing a stand or
wall mount brackets.
• The display on your TV is fragile. Make sure the TV screen is not
scratched or damaged by hard objects or from pressure.
• After the installation is complete, make sure the TV is steady on a table
or firmly attached to a wall mount, before removing all protective film,
if any.
Installing the Stand
1. Carefully place your TV face-down on a soft, flat surface to prevent
damage to the TV or scratching to the screen.
2. Take out the Base Stand from the accessory bag and then insert the
stand into the bottom slots of the TV.
3. Secure the Base Stand to the TV with 4 screws in accessory tightly.
NOTE
• The accessories may be different from the list above due to different
models, countries/regions, please refer to the actual accessory bag.
Before mounting the TV, remove the TV stand if you have already attached it,
and make sure the wall mount bracket supports the weight of your TV.
CAUTION
When mounting the TV on a wall, follow instructions provided with the
wall mount bracket. If it is not correctly mounted, the TV may fall and cause
property damage or personal injury.
• Place spacers between the TV and bracket.
• Make sure the tilt angle between the TV screen and the vertical
surface is no more than 15 degrees.
≤15°
TV screen
Vertical
surface
Wall Mount Bracket
Wall Mount Screw
Wall Mount Spacer
Rear cover of the TV
NOTES
• The diameter and length of the screws differ depending on the wall
mount bracket model.
• Wall mount bracket is optional. Your TV may not have wall mount bracket.
Please refer to the actual accessories.
• Standard dimensions are shown below.
The following accessories are included with TV:
OWNER’S MANUAL× 1 Remote Control × 1 AAA Battery × 2
Base Stand × 2 Screw × 4
Power Cord × 1(only for
65")
For 43"/50"/55"
For 65"
Wall mount hole pattern (mm)
200 × 200
(43")
200 × 300
(50"/55")
300 × 200
(65")
Wall mount screw size M6
NOTES
• Insecure installation may cause the tilt or falling of the product, and
further lead to personal injuries or product damages.
• P-clip and corresponding screws may not included with TV set, please
purchase them by yourself if necessary.
Screws:
M5×12(65") ×4
Base stand
Base stand
8.0-10.0 mm(50
"
/55
"
)
9.5 -11.5 mm(43
"
/65
"
)
Screws:
M4×16(43") ×4
M4×12(50"/55") ×4
Base stand
Base stand
Installing the P-Clip
Please place the TV on a horizontally stable surface, and then use P-Clip to
connect the TV and the wall or pillar.
1. Fix the larger side of P-Clip to the
screw hole on the back of TV set
with a M6×12 screw.
2. Fix the other side of P-Clip to the
wall or pillar with a ST4×25 screw.
6
TV Rear
TV Front
Getting started
NOTES
Check the jacks for position and type before making any
connections. Loose connections can result in image or color
problems. Make sure that all connections are tight and secure.
Not all A/V devices have the ability to connect to a TV, please
refer to the user’s manual of your A/V device for compatibility and
connections procedure.
Before connecting external equipment, remove the mains plug from
the wall socket. Otherwise, it may cause electric shock.
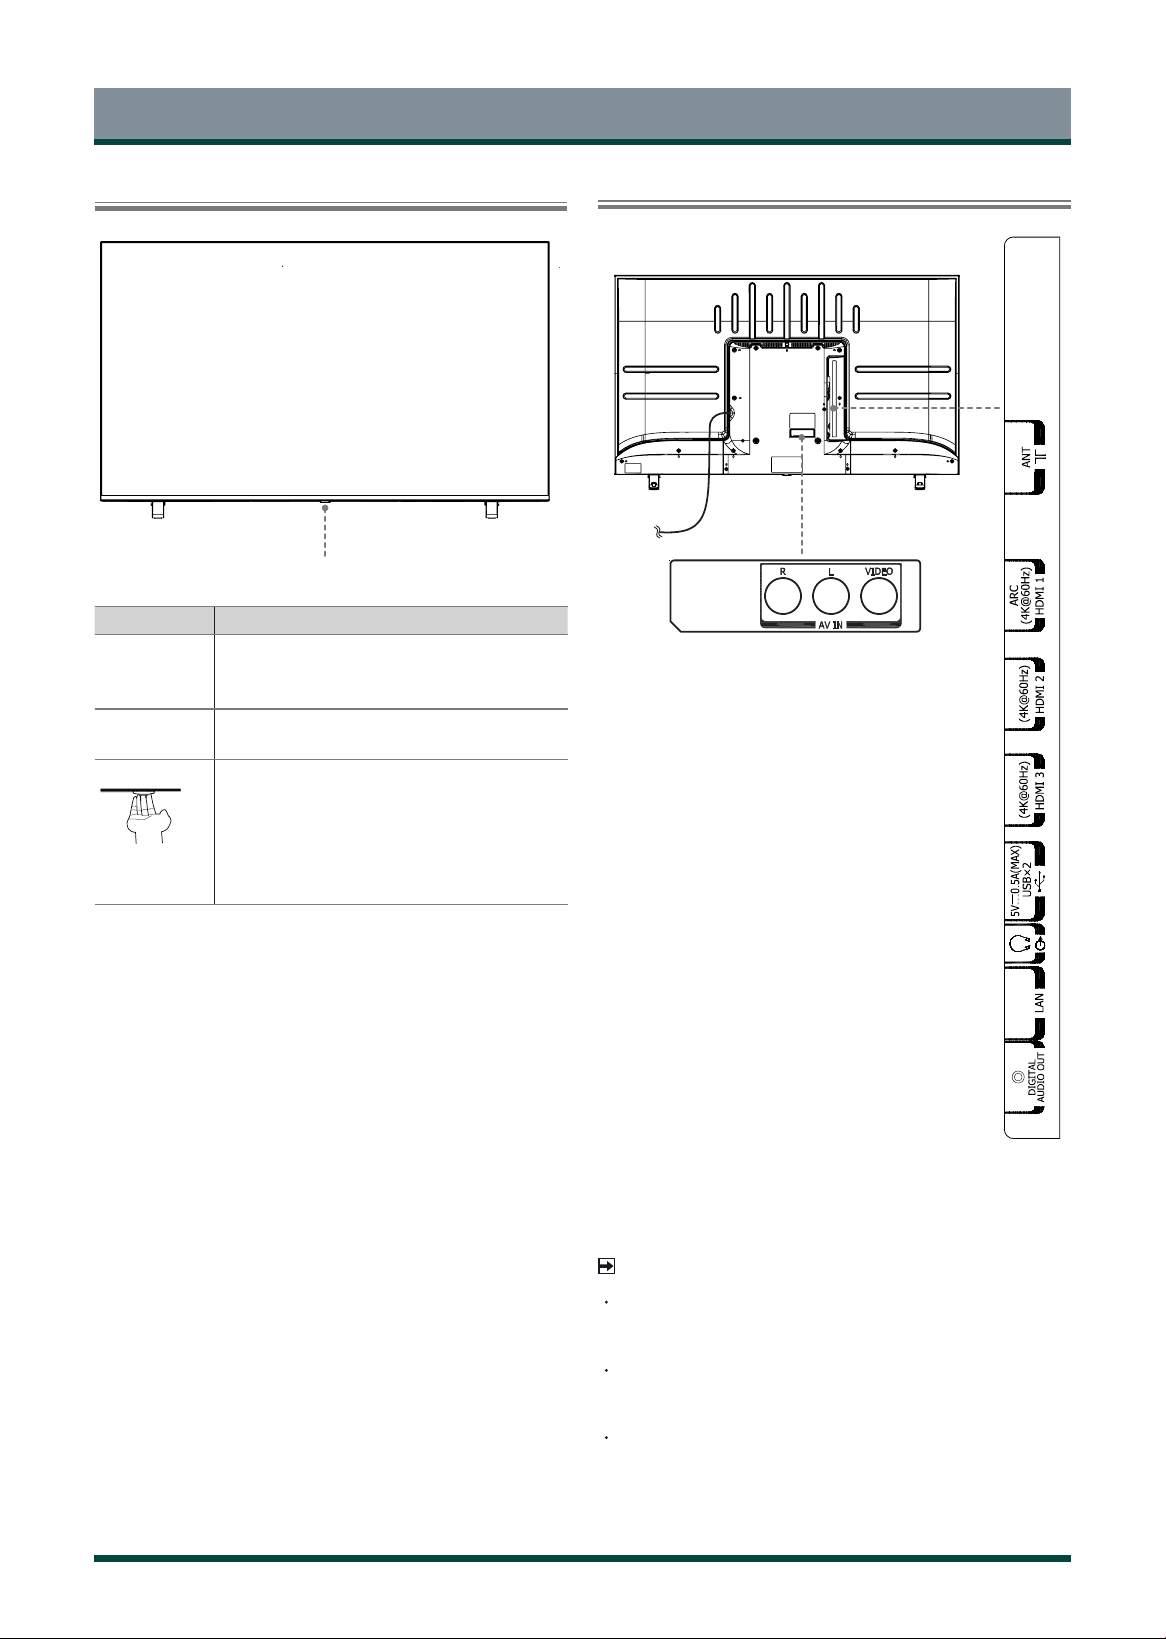
For 43"
Item Description
Remote sensor
Receive remote signals from the remote control.
Do not put anything near the sensor, as its function
may be affected.
Power
indicator
The light is red in standby mode, the light is green
when TV is on.
Standby /
Source
Press the single button when in standby mode, TV
will be turned on. Press the single button to call up
the menu, when the focus is on “Power Off”, wait for
3 seconds, then the TV will go into standby mode
automatically.
/ Press the single button to call up the menu and
then select among the different input signal sources.
Single button / Remote sensor / Power indicator
Power cord
7
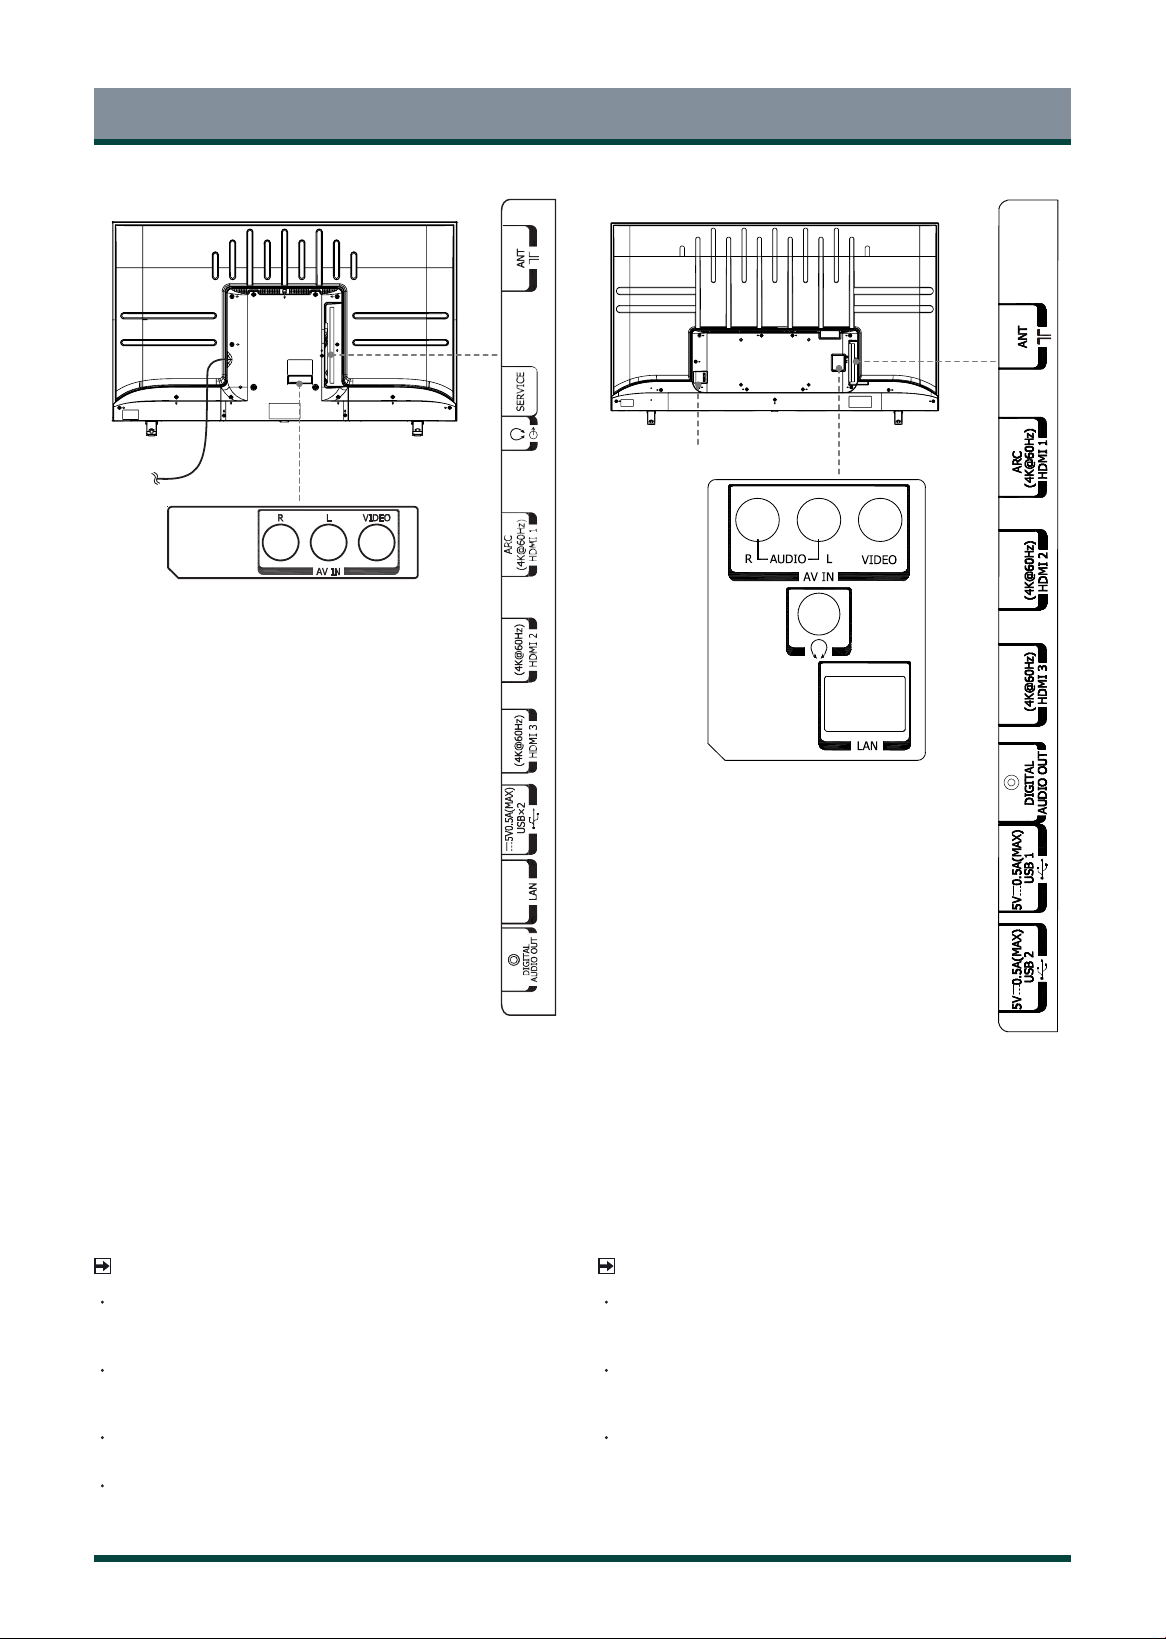
Getting started
NOTES
Check the jacks for position and type before making any
connections. Loose connections can result in image or color
problems. Make sure that all connections are tight and secure.
Not all A/V devices have the ability to connect to a TV, please
refer to the user’s manual of your A/V device for compatibility and
connections procedure.
Before connecting external equipment, remove the mains plug from
the wall socket. Otherwise, it may cause electric shock.
Service jack is not available for you to connect an external device. It
can only be used by our factory for testing purposes.
For 65"
AC Input
For 50"/55"
Power cord
NOTES
Check the jacks for position and type before making any
connections. Loose connections can result in image or color
problems. Make sure that all connections are tight and secure.
Not all A/V devices have the ability to connect to a TV, please
refer to the user’s manual of your A/V device for compatibility and
connections procedure.
Before connecting external equipment, remove the mains plug from
the wall socket. Otherwise, it may cause electric shock.
8
Getting started
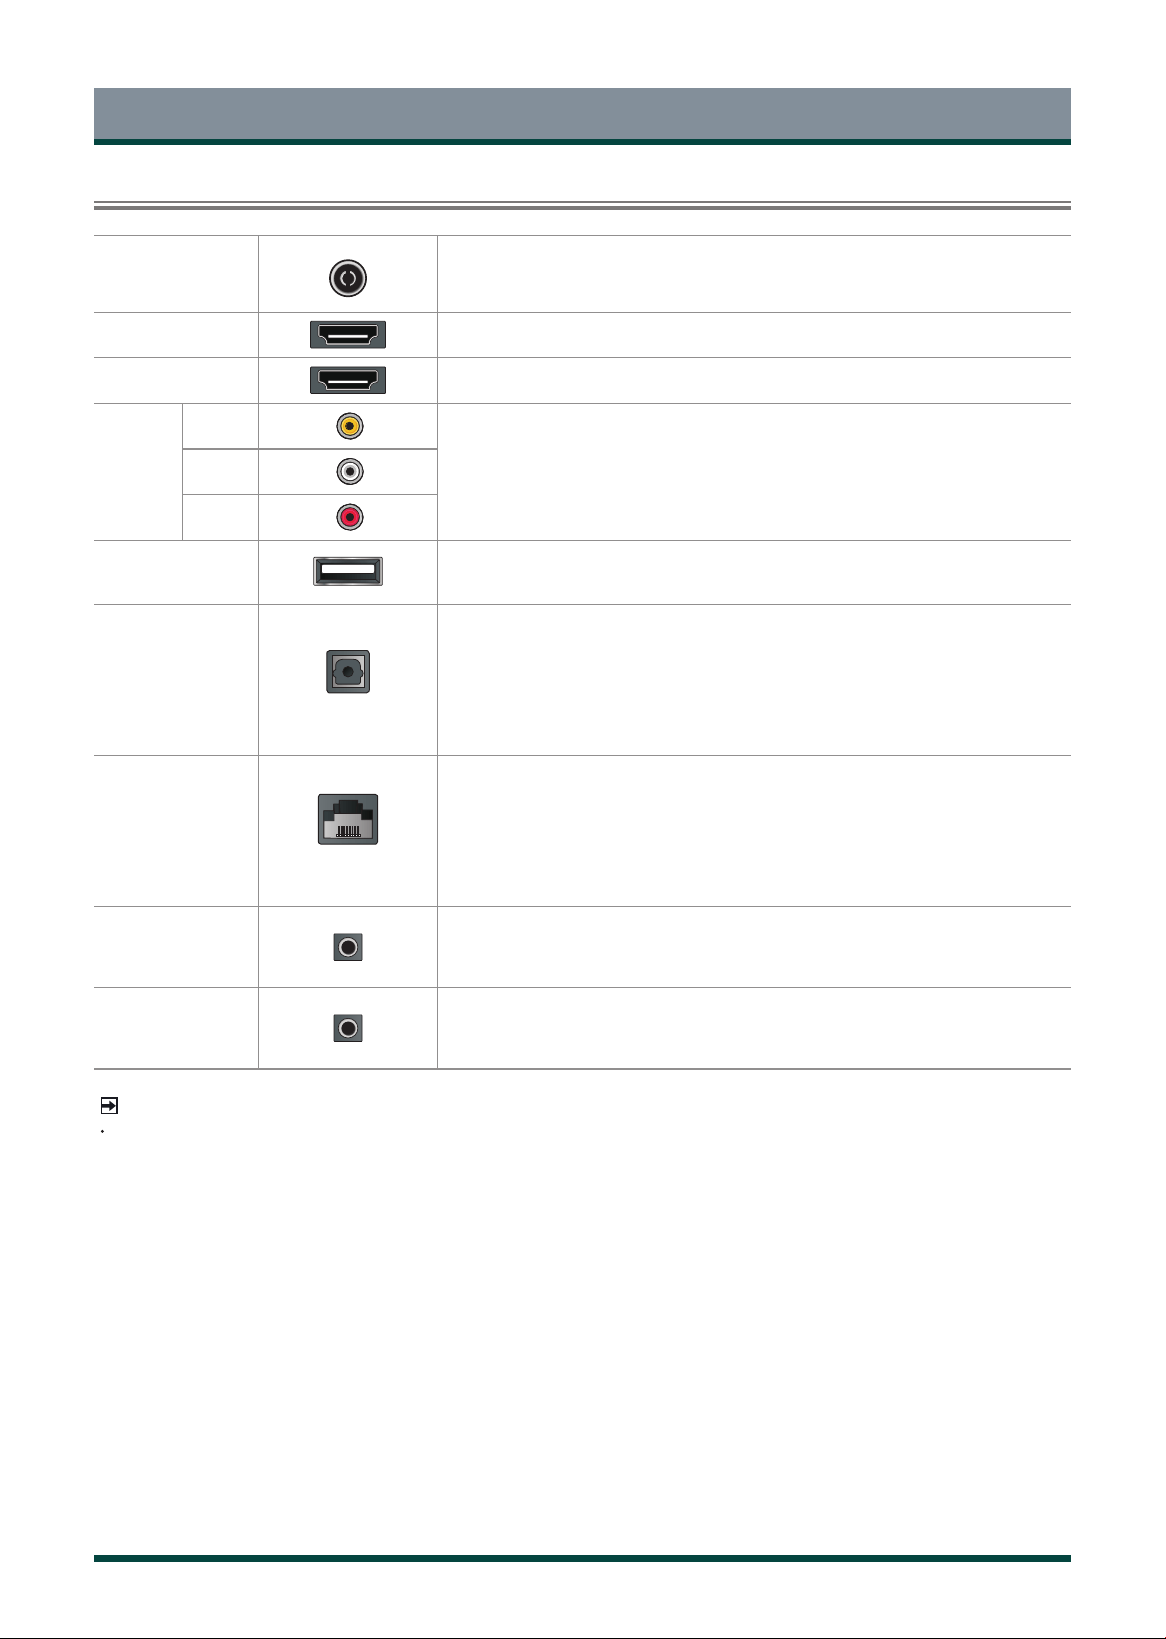
Terminals
NOTE
The location and names of the terminals on the TV may vary according to TV model, and not all terminals are available on all models.
ANT Connect an outdoor VHF/UHF antenna.
HDMI Connect an HDMI cable from an external A/V equipment.
HDMI (ARC)
Connect an HDMI cable from an external digital audio system.
VIDEO
INPUT
VIDEO
Connect a composite video cable and left-right audio cables from an external AV device.
The VIDEO can be used to connect a range of equipment, including video recorders,
camcorders, decoders, satellite receivers, DVD players, or games consoles.
L
R
USB Connect a USB device for browsing photos, music and movies.
DIGITAL
AUDIO OUT
Connect an optical cable from an external digital audio system.
LAN Connect an Ethernet cable to access a network or the Internet.
HEADPHONE
Connect headphones to listen to the sound coming from the TV.
Note: Excessive sound pressure from earphones can cause hearing loss.
SERVICE
This port is not available for you to connect an external device. It can only be used by our
factory for testing purposes.

9
Getting started
Wired Setup
Connect your TV to your network by connecting the LAN port on the back of
your TV to an external modem or router using a LAN (Ethernet/Cat 5) cable.
See the illustration below.
NOTES
• You get access to the Internet through your TV.
• You are recommended to use a modem or router that supports
Dynamic Host Configuration Protocol (DHCP). Modems and routers
that support DHCP automatically provide the IP address, subnet mask,
gateway, and DNS, so you don’t have to enter them manually. Most
home networks already have DHCP.
LAN
Modem CableLAN Cable
LAN Cable
External Modem
(ADSL / VDSL / Cable TV)
IP Sharer (Router)
(with DHCP server)
Wireless Setup
To connect your TV to your wireless network, you need a wireless router or
modem. See the illustration below.
The TV’s built-in Wireless LAN Adapter supports the IEEE802.11 ac/a/b/g/n
communication protocols.
NOTES
• You get access to the Internet through your TV.
• Connect to an available wireless network.
• Make sure that you have the wireless router’s SSID and password
before attempting to connect.
Wireless Adapter
built-in the TV set
LAN Cable
Wireless Router
The LAN Port
on the Wall
(not provided)
Connecting with an HDMI (ARC) Cable
Connect an HDMI cable from an external digital audio system.
ARC enables the TV to directly output the digital sound through an HDMI
cable. Please note that it works only when the TV is connected to the audio
receiver that supports the ARC (Audio Return Channel) function.
HDMI cable (not included)
Audio Amplier/Speaker
HDMI
ARC
HDMI
NOTES
• When this port is used as the ARC function, it can be used as signal
input when DVD is connected to amplifier and the amplifier is
connected to the TV at the same time. (Some amplifiers may not
support series connection.)
• ARC work by auto as per input ARC condition.
Connecting with an HDMI Cable
Connect an HDMI cable from an external A/V equipment.
Some devices such as DVD player require HDMI signal to be set to output in
the device’s settings. Please consult your device user manual for instructions.
Please note that the HDMI connector provides both video and audio signals,
so it’s not necessary to connect an audio cable.
DVD/Blu-Ray/AV receiver
/Set-top Box
HDMI cable (not included)
HDMI
HDMI
Connecting with an USB Cable
Connect the USB devices such as hard drives, USB sticks and digital cameras
for browsing photos, listening to music.
USB
• Support the U disk 4G, 8G, 16G, 32G, 64G, 128G and other common
market size, and 8T hard drive is currently supported.
• Support format: NTFS, FAT32, EXT4.
Using the USB storage device function
The USB storage device function can be used to record and view digital
broadcast programmes.
Read the precautions below before recording or viewing programmes using
the USB storage device function.
NOTES
• Be sure to select the correct country/region for use.
Use of the recording function may not be possible depending on the
selected country/region.
Use with incorrect settings may violate certain laws or other
regulations, and may result in criminal punishment.
In such cases, TOSHIBA CORPORATION and the Toshiba Group shall
bear no responsibility whatsoever.
• Recorded programmes saved on the USB storage device can only be
viewed on this TV. They cannot be viewed when connected to another
TV (including the same model of TV), a PC, or other device.
• You cannot watch one channel while recording another.
• If the recording time to the USB storage device is too short, no data
may be saved.
• You cannot record video input signals on the USB device.
• Not all types of broadcast may be recordable.
• After programing the TV to record digital broadcasting, do not
disconnect the power plug before recording starts.
• Should video or audio recording fail due to malfunction of the TV or
poor reception, no compensation shall be paid.
• Certain digital cameras may not be compatible with the TV.

10
CT-95022
Remote Control
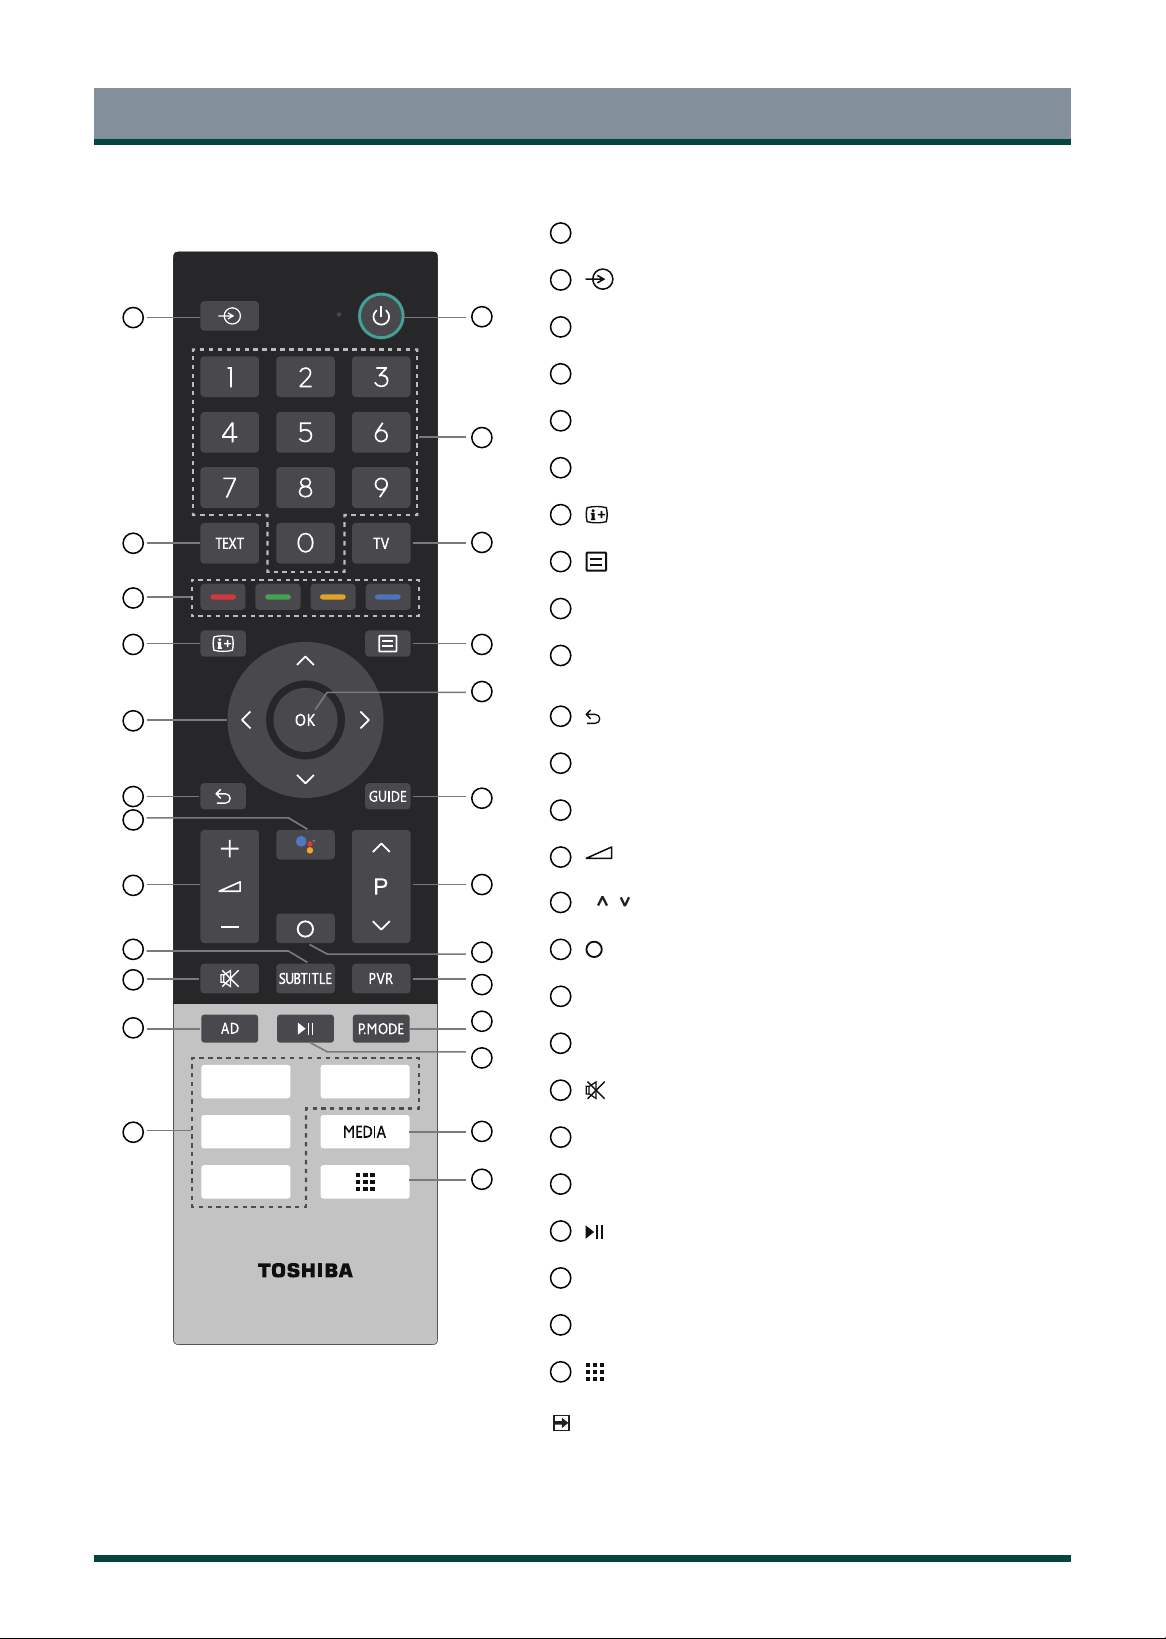
Buttons on the Remote Control
1
POWER: Turn the TV on or into standby mode
2
: Select input source
3
0-9: Direct channel selection or numbers input
4
TEXT: Turn on/off the teletext function
5
TV: Enter the Live TV in the Home screen (TV mode)
6
Special function buttons
7
: Display the current programme information
8
: Display the quick setup menu
9
OK / Confirmation button
10
D-pad: Allow you to navigate the OSD menus and adjust the system
settings to your preference
11
Back: Return to previous menu
12
GUIDE: Display the Electronic Programme Guide (DTV mode)
13
Google Assistant of TV
14
+
/
-
: Adjust the volume
15
P /
: Switch channel
16
: Display the Home screen
17
PVR: Record the current program (DTV mode)
18
SUBTITLE: Press to display the Subtitle Language menu
19
: Mute or restore the TV sound
20
S.MODE: Select the sound mode
21
P.MODE: Select the picture mode
22
:
Media content control function buttons
23
APPS: Fast access to applications
24
MEDIA: Enter the media
25
: Fast access to all applications
NOTE
The included remote control will vary depending on model,
country/region. Check information according to the actual
remote control in the accessory bag.
1
3
4
5
7
8
10
12
15
19
2
6
9
11
13
14
17
18
20
22
23
24
25
16
21
11
Remote Control
1
POWER: Turn the TV on or into standby mode
2
: Select input source
3
0-9: Direct channel selection or numbers input
4
TEXT: Turn on/off the teletext function
5
TV: Enter the Live TV in the Home screen (TV mode)
6
Special function buttons
7
: Display the current programme information
8
: Display the quick setup menu
9
OK / Confirmation button
10
D-pad: Allow you to navigate the OSD menus and adjust the system
settings to your preference
11
Back: Return to previous menu
12
GUIDE: Display the Electronic Programme Guide (DTV mode)
13
Google Assistant of TV
14
+
/
-
: Adjust the volume
15
P /
: Switch channel
16
: Display the Home screen
17
PVR: Record the current program (DTV mode)
18
SUBTITLE: Press to display the Subtitle Language menu
19
: Mute or restore the TV sound
20
AD: Set the Audio Description on or off
21
P.MODE: Select the picture mode
22
:
Media content control function buttons
23
APPS: Fast access to applications
24
MEDIA: Enter the media
25
: Fast access to all applications
NOTE
The included remote control will vary depending on model,
country/region. Check information according to the actual
remote control in the accessory bag.
1
3
4
5
7
8
10
12
15
19
2
6
9
11
13
14
17
18
20
22
23
24
25
16
21
CT-95027
12
Remote Control
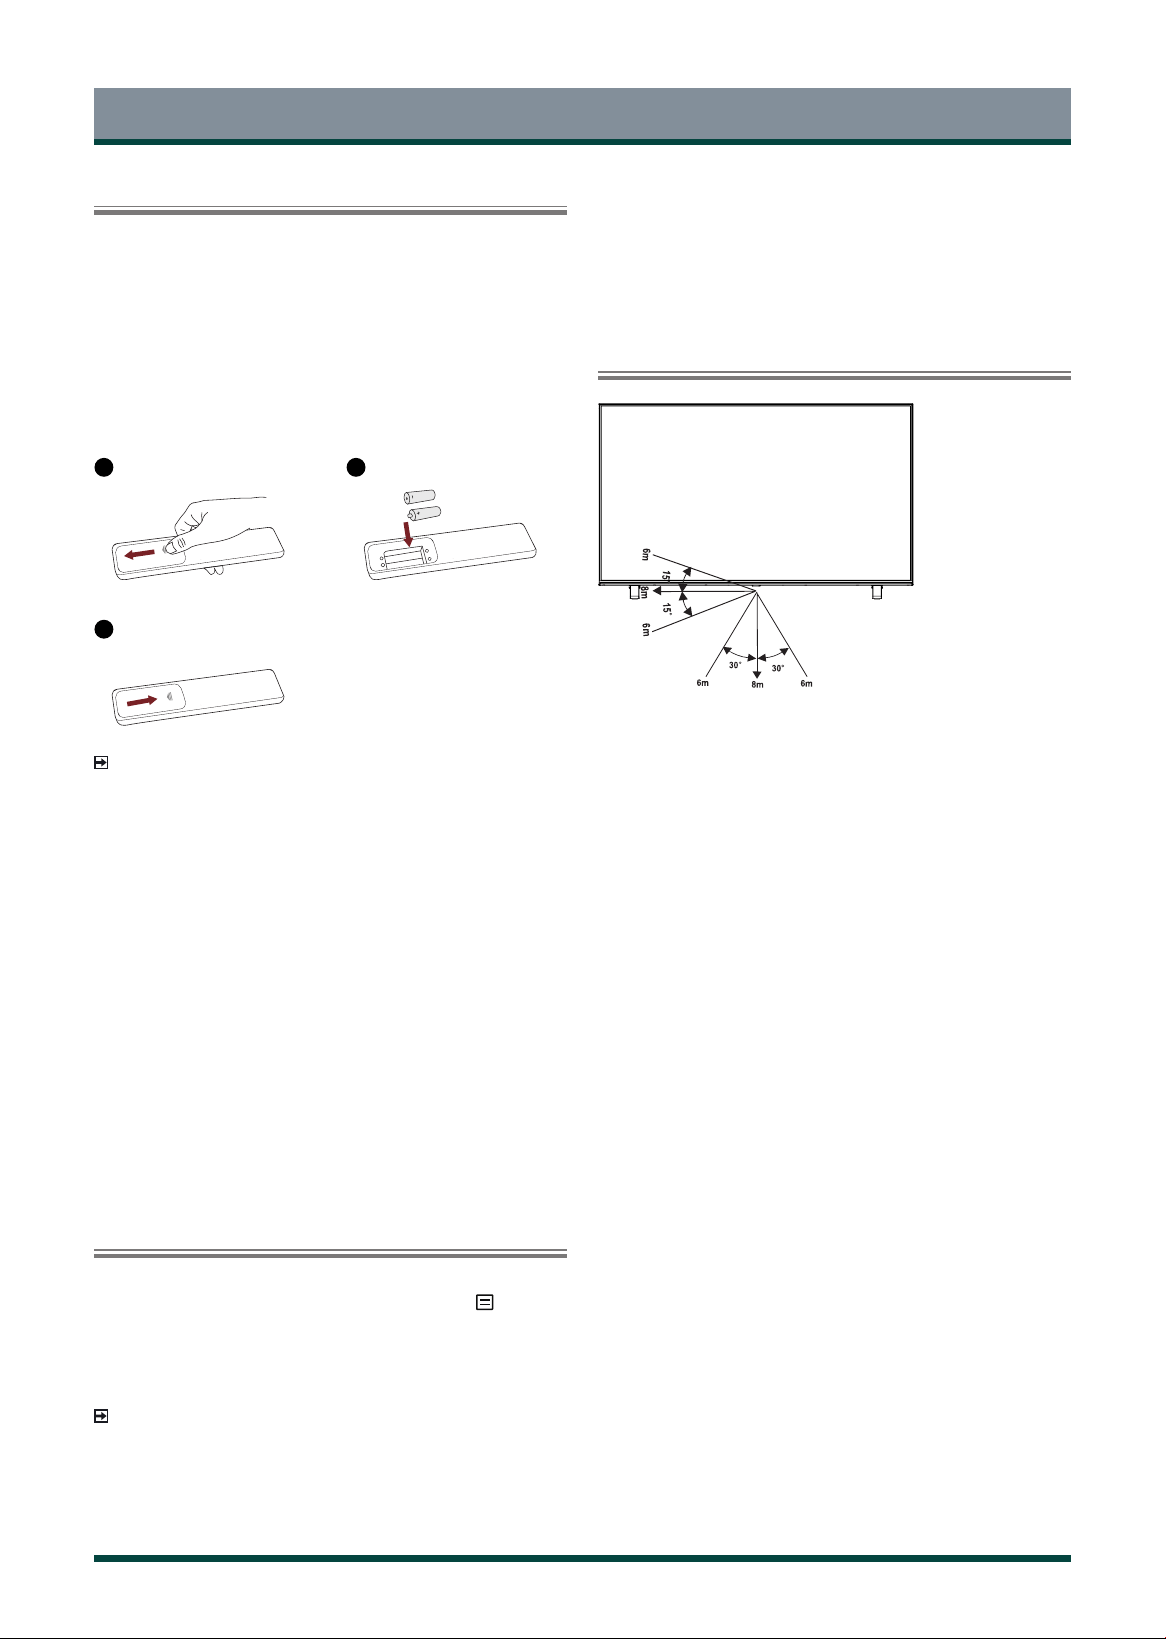
Installing Batteries in the Remote Control
Press the release button on the back of the remote control to remove the
battery compartment cover.
1. Slide the back cover to open the battery compartment of the remote
control.
2. Insert two AAA size batteries. Make sure to match the ( + ) and ( - )
ends of the batteries with the ( + ) and ( - ) ends indicated in the
battery compartment
.
3. Close the battery compartment cover.
NOTES
• Product image is only for reference, actual product may vary in
appearance.
Handling the Batteries
• Incorrect use of batteries may cause corrosion or battery leakage,
which could cause fire, personal injury or damage to property.
• Only use the battery type indicated in this manual.
• Do not mix old and new batteries or different types of batteries.
• Do not dispose of used batteries as domestic waste. Dispose of them
in accordance with local regulations.
• Battery chemicals can cause a rash. If the batteries leak, clean the
battery compartment with a cloth. If chemicals touch your skin, wash
immediately.
• If you do not intend to use the remote control for a long time, remove
the batteries.
• Remove depleted batteries immediately to prevent battery acid from
leaking into the battery compartment.
Pairing the Remote Control
1. Pair the remote to the TV after you power it on. Make sure your remote
is close to this TV around 3 meters. Press and hold the
[ ] button at
least 3 seconds to start pairing.
2. If the remote pairs successfully, a confirmation will display on the
screen. If it does not pair successfully, an unsuccessful message will
display. Repeat step 1.
NOTES
• This function is only available on certain models and bluetooth
remote control in some countries/regions.
• If an unknown error occurred with the remote then it could have been
caused by interference. Try to remove what’s causing the interference
1
Gently push and slide
2
Insert the batteries
3
Gently push and slide
and pair it again.
• If an unknown error occurred in the remote control while the battery
power is normal, you can take out the batteries and press any key for
1~2 seconds, then the remote control can work normally.
• The remote cannot be paired to the TV while the TV is in standby
mode.
Remote Control Operation Range
13
General Operation
Turn on/o your TV
Select the Input Source depending on the video device you have
connected to your TV.
To select the input source:
1.
Turn on your TV, then press the [ ] button on the remote, and
the list of Source appears.
2. Press the
[ Up / Down ]
buttons to select the input source.
3. Press the
[ OK ]
button to confirm your selection.
Selecting the Input Source
Using the Live TV
To view broadcast programs, press the [ ] button on your remote to
select Channels.
Channel search guide
When you select Channels as input, if no TV channels were saved before,
you will be prompted to do a channel search. You can also go to Menu >
Channels to change the channel settings.
Launch Live TV
After channel scanning is done for the first time, the screen will display
LiveTV operating tutorial, including: how to Load info Bar, how to load
the channel list and so on.
[ Up ] Load info bar
[ OK ] Load channel list
[ GUIDE ]
Load EPG (GUIDE)
[ MENU / ] Load onscreen menu
[ Down ]
Initiate PVR or Timeshift
[ / ] Jump to previous channel
Turn on your TV for the first time
Connect the mains cable to the mains socket after you have
completed all the connections.
The first time you turn the TV on, it will go straight into the
Installation Guide.
The guide setting is completed according to the boot navigation
prompt. The navigation information is specific to the actual
condition.
The Home screen will be your starting point for navigating the TV.
To turn your TV on or off :
1 Plug the AC power cord into a socket outlet of AC power supply.
2
When the TV is powered on, press the [ ] button on the remote
control, to turn TV on or off.
NOTES
·
When your TV is in standby mode, it is still consuming power. To
completely disconnect power, please remove the mains plug from
the mains socket.
·
If your TV does not receive an input signal for several minutes, it
automatically goes into standby mode.
Viewing channel information
As you use the [ P / P ] button on your remote to scroll through
channels, an information banner appears on the top of the screen.
Viewing a channel list
After you have done an automatic channel scan (if you’re using an
antenna) or receiving your channels through a cable provider, you can
view your list of channels by pressing [ OK ] button on your remote. You
will see the channel list display on the screen.
Creating and editing Favorites List
To quickly access your most-watched channels, you can create a Favorites
List.
To create and edit your Favorites List:
There are 2 ways to enter the edit menu
:
1. Press the [ OK ] button and the [ Left ] button on your remote when
viewing channels to select
Channel List >
Favorite List
>
Add fav
list
(Max 4 fav lists can be added)
2. Press the
[ ] button on your remote to access the Menu, and then
select
Channels
> Channel Edit > Favorite 1 > Add channels.
Viewing your Favorite list
To view channels that you’ve added to your Favorites List simply press [
OK ] button on your remote to call out the channel list.
The channel list appears on the screen and heart-shaped icons are shown
next to the channels that make up your Favorites List.
EPG (GUIDE)
It provides convenience to check TV programmes that will be available
in the next 7 days. The information displayed by the EPG is made
available by the commercial television networks for digital channels
only. The EPG also provides a simple way to program the recording of
your favorite programmes and a reminder function which can switch
channel automatically at scheduled time so that you do not miss
programmes of interest. (The availability and amount of programme
information will vary, depending on the particular broadcaster).
Watch
In Guide (EPG), when a current programme is selected, press the [
OK ] button to watch.
PVR/Reminder/Detail
In Guide (EPG), press the [ Up / Down ] buttons to select the
channels, press the [ Left / Right ] buttons to select program based
on the time schedule.
Press the [ OK ] button to select PVR or Reminder.
Press the [ Up / Down / Left / Right ] buttons to change and set
different options.
In Live TV, press the [ GUIDE ] button on the remote control to display
channel information on program guide list.

14
General Operation
101 Rbb Berlin
Social Service
13:00-14:00 26 Oct.
PVR Reminder Detail
·
Select and set Start time/End Time: Press the [ OK ] button,
and then press the [ 0-9 ] button to input the desired numbers.
(Selecting and setting end time is only available for PVR)
·
Repeat: You can select from Once, Daily, Mon to Fri, Sat to Sun,
Sun, Mon, Tue, Wed, Thu, Fri and Sat.
NOTES
·
Reminder is only available for programmes that haven’t been aired
yet.
·
A storage device must be attached to the television for recording
purposes.
·
The TV will record the program even in standby mode.
·
The PVR function is only available on certain models in some
country/region.
Page Up/Down
In Guide (EPG), press the [ P / P ] buttons to move programme
listing page up/down.
Schedule
In Guide (EPG), press the RED button view a list of scheduled
reminders and recordings.
Detail
In Guide (EPG), press the GREEN button to display detailed
information of the selected programme (only available on certain
models in some country/region).
24h-
In Guide (EPG), press the YELLOW button to go backwards a day.
24h+
In Guide (EPG), press the BLUE button to move forwards a day.
PVR/T.Shift
PVR
The PVR function allows you to easily record digital television content
for later viewing. The function is only available in DTV source. To use
PVR, you must connect a USB device for recording. The format of the
storage disk should be FAT32. The PVR will not function if a data storage
device has not been connected.
Schedule Recording
In Live TV, press [ GUIDE ] button, select the programme to be
played, press [ OK ] button to set the appointment time and period,
the reservation is successful. Press the RED button to view the
schedule recording. In the schedule recording list, you can readjust
the reservation information that has been set.
Instant Recording
Press [ Down ] button to select PVR.
Select the partition, and the USB device speed will be tested (appear
when using for the first time).
You can choose to Manual stop or automatically match the
programme time.
Standby record
If you press the power button during recording, TV will go into
standby mode but the recording process is still going on. If you
press power button again and wake up the TV, recording process
will not be affected. After recording, the recorded file will be
automatically saved to the disk.
Recording List
Viewing the recorded programmes.
Press the [ Down ] button on your remote to select Recording List
> Recorded, You can watch or delete recorded programmes.
NOTES
·
Available on Channel (DTV) source only.
·
The storage space of your USB device should be no less than 2G (for
15 minutes high definition video).
·
If the transfer rate of your hard disk is too slow, a pop-up notice will
appear, in this case, you can try another one.
·
The PVR function doesn’t support analogue channels.
·
The schedule recording function is not available while you are
watching a programme that is currently being broadcast.
·
Some broadcasters may restrict to record the programme.
·
During the recording progress, channels locked with Channel Lock
(password needed) are disabled to watch.
·
The PVR function is disabled for scrambled channels (CI module
needed).
·
The PVR function is only applicable in certain models.
T.Shift
This option allows you to pause and rewind live TV. This function
operates by recording temporarily to a storage device. Please ensure
your storage device is connected and there is enough free disk space.
Otherwise the recording will not commence.
Press the [ Down ] button on the remote to select T.Shift and then the
menu will appear, click the [II] icon to pause the live broadcast and click
the [
►
] icon to play. Click the [ ] icon to rewind and click the [ ]
icon to fast forward. Click the [
■
] icon to exit the function and watch the
current broadcast.
NOTES
·
The T.Shift function doesn’t support analogue channels.
·
The storage space of the USB device should be no less than 1G.
·
The T.Shift function is disabled for channels locked with Channel
Lock or scrambled channels (CI module or password needed).
·
The Timeshift function is only applicable in certain models in some
country/region..

15
Menu
Using the Menu
1
Press the [ ] button on your remote to enter the Menu in TV
mode.
The Menu consists of the following settings:
• Picture
• Sound
• Channels
• Parental Control
• Teletext
• Subtitle
• EPG (GUIDE)
• HDMI 2.0 Format (only for HDMI mode)
• Audio Language (MTS)
• Audio Only
• Sleep Timer
• Settings
• Help
2 In each menu, you can:
Press the [ Up / Down / Left / Right ] buttons to select an item,
Press the [ OK ] button to enter the sub-menu or to set on or off,
Press the [
Left / Right
] buttons to adjust the value,
Press the [ ] / [ ] button to return to the previous menu.
NOTE
The menus in the user manual may vary slightly from the actual screen.
Picture
Backlight
Adjust Dynamic Backlight Control
and Backlight Level
to change the
overall brightness of the screen.
• Dynamic Backlight Control: Enhance the contrast ratio between
light and dark areas of the picture. You can select On or Off.
NOTE: Some models don’t support this function.
• Backlight level: Adjust how bright you want images to appear,
lower settings create darker images. The Backlight level is only
available when Dynamic Backlight Control select Off.
Picture Mode
Select a preset picture mode to best suit the content you’re viewing.
Once you choose the mode, you can adjust the picture based on the
following settings:
Contrast
Adjust the Contrast level to increase or decrease how bright images
appear.
Brightness
Adjust the Brightness level to generate lighter or darker images.
Colour
Adjust the colour intensity of the picture for a more vibrant image.
Tint
Adjust the colours from a green to magenta tint to view the natural
skin tones of people on the screen.
Sharpness
Adjust how sharp or soft edges of images appear.
Aspect Ratio
Adjust the Aspect Ratio to stretch or zoom in on your picture.
NOTES
• Using the special functions to change the size of the displayed
image (e.g. changing the height/width ratio) for the purpose of
public display or commercial gain may infringe on copyright laws.
• If the aspect ratio of the selected format is different from the
one of the TV transmission or video programme, it can cause a
difference in vision.
• When using PC connected via HDMI terminal, the moving image
quality may be deteriorated.
Advanced Settings
Adjust advanced picture settings based on your viewing preference.
• Overscan: Change the video size settings to slightly crop the
edges of the displayed image.
• Colour Temperature: Select a preset colour temperature adjust
to Low, Mid-Low, Medium or High the white areas of an image
appear.
• Motion Enhancement: Reduce seeing afterimages that are left
on the screen when viewing fast-moving objects.
NOTE: Some models don’t support this function.
• Noise Reduction: Improve how clear the picture appears by
reducing noise.
• Digital Noise Reduction: Reduce MPEG block noise and provides
clearer edge transitions.
NOTE: Some models don’t support this function.
• HDMI Dynamic Range: Adjust the HDMI signal range to be more
suitable for the content. (HDMI mode only)
• Active Contrast: Automatically darken dark areas and lighten
light areas of images to see more details.
• Colour Space: Change the range of colours the TV displays.
NOTE: Some models don’t support this function.
Calibration Settings
Adjust the colour space and Gamma to best suit the content you’re
viewing.
• Colour Tuner: Adjust the Hue, Saturation, Brightness of colour
settings and restore colour tuner settings.
• White Balance: Adjust the intensity of red, green and blue lights
to view the true colours of all images in the picture and make
reset.
• Gamma: Adjust the Gamma to alter how the TV will respond to
the grayscale content. In a dark room choose a Higher number like
2.2. In a brighter area select a Lower number like 2.0. In general, 2.2
is normally recommended.
NOTE: Some models don’t support this function.

16
Menu
• Gamma Calibration: Adjust selected Gamma curve.
• RGB Only: View images based on default settings or choose off,
red, green or blue.
Apply Picture Settings
Adjust current picture mode to apply to current source or all
sources.
Reset
Reset current picture settings to factory mode.
Sound
System sounds
Open the default system sound.
Sound Mode
Select a preset sound mode to suit the type of content you are
listening to.
Speakers
Select the speakers which you want to use.
Dolby Atmos
Turn the Dolby Atmos on or off.
NOTE: Dolby Atmos may not be supported depending on the
model.
TruBass HDX
Optimize overall sound quality by increasing bass, making dialog
clear and natural, and widening the sound field.
TruSurround: X
Provide surround sound experience with psycho-acoustic
processing to place sounds beside, behind, and above the viewer.
For best results use with Surround Sound.
Dialog Clarity
Improve dialogue clarity.
TruVolume HD
Maintain consistent loudness levels from wide dynamic range
programs, loud commercials, and channel or input changes.
NOTE: TruBass HDX, TruSurround: X, Dialog Clarity and
TruVolume HD may not be supported depending on the model.
Wall Mount Setup
Automatically optimize the sound based on the position of the TV.
Advanced Settings
Tune the audio settings and quality of the TV.
• Balance: Adjust the left and right speaker strength to optimize
audio for a specific location.
• Auto Volume Control: Turn Auto Volume Control on or off.
• Digital Audio Out: Select the digital audio output format that
best suits the audio device type.
NOTE: When connected the TV with optical, Dolby Digital Plus
is not suggested.
• Digital Audio Delay: Adjust the digital audio output delay time
to sync sound from an external speaker with the images on the
TV.
• Lip Sync: Synchronize the displayed image with the audio output.
• Equalizer: Boost the volume at different frequencies.
• Headphone Mode: Change the way audio is sent through the
type of device that’s connected to your TV Audio Out port.
NOTE: Some models don’t support this function.
• Headphone Volume: Independently adjust the volume of audio
out devices.
NOTE: Some models don’t support this function.
Audio Type
• Audio Type: Select the audio type of programmes.
• Voiceover output: Select the voiceover audio out.
NOTE: Some models don’t support this function.
• Voiceover volume: Independently adjust the volume of
voiceover.
Reset
Reset current audio settings to factory mode.
Channels
Tuner Mode
Select if you receive TV channels over the air (antenna) or through a
cable set top box as the input will be used during a channel scan.
Auto Scan
Automatically scan for channels to view programmes from your TV
source.
Channel Edit
Manually edit the channel list order to your preference.
Postal Code
Set the Postal Code.
NOTE
• This function may not be available in your country/region.
Advanced Settings
Adjust advanced settings for Channel.
• DTV Manual Scan: Search and store the channels under DTV
mode.
• ATV Manual Scan: Search and store the channels under ATV
mode.
• ATV Fine Tuning: Fine tuning current channel to improve the
programme picture.
• Channel List Auto-Update: Allow your TV auto-update the
channel list from the content provider.
• Language: Select a desired language from the list in DTV mode.
NOTE: This function may not be available in your country/
region.
• PVR&Time-Shift Settings: Initialize the external USB disk to
support PVR and Time-Shift. (Since the function record temporary
the program onto a hard disk only.)

17
Block Time
Block certain channels and programmes during certain periods of
time.
Channel Block
Block selected channels.
Program Block
Block programs by ratings.
Input Block
Block selected inputs.
Change PIN
Change the PIN that you use to access Parental Control.
NOTE
If you forget your password, call the Consumer Electronics Care
Center.
Reset
Reset Parental Control back to the factory setting.
Teletext
Display the teletext mode.
Subtitle
Select desired subtitles from the list if the selected channel supports
multi-language subtitles. (Only available for DTV channels)
EPG (GUIDE)
Enter guide function under DTV mode.
It provides an overview of each digital channel’s programme lineup.
HDMI 2.0 Format
Match the connected device output format. Select Enhanced for devices
with output of 4K, 60Hz, 4:4:4, 4:2:2 or 4:2:0, 10 bit and above.
(Only
available for HDMI mode)
Audio Language (MTS)
You can choose the audio language in DTV mode and you can set MTS
for Mono, Stereo, DUAL1 or DUAL2 in ATV mode.
NOTE: This function may not be available in your country/region.
Audio Only
When you select this option, the screen will not display the picture. You
can only listen to the audio. Press any button except the [ ] button, [
+ / - ] buttons and [ ] button to restore operation.
Sleep Timer
Set the sleep timer to automatically turn the TV off within a specified
time: off, 10 Minutes, 20 Minutes, 30 Minutes, 40 Minutes, 50 Minutes,
60 Minutes, 90 Minutes and 120 Minutes.
Settings
Settings lets you configure the TV, set app options, add accounts, and
change other preferences.
Help
System Message
View system message, including: Serial Number, Service Code,
Software Version, etc.
NOTE
Serial Number may not be displayed in your country/region.
Signal Diagnosis
Perform self diagnosis to test Video Format, Audio Format, Colour
Depth, etc.
Menu
Parental Control
The Parental Control setting allows you to block content that is not
appropriate for children to watch.
Turning Parental Control On
1
Go to Locks.
2 Press the [ OK ] button on your remote, a Create PIN window
displays. Using the D-pad on your remote, create the password.
3
Press the [ OK ] button to turn the locks On.
You will see the other Parental Control settings change from a greyed
out state to highlighted. When this occurs, begin adding other settings
to the Block Time, Channel Block, Program Block, Input Block, Change
PIN or Reset features.

18
Settings
Using the Settings
Press the [ ] button on your remote to enter the Home screen, and
use the D-pad to select the icon to access the Settings.
Picture / Sound / Parental Control
See other chapters for more information about these settings. For
example, for Picture settings, see Picture on page 15.
Network & Internet
Wi-Fi
Turn on the Wi-Fi to access the Internet via a wireless network
connection.
Select an available network, press [ OK ] to confirm. A screen will
appear prompting you to enter the password if necessary.
See all / See fewer
View all available network or fewer.
Add new network
You can add wireless network.
Scanning always available
Check to scan for networks even when Wi-Fi is turned off.
Wake on Wireless Network
Using a wireless connection, turn on your TV with a screen-cast
feature inside an app.
Wake on LAN
:
Using an Ethernet connection, turn on your TV with a screen-cast
feature inside an app.
Wake on Cast
:
Using a cast connection, turn on your TV with a screen-cast feature
inside an app.
Connected / Not connected
Show whether the Ethernet is connected.
Proxy settings
You can set the proxy server.
NOTE
HTTP proxy is used by the browser but may not used by other apps.
IP settings
Configure the IP setting for your network connection.
Content Sharing
Allow to view videos, images and music shared from another device
in your network.
Accounts & Sign In
You can use multiple Google Accounts on your TV. You may also be able
to add other kinds of accounts, depending on your apps.
Apps
You can view details about an app or other item listed. The information
and controls available vary among different types of apps.
Device Preferences
See Device Preferences on page 19.
Remotes & Accessories
Add accessory
Connect your Bluetooth devices (like a keyboard, a mouse, a
soundbar etc.) to the TV.
Before you can use a Bluetooth device with your TV, you must first
pair it.
1. Make the device you want to pair discoverable. See the
documentation that came with your device to learn how to make it
discoverable.
2. The TV displays the ID of all available devices in range
3. Click the ID of the Bluetooth device in the list on your TV to pair
with it.
4. Follow the prompts to complete the pairing.
Device List
Show up available devices.
Advanced System
See Advanced System on page 20.

19
Settings
Device Preferences
Date & time
Automatic date & time
Use network-provided time or use DTV-provided time (only available
for DTV channels). You can also set the current time manually when
Off is selected.
Set date
Set the date.
Set time
Set the time.
Set time zone
Select your time zone.
Jalaali
Turn the Jalaali On or Off.
NOTE
This function may not be available in your country/region.
Daylight Savings
Select whether to apply Daylight Savings time to the TV.
NOTE
Some models don’t support this function.
Use 24-hour format
Set the time to display in a 12 or 24-hour format.
Language
Adjust the default Language settings for the TV.
Keyboard
Adjust the default settings for the keyboard.
Inputs
You can see the state of devices that the TV connected: Connected
Input and Standby Inputs.
Consumer Electronic Control (CEC)
HDMI control
Allow the TV to control HDMI devices.
Device auto power off
Power off HDMI devices with the TV.
TV auto power on
Power on the TV with HDMI device.
NOTE
• HDMI cables must be used to connect HDMI CEC-compatible
devices to your TV.
• The HDMI CEC feature of the connected device must be turned
on.
• If you connect an HDMI device that is not HDMI CEC-compatible,
all the HDMI-CEC Control features do not work.
• Depending on the connected HDMI device, the HDMI-CEC Control
feature may not work.
Storage
You can view the TV storage.
Home screen
Customise channels
Add or delete the app channel row from Home screen.
Enable video previews
Enable or disable the video previews.
Enable audio previews
Enable or disable the audio previews.
Reorder apps / Reorder games
Rearrange the Apps screen.
Android TV Home / Android TV Core Services
See the information of open source software licences.
Google Assistant
View permissions about accounts and limit the search results.
Chromecast Android Shell (Chromecast built-in)
Enable you to extend your app to direct its streaming video and audio
to the TV.
Screen saver
Enable Screen saver when the TV is idle.
Location
Your TV can use different modes to access location information. Each
mode uses different sources to estimate the TV’s location.
Usage & Diagnostics
Help improve Android performance by automatically sending
diagnostics information.
Security & restrictions
Enable unknown sources, checking of apps installed for harmful
behavior.
Reset
You can reset to the factory data.
About
You can view the version information, the status of network, and other
information. You can also update the software version or change the
TV’s name.
System update
We will provide software updates to continuously enhance your TV and
correct any issues that may impact your user experience; therefore,
you are recommended to keep your TV connected to the Internet to
automatically receive updates when they are available.

20
Settings
Device name
Choose a name for your TV. The name will be shown to devices that
are available for sharing data.
Timer
Power On Timer Type
Set the type Off, Daily, Once.
Power On Timer
Set the clock for the time you want the TV to turn on automatically.
Power Off Timer Type
Set the type Off, Daily, Once.
Power Off Timer
Set the clock for the time you want the TV to turn off automatically.
Power
Sleep Timer
Set the sleep timer to automatically turn the TV off within a
specified time: off, 10 Minutes, 20 Minutes, 30 Minutes, 40 Minutes,
50 Minutes, 60 Minutes, 90 Minutes and 120 Minutes.
Power On Mode
TV will be powered on based on the mode when TV is reconnected
with AC power.
Auto Sleep
Set the amount of time that you’d like for TV auto power off without
any activity: Off, 3H, 4H.
NOTE
This function may not be available in your country/region.
Store Mode
Home Mode uses less energy. Select Store Mode if the TV will be on
display in a retail setting. Store Mode effects E-Streamer and other
demo functions.
Support
Setup assistant (Setup Wizard)
Use the Setup assistant for instructions to help you set up your TV.
Send Diagnostics and Usage
Allow to send the diagnostics and usage of the report.
Help
System Message
View system message, including: Serial Number, Service Code,
Software Version, etc.
NOTE
Serial Number may not be displayed in your country/region.
Advanced System
Signal Diagnosis
Perform self diagnosis to test Video Format, Audio Format, Colour
Depth, etc.

21
Getting Familiar with the Home screen
The simple design of the Home screen menu makes it easy to navigate.
And you can easily add or delete applications in the Home interface
according to your needs.
To access the Home screen, press the [ ] button on your remote
control and use the D-pad to make your selection.
Indicators and Icons on the top of the Home screen
Google Assistant
You can search movies, TV, and more by speaking.
Google Search
You can search movies, TV, and more by typing.
Notifications
Notifications can come from the system, an external device, an
application, the media player etc.
Inputs
Select the Input source depending on the device you have
connected to your TV.
Network & Internet
You can set up the Network & Internet.
Settings
Settings lets you configure the TV, set app options, add accounts,
and change other preferences.
Time
You can always view the current time on the Home screen.
Names of sections that appear on the Home screen
The Home screen displays the following section names.
Apps
This is the one location where you have access to all the apps on
your TV, You can enjoy a wide range of services including video
streaming.
Play Next
You can select types of content for play next, you can also manually
add a programmes to play next by long-pressing on a programmes
in the Home screen.
Recommended content
Here the premium content will display on the screen, you can
quickly enter these contents what you want.
Apps
Numerous factory-installed apps are available for you to choose from
for your entertainment preferences.
Installing an App
To install an app:
1 From the Home screen, click on the Apps and select the Get more
apps.
2 Use the navigation buttons on your remote to select the app that
you want to install.
3 Select the INSTALL.
Removing an App
You can only delete apps that you’ve installed to the TV. Factory-
installed apps can not be deleted.
To delete an app:
1 From the Apps screen, use the navigation buttons on your remote
to select the app that you want to remove. Long press the [ OK ]
button on your remote.
2 Click on Uninstall.
3 A dialog message displays that asks do you want to uninstall this
app. Confirm and the icon is removed from the Apps screen.
NOTE
If an app is deleted, the information related to that app is also removed.
Moving App Icons around
To move an app:
1 From the Apps screen, use the navigation buttons on your remote
to select the app that you want to move. Long press the [ OK ]
button on your remote.
2 Click on Move.
3 Use the navigation buttons on your remote to move the location of
app. Press the [ OK ] button to confirm.
Advanced Features
22
Media
Media is a central location for you to view or listen to different types
of content (for example, your photos, music and movies) through the
following methods:
·
A USB thumb drive or hard drive.
·
Compatible mobile phone, tablet or other personal devices: You can
stream movies, music and photos that are stored on Compatible
personal device and play or view the content on your TV.
Browsing Content
You have two ways to enter Media:
·
Insert a USB device, a prompt message appears and you can choose
whether to go to the Media.
·
When your USB device is connected to the TV that doesn’t show
Media page, press the [ ] button on your remote, and browse
down to click Media.
To browse through content based on the type that you wish to access:
1 Navigate to the appropriate menu tab on the screen and select All
Media, Videos, Photos, Music.
2 Click on the name of the folder that contains your content.
3 Make your selection to play or view the content.
If you want to close out of the Media center, then press the [ ] / [ ]
button on your remote.
You must obtain any required permission from copyright owners to
download or use copyrighted content. TOSHIBA cannot and does not
grant such permission.
Advanced Features
23
Troubleshooting
The Problem Possible Solutions
No picture, or
black and white
picture.
·
Unplug TV from AC outlet and re-plug after 60
seconds.
·
Try different TV channels.
The picture is
distorted.
·
The compression of video content may cause
picture distortions, especially in fast moving
pictures from sports programmes and action
movies.
·
If the signal reception is weak or poor, screen
distortion may be visible but it is not a
malfunction.
·
Mobile phones used close to the TV (within
1m) may cause noise on analogue and digital
channels.
Picture Problem
When the TV has trouble with the picture, these steps may help
resolve the problem.
The Problem Possible Solutions
There is no sound
or the sound is too
low at maximum
volume.
·
Check the volume control of the device (cable
or satellite box, DVD, Blu-ray, etc.) connected to
your TV.
Picture is normal,
but no sound.
·
Check the volume settings.
·
Check if ‘Mute’ mode is set to on.
The speakers are
making an odd
sound.
·
Make sure that the audio cable is connected
to the correct audio output connector on the
external device.
·
For antenna or cable connections, check the
signal information.
·
A low signal level may cause sound distortions.
Sound Problem
When the TV has difficulties with sound, these steps may help resolve
the problem.
The Problem Possible Solutions
No sound and
picture.
·
Check if the power cord is plugged into a
powered AC outlet.
·
Press the button in the remote control to
activate the unit from Standby.
·
Check to see if the LED light is on or not. If it is,
then the TV is receiving power.
I have connected
an external source
to my TV but I get
no picture and/or
sound.
·
Check the correct connection on the external
source and the input connection on the TV.
·
Make sure you have made the correct selection
for the input mode for the incoming signal.
Sound and picture
distorted or
appear wavy.
·
Some electrical appliances may affect TV set. If
you turn off the appliance and the interference
goes away, then move it further away from TV.
·
Insert the power plug of the TV set into another
power outlet.
Sound and picture
is blurry or cuts
out momentarily.
·
If you use an external antenna, check the
direction, position and connection of the
antenna.
·
Adjust the direction of your antenna or reset or
fine tune the channel.
Picture and Sound Problem
When the TV has difficulties with sound and picture, these steps may help
resolve the problem.
If the TV does not operate as usual or appears to be faulty, please read
carefully this section. Many operational issues can be resolved by users.
It is also advisable to unplug the TV from the AC socket on the wall
for 60 seconds or more, then reconnect and start again. This simple
procedure helps in restoring stable conditions for electric circuits and
firmware of the unit.
The Problem Possible Solutions
The TV cannot
connect to your
network or apps.
·
Contact your Internet service provider.
·
Make sure the TV has a network connection.
The wireless
network
connection failed.
·
Make sure your wireless modem/router is on
and connected to the Internet.
The wireless
network signal is
too weak.
·
Position your wireless router, modem router, or
access point in a central location. Avoid putting
it in a corner.
Internet Problem
When the TV has difficulties connecting to the Internet, these steps may
help resolve the problem.
24
Troubleshooting
The Problem Possible Solutions
Schedule
Recording cannot
be used.
·
Check if there is a USB device connected to the
TV.
·
Recording will automatically stop if the signal
becomes too weak.
·
Check the free space on the USB device. The
function will not work if there isn’t enough
storage space on the USB device.
Recording/Timeshift Function Isn’t Working
When Timeshift or Schedule recording aren’t working, these steps may
help resolve the problem.
NOTE
·
The Recording/Timeshift functions are only applicable in certain
models.
The Problem Possible Solutions
Some files can't
be played.
·
This problem may occur with high-bitrate files.
Most files can be played back, but you might
experience problems with high-bitrate files.
My File Won’t Play
When files aren’t playing, this may help resolve the problem.
The Problem Possible Solutions
The TV is hot.
·
Watching TV for an extended period of time
causes the panel to generate heat. The heat
from the panel is dissipated through internal
vents running along the top of the TV. However,
after extended use, you may feel hot when
touch it. This heat, however, is not a defect and
does not affect the TV’s functionality.
The TV smells of
plastic.
·
This smell is normal and will dissipate over
time.
The plastic cabinet
makes a “clicking”
type of sound.
·
The ‘click’ sound can be caused when the
temperature of the television changes. This
change causes the television cabinet to expand
or contract, which makes the sound. This is
normal and the TV is OK.
Remote control
does not work.
·
Confirm that TV still has power and is
operational.
·
Change the batteries in the remote control.
·
Check if the batteries are correctly installed.
Other Issues
Use these procedures to resolve other issues that may occur.

25
Other Information
Features, appearance and specifications are subject to change without notice.
Specications
Item 43" 50"
Dimension
(W × H × D)
Without Stand 961 × 560 × 83 mm 1116 × 647 × 85 mm
With Stand 961 × 598 × 212 mm 1116 × 692 × 226 mm
Weight
Without Stand 7.0 kg 9.8 kg
With Stand 7.3 kg 10.1 kg
Active Screen Size (Diagonal) 43 inches (108 cm) 50 inches (126 cm)
Screen resolution 3840 × 2160 3840 × 2160
Audio power 10W + 10W 10W + 10W
Power consumption 120W 120W
Item 55" 65"
Dimension
(W × H × D)
Without Stand 1230 × 712 × 86 mm 1448 × 834 × 81 mm
With Stand 1230 × 757 × 227 mm 1448 × 893 × 299 mm
Weight
Without Stand 12.3 kg 16.8 kg
With Stand 12.7 kg 17.2 kg
Active Screen Size (Diagonal) 55 inches (139 cm) 65 inches (164 cm)
Screen resolution 3840 × 2160 3840 × 2160
Audio power 10W + 10W 10W + 10W
Power consumption 150W 200W
Power supply 100-240V~ 50/60Hz
Receiving
systems
Analog PAL-D/K, B/G, I, SECAM-D/K, B/G
Digital DVB-T/T2, DVB-C
Wireless
LAN Module
specifications
Model ZDGF7668AU-C(43")
/
ZDGF7668AU-F(50") / ZDGF7668AU-T(55"/65")
Frequency Range
2.4~2.4835GHz
5.15~5.85GHz
Output Power (Max.)
2.4~2.4835GHz 18dBm
5.15~5.25GHz 14.5dBm
5.25~5.35GHz(DFS Band) 14.5dBm
5.49~5.71GHz(DFS/TPC Band) 14.5dBm
5.725~5.85GHz(for Non EU) 14.5dBm
Bluetooth
Module
specifications
Model ZDGF7668AU-C(43") / ZDGF7668AU-F(50") / ZDGF7668AU-T(55"/65")
Frequency Range 2.4~2.4835GHz
Output Power
(Max.)
2.4~2.4835GHz, Class1, 6dBm
Environmental conditions
Temperature: 5°C - 45°C
Humidity: 20% - 80% RH
Atmospheric pressure: 86 kPa - 106 kPa
HDMI Input
RGB / 60 Hz (640×480, 800×600, 1024×768)
YUV / 60 Hz (480 I, 480 P, 720 P, 1080 I, 1080 P)
YUV / 50 Hz (576 I, 576 P
,
720 P, 1080 I, 1080 P)
24 Hz 25Hz 30 Hz 50 Hz 60 Hz (3840×2160)

26
Other Information
Media Format List
Video:
Number Container
Video Codec
(file type)
File Extension
Name
Sampling rate SPEC Bit Rate Profile Remark
1
MPG
Mpeg1 .dat .mpg.mpeg 1080P @ 60fps 80Mbps
Y(.mpg.mpeg)
N(.dat)
2 Mpeg2 .dat .mpg.mpeg 1080P @ 60fps 80Mbps Main Profile
Y(.mpg.mpeg)
N(.dat)
3
MPEG
Mpeg1 .dat .mpg.mpeg 1080P @ 60fps 80Mbps
Y(.mpg.mpeg)
N(.dat)
4 Mpeg2 .dat .mpg.mpeg 1080P @ 60fps 80Mbps Main Profile
Y(.mpg.mpeg)
N(.dat)
5
MP4
Mpeg4 .mp4 1080P @ 60fps 40Mbps
Simple Profile and
Advanced Simple Profile
@Level 5
Y
6 H.264 .mp4 3840X2160 @ 60fps 135Mbps
Main Profile and High
10@Level 5
Y
7 H.265 .mp4 3840X2160 @ 60fps 100Mbps
Main/Main10 Profile, High
Tier @Level 5.1
Y
8 Motion JPEG .mp4 1080P @ 30fps 10Mbps Y
9
MKV
Mpeg1,2,4
.mkv 1080P @ 60fps 40Mbps
MPEG2: MP@HL
MPEG4: Simple Profile and
Advanced Simple Profile
@Level 5
Y
10 H.264 .mkv 3840X2160 @ 60fps 135Mbps
Main Profile and High
10@Level 5
Y
11 H.265 .mkv 3840X2160 @ 60fps 100Mbps
Main/Main10 Profile, High
Tier @Level 5.1
Y
12 Motion JPEG .mkv 1080P @ 30fps 10Mbps Y
13 VP9 .mkv 3840X2160 @ 60fps 100Mbps Profile0/2 Y
14
AVI
Mpeg2,4
.divx.avi
1080P @ 60fps 40Mbps
MPEG2: MP@HL
MPEG4: Simple Profile and
Advanced Simple Profile
@Level 5
Y(.avi)
N(.divx)
15 H.264
.divx.avi 3840X2160 @ 60fps 135Mbps
Main Profile and High
10@Level 5
Y(.avi)
N(.divx)
16 Motion JPEG .divx.avi 1080P @ 30fps 10Mbps
Y(.avi)
N(.divx)
17
ASF
Mpeg2,4 .asf.wmv 1080P @ 60fps 40Mbps
MPEG2: MP@HL
MPEG4: Simple Profile and
Advanced Simple Profile
@Level 5
Y(.wmv)
N(.asf)
18 H.264 .asf.wmv 3840X2160 @ 60fps 135Mbps
Main Profile and High
Profile@Level 4.0
Y(.wmv)
N(.asf)
19 FLV
H.264 .swf.flv
3840X2160 @ 60fps 135Mbps
Main Profile and High
Profile@Level 4.2
Y(.flv)
N(.swf)
20
MPEG
transport
stream
H.265 .ts, .trp, .tp 3840X2160 @ 60fps 100Mbps
Main/Main10 Profile, High
Tier @Level 5.1
Y
H.264 .ts, .trp, .tp 3840X2160 @ 60fps 135Mbps
Main Profile and High
Profile@Level 4.2
Y
MPEG1/2 .ts, .trp, .tp 1080P @ 60fps 80Mbps MP@HL Y
21 WebM VP9 .webm 3840X2160 @ 60fps 100Mbps Profile0/2 Y
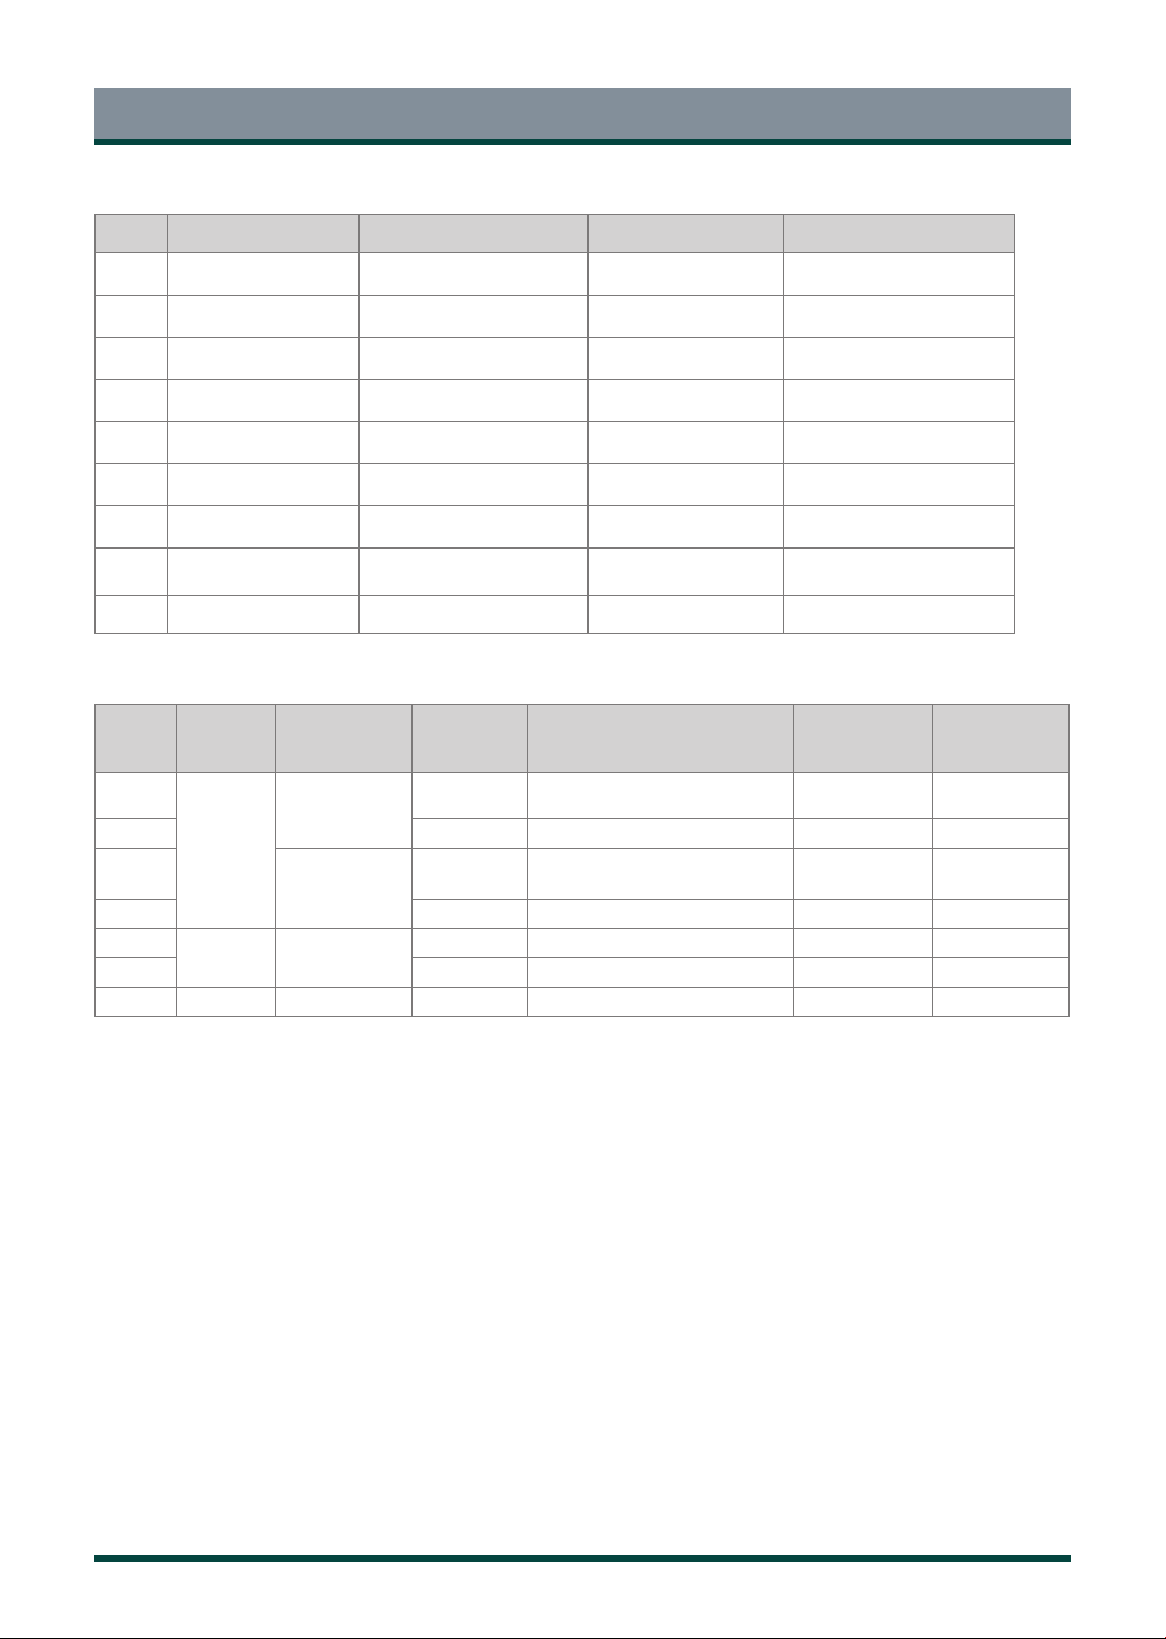
27
Photo:
Other Information
Number Container
File Extension
Name
Photo Resolution
Required DRAM
size (Mbytes)
bytes
1
JPEG
.jpeg
Base-line
15360x8640
(1920X8 1080X8)
3.96 414720
2 Progressive 1024x768 6.00 6291456
3
.jpg
Base-line
15360x8640
(1920X8 1080X8)
3.96 414720
4 Progressive 1024x768 6.00 6291456
5
PNG .png
non-interlace 9600x6400 3.66 3840000
6 interlace 1200x800 3.66 3840000
7 BMP .bmp 9600x6400 3.66 3840000
Audio:
Number Audio Codec(file type) File Extension Name Bit Rate Sampling rate
1
MPEG1/2 Layer1 .MP3 32kbps ~ 448kbps 16kHz ~ 48kHz
2
MPEG1/2 Layer2 .MP3 8kbps ~ 384kbps 16kHz ~ 48kHz
3
MPEG1/2 Layer3 .MP3 8kbps ~ 320kbps 16kHz ~ 48kHz
4
AAC, HEAAC .m4a.aac 24kbps ~ 384kbps 8kHz ~ 48kHz
5
WMA .wma 128bps ~ 320kbps 8kHz ~ 48kHz
6
WMA Pro .wma <768kbps ~ 96kHz
7
LPCM
N/A
(work with video files only)
64kbps ~ 1.5Mbps 8kHz ~ 48kHz
8
IMA-ADPCM/MS-ADPCM
N/A
(work with video files only)
384kbps 8kHz ~ 48kHz
9
AC-3 .ts .mkv 32Kbps ~ 640Kbps 32KHz, 44.1KHz,48KHz
28
License Information
•ThetermsHDMIandHDMIHigh-DefinitionMultimediaInterface,andtheHDMIlogoaretrademarksor
registered trademarks of HDMI licensing
Administrator ,Inc. in the United States and other countries.
•DVBisaregisteredtrademarkoftheDVBProject.
•[1]EIA/CEA-861-Dcompliancecoversthetransmissionofuncompresseddigitalvideowithhigh-bandwidthdigitalcontentprotection,whichisbeing
standardized for reception of high-definition video signals. Because this is an evolving technology, it is possible that some devices may not operate
properly with the television.
MP3 licence letter
MPEG Layer-3 audio coding technology licensed from Fraunhofer LLS and Thomson.
MP4 licence letter
THIS PRODUCT IS LICENSED UNDER THE MPEG-4 VISUAL PATENT PORTFOLIO LICENSE FOR THE PERSONAL AND NON-COMMERCIAL USE OF A
CONSUMER FOR (I) ENCODING VIDEO IN COMPLIANCE WITH THE MPEG-4 VISUAL STANDARD (MPEG-4 VIDEO) AND/OR (II) DECODING MPEG-4 VIDEO
THAT WAS ENCODED BY A CONSUMER ENGAGED IN A PERSONAL AND NON-COMMERCIAL ACTIVITY AND/OR WAS OBTAINED FROM A VIDEO PROVIDER
LICENSED BY MPEG LA TO PROVIDE MPEG-4 VIDEO. NO LICENSE IS GRANTED OR SHALL BE IMPLIED FOR ANY OTHER USE. ADDITIONAL INFORMATION
INCLUDING THAT RELATING TO PROMOTIONAL, INTERNAL AND COMMERCIAL USES AND LICENSING MAY BE OBTAINED FROM MPEG LA,L.L.C. SEE
License Information
Disposal of Used Electrical & Electronic Equipment
Packaging and electrical goods should be recycled appropriately, and not treated as household waste. Please
dispose of
this equipment at your applicable collection point for the recycling of electrical & electronic equipment
waste. By ensuring
the correct disposal of this product, you will help prevent potentially hazardous to the
environment and to human health,
which could otherwise be caused by unsuitable waste handling of this product.
The recycling of materials will help conserve
natural resources. Please do not therefore dispose of your old electrical
and electronic equipment with your household
waste. For more detailed information about recycling of this product,
please contact your local city office, your household
waste disposal service or the shop where you purchased the
product
.
HTTP://WWW.MPEGLA.COM
AVC licence letter
THIS PRODUCT IS LICENSED UNDER THE AVC PATENT PORTFOLIO LICENSE FOR THE PERSONAL AND NONCOMMERCIAL USE OF ACONSUMERTO (I)
ENCODE VIDEO IN COMPLIANCE WITH THE AVC STANDARD (“AVC VIDEO”) AND/OR (II) DECODE AVC VIDEO THAT WAS ENCODED BY A CONSUMER
ENGAGED IN A PERSONAL AND NON-COMMERCIAL ACTIVITY AND/OR WAS OBTAINED FROM A VIDEO PROVIDER LICENSED TO PROVIDE AVC VIDEO.
NO LICENSE IS GRANTED OR SHALL BE IMPLIED FOR ANY OTHER USE. ADDITIONAL INFORMATION MAY BE OBTAINED FROM MPEG LA,L.L.C. SEE HTTP://
WWW.MPEGLA.COM
Licence Notification
TRADEMARK ACKNOWLEDGMENT
For DTS patents, see http://patents.dts.com. Manufactured under license from DTS Licensing Limited. DTS, the Symbol, DTS
and the Symbol together, Virtual:X, and the DTS Virtual:X logo are registered trademarks and/or trademarks of DTS, Inc. in the
United States and/or other countries. © DTS, Inc. All Rights Reserved.
For DTS patents, see http://patents.dts.com. Manufactured under license from DTS Licensing Limited. DTS, the Symbol, DTS
and the Symbol together, DTS-HD, and the DTS-HD logo are registered trademarks and/or trademarks of DTS, Inc. in the
United States and/or other countries. © DTS, Inc. All Rights Reserved.
NOTE
This product does not support decoding of DTS CD bitstream. Playback of this format may produce undesirable noise.
Manufactured under license from Dolby Laboratories. Dolby, Dolby Audio, Pro Logic, and the double-D symbol are
trademarks of Dolby Laboratories. Confidential unpublished works. Copyright 1992-2019 Dolby Laboratories. All rights
reserved.
